We’re Sorry, an Error Occurred: How to Fix This Restart Issue on Monopoly GO

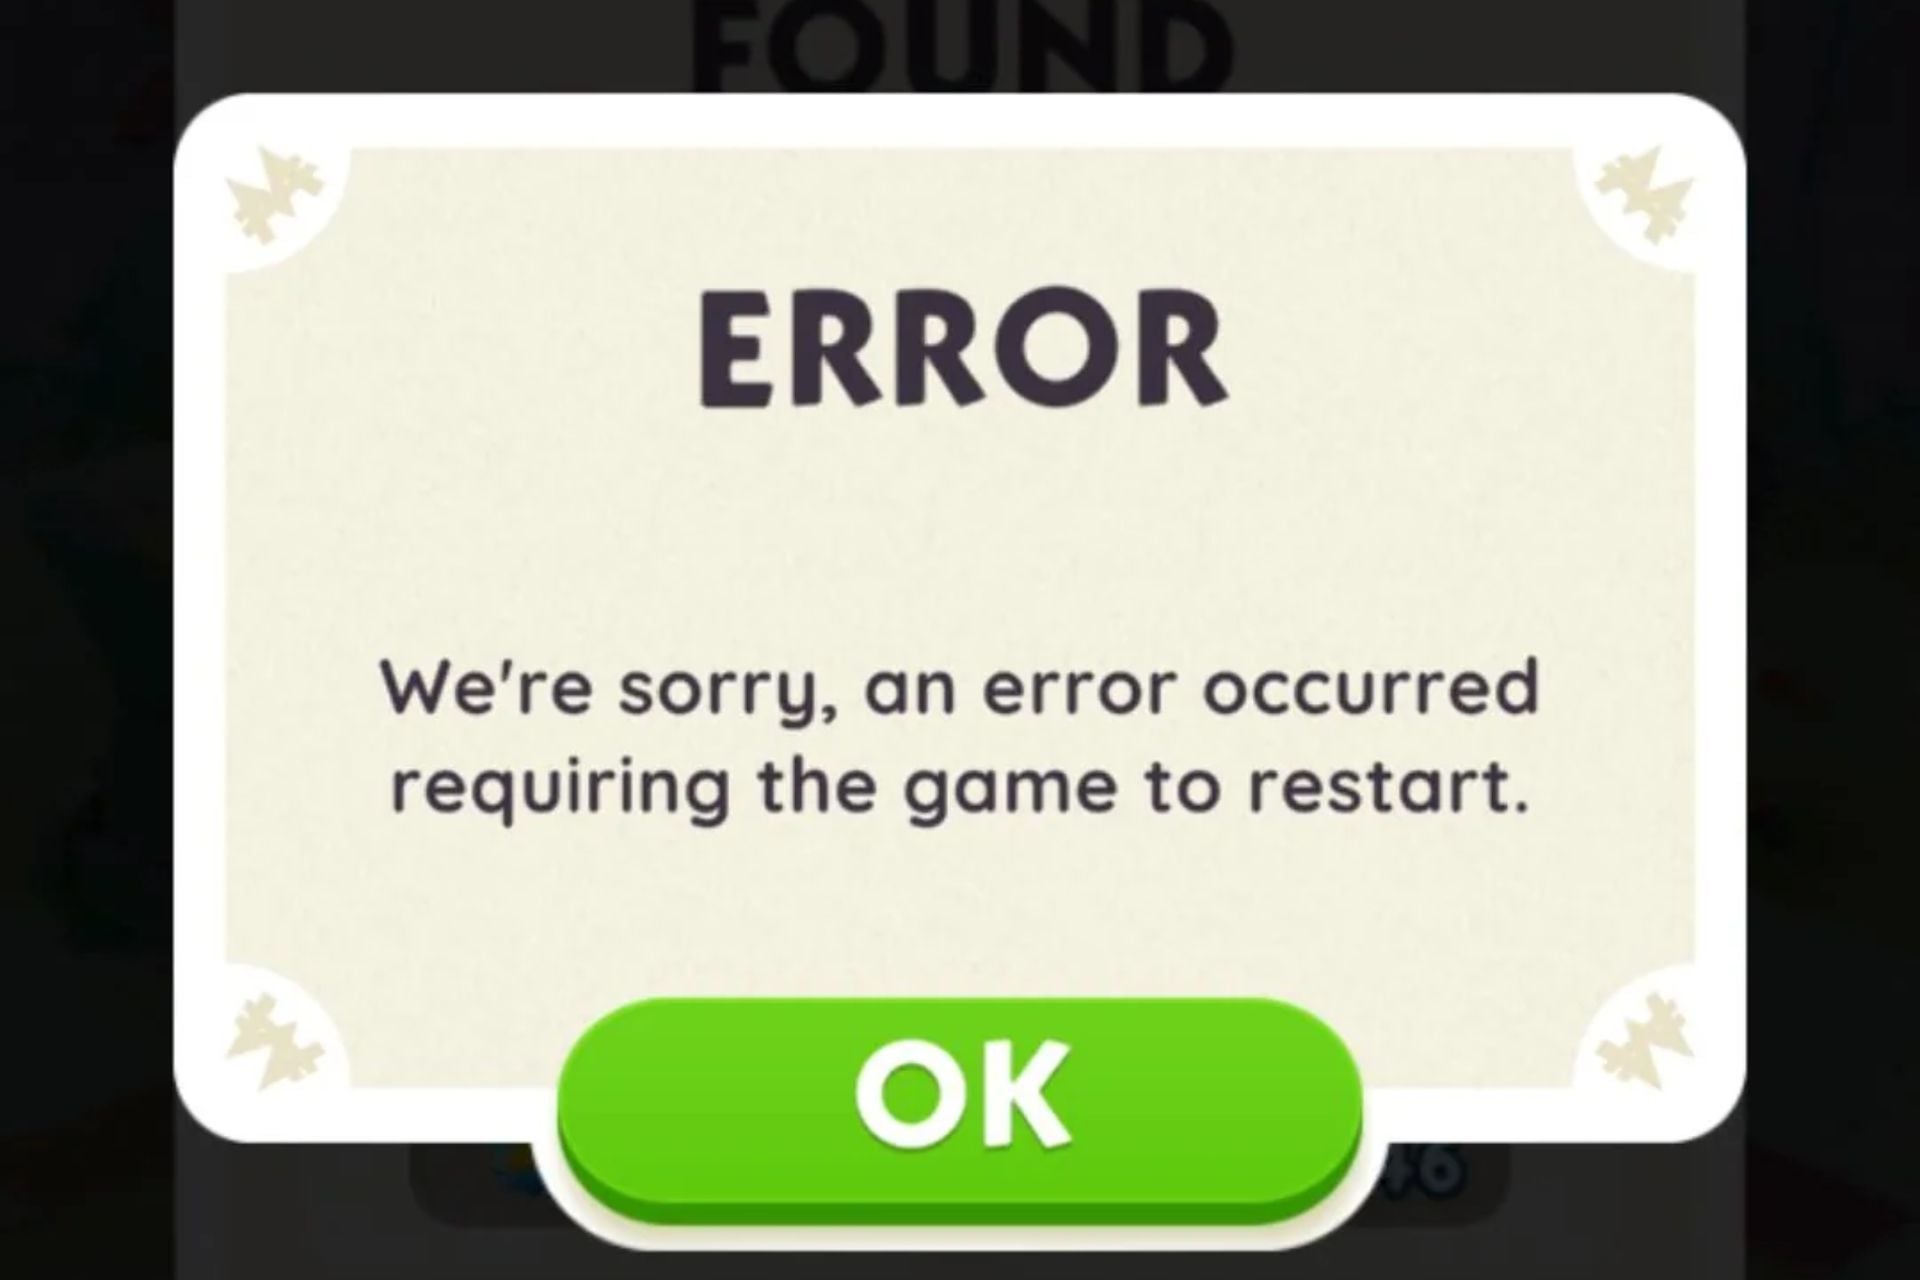
The Monopoly GO restart error is an annoying message that may pop up on your screen while playing your favorite game.

Our WindowsReport gaming specialists had a similar experience and are offering the best solutions below.

Why is Monopoly GO crashing?

The Monopoly GO crash seems peculiar and happens just when you are about to upgrade your landmarks or about to perform a bank heist. When it restarts, all your dice are missing, and so is your money. This could be a temporary glitch, server issues, or a faulty game.

How do I stop Monopoly GO from restarting?

Perform the following preliminary checks first:

  • Close and restart the game, then check for any updates from the relevant app store, Android or iOS.
  • Verify that Monopoly GO’s server is not experiencing downtimes and ensure you have a good and stable internet connection.
  • Try playing Monopoly online and see if the error persists then finally, shut down your device and restart it.

1. Wait it out

While this may not seem like a viable solution, it is one of the best, especially if you have a lot to lose. You may have accumulated lots of game rewards or are at an advanced stage in your board game.

Any tampering with the game may upset the status quo. Your game usually returns to the last saved state, so if you try to reset it, you may lose all your gains. You’re better off waiting for the developer to fix it. However, if you’re just starting off, proceed with the next steps.

2. Update your device’s OS

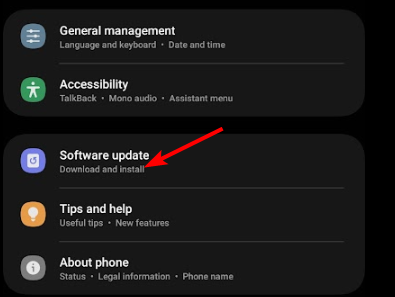
  1. Locate Settings on your device. (We’ll be using the Samsung model for this step).
  2. Go to Software update.
  3. Tap on Download and install.
  4. Wait for the update to finish installing if available, and restart Monopoly GO.

It’s possible that your device is running an outdated version of its software. This could easily cause compatibility issues with the game.

3. Clear app cache

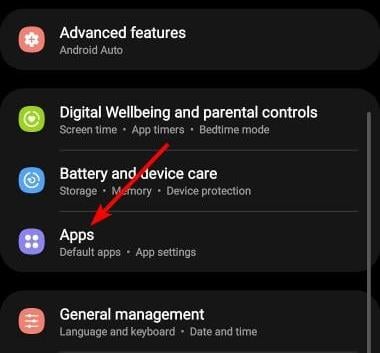
  1. Tap on settings on your phone.
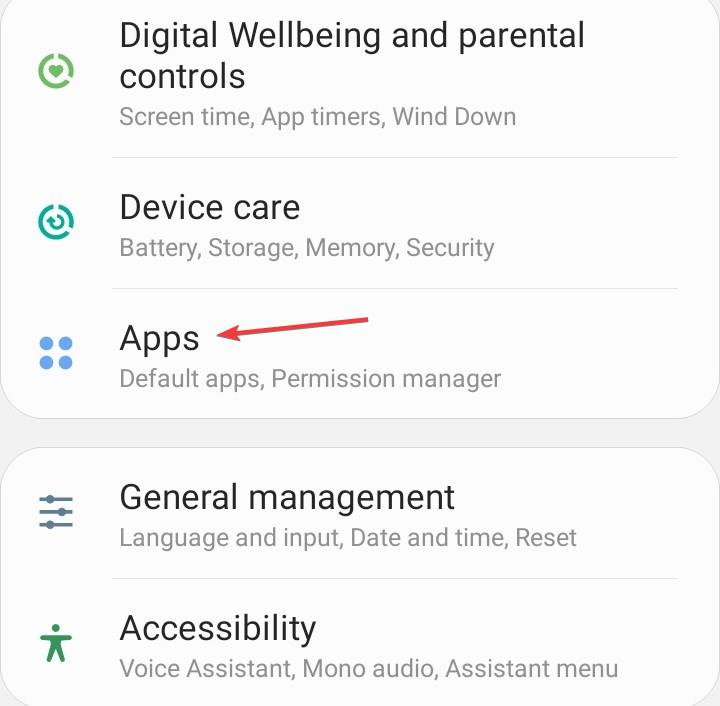
  2. Next, tap on Apps.
  3. Find the Monopoly GO app and tap on it.
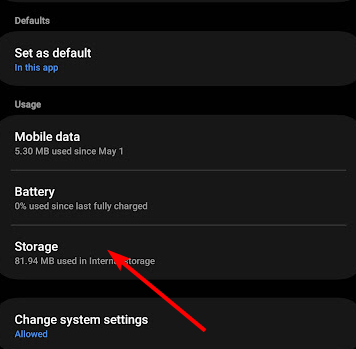
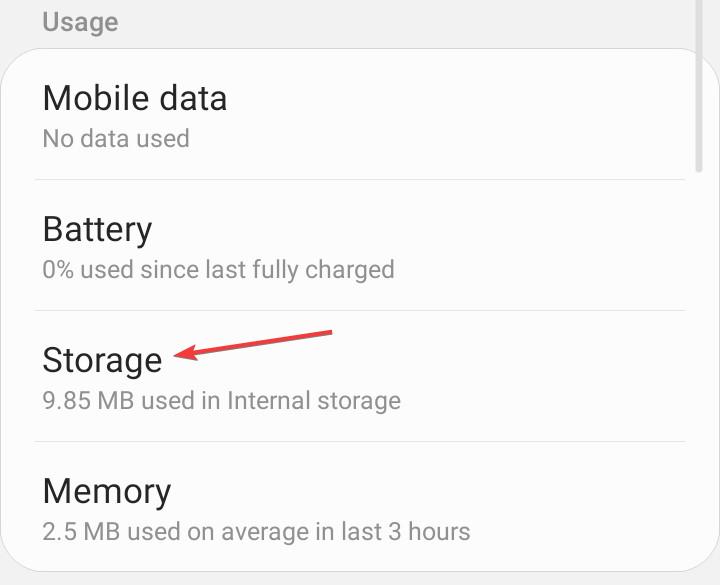
  4. Scroll down and select Storage.
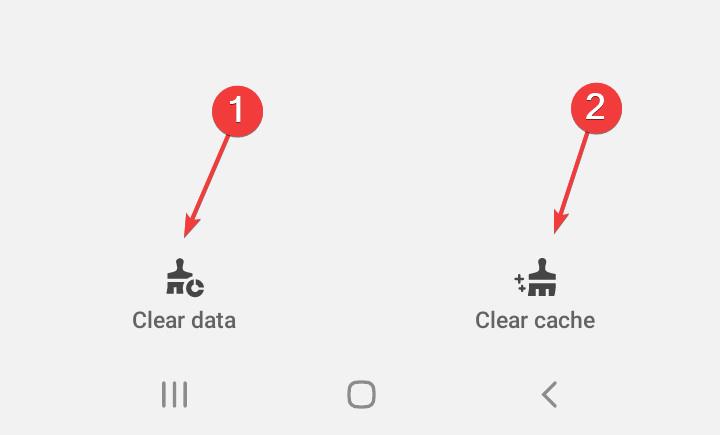
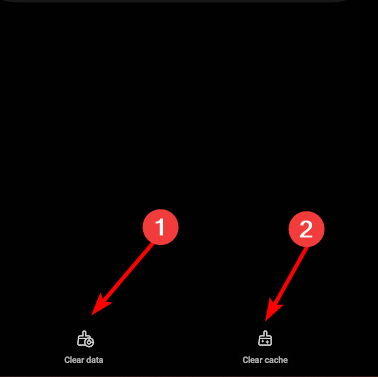
  5. Tap on Clear data and Clear cache, then try again.
And if this still doesn’t work, try uninstalling the app and reinstalling it from scratch. However, if you’re one to wait it out, perhaps we may interest you with other board games as you wait for things with Monopoly GO to be streamlined.

You can also try online games since app-related ones tend to have lots of game crashes or loading issues.

That’s all we had for this error message, but we’re keen to hear from you. Since this is a fairly new issue, there may still be more solutions, so if you’ve come across any helpful ones not mentioned here, drop us a line below.

AI is finally coming to YouTube: Here’s what you need to know

YouTube has finally announced that AI capabilities will be coming to the platform in the following weeks, after it has begun testing them on a limited number of channels, according to the latest entry in its experimental features blog.

The announcement comes weeks after YouTube unveiled a plethora of new features, including animated buttons, faster playback speed, stable volume, lock screen while playing YouTube, and many more.

Now, it seems that the platform is experimenting with AI capabilities, including AI summarization, and a chatbot that will tell you more about the videos you’re watching.

New generative AI experiments: We’re exploring ways to integrate generative AI into the YouTube experience to make it easier and more enjoyable for you to use YouTube. We’re testing two experiments: comment topics summarized by AI, which helps you see themes in large comment sections more easily and a conversational AI tool, which you can use to ask questions about videos you watch. These experiments are very small and availability varies.

YouTube

YouTube’s AI features: What can you do with them?

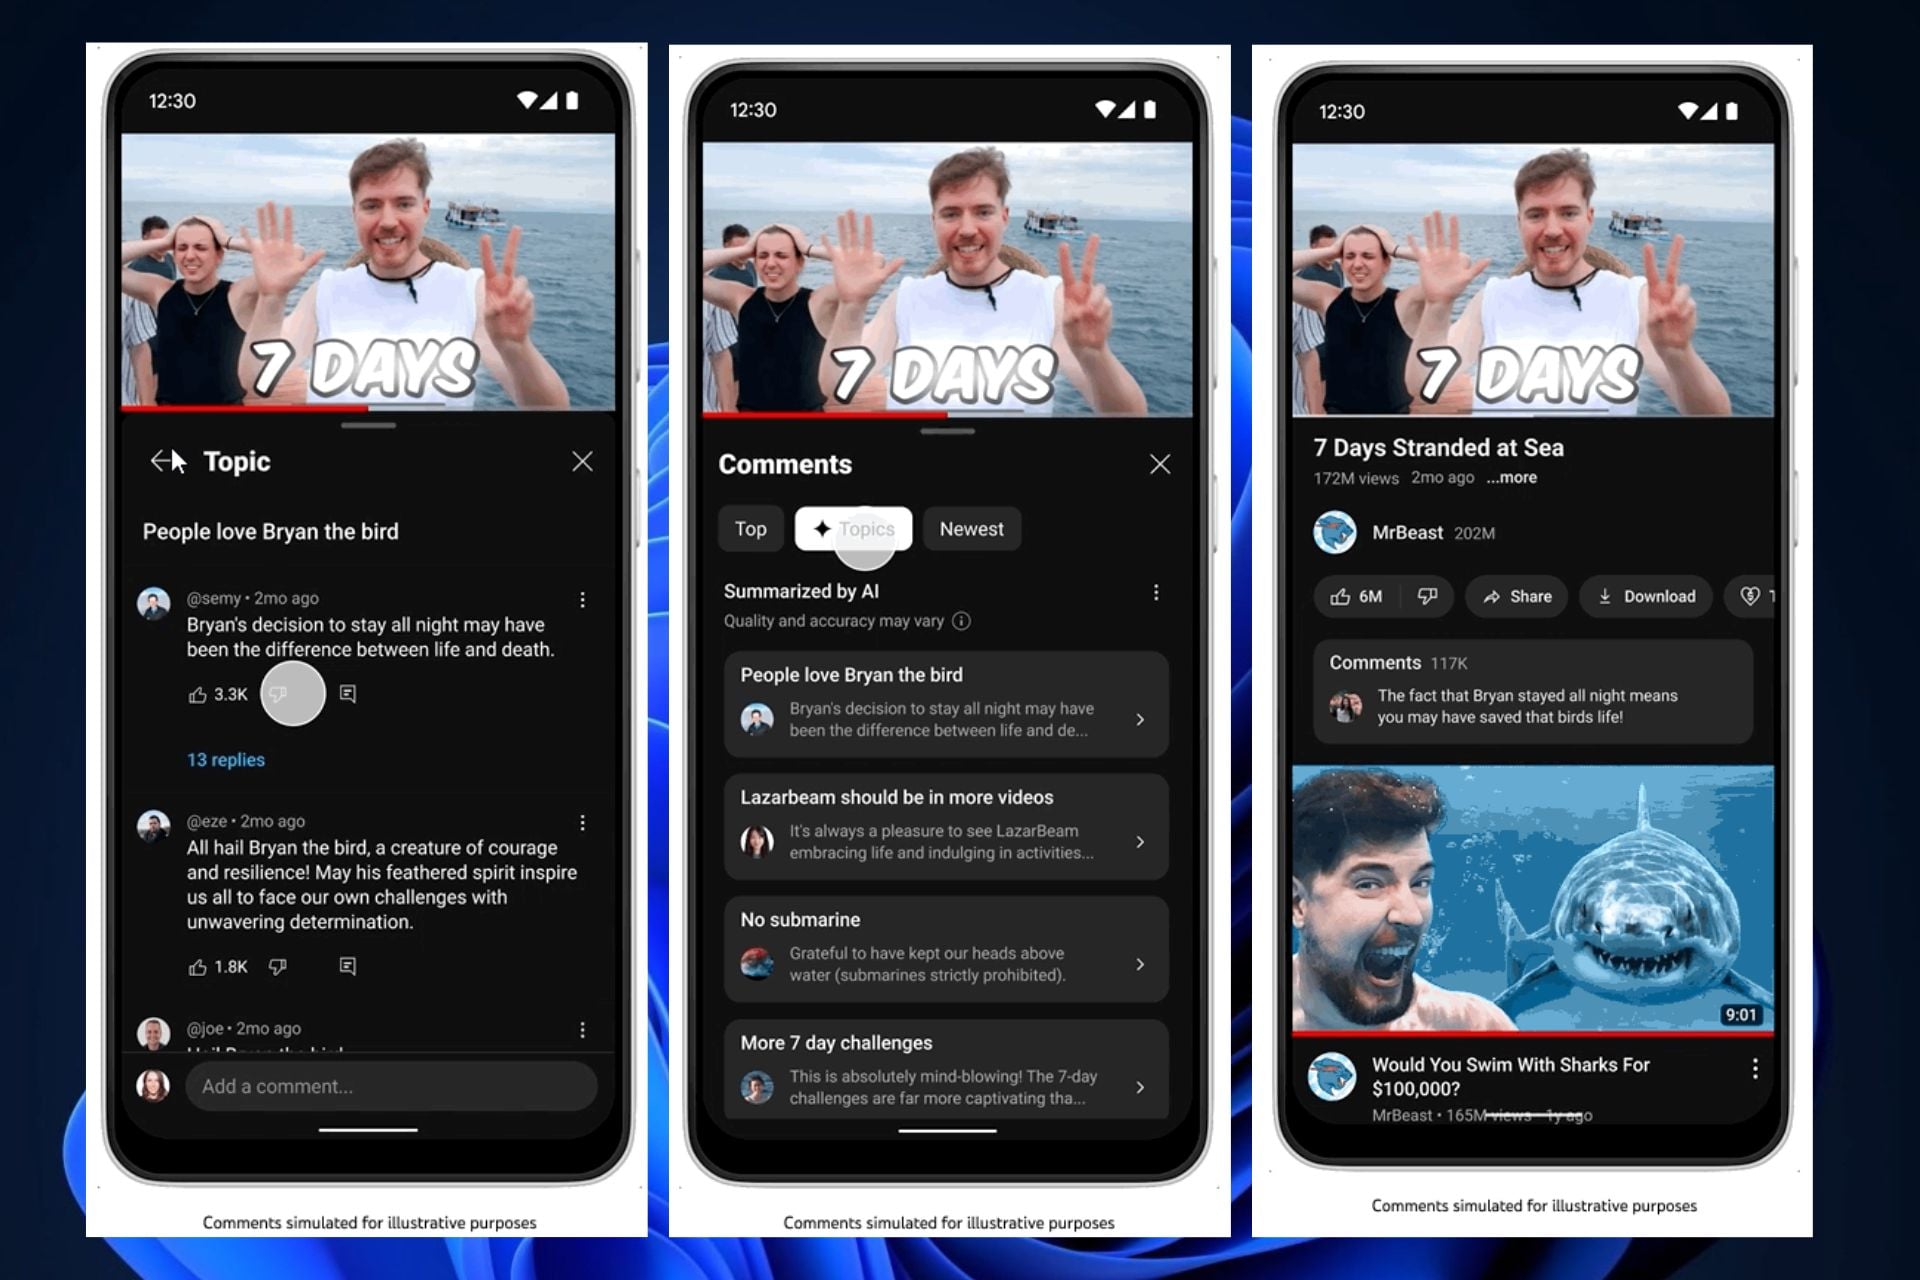
The first of these AI features is comment topics summarization by AI. YouTube will release a new option, Topics when clicking on the Comments pane on YouTube for mobile.

There, once users click on the new option, they will be able to see comment topics summarized by AI. However, AI only summarized comments that are approved by the channel, so blocked comments, under-review comments, or comments that contain muted words are not taken into consideration.

YouTube says this feature will help inspire users and video creators to engage with others watching the same clip.

Creators can use these comment summaries to more quickly jump into comment discussions on their videos, or to draw inspiration for new content based on what their audiences are discussing.

YouTube

For now, the experiment is only available to videos in the English language that have a large comments section.

The second feature is an AI chatbot that users can access to ask anything they want about the video they’re watching. It’s worth mentioning that doing so won’t stop the video playback, so it will keep running even when you’re engaged in a conversation with the AI tool.Youtube AI features

To help you dive deeper into the content you’re watching, we’re experimenting with a conversational AI tool. This tool lets you get answers to questions about the video you’re watching, recommendations for related content, and more, all without interrupting playback.

YouTube

The AI chatbot will be available to a limited number of YouTube Premium users on Android devices.

What do you think about these new AI features coming to YouTube? Are you excited about them?

GPTs are OpenAI’s versions of Microsoft Copilots, but more personalized

OpenAI announced GPTs, which are tailored custom versions of ChatGPT, at its first-ever OpenAI DevDay event. These GPTs, which can be built by anyone, are similar to Microsoft Copilots, but they’re far more personalized and tailored to each user’s needs.

According to OpenAI, building these GPTs won’t require users to know how to code, as creating them will be a very natural process.

Anyone can easily build their own GPT—no coding is required. You can make them for yourself, just for your company’s internal use, or for everyone. Creating one is as easy as starting a conversation, giving it instructions and extra knowledge, and picking what it can do, like searching the web, making images or analyzing data.

OpenAI

You can create your GPT, already, as OpenAI has made it possible for people to try this experience: chatgpt.com/create.

GPTs: Here’s what you need to know about building your copilot

GPTs are highly customizable and highly specific

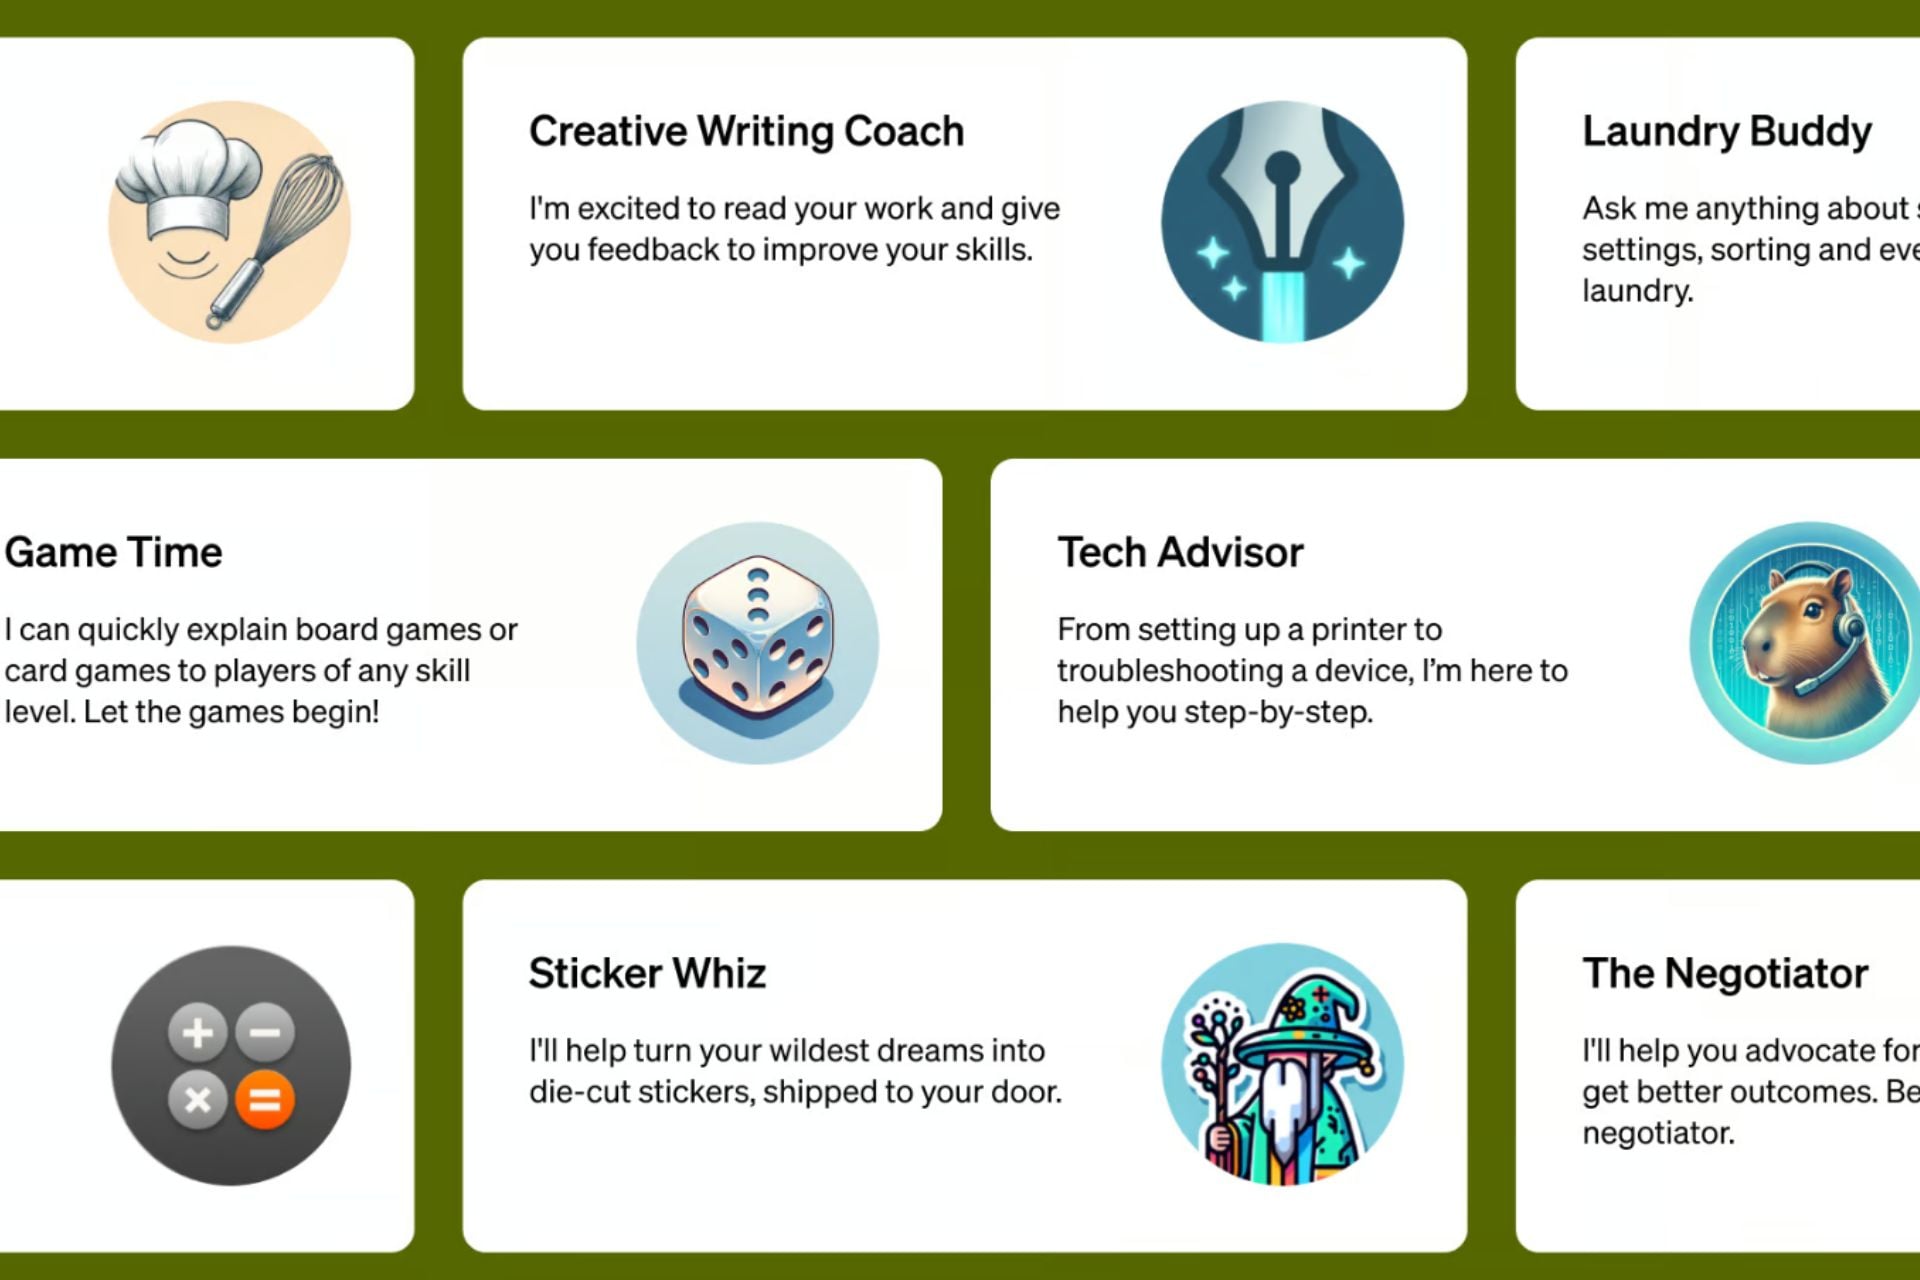
Users will be able to build specific GPTs for specific tasks, such as creative writing, tech advising, summarising, etc.

Everyone can build GPTs

Users won’t need to know how to code to build their own GPT.

GPT Store is coming soon, and users will be able to make money out of their GPTs

Later this November, OpenAI will launch the GPT Store, and people will be able to publish and commercialize their GPTs to the public. Since creating GPTs is available starting today, there is more than enough time to get accustomed to building GPTs.

No data will be shared with anyone unless you want

When building GPTs, users can opt to share data with APIs or not, but aside from that users are in total control of their data.

When builders customize their own GPT with actions or knowledge, the builder can choose if user chats with that GPT can be used to improve and train our models. These choices build upon the existing privacy controls users have, including the option to opt your entire account out of model training. 

OpenAI

GPTs can be connected to third-party apps

OpenAI will allow GPT developers to connect their GPTs to a plethora of third-party apps, in a process similar to plugins. This integration will allow for a much better flexibility of the GPT.

Connect GPTs to databases, plug them into emails, or make them your shopping assistant. For example, you could integrate a travel listings database, connect a user’s email inbox, or facilitate e-commerce orders.

OpenAI

Aside from this, companies will also be able to build their internal GPTs tailored to their infrastructure. They can be integrated into the company’s workspace to ease the workload and improve efficiency.

We mentioned earlier that these GPTs are very similar in idea to Microsoft Copilots, but instead of a company developing them, OpenAI lets people build their own AI models to suit their needs and activities.

Since GPTs are available starting today, we’ll have to wait and see if the concept is as useful as it seems to be right now. Individuals and companies being able to build their own personalized and internal AI models means less reliance on external Copilots to do the job.

But what do you think?

GPT-4 Turbo extends the context length to 128,000 tokens

OpenAI just announced GPT-4 Turbo, at its first-ever OpenAI DevDay Event. GPT-4 Turbo extends the context length to 128,000 tokens.

The company says the 128,000 tokens are comparable to a 300-page book, so users will now have much more space to interact with ChatGPT in one single discussion.

While unlimited context length is still in development, as we covered a story earlier this year where Microsoft is trying to achieve it, GPT-4 extending its context length to such a degree will be more than useful.

GPT-4 Turbo is more capable and has knowledge of world events up to April 2023. It has a 128k context window so it can fit the equivalent of more than 300 pages of text in a single prompt. We also optimized its performance so we are able to offer GPT-4 Turbo at a 3x cheaper price for input tokens and a 2x cheaper price for output tokens compared to GPT-4.

OpenAI

GPT-4 Turbo is currently available in preview mode, but OpenAI promises to release its stable version in the following weeks.

GPT-4 Turbo: Here’s everything you need to know about it

GPT-4 Turbo will have an improved instruction following, and according to OpenAI, this GPT version will also feature new improvements for function calling.

We’re releasing several improvements today, including the ability to call multiple functions in a single message: users can send one message requesting multiple actions, such as “open the car window and turn off the A/C”, which would previously require multiple roundtrips with the model (learn more). We are also improving function calling accuracy: GPT-4 Turbo is more likely to return the right function parameters.

OpenAI

The model will also be capable of reproducible outputs, which according to OpenAI’s own words, is invaluable to developers.

This beta feature is useful for use cases such as replaying requests for debugging, writing more comprehensive unit tests, and generally having a higher degree of control over the model behavior. We at OpenAI have been using this feature internally for our own unit tests and have found it invaluable. 

OpenAI

Along with GPT-4 Turbo, GPT 3.5 Turbo is also coming, and it will be released with multiple new features.

The new 3.5 Turbo supports improved instruction following, JSON mode, and parallel function calling. For instance, our internal evals show a 38% improvement on format following tasks such as generating JSON, XML and YAML. Developers can access this new model by calling gpt-3.5-turbo-1106 in the API. Applications using the gpt-3.5-turbo name will automatically be upgraded to the new model on December 11. Older models will continue to be accessible by passing gpt-3.5-turbo-0613 in the API until June 13, 2024.

OpenAI

What are your thoughts on the new GPT-4 Turbo?

Xbox and Inworld AI to release Copilot for game development

Xbox and Inworld AI will release generative AI tools for game development announced Inworld AI in a press release. The two companies will work together to develop AI tools good enough to come up with complex game development, from game design to narrative enrichment and character creation.

The partnership will last for multiple years, and the two companies will develop a Copilot which could assist game studios in developing games much faster than ever.

Together, we aim to deliver an accessible, responsibly designed multi-platform AI toolset to assist and empower creators in dialogue, story, and quest design. As with all creator tools at Xbox, our goal is to deliver state-of-the-art AI for game developers of any size, anywhere in the world, and on every platform where players want to play. We want to help make it easier for developers to realize their visions, try new things, push the boundaries of gaming today, and experiment to improve gameplay, player connection and more.

Xbox

Inworld is already a company that develops AI tools for game creation, and its partnership with Xbox will make use of Microsoft’s cloud-based AI solutions such as Azure OpenAI Services, and Xbox’s expertise in gaming to develop the Copilot.

What would a Copilot for game development be capable of?

We all know by now how Copilot functions. In Windows 11, Copilot is practically an assistant that will take your input to make the experience on the operating system more pleasant.

In Microsoft 365, Copilot will handle all sorts of different data, to come up with solutions to users’ requests. But what would a Copilot for game development be capable of?copilot game development

In their announcement, Inworld says that this Copilot would be a complex AI tool capable of:

  • Assisting and empowering game designers to explore more creative ideas, turning prompts into detailed scripts, dialogue trees, quests, and more.  

The two companies will also work on an AI character runtime engine. According to the announcement, it will be capable of:

  • Integration into the game client, enabling entirely new narratives with dynamically generated stories, quests, and dialogue for players to experience. 

The closed beta for the game development Copilot is already happening, and the company will share more details about it on November 17, at the G-Star Korea event.

What are your thoughts on this?

Solved: Can’t Install Marathi Language Pack

If you can’t install the Marathi language pack on your Windows computer, then this guide will offer you WR-tested solutions to fix it.

How do I manually download language packs on Windows 10 & 11?

You can manually download language packs on Windows 11 and 10 using the Settings app, or you can visit the Microsoft website if you know the Windows OS version and search for the one that is compatible with it.

How do I force install the Marathi language pack on Windows 11?

Before proceeding with any steps to fix the can’t install Marathi language pack error, go through the following preliminary checks:

  • Ensure your Windows OS is updated to the latest version and you are logged in using the account with administrative privileges.
  • Restart your computer and verify if you have a stable internet connection.
  • Check whether your Windows supports multiple display languages.
  1. Press Windows + I to open the Settings app.
  2. Select Time & lanugage from the left pane, then click Language & region.Time & lanugage from the left pane, then click Language & region - Can’t Install Marathi Language Pack
  3. Locate Preferred languages and click the Add a language button.Add a language
  4. Search for Marathi, then click Next.Marathi Click Next
  5. Click Install.Install - Can’t Install Marathi Language Pack
  6. Once the language is installed, you will have the Language pack, Basic typing, Handwriting, and Text-to-speech features installed.
  7. You can select it as the primary language as well.

In case the language pack is not installed or stuck at downloading, the reason could be corrupted system files or an outdated version of Windows; read this guide to learn more.

However, if you have a single language edition of Windows installed, that means your Windows OS only supports a single display language.

So, if you install a language, you can use it for Basic typing, Handwriting, and Text-to-speech but not as display language. For that, you need to upgrade it to a different Windows Home or Pro version.

How can I use multiple display languages on Windows 11 single edition?

Note icon NOTE
This method is not the direct solution, but if you don’t want to upgrade your Windows version but wish to select a different display language, you can go for it.
  1. Once you have installed the preferred language using the abovementioned steps, press the Windows key, type cmd, and click Run as administrator.CMD elevated -Can’t Install Marathi Language Pack
  2. Type the following command and hit Enter: dism /online /get-packagescmd_DISM
  3. Now locate the entries starting with Microsoft-Windows-Client-LanguagePack-Package and ensure the state is mentioned as Installed.
  4. Check what language it is by checking the Package Identity.

If you can’t find the language pack listed, you need to download the language file manually. To do that, follow these steps:

  1. Press Windows + R to open the Run box.explorer_lpksetup
  2. Type lpksetup and click OK to open the Install or uninstall display languages wizard.
  3. Click Install display languages.Install a display language
  4. Click Browse, select the Language pack you downloaded, and click Next.lpksetup_Can’t Install Marathi Language Pack
  5. Follow the onscreen instructions to complete.

Once the process is complete, follow these steps to add it to the registry entries:

  1. Now press Windows + R to open the Run box.Regedit RUN COMMAND - Can’t Install Marathi Language Pack
  2. Type regedit and click OK to open the Registry Editor. Click Yes on the UAC prompt.
  3. Go to File, click Export, and save the .reg file to an accessible location.fILE - EXPORT - Can’t Install Marathi Language Pack
  4. Navigate to this path: Computer\HKEY_LOCAL_MACHINE\SYSTEM\CurrentControlSet\Control\Nls\Language
  5. Double-click default and change the Value data to the language pack you want to use from the Language ID list. For En-US, it is 0x0409, and for Marathi, it is 0x004E. So the Value data should be 004E, and click OK.regedit_change the value data
  6. Next, if you want to change the Installed Language, locate the Installed Language DWORD, then change the Value data for the entry.
  7. Restart your computer to let the changes take effect.

You can use these steps to add any language as a display language, and if you have selected Hindi and want to get Hindi typing software, read this guide.

How can I change the language pack for Microsoft Word?

  1. Reboot your PC, and don’t launch Microsoft Word. Open your preferred browser, then go to the Microsoft Language Accessory page.
  2. From the Which Language do you need drop-down list, select the preferred language; you will get the Download link for the same.Download the language - Can’t Install Marathi Language Pack
  3. Click on the link to initiate the download, and double-click it to start the installation.
  4. Click Yes on the UAC prompt.
  5. Launch Microsoft Word and go to File.
  6. Click Options to open Word Options.WINWORD_Options
  7. Under Office display language, select the display language you want to use.
  8. Also, under Office authoring languages and proofing, select the language you want to use for authoring your document.WINWORD_add a language - Can’t Install Marathi Language Pack
  9. Click OK.
  10. Restart the app to let the changes take effect.

Can I download & install the Marathi language pack on Windows 10?

Yes, you can download and install the Marathi language pack on Windows 10 using the similar steps mentioned in the guide.

If you want to learn the steps to uninstall a language pack on Windows 10, you can check out this guide to learn the easy steps.

Remember, you must have a reliable internet connection and an updated Windows version to avoid conflicts while making system changes.

In case you don’t want to use the workaround but are looking for a way to add the keyboard layout for additional languages, read this guide.

If you have any questions or suggestions about the subject, feel free to mention them in the comments section below. We will be happy to help!

How to Turn Off Adblocker on Opera GX [Easy!]

Want to access a site that won’t work unless you allow ads? Here’s how to turn off the Opera adblocker on Opera GX in just a few simple steps:

How do I turn on or off the Opera GX adblocker?

1. Use the AdBlock icon

  1. Click the shield icon in the address bar.
     adblock icon opera
  2. Next, enable Block Ads option.
    block ads opera gx
  3. After doing that, the ad block will be enabled for all websites.

While these steps enable adblock on all websites, you can’t disable it for all pages using this method.

2. Use Easy setup panel

  1. Open the Easy setup panel by clicking its icon in the top right corner.
     easy setup opera gx
  2. Scroll down to the Privacy & Security section.
  3. Enable or disable the Block ads option.
    block ads privacy and security

3. Change privacy protection settings

  1. Click the Opera icon in the top left corner and choose Settings from the drop-down list.
    opera menu settings
  2. Locate the Privacy protection section. It should be on the top of the page.
  3. Enable or disable Block ads and surf the web up to three times faster.

How to disable Opera GX adblock for YouTube?

  1. Open YouTube. Click the adblock icon.
  2. Next, click on Turn off for this site.
  3. Check if YouTube has been added to the list of exceptions.

Tips & tricks for better protection against ads and online tracking

  • Use a reliable third-party ad blocker such as uBlock Origin and enable the Do Not Track feature in your browser.
  • Use a privacy-focused and secure browser, such as Firefox, Brave, or Tor. For an additional layer of privacy, it’s always a good idea to use a VPN.
  • Disable cookies or at least clear them regularly. Alternatively, you can use the private browsing mode.
  • Use a privacy-focused search engine that doesn’t collect your data, such as DuckDuckGo or StartPage.

As you can see, it’s pretty simple to enable or disable adblock on Opera GX, and the fastest way is from the Easy setup panel, but you can also do it from the settings page. To learn more about this feature, we have an in-depth guide on Opera GX adblocker, so we encourage you to check it out.

Do you use Opera GX adblock or do you prefer third-party solutions? Let us know in the comments below.

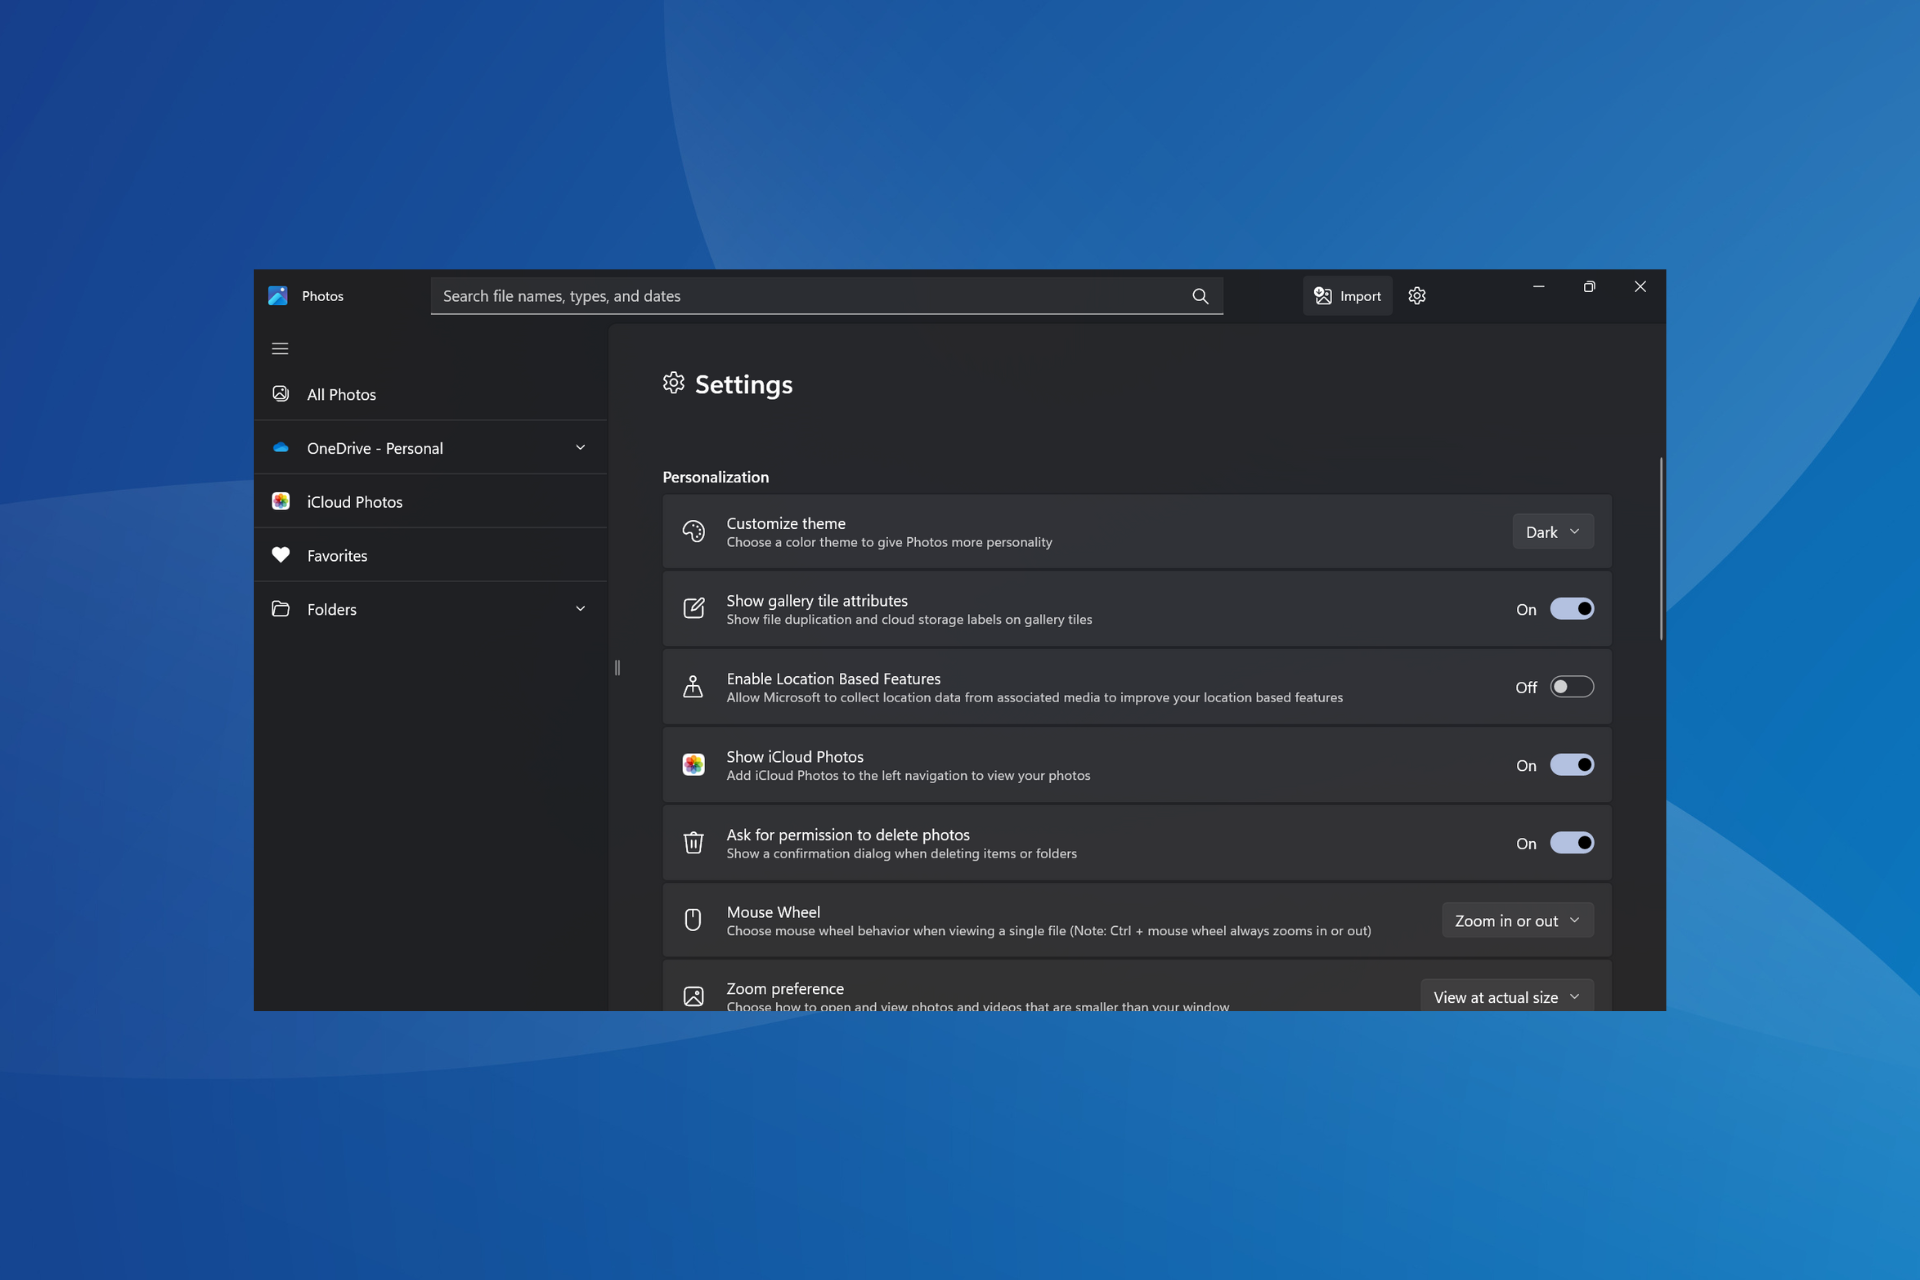
Solved: Portrait Photos Showing in Landscape on Windows 11

A few users report that photos configured to load in portrait mode opened in the landscape orientation instead on Windows 11. As per forum reports, the issue was present in Windows 10 as well.

In some cases, the images appeared fine in File Explorer, but when opened in the Windows Photos app, they automatically switched to landscape mode. 

Why is my gallery displaying portrait photos as landscape?

It happens when the program or OS doesn’t read the EXIF orientation assigned to the photo. This is often the case with raw files. Also, corrupt system files or a bug in the OS can trigger the problem.

How do I stop portrait photos from showing as landscape in Windows 11?

Before we start with the slightly complex solutions, try these quick ones:

  • Manually change the orientation for each photo from landscape to portrait and save the changes. 
  • Check for any pending OS and photo viewer updates and install them.
  • If the images were downloaded from the web, download them again in case the metadata is missing. For images created using an editing software, save them again.

1. Download the necessary codec

When Microsoft Photos automatically rotates raw images, download the necessary codec for the image format. Just search for the format’s codec on Google, download the setup from the official website, and run it to install the missing codec.

For instance, you will need to download the Nikon RAW NEF codec to display the Nikon RAW NEF image format correctly.

2. Disable AutoRotation from the Registry

  1. Press Windows + R to open Run, type regedit in the text field, and hit Enter.regedit
  2. Click Yes in the UAC prompt.
  3. Navigate the following path or paste it in the address bar and hit Enter: Computer\HKEY_LOCAL_MACHINE\SOFTWARE\Microsoft\Windows\CurrentVersion\AutoRotation
  4. Double-click the Enable DWORD on the right.enable
  5. Enter 0 under the Value data field, and click OK to save the changes.change to fix portrait photos showing in landscape windows 11
  6. Finally, restart the computer and check whether Windows’ photos still auto rotate.

Alternatively, you can head to the Display settings and disable the Rotation lock. Though, the Registry changes are more effective!

3. Repair the corrupt system files

  1. Press Windows + S to open Search, type Command Prompt in the search bar, right-click on the relevant result, and select Run as administrator.command prompt 
  2. Click Yes in the UAC prompt.
  3. Paste the following DISM commands individually and hit Enter after each: DISM /Online /Cleanup-Image /CheckHealth DISM /Online /Cleanup-Image /ScanHealth DISM /Online /Cleanup-Image /RestoreHealth
  4. Now, execute this command to run the SFC scan: sfc /scannowsfc scan to fix portrait photos showing in landscape windows 11
  5. Restart the computer and check whether the orientation still automatically changes from portrait to landscape.

Repairing the system files also helps when the rotate option is greyed out in File Explorer. We also recommend a third-party tool just in case you want to save time and prevent other possible errors.

4. Update the graphics driver

  1. Press Windows + X to open the Power User menu, and select Device Manager.
  2. Expand the Display adapters entry, right-click on the active graphics adapter, and select Update driver.display adapters
  3. Choose Search automatically for drivers and wait for Windows to locate and install the best driver version available locally.update driver to fix portrait photos showing in landscape windows 11

Often, a corrupt, buggy, or outdated driver can cause issues with the image orientation and display. So, if the photo gallery only displays portrait photos as landscape, update the graphics driver. 

And if Windows can’t find a newer version, head to the manufacturer’s website and manually install the latest driver.

5. Repair/reset the Microsoft Photos app

  1. Press Windows + I to open Settings, go to Apps from the left pane, and select Installed apps.installed apps
  2. Locate Microsoft Photos from the list, click the ellipsis next to it, and select Advanced options.advanced options
  3. Scroll down, click the Repair button, wait for the process to complete, and then check for improvements.repair to fix portrait photos showing in landscape windows 11
  4. If the problem persists, click the Reset button.reset to fix portrait photos showing in landscape windows 11
  5. Again, click Reset in the confirmation prompt, and verify whether portrait photos are still showing in landscape on Windows 11.

6. Uninstall the recent Windows updates

  1. Press Windows + I to open Settings, go to Windows Update from the navigation pane, and click on Update history.update history
  2. Scroll down to the bottom and click on Uninstall updates.
  3. Now, click the Uninstall button next to the recently installed updates. For many users, downgrading from Windows 11 22H2 to 21H2 fixed things.uninstall update to fix portrait photos showing in landscape windows 11
  4. Again, click on Uninstall in the confirmation prompt to remove the OS update.

7. Perform an in-place upgrade

  1. Go to Microsoft’s official website, select the OS edition and product language, then download the Windows 11 ISO.
  2. Double-click the ISO file, and then click Open in the confirmation prompt.
  3. Run the setup.exe file.setup.exe
  4. Click Next in the Windows 11 Setup to proceed.
  5. Read through Microsoft’s license terms and click Accept.
  6. Make sure the setup says, Keep personal files and apps, and click Install.in-place upgrade to fix portrait photos showing in landscape windows 11
  7. Wait for the in-place upgrade to complete. It may take a few hours.

When nothing else works, you can always perform an in-place upgrade to fix issues with the Windows installation. It’s basically the same as reinstalling the OS, but the saved files and apps remain unaffected. 

Can I uninstall Windows 11 2023 Update (23H2)?

Yes, you can uninstall any Windows update, including Windows 11, version 22H3.

To do that, open Settings > go to Windows Update > select Update history > click Uninstall next to Windows 11 23H2 > confirm the change. 

You now know all the ways to get things running when the portrait orientation photos are showing in landscape mode on Windows 11. In case the problem remains unresolved, another option is to switch to an effective photo viewer.

Besides, did you know it’s possible to rotate the screen in Windows 11? There are several ways, including a dedicated keyboard shortcut!

For any queries or to share which solution worked for you, drop a comment below.

Error: Cannot Decrypt in Bitwarden [Fix]

Many experienced Bitwarden Cannot decrypt error message, and if this issue appears, you won’t be able to see and differentiate your saved logins. This will make logging in to certain services almost impossible.

This is a major problem, especially if you can’t access your work or bank account, however, there are a few solutions that you can use to fix this issue.

How do I fix Error: Cannot Decrypt in Bitwarden?

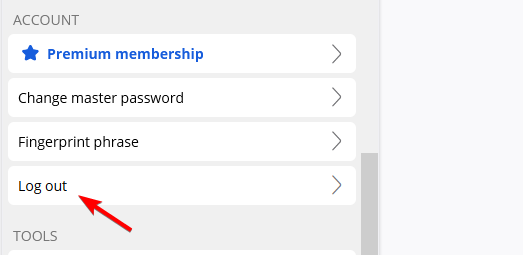
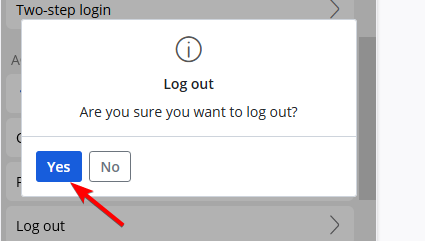
1. Log out and log in again

  1. Click the Bitwarden browser extension icon in your browser.

     
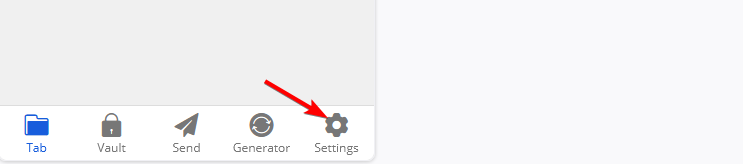
  2. Next, click the Settings icon in the bottom right corner.
  3. Select the Log out option.
  4. When the confirmation dialog appears, click on Yes.
  5. Now log back into the extension with your login details.

Few users reported that you don’t have to log out fully, it might be enough to lock your password vault and unlock it again.

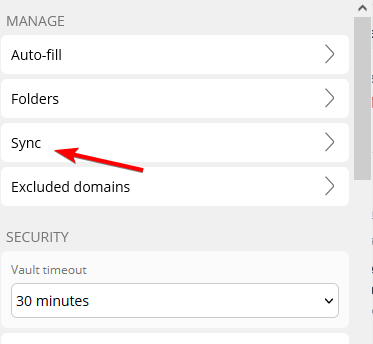
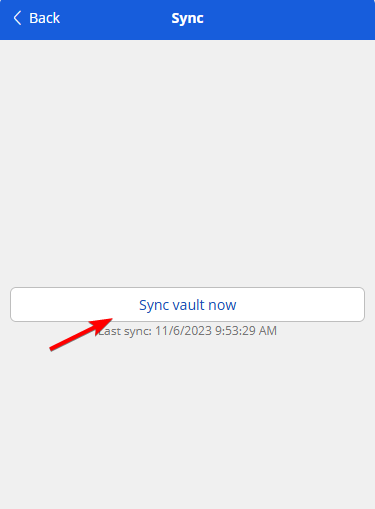
2. Sync your vault

  1. Click the Bitwarden extension.
  2. Next, go to Settings.
  3. Select Sync from the list.
  4. Lastly, click on Sync vault now.
  5. After the syncing is complete, check if the problem is still there.

3. Reinstall the extension

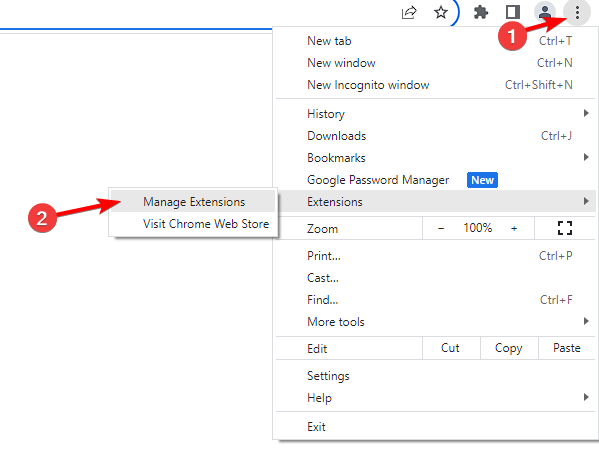
  1. Click the Menu button and choose Extensions. Then select Manage Extensions.
     
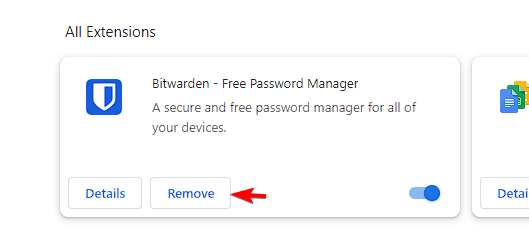
  2. Locate Bitwarden and click on Remove. When the confirmation dialog appears, click on Yes.
  3. Visit the Bitwarden extension page and download it again.
  4. Once it’s installed, log in and check if the issue is still there.

Tips for good password habits & security practices

  • Use a reliable password manager and secure it with a strong and unique master password.
  • Ensure that each online account uses a different password. In addition, try to make your password at least 8 characters long and try to include uppercase letters, symbols, and numbers.
  • Use two-factor authentication for all your accounts. This will prevent hackers from accessing your account even if they have your password. For maximum security, it’s suggested to use multi-factor authentication.

Bitwarden CLI error cannot decrypt is just a temporary issue, and it can be fixed by logging out or by performing a manual sync. All these solutions should work for the desktop application as well, so don’t hesitate to use them.

Despite being a great password manager, Bitwarden has its issues, and many reported that Bitwarden autofill is not working in Firefox and Bitwarden failed to fetch error. We covered those in separate guides, so don’t miss them.

Recently we published a guide on An error has occurred message in Bitwarden, so don’t hesitate to visit it for more information.

Did you ever experience this issue and how did you fix it? Let us know in the comments section!

Solved: Rainbow Six Siege Error Code 10-0x00000

The Rainbow Six Siege error code 10-0x00000 affects several players across consoles, including PS5, Xbox, and PC. For some, it came up during launch, a few encountered the error message during gameplay, while others found no operators unlocked.

It also throws the Offline-Connecting status when logging into the R6 servers. The error message lists no troubleshooting measures, and the gaming experience stands affected.

What is Error Code 10-0x00000 in R6?

The error code highlights a networking issue with the game server. It could be at the game end or a problem with your device’s network configuration. An unstable Internet connection or corrupted game files also trigger the error.

How do I fix Rainbow Six Siege Error Code 10-0x00000?

Before we start with the slightly complex solutions, try these quick ones:

Tip icon Tip
The steps listed here are for a Windows PC. In case you are facing the error on PlayStation or Xbox, the equivalent measures would do just as well.

1. Use a VPN

Your primary approach when faced with Rainbow Six Siege error code 10-0x00000 on Xbox, PS4, or PC should be to use a reliable VPN solution.

Remember, you will have to select a server based in another region before starting the online game. Try out the various server options until one works!

We recommend for this task ExpressVPN as it is a robust and powerful VPN solution. ExpressVPN comes with servers in 105 countries and very high connection speeds, so you never have to worry about any issues when playing your favorite online games.

ExpressVPN

Enjoy error-free gaming sessions with this amazing VPN solution.
Check Price Visit Website

2. Repair the corrupt game files

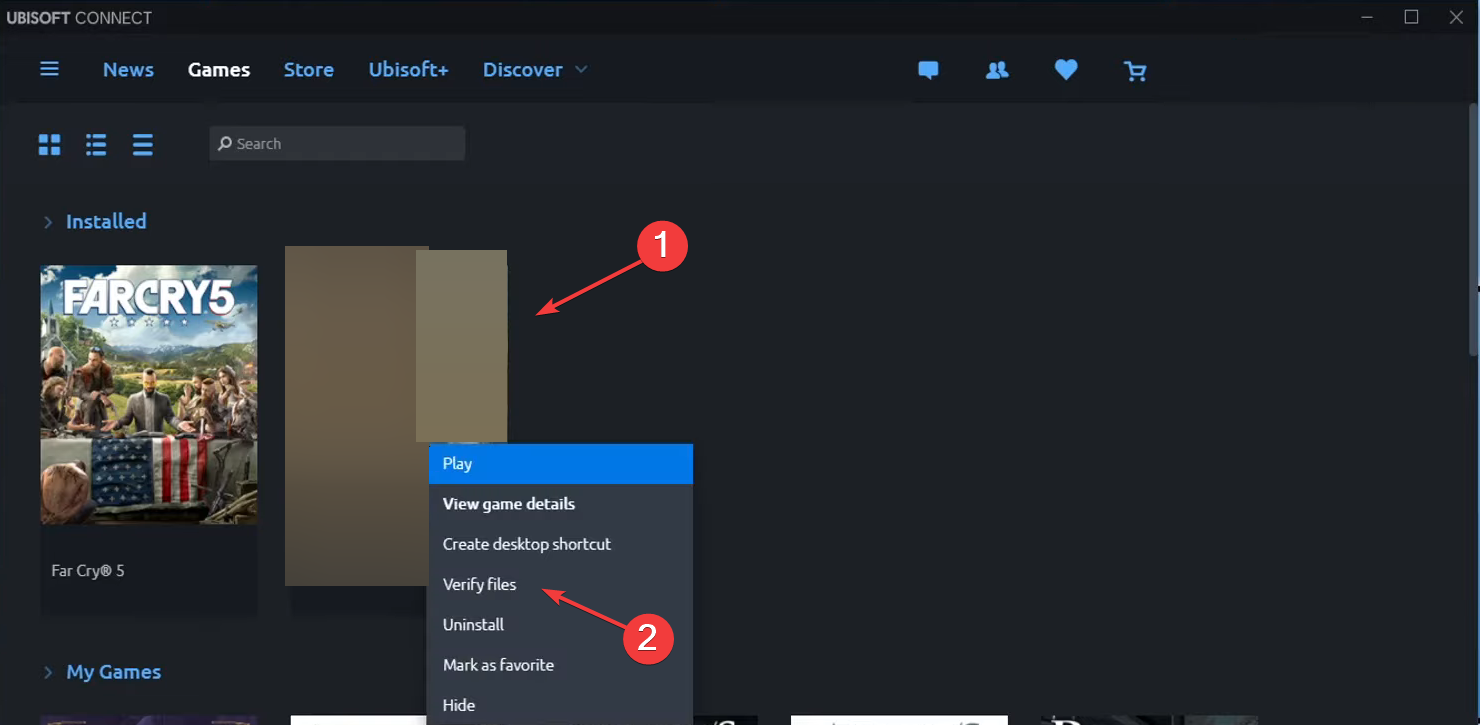
  1. Launch the Ubisoft Connect program and head to the Games tab. 
  2. Right-click on Rainbow Six Seige and select Verify files from the context menu.verify files to fix rainbow six siege error code 10-0x00000
  3. Wait for the file verification to complete.verification
  4. Finally, relaunch the game and check whether the error message disappears. 

When the game files are corrupt, the gameplay is interrupted, or you start to encounter errors. Repairing the game files also helps if Rainbow Six Seige won’t update.

3. Configure port forwarding

Another fix for Rainbow Six Siege error code 10-0x00000 is to set up port forwarding. This worked for 4 out of 5 users faced with the problem. You will have to configure the following ports in the router settings:

TCP Ports: 80, 443, 13000, 13005, 13200, 14000-14001, 14008, 14020-14024

UDP Ports: 3074​, 6015, 10000-10099

Remember, the steps to reconfigure port forwarding are different for each manufacturer. So, it’s best that you check the manufacturer’s official website or contact their dedicated support team.

4. Change the DNS server

  1. Press Windows + R to open Run, type ncpa.cpl in the text field, and hit Enter.ncpa.cpl
  2. Right-click on the active network adapter, and select Properties.
  3. Select Internet Protocol Version 4 (TCP/IPv4), and click the Properties button.ipv4
  4. Select Use the following DNS server addresses and enter the following in the fields underneath:
    • Preferred DNS server: 8.8.8.8
    • Alternate DNS server: 8.8.4.4change DNS to fix rainbow six siege error code 10-0x00000
  5. Click OK to save the changes, and then check for improvements.

Remember, we used Google’s DNS address, but you can select the fastest DNS server near you or another one.

5. Reset the host file

  1. Press Windows + E to open File Explorer, paste the following path in the address bar and hit Enter: c:\Windows\System32\drivers\etcpath
  2. Right-click on the hosts file, select Rename from the context menu, and then name it hosts_old.rename to fix rainbow six siege error code 10-0x00000
  3. Click Yes in the UAC prompt to confirm.
  4. Now, open a new text document (Notepad), and paste the following code into it:
    # Copyright (c) 1993-2009 Microsoft Corp.
    #
    # This is a sample HOSTS file used by Microsoft TCP/IP for Windows.
    #
    # This file contains the mappings of IP addresses to host names. Each
    # entry should be kept on an individual line. The IP address should
    # be placed in the first column followed by the corresponding host name.
    # The IP address and the host name should be separated by at least one
    # space.
    #
    # Additionally, comments (such as these) may be inserted on individual
    # lines or following the machine name denoted by a '#' symbol.
    #
    # For example:
    #
    # 102.54.94.97 rhino.acme.com # source server
    # 38.25.63.10 x.acme.com # x client host

    # localhost name resolution is handled within DNS itself.
    # 127.0.0.1 localhost
    # ::1 localhost
    code
  5. Click the File menu, and select Save.save
  6. Enter hosts as the file name, and click the Save button. 
  7. Move the text file to the etc folder from step 1 (the one where the original hosts file was saved).
  8. Right-click on the new file, select Rename, and remove the .txt extension. If it’s not visible, you will have to configure File Explorer settings to show file extensions. remove .txt extension
  9. Finally, relaunch the game and verify whether Rainbow Six Siege error code 10-0x00000 on the PC is fixed.

6. Reinstall the game

  1. Open Ubisoft Connect, go to the Games tab, right-click on Rainbow Six Seige, and select Uninstall.uninstall to fix rainbow six siege error code 10-0x00000
  2. Follow the on-screen instructions to remove the game.
  3. Reboot the device, and then reinstall Rainbow Six Seige. 

If it’s the installation or missing files to blame for the connection error, you can always reinstall the game. This also helps when Rainbow Six Siege is loading slowly.

Besides, if the error remains unresolved, use an effective uninstaller tool to get rid of any leftover files and Registry entries.

7. Contact Ubisoft support

When nothing else works, the last option is to contact Ubisoft support. You can chat with a Ubisoft agent or send them a message.

They should be able to share a solution or provide a rough timeline as to when things will be up and running, if the problem lies at their end.

Remember, the Rainbow Six Siege error code 10-0x00000 has to do with the game cache, game server, or your network connection.

Though it’s not a guaranteed fix, you may try updating the drivers. It will nevertheless improve the game’s performance. Also, a VPN will help with the Rainbow Six Siege packet loss and optimize the gaming experience.

For any queries or to share what worked for you, drop a comment below.

Fix: Get the Latest Updates as Soon as They’re Available is Missing

If the Get the latest updates as soon as they’re available option is missing or grayed out, you are probably running a Dev channel Windows 11 version, which is normal.

For others, the problem appeared after installing the KB5026446 (22621.1778) update. Here’s what you can do to get back the Get the latest updates as soon as they’re available option.

How do I get back the Get the latest updates as soon as they’re available option?

Before starting any of the solutions below, make sure that you check for the latest Windows 11 updates and install them.

1. Use ViVeTool

  1. Go to the Microsoft Update Catalog page and look for the KB5026446 update.
  2. Download and reinstall the update on your PC.
  3. Now, go to the ViVeTool page on GitHub, then download and install the app on your computer.
  4. Next, use ViVeTool with the following command and reboot your computer afterward: vivetool /enable /id:42921948

After the reboot, if you go to Settings>Windows Update, you should see the Get the latest updates as soon as they’re available option back below the Check for updates button.

This solution worked in the WR labs tests, but it’s possible that after a restart, the function will disappear again, so rerun the ViVeTool command to reenable it.

2. Enable the function from the Registry

  1. Press the Win + R keys to start the Run console, type regedit, and press Enter or click OK.
  2. Now, navigate to the following path in the Registry: HKEY_LOCAL_MACHINE\SOFTWARE\Microsoft\WindowsUpdate\UX\Settings
  3. Now, look for the IsContinuousInnovationOptedIn DWORD. If it’s not there, right-click on an empty space and create a new DWORD key with this name.
  4. Finally, double-click the new value and set it to 1.

Enabling the Continuous Innovation option will also enable the Get the latest updates as soon as they’re an available feature. However, this solution didn’t work for all the users. If it’s ineffective, return to the Registry and delete the IsContinuousInnovationOptedIn value or set it to 0 to disable it.

3. Reinstall Windows 11

As we explained at the beginning of the article, if you’re running a Windows 11 Dev channel version, you won’t be able to see the Get the latest updates as soon as they’re available option.

The best solution in this case would be to install a fresh copy of Windows 11 and not join the Dev Insider channel this time.

Get the latest updates as soon as they’re available is greyed out

That means you are not running a Windows 11 insider build, but you’re facing a bug from one of the latest security updates you installed.

To fix the problem, try uninstalling the latest update or updates. Here’s how to do that:

  1. Go to Settings> Windows Update and select Update History.
  2. Now, scroll down on the right pane and click on Uninstall updates.
  3. Select the most recent update and click on Uninstall.

After uninstalling the update, you can go to the Microsoft Update Catalog page and reinstall that update manually and see if that makes a change.

Other tips to fix the Get the latest updates as soon as they’re available problem

  • When reinstalling the update, follow the update process and see if there are any issues along the way.
  • Look if there is any optional update pending and install it. You can find them in Windows Update > Advanced options.
  • Set the update service to get Windows 11 updates ASAP and receive update notifications.
  • As we mentioned above, uninstalling the latest updates and getting them manually may fix the problem if you’ve had problems with your internet connection lately.

To sum up our guide, you can restore the Get the latest updates as soon as they’re available by using ViVeTool open-source software, by changing the settings in the Registry, or by reinstalling Windows 11.

However, first, check for any new updates and install them because the latest Windows 11 versions don’t display this issue.

If the Check for updates button is missing, this guide will provide step-by-step instructions to fix it immediately.

For any other questions or solutions, don’t hesitate to access the comments section below.

Fix: Rainbow Six Siege Error Code 3-0x000c0054

If you have encountered Rainbow Six Siege error code 3-0x000c0054 while trying to load the game, this guide can help!

We will offer you some WR-tested effective solutions with step-by-step instructions to fix this server connectivity issue in no time.

How do I fix error code 3-0x000c0054 in Rainbow Six Siege?

Before proceeding with any steps to fix the Rainbow Six Siege error code 3-0x000c0054, go through the following preliminary checks:

  • Restart your game multiple times; if this doesn’t work, reboot your PC & check the Rainbow Six Siege server status.
  • Turn off your router, remove the cables and power cord, then wait for 30 seconds, connect the power cords, and turn it on. Verify if you have a stable internet connection; if not, try switching to an ethernet cable connection.
  • Run your computer in clean boot mode to single out the cause of the issue and ensure the game is updated to the latest version.

1. Clear your DNS cache

  1. Press the Windows key, type cmd in the search box, and click Run as administrator.CMD elevated -rainbow six siege error code 3-0x000c0054
  2. Type the following commands one by one to clear the DNS cache and hit Enter after every command:cmd_
    • ipconfig /flushdns
      ipconfig/registerdns
      ipconfig/release
      ipconfig/renew
  3. Once the commands are executed, restart your computer.

The DNS cache stores the IP addresses of recently viewed websites. Therefore, it is best to clear them from time to time so your computer can communicate with game servers properly. It can also help you fix the slow loading issue on the Rainbow Six Siege game.

2. Change your DNS server

  1. Press Windows + R to open the Run window.NCPA run command  - rainbow six siege error code 3-0x000c0054
  2. Type ncpa.cpl and click OK to open the Network Connections.
  3. Locate the Network connection you use, right-click it, and select Properties.Network Connection - Properties
  4. Select Internet Protocol Version 4 (TCP/IPv4) from This connection uses the following items box and click Properties.IPv4 Properties - rainbow six siege error code 3-0x000c0054
  5. Now click the radio button next to Use the following DNS server addresses, set Preferred DNS server as 8.8.8.8 and Alternate DNS server as 8.8.4.4.DNS server
  6. Click OK, then OK to confirm the change.

Changing the DNS server can help you stabilize the connection and, thereby, help you reach the servers of Rainbox Six Siege. It can also help you fix similar issues like error code 6-0x00001000; read this guide to learn more about it.

3. Reset your network settings

  1. Press Windows + I to open the Settings app.
  2. Go to Network & Internet, then select Advanced network settings.Network & Internet - advanced network settings - rainbow six siege error code 3-0x000c0054
  3. Under More settings, select Network reset.Network Reset` 1
  4. On the following page, click the Reset now button.Network Reset now
  5. Click Yes to confirm the choice.Network Reset click Yes

Your computer will restart in 5 minutes after resetting the network, so make sure you save your work before it reboots.

4. Allow the app through Windows Firewall

Note icon NOTE
Before moving with the steps below, check if Rainbox Six Seige is blocked by the Windows Firewall using our guide.
  1. Press the Windows key, type control panel in the search box, and click Open.Control Panel start menu -rainbow six siege error code 3-0x000c0054
  2. Select Category for View by and click System and Security.System and Security CP -rainbow six siege error code 3-0x000c0054
  3. Under Windows Defender Firewall, select Allow an app through Windows Firewall.aLLOW AN APP THROUGH FIREWALL
  4. On the Allowed apps page, click Change settings, then select Allow another app.Change app
  5. Click Browse and locate the executable file of Rainbow Six Siege.Browse
  6. Click Add.ADD
  7. On the Allowed apps window, Rainbow Six Siege will be added to the list; place a checkmark next to Private and Public, and click OK to save the changes.

5. Edit the Game Settings folder

  1. Press Windows + E to open the File Explorer window.
  2. Navigate to this path: Documents\MyGame\Rainbow Six – Siege\7564b1ec-0856-4f93-8aef-71232c035d75
  3. Locate the GameSettings folder and double-click it to open it on Notepad.
  4. Scroll and find the DataCenterHint=default line, and change the default to the closest server you have. You can find a list of servers on the Ubisoft website.
  5. Press Ctrl + S to save the changes.

6. Verify your game files’ integrity

  1. Press the Windows key, type ubisoft connect and click Open.
  2. Go to the Games tab and select Rainbow Six Siege.
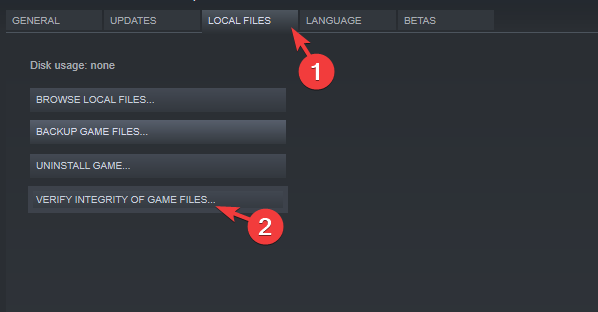
  3. From the left side pane, click Properties.
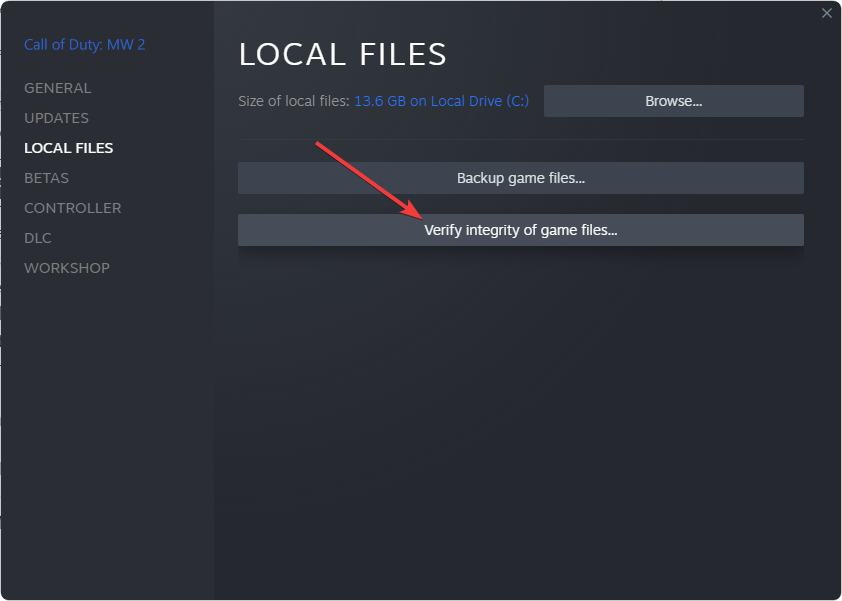
  4. Locate Local files, and click Verify Integrity of game files. The game files will be verified, and the bad ones will be spotted.Verify integrity of game files - Rainbox six seige
  5. Click Repair, and the broken files will be fixed. Restart the Ubisoft Connect software, then relaunch the game.

Verifying the game files can also help you fix the Rainbow Six Siege game won’t update error; read this to know more.

If nothing worked and the game server is up and running, you must contact the internet service provider to get the connection issues fixed.

However, if there is no issue with your internet connection, contact Rainbox Six Seige’s customer service team and explain your issue along with the steps taken for further assistance.

Did we miss a step that helped you with the error message? Don’t hesitate to mention it in the comments section below. We will happily add it to the list.

Fix: Copilot Is Not Available on Windows 11 23H2

Many reported that Windows 11 23H2 has no Copilot. This is unfortunate, especially if you were looking forward to trying the new artificial intelligence assistant.

We at WindowsReport experienced the same issue, and in today’s guide, we will show you a few potential solutions that might help if Windows 11 Copilot is missing.

What can I do if Copilot is missing on Windows 11 23H2?

1. Perform a full shutdown

  1. Press the Windows key + R.
  2. Next, type the following and press Enter: shutdown /s /t 0
  3. Once the PC turns off, start it again.
  4. Check if Copilot is available among other Taskbar buttons.

2. Use the Run dialog

  1. Press the Windows key + R to open the run dialog.
  2. Next, enter the following: microsoft-edge://?ux=copilot&tcp=1&source=taskbar
  3. Click OK.
  4. Copilot should now open.

3. Use ViVeTool

  1. Visit the ViveTool download page and download the latest version.
     
  2. Extract the tool to the desired location. We used Desktop and set the folder name to ViVeTool.
  3. Press the Windows key + S and enter cmd. Select Run as administrator from the menu.
  4. Next, switch to the ViVeTool folder from step 2. In our example, we used the following command: cd C:\Users\WindowsReport\Desktop\ViVeTool
  5. Lastly, run vivetool /enable /id:44774629,44776738,44850061,42105254,41655236
  6. Once the command is executed, restart your PC and check if the Copilot is available next to the Search box.

How do I enable Copilot on 23H2? (Quick Steps)

  1. Open Settings and navigate to Personalization.
  2. Select Taskbar. This will open the Taskbar settings panel.
  3. Lastly, toggle Copilot (preview) to enable it, and it should appear next to the Search bar.

Windows 11 23H2 is a major update, with Copilot being one of the most anticipated features. However, many reported Copilot is not available in your location error, but we tackled that issue in a separate guide.

If you’re not a fan of the AI-powered Copilot tool and you don’t want to use it, we also have a great guide on how to remove Windows Copilot on Windows 11, so be sure to check it out.

Also, if Copilot throws the Sorry, I can’t access your webpage at the moment error, troubleshooting it won’t take much time.

Did you experience the issue with a missing Windows 11 Copilot, and how did you fix it? Let us know in the comments section below.

Solved: Windows 11 23H2 Not Showing Up in Windows Update

Microsoft recently rolled out Windows 11, version 23H2, to all compatible devices, but it’s not showing up for many. The version was earlier exclusively available to those in the Beta and Dev channels. And ever since the public release, users can’t wait to try the latest OS version.

First things first, Microsoft rolls out updates in a phased manner, where some users receive them before others. This doesn’t at all indicate that your device is not compatible or won’t be receiving the update. But if it’s been a few days, you should check for issues.

Why doesn’t Windows 11 23H2 appear?

It usually happens when the device blocks newer versions of Windows, there are corrupt update components, the PC is not eligible due to missing TPM 2.0 or Secure Boot, or Microsoft is yet to release an update for your PC.

What can I do if Windows 11 23H2 is not showing?

Before we start with the slightly complex solutions, try these quick ones:

  • Restart the computer and again check for updates.
  • Switch to another network, preferably a wired connection. 
  • Make sure your PC meets the minimum system requirements for Windows 11. If you previously installed the OS through manipulations, it might not show 23H2.

1. Run the Windows Update troubleshooter

  1. Press Windows + I to open Settings, and click on Troubleshoot on the right in the System tab.troubleshoot
  2. Click on Other troubleshooters.
  3. Now, click on the Run button next to Windows Update.troubleshooter to fix windows 11 23h2 not showing
  4. Follow the on-screen instructions to complete the process and make the recommended changes, if any.

The built-in troubleshooter helps a great deal when Windows 11 23H2 is not showing up. Besides, it also helps if you can’t find Windows 11 under updates while upgrading to the latest iteration.

2. Enable the Windows Update service

  1. Press Windows + R to open Run, type services.msc in the text field, and hit Enter. services.msc
  2. Scroll down and locate the Windows Update service, right-click on it, and select Properties.windows update service
  3. Select Automatic from the Startup type dropdown menu, click the Start button under Service status, and then OK to save the changes.start service to fix windows 11 23h2 not showing
  4. Finally, restart the computer, again check for updates, and see if Windows 11, version 23H2 feature update, now shows up for download.

3. Reset the Windows Update components

  1. Press Windows + S to open the Search menu, type Command Prompt, right-click the relevant result, and select Run as administrator.command prompt
  2. Click Yes in the UAC prompt.
  3. Paste the following commands individually and hit Enter after each to stop the related services: net stop bits net stop wuauserv net stop appidsvc net stop cryptsvc
  4. Now, execute this command to delete the qmgr*.dat files created by BITS: Del "%ALLUSERSPROFILE%\Application Data\Microsoft\Network\Downloader\*.*"command to fix windows 11 23h2 not showing
  5. Type Y and press Enter to confirm.
  6. Now, run the following commands to clear the Windows Update cache: rmdir %systemroot%\SoftwareDistribution /S /Q rmdir %systemroot%\system32\catroot2 /S /Q
  7. Next, execute these commands to reset the BITS and Windows Update service: sc.exe sdset bits D:(A;;CCLCSWRPWPDTLOCRRC;;;SY)(A;;CCDCLCSWRPWPDTLOCRSDRCWDWO;;;BA)(A;;CCLCSWLOCRRC;;;AU)(A;;CCLCSWRPWPDTLOCRRC;;;PU) sc.exe sdset wuauserv D:(A;;CCLCSWRPWPDTLOCRRC;;;SY)(A;;CCDCLCSWRPWPDTLOCRSDRCWDWO;;;BA)(A;;CCLCSWLOCRRC;;;AU)(A;;CCLCSWRPWPDTLOCRRC;;;PU)
  8. Paste this command and hit Enter: cd /d %windir%\system32system32
  9. Execute the following commands individually to re-register the critical DLL files:
    regsvr32.exe /s atl.dll
    regsvr32.exe /s urlmon.dll
    regsvr32.exe /s mshtml.dll
    regsvr32.exe /s shdocvw.dll
    regsvr32.exe /s browseui.dll
    regsvr32.exe /s jscript.dll
    regsvr32.exe /s vbscript.dll
    regsvr32.exe /s scrrun.dll
    regsvr32.exe /s msxml.dll
    regsvr32.exe /s msxml3.dll
    regsvr32.exe /s msxml6.dll
    regsvr32.exe /s actxprxy.dll
    regsvr32.exe /s softpub.dll
    regsvr32.exe /s wintrust.dll
    regsvr32.exe /s dssenh.dll
    regsvr32.exe /s rsaenh.dll
    regsvr32.exe /s gpkcsp.dll
    regsvr32.exe /s sccbase.dll
    regsvr32.exe /s slbcsp.dll
    regsvr32.exe /s cryptdlg.dll
    regsvr32.exe /s oleaut32.dll
    regsvr32.exe /s ole32.dll
    regsvr32.exe /s shell32.dll
    regsvr32.exe /s initpki.dll
    regsvr32.exe /s wuapi.dll
    regsvr32.exe /s wuaueng.dll
    regsvr32.exe /s wuaueng1.dll
    regsvr32.exe /s wucltui.dll
    regsvr32.exe /s wups.dll
    regsvr32.exe /s wups2.dll
    regsvr32.exe /s wuweb.dll
    regsvr32.exe /s qmgr.dll
    regsvr32.exe /s qmgrprxy.dll
    regsvr32.exe /s wucltux.dll
    regsvr32.exe /s muweb.dll
    regsvr32.exe /s wuwebv.dll
  10. Run the following two commands to reset the network settings: netsh winsock reset netsh winsock reset proxynetwork reset
  11. Finally, execute these commands to restart the critical services you disabled earlier: net start bits net start wuauserv net start appidsvc net start cryptsvc

If it’s not the unsupported hardware to blame, you can get the optional update when Windows 11 23H2 is not available by resetting the update components.

4. Update via the installation assistant

  1. Go to Microsoft’s official website and click the Download Now button to get the Windows 11 Installation Assistant.download now
  2. Run the downloaded setup and click Yes in the prompt that appears.
  3. Click on Accept and install.accept and install
  4. Wait for the download to complete. It may take a 30-45 minutes.assistant to fix windows 11 23h2 not showing
  5. Once done, it will automatically install Windows 11 23H2. Follow the instructions and restart the computer when prompted for the changes to come into effect.

When the other options don’t work, you can download the Windows 11 23H2 official ISO file and install the latest version of the OS.

How do I know if my computer is eligible for Windows 11 23H2?

If Windows 11 23H2 appears under Windows Update, it means your PC is eligible. Besides, you could use the PC Health Check app to verify compatibility. The dedicated app also lists why the device is incompatible so you can reconfigure the relevant settings.

In case Windows 11 was not showing up earlier, it should now, and your installation experience should be seamless, given the device doesn’t face compatibility issues with the latest iteration and version.

Besides, while the updates are underway, find out the top features of Windows 11 23H2 and start using them right away!

For any queries or to share your feedback on the latest version of Windows 11, drop a comment below. 

CLR Error 80004005: How to Fix it

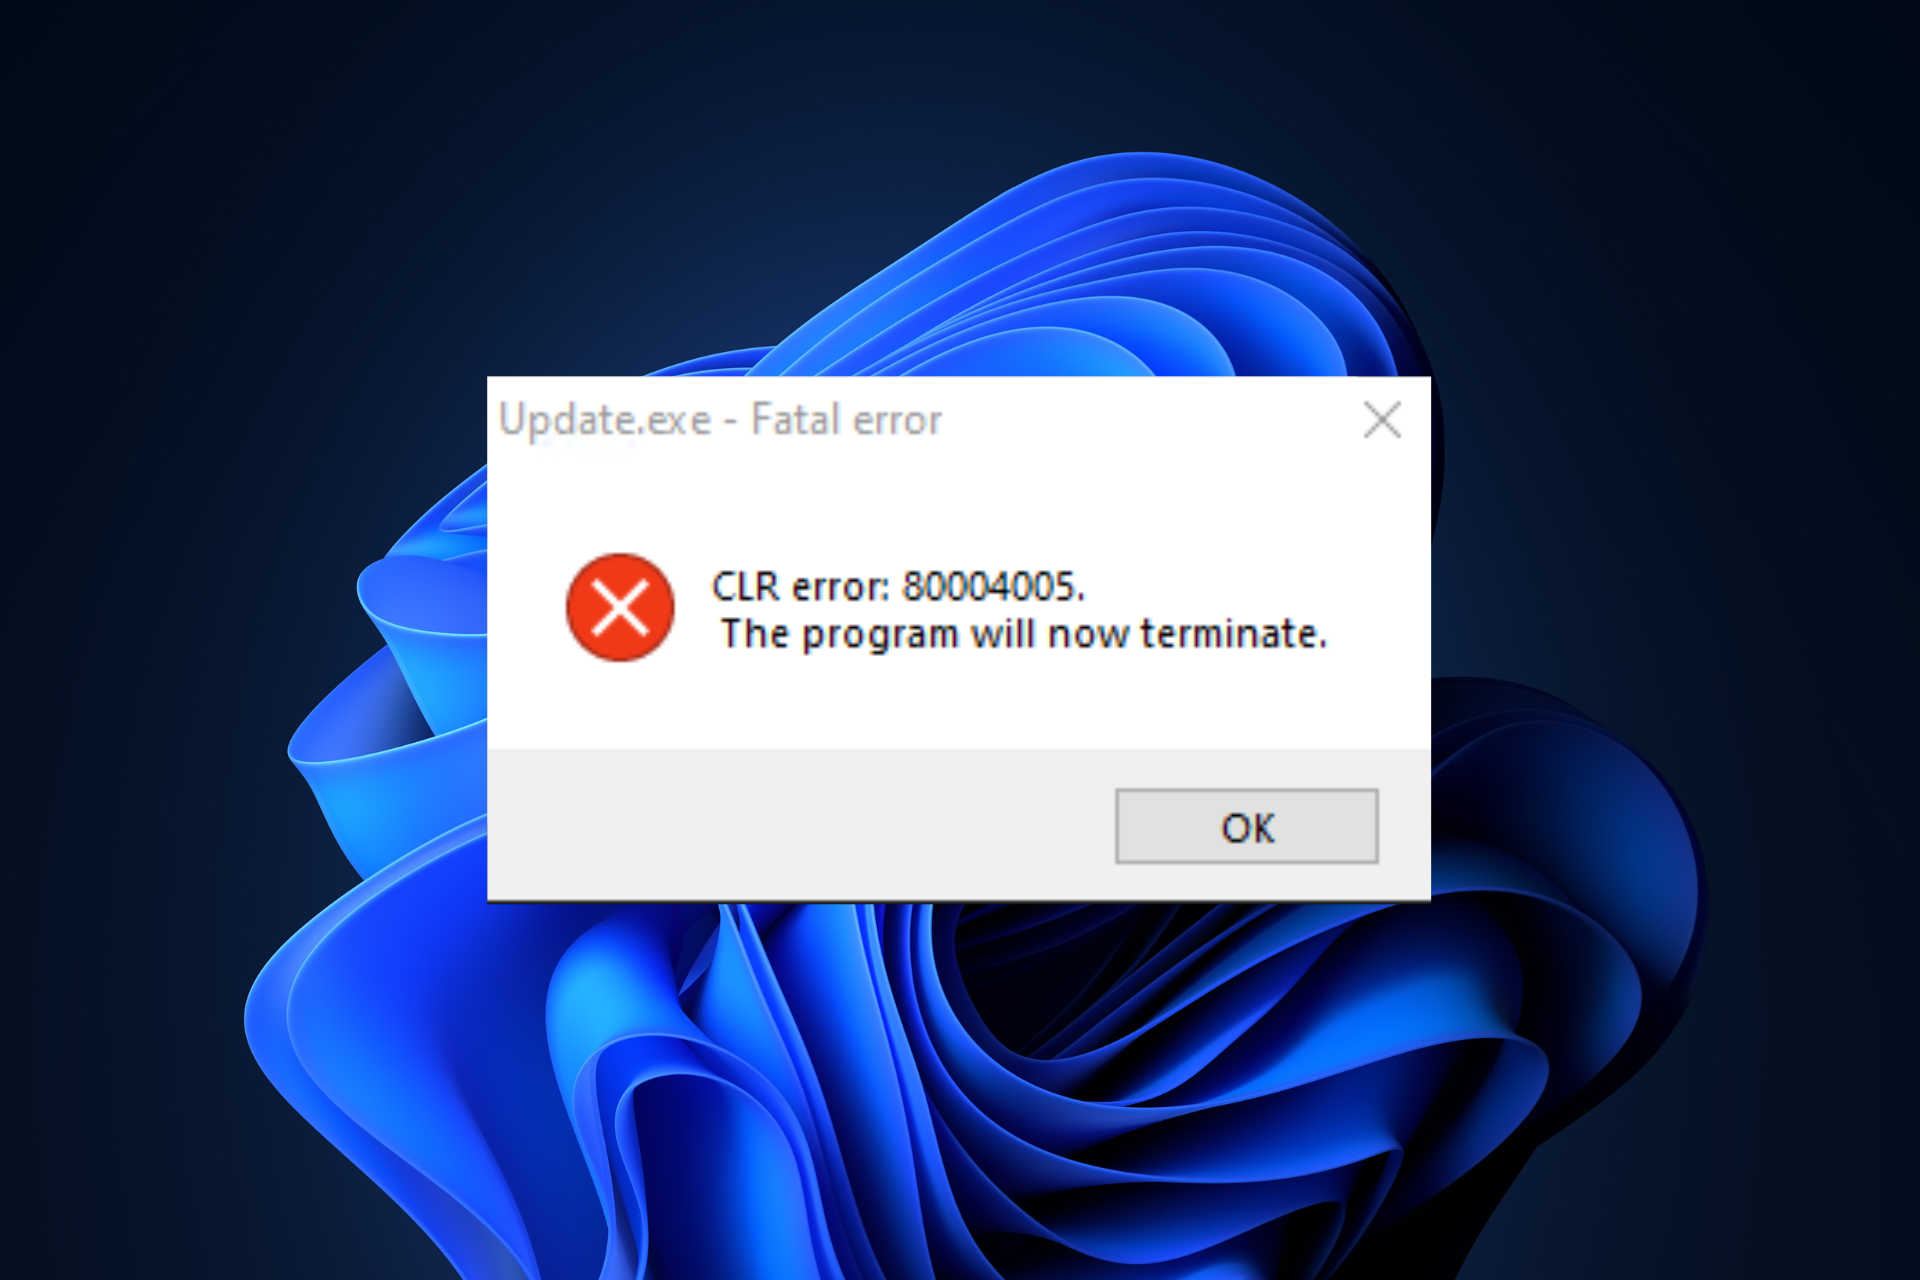
If you are getting the CLR error 80004005, The program will now terminate prompt when trying to launch a program; this guide will explore the probable causes and offer WR-tested solutions with step-by-step instructions to help you fix the issue in no time.

What is CLR error 80004005?

The CLR error 80004005 is an error code associated with Microsoft’s .NET Framework, specifically the Common Language Runtime (CLR), which indicates the .Net application has encountered an issue that prevents it from running. The main causes are:

  • Missing or corrupted .Net Framework file or components.
  • Outdated or corrupted software using .Net.
  • Windows OS is outdated.

How do I fix CLR error 80004005?

Before proceeding with any steps to get rid of CLR error 80004005, go through the following preliminary checks:

  • Restart your computer and try launching the affected app.
  • Ensure your Windows OS and drivers are up to date.
  • Right-click the app, and select Run as administrator.

1. Run the .Net Framework Repair tool

  1. Go to the .Net Framework Repair tool website and download it.clr error 80004005 - Download the repair tool
  2. Double-click the downloaded file, then click Next.Step 1
  3. Click Next again.Step 2 repair tool
  4. Follow the on-screen instructions to complete the process. Once done, click Finish and restart your computer.Finish - repair tool

2. Repair/reinstall the affected app

  1. Press Windows + I to open the Settings app.
  2. Go to Apps, then select Installed apps.Apps, installed apps -clr error 80004005
  3. Locate the app, click the three dots, and select Advanced options.Advanced options
  4. Go to the Reset section and click the Repair button.Repair the app -clr error 80004005

If you are still getting the fatal error, then you need to reinstall the app; follow these steps to do so:

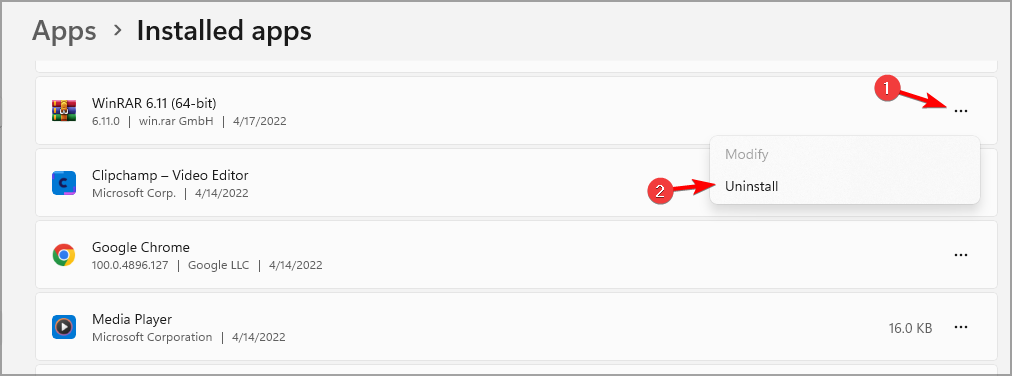
  1. Locate the app under the Installed apps, click the three dots, and select Uninstall.Uninstall the app -clr error 80004005
  2. Click Uninstall again to confirm the action.Uninstall 1
  3. Go to the official website and download the app again.

Follow the same steps to reinstall the latest version of .Net Framework from the official website; this can also help you fix other issues like Docker CLR error 8000405.

3. Re-register and restart the Windows installer service

Note icon NOTE
If running the .Net Framework Repair tool didn’t help, try registering and restarting the Windows installer service manually.
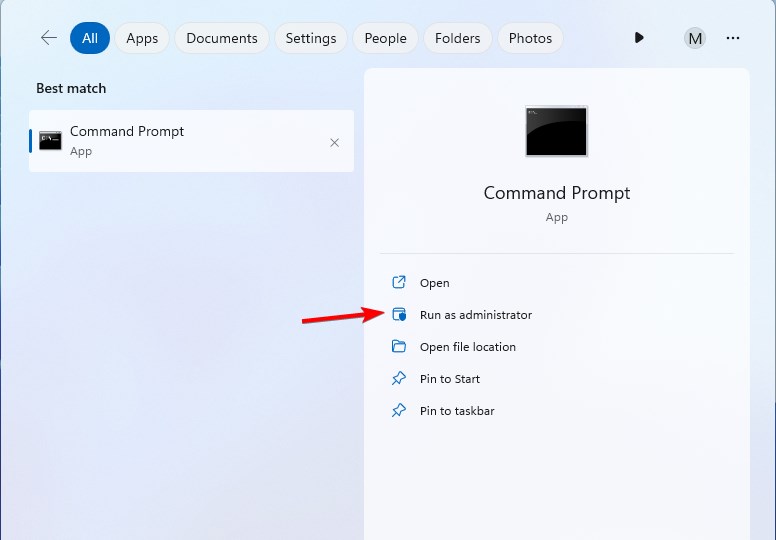
  1. Press the Windows key, type cmd, and click Run as administrator.CMD elevated -clr error 80004005
  2. Type the following commands one by one to unregister, then re-register the Windows installer service and hit Enter after every command:
    • msiexec /unreg
      msiexec /regserver
  3. Close the command prompt window, then reboot your PC

Re-registering a service can fix this installation issue and could also fix the clr.dll file missing error; read this guide to know more. Next, you need to restart the service, for that, follow these steps:

  1. Press Windows + R to open the Run box.Services RUn command -clr error 80004005
  2. Type services.msc and click OK to open the Services app.
  3. Locate the Windows Installer service and double-click it.Windows INstaller
  4. Make sure the Startup Type, is set to Automatic.
  5. Under Service status, click Stop, let the service stop, then click Start.Stop the service
  6. Restart your computer.

4. Restore your PC to the last known configuration

  1. Press Windows + R to open the Run box.rstrui command Restore point -clr error 80004005
  2. Type rstrui and click OK to open the System Restore window.
  3. Select Choose a different restore point and click Next.Next Choose a different restore point
  4. Choose a restore point and click Next.System restore Show more restore points
  5. Click Finish.Finish

Windows will restart and restore your computer to the chosen point. If the restore point did not successfully complete, then check out this guide.

5. Perform an in-place upgrade

  1. Go to the Windows 11 official website.
  2. Click Download Now under the Create Windows 11 Installation Media option.
  3. Double-click the downloaded file and click Accept on the Windows 11 Setup page.Accept - clr error 80004005
  4. Choose the language and edition of Windows and click Next.Next
  5. For the Choose which media to use option, select ISO file and click Next.Select ISO file
  6. Choose a location and click Save. The process will take some time; once done, click Finish.Save the file
  7. Next, right-click the ISO file and select Mount.Mount the file
  8. Double-click the setup.exe file and follow the on-screen instructions.Setup file - clr error 80004005
  9. Before clicking Install, make sure the Keep personal files and apps option is selected, then wait for the process to complete.

Remember always to have an updated .NET Framework version installed on your computer to avoid CLR errors and other installation issues.

Did we miss a step that helped you fix the error message? Feel free to mention it in the comments section below. We will happily add to the list.

How to Fix Error Code 524 in Roblox

If you have encountered Error code 524, You do not have permission to join this game while trying to join a server on Roblox; this guide can help! We will discuss some common reasons and offer WR experts-tested solutions to fix the authorization error.

What does error code 524 in Roblox mean?

The error code 524 on Roblox stating Not authorized to join this game or You do not have permission to join this game indicates authorization issues. The leading causes are:

  • Game server issues or the Roblox app is corrupted.
  • Trying to access the VIP server or as a guest.

How do you fix error code 524 on Roblox?

Before proceeding with any steps to fix error code 524 on Roblox, go through the following preliminary checks:

  • Check the Roblox’s server status, and if using Wi-Fi, switch to the ethernet connection to fix connectivity issues, then try using a VPN.
  • Restart your router and computer, then use the updated browser.
  • Check the age restrictions for the server you want to join and ensure your birthdate is correctly mentioned in account settings.

1. Check the Privacy settings

  1. Close the Roblox app on your computer.
  2. Open your preferred browser and go to Roblox’s official website.
  3. Go to the gear icon located at the upper right corner, then choose Settings.
  4. Next, select Privacy from the left pane, and make sure the Account Restrictions are disabled option is turned off.Age restrictions - error code 524 roblox
  5. Locate Other Settings, then for the Who can make me a member of their private server option, select Everyone.Select Everyone
  6. Next, for the Who can join me in experiences option, select Everyone.

2. Delete browser cache and cookies

  1. Open the preferred browser; we are demonstrating steps using Google Chrome. Click the three dots icon from the top right corner, then select Settings.Settings CHrome - error code 524 roblox
  2. Select Privacy & Security from the left pane, then select Clear browsing data.Clear browsing data
  3. For Time range, select All time from drop-down list, and place a checkmark next to Cookies and other site data, & Cached images and files.Clear data
  4. Click Clear data.

3. Disable the Adblock extension

  1. Open your preferred browser. Here, we are demonstrating the steps for Google Chrome.
  2. Click the three dots from the upper right corner and select Extensions from the drop-down menu, then click Manage Extensions.Manage Extensions new
  3. Locate the extension related to Adblocker and toggle off the switch to disable it.Disable or remove extensions - error code 524 roblox
  4. You can also click the Remove button to delete the unwanted extensions.

4. Update/reinstall the app

  1. Press the Windows key, type store and click Open to launch Microsoft Store.Microsoft Store -error code 524 roblox
  2. In the search box, type roblox and press Enter.
  3. Click Update to install the latest version of the app.

Updating the app can also help you fix other issues like Error Code 280: Your version of Roblox is outdated; read this to know more. If the update is not available, try reinstalling the app; for that, follow these steps:

  1. Press Windows + I to open the Settings app.
  2. Go to Apps, then click Installed apps.Apps, installed apps -error code 524 roblox
  3. Locate Roblox, click the three dots, then select Uninstall.Roblox uninstall
  4. Click Uninstall to confirm the action.Uninstall 1
  5. Press Windows + R to open the Run box, then type %localappdata% and click OK.Roblox  - error code 524 roblox
  6. Look for the Roblox folder and double-click it to open.
  7. Now press Ctrl + A to select all files, then click the Delete button.
  8. Restart your computer, press the Windows key, type store, and click Open to launch Microsoft Store.Microsoft Store -error code 524 roblox
  9. In the search box, type roblox and press Enter.
  10. Click Install to get the app on your computer.Install roblox

Reinstalling the app is a common fix for this error message and others like Roblox error code E01; read this guide to learn about other solutions.

5. Start a new server on Roblox

  1. Press the Windows key, type roblox, and click Open.
  2. Go to the Game section and choose the game you want to play.
  3. Next, go to the Chat button, invite at least 5 friends, then join the game while leaving the game party simultaneously.

You might have to try it several times to initiate a new server on a Roblox game successfully.

How do you get permission to join a Roblox game?

You need to ask your friend to add your username to the invited players list to get permission to join a Roblox game; here is how it can be done:

  1. Go to the game page and select the Servers tab.
  2. Place a checkmark next to Friends Allowed, then click Save.Add a username - error code 524 roblox
  3. Enter your username for the Invited Player field, then click Add and select Save.

Remember, to avoid encountering this error; you must have the privacy settings set to allow other players to invite you and ensure there are no connection issues.

If nothing worked for you, you should contact Roblox customer support and explain the issue and solutions you tried for further help.

In case you are not able to play Roblox due to error code 264, then it could be due to network congestion; read this guide to learn more about it.

If you have any questions or suggestions about the subject, feel free to mention them in the comments section below.

How to Fix Error Code 83 in Fortnite

If you are getting the Unable to join party Error code 83 message on Fortnite while trying to connect with your friends, this guide can help!

We will discuss the common causes and offer WR experts-tested solutions to fix the issue so that you can join other groups or players seamlessly.

What is error code 83 in Fortnite?

The error code 83 in Fortnite indicates a network issue either on your end or due to the game servers. The main reasons are:

  • Server outages or maintenance.
  • Unstable internet connection or network congestion.
  • Misconfigured router.

How do I fix error code 83 in Fortnite?

Before proceeding with any troubleshooting steps to fix the error code 83 in Fortnite, go through the following preliminary checks:

  • Restart your device and verify if you have a stable internet connection.
  • Check if the Fortnite game servers are down, and if you use a VPN, disable it.
  • Ask your host to click three horizontal lines, choose the Privacy option, select Public, or ask your friends to join via Epic Games.

1. Power cycle your router

  1. Turn off your router, unplug it, and remove cables from your modem.
  2. Leave them as it is for 30 seconds.
  3. Now plug the cables back into the modem, then your router.

Wait for it to start; power cycling your router can clear out the device cache, which allows the router to select the less crowded channel.

2. Run the Network troubleshooter

  1. Press Windows + I to open the Settings app.
  2. Go to System, and click Troubleshoot.troubleshoot - fortnite error code 83
  3. Click Other troubleshooters.Other troubleshooters
  4. Next, locate Network & Internet and click Run.Network & Internet -
  5. Follow the on-screen instructions to complete the process.

3. Update your network driver

  1. Press Windows + R to open the Run window.Device Manager Run command -fortnite error code 83
  2. Type devmgmt.msc and click OK to open the Device Manager app.
  3. Next, look for Network adapters, right-click network driver, and select Update driver from the context menu.Update network driver1
  4. Click Search automatically for drivers.Update driver 2
  5. Follow the on-screen prompts to complete the process.

Updating your drivers can be automated by using a dedicated tool, such as Outbyte Driver Updater. This software will scan your computer and download any missing or broken drivers in no time.

⇒ Get Outbyte Driver Updater

4. Disable the Windows Firewall temporarily

  1. Press the Windows key, type control panel, and click Open.Control Panel start menu -fortnite error code 83
  2. Select Category as View by & click System and Security.System & Security and select Category - fortnite error code 83
  3. Next, click Windows Defender Firewall.Windows Defender
  4. Click Turn Windows Defender Firewall on or off.Turn the Windows Firewall on or off
  5. Now, select Turn off Windows Defender Firewall (not recommended) for Private and Public network settings.Turn off Defender
  6. Click OK.

Now check if this fixes your issue; once you are done, reverse engineer these steps to turn on Windows Firewall to keep your system protected.

Disabling the firewall can also clear up other error messages like something went wrong while paying on Fortnite; read this guide to learn more.

5. Disable the Houseparty Video chat integration

  1. Launch the game, and click Settings.Video chat off - fortnite error code 83
  2. Go to Audio, look for House Video Chat Integration, and turn it off.

6. Reinstall the game

  1. Press Windows + I to open the Settings app.
  2. Go to Apps, then click Installed apps.Apps - Installed apps fortnite error code 83
  3. Locate Fortnite, click three dots, then select Uninstall.Uninstall the app
  4. Click Uninstall again to confirm.Uninstall
  5. Press the Windows key, type epic games, and click Open.
  6. Go to Library, search for Fortnite, and select Install.Library - fortnite error code 83
  7. Wait for the process to complete and check if the issue persists.

Reinstalling the game could help fix similar issues like game security violations detected on Fortnite; read this guide to know more.

So to fix or avoid the Unable to join party Error code 83, you must ensure you have a stable internet connection and there are no game server issues.

Also, make sure the Windows operating system and network drivers are up to date, and the host or your friend has given you enough permission to join the party.

If you encounter other error messages on Fortnite, like the Invalid game executable file application or error code 6 preventing you from playing the game, read this guide to know the fixes.

Did we miss a step that helped you? Don’t hesitate to mention it in the comments section below. We will happily add it to the list.

Solved: Phone Doesn’t Work Without Wi-Fi

If your phone doesn’t work without Wi-Fi, that means there’s a problem with your cellular connection or the mobile data. All Windows Report editors have had this problem, and here we’re bringing all the solutions to fix it.

Why is my phone not working unless connected to Wi-Fi? The phone doesn’t work without Wi-Fi because you either have bad cellular coverage, the mobile data is not turned on or not working, or the SIM card is not connected correctly or is damaged.

What do I do if the phone doesn’t work without Wi-Fi?

There are a few workarounds you should try first:

  • Go to an open space above the ground and look for a better signal.
  • Turn off the phone, remove the SIM card, put it back, then turn it back on.

1. Check if Mobile Data is turned on

1.1 On Android

  1. Go to Settings on your phone and tap on Network & internet.
  2. Now, access the SIM card or SIM cards.
  3. Check if the Data switch is On. If not, turn it to On.

Of course, if you have 2 SIM cards, check if the right one is selected.

1.2 On iPhone

  1. Go to Settings and select Mobile Data.
  2. Now, turn on the Mobile Data switch.

On older iPhones, you will see Cellular Data instead of Mobile Data. Usually, this will fix the problem if the mobile data is not working.

2. Reset the APNs

2.1 On Android phones

  1. Go to Settings and tap on Network & Internet.
  2. Now, select Mobile network and go to Access point names. On some phones, you will find this option in SIM cards instead.
  3. Tap on the three dots icon from the top-right corner of the screen.
  4. Then, select Reset to default

2.2 On iPhone

  1. Go to Settings and select Mobile data.
  2. Next, access the APN Settings and tap on Reset settings from the bottom.

3. Clear the cache on Google Play services

  1. Go to Settings>Apps and tap on See all apps.
  2. Now, select the Google Play services app.
  3. Go to Storage & cache, then hit the Clear cache button.

If only the apps on your phone are not using the mobile data, clearing the cache of Google Play services can fix the problem. If this doesn’t fix the issue, you may also remove the Google account and add it again.

Other tips to fix the phone if it doesn’t work without Wi-Fi:

  • Check your mobile data plan to see if you exceeded the internet usage specifications.
  • Contact your mobile operator and ask for a mobile data configuration file. Once you install it, all the settings will be renewed.
  • If you are out of the country, turn on the roaming or contact your mobile operator to do that for you. Check the applicable rates for that country first. Otherwise, you may end up with a huge bill.

Do mobile phones work without Wi-Fi?

Of course, mobile phones work without Wi-Fi. You can use the mobile data connection and even set up a hotspot for other devices.

However, you won’t be able to use the mobile data if you have a poor cellular connection or GSM signal.

That’s it! To summarize, check if you have a stable cellular connection, turn on the mobile data, and reset or reconfigure your APNs. If only the apps can’t connect to mobile data, clear the cache for the Google Play services.

The last resort is to reset your phone to factory settings, but before that, make sure you back up your data on your Google account or by using dedicated mobile backup software.

You might also be interested in how to enable the eSIM on Windows 11 and restore your connection. If you are using a Giffgaff mobile operator and facing issues while sending messages with error code 38, check out the guide to find the solutions.

If you have questions or suggestions on fixing this issue, leave us a note in the comments section below.

Pokemon TCG Live Error 10099: How to Quickly Fix it

Many users have reported Pokemon TCG live error 10099 and this error will prevent you from starting the game on your PC.

As you can see, this is a big problem for an online game since you won’t be able to pass the login screen, but we have managed to come up with a few solutions that should be able to help you fix this problem.

What is error 10099 in Pokémon TCG Live?

  • This is a server-side error that affects all platforms.
  • Due to bugs, the issue will appear when using certain time zones.
  • Corrupted installation can cause this issue on a PC.

How do I fix error 10099 in Pokémon TCG Live?

1. Change the keyboard layout

  1. In the bottom right on the Taskbar, click the language bar.
     
  2. Make sure that English is selected.
  3. Alternatively, you can use Alt + Shift or Windows + Space to switch through different keyboard layouts.
  4. After changing the layout, start the game.

2. Change your timezone

  1. Right-click the time in the Taskbar and choose Adjust date/time.
  2. Set the Time zone to UTC -6 or UTC -8.
  3. Save changes.

This is just a workaround, so if it works, you’ll have to use it whenever you want to start the game.

3. Reinstall the game as administrator

  1. Press the Windows key + I to open the Settings app.
  2. Next, go to Apps and select Installed apps.
  3. Locate Pokemon TCG Live and click on Uninstall next to it.
  4. Follow the process on the screen to uninstall the game.
  5. Once the game is uninstalled, press the Windows key + R and enter appdata.
     
  6. You should now see three directories. Head to each of them, look for the Pokemon directory, and if it’s available, delete it. Be sure to check in all 3 directories.
  7. Next, download the Pokemon TGC Live installation file and memorize its download location. In our example, it’s the Downloads folder, but it might be different on your PC.
  8. Next, press Windows key + S, type cmd, and choose Run as administrator.
  9. Change the directory to the location of the setup file from step 7. In our example, the command is: cd C:\Users\WindowsReport\Downloads
  10. Lastly, run type the following to run the setup file PokemonTCGLiveInstaller.msi
  11. Follow the steps on the screen to install the game and check if that solves the problem.

Pokemon TCG Live error 10099 on PC is caused by timezone glitches or a corrupted installation, but a quick reinstall usually fixes it.

After reinstalling, you may also encounter update problems. In that case, follow our dedicated guide on Pokémon TCG not updating to fix update loops and installation errors.

If you just reinstalled the game but still cannot log in because the verification email never arrives, see our full guide here: Pokemon TCG Not Sending Verification Code.

While there are many Pokemon games for PC, they still have certain issues. Many reported that Pokemon Showdown isn’t working for them, while others reported Pokemon Home error code 400.

Speaking of which, you can also play Pokemon Go on Windows, and we have an in-depth guide that shows you how to do that.

For complete troubleshooting steps, check our Pokémon TCG Not Working guide to fix crashes, login errors, and connection problems.

What solution did you use to fix Pokemon TCG Live error 10099 on PC? Share it with us in the comments below!

Generic Playback Error on Peacock: 5 Ways to Fix it

When we come across issues with streaming services, there’s mostly some valuable information provided to help troubleshoot, but that’s not the case with the Generic Playback error with Peacock. 

The message on Peacock reads, Generic Playback Error Protected content license error, and it’s seen across devices, including smartphones, the PC application, the website, Amazon Firestick, and Roku TV.

What does Generic Playback error mean on Peacock?

While there’s no official update, the Generic Playback error indicates a problem with the video playback arising out of a technical issue, corrupt app or browser cache, network issues, or an error specific to the streaming content. Because, in most cases, other shows played fine.

How do I fix the Generic Playback error on Peacock?

Before we start with the slightly complex solutions, go with these quick ones:

  • Try again in a few hours, or watch another program. Sometimes, switching to another program and reverting to the affected one works.
  • Use the Peacock TV’s official website or the standalone app on a PC or mobile device.
  • Disconnect additional streaming devices from your Peacock TV account. Also, check the Internet connection or switch to another network.
Note icon NOTE
The steps listed here are for Amazon Firestick, but the idea remains the same throughout. In case you are facing the issue on another device, apply the equivalent measures.

1. Restart the device

  1. Open your TV Settings, and go to My Fire TV.settings
  2. Scroll down and select Restart.restart to fix peacock generic playback error
  3. Again, choose Restart in the confirmation prompt.
  4. Relaunch Peacock TV, and check for improvements. 

2. Clear the app cache

  1. Open the device Settings, and then head to Applications.applications
  2. Now, go to Manage Installed Applications.manage
  3. Select Peacock TV from the list.
  4. Choose Clear data and Clear cache to delete the corrupted cache files.clear data to fix peacock generic playback error
  5. Once done, check for improvements.

If you are viewing shows on the official website, clear the browsing data instead. Also, this helps when Peacock keeps buffering.

For some, Peacock is giving errors after clearing the cache, and if you’re affected, check our detailed guide on why is Peacock not working for more fixes.

3. Reinstall the Peacock app

  1. Go to Settings on your device, and select Applications.
  2. Choose Manage Installed Applications.
  3. Select the Peacock TV app from the list.
  4. Now, choose Uninstall and select the appropriate response in case a confirmation prompt appears.uninstall to fix peacock generic playback error
  5. Finally, reboot the streaming device and then install Peacock TV as you did earlier.

4. Reset the device to factory defaults

  1. Open the Settings on your Firestick, and go to My Fire TV. 
  2. Scroll down to the bottom and select Reset to Factory Defaults.reset to factory defaults to fix peacock generic playback error
  3. Finally, choose Reset in the confirmation prompt.
  4. Once done, set up the device, wait for the updates to download, reinstall Peacock TV, and it should now start working.

A device reset is effective against the streaming issue and also works for the Peacock Generic Playback error on Roku TV.

5. Contact support 

When nothing else works, contact Peacock support. They have a live chat available to address user queries.

They will ask a series of questions to identify the device type and underlying cause, and then share some solutions. While most will be generic, customer service always has device-specific solutions, given the high number of queries they receive.

Why does Peacock say I’m streaming on too many devices?

While you can set up Peacock TV on multiple devices, the service only allows 3 simultaneous streamings. So, if you have more going on, ask others to terminate the session, then refresh on your end, and it should work fine.

To conclude, the Peacock’s Generic Playback error usually arises due to a problem at the user’s end and rarely does it have to do with a service outage. But you should still check for any service interruptions on Downdetector.

Besides, even users based in a non-supported region can easily get rid of the Peacock Is not yet supported in your region error and enjoy seamless streaming. And when Peacock won’t accept payment, use a VPN!

For any queries or to share which fix worked for you, drop a comment below. 

Diablo 4 Error Code 395002: Account is Currently Locked [Fix]

Many users reported Diablo 4 error code 395002, and this message prevents them from logging in and playing the game. This is a big issue since it will make the game completely inaccessible.

While this looks like a big problem, a few simple solutions might help you fix it, so keep reading to learn how to get back to Diablo 4.

Why did my Diablo 4 account get locked?

  • When you log in to Diablo 4, your account is locked while using it to prevent unauthorized access.
  • If you disconnect suddenly, the account will remain locked for a few more minutes.
  • Server issues can also cause your account to get temporarily locked and get this error message.

How do I fix error 395002 and unlock my Diablo 4 account?

Before trying anything else, wait for a couple of minutes. According to Blizzard, this issue can appear if you have several consecutive login attempts. Wait for 10-15 minutes and try again. You can also try restarting your device.

1. Switch characters

  1. Start the game.
  2. On the character select screen, select a different character or create a new one.
  3. Once you start playing with a new character, log out and switch back to the main character.

2. Connect to mobile hotspot

  1. Create a mobile hotspot on your phone.
  2. Next, click the network icon in the bottom right.
  3. Select your mobile hotspot and connect to it.
  4. Try to log in to the game.

3. Change the Battle.net password

  1. Navigate to the Battle.net recovery page.
  2. Select Forgot password.
     
  3. Next, enter your email address.
  4. You’ll get instructions on how to reset your password in the email.
  5. After resetting the password, try logging in with the new one and check if the issue is gone.

Tips to avoid getting stuck on error code 395002 in the future

  • Ensure that your Internet connection is stable without any drops.
  • Always properly log out of the game to prevent this issue.
  • Don’t suddenly disconnect or close the game.

If you get Diablo 4, your account is currently locked error or PC or PS5, you should know that you’re not banned from the game. This is a temporary glitch caused by a sudden disconnect, so you can wait a few minutes until it’s resolved.

This isn’t the only issue users reported; many said they can’t redeem the Diablo IV code. Sadly, all Diablo games have problems, and we wrote extensively about Diablo 3 issues in the past.

Among the most prominent issues are the Diablo 3 error code 1016 and There was a problem joining the game error in Diablo 3.

Other recent errors that many gamers encountered are Diablo 4 error code 700004, and Data Retrieval error, but we have a dedicated guide that addresses this issue.

Did you find a different way to fix Diablo 4 error code 395002? If so, let us know in the comments section below!

How to Fix Error Code 91 on Fortnite

While Fortnite usually runs seamlessly, some users came across Error Code 91 when trying to join a party. For a few, it went away within a few hours, but many had this error code for weeks.

It could have to do with Fortnite game servers, connectivity issues, a slow Internet connection speed, corrupted game files, or misconfigured router or network settings.

What does Error Code 91 mean?

Error code 91 is a network-related issue that affects the ability to join a private or public party. The error message could read either, Unable to join party. Error Code-91, or The party is currently not responding to join requests. Please try again later.

How do I fix error 91 on Fortnite?

Before we start with the slightly complex solutions, try these quick ones:

  • Check Fortnite’s server status and verify whether the Parties, Friends, and Messaging service is operational. If not, wait for a few hours.
  • Restart the device and the router. For the latter, unplug it from the power source for a few minutes. Or you could connect via an Ethernet cable or use a mobile hotspot.
  • Update Fortnite and the OS. This will help with Fortnite Error code 91 on Xbox One and the Game security violation detected Fortnite (#0000000D) error across devices.

If none work, head to the fixes listed next.

1. Modify the in-game settings

  1. Launch Fortnite and open the in-game settings.
  2. Now, you will have to manually configure these settings if set differently:
    • Online Status: Online
    • Party Joinability: Friends
    • Matchmaking Region: Publicgame settings
  3. If you are trying to play alongside someone on a different platform, enable Crossplay.

When you are unable to join a party, reconfigure the in-game settings. Also, while Xbox and PlayStation support crossplay, you will have to manually enable the option to fix Fortnite Error code 91 on PS4 and PS5.

2. Disable UPnP in the router settings

Tip icon Tip
The steps listed below are different for every router but will provide you with a basic understanding of the process. Check the router manufacturer’s website for the exact steps.
  1. Access the setup page of your router. This can be done through the router’s internal IP address, usually printed on its backside.
  2. Navigate to the Advanced Network tab from the navigation pane, and then go to Advanced.
  3. Untick the checkbox for Enable UPnP and save the changes.disable to fix error 91 fortnite
  4. Once done, check for improvements.

3. Change the DNS server

  1. Press Windows + R to open Run, type ncpa.cpl in the text field, and hit Enter.ncpa.cpl
  2. Right-click on the active network adapter, and select Properties.
  3. Select Internet Protocol Version 4 (TCP/IPv4), and click the Properties button.IPv4
  4. Now, select Use the following DNS server addresses and enter the following:
    • Primary DNS server: 8.8.8.8
    • Secondary DNS server: 8.8.4.4change DNS server to fix error 91 fortnite
  5. Finally, click OK to save the changes, reboot the PC, and check whether the error is fixed.

We choose Google’s DNS server, but you can always select the fastest DNS server near you.

4. Repair the game files

  1. Open the Epic Games Launcher, and go to the Library.
  2. Right-click on Fortnite and select Manage from the context menu.manage
  3. Click the Verify button next to Verify Files.verify to fix error 91 fortnite
  4. Wait for the file verification to complete, and then relaunch Fortnite.

Verifying helps recover all the missing and corrupt critical game files. And even for users facing Error Code 91 in Fortnite on a Nintendo Switch, checking for corrupt data will do the trick!

This also helps with the Invalid Game Executable Fortnite error. 

5. Reinstall Fortnite

  1. Press Windows + I to open Settings, go to Apps from the left pane, and click on Installed apps.installed apps
  2. Locate Fortnite from the list, click on the ellipsis next to it, and select Uninstall.uninstall
  3. Again, click Uninstall in the confirmation prompt and follow the on-screen instructions to complete the process.
  4. Once done, reboot the device and then reinstall Fortnite.

If this doesn’t work right away, some remnant files could still be conflicting. In this case, it’s best that you use an effective uninstaller tool to clear all leftover files and Registry entries. 

6. Contact the support team

When nothing else works, you will have to contact Fortnite support. Some issues are rather device-specific, or maybe a game update is needed.

In such cases, the support team will be able to better assist with Error Code 91 in Fortnite.

One of these solutions should have fixed things for you. Besides, if Fortnite is stuck on Please Wait, disable the firewall and proxy settings.

Before you leave, discover some quick tips to optimize your PC for gaming and get the best performance.

For any queries or to share what worked for you, drop a comment below.

#VALUE Error in Excel: How to Fix it

Whether you are a beginner or an experienced Excel user, you might have encountered the #VALUE error. In this guide, we will discuss the reasons and simple ways to eliminate it effectively.

How do I fix the #VALUE error in Excel?

1. Ensure the function argument has the expected data type

One of the common reasons why you see the #VALUE error is that you have typed in the wrong data type. Let’s say you are working on a sheet wherein you need to mention a number in one column and text in another, but you end up entering a number in the text column or vice versa; you can get this error.

Ensure the function argument has the expected data type - #VALUE Error in Excel

To fix it:

  1. Find the missing numeric values and enter them.
  2. If the data is too long, use an Excel function to ignore text values.

2. Check if the referred ranges are compatible

If you are using a function with multiple ranges in their agreement, then you need to make sure the selected ranges are of the same size. If they are not, you will get #VALUE. For example, if your formula says FILTER(D3:F20, D3:D22=”Pen”), you will get the error.

To avoid it, you need to use this formula instead: FILTER(D3:E20, D3:D20="Pen")

3. Look for hidden characters and spaces

If there are hidden spaces or special characters in a formula or between cell references, it can cause the #VALUE error as in Excel; they are considered as text, so to fix it:

Look for hidden characters and spaces - #value error in excel
  1. Check the problematic cells to ensure they are blank cells. To do that, go to a cell, select it, and press the Delete key to remove the hidden character.
  2. Use the Excel function to ignore text values or space characters, such as the SUM function.

4. Ensure the dates are not stored as text

In Microsoft Excel, dates are stored as numeric values; however, if stored as text strings, you can get a #VALUE error. To avoid that, you must convert the text-formatted dates to Excel dates by following these steps:

  1. Select the cells you want to change the format for and press Ctrl + 1 to open the Format Cells dialog box.
  2. Go to the Number tab, choose Date, then select the desired date format under Type, then click OK.
Number - type -#value error in excel

Converting text to number can help you remove the # Value from the sheet and can also fix Excel Formula returning 0; to learn more solutions, read this guide.

5. Double-check the formula syntax

A syntax error could also be the reason behind the #VALUE error in Excel; follow these steps to spot it:

  1. Select the cell that is showing the #VALUE error.
  2. Now, click the Formula tab, then under Formula Auditing, select Error checking.EXCEL_error checking - #VALUE error in Excel
  3. Excel will check and highlight the part of the formula with the issue. Once it is detected, you can correct it and re-evaluate the formula.

Checking the syntax in the formula can also help you prevent problems in Formulas in Excel; to know more about other solutions, read this guide.

Why am I getting the #VALUE error in Excel XLOOKUP and VLOOKUP?

  • There is a mismatch in the data type, so look for the correct one in the selected range.
  • The Lookup value is not found in the range; ensure the value you seek exists.
  • If the external sources or databases are not correctly linked.
  • Non-printing characters, leading or trailing spaces, or other hidden characters in your data.

How do I remove the #VALUE in Excel but keep the formula?

You can use Method 5 and the Error-checking feature under the Formulas tab to identify and eliminate the problem, removing the #VALUE error.

So, by understanding the reasons and spotting the issues, you can effectively remove the #VALUE error in Excel from your Worksheet.

In case you are getting the Too many different cell formats error message in Excel, it could be due to excessive cell formatting; try clearing that; to learn other solutions, refer to this detailed guide.

If you are getting #VALUE in Google Sheets indicating a Formula parse error, read this guide to learn about the solutions. We also have a great guide on how to add a new line in cell in Excel, so don’t miss it.

Moreover, we can help you out if the YEAR function isn’t working correctly.

If you have any questions or suggestions about the subject, please mention them in the comments section below.

Microsoft’s new Secure Future Initiative promises next-level cybersecurity

Microsoft announced the Secure Future Initiative, a new division that will focus on strengthening cybersecurity and pursuing new ways to deal with threats all around the world, according to the company’s latest blog post.

Secure Future Initiative will be based on three pillars that will cover all cybersecurity threats as best as possible, and it is launching on November 2, 2023, across the company, says Microsoft.

Therefore, we’re launching today across the company a new initiative to pursue our next generation of cybersecurity protection – what we’re calling our Secure Future Initiative (SFI). This new initiative will bring together every part of Microsoft to advance cybersecurity protection. It will have three pillars, focused on AI-based cyber defenses, advances in fundamental software engineering, and advocacy for stronger application of international norms to protect civilians from cyber threats.

Microsoft

It’s worth mentioning that Microsoft has been having issues with security over the years, and even if AI promised a new era for cybersecurity, the company is heavily targeted by threat actors. For example, Microsoft Teams is prone to modern malware, according to security experts, and just last year, 80% of the Microsoft 365 accounts were attacked by hackers.

Earlier this year, Tenable’s CEO accused Microsoft of not addressing a critical vulnerability in time, which sparked a backslash on the Redmond-based tech company. The vulnerability was eventually addressed in its entirety, and Microsoft vowed to come back with stronger solutions.

Secure Future Initiative: A new way to envision cybersecurity

Microsoft envisions 3 pillars with Secure Future Initiative. These pillars are meant to strengthen security all around by using AI, developing new ways to protect people from malware and other attacks, and educating them on the effects of cyberattacks and protection against them.

In other words, according to Microsoft, these are the three pillars Secure Future Initiative is based on:

  1. AI-based cybersecurity: Microsoft will make use of AI to enhance protection all around, providing much faster protection against all threats, even if they’re well hidden. Secure Future Initiative
  2. New technological advances in cybersecurity: Microsoft plans to release AI features to enhance protection, a plethora of new ways of authentication, and stronger cloud security in the future.
  3. Stronger application of international norms: For cybersecurity to work efficiently, all countries should implement the same kind of protection and work together to reduce their impact, and Microsoft promises to ask and propose new practices for it.

What do you think about the new Secure Future Initiative?

How to Fix the Cannot Find Template With ID Tarkov Error

Many users reported Tarkov error cannot find a template, and if this issue appears you won’t be able to connect to the server or play the game at all.

While this can be a frustrating error, there are a couple of quick solutions that can help you, so keep on reading to find out how to fix the problem.

What does Cannot Find Template With ID error mean?

  • This is a relatively common error that occurs after an in-game event ends.
  • It’s usually caused by server-side issues, but it can be caused by corrupted local files or cache.

How do I fix the Cannot Find Template With ID error on Tarkov?

1. Verify the integrity of game files

  1. Open Steam and go to your Library.
  2. Locate Tarkov, right-click it, and choose Properties.
  3. Navigate to Local Files. Next, click on Verify integrity of game files.
  4. Wait for the process to complete.
  5. Once finished, check if the problem is resolved.

2. Clear the cache

  1. Open the Tarkov client.
  2. Click your username in the top right and choose Logs from the menu.
     
  3. A new window will appear containing all your logs. Delete them all.
  4. Go back to the client, select your user profile, and choose Clear cache from the menu.
  5. Wait for the process to finish and start the game again.

3. Start the client as an administrator

  1. Right-click the Tarkov client and choose Run as administrator.
  2. Now try to launch the game.
  3. If this method works, you’ll have to use it every time you want to start the game.

If the Tarkov update is not working, there may be an issue with the cache or local files. It’s also likely that servers are experiencing issues after an event, but that should be fixed shortly by the developers since this is a Tarkov backend error.

This isn’t the only issue you can encounter, and many reported Tarkov error on POST as well as packet loss in Escape From Tarkov, but we covered those issues in separate guides.

Another related problem is Tarkov error 228, which can also disrupt gameplay.

Did you manage to fix the problem with Tarkov not working? Let us know which solution worked for you.

Is There a Left Hand Xbox Controller? [One-handed Controller]

Many people imagine that there is no need for a left-hand Xbox controller or a left-hand PlayStation controller, for that matter. The truth is that left-handed people need it, but after a bit of struggle, they learn how to play on a regular one.

Why is there no left-hand Xbox controller yet? The answer is pretty simple, although a bit shocking: only about 10-12% of people have a dominant left hand, so there is not so much business around creating such a device.

What can I do if I need a left hand Xbox controller?

Right now, Microsoft doesn’t offer a left-hand Xbox controller because they are made to be used with both hands, right?

Wrong, because even though you can switch some commands from the joystick to the pad and vice-versa, the other buttons are on the other side of the dominant hand, and it’s just not the same thing.

If you are a lefty and you want to play Xbox games, you have a few choices:

  • Adapt and play with a right-hand controller
  • Program the right-hand controller and switch any possible commands for the left hand.
  • Buy a one-hand controller for the left hand
  • But a one-hand controller adapter for a regular Xbox controller

Here are the best options we found for a left hand Xbox controller.

1. Xbox Series X One-Handed Controller

The Xbox Series X one-hand controller from Evil Controllers is the best next thing to an actual controller for the left hand.

It is actually designed for people who can use one hand but it would work wonders if you’re a lefty as well.

The point is that you can access all the inputs that are not reachable with extensions that can be placed conveniently.

Moreover, it’s customizable for the left hand, and you can get extensions separately or even a cable.

⇒ Get Xbox Series X One-Handed Controller

2. Ben Heck Controller

To see how bad the situation is, there is a guy called Ben Heck who actually buys the Xbox controllers and modifies them for single left-handed action for $350.

It takes a little more than an hour, but you will get yourself a great controller that you can use with only the left hand and all controls reachable with a hand.

Of course, being a one-man shop, the queue is pretty long, and you will have to preorder yours.

⇒ Get Ben Heck Controller

3. Akaki One-handed Xbox One attachment

Instead of modifying the controller, you can use an attachment that brings all the buttons and controls from the right hand to your left.

It’s a bit bulky and complex, but it does the job if you only want to control it with the left hand.

Akaki builds these accessories for most controllers out there, including the ones for Xbox or PlayStation.

⇒ Get Akaki Controller attachment

4. Microsoft Xbox Adaptive controller

Microsoft Xbox Adaptive Controller is a box that you can attach all sorts of separate controllers you can use individually and map out for Xbox games.

You can have controls for your feet, any of your hands, and even switches you can trigger with your mouth or head.

The level of customization for this controller is unlimited because you’ve got all types of ports and accessories you can hook up to.

⇒ Get Microsoft Xbox Adaptive controller

These are the best options for left-handed Xbox controllers. If you still want to use both hands, we recommend remapping the button on your right-hand controller for lefties.

To understand the Xbox controller better, here is more information on the L1 and R1 buttons.

How do I remap the buttons on my Xbox controller for left hand?

  1. On the Xbox home screen, press the Xbox button on your controller and select Settings.
  2. Choose to Ease of Access.
  3. Now, go to Controller, and Button mapping.
  4. You can set up a profile and map the buttons to fit your game style better.

Some games have profiles for left hand users, and you can map your buttons for a particular game.

Summing up our guide, unfortunately, there are still no left-hand controllers for Xbox. But there are a few ways of making your gaming experience better. We hope that our guide helped you with all the information needed, and we hope that if you’re a lefty, you’ve got everything sorted out.

Of course, we hope manufacturers will make the extra effort to consider everyone’s needs, even though they are a minority.

Here is our selection of some of the best Xbox controllers you can buy right now. Also, if you plan to use it on a Windows PC, our guide on how to get the driver for the Xbox controller will come in handy.

Fix: Web Filter Service Error All Fortiguard Servers Failed to Respond

Several users who had FortiGate set up and running reported encountering the Web Filter Service Error: all Fortiguard servers failed to respond, and most websites were inaccessible, even the established ones.

Funnily, for a few, FortiGuard’s official website was blocked, too

The problem usually arises when there’s a change in the DNS server, FortiGate tries to connect only to IPv6 addresses, or if you have poorly set filtering and rating settings. 

How do I fix Web Filter Service Error all fortiguard servers failed to respond?

1. Change the DNS server

  1. Open the dashboard, expand the Network tab from the left pane, and select DNS.dns
  2. Head to the Specify tab to use another DNS server instead of the default FortiGuard server.new DNS to fix web filter service error all fortiguard servers failed to respond
  3. Enter the following in the text field:
    • Primary DNS Server: 8.8.8.8
    • Secondary DNS Server: 8.8.4.4
  4. Provide a local domain name, and click Apply to save the changes.

Changing the DNS server helps eliminate several network-related issues, including Unable to connect to FortiGuard servers.

2. Disable anycast

For many users, disabling FortiGuard – anycast worked when content filtering wasn’t optimal, or they came across the FortiGuard webfilter services are not reachable error.

To do that, use the following CLI (Command Line Interface):

config system fortiguard
      set fortiguard-anycast disable
      set protocol udp
      set port 8888
      set sdns-server-ip 208.91.112.220
end

Once done, the websites should open properly. This method worked in 4 out of 5 instances of the error we came across.

3. Turn on Allow websites when a rating error occurs

  1. Open the dashboard, go to Security Profiles from the navigation pane, and select Web Filter.
  2. Now, enable the toggle for Allow websites when a rating error occurs and save the changes.allow websites

4. Configure the update server location

  1. Open the Fortigate dashboard, expand System from the left, and select FortiGuard.
  2. Scroll down the FortiGuard Updates section, choose Restrict to next to Update server location and then select EU only.EU only
  3. Save the changes, and check for improvements.

5.  Contact Fortinet support

If nothing else works, it’s best that you contact Fortinet support and ask for a resolution because it’s most likely a setup-specific problem.

Apply the changes they recommend, or wait for an update to get things up and running.

These are all the ways you can fix the Web Filter Service Error all FortiGuard servers failed to respond issue in no time. Remember, based on our research, it generally turned out to be some misconfiguration at the user’s end. So verify that before you contact the support team.

A few even reported issues with the VPN, where Fortinet VPN locks out after 1 failed attempt, and here, too, the command line interface comes to the rescue!

For any queries or to share more solutions with us, drop a comment below.

How to Fix Virgin Media Error Code w02?

If you have encountered Virgin Media error code w02 and found yourself wondering how to get back to seamless connectivity, this guide can offer you effective solutions.

What does error code w02 mean on Virgin Media?

The error code w02 on Virgin Media indicates that there are signal issues or problems with your TV box, which can be caused by loose cables, signal interference, service outage, or issues with equipment.

How do I fix the error code w02 on Virgin?

Before proceeding with any steps to get rid of the error message on Virgin Media, go through the following preliminary checks:

  • Double-check your ethernet cable to ensure you have a stable internet connection, as it could prevent many issues, including Virgin Media not connecting to Netflix.
  • Ensure the white cable is properly connected to your TV box, the Virgin media wall socket, and the splitter.
  • If your TV box is connected to the hub, ensure the white wire going into the Hub is tightly connected, and the Hub is in an upright position.

1. Reboot your TV box

  1. Turn it off using the button on the back of the box.
  2. Wait for 30 seconds, then press the button again to power on your device.Switch on the box - Fix Virgin Media Error Code w02
  3. The Virgin TV box will reboot; it might take up to 15 minutes. Once done, you will see the welcome screen.

If you still see the error, repeat these steps to restart the box twice to refresh the connection.

2. Check if the N27 cable is connected properly

  1. Remove the N27 cable from the HDMI port on the back of your TV and unplug it from your Virgin Media TV box.
  2. Wait for 30 seconds, and plug the cable into your TV box and TV.
  3. Turn on your TV and TV box.
  4. Now check the connection. If you can’t get the signal, try connecting the cable to a different HDMI port.

3. Reset the TV box

  1. Turn off your TV box using the switch at the back.Switch on the box - Fix Virgin Media Error Code w02
  2. Press and hold the + button and the Long flash button together.Long flash light
  3. While pressing them, turn on your TV box using the switch at the back.
  4. Once you see the startup screen, let go of all the buttons.
  5. Follow the on-screen instructions to complete the process.

Resetting the box also helps with Virgin Error Code V53.

If nothing has worked for you, you must contact Virgin Media’s customer service team and explain your issue and the steps you have performed for further assistance.

Remember, for a seamless TV viewing experience, all the wires connected to the TV box must be properly placed, and you should have a stable internet connection.

Speaking of seamless connectivity, if you have a Virgin Media internet connection and are facing packet loss issues and a dropping connection, we recommend you check out this guide.

You can also try using a VPN if the internet service provider is blocking sites; read this guide to learn more.

Did we miss a step that helped you fix the error code w02 on Virgin; feel free to mention it in the comments section below.

Solved: Error Occurred During Initialization of VM

The error occurred during initialization of VM is a classic Java issue when you are trying to run the VM. The error message can appear on any system you try to launch a virtual machine, including Windows, Mac, or Linux.

This issue occurs because the JVM allocates a big chunk of initial heap memory from the system that Windows or other OSes can’t provide. So, even if you have 8GB of RAM, if it’s already in use and the heap size is too big, you will see the error during the initialization of the VM.

Restart your PC and try to run Java before the other programs initialize, and make sure you’re running a 64-bit JVM. The 32-bit version can’t use more than 1.5 GB of RAM.

How do I fix error occurred during initialization of VM?

1. Change the Java heap size using Command Prompt

  1. Click the Start button, type cmd, and click on Run as administrator from the results.
  2. Type or paste the following command and press Enter: java -Xms256m -Xmx512M

This command will set the Java Xms initial heap memory to a lower value, and now you can initialize VM without any issues.

From our tests in the WR labs, this solution worked in all situations to fix the VM initialization error. However, you can also apply the solutions below for the same effect.

2. Change the variables in the batch file

  1. Press the Win + E shortcut to start File Explorer.
  2. Locate and edit the .bat file of the server you want to run.
  3. Now, change the Xms and Xmx values in the file with lower ones. For instance, -Xms256M -Xmx512M. You can go even higher, depending on the actual RAM you have.

If you go too high with the virtual memory values, Java will display a Could not reserve enough space for object heap error.

This simple solution will work on the Could not reserve enough space for 2097152kb object heap error. But for this one, you should check if you’re using a 32-bit JVM. As we’ve mentioned above, the 32-bit version will not handle the 2 GB memory it’s trying to allocate.

3. Run a Bash command

  1. Log into another session of your server and go to Bash to run a Java command.
  2. Type or paste the following command and press Enter: -bash – 3.3$ export _JAVA_OPTIONS = ” – Xmx256M”
  3. To make sure, run the following command to see if you have changed the Java setting: -bash – 3.3$ javac HelloWorldApp.java
  4. If you get the message Picked up _JAVA_OPTIONS: – Xmx256M, you are fine.

If you still get the error occurred during initialization of VM, try closing some apps that are running in the background and try again. There is also the possibility that the physical memory is too low to run the VM.

Here are some of the error instances found by our Windows Report software experts:

  • Error occurred during initialization of VM noclassdeffounderror java/lang/object.
  • Error occurred during initialization of VM Minecraft server – The Minecraft server could not reserve enough memory to run.
  • Error occurred during initialization of VM Could not reserve enough space for object heap

Another server problem you might encounter is the Io.Netty.Channel.Abstractchannel on Minecraft but this guide will help you.

To sum up our guide, the error occurred during initialization of VM is actually a problem with Java allocating too much initial heap memory, and from the WR lab tests, setting the values lower will fix the problem quickly.

You can do that by running a Command Prompt command, by editing the batch file, or by running a Bash command.

If you get an internet connection error in Minecraft, hit the highlighted guide to fix the problem quickly.

We also have a special guide that can help you resolve Coredump target configuration issues effectively, so don’t miss it.

For any other suggestions and tested solutions, go to the comments section below and drop us a note.

Steam Disk Write Error: How to Fix it

Steam disk write errors will prevent you from downloading and installing new games, which can be a big problem, especially if you bought a new game and are eager to try it out.

The issue affects various games, and it will completely ruin your gaming experience, so it’s important to fix it, and this guide will show you how to do that.

Why does Steam say disk read error when verifying?

  • Your user account or Steam doesn’t have the necessary privileges over the Steam directory.
  • The game files or appmanifest file is damaged and needs to be repaired.

How do I fix the Steam disk write error?

Before we start fixing this issue, there are a few checks you can perform:

  • Clear the Steam download cache. Go to Downloads, click on Clear Download Cache, and wait for the process to finish.
  • Delete the Steamworks shared folder. This also fixes the Palworld disk write error. You can find it in Steamapps\common
  • Temporarily disable or uninstall your antivirus program since it can block Steam.
  • Start Steam as administrator to ensure that the software has maximum permissions.

1. Change the installation directory

  1. Open the Steam client and select Settings from the drop-down menu.
  2. Navigate to the Storage tab. Next, click the + button at the top.
     
  3. Choose the new installation directory, preferably on another drive.
  4. Check if the problem is resolved. You can move the installation to the original download folder if it is.

Some users suggest using the repair option instead of creating a new download folder, so try that as well.

2. Delete the damaged game files and check the integrity

  1. Open the Steam log file. You should be able to find it at Steam\logs\content_log.txt
  2. Look for a message that mentions corrupt chunks and write down the path of these .pak files.
  3. Navigate to that game folder and delete affected .pak files or all .pak files.
  4. Next, go to Steam Library.
  5. Locate the affected game, right-click it, and choose Properties.
     properties resident evil 5 not launching steam
  6. Next, go to the Local Files tab and click on Check integrity of game files.
    clicking verify integrity of game files cod mw2 steam properties
  7. Wait for the process to replace the corrupted files.

3. Change the permissions

  1. Locate the Steam folder on your PC, right-click it, and choose Properties from the context menu.
  2. Navigate to the Security tab and click the Edit button.
    edit security
  3. Click on Add.
  4. In the Enter the object names to select type Everyone (or you can use your username), click on Check Names, and then OK.
    ype Everyone, click Check Names- Error Code 2502 & 2503 on Windows 11
  5. Select Full control in the Allow column for Everyone and save changes.
    Full control
  6. Lastly, uncheck the Read-only option and click Apply and OK.
  7. Now restart the Steam app and verify the file integrity of the game you’re trying to download or update.

4. Delete the appmanifest file

  1. Open the log file at the following location: steam\logs\content_log.txt
  2. Look for a message that mentions the app number, similar to this: Update job for app 70 canceled
  3. Next, go to your Steam directory, navigate to Steamapps folder, and then to your user account folder.
  4. Locate appmanifest_70.acf or appmanifest file that matches the number from step 2 and delete it.
  5. Check if the problem is resolved.

5. Change download region

  1. Open Steam and navigate to Settings.
  2. Select Downloads and change the Download region.
    Steam error code 53
  3. Pick another location that is close to you and save changes.

If a Steam disk write error is causing the download to be paused, changing the user permissions will give your PC full access to the Steam folder and helpfully fix the problem. This is just one of many common Steam errors, and we covered issues such as failed to find Steam in our earlier guides.

As for download problems, many reported an error while updating Steam games as well as an incomplete installation error in Steam, but we tackled those in separate articles.

Did you find a different solution for the Steam disk write error on SSD? If so, share it with us in the comments section.

9Now Error Code P2: How to Fix it

While it usually works seamlessly, 9Now was seen throwing Error Code P2 for several users on smart TVs. And for most, the streaming service worked fine on other devices.

You may be facing 9Now streaming issues due to misconfigured network settings, issues with the Internet connection, corrupt cache on the streaming device, a bug in the installed app version, or when running outdated firmware. 

How do I fix the 9Now error code P2?

Before we start with the slightly complex solutions, here are a few quick tricks:

  • Power cycle the affected device. And if possible, switch to a wired connection (Ethernet cable) or use a mobile hotspot. This also helps when 9Now keeps freezing.
  • Check the Internet speed and disable any proxy settings or restrictions set on the network.
  • Check the 9Now server status using Downdetector and look for a sudden spike in reports.

If none work, head to the fixes listed next.

Tip icon Tip
The solutions listed below are for Amazon Firestick, but the idea remains the same across devices. If you are facing the error on an LG TV, PC, iPhone, or Android device, execute the equivalent measures.

1. Clear the app cache

  1. Open the TV Settings and go to Applications.applications
  2. Select Manage Installed Applications.manage
  3. Now, locate and choose 9Now from the list.
  4. Select Clear data and then Clear cache to delete all the non-critical app files.clear cache to fix 9now error code p2
  5. Once done, reboot the device and check whether you still get an error while streaming 9Now. 

2. Update the 9Now app

  1. Head to Applications in your device Settings.
  2. Select Appstore from the list of options.
  3. Go to Automatic Updates and set it to ON.enable to fix 9now error code p2
  4. Finally, restart the device, and if any app updates are installed, check for improvements.

3. Update the TV’s firmware

  1. Open the device Settings, and select My Fire TV (will be different for other manufacturers).settings
  2. Go to About.
  3. Head down to Install Updates, and if any newer versions are available, select the option to download them.update

4. Reset the device to factory defaults

  1. Open the Settings, and go to My Fire TV.
  2. Scroll down and select Restore to Factory Defaults at the bottom.reset to fix 9now error code p2
  3. Choose Reset in the confirmation prompt that appears.

For a few users, resetting the device to factory defaults and then updating the firmware did the trick. So you must try out all of our solutions!

Besides, if it’s the 9Now’s PC app throwing Error Code P2, you can always repair or reset Windows apps or reset the PC to default settings.

5. Contact the support team

When nothing else works, you should contact 9Now support. Leave the query in the complaint’s form and wait for a response.

They will inform you of any bugs in the app and may share more device-specific troubleshooting measures to get rid of the streaming error.

Remember, it could be a problem both at the app’s or your end that triggered the 9Now Error Code P2. So, you may have to wait for a while before things are finally fixed. Besides, the solutions listed here also help if you come across Error Code 2 or the 9Now Error Code N-2.

If you find that 9Now keeps logging out, clear the cache or switch to the streaming service’s dedicated app. 

For more queries or to share what worked for you, drop a comment below.

How to Fix Error Code VAL 46 on Valorant

Valorant errors significantly affect the gaming experience, especially any that terminate the active session, and one such is Val Error code: 46.

The error message reads, Valorant is currently offline for scheduled maintenance. Please come back later once service resumes. Here, players actively gaming are kicked out of the session, while new ones can’t join and are presented with the error code on launch. 

What is code 46 in Valorant?

Error code 46 in Valorant indicates server maintenance. The official website describes it as, planned downtime allotted for the engineers to work on our systems. For those wondering how long does Val 46 last, it may take anywhere between 2-4 hours. 

How do I permanently fix the Val 46 error on Valorant?

Before we start with the slightly complex solutions, try these quick workarounds:

  • Restart the device or check for server issues through the Riot Game Service Status or a third-party service like Downdetector. Also, server issues can trigger the Val 59 error.
  • Many users reported that spamming WASD helped them get past the loading screen without the error message appearing. For a few, this also reduced the game loading time.
  • Run Valorant through the Riot Client instead of the standalone game launcher.

If none work, head to the fixes listed next.

1. Change the region in your Riot account

A lot of users reported getting the Val Error code: 46 after the gaming client automatically changed the region. While there’s no clarity as to why this happened, switching to the actual region helped fix things in no time!

Raising a ticket with Riot support

For this, you will have to raise a ticket with Riot Support under Account Management, Data Requests, and Deletion. Make sure to choose Need help changing Region of Residence/ Country assigned to account as the inquiry.

2. Contact Valorant support

When nothing else works, and there’s no ongoing maintenance, it’s best that you contact Valorant support. 

They will either share a solution or a timeline as to when things should be up and running!

As you see, Val Error code: 46 has to do with the server side of things, and rarely is it related to a problem at your end. The ideal approach would be to wait for 2-4 hours or overnight, and Valorant should run fine the next day!

Some errors, say Valorant Error code: 51, are related to the VGC service, but we haven’t found any links in this case. Before you leave, check our list of Valorant error codes and fixes to enjoy uninterrupted gameplay.

For any queries or to share what worked for you, drop a comment below.

Origin Error Code 20.403: How to Quickly Fix it

If you are stuck with the Whoops – the installer encountered an error and an error code 20.403 while updating or installing the Origin app, then this guide can help!

We will discuss the common causes and delve into WR expert-tested effective solutions to fix the problem, enhancing the gaming experience.

What does error code 20.403 mean?

The error code 20.403 indicates that the Origin app on your computer can’t connect to the EA server. However, if we look at the broader perspective, it seems that EA is encouraging users to transition from Origin to the EA app.

How do I fix Origin error code 20.403?

Before proceeding with any steps to get rid of the error message, go through the following preliminary checks:

  • Restart your computer and right-click the game, then select Run as administrator. This also helps with issues like Origin Error Code 327683:0
  • Verify if you have a stable internet connection, check the EA origin server status here, and disable the VPN if you’re using one.
  • Ensure you have an updated version of Windows OS and essential drivers.

1. Allow an app through the Windows Firewall

Note icon NOTE
Before moving with the steps mentioned below, check if  Origin is blocked by the Firewall using our guide.
  1. Press the Windows key, type control panel in the search box, and click Open.Control Panel start menu - origin error code 20.403
  2. Select Category for View by and click System and Security.System and security - origin error code 20.403
  3. Locate Windows Defender Firewall and click Allow an app through Windows Firewall.Allow an app through Windows Firewall -origin error code 20.403
  4. On the Allowed apps screen, look for Origin; if not found, click Change settings, then select Allow another app.Change app
  5. Click Browse and select the app, then click Open.Browse origin error code 20.403
  6. Now click Add.explorer_click Add
  7. Once added to the Allowed apps page, place a checkmark next to Private and Public for the app and click OK to complete.explorer_Public & Private

Once the app is allowed, the Firewall will not interfere and let it run smoothly. This method can also help you fix common errors like An unexpected error has occurred in Origin; read this guide to know more.

2. Use the Google DNS

  1. Press Windows + R to open the Run window.NCPA run command  - origin error code 20.403
  2. Type ncpa.cpl and click OK to open Network Connections.
  3. Right-click the network connection and click Properties from the context menu.Properties - Network connections
  4. Under This connection uses the following items, select Internet Protocol Version 4 (TCP/IPv4) and click Properties.dllhost_select IPV4 properties
  5. Place a checkmark next to Use the following DNS server addresses, then for Preferred DNS server: type 8.8.8.8 and for Alternative DNS server: 8.8.4.4DNS server -origin error code 20.403
  6. Click OK and restart your computer to let the changes take effect.

If an unstable internet connection is causing the issue, changing DNS can speed up your internet connection and refresh the network or fix it.

3. Download the offline version of the app & disable the automatic updates

Note icon NOTE
Before uninstalling the game, back up the game data, go to the Origin game library, right-click the game, and select Move Game, save it to an accessible location. After you reinstall Origin, go to the game library, click Install, and choose the location where you saved the game files.
  1. Press Windows + I to open the Settings app.
  2. Locate Origin from the list of installed apps, click the three dots icon, and select Uninstall.Uninstall Origin  - origin error code 20.403
  3. Click Uninstall again to confirm the action.
  4. Go to Origin’s official website and click Download Origin.
  5. Click Install.Install Origin
  6. On the following screen, ensure you uncheck Keep Origin and my games up to date, then click Continue.Click Continue
  7. Follow the on-screen instructions to complete the process.
  8. Press Windows + E to open the File Explorer window.
  9. Navigate to this path: C:\Program Files (x86)\Origin\EACore.iniexplorer_Open the file -origin error code 20.403
  10. Double-click the EACore.ini file and add this code:Notepad_add the code
    • [Bootstrap]
      EnableUpdating=false
  11. Press Ctrl + S to save the changes, then close the window.

Using an offline installer for the app can save you from the constant pop-up notifications to update the Origin app to the new EA app, allowing you to play your games on the existing platform. However, to keep your games up to date, you will eventually need to update the app to the new EA version.

4. Download the EA app

  1. Go to EA’s official website and click Download the EA app.chrome_download EA - origin error code 20.403
  2. Double-click the downloaded file, and click Let’s Go.EAappInstaller_(2) Let's Go
  3. Click Yes on the UAC prompt, then follow the onscreen instructions to complete the process.

If you are getting Origin error code 20.403 due to network or firewall interference, you can add the app to the Firewall or change the DNS settings.

However, if it is happening as the EA is encouraging the transition and you are not ready for it, you can try the offline version of the app and disable it automatically.

If you are facing any other errors during the Origin installation process, read this guide to learn about the solutions.

Did we miss a step that worked for you? Don’t hesitate to mention it in the comments section below. We will happily add it to the list.

Solved: Alabasterbeard Error on Sea of Thieves

Alabasterbeard error in Sea of Thieves can be frustrating, but there are ways to fix it. The error signals there’s a connection issue or problems with your Microsoft account. Here’s how to fix it:

How do I fix the Alabasterbeard error on Sea of Thieves?

? First, restart your device and update the game. Also, check Sea of Thieves’ X page to check the status of their servers.

If the error persists, keep reading.

1. Change matchmaking preferences

  1. On your Xbox, start the game client and go to Settings.
  2. Navigate to Matchmaking Preferences in the right pane. In the left pane, set Prefer Xbox Players With Controllers to No.
  3. Save changes to the matchmaking settings.

2. Unlink Steam and Xbox Live account

  1. Start the game.
  2. On the Start Game screen or main menu, select Sign Out.
     
  3. You’ll be asked to confirm that you want to sign out of your Xbox account. Select Yes.
  4. Check if the problem is resolved.

3. Change the MTU value on the router

  1. Open your browser and enter your router’s IP address.
  2. Log in with your credentials.
  3. Navigate to Network and look for MTU value.
  4. Set it to 1384 or higher and save changes.

4. Verify the integrity of the game files

  1. Open Steam and go to the Library.
  2. Right-click Sea of Thieves and select Properties.
  3. Click on the Installed Files tab.
  4. Select Verify Integrity of Game Files.verify integrity of game files steam

5. Repair/Reset from Windows settings

  1. Open the Settings app (Win + I).
  2. Go to Apps > Installed apps.
  3. Find Sea of Thieves in the list, click the three dots, and select Advanced options.
  4. Scroll down and click Repair. If that doesn’t work, try clicking Reset.repair reset game bar app

Failed to connect to Sea of Thieves servers alabasterbeardis error is common, and it’s caused by a glitch with the crossplay feature, and you can avoid it by enabling this feature and by installing the current version of the game.

This isn’t the only problem you can encounter and we already covered various Sea of Thieves issues in the past, such as Sea of Thieves crashes or the Kiwibeard error.

Many users reported that Sea of Thieves is not launching at all for them, but we have a special guide that addresses that.

Did you use a different solution to fix this error? If so, let us know in the comments section below.

Dasher Must be Active DoorDash Error: How to Fix it

Many DoorDash drivers (or Dashers as they are referred to) came across the Dasher must be active to schedule dashes error on the Android or iOS mobile app. This was usually the case with new Dashers, but a few established drivers, too, faced the same problem.

What does it mean for a dasher to be active? A dasher is considered active when they have completed the sign-up process, underwent the background check, and added a Red Card to their profile.

Common reasons you are unable to do deliveries on DoorDash are:

  • Critical profile information is missing
  • The DoorDash’s Red Card is not added to the profile
  • The account is temporarily or permanently suspended

How do I fix the Dasher must be active DoorDash error?

Before we start with the slightly complex solutions, try these quick ones:

  • Log out and then sign back into the DoorDash app. Also, if you are going with Schedule a Dash, try the Dash Now option.
  • Make sure your profile is updated and has been approved by the team. After the background verification, you may have to wait a week before being eligible for dashing.
  • Verify whether you have been waitlisted. Often, when there are several dashers in an area, a few may get waitlisted.

If none work, head to the fixes listed next.

1. Add the DoorDash’s Red Card to your profile

Dashers need the prepaid Red Card to pay for some of the orders, and it’s received during the orientation or delivered along with the welcome kit. But if you haven’t got one, order your Red Card online.

After you receive the Red Card, enter the delight number and the last four digits in the dedicated section of the app to activate it. Many dashers keep a backup Red Card to not lose out on deliveries.

Almost 9 out of 10 riders were able to get rid of the Dasher must be active DoorDash error by ordering and adding a Red Card to their profile.

2. Choose a vehicle

  1. Open the DoorDash app, and in the Dash tab, select the vehicles dropdown menu.
  2. Now, choose the vehicle you will use for dashing from the list.dash type
  3. Finally, check whether you can schedule a dash.

If you don’t yet have a dash type added to your account, check the steps outlined on the official website and add a vehicle to start dashing!

3. Clear the app cache

  1. Open the phone Settings, and go to Apps.apps
  2. Select DoorDash from the list.
  3. Tap on Storage.storage
  4. Now, tap on Clear data and Clear cache.clear data to fix doordash error dasher must be active
  5. Relaunch the app and log in to your DoorDash account.
  6. Schedule a dash and check whether it goes through.

4. Check for account suspension

The error is just as likely to appear when your DoorDash account is placed under suspension. Though you are supposed to receive an email informing you of the same, this is not always the case. But it’s best that you check the linked email account, even the Spam folder.

The likely reasons for suspension are driving under the influence, fraud, duplicate accounts, and theft, amongst others. Remember, acceptance rating doesn’t play a role here.

Tip icon Tip
You will have to contact the support team for account suspensions. They generally rectify incorrect suspensions within 48 hours.

5. Contact the support team

When nothing else works, it’s best that you contact DoorDash’s dasher support. Based on forum reports, DoorDash support doesn’t seem very actively involved with queries, but a few did manage to get help.

Besides, there isn’t much you can do. So, contact them, share your concerns, and wait for a resolution!

Most likely, you should have a solution for the Dasher must be active Doordash error by now, and if not, wait for a while. It took many dashers months to finally make deliveries again again.

Also, remember, CreateShiftV2 Dasher must be active to schedule dashes (actual:Optional(400), Expected: [200]), too, means the same thing, and these solutions will help.

And if you are facing DoorDash Error code 500, whether as the end user or the dasher, an unstable Internet connection is to blame!

Many also encountered DoorDash Payment failed error, but we tackled that issue in a separate guide.

For any queries or to share what worked in your case, drop a comment below.