How to Enable Running Scripts on Windows 10

The ability to run scripts on Windows 10 can empower users with automation, customization, and troubleshooting capabilities.

This guide will guide you through the process of enabling running script on Windows 10, highlighting the benefits and considerations involved.

What are the benefits of enabling running scripts on Windows?

Enabling the execution of scripts can be beneficial in many ways. Some of them are mentioned here:

  • Automation – Allows you to automate repetitive tasks and processes, thereby streamlining operations such as software installations and file management, saving you time & effort.
  • Customization – Enables you to create scripts to modify system settings, personalize the user interface, configure network settings, or tailor applications to your preferences.
  • Troubleshooting and maintenance – It allows you to develop diagnostic scripts that gather system information, check for errors, and perform automated troubleshooting steps.
  • Script-based applications – Ensures you can fully utilize the capabilities of these script-based applications, thereby allowing you to leverage additional features and functionalities.
  • Task streamlining – This allows you to combine multiple tasks or commands into a single script, simplifying complex processes.

Overall, it empowers users with greater control, efficiency, and customization, ultimately improving productivity and system management capabilities.

However, it’s important to note that running scripts can pose security risks if executed from untrusted sources or without proper validation.

How can I enable running scripts on Windows 10?

Before engaging in advanced troubleshooting steps, you should consider performing the following checks:

  • You must have administrative rights to the machine.
  • Check if you have Windows PowerShell installed. If not, download and install it from the Microsoft website.

Once you are through these checks, move to different steps to run scripts on Windows.

1. Use the Settings app

  1. Press Windows + I to open the Settings app.
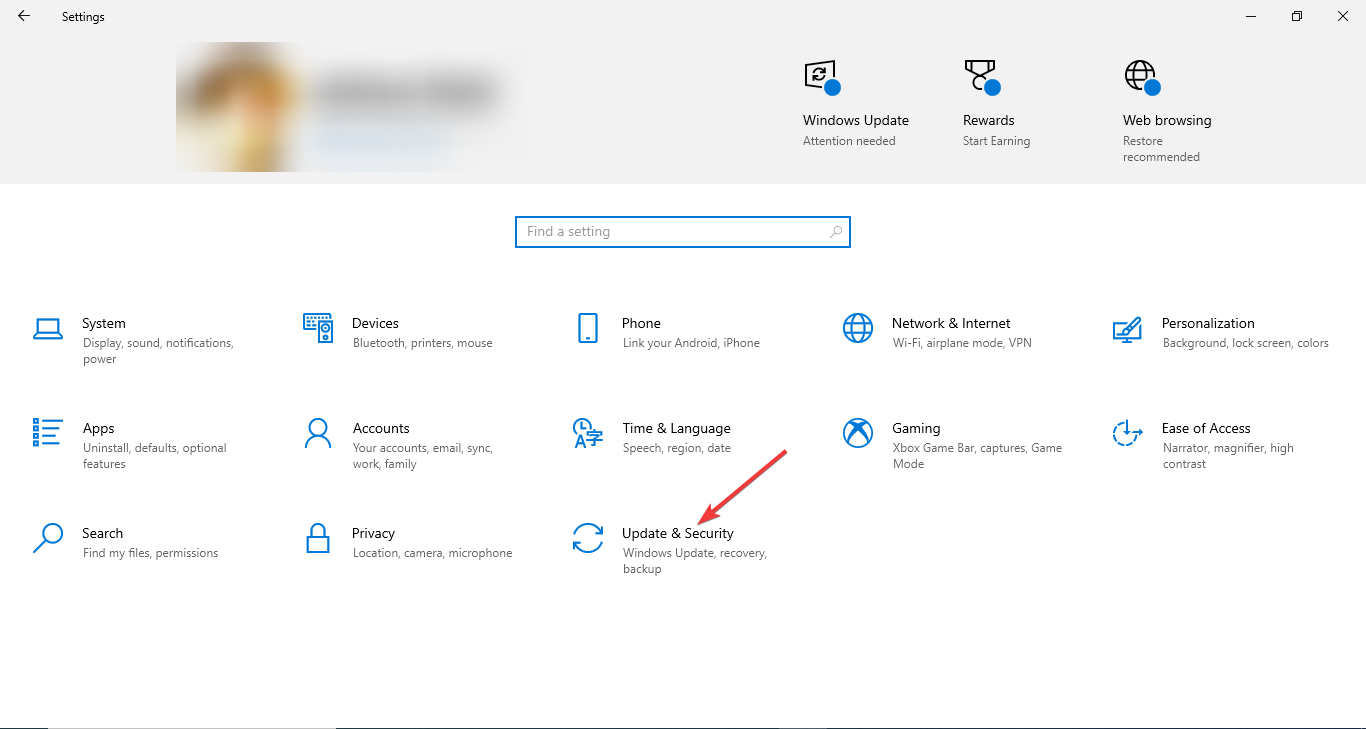
  2. Go to Update& security.Update & Security enable running scripts on windows 10
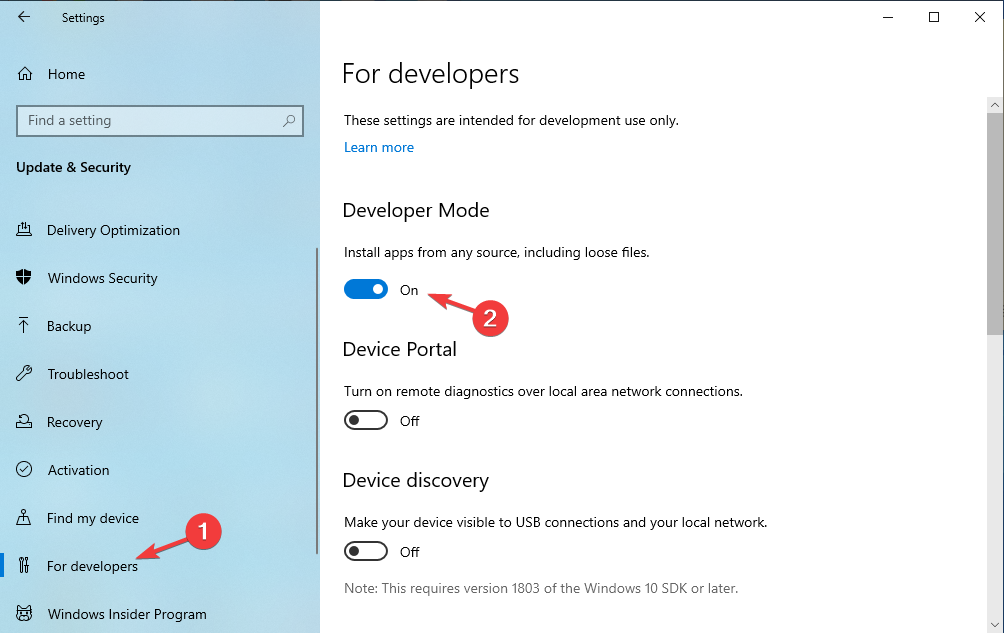
  3. From the left pane, select For developers.
  4. Toggle on the switch under Developer Mode.Developer mode on
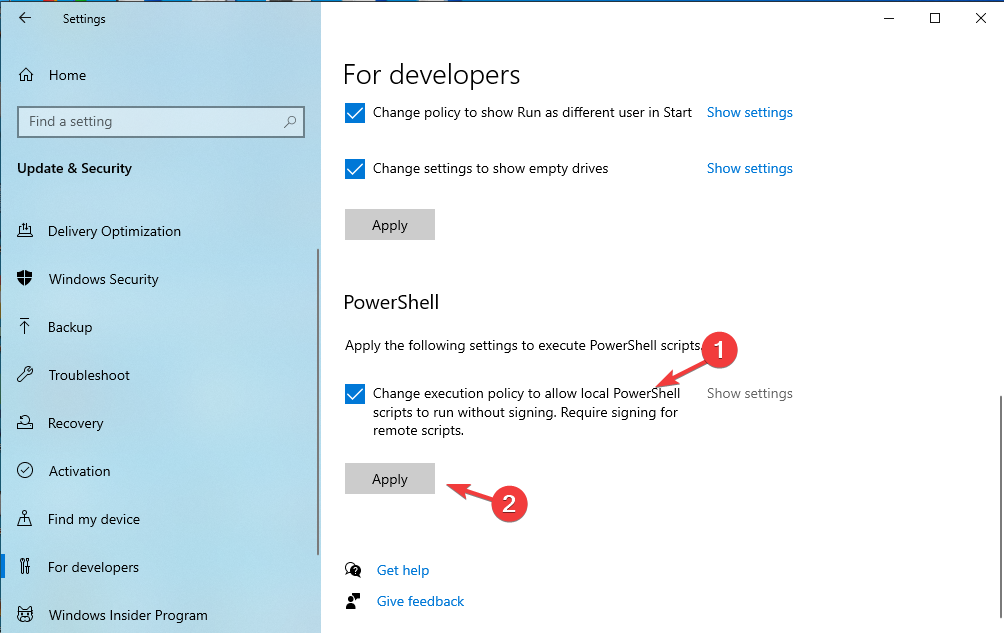
  5. Locate and expand PowerShell and place a checkmark next to Change execution policy to allow local PowerShell scripts to run without signing. Require signing for remote scripts.Enable script Windows 10
  6. Click Apply.
  7. Close the Settings window and try running the scripts you want.

2. Use Windows PowerShell

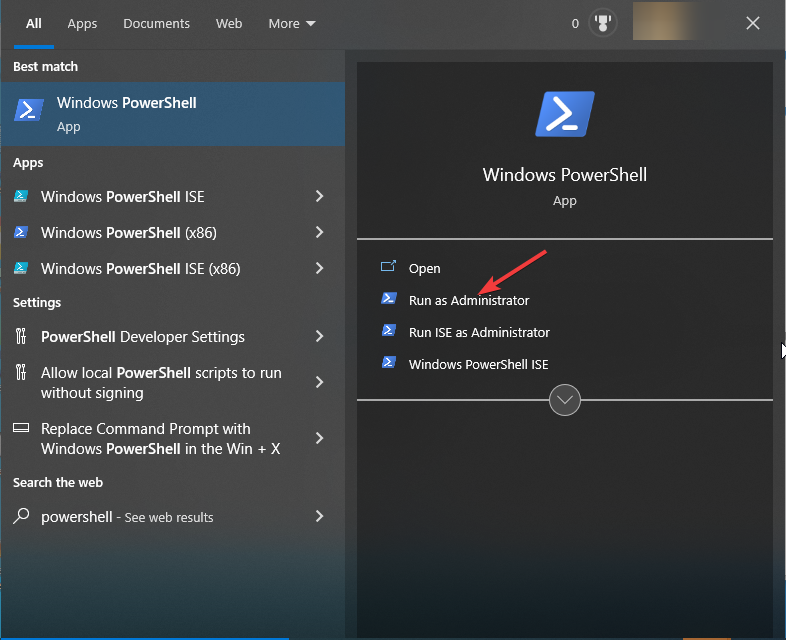
  1. Press the Windows key, type powershell and click Open.PowerShell command enable running scripts on windows 10
  2. Copy & paste the following command to enable running scripts on Windows 10 for the current user, and hit Enter: Set-ExecutionPolicy Bypass -Scope CurrentUser -ForceCurrent USER
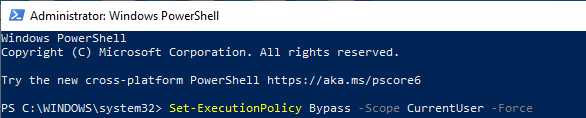
  3. Type the following command to enable running scripts for the local machine and press Enter: Set-ExecutionPolicy Unrestricted -Scope LocalMachine -Force
  4. However, if you are concerned about security, you can enable it on a per-script basis or per-instance basis. For that, copy & paste the following command and hit Enter: Set-ExecutionPolicy Bypass -Scope Process -Force

Now you can run the script on your Windows 10.

3. Use the Group Policy Editor

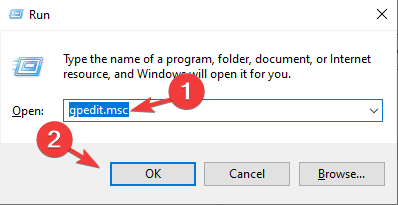
  1. Press Windows + R to open the Run console.Gpedit.msc enable running scripts on windows 10
  2. Type gpedit.msc and click OK to open the Group Policy Editor.
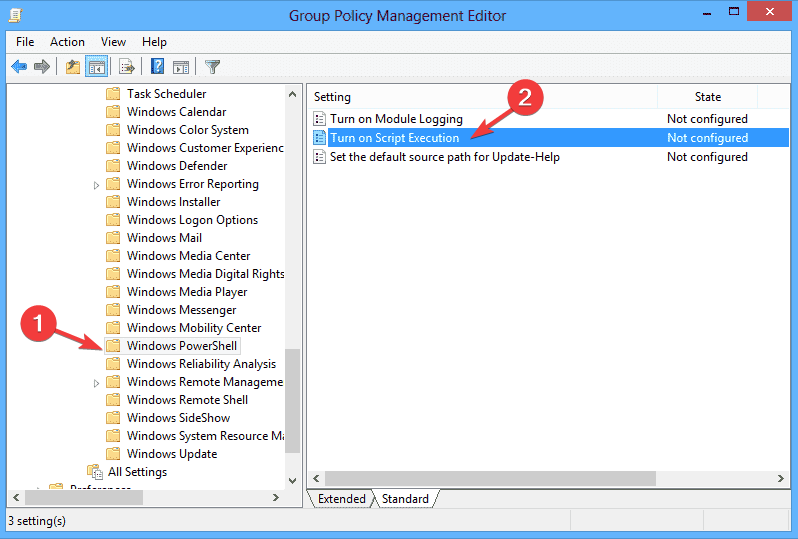
  3. Navigate to this path: User Configuration\Administrative Templates\Windows Components\Windows PowerShell
  4. From the right pane, double-click Turn on Script Execution to open its Properties.Execution scripts
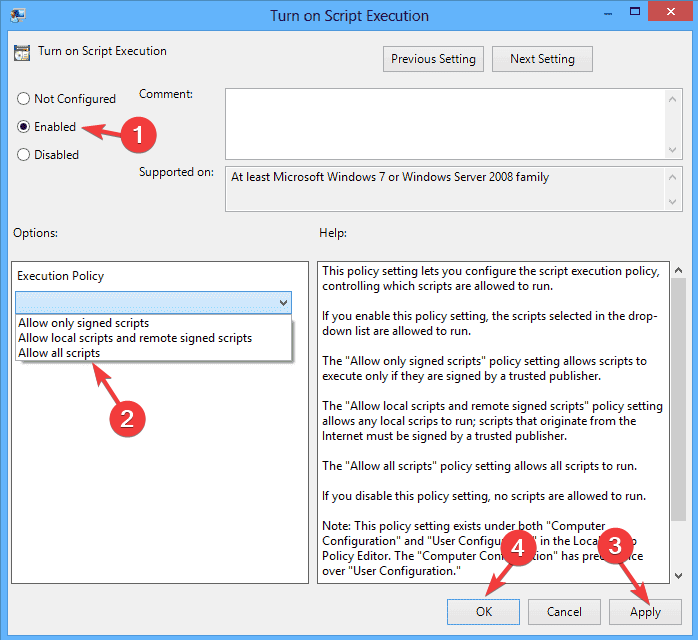
  5. Select the Enabled option, and under Options, select Allow all scripts from the drop-down for Execution Policy.Enabled and allowed scripts
  6. Click Apply, then OK.

4. Modify the registry entries

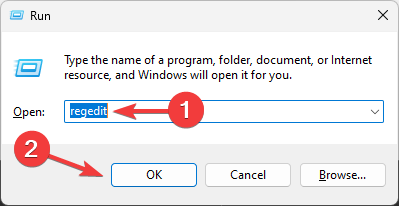
  1. Press Windows + R to open to Run dialog box.Regedit enable running scripts on windows 10
  2. Type regedit and click OK to open the Registry Editor.
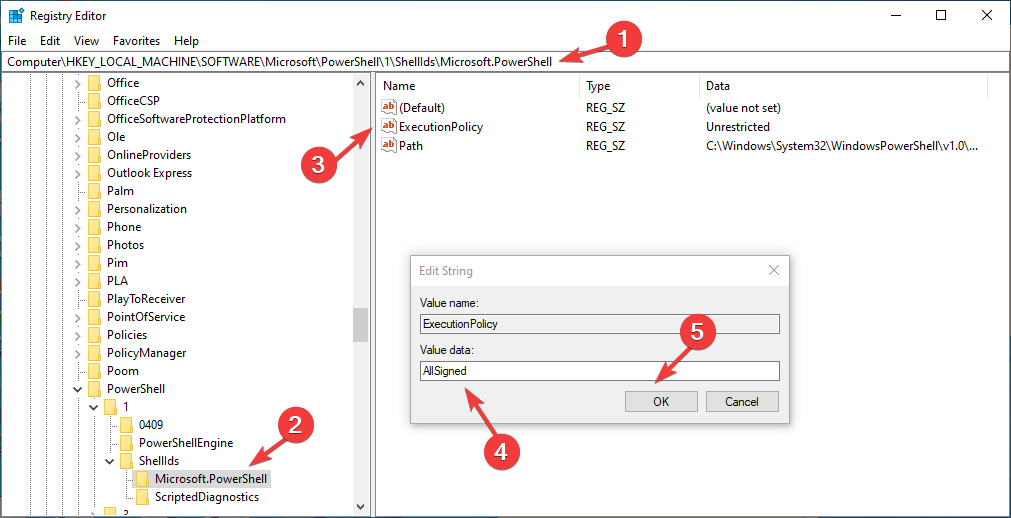
  3. Navigate to this path: Computer\HKEY_LOCAL_MACHINE\SOFTWARE\Microsoft\PowerShell\1\ShellIds\Microsoft.PowerShell
  4. Locate and double-click the ExecutionPolicy entry to edit the string.All signed
  5. Change the Value data to either AllSigned or RemoteSigned to enable it.
  6. Click OK to confirm the changes.

So, these are methods to enable running scripts on Windows 10. It’s important to exercise caution when enabling script execution, as it can pose security risks.

You must only enable scripts from trusted sources and consider the potential consequences before changing the script execution policy.

If you are still not able to run scripts on PowerShell, then check out this informative guide to find the solutions

Please feel free to give us any information, tips, and your experience with the subject in the comments section below.

Securityhealthsystray.exe: What is It & How to Fix Its Errors

SecurityHealthSystray.exe is a crucial component of the Windows Security app, developed to enhance your PC’s security by providing easy access to essential security features.

In this guide, we will delve into what it is, its purpose, and, most importantly, how to troubleshoot and fix any errors associated with it effectively.

What is SecurityHealthSystray.exe?

SecurityHealthSystray.exe is a legitimate executable file associated with the Windows Security app, and is responsible for displaying the Windows Security icon in the system tray, serving as a visual indicator of your computer’s security status.

The file’s main function is to provide users with quick access to the Windows Security app and its various security features and settings, allowing you to manage antivirus and threat protection, firewall settings, device performance and health, app and browser control, and more.

It also runs background processes to ensure real-time protection against threats, automatic updates of virus definitions, and regular system scans to detect and remove malicious software.

The file’s original location is C:\Windows\System32, and you can always find it running in Task Manager. If you find it somewhere else, run a malware scan to remove it.

What are the common errors associated SecurityHealthSystray.exe?

Some of the common errors that users encounter are:

  • securityhealthsystray.exe not found -This error message indicates that the file is missing or has been accidentally deleted.
  • Application Error – It appears that there is a problem with the SecurityHealthSystray.exe file or application.
  • securityhealthsystray.exe has stopped working – This error message comes up when the file encounters an error while running due to memory or compatibility issues.
  • High CPU usage – It can occur when the file uses excessive CPU resources, resulting in system slowdowns and other performance issues.
  • Access Violation – It can appear if there is a problem accessing the memory location the file is attempting to utilize.

If you are facing other issues related to this file, such as SecurityHealthSystray.exe Bad Image Error, we suggest you check out this guide to find quick solutions.

Before engaging in advanced troubleshooting steps, you should consider performing the following checks:

Once you are done with these steps, move to the troubleshooting solutions mentioned below.

1. Update the Windows OS

  1. Press Windows + I to open the Windows Settings app.
  2. Go to Windows Update, click Check for Updates.securityhealthsystray.exe Windows Update Check for updates
  3. If the update is available, click Download and Install to update Windows.

2. Reset the Windows Security app

  1. Press Windows + I to open the Settings app.
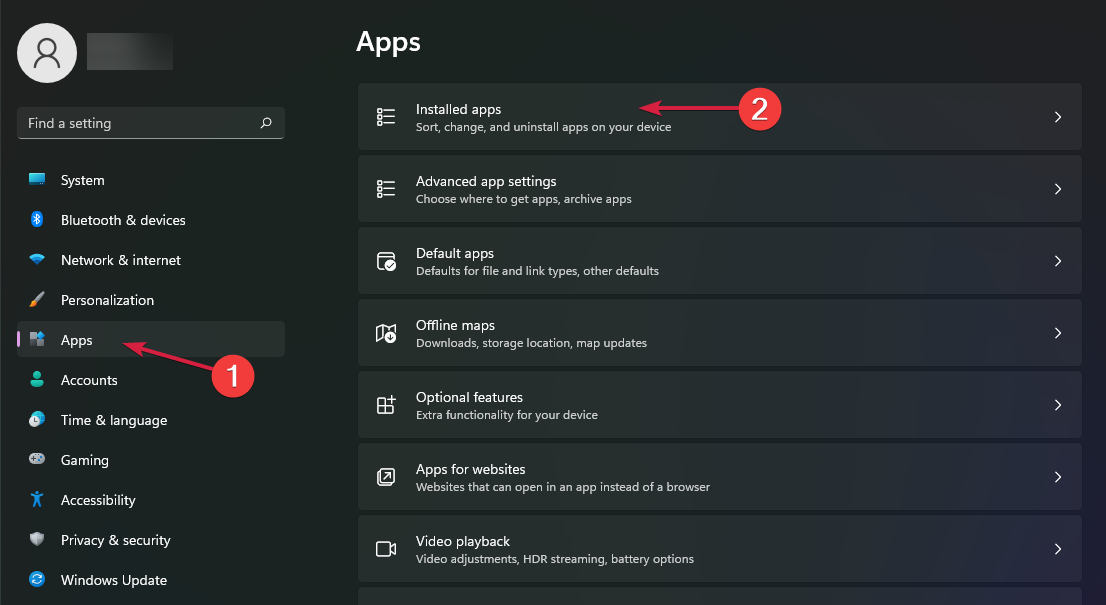
  2. Go to Apps, then click Installed apps.Apps - Installed apps  securityhealthsystray.exe
  3. Locate Windows Security, click on three dots and select Advanced options.Advanced options
  4. Click Reset button.Reset
  5. Then, click Reset to confirm your choice.Confirm reset

Windows security will be restored to default, and the app data will be deleted, resolving your issue. If the issue still persists, move to the next solution.

3. Run SFC & DISM scans

  1. Press the Windows key, type cmd and click Run as administrator.CMD elevated securityhealthsystray.exe
  2. Copy & paste the following command to repair system files and hit Enter: sfc/scannowSFCSCANNOW CMD
  3. Wait for the process to complete, then type the following command to restore Windows OS image files and press Enter: DISM /Online /Cleanup-Image /RestoreHealthRestore health
  4. Restart your computer to let the changes.

4. Perform a System Restore

  1. Press Windows + R to open the Run console box.securityhealthsystray.exe SysDM.cpl open
  2. Type sysdm.cpl and click OK to open System Properties.
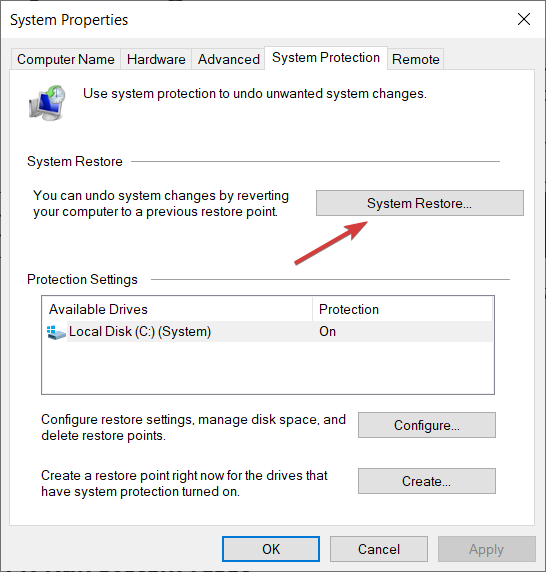
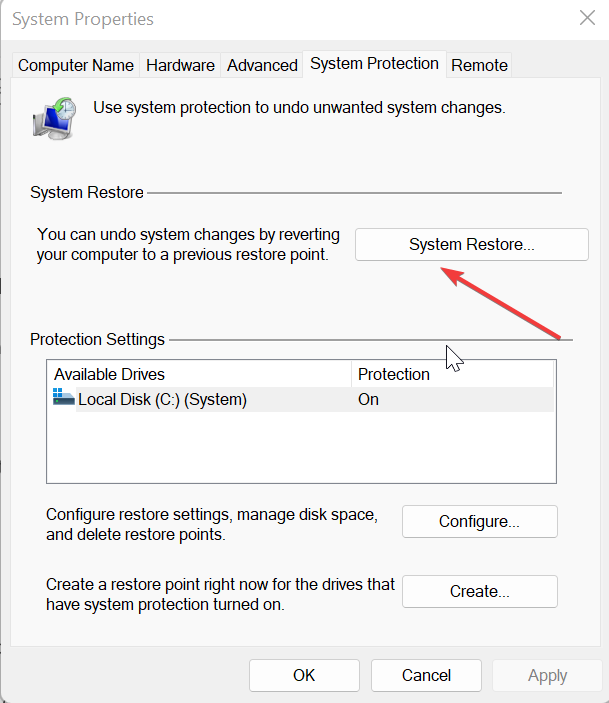
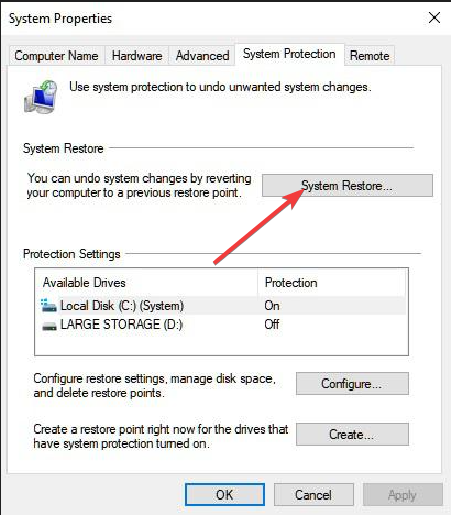
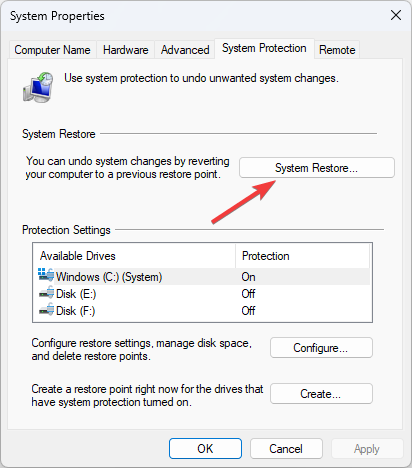
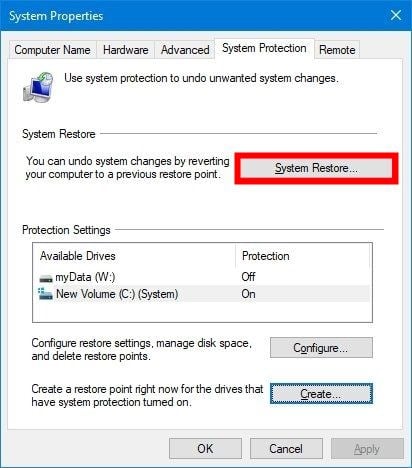
  3. Go to System Protection tab, click the System Restore button.SystemPropertiesComputerName_Z5BXqVzSCV
  4. On the System Restore window, select Choose the different restore point and click Next.Next Choose a different restore point
  5. Select the version you want to restore it to and click Next.Choose a point
  6. Click Finish.Finish

Windows will restart and restore it to the chosen version, solving the problem associated with SecurityHealthSystray.exe. If the System Restore didn’t work for you, you can check out this informative guide to find solutions.

So, these are the steps you can take to fix the issues related to SecurityHealthSystray.exe. If nothing worked for you, you might have to reset your Windows PC to fix the issue.

Please feel free to give us any information, tips, and your experience with the subject in the comments section below.

Learn more

0xC19A0023 Printer Error: 4 Ways to Fix It

If you have encountered the error code: 0xc19a0023 Printer head appears missing or not detected; this guide can help!

In this guide, we will discuss some of the troubleshooting methods to fix the error right after explaining the causes.

What causes the error code 0xc19a0023?

The error code 0xc19a0023 is typically associated with an issue in HP printers, particularly models in the Photosmart, Officejet, and Deskjet series. There could be various reasons for it; some of the common ones are mentioned here:

  • Printhead problem – The printhead, responsible for transferring ink onto the paper, might be clogged or malfunctioning, leading to this error. Try cleaning or replacing the printhead.
  • Ink cartridge issue – The error may occur if the ink cartridges are not properly installed or if they are low on ink. Check the cartridges are correctly inserted and have sufficient ink levels.
  • Firmware or driver issue –Outdated or corrupted firmware or printer drivers can cause various errors, including this one. Ensure the printer has the latest firmware installed & update the PC drivers.
  • System or software conflict – Occasionally, conflicts between the printer software and other programs on your computer can trigger an error. Try restarting your computer and printer.

So, these are the causes of this error; let us dive into the solutions to fix the issue.

What can I do to fix the error code 0xc19a0023?

Before engaging in advanced troubleshooting steps, you should consider performing the following checks:

  • Try restarting your computer.
  • Check ink cartridges to ensure they are properly installed.
  • Clean the ink cartridge contacts.
  • Remove dust particles from the printer.
  • Turn off the printer and unplug it from the power source. Wait for 30 seconds.
  • Reinstall the cartridges and make sure they are properly seated.

Once done, move to the solutions mentioned below.

1. Resetting the printer

  1. Turn on the printer and wait for a couple of seconds until the printer gets idle and silent.Power-On-HP-printer 0xc19a0023
  2. Unplug the power cable from the printer while it is ON.
  3. Disconnect the power cord from the power outlet.
  4. Wait for a minute, then reconnect the power cable to the printer.
  5. If the printer doesn’t turn ON automatically, press the Power button on your printer to turn it on.

Now check if the issue is still there, and if it is, move to the next method.

2. Resetting the print head

  1. Remove the printer power cord so that you can stop the carriage movement.
  2. Now open the cartridge access door and wait for the carriage to become idle and silent.Ink-cartridge-in-central-position
  3. Next, lift the carriage lever and then lift the print head from the carriage, but don’t remove the printer head fully.
  4. Reinsert the printer head; Verify that it is properly seated in the carriage by gently moving the print head from left to right.
  5. Next, lower the carriage lever and close the ink cartridge’s access door.
  6. Attach the power cable to the printer and turn it ON. Now wait for the printer to get idle and silent.

Check if the error is resolved; if not, reinsert the print head up to three times to fix it. If this doesn’t help, contact the printer manufacturer’s support team.

3. Update your drivers

  1. Press Windows + R to open the Run window.Device Manager Run command  0xc19a0023
  2. Type devmgmt.msc and click OK to open the Device Manager.
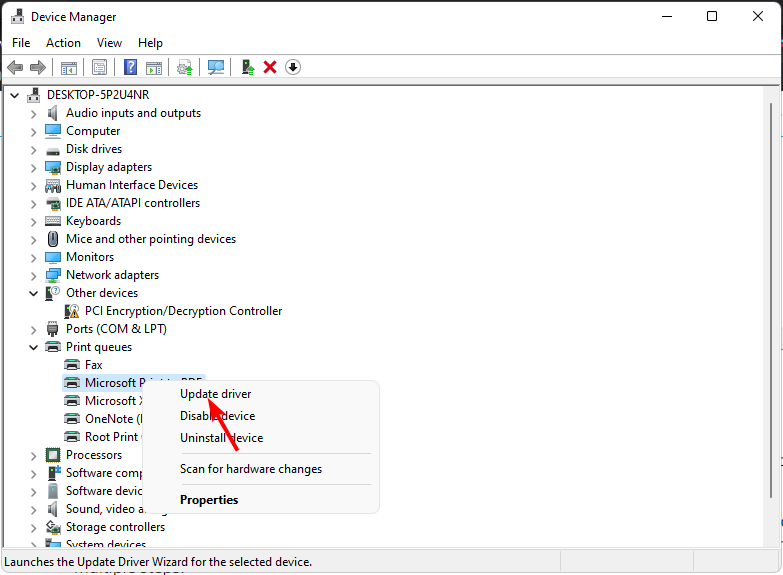
  3. Locate and expand Print queues. Right-click the printer driver associated and select Update driver.Update drivers Print queues
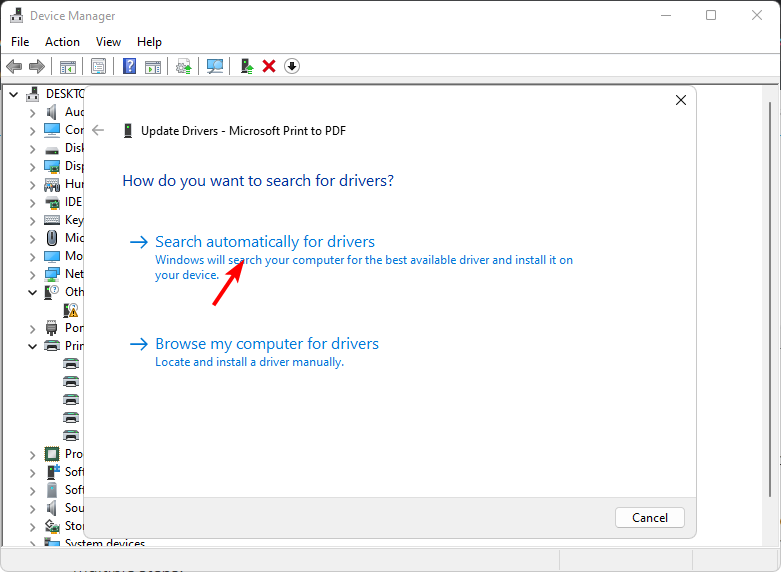
  4. Click Search automatically for drivers.Update driver 2
  5. Follow the onscreen instructions to complete the process.

This Device Manager task might not find the latest driver version for your Printer, so you would need an alternative.

Luckily, it’s possible to update or install the latest drivers on your PC using a dedicated driver tool with automatic and secure technology.

⇒ Get Outbyte Driver Updater

4. Update the printer firmware

Note icon NOTE
There are no firmware updates if you can’t see a firmware option for your printer.
  1. Make sure your printer is connected to your computer.
  2. Go to HP Software and Driver Downloads and click Printers.Printers  0xc19a0023
  3. Enter your printer model and click Submit.Submit
  4. Choose Firmware from the list of drivers, click Download next to the update, and then follow the onscreen prompts.Firmware update and click Download
  5. On the HP Printer Update screen, check the status of your printer. If you can’t see the network printer, use a USB cable to connect your printer temporarily to the PC. Wait for 15-20 seconds, then click Refresh.
  6. Next, if the status says Ready, place a checkmark next to the serial number and select Update.
  7. Once the status is Up-to-Date, the firmware is updated.

So, these are the methods to fix error code 0xc19a0023 and make your printer up and running. If nothing works for you, the print head or cartridges might be damaged, and you need to replace them to eliminate the error once and for all.

If you are looking for solutions for other HP printer errors like 83C0000B, we suggest you check out this guide.

Please feel free to give us any information, tips, and your experience with the subject in the comments section below.

Windows 7 Games for Windows 11: How to Download & Play

Older Windows OSs such as Windows 7, although not feature-rich as per modern standards, came with some exciting and iconic games. You might be wondering if it is possible to get Windows 7 games for Windows 11.

If that’s your query, then this guide is for you. Here, we will give you some methods to help you get Windows 7 games for Windows 11. Let us check out the solutions.

Which Windows 7 games are available for Windows 11?

Well, Windows 7 games work without any issues on Windows 11. All you need to have are the games, install them, and you are all set to play.

Since the gaming architecture isn’t changed with Windows 11, you can even play Windows Vista games on Windows 11.

Here is a list of the iconic and fun Windows 7 games available for Windows 11:

  • Solitaire
  • Spider Solitaire
  • Minesweeper
  • FreeCell
  • Hearts
  • Chess Titans
  • Mahjong Titans
  • Purble Place
  • Internet Spades
  • Internet Checkers
  • Internet Backgammon

In this guide, we will be making use of an external link that is safe. Win7games is responsible for bringing fun Windows 7 games to Windows 11 and other Windows operating systems.

To install Windows 7 games on your PC, follow each step mentioned in this guide carefully to avoid any issues.

Which are the supported languages for Windows 7 games?

Below is the list of the supported languages that are supported by the Windows 7 games:

  • Arabic (Saudi Arabia), ar-SA
  • Bulgarian (Bulgaria), bg-BG
  • Czech (Czech Republic), cs-CZ
  • Danish (Denmark), da-DK
  • German (Germany), de-DE
  • Greek (Greece), el-GR
  • English (United States), en-US
  • Spanish (Spain, International Sort), es-ES
  • Estonian (Estonia), et-EE
  • Finnish (Finland), fi-FI
  • French (France), fr-FR
  • Hebrew (Israel), he-IL
  • Croatian (Croatia), hr-HR
  • Hungarian (Hungary), hu-HU
  • Italian (Italy), it-IT
  • Japanese (Japan), ja-JP
  • Korean (Korea), ko-KR
  • Lithuanian (Lithuania), lt-LT
  • Latvian (Latvia), lv-LV
  • Norwegian, Bokmål (Norway), nb-NO
  • Dutch (Netherlands), nl-NL
  • Polish (Poland), pl-PL
  • Portuguese (Brazil), pt-BR
  • Portuguese (Portugal), pt-PT
  • Romanian (Romania), ro-RO
  • Russian (Russia), ru-RU
  • Slovak (Slovakia), sk-SK
  • Slovenian (Slovenia), sl-SI
  • Serbian (Latin, Serbia, and Montenegro (Former)), Sr-Latin-CS
  • Swedish (Sweden), sv-SE
  • Thai (Thailand), th-TH
  • Turkish (Turkey), tr-TR
  • Ukrainian (Ukraine), uk-UA
  • Chinese (Simplified, China), ZH-CN
  • Chinese (Traditional, Taiwan), zh-TW

How can I get Windows 7 games for Windows 11?

1. Use the Win7games installer

  1. Visit the official Win7games website.
  2. Scroll down and click on DOWNLOAD GAMES.
  3. Open the location where you just downloaded the ZIP file.
  4. Right-click on the ZIP file and select Extract here.
  5. Double-click on the EXE file.
  6. Choose your language and click OK.
  7. Click Next to continue.
  8. Select the games that you wish to download and click Install.
  9. After the installation is complete, click Finish.

This is one method that makes you go through the installation wizard to complete the installation of the games on your computer.

However, another way negates the need to follow the installation wizard and silently installs all Windows 7 games for Windows 11, which you will learn about in the next method.

2. Perform a silent install

  1. Visit the official Win7games website.
  2. Scroll down and click on DOWNLOAD GAMES.
  3. Open the location where you just downloaded the ZIP file.
  4. Right-click on the ZIP file and select Extract here.
  5. Press the Win key to open the Start menu.
  6. Type Command Prompt and run it as an administrator.
  7. Type the below command and press Enter. cd /d C:\Users\XXX\Downloads\Windows7Games_for_Windows_11_10_8
    (Replace the XXX in the above command with the username for your account)
  8. Now, run the below command to silently install the games. Windows7Games_for_Windows_11_10_8.exe /S
  9. The installation will begin.

The best part about using the silent install process is that it will skip the installation wizard and once you run the command, there isn’t any input required from your end to complete the installation.

How can I run the Windows 7 games on my Windows 11 PC?

  1. Open the Start menu by pressing the Win key.
  2. Click on All apps.
  3. Scroll down and open the Games folder.
  4. Here you will see the list of all Windows 7 games for Windows 11 you just installed.
  5. Click on any game to launch it.

Alternatively, you can use the search bar and type the game name to locate it and play it instantly without going through the above steps.

To uninstall the game, all you need to do is head over to the Control Panel and uninstall the Windows 7 Games for Windows 11, 10, and 8 from your PC.

That is it from us in this guide. We have a guide that explains how you can play old PC games on Windows 11 computer.

Before you go, don’t miss our guide on how to get Purble Place on Windows 11.

Feel free to let us know in the comments below which one of the above methods you followed to get Windows 7 games.

Having issues with Exchange, Outlook, Teams, OneDrive? Microsoft confirms and is currently working on a fix

If you’ve encountered issues accessing the Microsoft 365 Admin Center or Teams, SharePoint Online, and OneDrive for Business, you’re not alone. Earlier today, several IT admins took to Reddit to report instances where they had issues loading the Admin center, while the rest indicated that Exchange Powershells were slow.

The issue seems to be quite critical as some users have also indicated that they are having issues accessing Outlook on the web. Microsoft has since confirmed the issue via its Microsoft 365 Status account on Twitter, and is currently investigating the matter.


After reviewing its networking systems and recent updates, Microsoft identified the issue as highlighted below:

We’ve identified downstream impact for Microsoft Teams, SharePoint Online and OneDrive for Business. We’re providing full impact details and updates for those services via MO571683. Updates pertaining to Exchange and Outlook on the web will continue to be provided via EX571516.

Consequently, the company has placed a pause on ongoing deployment and is keeping a close eye on things. It further added that users can get more details pertaining to the issue via the admin center under EX571516 and MO571683.

Additionally, the company also indicated that it has reverted the update citing significant improvements in the affected services. Microsoft has indicated that it’ll continue monitoring the situation and put elaborate measures in place to ensure that the issue is resolved fully.

Have you encountered this issue? Is the service better now? Share your experience with us in the comments.

via Neowin

What is Runtime Error 216 & How to Quickly Fix it

You will come across the Runtime Error 216 on your computer when your PC is hit and infected by the SubSeven Trojan virus. This is a serious issue as all of your data is at risk of being compromised.

In this guide, we will share some of the most effective solutions to help you resolve the Runtime error 216 and remove the SubSeven Trojan virus.

What is Runtime error 216?

According to Microsoft, the Runtime error 216 usually pops up when you try to run a Microsoft program or even Internet Explorer (which is now replaced by the Edge browser).

You will see the error message Runtime Error 216 at Address. And according to Microsoft, this issue occurs when your PC is infected with the SubSeven Trojan virus.

This is why you should ensure that your PC is always protected with dependable antivirus software. If you are confused about which one to choose, you should check out our guide, which lists down some of the best antivirus tools you can have to safeguard your PC.

How can I fix the Runtime error 216?

1. Remove the virus from your PC

  1. Open the Start menu by pressing the Win key.
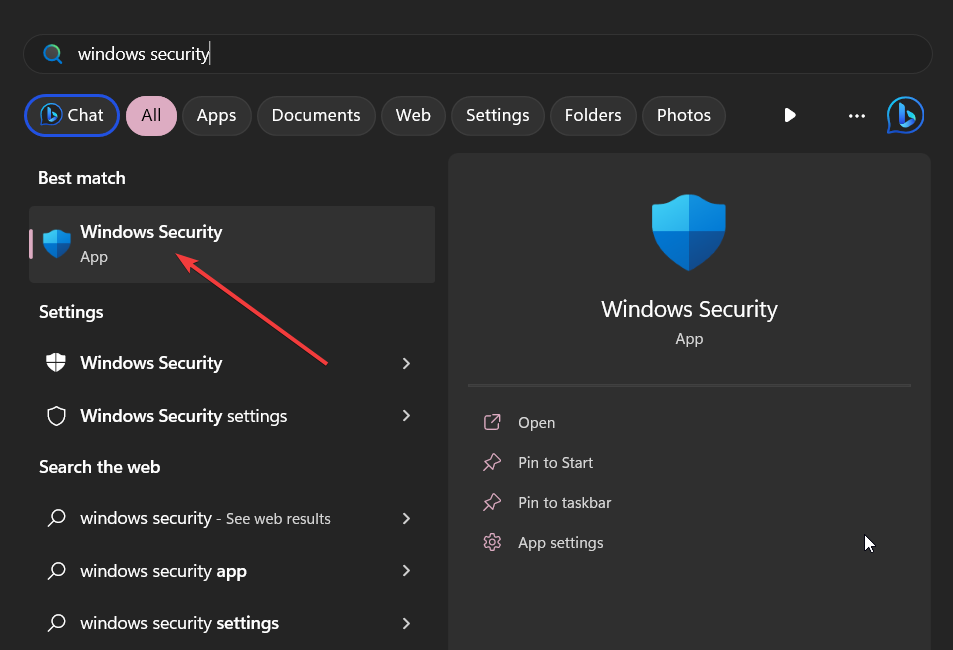
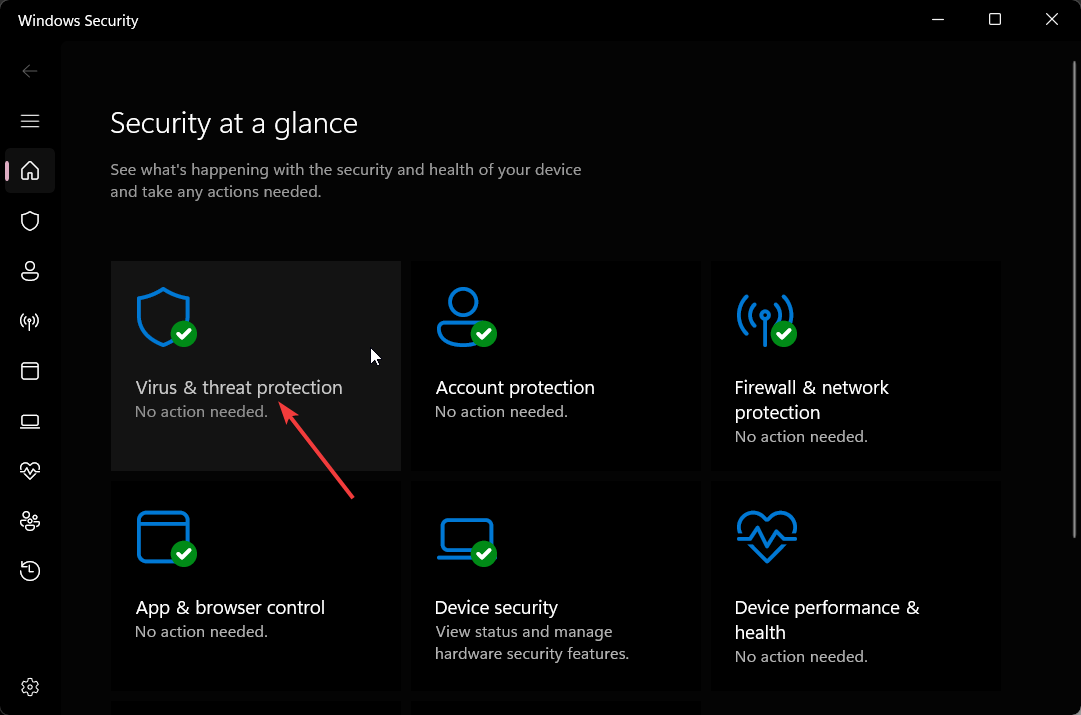
  2. Type Windows Security and open the appropriate result.
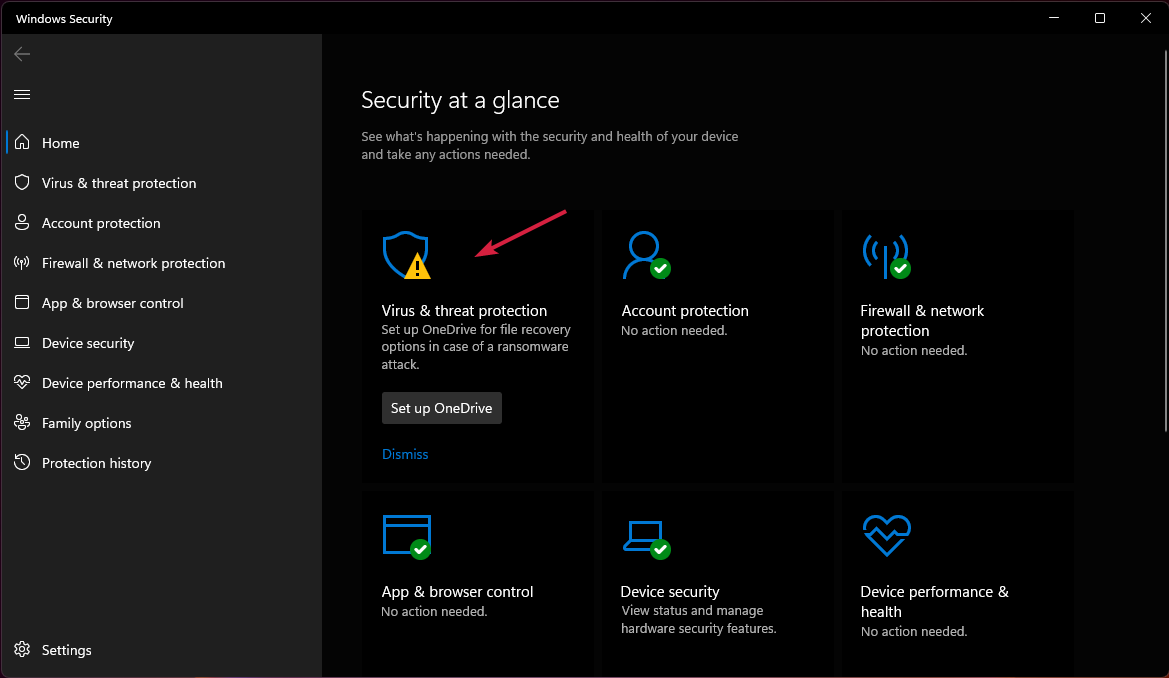
  3. Choose Virus & threat protection.
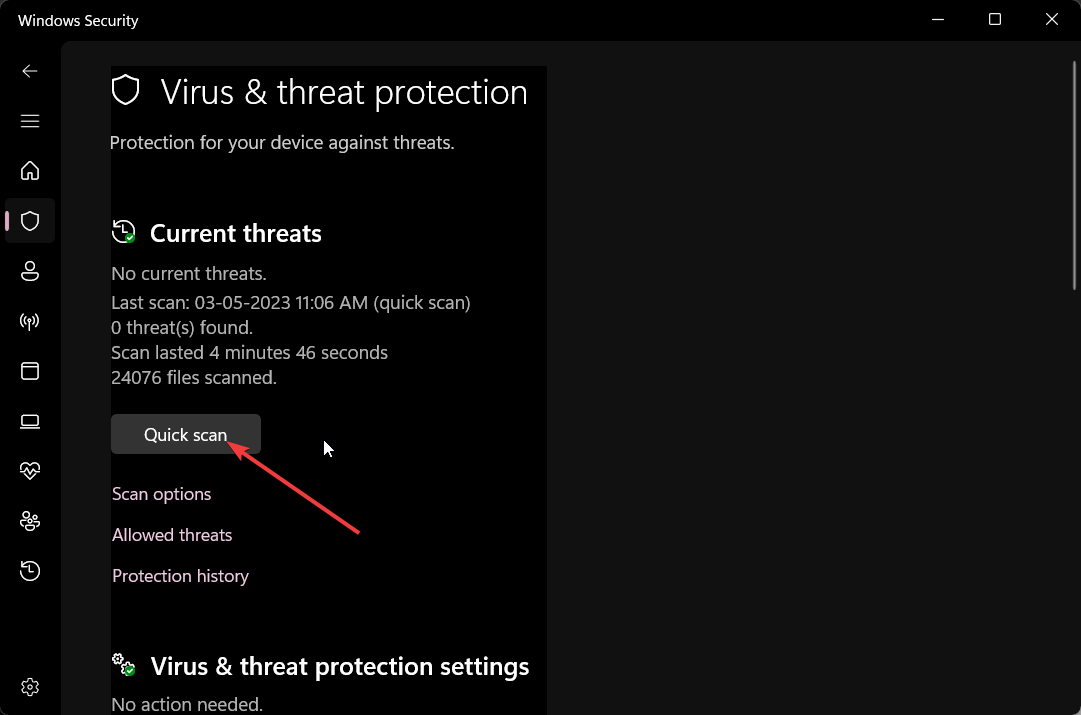
  4. Click Quick Scan.
  5. Let the process complete and then apply the fixes.
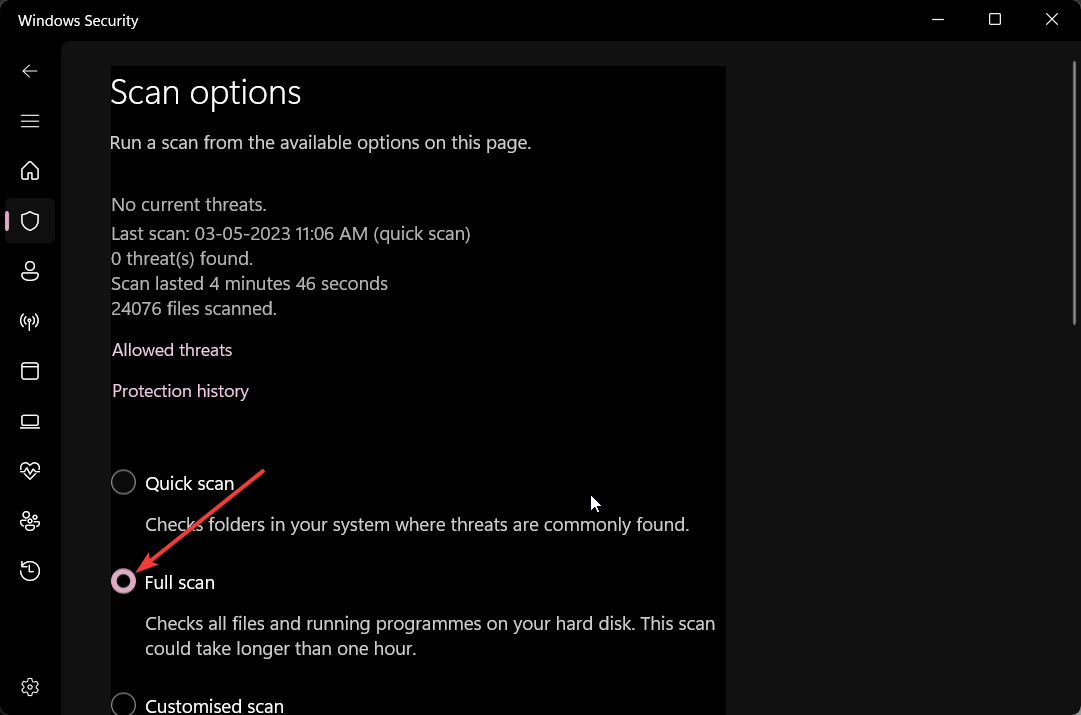
  6. You can also select Scan options and choose Full scan for in-depth scanning, and after that, restart your PC.Full scan -

You can use your dedicated antivirus software or the in-built Windows Security tool to remove the SubSeven Trojan virus and fix the Runtime error 216.

2. Delete the SubSeven registry file

  1. Press the Win + R keys to open the Run dialogue.
  2. Type regedit and press Enter.
  3. Click on HKEY_LOCAL_MACHINE on the left pane.
  4. Locate the SubSeven registry key, right-click on it, and select Delete.
  5. Restart your computer.

The SubSeven trojan can create a registry file, run in with the system process, and malfunction your PC. You should follow the above steps and check if there is a SubSeven registry key and delete it.

3. Install the latest Windows update

  1. Press the Win + I keys to open Settings.
  2. Click on Windows Update on the left.
  3. Hit the Check for updates button to install the latest update.
  4. Restart your PC.

Some users have reported that they are facing Runtime error 216 even though their PCs aren’t infected with the SubSeven trojan virus.

In such a case, it might be a chance of program incompatibility. So, always make sure that you are running the latest version of Windows on your PC by following the above steps.

For those that Windows update isn’t working, you can check out the solutions and fix the problem at your end.

4. Perform System Restore

  1. Open the Start menu by pressing the Win key.
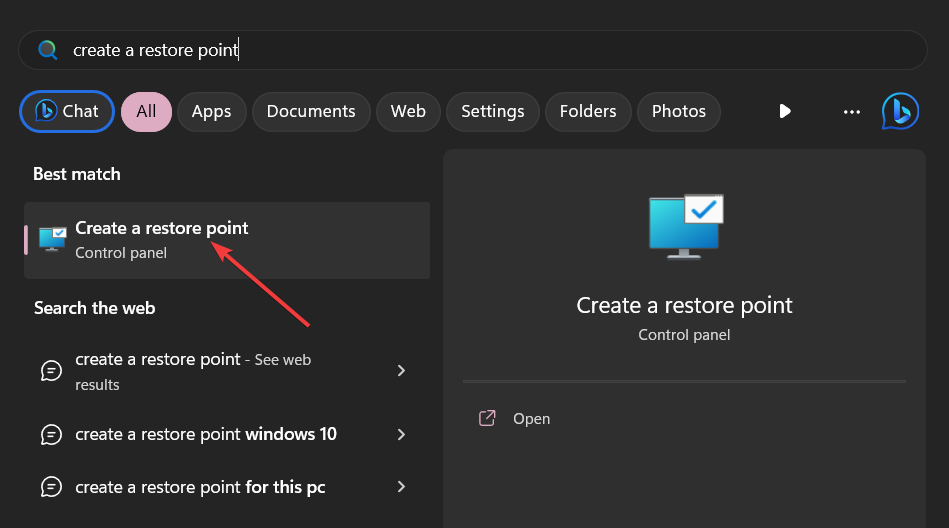
  2. Type Create a restore point and open the appropriate result.
  3. Select the drive where you have installed the OS and select System Restore.
  4. Select the restore point and select Next.restore to fix brYNSvc.exe
  5. Click Finish to begin the restore process.

If this Runtime error 216 started happening recently, then chances are that the installation of a third party or any program or tweak in the system settings has caused the problem.

To fix this, follow the above steps and perform a system restore. When you do that, it will take your computer to a state where everything was working normally.

However, for the system to restore process to work, you need to create a system restore point on your PC. If you aren’t sure how to do that, you can check out our guide, which will explain how to create a system restore point.

That is it from us in this guide. Often you will encounter an issue where the Windows Defender or Windows Security fails to remove the trojan from your PC.

In this scenario, you can check out our guide that explains how you can easily fix the problem and remove the trojan from your PC.

Let us know in the comments below which one of the above solutions resolved the Runtime error 216 on your Windows computer.

Microsoft confirmed Clop ransomware gang responsible for MOVEit data-theft attacks

In a recent revelation, it has come to light that hackers are taking advantage of a newly discovered vulnerability in MOVEit Transfer, a widely used file-transfer tool employed by enterprises for sharing large files online. Microsoft, in its investigation, has identified the Clop ransomware gang as the culprit behind the recent attacks that exploit a zero-day vulnerability in the MOVEit Transfer platform. Their objective has been to steal data from various organizations.

This vulnerability has enabled unauthorized access to the databases of affected MOVEit servers. Progress Software, the developer of MOVEit software, has already taken steps to address this issue by releasing several patches.

According to a tweet by the Microsoft Threat Intelligence team on Sunday night, the attacks exploiting the CVE-2023-34362 MOVEit Transfer 0-day vulnerability have been attributed to Lace Tempest, a threat actor known for ransomware operations and operating the Clop extortion site.

MOVEit Transfer is a managed file transfer (MFT) solution that enables secure file transfers between enterprises, business partners, and customers through protocols like SFTP, SCP, and HTTP-based uploads.

The attacks, which are believed to have commenced on May 27th during the extended US Memorial Day holiday, have resulted in the theft of valuable data from numerous organizations.

To execute their malicious activities, the threat actors exploited the zero-day vulnerability in MOVEit Transfer to deploy specially crafted webshells on servers. These webshells allowed the hackers to obtain a list of files stored on the server, download files, and steal credentials and secrets associated with configured Azure Blob Storage containers.

The Clop ransomware operation has a history of targeting managed file transfer software, previously exploiting a GoAnywhere MFT zero-day in January 2023 and conducting zero-day attacks on Accellion FTA servers in 2020.

Authorities and affected organizations are actively working to mitigate the impact of these attacks and prevent further exploitation of the vulnerability. It is crucial for enterprises utilizing MOVEit Transfer to promptly apply the released patches and ensure the security of their systems to safeguard their valuable data.

Via: Bleeping Computer

What is Runtime Error 339 & How to Quickly Fix it

You will get the Runtime error 339 or another Runtime error message when the DLL file is incorrectly registered or that particular file is missing. The name of the file will be mentioned in the Runtime error message.

In this guide, we will share a list of solutions you can apply and resolve the Runtime error 339 on your Windows PC. Let us go through the guide.

What is Runtime error 339?

The Runtime error 339 messages will appear when a certain DLL or OCX file is missing from your PC. Also, if the DLL or OCX file isn’t registered, you will encounter a Runtime error message.

Below are some of the few Runtime error messages that will give you an idea:

  • Error – Runtime error 339: Component DUZOCX32.OCX is not correctly registered or the file is missing.
  • Error – Runtime error ‘339’: Component “FM20.DLL” or one of its dependencies is not correctly registered: a file is missing or invalid.
  • Error – Runtime error 339

The good thing about the Runtime error is that the error message will always name the file in the problem. This makes troubleshooting much easier.

The Runtime error 339 could pop up if some files related to the program are corrupt, the DLL or OCX file is missing or not registered, or some system files have gone corrupt that are required by that DLL or OCX file.

How can I fix the Runtime error 339?

1. Reinstall the program

  1. Press the Win key to open the Start menu.
  2. Open Control Panel.
  3. Click on Programs and Features.
  4. Select the problematic program and hit the Uninstall button at the top.uninstall program roblox configuring stuck
  5. Follow the on-screen steps to remove the program and restart your PC.
  6. Reinstall the program.

The best way to resolve the Runtime error 339 is to uninstall the problematic program from your PC and reinstall it. Chances are that a particular file went missing related to the program.

2. Register the corrupt file

  1. Press the Win + R keys to open the Run dialogue.
  2. Type regsvr32 comdlg32.ocx and press Enter. (You need to type the name of the DLL or OCX file that is giving you the Runtime error 339.
  3. You will get a success message. For example DllRegisterServer in comdlg32.ocx succeeded.
  4. Restart your computer and check if this fixes the Runtime error or not.

As mentioned above, the DLL or the OCX file mentioned in the Runtime error 339 message might not be registered or has gone corrupt. You can follow the above steps and register the file and do away with the error.

3. Use a dedicated DLL fixing tool

Fixing the DLL-related issues on your PC can be tiring as it requires you to troubleshoot the problem correctly and then apply the fixes if found. This is apt for both system levels or related to third-party DLL issues.

Moreover, you shouldn’t download the DLL file from any source and try to resolve the issue at your end, as the source could be malicious or targeted by attackers.

In such a scenario, you should take the help of dedicated DLL fixing tools. To ease this, we have a guide that lists down some of the best DLL fixers that will help you resolve DLL-related problems easily.

Some of the tools are guaranteed to resolve your DLL-related issues 100%. So, you should check out the DLL fixing tools.

4. Use the System Restore

  1. Open the Start menu by pressing the Win key.
  2. Type Create a restore point and open the top result.
  3. Select the drive where you have the restore point created and click on System Restore at the top.system restore
  4. Click Next.
  5. Select the restore point and press Next.restore to fix windows movie maker no video
  6. Hit the Finish button to begin the system restore process.

Performing a system restore will take your system to the state where everything worked normally. However, for that to happen, you should create a restore point on your PC.

If you are not sure how to do that, you can simply follow the steps in our guide on how to create a restore point and get with the task swiftly.

That is it from us in this guide. For users coming across the Runtime Error: Could Not Call Proc, you can apply the fixes mentioned in our guide to resolving the problem.

Also, we have a guide that explains how you can resolve the Runtime error 91 on your Windows computer.

Let us know in the comments below which one of the above solutions resolved the Runtime error 339 for you.

Microsoft says ChatGPT creator OpenAI is contemplating investment opportunities in Israel

As quoted by Microsoft Israel R&D center, Sam Altman, the CEO of OpenAI, during a visit to Israel, said the organization is currently exploring potential investment opportunities in the region. The statement was made while Altman was hosted by Microsoft Israel Research and Development (R&D) Center. Microsoft, a known supporter of OpenAI, facilitated the visit at its Israel headquarters.

Altman was questioned about the possibility of his company setting up a local office during his visit to Microsoft Corp’s research and development center in Israel. As per Microsoft’s official statement, he conveyed that while his company favors working from a single location, various investment options in Israel are currently being evaluated.

Moreover, Altman reassured that despite the increasing automation trend, he dismisses any concern about the potential impact of AI on employment. He emphasized that there will always be work opportunities for human beings and asserted that the jobs of the future, almost a century from now, will be remarkably different from those of the present.

During his speech at Tel Aviv University, the OpenAI CEO lauded the exceptional talent pool in Israel and expressed his conviction that the local tech ecosystem will undoubtedly play a pivotal role in the ongoing AI revolution.

The widespread adoption of generative AI, particularly after the introduction of Microsoft-sponsored ChatGPT by OpenAI last year, has spurred lawmakers worldwide to consider safety concerns surrounding this technology. The European Union is leading the charge with its proposed AI Act, slated to be ratified later in the year.

Meanwhile, the United States appears to be more inclined towards modifying existing regulations than creating entirely new ones for AI. British policymakers are also keen to ensure that any legislation on the matter does not inadvertently stifle innovation.

Following his visit to Israel, Altman has scheduled trips to Jordan, Qatar, the United Arab Emirates, India, and South Korea, all within the next week.

Via Reuters

How to Fix Your Browser is a Bit Unusual GoDaddy Error

If you’re a website owner and use GoDaddy as a hosting or domain platform, you may know about the GoDaddy sign-in issues in general and your browser is a bit unusual GoDaddy error in particular.

This hosting website is quite popular and represents an appealing option for entrepreneurs looking to get acquainted with the online environment for the first time.

However, it seems that multiple users are struggling with an error saying GoDaddy your browser is a bit unusual. Obviously, this can be problematic for online businesses using this hosting service, especially since it affects different browsers or platforms.

We’ll take a closer look at this shortly but for now, it’s important to retain that whatever is your niche – whether you use a headless e-commerce platform or simply write on a blog – you would need reliable support if you can’t log in to GoDaddy.

What browser does GoDaddy use?

There are different browsers that can be used with GoDaddy and these are Google Chrome, Mozilla, or Safari for Macs.

It is confirmed by the company itself, so you might experience this issue on each of these browsers stating the following error message:

  • GoDaddy your browser is a bit unusual on iPad
  • Your browser is a bit unusual on Safari
  • Finally, your browser is a bit unusual on Firefox/ Chrome

?️ Quick Tip:

If you require to solve the issue in due time without much effort, here’s an enhanced browser for you to try. We’re talking about Opera, of course, the browser with high-end security and polished UI.

How do I fix my GoDaddy browser is a bit unusual?

1. Enable and disable the pop-up blocker

  1. Visit the GoDaddy website on your browser (e.g Chrome)
  2. Click on the lockpad in the URL section.
  3. Choose Site Settings to open it.
    Site Settings Godaddy
  4. Now, locate Pop-ups and redirects option in the list.
  5. Click on it and select Allow.
    click on Pop-ups and redirects
  6. Now, click on Reset permission to refresh the page.

This method may help unblock other popular web apps or web services that are not working on your browser.

2. Use the SafeGuard mode on Firefox

  1. First, click on the 3 lines button in the left pane.
  2. Choose the Help option.
    Help option firefox
  3. Now, click on the Troubleshoot mode.
    click on Troubleshoot mode
  4. Select the Restart button in the prompted window.
    restart Firefox
  5. Go to the website and try GoDaddy again.

3. Clear the browsing data

  1. Open the browser settings on the homepage.
  2. Go to the Privacy and Security tab and click on Clear browsing data.
  3. In the Basic tab, select the cache and cookies data boxes.
  4. Choose the time range you need to erase data.
  5. Lastly, click on Clear data.

4. Disable interfering browser extensions

  1. Click on the puzzle icon on the homepage.
  2. Select Manage Extensions.
    click Manage Extensions
  3. In the next page, toggle off the potential interfering extensions.
  4. Also, you can use the Remove button to delete them.

5. Activate Javascript

  1. In the browser, click on the Settings button.
  2. On the Privacy and Security tab, click on Site Settings.
  3. Navigate to the list and select the Javascript option.
  4. Click on it to allow it from now on when accessing GoDaddy.
  5. Press the Reset permission button.

The methods described in the article can help you fix this annoying issue reported by lots of users that use GoDaddy.

We also encourage you to use a performant browser that can easily access busy websites with high traffic like this one.

Services.exe: What is It & How to Fix Its High CPU Usage

The Windows OS is comprised of many files and processes. While some are common and more vastly recognized, others remain a mystery. The services.exe file is one many users will encounter.

We break it down in this guide and explore some of the most practical solutions to its high CPU usage.

What is the services.exe process?

The genuine Windows process known as services.exe is in charge of managing system services. System services are applications that operate in the background and provide vital Windows features.

It is a small file, usually under 100 KB. Also, the fact that Microsoft has digitally signed the file verifies that Microsoft made it and is free of malware or viruses.

When Windows is operating, services.exe is always running. Little CPU and memory resources are used by it. However, it sometimes uses much CPU power, which might slow down your computer. So, below are the best solutions.

How do I fix the services.exe high CPU usage?

It would be best if you tried these workarounds as a first set of solutions:

  • Try a simple reboot, as it will help if the issue is due to a momentary hardware or software issue with your computer.
  • Scan for viruses or malware since viruses on your computer can also cause high CPU usage.
  • Uninstall applications that are unneeded or unused.
  • Close all unused programs to free up some memory.

However, if you still face high CPU usage after the above pre-solutions, proceed to the detailed fixes below.

1. Update device drivers

  1. Right-click on the Start menu and select Device Manager.
    services.exe
  2. Expand any category with an outdated driver (they will typically have a yellow badge), right-click on your driver, and select Update driver.
  3. Select Search automatically for drivers.
    services.exe
  4. Follow the steps to complete the update.

If the manual process of updating drivers doesn’t seem to solve the issue, you can do it differently.

Namely, using the most effective driver software with an 18 million drivers database and automatic updating process.

⇒ Get Outbyte Driver Updater

2. Disable unnecessary services

  1. Press Windows + R to open the Run dialog.
  2. Type services.msc and hit Enter.
    services.exe
  3. Right-click on any service you do not need and click the Stop option.
  4. Do this for as many services as possible. We share some Windows 11 services you may disable in this comprehensive guide.
  5. Once done, verify if it fixes the services.exe high CPU usage.

3. Reinstall Windows

Note icon NOTE
This is an extreme measure, and you may lose important data. It would be best if you only tried it as a last resort.
  1. Press Windows + I to open the Settings app.
  2. On the right pane, click on Recovery.
    services.exe
  3. Click on the Reset PC button.
    services.exe
  4. Select Remove everything and follow the prompts to complete the reset.
  5. After completion, verify that it fixes the services.exe high CPU usage.

In closing, note that services.exe is essential to the Windows OS. If you delete the file, many essential functions will no longer work on your computer.

However, using any of the solutions above, you may solve problems relating to it. Also, find out all about Svchost.exe Imgsvc, another process that often affects the performance.

Also, don’t hesitate to contact us in the comments section if you have any additional questions.

Has Blizzard done it yet again? Our Diablo IV review roundup

Diablo IV is the latest in a parade of hit games to hit Xbox so far in 2023 (at just below the halfway point): Dead Space Remake, Hi-Fi Rush, Resident Evil 4 Remake, Minecraft Legends, Street Fighter 6, and more.

The follow-up to 2012’s Diablo III, the fourth mainline entry in Blizzard’s acclaimed action-RPG series has some pretty big shoes to fill. In its endeavor to live up to the considerable reputation the franchise has built up, Diablo IV seems to play it relatively safe in the sense that it doesn’t completely jettison the core Diablo foundation—a wise move, no doubt. Rather, it attempts to refine that foundation and bring a fresh spin to it with a large open world and PVP elements. Does Diablo IV accomplish this successfully? Read our review roundup to see what the critics have to say.

IGN Diablo IV Review (9/10)

Diablo 4 is a stunning sequel with near perfect endgame and progression design that makes it absolutely excruciating to put down…Diablo 4 takes the strategy of refining things the series already did so well rather than giving it a more substantial overhaul, and that careful and reverent path has shaped this massive sequel into one of the most polished ARPGs ever created, which makes slicing through the legions of the damned a hell of a good time.

When and how to participate in the Diablo 4 beta? - Time News

CNN Diablo IV Review—“Diablo IV is a true return to form for an iconic role-playing series”

Diablo IV should serve as a grand reintroduction to one of the greatest action role-playing series around. It does a great job catering to veterans of the Diablo games while being incredibly accommodating to newcomers. As an added cherry on top, there are also a slew of accessibility options…There’s so much value packed into Diablo IV that players will have a hard time putting it down even after reaching the level cap.

Engadget Diablo IV Review—“A mechanically perfect romp through a shallow world”

In a lot of ways, it’s the Diablo game I’ve been dreaming of ever since I first set foot in the world of Sanctuary back in 1997. But it is also a reminder of all the ways Blizzard has changed since I first encountered its games. There’s no way the company that released Diablo II in 2000 and even Diablo III in 2012 could have created a game of Diablo IV’s scale, but sheer size is not what makes Diablo IV enjoyable. So often, that scale works against the game, resulting in a world that is, as Warren Spector might say, simulated at a level of an inch per mile.

Diablo® IV - Ultimate Edition

Push Square Diablo IV Review (9/10)

Diablo 4 is the true successor to the bad old days of action RPGs and oozes quality in its frenetic combat and deep, engaging character development. It tells a complex, gritty narrative set in the darkly beautiful world of Sanctuary. Even better, it provides a solid foundation for years of Diablo content to come.

Forbes Diablo IV Review (9./10)

Blizzard really seems like it’s nailed this, and I’m going to say the only way this will be poorly received at launch is if technical issues kill people’s ability to play. But once it gets rolling? Yes, I think you’re going to like Diablo 4.

Fextralife Diablo IV Review (9.3/10)

Calls it “the best Diablo yet.”

Diablo 4 is an excellent game and a fantastic next step for the ARPG genre. Smartly melding Open World and Online elements with traditional dungeon crawling and loot farming, this game will become the favorite time-sink of millions for years to come.

Which class should you play in Diablo 4? Here are the pros and cons of all the classes in D4

Gameskinny Diablo IV Review (9/10)

The fact that this game was developed while Blizzard has been rocked by scandal is a testament to the skill and dedication of the team that made it.
Diablo 4 feels like a statement game from Blizzard, a “we’re back” for anyone who was concerned after Diablo 3’s rough launch and the middling reception to Diablo Immortal. It’s the sequel to Diablo 2 people have been waiting for, and it doesn’t disappoint. Diablo 4 is a game about legacies, so it’s fitting that in developing it, Blizzard has re-solidified the franchise’s — and its own.

The verdict is in: Diablo IV is one hell of a game

Some are calling Diablo IV the best entry yet in the venerable franchise, and that is considerable praise indeed. It’s also proof as to why Blizzard is one of the biggest names in gaming right now. The game releases on June 6 for Windows, PS4/5, Xbox One and Xbox Series X|S consoles.

Featured image via Xbox.com. 

Userinit.exe: What is It & Should you Remove It?

We run into a few processes and applications on our computers that we know little about. For some readers, userinit.exe falls into this category.

So, we have done all the research on this executable, and in this guide, we will explore all there is to know about it.

Where is the Userinit EXE file located?

Userinit.exe is a small file, usually around 116 KB. The file has a digital signature by Microsoft, indicating that it belongs to Microsoft and is neither malware nor a virus. You may find it in the directory below:

C:\Windows\System32
userinit.exe

What is userinit.exe?

The legal Windows process called userinit.exe is used to set up user profiles and launch the Windows shell. This executable is an essential component of the Windows operating system.

Upon starting the Windows operating system, userinit.exe automatically starts. This means your user profile, which contains your desktop preferences, favorite websites, and other customized data, loads.

Additionally, the Windows shell, which is the graphical user interface you use to interact with Windows, is also loaded.

Should I remove userinit.exe?

If you delete the file, you can no longer log into Windows and will get the following error message: Windows could not start because the following file is missing or corrupt: C:\Windows\System32\userinit.exe.

So, if you’re worried that userinit.exe is malware or infected with a virus, or if there are any other problems surrounding the executable, you may run a virus scan on your computer rather than delete it.

How do I know if the userinit.exe is a virus?

1. Check the location

Ensure that the location tallies with the drive directory we highlighted in the Where is the Userinit EXE file located section. And also, make sure it is around 116KB.

If it doesn’t match these, it is most likely malware and may be removed.

2. Check the Publisher

  1. Press Windows + E to open File Explorer.
  2. Navigate to the path below and right-click on userinit and select Properties.
    C:\Windows\System32
    userinit.exe
  3. Lastly, click the Details tab and ensure that the Copyright has Microsoft Corporation. If it doesn’t, it likely is malware.

That is as much as there is to know about the userinit.exe file. As a reminder, a virus may often mimic some of your important system files, so we encourage you to verify before taking any actions. Also, a virus scan is always the best solution when in doubt.

Lastly, drop any questions in the comments section if you think we missed a detail. We love to hear from you and will happily update you with additional information.

What is Runtime Error 255 & How to Quickly Fix It

A few of our readers have complained about receiving the following error: Runtime Error 255. An unexpected error has occurred. Please contact the program’s technical support for assistance.

Even when this error message has slight variations depending on the programs causing it, the solutions are often very similar.

What is runtime error 255?

This is an error that occurs while a program runs or is executing and may be caused by the following:

  • Corrupted or missing files – Programs with corrupt or missing file components will trigger the error when launched. This also leads to Run-time error 76.
  • Hardware problems – Computer hardware, such as a faulty hard drive or memory module, can also cause Runtime Error 255.
  • Software conflicts – For some users, the trigger is two programs trying to access the same resources on the computer.
  • Outdated drivers – If your computer has outdated drivers for specific programs, you will likely get a runtime error during program execution.
  • Viruses or malware – You may have files damaged by malware on your device, leading to the error.

How do I fix runtime error 255?

You should start with the following workarounds:

  • Scan the computer for viruses to eliminate the error due to malware infection.
  • Uninstall apps that may cause conflicts; these may be your more recently installed applications.
  • If you’re experiencing an error, try restarting your computer. Sometimes, temporary issues with your hardware or software can be resolved through a simple restart.

Now, you may proceed with detailed fixes if the above pre-solutions do not work.

1. Run a file scan

  1. Press Windows + R to open the Run dialog.
  2. Type cmd and hit Ctrl + Shift + Enter to open an elevated Command Prompt.
    runtime error 255
  3. Type the script below and hit Enter.
  4. Wait for the scan to complete, restart the device, and verify if it fixes the runtime error 255.

You can also rely on specialized repair software. These tools can greatly simplify the process. After installation, you can run a scan of your whole system and identify any broken or corrupted files, after that with the press of a button, you can download clean files for your system.

2. Update related drivers

  1. Right-click on the Start menu and select Device Manager.
    runtime error 255
  2. Expand the category related to the runtime error, right-click on your driver, and select Update driver.
    runtime error 255
  3. Select Search automatically for drivers.
    runtime error 255
  4. Follow the steps to complete the update.

In addition, you can update your PC drivers automatically and avoid any difficulties from using the manual process.

We highly recommend you utilize a dedicated driver updater. These tools are able to automatically scan and identify out-of-date or broken drivers and replace them in a matter of minutes.

3. Reinstall the application

Since the runtime error 255 often comes with an error code pointing to the problematic program, you may reinstall the problematic application.

However, you must reinstall a freshly downloaded copy of the application, as the old copy may be corrupted and unusable.

If you have tried all the solutions in this guide, you may consider contacting the program’s technical support assistant for more help.

We have written a guide on the Microsoft Visual C++ Runtime Error. A few of the fixes may be applicable.

Any solution in this guide should be able to resolve the error, but we are curious to know what worked for you. So, please let us know using the comment section below.

How to Fix CAA30194 Microsoft Teams Error

Microsoft Teams is among the best popular collaboration and communication tools for businesses and individuals.

Despite that, it is not free from errors, and one such popular error is error code caa30194. In this guide, we will explore various troubleshooting methods to fix the issue and get Teams up and running smoothly again.

What causes the error code caa30194 on Microsoft Teams?

There could be various reasons for this error; some of the common ones are listed here:

  • Network connectivity issues – If the network firewall settings block communication between the Teams app and necessary Microsoft servers, you may see this error.
  • Proxy or VPN configuration – This error could occur if you use a proxy server or VPN that is misconfigured or incompatible with Microsoft Teams. Disable the VPN.
  • The app is outdated – Using an outdated version of Microsoft Teams can lead to compatibility issues and trigger this issue. Try reinstalling the application to fix the problems.
  • Cache file issues – Corrupted or outdated cache files and temporary data related to Microsoft Teams can interfere with its normal functioning, causing this problem.
  • Conflicting apps – Certain third-party applications installed on your computer can conflict with Microsoft Teams, causing the error. Uninstall unwanted apps.

Now that you know the causes, let us dive into the solutions to resolve the problem.

How do I fix the error code caa30194 on Microsoft Teams?

Before engaging in advanced troubleshooting steps, consider performing the following checks:

  • Try restarting your computer.
  • Verify you have a stable internet connection.
  • Ensure no Windows updates are pending.
  • Disable antivirus temporarily.
  • Turn off VPN if applicable.
  • Check if Microsoft Teams servers are up and running.

Once you are through with these, move to the next section to fix the issue.

1. Add your Microsoft account

  1. Press Windows + I to open the Settings app.
  2. Go to Accounts, then click Email & accounts.
    Accounts CAA30194
  3. Under Accounts used by other apps, click Add a Microsoft account or Add a work or school account.
    Add an account
  4. Next, please enter the email address connected to it and click Next.
    sIGN IN
  5. Input your password associated with the account and click Sign in.
    Enter Password
  6. Click Done to complete.
    Click Done
  7. Restart the Teams app and use it to see if the error persists.

You must follow these steps to add the Microsoft account, even if you already have the particular account added.

2. Clear the cache

  1. Press Windows + R to open the Run window.
    Run command Teams CAA30194
  2. Type the following path to open the Teams folder and click OK:  %appdata%\Microsoft\teams
  3. Locate and open the Cache folder and press Ctrl + A to select all files, and click the Delete button to remove all the content.
    Delete cache files
  4. Come out of the Cache folder, locate Blob_storage, databases, GPUCache, IndexedDB, Local Storage, & tmp, open these folders one by one, and press Ctrl + A to select all the files & click Delete to remove the content from the folder.
    All folders Delete
  5. Once you have cleaned the contents from all the folders, close the File Explorer window.
  6. Restart the Teams app to check if the see still occurs.

3. Run the app in compatibility mode

  1. Right-click the Teams app and select Properties.
    Properties CAA30194
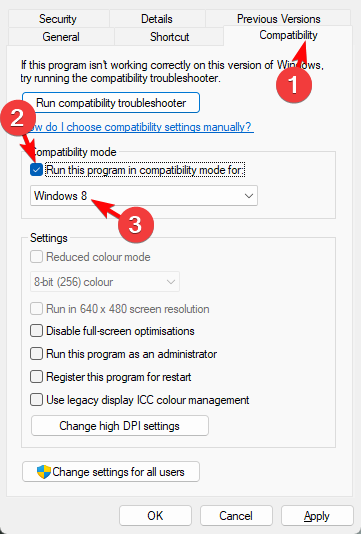
  2. Go to the Compatibility tab, select Run this program in compatibility mode for and choose Windows 8.
    Run the compatibility for
  3. Click Apply, then OK to close the window.

If the app starts working for you, you can revert to the original settings.

4. Reset Internet options settings

4.1 Enable TLS 1.0 / 1.1 and 1.2

  1. Press Windows + R to open the Run dialog box.
    Internet options  CAA30194
  2. Type inetcpl.cpl to open Internet Properties and click OK.
  3. Go to the Advanced tab, navigate to Security, and locate & place a checkmark next Use TLS 1.0, Use TLS 1.1, & Use TLS 1.2.
    TLS 1.1, TLS 1.2
  4. Click Apply and then OK to confirm the changes.

If this didn’t help, move to the next section.

4.2 Restore to default

  1. Open Internet Properties again.
  2. Go to the Advanced tab, and click Restore advanced settings.
  3. Once done, click Apply, then OK to save the changes.

Restart the Teams app and check if you are able to login.

5. Delete the JSON files

  1. Press Windows + R to open the Run window.
    CAA30194  Teams Run command
  2. Type the following path and click OK: %appdata%\Microsoft\teams
  3. Locate all the files ending with .JSON and delete them.
    CAA30194  Teams

If these files are corrupted, they may prevent you from logging. Deleting these files can rectify the issue. Once you have deleted the files, restart the Teams app, and the app will recreate new JSON files.

6. Add Teams to Windows Firewall

  1. Press the Windows key, type control panel, and click Open.
    Control Panel start menu CAA30194
  2. Click View by and select Category, now click System and Security.
    System and security CAA30194
  3. Under Windows Defender Firewall, select Allow an through Windows Firewall.
    Windows Defender
  4. Click Change settings.
  5. Now click Allow another app.
    Allow another app
  6. On the next window, click Browse.
    Browse1
  7. Locate the Teams folder from Program Files and click Open.
  8. Click Add.
  9. Now on the Allowed apps window, locate Microsoft Teams, place a checkmark next to Private and Public, and then click OK.

This will allow Microsoft Teams to communicate through Windows Firewall. Once done, check if the issue persists.

You might also come across errors like CAA50021, CAA50024, and CAA70007, which are typically linked to sign-in or connectivity issues. Check our dedicated guides to get them fixed.

If you are facing another log-in issue like Microsoft Teams: We’re sorry – we’ve run into an issue; we suggest you read this guide to find the solutions

So, these are methods you can use to fix the error code caa30194 on Microsoft Teams. Please feel free to give us any information, tips, and your experience with the subject in the comments section below.

Fix: Windows Update May Have Automatically Replaced AMD

Many Windows users complain about running into an error that reads Windows Update may have automatically replaced your AMD graphics drivers. The error appears when you go to the AMD Adrenaline edition or during system startup.

Hence, this guide will discuss the basic steps for fixing the problem. Alternatively, you can read our article about the no AMD graphics driver installed error and detailed steps for fixing it in Windows 11.

Why did Windows replace my AMD graphics driver?

The Windows update may have automatically replaced your AMD Graphics driver error can occur for several reasons. Some notable ones are listed below:

  • Automatic driver updates – Sometimes, Windows updates may install a generic driver or a different version of the AMD graphics driver that is incompatible with your specific hardware configuration.
  • Incompatible hardware – In some cases, the AMD graphics driver provided by Windows Update may not be compatible with your specific AMD graphics card or integrated graphics chipset.
  • Driver conflict – Installation of a new AMD graphics driver through Windows Update may conflict with your system’s existing AMD driver or software, leading to the error.
  • Driver corruption or installation issues – Problems during the AMD driver installation process, such as corruption or incomplete installation, can result in the driver-replaced error message after a Windows update.

These causes can vary from each other on different devices. Nonetheless, we’ll take you through some detailed steps to resolve the error and reinstate the AMD driver.

How can I fix the Windows update replacing the AMD graphics driver?

Before trying any advanced fixes, go through the following preliminary checks:

  • Roll back the driver – Since the Windows updates caused this, manually returning to the previous driver should fix the issue.
  • Use a different set of PCIe connectors – Sometimes, the cable’s pins may be faulty or damaged. So, using different PCIe connectors should fix it.

If you still can’t fix the issue, proceed with the solutions below:

1. Install an old AMD driver

  1. Press Windows + R keys to prompt the Run window, type devmgmt.msc, and click OK to open the Device Manager.
  2. Expand the Display Adapter entry, right-click on the AMD driver, then select Update driver from the drop-down menu.
  3. Click on Browse my computer for drivers option.
  4. Then select Let me pick from a list of available drivers on my computer.
  5. Check the box for the Show compatible hardware option. Select an older driver version from the list and click Next.
  6. Restart your PC and check if the error persists.

Running an older AMD graphics driver will fix incompatibility issues and restore the functioning version. Check our article about updating graphics drivers on Windows 11 if you have any issues.

On the other hand, you can also handle this driver process with a dedicated driver manager. Using this tool, you can back up any drivers and install old driver versions safely and efficiently.

⇒ Get Outbyte Driver Updater

2. Run system restore

  1. Press Windows + R key to open the Run dialog box, type control, then press Enter to open the Control Panel.
  2. Type recovery in the Control Panel search bar and select Recovery.
  3. Then, click Open System Restore.
  4. Click Next in the Restore system files and Settings window.
  5. Choose the restore point you want to restore from and click Next.
  6. Then, select Finish in the next window.

Performing a system restore will revert your system’s settings and installed programs to a previous state.

It backdates the update prompting the errors, and restores the functioning AMD driver on the computer. Read our guide on how to fix Restore Point if it’s not working on your PC.

3. Prevent automatic updates for AMD Radeon graphics

  1. Press the Windows key + R to open the Run dialog box, type gpedit.msc in the dialog box, and press Enter to open the Local Group Policy Editor.
  2. Navigate to the following path: Computer Configuration\Administrative Templates\Windows Components\Windows Update
  3. In the right pane, locate and double-click on the policy named Do not include drivers with Windows Updates.
  4. In the policy settings window, select the Enabled option, click the Apply button, then click OK.
  5. Close the Local Group Policy Editor.

By enabling this policy, you are instructing Windows Update to exclude device drivers, including the AMD Radeon graphics driver, from being installed automatically.

4. Use DDU to prevent driver downloads

  1. Download the latest version of Display Driver Uninstaller.
  2. Click on the downloaded file and install the DDU.
  3. Launch DDU to remove all the graphic drivers. Under options, tick the box for Prevent downloads of drivers in “Windows Update” when Windows search for a driver for a device.
  4. Download the appropriate AMD driver, then turn off the internet connection and restart your PC.
  5. Now, manually install the AMD driver without an internet connection and check if the error is fixed.

If you have any difficulties using DDU correctly, do not hesitate to follow our guide, where we have outlined the correct way to use it.

In addition, we have a comprehensive article on quickly resetting your GPU with a shortcut key or hotkey on Windows PCs.

Also, you may be interested in our post about ways to fix the AMD graphics card not detected or recognized in the Device Manager.

If you have any questions or suggestions, kindly drop them in the comments section.

How to Quickly Remove the Login Password From Windows 10

Many users complain about the stress of entering a password whenever they need to sign in to their computers. So, they seek ways to remove the login password even though it is not recommended. However, this guide will discuss how to quickly remove login passwords from Windows 10.

Also, we have a detailed guide about the error code 0x80280013 when you try to log in to Windows and some steps for fixing it.

Can I secure my PC without a password?

Windows security lock features allow you to add a unique password to help keep your business computer’s information secure.

It prevents other users or intruders from accessing it without your consent. Thus, your PC will be rendered vulnerable when you set up passwordless login for Windows 10.

Furthermore, newer devices have other biometric security features like facial recognition and fingerprint scanning technologies. So, you can secure your PC without a password if you use such a device. If otherwise, your PC will be vulnerable to unauthorized access locally and remotely.

However, you have nothing to worry about concerning security if you have a device without critical files and only need quick access.

How can I remove the password from Windows 10?

1. Disable the password login in User Accounts

  1. Left-click the Start button, type netplwiz in the search box, then select netplwiz from the result to open User Accounts.
  2. Uncheck the box for the Users must enter a username and password to use this computer option, then click the Apply button.
  3. On the Sign In automatically prompt, enter your Username and Password, then click the OK button.
  4. Click OK to apply the changes.
  5. Restart your computer and check if it requires a password before login.

The above steps will disable the password and prevent the system from requiring users to enter a username and password before using the computer.

If there is no checkbox in the netplwiz window, check the link above for detailed steps to get it back.

2. Remove the password from Settings

  1. Press Windows + I key to open the Windows Settings app.
  2. Click on Accounts and select Sign in options from the left pane.
  3. Click on Change under the Password section.
  4. Enter the current password and click Next.
  5. On the new window to input new passwords, leave all the spaces empty and click Next.

This process will remove the passwords altogether.

3. Remove the password via the Control Panel

  1. Left-click the Start button, type control panel, and launch it.
  2. Select User Account.
  3. Then, select Manage another account.
  4. Now, select the account whose user will be removed from this window.
  5. Click on the Change the password link.
  6. Input your current password and leave other boxes empty. Then click on Change password.

Similar to the Windows settings, this is an alternative to removing the passwords on a user account.

4. Use the Command Prompt

  1. Press Windows + R keys to open the Run dialog box, type in cmd, and hit Enter.
  2. When the command prompt window opens, type in the following command and press Enter: net user Administrator *
  3. The system will ask you to provide a new password. Don’t enter anything, and press the Enter key twice.

This process will remove the administrator’s password.

5. Remove using Local Users and Groups

  1. Press Windows + R keys to open the Run dialog box, type in lusrmgr.msc, and hit Enter.
  2. Now, click on Users, right-click on your user account, and select Set Password.
  3. Then, select Proceed on the following screen.
  4. Leave the fields empty on the following screen and click on OK.

Local Users and Groups is another utility that lets you change your system. Using it will enable you to change or remove your password easily.

This process is the last resort because it will disable the sign-in option altogether. Hence, no need to even set or remove the password.

Alternatively, our readers can check our article on fixing the no login screen issue on Windows PCs.

Also, you may be interested in our comprehensive guide on resolving the Microsoft accounts don’t exist error on your computer.

For further questions or suggestions, kindly drop them in the comments section.

Compname is Not Accessible: 3 Ways to Fix it

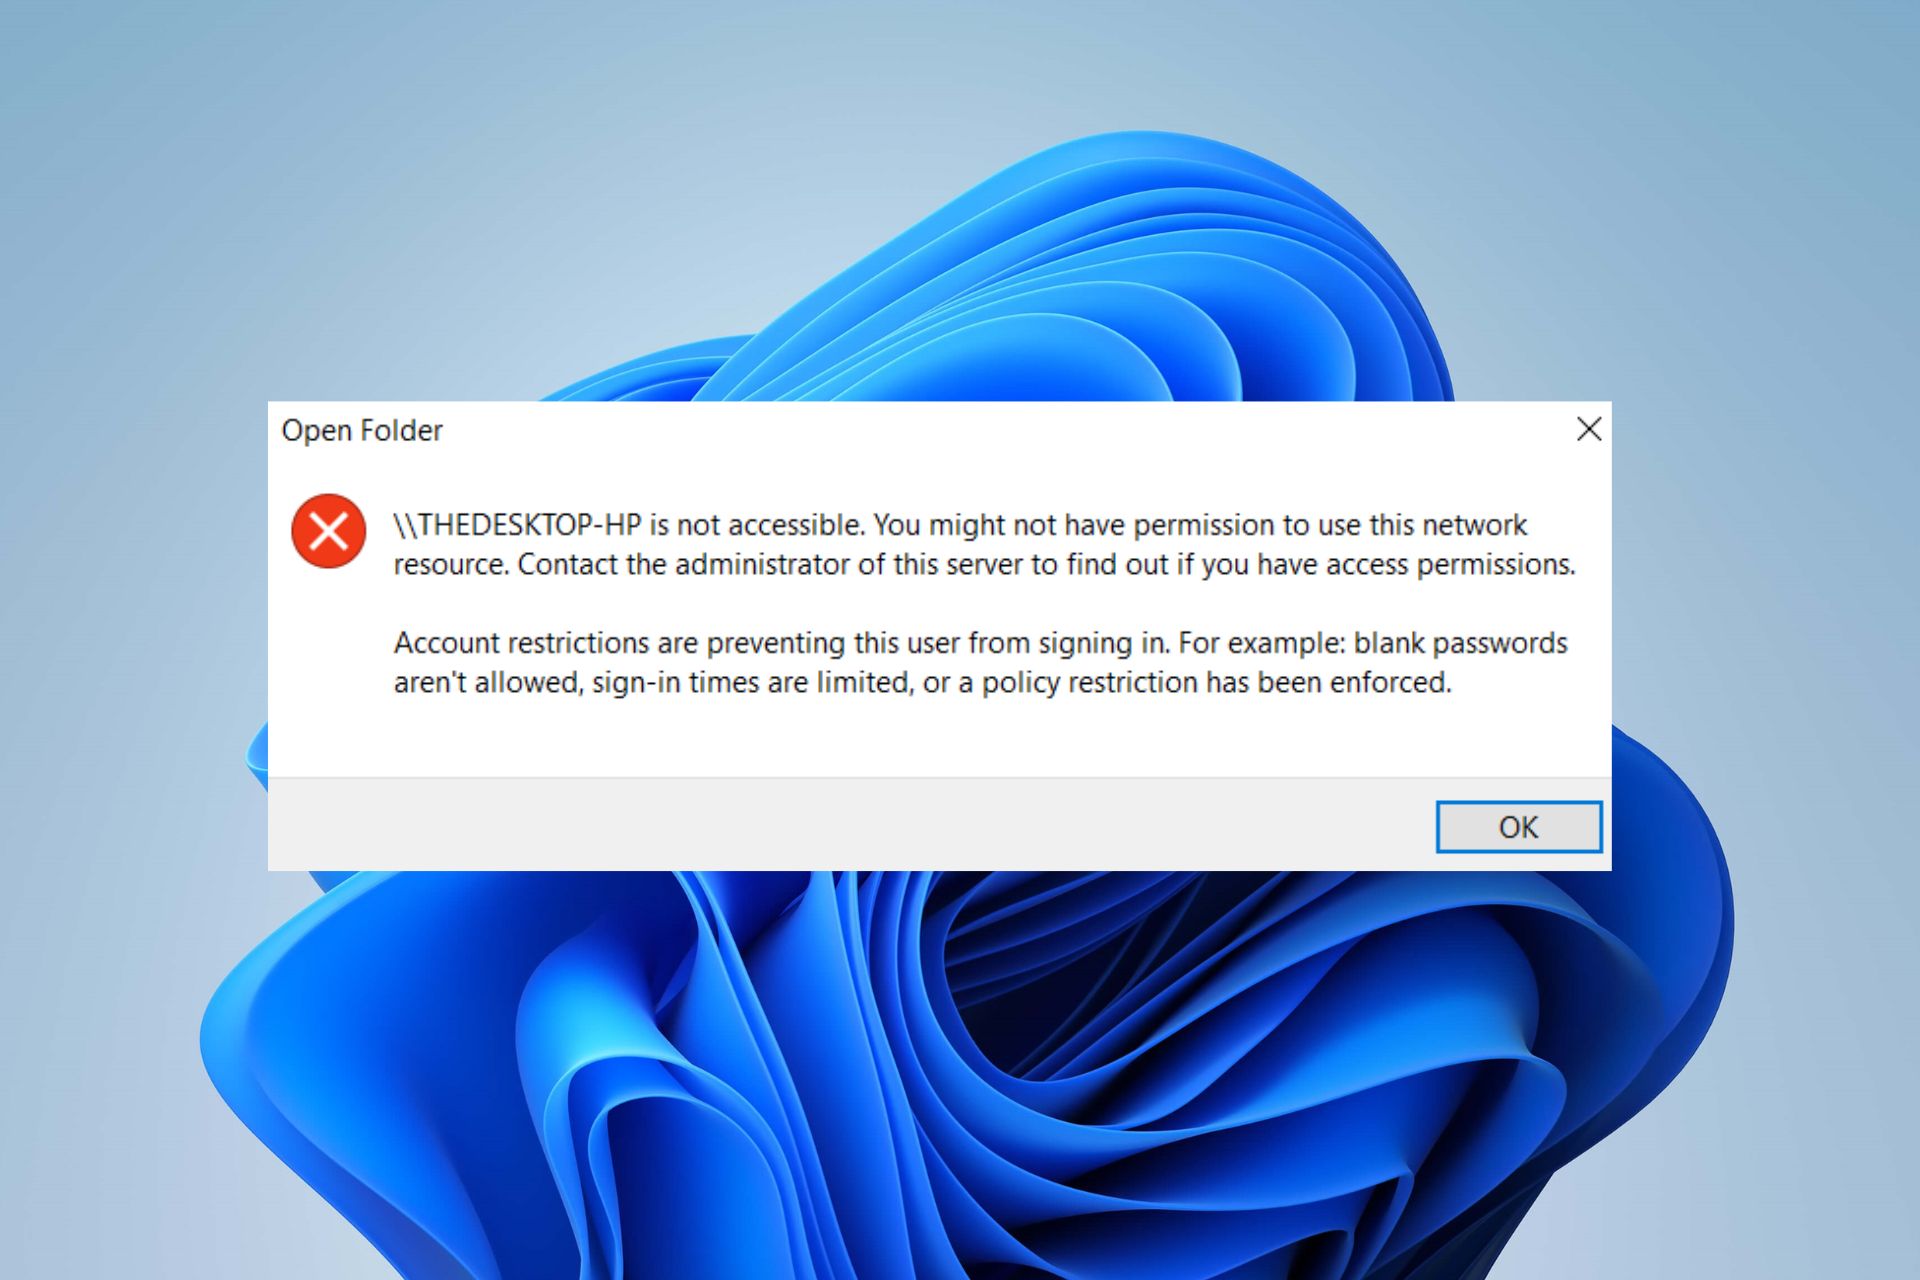
The Compname not accessible error typically occurs when you try to access a computer or network resource but encounter difficulties. It causes issues connecting to a computer or network. However, this guide will discuss how to fix the error on Windows 11.

Also, you can check our article about the group or resource that is not in the correct state error and ways to resolve it on your PC.

Why am I getting the Compname not accessible error?

Many factors may be responsible for the compname not available error. Some are:

  • Incorrect network path or address – If you enter an incorrect computer name or network path when trying to access a computer or resource, it can result in the compname not accessible error. Double-check the name or path to ensure its accuracy.
  • Network connectivity issues – The computer resource you are trying to access may have connectivity issues, such as network congestion, misconfigured network settings, or firewall restrictions.
  • Permissions and access restrictions – If your user account does not have the necessary access rights, you may encounter the compname not accessible error.
  • Network name resolution issues – If the computer or network resource cannot be resolved by the DNS (Domain Name System) or WINS (Windows Internet Naming Service) servers, you may experience difficulties accessing it.
  • Firewall and security software – Firewalls or security software on your computer or the target computer/resource may block the connection. These security measures could prevent you from accessing the resource, resulting in an error.

Thus, the above-listed causes are liable to vary on different computers. Regardless, you can fix the issue by following the troubleshooting steps in the next section.

How can I fix Compname is not accessible message?

Before proceeding with any advanced troubleshooting steps, we recommend you go through these preliminary checks:

  • Check network connection – Ensure you have a stable network connection and that the target computer or resource is accessible.
  • Verify computer name or network path – Double-check the network path or computer name you are using to access the resource to ensure it is accurate and properly formatted.
  • Check Permissions and access – Confirm that your user account has the necessary permissions to access the resource.
  • Add credentials for the machine to all the computers in the network – This should be done after turning off password protected sharing.
  • Disable firewalls and security software – Temporarily disable any firewalls or security software on your computer and the target resource to prevent any interference from causing the issue.
  • Use IP Address instead of computer name – Try accessing the resource using its IP address instead of using the computer name. This bypasses any potential name resolution issues and allows a direct connection.

If the above preliminary checks can resolve the problem, go ahead with the solutions below:

1. Turn on File and printer sharing

  1. Left-click the Start button, type the control panel, and launch it.
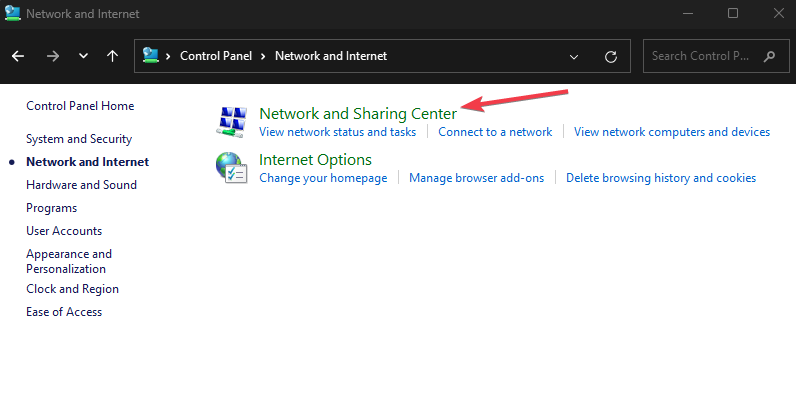
  2. Click on Network and Internet, then select Network and Sharing Center in the next window.
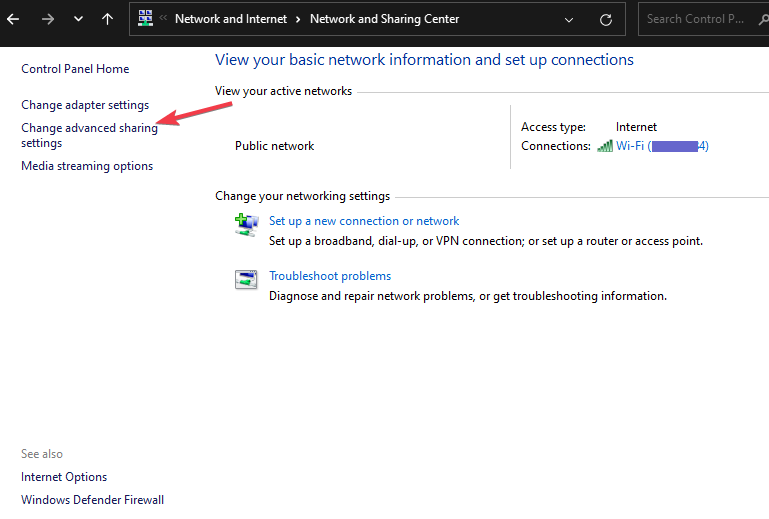
  3. Then, click on Change advanced sharing settings.
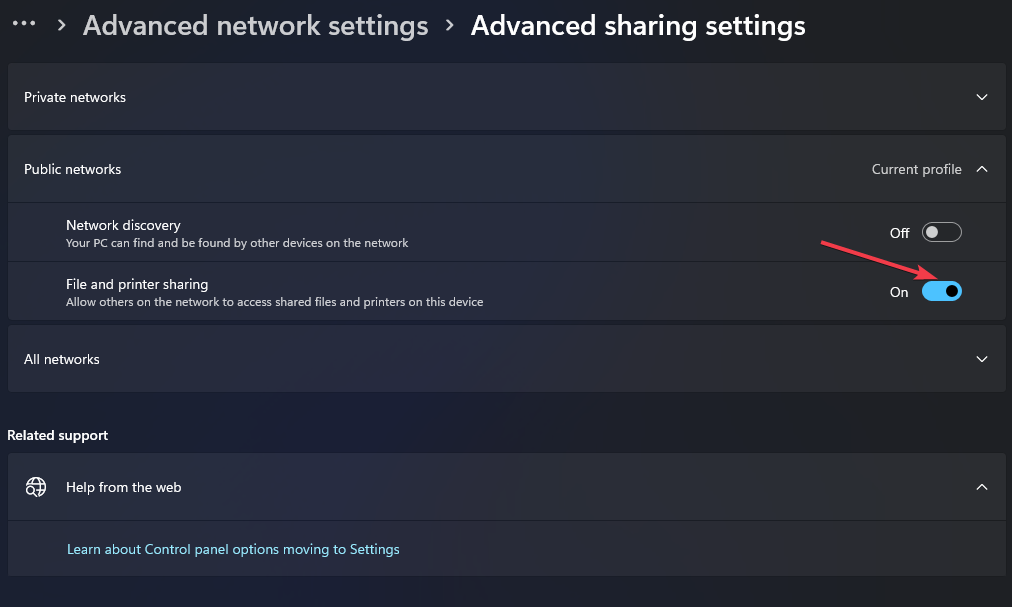
  4. Now, locate File and printer sharing, and toggle on the option.
  5. Press Windows + R to open the Run window, type services.msc, and click OK to open Windows Services.
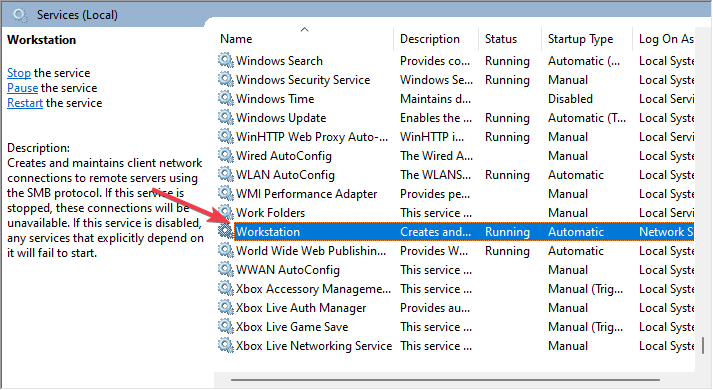
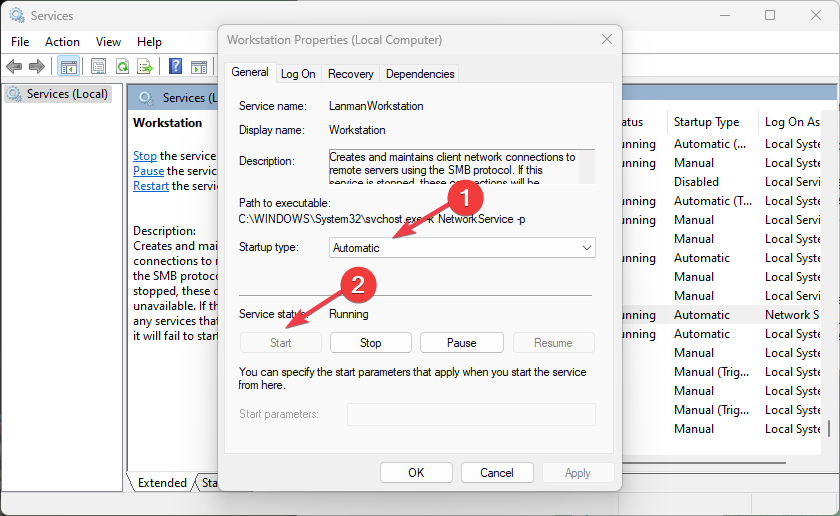
  6. Locate the Workstation service and Computer Browser service, and double-click on each.
  7. Now, select Automatic under Startup type, and click on the Start button.
  8. Apply the changes and close the services.

With both of those services running, the File and printer sharing settings will remain on and ensure connection to other devices on the network.

2. Delete saved credentials

2.1 Use Command Prompt

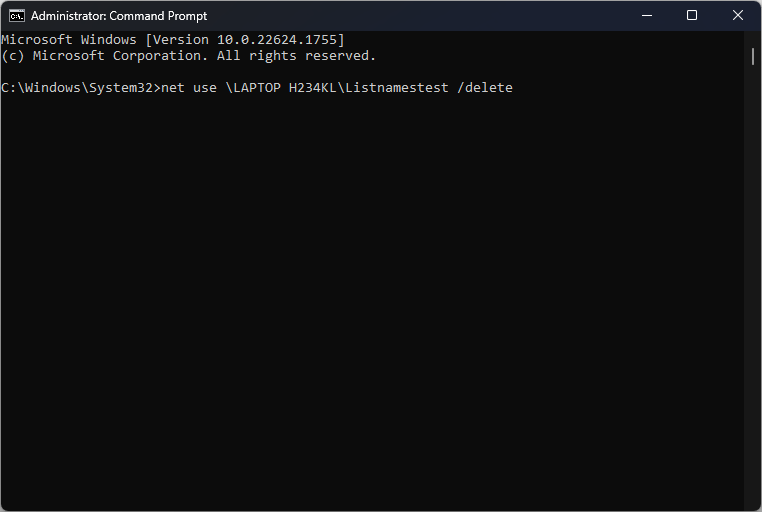
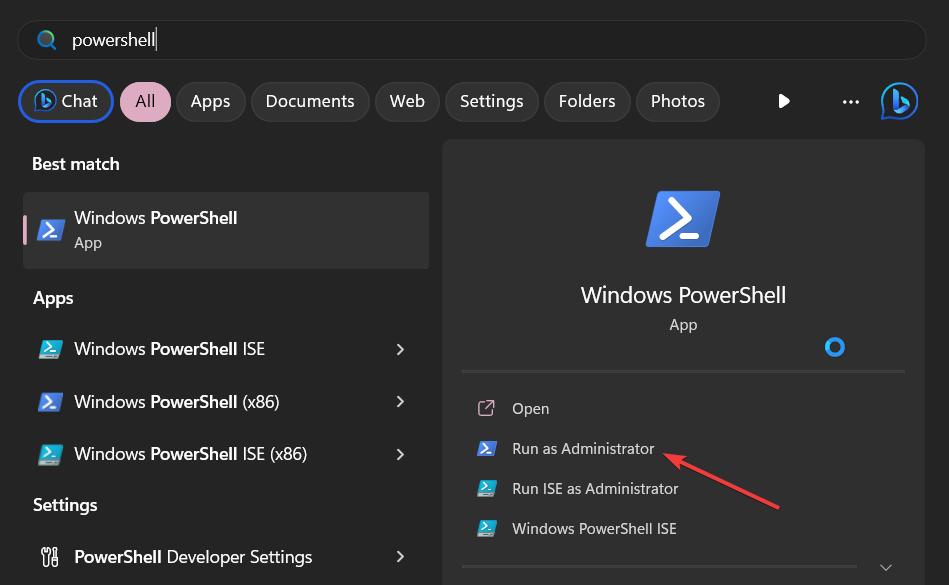
  1. Left-click the Start button, type cmd, and click Run as administrator.
  2. Input the following and click Enter: net use \computername\sharename /delete
  3. Ensure to input the proper computer name and sharename above to replace the code.
  4. Then, close the Command Prompt and restart the PC to take effect.

2.2 Use the Control Panel

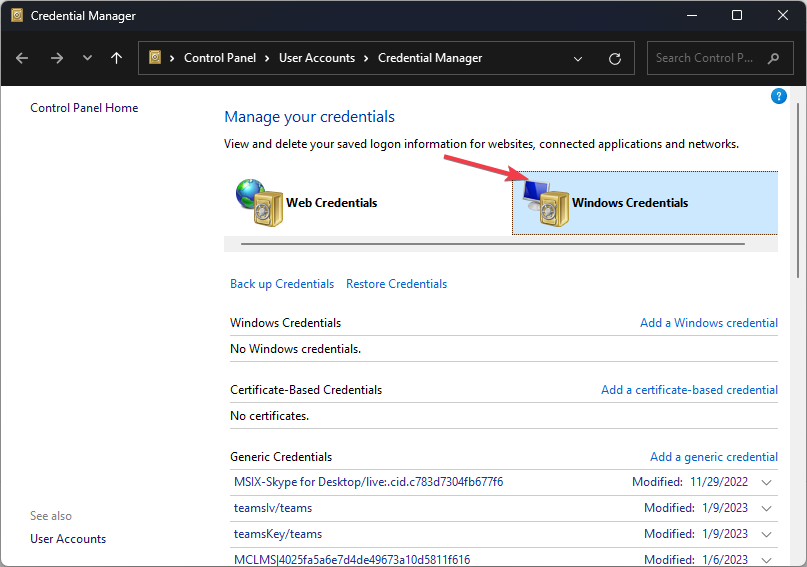
  1. Left-click the Start button, type credential manager, and launch it.
  2. Click On Windows credentials.
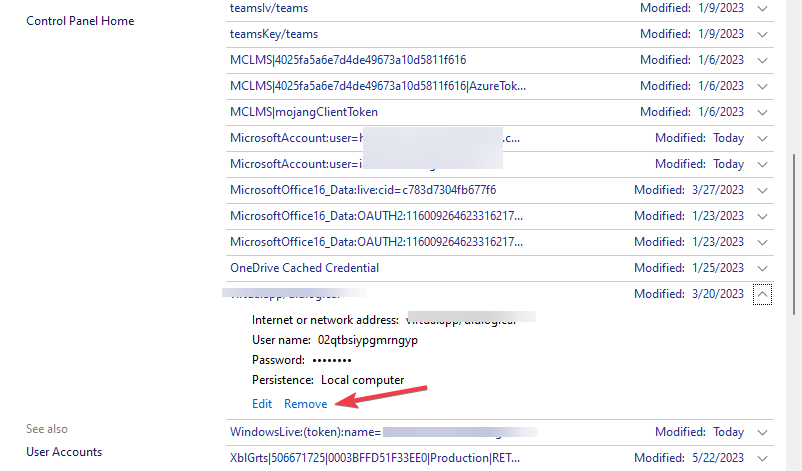
  3. Locate the name of the credential under Generic credentials, click on it to expand, and select Remove.
  4. Confirm the process and close the Control Panel.

By removing or deleting the saved credentials, you can input a new one to fix the error as claimed by some users.

3. Enable network discovery

  1. Left-click the Start button, type the control panel, and launch it.
  2. Click on Network and Internet, then select Network and Sharing Center in the next window.
  3. Then, click on Change advanced sharing settings.
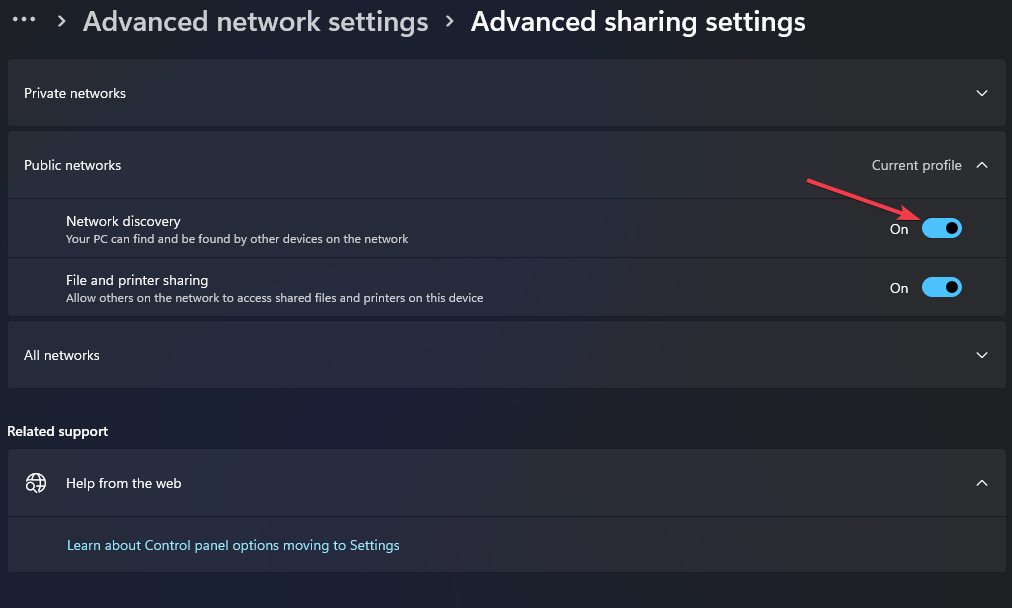
  4. Toggle on the Network discovery option.

In conclusion, you may be interested in our article about how to fix the specified network password is not correct on Windows PCs.

If you have further questions or suggestions regarding this guide, kindly drop them in the comments section.

Deployment Failed With HRESULT: 0x80073D06 [Fix]

When the Microsoft Store apps stop working or malfunction, then you will come across multiple errors. One of which is the Deployment Failed with HRESULT 0x80073d06, The package could not be installed because resources it modifies are currently in use error message.

In this guide, we will show you how you can easily resolve the Deployment failed with HRESULT: Error 0x80073d06 and get the Microsoft Store app to work perfectly. Let us get right into it.

Why am I getting the Deployment failed with HRESULT: Error 0x80073d06?

We did some research and found out some common reasons that could trigger the Deployment failed with HRESULT: Error 0x80073d06 on your PC.

  • The app is unregistered: Often, Microsoft Store apps can get unregistered when they are updated and cause multiple issues, including the error 0x80073d06.
  • The issue with the MS Store: Chances are there are some underlying issues with the Microsoft Store itself which is causing the problem.
  • Corrupt user account: There might be some issue with your Microsoft account, which you are using for Microsoft Store thereby causing the problem.
  • The app is running in the background: If the app is running in the background, the Microsoft Store won’t be able to register it and run on your PC.
  • Outdated Windows version: You aren’t running the latest version of the Windows update on your PC, which is why you’re getting the error 0x80073d06.

Let us go through the solutions and resolve the Deployment failed with HRESULT: Error 0x80073d06.

How can I resolve Microsoft Store error 0x80073d06?

1. Run the Windows Store Apps troubleshooter

  1. Press the Win + I keys to open the Settings menu.
  2. Click on Troubleshoot.
  3. Select Other troubleshooters.
  4. Hit the Run button for Windows Store Apps.
  5. Apply the prompted fixes and complete the process.
  6. Restart your computer.

Whenever you come across the Windows Store or Microsoft Store error as the Deployment failed with HRESULT: Error 0x80073d06, you should run the Windows Store Apps troubleshooter and check if this fixes your problem.

2. Close the app in the background

  1. Press Ctrl + Shift + Esc to open the Task Manager.
  2. Look for the app or process.
  3. Click on the app or process and select End Task from the top.
  4. Restart your PC.

The error message is self-explanatory. If you read the complete error message you will find that the app wasn’t able to register because the app was running in the background. Simply end the background process for the app and check if this fixes the issue or not.

3. Re-register the app

  1. Open the Start menu by pressing the Win key.
  2. Type Windows PowerShell and open it as an administrator.
  3. Type the below command and press Enter. Get-AppXPackage | Foreach {Add-AppxPackage -DisableDevelopmentMode -Register "$($_.InstallLocation)\AppXManifest.xml"}
  4. Reboot your PC.

After you have closed the background process for the app, re-register the app as mentioned above and check if this resolves the Deployment failed with HRESULT: Error 0x80073d06.

4. Create a new user account

  1. Press Win + I to open Settings.
  2. On the left pane, click on Accounts.
  3. From the right, select Other users.
  4. Select Add Account.
  5. Enter your email address and password when asked.
  6. Complete the process to create your account on Windows 11.

There might be some issue with your Microsoft account, which is why you are getting the Deployment failed with HRESULT: Error 0x80073d06.

Follow the above steps and create a new Microsoft account, log in with it, and check whether this resolves the issue.

5. Reinstall the application

  1. To open Settings, press Win + I keys.
  2. Select Apps from the left pane.
  3. Click on Installed apps.
  4. Click on the 3-dot menu icon next to the app and select Uninstall.
  5. Launch Microsoft Store.
  6. Search for the app and re-download it.

Reinstalling the app will help install all the files correctly which might have been replaced or missed during the previous installation. Once the installation is done, check if this has fixed the Deployment failed with HRESULT: Error 0x80073d06.

That is it from us in this guide. If the Microsoft Store is not working on your Windows 11 PC, then you should apply the solutions in our guide to resolve the problem.

If you are excited about AI, you should check out our guide that explains how you can infuse the features of AI with the Microsoft Store in Windows.

Those who used a different solution to resolve the error, please let us know in the comments below, as it can help others facing similar problems.

Windows Migration Assistant Not Working? Fix it in 7 Steps

Migration Assistant is a useful tool for transferring data between Windows and Mac. The utility allows users to move files between devices, but the process is not as effortless as claimed. Many users reported that Windows Migration Assistant is not working.

For some users, the device was not located, while others found the process to be stuck. When faced with something similar, your primary approach should be to identify and eliminate the underlying cause. Let’s find out how!

Why is my Migration Assistant not working?

Here are a few reasons Migration Assistant is stuck or not opening:

  • Background apps triggering conflicts: The Migration Assistant often runs into an issue when an app is running in the background, generally Edge. And here, the tool reads, Before you can transfer information, the following programs must be shut down.
  • Issues with the disk: In some cases, an issue with the disk can prevent data migration between a Windows PC and a Mac.
  • Security software preventing the migration: A security software, antivirus, firewall, or VPN can all conflict with the connection and lead to the Windows Migration Assistant not working
  • Missing permissions: Users require several critical permissions to transfer data, most of which are only available on an administrator account.
  • Problems with the connection: The Windows and Mac devices need to be on the network for the migration to start, a vital aspect often missed by users, causing issues with Windows Migration Assistant.

What can I do if Windows Migration Assistant is not working?

Before we proceed to the complex ones, try these quick solutions first:

  • Make sure the devices or on the same network. Some routers have dual bands (2.4 GHz and 5 GHz), so verify that it’s also the same band.
  • Restart the Windows PC and Mac, and again run the Migration Assistant.
  • Disable the antivirus on the Windows PC and Mac.
  • Turn off the VPN.
  • Make sure you have the correct version of Migration Assitant installed on the PC, depending on the MacOS. The complete list, along with the download links, can be accessed on Apple’s official website.
  • Install the pending Windows updates, if any are available. Do the same on your Mac.
  • Check whether you are using an administrative account. In case not, switch to an administrator account.
  • When selecting the data to transfer, uncheck Apps, as these take up significant time and give the impression that Migration Assistant is stuck.

If none work, move to the fixes listed next.

1. Disable Edge from running

  1. Launch Edge, click on the ellipsis near the top right, and then select Settings.edge settings
  2. Select System and performance from the navigation pane, then disable the toggles for Startup boost and Continue running background extensions and apps when Microsoft Edge is closed.disable to fix windows migration assistant not working
  3. Once done, restart the computer for the changes to come into effect and run the Migration Assistant.

Most users reported that Windows Migration Assistant says Edge is running, and, as a result, it is not working. But preventing the browser, as well as the extensions, from running should do the trick.

2. Disable startup and background apps

  1. Press Ctrl + Shift + Esc to open the Task Manager, and navigate to the Startup apps tab.startup apps
  2. Select any app that reads Enabled under the Status column, and click on Disable near the top-right corner.disable to fix windows migration assistant not working
  3. Next, press Windows + I to open Settings, go to Apps from the left, and then click on Installed apps.installed apps
  4. Click on the ellipsis next to the app, and select Advanced options.advanced options
  5. Now, select Never from the Let this app run in the background dropdown menu.never to fix windows migration assistant not working

Besides Edge, other apps, too, can affect the functioning of Migration Assistant, and it’s recommended that you disable all these from startup and running in the background.

3. Turn off the firewall

  1. Press Windows + S to open Search, type Windows Defender Firewall in the text field, and click on the relevant search result.firewall
  2. Select Turn Windows Defender Firewall on or off from the left.turn on or off
  3. Now, choose Turn off Windows Defender Firewall under both Private network settings and Public network settings.turn off to fix windows migration assistant not working

If the Migration Assistant is not finding Windows PC, it could be the firewall to blame. So, disable the Windows Defender Firewall as well as any other third-party ones installed on the PC, and the problem should disappear.

4. Repair the disk

  1. Press Windows + R to open Run, type cmd, and hit Ctrl + Shift + Enter.cmd
  2. Click Yes in the UAC prompt.
  3. Now, paste the following command and hit Enter:chkdsk /rcheck disk to fix windows migration assistant not working
  4. Press Y and hit Enter when asked to confirm running the scan the next time you reboot.
  5. Finally, restart the computer and wait for the tool to run.

Check Disk is a built-in utility in Windows that runs extensive scans on the disk and eliminates issues triggering errors. And since disk-related problems can lead to Windows Migration Assistant not working, running the CheckDisk scan should work.

5. Run Migration Assistant in compatibility mode

  1. Right-click on the Windows Migration Assistant tool, and then select Properties from the context menu.properties
  2. Navigate to the Compatibility tab, tick the checkbox for Run this program in compatibility mode for, and select Windows 7 from the dropdown menu.compatibility mode to fix windows migration assistant not working
  3. Once done, click on Apply and OK to save the changes.

For some users, running Windows Migration Assistant in compatibility mode helped when the tool was stuck or not working. Compatibility Mode helps in cases when an app was ideally developed for an earlier iteration and is to be run on one released later.

6. Uninstall the antivirus

  1. Press Windows + R to open Run, type appwiz.cpl in the text field, and hit Enter.appwiz.cpl
  2. Select the installed antivirus from the list, and click Uninstall.uninstall antivirus to fix windows migration assistant not working
  3. Follow the on-screen instructions to complete the process.

Simply disabling the antivirus doesn’t work in every case because some processes keep running and conflict with Windows Migration Assistant. In this case, it’s best that you uninstall the program to fix the problem.

7. Manually transfer the files

When nothing else works, you can always manually transfer the files. For that, you could use an alternate Windows to Mac data transfer software. These tools resemble Windows Migration Assistant in every aspect and should work just as well.

Another option is to use an external hard drive. But, with it, you would be able to copy just the files and not the program, emails, or other pieces of data. Nevertheless, it’s an evergreen method to transfer data between two devices.

After you have fixed Windows Migration Assistant when it’s not working, do not forget to read our comparison of Windows 11 and MacOS. Besides, if you haven’t found one, check the best browsers for Mac.

For any queries or to share which solution worked for you, drop a comment below.

How to Rotate Ruler in Snip and Sketch: 2 Ways

In this guide, we explore the Microsoft Snip and Sketch tool released for Windows 10 and show you how to rotate the ruler in the app. Of course, screenshots and annotations are useful for many people. Hence apps that perform these functions are pretty popular. While Snip and Sketch is not the most known, it serves a function. So, let’s get to it.

How do you rotate the ruler in Snip and Sketch?

1. Using the mouse

  1. Launch the Snip and Sketch tool and take a screenshot.
  2. Click on the Ruler icon on the app toolbar, and the ruler will appear on your screenshot.
    how to rotate ruler in snip and sketch
  3. Place your mouse cursor over the ruler and scroll with the scroll wheel up or down to rotate it.

2. Using the Touchpad

  1. Launch the Snip and Sketch tool and take a screenshot.
  2. Click on the Ruler icon on the app toolbar, and the ruler will appear on your screenshot.
    how to rotate ruler in snip and sketch
  3. Position the cursor on the ruler, place two fingers on the touchpad and drag them up or down to rotate the ruler.
  4. Release your fingers when you are satisfied with the rotation angle.

Is Snipping Tool the same as Snip and Sketch?

Snipping Tool and Snip & Sketch are not the same. The MS legacy program, Snipping Tool, was initially available in Windows Vista. You can screenshot your desktop with it, but it doesn’t have annotation or sharing options.

The more recent program, Snip and Sketch, debuted with Windows 10. It contains all of Snipping Tool’s functionality in addition to annotation and sharing options.

Your preferences will determine how to rotate the ruler in Snip and Sketch. For instance, the first way is perhaps the simplest if you use a mouse.

However, we hope one of the solutions discussed appeals to you. So please write to us using the comments section, and let us know your preferred option.

Error Code: 53003 on Sign-in [2 Ways to Fix It]

Microsoft is well-known for creating reliable products. However, occasional errors can cause significant problems for users. Some of our readers have recently reported encountering error code 53003, commonly associated with Azure Conditional Access Policies.

The practical solutions offered in this guide should help you resolve this error in a few easy steps.

Why am I getting error code 53003?

  • Permission issues – This error code may have been triggered by a feature enabled by an administrator in your Azure Conditional Access Policies.
  • Outdated app – If the app you use to access the Microsoft service is outdated, you may get an error message.
  • Outdated operating system – Some users will experience this error if they are not accessing the service from the latest OS versions.

How do I fix Microsoft error code 53003?

Before any complex steps, we recommend doing the following:

  • Contact your organization’s IT administrator or admin and ask them to review your account’s Azure Conditional Access Policies.
  • Update your Microsoft apps.
  • Ensure you are not signing in from a location not supported by your administrator.
  • Verify that you have a strong and reliable internet connection.
  • Disable your firewall or antivirus software because they can interfere with certain applications or services, causing errors.
  • Wait a few minutes to see if the problem resolves itself because the error may be caused by temporary issues with Microsoft’s servers.

However, after you have gone through the above workaround, you may proceed to the solutions below if you still have the error.

1. Update your OS

  1. Press Windows + I to open the Settings app.
  2. On the left pane, click Windows update, then click Check for updates on the right.
  3. If there are any updates, click on Download & Install.
    error code 53003
  4. Lastly, restart the computer and confirm it fixes the error with code 53003.

2. Clear the app cache

  1. Press Windows + I to open the Settings app.
  2. On the left pane, click Apps, then click Installed apps on the right.
  3. Click the ellipses in front of the app that triggers the error, and select Advanced options.
  4. Scroll down and click the Reset button.
    error code 53003
  5. Restart the computer and verify if it fixes the error.

If you have tried all the steps mentioned above and are still experiencing the error code 53003, it might be best to seek further assistance from Microsoft support. Their team can offer personalized guidance and troubleshooting to help resolve the issue on your system.

This is as much as we cover in this guide. You may notice that it often is not within your power, and most people will need admin help.

We also recommend reading our guide on fixing error 1061 which will offer additional solutions.

Finally, drop a comment if you know of other solutions; our readers will love to hear from you.

Microsoft news recap: CMA appeal hearing date set, Ratchet & Clank: Rift Apart coming to Windows, and more

Microsoft news recap is a weekly feature highlighting the top Microsoft news stories of the past week. Sit back, grab some coffee, and enjoy the read!

Microsoft to kill Cortana app for Windows 10 and 11 later this year

Later this year, the standalone app for Cortana will no longer be supported on Windows 10 and 11. This isn’t a totally unexpected development, as the focus on Cortana has diminished over time, particularly after Microsoft tried to integrate Alexa into the mix, which didn’t lead to any success in increasing engagement.

Halo Infinite video game on Xbox Series X

Microsoft’s CMA appeal hearing set for July 24

Microsoft will have its chance to appeal the UKs Competition and Markets Authority ruling against its acquisition of Activision Blizzard on July 24, after the hearing date was set, on an expedited timeline.

Uk Cma Custom

PS5 exclusive Ratchet & Clank: Rift Apart is now headed to Windows PCs

Ratchet & Clank: Rift Apart is making its way to Windows PCs on July 26, after it was announced that the previously PS5-exclusive title will find its way onto a new platform for the first time.

Microsoft lawyers could be examining Plan B to close Activision deal without CMA approval

Whilst a date for Microsoft’s appeal of the CMAs decision to block its ABK acquisition has been set, it has been reported that the company’s lawyers are looking at other options to complete the acquisition irrespective of the UK, should UK approval of the acquisition not come to fruition.

Microsoft Lawyer Activision Cma Deal

That’s it for this week. We will be back next week with more Microsoft news.

MegaStat for Excel: How to Download & Install

MegaStat is one of the excellent plugins for Microsoft Excel that eases the work of users. It integrates effortlessly with Excel and does some of the complex jobs that would have taken a lot of time.

However, downloading and installing MegaStat is all that straightforward. Fortunately, this guide will detail everything you need to do to get the plugin easily.

What is MegaStat?

MegaStat is a top-notch plugin that offers full features on Excel. It helps to perform major statistical analysis on your Excel worksheet.

Some of the tasks it performs include frequency distributions, descriptive statistics, and probability calculations. Also, it does hypothesis testing, regression, and ANOVA.

So, it offers just about everything you need to perform basic statistics tasks on Excel.

How do I download and install MegaStat in Excel?

1. Download and install the tool

  1. Go to the official website, enter your email to join Megastat for Excel, and click the Continue button.
    email megastat excel
  2. Now, fill in your details appropriately and click the Submit button.
  3. Finally, you will be presented with the subscription page, choose a suitable plan, and follow the onscreen instructions to complete the download and installation process.
    subscription

MegaStat is not a free tool; it requires you to register and subscribe to the official website. The download and installation process is pretty straightforward, just like other apps.

So, all you have to do is to complete the registration, and the installation will be effortless.

2. Integrate MegaStat

  1. Launch Microsoft Excel and click the File tab.
    file
  2. Click the More > Options.
    more options megastat excel
  3. Select the Add-ins option in the left pane.
    add ins
  4. Now, check the Inactive Application Add-ins list, and you should find MegaStat there.
  5. Next, click the Go… button before the Manage Excel Add-Ins option.
    go
  6. Check the box next to MegaStat and click the OK button.
    ok
  7. In a case where you have more than one MegaStat listed on the Add-ins list, press the Windows key + R, type appwiz.cpl, and click OK.
  8. Now, right-click the older MegaStat versions, select Uninstall option, and follow the onscreen instructions to complete the removal process.
  9. Finally, to access MegaStat on Excel, click the Add-ins ribbon, and you will find it there.

With the above steps, you should now have the add-ins functional in Excel. Note that some of the steps above might differ depending on your version of Excel.

But the general concept and terminology should be close.

Why is MegaStat not showing in Excel?

If MegaStat is not showing on the more recent versions of Excel, like 2016, it might be due to a new layer of security in them. It might be because the MegaStat files are blocked.

So, you may have to block your downloaded files before using them in Excel. Lastly, if you use Excel VBA, it is important to note that it uses old features related to the pre-2007 versions.

Hence, you might not find the Ribbon tab at the top to use MegaStat after enabling it.

At this point, we can now conclude this detailed guide on downloading and installing MegaStat on Excel. If the Excel toolbar is missing, you can fix it with the steps in our detailed guide.

Feel free to let us know in the comments below if you encounter any problems installing the add-in.

Steam Shared Library Locked: 3 Ways to Fix it

It has been observed that a considerable number of gamers face an issue where they encounter the error message Steam Shared Library Locked while trying to share their Steam library with their loved ones. Furthermore, certain users have reported being unable to access the game on their computer and are presented with this error message on their screen.

The topic at hand resembles a past issue we addressed in great detail – that of Steam failed to authorize computer.

We must delve into its underlying root cause to effectively address the issue.

What does it mean if the Steam shared library is locked?

It’s quite common for this issue to surface for various reasons. Numerous factors can lead to its manifestation:

  • Issues with users – If you’re experiencing an error with your Steam shared library, it may be due to multiple users accessing it simultaneously. In particular, if one player is currently running a game through Steam and another user attempts to access the library, this can cause issues for you.
  • Difficulties with Steam – At times, accessing the Steam shared library can be hindered by internal issues on the Steam side. In such cases, users may encounter error messages on their screens preventing them from accessing the library.

How can I fix the Steam shared library if it’s locked?

1. Log out of Steam on other devices

  1. Simply exit the Steam client on your computer completely.
  2. Instruct your families or friends to sign out from their computers that access the Steam shared library.
  3. Now restart the Steam client on your PC and check if the error has been resolved.

2. Prevent Steam access to the Internet Connection

  1. Hold Windows + R keys to open the Run dialog box, and then type firewall.cpl in it and press Enter.
  2. Next, click on Advanced settings from the left-hand panel to open the Windows Defender Firewall with Advanced Security.
  3. Click Outbound Rules from the left side and choose New Rule.
  4. Now in the New Outbound Rule Wizard dialog box, choose Program from the left panel and click Browse. Navigate to Steam’s installation directory and select steam.exe. Then click on Next to take you to the following phase.
  5. Choose the Block the connection option and click Next. Then be certain the Domain, private, and public options are all checked in the next window.
  6. Now, you can name the rule by your own choice and add a Description (Optional), and click Next.
  7. The moment you are done, you can restart the Steam client.
Note icon NOTE
You’ll likely experience issues with Steam after applying this solution. If you need to play online, disable this rule in the firewall.

We sincerely hope that our guide has assisted you in resolving your issue. In case you encounter any additional hurdles.

It would be worthwhile to consider investigating the potential of Steam family sharing not working, as it may offer alternative remedies.

We greatly value your input on the most efficient solution you’ve encountered. Please share your insights with us by leaving a comment below.

WinThruster.exe: What is It & Should You Remove It?

We often get a few executable file names on our computers that raise suspicion; we wonder if they are legit, some form of malware, or if they will slow down our computers. The WinThruster.exe file may fall into this category.

In this article, we do a breakdown of the file, explaining all the essential details and helping you understand what to do with it.

What is WinThruster.exe?

WinThruster.exe is a file associated with the WinThruster software, a tool developed by the Solvusoft Corporation. The executable file runs silently in the background.

This program aims to optimize your computer’s performance by fixing registry errors, removing unnecessary files, and managing startup programs. Additionally, it tries to enhance system speed, reduce startup times, and improve overall stability.

However, you may doubt its effectiveness and wonder if it should be uninstalled.

Can I delete WinThruster?

In the end, this will come down to individual preferences. However, we must note that this program is not malware and does not necessarily cause any adverse effects on your device.

That said, many executable files can easily be duplicated by virus programs and used to breach your computer. So it is recommended to run a malware scan with an efficient antivirus when in doubt.

However, WinThruster.exe is not native to the Windows operating system, and you will not expect it to hinder the normal operations of your computer if removed.

How can I uninstall WinThruster?

  1. Close WinThruster.
  2. Press Windows + R to open the Run dialog, type appwiz.cpl, and hit Enter.
    winthruster.exe
  3. Scan for WinThruster among the program list, click it, and click the Uninstall button.
    winthruster.exe
  4. Finally, follow the prompts to complete the process and restart your computer at the end.

Are there any alternative optimization tools?

If you have decided to remove WinThruster, you may want to replace it with any of the following software:

  • CCleaner – CCleaner removes garbage files, corrects registry issues, and controls starting processes. It offers dependable optimization features and a user-friendly UI.
  • Advanced SystemCare – It packs over 20 tools, such as a disk cleaner, a registry cleaner, and a privacy sweeper; it can even defrag your disks and help you uninstall any software on your PC.

And there you go. We have run through all the important elements surrounding WinThruster.exe and hope you can make an educated decision on using or removing it.

We like to know your choice, so please comment in the section below.

What is at.exe & How to Properly Use it


The at.exe and schtasks.exe are handy command line tools that help you automate actions on your computer without doing them manually. They make it easy to set up the same task on multiple computers and are useful when working on applications or scripts that need to use the Task Scheduler.

Microsoft has deprecated the at.exe command and recommends using the more advanced schtasks.exe command for managing scheduled tasks.

In this guide, we will show you how to manage scheduled tasks using the at.exe and schtasks.exe tool in Command Prompt.

What is the use of at exe?

The at.exe is a command-line utility in Windows operating systems that allows you to schedule tasks to run at a specified time. It can be used to create, view, modify, or delete scheduled tasks, enabling you to perform various operations from the Command Prompt or batch files.

With the at.exe command, you can specify the exact time and date for a task to be executed, along with the program or command that needs to be run.

The command is available in several Windows operating systems, including Windows 7, Windows Vista, Windows XP, and some older versions of Windows.

What is schtasks.exe?

schtasks.exe is the Task Scheduler tool that allows you to manage scheduled tasks. It provides a more advanced and flexible way to create, modify, view, and delete scheduled tasks compared to the deprecated at.exe command.

Even though Task Scheduler has a graphical interface, you can also use Command Prompt to create, edit, and remove tasks.

How to use at.exe and schtasks.exe?

1. Create a scheduled task:

  1. Open the Start menu, search for Command Prompt, and select Run as administrator.
  2. To create a daily task that runs an app at 8:30 AM using schtasks.exe on Windows 8 and later, type the following command: SCHTASKS /CREATE /SC DAILY /TN "MyTask\Script Task" /TR "C:\Scripts\script.bat" /ST 08:30 Replace MyTasks with the desired folder path, Script Task with the name you want to give to the task, and C:\Scripts\script.bat with the path to the application or script, you want to run. Set the desired time for the task in 08:30 format.schtasks
  3. To create a task using at.exe on Windows 7 and earlier versions, type the following commands: AT 09:00 /EVERY:D "C:\Scripts\script.bat"at command
  4. Press Enter to create the task.

2. Change a scheduled task:

  1. Open Command Prompt as administrator.
  2. For Windows 8 and later, enter the following command to change the time when a task named Script Task runs to 9:00 AM: SCHTASKS /CHANGE /TN “MyTasks\Script Task” /ST 09:00 change Replace MyTasks with the desired folder path, Script Task with the name you want to give to the task. Set the desired time for the task in 09:00 format.
  3. For Windows 7 and earlier version, use the at.exe command instead: AT 09:00 /CHANGE "MyTasks\Script Task"at  change
  4. If prompted, type your user account password and press Enter.

3. View the scheduled task

  1. Open Command Prompt as admin.
  2. To view scheduled tasks on Windows 10 and newer, you can use the following command:SCHTASKS /QUERY query
  3. This command will display a list of all scheduled tasks on your system, including their names, status, triggers, and other details.
  4. For Windows 7 and older, run the below command: AT

The tasks you created using the Task Scheduler will be at the bottom of the list.

4. Cancel a scheduled task

  1. Launch Command Prompt as administrator.
  2. For Windows 8 and later, run the below command to delete a scheduled task named Cleanup Task: SCHTASKS /DELETE /TN "MyTasks\Cleanup Task" This example removes the Cleanup Task located in the MyTasks folder from the scheduled tasks.
  3. To confirm the deletion, type Y when prompted and press Enter.Delete command
  4. For Windows 7 and earlier versions, run the below at.exe command to delete a scheduled task: AT 8 /DELETE Replace 8 with the id of the task you wish to delete.delete 8
  5. To delete all tasks from Windows 8 and newer operating systems, run the below command: SCHTASKS /DELETE /TN * /Fdelete schedule
  6. To delete all tasks from Windows 7 and older, use this command instead: AT /DELETE

Unlike at command, schtasks is a more advanced and flexible command for managing scheduled tasks in Windows. To learn more about the parameters and options of the schtasks commands, visit the official Microsoft Learn page.

You can also use the Task Scheduler utility for creating, modifying, and managing scheduled tasks.

For any questions and more suggestions, please use the comments section below.

0x87DD0003 Error on Xbox & PC: How to Fix It

Error code 0x87dd0003 on Xbox and PC is associated with connectivity issues sometimes, even on the Xbox Live service. The error typically indicates your console or PC cannot reach the Xbox Live servers.

Sometimes you will realize that the error is severe enough to restrict you from updating your game.

What causes the 0x87DD0003 error on Xbox & PC?

  • Internet connection – If there is an issue with your modem, router, or ISP, or any problem that limits your internet use, you may face the error.
  • Console or PC issues – If you are experiencing other device hardware problems, they are most likely related to the error.
  • Xbox Live service errors – While everything may be fine on your end, if the Live servers are down, you will likely get the error.
  • Firewall or security software conflicts – The connection to Xbox Live servers may sometimes be blocked by firewalls or security software, resulting in this error.

How do I fix error code 0x87DD0003?

First, you should try these workarounds:

  • Check the Xbox Live status page since you will see a notification on the status page if there is an outage or service interruption. In such a case, you will have to wait a while.
  • Power cycle the device by holding down the power button for 10 seconds until it turns off. Then, unplug the power cable from the back of the console or PC for about 5 minutes.
  • Restart your modem and router.

If, after the above, you do not have any success, move on to the more detailed fixes below.

1. Clear the Xbox cache

  1. Press the Xbox button on your controller to open the guide.0x87dd0003
  2. Select the Devices & Connections option, then click Blu-Ray.
  3. Click on Persistent storage.
  4. Click Clear persistent storage.
  5. Now restart the device and see if it fixes the 0x87DD0003 error.

2. Reinstall the Xbox app

  1. Press Windows + I to open the Settings app.
  2. Click Apps on the left pane, then Installed apps on the right.
  3. Scroll down to Xbox, click on its ellipses, and select Uninstall.
  4. Confirm your selection and follow the prompts to complete the uninstallation.

3. Reset the network settings and connect to Xbox Live

3.1 How to reset the network settings on Xbox console

  1. Press the Xbox button on your controller to open the guide.
    0x87dd0003
  2. Navigate Profile & System, Settings, General, then Network settings.
    0x87dd0003
  3. Select Advanced settings.
    0x87dd0003
  4. Click Alternate MAC address.
    0x87dd0003
  5. Select Clear, restart the device, and verify if the 0x80270254 error is resolved.
  6. Lastly, ensure you are connected to Xbox Live and are signed in to your profile.

3.2 How to reset the network settings on the PC

  1. Press Windows + R to open the Run dialog.
  2. Type cmd and hit Ctrl + Shift + Enter to open an elevated Command Prompt.
    0x87dd0003
  3. Type the script below and hit Enter.
    netsh winsock reset
    0x87dd0003
  4. Restart the computer and see if it fixes the 0x87DD0003 error.

You may ask Xbox support for assistance if you have tried all the above solutions and are still receiving the error number 0x87DD0003.

In most instances, if you resolve the network issues on your device, the 0x87DD0003 error should clear. You may learn more about fixing Windows 11 network issues in our comprehensive guide.

Lastly, if there are solutions we have not included, please share them with our readers using the comments section.

0x000006ba Printer Error: 6 Quick Ways to Fix it

Even the best printer can sometimes fail to get the job done. Users reportedly get the error 0x000006ba whenever they try to print a document. 

The error is accompanied by a message that says the operation could not be completed and directs you to restart the Print Spooler Service. If this sounds like a problem you have encountered, we explore some solutions below.

What is error 0x000006ba?

To use a printer, you need to connect it to your computer and network. This is so that it can be discoverable among the list of printers. However, users claim that when they try to print a document, they are getting the error 0x000006ba.

Further, their selected printer fails to show up, and they are directed to add a printer. The strange thing is that when you try to add your printer, it is not discoverable among the listed devices. Some even say there is an unknown printer on the list.

When you attempt to restart the print spooler service, it keeps stopping.

So why does the Windows 11 print spooler keep stopping? Below are some possible reasons:

How do I fix error 0x000006ba?

Attempt the following workarounds before any technical steps:

  • Disconnect all peripherals and reconnect only those required for the print job.
  • Check for any damaged USB ports or cables and replace them where necessary.
  • Ensure your PC and printer are on the same network.
  • Clear the print queue and retry printing.
  • Check for any corrupt files using the SFC scan.
  • Try restarting your printer and see if it works.
  • Finally, restart your PC and try printing again.

1. Delete the Printer Spooler folder

  1. Hit the Windows + E keys to open File Explorer.
  2. Navigate to the following location: C:\Windows\System32\spool
  3. Locate the Printers folder and click to open.
  4. Select all items in the folder and delete them.
  5. Restart your PC.

2. Run the Printer troubleshooter

  1. Hit the Windows key and click on Settings.settings windows 11
  2. Select System on the left pane, then click Troubleshoot on the right.Open system troubleshooter
  3. Click on Other troubleshooters.other troubleshooters
  4. Find the Printer troubleshooter and click the Run button next to it.printer-run windows cannot connect to the printer

3. Restart the Print Spooler service

  1. Hit the Windows + R keys to open the Run command.
  2. Type services.msc in the dialog box and hit Enter.run services.msc command
  3. Locate the Print Spooler service, right-click on it, and select Stop.
  4. Right-click on it again, then select Restart.

4. Update Printer drivers

  1. Hit the Windows key, type Device Manager in the search bar, and click Open.device manager w11
  2. Navigate to Printers and locate your printer.
  3. Right-click on it and select Update driver.
  4. Select Search automatically for updated drivers.
  5. Windows will find the most suitable driver and recommend you install it.

If, for some reason, Windows fails to get the right driver or you’re just not a fan of manual updating, you can opt for a third-party driver updater utility.

This tool will scan your PC for any damaged, outdated, and incompatible drivers and then match you with the correct ones.

⇒ Get Outbyte Driver Updater

5. Check for Windows updates

  1. Hit the Windows key and click on Settings.settings windows 11
  2. Click on Windows Update and select Check for updates.check-updates-w11 windows 11 blue screen
  3. Download and install if available.

6. Perform a clean print

  1. Press the Windows + R keys to open the Run command.
  2. Type services.msc in the dialog box and hit Enter.run services.msc command
  3. Find the Print Spooler service, right-click on it, and select Stop.
  4. Next, click on the Start Menu icon, type Control Panel in the search bar, and click Open.control-panel-search fallout new vegas runtime error
  5. Navigate to Uninstall a program under Programs.going uninstall program control panel
  6. Find your printer software and click on Uninstall.
  7. Now, press the Windows + R keys to open the Run command.
  8. Type regedit in the dialog box and click on Enter to open the Registry Editor.
  9. Navigate to the following path: Computer\HKEY_LOCAL_MACHINE\SYSTEM\CurrentControlSet\Control\Print\Environments\Windows x64\Drivers
  10. Find your printer and click to delete it.

Ensure that you backup your Registry or create a restore point in case things don’t go as planned.

Hopefully, one of these solutions has been the perfect 0x000006ba error fix you needed for your printer spooling problem. 

If you are unable to manage the number of print jobs you’re sending to your printer. We’d recommend installing printer software.

You may also run into the error 0x00003e3, so don’t hesitate to check out our detailed guide on resolving it.

Drop us a comment if you have been able to correct this issue and indicate the solution that worked for you.

Best Way to Restart Audio Driver in Windows 10

An audio driver is essential, but if issues occur, you need to restart the audio driver on Windows 10.

Also, you can read about what to do if you’re unable to install drivers on Windows 10 if you need more information on the subject matter.

Join us while we show you the best way to restart drivers on your PC.

Why should I restart the audio driver?

  • Troubleshooting – If you’re experiencing issues with a particular audio hardware device or peripheral, restarting the driver can help resolve the problem. It clears any temporary glitches or conflicts that may have occurred.
  • Driver updates – Sometimes, a restart is necessary after installing audio driver updates or making changes to the system for the changes to take effect. Hence, it ensures that all updates are applied.
  • Compatibility issues – Restarting the audio driver can help resolve any compatibility issues that may arise after connecting a new device or installing new software. It can fix driver error issues on Windows 10.
  • Performance improvement – Restarting the driver allows it to refresh its processes and can improve the device’s performance.
  • Optimize system resources – Audio devices can consume significant system resources. So, restarting the driver can help release any allocated resources that may not be freed correctly and improve the system’s performance.

You can check our article about ways to fix this driver has been blocked from loading error on your computer.

How can I restart the audio driver in Windows 10?

Use the Device Manager

  1. Right-click the Start button and select Device Manager from the drop-down menu.
  2. Expand the Sound, video, and game controllers categories to view the audio devices.
  3. Then, right-click on the audio device you want to restart and select Disable device from the drop-down menu.
  4. In the new window, click Yes to confirm the process.
  5. Now, you may need to repeat this step for each device if you have multiple audio devices.
  6. After disabling the audio device, right-click on it again and select Enable device from the drop-down menu to initiate the restart process for the audio driver.
  7. Once the driver is restarted, you should see the audio device re-enabled in the Device Manager.

The above steps will disable the audio driver to stop its process running on your computer and enable the device to initiate its restart.

Further, you can check our comprehensive article on how to fix the Windows encountered a problem installing the driver error on Windows 10.

Likewise, we have a post about easy steps for updating outdated drivers on Windows 10.

Should you have further questions or suggestions regarding this guide, kindly drop them in the comments section. We’d like to hear from you.

Runtime Error 13: Type Mismatch [Fix]

Runtime error 13 is a common error when you try to run an application on a computer that does not have the correct version of the runtime libraries installed. Most users say they encounter this error when opening a Microsoft Excel file.

The most common reason this error occurs is that the program was written for one version of an operating system and is being run on another. For example, if you try to run Windows 11 software on Windows 8, you may get such an error.

What is error 13 at run time mismatch?

Error 13 is a run-time error that occurs when Microsoft Excel cannot find the correct function or macro to do the task you are trying to perform. 

This mainly occurs when an application fails to initialize its resources because of an incompatibility between the application and the operating system. 

It’s likely to happen if the application was developed for an older version of Windows or if it’s incompatible with the version you’re running.

Other reasons include:

  • Missing files – If there are missing files in your system, then it will cause this error. Some third-party applications may delete some files from your system that Windows requires to run properly.
  • Corrupted DLLs and EXE files – Corrupted DLLs and EXE files can also cause the error 13 at runtime mismatch because Windows requires these files to execute different programs.
  • Virus infection – If a virus finds its way to your system, it can infect system-related files, including Excel files, and cause this error.
  • Incorrect installation/uninstallation – Improperly uninstalling a previous version of an application and then installing it again without uninstalling it completely can also cause this runtime error.

How do I fix Runtime Error 13?

A few workarounds that could resolve this issue include:

1. Use the Program Compatibility Checker

  1. Hit the Windows key, type Program Compatibility Checker, and click on Open under Run programs for previous versions of Windows.Porgram compatibility checker- excel has run into an error that is preventing it from working correctly
  2. On the Program Compatibility Checker window, click Next.Program Compatibility Checker
  3. From the next window, scroll and select the program; in this case it is Excel. Click Next.Excel NEXT
  4. Click on Troubleshoot program.Select any
  5. Now select the most suitable option presented under What problems do you notice?
  6. Click Next. Select any click Next
  7. You might have to repeat the process with different options to see what resolves the error.

2. Repair Excel

  1. Launch MS Excel and open a blank workbook.
  2. Click on File.file
  3. Select Open and click on Browse.
  4. Locate the problematic file, select it, and click on the drop-down icon next to Open.
  5. Select Open and Repair.

If this fixes the issue, good, but if it doesn’t, you can try out the automatic Excel repair tools, which are more thorough.

3. Run the Program Install and Uninstall troubleshooter

  1. Download the Program Install and Uninstall troubleshooter and install it.
  2. Launch it and click on Next.
  3. You’ll be asked whether you have a problem installing or uninstalling a program. Select one option.
  4. Next, you’ll be asked to select the program that is not installing. Pick the problematic program from the list.
  5. The troubleshooter will start scanning for problems.
  6. Once it completes, you’ll be presented with two options. Pick either and wait for the troubleshooter to recommend fixes.

4. Scan for viruses

  1. Click on the Start Menu icon, search Windows Security, and click Open.
  2. Select Virus & threat protection.
  3. Next, press Quick scan under Current threats.
  4. If you don’t find any threats, proceed to perform a full scan by clicking on Scan options just below Quick scan.Scan options
  5. Click on Full scan, then Scan now to perform a deep scan of your PC.Full Scan Scan Now
  6. Wait for the process to finish and restart your system.

5. Run Excel in compatibility mode

  1. Locate the .exe file of the problematic problem usually in one of the following paths depending on your version of Windows:C:\Program Files (x86)or C:\Program Files
  2. Scroll down until you find the program you’re looking for. 
  3. Right-click on the .exe file of the program and select Properties.    
  4. Navigate to the Compatibility tab, check the Run this program in Compatibility mode option, and select Windows 8  from the drop-down menu.   run this program in compatibility for
  5. Allow the program to finish installing, then check whether the error persists.

6. Reinstall Excel

  1. Click the Start button and select Settings.settings windows 11
  2. Choose Apps from the left pane and click on Installed apps from the right.
  3. Look for the Office suite in the list of apps, click the three dots icon from its right, and select Uninstall.
  4. Go to the official Office 365 website and sign into your account.
  5. Now, from the main Microsoft 365 account, click on Install Office.Install office

You may also come across runtime error 217 but worry not, as we have also laid down an easy fix guide to help you resolve the issue.

Speaking of runtime errors, we’d also like to recommend installing runtime repair tools to help you easily navigate such issues.

That’s it for this article, but let us know which solution fixed this error for you in the comment section below.

Split Screen on Windows 10 in 2 Ways

The split screen feature on the computer allows you to project multiple shots onto the same screen without interfering with each other. Sadly, many users complain about not knowing how to use the feature.

This article will take you through how to split screen on Windows 10. Alternatively, you can check our review of the best and most tested split screen software you can use.

Can I split the system screen with shortcuts?

Yes, you can split the screen on Windows 10 using shortcuts. Windows 10 has a feature called Snap Assist that allows users to arrange windows side by side. Here are the keyboard shortcuts you can use to split the screen:

  • To snap/position a window to the left – While you want to snap on the window, hold the Windows key, and press the Left arrow key. The window will position to the left half of the screen.
  • To snap a window to the right – Select the window you want to snap, hold the Windows key, and press the Right arrow key. The window will position it to the right half of the screen.
  • To snap a window to the top – If you want to maximize a window vertically, hold the Windows key and press the Up arrow key. The window will expand to fill the entire screen vertically.
  • To restore a window – To restore a window to its original size after snapping, hold the Windows key and press the Left or Right arrow key, depending on the side it is snapped to. It will return the window to its previous size.
  • To switch between snapped Windows – If you have multiple windows snapped, you can switch between them using the Windows key and the Left or Right arrow key. Pressing the left or right arrow key will cycle through the snapped windows.

These shortcuts allow you to quickly split the screen and work with multiple windows side by side. Also, it can enhance your productivity and the multitasking capabilities on your computer.

How can I split screen on Windows 10?

1. Using the title bar

  1. Open the first window you want to display on one side of the screen. Click and hold the title bar of the window.
  2. Drag the window to the left or right side of the screen until the cursor reaches the edge. You’ll see an outline indicating where the window will snap.
  3. Release the mouse button to snap the window to that side of the screen.
  4. Open the second window you want to display on the other side of the screen.
  5. Drag the second window to the opposite side of the screen, and it will automatically snap into place.
  6. Alternatively, just select one of the available windows and it will automatically fill the other half of the screen.

Remember that you can split your screen into quarters using the same steps. If you’re having issues, check what to do if split screen is not working on your Windows PC.

2. Using keyboard shortcuts

  1. Open the first window/application you want to display on one side of the screen.
  2. Press the Windows key + Left arrow key to snap the window to the left side.
  3. Open the second window/application you want to display on the other side of the screen.
  4. Press the Windows key + Right arrow key to snap the window to the right side.

These steps allow you to split the screen and work with multiple windows side by side, making it easier to multitask and increase your productivity.

In conclusion, we have a comprehensive guide about how to split screen in portrait mode on Windows computers. Also, you can read through for detailed steps on how to split screen on Windows 11.

If you have further questions or suggestions, kindly drop them in the comments section here.

Avp.exe: What Is It & How to Fix Its High Memory Usage

If you’ve noticed your computer using a lot of RAM and come across avp.exe, you may wonder what it is and how to resolve it.

So, in this article, we’ll delve into the executable, explaining its functions and offering practical solutions to problems around it.

What is avp.exe?

The avp.exe process is connected to the Kaspersky antivirus software. This well-known cybersecurity tool offers a defense against malware, viruses, and other internet dangers. The antivirus engine provides real-time protection for your computer, which is executed by the avp.exe process.

However, avp.exe high memory usage can arise due to any of the following:

  • Real-time scanning – Activities like real-time scanning are resource intensive and may cause spikes in memory use.
  • Virus scan – When your system runs a virus scan, it will cause the avp.exe to consume more memory leading to spikes.
  • Outdated antivirus program – Memory spikes are routine for some users with outdated apps since the app stops being as efficient as expected.
  • Hardware problems – Lastly, a range of hardware problems may reduce the efficiency of your computer and cause memory usage when you activate or use any application.

How do I fix avp.exe high memory usage?

Before you continue, you should start with the following workarounds:

  • Run a virus scan to rule out chances of the memory spike caused by malware on your device. You may use the already installed Kaspersky or some other robust antivirus.
  • Restart your computer, as this step may end problematic processes that can trigger a spike.
  • Check for hardware faults, especially with your RAM, as it may also trigger the spike.

With the pre-solutions out of the way, you may advance to a more detailed fix.

1. Reinstall your antivirus program

  1. Press Windows + R to open the Run dialog.
  2. Type appwiz.cpl and hit Enter.
    generative fill not working in adobe photoshop
  3. Click on the Kaspersky antivirus from the program list and press the Uninstall button. Follow the prompts from the Wizard to complete the uninstallation, then restart your computer.
    generative fill not working in adobe photoshop
  4. Download a new version of Kaspersky and install it.
  5. Restart your computer and confirm it fixes the avp.exe high memory usage.

2. End all related processes

  1. Press Ctrl + Shift + Esc to open the Task Manager.
  2. Click on the Processes option on the left pane.
    avp.exe
  3. On the Name column, click on any Kaspersky process and click the End task button.
  4. Finally, repeat step 3 for as many Kaspersky processes as possible, then check if it fixes the avp.exe issue.

That is as far as we will be discussing in this guide. Since this avp.exe memory hike bothers around the antivirus, you may consider using a different malware solution.

Lastly, let us know if there are any other fixes you know in the comments section; our readers would love to hear from you.

Link State Power Management: Should You Turn it On or Off?

Today, we’ll explore how you can further personalize Windows 11 by toggling Link State Power Management On or Off.

This feature is a great addition to the already impressive list of customization options offered by Windows. The current subject at hand bears similarity to a previous matter we extensively covered – the Power Management tab is missing. So let’s dive in and see how it’s done.

What Is Link State Power Management?

It is a crucial component of the PCI Express Specification, this feature seamlessly integrates with Microsoft Windows Active State Power Management (ASPM) system.

The Link State Power Management feature comprises three distinct modes: Off, Moderate & Maximum power savings:

  • Off – Choosing this option will result in no power-saving mode, as the computer will continue to run regardless of its state (plugged in or not). However, the Sleep state can be quickly recovered from.
  • Moderate power savings – Opting for this choice may result in lower power savings, but the duration it takes to awaken from Sleep mode will be significantly reduced.
  • Maximum power savings – Choosing this option can lead to greater energy efficiency, but it comes at the cost of a significantly longer recovery time from the Sleep state.

When configuring the aforementioned feature, making the appropriate selection is crucial. You can also select varying modes for different states, such as plugged and unplugged.

Should I turn off Link State Power Management?

When it comes to the power-saving feature on your computer, the decision to enable or disable it depends on your specific needs:

  • Pros – If you typically keep your computer plugged in, disabling the feature could lead to faster performance.
  • Cons – If conserving battery life is a priority, it’s best not to disable it. One option is to find a compromise by turning off the feature when your computer is plugged in and turning it back on when you’re running on battery power.

Remember that the impact on battery life can vary greatly depending on your specific usage patterns – sometimes there may be a significant difference while other times it may be negligible.

How can I turn Link State Power Management On or Off?

Change the settings of PCI Express Link State Power Management

  1. On your search bar, type Control Panel and click open.
  2. Be certain that your View by is set to Large icons.
  3. Now choose Power Options.
  4. Click Change Plan Settings.
  5. Now, click Change advanced power settings.
  6. Scroll down to reach PCI Express, and expand it.
  7. Expand Link State Power Management and configure the setting.

If you haven’t yet utilized this feature, it’s worth considering due to the numerous functions it can provide for your system. Its usefulness is undeniable.

We have a great guide on a power plan that keeps changing on Windows 10, so be sure to check it out. We value your input and eagerly anticipate receiving more feedback from you!

Event ID 1008: How to Fix It on Windows 10 & 11

Event ID 1008 is an error code that typically indicates an issue related to the performance monitoring infrastructure of the operating system.

In this blog, we will explain the expert-tested troubleshooting methods after discussing the causes.

What causes the Event ID 1008 on Windows 10 & 11?

Event ID 1008 on Windows 10 and Windows 11 could be caused due to various reasons; some of the common ones are mentioned here:

  • Corrupted or missing performance counters – Performance counters monitor system performance. If these counters become corrupted, you may see the Event ID.
  • Disabled DLL file – If a DLL file related to the performance counter is disabled or unregistered, you may see this error. Try re-registering the DLL file.
  • Software conflicts – Conflicts between different software components or conflicting software installations can disrupt the performance monitoring system and cause this problem.
  • Corrupted system files – If the system files necessary for the proper functioning of performance counters become corrupted, it can trigger the error. Try running an SFC scan to fix it.

Now that you know the causes of the issue, let us check out the troubleshooting methods to fix it.

What can I do to fix the Event ID 1008 on Windows 11?

Before engaging in advanced troubleshooting steps, you should consider performing the following checks:

  • Try restarting your computer.
  • Reinstall all recently updated applications if they are not working properly.
  • Ensure Windows is up to date.
  • Make sure you have the administrative privileges for the machine.

Once you are done with these, move to the detailed solutions to resolve the issue.

1. Run an SFC scan

  1. Press the Windows key, type cmd and click Run as administrator.CMD elevated Event ID 1008
  2. Type the following command to repair system files and hit Enter: sfc/scannowSFCSCANNOW CMD
  3. Wait for the process to complete, copy and paste the following command, and press Enter: DISM /Online /Cleanup-image /RestorehealthRestore health Event ID 1008
  4. Once the command is executed, Windows will patch faulty files in the component store of the Windows system image.
  5. Restart your computer to let the changes take effect.

Restoring the corrupted files of your Windows 10/11 computer can help you fix other issues like Event ID 5858; to learn more, read this guide.

Additionally, you can use a professional repair tool which will help you simplify this process.

2. Re-register the DLL file

2.1 Identify which DLL file is affected

  1. Press the Windows key, type event viewer and click Open.Event Viewer Event ID 1008
  2. Go to Windows Logs, then System.Event Viewer Check the error
  3. On the right pane, locate the Event ID and check the description to know the DLL file. Note the DLL file name and proceed to the next section.

2.2 Rebuild the performance counters

  1. Press the Windows key, type cmd and click Run as administrator.CMD elevated Event ID 1088
  2. Type the following command to navigate to the System32 directory and hit Enter: CD %SYSTEMROOT%\System32
  3. To rebuild the performance counter setting from the system backup store, copy & paste the following command and press Enter: lodctr /rcmd_pLiljO8F4f
  4. Type the following command to register the DLL file after replacing DLLfilename with the name of the DLL and hit Enter: lodctr /e:DLfilename
  5. To resync the counter with Windows Management Instrumentation, copy & paste the following command and press Enter: WINMGMT.EXE /RESYNCPERF
  6. Close the Command Prompt and reboot your PC to save the changes.

3. Modify a registry entry

3.1 Backup your registry entries

  1. Press Windows +R to open the Run console.Regedit Run command Event ID 1008
  2. Type regedit and click OK to open Registry Editor.
  3. Go to File, then click Export.Export
  4. On the File Explorer window, navigate to the location where you want to save the .reg file. Name it and click Save to close the window.Save

3.2 Delete the registry entries

  1. Now on Registry Editor, navigate to this path, and replace BITS with the service which is causing the issue: Computer\HKEY_LOCAL_MACHINE\SYSTEM\ControlSet001\Services\BITS\Performanceregedit_Event ID 1008
  2. On the right pane, locate First Counter, Last Counter, First Help, Open and Last Help and right-click them one by one and select Delete to remove them.Delete
  3. Restart your PC to complete the process.

3.3 Restore the entries

  1. Press Windows +R to open the Run console.
  2. Type regedit and click OK to open Registry Editor.
  3. Go to File, then click Import.Import Event ID 1008
  4. Locate the .reg file that you created and click Open.
  5. Wait for the changes to appear and check if the issue persists.

4. Use a third-party tool

  1. Download and install Extensible Counter List.Download the tool Event ID 1008
  2. Navigate to this path: C:\Program Files (x86)\Resource Kit
  3. Locate and right-click Exctrlst.exe, then select Run as Administrator.
  4. Find the affected service(s) from the list and remove the checkmark next to Performance Counters Enabled for each service.Performance Counters Enabled

Although this method doesn’t directly fix the problem, it obliterates the notifications from Event Viewer.

What can I do to fix the Event ID 1008 on Windows 10?

To fix the issue related to Event ID 1008, you need to have a user account with admin rights on your Windows 10 computer, then follow the methods mentioned above for Windows 11.

If you want to know more about Event Viewer and how it can help you identify issues on your Windows 10 or 11 computer, we suggest you check out this guide.

Encountering the Event ID 1008 on Windows 10 or 11 is annoying, but this is not a critical error. You can follow these methods to fix this Event error.

Please feel free to give us any information, tips, and your experience with the subject in the comments section below.