Windows 11 is Stuck in Tablet Mode: 5 Ways to Get Out [Fix]

Sometimes Windows 11 can get stuck on Tablet Mode and this can be a problem since your interface will change to adapt to touchscreen input.

This can be a problem and affect your productivity, especially if you prefer using your device in desktop mode, so today we’re going to show you how to fix it.

Why is Windows 11 in Tablet Mode?

  • The tablet keyboard isn’t detected or working properly thus causing Windows to enter Tablet Mode.
  • Temporary glitches or missing firmware or driver updates can cause this problem.
  • Preinstalled software can sometimes cause this issue on Lenovo devices.

What do I do if my Windows 11 laptop is stuck in Tablet Mode?

Before we start, be sure to perform the following checks, and see if they work for you:

  • Make sure that the tablet keyboard is connected and working properly. You can also try connecting a USB keyboard and unplugging it as a temporary workaround.
  • Try rotating your device. It should automatically switch to Desktop mode if you use the landscape orientation.
  • Perform a soft reset on the Surface device by pressing and holding the Power button for 30 seconds. Release the button, wait for 10 seconds, and start your device again.

1. Update Windows 11

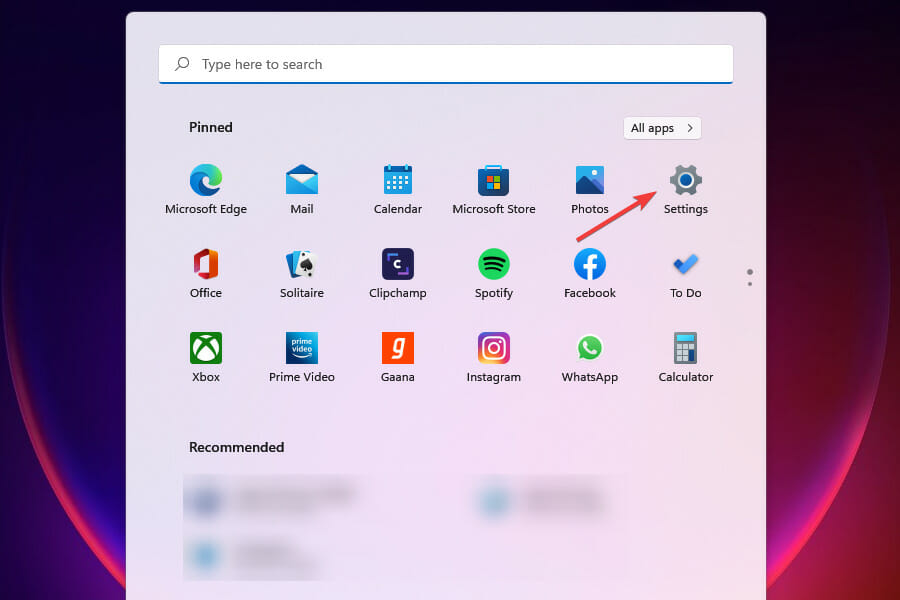
  1. Click on the Start button in the Taskbar to launch the Start menu.
  2. Select Settings from the apps listed at the top.Launch Settings
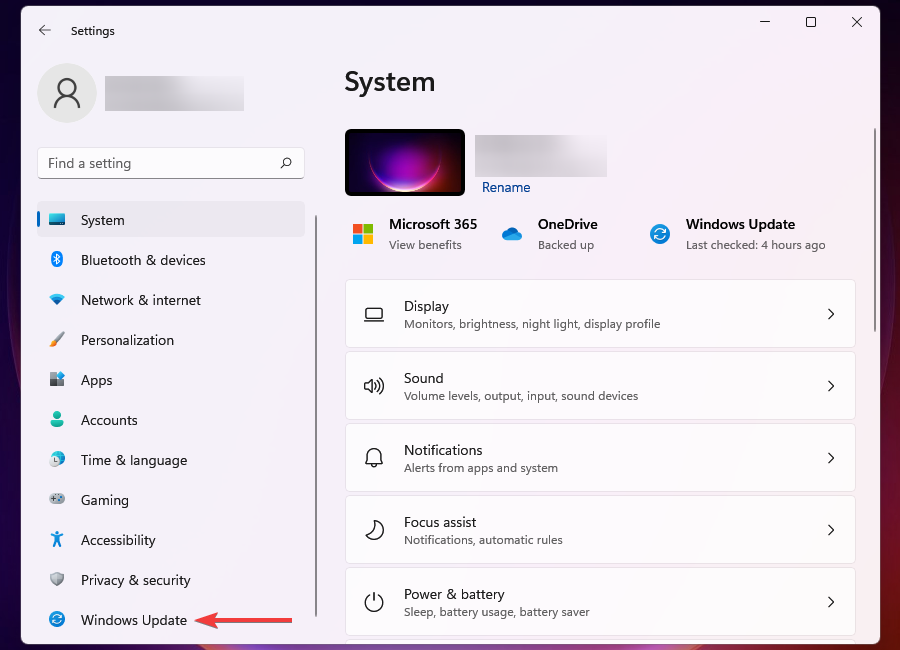
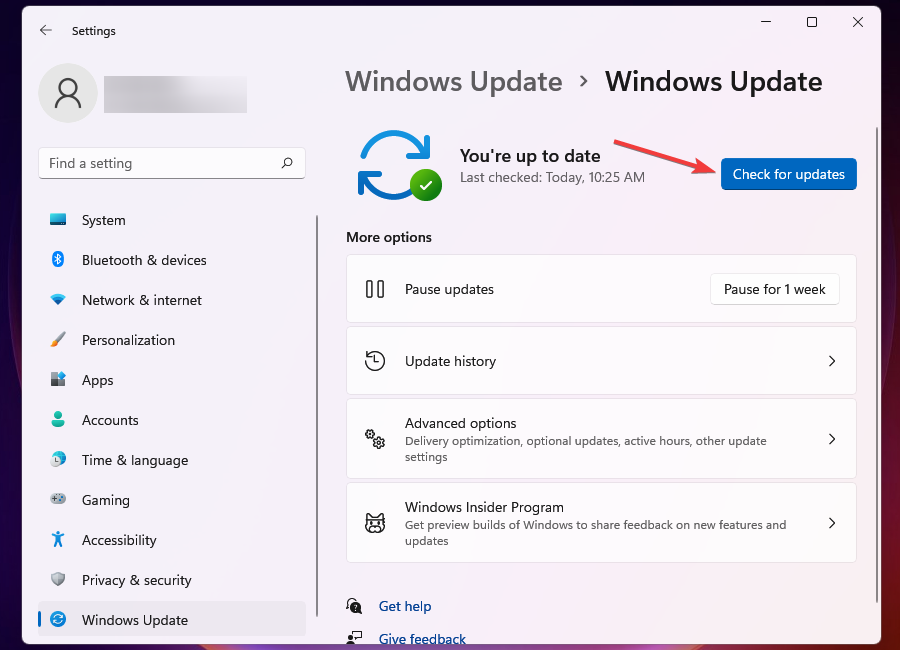
  3. Next, select Windows Update from the tabs listed in the navigation pane on the left.Update Windows to fix stuck in tablet mode issue
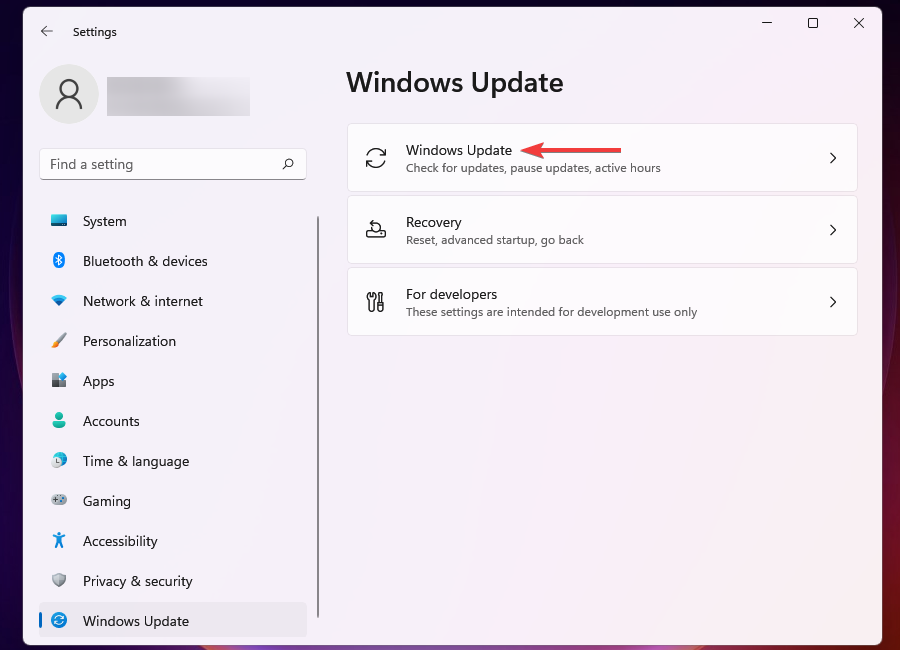
  4. Click on Windows Update on the right.Windows Update
  5. Click on Check for updates to let Windows scan for any available newer version.Check for updates
  6. If any are found, download and install them.
  7. Also, download Optional updates to update all your drivers.

2. Update the firmware on Surface devices

Note icon NOTE
Installing the wrong firmware can cause issues with your device, so ensure that you download and install the correct version.
  1. Make you know the exact model and firmware version of your device. You can check that from the Surface app on your PC.
  2. Next, go to the Surface firmware download page.
  3. Locate your model on the list and select it.
     
  4. Click the Download button.
  5. Once the firmware is downloaded, run the setup file and follow the instructions on the screen.

3. Disable the Lenovo Yoga Mode Control service

  1. Press the Windows key + R enter services.msc and then click OK.
    SERVICES
  2. Locate the Lenovo Yoga Mode Control service and double-click it.
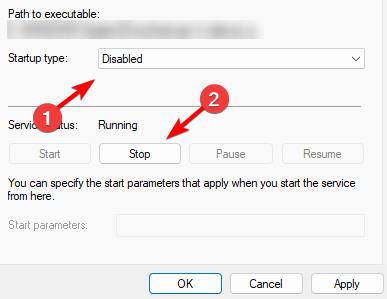
  3. Locate the Startup type and set it to Disabled. Next, click on Stop and then go to Apply and OK.
  4. Restart your PC.

4. Run an SFC scan

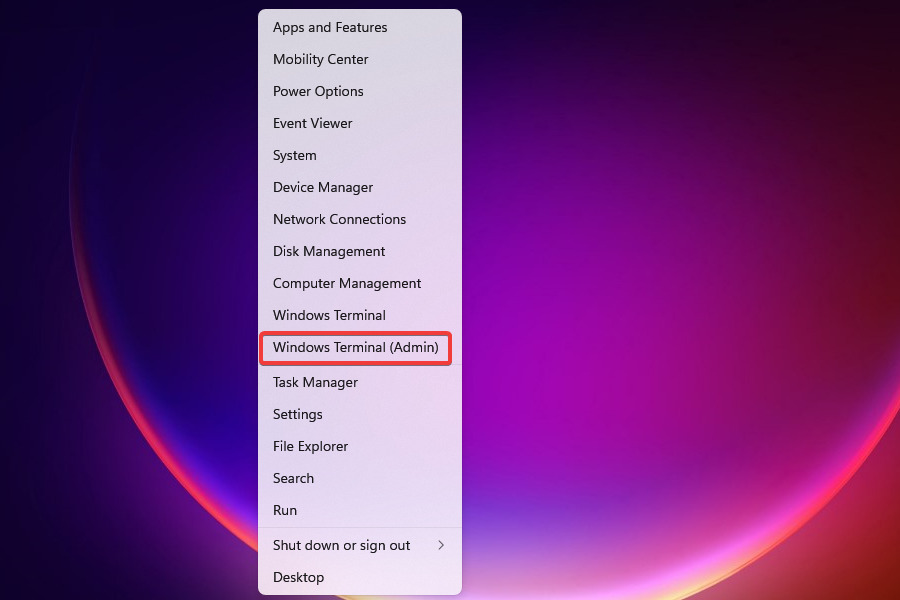
  1. Launch the Power User/Quick Access menu, and select Windows Terminal (Admin) from the list of options that appear.Launch Windows Terminal to fix when stuck on tablet mode
  2. Click Yes on the UAC (User Account Control) prompt that appears.
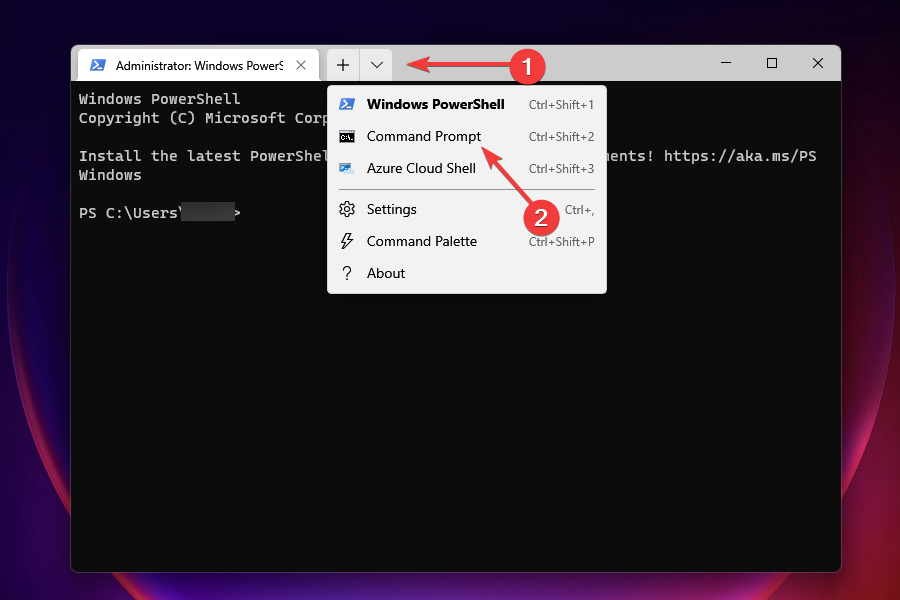
  3. Click on the downward arrow at the top and select Command Prompt from the list of options. Alternatively, you can press Ctrl + Shift + 2 to directly launch the Command Prompt tab.Command prompt
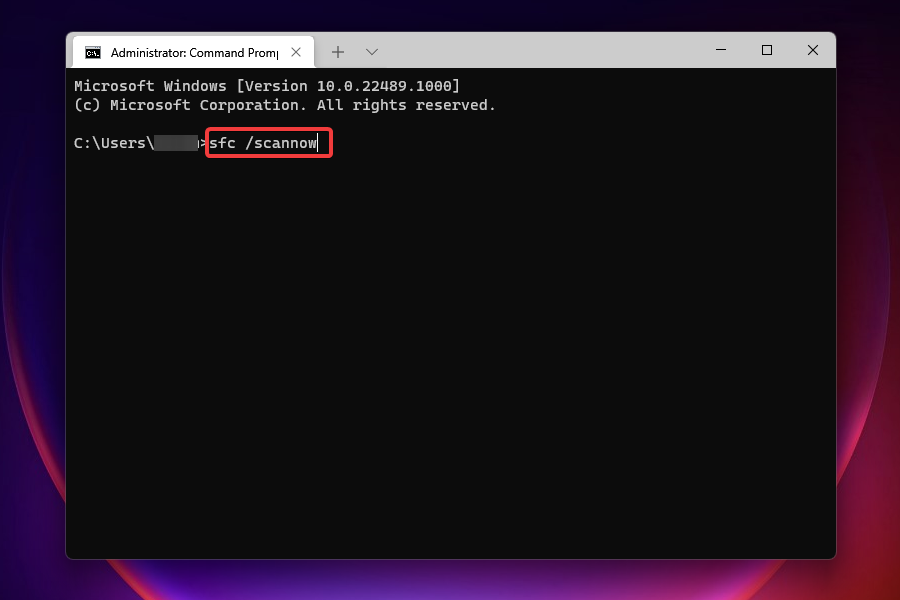
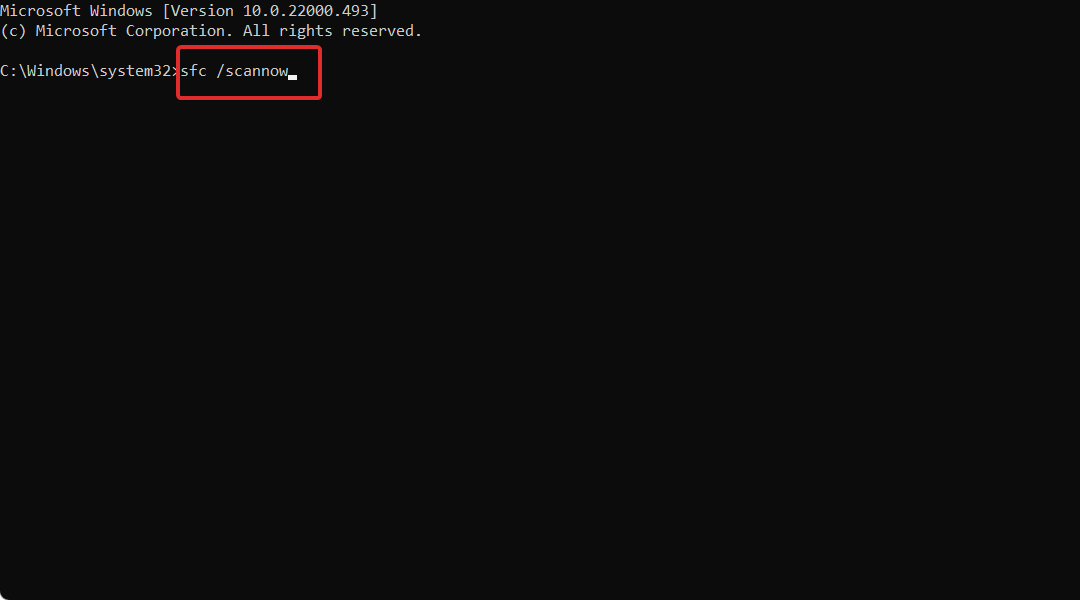
  4. Next, type/paste the following command, and hit Enter to run the SFC scan:sfc /scannowRun SFC scan
  5. After the scan is complete, restart the computer, and check if the Windows 11 stuck in Tablet Mode issue is resolved.

If you’re looking for an effort-free alternative, you can try a dedicated repair tool because it can run an in-depth scan of your PC system and automatically find and repair all malfunctioning or missing files.

5. Perform a system restore

  1. Click on the Start button in the Taskbar to launch the Start menu.
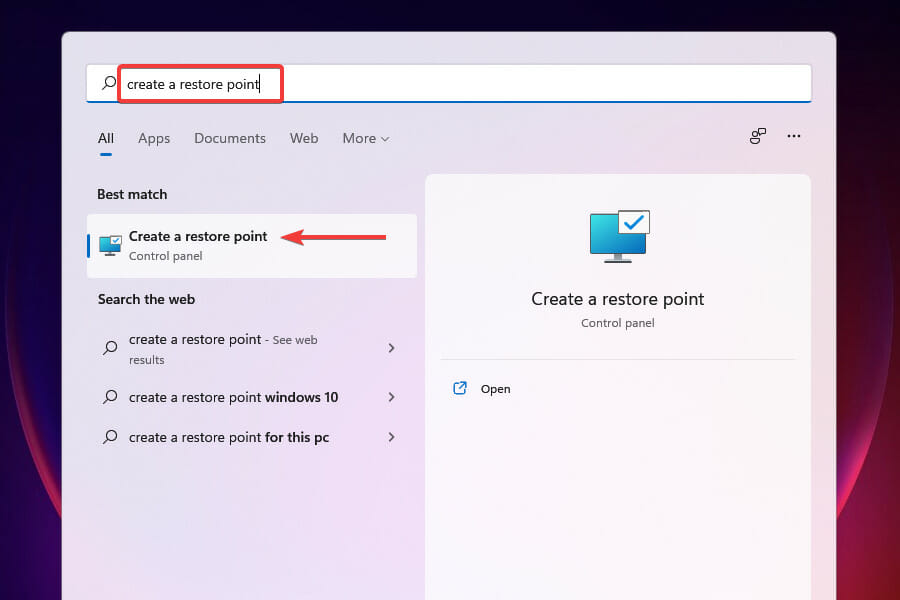
  2. Enter create a restore point in the text field at the top, and click on the relevant search result that appears.System Restore to fix windows 11 stuck in tablet mode
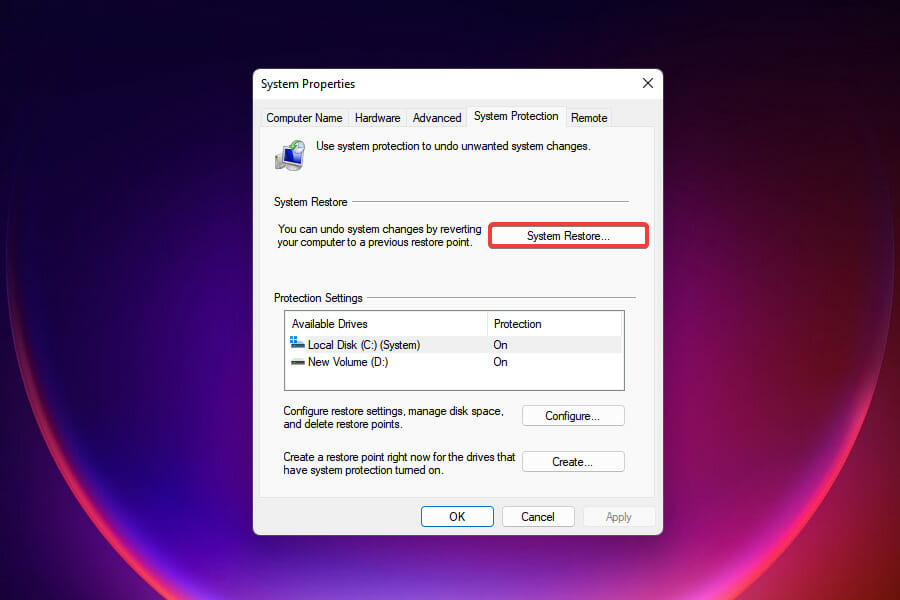
  3. Next, click on the System Restore button.System restore
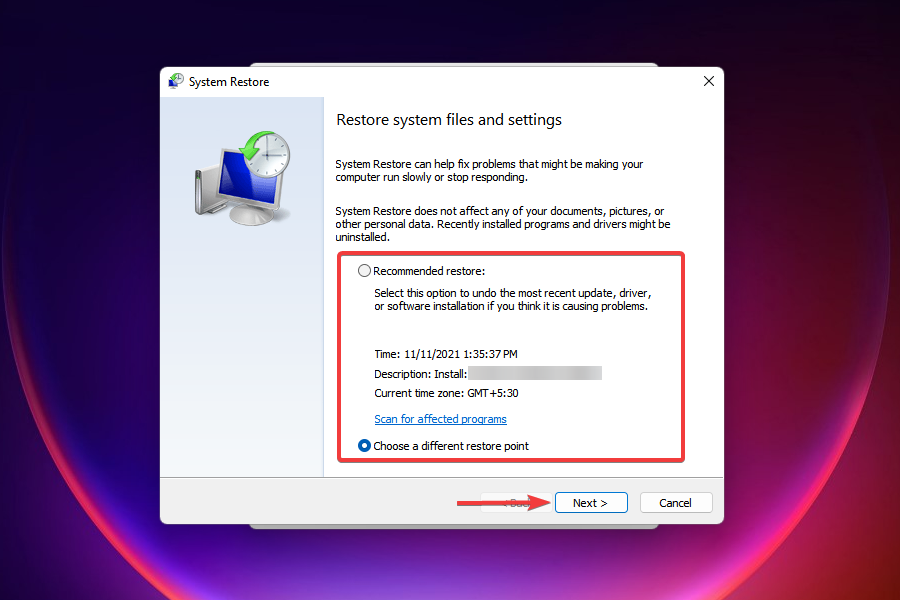
  4. Now, you can either proceed with the Recommended restore point or tick the option for Choose a different restore point to manually select one, and then click on Next. We choose the latter to help you get acquainted with the process.Choose a restore point
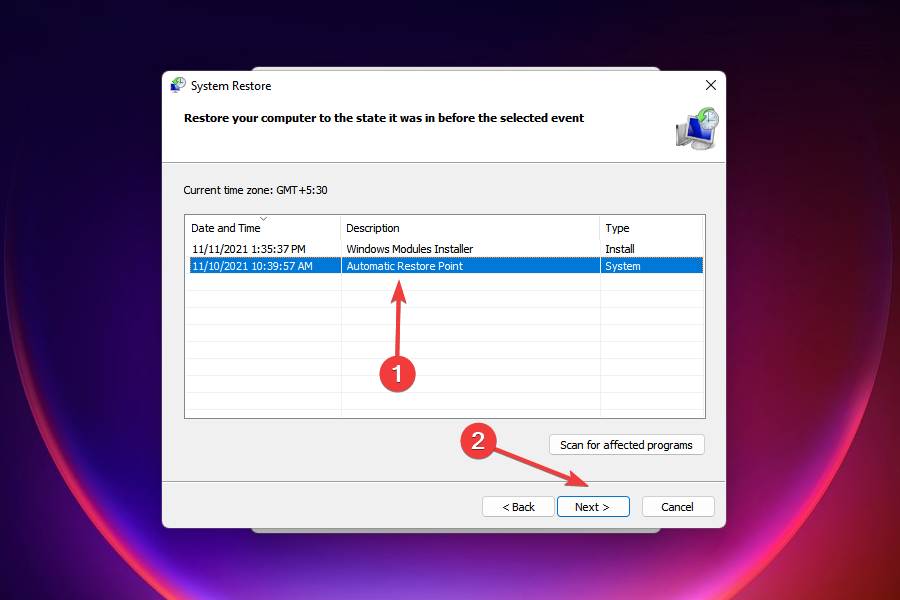
  5. Now, select a restore point from the ones listed here, and click on Next.Select restore point
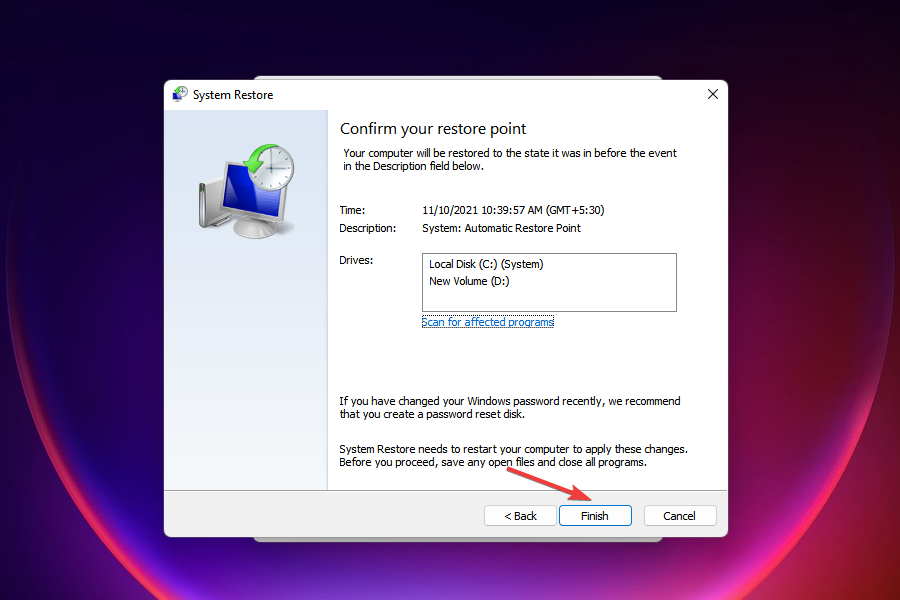
  6. Finally, review the restore settings and click on Finish to start the process.Start restore process to fix stuck on tablet mode issue in Windows 11

What is the difference between Windows 10 and Windows 11 Tablet Mode?

  • In Windows 10, this feature can be enabled manually at any time, while on Windows 11 it is activated automatically.
  • Windows 10 Tablet Mode forces users to use apps in full screen and brings back the full-screen Start Menu.
  • Windows is more intuitive and it doesn’t change user experience as much, but it makes icons larger and easier to tap on a touchscreen.

To learn more about the differences between the two systems check our comparison of Windows 10 and Windows 11.

How do I change to desktop mode in Windows 11?

Due to the nature of Windows 11, the only way to switch back to desktop mode is to set your device in landscape mode or to attach a keyboard or keyboard dock.

To learn more, we suggest reading our guide on Windows 11 Tablet Mode.

You can apply these methods when Windows 11 is stuck in Tablet Mode. In case these tips don’t work, you can always reset the system to its factory settings, a sure-shot fix for almost all issues with the software.

This isn’t the only issue you can encounter and many reported that the touchscreen is not working in Tablet Mode, but there’s a way to fix it.

Tell us which fix worked for you and the experience with Tablet Mode in Windows 11 in the comments section below.

Windows 10 Backup Not Working/ System Image Fails [FIXED]

Having a system backup is always useful, especially if your system gets corrupt or damaged.

Although the system Backup tool in Windows 10 is a great feature, it can sometimes fail to work on Windows 10, so let’s see how to fix it.

Why is Windows 10 Backup not working?

There are a lot of reasons why the Windows 10 Backup might not work. Here are some of the most common causes:

  • Corrupt system image – If something damaged the backup image, the system will not be able to finish the backup.
  • Not enough space on disk – If you’re performing a local backup, you must ensure you have enough space on the designated drive for the backup.
  • Older backup files are preventing backup – The WindowsImageBackup folder holds older backup files that are interfering with the new one. Try deleting the folder using one of the solutions below.
  • The source drive is not suitable for backup – If you’re using an external drive for backup and it’s a brand new disk, it needs to be formatted before proceeding with the backup.
  • Bad connection with the network drive – In case you’re making a backup on a network drive, make sure you have a good connection with it. A poor connection will result in the backup failing.

Our readers have reported other instances of this error including Windows 10 backup error 0x807800c5, Windows 10 backup fails to complete, Windows 10 backup did not complete successfully, Windows 10 backup to network drive fails, and more.

Rest assured that by using the solutions below, you will be able to fix all these problems.

How to fix system backup problems in Windows 10

Before going through the more complex solutions, let’s crosscheck some quick methods to fix this issue:

  • Disable third-party disk tools – It was reported that certain disk tools can cause problems with system backup, therefore if you’re using any disk optimizers or disk cleaning tools make sure to disable them before trying to create a system backup.
  • Use a USB 3.0 hub – Few users reported that using USB 3.0 external hard drives can cause problems due to USB 3.0 drivers. In order to avoid these issues, it’s advised to use a USB 3.0 hub in order to connect your external drive.
  • Set your background to solid color – It might seem unusual, but a few users reported that system backup issues can be caused if your background is set to Slideshow. You can change that setting from the Personalization menu.

If none of the above tweaks worked, start performing the solutions below in this exact order.

1. Delete the WindowsImageBackup folder

  1. Press the Windows key + E to launch Windows File Explorer.
  2. Navigate to the following location on your system drive: C:/System Volume Information
  3. Now, select the folder and delete it.

Sometimes you won’t be able to create system backup due to previous backup files, and in order to fix this problem, you need to delete those files.

To do that, locate and delete WindowsImageBackup folder. If you want to save your previous backups, you can also move them from WindowsImageBackup to a different folder.

Note that by default, you will not have access to this folder. You will need to change the ownership of the folder first.

2. Format your external hard drive

  1. Open This PC and locate your external hard drive. Right-click it and choose Format.
    format-hard-drive
  2. When the Format window opens, check Quick Format option and click the Start button. This process might take a minute or two, so be patient.

This is a prerequisite before creating a system backup image on an external hard drive. Also, before formatting your external hard drive make sure to move any files from it to a safe location.

After your external hard drive has been formatted, try creating the system backup on it again.

3. Delete EFI System Partition and Recovery Partition

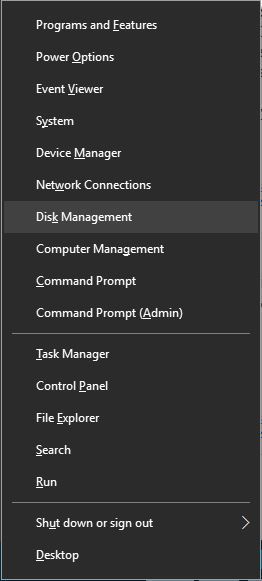
  1. Press Windows key + X and select Disk Management from the menu.
    disk-management
  2. When Disk Management opens, locate the hard drive on which you wish to store your system backup.
  3. You should see EFI System Partition and Recovery Partition for that hard drive in Disk Manager. Delete them both.

In some cases, when you upgrade to Windows 10 or install it on a new hard drive, certain partitions from previous versions of Windows might still be present on your computer causing System Backup to fail.

In order to fix this, it’s advised that you remove EFI System Partition and Recovery Partition.

After deleting these two partitions, you should be able to successfully create a system backup on that hard drive.

4. Turn on System Protection

  1. Press Windows key + S and type system restore and choose Create a restore point from the list of options.
  2. Click the System Protection tab and select Configure below.
  3. Select Turn on system protection and click Apply and OK to save changes.

We have listed this solution because some users claim that in order to create System Backup, System Protection must be enabled on your PC.

Also, in the Disk Space Usage section move the Max Usage slider to the left to about 10-15%.

A few of our readers reported that Max usage was set to 100% on their computer by default and that was the main culprit for system backup failure.

5. Turn off System Protection and delete restore points

  1. Press Windows key + S and type system restore and select Create a restore point from the results.
  2. Click the System Protection tab and select Configure below.
  3. Make sure to select Disable system protection, then click the Delete button to delete previous restore points.
  4. Repeat these steps for all your hard drivers.

Some of our readers managed to fix the problem by disabling the System Protection and deleting all the restore points, as shown in the solution above.

After you’ve disabled system protection and deleted previous restore points you should be able to create a system backup.

6. Use chkdsk command

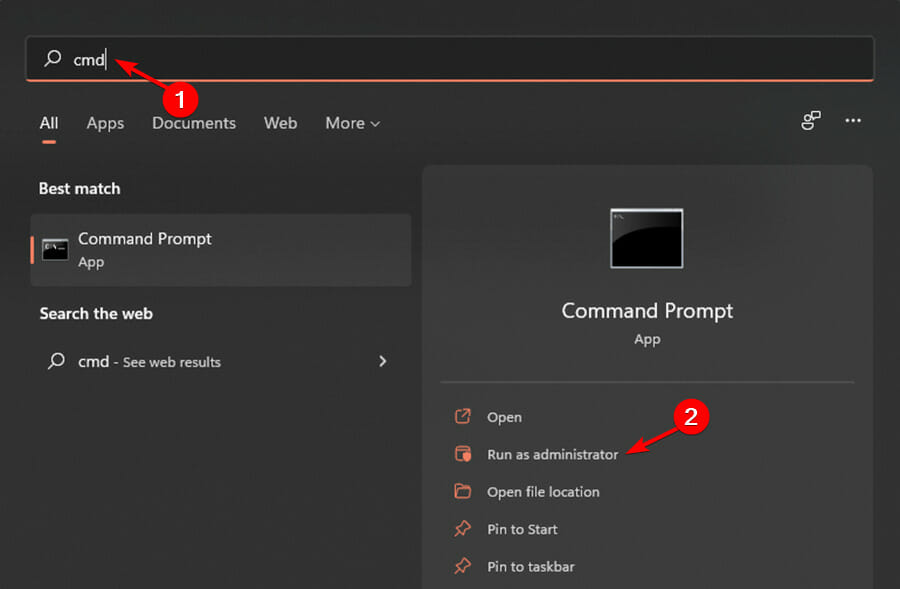
  1. Press the Start button, type cmd, and select Run as administrator from the results.
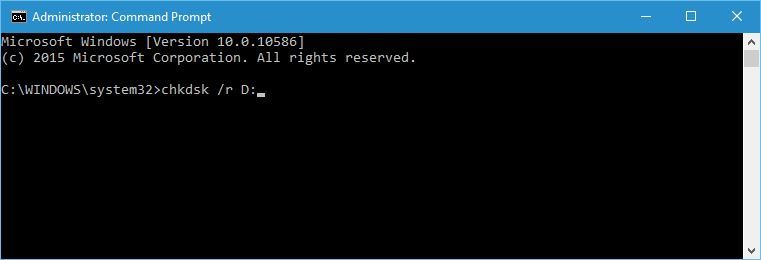
  2. When Command Prompt opens, type the following command where D: is the drive partition (change it accordingly to your own letter) and press Enter to run it: chkdsk /r D:
    chkdsk-cmd
  3. Wait for the process to complete and repeat the same process for all hard drive partitions.

We have to mention that you might be unable to run chkdsk command on drive C, and you’ll be asked whether you want to scan drive C the next time your system restarts.

Press Y (Yes) and restart your computer in order to scan and check drive C.

If your hard drive contains corrupted files, a system backup will fail. This is why using the chkdsk command should repair them.

7. Use diskpart to remove the EFI partition

Note icon NOTE
We advise you to be extremely careful while using this method because you can permanently delete your important files.
  1. Click the Windows button, type cmd, and select Run as administrator from the results.
  2. When Command Prompt opens, type diskpart and press Enter.
  3. Type list disk and press Enter. You should see several hard drives available.
  4. Find your hard drive on the list and type the following command and press Enter (make sure that you use the correct number that matches your hard drive): select Disk 0
  5. Now type the following command and press Enter: list partition
  6. Locate the system partition and type the following command (make sure that the number matches your EFI partition): select Partition 1
  7. At this point, we recommend backing up all files from that partition because they will get deleted.
  8. Type the following command and press Enter (this will delete the partition and all files on it): del partition override
  9. Now, you may add the newly created free space to any other disk partition by using the Disk Management tool.

If you install an additional hard drive and install new Windows on it, your previous EFI partition from the old hard disk can remain on your old hard drive and cause you problems with system restore.

Once again, be extremely careful while doing this because you can permanently delete your system files if you’re not careful. Use this solution at your own risk.

System backup is rather important, and if you can’t create a system backup on Windows 10, make sure to try some of our solutions.

We also recommend checking our selection of the best automatic backup tools for Windows 10.

And, if you’ve already tried, do let us know which one worked for you in the comments section below.

How to Open ICA files on Windows 10, Chrome & Edge

Are you in a dilemma about opening ICA files on your Windows 10 PC? While the process might seem tricky, it becomes easy if you have the required know-how.

This post gives detailed information about ICA files and how to open them on your Windows 10 computer.

What is an ICA file?

ICA file is an Independent Computing Architecture file format used by specialized Citrix application servers; this file format contains all the relevant data required for connecting various servers together.

It could also have configuration information linking an application or a desktop server location.

In addition, an ICA file enables you to access virtual desktop servers; hence, ensuring that you bypass the application installation process before use.

Moreover, this helps small business administrators to link various users to access their enterprise software from different locations.

Open ICA files on Windows 10 with these tools

Notepad++

best software to open csv files

Notepad++ is a text-based editor which can be used to open ICA files. This tool is primarily used for source code editing because it supports many programming languages. However, it can open these types of files on Windows 10 computers.

This software gives extra functionality, flexibility, and efficiency. Although, it is a powerful text editor which surpasses other text editors in terms of coding and support for multiple file formats.

On the other hand, the Notepad++ editing tool utilizes the drag-and-drop function and a tabbed document interface for opening multiple files simultaneously. Also, it supports third-party plugins for increased performance.

If you intend to modify ICA files on Windows 10 computers, Notepad++ is the best software for this purpose.

⇒ Get Notepad++

Citrix XenApp

how to open ica files in windows 10

Citrix XenApp can also open ICA files on Windows 10 computers. On the other hand, this program enables simplified management of servers and virtual applications.

Also, it enables unified communications in business for virtual apps.

Citrix XenApp supports ICA file format.  Using this program, you can modify these files on Windows 10 computers.

Also, you can manipulate configuration details on servers and virtual desktops easily using this software. Lastly, the software gives an excellent solution for accessing the ICA file format.

⇒ Get Citrix XenApp

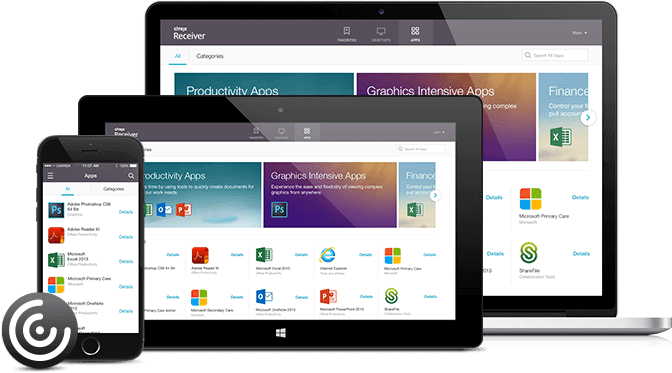
Citrix Receiver

how to open ica files in windows 10

Citrix Receiver is an excellent tool for opening ICA files on Windows 10 computers. The software is very lightweight and easy to install.

In addition, this program enables you to configure, manage, and update contents within the ICA file. Also, it supports all types of ICA file formats.

Meanwhile, this software is recommended for use as it offers flexible and easy setup options. Also, this software has different versions for smartphones, tablets, and Windows desktop versions.

However, to use the program, you must input your email and server address to authenticate the connection with your Citrix Receiver.

⇒ Get Citrix Receiver

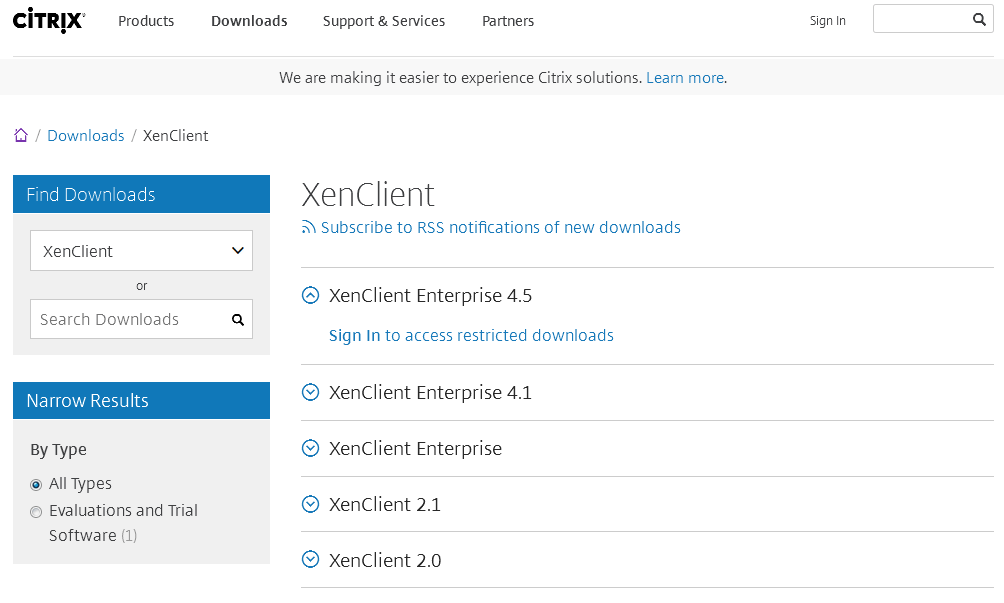
Citrix XenClient

how to open ica files in windows 10

Citrix XenClient is software that enables users to manage virtual servers. This software enables you to create ICA files and save and export them.

In addition, Citrix XenClient makes it easy to open ICA files on Windows 10 computers. Also, you gain access to modify and update already-existing ICA files. However, this program has limited features, but it can be used to open ICA files on Windows 10 PC.

⇒ Get Citrix XenClient

All the programs listed above would enable you to open ICA files in Windows 10. However, we do appreciate it if you would share your experience with us by commenting below.

Forza Horizon 4 0x89232001 Error: 3 Quick Ways to Fix It

Forza Horizon 4 is one of the popular racing games, first released in 2018. Though it has had its share of success, users face quite a few issues on Forza Horizon 4, including the IPSEC 0x89232001 error.

The error is encountered when users try to connect to an online lobby. Also, a few users reported the IPSEC 0x89232000 error as well. But there are a few quick fixes that will help you get things up and running.

Why am I getting IPSEC 0x89232001 error in Forza Horizon 4?

Here are a few reasons you might be getting the Forza Horizon 4 0x89232001 error:

  • Forza Horizon servers are down: If the Forza Horizon servers are down, you will have trouble connecting to the game and will encounter the error instead.
  • Outdated firmware: An outdated Xbox firmware can also trigger various issues and affect the console’s performance.
  • Misconfigured network settings: Optimal network settings and a stable connection are required to connect to the game’s server, so check if these are properly configured.

How do I fix the Forza Horizon IPSEC 0x89232001 error?

Before we head to the solutions that require making complex changes, here are a few tricks that might work:

  • Restart the Xbox console and the modem/router it’s connected to.
  • Check if Forza Horizon is down using a reliable platform like Downdetector. In case it is, wait for a while until the servers are up and running.
  • Ensure there are no security settings configured on the router that might conflict with the connection.

If these don’t work, the solutions listed next should.

1. Modify the network settings

  1. Open the Settings on your Xbox, head to the General tab, and choose Network settings from the right.network settings
  2. Select Advanced settings.advanced settings to fix forza horizon 4 0x89232001
  3. Now, choose the Alternate MAC address option.alternate mac address
  4. Select the Clear button.clear
  5. Once done, choose Restart for the changes to come into effect.restart to fix forza horizon 4 0x89232001
  6. After the Xbox restarts, head to Advanced settings, and then choose IP settings.ip settings
  7. Now, choose Automatic here.change IP settings to forza horizon 4 0x89232001
  8. Similarly, go to DNS settings, and set it to Automatic as well.
  9. Finally, choose Automatic for Alternate port selection.
  10. Now, relaunch the game.

Once done, you shouldn’t encounter the Forza Horizon 4 IPSEC 0x89232001 error anymore. This solution has worked for several users. In case the problem persists, head to the next solution.

2. Change the DNS server

  1. In your Xbox settings, head to Network settings under the General tab.network settings to fix forza horizon 4 0x89232001
  2. Choose the Advanced settings option here.advanced settings
  3. Select DNS settings.DNS settings
  4. Next, choose Manual.Manual DNS to fix forza horizon 4 0x89232001
  5. Now enter the following DNS addresses:
    • Primary DNS: 8.8.8.8
    • Secondary DNS: 8.8.4.4

Once done, save the changes, and you should be able to play Forza Horizon 4 without encountering the 0x89232001 network error on Xbox.

3. Update the Xbox firmware

  1. Launch the Xbox Settings, head to System, and then select Updates.updates
  2. Choose the Update console option.update console to fix forza horizon 4 0x89232001
  3. If an update is available, click on the Start Update button.start update

After the update is installed, things should be up and running, and the Forza Horizon 4 error 0x89232001 should disappear.

Now that you have fixed the error, also check the best Xbox games and try your favorite one from the list today.

For any other queries or to share a solution that’s not listed here, drop a comment in the section below.

Can’t Set up Pin on Windows 10: Why & How to Fix

PIN sign-in is a convenient way to log in to your computer through a four-digit code that is easy to remember and use as the primary sign-in option on your Windows computer.

However, there are times when Windows 10 won’t let you add a PIN, or it is just not working anymore, as this user reports:

For the past few days, the login with PIN on Windows 10 Pro is not available anymore on my laptop.  On the sign-in options screen I can only add a PIN but not remove or change it. When try to add a PIN after Password confirmation it asks to confirm my identity with a PIN and then nothing happens anymore.  […] If I instead enter a PIN select forget PIN it only open the dialog to go to sign-in option screen to reset my PIN.  

Similar situations include:

  • The inability to add or update your PIN
  • Adding a PIN but not being offered the sign in option on the login screen
  • PIN sign in option is offered, but the system rejects your PIN
  • PIN sign in is stuck, and you need to reboot or use a different login option
  • The PIN was added, but after an update, it was broken

If one of these issues applies to your case, you can try the solutions listed below to resolve it.

What can I do if Windows won’t let me add a PIN?

1. Set up PIN log in

  1. Go to the search box and type CMD, then press Enter.
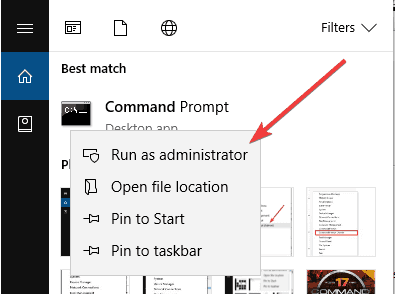
  2. Pick Command Prompt, right-click it, and select Run as administrator.
  3. In the Command Prompt (Admin) black screen, type gpedit.msc and press Enter.
  4. Double-click on Computer configuration.
  5. Click Administrative Templates.
  6. Double click System.
  7. Double-click Logon.
  8. Double-click Turn on convenience PIN sign in.
  9. Select Enable.

2. Alter Permissions

  1. Click Start and select File Explorer.
  2. Click View.
  3. Click Show/Hide and check Hidden Items.
  4. Go to the following folder: C:\Windows\ServiceProfiles
  5. Double-click LocalService.
  6. Follow the path below: AppData\Local\Microsoft
  7. Right-click on the NGC folder.
  8. Select Properties.
  9. Go to the Security tab.
  10. Click Advanced.
  11. Click the Change link against Owner under Advanced Security Settings for NGC window.
  12. Take ownership of the NGC folder.
  13. Check Replace owner on sub-containers and objects, and replace all child object permission entries with inheritable permission entries from this object.
  14. Click Change permissions.
  15. Click Add.
  16. In the permission entry for NGC, click Select a principal.
  17. Enter SYSTEM as the object name.
  18. Click Check Names and click OK.
  19. Check Full Control under Basic Permissions and click OK.

Check if you can add a PIN after following these steps.

3. Disable or change your security software

Sometimes Windows 10 won’t let you add a PIN when your security software (antivirus or firewall) is blocking the powershell.exe after a Windows update.

Allow the program/unblock it via your antivirus program setting, and see if you can go straight to your account settings and add a PIN.

Not every security software behaves restrictively, though. While most such programs are designed to have minimal impact, some are more successful than others.

One such software is the ever-reliable ESET NOD32 antivirus. ESET NOD32 is a top-notch tool that offers complete online and offline security without messing with your PC.

It employs uses the latest technology to dig out the most stubborn virus on your PC. What’s more, this software can detect even the most hidden virus before it can harm your PC.

If you are looking for a lightweight antivirus that takes a no-nonsense stand against viruses without affecting your activities, you should give ESET NOD32 a try.

4. Reset ACLs on NGC folder

  1. Go to the search box and type CMD, then press Enter.
  2. Pick Command Prompt, right-click it, and select Run as administrator.
  3. In the Command Prompt (Admin) black screen, type this command: icacls C:\Windows\ServiceProfiles\LocalService\AppData\Local\Microsoft\Ngc /T /Q /C /RESET
  4. Press Enter.
  5. Close Command Prompt.
  6. You might need to add a new PIN now, which should work as expected.

5. Use a local account

  1. On the login screen, click on the Sign-in options.
  2. Try to login to Windows with your Microsoft account or local account Password.
  3. Click on the Windows icon in the bottom-right corner.
  4. At the top of the Start Menu, click on your account
  5. Select Change account settings
  6. On the left-side panel of Accounts settings, select Sign-in options
  7. Under the PIN option, click on Remove.
  8. Click Remove when you get Are you sure you want to remove your PIN prompt.
  9. A Log-in Box will open for you to re-enter your password. Enter your password, then click OK.
  10. You will be returned to the Sign-in options page, where you can add a PIN code again.
  11. Enter your new PIN and confirm it.
  12. Click OK to reset your new PIN.
  13. Restart your PC and sign in with your new PIN to confirm.

6. Login using another user account

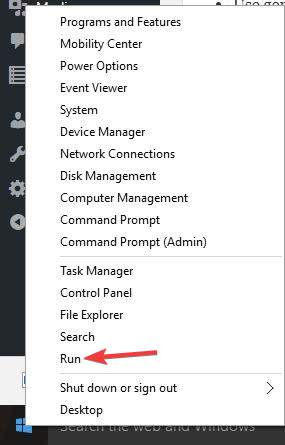
  1. Right-click on Start.
  2. Select Run.
  3. Type control userpasswords2 and press Enter.
  4. Select your account.
  5. Click Reset Password.
  6. Enter a new password, then click OK. Try logging into the account.

For computers connected to a Domain, contact your Network Administrator. There might be an issue with Kerberos authentication, or the version of Windows Server is not compatible.

Restart your computer a few times to see if you can log in. There might be a small delay also, so wait a few seconds, then try again. Use the preview button to make sure you entered the right characters.

7. Clear TPM

  1. In the search box, type tpm.msc, and press Enter.
  2. Click Clear TPM. (It will reboot you to a part of the system’s UEFI/BIOS).
  3. Press F1 to clear TPM.
  4. Click Start and select Settings.
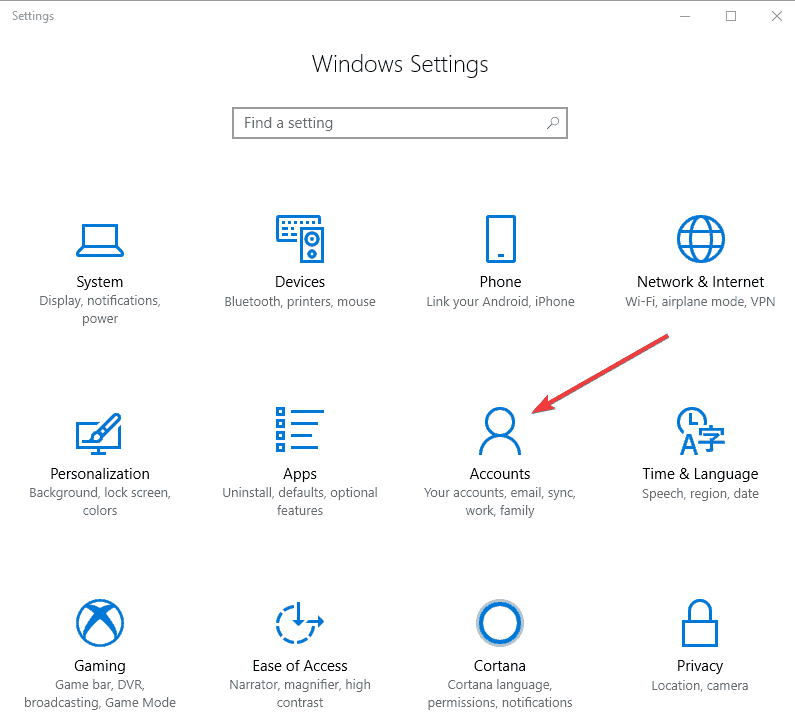
  5. Click Accounts.
  6. Go to the Add PIN function and select it to see if it works.

8. Run an SFC scan

  1. Go to Start and type CMD.
  2. Right-click Command Prompt and select Run as Administrator (elevated command prompt).
  3. Type the command below and hit Enter: sfc /scannow
  4. Wait for the process to finish.

The result should show one of these three things:

  • Windows did not find any integrity violations (a good thing)
  • Windows Resource Protection found corrupt files and repaired them (a good thing)
  • Windows Resource Protection found corrupt files but could not fix some (or all) of them (not a good thing). If you get this message, run DISM as described below

9. Run the DISM tool

fix won’t accept a PIN at log in
  1. Click Start.
  2. In the search field box, type CMD.
  3. Click Command Prompt in the search results list.
  4. Type the following commands and press Enter after each: Dism /Online /Cleanup-Image /ScanHealth Dism /Online /Cleanup-Image /CheckHealth Dism /Online /Cleanup-Image /RestoreHealth

These commands will scan for missing components, check for missing or broken files and correct any causes of the Windows 10 desktop being slow to load issue respectively.

Note: The DISM tool usually takes 15 minutes to complete. However, sometimes it may take longer. Do not cancel when it is running. You may want to re-run SFC to check if the repair is successful.

The Deployment Image Servicing and Management (DISM) tool helps fix Windows corruption errors when Windows Updates and service packs fail to install due to corruption errors.

Before you leave, verify if you using an organization-based account and get rid of the Your organization requires you to change your PIN message.

Did any of these solutions help you add a PIN again? Let us know in the comments section below.

Microsoft 365: Account Temporarily Locked to Prevent Unauthorized Use

Getting a Your account is temporarily locked to prevent unauthorized use. try again later, and if you still have trouble, contact your admin error? We got you.

In some cases, your Microsoft account can get blocked for no reason. In today’s guide, we’ll show you how to get it reinstated.

How can users fix blocked Office 365 accounts?

Before we start fixing this issue, be sure to try the following:

  • Wait for 15 minutes – When administrator makes changes to your account, it takes about 15 minutes for the changes to apply properly. It’s possible that some changes were made and that they aren’t applied yet to your account.

1. Unblock account as an administrator

Note icon NOTE
This solution only applies to Office 365 administrators.
  1. Open Admin Center.
    Admin center microsoft office account blocked
  2. Once you open it, expand Users and choose Active users on the left.
  3. Then select the blocked user in the list of users.
  4. After that, from the top, choose Block sign-in.
  5. Once the Block sign-in screen appears, select Block this user from signing in and save changes.
  6. Lastly, in the Unblock sign-in screen, uncheck Block this user from signing in and save changes.

Alternatively, you can just choose Unblock sign-in feature and unblock the user, but sometimes blocking and unblocking can also help if your Microsoft Office account is blocked.

If you’re getting Your account is temporarily locked to prevent unauthorized use try again later, and if you still have trouble, contact your admin message, unblocking the user from admin panel usually works.

2. Fill Out the MS account services reset form

  1. First, open the MS Account services form.
  2. Next, fill in the form properly.
  3. After that, click Submit once you’re done.

If you get Your account is temporarily locked to prevent unauthorized use message, perhaps reinstating your Microsoft account is the best course of action.

3. Reset user password

Note icon NOTE
These steps apply on to Office 365 administrators.
  1. Open the Admin panel.
  2. Expand the Users section and select Active Users.
  3. Locate the affected user and click the key icon next to its name.
  4. Lastly, enter the new password od generate a random one and choose Reset.

Resetting the user password can also help with if your Microsoft Office account is blocked, so be sure to try it.

So, that is how users can unblock Office 365 accounts. If you have more issues, our guide on how to fix Office account errors can offer more assistance.

Did you find a different solution for this problem? Share it with us in the comments below.

How to set up IFTTT on Microsoft Teams in 6 easy steps

IFTTT (If This Then That) is a service that enables users to create simple conditional statements, called applets, that trigger actions based on events. You can use IFTTT to automate tasks and connect different services and devices together. Microsoft Teams is a collaboration platform allowing users to communicate and work together.

With the IFTTT on Microsoft Teams integration, you can set up applets that trigger actions in Teams based on events from other services such as weather, social media, and more.

IFTTT on Microsoft Teams

To do this, you will need to create an IFTTT account and then set up “applets” (IFTTT’s name for its automation recipes) that connect Microsoft Teams (or another service) to the other apps and services you want to use.

  1. Go to the IFTTT website (ifttt.com) and create an account if you don’t already have one.
  2. Once you’re logged in, click the Create button to create a new IFTTT applet. Alternatively, you can find the applet (or service) you want to use by typing in the search box or picking one of the IFTTT on Microsoft Teams applets already provided.ifttt on microsoft teams
  3. In the “If This” section, click the Add button to add a trigger.  ifttt on microsoft teams
  4. Search for and find the trigger you want to use with IFTTT on Microsoft Teams. For example, you could use the “Weather” service to set the trigger to send the daily forecast weather report. Fill in the details for the trigger and click Create trigger to create the trigger. ifttt on microsoft teams
  5. In the “Then That” section, click the Add button to choose the action you want to take. For this example, and pick the Microsoft Teams service, configure the Teams action you want to take, or suggest a new one, then click Create action when you are finished. ifttt on microsoft teams
  6. Customize the settings for the Microsoft Teams applet and give it a name, then click the Finish button to create it.

That’s it! Your applet is now set up and will run automatically in the background, triggering the event you specified whenever the conditions are met.

At the time of this guide, there are no IFTTT triggers available for Microsoft Teams. However, there are plenty of Teams triggers available to use in Power Automate.

If you want to customize the settings of your applet, you can go back to the “My Applets” tab in the top menu and select the applet you just created. From there, you can edit the settings, turn the applet on or off, or delete it entirely.

Windows 11 Backup Error: Causes & How to Fix it

The Windows 11 backup error is quite common, but it isn’t the end of the world. Like any software, Windows 11 built-in backup feature is not perfect, and may sometimes encounter different kinds of problems. 

For example, the backup may be stuck at 99% without moving forward; the backup fails with an error code or Windows 11 starts backup automatically without your consent.

What causes the Windows 11 backup error?

The Windows 11 backup error can be caused by a number of reasons. Some of the common reasons include:

  • Insufficient disk space – If you are encountering this problem, try checking the available disk space on your target drive. You can resolve the issue by either clearing out some of the existing files on your target drive or by using a larger drive.
  • Windows update-related error – A recent Windows update may be causing problems with your backup. If it was working fine before, then you should uninstall the update.
  • Corrupt system files – This issue can occur if you are trying to back up files that are corrupted. If this is the case, you will need to find a way to repair those files.
  • Issues with the driver or device – If you are using an external drive to perform the backup procedure, try using another one to see if it resolves the issue.
  • Missing or corrupt registry keys or files – If a registry key or file is missing or corrupt, the backup will fail with an error message. Make sure all the automatic updates have been completed and check for any software that may have been installed.

If you experience any of the above errors, proceed to our advanced troubleshooting techniques and attempt to remedy the situation.

How can I fix Windows 11 backup errors?

1. Run the DISM command

  1. Press the Windows key, type cmd on the search bar, and click Run as administrator.
  2. Type in the following command and press Enter: DISM /Online /Cleanup-Image /ScanHealth

2. Run System file checker

  1. Press the Windows key, type cmd on the search bar, and click Run as administrator.
  2. Type in the following command then press Enter: chkdsk:/f
  3. Next, type in the following command and press Enter: sfc /scannow
    sfc-scannow windows 11 error system thread exception not handled

3. Update outdated drivers

  1. Press the Windows key, search Check for updates, and click Open.
  2. Select Advanced options.
  3. Go to Optional updates.
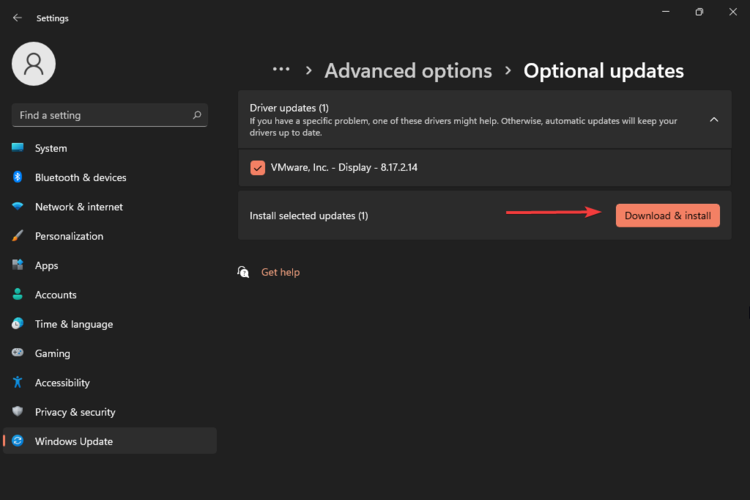
  4. Select Driver updates and proceed to Download & install then restart your system.

You can also opt for an automatic driver update tool, created to help you solve problems with your computer and save you a lot of time. Outbyte Driver Updater will automatically download and install outdated drivers for all your hardware devices.

4. Enable sync on Windows backup

  1. Press the Windows key and click on Settings.
    open settings
  2. Navigate to Accounts and select Windows backup.
  3. Select Manage sync settings.

After completing the above steps, do not hesitate to check if the problem is finally solved.

5. Delete the WindowsImageBackup folder

  1. Press the Windows key + E to start File Explorer and navigate to the following location: C:\System Volume Information\
  2. Locate the WindowsImageBackup folder and delete it.

6. Uninstall recent system updates

  1. Press the Windows + I keys simultaneously to open Settings.
    open settings
  2. Navigate to Windows Updates then select Update history.
  3. Click on Uninstall updates.
  4. Select the most recent update then click Uninstall.

If Windows backup has failed, it could be caused by a new update of the operating system or your antivirus. You will need to disable your firewall temporarily or uninstall the recent update and see if the problem persists.

Some of our readers rightfully asked us: Is Windows 11 Backup any good?

Windows Backup is the most basic backup solution available to Windows users but it’s definitely better than nothing. It’s free, it’s easy to use, and it works well.

It works great for backing up documents, music, videos, and photos both locally (hard drive) and externally (USB). It also will back up system files which allows you to restore from scratch in the event of a catastrophe or if you upgrade or replace your hard drive.

However, it does have some limitations. First of all, you need some space where the backup can be stored, and it needs to be accessible from the PC that you want to backup.

Secondly, the program has very limited functionality when it comes to scheduling backups or backing up network drives and libraries.

If you are looking for advanced backup software, check out our comprehensive guide on the same.

Also, feel free to refer to our guide on how to fix Windows backup errors if you run into any additional problems.

We’d love to hear from you so share your thoughts and any other suggestions in our comments section below.

100% Disk Usage Error in Windows 10: 6 Easy Fixes to Use

Regulating your disk usage is one of the ways to keep your PC running optimally. However, apps can sometimes record 100% disk usage on Windows 10 due to their activities or the registry.

While this is not advisable, it is still not out of the norm if it is for some time. However, users complain that the registry and system processes register high usage for prolonged periods.

These processes typically use little resources and are essential to the PC. So, this high disk usage denotes a problem. This guide will help you fix this abnormal registry 100 percent disk usage on your PC.

What causes 100% disk usage?

The possible reasons for the registry’s high disk usage issue are so many that it might be hard to pinpoint them all. But these are some of the common ones:

  • Background app activities: Some background apps and processes can cause the registry and system to use 100% disk. This can be because they use the system resources to run resource-intensive processes.
  • System services: Some critical system services like Windows Search, Prefetch, and Superfetch have also been found to cause this problem.
  • Faulty hard disk: If your hard disk is defective, it might misbehave and give a false alarm.
  • Issues with OS installation: In some cases, the cause of this problem can be hard to trace. To be on the safe side of things and rescue your PC from damage, you must perform a clean install of Windows 10.

How can I fix 100% disk usage on Windows 10?

1. Disable some system services

  1. Press the Windows key, type cmd, and select Run as administrator under Command Prompt.
    cmd admin registry high disk usage
  2. Type the command below and hit Enter: net stop Windows Searchnet windows
  3. Now, press Windows + R, type services.msc, and click OK.
    service.msc
  4. Double-click on the Windows Search service to open its properties.
    windows search
  5. Set the Startup type to Disabled, click the Stop button, followed by OK.
    disabled registry high disk usage
  6. Similarly, disable the following services:
    • SysMain (previously named Superfetch)
    • Windows Update

While most Windows services are there to help improve your user experience, they can sometimes lead to the registry registering high disk usage. To help curtail their effects, you need to disable them.

2. Clean boot your computer

  1. Press Windows + R, type msconfig, and click OK.
    msconfig registry high disk usage
  2. Select the Services tab, check the Hide all Microsoft services check box and click Disable all.
    hide services
  3. Go to the Startup tab and click Open Task Manager.
    startup
  4. Right-click each startup item, and select Disable.
    disable
  5. Return to the System Configuration window, click Apply, then OK, and restart your PC.
    apply registry high disk usage

The registry can register 100 percent disk usage on Startup due to the activities of the startup apps and processes. A clean boot disables these apps and leaves only the needed Microsoft services.

Should this fix the issue, you can now start enabling the apps and processes in batches to know the problematic one

3. Delete pending or failed problem reports

  1. Press the Windows key, type problem report, and select View all problem reports.
    problem registry
  2. Right-click any pending report and choose the Delete option.
    delete report
  3. Now, restart your PC.

Your PC sends reports of crashes and issues to the report center. However, too many reports in the queue to be sent can cause the registry or system to register high disk usage.

Thus, you need to delete these reports to relieve the registry and system of the task.

4. Run Disk Check

  1. Press Windows + R to open Run, type cmd, and hit Ctrl + Shift + Enter.command prompt
  2. Paste the following and hit Enter: chkdsk /f /rchkdsk registry high disk usage
  3. Wait for your computer to process the command

The Registry high disk usage might not just be a software issue. It can also be due to problems with your hard disk. Running the Check Disk utility will check the disk for possible problems and try to fix them.

5. Run Disk Cleanup

  1. Press Windows + S, type Disk, and select the Disk Cleanup option.
    disk registry high disk usage
  2. Now, select a drive from the dropdown menu and click on OK.drive
  3. Check the boxes for Downloaded Program Files, Temporary Internet Files, Temporary Files, Recycle Bin, and Thumbnails, and click on OK to clean them up.choose files
  4. Choose Delete Files in the confirmation prompt that appears.delete files
  5. Once done, again open Disk Cleanup, and this time, click on Clean up system files.
    clean up
  6. Again, choose a drive to proceed.system files
  7. Now, select the files that you want to remove and click on OK.delete system files

Too many junk files on your hard disk might lead to unnecessary issues like the registry high disk usage. Using the Disk Cleanup tool helps to remove these files and optimize the memory.

6. Perform an in-place upgrade

  1. Go to the Windows 10 page, and click on Download Now to get the Windows 10 installation media.
    download now
  2. Run the downloaded file.
  3. Tick the radio for the Upgrade this PC now option and click the Next button.
    upgrade
  4. Check that the Keep personal files and apps box is marked on the Ready to Install page. If not, click the Change what to keep option, choose to Keep personal files and app, and finally click on Install.
    change registry high disk usage

If all the fixes above fail to solve the registry high disk usage issue, it might be best to reinstall Windows 10. Performing an in-place upgrade installs the latest OS on your PC without losing your files.

This should eliminate all processes that can be causing this problem.

And this signals the end of this guide. We hope our detailed solutions helped you stop the registry and system from registering high disk usage.

Are you facing a similar issue to the Service Host Sysmain’s high disk usage on Windows 10? Then, check our excellent guide to fix it for good.

If you have any comments or questions, feel free to write them down in the comments below.

Xbox Free Play Days: Assetto Corsa Competizione and more

Xbox Free Play Days returns for another weekend of games for subscribers of Xbox Live Gold and Xbox Game Pass Ultimate to play for free. This week’s Xbox Free Play Days lineup features three games. They will be available from Thursday, January 26th through Sunday, January 29th. Check them out below.

Assetto Corsa Competizione

Born from KUNOS Simulazioni’s long-term experience in recreating top-grade driving simulations, Assetto Corsa Competizione allows you to feel the real atmosphere of the GT3 championship, competing against official drivers, teams, cars & circuits reproduced in-game with the highest level of accuracy ever achieved on console.

Lawn Mowing Simulator

Experience the beauty and detail of mowing the Great British countryside in Lawn Mowing Simulator, the only simulator that allows you to ride an authentic and expansive roster of real-world licensed lawn mowers from prestigious manufacturers; Toro, SCAG and STIGA as you manage your mowing business.

Train Sim World 3 – Deluxe Edition

Master more machines with Train Sim World 3: Deluxe Edition

Wrap up

As part of the Xbox Free Play Days event these games are discounted, so if you try a game you’d like to own this would be the time to buy. Assetto Corsa Competizione is currently 65% off, and Train Sim World 3: Deluxe Edition is 40% off.

Visit the Xbox Free Play Days FAQ page to learn more about the program.

Featured image via GT World Challenge Europe.

Internet is Not Working After a Power Outage: 6 Easy Fixes

Power outages are a common occurrence, and you may end up with a PC that won’t turn on. Another annoying problem is your Internet not working after a power outage. When the power goes out, it’s important to ensure that all of your devices are still connected to the Internet.

If you have been experiencing issues with your Wi-Fi not working after a power outage, then you should follow these steps to get things back up and running as soon as possible.

Why does my router not work after a power outage? 

There are several different reasons why a router is not working after a power outage. Here are some of the most common ones:

  • The router has been disconnected – It takes time for devices to reconnect after an interruption in power because they need to be powered up before they can connect to their network again. 
  • Internet wiring has been damaged – If your Internet is not working after a power outage, your home’s wiring may have gotten damaged. It will need repair by a technician before being restored.
  • Electrical fault – The router may have been disconnected from its main electrical outlet. This could happen if the power at the main breaker or fuse box has been cut off or if there is something wrong with the electrical outlet itself.
  • Faulty cables – The Ethernet cable may not be working because it’s damaged and hence not receiving an IP address from your ISP. That’s why the Internet is not working after a power outage. 
  • Modem/router firmware – If you’re experiencing problems with your modem not working after a power outage, it’s likely that there’s a problem with the firmware.
  • Router has lost its configuration settings – Your router won’t connect to the Internet if it has lost its configuration settings. It will not be able to send out an IP address or other information needed. 
  • Outdated routers – If you have an old router that doesn’t support USB or Ethernet ports, it may take some time before the Internet is restored. You can still use wireless if you have an older model, but if you want to connect wired devices, you need to upgrade your router.

How do I fix my Internet after a power out?

A power outage may not be a serious matter so try the following before escalating to the slightly advanced solutions:

  • Check for any abnormal flashing lights on your router.
  • Verify if the cable is attached properly to both ends of the wire, especially at the outlet where you plug into a power source. 
  • Unplug all cables attached to your computer and router, including network cables and USB devices then plug them in one by one.
  • Test each of the router’s ports with an Ethernet cable and see if you can access the Internet from those ports.
  • Try to update your router firmware.
  • Restart your router.
  • Reboot your connecting devices. Sometimes your laptop can not detect Wi-Fi but your phone can.

1. Check for Internet connection issues

  1. Press Windows + I to launch Settings.settings windows 11
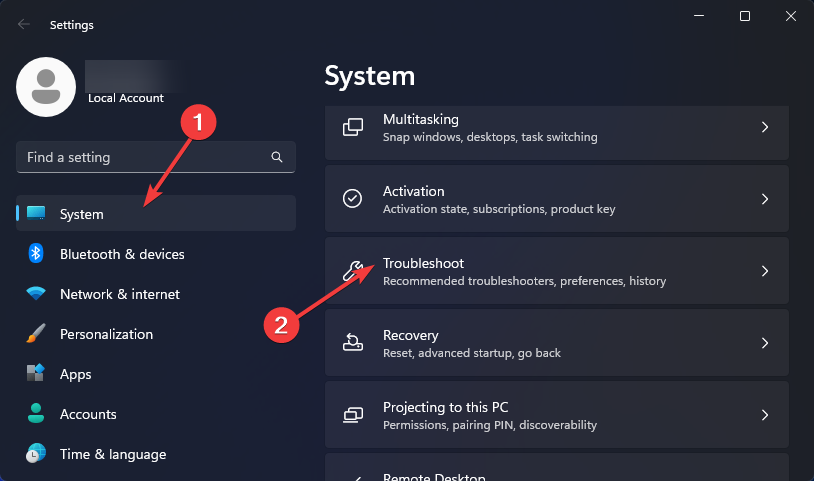
  2. Select System then click on Troubleshoot.Open system troubleshooter
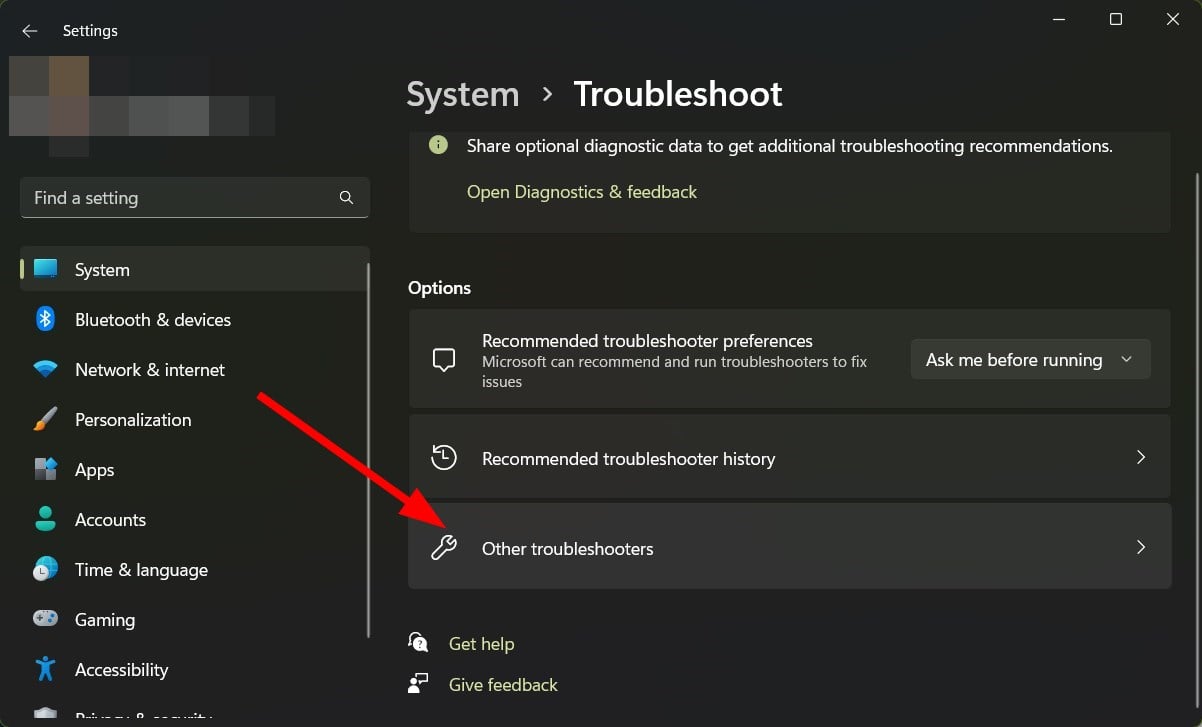
  3. Navigate to Other troubleshooters.
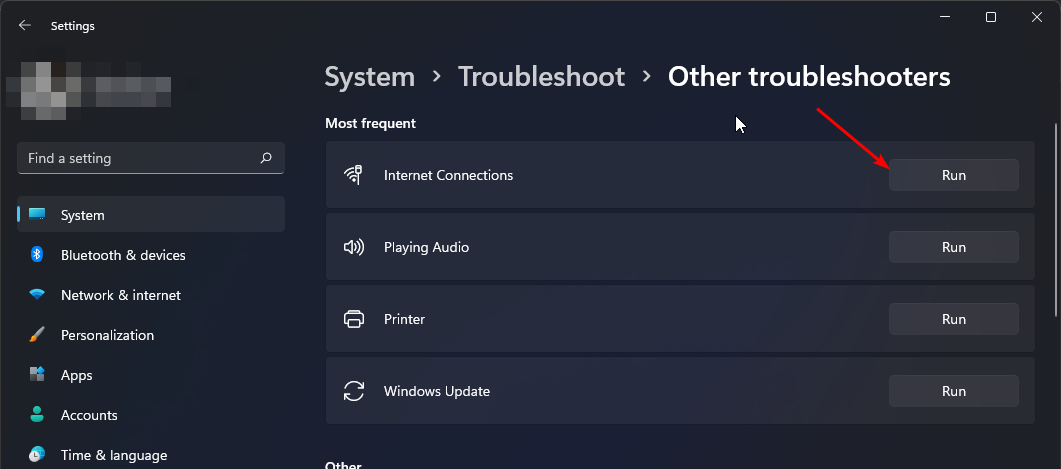
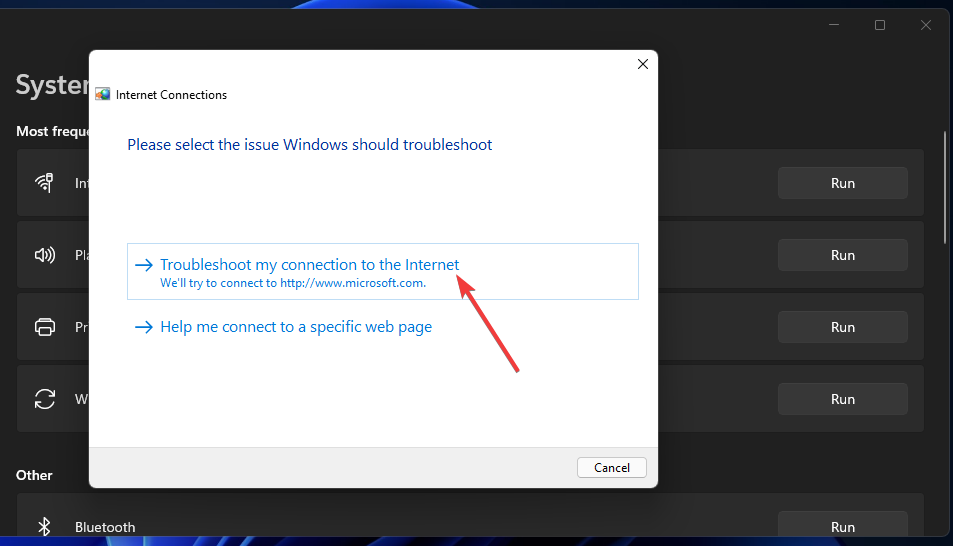
  4. Click the Run button next to Internet Connections.
  5. Select Troubleshoot my connection to the Internet in the pop-up window and wait for Windows to identify the problem and recommend a fix.

2. Run the Network Adapter troubleshooter

  1. Press Windows + I to launch Settings.settings windows 11
  2. Click on Troubleshoot on the right in the System tab.Open system troubleshooter
  3. Select Other troubleshooters.
  4. Locate the Network Adapter troubleshooter and click on the Run button next to it.

3. Forget the Network

  1. Hit the Windows key and click on Settings.settings windows 11
  2. Navigate to Network & internet and click on Wi-Fi.
  3. Scroll down and click on Manage known networks.
  4. Locate the problematic network and click on Forget.
  5. Restart your PC and check if the issue persists.

4. Update your Network drivers

  1. Hit the Windows + I keys to open Settings.settings windows 11
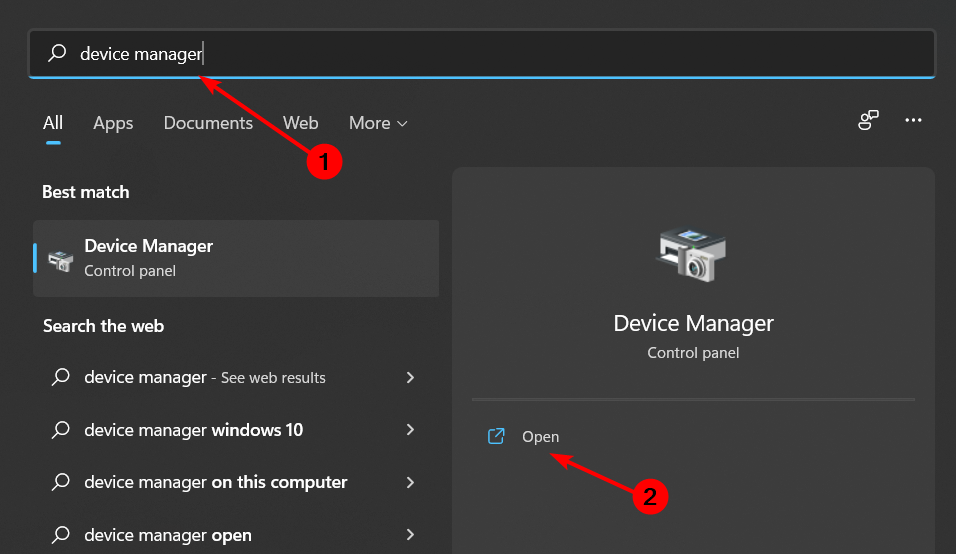
  2. Type Device Manager in the search bar and click Open.
  3. Navigate to your Network adapter, right-click and select Update driver.
  4. Select Search automatically for updated drivers.Search automatically for drivers

If you don’t fancy going through multiple steps to update your drivers, you’ll be happy to know that there exists a driver updater tool that can do all that for you in one click. 

Outbyte Driver Updater is a powerful and easy-to-use tool designed to update all device drivers in your computer, including network drivers. It is one of the most comprehensive driver updating programs available, with a wide range of features to help you get the most out of your system.

Outbyte Driver Updater will scan and download all the drivers that are compatible with your system. It will select the best match and install them for you.

⇒ Get Outbyte Driver Updater

5. Reinstall your Network drivers

  1. Hit the Windows + I keys to open Settings.settings windows 11
  2. Type Device Manager in the search bar and click Open.
  3. Navigate to your  Network adapter, right-click and select Uninstall device.
  4. Confirm Uninstall in the next confirmation dialog.
  5. Restart your PC and your drivers will be automatically reinstalled.

6. Perform a Network reset

  1. Hit the Windows key and click on Settings.settings windows 11
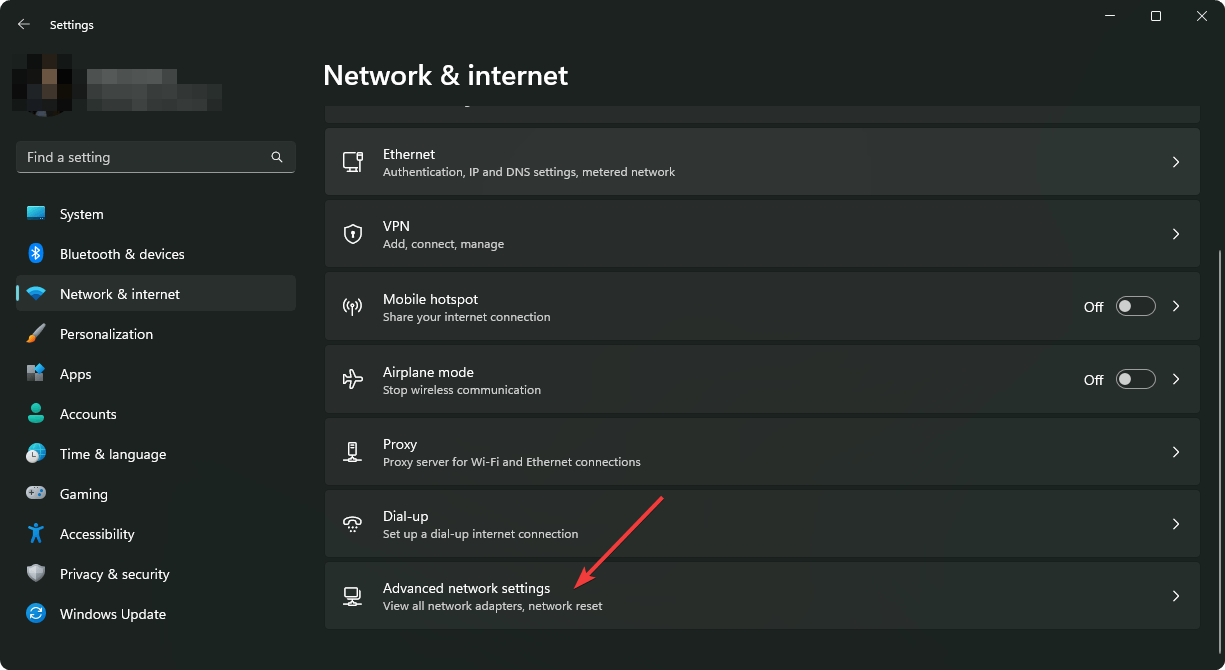
  2. Navigate to Network & internet and select Advanced network settings.going advanced network settings win11
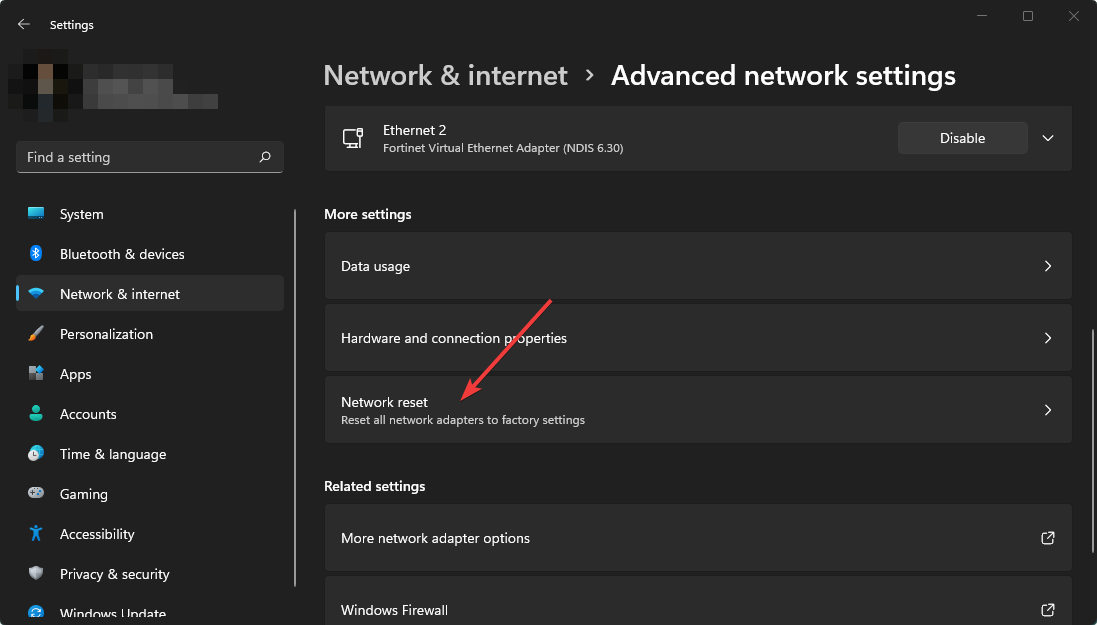
  3. Click on Network reset.clicking network reset win11 settings
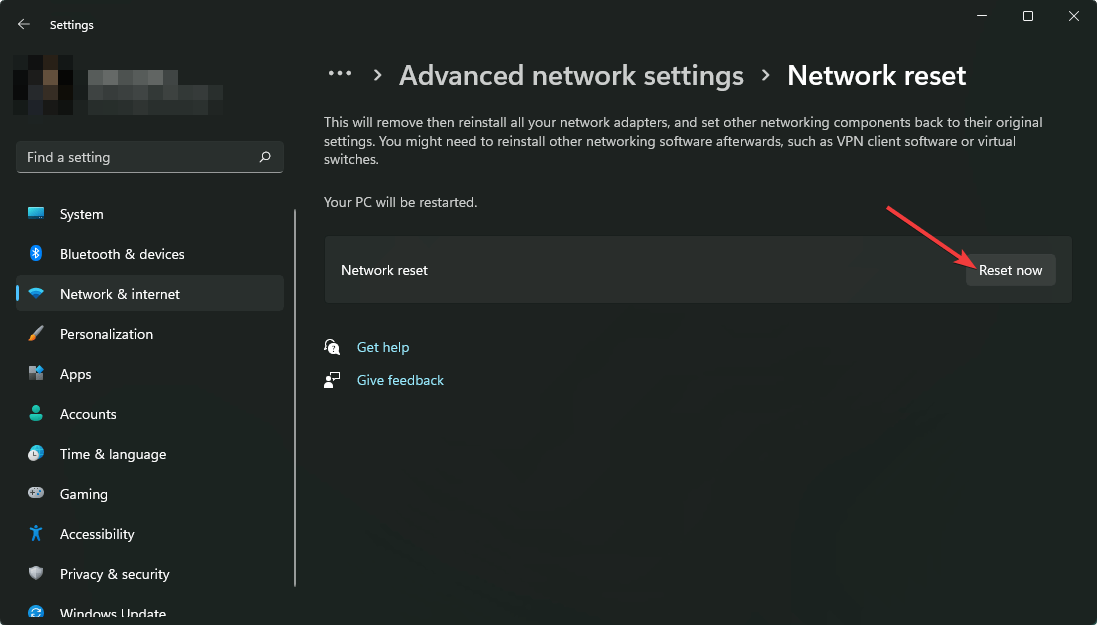
  4. Next, hit the Reset now button. clicking reset now for network reset win11 settings

If none of the above methods work, it may be an issue with your ISP provider. In this case, try contacting them for further guidance. You may also experience issues with your Internet not connecting after a Windows update but worry not as we got you covered in our expert article.

We’d love to hear from you if you have managed to restore your Internet connection after a power outage especially if it was not working. Leave a comment down below.

Chrome Sound Is Not Working: 7 Tested Ways to Fix It for Good

Google Chrome is one of the most popular browsers, but that does not make it immune to problems. And one of the common problems many are facing is with Chrome sound not working.

That might sound too trifle an issue, but it also can be most frustrating when all other apps on your device playback sound except Chrome.

Some users were unlucky enough to have the same sound issue when using the Incognito Mode on Chrome.

However, the solution is equally straightforward to deal with. Here is what you need to do when Chrome has no sound on your computer.

Why can’t I hear anything on Google Chrome?

There are a few reasons why sound on Chrome may not work. While this may be specific to the Chrome browser, it may also be caused by broader factors like muted apps or devices, or problems with your computer’s hardware.

Many users quickly discover that the specific tab has been muted; in such cases, a simple unmute will suffice. Whatever the case is, we will share solutions that could help you be well on your way in no time.

Where are the Google Chrome settings?

You will be able to find all your Chrome settings by navigating to the Settings page using this path:

chrome://settings/

Additionally, you can enable sound for individual websites by navigating to the address below:

chrome://settings/content/sound

Quick Tip:

Are you looking for a fast and easy workaround? Why not try our Opera One browser? It is also based on Chromium which means they share many things in common. So it has the same standard features plus a bunch of others.

It’s faster than Chrome and doesn’t hog as much RAM. Switching to Opera One will still work if your Chrome has no sound on a Mac computer because it is an efficient MacOS browser alternative.

Opera One

Improved speed and a bunch of free extra features make it a better browser than Chrome. Make the switch today.

How do I fix no sound on Google Chrome?

Before heading to the slightly complex solutions, try these quick ones:

  • Restart the computer.
  • If you have the QuickHeal antivirus installed, disable the Browser Sandbox settings or lower the level since it has been found to conflict with the functioning of browsers.

In case these don’t work, the ones listed next would.

1. Check speaker volume and mixer

  1. Right-click on the speaker icon on the system tray at the bottom right of your taskbar.
    no sound in chrome
  2. Select the Open volume mixer option.
  3. Make sure that your Volume under the System section is not muted by sliding it right to 100% to be on the safe side.
    no sound in chrome
  4. Under the Apps section, make sure that the Google Chrome option is not muted by sliding it to 100% to be on the safe side.

Note that this solution will work for Chrome if there is no sound on Windows 10/11. First, check if Chrome can playback sound. If not, proceed to the next step.

2. Remove malicious or other unwanted software

  1. Paste the address below in your URL bar and click Enter to open Chrome Settings.
    chrome://settings/
  2. On the left pane, click on Reset and clean up.
    no sound in chrome
  3. Select the Clean up computer option.
    no sound in chrome
  4. Click Find.
  5. If Chrome asks to remove unwanted software, click Remove. You may be asked to reboot your computer.

Check to see if the issue has been resolved.

3. Disable extensions

  1. Copy and paste the extensions page into your URL bar and press Enter.
    chrome://extensions
    no sound in chrome
  2. You will be provided with a list of extensions embedded inside your Chrome browser.
    no sound in chrome
  3. If you installed any extension before you noticed the sound issue, toggle the switch to disable it. For example, the Pepper Flash extension has been a common reason for the sound loss in Chrome.

It would be a good idea to delete all other extensions and reinstall them while checking if you are getting sound after each installation.

To ensure that some extension is causing the problem, open Chrome in Incognito Mode. To do that, press Ctrl + Shift + N on Chrome or click on the ellipsis and select New Incognito Window from the menu provided.

Check to see if you are getting sound. If yes, then there might be an extension causing the issue.

4. Clear cache and cookies

  1. On your Chrome browser, click on the three vertical dots in the top right corner.
  2. Select More tools, then Clear browsing data.
    no sound in chrome
  3. In the Clear browsing data window that appears, you have the option to set a timeline against which the data will be cleared. Select All time for a thorough clean-up job.
    no sound in chrome
  4. Click on Clear Data.
  5. There is an Advanced tab as well that you can check for additional options.
  6. Restart your PC, check if the sound issue has been resolved, or read on for other steps.

This should work for most sound issues on the browsers. For example, users who have experienced Chrome no sound issues on YouTube or while playing other videos or streams have found clearing the cache to be a helpful fix.

5. Reset Chrome settings

  1. Click on the three vertical dots in the top right corner of your Chrome browser.
  2. Select Settings.
    no sound in chrome
  3. On the left pane, click on Reset and clean up.
    no sound in chrome
  4. Click on Reset settings to their original default.
  5. Click the Reset settings at the bottom.
  6. There will be a confirmation box. Click on the Reset tab for the process to begin.

6. Update Chrome

  1. Click the three vertical dots in the top right corner of your Chrome browser, hover the cursor over Help, and then choose About Google Chrome.
    no sound in chrome
  2. Chrome will automatically check, download and install any update available.
  3. Relaunch when prompted to complete the installation process.

7. Uninstall and reinstall Chrome

Uninstalling Chrome:

  1. Start by closing all instances of Chrome already running on your device.
  2. Next, click on the Start menu and select the Settings app.
  3. On the left pane, choose Apps, then select Apps & features on the right pane.
  4. Scroll down to Google Chrome, click the three vertical dots, then click Uninstall.
  5. Click Uninstall again for the process to begin.
  6. Next, open another browser, head to Chrome’s official website, and click the Download Chrome button.
  7. Click on the downloaded file and follow the wizard to reinstall Chrome.

We suggest you check our Chrome installation guide to see how to install the browser properly.

That’s all. There will be a new Chrome window shown after the installation is complete. This should eliminate all Chrome issues, including sound not working.

What can I do if Chrome has no sound after the first video?

A few users have complained about this variation to the sound problem on Chrome. In this case, you may try simply restarting your Chrome browser.

If that does not help, you should clear the browser cache, and if the problem persists, reinstall the browser.

There you have it. If you have issues with Chrome not playing sound, any of the above solutions should help fix it.

And in case you are looking for an alternate option, check our curated list of the best browsers that work on all devices.

Let us know which of these solutions has been most influential in restoring your sound.

5 Best Metronome Software [2026 Guide]

If you’re learning to play an instrument, metronome software is a must-have. By using it, you can learn how to properly follow a beat while playing.

Speaking of instruments, if you don’t have one, you can always use digital instrument software and play on your PC.

As for metronome apps, this guide will show you some of the best picks that are currently available for download.

What are the best metronome software tools?

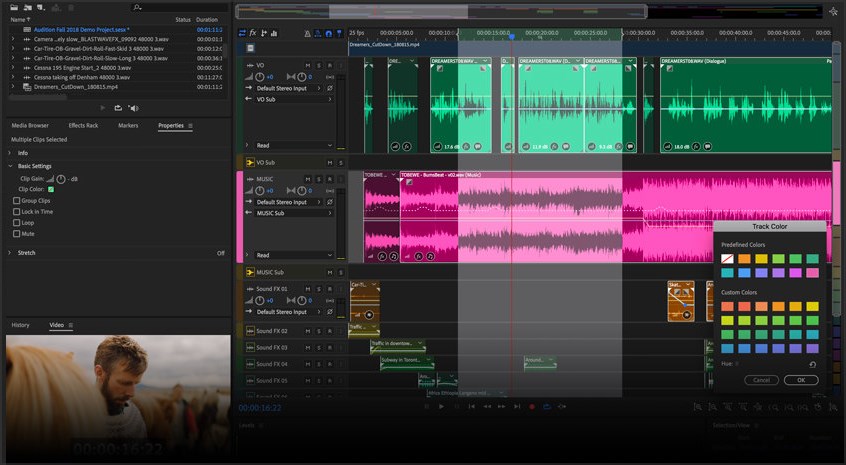
Adobe Audition – For music professionals

adobe audition

You can’t go wrong with any Adobe product, that fact also holds true for Adobe Audition. It comes with a full suite of features and tools usually available in digital audio workstations.

Adobe Audition allows you to customize meters and gauge tempo based on your personal preference.

Although for a beginner the editing process can be overwhelming, don’t worry, there are plenty of guides that will help you set the perfect tempo.

With the ability to stop and pause the metronome, you can spot if you are rushing or dragging, which makes it perfect for drummers.

You can also set the tempo to gradually increase so you don’t need to set it every time you need it.

Other reasons to consider it as your go-to option for any audio editing needs:

  • Supports a large number of audio file types
  • Available as a standalone option or as a part of Creative Cloud
  • Media Browser guarantees effective session management
  • Comes with an extensive stock audio files
  • Intuitive interface when compared to other Adobe products
  • Has a 7-day free trial

Adobe Audition

Train your musical skills to perfection using Adobe Audition and its metronome feature.
Free trial Visit website

Piano 10 – Great for learning

The reason why Piano 10 is among the best metronome software might be a bit confusing, but it’s actually really simple.

It encompasses a metronome that lets you adjust the BPM value, and you can use the app for other music-related reasons, as well, such as tuning your instrument or learning piano.

If you own a Windows 10 PC, it’s pretty simple to install Piano 10 on your device, since all you have to do is reach the product’s page in the Store App or in your browser, click a couple of buttons and you’re set.

If you want the app exclusively for its metronome feature, you might want to know how to reach it, to begin with.

First things first: launch the app, then choose a piano type (doesn’t matter which one), click the metronome-shaped button, adjust the BPM setting, and there you have it.

You might need to turn the volume a little up to hear the metronome clearly.

Other great features:

  • Comes with a digital piano
  • Incredibly simple user interface
  • Perfect for students
  • Comes with a metronome feature

⇒ Get Piano 10

Metronome + – Incredibly simple to use

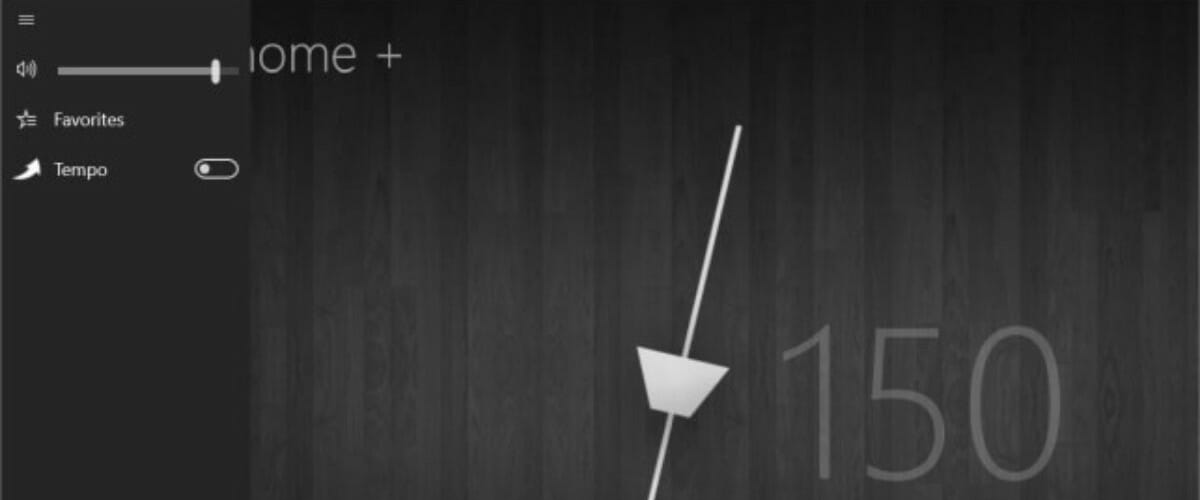
Metronome + is one of the best (and most stylish, we might add) metronome apps that you can have on your Windows 10 PC.

What makes it really attractive even for beginners, aside from its easy two-click setup, is the sleek interface it comes with and the fact that it somehow acts as a real metronome, if you ever got close to one.

Controlling Metronome + can be done almost exclusively using your mouse, dragging and clicking until you reach a profile you’re satisfied with.

You can adjust the tempo by dragging the sliding weight on the pendulum until the BPM value matches your needs.

In a similar fashion, you can start the metronome by clicking its counterweight (the part that looks like a ball at the end of the pendulum).

Metronome + allows you to customize its presets by choosing your favorite measure and adjusting the way it sounds.

So instead of the traditional “puck-click-click-click”, you can have various sounds including beeps, a bass drum, a djembe, a shaker, a tambourine, or even a triangle.

Overall, it’s a solid metronome software, so it’s worth checking out.

Other great features:

  • Simple user interface
  • Animated metronome
  • Available in 40+ languages
  • Easy to configure

⇒ Get Metronome +

Metronome 10 – Highly customizable

Metronome 10 is another free metronome software tool that you can install on your Windows 10 computer and use for free.

Considering that Metronome 10 is actually a Windows 10 Store app, installing it on the target computer shouldn’t take longer than a few moments.

Metronome 10 comes with several parameters that you can configure, such as the virtual device’s beats (the first beat can be different than the rest, depending on what time signature you plan on using)

The program also comes with an adjustable time signature and customizable BPM which are excellent for learning.

If you can’t quite put your finger on what BPM setting should the metronome play its beats back to you, you can just tap the rhythm on the designated button and it will convert it to a BPM value.

Unfortunately, you can’t create your own tempo with pauses and breaks, but Metronome 10 can still be of great help, especially if you’re struggling to train your rhythm.

Other great features:

  • Tempo range from 40 to 220bpm
  • Highly configurable
  • Multiple sounds to choose from
  • Easy to use

⇒ Get Metronome 10

Pulse Metronome – Perfect for basic users

Pulse Metronome is another great app that you can use to train your timing directly from your Windows 10 computer, without having to buy a traditional metronome.

However, this one’s interface doesn’t even attempt to emulate any traditional metronome you’ve ever seen so far. Its controls might seem a bit cryptic at first, but after you’ll realize how simple it is to use, you’ll forget all about it.

You can adjust the BPM by performing a click-and-hold on the small circle inside the bigger one, then dragging it in a concentric motion. Watch out, because breaking the circle will cancel the adjustment action.

Pulse Metronome also lets you adjust the way you hear the metronome’s beats by offering you three different pitches for each beat, or the possibility to mute it altogether, depending on your needs.

Other great features:

  • Simple user interface
  • Ability to create presets
  • Tempo indicator
  • All information is always available

⇒ Get Pulse Metronome

To wrap it up, if you need a handy assistant that can help you train your timing, regardless of what instrument you play, you can always count on metronome software solutions.

Pulse Metronome, Piano 10, and Metronome + are all great choices if you’re looking for metronome software for your Windows 10 computer, and the best part about them is that they’re entirely free to use.

Now that you have metronome software, you should consider getting free audio recording software to record your sessions.

What is your metronome software of choice? Let us know in the comments below.

What are the Signs of CPU Failure & What Can You Do?

The CPU is often likened to the human brain in terms of the work it does on your PC. As such, it’s a very important component that should be kept healthy at all times. While good maintenance will extend the lifespan of your CPU, you cannot escape from the inevitable wear and tear. 

At some point, your CPU will show failure symptoms, especially if you get high CPU usage messages from time to time. In this article, we let you in on some of the symptoms to look out for so that you can be prepared.

How do I know if my CPU is failing?

CPU failure is a very serious situation. It can be caused by many factors, but the most common is overheating.

If you have a dead CPU, there are many things that can go wrong in your computer system –  from slow performance to total system failure. If you suspect that your CPU is on the brink of collapsing, try the following steps to help determine whether or not it’s time for a new one:

  • CPU temperature – This is a classic CPU failure symptom. If the temperature is abnormal, you need to check the CPU temperature just to be sure.
  • Warning messages – If you keep getting notified that your CPU is overheating or advised to shut down while working on your PC, your CPU doesn’t have much time.
  • Dust and corrosion – Dust is a major factor in overheating because it gets inside the computer and prevents heat from dissipating out through the vents. It can make your fan extremely loud.
  • Physical damage – Corrosion is visible and builds up over time, so if there has been no use for the CPU for a while, it probably has some corrosion built up inside which is interfering with its operation.
  • Software corruption/crash/failure – This is a common cause of CPU failures as software bugs and errors can cause a lot of damage to your computer’s hardware components including the motherboard and even your whole computer system.

What happens when the CPU fails?

CPU failures are usually caused by overheating, dust and corrosion. Overheating is the most common cause of CPU failure. The CPU is designed to operate within certain temperature limits. When the temperature reaches a certain point, it causes the CPU to fail. 

The first thing that happens when the CPU fails is that it crashes. While you can take steps to lower high CPU temperatures, sometimes, your CPU is beyond help. Your PC will make a short series of sounds and then shut down. It’s a pretty dramatic way to go, but it happens fast.

Most modern computers are designed to be tolerant of crashes. They can be restarted, and they will continue running without missing a beat. But there’s a limit to how much they can tolerate before they start breaking down.

If it happens often enough, your operating system may have been scrambled by whatever happened. Some signs such as apps freezing, random shutdowns, slow boot time, and a generally deteriorated performance indicate that you may need a new CPU.

What are the signs of a dead CPU?

1. High CPU temperature

A high CPU temperature is not always due to overheating problems but could also be caused by other issues such as bad cooling or defective fans. When the CPU heats up too much, it will have an impact on system performance and cause errors.

The first sign of a dead CPU is high CPU temperature. You can install CPU monitoring software to ensure the temperatures don’t go beyond the recommended limit and keep your PC healthy.

2. It won’t boot up

If the computer continues to boot, but then shuts down again, this could be a CPU failure symptom. For laptops, even when fully charged, it may be slow in booting.

You may have to hold down the power button for a few seconds before your computer will turn on. This could be due to a bad keyboard cable or faulty battery, but it could also be a dead CPU symptom and needs to be replaced immediately.

3. Random shutdowns

When a computer’s CPU is dying, it can cause various problems with the system. This can include random shutdowns caused by overheating. Random PC shutdowns can be very annoying because they often occur at inopportune times.

You may be working on a project and need your computer to stay online but it just shuts down. You may also get the Windows didn’t load properly during boot. If you’re experiencing this problem, your CPU might just be on its death bed and you need to start thinking of getting a new one.

4. Abnormal behavior from the CPU fan 

When you notice your CPU fan isn’t spinning as fast as it used to, it’s a good sign that your CPU is dead. If your CPU fan slows down, then the heat generated by your CPU can’t escape through the heat sink and dissipate. 

This can eventually lead to severe overheating and damage to the motherboard or other components. If the fan doesn’t spin at all, it may have burned out, or it could be something more serious like a faulty power supply. Always check your fan speed to ensure it is at optimum levels.

5. Inability to use several applications simultaneously

When you open multiple applications or programs at once, your CPU may overload with all the data. This often causes the system to slow down and eventually crash. If this happens frequently, it could be an indication that something is wrong with your CPU or motherboard.

You’ll find that you can’t play games or use several applications at once without experiencing lag time or slow-down issues. 

This is because your computer will not be able to handle its full potential when using multiple applications simultaneously. It will usually freeze up when using certain applications and eventually shut down.

Can I fix a CPU failure?

CPU failure is a common issue with computers and laptops, especially if you use the computer for long hours. When a CPU fails, it can be hard to tell if it’s actually broken or if the problem is somewhere else. 

If you want to salvage whatever little life is remaining from your CPU, proceed to do the following:

  • Clean your CPU – You can use a vacuum cleaner to blow out dust from inside the CPU.
  • Disable overclocking – If you have a CPU that is overheating, then it might be time to disable overclocking. Overclocking can cause your CPU to overheat, or it could also damage your processor.
  • Replace your CPU fan – If your PC is overheating, then you need to replace its fan or get a CPU cooler. You should also check whether there are any cracks in the fan casing. These can cause the fan to stop working completely.
  • Upgrade your CPU –  A healthy computer is one that has all its components working together properly and in order. If your CPU has reached its end of life, you need to get a new CPU.

Also, CPU cleaners can help you with the efficient resource management of your CPU so that it isn’t overworked. Hopefully, you now know what signs indicate CPU failure and take the necessary steps to ensure you keep yours for as long as possible.

Let us know what tips you use to keep your CPU in good shape in the comment section below.

5 Best Browsers for Seamless Disney Plus Streaming

Disney Plus supports most browsers, but many are wondering what’s the best browser for Disney Plus. While you can use any browser for watching videos, some do have certain advantages over others.

We have tested the existing browsers available and in this article, we will explore some of the best that you can use when watching Disney Plus.

Is Disney Plus 4K on Web Browser?

No, 4K playback is not supported on web browsers. In fact, all browsers are limited to 720p because they don’t have Widevine DRM.

This doesn’t apply just to Disney+, it applies to all streaming services that you use in your web browser.

How do I make Disney Plus quality better on my browser?

  1. Go to the Disney Plus website on your browser and log in.
  2. Click on your profile icon and go to App Settings.going disneyplus app settings browser
  3. Set the quality to Automatic and click on Save.saving 4k playback settings disneyplus browser

Doing the above things will let Disney Plus use the unrestricted amount of bandwidth. As a result, you will get higher video playback quality.

If you don’t have a UHD monitor, Disney Plus will always give you a lower resolution on your browser or app.

For your convenience, we have prepared a list of the best browsers that can stream Disney Plus content.

What are the best browsers for Disney Plus I can use?

Opera One – Best streaming experience

Opera One is one of the best browsers when it comes to a high-quality streaming experience thanks to the unique features it has.

The turbo mode available allows you to save bandwidth when playing videos and will also speed up the browsing.

Moreover, Opera One comes with an included pop-up that will allow you to move the Video, if needed, outside of the web page into a separate frame. You can even put it anywhere on your Windows desktop.

Moreover, Opera One is a browser that ensures your online privacy thanks to the built-in VPN, tracker blocker, and ad-blocker.

This means that your streaming time won’t be interrupted by commercials allowing you to enjoy the Disney Plus videos.

Other great features:

  • Based on Chromium
  • Supports all Chrome extensions
  • Built-in VPN and adblocker
  • Various enhancements

Opera One

Watch all Disney Plus videos without interruptions and with high-quality streaming with this fantastic browser.

UR Browser – Second best for video streaming

UR Browser is another important browser when it comes to online streaming and watching Disney Plus online.

We would like to recommend you try this browser since it comes with amazing features that will make you choose each time.

This Browser is based on the same Chromium engine as Opera One, Chrome, and Chromium-Edge.

Secondly, the HTML5 video support will ensure that the videos are being played without a problem. This is a feature that you won’t find on all browsers.

In terms of online security, since this is equally important if not more, UR Browser comes with a built-in VPN that will ensure your privacy.

Other great features:

  • Privacy-oriented
  • Has its own ad blocker
  • Built-in VPN for extra security
  • Simple to use

UR Browser

Watch Disney Plus videos with this fantastic browser that supports all HTML5 videos. Try it now!
Get it free Visit website

Microsoft Edge – A perfect built-in browser for Disney Plus

microsoft edge

Edge is a browser that many have overlooked although it is included in Windows 11 and 10 and comes with some pretty great features.

We have tested it and the results confirm that you can use Edge for high-quality streaming on Disney Plus.

Edge is the only browser that supports all HTML5 videos and thanks to the PlayReady DRM tech it might be able to handle full HD videos.

Moreover, when using Edge to watch Disney Plus you will not have to worry about the battery of your device since this browser provides the most battery-efficient video playback.

Other great features:

  • Comes preinstalled with Windows
  • Based on Chromium
  • Supports Chrome extensions
  • Has PlayReady DRM

⇒ Get Edge

Google Chrome – Most compatible

Google Chrome

Our next recommendation for watching Disney Plus goes to Google Chrome, which is without wonder considering that this is one of the most used browsers out there.

With extensive HTML5 support and the latest web technologies, you will be able to stream videos without issues.

Also, when it comes to speed, Google Chrome is one of the fastest browsers for streaming videos.

Moreover, you can add YouTube video extensions, such as Magic Action, and YouTube Plus to just name a few.

Other great features:

  • The most popular browser in the world
  • Abundance of extensions
  • Easy to use
  • Available on any platform

⇒ Get Google Chrome

Mozilla Firefox – Best Non-Chromium browser

mozilla-firefox-browser

Firefox is another Disney Plus browser that can help you have a smoother streaming experience.

This is a browser that allows you to install various extensions that will ensure your video experience is improved significantly.

It is crucial to ensure that you are using the latest version of the browser since they always come with improved features.

In addition, Mozilla Firefox ensures your online privacy, so you can use it without having to worry about this aspect.

Other great features:

  • Not based on Chromium
  • Privacy-oriented
  • Customizable user interface
  • Lightweight

⇒ Get Firefox

Disney Plus App vs. Browser

Now, you may have a question what is the difference between the DisneyPlus experience on App and the browser? According to our real-world experience, it depends on your device.

Smartphone apps, tabs, smart TVs, and consoles give you a better experience, plus access to 1080p and 4K video quality, which isn’t the case for the Windows app.

Disney Plus App vs Browser

However, on the desktop, there is no apparent difference between the Disney Plus app and the browser.

Unfortunately, this streaming service doesn’t offer an app for macOS and Linux. However, there is a straightforward app for Windows 11 and Windows 10.

However, the app is nothing but a progressive web app. That means it is a copy of Disney Plus web. Therefore, you will not get any extra benefit from launching it as a dedicated application.

We hope that the information offered above will help you make an informed decision on which browser is best to be used for playing Disney Plus.

In case you can’t access this or any other service, consider using one of these great VPNs for video streaming.

Let us know in the comments section below which one you have used and what is your experience with it.

Microsoft Teams gets Presenter window while screen sharing enhancements

Microsoft has announced the availability of a couple of user improvements to the Presenter window while screen sharing in Teams Public Preview. Back in 2021, the company began rolling out the in-meeting Share experience which was designed to help presenters share content from their devices easily.

And now, with these new improvements to the new Presenter window feature, users will be able to establish more control over the Teams meeting activity even while screen sharing or when engaged in other activities away from the main meeting window.

According to Microsoft:

  • Controls are docked at the top, which makes active speakers’ faces clearly visible.
  • Raise hands and other important meeting notifications are surfaced for easier recognition.

That said, it should be noted that these improvements come with one know issue. Live Events Presenters aren’t able to see the Live Events status label in the Presenter window. However, they can get to see it via the main window.

Users that are part of Teams Public Preview should be able to access this feature provided they are using Windows or macOS Teams client.

Microsoft Excel makes it easier to check formulas

Microsoft has announced the incorporation of new tooltips in Excel designed to help users check their formulas directly in the formula bar or in the cell they are editing. Here’s everything you need to know about this neat feature:

Once you select part of the formula, Excel will in turn show you a tooltip that features the current value of the section you are on. Here’s an illustration of how the feature works:

Animation of the Value Preview feature

Microsoft further indicated:

A common trick to get the current value of part of a formula is to select that part, then press F9. Doing so replaces the selected part of the formula with its current value. So, you would likely only do this to check the value, and then you press ESC to avoid keeping it as a hard-coded value in your formula.

Alternatively, you can make use of the Evaluate Formula dialog which will also let you see the current value of each part of your formula. If you are part of the Beta channel and running on Windows Version 2302 (Build 16116.20000) or later or Mac Version 16. 70 (Build 230116) or later you should be able to access this feature.

In related news, Excel also got a nifty feature that lets users record repetitive spreadsheet tasks earlier this month dubbed Action Recorder. Share your thoughts with us in the comment section.

My Printer Wants to Fax Instead of Printing: Here’s a Fix

Dealing with multifunction printers shouldn’t be that big of a fuss since printing, scanning, or faxing modes can easily be changed with both physical buttons and software UI.

However, some users have had difficulty with their printers, as they are stuck in fax mode. Namely, it seems that the printer wants to fax instead of print and gets stuck in that mode.

Check the steps below to address this issue accordingly.

Why does my printer want to fax instead of print?

There are a few reasons why you may fax rather than print. Some common triggers include the following:

  • Wrong commands – The printer may receive a fax command from the computer or software sending the print job. Check the computer or software settings and ensure that it sends a print command, not a fax command.
  • Glitches in the printer – The printer may malfunction and mistakenly interpret print commands as fax commands. 
  • Outdated or corrupt software – The printer may run on outdated software or firmware. 
  • Network connection issues – The printer may be part of a network, and another device sends a fax command to the printer. 
  • Problems with some settings – The printer may have a fax feature enabled, causing it to default to fax mode. 

Now let us explore how to fix this issue.

How do I turn off fax on my printer?

1. Try updating the drivers

  1. Press Windows + X and select Device Manager.
  2. Select the View tab and choose Show Hidden Devices.
  3. Click Print queues, right-click on your printer’s name, and Select Update Driver Software.
  4. Select the option to Search automatically for browsers.
    printer wants to fax instead of print
  5. Follow the subsequent steps to update your driver.

Additionally, dedicated software performs this job for you if you need a more straightforward way to update any driver from your PC.

By choosing this method, you will manage drivers easily and install or update them in minutes. Scanning your system, the tool will find outdated or missing drivers and install them properly.

You can trust the process because all hardware manufacturer sources store the drivers in online libraries.

⇒ Get Outbyte Driver Updater

2. Reinstall the printer

2.1 Uninstalling the printer

  1. Firstly, press Windows + I to open the Settings app.
  2. Click on the Devices.
    printer wants to fax instead of print
  3. Select Printers & scanners, expand your printer, and click on the Remove device button.
    printer wants to fax instead of print
  4. Click on the Yes button to remove it.

Now you have successfully removed the printer. It’s time to reinstall it again.

2.2 Reinstalling the printer

  1. Connect the printer to your computer and turn it ON.
  2. Press Windows + I to open the Settings app.
  3. Click on the Devices.printer wants to fax instead of print
  4. Select Printers & scanners and click on Add a printer or scanner.
  5. Subsequently, your computer will detect your printer. You will have to follow the instructions to finish the installation.
  6. If the computer does not detect your printer, click on The printer I want isn’t listed.
  7. Once you are taken to the troubleshooting zone, the computer will ask you to provide your printer’s name to search for it. Follow the instructions to finish the installation.

3. Disable the fax feature

To disable the fax feature, the specific instructions will vary depending on the type of fax machine or fax software you use.

For example, if you are using a physical fax machine, you may need to consult the user manual for instructions on disabling the fax feature. While if you are using fax software on a c.omputer, you may need to look for options or settings in the program to disable the fax feature.

You may need to contact your printer manufacturer or the software developer for assistance if you are still looking for the information.

If your printer wants to fax instead of print, you should have successfully resolved the issue using any of the solutions recommended in this guide.

Please, let us know what worked for you in the comments below.

Best Xbox Web Browser to Surf the Internet [Xbox One, Series X/S]

Xbox One is a great console that supports various services and apps, including web browsers. Follow along as today we will show you the best browser for Xbox One and Series X/S.

A gaming console may add a lot of value to a home entertainment system by providing streamlined access to various video streaming services and the ability to view movies and television series.

How do you browse the Internet on Xbox?

The Xbox console allows us to utilize a web browser to explore the Internet, which enables us to visit websites immediately on our TV or monitor.

If you want to use a different browser on your Xbox One, there are not many available, but today we’re going to show you the best browsers you can use.

Is there a browser on Xbox One?

Yes, when you buy it, Microsoft Edge should already be pre-installed on your Xbox One console.

Microsoft Store marketplace home page.
Source: Xbox.com

If you cannot locate it, check your Xbox applications, download it from the app store, and maintain the most recent version of your console software.

How do I install a web browser on Xbox One?

  1. Press the Xbox button to navigate to the Home page and select the Xbox app store.
    search-xbox-one best browser xbox one
  2. Type the browser name you want to download and hit Install next to it.

This being said, let’s see what the best Internet app for Xbox One is and how to download a browser on Xbox One step by step. Keep on reading!

What is the best browser for Xbox One?

Microsoft Edge – Revamped new browser

Microsoft Edge is available on most major platforms, so it seems natural to see it on Xbox One. The browser has been on Xbox One for quite some time, and it’s available out of the box.

The user interface is similar to the desktop version; you can open multiple tabs. File download and streaming are also supported, allowing you to enjoy multimedia easily.

Overall, Microsoft Edge offers decent features, and it’s a solid choice for Xbox One and Xbox SERIES X/S users.

Notable Microsoft Edge features:

  • Available by default
  • Available on other platforms
  • Support for streaming and file download

⇒ Get Microsoft Edge

Monument Browser – Lightweight browser

Monument Browser is a speed-focused web browser that is streamlined and lightweight for use on the Xbox One. With its streamlined and aesthetically pleasing user interface, Monument Browser delivers a seamless surfing experience.

Other Monument features:

  • An Internet download manager with high speed
  • Online page storage
  • Unidentified navigation

⇒ Get Monument Browser

How do I update the browser on my Xbox One?

Because the Xbox One and Series X/S consoles will automatically update their browsers, you won’t need to bother keeping your browser up to date on those systems.

Can I download Chrome on Xbox One?

The Xbox One and Xbox Series X/S consoles support the built-in Microsoft Edge browser to browse the internet.

There is no way to install additional browsers like Chrome on an Xbox One console. If you want to use Chrome, you will have to use it on a device that supports it such as a PC, Mac, or mobile device.

Did Xbox remove Microsoft Edge?

No, the Edge browser can be downloaded on any Xbox. The 2021 upgrade to the Chromium-based version of Edge will provide you with the best that the web offers.

Including updated web standards and a streamlined, protected, and up-to-date surfing experience that you can access directly from your console.

However, if you can’t find Edge anywhere in your console, press Y while on the home screen and search edge. Then you may access it from there. Users reported the browser reappeared in the applications area afterward.

We recommend that you check out the best NFT Xbox games to try out to expand your horizons and interests.

These are the seven best browsers for Xbox One and Series X/S. Let us know in the comments section below which one you prefer. Thanks for reading!

How to Install & Use Print Management on Windows 11

Print Management is a handy tool to monitor and control the connected printer(s) and the ongoing print jobs or the ones in the queue. But, it’s not added by default, and users must install Print Management in Windows 11.

The process to install Print Management is quite simple and shouldn’t take more than a few minutes of your time. So, let’s find out all about it.

Is Print Management available in Windows 11 Home?

As with Windows 10, Print Management is also not available in the Windows 11 Home edition. Therefore, the console wouldn’t be listed when searching for it in optional features.

So, if you find Print Management missing in Windows 11, first check the Windows edition.

For Windows 11 Home users who try to install Print Management, an alternative is the Printers and scanners section in Settings.

Printers and scanners

Here, they can control certain features and settings of the connected printers and manage the ongoing and queued print jobs.

How can I install Print Management in Windows 11?

1. Via Settings

  1. Press Windows + I to open Settings, head to Apps from the navigation pane, and then click on Optional features on the right.
    optional features to install print management windows 11
  2. Now, click the View features button next to Add an optional feature.
    view features
  3. Enter Print Management in the search box, tick the checkbox for the tool, and then click on Next.
    print management
  4. Click on Install to begin the process.
    install print management windows 11
  5. Wait for Print Management to install on the PC completely.
    install in process
  6. Once done, restart the computer for the changes to come into effect.

That’s it! You have now successfully installed Print Management in Windows 11.

2. Via command line

  1. Press Windows + R to open Run, type cmd, and hit Ctrl + Shift + Enter.
    command prompt
  2. Click Yes in the UAC prompt.
  3. In the elevated Command Prompt, paste the following command and hit Enter:DISM /online /add-capability /CapabilityName:Print.Management.Console~~~~0.0.1.0
    command to install print management windows 11
  4. Wait for the command to execute.
    installation

After completing the installation process, Print Management is ready for use in Windows 11. Let’s find out how you can do that.

How do I use Print Management?

1. View the available printers

  1. Press Windows + R to open Run, type printmanagement.msc in the text field, and hit Enter.
    print management
  2. Now, expand Custom Filters in the navigation pane and double-click on All Printers under it.
    all printers
  3. The utility will now list all the printers ever connected to the PC.
    all printers
  4. To view the printers currently performing a printing task, head to Printers with Jobs.
    printers with job

Here, you can also select an individual printer, modify its settings, and configure things per the requirement.

When your HP printer fails to respond or print correctly, consider using the HP Print and Scan Doctor to automatically detect and repair common printing or scanning issues on Windows 11.

2. Add a new printer

  1. To add a new printer via the Print Management console, expand Print Servers, double-click on your PC’s name, and choose Printers.
    printers
  2. Click on More Actions on the right, and select Add Printer from the context menu.
    add printer
  3. Choose the appropriate option and follow the on-screen instructions to add a printer.
    choode mode

While there are several ways to add a printer in Windows 11, the Print Management console offers the option, in addition to a plethora of other user-friendly features meant to simplify the process of managing the connected printers.

For more details on installing a local printer in Windows 11, check out this guide on installing a local printer on Windows 11.

Remember, no matter which printer you use, an updated driver is critical for its effective functioning. So, find out how to install the latest printer drivers in Windows 11.

In the comments section below, please tell us your review of the Print Management console and how it helps you with everyday printing tasks.

Fix Windows Resource Protection Could not Start Repair Service

windows resource protection could not start the repair service is an error message displayed while SFC is running on your Windows 10 computer. Since SFC is a tool for repairing and restoring system files, finding a quick fix for this system bug is imperative.

In this guide, we will show you quick ways to fix this issue and restore normalcy on your PC.

How to fix the Windows resource protection SFC error?

1. Run SFC in Safe Mode

  1. Press the Windows key + I to open the Settings app and select the Update & Security option.
    update and windows resource protection could not start the repair service
  2. Select the Recovery option in the left pane and click the Restart now button under Advanced startup.
    restart now
  3. When your PC restarts, choose Troubleshoot > Advanced options.
    advanced options
  4. Now, select the Startup Settings option.
    startup settings windows resource protection could not start the repair service
  5. Click the Restart button.
    restart
  6. Once your PC restarts, press the corresponding key to Enable Safe Mode or Safe Mode with Networking.
    enable safe
  7. Next, when your PC boots up, press the Windows key, type cmd, and select Run as administrator under Command Prompt.
    cmd admin windows resource protection could not start the repair service
  8. Finally, copy and paste the SFC command below and hit Enter to run it: sfc/scannowsfc scannow

If you are getting the Windows resource protection could not start the repair service error while trying to run the SFC scan on normal boot, you might need to run the scan in Safe Mode.

If the scan works normally, the problem could be due to a third-party app or process.

2. Make some security changes

  1. Press the Windows key + S, type cmd, and click Run as administrator under Command Prompt.
    cmd admin windows resource protection could not start the repair service
  2. Type the command below and hit Enter: ICACLS C:Windowswinsxsicalcs
  3. Finally, wait for the command to finish running and restart your PC.

SFC might be interrupted if the winsxs folder cannot be accessed for some reason. The might be why you are getting the Windows resource protection could not start the repair service error.

You can fix this by modifying security descriptors for that folder.

3. Run CHKDSK from Command Prompt

  1. Launch Command Prompt as an administrator.
  2. Type the command below and hit Enter: chkdsk c: /rchkdsk windows resource protection could not start the repair service
  3. Now, press Y when you are prompted.
  4. Finally, restart your PC and the scan will begin automatically when your PC boots up.

Another reason for the Windows resource protection could not start the repair service is related to hard disk errors. The easiest way to fix this is to run the CHKDSK command.

The three methods detailed in this tutorial should help you solve the Windows resource protection could not start the repair service error on Windows 10. It means that now you can run the SFC scan without any sort of problems.

If the SFC scan is still not working on your PC, check our detailed guide to fix it quickly.

Let us know which of the methods worked best for you by leaving us a message in the comments below.

Fax Cover Page Editor on Windows 11: How to Use It?

In the world of sending messages and emails, some people still prefer using a Fax machine. Windows 11 respects that and still comes with the Fax Cover Page Editor. If you are looking for a way to open and use it, you are at the right place.

In this guide, we will cover ways to open Fax Cover Page Editor and use it to customize the Fax Cover for your next fax.

How can I open the Fax Cover Page Editor on Windows 11?

1. Use the Windows Search tool

  1. Click on the Search icon and type fxscover. Start menu Fxscover - fax cover page editor on windows 11
  2. Under Best match, click fxscover to open Fax Cover Page Editor. 

2. Use the Windows PowerShell

  1. Press the Windows key, type PowerShell, and click Run as administrator. Powershell - fax cover page editor on windows 11
  2. Type the following command and hit Enter: fxscoverpowershell_fax cover page editor on windows 11

3. Use the Run window

  1. Press Windows + R to open the Run box.Run windows fxscover - fax cover page editor on windows 11
  2. Type fxscover and hit OK.

4. Use the Command Prompt

  1. Press the Windows key, type CMD, and click Run as administrator. CMD fxscover - save fax cover page editor on windows 11
  2. Type the following command and hit Enter: fxscover.exe

How can I use Fax Cover Page Editor on Windows 11?

  1. First, open the Fax Cover Page Editor using the methods mentioned above. 
  2. Next, click on the Insert menu, Recipient, and then click Name. Enter the name.Insert menu and click Recipient - fax cover page editor on windows 11
  3. Again under the Insert menu, select the Fax number option and enter the number.
  4. Go to the Insert menu and click Sender. Add sender details, including name, address, company title, office location, telephone number, and email address. Insert menu and add sender details
  5. Now from the Insert menu, click Message. Add your message. You can add different shapes to your page and message with a subject, date, and more. Insert menu Message
  6. Make changes to the format and layout as you prefer.
  7. Go to File, and click Save. The file saved will be in .cov format.save fax cover page editor on windows 11

So, in this way, you can open and use the Fax Cover Page Editor on Windows 11. If you have any questions or concerns related to the topic, please mention them in the comments section below. We are happy to help!

Change File Type on Windows 10: 4 Quick Ways to Do It

The file extension of the respective item lets the operating system identify what type of file it is and what software is needed to open it.

Sometimes, you cannot open the file as the file format is incorrect. In that case, you need to change the file type.

This guide covers how to change the file extensions on your Windows 10 computer. Let’s get started!  

What can I do to change the file type on Windows 10? 

1. Use the Windows Explorer

  1. Press Windows + E to open File Explorer. 
  2. Go to the View tab, and click Options.
  3. Select the Change folder and search options.change file type windows 10 - Folder options
  4. In the Folder Options window, switch to the View tab.
  5. Remove the checkmark next to Hide extensions for known file types.
  6. Click Apply, then click OK. Folder options - change file type windows 10
  7. Go to the file you want to change the extension, right-click, and choose the Rename option. 
  8. Change the file extension with the new extension, then press Enter. 
  9. On the following prompt, select the Yes option. 

2. Online converters 

  1. Go to the online converter website, such as Zamzar.Zamzar - change file type windows 10
  2. Select the file, and drag it to upload the file.
  3. Choose the file type and click on Convert. 
  4. Once the file is converted, download it.

3. Use Save as feature 

  1. Some programs, such as MS Paint and MS Office, come with the Save As feature.
  2. Open a file, and go to the File menu.
  3. Select Save As. Save As PNG -change file type windows 10
  4. Choose the selected file type and save the file with a new name. 

4. Run the Ren command 

  1. Select the file for which you want to change the file format, press the Shift key and while holding the key, right-click on it to open Advanced options. 
  2. Click the Open PowerShell window here. Open PowerShell Window - Open PowerShell Window -change file type windows 10
  3. Copy and paste the following command and press Enter: ren filename.extension newfilename.newextension

So, these are methods you can follow to change file type on Windows 10. If there are questions or concerns about the topic, feel free to mention them in the comments below. 

Fix: This App Can’t Run on Your PC [Cisco ASDM Error]

If you are getting This App Can’t Run on your PC error while running the Cisco ASDM launcher file, then you are not alone. But don’t worry; it can be fixed with a few simple steps.

This guide will cover all possible solutions to fix this error right after discussing the probable causes.

What causes this app can’t run on your PC? 

There are several reasons for this error message to appear when running the Cisco ASDN launcher on a PC; some of the popular ones are: 

  • Incompatibility with the operating system: Cisco ASDM may not be compatible with the version of Windows or another operating system on your PC, hence the error message.
  • Minimum system requirements not met: Cisco ASDM may require a certain amount of RAM or a specific processor to run smoothly. If the system requirements are not met, you may get this message.
  • Java version outdated: The launcher file needs the latest version of Java to run, and if the version you have is outdated, the app will not run.
  • Corrupted installation: If Cisco ASDM may have become corrupted or damaged, it can prevent the app from running correctly. 

What can I do to fix this app can’t run on your PC error?

Before going into the detailed troubleshooting steps, please go through these preliminary checks: 

1. Make changes in launcher file properties

  1. Go to your ASA administrator web interface, and you will get a page like this to download the Cisco ASDM launcher. Cisco ASDM - this app can't run on your pc cisco asdm
  2. Click Install and sign in using an Administrator account.
  3. The file named dm-launcher.msi will be downloaded; double-click it to run.
  4. Follow the on-screen instructions to complete the installation.
  5. Go to the Start menu, locate the Cisco ASDM-IDM Launcher file, and right-click it to get the context menu. 
  6. Now, select the Open file location option.Open File location -this app can't run on your pc cisco asdm
  7. Next, right-click Cisco ASDM-IDM Launcher and choose Properties.
  8. On the Properties window, switch to the Shortcut tab.Change the target -this app can't run on your pc cisco asdm
  9. Locate Target and replace the context beside the field with the one mentioned below: C:\Windows\System32\wscript.exe invisible.vbs run.bat
  10. Now click Apply, then OK to complete the process.
  11. Next, locate the ASDM launcher shortcut on your desktop, right-click it, and select Properties. 
  12. Change the Target value here as well.

2. Enable User Account Control

  • This method might not work for everyone, especially users with the Windows Home version. Instead, go to the Start menu, and type Local Security Policy. From the Best match, select Local Security Policy and click Open.Local Group Policy -this app can't run on your pc cisco asdm
  • Go to Local Policies, then click Security Options.Security Options - this app can't run on your pc cisco asdm
  • Now, locate and double-click User Account Control from the right pane: Allow UIAccess applications to prompt for elevation without using the secure desktop.
  • Go to the Local Security Setting tab, and click Enabled.Enabled - this app can't run on your pc cisco asdm
  • Now click Apply and OK to save the changes.
  • Close Local Security Policy and restart your computer.

So, these are methods that you need to follow to get rid of This app can’t run on your PC error message. Try them and let us know what worked for you in the comments below.

FFXIV Unable to Download Patch Files: Why & How to Fix

Some Final Fantasy XIV players have posted on Square’s forum about an Unable to download patch files FFXIV error message. The issue pops up when they try to download patch updates for the game.

FFXIV doesn’t get updated when the mentioned error message appears. If you need to fix this error, take note of the potential resolutions below.

How can I fix the FFXIV patch files error?

1. Connect to a VPN server

Some users have fixed the Unable to download patch files error by utilizing a VPN when downloading.

We recommend Private Internet Access (PIA) for a few reasons:

  • Easy install
  • Instant access to hundreds of servers all over the world
  • Unlock not just gaming, but any media streaming content
  • Protect up to 10 devices with one subscription
  • 30-day money-back guarantee in case you’re not satisfied with the service
  • No logs policy – ultimate privacy;
  • Unlimited streaming bandwidth

Private Internet Access

Looking for a no-fuss download for the FFXIV patch you need? This VPN guarantees just that, plus top privacy for your online activity.
Check price Visit Website

2. Turn off your third-party antivirus software

Antivirus utility's context menu unable to download patch files ffxiv

First, try disabling any active third-party antivirus software installed. To do that, right-click the antivirus utility system tray icon on the right of the taskbar to select a disable/shut down option.

Alternatively, you can select to turn off the antivirus software for a specific period. Thereafter, try downloading the patch update with the antivirus shield disabled.

3. Turn off Windows Defender Firewall

  1. Press the Windows key, type firewall, and select Windows Defender Firewall.
    defender unable to download patch files ffxiv
  2. Click Turn Windows Defender on or off in the left pane.
    turn windows
  3. Now, tick the radio buttons for Turn off Windows Defender Firewall under Private and Public network settings.
  4. Next, click the OK button.
    turn off
  5. Finally, try downloading the required FFXIV patch files with Windows Defender Firewall off. Turn the firewall back on when you’ve updated the game.

4. Change your DNS Server to Google

  1. Press the Windows key + R, type ncpa.cpl, and click OK.
    ncpa unable to download patch files ffxiv
  2. Right-click your active network connection and select Properties.
    properties
  3. Now, select Internet Protocol Version 4 (TCP/IPv4) and click the Properties button.
    ipv4  unable to download patch files ffxiv
  4. Tick the Use the following DNS server addresses radio button.
  5. Input 8.8.8.8 as the Preferred DNS server value.
  6. Next, enter 8.8.4.4 in the Alternative DNS server box.
    use the
  7. Now, check the Validate settings upon exit box.
  8. Click OK to close the windows.
    validate
  9. If Google DNS doesn’t fix the issue, try entering the values 4.2.2.2. and 4.2.2.4 in the Preferred and Alternative DNS server boxes instead.
  10. Restart your laptop or desktop after changing the DNS.

5. Delete the 4e9a232b subfolder

  1. To open File Explorer, press the Windows key + E keys simultaneously.
  2. Click Documents on the left of File Explorer.
    documents unable to download patch files ffxiv
  3. From there, open this folder path in Explorer: My Games / Final Fantasy XIV A Realm Reborn / Downloads / Patch
  4. Then right-click the 4e9a232b subfolder and select Delete.
    delete
  5. Thereafter, try downloading the required patch files to update FFXIV with Steam in its offline mode.

Deleting FFXIV’s 4e9a232b subfolder is another potential fix for its Unable to download patch files error.

Those are possible resolutions for the Unable to download patch files error that might get FFXIV updated again. Make sure you follow them to the letter, and you should be able to force the download through.

If you want to know how to fix League of Legends patch issues, check our detailed guide to do it quickly.

Feel free to let us know the solution that helped you fix this issue in the comments below.

How to Solve Installation Stopped Xbox One [Simple Guide]

Some users reported that installation stopped on their Xbox One, and today we’ll show you how to fix this problem.

Xbox One allows you to install both applications and games on your console. Installing games on your hard drive has its benefits and will enable you to start your games faster.

Why does Installation Stop in Xbox One?

There are various reasons why an installation may stop on an Xbox One. Some common causes include the following:

  • Insufficient storage space – The installation process will stop unless the Xbox One has enough storage space.
  • Interrupted internet connection – If the internet connection is lost during installation, the installation will stop.
  • Corrupted game file – The installation will stop if the game file is corrupted or damaged.
  • Conflict with other apps or games – If another app or game runs in the background, it may cause a conflict and stop the installation process.
  • Hardware issues – If there are any issues with the Xbox One’s hardware, such as a damaged hard drive, the installation may stop.
  • Xbox Live service outage – The installation may stop if the Xbox Live service is down or experiencing issues.
  • Incorrect installation settings – If the installation settings are not configured correctly, the installation may stop.

How can I fix the Installation stopped Xbox One error?

1. Clear local saved games and try to reinstall the game

  1. Make sure that there’s no disc in the disc tray.
  2. Scroll left on the Home screen to open the Guide.
  3. Select Settings, then All Settings.
    installation stopped xbox one
  4. Choose System, then select Storage.
    xbox one system settings
  5. Now select Clear local saved games.
    installation stopped xbox one
  6. Choose Yes to confirm, then restart your console and try to install the game again.

Using this option, you’ll only delete the saved games stored locally on your console, but you can download them again from Xbox Live and continue where you left off.

2. Go offline and try to install the game

2.1 Go offline

  1. Scroll left on the Home screen to open the Guide.
  2. Select Settings, then All Settings.installation stopped xbox one
  3. Choose Network, then Network settings, then select the Go Offline option.
    installation stopped xbox one

2.2 Cancel the download

  1. Scroll right on the Home screen to open My games & apps, then select Queue.
    https://windowsreport.com/wp-content/uploads/2022/11/queue-1.png
  2. Highlight the game that you’re trying to install.
  3. Press the Menu button on the controller and select Cancel.

2.3 Restart console

  1. Eject the game disk.
  2. Scroll left on the Home screen to open the Guide. Alternatively, you can double-tap the Xbox button on your controller to open the Guide.
  3. Choose Settings, then select Restart console option and select Yes to confirm.

If your console is frozen, you can restart it simply by holding the power button on the front for 10 seconds. After your console restarts, insert the game disc and try to install it again.

2.3 Get the latest updates

  1. Scroll right on the Home screen and open My games & apps.
  2. Select Settings, then All Settings.
    installation stopped xbox one
  3. Choose Network and Network settings, then select Go online.

After going online, you need to download the latest updates for your game, and you’re good to go.

3. Check the status of Xbox Live services

  1. Visit the Xbox Live website, and click Sign in on the far right, top corner.
  2. Log into the service using your account.
  3. Click on Support at the top center of the website, and select Xbox status.

Sometimes to install games, you need to have access to Xbox Live. However, if Xbox Live is having some issues and its services aren’t running, you might encounter problems during the installation process.

Some installations require Xbox Live Core and Social and Gaming services to be running, and if those two services are down, you might encounter problems during the installation.

Unfortunately, this is a server-side issue, and you can only wait until Microsoft fixes this problem. However, you can check the status of Xbox Live services by visiting the Xbox website.

If you have slow performance on Xbox Live, this guide will help you restore it.

4. Make sure that you’re using the correct account

Sometimes you might encounter problems with your installation if you’re signed in with the wrong account.

All your games are tied to your Xbox account, and if you have multiple accounts on your console, you need to be sure that you’re signed in with an account you used to purchase this game.

Keep in mind that this solution only applies to digital downloads.

5. Make sure that you have enough storage space

5.1 Check your storage

  1. Tap the Xbox button on your controller and then go to the Notifications section.
  2. Check if there are any notifications regarding insufficient hard drive space.
  3. If that’s the case, you can add an external hard drive and install your games or free some space on your internal hard drive.

To delete items from your hard drive, you need to do the following:

5.2 Uninstall apps

  1. On the Home screen, press the Right Trigger and the A button to open My games & apps.
  2. Locate the game or app you want to delete and highlight, then press the Menu button on the controller and choose the Manage game or Manage app option.
    installation stopped xbox one
  3. Now select Internal Manage all, and click Uninstall all.
  4. You might have to repeat the process a few times until you free up the necessary space.

Xbox One games can be pretty significant, and to install them, you’ll need a lot of hard drive space. Sometimes this problem can occur if your hard drive doesn’t have enough room for you to install a specific game.

Usually, you’ll get a notification when you’re low on hard drive space, but if you missed the information, you could check it by following the steps above.

6. Check for system updates

  1. Tap the Xbox button to open the Guide.
  2. Select Settings, then All settings.
    installation stopped xbox one
  3. Now select System, then Console info & updates.
  4. If there’s an update available, it should appear at the bottom of the first column.

After downloading the latest update, try to install the game again.

Sometimes you might encounter problems with the installation if your console is out of date. To fix this issue, it’s advised that you check if there are any updates available for your console by following the steps above.

7. Install your game to the internal hard drive

Users reported that their installation stopped while trying to install the game on an external hard drive. Installing a game on an external hard drive is a great way to preserve your storage space, but unfortunately, specific errors can appear while trying to do that.

Users reported that they fixed this issue simply by installing the game to the internal hard drive and setting the download location for all new downloads to the internal hard drive.

After doing that, they could install their game without any problems.

8. Restore your Xbox to factory defaults

  1. Scroll left on the Home screen to open the Guide.
  2. Choose Settings, then All Settings.
    installation stopped xbox one
  3. Select System.
    xbox one system settings
  4. Choose Console info & updates.
  5. Now select Reset console.
    reset xbox one
  6. Select Reset and keep my games and apps. If this option doesn’t work, you’ll have to use the Reset and remove everything option (Remember this option will delete all your games, saved games, files, and apps, therefore, be sure to back up important files so you don’t have to download them again).

After the reset process is completed, try to install the game again, and the installation stops; Xbox One should disappear.

Remember that you should use factory reset as the last resort if all other solutions don’t work.

Sometimes, problems with installation can occur due to corrupted files, and one of the fastest ways to fix them is to perform a factory reset.

We must warn you that a factory reset can delete all your files from your console; therefore, be sure to back them up.

9. Uninstall and reinstall the game on your Xbox One

9.1 Uninstall the game

  1. Go to your Dashboard and navigate to My Games & Apps.
  2. Highlight the game you want to remove and press the Menu button on your controller.
  3. Select the Manage Game option from the menu.
    installation stopped xbox one
  4. Now you should be able to see how much space the game takes. Finally, select the Uninstall option to uninstall the game.

After removing the game from your Xbox, you need to reinstall it.

9.2 Reinstall the game

  1. Go to the My Games & Apps section.
  2. Locate the Ready to install section. This section lists all the games you own but don’t have installed.
  3. Select the game you want to install and wait for the installation to complete.

Some users are also suggesting that you should try refreshing your Dashboard before you delete and reinstall the game. We aren’t sure how refreshing the Dashboard solves the problem, but you can refresh it by holding the Left Trigger + Right Trigger + Y button combination.

10. Clean your Xbox One disc

If the installation stops while trying to install a game from a disc, it might be because your disc is damaged. If that’s the case, you might be able to fix the problem simply by cleaning your disc.

To do that, hold the disc by its side and make sure that you’re not touching its top or bottom surface. Then, use a clean, damp cloth and gently clean it from center to edges.

In addition, you can also take your disc to any store with a disc polishing machine and ask them to clean it.

If cleaning or polishing your disc doesn’t fix the issue, you might want to consider a replacement. However, before replacing your disc, you might want to try it on your friend’s console and see if it works without any problems.

If the installation stopped on your Xbox One still appears, contact the retailer and ask for a replacement.

11. Use Google DNS

  1. Press the Menu button on your controller and choose Settings.
  2. Select Network, then Advanced settings.
  3. Select DNS settings, then choose Manual.
  4. Now enter the first numbers below as Primary DNS and the second as Secondary DNS. You can also use OpenDNS by 208.67.222.222 as Primary DNS and 208.67.220.220 as Secondary DNS.
    8.8.8.8
    8.8.4.4
  5. After entering the DNS server addresses, press the B button on your controller to save changes. If everything is in order you’ll see an It’s all good message.

After switching to Google DNS or OpenDNS, check if the problem is resolved.

Sometimes installation can stop on your Xbox One due to DNS settings. Issues with your DNS can occur and cause this and many other errors to appear.

Users reported fixing this problem simply by using Google DNS or OpenDNS. However, to change your DNS settings on Xbox One, you need to follow the steps above.

12. Format your hard drive for games & apps

  1. Scroll left on the Home screen and opened the Guide.
  2. Select Settings, then All Settings. 
    installation stopped xbox one
  3. Choose System, then select Storage.
    xbox one system settings
  4. Select your storage device and choose the Format for games & apps option.
    installation stopped xbox one

Remember that not all external hard drives can store games and apps. To keep apps and games on your external hard drive, your campaign needs to have a capacity of 256GB or more and use a USB 3.0 connection.

If your drive doesn’t meet those requirements, you can only use it to store other files, such as music and videos.

Many users use an external hard drive to store games and apps, which is a great way to save space on your internal hard drive.

However, before using your external hard drive for games and apps, you must format it correctly. Formatting your hard drive will remove all files from it; therefore, be sure to back them up.

13. Connect the console to your modem

Many Xbox One users use a wireless connection to connect to the Internet. Wireless connection has advantages since it allows you to connect to the Internet without cables easily.

This is especially useful if you want to keep your room neat and cable-free.

Despite its simplicity, a wireless connection is prone to interference and data loss, sometimes preventing certain games from installing on Xbox One.

If you have problems with installation on Xbox One, you need to connect your Xbox One directly to your modem by using an Ethernet cable.

A few users reported that the installation stopped issue on their Xbox One was resolved for them after switching to a wired connection, so you might want to try that.

Installation stopped error can be a severe problem since it will prevent you from installing games, but you should be able to fix it by going offline and trying to install the game again. If that doesn’t work, try any other solution from this article.

Don’t forget to tell us in the comments section below what worked for you and if you found another way to solve the problem.

Google Drive Slowing Down Computer: 4 Quick Fixes

As you all know, Internet bandwidth is the new king in the smart digital age and every other app is vying for their share of the data transfer rate. No wonder, there also are situations where one app ends up being greedy and eats up most of the bandwidth, leaving others gasping for breath.

Case in point: Google Drive which has been found to reduce others to crawling speed till the time files are uploaded or downloaded to and from the cloud storage. However, that sure can be taken care of and justice meted out to the other apps with just a few simple steps. Here we go.

What can I do if Google Drive is slowing down my PC?

1. Restart Google Drive’s process

This is often the most basic preventive method used to solve many an issue. In this case, stopping Google Drive operations in your PC will bring to an end all that is causing your PC to slow down, including de-clogging the RAM. Here is how to stop Google Drive.

  1. Open Task Manager. You can do this by either pressing Alt + Ctrl + Del  and choosing Task Manager from the screen that appears or better still, press Ctrl + Shift + Esc to launch Task Manager directly.
  2. Locate and select googledrivesync.exe
  3. Click on End Process. This will stop instance of Google Drive running on your PC.

2. Restart Google Drive

This will make the cloud service to start again on your PC and should be working fine.

3. Manually limit Google Drive data transfer rate

Google Drive is known to use up the entire bandwidth, or the lion’s share of it to get about doing its job. That happens to be the primary reason why the cloud storage service has been found to cause Windows 10 to lag.

Here is how to limit the data transfer rate for Google Drive to use to free up bandwidth for other applications to use.

  1. Right click on Google Drive icon. It should be on the left of your taskbar itself.
  2. In the dialog box that opens, click on the three vertical dots at the top right corner and select Preferences.
  3. In the Preferences window that opens, click on the Advanced tab.
  4. Here, you will get to see the settings for both the upload and download rate.
  5. Select a rate depending on your internet plan that should leave enough bandwidth for other apps to operate comfortably.
  6. Click on Apply and there you are, you now have a set internet bandwidth limit for apps to act within.

4. Limit files to be uploaded

Another way to prevent Windows 10 to be bogged down by Google Drive is to ensure it is only the files that you need to be backed up in the cloud gets stored in Google Drive, and not your entire hard drive.

  1. So, the best thing to do here is to save all the files in a folder that you would like to store in Google Drive.
  2. Next, click on Google Drive.
  3. In the windows that opens, select the Overflow menu > Preferences.
  4. Check only those boxes next to Only sync some folders to this computer.google drive only sync some folders to this computer
  5. Select the folder that you’d like to sync to your Google Drive account.
  6. Click on Apply. This way, you will only be uploading those files that is needed and won’t be clogging the network unnecessarily. In fact, organising your files that needs to be uploaded can be a nice practice to preserve bandwidth each time.

Practicing the above steps should be enough to help your Windows 10 PC to retain its proficiency and speed irrespective of Google Drive getting about doing its job.

In fact, the above steps are more about taming Google Drive to act in a manner that other apps do not have to wait for internet bandwidth and restore a sort of order in your PC.

We hope you managed to fix the issue of Google Drive slowing down your PC. Let us know your thoughts in the comments section below.

Microsoft Store Error 0x800700005 [Solved]

The error code 0x800700005 sure is one of the most disturbing error messages regarding the Windows Store platform in Windows 10.

Fix 0x800700005 error message when trying to download and install apps (Windows 8.1)

The good news is that there are a few things that you can do to bypass this issue. Simply follow the tutorial below and you will successfully install your apps in the shortest time possible on your Windows 10 PC.

Follow the instructions below to check if you have the correct permissions for the folder where the application you are trying to install is stored.

You’ll also download and run some troubleshooting applications in order to automatically fix your system errors in Windows 10, and be able to download apps from the Windows Store.

How do I fix the error code 0x800700005?

1. Make sure you’ve got the correct permissions

  1. Open your File Explorer in Windows 10.
  2. Double click to open the Windows partition
    • Note: Usually the C:/ partition is the Windows partition.
  3. Double click or double tap on the Users folder to open it.
  4. Double click or double tap on the folder with your username.
  5. Select the AppData folder.
  6. From the AppData folder, double click or double-tap to open the Local folder.
    • In some cases, the Local folder is located in the Default.migrated folder.appdata local folder
  7. In the Local folder, you will need to find the Packages folder.
  8. After you found the Packages folder, right-click or hold tap on it.
  9. From the menu that appears, left click or tap on the Properties feature.
  10. Click or tap on the Security tab situated in the upper side of the window.
  11. In the Group or user names list check each username and be sure it has full permissions.
    • If a username does not have full permissions, you need to left-click on the Advanced button.
  12. In the Advanced window, check what usernames does not have full permissions and left click on the username.
  13. Click or tap on the Add button.
  14. Left-click or tap on the Select a principal link.
  15. Write Users under the Enter an object name to select topic.
  16. Next left-click or tap on the Check Names button.
  17. Under the Basic Permissions topic check the box next to Full Control.
  18. Left-click or tap on the Apply button.
  19. Left-click or tap on the OK button.
  20. Reboot your Operating System
  21. Check again to see if you still get the error message 0x800700005 while trying to download apps.

2. Run the Windows App Troubleshooter

  1. Left-click or tap on the link posted below to download the Windows App troubleshooter.
  2. Save the executable file to your Windows device.
  3. Right-click or hold tap on the executable file
  4. From the menu that appears left click or tap on the Run as Administrator.
  5. Follow the instructions on the screen to finish the troubleshooting process and reboot your PC.
  6. Check again if you still get the error message 0x800700005

If you’re running Windows 10, you can also launch the Windows Store Apps Troubleshooter from the Settings page.

Navigate to Settings > Update & Security > Troubleshooter > locate and launch the troubleshooter, as shown in the screenshot below.

windows store apps troubleshooter

3. Reset your Windows Store app

  1. Open a Run window and enter the WSReset.exe command.
  2. Hit Enter, wait for a few seconds and then restart your computer.
reset windows store

One quick method to solve error 0x800700005 is to reset your Windows Store app. This tool is essential for downloading and installing other Windows Store apps.

In other words, if there is something wrong with the Windows Store App, you won’t be able to download new apps or update the ones you already installed.


4. Restart the Windows Update services

  1. Press Start
  2. Type in cmd to launch the Command Prompt
  3. When Command Prompt starts, run the following commands:
    • net stop wuauserv
    • net stop bits
    • rename C:WindowsSoftwareDistribution SoftwareDistribution.old
    • net start wuauserv
    • net start bits
  4. Open the Windows Store again and check if the problem is still there.

The Windows Store App depends on the Windows Update service to work properly. If the Windows Update Service is affected by various issues, this may also impact the Store app.


By following these steps, you should be able to quickly fix error code 0x800700005 in Windows 10 so that you can start downloading and installing your favorite apps from Store again.

If you do have any questions regarding this article, please write to us in the comments below and we will get back to you as soon as possible.

FIX: Microsoft Store error code 0x803fb107

Some users have posted on forums about a 0x803fb107 Microsoft Store error. That error arises for some users when they try to download games from the MS Store.

Error 0x803fb107 is primarily a Windows 10 issue that stops users from downloading games and other apps from Microsoft Store. However, users have fixed that error with the resolutions below.


How do I fix the MS Store 0x803fb107 error?

1. Sign out and back into to MS Store

  1. Click the Microsoft Store shortcut on the Start menu.
  2. Click the account button at the top right of the MS Store window.
    Profile button 0x803fb107 microsoft store
  3. Select your account.
  4. Click the Sign out option.
    Account window 0x803fb107 microsoft store
  5. Then click the account button again.
  6. Click Sign in, and then select the account.
  7. Click the Continue button.

2. Open the Windows Store App troubleshooter

  1. Press the Windows key + S hotkey.
  2. Enter the keyword troubleshoot in the search box.
  3. Then click Troubleshoot settings, which will open Settings as in the snapshot directly below.
    Troubleshoot tab 0x803fb107 microsoft store
  4. Select Windows Store Apps to click its Run the troubleshooter button.
    Windows Store Apps window 0x803fb107 microsoft store
  5. Click Apply this fix if the troubleshooter provides a potential resolution.

3. Reset the Microsoft Store cache via Command Prompt

  1. Press Start
  2. Click the Type here to search taskbar button.
  3. Input cmd to search for the Command Prompt
  4. Right-click Command Prompt to select the Run as administrator option.
  5. Enter wsreset.exe, and press the Return key.
    wsreset.exe command 0x803fb107 microsoft store
  6. Restart Windows 10 after resetting MS Store.

4. Reset Microsoft Store with PowerShell

  1. Open Windows 10’s search box.
  2. Type the keyword PowerShell in the search box.
  3. Right-click Windows PowerShell and select Run as administrator to open it with elevated user rights.
  4. Input the following command:
    • Get-AppXPackage -AllUsers -Name Microsoft.WindowsStore | Foreach {Add-AppxPackage -DisableDevelopmentMode -Register “$($_.InstallLocation)AppXManifest.xml” -Verbose}.
    • You can copy and paste that command into PowerShell with the Ctrl + C and Ctrl + V hotkeys.
      PowerShell window 0x803fb107 microsoft store
  5. Don’t forget to press Enter to initiate the command.
  6. Thereafter, reboot your desktop or laptop.

5. Reinstall Windows 10

  1. Open the search utility, and enter the keyword reset in the text box.
  2. Click Reset this PC to open Settings as shown directly below.
    Recovery tab 0x803fb107 microsoft store
  3. Press Get started button to open the Reset this PC window.Keep my files option 0x803fb107 microsoft store
  4. Select the Keep my files option.
  5. Press the Next button to proceed.
  6. Click Reset.

Note: This method has the highest chance of success in fixing your issue, but it will also result in the loss of all of your data. As such, create a backup before proceeding with this method.

Those resolutions have fixed error 0x803fb107 for numerous users. So, there’s a strong chance they’ll fix the same issue for you.

Let us know which of the above-mentioned methods worked best for you by leaving us a message in the comments section below.

Fix: DaVinci Resolve Keeps Crashing on Startup [5 Ways]

Blackmagic Design’s DaVinci Resolve is a popular free video editor available on multiple platforms. However, some users have reported the DaVinci Resolve keeps crashing issue when editing a video.

Unlike Adobe’s Premier Pro, the popular DaVinci Resolve video editor works better with a system that has a dedicated GPU. Lack of which can result in occasional crashes.

In this article, we explore a few troubleshooting steps to help you resolve the DaVinci Resolve crashing issues for good.

How can I fix DaVinci Resolve crashing on startup?

1. Change process priority

DaVinci resolve keeps crashing
  1. Make sure DaVinci Resolve is running.
  2. Right-click on the Taskbar and select Task Manager.
  3. Open the Details
  4. Scroll down and right-click on Resolve.exe.
  5. Go to Set Priority and select High.

That’s it. Try working on any of your projects and check if the problem is resolved. Note that you may have to set the Priority to High every time you restart DaVinci Resolve.

2. Install Nvidia Studio Driver

DaVinci resolve keeps crashing
  1. Launch Nvidia GeForce experience.
  2. Click the menu icon (three dots in the top right corner).
  3. Select Studio Driver.
  4. GeForce Experience will download and install the Nvidia Studio Driver.

If you already have the Studio Drivers installed, try performing a clean install.

DaVinci resolve keeps crashing
  1. Download and install the Display Driver Uninstaller.
  2. Run the tool and select the graphic card,
  3. Click on Clean and restart.
  4. Once uninstalled, download the latest version of NVIDA Studio Driver.
  5. Run the installer and install the necessary packages through custom installation.
  6. Restart the computer and relaunch DaVinci Resolve.

Nvidia Studio driver can also trigger DaVinci Resolve crashes. Try clean installing the drivers to fix the issues.

If you need to install this Nvidia driver correctly, without causing major issues, better try the dedicated update driver tool and efficiently install or update any drivers on your PC.

⇒ Get Outbyte Driver Updater

3. Which version of DaVinci resolve is best to avoid crashing?

Let’s begin with the most common reason for DaVinci Resolve crashing issues. DaVinci Resolve 15 was riddled with a few glitches and bugs that were causing frequent crashes.

These crashes also occurred on a system that had sufficient hardware to run the video editor. That said, installing the latest version, DaVinci Resolve 16, seems to have fixed many issues with the software.

Update DaVinci Resolve

DaVinci resolve keeps crashing on startup
  1. Launch the Resolve app.
  2. Click on DaVinci Resolve.
  3. Select Check for updates.
  4. Download and install any pending updates.

Once installed, relaunch the app and check if the crashing issue is resolved. If not, you may have to uninstall, then reinstall the latest version to fix the issue. Here’s how to do it.

DaVinci resolve keeps crashing on startup
  1. Press Windows key + R.
  2. Type appwiz.cpl and click OK.
  3. In Control Panel, select DaVinci Resolve.
  4. Click on Uninstall, and then confirm the action.
  5. Once uninstalled, download the latest version of DaVinci Resolve from here.
  6. Run the installer and check for any improvements.

4. Enable IGPU Multi-Monitoring

Davinci Resolve freezes
  1. Shut down your computer.
  2. Press the power button to restart the computer. When restarting, start pressing the Setup key (F2) on your keyboard to enter BIOS.
    Note: The setup key is usually displayed on the initial screen. Check the user manual for your Laptop or motherboard manual (in case of the desktop) to find the Setup key.
  3. In the BIOS menu, open the Advanced tab.
  4. Locate IGPU Multi-Monitoring and make sure it is enabled.
  5. Save the changes and exit.

5. Check for GPU compatibility

Disable integrated GPU

Davinci Resolve freezes
  1. Press the Windows key + R.
  2. Type devmgmt.msc and click OK.
  3. In Device Manager, expand the Display Adapter section.
  4. Right-click on your Integrated Intel GPU.
  5. Select Disable Device.
  6. Open DaVinci Resolve and check if you are still encountering crashes.

Upgrade GPU

As discussed earlier, DaVinci Resolve is a GPU-heavy application. It is recommended to have a decent dedicated graphics card installed for stable performance. If you only have an Intel Integrated GPU, time to consider upgrading to a dedicated GPU.

The DaVinci resolve keeps crashing issue usually occurs due to GPU driver incompatibility or a bug in the software itself. Follow the steps one by one to diagnose and fix the issues triggering crashes.

Error 0x803F700 in Microsoft Store [Solved]

Windows Store is slowly but steadily becoming the viable alternative to old-school programs in Windows 10.

Even though apps are moderately improved and overall usability enhanced, there are still errors that can corrupt the positive image. One of those errors frequently reoccurs and goes by the code 0x803F700.

Users who reported this error were unable to access, download, and install apps in Windows Store. Speaking of which, if you can’t install Windows Store apps, our general troubleshooting guide may help you.

We prepared a list of possible fixes for error 0x803F700 that should come in handy. If you have had issues with the above-mentioned error code, make sure to check the steps below.

How can I fix the error 0x803F700?

1. Run the Windows Troubleshooter

First things first. Troubleshooting with the firm presence of built-in tools is a great thing to start with. And, even though Windows 10 lacks some advanced features, it certainly does not lack troubleshooting tools. If you’re unable to access Windows Store and/or download apps while receiving a repetitive network error, make sure to run the responsible troubleshooter from the unified menu and look for changes.

If you’re not sure how to do it, the steps below should show you how:

  1. Open Start and click on the cog-like icon to open Settings.
  2. Open Update & security.
  3. Choose Troubleshoot.Windows 10 Error Code 0x803F700
  4. Scroll to the bottom and highlight the Windows Store Apps troubleshooter.
  5. Click on the ”Run the troubleshooter” button.

If the Windows native troubleshooter fell short, you should move on with the below-presented solutions. One should suffice.

2. Disable Windows Firewall and third-party antivirus temporarily

Now, even though disabling Windows security measures is highly unadvised in everyday use, you can make an exception from time to time. Namely, more than a few third-party antivirus solutions can occasionally block certain Windows features and prevent their execution.

For more information on the best antivirus software to install on Windows 10 without worrying about compatibility issues, check out this article.

Furthermore, Windows Firewall, the built-in protective barrier, can also, in the worst-case scenario, prevent affected applications from connecting to a network.

So, even though that’s a long shot, it will cost you nothing to temporarily disable Windows Firewall and third-party antivirus. In addition, you can do so with Windows Defender, too. If you’re not sure how to disable Windows Firewall in Windows 10, make sure to check the steps below:

  1. Type Firewall in the Windows Search bar and open Windows Firewall.
  2. Click on ”Turn Windows Firewall on or off” in the left pane.Windows 10 Error Code 0x803F700
  3. Disable Firewall for both Private and Public networks and confirm changes.
  4. Try running Windows Store apps again and look for the error.

If the issue is persistent and you’re still stuck with the same error, continue with the troubleshooting.

3. Reset Store cache

Windows Store is developed and presented just like the majority of other Windows 10 apps, with a few distinctive traits. You can’t reinstall it, at least not with a conventional approach. On the other hand, you can clear its cache easily. Windows Store stores all kinds of cache and preferences in order to speed up the loading time and improve the overall experience. However, once that data piles up, and it will gradually, Windows Store will suffer.

In order to address this, you should move to resetting Windows Store cache. That can be done with a simple command that summons the WSReset tool. After you run it, Store’s cache will be wiped and, hopefully, the error at hand resolved.

If you’re not sure how to run this tool, make sure to follow the below-enlisted steps:

  1. Press Windows key + S.
  2. In the Search bar, type WSReset.exe and press Enter.
  3. This should restart Windows Store and clear the cache.

READ ALSO: Fix: Windows Store Won’t Open after Windows 10 Upgrade

4. Update Windows Store

In the last couple of months, Windows Store changed a lot in many aspects, and overall stability is one of them. Mainly, Microsoft is making an effort to finally place Windows Store as a competitor in the market, and all indications are that it will with the Fall Creators Update. This, consequently, means that errors are more frequently addressed with timely updates.

So, if you’ve experienced this or similar errors, make sure to check for updates and, hopefully, resolve the issue at hand. In order to do so, follow these steps:

  1. Open the Windows Store app.
  2. Click on the 3-dot menu in the far right corner and open Downloads & updates.
  3. Click on the ”Get the updates” button.Windows 10 Error Code 0x803F700

5. Reset App Packages

For the majority of issues with third-party programs, users can turn to reinstallation as a viable solution. However, as you probably know, you can’t uninstall Windows Store. What you could do is to reset app packages and re-register the Windows Store.

This can be done within the PowerShell elevated command line. If you’re not sure how to do it, follow the instructions below:

  1. Type PowerShell in the Search bar, right-click and open PowerShell as an administrator.
  2. In the command line, copy-paste the following command and press Enter:
    • Get-AppXPackage -AllUsers | Foreach {Add-AppxPackage -DisableDevelopmentMode -Register “$($_.InstallLocation)\AppXManifest.xml”}
  3. Restart your PC.

6. Sign out and sign in again in Windows Store

Signing out and in again has done miracles for some users troubled by the Windows Store error at hand. For some awkward reasons, the Store just starts misbehaving and, in order to resolve the stall, you’ll need to sign out and sign in again with the same or alternative credentials.

Follow the instructions below to do so:

  1. Open the Windows Store app.
  2. Click on your account icon located in the upper right.
  3. Select the active account and click Sign Out.
  4. Now, click again on the account icon and choose to Sign In.Windows 10 Error Code 0x803F700
  5. Insert your credentials and sign in.
  6. Look for changes.

That should wrap it up. We hope you were able to resolve the Windows Store error 0x803F700 with one of these fixes.

In case you have any questions or alternative solutions, make sure to give us a shout in the comments section below.

From Field is Missing in Outlook: How to Restore It?

The From field in Outlook allows you to see from which email address you are sending an email. It is useful, especially when you have multiple accounts.

And if From field has disappeared in Outlook, it could create confusion and make it difficult to send emails using the correct email address. However, it is fixable.

This guide will explore the causes of this issue and the available fixes to restore the “From” field in Outlook. Let’s get started! 

What causes From field to be missing in Outlook?

There could be various reasons why From field might have disappeared from Outlook; some of the popular ones are: 

  • Faulty add-ins – Some add-ins you installed on Outlook, if faulty, could cause the From field to disappear. To fix it, you need to remove the add-ins one by one to check which was causing the issue.
  • Email Rules – Some email rules on Outlook might make From field disappear or hide. Check the email rules that you have set up in Outlook.
  • View settings – If the From field is hidden, you might not see From when composing emails. You need to check the settings to be sure.
  • Corrupted Outlook profile or data file – If the Outlook profile or data file is damaged or corrupt, it might cause different issues, such as From field disappearing.
  • Outdated Outlook – The older version of Outlook installed on your computer would make it run slowly and not add new features to the app; then, it could cause this issue.
  • Email account settings – If your email account is incorrectly configured or deactivated, you might not see the From field.

What can I do to fix From field disappearing in Outlook?

Before moving into detailed troubleshooting steps, please make sure you go through these preliminary checks: 

  • Check Manage Rules & Alerts and ensure no rules are causing the From field to disappear.
  • Double-check the Settings and make sure From field is selected in the current view.
  • Remove all the Add-ins one by one to check which is faulty.

1. Add another email account

  1. Launch Outlook.
  2. Go to File.File - FROM field disappearing in Outlook
  3. Click Add Account.Add account
  4. Enter the email address and click Connect.Outlook account connect
  5. If asked, enter the password for the email address and select OK.
  6. Now click Finish.

2. Add From button manually

  1. Click Compose to create a new email message.
  2. Choose Options. From selected  - FROM field disappearing in Outlook
  3. From the Show Fields group on the ribbon, select From.

3. Change your default email account

  1. Launch Outlook.
  2. Select File.File - FROM field disappearing in Outlook
  3. Go to Account or Office Account, and click Account Settings.Account Settings
  4. Select the account you want to use as default from the list of accounts on the Email tab.
  5. Click Set as default.
  6. Now click Close.

4. Update Outlook

  1. Go to File.
  2. Click Account.Update options - FROM field disappearing in Outlook
  3. Go to Office Updates, and click Update Options. 
  4. From the dropdown, select Update Now.
  1. Reinstall Microsoft Office 
  1. Press Windows + R to open the Run window.programs and features - FROM field disappearing in Outlook
  2. Type appwiz.cpl and hit OK to open Programs and Features.
  3. Select Microsoft Office and click Uninstall.Microsoft Office Uninstall
  4. Now sign in to your Microsoft account, click Profile, and select My Microsoft account.Microsoft Account - FROM field disappearing in Outlook
  5. Go to Services & Subscriptions.Services & Subscriptions
  6. Locate Microsoft Office and click Install.Install
  7. Follow the on-screen instructions to complete the process.

So, you can follow these steps to fix From field disappearing in Outlook issue. If nothing worked for you, it is advised to contact Microsoft Support for further assistance.

Please let us know in the comments section below if you have any questions or concerns about the issue.

Fix: Printer Keeps Printing 2 Pages Instead of 1

Is your printer always printing two copies whenever you send a document to print? Well, this can be attributed to your printer settings either from the printer or from the document settings you’re working from. Otherwise you’d have to check your printer’s drivers if the settings are fine.

Before you try some of the fixes below, check whether there are any changes you made to your printer, whether the issue persists when you make a copy from your printer, if you can print from a different application and still get the same results.

Here are some solutions you can use to try and resolve the problem and get your printing back in order.

What can I do if my printer prints twice in Windows 10?

  1. Change the number of copies from printer settings
  2. Uncheck Enable bidirectional support (for HP printers)
  3. Install the latest printer drivers
  4. Adjust number of copies from the document
  5. Reset Printing system
  6. Reinstall your printer

1. Change the number of copies from printer settings

  1. Click Start and select Control Panel.
  2. Select Hardware and Sound.
  3. Click Devices and Printers.HP LaserJet p1102w not printing USB
  4. Click printer properties.
  5. Select number of copies. If it is set to 2, change it to 1 and see if it helps.

2. Uncheck Enable bidirectional support (for HP printers)

  1. Click Start and select Control Panel.
  2. Select Hardware and Sound.
  3. Click Devices and Printers.
  4. Right-click your HP printer icon.
  5. Select Printer server properties.
  6. Select Ports.
  7. Uncheck enable bidirectional support.
  8. Click Apply.

3. Install the latest printer drivers

You can do this via the Add a Printer wizard. Here’s how:

  1. Click Start and select Control Panel.
  2. Select Hardware and Sound.
  3. Click Devices and Printers.
  4. Click Add a printer which opens a Choose a device or printer to add to this PC Click Next if you see your printer.
  5. If you don’t see your printer, click The printer I want isn’t listed and select Add a local printer or network printer with manual settings then click Next.
  6. Choose the port you want your printer to use then click Next.
  7. Click Windows Update then click the name of your printer in the Printers pane.
    • If it is on the list, click Next.
    • If it isn’t on the list, click back twice then go to Find a printer by other options.
  8. Select Add a printer using TCP/IP address or hostname and click next.
  9. Select Autodetect from Device type dropdown.
  10. Type your printer’s IP address and click Next.
  11. Wait for your computer to connect to your printer and click Next to install the printer driver.

4. Adjust number of copies from the document

Depending on the document you’re using, do the following to control the number of copies of your printed document in the application or software submitting the job to the printer:

Word document

  1. Click File
  2. Select Print
  3. Select Copies.
  4. Adjust the number of copies.

PDF document

  1. Click Printer icon.
  2. Click Copies.
  3. Adjust the number of copies.

Web page

  1. Click File.
  2. Select Print.
  3. Select Copies.
  4. Adjust the number of copies.

5. Reset Printing system

  1. Click Start and select control panel and select View by Large Icons.
  2. Click Administrative tools.
  3. Click Print management.
  4. Click Print servers.
  5. Right-click on the empty space next to the name of the print server.
  6. Select Add/Remove servers.
  7. Click Remove All, and then click OK.

6. Reinstall your printer

  1. Click Start and select Control Panel.
  2. Click Programs.
  3. Right-click Start and select Device Manager.
  4. Check if your printer is listed there and delete it.
  5. Go to Control Panel.
  6. Select Hardware and Sound.
  7. Click Devices and Printers.
  8. Select any printer listed and check options on the top.
  9. Click Print Server properties.
  10. A popup will display, click the Drivers tab.
  11. Delete all printer drivers listed there.
  12. Restart your computer.
  13. Update the firmware from Control Panel.
    • For this, you have to be connected to your wireless network.
  14. Right-click Start and select Run.
  15. Type %temp% in the run box and click OK or press enter.
    • This brings up the temporary files folder.
    • Delete all files in the folder and restart your computer again.
  16. Download the latest full feature printer driver from your device manufacturer’s website and install it.

Many also reported that printer is printing even pages first, but we covered this issue in another guide.

Were you able to resolve the printer always prints 2 copies issue? Share your experience in the comments section below.

Can’t Install Fonts on Windows 10? Here’s What to Do

A great number of users have complained about the fact that their version of Windows 10 can’t install new fonts.

This issue can become extremely frustrating, as it can stop you from accessing the full capability of your PC.

What makes it even more annoying is the fact that encountering this issue doesn’t produce any sort of error message that you can troubleshoot with online help.

There can be a variety of reasons for encountering this problem. For this reason, in today’s guide, we will cover them all and give you suggestions about how to deal with each of them.

Read on to find out more.

What do I do if Windows 10 won’t let me install fonts

1. Check if the TTF file is corrupted

  1. Open the Windows Store.
  2. Search for fonts by using the search bar.
  3. Download the font you want to use.
  4. Try installing it.
  5. If it fails, it means that your original file was not corrupted, and other factors are at fault.
  6. Follow the next method.

If you’re trying to install a font file that has been corrupted in any way, Windows will not allow you to do so.

Sometimes files can become corrupted just by simply doing a restore of the data on your PC, or by a power outage during the update process of Windows.

This is a simple workaround, but it might come in handy if fonts are not installed on Windows 10 at all.

2. Use a dedicated tool

Adobe Fonts truly excels when it comes to giving access to unlimited fonts for word processing, print design, and more.

Firstly, you can enjoy a great library, with thousands of fonts included with your Creative Cloud subscription. As an avid Adobe user, you’re about to love this part too.

Well, activating fonts from Adobe Fonts is enough to make them all appear in the font menus of all your desktop applications, such as Illustrator, InDesign, Photoshop, and Microsoft Office.

Moreover, Adobe Fonts offers far more customization than other tools and has immense potential for both your personal and business projects.

The collection of Japanese fonts has countless filtering options to bring you closer to the desired results and all fonts can be used on mobile on iOS13.1 and newer apps that support Apple’s custom font APIs.

Last but not least, Creative Cloud will watch over those apps that are meant to run smoothly by constantly cleaning up all fonts that you don’t seem to be using.

Adobe Fonts offers some great features, and it’s a great solution if a specific font won’t install on Windows 10.

Adobe Fonts

If you’re working with fonts frequently, Adobe Fonts is the best choice for font management and installation.
Check price Visit website

3. Don’t install fonts from removable storage

Please make sure that you are not trying to install the font from a removable flash drive, or other storage media. This will more than likely cause the error mentioned above.

To avoid this problem, copy the files to your computer’s HDD and try installing the fonts again.

4. Copy the file and paste it

Even though this method doesn’t seem to make sense, some users have managed to solve this issue by simply copying the TTF file, and pasting it either into the same folder or into another folder.

If after trying this solution the desired font won’t install on Windows 10, you should move to the next solution.

5. Enable Windows Firewall

Again, we know how this method sounds. You might be thinking: What does the Windows Firewall have to do with fonts? We understand.

Even though we asked ourselves the same question, this method has proven useful in the case of a large number of users encountering the same issue as you did.

Try this method out and check to see if this fixes your problem.

In today’s guide, we discussed the best methods to apply if fonts are not installed on Windows 10.

Because we understand how important it is to be able to use different fonts to write and edit your texts, we tried to cover the entire range of possible causes for this problem.

Please feel free to let us know if you found this guide helpful. You can do so by simply using the comment section found below.

Antivirus Blocking Printer [Avast, AVG & More]: Quick Fix

Most regular Windows 10 users try to secure their systems with dedicated antivirus solutions. They can buy specialized programs, or built-in Microsoft security software, but the final goal is the same.

They all want to protect their personal data and files. But, what should you do when these security measures are messing up some of our usual devices?

There are situations that can get quite annoying such as when the antivirus is blocking the printing process or the printer itself. However, you need to know that the issue can be fixed.

And, when discussing the Antivirus is blocking the printing/printer situation, the problems can be addressed without the hassle by adding an antivirus exception or by creating a new Firewall rule.

More unprofessional solutions imply temporarily deactivating the antivirus software during the printing process or while you need to use the printer (locally or through a network).

But, that’s not really a solution as it implies repeating the same process each time you need to print something.

So, bottom line, what you need to do is to communicate with your security program and let it know which program/process can be trusted and which cannot.

Before following the troubleshooting methods from below make sure that the printer/printing problems are indeed caused by your antivirus.

Just disable your antivirus and resume the printing operation; if everything works without problems you can use the steps from below.

Otherwise, it might be another thing that stands behind the printing malfunctions. Assuming that it’s not, add an exception or to create a Firewall rule within your antivirus program.

Well, here is how you can complete these processes for some of the best security programs available for the Windows 10 platform.


What can I do if the antivirus is blocking my printer?

1. Bitdefender blocking printer

  1. Run Bitdefender on your PC, so double-click on its icon usually located in the system tray.
  2. Now, from the main user interface, click on the Protection icon.
  3. Next, click on the View Features link.add exclusions bitdefender
  4. Under the Firewall section, click on the Settings icon.
  5. Switch to Rules tab and click on Add for setting up a new Firewall exception.
  6. Now, choose the executable file for your printer in order to enable access for its functionality.
  7. Complete the other field by using on-screen prompts – if you are using a wireless printer, or if you want to print files over a network, enter the implied URL similar as you did for the executable file.
  8. Save your changes and then restart your Windows 10 system.

Bitdefender is an award-winning antivirus, protecting hundreds of millions of users worldwide. If your printer is blocked by it, just follow the above steps in order to resolve the issue.


2. Kaspersky blocking printer

  1. Bring up the Kaspersky main user interface.
  2. Navigate to Settings and from that field click on the Additional section.
  3. Within the right frame of the windows that will be displayed on your computer, select Threats and exclusions.add exclusion kaspersky
  4. Click on the Configure exclusion rules link.
  5. Just fill out the required fields and add an exclusion for your printer (locally or through a network).

This software tool has evolved for some time now, providing anti-malware solutions for both home environments and much larger business environments.

The interface is really simple to use, and you can set an exclusion rule if your printings are blocked by Kaspersky.

Sometimes this antivirus won’t update, leading to several issues. If this happens for you, check our dedicated guide in order to fix the problem.


3. Avast blocking printer

  1. Open Avast on your Windows 10 computer.
  2. Then, go to Protection.
  3. Under Protection, select the Firewall entry.
  4. Choose Application settings, located at the bottom of that screen.
  5. Next, initiate a new Firewall rule by choosing New application rule.set avast exclusion rule
  6. Just add the app you want to include in the Firewall exception list.
  7. Save everything and reboot your system in the end.

Avast is a great antivirus solution that has a free solution for those that need only basic home protection for their personal computers.

If you want to try out for free multiple antiviruses before deciding which one to keep, check our guide including the best free antiviruses for up to one year.


4. Avira blocking printer

  1. From Avira, you need to go to Menu followed by Configuration.Avira menu
  2. Then, you have to access the Internet Protection feature.
  3. From there you can pick up the Application rules entry.
  4. So, click on the Application rules link in order to bring the Firewall settings.
  5. Select Change parameters and under allowed programs list locate the printer app and enable it.

Avira is another freeware antivirus tool in the security landscape. The developer has improved the software a lot over the past year to be competitive enough.

There are also many freeware security tools. If you don’t know them yet, just head to our complete guide and discover their features.


5. AVG blocking printer

  1. Launch the AVG app and from its main interface click on the Firewall option (it should be the last entry).avg exclusion list
  2. Next, from Enhanced Firewall click on the Settings icon – it should be located at the bottom of that window.
  3. Choose Advanced Settings and from the left side click on set avast exclusion rule.
  4. Now, click on the Add button and fill up the on-screen form in order to add a new exclusion for your printer.
  5. Save your new settings and reboot.

AVG is among the best antiviruses that can stop viruses, spyware, malware, protecting your computer from any cyber threats you can think of.


6. Norton blocking printer

  1. Open the Norton app.Norton antivirus
  2. Go ahead and select Advanced options.
  3. The Firewall entry should be located in the left panel; select it.
  4. Click on the Settings icon from the Application Blocking row.
  5. Pick up Add application and set the executable file for your printer.
  6. Apply these settings and save everything.
  7. Done.

Norton does a fantastic job of updating their virus databases, with new updates being available almost daily. It also comes with a VPN and more great features.


7. Windows Defender blocking printer

  1. Open Windows Defender Security Center – in the Windows Search field (just click on the Cortana icon) type Windows Defender and launch the app with the same name.Windows Defender
  2. Select Virus & threat protection and navigate towards Virus & threat protection settings.
  3. From there you can choose Add or remove exclusions.
  4. You can now include your printer in the exclusion list which means that you can now successfully use your printer without any further issues.

Windows Defender is the built-in solution that is included in Windows 10. Basically, you can use only the Defender alone to protect your computer from viruses and other threats.


So, these are the steps that should be applied when the antivirus is blocking your printer or the printing process. If you are currently using a different program than the already discussed ones, don’t panic.

You should be able to use similar configuration steps for your own tool. However, we recommend you use any of these best antiviruses for Windows 10 in order to avoid compatibility issues.

In that respect, if you have further questions or if you need our further assistance don’t hesitate and get in touch with our team (you can do it by using the comments field from below).

Windows Store Code: 0x87AF0813 [Solved]

Microsoft Store is a great way to install a wide range of apps and some exciting games in Windows. But, many users reported encountering issues, usually the Microsoft Store Error Code: 0x87AF0813.

The error is seen while downloading new apps and updating the ones already installed. And it’s been encountered both by mobile and computer users running Windows. If you, too, are getting Windows Store Error Code: 0x87af0813, here’s all you need to know.

Why do I see the Microsoft Store Error Code: 0x87AF0813?

Here are a few reasons you might be encountering the error:

  • Corrupt store cache: In most cases, it’s a corrupt store cache that’s leading to issues updating or downloading apps from the Microsoft Store.
  • Issues with the system files: If the system files are corrupt or missing, Microsoft Store will throw errors.
  • Poor Internet connection: A slow Internet connection is another reason why users encounter the Microsoft Store Error Code: 0x87AF0813.
  • PC is out of storage: Many users reported that the reason they received the error was due to low storage space on the PC.

How do I fix Microsoft Store Error Code: 0x87AF0813?

Before trying the full-fledged solutions, here are a few tricks to get things running:

  • Check your Internet speed using a tool like Speedtest, and make sure it’s optimal. If not, take measures to increase the Internet speed.
  • Sign out of the Microsoft Store and then log back in using the same credentials.
  • If you have a third-party antivirus, firewall, or a similar security software installed on the computer, disable it, and verify whether the problem is resolved. These tools can often conflict with the download process in Microsoft Store.
  • Make sure you are running the latest version of Windows. In case there are any available updates, download them.

If these didn’t work, the solutions listed next should.

1. Reset the store cache

  1. Press Windows + S to open Run, type wsreset.exe in the text field, and hit Enter.wsreset.exe to fix Code: 0x87AF0813
  2. Now, wait for the reset process to complete.

2. Run the Windows Store Apps troubleshooter

  1. Press Windows + I to open Settings, and click on Troubleshoot in the System tab.troubleshoot
  2. Now, click on Other troubleshooters.other troubleshooters
  3. Locate Windows Store Apps, and click on the Run button next to it.Windows Store Apps troubleshooter to fix Code: 0x87AF0813
  4. Follow the on-screen instructions and choose the appropriate response when prompted to complete the troubleshooting process.instructions

Microsoft offers a bunch of a built-in troubleshooters to identify and eliminate issues in Windows. So run the Windows Store Apps troubleshooter, and verify whether it fixes Error Code: 0x87AF0813.

3. Run the DISM and SFC scan

  1. Press Windows + R to open Run, type cmd, and hit Ctrl + Shift + Enter.command prompt
  2. Click Yes in the UAC prompt.
  3. Now, paste the following commands one at a time and hit Enter after each to run the DISM tool:DISM /Online /Cleanup-Image /ScanHealth DISM /Online /Cleanup-Image /RestoreHealth
  4. Once done, execute the following command to run the SFC scan:sfc /scannowsfc scan to fix Code: 0x87AF0813

Corrupt system files are one of the prime reasons behind issues with the Microsoft Store and running the DISM tool, and the SFC scan has been found to fix problem in no time.

4. Clear storage space on the PC

If you find that the PC is running out of storage space, it’s time you clear up some. The best way to do that is to either run Disk Cleanup or configure Storage Sense to automatically delete unwanted files.

Disk Cleanup

Also, you could use a reliable third-party disk cleaning tool to free up storage space and fix the Microsoft Store Error Code: 0x87AF0813.

5. Change the region

  1. Press Windows + I to open Settings, choose Time & language from the left, and then click on Language & region.language and region
  2. Now, choose the United States from the dropdown menu next to Country or region.change region to United States to fix Code: 0x87AF0813

A few users managed to resolve issues by simply switching the region to the United States. It seems that some apps or features in Windows Store are not accessible to users in certain regions.

6. Re-register the Microsoft Store app

  1. Press Windows + S to open Search, type Windows PowerShell in the text field, right-click on the relevant search result, and choose Run as administrator.powershell
  2. Choose Yes in the UAC prompt that appears.
  3. Now, paste the following command and hit Enter:Get-AppXPackage -AllUsers | Foreach {Add-AppxPackage -DisableDevelopmentMode -Register “$($_.InstallLocation)AppXManifest.xml”}re-register store to fix Code: 0x87AF0813
  4. Wait for the process to complete.

Once done, the Microsoft Store wouldn’t throw the Error Code: 0x87AF0813 anymore, and you can download and update apps like before. In case nothing works, as a last resort, factory reset Windows, and it will get things running.

And now that you have Microsoft Store working, do check the best apps for Windows and get them today.

Tell us which fix worked for you in the comments section below.