FIXED: 0x00000040 Operation Could Not Be Completed Printer Error

Some readers have reported a printing error message that reads Operation could not be completed (error 0x00000040), when attempting to print a document.

In this article, we solve the problem so that you can use your printers on Windows 11 seamlessly again.

How do I fix the 0x00000040 printer error in Windows 11?

First, restart your PC and reset your router. If you’re still having problems, keep reading:

1. Run the printer troubleshooter

  1. Press Windows + I to open the Settings app.
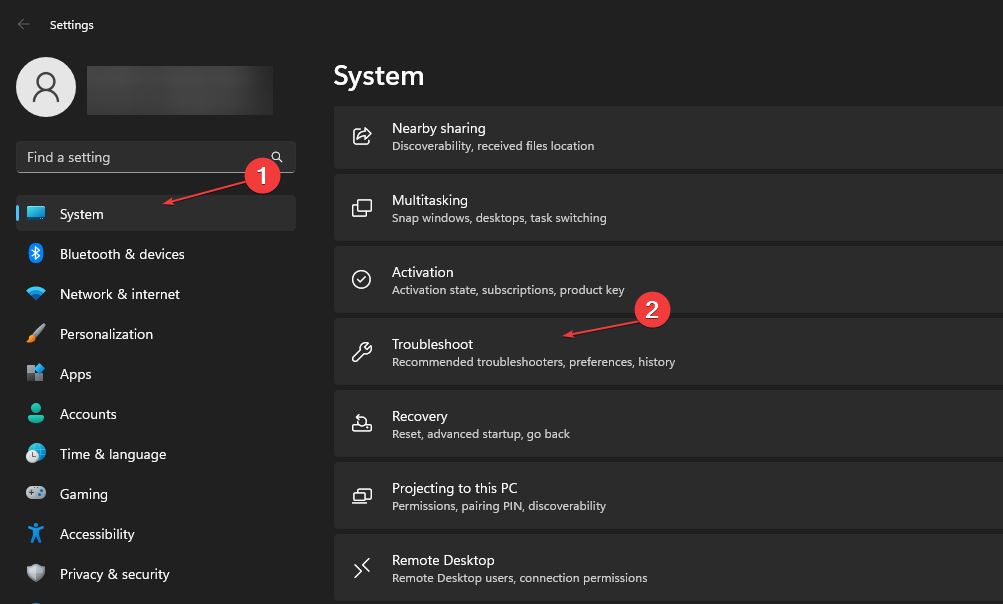
  2. On the right pane, click on Troubleshoot.
    0x00000040
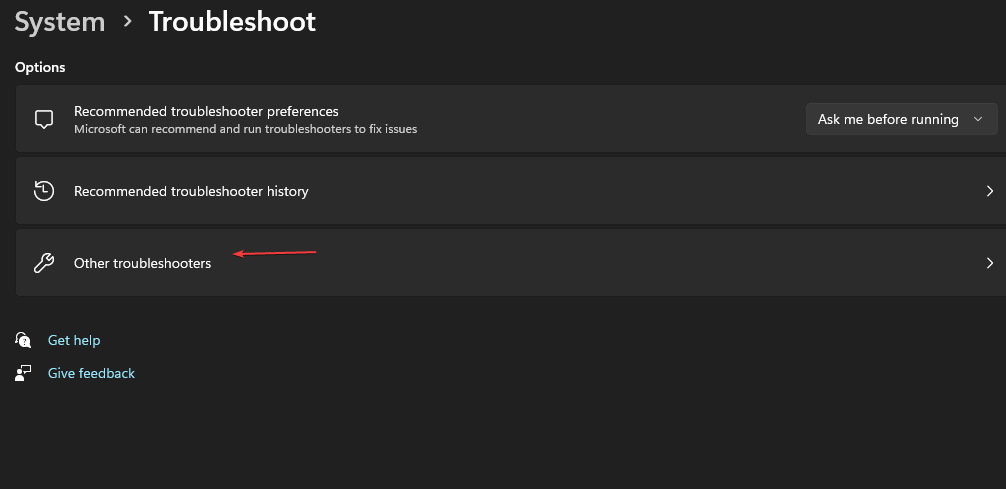
  3. Select Other troubleshooters.
    0x00000040
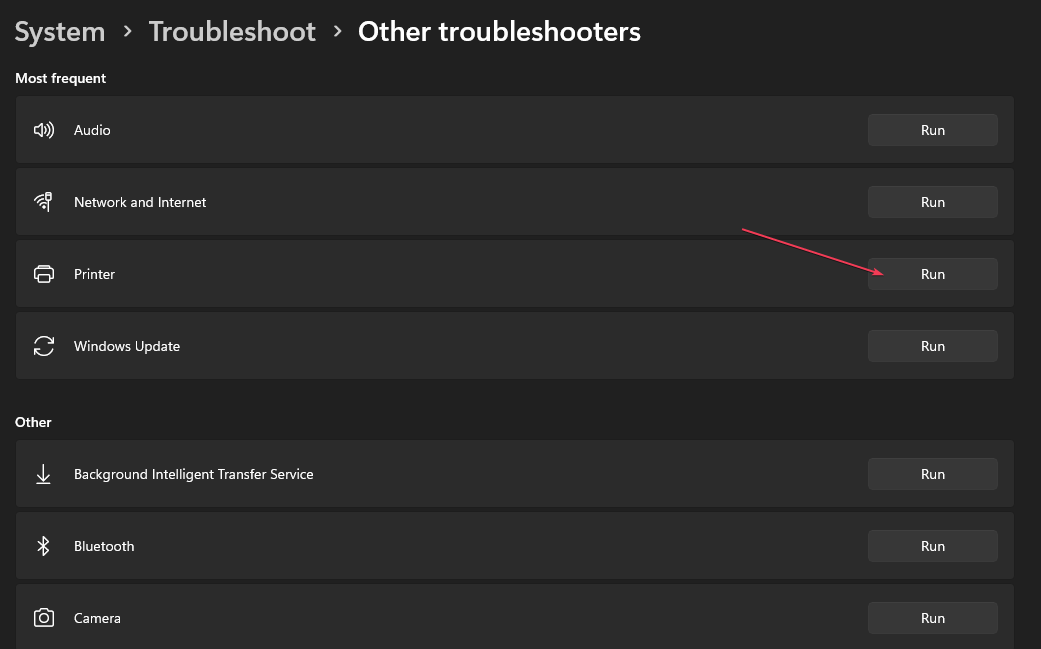
  4. Click on the Run option for Printer, then follow the prompts to complete the troubleshooting process.
    0x00000040
  5. Verify if it fixed the 0x00000040 printer error.

2. Repair corrupted files

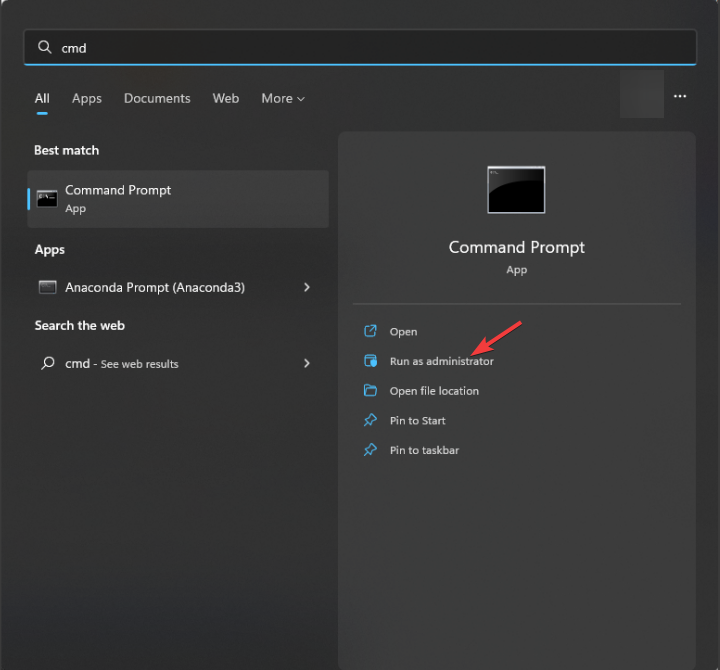
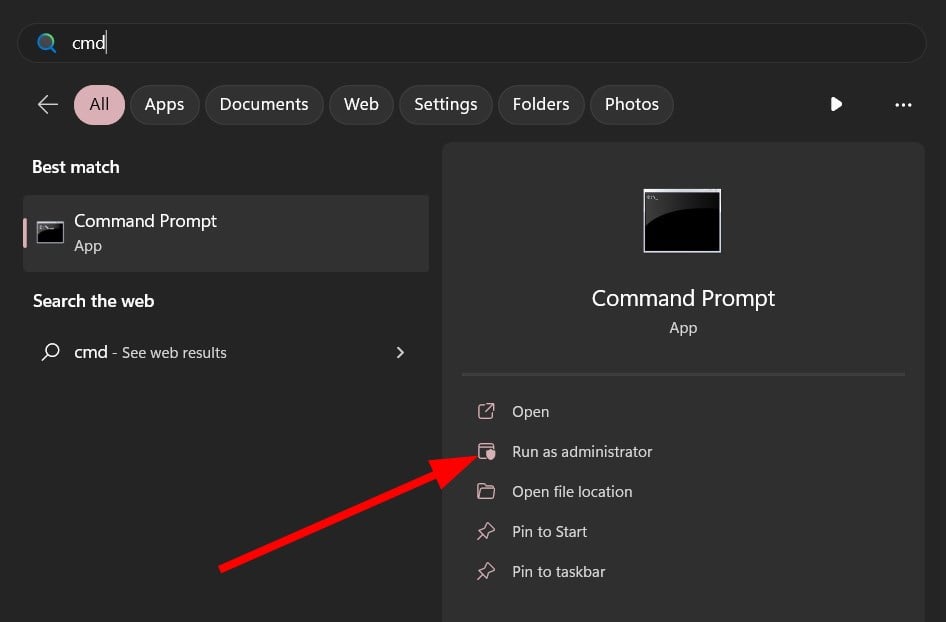
  1. Press Windows + R, type cmd, and hit Enter.
    0x00000040
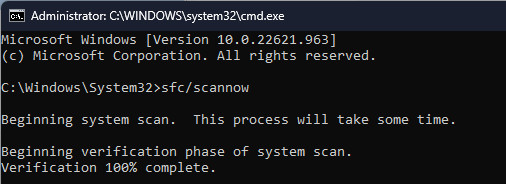
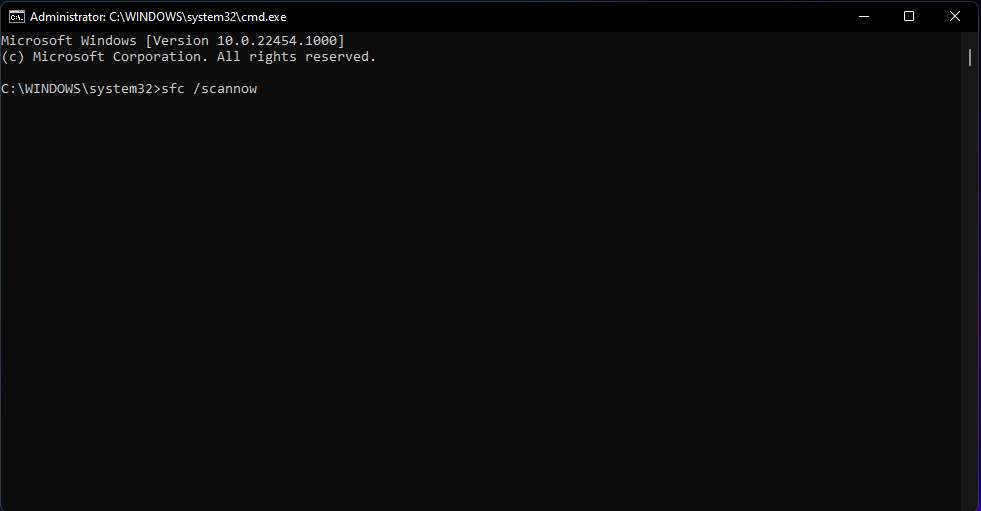
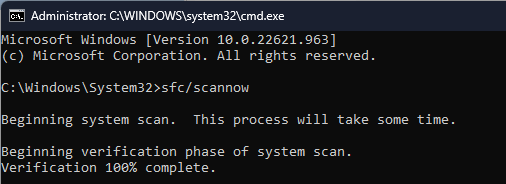
  2. Run the file checker script below, and give it a while to completely execute.
    sfc /scannow
    0x00000040
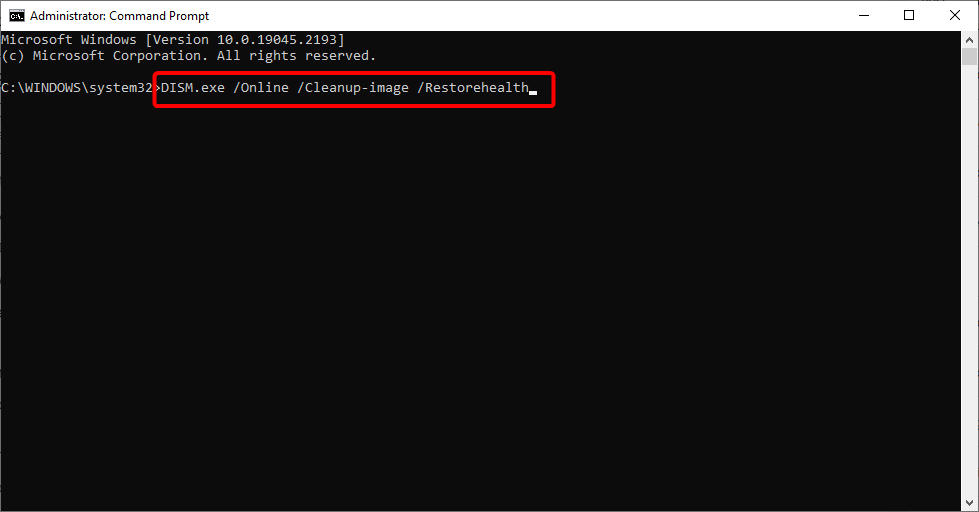
  3. In the Command Prompt, input the scripts below, hitting Enter after each one.
    DISM /Online /Cleanup-Image /CheckHealth
    DISM /Online /Cleanup-Image /ScanHealth
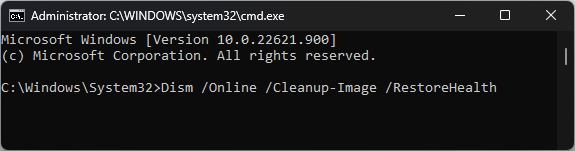
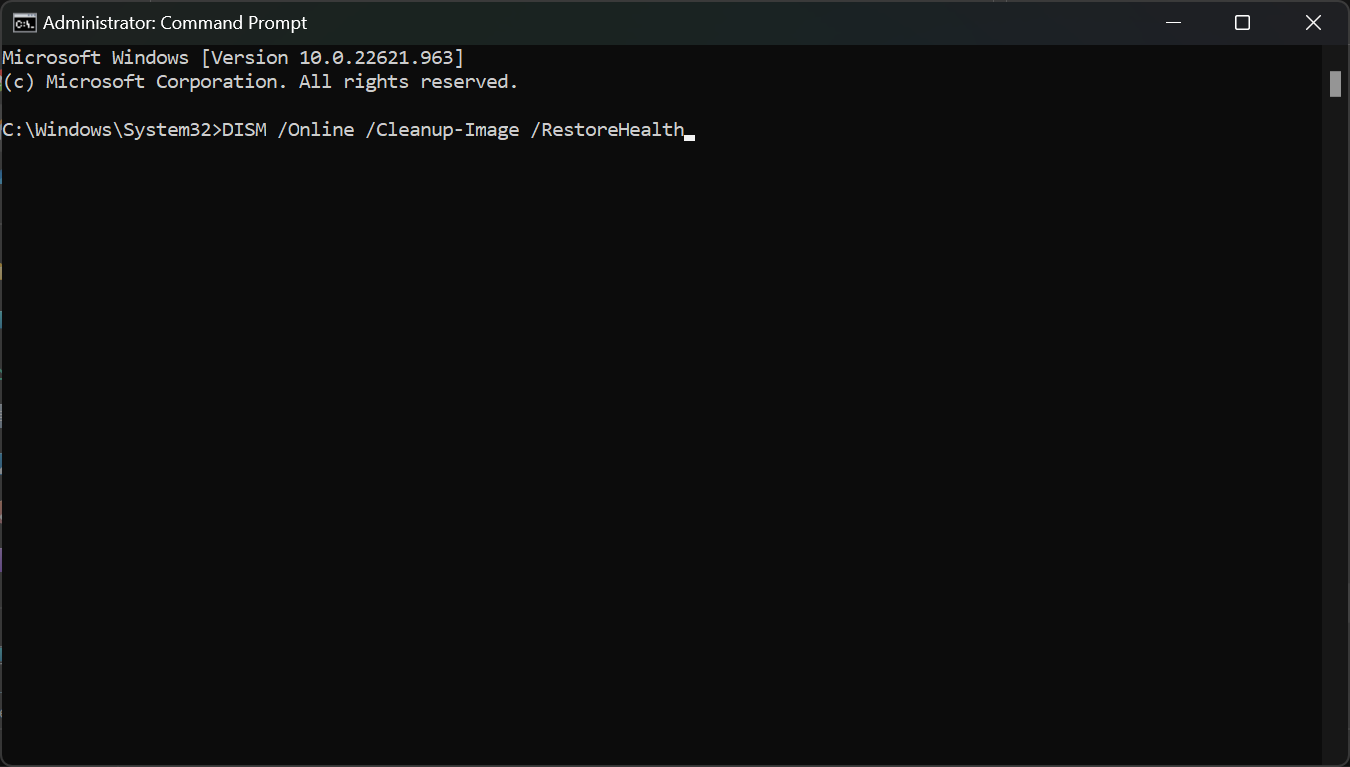
    DISM /Online /Cleanup-Image /RestoreHealth
    0x00000040
  4. Restart the device and confirm that the 0x00000040 printer error is resolved.

3. Update printer drivers

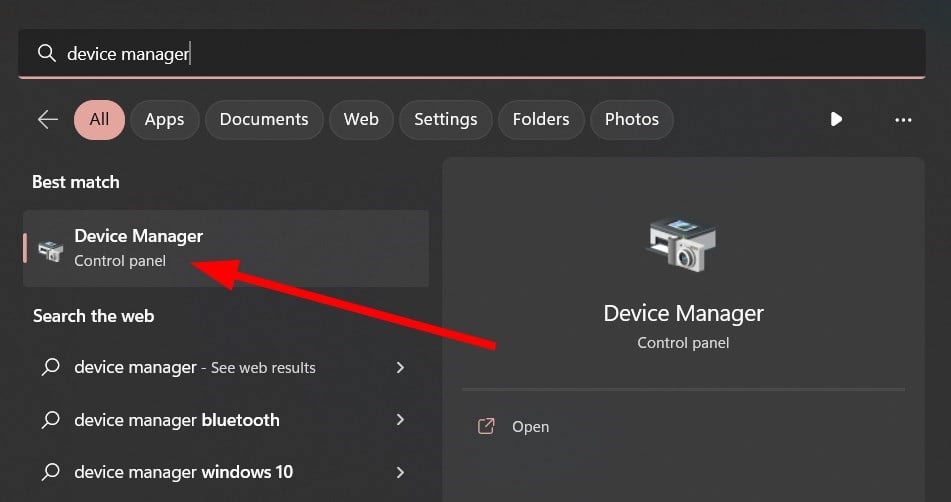
  1. Right-click on the Start menu and select Device Manager.
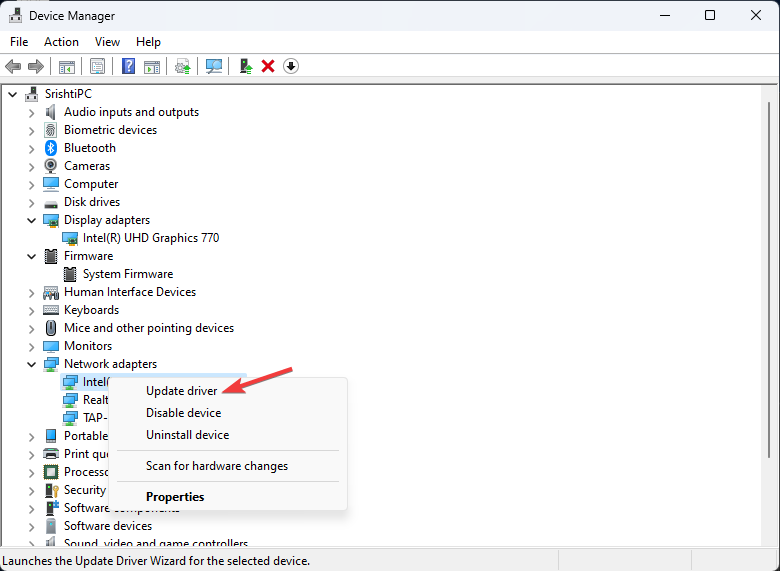
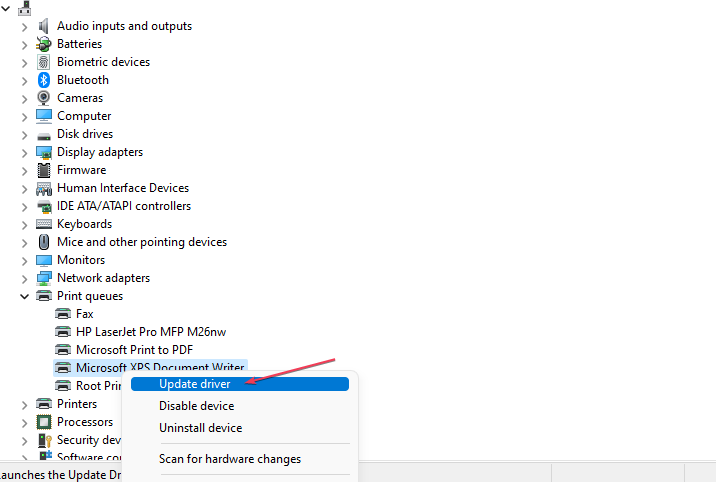
  2. Expand Print queues, right-click your printer and select Update driver.
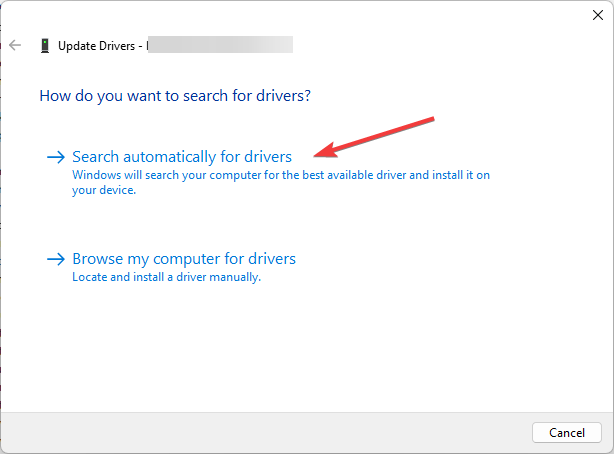
  3. Select Search automatically for drivers.

If the manual steps to update your printer driver didn’t solve it, you could utilize another efficient solution.

Hence, one helpful suggestion is to use a driver manager that automatically updates or repairs drivers on your device.

⇒ Get Outbyte Driver Updater

4. Restart vital print services

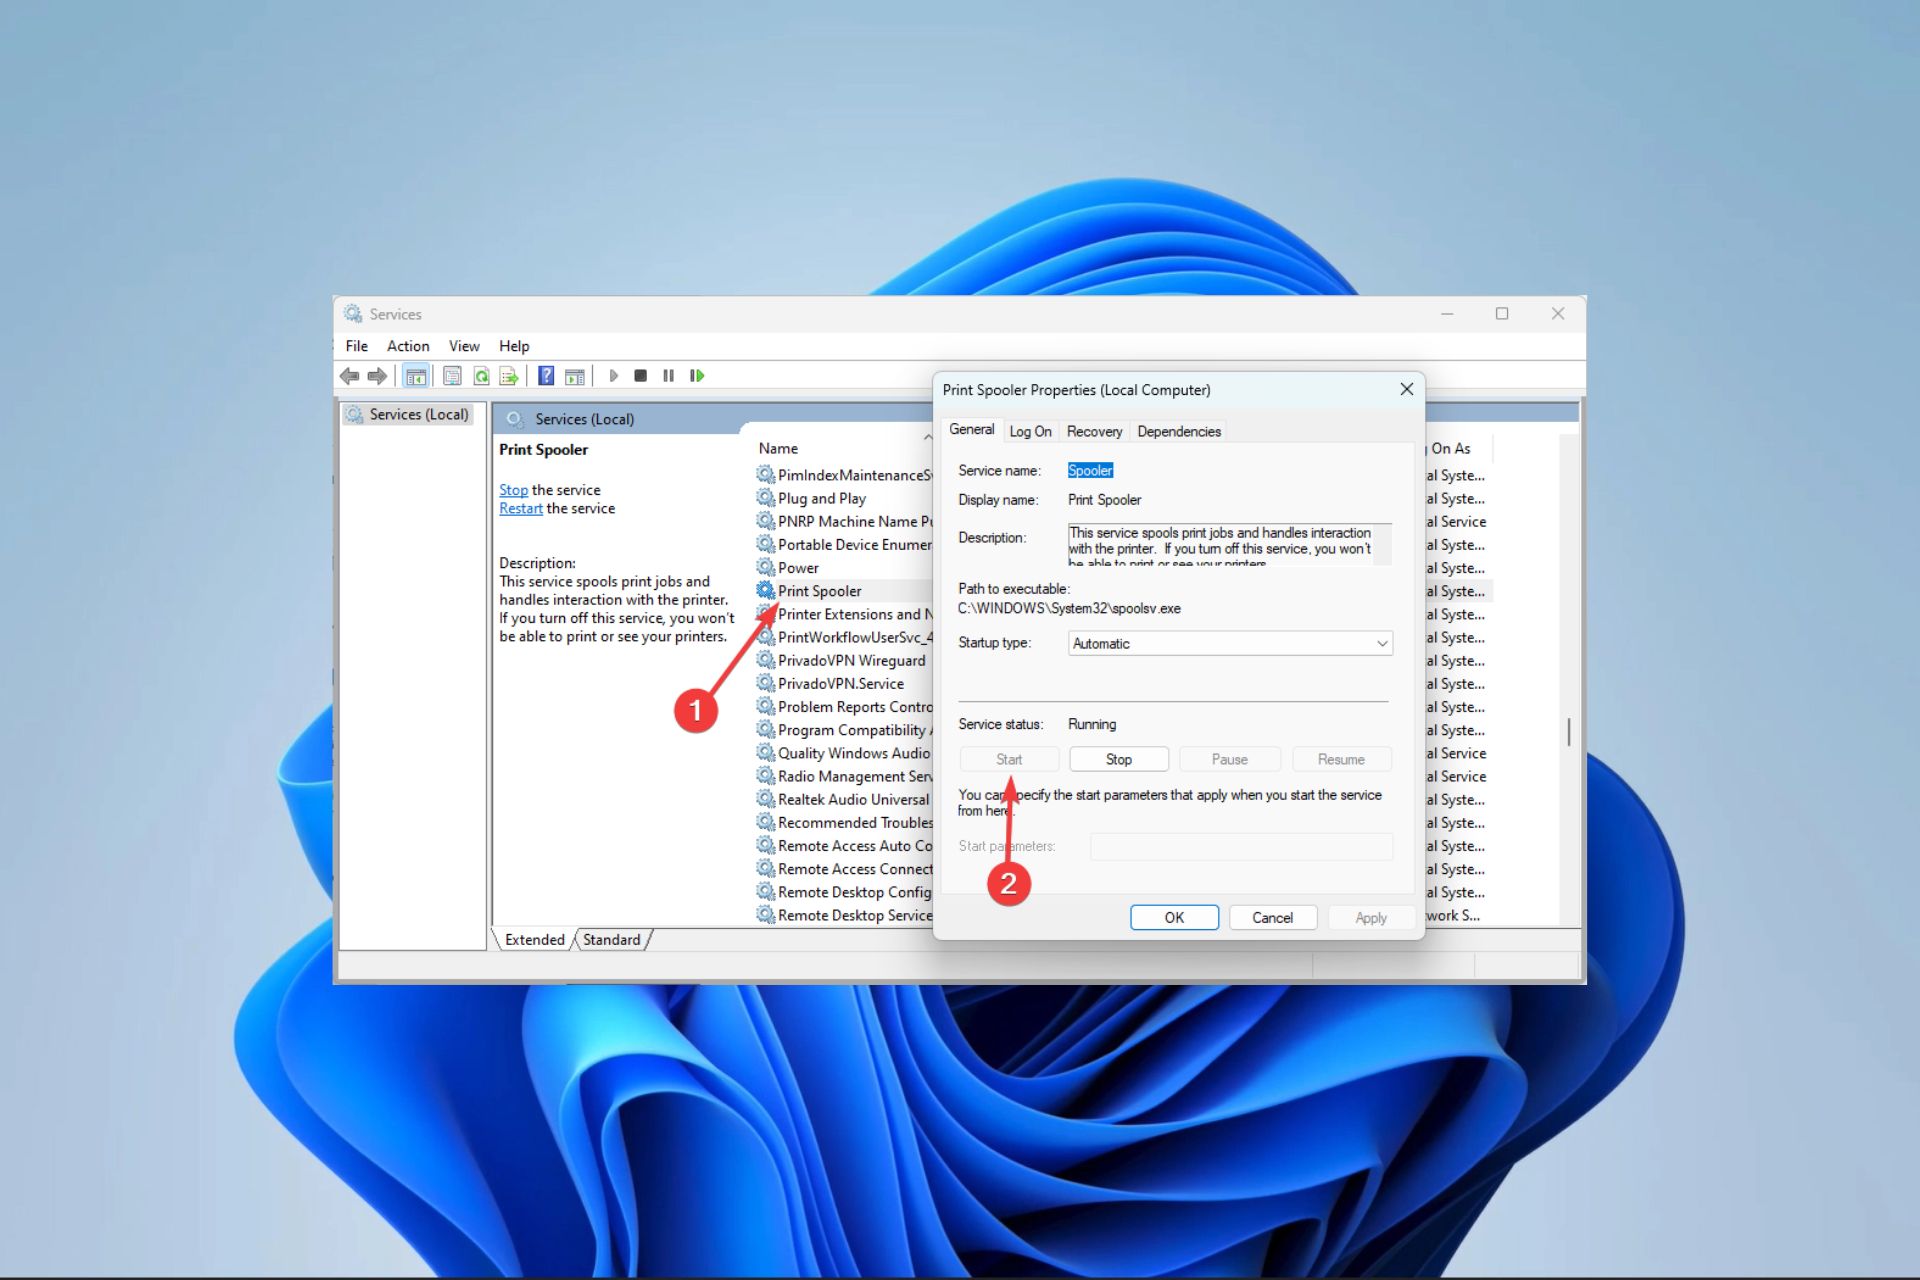
  1. Press Windows + R, type services.msc, and hit Enter.
    0x00000040
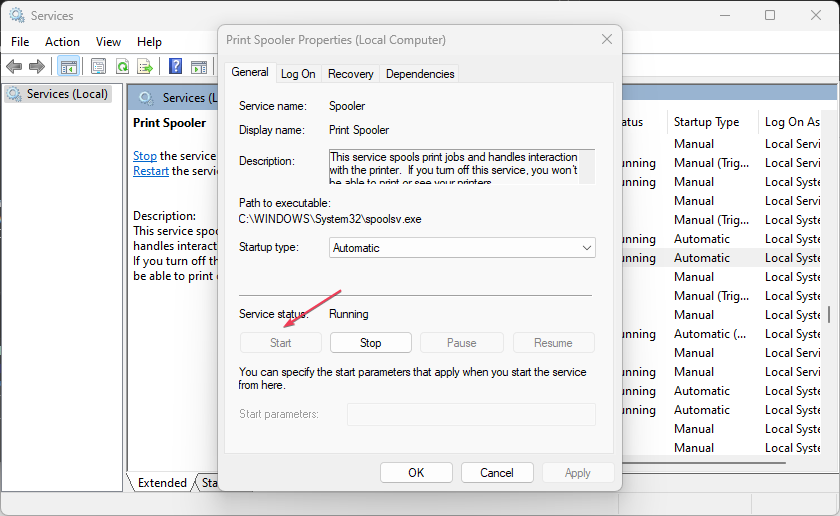
  2. Double-click on the Print Spooler service; if it is stopped, click the Start button.
  3. Also, Restart the Printer Extensions and Notifications, the PrintWorkFlowUserSvc, and the Workstation services, using the same steps above.
  4. Finally, verify the printer error has been resolved.

What causes the 0x00000040 printer error?

Any of the following factors could result in the printer error:

  • Malware infections – These malware infections will cause computer problems, such as printer error with code 0x00000040.
  • Driver issues – This error can occur if your printer drivers are corrupted, outdated, or incompatible with your system.
  • Printer spooler service-related issues – Any problems with the printer spooler service can lead to errors in managing the print queue and print jobs.
  • Hardware issues – If the printer hardware is defective due to damaged cartridges, faulty cables, or paper jams, this error code may also be caused.

How do I fix the 0x00000040 printer error in Windows 10?

All the solutions we have gone through above are also valid fixes for the older Windows 10 OS. However, you may notice slight changes in the user interface.

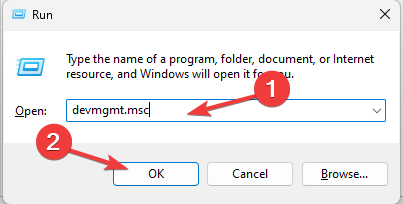
To open the Device Manager in Windows 10, you may rather press Windows + R, type devmgmt.msc, and hit Enter rather than follow the process in Solution 3.

The 0x00000040 printer error is pretty easy to resolve, you should choose any of the solutions and walk your way through the rest till it is fixed.

That is as much as we cover in this guide. If you have any comments or want to share what solutions worked for you, we would like to read from you in the comments section.
7 Ways to Enable or Disable Startup Apps on Windows 11

When you switch on your computer, it takes some time for Windows to boot up. This is mainly because the applications perform their tasks in the background. These applications are called startup apps.

While they make work easier, they can be disabled if they do not benefit your computer. If you have been wondering how to improve your boot time, we share which apps to disable and how to disable them.

Why should I enable/disable startup apps?

When you turn on your PC, it launches several applications automatically. Startup apps can be either good or bad for your computer. So, what are the advantages of enabling startup apps?

  • They save time since they launch automatically when your system boots up. This lets you get on with what you must do as soon as possible.
  • Startup apps also reduce potential security risks, especially if you have enabled antiviruses as startup apps to check for malware immediately after your system boots up.

Now, onto the disadvantages:

  • If you have multiple startup applications that are set to run at startup automatically, they can significantly slow down the time needed for your computer to boot up. This is because each of these applications needs to load before the operating system will continue booting up, which can affect your system’s performance. 
  • Some startup apps can lead to performance issues or even drain your battery faster than normal because they’re running continuously whether or not they need to do anything at any given moment.
  • Too many unnecessary startup apps can eat up your RAM. If your PC is low on memory, you’ll have problems operating your PC, such as freezing random crashes.
  • It can take a long time to boot your PC. The time your computer takes to boot up is directly proportional to the number of startup apps you have loaded. Therefore, the more apps you have running at startup, the longer it will take for your computer to boot up completely.

Disabling will help reduce memory usage on your computer and improve its overall speed and performance by making available more memory for other programs that need it urgently.

You can also follow a dedicated guide on how to make a program run on startup in Windows 11 when you want specific apps to launch automatically as soon as the system boots.

How do I change what programs run at startup?

1. Use the Task Manager 

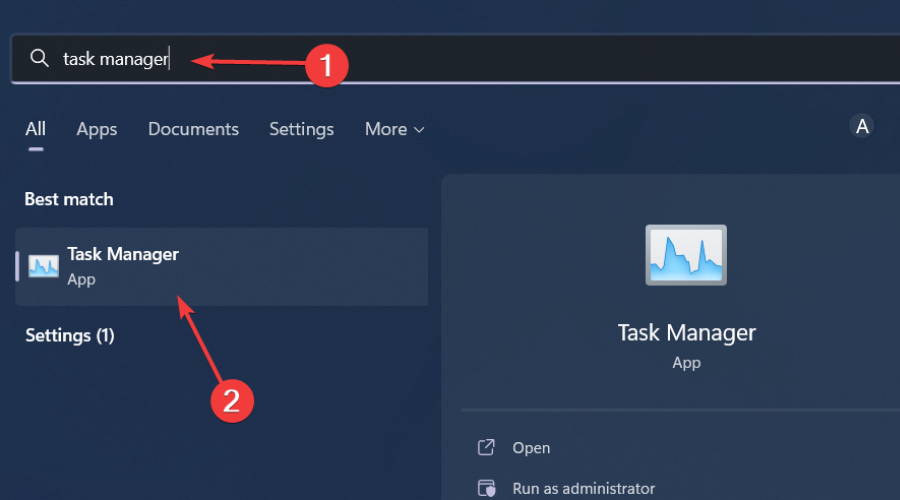
  1. Hit the Windows key, type Task Manager in the search bar, and click Open.
    task manager search
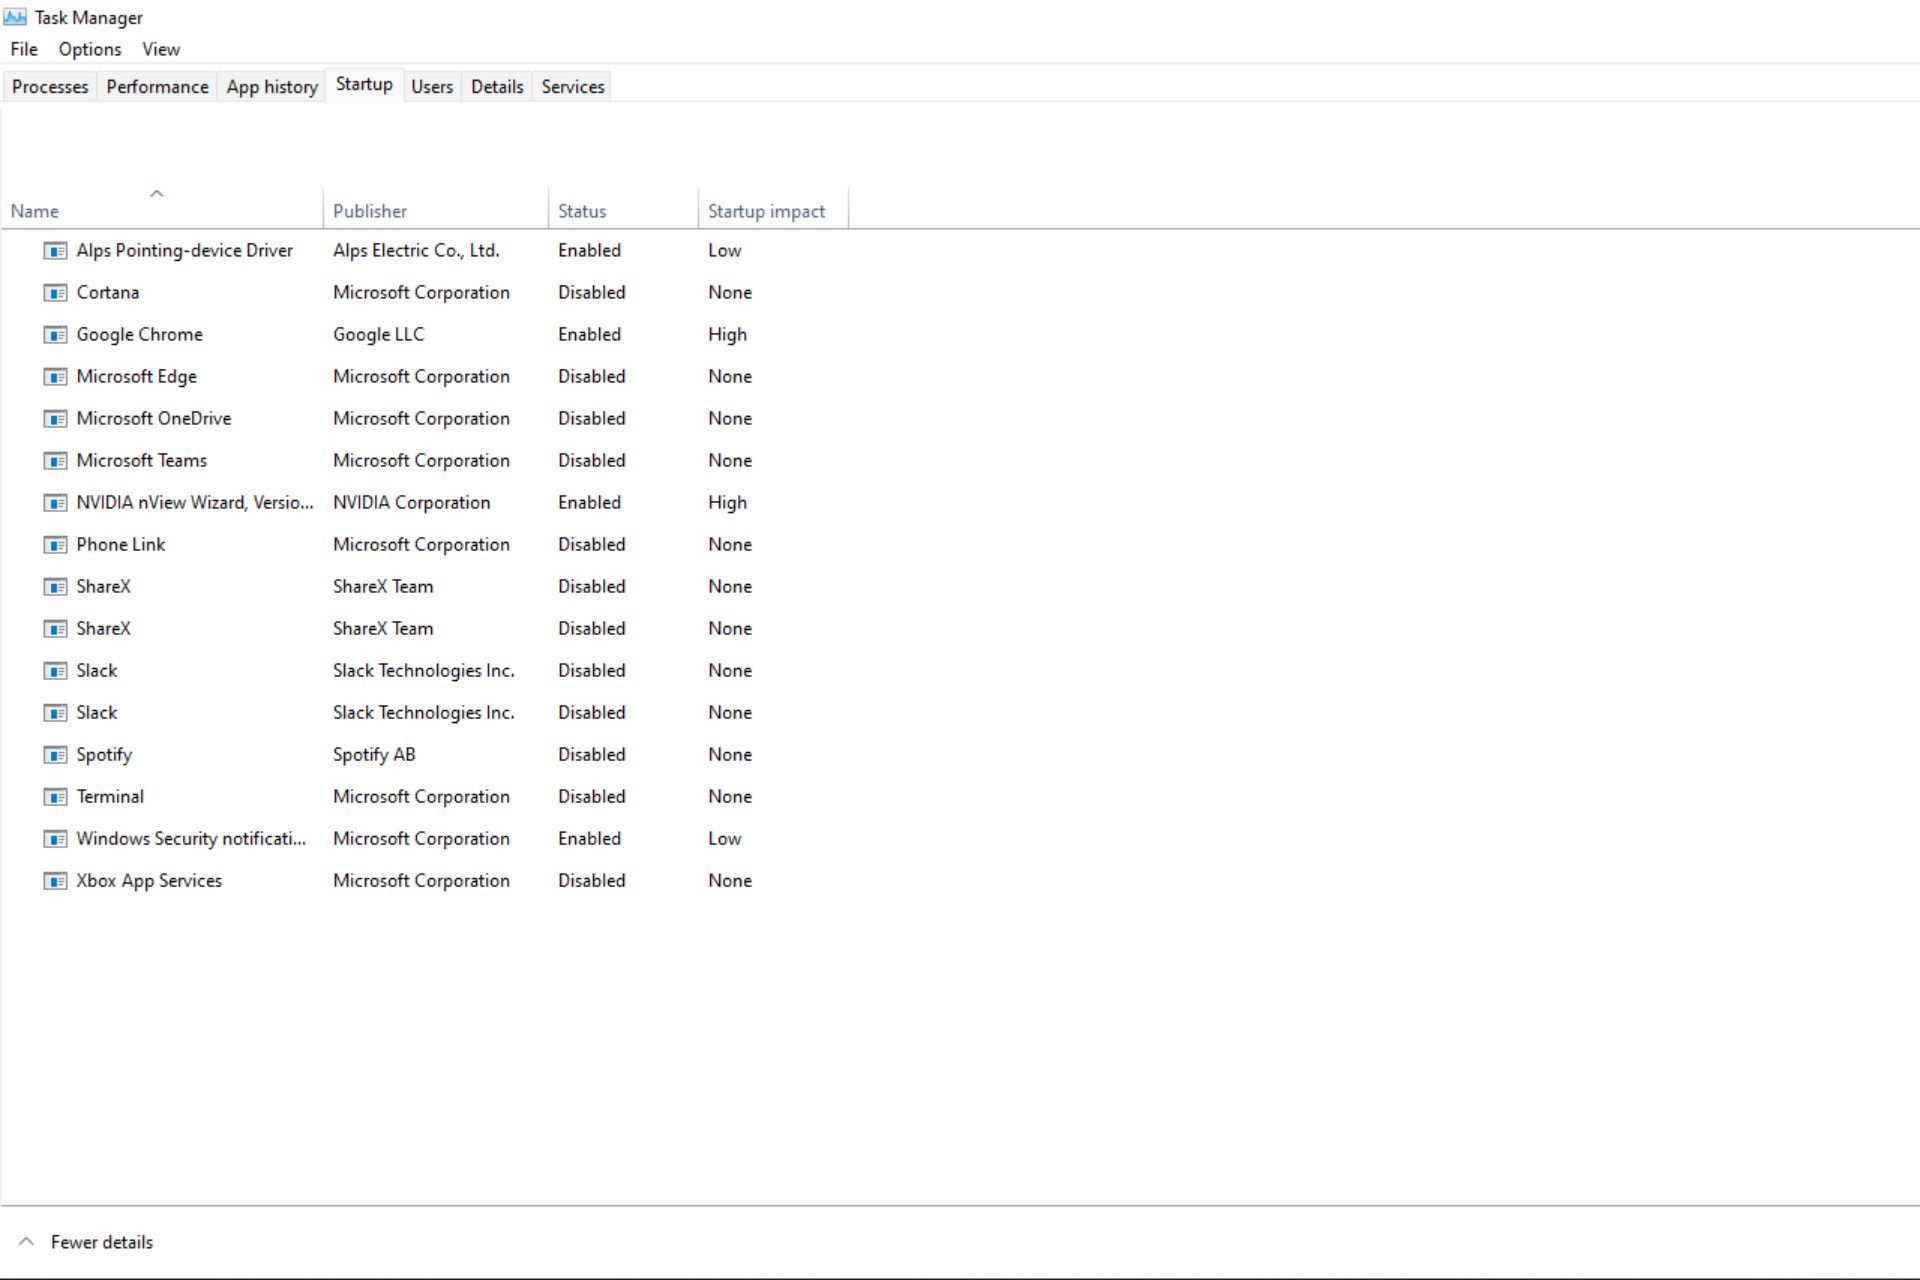
  2. Navigate to the Startup tab to view the list of startup apps.
  3. Go through the list and select each app you want to disable or enable by clicking on the options at the bottom.

2. Use Settings 

  1. Hit the Start Menu icon and click on Settings.
    settings windows 11
  2. Click on Apps on the left pane then select Startup on the right pane.
  3. A list of apps on Startup will appear. Toggle the off button to disable and the on button to enable. 

If you are unsure which apps to disable, you can sort by high impact. The difference between a high-impact and low-impact app is the amount of resources they use. 

High-impact apps are programs that require a lot of resources to run. These programs can slow down your computer if you have too many running simultaneously. 

Low-impact apps are lightweight applications that don’t take up much space on your hard drive or require much power from your computer’s CPU or RAM. 

You can, therefore, balance between the two categories and only enable the necessary apps.

3. Use app built-in settings 

  1. Hit the Windows key and click on Settings.
    settings windows 11
  2. Click on Apps on the left pane then select Apps & features.
  3. Examine the list and find the apps you want to disable on Startup.
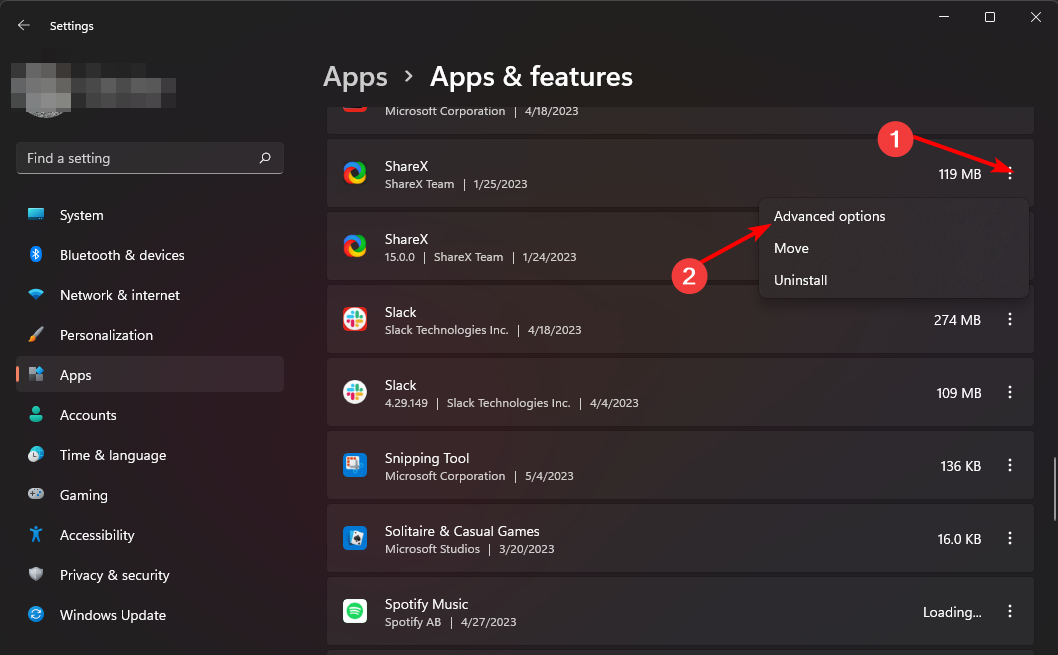
  4. Click on the three ellipses of the select app and click on Advanced options.
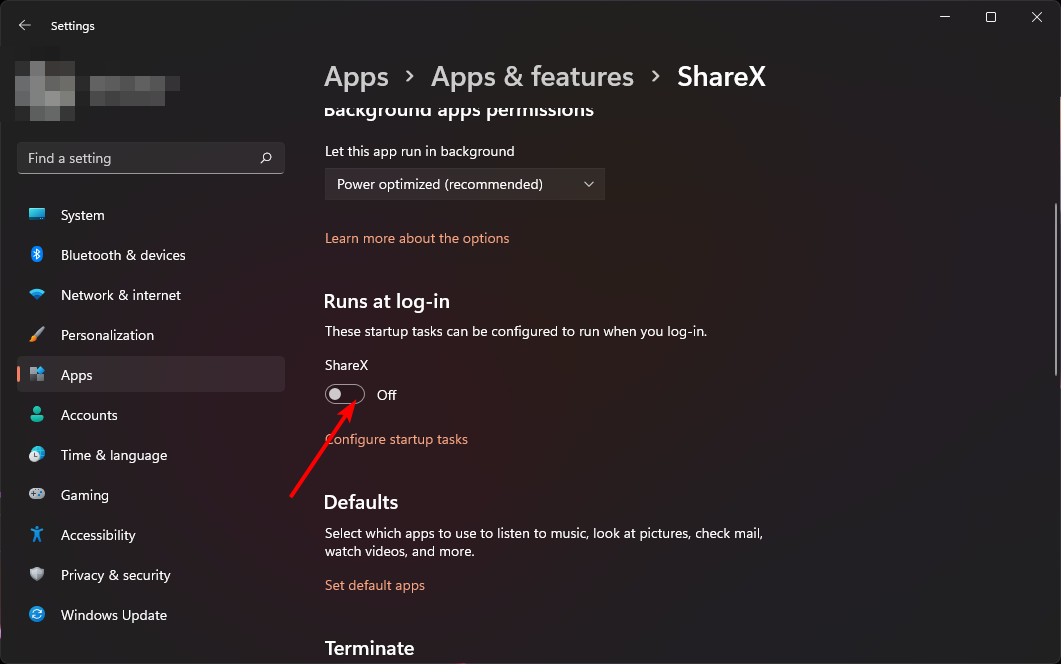
  5. Under Runs at log-in option, toggle the Off button to disable and back on to enable.

If you want to remove the app from your computer completely, we have a great guide to remove apps using PowerShell to get the work done using a single command.

4. Use a third-party app

Although Windows offers a handful of options to change startup programs in Windows 11, you may have noticed that these steps are somehow cumbersome and can take a significant amount of time, especially if you have a lot of programs.

You don’t have to go through this excruciatingly painful process when installing a third-party tool. Startup managers are incredibly helpful in managing your startup apps, so you should consider installing one.

CCleaner is our recommended fighter, and this is how to go about it.

  1. Download and launch the CCleaner app.
  2. Click on the Tools option, then select Startup.
  3. Navigate to the Windows tab and select the app you want to enable or disable by clicking the options on your right.

5. Use the Startup folder 

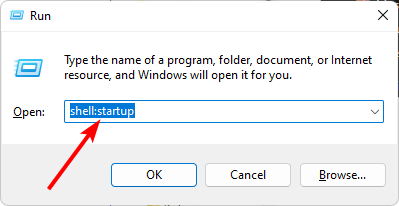
  1. Hit the Windows + R keys to open the Run command.
  2. Type in shell:startup in the dialog box and hit Enter to open the Startup folder.
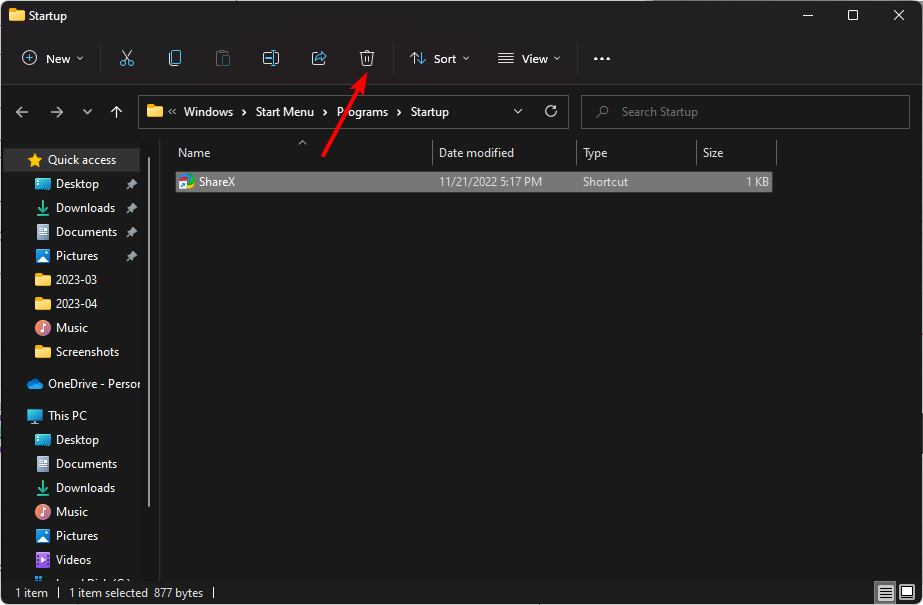
  3. Select the app you want to disable then click on the trash icon to delete. To enable, restore this folder from the Recycle bin.
  4. If you want to add a new startup program, find the executable file and drop it in the startup folder.

Should you find out that your Startup folder is not working, we have an excellent article on how to bypass this issue. 

6. Use System Configuration 

  1. Hit the Search icon on the taskbar, type msconfig, and click Open.
  2. Navigate to the Services tab and click Open Task Manager to view all the startup programs.
  3. Go through the list click and disable all the apps you want to disable, then check those you want to enable.
  4. Restart your PC for the changes to take effect.

7. Use the Registry Editor

  1. Hit the Windows + R keys to open the Run command.
  2. Type regedit in the dialog box and hit Enter to open the Registry Editor.
  3. Navigate to the following location: Computer\HKEY_LOCAL_MACHINE\SOFTWARE\Microsoft\Windows\CurrentVersion\Run
  4. A list of startup apps will appear on the right.
  5. Right-click on those you want to disable then select Delete to remove startup programs from Registry in Windows 11.
  6. To enable a new startup program, right-click on Run in the left pane and select New String value.
  7. In the Value name entry, set it to the name of the program you want to enable. For instance, Slack in this case.
  8. Under Value data, enter the path location of the app, then hit Enter. 
  9. Repeat these steps for all the apps you want to enable for startup.

As a disclaimer, changing any portion of the Registry can have unpredictable effects on your computer. The scary thing is that some may not even be immediately apparent.

If you aren’t comfortable making Registry changes, don’t do it. However, if necessary, create a restore point first to act as a safety net. This way, should anything happen, you can revert to an earlier time when your PC was functioning correctly.

You can also look at ways to optimize your startup to minimize the excessive use of resources. Also, check out how to disable startup apps in Windows 10. 

And that’s how to change startup programs in Windows 11. Let us know of any additional thoughts you may have on this topic down below.

How to Fix 0x000000FE BSoD Error in 6 Steps

0x000000FE is an error code that appears when your PC comes from sleep or hibernation mode. If your computer freezes or reboots after coming out of sleep mode, it’s likely due to bad memory on the motherboard or an incompatible driver running in the background.

When you experience this error, your computer automatically restarts itself and displays a blue screen with information about what caused the problem. Sometimes, it may resolve itself, but other times, you need to troubleshoot. 

This article is for when you need to troubleshoot it.

What is the bugcheck 0x000000FE? 

You may get a 0x000000FE error if your computer wakes up after going into sleep mode or hibernation mode and then attempts to load Windows again. 

This happens because some drivers aren’t properly loaded when waking up from sleep mode, causing them not being able to function correctly. Other causes include:

  • Incorrect/failed uninstallation – If you have recently removed a program from your computer, and are now receiving this error message, then it’s likely that the uninstallation process did not complete successfully. 
  • Unexpected shutdown – The error can also occur if you try to shut down your computer while it’s still trying to perform an action or while it’s loading a program. 
  • Corrupt/deleted system files –  If a system file has been corrupted or gone missing, you won’t be able to access it, and will cause errors when it’s called upon. This may result in 0x000000FE BSoD error or PC crash.
  • Failing hard drive – A failing hard drive can cause BSODs by corrupting or losing data required for operation.
  • Bad hardware component – A bad component, such as a graphics card that has failed due to age, heat damage, or other factors, can also cause the BSoD error 0x000000FE.
  • USB Suspend Settings – Some computers have a setting that automatically turns off USB devices when not in use. This can cause a bugcheck 0x000000FE error code if you are using an external device and the computer goes into sleep mode.
  • Outdated BIOS – The BIOS is responsible for initializing all hardware components and loading the operating system kernel. If any of these processes fails due to an outdated version of BIOS software, then your computer will display the bugcheck 0x000000FE error message.

How do I fix the BSoD error 0x000000FE? 

We recommend you try the following basic checks before proceeding to the more complex solutions:

For the below steps, ensure to start your PC in Safe Mode.

1. Run the DISM and SFC scans

  1. Click on the Start Menu icon, type cmd in the search bar, and click Run as administrator.cmd-run-admin-w11 unexpected kernel mode trap windows 11
  2. Type the following commands and press Enter after each one: DISM.exe /Online /Cleanup-Image /Restorehealth sfc /scannow
  3. Restart your PC.

This Windows process can be useful, yet it may not be suitable for the average user. If you need an easier and more effective system repair software.

2. Perform a disk check

  1. Click on the Start Menu icon key, type cmd in the search bar, and click Run as administrator.cmd-run-admin-w11 unexpected kernel mode trap windows 11
  2. Type the following command, replace the C letter with your drive’s letter, and press Enter: chkdsk C: /f

3. Scan for viruses

  1. Click on the Search icon, type Windows Security, and click Open.
  2. Select Virus & threat protection.
  3. Next, press Quick scan under Current threats.
  4. If you don’t find any threats, proceed to perform a full scan by clicking on Scan options just below Quick scan.Scan options
  5. Click on Full scan then Scan now to perform a deep scan of your PC.Full Scan Scan Now
  6. Wait for the process to finish and restart your system. 

4. Update display drivers 

  1. Click the Windows button, type Device Manager in the search bar, and click Open.device manager w11
  2. Navigate to Display adapters to expand, right-click on your graphics card and select Update driver.Graphic Driver Update
  3. Select Search automatically for drivers.

Consequently, a third-party driver updater utility can also do the job in one click. Outbyte can scan your system for any missing or outdated drivers and replace them with the correct ones from its official driver database.

5. Check for Windows updates

  1. Hit the Windows key and click on Settings.settings windows 11
  2. Select Windows Update and click on Check for updates.check-updates-w11 windows 11 blue screen
  3. Download and install if available.

6. Disable USB selective suspend settings

  1. Hit the Windows key, type Edit power plan in the search box, and click Open.
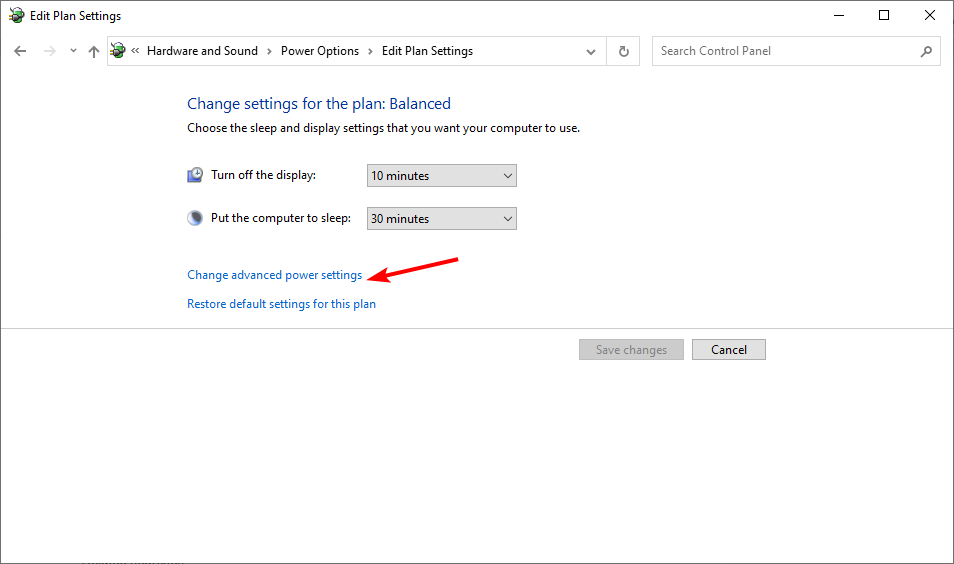
  2. Click on Change advanced power settings.windows-11-not-recognizing-usb
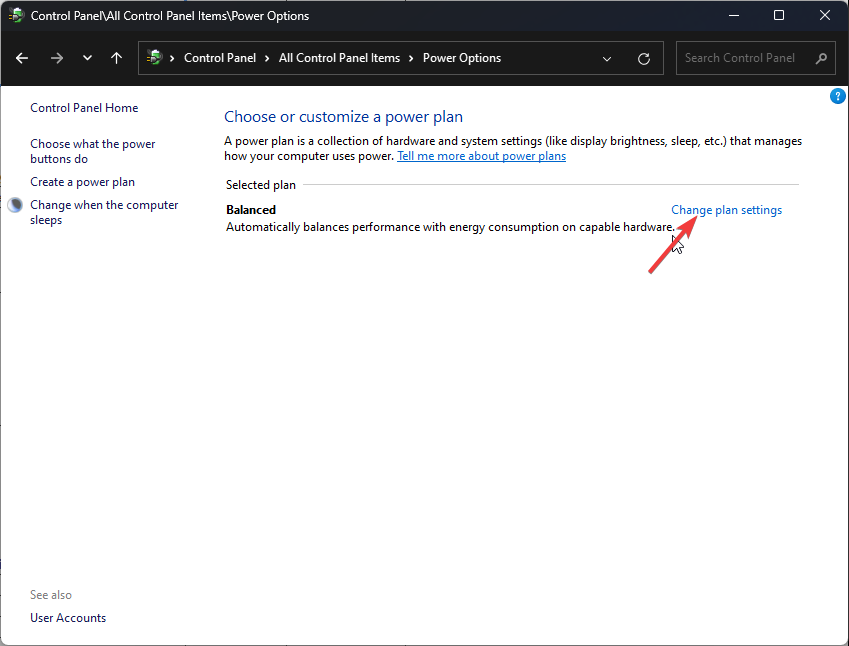
  3. Select Change plan settings.Change plan settings
  4. In the Power Options dialog box that opens, click on USB settings to expand.
  5. Click on USB selective suspend setting and in the drop-down menu, select Disabled.

The USB selective suspend setting is a feature in Windows that allows your computer to enter a low-power state by suspending USB ports that are not in use. 

This means that your computer will not require as much power to run, and thus your battery will last longer. However, if you encounter USB-related BSoD errors, it is best to disable it.

If none of these methods solve the 0x000000FE error, it may be time to perform a System Restore or clean install on your PC. 

Alternatively, BSoD fixers can save the day as these automatic tools can scan your system and fix any BSoD errors effortlessly.

Leave a comment below if we have missed any solution that was instrumental in helping you fix this error.

Hswultpep.sys BSoD Error: 5 Ways to Fix It

If you are a Windows user, you may encounter various issues while using your PC. One such common problem is hswultpep.sys BSoD error can be caused by faulty or outdated driver-related Intel Wireless Bluetooth software.

What causes the hswultpep.sys BSoD error on Windows?

There could be various reasons for this blue screen error; some of the common ones are mentioned here:

  • Faulty or outdated driver – If the hswultpep.sys driver becomes corrupted or obsolete; it can cause instability & result in a blue screen error. Try updating the drivers to fix the problem.
  • Drivers or software interference – The hswultpep.sys driver can conflict with other drivers or software installed on the computer, resulting in the BSoD error.
  • Malware infections – Malware or viruses can corrupt system files, which could cause this issue. You can run SFC scan to repair system files.
  • Hardware issues – If there are the hardware issues, including a faulty Wi-Fi or Bluetooth adapter, they could cause the BSoD error.

Now that you know the causes of the issue, let us check out the solutions to fix the problem.

How can I fix the hswultpep.sys BSoD error on Windows?

Before engaging in advanced troubleshooting steps, you should consider performing the following checks:

  • Try restarting your computer.
  • Run a malware scan using an antivirus tool.
  • Make sure there are no pending Windows updates.
  • Uninstall the recently installed apps.

If these minor tweaks don’t work for you, move to the detailed solutions.

1. Run the computer in Safe mode

1.1 If you can access the Settings app

  1. Press Windows + I to open the Settings app.
  2. Go to System, then click Recovery.System - Recovery Windows 11 Hswultpep.sys bsod
  3. Under Recovery options, click Advanced startup and then Restart now.Advanced Startup
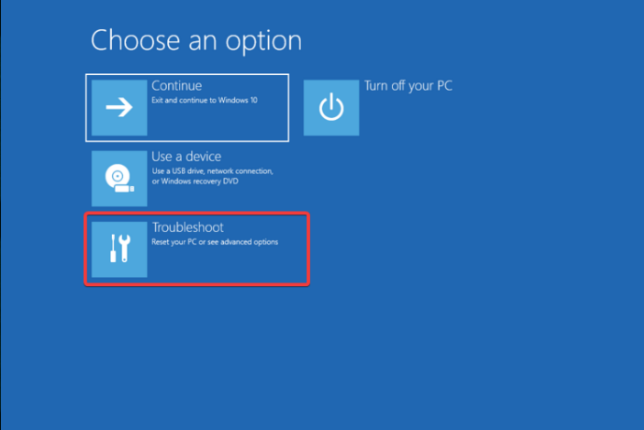
  4. On the Choose an option screen, click Troubleshoot.Choose an option - Troubleshoot Hswultpep.sys bsod
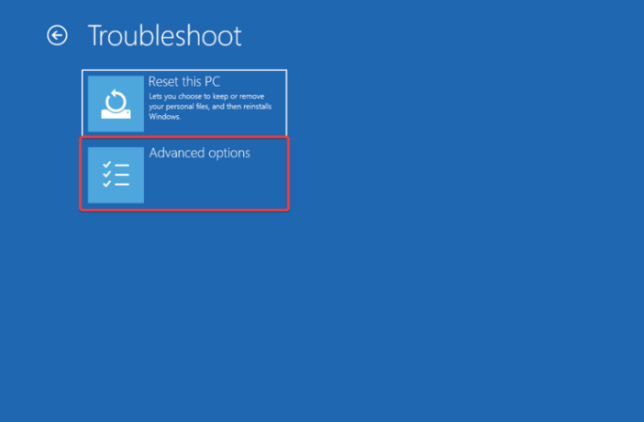
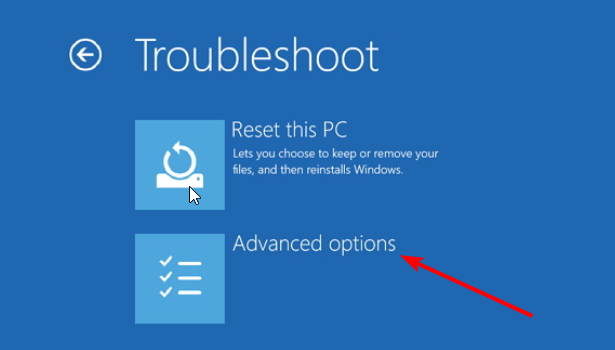
  5. Select Advanced options.Advanced options
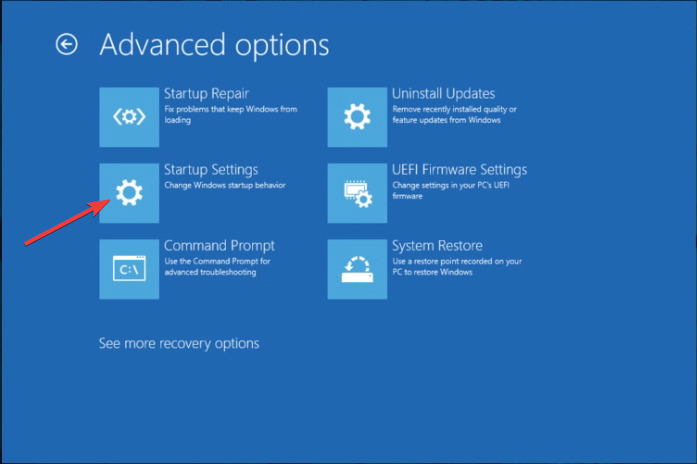
  6. On the Advanced options page, select Startup Settings.Startup Settings Hswultpep.sys bsod
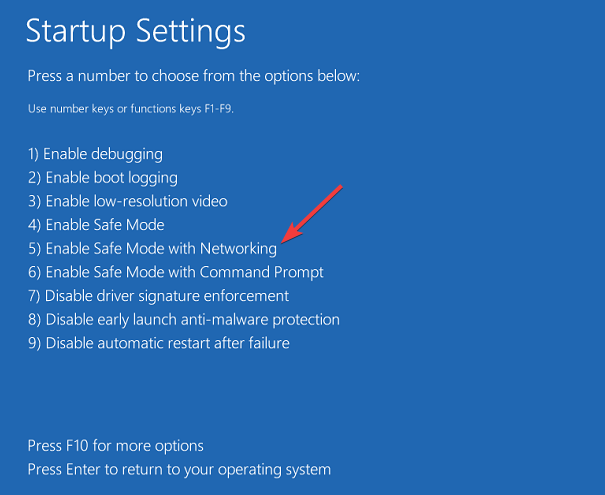
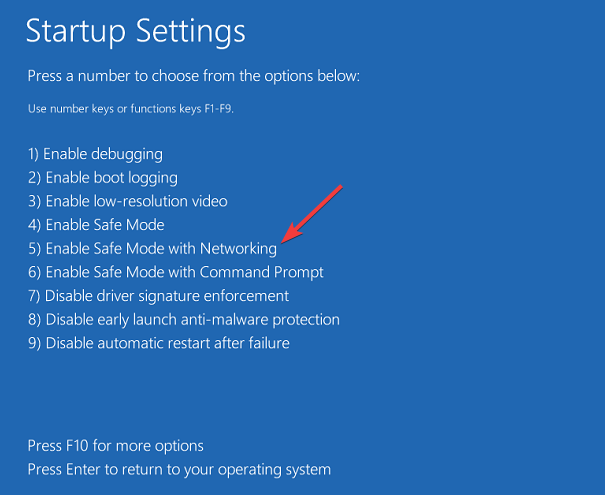
  7. Press the key relevant to select Enable Safe Mode with Networking and click Restart.Enable safe mode with networking

1.2 If your computer doesn’t boot up

  1. Press and hold the Power button on your machine for a few seconds to turn it off.
  2. Press the Power button again to boot it.
  3. As you see the manufacturer’s logo, press the Power button for 10 seconds again to enter Windows Recovery Environment.
  4. On the Choose an option page, click Troubleshoot.Choose an option - Troubleshoot
  5. Select Advanced options.Advanced options
  6. Choose Startup Settings.Startup Settings Hswultpep.sys bsod
  7. Press the key relevant to select Enable Safe Mode with Networking and click Restart.Enable safe mode with networking Hswultpep.sys bsod

Once you are in Safe mode, follow the steps mentioned below.

2 Update or rollback the driver

2.1 Update the driver

  1. Press Windows + R to open the Run dialog box.Device Manager Run command Hswultpep.sys bsod
  2. Type devmgmt.msc and click OK to open Device Manager.
  3. Locate and expand the Network adapters (assuming the Bluetooth driver is causing the problem).
  4. Now right-click the Wi-Fi driver and select Update driver.Update driver Hswultpep.sys bsod
  5. Click Search automatically for drivers.Update driver 2
  6. Follow the onscreen instructions to complete the process.
  7. If this doesn’t work for you, right-click the Wi-Fi driver and choose Properties.Wi-Fi properties Hswultpep.sys bsod
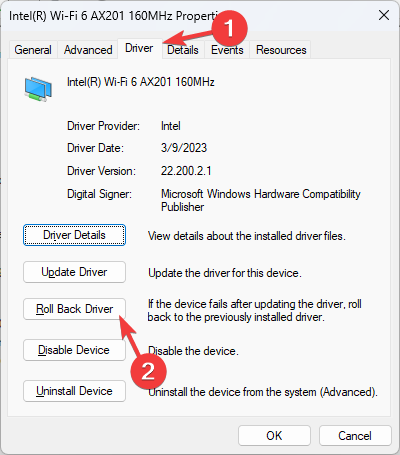
  8. Go to the Driver tab, and select the Roll Back Driver button.Roll Back Driver update
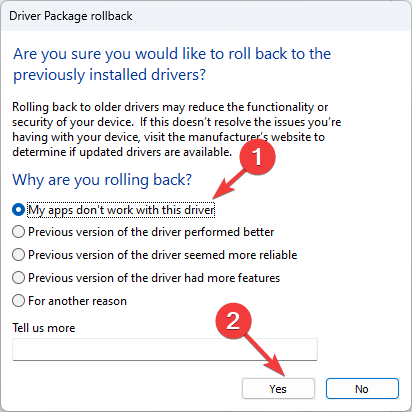
  9. Select the reason for the rollback and click Yes to continue.Rollback Hswultpep.sys bsod

Windows will automatically roll back to the last version of the driver.

In addition, you have an alternative way to update old drivers from your PC efficiently. More exactly, we suggest you utilize tailored software for repairing or updating drivers entirely automatically.

3. Run DISM & SFC scans

  1. Press the Windows key, type cmd, and click Run as administrator.CMD elevated Hswultpep.sys bsod
  2. Copy & paste the following command to repair the Windows OS image and hit Enter: Dism /Online /Cleanup-Image /RestoreHealthRestore health Hswultpep.sys bsod
  3. Wait for the scan to complete, then type the following command to repair the system files and press Enter: sfc/scannowSFCSCANNOW CMD
  4. Windows will take time to scan and replace the corrupt files, then reboot your computer to let the changes take effect.

4. Uninstall the recent Windows update

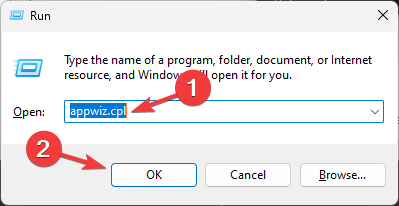
  1. Press the Windows + R to open the Run box.Appwiz.cpl Hswultpep.sys BSoD
  2. Type appwiz.cpl and click OK to open Programs & Features.
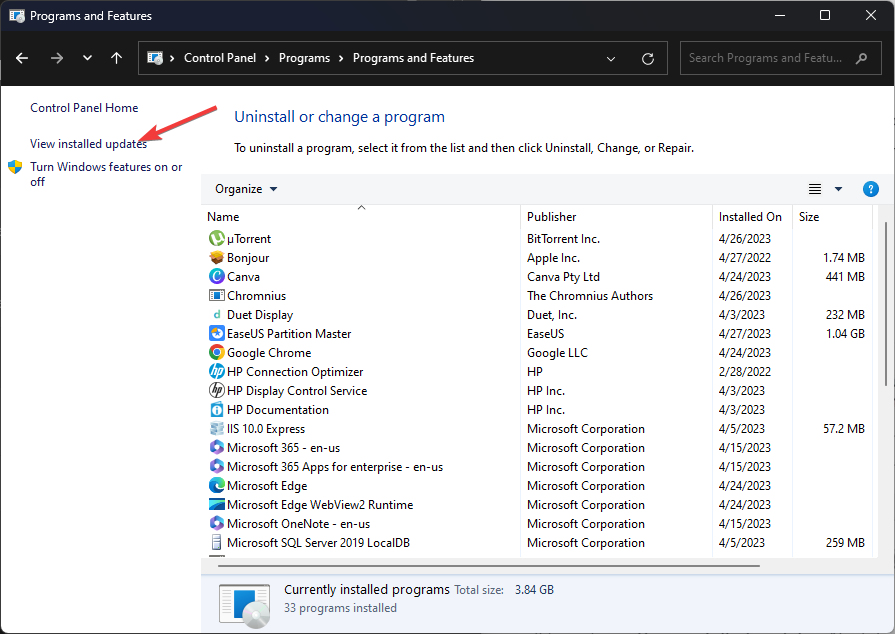
  3. Click View installed updates.View installed updates
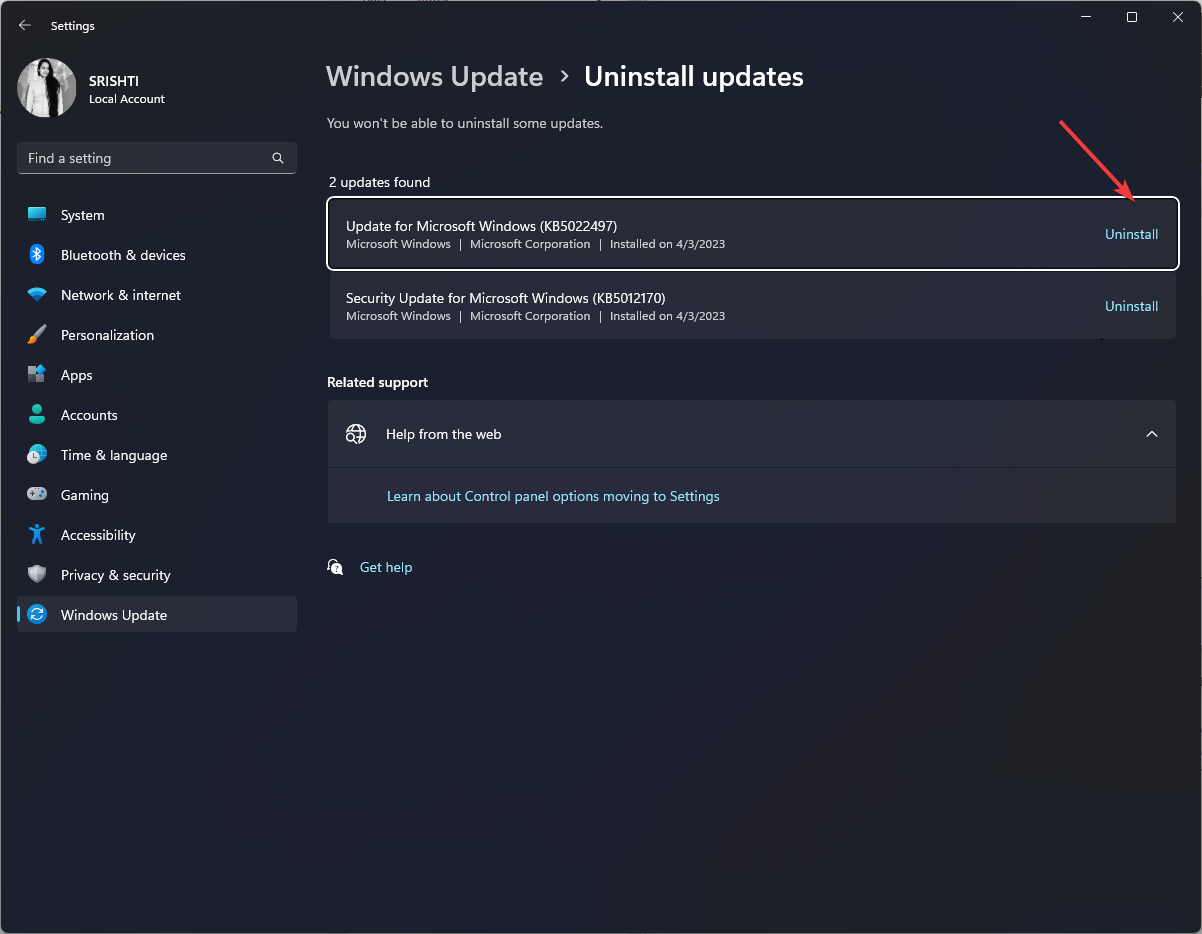
  4. Locate the update and click Uninstall.Uninstall Windows update
  5. Follow the onscreen instructions to complete.

5. Restore your system to a previous point in time

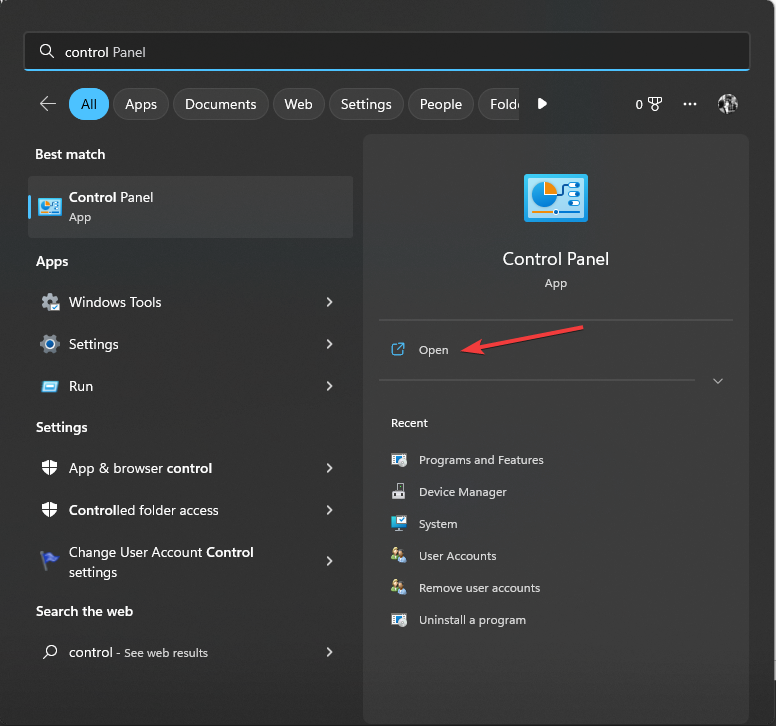
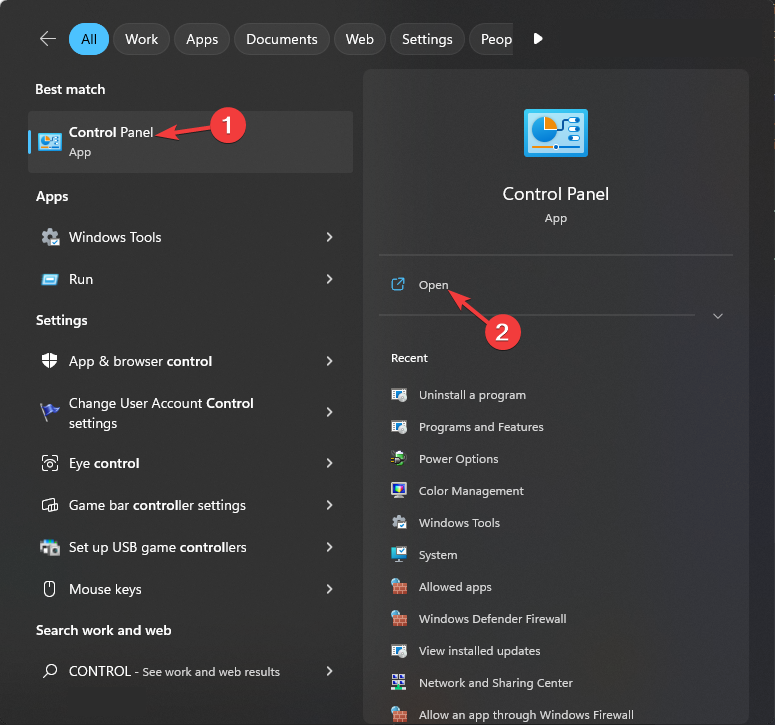
  1. Press the Windows key, type control panel, and click Open.Control Panel start menu Hswultpep.sys BSoD
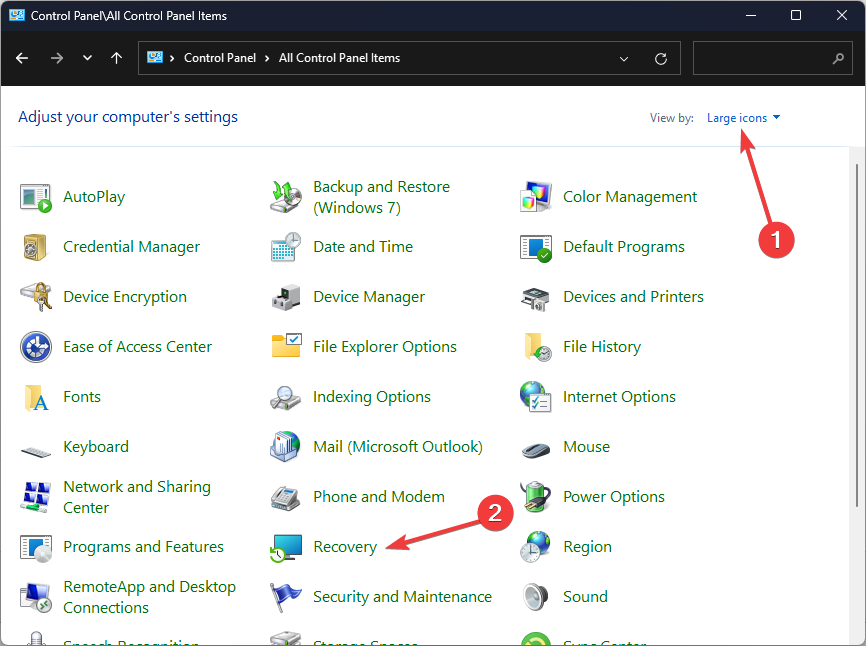
  2. Select Large icons as View by and click Recovery.Recovery Control Panel
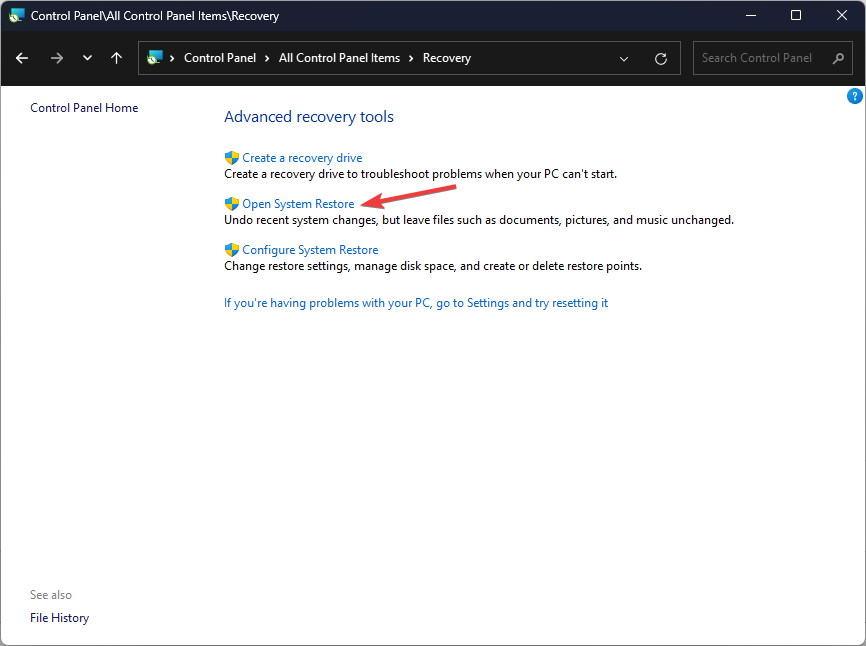
  3. Click on Open System Restore.Open system restore
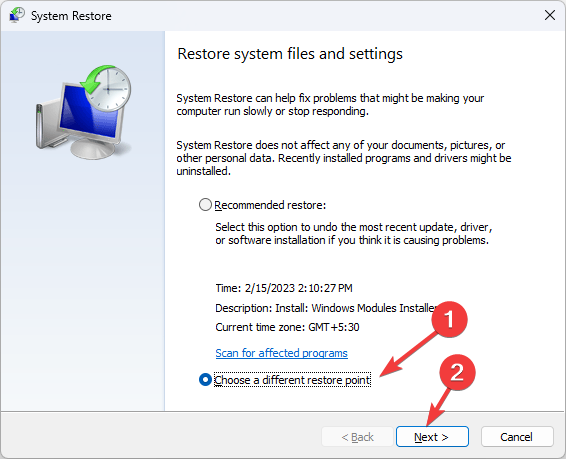
  4. On the System Restore window, select Choose a different restore point and click Next.Next Choose a different restore point
  5. Select a restore point and click Next.Choose a point Hswultpep.sys bsod
  6. Now select Finish.Finish Hswultpep.sys bsod

Windows will restart, and your computer will be restored to the selected point in a few minutes. If the System Restore didn’t successfully complete, we advise you to check out this informative guide for solutions.

If nothing worked for you, you can perform a clean installation to fix the problem. So, these are methods that you can follow to fix the hswultpep.sys BSoD error on Windows.

If you have any questions or suggestions, feel free to mention them in the comments section below.

VirtWiFi Has No Internet Access: 6 Ways to Fix This Error

With Windows 11, you can run Android apps on your computer and all this is done using the Windows Subsystem for Android. However, many of our readers are facing the VirtWiFi Has No Internet Access error that prevents Amazon App Store from accessing the internet on the Windows 11 PC.

What is VirtWiFi and why doesn’t it have internet access?

VirtWiFi lets your network switch your wireless card across different networks by exposing all the virtual networks. If your PC is connected to the internet using an ethernet cable, you can make use of VirtWiFi to connect.

There can be multiple reasons that could trigger the VirtWiFi Has No Internet Access error:

Now that we know what we’re dealing with, let’s fix the problem with the solutions below.

How can I fix the VirtWiFi Has No Internet Access error?

1. Run the Network Adapter troubleshooter

  1. Press the Win + I keys to open the Settings menu.
  2. Click on Troubleshooter.
  3. Select Other troubleshooters.
  4. Hit the Run button next to the Network Adapter option.
  5. Select the adapter type from the list and hit Next.
  6. Wait for the process to complete.
  7. Restart your PC.

2. Update your network adapter driver

  1. Open the Start menu by pressing the Win key.
  2. Open Device Manager.
  3. Expand the Network adapters section.
  4. Double-click on your network driver.
  5. Switch to the Driver tab.
  6. Click on the Update driver button.
  7. Select Search automatically for drivers option.
  8. Install the latest update in case available.
  9. Restart your PC.

If your network driver is outdated, you should install the latest version as it will fix various bugs that were presented with the previous version.

In any case, it’s most likely to update any of your PC drivers with the latest official version using dedicated driver update software.

You only have to launch on the desktop to initiate the scan, thus select all the drivers that need updating and update them in bulk.

⇒ Get Outbyte Driver Updater

3. Flush the DNS and reset the IP

  1. Open the Start menu by pressing the Win key.
  2. Run Command Prompt as an administrator.
  3. Type the below command and press Enter. ipconfig/flushdns
  4. Execute the below command one by one and press Enter after each command: nbtstat –r netsh winsock reset netsh int ip reset
  5. Close Command Prompt and restart your PC.

Running the above commands will clear the DNS cache that might be causing trouble with your network and hopefully fix the VirtWiFi Has No Internet Access error.

4. Fix the corrupt system files

  1. Press the Win key to open the Start menu.
  2. Open Command Prompt as an admin.
  3. Type the below command and press Enter: sfc /scannow
  4. Wait for System File Checker to fix the corrupt system files.
  5. Type the below commands and press Enter after each one: DISM.exe /Online /Cleanup-image /Scanhealth DISM.exe /Online /Cleanup-image /Restorehealth DISM.exe /online /cleanup-image /startcomponentcleanup
  6. Restart your PC and see if the issue persists.

5. Enable Windows HyperVision Platform

  1. Open the Start menu by pressing the Win key.
  2. Open Turn Windows features on or off option.
  3. Locate and check the Windows HyperVision Platform box, then hit OK.
  4. Restart your PC and see if the error persists.

6. Change the DNS address

  1. Press the Win + R keys to open the Run dialogue.
  2. Type ncpa.cpl and press OK.
  3. Double-click on your network adapter.
  4. Click on Internet Protocol Version 4(TCP/IPv4) and tap on Properties.
  5. Click on Use the following DNS server addresses radio button.
  6. Enter the below values to use the Google DNS:
    • Preferred DNS server: 8.8.8.8
    • Alternate DNS server: 8.8.4.4
  7. Check the box for Validate settings upon exit and click OK.
  8. Restart your PC.

When you modify the DNS address, it will configure a new VirtWiFi network connection and will fix the issue.

That is it from us in this guide. Users coming across the Windows could not find a driver for your network adapter error, we would suggest you check out our guide that will help resolve the problem at your end.

Some users have also reported coming across the checking network requirements error. You can easily fix it by following the solutions in our guide.

Feel free to let us know in the comments below, which one of the above solutions resolved the VirtWiFi Has No Internet Access error.

Remote Desktop Can’t Find The Computer? Fix It in 8 Steps

Remote Desktop is a powerful tool that enables you to access a computer from a remote location. However, sometimes you may encounter an error message stating that Remote Desktop can’t find the computer, which can be frustrating.

Why can’t Remote Desktop find the computer?

There could be various reasons why you are not able to connect to your computer remotely; some of the common ones are mentioned below:

  • No Entry in the Hosts File – This error may occur if the system hosts’ files have no entry to your RDP server. Try adding it manually to fix the issue.
  • Network connectivity issues – The weak internet connection could be why you cannot establish a connection with a remote PC. Try troubleshooting your network.
  • DNS is not configured – If the DNS is not configured for the system, you might see this error. Configure DNS and try to access the remote device.
  • Remote Desktop Connections Credentials cache – The credentials cache of RDP connections could also be the reason for the issue. Clear them to fix the problem.

Now that you know the reasons for the issue, let us move to the solutions.

How do I fix the Remote Desktop can’t find the computer error?

Before engaging in advanced troubleshooting steps, you should consider performing the following checks:

  • Try restarting your computer and the router.
  • Ensure no Windows update is pending.
  • Check internet connectivity.
  • Verify the host computer name.

If none of the above fixes worked for you, jump right into the detailed solutions to eliminate the error.

1. Allow the remote connections to the computer

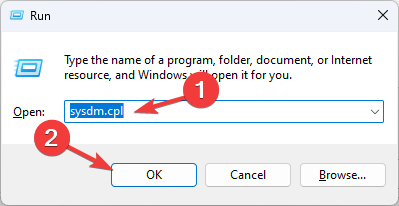
  1. Press Windows + R to open the Run dialog box.sysdm.cpl Remote Desktop Can't Find the Computer
  2. Type sysdm.cpl and click OK to open System Properties.
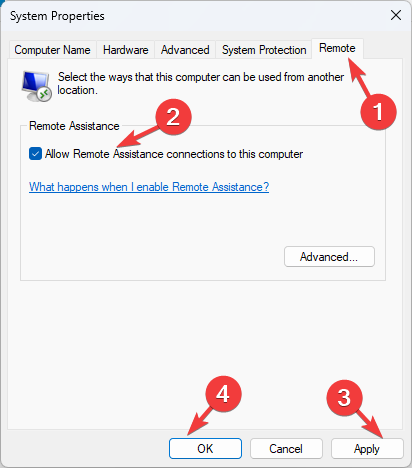
  3. Go to the Remote tab, under Remote Assistance, and select Allow Remote Assistance connections to this computer.SystemPropertiesComputerName_Remote Desktop Can't Find the Computer
  4. Click Apply and OK.

2. Verify that Remote access is enabled

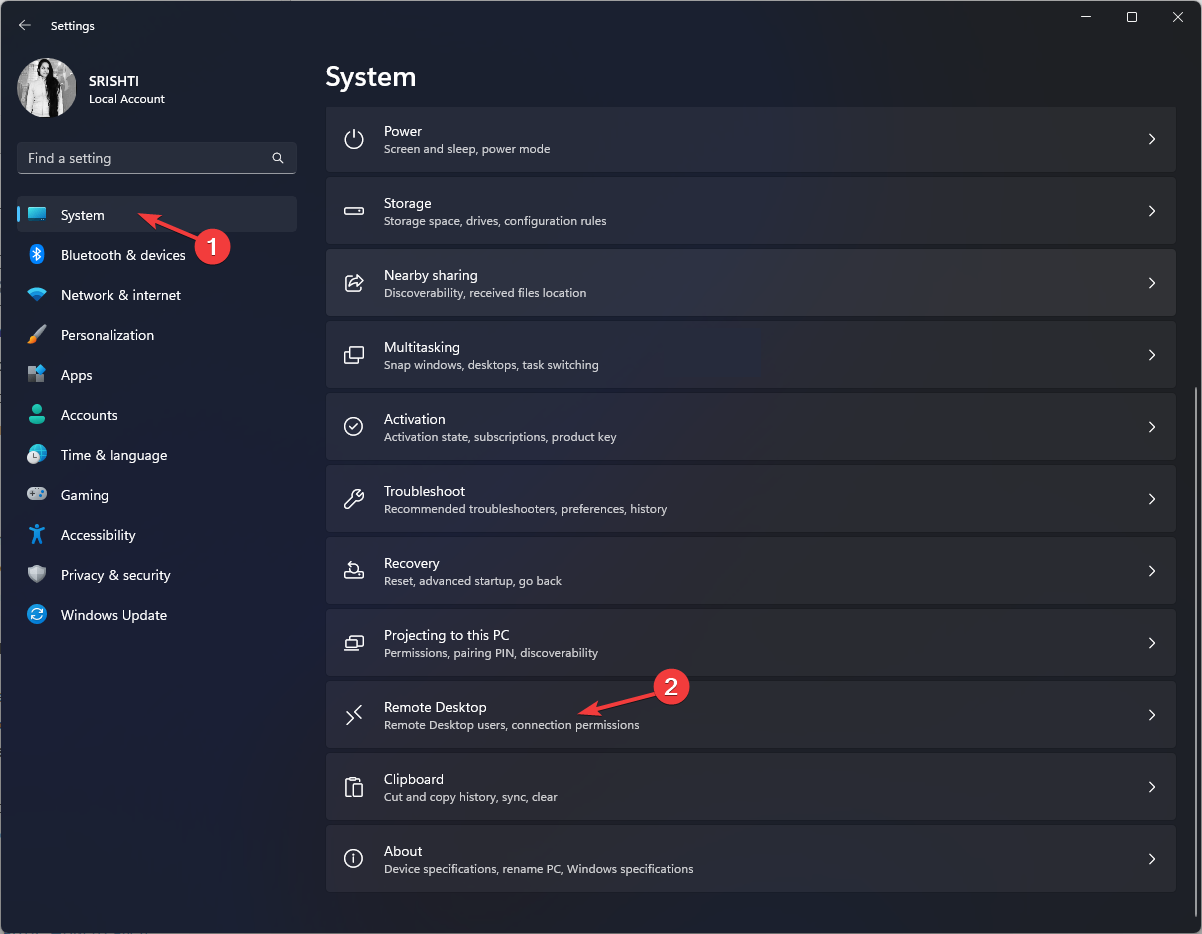
  1. Press Windows + I to open the Settings app.
  2. Go to System, then click Remote Desktop. System - Remote Desktop - Remote Desktop Can't Find the Computer
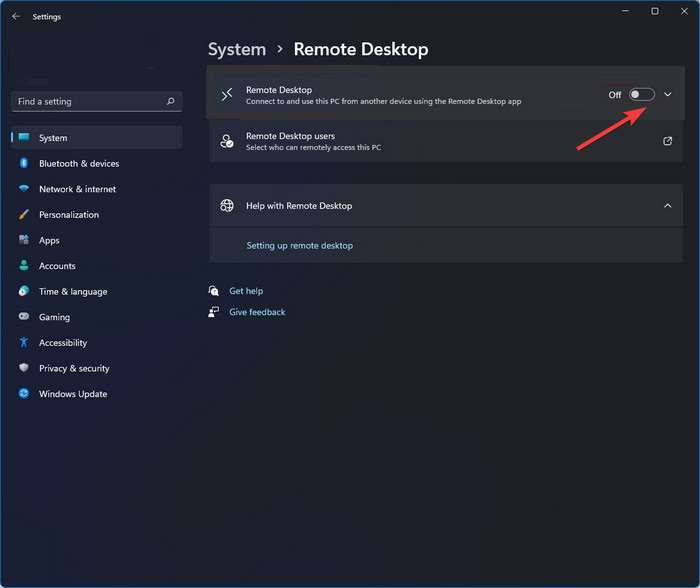
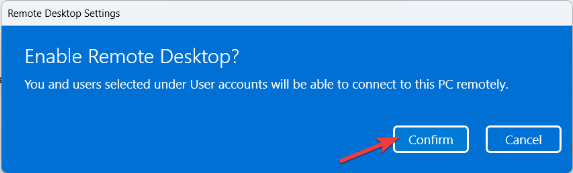
  3. Locate Remote Desktop and toggle on the switch to enable it.Remote access on
  4. Click Confirm to save the changes.Confirm Remote access on

Now check if you can access the remote computer.

3. Flush the DNS

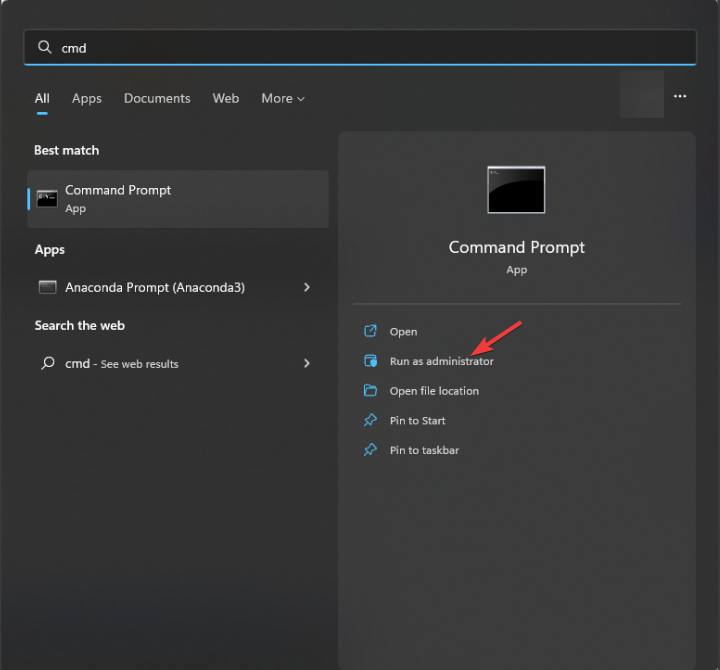
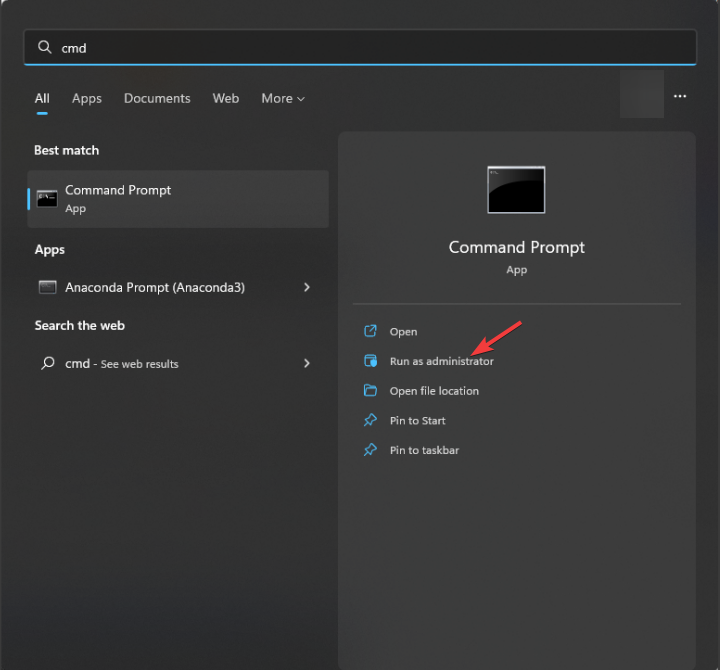
  1. Press the Windows key, type cmd, and click Run as administrator.CMD elevated Press the Windows key, type cmd, and click Run as administrator. Copy and paste the following command to flush DNS and hit Enter: ipconfig/flushdns Close the Command Prompt and restart your computer.
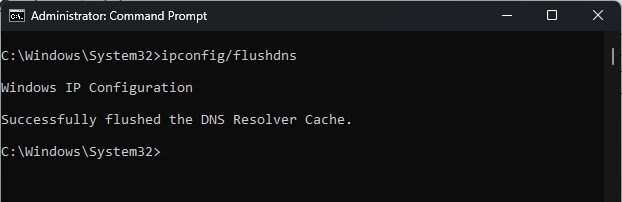
  2. Copy and paste the following command to flush DNS and hit Enter: ipconfig/flushdnsIpconfig DNS  Remote Desktop Can't Find the Computer
  3. Close the Command Prompt and restart your computer.

4. Delete the RDP connections history

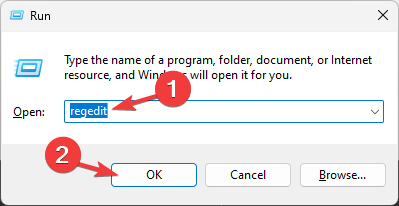
  1. Press Windows + R to open the Run dialog box.Regedit run command Remote Desktop Can't Find the Computer
  2. Type regedit and click OK to open the Registry Editor.
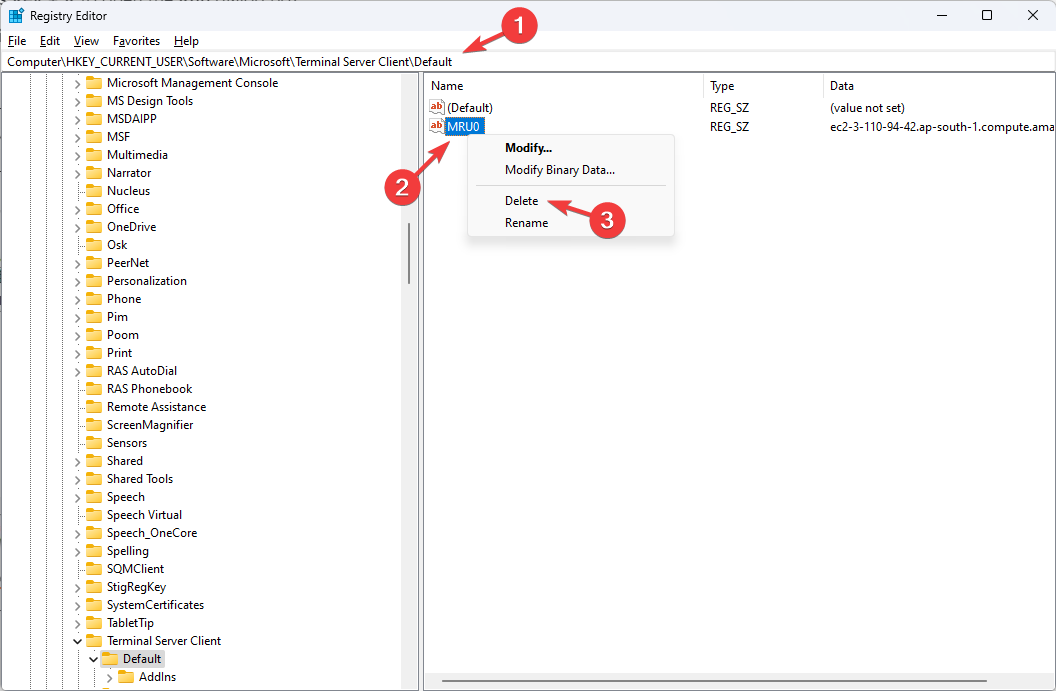
  3. Navigate to this path: Computer\HKEY_CURRENT_USER\Software\Microsoft\Terminal Server Client\Default
  4. Select MRU0, right-click it, and select Delete to remove all the entries.MRU0 Remote Desktop Can't Find the Computer
  5. Close Registry Editor and reboot your PC.

5. Add Hostname to the Host file

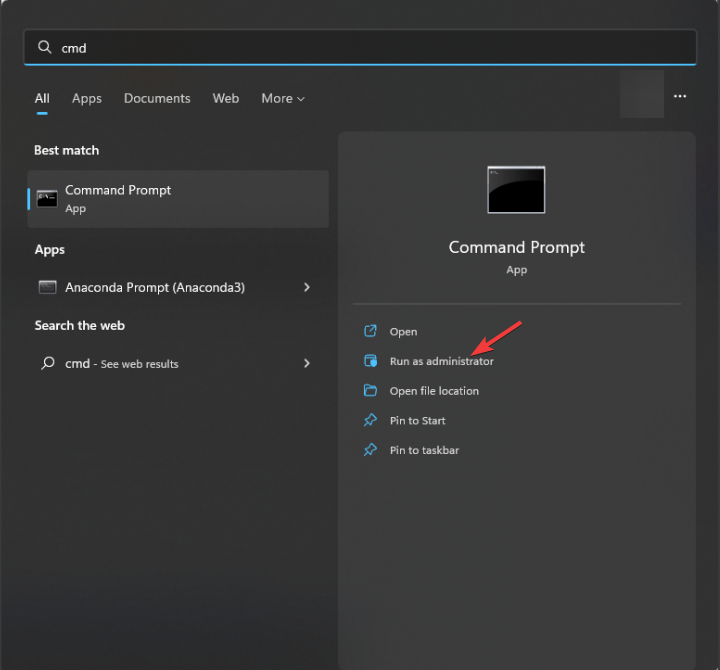
  1. Press the Windows key, type cmd, and click Run as administrator.CMD elevated Remote Desktop Can't Find the Computer
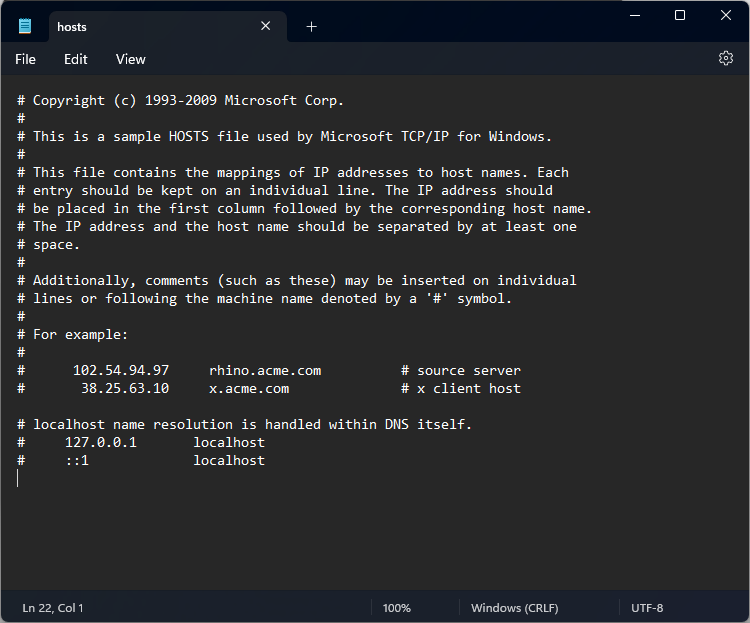
  2. Copy & paste the following command to open the hosts’ file in a notepad, and hit Enter: Notepad C:\Windows\System32\drivers\etc\hostsAdd host Remote Desktop Can't Find the Computer
  3. You will have to add a string in the following format: 127.0.0.1    [hostname of the server]Notepad_Remote Desktop Can't Find the Computer
  4. Press Ctrl + S to save the changes. Close Notepad, and then Command Prompt.

6. Allow Remote connection through the firewall

  1. Press the Windows key, type control panel, and click Open.CMD elevated Remote Desktop Can't Find the Computer
  2. Select View by as Category and click System & Security. System and security
  3. Click Windows Defender Firewall.Windows Defender Remote Desktop Can't Find the Computer
  4. Now click Allow an app or feature through Windows Defender Firewall.Allow an app
  5. Click Change settings.Change settings
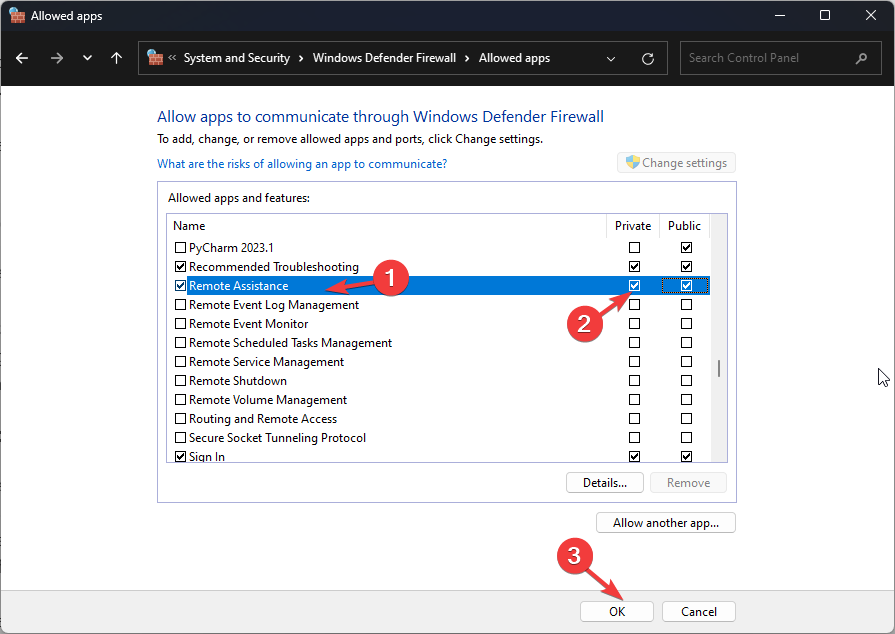
  6. Locate Remote Assistance and Remote Desktop, select them, and make sure the Private & Public option for both is selected.Remote assistance and Remote desktop select
  7. Click OK to close the window.

7. Change the Port number

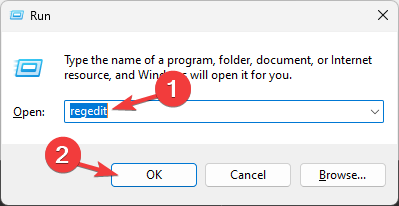
  1. Press Windows + R to open the Run window.Regedit Windows
  2. Type regedit and click OK to open the Registry Editor.
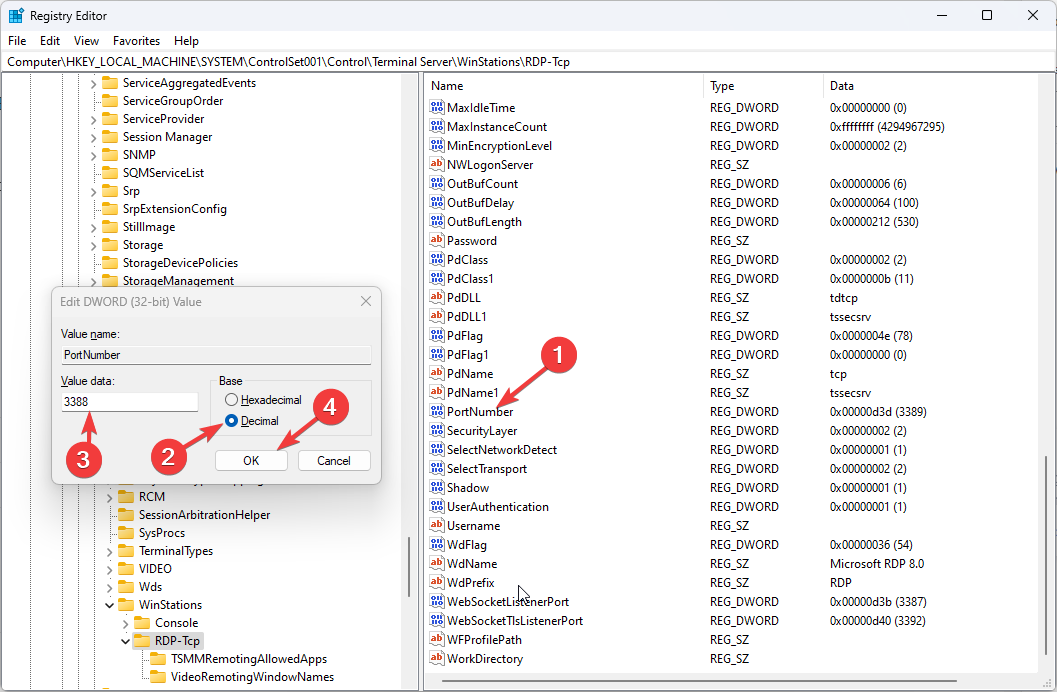
  3. Navigate to this path: Computer\HKEY_LOCAL_MACHINE\SYSTEM\ControlSet001\Control\Terminal Server\WinStations\RDP-Tcp
  4. Locate and double-click PortNumber.regedit_change port number
  5. Change the Base to Decimal and the Value data from 3389 to 3388.
  6. Click OK and reboot your computer.

8. Enable the Remote Desktop Services

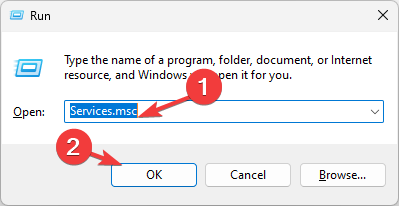
  1. Press the Windows + R to open the Run dialog box.Services Remote Desktop Can't Find the Computer
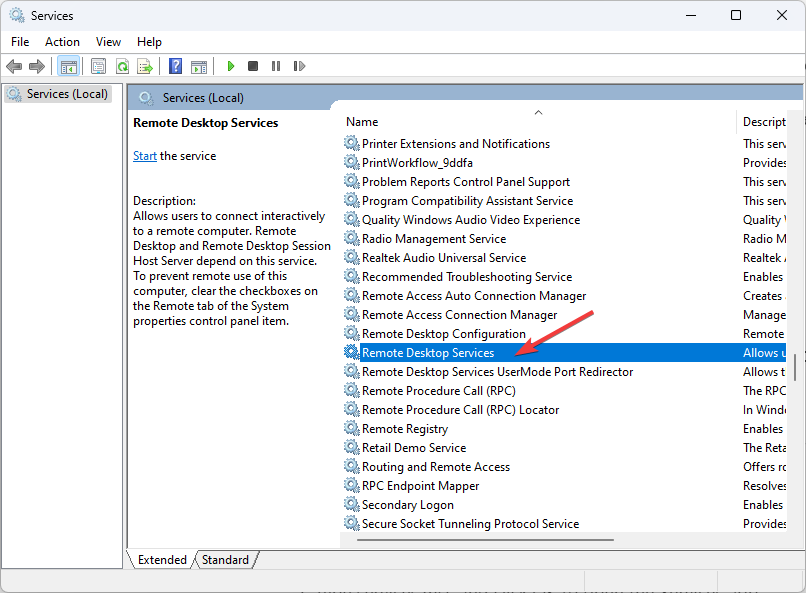
  2. Type services.msc and click OK to open the Services app.
  3. Locate and double-click Remote Desktop Services to open Properties.Remote desktop services
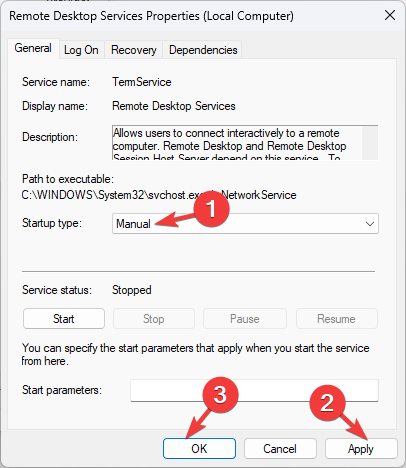
  4. Select Startup type as Manual and click Apply, then OK.Startup type manual
  5. Restart your PC to confirm the changes.

So, these are methods you can use to get rid of the Remote Desktop can’t find the computer error. If you have any questions or suggestions, please let us know in the comments section below.

How to Disable Password Complexity on Windows 11

Windows enforces strong password complexity requirements to enhance the user accounts’ security. However, if you want simpler passwords, you need to disable Windows password complexity requirements.

How can I disable Windows password complexity requirements?

1. Use the Group Policy Editor

  1. Press Windows + R to open the Run box.GPEDIT MSC RUN Remove Password Complexity Requirements In Windows
  2. Type gpedit.msc and click OK to open the Group Policy Editor.
  3. Navigate to this path: Computer Configuration\Windows Settings\Security Settings\Account Policies\Password Policy Password requirements Remove Password Complexity Requirements In Windows
  4. Locate and double-click the Password must meet complexity requirements option to open Properties.Disabled Password Policy password must meet complexity requirements
  5. Click on the radio button next to Disabled, click Apply, then OK to confirm the changes.
  6. Restart your computer to let the changes take effect.

2. Use the Command Prompt

  1. Press the Windows key, type cmd, and click Run as administrator.CMD elevated password must meet complexity requirements
  2. Copy & paste the following command to dump the local policy or domain policy for the system and hit Enter: secedit.exe /export /cfg C:\secconfig.cfgcmd_local security policy editor
  3. Type notepad.exe and press Enter.cmd_notepad.exe password must meet complexity requirements
  4. On Notepad, click File, then Open to open C:\secconfig.cfg
  5. Now locate Passwordcomplexity and change its value from 1 to 0.
  6. Press Ctrl + S to save the changes.
  7. Open the Command prompt with admin rights.
  8. Copy & paste the following command and press Enter: secedit.exe /configure /db %windir%\securitynew.sdb /cfg C:\secconfig.cfg /areas SECURITYPOLICYcmd_confirm & save the changes password must meet complexity requirements
  9. Reboot your computer to confirm the changes.

3. Use the Local Security Policy Editor

  1. Press Windows + R to open the Run box.Local Security Policy Editor password must meet complexity requirements
  2. Type secpol.msc and click OK to open the Local Security Policy Editor.
  3. Click Action, then select Export policy.Export policy
  4. Once you have saved the file, open it with Notepad.
  5. Go to System Access, and locate Password Complexity. Change its value from 1 to 0.
  6. You can also edit the values for MinimumPassword Age, MaximumPassword Age, & MiniumPassword length. Press Ctrl + S to save the changes.
  7. Press the Windows key, type cmd, and click Run as administrator.CMD elevated password must meet complexity requirements
  8. Type the following command and hit Enter: secedit.exe /configure /db %windir%\securitynew.sdb /cfg C:\secconfig.cfg /areas SECURITYPOLICYcmd_confirm & save the changes password must meet complexity requirements
  9. Restart your computer to confirm the changes.

You can now go to Local Security Policy Editor to confirm if the setting is disabled. If Local Security Policy Editor is missing or is grayed out, we recommend you check out the solutions in this informative guide.

So, these are methods you can follow to remove the password complexity requirements in Windows. You can also delete all saved passwords and input simpler ones if you wish.

If you have any questions or suggestions, feel free to let us know in the comments section below.

Number matching for the Microsoft Authenticator MFA is finally here

Most of us are all about staying secure while online and protecting our identity and valuables. We should all be so concerned when it comes to online exposure.

If your next question would have been Protection from whom?, then maybe you should check out the redesigned list of threats from Microsoft.

Also, before we get into the topic, remember that Windows 11 kernel will soon boot with Rust inside. Just in case you didn’t already know.

Here’s how you can stay more secure with number matching

It’s widely known that even with MFA you should be ultra-careful, as it has shown in the past that it is exploitable.

As a matter of fact, in August of 2022, Microsoft email users were falling to a new phishing attack, even with the feature on.

Fast forward a couple of weeks later, there were reports of hackers bypassing MFA and brute forcing passwords.

Not to mention that there’s also MFA fatigue or MFA spamming or push bombing attacks, which bombards the user with MFA push notifications in hopes that a user accepts the request and gives access to a threat actor by mistake.

On that note, Microsoft has decided that an extra layer of protection was necessary to fight these attempts and further secure them.

And, in order to efficiently combat such attacks, Microsoft introduced number matching as an additional step in its Microsoft Authenticator app to enhance the security provided by Multi-Factor Authentication (MFA) last year.

Starting today, May 8, 2023, the Redmond giant is enforcing number matching for all users, so that’s definitely something to be happy about.

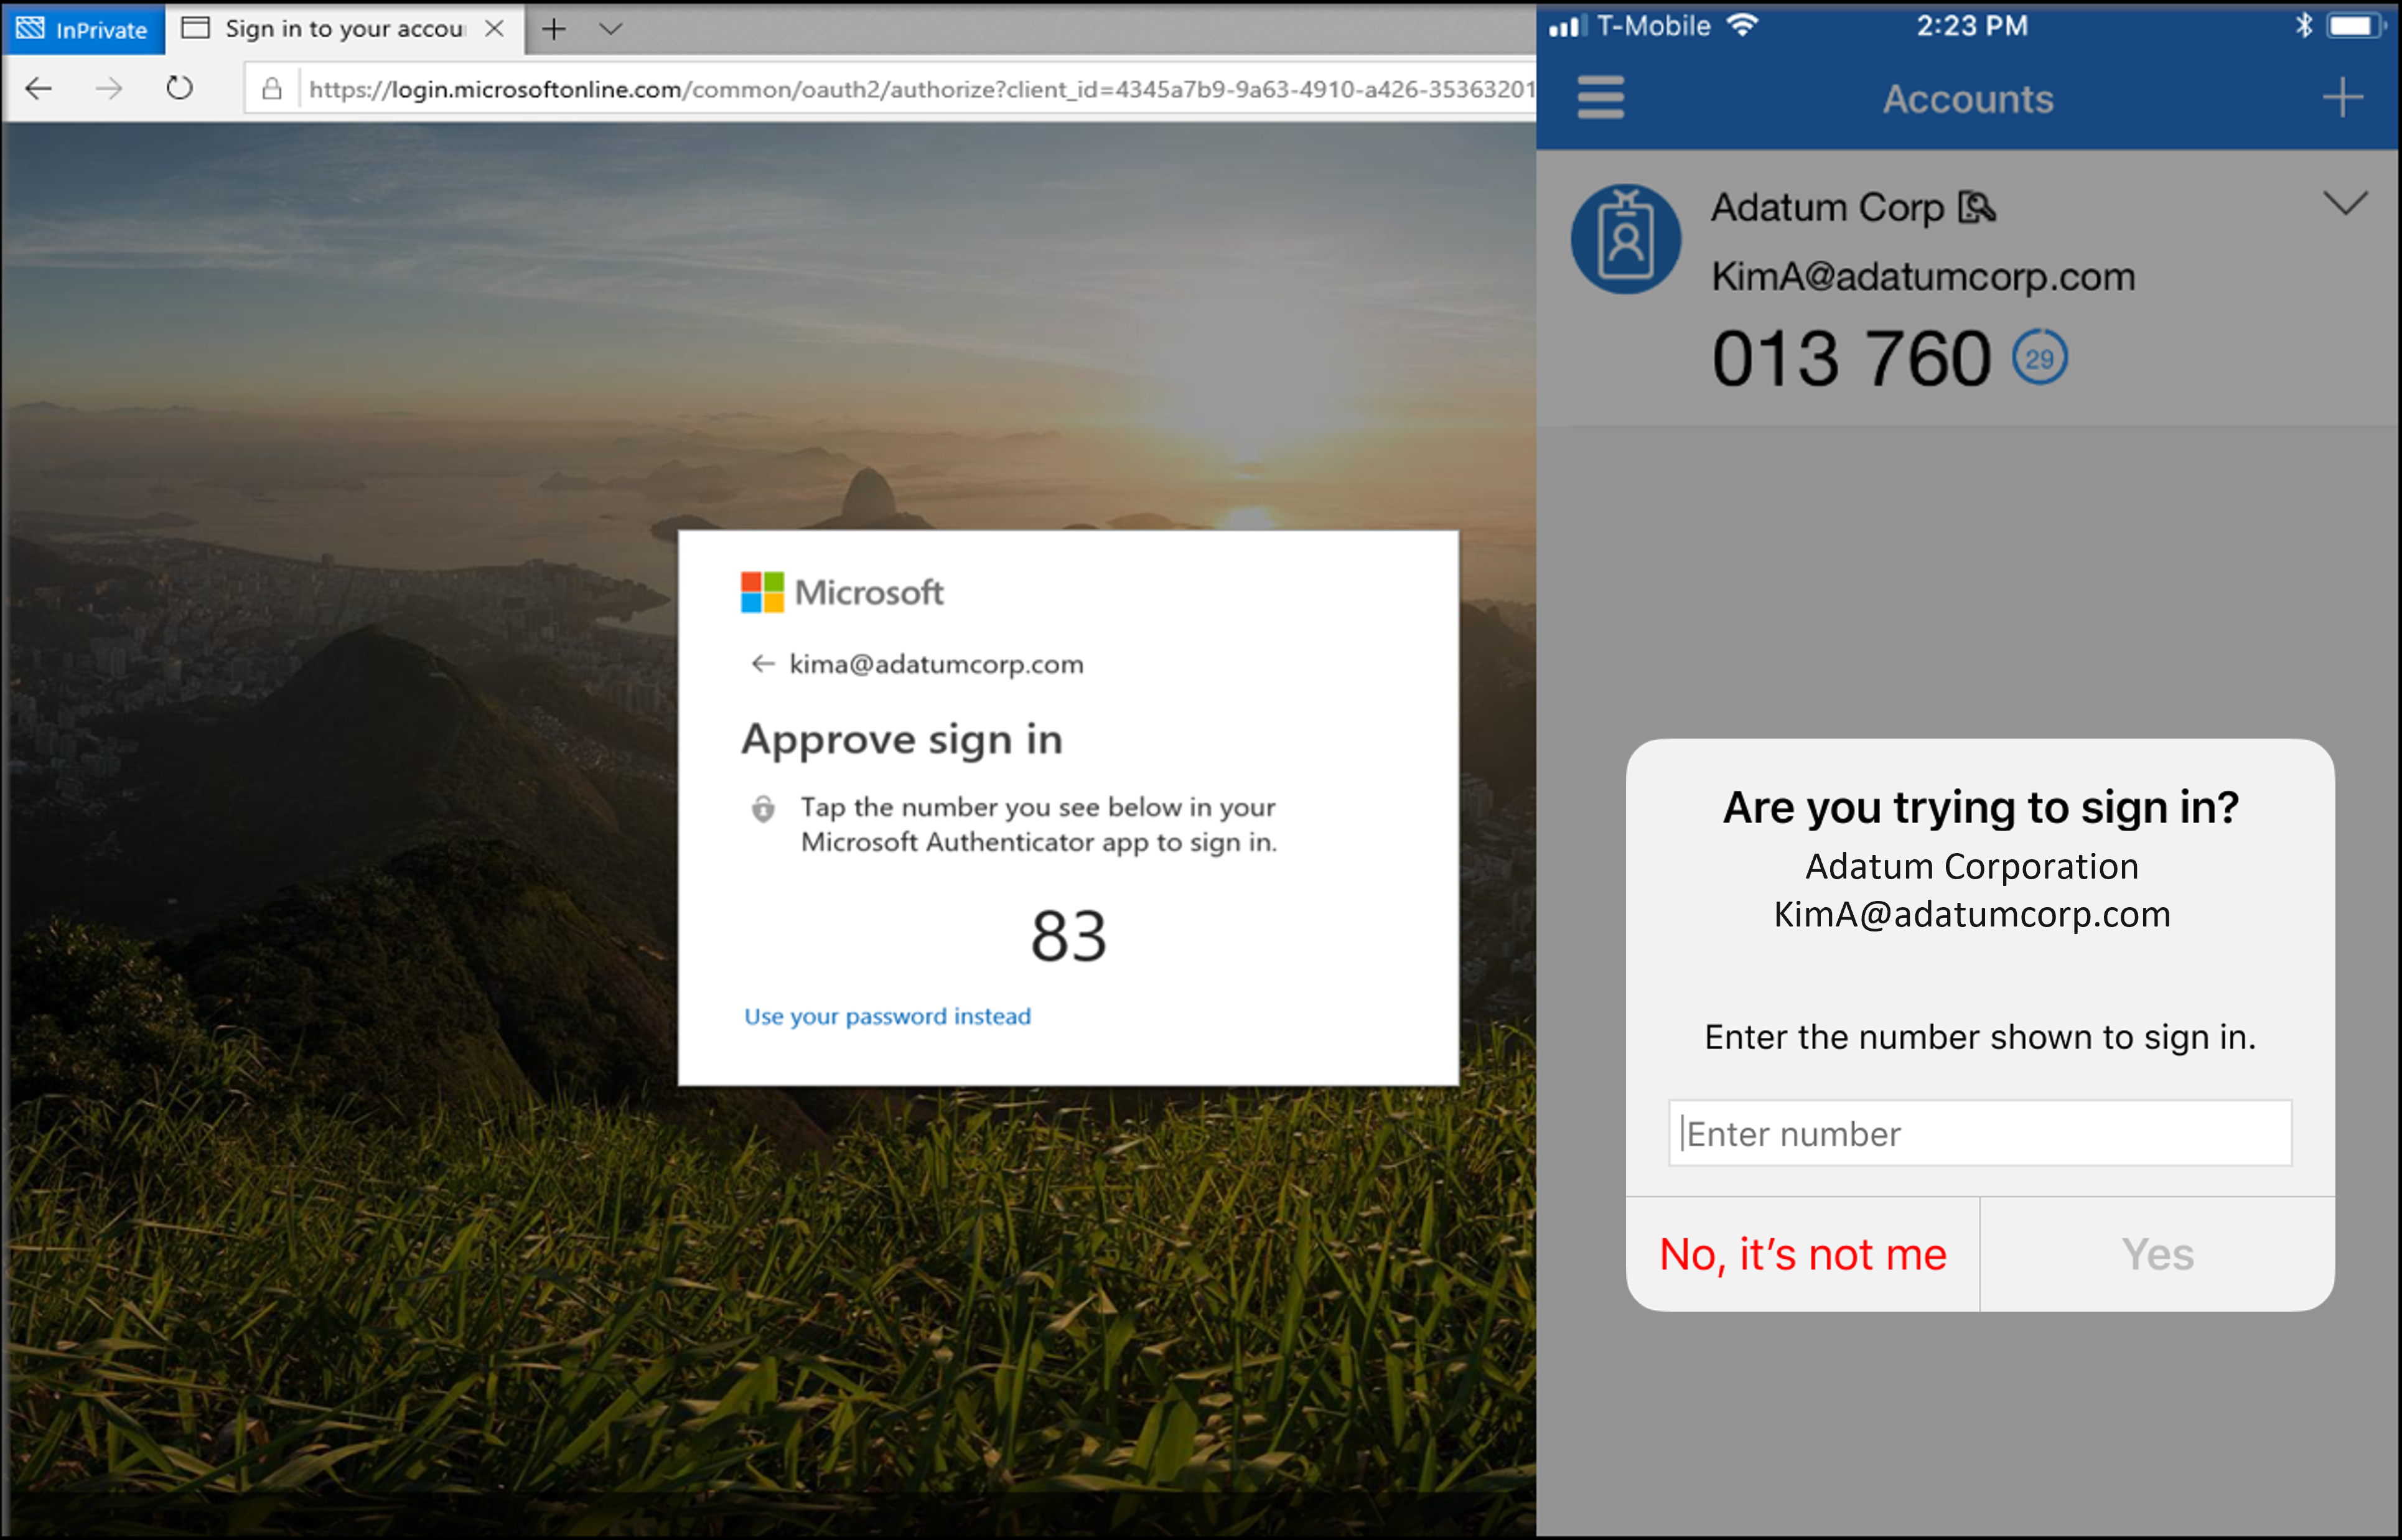
Thus, users will need to enter the number provided into their Authenticator app when signing in, as we are about to show you below.

As Redmond said, number matching is a key security upgrade to traditional second-factor notifications in Microsoft Authenticator.

The company mentioned it will remove the admin controls and enforce the number match experience tenant-wide for all users of Microsoft Authenticator push notifications starting today.

Both we and Microsoft highly recommend enabling number matching in the near term for improved sign-in security.

As you know, relevant services will begin deploying these changes after May 8, and users will start to see a number match in approval requests.

Furthermore, as services deploy, some may see number match while others don’t. To ensure consistent behavior for all users, we also recommend you enable number match for Microsoft Authenticator push notifications in advance.

We’ve recently shared the fact that Windows 11 Build 25357 will absolutely bombard us with notifications left and right.

And, on the same note, we are soon going to inevitably see a lot more Microsoft-inspired ads in the Windows 11 Settings app.

What is your take on this situation? Be sure to leave your thoughts, ideas, and opinions in the comments section below.

0x00000021 BSoD: What is it & How to Fix it

Our readers have reported coming across 0x00000021 – QUOTA_UNDERFLOW Blue Screen of Death error. This basically puts their PCs in a restart loop. Windows 10 users are the ones that are affected because of this 0x00000021 BSoD error among other BSoD problems.

Why am I getting the 0x00000021 – QUOTA_UNDERFLOW error?

After going through various user reports and forum posts, we have listed down some of the most common reasons that could trigger the 0x00000021 QUOTA_UNDERFLOW BSoD error on your PC:

  • Outdated drivers – If your PC has outdated drivers then not only the performance won’t be optimal but you will face multiple issues.
  • Malware infections – Virus or malware can cause great damage to the system files thereby causing issues such as the 0x00000021 QUOTA_UNDERFLOW BSoD error.
  • Corrupt system files – Chances are some important system files are corrupt or are missing from your PC, which is causing the problem.
  • Hard disk errors – Hard disk malfunction or bad sectors can also give rise to multiple Blue Screen of Death errors.

Let us check out the solutions to resolve the 0x00000021 – QUOTA_UNDERFLOW error.

How can I fix the 0x00000021 – QUOTA_UNDERFLOW BSoD error?

1. Perform a Startup Repair

  1. Turn off and on your PC three times using the Power button to boot into the Advanced Startup environment.
  2. Click on Next, then select the Repair your computer option.
  3. Hit the Troubleshoot option.
  4. Click on Advanced options.
  5. Hit the Startup Repair option.
  6. Select your account, enter your password, and click Continue.

You may also use a dedicated tool and fix the BSoD or startup problem pretty easily. For that, we have listed the best boot repair tools that you can use on your Windows 10 PC.

2. Fix corrupt system files

  1. Enter the Advanced Startup environment as instructed in Solution 1.
  2. Click on Next and choose the Repair your computer option.
  3. Hit the Troubleshoot option.
  4. Click on Advanced options.
  5. Select Command Prompt.
  6. Type the below command and press Enter. sfc /scannow
  7. Wait for the process to complete.
  8. Type the below commands and press Enter after each one. DISM.exe /Online /Cleanup-image /Scanhealth DISM.exe /Online /Cleanup-image /Restorehealth DISM.exe /online /cleanup-image /startcomponentcleanup
  9. Restart your PC.

You can easily resolve the system file corruption by using the above two commands and hopefully fix the 0x00000021 – QUOTA_UNDERFLOW error.

Besides this, you can try a specialized repair tool that can fix broken system files automatically in less than 5 minutes.

3. Update the drivers

  1. Press the Win key to open the Start menu.
  2. Open Device Manager.
  3. Expand each section.
  4. Double-click on your driver.
  5. Click on the Driver tab.
  6. Select the Update driver option.
  7. Choose Search automatically for drivers option.
  8. Restart your PC.
  9. Follow the same process for every driver.

4. Scan your PC for viruses

  1. To open the Start menu, press the Win key.
  2. Open Windows Security.Windows Security open Windows key
  3. Select Virus & threat protection.
  4. Click Quick Scan.
  5. You can also click on Scan options and select Full scan for a deep scan.
  6. Restart your PC after the process is finished.

Using the Windows Security tool, you can remove the virus or malware from your PC. However, it isn’t proven to be that effective as compared to dedicated antivirus tools.

We have compiled a list of some of the best antivirus software to protect your PC from various malware and also resolve issues such as 0x00000021 – QUOTA_UNDERFLOW error.

5. Perform a System Restore

  1. Enter the Advanced Startup environment as instructed in Solution 1.
  2. Click on Next.
  3. Choose the Repair your computer option.
  4. Select the Troubleshoot option.
  5. Choose Advanced options.
  6. Choose the System Restore option.
  7. Click Next.
  8. Choose the restore point and hit the Next button.restore point
  9. Hit the Finish button.

You can perform the system restore in order to take your PC back to a state where everything was working without any issues.

That is it from us in this guide. Windows 11 users are reportedly coming across the Black Screen error, which you can easily fix by following the solutions mentioned in our guide.

Let us know in the comments, which solution fixed the problem for you.

Get ready to see a lot more ads in the Windows 11 Settings app

We’ve recently shared the fact that Windows 11 Build 25357 will absolutely bombard us with notifications left and right.

However, if you thought that was the only annoying feature to come to your new favorite OS, you might want to rethink that.

In fact, it was found that the Redmond tech giant is planning to show a lot more ads within the Settings app, in Windows 11.

Many users will surely be displeased and another wave of complaints is bound to come. We already knew that Microsoft has been looking to increase advertising for its products, so here it is.

The Settings app will soon display more ads

Let’s start by saying that an online investigation performed by Twitter user Albacore into a recent Insider build uncovered some disconcerting news.

He learned that the Settings home page will soon start to present adverts for Microsoft 365 products in the near future.

Thus, a banner asking users who aren’t subscribed to the platform to Try Microsoft 365 shows at the top of the Home tab in Settings.

As you see, below the advertisement, there is a section that will show the current storage status for a user’s OneDrive account, and then a security tips section for users to secure their account.

Know that this isn’t the only version of the Home tab that has been seen, with another version having the storage information listed first and the Microsoft 365 prompt to Sign In listed below.

As you would have expected, the final update that has been seen during this investigation into the Settings tab on this Insider build is a small prompt on the Accounts tab.

It shows information about products that are installed in the user’s system that have reached the end of support, such as Office 2013 for example.

We, you, and everybody else know that this isn’t the first time that Microsoft has been incorporating adverts into its operating system.

If we look back just a little, we can remember that Start Menu ads were being seen in the Start Menu of Windows 11 since November 2022.

The tech giant seems keen to drive more subscriptions to the 365 platforms through these adverts and its apparently intrusive approach to advertising, such as the full-screen upgrade ads presented to users in February.

Certainly, we will closely monitor this subject and see exactly when and through what update Microsoft plans to push this feature.

Leave a comment below and express your thoughts, and opinions on this matter and we’ll get back to you as soon as possible.

Microsoft Edge 113 ships to the Stable Channel

Microsoft released a new update for its browser Edge in the Stable Channel bumping it up to version 113.0.1774.35. The update ships with several feature updates as well as the usual policy updates.

Here’s everything you need to know about this update:

First up, the update brings significant enhancements to enhanced security mode. The feature is essentially designed to provide an extra layer of security for users while using the web. But this new release adds a new feature that lets users switch their security level settings between Balanced and Strict modes in a bid to enhance the browsing experience.

Next up, the new update also transitions Microsoft Autoupdate to EdgeUpdater for macOS. This change will only affect Microsoft Edge on macOS, therefore, if you use the feature to block browser updates, you’ll have to switch to the new EdgeUpdater UpdateDefault policy to maintain the same arrangement.

Additionally, the update ships with a new policy for PDF View Settings. The RestorePdfView policy in Microsoft Edge will allow users to get back to the last position they were in the PDF when it was last opened. This is regardless of whether the policy is enabled or not.

And finally, the Microsoft Root Store policy has been updated and will be supported in Microsoft Edge versions 113 and 114. However, it won’t be part of the Microsoft Edge 115 release.

Aside from these feature updates, the release also features some depreciated and new policies. We invite you to check out Microsoft’s changelog for more details.

Microsoft Edge should auto-update to the latest version, but if it doesn’t, you can trigger it manually. Just head to the browser’s menu, choose Help and Feedback then About Microsoft Edge and wait for the update to download, and then restart.

In related news, Microsoft is busy at work trying to integrate Bing into Edge further with reports indicating that Bing Chat has been incorporated into the browser’s context menu.

WFP INVALID OPERATION: How to Fix This BSoD Error

Several of our readers have reported facing coming WFP INVALID OPERATION BSoD error on their Windows 10 and Windows 11 PCs when running certain games.

In this guide, we have the solutions you need to resolve the WFP INVALID OPERATION BSoD error on your PC. Do note that the solutions in this guide are applicable to both Windows 10 and 11 OSs.

What is causing the WFP INVALID OPERATION BSoD error?

WFP in the error message WFP INVALID OPERATION means Windows Filtering Platform. It is basically a set of APIs and system services which allows your PC a base for network filtering apps.

Here are the reasons that could trigger the WFP INVALID OPERATION BSoD error on your PC:

  • Corrupt system files – Missing or corrupt system files are responsible for various petty and annoying errors on your PC, one of which is the error at hand.
  • Malware or virus infection – If your PC is infected with a virus or malware then your PC is bound to throw errors such as this BSoD.
  • Problematic update files – Often corrupt Windows update cache files cause various mishaps on your PC and throw errors such as WFP INVALID OPERATION error.
  • Problem with the game – The game file might be missing or is replaced by some conflicting apps causing the error on your PC.
  • Issue with Windows: If you haven’t updated your PC or some files have been tweaked then you will face multiple system issues on your PC.

Now that we know what we’re facing, let’s go to the actual solutions to fix the problem.

How can I fix the WFP INVALID OPERATION error?

1. Uninstall the latest Windows update

  1. Press the Win + I keys to open the Settings menu.
  2. Select Windows Update.
  3. Click on Update history.
  4. Click Uninstall updates under Related settings.
  5. Select the recently installed update and hit the Uninstall button.
  6. Restart your PC.

You might have installed the latest version of the Windows update on your PC to enjoy the new features and stability improvements, but chances are the update brought in a bunch of bugs causing the WFP INVALID OPERATION error.

Simply remove the recently installed update on your PC by following the above steps and check if this resolves the issue or not.

2. Check for software conflicts

  1. To open the Run dialogue press the Win + R keys.
  2. Type msconfig and press Enter.msconfig
  3. Click on the Services tab.
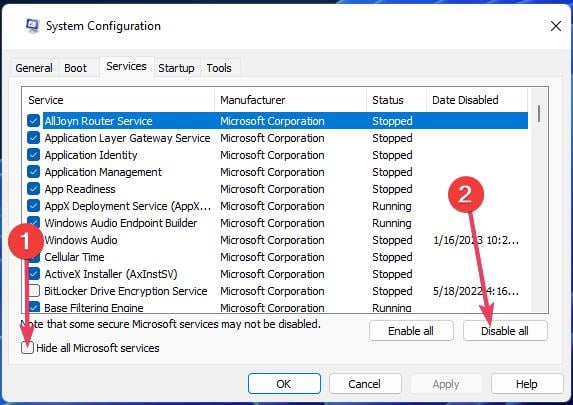
  4. Check the Hide all Microsoft services box and select Disable all.
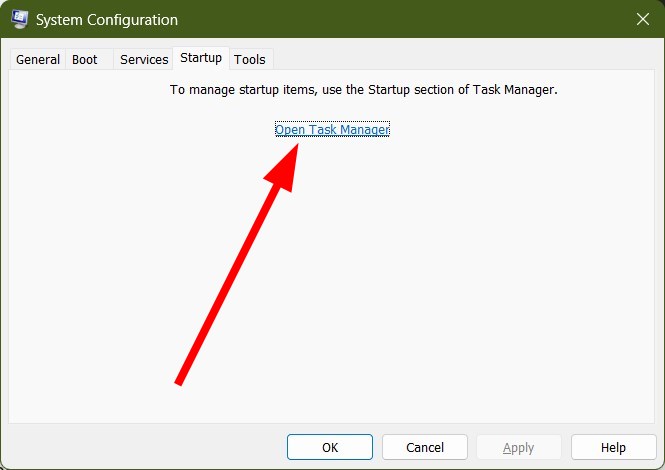
  5. Click on the Startup tab.
  6. Click the Open Task Manager option.
  7. Right-click each item in the task manager and disable them.
  8. Close Task Manager.
  9. Switch to the Boot tab.
  10. Check the Safe Boot box.
  11. Click Apply and OK.
  12. Restart your PC.

When you boot your PC in safe boot, you are creating an environment that will help you detect apps that are conflicting with each other and causing several issues including the WFP INVALID OPERATION error.

3. Perform a virus scan

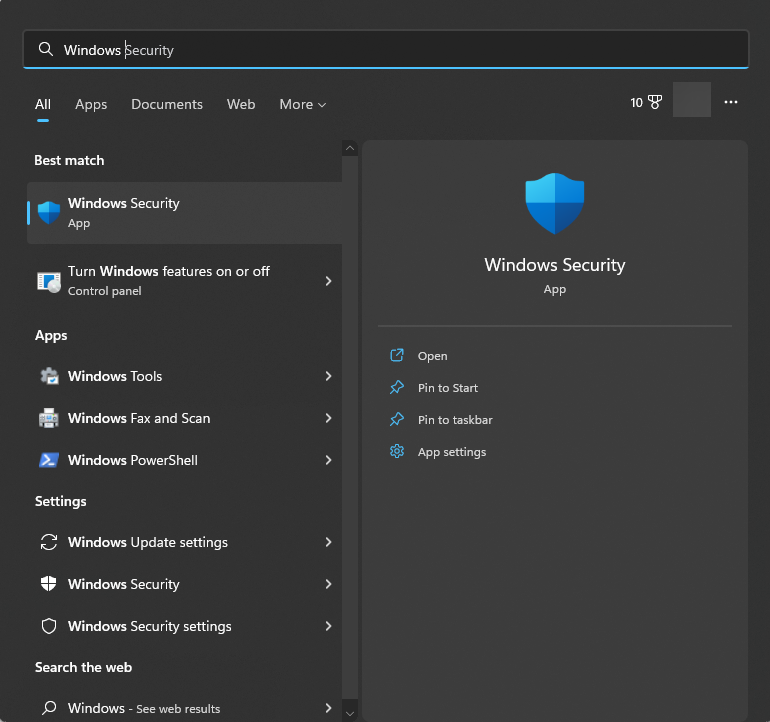
  1. Press the Win key to open the Start menu.
  2. Open Windows Security.security navagio.sys
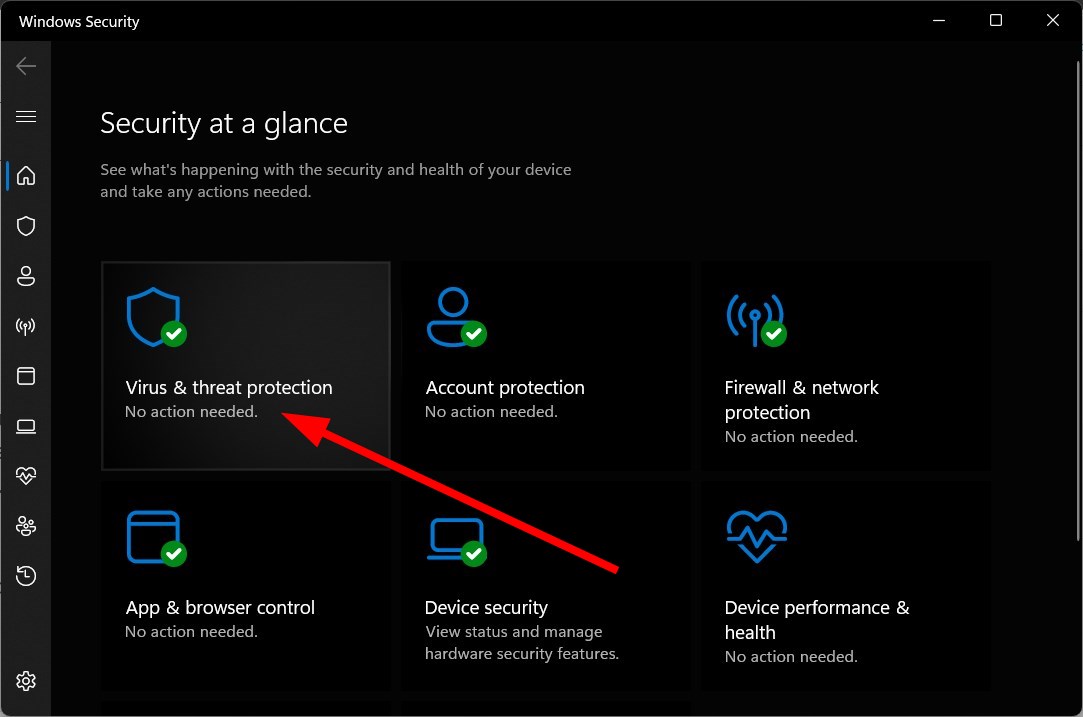
  3. Select Virus & threat protection.
  4. Click on Quick Scan.
  5. You can select the Scan options and click on Full scan for an in-depth scan.
  6. Apply the fixes.
  7. Restart your PC.

You should scan your PC for viruses or malware regularly to make sure that it isn’t infected with it and that your private files aren’t at risk of being exposed.

Often, Windows Security won’t be that great to locate the virus or malware that is modern. In that case, we would recommend you choose among some of the best antivirus tools to keep your PC safe.

4. Fix corrupt system files

  1. Press the Win key to open the Start menu.
  2. Run Command Prompt as an administrator.
  3. Type the below command and press Enter: sfc /scannowsfc scan
  4. Let the process fix corrupt files.
  5. Type the below commands and press Enter after each one: DISM.exe /Online /Cleanup-image /Scanhealth DISM.exe /Online /Cleanup-image /Restorehealth DISM.exe /online /cleanup-image /startcomponentcleanup
  6. After the process completes, restart your PC.

Corrupt system files can cause multiple issues on your PC. So, you should also run the above two commands and fix system files and hopefully resolve the WFP INVALID OPERATION error.

That is it from us in this guide. Apart from the Blue Screen of Death error, Windows 11 users have also reported coming across the Black Screen error. You can fix it by following the solutions in our guide.

Recently, many of our readers reported facing rt640x64.sys BSoD error. You can refer to the solutions in our guide to resolve the issue.

Feel free to let us know in the comments below, which one of the above solutions fixed the problem for you.

Xbox Series X|S Seagate expansion cards get a permanent price cut

Microsoft has finally dropped the price of its proprietary Xbox Series X|S expansion cards. Manufactured by Seagate, the storage cards (which were originally priced at a hefty $219 for the 1TB option) remain the only option available at the time of this writing for playing games from a fast portable SSD solution.

And current-gen gamers on Series X|S need all the storage they can get, with many modern AAA games taking well over 100GB of storage. For example, the recent Star Wars Jedi: Survivor weighs in at just over 135GB.

The 1TB cards are still not exactly easy on the wallet at the new price of $149.99. Other size options are now priced as follows:

  • 512GB: $89.99
  • 2TB: $279.99

That 2TB expansion card is still eye-watering at nearly the cost of an Xbox Series S console (and over half the price of a Series X). The official Xbox Twitter account announced that the price cuts were permanent following a week-long “discount” period.

If you’ve held out this long, you might want to wait a bit longer as a new competitor may be about to hit the scene in the form of Western Digital. We reported on this last month; and while the supposed $179.99 price point for the Western Digital 1TB card would no longer be the more affordable choice, a new player on the scene is likely what is needed to bring these prices down to a more reasonable level.

Via Tom’s Guide. 

0x000000C1 Error Code: Unable to Install Printer [3 Fixes]

The 0x000000C1 error code occurs when installing a printer on a Windows computer. It can prevent you from using your printer and be frustrating to fix. Therefore, we will examine how to fix the 0x000000C1 error code on your PC.

Likewise, we have a detailed article on how to fix printing errors on Windows PCs.

Why do I get the 0x000000C1 error code?

Several factors can cause the 0x000000C1 error code. Some include:

  • Outdated or corrupted printer drivers – If the printer driver is outdated or corrupted, it can affect the communication between the Windows OS and printer and cause the 0x000000C1 error code.
  • Printer spooler service issues – Issues with the printer spooler service, which manages print jobs in the queue, can also cause this error code.
  • Faulty printer cables – Faulty or damaged printer cables can prevent the printer from communicating with the computer and cause this error.

The following causes differ on various computers. Hence, we will discuss ways to fix the issue.

What can I do if get unable to install printer error code 0x000000C1?

Apply the following before proceeding with advanced troubleshooting:

  • Check for Windows OS updates on your computer.
  • Restart your computer and printer.
  • Perform a Disk Clean up / Disk Defrag.

Proceed with the advanced steps below if the error persists.

1. Restart the Print Spooler service

  1. Right-click the Windows icon and select Run to open the Run dialog box. Type services.msc and press Enter to open the Windows Services.
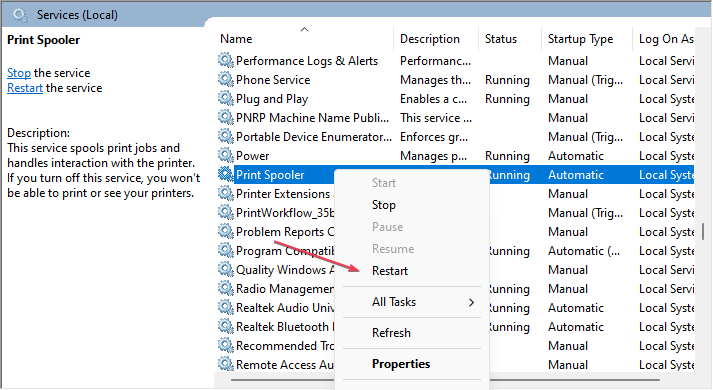
  2. Navigate to the Print Spooler option and check its status. If the Print Spooler status displays running, right-click it and select restart.
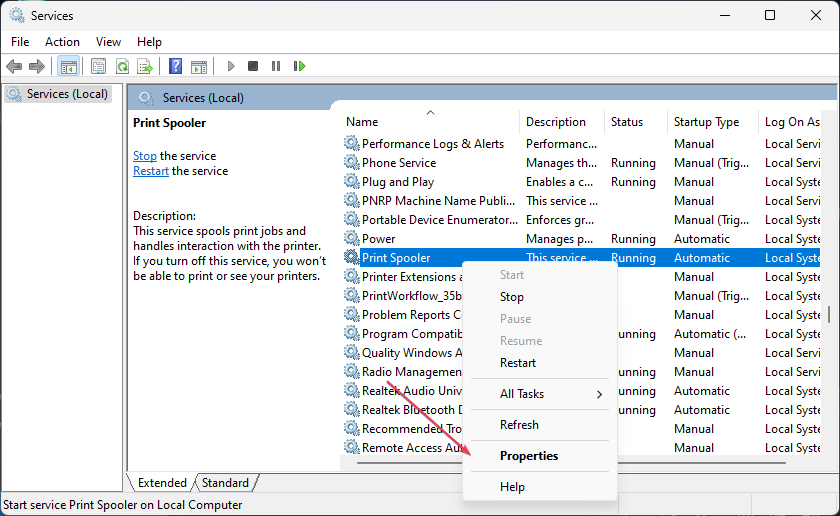
  3. If the status doesn’t display running, right-click it and select Properties.
  4. Click the Start button in the Services Status section. Select OK and restart your device.

Restarting the print spooler can help resolve issues preventing the printer from being installed correctly. Check our comprehensive guide on fixing Local Print Spooler Service is not running on your PC.

2. Use the Windows troubleshooter

  1. Press the Windows + I key to open the Windows Settings.
  2. Click the System tab and select Troubleshooter from the left pane.
  3. Choose other troubleshooters link from the right side pane.
  4. Click on the Run button beside the Printer option.
  5. Follow the on-screen command and restart your PC.

Using the Windows inbuilt printer troubleshooter will fix issues with the printer. Read our detailed guide on the best Windows troubleshooter tools to fix issues on your computer.

3. Modify the Registry Editor and update the printer driver

3.1 Stop Printer Spooler services

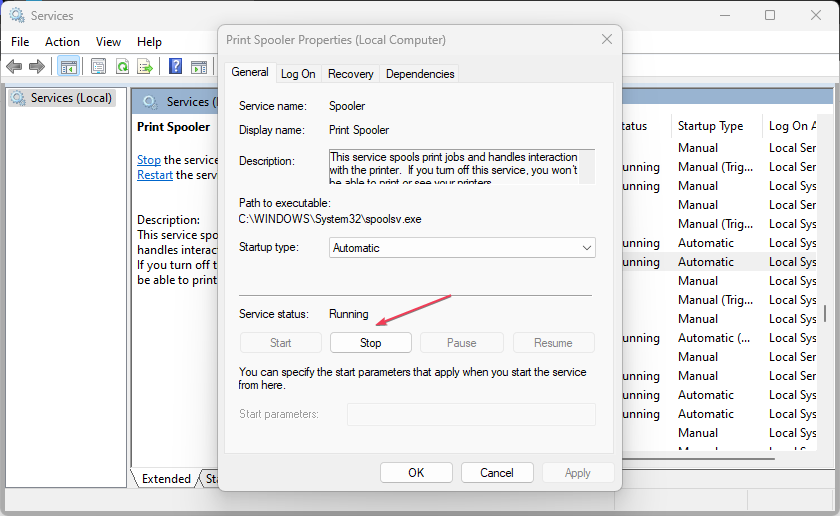
  1. Press the Windows + R to open the Run dialog box, type services.msc, and press Enter to open the Windows Services.
  2. Scroll to the Print Spooler, right-click on it, and select Properties.
  3. Then, click the Stop button and select OK.
  4. Left-click the Windows icon, type File Explorer, and press Enter to open it.
  5. Navigate to the following path: C:\Windows\System32\Spool\Printers
  6. Right-click on the folder, and select Delete from the context menu.
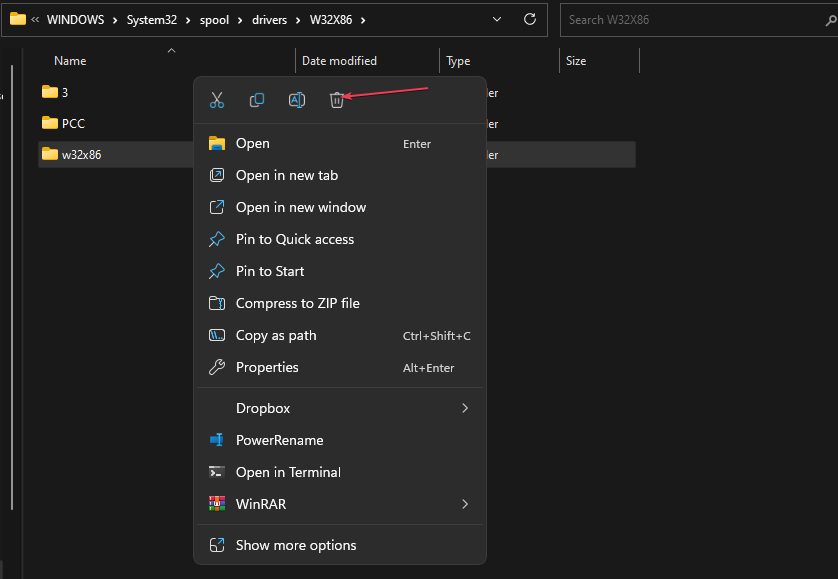
  7. Then, navigate to the following path: C:\Windows\System32\Spool\Drivers\w32x86
  8. Right-click the w32x86 folder and select Delete from the menu.

3.2 Modify the Registry Editor

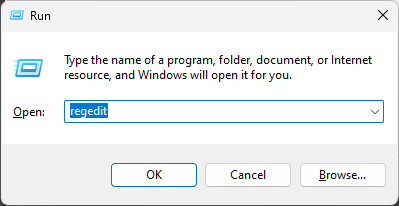
  1. Press the Windows key, type regedit, and press Enter to open the Registry Editor.
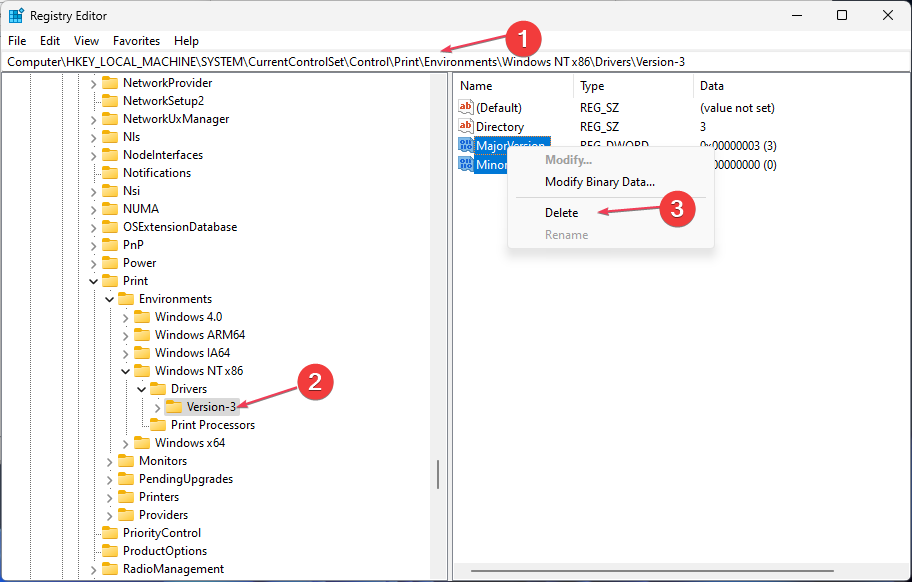
  2. Copy and paste the following path into the Registry Editor address bar and press Enter.
    • For 32bit computer: HKEY_LOCAL_MACHINE\SYSTEM\CurrentControlSet\Control\Print\Environments\Windows NT x86\Drivers\Version-x (x represents the version number which varies on different PC).
    • For 64bit computer: HKEY_LOCAL_MACHINE\SYSTEM\CurrentControlSet\Control\Print\Environments\Windows x64\Drivers\Version-x (x represents the version number which varies on different PC).
  3. Select all the entries in the Registry Editor and delete them all.
  4. Go to Windows Services, start the Print Spooler, and restart your computer.

3.3 Update the driver

  1. Press the Windows, type Device Manager, and launch it.
  2. Navigate to Print queues, right-click the driver, and select Update driver from the menu.
  3. Select Search automatically for drivers.
  4. Wait for the process to complete and restart your device.

As an alternative to this, you can automatically update all PC drivers with a standalone application like Outbyte Driver Updater.

This software will fully scan the OS and detect all the outdated drivers, and then install them simultaneously.

Modifying the Windows Registry Editor and updating the printer driver will troubleshoot issues with printer installation.

Check our guide about how to master the Windows Registry with Registry Editor in Windows 11.

Conclusively, you can read about how to fix printer error 0x00000b11 on Windows PCs. Also, check our guide on fixing printer error 1260 with a couple of steps on your computer.

Did you find a different solution? Share it with us in the comments section below.

Hogwarts Legacy reaches $1 billion in sales as the game comes to Xbox One

Hogwarts Legacy has amassed a staggering $1 billion in sales as of Friday, May 5. The news was delivered by Warner Bros. Discovery CEO David Zaslav during the company’s latest earnings call.

What’s even more impressive is that Hogwarts Legacy is likely not even done yet, with previous-gen releases launching that same day, including on Xbox One. The Nintendo Switch version of the game will release in July, and it is expected to do very well on that platform.

Hogwarts Legacy

Hogwarts Legacy has already climbed back to the no.1 spot in the U.K. sales charts for the week ending on May 6, dethroning Star Wars Jedi: Survivor.

The game doesn’t seem to be getting by on name alone, either. It also received a lot of critical acclaim upon release, as can be seen in our Hogwarts Legacy review roundup. With all the game’s incredible success, even in the face of all the controversy that has surrounded it, a sequel seems all but certain. And already a TV show based on the events of the game is reportedly in the works at HBO.

Via Pure Xbox. 

How to Fix 0x801c03f3 Hybrid Azure AD Error

When working on a project in Azure, you must register your device with the Azure account. If you have multiple devices and a single Azure account, you can use one to register all the devices. 

However, sometimes it will happen that your device is not registering with your Azure account. This may be accompanied by the error code 0x801c03f3. You might be wondering how to fix this issue, so keep reading to find out how.

How do I fix error 0x801c03f3?

Start by checking your Office 365 subscription status. Make sure your device is connected to the internet and check check whether TPM is on or off and update TPM.

1. Re-enroll the device in Azure

  1. Hit the Windows key and click on Settings.
  2. Click on Accounts on the left pane, then Access work or school on the right pane.
  3. Locate your account connected to your AD account and click on Disconnect.
  4. Restart your PC, then repeat steps 1-3, but this time, click Connect to re-enroll the device.

2. Re-sync your Azure account

  1. Hit the Windows key and click on Settings.
  2. Click on Accounts on the left pane, then select Access work or school.
  3. Locate your account connected to Azure, then select Info.
  4. Select Sync under device Action status.

Resynchronization can help get your devices back in sync with your Azure AD tenant.

3. Enable automatic enrolment

  1. Login to your Azure portal.
  2. Click on Azure Active Directory on the left pane, select Mobility (MDM and MAM), and click on Microsoft Intune.
  3. Under MDM User scope, configure the settings and select All so that all devices can automatically enroll for Intune.

You don’t need to manually enroll devices in the directory when automatic enrollment is enabled. Automatic enrollment makes it easier for users to sign in from a new device and eliminates the need for administrators to enroll all new devices manually.

Elsewhere, you may run into an error 80180002 where you can’t join the Azure domain with your account, but we’ve already unpacked how to bypass this issue in our detailed article.

What is autopilot error code 801c03ed?

The error 0x801c03f3 is a common error that may occur when you try registering a device with Azure AD, but it keeps failing.

The Windows Autopilot feature is designed to make it easy for automatic registration. You can use Autopilot to automatically enroll new devices into your organization’s Azure AD tenant or to re-enroll existing devices.

However, when devices are brought back onto the network after being taken offline for a period of time, they can sometimes fail. That’s when you might get the error message that the device object by the given id is not found 0x801c03f3.

This brings us to the question of why the device is not registering. Below are some possible reasons:

  • Outdated TPM – You are already aware that TPM is one of the requirements to run Windows 11. It is also required to join a device to Azure AD. If it’s outdated, then you can’t join the device.
  • Offline device – The device may be offline, or you may have an incorrect account ID. 
  • The device is not registered in AD – It is possible that it has not been registered with Azure and must be registered in AD.
  • Compatibility issues – The device you’re trying to register may have an old version of Windows installed and needs to be upgraded to the latest version before joining.
  • Exclusion filter – Sometimes, when creating policies, you may have included an exclusion filter that prevents new devices from registering.

That’s all we had for this error, but hopefully, your device has been able to register in Azure. 

If you tried another solution that worked for you, share it with us in the comment section below.

Microsoft ships Authenticator’s number matching feature to all users

Towards the end of last year, Microsoft announced a couple of security changes coming to its Microsoft Authenticator app. This move was prompted after attackers started leveraging push-based MFA to spam users to bypass Microsoft’s multi-factor authentication.

While the company provided a handful of tips and recommendations that users can use to avoid falling victim to such cons. There was still a need to add an extra layer of protection, that is, the announced number matching feature that’s designed to assist users from making accidental approvals while simultaneously protecting them from MFA attacks by hackers.

Microsoft has announced that the number matching feature is shipping to all Microsoft Authenticator app users starting today. This means users will now need to enter the number displayed on the sign-in screen when approving an MFA request in Authenticator as illustrated below.

Screenshot of user entering a number match.

Microsoft further added that:

We highly recommend enabling number matching in the near term for improved sign-in security. Relevant services will begin deploying these changes after May 8, 2023 and users will start to see number match in approval requests. As services deploy, some may see number match while others don’t. To ensure consistent behavior for all users, we highly recommend you enable number match for Microsoft Authenticator push notifications in advance.

The company also highlighted its plans to do away with admin controls and enforce the number match experience tenant-wide for all users of Microsoft Authenticator push notifications to further enhance security.

We’d also like to invite you to check out our expert guide on how to move Microsoft Authenticator App to a new phone as well as our feature post comparing the Microsoft Authenticator app to LastPass.

Do you use the Microsoft Authenticator app? Share your experience with us in the comments.

via Neowin

DXGI ERROR DEVICE REMOVED: 6 Quick Ways to Fix It

If you have encountered the DXGI ERROR DEVICE REMOVED pop-up message while launching specific games or graphics-intensive programs on your Windows computer, then this guide can help!

The majority of users who complained about this issue had NVIDIA graphics cards but you can use our solutions on other popular graphics cards, including AMD Radeon, & Intel.

What causes the DXGI ERROR DEVICE REMOVED error?

There could be several reasons for which error appears; some of the common ones are mentioned here:

  • Faulty RAM – If the RAM on your computer is damaged or corrupted, it could cause this problem. You need to run a memory diagnostic check to know more about it.
  • Shadow Play is enabled – The NVIDIA Shadow Play is a screen recording feature in GeForce Experience; if it is enabled, it could cause this error. Try disabling it to fix the issue.
  • The graphics card is not running properly – If your graphics card is damaged or not functioning properly, you may encounter this error.
  • Outdated graphics driver – The graphics driver should always be updated. As an outdated driver could cause various problems, including this one. Try updating the driver to the latest version.

Now that you know what causes the issue let us check out the solutions to fix the error.

How can I fix the DXGI ERROR DEVICE REMOVED error?

Before engaging in advanced troubleshooting steps, you should consider performing the following checks:

  • Restart your computer.
  • This problem often occurs when you change a graphics card with one from another brand (from NVIDIA to AMD and vice versa).
  • Make sure there are no pending Windows updates.
  • Make sure that the graphics card is properly seated.
  • Run a deep scan using an antivirus tool.
  • Remove dust from the graphics card and disable overclocking.

If these small fixes didn’t work, let’s move to the detailed methods mentioned below.

1. Use the Registry Editor

  1. Press Windows + R to open the Run dialog box.Regedit DXGI ERROR DEVICE REMOVED
  2. Type regedit and click OK to open the Registry Editor.
  3. Navigate to this path: Computer\HKEY_LOCAL_MACHINE\SYSTEM\CurrentControlSet\Control\GraphicsDrivers
  4. Select GraphicsDrivers, right-click it, choose New, then click DWORD (32-bit) Value. New Dword DXGI ERROR DEVICE REMOVED
  5. Name the DWORD as TdrLevel.
  6. Double-click TdrLevel, and change the Value data to 0.Value data TDR LEVEL DXGI ERROR DEVICE REMOVED
  7. Click OK, then reboot your computer.

2. Disable the Shadow Play option

  1. Locate and right-click the GeForce Experience shortcut and click Run as administrator.
  2. Navigate to the General tab, locate, and toggle off In-game Overlay.Overlay disable DXGI ERROR DEVICE REMOVED
  3. Click Apply to confirm the change and restart your PC.

3. Turn off the Anti-Aliasing feature

  1. Right-click the space on the desktop and select NVIDIA Control Panel.
  2. Click Manage 3D settings from the left pane, and go to the Global Settings tab.
  3. Locate Antialiasing and select Off from the drop-down.Manage 3D settings DXGI ERROR DEVICE REMOVED
  4. Switch to Program Settings and turn off Antialiasing.
  5. Click Apply to save the changes and reboot your computer.

You can disable the Antialiasing option on AMD and other graphics card software to fix this error.

4. Update or reinstall the graphics driver

  1. Press Windows + R to open the Run console.Device Manager Run command DXGI ERROR DEVICE REMOVED
  2. Type devmgmt.msc and click OK to open Device Manager.
  3. Click Display adapters to expand it, right-click the graphics driver from the list, and click Update driver.Graphics Driver update DXGI ERROR DEVICE REMOVED
  4. Select Search automatically for drivers.Update driver 2
  5. Follow the onscreen instructions to complete the process.
  6. If this doesn’t work, in Step 3, choose the Uninstall device option.Uninstall graphics driver DXGI ERROR DEVICE REMOVED
  7. Go to Action, and click Scan for hardware changes.Action scan for hardware changes
  8. The system will install a new driver automatically.

5. Check your RAM

  1. Press the Windows key, type windows memory diagnostic, and click Open.Memory diagnostic tool DXGI ERROR DEVICE REMOVED
  2. Click Restart now and check for problems (recommended). memory-diag-tool 3 Memory diagnostic tool DXGI ERROR DEVICE REMOVED
  3. Your computer will restart, and the Windows Memory Diagnostics tool will perform a test.
  4. Once the test is complete, your computer will boot up and show you the results.

If any errors are detected during the memory diagnostic test, it means that there is a problem with your computer’s RAM, and you should take action to resolve the issue.

In case it’s a minor issue, you can try cleaning memory modules and reseat them in their slots. However, if you still facing the issue, you might have to replace one or more memory modules.

6. Reinstall the NVIDIA GeForce Experience app

  1. Press the Windows key, type control panel, and click Open.Control Panel start menu DXGI ERROR DEVICE REMOVED
  2. Select View by as Category, and click Uninstall a program.Uninstall a program
  3. Select the Graphics card app for NVIDIA GeForce Experience and select Uninstall.Uninstall DXGI ERROR DEVICE REMOVED
  4. Go to the Geforce Experience website and click Download Now.GeForce Experience DXGI ERROR DEVICE REMOVED
  5. Double-click the installer file and follow the on-screen instructions to complete the process.

Follow the same process if you have AMD, Intel, or another graphics card to reinstall the app to get rid of the issue.

So, these are methods you can follow to fix the DXGI ERROR DEVICE REMOVED error so that you can launch your games without any problems.

If you have any questions or suggestions, feel free to mention them in the comments section below.

Microsoft news recap: third-party plugins coming to Bing Chat, Xbox Game Pass referral scheme, and more

Microsoft news recap is a weekly feature highlighting the top Microsoft news stories of the past week. Sit back, grab some coffee, and enjoy the read!

Bing Chat finally hits general availability, with third-party plugins on the way

This week saw Bing Chat enter general availability, ending the need to join a waitlist to get access, instead people can jump straight in to using Bing Chat. Additionally, Microsoft has confirmed that it is working to add third-party plugin in support, giving an example of finding and booking a restaurant on OpenTable via Bing Chat.

Microsoft further integrates the new Bing in Edge

As Microsoft continues to push the new Bing, the company has begun testing a new “Ask Bing Chat” option in the right-click context menu when selecting text. The new option is not currently available to everyone, but does offer a new way to access Bing Chat and send information to it to receive more context.

Xbox Game Pass unveils new friend referral program

Xbox Game Pass Ultimate and PC Game Pass members are receiving a new feature to invite up to five friends to a 14-day free trial of PC Game Pass, as part of a new friend referral program that has been launched.

Minecraft Legends gets its first update as game surpasses 3 million players

The latest game under the Minecraft umbrella, Minecraft Legends, has crossed the 3 million players mark, and also saw its first update this week, bringing a number of improvements, but notably the ability to invite friends to join your team in matchmaking.

That’s it for this week. We will be back next week with more Microsoft news.

How to Stop Spatial Sound Reverting to Windows Sonic

Spatial Sound using Dolby Atmos is the primary choice for many, given the significantly enhanced experience. But it’s not completely error-proof, with many reporting that Spatial Sound keeps switching to Windows Sonic.

This usually happens after a restart or even when the PC is turned on from sleep or hibernation. And if spatial sound keeps resetting, there are a few quick solutions to get things up and running. Let’s find out!

Why does Spatial Sound keep switching to Windows Sonic?

Here are a few reasons Spatial Sound in Windows 11 keeps reverting to Windows Sonic:

  • Corrupt system files: When the system files are corrupt on the PC, you are likely to encounter issues with Windows processes and even notice reduced PC performance.
  • Corrupt or outdated sound drivers: If the installed drivers are outdated or corrupt, it will affect how the OS handles sound-related tasks and could be the reason Spatial Sound keeps switching to Windows Sonic.
  • Playback device settings are reconfigured: In a few cases, third-party apps reconfigured the playback device and chose Windows Sonic instead of Dolby Atmos.
  • Misconfigured audio settings: Even issues with the audio settings can lead to a wide range of sound-related problems.

What can I do if Spatial Sound keeps switching to Windows Sonic?

Before we head to the slightly complex solutions, try these quick ones:

  • When spatial sound is not working in Windows 11, ensure you have the compatible headphone connected. Check this and verify again.
  • Install pending Windows updates.

If none work, move to the fixes listed next.

1. Disallow apps from taking access

  1. Press Windows + S to open Search, type Change system sounds in the text field, and click on the relevant result.change system sounds to fix Spatial Sound keeps switching to Windows Sonic
  2. Navigate to the Playback tab, right-click on the affected device, and then select Properties.properties
  3. Go to the Advanced tab, untick the checkbox for Allow applications to take exclusive control of this device, and click OK to save the changes.disable exclusive control

Your primary approach when Spatial Sound keeps switching to Windows Sonic should be not to allow applications to take exclusive control. This has worked for a lot of users.

2. Disable high-definition audio

When faced with the problem, another quick solution is to disable the high-definition audio device. It works both for Nvidia and AMD. The option can be found in the dedicated control panel. And while you are at it, make sure to uninstall the related sound driver as well.

The solution has been confirmed to work by users, but we still recommend you create a restore point beforehand to revert in case things don’t work out.

3. Update the audio driver

  1. Press Windows + X to open the Power User menu, and select Device Manager.device manager
  2. Expand the Sound, video and game controllers entry, right-click on the playback device, and select Update driver.update driver to fix Spatial Sound keeps switching to Windows Sonic
  3. Now, select Search automatically for drivers and wait for Windows to install the best one.search automatically for drivers

Be it corrupt or outdated drivers, updating the audio driver should get things up and running in no time when Spatial Sound keeps switching to Windows Sonic.

And in case Windows is unable to find one, you can always locate the latest version on the manufacturer’s website and manually install the driver.

For an error-free process, you can try using reliable software to update not only your audio drivers but all your device drivers as well.

This software will detect your PC’s outdated or malfunctioning drivers and then proceed to locate the newest versions as replacements.

Outbyte Driver Updater

Keep your device in check and let Outbyte Driver Updater update your drivers with the best options.
Free Trial Download now

4. Modify the Registry

  1. Press Windows + R to open Run, type regedit in the text field, and hit Enter.regedit
  2. Click Yes in the UAC prompt.
  3. Paste the following path in the address and hit Enter:Computer\HKEY_CLASSES_ROOT\Local Settings\MrtCache\C:%5CWINDOWS%5CSystemResources%5CWindows.UI.SettingsAppThreshold%5CWindows.UI.SettingsAppThreshold.pri\1d7b5d22d14df5e\ec2e2645modify to fix Spatial Sound keeps switching to Windows Sonic
  4. Double-click the entry available on the right.
  5. Type Dolby Atmos under Value data and click OK to save the changes.
  6. Finally, restart the computer for the changes to apply.

5. Reinstall the Dolby app

  1. Press Windows + I to open Settings, go to Apps from the navigation pane, and then click on Installed apps.installed apps
  2. Now, locate the Dolby app, click on the ellipsis next to it, and select Uninstall.uninstall to fix Spatial Sound keeps switching to Windows Sonic
  3. Again, click Uninstall in the confirmation prompt.uninstall
  4. Once done, restart the computer.
  5. Now, download the Dolby Access app you removed earlier from the Microsoft Store.

Often it’s an issue with the app installation that triggers problems behind Spatial Sound switching to Windows Sonic. And the best option, in this case, is to uninstall the app and then download it from a reliable source, preferably the Microsoft Store.

6. Perform an in-place upgrade

Tip icon Tip
The steps listed here are to perform an in-place upgrade on Windows 11. For Windows 10, download the Media Creation Tool from the official page, and use it for the upgrade.
  1. Go to Microsoft’s official website, choose the edition and product language, and download Windows 11 ISO.download
  2. Double-click the ISO file, and click Open in the prompt.iso to fix Spatial Sound keeps switching to Windows Sonic
  3. Now, run the setup.exe file.setup.exe
  4. Click Next to proceed.next
  5. Click Accept to agree to Microsoft’s license terms.accept license terms
  6. Make sure the setup reads Keep personal files and apps, and click on Install to start the process.in-place upgrade to fix Spatial Sound keeps switching to Windows Sonic
  7. Wait for the in-place upgrade to complete. It may take a few hours.

If the previous solutions didn’t work, it’s likely a problem with the OS installation, and performing an in-place upgrade is the most viable solution. You won’t lose any data in the process, but the PC will perform faster after the upgrade, and any errors should disappear.

By now, you should have fixed things when Spatial Sound keeps switching to Windows Sonic, and the problem shouldn’t reappear.

And before you leave, find out how to increase the sound in your laptop beyond 100%.

For any queries to share which fix worked for you, drop a comment below.

0x8007001d Windows Update Error Code: 4 Ways to Fix It

Error code 0x8007001d is a Windows Update error that can occur when updating or upgrading Windows. It typically indicates that there is a file or setting that the Windows Update service is unable to access or modify, which can prevent the update from being installed successfully.

Users have also reported encountering error 0x8007001d when attempting to activate Microsoft Office or other applications that require activation post-purchase.

The error code 0x8007001d can stem from a variety of causes. Try the following solutions to resolve the error.

What is error code 0x8007001d?

Error code 0x8007001d typically indicates a problem updating Windows. There are several possible causes of this error, including:

  • Corrupt system files: If one or more of your system files are corrupt, you may encounter this error when trying to update your operating system.
  • Outdated drivers: If your drivers are outdated or incompatible with your system, you may encounter this error when trying to update your operating system.
  • Malware infection: If your system is infected with malware, it can interfere with your updates and cause this error.
  • Insufficient disk space: If you do not have enough free disk space on your system, you may encounter this error when trying to update your operating system.
  • Faulty RAM: If you have faulty RAM, it can cause problems with your system and interfere with updates.

How do I fix Windows 11 update error 0x8007001d?

To resolve this error before attempting more complex solutions, try the following prerequisite steps:

  • Restart your computer: A simple reboot can sometimes resolve the issue.
  • Check your internet connection: Before attempting to update Windows, ensure you have a reliable and stable internet connection.
  • Disable firewall and antivirus: In some cases, disabling the Windows Firewall and the antivirus program helps.

1. Run Windows Update troubleshooter

  1. Press Windows + I to open Windows Settings app.
  2. Select System on the left pane, scroll down, and click the Troubleshoot tile on the right pane.select Troubleshoot
  3. On the Troubleshoot settings page, click on Other troubleshooters.Other troubleshooter
  4. Now, click the Run button next to Windows Update.Run troubleshooter
  5. Follow the on-screen instructions to complete the troubleshooting process.
  6. Close the troubleshooter and restart the computer.

The troubleshooter will automatically detect and fix any problems that it finds. If it is unable to fix the problem, it will provide you with suggestions on how to fix it manually.

2. Run SFC and DISM scan

  1. Press Windows + R to open the Run dialog, type cmd, hold the Ctrl + Shift key, and click OK to run Command Prompt as administrator.
  2. Click Yes on the User Account Control (UAC) prompt window.
  3. Type the following command in the command prompt window and press Enter: sfc /scannow
  4. After the SFC tool finishes scanning, proceed to run the DISM tool. Type in the following commands and press Enter after each: DISM /Online /Cleanup-Image /ScanHealth DISM /Online /Cleanup-Image /RestoreHealth DISM scan
  5. Once you have executed the SFC and DISM tools, reboot your PC and see if the 0x8007001d error is gone.

3. Reset Windows update components

  1. Press Windows + R to open the Run dialog, type cmd, and hit the Ctrl + Shift + Enter.
  2. Click Yes in the User Account Control prompt.
  3. In the Command prompt, enter the following commands and Enter after each line: net stop bits net stop wuauserv net stop appidsvc net stop cryptsvc Del "%ALLUSERSPROFILE%\Application Data\Microsoft\Network\Downloader\*.*" rmdir %systemroot%\SoftwareDistribution /S /Q rmdir %systemroot%\system32\catroot2 /S /Q sc.exe sdset bits D:(A;;CCLCSWRPWPDTLOCRRC;;;SY)(A;;CCDCLCSWRPWPDTLOCRSDRCWDWO;;;BA)(A;;CCLCSWLOCRRC;;;AU)(A;;CCLCSWRPWPDTLOCRRC;;;PU) sc.exe sdset wuauserv D:(A;;CCLCSWRPWPDTLOCRRC;;;SY)(A;;CCDCLCSWRPWPDTLOCRSDRCWDWO;;;BA)(A;;CCLCSWLOCRRC;;;AU)(A;;CCLCSWRPWPDTLOCRRC;;;PU) cd /d %windir%\system32 regsvr32.exe /s atl.dll regsvr32.exe /s urlmon.dll regsvr32.exe /s mshtml.dll regsvr32.exe /s shdocvw.dll regsvr32.exe /s browseui.dll regsvr32.exe /s jscript.dll regsvr32.exe /s vbscript.dll regsvr32.exe /s scrrun.dll regsvr32.exe /s wuaueng1.dll regsvr32.exe /s wups.dll regsvr32.exe /s wups2.dll regsvr32.exe /s wuweb.dll regsvr32.exe /s wucltux.dll regsvr32.exe /s muweb.dll regsvr32.exe /s wuwebv.dll netsh winsock reset netsh winsock reset proxy net start bits net start wuauserv net start appidsvc net start cryptsvc reset windows components
  4. Restart your computer and check if the 0x8007001d error is resolved.

4. Manually install Windows update

  1. Go to the Microsoft Update Catalog website 
  2. Type the KB number of the update you want to install in the text field and click Search.search with KB number
  3. Click on Download next to the update you want to install.download
  4. On the pop-up window, click the download link.click the download link
  5. Double-click on the downloaded file to start the installation process.
  6. Follow the on-screen instructions to complete the installation.

If you’re a Windows 11 user, discover the best security settings for a safer Windows experience.

In case of any additional questions or suggestions, leave them in the comments section.

Zoom Error Code 103033: 5 Quick Ways to Fix It

Many of our readers complained about encountering the Zoom error code 103033 while trying to join a meeting. This issue usually occurs if your email ID is not registered or skipped during registration. Here are our solutions to fix the problem after explaining the potential causes.

What causes the Zoom error code 103033?

There can be various reasons behind this Zoom error; some of them are mentioned here:

  • Zoom server issues – If the Zoom server is down or there is an internal bug, you may see this error. Check the server status to be sure.
  • Internet connectivity – The internet connection should be stable to use these communication apps. If not, you may see this error. Try troubleshooting your network connection.
  • Your email ID is not registered – If your email ID was skipped at the time of registration, you may not be able to access the meeting. Contact the meeting host.
  • Outdated app – Keeping apps like Zoom up to date is essential, as an obsolete app could cause various problems. Check for updates and ensure you have the latest version.

So, these are the causes of the error code; let us jump into the solutions.

What can I do to fix the Zoom error code 103033?

Before engaging in advanced troubleshooting steps, you should consider performing the following checks:

  • Restart the Zoom app
  • Contact your Meeting host.
  • Try checking the server status to ensure Zoom is operational.
  • Check the meeting ID and the time of the meeting.
  • Restart your router.
  • Try using a VPN and try to join the meeting. If you can attend it, that means it could be a geo-restriction error.

If these minor tweaks didn’t help, move to the detailed troubleshooting steps.

1. Run the Internet Connections troubleshooter

  1. Press Windows + I to open the Settings app.
  2. Go to System, then click Troubleshoot.System troubleshoot Zoom Error Code 103033
  3. Click Other troubleshooters.troubleshooters System troubleshoot Zoom Error Code 103033
  4. Locate Internet Connections and click Run.Internet connections troubleshooters System troubleshoot Zoom Error Code 103033
  5. Follow the onscreen instructions to complete the process.

2. Clear the Zoom app cache

  1. Launch the Zoom app.
  2. Go to the Profile picture and click Settings.Zoom settings Zoom Error Code 103033
  3. Click Zoom Apps.
  4. Under Zoom Apps Local App Data & Cookies, click the Clear button.Zoom Apps Zoom settings Zoom Error Code 103033
  5. Now restart the Zoom app and try to attempt to join the meeting.

3. Reinstall Zoom

  1. Press the Windows key, type control panel, and click Open.Control Panel Zoom Error Code 103033
  2. Select View by as Category, and click Uninstall a program.Uninstall a program Zoom Error Code 103033
  3. Click Zoom and select Uninstall.Uninstall Zoom Uninstall a program Zoom Error Code 103033
  4. Now go to the Zoom website and click Download.Download Zoom
  5. Double-click the file to begin the installation.
  6. Follow the onscreen instructions to complete the process.

Zoom install errors are more common than you may think, so a fresh install will do you some good.

4. Add Zoom to the Firewall exception list

  1. Press the Windows key, type control panel, and click Open. Control Panel start menu Zoom Error Code 103033
  2. Select View by as Category and click System & Security.System and security
  3. Click Windows Defender Firewall.Windows Defender
  4. Now click Allow an app or feature through Windows Defender Firewall.Allow an app
  5. Click Change settings.Change settings
  6. Select Allow another app.Allow another app
  7. Click the Browse option and select Zoom. Browse Zoom Error Code 103033
  8. Next, click the Add option. ADD
  9. Make sure for the Zoom Video Conference app, Private and Public options are select
    Click OK
  10. Click OK to close the window.

If this doesn’t work for you, then you can disable the firewall temporarily and try to connect again.

If nothing worked for you, you must go to the Zoom Support page, select the appropriate category, and register your query.

So, these are methods you can follow to fix the Zoom error code 103033 so that you can join the webinar or meeting without any further issues.

If you have any questions or suggestions, feel free to mention them in the comments section below.

0x800423f4 VSS error: 6 Ways to Fix It

0x800423f4 VSS error happens when a backup or restore operation using Volume Shadow Copy Service (VSS) fails. This error indicates that the storage volume is running low on space or there is an issue with the VSS service itself.

The 0x800423f4 error can occur for several reasons, such as insufficient disk space, conflicts with other backup software or antivirus programs, Shadow Copy storage being corrupt, corrupt system files, or issues with VSS writers.

What causes the 0x800423f4 VSS error?

Let’s take a closer look at some of the common causes of 0x800423f4 error:

  • Insufficient disk space: If there is not enough free space on the drive where the VSS snapshot is being created, the snapshot may fail and result in the error code.
  • VSS writer or provider failure: The VSS writer or provider may fail due to various reasons, such as incorrect configuration, permissions, or compatibility issues with other software on the system.
  • Third-party backup or antivirus software interference: Antivirus software that uses VSS can sometimes interfere with VSS operations and cause errors.
  • System file corruption: Corrupt or damaged system files can also cause VSS errors.
  • Improperly configured VSS settings: Incorrect configuration of VSS settings can also cause the error code 0x800423f4. For example, if the VSS storage area is not configured properly, the VSS snapshot creation process may fail.

How can I fix the VSS error 0x800423f4?

1. Check and enable the Volume Shadow Copy service

  1. Press the Windows + R on your keyboard to open the Run dialog box and type services.msc into the box and press Enter.services.msc
  2. In the Services window, locate the Volume Shadow Copy service and double-click on it to open its Properties window.Volume Shadow copy
  3. Set the Startup type to Automatic or Manual.Manual
  4. If the service is stopped or paused, click the Start button to restart the service. Then, click Apply and then OK to save the changes.Start

After that, close the Service window and re-attempt the backup process. If the 0x800423f4 error persists, try the next method.

2. Disable Windows Defender Firewall and the antivirus program

2.1 Disable Windows Defender Firewall

  1. Press Windows + R to open the Run dialog, type firewall.cpl, and click OK or press Enter.firewall.cpl
  1. From the left sidebar of the Windows Defender Firewall window, click on Turn Windows Defender Firewall on or off.Turn on and Off firewall
  1. Select Turn off Windows Defender Firewall (not recommended) under both Private and Public network settings and then click OK to save the changes.Turn off Windows firewall

2.2 Disable the antivirus program

  1. Click the Show Hidden Icons button on the taskbar to view hidden icons and click on the Windows Security icon.open from taskbar
  2. Navigate to Virus & threat protection on the left-side pane and click Manage settings underneath Virus & threat protection settings on the right pane.Virus & threat protection
  3. Then, turn off the toggle under Real-time protection.Real time protection Off

It’s not recommended to disable your antivirus for virus protection and security reasons. However, if you need to troubleshoot a Volume Shadow Copy Service error, you can temporarily disable the antivirus and check if the issue persists.

After turning off the antivirus program, check if the same problem happens again. Then, quickly turn the antivirus program back on to keep your computer protected.

3. Check the hard drive for errors

  1. Open Windows Explorer by pressing Windows + E on your keyboard.
  2. Right-click on the C drive and select Properties.Properties
  3. In the Properties window, click on the Tools tab.
  4. Under the Error Checking section, click on the Check button or Check Now button. Check
  5. In the Error checking dialog window, click the Scan drive option. Scan drive

4. Run the SFC and DISM tools

  1. Press Windows + R to open the Run command box, type cmd, hold the Ctrl + Shift key, and click OK to run Command Prompt as Administrator.
  2. Click Yes on the User Account Control (UAC) prompt window.
  3. In the Command Prompt window, type the following command and press Enter: sfc /scannow
  4. Wait for the SFC tool to complete the scan, then run the Deployment Image Servicing and Management (DISM) tool. To do that, type the following commands and press Enter after each: DISM /Online /Cleanup-Image /ScanHealth DISM /Online /Cleanup-Image /RestoreHealth DISM scan
  5. After running both the SFC and DISM tools, restart your computer to ensure that any changes made by the tools take effect.

Running the SFC and DISM tools can help fix issues with system files and Windows images, respectively.

5. Re-register the VSS configuration

  1. Press Windows + R to open the Run command box, type cmd, hold the Ctrl + Shift key, and click OK to run Command Prompt as Administrator.
  2. Click Yes on the User Account Control (UAC) prompt window.
  3. Type the following command one after the other and press Enter after each one: net stop vss net stop swprv regsvr32 /s ole32.dll regsvr32 /s oleaut32.dll regsvr32 /s vss_ps.dll vssvc /register regsvr32 /s /i swprv.dll regsvr32 /s /i eventcls.dll regsvr32 /s es.dll regsvr32 /s stdprov.dll regsvr32 /s vssui.dll regsvr32 /s msxml.dll regsvr32 /s msxml3.dll regsvr32 /s msxml4.dll Cd /d %systemroot%\syswow64 regsvr32 /s ole32.dll regsvr32 /s vss_ps.dll regsvr32 /s es.dll regsvr32 /s stdprov.dll regsvr32 /s msxml3.dll regsvr32 /s msxml.dll regsvr32 /s msxml4.dll Re-register VSS
  4. Restart your computer, re-attempt the backup, and see if the 0x800423f4 reappears.

6. Repair VSS Writers

  1. Open Command Prompt with Administrative privileges.
  2. Type the following command and press Enter to list all the Volume Shadow Copy Service (VSS) writers that are currently installed on the system: vssadmin list writers
  3. Then, confirm all the VSS writer’s States are showing Stable. Take note of any writers that are currently in a state of Failure. list VSS writer
  4. After that, press Windows + R, type services.msc, and hit Enter to open the Services app.services.msc
  5. Locate the service for the VSS writers that have failed and double-click on it.open failed service
  6. Then, click the Stop button to stop the services.Stop
  7. Next, open Task Manager with Ctrl + Shift + Esc shortcut keys and kill the processes associated with the VSS writers that have failed.
  8. Go back to the Services console and restart the services that you stopped earlier by clicking Start.Start
  9. Return to the elevated Command Prompt and run the below command again to verify that the VSS writers are now listed as stable: vssadmin list writers

It’s important to keep your data safe by backing it up regularly. Hence, it’s essential to address the 0x800423f4 error code as soon as possible. By following these steps, you can resolve the error and continue backing up your data without any issues.

Chrome OS is Missing or Damaged: Causes & How to Fix It

Chromebook users fear no error message more than Chrome OS is missing or damaged. This error may mean it is impossible to boot into the OS or use some key system functions.

However, several ways exist to address this issue and restore your laptop to full functionality. So, in this guide, we take you through some of the best approaches and explore potential causes.

What does it mean when my Chromebook says Chrome OS is missing or damaged?

This message on your Chromebook could indicate that the operating system has been erased or corrupted. There are several potential reasons for this problem, which may include:

  • Updates-related issues – For many users, this indicates that their software or system updates were either disrupted or not fully executed.
  • Malware or virus problems – Sometimes, the operating system may have been compromised by malware or viruses. We always recommend a robust antivirus system.
  • Power-related issues – Power outages or unexpected shutdowns while performing system updates or other important tasks can cause concern for certain users.
  • Hardware failure – One of the known triggers for system malfunctions is hardware issues, which may include a failing hard drive or other storage device.

This error cuts across manufacturers, and users may experience missing or damaged Chrome OS in HP, Acer, Samsung, and other brands.

How do I fix Chrome OS missing or damaged?

Before venturing into the solutions, to address this problem, a temporary solution is to switch off your device and then switch it back on using either the power button or a Hard reset. If this does not work, continue to elaborate fixes.

1. Factory reset the Chromebook

  1. Make sure it is powered down completely.
  2. Hold down the Esc, Refresh, and Power buttons for between 5 and 10 seconds to open the recovery screen shown below.
    chrome os is missing or damaged
  3. Hit the Crtl + D buttons, and as soon as the notification pictured below is displayed, hit Enter.
    chrome os is missing or damaged
  4. Your screen should turn off and come back on; then, you need to hit the Space Key to re-enable OS verification.
  5. Now, you should hear 2 beeps, go through a screen that says Preparing for Developer mode, and return to the previous screen that asks you to Press Space to re-enable verification.
  6. Press Space again.
  7. On the screen for Press ENTER to confirm you wish to turn the OS verification on, hit the Enter button.
  8. At this point, the system will begin to reboot, and finally, you only need to follow the onscreen settings to get correctly set up.

Verify that Chrome OS is missing or damaged is fixed.

Please note that executing this step will result in deleting all data stored on your device. Before proceeding, creating a backup of any critical files to an external drive or cloud storage platform is advisable.

Resetting your Chromebook can help you fix the Chromebook keeps restarting itself; read this guide to learn more.

2. Install a fresh copy of the OS

2.1 Create a recovery USB for Chrome OS

  1. On a separate device, navigate to the Recovery utility page and click Add to Chrome.
    chrome os is missing or damaged
  2. Select App app or Add extension.
    chrome os is missing or damaged
  3. Click on Launch app.
    chrome os is missing or damaged
  4. Plug in a USB flash drive or SD card with at least 8GB of storage.
  5. Click the Get started button.
  6. Input your Chromebook model number (you will find it on the same page that shows the Chrome missing error) and click Continue.
  7. Select your USB or SD card from the dropdown and hit the Continue button.
    chrome os is missing or damaged
  8. Hit the Create Now button to begin the media creation.
  9. This process may take several minutes, but finally, click the Done button at the end, and you should have successfully created the Recovery USB.

2.2 Install using the Recovery USB

  1. Make sure the computer is plugged in.
  2. Start the Chromebook to get the screen that says Chrome OS is missing or damaged.
  3. Insert the recovery USB into the Chromebook, and the device should recognize it and automatically start the recovery process.
  4. Take out the recovery media once prompted, the system will restart, and you can configure the newly installed Chrome OS.

Of course, this installation process should be only used as a last resort since you will lose all the data previously on your device. However, it is very effective in fixing the error. Remember, after connecting the bootable USB, you may get The security module on this device is not working error.

That is as much as we will be discussing in this article. We have listed the solutions on a scale of difficulty, starting from the most straightforward fixes. So, we encourage you to walk your way down the steps.

We also have a guide that can help you if your Chromebook keyboard is not working, so don’t hesitate to check it out.

Lastly, if you have any questions, we love to hear them in the comments section. Also, remember to tell us what worked for you.

521 Error Cloudflare: How to Troubleshoot & Repair

Cloudflare is a popular name amongst those who understand the backend of the Internet and the aspects concerning security and privacy. Its primary role is to make things faster, more secure, and more reliable. But, the Cloudflare 521 error acts as an impediment when accessing a website.

The message reads, Web server is down, Error code 521, and is usually encountered on websites developed using WordPress. The problem has been present for a long time and gives developers and users a hard time. So, let’s find out all about it!

What is Cloudflare error reference number 521?

The error appears when the server doesn’t respond to requests from Cloudflare. And while the message lists server issues as the reason behind the errors, that’s not always the case.

Here are a few reasons users encounter the 521 error in Cloudflare:

  • The server is down: Though rare when using a reliable hosting platform, there’s still a chance that server downtime is the underlying cause here.
  • Misconfigured server settings: Often, misconfigured server settings are why users can’t access the website. Recent changes could also trigger the error.
  • Problems with the certificate: Cloudflare has its SSL (Secure Sockets Layer) certificates for enhanced security and encryption, and issues with it, too, can lead to a 521 error on Cloudflare.
  • Requests blocked by the server: In a few cases, the configured firewall blocks requests from Cloudflare, if identified as suspicious. This usually happens when there are multiple requests from the same IP address.

How do I fix 521 error Cloudflare?

Tip icon Tip
For users getting the Cloudflare Error code 521, we recommend waiting for a while or checking with the website’s support team for a resolution. Since the problem usually lies with the backend, there isn’t much you can do other than apprise the team.

Before we move to the slightly complex solutions, here are a few quick things to try:

  • Disable proxy.
  • Purge the cache.
  • When a user complains of the 521 error Cloudflare, verify whether it’s a problem at their end triggering the error.

If none work, head to the fixes listed next.

1. Check the site status

For those wondering how to fix Cloudflare errors, your primary approach should be ensuring the site’s running fine. The easiest option is to run a ping test via the command line.

Use the following command for it while replacing website with the actual address:ping website

For instance, when checking for issues with the WindowsReport, the command becomes as follows:ping windowsreport.com

Check the test results and look for any anomalies here. Besides, you could use Downdetector, a reliable service that allows users to report issues with the website, thus providing statistics in real time.

2. Whitelist for Cloudflare

When the website’s status is fine, the next possible reason for the 521 error Cloudflare with DigitalOcean is blocking connection attempts at the backend. In this case, you must ensure that Cloudflare IPs are not blocked in the firewall, .htaccess, and iptables.

You can use the following command to allow connections from a given IP in iptables while replacing IP Address with the one for Cloudflare:sudo iptables -A INPUT -s IP Address --dport 443 -j ACCEPT

Check the full list of Cloudflare IPs, whitelist all these, and make sure port 443 is accessible. The process might be slightly different for each, depending on the configured firewall, but it shouldn’t be too tricky.

List of Cloudflare IPs

Also, while verifying this aspect, make sure to check with the hosting service whether they are blocking connection attempts from Cloudflare, and get this rectified,

3. Check for issues with the SSL certificate

For many users getting the 521 error Cloudflare with WordPress, the problem lies with the website’s security certificates. Users can generate the certificate from Cloudflare’s dashboard and upload it to the web server to eliminate such issues and ensure seamless connectivity.

In case the website already has an SSL certificate, check for issues with it and make sure the other settings are configured right.

4. Reconfigure the encryption settings

Often, an incorrect encryption mode can trigger a 521 error Cloudflare with Nginx. Cloudflare offers several modes designed per the website’s and developer’s requirements. These are:

  • Flexible: Connections are established via HTTPS. Though less secure, it’s preferred by developers for websites that don’t have an SSL certificate.
  • Full: Allows connection via HTTP and HTTPS based on the request from the visitor but doesn’t check the certificates.
  • Full (strict): Similar to Full, but the SSL certificates are verified before a connection can be established.
Encryption modes

Now that you understand the three switch to different modes and verify which works best for your website, though it’s usually Flexible. Again, it depends on several factors, and for some users, setting SSL mode to Full (strict) did the trick.

5. Contact support

If none of the solutions listed here helped fix Cloudflare Error code 521, the last option is to contact Cloudflare support. They can better assist you if the underlying cause is tricky to identify.

Once things are up and running, get a reliable network and traffic inspection tool for detailed insights. In case you’re dealing with additional issues, don’t miss our Cloudflare error 1001 guide.

Before you go, don’t miss our latest guide that tackles the Argo tunnel error on Cloudflare.

For any queries or to share the solution that worked for you, drop a comment below.

The Requested Address Is Not Valid in its Context [Fix]

You must have encountered the error message the requested address is not valid in its context, indicating that your device has issues resolving a specific address.

After conducting thorough research on the matter, we have compiled a guide that outlines the potential causes of the error and offers practical solutions to resolve it.

What causes the requested address is not valid in its context?

From our interactions with users, we conclude that the following are the primary triggers:

  • Network connectivity issues – This error may occur due to network connectivity problems, such as a slow or unstable internet connection or issues with the DNS server.
  • Proxy issues – A few users get this error because they have configured the device to access the internet using a proxy.
  • Firewall restrictions – The connection can be blocked, and this error can occur if a firewall or antivirus software is installed on the server or client.

The below solutions will help resolve the error.

How to fix the requested address is not valid in its context?

We recommend you try these workarounds before venturing to more detailed fixes:

  • Disable your antivirus/firewall – You may temporarily disable a very restrictive firewall since this is an easy trigger for the error.
  • Change your internet connection – A slow connection may trigger the problem, so you may consider switching your ISP or trying a wired connection.
  • Restart your computer – This is a general solution but may help resolve minor bugs that trigger the error.

If none of the above work, please proceed to more elaborate solutions below.

1. Reconfigure DNS

  1. Press Windows + R to open the run dialog.
  2. Type cmd and hit Ctrl + Shift + Enter.
    the requested address is not valid in its context
  3. Type the scripts below and hit Enter after each one.
    ipconfig /flushdns
    ipconfig /renew
    the requested address is not valid in its context
  4. Lastly, restart the computer and see if the requested address is not valid in its context persists.

2. Disconnect the proxy connection

  1. Press the Windows key, type internet options, and click on the application.
    the requested address is not valid in its context
  2. Select the Connections tab, then click on the LAN settings button.
    the requested address is not valid in its context
  3. If you do not use a proxy, uncheck the option for Automatically detect settings, then click the OK button.
  4. Ensure to verify the address of the proxy server with your proxy service. if you are using one.
  5. Verify the error is fixed.

3. Change to IPV4

  1. Press the Windows key, type connection, and select the View network connections option.
  2. Right-click on your network and select Properties.
  3. Uncheck Internet Protocol Version 6 and tick Internet Protocol Version 4.
  4. Verify the requested address is not valid in its context is resolved.

4. Reset the TCP/IP stack

  1. Press Windows + R to open the run dialog.
  2. Type cmd and hit Ctrl + Shift + Enter.
    the requested address is not valid in its context
  3. Type the script below and hit Enter.
    netsh int ip reset
  4. After it executes, restart the computer and verify that the error is resolved.

That is as much as we will cover in this article. Any of the above solutions may be an excellent fix for the connection problem. We recommend you start with the initial workarounds, then any solution that seems most applicable to you.

Lastly, do not forget to write in the comments section and tell us what solutions were most effective for you.

Fix: Disk Management Connecting to Virtual Disk Service

When accessing the Disk Management utility, a few of our readers have gotten a screen stuck with the message Disk Management connecting to Virtual Disk service.

For these users, it is impossible to access the utility, so we have come up with the most straightforward solutions you may explore in this guide.

Why am I stuck on Disk Management connecting to Virtual Disk service?

You could have trouble connecting to the Virtual Disk service in Disk Management for several reasons. Here are some potential causes:

  • Firewall restrictions – Sometimes, you will have this problem using a restrictive firewall that blocks connections.
  • Trouble starting the service – If Disk Management could not start the Virtual Disk Service, you won’t be able to connect to it at all.
  • Disabled services – If the VDS (Virtual Disk Service) is not running, you may not have access to the management utility.
  • Outdated drivers – The disk drivers are the main problem here, and if these drivers are outdated, you may expect varying problems using the Windows utility.

Note that the error message may vary as some users have gotten an Unable to connect to Virtual Disk Service error. This is the same problem, and the solutions below will work.

How to fix Disk Management connecting to Virtual Disk service?

Before getting into some practical solutions, you may try these workarounds:

  • Use an alternative disk management tool – A few third-party management utilities will get the job done and may not pose the same error, so they may be worth trying.
  • Eject peripherals – You may want to start by detaching all your external storage since some faulty peripherals may trigger the problem.

However, if the two workarounds do not work, you should proceed to more detailed solutions below.

1. Change the firewall settings

  1. Press the Windows key, type firewall, and select the Allow an app through Windows Firewall option.
    disk management connecting to virtual disk service
  2. Click the Change settings button.
    disk management connecting to virtual disk service
  3. Tick both checkboxes in front of Remote Volume Management.
    disk management connecting to virtual disk service
  4. Finally, click the OK button to save your changes.

2. Update disk drivers

  1. Right-click on the Start menu and select Device Manager.
    disk management connecting to virtual disk service
  2. Expand the Disk drives category, right-click on your disk driver, and select Update driver.
    disk management connecting to virtual disk service
  3. Click Search automatically for drivers.
  4. Finally, follow the process to complete the update.

If you applied this method and it doesn’t seem to solve the issue, worry not because you can still fix it with a standalone app.

Accordingly, this driver manager will scan your PC for outdated or missing drivers, giving you the full report with the ones that need to be updated. From there, all you have to do is to press the button.

⇒ Get Outbyte Driver Updater

3. Enable the Virtual Disk service

  1. Press Windows + R, type services.msc, and hit Enter.
  2. Double-click on the Virtual Disk service and click the Start button if the service is not running.
  3. Click on the Recovery tab, set Second failure and Subsequent failures to Take no action, then click Apply and OK.
  4. Lastly, reopen the Disk Management utility and verify the error is resolved.

4. Run important file and disk repairs

  1. Press Windows + R, type cmd, and hit Ctrl + Shift + Enter.
  2. Type the script below and hit Enter to locate and repair corrupted system files.
    sfc /scannow
  3. Now type the two scripts below, hitting Enter after each one.
    exe /Online /Cleanup-image /Scanhealth
    exe /Online /Cleanup-image /Restorehealth
  4. Finally, when the scripts are completely executed, verify if the problem is resolved.

Any of the above processes should fix the problem. However, we have not made these solutions in any particular order, and we encourage readers to start with what seems the most applicable.

We like to hear about your success, so please reach out to us in the comments section below and tell us which solutions worked best.

How to Stop Websites from Opening Automatically in Chrome

Chrome has long been the primary choice of users amongst all the reliable browsers. What makes it even better is the ability to sync between devices seamlessly. But many reported that websites are opening automatically in Chrome.

We did some digging and found that Chrome automatically opens sites on all devices, be it mobiles, tablets, or computers, and the problem usually has to do with an issue at the user’s end. Let’s find out all about it!

Why are websites opening on their own?

Here are a few reasons unwanted websites are opening automatically in Chrome on Windows:

  • PC infected with malware: In most cases, malware turned out to be responsible for the problem after a full system scan was run using either the built-in Windows Security or an effective antivirus solution.
  • Problematic browser extensions: We often install extensions to enhance the browser experience, but some of these affect its core functioning, and Chrome randomly opens websites.
  • Corrupt browser cache: When the browser cache is corrupt, there’s a likelihood of encountering problems while running Chrome.
  • Misconfigured Chrome settings: Various built-in settings might just as well be the underlying cause when sites open automatically in the browser, so you will have to check those as well.

How do I stop websites from opening automatically in Chrome?

1. Remove the problematic extension

  1. Launch Chrome, click the Extensions icon in the toolbar, and then select Manage extensions.manage extensions
  2. Now, disable the extensions listed here one at a time, and restart the computer after each.disable to fix websites opening automatically in Chrome
  3. As soon as the problem stops, the extension disabled last was problematic.
  4. Again, open the list of extensions, and click on Remove under it.remove to fix websites opening automatically in Chrome
  5. Click Remove to confirm.confirm

For those wondering how to stop websites from opening automatically in Chrome, a quick solution is to identify and remove the extension causing it. If you have added any recently, start with those first, especially any related to shopping or coupons.

2. Run a malware scan

  1. Press Windows + S to open Search, type Windows Security in the text field, and click on the relevant search result.windows security
  2. Click on Virus & threat protection.virus & threat protection
  3. Choose Scan options.scan options
  4. Now, select Full scan and click on the Scan now button.full scan to fix websites opening automatically in Chrome
  5. Wait for the scan to complete. Then restart the computer and check if the problem is fixed.

Regardless of the Windows virus protection, you have more effective anti-malware solutions to consider.

For instance, we advise you to use enhanced security software that ensures you unbreakable virus defense and new emerging detection tools.

TotalAV

Avoid risky malware threats or unwanted programs with this multilayered antivirus.
Free Trial Visit Website

3. Clear the browsing data

  1. Launch Chrome, and press Ctrl + Shift + Delete to open Clear browsing data.
  2. Now, select All time from the Time range dropdown menu, tick the checkboxes for Browsing history, Cookies and other site data, and Cached images and files, and then click on Clear data.clear data to fix websites opening automatically in Chrome
  3. Once done, relaunch the browser for the changes to come into effect.

When you find websites opening automatically in Chrome, it could be the corrupt browsing data to blame. And clearing it, in most cases, should do the trick.

4. Reconfigure Chrome settings

  1. Open Chrome, click on the ellipsis near the top right, and select Settings from the flyout menu.settings
  2. Choose Privacy and security from the navigation pane, and click on Site settings.Site settings
  3. Now, click on Notifications under Permissions.notifications to fix websites opening automatically in Chrome
  4. Finally, select Don’t allow sites to send notifications.disable to fix websites opening automatically in Chrome
  5. Once done, relaunch the browser for the changes to come into effect.

5. Reset the browser

  1. Launch Chrome, paste the following path in the address bar, and hit Enter:chrome://settings/resetpath
  2. Now, click on Restore settings to their original defaults.reset settings to fix websites opening automatically in Chrome
  3. Click on Reset settings to confirm.restore settings

If the solutions listed previously didn’t help and websites are still opening automatically in Chrome, resetting the browser settings should work. This will also do the trick when unwanted websites are opening automatically in Chrome mobile.

6. Reinstall Chrome

  1. Press Windows + R to open Run, type appwiz.cpl in the text field, and hit Enter.appwiz.cpl
  2. Select Google Chrome from the list of installed programs, and click Uninstall.uninstall to fix websites opening automatically in Chrome
  3. Follow the on-screen instructions to complete the uninstall process, and then restart the computer.
  4. Now, head to the official website and click on Download Chrome to get the setup.download chrome
  5. Run the setup and get done with the installation.

Another solution that worked for users was to reinstall the browser when websites are opening automatically in Chrome. This will fix any misconfigured settings as well as get rid of conflicting extensions in Chrome. Make sure to create a new user profile after the reinstall.

7. Perform a system restore

  1. Press Windows + S to open Search, type Create a restore point, and click on the relevant search result.create a restore point
  2. Click on the System Restore button.system restore to fix websites opening automatically in Chrome
  3. Select Choose a different point and click Next to proceed.choose a different restore point
  4. Pick a restore point from the list and click Next.restore to fix websites opening automatically in Chrome
  5. Verify the restore details and click Finish to start the process.restore
  6. Wait for it to complete.

In many cases, users can’t figure out the changes that triggered things and led to websites opening automatically in Chrome. So, an ideal solution would be to perform a system restore. Just make sure to pick a point created before the problem first appeared.

After fixing the problem, do not forget to check some quick tips to significantly speed up Chrome.

For any queries or to share more solutions with us, drop a comment below.

0x80070569 Error Code: What Is It & How to Fix It

Many of our readers have reported Error 0x80070569 that occurs when they try to start the virtual machine in Hyper-V Manager. The error can occur for many reasons, and it can be difficult to deal with. However, this guide is dedicated to providing solutions to resolve the error.

Also, you may be interested in our article about Hyper-V Error 0x8009030e and some steps to fix it on your PC.

What is the 0x80070569 error?

The error code 0x80070569 can appear with two varying error messages;

  • (‘VM_NAME’ failed to start worker process: Logon Failure: The user has not been granted the requested logon type at this computer.)
  • Failed to create Planned Virtual Machine at migration destination: Logon failure: the user has not been granted the requested logon type at this computer.

The error occurs when the virtual machines can’t start or when you can’t do a live migration for a Hyper-V virtual machine in Windows Server.

What causes the error code 0x80070569?

Some factors that can cause the error are:

  • Permission errors in the GPO policy – The error can appear when there is a configuration issue relating to the permissions of the GPO policy. Also, it can be that the NT Virtual Machine\Virtual Machines special identity doesn’t have the Log on as a service right on the Hyper-V host computer.
  • Connection issues between Hyper-V computer and the domain – You can also encounter the error code 0x80070569 if the Hyper-V computer is lost or can’t establish a connection to the domain. Issues such as a credentials mismatch can cause logon errors.

Fortunately, you can follow some basic steps to resolve the issue. As we go further into this article, we’ll discuss them.

How can I fix the error code 0x80070569?

Before trying the advanced steps, follow the preliminary checks below:

If the error persists, run the following steps:

1. Run gpupdate /force on the Hyper-V host

  1. Sign in to the machine as a Domain Administrator.
  2. Go to the Server Manager console and install the Group Policy Management feature.
  3. Follow the on-screen instructions to complete the installation.
  4. Open the GPMC MMC snap-in and navigate to the policy that manages User Rights.
  5. Right-click on the policy and select Edit from the drop-down menu, then include the following in the entries for Log on as a service: NT Virtual Machine\Virtual Machines 
  6. Exit the Policy editor.
  7. Left-click the Start button, type Command Prompt, and select the Run as administrator option.
  8. Click Yes on the User Account Control prompt.
  9. Copy and paste the following in the command bar and press Enter to run it: gpupdate /force

Running the above command will refresh the policy and remove the user permissions that the policy has added. Hence, the user rights defined in the local security policy will take effect and resolve the permissions issue.

2. Edit the Group Policy Editor

  1. Press the Windows + R keys, type gpedit.msc, and click OK to open the Group Policy Editor.
  2. Navigate through this path: Computer Configuration\Windows Settings\Security Settings\Local Policies\User Rights Assignment
  3. Double-click on Log on as a batch job.
  4. Click on Add User or Group button.
  5. Enter Administrator into the empty space, click Check Names, and click OK.
  6. Now, select Apply and click OK.

Alternatively, you can check our comprehensive guide on how to install Hyper-V on Windows 11.

Also, read about what to do if Virtualization support is disabled in the Firmware on your PC.

What solution worked for you? Let us know in the comments below.

Windows 11 Screen Timeout Not Working: 5 Ways to Fix It

Screen timeout setting is one many users, and even administrators work with for various reasons. It helps conserve battery life though some prefer the display to be on even after minutes of inactivity. And this poses a problem when Windows 11 screen timeout is not working.

While it’s easy to change screen timeout in Windows 11, there isn’t much users can do without additional support when the feature is not working. And that’s what we are for! So, let’s learn about the problem and the solutions that work.

Why my screen timeout is not working?

Here are a few reasons screen timeout is not working in Windows:

  • Corrupt or outdated graphics driver: In most cases, it was an issue with the graphics driver that triggered the error. Usually, running a corrupt or outdated driver is the reason.
  • Misconfigured settings: Several settings affect how the timeout feature works, and if these are misconfigured, you are likely to face issues.
  • Issues with the recent Windows update: For some users, the problem started after updating to a new version of the OS, which points to a bug in it.

What can I do if Windows 11 screen timeout is not working?

Before we proceed, try these quick solutions first:

  • Install any pending OS updates if Windows 11 lock screen timeout is not working.
  • Check for any available newer versions and update the BIOS.
  • Disconnect all non-critical external peripherals from the computer since these could be preventing the display from turning off.

If none work, move to the fixes listed next.

1. Change the screensaver settings

  1. Press Windows + S to open Search, type Change screen saver in the text field, and click on the relevant search result.change screen saver
  2. Select the desired screensaver from the dropdown menu, enter a wait time, and tick the checkbox for On resume, display logon screen.change settings to fix windows 11 screen timeout not working
  3. Once done, click on OK to save the changes.

A quick solution that works for many when Windows 11 screen timeout is not working is to reconfigure the Screen Saver Settings. This will allow you to configure the screen timeout settings in Windows 11.

2. Update the graphics driver

  1. Press Windows + R to open Run, type devmgmt.msc, and hit Enter.device manager
  2. Expand the Display adapters entry, right-click on the listed graphics card, and select Update driver.update driver to fix windows 11 screen timeout not working
  3. Now, choose Search automatically for drivers, and Windows will install the best available one from the PC.search automatically

When facing issues with screen timeout settings, updating the graphics driver could get things up and running in no time. Updating drivers will also work when Windows 10 screen timeout is not working.

Remember, the offline update method doesn’t work in every case, so you may as well check the manufacturer’s website and manually install the latest driver.

3. Roll back graphics driver

  1. Press Windows + X to open the Power User menu, and select Device Manager from the list.device manager
  2. Double-click on the Display adapters entry, right-click on the graphics adapter, and choose Properties.properties
  3. Navigate to the Driver tab, and click on Roll Back Driver.roll back driver to fix windows 11 screen timeout not working
  4. Select a reason for rolling back the version, and click on Yes to proceed.reason to fix windows 11 screen timeout not working
  5. Once done, restart the computer for the changes to come into effect.

If Windows 11 screen timeout is not working since a driver update, rolling back the driver could do the trick. It’s simple, and you can always reinstall the version if things don’t work out.

4. Perform a clean boot

  1. Press Windows + R to open Run, type msconfig in the text field, and click hit Enter.msconfig
  2. Go to the Services tab, tick the checkbox for Hide all Microsoft services, and then click on Disable all.disable services to fix windows 11 screen timeout not working
  3. Now, navigate to the Startup tab, and click on Open Task Manager.open task manager
  4. Select any apps that read Enabled under the Status column, and click Disable.disable to fix windows 11 screen timeout not working
  5. Once done, head back to System Configuration, and click on Apply and OK.apply
  6. Click on Restart in the prompt that appears.restart
  7. After the PC restarts, check if the problem is fixed. If yes, one of the processes or services you disabled earlier is the underlying cause.
  8. Now, enable the services and startup apps one at a time unless the problematic one is identified, and then make sure to disable it.

A clean boot provides an optimal troubleshooting environment to identify the reason Windows 11 screen timeout is not working. And in most cases, things should work out once you are done. In case it’s an app, make sure you uninstall the app to prevent the error from reappearing.

5. Uninstall recent updates

  1. Press Windows + I to open Settings, select Windows Update from the navigation pane, and click on Update history.update history
  2. Scroll to the bottom and click on Uninstall updates.uninstall updates to fix windows 11 screen timeout not working
  3. Click Uninstall next to the recently installed update, after which the error first appeared.uninstall to fix windows 11 screen timeout not working
  4. Again, click Uninstall in the confirmation prompt.uninstall
  5. Restart the computer once done.

If the Windows 11 screen timeout stopped working after installing a newer version, uninstalling the update should work. And by now, the problem should be fixed for good.

Before you leave, check some quick tips to make Windows 11 run faster than before.

For any queries or to share the solution that worked for you, drop a comment below.

0x000000C5: How to Fix This BSoD Error in 8 Ways

The 0x000000C5 BSoD error, or DRIVER_CORRUPTED_EXPOOL error, is a type of Blue Screen of Death (BSOD) that can occur when a driver tries to access a memory location that it is not authorized to access or when there is corruption in the system pool memory.

Many users have reported encountering this BSoD error when running a resource-intensive program, such as a video editor or a game. It can also occur during startup, shutdown, and while using specific applications.

Why am I getting a 0x000000C5 BSoD error?

This error occurs when a driver attempts to access an invalid memory location, which can happen for a variety of reasons, such as:

  • Outdated or incompatible drivers: If your computer’s drivers are outdated or incompatible with your operating system, they can cause this error.
  • Corrupted system files: If important system files are corrupted or missing, it can cause errors like this.
  • Malware or virus infections: Malware or virus infections can damage system files or drivers, leading to the BSoD error.
  • Hardware issues: Problems with your computer’s hardware, such as faulty RAM or a failing hard drive, can also cause the 0x000000C5 error.

How do I fix the 0x000000C5 BSoD error?

Here are some simple steps you can take to troubleshoot and resolve this error before diving into more complex solutions:

  • Restart your computer: Sometimes, a simple restart can fix the issue.
  • Uninstall the third-party antivirus or recently installed programs: You can try turning off the real-time protection of the antivirus program (such as SUPERAntiSpyware, Avira Antivirus, and Security Essentials), or uninstalling it completely if that doesn’t work.

If none of the above steps worked, you can try the solutions below one by one.

1. Repair the hard drive

  1. Press Windows + R to open the Run dialog box, type cmd, hold the Ctrl + Shift key, and click OK to launch Command Prompt as Administrator.cmd
  2. Click Yes on the User Account Control (UAC) prompt window.
  3. In the Command Prompt window, type the following command and press Enter: chkdsk /f/r chkdsk
  4. In case you are prompted to schedule the scan on the next restart, type Y and press Enter.
  5. After that, restart your device to run the hard disk checkup.

2. Update the device drivers

  1. Press the Windows key, type device manager, and click on Device Manager from the search result.Devmgr
  2. To update a driver, search for any outdated or faulty driver in the Device Manager window with a yellow exclamation mark beside it. Then, right-click on the driver and choose the Update driver option. Update
  3. On the next window, select Search automatically for drivers.search update
  4. In case a newer driver is available, the system will notify you. Simply follow the on-screen instructions to install it.
  5. Then, restart your device and check if the problem is resolved.
  6. If the Device Manager fails to update the driver, you may need to visit the manufacturer’s website and manually download the most recent driver.
  7. Then, install the driver and restart the computer.

If you need a way to update all the drivers on your computer quickly, you can use a handy driver updater. It scans your computer to find old drivers and replace them with the newest versions.

⇒ Get Fortect Driver Updater

3. Roll back the recently updated driver

  1. Open Device Manager and locate the recently updated or problematic driver.
  2. Right-click on the driver and select Properties.Properties
  3. In the driver Properties window, switch to the Driver tab, and click the Roll Back Driver button.Roll back driver
  4. Select an appropriate reason and click Yes to roll back the driver.Choose a reason
  5. After that, restart your computer and check if the error has been resolved.
Note icon NOTE
If you encountered the 0x000000C5 BSoD error after updating drivers, you can try rolling back the driver to the previous version. Rolling back a driver can help restore the device’s stability and functionality.

4. Check the CPU temperature

  1. Go to the CoreTemp website on your browser and download the latest version of the Core Temp tool.
  2. After downloading the tool, run the installer, click Yes at the User Account Control dialog and follow the on-screen to complete the installation.Install coretemp
  3. While installing, uncheck the Build your Kingdom With Goodgame Empire option and click Next on the Select Additional Tasks screen to prevent bloatware installation.Uncheck bloat
  4. Once the tool is installed, launch the Core Temp tool.
  5. Now, take a look at the Temperature Readings for the CPU temperature. CPU Temp
  6. Next, close all unnecessary programs, background processes, and non-critical services that might consume CPU resources.
  7. If the computer crashes while running a particular application or game, try rerunning them and check the temperature readings.
  8. If your CPU frequencies are overclocked or the temperature is too high, try to bring them back to the standard temperature and see if the 0x000000C5 error persists.
Note icon NOTE
Overheating has been reported as one of the most common causes that could lead to the stop code 0x000000C5. If you’ve overclocked your CPU and pushed it too far, it may result in overheating, which can cause this error.

Laptops, notebooks, and ultrabooks have higher temperature readings than desktop computers. Therefore, it’s crucial to research the standard temperature for your CPU model online to know what temperature range to expect.

A typical temperature range for idle PCs is between 30 and 40 Celsius. If you’re performing a resource-demanding activity like gaming, the ideal temperature range should be between 65 and 80 degrees Celsius to prevent overheating issues.

You could also apply or reapply thermal paste (if it has dried up), clean your CPU cooler, or even install extra cooling options to prevent your system from overheating.

5. Perform a Clean Boot

  1. Open the Run command box by pressing Windows + R, type msconfig and press Enter.msconfig
  2. Go to the Services tab, check the Hide all Microsoft services box, and click Disable all.hide microsoft service
  3. Then, click Apply to save the changes.Apply
  4. Next, switch to the Startup tab and click on Open Task Manager.Open Task Manager
  5. Now, check the Start-up impact section and disable the apps of high impact. Select the app and click the Disable button. disable startup
  6. After that, restart your computer. When the computer restarts, it will only run the necessary services.
  7. If the 0X000000C5 error no longer appears during clean booting, it means that the third-party program or service is the cause of the problem.
  8. If this is the case, open the System Configuration console again, re-enable a few of the disabled services at a time, and then reboot the computer to see if the BSoD appears. Repeat the process until every previously disabled service is enabled.re-enable services
  9. After identifying the exact culprit, you can permanently disable the service or remove the associated app from your system.

6. Disable Overclocking 

  1. To check if your CPU is overclocked, download and install CPU-Z Software.
  2. Then, launch the CPU-Z application and check Core Speed and Multiplier under the CPU tab. Alternatively, you can access the BIOS/UEFI settings and look for Core Ratio, Voltage, and FSB Frequency values.Core Speed
  3. If the Core Speed and Multiplier values exceed their original ones, your CPU is overclocked.
  4. If your computer is overclocked, enter the BIOS / UEFI settings by pressing the appropriate key (usually F2 or Delete).
  5. Once in the BIOS / UEFI settings, locate the Overclocking option, OC, or options related to frequency and voltage settings for your CPU, GPU, and RAM. 
  6. Then, disable overclocking or reset the frequency and voltage settings to their default values.
  7. Restart your PC and check if the 0x000000C5 error stops happening.

Depending on your specific machine and motherboard, overclocking settings may be located in different sections of the BIOS / UEFI settings.

7. Manually install KB4012598 Windows update

  1. Go to the Microsoft Update catalog and find the update patch compatible with your operating system.
  2. Click the Download button next to the update you want to download.manually update
  3. On the pop-up window, click the hyperlink to download the update.download msu
  4. After the .msu file is downloaded, double-click on the file and follow the on-screen instructions to install the KB4012598 patch.
  5. Once the patch is installed, restart your device and check if the 0x000000C5 BSoD error has disappeared.
Note icon NOTE
If you are experiencing the 0X000000C5 BSoD error on Windows 8 or lower version or  Windows Server, it may be caused by a software malfunction. Microsoft has already released a patch update (KB4012598) to address this problem.

If the previous solutions don’t work, you can return to a previous point when your computer works fine using System Restore or completely start fresh by reinstalling Windows with the Windows reset feature.

If you happen to fix this BSoD error another way, please let us know in the comment section below. And don’t forget to take a closer look at our article on how to solve error code 0xc0000420, since more tips are included there.

Usb80236.sys BSoD Error: 5 Ways to Fix It

The usb80236.sys Blue Screen of Death (BSOD) error typically arises due to various reasons, such as damaged system files and outdated or corrupted USB drivers, among others.

The error typically occurs when the operating system has reached a critical condition and cannot recover from the problem, resulting in a system crash and the blue screen of death (BSOD) with the usb80236.sys error message.

If you are experiencing the usb80236.sys Blue Screen of Error, this guide offers some effective solutions to help you eliminate the issue.

What is the usb80236.sys error?

The usb80236.sys error is a type of Blue Screen of Death (BSOD) error related to the USB device driver in Windows. This error can occur due to various reasons, such as:

  • Outdated or corrupted device driver: The USB network adapter driver may become outdated or corrupted, causing the system to crash and display the error.
  • Hardware malfunction: The hardware component of the USB network adapter, such as the USB port or the adapter itself, could be damaged or malfunctioning, leading to the error.
  • Conflicting programs: Sometimes, other programs or drivers may conflict with the USB network adapter driver, causing the error.
  • Malware or virus infection: Malware or virus infections can corrupt system files, including the USB network adapter driver, leading to the error.

How do I fix the usb80236.sys BSoD error?

1. Reinstall the USB driver

  1. Press Windows + R to open the Run box, type devmgmt.msc and hit Enter.devmgmt
  2. Scroll down to the bottom of the list and click on Universal Serial Bus Controller to expand.expand USB controllers
  3. Right-click on the USB Root Hub (USB 3.0) device and select the Uninstall device option. uninstall device
  4. Then, Uninstall to confirm.Uninstall
  5. If you have more than one USB Root Hub device driver, uninstall all of them.
  6. After that, reboot your computer.

After the restart, the driver will be automatically re-installed, but the usb80236.sys Blue Screen error should no longer occur.

2. Run System File Checker

  1. Click on the Start button, then type Command Prompt and select Run as administrator from the options. cmd as admin
  2. When the User Account Control prompt appears, click Yes.
  3. Next, type the below command and press Enter: sfc /scannowsfc scan
  4. This will initiate a scan that can repair any corrupt or missing system files that may be causing errors.

3. Run the DISM scan

  1. Press Windows + R to open the Run dialog, type cmd, hold the Ctrl + Shift key, and click OK to run Command Prompt as Administrator.cmd admin
  1. Then, type the following command lines, and press Enter after each: DISM /Online /Cleanup-Image /CheckHealth DISM /Online /Cleanup-Image /ScanHealth DISM /Online /Cleanup-Image /RestoreHealth DISM
  2. The DISM scan may take some time to complete, and you should not interrupt the process.
  3. After completing the restoration process, restart your device and check if the usb80236.sys BSoD error still occurs.

4. Install Pending Updates

  1. Press Windows + I to open Windows Settings app.
  2. Go to the Windows Update tab and click on the Check for Updates button.check for updates
  3. Let the computer check for updates and install them.
  4. Once the updates are installed, restart your computer.

5. Perform System Restore

  1. Press Windows + R to open Run, type rstrui.exe, and press Enter.istrui
  2. In the System Restore control panel, select Choose a different restore point option if prompted and, click Next to continue.choose a different restore point
  3. Select a restore point from the list of available dates and click Next.choose a restore point
  4. Finally, click Finish to start the restoration process.click finish
  5. Wait for the restoration process to complete, and then restart the computer to see if the usb80236.sys error has been resolved.

If the previously mentioned solutions did not work in resolving the usb80236.sys Blue Screen of Death (BSoD) error on your computer, you may want to consider resetting your PC. You can also run hardware diagnostics to identify and solve hardware-related problems.

By following the solutions provided in this guide, you should be able to eliminate the usb80236.sys BSOD error and ensure your Windows operating system is functioning correctly.

If you have any additional questions or suggestions, please leave them in the comments section.

Spotify Installation Error Code 53: How to Quickly Fix It

Are you trying to switch to Spotify? You may have encountered the Spotify installation error code 53. Since a few of our readers have complained, this article will address the error and provide the best solutions.

People have encountered the error when installing from the official site, and the full error message reads: The installer encountered an unknown error. (Error code: 53).

What is error code 53 on Spotify install?

If you encounter error code 53 while installing Spotify, it may signify a conflict with an earlier installation or a file permission problem on your computer. Any of the below may trigger the error:

  • Conflicting installations – One of the leading causes of issues with Spotify is when another software that uses the same files is installed, causing conflicts.
  • Privilege issues – Some users may try an installation without the proper admin access, thus triggering the error.
  • Storage issues – For all installations, there must be adequate space. If the storage is less than required, users may get the error.

It would be best to try the fixes below to resolve the error.

How do I fix Spotify installation error code 53?

Before proceeding to the leading solutions, you should try the following:

  • Uninstall the app – Perform an Uninstallation of any existing or duplicate application instances on your computer.
  • Restart the computer – While a restart is general, it is often strong enough to clear out minor glitches that may cause the error.

You may now proceed to more detailed solutions below if the problem persists.

1. Extend the installation drive

  1. Right-click on the Start menu and select Disk Management.
  2. Right-click on your installation drive and select Extend volume.
    Spotify Installation Error Code 53
  3. Click the Next button.
    Spotify Installation Error Code 53
  4. In the Select the amount of space in MB dropdown, input how much extension you want, then click Next. You must note the maximum because you cannot go beyond that figure.
    Spotify Installation Error Code 53
  5. Lastly, click on Finish.

Once the extension is complete, you may try downloading and reinstalling Spotify again to verify that the error is fixed.

2. Move the AppData directory to Program Files

  1. Press Windows + R to open the Run dialog.
  2. Type cmd and hit Ctrl + Shift + Enter.
  3. If you have a 32-bit OS, type in the command below and hit Enter.
    cmd /k move "%AppData%\Spotify" "%ProgramFiles%"
    Spotify Installation Error Code 53
  4. If you have a 64-bit OS, type in the command below and hit Enter.
    cmd /k move "%AppData%\Spotify" "%ProgramFiles(x86)%"
  5. Lastly, if no errors are displayed in the Command Prompt, close the terminal and verify if the Spotify installation error code 53 is fixed.

3. Install the app in Windows Safe Mode

  1. Click the Start menu, type advanced startup, and select the Change advanced startup options menu.
    Spotify Installation Error Code 53
  2. Click on the Restart now button of the Advanced startup menu.
  3. Navigate Troubleshoot, then Advanced options.
  4. Select Startup Settings, then click the Restart button.
  5. Press F5 or 5 to boot Windows in Safe Mode with Networking.
  6. Now download Spotify from the official website and reinstall it. The Spotify installation error code 53 should have disappeared.

That will be it for this article. Remember that the initial workarounds are very important because they may save you the extra time of further troubleshooting. However, starting with any solution that seems the most applicable would be best.

If you have struggles booting into Safe Mode, this comprehensive guide on how to boot to Safe Mode may be useful.

Please let us know in the comments section below if these fixes have been effective for you.

0x80070008: How to Fix This Windows Update Error

The Windows Update error 0x80070008 occurs when the OS fails to update and it’s usually accompanied by the message: ERROR_NOT_ENOUGH_MEMORY, The system is out of memory. Let’s see why is this happening and how to fix the Windows Update error 0x80070008.

Why do I get the 0x80070008 error when updating Windows?

There are many reasons why the 0x80070008 error occurs but we will mention the most important:

  • Not enough memory – As the message suggests, there is not enough memory to install the update.
  • Connection problems – If you have a poor internet connection, the update is not downloaded properly and you get the 0x80070008 error code.
  • Insufficient disk space – You might run out of space on the system drive, so the update can’t be downloaded properly.
  • System file corruption – If the system has corrupted files, the 0x80070008 error will follow.

Now that we know what we’re up against, let’s fix this problem by using the solutions below.

How do I fix the 0x80070008 Windows Update error?

Before going to more complex troubleshooting, let’s perform some preliminary actions that might solve the problem quicker:

  • Try to free up some disk space and close all the apps you don’t need at the moment and try to install the update again.
  • Restart your router and try to download and install the update afterward.
  • Restart your PC. Sometimes, all the problems can get solved by this simple action.

If none of these actions fixed the issue, start applying the solutions below to fix the 0x80070008 error.

1. Empty the SoftwareDistribution and catroot2 folders

  1. Click the Start button, type cmd, and select Run as administrator from the results.
  2. Type the following command to stop the Windows Update Service and press Enter to run it: net stop wuauserv
  3. Now, paste the following command and press Enter: net stop bits
  4. Press the Windows key + E to open File Explorer and go to the following path: C:\Windows\SoftwareDistribution
  5. Select all the contents in the folder, right click on one of the files and select the Delete icon.
  6. Next, navigate to the following folder: C:\Windows\System32\catroot2
  7. Select all the contents within the folder and hit the Delete key.
  8. Go back to the Command Prompt window, paste the following command, and press Enter: net start wuauserv
  9. Paste the following command and press Enter as well: net start bits
  10. Restart your PC and see if now you can update Windows.

2. Run the Windows Update troubleshooter

  1. Click the Start button and select Settings.
  2. In the System category, click on Troubleshoot from the right.
  3. Now, select Other troubleshooters from the list of options.
  4. Finally, click the Run button to the right from the Windows Update troubleshooter.
  5. The troubleshooter will find and fix any problems concerning the updates.

3. Download the update manually

  1. First, verify which is the failed update by checking the Windows Update section from Settings.
  2. Now, visit the Microsoft Update Catalog website and look for that particular update or search for Windows 11 and see if you can find it on the list.
  3. Then, hit the Download button to its right and double-click on it when it finishes downloading.

4. Disable the firewall temporarily

  1. Click the Search button from the taskbar, type windows security, and click on the app from the results.
  2. Now, choose Firewall & network protection.
  3. Select the active firewall.
  4. Finally, toggle Off the firewall protection.
  5. Try to update Windows now.

Antiviruses may block the Windows Update download, so it’s recommended to turn off the firewall temporarily.

Also, if you’re using a third-party antivirus, you should use its settings to turn off its protection. If that was the problem, you should consider upgrading to a better antivirus that won’t interfere with your system and apps.
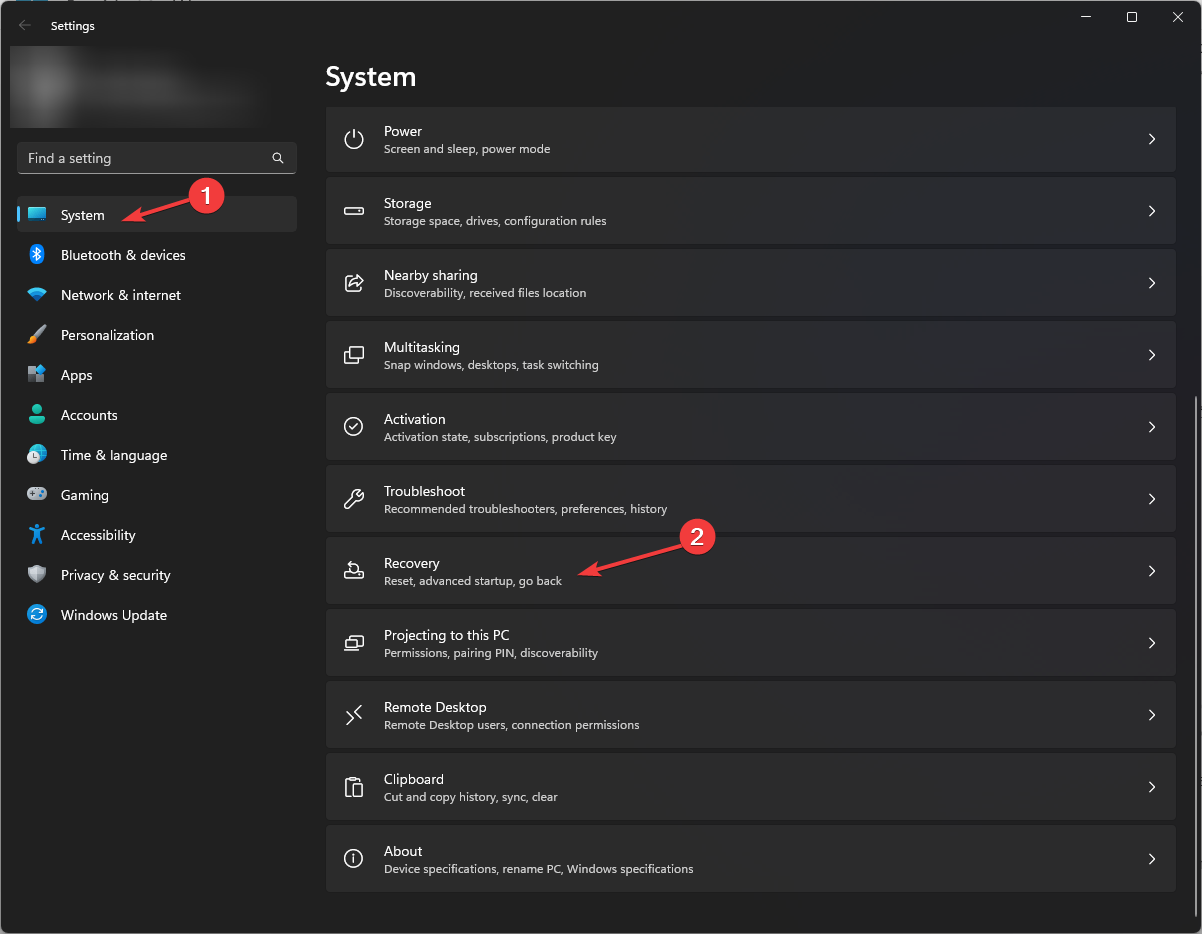
5. Run an SFC scan

  1. Click the Search icon, type cmd, and select Run as administrator from the results.
  2. Type or paste the following command and press Enter to run it: sfc /scannow
  3. Wait for the scan to finish, then restart your PC and try updating Windows.

These are the best solutions to fix the Windows Update error 0x80070008 on Windows. You should also know that all the solutions above can be applied on Windows 11 and 10.

You should also look at our guide on how to install Windows updates in Safe Mode because that can also be a good solution.
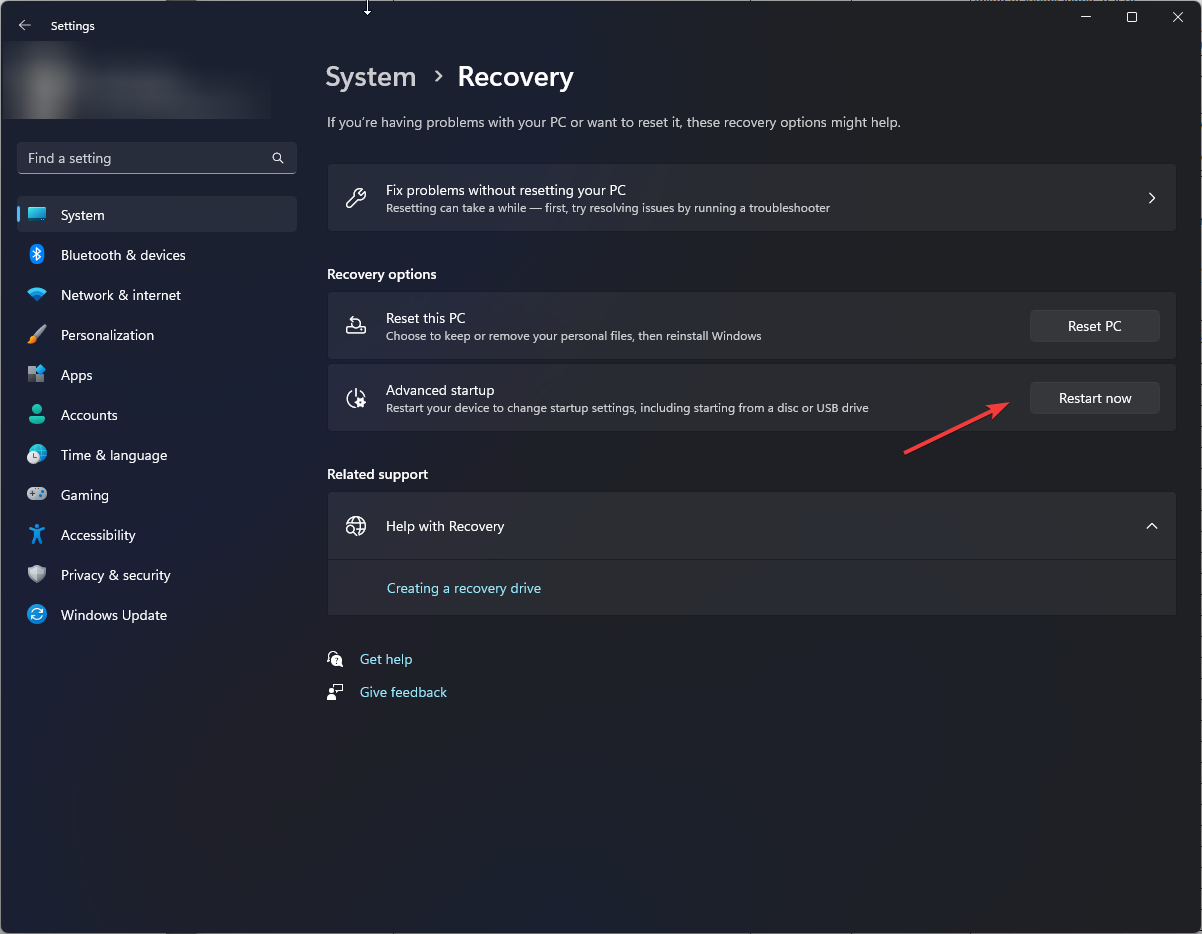
If you have any questions or suggestions, don’t hesitate to address them in the comments section below.

Runtime Error: Could Not Call Proc [Fix Guide]

Runtime errors occur when running or executing a program that hangs or crashes, displaying an error message. The Could not call proc part means the app or script can’t execute a function or procedure. This often occurs due to a missing library or dependency.

Why do I get the Runtime error: Could not call proc?

There are many causes of the Runtime error: Could not call proc, but we will highlight the most probable:

  • The PC doesn’t meet the system requirements – If you’re trying to install software or a game without meeting the minimum system requirements, this error may occur.
  • Memory leaks – Due to memory leaks, although you have the right amount of RAM or GPU memory, the app is detecting less.
  • Corrupted installer – If the installer download didn’t finish properly, you might have a corrupted software kit, and installing it will return this error instead.
  • Virus or malware infection – Viruses and malware are known to mess with the system and files and if some of the installation files are corrupted, you will get this runtime error.

Now that we know the possible causes for the Runtime error: Could not call proc, let’s try to fix it.

How do I fix the Runtime error: Could not call proc?

Before getting into more complicated solutions, let’s check a few trusted methods for quicker recovery:

  • Check if your device meets the app system requirements.
  • Try to download the app installer again and ensure you have all the files for it.
  • Close all the programs and processes you don’t need before running the installer.
  • Run a full scan using a reliable antivirus.

If these preliminary measures didn’t fix the problem, apply the solutions below.

1. Change the Temp folder location

  1. Click the Start button, type cmd, and select Run as administrator from the results.
  2. Type or paste the following commands one by one, pressing Enter after each: set TEMP=C:\Windows\temp
    set TMP=C:\Windows\tmp
  3. Now, try to relaunch the installer and see if the error persists.

As weird as it seems, if the Temp folder doesn’t have the right location, it can cause runtime errors while installing an application. Setting things right will solve the issue like magic.
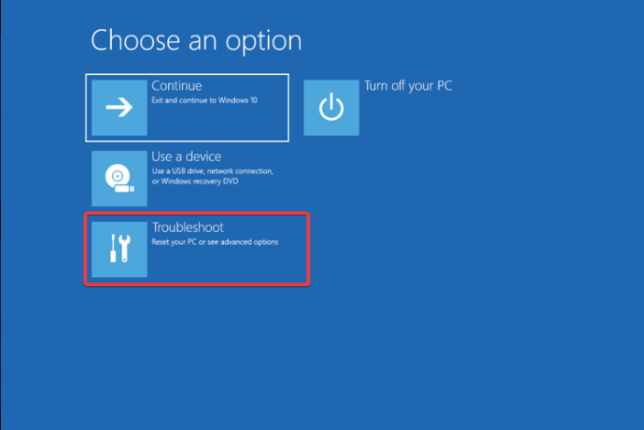
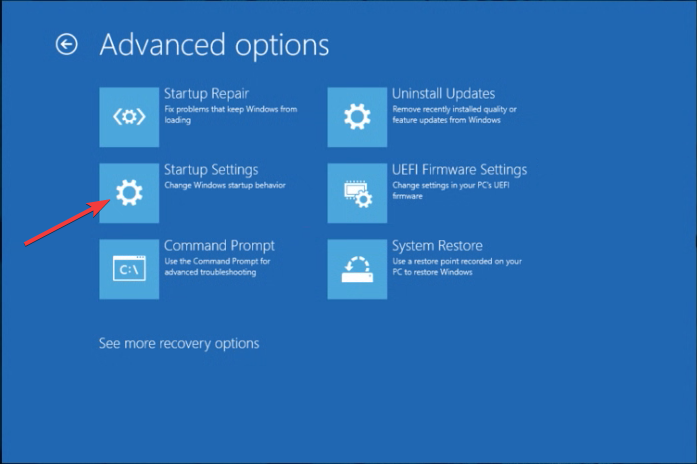
2. Run SFC and DISM scans
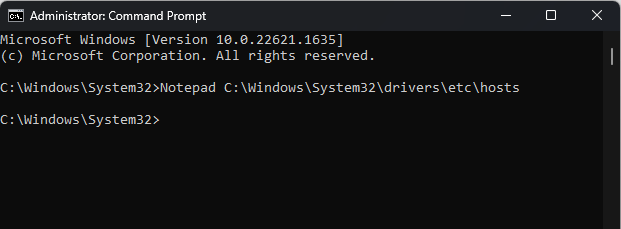
  1. Click the Windows button, type cmd, and select Run as administrator from the results.
  2. Type or paste the following command and press Enter to run it: sfc /scannow
  3. Wait for the scan to finish, then paste the following command to execute the DISM scan and press Enter: DISM /Online /Cleanup-Image /RestoreHealth
  4. Wait for the scan to finish, then restart your PC and check if the error persists.

In case you find the steps below too technical and time-consuming, there is another method we tested for you.

It’s more likely to fix this runtime error code using a dedicated PC repair tool, as it can diagnose the system and replace corrupted system files immediately.

3. Use the Program Install and Uninstall troubleshooter

  1. Go to Microsoft’s official page and download the Program Install and Uninstall troubleshooter.
  2. Double-click the installer, then hit Next and Install.
  3. Select the program you’re having trouble installing and follow the on-screen instructions to fix it.

4. Run the installer in Compatibility mode

  1. Right-click on the apps shortcut file on your PC and select Properties.
  2. Go to the Compatibility tab.
  3. Check the option Run this program in compatibility mode for and select Windows 8 from the drop-down below.
  4. Now check the option Run this program as an administrator.
  5. Click on OK to save changes.

Maybe the app you’re trying to run is not compatible with Windows 11 or even with the older Windows 10, and this solution will fix that problem.

All the solutions we highlighted above can also be applied to Windows 10 without any problems.

We also recommend exploring our runtime errors guides for more information regarding this problem. To understand these errors better, read our complete guide on what are runtime errors.

If you have any questions or suggestions, we wait for your feedback in the comments section below.