0x80073CFB Microsoft Store Error [Solved]

Error code: 0x80073CFB occurs for some users when they try to download and install Microsoft Store apps.

Instead of downloading and installing a selected app, MS Store displays an error message with the 0x80073CFB code. The 0x80073CFB error message says this:

Something unexpected happened… Reporting this problem will help us understand it better. You can wait a bit and try again or restart your device. That may help.

As a consequence, users can’t download and install any MS Store apps for which that issue occurs. Does that error message sound familiar to you? If so, you might be able to fix the Microsoft Store error 0x80073CFB with some of the potential resolutions in this guide.

What is the 0x80073CFB Microsoft Store error?

Some users have discussed the 0x80073CFB error on the Microsoft support forum, Reddit, and others. That error can arise in both Windows 11 and 10. One user’s forum post said this about a Web Media Extensions 0x80073CFB error:

Several days ago, I received an update notification on Microsoft Store for Web Media Extension. I try to install it and get error 0x80073CFB. My question is: does Windows 11 need Web Media Extension? If Windows 11 needs it, can anyone help me to fix the error?

Aside from that, users have reported error 0x80073CFB arising when they try to download and install game apps. Numerous players have reported error 0x80073CFB for Forza Horizon 4. In one forum post, a user stated:

I need help fixing this problem. I just bought the game (Forza Horizon 4), and when I start to download it stops after seconds and this message appears: (Reporting this problem will help us understand it better. You can wait a bit and try again or restart your device. That may help. 0x80073CFB).

Some players have also posted on forums about a 0x80073CFB Minecraft error. Another user’s Microsoft forum post said this about the error:

I bought Windows 10 Minecraft, but keep getting error code 0x80073CFB. My purchase went through, and I have Minecraft on the store. Whenever I try to download it, however, it keep saying that something unexpected happened.

So, error 0x80073CFB isn’t an entirely uncommon Windows 11/10 issue. The exact causes for it aren’t entirely clear, and there are numerous ways you might be able to resolve that error. These are some of the most likely potential fixes for the 0x80073CFB Microsoft Store error.

How do I fix the error code: 0x80073CFB?

Although the steps below are for Windows 11, the solutions work just as well for Windows 10, so you can safely try them out.

1. Run the Windows Store Apps troubleshooter

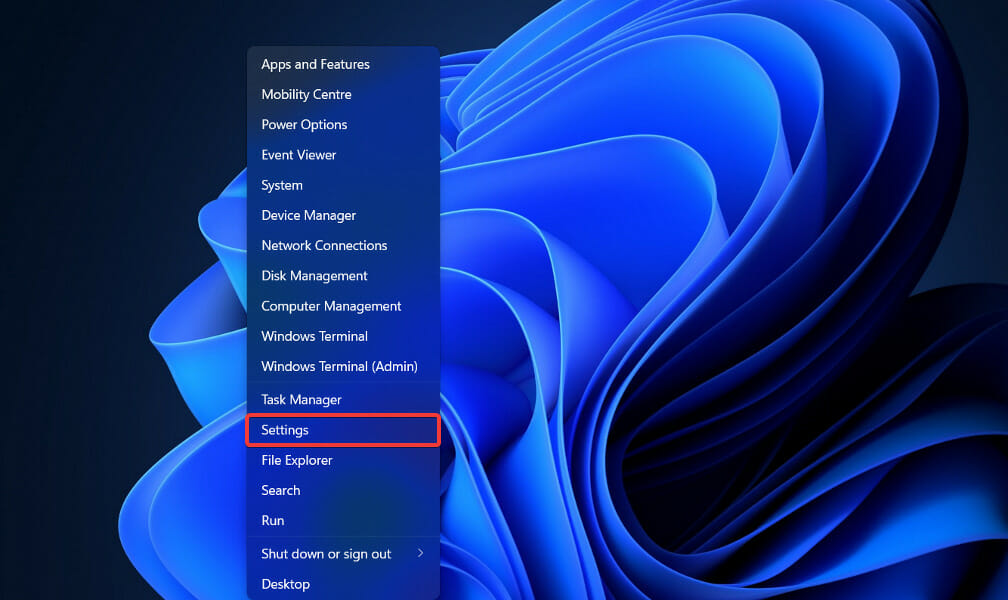
  1. Open your Start menu, and select Settings from there.
    The pinned Settings app 0x80073cfb microsoft store
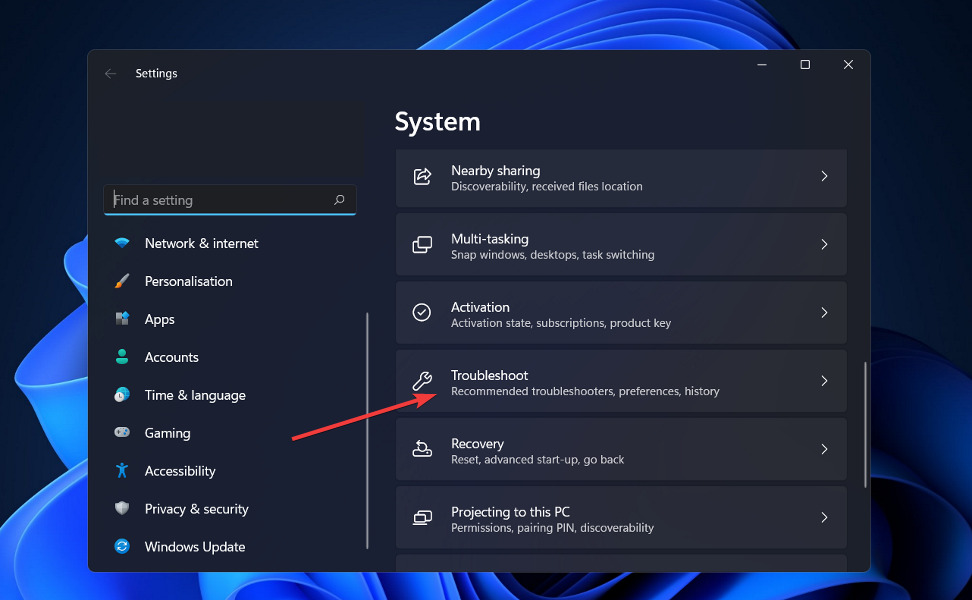
  2. Next, click the Troubleshoot navigation option.
    Troubleshoot navigation option 0x80073cfb microsoft store
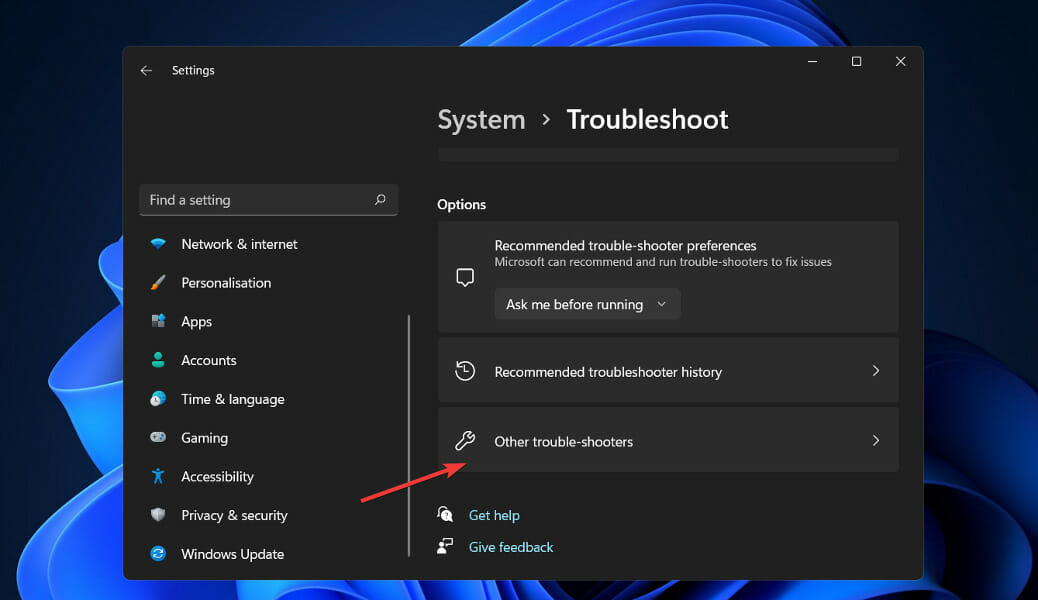
  3. Select Other trouble-shooters to view a list of Windows 11 troubleshooters.
    Other trouble-shooters navigation option
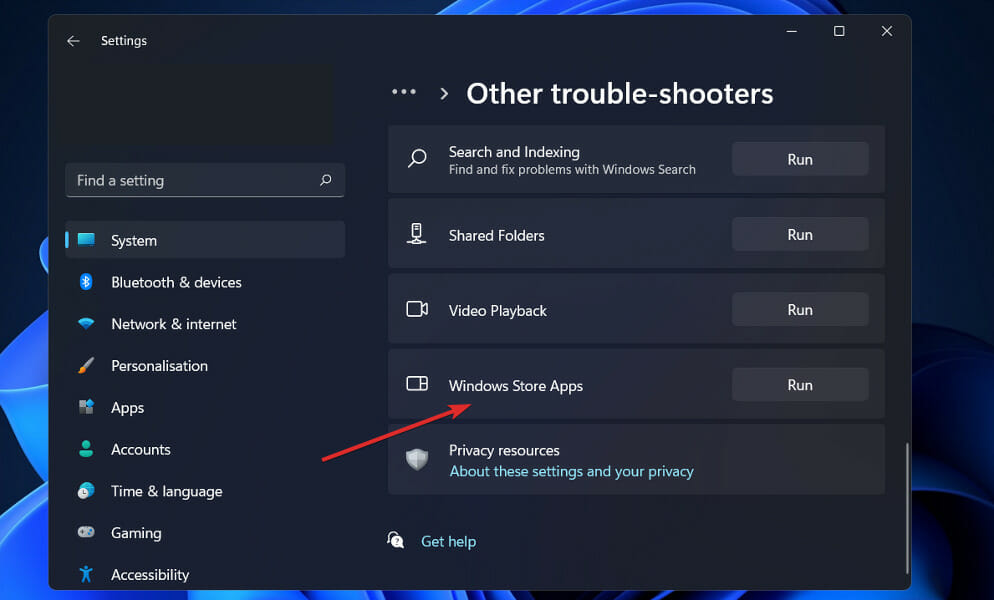
  4. Then click the Run button for Windows Store Apps to open that troubleshooter.
    The Run button 0x80073cfb microsoft store
  5. Go through that troubleshooter to apply any potential fixes.

2. Sign out and back into the Microsoft Store

  1. Bring up the Start menu, and click the pinned Microsoft Store app.
    Microsoft Store app 0x80073cfb microsoft store
  2. Click the user account button at the top of the Microsoft Store app.
    The user account button 0x80073cfb microsoft store
  3. Then select the Sign out option.
    The sign out option 0x80073cfb microsoft store
  4. Click the user account button again and Sign in.
    The Sign in option 0x80073cfb microsoft store
  5. Select an account to sign in with, and press the Continue button.

3. Clear the MS Store Cache

  1. Press Windows’s search taskbar button shown directly below.
    The search button 0x80073cfb microsoft store
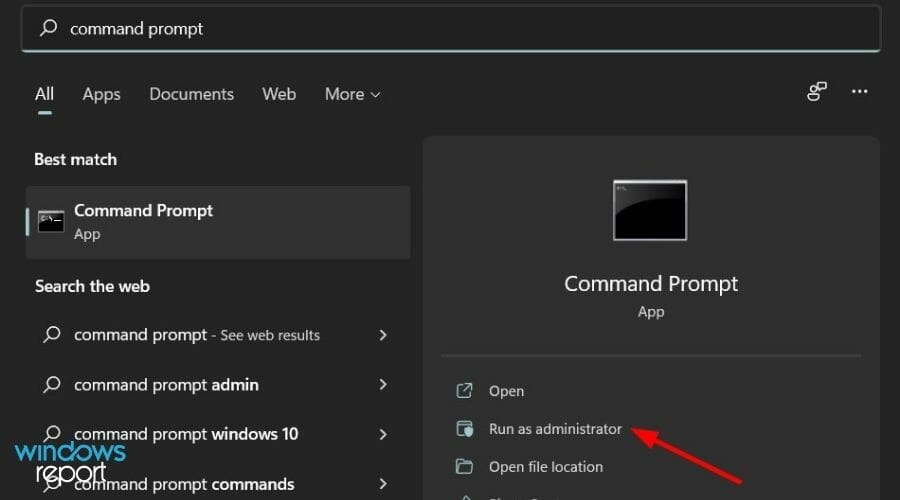
  2. Enter cmd to find the Command Prompt.
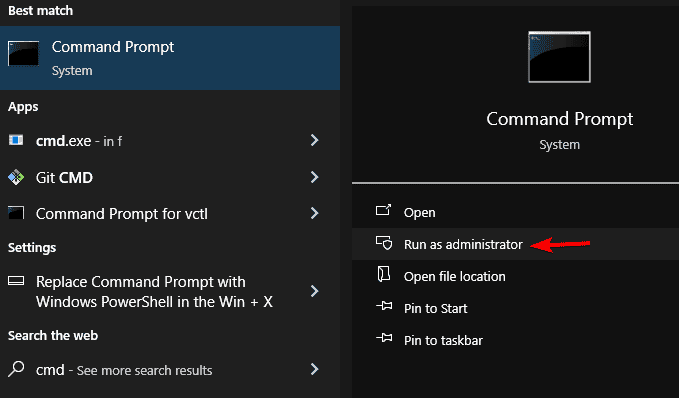
  3. Click the Run as administrator button for the Command Prompt.
    Run as administrator option 0x80073cfb microsoft store
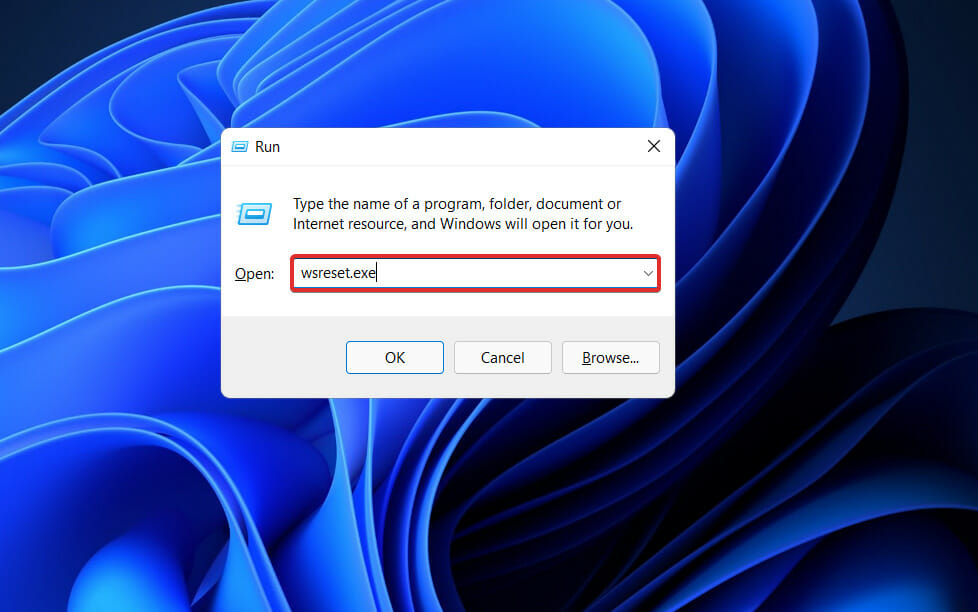
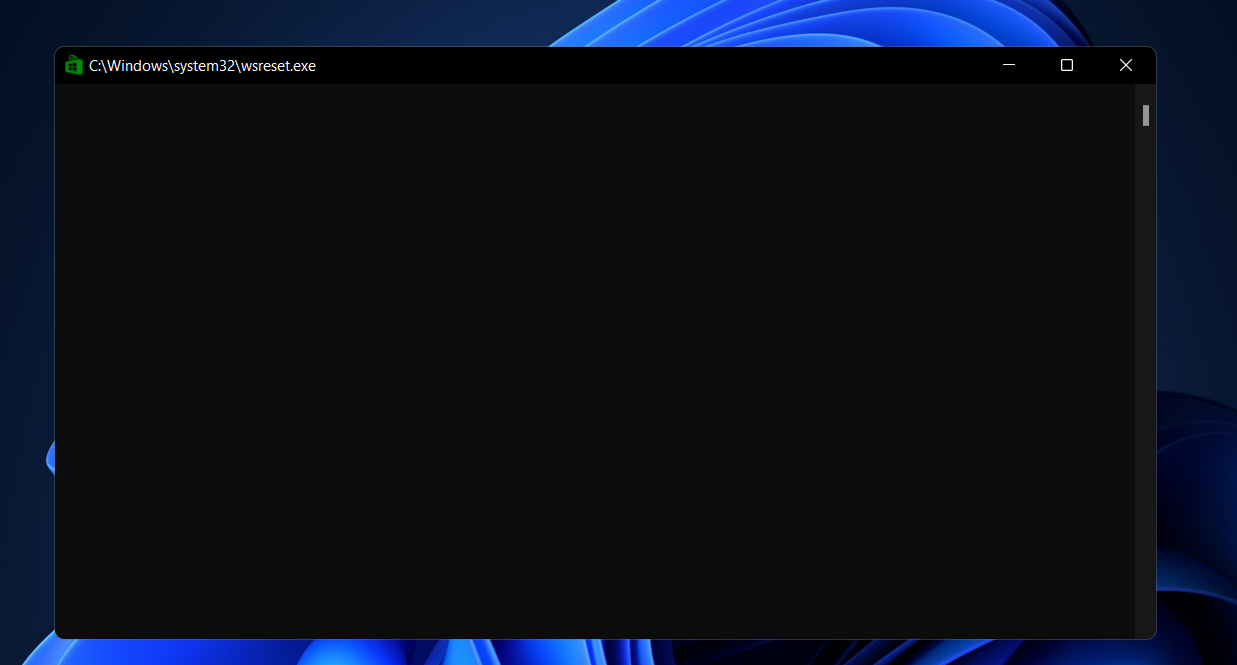
  4. Then type in this command: wsreset
  5. Press the Enter key to clear to run wsreset.
    wsreset command 0x80073cfb microsoft store

4. Repair the Microsoft Store App

  1. Bring up Settings by pressing its Windows + I key combination.
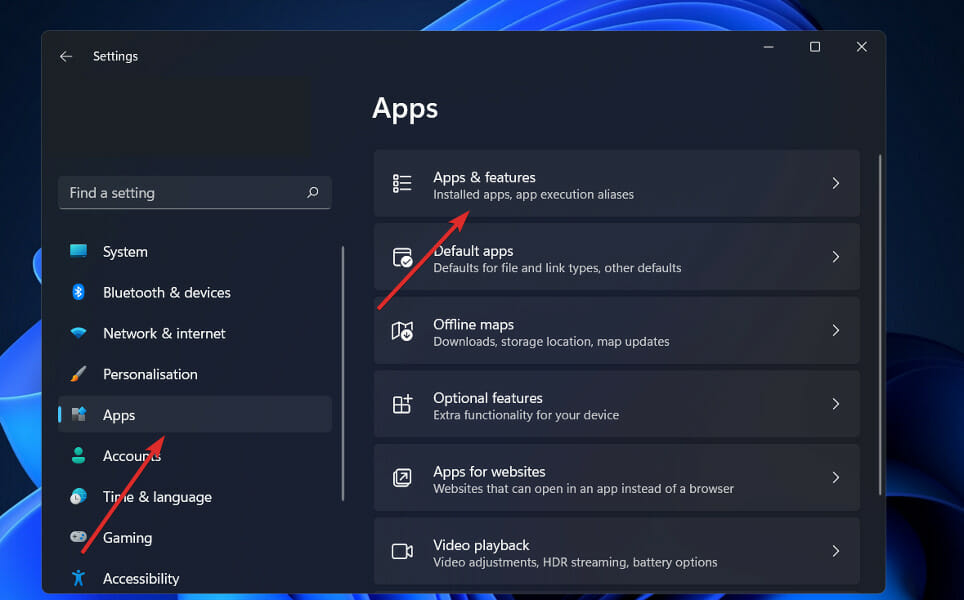
  2. Select Apps on the left side of Settings.
  3. Click Apps & features to view a list of installed apps.
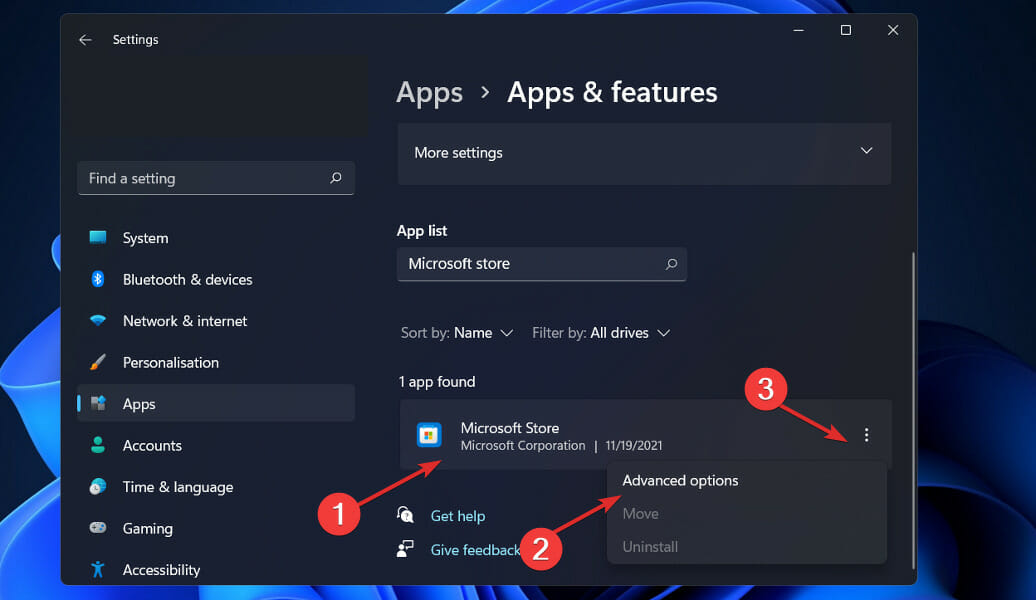
  4. Next, click the three-dot button for Microsoft Store shown directly below.
    three-dot button 0x80073cfb microsoft store
  5. Select Advanced Options to view further settings.
  6. Press the Repair button.
    Repair button 0x80073cfb microsoft store
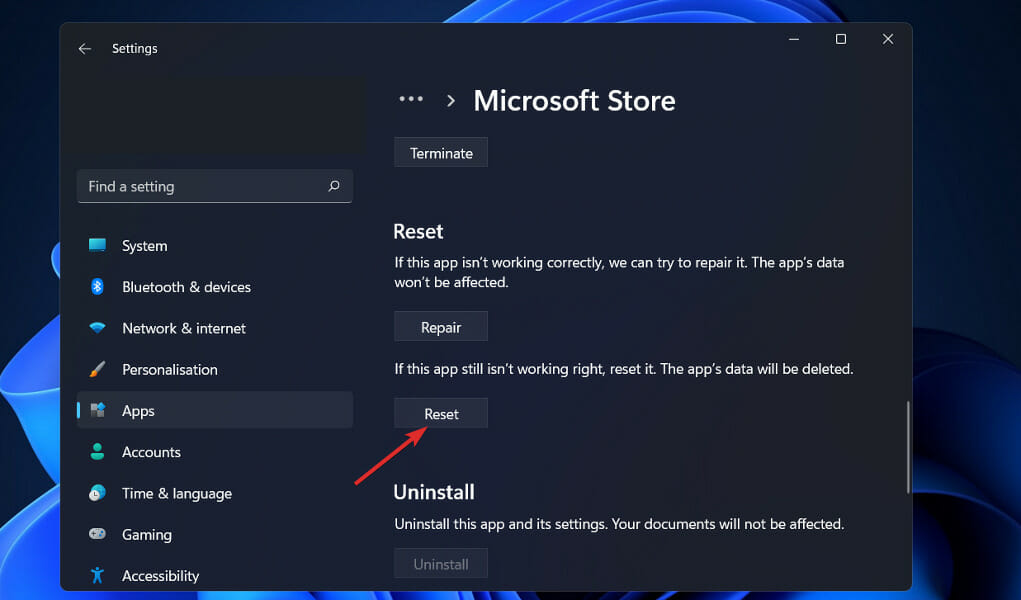
  7. Finally, click the Reset option.
    The Reset option 0x80073cfb microsoft store

5. Check your PC’s date/time settings are right

  1. Press the Settings app’s Windows key + I keyboard shortcut.
  2. Select the Time & language tab.
  3. Click the Date & time navigation option.
  4. Toggle the Set time automatically option on.
  5. Turn on the Set time zone automatically option if it’s off.
  6. If a Time Zone Change prompt pops up, click OK on it.
    The Time Zone prompt 0x80073cfb microsoft store
Note icon NOTE
If the Windows system tray’s clock time gradually changes after correcting it, you might need to replace your PC’s CMOS battery. Alternatively, sync your PC’s clock with Windows Time Server. To do so, press the Sync now button within the Date & time settings.

6. Disable proxy server

  1. First, open the search utility’s text box with the Windows key + S keyboard shortcut.
  2. Enter the keyword proxy in the Type here to search box.
    The search button 0x80073cfb microsoft store
  3. Click Proxy settings in the search tool.
    A Proxy settings search 0x80073cfb microsoft store
  4. Press the Set up button for the Use a proxy server option.
    The Set up option 0x80073cfb microsoft store
  5. Turn off the Use a proxy server option.
    Use a proxy server option 0x80073cfb microsoft store
  6. Select the Save option.
Note icon NOTE
It’s also recommended that users disable or uninstall VPN connection software. Our How to turn off VPN on Windows 10/11 guide provides details for how to do that.

7. Run a System File Checker scan

  1. Launch Command Prompt with elevated rights as outlined within steps one to three of the third resolution.
  2. Before running an SFC scan, input this command and press Enter: DISM.exe /Online /Cleanup-image /Restorehealth
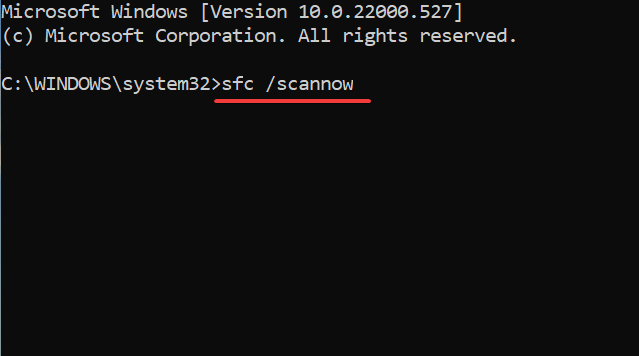
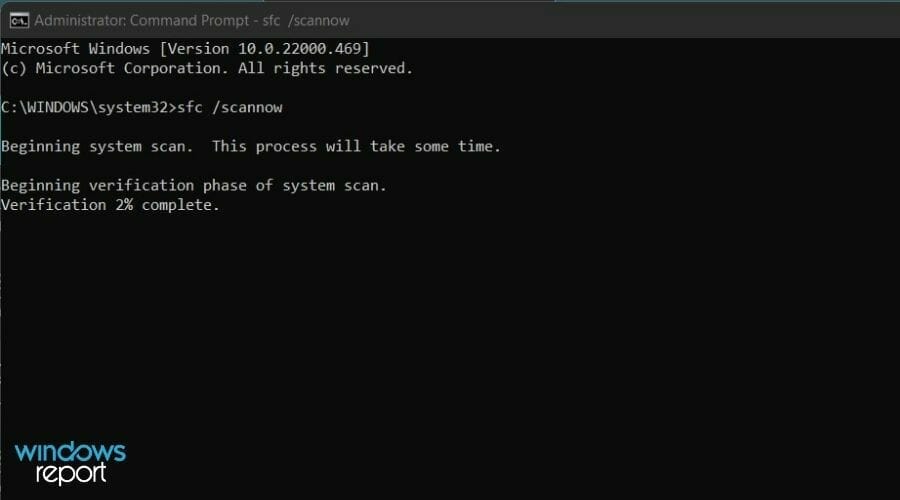
  3. Then input the following command and hit Return: sfc /scannow
  4. Wait for the system file scan to reach the 100 percent mark and display an outcome within the Command Prompt’s window.

8. Clear the Software Distribution folder

  1. Open Command Prompt as an administrator as specified in resolution three.
  2. To stop the Windows Update service, input this command and press Enter: net stop wuauserv
    The net stop command 0x80073cfb microsoft store
  3. Type in this command and press Enter: ren c:/windows/SoftwareDistribution softwaredistribution.old
    The ren command 0x80073cfb microsoft store
  4. Now restart Windows Update by typing this command and pressing Return: net start wuauserv
    The net start command 0x80073cfb microsoft store

9. Reinstall Microsoft Store

  1. Click Start with your right mouse button and select Windows Terminal (Admin) on the menu.
    The Windows Terminal shortcut 0x80073cfb microsoft store
  2. Next, click the Open a new tab button to select Windows PowerShell.
  3. Input this PowerShell command and press Enter: Get-AppxPackage -allusers *WindowsStore* | Remove-AppxPackage
  4. Select Power and Restart on your Start menu to reboot.
  5. Open PowerShell again after restarting Windows.
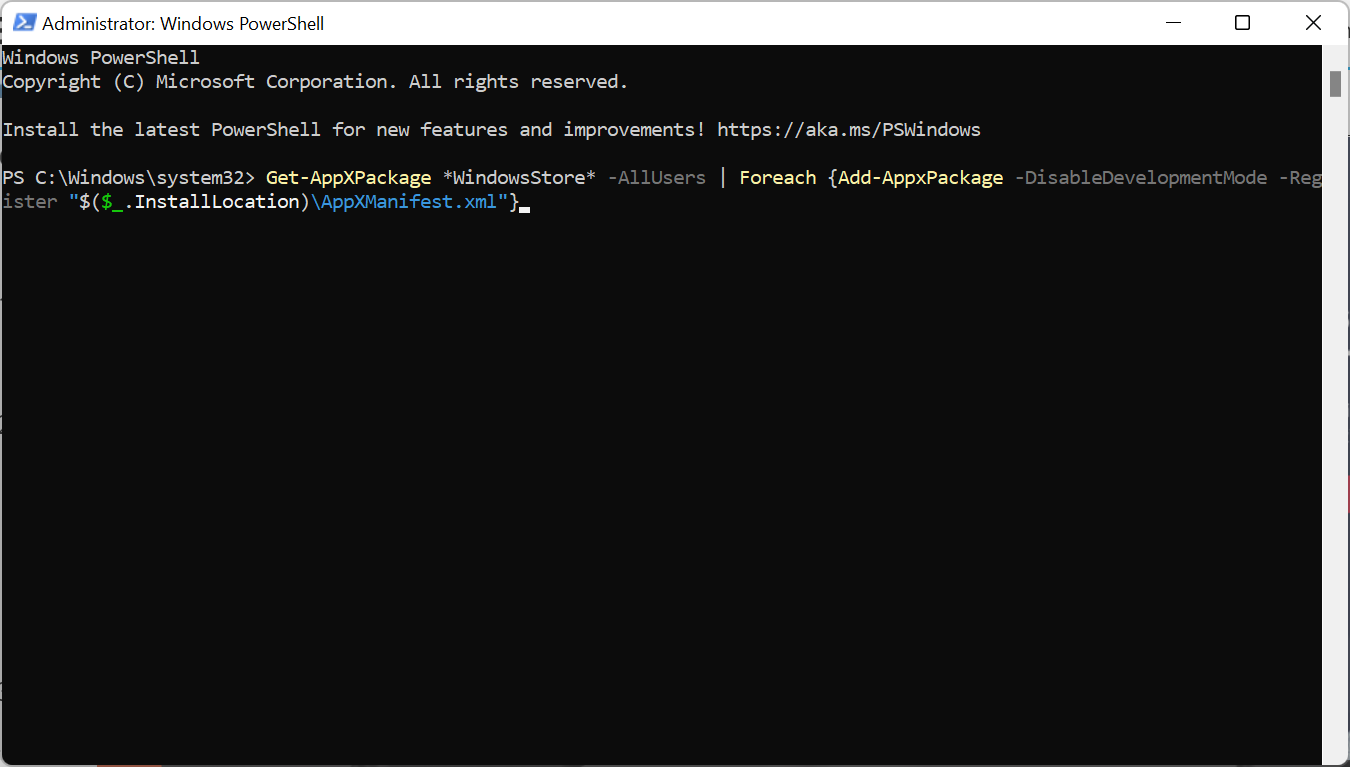
  6. To reinstall MS Store, input this command and press Return: Get-AppxPackage -allusers *WindowsStore* | Foreach {Add-AppxPackage -DisableDevelopmentMode -Register “$($_.InstallLocation)\AppXManifest.xml”}

Should I reinstall Windows 11/10 to fix this?

Some users have said reinstalling Windows has resolved the 0x80073cfb Microsoft Store error for them. So, that might be a potential resolution worth considering. As that’s a very drastic potential fix, however, it should only be a last resort if other alternatives don’t fix the issue.

If you must reinstall Windows 11/10, we recommend you do so with Reset this PC. With that utility, you can restore Windows to its factory defaults and preserve user files (you’ll still need to reinstall software). Check out our How to reset Windows 11 to its factory settings guide for further details.

Hopefully, you won’t need to take such drastic action. The above potential resolutions are among the most widely confirmed to fix the 0x80073CFB Microsoft Store error. So, there’s a good chance at least one of them will fix the same issue on your PC.

If those potential fixes aren’t enough, however, you can send a support request to Microsoft’s help service for Windows. You can get in touch with that service by entering a description on the Contact Microsoft Support page and clicking Get Help > Contact Support.

You can also discuss the 0x80073CFB error in the comments section below. Feel free to add any pertinent questions there. Users who have resolved this issue with alternative resolutions not mentioned above are most welcome to share their fixes below.
Simple Steps to Fix Windows 11 Error 0x800704: Microsoft Store Is Blocked

If Microsoft Store is blocked in Windows 11, you won’t be able to download or update apps. You might see an error like 0x800704 or a message saying it’s blocked by your administrator.

This usually happens because of account restrictions, system settings, or broken files. If you’re using a work or school device, it could be set up that way on purpose. But even personal devices can run into this. Below are the most common reasons and how to fix them fast.

What can I do if my Microsoft Store is blocked in Windows 11?

1. Use the Windows Store Apps troubleshooter

  1. Right-click on the Start icon in the Taskbar or press Windows + X to launch the Quick Access menu and select Settings.
    settings-quick-access-menu microsoft store is blocked
  2. The System tab will be open by default. Scroll down on the right side of the window and select Troubleshoot from the list of options.
    troubleshoot-menu microsoft store is blocked
  3. Tap on Other troubleshooters.
    other-troubleshooters-option microsoft store is blocked
  4. Locate the Windows Store Apps and click on Run next to it.
    windows-store-app-run microsoft store is blocked

Windows will now discover and resolve any issues that may have arisen with the software or its configuration settings. Once the mistakes have been identified, instructions will be provided, so make sure to carefully follow these instructions.

2. Clear the cache

  1. Press the Windows key + R to start the Run app, then type or paste in wsreset.exe and press Enter or click OK.
    wsreset microsoft store is blocked
  2. The reset will take a few settings and then the Store will open again.
    reset-store microsoft store is blocked

Clearing your cache just gets rid of the data your device has stored from the websites and apps you visit, it has no effect on your photos or the files you have put there.

3. Reset the app

  1. Press the Windows key + I to open the Settings app, then click on Apps in the right panel followed by Apps & features.
    apps-apps-and-feature microsoft store is blocked
  2. Now search for Microsoft Store, click on the three dot menu, and choose Advanced options.
    microsoft-store-advanced-options microsoft store is blocked
  3. Navigate to the Reset section and click on the Reset button.
    reset-store-reset microsoft store is blocked

Any deactivated apps, notification restrictions, default apps, background data limits, and permissions restrictions will be erased from your device’s storage when you reset your app options. This is likely to help you when the Microsoft Store is blocked on Windows 11.

4. Enable Microsoft Store from the Group Policy Editor

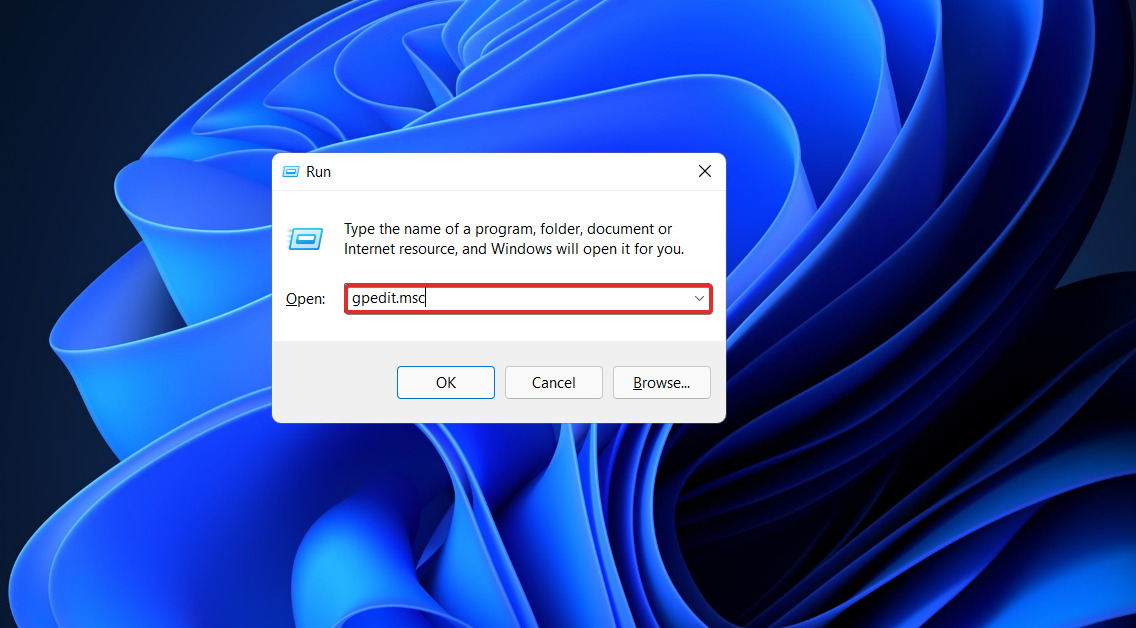
  1. Press the Windows key + R to start the Run app then type or paste in gpedit.msc and press Enter or click OK.
    gpedit-run microsoft store is blocked
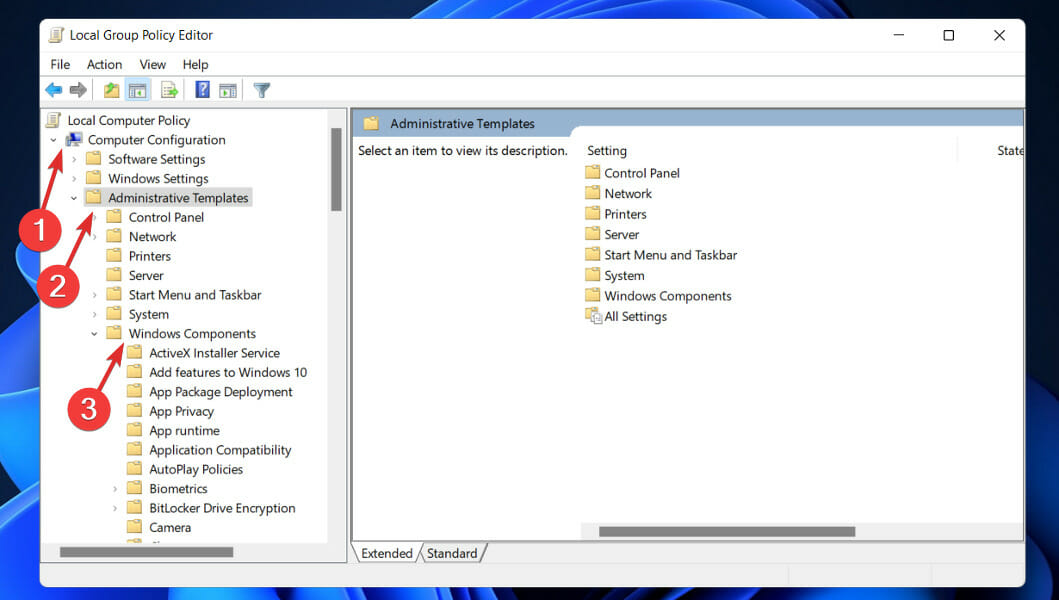
  2. Navigate to Administrative Templates under Computer Configuration, then choose the Windows Components subfolder and scroll down to Store.
    windows-components microsoft store is blocked
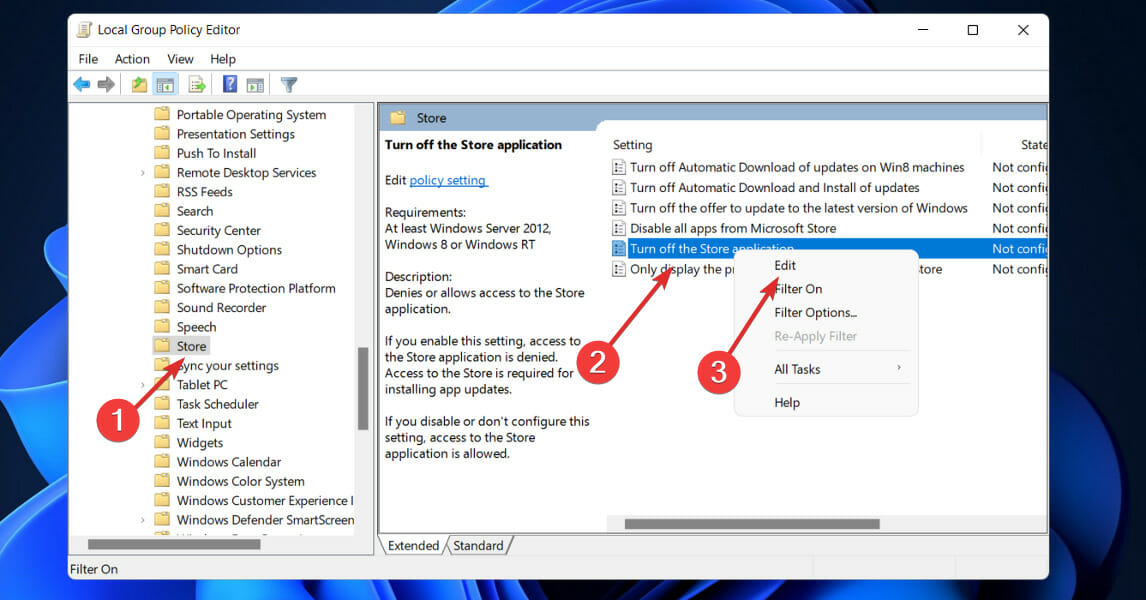
  3. In the right pane, locate the Turn off the Store application policy, then right-click on it and select Edit.
    turn-off-store-edit microsoft store is blocked
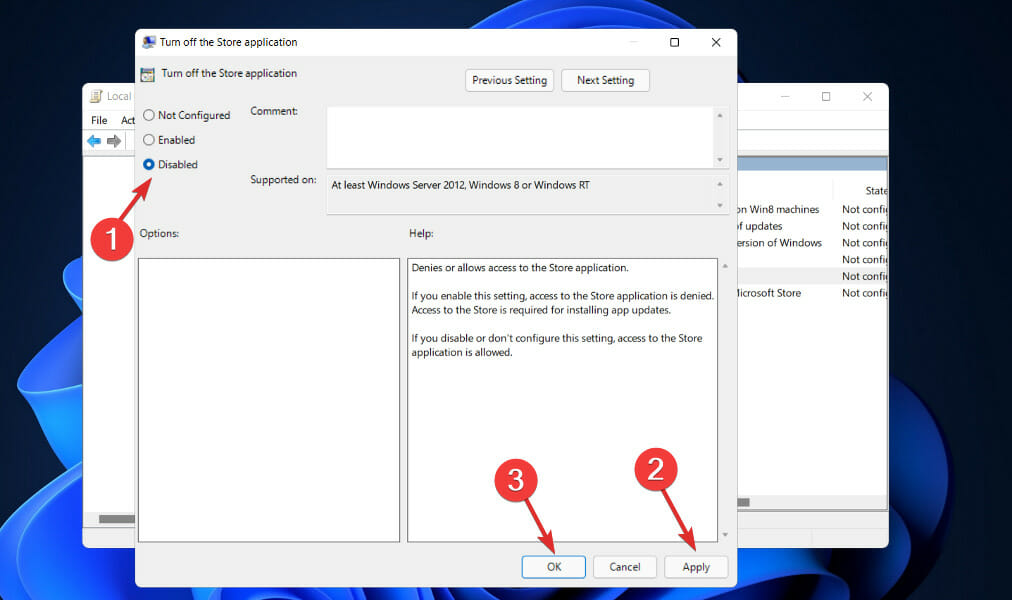
  4. If the setting is Enabled, then modify its feature to Not Configured or Disabled, then hit the Apply and OK buttons.
    disabled-store microsoft store is blocked

After you’re finished, restart your computer to ensure that the modifications take effect, and then reopen the Store application.

5. Update Windows

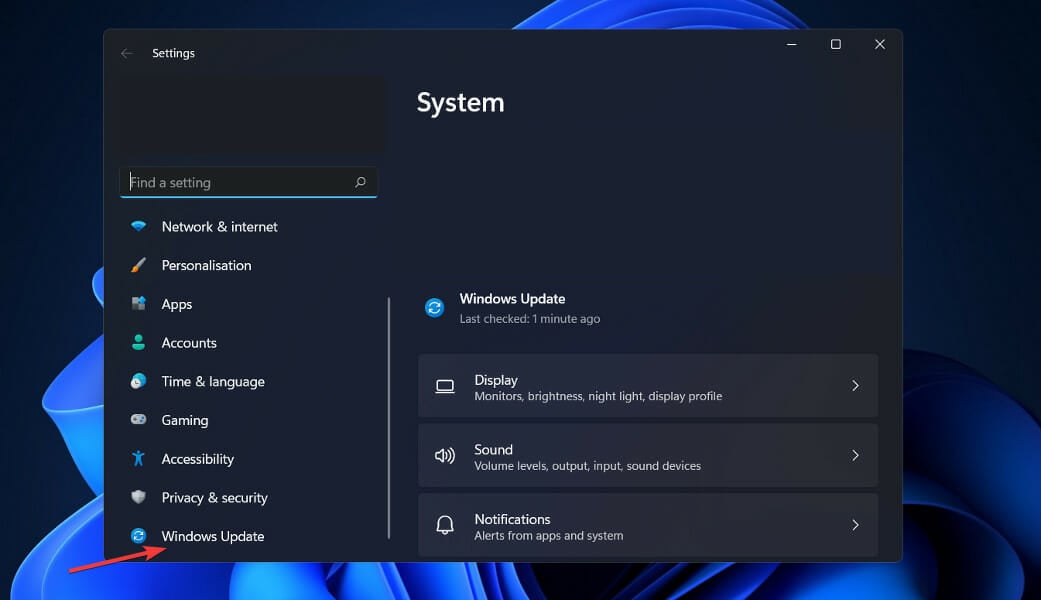
  1. Press the Windows + I buttons from your keyboard to open the Settings app and click on the Windows Update option in the left panel.
    windows-update-settings kernel security check failure windows 11
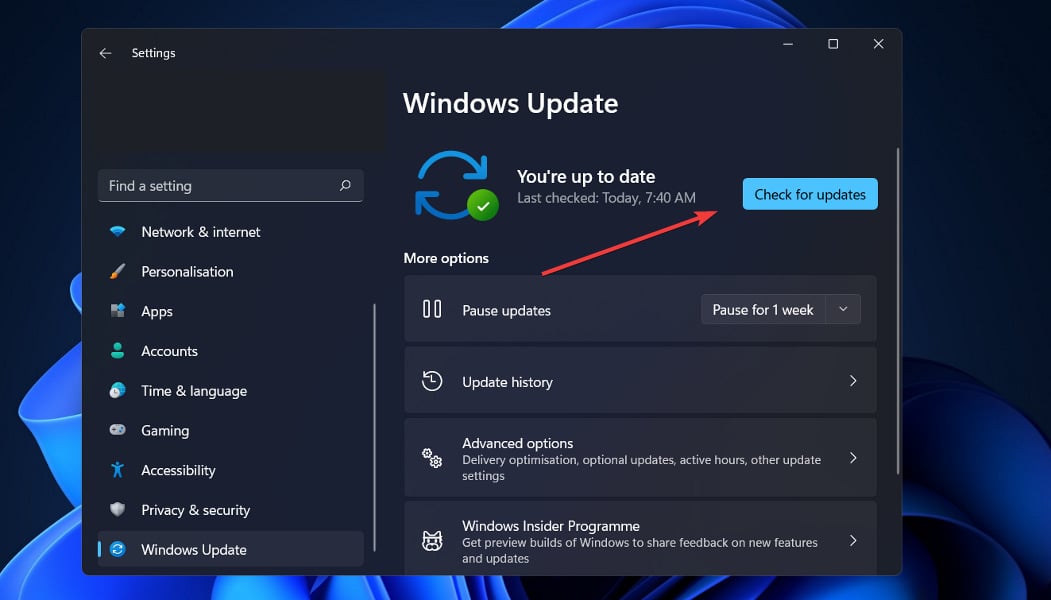
  2. If you have any new updates to download, click on the Install now button and do wait for the process to complete, otherwise click on the Check for updates option.
    checl-for-updates kernel security check failure windows 11

If you’re using an earlier version of Windows, it’s conceivable that this is causing the problem, which may be solved by updating the operating system. The bug will almost certainly be fixed in a future software version.

6. Turn off third-party antivirus software

Another possible cause of the Microsoft Store blocking problem could be the use of third-party antivirus software. Third-party antivirus utilities should be turned off to ensure this does not happen.

The antivirus utility icons are located in the system tray to the right of the Windows 10 taskbar, and users may right-click on them to access context menu options for the software that has been installed.

Those context menus typically feature a deactivate setting of some type, which users can pick in order to turn off the antiviral software in the background.

What happens if I remove the Microsoft Store app?

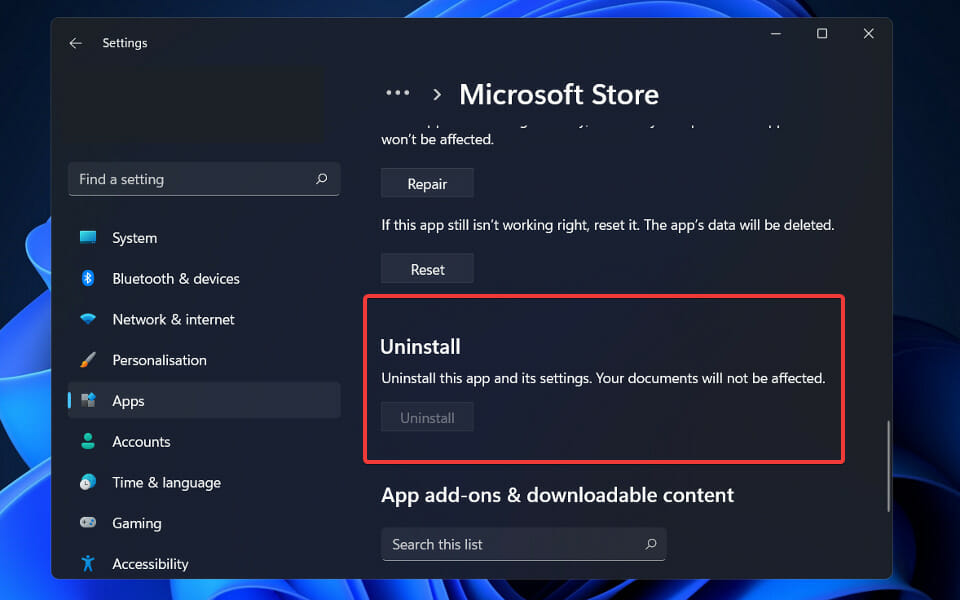
In the first place, Microsoft has said that the ability to uninstall the Microsoft Store application is not supported.
uninstall-microsoft-store microsoft store is blocked

Given that a mechanism to uninstall the software was actually introduced in Windows 10, the phrase appears to be a little strange.

It is most probable that Microsoft meant that uninstalling the Microsoft Store app is not recommended rather than not supported.

Then, according to Microsoft, there is no other option than to reset or reinstall the operating system in order to reinstall the app.

To put it another way, if you uninstall the Microsoft Store app from your device and later decide that you want it back, the only option to get it back is to reinstall Windows 11 or reset your device.

The fact that the app has been deleted may be worrying to some users; however, a simple PowerShell script may be used to restore it.

To accomplish this, first start PowerShell with administrator privileges from the Windows + X menu, and then type or paste the following command and hit Enter:
Get-AppXPackage *WindowsStore* -AllUsers | Foreach {Add-AppxPackage -DisableDevelopmentMode -Register “$($_.InstallLocation)\AppXManifest.xml”}

Wrap up

For further information about Microsoft Store and potential fixes, check out our article on how to prevent Microsoft Store from crashing in Windows 11.

As previously stated, the error we discussed today was not a new one, as it was also present in Windows 10. We’ve already published an article on how to unblock the Microsoft Store in Windows 10, so be sure to check it out.

And lastly, you might want to take a look at our post on the new Microsoft Store in Windows 11 for additional information on its features and changes.

If you’re also dealing with other Store issues, check out how to restore Microsoft Store if it’s missing after an update, download apps without using the Store, or reinstall Microsoft Store on Windows 11.

FAQ

Do I need Microsoft Store?

Yes, if you want to download or update apps like Xbox, Photos, Calculator, or any tool that comes through the Windows Store. It’s also the easiest way to get official, safe apps without digging around online.

2. Why is Microsoft Store blocked on my Windows 11 device?

It’s usually blocked by admin settings, group policy, or parental controls. On work or school devices, IT might have disabled it on purpose.

3. What does error code 0x800704 mean?

This code shows up when Windows can’t open the Store due to permission issues, broken services, or missing system files.


How to Install Microsoft Store on Windows 11 Computers [Step-by-Step]

Want to install the Microsoft Store on a Windows 11 computer? Whether you’re missing it, want to fix errors, or just need to reinstall after a system reset, this guide breaks down everything you need to know to restore full app access.

How do I install the Microsoft Store on Windows 11?

1. Reinstall Microsoft Store using PowerShell

  1. Press the Windows key, type PowerShell, and click Run as administrator under Windows PowerShell.
    run as admin install microsoft store windows 11
  2. Copy and paste the command below and hit Enter: Get-AppXPackage *WindowsStore* -AllUsers | Foreach {Add-AppxPackage -DisableDevelopmentMode -Register "$($_.InstallLocation)\AppXManifest.xml"}powershell command
  3. Finally, restart your PC.

The first thing to try to fix this issue is to install the Microsoft Store app on Windows 11 using PowerShell. The above command will help to reinstall the app and all the needed packages when you start your PC.

2. Run the executable file WSReset

  1. Go to Search, type wsreset, and click Open to run the command.ws reset
  2.  A command-line window will open and run the executable file WSReset.exe. Wait for a few seconds, and the command-line windows will close automatically. ws reset command
  3. The Microsoft Store app will now open up. microsoft store updated

By running this command, Microsoft Store will reset and clear the cache without altering the account settings and disabling the installed applications.

Run this command and try the previous solution again to successfully install the new Microsoft Store on your Windows 11 PC.

Now that Microsoft Store opens correctly, learn how to browse, install, and update apps with this quick guide: How to Use Microsoft Store.

3. Update the Store manually

  1. Once again, open Microsoft Store by clicking the icon from the taskbar.Open Microsoft Store
  2. Click on the three dots in the corner of the screen.Microsoft-Store
  3. Choose Downloads and updates.Microsoft-Store-downloads-and-updates
  4. Click the Get updates button.Microsoft-Store-Get-updates
  5. The system will now check all apps for updates, including the Microsoft Store. Note that after the updating process is complete, the app store will close automatically.

Updating the Microsoft Store manually only works if you use the preview version of Windows 11. With this, you should have a preview version of the Store app that only needs to be updated.

4. Repair and install Windows 11

  1. Download the Windows 11 ISO file and open the downloaded file.
    open install microsoft store windows 11
  2. Please wait for it to mount the installation file to a separate drive on File Explorer and launch the drive.
  3. Now, double-click on the setup.exe file.
    setup
  4. Click the Next button on the Install Windows 11 page.
    next install microsoft store windows 11
  5. Wait for the necessary updates to be downloaded and click the Accept button on the license page.
    accept
  6. Choose the Keep personal files and apps option and click the Next button.
    keep personal files
  7. From here, follow the simple onscreen instructions to complete the setup.

Wrapping up

It’s not impossible to download Microsoft Store apps without the store, but it sure is more difficult. While the Store is typically built in, if you have trouble with it, you can qucikly install it again following the steps outlined above.

There you have it; everything you need to install the Microsoft Store app on Windows 11 easily. With the info in this guide, you should be able to reinstall the app or update it to the whole package if you use the preview.

Feel free to let us know the solution that helped you get the Store app working on Windows 11 in the comments below.

Frequently Asked Questions

Why is the Microsoft Store missing from my computer?

You might find that the Microsoft Store app is blocked or unavailable if you sign in to a local account. Also, if you are using a work or school Windows 11 PC, the Store app might be disabled by the admin. In this case, you need to contact the admin to enable the app.

Can you uninstall the Microsoft Store?

No, you can’t completely uninstall Microsoft Store. It’s part of core system apps. However, you can disable or hide it through Powershell.

Microsoft Store Not Downloading Anything in Windows 11 [Fix]

Microsoft Store in Windows 11 offers several improvements over the previous iteration and is a vital part of the OS. But, many users, of late, reported that Windows 11 Microsoft Store is not downloading anything and installing apps.

One subjacent issue that is particularly frustrating is that the Xbox app won’t install if you try to perform this operation from the Microsoft Store.

And that’s not the only problem. Sometimes, the Store keeps crashing or some apps are not showing up in the store. But in many cases, the underlying cause is the same. So, let’s go ahead and find out what to do if you can’t install apps in Microsoft Store.

Why is my Windows 11 Microsoft Store not installing apps?

Here are some of the reasons why Microsoft Store won’t install apps on Windows:

  • Running an outdated OS or Microsoft Store – If either is outdated, Microsoft Store may throw errors when downloading apps.
  • Critical services not running – You need to have the Microsoft Store Install service running for the application to seamlessly install apps.
  • Corrupt system files – It’s another reason behind problems installing apps from Microsoft Store, and fixing the corrupt system files should get things up and running.
  • Antivirus or firewall triggering conflicts – In case you have a third-party antivirus or firewall installed on the computer, it might conflict with the Microsoft Store or impose restrictions on downloads.

What can I do if the Microsoft Store is not downloading anything on Windows 11?

Before we try the slightly complex solutions, here are a few quick ones that might do the trick:

  • Restart the computer and once it’s turned on, check whether Microsoft Store is now installing apps.
  • Install all available updates for Windows 11 since it helped fix things for a few users.
  • Disable any third-party antivirus, firewall, or VPN that you may have installed.

If these don’t work and you still can’t install apps from the Microsoft Store on Windows 11, head to the solutions listed next.

1. Relogin to Microsoft Store

  1. Open the Microsoft Store app, click on the profile near the top-right corner, and select Sign out.sign out to fix windows 11 microsoft store not installing apps
  2. Now, close Microsoft Store and restart the computer.
  3. Once done, relaunch Microsoft Store, click on the profile, and select Sign in.sign in
  4. Choose your Microsoft account, and click Continue.choose account
  5. Verify your identity to complete the process.

If the current login session has run into an issue, re-logging into the Microsoft Store should help fix things when it’s not installing any apps. Also, if you haven’t yet signed in, make sure to do so.

2. Run the built-in troubleshooter

  1. Press Windows + I to open Settings, and click on Troubleshoot in the System tab.troubleshoot
  2. Click on Other troubleshooters.other troubleshooters
  3. Now, click on Run next to the Windows Store Apps troubleshooter.run to fix windows 11 microsoft store not installing apps
  4. Follow the on-screen instructions to complete the process.follow

The built-in troubleshooter helps fix many issues with the Microsoft Store, so try that as well.

3. Reset Microsoft Store cache

  1. Press Windows + R to open Run, type wsreset.exe in the text field, and click OK.wsreset.exe to fix windows 11 microsoft store not installing apps
  2. Now, wait for the reset process to complete.

Once done, check whether Microsoft Store is now installing apps in Windows 11. If not, head to the following method.

4. Run the System File Checker

  1. Press Windows + S to open the Search menu, type Command Prompt in the text field, and click on Run as administrator.command prompt
  2. Click Yes in the UAC prompt.
  3. Type in the below command and press Enter:sfc/scannowRun SFC scan to fix windows 11 error recovery

Your system will now be checked for corrupt files; if it finds missing or corrupt files, it will repair them automatically.

After the process is complete, reboot your PC and see if this fixes Windows 11 Store not installing apps issue.

5. Make sure the critical services are running

  1. Press Windows + R to open Run, type services.msc, and hit Enter.services
  2. Now, locate the Microsoft Store Installation Service, right-click on it, and choose Properties.properties
  3. Select Automatic from the Startup type dropdown menu, click on Start to run the service, and then on OK to save the changes.start service to fix windows 11 microsoft store not installing apps

6. Reset Microsoft Store

  1. Press Windows + I to open Settings, choose Apps from the navigation pane, and click on Installed apps.installed apps
  2. Locate Microsoft Store, click on the ellipsis next to it, and select Advanced options.advanced options
  3. Now, click on the Reset button.reset to fix windows 11 microsoft store not installing apps
  4. Again, click Reset in the confirmation prompt.reset

A reset is another effective troubleshooting method when Microsoft Store is not installing apps in Windows 11. You might lose the search history and stuff, but it will get Microsoft Store working again.

7. Perform an in-place upgrade

  1. Go to Microsoft’s official website, and download the ISO file for Windows 11.iso file to fix windows 11 microsoft store not installing apps
  2. Launch the ISO file when downloaded, and click on Open.open
  3. Now, launch the setup.exe file.setup to fix windows 11 microsoft store not installing apps
  4. Click Yes in the UAC prompt.
  5. Wait for the tool to configure things, then click on Accept to agree to the license terms.agree to license terms
  6. Verify that the setup lists Keep personal files and apps and click on Install.install

That’s it! If nothing has worked, an in-place upgrade is an ideal fix. It eliminates many issues with the OS that might prevent apps from running. And you wouldn’t lose the files or installed apps after the upgrade.

Now that you have gotten Microsoft Store to install apps in Windows 11 find out how to boost the PC’s performance.

If you still can’t install apps from the Microsoft Store, check out our dedicated guide for more help.

Also, do not forget to tell us which fix worked for you when the Microsoft Store was not downloading anything in Windows 11 in the comments section below.

Monster Hunter Rise is coming to Xbox Game Pass on January 20

After an Xbox Twitter accident spoiled the surprise for eager fans, Capcom has also come out and confirmed Monster Hunter Rise is finally coming to more platforms other than just the Nintendo Switch and Steam.

Even the game’s trailer confirms the Xbox One, Xbox Series X|S, PlayStation 4, and PlayStation 5, as well as Xbox and PC Game Pass subscription services, will be available on January 20.

So, if you are a fan of the Monster Hunter titles, this is a great opportunity to continue the adventure and slay even more challenging foes.

Monster Hunter Rise is hitting all platforms in January 2023

Note that all updates released for the Switch and PC versions since Rise’s launch will be available on the new platforms as well.

This, whitout question, will offer plenty of monster battling and capturing action in Kamura Village, so make sure you are prepared.

Unfortunately for fans hoping for a complete experience, Monster Hunter Rise’s Sunbreak expansion won’t be there on the new platforms at launch, as Capcom is aiming for a spring 2023 launch for it.

However, with the new launch, there are some additional features being attached to all platforms other than the Switch.

We’re talking 4K at 60FPS or 1080p at 120 FPS modes on the Xbox Series X and PS5, as well as 3D audio, visual filters, voice chat, and Adaptive Triggers on PS5.

This co-op title will also feature cross-play on Xbox platforms, with Xbox Series X|S, Xbox One, and Xbox app on Windows (PC Game Pass) players being able to hunt together.

Price-wise, Monster Hunter Rise, which is hitting the new Xbox and PlayStation platforms on January 20, 2023, will start at $39.99 for the standard edition and pre-orders are now available.

Are you eager to try out this new Monster Hunter game? Share your thoughts and opinions with us in the comments section below.

Chicken Invaders 5: Christmas Edition [PC, Android, iOS]

The invading intergalactic chickens are back in business. They’re unleashing their dark forces on Christmas Eve, exactly when everyone awaits the dawn of Christmas Day.

They’ve hatched a dark plan to make sure there will be no opening of presents, no riding a one-horse sleigh, no Christmas dinner.

Bundled with eye-catching graphics, the Chicken Invaders 5 multiplayer Christmas Edition game has an interesting back story as well. Don’t hesitate to find out all about it right away.

What’s Chicken Invaders 5: Christmas Edition all about?

get Chicken Invaders 5

If you have in mind the idea of a Chicken Invaders 5 Christmas edition free download full version for PC, rest assured that you are in the right place.

While everyone is preparing for the dawn of Christmas Day, evil intergalactic chickens invade Earth. They want to take revenge against the human race and make us pay for what we’ve done to Earth chickens.

Their plan involves blocking out sunlight and killing all human beings. Your task is to dismantle their plan and heroically save the day.

Players are given a huge responsibility to fight the most important battle of the galaxy against these evil birds. If you fail, Christmas as we know it will be history and this can’t happen.

To boost your gameplay, you can customize your very own aircraft. The settings allow you to change the color of the wings, the base of the aircraft, and the engine itself and upgrade your weapons.

You can grab your mate to get gaming together, as Chicken Invaders 5 Christmas Edition supports multiplayer. Or, if you want to be the only hero, there is also a single-player option available.

Apart from a stable Internet connection, there are several other requirements your computer needs to meet:

  • OS: Windows XP/Vista/7/8/8.1/10
  • Memory: 512 MB RAM
  • DirectX: Version 9.0c
  • Storage: 220 MB available space

Already got what the game needs? A quick Chicken Invaders 5 free download full version was in the cards for quite a long time, so you know what you have to do.

Chicken Invaders 5: Christmas Edition

Intergalactic chickens have hatched a plan to make sure the dawn of Christmas Day never comes. Will they be successful?
Check price Get it now

This is not the only gaming Christmas article we prepared for you. We have another great list including the best Christmas games to play on your Windows 10 computer.

If you’ve got a VR-capable PC and all the necessary VR accessories, then you can play one of these amazing Christmas-themed VR games as well.

Let us know if Chicken Invaders 5: Christmas Edition is an inspired choice for you as well by using the comments section below.

Microsoft frees up access to 350 courses and 6 new Career Essential Certificates for new job training

Microsoft is expanding its Skills for Jobs program by providing free access to 350 courses and six new Career Essentials.

Announced via LinkedIn post, cvp of Microsoft Philanthropies Kate Behncken lists the six new career roles that are in greatest demand and have become part of the Career Essentials Certificate program that include Administrative Professional, Project Manager, Business Analyst, Systems Administrator, Software Developer or Data Analyst.

As a refresher, Microsoft’s Skills for Jobs program is an effort from the company to “work with communities, nonprofits, and governments to help people excluded from the digital economy gain the foundational, role-based, and technical skills to gain jobs and livelihoods.”

For those interested, Microsoft is making this free to anyone that is looking to learn a new skill, completely free. In addition, Microsoft will also be providing grants to nonprofit partners to aid in training for these newly skilled participants.

Alongside the free courses, Microsoft will also be offering up to 50,000 LinkedIn Premium subscriptions to its nonprofit partners to hand out to those who obtain certificates as well as access to 18,000 LinkedIn Learning courses that are only offered via the paid Premium LinkedIn experience.

Microsoft is encouraging folks to visit opportunity.linkedin.com to check out courses and certificates available.

Avast Firewall is Blocking Network Share: 5 Ways to Fix It

Is the firewall of your Avast blocking the network share process? That’s not new, but there are a few ways to bypass that.

While Avast is a strong anti-exploit software for malicious applications/processes and websites, its firewall may sometimes trigger outgoing communication issues.

What causes Avast Firewall to block network share?

Some of the reasons why the Avast firewall triggers data traffic sharing issues over the network, or blocks the printer are:

Fortunately, we know a few workarounds that will help you resolve the Avast Firewall blocking network share issue.

How do I fix Avast Firewall blocking network share?

Before you try the primary troubleshooting methods, you may try the following:

1. Disable HTTPS scanning in Avast Firewall

  1. Open Avast, and click on Menu (three parallel lines). click on Avast menu
  2. Next, click on Settings in the menu. avast settings
  3. Now, select Protection from the left and click on Core Shields on the right. avast protection core shields
  4. On the right, scroll down to Configure shield settings, and go to the Web Shield tab. Here, uncheck the Enable HTTPS Scanning option. deselect Enable HTTPS Scanning

Now, check if the Avast firewall is still blocking network share or if the issue is resolved. But if you are unable to turn on the firewall in Avast, you can fix it easily.

2. Change the Firewall network rules 

  1. Launch Avast antivirus, and click on Menu at the upper right. click on Avast menu
  2. Click on Settings in the menu. avast settings
  3. Next, click on Protection on the left, go to Firewall on the right, and then click on View Firewall Rules. View Firewall Rules
  4. In the new window (Rule list), select the Network Rules tab, click on More, and then choose Filter rules to search or view the specific rule that meets certain criteria.  change Network Rules
  5. You can also click on More on the top right, and select Add new rule. avast network rules add new rules
  6. In the Edit rule window, define each parameter. Here, you can change the Profile to Private instead of Profile, and click on Save. edit new rule
  7. You can also click on the pencil icon on its right to edit the parameters later, and even enable or disable the rule. edit rule or enable or disable

Now, check if network sharing is working or firewall is still blocking it.

Note icon NOTE
You can also click on the Trash can button on the left to delete a rule. Or, you can also select the rule and drag it to set its position as well as the priority.

Is your Avast antivirus blocking the remote desktop? Changing the firewall network rules is also applicable in this case as explained in our detailed post.

3. Configure the Avast Firewall settings

  1. Open Avast antivirus, and click on the Menu icon on the top right. click on Avast menu
  2. Next, select Protection on the left, click on Firewall on the right and then select View Firewall rules.avast settings
  3. Now, select the Application rules tab, expand the application/process, and click on the pencil icon to edit the rule. change Application rules for process
  4. You can now change the profile type to Public or Private, and other parameters. application edit rule
  5. You can also enable or disable the rule, and even delete it by pressing the Trash can icon next to it. make changes to application rules

Once you have made the changes successfully, the Avast firewall should not be blocking network share anymore.

But, if it’s your Windows Defender Firewall rule that’s blocking your connection, we have some quick troubleshooting methods.

4. Add exceptions to the Avast firewall

  1. Open the Avast antivirus app, click on Menu, and click on the Settings option.avast settings
  2. Here, select General on the left, click on the Exceptions tab, and then press the Add Exception button on the right. avast antivirus add exception
  3. In the Add Exception window, you can either type in the URL or browse to the file that you want to whitelist. Click on Add Exception to save the URL.type url or browse to add exception

5. Disable Avast temporarily

  1. Launch Avast, click on Menu, and select Settings. avast settings
  2. Next, click on the Protection tab and select Core Shields on the right. avast protection core shields
  3. Now, on the right, go to each of the shields (File Shield, Behaviour Shield, Web Shield, and Mail Shield), and disable them one by one. disable all core shields

You may also stop the Avast secure browser from opening on startup if you suspect it’s instead a virus causing an issue with your PC and network sharing.

Does Avast interfere with the internet connection?

Avast does not block the internet, but it can sometimes block file downloads, or certain web pages that it may suspect as malicious.

In such cases, apart from following the above methods, you can also update Avast to the latest version as shown below:

  1. Open Avast, click on Menu, and then select Settings. avast settings
  2. Next, select General on the left and then click on Update.avast settings update
  3. On the right, go to Virus definitions and click on Check for updates. avast check for updates
  4. Avast will now start checking for updates and if any are found, it will install them automatically.

Once done, restart your PC and check if the issue is resolved.

At the same time, make sure that you follow our detailed guide to allow programs through Avast Firewall to make sure that it’s not blocking network share.

Alternatively, you can also turn off the Avast Firewall, reinstall the software, or contact their customer support for further assistance.

For any other queries related to Avast, you can feel free to let us know in the comments section below.

Fix: PC Stuck at Cleaning Up Don’t Turn Off Your Computer

If your computer is stuck at Cleaning up, don’t turn off your computer for longer than expected, then there could be a problem. But don’t worry, it can be fixed.

In this guide, we will talk about all possible fixes and the reasons behind the issue. Let’s start! 

What causes the PC stuck at Cleaning up don’t turn off your computer?

There could be various reasons for the issue to occur. Some of them are listed below:

  • Computer infected with a virus – If your computer has a virus or malware, it could take forever to install an update. Use Windows Security or any reliable security software to initiate a scan.
  • Unwanted software– Check your computer for unwanted apps and uninstall them for smooth performance.
  • Poor network connection – Your internet could also be a culprit. Check whether your internet is working properly on other devices.

What can I do to fix PC stuck at Cleaning up don’t turn off your computer error?

Before diving into serious troubleshooting, make sure you do this:

  • Sometimes it takes more time for the update to be installed and clean up after; please wait for a while.
  • If you have already waited long enough, remove all unnecessary peripherals and restart your PC.
  • Check your internet connection.
  • Run a deep scan using an antivirus tool.

If nothing comes up in the scan and your internet is working fine, check out the detailed steps:

1. Use the Automatic Repair tool

  1. Press Windows + I to get Settings.
  2. Go to System, then Recovery.Recovery
  3. Select Advanced startup, then click Restart Now.Recovery Advanced Startup
  4. On Choose an option screen, click Troubleshoot.Choose an option - Troubleshoot
  5. Now select Advanced Options.Advanced options
  6. Under Advanced Options, select Startup Repair.Startup Repair
  7. Follow the on-screen instructions to repair and fix problems on Windows.

Another simpler and faster alternative is to use a specialized repair tool to scan and find all errors on your computer and fix them if possible.

2. Perform a system restore

  1. Press Windows + I to open Settings.
  2. Go to System, then Recovery.
  3. Locate Advanced startup, and click Restart Now.
  4. Click Troubleshoot.
  5. Select Advanced Options.System Restore
  6. Choose System Restore and follow the on-screen prompts to complete.

3. Use Safe Mode to install updates

  1. Press Windows + R to open the Run window.
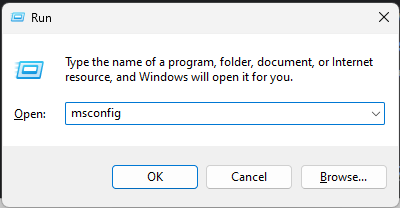
  2. Type msconfig and press Enter to open System Configuration.CLEAN BOOT 1
  3. Go to Boot, then select  Safe boot and Network under Boot options.Safe boot with Network
  4. Click Apply and OK.
  5. On the next screen, select Restart.
  6. Once your computer restarts, press Windows + I to open Settings.
  7. Go to Windows Update, and click Check for updates.Updates
  8. Install updates and follow the above steps to reopen the System Configuration window.
  9. Uncheck Safe boot and click Apply and OK to restart normally.

4. Reset your PC

  1. Press Windows + I to open Settings.
  2. Go to System, then click Recovery.
  3. Now choose Reset PC from the Recovery options.Reset
  4. On Choose an option, click Keep my files.
  5. On the next window, select Cloud download.Reset2
  6. Follow the on-screen prompts to refresh your PC settings.

So, these are steps to fix PC stuck at cleaning up don’t turn off your computer. Try these fixes and let us know which worked for you in the comments section below.

CCleaner Crashes on Windows 10: 5 Thorough Ways to Fix it

Are you experiencing CCleaner crashes on Windows 10? Here is all you need to know about this problem.

If you have been a Windows user for a long time, then CCleaner is no stranger to you. For starters, CCleaner works to scan and delete unnecessary files to free up space in your computer storage.

As a third-party software, CCleaner also helps to resolve computer issues arising from old or corrupted files.

While the software is designed to help fix computer problems, it can sometimes run into an error itself. Users are reporting a crash issue in CCleaner while the tool is running.

Let’s discuss common causes and the best solutions.

What causes CCleaner crashes on Windows 10?

Several factors can cause CCleaner to crash (C000021A error). Here are the most common factors:

  • Bad app files – This could be a corrupt download or improper software installation.
  • App modification or update – The problem arises after you have modified or updated CCleaner, which can corrupt the Windows registry if the change is incomplete.
  • Malware – Malware infection is another major contributor to the CCleaner crash as it corrupts Windows system files or CCleaner files. However, even non-malware programs can cause CCleaner to crash when files related to the disk cleanup tool are inadvertently deleted upon running those programs.
  • Outdated drivers – There’s a good chance that outdated PC device drivers are causing the C000021A error.

Below is a list of solutions to help you fix CCleaner crashes.

How can I fix CCleaner crashes on Windows 10?

Before you go into these solutions, you may consider using an alternative disk cleanup software. It may save you the stress of troubleshooting.

1. Scan your computer for malware

  1. Type Windows Security in the Search bar, and click on the relevant search result.
    ccleaner crashes windows 10
  2. Now, click on Virus & threat protection here.
  3. Click on Scan options.
    ccleaner crashes windows 10
  4. Now, select Full scan and click on the Scan now button at the bottom.

The C000021A error sometimes arises due to malware on your computer. Malicious software could corrupt and remove runtime-related files.

Instead of using the built-in Windows Security system, a compatible antimalware in Windows 10 should be suitable for protection and not interfere with other system settings or programs.

2. Update device drivers to fix the C000021A error

Driver updates are always available to download from software manufacturers.

The challenge, though, is the arduous task of finding the exact driver for the C000021A-related device. Worse, installing the wrong driver update can even lead to further issues.

You can also deal with this problem a lot easier by using specialized software to update drivers automatically. There are a few such third-party software, but we recommend Outbyte Driver Updater.

Here’s what you need to do:

  1. Download Outbyte Driver Updater
  2. Start the program and wait for it to scan your PC
  3. Select the drivers from the list and wait for their installation
  4. Restart your PC

Outbyte Driver Updater

Easily install the Outbyte Driver Updater app to automatically update your drivers with the most recent versions.
Free Trial Download now

3. Disable your antivirus

  1. Click on the hidden access arrow in the Taskbar.
  2. Click on your antivirus icon, hover over Avast shields Control and select Disable for 10 minutes (This step varies for different antivirus software).
    ccleaner crashes windows 10

Note that the steps may differ depending on the antivirus that you use.

4. Download and install Windows updates

  1. Press Windows + I to open the Settings app.
  2. Click on Updates & Security.
    ccleaner crashes windows 10
  3. Select Windows Updates and click Check for updates.

Microsoft constantly rolls out updates to improve Windows. But most users frequently ignore these updates, inadvertently or otherwise.

These updates, in fact, usually help to fix C000021A errors with the newest Service Pack and the latest patches.

5. Reinstall CCleaner

  1. Press Windows + R and type appwiz.cpl, then hit Enter.
  2. Click on CCleaner and select the Uninstall/Change button.
  3. Follow the wizard to complete the process.
  4. Download and install a fresh copy of the app.

Disk Clean-up should be performed at least once a month as a preventative maintenance operation. Disk Clean-up may erase temporary internet data, downloaded application files, and offline web pages.

So, if CCleaner crashes on Windows 10, any of these fixes should help you resolve it.

You may also use disk clean-up to clear the recycle bin, erase temporary files, and delete thumbnails.

Finally, please leave your comments below and tell us what solution worked for you.

Keep Screen On When Laptop is Closed [Windows 11 Guide]

No other device can match the portability and convenience of a laptop computer. If you wish to buy and use a laptop for work purposes or if you like to consume some information on a screen larger than your laptop from time to time, you may wish to connect it to an external display.

This is where the issue arises since you will most likely want to keep the monitor on when the laptop is closed on Windows 11. By default, the Windows 11 lid close action is set to put your laptop to sleep when you close the lid.

As you might imagine, having an open laptop lid sitting on your desk while connected to a newly bought external monitor is not an ideal situation, nor is it a comfortable one to be exposed to. Thus we will show you how to customize the Windows 11 lid close action in order to fix this issue.

You don’t have to put up with this cruel condition, and you can close the lid of your laptop without putting it to sleep or interfering with its operation. Let’s see how you can achieve this, right after we understand what hibernate and sleep modes are.

How do I keep the monitor on when the laptop is closed on Windows 11?

  1. 1. Press the Windows key on your keyboard to open the Windows Search function.

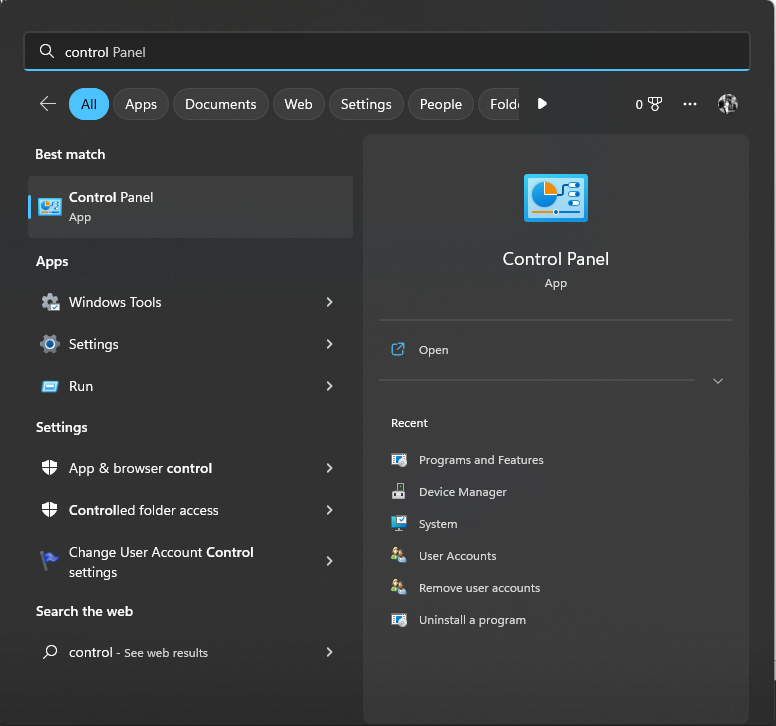
  2. 2. Type Control Panel in the search box and click to open the topmost result.

    control-panel-search what is windows control panel
  3. 3. Navigate to Power Options.

    power-options Windows 11 lid close action
  4. 4. Next, select the Choose what closing the lid does option to edit the Windows 11 lid close action when opening your laptop.

    choose-lid Windows 11 lid close action
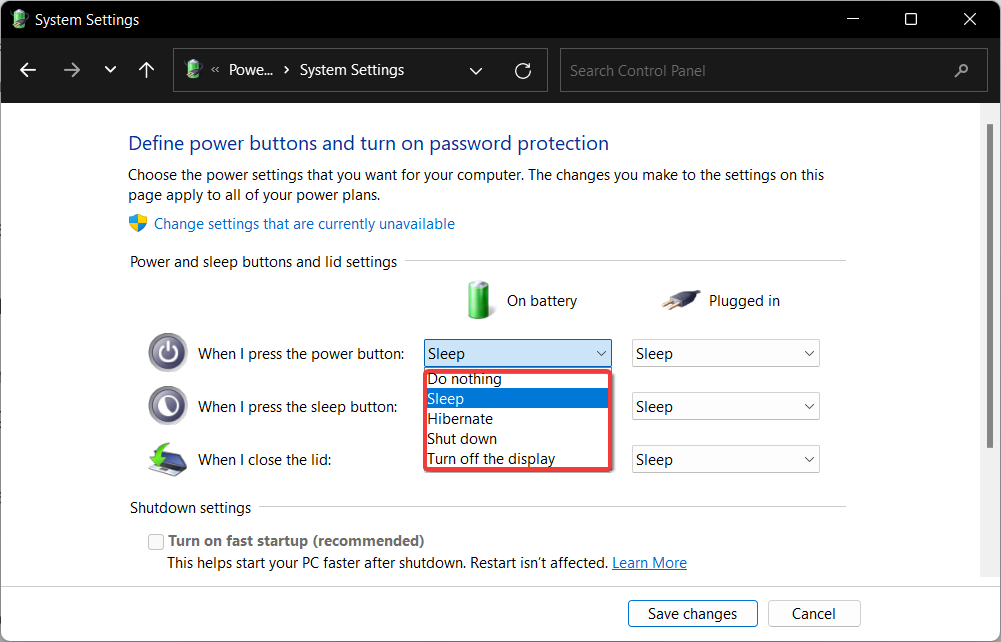
  5. 5. Here, you can select the Do nothing option under the On battery section and Plugged in one, in order to keep your monitor on when the laptop lid is closed.

    For more information on the other options, check out Microsoft’s page on those actions.

    do-nothing Windows 11 lid close action
  6. In order to do nothing when the laptop lid is closed in Windows 11, you need to tweak your PC’s Power Settings.

    When your laptop is linked to an external monitor, you may now close the lid and continue working without having to worry about it going to sleep or hibernating.

    Note that this mode of operation is called the clamshell mode and refers to a working laptop that has the lid shut off.


What can I do if lid customization settings are missing?

  1. Note that this solution also works for the lid close action missing in Windows 10 error. Open your Command Prompt app by typing cmd inside the Windows Search function.cmd-run Windows 11 lid close action
  2. Next, type or copy-paste the following command and press Enter in order to fix the lid close action missing in Windows 11 / 10: REG ADD HKLM\SYSTEM\CurrentControlSet\Control\Power\PowerSettings\4f971e89-eebd-4455-a8de-9e59040e7347\5ca83367-6e45-459f-a27b-476b1d01c936 /v Attributes /t REG_DWORD /d 2 /freg Windows 11 lid close action
  3. If you wish to also add the missing Windows 11 lid open action type or paste the following command and press Enter: REG ADD HKLM\SYSTEM\CurrentControlSet\Control\Power\PowerSettings\4f971e89-eebd-4455-a8de-9e59040e7347\99ff10e7-23b1-4c07-a9d1-5c3206d741b4 /v Attributes /t REG_DWORD /d 2 /f
  4. In order to customize the lid open action, go to the Power Options section inside Control Panel and choose Change plan settings next to your current plan.change-plan
  5. Next, click on Change advanced power settings and expand the Power buttons and lid option in order to tweak the configuration.change-advanced

Now you should be able to change the Windows 11 lid close action when starting settings as we have shown in the first solution, as well as tweak the lid open action configuration.

Are hibernate and sleep mode the same thing?

Two computer modes that must be distinguished are sleep and hibernate modes, which are frequently used interchangeably but are not the same thing in reality.

Sleep mode is a power-saving one that allows activities to restart once the device is ultimately charged again.

sleep Windows 11 lid


Hibernate mode, is intended to conserve power, but it differs from sleep mode in terms of what happens to your data. The documents and files that you are now working on are stored in the RAM, requiring only a minimal bit of power in the process.

The former effectively accomplishes the same thing as hibernate mode, except it stores the information on your hard disk, allowing you to power off your computer and saving all of the energy it would have consumed.

When you turn your computer back on, the hard drive allows you to pick up precisely where you left off with your work. Hibernate is primarily intended for laptops, and it is most effective when you are not planning to use your device for an extended time.

Moreover, if you encounter troubles when connecting a second monitor, check out our guide on what to do when your laptop doesn’t detect the second monitor.

Alternatively, take a look at our post on how to fix random external monitor behavior, such as turning off or disconnecting.

Don’t hesitate to tell us what you think in the comments section below as well as if you have more solutions in mind. Thanks for reading!

You May Be A Victim of Software Counterfeiting: How to Fix It?

Getting you may be a victim of a software counterfeiting warning can be frustrating. This Windows Authentication error occurs when a Windows license is flagged as not genuine.

This guide will discuss the potential reasons for the issue and available fixes. Let’s begin!

What causes you may be a victim of software counterfeiting?

There could be a handful of reasons for getting this error. We have mentioned some of the popular ones here:

  • Windows License is not genuine – If your computer has a cracked version of Windows, and Windows Genuine Advantage Update scans your PC to ensure Windows license authenticity, this issue could occur.
  • Registry files are corrupted – If the Registry keys on your computer are missing or corrupted, you could see the error.
  • Windows  License is used in more than one computer – If you have the original Windows license, but it is being used on more than one computer, the issue can occur. It is advised to cross-check with your seller to ensure the same.

How do I deal with the you may be a victim of software counterfeiting message?

Before performing serious troubleshooting, let us check out some quick fixes:

If these fixes didn’t work for you, try using the methods mentioned below to re-authenticate your Windows license.

1. Reactivate Windows

  1. Press the Windows key, type CMD, and click Run as administrator.CMDm elevated
  2. On the Command Prompt window, copy and paste the following command to get the Windows product key and press Enter: wmic path softwareLicensingService get OA3xOriginalProductKeyProduct key
  3. Note the product key. Press Windows + R to open the Run window.
  4. Type slui.exe and hit Enter.Activation window
  5. Click Upgrade your edition of Windows, then go to the Change Product key and click Change.
  6. On Enter a product key window, type in or paste the license key you noted and press Next.Activation
  7. Click Activate, and it is done.

2. Disable Plug and Play service via Group Policy Editor

  1. Press Windows + R to open the Run window.
  2. Type rsop.msc and press Enter to open the Resultant Set of Policy.
  3. Now navigate to the following path:  Computer Configuration\Policies\Windows Settings\Security Settings\System ServiesRSOP
  4. Locate Plug and Play and check if Startup and Permission are set to Not Defined. If not, right-click on Plug and Play and select Properties.
  5. Now change Permission and Startup status to Not defined.
  6. Close the window and restart your computer.

3. Delete Wgalogon folder from Registry Editor

  1. Press Windows + R to open Run.REGEDIT RUN COMMAND
  2. Type regedit and hit Enter.
  3. Go to this path: Computer\HKEY_LOCAL_MACHINE\SOFTWARE\Microsoft\Windows NT\CurrentVersion\Winlogon\Notifywgalogon
  4. Locate and right-click on the Wgalogon folder and select Delete.

4. Remove WGA files

  1. Press Windows + E to open Windows Explorer.
  2. Follow this path to get WGA files: C:\Windows\System32
  3. Type wga in the search bar and press Enter to locate all WGA files, including WgaSetup.exe and Wgatray.exe.wga DELETE
  4. Delete all the files and reboot your computer.

Note: If you can’t find the System32 folder, go to View, select Show, and then select Hidden items.

5. Add Necessary Network Service Permissions

  1. Press Windows + R to get the  Run window.
  2. Type regedit and hit Enter to open Registry Editor.
  3. Go to HKey_Users, click it to expand, and right-click S-1-5-20.
  4. Select Permissions.regT
  5. Now on the next screen, check if Network Service is available in Group or user names section.
  6. If yes, then go to step 8. If not, click on Add, and under Enter the object names to select, type Network Service.
  7. Now click the Check Names button and click OK.Change value
  8. Click Network Services and put a checkmark on Allow box for the Full Control and Read option. Click Apply and then OK.Aloow and read
  9. Reboot your PC to let the changes take effect.

6. Disable Automatic Updates

  1. Press the Windows + R to open the Run window.
  2. Type regedit and press Enter.REGEDIT RUN COMMAND
  3. Follow this path: HKEY_LOCAL_MACHINE\SOFTWARE\Policies\Microsoft\Windows
  4. Select Windows and right-click on Windows, choose New, then Key.
  5. Rename the key as WindowsUpdate, right-click, select New, then Key.
  6. Name the key AU. Right-click on the AU key and choose New. Select DWORD (32-bit) Value.
  7. Rename the DWORD as NoAutoUpdate. Double-click it to modify the Value data, type 1, and click OK.Regedit
  8. Restart your computer.
  9. Your computer will not automatically download updates, but you can manually check and download updates when needed.

So, these are steps to fix you may be a victim of software counterfeiting issues. If you think we missed the method that worked for you, please let us know in the comments section below.

Find and Delete Duplicate Files in Windows 11 [3 Easy Steps]

Is your system becoming slow due to low storage? That’s a problem we all face at some point, but everyone has a different approach. While many go around uninstalling applications, it’s recommended that you first remove duplicate files in Windows 11.

No matter how careful you are while arranging the various files on your PC, there’s always a chance that some of these could be duplicated inadvertently. And if these are scattered across folders and drives, the process is even more difficult.

You can also check how to remove duplicate files in Windows 10.

Is there a way to search for duplicate files in Windows?

Before removing duplicate files in Windows 11, you must know how to find them. There are a few ways you can go about this, and here are our top methods:

  • Third-party tools – In this domain, you will find more than enough; you, however, must be careful to use only trusted third-party duplicate finder apps.
  • Sort function – This works when you are using File Explorer. You can search by Name, Size, and other parameters.
  • File Explorer’s view – This may not be the sleekest way to do this globally, but it is efficient, especially while searching through a folder.

If you encounter problems with the File Explorer, the first method would be your preferred option.

Let us explore better ways to find and eliminate these duplicates on Windows 11.

How do I find duplicate files on Windows 11?

1. Via File Explorer

  1. Click on the Sort menu and select Name.
    find duplicate files windows 11
  2. Click on View and select Details.
    find duplicate files windows 11
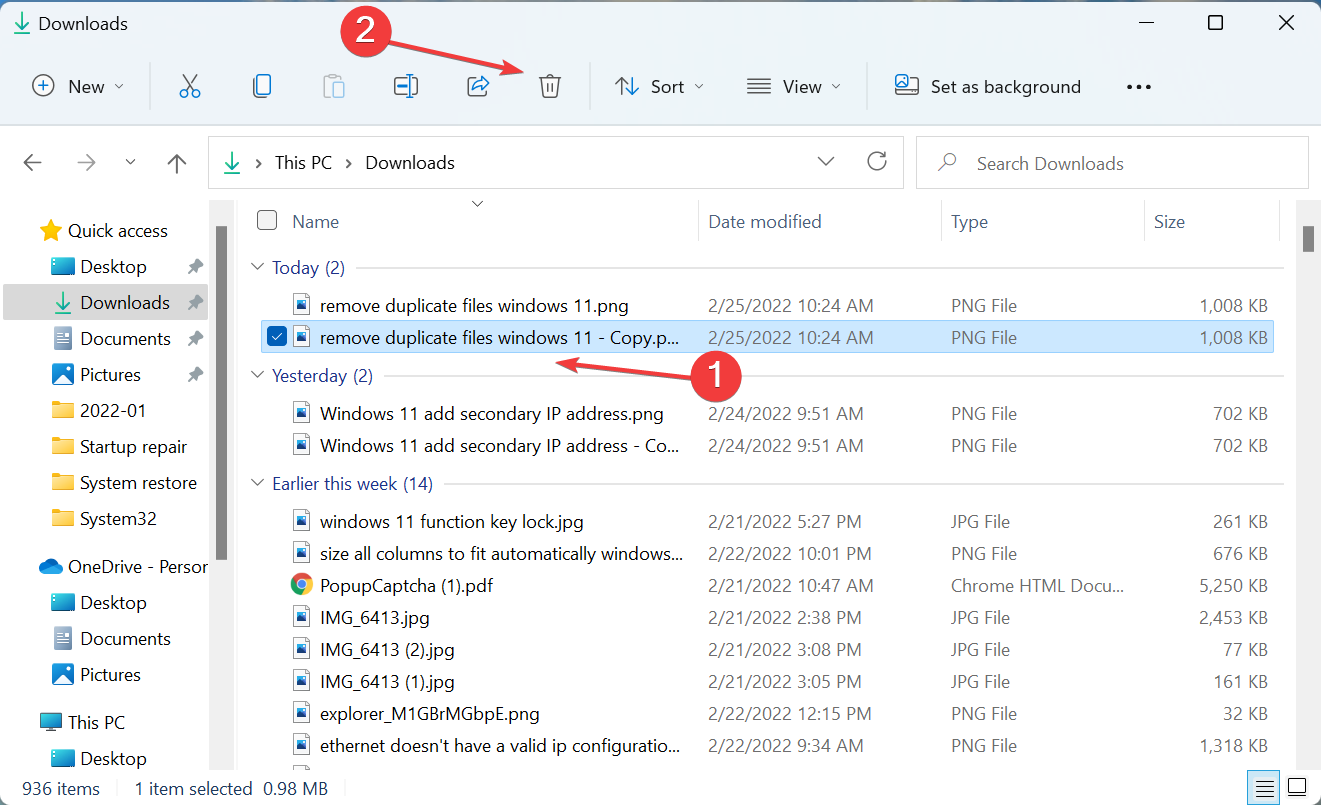
  3. Select the duplicates individually, and then either click on the Delete icon in the Command Bar or hit the Del key.Click Delete icon to remove duplicate files in Windows 11
  4. A more straightforward way to delete many in one go would be to press and hold the Ctrl key, select all the files to be deleted, and then hit the Del key.Select multiple duplicate files
  5. Click Yes in case the confirmation box pops up in either case.

This is probably the simplest way to remove duplicate files in Windows 11, but it’s monotonous. Navigating to each folder, sorting the files, finding the duplicate ones, and then removing them might not be something you’re able to do.

But it’s also safer since you don’t delete any critical files. Unfortunately, there have been cases where people used a third-party software solution, and it ended up deleting some important files.

2. Use Command Prompt

  1. 1. Locate the folder where the duplicate files to be removed are stored, right-click on it, and select Copy as path from the context menu.

    Copy as path to remove duplicate files windows 11
  2. 2. Once you have the path to the folder, press Windows + S to launch the Search menu.

  3. 3. Enter Windows Terminal in the text field at the top.

  4. 4. Right-click on the relevant search result, and select Run as administrator from the context menu.

    Launch Windows Terminal
  5. 5. Click Yes on the UAC (User Account Control) prompt that pops up.

    Click Yes on uac
  6. 6. Now, click on the downward-facing arrow at the top, and select Command Prompt from the list of options. Alternatively, you can hit Ctrl + Shift + 2 to launch Command Prompt in a new tab.

    Open Command Prompt to remove duplicate files windows 11
  7. 7. Type/paste the following command while replacing the folder path with the actual one that you copied earlier, and hit Enter: cd /d "folder path"

    Execute command cmd
  8. 8. Execute the following command while replacing the name and extension here for the files to be deleted: del "* - Copy.png"

    For instance, if you want to delete .txt files with the suffix 1, the command becomes as follows: del "* - 1.txt"

    Run command to remove duplicate files windows 11
  9. In case you are comfortable using commands to execute tasks, you can use a command line tool to automatically delete a large chunk of duplicate files in one go.

    The recommended tool to use is Command Prompt, but this method works with Powershell as well. Through commands, you can modify your PC’s files and sort out the duplicates.

That’s it! The duplicate files under the command will now be removed in Windows 11. It’s simple and quick, but there’s even a more straightforward and faster method, i.e., using reliable third-party software.

3. Use a reliable third-party software

If you do a Google search, it will list a plethora of third-party software. And most of these will claim to be the best in removing duplicate files in Windows 11.

But not all are effective. On the contrary, some could even remove critical files and prevent the OS from booting. So it would be best if you chose reliable third-party software.

We recommend using Easy Duplicate Finder, a dedicated tool that scans for all duplicate files on the computer and allows you to remove them with a single click.

It’s simple to run and one of the quickest. Also, it can find duplicates amongst different file types, be it images, videos, audio clips, and many more. It can find duplicate files on the computer, Google Drive, iTunes, Windows Media, and other platforms.

You now know how to find and remove duplicate files in Windows 11. With a proper understanding of the various ways, you can easily choose the one that best suits your requirements and is the most efficient. And do not forget to remove the duplicate drives as well.

Besides, check the best tools to find and remove duplicate files in Windows 10. This should work in case you have another PC running the previous OS.

Our readers also had problems with removing email duplicates in Outlook, but the highlighted guide will provide help for that.

Tell us which method worked best or if you choose a third-party app to remove duplicate files in the comments section below.

Microsoft Teams Status is Not Updating: How to Fix It?

If Microsoft Teams is not updating your status correctly, appears stuck on Away, shows “Status Unknown,” or prevents you from changing your availability, the issue can usually be traced to cached data, account sync problems, or outdated app behavior. Below are specific steps to help resolve the problem.

What can I do to fix the Microsoft Team status not updating?

1. Add Outlook profile again

  1. Press the Windows key, type Control Panel and click Open.Control Panel
  2. Click on Category, and choose Small icons. Click on Mail.CP 2
  3. Now click Show Profiles.Show profiles
  4. Select Outlook and click Remove.Outlook profile
  5. Click Apply and OK.
  6. Open Outlook and enter a profile name Outlook.
  7. Restart your computer and relaunch Teams.

2. Create a Day Meeting

  1. Launch the Teams app and click on Calendar from the left pane.
  2. Click New Meeting.Create Meeting
  3. Enter the details for the meeting and toggle on for All Day option.MT 2
  4. Click Save and wait a few minutes,
  5. Now, go to Calendar and double-click on the meeting.
  6. Click the Cancel the meeting option.Cancel Meeting
  7. On the next prompt, click Cancel meeting.

3. Delete configuration files

  1. Press Windows + R to open the Run window.
  2. Follow this path and replace the user with your username: C:\Users\user\AppData\Roaming\Microsoft\Teams
  3. Navigate to the settings.json file, copy and paste it on Desktop.Delete Settings 
  4. Once done, delete it from the Teams folder.
  5. Sign out from the Teams app and restart your PC.
  6. Now sign back in.

4. Clear the cache

  1. Close the Teams app and follow this path but replace the user with your username: C:\Users\user\AppData\Roaming\Microsoft\TeamsTeams folder Delete files
  2. Locate these files and delete them one by one: application cache\cache, blob_storage, Cache, databases, GPUcache, IndexedDB, Local Storage, tmpdelete teams cache files.
  3. Restart your computer, launch Teams, and check if you can change the status.

Before you leave, we have a whole guide dedicated to the CAA50021 error code that can affect Teams among other Microsoft services, so be sure to check it out.

So, these are the methods you must follow to resolve Microsoft Teams’ status not updating issue. Try these methods and let us know what worked for you in the comments below.

Windows Defender Blocking Steam Games: 5 Easy Fixes to try

Has Windows Defender been blocking Steam games on your computer? Here is all you need to know about this problem.

Windows Defender is essential antivirus software that comes pre-installed with Windows 10.

Although Windows Defender isn’t the best antivirus software, it can do a decent job, but sometimes it can cause problems.

We have reports that Windows Defender is blocking Steam or other games, so let’s explore possible triggers and some good solutions.

Does Windows Defender interfere with Steam?

Windows Defender is very compatible with programs that run on the OS. So, you would not expect it to interfere with Steam usually. However, there are a few factors that can lead to this. At the top of this list, include the following:

  • Outdated OS – Many system utilities are updated with new OS updates, so if the Defender is outdated, it may consider certain files as threats.
  • Windows Defender exclusions not working – Windows Defender might block specific applications even if they are on the exclusions list. You may have to disable Windows Defender entirely or switch to a different antivirus solution.

These are the leading two causes users have highlighted, but the following fixes should work irrespective of what triggers the issues.

What can I do if Windows Defender closes your games?

Before proceeding with other solutions, you may consider switching to a third-party antivirus.

Windows Defender offers solid protection, but sometimes it can cause specific game issues. On the other hand, third-party antivirus applications often provide better protection and more security features.

We recommend the tool below because it’s light on your system and doesn’t interfere with your games.

TotalAV

This tool doesn’t interfere with your games and will help you enjoy them by blocking distractions.
Free Trial Visit Website

1. Add an exclusion

  1. Press Windows + I to open the Settings app, and click Update & Security.
  2. In the menu on the left select Windows Security. In the right pane, click Open Windows Defender Security Center.
    Windows Defender blocking Steam
  3. On the right side of the window, navigate to Virus & threat protection and click on Add or remove exclusions.
    Windows Defender exclusions not working
  4. Choose Add an exclusion.
    windows defender blocking steam games
  5. Now select the game’s directory that is being closed by Windows Defender.
  6. Click Exclude this folder, which Windows Defender won’t monitor anymore.

One way to make Windows Defender leave your game alone is to exclude its folders from scanning. First, however, make sure that the contents aren’t truly harmful.

2. Turn off Windows Defender using group policy and the registry

  1. In the Search bar, type gpedit.msc to open Local Group Policy Editor.
  2. On the left side, navigate to the path below:
    Computer Configuration/Administrative Templates/Windows Components/Windows Defender
    Windows Defender blocking programs
  3. On the right side, find Turn off Windows Defender and double-click it, and select the Disabled option.
    windows defender blocking steam games
  4. Click Apply and OK.
Note icon NOTE
Note: The Group Policy Editor is not available for users running a Windows Home version. However, we have an excellent guide that will help you install it.

3. Turn off Controlled folder access

  1. Press Windows + I to open the Settings app, and click Update & Security.
  2. In the menu on the left select Windows Security. In the right pane, click Open Windows Defender Security Center.
    Windows Defender blocking Steam
  3. Go to Virus & threat protection in the left pane and click on Virus & threat protection settings from the right.
    Windows Defender blocking everything
  4. Scroll down to the Controlled folder access section and click Manage Controlled folder access.
    Windows Defender blocking programs
  5. Disable the Controlled folder access feature.
    Windows Defender blocking Steam

4. Turn off Real-time protection

  1. Press Windows + I to open the Settings app, and click Update & Security.
  2. In the menu on the left select Windows Security. In the right pane, click Open Windows Defender Security Center.
    Windows Defender blocking Steam
  3. Go to Virus & threat protection in the left pane and click on Virus & threat protection settings from the right.
    Windows Defender blocking everything
  4. Locate the Real-time protection option and disable it.
    Windows Defender blocking application

5. Install the latest updates

  1. Press Windows + I to open the Settings app, and click Update & Security.
  2. Click the Check for updates button.

Updates will be downloaded automatically in the background if any updates are available. Once the updates are downloaded, you’ll install them automatically as soon as your system restarts.

According to users, sometimes there might be a bug with Windows Defender that causes issues with games. However, you can fix the problem simply by installing the latest Windows updates.

Microsoft is frequently releasing new system updates, which address various bugs and issues, so if you’re having any problems with Windows Defender, keep your system up to date.

We don’t have any other solutions to fix this issue, but we’ll keep you updated with new solutions if we find them.

PUBG and Warzone are known to be blocked often by Windows Defender, but these solutions will also resolve that.

However, if the built-in security solution gives you headaches, you can always pick a third-party tool from our best antiviruses with unlimited license lists to replace it.

If you have any comments, questions, or suggestions, reach for the comment section below, and maybe we can help you even more.

How to Remove Bluetooth Device from Windows PC

Removing your Bluetooth device can fix issues like pairing errors, disconnections, poor audio, or unrecognized devices. There are a few different ways to do it, and today we’ll walk you through the most reliable ones. Even if you’re getting a Remove Bluetooth Device Failed error, the steps below will do the trick.

How to Uninstall Bluetooth Devices from Windows

1. Uninstall Bluetooth devices from the Device Manager

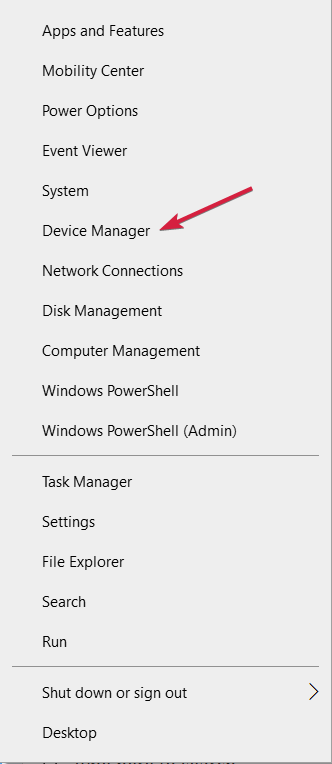
  1. Right-click the Start icon, then select Device Manager from the list.select device manager
  2. Select the View tab.
  3. 3. Click on Show hidden devices.show hidden devices device manager
  4. 4. Expand the Bluetooth section, then right-clicking on the device you had trouble removing and selecting Uninstall.
  5. 5. Restart your PC.

2. Use the Built-in Bluetooth Troubleshooter

  1. Open the Settings app by pressing Windows + I, and go to the Update & Security section.update-security nmi hardware failure windows 10
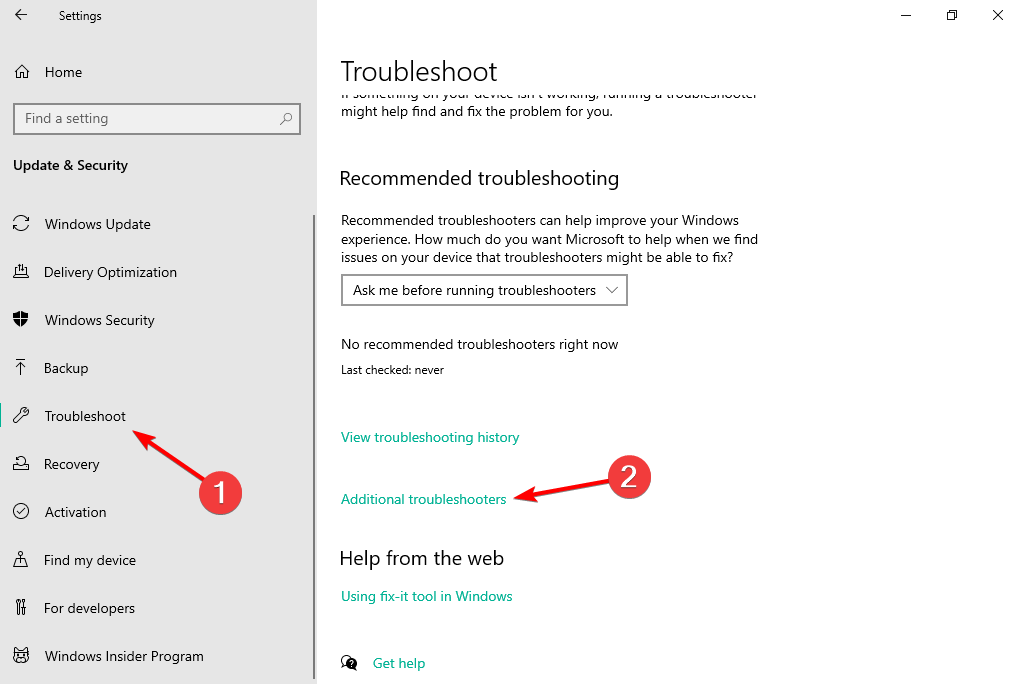
  2. Here, select Troubleshoot from the menu on the left side, followed by Additional troubleshooters on the right side.troubleshoot-aditional can't remove bluetooth device windows 10
  3. Click the Bluetooth option and select Run the troubleshooter. run-troubleshooter can't remove bluetooth device windows 10

After the troubleshooter is finished, check if the problem is still there.

3. Set Bluetooth services to Automatic

  1. Press the Windows and R keys simultaneously to launch Run, then type services.msc and hit Enter.
    service teredo tunneling pseudo-interface missing
  2. Scroll down to the Bluetooth Support Service, then double-click it.
  3. Here, check if the Startup type is set to Automatic; if not, put it so. Then, click OK to save the changes made.

4. Update Your Bluetooth Drivers

Outdated or corrupted drivers often cause stuck devices or make removal options unresponsive:

4.1 Use Device Manager

  1. Right-click the Start icon → Device Manager.
  2. Expand Bluetooth, right-click your device, and select Update driver.update msi bluetooth driver
  3. Choose Search automatically for drivers and follow the prompts.

4.2 Use Windows Update

  1. Open Settings → Update & Security.
  2. Click Check for updates and install everything available.

Alternatively, use dedicated tools like Fortect Driver Updater to simplify the process. It scans, detects, and updates missing or outdated drivers automatically.

5. Clean your Registry

  1. Press Windows key + R and type regedit. Press Enter.
  2. Next, navigate to the following path: Computer\HKEY_LOCAL_MACHINE\SYSTEM\CurrentControlSet\Services\BTHPORT\Parameters\Devices
  3. In the right pane, locate the device that you want to remove, right-click it and choose Delete.

In addition, you can best use specialized repair software to eliminate the clutter in your registry and repair damaged registry files in minutes.

6. Clear Paired Bluetooth Devices Using Command Prompt

Sometimes the device stays cached at the system level. You can use a quick command to reset:

  1. Type cmd in Start, right-click Command Prompt, and select Run as administrator.run as administrator cmd
  2. Run this command: fsquirt.exe If the pairing UI opens, close it.
  3. Then run: rundll32.exe bluetoothapis.dll, BluetoothRemoveDevice <device-MAC-address> Replace <device-MAC-address> with the actual MAC (you can find it from Device Manager or Registry).

This forcibly unregisters the device.

Wrapping up

Keeping your system updated and fixing Registry or driver issues, like in cases of a Bluetooth mouse not working or a headset not being recognized, can help resolve Bluetooth removal errors. Let us know in the comments if you need more help.

WindowsApps Folder Missing: 3 Quick Ways to get it Back

Are you missing the WindowsApps folder? Here is all you need to know.

Windows 8 was the first version of Windows to introduce Universal apps. These apps made their way to Windows 10 and are now an integral part of the OS.

Sometimes issues with these apps can occur; you need to access the WindowsApps folder to fix them.

However, some users reported that this folder was missing. This can be a problem, so today, we’ll show you how to find and access the WindowsApps folder on Windows 10.

Why is my WindowsApps folder missing?

WindowsApps is a secret folder in the Microsoft Windows operating system. It’s where Windows keeps your Microsoft apps and other essential files. There are three main reasons why it may be missing:

  • Deletion – While this may not be intentional, there is a slight chance that you have deleted the folder
  • Hidden feature – For some users, the Hide files and folders feature may have been enabled for WindowsApps.
  • WindowsApps folder permissions corrupted – In most cases, you may still be able to see the folder, but you will not be able to access it; in other cases, it will disappear altogether.

Now let us discuss what to do if this folder can not be found.

How can I fix the missing WindowsApps folder?

1. Turn on Hidden files

  1. Press Windows + E and navigate to the path below:
    C:\Program Files
  2. Now go to the View menu and make sure that the Hidden items option is checked.
    windowsapps folder missing
  3. After doing that, the WindowsApps folder will appear, and you should be able to access it.
    windowsapps folder

2. Run the DISM scan

  1. Click on Start, type cmd, and open it with admin privileges.
    windowsapps folder missing
  2. Type the two scripts below, pressing Enter after each one.
    Dism /Online /Cleanup-Image /ScanHealth
    Dism /Online /Cleanup-Image /CheckHealth
  3. Finally, if any of the above scripts detect an issue, input the script below and once again hit Enter to restore your PC health.
    DISM /Online /Cleanup-Image /RestoreHealth

Alternatively, you can use a dedicated repair tool to fix these corrupt system files. These tools detect any missing system files and replace them with the original version from its extensive database.

3. Use the system Recovery tool

  1. Click the Start menu, type recovery, and select the Recovery option.
    windowsapps folder missing
  2. Select Open System Restore.
    windowsapps folder missing
  3. Click on Next.
  4. Select a restore point and click Next.
  5. Once the Wizard completes and the restore is successful, verify that the WindowsApps folder is no longer missing.

In most cases, any of these three solutions should help resolve issues of the missing WindowsApps or a folder disappearing in Windows 11. However, in extreme cases, you may need to reset your PC or individually reinstall apps affected by the missing folder.

Please, let us know what has worked for you in the comments section.

How to Ping in League of Legends [Fast Hotkeys/Buttons]

You are at the right place if you are wondering how to ping on League of Legends to warn your teammates about any threats.

Whether new to the game or an experienced gamer, you are communicating with your team at the right time is essential to winning games. Pings help you precisely with that.

At the same time, to increase FPS in League of Legends and enjoy the game without breaking the flow, refer to the solutions in our detailed guide.

Why do you need to use pings in League of Legends?

Some of the reasons why you should use pings in League of Legends are:

  • Helps communicate with the team – Smart Pings in LoL are pre-fed visual alerts in the game to help you connect to your team about the gameplay.
  • Alert your team of threats – League of Legends comes with a set of pings (player-relayed alerts) that help you to alert your team at the right time when sudden threats pop up.
  • Useful and time-saving – Also, transcribed in the chat, pings save time, and make communication smooth and fast than typing a message.
  • Regular additions of new pings – LoL keeps introducing different ping types in the game at regular intervals for your convenience.
  • Helps you stay safe during the game – Keeping a track of your ping is important, or you can end up missing skillshots, or unknowingly crossing the boundaries with your opponents.

So, if you want to know how to ping in League of Legends, we have created a quick guide for your understanding.

How do I ping in LoL with fast hotkeys and buttons?

Here are a few things to keep in mind before you move on to the primary section to know about the dedicated hotkeys and buttons:

  • Pings are found on the map, and they are designed to inform the team of any strategic information, with each of them making a unique sound.
  • The unique sound ensures that your teammates do not have to see the ping. In addition, hearing these unique voices helps them understand the type of alert.
  • This information includes many critical things like indicating the location of an opponent champion and telling that you are retreating or about to enter the fight.
  • You can directly give this information by using a ping instead of typing a message which can break the game flow.

You can now move on to the below section to learn about the fast hotkeys and buttons for the different ping types and how to ping in the League of Legends.

1. Regular Pings

  1. Basic ping – G or CTRL and then left-click regular pin - basic ping
  2. Caution ping – V or ALT and then left-clickregular ping - caution ping

These hotkeys can be used on both the terrain and minimap.

2. Smart Ping menu

  1. Hold down the Alt, Ctrl, G, or V keys and then left-click to open the Smart Ping menu. smart ping menu
  2. To select one of the pings (Danger/On my Way/Assist Me/Enemy Missing), drag your mouse toward the desired ping and release the mouse button.
    1. Danger Ping danger ping lol
    2. On my Way (OMW) PingOn my Way Ping
    3. Assist Pingassist ping
    4. Missing Pingmissing ping
  3. Each of these pings appears on the terrain, and the minimap and so can be used on both the terrain and minimap visuals.

3. Warded Pings

  1. To use the Area is Warded ping, press the Esc key, go to the menu and select Hotkeys. click on hotkeys
  2. Next, expand the Communication category. expand Communication
  3. Now, add a button to the Area is Warded Ping. add button to area is warded ping

While it looks much like the Danger ping on the minimap, the Area is Warded ping sounds different when clicked on.

Besides, this ping is not available on the smart ping menu. At the same time, it cannot be used by default, so you can follow the above steps to use the ping.

4. UI Pings

You can relay different UI elements in the team chat that displays additional information based on the team association.

To ping a UI element hold Alt and press Left-click on that element. You do not need to hold to click on scoreboard elements.

Some of the examples of the features you can select in League of Legends are as below;

Scoreboard ElementInformation
Health bar (Self)% amount of health
Mana bar (Self)% amount of mana
Experience bar (Self)% amount of level experience
Champion LevelLevel
StatisticStatistic amount (champions only)
RuneRune
Player PortraitAlive or Respawn timer
Monster IconRespawn timer
Ability icon,
Spell icon
or Ultimate indicator
Ally: Cooldown remaining/Activation details/Ability in range enemy: Ultimate/Spell
RecallRecall
Item icon
or
Trinket icon
Item Self: Cooldown, Charge
GoldGold amount
BountyBounty amount
PingPing (Latency)
Vision ScoreVision Score

Here’s a quick round-up of some of the essential hotkeys in League of Legends:

HotkeyDescription
A or X or Shift+right clickAttack Move
GToggle alert ping cursor
H
Toggle area is warded ping cursor
VToggle retreat ping cursor
Alt+left click
Ping location/Open Radial Menu
Ctrl+left clickRetreat Ping location/Open Radial Menu

Additionally, when you buy an item that directly benefits a minimum of one other player, you will see a purchase notification that will be transcribed in the team chat.

But if you are facing an issue where League of Legends is not opening, you can use the methods in our detailed post to fix the problem.

For any other queries, guides, or fixes related to LoL, do let us know in the comments box below.

Power Surge on USB Port: 3 Ways to Fix any Potential Damage

We use USB devices daily, but sometimes error messages such as a Power surge on the USB port can appear while using specific devices.

Sometimes, the error message in full reads:

Power surge on the USB port – Unknown USB Device needs more power than the port can supply. A USB device has malfunctioned and exceeded the power limits of its hub port. You should disconnect the device.

This message sounds alarming, and we’ll show you how to deal with it properly in today’s guide.

Why is my USB port saying power surge?

From what we gather, users have experienced this problem for varying reasons. At the top of the list of triggers are the following:

  • Hardware malfunctions – In most cases, these are malfunctions with your attached USB devices that have made them go beyond the port’s power limits. You should always use only the best USB devices to avoid this.
  • Power management – If your Power Management settings are off for that USB driver, it may trigger this error.

In rare instances, users have gotten a Power surge on USB port error with nothing plugged in; you may still try the solutions listed below to resolve this.

How do I fix a power surge on a USB port?

Before venturing into any solutions, you should try detaching all USB peripherals and attaching only the ones you need. In some cases, this has been efficient in resolving the error.

Also, try connecting to a different USB port to rule out the possibility of a damaged port.

1. Use the Reset option from the error window

  1. Expand or double-click on the error message to open the complete window.
  2. Disconnect all the USB peripheral devices from your system, then click the Reset button from the screen.
    power surge on usb port
  3. Reboot the computer and reconnect the device again to see if the error persists.

This is a simple solution, but it might be helpful if the Power surge on USB port message appears with nothing plugged in.

2. Reinstall the USB Controller Driver

  1. Disconnect the USB devices from your computer.
  2. Press Win + X and click Device Manager.
  3. Click Universal Serial Bus controllers to expand the options, then right-click on each driver and click Uninstall device.
    power surge on usb port
  4. Confirm your choice when prompted.
  5. Restart your computer, and Windows will reinstall the controller drivers.
  6. Plug the USB device and see if the error has disappeared.

Note: You need an internet connection; otherwise, Windows might not automatically reinstall the newest drivers.

Additionally, it is recommended to use specialized driver software to install, reinstall, or perform other driver-related actions that automatically solve drivers’ issues.

Outbyte Driver Updater

The best-automatized solution for updating your drivers to maintain your PC running smoothly.
Free Trial Download now

3. Use and USB Hub

If the error happens with only a specific device on multiple computers, then maybe the device needs more voltage. In this case, you can use a USB hub with its power source.

These devices are standard, feature multiple USB ports, and are cheap. Therefore, they will help with the Power surge on USB port error.

The above solutions will help you solve the issue. Also, note that if you get this error message with nothing connected to the port, it may be a sign of a problem with the board, and you should try a BIOS update.

These are just a few simple solutions that you can use to fix Power surge on USB port, so be sure to try them all, and let us know which solution works for you.

Logitech G Hub not Detecting Blue Yeti: 4 Ways to Fix It

Now, a microphone is one of the most helpful hardware accessories for a laptop computer. It is required for every task, from recording audio to communicating with someone over the Internet.

However, several people worldwide have reported that their Blue Yeti microphone is not detected on their PCs, not even when using the Logitech G Hub program.

Why is Logitech G Hub not detecting Blue Yeti?

This error can happen due to a variety of issues, such as the following:

  • Hardware issues – Physical problems with the microphone will cause the Blue Yeti mic not showing up in the Ghub issue. And this can only be solved by replacing your microphone.
  • Loose cables – Check if you have connected the microphone to the correct port and if it is inserted all the way in. Also, try to disconnect, then reconnect it.
  • Driver incompatibilities – Drivers need to be up-to-date on both sides to allow the communication between computer components to end successfully. If your driver is outdated, the Logitech G hub won’t recognize your headset and microphone. Thus, in this case, we will have to update them as shown below.
  • Incorrect settings – You will have to check the microphone’s privacy settings to see whether G Hub can access it.

What can I do if Logitech G Hub is not detecting Blue Yeti?

1. Set Blue Yeti as the default device

  1. Right-click on the Speakers icon in the bottom right of your Windows 11 display, then choose Sound settings.sound-settings-right-click blue yeti not recognized logitech g hub
  2. Now scroll down until you meet the Input section and choose the Blue Yeti mic next to Choose a device for speaking or recording.choose-microphone-input blue yeti not recognized logitech g hub
  3. Finally, click the dropdown before Choose where to play sound under the Output section and select Yeti Speaker.

2. Update the Blue Yeti driver

    Outdated drivers can be the cause for undetectable Blue Yeti microphone, so this short guide will show you how to easily update it on your PC.

  1. 1. To open Device Manager, select it from the Start menu by selecting it from the context menu.

    device-manager blue yeti not recognized logitech g hub
  2. 2. Now expand the Sound, video and game controllers section and right-click on each option then choose Update driver.

    configure and test Surround Sound on Windows 10
  3. 3. Next, select Search automatically for drivers then reboot your system to successfully install the Blue Teti drivers on Windows 11.

    automatically-search bluetooth not working windows 10

Wait for the processes to complete before restarting your computer to ensure that the modifications are applied.

We strongly recommend using a dedicated program to automatically update your drivers in Fortect Driver Updater.

⇒ Get Fortect Driver Updater

3. Update G Hub

  1. Open Logitech G HUB app.
  2. Click on the three lines in the top left. corner.g hub options
  3. Select Settings.g hub settings
  4. Click Check for update.g hub check for update
  5. If a new update is available, G HUB will automatically install it.

4. Enable Blue Yeti Mic & Speakers in Windows Settings

  1. Right-click the sound icon in the system tray (lower-right corner of your screen).windows sound tray
  2. Select “Sound Settings” from the context menu.sound settings windows
  3. Check both Output and Input settings and make sure to pick the Yet Mic & Yeti Speakers. If you can’t find the option, click on the Add device button to identify and add them to the device list.

For more information and other solutions applicable in Windows 11, check out our guide on how to fix the Blue Yeti mic not recognized issue.

And lastly, you will want to read our post on how to enable microphone access in Windows 11 to ensure that you didn’t miss this small detail.

In the comments section below, let us know which solution worked best for you and which microphone version you love the most.

Hello Neighbor 2, Chained Echoes and more releasing on Xbox next week

There are a dozen more slated for release on Xbox consoles next week, between December 5th and December 9th. Among them are a couple of day-one Game Pass releases. Without further ado let’s go ahead and check out the lineup, and note that all release dates are subject to change.

Hello Neighbor 2 - December 6 Optimized for Xbox Series X|S / Smart Delivery / Game Pass

Hello Neighbor 2 is a stealth horror game about uncovering your creepy neighbor’s secrets. Play against a complex opponent controlled by an advanced AI that learns from you and all the other players! As time passes and the Neighbor adapts to the players’ patterns, his own behavior will change and surprise you. Will you be the one to outsmart the Neighbor and find out what he’s hiding? Pre-order now and start playing today!

Available on day one with Game Pass!


Chained Echoes - December 8 Game Pass

Valandis is at war. The three kingdoms have been fighting for centuries. Peace seems to be no option. And yet, a magical weapon of mass destruction leads to a fragile one. One, which won’t last. Prepare yourself for an adventure in a world full of wonders, magic, mechs, charming characters, airships, and vicious foes. Will you be able to make peace everlasting with your heroes?

Available on day one with Game Pass!


So which of these new Xbox games have got you most excited? Let us know in the comments section.

Featured image via Xbox Wire. 

German watchdog group reports Microsoft 365 violates GDPR child consent protections

Microsoft and German federal and state data protection authorities are going back and forth over General Data Protection Regulations (GDPR) as the country looks to ban Microsoft 365 in schools.

The most recent dispute comes as the German Watchdog group Datenschutzkonferenz published a new report that states Microsoft remains in breach of GDPR despite two years of negotiations.

Datenschutzkonferenz’ issues with Microsoft 365 are two-fold with the first being a violation of cloud data sovereignty and the other having to do with adolescent data consent policies. GDPR stipulations state that children under 13 cannot consent to having their data collected and the Datenschutzkonferenz report claims that accessing Microsoft 365 by children automatically give Microsoft “access to unencrypted and non-pseudomized data.”

Microsoft disputes the DSK’s report with the following statement, “We ensure that our M365 products not only meet, but often exceed, the strict EU data protection laws. Our customers in Germany and throughout the EU can continue to use M365 products without hesitation and in a legally secure manner.”

However, over the past two years, Microsoft has attempted to make concessions to meet the demands of Germany’s DSK, but efforts have stalled with DSK claiming Microsoft has only changed its wording but not the actual way Microsoft 365 collects data, and Microsoft reiterating its commitment to addressing “any remaining concerns.”

While Microsoft is attempting to assuage fears the German DSK have over data access and collection, the company is realistically hamstrung by several US-based regulations that include the Lawful Overseas Use of Data Act (CLOUD Act) and FISA 702 which supersede foreign citizens’ rights to expedite data access when pursuing criminal investigations.

By their very nature, the CLOUD Act and FISA 702 require that Microsoft, Google, Apple, and other large scale international data traffickers “preserve, backup, or disclose contents of electronic communication or noncontent records.”

It is unclear where Microsoft and Datenschutzkonferenz go from here but unless the software giant can figure out a loophole to US-based regulatory policies dealing with international data, they and other companies will continue to potentially run afoul of GDPR standards in both broad and specific cases like those dealing with consent of minors.

Outlook Signatures Disappeared: 5 Ways to Get it Back

If you are wondering why my Microsoft Outlook signatures disappeared every day and how to fix this issue, then you are at the right place.

This guide will discuss all the available fixes for the recurring issue after discussing the potential causes.

Why has Microsoft Outlook Signature disappeared?

There could be a few reasons why the issue occurs. Some of them are mentioned below: 

  • Conflicting software – This issue could arise if you have the trial version of Office installed on your computer. You need to uninstall the trial version.
  • Office version is of different architecture – If your computer support 64-bit and you have the software of 32-bit installed, there could be issues.
  • Browsing data – Your browser cache can cause this issue; if using the Outlook Web app, try deleting the cache and cookies.

How can I fix the Microsoft Outlook signature disappears?

Before trying out the serious fixes, let us check out the quick fixes:

If none of the above fixes worked for you, then you must try the troubleshooting steps mentioned below: 

1. Double-check the Signature settings 

1.1 For the OWA app

  1. Login to your outlook account on your browser.
  2. Go to Settings, then click View all Outlook settings.View all settings
  3. Click Mail from the left pane and click on Compose and reply.Outlook web 2
  4. Under default signatures, ensure you have selected the signature name from the drop-down beside For New Messages and For Replies/Forwards.
  5. If not, mark it and click Save.

1.2  On the Outlook app

  1. Launch the Outlook app and go to File.Outlook app  File  option
  2. Click Options.Outlook app 2
  3. On the Outlook Options window, select Mail and then click on Signatures.OUTLOOK app 3
  4. Under Choose default signature, ensure you have selected the desired signature name for New messages and  Replies/forwards.Outlook app 4
  5. If not selected, select them and click OK.

In case Outlook signatures disappeared after an update, reconfiguring the signature settings should do the trick. Because an update often changes things.

2. Clear browsing data (OWA app)

  1. Open Chrome and click on three dots and select More tools.
  2. Now select Clear browsing data.Browsing data
  3. Put a checkmark beside Cookies and other site data, Cache images and files, and select All time.Clear Cache
  4. Click Clear data.

3. Check your device for signatures (Outlook app)

  1. Press Windows + E to open File Explorer.
  2. Copy this path and replace the username with the user account name on your computer. C:\Users\{Username}\AppData\Roaming\Microsoft\SignaturesSignatures
  3. In this folder, check if the contents are being overwritten.

4. Use Registry Editor

Tip icon Tip
Before making any changes, it is advised to back up your registry files. To do that, go to File, then click Export. Now save the .reg file to an accessible location.
  1. Press Windows + R to get the Run window.REGEDIT RUN COMMAND
  2. Type Regedit and press Enter to open Registry Editor.
  3. Copy and paste this path into the address bar: HKEY_CURRENT_USER\Software\Microsoft\Office\16.0\Outlook\Setup\DisableRoamingSignaturesTemporaryToggle
  4. Double-click DisableRoamingSignaturesTemporaryToggle and change the Value data to 1.Regsitry 2
  5. Click OK and close the Registry Editor.
  6. Restart your PC.

5. Use a third-party app

If managing signatures is an integral part of your work, and you don’t want to deal with disappearing signatures on Microsoft Outlook, then you can try using Code Two Email Signatures.

The cloud service helps you create and manage email signatures, automatic replies, and more. This will help you add your signature directly when composing emails. 

Using a reliable tool works when the Outlook signature disappears every day since it’s likely a bug triggering the issue. And you can always switch back, once a patch is released.

So these are some of the workarounds to fix the Microsoft Outlook signature disappearing issue. If nothing worked for you and you don’t want to use the third-party app, then sadly, you will have to wait for the update from Microsoft.

As for Excel not adding signatures, we’ve already covered that in our comprehensive guide.

Please let me know if something else worked for you in the comments section below.

Microsoft releases official Xbox 2022 Christmas wrapping paper

T’is the season and Microsoft has now released their own official Xbox-themed wrapping paper for the 2022 Christmas season.

“Whatever you’re wrapping this year, wrap it with an original signature gift wrap that makes every present more awesome,” the official product description reads. “The Xbox Holiday 2022 Signature Gift Wrap features original holiday-meets-gaming artwork with a cozy and nostalgic feel, and tons of cameos, Easter Eggs, and references for gamers to pore over. Repeating Pattern Design printed on 65# photo quality Satin Paper. Full color edge to edge and easy to work with when wrapping your gift.”

Xbox 2022 Christmas Wrapping Paper. Image Credit: Microsoft

The wrapping paper can be purchased from this week on the Xbox Gear Shop website along with the recently announced Xbox ugly sweater and the many other newly added Xbox items.

LoadLibrary Failed With Error 1114: 6 Confirmed Fixes to Use

Encountering errors in Windows is common, and we get a lot of them. But, LoadLibrary failed with error 1114 is one that prevents apps from launching on PCs running Nvidia and AMD graphics.

The complete error message reads, LoadLibrary failed with error 1114: A dynamic link library (DLL) initialization routine failed. So, let’s find out how you can fix things in no time.

Why is LoadLibrary failing with error 1114?

LoadLibrary is employed by processes to access or link to a DLL file. And when it fails, the corresponding application fails to launch. It could fail with several error codes, with 1114 being one of them.

Here are some of the reasons you are getting the error:

  • Misconfigured graphics settings – In most cases, misconfigured graphics settings were responsible for the error.
  • Incorrect power settings – If you have a power saving setting turned on, it might lead to issues with the graphics.
  • Missing DLL files – Oftentimes, the DLL files were missing, which led to trouble accessing them, and as a result, the LoadLibrary failed with error 1114 showed up.
  • Corrupt system files – When the system files are corrupt, it leads to issues with OS, including this error.

Besides, here are some of the cases you may encounter the error:

  • AMD Driver LoadLibrary failed with error 1114 – The error is usually encountered due to issues with the AMD graphics driver.
  • Autodesk LoadLibrary failed with error 1114 – Autodesk applications often throw the error, but the solutions remain the same.
  • Minecraft LoadLibrary failed with error 1114 – Some users had trouble with Minecraft but reinstalling it usually did the trick.
  • Raft Failed to load DLL from the list error code 1114 – Many also reported the error with Raft, and our solutions would help in this case.

How can I fix Failed to load dll from the list error code 1114?

Before we try the slightly complex solutions, here are a few quick ones that might fix things:

  • Restart the computer.
  • Update Windows and the program that throws the error.
  • Uninstall the app installed recently in case the error starts appearing after you downloaded it.

1. Get the DLL file

The easiest way to fix the error is to get the missing DLL file. You can perform this manually and identify the missing files triggering the error, or better use dedicated software to fix any DLL file issues.

Thus, the most practical method you can employ is using an expert system repair tool that can detect and solve broken DLL files or damaged system files.

2. Change power plan settings

  1. Press Windows + S to open Search, type Control Panel in the text field, and click on the relevant search result.control panel
  2. Now, click on System and Security.system and security
  3. Click on Power Options.power options to fix loadlibrary failed with error 1114
  4. Click on Change plan settings next to the current plan.change plan settings to fix loadlibrary failed with error 1114
  5. Now, choose Change advanced power settings.change advanced power settings
  6. Expand Switchable Dynamic Graphics, double-click on Global settings, choose Maximize performance for both On battery and Plugged in, and then click OK to save the changes.maximize performance to fix loadlibrary failed with error 1114

3. Run the Diagnostic Policy Service

  1. Press Windows + R to open Run, type services.msc, and hit Enter.services
  2. Locate the Diagnostic Policy Service, right-click on it, and select Properties.properties
  3. Select Automatic from the Startup type dropdown menu, click on Start to run the service, and then on OK to save the changes.run to fix loadlibrary failed with error 1114

Once done, restart the computer for the changes to come into effect and verify if the LoadLibrary failed with error 1114 dialog disappears for good.

4. Update the graphics driver

  1. Press Windows + X to open the Power User menu, and select Device Manager.device manager
  2. Now, expand Display adapters, right-click on the NVIDIA or AMD graphics adapter, and select Update driver.update driver to fix loadlibrary failed with error 1114
  3. Now, choose Search automatically for drivers and wait for the update to complete.search automatically for drivers

An outdated driver is just as likely to cause the error, and updating the graphics driver should get things running for most. Also, if Windows is unable to find an update, you can always manually install a newer driver version.

Update drivers automatically

Keep in mind that downloading and updating drivers manually from the manufacturer’s website can damage your system by choosing and installing the wrong driver version.

In order to prevent that, we strongly suggest doing it automatically by using Outbyte Driver Updater.

This tool is tested and approved by our team and will help you not damage your PC by downloading and installing the wrong driver versions.

After several tests, our team concluded that this is the best automatized solution. 

Outbyte Driver Updater

Avoid installing the wrong drivers and get the right versions for your device by using Outbyte Driver Updater.
Free Trial Download now

5. Change the graphics settings

5.1 NVIDIA graphics

  1. Launch the NVIDIA Control Panel.
  2. Now, choose Manage 3D settings under 3D Settings, select High-performance NVIDIA processor under the Preferred graphics processor dropdown menu, and click on Apply for the changes to come into effect.nvidia processor

5.2 AMD graphics

  1. Launch the AMD Radeon Settings.
  2. Now, navigate to Switchable graphics, select Installed Profiled Applications from the dropdown menu, and verify that the problematic app is set to High performance.change settings

This should fix LoadLibrary failed with error 1114. A dynamic link library (dll) initialization in Windows. In case the error appears again, head to the last solution.

6. Reinstall the app that throws the error

  1. Press Windows + R to open Run, type appwiz.cpl, and click OK.appwiz.cpl
  2. Now, locate the app that throws the error, select it, and click on Uninstall.uninstall to fix loadlibrary failed with error 1114
  3. Follow the on-screen instructions to complete the process.
  4. Once done, head to the official website or the Microsoft Store, and download the app again.

If nothing else worked, the last option is to reinstall the app that’s throwing the LoadLibrary failed with error 1114 dialog in Windows. And this should get things up and running.

Also, find out how to fix things when DLL files are missing in Windows, and prevent such errors from reappearing.

Tell us which fix worked for you in the comments section below.

5 Best DisplayPort to HDMI Adapters

DisplayPort to HDMI adapters come in handy when connecting a video source to an external display. While buying one, only go with the best. There are plenty of options available, so we present to you the best DisplayPort to HDMI adapter supporting 4K.

Choosing a reliable and sturdy DisplayPort to HDMI adapter not just guarantees longer life but also helps deliver better performance and also improves the overall experience. Keep reading to find out the best options!

Note icon NOTE
Deals are subject to change. Keep in mind that the price often varies. We recommend checking the price on the vendor’s website. Some products may be out of stock by the time you check. So, hurry up and hit the buy button.

Are DisplayPort to HDMI adapters any good?

It all comes down to requirements, but you will find a display adapter that fits the budget and meets all conditions. Though, remember that DisplayPort to HDMI adapters are not bidirectional.

Otherwise, outputting from DisplayPort to HDMI would be just fine, and the ones listed here should do the job. Using one of these would also improve graphics in Windows.

What are the best DisplayPort to HDMI adapters to buy?

AmazonBasics Mini – Lightweight and portable

  • Measures 6 feet (1.83 meters)
  • Both lightweight and portable
  • Gold-plated connectors and foil-and-braid shielding
  • Easy-grip treads
  • Boot around the mini display port is way too thick

DisplayPort to HDMI adapters are supposed to cost a few dollars or so, and that’s proof that quality can come cheap at times. And this one is the best buy DisplayPort to HDMI in the market.

Don’t fear trying out one of AmazonBasics products! One of the best Mini DisplayPort to HDMI cables, this one can easily transmit audio and video from a computer or tablet to an HD display, besides delivering several other advantages over similar adapters.

Cable Matters – Easily fits in a laptop sleeve

  • Supports video resolutions up to 1080P (Full HD)
  • Audio support for 2, 5.1, and 7.1 channels
  • Great for digital projectors or simply extending your workspace to LED monitors
  • Easily fits in a laptop sleeve
  • Is not bi-directional; it only connects to a display with HDMI

This Cable Matters adapter performs perfectly. It can transmit crisp 1080p HDTV and uncompressed 7.1-channel audio at lossless quality.

Even more, its gold-plated connectors, non-slip surface, and molded strain relief make it both robust and ergonomic. Also, this is the best DisplayPort to HDMI cable for gaming.

StarTech DisplayPort to HDMI – Free lifetime technical support

  • No installation software or drivers required
  • Unbeatable price point
  • Backed by a 3-year warranty
  • Free lifetime technical support included too
  • Cannot transmit 4K

Do you want solid construction at a modest price? The StarTech DisplayPort to HDMI Adapter seems to be the right choice for most people, including yourself.

Once you’ve got the cord in your hand, it seems quite sturdy inside and out. It has support for resolutions up to 1920×1200 and assures crisp, crystal-clear picture quality.

Cable Matters 4K – Gold-plated connection heads

  • Active HDMI to Display port converter
  • Gold-plated connection heads
  • 4K video resolution
  • Support up to 3840x2160 at 30Hz
  • Certain 4K monitors only support 1440p@60Hz instead of 4K@30Hz with this adapter

The Cable Matters HDMI to DisplayPort Adapter is your best bet for 4K Video Resolution Support. In fact, it’s one of the very few adapters that can reliably transmit 4K video at a smooth 30-Hz or 60-Hz refresh rate.

And the price should fit well within your budget. It’s got stellar customer reviews with no major complaints. Also, Cable Matters develops one of the best DisplayPort 1.4 to HDMI 2.1 cables.

A limited amount of users report problems when it comes to choosing a resolution higher than 1080 in the display settings, yet they can be solved.

AmazonBasics Adapter Cable – Perfectly well-built

  • Supports 1080p content, as well as audio content including 7.1, 5, or 2 channels
  • Ideal for using a mirrored display, or configuring a second monitor
  • Gold-plated connectors
  • Perfectly well-built
  • Can only convert signal from DisplayPort to HDMI

Choose this AmazonBasics Adapter Cable, and you can connect any laptop equipped with a DisplayPort port to an HDTV, monitor, or projector with HDMI input.

Well, it is all about what you’d expect from an inexpensive AmazonBasics product. Not the perfect option, but it does the job!

Everything considered, a feature such as vibrant 4K Definition Video is assured by an adapter such as Cable Matters 4K HDMI to DP. Yet AmazonBasics Mini DisplayPort to HDMI or Cable Matters DisplayPort to HDMI adapters are great choices too.

As we said earlier, choose one that best suits your requirements. And before you leave, do not forget to check the best color calibration software in Windows.

If you have any other queries or want to share a recommendation for the best DisplayPort to HDMI adapter, drop a comment below.

Fix: Windows was Unable to Install Your Base System Device

Often you might be faced with a situation where you encounter Windows was unable to install the base system device message. This mainly occurs after installing or upgrading to Windows 10.

The problem is compounded by the fact that you aren’t sure what the base system device stands for, while the only clue you have is the yellow exclamation mark in Device Manager.

However, the problem is easy to deal with, and we will show you how to fix it in this guide.

What does Windows was unable to install your base system device error mean?

Windows was unable to install your base system device error means that your PC could not find the problematic device’s official driver to connect to. A yellow exclamation mark usually denotes this, and the faulty device is listed chiefly under Other devices.

This issue can be down to the two major factors listed below:

  • Faulty or outdated driver: The primary cause of the base system device doesn’t have a driver issue is a faulty or outdated driver. The quick way out here is to reinstall or update the driver.
  • Outdated PC: If you have not installed the latest Windows update, you might get the base system device driver error Windows 10 HP system and other products. The solution here is to download and install the latest updates.

How can I fix Windows was unable to install your base system device?

1. Update your PC

  1. Press the Windows key + I to open the Settings app and select Update & Security.
    update and windows was unable to install your base system device
  2. Click the Check for updates button and install any available updates.
    check for
  3. Now, click the View optional updates option and install the updates there too.
    view optional

Windows updates are essential in keeping your PC running smoothly. They can also help install driver updates.

Hence, if you have not updated your PC in a while, you might get the Windows was unable to install your base system device error. Updating and restarting your PC should fix the issue.

2. Update the driver

  1. Right-click the Start icon and select the Device Manager option.
    device manager
  2. Click the arrow next to Other devices or any other option where the driver shows the error.
  3. Right-click on the device causing this error and select Update driver.
    update driver
  4. Lastly, select the Search automatically for drivers and install any available update.
    search auto windows was unable to install your base system device

Outdated drivers can lead to problems and can also be the cause of Windows was unable to install your base system device prompt. If the built-in updater can’t find an update, you need to go to the manufacturer’s website to download the latest version.

Alternatively, you can use a dedicated driver updater in Outbyte Driver Updater to update your drivers automatically. This tool scans for outdated, missing, and corrupt drivers and installs the updated version from its database.

With this, you can focus on other things while Outbyte Driver Updater takes care of everything driver on your PC.

Outbyte Driver Updater

A trustworthy tool with which you can update all your drivers in a second with the newest versions.
Free Trial Download now

3. Reinstall the driver

  1. Press the Windows key + X and select Device Manager.
    device manager
  2. Click the arrow next to Other devices or any other option where the driver showing the error.
  3. Now, double-click the driver there to open its properties and click the Details tab.
  4. From here, select Hardware Ids from the Property drop-down menu.
    hardware ids
  5. Right-click the code there and select Copy.
    copy
  6. Go back to the Device Manager window and right-click the driver.
  7. Select the Uninstall device option.
    uninstall device windows was unable to install your base system device
  8. Click the Uninstall button to confirm the action.
    uninstall
  9. Now, paste the information on your browser to search for the latest driver.
  10. Finally, select the driver manufacturer’s website to download and install the latest version.

If updating your PC does not eliminate the Windows was unable to install your base system device error message, you need to uninstall and reinstall the faulty driver. Going to your PC manufacturer’s website is the quickest way to do this.

There you have it: Everything you need to fix the Windows was unable to install your base system device error message. You only need to follow the steps carefully, and things should be back to normal.

In the same vein, if you are unable to install drivers on Windows 10, check our detailed guide to solve the problem.

Feel free to let us know the solution that helped you fix this problem in the comments below.

How to Factory Reset Windows 11 Without Logging in

If you want to perform Windows 11 factory reset without login, this article will tell you if it is possible or not. You will also know, if yes, how to do it.

Usually, on Windows settings, there is an option to reset a PC. It requires you to sign in. You also need to be an administrator to perform such a task. But what if you have forgotten your admin password or can’t sign in? You must follow the alternative in these situations.

Is it possible to do a factory reset without signing in on Windows 11?

Yes. You can reset your PC even if you cannot log in or forget your password. For this, you will not need to be a very technical person.

In general, you can easily do a factory reset of Windows 11 when you are signed in. But if you can’t log in, you will need to follow the methods mentioned in the next part of this article.

How can I do Windows 11 factory reset without login?

Though it is not a requirement, you still may need to have the following things for possible critical situations:

Now, you can follow these methods to perform a factory reset.

1. Reset from the login screen

  1. Turn on the PC if it is not turned on already.
  2. Click on the power button on the login screen.
  3. Press and hold Shift on your keyboard and click on Restart.
  4. If it shows any additional things, click on Restart anyway.
  5. PC will restart and boot into recovery mode.
  6. Click on Troubleshoot.choosing troubleshoot windows recovery environment
  7. Then, click on Reset this PC.choosing reset this pc windows recovery environment
  8. You will have two options: Keep my files and Remove everything. Choose either one you need.
  9. Follow the on-screen steps to finish the reset process.

This is probably the most popular method to do a factory reset on Windows 11 or other Windows versions without login. If for any reason, you cannot do it, as an alternative, you can consider following the next method.

2. Reset using bootable media

  1. Insert the bootable installation media on your PC.
  2. Restart or power on your computer.
  3. When the first thing appears on the monitor, keep pressing F9/F8/Esc/Del, etc., depending on your motherboard brand and model, to open the boot menu.
  4. On the boot menu, choose the installation media to boot.
  5. Now, you can choose your preferred options for Windows and click on Next.choosing time language keyboard windows setup click next
  6. At a time, you will get the option Install Now. Click on it.clicking install now windows setup
  7. Select your preferred Windows 11 edition and click on Next.
  8. Click on Next again.
  9. Now, you can choose between an Upgrade or a Custom install. Choose custom.choosing custom windows setup
  10. Format the system drive and install Windows on it.

Doing this will also act like a factory reset. It will clean everything on the system drive and won’t touch other drives of your partition.

For more details, we suggest you learn how to do a clean Windows 11 installation. You also may want to know the differences between Windows 11 reset vs. clean install.

Please keep in mind that after resetting using bootable media, you may need to install drivers on Windows 11 again. For this, you can use a tool like Outbyte Driver Updater. It can install and update drivers automatically.

This article has explained how you can do Windows 11 factory reset without login. If you have any suggestions or opinions, you can write them in the comment box below.

7 best Christmas ideas for large families [Gadgets for all]

Celebrating the yuletide with a large family is always full of love, fun, and excitement. When looking for Christmas gift ideas large families will require, it could sometimes be a challenge to pick what’s appropriate. One reason is that it should center on something almost everyone should enjoy.

A wide range of Christmas gift exchange ideas for large families should be the first choice. So to keep one’s sanity intact and to save big on credit cards, here are some amazing large families’ Christmas gift ideas.

What are the best gift ideas for large families?

Cameras for Family Memory at Christmas

GoPro HERO8 Black

  • 4K video and 12MP photos
  • Live streaming stabilization
  • Time-lapse videos
  • Bluetooth connectivity
  • The battery life is not so great

Enjoy the GoPro HERO8 Black 4K Camera offering UHD videos and 12MP photos. It has advanced camera control and built-in features to edit videos on the touch-screen. All help to make family moments an intriguing one this Christmas.

Culinary Gift Ideas at Christmas

Chef Di Cucina Pizza Maker

  • Ceramic stone base
  • Easy cleaning
  • Compact and easy to store
  • Specially designed rim that eliminates moisture
  • Not like wood ovens

Let the family enjoy, nice and tasty pizza of different designs this Christmas season with Pizzacraft Pizzaque PC6500.

It doesn’t take more than 15 minutes to get started cooking and delivers pizza crispy in less than 10 minutes. It’s the best Christmas gift idea for large families to experience going camping, tailgating, etc.

Desserts Christmas Gift Ideas

Cuisinart ice 21 frozen yogurt ice cream maker

  • Makes frozen desserts in 20 minutes or less
  • Up to 1-1/2-quarts capacity
  • Double insulated freezer bowl
  • Easy lock Transparent lid
  • Cannot create big batches of icecream

What more can a fun Christmas have other than this frozen yogurt ice cream maker? Get delicious and yummy ice cream in less than 20 minutes. It has a capacity for making up to 1 ½ quarts of ice cream.

Cuisinart ice cream maker comes with a mixing paddle and freezer bowl with a double insulator as amazing Christmas gift ideas for large families.

Family Games at Christmas

Lego Building set

What better season is there for the best Christmas gift ideas large families can enjoy together playing indoor and outdoor games such as:

  • Jax Doodle Dice– Excellent game time for small and large families with kids aged 4+.
  • Cardinal Mexican Train Dominoes– Play and learn for ages 8+.
  • Pit – An exciting childhood game time with winning moves – ages 8+.
  • LEGO Classic Large Creative Brick Box 10698 – Learn and playtime with kids.
  • Jenga Classic Game – Playing the game of stacking with kids 8+.
  • Playaboule Bocce Ball Premium Set – is an interesting out-yards game for ages 6 to 12.
  • Indoor Snowball Fight – Now the whole family can have a snow fight if you reside in an area without snow.
  • Microsoft Xbox One S 1 TB/ 2 TB Console – Enjoy Minecraft Bundle, individual or family competitions even for Windows 10 plus 4k Media streaming, Netflix, and more for true family entertainment.
  • Combo Entertainment game swivel table – enjoy family games playing any of four games including flip-it football, billiards, table tennis or hockey.
  • Hedbanz – It’s a quick question family guessing game for the whole family to enjoy.
  • Kids Against Maturity – It combines the fill-in-the-blank gameplay with the funniest content to bring your family together.
  • Exploding Kittens Card Game – This is the perfect card game for adults, teens, and kids who love kittens, explosions and laser beams, and sometimes goats.

Audio-visual Gift Ideas for Christmas

The best Christmas gift ideas large families need clearly are in these blends of products to enjoy music and visuals:

Ion Audio Tailgator

  • 50W of power
  • 50 hour battery autonomy
  • Microphone, radio and USB charging
  • NFC connectivity
  • The microphone is not the greatest

Enjoy some of the best classic, oriental, and hip-hop songs with the family this Christmas using the Smart ion tailgator. It offers 50 Watts sound output, 50 hours battery, Bluetooth features, and phone charging ports.

Casio Privia PX-S1000

  • Adjustable stand
  • Bench
  • Sustain pedal
  • Online lessons
  • 88 keys
  • Pretty expensive

This Casio Privia piano is an exciting gift for the family. It creates learning and bonding time for the family, a perfect time to learn a new skill. Plus it has a video tutorial and kids and adults to learn how to play.

Fitness & Fun Gift Christmas Ideas

JumpSport 250 Fitness Trampolines

  • Premium Bungees
  • Workout DVD
  • Online Access to Video Workouts
  • Small for indoor use
  • You can injure yourself without proper guidance

Keep in form while you play this Christmas season in the JumpSport 250 safety cushioned trampoline. It offers music and video workout sessions. It is a top-quality product with a 40% reduction to improve safety.

The JumpSport 250 comes as easy to install with little left to do but enjoy your exercise session while the family applauds you.

Home Improvement Gift Ideas for Christmas

iRobot Roomba 675

  • Works with Alexa
  • Self-charging
  • Works perfectly on hard floors or carpets
  • 3 Stage cleaning system
  • Not good if you have a lot of obstacles in your home

Take the stress off loved ones with the best Christmas gift ideas large families will love. The iRobot can help give more time to family playtime and fun while it does the house cleaning. It can help clean the bathroom, hardwood floors, kitchen, and more.

The iRobot is so equipped it can help mop hard-to-reach places in the house such as hidden cabinet space, tight corners, toilet areas, and more. It can carry out wet mopping, dry sweeping, and damp sweeping.

With any of the above Christmas gift ideas, large families can enjoy nothing short of an intriguing celebration this season. Some of the products such as the camera would do better with a tripod stand but most of them are standalone products.

But whatever your picks, be sure to experience the best Christmas ever with family and friends.

AMD Software Installer Stuck: Use These 3 Methods to Fix It

Keeping your graphics card drivers up to date is essential, especially if you want to ensure that the latest titles are working correctly and at maximum performance.

The AMD Software Installer plays a vital role in this, as it makes the update process of AMD drivers. However, many users reported that the software gets stuck while installing drivers. Luckily, there are a couple of methods that you can use to fix this problem.

Why is the AMD software installer stuck?

There are various factors that can cause the AMD Software Installer to get Stuck on your PC. Listed below are some of the common ones:

  • Interference from antivirus software: The first thing you need to check if the AMD Software Installer is taking forever is your antivirus. The security software might be blocking the update or installation process. To fix this, you might need to disable the antivirus and switch to one of the best antivirus software for Windows 10.
  • Lack of privileges: Another cause of this problem is the lack of ownership of the AMD folder. You can fix this by taking ownership of the folder.
  • Issues with the graphics driver: If you are facing this issue when updating your drivers, the problem might be your graphics driver. Reinstalling your graphics driver in Safe Mode should fix this effectively.

What can I do if the AMD Radeon software installer is stuck?

1. Reinstall the AMD graphics driver in Safe Mode

  1. Press Windows key + I to open the Settings app and select the Update & Security option.
    update and amd software installer stuck
  2. Choose Recovery in the left pane and click the Restart now button under the Advanced startup section.
    restart now
  3. When your PC restarts, choose Troubleshoot > Advanced options.
    advanced options
  4. Now, select the Startup settings option.
    startup setting amd software installer stuck
  5. From here, click the Restart button.
    restart
  6. Choose the Enable Safe Mode with Networking option.
    enable safe network
  7. Now, press the Windows key + X and select the Device Manager option.
    device amd software installer stuck
  8. Double-click the Display adapters option to expand it and right-click the device there.
  9. Select the Uninstall device option.
    uninstall device
  10. From here, check the box for Delete the driver software for this device and click the Uninstall button to confirm the action.
    uninstall
  11. Finally, download the latest driver with AMD Software.

If the AMD Software Installer is stuck when installing a driver update, you can fix it by uninstalling the graphics driver. Another option to make sure that the driver is completely removed, use the Display Driver Uninstaller.

Alternatively, if the AMD software installer is stuck at 0 or 99, you can always use third-party solutions that can update all your drivers with just a couple of clicks.

This helps you to bypass the stress of the installer getting stuck and having to restart the update process.

⇒ Get Fortect Driver Updater

2. Check the ownership of the AMD directory

  1. Locate the AMD directory that the setup has created. In most cases, this should be the directory in question: C:\AMD
  2. Right-click the AMD directory and choose Properties from the menu.
  3. Go to the Security tab and click the Advanced button.
  4. Click on Change next to the Owner section.
  5. Enter your username, and click on the Check Names button. If the username is valid, click on OK to save changes.
  6. Now, check Replace owner on subcontainer and objects and click on Apply and OK.

After making these changes, you’ll have full ownership over the AMD directory, and the AMD Radeon Software Installer won’t get stuck anymore.

3. Disable your antivirus software

  1. Press the Windows key, type virus, and select the Virus & threat protection option.
    virus
  2. Choose the Manage settings option.
    manage setting
  3. Finally, toggle the switch for Real-time protection backwards to disable it.
    real time

In some instances, the AMD Radeon Software installer can get stuck due to your antivirus software. If that’s the case, you can try disabling your antivirus and check if that helps.

If the AMD Software Adrenalin Edition is stuck on the screen, that can be a significant problem. Hopefully, you can fix it using the fixes in this guide.

There are also times when Windows 10 prevents the installation of AMD drivers. In such a case, our dedicated guide will undoubtedly help you out.

Feel free to let us know the solution that helped you fix this issue in the comments below.

Fix Error Code 0xc000000d with These 4 Detailed Solutions

Error code 0xc000000d is a Windows error that appears when the system cannot boot to Windows due to a messy PC boot configuration.

The error message appears in a Blue screen display with the message Your PC needs to be repaired. This can be devastating, but it is not the most challenging issue to fix, as shown in this guide.

What does it mean when it says your PC needs to be repaired?

There are a series of reasons for your PC needs to be repaired error code 0xc00000d on Windows 10. Below are some of the prevalent ones:

  • Faulty boot drive: A faulty hard drive is one of the major causes of the error code 0xc00000d on Asus or Lenovo laptops. In extreme cases, you must run some commands or replace the hard drive.
  • Corrupt system files: Another known cause for this issue is the corruption of the system files needed to boot up your PC correctly. Repairing and restoring these files should solve the problem for good here.
  • Faulty Windows installation: If you didn’t install your OS correctly, you could get this error. Reinstalling Windows is the way out of this.

How can I fix error code 0xc000000d?

Note icon NOTE
You may need to boot into Safe Mode for most of these solutions, especially if you can not start the computer normally.

1. Run Startup Repair

  1. Create and insert a bootable installation media and boot your PC from it.
  2. Choose your language and other available info and click Next.
    language  error code 0xc000000d
  3. Now, select the Repair your computer option.
    repair
  4. Choose Troubleshoot > Advanced options.
    advanced option
  5. Select the Startup Repair option.
    startup error code 0xc000000d
  6. From here, choose your operating system if you are prompted to do so and enter your password.
  7. Finally, click the Startup Repair button to begin the process.

Startup Repair is one of the best repair tools on Windows for fixing startup issues.

Thus, if you can’t find a way past the error code 0xc000000d, you need to use this tool to diagnose and fix any issue preventing your PC from booting normally.

2. Use Command Prompt

  1. Insert your bootable media into your PC and repeat Steps 2 to 4 in Solution 1.
  2. Now, select the Command Prompt option.
    cmd
  3. Type the command below and hit Enter: sfc /scannowsfc error code 0xc000000d
  4. Wait for the command to finish, then type the line below (replace c with the letter of your boot drive)and hit Enter: chkdsk D: /rchkdsk
  5. Finally, restart your computer after the command finishes running.

In some cases, faulty system files can cause the error code 0xc000000d. Running the SFC scan should fix this and restore normalcy.

Also, problems with your hard drive. The CHKDSK command should detect and fix this issue.

3. Run System Restore

  1. Insert your installation media and repeat Steps 1 – 4 in Solution 1.
  2. Select the System Restore option.
    system restore
  3. Now, enter your username and password and choose a restore point.
  4. Finally, wait for the restore to complete.

If you started noticing the error code 0xc000000d after making some changes to your PC, you might need to restore Windows 10 earlier. However, you must have created a restore point in the past to use this solution.

4. Clean install Windows

If all the fixes above do not fix the error code 0xc000000d, you might need to clean install Windows. This will give you a new version of the OS and eliminate all the possible causes of the issue.

To get the detailed steps to follow, the requirements, and to prevent further problems, check our detailed guide on how to clean install Windows 10.

With this, we can conclude this guide. We believe you now have everything needed to fix the error code 0xc000000d.

If you are facing other issues like Windows activation error 0xc0020036, check our detailed guide to fix it effectively.

Feel free to let us know the solution that helped you solve this problem in the comments below.

Windows Defender is Blocking Avast Antivirus: 5 Ways to Fix It

Windows Defender is the built-in antivirus software for Windows PCs. It is effective in protecting your PC. However, some users use other antivirus services, running into issues with the Windows Defender. The Windows Defender blocking avast is a common complaint.

Why is Windows Defender blocking Avast?

Windows Defender is known for not working with other antivirus software. It will conflict with antivirus software like Avast, which has a firewall feature on it. So, the common cause of issues between Windows Defender and Avast antivirus is that the two programs are conflicting.

Furthermore, a couple of factors can cause Windows Defender to block the Avast antivirus software on your PC. Some are:

  • Avast antivirus compatibility issues – When the version of Avast antivirus you have on your computer is not compatible with your computer, it may not work, seeming like it was blocked. So, you can have issues with Avast not running on your PC if you don’t install a usable version.
  • Corrupt Avast installation file – Corrupt Avast installation files can be detected by Windows Defender, stopping the program it is responsible for from running. Hence, the built-in Defender blocks Avast and can make it unresponsive.
  • Outdated Avast software – Running an outdated Avast on your PC can cause many issues. So, it can cause concerns with how it interacts with other apps on your PC, especially another third-party antivirus.

Regardless of the reason, Avast, you can fix the problem by trying some fixes on your PC.

What can I do if Windows Defender is blocking Avast?

Go through the following preliminary checks:

If you still can’t fix it, try the solutions below.

1. Reset Avast

  1. Double-click the Avast client icon on your desktop to launch it.
  2. Click the Menu button and select Settings from the drop-down.
  3. Click on Troubleshooting and select the option to Reset to Default.
  4. Restart your PC and check if the issue has been fixed.

Restarting the Avast client on your PC will fix any problems preventing it from running as it should.

2. Disable Windows Defender’s Real-time protection

  1. Left-click the Start button, type Windows Security in the search box, and launch it.
  2. Select the Virus & threat protection option, and click Manage settings.
  3. Toggle off the Real-time protection option to turn off Windows Defender Antivirus.

Disabling the Windows Defender antivirus on your PC can fix any interference preventing Windows Activation from connecting.

3. Disable Windows Firewall

  1. Click the Start button and type control panel, then open it.
  2. Select the Windows Defender Firewall option.
  3. Click the Turn Windows Defender Firewall on or off option from the left side.
  4. Go to the Private network settings and Public network settings, then click the radio buttons for the Turn off Windows Defender Firewall (not recommended) option.
  5. Close the Control Panel and restart your computer.

Disabling the Windows Defender Firewall can resolve any conflict between the service and Avast.

4. Stop Windows Insider Program

  1. Press the Windows + R key to open a Run dialog box, type ms-settings: windowsinsider, and press Enter to open the Windows Insider Program.
  2. Click the Stop Insider Preview builds option and press Yes to confirm.
  3. Click Roll me back to the last Windows release.
  4. Restart your PC and check if the problem persists.

5. Uninstall the Avast antivirus with Utility

  1. Go to Avast’s official website and download the avastclear.exe file.
  2. Press Windows + R to launch the Run dialog box, type msconfig, then press Enter.
  3. Navigate to the Boot tab and check the box for Safe boot.
  4. Click Apply, then OK to restart your computer to boot into Safe Mode.
  5. Right-click on the downloaded .exe file and select Run as administrator from the drop-down.
  6. Click Uninstall at the bottom of the screen to uninstall Avast and clear all files. 
  7. Download the latest version of Avast and check if the problem persists.

This tool will uninstall the Avast app and clear every file that it can from your PC, allowing you to install a clean one.

Conclusively, you can check what to do if Avast is not updating the virus definitions for some reason. Also, you can check what to do when Avast is blocking Remote Desktop on your PC.

For further questions and suggestions, kindly use the comments section below.

11 Best Windows 10 Laptops to Get This Christmas

It’s the season of giving all over again! One of the biggest joys of Christmas is buying presents for our loved ones. As computers have become an integral part of our lives, we’re sure there are some of you planning to get your kid/friend/cousin a new laptop for the upcoming year.

2016 was a great year for the laptop industry, mostly because of Microsoft’s concept of Windows 10. Therefore, the manufacturers have produced a huge number of high-quality laptops and convertibles.

As the choice is so rich, it might be a problem for you to pick up the best possible laptop. That’s where we come in, with our short list of the best Windows 10 laptops to get for Christmas 2016. The list is versatile, as it should contain someone of everyone’s taste and budget.

So, without any further ado, check out our list, and start making plans for the perfect gift for these holidays.

What are the best Windows 10 laptops to get this Christmas?

Acer Aspire 5 Slim

  • 15.6 inches Full HD IPS Display
  • AMD Ryzen 3 3200U and Vega 3 Graphics
  • 4GB DDR4 and 128GB SSD
  • Backlit Keyboard
  • Not very good for gaming

The Acer Aspire 5 Slim is one of the best values for money you can find on the market. This mid-range laptop is a combination of strong performance and ultra-portability. It sports an AMD Ryzen 3 3200U processor, 4GB of RAM, and a 128GB SSD, all packed in 14.31 x 9.74 x 0.71 inches.

The Aspire 5 Slim comes with a 15.6-inch and 1920 x 1080 IPS display. About battery life, it can last for 7.5 hours, which is pretty solid for its price range.

All in all, the Acer Aspire 5 Slim is a great student or travel laptop. It weighs just 3.9 pounds, which makes it suitable for any kind of activity. So, if you have a kid in school or a family member that travels a lot, considering this laptop as a holiday gift is a great idea.

2022 HP Stream

  • 4GB DDR4 RAM and 64GB eMMC + 64 Gb
  • Intel HD Graphics
  • Intel Celeron N4020 dual-core processor
  • 1 year Office 365, webcam
  • Not for gaming

This is a very good-priced laptop, perfect as a Christmas present. It doesn’t come with a gaming configuration but it does offer a 1 year Office 365 subscription which makes it great for a student.

The system is powered by a Intel Celeron N4020 dual-core processor an 4 GB of RAM. It’s enough to run the most important applications. It comes with an Intel HD Graphics GPU and it will do just great will most apps and videos but it won’t be up for intensive gaming.

2022 Lenovo IdeaPad

  • Intel Celeron N4020 dual-core processor
  • 4GB RAM and 64GB eMMC Flash Memory
  • 14-inch Intel UHD Graphics
  • Windows 11
  • Can be pretty slow

If you want do perform a good deed for a kid, the 2022 Lenovo IdeaPad can be a great gift for him or her. It comes with Windows 11 preinstalled and 4 GB of RAM.

A small problem can be the 64 GB of storage that can be considered small for nowadays but the 14-inch display and the Intel HD graphics makes up for it. It also comes with a sleek and slim design that is also a plus.

Dell XPS 13

  • 2.2 GHz Intel Core i5 Processor
  • 4 GB DDR3 SDRAM
  • 128 GB SSD
  • Only 13.3 inches display

The Dell XPS 13 is a beast for its price range. This line of laptops, especially the 2016 model is a winner of various awards by trusted online and offline media. And for a good reason. Dell took the last year’s model, and improved all of its main characteristics, in order to make an ultimate choice for buyers this year.

The Dell XPS 13 features the latest 7th-generation Intel Core CPUs (Kaby Lake), 8GB of RAM, and a 256GB SSD. The new version has improved WiFi performance, and excellent battery life.

Display of this device is also amazing. The Infinity display has almost no bezels around, which allowed Intel to pack the 13-inch screen into a chassis characteristic for 11-inch displays.

Of course, the Dell XPS 13 has its share of cons, like a weirdly placed webcam, but if we take into account all of its positive sides, this definitely shouldn’t be a deal-breaker.

Lenovo Yoga 710

  • 11.6-inch touch-screen
  • Intel 7th Generation Core i5-7Y54
  • 8GB Memory - 128GB SSD
  • 360° flip-and-fold design
  • Pretty expensive

Now, a little something for all you budget savers. The Lenovo Yoga 710 (11-inch) is a solid convertible, for those who don’t ask for too much, but still want a solid device for the upcoming year. This device is a great mix of solid performance and endurance, because of its exceptional battery life.

Being a 2-in-1 convertible, Yoga 710 is suitable for just about any use. It feels equally comfortable in both laptop and tablet modes. The Yoga 710 doesn’t have the greatest screen in the category, but it still manages to produce about 66 percent of the sRGB spectrum on a 1920×1080 display.

When it comes to specs, the Lenovo Yoga 710 sports the 6th Generation Intel Core m3-6Y30 processor, 4GB or RAM, and a 256GB SSD. Once again, not the greatest configuration on the market, but still pretty good for its price range.

Surface Book

surface book christmas

We can’t have a list of the best Windows 10 laptops to buy without the Surface Book. Microsoft’s first ever laptop is among the best pieces of tech you can buy today (Microsoft claims it’s the best laptop ever made). With its futuristic design, and powerful performances the Surface Book is an ultimate hub for all professionals, artists, and creators.

The tablet separation works flawlessly, giving this device some options you can’t find in the competition’s models. Microsoft will make the device even more powerful, with the upcoming Creators Update for Windows 10. So, a number of abilities you can do with the Surface Book is going to be huge.

The Surface Book also comes with one of the most powerful specs you can find in a laptop today. There’s the 7th generation of Intel’s processors, 8-16GB of RAM, and a 128GB – 256GB PCIe3.0 SSD. The screen of the Surface Book is a masterpiece, with the native resolution of 3,000 x 2,000.

But all of this comes with a spicy price, and that’s probably why the Surface Book will be a holiday purchase for just a few users.

⇒ Check it now on Amazon

Acer Aspire E 15

Acer Aspire E 15

The Acer Aspire E 15 is a powerful Windows 1o laptop, perfect for everyday use. It features blazing fast start-up, high-speed connectivity and multitask support.

The laptop is designed for speed and mobility, allowing you to enjoy amazing movies, music and games for hours on ends thanks to its long battery life.

The device features three image and sound enhancement options that will can turn it into an entertainment powerhouse:

  • Acer BluelightShield: reduces blue-light emissions, eye strain and prevents eye fatigue.
  • Acer ColorBlast delivers twice as many colors as the average laptop. In other words, images are extremely close to that of the source image.
  • Acer ExaColor tunes color temperature and contrast gamma value for an RGB-like display quality.
  • Acer TrueHarmony delivers lifelike and rich audio.

⇒ Check it now on Amazon

Microsoft Surface Laptop

Microsoft Surface Laptop

Microsoft launched the amazing Surface Laptop in 2017, and if your budget starts at at least $1,000 then this is definitely the best and coolest Windows 10 laptop to buy this Christmas.

The device is backed by the best of Microsoft, including Windows and Office. There are four tone-on-tone color combinations that you can choose from and five technical configurations.

The Surface Laptop is ultra-thin and light and offers a natural typing and trackpad experience, making it perfect for students and professionals.

⇒ Check it now on Amazon

Surface Pro 6

surface-pro-6-essentials

Speaking of new Surface devices, we’ve got another interesting laptop on the list: the amazing Surface Pro 6. If you need a versatile laptop, then this is the right choice for you. As always, Microsoft offers huge discounts on Christmas deals, so this is the perfect time to get this impressive hybrid laptop.

You can use it for work tasks, play your favorite games, stream your favorite content and so on. You name it and the Surface Pro 6 can handle it. You can use this device in laptop mode, tablet mode and studio mode. Surface Dial and Surface Pen support is also available.

⇒ Get the Surface Pro 6 from Amazon

Huawei MateBook X Pro

huawei-matebook-x-pro-christmas

This laptop is just incredible. It has a really nice and classy design — it’s thin and ultra-portable (0.57-inch thin weighing only 2.93 lbs). It features a 13.9″ highly responsive 3K touchscreen that’s faster than anything you tried so far. Under the hood, it packs an 8th-gen Intel i7-8550U CPU, 16 GB RAM, and 512 GB SSD.

Windows 10 Home  Edition comes pre-installed on this device and the good news is that there’s no bloatware. The 57.4 Wh battery can power you for up to 12 hours of video playback, 14 hours of office work, or 15 hours of web browsing, according to the official product description.

That’s definitely THE laptop that I would like to find under the Christmas tree this year.

⇒ Buy it now from Amazon

Acer Predator Helios 300

Acer Predator christmas

If you’re looking for a gaming laptop to buy this Christmas, then the Acer Helios 300 is an interesting choice. This machine is powered by  a reliable 7th-gen Intel Core i7-7700HQ CPU clocked at 2.8GHz with Turbo Boost. This allows you to clock it up to 3.8GHz.

Key specs include: NVIDIA GeForce GTX 1060, 6 GB GDDR5 VRAM, 256GB SSD, 16GB DDR4 DRAM Memory, 15.6″ Full HD (1920 x 1080) widescreen IPS display. If you’re planning to rely on battery power for your gaming sessions, keep in mind that this laptop can power you for up to 7-hours.

⇒ Buy this laptop from Amazon

That’s about it for our list of the best Windows 10 tablets to get this Christmas. If you want to purchase a new piece of tech for the holidays, we hope we gave you a clearer idea.

Do you agree with our list? Is there any laptop you’re planning to buy? Let us know in the comments below.

Check Bluetooth Capability Easily with These 3 Simple Steps

Bluetooth can be quite useful, but before you can use it, you need to check Bluetooth capability. If Bluetooth file transfer is not working, it’s possible that you’re having some issues with it, so you need to check it with these steps.

How can I check the Bluetooth capability on my device?

1. Use Device Manager

    The easiest way to check for Bluetooth support is to use Device Manager. This built-in app allows you to view and configure all the devices and their drivers on your PC.

  1. 1. First, press the Win key + X at the same time on your keyboard to open the WinX menu.

  2. 2. Select Device Manager on that menu to open the window shown in the shot directly below.

    device manager bluetooth
  3. 3. What you need to look for on that window is a Bluetooth Radios category. That should be listed somewhere nearer the top of the window.

  4. 4. If you can’t find Bluetooth Radios, click Network adapters on the Device Manager window. Bluetooth Radios might be listed there instead.

  5. 5. If you locate that section, it means that you have Bluetooth capability on your device.

2. Look for Bluetooth connection in Network connections

  1. Press Windows key + S and type network. Now select View network connections.
  2. Look for the Bluetooth adapter.
  3. If a Bluetooth network adapter is available, it means that your PC has Bluetooth.

3. Check the Settings app

  1. Click the Start menu button and select Settings.
  2. Click Devices.
  3. If you have Bluetooth, you should be able to turn Bluetooth on or off.
     

Those who don’t have Bluetooth can still add it to their desktop or laptop with a Kinivo BTD-400 USB dongle. You can plug that into a USB slot on your desktop or laptop.

How can I check the Bluetooth capability on Windows 11?

Windows 10 and 11 share many similarities, and checking Bluetooth compatibility is almost identical on both operating systems.

How can I add Bluetooth capability to my PC?

If you want to have Bluetooth on your PC, there are two methods you can use:

  • Use a PC with built-in Bluetooth – All laptops and some desktop computers have Bluetooth capability. If you’re buying a new PC and you need Bluetooth, consider getting a laptop computer.
  • Use a Bluetooth adapter – If you have a desktop PC and you need Bluetooth functionality, adding a Bluetooth adapter is the fastest way to do that.

This means that you can follow the steps from above and use them on Windows 11 as well.

FAQs

How do I know if my PC has Bluetooth?

To check if your PC has Bluetooth, go to the Device Manager (press Windows + X, then select Device Manager). Look for the “Bluetooth” section. If you see it, your PC has Bluetooth. If not, Bluetooth may not be installed or enabled.

Can I enable Bluetooth on my PC if it doesn’t show up?

Yes, you can enable Bluetooth by installing the necessary drivers for your device. Check your PC manufacturer’s website for Bluetooth drivers, or use the Windows Update feature to find and install them.

What do I do if my PC has Bluetooth but it’s not working?

Try restarting your PC and ensuring that Bluetooth is enabled in the Settings app. You can also troubleshoot by checking the Device Manager for driver updates or conflicts and re-enabling Bluetooth in the Bluetooth settings.

Can I add Bluetooth to a PC that doesn’t have it?

Yes, you can add Bluetooth functionality by using a USB Bluetooth adapter. Simply plug it into an available USB port, and install the necessary drivers to get Bluetooth working on your PC.

For more information on Bluetooth, check out this guide on how to pair multiple Bluetooth devices on Windows.

So that’s how to check Bluetooth capability on Windows. In case you don’t have the necessary drivers, visit our guide on how to download the Bluetooth driver.

Did you find this guide helpful? Let us know in the comments below.

Power Calibration Area Error: What it is & How to Fix it

We often need to burn a DVD or CD using the built-in drive or an external one in a Windows PC. And this usually goes smoothly for most, but many users reported getting the Power Calibration Area Error while burning a DVD.

The Power Calibration Area Error on ImgBurn and other tools arises due to a bunch of reasons, and it’s easy to fix them all. So, let’s find out how you can do that.

What is Power Calibration Area Error?

The error shows up when the computer is unable to burn a CD or DVD due to its inability to identify the Optimum Power Calibration rate. This could be both due to hardware and software issues.

Here are some of the reasons you might be encountering the error:

  • Issues with the burner – A hardware issue is usually responsible for the error, and if nothing works, you will have to get a new one.
  • Problems with the CD/DVD – In some cases, it was a problematic CD/DVD itself that caused the problem. This is generally the case when you buy a cheap one.
  • Outdated drivers – If the burner’s driver is outdated, it would perform as intended and may often throw the Power Calibration Area Error.
  • Incorrect speed – Burning speed is a critical aspect that often goes unnoticed, and if it’s wrongly configured, you will have trouble burning a CD/DVD.

How can I fix Power Calibration Area Error?

Before we head to the slightly complex solutions, here are a few quick ones that might work:

  • Make sure the burner is clean, and there are no dust particles deposited on it. It’s recommended that you wipe it gently with a soft cloth.
  • Make sure the connections are in order. For a desktop, check if the cable connecting the drive to the motherboard is properly secured at both ends.
  • Use another CD/DVD for burning, in case the problem lies with the current one.

If these don’t work, head to the solutions listed next.

1. Run the built-in troubleshooter

  1. Press Windows + R to open Run, paste the following command, and hit Enter:msdt.exe -id DeviceDiagnostichardware and devices troubleshooter
  2. Now, follow the on-screen instructions to complete the process.troubleshooter to fix power calibration area error

The built-in troubleshooter is usually the most effective when you receive the Calibration area full error on Nero. So try it and check if things get up and running.

2. Update the drivers

  1. Press Windows + I to open Settings, choose Windows Update from the left, and click on Advanced options.advanced options
  2. Click on Optional updates.optional updates
  3. Now, choose Driver updates.update driver to fix power calibration area error
  4. If a newer version of the drive’s driver is listed, tick the checkbox for it, and click on Download & install.download & install
  5. Once done, restart the computer for the changes to come into effect.

When you get the Power Calibration Area Error, make sure to update the drivers. There are various ways you can do it, but if none work, it’s recommended that you visit the manufacturer’s website and manually download and install the update.

If you want an unchallenging way to update your drivers, then you should give Outbyte Driver Updater a try as it can perform this process automatically.

Outbyte Driver Updater

A massive database available within this amazing software so your drivers can be updated with the latest options.
Free Trial Download now

3. Change the burning speed

Changing the burning speed worked for most users. Remember, you don’t necessarily have to lower the burning speed, as recommended by many. For some, increasing the burning speed from 8x to 24x fixed things.

So, the trick here is to slightly alter the burning speed, be it increasing or decreasing, and check if the Dvdfab Power Calibration Area Error is fixed. Keep changing the value until you get the right one.

4. Try a different software

If nothing so far has worked, we recommend using a software solution. And if you are already using one, switch to the best disc burning software for Windows.

The software you use plays a critical role, and issues with it can lead to errors. So, try another one, and the problem should be fixed.

In case the problem still persists, your only option is to get the CD/DVD drive checked by a hardware specialist and, if need be, replace it with a new one.

Also, before you leave, do not forget to check how to boost the performance of a Windows PC.

Tell us which fix worked for you in the comments section below.

13 Coolest Christmas Gifts for Zelda Fans [Personalized]

Christmas season is almost here and if you’re planning to make inspired choices, today we want to show you some of the best gifts for Zelda fans.

The Legend of Zelda is a popular action-adventure video game that has countless fans all over the world. Chances to know one of them too are quite high.

That’s precisely why a list including Zelda Christmas gifts is more than welcome these days. Just make sure to take your time and check it out below.

What are the best Christmas gifts for Zelda fans?

Legend of Zelda Twilight princess keychain set

  • Stored in a beautiful wooden box
  • High-quality metal alloys, no color, no rust, bright luster
  • Size 3-7 cm
  • Made in China

Christmas gifts don’t have to be always big and flashy, and if you’re looking for a small and subtle Zelda Christmas gift, you might be interested in this keychain set.

The set comes with 7 different keychains and you can easily attach them to your keys or necklace. Each keychain has an incredible design and it will look great alongside your keys.

Legend of Zelda triforce lamp

  • 7 color modes
  • 6 solid colors + color changing mode
  • USB powered
  • Can last more than 50,000 hours
  • The speed of colors changing is way too fast

Having a lamp on your table can always be useful, but if you’re a Zelda fan, perhaps you might be interested in this 3D lamp.

The lamp has 7 different color modes available and it’s powered by a USB cable. As for the lifetime, this lamp can last more than 50, 000 hours which is quite impressive.

The Legend of Zelda hyrule multi-tool

The Legend of Zelda hyrule

If you’re looking for a useful and geeky gadget, you might be interested in The Legend of Zelda hyrule multi-tool. The device has a unique design with a Hyrule crest on it.

This tool has a keychain attachment, but it also has a hidden screwdriver, as well as a bottle opener, so it can come in handy in certain situations.

⇒ Check The Legend of Zelda hyrule multi-tool price

The Legend of Zelda Hyrule coffee mug

Zelda mug

If you don’t like the idea of a simple Zelda Santa hat, let us come with a different suggestion. If you want to warm up during the cold winter days, what better way than having your favorite drink from a Zelda mug?

This mug has a 10 oz capacity, and with the electro-plated Hyrule logo, you shall be able to show off your love for the Zelda series.

Note that this is an officially licensed Nintendo product. However, it is not suitable for microwave or dishwasher use.

⇒ Check the Legend of Zelda Hyrule coffee mug

Legends of Zelda Hallmark ornament

  • Made of resin
  • Measures 2 x 3 x 1. 5 inches
  • Great gift for fans of Legend of Zelda
  • Lead-free
  • Small size

This amazing Nintendo detailed resin representation of Link with a sword in his hand will surely make the day for any Legend of Zelda fan.

The figurine measures 2 x 3 x 1.5 inches, so you will be able to easily hang it in any location on your Christmas tree without bending the branch.

No matter if you want to present it to your loved one by surprising them with a one-of-a-kind tree ornament that’s already hanged, or by presenting it as a gift, Hallmark has you covered, offering this package in a gift-ready box.

Legend of Zelda heart container icon light

  • Collectible
  • Illuminates your room with a soft red glow
  • An amazing present for fans of the series
  • 10 cm in height
  • Powered by batteries that often need to be changed

If you’ve ever played The Legend of Zelda, then you surely know about the iconic heart container symbol.

Besides the decorative element of this beautiful device, you also get a soft-glow illuminator for your room, to set the mood for some more gaming.

It is powered by two AA batteries, which is ideal when it comes to portability, but depending on how often you use it, the batteries might need changing often.

MONOPOLY: The Legend of Zelda

  • An amazing gift for fans
  • Can play as your favorite character/element
  • Buy and sell memorable locations from the game series
  • Game pieces don't include Link or the Master Sword

This is a special treat for fans of board games that want to have a geeky Christmas this year as well.

If you’re a fan of Zelda and board games, perhaps you might be interested in this unique Zelda edition of Monopoly.

The board has actual locations from Zelda games, and even player pieces are inspired by Zelda games. Overall, if you love Monopoly and Zelda, this might be a perfect gift.

Legend of Xmas sweatshirt

Christmas sweatshirt

Christmas season is almost here, and what would be a better gift for a Zelda fan than an ugly Christmas sweatshirt?

The sweatshirt comes with a unisex design and it’s made from 90% cotton and 10% polyester. As for the decorations on the sweatshirt, there are rupees, hearts, Triforce, and of course the Hyrule shield.

Do note that it is designed to look like an ugly Christmas sweater. It could actually bring a huge smile to someone’s face.

⇒ Check Legend of Xmas sweatshirt price

Deekec Legend of Zelda Ocarina 12

get Ocarina of Time

Ocarina of Time is probably one of the best-known Zelda games, and every Zelda fan will be familiar with the Link’s ocarina. If you’re into music or playing instruments, then this ocarina will be perfect for you.

The ocarina itself comes with a great design, and it even has its own songbook from the game, so you should be able to play all the familiar songs from the game on your own.

Do note that it is made from kiln-fired ceramic and durable glaze. It comes with a neck strap, songbook, display stand, and protective bag.

The ocarina has 12 holes and it measures 6 inches in length and 3.5 inches in depth

⇒ Check Deekec Legend of Zelda Ocarina 12 price

Paladone The Legend of Zelda drink coasters

Legend of Zelda Breath of the Wild

What do you think of the idea of buying the perfect accompaniment for your drinks? That’s your chance to protect your tables, desk, or bar with these useful Legend of Zelda: Breath of the Wild coasters.

We are talking about corked-back metal coasters with an embossed design of The Legend of Zelda’s symbols that will impress your friends and family.

Keep in mind that this pack contains no less than 4 corked-back metal coasters and none of them will scratch your coffee table.

⇒ Check The Legend of Zelda drink coasters price

Legend of Zelda Triforce ring

Triforce ring

Another great Christmas present for Zelda fans might be a Zelda inspired ring. This ring is made from tungsten carbide and it has motives from Skyward Sword on its surface.

In addition, it’s worth mentioning that this ring is scratch-resistant so it will remain in perfect shape for a long time.

Moreover, it is hypoallergenic, so it won’t cause any skin irritations. This could make a huge difference for those facing such issues.

⇒ Check Legend of Zelda Triforce ring

The Legend of Zelda chess set

The Legend of Zelda chess set

Another perfect geeky present for this year can be The Legend of Zelda chess set. This chess set comes with 32 custom figures.

It’s worth mentioning that both sides have unique figures, which is a major plus. In addition, all figures are made from vinyl, and they will look amazing during chess games.

⇒ Check The Legend of Zelda chess set price

Legend of Zelda Triforce pendant necklace

Zelda Triforce pendant necklace

If you’re not the type of person who simply thinks of a Zelda Christmas hat, another great geeky Christmas present for this season can be a Legend of Zelda Triforce pendant necklace.

This necklace is made from tungsten carbide, so it’s fully scratch-resistant. In addition, the necklace is hypoallergenic so it won’t cause any skin irritations to worry about.

⇒ Check Legend of Zelda Triforce pendant necklace price

We hope that this guide has managed to help you choose the perfect gift for your loved ones.

Feel free to share your suggestions with us by using the comments section found below this buying guide.