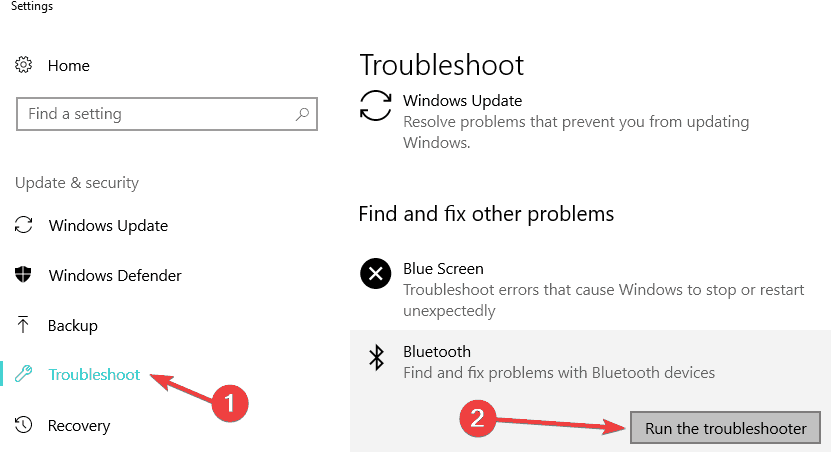
BootCamp Bluetooth Not Working: How to Fix it

Bluetooth is not working or can’t be recognized after some BootCamp users upgrade to Windows 10. This is a very annoying issue as it won’t find and pair your Bluetooth devices, such as the keyboard or a speaker. 

The problem is common and can be fixed with a series of quick solutions. Keep reading to find out what to do when the BootCamp Bluetooth stops working!

What can I do if BootCamp Bluetooth is not working?

1. Uninstall the MotionInJoy game driver

  1. Press Windows + R to open Run, type devmgmt.msc, and hit Enter. device manager
  2. Find the extra game driver MotionInJoy at the bottom of the list, right-click on it, and select Uninstall device.
  3. Again, click Uninstall in the confirmation prompt.
  4. Wait for a few minutes, or restart your system
  5. Now, open again the Device Manager and the Bluetooth Driver should be there.

If you can’t find the Bootcamp Bluetooth driver or it’s not working, often removing the MotionInJoy driver does the trick!

2. Reinstall the drivers

If the Bootcamp Bluetooth is still not working, try reinstalling the Apple drivers. Run BootCamp from the Mac side, and you should see a message inviting you to download new Windows drivers.

Download the Bootcamp Windows 10 Bluetooth drivers, and you should be good to go! In case you’re not sure how to perform this, it would be helpful to use dedicated driver update software applications.

3. Install Apple built-in Bluetooth driver

  1. Open the Device Manager, expand Bluetooth, right-click on Apple Broadcom Built-in Bluetooth, and select Update driver.update driver to fix bootcamp bluetooth not working
  2. Choose Browse my computer for drivers, and then click on Let me pick from a list of available drivers on my computer.
  3. Now, select Apple Inc. for Manufacturer and Apple Built-in Bluetooth, and click Next.
  4. Once the driver has been installed, you should see the Apple Built-in Bluetooth and Microsoft Bluetooth Enumerator listed under Bluetooth Radios.
  5. You should now be able to set up your Bluetooth devices.

One user suggested that installing the Apple built-in Bluetooth driver fixed things when the Bootcamp Bluetooth is not working.

Before you leave, find out how to download the latest Bluetooth drivers in Windows.

For any queries or to share more solutions, drop a comment below.

AliPay Payments Supported in Windows Phone 10, 8 [Update]

As a technology journalist, I have to be aware of almost everything that’s happening in the tech world, not only in the Windows or Microsoft world. And many other colleagues of mine are quite aware that right now is the moment when China is becoming a more interesting market for tech companies that it used to be before. Just look at Apple’s numbers for 2012, China is now a very serious market.

China has the biggest number of mobile subscribers and it’s only natural that foreign companies come in China and try to develop their business. And Microsoft isn’t sleeping with regards to this. Recently, Microsoft has announced that they are going to support AliPay as payment method for Windows Phone 8 and so, even for Windows 10, Windows 8. This move is obvious – Redmond needs more traction from Chinese developers and they are willing to do what it takes to obtain it.

ali pay windows 8

Also, recently it was announced that AliPay has reported that in 2012, the amount of their mobile payments has increased by 550%! Yes, that’s right – five times more! Ballmer wasn’t sleeping and he probably instructed his subalterns to get to work. So, as a result, AliPay payments are now possible in Windows Phone 8.

Microsoft adds AliPay as payment option in Windows Phone 8, Windows 10

AliPay for Chinese folks is just like PayPal for Americans and Western Europeans – is a very comfortable method of paying online. But what’s unbelievable is the amount of users it has – almost 800 million. Probably this is what convinced Microsoft to adopt this spread payment option. With this move, Microsoft wants to encourage the app development in the Windows Phone store and also in the Windows 8 one, which  even now seems scarce to some.

alipay windows phone 8

Right now, AliPay users can also get a touch of Windows 10, Windows 8 through the Wndows 8 Xbox app, so technically, AliPay payments are also available for Windows 8. If this “experiment” proves to be a success, I think Microsoft will continue and will introduce AliPay as legit payment options for the entire Windows 8 store, as well. Microsoft boasts and say that they are the first large OS to support AliPay as official payment solution. Here’s what else Microsoft said in their announcement:

Needless to say, this is a significant opportunity to reach new users – a good reason to visit the Dev Center to cross-submit your app for the China market today and over the coming months localize or customize your app to increase its appeal to users in China. And if you’re a game developer, Windows Phone 8 now supports Xbox games in China.

Let’s hope that this will have the desired effect and will help developers earn money for their work. And with this occasion I also hope for Microsoft to make it possible to pay with PayPal in the Windows 8, Windows 10 Store.

UPDATE: AliPay Payments is no longer supported in the Microsoft Store. Currently, the Chinese store supports only three payment methods: MasterCard, Visa or Credit Card. If you own an English or US credit, MasterCard or Visa card, you can then buy the apps from the Microsoft UK/US Store.

RELATED STORIES TO CHECK OUT:


Play Minecraft in Windows 10/11, 8 with Blockworld app

Blockworld is an awesome look-alike app to play Minecraft in Windows 10, 8. If you want to learn more about this awesome app, check out the guide below.

Sadly, probably many of you know that sometimes it’s not that easy, if not, impossible to play the immensely popular Minecraft game in Windows 10, 8. Also, the official Minecraft game or app is nowhere to be found in the Windows Store, neither. We don’t know how more to wait until Minecraft‘s creator, Markus Persson, will decide to release an official Minecraft app or certify the game, so we’ll have to rely on other solutions.

minecraft windows 8

And by other solutions, I mean the Blockworld Minecraft-like game available only as an app from the Windows Store, so you can’t download it in desktop mode. Previously, Blockworld was released as a game for Xbox 360 title, being featured as an indie game. Developed by 2.0 Studios, a team of developers that has only another Windows 8 app, the game has been around since 2010, according to them, so this means they have no copyright conflicts with the original Minecraft game creator.

Nonetheless, if you have played Minecraft before, you will probably be stunned by the fact that Blockworld has the exact retro graphical look of Minecraft.When it was launched, the game was only $2.49, then its price went up to $4.99 later and now the game is available for $6.99, but this is also a 60% discount.

Blockworld mimics original Minecraft in Windows 8, 10

windows 8 minecraft

The creators behind Blockworld are betting on the fact that there aren’t too many other developers to have released such a loyal copy of Minecraft, therefore they can afford to price it a little higher. This Minecraft game will also work on your Windows RT device. Inside Blockworld, you get to explore deep arctic oceans, mountainous plains and other environments. As for building, you can test your Minecraft skills constructing villages, cities, monumental constructions and many others.

Having played in Blockworld for a few good days in trial mode, I can definitely say that this game deserves to be played by loyal Minecraft gamers. And thanks to the trial option, you can get to see if this is a true Minecraft gaming experience on Windows 8 or not. By the way, I already run the final version of Windows 8.1 and Windows 10 and I can confirm that Blockworld, this Minecraft-like game, is working with no issues for me.

You can also have a look at Discover+ app, another Windows 8 app that seems to be designed to bring the Minecraft game to Windows 8 and Windows RT users.

UPDATE: Minecraft is now available for download in the Microsoft Store. You can now play the original Minecraft game on your Windows 10 computer and enjoy the full game features.

Microsoft regularly updates the game, adding new game features and improvements for the best possible gameplay experience. If Minecraft is blocked in your region, you can install a dedicated VPN software in order to access the game.

Download Minecraft

Should you encounter any issues after installing Minecraft on your computer, check out the troubleshooting guides listed below:


Xbox Sign in error 0x80072ee7: How to fix it

Xbox Sign in error 0x80072ee7 occurs when you try to open content on your Xbox One console. The following error message comes when you try to open content on your Xbox One console: Error 80072EE7.

What this may mean is that the console couldn’t load the resource you tried to open. Typically, Xbox Sign in error 0x80072ee7 occurs when a network connection error prevents the name of the resource from resolving to an IP address.

If you’re getting Xbox Sign in error 0x80072ee7 on your console, here are some solutions you can use to resolve the issue.

FIX: Xbox Sign in error 0x80072ee7

  1. Check Xbox Live service status
  2. Test your Xbox connection
  3. Power cycle your console and network hardware
  4. Check for MAC filtering
  5. Change the wireless channel and width
  6. Check for low wireless signal

1. Check the Xbox Live service status

If you see any alerts here, wait until the service is up and running and try again later.

2. Test your Xbox connection

If you’re seeing Xbox Sign in error 0x80072ee7 when you run the Network Connection Test on your Xbox One console, rerun the Network Connection Test on your console to verify the specific error message you’re getting, follow these steps:

  1. Press the Xbox button to open the guide.
  2. Select Settings.
  3. Select All Settings.
  4. Select Network.
  5. Select Network settings. Any known outages will appear in the middle of the screen.
  6. On the right side of the Network settings screen, select Test network connection.

test network connection xbox one

If the connection test is successful, your console will connect to Xbox Live. If the connection test is not successful, the Network Connection Troubleshooter will try to identify the problem.

If you see more than 5-percent packet loss, try the solutions below.

— RELATED: How to fix Xbox One S 4K and HDR issues

3. Power cycle your console and network hardware

Unplug the power cable from the back of the router, modem, or gateway then restart your Xbox One console by doing this:

  • Open the Guide
  • Select Settings.
  • Select Restart console.
  • Select Yes to confirm. If you can’t access the guide, or if the console seems frozen, press and hold the Xbox button on the console for 10 seconds, until the console turns off. Touch the Xbox button on the console again to restart.
  • Plug the modem or gateway in first and wait for all the lights to return to their normal state.
  • Plug in the router and wait for all the lights to return to their normal state.
  • Test your Xbox Live connection.

4. Check for MAC filtering

MAC filtering can also cause Xbox Sign in error 0x80072ee7 and prevent your console from connecting to Xbox Live. If it is turned on, add your console’s MAC address to your router’s authorized list, or, turn off MAC filtering temporarily on your router to see if MAC filtering is causing the problem.

  • Get your console’s MAC address
  • On Xbox Home, navigate to the left until you reach Pins.
  • Select Settings.
  • Select Network.
  • Select Advanced Settings.advanced wi-fi settings xbox one
  • Write down your Wireless MAC address.
  • Add your console’s MAC address to your router’s list of authorized MAC addresses
  • Restart your router before then connect to Xbox Live.

— RELATED: Fix: Netflix not working on Xbox One

5. Change the wireless channel and width

A wireless router can broadcast on several different channels. If another nearby wireless network is broadcasting on the same channel, or if there is wireless interference from devices, you may experience poor signal strength from your wireless network causing Xbox Sign in error 0x80072ee7. To resolve this issue, try changing the channel on which your router broadcasts.

Note: Most wireless routers have a channel width of either 20 MHz or 40 MHz available as a configurable option. The Xbox One prefers a 20 MHz setting. To resolve your connection issue, first make sure that your wireless router is configured to broadcast on a 20 MHz setting.

After you change your wireless channel and width, test your Xbox Live connection.

6. Check for low wireless signal

A weak wireless signal can cause Xbox Sign in error 0x80072ee7. To do this:

  • Open Guide
  • Select Settings.
  • Select All Settings.
  • Select Network.
  • Select Network settings. Any known outages will appear in the middle of the screen.
  • Select Detailed network statistics.
  • Your wireless signal strength is indicated as a percentage on the Detailed network status A signal strength below 20% is considered low and may cause Xbox Sign in error 0x80072ee7. You can also try a wired connection to router, a direct-to-modem connection, or connect directly to your modem, then test your Xbox Live connection.

Let us know if any of these solutions helped by leaving a comment in the section below.

RELATED STORIES TO CHECK OUT:

Jukebox Arcade for Windows 10/11, RT [Link & Review]

One basic feature of every operating system is its media player. It allows users to playback audio and video files and offer information on certain tracks, albums, or artists. Also, they allow the user to create playlists with their favorite music.

Windows Media Player is all well and good, but most of us feel the need for a better player with a nicer user interface and more features, and for desktop users, there are plenty to choose from. But for Windows 10, users are pretty limited regarding media players.

Not to say that there aren’t any. If do a quick search on the Microsoft Store, you will find quite a few such apps. Although the most known media players, such as Winamp and iTunes don’t have an official app yet, others can take their place.

One player that has potential is Jukebox Arcade, a free Windows 10 app that could achieve greatness with some work. Today we’ll be taking it through its passes, and we’ll see if it has what it takes.

Jukebox Arcade for Windows 10 [Review]

Jukebox-Arcade-for-windows-8-rt (4)

After only a few minutes using the app, I found that the interface has become familiar, and browsing throughout the app was simple and very snippy. The developers have done a great job making the app run smoothly, and changing menus has next to delay.

However, the design of the app does need a major once-over. This is the downside of having too many features: you end up with an interface that looks like everything was just thrown in and mixed up.

Unlike other apps, which have a more compact design and each element blends in with the rest, in Jukebox Arcade, everything is separate and seems glued together.

The controls are well placed at the bottom of the screen and are easily accessible. In terms of functionality, the app has pretty much everything you might want, with a few exceptions that would have made a huge difference.

For instance, there is no Delete button, and the rating buttons, shaped like hearts, are not to everyone’s liking.

Jukebox-Arcade-for-windows-8-rt (1)

One other feature that the app is missing is a manual file browser that allows the user to point to where the music files are. This option was replaced with an automatic media scanner that, to be honest, does not work pretty good.

The first time I tried the search option it found two tracks, but afterward, it couldn’t find anything else. Also, there are no options for creating playlists, organizing tracks in albums, etc.

Jukebox-Arcade-for-windows-8-rt (2)

There is an Auto-DJ button at the top of the app, and I cannot say what it does because every time I tried it the app instantly crashed. I think it will create a random playlist with the tracks in the media library.

One very nice addition to the app is the integration with last.fm, which pulls information about artists and tracks. Also, a good idea that the developers had was the YouTube integration which allows the user to search for videos of their tracks.

Jukebox-Arcade-for-windows-8-rt (3)

As you can see in the screenshot above, Jukebox Arcade provides you with information about the artists that you love. Listening to your favorite tracks lets you learn many interesting details about their personal and professional lives.

The latest Jukebox Arcade update brought new customization options for album artwork elements. Thanks to the same update, users can now adjust screen colors.

Jukebox Arcade has great potential, offering users great features. However, it needs a lot of work for the app to be a serious competitor to the other music players.

For starters, we’d like all the features that it currently has to work properly, as well as other organizing tools and the possibility to manually add music files from different locations.

Also, with an overhaul of the user interface, we could say that Jukebox Arcade could be a great Windows 10 music player.

Download Jukebox Arcade for Windows 10

Windows 10 Embedded ISO Download

In 2015, Windows 10 IoT Core was made available for commercial use and since 2017 it supports Intel’s full processor family. If you are looking to use Windows Embedded devices, we suggest you update to the latest versions.

Back in 2013, Microsoft announced that Windows Embedded 8 was available as well as the release dates for other Windows Embedded operating systems.  For those of you who don’t know what Windows Embedded is, think of all the industrial robots that put together cars, or retail point-and-service devices – many of these work on Windows Embedded, which in essence is a tailor-made version of Windows OS, designed especially for these devices.

Upgrade to Windows Embedded 10

For customers who already have a Windows 10 Enterprise license, the following table shows the upgrade path for different Windows Embedded devices.

upgrading Windows Embedded devices

The upgrade is not possible for other devices, which must be completely wiped and then reload Windows 10 Enterprise in order to run the new version properly from:

  • Windows Embedded 8.1 Industry Enterprise
  • Windows Embedded 8.1 Industry Pro
  • Windows Embedded 8 Industry Enterprise
  • Windows Embedded 8 Industry Pro
  • Windows Embedded POSReady 7
  • Windows Embedded 8 Standard
  • Windows Embedded Standard 7
  • Windows Embedded Standard 7 Service Pack 1
  • Windows XP Embedded

What is Windows Embedded?

windows-embedded-8-available-download

Kevin Dallas, general manager of Windows Embedded at Microsoft explains how users can benefit from using Windows Embedded 8:

Edge devices connected and working in unison with an enterprise’s broader IT infrastructure unleash the potential of the Internet of Things by yielding the actionable data and operational intelligence that drive businesses forward. From the rich, familiar experience of Windows to integrated management, analytics and cloud platforms, Windows Embedded 8 coupled with the full breadth of Microsoft technologies for intelligent systems helps enterprises gain lasting competitive advantages in retail, manufacturing, healthcare and a variety of industries.

Windows Embedded 8 is a custom version of Windows 8 that works on any device that has the computing power, allowing it to be a part of the Internet of Things, a place where all non-traditional computing devices (any intelligent device that isn’t an actual computer) connect with each other. Windows Embedded 8 will also come in different versions, depending on the type of devices that will run it.

Availability of Windows Embedded 8 Operating Systems

For the moment, users can use the Windows Embedded Standard Edition or the more powerful Pro Edition and in the near future, we’ll see other products be released from the Windows Embedded Family. These two versions are generally available now, and they can be downloaded via the Microsoft Download Center.

OEMs and Businesses will be able to use different versions of Windows Embedded 8, depending on what type of application they need. For handheld devices, the Windows Embedded 8 Handheld SDK will be available later this year, which means that devices running it will be available at the end of 2013 or possibly in Q1 of 2014.

[UPDATE] For more information on how to upgrade and enable offline updates on Windows Embedded Handheld devices, see the official blog post.

Windows Embedded 8 Industry, which consists of the bulk of the Windows Embedded 8 platform is available from April 2nd, 2013 and it was implemented very soon in point-and-service systems, healthcare systems, and other manufacturing systems.

RELATED ARTICLES TO CHECK OUT:

Microsoft releases 17677 builds for Windows Server 2019 and the Windows 10 SDK

Following the release of the Windows 10 Insider build 17677 last week, Microsoft has just announced that 17677 builds for Windows Server 2019 and the Windows 10 SDK are now available for Insiders. For Windows Server users, this latest build is available for both Windows Server 2019 and Windows Server version 1809, which is the next semi-annual channel release.

In the blog post, Microsoft’s Brandon LeBlanc mentioned some improvements for the performance history feature of Storage Pages Direct as well as other changes to reduce Windows Server Core image size. As usual, Windows Insiders can download this build from the Windows Server Insider Preview download page.

As for the new Windows 10 SDK, the build 17677 introduces some important changes to the C/C++ ETW code generation of mc.exe (Message Compiler), but there are also some known issues to be aware of: Microsoft notes that enabling Developer Mode through the For Developers settings page is broken in this build, and Windows Device Portal is also unavailable. You can download this latest build from the developer section of the Windows Insider website, though you may want to skip this build if you need the aforementioned features.

Two Saints Row games, Toy Box Turbos added to Xbox One Backward Compatibility

Microsoft’s Major Nelson today announced the addition of three new games to the Xbox One Backward Compatibility catalog. The additions come just five days after the hit game Battlefield 1943 was added to the list, and brings the overall list of backward compatible Xbox 360 titles to just over 510 games.

First off there is Saints Row, the open world action-adventure video game which was originally released back in 2006. There is also Saints Row: Gat Out of Hell, which was released in 2015, and was the epilogue to Saints Row IV via a standalone expansion. Finally, there is Toybox Turbos, which racing video game developed and published by Codemasters originally released in 2014.

This is not the only Xbox themed story of the day since Microsoft also announced the Games with Gold titles for June 2018. As always, you can enjoy these Backward Compatible games on your Xbox by just inserting the disc into your system, or checking the “ready to install” section of your Xbox dashboard.

Windows Live Messenger for Windows 8, Windows 10: Where is it?

If you are looking for Windows Live Messenger in Windows 10, you will be disappointed to hear that it is no longer available.

If you’re like me, then you have a strange passion for old software or, to be more precise, for software that is now outdated. And such an example is the Windows Live Messenger, so with the appearance of Windows 10, Windows 8, this became obsolete.

This is very similar to what has happened with Outlook Express, another “oldie”, in Windows 7 and Windows 10, Windows 8. Those of you with a nostalgic feeling for Windows Live Messenger is probably looking for it on Google. Look no more.

Windows Live Messenger was shut down in 2013

The last time when I checked for Windows Live Messenger was on Microsoft‘s official website, on the Download Center. And guess what, it was still there, or, at least the search result was.

windows live messenger windows 8

Thus, when you click on it to download, the following message appears:

windows live messenger for windows 8

Windows Live Messenger is gone in Windows 10, Windows 8

The sad truth is that Microsoft is retiring Windows Live Messenger and some users have already been migrated to Skype since March 15th. So, the simple step is to embrace the Skype experience but we’re strongly suggesting you try the desktop version first, prior to the Windows Store one. We just didn’t like it that much. Thus, by the end of April 2013, Microsoft has completely phased out support for Windows Live Messenger, so if you’re looking for that “old” experience on Windows 10, Windows 8, it saddens me to say that it will be impossible.

merge accounts windows live messenger

This was the natural thing to happen, even before Microsoft had bought Skype for an immense amount of $8.5 billion. Windows Live Messenger wasn’t present by default in Windows 7, as you were only able to use it after installing or after using services from a different company. What will most likely follow is that Microsoft accounts will be linked to Skype names for a seamless transition. This is a quick explanation from a smart TheVerge commenter on the differences between Skype and Windows Live Messenger:

Skype was peer to peer, i.e. messages could be sent only when both parties were online. Messenger stored messages on MS servers but now both Skype is running on Messenger’s servers so that’s solved. Messenger was available from any computer, you only had to be logged into your Live account via any browser. Skype required desktop client which led to issues on Mac and Linux with bad updates or lack of updates.

Now that’s solved (well, will be this month or so) because Skype is coming to outlook.com. Basically, Skype was better at video calls, Messenger better at messaging. Now they are both the same thing so it should be the best thing ever. New Skype is a competitor to iChat, Google Voice and Google Talk all at once

Can we get it back?

Unfortunately, no, unless you are living in China, where it will still remain active. You can still try and install the IM+ app in the Windows Store, but from my own experience, syncing your contacts on Skype will actually prove to be pleasant, so don’t be afraid of doing it. If you encounter some issues, though, you can always voice your concern in the official forums.

[UPDATE] Microsoft introduced Skype instead of Windows Live Messenger, but users were not happy about the updates. Microsoft was focused on the corporate market and Skype was not user-friendly any longer. Even so, Microsoft forces Skype users to install the new version on May 25.

The good news is the traditional Skype app for desktop is once again available for download from the official Skype website and it’s listed as the ‘classic Skype’. Although, users are warned that some of its features may differ when using Windows 10 Anniversary Update or higher versions of the operating system.

What are your thoughts on this and which chat program is your favorite on Windows 10? Let us know in the comments below.

RELATED ARTICLES TO CHECK OUT:

Xbox One error 0x87e00064: Here’s how to fix it

Xbox One error 0x87e00064 usually occurs when a game is installed at the same time both from the Xbox Store and from the disc. In order to fix Xbox One error 0x87e00064, you can either install the game on a stable internet connection, install it from Xbox Store, and/or delete the cache and any related files saved to it that could have been corrupted for one reason or another.

FIX: Xbox One error 0x87e00064

  1. Install the game on a stable internet connection
  2. Install the game from Xbox Store
  3. Delete cache and save the file

1. Install the game on a stable internet connection

As mentioned, Xbox One error 0x87e00064 can happen when you install a game simultaneously from the Xbox Store and using a game disc. However, this can fail to happen especially when the internet connection is unstable or slow.

There are some disc installers for different games that require an internet connection so as to install the game completely and properly. Therefore, if your internet connection is problematic, the installation won’t be complete or it will fail altogether, because the required additional files cannot be downloaded successfully.

It is important to note, however, that some disc installers download the game updates only, so you need to install the game while your Xbox console is offline, or disconnected from the internet, and this can resolve Xbox One error 0x87e00064.

You can verify if your internet connection has a problem, by visiting a site like speedtest.net, and see your internet download and upload speeds. If the results of these two are lower than those of your internet service provider, check with your ISP. You can also install the game later when there is less internet traffic.

If your speeds are okay but you still get Xbox One error 0x87e00064, meaning the game failed to install, then there may be excess usage of your bandwidth from within the home or wherever you are.

If you’re using a Wi-Fi connection, check that your console is receiving a strong signal, or change to using a wired connection as this gives more stable internet than a wireless one. You can also leave your game installing overnight if it requires downloading a single large file.

2. Install the game from Xbox Store

Sometimes the game disc can be physically damaged causing Xbox One error 0x87e00064. In this case, you can install the game from the Xbox Store, and then use the game disc to play. To do this:

  • Go to Xbox Store.
  • Go to the Search bar.
  • Type in the name of the game
  • Install the game
  • Wait for the console to finish downloading and installing the game.
  • If the installation is complete, insert your game disc and play

— RELATED: How do I fix Xbox error code 80151103? Here’s the solution

3. Delete cache and save the file

If your game was not installed or uninstalled, Xbox One error 0x87e00064 may occur due to a cache or a game saved that is related to the game you are installing. Corrupted files that have been saved can also cause the error so in this case, delete all of these items.

To delete saved files, do the following:

  • Press the Guide button on your Xbox controller
  • Go to Settings Tab
  • Select System Settings.
  • Select a storage device.
  • Select Games and Apps.
  • Look for a corrupted game among the saved files.
  • Delete it if there is any.

To delete cache, do the following:

  • Press the Guide button on your Xbox controller.
  • Go to Settings Tab
  • Select System Settings
  • Select Storage.
  • Select any of the listed storage device
  • Press Y on the Xbox controller.
  • Select Clear System Cache.
  • If prompted to confirm the action, select Yes.
  • Turn off your Xbox console and then unplug it for at least 30 seconds to flush out the memory cache.
  • Turn the Xbox console on and install the game using the game disc.

Were you able to resolve Xbox One error 0x87e00064 using any of the solutions above? Let us know in the comments section below.

RELATED STORIES TO CHECK OUT:

Microsoft forces Windows 10 v1803 on PCs that blocked updates

Windows 10 Pro PCs with branch readiness set to Semi-Annual Channel are supposed to avoid installing Windows 10 version 1803. Microsoft doesn’t seem to care, and it’s rolling the OS version to the systems anyway, according to various reports so far. These systems are specifically designed to bypass the upgrade until it’s declared fit for business use.

This happened before with Windows 10 version 1709

Back in November 2017, Microsoft pushed lots of Windows 10 1703 customers with Current Branch for Business selected onto version 1709. After that, in January 2018, the tech giant pushed lots of Windows 10 1703 customers onto version 1709 even if they had the feature update deferrals set to 365 days. In March 2018, Microsoft pushed Windows 10 1703 customers onto version 1709 based on the fact that the company is allowed to do this if the telemetry is turned off on the system.

Microsoft did it again

The Semi-annual channel was formerly known as the Current branch for business, and the setting is supposed to delay updates until the company determines that the latest version of the OS is fit for paying business customers. Users who do not have the branch readiness set to this feature (including Windows 10 Home users who don’t have to ability to set branch readiness) are considered targets for the unpaid beta testing phase by Microsoft.

The company used to say that it takes four months to get the best final version of Windows 10 debugged to corporate standards. Currently, the delay’s length is a debated issue because it kept changing with each and every Windows 10 version.

For the moment, it’s not very clear whether systems that are upgraded to version 1803 of Windows 10 have their Diagnostic Data set to zero. Now, you have to use the wushowhide app to destroy the update before it gets installed.

RELATED STORIES TO CHECK:

How do I fix max display brightness issues in Windows 10 v1803?

We’re not at all surprised to announce yet another issue triggered by the Windows 10 1803 upgrade. It seems that after installing the update, the display is set to maximum brightness and using the F keys in order to lower the brightness does nothing. The issue was observed and highlighted by a user who posted it on Microsoft’s forum.

Displays set to maximum brightness

Users said that they updated their laptops to Windows 10 version 1803 and right after that the display was set to maximum brightness. The user also notes that using the F keys to lower the brightness is useless and what’s even more annoying is that you are also unable to change the brightness in the display settings. The user noted that all essential drivers had been updated, so the lack of driver updates cannot be responsible for the problem.

How to fix max display brightness

A Microsoft representant responded to the user offering two available solutions. Here is the first one:

  • Click Device Manager
  • Expand Display adapters
  • Right-click the current display adapter
  • Click Propertiesfix maximum display brightness
  • Click Driver tab
  • Click Rollback driver if the option is available.

roll back display driver windows 10

The second solution in case the one described above does not work involves following the steps below:

  • Right-click the current display adapter
  • Click Uninstall
  • Check the box that says, “Delete the driver software for this device.”
  • Exit Device Manager
  • Restart

After this, you have to head over to Start – Settings – Update & Security. There you will have to Check for updates and install all the available updates that you can find. It seems that one of these solutions should definitely fix the problem, so make sure to follow the required steps if you bump into the same display brightness issue as well. Good luck!

RELATED STORIES TO CHECK:

Microsoft bundles State of Decay 2 with new Xbox One X purchases for a limited time

State of Decay 2, the zombie survival game published by Microsoft Studios launched last week on Xbox One, and Microsoft is once again giving its latest exclusive a special treatment. Just like it did for PUBG and Sea of Thieves recently, the company is now offering a free digital copy of State of Decay 2 with new Xbox One X purchases, a limited-time offer that will last through Saturday, June 2.

State of Decay 2 is currently priced at $29.99, and it’s also free with Xbox Games Pass. It’s also enhanced for the Xbox One X with support for 4K graphics and HDR, but the game may not make the best use of the console’s 6 teraflops of power. Indeed, Digital Foundry’s recent technical analysis revealed that frame-rate was lower on the Xbox One X compared to the standard Xbox One models, with frequent dips below 30 FPS. The game also has its fair share of bugs, but hopefully this is something that developer Undead Labs will address with future patches.

State of Decay 2 may not be the most polished game Microsoft released in recent years, but it seems the survival game may be benefiting from the cult following the first episode enjoyed. Indeed, Microsoft announced last week that over one million people have been playing State of Decay 2 just two days after the game launched on Xbox One and Windows 10, which is really good for a game that didn’t have an AAA budget. Did you get the chance to play the game, and do you think it could drive Xbox One X sales this week? Let us know below.

Microsoft To-Do set to begin rolling out List sharing next month

After picking up subtasks support two months ago, Microsoft To-Do will soon let users share lists with friends or coworkers. As spotted by developer Tero Alhonen, Microsoft explained on the support page for the task manager app that List Sharing would roll out to all platforms in June, and you can see how it works in the image below.

Sharing a list with someone in Microsoft To-Do will require you to generate a link, just like you do for sharing files or folders with OneDrive. Users who get access to the shared list will be able to view and modify its content, but list owners will stay in control and be able to turn off the share link at any moment.

“This update will begin rolling out to Microsoft To-Do for iOS, Android, Windows 10 and the web in early June,” the company said on the support page, adding that all users should have it mid-June. List Sharing is currently the top-requested feature on the dedicated UserVoice website, ahead of Outlook Mail integration and Priority levels. Wunderlist, another task manager app from Microsoft had this feature for years, so it will be nice to see To-Do finally catch up next month.

What is Xbox sign in error 0x87DD0017 and how to fix it

Do you get the Xbox Sign in error 0x87DD0017 when you try to connect to Xbox Live, or even download your profile? This error is displayed as 0X87DD0017 and what it means is you may be experiencing network connectivity problems, with either your wired or wireless connection, or your ISP could have a problem.

To troubleshoot Xbox Sign in error 0x87DD0017, you can try any of the solutions below.

FIX: Xbox sign in error 0x87DD0017

  1. Run the Xbox speed test
  2. Disconnect third-party headsets
  3. Check for other wireless interference
  4. Power cycle your console and network hardware
  5. Change the wireless channel
  6. Check the wireless channel width
  7. Check for low wireless signal
  8. Change your firewall settings
  9. Enable perimeter network (also known as DMZ) functionality on your router
  10. Check with your Internet Service Provider
  11. Try a different cable or port
  12. Test a different cable

1. Run the Xbox speed test

Check the speed of your internet connection, then verify the speed of your Internet connection, by running a console speed test:

  • Press the Menubutton on the Xbox One controller.
  • Select Settings.
  • Select Network.
  • Select Detailed Network Statistics.detailed network statistics xbox one
  • The results should appear in a few moments.

Write down the download speed, upload speed, and ping from the speed test as it will be useful when you need to contact your ISP in case of poor streaming issues.

2. Disconnect third-party headsets

These can cause active interference because they broadcast on the same frequency as wireless routers. To find the problematic headset, do this:

  • Disconnect the power from the wireless headset.
  • Test your Xbox Live connection. If successful, your console will connect to Xbox Live.

— RELATED: The 7 Best Gaming Headsets for Windows 10

3. Check for other wireless interference

Devices such as microwaves, air conditioners, ovens, CRT televisions, baby monitors, other wireless networks, cordless phones, and wireless speakers, between your console and router, should be removed to minimize such interference. Other objects like glass, lead, copper piping, concrete, insulation, mirrors, gun safes, filing cabinets, tile, and plaster should be discarded. After this, test your Xbox Live connection.

4. Power cycle your console and network hardware

Unplug the power cable from the back of the router, modem, or gateway for 5 minutes, then restart your Xbox One console by doing this:

  • Press the Xbox button to open the guide.
  • Select Settings.
  • Select Restart console.
  • Select Yes to confirm. If you can’t access the guide, or if the console seems frozen, press and hold the Xbox button on the console for 10 seconds until the console turns off. After the console shuts down, touch the Xbox button on the console again to restart.
  • Plug the modem or gateway in first and wait for all the lights to return to their normal state.
  • Plug in the router and wait for all the lights to return to their normal state.
  • Test your Xbox Live connection. If successful, your console will connect to Xbox Live.

5. Change the wireless channel

A wireless router can broadcast on several different channels. If another nearby wireless network is broadcasting on the same channel, or if there is wireless interference from devices, you may experience poor signal strength from your wireless network.

— RELATED: Xbox Live Networking Service missing? Here are 9 ways to fix it

6. Check the wireless channel width

Most wireless routers have a channel width of either 20 MHz or 40 MHz available as a configurable option. The Xbox One console prefers a 20 MHz setting. To resolve your connection issue, first make sure that your wireless router is configured to broadcast on a 20 MHz setting, then test your Xbox Live connection.

7. Check for low wireless signal

  • Open Guide
  • Select Settings.
  • Select All Settings.
  • Select Network.
  • Select Network settings. Any known outages will appear in the middle of the screen.
  • Select Detailed network statistics.
  • Your wireless signal strength is indicated as a percentage on the Detailed network status A signal strength below 20% is considered low and may cause problems with your Xbox Live connection.

If your Wi-Fi signal is too weak, you may want to purchase a Wi-Fi repeater.

8. Change your firewall settings

Firewalls in your network hardware help secure your network by restricting information that travels between your devices and the Internet. You may experience connection issues if your firewall restricts necessary traffic which may be blocking your Xbox from connecting to Xbox Live. Some firewall settings, such as IP flood detection, can also cause connection issues.

9. Enable perimeter network (also known as DMZ) functionality on your router

This functionality removes restrictions to the Internet by moving your device to an area outside your network firewall. You should be able to connect to Xbox Live if you enable perimeter network functionality on your router. You can also check to see if the connection quality has improved by doing this:

  1. Press the Xbox button  to open the guide.
  2. Select Settings.
  3. Select All Settings.
  4. Select Network.
  5. Select Network settings. Any known outages will appear in the middle of the screen.
  6. Select Detailed network statistics.

Look for an increase in upload/download speed and a reduction in packet loss (0% packet loss is best).

You can also try a wired connection to the router, or a direct-to-modem connection.

— RELATED: Want to use a VPN on your Xbox One S? Here are 5 of our favorite

10. Check with your Internet Service Provider

You may need to contact your Internet service provider (ISP) to resolve Xbox Sign in error 0x87DD0017, in case you need to replace a defective modem, request a replacement modem, verify the settings on your modem, or check your connection speed.

11. Try a different cable or port

Do you have another network cable? Try using one that’s known to work (temporarily use the network cable that your computer is using).

12. Test a different cable

Verify that the networking cable is working. To do this, follow these steps:

  1. Unplug the Ethernet cable from the Xbox and from the networking device (your modem, router, or gateway).
  2. Use a different network cable to connect your Xbox console and the networking device.
  3. Test your Xbox Live connection:

Did any of these solutions help fix Xbox Sign in error 0x87DD0017? Let us know by leaving a comment in the section below.

RELATED STORIES TO CHECK OUT:

Windows 10 news recap: Microsoft and Google reveal another variant of Spectre and Meltdown exploit, Acer adding Alexa to its PCs, and more

Welcome back to our Windows 10 news recap, where we go over the top stories of the past week in the world of Microsoft’s flagship operating system.

Microsoft, Google reveal fourth variant of Meltdown and Spectre exploit, Intel promises new security patches
It seems like a never-ending mess of exploits, but Microsoft and Google have revealed yet another variant of the Spectre and Meltdown exploit that has been discovered in Intel CPUs. Intel has promised new security patches for the latest findings.

Microsoft To-Do app now opens faster on Windows 10 devices
Some would expect a To-Do app to load fast, since it is supposed to improve productivity and help you remember things. In the latest update to the Microsoft To-Do app, the team have “substantially” increased the startup speed of the app on Windows 10 devices.
Project To-Do, Project Cheshire

Acer is rolling out Alexa to its PC lineup, starting with the Spin 3 and Spin 5 laptops this week
Amazon’s Alexa is moving into the world of Windows 10, creating a mystery as to what Cortana’s role will be in the future. PC manufacturer Acer has begun rolling out Alexa to some Windows 10 PCs in its lineup, and it’s starting with the Spin 3 and Spin 5 laptops.

Edge on Windows 10 April 2018 Update will make your battery last 14% longer than Chrome, Microsoft claims
Microsoft is again making bold claims about the battery effect of Microsoft Edge compared to Google’s Chrome web browser. In the April 2018 Update for Windows 10, Microsoft is claiming that Microsoft Edge allows the battery to last 14% longer than Chrome.

That’s it for this week. We’ll be back next week with more Windows 10 news!

Microsoft news recap: Microsoft Launcher gets Microsoft Rewards integration, Microsoft shows support for user privacy as GDPR comes into force

Microsoft news recap is a weekly feature highlighting the top Microsoft news stories of the past week. Sit back, grab some coffee, and enjoy the read!

Xbox to sponsor first ever Special Olympics video gaming tournament
The Special Olympics will have its first ever video gaming tournament at the USA Games in Seattle, later this summer. Microsoft’s Xbox division will co-sponsor the tournament.

Microsoft Garage expands with new facility at NERD in Cambridge, Mass.
Microsoft has opened its seventh Microsoft Garage facility, this time in Cambridge, Massachusetts, at the New England Research & Development Center. The facility provides 15,000 square feet of space, great for presentations, workshops, and more.

As GDPR approaches, Microsoft emphasizes their support for user privacy
With the EU enriching privacy regulations with a stronger set of rules, Microsoft has reaffirmed its commitment to user privacy. Despite the regulations only covering companies who deal with EU citizens, Microsoft has said it will support GDPR worldwide for all of its users.

Microsoft Launcher updated with Microsoft Rewards integration, new Visual Search feature
Microsoft has released an update for its Android launcher, Microsoft Launcher, with integration to its rewards program, Microsoft Rewards, as well as adding a new visual search feature which will help recognise things and people in images.

Here is the changelog:

  • Microsoft Family: Parents with Microsoft Launcher can now view the last known location and activity report for their children across their Android phone, Windows PC and Xbox console! (Requires Android 4.4+ for parent devices and 5.0+ for child devices)
  • Search: Introducing Visual Search. Use the camera function through the Launcher Search bar to capture images and intelligently recognize celebrities, landmarks, items, apparel and more!
  • Microsoft Rewards (US only): Now Microsoft Rewards customers can see their Rewards balance in the Launcher Feed and earn points for using Bing Search through Microsoft Launcher;
  • Wallpaper: UX improvements and bug fixes;
  • UX improvements:
    support deeting documents through Documents card;
    welcome animation enhancements;
  • Improvements to folder naming experience
  • Additional crash/bug fixes

That’s it for this week. We’ll be back next week with more Microsoft news.

Windows 10 build 17677 causes GSOD errors and blocks apps

If you enrolled in the Windows Insider Program, you can now download and test Windows 10 build 17677 on your computer. This build release brings a series of interesting new features, as well as many bug fixes and improvements.

As usual, this build also brings issues of its own. After all, this is the main purpose of the Insider Program, isn’t it? We scoured Microsoft’s forum and identified two frequent build 17677 bugs that most Insiders complained about.

Windows 10 build 17677 issues

The first bug on the list is actually quite severe. Many Insiders reported that build 17677 is affected Green Screen of Death errors that block the build install process. It seems that the most frequent error code that appears on the screen is this one:

windows 10 build GSOD error

Fortunately, we do have a troubleshooting guide on how to fix MEMORY_MANAGEMENT errors. Follow the instructions available in the guide and do let us know if you managed to solve the problem.

The second issue concerns non-Microsoft apps. Insiders reported that non-Microsoft apps often fail to open. Sometimes, error 0xc0000005 appears on the screen as well.

Many non-Microsoft apps and app setups are erroring out with 0xc0000005 errors. This recurring after second full clean reinstall, and redownloading the build. SFC run, no violations. […] Avast Free Antivirus won’t run or reinstall. My VPN client won’t run or reinstall, utorrent and bit torrent won’t run or reinstall.

If Windows 10 build 17677 is too buggy for you, then the best solution is to simply use a previous OS version. You can also temporarily opt out of the Insider Program.

How has your Windows 10 build 17677 experience been so far? Comment below.

RELATED STORIES TO CHECK OUT:

What’s new in Windows 10 Insider build 17677?

Microsoft recently released Windows 10 Insider Preview Build 17677 (RS5) to Windows Insiders in the Fast ring besides users who decided to go with the Skip Ahead.

The official notes detail all improvements that are included in this build, and they target Microsoft Edge, Narrator, Kernel Debugging, Task Manager, PCs and more.

Microsoft Edge Improvements

There will be new and clearer Security and more menu so that it gets easier to find the options that users are looking for. The options will be organized in groups from now on.

You’ll also be able to see your top sites on the Jump List on the Windows taskbar or Start Menu. You can organize the tabs that you have set aside and this way, you will be able to remember what’s in each group when you’re coming back later. There are also some improvements targeting the download pane.

Narrator enhancements

There have been included selection command in the Narrator Scan Mode, and it now supports selecting content in Microsoft Edge, Word, Outlook, Mail, and most text surfaces. Microsoft also notes that there is a known issue in Edge where selecting forward gets stuck. The company says that they working on a fix.

Kernel debugging improvements

There has been added support for IPv6 to KDNET, and the payload size of packets is decreased to make room for larger headers required for IPv6.

Other improvements included in the update

There are also Task Manager Memory Reporting improvements and the main memory column in Task Manager Processes tab will not include memory used by the suspended UWP processes.

The Mobile Broadband LTE connectivity on Windows gets revamped, and Windows is transforming the networking stack after 20 years via the NetAdapter framework.

There are a lot of general improvements for PC as well, along with a bunch of known issues and you can check the detailed information provided by Microsoft in this blog post.

RELATED STORIES TO CHECK:

Windows 10 v1803 battery life tests show Edge is better than Chrome

Chrome and Firefox have a considerably larger user base than Edge, but Microsoft’s flagship browser does have a genuine edge when it comes to battery efficiency. Now that the Windows April 2018 Update is rolling out, Microsoft has uploaded another YouTube video that includes an Edge vs. Chrome vs. Firefox battery efficiency experiment. Of course, that video highlights that laptop batteries run out less quickly for users browsing with Edge.

Microsoft uploaded a Windows 10 Fall Creators Update Edge battery life video at the beginning of 2018. That video included three Surface Books streaming the same HD videos in Firefox, Chrome and Edge. The 34 second video showed that Edge’s Surface Book lasts for 16 hours and 8 minutes. Chrome finished with a 13 hour, 31 minute time and Firefox clocked in at 9 hours, 52 minutes.

Windows 10 April 2018 Update battery life test

Microsoft was no doubt delighted with the outcome of that battery test, and has now repeated the same experiment for the Windows 10 April 2018 Update in May 2018. A new Microsoft Edge Experiment video shows that Edge still outdoes Chrome and Firefox for battery efficiency. Edge’s Surface laptop lasted 14 hours and 20 minutes when streaming video, which is actually a drop of an hour and 42 minutes on its previous time. However, Chrome clocked up 12:32:58 and Firefox lasted 7 hours and 15 minutes.

As such, Microsoft now brags that Edge lasts up to 98% longer than Firefox on laptops when streaming video. Furthermore, the software giant also proclaims that Edge’s battery efficiency beats Chrome by a margin of 14%. Although the gulf between Edge and Firefox has widened, Edge streamed video 19% longer than Chrome in the Fall Creators Update video.

However, both the experiments leave out a few other notable Windows browsers. It would be interesting to see how Edge stacks up against Opera when it comes to battery efficiency. In fact, a Microsoft 2016 battery efficiency experiment video did also include Opera. It showed that laptops running Edge lasted 17% longer than those running Opera. Although Opera did finish second in that video, and that browser is a curious omission from the latest YouTube clips.

Opera’s engineering team countered Microsoft’s claims that Edge is more battery efficient than Opera with its own laptop battery experiment in 2016. Opera Software carried out its experiment with its browser’s native power saving and ad blocker enabled. The publisher released a video that highlights laptops running Opera last longer with the browser’s battery saver on. A post on Opera blogs states that Opera Developer (39.0.2248.0) lasts 22% longer than Edge (25.10586.0.0) on Windows 10 laptops.

Those browser versions are a little outdated now, but Microsoft’s omission of Opera in its 2018 browser battery videos suggests that the software giant is somewhat more reluctant to compare Edge’s battery efficiency alongside Opera. Why might that be? A post on Opera blogs states, “If Microsoft really wants to prove that its browser performs better than others (in any regard), the company should be transparent about its methodology so that others can replicate it.”

However, a few less biased websites have also carried out their own browser battery life experiments. Those sites’ experiments have included Opera, Chrome and Firefox and highlight that Edge is the most battery efficient browser (of those four at least). Nevertheless, Vivaldi, Safari and Maxthon 5 are notable browsers still forgotten about in most of the battery efficiency tests!

So laptop batteries last than much longer when you browse in Edge. It might not be the fastest browser, but when it comes to battery efficiency Edge is hard to beat.

RELATED STORIES TO CHECK OUT:

Yahoo Messenger for Windows 10: Where are we?

If you are looking for a touch-ready Yahoo Messenger app in Windows 10, Windows 8, you will be disappointed. Still, the desktop Yahoo Messenger app for Windows 10 works flawlessly, just as before.

UPDATE – After quite a long while, Yahoo Messenger has seen a major update, as an effort to try and keep users from fleeing to competing services.

Yahoo Messenger is not dead and still living even with the appearance of Windows 10, unlike Windows Live Messenger, users of which migrated towards Skype, Microsoft’s new product for chat services. With more than 15 years in history, Yahoo Messenger remains one of the most used chat options across the entire world and is a direct competitor to the above-mentioned Skype, Google Talk, and other free messaging and chat software on Windows, Mac, and mobile devices.

For those looking for an awesome touch experience (imagine using Yahoo Messenger with your fingers only), unfortunately, there’s no such application in the Windows Store. Or, shall we say, there’s YET no such application. So, you’ll have to use desktop software. One of the reasons for this is perhaps the fact that the Windows 10, Windows 8 adoption is still picking up.

You can download Yahoo Messenger for Windows 10 from the official website. If somehow the download isn’t working, this is the direct download link to the file.

The “old” Yahoo Messenger in the new Windows 10

I have many friends that stopped using Yahoo Messenger and they think it’s an outdated product. Probably the reason for that is the fact that they have Gmail accounts and they don’t need it anymore. But I have so many other friends that still use this product and in order to stay in touch with them, I don’t delete it. Of course, the membership has decreased drastically, with many users flocking to Skype or more likely, Facebook.

yahoo messenger windows 8

One of the great things that I like about Yahoo Messenger for Windows 10 and not only is that you can send files up to 2GB. After Skype retired the chess game (I still don’t understand why), I turned my eyes again towards Yahoo thanks to its Games feature. What I didn’t like when installing Yahoo Messenger was that it took quite a while, compared to other similar software and it installed the Yahoo! Toolbar even if I instructed it not to do so!

An awesome feature is a full-screen video calling that indeed offers incredible pictures and sound, but that obviously depends on your webcam and microphone.

Many users who downloaded Yahoo Messenger on Windows 10 complained about install issues. More specifically, the install tool is not able to identify the Windows 10 bit version and users can’t access the messaging platform. As a quick workaround, you need to run Yahoo Messenger in compatibility mode.

  1. Go to the folder where you downloaded Yahoo Messenger
  2. Right-click on the program > go to Properties > select the Compatibility tab
  3. Now, check the box ‘Run this application in compatibility mode for …’ > select your Windows version (you may also choose Windows 7). This should fix it.

If you’ve been using Yahoo Messenger until now, then on Windows 10 the experience will remain exactly the same. The question remains, though – is this enough to keep you faithful to Yahoo?

Fotor Photo Editing App for Windows 10/11 [Review & Download]

So, you’ve got your shiny Windows 10 or Windows RT device and are now looking to enhance your touch and even desktop experience with some awesome applications.

And if you’ve got a nice photo collection on your device, then chances are you’ll want to play around with them, add some effects and fix some issues. Fotor is one such application that promises to help you out and actually praises you to be the best all-in-one photo editing application.

Fotor App for Windows 10: Photo Editing at Its Best

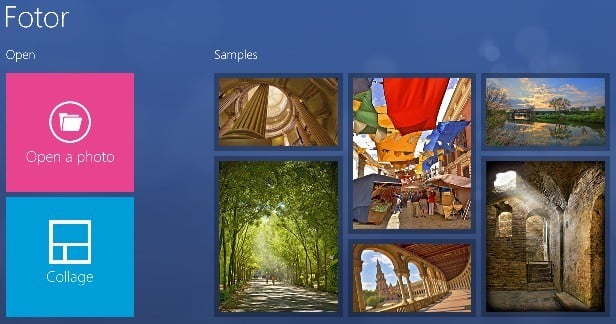
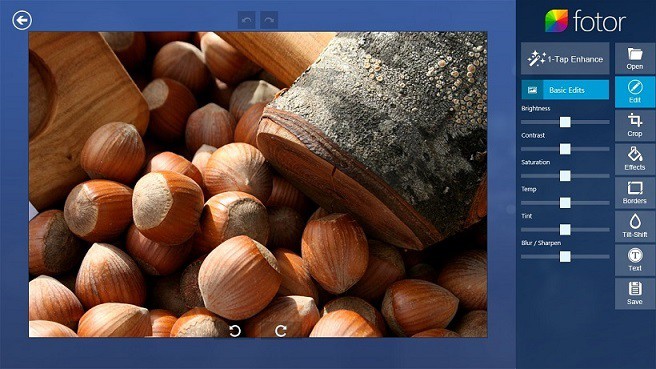
When opening the application, there are two big buttons: Open a photo and Collage. The “open a photo” button will allow you to edit whichever picture you want to. You’ll find there the “1-tap enhance” button – that’s like a quick way of improving your picture.

Just touch or click it, and your images will automatically be improved. With the Edit option, you can adjust the following parameters of your picture:

  • Brightness
  • Contrast
  • Saturation
  • Temp
  • Tint
  • Blur/Sharpen
fotor for windows 8

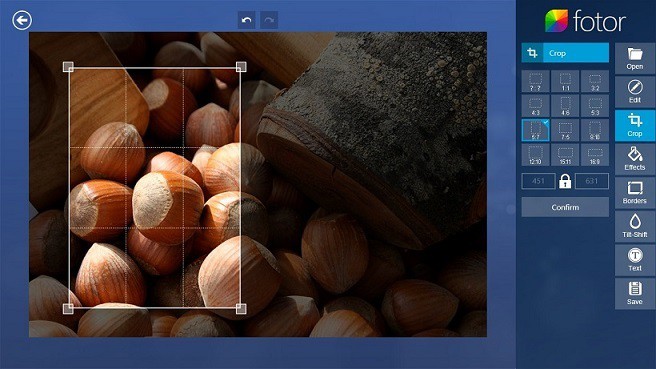
What I, and many other users would like to see is a button that would allow you to reset the changes to default. Next, cropping of images. The Crop button allows you to cut your image and choose the portion you’d like to take. It also comes with some preset cropping frames that you can use.

What impressed me about this app was the Effects tab where I found A LOT of nice effects that you can apply to your images.

So, if you’re that type of person who plays a lot with images, then you’ll find this feature very, very nice. And on a touch-enabled device, this is an absolute pleasure. So, go ahead and play around with the 5 effects: Classic, Lomo, B&W, Artistic, and Dark Corners.

Fotor for Windows 10 comes with a wide range of features

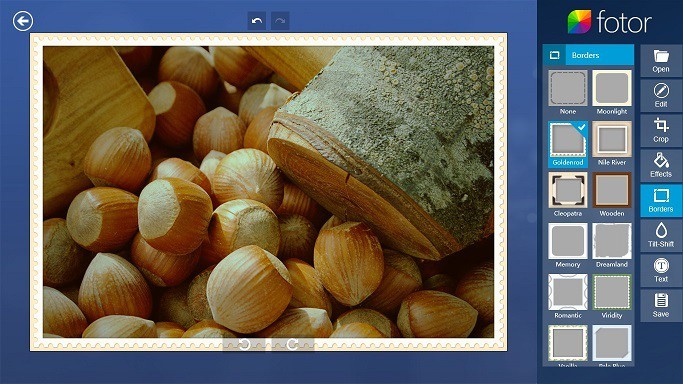
The next button, the Borders button, allows you to add a nice border to your picture. So, if you want to add an extra flavor to your picture, like using it in an electronic postcard, this nice feature should help you out.

Another creative feature that I didn’t really encounter on other photo editing apps for Windows 10 and not only, is the Tilt-Shift Mode. Basically, it will allow you to change your image’s focus as if you were to take the picture now. Somehow, for those who are aware, this is similar to what Lytro cameras do.

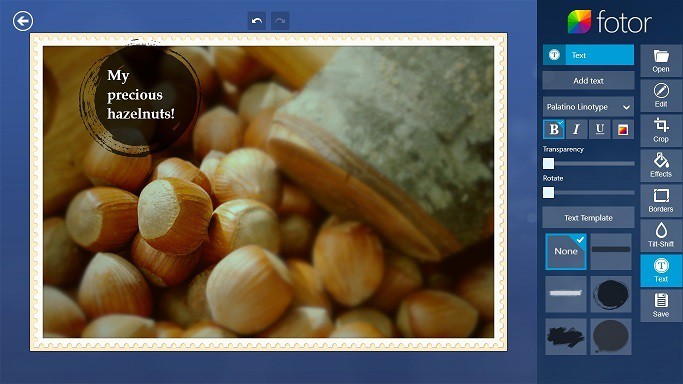
Next, the Text tab allows you to add text to your picture to customize it further. What I particularly liked about this feature was the Text template that allowed you to add a small shape around your text – really cool.

I didn’t like the poor diversity of fonts, and I didn’t frankly like none of them. More text and more artistically and classy drawn fonts will definitely add a lot of style to Fotor for Windows 10. And after you are all done, you can save your image in .jpeg, .bmp, .png, and .tiff formats.

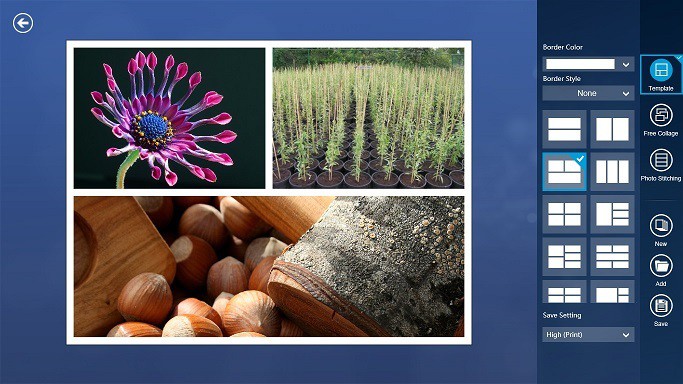
Also, don’t forget about the Collage tab upon opening the application. It will allow you to play around with multiple pictures and make a beautiful collage. You can add here, as well, a border and modify its theme and color.

The software is also available for Android, iOS, and Mac. So, if you need to continue your photo editing work on another platform, Fotor is the right choice.

Furthermore, Fotor’s online collage tool gives you access to more than 80 collage templates and other exclusive content for only $8.99/month. Fotor also includes 22 unique backgrounds for collages.

The tool also features export options for social media websites and photo platforms like Flickr. In this manner, you can quickly share your photos with the world.

The Fotor app for Windows 10 is, and I’ll have to agree, one of the best apps for all-in-one photo editing so use it with all your confidence! Check out the gallery from above and try out the app in the Microsoft Store.

Fotor

Edit your photos beautifully with Fotor’s enhanced set of features.

Whoops! There was a Problem Previewing this Document [Fix]

One of the great things about Google Drive (GD) cloud storage is that it not only stores files but enables you to open (or preview) compatible formats.

However, some Google Drive users have stated that a “Whoops! There was a problem previewing this document” error message appears when they try to open files with the GD viewer.

Google Drive then displays a Download option for the file that doesn’t open. If you’ve encountered the same GD issue, here are a few potential resolutions for it.

Google Drive won’t preview document

  1. Convert the File to a Compatible Google Drive Viewer Format
  2. Compress or Split Up the File
  3. Open Google Drive in Another Browser
  4. Update Your Browser
  5. Clear Your Browser’s Cache
  6. Switch Off Browser Extensions
  7. Sign Out of Google Drive Account

1. Convert the File to a Compatible Google Drive Viewer Format

First, note that the Google Drive viewer is compatible with a relatively limited number of file formats. As such, it might be the case that you’re trying to open an incompatible file format in Google Drive.

You can, of course, open native Google Docs, Sheets, Slides, Forms and Drawings formats in GD. However, GD doesn’t support that many third-party software file formats.

These are some of the audio, video, image, text, Adobe, and Microsoft Office formats you can open in Google Drive.

  • Audio: MP3, M4A, WAV and OGG
  • Microsoft Office: DOC, DOCX, XLS, XLSX, PPT, and PPTX
  • Text: TXT
  • Image: JPEG, PNG, BMP, TIFF, WEBP and GIF
  • Video: WMV, AVI, MOV, OGG, MPEG, MPEG4 and FLV
  • Adobe: PDF, PSD and AI

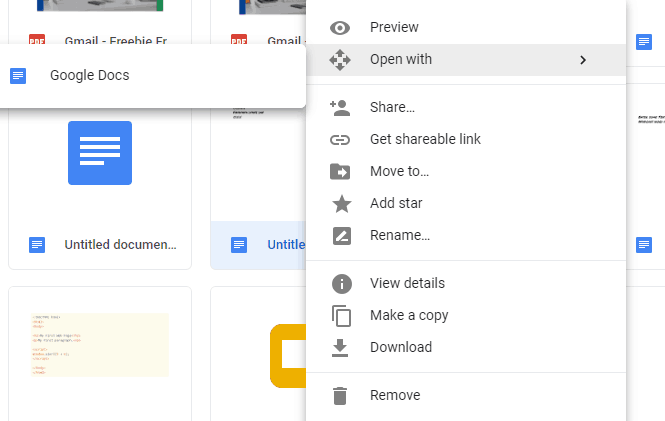
You can convert incompatible presentation, document, and spreadsheet formats to native Google formats within GD. To do that, right-click the incompatible file within Google Drive and select the Open with option. Then select to open it with Sheets, Docs, or Slides.

That will create a second copy of the spreadsheet, document, or presentation in a compatible native format that you can preview in GD.

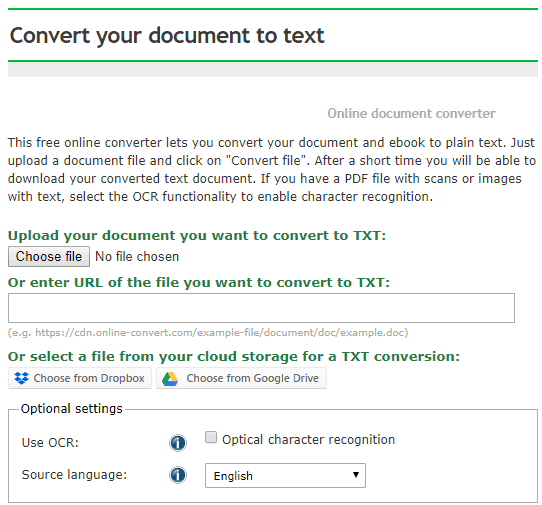
However, you’ll need to utilize a file converter web app to convert image, video and audio files to compatible formats. Check out the Online-Convert.com app with which you can convert files to a variety of alternative formats.

Open this page, select a target format from one of the drop-down menus and click Go to open the file conversion utility shown in the snapshot below. Then you can press the Choose and Convert buttons to convert a selected file.

2. Compress or Split Up the File

Note that Google Drive also has file size limits for documents and presentations. Thus, the GD viewer might not open documents and presentations that eclipse the file size restrictions. GD restricts Google Doc documents to 50 MB and  Slide presentation files to 100 MB.

As such, compressing or splitting a file up to reduce its file size might fix the Google Drive document preview error. You can split up a text document into two, or more, files with the software mentioned in this post.

To compress files, check out the WeCompress web app. That web app compresses PowerPoint, Word, Excel, and PDF file formats.

3. Open Google Drive in Another Browser

You might find that Google Drive previews files ok in an alternative browser. So, open the file in Google Drive with another compatible browser. Chrome, Firefox, Internet Explorer, Edge, and Safari are four browsers that you can utilize GD in.

4. Update Your Browser

Note that Google Drive compatibility is also limited to the two most updated versions of its supported browsers.

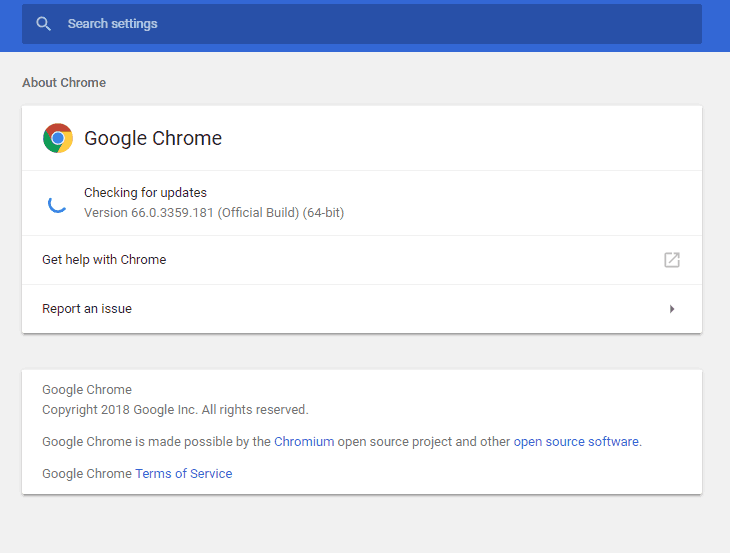
Thus, the Drive viewer might not open documents if your browser is not updated. You can update Chrome by pressing the Customize Google Chrome button, clicking Help, and selecting About Google Chrome. Chrome will then check for updates.

5. Clear Your Browser’s Cache

  1. First, press the Download button on the official website to save CCleaner‘s setup wizard.
  2. Open the setup wizard to install CCleaner.
  3. Open CCleaner and select Cleaner on the left of its window.
  4. Select the Internet Cache check box for your browser on the Windows or Applications tab.

Clearing corrupted browser caches can fix loading and formatting issues on sites. So it might also be worth clearing your browser cache when Google Drive doesn’t preview documents.

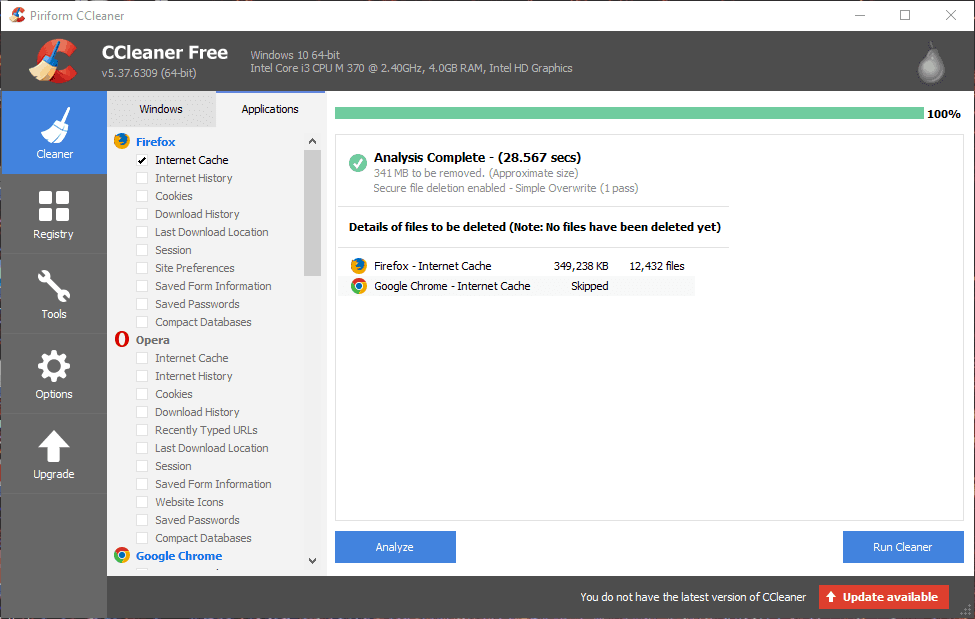
This is how you can clear caches for various browsers with the freeware CCleaner.

  1. Press the Analyze button to scan the browser cache.
  2. Then press the Run Cleaner button to clear the cache.

6. Switch Off Browser Extensions

The Google Drive file preview error might have something to do with browser extensions. To ensure that isn’t the case, switch off all your browser’s extensions. You can also disable extensions for various browsers with CCleaner.

Click Tools and Browser Plugins in CCleaner to open extension lists for your browsers as in the snapshot below. Then you can select multiple extensions thereby pressing the Ctrl key, and pressing the Disable button to switch them off.

7. Sign Out of your Google Drive Account

Some GD users have also confirmed that they’ve fixed the file preview error by signing out of their Google Drive accounts. Click the Google account button at the top right of GD and select the Sign out option. Then you can log back into Google Drive. GD might then preview your files as required.

Some of the above resolutions will probably fix the “Whoops! There was a problem previewing this document” error. Aside from those resolutions, switching anti-virus software and firewalls off might also resolve the Google Drive file preview issue.

What is the Max RAM for Each Windows 10 Edition

Windows 10 is a great operating system, but many users wonder what the maximum amount of RAM Windows 10 can handle.

Today, we will answer this and all other questions related to Windows 10 and RAM, so let’s get started, shall we?

What is the maximum amount of RAM for Windows 10?

The maximum that Windows 10 can support depends on the edition and architecture that you’re using. Here’s a quick overview of the maximum RAM that each edition can handle:

Version32-bit64-bit
Windows 10 Home4GB128GB
Windows 10 Education4GB128GB
Windows 10 Pro4GB2TB
Windows 10 Pro for Workstation4GB6TB
Windows 10 Enterprise4GB6TB

As you can see, all 32-bit editions are limited to 4GB of RAM, while for 64-bit versions the limit is 6TB.

Is there a limit to how much RAM I can add to my computer?

Yes, there are several limits to consider when adding additional RAM:

  1. Your operating system. Different editions of Windows can handle different amount of RAM.
  2. Number of RAM slots is also a limiting factor, so consider investing in larger RAM modules.
  3. Different motherboards have different RAM limits. Check your motherboard specification for correct information on RAM limit.

What happens if RAM is almost full?

  • Your PC will start slowing down since there’s no available RAM to allocate.
  • The computer will use virtual memory on your hard drive to compensate for RAM.
  • Disk usage will rise due to usage of virtual memory.
  • In some cases, certain applications might crash.

Why does my computer only use half its RAM?

  • Issues with your RAM module or motherboard slot.
  • The remaining RAM is allocated to your integrated graphics.
  • You’re using the 32-bit version of Windows.

We tackled this issue in our PC not using all RAM guide, so be sure to check it out for more information.

As you can see, different versions of Windows can handle different amounts of RAM, but keep in mind that your hardware also limits the maximum amount of RAM.

To learn more about your RAM, we have a great guide on how to check RAM type, so be sure not to miss it.

How much RAM do you use on your computer? Let us know in the comments section!

Create Various Beats With SoundPad For Windows 11

Passionate about music? Then you might want to try Soundpad app for Windows 11. The app is freely available from the Microsoft Store and works great on any touch screen device.

This isn’t the most advanced music production software, but will be perfect for beginners, so let’s see how it works and what it can do.

An in-depth look at SoundPad for Windows 11

As we’ve mentioned, the app is freely downloadable from the Microsoft Store, and one thing that we love about it is that even if it is free, there are no ads in the app that will annoy you.

The developers have really thought about the pleasure of the users, and we thank them for that.

sound-pad-for-windows-8 (2)

When you open the app, you will go directly into the mixing area, where you have all your tools to create your own custom beats.

Everything the app has to offer is on this single screen and might I say, very neatly designed. Starting from the left side, you will see all the volume rockers for each individual track, while on the opposite side, you will find the controls.

The user has at his disposal a volume control unit that allows him to mute all the channels at once or crank them up to full power.

It would have been nice to see a 50% volume button here also, or a custom volume button where the user can add in his own value, but nevertheless, handy.

Also, here, you can find the so-called Panic Button, which stops the sounds without interfering with the volume (essentially, a stop button).

sound-pad-for-windows-8 (3)

Underneath the Volume Control, you can find the Samples area, where you can add your own sounds to each of the 16 channels it has.

This is great for those who want to create unique sounds. By pressing the Change Samples button, you bring up the panel with all of the channels, and you can change any of them by clicking on it.

When you do this, the app opens the default file explorer and you have to browse for the sounds to replace the default ones.

At the bottom, you find the Metronome switch, which, when started, it continuously plays a generic drum sound. This can come in handy if you want a constant beat in your music.

The Sample Pads occupy the main portion of the window. This is where the magic happens. Each of these 16 pads has its own sound, and when you want to start creating music, all you have to do is start tapping or clicking on them.

To my surprise, there is no record function, which is quite a drawback if you ask me, as you cannot save any of the music you create.

sound-pad-for-windows-8 (1)

Overall, SoundPad for Windows 11 is a very nice way to have fun. If you enjoy making music, then you should give it a try.

Some features that we didn’t mention include:

  • The 10×6 Pad grid lets you launch up to 10 loops and sounds at a time
  • Preset Pack lets you remix songs that you’ve already created
  • The Edit Mode allows you to change your styles when you’re playing the session
  • Beat Synchronization automatically syncs your beat to the song.

⇒ Download Sound Pad for Windows 11

What are the requirements for Soundpad?

  • Available only on PC
  • Windows 8.1 or higher
  • Works on 32-bit, 64-bit, and ARM versions
  • 2 GB RAM

This is a great but simple app, and its features are limited compared to other premium apps. However, we have a guide on professional music software, so you might want to check it out and learn more.

If you already used SoundPad, do tell us more about your experience in the comments below.

Art Text for Windows 8, Windows 10 is Like WordArt at a New Level

If you want WordArt back in Windows 10, Windows 8, then you probably should be using Art Text as it is the most complete replica app that we managed to find so far in the Windows Store

art-text-for-windows-8-graphics-design-app-review (12)

A few years ago, everyone was using the Office feature WordArt to create graphics for documents. While this feature was pretty basic, many loved it for its simplicity and nice designs. Nowadays, graphics programs have evolved a great deal, and for Windows 8, Windows 10 users the classic WordArt just won’t cut it anymore.

However, they have at their disposal a magnificent app that can take its place. Art Text for Windows 10, Windows 8 is the way to go if you want to create gorgeous graphics and implement them in any of your projects, from documents to web pages and everything in between.

Using Art Text for Windows 10, Windows 8: What features does it have?

For everyone that wants to use Art Text for Windows 10, Windows 8, you can download it from the Windows Store. The developers offer users a demo version for testing out the features and for potential buyers to get of sense of what the app can do, and a paid version of the app for when you realize that the $4.99 price tag is a bargain for what you get in return. If you’re asking  yourself what that might be, well here it goes:

Art Text for Windows 10, Windows 8 is a graphics design app that allows the user to create both simple and complex graphics very easy with the help of an array of tools. Think of it as a slimmed down version of Photoshop where you don’t need years of experience to draw a circle. The simple and intuitive user interface allows every user to use the app just like a pro, the only limit to what can be created would be each one’s imagination.

art-text-for-windows-8-graphics-design-app-review (11)

When you first open the app, you are greeted by a page with the app’s name, which can be edited by using the provided tools. Think of it as a little tutorial or testing area where you can get a sense of what each tool does (and believe me, they are many). At the bottom of the window, you will see the menu from where you can access all the tools that the app provides. We’ll take a look at each of them in a few moments.

From the Windows 10, Windows 8 Settings charm, you can select the background color of the canvas, which is set by default to white and the Object Snap feature that allows users to accurately place objects on the canvas. On the menu at the bottom of the screen, you will see a list of different features. We’ll give you a quick walkthrough of what each of does.

art-text-for-windows-8-graphics-design-app-review (1)

The first of them is “Fill” and what this does is it fills an object with a Color, Gradient, Image or a Shader (if you know a bit of Photoshop, these Shaders are the Styles). Each of these options has their own tweaks so users can adjust every element until you think it looks good.

This level of customization is rarely found in a similar app, which makes Art Text for Windows 10, Windows 8 a wonderful graphics app.

The next button you will see on the menu is “Effects“. This is pretty self-explanatory, as it allows users to add certain effects to elements. These effects consist of Shadow, Glow and Stroke, and just like before, each of them allows the user to customize the effect as he sees fit.

art-text-for-windows-8-graphics-design-app-review (2)

Moving on to the third feature, “Transform“, where users can warp the text in different directions, in order to create effects. This feature is very well known by those who used to use the old WordArt feature. Art Text for Windows 10, Windows 8 gives users quite a few different styles they can choose from, making their text better integrated in the document.

art-text-for-windows-8-graphics-design-app-review (3)

The “Edit” button is only used for changing different elements. For instance, when you select a text, by pressing Edit you have the possibility to change it or modify the font. Also, when it comes to other shapes, “Edit” allows you to swap them with other shapes if your design doesn’t benefit from them.

art-text-for-windows-8-graphics-design-app-review (4)

The last button on the left side of the menu is “Add“. I don’t think there’s much explaining to do here: it allows you to add a text of a shape to your design. Also, if you don’t like the default shapes, Art Text for Windows 10, Windows 8 also provides a tool for creating custom shapes. This tool can be found at the top of the Shapes panel.

art-text-for-windows-8-graphics-design-app-review (5)

The other part of the menu has two more design-related button as well as the usual options that every document has: Zoom, Undo, Save, and Export. Keep in mind that the “Save” button saves your current progress, but it does not save the file to the disk. When you want to do this, you will have to use the “Export” button which opens a window where you can input the desired size of the picture and save it, or share it.

One thing to mention here is that even though the Share button exists when you click it, it opens the Share charm that alerts you of the app’s inability to share.

art-text-for-windows-8-graphics-design-app-review (9)

The “Design” button is probably the best feature that Art Text for Windows 10, Windows 8 provides. By clicking it, you will be forwarded to a gallery of pre-designed graphics, neatly organized by category. There are all kinds of designs here, from logos to names, shapes or web buttons. Also, from here, users can upload their own designs if they want.

One thing I didn’t quite like was the somewhat poor optimization for computers. There are no scroll bars, so cycling through the designs is quite difficult. We hope the developers will address this issue in the following updates.

art-text-for-windows-8-graphics-design-app-review (6)

The “Layers” option is the last design-related item on the menu. When you click it, it opens a menu on the top of the screen where users can manipulate each layer (element) individually. While this feature is not necessarily needed for simple designs, after you add multiple elements to your document, it will prove to be quite useful.

Also, it allows users to bring to the top or send to the back different elements. This tool is quite good when your design has overlapping layers. However, the same issue with scrolling is present here as with he Gallery.

Features of Art Text app

art-text-for-windows-8-graphics-design-app-review (7)

Now that you know what each button from the menu does, we’ll make a final recap of what features Art Text offers its users.

  • Easy to use UI
  • Smooth and fast transition between menus and features throughout the app
  • Possibility to save projects in PNG, BMP, JPEG and TIFF formats
  • Over 100 Fully customizable templates
  • More than 130 Shading materials
  • A whopping 170+ Image textures
  • More than 110 vector icons and shapes added
  • 20 adjustable vector transformations

After working with Text Art for Windows 10, Windows 8 on a few projects, I do believe that its services are top notch and it is a must-have app for any graphics designer. Also, thanks to the fact that it is easy to use, regular users can take a swing at it and create breathtaking designs. I loved it and I recommend it to anyone to who wants to add a plus of style to their projects.

Saving documents with special characters in the name used to cause the app to crash. Finally, this has been solved by the developers and now works well. While there are still many other similar apps in the store, this one still stays on top by simply doing the job right.

RELATED ARTICLES TO CHECK OUT:

What are some of the best Windows 10/11 apps to install?

If you have recently updated to Windows 10, Windows 8.1, then you need to have a look at these optimized apps. If you installed Windows 10, Windows 8.1, then this means you are also looking for some of the best apps to make the most of it.

While not too much has changed that involves developers to update the apps, there are some functionalities that Windows 10, 8.1 come with and which some apps have taken advantage off. So, we’ve gathered the best Windows 10, Windows 8.1 apps for you to use right now and install on your device.

With the release of Windows 8.1, Windows 10 upgrade, almost all the apps in the Windows Store had been updated, updates that are available for those who have upgraded to 8.1. Also some new apps had appeared and new Windows features like the Start button and the options to boot to desktop and disable hot corners.

Let’s talk a bit about the major changes in Windows Store that happened with the Windows 8.1, Windows 10 upgrade and which brought some new Windows 8.1 apps for users everywhere.

Best new Windows 10, Windows 8.1 apps

The launch of Windows 10, Windows 8.1 was also seen as a good occasion for many developers to launch new apps that employed Windows 8.1′ new functionalities that we have described shortly before. While it’s impossible to find all the new Windows 8.1, Windows 10 apps, a help from our readers would also be appreciated.


1. Facebook

facebook app windows 10

Along with Windows 8.1, Windows 10 an official Facebook application has been, finally, released for the users of the new Windows upgrade. It meets users’ expectations being really fast and seeming identical to the webpage with all its features and its design. In the left pane there are settings, groups, favorite features which stays there whatever the menu you are on. The news feed in on the center and the chat with your friends’ availability on the left. The only new feature, this new application brings, is the addition of a Windows Start tile.

2. New Bing apps in Windows 8.1

Not only they integrated an improved Bing Smart Search, a more efficient search showing results from your device and online, but also they come with two more Bing apps: Food & Drink and Health & Fitness.

  • Food & Drink

This application offers a variety of recipes to satisfy your culinary desires. It is designed for use in the kitchen as it has a Hands-Free Cooking Mode using gestures in front of the camera, browsing through the recipe’s pages using gestures control in Windows 10, windows 8.1. It even offers you a Shopping List feature.

  • Health & Fitness

The app, offers you nutritional information about the food you eat, fitness tutorials and videos, 3D body maps and a symptom checker. So, those of you who were loking for a true health and fitness Windows 8 app, this is you pick. The Bing Health & Fitness application in Windows 10, Windows 8.1 contains three trackers, as well:

  • Diet Tracker helps you keep a food journal giving you reports on your weekly and monthly goals.
  • Health Tracker can be synched with HealthVault so you can keep focus on your medical information.
  • Exercise Tracker monitors your fitness progress over time.

UPDATE: Microsoft discontinued both apps in 2015.

3. More awesome new apps in Windows 10, Windows 8.1

As I said, it’s virtually impossible to bring together all the new apps and describe them thoroughly, so we have compiled below another list that will definitely help you find some of the most needed new apps in Windows 10, Windows 8.1. There aren’t too many news apps at the moment because developers have just started working on them, so expect more in the near future.

internet explorer 11 new app windows 8.1

Windows 10, 8.1 updated apps

Not all the apps have been updated to Windows 8.1 as they didn’t have, so we will feature here only some of the best apps that we have found to come with important updates. If you also know a Windows 8.1 updated app, do let us know below in the comments section and if it is worth it, we will definitely add it to the list.

1. Xbox Music

This music app has been redesigned and seems to include a lot of changes. The three layers, on the previous version, are now a single clear page with features like Collection, Streaming Radio, Playlists and Store. Xbox Music app is, now, more user oriented than Store oriented focusing on the music the user listens to and the spreadsheet views being replaced by a grid view of album and artist.

Update – Xbox Music has been renamed into Groove Music. Microsoft recently discontinued Groove Music as well but you can transfer all your music files to Spotify.

2. Mail in Windows 10, Windows 8.1

The mail app includes accounts from Outlook.com, Gmail, Yahoo! Exchange, AOL and any exchange Activesync or IMAP account in one single application. It is more integrated in Windows 8.1 and you can download attachments or preview documents without the closing of the app. There are some extra features for the Outlook.com users like two extra folders on the sidebar for newsletters and social updates, being able to triage e-mails using “Sweep”. In Windows 8.1, unlike Windows 8, you can choose where you want to make a search, in the current folder or in all folders.

Windows 8.1 allows a pair of apps to split the screen so now you can split any app, this being useful, for example, for Xbox games if you are sharing with the Desktop or Skype. Once you start get used to it, it can become a great system because the main problem is that new users find it difficult at first because Modern UI apps behave differently than traditional desktop apps.

For more information about the best email clients for Windows 10, check out this list.

3. More awesome updated apps in Windows 10, Windows 8.1

Just like you’ve seen above with some of the most important new Windows 8.1 apps being listed, we will do the same here. Find below an extensive list of some of the most important and useful applications updated to Windows 8.1. Many of these apps have been reviewed by us, so you will also get to know what they are all about, as well.

skype new app windows 8.1

After seeing so many new and updated apps for Windows 10, Windows 8.1, what is your personal favorite? If you ask me, I still remain a big fan of chess and checker games, but what I am definitely looking forward is an awesome football app. What about you?

Of course, listing all the Microsoft Store apps in this post is impossible. If you want to check out the best free apps that you can download on your computer, go to Microsoft’s Store page.

Radu Tyrsina has contributed to this article.

RELATED STORIES TO CHECK OUT:


What do to if Windows 10/11 Update Doesn’t Show up

If,  for some reasons, Windows 10, 8.1 updates won’t show in the Windows Store, here’s what you need to do to solve the issue.
windows 8.1 update doesn't show up
After Microsoft has finally made Windows 10, 8.1 official, and besides the error of not seeing the Windows 10, 8.1 update appearing in the Windows Store, many other users have reported countless issues, making some of them even want to uninstall Windows 8.1. This is the first major issue that we’re going to try and discuss and perhaps find a solution to it.

I’ve seen many people complaining (including myself) mostly on Microsoft’s support forums that their 10, Windows 8.1 or Windows RT 8.1 update doesn’t show up in the Windows Store, leaving them with Windows 8 and with the desire of updating but without the possibility of doing so. The solutions for this issue are very simple, if, they can be used in your situation, let’s explore together.

Windows 10, 8.1, RT 8.1 upgrade is missing – Solutions

  1. Install Update KB2871389
  2. Your Windows 10 version won’t support the free update
  3. Temporarily disable your antivirus
  4. Run the Update Troubleshooter
  5. Run the WUReset script

These solutions to the missing Windows 10, 8.1 update are recommended by Microsoft itself, so if they won’t work for you, let us know in the comments section below and we’ll try to work together on a solution. Of course, if you are not upgrading from Windows 10, 8 or Windows 8.1 Preview, then you will have to buy Windows 8.1 separately, as Microsoft has made it available in that form.

1. Install Update KB2871389

Microsoft could’ve done a better job to tell everybody beforehand that they need to update their Windows 8 systems to a specific update, with the number KB2871389. You will need this last update to be able to make the transition to Windows 10 once and for all as it serves like an intermediary update. The reason why you probably didn’t get this one last final update was because you have probably didn’t set Windows Update to get automatic updates, which, if you would’ve done it, would have downloaded and installed automatically this update.

However, sometimes Windows Update might have a “delay” in getting the update, as it was in my case. So, if Windows Update is off, you need to do the following to install the KB 2871389 update manually:

  • Open Windows Update – do this be either pressing Windows + C and then typing “windows update” in the search box or by swiping in from the right edge of the screen, then choose Settings > Change PC settings> Update and recovery.
  • Check now and wait as Windows will look for the update you need
  • Click View details after updates are found and tap on the
  • From the available updates, select KB2871389 as this is the one you need, but you can also install any other updates you want

You might need to restart your PC to finish installing some updates. Save and close all your files and apps before you restart so you don’t lose anything. After you have installed the KB 2871389 updated, restart your PC, go to the Start screen, and look for the Windows 8.1 update in the Store. If this still doesn’t work, then check the following step.

2. Your Windows 10 version won’t support the free update

This was a little shock for me, but it is the hard truth – if you have any of the following Windows 8 versions running, then unfortunately, it won’t be as easy to update to Windows 10, 8.1 just by going to the Windows Store and looking for a free update. These are the Windows 8 versions that won’t let you update to Windows 8.1 just that easy:

  • Windows 8 Enterprise
  • Windows 8 Pro, installed by enterprises using KMS activation
  • Windows 8 editions installed using an MSDN ISO file, and which was activated with more ctivation keys

To upgrade to Windows 8.1 from the above-mentioned Windows 8 editions, you’ll need to be a MSDN subscriber to obtain the .ISO Windows 8.1 files. We will feature in the near time a guide on how you can do that, as well. Of course, if you want, you can still opt for a clean install, but I don’t think you really want that. All the above mentioned steps apply to Windows RT users, as well. At the moment of writing this article, though, Microsoft has pulled the update from the Store and the company is working on it.

Also, make sure that your computer is compatible with the update that you’re trying to install. Go to your computer manufacturer’s website and check if your machine is Windows 10-ready.

3. Temporarily disable your antivirus

Sometimes, your antivirus software may prevent your computer from installing the latest OS updates. You can try to temporarily turn off antivirus protection while installing the updates. Many users confirmed that the updates showed up as soon as they disabled their antivirus software. Don’t forget to enable antivirus protection as soon as you’re done installing the updates.

4. Run the Update Troubleshooter

The Update Troubleshooter is a very useful tool that allows you to fix various issues related to Windows Update. To run the Update Troubleshooter on Windows 10, follow these steps:

  1. Go to Search > type ‘troubleshoot’ > hit Enter
  2. Under ‘Get up and running’, select Windows Update
  3. Launch the Windows Update troubleshooter > wait until the tool scans your computerfix windows update won't show up
  4. Check for updates again.

To run the Windows Update Troubleshooter on older OS versions, follow these steps:

  1. Go to Search > type troubleshoot > open Troubleshooting
  2.  Go to System and Security > open Fix problems with Windows Update
  3. Wait for the wizard to find potential problems
  4. Check for updates once again

5. Run the WUReset script

If the Update Troubleshooter didn’t solve the problem, try running the WUReset script. Basically, this script is a batch script that resets all Windows Update components. For more information about it and a step-by-step guide on how to use it, check out this post.

If you are upgrading from the preview version of Windows 8.1, we will shortly post a short guide on that, as well. Let us know if these workarounds helped you to finally upgrade to Windows 10. If not, mentioned the detailed errors you are getting and we will try to find together a solution, if there is one.

RELATED STORIES TO CHECK OUT:


4 Best Torrent Apps for your Windows 10/11 Device

You really need to have a standalone torrent client app on your Windows 8.1, Windows 10 device, so that’s why we’ve gathered only the best for you to use.
windows 8 torrent apps
If you have a touchscreen device (laptop, tablet or hybrid) with Windows 8.1, Windows 10 on it, then you’re probably looking to get a very good torrent app to use on your Window 8.1 tablet, most likely. Of course, you can still resort to the good ol’ traditional torrent apps that we’re all acquainted with, but if you’re looking for some torrent apps specifically designed for your Windows 8, Windows 10 touch and user interface experience, then stick with us.

However, as an important tip that you need to take into consideration – there are also remote torrent apps that allow you to control your torrent downloads remotely. I guess you’re not looking for that kind of apps, so we’ll feature here three standalone torrent downloader/clients for Windows 10, Windows 8 and just one torrent remote app.

Without further ado, let’s have a look at some of the best apps that you can use on Windows 10, Windows 8 to download torrent files.


In case you want to download torrents using untraceable servers, automatically selected for you, we recommend using a full-dedicated VPN tool. Get now CyberGhost (77% flash sale).
CyberGhost has a special feature to download torrents anonymously.


 Windows 10 torrent apps you need

1. Torrent by Jujuba Software [Free]

torrent jujuba software windows 8

The free Torrent Windows 8.1, Windows 10 app released by Jujuba Software is currently one of the best we could find in the Windows Store. The Jujuba Software Torrent allows downloading torrent files, videos, and music via the BitTorrent protocol.

You can also add magnet URL links, as well. The app works on both Windows RT and Windows 8.1, Windows 10 Professional, not only on the standard Windows 8.1, Windows 10 version. Let us know what you think of it after testing it on your Windows 8.1 system.

[UPDATE] Latest version updated visual styles and added several premium features (auto file priority, county blocking, UL/DL ratio).


2. Torrex Lite: Windows 8.1, Windows 10 Torrent Downloader [Free]

torrex lite windows 8 torrent app

Unlike some Windows 8.1, Windows 10 torrent apps, Torrex comes with the ability to work in the background, letting you stream video and audio playback. Just like any other true desktop BitTorrent Client, this one also allows for the download of any torrents and magnet links and immediate viewing of the media content through the built-in media player. From this Windows 8.1, Windows 10 torrent’s app description:

Torrex is full-featured BitTorrent client for Windows Store today, which supports x86, x64 and ARM architectures (Windows 8, Windows 10 and Windows RT). Our goal is to make a high-quality, easy-to-use and handy product. Please, report us about any problems and bugs you find and do not hesitate to inform us about any features you would like to see in future versions of our application. Your opinion is very important for us. Email: [email protected]

And here are the features highlights of the Torrex Lite app, one of the best torrent apps to use on your Windows 8.1, Windows 10 devices:

  •     Background downloading
  •     Immediate streaming without waiting for torrent download completion
  •     Built-in player
  •     Download any torrent files, magnet links
  •     Background music playback

[UPDATE] Torrex Lite App is available on PC, Xbox One, Mobile Device, and HoloLens. The latest version has been targeted for Creators Update, which gives the best compatibility when you install the Windows Updates.


3. Torrent RT [Free]

torrent rt windows 8

Torrent RT, just like the name suggests, is an application designed for those that especially use Windows RT, but it shouldn’t be neglected by Windows 8, Windows 10 users, neither. This torrent app promises to make the most of your network bandwidth without draining your battery and making your tablet or hybrid device unresponsive. From the app‘s description:

Need a stable Metro style BitTorrent client for your Windows RT/8 tablet? Try Torrent RT and you won’t be disappointed! Powered by the highly optimized MonoTorrent library it supports all protocols you would expect from a modern BitTorrent client.

And here are some of its most important features:

  •     Open torrent files and download content as well as magnet links directly from browser
  •     Open downloaded files directly from Torrent RT
  •     Limit the upload and download speeds of torrents
  •     Download torrent files to SD card or USB drive and select what you want
  •     Set priority to your torrent downloads
  •     Search for torrents on 30+ trackers without leaving Torrent RT, or even directly from Windows Search
  •     Set your own custom backgrounds

[UPDATE] Latest version of Torrent RT fixed broken search and downloading of incomplete torrents. You should notice now some improvements on the app stability.


4. uTorrent Client [$1.99]

utorrent client torrent app windows 8

It needs to be said beforehand that this torrent app for Windows 8.1, Windows 10, albeit pretty useful, at least according to the reviews, isn’t the official app from the BitTorrent company. Like I mentioned at the beginning of this article, this is not a standalone torrent downloader/client app, and it works like a remote app. From the app‘s description:

This app connects to the uTorrent WebUI (and only this) system allowing you to view and add torrents to your uTorrent application – from anywhere in the world with a supported internet connection. (Requires the correct ports to be forwarded on your router when accessing from the internet).

And here are the most important features that the uTorrent Client app for Windows 10, Windows 8.1 has:

  •     View all torrent items by their label
  •     Sort torrents by status
  •     Control torrents by pausing, stopping or removing
  •     Add new torrents from URL, magnet links or from .torrent files
  •     Search torrents in real-time with the Windows Search Charm
  •     View tracker, file information, and properties for every torrent
  •     Change and remove labels on torrent jobs
  •     Change download priorities for individual files
  •     Open magnet links from the Internet and .torrent files from the Internet or local computer
  •     Pin individual servers to the Windows 8.1, Windows 10 Start Screen

[UPDATE] You can read all about the uTorrent official desktop app and how to use it in this article.

If you’ve been using a torrent app on your Windows 8.1, Windows 10 or Windows RT device and you are 100% sure it is worth sharing it with us, then feel free to do so. Just like the last reminder, don’t forget to check the laws in your residing country to see whether or not you might be infringing some copyrights and be careful with what you download, as well.

RELATED ARTICLES TO CHECK OUT:

What to do if Bluetooth is not working in Windows 10/11

A good number of Windows 10, 8.1 users have been reporting that they are experiencing problems with their Bluetooth connectivity. Here’s what they have been complaining about and how you can fix the problem.

In a previous post, we explained how Windows 10, 8 developers could establish a Bluetooth link between an Arduino device and a Windows 10, 8.1 app, but now it’s time to talk about some Bluetooth problems in Windows 10, 8.1. The Bluetooth not working problems in Windows 10, 8.1 aren’t limited, unfortunately, only to BootCamp users, as we’ve seen these on a lot of forums.

A user who has an HP Pavilion G6 2201AX says the following:

Hi just a week back i upgraded to windows 8.1, since then my display is acting weird my bluetooth over my pc not working. Prob: when i turn on bluetooth it keeps searching for devices., the light sensor when i turn my bluetooth stays on colour even after i switch off bluetooth. regarding this i tried downloading driverupdater softwares like, driver reviver, iobit DB, slim drivers, but all says no updates found, so could some one help me…

Another user who owns an ASUS K55VD is also complaining:

I am not able to get my Bluetooth Mouse, my Samsung Phone to connect via Bluetooth. Found new drivers for Windows 8.1 but they don’t work. Even when trying to acess the “add bluetooth device” my computer seems to just pause and doesn’t take you directly into that portion only to pc settings with the hour glass spinning.

Last, but not least, an ASUS ROG G750JW has the very same problem:

Hi, when I bought the laptop I immediately installed my mouse which works with bluetooth. Then I upgraded it to windows 8.1 and from that time onwards I cannot connect anything to bluetooth. Also when I enter the bluetooth settings the switch which used to appear from where you can switch it on/off has gone. It just says that it is looking for new devices but does not find any. Any idea, please? Thank you -would really appreciate any help.

And now, let’s see what you can do to fix this problem on your Windows computer.

Bluetooth won’t work on Windows 10 [FIX]

  1. Update your computer
  2. Update your Bluetooth drivers
  3. Run the Bluetooth troubleshooter
  4. Refresh the Bluetooth Support Service

1. Update your computer

Make sure that you’re running the latest Windows 10 version on your computer. For example, the Windows 10 April Update brings a series of Bluetooth improvements and bug fixes to the table. Also, not all Bluetooth profiles are supported in this OS version, so you should check out this information as well.

2. Update your Bluetooth drivers

As always, you need to check for the latest versions of your Bluetooth driver by going on your OEM’s dedicated pages for that. Outdated Bluetooth drivers often make your Bluetooth devices unresponsive, so make sure to rule out this possible cause as soon as possible.

2.1 Update Bluetooth drivers automatically

Using a dedicated tool would help you update drivers automatically and prevent PC damage caused by installing the wrong driver versions. The software below will help you to fix these issues.

Because there are hundreds of Bluetooth adapters available for dozens of different PCs and laptops, manually searching for it can take time and lead to the improper driver.

In some circumstances, the operating system may have a generic driver that enables basic hardware functions, but you may still require a manufacturer-supplied driver to unlock the full capabilities and functionalities of a given device.

This is where an automatic driver installer and updater come in handy; it will locate and update the appropriate drivers for your computer.

⇒ Get Fortect Driver Updater

3. Run the Bluetooth troubleshooter

Windows 10 allows you to quickly identify and fix Bluetooth issues by running the built-in Bluetooth troubleshooter. To do this, go to Settings > Update & Security > Troubleshoot > select Bluetooth and launch the scan.

bluetooth troubleshooter windows 10

On Windows 8, go to Control Panel > type ‘troubleshoot’ in the search bar > click on “View all” to view all the troubleshooting tools available on your computer. Select Bluetooth and run the tool.

fix bluetooth issues windows 8

4. Refresh the Bluetooth Support Service and change the startup type

If nothing worked, you can also try to refresh the Bluetooth Support Service. Here are the steps to follow:

  1. Go to Start > type ‘services.msc’ > hit Enter
  2. Locate the Bluetooth Support Service‘ > right-click on it > select Refreshrefresh bluetooth service windows pc
  3. Find the General Tab > change the startup type from Manual to Automatic.
set bluetooth service automatic

If the issue persists, let us know of your detailed issue and model number and we’ll have a look at a solution together since it is pretty difficult to suggest a universal solution for everybody.

Windows 10/11, 8 on 128-bit: What You Need to Know

Just like I was saying in a recent article, I have many friends that don’t know too much about computers. And I don’t consider myself an expert, neither, but there are some questions that even I can answer. So, whenever I see people looking for this –  “Windows 10, Windows 8 on 128-bit” or “Windows 8, Windows 10 works on 128-bit?” I realize that this needs a little bit of explanation. For those that don’t want to read too much (TL-DR adopters) or already know the difference between 128-bit and 64-bit, you should know that Windows 8, Windows 10 on 128-bit is nothing more but a fairytale.

128-bit computers

For those that are still looking for this, even now, after Windows 8, Windows 10 have been released, you should really read the following:

While there are currently no mainstream general-purpose processors built to operate on 128-bit integers or addresses, a number of processors do have specialized ways to operate on 128-bit chunks of data. The IBM System/370 could be considered the first rudimentary 128-bit computer, as it used 128-bit floating point registers

This explains it all, doesn’t it? We don’t need and we won’t go into very advanced and geekish argumentations – 128-bit is A LOT more processing power than x64 currently. Take into consideration quantum computer progress, for example. Today, barely anyone has 64-bit computers. And you’d think that 128-bit is just double the power of 64-bit. Well, ponder over this.

A 64-bit register can store 264 (over 18 quintillion) different values. Hence, a processor with 64-bit memory addresses can directly access 264 bytes (=16 exbibytes) of byte-addressable memory.

and now, for the “Holy Grail”, the 128-bit

128-bit processors could be used for addressing directly up to 2128 (over 3.40 × 1038) bytes, which would greatly exceed the total data stored on Earth as of 2010, which has been estimated to be around 1.2 zettabytes (over 270 bytes).

Windows 10 0n 128-bit – No, not really

So, who is looking for Windows 8, Windows 10 on 128-bit either needs a little bit of explanation to be done to him or he’s secretly keeping a supercomputer hidden in a bunker at the North Pole. A more fortunate comparison is perhaps looking at the first mobile phone bricks and the actual 5G standard that we’re striving for.

But who knows, maybe Windows 10 will live for 50 years or so, and the next version after it will indeed bring support for 128-bit computers. However, that is highly unlikely and it’s obvious that Windows 10 won’t be available for supercomputers. We have a modified version of Windows on various systems through Windows Embedded 8, but I don’t think it will go beyond that.

Taking into account mainstream consumer needs, it is safe to say that the 64-bit architecture is the peak of what average consumers need right now. Increasing to 128-bit makes sense when running powerful AI or Mixed Reality software. However, I really think we’re decades away from making AI software mainstream. Indeed, judging by the current progress rate, this will happen sometime in the future, but unfortunately, we won’t live long enough to test 128-bit computers during our lifetime.

RELATED STORIES TO CHECK OUT:


DualShock 4 on Windows 10/11 PC: How it Works

This might be the best-selling game controller of all time, but getting DualShock 4 to work on Windows 10 PC hasn’t been a blissful job. Now we can look back with pride and share our solutions for troubleshooting.

Many users had some rough time with DS4Windows not working or just getting started with that. If you are having the same quest at the moment, jump to the article that guides you to use DS4Windows and easily connect your controller to the PC.

It’s been a while since PlayStation DualShock 4 controllers can be used to play Steam games, and we hope you had a great time with that. In this detailed guide, we will show you how the DualShock 4 controller works.

How it all started – first impressions on DualShock 4

dual shock 4 on pc

I absolutely love the DualShock 4 on the PlayStation 4 and am looking forward to spending a lot of time with it when I buy Sony’s latest edition of the PlayStation.

But, you know that games for the PlayStation consoles sometimes aren’t exactly cheap, so for that, we try to play games on the PC, usually using the controller for that.

Using the DualShock 4 on PC is especially awesome when it comes to sports games. For me, playing Pro Evolution Soccer or the never-ending FIFA series with keyboard buttons is a pain in the a$$, if you know what I’m saying.

That’s why I am interested to find out whether the new DualShock 4 will work on PC or not. If you have the same curiosity, then read on to find out.

Will the DualShock 4 controller work on a PC?

Yes, the DualShock 4 controller will work on your Windows PC. You have the option of a wired or wireless connection.

However, your device needs to be compatible with the controller.

How does DualShock 4 work on a PC?

1. Mode of operation

The USB (Micro B) feature is what allows the DualShock 4 controller to be used on PCs. Also, you can connect a wireless DualShock 4 controller to your PC with the help of a DualShock 4 USB wireless adaptor.

However, your PC needs to be compatible with the controller to enjoy this.

2. Features

Here are the main features and specifications of the DualShock 4 controller, just as a little reminder:

  • Improved wireless connectivity
  • Improved dual analog sticks
  • Capacitive touchpad
  • Three-LEDs light bar
  • Share button for Ustream and social networks
  • Built-in speaker and stereo headset jack
  • Improved ergonomics shape
  • Enhanced vibration thanks to multiple motors

And some technical specifications:

  • Approximative 210g
  • USB (Micro B)
  • Extension Port
  • Built-in Lithium-ion rechargeable battery at 1000mAh
  • Bluetooth Ver 2.1 + EDR

We have reached the end of this guide discussing how the DualShock 4 controller works on Windows PC. You should now be able to take advantage of the controller and enjoy your gaming sessions.

However, if your PS4 controller is not connecting to your PC, check our detailed guide to fix it.

Feel free to share your experience using the DualShock 4 controller with us in the comments below.

Xbox Preview Alpha Insiders get Groups feature with the latest build

With the release of the latest system update last night, the Groups feature is now leaving the A/B testing phase and becoming available for all Xbox Preview Alpha insiders with the latest build. As the name suggests, this feature allows users to group Games and Apps together in a dedicated section in the My Games and App tabs. This build also introduces several other fixes and comes with some known issues, so here’s what you need to know.

New Features

  • [Guide] If you were looking for the Pins button in Guide, instead click on the “My games & apps” button – we’ve combined Groups/Pins with “My games & apps” to put all your stuff in one convenient location for quick access!
  • [My games & apps] If you go into “My games & apps” you will see a new tab on the left for your “Groups” – Pins will be your first Group and you can create more from there
  • [Home] If you go to Home you will still have access to your Pins block and can add other Groups to Home after you create them
  • Note: You may need to sign in/out again if you are not seeing Groups in “My games & apps” or your Pins block loading as expected after your first sign-in. If you do not see your Pins as the first Group, go to “My games & apps” > Groups and choose to reset your local Groups data

Known Issues

  • A few users are still experiencing the blank names for Groups. Workaround: You may need to rename these Groups if the local reset did not clear up the issue for you.
  • The Groups tab My games & apps may not show after sign in even though you can access Groups in Guide. Workaround: Sign in / out to refresh these pages.
  • You may see “This group does not exist” on Home on first sign-in for your existing Groups. Workaround: Sign in / out to refresh these pages.
  • Some changes might not be reflected when editing Groups between multiple consoles after coming out of connected standby. Sign in/out to fix.
  • Titles hidden from Ready to install will show up as an item you can add through the “Add more” or “Create a group” page
  • Choosing “Add to Home” for a game within a group will not add the block to Home
  • You may see issues roaming between a GA console and preview 1806 console. Workaround: Choose to reset your Groups locally to resync from the service.
  • We’ve updated the reset button at the bottom of the Groups page in “My games & apps” so now you can delete your local Groups data and re-sync with the service. This will clear up a lot of issues that may have occurred due to bad states or if data is not showing up as expected
  • Sometimes users may encounter an incorrect Profile color when powering on the console.
  • Work continues on the stability of the Wi-Fi connectivity. If you see any issues please report the problems for investigation.
  • Some users are encountering an issue where their YouTube account is being signed out whenever they launch the app.

The new build also has some fixes for when the name of an active game wasn’t showing up in recently used games and apps. Other fixes include correcting issues with USB webcams in Mixer broadcasting and removing an issue where the “Add more” or “Create a group” page for Groups would not show all installed content.

Since the Alpha Ring is the highest ring in the Xbox Insider program, you can expect for this same build to make its way down to the other rings soon. When it does, you can then expect a general rollout to everyone else on public versions of Xbox OS, who still don’t have Groups.

Brain Training Apps for Your Windows 8, Windows 10 Device

Your Windows 8, Windows 8, Windows 10 device can be used to train your brain’s activity if you know what are the right apps to be used for this. We have selected four of the best such apps to be used, read below to find all about them.
windows 8 brain training apps
Brain training is a new concept that has crept recently into our social culture. What’s the deal behind the whole buzz? A very sound neuroscientific logic actually. The principle of brain training applies is “use it or lose it”. The brain as an organ operates by making use of its synaptic connections (connections between two or more neurons).

The more you use one connection, the more the connection is maintained. Think of practicing an arpeggio with your guitar over and over again, after a while, you will be able to do it in the dark. Brain training specialists argue that if you engage daily in games that are specially designed to enhance certain abilities (like spatial visualization), you are bound to perfect them. And here what Dr. med. Thomas Knoll – a neurologist based in Munich has to say about the concept:

“Many of my patients complain about forgetfulness in everyday life. I recommend – in addition to a balanced work-life with relaxation time, body exercises and social activities – a brain training program.”

And good news for Windows 8, Windows 10 or Windows RT users who are interested in gaining some extra brain power – the Windows app stores features some interesting apps that might help them in that endeavor.

Most useful Brain Training Windows 8, Windows 10 apps

Einstein Brain Trainer [$8.99]

einstein brain training app windows 8

Aptly named after one of the most brilliant scientists of the modern era, this app allows users to exercise most parts of their brains. There are four categories offered from which to choose from Logic, Memory, Calculation, and Vision.

Each game under any of these categories will feature a comprehensive and scientific description of the exercise. Each day the app will prepare a special set of games that constitute the player’s daily workout. The progress will be tracked, if the daily scheduled is maintained. Multiple players can simultaneously engage in gaming on the same computer while the levels’ difficulty mode can be altered.

The latest version includes exercises optimized for color blind people. You can also find information and photos about the scientific test and certification of the 30 brain exercises. Plus, you have now a repeat function to easily replay each exercise.


Brain Train Challenge [Free]

brain train windows 8

This app features a collection of 12 games that will help the user challenge his memory resorts. It also measures the reaction time and allows for skill improvement. Over time as you build mental fitness, you will be able to accumulate gold medals. The graphics are simple yet colorful and attractive, attracting and keeping your attention.

[Update] The game still shows in Microsoft Store, but the download is not working. New versions have not been updated.


Brain app [$3.49]

brain app windows 8

A brain training app that offers the possibility of playing the games at three different difficulty levels: Easy, Advanced and Genius. Games include Speed Math, Balloon Burst, Card Count – each tapping into different sectors of brain activity. Game progress is recorded so users can see their progress over time. Compete against players from all around the world, be the best!

This app has been optimized for Windows RT tablets.

  • Read also: Windows 10 S Education PCs will ship this summer starting at $189

Play and Grow: Right Brain Exercises [$4.99]

brain exercise windows 8

This app is built on the assumption that the children’s right hemisphere is used mostly for learning and that simple games might help improve that process. Therefore it brings a selection of 15 animated stories which unravel into 56 sets of quiz games. Preschoolers will have no trouble playing this game since the gameplay only involves choosing pictures. Children will accumulate stars as they finish games and gain more accomplishments. The graphics are really endearing and remind me of Japanese manga, so the app is very suitable for children of all ages.

The trial mode is more attractive in the latest version due to the CurrentApp class added.

RELATED ARTICLES TO CHECK OUT:

Download the Periodic Table App [Review] for Windows 8.1, Windows 10

The Periodic Table app for Windows 8.1 and Windows 10 is probably your most important tool when it comes to learning chemistry. Read below our review and how you can use it on your Windows 8.1, Windows 10 tablet for better grades in chemistry.

Chemistry is by no means an easy subject to learn. There is a massive amount of information that needs to be learned before one can say that he knows chemistry. And after all of that is said and done, then comes organic chemistry, which is even harder and more complicated.

However, the stepping stone of chemistry is the Periodic Table. This chart of the known elements organized by their atomic number and other criteria. If you wish to learn chemistry, then this is the first thing you will have to master. After memorizing the periodic table, you can start to learn the really cool side of chemistry.

  • Read also: Asus VivoBook W202 running Windows 10 S is the perfect learning platform

Periodic Table App for Windows 10, Windows 8.1 – Review

periodic-table-windows-8 (4)

Daunting as it might seem, learning the periodic table of elements is not as hard as you might imagine. Also, if you have the Periodic Table app for Windows 8.1, Windows 10 devices, it is even easier. This free app can be downloaded from the Windows Store for free and you will find that it is an excellent learning aid.

After downloading and installing Periodic Table for Windows 10, Windows 8.1, once you open the app, you will see that it provides users with an interactive table of elements. All the known elements are placed in the same standard order, and each class of elements is color-coded for users to learn them more easily.

periodic-table-windows-8 (4)

Organized to help you learn at your own pace

This app is good for more than showing what are the elements. If you click or tap on any element, it will open a window with additional information about it. This window is organized in 4 areas:

  • General Info – where you will see the atomic weight, series, atomic number, if it is radioactive, electron configuration and an image of the atom.
  • Physical Info – this is where you can find the state of the element, melting point, thermal conductivity, atomic info and other physical properties.
  • Images – most elements have images of them in their natural form, so users of the app can see exactly how it looks.
  • External links – Each element has its own external links where users can find additional information about it. These links vary from Wikipedia (although it does not open the Wikipedia app for Windows 10, Windows 8) too many other chemistry-related websites.

periodic-table-windows-8 (4)

The latest version includes the first version in Dutch in addition to the other 9 languages supported in the app before. Chinese (Traditional and ) and international Spanish alphabet, Brazilian, Italian and others are supported.

The layout bug has been fixed in Windows 10, alongside these other fixes:
– Fix crash on Windows 10 when resizing the window quickly
– New custom view options on the app bar
– Show groups and periods on the table
– Maximized mode to use all the screen for the table

It’s all there so you can make use of a clean and well-designed app to help you learn chemistry.

elements of the Periodic Table App for Windows 8.1, Windows 10

All of this information is free to access by users of Periodic Table for Windows 10, Windows 8. This app can be a great resource for students and teachers alike. I gladly give it a thumbs up for the excellent quality of the app and we hope to see even more information about the elements in future updates.

RELATED ARTICLES TO CHECK OUT:

How to Fix Slow USB 3.0 Problems in Windows 10/11

Quite a lot of users have been experiencing problems with their USB 3.0 port in Windows 10, Windows 8,1 or other OS versions.

Most of them are reporting that the port is very slow or not responding at all. Read below to find more about this issue.

Here we go again, more Windows 8.1 woes, this time, related to the USB 3.0 functionality
Here we go again, more Windows woes, this time, related to the USB 3.0 functionality

I’ve been following this Windows problem closely and can now confirm that it is affecting a large number of users.

Mostly, what Windows 10 and Windows 8.1 users seem to be complaining about is slow response of USB 3.0 or other problems, such as a connected mouse, external hard drive or other devices not being recognized.

One user is reporting a problem with a Dell laptop:

I have Dell Inspiron N5110, I upgraded to windows 8.1 and now my USB port on the right side has stopped working. I cannot find the chipset drivers for 8.1 64 bit. Any good suggestion ?

While another Lenovo user is complaining about this:

I have a T430s computer model 2352CTO, running Windows 8.1, 64-bit version. Prior to upgrade from Windows 8.0 all drivers were updated. The USB 3 ports worked correctly, in particular running an external 1gb hard drive. After update to 8.1, the USB 3 ports still work, but only for about 30 seconds then the hard drive shuts down. The power light is still lit on the hard drive, but it no longer shows in windows explorer.

In device manager, I went to Universal Serial Bus Controllers -> USB Root Hub ->Properties->(under General it says “This device is working properly)->Power Management->Unchecked the box for “Allow the computer to turn off this device to save power”. Unfortunately this does not seem to stop problem. Any ideas?

Those affected by USB 3.0 woes have one of the following OEM’s – Buffalo, datAshur, Fantom Drive, Fujitsu, Hitachi, ADATA Nobility, Kingston DataTraveler, LaCie 2TB USB Drive, RaidSonic, Sans Digital, Vantect, Fantec, Digitus, Mediasonic, Samsung 1T, Apricorn, iStorage, DiskGenie, Verbatim, Western Digital.

Steps to fix USB 3.0 problems in Windows 10

Here are a few solutions that you could try to make it work. The first basic solution you could try is by going into device manager, find the USB root hubs, and turn off the save power option.

If not, then follow these steps:

1. To view the idle period that some USB devices use to save power

  1. Type “power options” in Search Charm
  2. Change Plan Settings of the currently selected power plan
  3. Click Change advanced power settings
  4. Expand Hard disk and then Turn off hard disk after

The Setting value indicates the system disk idle period. In this image the idle period is set to 20 minutes (default). For this system, if no file transfers occur within 20 minutes, the drive enters a suspend state and draws less power from the system. For most USB storage devices and USB host controllers, the power-saving mechanism works without issues.

However, a pre-existing problem in the USB drive or USB host controller might cause these problems after the specified idle period expires. The device periodically disconnects and might reconnect leading to poor user experience.  If you try to access files stored on the drive, Windows Explorer becomes unresponsive for 1-2 minutes.

If you notice any of those problems, first check whether the firmware on the USB host controller or the USB storage device is out of date. If so, get the latest firmware from the system or device manufacturer. A firmware update might resolve the issue. Otherwise, determine whether the problem occurs during the system disk idle time period (shown in Power Options). If it does, disable suspend on idle for this device as per the instructions given in the next section.

Note, you can set the value to “Never” in the Power Options just an experiment to see if that fixes the issue, but the right long term solution is to set the registry setting as described below. This registry setting does not affect the other USB storage devices and results in conserving power.

2. How to disable suspend on idle

Get  the hardware ID of the USB storage device

  1. Make sure the device is plugged in.
  2. Search for “device manager” in the Search charm, and open Device Manager.
  3. In Device Manager, expand the Disk Drives and locate the device:
  4. Select the View > Devices by connection from the menu:
  5. Right-click the USB Mass Storage Device node under which the device appears, and select Properties.
  6. On the Details tab, select Hardware Ids from the drop-down list.
  7. Make a note of the 4 digits occurring after “VID_” and “PID_” and close Device Manager. In this example, VID is 0004 and PID is 0001.

3. Change the device setting in the registry

  1. Run Registry Editor (regedit.exe) as administrator by searching for “regedit” in the Search charm. Right-click the regedit icon, and select Run as administrator.
  2. In Registry Editor, navigate to HKEY_LOCAL_MACHINESYSTEMCurrentControlSetControlusbstor.
  3. Right-click usbstor and create a key. The name must be VID and PID strings obtained previously. Leading 0’s is significant. For the device, in this example, the new key name is “00040001”
  4. Right-click the new key and create a DWORD entry named DeviceHackFlags. Set the value to 400 hexadecimal.
  5. Disconnect and reconnect the device.

The solution has been posted by the Microsoft Windows USB Core Team Blog (didn’t even know there existed such a team).

Anyway, let us know if this managed to solve your USB 3.0 problems in Windows 8.1.

4. Uninstall and reinstall Universal Serial Bus driver

Even though that is not the best solution, for many users it works. In order to make it properly, please follow the next steps:

 1. Click on ‘Windows key’ + ‘X’ and then, select Device Manager. 
2. Locate and expand “Universal Serial Bus controllers” in the Device Manager Window.      
3. Right-click on “Universal Serial Bus controllers” and click “uninstall”.
4. Restart the computer and check.

In case this solution doesn’t work, you can simply update the chipset drivers as they are responsible for the well-functioning of many features including USB.