How to Permanently Stop Firefox Screen Tearing When Scrolling

If you reached our page, then the Firefox screen is tearing when scrolling webpages. Sometimes, it looks like a piece of a strip with small squares on it.

Other readers experienced an effect where the text, images or both were turning into long vertical streams down the page. There are also cases of Firefox screen tearing on YouTube that seems to pop up more often.

Just like YouTube glitches on Firefox, screen tearing is pretty common. It doesn’t do much harm but can become annoying after a while. Needless to say, the issue is not exclusive to Firefox, or Windows for that matter.

In fact, you can just as well encounter Chrome screen tearing, or if we’re to resume to the browser under discussion, Firefox screen tearing in Linux.

But first, let’s understand why is Firefox so choppy. Is screen tearing normal?

Why is my screen tearing when I scroll?

This problem can be caused either by the VSync feature or the hardware acceleration option.

Of course, another possible issue may be caused by an old, damaged, or incompatible driver because that’s obviously a graphics-related occurrence.

Now that we know what the problem is and what it’s caused by, let’s go through the possible solutions.

?️ Quick Tip:

In case you don’t want to spend too much time repairing Firefox’s recurring issues, you can use the opportunity to switch to a more skilled browser.

We tested Opera and we strongly recommend it for steady navigation that does not impact your graphics or your PC’s performance.

Opera

Opera

Enjoy sleek, fast-paced browsing and convenient scrolling without screen tearing or slowdowns!

How do I stop Firefox screen tearing?

1. Disable hardware acceleration in Firefox

  1. Click the Menu button and select Settings.
  2. Scroll down until you reach the Performance section and uncheck the Use recommended performance settings.
  3. Now, uncheck the Use hardware acceleration when available box.
  4. Restart Firefox and see if the problems persist.

This is how to disable the hardware acceleration in Firefox. After you perform this action, you shouldn’t experience screen tearing anymore.

And speaking of that, if you also experience battery drains with Firefox, you should notice an improvement in energy consumption after you turn off this feature.

However, there were readers who, on the contrary, fixed the issue by turning on the hardware acceleration so try to switch this feature on or off and see if you experience any more screen tearing.

If this solution didn’t work in your case, perform the second solution below.

2. Disable acceleration from about:config

  1. Open a Firefox page, enter the following command in the address bar, and press Enter: about:config.
  2. Hit the blue button to accept the risks and continue.
  3. Now, paste the following command and click on the change button from the top right to get the true result in the middle: layers.acceleration.disabled
  4. Next, paste the following command and make sure that it is set to false: layers.acceleration.force-enabled
  5. If you followed the first solution and disabled the hardware acceleration, it should be already set to false. If not, hit the change button as you did in the previous step to turn it to false.
  6. Restart the browser and see if you experience any problems.
  7. If so, paste the following command just like you did with the other two and set this option to true: gfx.webrender.force-disabled

Disabling the hardware acceleration from the Firefox advanced configuration settings should solve this issue completely.

How to perform a screen tearing test?

You can’t disable VSync in a browser but the screen tearing in Firefox often comes from a vertical synchronization problem.

The solutions above should fix this problem too but here’s how to perform a screen tearing test:

  1. Visit the VSync tester website.
  2. If the VSYNC text frame on the top-right corner is red or cyan, then the vertical sync is problematic. If it’s grey, you’re good.

This test was conceived by a disgruntled but knowledgeable user who discovered that Firefox did not perform ideally on this.

If you want to get a more detailed view of how Firefox competes against Chrome or Brave, we’ve prepared an in-depth comparison for you.

We hope that by using our solutions, you managed to fix the screen tearing in Firefox. If the issue is still present, you can still use a better browser and improve your experience.

Word Has Run Into an Error: 5 Ways to Easily Fix It

Some of our readers have recently reported that they receive the Word has run into an error message whenever they try to open the Microsoft Word application.

If you’re experiencing similar issues and need the best solution to apply, don’t worry, we have provided some fixes to easily solve the issue in this article.

What causes Microsoft Word to run into an error?

Several reasons can be attributed to the Word has run into an error issue. Here are the most known triggers for this error:

  • Faulty Microsoft Office 365 Updates – According to several reports, Word has run into an error is mostly triggered when users try to upgrade the MS Office application to a newer version.
  • Executing MS Word in Compatible mode – The message can also pop up when a user executes the MS Office applications (Word, Excel, PowerPoint, Outlook, etc.) in the compatible mode.
  • Malware infection – Sometimes, Word may run into problems if infected. Using one of the best antivirus software on your PC may help you with this problem.

Knowing the reasons for this issue, let’s go to the actual solutions to fix it.

What can I do if Microsoft Word runs into an error?

Before going into any advanced troubleshooting process, you should consider the following:

  • Make sure you are properly connected to the Internet.
  • Try not to upgrade your MS Office app in Compatibility mode.
  • Restart your PC in Safe mode and check if the problem persists.

After attempting the above checks and the problem persists, go ahead with the solutions below.

1. Run Microsoft Word in Safe Mode 

  1. Press the Windows key + R to open Run.
  2. Type the following line and press Enter or click OK: word /safe

Starting an Office product in Safe Mode is pretty simple, as it was in previous Windows versions. If the problem persists, try the next fix.

2. Run Microsoft Office as an administrator

  1. Press the Windows + S keys, type word in the search bar, and select Run as administrator.
  2. Click Yes in the User Account Control prompt.

This method has worked for several users, so, try it on your system by following the steps as ordered.

3. Run an Online Repair for MS Office

  1. Click on the Start button, type control panel, and launch it.
  2. Navigate to the Programs and Features section.
  3. From the list of applications, right-click on Microsoft Office. From the options, select Change.
  4. Check the box next to Online Repair and click on the Repair button.

Although the error message comes with a Quick Repair button, affected users claimed clicking on it did not fix their problem. So, you can try running an Online Repair for Microsoft Office. Besides, it helps with the msosync.exe high CPU usage as well.

4. Disable the Compatibility mode

  1. Right-click on the Microsoft Word shortcut on your desktop and select Properties from the list.
  2. Navigate to the Compatibility tab. Uncheck the box next to Run this program in compatibility mode for the option in it.
  3. Finally, click OK.

All Microsoft Office app automatically starts running in compatibility mode, which is one of the major causes of Word has run into an error message. Disabling it should help fix the issue.

5. Reinstall Microsoft Office

  1. Click on the Start button, type control panel, and launch it.
  2. Navigate to the Programs and Features section under Programs.
  3. Locate and select Microsoft Office, then click on Uninstall.
  4. Follow the uninstaller wizard and click OK.
  5. Now, restart your PC and install the latest Microsoft Office version available for Windows.

If, after attempting the steps above, nothing works, reinstalling Microsoft Office should fix issues affecting the Word app. It will also help to update Microsoft Office to the latest version.

You may encounter the same error message on other Microsoft Office applications such as Excel, PowerPoint, Outlook, etc.

You can also apply the steps provided in this article to fix them or get further information on how to fix Microsoft Office if it’s not opening.

And that’s it on how to fix Microsoft Word run into an error and won’t work issue. If you have any questions or suggestions, do not hesitate to use the comments section below.

Best television shows based on video games: Cyberpunk: Edgerunners

Based on CD Projekt Red’s Cyberpunk 2077, this animated adaptation is considered partly responsible for the popularity surge the game enjoyed over the course of 2022. (That and a series of patches that finally ironed out the many issues the game suffered at launch).

Cyberpunk: Edgerunners was developed by Studio Trigger, the Japanese animation studio known for Kill la Kill, Little Witch Academia, Star Wars: Visions and more. The show’s premise goes as follows:

In a dystopia riddled with corruption and cybernetic implants, a talented but reckless street kid strives to become a mercenary outlaw — an edgerunner. —From the official Netflix description.

Watch Lucky You. Episode 4 of Season 1.

The story follows teenager David Martinez, a student at the Arakasa Academy who through a string of unfortunate events becomes an edgerunner—a mercenary who has become bionically enhanced with illegal modifications. The show is set in the same universe (Night City, in the Free State of California) as Cyberpunk 2077, about a year before the events in the game, though Edgerunners is entirely a standalone work. The show was co-created by Mike Pondsmith, the creator of the Cyberpunk universe. Check out the official trailer here.

Cyberpunk 2077
Cyberpunk 2077
Developer:
CD PROJEKT RED
Price:
$29.99

Cyberpunk: Edgerunners was always meant to be a 10-episode miniseries, and will not be getting a second “cour” or season despite the show’s success. On Rotten Tomatoes, it still enjoys a 100% rating with an audience score of 96%. Cyberpunk: Edgerunners also won many accolades including “Anime of the Year” from multiple outlets, and was nominated for “Best Adaptation” at The Game Awards 2022. But perhaps the biggest honor of all came in the form of some pretty high praise from non other than Hideo Kojima, who said of Cyberpunk: Edgerunners,

Netflix has really been on a roll with these video game anime adaptations, with the likes of Castlevania, The Cuphead Show! and Arcane: League of Legends in its catalog. And many more promising video game-to-television crossovers are coming in 2023 and beyond. Among them: Fallout, Sony’s Horizon Zero Dawn and God of War series, and A Plague Tale. We should all be especially stoked for that last one given the success of The Last of Us, because of the similarity between those two game franchises. Other recently announce small screen adaptations include those for Tomb Raider for Amazon and, reportedly, Hogwarts Legacy courtesy of HBO.

Featured image via Digital Mafia. 

Cannot See Environment in PowerApps? How to Access It

In PowerApps Automate, users and admins interact via environments by sharing, storing, and managing an organization’s data. However, new users often reported that they cannot see environments even after being granted access.

In this article, we’ll provide steps to help you if you cannot see an environment in PowerApps. 

Why can’t I see the environment in PowerApps?

Here are a few reasons why you can’t see the environment in PowerApps:

  • Inadequate access – To access certain environments in PowerApps, you need to have the required administrative access.
  • The environment was deleted – If you just can’t see a particular environment, maybe it was deleted. Read the solution below to see how you may recover it.
  • Poor Internet connection – To successfully operate PowerApps, you must have a stable Internet connection.
  • Outdated Windows OS – In rare cases, you might trigger the error cannot see an environment in PowerApps when you’re operating an outdated Windows OS. Install new OS updates just in case. 

Now that we know why this happens, let’s see how we can actually fix the problem with the solutions below.

What can I do if I can’t see the environment in PowerApps?

1. Instruct the admin to share it

  1. Contact your PowerApps admin, and ensure they navigate to the Power Platform Admin Center.
  2. Have them select the environment you cannot see, create, and save any canvas app. 
  3. The canvas app doesn’t need any content; you can leave it blank; ensure that it’s saved.
  4. Have the admin share the just-created canvas app with you via any means of text communication platform.
  5. Once you click on the shared app, it’ll take you directly to the environment. You’ll be able to see the environments from all the maker and admin portals. 

For this step to work, you’ll need to have administrative privileges. However, if you have admin privileges, you can quickly resolve the error without needing external effort from another admin. 

2. Recover the environment

  1. Sign in to the Power Platform admin center as an administrator. You can use the Dynamics 365, Global, or Power Platform credentials.
  2. Select Environments, and then click on Recover deleted environments.
  3. Select an environment to recover, and then hit the Recover button.
  4. Select Continue to confirm the recovery.

One of the reasons why you can’t see a particular environment is that it was deleted. However, the administrator can restore it within seven days of the deletion by applying the solution above.

Alternatively, a few Microsoft PowerApps users reported that they resolved the cannot see an environment in PowerApps error by logging into Power Automate and selecting the environment. 

Other users also reported that having the admin copy the URL of the environment and sharing the link with the user who can’t see the environment often resolves the error. 

A lot of users have had trouble locating environments while in Microsoft PowerApps. Resolving the error is easy; it only takes a couple of steps to fix it completely.

Hopefully, our brief guide has provided the necessary steps to help you resolve this error.

Can’t Convert Disk to GPT? Fix It in 3 Simple Steps

If you’d like to upgrade your PC from Windows 10 to 11 or switch from BIOS to UEFI, you need to convert your MBR disk to GPT. However, some users have reported they are unable to convert the disk to GPT.

Should you struggle to convert your basic disk to GPT, this article will provide you with three steps to help you resolve the error.

Why can’t I convert my drive to GPT?

Converting MBR to GPT is required if you’re aiming to upgrade a Windows 10 PC to Windows 11 or to move from BIOS to UEFI. However, you might find it hard to convert your drive to a GPT if there are existing partitions on the drive.

Conversion of MBR to GPT requires an empty drive that has no partitions. You must delete the partitions first before you can convert the drive.  The Windows Disk Management tool can only convert an empty non-system disk file.

If you’re unable to convert your MBR drive to GPT, it’s likely your drive has been previously partitioned or contains files.

If you intend to convert the disk to GPT on a drive that has been partitioned, you’ll have to back up all critical data on the disk first.

If you can’t convert Disk to GPT, here are a couple of steps you can attempt.

What can I do if I can’t convert a disk to GPT?

1. Convert Basic Disk to GPT with Windows Management

  1. Press the Windows key + E to start File Explorer and click on This PC.
  2. Navigate to the Manage option and select Disk Management.
  3. Locate the MBR disk you wish to convert, select each of the partitions, and select Delete Volume.
  4. Click OK to confirm the deletion.
  5. Repeat steps 3 and 4 until you’ve deleted all the different Disk Volumes, at this point, the whole disk should display as unallocated space.
  6. While still in the window, right-click on the MBR disk, and select the option of Convert to GPT Disk.
  7. Wait for the conversion process to complete and close the Disk Management window.

Disk Management in Windows comprises a set of Utility tools that help manage Disk data in a computer. With Disk Management, you can partition devices, create bootable devices, and bootable format disks.

With Disk Management, you should be able to convert your MBR disk to GPT.

2. Use a third-party disk partitioning software

One of the best and probably easiest ways to convert MBR to GPT without data loss is to use dedicated partition software.

For this purpose, we have a selection of the best partition manager software you can use right now.

All you need to do is download and install the software, then launch the application to begin the disk conversion. With such tools, you can convert your disk without any data loss.

An excellent partitioning software option you can definitely try is the AOMEI Partition Assistant Professional, as it is a multiskilled application that lets you manage disk partitions cautiously.

This tool helps you convert MBR to GPT without affecting the core data, including your operating system. A worth-mentioning detail of converting with this app is that it doesn’t require deleting all partitions before conversion.

AOMEI Partition Assistant Professional

Try this reliable tool to convert MBR to GPT without damaging your data.

3. Use Diskpart

  1. Press the Windows key + S, type in cmd, and select Run as Administrator.
  2. Click Yes in the User Account Control popup window to open Command Prompt with administrative privileges.
  3. Type the following and press Enter: diskpart
  4. You’ll need to type in the following series of commands, and press the Enter key after each command: list disk select disk (no) clean convert gpt
  5. After entering the last command, it will delete all the partitions on the disk and convert them to GPT. 
  6. Close the window after the conversion is complete.

Diskpart is Windows’ dedicated command interpreter, which handles dedicated computer drive management. It is used for Disk Partitions, Virtual Disks, Volumes, etc.

Using Diskpart to convert your Disk deletes all data from the storage. It is critical to back up all important files before beginning the process. 

You should, however, note that you’ll automatically lose all pre-existing data on the MBR disk.

If you’re unable to convert your MBR Disk to GPT, following the above steps should help you resolve the problem. This can be an issue, especially if you want to access GPT protective partition, but hopefully, you managed to fix that.

If you’ve got alternative solutions that helped you resolve the error, you can let us know in the comments below.

Microsoft is giving free USB drives to Windows Insiders, here’s why

At the beginning of this month, Microsoft made significant changes to its Windows Insiders program, which saw the birth of a new channel, the Canary Channel.

However, the new channel shipped with a not-so-welcome change that affected Dev Channel Insiders on 25000+ series builds. Aside from transitioning them to the new Canary Channel automatically, Microsoft didn’t provide an easy route that they could use if they wanted to go back to the Dev Channel. At least some Insiders weren’t happy:

If you want to move back to the Dev Channel, you’ll need to perform a clean install on your device and sign up to your preferred channel once again. In a bid to “mitigate the cost implication” users might incur when performing the clean install on their devices, Microsoft is currently giving away free USB drives to Windows Insiders.

The company has already sent out emails to Windows Insiders with a link to a page where they can make requests and get their USB drives. It should be noted that this giveaway is limited to Windows Insiders. Microsoft’s email comes with a special code that is required when claiming the free storage device.

This giveaway is only valid while the gadgets last. Microsoft hasn’t indicated how many USB drives it intends to give away, only that it’s a “first come-first serve” kind of arrangement. The company has also indicated that it won’t be able to send the drives to some countries due to mailing regulations.

There have been speculations, that Microsoft could be getting to launch Windows 12 in 2024, and that the Canary Channel is the company’s hidden way of testing the OS.

Have you been bumped to the Canary Channel? Share your thoughts with us in the comments.

How to Dual Boot macOS and Windwos 11: Step-by-Step

You can dual boot Windows 11 and macOS to enjoy the best of both worlds. Many users try options like dual booting with Windows 10 or Linux, but macOS is a popular choice too.

It’s not the simplest setup, but we’ll guide you through the steps to make it happen.

How can I dual boot Windows 11 and macOS?

You can do dual booting either by installing Windows 11 on a Mac PC or by installing macOS on a Windows PC. Here’s how:

Note icon NOTE
Dual booting Windows 11 and macOS is not possible on M1 or M2 Macs because Apple discontinued Boot Camp for those processors.

Install Windows 11 on Mac with BootCamp

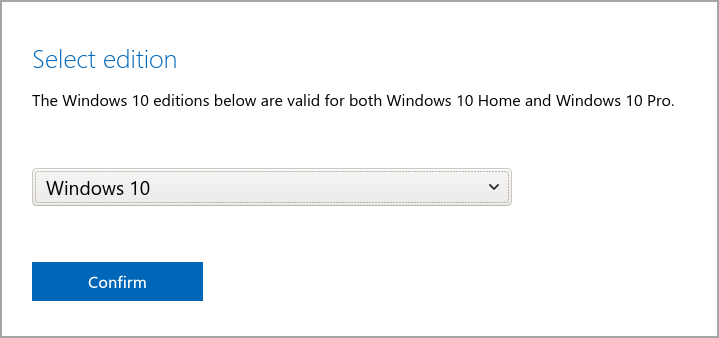
1. Download Windows 10 ISO and create a Windows partition

  1. Download Windows 10 ISO.
  2. Once the download is finished, go to Utilities and select Boot Camp Assistant.
  3. Optional: Back up your data before proceeding.
  4. Click on Continue.
  5. Click the Choose button and locate the Windows 10 ISO file that you downloaded.
  6. Select the desired size for the Windows partition. About 50GB should be a minimum, but if possible, make it larger.
  7. Now click the Install button.
  8. Enter your administrative password, and your Mac will restart.
Note icon NOTE
We used Windows 10 ISO since Windows 11 ISO isn’t officially available for download yet.

2. Install Windows 10

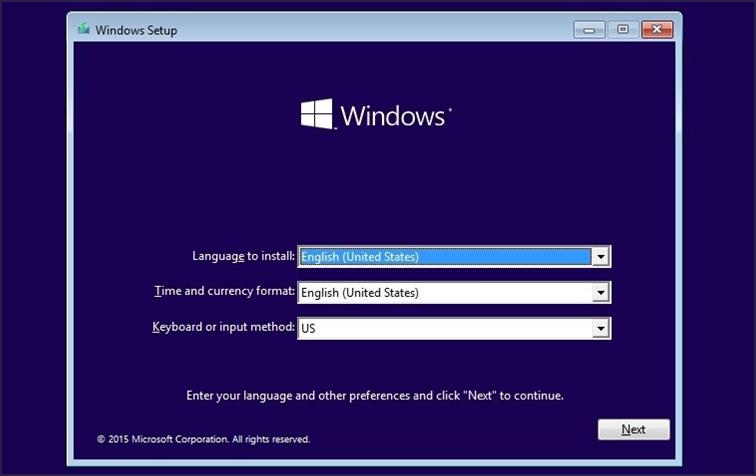
  1. Your Mac will now boot from the Windows 10 ISO.
  2. Select the desired language and the version of Windows that you want to install.
  3. Follow the instruction until you reach Which type of installation do you want screen. Select Custom: Install Window only (advanced).
  4. Select the BOOTCAMP partition and format it if needed.
  5. Wait for the installation to finish.

During the installation, it’s advised to disconnect all nonessential external devices.

3. Install the necessary Windows drivers

  1. You’ll now boot to Windows 10 and the Boot Camp Assistant will appear.
  2. Click on Next to proceed. Now click Install to download the necessary Windows drivers.
  3. Once the drivers are downloaded, click on Finish.

4. Join the Windows Insiders Program

  1. Your Mac should boot back to Windows. If it doesn’t hold the Option key (Alt) during the boot and select the desired operating system.
  2. Navigate to Settings.
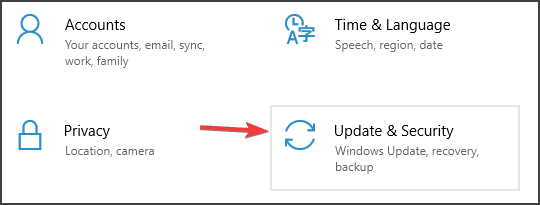
  3. Head to the Update & Security section.
  4. In the left pane, select Windows Insider Program. In the right pane, click on Get started button.
  5. Select Link an account and enter your Microsoft account credentials.
  6. Select Dev Channel and click on Confirm.
  7. Click the Restart Now button.
  8. After you boot to Windows 10 again, open the Settings app and head to the Update & Security section.
  9. Click the Check for updates button.
  10. Windows will now download Windows 11 upgrade.
  11. Once the upgrade is downloaded, restart your Mac and follow the instructions on the screen to upgrade to Windows 11.

After the process is finished, you’ll dual boot Windows 11 and macOS on your Mac computer without any issues. You must now realize how easy it is to dual boot Windows and macOS on PC.

Install macOS on PC after Windows 11

1. Check GPT

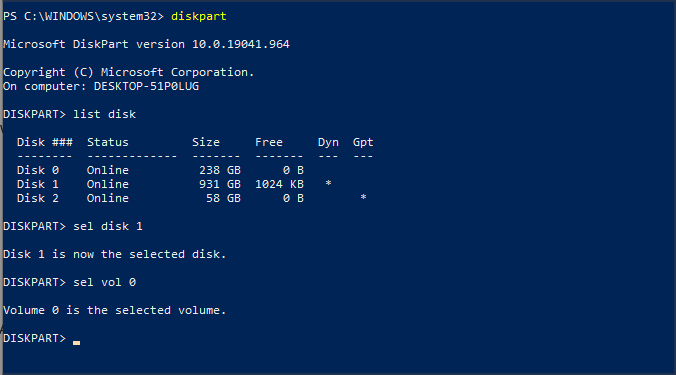
  1. Open PowerShell or Command Prompt. Type the following command and press Enter:diskpart
  2. When diskpart opens, execute this command:list disk
  3. Check if your hard drives are using GPT. If they don’t have a star in the GPT column, it means that your drives aren’t using GPT.

Before you proceed, you’ll need to convert MBR to GPT, and we have a special guide on how to convert MBR to GPT without file loss. Once your drives are using the GPT format, you can move to the next step.

2. Create the partition for macOS, format the flash drive

  1. Connect at least a 4GB flash drive to your PC.
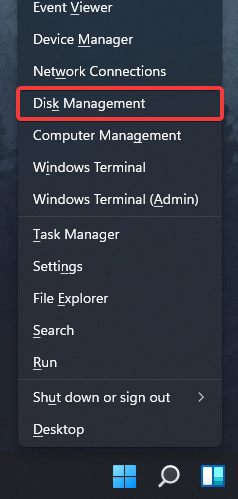
  2. Now press Windows Key + X and choose Disk Management from the list.
  3. Locate your flash drive on the list, right-click it and choose Format.
  4. Make sure to use the exFAT or FAT32 file system.
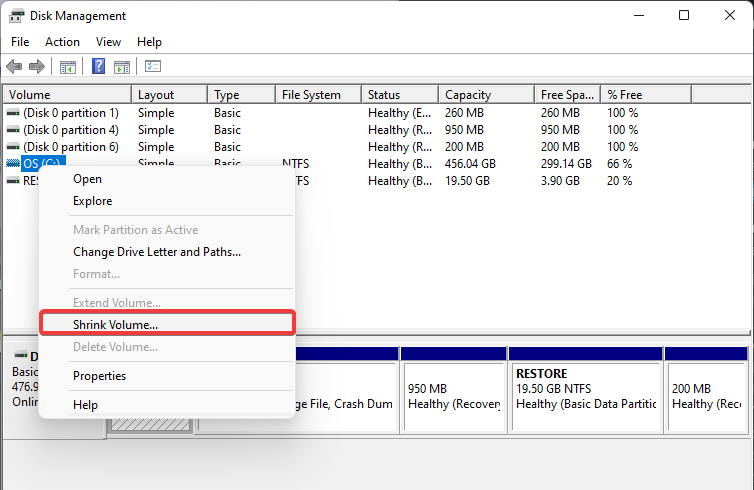
  5. Now select the partition that you want to shrink, right-click it and choose Shrink volume from the menu.
  6. Set the Enter the amount of space to shrink in MB to 50000 or more and click Shrink.
  7. Unallocated space will now appear. Right-click it and choose New Simple Volume.
  8. Set the Simple volume size in MB to the maximum value.
  9. Now set the File system to exFAT and the volume label to macOS.
  10. Follow the instructions on the screen to complete the process.

After you’re done, you should have the macOS partition ready on your PC.

3. Change the EFI partition

  1. Press Windows + X and choose PowerShell (Admin).
  2. Execute this command: diskpart
  3. Now run the following command:list disk
  4. Run the following command while replacing X with the number of your hard drive:sel disk X
  5. Now execute this command while replacing X with the number that represents the partition that you want to shrink:sel vol X
  6. Enter the following commands:
    Shrink desired=300
    Create partition efi size=200
    Format quick fs=fat32 label=“system”
    Assign letter z
    exit
  7. Once you’ve exited diskpart, run the following command: bcdboot c:\windows /s z: /f ALL

4. Create macOS ISO

  1. Install Python.
  2. Download OpenCore. Be sure to use the latest version. You can use Debug or the Release version. The Release version is faster, so it might be a better choice for you.
  3. Extract the file to the desired location. This location is important so be sure to memorize it. On our PC we extracted it to: C:\Users\WindowsReport\Desktop\OpenCore
  4. Go to the extraction directory. Now navigate to the Utilities\macrecovery\
  5. Copy the folder path to the macrecovery directory. Keep in mind that this path will look different on your PC. On our PC it was: C:\Users\WindowsReport\Desktop\OpenCore\Utilities\macrecovery\
  6. Open PowerShell as administrator.
  7. Run the following command: cd C:\Users\WindowsReport\Desktop\OpenCore\Utilities\macrecovery\
  8. Now run the following command: python macrecovery.py -b Mac-E43C1C25D4880AD6 -m 00000000000000000 download
  9. You’ll now begin downloading macOS BigSur. This process can take a while, so be sure to be patient and don’t interrupt it.
  10. Once the process is finished, two BaseSystem or RecoveryImage files should appear.
  11. Select BaseSystem.chunklist and BaseSystem.dmg or RecoveryImage.chunklist and BaseSystem.dmg files and copy them.
  12. Connect your USB flash drive, and in the root directory create a folder called com.apple.recovery.boot
  13. Move to the com.apple.recovery.boot directory. Paste the two BaseSystem or RecoveryImage files from Step 11.
  14. Go to the C:\Users\WindowsReport\Desktop\OpenCore
  15. Copy X64 directory. If you’re on a 32-bit system copy IA32.
  16. Go to the USB flash drive root directory and paste the X64 directory there.

The next part will differ greatly depending on your hardware configuration, so you’ll have to follow the instructions on your own depending on your hardware.

Luckily, a lot of useful information is available on the OpenCore GitHub page. To continue, follow the instructions for your type of hardware. Be sure to follow each of the links mentioned below:

  1. Adding The Base OpenCore Files
  2. Gathering Files
  3. Getting started with ACPI

5. Configure your BIOS

Note icon NOTE
This is an extremely technical process, and if you don’t perform it properly, your bootable drive won’t work, so be sure to follow the instructions from the OpenCore GitHub closely.
  1. Access BIOS.
  2. Go to Advanced, and set Above 4G Decoding to Enabled.
  3. Navigate to the Serial Port Configuration and set Serial Port to Off.
  4. Go back to the Advanced section and navigate to USB Configuration. Set XHCI Hand-off to Enabled.
  5. Head to the Boot section and go to Boot Configuration. Set Fast Boot to Disabled.
  6. Now go back to Boot and go to Secure Boot. Set OS Type to Windows UEFI.
  7. Now go to Key Management and select Clear Secure Boot Keys.
  8. Save changes.

Keep in mind that some of these options might not be available or they might be on different locations on your version of BIOS.

6. Install macOS

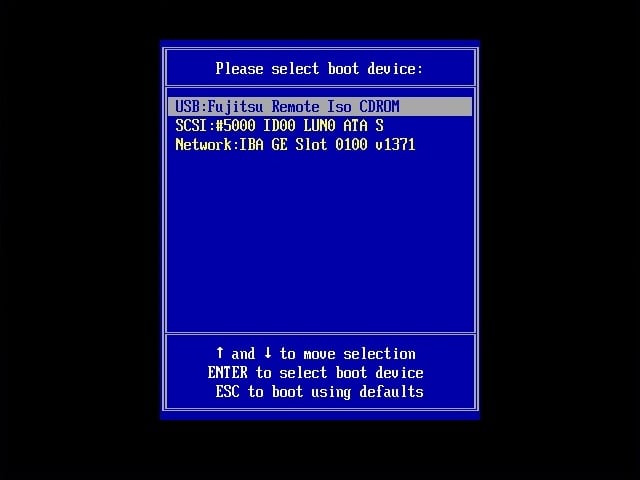
  1. Restart your PC and keep pressing the boot menu key. By default, it should be F12 or F10, but it might be different on your PC.
  2. Select your flash drive as the boot device.
  3. Choose Disk Utility.

  4. Select All Devices.
  5. Locate the partition that you created for Mac and format it to APFS.
  6. Make sure that the format is set to Mac OS Extended (Journaled) and the Scheme is set to GUID Partition Map.
  7. Install macOS to that drive.
  8. Follow the instructions on the screen to complete the setup.

7. Boot to Mac and configure your EFI

  1. On macOS, open the Terminal.
  2. Enter diskutil list
  3. Locate the EFI partition named system.
  4. Mount it by running diskutil mount disk0sx command. Replace X with the EFI partition number.
  5. Now insert your macOS boot media.
  6. Copy BOOT and OC folders to the EFI folder.
  7. Open config.plist and set value non for the following: Misc/Security/BootProtect
  8. Restart your PC.
  9. Windows should now automatically start.
  10. Open the PowerShell as administrator.
  11. Run the following command: bcdedit /set {bootmgr} path \EFI\OC\OpenCore.efi

After making these changes, you can choose between macOS and Windows when you boot. Also, remember that the same approach will help dual boot Windows 11 and macOS Monterey.

macOS system requirements for PC

To use macOS on your PC with OpenCore, you’ll need to make sure that your PC meets the hardware requirements:

  • CPU: Intel or AMD CPU with SSE4.2 support
  • Firmware: EFI64
  • Kernel: 64-bit kexts

macOS is designed to work only with specific hardware, so it might not work properly with your custom-built PC. For more information about hardware requirements, check the OpenCore guide.

Can Secure Boot interfere with macOS?

Yes, Secure Boot can interfere with macOS. It verifies software that attempts to load during startup, and if it doesn’t recognize the macOS operating system as secure and trusted, it can block it. While this feature helps protect against rootkits and malware, you can disable Secure Boot since it’s not required for Windows 11 to run.

Although your PC needs to support Secure Boot to install Windows 11, it doesn’t need to have it enabled. Users have reported TPM 2.0 errors that can prevent the upgrade and lead to issues when dual booting.

How do I switch between Windows and Mac with Boot Camp?

Switching between Windows and Mac is pretty simple when using Boot Camp. If you’ve already booted to Windows, do the following:

  1. Click the Boot Camp icon in the system tray.
  2. Now choose the Restart in macOS option from the menu.

Once your Mac restarts, you’ll boot to the macOS.

To change the operating system during the boot, do the following:

  1. Restart your Mac.
  2. Now press and hold the Option (or Alt) key as your Mac restarts.
  3. You’ll be presented with a list of startup volumes.
  4. Select the desired volume to boot to the appropriate operating system.

As you can see, switching between operating systems with Boot Camp is incredibly simple, and it can be done in a matter of seconds.

Is it better to dual boot on Mac or PC?

macOS has built-in dual boot support with the Boot Camp software, which makes dual-booting simpler and free from any issues.

Dual-booting macOS and Windows on a PC is not as simple, and macOS isn’t intended to run on PC hardware, so dual-booting can be harder to set up, and you might encounter various boot issues.

You can also use these methods to run GarageBand for Windows 10, so you might want to give them a try.

Remember, you can similarly triple boot Windows 11, Windows 7, and Linux.

Have you ever used dual boot or tried running macOS on your PC? Let us know in the comments below.

How to Create a Partition over 2TB: Simple Way

Disk partitioning has many advantages, which only a few Windows users explore. However, users with MBR disks find it hard to create a partition over 2TB. 

If you’ve been looking for a way to create a partition over 2TB, this article will provide ways to help accomplish it.

Why do I need to Partition over 2TB?

There are several reasons why you would attempt to partition your disk to over 2TB:

  • Easy Windows reinstallation – When you partition your drive, it separates the Windows files from your personal information. With a partitioned drive, reinstalling Windows or performing operations on the Disk becomes easier because your installed programs will stay where you left them, leaving you to operate solely on the partition housing the Windows files.
  • Increased storage requirements – Many modern applications like games or editing software require a lot of storage to install on your computer.
  • Improved security – Computers with partitioned drives often have a higher chance of emerging unscathed from a malware attack.
  • Install Multiple Operating Systems – If you’re a fan of running multiple operating systems on a single system, partitioning your drive over 2TB is a sure way to achieve it. 

Can MBR be more than 2TB?

MBR stands for Master Boot Record, one of the most common partition types in the Windows operating system. Traditionally, the Legacy (MBR) cannot handle physical drives larger than 2TB.  

Partitions above 2TB are virtually impossible with MBR because the drive uses 32-bit translation; and can only translate a maximum of 2,199 TB. If you need a partition above 2TB, an MBR won’t suffice.

Due to MBR’s limitations, most users are porting to GPT because, unlike MBR, which allows a maximum of 4 partitions, GPT allows users to create up to 128 partitions.

How do I create a Partition over 2TB?

1. Convert MBR to GPT

  1. Press the Windows key + E, to start File Explorer.
  2. Right-click on This PC, navigate to the Manage option, and select Disk Management.
  3. Locate the MBR disk you wish to convert, select each of the partitions, and select Delete Volume.
  4. Click OK to confirm the deletion.
  5. Repeat steps 3 and 4 until you’ve deleted all the different Disk Volumes; at this point, the whole disk should display as an unallocated disk.
  6. While still in the window, right-click on the MBR Disk, and select the option of Convert to GPT Disk.
  7. Wait for the Disk conversion process to complete and close the Disk Management window.

Once you’ve completed the above steps, your MBR Disk should be fully converted to GPT. Here is a detailed guide on how to convert MBR to GPT without data loss. 

With a GPT Disk, you should be able to create Partitions over 2TB without worrying about exceeding the MBR 4 partition limit.

After converting your MBR Disk to GPT, it’s essential to know the size of your hard disk and how much free space is left on it. This knowledge will be helpful when you start partitioning your newly converted GPT disk.

Most Windows users can get by without partitioning their disks; however, users who run heavy applications often need to partition their disks to maximize storage. 

If you’d like to avoid total data loss while converting the MBR Disk to GPT, you can make a backup of the Disk’s data or attempt the disk conversion using third-party partition software. 

For any questions or suggestions, access the comments section below and write them down.

Fix: Outlook Data File Has Reached The Maximum Size 

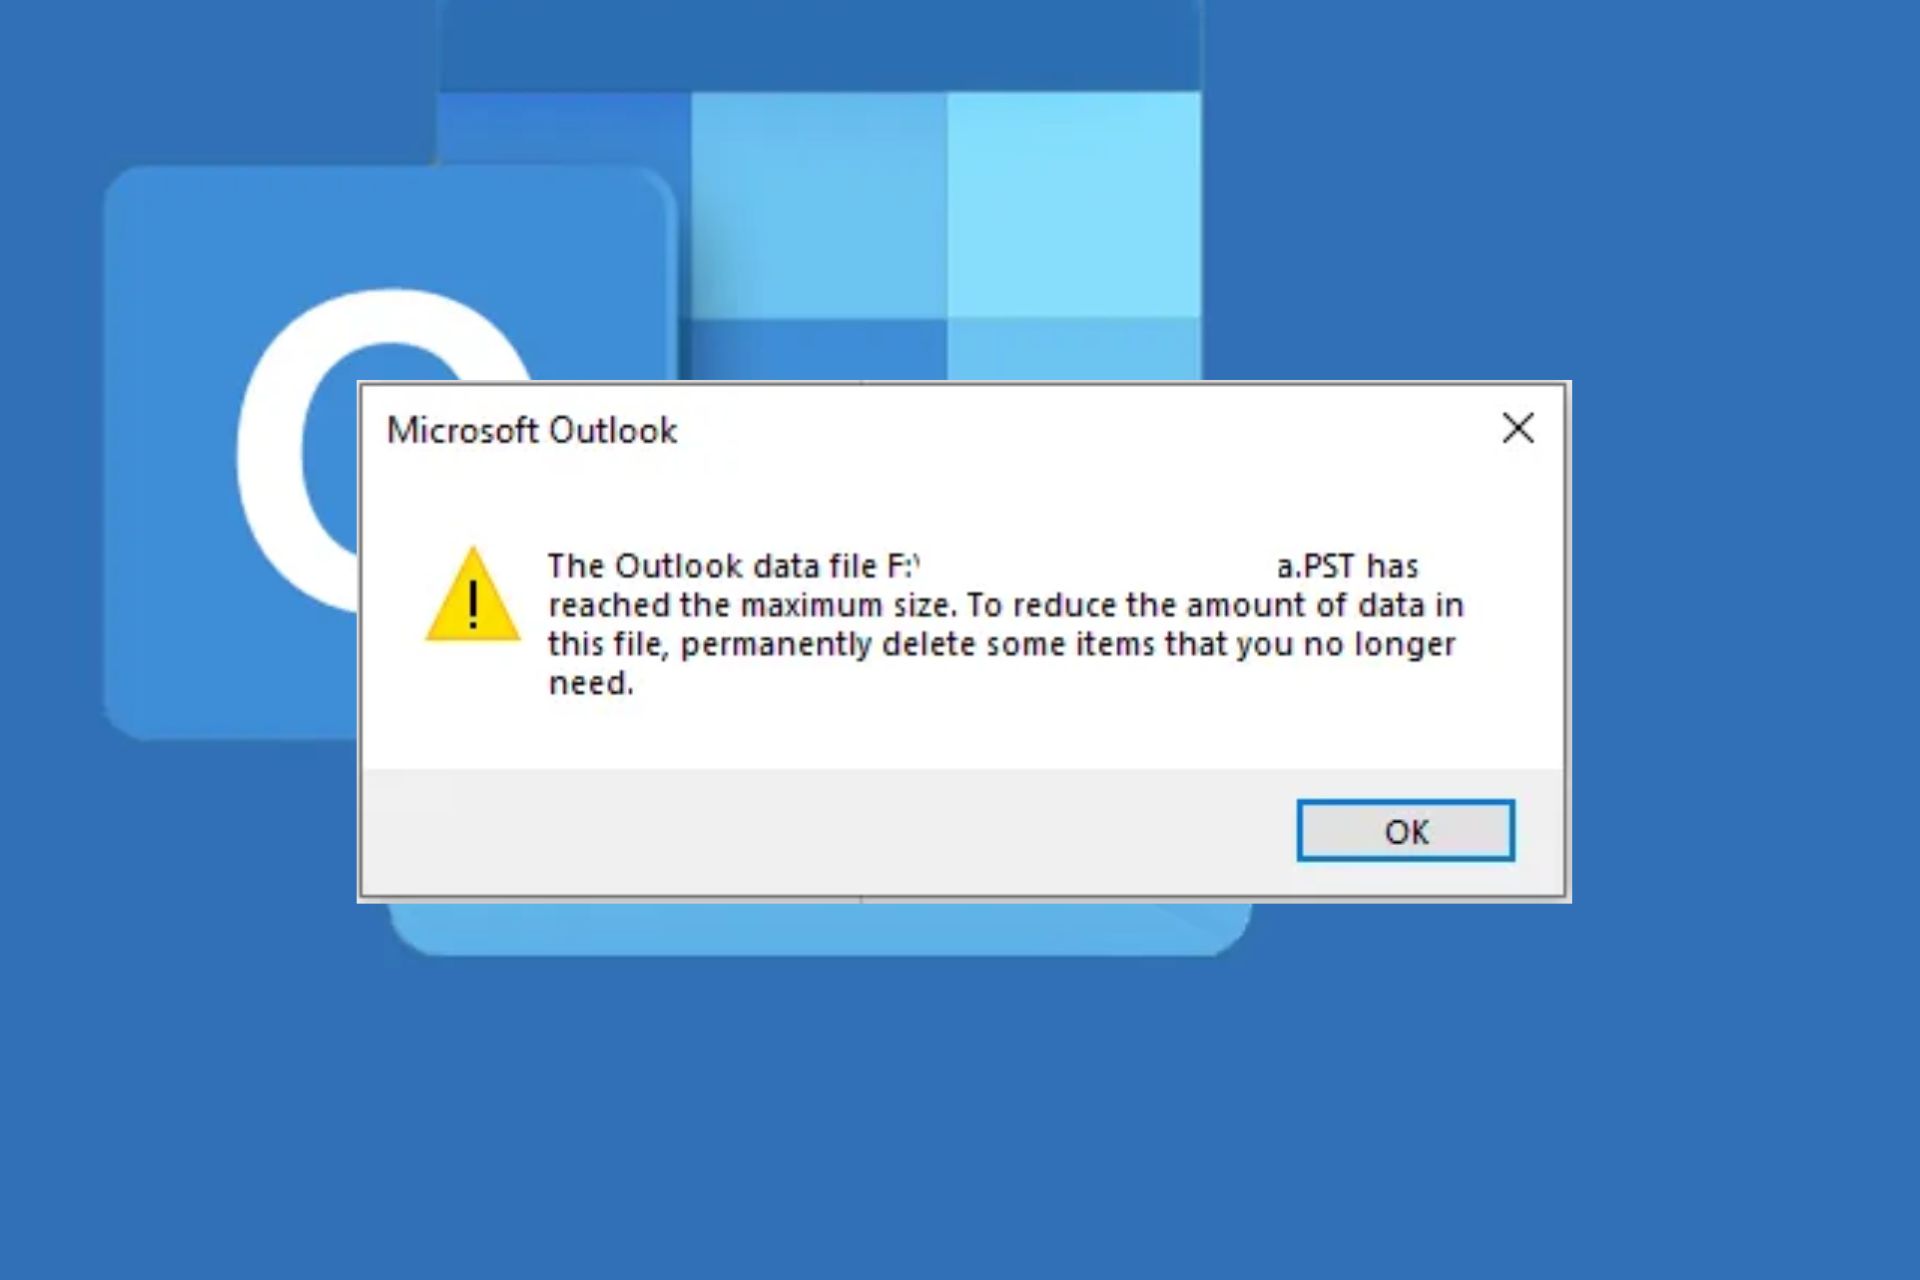
Some Outlook users have recently reported that they receive the Outlook data file reached maximum size error message whenever they open the Microsoft Outlook app which seems frustrating.

If you are experiencing similar issues, do not worry anymore as we have gathered some tricks that tackle this problem easily.

What does it mean when the Outlook data file has reached the maximum size pst?

Microsoft Outlook has an option that allows users to store email files and folders as offline files. These files are called Outlook data files and carry the extension .pst.  

When this error occurs, it means you have exceeded the default size limit of your Outlook data files, and it would not be able to store further emails.

A Microsoft Outlook mailbox can have a maximum size of 100GB, whereas .pst files have a 50GB maximum file size limit. The.pst file may still be added to your Microsoft Outlook mailbox if either of these limits is exceeded, but you won’t be able to open it, nor will you be able to share the .pst file.

Regardless, you can explore the advanced solutions provided in the next section to know how to fix the issue.

What can I do if the Outlook data file reached maximum size?

Before engaging in any advanced troubleshooting or settings tweaks for this error, here are a few tricks to try:

  • If this is the first time you are getting this error, restart your PC and check if the problem is resolved.
  • Delete the unnecessary mailbox items and empty the deleted files folder.

If, after applying the above checks, you still require further assistance, you can use the advanced solutions below.

1. Compress the Outlook data file

  1. Launch the Microsoft Outlook.
  2. At the top-left side of the screen, click on File to open its menu.
  3. Next, click on the Account Settings icon then select Account Settings from the list.
  4. Navigate to the Data Files tab. Then, select the .pst file for which you wish to reduce the size. Click on the Settings button.
  5. Next, navigate to the Advanced tab. Click on Outlook Data File Settings.
  6. Click on Compact Now and wait while it reduces the size of the .pst file.
  7. Finally, click OK.

The Compact Now feature is one of Outlook’s compressing options. This feature reduces the size of the data file to a tolerable limit.

2. Manually archive the Outlook mailbox

  1. Launch Microsoft Outlook and click on File at the top-left side of the screen.
  2. Navigate to the Info tab.
  3. Click on the Tools icon and select the Mailbox Cleanup option from the list.
  4. Now, choose the Cleanup Tools option and click on the AutoArchive button.
  5. Then, select the desired Outlook data file and press OK.

Instead of deleting older items, you may use Archive as an alternative.

3. Use the Registry Editor to increase the size limit

  1. Press the Windows + R keys to open the Run dialog box, type regedit in the dialog box and press Enter to open the Registry Editor window.
  2. In the Registry Editor window, go to the following path: Computer\HKEY_CURRENT_USER\Software\Microsoft\Office\16.0\Outlook\PST
  3. Right-click anywhere in the open space, select New and click DWORD(32-bit). Then, rename the entry MaxLargeFileSize.
  4. Double-click on this entry to open its properties. Now, change the Value Data to 102400 and click on OK to save the settings.
  5. Next, create another DWORD(32-bit) entry and name it WarnLargeFileSize.
  6. Double-click on this entry to open its properties. Then, change the Value Data to 97280 and click on OK to save the settings.
  7. This setting means you will be warned when the .pst file size exceeds 95GB. The previous limit was 47.5GB.
  8. Restart your computer and check if the problem is resolved.

With the aid of Windows Registry Editor, users can unlock many new features in Windows computers by making edits in the Registry Editor.

Make sure you work your way through the fixes provided in this article one after the other. Hopefully, one of the above steps will fix the issue for you.

If you have any questions or suggestions, do not hesitate to use the comments section below.

No Such Interface Supported: 5 Quick Ways to Fix the Error

The No such interface supported error encountered while opening a file or application can affect almost every program, lead to the app not launching, and is seen on every iteration of Windows, though troubleshooting is usually quick.

The error indicates Windows’ inability to launch a file/app. It could be a built-in program or one you downloaded from the Microsoft Store. The usual cause is a problem with the app itself or when the system files are corrupt or missing.

Several Windows 11 bugs or missing DLLs may also cause this issues or the Error 0x80004002: No such interface supported in Windows 11. We tested the solutions below and they work!

How to fix the No such interface supported error?

1. Update the affected application

Note icon NOTE
The steps here are for the Microsoft Store. If you downloaded the app from the official website, navigate to it, and install the available updates.
  1. Press Windows + S to open Search, type Microsoft Store in the text field, and click on the relevant search result.microsoft store
  2. Now, click on the Library icon.library
  3. Click on the Get updates button.update app to fix No such interface supported
  4. Now, wait for the updates to get installed.wait for update

If the affected application gets updated, restart the computer, and check whether the No such interface supported error is fixed. In case it persists, head to the next method.

2. Reset/repair the app

  1. Press Windows + I to open Settings, choose Apps from the left, and click on Installed apps.installed apps
  2. Locate the affected app, click on the ellipsis next to it, and choose Advanced options.advanced options
  3. Now, click on Repair, wait for the process to complete, and check whether the error is fixed.repair to fix No such interface supported
  4. If not, click on Reset.reset to fix No such interface supported
  5. Again, click Reset in the confirmation prompt to start the process.reset

Repair and restart are two effective built-in options that fix a range of issues with the Windows apps, including the No such interface supported error with Photos.

3. Reinstall the application

  1. Press Windows + R to open Run, type appwiz.cpl in the text field, and hit Enter.appwiz.cpl
  2. Choose the app that’s throwing the error, and click on Uninstall.uninstall app to fix No such interface supported
  3. Follow the on-screen instructions to complete the process.
  4. Once done, restart the computer for the changes to come into effect.
  5. Now, reinstall the application from an official source, say, the manufacturer’s official website or the Microsoft Store.

When facing the No such interface supported error with VLC or another app you got manually, reinstalling it should do the trick.

Just make sure to remove all associated files and registry entries before reinstalling the program. A good software removal tool should come to your aid in this case.

4. Re-register related DLLs

  1. Press Windows + R to open Run, type cmd, and hit Ctrl + Shift + Enter.command prompt
  2. Click Yes in the UAC prompt.
  3. Now, paste the following command and hit Enter:regsvr32 c:\windows\system32\actxprxy.dllcommand to fix No such interface supported
  4. If you still face issues, execute the following command:FOR /R C:\ %G IN (*.dll) DO "%systemroot%\system32\regsvr32.exe" /s "%G"

Reregistering the DLLs should help fix No such interface supported in Windows 7 as well.

5. Run a few commands

  1. Press Windows + S to open Search, type Command Prompt, right-click on the relevant search result, and then select Run as administrator.cmd
  2. Click Yes in the UAC prompt that pops up.
  3. Paste the following commands individually, and hit Enter after each:reg delete "HKCU\Software\Classes\Local Settings\Software\Microsoft\Windows\Shell" /f reg delete "HKCU\Software\Microsoft\Windows\CurrentVersion\Explorer\Streams" /f reg delete "HKCU\Software\Microsoft\Windows\CurrentVersion\Explorer\StuckRects2" /f reg delete "HKCU\Software\Microsoft\Windows\CurrentVersion\Explorer\MenuOrder" /f attrib -r -s -h "%userprofile%\AppData\Local*.db" del "%userprofile%\AppData\Local*.db"delete key

That’s it! You shouldn’t see No such interface supported in Windows 10 or the other iterations of the OS anymore, be it while opening files or programs. In case you do, the last option is to reinstall Windows, which can be done via a bootable USB drive or the setup.

Before you leave, check the best apps for Windows 11 and get a few of these today for a better experience.

Tell us which fix worked for you in the comments section below.

Xbox Game Bar Not Working: 8 Confirmed Fixes to Apply

Xbox is one of Windows 10’s default apps. This app integrates the Xbox with Windows and includes a handy Game Bar, but some can’t open it on Windows 10.

This Game Bar is a built-in tool you can use to take snapshots. It is also one of the best screen recording tools for Windows PC. To open the Game Bar, you only need to press the Windows key + G with a window selected. So, let’s find out all about it.

Why won’t Xbox game bar open?

If the Game Bar is not opening on Windows 10 and Windows + G is not working, it might be because you altered the shortcut that opens the tool.

Also, the issue might be down to the Game Bar settings on your PC. Lastly, some registry settings can make the tool fail to work on your PC.

Moreover, some of them may be applied even when facing the following issues:

  • Xbox Game Bar shortcut not working – Windows + G not opening Game Bar: If pressing the Windows key + G makes no difference, it’s time to check your Xbox Game Bar settings.
  • Xbox Game Bar keeps turning off – Xbox Game Bar turns itself off: Chances are you need to use Game Mode, but the Game Bar repeatedly turns off. If so, edit the registry and change AllowGameDVR to 1.
  • Game DVR not working in Windows 10: This is just a variation of the original issue, but if you encounter it, you should be able to solve it with the solutions from this article.
  • Can’t enable/open Xbox Game Bar – Xbox Game Bar not loading: Users reported that they can’t allow Game Bar on their PC. However, you can fix the issue by changing the Game bar settings.
  • Game bar not opening up on Steam, appearing: If you have issues with Game Bar and Steam, you might want to try changing the Game bar’s configuration. If that doesn’t work, you should try reinstalling the Xbox app.
  • Windows Game Bar nothing to record: Sometimes, you might get a message saying There’s nothing to record. We covered this issue in great detail in one of our older articles, so check it out for more solutions.
  • Xbox Game Bar not working in Windows 11, 10: The solutions below are applicable for both OSs, so make sure to follow them.
  • Xbox Game Bar not opening with controller – Try to uninstall, then reinstall the controller driver to fix this. This has worked for most users.
  • Xbox Game Bar not working properly – Not running the games in Full-Screen mode, proved to be one of the most effective solutions.
  • Xbox Game Bar not recording – Xbox Game Bar record button greyed out – Try to reinstall the feature through Powershell, as shown in the 6th solution below.
  • Enable Xbox Game Bar not working – Check the feature’s Hotkey settings.
  • Xbox Game Bar party chat not working – If you create a new user profile, you might get access to all the features included.
  • Xbox Game Bar not showing friends – Simply update your OS, then reboot it in order to bring everything up-to-date.

The Game Bar is usually enabled by default on your PC. But you can still follow the steps above to check if it is active.

How do I fix my Xbox game bar when it’s not working?

1. Check the Game bar’s Settings

  1. Search for Xbox in the Cortana search box and click the app.
    Can't enable Game bar
  2. Next, sign in to the Xbox app. Note that a Microsoft Account is required to sign in to the Xbox app.
  3. Click the Settings icon in the bottom left corner.
  4. Select Game DVR.
    Windows Game bar nothing to record
  5. Now, you can select Record game clips and screenshots using Game DVR option. If that option is off, click it to switch it back on.
  6. Close the Xbox app and then restart Windows.
  7. Press the Windows key + G again to open the Game bar.

It might be the case that the Game Bar Record game clips and screenshots setting is switched off in Windows 10.

Then the Game Bar isn’t going to open when you press its hotkey. So, you can check that option as described above.

2. Edit the Registry

  1. Press Windows + R, type regedit, and click OK.
    regedit
  2. Next, browse to the path below: HKEY_CURRENT_USER/SOFTWARE/Microsoft/Windows/CurrentVersion/GameDVR
  3. Then, right-click the AppCaptureEnabled DWORD and select Modify.
  4. If the DWORD’s value is 0, enter 1 in the Value data text box.
  5. Now, navigate to GameConfigStore.
    Windows 10 Game bar not working in fullscreen
  6. Right-click the GameDVR_Enabled DWORD and select Modify from the context menu to open the window below.
    Game bar not opening up on Steam
  7. Enter 1 in the Value data text box if its current value is 0.
  8. Restart Windows and press the Game bar hotkey.

You can also switch the Game Bar via the registry.

3. Don’t Run the Games in Full-Screen Mode

Is it the case that the Game Bar is not opening when you’re running a game on full screen? The Game Bar doesn’t open in full-screen modes because most games don’t recognize the Windows key + G hotkey.

That doesn’t mean you can’t use the Game Bar’s options in full-screen mode, but the overlay UI isn’t going to open. You can still record a game with the Windows + Alt + R hotkey or take a snapshot by pressing Windows + Alt + PrtScr.

Run the game in window mode and press the Windows key + G to open the Game Bar UI.

4. Check the Xbox app’s Hotkey Settings

  1. Press the Windows + I keys.
  2. Select the Gaming option.
    gaming option game bar not opening windows 10
  3. Check under the Keyboard shortcuts for the Game Bar hotkeys.
  4. To alter the hotkeys, fill in the field before Your shortcut with your desired shortcut.
    your game bar not opening windows 10
  5. Click the Save button.
    save

Check the Game Bar hotkeys haven’t been reconfigured in any way. The Xbox app enables users to customize the hotkeys so that somebody might have tinkered with the keyboard shortcut settings.

You can check the Game Bar hotkeys as described above.

5. Install the Windows Media Feature Pack

  1. Open this Windows Media Feature Pack page.
  2. Scroll down and click Download the Media Feature Pack update package now to save the installer.
  3. Open the folder to which you saved the Windows Media Feature Pack and run through its installer to add it to Windows.

Windows 10 N and KN versions don’t include all the media technologies and apps in more standard editions.

So if your platform is a Windows 10 N edition, that might be why the Game Bar isn’t opening for you.

Several apps need Windows Media files not included in Windows 10 KN or N.

However, you can install the media-related technologies otherwise lacking in Windows 10 N with the Windows Media Feature Pack.

6. Reinstall the Xbox Game Bar through Powershell

  1. Press Windows key + S and enter powershell.
  2. Right-click Windows PowerShell from the list of results and then choose Run as administrator.
    Windows 10 Game bar not working in fullscreen
  3. When PowerShell starts, run the following command to remove Xbox Game Bar: Get-AppxPackage *xboxapp* | Remove-AppxPackageremove game bar
  4. Once done, restart the computer.
  5. Now, open Microsoft Store, and then download Xbox Game bar and other applications all over again.download

If you were wondering how do I reinstall game bar, delete the app via PowerShell, and then download Xbox Game Bar from the Microsoft Store.

The Game Bar is a feature closely related to the Xbox app, and if you have any issues with it, you might be able to fix them simply by reinstalling the Xbox app.

Reinstalling a core Windows application is a slightly advanced process that involves PowerShell, but you should be able to reinstall the Xbox app without issues by following the above procedure.

After running this command, the Xbox app will be removed from your PC. You must open the Microsoft Store app and download the Xbox app again.

Once you download it, the problem with the Game bar should be entirely resolved.

7. Turn the Game Bar off and on

  1. If you are wondering how do I enable the Game Bar on Windows 10, press Windows key + I to open Settings.
  2. Select the Gaming option.gaming Xbox Game Bar not Working or Opening
  3. Toggle the switch under the Xbox Game Bar backward to disable it. Now, wait for a few moments and turn it back on again.
    toggle

If you are wondering how do I fix my Xbox game bar not popping up, simply turning the Game bar off and on or updating the OS should work. This is a temporary workaround, but it might help you with this issue.

After that, the Game Bar should start working again. Remember that this is just a temporary workaround, and if you encounter issues with the Game Bar, you’ll need to repeat this solution.

8. Create a new user account

  1. Open the Settings app and navigate to the Accounts section.
    Game bar something went wrong
  2. From the menu on the left, pick Family & other people.
  3. In the right pane, click the Add someone else to this PC icon.
    Game bar not appearing
  4. Select I don’t have this person’s sign-in information.
    Game DVR not working Windows 10
  5. Choose to Add a user without a Microsoft account.
    Can't enable Game bar
  6. Enter the desired user name and click on Next.
    Windows Game bar nothing to record

According to users, problems with the Game Bar can occur if your user profile is damaged or corrupted. However, you might be able to fix the problem simply by creating a new user account.

To do that, you need to follow these simple steps from above. After creating a new user account, switch to it, and check if that solves your problem.

If the problem doesn’t appear on the new account, you need to move all your files to the new account and use it instead of your old account.

9. Use third-party solutions

If you can’t fix the problem with the Game Bar, you might want to consider using third-party software.

Although the Game Bar comes preinstalled with Windows 10, it has certain limitations, and if you can’t get it to work correctly, you might want to try some other Windows 10 screen recording software.

If you’re looking for a different application to record your screen and gameplay sessions, we strongly recommend trying Icecream Screen Recorder.

This straightforward tool offers certain features that the Game Bar lacks, so feel free to try it out.

Speaking about recording issues, one particular topic caught our attention, and we would like to share it quickly with you.

What can I do if Xbox Game Bar is not opening on Windows 11?

If the Game Bar is not opening on Windows 11, it might be because you have not enabled it from the settings. You can follow the steps in this guide to activate the tool.

Also, it might be down to some glitches with the tool. Disabling and enabling the tool after some minutes should solve this. Lastly, you can apply any fixes in this guide to solve the problem.

What can I do if Xbox Game Bar stops recording when switching Windows?

While many users struggle with the Xbox Game Bar not recording, others only encounter this issue when switching between apps or using the Alt + Tab key combination in the browser. You can fix this by updating the tool by following the steps below:

  1. To do that, open the Windows Update settings from the Start menu.
  2. Next, press the Check for updates button. Thus, you will activate the search and, consequently, the installation of these files.
  3. Finally, restart your PC and check if the issue is still there.

There you have it: Everything you need to fix the Game Bar not opening issue.

Good luck with the troubleshooting, and don’t be shy to let us know if any of these solutions helped you solve the Xbox Game Bar not working issues.

How to Create a Custom Keyboard Layout in Windows 11

You don’t have to stick with just one keyboard layout for your PC. Windows 11 includes settings that enable you to add keyboard layouts to your desktop or laptop. You can become acquainted with different keyboard layouts by adding them via the Settings app.

When you’ve added new keyboard layouts, you can easily switch between them via the Windows 11 taskbar. Having different keyboard layouts available can come in handy when adding characters and symbols (such as currency) unique to foreign languages to documents.

What are the three different types of keyboard layouts?

QWERTY is by far the most standard layout for keyboards the world over. That was originally a 19th-century typewriter layout carried over to PC keyboards.

It has QWERTZ and AZERTY variations in some European countries, but QWERTY is the universal layout.

Colemak is an alternative layout that alters the position of 17 keys from QWERTY. Most of the non-alphabetical keys have the same position for the Colemak layout. However, unlike the Mac OS, Windows doesn’t natively support Colemak.

DVORAK is a keyboard layout specifically designed to increase typing speeds over the more traditional QWERTY alternative. The fact that typing speed records have been set with DVORAK keyboards highlights it’s a more efficient alternative. However, it’s also very different from the QWERTY layout.

DVORAK is available for English and other international keyboard layouts in Windows 11. So, that’s a layout you can add and switch to via Settings. This is how you can change, remove, and install different keyboard layouts in Windows 11.

How can I change, remove, and add keyboard layouts in Windows 11?

1. How to add and change keyboard layout

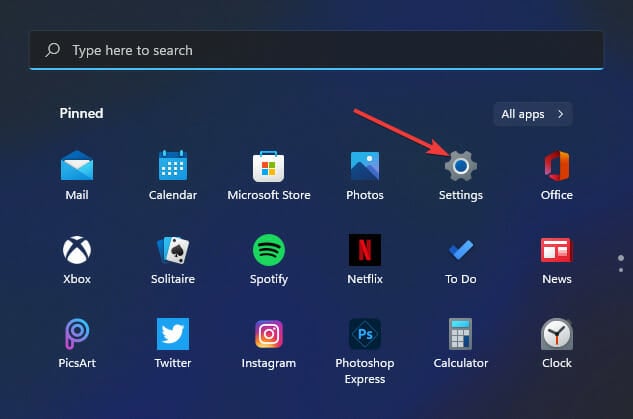
  1. Open your Start menu, and select the pinned Settings app to launch it.
    Pinned Settings app keyboard layout windows 11
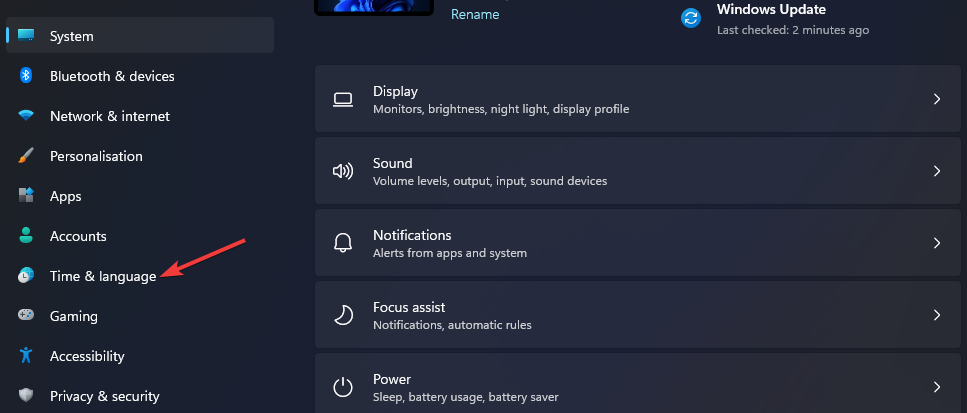
  2. Click the Time & language tab.
    Time & language tab keyboard layout windows 11
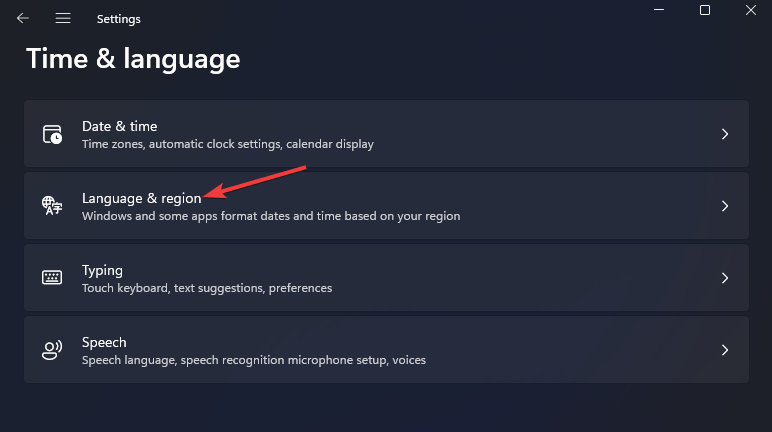
  3. Select the Language & region navigation option.
    The Language & region option keyboard layout windows 11
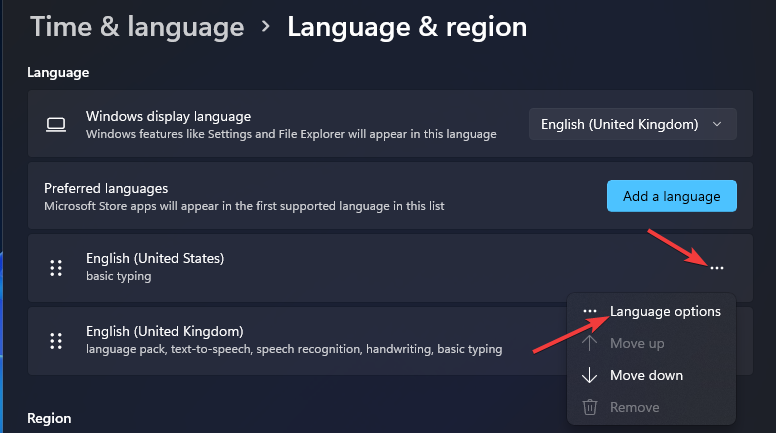
  4. Click the … button for your basic typing pack listed in Settings, and select Language options on the menu.
    The three-dot button keyboard layout windows 11
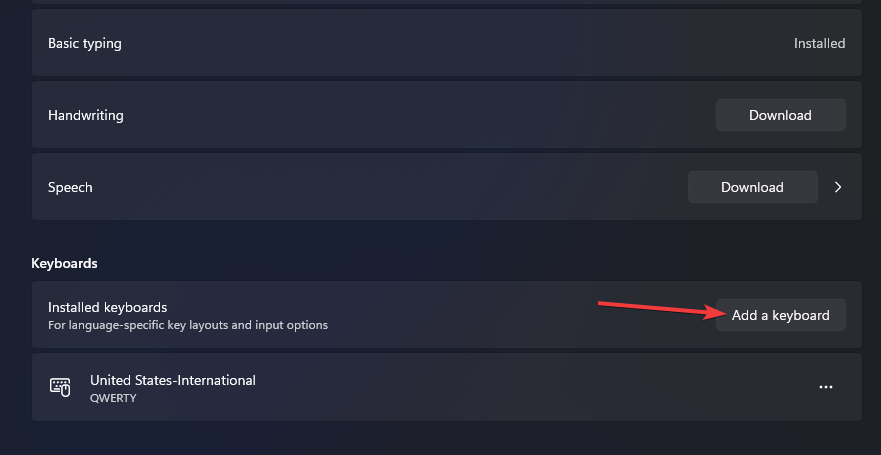
  5. Press the Add a keyboard button.
    The Add a keyboard option keyboard layout windows 11
  6. Select an alternative keyboard layout on the menu.
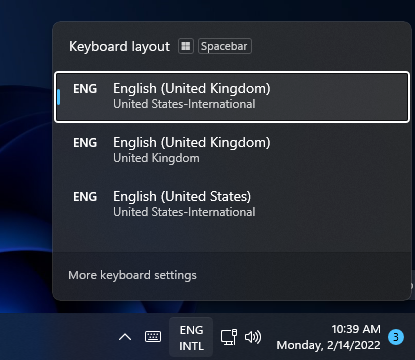
  7. Then you can change your keyboard layout to the one added by pressing the Windows + Space hotkey. That keyboard shortcut opens the system tray menu below, from which you can select different layouts added via Settings.

    Keyboard layout options keyboard layout windows 11

If you were wondering how to add a new language to keyboard in Windows 10, it could quickly be done via Settings.

While you are at this, you might be interested in our guide on how to type accents in Windows 11.

2. How to change keyboard layouts with Quick Settings

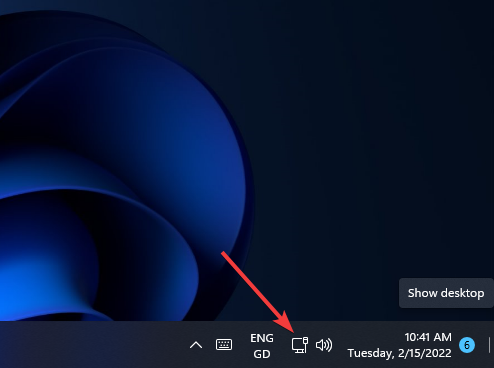
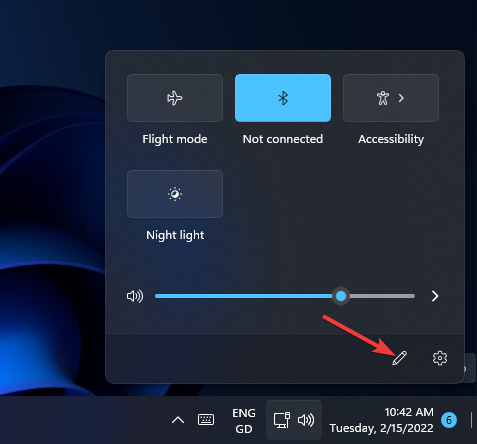
  1. Click the Quick Settings system tray icon.
  2. Press the Edit Quick Settings button.
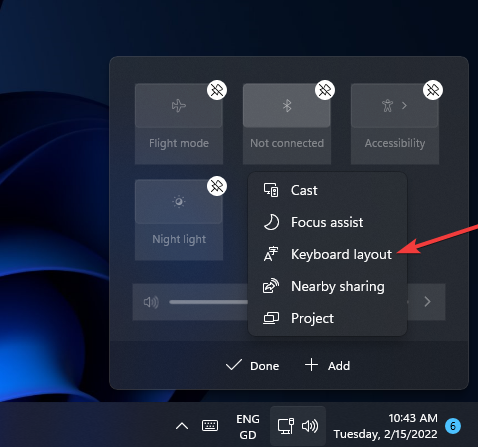
  3. Click the Add button, and select Keyboard Layout on the menu.
  4. Select the Done option.
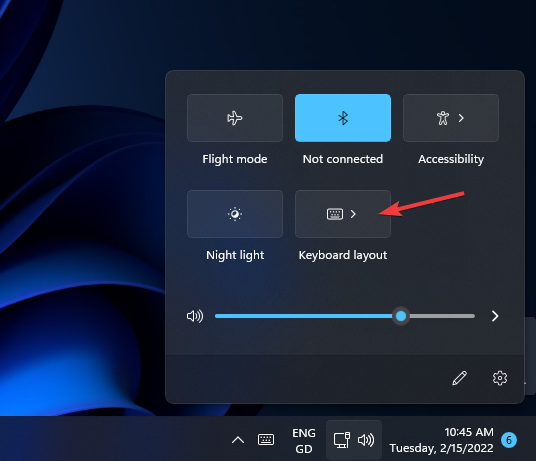
  5. Then click the Keyboard layout option in Quick Settings.

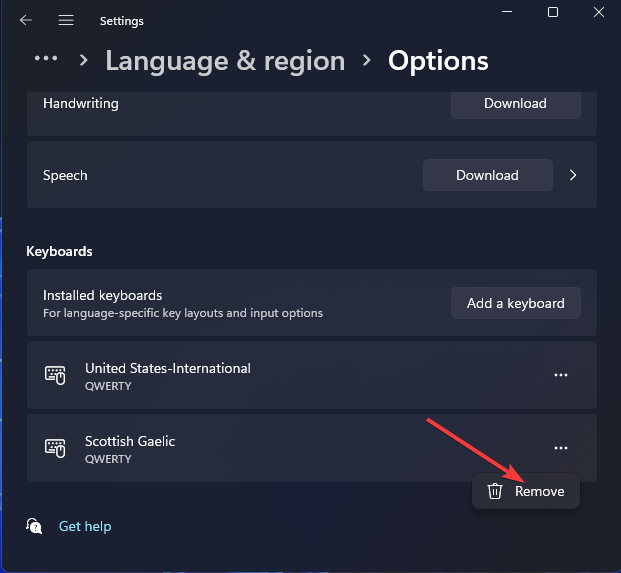
3. How to remove a keyboard layout

  1. Open Language & region options in Settings as outlined in the first three steps of the previous method.
  2. Then click the … button for your typing pack and select Language options.
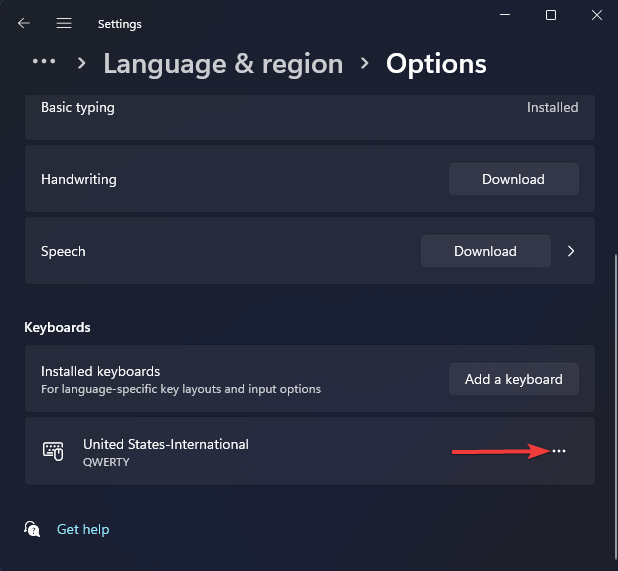
  3. Press the … button for an installed keyboard layout there.
    The three-dot button keyboard layout windows 11
  4. Select the Remove option.
    Remove option keyboard layout windows 11

This way, you can delete a keyboard layout in Windows 11.

4. How to install new keyboard layouts

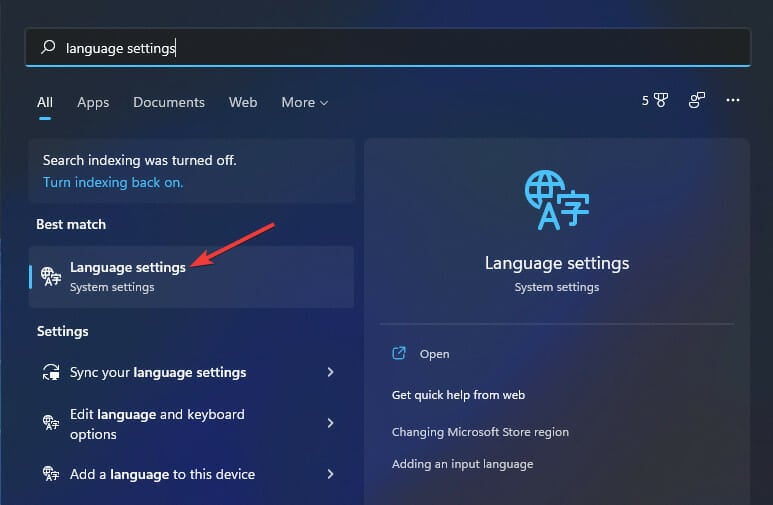
  1. Press the Windows + S keyboard keys simultaneously to bring up a search box.
  2. Type language settings in the search box.
  3. Select Language settings in the search results.
    Language settings search result
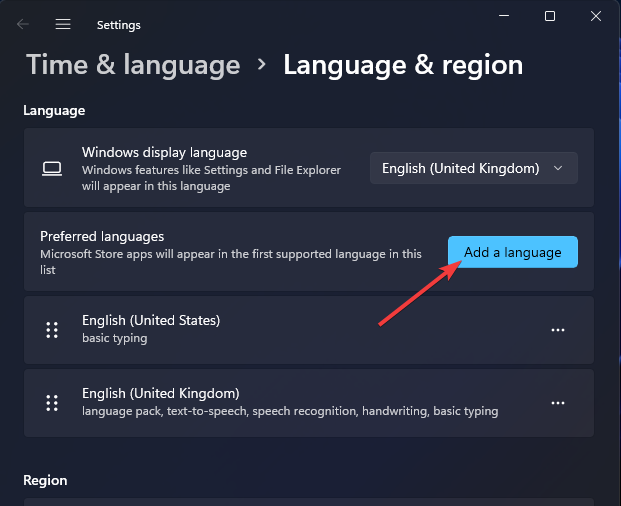
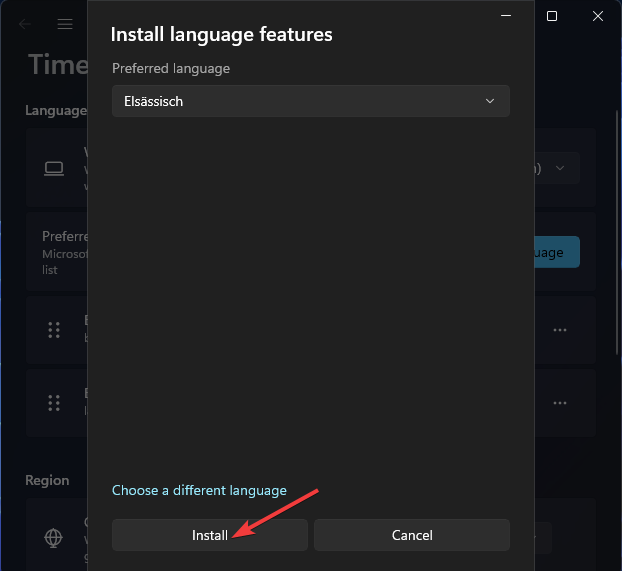
  4. Click the Add a language button shown directly below.
    The Add a language button keyboard layout windows 11
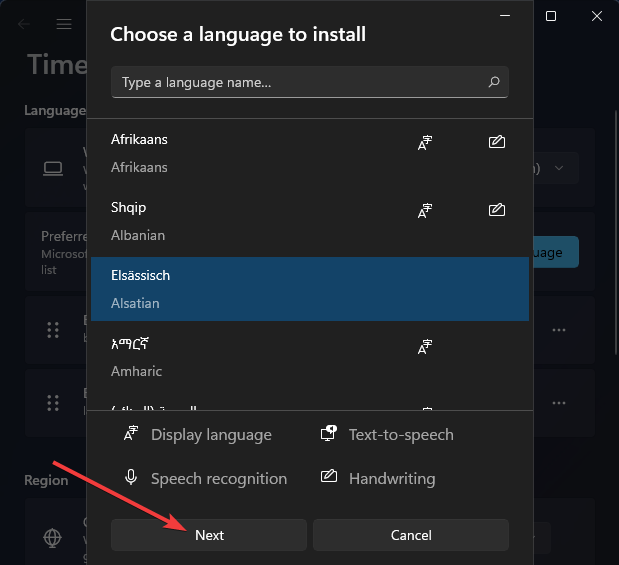
  5. Enter a language in the search box to find different keyboard layouts for it.
  6. Choose a keyboard layout to add.
  7. Press the Next button.
    Next button keyboard layout windows 11
  8. Click Install to add the keyboard layout.
    The Install option keyboard layout windows 11

5. How to add new keyboard layouts With PowerShell

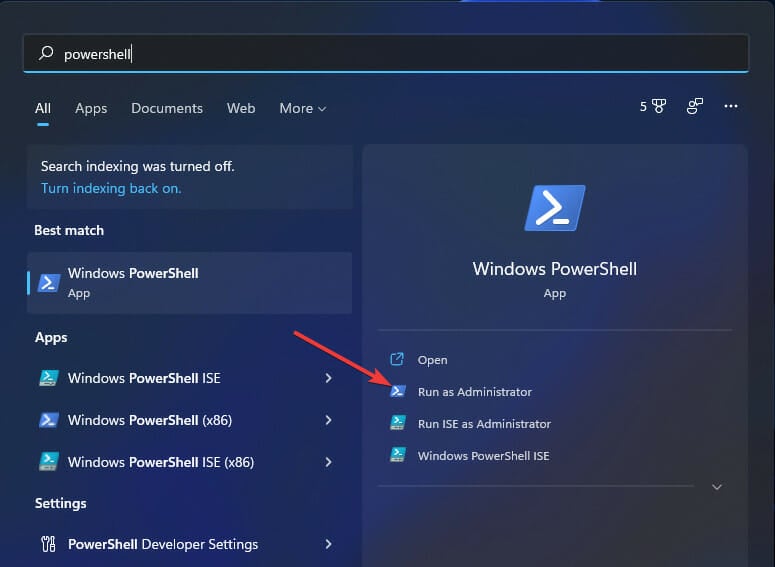
  1. Launch the search tool by simultaneously pressing the Windows key + S.
  2. Type Windows PowerShell in the search tool’s text box.
  3. Then click the Run as administrator option for PowerShell on the right of the search utility.
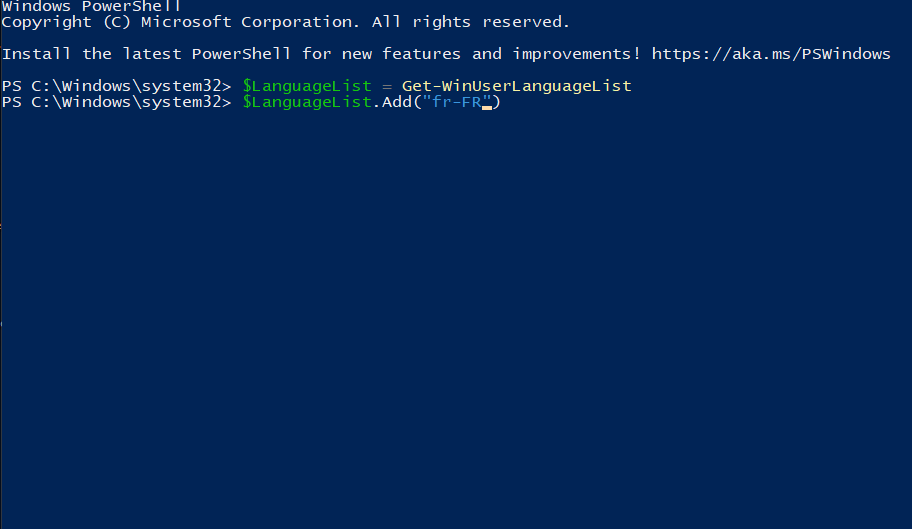
  4. Input this PowerShell command, and press Enter: $LanguageList = Get-WinUserLanguageList
  5. To add a new keyboard layout language, input the following command and press Return: $LanguageList.Add("language")
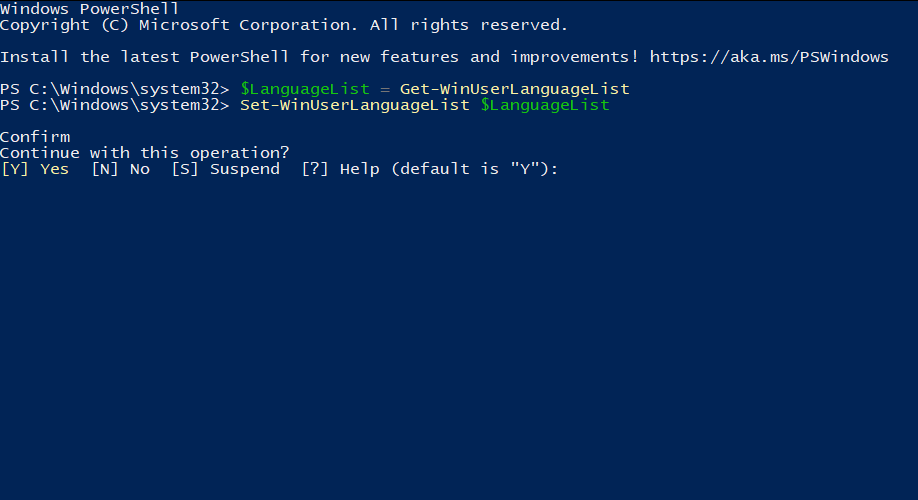
  6. Then type in this PowerShell command and press Enter to execute: Set-WinUserLanguageList $LanguageList
  7. Press the Y keyboard key to confirm and continue.
  8. Restart Windows 11 after entering those commands.
  9. Then you can switch to the new keyboard layout you just added via Settings.

You now know how to add language to keyboard in Windows, along with everything there’s to the process.

Note icon NOTE
Note that you’ll need to change the language in the above command with an actual keyboard layout language tag. For example, a command to add a French keyboard layout would include the fr-FR language tag.

Is there a way I can set up a custom keyboard layout in Windows 11?

There are various desktop apps for the job, but the one offered by Microsoft is the shortcut to change the keyboard layout in Windows 11. with which you can set up custom keyboard layouts.

Microsoft Keyboard Layout Creator 1.4 is one you can utilize in Windows 11. That app enables you to set up new layouts by remapping keys. This is how you can create custom layouts with Keyboard Layout Creator.

Download and Install the Software

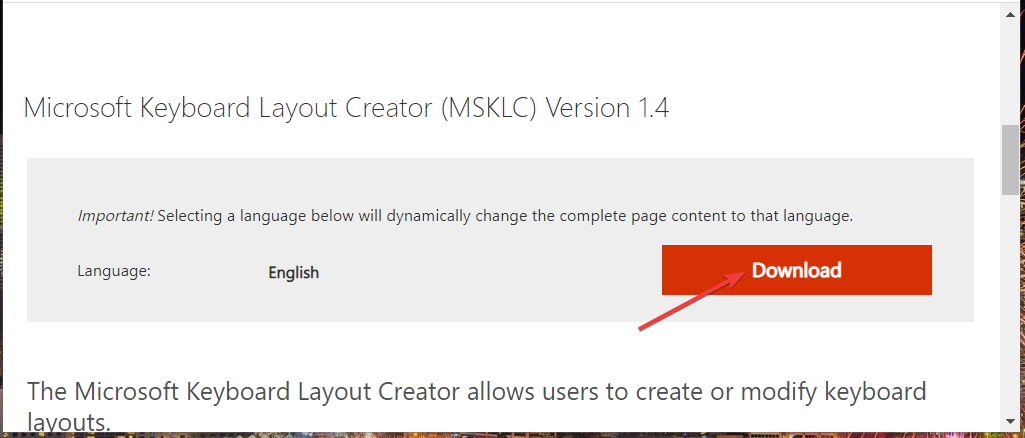
  1. Open the Microsoft Keyboard Layout Creator download page.
  2. Click Download on that page.
    The Download option keyboard layout windows 11
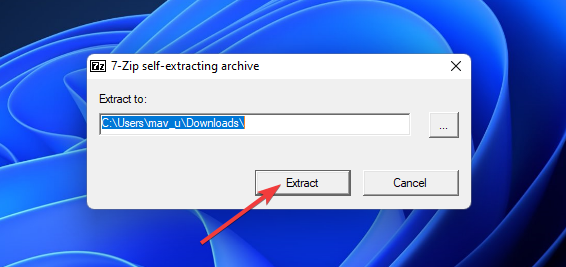
  3. Open the folder you downloaded the app to in File Explorer, and double-click the MSKLC.exe archive to extract it.
    Extract button keyboard layout windows 11
  4. Next, open the extracted MSKLC folder.
  5. Double-click the MSKLC.msi file to open its installer. Then install the software with its setup wizard.
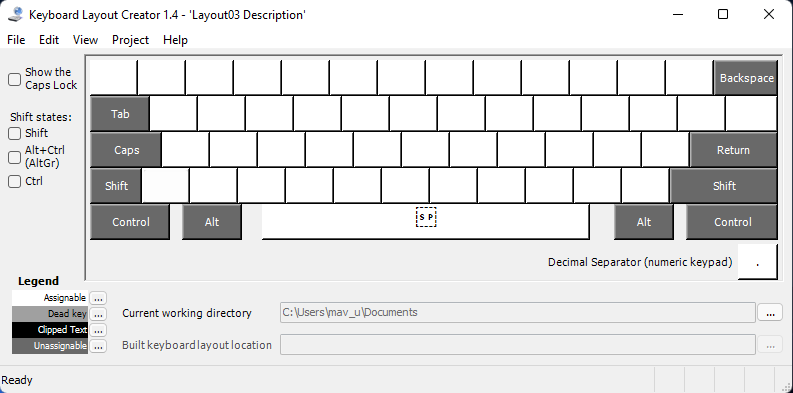
  6. Open the Keyboard Layout Creator app.
    The Keyboard Layout Creator app keyboard layout windows 11

Set up a new keyboard layout

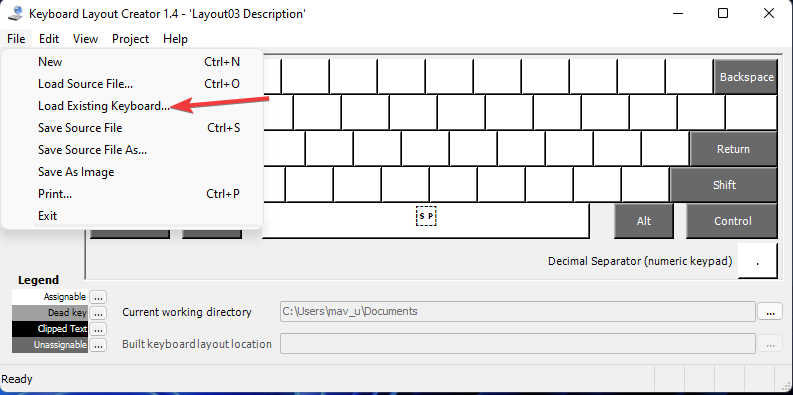
  1. Click the File menu, and select the Load Existing Keyboard option there.
    Load Existing Keyboard option keyboard layout windows 11
  2. Select a keyboard layout to customize that matches your current one.
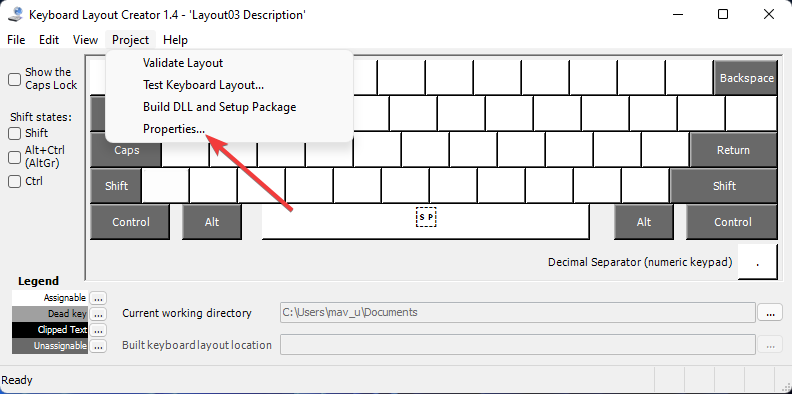
  3. Click the Project menu and select Properties there.
     Properties option keyboard layout windows 11
  4. Enter the name and description details for your custom keyboard layout, and click the OK button.
    Load Existing Keyboard window keyboard layout windows 11
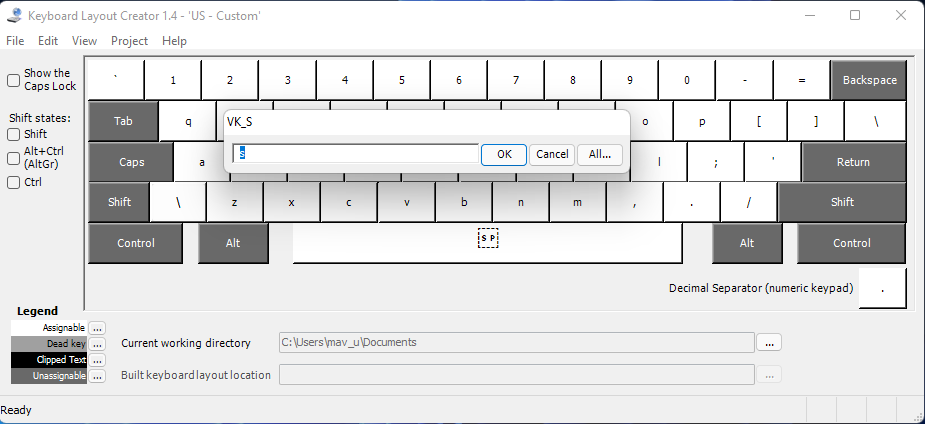
  5. Now you can remap the keys on the on-screen keyboard to set up a new layout. Click keys on the keyboard to bring up text boxes where you can enter different ones to change them.
    custom key window keyboard layout windows 11
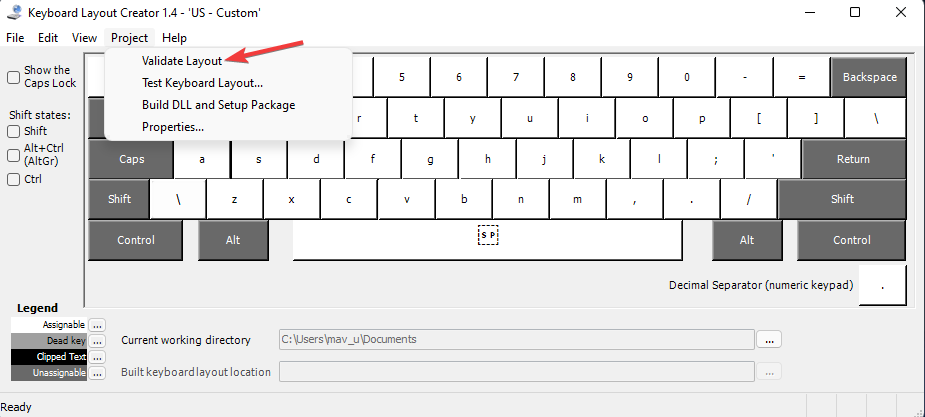
  6. When you’ve finished setting up your new keyboard layout, click the Project menu. Select the Validate Layout option there to verify.
    Validate Layout option keyboard layout windows 11
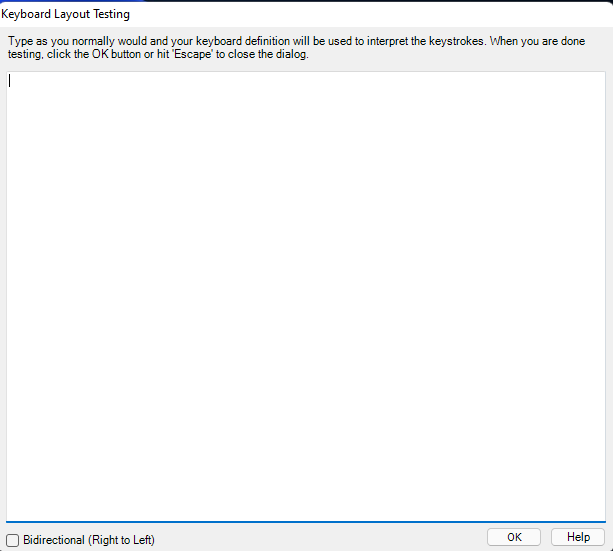
  7. Click Test Keyboard Layout to try out the new layout within a text editor.
    Keyboard Layout Testing windows keyboard layout windows 11

Install the custom keyboard layout

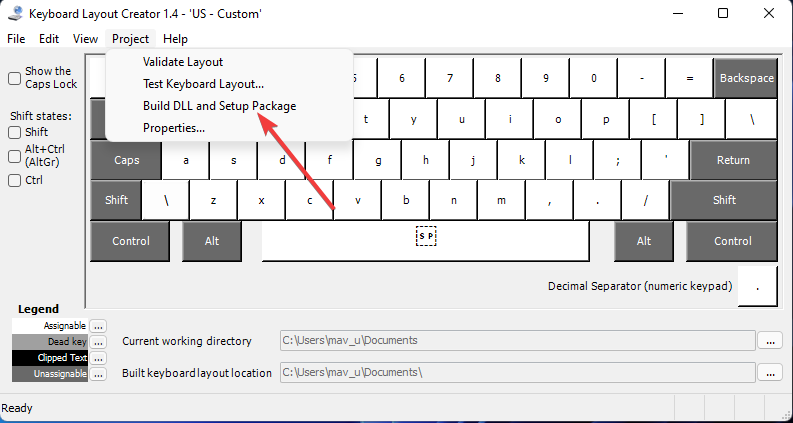
  1. If you’re satisfied with your new keyboard layout, you can apply it by clicking Project > Build DLL and Setup Package.
    Build DLL and Setup Package option keyboard layout windows 11
  2. Click Yes on the prompt that opens asking to open the directory for the keyboard layout’s installer package.
    Yes option keyboard layout windows 11
  3. Then double-click the setup.exe file for the custom layout to install it.
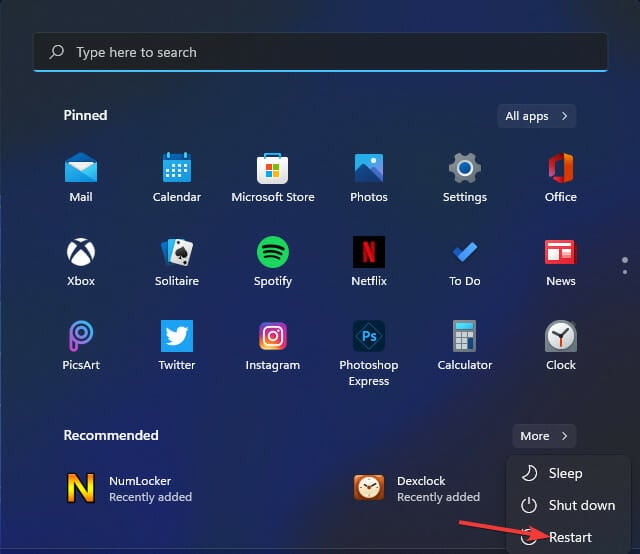
  4. Click Power > Restart on the Start Menu after installing the new layout.
    Restart option keyboard layout windows 11

Does the on-screen keyboard change for selected layouts?

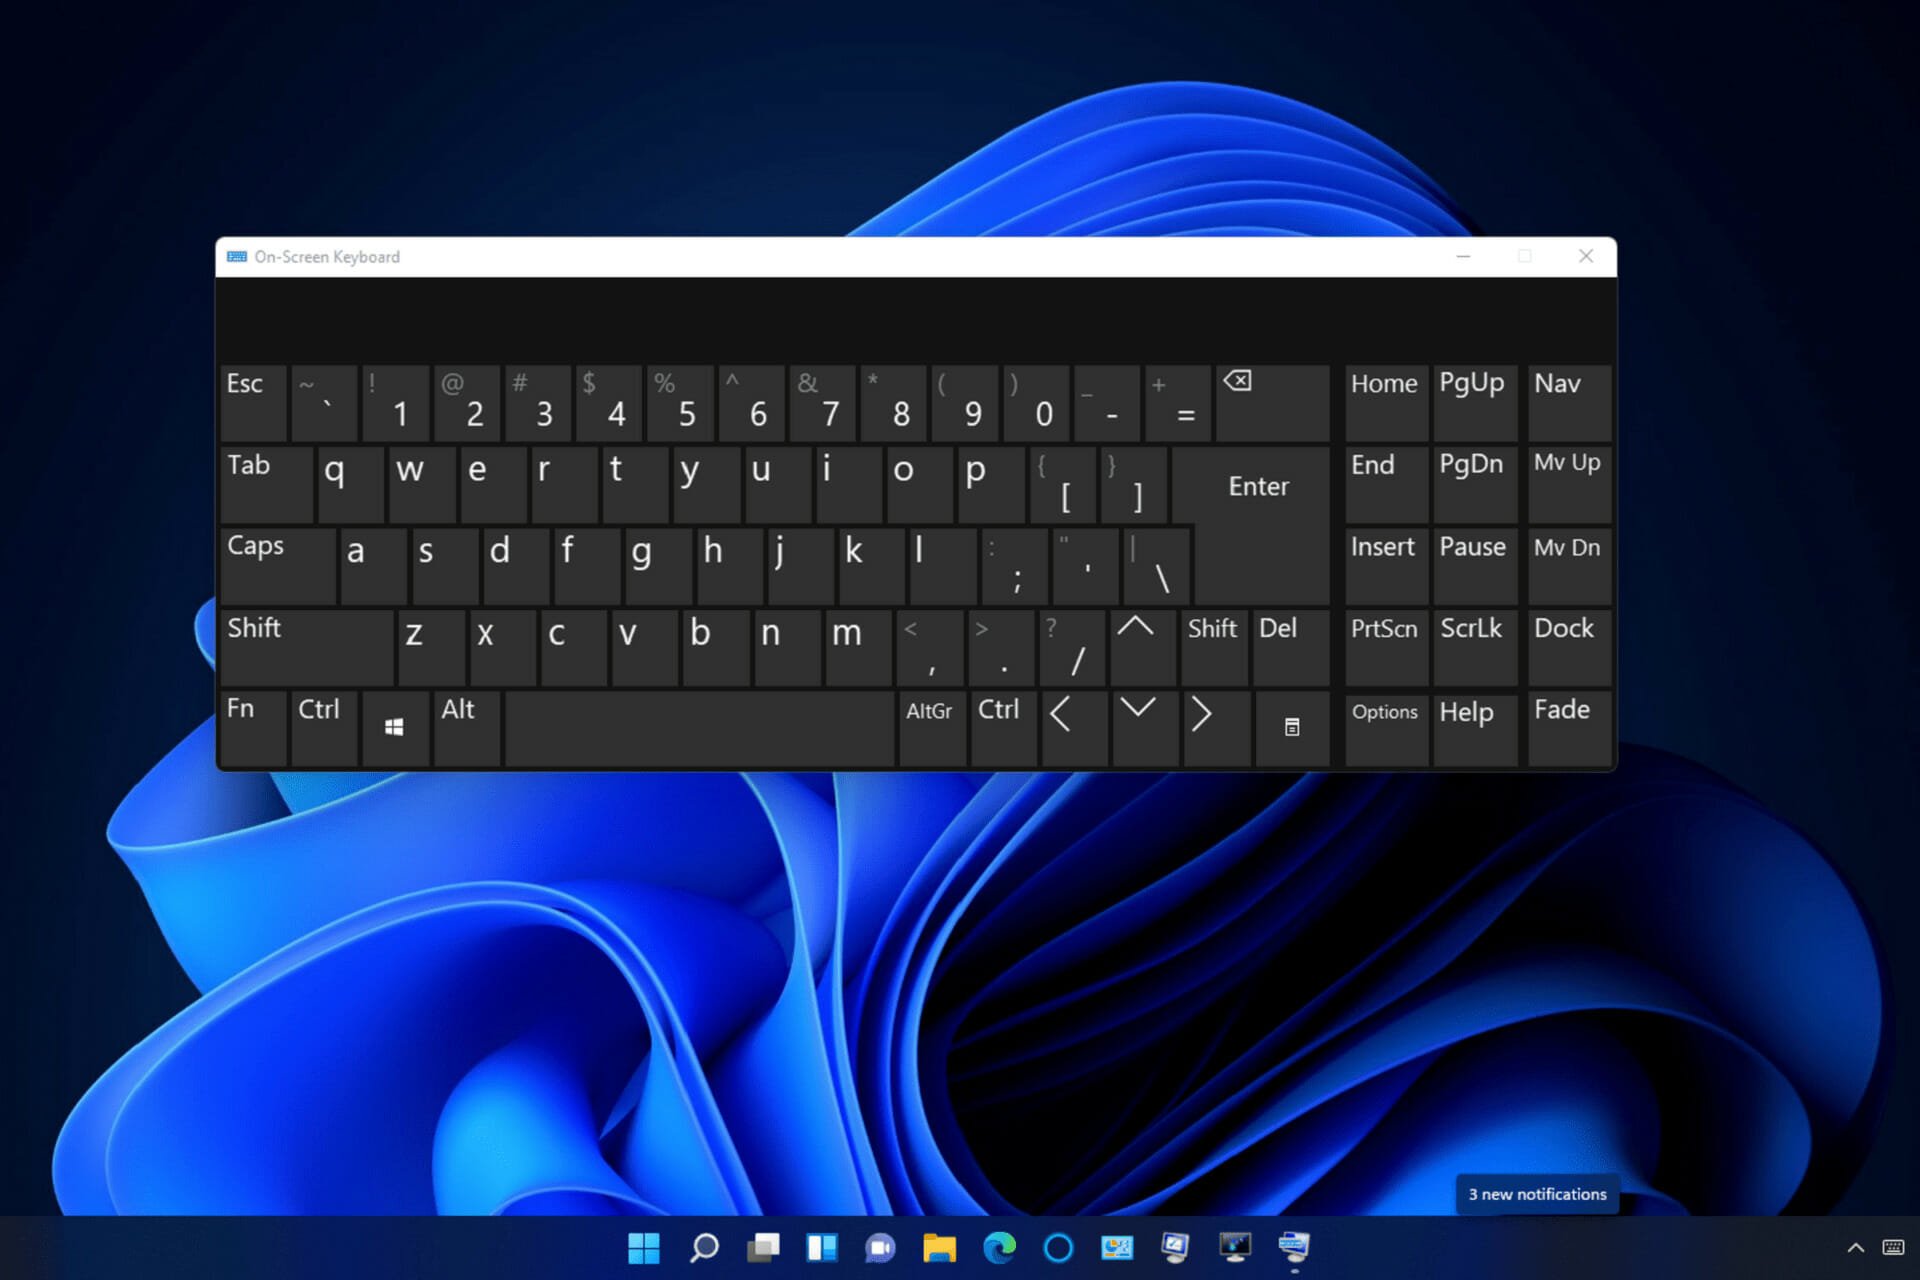
Yes, the On-Screen Keyboard app will match whatever layout you’ve selected. So, it’s worth opening that app to view a selected keyboard layout that doesn’t match your actual keyboard. You can open the On-Screen Keyboard like this.

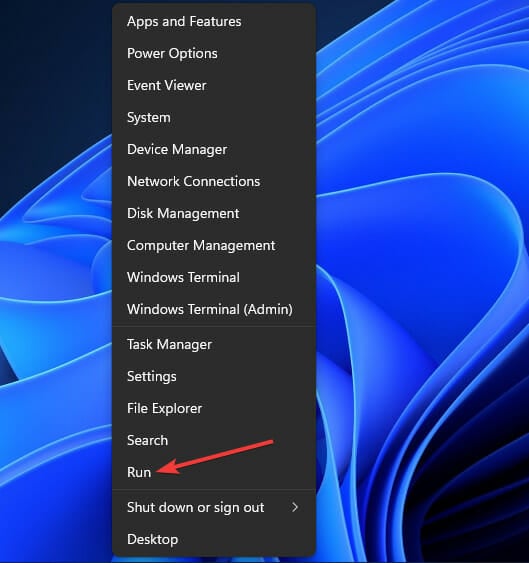
  1. Open the Power User menu by right-clicking the Start taskbar button.
  2. Click the Run shortcut on that menu.
    The Run shortcut keyboard layout windows 11
  3. Type this text in Run:osk
  4. Click OK to bring up the On-Screen Keyboard window.
    The osk command keyboard layout windows 11

Is there a way to add a Colemak keyboard layout in Windows 11?

As Windows doesn’t natively support that layout, you can’t add it with the methods above. However, you can manually set up a Colemak layout with the Microsoft Keyboard Layout Creator app and image references. There’s also a Colemak layout pack available for download at the Colemak website.

You can set up completely new keyboard layouts with Microsoft Keyboard Layout Creator. However, that’s not the only software you can customize keyboard layouts with. Our keyboard mapping software guide provides further details for other software you can customize keys with.

Also, find out what to do when the positions of ( @ ) and ( “) have changed in my keyboard on Windows 11.

Overall, installing and adding new keyboard layouts via Settings is pretty straightforward. So, why not experiment with different keyboard layouts in Windows 11? Let us know your thoughts in the comments section below.

Microsoft Forms lets you leverage AI technology to spruce up your invitations

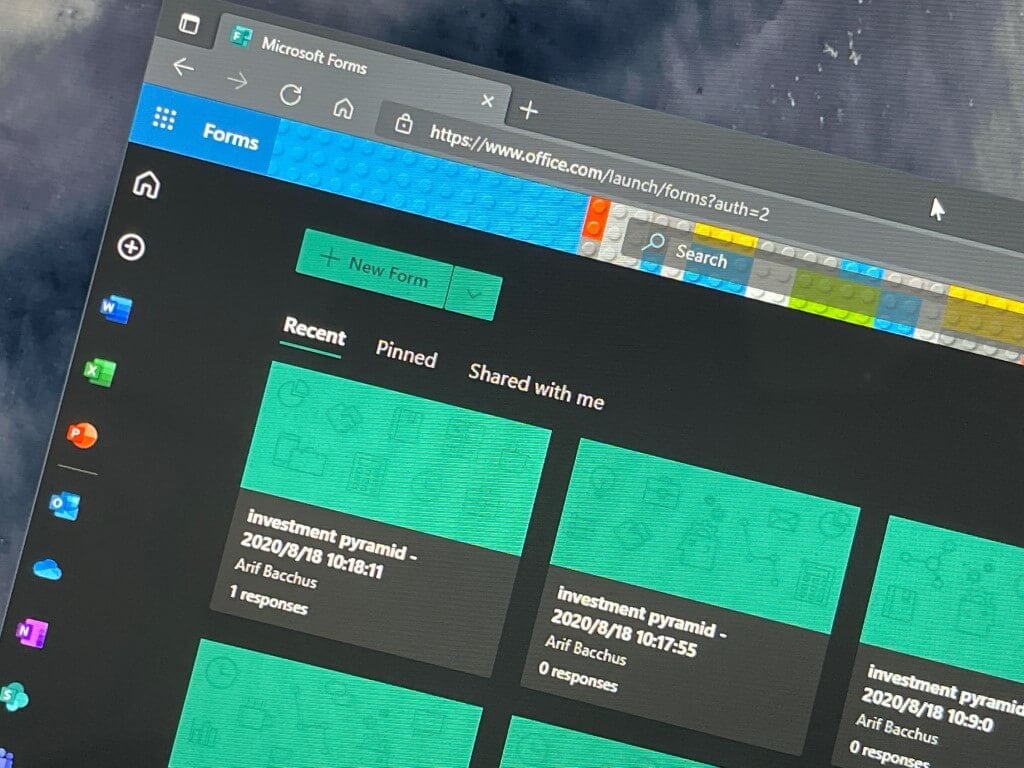
If you use Microsoft Forms to design invitations and track responses, Microsoft has made significant improvements to the tool to enhance the experience.
With Microsoft integrating AI across its products and services, the case isn’t any different with Microsoft Forms. In fact, Microsoft is making it easier for users to send invitations via Microsoft Forms by letting them leverage AI capabilities.

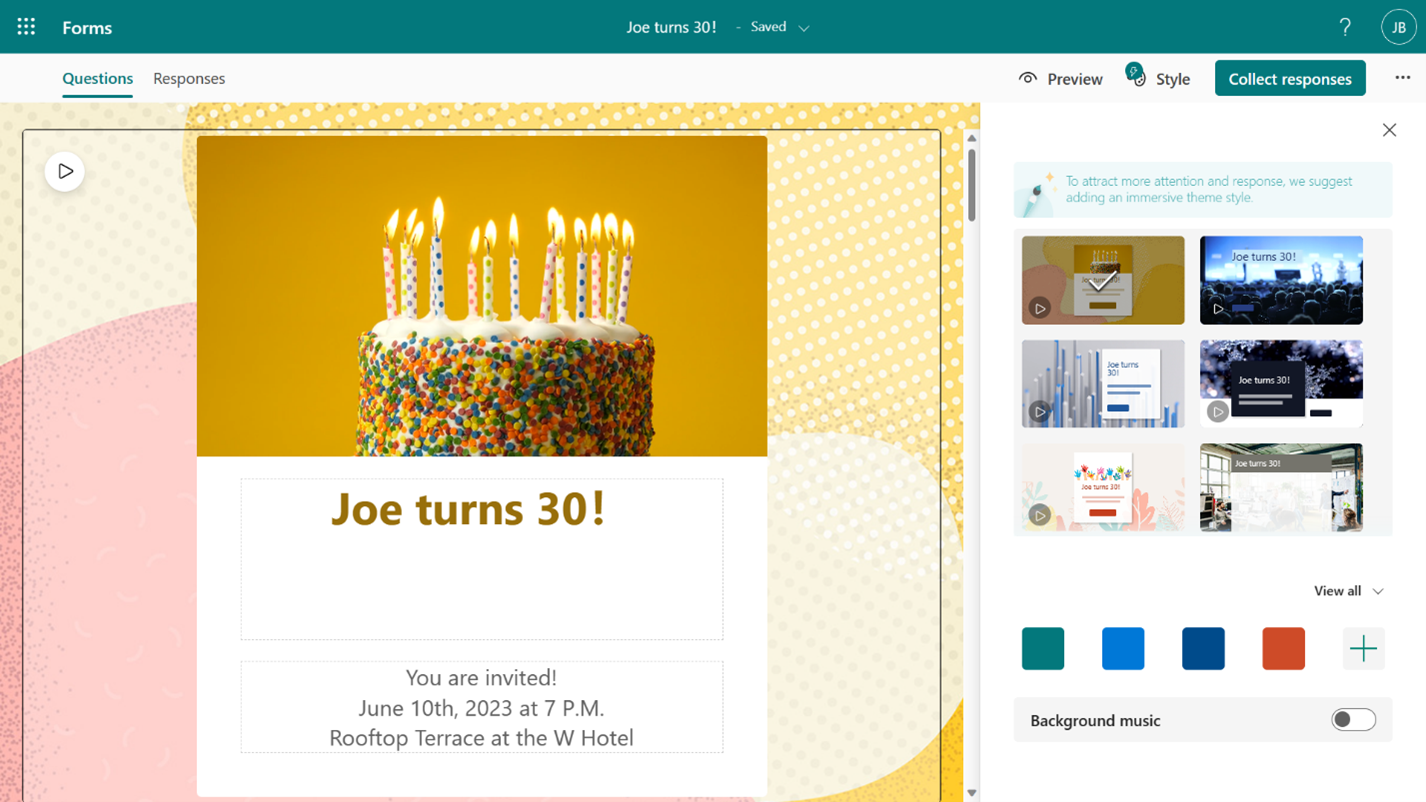
The tool ships with tons of themes as well as cover pages that you can use to enhance the aesthetic appeal of your invitation. All you need to do is key in crucial details like the event’s date, time, and location. From this point, you can personalize the invitation’s design to meet your specifications.

Invitation draft

Another notable feature is that you can also incorporate background music into the invitation that aligns with the event’s theme to build up the guests’ enthusiasm. What’s more, you can upload pictures from your device or even search results from Bing.com to enhance your cover page’s appeal.

The feature is currently available to all Business and Education subscribers.  It should also be noted that you can now send your form to both internal and external email addresses simultaneously.

Do you use Microsoft Forms? Let us know in the comments.

Microsoft’s new firmware update for Intel-based Surface Laptop 4 fixes abnormal shutdown issue

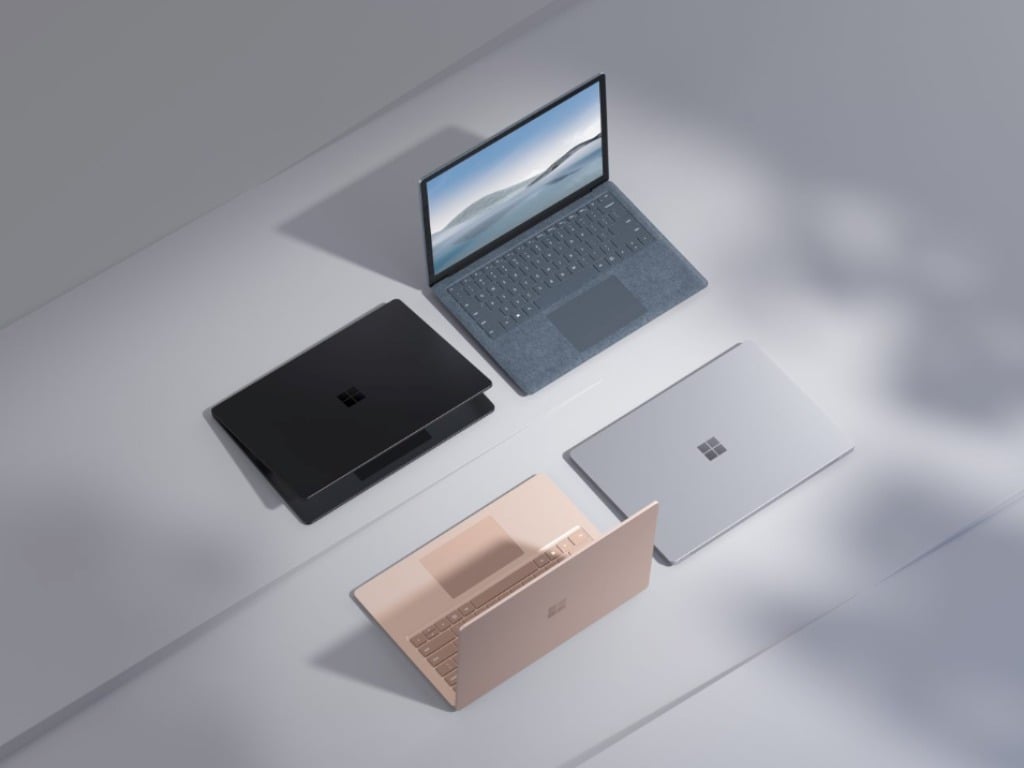
Microsoft has started rolling out a new firmware update for its Intel-powered Surface Laptop 4. The release doesn’t bring any new features but includes bug fixes and improvements in place to enhance the device’s stability thus resolving the abnormal shutdown issue.

You can check out the list of new drivers below:

Windows Update Name Device Manager
Surface – Firmware – 12.101.139.0 Surface System Aggregator – Firmware
Surface – Firmware – 18.302.143.0 Surface UEFI – Firmware
Surface – Firmware – 160.35.36.1 Surface TCON – 13
Surface – Firmware – 160.35.14.1 Surface TCON

As usual, not everyone gets these Surface firmware updates right away. You’ll know when it’s safe to install on your device when you see it listed in Windows Update. Just head there, Check for Updates, have it download, and then restart your device. Installing this firmware will also show the previous updates if your Surface doesn’t have them already.

We also invite you to check out our detailed guide on how to check and download the latest updates for Surface devices.

Latest Microsoft Edge Dev build adds automatic profile switching, video smart explorer, and more

Microsoft has released a new Edge Dev build update, coming in at 112.0.1722.7. The update is significantly major as it ships with multiple new features as well as the usual round of improvements. Here’s everything you need to know:

First, the build adds a new feature dubbed Pin tab group which is designed to persist tab group between browser sessions. Next, the update will also allow Edge users to switch profiles automatically when clicking on a Workspace join link.

Additionally, the release also featured an auto name suggestion on Tab Group that’s available in English only at the moment.  What’s more, it also ships with Video Smart Explorer. Android users will also be able to use an ad blocker on videos by long pressing.

The update also features a ton of reliability fixes as well as policy updates, be sure to check them out over at Microsoft’s Tech Community post.

The Edge build update should roll out to users automatically, however, if this is not the case, you can trigger the update manually by visiting Edge’s Settings menu, then click on Help and Feedback, select About Microsoft Edge, and then wait for the browser to download the update.

In related news, Microsoft Edge 111 shipped to the Stable Channel with Edge Copilot which is designed to boost your productivity and efficiency by providing intelligent suggestions and insights based on the context of the web page and the user’s goals.

Error 0x80071129 in OneDrive? 3 Ways to Fix it

OneDrive is the default cloud storage app that comes with Windows 11/10. That app has an On-Demand sync feature that enables users to view and access files within their OneDrive cloud without downloading them.

However, some users have reported a OneDrive 0x80071129 error arising when they try to move, copy, or extract files and apply folder properties with the On-Demand feature enabled.

That error displays the reparse point buffer is invalid message shown directly below when it arises. Users can’t carry out OneDrive file or folder actions whenever that issue occurs.

The error 0x80071129 message

So, for those wondering how do you fix Error 0x80071129: The tag present in the reparse point buffer is invalid, keep reading to find out!

What causes OneDrive error 0x80071129?

The first most probable cause for error 0x80071129 is a corrupted cache. OneDrive’s cache might include some corrupted temporary files. Clearing that cache by resetting OneDrive would then be a likely solution.

The 0x80071129 error message’s description says The tag present in the reparse point buffer is invalid. To put that in clearer English, that description highlights that OneDrive has some corrupted (damaged) On-Demand junction files. CHKDSK scans can fix OneDrive’s junction files.

How do I fix error code 0x80071129?

1. Run a CHKDSK scan

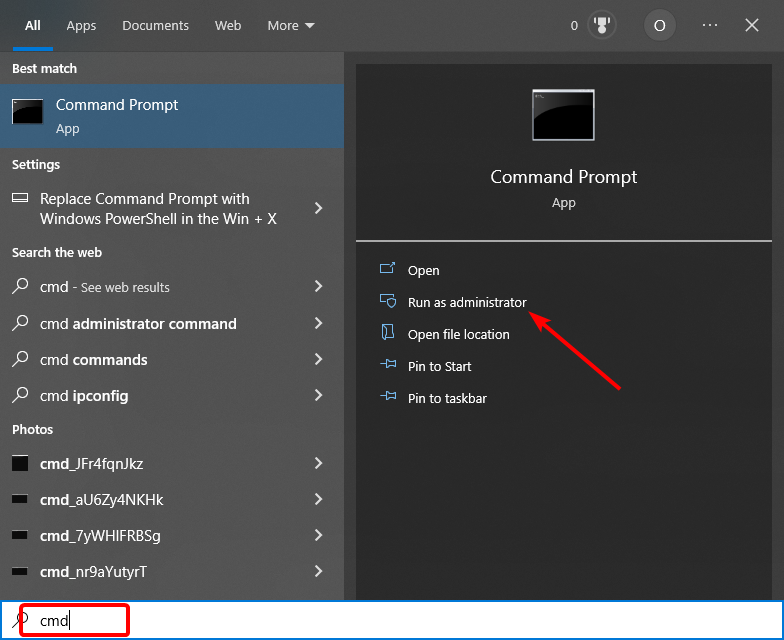
  1. Open your Start menu, click in the search box, and type cmd there to search for the Command Prompt. Launch it with elevated rights by clicking Run as administrator for its search result.
    Run as administrator option error 0x80071129
  2. To run a Check Disk scan, type in this CHKDSK command and press Enter: chkdsk /r /f
    The chkdsk command error 0x80071129
  3. Press the Y keyboard key to schedule the scan.
  4. Press the Power Start menu button, and click the Restart option.
    Restart option error 0x80071129

2. Scan system files

  1. Open Command Prompt as specified in steps one and two of the previous resolution.
  2. First, input the following text in the Command Prompt: DISM.exe /Online /Cleanup-image /Restorehealth
    Deployment Image scan command error 0x80071129
  3. Press Enter to initiate the command.
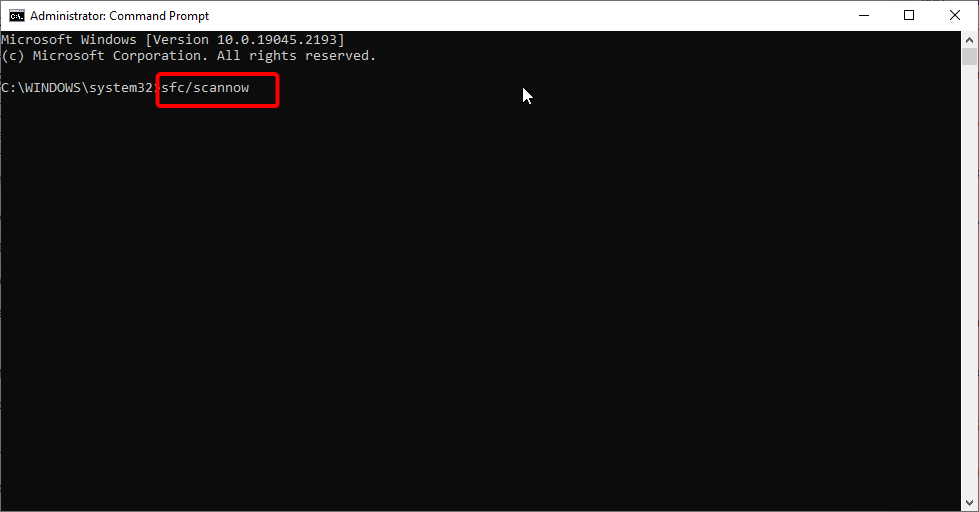
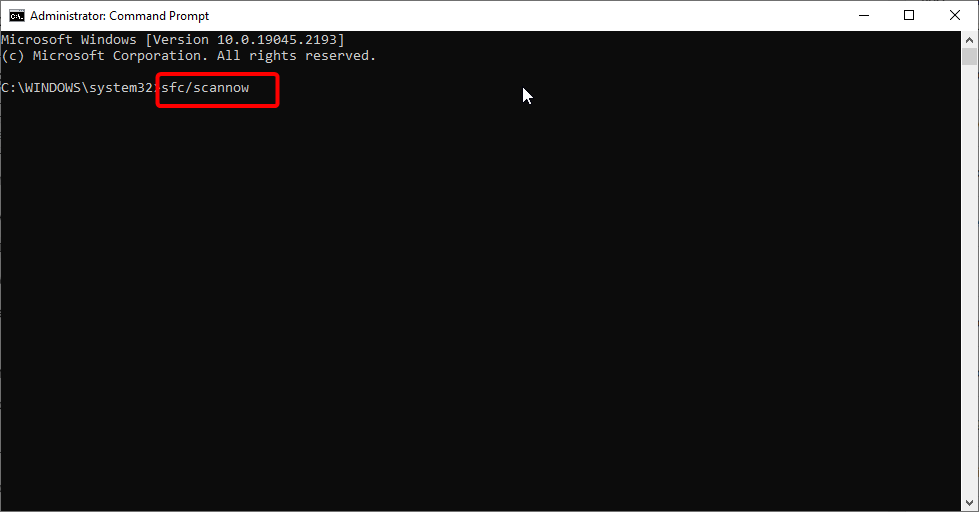
  4. Input this SFC command and press Enter: sfc /scannow
    The System File Checker scan error 0x80071129
  5. The SFC scan will take a while. Make sure you wait until the scan is fully completed before closing the Command Prompt.

3. Reset the OneDrive app

  1. Bring up the Command Prompt’s window (again, as covered in resolution one).
  2. Run this reset command and press Enter: %localappdata%\Microsoft\OneDrive\onedrive.exe /reset
    Reset OneDrive command error 0x80071129
  3. If OneDrive doesn’t automatically restart, type in this text and hit Enter: %localappdata%\Microsoft\OneDrive\onedrive.exe
    Start OneDrive command error 0x80071129
  4. Some users might need to input a modified reset command. If the command specified above returns a Windows cannot find message, try entering these modified commands: C:\Program Files\Microsoft OneDrive\onedrive.exe /reset C:\Program Files (x86)\Microsoft OneDrive\onedrive.exe /reset

There aren’t that many possible fixes for the OneDrive error 0x80071129. However, many users have confirmed in forums they’ve been able to fix that issue with the resolutions above. So, you might not need any other potential resolutions to resolve error 0x80071129.

However, reinstalling Microsoft OneDrive might also be worth a try. Doing so will completely reset the app’s settings.

Microsoft’s Reinstall OneDrive app page provides instructions for how you can reinstall that cloud storage app.

Have you discovered any other way to fix error 0x80071129? If so, let us know about it in the comments section below. You can also add any questions about the OneDrive error 0x80071129 there.

0xFFFFFFFF: How to Fix This Windows Update Error

You will come across the Windows update error 0xFFFFFFFF when you try to perform an upgrade to your PC. This is a frustrating error as this could cause system crashes, computer freeze, or even BSOD (Blue Screen of Death) errors.

The Windows update error 0xFFFFFFFF is a standard error and can cause issues with Windows Registry as well. In this guide, we will give you a bunch of solutions that will help you resolve the Windows update error 0xFFFFFFFF. So let us get right into it.

What causes Windows update error 0xFFFFFFFF?

Here are some of the most common reasons why you will come across the Windows update error 0xFFFFFFFF:

  • Damaged DLL files: If some important system-related DLL files are missing, you may not be able to update your PC.
  • Corrupt system files: System files are important in perfect health. If they are having some issues, then you will come across errors such as Windows update error 0xFFFFFFFF.
  • Windows update service isn’t running: Often, some crucial services, such as Windows Update service, are disabled by third-party software, and this could lead to errors such as the one at hand.
  • Virus or malware: Viruses and malware of the modern world are advanced, and they can sneak into your PC without your knowledge and could cause multiple issues.
  • Windows Update temporary cache folder is problematic: If cache files go corrupt, this could cause multiple issues such as Windows update error 0xFFFFFFFF.

How can I fix the Windows Update error 0xFFFFFFFF?

1. Clear Windows Update cache

  1. Press the Win + R keys to open the Run dialogue.
  2. Type %windir%\SoftwareDistribution\DataStore and press Enter.
  3. Press Ctrl + A to select all files.
  4. Press the Delete button to delete all the files.

Often corrupt cache files can cause conflicting issues and prevent you from updating your PC. For example, this would lead to you coming across the Windows update error 0xFFFFFFFF.

Follow the above steps and delete all the files inside the said folder to delete all the cache files for Windows update.

2. Re-enable the Windows Update service

  1. Open the Run dialogue by pressing the Win + R keys.
  2. Type services.msc and press Enter.
  3. Locate Windows Update.
  4. Double-click on it to open.
  5. Under Service status, click Stop.
  6. After some time, click Start.
  7. Restart your PC.

You should check if the Windows Update service is enabled or not. In case it is stopped, you should allow it for its associated functions to work and also resolve the Windows Update error 0xFFFFFFFF.

3. Fix corrupt system files

  1. Press the Win key to open the Start menu.
  2. Open Command Prompt as an admin.
  3. Type the below command and press Enter. sfc /scannowSFCSCANNOW CMD
  4. Wait for the process to complete.
  5. Restart your PC.

SFC Scan is a built-in tool that lets you scan for corrupt system files and fix them with ease. However, most often, these aren’t as effective as dedicated tools.

In such a case, we would recommend you use a system repair tool that will be able to fix corrupt system files, fix system crashes, fix damaged DLLs, remove ransomware or malware, and much more.

4. Clean Windows Update download path

  1. Press the Win + R keys to open the Run dialogue.
  2. Type regedit and press Enter.
  3. Navigate to the below path. HKEY_LOCAL_MACHINE\SOFTWARE\Policies\Microsoft\Windows\WindowsUpdate
  4. Locate WUServer and WIStatusServer.
  5. Delete both.
  6. Restart your PC.

5. Perform a virus check

  1. Open the Start menu by pressing the Win key.
  2. Type Windows Security and open it.
  3. Click on Virus & threat protection.
  4. Hit the Quick Scan button.
  5. Wait for the scan to complete.
  6. Apply the prompted fixes.
  7. You can also hit the Scan options and select Full scan for a deep scan.

You can use the Windows Security tool to scan your PC for viruses or malware. However, this in-built tool again isn’t as effective and might not be able to detect the sticky virus on your PC causing the Windows update error 0xFFFFFFFF.

In such case, we recommend you check out our guide that lists some of the best antivirus software you can download and safeguard your PC against viruses.

6. Reset your PC

  1. Press the Win + I keys to open Settings.
  2. Click on Recovery.
  3. Under Recovery options, select Reset PC.
  4. Select the Keep my files option.
  5. Let the process complete.
  6. Restart your PC.

If nothing works, then as a last resort, we would suggest you go ahead and follow the above steps to reset your PC

When you reset your PC, all your system files will be restored, and in case they were the problem causing Windows update error 0xFFFFFFFF, then it will be fixed.

That is it from us in this guide. For users coming across Windows update error 0x8007045d, you can check out our guide and fix the issue.

Several users have also reported coming across the update error 0xc190011f. Our guide lists six solutions and will help you fix them.

When you try to install an update and are getting Windows update error 0x80070103, you should check out our guide and fix the issue.

Feel free to let us know in the comments below which one of the above solutions you opted to resolve the update error 0xFFFFFFFF.

How to Fix 10 Common Verizon FIOS Error Codes

Sometimes, the Verizon Fios fiber-optic network may experience issues, causing error messages to appear on your Fios box or router.

These errors often stem from connection problems, loose cables, overheating, or server outages. Here’s a quick guide for fixing common Fios errors like plyb_174 or error code 6304.

How can I fix the most common FIOS error codes?

1. Error code PLYB_174

If you’re seeing the PLYB_174 error, it might be due to channel restrictions or network issues. First, check if the channel is available in your subscription.

Then, ensure your internet connection is stable, switching between Wi-Fi and a wired connection if needed.

Next, update the Fios TV Mobile app to the latest version. If the issue persists, restart your device to clear any glitches. These steps should help fix the error.

2. FIOS error code 1202

If FIOS displays the 1202 error, you can relax knowing your issue is simple to resolve.

Service users have also encountered this issue multiple times, believing that the coaxial cable is the source of the problem, although the root reason is elsewhere.

A splitter is normally included with the router, or you can buy it separately. A splitter divides the signals into two pathways, allowing two devices to be linked.

The router and set-top box must be connected to the same coaxial port on the ONT through a splitter to function effectively.

If you connect them via different outlets, FiOS error code 1202 is unavoidable.

3. FIOS error code 9-6-25

  1. Go to Settings, then General, then tap Software Update.
  2. If an update is available, tap Download and install.

This problem is common on Apple devices since the application is incompatible with some iOS updates.

You can also power cycle your modem and router to check if that resolves the problem if you have it on other platforms.

  1. Unplug the modem after the router has been disconnected. Removing the power cord from the back of the modem or router is necessary.powercycling modem
  2. Wait at least 30 seconds, then plug it back in and reconnect it.

4. FIOS error code 7203

  1. First, connect the coax cable from your VMS or STB/DVR to a coax outlet.
  2. Then, connect the HDMI (other) cable from your VMS or STB to the TV. settop box hdmi port location
  3. Connect the power cord from your VMS or STB to an electrical outlet.
  4. Turn on your VMS or STB and TV using your FIOS remote; follow the on-screen instructions.

5. FIOS error code 5000

FIOS error code 5000 typically indicates that the movie or television show you are attempting to watch is no longer available.

This could be a server issue because the movies available should no longer be on the list of watchable shows, but they remain appealing and cause problems.

This message may also appear if you have recorded a show and attempted to rematch it, but the system cannot locate the saved file. To resolve this problem, inspect your DVR for any hardware failures.

6. FIOS error code 1500

FIOS error code 1500 has no known cause and is not listed as an official error code in the Version’s list.

This error most likely indicates a hardware problem, and your set-top box or router may need to be replaced. You can call support and present the code for a more accurate diagnosis.

However, before contacting support, double-check all the connections and ensure everything works.

There is a chance that your ISP is experiencing shortages and that your network is unstable; it would also be helpful to call your ISP to ensure everything is working properly on the internet’s end.

7. Verizon FIOS error e00

This is not an error but rather an indication of normal conditions after initializing the set-top box.

According to users, this code disappears after a while, and you can continue watching your favorite shows.

However, if it causes problems or notices something wrong with the service, you should contact customer support for assistance.FIOS customer support

8. FIOS TV one error code 1202

The 1202 error code usually indicates that the coax cable is faulty. Cable television companies have placed coaxial wiring in practically every community, connecting virtually every home and apartment.

A screw-on connector distinguishes coaxial cable at one end and a thin copper wire at the center.

If your television displays the 1202 error, double-check this cable to ensure everything is in working order. If nothing is incorrect, you may want to replace your Coax cable.

The set-top box may have a broken coax port; therefore, you should test your cable by connecting it to another device first to determine the problem.

9. FIOS TV one error code 1101

The 1201 error code is frequently associated with the OOB not detected message. However, you can find a confirmed solution in the forums.

First of all, OOB stands for out of band. The VMS cannot receive orders if the signal from the main Verizon box is weak.

The weak signal issue could come from a variety of sources. A bad splitter, wiring, or a broken ONT (main Verizon box probably in your basement or garage).

If you tested two boxes and they have the same problem, something else must be wrong. Aside from double-checking your connections from the ONT to the VMS, you’ll most likely require a tech visit.

10. FiOS error code 6304

The FiOS error code 6304 – FiOS app failed to load is a glitch that causes the update lights to keep blinking.

Verizon recognizes that issue as a problem with an update that should have already been fixed.

If you didn’t perform the latest updates on your router, you should do so. Also, resetting it should do the job.

How do I reset my FIOS?

Reset the FIOS Router

You will need a pin or a paper clip to reset the Verizon FIOS router. Use the pin/clip to hold the Reset button at the back of the router for 10 seconds, then release it.

The router will now reboot, and the default settings will automatically be in place, which indicates that the reset has been successful.

Reset the FIOS Set-Top box

Remove the power cable from the set-top box for 15 seconds, and plug it back in. Now, wait for the time to appear, then power on the device. Wait for the updates to install, and once that’s done, the reset is complete.

You may encounter hundreds of error codes when using the Verizon FIOS service.

The most common ones are listed above, but if you encounter any that are not on the list, here is an official list of the errors and their causes.

There should be no issues if you follow the setup guides mentioned above, as Verizon claims you can install the equipment without professional assistance.

However, if you run into any issues, customer service will be more than happy to assist you in resolving the problem in seconds.

What is Error 0xca020007 & How to Fix it?

There are several user reports where users have been complaining about coming across a Windows error 0xca020007. This error pops up when the user tries to update their PC and install the latest Windows update. The update is associated with Windows 10 and 11 versions.

Thankfully, in this guide, we will give you a bunch of solutions that will help you resolve the error 0xca020007 on your PC. After this, you can update your PC without any issues. So let us get right into it.

What is causing the error 0xca020007?

After researching the internet, we have found some of the most common reasons users have reported because of which they get face-to-face with the error 0xca020007:

  • Corrupt system files: System files if not in good health or are corrupt, can lead to multiple issues on your PC, one of which is the error code at hand.
  • There are pending updates: If you haven’t updated your PC for quite some time, then chances are the pending updates are causing the problem.
  • Your PC ran out of storage: If there isn’t enough storage space on your PC, then it won’t let you install any updates.
  • Driver issues: Some of the device’s drivers might be having issues or aren’t updated which is why you are getting error 0xca020007.
  • Hardware issues: Chances are some of the connected hardware devices are the culprit here and causing the problem.

How can I fix error 0xca020007 on my PC?

1. Run Windows Update Troubleshooter

  1. Press the Win + I keys to open the Settings menu.
  2. Click on Troubleshoot on the right.
  3. Click Other troubleshooters.
  4. Hit the Run button next to Windows Update.
  5. Apply the fix prompted by the troubleshooter.
  6. Restart your PC.

For such issues, Windows has already built-in a troubleshooting feature that would automatically detect any problems with your hardware or software and prompt you to apply the fixes to resolve the associated issues.

You can also run the Windows Update troubleshooter and see if this helps resolve the error 0xca020007.

2. Fix corrupt system files

  1. Press the Win key to open the Start menu.
  2. Open Command Prompt as an admin.
  3. Type the below command and press Enter. sfc /scannowsfc error accessing the registry
  4. Wait for the scan to complete.
  5. Restart your PC.

When you encounter an issue that could be because of corrupt system files, you can always rely on the SFC Scan command to fix the problem automatically.

However, it isn’t that practical sometimes, and in such a case, it would be better to use a dedicated tool that helps you fix system files, system crashes, BSOD errors, and damaged DLLs, removes spyware and malware, removes dupes of system files, and much more.

3. Clear Windows Update cache

  1. Open the Start menu by pressing the Win key.
  2. Open Windows PowerShell as an admin.
  3. Type the below command and press Enter. net stop wuauserv
  4. Input the below command and press Enter. ren c:/windows/SoftwareDistribution softwaredistribution.old
  5. Execute the below command to start the Windows update service. net start wuauserv

4. Restart the Windows Update service

  1. Press the Win + R keys to open the Run dialogue.
  2. Type services.msc and press Enter.
  3. Locate Windows Update service.
  4. Double-click on it.
  5. Under Startup type, select Automatic.
  6. Under Service status, click on Start.
  7. Click Apply and OK.
  8. Restart your PC.

Some of the services are disabled because of a conflict. For example, chances are the Windows update service stopped and is causing the error 0xca020007.

5. Upgrade using the Media Creation tool (For Windows 10 users)

  1. Download the Media Creation Tool.
  2. Launch the tool.
  3. Accept the agreement.
  4. Select Upgrade this PC now.
  5. Click Next.
  6. It will start downloading the latest update.

If the manual process of updating Windows isn’t working, you can use the Media Creation Tool and install the latest update on your PC. This would also help you fix the error 0xca020007 you are getting while updating your PC.

That is it from us in this guide. If you are getting the error 0x8007045d and are looking for solutions, you should check out our guide.

Several users have reported coming across Windows update error 0x80070057. We have mentioned seven easy fixes that will resolve the error code.

Another standard Windows update error is the error code 0x80072eff. You can quickly fix it by applying the solutions mentioned in our guide.

If you are getting a Windows update installation error, we have a guide that lists some of the best solutions to resolve the problem.

Feel free to let us know in the comments below which one of the above solutions resolved the error code 0xca020007 for you.

Posted in Fix

How to Remove Quick Access in Windows 11

Quick access is a bookmarking feature in Windows File Manager that shows recently accessed files and folders to improve accessibility.

This bookmarking feature replaced the classic Favorites section, but many readers do not like it and want to remove the Quick access section from Windows 11.

Why should I remove Quick access in Windows 11?

While the Quick access feature simplifies navigating between drives and folders, many don’t like it for two prominent reasons:

  • Invades Privacy – Quick Access creates privacy concerns on Windows PC as others get to know which files and folders you frequently access, especially if you share your system with others.
  • Creates confusion – Over time, too many folders appear in the Quick access section, cluttering the File Explorer and making it difficult to access the folders.

If you also want to remove the Quick access feature in Windows 11, our guide will provide all the possible methods.

How can I remove Quick access in Windows 11?

1. Prevent File Explorer from opening Quick access

  1. Use the Windows + E shortcut to launch File Explorer.
  2. Click the Menu icon (three dots) located on the right end of the Menu bar and choose Options after the drop-down menu expands.remove Quick access in Windows 11
  3. A Folder Options dialog box will open on the screen. Expand the Open File Explorer to drop-down and choose This PC instead of Quick access.Remove Quick access in Windows 11
  4. Finally, press the OK button to save the changes.

This method does not precisely remove Quick access in Windows 11 but ensures that File Explorer does not open to the Quick access section upon launch.

2. Disable Quick access in Windows 11

  1. Use the Windows + R shortcut to bring up the Run command dialog box, type the following command in the text field and press OK to execute the command. regeditremove Quick access in Windows 11
  2. Type or paste the following location in the Registry Editor window, and press Enter to navigate the folder. HKEY_CURRENT_USER\SOFTWARE\Microsoft\Windows\CurrentVersion\Explorer\Advanced
  3. You will find a list of entries inside the Advanced folder. Look for the LaunchTo entry in the right section of the registry, right-click it, and choose Modify from the context menu.remove Quick access in Windows 11
  4. In the Edit DWORD (32-bit) dialog box, assign 0 in the Value Data field and press the OK button to save the changes.remove Quick access in Windows 11
  5. After modifying the registry, reboot your Windows 11 PC to apply the changes.

This method disables Quick access in the File Explorer window of Windows 11. However, Quick access, though disabled, will still be present in the navigation pane of File Explorer.

If you don’t want the whole pane to be disabled, simply remove the Home icon in the File Explorer.

3. Permanently remove Quick access in Windows 11

Note icon NOTE
Before proceeding further, it is recommended to back up Windows Registry or create a System Restore Point to revert the changes if something goes wrong.
  1. Press the Windows key to launch the Start menu, type regedit in the Search bar and select Run as Administrator.remove Quick access in Windows 11
  2. When you access the Registry Editor on your Windows 11 PC, navigate to the following folder by pasting the path in the address bar. HKEY_LOCAL_MACHINE\SOFTWARE\Microsoft\Windows\CurrentVersion\Explorer
  3. Once inside the folder, right-click anywhere in the right pane and select New followed by DWORD (32-bit) value.remove Quick access in Windows 11
  4. Next, rename the newly created DWORD (32-bit) as HubMode.
  5. Right-click HubMode and choose Modify from the context menu.remove Quick access in Windows 11
  6. Assign 1 in the Value Data field, press OK to save the changes, and restart your Windows 11 PC.remove Quick access in Windows 11

4. Remove pinned folders from Quick access

  1. Press the Windows + E key combination to launch File Explorer. remove Quick access in Windows 11
  2. Click the arrow preceding Quick access on the left navigation page to expand the list of folders.
  3. Right-click the folder you wish to remove from Quick access and select Unpin from Quick access option from the context menu. It is also possible to unpin the default folders like Desktop and Downloads from the section.remove Quick access in Windows 11

5. Prevent Quick access from showing recent files and folders

  1. Launch the File Explorer using the Windows + E shortcut.
  2. Click the Menu icon (three dots) present on the top menu bar, and select Options from the drop-down menu.Quick access in Windows 11
  3. In the General tab of the Folder Options window, uncheck the checkboxes preceding the Show recently used files in Quick access and Show frequently used folders in Quick access.remove Quick access in Windows 11
  4. Hit the OK button to save the changes.

Quick access will no longer show the most recently accessed files and folders in the File Explorer window.

That’s pretty much it! You can implement some of these methods in combination with others to remove Quick access in Windows 11 or make it less obstructive.

Refer to this guide if File Explorer is not responding and freezing on your Windows PC. You can reach us in the comments section with any queries or suggestions.

0x00000190: 4 Ways to Fix This Microsoft Store Error

Error code 0x00000190 is one of the many reasons why you are unable to open the Microsoft Store on your Windows PC. The app displays a message saying Something happened at our end. Waiting a bit might Help. The error code 0x00000190 follows.

This affects the user experience and prevents you from downloading any apps and games from the Store.

What causes 0x00000190 Microsoft Store error?

The 0x00000190 Microsoft Store error can be due to various reasons; some of the common ones are:

  • Unstable internet connection – Slow and unstable internet connection prevents Microsoft Store from downloading apps.
  • Server Outages – You can also get the error code if the Microsoft Store server is down for some reason.
  • Incorrect Date and Time settings – Time synchronization issues on Windows prevent you from using the resources and apps like Microsoft Store that rely on Internet-based authorization schemes.
  • Corrupt Microsoft Store cache – Corrupt Microsoft Store cache triggers several error codes, including 0x00000190.

Regardless of the reasons behind the 0x00000190 error, this Microsoft Store error code is easy to tackle. This guide provides proven solutions to resolve the error code 0x00000190 when accessing Microsoft Store.

How do I fix the 0x00000190 error in Microsoft Store?

https://youtu.be/LEd3gYKNCTk

1. Reset the Windows Store cache

  1. Use the Windows + R shortcut to launch the Run command window.
  2. Type the following command in the text box and press Enter key. wsreset.exe0x00000190

As soon as you execute the command, Command Prompt will automatically open up on the screen, and the Windows Store cache will begin to reset. Once the process is successful, Microsoft Store will automatically launch on the screen as an indication.

2. Fix the Date and Time settings

  1. Press the Windows key, type control panel in the search bar, and select Control Panel from the search results.0x00000190 Microsoft Store error code
  2. Set View by drop-down to Large icons and select Region.Microsoft Store error code 0x00000190
  3. A Region properties window will open on the screen. Ensure that the Format dialog box is either set to Match Windows display language (recommended) or English (United States).Microsoft Store error code 0x00000190
  4. Now, go back to the previous screen and expand the Date and Time category.
  5. If the displayed date and time are wrong, press the Change date and time button on the Date and Time Settings window.Microsoft Store error code 0x00000190
  6. Assign the correct date in the timer, and press the OK button to save the changes and close the Date and Time window.

3. Modify the DNS server settings

  1. Press the Windows key to launch the Start menu, type the control panel in the search bar and select the relevant search result.
  2. Choose Network and Sharing Center category.0x00000190
  3. Select Change adapter settings from the left sidebar.0x00000190
  4. Right-click the Wi-Fi or Ethernet connection and select Properties.
  5. This will open the Wi-Fi Properties window. Double-click Internet Protocol Version 4 (TCP/IPv4) to access its properties.0x00000190
  6. In the Properties window, enable Obtain DNS server address automatically and press the OK button to save the changes.0x00000190

After modifying the DNS settings, open the Windows Store once again. You will no longer get the 0x00000190 error code.

4. Re-register Microsoft Store

  1. Use the Windows + S shortcut to launch the Search menu. Type powershell in the search bar and select Run as Administrator, located on the right.Microsoft Store error code 0x00000190
  2. Click the Yes button on the User Action Control prompt to proceed.
  3. Type or copy-paste the below command in the command prompt and press the Enter key to execute it. Get-AppXPackage Microsoft.WindowsStore | Foreach {Add-AppxPackage -DisableDevelopmentMode -Register "$($_.InstallLocation)\AppXManifest.xml"}0x00000190

Wait until the Microsoft Store is re-registered successfully. Once done, close the PowerShell window and reboot your system. This will fix the underlying glitch and corrupt files and, in turn, resolve the error.

Hopefully, the solutions in this guide will resolve the 0x00000190 Microsoft error code for you. You might be interested to know what to do if Microsoft Store is blocked on your Windows PC. Which of these methods helped resolve the 0x00000190 error in Microsoft Store for you? Do let us know in the comments below.

No Location Tab in Properties: How to Enable It

Folder properties give users details such as the date created, the name of the folder, the size, and so on. However, there are times you may encounter no location tab in the properties of your Windows folders. So, we’ll take you through the troubleshooting steps and re-enable it.

Alternatively, you can check our detailed guide on fixing the folder access denied issue on Windows 11.

Why can’t I find the location tab in the folder properties?

Several factors may be responsible for the missing location tab in folder properties on Windows 11. The most notable ones are:

  • Folder does not support moving – Some folders support moving to another location, while some don’t. The folders that support being moved from one location to another show the file location tab by default. So, the location tab may not show if the folder is not movable.
  • Issues with the Windows Registry – Windows registry contains the documentation for folders and services. So, the missing location tab from the folder properties can be due to some issues with registry keys and wrong configuration. Also, a corrupt registry can cause the Details tab to go missing.

The causes may vary on different computers depending on the kind of folder you’re trying to access. Nevertheless, let’s explore the following solutions highlighted below.

What can I do if I can’t find the location tab in properties?

Before trying any advanced steps, go through the following:

If the problem persists, try the solutions below:

1. Use Windows Registry

  1. Press Windows + R key to open the Run dialog box, type Regedit, and press OK to open the Registry Editor.
  2. Navigate to the following keys: HKEY_CLASSES_ROOT\Directory\shellex\PropertySheetHandlers
  3. Right-click on Property Handlers and select New from the drop-down menu, then click Key.
  4. Rename the new key to 4a7ded0a – ad25 – 11d0 – 98a8 – 0800361b1103.
  5. Exit the Registry Editor and restart your PC to see if the Location tab is visible in the folder Properties.

Tweaking the Registry Editor allows you to access and change registry keys to fix the no location tab in the properties issue.

2. End the File Explorer process and start it again

  1. Press Windows + R key to open the Run dialog box, type taskmgr.exe, and click OK to open Task Manager.
  2. Find the File Explorer app, right-click it, then select End Task from the drop-down menu.
  3. Select File from the taskbar and click Run new task from the menu.
  4. Type explorer.exe in the box and click OK to restart the File Explorer process on your computer.
  5. Restart your PC and check if the issue continues.

Ending tasks for File Explorer processes on your PC will stop background activities affecting the folder you’re trying to access.

Also, you may be interested in our article about how to take ownership of the folder or file on your PC to resolve permission issues.

Likewise, our detailed guide for fixing the File Explorer preview pane if it’s not working can also be useful if you encounter such issues.

For further questions or suggestions about this guide, kindly drop them in the comments section.

Windows 11 family support announced with Moment 2 update

We know that many of you are interested in the new family support features that Microsoft has envisioned for Windows 11, so we’re here with an update.

Even though it has been over a year since Microsoft released Windows 11, the company had not formally published any guidance for those with family features set up who were upgrading to Windows 11 from Windows 10.

That being said, Microsoft is finally making that amendment earlier today, as the Redmond giant updated its previous Windows 10 upgrade page for family feature setup to now include Windows 11 as well.

And, speaking of Windows 11, maybe you should check out guides on how to install RSAT on Windows 11, or how to disable the new context menu on Windows 11.

Get ready for more Family Safety features in Windows 11

Previous to this announcement, the support page titled Fix family features after Windows 10 upgrade said that if you had previously set up family features for a child account and then upgraded to Windows 10, there are a few steps you need to take to turn on family settings again.

This means that your child will need to sign in to Windows 10 with a Microsoft account, and then you’ll need to add that account to your family group at family.microsoft.com.

You should know that the new page, with the added mention of Windows 11 titled Fix family features after Windows 10/11 upgrade says:

If you had previously set up family features for a child account and then upgraded to Windows 10/11, there are a few steps you need to take to turn on family settings again. Your child will need to sign in to Windows 10/11 with a Microsoft account, and then you’ll need to add that account to your family group at family.microsoft.com.

Without a doubt, this was certainly a long time overdue and perhaps the firm felt the need to do this now as Windows 11 22H2 Moment 2 update will be available to all very soon via Patch Tuesday tomorrow.

Know that there is no change in the set-up process though and involves the Microsoft account (MSA). You can follow the steps in the official guide here on Microsoft’s site.

Since we’re on the topic of Windows 11, know that Microsoft is thinking of removing the Remote Mailslot protocol, and you’ll be able to create videos from texts with Microsoft’s ChatGPT-4.

What other family safety measures would benefit your and your family’s needs? Share your thoughts and opinions with us in the comments section below.

Fix: Download error 0x800c0008 on Games for Windows Live

GFWL was a popular online gaming service that allowed gamers worldwide to connect and enjoy their favorite games. However, users complain of a download error 0x800c0008 on Games for Windows Live.

With this, users are unable to download and install their favorite titles. This guide will show you how to fix this issue and continue playing your games.

What causes download error: 0x800c0008?

Below are some of the factors that can cause the download error: 0x800c0008:

  • Interference from third-party apps: One of the leading causes of the failed to download this file. error code 0x800c0008 error message is interference from apps running counter-programs. The solution is to perform a clean boot and uninstall the apps.
  • Issues with security software: Sometimes, your antivirus software might block the game you are trying to download, leading to this error message. It would be best if you disabled your antivirus temporarily to solve the problem.

How can I fix the download error: 0x800c0008?

1. Reinstall Games for Windows Live in compatibility mode

  1. Press the Windows key + R, type appwiz.cpl, and click OK.
    appwiz  download error 0x800c0008
  2. Right-click Microsoft Games for Windows Marketplace and Microsoft Games for Windows Live Redistributable and select Uninstall.
  3. Restart your computer after the uninstall process is finished.
  4. Now, search for Microsoft Games for Windows – LIVE 3.5.95.0 and download the legit GFWL installer.
  5. Right-click on the installer and choose Properties.
    properties
  6. Select the Compatibility tab at the top.
  7. Next, check the box next to Run this program in compatibility mode and select Windows 7 or Windows 8 from the dropdown.
    compatibility
  8. Now, check the box next to Run this program as an administrator and click Apply, followed by OK.
    run as download error 0x800c0008
  9. Finally, install Games for Windows Live, run your GFWL game, and retrieve your Gamertag profile if necessary.

If you are facing the download error: 0x800c0008, it might be because of compatibility issues. Also, it might be because the game is not installed correctly.

Hence, you need to uninstall the game and reinstall it in compatibility mode.

2. Install Games for Windows Live manually

  1. Download the Game for Windows Live installer.
  2. When clicking install, you should get a network error that takes you to a folder called Logs.
    prompt
  3. Navigate to the following location on your hard drive: C:UsersnameAppDataLocalMicrosoftGFWLiveexplorer download error 0x800c0008
  4. Click on Downloads.
  5. Here you should find two files. Click and install both of them.
  6. It would be best if you now had Games for Windows Live installed and working.

Another viable option to fix the download error: 0x800c0008 on GFWL is to install the software manually. This will clear the potential glitches stopping you from downloading and playing games.

3. Run Windows 7 or 8 in a VM for Windows 10

A virtual machine program for Windows 10 will allow you to run multiple operating systems on the same computer so that you can install GFWL and play your games without any errors.

You can avoid incompatibility errors and switch between multiple platforms by choosing a virtual machine solution. So there is no reason to run another OS using different desktops or other devices.

Hence, you should quickly run other Windows versions and fix this error with practical help from the best virtual machines available.

4. Temporarily disable the antivirus security software

  1. Press the Windows key, type virus, and select Virus & threat protection.
    virus and threat
  2. Click the Manage settings option.
    manage settings
  3. Now, toggle the switch for Real-time protection backward to disable it.
    real time
  4. Finally, if you use a third-party antivirus, right-click its icon on the taskbar and select Disable.

In some cases, the GWFL download error: 0x800c0008 can be caused by interference from your security software. This might be because it wrongly flagged the game you are trying to download as a threat.

In this case, you can disable your antivirus temporarily if you trust the game to complete the installation.

5. Perform a clean boot

  1. Press the Windows key + R, type msconfig, and click OK.
    msconfig download error 0x800c0008
  2. Select the Services tab at the top, check the Hide all Microsoft services, and click the Disable all button.
    services
  3. Now, click the Startup tab at the top and select Open Task Manager.
    open task
  4. Right-click each of the apps there and select Disable.
    disable download error 0x800c0008
  5. Finally, go back to the System Configuration window and click the Apply button, followed by OK.
    apply ok

After performing a clean boot, check if the download error 0x800c0008 on GFWL remains. Should this solve the problem, you need to enable the disabled apps and services in batches to know the faulty ones.

There you have everything needed to fix the GFWL download error: 0x800c0008. All you need to do now is to follow the instructions in this guide carefully, and the error should disappear in no time.

If the Games for Windows Marketplace installation failed on your PC, check our detailed guide to fix it.

Feel free to let us know the solution that helped you fix this issue in the comments below.

Netgear WiFi Adapter not Working: 6 Ways to Get it to Work

Users report that Netgear wireless adapter works fine when they start their computer, but after a while, the internet cuts off, and the adapter stops working.

This makes their network unreliable and, even worse, requires frequent reconnection to get going again. If you are also troubled by this issue, we will show you how to fix it and restore normal service in this guide.

Why is my Netgear WiFi adapter not working?

Several factors can cause the Netgear WiFi adapter to stop working. Below are some of the notable ones:

  • Faulty or incompatible drivers: If your Netgear A6100 is not detecting networks, it might be due to incompatible or outdated drivers. You need to update your driver from the official source to fix this.
  • Wrong power settings: Sometimes, your Netgear WiFi adapter disconnects because your PC needs to save power. The solution is to disable any power-saving feature that can cause your adapter to stop working.

What can I do if the Netgear WiFi adapter is not working?

1. Download and install the latest Netgear drivers

  1. Download the latest drivers for your adapter. Extract the driver in the download location.
  2. Press the Windows key + X and select Device Manager.
    device manager netgear wifi adapter not working
  3. Now, double-click the Network adapters option to expand it and right-click your Netgear adapter.
  4. Select Update driver.
    update driver
  5. Next, choose Browse my computer for driver software.
    browse my
  6. Select the Browse button.
    browse netgear wifi adapter not working
  7. Now, go to the driver location and choose the .inf file.
  8. Finally, click the OK button and wait for the installation to complete.

In most cases, the Netgear N300 wireless WiFi USB adapter WNA3100 stops working because of generic drivers installed by Windows update.

You must install the latest drivers from the Netgear website to fix this.

Alternatively, you can use the Outbyte Driver Updater tool to update your drivers to avoid permanently damaging your computer by manually downloading the wrong driver versions.

This incredible program looks for new hardware drivers and automatically downloads updates.

It scans your system and lists all existing and possibly missing drivers. The tool also detects if there is already a new version for current records. If necessary, these can be updated directly via Outbyte Driver Updater.

⇒ Get Outbyte Driver Updater

2. Change power settings

2.1. Disable USB selective suspend

  1. Press the Windows key, type power plan, and select Edit power plan.
    edit power
  2. Select Change advanced power settings.
    change advanced
  3. Now, expand the USB settings option and then USB selective suspend settings.
  4. Next, disable the On battery and Plugged in options.
  5. Finally, click the OK button to save the changes.
    usb settings

One of the power management features of your PC is the ability to suspend your USB settings. Unfortunately, this can cause the Netgear WiFi adapter to stop working. Disabling the feature should help restore normalcy.

2.2. Disable USB root hub power preserving

  1. Right-click on Start and select Device Manager.
  2. Expand the Universal Serial Bus controllers option and double-click the USB root hub option.
    usb root
  3. Now, click on the Power Management tab.
  4. Uncheck the Allow the computer to turn off this device to save power box and click OK.
    power management
  5. Finally, repeat the steps above for all USB devices and restart your PC.

Another power-saving option that can cause the Netgear WiFi adapter to stop working is the ability to turn off your USB hubs. Unfortunately, this can cause any device connected to the USB port to stop working temporarily.

2.3. Disable WLAN adapter suspend

  1. Open Device Manager again.
  2. Expand Network adapters and double-click on the Netgear adapter.
  3. Now, click the Power Management tab and uncheck the Allow the computer to turn off the device to save power box.
    power management option netgear wifi adapter not working
  4. Next, click the Advanced tab at the top and disable Selective suspend.
  5. Finally, click the OK button to confirm the changes.

Various power settings commonly hidden within the system are vital for the performance of the Netgear adapter.

Some of these are related to USB power reduction, while others are there to tend to wireless adapters. Both of these are valuable if you want to preserve the battery life.

The power-related settings are enabled by default, and what we need to do is to disable them.

3. Change channel settings

  1. Press the Windows key + R, type ncpa.cpl, and click OK.
    ncpa
  2. Right-click on your Netgear adapter and select Properties.
    properties
  3. Now, select Configure.
    configure Netgear WiFi adapter is not working
  4. Next, under the Advanced tab, scroll to WZC IBSS Number Channel.
  5. From the right drop-down menu, choose channels 1, 6, or 11 and confirm changes.

For the best overall WiFi performance, we advise you to stick to 20 MHz of channel width and channels 1, 6, or 11. This is because those are rarely crowded by non-Wi-Fi devices that use similar frequencies.

After doing this, check if the Netgear WiFi adapter is now working.

4. Check the equipment

Make sure that everything is working as intended hardware-wise. For example, try multiple USB ports and use the Netgear adapter on a different computer.

If everything works as it should, the problem lies in your PC rather than the Netgear adapter. That should point you toward the other solutions we provided in this article.

Note that it’s essential to know that USB 3.0 works properly on the 5 GHz bands. For 2.4 GHz, make sure to stick with USB 2.0.

5. Uninstall network adapter drivers

  1. Press the Windows key + X and select Device Manager.
  2. Expand the Network adapters option and right-click the Netgear adapter option.
  3. Now, choose Uninstall device.
    uninstall device
  4. Click the Uninstall button to confirm the action.
    uninstall button
  5. Finally, click the Scan for hardware changes icon.
    scan for

If you still can’t get your Netgear WiFi adapter to work, you might need to uninstall and reinstall the driver. Aside from scanning for hardware changes, you can install the latest drivers from the official website.

6. Disable the Block Internet Connection Sharing option

Antivirus software comes with a Firewall, and sometimes it can cause problems, so you might want to turn it off.

For example, Bitdefender has the Block Internet Connection Sharing option in its advanced settings, so to resolve this issue, it’s highly recommended that you turn it off.

That’s about it. You should now be able to fix the Netgear WiFi adapter not working issue with the solutions in this guide.

If no USB WiFi adapter works on your PC, check our detailed guide to fix it quickly.

Feel free to let us know the solution that helped you solve the problem in the comments below.

Microsoft will steal your information and give you nothing in return

Even though it seems that Microsoft is making all the right steps to make the world more accessible and bring all the information to your fingertips, there are downsides to it.

Yes, we are referring to the new ChatGPT chatbot initiative to revive Bing, a search engine that nobody really cares about.

Since Microsoft said it is going to launch its new OpenAI’s ChatGPT-powered browser Edge with the Bing search engine homepage, many are now worried about the ramifications of this decision.

It might not seem like much to start with, but a lot of smaller companies could actually go under as a result of these actions.

How will Microsoft make up for taking the information from you?

You might not be aware, but amid growing advancement in artificial intelligence (AI), OpenAI CEO and creator of ChatGPT Sam Altman shed some light on how AI tools can help us achieve greater productivity in important fields such as healthcare.

However, he also strongly believes that a hurried adaptation of ChatGPT-like AI tools can be dangerous and counterproductive.

Through a somewhat lengthy Twitter thread, issuing a warning that potentially scary AI tools are not far away from us, he called for regulations from institutions to figure out what to do with these AI tools.

Furthermore, while the OpenAI CEO believes that we would soon adapt to a world deeply integrated with AI, going super quick on adopting these AI tools could be a frightening experience.

Indeed, society needs time to adapt to something so big, so some challenges in AI need quick fixing before mass adoption can happen.

One of the biggest challenges highlighted in the thread was the issue of developing a bias toward or against something.

What does it mean? Well, users on social media recently raised the issue of bias, sharing screenshots of what seemed to be ChatGPT’s tacit approval of certain political ideologies. 

Bing and ChatGPT’s combination will result in a conversational AI that can create accurate, human-like text responses based on virtually any imaginable context.

Keep in mind that ChatGPT-3 is trained entirely from content on the web, learning more rapidly than any team of human beings could possibly dream of.

And, as Microsoft tries to make Bing relevant, it’s also taking the idea of search engines to a whole new level, which basically removes a user’s need to scroll through to an article and read.

Many would actually call this theft, even though it technically isn’t, and aren’t that eager in exploring everything Microsoft’s new AI integration has to offer.

The Redmond tech giant is not planning to exclude the sources it gets the precious information from, and has thought of a way to sort of compensate them.

Don’t go thinking Microsoft will start throwing millions of dollars at these companies because it most certainly won’t.

In fact, it plans on offering a tiny link in the footer of the query, mentioning that the information was taken from the site in question.

It might not seem like much because it really isn’t. A link at the bottom of the page, that literally nobody is ever going to click on, is a lousy trade.

You should also know that only three links are visible, but only after the user clicks on the See More button provided.

Looking a few years ahead, this initiative could really have a heavy impact and make guide writing or any type of online reporting unprofitable for a lot of websites.

In case you didn’t know, Microsoft also stated that it is actually planning to help large businesses, along with schools and governments create their own AI chatbots, using OpenAI’s ChatGPT technology.

This means that between Microsoft’s chatbot, Google’s chatbot (BARD), and whatever other chatbots different clients will create, all the hard-gathered information online is up for grabs.

The Redmond-based tech giant has announced an important change to its Bing AI chatbot, one that will change how it all works.

So, starting today, users with access to the Bing preview will no longer be able to chat with Bing AI freely, with conversations now being limited to just 5 chat turns per topic, and 50 chat turns per day.

Microsoft officials said the company is implementing these limits because testing has found that the chatbot can get easily confused during long conversations.

Why? Apparently, the software is struggling to keep up with all the context and data it has presented, often resulting in the AI bot going off-topic, and even becoming rude or outright weird in some instances.

Microsoft’s Yusuf Mehdi, the company’s Corporate Vice President and its Consumer Chief Marketing Officer, posted a Twitter message stating the daily chat turn limit had been expanded from 120 turns to 150.

The Redmond official has also added that the per-session turn limit had also been expanded from 10 to 15, in case you didn’t know.

Through the same Twitter message, Mehdi stated that the Bing Chat team was making a change to the Balanced option in the Bing Chat Tone Selector.

The tech giant is still working to add even more features to Bing Chat. Its number one addition request is to add the ability to save chats, which the company is working on.

And, after the mentioned message number in a day, the chatbot will stop functioning altogether, and you’ll be asked to come back tomorrow.

This is indeed a big change and one that highlights the very early nature of AI chatbots powered by large natural language models.

That being said, many think the software should be retired completely, after claims that the chatbot is going on destructive rampages.

However, let’s now use faith and hope that the situation will improve in terms of the compensation companies will get after Microsoft blatantly steals their information.

What are your thoughts and opinions on this delicate matter? Be sure to share them with us in the dedicated comments section located below.

An Error Occurred During Port Configuration: 5 Ways to Fix

Adjusting port settings is one way to kick-start offline printers. However, an error occurred during the port configuration error message popped up for some users.

Consequently, this prevents them from completing this configuration, rendering the printer useless. If you also face this issue, this guide will walk you through the steps to fix it effortlessly.

Why does An error occurred during port configuration access is denied occur?

An error occurred during port configuration, the requested resource is in use error message can be caused by the following factors:

  • Interference from third-party apps: Third-party antivirus and firewall can lead to an error occurred during port configuration this operation is not supported error message. You need to disable or uninstall these programs to solve the problem.
  • Lack of privileges: Another cause of this error message is the lack of administrative privileges. The solution to this is to switch to an administrator account.

How can I fix An error occurred during port configuration message?

1. Modify the Port Settings Within an Admin Account

  1. Press the Windows key + I to open the Settings app and select Accounts.
    accounts an error occurred during port configuration
  2. Click Family & other users in the left pane.
  3. Now, select your account, and click the Change account type button.
    family
  4. Finally, select Administrator from the Account type dropdown menu and click OK.
    admin

If you are getting an Access denied message and an error that occurred during port configuration, you lack the needed privilege. You need to switch to an administrator account to eliminate the error message.

2. Configure the port settings manually

  1. Press the Windows key + R, type control, and click OK.
    control an error occurred during port configuration
  2. Click View devices and printers under the Hardware and Sound option.
    view devices
  3. Now, click your printer and select Print server properties at the top.
    printer server
  4. Click the Ports tab at the top.
  5. Next, click the Change Port Settings button.
    change port an error occurred during port configuration
  6. Select the port you want to modify and click Configure Port.
    configure ports an error occurred during port configuration
  7. Finally, configure the port as you deem fit.

If trying to configure the printer port automatically keeps returning an error occurred during port configuration, you might need to perform the operation manually. However, this should help you bypass any process causing the error.

3. Reset the printer

  1. Turn the printer off and disconnect the power cord.
  2. Unplug the power cord from the power outlet and wait for 60 seconds.
  3. Now, plug the printer again and restart it.
  4. Finally, please wait for it to enter idle mode before doing anything

If you are getting an error occurred during port configuration. This operation is not supported message, it means the printer ran into a temporary glitch. The solution to this is to perform a hard reset.

4. Clear the Printer Queue

  1. Press the Windows key + R, type services.msc, and click OK.
    services
  2. Double-click Print Spooler to open its properties.
    print spooler an error occurred during port configuration
  3. Now, click the Stop button and OK to close the window.
    stop an error occurred during port configuration
  4. Next, press the Windows key + E to open File Explorer and follow the path below: C:\WINDOWS\System32\spool\PRINTERS
  5. Finally, use Ctrl + A to select everything in the folder and press the Delete key.
    path
  6. Now, repeat Steps 1 and 2 and click the Start button.
  7. Finally, click the Apply button and OK to save the changes.
    start

An error during port configuration can sometimes denote that the printer queue files are corrupt. Therefore, you need to clear these files and allow your device to build another one to solve the problem.

5. Disable third-party security software

According to users, you get an error occurred during port configuration due to interference from third-party antivirus or firewalls. Hence, you need to disable these apps if you have them.

If disabling them does not work, you should try uninstalling them and using Microsoft Defender instead.

Those are a few resolutions that can fix an error occurred during a port configuration issue. With this information, you should be able to resolve the issue for good and connect your printer.

If your printer only prints in grayscale, check our detailed guide to fix it effortlessly. Even more, here’s what to do when getting the Failed to install port handler service error code 1073.

Feel free to let us know the solution that helped you solve this problem in the comments below.

Ghost Spectre Windows 11 Superlite: Download & Install

Updating OS to the latest Windows 11 has posed challenges on many PCs due to insufficient system requirements. Hence, Microsoft released a modified version, Ghost Spectre Windows 11 Superlite, compatible with every PC. Therefore, we will discuss how to download and install it.

Similarly, you can read further on getting Windows 11 custom ISO if your PC meets Windows 11 system requirements.

What is Ghost Spectre Windows 11?

The Ghost Spectre Windows 11 is a modified version known as the light Windows 11. It is because system requirements for installation, such as the TPM 2.0, have been a limitation for most low-end PCs to run Windows 11.

Hence, the lighter version can be installed on low-end devices with lesser RAM, hard disks, and older CPUs. Also, unneeded features like Telemetry, Windows Security, OneDrive, and UAC notifications are no longer available on the modified Windows 11.

Furthermore, the Ghost Spectre is bloatware free, making it faster and the best choice for gamers. Having discussed what the modded Windows 11 is, we will explore how to download and install it.

How can I download and install Ghost Spectre Windows 11?

1. Download the Ghost Spectre Windows 11 Superlite

Note icon NOTE
While we don’t recommend downloading from third-party websites, our expert has tried the steps below and proven them secure.
  1. Open your browser and download the Ghost Spectre Windows 11 Superlite Version from a trusted website.
  2. Click on the downloaded file in your folder and unzip it to the desired location.
  3. Plug in your USB device and make the Superlite Windows 11 bootable USB.

2. Install the Ghost Spectre

  1. Insert the USB drive into the computer you want to install the Windows 11 light version.
  2. Restart your computer and press the F2, F10, F8, or F12 keys as the boot key before the PC boots up to open the Boot menu. (it varies depending on the manufacturer)
  3. Then, select the Windows logo below to enter the Windows Setup.
  4. Proceed to choose your Language, Time, and Keyboard. Now, select Next below the window.
  5. Choose from the Ghost Spectre Windows 11 options on the new window and click Next.
  6. Then, choose the drive you want to use for the installation process and click on Next.
  7. After this, the installation process will start. The process may differ based on your PC’s specs.

The Ghost Spectre Windows 11 Superlite gives you the alternative to use Windows Security during installation setup.

If you have any difficulties booting from USB on Windows OS, do not hesitate to read our article on how to fix it.

In addition, we still have a guide to download and install the official Windows 10 20h1 ISO files if your device cannot use the Ghost Spectre.

Lastly, our guide on fixing Windows ISO files not working on your device may be crucial if you encounter such issues during installation.

Should you have further questions or suggestions, kindly drop them in the comments section later.

Acgenral.dll is Either not Designed Error: 4 Ways to Fix it

DLL error messages are common on Windows PC. This is why the Acgenral.dll is either not designed to run on Windows issue is not surprising.

While this error message might look complicated, it is easy to fix, as shown in this guide’s ensuing sections.

What does Acgenral.dll is either not designed error mean?

The Acgenral.dll is either not designed error mainly denotes that the software that produced the error is not installed correctly. Below are some of the causes of the error:

  • Corrupt system files: Sometimes, this error is usually caused by missing or faulty system files. You need to restore these files to fix the issue.
  • Incomplete software installation: You might get this error message in some cases because the software you are trying to run is missing some files. The solution is to uninstall the program and reinstall it from official sources.

How can I fix the Acgenral.dll error on Windows 10?

1. Run a system file scan

  1. Press the Windows key, type cmd, and select Run as administrator under Command Prompt.
    cmd admin acgenral.dll is either not designed
  2. Type the command below and hit Enter to run it: DISM.exe /Online /Cleanup-image /Restorehealthdism restore
  3. Now, wait for the command to finish running, type the command below, and press Enter: sfc /scannowsfc  acgenral.dll is either not designed
  4. Finally, wait for the command to finish running and restart your PC.

The Acgenral.dll is either not designed to run on Windows, or it contains an error prompt can be due to missing or corrupt system files.

Running the DISM and SFC scans should solve the problem and restore normalcy on your PC.

2. Reinstall the app causing the error

  1. Press the Windows key + R, type appwiz.cpl, and click OK.
    appwiz
  2. Select the faulty app and select the Uninstall option.
    uninstall acgenral.dll is either not designed
  3. Now, follow the onscreen instructions to complete the process.
  4. Finally, reinstall the uninstalled software with its DVD or downloaded setup wizard. Make sure you install the latest version.

If the software you are trying to run is faulty, you will likely get the Acgenral.dll is either not designed error message. This can be because the software installation is incomplete or some files are corrupt.

The best thing to do here is to uninstall and reinstall the software from official sources.

3. Fix the acgenral.dll error with system repair software

There are a wide variety of system maintenance utilities for Windows. Some maintenance software incorporates repair tools that fix DLL, BSOD (blue screen of death), and other Windows errors.

A system repair tool can easily scan your computer, identify any problematic files and try to fix them or replace them with fresh ones.

4. Get a replacement Acgenral.dll

  1. First, you need to get a different PC with the same Windows 10 platform and system architecture as the one you need to fix the Acgenral.dll for.
  2. Press the Windows key, type acgenral.dll, and click Open file location.
    open file location Acgenral.dll is either not designed
  3. Now, insert a USB flash drive and copy the Acgenral.dll file.
    option
  4. Next, insert the USB flash drive into the PC showing the error.
  5. Launch File Explorer and navigate to the folder you need to move the DLL to, which will be of these paths: C:WindowsSystem32 (64-bit DLL files) C:WindowsSysWOW64 (32-bit DLL files)
  6. If a Replace or Skip Files window pops up, select Replace the files in the destination.
  7. Finally, launch Command Prompt as admin, type the command below, and hit Enter: regsvr32 acgenral.dllregsvr

If you still can’t fix the issue with the solutions above, you might need to replace the Acgenral.dll file on your PC. However, if you don’t have another PC, download a replacement acgenral.dll from DLL websites.

If you choose to do so, download a DLL from a reputable source. In addition, we advise users to scan downloaded DLLs with antivirus software and back up original DLL files.

With this, we can conclude that this detailed guide on fixing the Acgenral.dll is either not designed to run on Windows or contains an error message.

If you are facing a similar issue, like Lapryx.dll is missing error, check our detailed guide to fix it quickly.

Feel free to let us know the solution that helped you fix this issue in the comments below.

Windows 10 not Shutting Down Properly: 7 Fixes if it’s Stuck

Different power options are available on Windows PC, with the shutdown option being the most definite. However, some users complain that Windows 10 is not shutting down properly.

This makes it difficult to save power on their PC. If you are also troubled by this issue, this guide will walk you through how to fix it for good.

What causes Windows 10 not to shut down properly?

A series of factors can cause Windows 10 not to shut down properly. Listed below are some of the prominent ones:

  • Power settings: The Fast startup feature is the most significant cause of this problem. While this feature helps to improve your PC’s startup time, you need to disable it to fix this issue.
  • Corrupt system files: Sometimes, Windows 10 will not shut down entirely because of missing or faulty system files. You need to repair these corrupt files to get past this issue.
  • Outdated PC: An outdated operating system can cause many issues, including this problem. The solution to this is to update your PC to the latest version.

What are other Windows 10 shutdown issues?

Below are some of the variations of this issue as reported by users:

  • Windows 10 won’t shut down after the update: This issue can occur due to updates problems. To fix this, you need to run the Windows Update troubleshooter.
  • Windows 10 shutting down stuck: Sometimes, the shutdown process can get stuck. This can occur if you have problems with Windows Update. Run the Windows Update troubleshooter to fix the issue and check if that helps.
  • Computer won’t shut down (Windows 10): Many users reported that their PC wouldn’t shut down. This can occur due to Intel(R) Management Engine Interface device, so be sure to disable it and check if that helps.
  • Windows 10 not shutting down completely, black screen: This issue can sometimes occur due to the Fast Startup feature. To fix it, turn this feature off and check if that solves your problem.
  • Windows 10 restarts instead of shutting down: The cause of this issue is the fast startup feature that Microsoft has introduced with Windows 10.
  • Computer won’t shut down (Windows 10): This problem can also be caused by the fast startup feature that allows Windows 10 to boot faster.
  • Windows 10 takes forever to shut down: If your computer takes a lot of time, the programs need to close the window or don’t go beyond that; you have a problem with malfunctioning software.
  • Windows 10 computer turns on after shutting down: One common cause for this problem is a system crash. Windows is configured to restart when the system crashes automatically.
  • Windows 10 not fully shutting down: There’s a slight chance that this problem could also be caused by the fast startup feature in Windows 10.

What can I do if Windows 10 is not shutting down properly?

Below are some preliminary troubleshooting steps to perform before delving into the solutions in the section:

  • Force shut down your PC using the power button.
  • Unplug all peripherals.
  • Close unnecessary background apps.
  • Make sure to install all the OS updates.

If these steps do not work, you can explore the fixes below:

    1. Disable the Intel Management Engine interface

  1. 1.Press Windows key + X on your keyboard and choose Device Manager.

  2. 2. Go to Sistem Devices, locate the Intel(R) Management Engine Interface right-click it and choose Disable device from the menu. When the confirmation dialog appears, click Yes.

Apparently, after disabling the Intel Management Engine Interface, our readers were able to shut down Windows 10 properly. If it doesn’t fix the problem for you, perform this solution to reenable it.

2. Turn off the Fast startup feature

  1. Press the Windows key, type power plan, and select Choose a power plan.
    choose a  windows 10 not shutting down properly
  2. Click Choose what the power buttons do in the left pane.
    choose what
  3. Now, click on Change settings that are currently unavailable.
    change settings
  4. Finally, uncheck the Turn on fast startup (recommended) option and click Save changes.
    disable fast windows 10 not shutting down properly

Windows has a helpful feature called Fast Startup, which combines hibernation and shutdown into one, thus allowing you to boot your PC quickly.

However, this feature can also cause Windows 10 not to shut down properly. Hence, you need to disable the feature.

3. Run the Windows Update troubleshooter

  1. Press the Windows key + I to open the Settings app and select Update & Security section.
  2. Click Troubleshoot in the left pane and select Additional troubleshooters.
    additional troubleshooting windows 10 not shutting down properly
  3. Select Windows Update, click the Run the troubleshooter button and follow the onscreen instructions.
    run the troubleshooter
  4. Finally, you can also select the Power option to run the troubleshooter.
    power trouble

According to users, sometimes Windows 10 is not shutting down properly because of specific issues with Windows Update.

However, you can fix most of these issues simply by running the Windows Update troubleshooter.

4. Run an SFC scan

  1. Press the Windows key, type cmd, and select Run as administrator under Command Prompt.
    cmd windows 10 not shutting down properly
  2. Type the command below and hit Enter to run it: sfc /scannowsfc scan windows 10 not shutting down properly
  3. Finally, wait for the command to finish running and restart your PC.

If the system files responsible for shutting down your Windows 10 PC is corrupt, the operation might not be successful. Hence, you need to restore these files to shut down Windows 10 properly.

You can also fix your corrupt operating system files automatically with new components by using an expert assistant. Professional software can help you keep your system up-to-date and optimize so that issues like this never happen.

5. Use Command Prompt to shut down your PC

  1. Press the Windows key + S, type cmd, and choose Run as administrator under Command Prompt.
    cmd windows 10 not shutting down properly
  2. Type the command below and hit Enter: shutdown /s /f /t 0shutdown
  3. Finally, wait for your PC to shut down completely.

If your Windows 10 PC is not shutting down properly using the standard methods, you need to perform a hard shutdown. You can do this by following the steps above.

6. Reset your BIOS

  1. To see how to properly access and reset BIOS, we advise you to check your motherboard manual for detailed instructions.
  2. Navigate the BIOS and select the option to load the default settings. After resetting BIOS to the default, check if the problem is still there.

7. Cancel automatic restart in Safe Mode

  1. Press the Windows key + I and select the Update & Security option.
    update and
  2. Choose Recovery in the left pane and click Restart now under Advanced startup.
    restart now
  3. When your PC restarts, choose Troubleshoot > Advanced options.
    advanced options
  4. Now, select Startup Settings.
    startup settings windows 10 not shutting down properly
  5. Click the Restart button.
    restart
  6. When your PC restarts, press 4 or F4 to Enable Safe Mode.
    enable safe
  7. Next, press the Windows key + R, type sysdm.cpl, and click OK.
    sysdm windows 10 not shutting down properly
  8. Click the Advanced tab at the top.
  9. Now, click the Settings button under the Startup and Recovery section.
    advanced settings
  10. Finally, uncheck Automatically restart and click the OK button.
    automatically windows 10 not shutting down properly

In some cases, Windows 10 might not shut down properly because of some system failure. This is because your PC is set to restart when encountering an error.

So, it would be best if you disabled the automatic restart to solve the problem.

We have reached the end of this detailed guide on fixing a Windows 10 PC that is not shutting down properly. You should now be able to resolve the issue, provided you follow the steps.

If the shutdown button is not working on Windows 10, you can fix it by following the steps in our comprehensive guide.

Feel free to let us know the solution that helped you fix the issue in the comments below.

Error 1310 Error Writing to File: 5 Easy Fixes to Try

While installing an app like Microsoft Office, Adobe programs, Autodesk programs, and other software, the users have reported encountering the error 1310 error writing to file.

If you are also troubled by this error, here are a couple of troubleshooting tips to help you resolve the error 1310 error writing to file in Windows.

Why does Error 1310 error writing to file appear?

The error 1310 error writing to file shows up the installation of programs. Below are some of the factors that cause this error to show up:

  • Faulty system files: A missing or corrupt system file can cause this error to show up. You need to repair and restore these files to fix this issue.
  • Lack of privileges: In some cases, the error writing to file verify that you have access to that directory error message can be due to the lack of administrative privilege. The solution to this is to run the installer as an admin.
  • Issues with the Windows installer: Sometimes, there might be problems with the Windows Installer service. Restarting the service should restore normalcy here.

How do I fix error 1310 error writing to file?

1. Remove multiple instances of the same program

  1. Press the Windows key + R, type appwiz.cpl, and click OK.
    appwiz error 1310 error writing to file
  2. Now, check if there multiple instances of the program giving the error.
  3. If there are multiple instances, right-click each of them and select Uninstall.
    uninstall
  4. Finally, follow the onscreen instructions to complete the process.

The error 1310 error writing to this file can occur if you have remnant files from an older installation, which may prevent the installer from copying files. After uninstalling the program, use registry cleaning tools to clean all the traces of the uninstalled app.

2. Re-register the Windows Installer

  1. Press the Windows key + R, type msiexec /unregister, and click OK to unregister the installer.
    unregister
  2. Now, press the Windows key + R again, type msiexec /regserver, and click OK to re-register the service.
    regserver error 1310 error writing to file
  3. Finally, restart your PC.

Sometimes, the error 1310 error writing to this file can occur due to issues with the Windows Installer service. The solution to this is to re-register the service.

3. Perform a clean boot and reinstall the program

  1. Press the Windows key + R, type msconfig, and click OK.
    mscconfig
  2. Select the Services tab at the top, check the Hide all Microsoft services, and click the Disable all button.
    services error 1310 error writing to file
  3. Now, click the Startup tab at the top and select Open Task Manager.
    startup task
  4. Right-click each of the apps there and select Disable.
    disable error 1310 error writing to file
  5. Go back to the System Configuration window and click the Apply button, followed by OK.
    apply ok
  6. Next, restart your PC and repeat the steps in solution 1 to uninstall the faulty app.
  7. Now, download the app from official sources.
  8. Finally, right-click the installer and select Run as administrator.
    run as error 1310 error writing to file

Some users have found the error 1310 error writing to this file to be due to interference from other apps. In this case, you need to remove all instances of the app and reinstall it in Safe Mode

4. Change folder permission

  1. Right-click the faulty app or folder and select Properties.
    properties
  2. Click the Security tab at the top.
  3. Now, click the Edit button.
    security
  4. In the new dialogue box, select Administrators Group.
  5. Check the Allow box for Full Control.
    full control
  6. Finally, click Apply, followed by OK to save the changes, and restart your PC.
  7. Reboot the computer and check for any improvements.

Another potential cause of this error is the lack of permission to read or write to the file or folder. The solution is to take complete control of the file and folder.

5. Run an SFC scan

  1. Press the Windows key, type cmd, and select Run as administrator under Command Prompt.
    cmd error 1310 error writing to file
  2. Type the command below and hit Enter: sfc /scannowsfc
  3. Finally, wait for the command to finish running and restart your PC.

In some cases, this issue can be caused by corrupt or faulty system files. The quickest way around this is to run the System File Checker.

To make things faster and easier, you can use a dedicated tool that will replace the missing or corrupt files with the original version obtained from its cache.

The error 1310 error writing to file can occur for multiple reasons, including numerous instances of the same program, permission, and Windows Installer issues. But with the solutions in this guide, you should be able to fix them quickly.

If you are facing a similar error in error opening a file for writing, check our detailed guide to fix it effortlessly.

Feel free to let us know the method that helped you resolve the issue in the comments below.

5 Ways to Fix Error 0x80070522: Required Privilege Is Not Held

Some of our readers have reported that the error 0x80070522 Required privilege is not held appears on their PCs. It indicates the Update process lacks permission to access the needed components. So, you need to resolve the privileges issue to install, download or apply updates.

Hence, we will proffer possible solutions to fix this. Likewise, we have a similar guide on fixing the Windows Update error 0x8007045b.

What causes the error 0x80070522?

Many factors may trigger Error 0x80070522: A required privilege is not held by the client on your PC during a Windows update. Also, it can occur when trying to alter the location of a file. Other causes are:

  • Insufficient permission – Every user account has a specific amount of privileges assigned to them. So, the error may occur if your account lacks enough permissions to alter system properties.
  • Corrupt or faulty update files – Since the error also appears during Windows Update processes, it may be that the update files you’ve downloaded are corrupt.
  • Viruses and malware infections – Malware and viruses may infect system files or disguise them as legitimate files, interrupting the Windows update process. It can cause corrupted system files on your computer.

Though the error is critical and can be hard to deal with, there are some fixes you can follow to resolve it.

What can I do to fix the error code 0x80070522?

Before attempting any advanced troubleshooting steps, go through the following:

If you can’t resolve the error, try the steps below:

1. Disable User Account Control (UAC)

  1. Press Windows + R key to open the Run dialog box, type control, then press Enter to open the Control Panel.
  2. Click on Security and Maintenance.
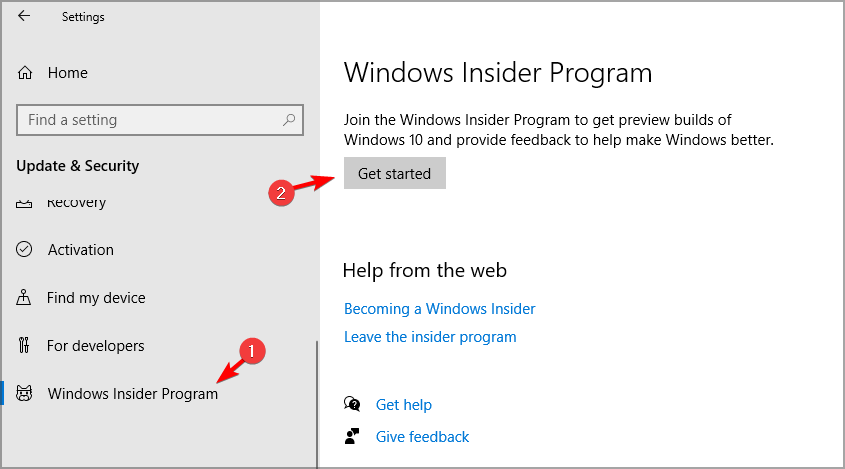
  3. Click Change User Account Control Settings from the left pane.
  4. Drag the slider control from Always notify to Never notify and click OK to save the changes.
  5. Try restarting your PC to see if the error persists.

Disabling the User Account Control allows the system services to run in administrative mode without permission.

2. Run an SFC scan

  1. Left-click the Start button, type Command Prompt, and click the Run as administrator option.
  2. Click Yes on the User Account Control prompt.
  3. Type the following and press Enter: sfc /scannow
  4. Restart your PC and check if the error persists.

Running an SFC scan will detect and repair corrupt system files causing the insufficient permissions error. You can check how to fix the run as administrator option if it’s not working on your PC.

3. Run Windows Update Troubleshooter

  1. Press Windows + I key to open Windows Settings app.
  2. Click System and select Troubleshoot.
  3. Then click on the Run button beside Windows Update.
  4. Follow the on-screen instructions and restart your PC afterward.

The troubleshooter will repair issues causing the Windows Update not to work on your PC. You can also check other ways to run the Windows Update troubleshooter in Windows 10 if you can’t get around the steps above.

4. Modify a Registry Key

  1. Press Windows + R key to open the Run dialog box, type Regedit, and press OK to open the Registry Editor.
  2. Click Yes if prompted by UAC.
  3. Navigate to the following path: HKEY_LOCAL_MACHINE\SOFTWARE\Microsoft\Windows\CurrentVersion\Policies\System
  4. Select EnableLUA key, double-click on DWORD, go to the Edit DWORD Value section, set its Value Data to 0, then click OK.
  5. Exit the Registry Editor and restart your computer.

Tweaking the Registry Editor can fix the Registry key causing the error.

5. Clear the SoftwareDistribution folder

  1. Press Windows + R key to open the Run dialogue box, type services.msc, then click OK to open the Services app.
  2. Double-click Windows Update and select Stop.
  3. Open the File Explorer, and go to the: C:\Windows\SoftwareDistribution\Download folder
  4. Press Ctrl + A to highlight all files, then press the Delete button.
  5. Find and double-click on Windows Update, then click Start.
  6. Restart your computer.

Clearing the SoftwareDistribution folder deletes Windows Update cache files and lets the system rebuild a usable distribution folder.

If your Windows Update services not running on your PC, read our guide to getting solutions.

Alternatively, you may be interested in fixing slow Windows updates on your PC. Likewise, check our guide on Windows Update stuck at 100% and some fixes.

Should you have further questions or suggestions, kindly drop them in the comments section.

0xc004c020: How to Quickly Fix This Activation Error

Many of our readers have reported the error 0xC004C020 while trying to connect their computers to their organization’s server. This error prevents to activation of their Windows operating system.

While the error can be frustrating, we will guide you toward resolving the error 0xC004C020 while trying to activate Windows on organization-linked computers.

What causes the error 0xC004C020?

If you are trying to activate Windows on your organization-linked computer and encounter the error 0xC004C020, then the possible causes could be as follows:

  • Non-MAK key – If a non-MAK key is used on an organization-linked computer, then the organization’s policy will not allow its activation.
  • Key access lost after formatting – Multiple Activation Keys can be used only once. If the computer is formatted, you cannot repeat the key by yourself.
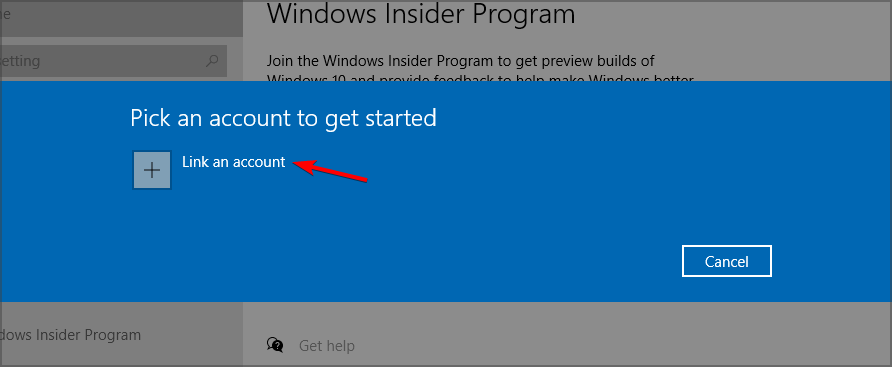
  • Wrong activation key – It could be possible for the activation key to be incorrect. This has to be verified with the system administrator.
  • MAK key usage limit crossed – Windows keys used by organizations have a limit on the number of systems on which they can be used. If this limit is exceeded, the key won’t work.

Now that we know the reasons behind the problem, let us try to fix it.

How do I fix the 0xC004C020 activation error on Windows?

Before proceeding with the troubleshooting involving your organization, you could try a few quick solutions:

  • Re-check the key you are typing and make sure it is correct.
  • Make sure your computer is connected to the organization’s network.
  • Restart your computer.
  • Contact the IT Server Administrator.

If the preliminary solutions were not helpful, please proceed with the following solutions sequentially.

1. Activate Windows using Command Prompt

  1. Click the Search icon on the taskbar, type command prompt, and click on Run as administrator from the results to start Command Prompt with full privileges.  
  2. Type the following command and hit Enter to execute the command (replace [product key] with the actual product key): slmgr.vbs /ipk [product key]

Windows systems should pick the activation key automatically, but if it doesn’t, the Command Prompt method can be helpful.

2. Run the Windows Activation troubleshooter

  1. Right-click on the Start button and select Settings from the menu. In the Settings menu, go to the System tab in the left pane.
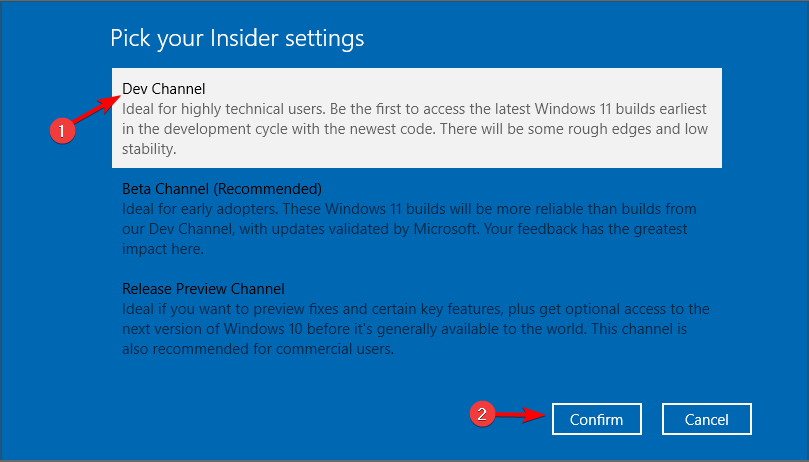
  2. In the right pane, select Activation.
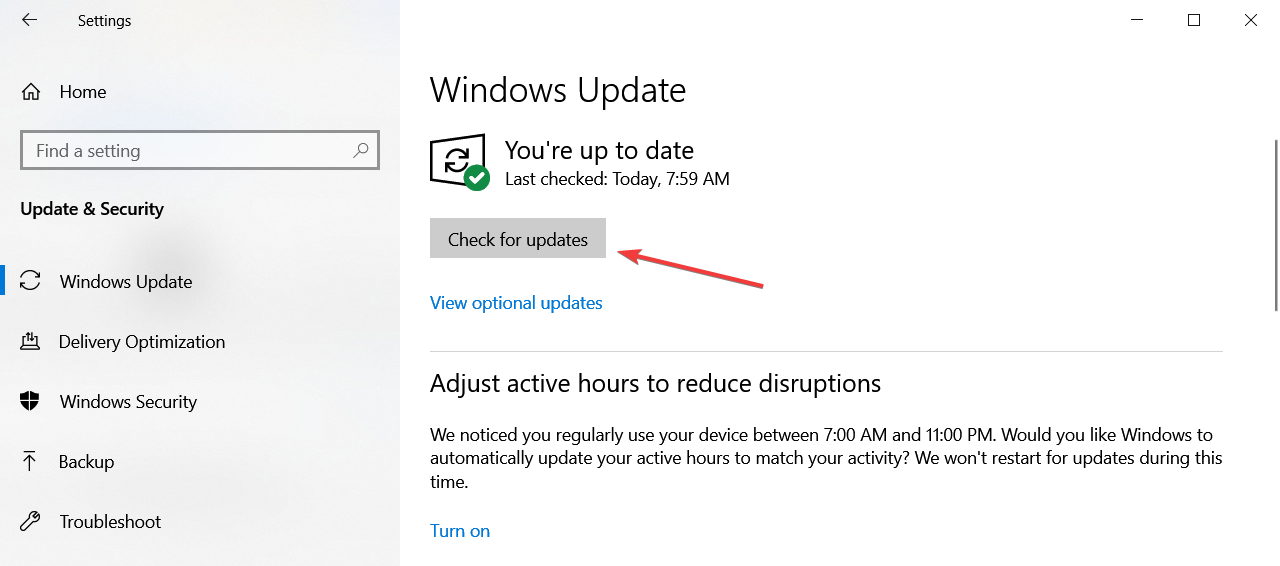
  3. If your Windows operating system is not active, then you will notice a button named Troubleshoot. Click on Troubleshoot to run the troubleshooter.
  4. The Windows Activation troubleshooter will pick up the key if it was deactivated after recent system changes.

3. Activate Windows through phone

  1. Right-click on the Start button and go to Settings.
  2. Go to System and select Activation.
  3. You will notice the option to Activate Windows Now. Under it, click on Activate by Phone.
  4. Select your country and click on Next.
  5. You will notice an Installation ID and freephone number. Call the freephone number to get the Confirmation ID.
  6. Enter the Confirmation ID and select Activate Windows.

These solutions should help you fix the activation error, but if not, you can always contact Microsoft support. Feel free to check our generic guide on solving general Windows activation issues.

If your problem persists, please let us know in the comment section. We will check for further solutions.

How to Delete the Windows.old Folder on Windows 11

Some users recently came up with a Windows.old delete Windows 11 request to save up space on their PC. Windows automatically removes the Windows.old folder after a month, but if you can’t wait till then, we have provided some methods to delete the Windows.old folder.

Do you need the Windows.old folder on your PC?

The Windows.old folder takes some space on your Windows 11 PC, but here are some arguments for whether or not you should delete it:

  • Windows Recovery Option – In the case where the installation process failed while installing a new version of Windows 11 PC, you can easily revert to the previous version of Windows using Windows.old folder.
  • Insufficient disk space – If you desperately need more usable storage space, delete the Windows.old folder will release several gigabytes of disk space for you.

With the reasons provided above, you should be able to decide whether to delete or keep Windows.old folder on your Windows 11 PC.

How do I remove the Windows.old folder on Windows 11?

1. Use File Explorer

  1. Press the Windows + E keys to open File Explorer.
  2. Click on This PC and navigate to the C: drive.
  3. Next, scroll down to Windows.old folder and right-click on it. Click on the Recycle bin icon to Delete.
  4. Once prompted, click Continue to provide administrator permission to delete the folder.
  5. Alternatively, you may hold the Shift key and press the Delete button to permanently delete the folder and all its contents.

If the Windows.old folder is for another user, you will need to take ownership of the folder before it can be deleted.

2. Use Disk Cleanup

  1. Press the Windows + R keys to open the Run dialog box. Type cleanmgr in the text field, and then press Enter.
  2. Select This PC from the left-side pane. Right-click on the C: drive on the right pane and select Properties.
  3. Click on the Disk Cleanup button under the General tab.
  4. Select Clean up the system at the bottom of the page. Wait for Disk Cleanup to scan your PC for unused files.
  5. Once the process is complete, scroll down and select the Previous Windows Installation(s) option, which is also the Windows.old folder.
  6. Check the boxes to select what you want to delete and click OK.
  7. Next, select Delete Files from the pop-up window to confirm the deletion.
  8. Click on Yes if you get another prompt.

Deleting the Windows.old folder will not affect your PC anyhow. You have to be sure you’re ready to let go of it if you’re okay with your current Windows version.

3. Via Storage Sense

  1. Press the Windows button, type Storage Sense in the search bar, and launch it.
  2. Locate Storage management and toggle On the Storage Sense option under it.
  3. Next, click the right arrow beside Storage Sense to access more options. Then click on the Run Storage Sense now button.
  4. Storage Sense will begin the cleaning process.

Storage Sense can remove unwanted files such as thumbnails, error reports, cache files, and previous installation files, and even empties the Recycle bin.

And that’s how to remove Windows.old folder on Windows 11 PC. Hopefully, one or all of these steps will be easy for you to navigate.

Speaking of other Windows folders, several users reported multiple Windows folders in the C drive, and we have a great guide on how to delete Windows folders in C drive, so don’t miss it.

Alternatively, if the sole objective of deleting the Windows.old folder was to clear storage, you can also here for other ways to free up disk space.

If you have any questions or suggestions, do not hesitate to use the comments section below.

5 Ways to Fix Group Policy When It Keeps Reverting

Have you encountered an issue where Group Policy keeps reverting? It turns out that this is a common issue. Group Policy settings in Windows are used to keep devices up-to-date and compliant with settings.

However, at times, Group Policy is stuck at applying, or the Local Group Policy keeps reverting your changes. This is no fun at all, but let’s look at ways to make your changes long-lasting, shall we?

Why do Group Policy settings keep reverting?

If you have been working with Group Policy for a while, you may have noticed that now and then, it seems like the policies don’t stick. After applying Group Policy changes, the next time you log in, the policies have reverted to their previous state. 

Wondering why this happens? Here are a few reasons:

  • Policies are not applied correctly – The most common cause of this issue is that policies are not applied correctly. If you have a lot of domain controllers, there can be delays in applying the policies due to replication. This can result in the policies being applied on one domain controller but not another. 
  • Incorrect permissions – To apply Group Policy, your user account must have permission to edit group policies on the target computer. If you don’t have permission to perform this operation, any changes made through group policies will be lost until they are applied again by an administrator account.
  • Conflict in GPOs – The Group Policy settings you have created for your domain can be managed using a tool called the Group Policy Management Console (GPMC). This tool allows you to manage the GPOs in your domain and view their settings. If there is a conflict between two GPOs in your network, GPMC will display an error message and revert the GPOs.
  • Corrupt user profile – If your user profile is corrupted then this can cause issues with group policies. In order for group policies to work properly, all users must have their profiles configured correctly. If any of your users’ profiles are corrupt, then group policies won’t be applied correctly and will need to be reverted back to their default state. 

So let’s look at how we can fix it.

How can I fix Group Policy when it keeps reverting?

Before you start troubleshooting Group Policy, it’s important to perform preliminary checks to ensure that the problem isn’t something else. To do this, follow these steps:

If none work, head to the solutions listed next.

1. Refresh policy settings

  1. Hit the Windows key, type cmd, and select Run as administrator.cmd-run-admin-w11 unexpected kernel mode trap windows 11
  2. Type in the following command and press Enter: GPupdate/force

2. Reset Group Policy Editor

  1. Hit the Windows key, type cmd, and select Run as administrator.cmd-run-admin-w11 unexpected kernel mode trap windows 11
  2. Type in the following commands and press Enter after each one: RD /S /Q "%WinDir%\System32\GroupPolicyUsers" && RD /S /Q "%WinDir%\System32\GroupPolicy" gpupdate /force
  3. Restart your PC.

3. Restart Group Policy Service

  1. Press the Windows + R keys simultaneously to open the Run command.
  2. Type in services.msc, then press Enter.
  3. Navigate to the Group Policy Client, right-click and select Properties.Group Policy Client Properties
  4. Select the General tab and change the Startup type to Automatic.
  5. Click on Start, then Apply.
  6. Hit OK to save the changes.

4. Use GPMC to troubleshoot

GPMC is a great tool for managing Group Policy in your network environment. If you have already installed it but aren’t using it regularly, spend some time learning how to use it properly — it will make managing Group Policy much easier.

One such way is that it can gather information and help troubleshoot why Group Policy keeps reverting and other related issues.

You may also encounter an issue where Group Policy is slow in generating reports, but we have covered how to boost speed in our detailed guide.

Also, check out what steps you should take if you find out that your version of Windows doesn’t have the Group Policy Editor.

Let us know whether you have been able to resolve this issue in the comments section below.

Why Does My PC Screen Turn Off and Fans Speed Up? [Fix]

A Windows PC can be very noisy, especially when it comes to the fans that help keep things cool. If you use your PC for gaming or work purposes, you might have noticed that the fans on your computer start spinning faster when you’re in the middle of a game or working on a big project.

This is perfectly normal and nothing to worry about. However, if the fans speed up and your PC screen goes off, this should be a cause for concern. Find out what to do if this happens to you.

Why does my PC screen turn off and fans speed up? 

If you’re wondering why your fans are running at high speed and you have a black screen, below are some possible causes:

  • Overheating – If your computer is overheating, it may turn off to protect itself. Overheating can be caused by several factors, including dust buildup and fans not running at full capacity.
  • Hard drive failure – A hard drive failure will often produce strange noises from the drive itself and cause other issues such as blue screens or crashes during bootup and the use of programs on the computer. 
  • You have a virus in your computer – If you have a virus on your computer, it can be very dangerous and slow down your system or even crash it completely.
  • Overclocking – Overclocked computers can overheat and turn off when the temperature reaches a certain point. The cooling fans are not strong enough to cool down the CPU, so they have to shut off until the temperatures go down.

What do I do if my computer has a black screen but still running?

Apply the following basic steps first before advanced troubleshooting:

  • Ensure your computer case is placed in a position with free air circulation.
  • Check if any of the fans are broken or clogged with dust or debris, then clean them out or replace them as needed.
  • Monitor the fan speed and adjust accordingly.
  • Check for any loose wires or cables that may have come loose over time due to wear and tear.
  • Disable any overclocking software.

1. Check for Windows Updates 

  1. Hit the Start Menu icon and click on Settings.settings windows 11
  2. Select Windows Update and click on Check for updates.check-updates-w11 windows 11 blue screen
  3. Download and install if available.

2. Update graphic drivers 

  1. Click on the Windows button, type Device Manager in the search bar, and select Open.device manager w11
  2. Navigate to Display adapters and click to expand, right-click on your graphics card and select Update driver.Graphic Driver Update
  3. Select Search automatically for drivers.

While this method works well most of the time, not every user enjoys going through multiple steps to update a driver. A good number appreciates a good driver updater utility that can do the work automatically.

Outbyte Driver Updater is the tool you need to comprehensively scan drivers from its huge database and replace them with the correct ones.

Outbyte Driver Updater

Let Outbyte Driver Updater find the right versions for your drivers in a minute.
Free Trial Download now

3. Rollback previous graphic drivers 

  1. Click on the Search icon, type Device Manager in the search bar and click Open.device manager w11
  2. Navigate to Display adapters and click to expand, right-click on your graphics card and select Properties.properties
  3. Click on the Driver tab, and select Roll Back Driver.Roll back graphics driver
  4. Select a reason for rolling back in the next prompt, then click Yes.
  5. Restart your PC, and the previously installed drivers for your device will be loaded.

4. Reinstall your graphic driver

  1. Click on the Search icon, type Device Manager in the search bar and click Open.device manager w11
  2. Navigate to Display adapters and click to expand, right-click on your graphics card and select Uninstall.Uninstall graphics driver dcom error 1084
  3. Confirm uninstallation in the next dialog box.Uninstall graphics driver
  4. Restart your PC and the drivers will automatically be reinstalled.

5. Run a virus scan 

  1. Press the Start menu icon, search Windows Security, and click Open.
  2. Select Virus & threat protection.
  3. Next, press Quick scan under Current threats.
  4. If you don’t find any threats, proceed to perform a full scan by clicking on Scan options just below Quick scan.Scan options
  5. Click on Full scan then Scan now to perform a deep scan of your PC.Full Scan Scan Now
  6. Wait for the process to finish and restart your system.

6. Uninstall/disable antivirus software

  1. Hit the Start menu icon, type Windows Security in the search bar and click Open.
  2. Click on Firewall & network protection, then select Public network.league of legends black screen after champion select
  3. Locate Microsoft Defender Firewall and toggle the off button.turning off Microsoft Defender Firewall Windows

7. Perform a clean boot

  1. Hit the Windows key, type msconfig, and open System Configuration.
  2. Switch to the Services tab and select Hide all Microsoft services.
  3. Click on the Disable all button, then hit the Apply button to save the changes.
  4. Go back and click on the Startup tab, select Open Task Manager then click OK.
  5. In the Startup tab of the Task Manager, Disable all the Enabled startup items.
  6. Close Task Manager and restart your PC.

Another option we recommend as a last resort is resetting your BIOS. Your BIOS controls devices such as hard drives and processors, performs system initialization and testing, and provides access to advanced setup features. 

Resetting your BIOS will clear all of your customizations and settings. This includes things like overclocking your processor and changing the boot order.

You should only reset your BIOS if it has been corrupted or tampered with or if you need to troubleshoot a hardware issue preventing the system from booting properly.

That’s all we had for this article, but be sure to check other related articles, such as when the fan keeps spinning. Also, if the screen turns off when you connect the charger, it could have to do with the misconfigured power settings. Check and rectify that.

Before you leave, don’t miss our guide on what to do if the monitor keeps turning off and on for more useful solutions.

Let us know which solution fixed the issue in the comment section below.