Hearthstone not Responding: Repair it With These 7 Fixes

Hearthstone is currently one of the most popular trading card games on PC, but users report having issues with Hearthstone and Windows 10. In some cases, Hearthstone is not responding.

Here we will cover some of the most common issues and try to resolve them. For example, users have reported having game lagging and black screen issues, so let’s see if we can fix them.

Why am I stuck at the loading screen of Hearthstone?

You are stuck at the loading screen in Hearthstone for many reasons. Some common causes include:

  • Network connection issues – A weak or unstable network connection can cause problems loading the game.
  • Outdated drivers – Outdated drivers can cause compatibility issues with the game, causing it to get stuck at the loading screen.
  • Incompatible software – Other software running on your device may conflict with Hearthstone, causing it to get stuck at the loading screen.
  • Corrupted game files – Corrupted game files can cause issues when loading the game, leading to it getting stuck at the loading screen.
  • System compatibility issues – If your device does not meet the system requirements for Hearthstone, it may get stuck at the loading screen.

What are other common Hearthstone problems?

Here are some common Hearthstone issues that users reported:

  • Hearthstone not working on PC – The most likely cause is your drivers. First, update your display drivers to the latest version and check if that solves the problem.
  • Hearthstone connection, lag issues, latency issues PC – Can be caused by your DNS, but you can fix them by switching to Google’s DNS. You can also try restarting your router.
  • Hearthstone not loading – Your antivirus usually causes this, so be sure to add Hearthstone to the list of exceptions.
  • Hearthstone fps, freezing issues – The issue might be the process priority or affinity. You can fix this right from Task Manager.
  • Hearthstone startup issues and launch problems – If this happens, ensure you use a dedicated GPU. You might have to disable the built-in GPU from BIOS to fix this issue.

With that out of the way, below are our top recommended fixes.

How can I fix Hearthstone if it’s not responding?

Before you try any of the solutions listed below, restart your device and reboot your router. Connection issues are a significant trigger, and these two steps may be necessary for removing processes that spoil the connection.

1. Keep your display drivers up to date

Many users have reported stuttering issues on Windows 10, and it has been reported that updating your display drivers to the latest version fixes these issues.

Nvidia users have confirmed that the latest drivers are fixing the stuttering problems, but it won’t hurt to update your drivers if you’re an AMD user.

We recommend Outbyte Driver Updater to download all outdated drivers on your PC automatically. The process is automatic and a lot safer than looking for drivers yourself.

Start by downloading and installing this great tool. After the installation, the software will start automatically and look for driver issues or updates for your system.

The result will come after a few seconds in the form of a list with recommended drivers to update.

The rest is a formality; you have to click on the Update All button to install all the drivers at once or check the individual boxes for each driver to install them separately.

Outbyte Driver Updater

Using Outbyte Driver Updater, you will solve the Hearthstone problem and return to what’s important: playing the game!
Free trial Visit website

2. Check your antivirus and disable it

  1. Click on the hidden access arrow in the Taskbar.
    hearthstone not responding
  2. Click on your antivirus icon, hover over Avast shields Control and select Disable for 10 minutes (This step varies for different antivirus software).

If you’re having Hearthstone issues on your PC, your antivirus may be the cause. Unfortunately, sometimes a third-party antivirus can interfere with your system, and that will cause this and many other errors to occur.

Apart from disabling the antivirus, you may ensure that Hearthstone is added to the list of exceptions in your antivirus and firewall.

However, if disabling the antivirus doesn’t help, your next step would be to uninstall your antivirus. Several users reported that removing their antivirus solved the issue, so try that.

A couple of users reported that McAfee caused this problem. Once the antivirus is removed, check if the problem is still there.

If removing the antivirus solves the problem, you should consider switching to a different antivirus solution.

The best antiviruses compatible with Windows 10 PCs will protect your system in real time without causing any errors.

3. Add Hearthstone to the Windows Defender Exclusions list

  1. Press the Windows Key + I to open the Settings app.
  2. Go to the Update & Security section.
  3. Select Windows Defender from the menu on the left and choose Open Windows Defender Security Center from the right pane.
    Hearthstone freezing issues
  4. Go to the Virus & threat protection.
  5. Navigate to Virus & threat protection settings.
  6. Select Add or remove exclusions.
  7. Click Add an exclusion, select Folder, and choose Hearthstone’s directory.

Check if the issue of Hearthstone not responding is resolved.

4. Delete the Hearthstone folder from AppData

  1. Press Windows Key + R, type %localappdata%, and press Enter.
    Hearthstone not loading
  2. Go to the BlizzardHearthstone directory.
  3. Delete the Hearthstone folder, or move it to your Desktop or any other location.
  4. Start the game now and see if the stuttering issues persist.

5. Disable Switchable graphics from BIOS

  1. When your computer boots, keep pressing Delete, F2, or F12 to enter BIOS.
  2. Locate the Switchable graphics and turn them off.
    hearthstone not responding
  3. Make sure that you save the changes.

Note: This solution only works if you have both integrated and dedicated graphics cards.

6. Use Google DNS

  1. Click the network icon on your Taskbar and select your network.
    Hearthstone fps issues
  2. Select Change adapter options.
  3. Right-click your network connection and choose Properties.
    Hearthstone not working on PC
  4. Select Internet Protocol Version 4 (TCP/IPv4) and click the Properties button.
    Hearthstone not working on PC
  5. Select Use the following DNS server addresses. Be sure to enter 8.8.8.8 as the Preferred and 8.8.4.4 as the Alternate DNS server. Click OK to save the changes.
    Hearthstone connection issues PC

Note: Keep in mind that switching to Google’s DNS can cause some latency issues, but that won’t be a problem for a game such as Hearthstone.

7. Change Hearthstone’s priority and affinity

  1. Start Hearthstone, and press Alt + Tab to minimize the game.
  2. Press Ctrl + Shift + Esc to open the Task Manager, go to the Details tab, and locate Hearthstone on the list.
  3. Right-click Hearthstone and, choose Set priority, set any other value higher than normal (some users even suggest using Realtime value, but that might cause issues on your PC).
    Hearthstone fps issues
  4. Right-click the Hearthstone process again and choose Set affinity.
    Hearthstone startup issues
  5. Ensure only the CPU 0 is checked and disable all the rest. Click OK.
    Hearthstone not working on PC

Note: Keep in mind that this is just a workaround, so you’ll have to repeat it every time you want to start Hearthstone.

Hearthstone is a great, widely-popular game, so that possible issues could spoil users’ experience. The Hearthstone not responding is one such issue.

However, we hope this article helped you solve all your problems with Hearthstone and that you can play the game without any interruptions now.

If you have any comments or questions, leave us a line in the comments section below.

NordVPN Not Working on Windows 11: 4 Easy Ways to Fix It

Many applications have issues with the latest version of Windows, and many reported that NordVPN is not working on Windows 11.

If this happens, NordVPN won’t connect and you won’t be able to protect your privacy. In this article, we will show you how to fix this issue for good. But first, let’s see what are the reasons for this problem and try to understand the issue.

Why is NordVPN not working on my Windows 11 PC?

The problem is that NordVPN can’t connect to the NordLynx adapter and which is a VPN protocol that helps improve the connection to a server. Additional causes include:

  • Compatibility issues – Certain software might not be fully compatible with Windows 11 yet, and that can lead to issues such as this one.
  • Tunnel drivers – Issues with drivers can cause this problem. If that happens, you need to remove and manually install drivers.
  • Registry issues – Sometimes registry keys will interfere with your software, and to fix that you’ll need to manually remove them using Registry Editor.

In addition to that, the users reported other issues with NordVPN software on Windows 11 and these are as follows:

  • Failed to turn on NordLynx Windows 11 (NordLynx adapter can’t be reached Windows 11)
  • NordVPN won’t open Windows 11
  • Can’t add NordVPN to Windows 11
  • NordLynx tunnel Windows 11 unreachable
  • NordVPN not working after the update to Windows 11

However, you can still go through our list including the best VPNs that work on Windows 11, and choose the right one for your needs.

Other reliable VPNs for Windows 11 that you can trust

Rest assured that there are alternatives to this VPN software if you just can’t get it to function on Windows 11.

Hence, if you tried to fix NordVPN multiple times and it doesn’t work, consider the following market-leading VPN apps that are compatible with your Windows 11 PC:

➡️ Private Internet Access – The highest VPN servers you can connect to increase your Internet speed

➡️ Surfshark – Affordable price and access to unlimited devices to fast VPN servers

➡️ ExpressVPN – Extensive server network in 90 different regions

➡️ CyberGhost – Comprehensive anonymity tools with 100% digital privacy

➡️ IP Vanish – Extremely secure VPN connection with WireGuard fast speeds

All being said, you can opt-in for any other professional VPN from here and get full privacy on your Windows 11 device.

How can I fix NordVPN not working on Windows 11?

1. Run the app in Compatibility mode

  1. Press the Windows key + E to start a File Explorer window and navigate to the NordVPN installation folder. You should find it in the Program Files folder.
  2. Right-click on the executable file and select Properties from the menu.
  3. Now, move to the Compatibility tab, check the box for Run this program in compatibility mode and select Windows 7 from the list.
  4. Click on Apply, then OK and see if the app works fine now.

Some of our readers reported that running NordVPN in Compatibility mode fixed the problem for them so you should definitely try it.

However, this solution doesn’t work for all users and if you’re one of them, move to the next.

2. Change the VPN settings

  1. Click on the gear icon found in the top right corner of the NordVPN app.
  2. Select the Auto Connect option from the left side menu.
  3. Disable the Choose a VPN protocol and server automatically setting.
  4. Click the toogle and choose the OpenVPN (TCP) protocol.

As you can see, it is extremely easy to change this option, and it fixes the NordVPN problem on Windows 11, so make sure to perform this procedure as fast as possible.

3. Reinstall the tunnel drivers

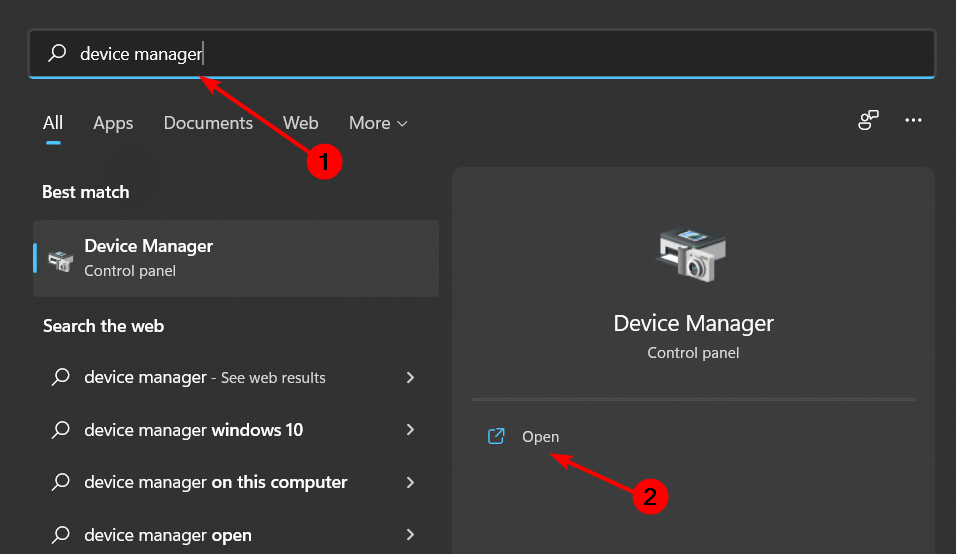
  1. Click the Search icon from the taskbar, type device manager, and open the app from the results.
  2. Expand the Network adapters section, right-click NordVPN Tunneling, and select Uninstall device.
  3. Close the window, click the Search icon again, type control panel and select the app from the results.
  4. Now, click on the Uninstall a program option.
  5. Look for NordVPN Network TUN, right click it and select Uninstall.
  6. After uninstalling the program, restart your PC.
  7. Download the latest NordVPN TUN drivers and install them.

If the step was not too detailed, you may check our guide on how to update your drivers on Windows 11 for more information.

This will be also useful for the next step when you will need to uninstall and reinstall NordVPN.

4. Reinstall NordVPN

  1. Click the Search icon, type control panel, and select the app from the results.
  2. Choose the Uninstall a program option.
  3. Find NordVPN in the list of apps, right click on it and select Uninstall.
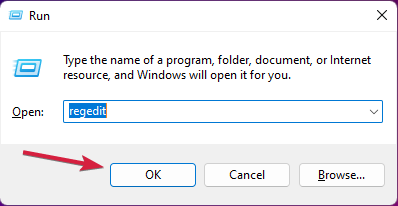
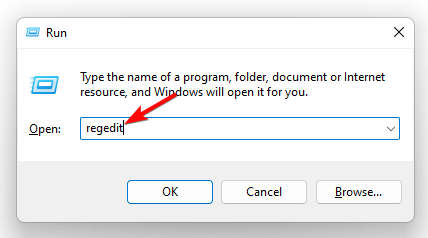
  4. After finishing the uninstallation, close the window, press the Windows key + R to start Run, type regedit and press Enter or click OK.
  5. Click on the Edit tab and select Find.
  6. Type NordVPN in the Seach tab and click on Find Next, then delete all the keys associated with the VPN.
  7. Restart your PC and install a fresh copy of NordVPN.

Before starting the application, you need to back up your registry like this:

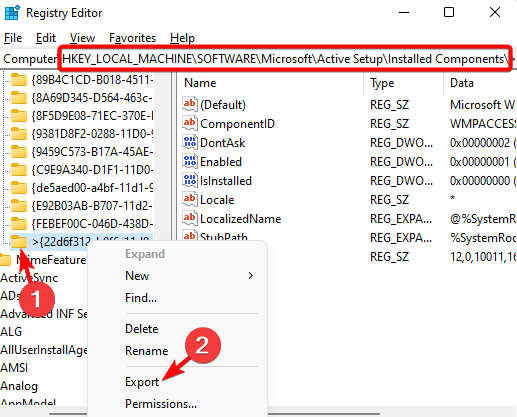
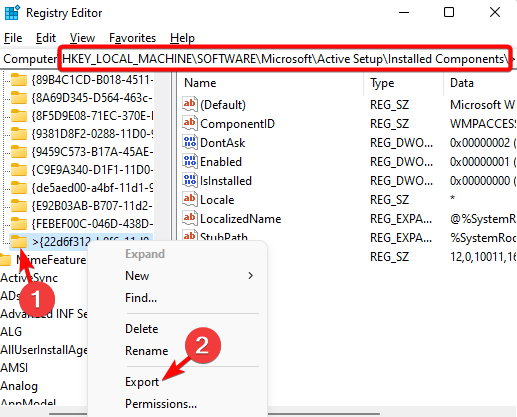
  1. Open Registry Editor.
  2. Search for NordVPN.
  3. Right-click the keys that contain NordVPN and choose Export.
  4. Name the file and choose a save location. Click on Save.
  5. Repeat these steps for all the keys that contain NordVPN.
  6. Start NordVPN again.

In case the problem appears again, simply run exported reg files to fix the problem.

If you don’t feel confident about manually removing the keys from the Registry, it’s a lot safer to use a dedicated repair tool.

It will do the job a lot faster and it will make sure that there are no leftovers after uninstalling NordVPN.

So there finally is a way that we can get NordVPN to function on the new OS. It’s a bit of a tricky process, but nothing out of the ordinary, even by Microsoft standards.

This solution is the quickest way to access the NordLynx protocol, and it spares you the trouble of having to re-image Windows again.

There are, more than likely, other VPN providers that can still offer their services, even on the new developers’ build of Windows 11, but these are the most popular and sought-after.

Remember that, as we mentioned above, NordVPN still works for some users, so you can also go ahead and give that a try. .

Have you tried Windows 11? If so, what VPN works for you on the new OS? Let us know in the comments section below.

Xbox Friend List Disappeared: How to Finally Fix It

Xbox Live Friend lists allow users to add, follow, and keep up with players via messaging and games and view their activity feed.

Sadly, some complain that their Xbox Friends list disappeared from their PC, Xbox One, and Xbox Series X consoles. This is still a common issue in 2024.

Why can’t I see my friends online on Xbox One?

Xbox Friends list not showing can occur in various instances. It can be that the user can’t see anyone on the Friends list, while some can see a few friends, but their complete list of friends is not showing.

Furthermore, the Xbox One and Xbox Series X consoles not showing friends on the Xbox Live Friends list can be due to many factors. Some factors that may be responsible for the error are:

  • Xbox server issues – When Xbox servers are down or not running as they should, it can affect the console’s abilities and it can cause problems accessing its Friends list.
  • Network connection issues – Users can encounter problems accessing their Friends list due to network connection problems on the Xbox console or app.
  • Bug-related and other Xbox issues – The Xbox app on your device may be affected by bugs, causing it to malfunction. Also, startup errors on the Xbox console can cause the Friends list not to appear.

What can I do if my Xbox friend list disappeared?

1. Power cycle your Xbox console

  1. Press the Power button on the Xbox console for ten seconds to remove any residual energy.Press Xbox power button
  2. Unplug the power cable from the console and wait for 1–2 minutes.
  3. Connect the power cable back into the console and press the Power button to turn it on.
  4. After the Xbox is fully booted, try to access your friends list and see if it appears.

Power cycling the Xbox console will fix startup errors causing activity problems.

2. Restart Windows in Safe Mode

  1. Click the Start button and select Settings.
  2. Choose Update & Security.
  3. Click on Recovery from the left pane, then click on Restart now under Advanced startup.
  4. After rebooting, you will get the Advanced Recovery Options page.
  5. Click on Troubleshoot, then select the Advanced options.WinRE troubleshoot
  6. Click on Startup Settings.Click the startup settings
  7. Press 4 to Enable Safe Mode and select Restart.Press 4 to Enable Safe Mode

Restarting Windows in Safe Mode will resolve startup issues that may affect the Xbox app on your PC.

3. Check your Friends list online

  1. Launch a browser on your PC.
  2. Go to Xbox.com and sign in with your Xbox Live login credential.
  3. Click on your Profile icon.Go to your Xbox profile
  4. Select Friends. Check if your Friends list appears and is complete.Select your Xbox friend list

Microsoft allows users to add to remove friends and interact with their friends list via their Xbox Live account online. We recommend you check your friends list online to know if the problem comes from the Xbox app or console.

4. Reset the Xbox console

  1. Power on your Xbox console and press the Xbox button on the controller to prompt the guide overlay.
  2. Select the System menu and click on Settings.Xbox settings
  3. Click on System to expand it and select Console info from the drop-down.Locate your Console info
  4. Click on Reset Console.
  5. Choose between Remove everything or Reset and keep my games & apps.Click on reset console

The Remove everything will delete all data and games, while the Reset console option will restore default factory settings.

You can also:

  • Fix network congestion on your PC. Restarting your router might help as well.
  • Restart your PC, Xbox One, or Xbox Series X console.
  • Check the Xbox server’s status: Users can experience issues with Xbox servers when a maintenance session occurs or the servers are down. You can visit the Xbox server status page to check for any updates.

Check our article on fixing the Xbox controller that is detected but not working if you have an issue with it.

Alternatively, our readers can check our guide about Xbox Live Networking Service missing and how to fix it. Likewise, you can read our guide if you cannot sign in to the Xbox account on your PC.

Nonetheless, you can check what to do if you can’t add a user to a friends list on Xbox or alternatively, add your Xbox friends on your PS5.

We hope you know what to do if your Xbox friend list disappears again. If you have further questions or suggestions, kindly drop them in the comments section.

How to Run Old Games on Windows 10: 6 Easy Ways to do it

We all get nostalgic sometimes, and we remember the games we used to play on our old PC, but can we still play them on Windows 10?

The answer is affirmative, but the process is not always straightforward. This guide will show the steps you need to follow to enjoy your favorite classic games on your Windows 10 PC.

Is there a way to play old PC games?

What you can do to see whether you can run old games in Windows 10 is make sure you follow these general guidelines:

  • Run the game as administrator: Some old games will run naturally on Windows 10. First, however, you need to run the executable file as an admin.
  • Enable compatibility mode: Windows 10 has a feature that allows you to run games in the compatibility mode of an older OS. Hence, you can use this feature if you have an old game from your previous OS.
  • Use DOSBox for really old Dos games: If you are looking for how to run old Dos games on Windows 10, this should be your preferred option. This is because DOSBox is an old PC game emulator that allows you to run your Dos games on any PC.
  • Try using a virtual machine: This involves using a virtual machine to run an older operating system on Windows 10. You can run your old game in the virtual machine window.
  • Run the program troubleshooter on the game: Another excellent feature of Windows 10 is the program compatibility troubleshooter. This helps you diagnose compatibility issues and reset some crucial features needed to run your old game.

How can I run old games on Windows 10?

1. Run the game as admin

  1. Right-click the game’s executable file or shortcut and select the Properties option.
    properties run old games on Windows 10
  2. Click the Compatibility tab at the top.
  3. Now, check the box for Run this program as an administrator.
  4. Finally, click the Apply button, followed by OK to save the changes.
    run as admin

The first thing to do it run your old games on Windows 10 is to start their shortcuts or executable files as admin. With this, the game will have the required privileges to run successfully.

2. Run Old Games in Compatibility Mode

    The most recommended method to play old PC games on your Windows 10 device is to use the Compatibility Mode setting. It is easier than having to run the game as an Administrator every time you open it.

    From the Compatibility menu, you can also enable the following settings: reduced color mode, running in 640 x 480 resolution, running the program as an Admin and registering the program for restart.

  1. 1. Navigate to desktop shortcut of your game or to its .exe file in the installation folder.

  2. 2. Right-click on the .exe file to bring up a menu.

  3. 3. In the menu, click on Properties.

    how to play old games on windows 10 properties
  4. 4. Navigate to the Compatibility tab in the upper side of the window.

    compatibility tab how to play old pc games on windows 10
  5. 5. Here you can find the Compatibility Mode section.

    how to play old pc games on windows 10 compatibility mode run
  6. 6. Check the box below this section and select from the drop-down menu which OS you want to run the game to run in compatibility mode for.

  7. 7. Click on Apply and OK to save the changes.

3. Use the Programs compatibility troubleshooter

  1. Press the Windows key, type program compatibility, and select Run programs made for older versions of Windows.
    compatibility
  2. Select the Advanced option.
    advanced how to run old games on Windows 10
  3. Now, choose Run as administrator and click the Next button.
    run next
  4. Wait for the scan to complete, and select Not Listed, followed by the Next option if your game is not among the listed files.
  5. Next, select your game’s executable file or shortcut.
  6. Finally, click Try recommended settings and follow the onscreen instructions to complete the process.

You should use the program compatibility troubleshooter if you still can’t run your old games on Windows 10 after the two methods above. This will help eliminate any compatibility issue that is blocking the game.

4. Try different compatibility settings

  1. Right-click the game’s executable file or shortcut and select Properties.
    properties run old games on Windows 10
  2. Click the Compatibility tab at the top.
    compatibility feature
  3. Now, enable the options below one after another and check if the problem is solved:
    • Reduce color mode
    • Run in 640×480 screen resolution
    • Disable display scaling on high DPI settings

Another excellent way of running your old games on Windows 10 is to try different compatibility settings. This is because one of the high compatibility settings on your PC might prevent you from playing the old game.

5. Disable driver Signature Enforcement

  1. Press the Windows key + I and select the Update & Security option.
    update and security how to run old games on Windows 10
  2. Select the Recovery tab in the left pane and click the Restart now button under Advanced startup.
    restart now
  3. When your PC restarts, choose Troubleshoot > Advanced options.
    advanced options
  4. Now, select Startup Settings.
    startup settings how to run old games on Windows 10
  5. Next, click the Restart button.
    restart how to run old games on Windows 10
  6. Finally, press 7 or F7 when your PC restarts to Disable driver signature enforcement.
    disable driver

The driver signature enforcement feature protects your PC from installing unsigned drivers. However, these latest drivers might prevent your old games from running on Windows 10.

So, you need to disable this feature and check if you can run your games. The only downside is that your PC will be a bit vulnerable. But it might be a temporary tradeoff that is worth it, depending on how much you want to play your favorite classic game.

6. Use a Virtual Machine or Emulator

If you still can’t run your old games after applying the solutions above, you should try using a Virtual Machine. With this, you can create a Windows XP mode on your PC and play the game on the window.

This method is helpful if you want to know how to play old 90s games on Windows 10. However, there is a caveat here as the success of the whole thing depends on the effectiveness of the Virtual Machine app.

Also, most VMs boast limited hardware support, which can affect your gaming.

Lastly, if you want to run old Dos games, the best thing to do is to use DOSBox. This free application will allow you to run Dos games and apps on your PC without issues.

Note icon NOTE
Note: If your games use SafeDisc or SecuROM DRM, Windows 10 won’t run them properly. In order words, due to digital rights management schemes, some older games on CDs or DVDs will be affected by installation issues on the latest Windows OS version.

With this, we can conclude this guide on how to run old games on Windows 10. We believe you now have everything to achieve this feat effortlessly.

Feel free to let us know in the comments below if you have any other suggestions.

Cowin Headphones not Working: Use These 5 Solutions

Bluetooth headphones are praised for their ability to deliver quality sound without cables, so the headphones industry has embraced this technology and has started producing it on a scale.

Considering the balance between price and performance, you can easily understand why Cowin Bluetooth headphones are so popular among users.

If you have a pair of Cowin headphones but are experiencing some troubles with them, this guide is for you. This post will list several solutions and suggestions to help you fix your problem.

Why are my Cowin headphones not working?

There could be many reasons why your Cowin headphones are not working, including the following:

  • Battery issues – Ensure your headphones are fully charged and that the battery is not damaged.
  • Connectivity issues – If your headphones are not paired correctly with the device you want to use them with, they will not work.
  • Damaged or loose Cables – Check to see if any cables are damaged or not connected correctly because they may trigger this problem.
  • Volume Control – If the volume is not turned up on both the device and the headphones, you may not know if it is responding.
  • Audio Settings – Verify that the audio settings on your device are not set to mute or low volume.

With the common causes out of the way, the solutions below should come in handy.

How do I fix Cowin headphones if they are not working?

Before going into these solutions, you should check if the problem is from the PC or the Bluetooth. You should see if any Bluetooth devices can be connected to your computer.

If you cannot connect other Bluetooth devices to your PC, the issue is not with your headphones; it is a Bluetooth issue with your computer. Also, you should check if your Cowin headphones work on another device.

Also, it would be best to verify that you are not already connected to a different device. Because if your headphones still do not connect, it might be that they are connected to another device.

  1. Use a third-party software
  2. Verify the headphones pair
  3. Reset your Cowin Bluetooth headphones
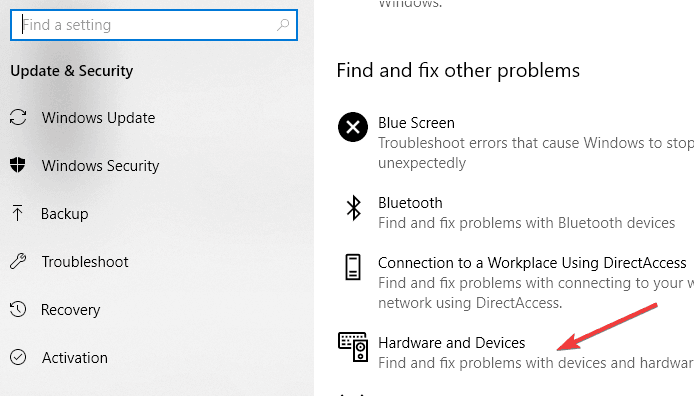
  4. Use the Hardware and device troubleshooter
  5. Restart your Bluetooth service

1. Use a third-party software

updated outdated drivers

Connection issues can sometimes happen due to outdated drivers. To ensure they are up to date, we recommend using a dedicated tool.

In that matter, after several tests made by our team, we strongly recommend using DriverFrix.

The program will automatically scan your PC for outdated drivers, check your installed driver versions against its cloud database of the latest versions, and recommend proper updates.

Once the scan process is completed, you will get a report on all problem drivers on your PC. Review the list and see if you want to update each driver individually or all at once.

Outbyte Driver Updater

Detect and update all of your missing drivers to keep your device run smoothly with this fast and reliable software. Try it now!
Free Trial Download now

2. Verify the headphones pair

  1. Turn the Cowin headphones into BT (Bluetooth) or NC (Bluetooth Noise Cancelling) mode.
  2. Turn on your computer and open Settings by pressing Windows + I. Now select Devices.
    cowin headphones not working
  3. Click on Bluetooth & other devices and turn on the Bluetooth toggle switch.bluetooth on
  4. Navigate to Add Bluetooth or other device button.add bluetooth or other device
  5. Choose your Cowin headphones from the list of devices.
  6. Click the Connect button to pair, and then click the Done button.

3. Reset your Cowin Bluetooth headphones

  1. Remove the battery cover on the left earcup by using the finger slot on top of the battery cover under the base of the headband.
  2. Quickly remove the battery by using the finger slot provided.
  3. Reinsert the battery.
  4. Reverse the process, ensuring the battery cover is put back in the same orientation as when it was removed.

4. Use the Hardware and device troubleshooter

  1. Type troubleshoot in the search box and press Enter.troubleshoot
  2. In the Troubleshooting window, go to Find and fix other problems and choose Hardware and Devices.
    troubleshoot hardware and devices
  3. Click on Run the troubleshooter and click Next to run the troubleshooter.
  4. Follow the on-screen directions to complete the task.

5. Restart your Bluetooth service

  1. Press the Windows and R keys at the same time.
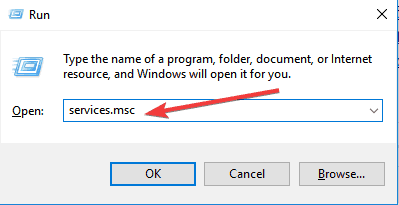
  2. Type services.msc and press Enter.
    services.msc
  3. Right-click on Bluetooth Support Service and click Restart.restart Bluetooth support service
  4. Right-click on the Bluetooth service again and click on Properties.
  5. Set the Startup type to Automatic and then click OK.start up type automatic
  6. Reboot your computer and try to connect your Cowin headphones again.

Hopefully, the solutions helped you to fix your Cowin headphones problems. Please comment below if you have other troubleshooting methods to fix this issue.

Visio Not Installing: 4 Methods You Can Use to Fix It

Microsoft Visio Pro is diagram software for users to set up flowcharts based on real-time data. However, Visio can throw up a few setup error messages when users try to install it.

Visio installation errors often arise due to compatibility issues between Visio and 32 & 64-bit MS Office suite versions.

Why is Visio not installing?

From experience with users, we figure there are a couple of reasons for Visio not installing:

  • Insufficient System Requirements -Visio may not install if your system does not meet the minimum requirements.
  • Software Conflicts – The installation process may be blocked if there are conflicts with other installed software on your system. 
  • Corrupted Installation File – If the installation file for Visio is corrupt, the installation process may fail. 
  • Licensing Issues – The installation may fail if you do not have a valid license for Visio. 
  • Malware or Virus – Malware or virus infections on your system may cause installation errors.
  • Disk Space – If your system does not have enough disk space, Visio may not install.
  • Windows Updates – Ensure that your system has installed the latest updates, and an outdated operating system may cause issues during installation.
  • User Account Control (UAC) – The User Account Control settings on your system may be blocking the installation of Visio. 

Once you know the cause, it is easier to know what action to take. So we will explore some of the best solutions you may explore.

What can I do if Visio is not installing?

Before going into any solutions, you may consider using an alternative. That being the case, there is no better option for you than Adobe Illustrator, an industry-standard in the world of vector-based imagery.

With the help of this tool, you can easily create diagrams, flowcharts, and pretty much any other graphic design elements.

The final results can then be easily exported both for use in other programs, as well as in printing. The best part is that this program can now be tested for free for 7 days, so don’t miss out on this chance!

Therefore, you will not regret using this alternative for creating great graphs or any other visuals you may think of.

⇒ Get Adobe Illustrator

1. Uninstall conflicting apps

  1. Press Windows + R, type appwiz.cpl, and hit Enter.
    visio not installing
  2. Please search for the conflicting app in the app list, click on it, then click on the Uninstall button.
  3. Follow the wizard to complete the uninstall process. Then check if you can now install Visio.

Conflicting apps would make it impossible to install Visio, so you may consider uninstalling them.

2. Repair corrupted files

  1. Press the Windows + X keys and select Command Prompt (Admin).
    visio not installing
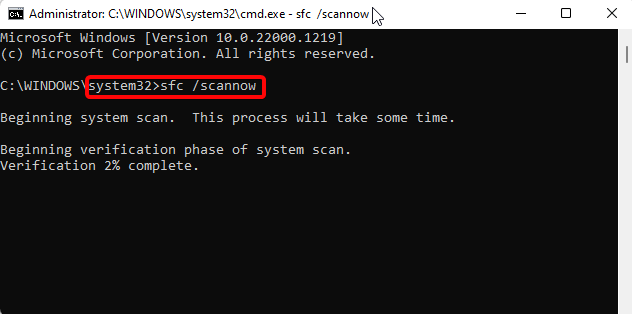
  2. Type the script below and hit Enter:
    sfc /scannow
  3. Wait for the scan to complete, then retry the installation.

3. Delete Office 15 Click-to-Run registry keys

  1. Type create a restore point in Windows 10’s search box and select Create a restore point.
  2. Press the Create button.
    visio not installing
  3. Enter a title for the restore point, and click the Create button.
  4. Users can then roll back Windows 10 with that restore point to undo registry changes if required.
  5. Press the Windows key + R hotkey to launch the Run accessory.
  6. Enter regedit in the text box, and click the OK button.
    visio not installing
  7. Next, go to this registry path:
    Computer\HKEY_CLASSES_ROOT\Installer\Products
  8. Then right-click the registry keys that begin with 00005 and select the Delete option.
  9. The registry keys should include Office 15 Click-to-Run ProductName DWORDs in them.
  10. Close the Registry Editor, and then try installing Microsoft Visio again.

Another Visio setup error message states: We can’t install the 64-bit version of Office because we found the following 32-bit programs on your PC: Office 15 Click-to-Run Extensibility Component.

Users have confirmed they’ve fixed that error by deleting some registry keys, by setting up a System Restore point.

4. Uninstall Office Language Package

  1. Press the Windows key + S hotkey.
  2. Enter add in the search box, and click Add or remove programs.
    visio not installing
  3. Select any foreign Microsoft Office language packs listed in that window. Don’t uninstall English language packs.
  4. Click the Uninstall button to remove the language pack. Removing Office from your computer uninstall message pops up, but that doesn’t mean it’s uninstalling the suite.
  5. After that, restart Windows and try installing Visio.
  6. Then users can also reinstall the language packs they uninstalled with the language accessory pack.

A Couldn’t stream Office error message pops up for some users when they try to install Visio. Following the steps above should fix the problem in no time.

So, that’s how users can quickly fix some Visio install errors in Windows 10. Users can also resolve Visio install issues with the Office Deployment Tool.

This enables users to set up custom Office software installations with its Configuration XML file. Please let us know how it all worked in the comment below.

0x80072f8f – 0x20000 Media Creation Tool Error [Fix]

Upgrading your Windows computer should be a straightforward process, but sometimes an error code like “0x80072f8f – 0x20000” can pop up and make things confusing. This error might happen because of simple things like your computer’s clock being set to the wrong time, or more complex issues like conflicts with other programs on your computer.

Don’t worry, though! This guide is here to help you understand what’s causing the error and how to fix it. Whether you’re using Windows 10 or Windows 7, the solutions provided here are easy to follow and will get you back on track with your Windows upgrade.

?What causes error code 0x80072f8f – 0x20000?

There are multiple causes for this error, with these being the most common ones:

  • TLS 1.2 turned off – It happens because the Media Creation Tool uses a specific security protocol called TLS 1.2, but this protocol is turned off by default on Windows 7,8 and Windows 10 computers. In simpler terms, the tool is trying to use a security feature that’s not enabled on your computer, causing the error.
  • Lack of privileges – Certain tools require administrative privileges, and to use them you need to make apps run as admin.
  • App conflicts – Third-party applications can sometimes come into conflict with Media Creation Tool and cause this problem. If that’s the case, you need to find and uninstall those programs.
  • Corrupted cache files – Sometimes installation cache can get corrupted. If that happens, deleting the SoftwareDistribution directory might help.

If you have these problems and you’re getting an error message when trying to run Media Creation Tool stating that There was a problem running this tool, check the tested fixes below.

How do I fix error code 0x80072f8f – 0x20000?

1. Run the Media Creation tool as an administrator ✅

  1. 1. Locate and navigate to the folder where the Media Creation Tool is stored.

  2. 2. Right-click on it to open the context menu.

  3. 3. Select Run as administrator from the context menu.

    Run as administrator to fix error code 0x80072f8f 0x20000
  4. 4. Click Yes in the UAC (User Account Control) prompt.

  5. 5. Check if the issue persists.

  6. If you are not running the Media Creation tool with administrative privileges, there’s a chance that you are encountering the error code 0x80072f8f – 0x20000 because of that.

    Therefore, manually running it as an admin is likely to fix the issue.

If this method doesn’t work in Windows 10, head to the next one.

2. Enable TLS 1.2 using the Registry

Enabling Transport Layer Security (TLS) 1.2 in Windows 7,8 and 10 is essential for secure network communication. This guide, requiring administrative access, will lead you through the process using the Windows Registry Editor. Care must be taken, as incorrect changes to the registry can cause system issues.

Note icon NOTE
The steps provided for enabling TLS 1.2 using the Registry Editor are generally applicable to Windows 7 and 8 as well. The process of navigating the registry and creating the necessary keys and values is consistent across different versions of Windows, including Windows 7.

Step 1: Open the Registry Editor

  • Press the Windows Key + R on your keyboard to open the Run dialog box.
  • Type regedit and press Enter.
  • If prompted by User Account Control, click Yes to allow the Registry Editor to make changes to your device.

Step 2: Navigate to the TLS 1.2 Key

  • In the Registry Editor, navigate to the following path: HKEY_LOCAL_MACHINE\SYSTEM\CurrentControlSet\Control\SecurityProviders\SCHANNEL\Protocols
  • Right-click on the Protocols folder, select New, and then Key.
  • Name the new key TLS 1.2.

Step 3: Create Client and Server Keys

  • Right-click on the TLS 1.2 key, select New, and then Key.
  • Name this new key Client.
  • Repeat the process to create another key under TLS 1.2 and name it Server.

Step 4: Configure Client and Server Keys

  • Select the Client key, right-click in the right pane, select New, and then DWORD (32-bit) Value.
  • Name the new DWORD DisabledByDefault.
  • Double-click DisabledByDefault and set its value to 0.
  • Right-click in the right pane again, select New, and then DWORD (32-bit) Value.
  • Name this new DWORD Enabled.
  • Double-click Enabled and set its value to 1.
  • Repeat these steps for the Server key.

Step 5: Close the Registry Editor and Restart

  • Close the Registry Editor.
  • Restart your computer to apply the changes.

Enabling TLS 1.2 in Windows 10 through the Registry Editor is a straightforward process that will help you get rid of 0x80072f8f – 0x20000 Media Creation Tool Error. If this does not solve your issue, please continue with the following fixing method.

3. Perform a Clean Boot

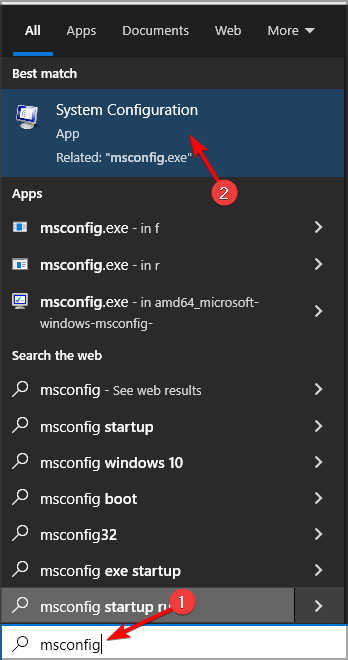
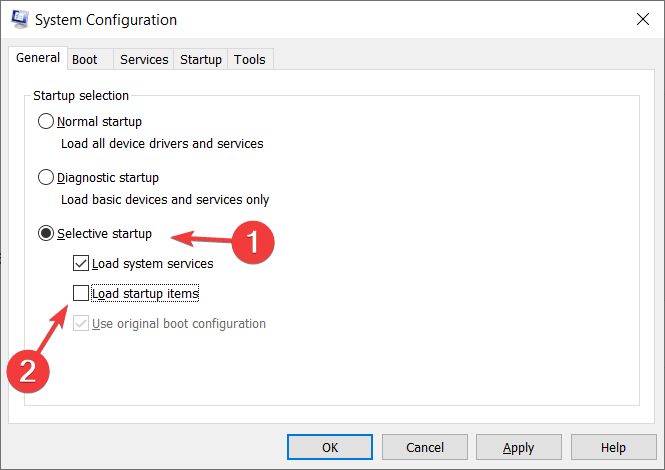
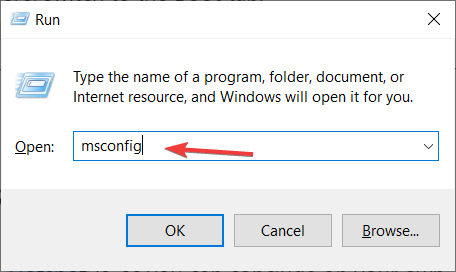
  1. Type MSConfig in the Start search and select System Configuration.
  2. In the General tab, select Selective Startup.
  3. Check Load System Services.
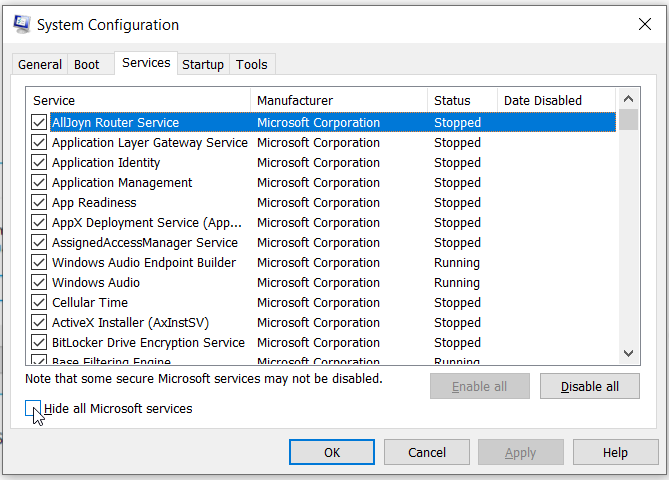
  4. Click the Services tab and choose to Hide All Microsoft Services.
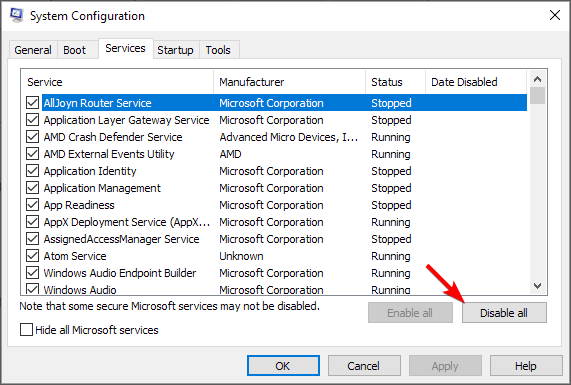
  5. Select Disable All. 
  6. Click Apply and OK and restart the computer.

If the problem does not appear with a clean boot, you may now try to locate the culprit program or service.

The simplest method to handle this is using a third-party specialized removal application to remove stubborn apps while in Clean Boot mode.

Otherwise, you could also utilize an automatic PC repair method that is capable of cleaning the Windows OS and thus restoring your system files. Such software is designed to detect various system issues and repair them quickly with its patented technology. This way, you can get rid of such Media Creation errors.

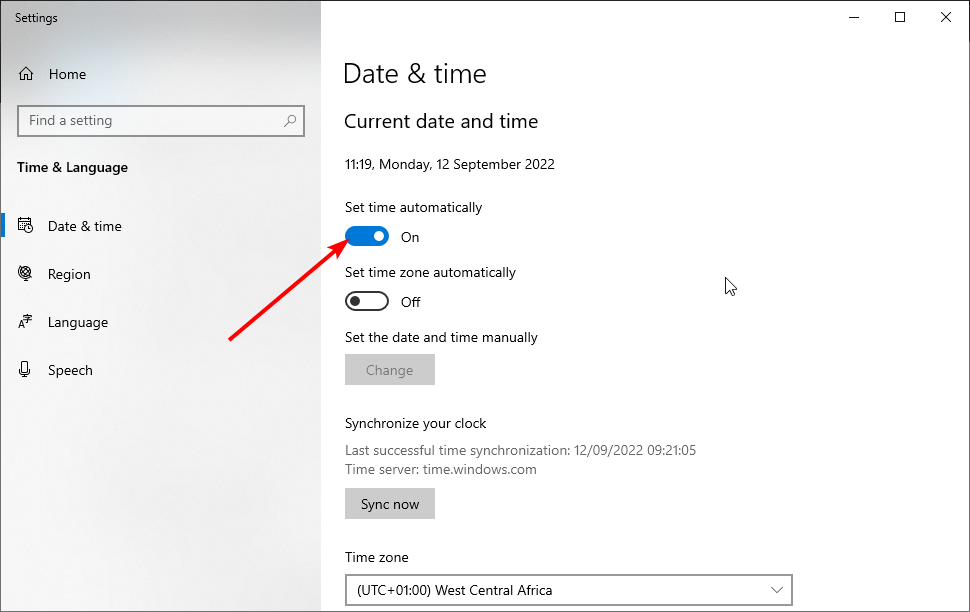
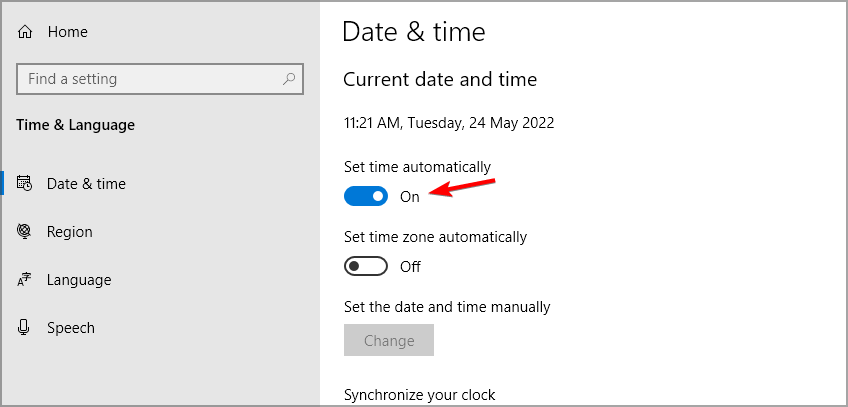
4. Check your date and time

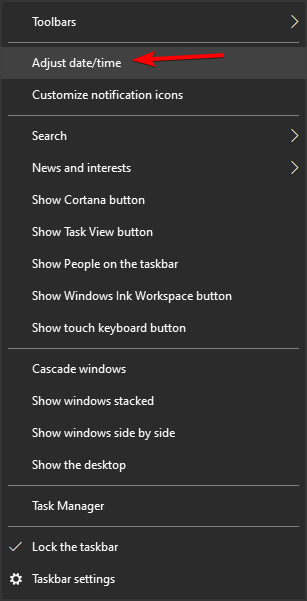
  1. Right-click the clock in the bottom right. Choose Adjust date/time.
  2. Disable Set time automatically.
  3. Wait for a few moments and then enable it again.

5. Clear the software distribution folder

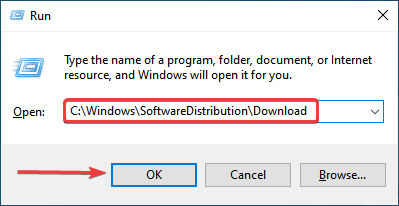
  1. Press Windows + R to launch the Run command.
  2. Paste the following path in the text field, and either click OK or hit Enter to launch the Software Distribution folder. C:\Windows\SoftwareDistribution\DownloadSoftware Distribution folder
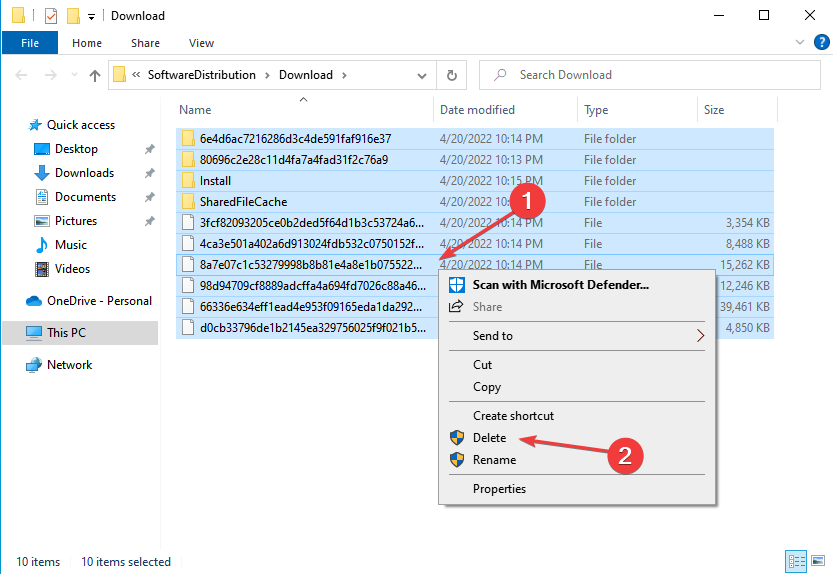
  3. Press Ctrl + A to select all the files.
  4. Then, right-click on them, and select Delete from the context menu. Alternatively, you can pick them up and hit the Delete key.Delete files to fix error code 0x80072f8f 0x20000
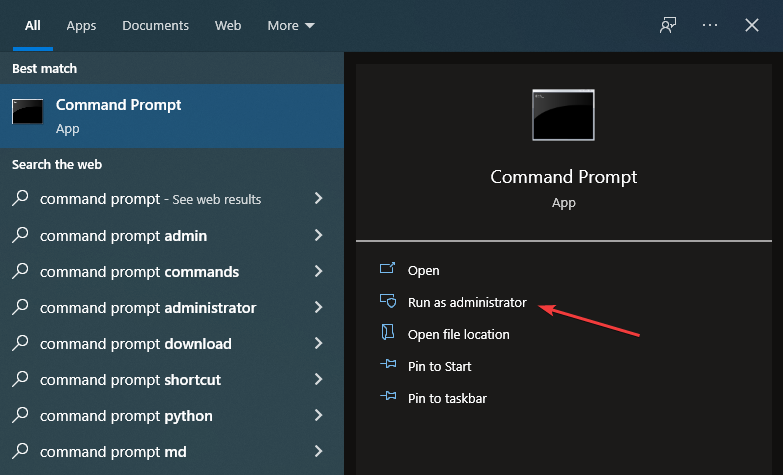
  5. Once done, press Windows + S to launch the Search menu, enter Command Prompt in the text field, and then click on Run as administrator at the right.Command prompt
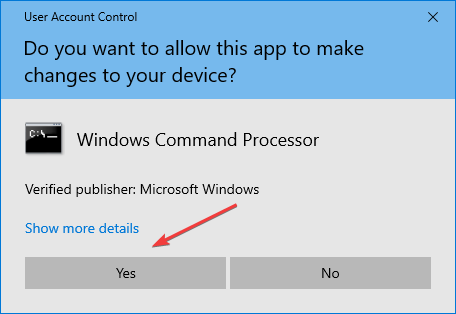
  6. Click Yes in the UAC prompt that appears.Click Yes
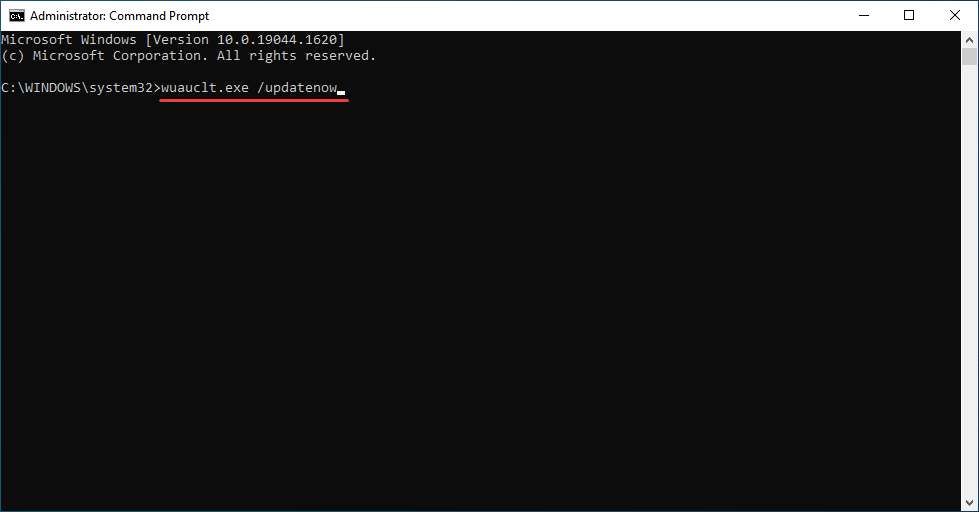
  7. Paste the following command and hit Enter: wuauclt.exe /updatenowExecute command to fix error code 0x80072f8f 0x20000

After following these steps, restart the computer for the changes to effect, and check if the error code 0x80072f8f – 0x20000 is fixed.

Nite than cleaning up the software distribution folder can also help with Media Creation Tool’s refusal to update your PC.

6. Modify the registry

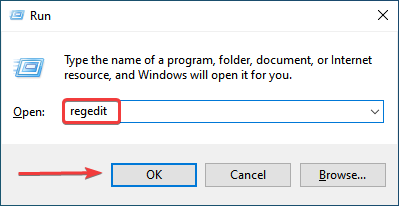
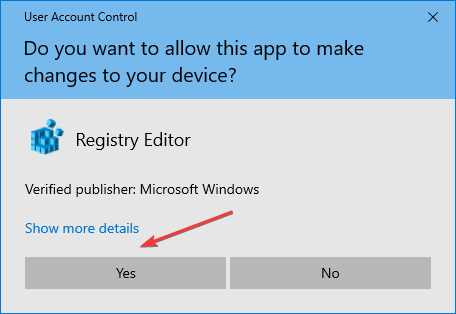
  1. Press Windows + R to launch the Run command dialog box, type Regedit in the text field, and click on OK to launch the Registry Editor.regedit to fix error code 0x80072f8f 0x20000
  2. Click Yes in the UAC prompt that pops up.Yes
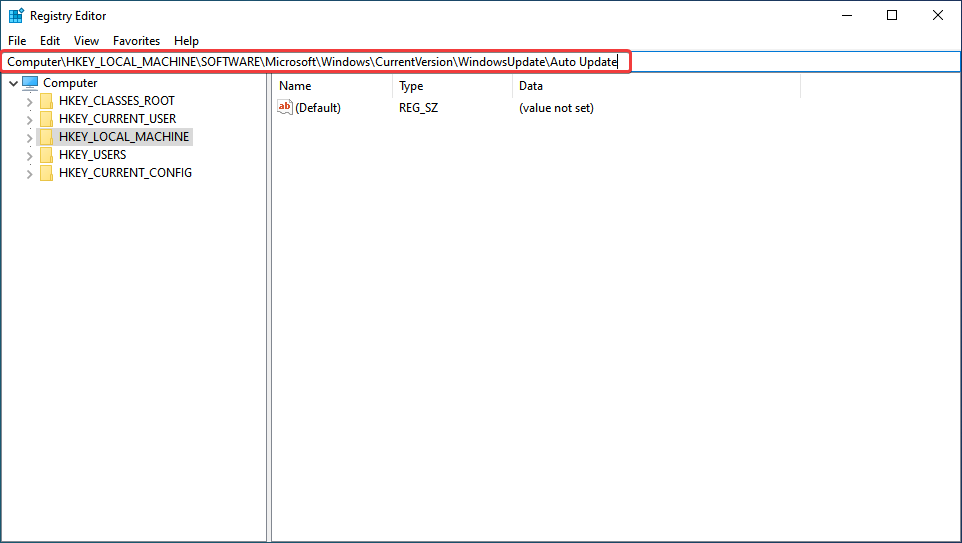
  3. Paste the following path in the address bar at the top, and hit Enter: Computer\HKEY_LOCAL_MACHINE\SOFTWARE\Microsoft\Windows\CurrentVersion\WindowsUpdate\Auto UpdatePaste path
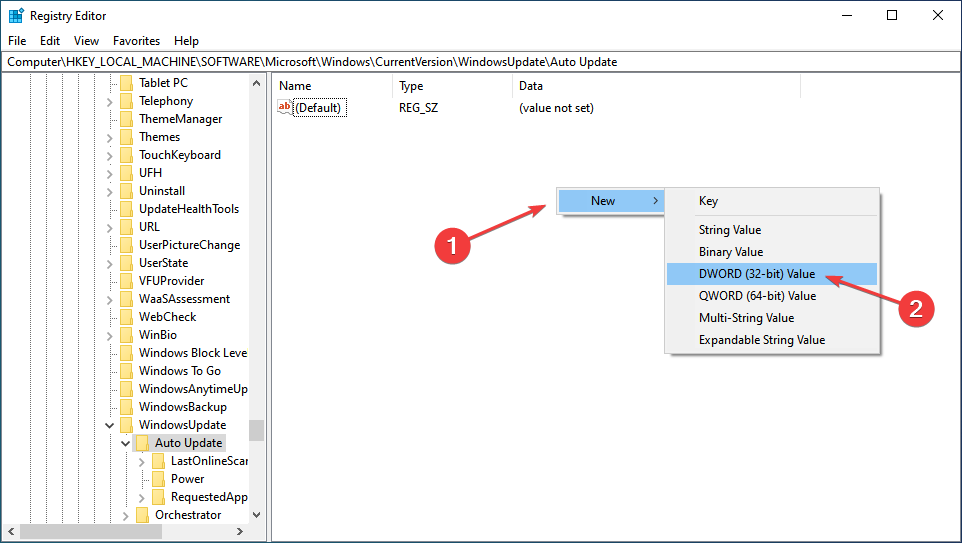
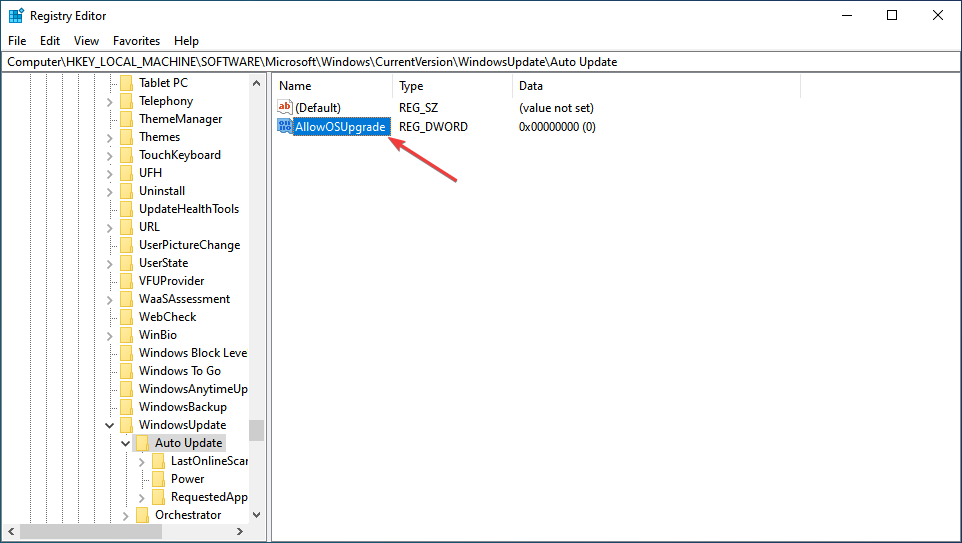
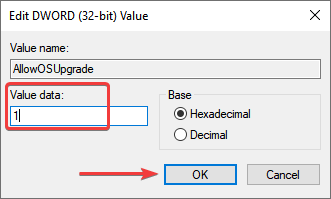
  4. Now, right-click on the empty portion on the right, hover the cursor over New, select DWORD (32-bit) Value from the context menu, and name it AllowOSUpgrade.Create entry
  5. Double-click on the key you just created to change its value.Modify to fix error code 0x80072f8f 0x20000
  6. Finally, enter 1 under Value data and click on OK at the bottom to save the changes.Value data

This registry fix has helped many users eliminate the error code 0x80072f8f – 0x20000, so try it in Windows 10. In all likelihood, the error should be fixed after this.

7. Uninstall antivirus or other conflicting apps

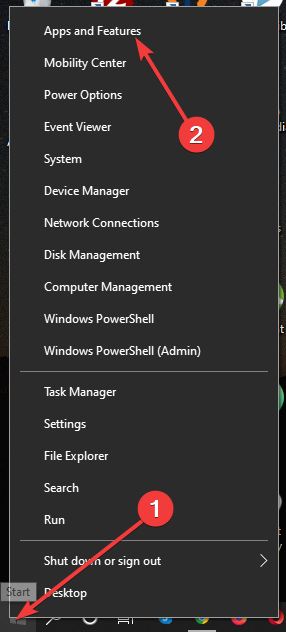
  1. Press the Windows key + X and select Apps and Features from the menu.
    Apps and Features - pale moon not playing videos
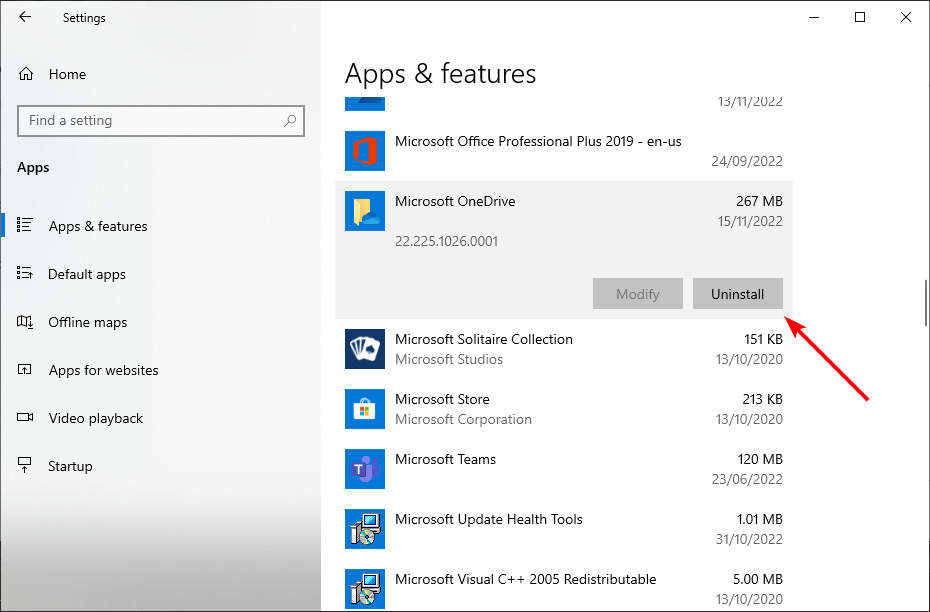
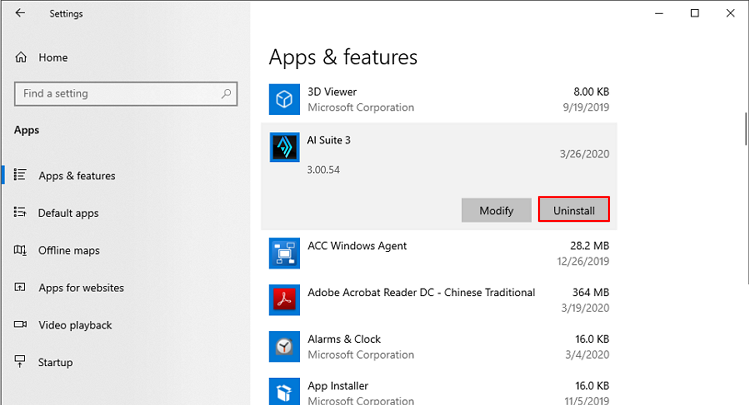
  2. Then, select your antivirus software and click on Uninstall.
  3. Follow the instructions on the screen to remove it.
  4. After removing the software, try to perform the upgrade again.

If you remove your antivirus, you can take a look at these best and most reliable antiviruses for Windows.

Error code 0x80072f8f – 0x20000 is a common issue and it can lead to Windows installation fails, so it’s important that you fix it.

Please tell us which fix worked and the iteration of Windows on which you were facing the problem in the comments section below.

How to Disable Network Adapter on Windows 11: 5 Easy Ways

A network adapter is a hardware component that allows a computer or other device to connect to a network. Disabling it on Windows 11 can help troubleshoot network connectivity issues or security reasons.

We will guide you through how to disable Network Adapter on Windows 11. Also, users can read how to fix Network Adapter drivers that not be found on their Windows devices.

Can I find hidden network adapters on my PC?

Yes, it is possible to find hidden network adapters on your PC. Hidden Network Adapters are usually those that are not currently in use or those that are not visible in the Device Manager.

Finding hidden Network Adapters on your PC can be a tool for troubleshooting network issues and identifying potential security vulnerabilities. To find hidden Network Adapters, you can follow these steps:

  1. Press the Windows + X button, navigate to the Device Manager, and open it.
  2. Further, select the View tab from the windows and select Show hidden devices.
  3. Expand the Network Adapter category. All the hidden Network Adapters on your PC will grey out.

Hidden network adapters can be hidden intentionally by the system administrator or device manufacturer, so enabling them may cause compatibility or security issues.

How can I disable the network adapter on Windows 11?

1. Use Windows Settings

  1. Press the Windows + I to open the Windows Settings.
  2. Navigate to Network & Internet category and select the Advanced network settings from the right pane.
  3. Then, select the Disable button for the Network Adapter you wish to disable from the list.
  4. Close the Settings window and rest your PC.

The Windows settings have an in-built option that allows the user to view and disable the network adapter in Windows. Read about how you can fix Device Manager keeps refreshing in Windows.

2. Disable the Network Connections folder

  1. Click on the Search icon, type Network Connections in the search box, and select the View network connections option.
  2. Then, right-click on the Network Adapter you want to disable in the View network connection folder and select Disable from the pop-up menu.
  3. Close the window and restart your PC to turn off Network Adapter.

The Network Connections folder is a Microsoft Windows OS folder that allows users to manage their network connections.

3. Use Command Prompt

  1. Press the Windows button, type cmd, and select Run as administrator.
  2. Input the following command and press Enter to view Network Adapter list on your PC: netsh interface show interface
  3. Type the following command with the name of the network adapter you want to disable and press Enter: netsh interface set interface "YOUR ADAPTER NAME" disable

Users input the name of the network adapter they wish to disable into the YOUR ADAPTER NAME. Check our guide on how to fix Command Prompt not working on your PC.

4. Use Device Manager

  1. Press the Windows + X button and select Device Manager from the list.
  2. Click on the drop-down button on the Network Adapter category to expand it. Right-click on the network adapter you want to disable.
  3. Then select Disable device from the context menu.

Microsoft device manager provides a centralized interface for controlling the various devices allowing users to enable and disable a Network Adapter.

5. Disable a network connection in PowerShell

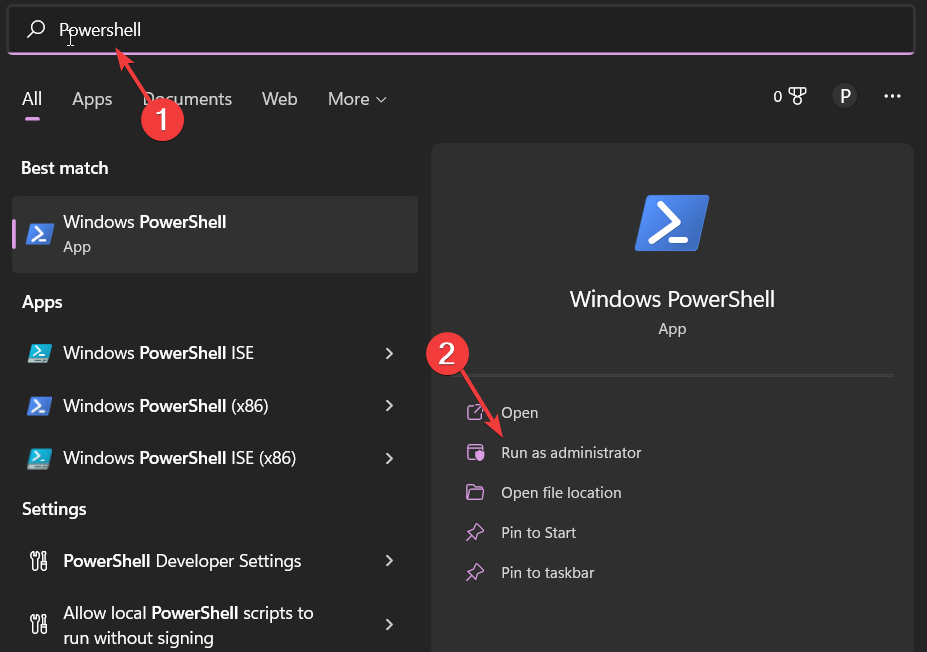
  1. Press the Windows button, type PowerShell, and select Run as administrator from the right pane to open the PowerShell.
  2. Type the following command and press Enter to identify the name of the adapter you wish to disable: Get-NetAdapter | format-table
  3.  Type the following command with the name of the network adapter you want to disable and press Enter: Disable-NetAdapter -Name "YOUR-ADAPTER-NAME" -Confirm:$false 
  4. Close the PowerShell and restart your device.

PowerShell provides access to system functions and services to view, enable and disable network adapters.

Alternatively, you can read how to fix the network adapter that is missing on your device and how to get network settings from your router.

In conclusion, this article should help you to disable Network adapters on Windows 11. Should you have further questions or suggestions, kindly drop them in the comments section.

How to Reduce Heat in Windows 10 Laptop With 5 Easy Methods

Besides the reduced hardware capabilities, the cooling system is that reduces heat in Windows 10 is the most common shortcoming a laptop user will encounter over the years of use.

And you’ll know when the overheating becomes an issue, as the laptop will suddenly shut down to prevent critical damage to hardware components.

To address this common issue which can cause many major problems if neglected, we prepared a few tips you can use to reduce heat in Windows 10 quickly.

Why is my Windows 10 laptop overheating?

Several factors can cause your Windows 10 laptop to overheat. Below are some of the prominent causes of overheating:

  • Accumulation of dirt: When dirt accumulates on your fan vent, it is likely to cause overheating. This is because it blocks the fan from blowing out the heat and circulation of cool air. In this case, you need to blow out the dirt in the vent.
  • Too many running apps: It is one thing to multitask on your PC; it is another to have too many unnecessary apps open. The latter uses too many resources leading to overheating. Closing these apps should reduce the heat in your Windows 10 laptop.
  • Faulty fan: Sometimes, the overheating issue is caused by a faulty fan or two. Also, it might be down to insufficient cooling. You need to repair or replace the faulty fan or get a cooling pad for your PC to normalize the temperature.
  • Presence of malware: This problem can sometimes be due to viruses using your PC resources in the background. You need to run a deep virus scan with Microsoft Defender or one of the best third-party antiviruses for Windows 10 to eliminate the malware.

Can overheating destroy your laptop?

Overheating can destroy your PC if left unattended. If your processor overheats, it can slow down your PC considerably and sometimes lead to an automatic shutdown.

If the issue persists, it can lead to more severe damage to some components. Also, overheating can lead to reduced battery life and complete battery damage.

Hence, it would be best if you always took the necessary precautions to reduce the heat in your Windows 10 laptop.

How can I reduce heat in Windows 10 laptop?

1. Clean the vents

The first thing you need to do is to clean your PC thoroughly. Check the vents for accumulated dirt and dust.

You can use an air blower to suck out the vents’ dirt, preventing the heat from going out. This should reduce the heat in your Windows 10 laptop.

Lastly, ensure you use your PC on an elevated and hard surface. This will leave space for the fan vents to dissipate heat and circulate cool air.

2. Limit high-intensity processes

Laptops have different specs suitable to different tasks. If you are using a low-end laptop for high-intensity tasks like gaming, it is likely to overheat.

Also, having too many apps and processes running simultaneously is not advisable. It would be best if you only opened the apps you need at a particular time.

Moreover, you shouldn’t open two or more high-intensity tasks simultaneously, as this will take a toll on your PC. To close apps and processes you are not using, follow the steps below:

  1. Right-click on the Taskbar and open Task Manager.
    laptop overheating windows 10
  2. In the processes tab, right-click any unnecessary process and select End task.
    end task how to reduce heat windows 10 laptop
  3. Click the Startup tab at the top.
  4. Now, right-click each app and select the Disable option.
    disable
  5. Finally, restart your PC and check if this reduces the heat in your Windows 10 laptop.

3. Use a cooling pad

In some cases, the overheating in your laptop is caused by an insufficient cooling system. This might be because one of your fans is faulty or the system is not enough to handle the heat dissipated from the rigors of your activities.

In this case, you need to invest in a cooling pad. This will complement your PC’s cooling system and considerably reduce the heat in your Windows 10 laptop.

4. Reduce processor temperature

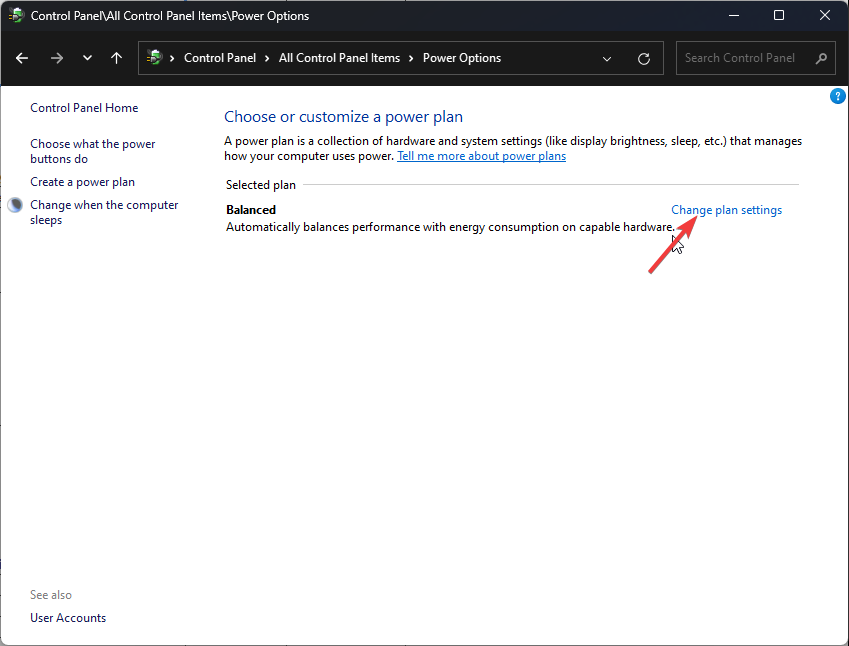
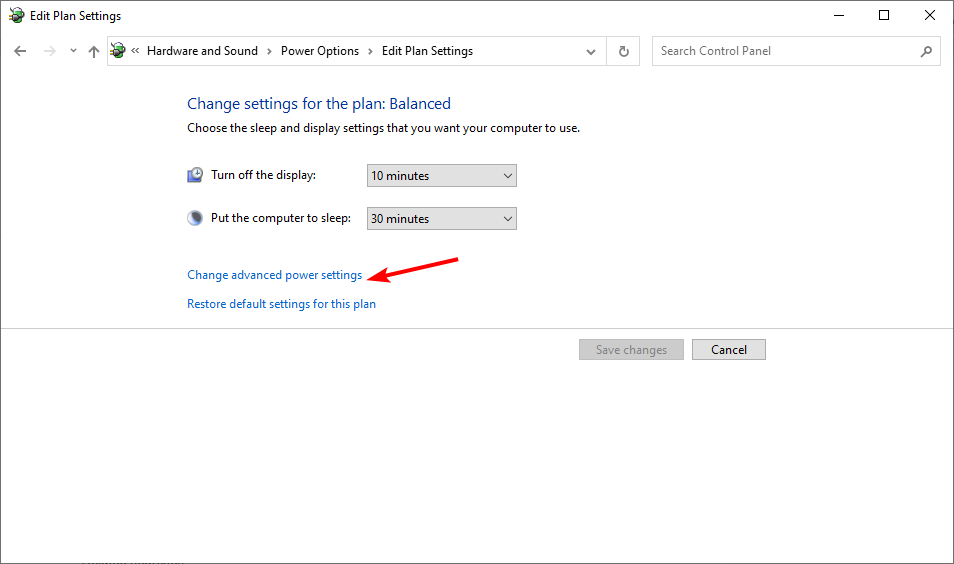
  1. Press the Windows key, type power plan, and select Edit power plan.
    edit power plan
  2. Click Change advanced power plan.
    change advanced how to reduce heat windows 10 laptop
  3. Click the Processor power management option and set the values according to your requirements.
    processor

Most times, we don’t fully use the maximum capacity of our processor. So, there is no need to set it to top performance.

In some cases, about 20% reduction might help reduce the heat in your Windows 10 laptop. Hence, you might want to make the changes.

5. Track CPU temperature in real-time

This solution is more of a prevention than a cure. If you can monitor your PC temperature in real-time, you can close the process or app causing the temperature increase.

To do so, you need to use one of the best third-party temperature monitoring software. Most of this software is free and easy to use.

So, you can employ them to monitor and reduce the heat in your Windows 10 laptop.

That should do it. If you’re still having issues, we recommend contacting the responsible support or taking it for repair. Either way, don’t use it if it keeps shutting down, as this is a particular shortcut to much more significant issues.

Don’t forget to share your thoughts or ask questions in the comments below. We’ll be glad to help you.

7 Best Anti Tracking Software to Protect Your Online Privacy

Do you want the best anti-tracking software to stop others from keeping tabs on your Internet activity? We have compiled the best for securing your data.

Nowadays, Internet privacy has become important as many Internet users prefer to surf the Internet anonymously.

This is partly due to various governments’ censorship of Internet content available. They have enacted laws that enable them to gather information about your Internet activities.

Advertisers may also use your Internet activity to identify you from their list of visitors, with them spamming your email with targeted adverts.

However, Windows users search for privacy tools that keep them secure and their information private.

What does anti-tracking software do?

There is a long list of the merits of using anti-tracking tools. They play an essential role in the following:

  • Tracker disabling – Trackers are disabled by the anti-tracking application, which also prevents them from sharing your data with their servers.
  • Data theft prevention – Because they ensure that your data can no longer be tracked, your data is more secure and can not be stolen.
  • Improves the online experience – Because they block tracking ads, you get better value from your online time.
  • Prevents fingerprinting – In digital fingerprinting, a distant website or service collects tidbits of data about a user’s computer. This can be blocked using anti-tracking tools.

That said, let us now introduce you to some of the best anti-tracking software for Windows.

What is the best anti-track software available?

Incogni – Fully automated

Incogni is a software solution that assists users in removing their personal information from the databases of hundreds of data brokers.

But exactly how does Incogni operate? Data brokers gather your personal information and sell it to other businesses. Incogni negotiates with data brokers on your behalf to get your information permanently removed, immediately enhancing your privacy.

This tool keeps your identity safe from numerous digital threats, including hackers, phishing sites, invasive shadow profiles, and other cyber-attacks.

It is an affordable, efficient and completely automated application with a user-friendly interface that saves you a significant amount of time and effort, making it a reliable program for your online privacy and safety.

Key features that Incogni brings to the table:

  • Covers all broker types
  • Substantial time saver
  • Easy usage
  • Affordable pricing

Incogni

Let Incogni keep your identity safe and remove sensitive information from multiple databases.
Check price Visit Website

DeleteMe – Outstanding support

DeleteMe is a very efficient software designed to remove users’ information from search results to ensure their right to own and manage their personal information.

You can simply submit a request for personal data deletion from search engines, and the software’s experts take care of it by finding the data and completely erasing it from the sources.

DeleteMe provides you with an exhaustive report of the removal procedure in 7 days to overview the course of action.

On top of that, this program will remove your personal information every 3 months which increases your online safety and security.

Key features that DeleteMe brings to the table:

  • Detailed and accurate report
  • Great customer service
  • Friendly user interface

DeleteMe

Improve your security and privacy and let DeleteMe remove your information from data brokers.
Check price Visit Website

ExpressVPN – Best DNS leak protection

When using ExpressVPN anti-tracking software, a kill switch will terminate the connection if the VPN fails or is disconnected. Security features include 256-bit encryption and DNS leak protection.

The automatic kill switch is an excellent feature of ExpressVPN for protecting your privacy while using the service.

Also, ExpressVPN conceals your IP address and prevents data leaks. Hence, tracking is impossible. Furthermore, the tool strictly adheres to a no-logs policy. This means that they do not keep track of the IP addresses of their users.

You can install the ExpressVPN client on unlimited devices with an ExpressVPN license, but you can only use five at once.

Lastly, installing the VPN on a router may be simpler so that all connected devices are automatically protected with anti-tracking and anti-hacking Wi-Fi protection.

Key features that ExpressVPN brings to the table:

  • No activity or connection logs
  • Own DNS servers for name resolution
  • Industry-leading AES encryption (256-bit)
  • Robust VPN protocols, including OpenVPN, IKEv2, and Lightway
  • DNS leak protection, WLAN protection
  • Trusted Server technology

ExpressVPN

Leading service expert that protects you against tracking and hacking and prevents DND leaks.
Check price Visit Website

NordVPN – Threat Protection – Fast and stable connection

NordVPN Threat Protection is a newly developed feature of NordVPN service that promises to maintain your online experience safe and secure.

You don’t necessarily need to connect to a VPN server for this feature to work, all you have to do it to enable it from the settings.

NordVPN Threat Protection protects your computer from ads, trackers, malware, and other possible threats to ensure your browsing activity isn’t tracked.

Moreover, you don’t have to worry about accessing malicious websites because this reliable feature will instantly counterbalance all cyber threats before they can even do damage to your PC.

Key features that NordVPN brings to the table:

  • Secure and private access to the internet
  • Fast and strong connection
  • Intrusive ads neutralizer

NordVPN – Threat Protection

Keep malware, intrusive ads, and trackers away from your computer with this great tool.
Check price Visit Website

Private Internet Access – Top-notch encryption

Concerning privacy, Private Internet Access (PIA) is hard to beat. Kape Technologies, the parent company of this VPN, is a leader in security.

PIA supports some of the most popular encryption techniques, including AES-256. For those unfamiliar with the term, this encryption standard is considered military-grade.

After all, it is used in top military and commercial applications worldwide. Furthermore, there’s a built-in Kill Switch to take into consideration.

Finally, this system immediately disconnects your computer from the Internet if the connection to the VPN fails.

Key features that Private Internet Access brings to the table:

  • Zero IP and DNS leaks
  • Incredible speeds for P2P torrenting
  • Browser extensions for Chrome, Opera, and Firefox
  • Support for Netflix and other popular streaming services
  • Multiple payment methods, including American Express and Zcash
  • Generous 30-day money-back guarantee if you change your mind

Private Internet Access

PIA is an excellent VPN with quality features to stop tracking. Currently available at a major discount!
Check price Visit Website

Avast AntiTrack – Best anti-tracking measures

anti tracking software

This software developed by the antivirus software giant Avast is one of the best software to stop tracking on your computer.

Avast AntiTrack helps you to keep your IP address private by hiding your IP when surfing the Internet.

Additionally, the software alerts users when they are being tracked and automatically detects the trackers. Especially since many online advertisers utilize your Internet activity to send annoying targeted ads.

Hence, Avast anti-track software helps to disguise your Internet activities so that you don’t receive spam messages.

Moreover, Avast also erases your browser history after browsing to keep your activity secret.

Key features that Avast AntiTrack brings to the table:

  • Connection encryption
  • Digital fingerprint masking
  • PC performance boosting
  • Ads blocking

⇒ Get Avast AntiTrack

Privoxy – Best to manipulate tracking cookies

anti tracking software

Privoxy is a popular web proxy tool with many powerful features. Firstly, one significant advantage of this software is its compatibility with numerous web browsers.

Also, you can easily embed the tool into any web browser and run the browser traffic through the tool.

Additionally, Privoxy is free to use and is very efficient in blocking both targeted and regular ads; another perk for the software is that it can keep your browsing anonymous.

Even more, it has an anti-track tool that helps to filter traffic and block trackers and other bugs.

Privoxy also enables users’ complete control; you can change the privacy settings and customize it to your preference.

Meanwhile, this software is ranked among the best software to stop tracking. Also, it is free to download and use.

Key features that Privoxy brings to the table:

  • Advanced filtering capabilities
  • Access control
  • Efficient ad blocking
  • Built-in browser-based configuration

⇒ Get Privoxy

Tor Browser – Native private browsing

anti tracking software

When it comes to anonymous browsing, Tor Browser is probably the most popular browser available.

The software hides your information by bouncing your connection through many encrypted internet points, making it difficult to determine your exact browsing location.

Additionally, Tor Browser is user-friendly and has a similar interface to Mozilla Firefox. There is also a tutorial that guides users through using it effectively.

Finally, we recommend it if you don’t want to go through the complex route of conventional VPN and antivirus solutions.

Key features that Tor Browser brings to the table:

  • Auto browsing history deletion
  • Traffic encryption
  • IP address masking
  • Cross-Platform availability

⇒ Get Tor Browser

In conclusion, any of the best software to stop tracking we mentioned above are ideal for protecting your Internet privacy.

However, while some are free, others are available at a premium price.

Have you used any of the software we mentioned above? Or do you know of any software which should make the list?

Feel free to share your experience with us in the comments below.

Microsoft Office Activation Wizard: All you Need to Know

If you have been using Microsoft Office without activating it, then the Microsoft Office Activation Wizard pops up every time you open the product.

And it persists until you take steps to activate your copy of Microsoft Office. Also, most of the features will be disabled till you eliminate the tool. This guide will walk you through everything you need about the Activation Wizard.

What is Microsoft Office Activation Wizard?

The Activation Wizard is a tool added to Office by Microsoft to help simplify the process of legitimately licensing the various Office versions.

The company asks that you activate your copy of the product to verify the legitimacy of your installation.

How do I get rid of Microsoft Office Activation Wizard?

1. Activate MS Office

  1. Purchase a product on Microsoft Store or any other retailer.
  2. Launch any Microsoft product. We are using MS Word as an example.
  3. Next, click the File option at the top.
    file microsoft office activation wizard
  4. Click More > Account in the left pane.
    account more
  5. Now, click the Activate Product Key option.
  6. Finally, enter your product key and click the Next button to complete the process.

The easiest way to get rid of the Microsoft Office Activation Wizard is to activate your Office product. Unfortunately, this will eliminate the tool for good.

If the wizard pops up before accessing the product, it will allow you to activate it.

2. Uninstall MS Office

  1. Press the Windows key + R, type appwiz.cpl, and click OK.
    appwiz.cpl
  2. Now, right-click your Microsoft Office product, select Uninstall, and follow the onscreen instructions to complete the removal process.
    uninstall control microsoft office activation wizard
  3. If you can’t find Office in step 2, press the Windows key + I and select the Apps option.
    apps
  4. Next, select your Office package and click the Uninstall button.
    uninstall microsoft office activation wizard
  5. Finally, follow the onscreen instructions to complete the process.

The installation might be faulty if the Microsoft Office Activation Wizard pops up on your PC after activating your product. The solution is to uninstall, reinstall, and reactivate your Office product.

That should do it. With the tips in this guide, you should be able to eliminate the pop-up in your Office products.

If Microsoft Word says your product isn’t activated despite activating it, check our detailed guide to fix it.

Feel free to let us know the solution that helped you fix this issue in the comments below.

Xbox February Update goes live today

This month’s Xbox update is now live. The centerpiece of the February update is the suite of sustainability features now available for the mainstream of Xbox consoles.

Among these features are carbon aware game downloads and updates. Also, all Xbox consoles are now set to Shutdown mode by default. Shutdown mode cuts energy use by up to 20 times the amount compared to Sleep power mode. Of course, users can manually set to whatever power options suits their needs at any time. These features were previously rolled out to members of the Xbox Insiders Program.

Below are some of the other changes coming with the Xbox February Update.

Hide game art when selecting tiles on Home

This option does pretty much what it states: it hides game art when navigating away from the Home screen. This means game art will no longer replace the Home background when a game tile is selected, making navigation less distracting.

Users can set this by going to Settings > General >  Personalization > My background > Solid color and game art. Toggle the use game art button on the bottom right of the screen.

Use Google Home to turn your phone into a touch remote for your Xbox

Interestingly, Xbox has partnered with Google to enable users of the Google Home app to add their Xbox console. This allows users with Google Home on their smart phone to use the touch screen as a remote control to turn the Xbox on or off, navigate on-screen, control media playback, record game clips and more.

Experimental party features

Random users will be able to try out some experimental features that should make it easier to jump back into a party with friends. To get started go to the “Parties & Chat” tab in the Xbox Guide. Then click “Party History” to see a list of previous parties.

Wrap up

It’s nice to see the Xbox team keeps finding cool new features and ideas to implement to make the Xbox OS better. What are your thoughts on this month’s Xbox update? Feel free to share them down in the comments.

Xbox App Crashing / Not Opening in Windows 11

Xbox is a popular console on the market, and it’s been around for a long time. The introduction of the Xbox app for Windows makes the games more accessible to users who don’t have a console. However, some of our readers complain about the Xbox app crashing on Windows 11.

Does the Xbox app work with Windows 11?

The Xbox app supports and works with Windows, turning your PC into an Xbox One console where you can access your games. It offers the same functionality and gaming quality as using the Xbox console.

Furthermore, some benefits come with using the Xbox app on Windows 11. It allows players to access the PC Game Pass on their PCs. Also, you can share, capture, and control your PC using Xbox Game Bar.

Moreover, the Xbox app on Windows allows you to launch games on your PC and play with your favorite Xbox accessories. So, the Xbox app works with Windows 11.

Why is my Xbox app crashing on Windows 11?

Several factors can cause the Xbox app to crash on Windows 11. Some are:

  • System requirements issues – The Xbox app has system requirements like any other. So, you can experience the Xbox app crashing if your PC doesn’t meet the system requirements.
  • Corrupt Xbox app on your PC – When the Xbox app installed on your PC is not corrupt or compromised, it can cause it to crash or not open on your PC.
  • Outdated Xbox app – Microsoft releases updates to fix bugs causing issues in the Xbox app previous versions and improve its performance. So, not updating the Xbox app on Windows 11 can result in some problems.

However, the causes of the Xbox app crashing or not running in Windows 11 can vary on different PCs. Nonetheless, we’ll take you through some essential fixes.

How to fix the Xbox app crashing or not opening on Windows 11

Go through the following preliminary checks before trying any advanced troubleshooting steps:

If these preliminary steps didn’t help you fix the problem, try the solutions below.

1. Restart the Xbox services and Gaming Services

  1. Left-click the Start button, type Services, and then click Open.
  2. Locate the Gaming Services, right-click on them, and select Restart from the drop-down.
    restart gaming services
  3. Locate all the Xbox services in the list, right-click them, and select Restart from the drop-down.
    restart xbox services

Restarting Xbox Services and Gaming Services on your PC will fix any activities impeding its processes. Read how to download the Xbox gaming services app on your PC.

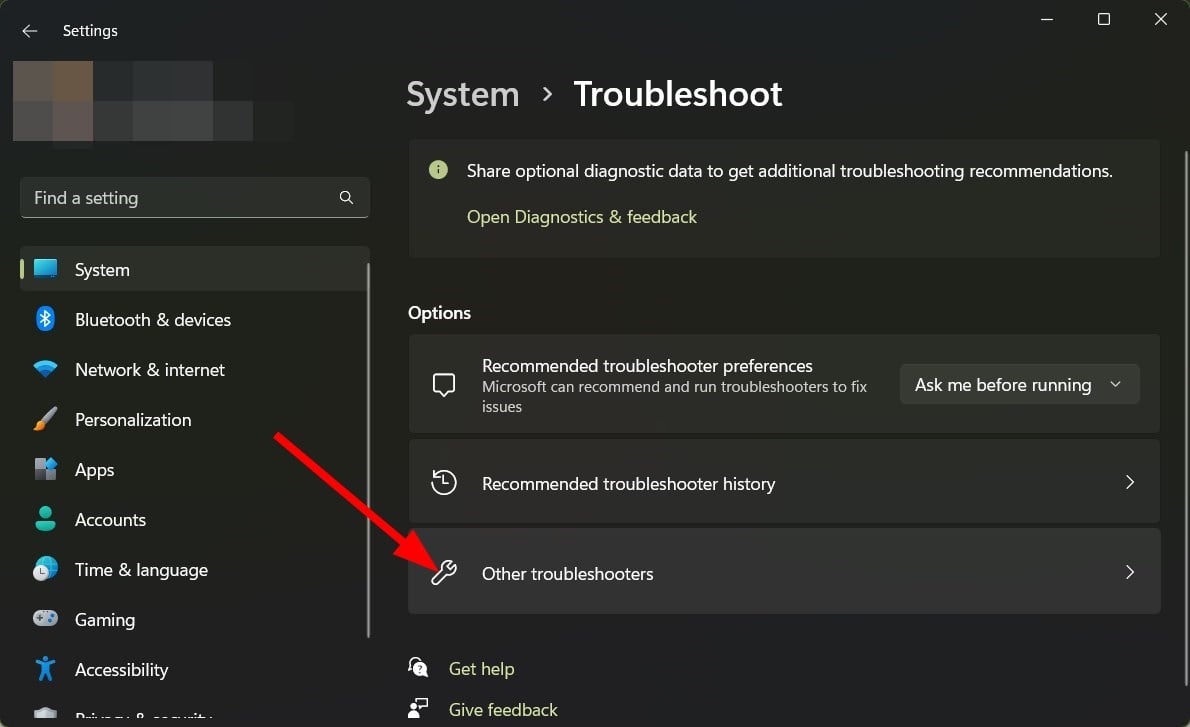
2. Run Windows Store Troubleshooter

  1. Press Windows + I key to launch the Windows Settings app.
  2. Click on System and select Troubleshoot.
    Settings troubleshoot
  3. Select Other troubleshooters.
    other troubleshooters
  4. Locate the Windows Store Apps and click the Run button beside it.
    troublshoot windows store apps
  5. Afterward, launch the Xbox app and check if it works properly.

The Windows Apps Troubleshooter will resolve issues with Windows Store apps causing the Xbox app to crash.

3. Update the Xbox app

  1. Left-click the Start button, type Microsoft store and click Open.
  2. Click on Library in the bottom left corner, then select Get Updates.
    Microsoft store library
  3. Check if any update is available, then download and install the update.
    Microsoft store get update
  4. Restart the Xbox app on your PC to check if it opens or launches.

Updating the Xbox app will install the patches and updates needed to fix bugs and improve its functionality.

Also, some users experience the Xbox app not launching games in Windows 11 for some reason.

Read about fixing Windows not connecting to update service if the error occurs on your PC.

Further, we have a detailed guide on what to do if you can’t send messages on Windows 10/11 Xbox app or Xbox One.

Conclusively, check how to fix the Xbox app not downloading or installing on Windows 11.

If you have further queries or questions and suggestions about this guide, kindly drop them in the comments section.

What is Event ID 4769 & How to Fix It?

The Event ID 4769 Kerberoasting is a security alert. This event can be used to detect the presence of malicious users who are attempting to use Kerberos to impersonate another user or service.

It is generated every time a DC is contacted to validate the security token. The Kerberos authentication protocol is used to prove the identity of a client who wants to access a network resource on behalf of an end user. So, if you spot this particular Event ID, here is what you should do.

What causes the Event ID 4769?

This event indicates that the server attempted to request a Kerberos service ticket for the user account specified in the Event ID. Usually, the user’s security token was sent to a domain controller (DC) for validation. 

This can happen because the requested user account is not in the domain or because of an error in the KDC database. Other reasons include:

  • Server has an expired database entry – This event is logged when a client tries to connect to a server using Kerberos authentication. The KDC cannot verify that it is still in possession of a valid TGT ticket for the client.
  • Client has an expired entry in the database – When a client’s entry has expired, Kerberos failure audit Event ID 4769 0x17 will be recorded. This happens when a client computer cannot renew its ticket-granting ticket (TGT).
  • Multiple entries – A Kerberos ticket is generated for each principal to identify the user (or service) when they connect to other computers on the network. This ticket contains information about what services they can use and what they have access to after they log in. 
  • Unsupported protocol version – When a client tries to connect to a server using an old protocol version, the Kerberos failure audit event 4769 is logged in. The server will reject the login attempt because the client may be using an outdated version of Kerberos. It’s also possible that the user is attempting to log in with a compromised account.
  • Weak passwords – An Event ID 4769 Kerberoasting occurs when a malicious entity obtains and uses the victim’s Kerberos tickets. A user may be performing a brute-force attack on the service principal names of a domain controller or was able to obtain and decrypt the target’s encrypted ticket-granting ticket (TGT).

How can I fix Event ID 4769?

1. Raise the authentication level

  1. Hit the Windows + R keys to open the Run command.
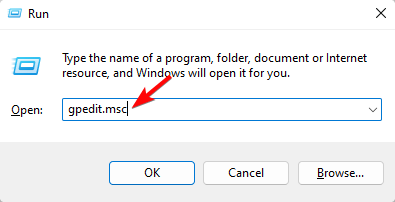
  2. Type gpedit.msc in the dialog box and hit Enter to open the Group Policy Editor.run gpedit command
  3. Navigate to the following location: Computer Configuration/Windows Settings/ Security Settings/Local Policies/Security Options
  4. Locate Network security: Configure encryption types allowed for Kerberos and double-click on it.
  5. Under the Local Security Settings tab, select AES256_HMAC_SHA1, then select Apply and OK.

It is important to change the Event ID 4769 ticket encryption type. This is because the authentication level of your encryption algorithm determines the strength of your password. The stronger the password, the more difficult it is for someone to hack into your online accounts.

2. Enable auditing

  1. Hit the Windows key, type Powershell in the search bar, and click Run as administrator.
  2. Type the following command and hit Enter: auditpol /set /subcategory:”logon” /failure:enable

If you have enabled Kerberos auditing, you can see this event. When unauthorized users attempt to log in, you’ll get a notification. It will also list the error code for users trying to obtain tickets using the credentials of other users or services in your environment. 

You can then take the necessary steps to block the users. This is especially important for the Event ID 4769 failure code 0x1b. Such errors can be hard to detect as they do not pass through client-server authentication.

3. Reset Kerberos password

Kerberoasting is a technique to harvest Kerberos tickets from Windows domain controllers. It’s one of the most effective ways to gain elevated privileges in a domain environment.

To resolve this issue, you must reset the user’s password in Active Directory Users and Computers (ADUC). Usually, these are privileges exclusive to the administrator, so you need to get in touch and request a password reset.

You may also encounter the Event ID 4771 error where Kerberos pre-authentication has failed, so don’t hesitate to check out our guide for more.

Let us know if you have been able to solve this error in the comment section below.

Check out the February 2023 Adobe Patch Tuesday updates

We’re pretty sure that many of you have been anxiously waiting for the Adobe Patch Tuesday rollout, and we’re here to make it a bit easier for you to find what you’re looking for.

As you know by now, Microsoft isn’t the only company that has such a rollout on a monthly basis, so in this article, we’re going to talk about Adobe and some of the patches for their products.

And, as we do every month, we will also include links to the download source, so you don’t have to scour the internet to find them.

28 CVEs got addressed this month by Adobe

Before we begin, however, let’s also take a look at what happened in January 2023, when Adobe released 29 CVEs in four patches for Adobe Acrobat and Reader, InDesign, InCopy, and Adobe Dimension.

The highlight of last month’s release was definitely the Reader update which addressed a combination of 15 CVEs, eight of which were ranked Critical in severity.

It should absolutely go without saying that the most severe of these could allow code execution if an attacker convinces a target to open a specially crafted PDF document.

Now that that’s out of the way, let’s get back to the present and explore what the company has prepared for its users as a part of the February batch of patches.

This month, February 2023, we are looking at security fixes for software such as Adobe Photoshop, Substance 3D Stager, Animate, InDesign, Bridge, FrameMaker, Connect, and After Effects.

Photoshop

Without any doubt one of the most used media editing platforms, Adobe makes sure Photoshop is always up to standards.

The PhotoShop patch fixes five bugs, three of which are rated Critical, and an attacker could get arbitrary code execution if they can convince a user on an affected system to open a malicious file

Affected versions

ProductAffected versionPlatform
Photoshop 202223.5.3 and earlier versions     Windows and macOS
Photoshop 202324.1 and earlier versionsWindows and macOS

Premier Rush

Don’t think we’re out of the woods just yet, as malicious third parties also target other Adobe-designed applications at the same time.

Thus, this is the same scenario for Premier Rush, which corrects two Critical-rated code execution bugs. so keep that in mind as well.

Affected versions

ProductVersionPlatform
Adobe Premiere Rush2.6 and earlier versions      Windows

Animate

If you are an Adobe Animate user, then you have to consider the possibility that your favorite software has been compromised as well.

Yes, as Adobe mentioned on the support page, the Animate patch also fixes three similar critical code execution bugs.

Affected versions

ProductVersionPlatform
Adobe Animate 202222.0.8 and earlier versionsWindows and macOS
Adobe Animate 202323.0.0 and earlier versionsWindows and macOS

Bridge

This one is a bit worse than everything we have presented so far, so please be mindful if you are an Adobe Bridge user.

Security experts emphasized that the fix for Adobe Bridge fixes five Critical-rated code execution bugs plus two memory leaks

Affected versions

ProductVersionPlatform
Adobe Bridge  12.0.3 and earlier versions Windows  and macOS
Adobe Bridge  13.0.1 and earlier versions Windows  and macOS

After Effects

There are a lot of us that rely on Adobe’s After Effects for perfecting our products, but this software isn’t immune to attacks.

In fact, After Effects also has a memory leak to go along with three code execution bugs, just as some of its Adobe brothers do.

Affected versions

ProductVersionPlatform
Adobe After Effects23.1 and earlier versions     Windows and macOS
Adobe After Effects22.6.3 and earlier versions     Windows and macOS

Frame Maker

Yes, there still are apps from Adobe that are going through the same ordeal, so the company had to do something quickly.

Thus, the patch for FrameMaker also contains a mix of code execution and memory leak fixes, so the security patch is more than welcome.

Affected versions

ProductVersionPlatform
Adobe FrameMaker2020 Release Update 4 and earlier    
  
Windows
Adobe FrameMaker2022 Release
    
Windows

This is the first time we mention Adobe Connect in such an article, but the company had to take some immediate measures.

Note that the patch for Adobe Connect fixes a security feature bypass bug, although the company doesn’t provide any further info on what’s being bypassed.

Affected versions

ProductVersionPlatform
Adobe Connect11.4.5  and earlier versions            All
Adobe Connect12.1.5  and earlier versions    All

InDesign

Please keep in mind that the fix for InDesign corrects a denial of service caused by a NULL pointer deref, just in case you didn’t know.

Submit a support ticket to Adobe if you still experience problems after downloading and installing these security updates.

Affected versions

ProductAffected versionPlatform
Adobe InDesignID18.1 and earlier version.Windows and macOS 
Adobe InDesignID17.4 and earlier version.                                         Windows and macOS 

Last, but not least, the fix for Adobe Substance 3D Stager doesn’t actually address any new CVEs, so there’s no need to worry.

That being said, Adobe is updating third-party libraries used by the 3D modeling tool, so there’s another detail to look forward to.

Experts say none of the bugs fixed by Adobe this month are listed as publicly known or under active attack at the time of release.

Have you found any other issues after downloading and installing these updates? Share your thoughts with us in the comments section below.

Fix: Mouse Cursor Gets Stuck in the Corner of the Screen

Is your mouse stuck in the corner? Many users, particularly those using laptops and notebooks, experienced this problem, and in today’s guide, we’ll try to fix this issue, so let’s get started.

Why is my mouse stuck in a corner?

Problems with your mouse connection or hardware malfunction are the most common culprits. In some instances, outdated drivers can cause this problem as well.

What can I do if the mouse is stuck in a corner?

Before we move to the slightly complex solutions, press the Function key and F5, F7, F8, or F9 and check if it helps. You can also use a different USB port or mouse pad.

1. Update drivers

  1. Right-click the windows start button and then select Device Manager.Start device manager - mouse stuck in corner
  2. Expand Mice and other pointing devices and then right-click on your Mouse driver.Mouse Driver
  3. Click Update driver and then select Search automatically for drivers.Search automatically for driver
  4. Follow the on-screen instructions to install the update. 

Drivers are essential for a smooth operating system, especially regarding your mouse. A specialized tool, such as Fortect Driver Updater, can help you update all your drivers and provide long-term maintenance so you make sure no issues arise due to malfunctioning or outdated drivers.

⇒ Fortect Driver Updater

2. Fix mouse settings

  1. Click on the Windows Start button, type Control Panel, and then launch it.windows start - mouse stuck in corner
  2. Select Mouse from the menu.Control panel
  3. Click on the Pointer Options tab at the top.
  4. Confirm that all settings are correct. Pointer options

Once done, verify whether the mouse corner is still stuck in the corner. If yes, consider enabling the ease cursor movement between displays option, especially if working on multiple displays.

3. Enable the trackpad

  1. Go to the Start button, type Mouse in the search bar, and then select Mouse settings.Start mouse settings - mouse stuck in corner
  2. Click on Additional mouse settings.Additional Mouse Settings
  3. Under the Hardware tab, ensure that your mouse is working properly.Mouse harware tab - mouse stuck in corner

4. Check for malware on your computer

  1. Press the Windows + I key combination to launch Settings.
  2. Select Update & Security from the Settings menu.Update and security
  3. Click on Windows Security on the left-hand side and then select Virus & threat protection.Windows malware detection - mouse stuck in corner
  4. Select Quick scan to check for malware.

If it was malware responsible for your mouse cursor stuck in a corner, things should now work fine.

How do I know if my mouse is broken?

If the mouse is not working, turn it on and replace the batteries. Check whether all the buttons work, including the scroll wheel. Also, you can connect the mouse to other PCs or update the mouse drivers just to be sure.

If nothing works, check whether the laser under the mouse emits light. If not, the mouse is most likely broken, and you will need to replace it.

What are the best external mice to pick from?

Many models are available on the market, and picking the best isn’t always easy. Luckily our best computer mice guide should be able to help you with that.

In it, you’ll be able to find a suitable mouse for every budget, so be sure to check it out.

The freezing of mouse cursors is a relatively typical issue that users encounter. The solutions above can be examined individually to determine which works best for your PC.

This isn’t the only issue you can encounter, and many reported that the mouse pointer disappears. The problem is also present on laptops, and we covered it in our cursor disappeared on the laptop guide.

If the issue is still present, it’s possible that the mouse keeps freezing or that your mouse is lagging. Luckily, we tackled these issues in separate guides.

Hopefully, you’ve already found a solution to the mouse problem.

Error Code 0x80072af9: Fix It With These 4 Simple Solutions

With each new version of Windows, users get a bunch of additional features and security enhancements critical to the effective functioning of the PC. But the error code 0x80072af9, a Windows Update error, often stands in the way.

The error is encountered when trying to install the latest version of the OS. However, the code is not limited to Windows Update and often pops up in other built-in and third-party apps. So, let’s find out all about the error.

What is error code 0x80072af9?

The error code 0x80072af9 signals that a critical update has failed to install on the PC and prevents you from getting to the latest build. Here are a few reasons you might be getting the error:

  • Unstable Internet connection: The most common issue behind this Windows Update error is a slow Internet connection, so you might want to check that.
  • Issues with the network adapter: If the network adapter fails at times, primarily while the update is underway, the error code will appear.
  • Corrupt system files: When the system files are corrupt, several components of the PC, including Windows Update, fail to function effectively.
  • Third-party apps blocking the update: An antivirus or firewall can often block the update from installing. Several users also observed error 0x80072af9 when VPN was set up.

The error code 0x80072af9 appears in the following cases as well:

  • Error code 0x80072af9 Outlook: Many reported the error when sending emails on Outlook.
  • 0x80072AF9 Time Service: A few users had an error log in the Event Viewer pertaining to the Time Service with this error code.
  • Error code 0x80072af9 Mail: The Windows Mail app, too, throws the error, usually due to misconfigured browser settings.
  • Result failure (error code 0x80072af9): The error code may also be encountered when setting up printers on a Windows device.

How can I fix error code 0x80072af9?

Before we head to the complex solutions, here are a few tips and tricks to try:

  • Check the Internet speed and verify if the connection is unstable. If you are connected to a Wi-Fi network, switch to Ethernet when installing the update.
  • If you have a VPN set up, or a third-party antivirus or firewall running in the background, disable them all and install the update.
  • Many also reported that disabling Tablet Mode allowed them to download the updates, which earlier triggered error code 0x80072af9.

If these don’t work, head to the methods listed next.

1. Reinstall the network drivers

  1. Press Windows + X to open the Power User menu, and select Device Manager from the list.device manager
  2. Expand Network adapters, right-click the active adapter, and then choose Uninstall device.uninstall device to fix error code 0x80072af9
  3. Tick the checkbox for Attempt to remove the driver for this device, and click on Uninstall to confirm.remove the driver
  4. Once done, restart the computer, and Windows will automatically install the best driver.

If an intermittent drop in connection led to error code 0x80072af9, reinstalling the network adapter’s driver should do the trick.

2. Run the DISM and SFC scan

  1. Press Windows + R to open Run, type cmd, and hit Ctrl + Shift + Enter.command prompt
  2. Click Yes in the UAC prompt.
  3. Paste the following commands one at a time and hit Enter after each to run the DISM tool:DISM /Online /Cleanup-Image /CheckHealth DISM /Online /Cleanup-Image /ScanHealth DISM /Online /Cleanup-Image /RestoreHealth
  4. Once done, execute the following command to run the SFC scan:sfc /scannowsfc scan to fix error code 0x80072af9

Running the DISM tool and SFC scan can help fix corrupt system files. And if that was the underlying cause, you shouldn’t encounter the Windows Update error code 0x80072af9 again.

3. Manually install the update

  1. Identify the KB (Knowledge Base) number for the update triggering the error and then head to Microsoft Update Catalog.
  2. Paste the KB number in the search box, and hit Enter.search
  3. Click on the Download button next to the update that matches the system architecture, i.e., 32-bit or 64-bit version.download update to fix error code 0x80072af9
  4. Now, click on the correct link here, and the download will start.link
  5. Next, run the setup, and follow the on-screen instructions to complete the installation process.installation

When Windows is unable to install updates automatically, you can always do it manually via the Microsoft Update Catalog and get rid of error code 0x80072af9. All the updates released by Microsoft are listed here.

4. Perform an in-place upgrade

  1. Go to Microsoft’s official website, and download the installation media for Windows 10.installation media
  2. Now, run the setup and wait for things to get ready.getting things ready
  3. Click Accept to agree to the license terms.accept
  4. Select Upgrade this PC now, and click on Next to proceed.upgrade this PC now to fix error code 0x80072af9
  5. Wait for the setup to download the required files, and then follow the on-screen instructions to complete the process.windows 10

That’s it! If the previous solutions didn’t work, performing an in-place upgrade will help eliminate any underlying causes behind the Windows Update error code 0x80072af9.

How do I fix error code 0x80072af9 with Microsoft Office?

The error code also appears when installing updates for Microsoft Office and could be due to issues with the app itself. That’s why we recommend either repairing or reinstalling Office to fix error code 0x80072af9.

For complete removal before reinstallation, we recommend you use an effective tool. There are many great uninstaller applications on the market, but IOBit Uninstaller offers the most features, so you might want to try it out.

Also, before you leave, check the best PC repair tools, and get one of these to avoid running into such issues again.

For any queries or to share a solution that’s not listed here, drop a comment below.

Windows 10 License Key Backup Tools: Best to Use in 2026

The license key is probably one of the most important keys on your computer. Hence, you need to have a backup of the license of your Windows 10 computer even if you have to use a tool.

While picking just any license key backup tool is easy, getting a reliable one you can always trust is not straightforward. To ease the selection process, we have gathered the best tools available in the market in this guide.

How do I Backup my Windows 10 license?

There are different ways to back up your Windows 10 license. Below are some of the reliable ones:

  • Link key to Microsoft account: If you use a digital license key, Microsoft allows you to link it with your account. With this, you only need to log in to your account on the new PC, and you will be able to activate it using the troubleshooter.
  • Save manually on Notepad: Another option is to save the license key manually on Notepad and copy the file to another PC or drive. This allows you to copy the file to the PC you want to activate whenever you want.
  • Use a specialized tool: This is probably the most effective method to back up your license key on Windows 10. This is because most specialized tools have cloud storage for storing your key. What’s more, some of these tools can even help you recover your lost product keys.

What is the best Windows 10 license backup tool?

Tenorshare Windows Boot Genius – Best license key backup software

Tenorshare Windows Boot Genius is a software that can help you recover the Windows license key and solve many other Windows problems.

There can be plenty of ways to lose your license key, either forgetting where you saved it, losing access to the computer, or won’t boot. Either of these is no problem for Tenorshare.

Now you can recover all windows passwords and all product keys with ease. This software specializes in data recovery, with Windows booting solutions created for almost every issue.

However, it also offers the ability to back up your files, including your product key.

What’s more, Tenorshare doesn’t leave you alone to solve these problems. It provides step-by-step guides for all the issues it can resolve. All that is left is to follow them and get that license key back.

Tenorshare can also boot your PC from Windows failures like freezes, crashes, and even a blue screen of death. So, if you want to transfer Windows 10 license from a dead computer, this app is your go-to option.

Also, the key features are:

  • Fix Windows booting failure, Blue/Black Screen, crash, freeze, etc.
  • Clone hard drive
  • Recover Windows passwords and product keys
  • Backup and restore files and system
  • Wipe the entire hard drive or partition

Tenorshare Windows Boot Genius

Never lose a license key again with this amazing recovery software.
Free Trial Visit Website

Recover Keys – Simple license keys backup software

Recover Keys is a simple application for Windows that will keep safe the activation keys of all software tools that you will install and activate on your computer.

It allows you to back up your activation keys in different document formats to save them in one place and never lose them again.

It can also recover lost keys for over 10.000 products. These may be from Windows, Office, Adobe, Electronic Arts, Acronis, WinRar, Nero, and other important utilities.

These are some key features that Recover Keys brings to the table:

  • Scans your local computer for product keys
  • Scans for product keys on remote network PCs
  • It easily backs up your key
  • Both cloud and local databases
  • Windows NT, 2000, XP, Vista, 7, 8, 8.1, 10. (32/64 bit system) compatibility 

Recover Keys

A comprehensive tool that can help you restore your license key. Ready to try it out?
Free trial Visit Website

ProduKey – Simple product key recover

If you want a simple, straightforward program for restoring your license key, ProduKey is probably the best available solution.

This small tool allows you to check out the product key of any Microsoft Office program, Windows version, Exchange Server, and SQL Server installed on your computer.

As soon as you launch the program, it will list the product keys of all your software, so all you need to do is to look for it. So, it more or less serves as a backup option with which you can always get any product key linked to your PC.

ProduKey is developed by Nirsoft, a developer famous for its effective password recovery and security solutions. And they did a great job with ProduKey as well.

This program is a portable application, so you must download it, extract the ZIP file, and look for your license key.

⇒ Get ProduKey

LicenseCrawler – Portable tool to recover license keys

LicenseCrawler is another small, portable tool for checking the license keys of Windows 10, its default apps and services, and every other third-party program installed on your computer.

This program scans your registry to find all available license and product keys and makes them visible to you. It also allows you to back up your PC for free, including your license key, as much as you are a private user.

The user interface of LicenseCrawler might be a little more complex than in some other license key recovery tools, but you should have absolutely no problems getting around.

Once you start the program, click the Start Search button to start the registry scan, and once the scan is finished, all your product keys will be listed.

Product keys will be listed as registry entries, but you should have no problems recognizing programs and services.

⇒ Get LicenseCrawler

Magical Jelly Bean Keyfinder – Fastest to show your license key

Although it sounds like a license key recovery tool for some older versions of Android, Magical Jelly Bean Keyfinder is for Windows and runs pretty smoothly.

The program is as simple as it can get. It shows your Windows license key and a few more system information. No other Microsoft services, no third-party apps.

As soon as you open Magical Jelly Bean Keyfinder, the key will show up, and that’s pretty much the whole philosophy of this simple tool. Also, it has a save and print feature that allows you to save and download your product key.

We have to warn you that this program brings some bloatware with itself. So, be careful when installing Magical Jelly Bean Keyfinder, and make sure you’ve unchecked all unwanted offers.

⇒ Get Magical Jelly Bean Keyfinder

Keyfinder Thing – Wide range use

Keyfinder Thing is among the most popular tools for recovering Windows license keys.

Of course, it supports Windows and up to 90 third-party software titles. It also features a list of supported programs, which you can check by accessing View > Software List.

A few more handy options include copying a product key to the clipboard. Another important option is the ability to save your license key and other results from the File menu. All in all, the tool is very simple to use.

We must warn you that Keyfinder Thing also comes with bloatware, just like a few other tools from this list.

⇒ Get Keyfinder Thing

ShowKeyPlus – Easy to install

ShowKey Plus is a free, portable, and very simple tool for finding and managing the product key of your operating system. It gives you different options for saving your product key, including the ability to save from GUI.

When you open ShowKeyPlus, the program shows you the current Windows version, the Product ID, and the license key.

This program also has more options, like restoring your license key from a backup, which is a nice touch. It also allows you to change your product key, but it is not recommended.

⇒ Get ShowKeyPlus

Product Key Finder – Restore license key to over 200 apps

Product Key Finder supports over 200 third-party programs, the operating system, and some in-house features. It is simple but doesn’t provide detailed program info, only the license key.

The best feature of Product Key Finder is that it allows you to back up all your product keys in a CSV file, quickly moving them between computers.

However, there are a few reasons this program is last on our list. First, it only supports x32 versions of Windows, so not many users can run it now. And secondly, it also comes with bloatware by default.

⇒ Get Product Key Finder

This concludes our list of the best license key backup tools for Windows 10 (and other versions of the system).

You can choose between whichever of these keys, depending on what you need to do. They’re all free and relatively easy to use.

These tools can be helpful if you ever encounter Your Windows license will expire soon message, so be sure to get one.

Do you agree with our list? Or do you have some options of your own? Well, tell us about that in the comments.

Windows 11 Power Plan Keeps Changing: How to Stop It

A power plan is a set of hardware and software settings that determine how your system uses power. When you change the power plan, you are tweaking settings to achieve either high performance or efficiency.

Depending on how you use your PC, you should select the best power settings to balance performance and efficiency. However, users can’t get these settings to stick as their power plans keep changing. Let’s have a look at how we can resolve this below.

Why does my power plan keep changing on Windows 11?

It is important to note that the power plan affects all activities on your computer. For example, if you are playing games and using the internet simultaneously, your CPU will use more energy than it would if you were only using it for one task at a time.

You’ll therefore notice that your PC suddenly becomes slow or lags since your power plan settings need to reflect your activities. To get to the root of these issues, we explore some of the possible reasons why your Windows 11 keeps changing the power plan:

  • Power-saving software conflicts – You may use a third-party program to monitor or manage your computer’s power usage. If so, it may be overriding the default power settings.
  • Low battery – If you’re not charging your laptop, Windows will automatically change the power plan when your battery is running low. Battery management software can help you increase its longevity.
  • New application – You may have installed a new program that requires different power settings than those initially set and hence keeps changing them.
  • Battery issues – It’s worth checking the battery health of your machine. If it has a dead battery or a faulty battery sensor, it may not respond to any power plan settings.
  • Corrupted system files or registry entries – A corrupted system file or bad entry in your registry can cause Windows 11 to revert back to its default power options every time you restart your computer.
  • Faulty driver – A faulty driver can cause your computer’s power plan to change without your knowledge.
  • Antivirus software – Many antivirus programs include an option to automatically change your system’s power plan whenever they detect malware on your PC. 

How do I fix my power plan keeps changing?

A few preliminary checks that could help before the advanced solutions include:

1. Run the power troubleshooter 

  1. Hit the Windows key and click on Settings.settings windows 11
  2. Click on System on the left pane, then Troubleshoot on the right pane.Open system troubleshooter
  3. Select Other troubleshooters.other troubleshooters
  4. Scroll down, locate Power and click the Run button.running power troubleshooter

2. Run the DISM and SFC commands 

  1. Hit the Start Menu icon, type cmd in the search bar, and click Run as administrator.cmd-run-admin-w11 unexpected kernel mode trap windows 11
  2. Type the following commands and press Enter after each one: DISM.exe /Online /Cleanup-Image /Restorehealth sfc /scannow
  3. Restart your PC.

3. Run a virus scan

  1. Press the Windows key, search Windows Security and click Open.
  2. Select Virus & threat protection.
  3. Next, press Quick scan under Current threats.
  4. If you don’t find any threats, proceed to perform a full scan by clicking on Scan options just below Quick scan.Scan options
  5. Click on Full scan then Scan now to perform a deep scan of your PC.Full Scan Scan Now
  6. Wait for the process to finish and restart your system.

4. Update your graphic driver

  1. Hit the Windows key, type Device Manager in the search bar, and click Open.device manager w11
  2. Navigate to Display adapters and find your graphics card.
  3. Right-click on your graphics card and select Update driver.Graphic Driver Update
  4. Select Search automatically for drivers.

If you’re not tech-savvy, you could end up downloading the wrong driver and causing more problems than you solve. Thankfully, some tools can make this process much easier. One such tool is Outbyte Driver Updater, which automatically finds and updates all your drivers in one click.

Outbyte Driver Updater scans your computer for outdated or missing drivers and automatically installs them. This saves time and ensures that everything runs smoothly on your PC.

Outbyte Driver Updater

Prevent various errors from choosing the wrong drivers, and let Outbyte Driver Updater find the best updates.
Free Trial Download now

5. Restore default power plans

  1. Hit the Start Menu icon, type Control Panel in the search bar and click Open.control-panel-search fallout new vegas runtime error
  2. Navigate to Power Options and click to Open.
  3. Select Change plan settings.Change plan settings
  4. Click on Change advanced power settings.windows-11-not-recognizing-usb
  5. In the Power Options dialog box that appears, select Restore defaults, then click Apply and OK to save changes.

6. Perform a clean boot

  1. Hit the Windows + R keys to open the Run command.
  2. Type in msconfig and hit Enter.
  3. In the System Configuration window that opens, navigate to the Services tab, check Hide all Microsoft services option, and click on Disable all.Hide all Microsoft services
  4. Restart your PC.

We also have a similar article for when Windows 10 power plan keeps changing, so check out our recommended fixes. 

In another odd situation, the power plans might be missing altogether but do not fret as we show you how to get them back in our detailed guide.

Also, learn more about the difference between balanced and high-performance settings and decide which is the best for your system.

Do let us know if the issue has been resolved in the comment section below.

System Event ID 1060: 5 Ways to Fix Application Popup

Windows is an advanced OS, and due to this, several intricacies are involved, and a bunch of errors may appear in case things go wrong. One such is the Event ID 1060, which shows up in the Event Viewer.

The error doesn’t harm the PC or lead to any major inconvenience unless the affected driver is critical. Even in that case, the fixes remain relatively simple, and you should have things up and running in no time.

What is Event ID 1060?

The Event ID 1060 highlights an incompatibility issue usually arising from running drivers that don’t suit the system architecture. The error is logged and can be checked in the Event Viewer, along with the other relevant details.

Here are a few reasons you might be getting the error:

  • Running outdated drivers: Many usually get the error when running outdated drivers on the PC, even after several upgrades have been offered.
  • Driver version not suitable: If you have installed a 32-bit driver on 64-bit OS, it will trigger Event ID 1060.
  • Incompatible apps: Incompatible apps or programs, too, may sometimes lead to this error.

How can I fix Event ID 1060?

Before we head to the complex solutions, here are a few quick ones:

  • Check if any updates are available for Windows and install them.
  • If you have connected a non-critical peripheral to the PC, remove it, and check if the Event ID 1060 from the source application popup still appears.
  • Ensure you haven’t installed 32-bit drivers on a 64-bit version of Windows. If there are any, switch to their 64-bit counterparts.
  • Look for Event Viewer Event ID 1060, and identify the affected software/driver. Now use Google or any other search engine to find the manufacturer and check if a patch has been released.

If these don’t work, move to the ones listed next.

1. Reinstall the affected driver

  1. Press Windows + R to open Run, type devmgmt.msc in the text field, and hit Enter.device manager
  2. Now, locate the device linked to the affected driver, right-click on it, and choose Uninstall device.uninstall device to fix event id 1060
  3. Tick the checkbox for Attempt to remove the driver for this device, and click on Uninstall.attempt to remove the driver for this device
  4. Once done, restart the computer for Windows to automatically identify the best driver and install it.

The easiest solution to fix system Event ID 1060 is to reinstall the affected driver, in case the process didn’t go through successfully the last time. If the problem persists, head to the next solution.

2. Update the driver

  1. Press Windows + X to open the Power User menu, and choose Device Manager from the list of options.device manager
  2. Right-click on the device linked to the driver that throws the error, and select Update driver.update driver to fix event id 1060
  3. Choose Search automatically for drivers, and wait for the process to complete.search automatically for drivers

If Windows is unable to find an update, you could head to the manufacturer’s website to manually install the driver. Many OEMs release updates directly to their official website instead of submitting them to Microsoft, so this might work.

To make sure you don’t make any mistakes by choosing the wrong drivers, use software that automatically does the job. Automated driver update tools will scan your PC and identify outdated, damaged, or missing drivers.

You just have to select the ones to be fixed/updated and then wait for the process to complete.

3. Uninstall the software

  1. Press Windows + R to open Run, type appwiz.cpl, and click on OK.appwiz.cpl
  2. Now, locate the software installed around the same time the error first appeared, and click on Uninstall.uninstall to fix event id 1060
  3. Follow the on-screen instructions to complete the process.

You may have to uninstall some apps before finally identifying the one that’s triggering Event ID 1060. And once you do, reinstall the other ones removed during the process.

4. Manually delete the file

A few users managed to get rid of the problem by simply deleting the file listed in the Event Viewer details. All you have to do is navigate the path mentioned there, select the problematic file, and hit Del.

Once done, restart the computer for the changes to apply and verify whether the problem is resolved. If not, an in-place upgrade seems like the only viable solution.

5. Perform an in-place upgrade

  1. Go to Microsoft’s official website, and download the installation media for Windows 10. Those on the latest iteration should get the Media Creation tool for Windows 11.installation media
  2. Once done, run the tool and wait for it to get things ready.getting ready
  3. Click Accept to agree to the license terms.lincense
  4. Choose the Upgrade this PC now option and click on Next to proceed.upgrade to fix event id 1060
  5. Wait for the download to complete and follow the on-screen instructions to perform the upgrade.download

When nothing works, an in-place upgrade helps fix Event ID 1060 in Windows. And for those wondering, you don’t lose the installed apps or files, but certain settings might be set to their default state.

Also, an in-place upgrade would resolve SC OpenService failed 1060 in Windows 10, and in some cases, the Event id 1060 Terminal Services User Home Directory was not set error as well.

To avoid running into such issues and wasting time troubleshooting them, we recommend you use effective PC repair software.

For any queries or to share solutions that are not listed here, drop a comment below.

How to Extract Files From Multiple Folders [Easy Steps]

Extracting files from a single folder is simple as it only involves copying and pasting from one destination. But, extracting files from multiple folders is a bit difficult as opening and closing multiple folders can be pretty time-consuming.

We’ve already discussed how to extract multiple zip files, but for today, let’s focus on something closer to home. There is no direct option provided in Windows File Explorer to extract all the files at once, but let’s look at some tips that can get you all your files in one place.

Can you extract files from multiple folders at once?

Suppose you have files saved in different folders but want to extract them simultaneously and maybe form a new folder. 

The most common way to extract files from a bunch of folders is to open each folder, find the one you want, and then copy it to a different location. This can take a while if you have many folders and many files.

Extracting files from multiple folders is a common task, especially when extracting the contents of an entire folder structure. Depending on how often you extract files from multiple folders, it’s an optional feature that you may or may not need.

Instead of opening file locations and copying files from one location to another, you need an easier and quicker method. 

Although doing it manually for each folder is possible and the most common way, it is also time-consuming and tedious.

The situation worsens if there are many subfolders and you need to extract only some. To make it easier, you can use built-in File Explorer settings to achieve this. Below, we show you easy ways to extract files from multiple folders in Windows 10 and 11.

How do I get files out of folders at once?

Before you start extracting files, ensure that:

1. Use an asterisk 

  1. Hit the Windows + E keys to open File Explorer.
  2. Navigate to the folder location you wish to extract the files from.
  3. Go to the search bar and press the * button then hit Enter.
  4. All files in all folders will be listed.
  5. You can now choose to sort by date, name, or size to sort the files easily and extract the ones you need quickly to a selected location.

2. Use a third-party tool

There are many third-party tools available that can help you extract files from multiple folders. One of these is a tool called WinZip. It’s easy to use and allows anyone to extract files from multiple folders at once.

WinZip is a complete archiving and file management solution. This software will make it much easier to share files, due to its high compression rates and encryption features.

⇒ Get WinZip

3. Use the compression feature

  1. Hit the Windows + E keys to open File Explorer.
  2. Navigate to the folder location you wish to extract the files from.
  3. If they are multiple folders, hold the CTRL button as you select.
  4. Click on the three ellipses at the top and select Compress to ZIP file.
  5. The files will begin the compression process, and a new folder will be formed. You can choose to rename it or leave it as is.
  6. You can click on the new folder to view your files or click on Extract all.
  7. A new prompt will appear asking you to select a new folder location so click on Browse, select the new folder location then hit Extract.
  8. You can now view all files you want in the new folder location.

The only downside of this method is that there is no provision to sort out the files you want. When extracting the files, it will pick all in the folder, even those that are unnecessary. We recommend using the first solution if the folders have too many files.

Hopefully, one of these methods has helped you extract files from multiple folders on Windows 11. We also have an exciting article on how to create and extract RAR files, so be sure to check that out too.

If you’re looking to master your file management skills, check our guide on how to automatically copy files from one folder to another on Windows 11.

Share with us in the comment section what your favorite multiple file extraction method is.

6 Ways to Permanently Fix Low FPS in Sea of Thieves

Sea of Thieves is a massively popular action-adventure game created by Rare. Users play as a pirate to complete missions and work with trading companies.

However, users have reported low FPS in Sea of Thieves. Follow the solutions below to fix this issue permanently.

Why is my FPS suddenly so low in Sea of Thieves?

Sudden FPS drops in Sea of Thieves could be due to several reasons, and we will highlight the most important:

  • Lack of computer resources – Below, you will see a list of requirements, so ensure your system is over the minimum threshold.
  • Corrupt graphics card driver – An old or corrupt video driver may cause many issues, including a drop in FPS. Updating the driver is essential.
  • Corrupt files – Like any other app, Sea of Thieves may have damaged files due to crashes of the system and other failures, and that, in turn, may trigger FPS drops.
  • Poor connection – If you’re playing the game online, a poor internet connection can alter the frame rate.
  • Incorrect graphics settings – For increased framerate, you might try to lower the graphics settings, especially if you’re running the game on a less powerful configuration PC.

How much FPS do you need for Sea of Thieves?

The FPS for Sea of Thieves depends on the specs of your PC, but the average frame rate for Sea of Thieves is 60 FPS at 1920×1080. Faster graphics cards can support more hi-res framerates, depending on what you have equipped on your PC.

How do I fix low FPS on Sea of Thieves?

Before tweaking the game and system, make sure you complete some basic checks:

  • Check system requirements for Sea of Thieves after an update. As you may see, the game requires a 64-bit Windows 10 OS with at least 4 GB of RAM, 50 GB of storage, and Nvidia GeForce GTX 650 or AMD Radeon 7750 graphics card or newer.
  • Restart the game and the system. Sometimes, this can fix everything.
  • Ensure the game and your OS are updated to the latest versions.
  • Close any programs you are not using at the time. You may also end some services from Task Manager while you are at it.

If you are unable to update Sea of Thieves on Windows 10/11, we offer solutions for that issue as well. Now, let’s perform the actual solutions if the FPS is still low.

1. Update graphics drivers if Sea of Thieves has low FPS on islands

  1. Right-click the Start button and select Device Manager.
  2. Click on Display adapters to reveal the drivers, right-click on the device and select Update driver. update driver to fix low fps in sea of thieves.
  3. Select Search automatically for drivers. search automatically for drivers.
  4. Perform any necessary updates.

If you have outdated display drivers then you may experience low FPS on Sea of Thieves, especially when visiting islands or outposts.

We recommend using specialized software, which will help to keep your drivers updated all the time.

2. Turn off VSync for Sea of Thieves low FPS on a high-end PC

  1. Click on Start and search NVIDIA Control Panel and hit Enter.
  2. Under 3D Settings select Manage 3D settings. open manage 3d settings.
  3. Under Settings, scroll until you find Vertical sync, and select Off from the drop-down menu. turn off vsync if low fps in seat of thieves.
  4. Click Apply.

VSync ensures that your monitor sync with your graphics card input. If you’re experiencing lagging on Sea of Thieves on a high-end PC, then try turning VSync off to see if that solves the issue. If you’re still having low FPS on Sea of Thieves, then try the next solution.

3. Verify the game files integrity

  1. Open Steam and click the Library menu.
  2. Right-click on Sea of Thieves and select Properties.
  3. Choose the Local Files tab, then click on Verify integrity of game files.

If there are any corrupted or missing files in the game, Steam will fix and download them automatically.

4. Set Sea of Thieves as high priority

  1. Right-click on Start and select Task Manager.
  2. Navigate to the Details tab and select Sea of Thieves. Task manager details.
  3. Right-click on Sea of Thieves and hover over Set priority then select High. set sea of thieves to high priority.

Setting Sea of Thieves at a high priority will have your PC focus its resources on the game and thus improve FPS.

5. Adjust in-game graphics

  1. Launch Sea of Thieves and open the Settings menu.
  2. Under Graphics Settings, lower the Default Quality Selection or go through and adjust the quality of each detail. change graphics in sea of thieves if low fps.
  3. Restart the game if needed.

Adjusting in-game graphics may lower the quality of details that you see, but it will improve the FPS in SOT. Try making slight changes at a time and see if it makes a difference in the frame rate.

6. Reinstall Sea of Thieves

  1. Launch Steam and click on Library.
  2. Right-click on Sea of Thieves, hover over Manage, and select Uninstall.
  3. Now, return to your existing games and proceed with a fresh installation.

So, if you’re asking how do I increase my FPS in SOT, the solutions above might have answered that question.

Of course, one of the best ways to improve your FPS for SOT is to have an optimized PC with a good graphics card. However, following the steps above in this guide will also help increase your FPS in the game.

Clearing out junk and corrupt files and prioritizing Sea of Thieves will help your PC focus its resources on the game and improve FPS.

Hopefully, one of the above solutions helped you fix low FPS in Sea of Thieves. If you’re having difficulties downloading Sea of Thieves on Windows 10/11, we offer solutions for that as well.

Let us know in the comments which solution worked for you or if you have any other suggestions.

3 Ways to Fix FPS Drops, Lag & Stuttering in Doom Eternal

Doom Eternal is an incredible-looking first-person-shooter game, but it’s far from a perfect experience. It suffers from inconsistent frame rate problems during intense encounters, which can be a real bummer when you’re in the thick of battle.

When it comes to any game that requires you to be able to aim precisely, dropped frames will have an impact. These games are more likely than others to have lower FPS because they require more processing power and perhaps more graphics memory than others.

Almost every action-oriented video game drops frames. It’s not just a Doom Eternal thing; it cuts across the board. However, with a few tweaks here and there, you can easily achieve decent framerates that won’t frustrate your gameplay.

Why does Doom Eternal keep dropping frames?

For a game called Doom Eternal, it sure seems to be dropping the ball a lot. The framerate tends to fall below smooth levels. But the bigger question here is why? Here are some possible causes:

  • System requirements – Doom Eternal is a fast-paced, intense game that requires your computer to run at a high frame rate so that you can enjoy playing the game and experience everything it has to offer. To make sure you’re able to run Doom Eternal at the best frame rates possible, we recommend your computer meet or exceed the minimum system requirements.
  • Poor graphics card – If you don’t have a good enough graphics card to support the resource-intensive modern games, you may experience random FPS drops in Doom Eternal. Even with sufficient RAM or processing power by itself, a video card that just can’t keep up with your games can cause them to run slow and crash frequently.
  • Outdated OS – If you are playing the game on a PC, ensure you are up-to-date with the latest updates. Most games are optimized to work with the latest versions, so if the game detects an old OS, it may struggle to balance the available resources for maximum efficiency.

How can I fix FPS drops, lag, and stuttering in Doom Eternal?

Before you start making changes to the PC, here are a few quick tricks to try:

  • Make sure your PC meets the minimum system requirements for Doom Eternal, if not the recommended ones. Running a demanding game on a PC with low specifications can lead to performance issues.
  • Certain game settings like shadows and ray tracing need more resources and may, as a result, lead to FPS drops, lag, and stuttering in Doom Eternal. Disable them and check whether it helps get rid of the problem.
  • Force the game to run on GPU for better performance.

If these don’t work, move to the solutions listed next.

1. Terminate non-critical processes

  1. Press Ctrl + Shift + Esc to open Task Manager, and locate all the non-critical programs and background processes.task manager
  2. Now, right-click on them individually, and choose End task from the context menu.end task
  3. After you have terminated several of these, relaunch Doom Eternal.

When several processes and apps are running in the background, there aren’t enough free resources for Doom Eternal, which leads to lags and FPS drop. Another workaround based on the same idea is to restart the computer before you launch the game.

2. Update your graphics card

  1. Press the Windows key, type Device Manager in the search box, and click Open.
  2. Navigate to Display adapters, right-click on your graphics card and select Update driver.display adapters
  3. Select Search automatically for drivers.

Since this solution might not work every single time, we recommend using a specialized tool to scan your PC and update all outdated drivers automatically.

3. Update your OS

  1. Press Windows + I to open Settings, choose Windows Update from the navigation pane, and click on Check for updates on the right.check for updates
  2. If an update is available, click on Download & install to get it.download & install

Your operating system is one of the most important parts of your computer’s hardware configuration. It contains all the programs that make your PC work correctly and efficiently.

When it comes to gaming, however, there are some bugs that may cause low FPS issues in games like Doom Eternal. Updating your OS will ensure that any bugs or software issues have been fixed and you’re ready to play without any problems.

Does CPU affect FPS?

Yes, the CPU does affect the FPS. A common rule, the higher the number of cores, the better the FPS. Though the increase in FPS will vary in different games, depending on how much it relies on the CPU and GPU.

Besides, even if the game relies on GPU for rendering, the CPU provides the relevant details and works on other critical aspects relevant to the game’s performance.

Does Doom Eternal run at 120 FPS?

Doom Eternal runs at 60 frames per second on consoles but can be unlocked to run at 120 FPS on PC if you’ve got the hardware for it. Why does this matter? A high framerate is crucial for an enjoyable experience with Doom Eternal. 

If your game can’t keep up with the action, it’ll feel sluggish and frustrating. You’ll be able to appreciate the level of detail in Doom Eternal’s world and combat when it’s running at 120 FPS.

Is 60 FPS good for Doom Eternal?

60 FPS is the default framerate for Doom Eternal on most platforms except for the Nintendo Switch, so it’s pretty decent for any gamer.

If you don’t have the hardware for higher FPS, you can install FPS booster software for an elevated experience.

Alternatively, you can also tweak your computer with the best FPS settings to enhance your gameplay.

How do you keep your framerates at an optimum level on your PC? Let us know in the comment section below.

Check out the Windows 7 & 8.1 February Patch Tuesday updates

We know that the main focus right now is on Windows 11, but the majority of Windows users still don’t feel like abandoning its predecessor (Windows 10).

Be sure to check out the latest versions of Windows 10, which is 22H2, and also Windows 11, which has also reached version 22H2.

And, as you surely know by now, the Redmond-based tech colossus also releases security updates for some of the obsolete operating systems, during Patch Tuesday.

This actually means that not only Windows 10 and 11 users will receive updates during this time. We’re also looking at Windows 7, Windows 8, and various Server versions as well.

We’ve already presented the 75 new updates that became available, along with the official download links, so all that remains is going a bit more in-depth.

Without any further ado, let’s take a closer look at what Windows 7 and Windows 8 users were given to work with on the February 2023 Patch Tuesday.

What’s new in the January 2023 Patch Tuesday?

The Redmond-based tech colossus has just released Patch Tuesday updates for Windows 8.1, in the form of KB5022899, and Windows 7, in the form of KB5022872.

Keep in mind that they each come with a whole host of improvements and known issues with some pretty neat workarounds.

Also, remember that Microsoft has recently terminated all ESU for both Windows 8.1 and Windows 7 operating systems.

Windows 7

KB5022872 

Improvements

  • This update contains miscellaneous security improvements to internal Windows OS functionality. No specific issues are documented for this release.

Known issues

  • After installing this update and restarting your device, you might receive the error, “Failure to configure Windows updates. Reverting Changes. Do not turn off your computer”, and the update might show as Failed in Update History.
  • After this update or a later Windows update is installed, domain join operations might be unsuccessful and error “0xaac (2732): NERR_AccountReuseBlockedByPolicy” occurs. Additionally, text stating “An account with the same name exists in Active Directory. Re-using the account was blocked by security policy” might be displayed.

Windows 8.1

KB5022899

Improvements

  • This update contains miscellaneous security improvements to internal Windows OS functionality. No specific issues are documented for this release.

Known issues

  • After this update or a later Windows update is installed, domain join operations might be unsuccessful and error 0xaac (2732): NERR_AccountReuseBlockedByPolicy occurs. Additionally, text stating. An account with the same name exists in Active Directory. Re-using the account was blocked by security policy” might be displayed.

These older, now obsolete versions of the Windows operating system are no longer safe for use, and it is highly recommended you upgrade to a supported version.

And, since the time has come to say goodbye, it is about time you figure out the next steps you will need to take.

Have you encountered any issues after downloading and installing these new security updates for Windows 7 and 8.1?

Share your experience with us in the dedicated comments section located below.

75 CVEs addressed through the 2023 February Patch Tuesday

Valentine’s Day is upon us, but not everything comes down to flowers and chocolates. There are those who eagerly await Microsoft’s Patch Tuesday rollout/

And, as you know, it’s the second Tuesday of the month, which means that Windows users are looking towards the tech giant in hopes that some of the flaws they’ve been struggling with will finally get fixed.

We have already taken the liberty of providing the direct download links for the cumulative updates released today for Windows 7, 8.1, 10, and 11, but now it’s time to talk CVEs again.

For February, Microsoft released 75 new patches, which is still more than some people were expecting for the second month of 2023.

These software updates address CVEs in:

  • Windows and Windows components
  • Office and Office Components
  • Exchange Server
  • .NET Core and Visual Studio Code
  • 3D Builder and Print 3D
  • Microsoft Azure and Dynamics 365
  • Defender for IoT and the Malware Protection Engine
  • Microsoft Edge (Chromium-based)

You probably want to know more on the matter, so let’s dive right into it and see what all the fuss is about this month.

Microsoft released 75 new important security patches

January 2023 was a pretty packed month in terms of security patches, so developers decided to take a breather and release fewer updates.

You might like to know that, out of the 75 new CVEs released, only nine are rated Critical and 66 are rated Important in severity by security experts.

Furthermore, keep in mind that this is one of the largest volumes we’ve seen from Microsoft for a February release in quite some time.

We have to say that it is a bit unusual to see half of the Patch Tuesday release address remote code execution (RCE) bugs.

Remember that none of the new CVEs released this month are listed as publicly known, but there are two bugs listed as being exploited in the wild at the time of release.

That being said, let’s take a closer look at some of the more interesting updates for this month, starting with the bugs under active attack.

CVETitleSeverityCVSSPublicExploitedType
CVE-2023-21715Microsoft Office Security Feature Bypass VulnerabilityImportant7.3NoYesSFB
CVE-2023-23376Windows Common Log File System Driver Elevation of Privilege VulnerabilityImportant7.8NoYesEoP
CVE-2023-21808.NET and Visual Studio Remote Code Execution VulnerabilityCritical8.4NoNoRCE
CVE-2023-21689Microsoft Protected Extensible Authentication Protocol (PEAP) Remote Code Execution VulnerabilityCritical9.8NoNoRCE
CVE-2023-21690Microsoft Protected Extensible Authentication Protocol (PEAP) Remote Code Execution VulnerabilityCritical9.8NoNoRCE
CVE-2023-21692Microsoft Protected Extensible Authentication Protocol (PEAP) Remote Code Execution VulnerabilityCritical9.8NoNoRCE
CVE-2023-21718Microsoft SQL ODBC Driver Remote Code Execution VulnerabilityCritical7.8NoNoRCE
CVE-2023-21716Microsoft Word Remote Code Execution VulnerabilityCritical9.8NoNoRCE
CVE-2023-23381Visual Studio Code Remote Code Execution VulnerabilityCritical8.4NoNoRCE
CVE-2023-21815Visual Studio Remote Code Execution VulnerabilityCritical8.4NoNoRCE
CVE-2023-21803Windows iSCSI Discovery Service Remote Code Execution VulnerabilityCritical9.8NoNoRCE
CVE-2023-21722.NET Denial of Service VulnerabilityImportant4.7NoNoDoS
CVE-2023-233773D Builder Remote Code Execution VulnerabilityImportant7.8NoNoRCE
CVE-2023-233903D Builder Remote Code Execution VulnerabilityImportant7.8NoNoRCE
CVE-2023-21777Azure App Service on Azure Stack Hub Elevation of Privilege VulnerabilityImportant8.7NoNoEoP
CVE-2023-21703Azure Data Box Gateway Remote Code Execution vulnerabilityImportant6.5NoNoRCE
CVE-2023-21564Azure DevOps Server Cross-Site Scripting VulnerabilityImportant7.1NoNoXSS
CVE-2023-21553Azure DevOps Server Remote Code Execution VulnerabilityImportant7.5NoNoRCE
CVE-2023-23382Azure Machine Learning Compute Instance Information Disclosure VulnerabilityImportantUnknownNoNoInfo
CVE-2023-21687HTTP.sys Information Disclosure VulnerabilityImportant5.5NoNoInfo
CVE-2023-21809Microsoft Defender for Endpoint Security Feature Bypass VulnerabilityImportant7.8NoNoSFB
CVE-2023-23379Microsoft Defender for IoT Elevation of Privilege VulnerabilityImportant6.4NoNoEoP
CVE-2023-21807Microsoft Dynamics 365 (on-premises) Cross-site Scripting VulnerabilityImportant5.8NoNoXSS
CVE-2023-21570Microsoft Dynamics 365 (on-premises) Cross-site Scripting VulnerabilityImportant5.4NoNoXSS
CVE-2023-21571Microsoft Dynamics 365 (on-premises) Cross-site Scripting VulnerabilityImportant5.4NoNoXSS
CVE-2023-21572Microsoft Dynamics 365 (on-premises) Cross-site Scripting VulnerabilityImportant6.5NoNoXSS
CVE-2023-21573Microsoft Dynamics 365 (on-premises) Cross-site Scripting VulnerabilityImportant5.4NoNoXSS
CVE-2023-21778Microsoft Dynamics Unified Service Desk Remote Code ExecutionImportant8.3NoNoRCE
CVE-2023-21706Microsoft Exchange Server Remote Code Execution VulnerabilityImportant8.8NoNoRCE
CVE-2023-21710Microsoft Exchange Server Remote Code Execution VulnerabilityImportant7.2NoNoRCE
CVE-2023-21707Microsoft Exchange Server Remote Code Execution VulnerabilityImportant8.8NoNoRCE
CVE-2023-21529Microsoft Exchange Server Remote Code Execution VulnerabilityImportant8.8NoNoRCE
CVE-2023-21704Microsoft ODBC Driver for SQL Server Remote Code Execution VulnerabilityImportant7.8NoNoRCE
CVE-2023-21797Microsoft ODBC Driver Remote Code Execution VulnerabilityImportant8.8NoNoRCE
CVE-2023-21798Microsoft ODBC Driver Remote Code Execution VulnerabilityImportant8.8NoNoRCE
CVE-2023-21714Microsoft Office Information Disclosure VulnerabilityImportant5.5NoNoInfo
CVE-2023-21721Microsoft OneNote Spoofing VulnerabilityImportant6.5NoNoSpoofing
CVE-2023-21693Microsoft PostScript Printer Driver Information DisclosureImportant5.7NoNoInfo
CVE-2023-21684Microsoft PostScript Printer Driver Remote Code ExecutionImportant8.8NoNoRCE
CVE-2023-21801Microsoft PostScript Printer Driver Remote Code ExecutionImportant7.8NoNoRCE
CVE-2023-21701Microsoft Protected Extensible Authentication Protocol (PEAP) Denial of Service VulnerabilityImportant7.5NoNoDoS
CVE-2023-21691Microsoft Protected Extensible Authentication Protocol (PEAP) Information Disclosure VulnerabilityImportant7.5NoNoInfo
CVE-2023-21695Microsoft Protected Extensible Authentication Protocol (PEAP) Remote Code Execution VulnerabilityImportant7.5NoNoRCE
CVE-2023-21717Microsoft SharePoint Server Elevation of Privilege VulnerabilityImportant8.8NoNoEoP
CVE-2023-21568Microsoft SQL Server Integration Service (VS extension) Remote Code Execution VulnerabilityImportant8NoNoRCE
CVE-2023-21705Microsoft SQL Server Remote Code Execution VulnerabilityImportant8.8NoNoRCE
CVE-2023-21713Microsoft SQL Server Remote Code Execution VulnerabilityImportant8.8NoNoRCE
CVE-2023-21528Microsoft SQL Server Remote Code Execution VulnerabilityImportant7.8NoNoRCE
CVE-2023-21799Microsoft WDAC OLE DB provider for SQL Server Remote Code Execution VulnerabilityImportant8.8NoNoRCE
CVE-2023-21685Microsoft WDAC OLE DB provider for SQL Server Remote Code Execution VulnerabilityImportant8.8NoNoRCE
CVE-2023-21686Microsoft WDAC OLE DB provider for SQL Server Remote Code Execution VulnerabilityImportant8.8NoNoRCE
CVE-2023-21688NT OS Kernel Elevation of Privilege VulnerabilityImportant7.8NoNoEoP
CVE-2023-21806Power BI Report Server Spoofing VulnerabilityImportant8.2NoNoSpoofing
CVE-2023-23378Print 3D Remote Code Execution VulnerabilityImportant7.8NoNoRCE
CVE-2023-21567Visual Studio Denial of Service VulnerabilityImportant5.6NoNoDoS
CVE-2023-21566Visual Studio Installer Elevation of Privilege VulnerabilityImportant7.8NoNoRCE
CVE-2023-21816Windows Active Directory Domain Services API Denial of Service VulnerabilityImportant7.5NoNoDoS
CVE-2023-21812Windows Common Log File System Driver Elevation of Privilege VulnerabilityImportant7.8NoNoEoP
CVE-2023-21820Windows Distributed File System (DFS) Remote Code Execution VulnerabilityImportant7.4NoNoRCE
CVE-2023-21694Windows Fax Service Remote Code Execution VulnerabilityImportant6.8NoNoRCE
CVE-2023-21823Windows Graphics Component Elevation of Privilege VulnerabilityImportant7.8NoNoEoP
CVE-2023-21804Windows Graphics Component Elevation of Privilege VulnerabilityImportant7.8NoNoEoP
CVE-2023-21822Windows Graphics Component Elevation of Privilege VulnerabilityImportant7.8NoNoEoP
CVE-2023-21800Windows Installer Elevation of Privilege VulnerabilityImportant7.8NoNoEoP
CVE-2023-21697Windows Internet Storage Name Service (iSNS) Server Information Disclosure VulnerabilityImportant6.2NoNoInfo
CVE-2023-21699Windows Internet Storage Name Service (iSNS) Server Information Disclosure VulnerabilityImportant5.3NoNoInfo
CVE-2023-21700Windows iSCSI Discovery Service Denial of Service VulnerabilityImportant7.5NoNoDoS
CVE-2023-21811Windows iSCSI Service Denial of Service VulnerabilityImportant7.5NoNoDoS
CVE-2023-21702Windows iSCSI Service Denial of Service VulnerabilityImportant7.5NoNoDoS
CVE-2023-21817Windows Kerberos Elevation of Privilege VulnerabilityImportant7.8NoNoEoP
CVE-2023-21802Windows Media Remote Code Execution VulnerabilityImportant7.8NoNoRCE
CVE-2023-21805Windows MSHTML Platform Remote Code Execution VulnerabilityImportant7.8NoNoRCE
CVE-2023-21813Windows Secure Channel Denial of Service VulnerabilityImportant7.5NoNoDoS
CVE-2023-21819Windows Secure Channel Denial of Service VulnerabilityImportant7.5NoNoDoS
CVE-2023-21818Windows Secure Channel Denial of Service VulnerabilityImportant7.5NoNoDoS
CVE-2019-15126 *MITRE: CVE-2019-15126 Specifically timed and handcrafted traffic can cause internal errors (related to state transitions) in a WLAN deviceMedium3.1NoNoInfo

Note that there are three CVSS 9.8 bugs in Microsoft’s Protected Extensible Authentication Protocol (PEAP), but it doesn’t seem that this protocol is used much anymore.

Frankly, we find CVSS 9.8 bug in the iSCSI Discovery Service a lot more alarming, as data centers with storage area networks (SANs) should definitely check with their vendors to see if their SAN is impacted by the RCE vulnerability.

Please take into consideration the fact that the bug in SQL would require someone to connect to a malicious SQL server via ODBC.

There are no Print Spooler bugs getting fixed this month, but there are two bugs in the PostScript Printer Driver that could allow an authenticated attacker to take over a system sharing a printer.

Actually, there are quite a few fixes for SQL Server, and exploiting these would require an affected system to connect to a malicious SQL Server, typically through ODBC.

Experts say that, while that seems unlikely, they are worried about the various servicing scenarios between all the available versions of SQL Server.

We also have to mention the bug in Azure Data Box Gateway, which requires high privileges to exploit, but that’s not the case for Azure DevOps Server vulnerability.

To get access, an attacker only needs to have only Run access to the pipeline, but not every pipeline is vulnerable.

Unfortunately, the tech giant doesn’t provide information on how to distinguish the affected and non-affected pipelines.

The Dynamics bug does require authentication, an attacker might be able to call the target’s local files in the Resources directory and execute Windows commands that are outside of the Dynamics application.

There are also a couple of RCE bugs, but they do allow us to remind you the Fax Service is still a thing, so the final RCE bug is the lone Moderate-rated bug this month for Edge (Chromium-based).

Feel free to check each individual CVE and find out more about what it means, how it manifests, and what scenarios can malicious third parties use to exploit them.

Have you found any other issues after installing this month’s security updates? Share your experience with us in the comments section below.
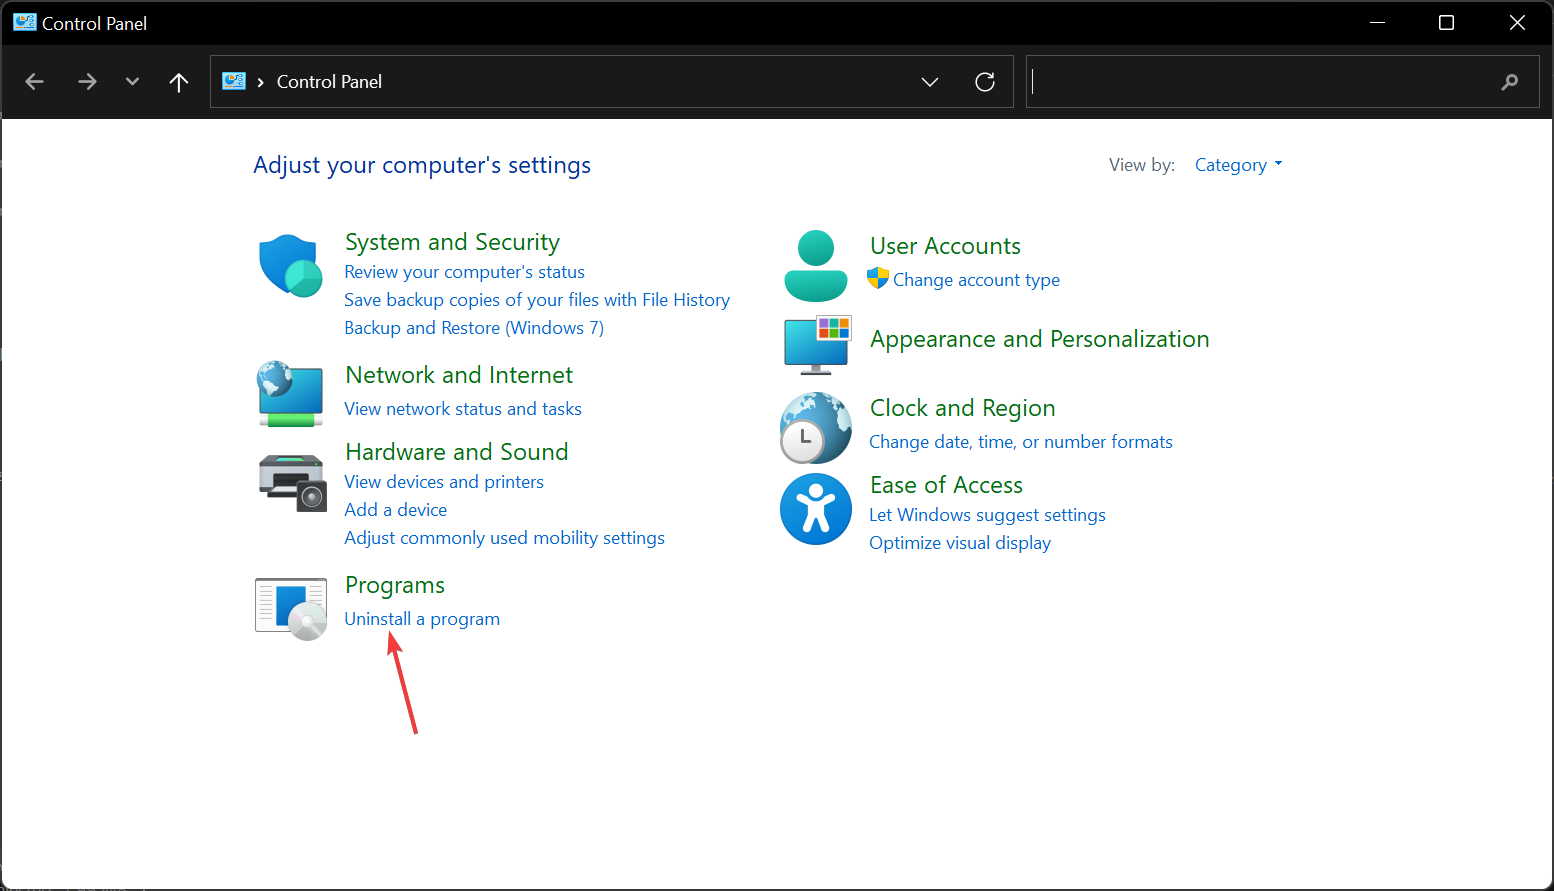
Get the Windows February 2023 Patch Tuesday security updates

Friends, the second month of 2023, and the time has come for us to get excited about a brand new batch of security updates from Microsoft.

Please remember that these updates actually bring an entire array of changes for both Windows 10 and Windows 11, regardless of whether it is a newer or an older version.

This February 2023 Patch Tuesday batch of updates is expected to fix some of the issues that were still pending, and in the article below we will be looking to see exactly what we get.

We have included a detailed changelog for each cumulative update, and we will also be providing you with direct download links from Microsoft’s Windows Update Catalog, so you know that they are secure.

With all that being said, remember that, alternatively, you can always use other methods to get the latest updates, including:

  • The Windows Update menu on your OS
  • The WSUS (Windows Server Update Service)
  • Group Policies set up by your admins if you’re part of a larger network.

Now that we got this out of the way, let’s have a closer look at the February 2023 Patch Tuesday updates rollout from Microsoft.

Changes included in the February Patch Tuesday updates

This image has an empty alt attribute; its file name is Windows-10-Banner.jpg

Windows 11

There really isn’t further need for introductions, since most of you are already running Windows 11 on your devices.

You might also like to know that the 22H2 version of Windows 11, the operating system’s first major update, is now ready for downloading and installing.

Beware, however, of the great number of bugs and glitches that will test your patience when discovering all the new features coming to Windows 11.

Cumulative update name

KB5022836

Changes and improvements

  • This update makes miscellaneous security improvements to internal OS functionality. No additional issues were documented for this release.

[DIRECT DOWNLOAD LINK]

Windows 10 versions 21H2, 21H1, and 20H2

Windows 10 version 22H2 is the latest major version of Windows 10, and as such has the most experimental features on it.

Fortunately, most bugs that were first present when it was first made available have been weeded out, and this version of Windows 10 is far more stable.

Cumulative update name

KB5021233

Changes and improvements

  • This build includes all the improvements from the supported Windows 10, version 20H2 editions.
  • This update addresses an issue that affects certain Internet of Things (IoT) devices. They lose audio.

Known issues

  • Devices with Windows installations created from custom offline media or custom ISO image might have Microsoft Edge Legacy removed by this update, but not automatically replaced by the new Microsoft Edge. This issue is only encountered when custom offline media or ISO images are created by slipstreaming this update into the image without having first installed the standalone servicing stack update (SSU) released March 29, 2021 or later.

Windows 10, version 1809

This version of the Windows operating system is outdated and will no longer receive any updates from the Redmond tech company.

Therefore, users that are still running this old version on their devices are strongly advised to choose a more recent one to update to.

If you still want to use Windows 10 and are not willing to upgrade to 11, you don’t have to do so right away. After all, Microsoft announced that the support for Windows 10 will go on until 2025.

Cumulative update name

KB5022840 

Improvements and fixes:

  • It updates the text and web link for Windows Admin Center (WAC) notifications. These appear after you sign in to the desktop unless you have turned them off. The WAC notifications highlight the available Windows Server management options.
  • This update addresses an issue that affects searchindexer.exe. It randomly stops you from signing in or signing out.
  • This update affects HTML dialogs in Microsoft Edge IE mode. Administrators can now reset the zoom for HTML dialogs to the default.
  • This update addresses an issue that affects dialogs in IE Mode.
  • This update addresses an issue that affects Microsoft Edge when it is in IE Mode. The titles of pop-up windows and tabs are wrong.
  • This update addresses an issue that affects certain Internet of Things (IoT) devices. They lose audio.
  • This update addresses an issue that affects local Kerberos authentication. It fails if the local Key Distribution Center (KDC) service is not active.
  • This update addresses an issue that affects Windows Server 2022. Phone activation of a Key Management Services (KMS) key does not work.
  • This update affects Active Directory (AD). It improves the replication performance of AD in large environments.
  • This update addresses an issue that affects the Resilient File System (ReFS) MSba tag. The issue causes a nonpaged pool leak.
  • This update addresses an issue that affects the Resilient File System (ReFS). The issue causes high nonpaged pool usage, which depletes system memory.

Known issues

  • After installing KB5001342 or later, the Cluster Service might fail to start because a Cluster Network Driver is not found.

Windows 10, version 1607

Windows 10, version 1607 has reached the end of service for all of its available editions. Update to the latest version of Windows 10 in order to keep your system protected.

Cumulative update name

KB5022838 

Improvements and fixes

  • This update addresses an issue that puts domain controllers (DC) in a restart loop. This occurs because the Local Security Authority Subsystem Service (LSASS) stops responding. The error is 0xc0000374. LSASS stops responding if you populate KrbTGT with the AltsecID on accounts that read-write and read-only DCs use.
  • This update affects HTML dialogs in Microsoft Edge IE mode. Administrators can now reset the zoom for HTML dialogs to the default.
  • This update addresses an issue that affects AppV. It stops file names from having the correct letter case (uppercase or lowercase).
  • This update addresses an issue that affects certain Internet of Things (IoT) devices. They lose audio.​​​​​​​
  • This update addresses an issue that affects searchindexer.exe. It randomly stops you from signing in or signing out. ​​​​​​​

[DIRECT DOWNLOAD LINK]

Drawing the line, this is pretty much what we are dealing with in terms of security updates for the month of February 20232, as a part of the Patch Tuesday rollout.

Have you noticed any issues after downloading and installing these security updates for your version of the Windows operating system? Let us know in the comments section below.

New Bing waiting list bug is annoying, but here’s the fix

Microsoft integrates the power of AI into its Bing search engine. Collaborating with OpenAI, the tech giant brings a ChatGPT-like feature to the often-overlooked search engine to allow it to perform complex searches and tasks. 

While it’s not out for the public yet, Microsoft has rolled out a waiting list for those interested. The list is long, but you can sign up & get ahead by setting Microsoft defaults on your PC and installing the Bing mobile app.

However, several users reported that they’ve been locked out of the feature even after receiving a confirmation email that they’re in for the new Bing. 

“I received the “you are in” mail of new bing. But when I access https://www.bing.com/new , it only says I can join the waitlist so I tried to join again and I joined successfully. I then tried to ask questions to bing and chat with it since it says I’m on the waitlist. I tried to opt out the waitlist in https://www.bing.com/waitlist/optout  to resolve this problem but received “An unexpected error has occurred. Please try again later.” I think this is a bug. Will I ever be able to access the new Bing?”

The bug is annoying, considering how highly-anticipated this feature is. Some other users even reported that a pop-up message saying “Something went wrong. Please try again” always comes out whenever they want to enlist themselves for the waiting list.

Does this relate to you? Follow along to find out what you need to do. 

How can I fix the Bing waiting list bug?

1. Private browsing

1. Open your Microsoft Edge browser.

2. Click on the vertical ellipsis on your upper right screen ➜ New InPrivate window.

3. With your InPrivate window open, access the New Bing‘s website at https://www.bing.com/new and you should be able to see the new Bing by now.

If not, click Join the waitlist again.

2. Alternative login credential (if you have another Microsoft account)

1. With your Edge browser open, access the New Bing‘s website.

2. Click on Sign in on your upper right screen

3. Fill in your email and password ➜ Next.

4. Access The New Bing‘s website & click Join the waitlist.

3. Alternative login credential (if you do not have another Microsoft account)

1. On the Sign in page, click Create one! instead

2. Fill in your desired email and password ➜ Next.

3. Finish the captcha verification until it says Verification complete.

4. The New Bing window will pop up. Click Join the waitlist.

On the other hand, Google has also rolled out its answer to the growing competition in the AI world, Bard. It simplifies complex searches using Google’s Language Model for Dialogue Applications (LaMDA) and is currently being tested by several select users.

Are you excited about the integration of AI and search engine? Let us know in the comments!

Skype’s annual revenue takes a major hit, drops by 74.5% in approximately 10 years

At the height of the COVID-19 pandemic, Skype hit 40 million daily active users. This is because organizations started transitioning to hybrid work, forcing them to become dependent on virtual meeting tools in a bid to prevent the further spread of the virus.

However, the communication tool seems to be on a downward spiral. According to a report by L’Informé, a french publication, Skype’s annual revenue is at an all-time low. In retrospect, the company’s annual revenue in 2013 was $722 million.

With a difference of almost 10 years, Skype’s annual revenue has dropped by 74.5% with last year’s annual revenue coming in at $184.3 million. Last year, Microsoft released a preview version of Skype that allowed them to make phone calls to and from Ukraine for free.

The company’s financial information indicates that this move caused it to incur a $7.5 million loss. The financial report further highlights that the demand for Skype credit has significantly dropped, an indication that users are not making calls as much using the platform.

What’s more, the platform’s annual profit has also been affected having dropped from 90.8 million to $6.35 million. This translates to a 93% drop in almost 10 years. Perhaps, these margins can be traced back to when Microsoft removed some key features from the platform, a move that was not well-received by users.

Besides, Microsoft championing Teams to become its default messaging app, having exceeded 270 million monthly active users last year doesn’t help Skype’s case. Share your thoughts with us in the comment section.

via Thurrott.com

Master the Windows key alphabet with these 10 amazing keyboard shortcuts

The Windows key is the most underrated on your keyboard. Most people only use it to open the Start menu, but you can use it for the Windows key alphabet instead to drastically improve your productivity. In this guide, we will show you some fantastic keyboard shortcuts that use the little-known Windows key alphabet.

Windows key alphabet

  1. Windows key + A: Opens the Action Center, where you can access quick settings and notifications. windows key alphabet
  2. Windows key + B: Show hidden icons on the taskbar. windows key alphabet
  3. Windows key + C: Opens Microsoft Teams Chat (personal). windows key alphabet
  4. Windows key + D: Minimizes all your open windows and shows your desktop. This can help if you need to quickly access files or shortcuts that are on your desktop.
  5. Windows key + E: Opens File Explorer, where you can navigate directly to the files or folders you need. windows key alphabet
  6. Windows key + I: Opens the Settings app, where you can customize your Windows settings. windows key alphabet
  7. Windows key + L: Locks your Windows PC and takes you to the login screen that you see when your PC turns on. This is a good way to secure your PC if you need to step away for a moment. WINDOWS KEY ALPHABET
  8. Windows key + R: Opens the Run dialog box, where you can quickly run a command. windows key alphabet
  9. Windows key + S: Opens Search, which you can use to find files, apps, and settings on your Windows PC. WINDOWS KEY ALPHABET
  10. Windows key + X: Opens the Quick Link menu, where you can quickly access various Windows system tools and settings. WINDOWS KEY ALPHABET

Mastering the Windows key alphabet can be a game-changer for any Windows 10 or Windows 11 user.

By using these Windows key alphabet keyboard shortcuts, you can perform your daily tasks much more efficiently and save yourself a ton of time. The best part is these shortcuts are easy to remember and can quickly become a habit that you can incorporate into your daily workflow.

Something Went Wrong Linkedin Error: 2 Best Ways to Fix It

We’ve all been on Linkedin, but sometimes you might get Something went wrong message on LinkedIn. If that happens, LinkedIn won’t load in Chrome or in other browsers properly.

How do I fix LinkedIn Something went wrong error?

There are a few preliminary checks that you can take:

  • Log out and log back in – It’s possible that there’s an issue with a website, so logging out can sometimes help.
  • Use a different browser – Issues with the browser can prevent LinkedIn from working. To fix it, you might have to switch your browser.

1. Clear your browser cache

Chrome

  1. Open Chrome. At the top right, click More.
  2. Click More tools, then click Clear browsing data.
    clear cache Linkedin Something Went Wrong
  3. Choose a time range, might be Last hour or All time.
  4. Select the type of data you want to remove.
  5. Click the Clear data button.
    Linkedin problem clear data
  6. You’re all set.

Firefox

  1. Click on the Menu button and choose Options.
    Firefox settings
  2. Select the Privacy & Security panel and go to the Cookies and Site Data section. Next, click on the Clear data button.
  3. Select all options and click on Clear.
    Firefox Clear Data

Microsoft Edge

  1. Click the Menu button in the top right and choose Settings.
  2. In the left pane, select Privacy, search and services. Next, click on Choose what to clear.
  3. Set Time range to All time and check the components that you want to clear. Next, click on Clear now.

2. Check the client_id

  1. Make sure that your client_id in the authorize URL matches the client_Id on your APP page.
  2. Next, Make sure that the redirect_url value in your authorize URL section has been authorized on your app page.

This solution can be helpful to individuals who are having issues with login into their LinkedIn Developer Portal accounts.

3. Disable browser extensions

  1. Open your browser.
  2. Click the three dots (menu) in the upper right corner.
  3. Select More tools > Extensions.Chrome, more tools, extensions
  4. You’ll see a list of installed extensions.
  5. Toggle the switch next to each extension to disable it.disable extensions google chrome
  6. Restart your browser.
  7. Try accessing LinkedIn.

If the issue is fixed, re-enable the extensions one by one to pinpoint the culprit.

Why does LinkedIn keep saying something went wrong?

  • Server/client glitches – Sometimes, there might be a certain glitch with your browser that causes this error. Logging out usually helps.
  • Web browser – Issues with the browser can cause these types of problems. To prevent them, use an enterprise web browser.
  • Cache – Browser cache can cause issues such as this. However, you can always manually clean the cache or use cookie cleaner software.

After trying all of our solutions, you should be able to visit LinkedIn without any issues. Don’t hesitate to let us know if you still encounter any problems.

Did we miss a solution that worked for you? If so, let us know what solution you used to fix LinkedIn Something went wrong please try again error in the comments section.

How to Reduce CPU Usage While Gaming: 7 Handy Tips That Work

Your gaming performance is heavily affected by your hardware. This is why many games want to reduce CPU usage while gaming.

This isn’t the only problem, and many reported high CPU and low GPU usage when gaming. However, CPU issues can be fixed with the steps from this guide.

What are the causes of high CPU usage on a Windows PC?

While we will take a look at how to reduce CPU usage while gaming, let us first take a look at the different causes that trigger this problem:

  • Your CPU is overheating – Overheating problems on your PC or laptop are usually caused by dust buildup. This is especially true if your PC isn’t cleaned up in a while or if it’s kept in a dusty area.
  • Game is not compatible with your PC – Make sure that your PC meets the hardware requirements of the game that you’re trying to run. It might be necessary to upgrade your PC or OS if you want to run certain games.
  • The drivers aren’t updated – Another important thing to keep in mind is that you need to update drivers on your PC because it can eliminate compatibility and bugs that increase CPU usage.
  • Background processes – Buggy or unexpected behavior can cause certain issues. This is especially true if you have too many background processes on your PC.
  • Presence of virus or malware – Malware or virus can often disguise themselves as normal windows process and use CPU and GPU bandwidth, crashing games and resulting in increased CPU usage.

How can I reduce CPU usage while gaming on Windows?

Here are a few things that you can do before applying advanced solutions to reduce high CPU usage on your PC:

  • A simple restart can fix multiple issues you might be experiencing while running programs.
  • Check if a new update is available for the game that you are playing, and install it because it could fix the bug that is causing the high CPU usage problem.

Let us check out the advanced troubleshooting solutions.

1. Scan your PC for malware

  1. Open the Start menu by pressing the Windows key.
  2. Search for Windows Security and open it.
  3. Click on Virus & threat protection.virus and threat protection steam error e502 l3
  4. Hit the Quick Scan button.
  5. Windows Security will scan your PC and will ask you to take necessary actions to remove any virus or malware.

The above steps are for the in-built Windows Security antivirus tool. You can perform a virus scan on your PC using any third-party antivirus tool.

If you are confused about which antivirus tool to get for your PC, you can refer to our guide, which lists some of the best antivirus software for Windows 10.

2. Close background apps that use a lot of CPU

  1. 1. Press Ctrl + Shift + Esc to open the Task Manager.

  2. 2. Click on the Processes tab.

    go to processes
  3. 3. Click on the CPU column to sort the processes by their amount of CPU usage.

  4. 4. Locate in the list which apps use up a lot of CPU, but are not necessary for playing the game.

  5. 5. Select one of the apps and right-click on it, then choose End task from the options.

    end task with high cpu
  6. 6. Perform the same steps for all other apps eating up your CPU that are not needed for you while you play video games.

  7. If you noticed that your CPU usage is very high while gaming, it is likely that it’s not just the game you’re playing to blame, but other apps as well.

    Basically, there are apps that can be left in the background, which take up CPU power, even though they are not currently used. By closing them in Task Manager, you can free up your PC’s resources, so that your games work better.

3. Update drivers

  1. Right-click on the Start menu and select Device Manager.device manager
  2. Expand each section such as your GPU, audio, etc.
  3. Right-click on your driver and select Update driver.update-graphics live kernel event 141
  4. Select Search automatically for drivers.search for drivers automatically
  5. Your system will look for new drivers online, and if it detects one, will prompt you to install it.

If your graphics, audio, or other drivers on your PC aren’t up to date, then it can cause optimization issues with the game, and it will result in high CPU usage while gaming.

The above steps require you to manually go through each section and update the drivers. To ease this process, you can check out our recommended tool called Outbyte Driver Updater.

Outbyte Driver Updater helps you scan all the drivers on your PC, and update them with just a single click.

Outbyte Driver Updater

Increase your gaming experience by quickly updating your device drivers with Outbyte Driver Updater.
Free Trial Download now

4. Disable overclocking

  1. Launch the PredatorSense program on your PC.
  2. In the Overclocking section, select the Normal option.
  3. You can set the Fan Control mode as Auto.

PredatorSense is a gaming tool that helps you control your fan speed or overclock GPU for better gaming performance on Acer laptops.

Similarly, other brands have their gaming tool that lets you control the same aspects of your CPU and GPU.

You should disable overclocking so your CPU doesn’t have to work hard for smoother gameplay if you are experiencing excessive CPU heating.

5. Disable power saving mode

  1. Open the Start menu by pressing the Windows button.
  2. Type Edit power plan and open it.
  3. Click on Change advanced power settings.
  4. Select Ultimate performance from the drop-down menu.

6. Reinstall the game

  1. Press the Windows key + I to open the Settings app.
  2. Navigate to the Apps section. Now select Installed apps.
  3. Select the game you want to uninstall and click the Uninstall button.
  4. Once the game is removed, install it again.
Note icon NOTE
If you installed the game using a distribution service such as Steam or Origin, you’ll have to uninstall it from the distribution client.

7. Upgrade your hardware

As a last resort, if nothing works, then it is time for you to upgrade your PC. You might be playing a game that is not meant for your PC, and your PC has to do hard work in order to run the game.

You can try upgrading your graphics processor, increasing the RAM on your PC, installing cooling components, etc., basically go for recommended PC requirements of a game and not the minimum requirements.

Is 50% CPU usage normal while gaming?

Yes, a 50% or even slightly higher CPU usage is normal when playing resource-intensive games. For many, the CPU usage was in the 50% range when playing Doom Eternal or Cyberpunk 2077.

Just make sure it’s the game that’s using half the CPU. You could easily verify this in the Task Manager, and if that’s indeed the case, there’s nothing to be worried about.

Does 100% CPU usage damage the PC?

A 100% CPU usage does not damage the PC or its components, even when run at the same load for several hours at a stretch. Though you will notice a considerable fall in performance, and some processes, apps, and games will lag.

Besides, when running the PC at 100% CPU usage, there’s a chance of overheating in Windows. But most modern-age PCs are designed to shut down automatically before the temperature reaches levels that can damage the components. So, you are safe!

And while we are on the subject, find out some expert recommendations on to optimize Windows for gaming and get the best performance.

That is it from us in this guide. We hope the above tips helped you reduce CPU usage while gaming on your PC.

Windows 10 Running Slow: 12 Ways to Fix it

Below, we’ll show you what to try when Windows 10 is very slow and unresponsive. We’ve outlined everything in easy-to-understand instructions, but if you’re a visual person, we have a video summary:

(You can always come back to this article because it has a few more details than the video).

After upgrading, Windows 10 proved very slow, frozen, or unresponsive on startup and when opening programs or folders.

What’s more, even File Explorer shows a delayed response.

If all of that sounds familiar, the solutions below should help.

How do you fix a slow computer running on Windows 10?

1. Use a cleaning tool

Excessive and unnecessary data can cause hard drive fragmentation, affecting overall system performance. So cleaning your PC makes sense here.

Specialized cleaner applications come in handy here. The built-in Windows Defrag app can also help. You can erase useless data from your PC and optimize your computer performance with a few clicks.

2. Update your drivers and software

If you wonder My Windows 10 laptop is very slow, what can I do?, you should know that sometimes your Windows 10 can become slow if your essential components, drivers, or applications are outdated.

You can easily update drivers in Windows:

  1. Open Device Manager.Device Manager Run command
  2. Locate relevant device drivers in the list.
    Drivers that usually cause slowdowns: Network Adapter (Internet driver), Display Adapters (Your graphic card – NVIDIA, AMD Ryzen, etc).
  3. Right-click on the driver & hit update.

However, it takes a long time to find the appropriate suitable drivers to improve Windows 10’s slowness and responsiveness.

Also, keeping the drivers up to date can help you fix other issues like laptop lagging when charging; read this guide to learn more.

3. Disable heavy performance processes

  1. Open Task Manager by pressing Ctrl + Shift + Esc on your keyboard.
  2. Go to the Startup tab and sort the processes by their Startup impact rating.
    Windows 10 running slow and freezing
  3. Right-click on processes with High ratings and select Disable, but don’t disable crucial programs such as your antivirus. The computer running slow Windows 10 issue will be fixed.
    Windows 10 slow

One of the simplest ways to do this is to disable the processes you don’t need. However, this will leave more resources to other apps, thus making the PC faster.

This is just one method you can use; there are, however, many other easy solutions to speed up Windows 10 and make it lightning-fast.

Elements such as disabling animations, shadows, and other special effects play a significant role in PC speed.

4. Enable a faster startup option

  1. Press Windows Key + S and enter power settings. Select Power & sleep settings.
    Windows 10 very slow startup
  2. Click Additional power settings.
    Windows 10 very slow and unresponsive
  3. Click on Choose what the power button does from the menu on the left.
    Slow windows 10 after update
  4. Now select Change settings that are currently unavailable.
    Windows 10 running slow and freezing
  5. Make sure to check Turn on fast startup (recommended).
  6. Save your changes, and you’re good to go.

This feature is called Hybrid Startup and Shutdown, and it puts your PC into a hibernation state, improving the startup and shutdown process.

5. Check for slow services

  1. Press Windows key + R and type services.msc and press Enter.
  2. In the list of all services that start with your Windows 10, look for any services that take too long to launch.
  3. Right-click each service and change the settings from Default to Automatic (Delayed Start).
    Slow Windows 10 File Explorer
  4. Save your changes and restart.

6. Disable blur effects and transparency

  1. Open the Settings app.
  2. Then click on Personalization.
    Slow Windows 10 File Explorer
  3. Next, click on Colors, and set Transparency effects to Off.
    Windows 10 very slow startup

7. Stop Windows Module Installer service

  1. Press Windows Key + R and enter services.msc. Now press Enter or click OK.
    Windows 10 very slow and unresponsive
  2. Locate Windows Module Installer on the list and double-click it to open its properties.
    Slow windows 10 after update
  3. Check the Service status. If it’s set to Running, click the Stop button to stop the service.
  4. In addition, you can also change the Startup Type to Disabled if you want to disable this service permanently.
  5. Now click on Apply and OK to save changes.

After disabling this service, check if the problem is resolved. You may want to try this solution if Windows 10 is slow after an update.

Note: By disabling this service, you might not be able to receive Windows updates, so be sure to enable it to avoid any other problems.

8. Disconnect all peripherals

photo image of USB peripheral entries on PC
Try to disconnect USB peripherals like your mouse, printer, or keyboard.

Sometimes, your hardware can cause Windows 10 to become slow. So it would help if you disconnected all peripherals from your PC to fix that problem.

This includes all USB devices, such as printers, hard drives, cameras, etc.

9. Defragment your drive

  1. Press Windows Key + S and enter defrag. Now choose Defragment and Optimize Drives.
    Windows 10 slow opening programs
  2. When the Optimize Drives window opens, select the desired drive and click on Analyze.
    Windows 10 slow opening programs
  3. After scanning the drives, select the fragmented drive and click on Optimize.
  4. Wait while Windows defragments your drive, and repeat this process for all your drives.

Once the defragmentation process is finished, check if the problem is resolved. This is a critical fix if Windows 10 is slow to open programs.

It’s worth mentioning that many other great third-party defragmentation tools offer various advanced features.

10. Adjust the size of the virtual memory

  1. Press Windows Key + S and enter advanced. Select View advanced system settings.
    Windows 10 very slow startup
  2. Click the Settings button in the Performance section.
    Windows 10 very slow and unresponsive
  3. Go to the Advanced tab and click on the Change button.
    Slow windows 10 after update
  4. In the Virtual Memory window, uncheck Automatically manage paging file size for all drives.
  5. Then, select the Custom size, and enter an Initial Size and Maximum size. Now click on the Set button and OK to save changes.
    Windows 10 running slow and freezing

After doing that, you’ll set the virtual memory size for that drive. This is a critical fix if Windows 10 is slow and unresponsive. Additionally, you might have to select the manual size for all your drives.

The size of your virtual memory is related to your RAM size.

As a general rule, the Initial size should be at least 1.5 times larger than your PC’s RAM. As for Maximum size, it should be up to 4 times larger than your PC’s RAM.

11. Check for viruses

Windows 10 is vulnerable to viruses like any other software, so ensure your system is clean. You can use any free antivirus software and do a full system scan to be sure.

We believe that any slowdown problem should be resolved after trying out these solutions.

12. Perform a clean Windows 10 install

Sometimes, there are software issues when you upgrade from Windows 8 or Windows 7 to Windows 10, or even when installing the latest Windows 10 updates.

So, it’s advised that you perform a clean install of Windows 10. Just be sure that you back up your important files before doing this.

A clean install is effective for extreme cases, for example, if Windows 10 has a slow boot or a black screen or exhibits slow login.

How do I clear my RAM cache on Windows 10?

  1. Search for cmd on your computer search and select Run as administrator.
  2. Type in the script below and click Enter.
    ipconfig /FlushDNS
  3. Wait for the command to run, and your cache should be cleared.

There you have it. Now you should have your slow Windows 10 PC running at average speed again.

If these symptoms look familiar, here’s what to do:

So in today’s article, we’ll go through possible causes and solutions, hoping to boost your OS so that you get complete control over your device.

Why is my Windows 10 computer so slow?

Too many background processes may be the main reason for sluggish performance; memory, laptop battery life, processor power, and internet bandwidth may all be depleted.

Also, if applications, apps, and other objects are programmed to open automatically whenever you start your PC, Windows 10 machines may get clogged immediately.

Furthermore, Windows 10 includes a variety of visual effects by default, such as shadows to give application windows a sense of depth, animations for making on-screen movements seamless, transparencies, thumbnail previews, and more.

So, why is Windows 10 so slow? The issue is that each effect consumes system resources, which might cause your PC to lag. Of course, there is also the possibility of malware, wherein you must perform a full PC scan. Below are some of the variations of the Windows running slow issue:

  • Windows 10 running slow after update or fresh install
  • Windows 10 running slow after reset or factory reset
  • Windows 10 running slow and freezing
  • Windows 10 running slow on laptop
  • Windows 10 running slow on SSD
  • Windows 10 running slow for no reason
  • Lenovo, HP laptops Windows 10 running slow
  • Windows 10 slow performance – computer suddenly slow and unresponsive
  • Windows 10 very slow and unresponsive

How can I fix Windows 11 if it’s slow?

Sadly, your new Windows 11 PCs may also become slow. The reasons behind this are similar to those in Windows 10 PCs.

You should note that you can use similar fixes discussed in this article to get them to average speed again.

Additionally, these particular steps to make Windows 11 faster will come in handy.

Note that we have not written these solutions in any particular order, and we hope you will be able to try the fixes that seem most relevant to your case.

On the other hand, if you have other suggestions on this topic, feel free to reach us using the comments section.

High GPU usage when watching YouTube videos? There’s a fix

Several users have complained about the sudden high jump in GPU usage while browsing YouTube, notably on Windows 11 users with the dark mode of the popular video-sharing platform. 

The dissatisfaction comes because some computers couldn’t manage the high requirement needed by the new feature, while the company doesn’t offer a lite solution for it. 

While running YouTube in dark mode, their 3D GPU usage skyrockets even after turning off Windows 11 animations feature which could potentially cause it.

“While watching Youtube videos the 3D GPU usage increases to 60-80%. The drivers are upto date and I even did fresh install of windows 11 but still the issue persists. Although by disabling the windows animations seems to fixes it. Can anybody guide me how to fix it without disabling aminations?”

The answer to it is turning off the ambient mode, which can be energy and resource-consuming for some users.  

Introduced in October 2022 for dark mode users on both desktop and mobile, the feature uses dynamic color sampling to make the screen adapts to the video by picking up its tone in real time as glowing background.

Follow along as we will show you step-by-step how to do this. 

How can I fix high CPU usage when playing YouTube videos?

1. With YouTube opened on your browser, click ⚙️

2. Click on Ambient mode, then toggle it off. 

Do you find these tips helpful? Let us know in the comments!

Personalized Settings Not Responding? 5 Ways to Fix it

When trying to access the personalization settings in Windows 11, you may often encounter the personalized settings not responding error.

You may want to choose a different Windows 11 theme, screen color, fonts, or lock screen to personalize your Windows appearance, however, this error can be annoying.

Why does Windows 11 Personalize not work?

If you are trying to access the Personalized Settings on your PC to change icons, themes, etc., but are unable to, there could be quite a few reasons for this issue:

  • Windows Explorer fails to start – When Windows Explorer continues to run in the background but cannot be opened normally.
  • System files – Most often, a Windows error may arise due to corrupted system files.
  • Faulty Windows update – Chances are that the recent Windows update came with bugs that may be causing the issue.
  • File Explorer did not start correctly – Sometimes, the File Explorer may crash, leading to the personalized settings not responding issue.
  • Outdated graphics drivers – You may not be able to access the personalized settings due to the graphics drivers that have not been updated, so it’s time to take action.

Fortunately, we have some solutions that will have you get rid of the personalized settings not responding black screen issue and help you continue making the changes.

How do I fix personalized settings not responding?

Try the preliminary checks below to see if they help fix the issue:

  • Reboot your PC.
  • Disconnect your devices.
  • Try to disable the network connection before rebooting or shutting down after an update.
  • Switch the network connection.
  • Reset the GPU.
  • Try using your password instead of your PIN.
  • Uninstall previous Windows updates.

If the above steps fail, you can proceed with the main troubleshooting methods below.

1. Restart the Windows Explorer

  1. Right-click the Start button and select Task Manager to open the Task Manager window. task manager
  2. Next, go to the Processes tab and under Windows Processes, look for Windows Explorer.
  3. Now, right-click on Windows Explorer, and select Restart. restart windows processes

2. Update the graphics driver

  1. Go to the Windows icon on the taskbar, right-click the Start button, and select Device Manager to open the Device Manager window. device manager
  2. Navigate to Display adapters, right-click on the device, and select Update driver. update display adapter
  3. Next, in the Update Drivers window, click on Search automatically for drivers. search for graphics drivers
  4. Now, Windows will start looking for the latest drivers, and if any are available, it will apply the updates automatically.

Alternatively, you can also install the drivers manually by following three quick methods in this post.

Now, close Device Manager, restart your PC, and check if you still encounter the personalized settings not responding issue.

To make sure that your driver updates are safely we recommend using Outbyte Driver Updater, a specialized tool that finds and automatically keeps all outdated drivers up to date.

3. Repair system files using the SFC command

  1. Press the Win + R keys together to open the Run console.
  2. Type cmd in the search bar, and press the Ctrl +Shift + Enter shortcut keys to launch the elevated Command Prompt window. open elevated command prompt
  3. Run the below command in the Command Prompt (Admin) window and hit Enter: sfc / scannowrun sfc scannow
  4. The system checker utility will now start checking for any corrupted files and if any are found, will repair them automatically.

Once you see the success message, close Command Prompt, reboot your PC, and check if you can access the Personalized Settings now.

4. Delete an installed update in the registry editor

Note icon NOTE
Before you make any changes to the registry data, make sure that you create a backup of the registry settings. This will help you recover any data that may be lost during the process.
  1. Press the Win + R keys simultaneously to launch the Run console.
  2. Type regedit in the search box and hit Enter to open the Registry Editor. run command to open registry editor
  3. Next, navigate to the below path to find the installed update: HKEY_LOCAL_MACHINE\SOFTWARE\Microsoft\Active Setup\Installed Components
  4. Here, on the left side, under Installed Components, right-click on the last key and select Export to create a backup of the folder. export installed components
  5. Now, right-click again and select Delete. delete installed components

This will help you uninstall the last update. Restart your PC and check if you still encounter the error while trying to access Personalized Settings.

Alternatively, you can also uninstall the previous Windows update on Windows 11 using Advanced Startup.

5. Open File Explorer using Task Manager

  1. Go to Start, right-click and select Task Manager. open task manager
  2. Click on the File tab on the top left and select Run new task. Run new task
  3. Type explorer in the Create new task search box and hit Enter. search for explorer

This will open File Explorer instantly. Once done, check if you can access Personalized settings or if it’s still not responding.

How do I reset my Personalization on Windows 11?

To reset all your Personalization settings to default, you can follow the below instructions:

  1. Right-click on the Desktop and click on Personalize to open the Personalization settings window. personalize settings
  2. Here, on the right, click on Themes. themes settings
  3. On the next screen, scroll down and click on Desktop icon settings. desktop icon settings
  4. In the Desktop Icon Settings dialog, click on Restore Default. restore defaults
  5. Now, return to the Personalization settings window and you can select Start, Taskbar, etc., one by one and change enable or disable the options to default settings.
  6. You may change the other settings like color, background, fonts, etc. to default.

How long does it take to set up personalized settings for Microsoft Edge?

Given the plethora of customizations available in Microsoft Edge, it may take anywhere between 5-20 minutes to get the personalized settings set up.

But for those intending to modify only a few personalized settings, say, change the Edge theme or reconfigure specific actions, it shouldn’t take more than a few minutes.

If you see a black screen and a popup window with the error, refer to our detailed post on troubleshooting the Windows 11 black screen issue.

However, if none of the above methods work, use a restore point you created earlier on Windows 11.

For any other queries related to personalized settings, leave a message in the comments box below.

How to Mark All Emails as Read in Outlook: 3 Easy Methods

Outlook emails are left unread when not opened, meaning they are still unattended by the recipient. However, these email feeds create a rowdy inbox that is not appealing to many users.

Having too many emails left unread on Outlook can make navigating your inbox challenging and leave unwanted emails. Hence, knowing how to mark emails as read in Outlook is essential.

What is the shortcut to mark all emails as read in Outlook?

You can employ some shortcuts to mark all the email feeds on Outlook as read. Because Outlook is available on different operating systems, we’ll take you through shortcuts for Windows and Mac:

  • On Windows – Launch the Outlook app, open your inbox, then press Ctrl + Q to mark all messages as read.
  • On Mac – Open Outlook and go to your email inbox, then press Option + Command + T to mark all messages as read.

Aside from tidying up your feed, you may also want to make your emails engaging, and inserting GIFs in your Outlook email will help you achieve that.

Now that you know the shortcuts for this operation, you may see other methods below. If you want to know about Outlook keyboard shortcuts, check out our guide.

How do I mark all emails as read in Outlook?

1. Mark all Emails as Read in Outlook for Web

  1. Launch a browser on your PC, go to Outlook for Web, and sign into your account.
  2. Click on Inbox and press Ctrl + A on your keyboard to mark all the emails. Or tick the radio button beside Focused to select all emails.
  3. Then, select Mark all as read.Mark all as read
  4. Click OK on the confirmation prompt to mark all your unread conversations as read.

It’ll remove the new message receipt on emails yet to be opened and mark them as read. Check the best browsers for Outlook 365 you can download on your device.

2. Create a Search Folder to find unread emails and mark all as Read (Windows and Mac)

  1. Open Outlook and go to the Home tab.
  2. Scroll down the menu and right-click on Search Folders, then click on New Search Folder.Outlook's new search folder
  3. Click the Create a custom Search Folder option and the Choose button.
  4. Type Unread in the Name bar, then click the Criteria button to specify what items this search folder contains.
  5. Click the More Choices tab, check the box for Only items that are, ensure that it’s showing as unread, then click OK.outlook more choice
  6. Press OK on the Custom Search Folder page, then click OK again.
  7. On the Outlook Home menu, scroll down and select the new Unread search folder, right-click on it, and click Mark All as Read.outloo mark as read

Creating a Search folder to find unread emails will classify your inbox, making all the emails yet to be read in a folder. Read how to see which folder emails are in Outlook to learn more. Our guide on how to view the next unread message in Outlook can also help you never miss an email, so don’t hesitate to check it out.

We also have a great guide that can help you remove Outlook subject prefixes FW and RE, so be sure not to miss it.

3. Mark all Emails as Read in Outlook for Windows

  1. Launch Outlook and log in to your account.
  2. Go to the folder pane and select a folder.
  3. Click on any message in the list, and then press Ctrl + A to select every email in the folder.
  4. Right-click any of the selected messages, then select Mark as Read from the drop-down.outloo mark as read

Conclusively, our readers can check our guide on Outlook not receiving emails from Gmail and how to fix the problem. Also, you can read our guide on what to do if Outlook email fails after Windows upgrade.

Another problem users complain about is emails disappearing from Outlook without being deleted by the user.

If you have more questions or suggestions, kindly drop them below in the comments section.

Fix: Windows Could Not Start Audio Service on Local Computer

Not getting sound out of your PC is one of the annoying issues that you would come across. Users have reported seeing a red cross mark on the Volume icon on the Taskbar, and an error message that reads Windows could not start the Windows Audio service on Local Computer Error 0x80070005. Access is denied.

Moreover, turning on the Windows Audio service also hasn’t helped users in fixing this problem. So, how can you fix this error? Well, that’s exactly what we are going to show you in this guide.

Why am I getting Windows could not start the Windows Audio service on Local Computer error?

Here are a few common reasons that could trigger the Windows Audio service on Local Computer Error 0x80070005. Access is denied problem:

What to do if Windows could not start the Windows Audio service on the local computer?

Before going with the advanced solutions, you can check and apply the preliminary fixes mentioned below.

  • Perform a simple restart and check if this fixes the sound issue on your PC.  Here’s what to do if the computer remains stuck on restarting.
  • Make sure that the audio driver is installed on your PC for your device. If it is missing then it could result in this error.
  • Check the volume levels and see if your speakers aren’t set to mute.

Now that you have tried the above fixes and are still not able to resolve the problem, then you can jump to the below-advanced troubleshooting solutions.

1. Run the sound troubleshooter

  1. Press the Win + I buttons to open Settings.
  2. Click on Troubleshoot.
  3. Select Other troubleshooters.
  4. Hit the Run button next to Playing Audio.
  5. Let the system detect any issues with your sound hardware.
  6. Follow the system prompts if it detects any issue and check if this fixes the problem or not.

2. Tweak Windows Audio service log-on settings

  1. Open the Start menu.
  2. Type services and open it.
  3. Locate Windows Audio.
  4. Double-click on the Windows Audio service.
  5. Switch to the Log on tab.
  6. Select the Local System account option and check the box for Allow service to interact with desktop option.
  7. Hit Apply and OK.
  8. Restart your PC and check if this resolves the issue or not.

When you perform the above steps, this ensures the system whose user account is to be used by the Windows Audio service when the system boots up.

3. Give complete permissions

  1. Open the File Explorer.
  2. Right-click on the problematic drive and select Properties.
  3. Switch to the Security tab.
  4. Click on Advanced.
  5. Click on Change in front of owner.
  6. Hit Advanced.
  7. Select Find now.
  8. Choose Everyone and click on OK.
  9. Under Permissions for Administrators check the Allow box for Full Control.
  10. Hit Apple, and OK.
  11. Restart your PC.
  12. Open the Start menu.
  13. Type services and open it.
  14. Locate Windows Audio.
  15. Double-click on the Windows Audio service.
  16. Start the service and check if this resolves the problem or not.

4. Run SFC and DISM scans

  1. Open the Start menu.
  2. Search for Command Prompt and run it as an administrator.
  3. Type the below command and press Enter. sfc /scannowrun sfc scannow
  4. After the scanning completes, enter the below command and press Enter after each one. Dism /Online /Cleanup-Image /CheckHealth Dism /Online /Cleanup-Image /ScanHealth Dism /Online /Cleanup-Image /RestoreHealthdism

The issue can also pop up because of corrupt or missing system files. In such a case, you can make use of the built-in SFC Scan or DISM tool to resolve the issue.

5. Update the Audio driver

  1. Open the Start menu.
  2. Open Device Manager.
  3. Expand the Audio input and output option.
  4. Right-click on your audio device and select Update driver.
  5. Select Search automatically for drivers option.
  6. Restart your PC and check if this fixes the issue or not.

The above steps require you to manually update the driver software. And in case there are a bunch of driver updates, then it becomes a tedious task.

To automate the process of updating device drivers, we would suggest you make use of a recommended tool called Fortect Driver Updater.

As the name suggests, with the help of this tool, you can keep all the drivers of your PC up to date with just a few clicks. Apart from this, it also helps you to create driver backups in case things go south.

That is it from us in this guide. We have a guide that will help you resolve the audio issues with the Realtek sound driver.

Let us know in the comments below which one of the above solutions helped you resolve the audio issue on your Windows PC.