Microphone Boost Missing in Windows 11: How to Enable It

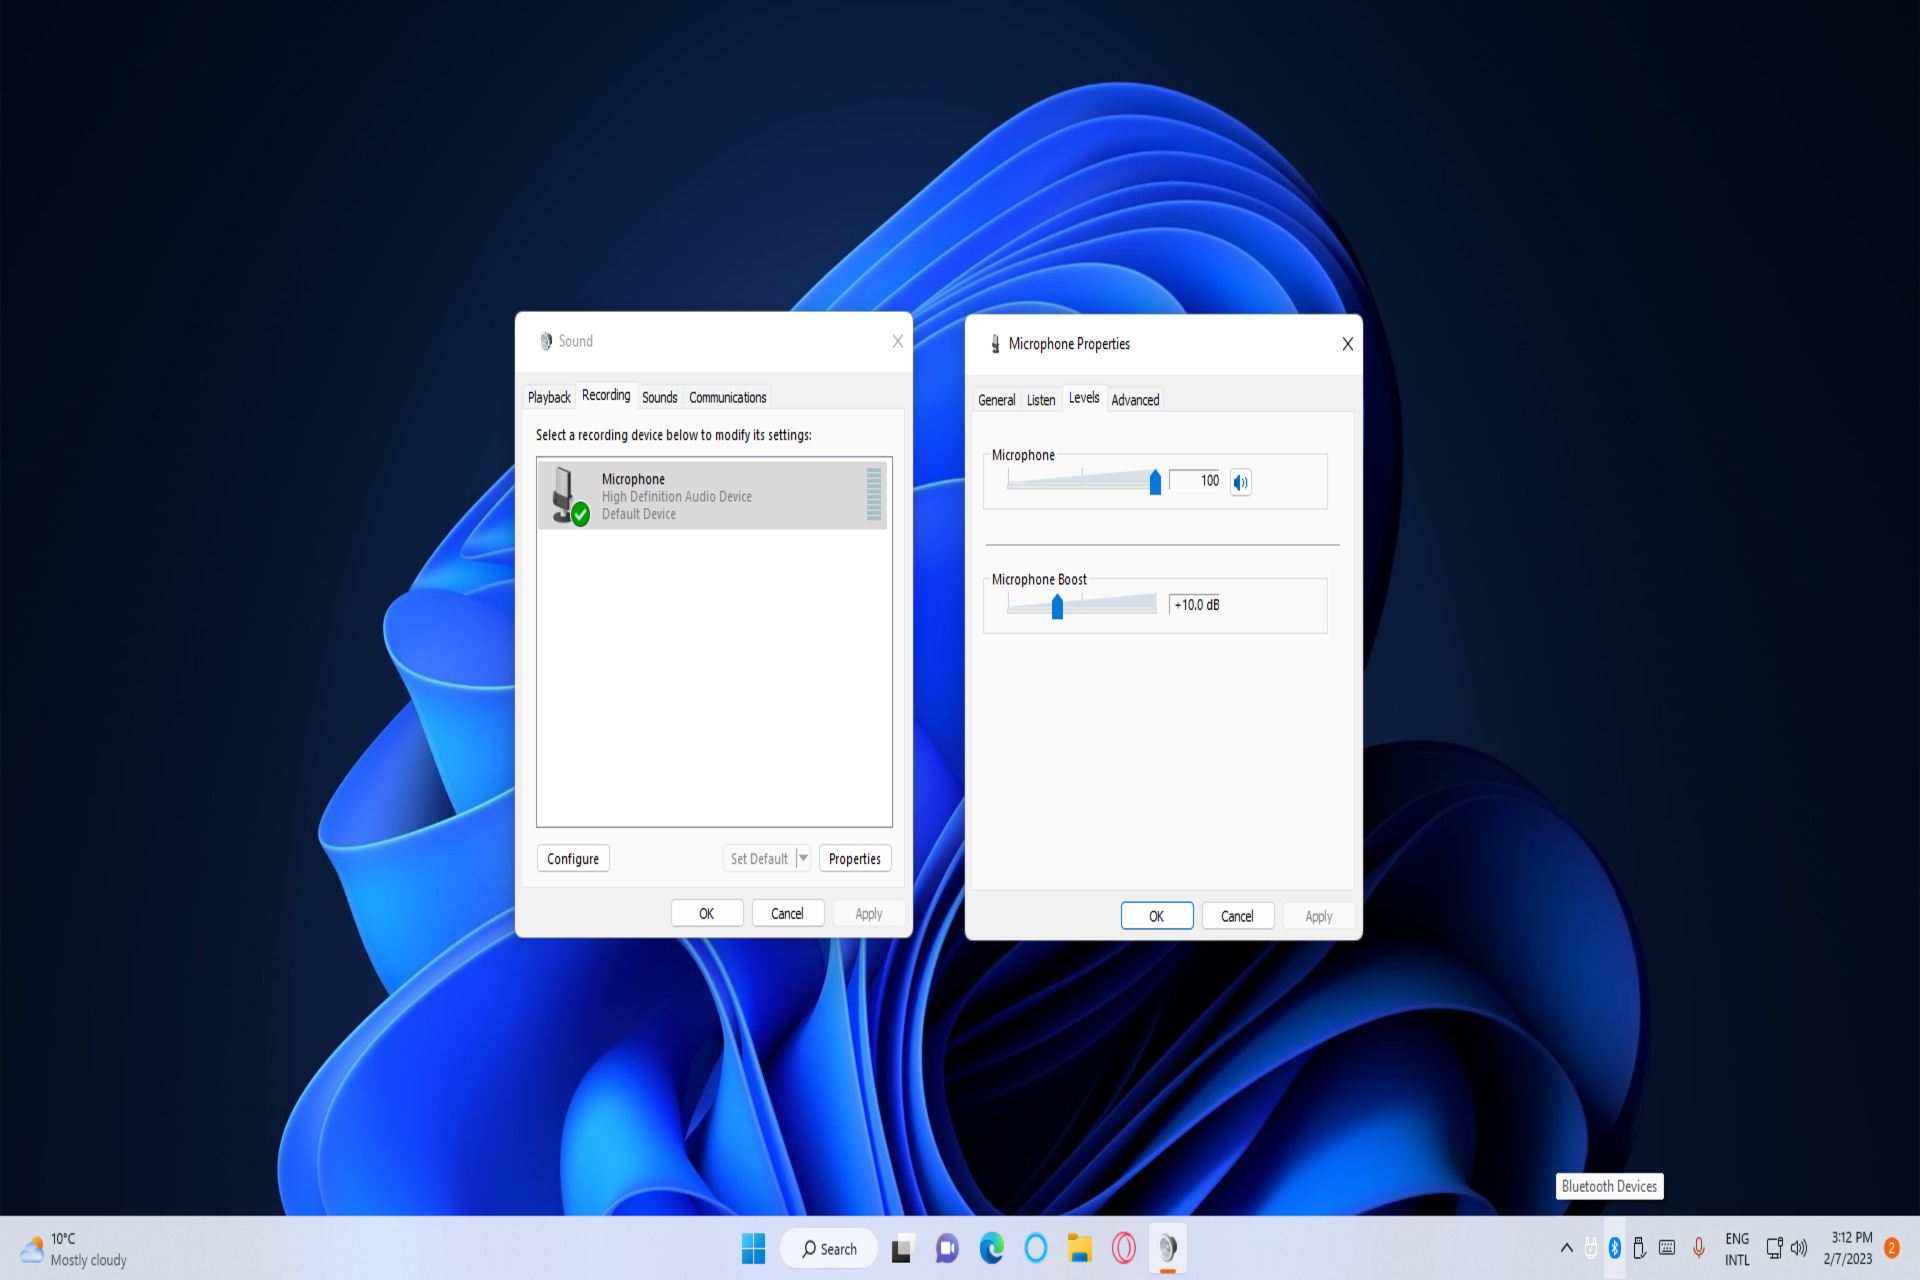
The Microphone Boost setting in Windows 11 enables users to increase mic volume. That’s a handy feature for users who utilize their microphones with apps like Discord and Skype.

However, some of our readers have reported the Microphone Boost option to be missing on their PCs. If that feature is missing in Microphone Properties on your PC, you might be able to restore it as outlined below.

Does your mic/sound card support Microphone Boost?

Note that it’s not necessarily entirely unusual for the Microphone Boost option to be missing on the Level tab. That feature isn’t available for all microphones and sound cards.

So, it might be the case you need to add a new PCI sound card or microphone to your PC to enable that feature. However, there can also be other reasons for a missing Microphone Boost setting, such as:

  • Disabled microphone
  • Outdated microphone driver
  • The microphone is connected to the wrong port

If you’re sure Microphone Boost should be available on your PC, there are a few ways you might be able to re-enable it. Try applying the following Windows 11 methods for enabling missing Microphone Boost.

How can I fix a missing Microphone Boost setting in Windows 11?

Before getting into more complicated tweaking, let’s make sure that we check the following steps:

  • If you’re using an external microphone, make sure you’ve plugged it into the right port on your PC. Or try plugging a USB microphone into a different USB slot.
  • Select the correct microphone in the Input device settings from the Audio options.

If these methods didn’t fix the problem, follow the solutions below to correct it.

1. Check the microphone you utilize is set as a default device

  1. First, bring up Run (accessible with the Windows logo + R hotkey).
  2. Open sound settings by inputting this Control Panel command and pressing Enter: control mmsys.cpl sounds
  3. Select the Recording tab.
  4. Click the microphone you want to boost and select Set Default.
    Set Default button microphone boost missing windows 11
  5. Select Apply to save the new default microphone setting.
  6. Right-click the microphone and select Properties.
    Properties option microphone boost missing windows 11
  7. Deselect the Allow applications to take exclusive control of this device checkbox.
    Allow applications checkbox microphone boost missing windows 11
  8. Click the properties window’s Apply and OK buttons.

2. Open the troubleshooter for recording audio

  1. Start Windows 11’s Run accessory by pressing the Windows key + R combination.
  2. Enter this URI Run command and select OK: ms-settings:troubleshoot
  3. Select Other troubleshooters to access Windows 11’s troubleshooting tools.
    Other trouble-shooters option microphone boost missing windows 11
  4. Click Run for the Recording Audio troubleshooter.
    Run option microphone boost missing windows 11
  5. Select Apply fix if the Recording Audio troubleshooter suggests any kind of resolution.

3. Update your microphone’s driver

Microphone Boost could be missing because your microphone’s driver is outdated. In this case, updating the driver for the microphone might restore the missing boost feature.

You can update your microphone’s driver with one of the methods in WR’s guide to updating drivers in Windows 11.

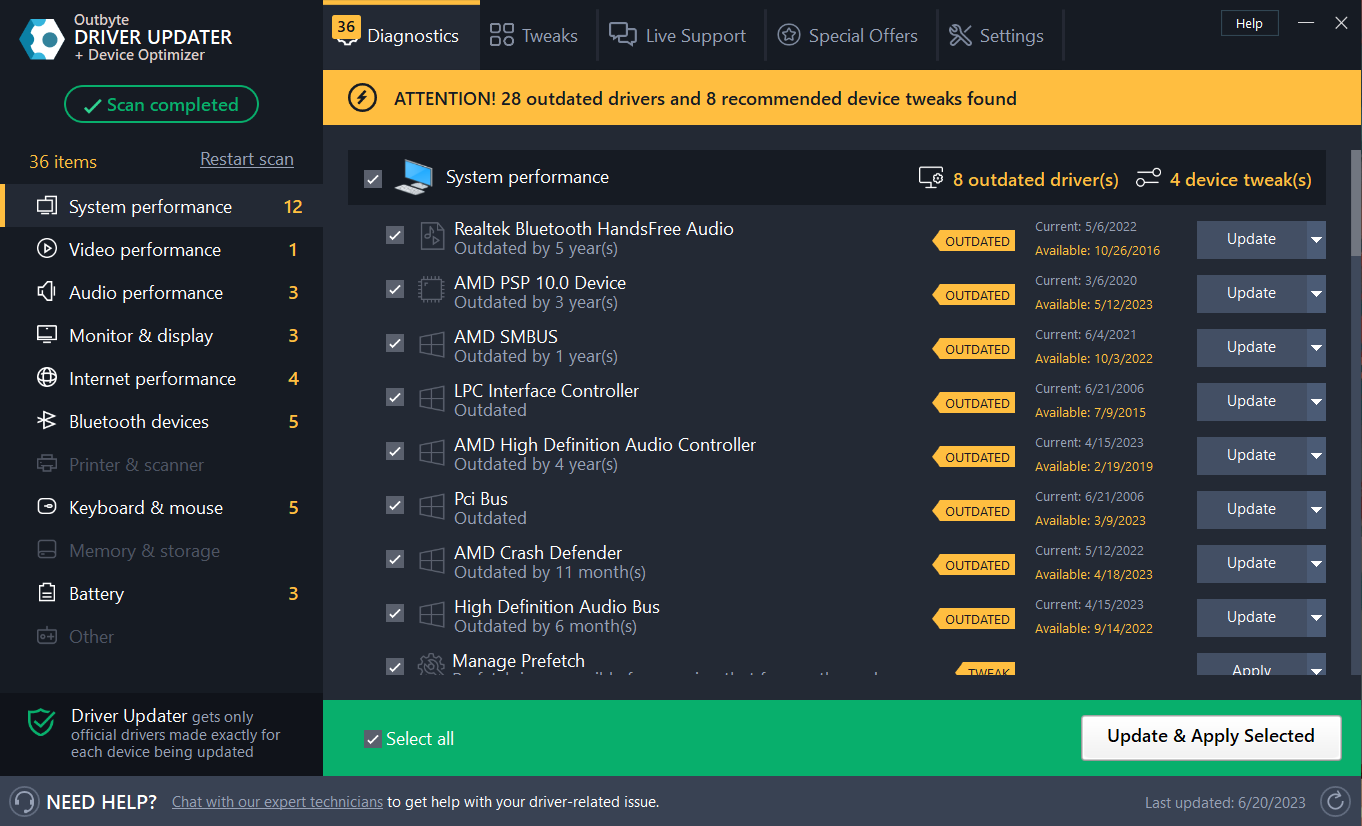
Another dependable solution that you can use to update your microphone’s driver is a dedicated tool designed to perform this automatically.

Outbyte Driver Updater is the best choice because it helps you run a complete scan to find outdated, missing, or malfunctioning drivers and update them with new versions immediately after.

Outbyte Driver Updater

If you’re looking for the easiest way to update your drivers, Outbyte Driver Updater is the best tool.
Free Trial Download now

4. Reinstall the sound card’s driver

  1. Press the Power User menu’s Windows logo + X key combination.
  2. Select Device Manager to access that tool.
    Device Manager shortcut microphone boost missing windows 11
  3. Double-click the Sound, video and game controllers category.
  4. Right-click your sound card and select its Uninstall device context menu option.
    Uninstall device option microphone boost missing windows 11
  5. Select the Delete the driver for this device checkbox and click the Uninstall option.
    The Uninstall button microphone boost missing windows 11
  6. Now restart your PC for Windows 11 to reinstall the sound card’s driver automatically.

Those resolutions can restore a missing Microsoft Boost setting on supported hardware. If they don’t work, then it’s probably the case that the feature doesn’t support your sound card.

We also recommend reading our guide on what to do if the microphone is not working in Windows 11.

If you have any other suggestions or potential solutions, feel free to comment in the section below.

Nvbackend Exe Error: How to Fix It in 5 Steps

Users with an NVIDIA graphics card installed on their PC should notice processes and services like nvbackend.exe and nvcpl.exe. The Nvbackend, also known as NVIDIA Backend or NVIDIA GeForce Experience Backend processes may cause numerous issues with the system.

Hence, we’ll take you through some fixes for the Nvbackend exe error. Also, you can check our guide on Something went wrong error on Nvidia GeForce Experience on Windows 11.

What causes the Nvbackend exe error?

The Nvbackend.exe error may appear while launching a game or when starting Windows. It prevents users from accessing programs on the system, and it can also cause other issues like high CPU usage.

Some notable factors liable to cause the Nvbackend exe error are:

  • Corrupt or missing system files – If you have corrupt system files on your computer or an essential file is missing, it can cause issues with the system. It may impede the activities of other programs and services, including Nvidia, prompting the Nvbackend exe error.
  • Malware or virus infection – The Nvbackend exe error may occur on your PC due to malware or viruses impeding its performance. They can distort the functionality of your system and its components, causing many problems.
  • Outdated Nvidia graphics card – Many errors may occur when you don’t install updates and patches for fixing bugs affecting the Nvidia graphics card. It affects its performance and that of other services depending on it.

Other factors like outdated Windows OS may also be responsible for the error. Nevertheless, you can easily resolve the error by following the steps provided further in this article.

How can I fix the Nvbackend exe error?

Try the following preliminary checks:

  • Turn off background apps running on your PC.
  • Disable antivirus software.
  • Restart Windows in Safe Mode and check if the error appears when performing tasks.

If you can’t resolve the error, follow the steps below.

1. Update Nvidia Graphics drivers

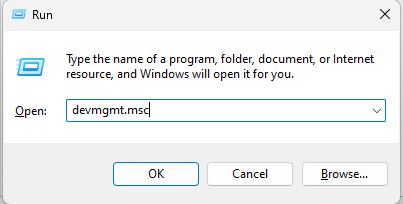
  1. Press Windows + R keys to open the Run dialog box, type devmgmt.msc, and click OK to open the Device Management window.
  2. Click the Display Adapters, right-click the Nvidia driver, and select the Update driver.
  3. Then, click the Search automatically for drivers option.
  4. Restart your PC and check if the issue persists.

Update Nvidia graphics cards will install patches for fixing bugs that can cause the error and install the latest features to improve its performance.

Read our detailed article on updating graphics drivers on Windows 11 if you have any issues.

If you’re not sure about updating your drivers manually, you can always opt for third-party software that can help you do that automatically.

2. Restart GeForce Experience Backend

  1. Press the Ctrl + Shift + Esc keys to launch the Task Manager.
  2. Click on More to expand the Task Manager, then locate the Nvidia GeForce Experience Backend.
  3. Right-click and select End task or process from the drop-down.
  4. Close the Task Manager and reopen GeForce Experience to check if the error persists.

Restarting the Nvidia GeForce Experience Backend process on your PC will resolve background activities impeding its performance.

3. Update Windows Operating System

  1. Press Windows + I key to open the Windows Settings app.
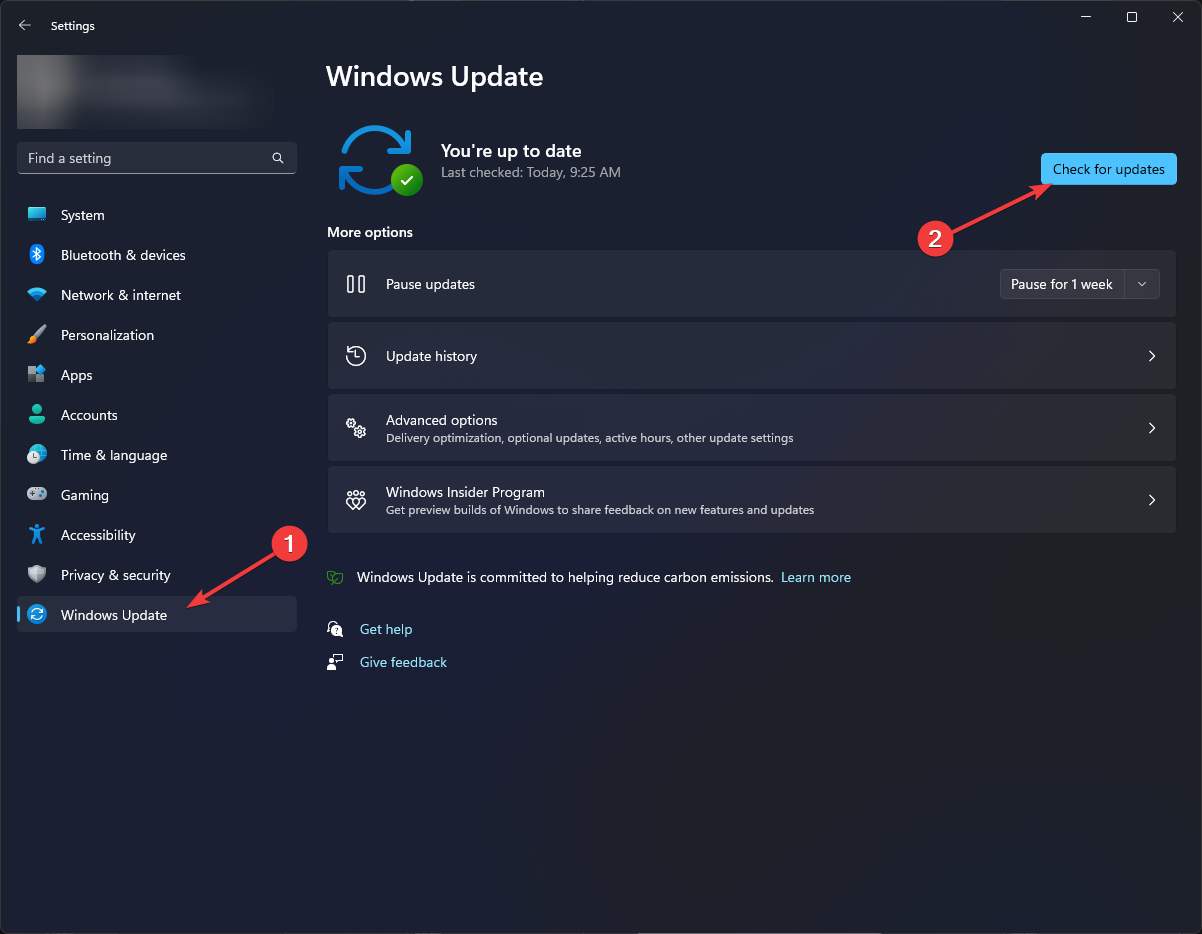
  2. Click on Windows Update and click on Check for updates. If there are any updates available, it will search for and install them.

Updating Windows will fix the bugs affecting your PC and resolve compatibility issues that may prompt the Nvbackend exe error.

Read about fixing Windows not connecting to update service if the error occurs on your PC.

4. Uninstall Nvidia GeForce Experience

  1. Press Windows + R key to open the Run dialog box, type appwiz.cpl, and click OK.
  2. On the Programs page, find Nvidia GeForce Experience from the list of installed applications, click on it, and select Uninstall.
  3. Follow the on-screen instructions to complete the process.
  4. Restart your PC.

Removing the program will fix any corrupt installation or missing files issues causing the error.

5. Reinstall Nvidia drivers

  1. Press Windows + R key to open the Run dialog box, type devmgmt.msc, and press Enter to open the Device Manager.
  2. Click the drop-down button against the Display adapters to view the devices under it. Right-click on the Nvidia device and select Uninstall device from the drop-down.
  3. Check the box for Attempt to remove the driver for this device and click on Uninstall.
  4. Restart your PC and check if it helps resolve the error.

Reinstalling Nvidia drivers will allow its components to run smoothly.

In conclusion, our readers may be interested in fixing the Unable to Connect to Nvidia Try Again Later error on Windows 11.

Thank you for reading this article, and we hope it’s been informative! Please share your thoughts in the comments area below.

How to Disable the Print Screen Button on Windows 11

The Print Screen button on Windows 11 allows users to take screenshots of their computer screen and save them. However, users report issues regarding the Print Screen button taking unauthorized screenshots of sensitive information on their computers.

Hence, Disabling the print screen button on Windows 11 will help you prevent the risks. You can also read about how to fix the print screen not working on Windows 11.

Can I disable screenshots on Windows?

Yes, it is possible to disable screenshots on Windows by using third-party software or changing the registry settings.

However, it is not a foolproof technique and can be bypassed by experienced users. Additionally, disabling screenshots may impact the functionality of specific programs that rely on screen capture functionality.

So, we recommend you carefully consider your options or consult a professional for more enlightenment.

How do I disable the Print Screen button on Windows 11?

1. Use the Windows settings app

  1. Press the Windows + I button to open the Windows Settings.
  2. Click on the Accessibility category and select Keyboard from the right-side menu.
  3. Navigate to the Use the Print Screen button to open screen snipping and toggle off the option to disable it.
  4. Close the windows settings and restart your PC.

The Windows OS has a Use the Print Screen button to open screen snipping option that allows them to enable and disable Print Screen. So, toggling the option off can help.

Check out our guide on how to fix Windows Settings not opening if you have difficulties using Windows settings.

2. Modify the Registry Editor

  1. Press Windows + R key to open the Run dialog box, type regedit, then press Enter to open the Registry Editor.
  2. Copy the following path and paste it into the Registry Editor’s address bar, then press Enter: HKEY_CURRENT_USER\Control Panel\Keyboard
  3. Right-click anywhere in the right pane, select New from the drop-down, then click on DWORD (32-bit) Value from the list of options.
  4. Rename the New value to PrintScreenKeyForSnippingEnabled and press Enter.
  5. Double-click on the PrintScreenKeyForSnippingEnabled value, input 0 in the Value data bar to disable it, and 1 to enable it.
  6. Close the Registry Editor and restart your PC to save changes.

Tweaking the Registry Editor allows you access to information concerning programs that allow users to modify relevant keys, like disabling and enabling the Print Screen button. You can read about how to fix a corrupt registry on Windows.

You may also use third-party apps to disable the Print Screen function on Windows. These help businesses or individuals who want to protect sensitive information from being captured and shared.

Likewise, such apps work by preventing the user from taking screenshots or capturing images on windows 11, thus ensuring the confidentiality of their data.

Also, you may be interested in our guide on taking screenshots or capturing images on Windows 11.

Don’t hesitate to let us know which procedure worked for you.

Fix: The Request Contains No Certificate Template Information

If you encounter the request contains no certificate template information in Windows, this article will provide you with the methods to solve it.

When you try to sign or submit a CSR on Windows using Certificate Authority (CA), it should be finished successfully. But, in some cases, you may get a certificate request processor error. When it appears, you may see the following error message:

The request contains no certificate template information. 0x80094801 (-2146875391) Denied by policy module 0x80094801, The request does not contain a certificate template extension or the Certificate Template request attribute

This problem appears on any Windows edition, especially the Windows Server or Enterprise versions.

What causes no certificate template information error?

If you repeatedly face this problem, it can be because of the following reasons:

  • No embedded certificate template: If the certificate signing request file does not have an embedded template, you will encounter this problem.
  • Improper method: Your method of signing or issuing the certificate may have some problems.
  • No template name is specified: If you don’t specify the template name, you will get this error.

How can I fix the request contains no certificate template information on Windows?

Before going through our recommended methods, we suggest you do the following:

  • Make sure that any security patch update of your Windows server or PC is not pending.
  • Ensure that the CSR file you are trying to sign has no problem.

After ensuring the above things, follow these methods to fix no certificate template information error:

1. Specify the certificate template

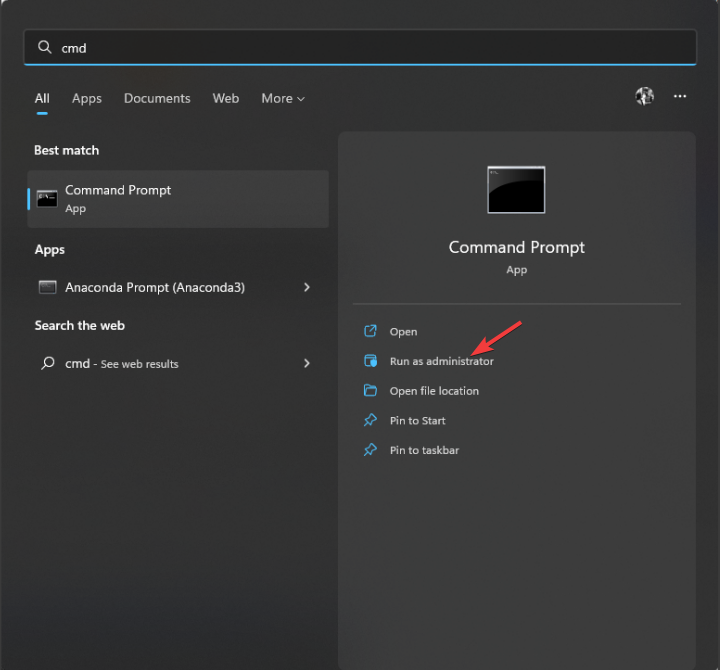
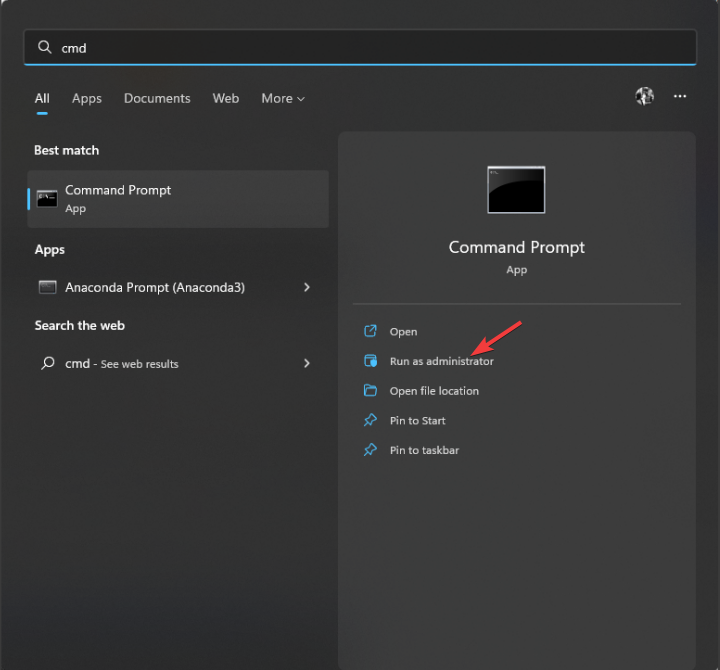
  1. Open the Start Menu, and type cmd.
  2. Right-click on the Command Prompt and choose Run as administrator.
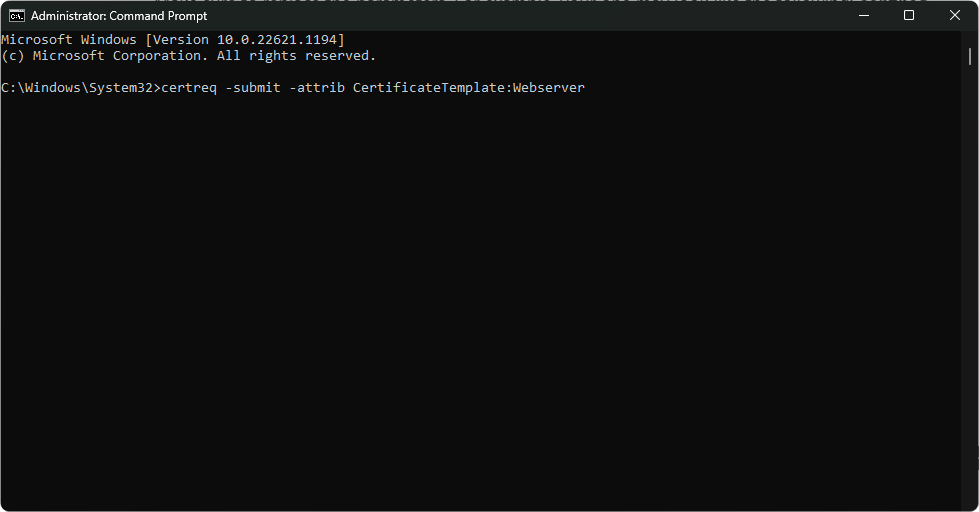
  3. Type the following command by replacing the necessary strings with your ones and press Enter to execute it: certreq -submit -config "Your_Existing_Config_Name" -attrib "CertificateTemplate:Your_Existing_Template_Name" your_CSR_File.csrsigning csr command with specifying template name

Make sure to replace the parameters. For example, your one may look like the following: certreq -submit -config "MyIssuingCA" -attrib "CertificateTemplate:CA11-SUN-SSL-C3-1" CertRequest.csr

You also can run the command without specifying the CSR file. In this case, a pop window will appear and ask to select the CSR file.

If you want to view the Windows CA template list, you can use the following command:

certutil -CATemplates -Config Machine\CAName

2. Try signing with no template information

  1. Open the command prompt as administrator, as shown before.
  2. Type the following command and hit Enter: certreq -submit -attrib CertificateTemplate:Webserversigning csr without specifying custom template name command
  3. Now, choose the CSR file when a pop-up window appears and asks you to do it and click on OK.choosing csr text file
  4. Save the certificate when it asks to save it.

After saving, you should find the certificate file where you have saved it. Now, you can use it in your own way.

These methods will help you to sign a CSR file by avoiding the error the request contains no certificate template information on Windows PC or server.

You also can avoid encountering this problem without trying it from the command line. In this case, you will need to specify the template on the GUI of Certificate Authority manually. But, using the command line way mentioned in this article is the best idea. It will save you time.

If necessary, you also can learn how to solve Windows doesn’t have enough information to verify this certificate.

In this post, you have learned how to solve the request contains no certificate template information error. If you have any better ideas to tackle this problem, feel free to let us know in the comment box.

Sleep Option is Missing on Windows 11: How to Enable it

Many reported that the sleep option is missing in Windows 11, and this can be a problem, especially if you don’t want to turn off your PC completely.

While this can be a problem, it’s easily fixable, and today, we will show you how to fix it properly.

Why has the sleep option disappeared in Windows 11?

Security settings or power settings can cause this option to become missing. Group policy settings can also interfere with the Sleep feature; in some rare cases, even your drivers can cause this issue.

What can I do if the sleep option is missing on Windows 11?

1. Change Security settings

  1. Press the Windows key + S and enter security. Select Windows Security.
     Windows Security open Windows key
  2.  In the left pane navigate to Device security and then click on Core isolation details.
  3. Disable Firmware protection.
  4. Restart your PC.

Keep in mind that disabling this feature can reduce the security of your system.

2. Enable Sleep in the Control Panel

  1. Press the Win key to open the Start menu.
  2. Open Control Panel.
  3. Select Power Options.
  4. Click on Choose what the power button does option from the left.
  5. If the Sleep option is unchecked, click on the Change the settings that are currently unavailable option.
  6. Click on Sleep.
  7. Hit Save changes.
  8. Check the power option in the Start menu and see if the Sleep option is available.

3. Enable sleep via Group Policy Editor

  1. Press the Win + R keys to open the Run dialogue.
  2. Type gpedit.msc and press OK.
  3. Click on Computer Configuration.
  4. Click on Administrative Templates.
  5. Select Windows Components.
  6. Expand File Explorer.
  7. On the right side, right-click on Show sleep in the power options menu policy and choose Edit.
  8. Select Enabled.
  9. Click OK.
  10. Go to the Power menu and check if the sleep option has returned.

Do note that on Windows 11 Home and Windows 10 Home, the Group Policy Editor is unavailable. However, you should worry as we have a guide that will help you to enable the Group Policy Editor on the Windows 11 and 10 Home edition.

4. Restore default power options

  1. Press the Win + R keys to open the Run dialogue.
  2. Type powercfg -restoredefaultschemes and press Enter.
  3. Restart your PC.

5. Run the power troubleshooter

  1. Press the Win + R keys to open the Run dialogue.
  2. Type msdt.exe /id PowerDiagnostic
  3. Click Next.
  4. The troubleshooter will run the scan and will prompt you to apply a fix.
  5. Restart your PC.

6. Update display driver

  1. Open the Start menu by pressing the Win key.
  2. Open Device Manager.
  3. Expand the Display adapters section.
  4. Right-click on your GPU and select Update driver.update driver
  5. Select Search automatically for files.
  6. Install the latest driver.
  7. Restart your PC.

Some issues with the display driver often cause the sleep option missing from the Windows 11 power menu. In such a case, we would suggest updating the driver.

However, you can also use a dedicated tool called Outbyte Driver Updater. Outbyte Driver Updater will help you keep all of your drivers up to date and keep you away from such issues.

Apart from updating drivers, Outbyte Driver Updater can also help in batch driver updating, scheduling scans, acting as a powerful download manager, creating driver backups, and much more.

Outbyte Driver Updater

You need to keep your drivers updated at all times, and Outbyte Driver Updater will make your PC faster as well!
Free Trial Download Now

How do I hide the sleep button?

To hide the sleep button on your PC, revert the changes from Solution 2 or 3; the sleep button should be gone.

That is it from us in this guide. There are several user reports regarding the power options missing from a Windows 11 PC. Fortunately, we have a guide that will help you fix this problem.

You can also check out our guide that lists some effective solutions to fix the sleep mode closes all programs problem in Windows 11.

Feel free to let us know in the comments below which one of the above solutions helped you resolve the Windows 11 sleep button missing problem.

Fix: Windows 11 Security Actions Recommended But Not Found

Windows Security is an antivirus software designed by Microsoft for Windows PC. It helps secure and protect your PC against malware, viruses, and other external threats liable to attack it.

However, users report Windows Security actions recommended warning appearing, but nothing was found. Also, you can check our article about Actions recommended for yellow warnings appearing on Windows 11.

What causes the Windows security actions recommended message?

Windows Security actions recommended warning popping up on your computer can be due to many factors. Some factors that are liable to cause the warning message are:

  • Bugs and viruses on your PC – The actions recommended warning appearing on your computer can be due to the impact of bugs and viruses impeding the security app performance. Also, these bugs can cause the software or system to malfunction.
  • Pending Windows Security update – Microsoft releases updates and patches to fix bugs on Windows devices and improve system performance. If a security update is pending on your PC, it may affect antivirus software and other security-related software.
  • Issues with Windows Defender Firewall – Many things can go wrong with the activities of the Windows Defender Firewall on your PC, causing it to run into errors. Also, Windows Defender Firewall can interfere with other applications with the Firewall service, prompting the system to behave differently.
  • Corrupt system files – Having corrupt system files can cause irregularities in your PC performance. It is liable to affect programs and other services running on the computer.

These causes may vary on different PCs. Hence, we’ll take you through some basic steps to resolve the Actions recommended error.

How can I get rid of the Windows security actions recommended but not found message?

Before proceeding with any advanced troubleshooting steps, we recommend you go through the following:

If you can’t resolve the error, go ahead with the next solutions.

1. Enable everything in the Reputation-Based protection settings

  1. Press Windows + I key to open the Settings app.
  2. Select Privacy and security from the menu and click on Windows Security.
  3. Select the App and Browser control tab.
  4. Click on Reputation-Based protection settings and toggle on every switch on the window.
  5. Restart your computer and check if the prompt appears.

Toggling on every option the Reputation-Based protection settings can prevent the action recommended message from appearing on your computer.

2. Install pending Windows Updates

  1. Press Windows + I key to open the Windows Settings app.
  2. Click on Windows Update and tap on the Check for updates button. If there are any updates available, it will search for them.

Updating Windows helps fix the bugs affecting the system’s security performance. Also, it resolves compatibility issues that may cause issues with the security programs on your PC.

Read about fixing Windows not connecting to update service if the error occurs on your PC.

3. Install any pending security updates in Windows Security

  1. Left-click the Start button, type Windows Security, then click on it to open the app.
  2. Click on Virus & threat protection from the menu.
  3. Navigate to the Virus & threat protection updates section, then click on the Protection updates hyperlink.
  4. In the new window, click the Check for updates button. If there are any updates available, install them one by one.
  5. Close the Windows Security window and restart your PC to check if the Actions recommended prompt persists.

Installing pending security updates can resolve the problem causing Windows Security to send empty notifications.

4. Reset the Security Application

  1. Left-click the Start button, type PowerShell, and click Run as administrator.
  2. Click Yes on the User Account Control prompt.
  3. Copy and paste the following lines and press Enter: Get-AppxPackage Microsoft.SecHealthUI -AllUsers | Reset-AppxPackage
  4. Wait for the command to execute, restart your PC, and check if the issue is resolved.

Resetting the Windows security app can fix any corrupt cache issues that might cause the Actions recommended warning error.

5. Run an SFC scan

  1. Left-click the Start button, type Command Prompt, and click the Run as administrator option.
  2. Click Yes on the User Account Control prompt.
  3. Type the following and press Enter: sfc /scannow 
  4. Restart your PC and check if the error persists.

An SFC scan will find corrupt system files on your PC that can prompt the Windows Security notifications without any content.

You can check how to fix the Run as administrator option if it’s not working on your PC. Our readers may be interested in our guide on what to do if Windows 11 shows notifications, but there are none.

Don’t hesitate to let us know which tip worked for you this time.

Fix: Speakers Stopped Working After a Power Outage

Power outages can be disastrous to a computer because the power surges that typically accompany them can cause serious damage. USB ports, for example, can suddenly stop working correctly.

In more dire cases, the computer just won’t turn on. But in this instance, we’ll break down and recommend solutions for when your computer’s speakers stop working post a power outage.

How to protect my computer against power outages?

Technically, it’s impossible to completely protect your computer against power outages and the surges associated with them. But what you can do is reduce the damage:

  • Shut down your computer after using it – Turning your machine off and removing the power plug greatly reduces the chance of long-term damage.
  • Connect your computer to a surge protector – Surge protectors look like bulky power strips and can lessen the damage done by random power surges.
  • Use an Uninterruptible Power Supply – Better known as a UPS, these devices are essentially big batteries that kick in during a power outage, so your hardware is safe from surges.
  • Use a laptop during a storm instead of your desktop – Since laptops have their own power supply, you won’t have to deal with a surge; assuming it’s not charging.

There are a variety of things that you can do to fix your power after a power outage has happened. The following showcases several hardware and software solutions that you can try out for yourself.

How can I fix my speakers after a power outage?

Here’s what you should do first:

  • Double-check if any of the cables have gotten loose and if the volume is low. Sometimes a power surge does nothing at all, and the audio problems result from something loose.
  • Run the Audio Troubleshooter, which you can access on Windows 11 by going to the System tab in the Settings menu. From there, go into the Troubleshooter section.
  • You can also try rolling back the latest Windows Update. Sometimes the patch itself causes problems, so getting rid of it should fix everything.
  • Additionally, you can take your computer in for repairs. Perhaps something in the wiring got fired because of a power surge, or some other component got damaged.
  • If all else fails and none of the solutions work, you’ll have to purchase a new set of speakers for your computer. Your speakers are beyond repair, unfortunately.

1. Set the default audio device

  1. Open the Windows 11 Settings menu. Stay in the System tab, then select Sound on the right-hand side.
  2. Under the Output section, select which of the devices you want to play sound. In this case, Speakers will be chosen.
  3. Expand the menu next to Set as default sound device and select Use as default device for audio.
  4. There’s an alternative way to set a default device by going back to the Sound tab and selecting More sound settings at the bottom.
  5. In the new window that appears, right-click the speakers and select Set as Default Device.
  6. Click Apply, then OK to close the window.

2. Turn off audio enhancements

  1. Return to the Sound section of the Settings menu on your Windows 11 computer.
  2. Select your computer’s audio output device (in this case, the speakers) and scroll down to the bottom.
  3. Set Audio Enhancements from Device Default Effects to Off. If spatial audio is enabled, turn that off as well.

3. Manually download the latest drivers

  1. Go to your computer’s manufacturer’s drivers and software website. In this example, it will be Intel.
  2. Click Get started if the button appears for you.
  3. The website will then automatically scan your computer to find the right drivers for you.
  4. Select Download all, and give the page enough time to finish preparing.
  5. Click the Install button when it appears.

4. Restart Audio Services

  1. In the Windows 11 search bar, type in Services and select the first one that appears.
  2. Scroll down until you find Windows Audio.
  3. Right-click the entry and select Restart.
  4. A window titled Restart Other Services will pop up. Select Yes.
  5. Locate the following services and do the same thing to them: Windows Audio Endpoint Builder and Remote Procedure Call (RPC).

What other computer parts can be ruined by a power outage?

As stated earlier, power surges can come from outages and ruin the circuitry like the motherboard, resulting in random computer crashes.

If this happens to you, check your motherboard for damaged pins or burned transistors. You may have to get some replacement parts. Also, be wary of overheating your machine.

Overheating is a more common problem than power outages because you could be doing it right now without even noticing. Make sure your ports are free from dust, and there’s plenty of cooling ventilation.

Feel free to comment below if you have questions about other gaming tips and tricks. And please tell us if there’s a specific guide for any gaming error or how to use a specific tool you’d like to see.

Download and Use Quick Assist on Your PC [How to]

You are in the right place if you want to know how to download the Quick Assist app and use it properly on Windows 11. Join us while we take a closer look at this software and its features.

What is the main purpose of the Quick Assist app?

This app allows you to take control of someone’s PC to troubleshoot issues. You can also ask others to do the same. During the remote sessions, users can send instruction messages or annotations.

How to download and use the Quick Assist app properly?

If you want to use this tool comfortably, ensure you have a stable Internet connection and the latest updates installed.

How do I download Quick Assist?

  1. Go to the Quick Assist download page.
  2. Click on the Get in Store app.
  3. Click on Open Microsoft Store.
  4. Next, click on Get to install it.get quick assist

How do I use Quick Assist?

  1. Start the application.
  2. Click on Assist another person. Send the code to the person you want to assist.
    clicking assist another person quick assist
  3. Next, the other person needs to enter your code and click on the Share screen.
    share screen click quick assist
  4. Select if you want full control or just to view the screen.
    choose what you want to do on remote pc quick assist
  5. Once you’re done, click on Leave button.
    leaving quick assist

You can now use the Quick Assist app on Windows 11 in the ways mentioned above. It has these few but very useful features. In the future, we may see additional functionalities.

This app is not a direct alternative to TeamViewer or AnyDesk. It is very Windows-oriented and has particular use cases, which is very helpful for a class of users.

If necessary, learn how to solve Quick Assist not working problem. You can do so by viewing Quick Assist logs with Event Viewer.

We also have a guide on Windows 11 Remote Assistance, so don’t miss it if you want to learn more about similar tools.

This article has explained how to use the Quick Assist app effectively on Windows 11. Share your experience in the comment box if you have already used this app.

Windows 11 Advanced Options Missing: How to Get Them Back

Windows 11 has several options available to recover your Windows PC. But what happens when the advanced options settings are missing? You may have tried to recover your PC using the built-in recovery tools, but they don’t seem to be available.

Although there are various ways to enter Windows Recovery mode, when there are no advanced options where other apps and features are in Windows 11, it can be frustrating. So, if this option is missing in your Windows 11, we show you how to restore them.

Why are my Windows Recovery options not showing?

The Windows Recovery Environment provides a way to recover your PC from a problem. It’s designed for advanced users and provides access to the tools used to create recovery media and perform advanced recovery tasks.

In Windows 11, you can find these settings under Recovery as Advance startup options. If they’re mysteriously missing, below are some reasons:

  • Resetting gone wrong – This can happen if you installed a new operating system and had problems, or if Windows has become unresponsive or hangs on startup.
  • The recovery partition is broken – This can happen if the hard drive has been badly damaged by a virus or other software that has affected the operating system.
  • Corrupt program – The windows recovery options may be missing because you have installed untrusted third-party software on your computer. 
  • Hardware change – Windows may fail to start after a hardware change, such as the motherboard or other hardware components. Some settings, such as the recovery options, may also not appear.
  • Unlicensed OS – If you’re running an unofficial version of Windows or your product key isn’t working, some settings may be missing from your system.
  • Missing updates – If you can’t locate your advanced options, your PC may be missing some important update files required for the environment.
  • Corrupt updates – It is also possible that a recent update on your PC was corrupt which caused the advanced options to go missing in Windows 11.

How do I fix Windows Advanced Options missing in Windows 11?

We recommend you try the following basic steps before any advanced troubleshooting:

1. Run DISM and SFC scans 

  1. Hit the Windows key, type cmd in the search bar, and click Run as administrator.cmd-run-admin-w11 unexpected kernel mode trap windows 11
  2. Type the following commands and press Enter after each one: DISM.exe /Online /Cleanup-Image /Restorehealth sfc /scannow
  3. Restart your PC.

2. Run a virus scan 

  1. Press the Windows key, search Windows Security, and click Open.
  2. Select Virus & threat protection.
  3. Next, press Quick scan under Current threats.
  4. If you don’t find any threats, proceed to perform a full scan by clicking on Scan options just below Quick scan.Scan options
  5. Click on Full scan to perform a deep scan of your PC.Full Scan Scan Now
  6. Wait for the process to finish and restart your system.

Moreover, you can try dedicated antivirus software to maximize your computer’s privacy and security with multi-layered protection features against all types of cyber threats.

TotalAV is one of the most reliable choices because it has outstanding antivirus technology with proactive protection, including sensitive data encryption, anti-theft and anti-phishing protection, and many others.

TotalAV

Keep your computer safe and secure all the time with TotalAV.
Free Trial Visit Website

3. Uninstall recent Windows updates

  1. Hit the Windows key and select Settings.settings windows 11
  2. Click on Windows Update and select Update history on the right pane.update-history restart to repair drive errors
  3. Scroll down and under Related settings, click on Uninstall updates.uninstall-updates-w11 computer-recognize-logitech-unifying-receiver
  4. This will take you to the most recent installed updates.
  5. Select the topmost update and click on Uninstall.Windows Updates Uninstall
  6. Restart your PC and check if the problem persists.

4. Check for Windows updates

  1. Hit the Windows key and click on Settings.settings windows 11
  2. Select Windows Update and click on Check for updates.check-updates-w11 windows 11 blue screen
  3. Download and install if available.

5. Run the System Maintenance troubleshooter

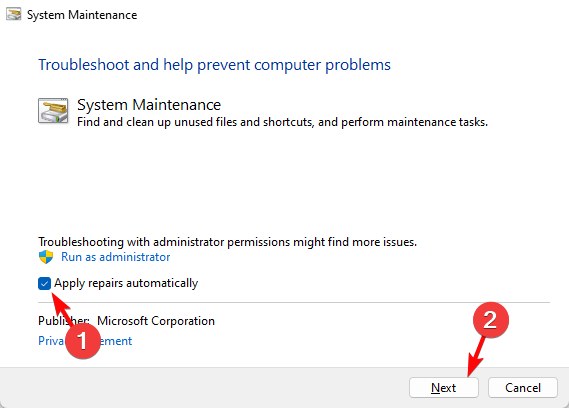
  1. Search for Perform recommended maintenance tasks automatically and open the app.
  2. Click on Advanced.
  3. Select Apply repairs automatically, then click on Next.Apply repairs automatically

If you have installed any updates and your system is not working properly, you can use the System Maintenance troubleshooter. This tool performs several tasks that optimize your computer’s performance. 

You can use this tool to run through the system maintenance checklist and see whether there are any issues with Windows, such as missing drivers or a virus scan that needs to be run.

6. Perform a system restore

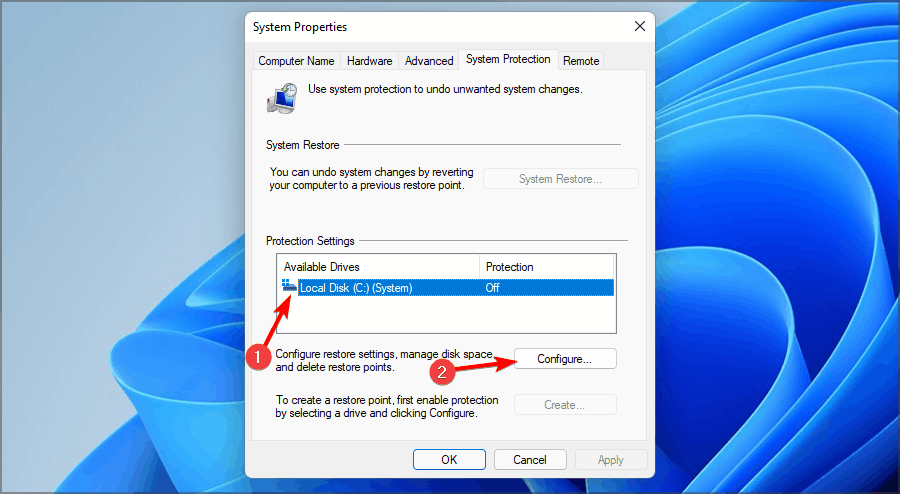
  1. Click the Search icon, type Create restore point and click Open.
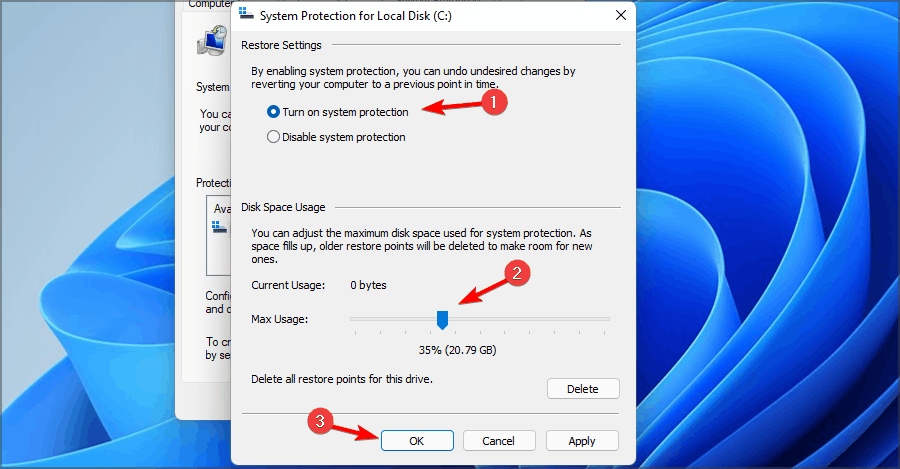
  2. Select the drive you wish to enable system restore for and click on Configure.
  3. Now select Turn on system protection. Set the Max Usage value and click on Apply and OK to save changes.
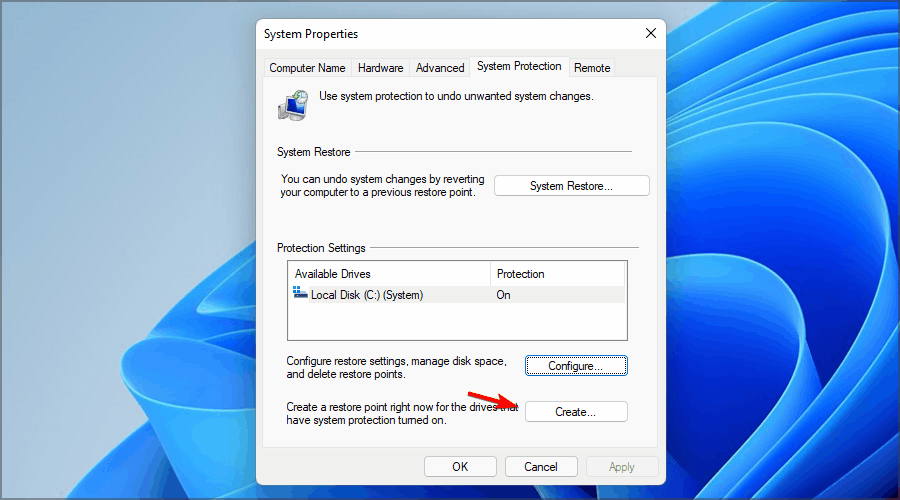
  4. Go back and repeat step 1.
  5. When the System Properties window opens, click on Create.system properties create restore point windows 11
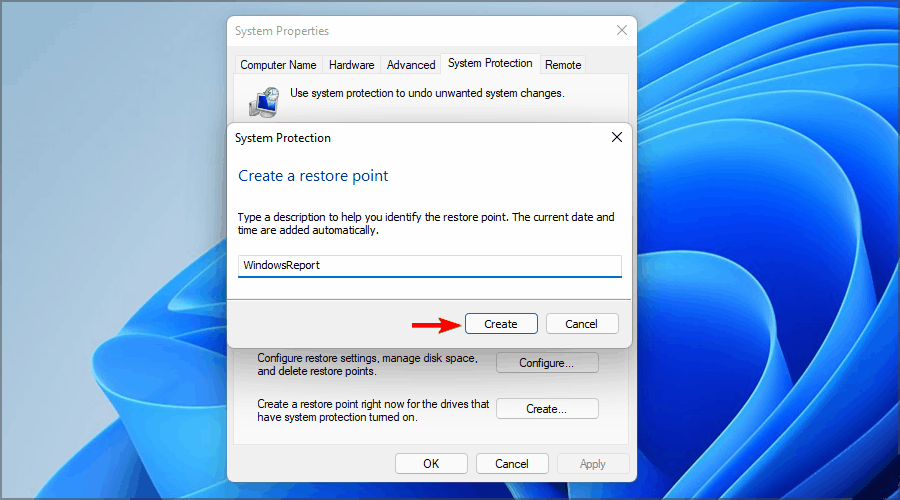
  6. Enter the desired name for the restore point and then click the Create button.create a restore point windows 11 name
  7. Wait while Windows creates the restore point.
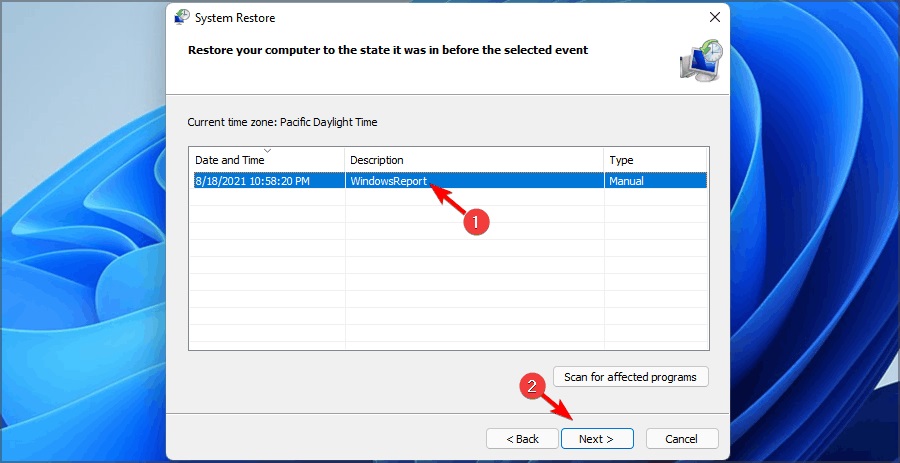
  8. Press the Windows + R keys, type rstrui, and hit Enter.rstrui restart to repair drive errors
  9. Select the restore point you wish to revert to and click on Next.
  10. Now click on Finish.

7. Reset your PC

  1. Hit the Windows key and select Settings.settings windows 11
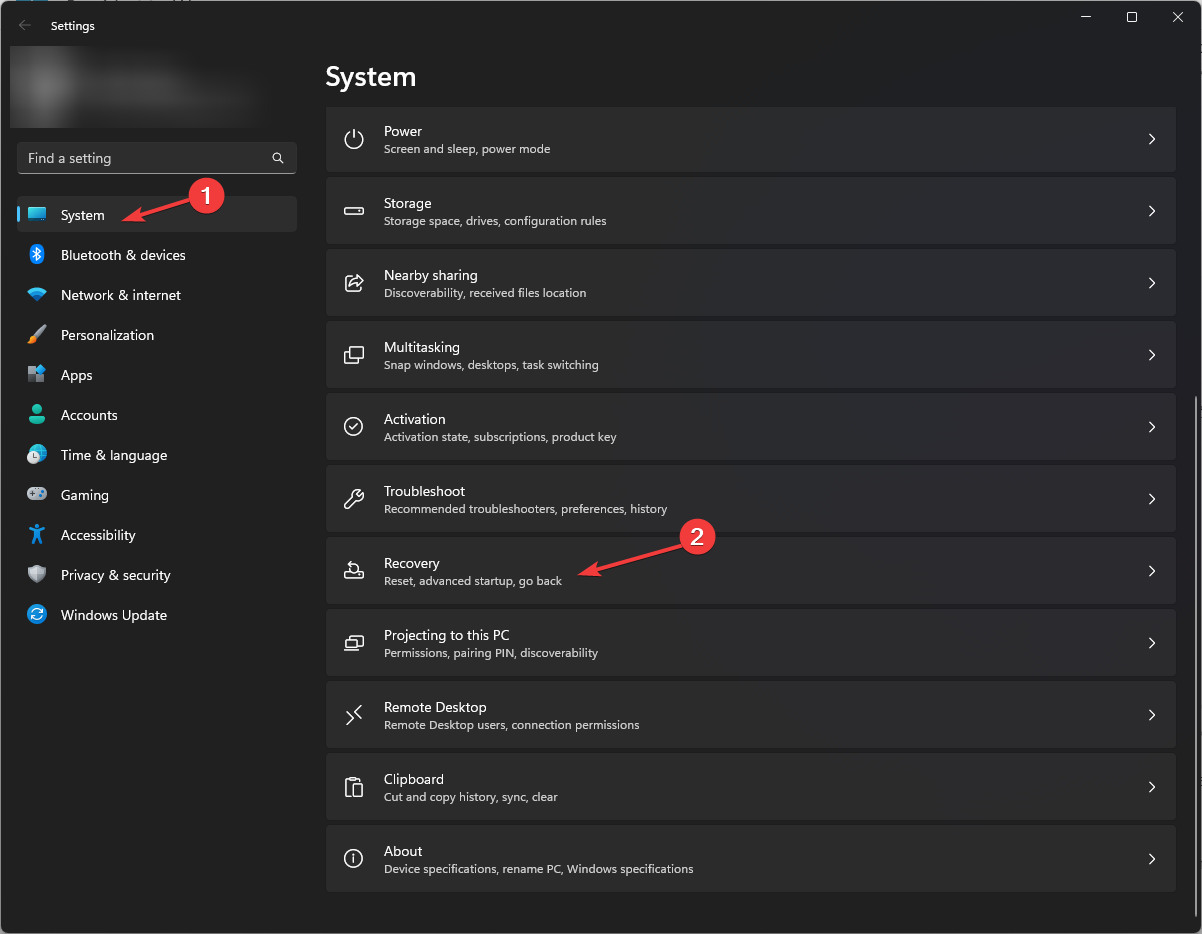
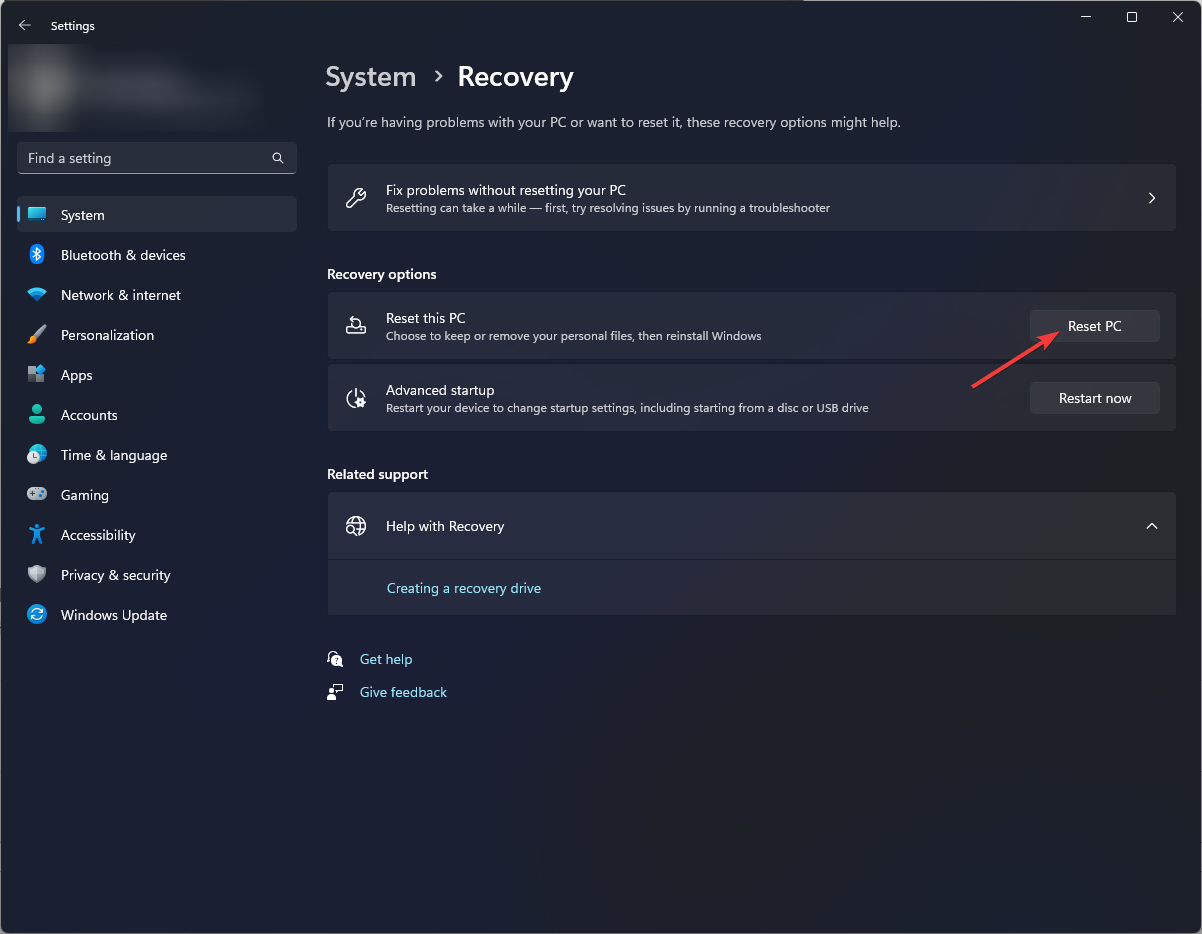
  2. In the left window pane, select System, then click on Recovery on the right pane.System-Recovery-Windows-11 - secure boot enable without bios
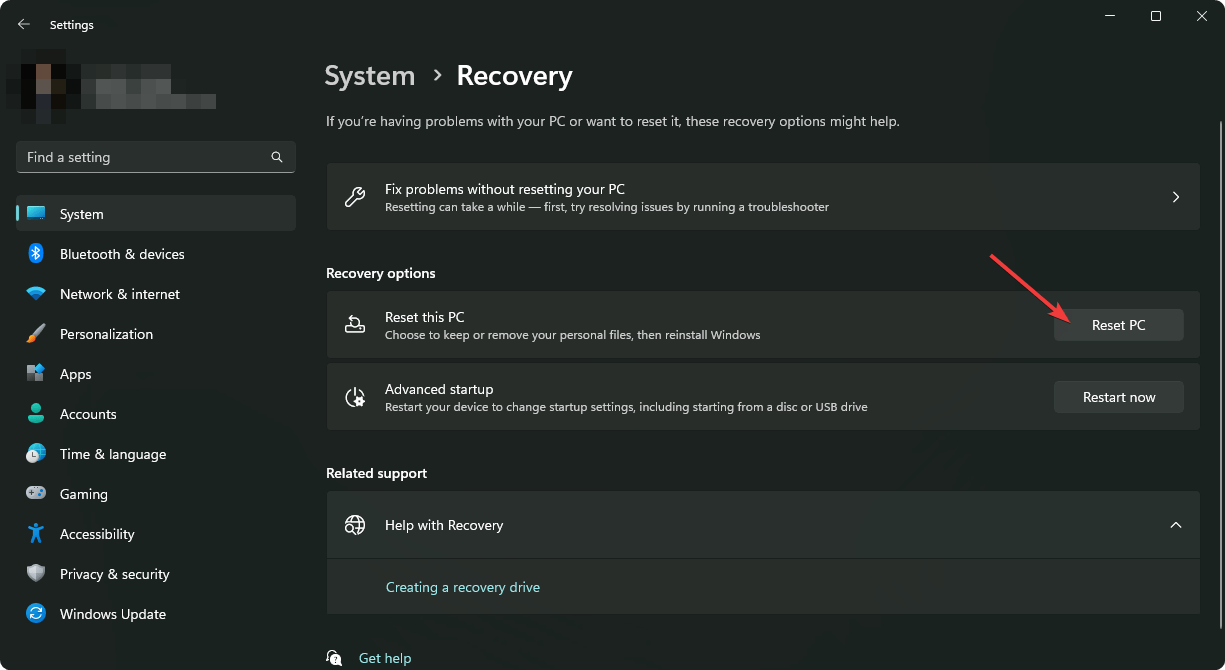
  3. Click on Reset PC from the right side.clicking reset PC win11 settings
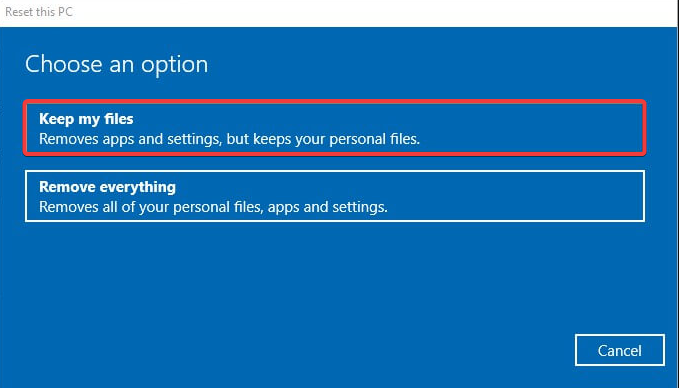
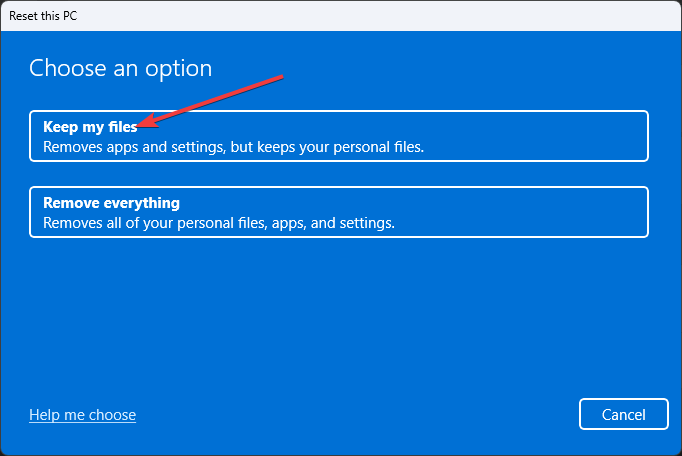
  4. Choose the type of factory reset you need. You can keep your files or completely delete all the files, apps, and settings on the PC.
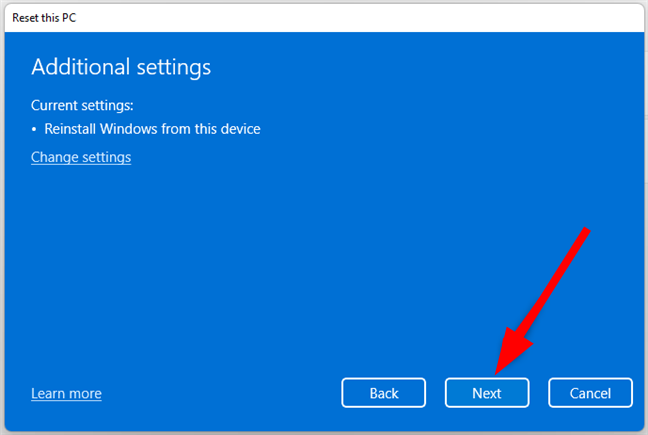
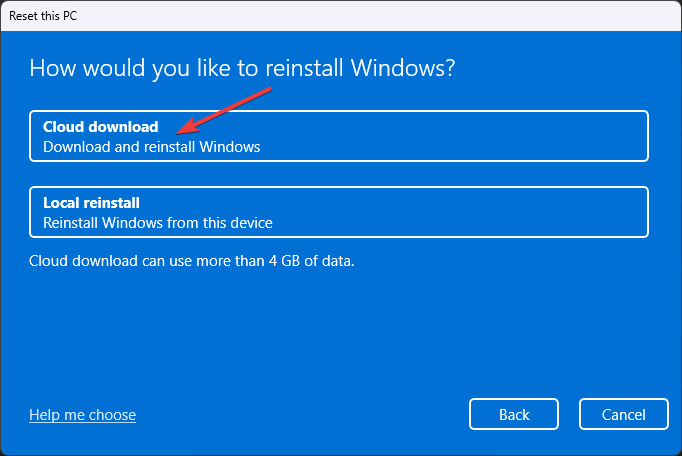
  5. Select the option you want to reinstall Windows: Cloud download or Local reinstall.
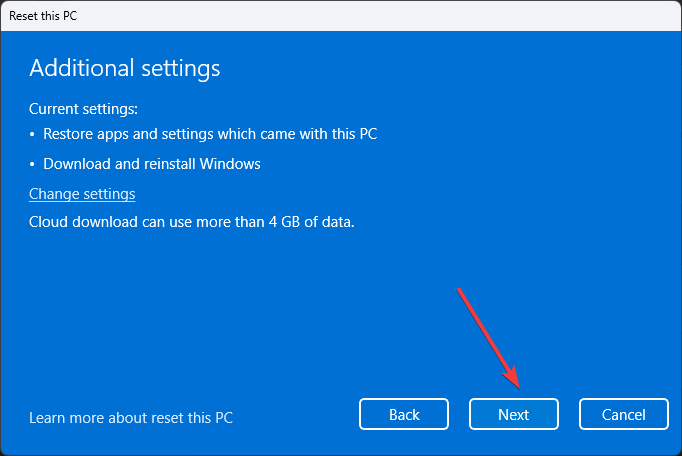
  6. Click on Next.
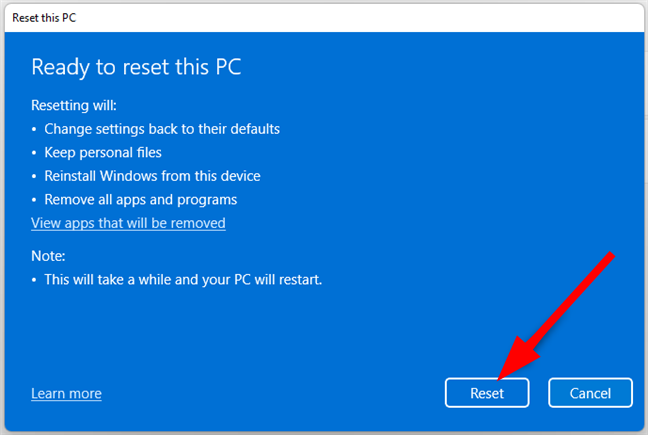
  7. Finally, press the Reset button.

Resetting your PC is a good option if you’re having problems with Windows. It just means that you’ll start from scratch, but it also means that you’ll have a clean install of Windows on your computer.

The advanced options are not the only ones that can do a disappearing act. Users also found that Windows 11 power plans were missing. If this sounds familiar, check out our guide for quick fixes.

Let us know if you can resolve this issue in the comment section below.

Xbox 360 MTU Error: What Is It & How to Fix It

The Xbox 360 MTU error refers to a problem with the Maximum Transmission Unit (MTU) size on the Xbox 360 gaming console. This error can prevent you from connecting to Xbox Live, causing slow or unstable connections and even disconnects.

Therefore, we will look at the causes and how to fix Xbox 360 MTU errors to help users. Also, you can read how to fix error 0x800701c4 on Xbox, as it is a frequent error encountered by users.

What is the Xbox 360 MTU error?

The Xbox MTU is the Maximum Transmission Unit and is the largest packet to be transmitted over a network.

An Xbox MTU error typically indicates that the Xbox console cannot communicate with other devices on the web due to a problem with the MTU settings. You can always adjust your MTU size in Windows 11 to ensure you’re getting optimal network performance.

What are the causes?

Various factors can cause the Xbox 360  MTU error. Below is a list of factors affecting the Xbox 360 MTU error:

  • Network-related problems – Incorrect network configuration, such as wrong MTU values, can lead to MTU errors on Xbox. Also, interference from other devices on the network, such as routers or modems, can cause MTU errors on Xbox.
  • Network congestion – Network congestion can also cause MTU errors on Xbox, as the network may not be able to handle the amount of data transmitted.
  • ISP Limitations – Some Internet Service Providers (ISPs) may limit the MTU size, which can cause MTU errors on Xbox.
  • Xbox Network Settings – incorrect Xbox network settings, such as wrong IP addresses and DNS settings, can cause MTU errors on Xbox.
  • Physical Network Issues – Physical issues with the network, such as damaged cables and faulty networking equipment, can cause MTU errors on Xbox.

These are the causes of Xbox MTU errors, which can vary on different devices. As we go further, we’ll discuss some fixes for the error.

How can I fix the Xbox 360 MTU error?

Users should perform the following preliminary checks before proceeding with an advanced solution:

  • Check your network connection.
  • Restart your Xbox 360 console.
  • Check for Router Firmware updates – Go through the router manual and check for router Firmware update procedures. Also, you can contact the manufacturer for guidance on how to update your router.

Proceed with the following advanced steps if these preliminary checks do not resolve the Xbox 360 MTU error.

1. Restore Xbox 360 console network settings to default

  1. Press the Guide button on your Xbox 360 controller.
  2. Select Settings and choose System Settings.
  3. Go to the Network Settings and select the Wired Network option or your wireless network name.
  4. Select Configure Network.
  5. Navigate to the Additional Settings category, select Restore to Factory Defaults, and choose Yes to confirm the Restore to Factory Defaults when prompted.
  6. Restart your Xbox 360 console and check if the error persists.

Restoring the Xbox 360 network settings will only restore network settings to default and not erase any of your data.

2. Text Xbox live connection

  1. Press the Guide button on your Xbox 360 controller.
  2. Go to Settings and select System Settings.
  3. Under Network Settings, select either Wired Network or the name of your wireless network (for wireless connection).
  4. Select Test Xbox LIVE Connection.

The method above will connect the Xbox 360 console to the Xbox Live. You can check our guide on How to fix slow performance on Xbox Live on your Xbox console.

3. Power cycle your router or modem

  1. Hold the power button on your router for about 10 seconds.
  2. Unplug the Ethernet and power cable from the router for a few seconds to allow it to power off.
  3. Plug in the necessary cables to your router and plug it into a power source.
  4. Press the Power button to turn it On.
  5. Connect to Xbox 360 and check if you can update your console.

Power cycling the router or modem will refresh its network and make its connection faster. Read our guide on fixing Xbox One not connecting to Xbox Live issues for more details.

Alternatively, you can read about How to Fix the game not starting on Xbox 360. Also, you can read about fixing Xbox Error Code 80153048 on your console.

In conclusion, these are the best fixes to troubleshoot the Xbox 360 MTU error. Should you have further questions or suggestions, kindly drop them in the comments section below.

What is Netfilter2.sys & How to Remove It?

The netfilter2.sys is a system driver file that is associated with the system firewall in Windows operating systems. It is responsible for managing incoming and outgoing network traffic. Some users have reported that netfilter2.sys can cause a blue screen of death (BSOD) performance issues.

Therefore, this guide will explain what netfilter2.sys is and how to remove it. Also, users can read about how to fix BSoD error 0x00000154 on Windows 11.

What is Netfilter2.sys?

The netfilter2.sys is a NetFilter SDK WFP driver that is essential to your device though not part of the Windows OS. Users can find the netfilter2.sys file in this directory: C:\Windows\System32\drivers

Also, the netfilter2.sys is not visible to the system. Nevertheless, users can find it in the Windows Task Manager. The netfilter2.sys file is compressed using the same EXE-Packer method used by Trojans; this, however, does not categorize it as such. The following are the causes of netfilter2.sys error:

  • Hardware problems – Hardware issues such as overheating, missing hardware components, and malfunctioning hardware can trigger a netfilter2.sys BSOD error. Also, incompatible hardware on your system can cause the error to appear.
  • Malware or virus attack – Virus and malware activities on your PC can cause missing or corrupted system files on your device. Hence, a corrupted netfilter2.sys file can cause a BSOD error in Windows.
  • Outdated driver – The system drivers help the Windows OS to communicate with the computer hardware components smoothly and carry out tasks swiftly. However, an outdated netfilter2.sys driver pack can cause an error on your device because it can’t fix the bugs affecting it.

These causes may vary depending on your system. Nonetheless, we’ll take you through some basic fixes to get your system running again.

How can I remove Netfilter2.sys?

Before proceeding with any advanced steps, try the following:

If the issue persists, try the following advanced steps.

1. Reinstall System Mechanic Free software

  1. Press the Windows + I key to open the Windows Settings app.
  2. Click on the Apps and select Installed apps.
  3. Find the entry for System Mechanic Free 19.5.0.1, click the three dots beside it and select Uninstall.
  4. Follow the on-screen prompt to uninstall it.
  5. Close the Settings window, restart your PC, and reinstall System Mechanic Free software.

Reinstalling the System Mechanic Free software to fix bug issues can resolve corrupt installation files causing interferences.

2. Update Windows OS

  1. Press the Windows + I to open the Windows Settings.
  2. Click on the Windows Update category and click on Check for Updates. Wait for the Windows update result and click on Install Update if a Windows update is available.

Updating the Windows OS will help fix driver issues on your PC.

3. Run the SFC on your device

  1. Press the Windows button, type Command Prompt, and select Run as administrator.
  2. Click Yes if the Windows User Account Control prompt appears.
  3. Type the following and press Enter: sfc /scannow
  4. Restart your PC and check if the error persists.

Running an SFC scan will help to fix the BSOD error caused by the netfilter2.sys error.

Sometimes, using a specialized tool can help you run an in-depth scan of your computer to detect malfunctioning system components and automatically repair or replace them with healthy files from its database.

4. Run System Restore

  1. Left-click the Start button, type Restore, and tap on Create a Restore Point.
  2. Then the System Protection tab, and click System Restore.
  3. Choose a different system restore and click Next to select a specific Restore Point.
  4. Select the last time you were able to install updates on your PC, and click Next.
  5. Click the Finish button.

System Restore backdates your system to the select restore point and fixes issues causing the netfilter2.sys errors.

Check how to fix Restore Point if it’s not working and if you have any issues running it.

Conclusively, our readers may be interested in our guide on how to fix driver error issues in Windows. Also, you can check the causes and how to troubleshoot BSOD errors on Windows 11 operating system.

For any feedback on this topic, feel free to comment below.

How to Fix STTub30.sys Windows Driver Errors [Step-by-Step]

Getting a Memory integrity not running due to STTub30.sys (STMicroelectronics) incompatible driver error? It’s most likely due to corrupt drivers or incompatibility issues.

First, turn off useless background apps and try restarting your PC in safe mode. If you’re still having issues, keep reading.

How do I fix STTub30.sys issues?

1. Remove the driver using the DISM and PNPUtil tool

  1. Left-click the Start button and type cmd and select Run as Administrator.
  2. Copy this command and paste this command, then press Enter: dism /online /get-drivers /format:table
  3. Under the Provider Name table, find the line containing the STMicroelectronics, then take note of the Published name.
  4. Type in the following command, replacing the Published name with the driver name and press Enter: pnputil /delete-driver Published name /uninstall /force
  5. Restart your PC and check if the error persists.

Removing the driver can get rid of the issues it’s causing with the PC. However, this might cause the system to misbehave for some users.

2. Update Windows Operating System

  1. Press Windows + I key to open the Windows Settings app.
  2. Click on Windows Update and click on Check for updates. If there are any updates available, it will search for and install them.

Updating Windows will fix the bugs affecting your PC and resolve compatibility issues causing the issues with the driver.

Read about fixing Windows not connecting to update service if the error occurs on your PC.

3. Update the Sttub30.sys driver and other concerned drivers

  1. Press Windows + R keys to prompt the Run window, type devmgmt.msc, and click OK to open the Device Manager.
  2. Go to the View tab and click Show hidden devices.
  3. Find the device that has a yellow triangle with an exclamation mark inside it or the Sttub30.sys driver.
  4. Right-click on the device and select the Update driver option from the drop-down.
  5. Select the Search automatically for drivers option and wait till the update finishes.
  6. Restart your PC and check if the error persists.

Updating the driver will resolve bugs affecting Memory Integrity.

If you don’t like Device Manager, use Fortect Driver Updater. It offers thorough scans and automated updates, unlike Device Manager’s manual, less comprehensive approach, and potential for missing drivers.

Fortect Driver Updater

If you want your PC to run smoothly, try Fortect Driver Updater to update your drivers effortlessly.
Free Trial Visit Website

4. Run an SFC scan

  1. Left-click the Start button, type Command Prompt, and click the Run as administrator option.
  2. Click Yes on the User Account Control prompt.
  3. Type the following and press Enter: sfc /scannow
  4. Restart your PC and check if the Windows update error persists.

What is Sttub30.sys?

Sttub30.sys is a driver by STMicroelectronics that runs as a Windows 64-bit kernel mode device driver named USB Driver for Tube device v3.0.1.0. Its presence on your device is likely legitimate as it can get installed alongside some programs.

However, many PCs pick Sttub30.sys as a threat as it usually accompanies errors users encounter on their computers. It is located in the following path: C:\Windows\System32\drivers\sttub30.sys

Furthermore, the Memory integrity not running due to STTub30.sys (STMicroelectronics) incompatible driver error on your PC can be due to the following factors:

  • Corrupt drivers – Drivers, just like other programs can become corrupt and misbehave. So, you run into the Sttub30.sys incompatible driver error when the said driver is corrupt.
  • Incompatibility issues – Instances like not keeping Windows or drivers updated can cause compatibility problems. The version of the driver running on your computer might not be compatible with the OS you have installed. Hence, it results in the Sttub30.sys error.

Other factors like issues with recent Windows updates can also be responsible for the error. Nonetheless, we’ll take you through some basic steps to resolve the error.

An SFC scan will find and repair corrupt system files causing the stub30.sys error. You can check how to fix the run-as-administrator option if it’s not working on your PC.

Our readers may check our guide on Wdcsam64.sys Memory Integrity Error and how to fix it on Windows 11. Also, you can read about fixing Win32kfull.sys BSOD errors on your PC.

Which solution worked for you? Let us know in the comments area below.

How to Quickly Change the Drive Letter in Windows 11: 5 Ways

Windows 11 automatically assigns letters to drive partitions and external storage devices. The primary hard drives on PCs always have the letter C, but letters for other drives can vary.

Some users who partition drives may prefer to choose letters for them. You can change a drive letter in Windows 11 with alternative methods.

How can I change a drive’s letter in Windows 11?

1. Change a drive’s letter with Settings

  1. Press the Windows logo icon and select Settings.
  2. Click System and select Storage to view an overview of drive usage.
    Storage option change drive letter windows 11
  3. Select the Advanced storage settings navigation option.
  4. Click Disks & Volumes to view drives in Settings.
  5. Select a drive for which to change the letter.
  6. Click the Properties button for the drive.
    Properties button change drive letter windows 11
  7. Press the Change drive letter button.
    The Change drive letter button change drive letter windows 11
  8. Then select a different letter on the Choose which drive letter to use drop-down menu.
  9. Click OK on the Change Drive Letter window.

2. Change a drive’s letter with Disk Management

  1. To view and access the Power User menu, press the Windows key + X combo.
  2. Select Disk Management to bring up that drive management tool.
    Disk Management option change drive letter windows 11
  3. Right-click a drive you want to edit the label for and select Change Drive Letter and Paths.
    Change drive letter and paths option change drive letter windows 11
  4. Click the Change button.
    Change option change drive letter windows 11
  5. Then select an alternative letter on the drop-down menu.
    Drive drop-down menu change drive letter windows 11
  6. Click OK to save your drive’s new letter setting.
  7. Select Yes on the confirmation dialog box you’ll see.

3. Change a drive’s letter with PowerShell

  1. Click the Search incon, input Windows PowerShell to locate that command-line app.
  2. Click the Windows PowerShell search result with the mouse’s right button and select Run as administrator.
  3. Then type the command into PowerShell and press Enter: Get-Disk
    Get-Disk command change drive letter windows 11
  4. Next, change a drive’s letter by executing this command: Get-Partition -DiskNumber 0 | Set-Partition -NewDriveLetter F
    set-partition command change drive letter windows 11

You’ll need to change the disk number (0) in that command to an actual drive number on your PC. Also, change the drive letter F to one of your choosing.

4. Change a drive’s letter with Command Prompt

  1. Open Windows’ Search icon, type Command Prompt, and select the Run as administrator option.
  2. Type in the following text for activating a Command Prompt utility: diskpart
  3. To view drives, execute this command: list volume
    list volume command change drive letter windows 11
  4. Execute this command with an actual drive number included: select volume X
    select volume command change drive letter windows 11
  5. To change a drive’s letter, execute the following command: assign letter=X

Replace the X in the volume command with an actual drive reference number. Remove the X in the assign letter of preference command and replace it with any alternative one of preference.

5. Change a drive’s letter with Drive Letter Changer

  1. Download and install Drive Letter Changer.
  2. Press Windows key + E and navigate to the folder containing the dChanger ZIP.
  3. Right-click the dChanger ZIP to select an Extract All option for unzipping that archive.
    Extract All option change drive letter windows 11
  4. Select the Show extracted files and Extract options to unzip the dChanger archive.
    Extract button change drive letter windows 11
  5. Double-click the dChanger.exe to open Drive Letter Changer.
    Drive Letter Changer window change drive letter windows 11
  6. Click a drive to edit in the software’s window.
  7. Select the Change Drive Letter option.
    Change Drive Letter option change drive letter windows 11
  8. Choose a letter on the menu.
  9. Select Yes to confirm you want to change the drive’s letter.

Can I also rename drives in Windows 11?

Yes, you can change a drive label to something more preferable via File Explorer and Settings. This is how you can change a drive’s label in File Explorer.

  1. Open File Explorer by clicking the taskbar button shown below or with the Windows + E key combination.
    File Explorer button change drive letter windows 11
  2. Then select This PC in Explorer.
  3. Right-click a drive to rename and select Properties.
    Properties option change drive letter windows 11
  4. Click the General tab in the drive properties window.
  5. Enter a new label for the drive in the text box.
    The drive name box
  6. Click Apply to save the drive’s new name.

So, you don’t have to stick with whatever letters Windows 11 gives to your PC’s drives. Changing a drive’s letter with any of the above methods is quick and easy.

However, changing a drive’s letter can cause file referencing issues. So, users must change letters for new drives that don’t include lots of software and files.

Inet_e_security_problem: How to Fix This Error Code

Inet_e_security_problem is an error encountered by users trying to load a web page in the  Microsoft Edge browser.  This error occurs when the connection to the DNS server is not well connected.

Therefore, this guide will outline how to fix the inet_e_security_problem error code. Also, you can check our guide on how to fix Microsoft Edge not working on Windows.

What causes the Inet_e_security_problem?

Various factors can cause the inet_e_security problems in Microsoft Edge. One of the common factors is app bugs from developers. Other are:

  • Outdated drivers – An outdated driver can cause issues with how the Microsoft Edge browser communicates with your device. You can check how to fix driver error issues in Windows here.
  • Session timeout – When the website request exceeds the specified time request becomes inactive, which may cause the error to appear.
  • Server issues – When the client device fails to secure a connection with the server network, which can lead to this issue.
  • DNS error – Failure of the browser to resolve the IP address for a website failing to access requested resources can cause the inet_e_securtiy problem.

Other issues with the Edge browser can cause the Inet_e_security_problem in Microsoft Edge. However, let’s explore the possible solutions.

How do I fix the Inet_e_security_problem error code?

Before trying advanced Microsoft Edge troubleshooting, here’s what you should do:

After trying the preliminary checks, you can proceed with the following advanced steps.

1. Rename the connection folder in Registry Editor

  1. Press the Windows + R button to open the Run dialog box, type in regedit, and then press Enter to open the Registry Editor.
  2. Copy the following path and paste it into the Registry Editor’s address bar and press Enter: HKEY_LOCAL_MACHINE\Software\Microsoft\Windows\CurrentVersion\Internet Settings\Connections  
  3. Right-click the Connection folder and select Rename.
  4. Change the name of the Connection folder to a different label and Save the name.
  5. Close the Registry Editor and check if the error persists.

Renaming the Connection folder in Registry Editor gives you access to information about programs that allow users to modify relevant features. You can read about how to fix a corrupt registry on Windows.

2. Clear Microsoft Edge browser history

  1. Launch the Microsoft Edge browser, click on the three dots in the top right corner, and select Settings.
  2. Click on Privacy, search, and service on the left pane. Navigate to Clear browsing data on the right side pane and click on Choose what to clear button.
  3. From the menu, check the boxes of data you want to clear and select Clear now.

Clearing the browser history and cookies helps resolve loading issues on your browser.

3. Reset network configuration

  1. Press the Windows button, type CMD, and select Runs as administrator to open the Command Prompt.
  2. Type in the following command and press Enter after each: ipconfig /flushdns ipconfig /registerdns ipconfig /release ipconfig /renew netsh winsock reset
  3. Wait for the commands to be executed and reboot your PC.

Resetting the network configuration helps fix network connectivity and performance issues. Check our complete guide on how to reset network settings in windows.

4. Change DNS address settings

  1. Left-click the Start button, type Control Panel, and press Enter to open it.
  2. Select the Network and Internet category and click on the Network and Sharing Center.
  3. Click on the Change adapter settings link in the top left corner.
  4. Right-click on the current network and select Properties.
  5. Below This connection uses the following items: navigate and double-click on Internet Protocol Version 4 (TCP/IPv4).
  6. Select Use the following DNS server addresses and input the following: Preferred DNS server: 8.8.8.8 Alternate DNS server: 8.8.4.4.
  7. Click on OK to save DNS.

Changing the DNS address will resolve connectivity issues and improve network speed.

Read about diagnosing and changing DNS addresses on Windows if you encounter issues following these steps.

5. Remove browser extensions

  1. Open the Microsoft Edge browser and click the three dots at the top right corner. Navigate through and click on Extensions.
  2. Select from the list of Extensions and click on Manage Extensions.
  3. Toggle off the Extension to disable it and check if the error persists.
  4. Repeat this process for all Extensions to find the ones causing the error.
  5. Select Remove to remove the Extensions causing the error.

Hence, identifying and removing interfering extensions will help Microsoft Edge function properly.

In conclusion, our readers can check how to fix network connection issues on windows. Also, you can read how to troubleshoot the Microsoft Edge browser on your PC.

Hopefully, you managed to resolve the inet_e_security issue. We encourage you to tell us which fix worked in the comments below.

Windows 11 Battery Not Charging: Causes & How to Fix It

With the introduction of Windows 11, many users shifted to the new OS to enjoy the new features. There are still a bunch of users who have recently switched over to Windows 11. However, multiple users have pointed out that the battery is not charging as soon as they upgrade their PCs to Windows 11.

This issue is critical as it prevents users from using their laptops, ultimately creating a hurdle in their daily tasks. If you are also facing such an issue, then in this guide, we will give you a bunch of solutions to fix the Windows 11 battery not charging issue.

Why is my Windows 11 PC battery not charging?

After some internet digging, we have created a list of reasons that could potentially be the culprit behind the Windows 11 PC battery not charging problem.

  • It is a hardware issue: The problem could be genuine, and there might be a problem with the battery of your laptop.
  • The changing cord is damaged: The charging cord you are using might be damaged or worn out, which is why the battery is not charging on your Windows 11 laptop.
  • An issue with the power plan selected: The power plan that you might have selected could be triggering the problem.
  • Problem with the recently installed Windows update: The recent version of the Windows update might have brought in a bug that is causing the problem.
  • BIOS problem: Some accidental tweaks in the BIOS settings might be the reason you are facing this issue.

What can I do if the battery is not charging on my Windows 11 laptop?

Here are a few things that you can do before going ahead with the advanced methods:

  • Perform a restart. If a single restart doesn’t work, then you can try restarting your PC multiple times, as this has helped users get inside their Windows 11 laptops.
  • Charge your laptop overnight and see if this helps fix the problem. Chances are that the battery is completely drained.
  • Check the charging cord for any damages. Replace the charging cord and try using a different one and see if this helps charge the laptop.
  • You should also check whether the charging port is damaged or not.
  • Replace the battery and see if this boots up your laptop or not.
Note icon NOTE
The below-mentioned solutions are applicable only if you can get inside your PC. Even if you can boot to the OS, you can apply the solutions one by one and possibly resolve the problem.

1. Run Power troubleshooter

  1. Press the Win + I keys to open the Settings menu.
  2. Select Troubleshoot.
  3. Click on Other troubleshooters.
  4. Hit the Run button for the Power option.
  5. The system will scan your PC for any issues and prompt you to apply the fixes.
  6. Restart your PC and check if this fixes the issue or not.

The inbuilt troubleshooting solutions will help you fix multiple petty issues on your PC. There might be some issues with the Power options, and it can be easily fixed by using the power troubleshooter.

2. Change the charging type

  1. Turn off your laptop.
  2. Turn it on by pressing the Esc or Del button. For some other brands’ laptops, you may need to press F2.
  3. Switch to the Advanced tab.
  4. Go to Battery Charge Configuration.
  5. Select Standard.
  6. Press F10 to save the changes.

This method is meant for users facing the Windows 11 battery not charging issue on a Dell laptop. The steps might vary for users using different brands of laptops.

3. Update BIOS

  1. Go to your laptop manufacturer’s website. In this example, let us take Acer.
  2. Enter the serial number of your device. You can find it on the back panel.
  3. Switch to the BIOS/Firmware section.
  4. Check the latest version of the BIOS and hit the Download button for it.
  5. Launch the file.
  6. Follow the instructions carefully to update the BIOS on your PC.

For users who find the process of updating BIOS confusing, we have a dedicated guide that will help you check the version and how you can update BIOS on your Windows 11, and also Windows 10 PC.

We have shown the above steps for a specific brand of laptop. You can head over to your manufacturer’s website and carefully go through the driver manual before updating your BIOS.

4. Update the battery driver

  1. Press the Win key to open the Start menu.
  2. Open Device Manager.
  3. Expand the Batteries section.
  4. Right-click on the Microsoft ACPI-Compliant Control Method Battery.
  5. Select Update driver.
  6. Click on Search automatically for drivers.
  7. Install the latest update.

This way of updating the driver can sometimes be cumbersome as there are other drivers to update too. In such a case, we suggest you take the help of a dedicated driver updating tool called Outbyte Driver Updater.

Outbyte Driver Updater not only helps you to update the driver, but it also helps you to schedule scans for drivers, create driver backup, use it as an effective download manager, and much more.

Outbyte Driver Updater

You need to keep your drivers updated at all times, and it will make your PC faster as well.
Free trial Visit website

5. Fix system files

  1. Press the Win key to open the Start menu.
  2. Open Command Prompt as an admin.
  3. Type the below command and press Enter. sfc /scannow
  4. Wait for some time for the process to complete.
  5. Type the below command and press Enter. DISM /Online /Cleanup-Image /RestoreHealth
  6. Once the process completes, restart your PC.

You can fix corrupt system files or missing system files by using the above commands. However, often these commands aren’t known to be effective in fixing corrupt system files.

That is it from us in this guide. For users who wish to update or reinstall the battery driver on their Windows 11 PC, then you can check out our guide.

The Windows 11 battery not charging problem also exists on Windows 10 PCs. You can check out our guide that will help you fix your laptop battery that is not charging after Windows 10 update.

Feel free to let us know in the comments section below which one of the above solutions helped you resolve the Windows 11 battery is not charging problem.

How to Disable Guest Mode in Chrome on Windows 11

The Guest Mode option on Google Chrome allows users to use the browser without signing in with any account. It gives you the ability to browse without documenting any personal information. However, the Guest Mode feature can sometimes create a loose end in your security.

Hence, we’ll discuss how you can disable Guest Mode on Chrome on Windows 11 and remove the feature from the browser. Likewise, we have a detailed guide on why Google Chrome is not responding and the ways to fix it.

What is the Guest Mode in Chrome?

The Guest Mode in Chrome browser is a feature that allows users to temporarily use the browser without creating a profile. It lets you browse through the web without saving any record of the browsing history and disables all extensions that may collect information.

Also, closing the window immediately ends the Guest mode session and erases all traces of the guest user’s browsing.

Furthermore, the user can’t make any changes in the Chrome settings. The only available change option Guest users are allowed to make is the default search engine.

Chrome doesn’t trust the user since there’s no credible account information logged in. Also, browsing history, bookmarks, or downloads from the main Chrome profiles are not accessible.

However, Guest networks tend to be targeted by hackers. It is because the networks are often poorly secured. Also, it creates a path in the primary network while bypassing software-based security solutions. Hence, it can be a security threat to the main user profile, exposing it to the risk of data loss.

How can I disable the Guest Mode in Chrome?

1. Use Command Prompt

  1. Left-click the Start button, type Command Prompt, and select Run as Administrator.
  2. Copy this command and past it into the Command Prompt, then press Enter: REG ADD HKLM\SOFTWARE\Policies\Google\Chrome /v BrowserGuestModeEnabled /t REG_DWORD /d 0
  3. Close the Command Prompt and restart your PC to put the command in effect.
  4. Go to your profile picture in the upper-right corner and check if Guest Mode is unavailable.

Running the above command will remove the Guest Mode option in Chrome, making it inaccessible for users without prior authorization to use the browser.

If you encounter issues running the Command Prompt as an administrator on Windows 10/11, check our guide for some fixes.

2. Use Registry Editor

  1. Press Windows + R key to open the Run dialog box, type regedit, right-click on the Registry Editor and select Run as administrator.
  2. Copy the following path and paste it into the Registry Editor’s address bar, then press Enter: HKEY_LOCAL_MACHINE\SOFTWARE\Google\Chrome
  3. Double-click on the Chrome folder in the left pane.
  4. Right-click on a blank space on the right side of the Registry Editor, select New from the drop-down, then select DWORD (32-bit) Value.
  5. Rename the file as BrowserGuestModeEnabled, then double-click to open it.
  6. Type 0 in the Value data box, and then click OK.
  7. Restart your PC and confirm that the Guest Mode option is no longer available on Chrome.

Tweaking the Google Chrome keys via the Registry Editor allows you to make changes in the software without having to access it. It can disable the Guest mode option, removing it from the modes menu.

Read our guide if you encounter the Registry Editing has been disabled by Your Administrator error when using it.

In conclusion, you can check more articles regarding other issues affecting the Chrome browser. Read about Chrome sound not working and some tested ways to fix it. Also, you may be interested in what to do if Chrome Sync keeps pausing and asking to Sign In on your device.

Let us know if the methods described above worked for you in the comments section.

Code 80246013: How to Fix This Windows Update Error

Microsoft releases timely updates and patches to improve Windows PC performance and fix bugs affecting the previous version. However, users may run into several issues on their PCs if there is an issue with the update process.

It may result in the Windows update error code 80246013 when installing Windows updates. Also, users can read our guide on the Windows Update Error 0x80073701 and some fixes for the error.

What causes the error code 80246013?

Many factors may cause Windows users to run into the error code 80246013 during a Windows update installation. It indicates issues with Windows Update services running correctly on your device.

Some notable causes are:

  • Windows Defender Firewall interference – Some activities on your computer may get picked up as threatening to the system by the Windows Defender Firewall. It causes the Windows update process to run into errors. Likewise, Windows Firewall can impede the connection between the PC and Windows updates services.
  • Corrupt system files – System files are essential for maintaining the smooth operation of your system. So, the update error may occur due to corrupt Windows components or damaged system files. Corrupt system files prevent the services dependent on it from performing as expected, resulting in errors. Also, missing system files can cause errors.
  • Issues with Windows update components – Windows update uses some components to help run the update process. If these components are not intact, you may encounter the Windows update error code 80246013 on your PC.

These factors may vary in different computers. Hence, we’ll discuss some effective methods to resolve the Windows update error and get your system updated.

How can I fix the Windows update error code 80246013?

Before proceeding with any advanced steps for the error, try the following:

If you can’t fix the error, proceed with the following solutions.

1. Run Windows Update Troubleshooter

  1. Press Windows + I key to open the Settings app.
  2. Click System and select Troubleshoot.
  3. Then click on Other troubleshooters.
  4. Click Run beside the Windows Update.
  5. Follow the on-screen instructions and restart your PC afterward.

Running the Windows Update Troubleshooter will repair issues causing the Windows update not working on your PC.

If you can’t use the steps above, check other ways to run the Windows Update troubleshooter in Windows 11.

2. Reset the Windows Update process

  1. Left-click the Start button, type cmd, and select Run as Administrator.
  2. Input the following commands and press Enter after each one: net stop wuauserv net stop cryptSvc net stop bits net stop msiserver
  3. Run the following command one after the other: ren C:\Windows\SoftwareDistribution SoftwareDistribution.old  ren C:\Windows\System32\catroot2 Catroot2.old
  4. Type the following commands and press Enter after each one: net start wuauserv net start cryptSvc net start bits net start msiserver
  5. Close the Command Prompt and restart your PC.

The above steps reset the activities involved in the Windows Update process and fix the problems causing the update error. Also, it can clear the update caches on your PC, impeding the process.

3. Run an SFC scan

  1. Left-click the Start button, type Command Prompt, and click the Run as administrator option.
  2. Click Yes on the User Account Control prompt.
  3. Type the following and press Enter: sfc /scannow 
  4. Restart your PC and check if the Windows update error persists.

An SFC scan will detect corrupt system files that can prevent the user profile from loading. You can check how to fix the run-as-administrator option if it’s not working on your PC.

Another reliable solution for the above process is using a dedicated third-party repair tool that offers a thorough report of your PC’s corrupt files and automatically locates healthy components as replacements.

4. Disable Windows Firewall

  1. Click the Start button, type control panel, then press Enter to open the Control Panel.
  2. Click on the Windows Defender Firewall option.
  3. Select the Turn Windows Defender Firewall on or off option from the left side.
  4. Go to the Private network settings and Public network settings, then click the radio buttons for the Turn off Windows Defender Firewall (not recommended) option.
  5. Exit the Control Panel and restart your computer.

Disabling the Windows Defender Firewall will fix any interference it’s causing in the Windows update process.

Alternatively, our readers can check our guide on fixing slow Windows updates on their PCs. Likewise, we have a detailed guide on Windows Update error 0x8007045b and some fixes to apply.

Let us know which of the above solutions worked for you as well.

How to Fix the Parameter Is Incorrect Error on Windows 11

Are you suddenly getting the parameter is incorrect error on Windows 11? This article will give you the proper solutions to get rid of this problem permanently.

Any PC user may encounter this problem at any time. This issue may come in different ways. Some users face this problem at the start-up, some while accessing specific disk drives. When this error appears, you may see similar messages like the following ones:

There was a problem starting. The parameter is incorrect

Location is not accessible. The parameter is incorrect

Sometimes, it may appear with an error code: 0x80070057.

What causes the parameter is incorrect error?

Usually, this problem occurs due to the following things:

  • Pending update: Pending updates are very common reasons some specific PC users face this problem.
  • Problematic disk drive: Bad sectors or other errors with disk drives also may cause this issue.
  • Corrupted system files: Problematic system files are responsible for many problems, including this error.
  • Permission issue: If you don’t have proper permission to access a drive, this problem may appear.
  • Malware: Virus or malware problems are a very common and old reason for this type of issue.
  • Incorrect settings: In some cases, incorrect configuration of specific settings may lead you to this type of problem.

How can I solve the parameter is incorrect error?

You may feel lucky that you can easily overcome this annoying problem. However, before going through the troubleshooting steps, we strongly recommend you do the following things:

After ensuring the above things, go through these methods to troubleshoot the parameter is incorrect error on Windows 11.

1. Run chkdsk

  1. Open This PC.
  2. Right-click on the problematic disk drive and go to its Properties.going to a local disk properties windows 11
  3. Go to the Tools tab.
  4. Click on Check under the Error checking section.clicking check for disk error checking properties
  5. Click on Scan drive on the popup window.clicking on Scan drive for a disk windows 11
  6. Wait until Windows finishes the process.

2. Repair system files

  1. Press Win + X on the keyboard and choose Terminal (Admin).
  2. Type the following command and hit Enter to execute it: sfc /scannowsfc scannow command
  3. After finishing, run the following commands one by one: DISM /Online /Cleanup-Image /CheckHealth
    DISM /Online /Cleanup-Image /ScanHealth
    DISM /Online /Cleanup-Image /RestoreHealth
  4. Restart your PC.

If any system file corruption causes the problem, doing the above things will solve the parameter is incorrect issue on Windows 11.

3. Format the drive

  1. On This PC, right-click on the problematic drive and choose Format.clicking format for a disk drive windows 11
  2. Click on Start.
  3. Wait for a while to finish the process.

If you have the necessary files in the specific drive or folder, you should skip this method. Consider taking a backup on another device if it is an external drive.

4. Change the decimal symbol

  1. Open the Start Menu, type control panel, and hit Enter.
  2. Go to Clock and Region.going clock and region control panel
  3. Click on Region.
  4. Next, under the Formats tab, click on Additional settings.going additional settings... region properties
  5. Set the decimal symbol is set to “.” if it is different.decimal symbol customize format windows
  6. Save the settings and restart your PC.

If somehow the decimal symbol gets altered by you or anything else, you may face the problem. According to a significant number of users, correcting the symbol has fixed the parameter is incorrect problem.

5. Clean boot

  1. Press Win + R on the keyboard to open Run.
  2. Type the following command and press Enter:msconfig
  3. Next, go to the Services tab.
  4. Check Hide all Microsoft Services and click on Disable all.disabling non microsoft background items system config windows
  5. Click on OK.
  6. At last, restart your PC.

If you don’t see the error in the clean boot state, it means a third-party service was causing the problem. In this case, enable the services one by one until you find the culprit. Then, you can keep it disabled or remove related software from your PC.

6. Modify the registry

Note icon NOTE
We strongly recommend you backup your registry before proceeding with this method.
  1. On Start Menu, type regedit and press Enter.
  2. Now, navigate to the following location: Computer\HKEY_LOCAL_MACHINE\SOFTWARE\Microsoft\WindowsUpdate\UX
  3. Double-click on IsConvergedUpdateStackEnabled.double clicking on isconvergedUpdateStackEnabled
  4. Set its value to 0.
  5. Save it.
  6. If it doesn’t work, go to the following location: Computer\HKEY_LOCAL_MACHINE\SOFTWARE\Policies\Microsoft\SystemCertificates
  7. Create a new DWORD (32-bit value) and name it as CopyFileBufferedSynchronousIo.
  8. Set its value to 1.giving value 1 to CopyFileBufferedSynchronousIo
  9. Save it and restart your PC.

If this method does not work, undo the changes you have made. However, in most cases, it should solve the parameter is incorrect error on Windows 11.

But, if you are unlucky, the problem may still persist. In this case, we suggest you connect the disk drive to another PC and see if it works. Also, verify if it is physical damage or not. You also can consider resetting Windows or doing a clean installation.

The above methods should solve the parameter is incorrect error on Windows 11 PC. Do you have a suggestion or opinion on this topic? You can write it in the comment box.

How to Merge Folders in Windows 11: 3 Simple Methods

You often may want to merge folders in Windows 11. If you don’t know the efficient ways to do it, follow this article.

Organizing your files and folders will make everything look good and neat. If the opposite happens, it may affect your mentality and productivity. So, organizing your files and folders is important.

You can start organizing by finding and deleting empty folders. However, merging duplicate folders is also essential.

Does Windows have a built-in tool to merge folders?

Windows don’t have a dedicated tool or a magic function that can combine multiple folders into one. But this OS is very user-friendly. It has many valuable features which can help you to merge folders and files.

In addition, there are many good third-party tools that also can help you with this type of task.

How can I merge folders in Windows 11?

Before getting started, we suggest you ensure these things:

Now, you can follow these ways to merge folders.

1. Merge when both folders have the same name

  1. Right-click on the duplicate folder and click on the Copy icon.copying duplicate folder windows 11
  2. Go to the location where the primary folder exists.
  3. Press CTRL + V on the keyboard or right-click and choose the Paste icon.
  4. Click on Replace the files in the destination.replace the files in the destination
  5. Verify that all content has been available in the primary folder.
  6. Delete the old one.

This method is ideal when you want to combine two folders in two different locations. In this case, both folders should have the same names. You also can merge these folders using the method described next.

Not only just two, but you also can apply this technique to as many folders as possible. Just paste the duplicate folder in the location of the primary one, as described above.

2. Merge when both folders have a different name

  1. Go to the secondary folder.
  2. Select all files and folders by pressing CTRL + A.
  3. Press CTRL + C or copy by right-clicking on any of these files.copying files windows 11
  4. Go to the primary folder.
  5. Paste everything there.
  6. Verify if everything looks fine.
  7. Delete the secondary folder.

Alternatively, you can rename the folder by matching it with the primary one and merge it using the steps mentioned in the previous method. In this case, both folders need to be located in different places.

If needed, learn how to solve unable to rename a folder.

3. Use third-party tools

  1. Download and install a folder merger software.
  2. Open it on your PC.
  3. Choose the folders you want to merge.
  4. Click on Combine/Merge button.merge multiple folders screenshot third-party tool vovo soft

There are several paid and free tools available. You can use any of these if you wish. However, make sure you are not using any pirated copies of these tools.

Merging will not do any magic to organize everything on your PC. So, make sure to apply the best Windows 11 folder settings so that it looks pretty well.

If you are interested, learn how to force delete a folder in Windows.

This article has mentioned the ways to merge multiple folders into one in Windows 11. If you know other methods, let us know in the comment box.

Windows 11 Can’t Change Background: 10 Ways to Force It

Changing the background on your Windows computer is a neat little way to personalize it. Not being able to do so can certainly feel frustrating, especially when there are so many great wallpapers out there.

Luckily, there are many ways to fix this error — assuming that your copy of Windows 11 has been activated. And even if it isn’t, there are ways to overcome that obstacle.

Why can’t I change my computer’s background?

Before we go into the solutions, it’s important to break down why a background wallpaper won’t change and the circumstances that cause this error in the first place.

  • Corrupt files affecting system files – Data corruption can be caused by improperly shutting down the computer or faulty software. You have to run a DISM scan to address this issue.
  • Malware has infected your computer – Like corrupt data, a computer virus can cause certain functions not to work. You should use antivirus software to clean this up.
  • Your system is out of date – All you need to do to fix this error is download and install the latest Windows Update.
  • The wallpaper you want is not supported – Certain websites will use the Webp format for their images to save space on their site, but they won’t work as wallpapers.

How can I change my computer’s background?

Before you go ahead with any of the following solutions, it is strongly recommended that you create a system image backup in case things go wrong in the process and you want to revert things.

It may take some time, but restoring a system image backup ensures everything is right where it’s supposed to be. That said, let’s go over the various fixes: both easy and complex.

  • A quick reboot is by far the easiest thing that you can do. Most of the time, restarting allows your computer to come back with a clean slate.
  • Perform a clean boot of your Windows 11 computer and try to change your computer’s background. If you can under a clean boot, you have a faulty Windows Update, which you’ll need to uninstall.
  • It’s also recommended that you disable the Windows 11 sync settings. You can do this by launching the Settings menu and going to the Windows backup section of the Accounts tab.
  • As stated earlier, corrupt files can interfere with the system. You should run an SFC scan with the Command Prompt to clean up the corrupt.

1. Turn off the Slideshow feature in Settings

  1. Launch the Settings menu, go to the Personalization tab, and select Background.
  2. Click Slideshow next to Personalize your background.
  3. Select Picture.
  4. If you still want to keep Slideshow, make sure that the toggle next to Shuffle the picture order is off.

2. Clear out corrupt Transcoded Wallpaper file

  1. Click the Windows logo in the bottom left corner and select Run.
  2. In the Run command, enter the following and click OK: %USERPROFILE%\AppData\Roaming\Microsoft\Windows\Themes\
  3. In the File Explorer window that appears, right-click TranscodedWallpaper, and select Rename in the context menu that appears.
  4. Give it the name TranscodedWallpaper.old.
  5. If a file called slideshow is present, double-click it, and it will open in Notepad. Highlight all the text, then delete it.
  6. Select File, then Save. Close the slideshow file.
  7. Close the File Explorer window and locate the image set as your background image.
  8. Attempt to apply the picture as the background of your Windows 11 computer. It should work.

3. Adjust Remove Background setting

  1. Launch the Control Panel and click Ease of Access Center. If you don’t see it, ensure View By is set to Large icons.
  2. Click Make the computer easier to see under the Explore all settings section.
  3. Uncheck the box next to Remove background images if it’s enabled.
  4. Click Apply, then OK.

4. Double-check Group Policies

  1. Like the first solution, open the Run command and type in gpedit.msc. Click OK.
  2. In the Local Group Policy Editor, expand Administrative Templates under User Configuration.
  3. Click the Control Panel folder, then select Personalization.
  4. Double-click Prevent changing desktop background to open it.
  5. In the new window that appears, select Not Configured.
  6. Click Apply, then OK.

The Group Policy Editor is normally exclusive to the Pro version of Windows 11. However, it is possible to enable the tool on Windows 11 Home. It requires you to run a specific batch file on Notepad.

5. Disable select files in the Registry Editor

  1. First, launch the Registry Editor.
  2. Copy and paste the following direction to the top of the Registry Editor: HKEY_LOCAL_MACHINE\SOFTWARE\Microsoft\Windows\CurrentVersion\Policies
  3. In Policies, click ActiveDesktop.
  4. On the right side of the window, right-click and hover over New. Choose DWORD.
  5. Rename the DWORD value to NoChanging WallPaper.
  6. Double-click and set the Value Data to 1. This will stop any changes to the desktop wallpaper.
  7. If you don’t see ActiveDesktop, right-click Policies, hover over New, and select Key.
  8. Rename the Key as ActiveDesktop.

6. Set wallpaper without needing Windows activated

  1. Locate the image you want to use as your computer’s wallpaper and open it in the Paint app.
  2. Click File, hover over Set as desktop background, and choose one of the placement options.
  3. If that doesn’t work, open the image in the Photos app.
  4. Click the three dots at the top of the window. Hover over Set as and choose Background.

What can I do if the wallpaper is constantly changing?

Some people have the opposite problem in that their wallpaper is always changing to something else. There are multiple ways to fix this, like tweaking the computer’s power plan and disabling Slideshow.

If that doesn’t work, you must delete the files in the Windows 11 Themes folder. Apart from wallpaper, you should add a skin to your computer to take computer customization to the next level.

And one of the best apps out there is called Rainmeter, which can completely change how your Windows 11 machine looks. It’s a bit of work to set up, but it’s worth it in the end.

Did you manage to complete the procedure? Let us know in the comments area below.

Webcam Flickering on Windows 10: 4 Ways to Stop it

Imagine you are in the middle of your classes or meeting, and your webcam starts flickering. You might think it could be because of low light in your surroundings, but what if that’s not the case? Webcams are pretty much mandatory in our post-COVID era.

Some users have reported facing webcam flickering and the webcam not working on Windows 10. This issue also applies to the laptop’s inbuilt webcam. If you are also looking for solutions in this guide, we will give you 5 effective ways to stop the webcam flickering issue on Windows 10.

Why does my webcam keeps flickering in Windows 10?

We have found some of the most common reasons why the webcam keeps flickering on your Windows 10 PC.

  • There is not much light: This issue could be genuine and low lighting conditions can often result in webcam flickering.
  • There is a bug in your Windows version: The version of Windows installed on your PC might be buggy and is causing the webcam to flicker.
  • Webcam drivers aren’t updated: Outdated drivers can often cause compatibility issues and could also trigger webcam flickering problems.
  • The USB port is faulty: Faulty connection or a faulty USB port won’t transmit the signal perfectly thus causing flickering issues.
  • Faulty webcam settings: You should check if there aren’t any incorrect settings applied within the webcam app.

How can I fix the webcam flickering issue on Windows 10?

Here are a few simple solutions that you can apply before going ahead with the advanced troubleshooting solutions.

  • Connect your webcam to a different USB port if you are using an external webcam.
  • Check if the webcam is having issues with a particular program such as Skype.
  • Connect the webcam to a different PC and see if the issue exists there or not. If not then there could be some internal issues with your PC.

1. Update webcam drivers

  1. Press the Win key to open the Start menu.
  2. Open Device Manager.
  3. Expand the Imaging devices section.
  4. Right-click on your webcam and select Update driver.
  5. Select Search automatically for updated driver software.
  6. Install the latest driver.
  7. Restart your PC.

An outdated webcam driver can cause multiple issues. The webcam often misbehaves and could trigger problems such as the webcam flickering issue on Windows 10. The above is the usual way of updating drivers.

However, an effective tool called Outbyte Driver Updater eases the process of updating drivers on your PC. You can edit all drivers on your PC in just a few clicks.

Apart from updating drivers, you can use Outbyte Driver Updater as an efficient download manager, schedule scans to keep all drivers up to date, create driver backups, and much more.

Outbyte Driver Updater

You must always keep your drivers updated, and Outbyte Driver Updater will also make your PC faster!
Free trial Visit website

2. Update your Windows

  1. Press Win + I keys to open the Settings menu.
  2. Select Update & Security.
  3. Hit the Check for updates button.
  4. If there is a new update available, download and install it.
  5. Restart your PC.

Often the issue could be related to Windows, and a bug might be causing the webcam flickering issue on your Windows 10 PC. In such a case, it is advised that you should make sure that your PC is running the latest available Windows version to avoid such petty issues.

3. Tweak the webcam settings

  1. Press the Win key to open the Start menu.
  2. Open the Camera app.
  3. Click on the cogwheel icon to open Settings.
  4. Scroll down and select Disabled for the Flicker reduction dropdown.
  5. You can also try alternating between the available 50Hz or 60Hz options to see which helps reduce flickering.

This will work only with the inbuilt webcam that comes with your laptop. Your external webcam will have a dedicated program containing a similar feature.

4. Disable Battery Saver mode

  1. Open the Settings menu by pressing the Win + I keys.
  2. Select Battery.
  3. Uncheck the Turn battery saver on automatically if my battery falls below option.

If you are using the Battery Saver mode on your laptop, this could also cause the webcam to flicker. Because this mode could reduce the amount of power used by specific features, thus causing flickering webcam issues on Windows 10.

Disable the feature by following the above steps and check whether this resolves the issue.

That is it from us in this guide. We have a guide that will help you with your confusion if you are looking for the best webcam with a microphone for your PC.

Also, several users have reported that on their PCs, their webcam isn’t listed in the Device Manager. You can refer to our dedicated guide for help.

Apart from flickering issues, users also come across webcam black screen issues in which the picture isn’t shown. This can be easily fixed by following the solutions mentioned in our guide.

Feel free to let us know in the comments below which one of the above solutions helped you resolve the webcam flickering problem in Windows 10.

DLLRegisterserver Failed with Error 0x80070715 [Fix]

The DLLRegisterserver failed with error 0x80070715 occurs if you try to open Windows Security or perform any other task which involves DLLRegisterserver.

This indicates either the Windows Security app is corrupted or Windows updates are pending.

This guide will discuss some tested methods to fix the error after talking about the causes. Let’s get started! 

What causes the DLLRegisterserver failed with the error 0x80070715 issue? 

There could be several reasons for the error; some of the common ones are mentioned here: 

  • Pending Windows Updates – If you have an outdated version of Windows on your computer, you can encounter this error. You need to install all the pending updates. 
  • Disabled Volume Shadow Copy service – If you got the error while running commands on Command Prompt, the reason could be disabled Volume Shadow Copy service.
  • Disabled Windows Update service – If you get this error when Windows security tries to add a new virus signature, it could be due to a stopped Windows Update service.
  • Corrupted Windows Security app – If the error message comes up when you launch the Windows Security app or initiate a scan using the Security app, then your security app might be damaged. You need to reset the app. 

What can I do if  DLLRegisterserver failed with the error 0x80070715? 

Before engaging in advanced troubleshooting steps, you should consider performing the following checks:

1. Install Windows Updates

  1. Press Windows + I to open the Settings app.
  2. Go to Windows Update and click Check for updates.Check for updates -0x80070715
  3. If there is an update available, click Download and Install.
  4. Once the update is installed, restart your computer when prompted.

2. Enable Windows Update service

  1. Press Windows + R to open the Run window.Services Run Command
  2. Type services.msc and press Enter to open Services.
  3. Locate and double-click Windows Update to open Properties.Windows Update -0x80070715
  4. On the General tab, select the Startup type as Automatic from the dropdown.
  5. Under Services status, click the Start button to force start the service.Automatic
  6. Now click Apply and OK to confirm the changes.

3. Reset the Windows Security app

3.1 Use the Startup

  1. Press the Windows key, type Windows Security, and click App settings.0x80070715 Windows Securitty App Settings
  2. On the next window, scroll and, find the Reset header, click the Reset button.Reset Windows Security
  3. Select Reset again to confirm the choice.

3.2 Use the Windows PowerShell

  1. Press the Windows key, type PowerShell, and click Run as administrator.Powershell
  2. Type the following command and press Enter:  Get-AppxPackage *Microsoft.Windows.SecHealthUI* | Reset-AppxPackagepowershell_reset
  3. Once the process is complete, restart your computer.

3.3 Use the Command Prompt

  1. Press the Windows key, type Command Prompt, and click Run as administrator.CMD elevated
  2. Copy and paste the following command to reset Command Prompt, and press Enter: PowerShell -ExecutionPolicy Unrestricted -Command "& {$manifest = (Get-AppxPackage *Microsoft.Windows.SecHealthUI*).InstallLocation + '\AppxManifest.xml' ; Add-AppxPackage -DisableDevelopmentMode -Register $manifest}"

4. Enable Volume Shadow Copy service

  1. Press Windows + R to open the Run window.
  2. Type services.msc and press Enter to open Services. Volume Shadow Copy 0x80070715
  3. Locate and right-click the Volume Shadow Copy service and select Start to initiate the service.

5. Reregister DLL files

  1. Press the Windows key, type Command Prompt, and click Run as administrator.
  2. Type the following commands one by one and press Enter after every command: net stop vss net stop swprv regsvr32 ole32.dll regsvr32 vss_ps.dll vssvc /register regsvr32 /I swprv.dllCMD Register 1
  3. Restart your computer and check if the issue persists.

6. Reset your computer

  1. Press Windows + I to open the Settings app.
  2. Go to System, then click Recovery.System-Recovery-
  3. Next, click Reset PC.Reset PC 0x80070715
  4. On Choose an option screen, click Keep my files.Choose an option
  5. On How would you like to reinstall Windows screen, choose Cloud download.Cloud Download
  6. Now on Additional settings, click Next.Additonal settings
  7. On Choose settings page, confirm the choices and click Next.
  8. You will get a list of apps to be removed; click Reset to start the process.
  9. Once complete, all the system-related issues will be removed.

So, these are the methods you need to follow to fix DLLRegisterserver failed with error 0x80070715. Try them and let us know what worked for you in the comments below.

Programs Disappeared on Windows 10: 11 Ways to Restore Them

No computer user would anticipate a scenario of programs disappearing, especially pre-installed programs, because you’re sure they’re here to stay. However, users have said programs disappeared from their Windows 10 PCs.

This issue could happen when the pinned items on your start-up menu or taskbar get corrupted.

There are several solutions to troubleshoot and fix the issue, and this article covers some of them.

Why do my apps keep disappearing from Windows 10?

There could be several reasons why your apps are disappearing from Windows 10. However, some common reasons include the following:

  • Windows Updates – Windows 10 frequently releases updates, which can sometimes cause problems with installed apps. If an update is causing the issue, try rolling back to the previous version of Windows.
  • Corrupted System Files – Corrupted system files can also cause apps to disappear. You can use the Windows 10 System File Checker (SFC) tool to repair any corrupted system files.
  • Incorrect User Account – If you are logged in to the wrong user account, your apps may not be accessible. Make sure you are logged in to the correct account.
  • Disk Drive Issues – Disk drive issues such as bad sectors, low disk space, or file system errors can cause apps to disappear. You can use the built-in Disk Cleanup tool to free up space or run a disk check to fix file system errors.
  • Third-Party Software – Some third-party software, such as antivirus or anti-malware programs, can cause apps to disappear. If you suspect this is the case, try temporarily disabling the software and see if the issue persists.

What can I do if my programs have disappeared on Windows 10?

1. Delete pinned items

  1. Press Windows + E to open File Explorer.
  2. Navigate to the path below:
    C:\Users\[user name]\AppData\Roaming\Microsoft\Internet Explorer\Quick Launch\User Pinned\TaskBar
  3. Delete the icons, and re-pin your programs to the Taskbar.

If the pinned items on your startup menu or taskbar are corrupted, you can delete the pinned items, then re-pin each item to the taskbar and check if the issue of programs disappearing goes away.

2. Create a new user profile

  1. Press Windows + I and select Accounts.
    programs disappeared windows 10
  2. Under Family and other users, click Add someone else to this PC.
    programs disappeared windows 10
  3. Select I don’t have this person’s sign-in information.
    programs disappeared windows 10
  4. Now click on Add a user without a Microsoft account, add a username and password for this account, and click Next.

Check whether the issue of programs disappearing goes away when using the newly created account. If it does, you can fix the old user account or migrate to the new account.

For more information on fixing a corrupted user profile, follow the instructions in this troubleshooting guide.

3. Use the App Troubleshooter

  1. Press Windows + R, type control, and hit Enter to open the Control Panel.
  2. Go to the top right corner and change View by option to Large icons.
    programs disappeared windows 10
  3. Click Troubleshooting.
    programs disappeared windows 10
  4. Click on the View all option on the left panel.
  5. Select Windows Store Apps.
    programs disappeared windows 10
  6. Follow the instructions to run the app troubleshooter.

4. Perform a System Restore

  1. Click Start, type System Restore, then click Create a restore point in the search results list.
  2. In the System Properties window, click on the System Restore button.
  3. Press on the Next button to proceed.
  4. Check the Show more restore points option, if available, or choose your restore point and click Next to proceed.
  5. Follow the on-screen instructions to complete the process.

Restoring doesn’t affect your files. It, however, removes apps, drivers, and updates installed after the restore point was created.

Use System Restore to create restore points when you install new apps, drivers, or Windows updates or when you create restore points manually.

5. Perform an SFC scan

  1. Press the Windows Key, type command, right-click on the app, and select Run as administrator.
  2. In the command prompt, type the script below and hit Enter.
    sfc /scannow
  3. Wait for the command to run entirely, then restart your computer.

You can also use one of the following registry cleaners to do the job. If the issue of programs disappearing persists, try the next solution.

6. Temporarily disable your antivirus

  1. Click on the hidden access arrow in the Taskbar.
    programs disappeared windows 10
  2. Click on your antivirus icon, hover over Avast shields Control and select Disable for 10 minutes (This step varies for different antivirus software).

You can uninstall third-party software on your computer, such as a computer cleaner or antivirus.

Note: for antivirus, temporarily disable it because you need it to prevent your computer from security threats. Immediately after you’re done fixing the connection error, re-enable your antivirus.

7. Run the DISM tool

  1. Press the Windows Key, type command, right-click on the app, and select Run as administrator.
  2. In the command prompt, type the script below and hit Enter.
    DISM /online /cleanup-image /restorehealth

If programs disappeared from your Windows 10, run the DISM or Deployment Image Servicing and Management tool.

The DISM tool helps fix Windows corruption errors when Windows Updates and service packs fail to install due to corruption errors, like if you have a damaged system file.

8. Boot in Safe Mode

  1. Press Windows + I, then click Update & Security.
    programs disappeared windows 10
  2. Select Recovery from the left pane, then under Advanced start-up, click Restart now.
  3. Select Troubleshoot from the choose an option screen, then click Advanced options.
    programs disappeared windows 10
  4. Go to Startup Settings and click Restart.
  5. Once your computer restarts, a list of options will come up.
  6. Choose 4 or F4 to start your computer in Safe Mode.

Safe mode starts your computer with limited files and drivers, but Windows will still run. To know whether you’re on Safe mode, you’ll see the words at the corners of your screen.

If the issue of programs disappearing persists, check whether it occurs while your computer is in Safe mode.

If Safe Mode is unavailable, follow the instructions in this guide to fix the problem.

9. Perform a clean boot

  1. Press Windows + R, type in MSConfig, and hit Enter.
  2. Go to the Services tab.
  3. Check the box labeled Hide All Microsoft Services, and select Disable all.
  4. Go to the Startup section, and select the Open Task Manager.
    programs disappeared windows 10
  5. Right-click on all displayed apps and select Disable one by one.
  6. Exit the Task Manager, and click OK on the System Configuration window.
  7. Restart your PC, and check if anything has changed.

You will have a clean boot environment after all these steps are carefully followed, after which you can try and check if the issue of programs disappearing is still there.

Performing a clean boot for your computer reduces software-related conflicts that can bring up the root causes of the programs disappearing issue.

These conflicts can be caused by applications and services that typically start up and run in the background when you start Windows.

10.  Perform a Startup Repair

Here’s how to use Startup Repair to fix the issue of programs disappearing:

  1. Press Windows + I, then click Update & Security.programs disappeared windows 10
  2. Select Recovery from the left pane, then under Advanced start-up, click Restart now.
  3. Select Troubleshoot from the choose an option screen, then click Advanced options.programs disappeared windows 10
  4. Choose Repair your computer, and select Startup Repair.
  5. Follow the prompts to complete the repair.

11. Use a cleaning software

If a program is not showing up where you left it, you might as well try to reinstall it. But first, you will have to uninstall it.

A regular uninstall will likely leave a trail of unwanted leftovers, and the reinstallation could cause problems or simply clutter.

To ensure you get rid of any remaining files, you can employ a clean-up software like CCleaner.

This reliable program allows you to analyze your computer to find junk files or unwanted software on your system.

It’s known that your PC collects residual files or outdated software files that can slow down the system and cause potential crashes.

In addition, you can erase browsing history or cookies and free up memory space for your applications.

⇒ Get CCleaner

If you are interested in data recovery, you can check out the Data Recovery section, but if it’s a case of apps not showing up in the Control Panel, we have a quick fix guide for that.

For more information about how to fix problems with your Windows 10, visit the Windows 10 Troubleshooting Hub.

If programs disappeared from your Windows 10 device, let us know in the comments section whether any of these solutions worked.

Event ID 161 Volmgr: What is This Error & How to Fix It?

If your computer suddenly crashes and you see event ID 161 Volmgr on Windows 11, you are not alone. Unfortunately, it is quite a common occurrence.

In this guide, we will explain what event ID 161 means, how to fix the related error and the causes of the error. Let’s start! 

What does Event ID 161 Volmgr mean on Windows 11?

The Event ID 161 Volmgr is an error related to the Volume Manager Driver file. It is logged when Volmgr encounters an error with the disk or the disk volume. 

The description of the error says Dump file creation failed due to an error during dump creation, indicating that Windows could not create a dump file. 

What causes Event ID 161 Volmgr on Windows 11?

There could be several reasons for the event to appear; some of the common ones are mentioned here: 

  • Wrong write debugging information – If the write debugging information setting is incorrect, you might see the event ID.
  • Disk or RAM issues – If the disk is corrupt or your RAM is not configured correctly, your computer might not be able to create dump files, hence the error.
  • Damaged system files – If Windows system files are corrupted, dump files will not be created properly. That’s when this Event ID is logged in Event viewer.
  • Third-party optimizing apps – The third-party cleaning apps optimize your computer by cleaning temp files and other data. These apps could also delete your dump file storage, hence the error.
  • Outdated BIOS – If the BIOS on your computer is outdated, then you may encounter this issue. You need to update the firmware to the latest version.

What can I do to fix Event ID 161 Volmgr on Windows 11?

Before engaging in advanced troubleshooting steps, you should consider performing the following checks:

  • If you have a third-party cleaning app installed, uninstall it.
  • Remove all the unwanted external peripherals.
  • Clean the dirt and debris of the RAM slot.
  • Update BIOS firmware.
  • Change the Power Supply Unit.

1. Disable automatic restart

  1. Press Windows + R to open the Run window. sysdm.cpl System propeties
  2. Type sysdm.cpl and press Enter to open System Properties.
  3. Go to the Advanced tab, under Startup and Recovery, and click Settings.System Startup Recovery -event id 161 volmgr
  4. Under System failure, remove the checkmark next to the Automatically restart option and click OK to confirm.Automatically Restart disable

2. Use the Registry Editor

  1. Press Windows + R to open the Run console.Regedit w11
  2. Type regedit and hit enter to open Registry Editor.
  3. Navigate to this path: Computer\HKEY_LOCAL_MACHINE\System\CurrentControlSet\Control\CrashControl
  4. Right-click on the empty space on the right pane, select New, then click DWORD (32-bit) Value.New key Crash Control event ID 161 volmgr on Windows 11
  5. Right-click on the newly created value, click Rename and name it DisplayParameters. Rename
  6. Double-click it and change the Value data to 0  and click OK.Display Parameters
  7. Restart your PC to let the changes take effect.

3. Use the Command Prompt

  1. Press the Windows key, type CMD, and click Run as administrator.CMD elevated
  2. Type the following command to repair Windows system files and press Enter: sfc/scannowCMD sfc scannow - event ID 161 volmgr
  3. Once the scan is complete, copy and paste the following command to restore the Windows image and press Enter: DISM /Online /Cleanup-Image /RestoreHealthRestore health

4. Check the Debug settings

  1. Open the Run console and type sysdm.cpl to open System Properties.
  2. Go to the Advanced tab, under Startup and Recovery, and click Settings.System Startup Recovery
  3. Under Write debugging information, select Complete memory dump.Complete memory dump -event id 161 volmgr
  4. Click OK to confirm your choice and restart your computer.

5. Update the device driver

  1. Press Windows + R to open the Run window.Device Manager RUN COMMAND
  2. Type devmgmt.msc and hit Enter to open Device Manager.
  3. Look for any driver with a yellow driver on the icon, right-click it, and select Update driver.update
  4. On the next window, click Search automatically for drivers.Search-automatically-for-drivers-2
  5. Follow the on-screen instructions to complete the installation.

6. Scan for viruses or malware

  1. Press the Windows key, type Windows Security, and click Open.Windows Security open
  2. Go to Virus & threat protection and click Scan options.Windows Security - V& T protection event id 161 volmgr
  3. Choose Full Scan and click Scan now. The scan will take some time, depending on the space occupied on your computer. Full scan -

So, you can follow these methods to fix Event ID 161, volmgr on Windows 11 computer. If nothing has worked for you so far, it is advised to reset or reinstall Windows to fix it. 

If you have any questions or concerns about the event ID, feel free to mention them in the comments below.

Fix: A Technical Error has Occurred in FFXIV Launcher

If you are facing a technical error has occurred while launching the FFXIV launcher, don’t worry; you are not alone. But the good news is it can be easily fixed in no time.

This guide will discuss the reasons and methods to fix this problem with one of the most popular games, so you can play your favorite MMORPG without interruption.

What causes a technical error has occurred in the FFXIV launcher?

There could be several reasons behind this launcher error; here, we have mentioned some of the most common ones:

  • Your Square Enix and Steam accounts are not linked: If both accounts are not connected, you could face this issue.
  • FFXIV doesn’t have enough rights: The technical error might occur if the launcher is not run as administrator, try to run it as admin to avoid such issues.
  • Your Steam Username: If your Steam username has special characters, it may cause problems.
  • Network issues: If your DNS and DNS client service is not responding, this could cause the launcher issue.
  • SSL issue: If there is an SSL error while connected to the site, you could face this error.

What can I do if a technical error has occurred in the FFXIV launcher?

Before diving into the troubleshooting methods, let us check out the quick fixes:

  • Close and reopen the launcher.
  • Close and reopen Steam.
  • Restart your computer, then the game.
  • Change Steam username.
  • Click Reset System Settings for FFXIV.
  • Ensure there are no pending Windows Updates.

If these fixes didn’t solve your problem, and the launcher won’t load for you, try these detailed steps: 

1. Disable DirectX11

  1. Go to the FFXIV launcher, and click on Config.
  2. Locate DirectX 11 Support, and toggle Off the switch to disable it.DIRECT X Disable
  3. Reboot the launcher and try to log in again.

2. Delete the ETC folder

  1. Press Windows + E to open File Explorer, paste the following path in the address bar, and hit Enter: C:\Program Files (x86)\SquareEnix\FINAL FANTASY XIV - A Realm Reborn
  2. Locate the etc. folder, right-click on it, and select Delete.ETC folder delete
  3. Choose the appropriate response in case a confirmation prompt appears.

3. Disable Firewall

  1. Press Windows + I to open Settings, go to Privacy & Security, then click Windows Security.Privacy Security - WIndows security
  2. Click Firewall & network protection.Firewall - Windows Security
  3. Now click on Domain network, Private network, and Public Network one by one.Firewall
  4. Toggle off Microsoft Defender Firewall.Firewall 3
  5. Click Yes on the UAC prompt to finish.
  6. Restart your PC and try to launch the game.

4. Set the launcher to run as administrator.

  1. Locate the launcher file, right-click on it, and select Properties.
  2. Now click Advanced.RUN as admin
  3. Next, tick the checkbox for Run as administrator, and click OK.Run as admin 2
  4. Now click Apply and OK to save the changes.

5. Checkmark SSL 2.0 and 3.0 Internet Options

  1. Press the Windows + S to open Search, type Control Panel and click Open.Control Panel
  2. Go to Network and Internet.Network & Internet Settings
  3. Double-click on Internet Options.Internet Options
  4. Go to the Advanced tab, tick the checkbox for SSL 2.0 or SSL 3.0, whichever is available, and click Apply and OK to save the changes.Internet Properties

6. Modify FFXIV_Boot.cfg file

  1. Press Windows + E to open File Explorer.
  2. Paste this path in the address bar after replacing User with your current account name:  C:\Users\user\Documents\My Games\FINAL FANTASY XIV - A Realm Reborn
  3. Right-click on the FFXIV_BOOT.cfg file and select Open with.
  4. Now select Notepad and click Just Once.Modify settings
  5. Next, crosscheck the info mentioned below and ensure the value is the same as mentioned; if not, alter it.
    • Region 2
    • Language 1
    • StartupCompleted 1
    • EulaAgreement 1
    • ConfigReset 0
    • B4EulaAgreement 1
    • BootVersionCheckMode 1Modify file
  6. Once you are done with the changes, press Ctrl + S to save the file.

7. Change DNS Settings 

  1. Press Windows + I to open Settings, select Network & Internet, then click Advanced network settings.Network Settings
  2. Now click More network adapter options.Adapter settings
  3. From the network connection, right-click on the active network adapter, and select Properties.Network Properties
  4. Select Internet Protocol Version 4 (TCP/IPv4) and click Properties.IPv4 Properties
  5. Select the Use the following DNS server addresses option, and enter the following:
    • Preferred DNS server: 8.8.8.8
    • Alternate DNS server: 8.8.4.4.
  6. Select the Validate settings upon exit option and click on OK to save the changes.Network 5

Can I still play FF14 without a subscription?

You can’t play FF14 (Final Fantasy XIV) without a subscription, though there’s a 30-day free trial for users. Download the game from the official website, try it out, and if you feel like it’s worth the money, purchase the subscription.

Though the free trial does have some limitations. For instance, your character can’t progress beyond Level 60, and the number of characters has been capped at 8. Remember, there’s no free trial for FINAL FANTASY XIV: Endwalker.

So, these are fixes that can help you resolve technical errors has occurred while loading the game via the FFXIV launcher.

If nothing has worked for you so far, it is suggested to uninstall and reinstall the game. 

Please let us know in the comments section below if any other method worked for you.

System Thread Exception not Handled Ntfs.sys: 6 Easy Fixes

You might encounter the System thread exception not handled ntfs.sys error message appearing on your display alongside the Interrupt Exception Not Handled error.

While different factors can cause this error, it is impossible to address, as we will show in the following sections of this article.

What is the System Thread Exception not Handled error?

  • Faulty or outdated driver: Sometimes, this issue can be due to issues with some drivers on your PC. The quick way out here is to reinstall, roll back, or update these drivers to the latest version.
  • Faulty system files: In some cases, the system_thread_exception_not_handled ntfs.sys error is due to missing or broken system files. Repairing and restoring these files should do the trick here.

How can I fix System Thread Exception not Handled ntfs.sys error?

1. Power cycle your PC

  1. Shut down your PC and unplug it from the power source.
  2. Remove the battery and press and leave it for a few minutes.
  3. Now, press and hold the power button for 5 to 10 seconds.
  4. Plug the charger back without the battery.
  5. Next, power on your PC and put the battery back when it boots normally.

The thing to try is if you are getting the system thread exception not handled ntfs.sys failed error is to power cycle your PC. This has worked for some users, especially on Acer Aspire. So, it would be best if you tried it too.

2. Fix the error using third-party software

If you’re unfamiliar with such errors, this blue screen might scare you a little. However, system thread exception not handled ntfs.sys is not very common, but it can be fixed.

But you can do this the hard way by tweaking the system or using a clever repair solution that automatically clears these errors in just a few seconds.

3. Reinstall your graphics drivers

  1. Create and insert a bootable media creation tool into your PC.
  2. Now, boot your PC from the drive. If your PC does not boot automatically from the drive, restart it and press Esc, F2, or F8 to enter the BIOS and change the boot order.
  3. After booting your PC from the drive, enter your language and other information and click Next.
    language  system thread exception not handled ntfs.sys
  4. Click Repair your computer in the bottom left corner.
    repair computer
  5. Now, select Troubleshoot > Advanced options.
    advanced options
  6. Select Startup Settings.
    startup settings system thread exception not handled ntfs.sys
  7. Next, click the Restart button.
    restart
  8. Press the corresponding key to Enable Safe Mode or Safe Mode with Networking when your PC restarts.
    enable safe
  9. After your PC boots up, press the Windows key + X and select the Device Manager option.
    device manager system thread exception not handled ntfs.sys
  10. Now, double-click the Display adapters option to expand it and right-click the device there.
  11. Choose the Uninstall device option.
    uninstall device
  12. Finally, click the Uninstall button to confirm the action and restart your PC.
    uninstall button

Another effective solution to the System thread exception not handled ntfs.sys error is to reinstall your drivers. Again, this is especially effective for AMD driver users.

4. Use Command Prompt

  1. Repeat steps 1 to 5 in Solution 3.
  2. Now, select the Command Prompt option.
    command prompt system thread exception not handled ntfs.sys
  3. Type the C: in the command line and hit Enter.
  4. Now, copy and paste the command below and hit Enter: BCDEDIT /SET {DEFAULT} BOOTMENUPOLICY LEGACYbcdedit
  5. Next, type Exit and press Enter to exit the command prompt window.
  6. Finally, restart your PC.

Sometimes, the System thread exception not handled ntfs.sys issue might occur due to corrupt boot files. Running the commands above should repair these files and help to boot your PC normally.

5. Install the latest graphics drivers

  1. Repeat steps 1 to 8 in solution 3 to enter Safe Mode.
  2. Press the Windows key + R, type devmgmt.msc, and click OK.
    devmgmt
  3. Expand the Display adapters option and right-click the device there.
  4. Now, select the Update driver option.
    update driver system thread exception not handled ntfs.sys
  5. Finally, choose Search automatically for drivers and install any available update.
    search auto

A problematic graphics driver most likely causes the System thread exception not handled ntfs.sys error. So, updating your driver should fix the issue.

However, for some users, rolling back their driver did the trick. So, you can try that too.

To make things easier, you can use a dedicated driver updater in Outbyte Driver Updater to automatically detect what type of graphic hardware you use and find the best driver version available. Then, in just a few minutes, your drivers will be up-to-date.

⇒ Get Outbyte Driver Updater

6. Use a Restore Point

  1. Repeat steps 1 to 5 in solution 3.
  2. Choose the System Restore option.
    system restore
  3. Now, select a restore point and click the Next button.
    restore point system thread exception not handled ntfs.sys
  4. Finally, follow the onscreen instructions to complete the process.

If the problem persists, try restoring your computer to a previous working state using System Restore. This involves installing an image of your OS before you have any issues with it.

With this, we can conclude this guide on the System thread exception not handled ntfs.sys error. Hopefully, you don’t have to exhaust the fixes in this guide before restoring normalcy on your PC.

Suppose you face a similar error in the Kmode exception not handled ntfs.sys, check our detailed guide to fix it.

Another standard error from the same error family is the atikmdag.sys system_thread_exception_not_handled error, but we also have a dedicated guide on that.

If you ever encountered System Thread Exception Not Handled ntfs.sys error on Windows 10, feel free to let us know the solution that helped you fix this issue in the comments below.

Failed to Load SteamUI.dll: How to Fix This Fatal Error

You are not alone if you encounter a failed to load SteamUI.dll error when launching Steam. This can be frustrating as it prevents you from playing games on Steam.

This guide will discuss some expert-tested methods to fix the issue after discussing the causes. 

What causes the failed to load SteamUI.dll error? 

There could be various reasons why you encountered the error. However, here are some of the common ones: 

  • Outdated device drivers – If your computer has corrupted or old device drivers, you might get this error. To fix this, you need to install the latest device drivers.
  • Steamdui.dll file is missing – If the steamui.dll file is deleted or missing, then it won’t be able to load, hence the error.
  • Incomplete Steam app updates – If the updates installed for the Steam app are incomplete or corrupted, you might face this issue.
  • Malware infection – If your computer has a virus or malware infection, it can cause many issues. You need to run a deep scan on your antivirus software to find and remove the malware.
  • Damaged Windows installation files – If the Windows installation files are corrupted, they could also cause this error. You need to check the latest update you installed and delete it, or you can repair it via Command Prompt.

What can I do to fix failed to load SteamUI.dll error? 

Before engaging in advanced troubleshooting steps, you should consider performing the following checks:

1. Repair Steam

  1. Press the Windows key, type PowerShell, and click Run as administrator.Powershell 2 -failed to load steamui.dll
  2. To check the installation for errors & download new files, copy and paste the following commands one by one and press Enter after every command: cd “C:\Program Files (x86)\Steam\bin\ .\steamservice.exe \repair

2. Clear download cache

  1. Launch Steam client.
  2. Click on Steam, and select Settings from the top left corner. Settings Steam -failed to load steamui.dll
  3. On the next window, go to Downloads and click Clear Download Cache. Download clear cache
  4. Click OK. 
  5. On the next window, click OK to continue.OK download cache

3. Delete the libswscale-x.dll and SteamUI.dll files

  1. Locate the desktop shortcut of Steam, right-click on it, and select Properties. Steam properties -failed to load steamui.dll
  2. Switch to the Shortcut tab, and click on the Open File Location button. Open File Location
  3. Now in the Steam folder,  look for libswscale-x.dll, right-click it, and click the Delete icon. Delete lib Dll file
  4. Look for SteamUI.dll, right-click it, and click the Delete icon.Steamui Delete
  5. Restart Steam and check if the issue persists. 

4. Delete the beta version

  1. Press Windows + E to open Windows Explorer.Package -failed to load steamui.dll
  2. Follow this path: C:\Program Files (x86)\Steam\package
  3. Locate and right-click the file named Beta and choose the Delete icon.Beta delete
  4. Restart your computer and launch Steam to check if the problem is there.

5. Check for system errors

  1. Press the Windows key, type CMD, and click Run as administrator.DOS COmmand Prompt
  2. Type the following command to scan and fix system errors: sfc/scannowCMD DISM & SFC
  3. Then, copy and paste the following command one by one to repair the Windows image and press Enter after every command: DISM /Online /Cleanup-Image /CheckHealth DISM /Online /Cleanup-Image /ScanHealth DISM /Online /Cleanup-Image /RestoreHealth
  4. Restart your PC to let the changes take effect.

6. Update drivers

  1. Press Windows + R to open the Run console.Device Manager RUN COMMAND
  2. Type devmgmt.msc and press Enter to open Device Manager.
  3. Go to Display adapters, expand it, right-click the graphics driver, and select Update driver.Graphics Driver update -failed to load steamui.dll
  4. Click Search automatically for drivers.Update driver 2
  5. Now follow the on-screen instructions to download the latest driver.

While you can manually update your drivers and search and install the driver from the manufacturer’s website, you can also use dedicated software.

Outbyte Driver Updater is the perfect solution for the job as it is a tool specifically designed to detect outdated, missing, or malfunctioning drivers, ultimately replacing them automatically with the latest updates.

Outbyte Driver Updater

Locate the latest updates for your drivers without the hassle of choosing the right one manually.
Free Trial Download now

7. Reregister SteamUI.dll

  1. Press the Windows key, type CMD, and click Run as administrator.Register steam -failed to load steamui.dll
  2. Copy and paste the following command and press Enter: regsvr32 steamui.dll

So, this is how you can fix the failed to load steamUI.dll error. If nothing has worked for you so far, it is advised to restore your computer to the last known good configuration or reinstall Steam.

If you have any questions or concerns, feel free to mention them in the comments section below.

Fix: Failed to Load Library Steam.hdll in Dead Cells

Dead Cells is one of the best games in the action platformer genre, with Metroidvania setting and excellent fast-paced gameplay. However, users reported getting the Failed to load library Steam.hdll error message.

If you are also facing this issue, the solutions below will help you get your game up and running again in no time, so make sure you read it thoroughly.

What causes Failed to load library steam.hdll error?

Below are some of the causes of the failed to load library steam.hdll error:

  • Corrupt game files: If your game file is corrupt, you will be unable to load the Steam support library. The way out of this is to repair the game files and restart Steam.
  • Outdated app: This error might sometimes appear because the Steam app is outdated. You need to check for and install the latest updates to get past this error.
  • Missing redistributable pack: At times, the DLL pack might be missing on your PC. You need to download them and restart Steam to get back to playing your game.

After listing the possible causes of this issue, below are some of its variations, as reported by users:

  • The program can’t start because Steam.hdll is missing from your computer: Hdll is a crucial component for various Windows programs, and the error message hints that the file is either damaged or missing, which causes problems for the software.
  • Error loading Steam.hdll. The specified module could not be found: If you see the message Failed to load library steam. hdll, it indicates that either your system or game files are corrupted. This might be the consequence of changes made to the system, a false positive detected by the antivirus software, or, most commonly, an incorrect update.
  • There was a problem starting Steam.hdll: Your machine lacks the file steam.hdll, which prevents the software from starting properly.
  • Steam.hdll could not be located: This error message pops up when the file is missing. By reinstalling the game, you will be able to address the problem.
  • Cannot register Steam.hdll: Just like before, updating or reinstalling the game will ensure that its files get looked over and replaced.

That said, let’s jump into the list of solutions we provided for you to implement and fix the Failed to load library Steam.hdll issue. Follow along!

How can I fix Failed to load library steam.hdll error in Dead Cells?

1. Run a third-party DLL fixer

A dynamic link library (DLL) is a small piece of software that sits in its file and is frequently referenced by other programs. As a result, if one is missing from the Steam Library registry file, Dead Cells may experience difficulties.

The DLL is occasionally installed by something else, such as your operating system, and is just expected to exist.

This problem can occasionally be fixed by running a repair tool that looks for and replaces any missing DLLs. It also creates a backup of your registry so it may be restored at any time.

2. Install the Redistributables pack

Dead Cell, like any other game, requires specific associated applications to work optimally.

In this case, the probable reason for the error is your system’s absence of Redist C++ Studio.

This, of course, can be quickly resolved by installing the right package on your PC. You can go for the x86 or x64 versions depending on the system architecture.

In addition, we recommend installing various versions, just to be sure (install the x86 version even if you have a 64-bit Windows). If this does not fix your problem, move to the next solution.

3. Launch the game from the game folder

Instead of relying on Steam to run the game (which seems to be an issue starter here), you can always use the executable file from the installation folder.

To make things easier, create a desktop shortcut. Certain games work better when running through the Steam client, but that doesn’t need to be the case.

The game installation for Steam-based games is found in the following path: C:\Program Files\Steam(x86)\SteamApps\Common

Once there, open the Dead Cell folder and create a desktop shortcut from the deadcell.exe. Then, try starting the game and look for changes with the Failed to load library Steam.hdll issue.

4. Try repairing the game

  1. Press the Windows key, type Steam, then click on the first result.steam-search failed to load library steam.hdll
  2. From the main menu shown on the opened window, choose Library.library-steam failed to load library steam.hdll
  3. Right-click on the Dead Cells and open Properties. prop-game failed to load library steam.hdll
  4. Select the Local files tab.
  5. Click on the Verify Integrity of Game Files button.

Even though it rarely occurs, the corruption of game installation files might be why the game won’t run through Steam.

The Failed to load library Steam.hdll error means that either system or game files are not as it’s supposed to be. This might result from system changes, antivirus false positives, or, most likely, an erroneous update.

You can always rely on Steam’s built-in Verification Checker when this happens. This tool allows you to scan for changes with game files and fix corrupted or incomplete files, so use it freely in any similar unhappy events.

5. Update Steam

  1. Hit Windows, type Steam, then open the app.steam-search failed to load library steam.hdll
  2. From the window’s top-left corner, click on Steam, then choose to Check for Steam client updates.steam-update failed to load library steam.hdll
  3. Wait until the process is completed, then restart the app.

As we said in the previous step, the probable reason for the issue is recent changes made to the game or the system.

You can address this by updating again, hoping there’s a patch for the game that sorts out the issue at hand.

Note that this solution also works in the case of Failed to load library video.hdll. Making sure that the Steam client is always up to date.

Once you’ve updated Dead Cell and Steam, restart your PC and look for changes. If the issue persists, try reinstalling the game.

6. Reinstall the game

  1. Hit the Windows key, type Steam, and click on the app to open it.steam-search failed to load library steam.hdll
  2. From the main context menu, select Library.library-steam failed to load library steam.hdll
  3. Now, right-click on Dead Cell and choose Uninstall from the contextual menu.
  4. Restart your PC then, open Steam, then choose Library.
  5. Right-click on Dead Cell, then select Install. Steam.hdll will download as well.install-steam-game failed to load library steam.hdll

This would be the last resort if none of the previous steps removed the Failed to load library pop-up. Even if, in some cases, this option didn’t work, you might be lucky as some users claimed to solve today’s error in this way.

Don’t worry. Your game progress will be saved in Steam Cloud.

Why is my Steam library a black screen?

There are various potential causes of the Steam games library not loading issue. Multiple scenarios are possible, ranging from your antivirus software interfering with your Steam to bugs found inside the Steam installation.

But don’t worry, as we’ve already put together a step-by-step guide on how to fix Steam windows going black.

Is there going to be a Dead Cells 2?

If you’re a Dead Cells fan, you’re undoubtedly excited about a new and improved release. However, speaking in an interview, Dead Cells designer Sébastien Bénard was pretty honest about this subject, and his words are not too optimistic, as follows:

If you create a big hit, it’s best to use this energy to make something different. I don’t think we’ll make a Dead Cells 2. We’re more open to creating more content and opening the game up more to the community.

If we did make a Dead Cells 2, it’s because we really need the money (laughing). We don’t want to stick to the same thing though… if we did come back it would be something quite different.

In order words, we are not expecting a new Dead Cells game, but who knows? The future is unpredictable so manufacturers might surprise us.

Until then, it is best to hope they will come up with fresh content that will raise the gaming experience standards even more. Also, check out our list of the 50 all-time best games to try before Dead Cells 2 comes out.

That should do it. If you’re still stuck with the Failed to load library Steam.hdll error, consider posting the details in the comments below. We might be able to assist you.

Invalid Kernel Handle Error: Use These 9 Methods to Fix it

Blue Screen of Death errors, such as INVALID KERNEL HANDLE, can be a significant problem on Windows 10.

These errors will crash your PC, and restart it to prevent further damage. Therefore, you must know how to fix them.

What does Invalid Kernel Handle mean?

The Invalid Kernel Handle error denotes that the kernel code is attempting to reference or close a handle that is invalid to handle. There are a series of factors that can cause this error. Below are some of them:

  • Outdated drivers: One of the notable causes of this issue is a faulty or outdated driver. You can fix this by updating your drivers to the latest version.
  • Faulty system files: If some of your system files are missing or broken, you are liable to face this BSoD error. Repairing and restoring these corrupt files should solve the problem in this case.
  • Antivirus interference: Sometimes, it might just be your antivirus software messing with your processes, leading to the error message. The best way around this is to disable or uninstall your antivirus.

How can I fix an INVALID_KERNEL_HANDLE BSoD error?

1. Update your drivers

  1. Press the Windows key + X and select the Device Manager option.
    device manager invalid kernel handle
  2. Double-click the section you want to update drivers for and right-click the device there.
  3. Now, select the Update driver option.
    update driver
  4. Finally, choose Search automatically for drivers and install any available updates.
    search auto

Keeping your drivers up to date is crucial if you want to ensure that your system is stable and safe from errors.

If a particular driver is outdated or not compatible with Windows 10, your system won’t be able to recognize and use that hardware, which will cause an INVALID_KERNEL_HANDLE BSoD error to appear.

If the Windows update cannot get the latest driver, you can visit the manufacturer’s website to download it.

Alternatively, you can employ automated driver updater software in Outbyte Driver Updater to do the job for you. This scans, updates, and repairs missing, outdated, and broken drivers with the original version from its enormous database.

This saves you from the stress of having to do it all yourself.

As the process is not straightforward, we recommend using an automated tool for the job.

⇒ Get Outbyte Driver Updater

2. Uninstall your antivirus software

  1. Press the Windows key + I and select the Apps option.
    apps invalid kernel handle
  2. Now, select your antivirus and click the Uninstall button.
    uninstall
  3. Finally, follow the onscreen instructions to complete the process.

To protect your PC from malicious users, you must install antivirus software. However, they can cause issues, like the Invalid Kernel Handle BSoD error.

Hence, you need to remove any third-pat antivirus and the Windows Defender instead.

3. Run the SFC scan

  1. Press the Windows key, type cmd, and click Run as administrator under Command Prompt.
    cmd admin
  2. Type the following command and press Enter: sfc/scannowsfc scan invalid kernel handle
  3. Finally, wait for the command to finish running and restart your PC.

Sometimes, the Invalid Kernel Handle issue can be due to faulty or corrupt system files. The quickest way to repair them is to run the SFC scan, which will automatically diagnose and fix the issue.

If the SFC scan fails, you can proceed to the solution below.

4. Run DISM

4.1. Standard way

  1. Open Command Prompt as an administrator, as shown in solution 3.
  2. Paste the following command and press Enter: DISM /Online /Cleanup-Image /RestoreHealthdism restore
  3. Wait until the scan is finished.
  4. Restart your computer and try updating again.

4.2. Run DISM with Windows Installation Media

  1. Create and insert your Windows installation media.
  2. Open Command Prompt as administrator, as shown in the previous solutions.
  3. Type the following commands and press Enter after each: dism /online /cleanup-image /scanhealthdism scan dism /online /cleanup-image /restorehealthdism restore
  4. Type the following command and press Enter: DISM /Online /Cleanup-Image /RestoreHealth /source:WIM:X:SourcesInstall.wim:1 /LimitAccessdism limit invalid kernel handle
  5. Make sure to change an X value with the letter of the mounted drive with Windows 10 installation.
  6. After the procedure is finished, restart your computer.

If the SFC scan fails to fix the Invalid Kernel Handle issue, the DISM scan should do the trick. This is because the DISM runs a deeper scan and reaches more than SFC.

You can still run the SFC scan after the DISM to be sure the corrupt system file is fixed.

5. Check the hard drive

5.1. Use Bootrec commands

  1. Press the Windows key and click the Power icon.
  2. Press and hold the Shift key and click the Restart option to enter the Advanced Startup.
  3. Now, choose Troubleshoot > Advanced options.
    advanced options
  4. Select Command Prompt from the list of options.
    command prompt
  5. Next, type the following lines and press Enter after each line to run it: bootrec.exe /rebuildbcdrebuild invalid kernel handle bootrec.exe /fixmbrfixmbr bootrec.exe /fixbootfixboot invalid kernel handle

At times, the Invalid Kernel Handle issue might be due to faulty boot files. The quickest way to fix this is to repair these files running the commands above.

5.2 Use CHKDSK commands

  1. Enter the Advanced Startup, as shown above.
  2. Select Troubleshoot > Advanced options.
  3. Now, choose Command Prompt.
    command prompt
  4. Type the command (replace c with your drive letter) below and hit Enter to run it: chkdsk c: /rchkdsk
  5. Then, finally, wait for the command to finish running and restart your PC.

Some users are also suggesting that you need to run additional CHKDSK commands as well. This has fixed the Invalid Kernel Handle issue for many users. So, it would be best if you tried it too.

6. Update Windows 10

  1. Press the Windows key + I and select Update & Security.
    update and
  2. Click the Check for updates button.
    check for
  3. Finally, download and install any available updates and restart your PC.

Keeping your drivers up to date is quite important, but you must also download Windows updates.

By downloading the latest updates via Windows Update, you’ll install the latest security patches and new features. These patches also offer many bug fixes that can fix BSoD issues like the Invalid Kernel Handle error.

7. Perform a Clean boot/ enter Safe Mode

7.1. Perform a Clean boot

  1. Press the Windows key + R, type msconfig, and click the OK button.
    msconfig invalid kernel handle
  2. Click the Services tab at the top, check the Hide all Microsoft services, and click Disable all.
    services hide
  3. Click the Startup tab at the top and select Open Task Manager.
    open startup
  4. Next, right-click each of the apps there and select Disable.
    disable
  5. Finally, go back to the System Configuration window and click the Apply button, followed by OK.
    apply ok invalid kernel handle

If the error is fixed, you can start enabling services and applications by following similar steps. Be sure to promote services and applications one by one until you find the one causing this problem.

7.2 Enter Safe Mode

  1. Restart your computer a few times while it boots to enter the Advanced recovery environment. Alternatively, you can press and hold the Shift key and click the Restart button.
  2. Choose Troubleshoot > Advanced options.
    advanced options
  3. Now, select Startup Settings.
    startup setting
  4. Click the Restart button.
    restart
  5. When your PC restarts, press 5 or F5 to Enable Safe Mode with Networking.
    safe networking

When Safe Mode starts, test your PC. If the system is stable, the BSoD error is caused by specific software, so be sure to find the problematic software and disable it or uninstall it.

8. Perform a Windows 10 reset

  1. Restart your computer a few times while it boots to enter the Advanced recovery environment. Alternatively, you can press and hold the Shift key and click the Restart button.
  2. Choose Troubleshoot.
    troubleshoot invalid kernel handle
  3. Now, select Reset this PC.
    reset pc
  4. Select Remove everything.
    keep or remove
  5. Next, click on Only the drive where Windows is installed and select remove my files.
  6. Finally, click the Reset button and follow the instructions to complete the reset process.

If the INVALID KERNEL HANDLE error is caused by software, you can fix that by performing Windows 10 reset. Note that resetting Windows 10 is similar to a clean install. Therefore, back up all critical files from your C partition.

You might need Windows 10 installation media to complete this step, so be sure to create a bootable USB flash drive using the Media Creation Tool.

9. Check your hardware

The common cause for BSoD errors is RAM, so ensure your RAM works appropriately. You can use tools such as MemTest86+ to perform a detailed test of your RAM.

Bear in mind that almost any other hardware component can cause a BSoD error, so make sure that you check all other major hardware components, such as your hard drive, motherboard, etc.

The Invalid Kernel Handle error can be a big problem, but hopefully, you managed to fix this error using one of our solutions.

If you are facing a similar issue, like Kernel Mode Exception not Handled M on Windows 10, check our detailed guide to fix it quickly.

Leave a line in the comments section below if you have successfully used any other method to get over this issue.

Windows 11 is collecting more user data than you know

YouTuber PC Security Channel shows that Windows 11 system sends a staggering, unhealthy amount of its users’ data to third-party organizations.

It always seems like a debate of an eternity every time Microsoft releases a new Windows version. Some are trapped in the nostalgia train, and some always seek the better, newer version.

In the case of Windows 11, however, many users have complained about how it’s a metadata and privacy nightmare, while others have voiced their discontent against its overall performance. 

So, how does the new operating system collect its users’ data?

How is Windows 11’s users data being collected?

Just for food of thought, Windows 11 has a telemetry and data collection feature installed and activated by default albeit it’s nothing new. It aims to provide information about the device and how everything is working in the background to improve the quality of the services. 

For some users, this triggers privacy concerns like never before.

However, the YouTuber toggles this option off. Using WireShark Capture to analyze the traffic and all sorts of data that are being sent in the background, they compare two brand-new computers with freshly-installed Windows 11 and Windows X to see how the comparison bears a decade ago. 

After filtering them by DNS protocols to show names of websites that are making queries, the aggregator app shows that Windows 11 sends its data to plenty of third-party websites that have nothing to do with Microsoft and rather for marketing purposes: Bing search engine, McAfee antivirus, MSN, and even sites like ScorecardResearch and Onetrust that conduct marketing researches.

Shady enough?

You may ask, how did it look over two decades ago? Well, on the other hand, when experimented with under the same steps, Windows XP only sends data for OS update purposes. No third-party or scrappy-looking websites, nada. 

Does Windows 11 pose more privacy concerns than Windows 10?

Data harvesting has been so normalized these days that you would need to turn the telemetry option off manually, which isn’t too friendly for casual, non-tech-savvy users. 

“I’ve been telling people since day one that Win 11 is not really an improvement but rather a metadata nightmare. What did people expect from Microsoft though, privacy? Metadata tracking will only grow worse over time.”

user u/GunGoblin complains on the thread.

Compared to Windows 10 and its predecessors where you can easily create local accounts, Windows 11 Home requires its users to have a Microsoft account and an internet connection, meaning that its collection has to be a part of the package. 

Then, Edge’s aggressive advertising with its Discovery feature on the sidebar, which was released back in October 2022, and its crowded homepage could be adding another layer of concerns.

Windows 11 costs at least $139 for that version, and it may be free as an upgrade for Windows 10 users, but you know the old adage, “If you are not paying for the product, then you are the product.”

What are your thoughts about this? Let us know in the comments!

Runtime Error R6025: Fix it With These 4 Easy Solutions

Runtime error r6025 warning usually appears when specific programs or processes are being simulated to stop forcefully.

This error is typically linked to the Visual C++ framework and occurs due to incompatibility with third-party software or missing program components. This guide will show you quick ways to fix this issue for good.

What causes Runtime error R6025?

The Runtime error R6025 error can be due to various factors. Below are some of the prevalent causes:

  • Issues with the third-party app: The most common cause of the Runtime error R6025 error on Pure Virtual Function Call, Fallout New Vegas, Skyrim, Fallout 4, or Adobe edition is an issue with the affected app. The solution to this is to update or reinstall the app.
  • Faulty display driver: This problem can sometimes be due to issues with your display driver. The best thing to do here is to reinstall or update the driver.

How do I fix Runtime Error R6025?

1. Uninstalling the faulty app

  1. Press the Ctrl + Alt + Del keys to launch the Task Manager.
  2. Right-click the problematic app and select End task.
    end task
  3. Now, press the Windows key + R, type appwiz.cpl, and click OK.
    appwiz
  4. Find the problematic app and right-click it.
  5. Select the Uninstall option.
    uninstall runtime error r6025
  6. Next, press the Windows key, type cleanmgr, and hit Enter.
    cleanmgr
  7. Choose the drive to clean and click the OK button.
    select disk runtime error r6025
  8. Select the files you want clean, click the Clean up system files button, and follow the onscreen instructions to complete the process.
    clean up
  9. Finally, restart your PC and reinstall the app.

You must uninstall Bing Desktop, Visual Studio 2030, AutoCAD, or any app you are running when you get the runtime error r6025. Ideally, you should check for updates available for the app before uninstalling it.

However the safest option is to reinstall because the error denotes an internal problem with the app.

2. Update the display driver

  1. Press the Windows key + X and select Device Manager.
    device manager
  2. Double-click the Display adapters option to expand it and right-click the device there.
  3. Now, select Update driver.
    update driver
  4. Finally, choose the Search automatically for drivers option and install any available updates.
    search auto runtime error r6025

Sometimes, the runtime error r6025 can be due to issues with your display driver. So the first thing to do is to check for updates. If the Windows update can not find the latest driver, you can go to the manufacturer’s website to download it.

If this does not work, you should try rolling back the driver and even reinstalling it if everything fails.

Another option would be to use a third-party program that can scan your PC and install the display drivers for you within seconds.

Tools like Outbyte Driver Updater have comprehensive driver databases and always find the best driver version for your hardware. It is easy to use and lightweight, and you can set it up to regularly check your drivers.

⇒ Get Outbyte Driver Updater

3. Repair/reinstall C++ 2010 for Skyrim

  1. Launch File Explorer and navigate to the path below: C:\Program Files (x86)\Steam\SteamApps\Common\Skyrimpath runtime error r6025
  2. Open the folder named VCRedist.
  3. Now, double-click the vcredist_x86.exe file to run it. 
  4. Click the Repair option when prompted.
  5. If the repair option does not fix the problem, run the installer in Step 3 again and select the Remove option.
  6. Finally, wait for the process to complete and rerun the installer to clean and install the redistributable file.

If you are getting the runtime error r6025 on Skyrim, it might be because of issues with the C++ redistributable file. You need to repair or reinstall the file to fix the problem. This also helps if you are faced with Run-time error 76.

4. Perform a clean boot

  1. Press the Windows key + R, type msconfig, and click OK.
    msconfig
  2. Select the Services tab, check the Hide all Microsoft services box, and click the Disable all button.
    services hide
  3. Click the Startup tab at the top and select Open Task Manager.
    open startup
  4. Next, right-click each of the apps there and select Disable.
    disable runtime error r6025
  5. Finally, go back to the System Configuration window, click Apply, followed by OK, and restart your PC.
    apply ok

If you find it hard to pinpoint the app causing the runtime error r6025, you should perform a clean boot. This will disable all startup apps and processes and only start your PC with the necessary services.

If this fixes the issue, you must enable the apps in batches to find the faulty one.

We have come to the end of this detailed guide on fixing the runtime error r6025 – problems with the app triggering usually cause this issue. Thankfully, you should be able to fix it for good with the solutions in our guide.

If you are facing a similar issue, like runtime error r6025 in Visual C++ on Skyrim and Fallout, check our detailed guide to fix it.

Feel free to let us know the solution that helped you solve this problem in the comments below.

PC Crashes After Overclocking CPU: 3 Easy Fixes to use

Many users are overclocking their hardware to get better performance in games. However, some of them are complaining that CPU overclock is crashing games.

This can be a problem since you won’t be able to run the game properly, mainly if the crashes are regularly occurring.

Fixing this issue can be challenging, and in today’s guide, we’ll show you a couple of solutions that might help you fix this problem.

Can an overclocked CPU cause games to crash?

Yes, overclocking a CPU can cause games to crash and other issues. 

For example, overclocking involves running the CPU at higher clock speeds than the manufacturer intended, which can cause the CPU to become unstable and lead to various problems. 

Some common causes of overclocking-related crashes in games include:

  • Overheating – Overclocking the CPU increases the heat generated by the processor, which can cause the temperature to exceed the maximum safe limit. When this happens, the CPU may shut down to prevent damage, causing the game to crash.
  • Power supply issues – Overclocking the CPU can also increase the system’s power consumption, which may cause the power supply to become overwhelmed and unable to provide enough power to the CPU. This can lead to crashes and other problems, such as system freezes and reboots.
  • Memory instability – Overclocking the CPU can also cause memory instability, as the increased clock speed can cause the memory to become out of sync with the CPU. This can lead to crashes and other issues, such as data corruption and system freezes.
  • Compatibility issues – Overclocking the CPU can cause game compatibility issues, as some games may not be designed to run on a system with an overclocked CPU. This can lead to crashes and other problems, such as graphical errors and performance degradation.

What can I do if the PC crashes after overclocking the CPU?

Before jumping into solutions, you can test for overclocking using reliable overclocking stress test software.

Start the stress test and make sure that your computer can handle it. Then, to ensure everything is running smoothly, take advantage of dedicated software to change the CPU fan speed and ensure that your CPU is cooled correctly.

In case your overclock isn’t stable, you’ll need to adjust the settings and find the stable values to use.

1. Remove different overclocking and monitoring software

  1. Go to the Settings app. You can access it by quacking by using Windows Key + I shortcut.
  2. Now go to the Apps section.
  3. Select your overclocking/monitoring software and click on Uninstall.
  4. Follow the instructions on the screen to complete the process.

According to users, it seems that different overclocking software can cause conflicts and issues such as this one, so it’s advised that you remove it.

You can use the method from above to remove the software, but if you want to be sure that the software is completely removed from your PC, we suggest using a reliable uninstaller software tool.

⇒ Get CCleaner

2. Try increasing the CPU voltage

  1. Download ThrottleStop from the official website.
    pc crashes after overclocking cpu
  2. Unzip the file and run it.
  3. Tick Speed Shift – EPP, then click the FIVR option.
    pc crashes after overclocking cpu
  4. Under CPU Core Voltage, tick Unlock Adjustable Voltage, tick CPU core, then tick Adptive.
  5. Your CPU has to be undervolted; thus, you must change the Offset Voltage. The ultimate number depends on the processor and should be done in tiny increments.
  6. Begin by adjusting your millivolt (mV) using a large value. Then tick the CPU Cache option at the top and change the undervolt to match the value set for CPU Core. Lastly, undervolt Intel GPU slightly, and click Apply.

A few users suggested increasing the voltage if the CPU overclock crashing games, so you might want to try that.

Remember to use only the recommended voltage values and slowly increase them, or else you might cause permanent damage to your CPU.

3. Reduce the overclock settings

  1. Restart your PC.
  2. After the first screen comes on, start pressing the F10 key repeatedly until the BIOS screen is displayed. For PCs built before 2006, press the F1 key repeatedly during the booting process to get into BIOS.
  3. Open your overclock settings, and reduce the CPU speed.
    pc crashes after overclocking cpu
  4. Save the changes.

Many users reported that they fixed this problem simply by slightly reducing their overclock settings, so be sure to try that as well.

Note icon NOTE
If you donu2019t know the original overclock values, you might have to reset your BIOS to the default settings.

Unfortunately, if your overclock isn’t stable, resetting it and using your CPU with the default clock values might be best.

If the CPU overclock crashes games, you must ensure that the clock is stable or try adjusting your overclock settings.

Moreover, since you want to improve your experience, check out the best software to optimize game performance on PC.

Are you still facing any overclock issues? Don’t hesitate to share your thoughts in the comments below.

Guild Wars 2 Keeps Crashing: 3 Solutions That can Help you

Guild Wars 2 is a top-rated MMORPG game with hundreds of thousands of users worldwide; now, according to some complaints, Guild Wars 2 crashes and hangs on Windows 10.

When i launch the Guild Wars 2 game my computer used to crash. I then proceeded to update my video card drivers like they proposed on the forums (I’m on Windows 8.1) but now i get these constant error messages when i want to run the game. What further steps can i take so i can play Guild Wars 2 once more?

The Guild Wars 2 player then shares a link to the exact error he is getting:

Exception: c0000005; Memory at address 7425e8a9 could not be read; App: Gw2.exe.

If this hasn’t solved your Guild Wars 2 game crashing in Windows 10, describe your issue thoroughly in the comments box, and we will quickly research more on this to find a proper fix.

Why does Guild Wars 2 keep crashing?

Guild Wars 2 can crash for a variety of reasons. Some common causes of crashes in Guild Wars 2 include:

  • Game files corruption – Over time, game files may corrupt, causing the game to crash or freeze.
  • Outdated drivers – If you have outdated graphics cards or sound card drivers, it can cause the game to crash or have other performance issues.
  • Overheating – If your computer is overheating, it can cause the game to crash.
  • Outdated game client – If the game client is outdated, it can cause compatibility issues, resulting in crashes or other performance issues.
  • System resources – If your computer is running low on system resources such as RAM or CPU, it can cause the game to crash or have other performance issues.
  • Third-party software conflicts – Some third-party software, such as firewalls, antivirus programs, and game boosters, can conflict with the game and cause it to crash.

How can I fix Guild Wars 2 if it keeps crashing?

1. Update your drivers

Guildwars is a pretty old game, but the constant updates mean that the game has evolved a lot since it was first released, and so have the system requirements for running it properly.

That being said, just because the game is from 2012 doesn’t mean a 2012 PC will cut it.

However, if your PC is that old but was top-end in those days, then a complete round of driver updates may suffice to run the latest Guild Wars 2.

However, it’s hard to find the correct drivers, especially if your hardware is older, and that is when an excellent third-party solution such as Outbyte Driver Updater makes for a great addition to your digital library.

Powered by a library of 18 million drivers, this tool will scan your PC, download whatever drivers it deems necessary, and install them for you in one go.

Outbyte Driver Updater

Update your drivers and avoid all issues while playing Guild Wars 2. Use Outbyte Driver Updater today!
Check price Visit website

2. Repair your game files

  1. Locate your Gw2.exe file; this should be located in your Guild Wars 2 install directory:
    C:\Program Files (x86)\Guild Wars 2
  2. Right-click on the file and select Create shortcut.
  3. Change the name of the shortcut to Guild Wars 2 Repair., then right-click on the shortcut and select Properties.
  4. Look at the Target line and add –repair to the end.
  5. It should now look something like this:
    "C:GamesGuild Wars 2gw2.exe" -repair
  6. Select Ok.

Your game client should start repairing itself, and Guild Wars 2 should usually launch after it is done.

3. Perform a Clean Boot

  1. Press Windows + R, type in MSConfig, and hit Enter.
    guild wars 2 keeps crashing
  2. Go to the Services tab.
  3. Check the box labeled Hide All Microsoft Services, and select Disable all.
  4. Make sure you check any critical services you need to work, even in Clean Boot, such as the applications for your peripherals or your wireless connection software.
  5. Go to the Startup tab and select Open Task Manager.
  6. Right-click on all displayed apps and select Disable one by one.
  7. Click OK, reboot your PC, then try relaunching Guild Wars 2.

Guild Wars 2 has some problems in Windows 10, such as crashes, graphical glitches, driver issues, full-screen game mode problems, and game settings lag. If you encounter one of these problems, check this fix guide and eliminate them.

Let us know which method you used to fix your Guild Wars 2 issues by leaving us feedback in the comments below.

How to Fix ExitLag Not Working or No Connection Through (Step-by-Step)

If you’re getting no connection through Exitlag, it’s most likely due to connection issues, firewall restrictions, server outages, or configuration problems.

Whether you play Fortnite, Valorant, or CSGO, these issues will prevent optimization. Luckily, with a few simple tweaks, you can fix the problem.

Follow the steps below to cut your downtime as soon as possible.

How to fix ExitLag Not Working

Before changing any settings, check if ExitLag’s servers are down using Down for Everyone or Just Me. If the service is unavailable for everyone, it’s likely a server-side issue, just wait it out. Otherwise, proceed with the fixes below.

1. Modify the ExitLag settings

  1. Launch ExitLag and navigate to the Tools tab from the top. Tools to fix exitlag not working
  2. Ensure that the Accuracy in route optimization slider is towards the extreme right, i.e., set to High.Accuracy in route optimization
  3. Next, click on the Protocol to analyze routes dropdown menu, and select UDP/TCP SYN from the list of options.UDP/TCP SYN to fix exitlag not working

After making the changes, run the game you earlier had problems with, and check if things have improved. Frequently, when the settings are incorrect, there might be no connection through ExitLag, thus giving the impression that it is not working.

ExitLag can fail because of bad routing or firewall blocks, but proper setup usually fixes it. For detailed setup steps and correct routing options, check our ExitLag usage guide.

2. Enable ExitLag after starting the game

  1. Close the game that’s not working too well, go to ExitLag, and click on the toggle near the top-left to disable it.Disable to fix Exitlagnot working
  2. Start the game again, head to ExitLag, and enable the same toggle.Enable Exitlag

Some games detect tools like ExitLag when launching them and may throw connection errors immediately. In this case, enabling ExitLag after you start playing the game will get things working, and you should not face trouble anymore. Of course, this might also work if ExitLag is not working for Steam.

3. Add an exception for ExitLag in Firewall

  1. Press Windows + S to launch the Search menu, enter Control Panel in the text field, and click on the relevant search result.Control Panel
  2. Click on System and Security from the options here.System and security
  3. Next, click on Allow an app through Windows Firewall under the Windows Defender Firewall option.Allow an app through Windows Firewawall to fix exitlag not working
  4. Click on the Change settings button.Change settings
  5. Now, click on Allow another app at the bottom.Add an app to fix exitlag not working
  6. Click Browse in the Add an app window that appears.Browse
  7. Navigate to the location of the ExitLag launcher. Select it, and click on Open.Select launcher
  8. Next, click on Add.Add
  9. Finally, click on OK to save the changes.OK

Once done, restart the computer, and ExitLag should now work fine.

4. Flush DNS

  1. Type CMD in the Taskbar and select Run as Administrator.run cmd as admin
  2. Enter the following commands one by one and press enter after each:ipconfig flush dns
    • ipconfig /flushdns
    • ipconfig /registerdns
    • ipconfig /release
    • ipconfig /renew
  3. Wait for the process to complete, restart your PC and try running ExitLag again.

5. Run ExitLag as Administrator

Lack of permissions can prevent ExitLag from routing your traffic properly.

  1. Close ExitLag completely.
  2. Right-click the ExitLag shortcut on your desktop.
  3. Choose Run as administrator.
  4. Launch your game and test the connection again.

6. Disable Conflicting VPNs or Proxies

Other network services may override or block ExitLag.

  1. Press Windows + R, type inetcpl.cpl, and press Enter.
  2. In the Connections tab, click LAN settings.
  3. Uncheck Use a proxy server for your LAN.use a proxy server disable
  4. Disable any other VPNs or proxies running in the background.

7. Reinstall ExitLag

Reinstalling removes any corrupted files and resets configuration settings.

  1. Press Windows + R, type appwiz.cpl, and hit Enter.
  2. Scroll down to ExitLag, right-click it, and choose Uninstall.
  3. Restart your PC.
  4. Download the latest version from ExitLag’s official website and install it.
  5. Run it as administrator and test the routing again.

8. Manually Change Game Routing in ExitLag

Sometimes, the default route won’t connect to the best server.

  1. Open ExitLag and search for your game.
  2. Select the game and click Apply Routes.
  3. Manually change the server region to a nearby alternative (e.g., Paris instead of Frankfurt).
  4. Launch the game and check for improvements.

9. Update Your Network Drivers

Outdated drivers can block or slow down routing.

  1. Press Windows + X and choose Device Manager.
  2. Expand Network adapters.
  3. Right-click your active adapter and choose Update driver.
  4. Select Search automatically for drivers.
  5. Restart your PC once updated.

These are all the ways you can fix issues that lead to ExitLag not working on the computer. Once you fix the problem, you can play your favorite games again without lag.

Also, find the best game booster software, and try these if ExitLag doesn’t deliver optimal results. And if you enjoy playing online games in different regions other than your own, rest assured that our tips can help you.

No less important, here are the best VPNs for Albion Online to reduce ping and rest assured, these suggestions are also great for several other games.

If you have any other queries or know of a method not listed here, drop a comment below.

Windows Media Center Download: Everything you Need to Know

Microsoft decided to cut the Windows Media Center when launching Windows 10, but many are still wondering if Windows Media Center is available for download.

Those who ignored the app don’t miss it, but those who used it knew it was one of the best media center software to manage videos and other media content and probably want it back.

It used to be possible to install Windows Media Center in some earlier Windows 10 Preview builds. However, can you still do that? Keep on reading to find out.

What does Windows Media Center do?

Windows Media Center was an all-around media solution designed to bring the living room media experience to PC. It had the following features:

  • Live TV – The software allowed users to watch and record live TV shows using a TV tuner. This allowed you to use your PC as DVR.
  • Multimedia playback – With Media Center, you could play any media stored on your hard drive or any other device.
  • Streaming platform support – The software could handle YouTube, Netflix, and similar services thanks to the available plug-ins.

Is Media Center supported in Windows 10?

Media Center was a part of Windows XP, and it was available on all versions, including Windows 8. However, that’s not the case with Windows 10. The software hasn’t been in development since 2009, and it hasn’t got any updates.

However, if you install it, it should work on Windows 10, but your results might vary.

Why was Windows Media Center discontinued?

Shortly after Windows 7 release in 2009, Microsoft decided to disband the team behind Media Center development.

According to Microsoft’s Gabriel Aul, the reason for this is decreased use.

And we’ll have to agree since during our time with Windows 7, we rarely, if ever, used Windows Media Center, and we’re not the only ones.

The software didn’t achieve the expected popularity, so it’s no wonder that Microsoft wanted to focus its resources on something more beneficial to users.

What replaces Windows Media Center in Windows 10?

The DVD Player app replaces Windows Media Center. Remember that this app is available only to users that have upgraded from Windows 8.1 to 10.

If you have performed a clean install, you’d have to purchase the DVD Player app from the Microsoft Store. Another software that was intended as a replacement for Media Center is Groove Music.

Unfortunately, the Groove Music service is discontinued. On the bright side, the new Windows Media Player is coming to Windows 10, so that’s a decent alternative you can use.

Can you still download Windows Media Center?

The Windows Media Center is no longer available. Microsoft has since removed the media player and recorder on Windows 10.

Hence, there is no official way to get it back. However, you can still use unofficial third-party sources.

How can I install Windows Media Center on Windows?

If you want to download the software from an official and reliable source, that’s no longer possible since Microsoft has discontinued this software.

However, you can still get this software from other, third-party sources. This comes with its share of problems, including the following:

  • Legal issues – Different states have different laws regarding abandonware, but usually, it’s not illegal to download it. Hosting abandonware or sharing it is illegal.
  • Security issues – Since the software is hosted by third parties, it could be altered or infected by malware.
  • Compatibility issues – The software was optimized for Windows 8, and it hasn’t received an update for more than a decade, so, likely, it won’t work properly on a modern operating system.

Since the software can’t be downloaded safely from an official source, we’ll refrain from giving instructions on how to download it.

However, if you do so, use a reliable source and scan the downloaded file for malware with reliable antivirus software.

In case you are errors on Windows Media Center, check our detailed guide for the surefire fixes to get rid of them.

If you have more questions about the installation process, don’t hesitate to leave them in the comments below.

Star Citizen Not Using GPU/Low GPU Usage: 5 Simple Ways

If Star Citizen is not using the GPU properly, it’s because you have an older or lower-end card or Windows can’t detect your GPU. This can make getting good performance out of Star Citizen a hassle.

The graphics card is the most important component of a gaming PC. It’s responsible for displaying the game on your monitor, and if you have an older or lower-end GPU, it might not be up to the task. Luckily, this guide will show you how to fix the problem quickly and easily.

Why is my GPU not being used?

Windows doesn’t automatically use your GPU because doing so would put too much strain on your CPU and GPU simultaneously. This could cause overheating problems or other issues that could damage your hardware permanently.

However, if you’re using a GPU-accelerated program and it’s not using your GPU, it can be frustrating because it seems like the GPU is being wasted.

There are several possible reasons why Star Citizen is not using your GPU:

  • Incorrect configuration – If you’re running a program that doesn’t support GPUs, nothing will happen when you start up with a GPU attached.
  • Your CPU is too weak to support the graphics card – If you have a relatively old computer, this is most likely the case why Star Citizen is not using the GPU.
  • Too many programs – If other programs compete for the GPU, it could be impossible for Star Citizen to get its share.
  • The game has not been optimized for your GPU – Some games don’t use all of your GPU’s power. This can be because they don’t require it or haven’t been optimized yet.

How can I force Star Citizen to use GPU?

First, ensure you do the following:

  • Update Star Citizen to the latest available version.
  • Ensure you play Star Citizen in full-screen mode, especially if the game keeps minimizing.

1. Adjust graphic performance to high

  1. Press Windows + I to open Settings.
  2. Click on System on the left pane, then select Display.
    display
  3. Under Related settings, click on Graphics.graphics
  4. Select Star Citizen from the list, and click on Options.
  5. Now, choose High Performance and click Save.

For those wondering, can I force a game to use GPU, the answer is Yes. The steps listed above will allow you to switch to the GPU instead of the integrated processor.

2. Update your graphics driver 

  1. Click on the Search icon, type Device Manager in the search bar, and click Open.
  2. Navigate to Display adapters to expand, right-click on your graphics card, and select Update driver.update graphics driver
  3. Select Search automatically for drivers.

When it comes to driver updates, drivers are a necessary evil. Even though you might not want to install them manually, the fact remains that you need them. If you don’t like to spend time on manual driver updates, you might consider using a specialized tool.

The tool will scan your system and find out which drivers are outdated. With this software, you can update your drivers professionally in one simple step. It’s quick and easy to use, so even beginners can use it without problems.

3. Configure Star Citizen to use GPU

  1. Launch your dedicated graphics card control panel (In this case, Nvidia Control Panel)
  2. Select Manage 3D settings from the navigation pane on the left.manage 3d settings
  3. Next, choose a High-performance NVIDIA processor from the Preferred graphics processor dropdown menu.nvidia to fix Select Manage 3D settings from the navigation pane on the left.

4. Disable your default GPU

  1. Click on the Windows key, type Device Manager in the search bar, and click Open.
  2. Navigate to Display adapters to expand, right-click on your graphics card, and select Disable device.disable device to fix elden ring not using gpu

Before you go for this solution, ensure you have a dedicated graphics processor. When you disable the device’s integrated graphic driver, you disable the driver of your graphics card.

This means that your computer will no longer be able to use the graphics card to display any images or videos on the screen. All applications that use graphics cards will stop working, and you won’t be able to see anything on your screen.

5. Overclock your CPU

If you’re using an integrated graphics card, there’s nothing you can do. However, if you’re using a dedicated graphics card, you can use overclocking software if you notice Star Citizen is not using the GPU.

Overclocking your CPU can help improve performance, but it also increases its heat generation, which can cause instability. If you go through this route, ensure you have overclocking monitoring software to keep tabs in real time.

What are Star Citizen GPU requirements?

Star Citizen is a demanding game, so you’ll need to ensure your graphics card is up to the task. Below are the minimum and recommended PC specs for Star Citizen:

  • A DirectX 11.1 compatible Graphics Card
  • At least 3GB VRAM

For more system requirements, be sure to check out the official page. If your graphics card is the problem, it may be time to upgrade to a new one that can handle the task at hand.

Should a game be using 100% of my GPU?

This depends on the game itself and how resource-intensive it is. While a simpler lower-end game should not use 100% GPU, an advanced one could easily do.

But a game using 100% GPU shouldn’t be a problem. Rather it signifies that the GPU is fully utilized, and you are getting the best performance. However, if the GPU consumption remains high for extended periods, you may find the computer overheating.

There are also a bunch of settings you can tweak to get the ultimate gaming performance if you can’t afford new hardware.

And it’s a wrap from us, but keep the conversation going in the comment section below.