Windows updates are essential not only for the smooth running of your system but also to protect you from potential risks. However, users have, in several instances, been unable to complete their updates. Whenever you try to download a feature update, an error message appears.
The error is related to Windows Update and is accompanied by a code 0x80d02002. This message usually appears when the update has not been fully downloaded and installed. A restart of your system should ideally resolve the issue, but if not, below, we have more solutions you can try.
What is Microsoft download error 0x80d02002?
The error 0x80d02002, also called the Windows update error, can be caused by various factors. Some of these reasons are the following:
Corrupted Windows update components – The 0x80d02002 sccm error may occur when the update is incompatible with your operating system, or there are some missing update files.
Contradicting software – It is possible that one or more applications on your computer may be incompatible with each other. This could cause problems when they both try to install an update simultaneously.
Damaged/missing drivers – A driver is a piece of software required to run your device. If your drivers are not working properly, they may not communicate with the hardware properly.
Unstable internet – An unstable internet connection can affect the update process and cause the 0x80d02002 wsus error. You need to boost your internet speed if possible.
How do I fix error code 0x80d02002?
We recommend you check the following preliminary steps first before the main troubleshooting options:
Make sure you have enough disk space available for downloading updates from Microsoft’s servers.
Scan your system for any viruses/malware.
Reboot your PC.
1. Run the Windows Update troubleshooter
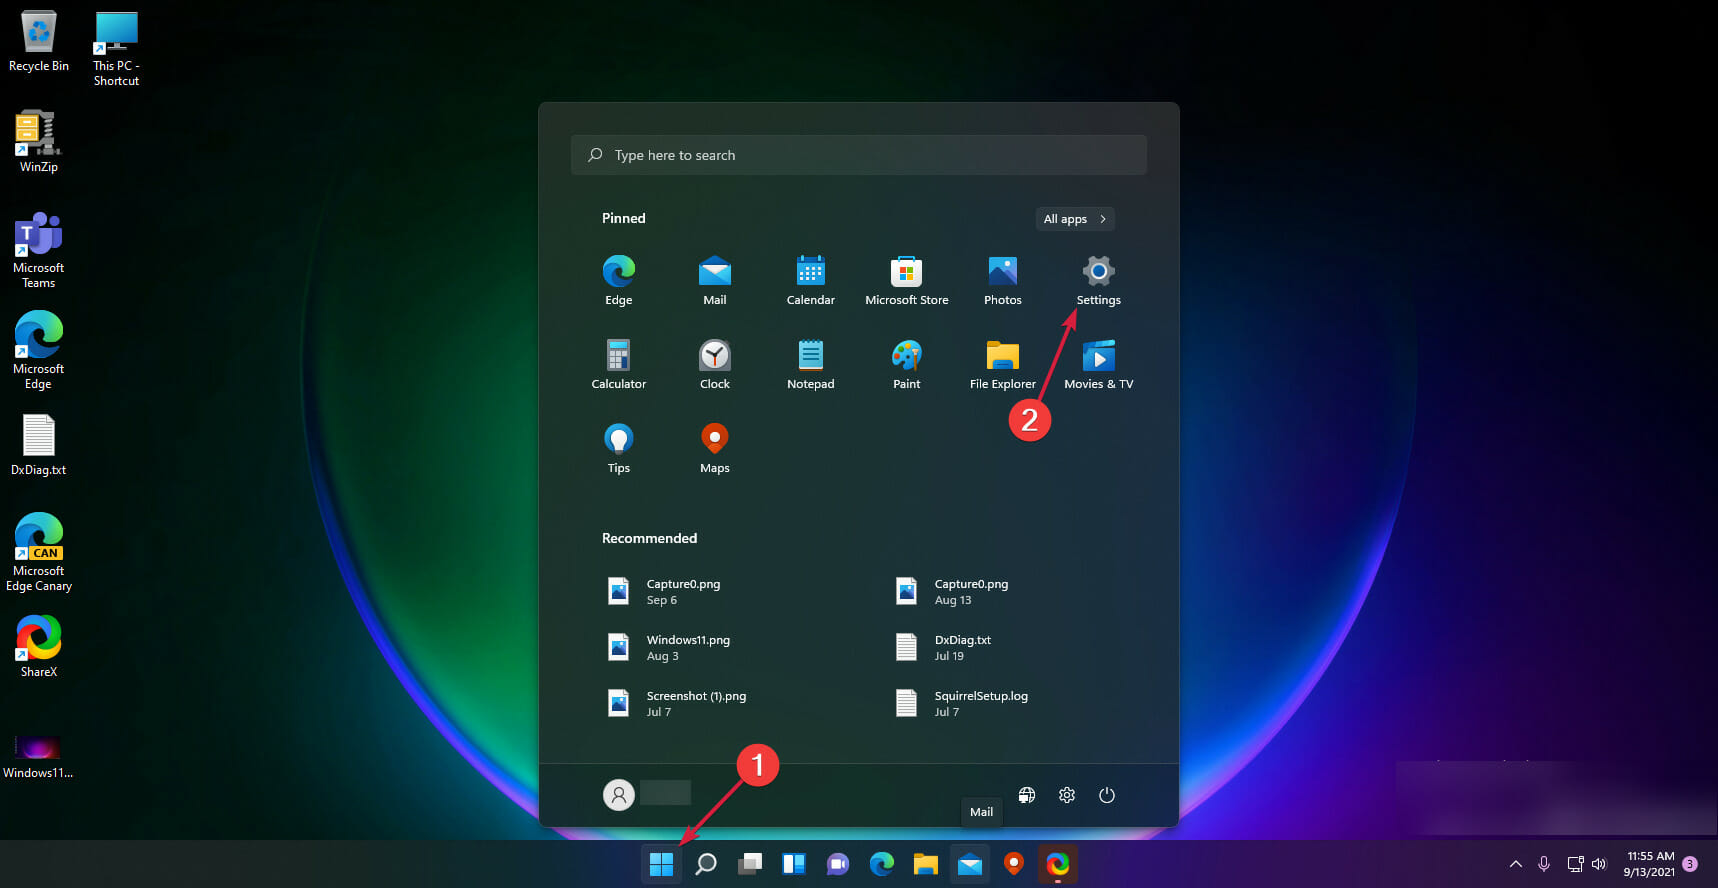
Hit the Windows key and click on Settings.
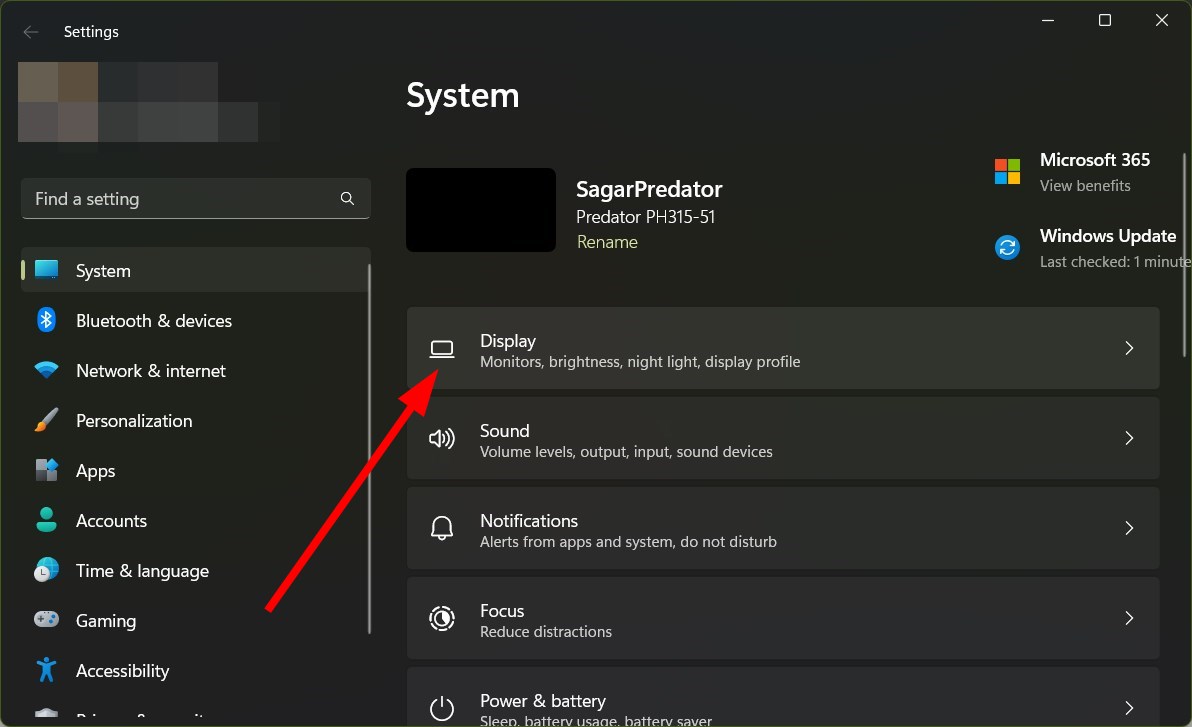
Click on System on the left pane then Troubleshoot on the right pane.
Select Other troubleshooters.
Scroll down, locate Windows Update, and click the Run button.
Windows Update troubleshooter is used to troubleshoot problems with the Windows Update client in Windows 11. Using the troubleshooter, you can fix any issues that may prevent your computer from downloading updates or installing them.
Some users, they may find that the Windows Update is not working. Feel free to check out our article to resolve this issue.
2. Update Regional and language settings
Hit the Windows key and click on Settings.
Select Time & language then click on Language & region.
Under Windows display language, set it to English (United Kingdom).
Next, under Preferred language, select a language of your choosing.
Scroll to Region and enter the details of your country, then under Regional format, select English (United Kingdom).
Restart your PC and check if the error persists.
According to Microsoft, the Region settings play a significant role in Windows updates. Windows may not allow you to install an update if the region settings do not approve it.
The region settings determine which updates your computer can receive and are controlled by the Microsoft Windows Update service. These regional settings can affect how Windows will download and install updates.
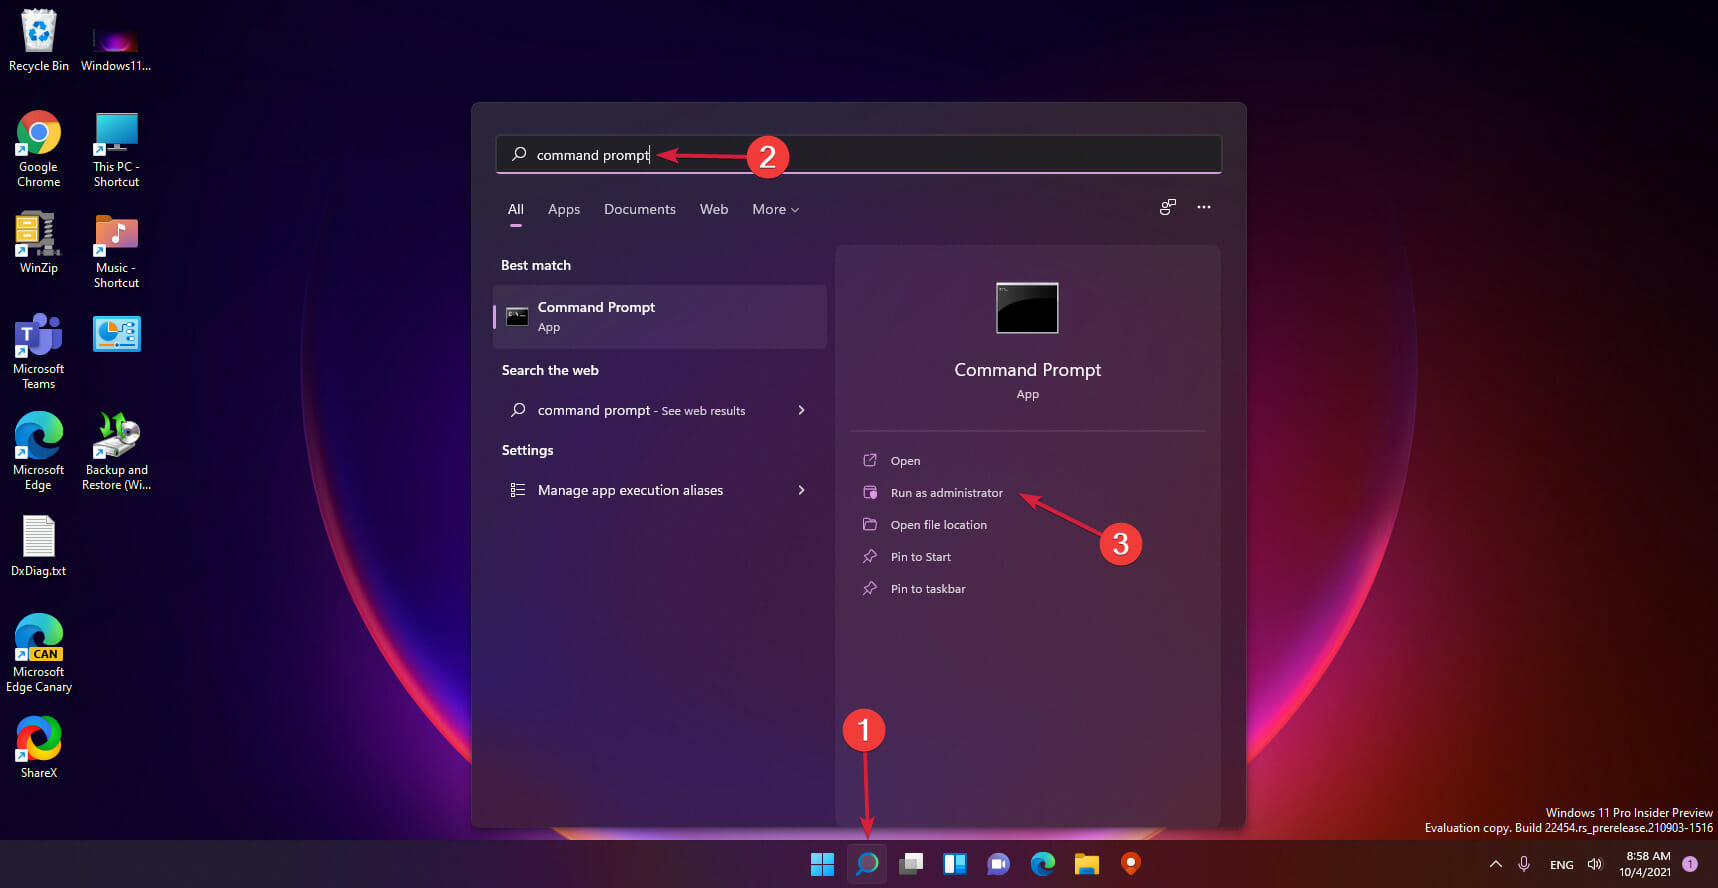
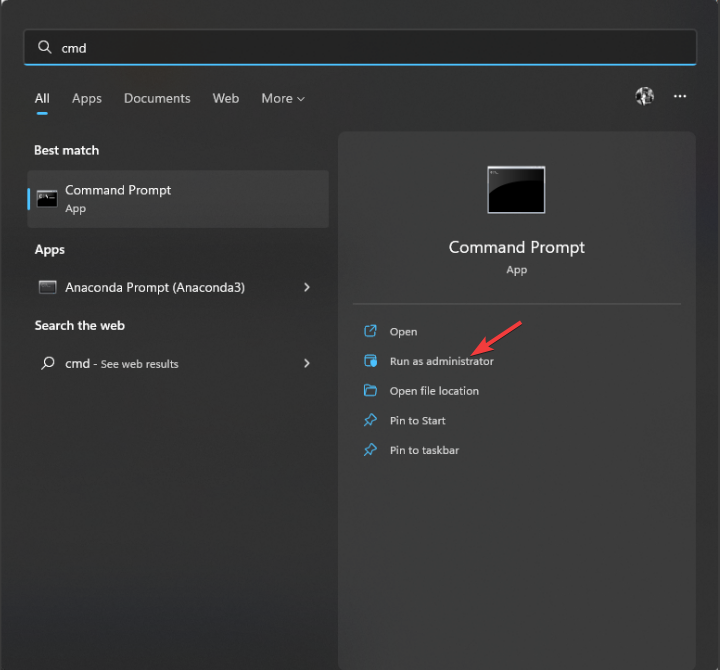
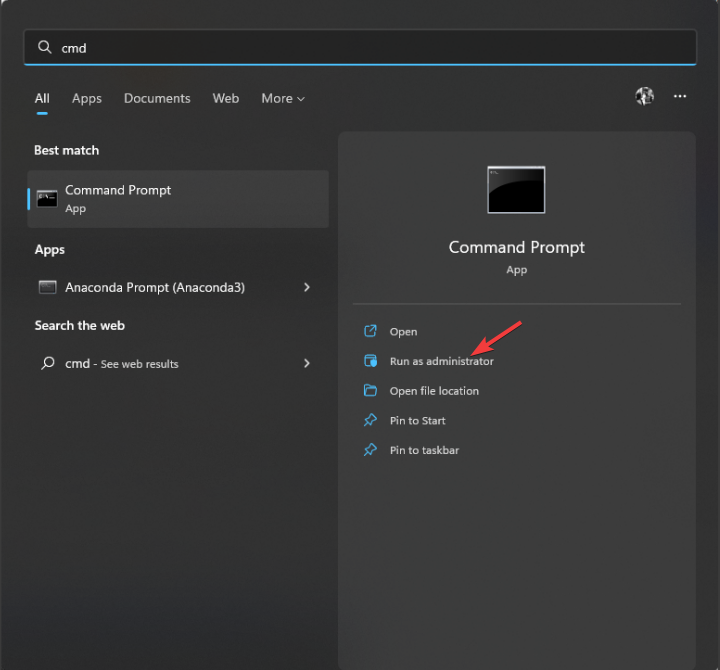
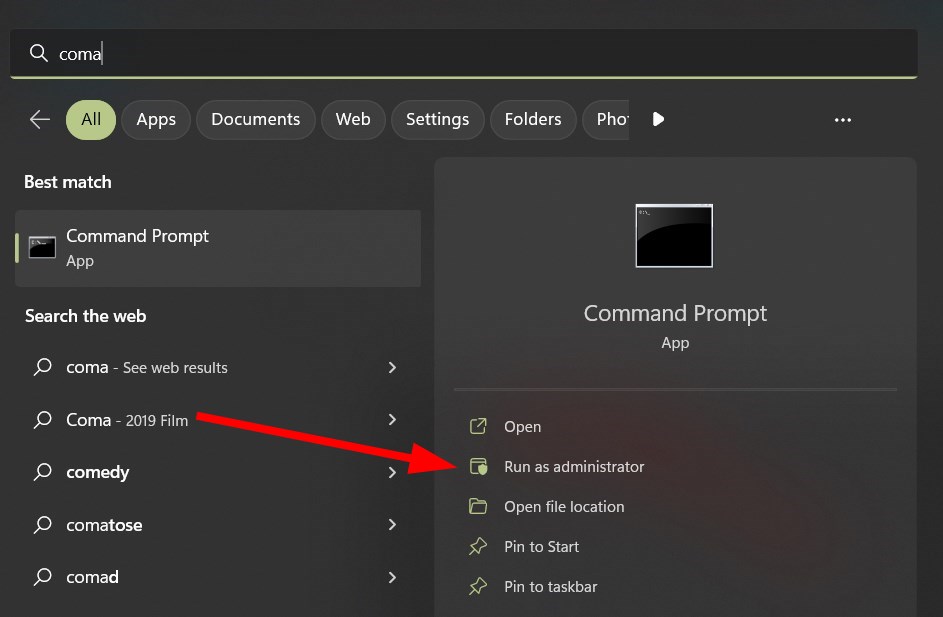
Hit the Windows key, type cmd in the search bar, and click Run as administrator.
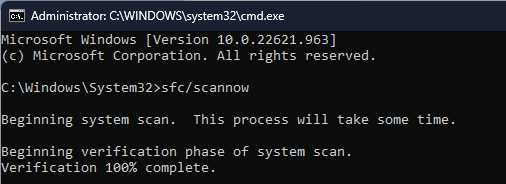
Type in the following commands and press Enter after each one: net stop wuauservnet stop cryptsvcnet stop bitsnet stop msiserverren %systemroot%\softwaredistribution softwaredistribution.bakren %systemroot%\system32\catroot2 catroot2.baknet start wuauservnet start cryptSvcnet start bitsnet start msiserver
Most people are aware that Windows updates are a good thing. They keep your computer running reliably, protect it from malware, and help keep you secure. As such, you should always ensure that your PC is up-to-date.
High ping and lag besides other Call of Duty bugs are some of the few glitches of online gaming that irritate gamers the most.
You can fix it by closing memory and bandwidth-intensive tasks running simultaneously with the game. Restarting your router and changing your DNS server can also help.
What causes high ping and lag in Call of Duty Vanguard?
The causes of lag and pings in firing games are the same everywhere. Some reasons you are seeing it in Call of Duty Vanguard include:
Using a VPN –Playing AAA games like CoD Vanguard with your VPN may cause connectivity issues like high latency, which ultimately leads to lagging. We have a dedicated guide on how to fix high ping when using a gaming VPN.
Network connection – According to many gamers, using a wireless network for Call of Duty Vanguard online results in high ping and lag.
Bandwidth competition – Several programs and applications consuming and competing for bandwidth on the same device may cause network congestion. Hence, high ping and lag in CoD Vanguard.
CoD Vanguard server issue – If the game server is down, high ping and lag are bound to happen. Then this is affecting not only you but all players.
System resources allocation – Multiple apps and programs sharing system resources with the game can also cause high ping and packet loss in Call of Duty Vanguard.
Irrespective of the reason, one or a combination of the fixes below should solve the problem for you.
How can I fix high ping and lag in Call of Duty Vanguard?
Before you proceed to the advanced solution in this article, try out the quick fixes below:
Check the game server status by visiting the Activision server page. If the game server is down, you need to wait till the server goes live again.
This improves performance as more system resources are committed to running the game. You can check out how to set task priority on Windows here.
Wireless networks are prone to interference and Wi-Fi packet loss. A wired network is more stable and can be all you need to eliminate all irritating pings and lags.
Do not connect multiple devices if you are keen on using a wireless network for gaming. This help avoids bandwidth competition.
If, in case, none of the above works for you, then try the following advanced troubleshooting methods to fix the problem.
1. Update the graphics driver
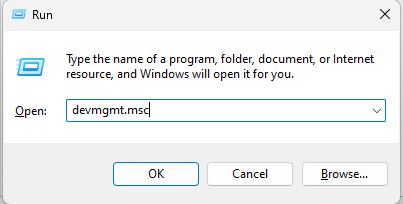
Press Windows + R key to launch the Run window, type the following command in the text space, and click OK: devmgmt.msc
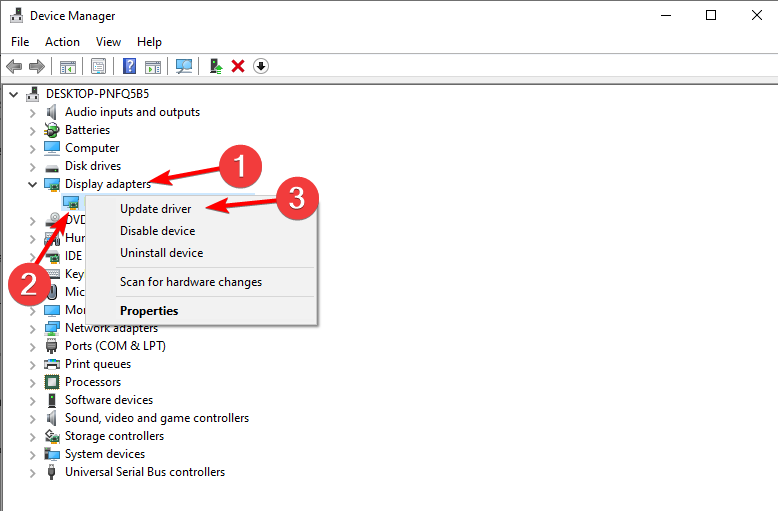
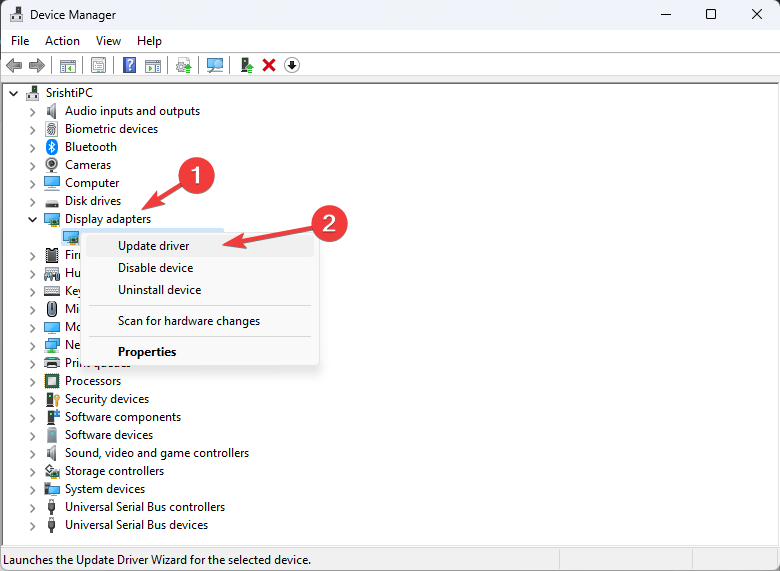
Expand Display adapters to see the driver you want to update, right-click on it and select Update driver.
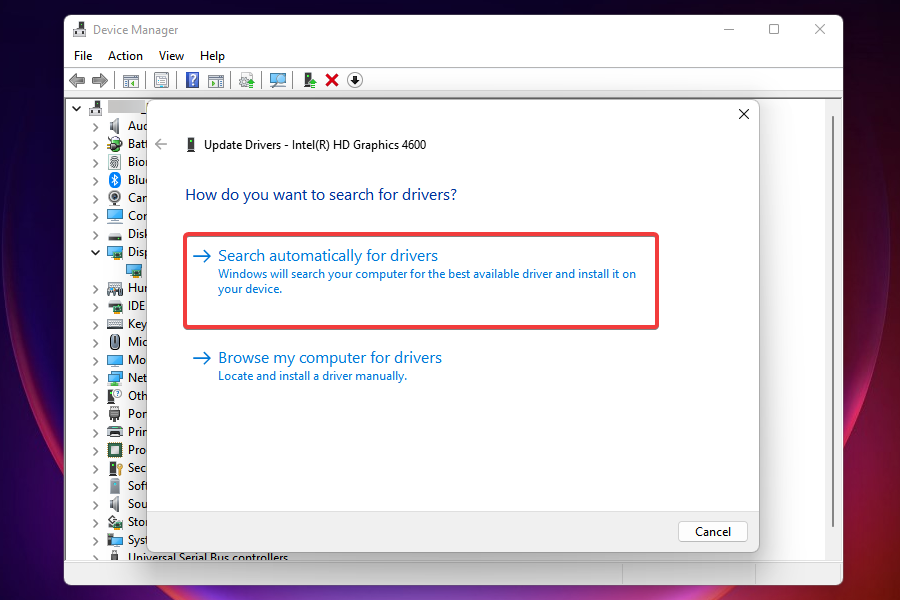
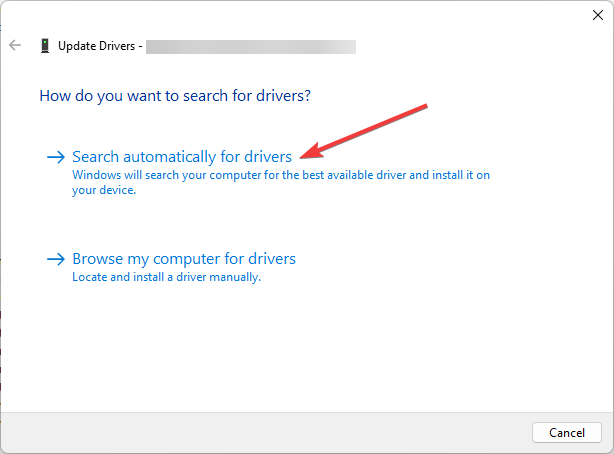
Select Search automatically for drivers and follow the on-screen prompt to complete the process.
Restart your device and check if the high ping and lag have disappeared. If you want to know more methods to update the graphics driver, read this post about how to update graphics drivers on Windows 11.
2. Change your DNS server address
Open the Windows Start menu and select Settings.
Click on Network & internet on the left pane and select Ethernet.
Navigate to DNS server assignment and click Edit.
Switch to Manual and toggle On the button under IPv4.
For Preferred DNS, input 8.8.8.8, for Alternate DNS, use 8.8.4.4, and click the Save button.
For these changes to be effective, you may need to clear the DNS cache. This guide on how to clear DNS server cache can be of help.
Open SETTINGS on Call of Duty Vanguard and switch to the GRAPHICS tab.
Next, click on the Display sub menu and scroll down to select ON-DEMAND TEXTURE STREAMING.
Toggle off ON-DEMAND TEXTURE STREAMING and restart the game.
You might discover that your settings are not saved upon restarting the game. Call of Duty not saving settings is a common problem. Everything you need to correct is in our guide.
4. Disable VBS on Windows 11
Click the Start menu on your taskbar and select Settings.
Scroll down to Privacy & security and click on Windows Security.
Next, select Device security.
Under Core isolation, click on Core isolation details.
Toggle Off the radio button under Memory integrity.
5. Disable Windows Security for Call of Duty Vanguard
Click the Search button, type Windows Security in the search box and click the Best match result.
Select Virus & threat protection and then choose Manage settings.
Scroll down to Exclusions, then click on Add or remove exclusions.
Select +Add an exclusion and add Vanguard Launcher.exe file.
Relaunch the game.
These are the best fixes for high ping and lag in Call of Duty Vanguard. If you follow the steps above, you should be able to fix the problem.
Call of Duty Vanguard Dev error is another issue you will likely encounter during your gaming journey. Ensure you read our linked guide to fix it.
USB flash drives are portable memory devices you can easily plug in and use with any computer. You can use them to transfer files between computers, store documents, music, and photos, and install the software.
When you insert a USB drive into your computer, it will often automatically detect it if you plug it in correctly. If it does not detect the drive properly, you cannot access its files. Find out why this happens and how to resolve it.
Why is my USB drive detected but not accessible?
USB drives are not always recognized by your computer, especially if they do not meet the device’s specifications. This can be due to several reasons, such as:
USB drive has been formatted – The drive may have been formatted with another operating system and doesn’t work with your computer.
Faulty USB drive – The USB drive may be damaged and therefore fail to be recognized by the computer.
Unsupported USB port – The device may be plugged into a non-standard port. You may get an error that says the USB drive is not accessible, and access is denied altogether.
Wrongful removal – You should always ensure that when ejecting a USB device from your PC, you do so carefully to avoid damaging it.
Damaged USB port – Your computer may not recognize the USB device if the port is damaged or defective.
Outdated drivers – If your USB drive is not being detected, you may want to check if you’re experiencing any driver errors on your system. The most common reason for this problem is that updated drivers are needed.
Missing updates – If your USB drive is not detected, it is because there are some missing updates that need to be installed.
Virus infection – If you are using a computer that has been infected with a virus, the virus may prevent the computer from recognizing your USB drive. You need to install antivirus for USB drives to protect them from potential risks.
Unreadable file system – If your USB drive has an unreadable file system, it will not be able to be read by anything on your computer. This is usually caused by a bad partition table or a corrupt MBR.
How do I fix a USB drive that is not accessible?
We recommend you try out the following first before jumping to the slightly technical solutions:
Try cleaning out any dust from inside your PC’s ports. Your USB may not be recognized if the ports have been dusty for a while.
Check to make sure that the device has been properly inserted.
Try with another USB port, as the one you’re using may be damaged.
Hit the Windows button, type Device Manager in the search bar, and click Open.
Navigate to Universal Serial Bus controllers and click to expand, right-click on your USB drive and select Uninstall device.
Restart your PC and the drivers will automatically be reinstalled.
2. Update USB drivers
Hit the Windows button, type Device Manager in the search bar, and click Open.
Navigate to Universal Serial Bus controllers and click to expand, right-click on your USB drive and select Update driver.
Select Search automatically for drivers.
Another potential method that is way faster would be to use a third-party driver updater tool. Outbyte Driver Updater is a tool that makes it easy to update your drivers.
The software scans your computer in a matter of seconds and checks whether there are any issues with your USB drivers.
Outbyte Driver Updater
Use Outbyte Driver Updater to find the latest updates for your outdated or damaged drivers.
Hit the Windows key, type cmd in the search bar, and click Run as administrator.
Type the following command, replace the C letter with your drive’s letter, and press Enter: chkdsk C: /f
Restart your PC.
5. Rename the USB drive letter
Right-click on the Windows key and select Disk Management.
Locate your USB drive in the list, right-click on it, and select Change Drive Letter and Paths.
Click on Change, then select a new letter.
6. Disable USB selective suspend settings
Hit the Windows key, type Edit power plan in the search box, and click Open.
Click on Change advanced power settings.
Select Change plan settings.
In the Power Options dialog box that opens, click on USB settings to expand.
Click on USB selective suspend setting, and in the drop-down menu, select Disabled.
7. Format the drive
If you’ve tried all the above, but your USB drive is still not accessible, it means that the file system on your drive is not recognized. This could be because the USB driver is corrupt or the disk has been damaged.
To make your data accessible again, you must format the drive to another file system, such as FAT32 or NTFS. If you lose your files, there is a way to recover deleted files from your USB.
Microsoft Edge is a pretty reliable and easy-to-use browser but not one without one or two glitches. One of such problems is the Edge error code STATUS_BREAKPOINT.
The error can sometimes be caused by a weak internet connection or how the website you are trying to visit handles the webpage request. However, it isn’t easy to pinpoint its cause in some cases.
This article contains fixes that will solve the problem irrespective of the cause. All you need is to follow the instructions to the letter, and you should have Edge working again.
How can I fix the STATUS_BREAKPOINT Edge error code?
1. Update Edge
Click the menu button (the three horizontal dots).
Select the Settings option.
Scroll down to the About this app section. You will find updates here if they are available.
The STATUS_BREAKPOINT edge error code is associated with the functionality of your browser. And an outdated browser is sure to function sub-optimally.
You should close Edge and relaunch it after the update.
2. Rename Microsoft Edge’s .exe file
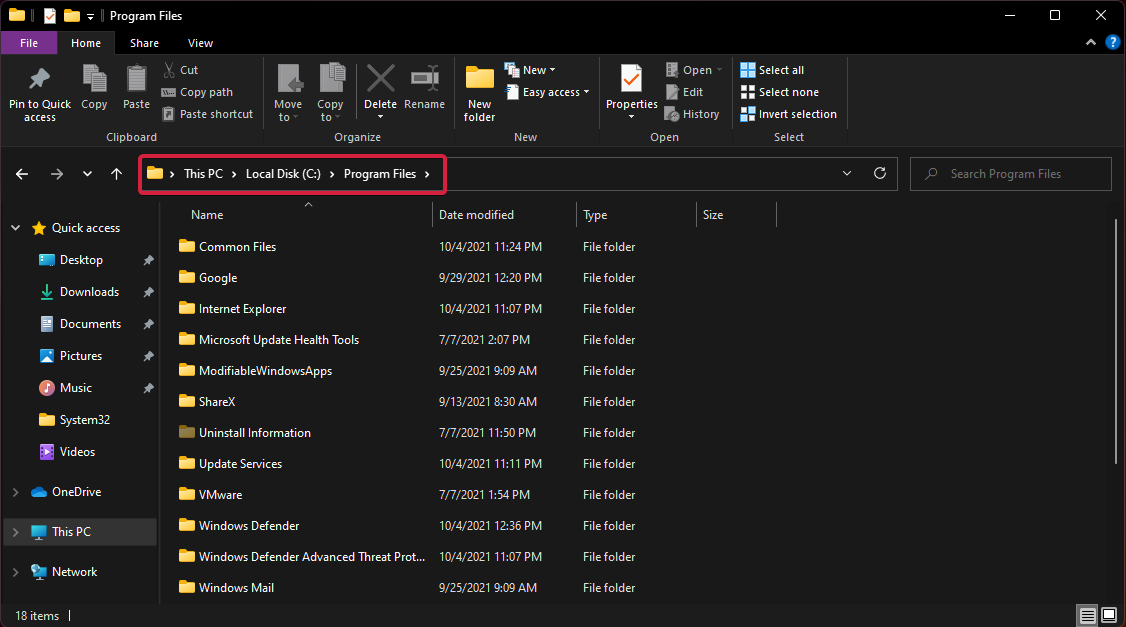
Open File Explorer and click the Local Disk (C:).
Select the Program Files (x86) folder, followed by the Microsoft folder.
Select Edge from the options displayed.
In the Edge folder, choose Application.
Now, right-click the msedge option and rename it to any other name.
Finally, close the File Explorer and relaunch Edge to see if the problem has been solved.
Select the Settings option followed by Privacy & Security on the left plane.
Click the Choose what to clear button.
Check Browsing history, Cookies and saved website data, Cached data and files, Tabs I’ve set aside or recently closed checkboxes.
Finally, click the Clear button and restart Edge.
Browser data helps to improve user experience. It saves you time and stress, especially when you need to access a site or information you have used before.
However, this data can get corrupted. Corrupted browser data leads to all sorts of issues, among which is the Edge error code STATUS_BREAKPOINT problem.
Clearing your browser data will automatically eliminate the corrupt data and overwrite the changes it might have made to your browser.
5. Try an alternative browser
If you still can’t fix the Edge error code STATUS_BREAKPOINT problem after exhausting the fixes above, you can disable Microsoft Edge and try an alternative in Opera One.
Opera One is a high-performance browser that is endowed with stunning features. Starting from the free built-in VPN to Ads blocker and Crypto Wallets, it houses diverse integrations that will more than meet your browsing demands.
Whether speed or privacy, Opera One more than makes up for what other browsers do without the error troubles.
The Edge error code STATUS_BREAKPOINT can be frustrating. But it is not the most difficult problem to solve, as proven in this article. Also, you can go for a better alternative if the problem persists after trying so many fixes.
If you were able to solve the issue successfully, you can check our list of Microsoft Edge tips and tricks for full optimization of your browser.
Feel free to share your experience with the error and the fix that helped you solve it in the comments section below.
This file came from another computer and might be blocked to help protect this computer message can appear while you’re trying to run a potentially dangerous file.
Since this can be a problem, today’s guide will show you how to fix it properly on your PC.
How can I fix This file came from another computer and might be blocked?
1. Use Registry Editor
Press Windows key + R to open the Run dialog box.
In the box, key in regedit and click OK. This will open the Registry Editor.
In the next window (Registry Editor), go to the Policies path: Computer\HKEY_CURRENT_USER\Software\Microsoft\Windows\CurrentVersion\Policies
Right-click on the Policies menu, select New and then click on Key. Name the new key Attachments.
On the right-hand side, navigate to an unoccupied area and right-click.
Select New and click on DWORD (32-bit) Value.
Rename and save the new key as SaveZoneInformation.
Double-click on it and set its value to 1.
Exit the program and restart the PC.
Once this is done, check if the problem is resolved. If it persists, you can try the next fix.
NOTE
This only ensures that subsequent transfers/downloads are not affected or blocked. As such, previously saved files remain unfixed. The same applies to the next solution.
2. Change Group Policy
Open the Run dialog box by pressing Windows key + R.
In the popup dialog box, enter gpedit.msc and press Enter. This will take you to the Group Policy Editor.
On the display window, expand User Configuration. Next, go to Administrative Templates. Lastly, select Windows Components.
Select Attachment Manager in the left pane. Next, double-click Do not preserve zone information in file attachments option.
Select Enabled and click Apply and OK to save changes.
Exit the program and restart your PC.
Once your PC reboots, check if the issue is resolved. If it’s not, you can try the next solution.
In the next window, click on Browse and navigate to the affected folder or file directory.
Click on the Scan.
After the scan, locate and select all files with the tag: Zone:Identifier:$Data$.
Right-click on the selection and select Delete Selected Streams from the list of options.
Close the program and restart the PC.
This, if properly executed, should fix the error. Consequently, all affected files would be unblocked. If the issue remains unsolved, try the next solution.
4. Use PowerShell
Launch Windows Powershell as an Administrator. To do that, press Windows key + X and choose PowerShell (Admin).
Enter the following command and press Enter: dir C:\Downloads -Recurse|Unblock-File
Close the program and restart your PC.
There you go; these are four simple solutions that should fix This file came from another computer and might be blocked to help protect this computer error on your PC, so be sure to try them all.
Windows 11 was touted as an excellent system for playing games, and although most users enjoy their titles, some of our readers complained about their games crashing.
There are numerous representations for this issue, and a few of them even reported the 0x80000003 error when trying to play a game. In this guide, we will explain some solutions that will help you resolve the problem.
Why my games keep crashing on Windows 11?
If your game is freezing or just not loading at all, the first thing you need to check is if your PC has the correct configuration to play the game.
Ensure you have the required programs: Many games require additional software to run. For instance, DirectX is a must for the huge majority of games.
Check the required configuration: You will be able to check the game requirements on the developer’s website or even on the ones from the resellers.
Verify if you have the latest drivers: If you don’t have the correct drivers or if you didn’t update them in a while, that can cause a lot of problems, and the game might not even run at all.
What can I do if games keep crashing on Windows 11?
1. Update the graphics card driver
1.1 Use Windows Update
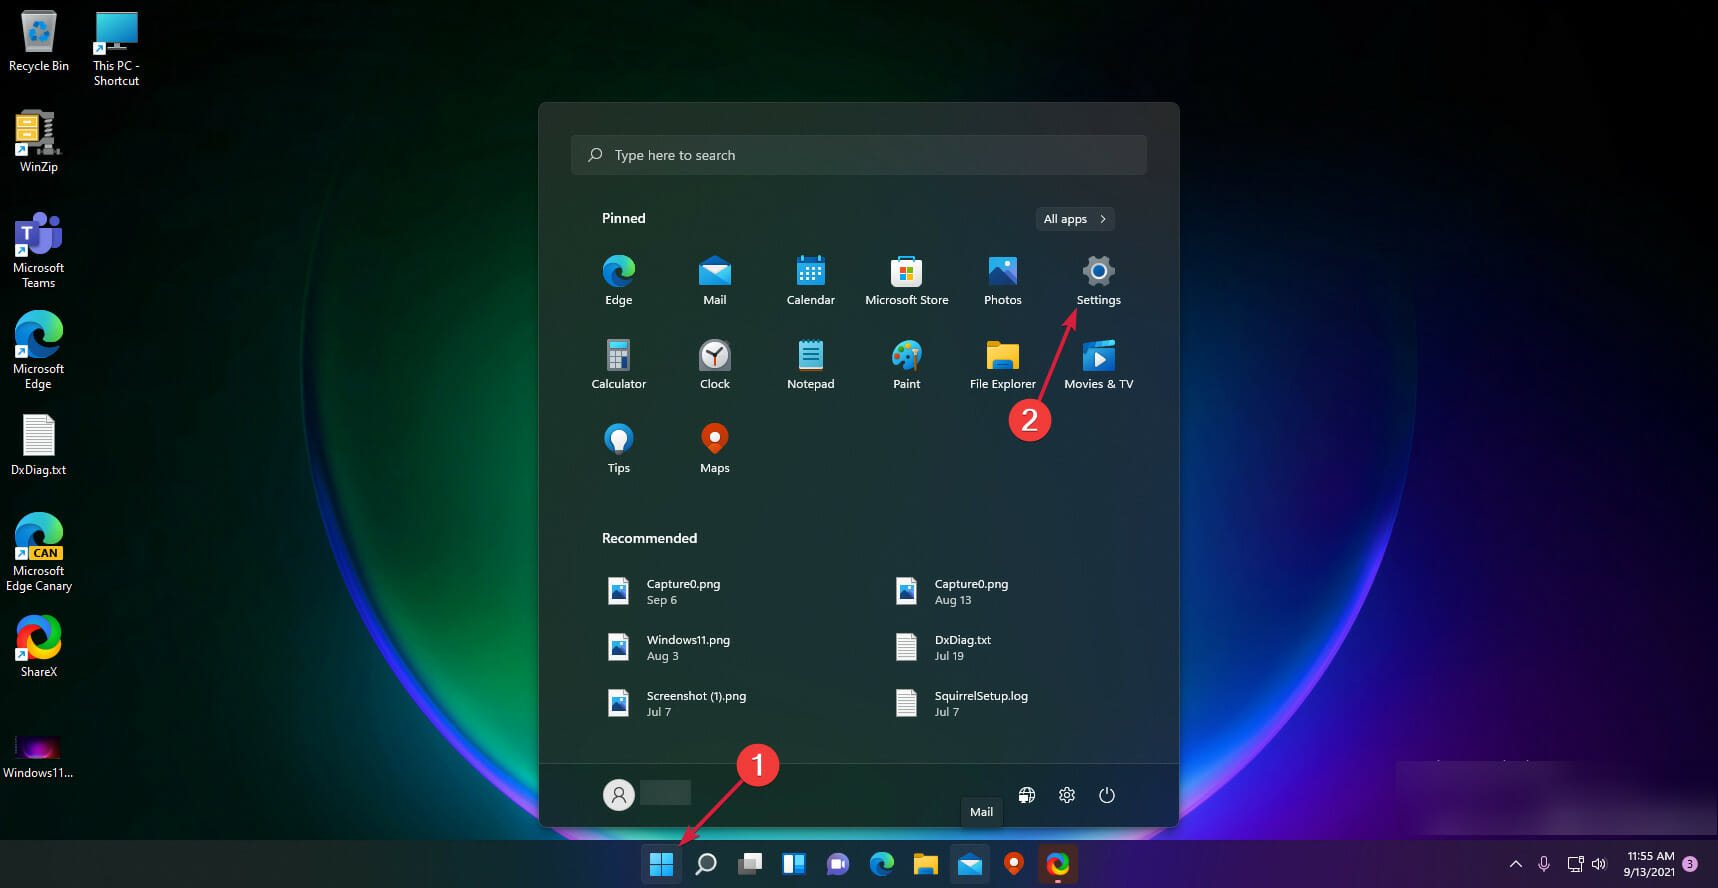
Click the Start button and choose Settings.
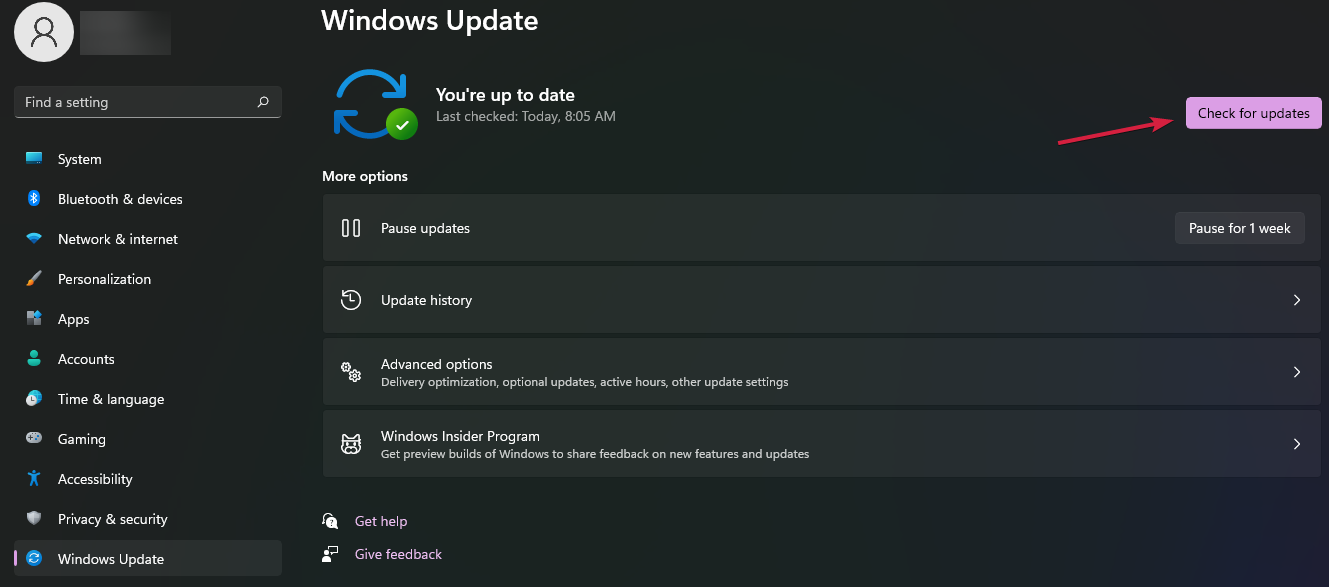
Select the Windows Update option from the left.
Click on the Check for updates button.
If there are any new updates, the system will download and install them.
Restart your PC.
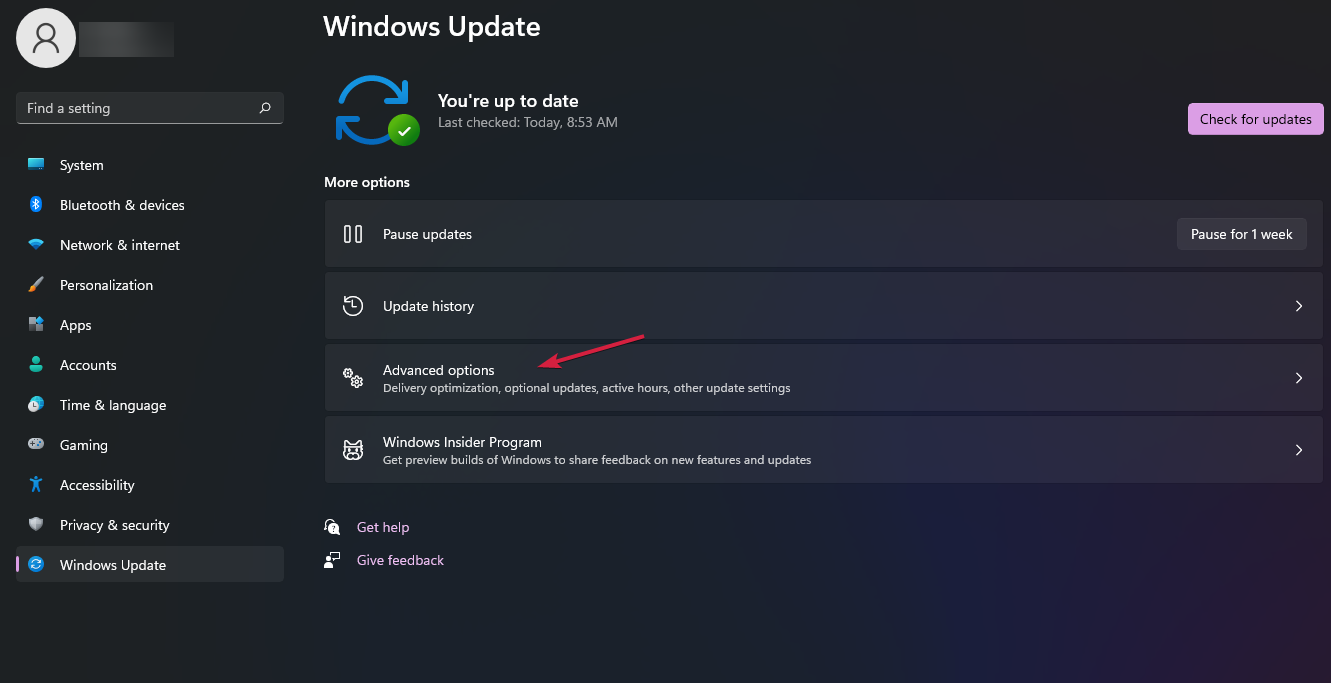
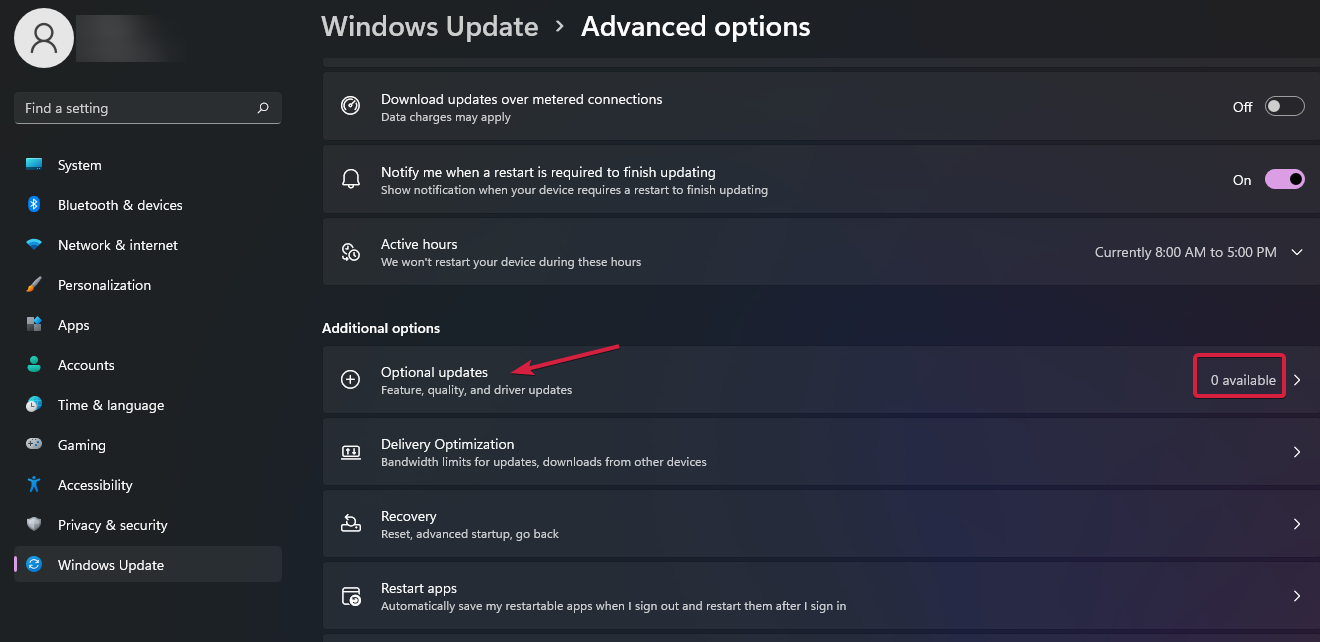
Click on the Advanced options to get to the optional updates.
Select the Optional updates section.
Select the available update and install it.
That’s the easiest method to update the drivers and especially the one for the graphics card, because usually, the manufacturers provide them for a system update.
However, it can be the case that it’s not published yet for your system, so you will need to navigate to the manufacturer’s website and get it yourself.
1.2 Install the driver manually from the manufacturer’s website
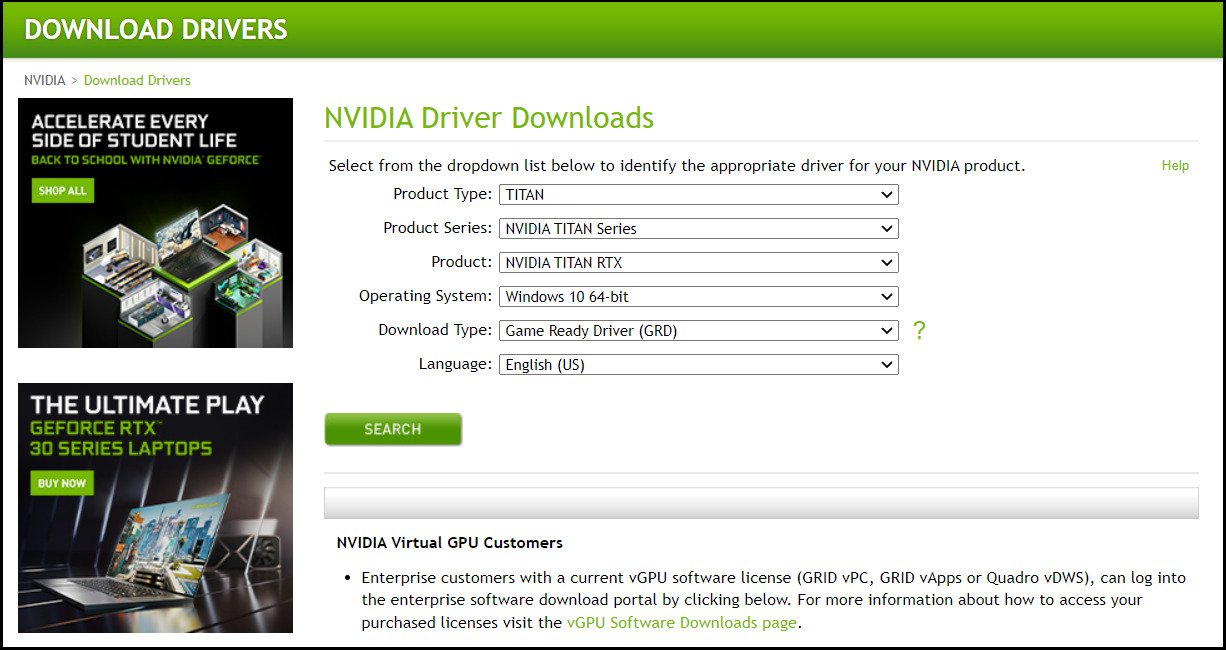
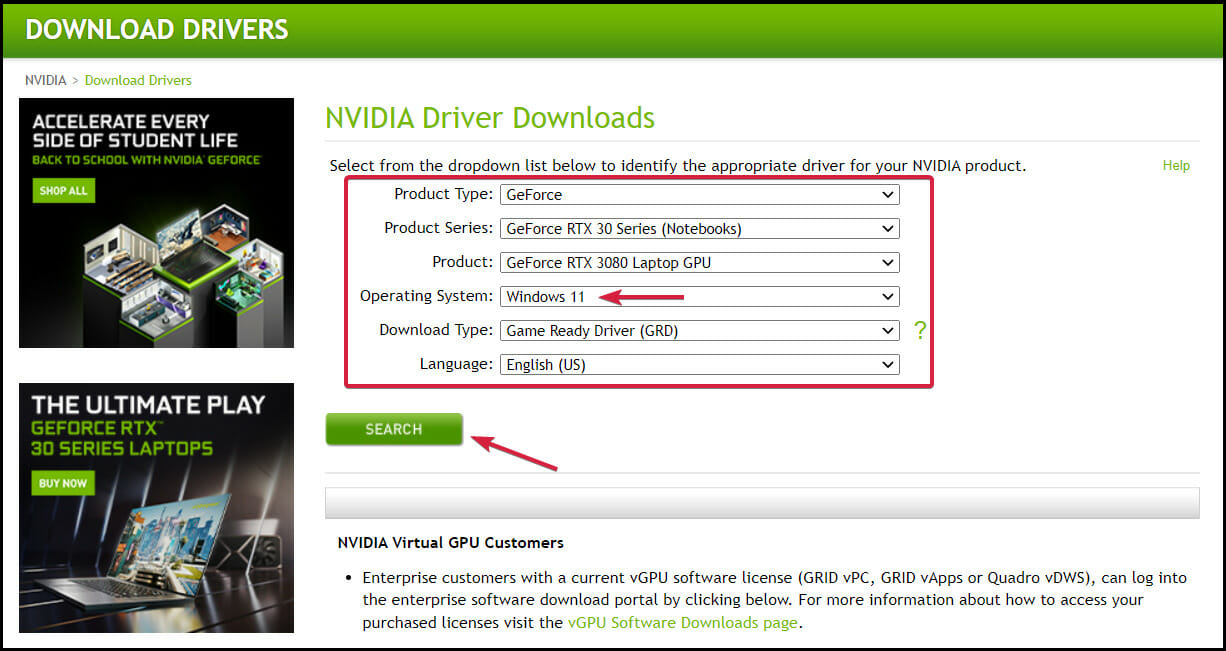
Go to the dedicated driver’s download page of the graphics card manufacturer. In our example, we went to NVIDIA’s webpage.
Enter all the data about your graphics card and specify the Windows 11 OS in the list.
Hit the Search button.
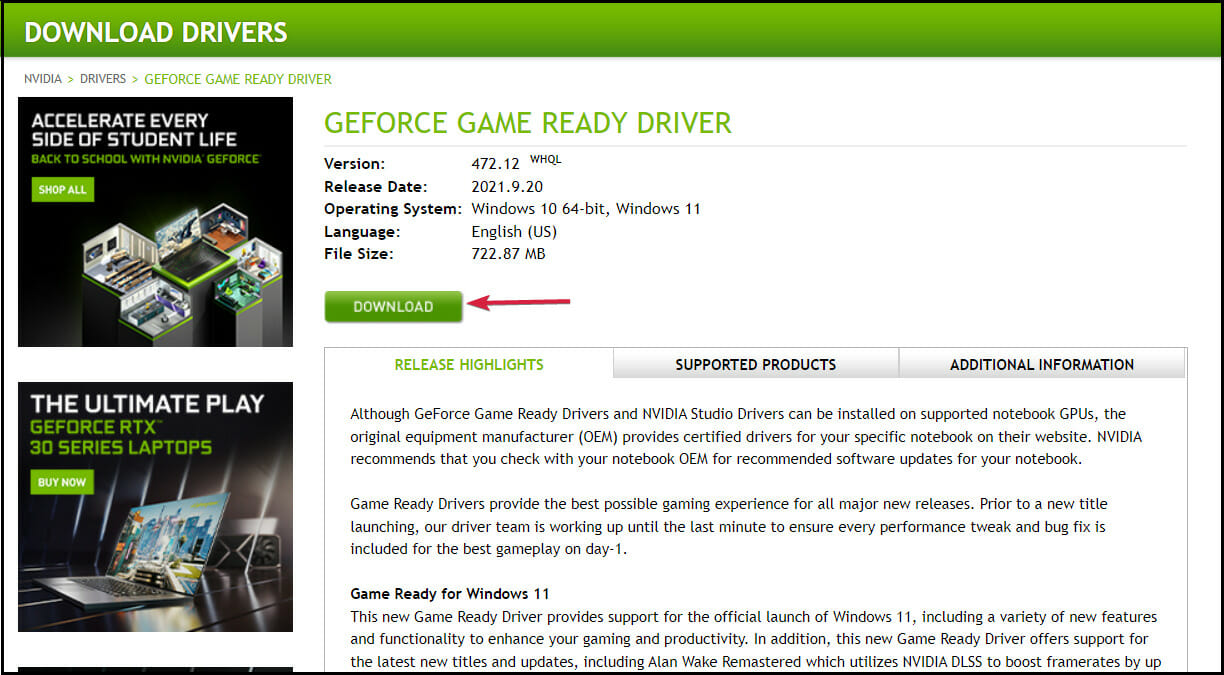
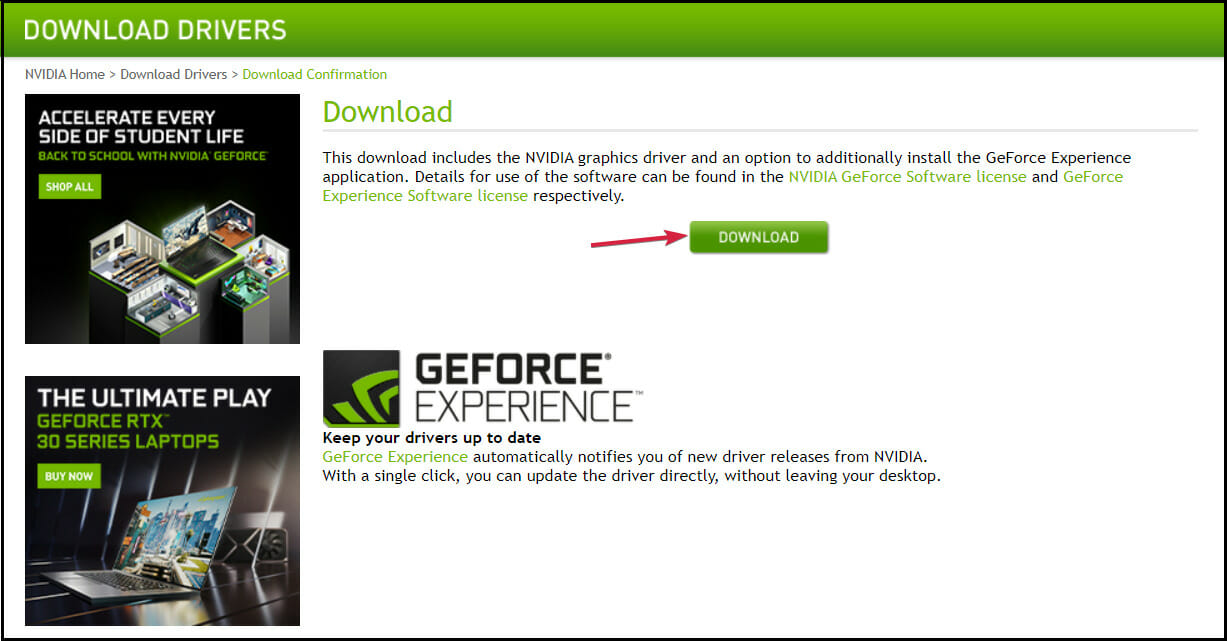
Click the Download button.
Select the Download button again.
Run the EXE file you just downloaded.
1.3 Install the driver with a specialized tool
Sometimes, updating your drivers using Windows Update or installing them from the manufacturer’s website can be tedious.
You can opt for the quickest alternative which is dedicated software such as Fortect Driver Updater which is created to provide you with a complete list of outdated or missing drivers and then locate the latest updates from its database.
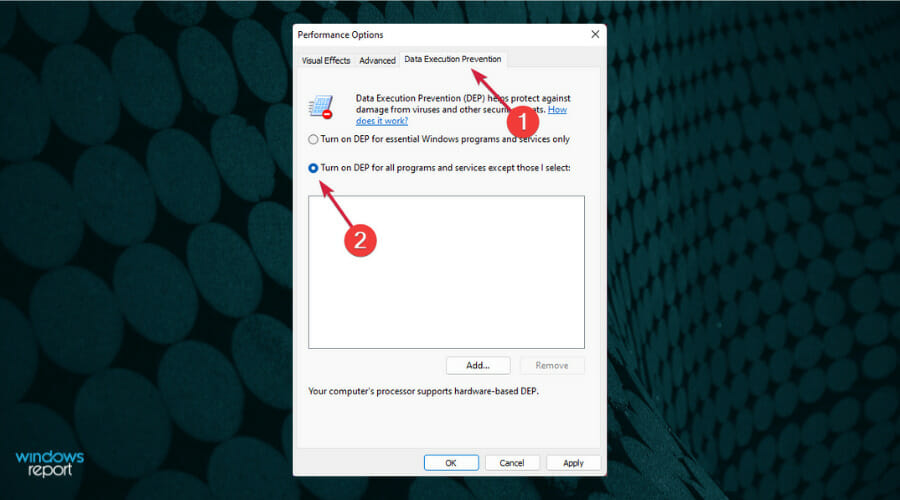
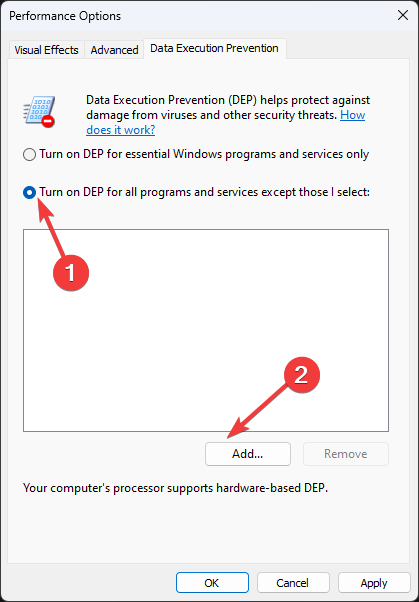
Check the Turn on DEP for all programs except those I select option.
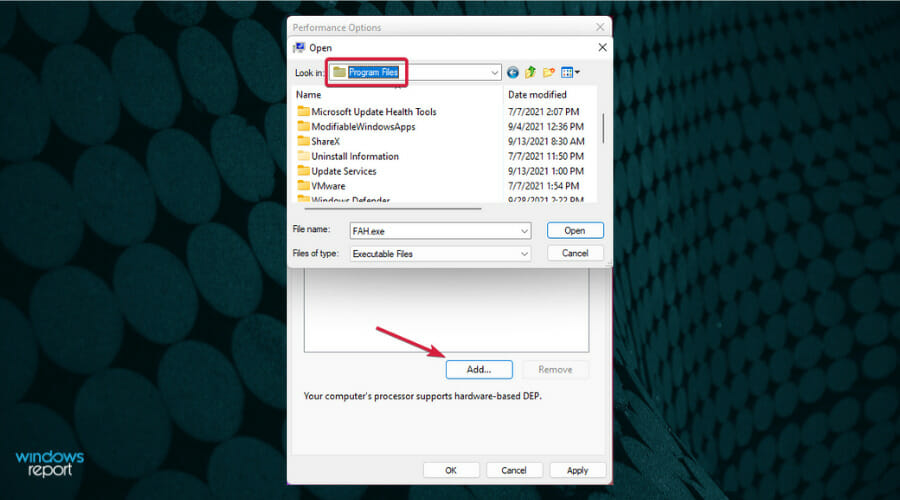
Click the Add button and select the game EXE file that you have problems running.
This procedure will prevent the system from applying Data Execution Prevention to your game, and this basically adds an exclusion for it.
4. Uninstall Sonic Studio 3
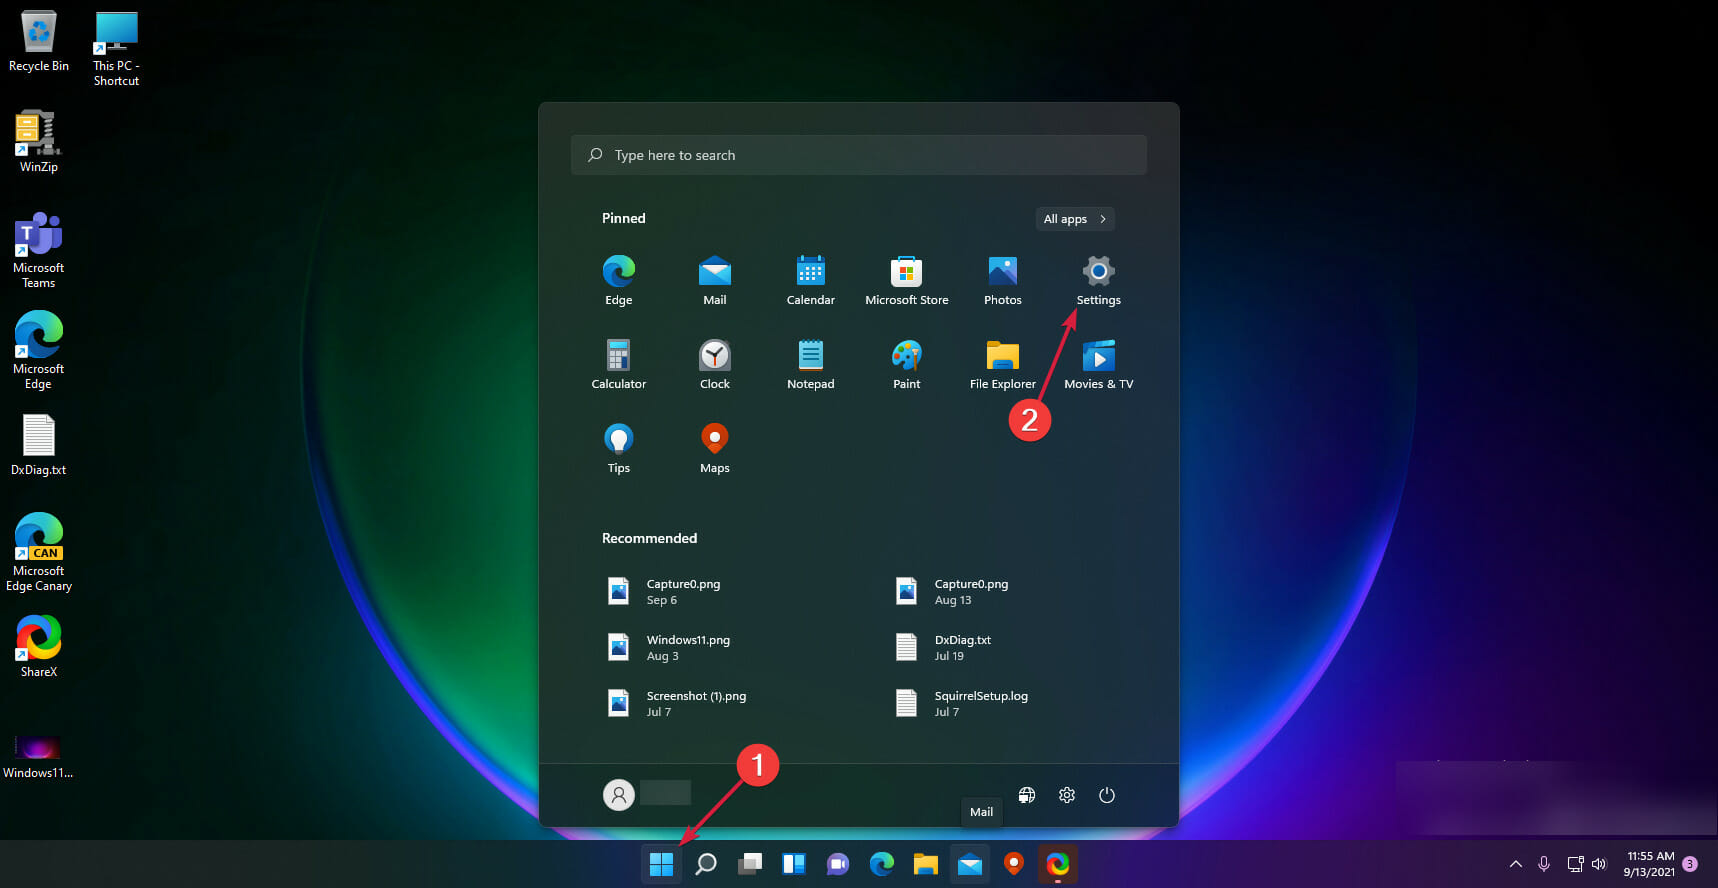
Click the Start button and select Settings.
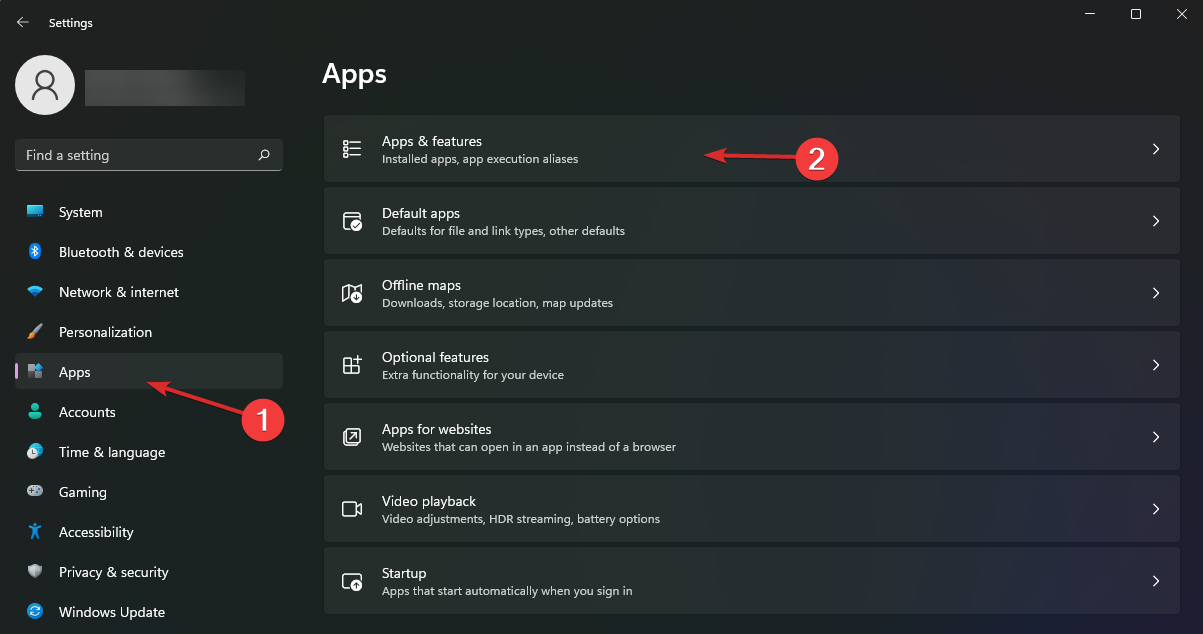
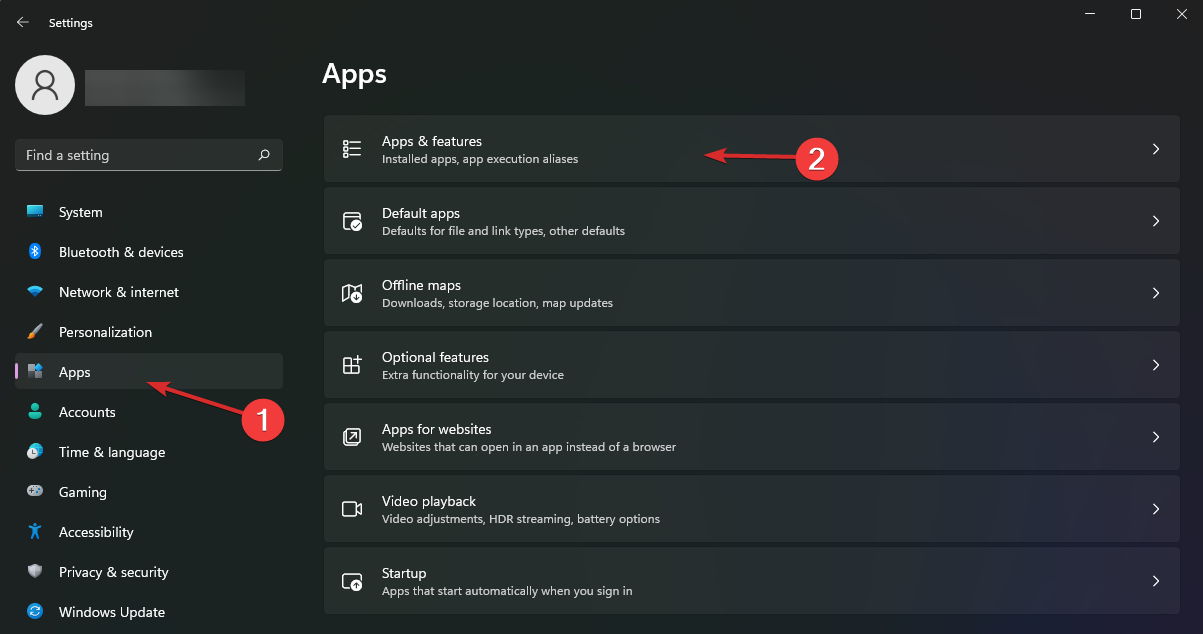
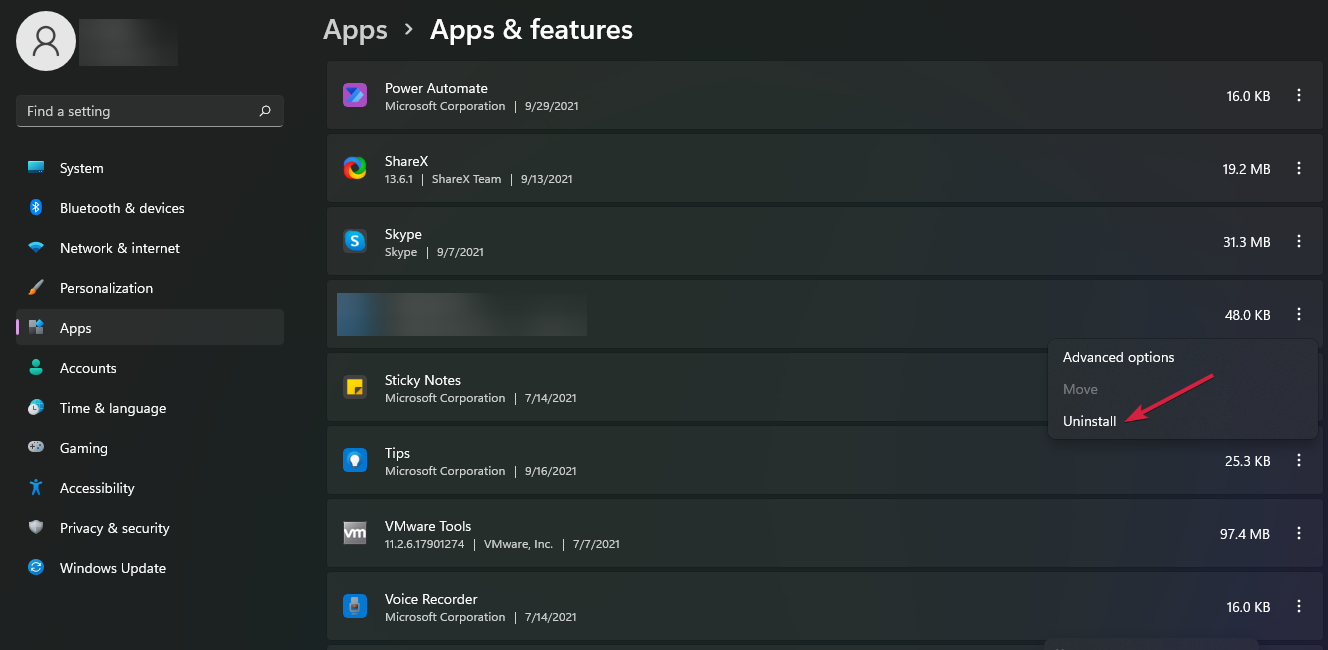
Choose Apps from the left pane, then click on Apps & features.
Look for Sonic Studio 3 in the list of apps.
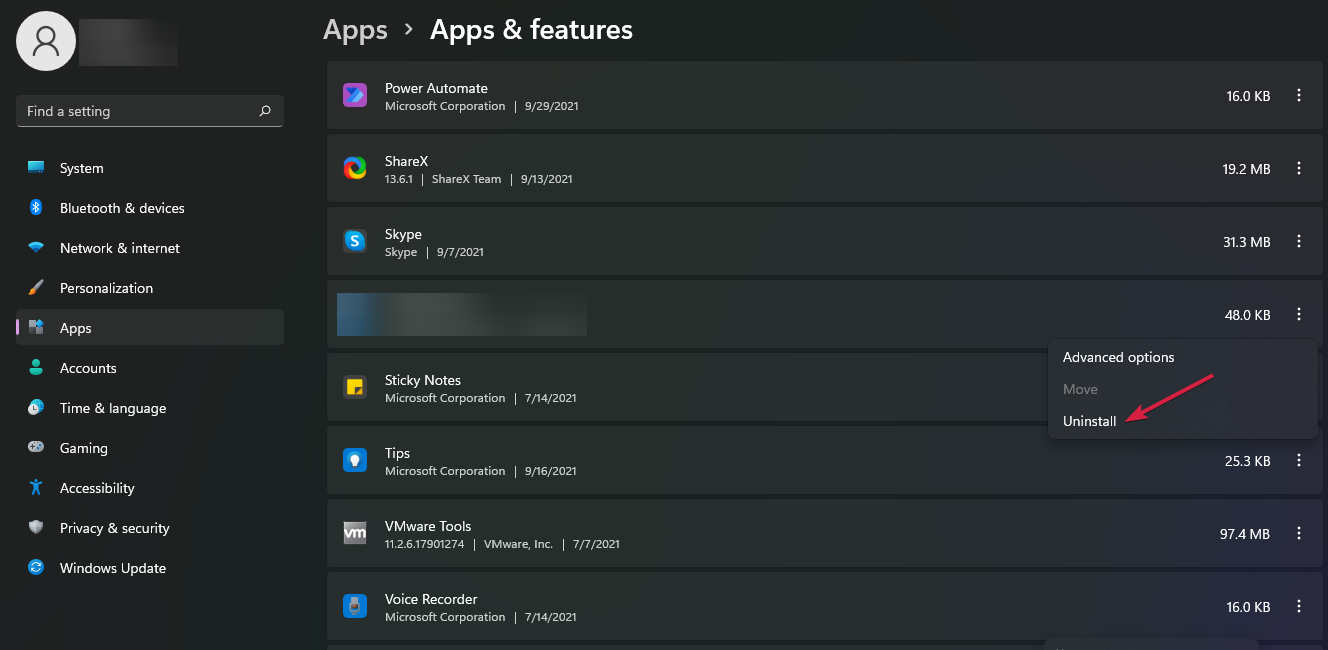
Click the vertical dots and select Uninstall.
Some of our readers fixed this problem by uninstalling the Sonic Studio 3 app, so if you have that software installed, try removing it at least temporarily and see if the game runs well.
Also, if the game was working fine until you installed third-party software, try uninstalling it and try running the game again to see if it crashes again.
5. Uninstall and reinstall your game
Select the Start button and choose Settings.
Click on Apps from the left pane.
Select Apps & features.
Click on three vertical dots from the right and select Uninstall.
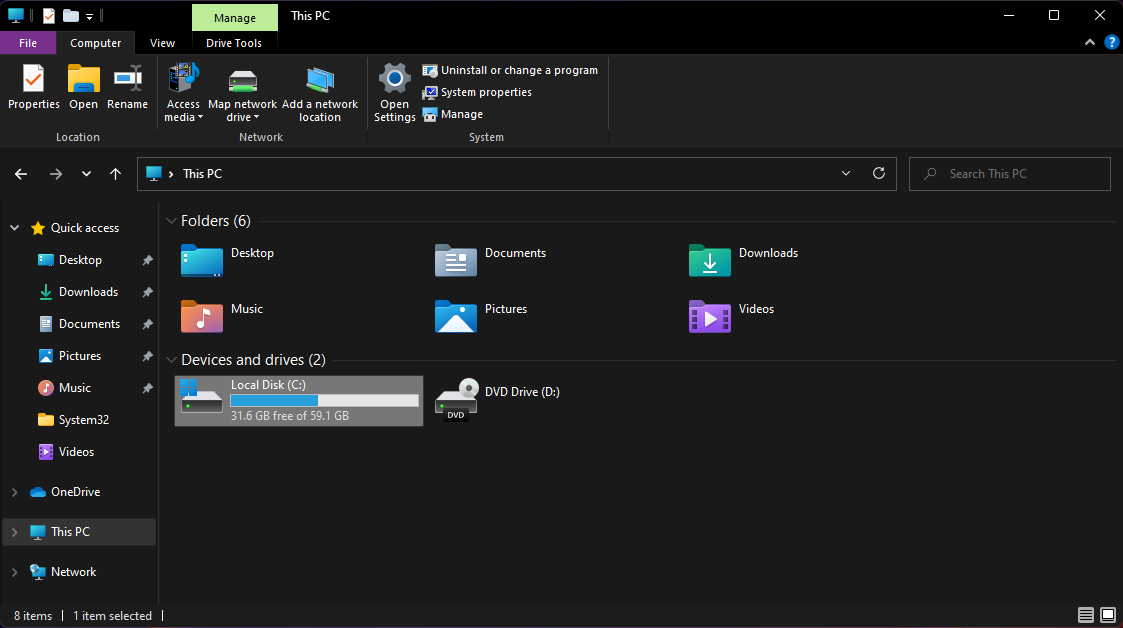
Press Windows + E to open File Explorer.
Delete the game’s installation folder.
Install the game using the setup file you have stored on your drive.
Repeated game crashes and freezes may be caused by a problem with the initial installation or if you reinstalled it on top of an older version. You’ll likely get a libvorbisfile.dll error so, make sure you completely uninstall the game this time and delete its folders before installing it again.
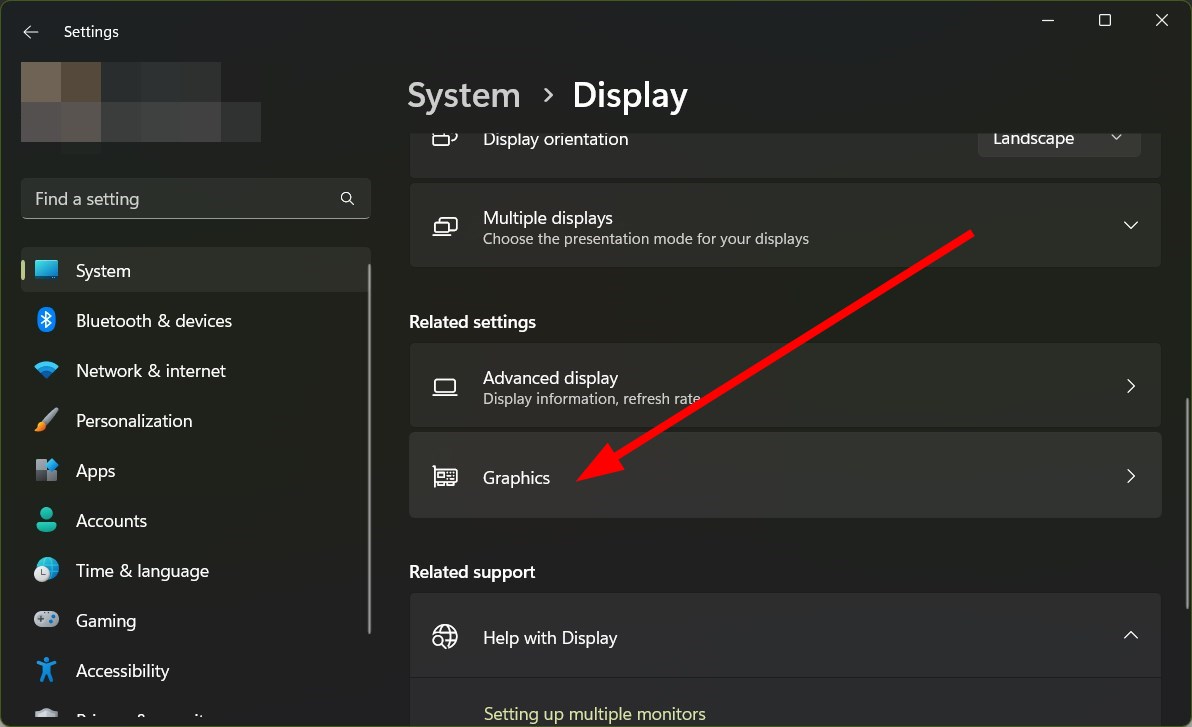
Select Graphics under the Related settings section.
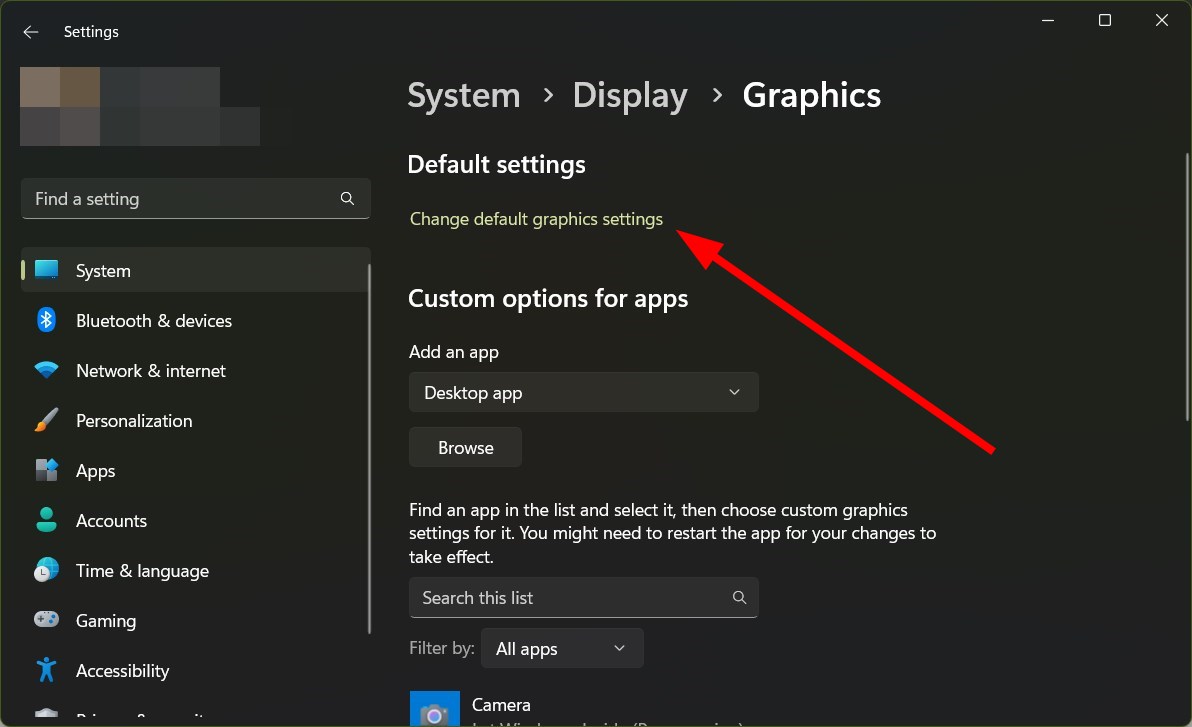
Click on Change default graphics settings.
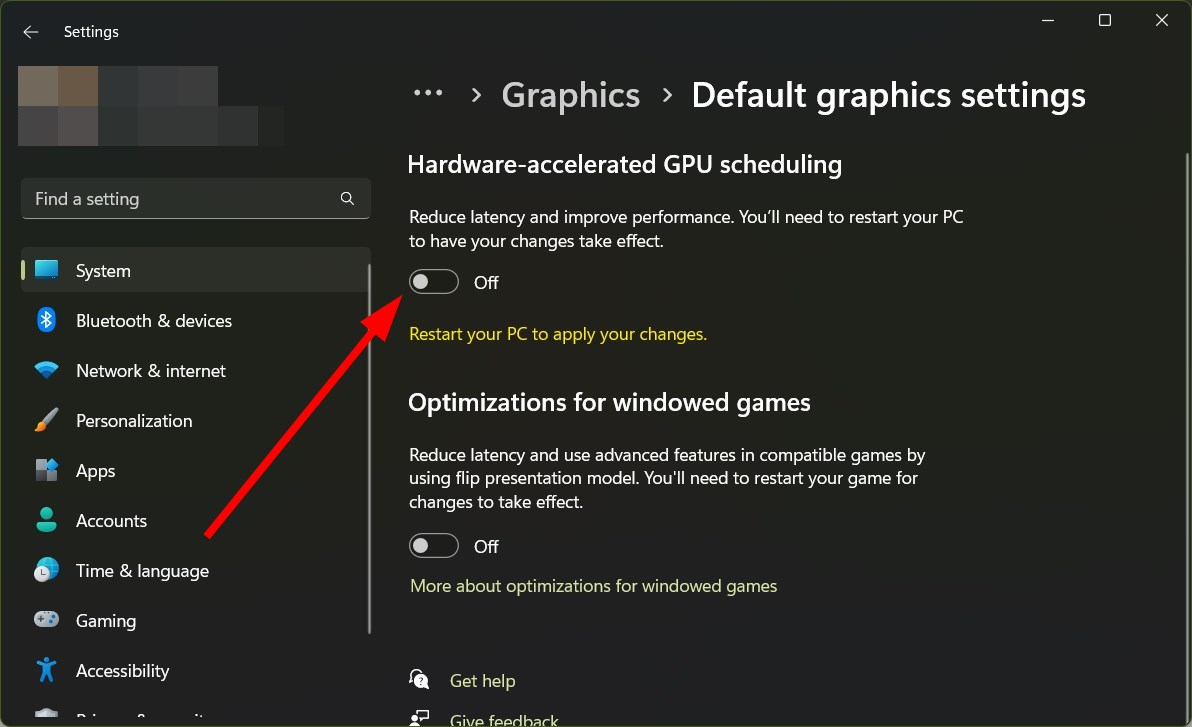
Toggle off Hardware-acceleration GPU scheduling.
Restart your PC to apply the changes.
This solution was suggested by one of our readers, and it’s confirmed to work.
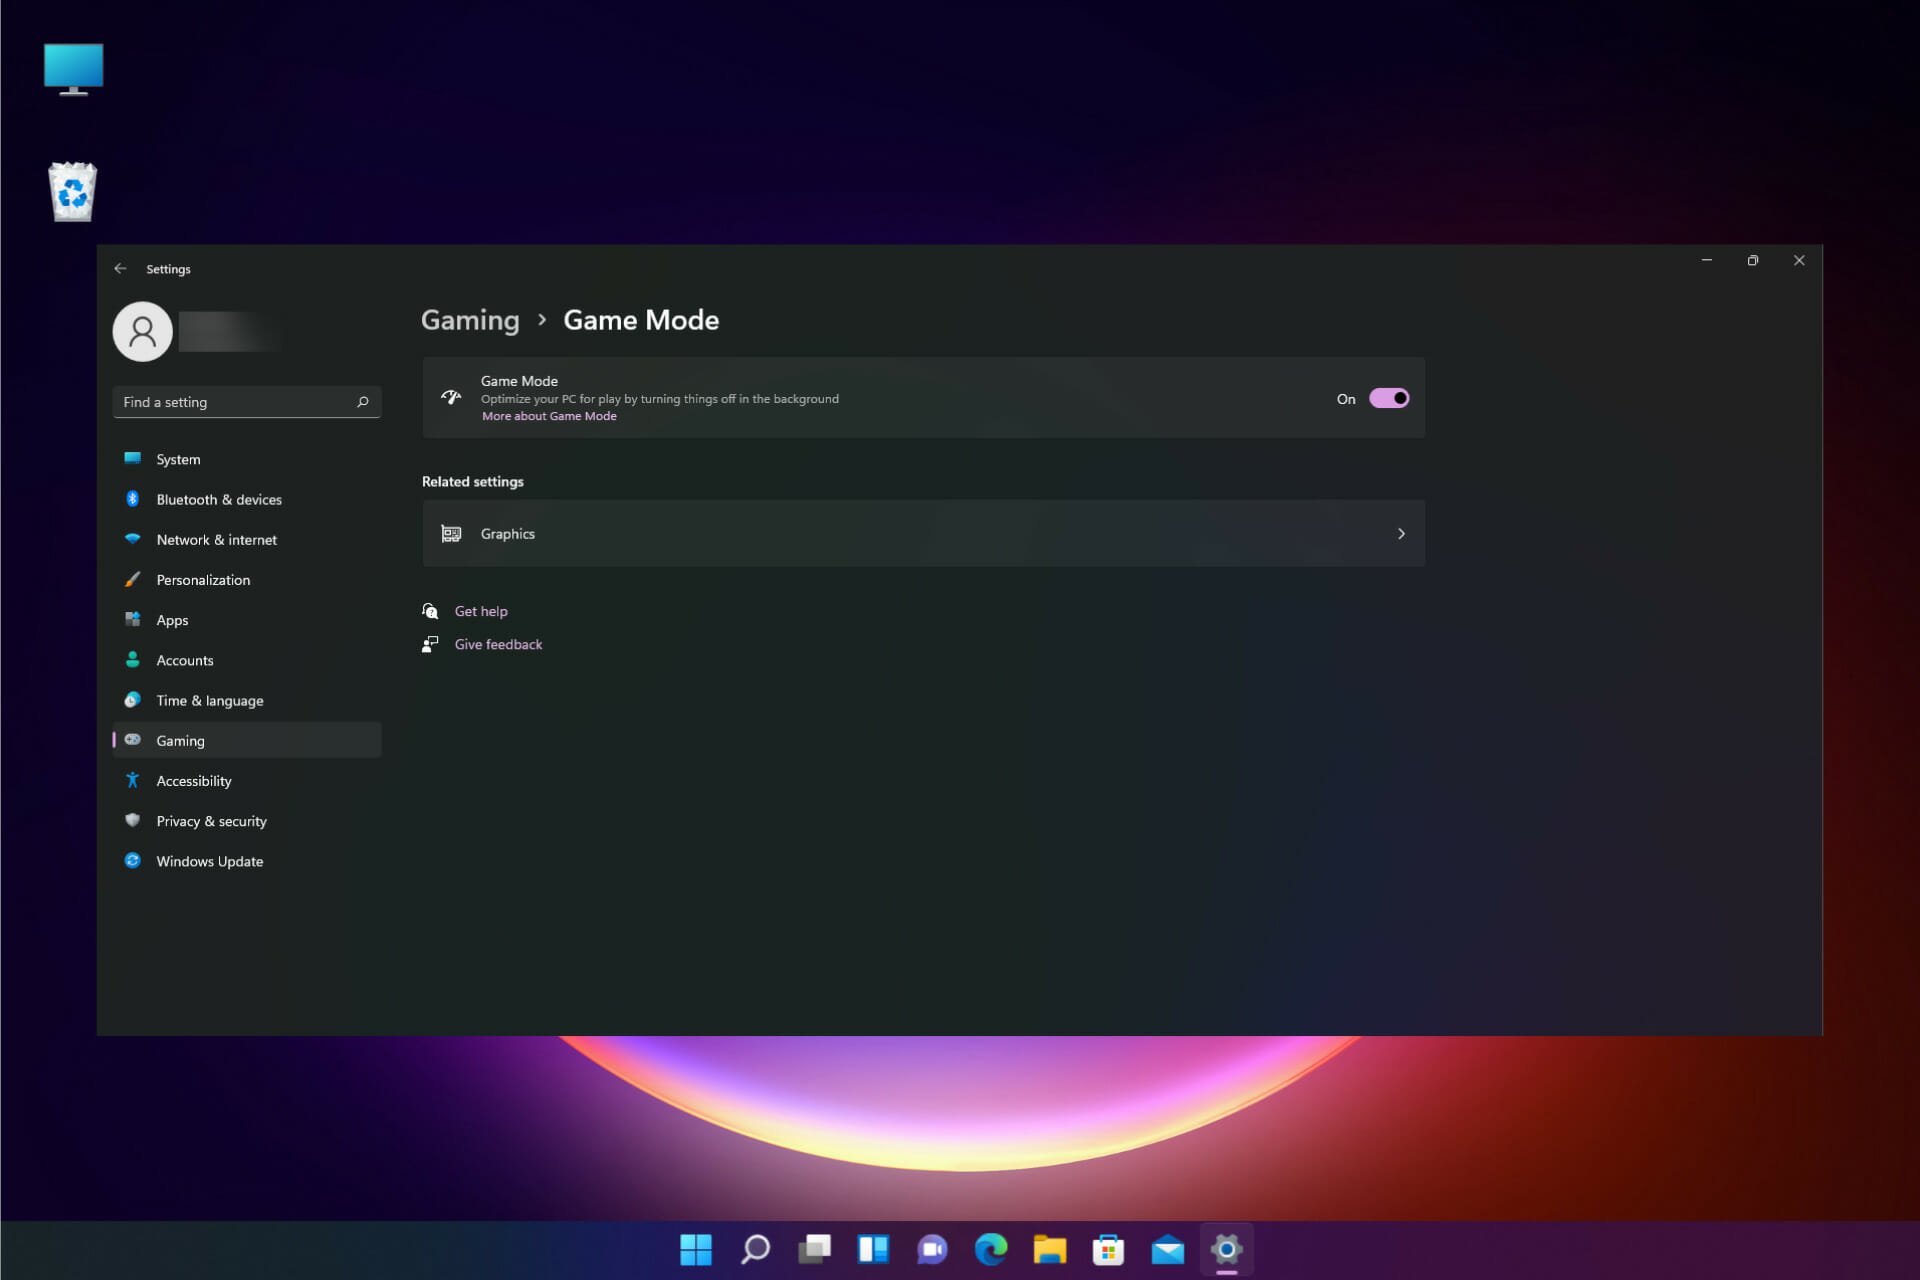
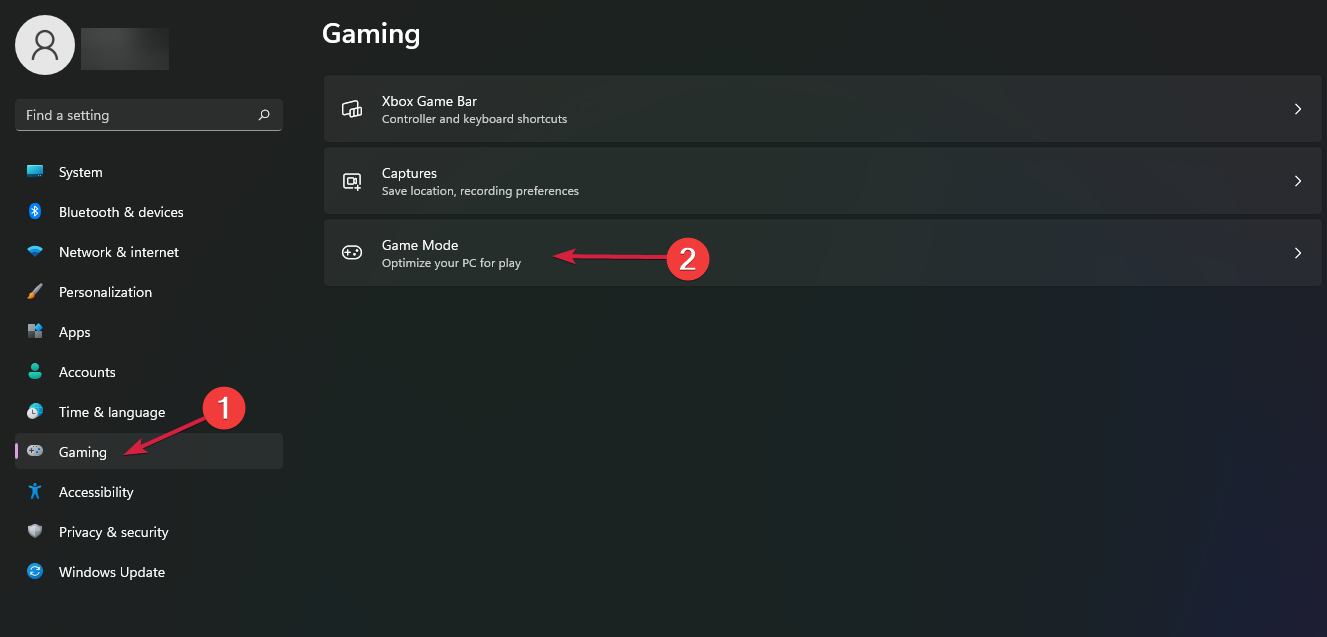
7. Turn off the Game Mode
Click the Start button and select Settings.
Choose Gaming from the left pane.
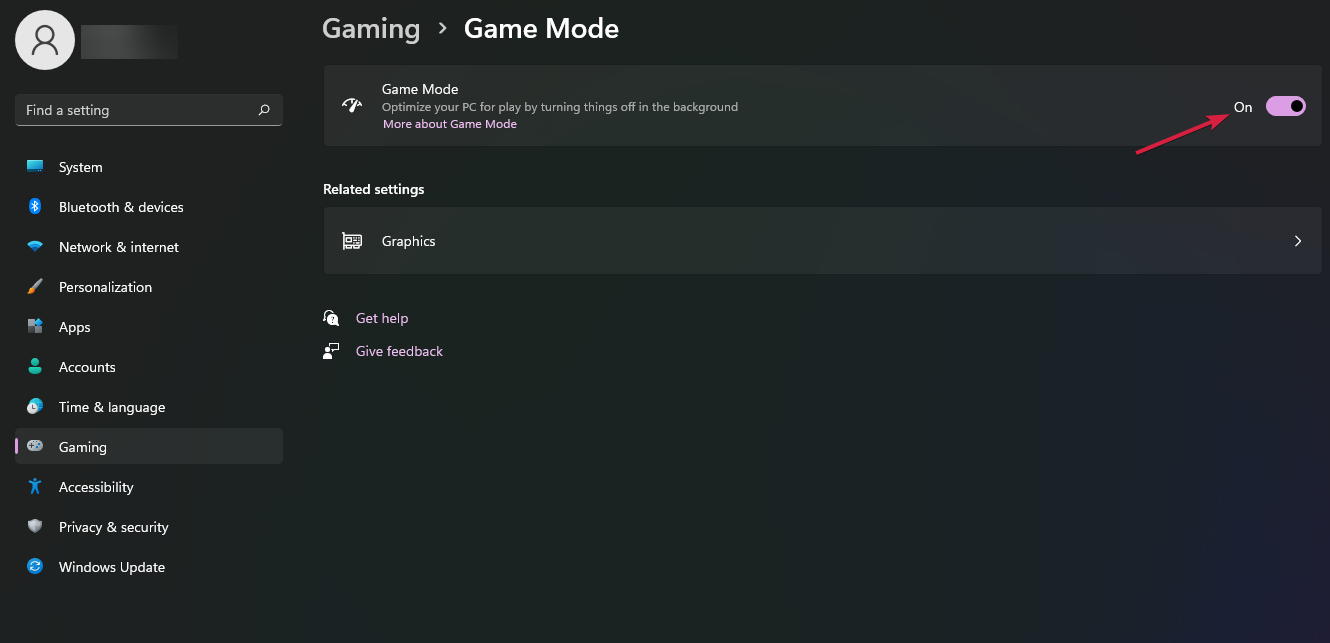
Click the Game Mode option.
Toggle off Game Mode.
Often aggressive game settings can cause multiple issues with the game. The Game Mode is there to help boost gaming performance, but this could also be the culprit for this error. You can turn it off and check if this resolves the issue or not.
If you bought the game from Microsoft Store, this problem may be also caused by the app crashing during the download, although it says that it downloaded the game. In this case, we have a guide to deal with Microsoft Store crashing on Windows 11 that might help.
Also, you may face problems with titles downloaded from specific clients, say Steam games crashing on Windows 11, and it’s just as easy to fix. Besides, if the crash leads to a blue screen error, it’s likely the graphics driver, memory management, or hardware at fault.
We hope that our steps helped you fix the game issues you were experiencing, and now you can enjoy it without interruptions.
For any questions or suggestions, leave your comment in the dedicated section below, and we will get back to you as soon as possible.
Some users utilize drive mapping to access remotely hosted disk drives. While ideally, the process should be seamless, several reported getting The local device name is already in use error in Windows 10.
The complete error message reads An error occurred while reconnecting <drive letter> to <file path> Microsoft Windows Network: The local device name is already in use. So let’s find out all about it and the solutions that worked for others.
Why do I get The local device name is already in use error?
Here are a few reasons you might be getting The local device name is already in use error in Windows 10:
Misconfigured firewall settings: You need to have File and Printer sharing enabled on the Firewall. Otherwise, there is a good chance that the error might appear.
Drive letter not assigned: In case a drive letter is not assigned to the network drive, you might get the error.
Lack of storage space: Lack of storage is one of the most common reasons users encounter the error, and in this case, the usual solutions fail to work. So, you will have to verify this first.
How do I fix the device name already in use error?
Before heading to the slightly complex fixes, try these quick ones:
Restart the computer since, in most cases, a simple reboot helped users fix this problem.
Make sure you are not using a VPN. If that’s the case, disable it.
Verify that there’s sufficient free storage on the shared drive. If not, you will have to clear some files.
Check whether you are using the correct user account the drive was mapped to initially.
In case none worked, move to the solutions listed next.
1. Remap the drive
Press Windows + R to open Run, type cmd, and hit Ctrl + Shift + Enter.
Click Yes in the UAC prompt.
Now, paste the following command while replacing X with the actual drive letter, and hit Enter:net use X /delete
Next, execute this command while replacing X, the username, and the password with the actual ones:net use X: \server\share /user:username password
A quick fix and one recommended by Microsoft, when you get The local device name is already in use error in Windows 10 is to remap the drive. Often issues come up with the previous remapping, and simply doing it again should get things running.
2. Assign a drive letter
Press Windows + X to open the Power User menu, and choose Disk Management.
If you find that the shared drive does not have a drive letter, right-click on it, and choose Change Drive Letter and Paths.
Now, click on Add.
Select Assign the following drive letter, choose one from the dropdown menu which is not already assigned, and click OK.
Again, click OK to save the changes.
Once done, verify whether The local device name is already in use error in Windows 10 is fixed. If not, head to the next solution.
3. Enable File and Printer Sharing
Press Windows + R to open Run, type control panel, and click OK.
Click on System and Security.
Next, choose Allow an app through Windows Firewall under Windows Defender Firewall.
Click on the Change settings button.
Locate File and Printer Sharing, make sure the checkboxes under both Private and Public are ticked, and click OK to save the changes.
Several users reported issues with network drives, and even The local device name is already in use error in Windows 10 when File and Printer Sharing was disabled in Firewall.
If you happen to use a third-party antivirus with a built-in firewall, make sure to verify the same there as well.
4. Modify the Registry
Press Windows + R to open Run, type regedit, and press Enter.
Click Yes in the prompt.
Paste the following path in the address bar and hit Enter: HKEY_CURRENT_USER\Software\Microsoft\Windows\CurrentVersion\Explorer
Locate the MountPoints2 key in the navigation pane, right-click on it, and choose Delete.
Finally, click Yes in the confirmation box.
Once done, restart the computer, and it shouldn’t throw an error when accessing the shared drive.
5. Restart the Computer Browser service
Press Windows + S to open Search, type Command Prompt in the text field, and click on Run as administrator.
Click Yes in the prompt that pops up.
Now, paste the following command and hit Enter to stop the Computer Browser service:net stop "Computer Browser"
Next, execute the following command to start the service:net start "Computer Browser"
Issues with the Computer Browser service have often been linked to The local device name is already in use error in Windows 10, and restarting it should do the trick.
One of the solutions here should have helped you fix the error. And while you are at it, also find out what to do if the mapped network drive is missing in Windows.
If you know of another method of fixing this issue, let us and everyone else know by leaving us a message in the comments section below.
Microsoft rolled out Teams Premium, and with this, the current free version of Teams for small businesses is set to hit its end of support date on April 12, this year. Before then, users can transition to Microsoft Teams (free), but there’s a catch.
Besides the name change and access to a different set of features, users won’t be able to make the transition from the current free version of Teams to the new free version with their data. To avoid this, you’ll need to upgrade to the paid tier if you want to keep the chats, files, teams, and meetings that are currently stored on Microsoft Teams Free (classic).
You’ll either have to upgrade to the Microsoft 365 Business Basic tier which will cost you $6/month or opt for the Teams Essentials plan at $4/month. You can choose to simply transition to Microsoft Teams (free) if you don’t want to make the payment or don’t have important data you’d want to make the transition with.
Alternatively, you can save your files manually within the new free version of Teams which can be quite tedious especially if you have a lot of data stored thus making the paid tier more attractive and efficient.
You should consider making the transition to the new free version or upgrading to either of the paid tiers if you want to retain the data stored. It should be noted that you will no longer be able to access the legacy free version of Teams once it reaches its end of support date.
Sometimes Yahoo search acts like a browser hijacker and forces itself as the default search engine in Chrome. In this piece, we’ll explain why it happens and how to fix it.
This usually happens when malware infects your computer or when a program or browser extension changes your default search engine without your knowledge.
More details about common causes, below. But first, let’s fix it:
How do I stop Yahoo from hijacking my browser?
1. How to get rid of Yahoo search using Settings
The easiest method to get rid of Yahoo search from your Chrome browser is to manually remove it from your Search Engines Settings.
Through Settings, you can configure which engines you want to set as default and which to delete.
1. Launch Google Chrome on your PC.
2. Paste the following path in the address bar:chrome://settings/searchEngines
3. Hit Enter to open the Settings menu.
4. Now, click on the ellipsis next to Yahoo, and select Delete from the menu.
5. A confirmation prompt will appear. Select Delete again.
6. Relaunch the browser and check if Yahoo keeps replacing Google as the search engine.
2. Run a malware scan to remove Yahoo Search from Chrome
This problem may be caused by the Search.yahoo.com redirect virus or the Yahoo redirect virus for short.
It is a browser hijacker that will change the search engine to Yahoo Search every time you look for a keyword in the address bar.
We recommend you install an antivirus for reliable security against hijackers.
For this task, ESET HOME Security Essential is an excellent choice. This is a robust security solution, it comes with a deeper and more comprehensive scan feature compared to the Windows default software.
Plus, with this tool, you will also have access to more advanced features, like real-time scanning, a powerful firewall, a ransomware shield, and many more.
ESET HOME Security Essential
Protect your computer and stay safe while browsing the internet with this complete security solution.
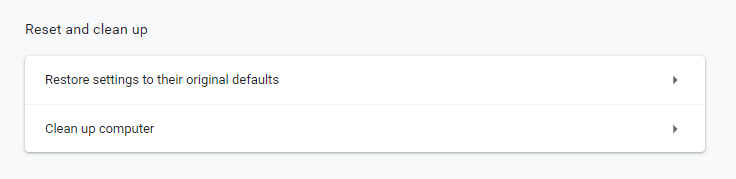
If Yahoo keeps replacing Google, paste the following path in Chrome’s address bar and hit Enter:chrome://settings/reset
Then click the Restore settings to their original defaults option.
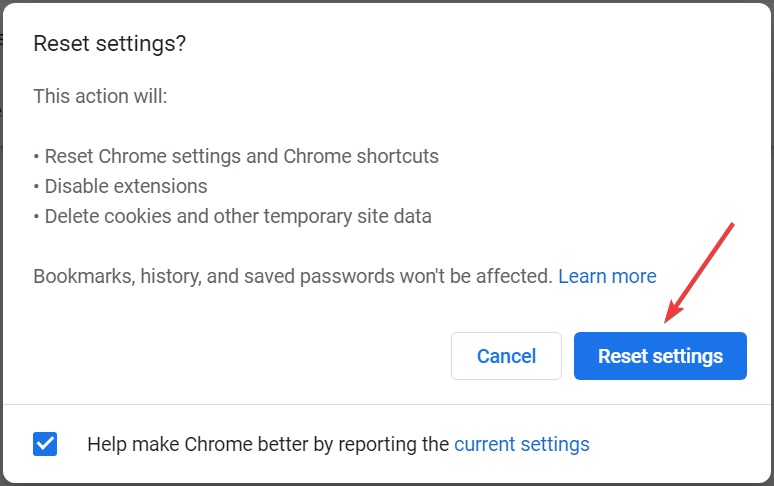
Click the Reset settings button to confirm.
Some users have confirmed that turning extensions off fixes browsers that redirect to Yahoo search. Users can manually turn off their installed extensions.
However, resetting browsers will either disable or uninstall all extensions and restore their original settings. Therefore, that’s probably a better way to fix browser search redirects.
4. Uninstall recently added programs
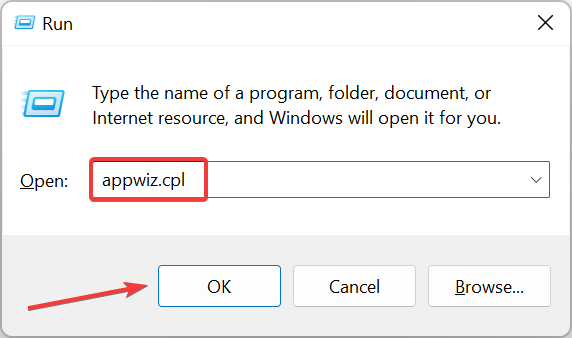
Press Windows + R to launch Run, enter appwiz.cpl, and clickOK.
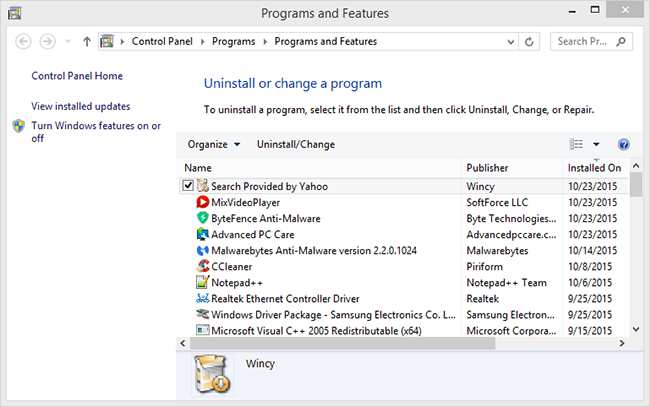
Select Search Provided by Yahoo, and press the Uninstall/Change button.
Click Yes to provide further confirmation.
If the uninstaller window doesn’t include Search Provided by Yahoo, look through the programs to check if there’s anything that looks a little dodgy.
If so, uninstall the dodgy software as it might be a browser hijacker.
Once done, the problem should be resolved, and Yahoo would no more become the search engine. Also, you may use an effective uninstaller tool to completely remove the software causing the trouble since these delete all associated files.
One user also suggested checking if you have the Google Legacy Browser Support installed and then removing it. That will also solve the problem, so try it out.
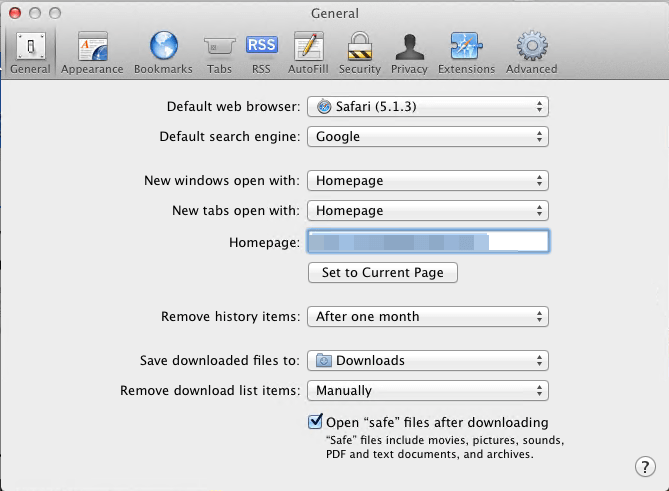
Open the browser, choose Safari, then select Preferences.
Go to the General tab and check the Homepage field.
If the homepage has been altered, change it and save the changes.
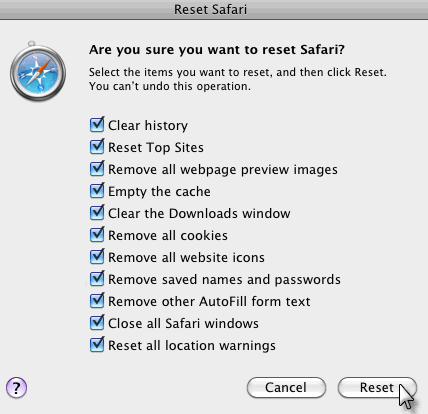
You can also reset the browser by navigating to the Safari menu and selecting Reset Safari.
Select all the available options and click on Reset.
This solution applies to Safari, the default Mac browser but if you’re using a different browser, you may change the homepage by following similar steps.
Why does Yahoo keep opening in Chrome?
If you haven’t set Yahoo search, your computer is likely infected with malware that’s changing the default search engine. It could be a program or an extension installed on the browser.
Generally, the malware doesn’t cause much harm but changing the default search engine every time can be frustrating. Also, the malware might collect critical data, which would invade privacy.
So, it’s best that you get rid of the malware and Yahoo Search using the methods listed in the next section.
What are the common iterations of Yahoo Search replacing Google?
Many of our readers are asking some questions about Yahoo Search replacing Google Search in Windows 10, 11, and Mac on their browsers.
So, don’t worry, we have answers and solutions in our guide if you are having one of these issues:
Why is Yahoo my default search engine? – You have probably installed a program that performed this change but one of the solutions below will fix this problem
How do I stop Yahoo from hijacking my browser? – In this case, scan and clean your computer and then change the settings; they will stick for good this time
Why does Yahoo keep opening in Google? – Malware issues and browser hijackers listed within Windows’ uninstaller may cause this
Why is Yahoo my default browser? – Some software that you installed might have made these changes, you can revert the settings and get things back to normal
How to get rid of Yahoo Search on Firefox? – Similarly to Chrome, open Preferences, go to Search, and there you can select a Default Search Engine
Wrapping up
If you were wondering how to get rid of Yahoo Search in Chrome The resolutions above will probably eliminate most Yahoo hijackers from your browser.
Then users can browse with the default search engines they originally selected. Also, find out how to remove Bing from Chrome.
If the above solutions helped or if you have any other suggestions we should add to our article, please comment below.
Windows 10 is a very gamer-friendly operating system, but many reported that GPU crashes when playing games.
Sometimes, things may not be as smooth as they should be, as there’s a chance that you could encounter game crashes in Windows 10.
Some gamers recently reported that their GPU crashes when playing games. And since this is a serious and annoying issue, we’ll discuss all the troubleshooting steps you can try.
Some users have reported that their monitor crashes when playing games. This occurs if the GPU can’t meet the game’s requirements.
In other situations, users encountered the same issue without the system overheating. This is usually an in-depth issue with the driver or GPU connectivity. This same principle applies if the computer crashes after a few minutes in the game.
Why do my games keep crashing on Windows 10?
Having your games crash is one of the worst feelings you can have as a gamer, especially if you have been waiting for the release of a game title for a long time.
It is worth noting that these types of errors occur no matter what kind of system you’re using, with many users mentioning that their PC freezes while gaming on AMD platforms.
In other situations, it seems that the problem appears as a game crash after updating a driver.
Here are the common causes of GPU crashes when playing games:
Using outdated GPU drivers
Installed the wrong GPU drivers
Outdated Windows version
Outdated DirectX
PC overheating
GPU not powerful enough
Other possible situations in which you might find yourself are caused by installing new hardware on your PC.
Some users have experienced games crashing after installing new RAM, which can be caused either because the motherboard is not properly recognizing the new hardware or if the RAM connectors are not properly cleaned before the installation process starts.
The same principle also applies if you’ve recently installed a new GPU. If there’s any issue with the hardware, it will affect your performance.
As you can see, there are plenty of reasons for which your GPU might be having issues while playing games on a Windows PC, and while most of them will be covered in this guide, if your GPU is not powerful enough to run the game, then there are only a couple of options available for you.
You can either invest in a powerful eGPU or connect it externally to your system, thus improving your PC’s GPU processing capabilities considerably.
If you haven’t already and don’t mind spending some time setting up your new GPU, you could also invest in an internal GPU that is powerful enough, and go through the process of installing it on your motherboard.
The exact method for fixing game crashes in Windows 10 and 11 will depend on your specific situation, but some general solutions could prove helpful.
Why does my GPU keep crashing?
If the GPU crashes when playing games, check your drivers. Outdated or corrupted drivers will cause your system to crash when playing games.
In addition, overclocking can put extra stress on your graphics card and cause it to generate more heat. As a result, it will overheat and crash.
These are some of the common causes, but there are other ones as well.
How do I stop my GPU from crashing?
1. Install the latest drivers
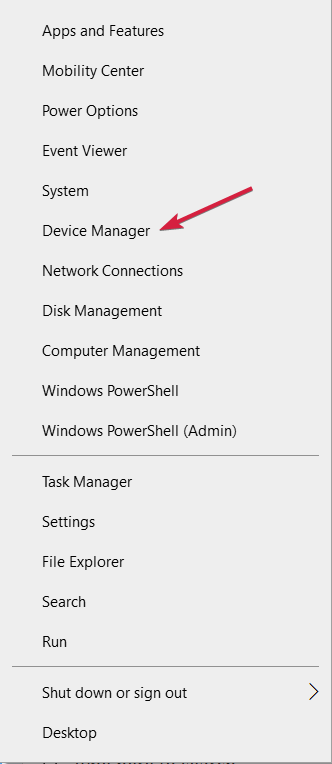
1. Press Win key+X and choose Device Manager.
2. Scroll through the list and toggle the Display Adapters option.
3. Right-click the entry or entries found in the list and choose Update Driver (Our system has two GPUs).
4. Choose either Search automatically for drivers (if you don’t have the driver downloaded), or Browse my computer for drivers (if you do).
5. Wait for the driver to be installed, then close the window and check whether the issue persists.
Windows 10 had problems with drivers compatibility since day one, and those problems are not resolved yet. So, there’s a chance your current graphics card driver isn’t compatible with Windows 10. This might be why your PC is crashing while gaming.
Many reported games crashing on Windows 10 with Nvidia GPU, but other brands also have this issue. As such, a driver update is mandatory.
2. Install the necessary software
Most of today’s games require some additional software to work properly and the best example is DirectX.
If GPU crashes when playing games, ensure you have the latest version on your PC.
If you’re unsure which programs you need to install to play your desired game, try searching for the information by exploring the game developer’s website or reading the game’s documentation.
Some games will not install if you don’t also have these specific programs. Most often than not, they will ask you to install them during the setup process.
If your PC crashes when playing games not overheating, check if you have all components installed.
3. Make sure the PC doesn’t overheat
Overheating is one of the most common instigators of sudden crashes on PCs. If games keep crashing on a high-end PC, it’s possible that your PC temperature is too high.
Your PC automatically shuts down if the CPU or GPU temperature hits critical levels. That way, it protects itself from major hardware failures.
These situations are quite common after extended exposure to the heat. So, you’ll need to check the cooling system, clean all fans, remove all dust and debris, and use a PC temperature monitoring tool.
Also, applying the thermal paste to the CPU is a must. It’ll reduce the overheating substantially. Moreover, you should also add some additional coolers if there’s free space to do it.
Just make sure that your power supply isn’t overwhelmed. If you need some software to follow the temperature changes, you can download SpeedFan and check the readings or even control the rotation of the main fans.
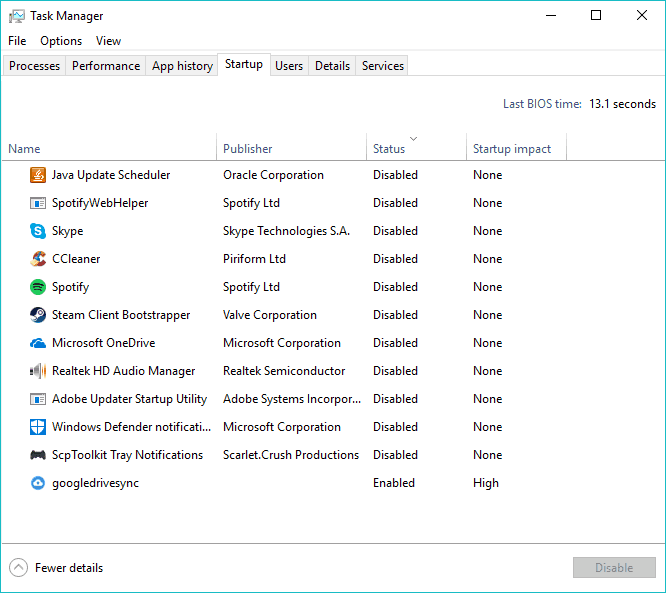
4. Disable background programs
Right-click on the Taskbar and open Task Manager.
Select the Startup tab.
Disable all unimportant and resource-heavy applications.
Restart your PC and look for changes.
In case GPU crashes when playing games, other apps are possibly interfering with it. Disable them and check if that helps.
Furthermore, you can also try using RAM optimizer software to ensure that all elements are checked and ready for gaming.
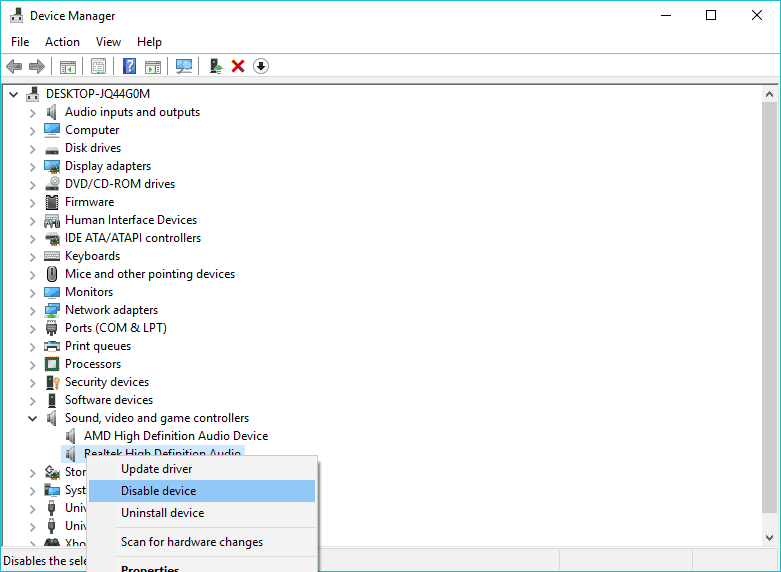
5. Disable the onboard sound device
Press Win key + X, and open the Device Manager.
Navigate to Sound, video, and Game controllers.
Expand this section, right-click on the onboard sound device and Disable it.
Close Device Manager and restart your PC.
The generic sound driver provided by Windows 10 Update for onboard sound devices occasionally collides with other devices, especially the one from the GPU.
That might lead to GPU failure, which will eventually cause it to crash and stop you from enjoying your games.
6. Scan for malware
Click on the search button in your taskbar, type Defender, and open Windows Security.
Choose Virus & threat protection.
Select Quick scan.
If you want a more thorough scan, select Scan options instead.
Then, select Windows Defender Offline scan.
Click Scan now.
There are only a few chances that malware would cause critical issues on your system, but because of the number of people doing crypto-mining lately, a wide range of crypto-related malware has been released.
For that purpose, we advise you to perform a thorough scan with either Windows Defender or any third-party antivirus you have at your disposal.
7. Check your hardware
Maybe the problem isn’t related to the system at all, maybe it’s on your hardware. If games are crashing without error, it’s possible that there’s a hardware issue.
Namely, the power supply was not strong enough for his graphics card, and that caused him a lot of problems.
So, keep in mind to check if your computer is assembled correctly, and if you find out something’s wrong, just change your current components with the proper ones.
The special emphasis goes to RAM and HDD. Sometimes, the HDD gets corrupted, or the RAM stick gets broken.
So, make sure everything works fine to exclude the hardware as the possible reason for the crashes while gaming.
Useful tips to improve your system’s gaming performance
Ensure your Internet connection is stable – Internet speed is all about today’s games. Even if you have the best rig in the neighborhood, ensure a great Internet plan and connection.
Match the game’s system requirements – Every game has minimum system requirements, but barely meeting them sometimes doesn’t cut it. Sometimes, you must invest in a proper gaming rig to ensure no problems.
Switch to Performance mode – If you’re gaming on a laptop, always switch the Power Management settings to High performance to spare no resources for your gaming endeavor.
Adjust the game settings – Everybody wants to play with all the features tuned to maximum, but sometimes you have to be a little modest and cut down the quality of the game’s graphics settings to speed it up.
Invest in an SSD – All the game’s resources are on your hard drive, and an SSD is faster. Investing in an SSD will be a great solution to speed up your game.
We also have to mention the compatibility problems with the games themselves. Some older games (10+ years old) are simply incompatible with Windows 10. Therefore, there’s nothing you can do to play them on your PC.
Windows 10 and 11 share many similarities as well as issues. Game crashes have been detected on both systems, and causes are usually related to the drivers or hardware issues.
Since both systems work similarly, almost all solutions are universal and will work on both operating systems.
We covered games crashing on Windows 11 in a separate guide, so if your PC crashes while gaming, we suggest you read that guide for more in-depth information.
Can a power supply cause games to crash?
A bad power supply can’t handle intensive tasks such as gaming, so it may cause your system to crash. This is especially true if the power supply doesn’t have enough power to handle other hardware.
Using an old power supply can also lead to stability issues, so if you’re having problems, perhaps you should consider replacing your power supply.
How to prevent game crashes in the future
1. Uninstall unwanted and unused apps
Press Winkey + X and choose Apps and features.
Scroll down the list of installed applications and identify the ones that you don’t need.
Select the applications which you want to remove and click the Uninstall button.
Repeat these steps for uninstalling all the apps you don’t need anymore.
Bloatware is the biggest enemy when it comes to the performance of your PC. This can sometimes lead to computer crashes when playing games.
Therefore, try to uninstall as many programs as you don’t need or use. You will be surprised by how many of those you will find in the list of apps installed on your computer.
2. Close as many unnecessary processes
Right-click your taskbar and choose Task Manager.
Click View and choose Group by type.
Inside the Processes tab, click the application you want to close.
Click End Task to close it.
Repeat these steps for all unnecessary processes, without closing any system applications.
3. Clean your disk
Click on the search button in the taskbar.
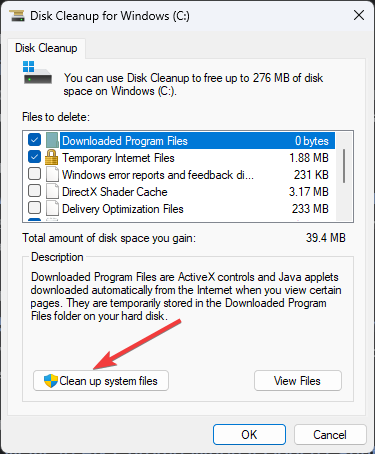
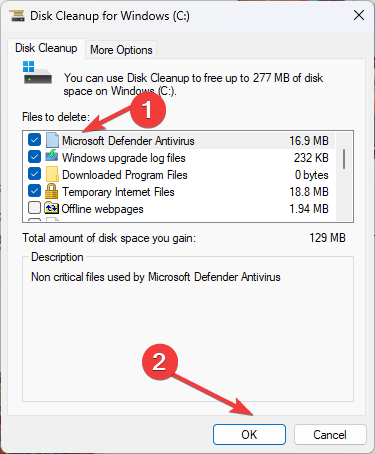
Type Cleanup and choose the Disk Cleanup option from the results.
Tick the boxes to choose which files you want to delete and press OK to initiate the process.
After performing this step, your PC will be in an optimal state to run games without any issues.
4. Set your antivirus to game mode
Right-click the antivirus icon found next to your Windows clock, and click the Open TotalAV.
Choose Setup from the software’s menu.
Click Computer protection.
Toggle the Gamer mode option.
Many antiviruses nowadays have a built-in Game mode specially created to ensure the software doesn’t start crunching your drive for viruses during your game and eliminate other distractions.
It’s usually straightforward to activate from the main menu of the antivirus, and it’s worth switching that feature on for your peace of mind.
Even though the specific steps will depend on the antivirus software you’re using, above is how you can do it with TotalAV.
As you can see, it’s not hard to cover all the possible causes of your gaming session being interrupted by system crashes.
If you follow the steps described in this guide carefully, you will surely be one step closer to solving this issue and avoiding encountering it at a future date.
The best way to avoid this issue is to ensure that your PC runs optimally, that no unnecessary applications are running in the background, and that your antivirus software is not causing issues.
Game crashes can also be avoided by using one of the game booster software options, which can optimize your computer’s resources and make the most out of them.
We hope this article helped you solve the problems with games crashing on your Windows 10/11 PC.
If you have any comments or questions, use the comment section below this guide.
Despite being a leading OS for video games, Windows is no short of errors and bugs. A quite common issue people face across different games is they keep cashing without displaying errors.
Not only does the game crash, but it’s also leaving you in darkness when it comes to troubleshooting. However, we got a few tricks up our sleeves and managed to identify a few common culprits.
Follow the steps below to get rid of this error fast.
1. Right-click the Start icon then select Device Manager.
2. Expand theDisplay adapters folder, right-click your AMD graphics card, and choose Update driver.
3. Click Search automatically for drivers to let Windows select and install the best available GPU driver on the system.
4. Wait for the drivers to be installed.
5. Once the installation is done, reboot your PC and check whether the games are still crashing.
Depending on what type of graphics card you’re using, it’s always good to keep your drivers updated.
You can automatically install the latest drivers via Device Manager. This is likely to prevent your games from crashing on your Windows 10 device, without you having to perform more complicated solutions.
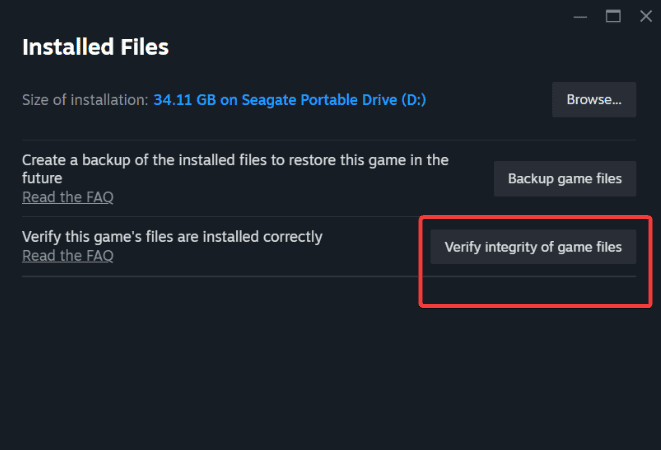
Right-click on the game you need to repair and choose Properties.
Navigate to the Installed Files tab.
Click Verify integrity of game files.
Steam will check your game files and replace any that are missing or corrupted.
Epic Games Store
Open the Epic Games Launcher.
Go to your Library.
Click on the three dots (…) next to the game you need to repair.
Choose Manage.
Click Verify under the Verify Files section.
The launcher will scan for any issues and download the necessary files.
EA App
Open the EA App.
Go to My Library.
Right-click on the game that needs repairing.
Select Repair.
The app will automatically scan and fix any issues with the game files.
Battle.net
Open the Battle.net launcher.
Select the game that needs repairing from the left-hand menu.
Right-click on it.
Choose Scan and Repair from the dropdown menu.
Click Begin Scan to start the process. Battle.net will check the files and repair them if necessary.
3. Run your games in window mode
If you experience crashes with your games on Windows 10 it doesn’t hurt to try running them in windowed mode.
To do this, you need to go to video settings in your game and find the option to run it in window mode.
4. Check your antivirus
Try enabling Gaming Mode in your antivirus settings to minimize interference. If that doesn’t work, temporarily disable or uninstall your antivirus to test if it resolves the issue.
If problems persist, consider switching to a different antivirus that better supports gaming.
5. Check your Windows Defender settings
Open the Settings app. You can do that quickly by pressing Windows Key + I. When the Settings app opens, navigate to Update & Security section.
Select Windows Security from the left panel. From the right panel, choose Open Windows Security.
Navigate to Virus & threat protection.
Now navigate to Virus & threat protection settings.
Click Add or remove exclusions.
Click Add an exclusion, select Folder, and select the game’s directory.
Now check if the problem is resolved. If the issue still persists, you might want to consider disabling Windows Defender. To do that, just follow steps 1-4 from above then disable Real-time protection.
Although Windows Defender is a solid application in terms of security, sometimes it can interfere with your games.
Keep in mind that disabling Windows Defender will leave your system vulnerable, so you might want to consider getting a new antivirus solution or a highly reliable VPN.
6. Remove overclock settings or underclock your graphics card
Many users tend to overclock their hardware in order to achieve better performance in games. However, sometimes your system can become unstable due to overclocking.
If your games are crashing, it could be due to overclocking. Try removing any overclock settings or underclocking your GPU to see if that helps. Be cautious, as overclocking and underclocking can cause system instability or hardware damage.
7. Update your operating system
Click the Start menu and select Settings (the gear icon).
In the Settings window, choose Update & Security.
Click on Check for updates to see if there are any available updates.
If updates are found, click Install now to start the update process.
Wrapping up
If the solutions above proved to be unsuccessful in your case, make sure to check out the official Microsoft Support page and try out their solutions.
That would be all if you have any comments, or suggestions, just leave your thoughts in the comments section, below.
Big Fish Games is the world’s largest producer of casual games, which claims to give you a new playable game every day.
You can play Big Fish Games on any device or web browser. While it works without any issues, there are several instances where users have reported Big Fish Games not working on Windows 11.
If you are an avid gamer and love playing Big Fish Games but are facing the Big Fish Games not working on Windows 11, then you have come to the right place. Here, in this guide, we will give you a bunch of solutions to help you resolve the problem.
Why is Big Fish Games not working on Windows 11?
After some research on the internet, we have created a list of the most common errors that could trigger the Big Fish Games not working on the Windows 11 issue.
There is some issue with the game: If you are running an outdated version of the game, then you will come across multiple issues.
Your graphics driver is outdated: You should make sure that all drivers, in our case, the GPU driver is running the latest version to avoid any gameplay issues.
You don’t have necessary permissions: Often, Big Fish Games require access to important files, and you might be running it with limited permissions.
Some important files are missing: Chances are that the game installation did not go as planned, and it skipped a few of the important files because of third-party interference.
How can I fix Big Fish Games not working on Windows 11?
1. Clear browser cache
1.1 Google Chrome
Launch Google Chrome.
Click on the 3-dot menu icon at the top.
Choose Settings.
Click on Privacy and Security.
Choose Clear browsing data.
Check the boxes for Cookies and other site data and Cached images and files options.
Click on the Clear data button.
1.2 Mozilla Firefox
Click on the 3-line menu icon.
Select Settings.
Click on the Privacy & Security.
Under the Cookies and Site Data section, hit the Clear Data button.
Check the boxes for Cookies, Site Data, and Cached Web Content options.
Hit the Clear button.
Cache files keep all your personalized settings for the websites or the web apps you use on a browser. If these cache files go corrupt, they can cause the browser to misbehave and trigger issues such as Big Fish Games not working on Windows 11.
We suggest you clear the browser cache often to avoid such petty problems. Also, you can switch to a different browser, as the problem could be because of the browser itself. And for that, we have created a list of some of the best browsers you can try.
Right-click on your graphics card and select Update driver.
Choose Search automatically for drivers.
Follow the on-screen prompts to install the latest graphics driver on your PC.
Restart your PC.
You can update your drivers by following the above steps on the Device Manager. However, it could be cumbersome when you have to update many drivers.
In such a case, we recommend using a third-party tool called Outbyte Driver Updater. This software can help you schedule driver scans, create driver backups, an efficient download manager, etc.
Outbyte Driver Updater
You must always keep your drivers updated, and Outbyte Driver Updater will also make your PC faster!
Install the program and see if this resolves the Big Fish Games not working on Windows 11.
You should uninstall the game from your PC. Next, restart it, reinstall the Big Fish Games launcher app, and hopefully fix the issue.
4. Disable Firewall
Open the Start menu by pressing the Win key.
Open Windows Defender Firewall.
Select the Turn Windows Defender Firewall on or off option from the left pane.
Check the boxes for the Turn off Windows Defender Firewall (not recommended) option for both Private and Public networks.
Click OK.
Run the Big Fish Games app and see if this fixes the issue or not.
Chances are that the Windows Firewall is blocking the application from running. But, of course, it could also happen with any of your third-party antivirus software.
In this case, disable the Firewall and check if this resolves the issue. If this doesn’t work, we recommend you turn on the Windows Defender Firewall, as leaving it off could expose your PC to threats.
5. Run the game as an administrator
Right-click on the Big Fish Games Game Manager app.
Select Properties.
Switch to the Compatibility tab.
Check the box for Run this program as an administrator.
Click on Apply and OK.
When you run the program as an administrator, it gives the program access to all the critical system files it might need to run correctly.
Here’s all you need for playing DVDs on your laptop. From compatible software (built-in or third party -you pick), to what you can do if it’s not working on the first try.
How do I play DVDs on Windows 11?
First, make sure your computer’s codecs to decode DVD video and audio streams are installed. Next:
1. Use the Windows Media Player Legacy
1.1 Install Windows Media Player Legacy on Windows 11
Press Windows + I to open Settings.
Click Apps, then Optional features.
Now, next to Add an optional feature, click View features.
On the Add an optional feature window, type Windows Media Player Legacy, select the appropriate option and click Next.
Click Install.
1.2 Play the DVD
Insert the DVD in your computer DVD’s slot.
Launch the Windows Media Player. To do that, press Windows key + S and enter media player. Select Windows Media Player Legacy from the list of results.
Go to the left pane, click the DVD option, and select your DVD drive
Click the Play button to play the media.
If you can’t install Windows Media Player Legacy, it’s probably already available on your PC. If not, you can go ahead to the next solution.
Double-click the installer to run the installation file.
On the UAC prompt, click Yes.
On the installer wizard, click Next.
Follow the onscreen instructions, and on the last window, click Finish.
Launch the VLC media player and click Media. From the options, click Open Disc.
On the Open Media window, switch to the Disc tab, go to Disc device, and select your DVD from the drop-down.
Click Play.
Why is my DVD not showing up in Windows 11?
Your registry isn’t configured properly.
Issues with DVD drive drivers.
The drive is faulty or not connected properly.
To learn how to fix this issue, we suggest reading our DVD drive is not detected guide for step-by-step instructions. This isn’t the only issue, and many reported that PC won’t read DVDs.
If you want to play DVD on Windows 11, you can use the built-in software as the default player, or you can use one of many DVD player apps. If you tend to play a lot of movies, perhaps you want to configure DVD autorun so that DVDs can play automatically.
So, these are methods that you can follow to play DVDs on your Windows 11 computer. Try them and let us know what worked for you in the comments section below.
Most external devices, such as external hard drives, webcams, mice, and more depend on USB connectivity. However, some users are complaining of a code 43 USB error on Windows 10.
This error prevents you from connecting to your external devices. Thankfully, it is an error you can fix quickly with the solutions in this guide.
What is device status code 43 Windows 10?
Below are some of the factors that can cause the code 43 error for USB devices on Windows 10:
Outdated driver: In some cases, this issue is due to faulty or outdated USB drivers. The solution to this is to uninstall or update your drivers.
Issues with power settings: Sometimes, this issue can be due to the fast startup feature. Many users have been able to fix it by disabling the feature.
Hardware issues: On rare occasions, this error code might be due to problems with your hardware components. You can fix this by running the hardware and devices troubleshooter.
How do I solve Error Code 43 for USB devices on Windows 10?
Before delving into the solutions in this section of this guide, there are some preliminary troubleshooting steps that might fix this issue. They are listed below:
Insert the USB Device into an Alternative USB Slot
Restart Your Laptop or Desktop
If the steps above do not solve the problem, proceed to the solutions below:
1. Run the Hardware and Device Troubleshooter
Press the Windows key, type cmd, and select Run as administrator under Command Prompt.
Type the command below and hit Enter to fix it: msdt.exe -id DeviceDiagnostic
Finally, wait for the diagnosis to be complete and apply the recommended fixes.
If you are facing the code 43 USB error on Windows 10, it might be due to hardware issues. Running the Hardware and Devices troubleshooter should help you diagnose and fix this issue.
2. Update the USB device drivers
Press the Windows key + R, type devmgmt.msc, and click the OK button.
Now, double-click the Universal Serial Bus controllers option to expand it and right-click each of the drivers there.
Select the Update driver option.
Finally, select the Search automatically for drivers option and install any available update.
It might be the case that the USB Device has an outdated driver. If that’s so, that’s probably why you’re getting this code 43 USB error on Windows 10.
You can update the driver by downloading it from the USB device manufacturer’s website or update it with the Device Manager by following the steps above.
3. Uninstall the USB Drivers
Press the Windows key + X and select the Device Manager option.
Expand the Universal Serial Bus controllers option and right-click each of the drivers there.
Now, select the Uninstall device option.
Next, click the Uninstall button to confirm the action.
Finally, restart your PC, and the drivers should be reinstalled automatically.
If updating your USB drivers does not fix the code 43 error on Windows 10, you need to uninstall the driver. This should eliminate any glitch causing the issue.
4. Restore Windows to the Previous Date
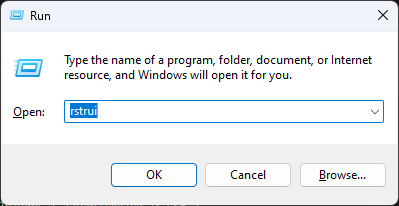
Press the Windows key + R, type rstrui.exe, and click OK.
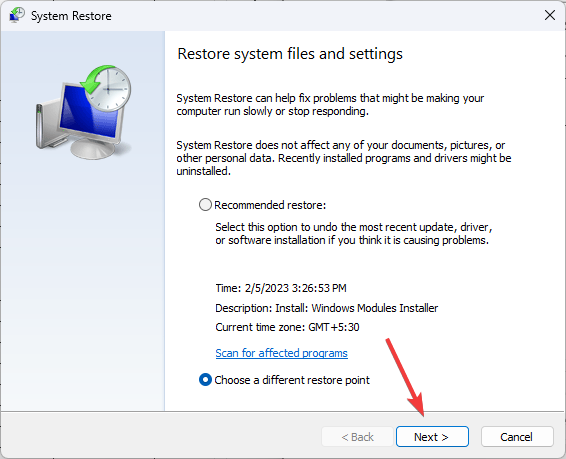
Click the Next button.
Now, select a restore point and click the Next button.
Finally, click the Finish button to confirm the action and follow the onscreen instructions.
If the USB device worked fine a few weeks back, the System Restore tool in Windows 10 could feasibly fix error code 43. It could fix any hardware that Windows isn’t recognizing.
Press the Windows key, type power plan, and select Choose a power plan.
Click Choose what the power buttons do on the left of the window.
Now, select Change settings that are currently unavailable.
Uncheck the box for Turn on fast startup (recommended).
Finally, click the Save Changes button and restart your PC.
At times, the code 43 USB error on Windows 10 can be due to the fast startup feature. While this feature improves your PC startup time considerably, it can sometimes lead to issues.
Hence, you need to disable the feature.
6. Adjust the USB Selective Suspend Settings
Press the Windows key + S, type power plan, and select Edit power plan.
Now, select the Change advanced power settings option.
Click the + beside USB settings and USB selective suspend settings.
Next, set the On battery and Plugged in battery settings to Disabled.
Finally, click the Apply button, followed by OK, and restart your PC.
If the fixes above fail to solve the code 43 USB error on Windows 10, it might be because of your power settings. This is because your power setting might be set to suspend your USB to save power.
Hence, you need to change this feature to restore normalcy.
With this, we can conclude this guide on how to fix the code 43 USB error on Windows 10. You only need to follow the steps above and everything should be back to normal.
The Try-Catch statement in PowerShell handles errors and exceptions in your code. If Try-Catch is not working as excepted on PowerShell, it can be frustrating.
In this guide, we will cover all the ways to fix the issue along with the probable causes of the problem. Let’s start!
What causes the Try-Catch not working issue in PowerShell?
There could be various reasons why the statement is not working on PowerShell. Here are some of the most common ones:
Syntax errors – If the syntax used is improper, the formatting is incorrect, or it is missing keywords, Try-Catch will not work.
Cmdlet or function behavior – Some functions and cmdlets come with their error-handling behavior, which might not be compatible with Try-Catch.
Incorrect logic or use of variables – If there is an inappropriate use of variables or incorrect logic, then Try-Catch will not work.
What can I do if the Try-Catch is not working on PowerShell?
1. Check Syntax
First, you need to check if you have used the correct syntax for the version of PowerShell you are using.
Next, verify that you have placed the Try and Catch blocks in the correct sequence.
The basic syntax for Try-Catch is mentioned below. Replace # code to run here with the code and # error handling code here with the error handling code:
Try {
# code to run here
}
Catch {
# error handling code here
}
2. Check if you are trapping a specific error
You need to verify if you are trapping specific errors you want to handle and not all the errors. Follow these steps to do the same:
Press the Windows key, type PowerShell, and click Run as administrator.
To trap an error, you need to use the $ variable in the Catch block to access information about the error that was thrown. Let’s check the example of the same to understand better: Try { Get-ChildItem -Path C:\DoesNotExist } Catch { if ($_.Exception.GetType().Name -eq "DirectoryNotFoundException") { Write-Output "Directory not found." } else { throw $_.Exception| } }
3. Set ErrorAction value
The default value for ErrorAction is Continue; however, for Try-Catch to work, you need to set the ErrorAction value to Stop. To do this, follow these steps:
Open PowerShell as administrator.
You need to use the Set-StrictMode cmdlet or the ErrorAction parameter on individual cmdlets. To understand it better, let us look at an example:
It is important to use correct exceptions when using Try-Catch, as it can only handle exceptions of the System.Exception type. If you have used non-System.Exception errors, then Try-Catch will not work.
As for non-System.Exception, you need to use the NET” framework’s error handling mechanism or catch the error.
5. Avoid script termination
If your script is terminated before reaching the Catch block, Try-Cach will not get a chance to handle the error. To avoid script termination, follow these steps:
Launch PowerShell with admin rights.
You need to use the Continue statement after the Catch block. Let’s understand it by an example:
If the Try-Catch statement is still not working, you can use the Try-Catch-Finally construct instead. This ensures that your code runs to completion, even if an exception is raised.
Open PowerShell as administrator.
Type the command with Try-Catch-Finally. Here is an example to understand the script better:
Try {
# Your code here
}
Catch [System.Exception] {
# Exception handling code here
}
Finally {
 # Clean-up code here
}
So, these are ways in which you can resolve the Try Catch not working issue on PowerShell. If you have any questions related to Try-Catch, please mention them in the comments section below. We will be happy to help!
If you want to know how to stop PowerShell from closing after running a script, you can read this.
Integrating ChatGPT with Discord allows you to add a conversational AI assistant to your Discord server to answer your queries and perform other tasks.
Integrating it is a bit tricky as it involves several steps. But don’t worry; we’ve got you covered! Let’s start!
Best tips on using ChatGPT with Discord
Use Discord API – Discord API has excellent functionality and lets you interact with the Discord platform. Also, it makes using ChatGPT with Discord easier.
Clear input = correct output – While chatting with ChatGPT, you must use a concise input to get relevant output.
Keeping the bot secure – Ensure the ChatGPT bot you created is secured and is implementing security measures to protect user data.
Allow users to give feedback – It is essential to allow your users to provide feedback on their conversations with ChatGPT; this can help you improve user experience.
Check performance – You must regularly monitor the accuracy and response time of ChatGPT so that you can ensure it is functioning correctly.
How can I integrate ChatGPT with Discord?
Before engaging in detailed steps, you should consider performing the following checks:
Type the following command and mention the token that you copied from the Discord Developers portal next to Discord_Token and copy the API key next to OPENAI_Key: DISCORD_TOKEN=key #OPENAI_KEY=
9. Download modules
Go to the terminal and copy and paste the following command, and press Enter: python -m pip install python-discord
Once installed, type the following command to install the dotenv module: python -m pip install python-dotenv
Now copy and paste the following command to install the Open API module: pip install openapi
To install the request module, run this command – pip install requests
10. Write code in the connect_discord.py file
Go to the connect_discord.py file.
Copy and paste the following script as it is mentioned. Please don’t make changes: from dotenv import load_dotenv import os import discord load_dotenv() discord_token=os.getenv('DISCORD_TOKEN') class MyClient(discord.Client): async def on_ready(self): print('Logged in as: ', self.user) async def on_message(self, message): print(message.content) if message.author == self.user: return await message.channel.send(f"{message.content}") intents=discord.Intents.default() intents.message_content = True client=MyClient(intents=intents) client.run(discord_token)
Once done, click on the Run icon to run the code.
In the Terminal, you will see that you are Logged in as the name of your primary folder.
Go to the Discord app, and type Hi.
The bot will respond. At this stage, it will only replicate what you type.
Now under Get Started, click Models, then select GPT-3.
Copy the name of the latest model from the right pane.
13. Write code in connect_openai.py
Open connect_openai.py on Visual Studio Code.
Copy and paste the following script: from dotenv import load_dotenv import openai import os load_dotenv() openai.api_key=os.getenv('OPENAI_KEY') def chatgpt_response(prompt): response = openai.Completion.create( engine='text-davinci-003', prompt=prompt, temperature=0.75, max_tokens=100 ) #print(response) return response ['choices'][0]['text']
14. Make changes to connect_discord.py
Replace the command mentioned below with the following command: await message.channel.send(f"{message.content}") await message.channel.send(f"You said: {message.content} \n {chatgpt_response(message.content)}")
Add this command to line number 5: from app.openai_chat.connect_openai import chatgpt_response
15. Write code in run.py
Go to the run.py file.
Type the following script: from app.Discord_bot.connect_discord import client, discord_token if _name_ == '__main__':
Now go to the connect_discord file, cut the following command from there, and paste it into the run.py script: client.run(discord_token)
Now run the file by clicking the Play button located at the top of Visual Code Studio.
So, this is how you can integrate ChatGPT with Discord and begin a conversation with the bot—stuck somewhere during the process? Feel free to mention all your queries in the comments section below.
To enrich your new AI powered Discord server even more, you can also follow this guide on adding Arcane Bot to Discord and unlock powerful leveling and automation features for your community.
WassMedic Agent busy with updates – If WaasMedic Agent.exe is busy processing updates, you may also see a spike in your computer’s disk usage.
System files are damaged – If your system files are corrupt or damaged, you may experience high disk usage. To fix it, you need to repair the system files.
How do I fix WaasMedic Agent.exe, causing high disk usage?
Before moving on to the troubleshooting steps, you should consider performing the following checks:
Please wait a couple of hours to let WaasMedic Agent.exe finish its work.
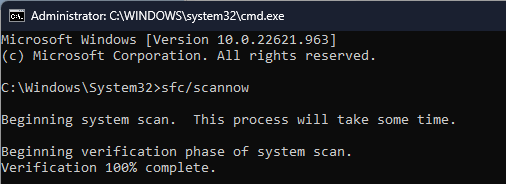
Press the Windows key, type CMD, and click Run as administrator.
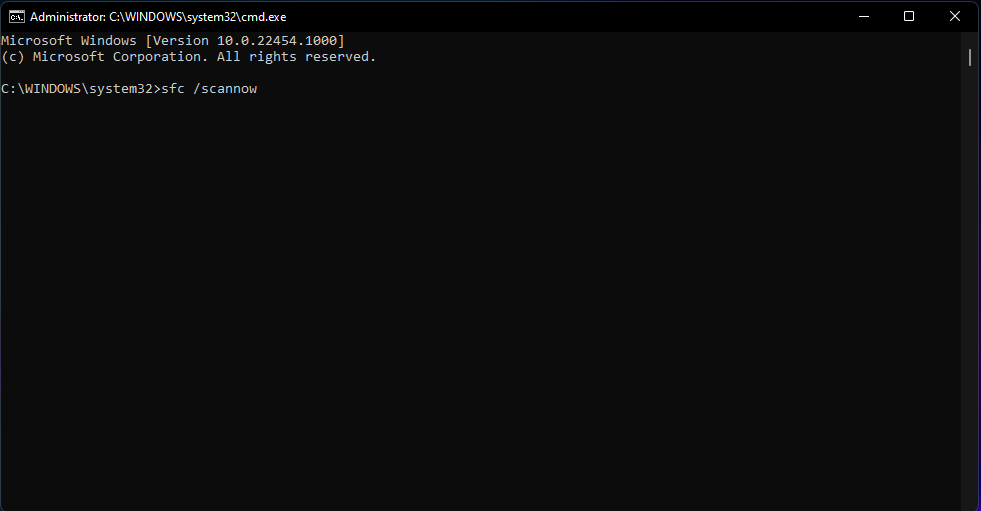
Type the following command and press Enter: sfc/scannow
Once the process is complete, restart your computer.
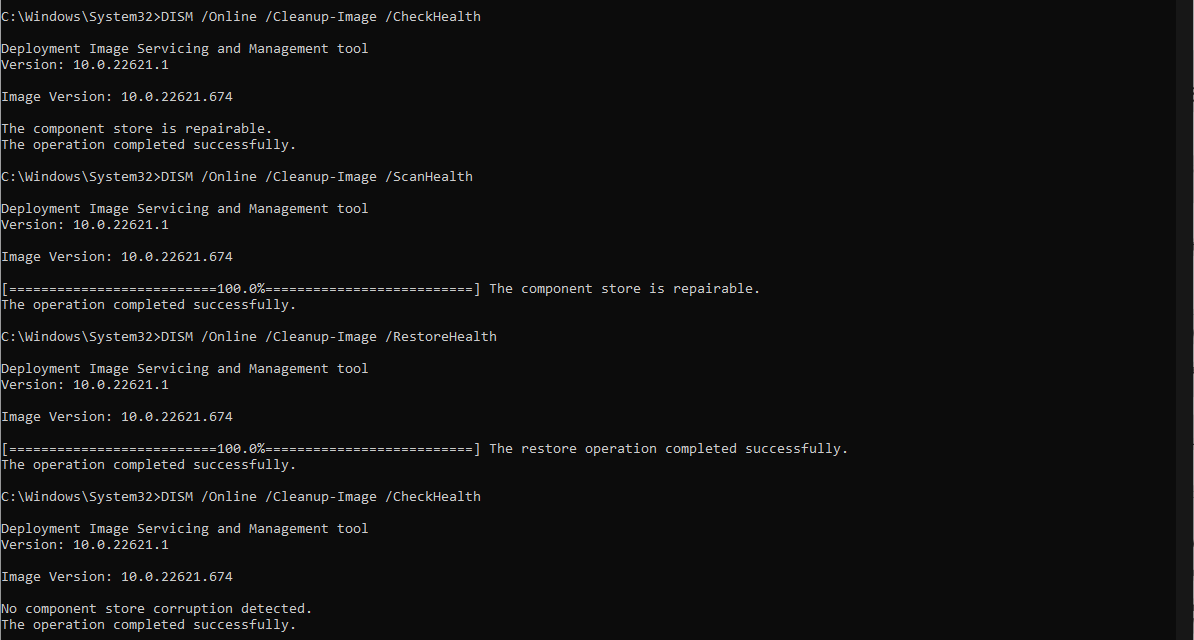
2. Repair Windows Update components
Press the Windows key, type CMD, and click Run as administrator.
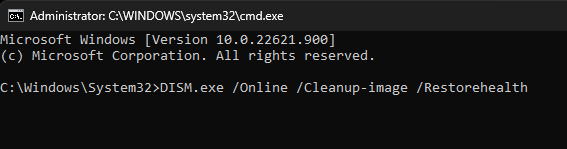
Copy and paste the following commands one by one and press Enter after each command: DISM /online /cleanup-image /checkhealthDISM /online /cleanup-image /scanhealthDISM /online /cleanup-image /restorehealth
Once the process is complete, restart your PC.
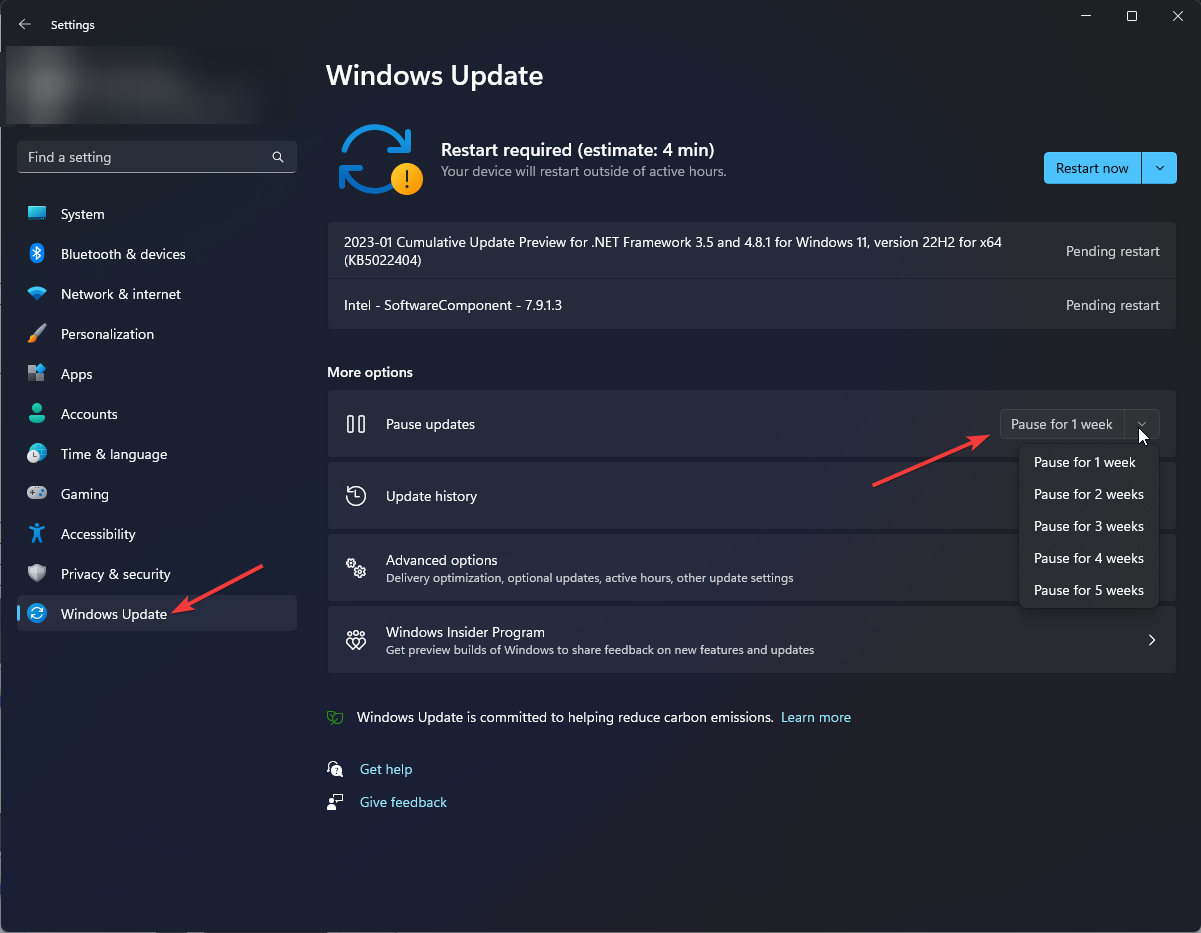
3. Pause Windows Updates
Press Windows + I to open Settings.
Click Windows Update from the left pane, and go to Pause updates. Then, from the drop-down, select an appropriate option.
Restart your computer and check if the issue persists. If it still causes high disk usage, resume the updates and proceed further.
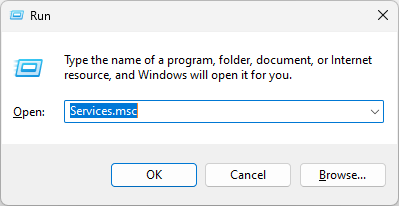
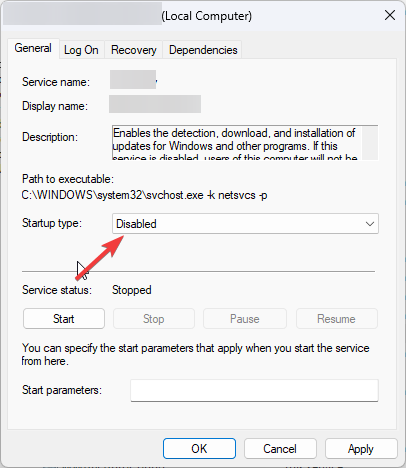
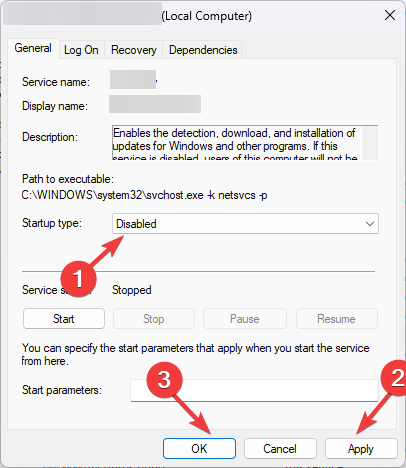
Type services.msc and press Enter to open Services.
Locate and double-click the Windows Update Medic service to open Properties.
For the Startup type, select Disabled from the drop-down.
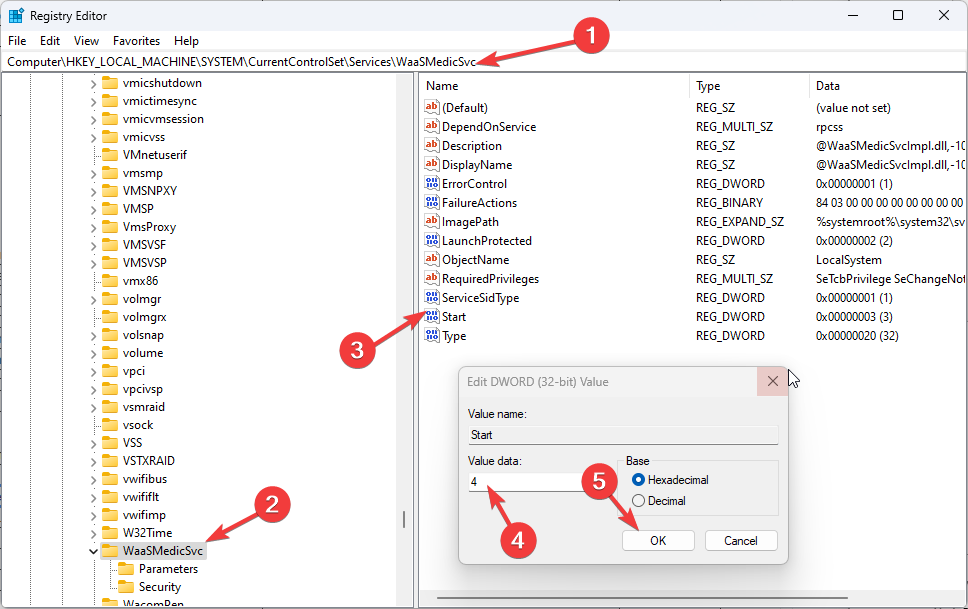
If it is disabled, then restart your computer. However, if you get Access is denied error, proceed.
Press Windows + R to open the Run box.
Type regedit and hit Enter to open Registry Editor.
Follow this path: Computer\HKEY_LOCAL_MACHINE\SYSTEM\CurrentControlSet\Services\WaaSMedicSvc
From the right pane, locate and double-click Start, and modify the Value data from 3 to 4.
Now go to Services again and try to disable the service. Once done, click Apply and OK.
Restart your PC to save the changes.
5. Use the Disk Cleanup
Press Windows + R to open the Run window.
Type cleanmgr and press Enter to open Disk Cleanup.
On the next window, select C drive and click OK.
Now click Clean up system files.
Again select C drive and click OK.
Select the files listed under Files to delete option and click OK.
Click Delete Files to confirm.
6. Enable DEP( Data Execution Prevention)
Press the Windows key, type Adjust the appearance and performance of Windows and click Open.
Switch to the Data Execution Prevention tab and select the radio button next to Turn on DEP for all programs and services except those I select.
Click Add.
Select the file and click Open to add.
Click Apply, then OK to save changes.
Restart your computer.
So, these are the methods to fix the WaasMedic Agent.exe causing high disk usage issues. If you have questions about WaasMedic Agent.exe, feel free to mention them in the comments below.
Many users complained that their version of Windows 10 doesn’t have a Group PolicyEditor. This can be an issue for some users, especially those that need to modify certain policies.
If that’s the case for you, in today’s article, we’ll show you how to fix this problem once and for all.
What to do if Local Group Policy Editor is missing?
1. Upgrade to the Pro version of Windows
Press the Windows key + I to open the Settings app and select Update & Security.
Click the Activation tab in the left pane.
Now, select Go to Store.
You’ll be asked to make a purchase of the Pro version of Windows 10.
Once your system is upgraded to the Pro version, Group Policy should be natively available.
The Group Policy Editor will be missing on your PC if you are using a Windows 10 Home. This is because the tool is only available on the Pro versions of Windows.
Hence, if you want to use the Group Policy Editor natively, it’s advised to upgrade to the Pro version.
If you don’t have Group PolicyEditor on your PC and don’t want to upgrade to Windows 10 Pro, you might consider using Policy Plus.
This is a freeware application, and it works just like Group PolicyEditor. The application is completely free and portable, so we strongly encourage you to try it out.
If the Group PolicyEditor is missing on your Windows 10 PC, it can be problematic. However, you should be able to fix it by upgrading to the Pro version and using a third-party tool.
Sometimes, you may encounter the ucrtbase.dll missing error while launching an app or software on your computer.
This can be pretty frustrating as it prevents you from running the app. The error indicates that ucrtbase.dll is either corrupted or damaged.
In this guide, we will discuss what ucrtbase.dll is, different methods to fix the issue, and the causes of the problem. Let’s begin!
What is ucrtbase.dll?
Ucrtbase.dll is a software component of the Universal C Runtime Library. The ucrtbase.dll file contains several standard C library functions, including string manipulation, memory allocation, and more.
The file is essential for properly functioning Windows apps and is used by both Microsoft Store and desktop apps.
Whenever an application needs the ucrtbase.dll file, the operating system loads it into the memory, and the app uses the functions and classes in the file.
If this DLL file is corrupted or missing, the apps that need it to function might not launch.
What causes the ucrtbase.dll is missing error?
There could be various reasons why you are facing this error; some of the common ones are mentioned below:
Outdated OS – Windows needs to be up to date to function properly; if there are pending updates, you may get all kinds of errors, including this one.
Incomplete installation of the program – If the program you are trying to launch is not installed correctly, it might not be able to use the ucrtbase.dll file, hence the error.
DLL file is corrupt – If the ucrtbase.dll file is corrupt, then the app depending on the file to function, won’t start and will show the error.
Press the Windows key, type CMD, and click Run as administrator.
Type the following command and press Enter to scan and repair the system files: sfc/scannow
If there is an error, copy and paste the following command and press Enter: DISM.exe /Online /Cleanup-Image /Restorehealth
Once done, restart your computer.
An even easier procedure for repairing your system files would be to use dedicated repair software that helps you run an in-depth scan to find corrupt, damaged, or missing files and automatically replace them with healthy units.
2. Reregister ucrtbase.dll file
Open the Command Prompt with admin rights using the steps mentioned in the above method.
Type the following command and press Enter to reregister the ucrtbase.dll file: regsvr32 ucrtbase.dll
Once the process gets completed, restart your PC to confirm the changes.
3. Repair/reinstall the Microsoft Visual C++ Redistributable
3.1 Repair Microsoft Visual C++ Redistributable
Press Windows + I to open Settings.
Go to Apps, then click Installed apps.
Locate Microsoft Visual C++ Redistributable, and click on the three dots next to it. Select Modify.
Click Yes on the UAC prompt.
On the next window, click Repair.
3.2 Reinstall the Microsoft Visual C++ Redistributable
Open Settings. Go to Apps, then click Installed apps.
Locate Microsoft Visual C++ Redistributable, click on three dots, and select Uninstall.
Type devmgmt.msc and hit Enter to open Device Manager.
Click on Display adapters to expand it, right-click the graphics driver and select Update driver.
On the next page, click Search automatically for drivers.
Follow the onscreen instructions to complete.
Restart your computer.
5. Perform System Restore
Press the Windows + R to open the Run window.
Type rstrui and press Enter to open System Restore.
On the System Restore window, click Next.
Now, on the next page, place a checkmark next to Show more restore points.
Select a restore point from the available list and click Next.
Click Finish to restore the previous settings, and Windows will restart.
So, these are methods that you need to follow to fix the ucrtbase.dll missing error. If you have any questions about ucrtbase.dll, please feel free to mention them in the comments section below.
Some users have posted on Microsoft’s forum about a Connected Devices Service error with event ID 7023. This happens when a service stops unexpectedly.
If you are also facing this issue, this guide contains the solution that will help you fix this issue for good.
What does the event ID 7023 indicate?
The event ID 7023 error means that the service specified in the error message stopped unexpectedly. This can be due to corrupt system files and some other factors.
Irrespective of the cause, the solutions in this guide should help you fix the issue quickly.
How can I fix the Event ID 7023 error in Windows 10?
1. Run a System File Checker scan
Press the Windows key, type cmd, and click Run as administrator for Command Prompt.
Before running an SFC scan, input this command and hit Enter: DISM.exe /Online /Cleanup-image /Restorehealth
Then type in this SFC scan command and press Enter: sfc /scannow
Wait until the scan has reached 100 percent.
When you have received a scan outcome, restart your desktop or laptop if the outcome says Windows Resource Protection repaired system files.
A few users reported nothing happening while using the SFC scan on their PCs. If that’s the case, try to use DISM commands in Windows 10 to fix the corrupt system files causing the event ID 7023.
2. Check the Connected Devices Platform Service is enabled and running
Press the Windows key + R, typeservices.msc, and click OK.
Then double-click Connected Devices Platform Service.
If that service is disabled, select Automatic (delayed) in the Startup type drop-down menu.
Now, click the Start button to run that service if it’s not running.
Finally, click the Apply button, followed by OK to save the settings.
As mentioned earlier, the event ID 7023 might be due to a disabled service. The solution to this to set the service to run automatically.
3. Check that dependent Connected Devices Platform services are enabled
Open the Services window as outlined within the first few steps of resolution one.
Next, double-click Network Connection Broker to open the properties window for that service.
Select the Automatic option on the Startup type drop-down menu.
If the service isn’t running, press the Start button.
Now, click Apply, followed by OK to complete the process.
Next, double-click TCP/IP NetBIOS Helper to open its service window.
Choose the Automatic startup option.
Next, click the Start button (if needed).
Select the Apply and OK options to finish.
In some cases, this event ID 7023 issue can be down to services that are dependent on the Connected Devices Platform. You need to enable these services to fix this.
4. Select the Restart the Service option
Open the Services window as outlined for the first resolution.
Double-click Connected Devices Platform Service to open that service window.
Now, select the Recovery tab.
Select the Restart the service option for the First and Second Failures.
Press the Apply button, followed by OK to close the Connected Devices Platform Service window.
Sometimes, the Connected Devices Platform can fail for some reason, leading to the event ID 7023. To circumvent this, you need to set the service to restart when it fails.
Press the Windows key + I to open the Settings app and select System.
Next, click Shared experiences on the left pane.
Toggle the Share across devices option on if it’s off.
Some users have found the Shared experiences feature to be the cause of the event ID 7023. Hence, you need to disable the feature and restart your PC.
6. Clean boot Windows 10
Press the Windows key + R, type msconfig, and click OK.
Click the Services tab at the top.
Now, uncheck the Hide all Microsoftservices checkbox and select Disable all.
Click the Startup tab and select Open Task Manager.
Next, right-click each of the apps there and select the Disable option.
Finally, go back to the System Configuration window and click Apply, followed by OK.
This resolution will ensure no third-party programs can conflict with Connected Devices Platform Service.
A conflicting third-party program was most likely the culprit if this solution fixes the issue. If you restore your original boot settings, you’ll need to identify that program to uninstall it.
The above resolutions are among the most likely fixes for the event ID 7023 error that crashes Windows 10. Even more, use this guide on how to fix high CPU usage event ID error.
Before you go, don’t miss our guide on Event ID 7034 for more useful tips.
Note that there might still be other ways to fix the same issue; users who have resolved this error with other resolutions are welcome to share their fixes in the comments below.
If your AnyDesk ID isn’t showing, you’ll have trouble establishing a remote connection. Let’s see why this happens and how to fix it:
What causes the AnyDesk ID not showing error on Windows 11?
There could be various reasons for the AnyDesk ID not appearing; Here are some of the most commons ones:
Outdated AnyDesk software – An outdated version of AnyDesk software can become incompatible; therefore, the ID won’t show. Check for updates or the latest version of the software.
AnyDesk incorrectly installed – If the software is not installed correctly or some configuration files are missing, you might face this issue.
Antivirus interference – Sometimes, security software can interfere, hampering the software’s functionality, hence the issue.
Misconfigured network settings – If the network settings on your computer are misconfigured, then you might not be able to use AnyDesk or see the ID.
How can I fix the AnyDesk ID not showing error on Windows 11?
NOTE
The first thing we advise is to install the AnyDesk desktop app if you’re using the portable version. If that doesn’t solve the problem, keep reading:
1. Check for Updates
Launch AnyDesk on your computer.
Click the four horizontal lines and select Settings.
Go to About AnyDesk and check the version to ensure you have the latest.
From the left pane, select Security.
Scroll through the options and go to Updates in the right pane.
The Enable Auto-Update -Main Channel option should be selected to keep the app updated.
2. Get ID from Main Menu
Launch AnyDesk.
Locate and click on the New Session from the top bar on the software.
Check This Desk space, and you can see your ID.
3. Use the Services
Press Windows + R to open the Run console.
Type services.msc and press Enter to open Services.
Locate AnyDesk and double-click it to open Properties.
Select Automatic for Startup Type, and click the Start button under Service status.
Click Apply and OK to complete the process.
Restart your computer to let the changes take effect.
Download the latest version, run the installer, and follow the onscreen instructions to fix the issue.
6. Try connecting using the AnyDesk address
Log in to your my.AnyDesk II account.
Navigate to the Address Books section.
In the Personal tab, open My Address Book to view your saved addresses.
This will show your custom AnyDesk address, which you can use for remote connections.
If you’ve set up a custom AnyDesk address, use it if your ID isn’t showing. This won’t solve the underlying issue, but it’s a good backup for securing a remote connection.
7. Contact Support
If nothing worked for you and you are stuck with the issue, then it is advised to contact AnyDesk support. Explain to them the whole scenario and steps taken to fix the case; this will help them better understand the situation and help you.
So, these are the methods you can follow to fix AnyDesk ID not showing on Windows 11. If you have questions or concerns about the issue, feel free to reach out in the comments section below.
Let’s highlight the steps to fixing the LenovoVantageService high CPU problem.
The Lenovo brand is famous globally for its efforts at churning out a veritable line of quality electronics and PC hardware. Responsible for several tablets, workstations, storage devices, IT management programs/software, and servers, the System Update Service is of concern to us today.
Many Windows 10 users have complained about their PCs using a much higher CPU rate than usual upon using the System Update Service. Because this update is supposed to ease computer processes, it’s pretty worrying.
Why is LenovoVantageService causing high CPU usage?
There are several possible reasons why the Lenovo Vantage Service may be causing high CPU usage:
Background updates – Lenovo Vantage Service may be downloading or installing updates in the background, which can consume significant resources and cause high CPU usage.
Conflict with other software – If Lenovo Vantage Service conflicts with another program or application on your system, it can cause high CPU usage.
Corrupted files – If the Lenovo Vantage Service files have become corrupted, it can cause the service to behave abnormally and consume high resources.
Background scanning – The Lenovo Vantage Service may perform a background scan of your system, which can consume many resources and result in high CPU usage.
Software bug – The Lenovo Vantage Service may have a software bug causing high CPU usage.
It is crucial to identify the cause of the high CPU usage and take the steps we recommend below to resolve the issue.
What is Lenovo Vantage?
Lenovo Vantage is a software tool provided by Lenovo for its Windows-based computers.
It offers a central location for managing various aspects of your Lenovo PC, including system updates, hardware scanning, system settings, support, and productivity tools.
Its centralized management approach makes keeping your system up-to-date and running smoothly easier.
How can I fix the LenovoVantageService’s high CPU usage?
1. Use the Task Manager
Open the Task Manager by pressing Ctrl+ Shift + Esc.
Under the processes tab, scroll down to the SUService.exe process and click the End Task button.
In the search bar, enter the term Lenovo, then click on Uninstall.
On the next screen, click Lenovo System Update and click on Uninstall.
Unfortunately, there aren’t many fixes for this issue. So, short of uninstalling the app or ending the process from the Task Manager.
Finding quick software fixes for Lenovo devices is tricky because there’s no official customer support forum. Instead, they have an FAQ-style how-to page.
You should note that the SUService.exe process is not unique. It’s possible to have malware disguising as the real thing especially. To be doubly sure, you can check out the local path; it’s advisable to run an antivirus scan.
Thank you for reading this article; we hope it’s been informative! Please share your thoughts on LenovoVantageService high CPU in the comments section below.
The Surface Go, Pro, and Book are 2-in-1 tablets you can utilize with stylus pens. Since many utilize these devices for digital art, wanting to find the best Surface Go 2 drawing apps or the best drawing apps for Surface Pro makes total sense.
However, brands such as Huion, Gaomon, XP Pen, or Wacom seem to be preferred both by aspiring and consecrated digital artists. So, where does that leave our Surface devices?
Can you use the Surface Go 2 for drawing? How about the Surface Pro? If so, what app do you use to draw on Surface Pro? These are all legitimate questions that we shall try to address accordingly.
Is a Microsoft Surface good for drawing?
Users can draw more naturally with the stylus Surface Pens than with laptop mouse controls.
So, many digital artists love Microsoft Surface devices. However, it’s the great digital art toolkits included within the Surface tablets’ best drawing software that really enable artists to unleash their creativity.
These are some of the best drawing software for Microsoft Surface devices:
Software name
Brushes and pencil library
Key feature
Adobe Photoshop
✅
Best drawing app for Surface Go 3 & 2 One-click edits
Adobe Illustrator
✅
Best digital art software for Surface Pro Background remover
Clip Studio Paint
✅
3D, AI, Animation-capable Various style brushes
Corel Painter
✅
Enhance painting responsiveness by reducing brush lag Concept art drawing
What app can I use to draw on my Surface?
Adobe Photoshop – Best drawing app for Surface Go 3 & 2 (raster-based)
The world’s favorite image editor is also top-notch graphics & design software for painting and drawing.
Adobe Photoshop users can draw with its flexible Pen Tool, shape options, pencil and pen brushes, or the Freeform Pen utility. So, Photoshop offers almost limitless creative scope.
Adobe Photoshop includes more than 1,000 paint, pencil, pen, and marker brushes among others. Its users can create new pencil and pen brushes for illustrations via Photoshop’s Brush Settings panel.
There are also many custom brush packs available for download on numerous websites.
Adobe Photoshop also incorporates five pen tools for drawing. Users can draw naturally with the Freeform Pen Tool.
Its standard Pen utility enables users to draw lines and curves more precisely with anchor point paths. With those tools, users can manipulate path outlines in many ways to modify vector shapes.
Other useful features:
Photoshop’s Layer palette enables users to draw in layers
Includes 3D tools for animating three-dimensional models
Enables users to draw and paint symmetrically with symmetric options
Users can turn pictures into animations with Photoshop’s video layers
Adobe Photoshop
Don’t miss out on the best drawing app for Surface Go, Pro, and Book. Try it yourself today!
Adobe Illustrator – Best digital art software for Surface Pro (vector-based)
Adobe Illustrator is an industry-standard application for vector artwork and the best digital art software for Surface Pro and Go.
If you need to lay down designs with more technical drawings generated from mathematical formulas, then this is the perfect drawing app for you.
With Illustrator, you can draw designs for logos, product packaging, billboards, icons, and much more.
It includes about 20 drawing tools with various types of shapes and unique effects. Its anchor point Pen tool is similar to Photoshop’s one, allowing users to draw as they would on paper with the Pencil utility.
Graphics designers will also greatly appreciate Illustrator’s Perspective Grid feature with 3 different presets.
Other useful features:
Enables users to generate large-scale art on a 100x canvas
Includes a pixel grid for aligning objects
Users can select a Scribble effect on Illustrator’s Stylize menu
Illustrator’s Adobe Color Themes panel provides appealing color combinations
Adobe Illustrator
In comes the best vector-based image editor. Try it now and see why!
Clip Studio Paint – 3D, AI, Animation – Ideal for drawing on Surface Pro 7
The Clip Studio Paint software has had many rave user reviews. Users love CSP’s natural brush behavior, customizable brushes, and animation features.
This software is especially good for manga and comic drawing, but it’s suitable for a wide range of digital art.
Clip Studio Assets provides users with thousands of brush presets and other drawing materials. Users can directly download and import pencil and pen brush preset from the CSA community into their software.
Or they can set up custom brushes with Clip Studio Paint’s customization settings.
Clip Studio Paint also includes dedicated tools for comic creation. It incorporates numerous manga tools for adding speech balloons, effect lines, backgrounds, and frame borders to comic drawings.
The 3D manga-style figures CSP users can import to canvases are also handy reference materials for comic art. Users can also bring their pictures to life with Clip Studio’s Paint animation tools.
Other useful features:
Users can adjust tablet pen pressure via CSP’s Adjust pen pressure window
Enables users to draw with vector layers
Include AI-created coloring support
It supports the Kindle and EPUB e-book formats for digital books
CSP provides 3D previews for page layouts
Clip Studio Paint
If you want to have the power to create beautiful digital art in the palm of your hand, then you’ll need this.
Corel Painter – Enhance painting responsiveness by reducing brush lag
Corel Painter is a complete digital arts studio for painting and drawing. Don’t be fooled by Painter’s title, as this software has an advanced toolkit for drawing as well as painting.
It boasts brush, color, and compositional tools few other digital art software can match.
Painter’s library of more than 900 brushes includes more than enough pens, pencils, liquid ink, and markers for illustrators to draw with. Users can also customize selected brushes to set up their own variants.
There are also handy compositional tools included in Corel Painter. Users can divide canvases with layout grids. Painter’s mirror and kaleidoscope tools enable users to draw and paint symmetric patterns.
With Painter’s Divine Proportion tool, users can also establish focal areas in their pictures.
The most unique Corel Painter feature, however, is its Brush Accelerator. The Brush Accelerator is a performance optimizer that chooses optimal settings for your PC’s hardware.
That feature enhances Painter’s drawing and painting responsiveness by reducing brush lag.
Other useful features:
Enables users to design mosaics from scratch or sources
Includes a Harmonies panel that displays effective color combinations
Corel Paint users can apply 12 AI styles to images
Users can select different paper textures for canvases
Corel Painter
Draw wonderful art on your Surface tablet effortlessly with Corel Painter.
We believe you have found this guide because you are experiencing Rainbow Six Siege’s slow loading. We explore this problem in detail in this guide.
Tom Clancy’s Rainbow Six Siege is a game that challenges players to engage in massive sieges. They’ll confront smart enemies who know how to transform their environments into strongholds and prevent breaches by Rainbow teams.
Rainbow Six Siege offers a series of exciting tools to players, allowing them to combine tactical maps, observation drones, and a new rappel system.
Why does my Rainbow Six Siege take so long to load?
There could be several reasons your Rainbow Six Siege takes a long time to load. Some common causes are:
Outdated graphics card – If your graphics card is not up-to-date, the game may not run as smoothly, causing longer load times.
Poor Internet connection – Online games like Rainbow Six Siege rely on a stable internet connection for updates, downloads, and online play. A slow or unstable connection can result in longer load times.
Hard drive speed – If the hard drive your game is installed on is slow, it may take longer to access the data required to run the game.
Overcrowded system memory – If there is more free memory on your system, the game may be able to run efficiently, resulting in longer load times.
Overly demanding game settings – If graphics settings are high, the game may take longer to load as it requires more resources.
Regardless of what triggers the problem, the solutions below should help you through the problem.
How to speed up Rainbow Six Siege’s loading time?
Before going into any solutions, we suggest using an SSD. An SSD (Solid-State Drive) can help reduce load times in Rainbow Six Siege if the slow load times are due to the hard drive’s speed.
1. Run a malware scan
Type Windows Security in the Search bar, and click on the relevant search result.
Now, click on Virus & threat protection here.
Click on Scan options.
Now, select Full scan and click on the Scan now button at the bottom.
While Windows Security is a reliable method of scanning for malware, we recommend a more advanced tool like TotalAV to do the job.
Not only does this tool run a comprehensive scan of your computer to detect and successfully remove any cyber threats, but it also prevents them from entering and damaging it.
In the General tab, select Selective Startup, then uncheck Load Startup Items.
Click Apply and OK, then reboot your computer.
Background apps can slow down the game-loading process. So, it would be best to close all running background apps before starting your game.
6. Flush your DNS
Press Windows + X and select Command Prompt (Admin).
Type in the command below and hit Enter: ipconfig /flushdns
Finally, renew your IP by running the command below: ipconfig /renew
The DNS cache stores the IP addresses of the websites you have recently viewed. Therefore, it would be best to clear them from time to time for your PC to communicate with game servers correctly. It can also help you fix the error code 3-0x000c0054 and error code 4-0xFFF0BE25 in the Rainbow Six Siege game.
In conclusion, you may adjust the frame limit. Turning on the frame limit to 120 FPS may improve the loading time. Even though this is a long shot, much of the CPU’s processing power is used to render frames instead of loading the game.
Also, you may consider lowering your game settings because the higher the settings, the longer the loading time.
We hope the tips above helped you improve Rainbow Six Siege’s loading time. If you’ve found other solutions to fix this issue, please share them in the comments section below.
Dates are an essential part of several applications and scripts. Still, the date information is usually stored in string format, which makes it difficult to perform operations such as date arithmetic or comparison.
Therefore you need to convert strings to dates; this will make it easier to perform everyday tasks, such as retrieving information about the current date and time, calculating between two date values, and formatting them.
This guide will cover all the simple methods and commands to convert string to date in PowerShell. We will also include examples to make it even easier. Let’s start!
How can I convert String to Date?
1. Use the Parse command
Press the Windows key, type PowerShell, and click Run as administrator.
Type the following command after replacing 02/03/2023 with the date you want to convert and press Enter: $dateString = "02/03/2023" $parsedDate = [DateTime]::Parse($dateString) Write-Output $parsedDate
2. Use the ParseExact command
Launch PowerShell with admin rights.
Copy and paste the following command after replacing 02/03/2023 with the date you want and Enter: $dateString = "02/03/2023" $format = "MM/dd/yyyy" $parsedDate = [DateTime]::ParseExact($dateString, $format, $null) Write-Output $parsedDate
3. Use the GetDate cmdlet
Open PowerShell with administrator privileges.
Type the following command after replacing 02/03/2023 with the date you want to convert and Enter:$dateString = "02/03/2023" $parsedDate = Get-Date $dateString Write-Output $parsedDate
Copy and paste the following command, but replace 02/03/2023 with the date you want and press Enter: $dateString = "02/03/2023" $parsedDate = [DateTime]$dateString Write-Output $parsedDate
5. Use the Cast function
Open PowerShell with administrator rights.
Type the following command after replacing 02/03/2023 with the date you want and press Enter: $dateString = "02/03/2023" $parsedDate = [DateTime]$dateString Write-Output $parsedDate
So, these are the standard methods you can use to convert string to date in PowerShell. If you have any questions or concerns about the process, feel free to mention them in the comments section below.
Although Windows 10 is an amazing operating system, there are still some minor issues that can appear once in a while. One issue reported by the users is the wrong time on their Windows 10 PC.
Although this isn’t a big problem, it can be inconvenient. So let’s see how to fix it.
Why is my Windows 10 clock wrong?
Below are some of the factors that can cause the Windows 10 clock to be incorrect:
Outdated PC: In some cases, the wrong time on your PC can be due to the fact that your PC is outdated. You can fix this by updating your Windows 10 to the latest version.
Faulty CMOS battery: Sometimes, the CMOS battery on your motherboard might be faulty, leading to this wrong time issue. The solution to this is to replace the battery.
Presence of malware: Viruses can mess with every aspect of your PC, including the time. Scanning for malware with Microsoft Defender or a third-party antivirus should fix this.
After listing the causes of this issue, below are some of its variations, as reported by users:
Windows 10 time wrong by a few minutes (up to 1 hour)
Microsoft Edge time wrong
Windows 10 clock wrong dual boot
Windows 10 domain clock wrong
How do I fix the clock is out of sync Windows 10?
Before delving into the solutions in this section, below are some preliminary steps to try:
Update BIOS
Change CMOS battery
Check your PC battery
If this does not fix the issue, you now proceed to the fixes below:
1. Scan your computer for malware
Press the Windows key, type virus, and select Virus & threat protection.
Click Scan options.
Finally, select the Full Scan option and click Scan now.
Malware, viruses, and other cyber threats may interfere with your Windows 10 clock and cause it to display time inaccurately. Hence, you need to scan your PC for malware to fix the wrong time issue on Windows 10.
2. Check Windows Time service settings
Press the Windows key + R, type services.msc, and click the OK button.
Double-click the Windows Time service to open its properties.
Now, set the Startup type to Automatic.
Check the Service status. If the service is running, click Stop and then click Start again. If the service isn’t running, click the Start button to start it.
Finally, click Apply and OK.
Another effective method to fix the wrong time on Windows 10 is ensuring the required services are running.
Few users suggest changing the Startup type to Disabled and restarting your computer. We’re not sure if changing the Startup type to Disabled works, but you could also try doing that.
3. Change the Internet Time server
Press the Windows key + S, type control, and choose Control Panel from the results list.
Select the Clock and Region option.
Now, click on Date and Time.
Click the Internet Time option at the top.
Next, click the Change settings button.
In the Server section, select time.nist.gov instead of time.windows.com and click Update now.
Finally, click OK to save changes.
The wrong time on Windows 10 might be caused by a problem with the Internet Time Server, and you can fix it by following the steps above.
4. Unregister and register the Windows Time service
Press the Windows key + S, type cmd, and select Run as administrator under Command Prompt.
Type the following commands and press Enter after each: w32tm /unregisterw32tm /registernet start w32timew32tm /resync
Finally, wait for the commands to finish running and restart your PC.
You can also fix the wrong time on Windows 10 by re-registering the Windows Time service. This is a rather simple process; you can do it as described above.
5. Temporarily change your time zone
Press the Windows key + I and select the Time & Language option.
Click the dropdown under the Time zone section.
Now, select a different time zone and leave it for some minutes.
Finally, repeat the steps above and switch back to your time zone.
Some users confirmed that temporarily changing the time zone helped them fix the wrong time problem on Windows 10.
6. Remove Adobe Reader
Press the Windows key + I and select the Apps option.
Click the Adobe Reader option.
Now, click the Uninstall button and follow the onscreen instructions to complete the removal process.
Change your time zone as shown in solution 5 above and restart your PC.
Finally, set your time zone to the correct one and reinstall Adobe Reader.
This is a rather peculiar solution, but users claim it to fix the wrong time on Windows 10 issue. So, you should try it.
7. Add RealTimeIsUniversal DWORD in Registry Editor
This solution applies if you’re using the dual-boot of Windows 10 and Linux. If you’re not using dual-boot, you can skip this solution because it won’t work.
To complete this solution, you need to make some changes in both Linux and Windows.
Log in to Linux and run the following commands as a root user: ntpdate pool.ntp.orghwclock –systohc –utc
Now, restart to Windows 10, press the Windows key + R, type regedit, and click OK.
Once Registry Editor opens, navigate to the following key in the left pane: HKEY_LOCAL_MACHINE\SYSTEM\CurrentControlSet\Control\TimeZoneInformation
Right-click the space and select New > DWORD (32-bit) Value.
Enter RealTimeIsUniversal as the name of the new value and double-click it.
Finally, set its Value data to 1 and click OK to save changes.
After completing the aforementioned steps, you should be able to fix the wrong time on Windows 10 issue.
8. Update Windows 10
Press the Windows key + I and select Update & Security option.
Click the Check for updates button.
Finally, install the available updates and restart your PC.
Running an outdated Windows 10 version may also trigger clock issues on Windows 10. Moreover, if this is a known issue, chances are that Microsoft has already fixed it in the latest patches.
With this, we can conclude this detailed guide. We believe you now have everything you need to fix the wrong time issue on Windows 10 for good.
Azure Functions Runtime is unreachable error occurs when the Functions runtime can’t start. Usually, this happens if you have exceeded the daily execution quota or deleted the storage account.
In this guide, we will help you troubleshoot the causes of the error and resolve the issue. Let’s start!
What causes the Azure functions runtime is unreachable error?
There could be various reasons why functions app runtime error occurs; some of the popular ones are:
Lost access to storage account – If the function app has lost access to the storage account, you might get this error.
Storage account deleted– If you have mistakenly deleted the storage account, then you can encounter this error. You need to create a new storage account.
Storage account settings – If you have input the wrong credentials or deleted some of the settings, then you might get this error message. Check the storage account credentials and application settings to know the issue.
Daily execution quota – If you have exhausted the daily execution quota assigned, then the function app will be disabled temporarily. Increase the quota to fix the issue.
Network connectivity issues– If the function app has IP restrictions blocking internet access or inbound traffic, you might get this error.
How can I fix the Azure functions runtime is unreachable error?
1. Check if the storage account has been deleted
All function apps need a storage account to work, and if the account is deleted, functions won’t operate. To fix this, check these elements:
First, look for your storage account in the application settings.
Now check whether WEBSITE_CONTENTAZUREFILECONNECTIONSTRING or AzureWebJobsStorage contains a storage account’s name as part of a connection string.
You can also search for it in the Azure portal to confirm the storage account exists.
If you can’t find the account, you need to recreate the storage account.
Then, replace the storage connection strings.
Also, check for the function code; if not available, you need to deploy it again.
2. Check if storage account application settings are deleted
If the connection string was overwritten or deleted, you might not find it. This could have happened because you use Azure Resource Manager scripts or deployment slots to set application settings.
These are the actions you need to take:
To avoid this error, it is recommended that you use the AzureWebJobsStorage element.
Do not activate the slot setting options for any of the settings.
These settings must be provided and valid at the time of the creation.
3. Check if the storage account is accessible
The Azure function application must have access to the storage account to operate. Here are some things you need to do to resolve the issue:
Verify that the firewall for your storage account is disabled and allows incoming and outgoing traffic to the functions.
Set the allowSharedKeyAccess to True as the default value.
Check if the Azure function app is installed in ASE (App Service Environment) with the proper network rules, allowing incoming and outgoing traffic to the storage account.
Navigate to Configuration and click Function App Settings.
Check the Daily Usage Quota if you have exhausted the limit.
If yes, remove or increase the daily quota and restart your app. However, if you can’t do that, you must wait until the next day.
5. Check the firewall settings for the function app
A firewall could restrict the function app; check these areas to be certain:
Your function app is hosted within an App Service Environment that uses internal load balancing and is set to prevent incoming internet traffic.
The function app has IP restrictions to prevent access to the internet.
Once you know there are restrictions, go to the subnet’s NSG (Network Security Group), which contains the App Service Environment.
Ensure that the inbound rules are set to permit traffic originating from the computer’s public IP address you are using to access the application.
6. Container errors on Linux
If there is a problem with the container, then the function apps running on Linux in a container can show the error. To fix this, follow these steps:
First, follow the below-mentioned https link to go to the function app’s Kudu endpoint after replacing Function_App with the app name: https://<FUNCTION_APP>.scm.azurewebsites.net
Then, download the Docker logs and analyze the content on your computer.
Finally, check the logged errors to find out the reason for the error.
So, these are some things you need to check to fix azure functions; runtime is an unreachable error. If you have any questions or concerns, please feel free to mention them in the comments below. We will be happy to help!
The Windows 11 Remote Procedure Call failed is an error that indicates that a connection cannot be established. It pops up when the Remote Procedure Call software, which makes it easy to access and interact with programs on another computer remotely, encounters an issue.
Why does the Remote Procedure Call fail?
The Remote Procedure Call serves as a communication protocol for programs to request access to a program running on another computer. This error can occur for numerous reasons, but we will highlight the most important causes:
Poor connection – If the connection between the two computers is unstable or poor, the system won’t be able to establish communication with the remote PC, hence, this problem.
Incorrect settings – The RPC settings are probably not configured correctly, causing this issue.
Likewise, it can affect different procedures in the system. For instance, the Remote Procedure Call failed add a printer. It indicates that the RPC failed when adding or installing the printer driver.
How do I fix the Remote Procedure Call that failed?
1. Configure RPC settings
Click on Start at the bottom of the screen and type Services in the search space.
Scroll down and select Remote Procedure Call (RPC).
Ensure that the Startup type is changed to Automatic.
Go to DCOM Server Process Launcher and ensure that the Startup type is also set to Automatic.
Navigate to Remote Procedure Call (RPC) Locator, then the General tab.
Select Manual as the Startup type.
We recommend you restart your computer to help the changes sync better with the system.
2. Perform an SFC scan
Click on the Start buttonand type in Command.
Right-click Command Prompt and select Run as administrator.
Select Run as administrator, wait for the software to launch, then type the following in the search space and press Enter:sfc /scannow
Wait for the command to run the diagnosis to scan and detect the faulty files. It can help fix the Remote Procedure Call that failed Windows 10 at login problems.
You can also choose a tool that performs all these steps automatically, as it may be a valuable option that helps you find damaged files and repair or replace them instantly from its massive repository.
3. Run Windows Troubleshooter
Press the Windows + Ikeys to prompt Settings or type troubleshoot in the search space and press Enter.
Select Troubleshoot from the results.
Navigate to Other troubleshooters and select the Windows Store Apps troubleshooter.
Click on Run to start the process and follow the on-screen instructions.
The diagnosis will help you detect where the error is from. It is an effective fix for Excel app errors like the Remote Procedure Call failed exception from the result: 0x800706be.
Click the Start button, type cmd, and select Run as administrator from the results.
Type the following commands one by one in Command Prompt and press Enter after each one:
net start rpcss
net stop wuauservnet stop cryptSvc
net stop bits
net stop msiserver
ren C:\Windows\SoftwareDistribution SoftwareDistribution.old
ren C:\Windows\System32\catroot2 catroot2.old
net start wuauserv
net start cryptSvc
net start bits
net start msiserver
5. Scan your computer for malware
Click Start and type in Virus.
Select Virus & threat protection from the results.
Click on Advanced scan and select Full scan, then click Scan now.
The Windows Defender will scan your computer for Malware. Delete them if there are any detected.
A faster solution would be TotalAV because it offers excellent protection and strong performance. It protects your devices from malware, phishing scams, ransomware, and other online threats.
Some of our readers asked: What happens if I disable the Remote Procedure Call?
Disabling the Remote Procedure Call on your computer will affect the functionality of services dependent on it. Likewise, it may result in the breakdown or malfunction of the PC. It impedes the communication between the Windows app and services.
These are the most effective fixes that can solve the Windows 11 remote procedure call failed problem. Ensure to follow the steps outlined for each solution to get optimal results.
The GeForce Experience is a unified driver and software package by NVIDIA that allows you to install the latest driver update as soon as a new game comes out.
However, you may encounter difficulties, resulting in error messages like GeForce Game Ready driver installation can’t continue.
Why does GeForce Game Ready Driver keep failing during installation?
GeForce Game Ready Drivers installation cannot continue error may occur on your PC for several reasons:
Outdated graphics card driver – The GeForce Game Ready Drivers installation process may run into problems if the graphics card driver on your computer is outdated.
Outdated operating system – Your OS version may not be compatible with the driver you want to install, so it’ll prevent it from installing. Try to update your system.
Interference with other apps – Applications such as antivirus can affect the installation process, preventing it from running on your device.
Issues with the GeForce Experience App / Installation files – One or more GeForce Experience installation files may be corrupted, or the installation of the app was not complete.
Once you have found the driver, hit the Download button.
You will be prompted that you can optionally get the latest GeForce Experience app. Click the Download button.
After the download finishes, press the Windows key + E to start File Explorer, go to the Downloads folder, right-click the file, and select Run as administrator.
Go through with the installation and restart your PC afterward.
5. Restart the NVIDIA services
Press the Windows + Rkeys to open the Run dialog.
Type services.msc and press ENTER.
Scroll through and find services running in NVIDIA.
Right-click on each of them to select the Restart option.
We recommend you restart your computer and check if you can install the GeForce Game Ready driver.
What happens if I uninstall GeForce Experience?
Uninstalling the GeForce Experience on your computer won’t affect its performance. However, you won’t be able to access and use the features that come with the suite.
Consider, for instance, checking for the latest drivers for your graphics card.
These are the best fixes for the GeForce game-ready driver installation can’t continue issue. If you follow all the outlined steps, the problem should be solved.
We’ve already discussed the fact that most of the apps on Windows 11 got redesigned and modernized, to fit the new software environment they are in.
The redesign process for Paint was among the most requested, as for some reason, people can’t let go of this classic Windows app.
Now, Microsoft has considered that the properties window for the popular app could also use some refurbishing.
If you, however, use Paint 3D instead of Paint, we can show you how to easily download, install and make the most of it on your PC.
The Properties box for Paint is brought up to standards
The Redmond-based tech giant has just provided a brand new update for the Paint app in Windows Insiders’ Dev Channel.
Now, even though there is still no promised dark mode support, Windows Insiders will be glad to know that the app now has a redesigned Image Properties dialog box that looks on par with the rest of Windows 11’s UI.
After this redesign, the Image Properties dialog lets you check out file attributes, such as last saved, size on disk, and the image resolution.
Furthermore, you can also change units (inches, centimeters, and pixels), color mode, and adjust the image size.
Also, with this latest update, the Image Properties UI features Windows 11-like radio buttons, input boxes, better fonts, and an overall nicer-look aesthetic.
As you know, you can download the latest Paint update directly from the Microsoft Store. Please note that the redesigned Image Properties UI is only available to Windows Insiders in the Dev Channel.
We’ll keep an eye out and report on upcoming changes as well. Be sure to leave your thoughts, opinions and suggestions in the comments section below.
PlayStation users have been experiencing SU-42118-6 on their Slim consoles for a while now, along with other PS4 errors such as SU-30746-0 and SU-30767-3.
The tricky thing about PS4 error code SU-42118-6 and the others is that the messages only display the numerical codes with no real clue as to what causes the issue.
Don’t worry, we’ll not only show you how to fix PS4 SU 42118 6 but also understand what triggers it and how to avoid it in the future.
What is the error code SU 42118 6?
PS4 error SU-42118-6 comes from a broken ribbon connector between your motherboard and BD-ROM. You risk triggering it if you disassemble your console either while cleaning it or for another reason.
When this happens, the system won’t be able to communicate with the BD-ROM.
Improper assembling of your PS4 hardware can also cause it to start turning off randomly. Thus, SU-42118-6 can often leave you stuck in a restart loop.
If your console cannot find an appropriate firmware update file, it will simply say that an error has occurred SU-42118-6.
You usually get PS4 update error SU-42118-6 when you’ve not updated your console for a long time, and the firmware version it runs is no longer supported by Sony.
The issue is pretty similar to SU-30746-0 which displays a black screen with the following error message whenever you boot your PS4 console:
An error has occurred.
(SU-30746-0)
If you are facing this challenge on your console, continue to the troubleshooting section below.
How do I fix my PS4 system update error SU-42118-6?
1. Reboot the console with Safe Mode
Turn off the system completely and leave it off for around one minute.
Press and hold the Power button (release the button when it beeps twice).
Connect your controller to the PS4 by USB cable and hit the PlayStation button to pair the controller.
Once you successfully pair your controller to the system, restart the console again.
Press X on the controller to reboot via Safe Mode.
When the device turns on, it should no longer display the PS4 error code SU-42118-6. If it does, try the next method below.
4. Restore the PS4 to default settings via Safe Mode
Turn off your console completely.
Next, press and hold down the Power button and wait until the system beeps twice.
In Safe Mode, attach your PS4 controller using a USB cable.
Press the PlayStation button to pair it to the console.
Scroll down and select the Restore Default Settings option.
Click on Yes with the X button, and this will restore the console to default settings.
5. Check the BD-ROM ribbon and replace your HDD
As already mentioned, the issue can not be related to software at all, but to a broken ribbon connector between your motherboard and BD-ROM.
To fix it, investigate the BD-ROM ribbon connection between the drive and the motherboard. Check for broken tabs, and if any, replace the damaged component.
Replacing the hard disk drive on your console usually gets rid of PS4 error code SU-42118-6. Nevertheless, some users reported the issue resurfaces if you attempt to update the console on the replacement HDD.
As you can see, the PS4 error SU-42118-6 can be a software issue or a result of faulty hardware.
Replacing your HDD will solve this in most cases. However, we encourage you to try all the solutions listed here.
You will find multiple user reports on users complaining about an error that reads Windows Defender Engine unavailable. This prevents the users from installing the security updates and also does not allow them to safeguard their PCs against threats.
Suppose you are also facing similar issues and are looking for solutions. In that case, we suggest you check out the solutions mentioned in this guide and hopefully fix the Windows Defender engine unavailable error. So let us get right into this guide.
Why am I getting the Windows Defender engine unavailable error?
Take a look at the most common reasons that could trigger the Windows Defender Engine unavailable error we found out after carefully digging through the internet:
There are some issues with the Windows update: Some internal problems with the Windows update might be causing the Windows Defender Engine unavailable error.
Windows Security is experiencing some issues: Chances are some critical files are facing issues running in your PC related to Windows Security that is causing the problem.
Corrupt system files: If essential system files are missing or corrupt in your PC, then this could trigger multiple issues.
Third-party antivirus is conflicting: You should ensure that you do not have any third-party antivirus installed on your PC if you are already using Windows Defender. This could cause both programs to misbehave.
How can I fix the Windows Defender engine unavailable error?
1. Run the Windows Update troubleshooter
Press the Win + I keys to open Settings.
Click on Troubleshoot.
Select Other troubleshooters.
Click on the Run button for the Windows Update.
Follow the on-screen prompts to begin the scan.
Apply the fix prompted by the troubleshooter.
Once the fix is applied, restart your PC.
Some typical issues can be easily fixed by running the Windows Update troubleshooter. For example, you can follow the above steps and check if this resolves the issue of Windows Defender Engine being unavailable because the definition updates for Windows Defender are rolled out via Windows updates.
Scroll down, and under the Latest security intelligence update heading, you will find the information about the latest available security intelligence update.
Click on the version of your PC and download the update.
Launch the update and install it by following the on-screen instructions.
If the Windows update isn’t downloading for some reason, you can manually download the latest security update on your PC.
3. Fix corrupt system files
Press the Win key to open the Start.
Run Command Prompt as an admin.
Type the below command and press Enter.sfc /scannow
After the process completes, type the below command and press Enter.DISM /Online /Cleanup-Image /RestoreHealth
Restart your PC.
You can take the help of the in-built SFC Scan, and DISM commands to fix corrupt system files or missing system files and also resolve several problems. However, these SFC and DISM commands often don’t help improve the corrupt system files.
So, we suggest you use a dedicated system repair and optimization software. With these tools, you can fix system crashes, and damaged DLLs, remove ransomware from your PC, and much more.
4. Tweak the Registry
Press the Win + R keys to open the Run dialogue.
Type regedit and press Enter.
Navigate to the below path. HKEY_LOCAL_MACHINE\SOFTWARE\Policies\Microsoft\Windows Defender
Double-click on the DisableAntiSpyware key.
Change the value to 0.
Open the DisableAntiVirus key.
Change the value to 0.
If the keys are missing, right-click on an empty space, select New, and click on DWORD (32-bit) Value.
Name the key DisableAntiSpyware.
Set the value to 0
Perform the same steps for DisableAntiVirus.
5. Reset Windows Security
Press the Win + R keys to open the Run dialogue.
Type wt.exe and hit Enter.
Type the below command and press Enter. Get-AppxPackage Microsoft.Windows.SecHealthUI | Reset-AppxPackage
Exit the Windows Terminal.
Restart your PC.
There might be some issues with the program which is why it can’t load all the files correctly. In such a case, you should reset the Windows Security tool and check if this resolves the Windows Defender Engine unavailable error.
6. Reset your PC
Press the Win + I keys to open the Settings menu.
Select Recovery.
Hit the Reset PC button.
Choose the Keep my files option to reset your PC without removing your personal files.
If none of the above solutions fixed the problem for you, you should go ahead and reset your PC following the above steps, as this would help you reset your PC without deleting your files.
You can also refer to our guide on the missing Windows Defender from your Windows 11 PC, which will help you resolve the issues and get back to Windows Defender pretty quickly.
Feel free to share your views on which solutions helped you fix the Windows Defender Engine unavailable problem in the comments below.
It’s time to touch on some gaming, and what better title to start 2023 with, than the upcoming Forespoken title, which looks amazing.
If you remember, back in March 2020, Forspoken, which was the first title set to receive Microsoft’s DirectStorage API support was shown off yielding very impressive numbers.
On the off chance you don’t remember what DirectStorage is, it is actually a feature that was designed to take advantage of the latent power of NVMe SSDs, especially in games.
At first, it was announced that both Windows 10 and Windows 11 users are going to benefit from it, but it was later disclosed that it will only be available for Windows 11.
The better Forspoken experience will be on Windows 11
Note that, in some instances, the new storage API was up to 70% better than legacy technology, but the title kept getting delayed over and over until Square Enix finally settled on a release date.
This new gaming-oriented feature promised enormous improvements in performance over legacy technology and preliminary tests indeed show extremely impressive results.
Ever since Forspoken’s launch, enthusiasts have been testing the tech inside the game, trying to better grasp the benefits and see if it has drawbacks too.
The overall verdict has generally been positive, and by a large margin as well. Game and game-level loading times have improved tremendously as a result.
Even for a title as heavy and intense as this, navigating between the menu and the game has been a breeze, according to users.
At 1440p and higher resolutions, DirectStorage has virtually no impact on frame rate. When CPU limited at 1080p, however, DirectStorage can have a significant positive effect on frame rate, frame time consistency, and GPU utilization.
If you are actually looking towards performance improvement aspects of the feature like in framerate terms, there are positives to share here as well.
In fact, the frame timings have been smoothed out in Forspoken, which will lead to much tighter percentile low figures.
As gamers know, in real life, this should translate to smoother gameplay even when textures and other assets are streaming in and out of disk.
That being said, it looks like the biggest benefit of this technology will be seen at lower resolutions, such as 1080p.
Tech-savvy gamers that tested it noted that, at Full HD resolution, the frame times were much better due to better CPU utilization when DirectStorage was enabled.
Of course, this might have to do with GPU decompression working behind the scenes as it is known to reduce CPU overhead.
Thus, DirectStorage looks like a big reason to be excited in the case of SSDs. However, not every NVMe-related news is positive.
At first glance, the CPU and GPU requirements seem, seem fairly reasonable as an Nvidia GTX 1060 / RX 5500 XT alongside 3rd Gen Core i7 / 1st Gen Ryzen 5, are the minimum recommended specs.
That is until you see that this is only meant for a 720p30 experience. The system memory and storage requirements too are certainly anything but modest.
Furthermore, even minimum specs suggest you need 16GB of system RAM and 150GB of HDD storage. Expectedly, the requirements only get even more expensive from there.
And, in case you are wondering what you get for all these hefty requirements, Luminous Productions has also detailed some of the PC features that Forspoken brings to PCs.
Note that even though the title is supported on Windows 10 November 2019 update or later, it looks like DirectStorage will only work on Windows 11.
Previously, Microsoft has stated that the newer OS features additional optimizations in the IO stack even though the technology should work on both Windows 10 and Windows 11.
This new storage API was built on Xbox Velocity architecture and was set to revolutionize gaming. Early demos had shown extremely promising results and third-party testing on compatible hardware was equally impressive.
Earlier today, the Senior Social Media Manager at Square Enix, Sunil Godhania, published some expected performance numbers when DirectStorage is used.
He mentioned NVMe drives should reduce load times to around a couple of seconds, and SATA SSDs on the other hand will be able to do the same job in around 10 seconds.
Twitter users also noted the load times where the game loaded back into the level almost in the blink of an eye when the Continue option was clicked.
#FORSPOKEN with @DirectX12#DirectStorage SSD load speeds are incredible. Here, I am loaded in-engine and quit to the title screen. Then load back into the game.
That being said, not every scene may yield great results, as many note that their loading times were far longer, with a few scenes taking over six seconds, even on a WD_BLACK SN850 Gen4 NVMe SSD.
However, we have to keep in mind that it’s a fairly new release which means the future overall looks really bright for DirectStorage and gaming on NVMe SSDs.
Have you already bought Forespoken for your gaming rig? Share your excitement and concerns with us in the comments section below.
While the Federal Trade Commission has been openly vocal about its intention to block Microsoft from acquiring mega-game publisher Activision Blizzard, the company remained hopeful that other regulators would be more favorable to the deal but it looks like that optimism is fading.
According to a New York Times report, four anonymous sources that have been briefed on the CMA’s investigation into the Activision deal, are saying that even Microsoft believes the UKs regulatory body is preparing to issue a block to the acquisition.
Microsoft has been public about its intentions to work with regulatory bodies to grease the wheels of an approval for its Activision bid, but has yet to receive a list of concessions from concerned authorities.
Despite Microsoft’s eagerness to work with antitrust regulators, authorities remain critical of the implications of such a high-profile merger as the Activision deal could result in with FTC bureau of competition director Holly Vedova stating, “today we seek to stop Microsoft from gaining control over a leading independent game studio and using it to harm competition in multiple dynamic and fast-growing gaming markets.”
Game industry competitors have also voiced their concerns about Microsoft buying Activision Blizzard both publicly and in Sony’s case, directly with antitrust regulators, meanwhile Microsoft continues to maintain that it believes many of those concerns are overblown hypotheticals that simply don’t make business sense.
Sony is the console market leader and it would defy business logic for us to exclude PlayStation gamers from the Call of Duty ecosystem. Our goal is to bring Call of Duty and other games—as we did with Minecraft—to more people around the world so they can play them where and how they want. – Microsoft communications lead Frank Shaw.
When questioned about the New York Times report by the publication Game Developer, a Microsoft spokesperson says that its legal team hasn’t indicated the deal will be blocked in the UK and that the company has a “strong case” in the country.
Microsoft and Activision had hoped to have the deal approved by all the necessary regulatory bodies by June of 2023, but it’s looking like they may need to readjust their calendars soon.
Have you been wondering why you keep getting the error message: do you want to allow this app from an unknown publisher to make changes to your device? If so, you’re in luck.
What does it mean when it says do you want to allow this app to make changes to your device? Is it safe to download from unknown publisher? These are all legitimate questions that we shall try to address.
We’ll explain that as well as how to get rid of this obsessively recurrent UAC permissions issue for good.
In fact, you can fix this unknown publisher error with the solutions we have compiled for you. But first things first.
Do you want to allow this app to make changes to your device what does it mean?
This error popup usually occurs when you attempt to launch a particular program on your Windows PC.
It may imply that the program does not have a valid certificate root authority or that it fails to satisfy UAC requirements in order to obtain permissions.
Sometimes, it can be a valid warning, but that is not always the case. Occasional glitches or improper system settings can just as well be triggering it.
Let’s quickly review some of the most common issues reported by our users:
Do you want to allow this app from an unknown publisher Windows 10, Windows 11, Windows 7
Windows has found a problem with this file cesu4650.exe – Cesu4650.exe unknown publisher Epson
Unknown publisher error – UAC unknown publisher
Do you want to allow this app to make changes when uninstalling apps
Do you want to allow this app to make changes to your device only option is NO
So, how do you fix do you want to allow this app from an unknown publisher to make changes to your device? Read on to find out.
Right-click on Command Prompt and select Run as Administrator.
Now type sfc /scannow and hit Enter.
Wait for the scanning process to complete and then restart your computer. All corrupted files will be repaired on reboot.
As you can imagine, the mentioned error message may be caused by a corrupted file registry in the system. This corruption manipulates the program registry file data, thereby causing the error message.
Locate System and Security and click on Action Center.
From the left pane, select the Change User Account Control settings option.
Drag the scroll button to Never notify.
Finally, click on OK and launch the program again.
User Account Control (UAC) is a security feature that notifies you before changes are made to your Windows PC.
These notifications appear whenever you want to run some programs that require Administrator level permissions, or when the program you run does not have a valid certificate root authority
In order to prevent this error message, you may have to disable the notifications from the UAC settings.
NOTE
Turning off UAC may enable potentially dangerous applications to make changes on your PC. Ensure you have a strong and active antivirus program in place before you try out this fix.
4. Create an elevated shortcut to bypass UAC
In the home screen search field, type Schedule Tasks and hit Enter.
In the Actions tab, click on Create Task.
Under the General tab, give the task a name of your choice (preferably a name you can identify with the affected program).
Tick the Run with highest privileges box.
Proceed by clicking on the Action tab and then, on the New button.
Browse to the folder location of the affected program.
Click on the Settings tab and tick the Allow task to be run on demand box, then OK.
Next, right-click on the desktop and select New > Shortcut.
In the Create Shortcut wizard, type: schtasks /run /TN task name
Click on next and proceed with the prompts to complete the shortcut creation.
Right-click on the new shortcut, go to Properties,and Change icon.
Select your preferred icon, and then click OK.
NOTE
After these steps above, double-click on the shortcut so as to launch the program. This procedure will enable you tobypass the error message.
Any of the fixes above will solve the error message do you want to allow this app from an unknown publisher to make changes to your device on your Windows PC.
Feel free to comment below if you have any additional solutions that you’ve successfully used to fix this.
Malwarebytes is one of the most robust anti-malware programs available, eliminating advanced threats from your PC.
While incremental security application updates help improve performance, some users still experience several issues, including occasional crashes and blue screens of death.
We will cover that in the article, explaining in great detail what you can do to stop BSoDs caused by running Malwarebytes.
Why is Malwarebytes causing a blue screen?
There can be various reasons why Malwarebytes can cause a blue screen (also known as the “blue screen of death” or BSOD) error on your Windows PC. Some common reasons include the following:
Compatibility issues – If you’re running an older version of Malwarebytes on an outdated version of Windows, it may not be compatible with your system and cause a BSOD error.
Conflicts with other software – Malwarebytes can sometimes conflict with other security software or drivers installed on your system, causing a BSOD error.
Corrupted or outdated drivers – Outdated or corrupted drivers can cause a BSOD error, and Malwarebytes may identify these drivers during a scan and trigger a BSOD error.
Malware or virus infections – Malwarebytes is designed to detect and remove malware and viruses from your system. However, it may cause a BSOD error if it encounters hazardous malware.
We will now explore some of the top recommended solutions.
How can I fix Malwarebyte’s blue screen?
Before you jump into the recommended solutions, consider using another antivirus software. There are many good options, and you may be able to avoid this issue.
Run the installer, and press OK in the UACpop-up.You need Microsoft .NET 4.0 Framework to be installed.
Check the empty checker box in the Malwarebytes Software License Agreement pop-up window and click Next.
After it is installed, open the Malwarebytes Support Tool and select Advanced.
In the Advanced Options, select Clean and then Yes.
Restart your PC.
The UAC pop-up will appear again, and you need to click Yes.
When prompted with the Reinstall Malwarebytes for Windows pop-up window, click Yes.
Select where you want to reinstall Malwarebytes, and click Install.
2. Turn off Fast Startup
Press Windows + R, type control, and hit Enter.
Navigate to the path below: Control Panel\All Control Panel Items\Power Options
Click on the Choose what the power buttons do link.
Click on Change settings that are currently unavailable.
Uncheck the Turn on fast startup box from under the Shutdown settings.
3. Disable any other conflicting antivirus
While Malwarebytes is a complete security solution, some users prefer installing it with other antivirus tools, such as Bitdefender. Still, the problem is that having two antivirus tools can lead to issues.
Many users suggested disabling web filtering in Bitdefender.
Another similar solution would be to disable Web Protection in Malwarebytes since that may also help.
BSoDs and crashes can be caused by many things, ranging from hardware incompatibilities to software inconsistencies, which makes identifying the problem complicated and time-consuming.
That’s precisely why third-party software solutions are becoming more and more of an acceptable alternative since they run your PC through a complete set of troubleshooting steps with minimal user input.
Thus, you can remove the specified corrupted or malfunctioning software files that determine such BSoD issues. The process is mainly automated, so the job is finished within a few minutes.
This pretty much wraps up our troubleshooting guide covering BSoDs triggered when running Malwarebytes.
Let us know which solution you went for by leaving us your feedback below.
Additionally, you can use the comments section to add other solutions we may have missed out on, and we will update the article accordingly.



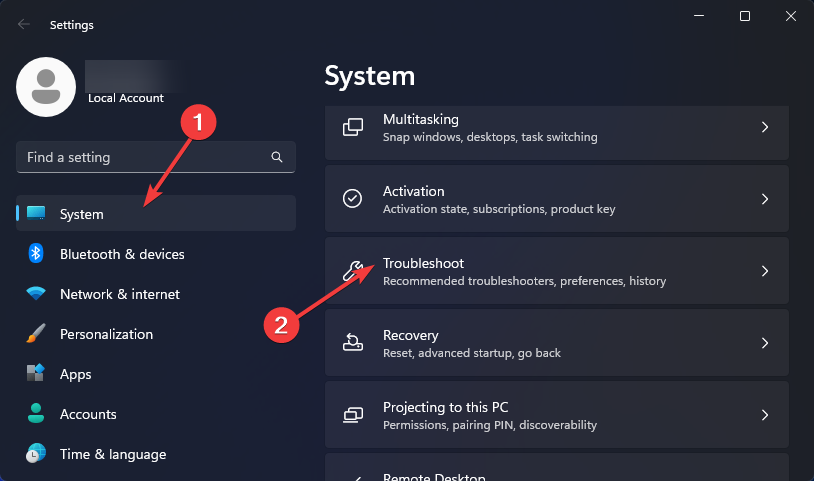
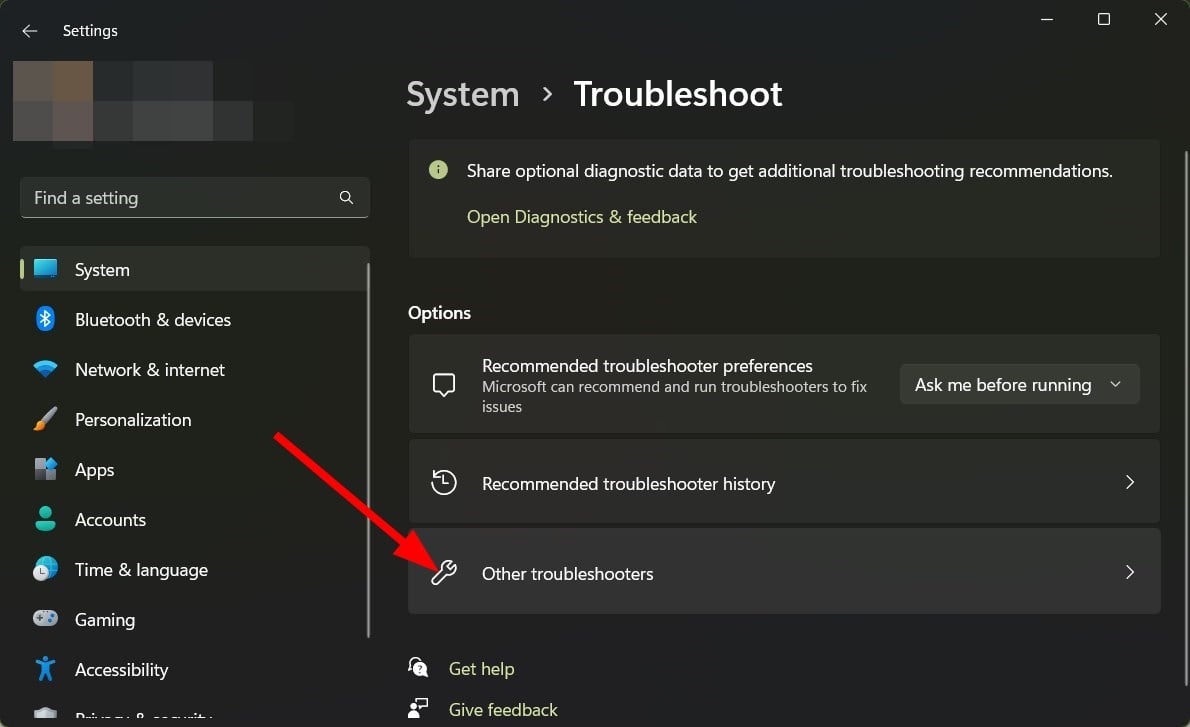
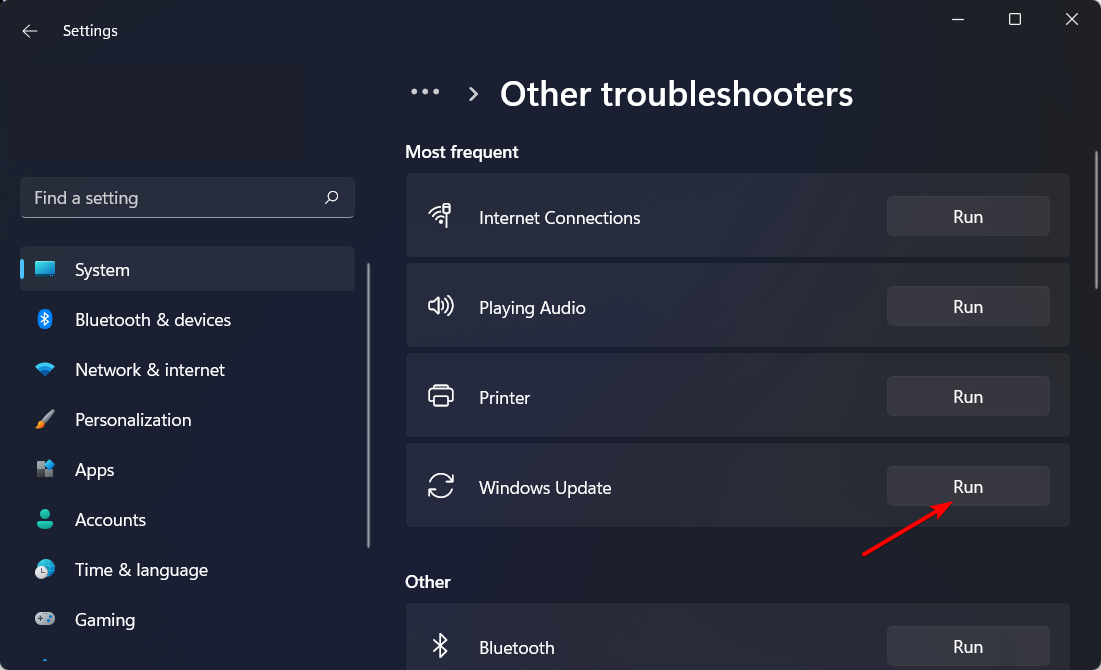
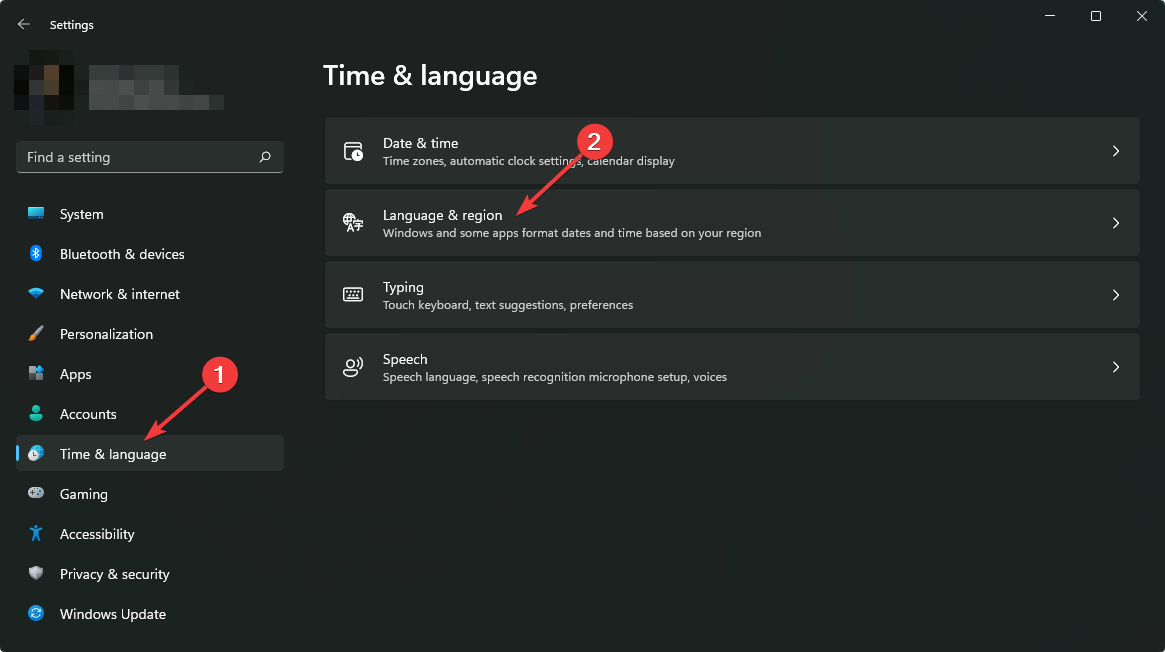


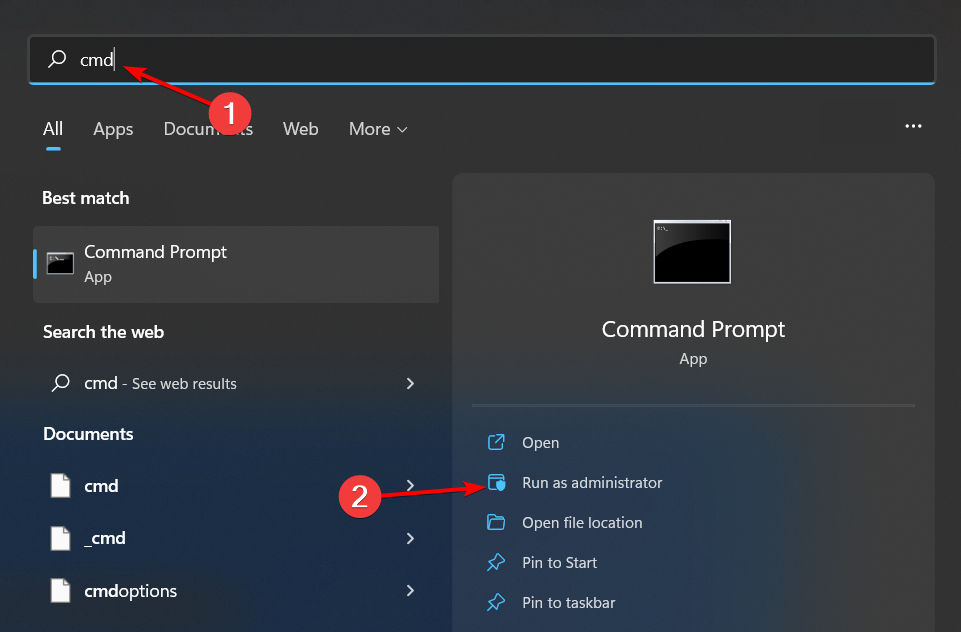


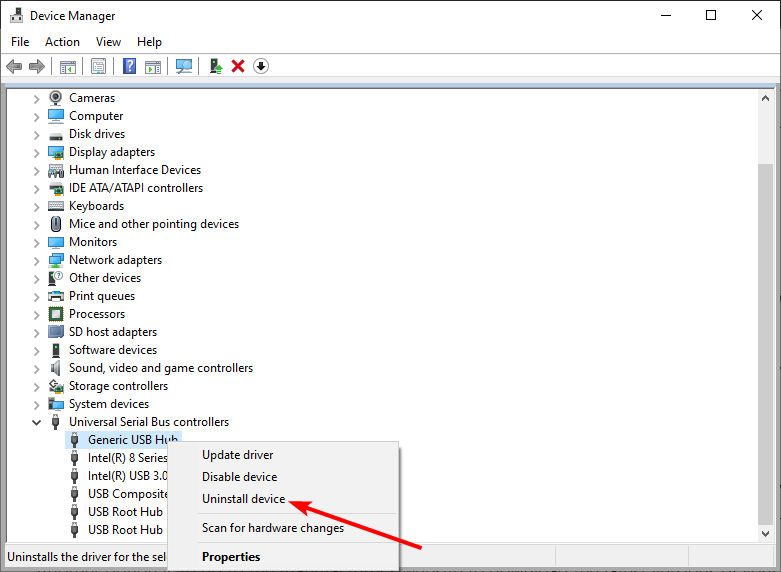


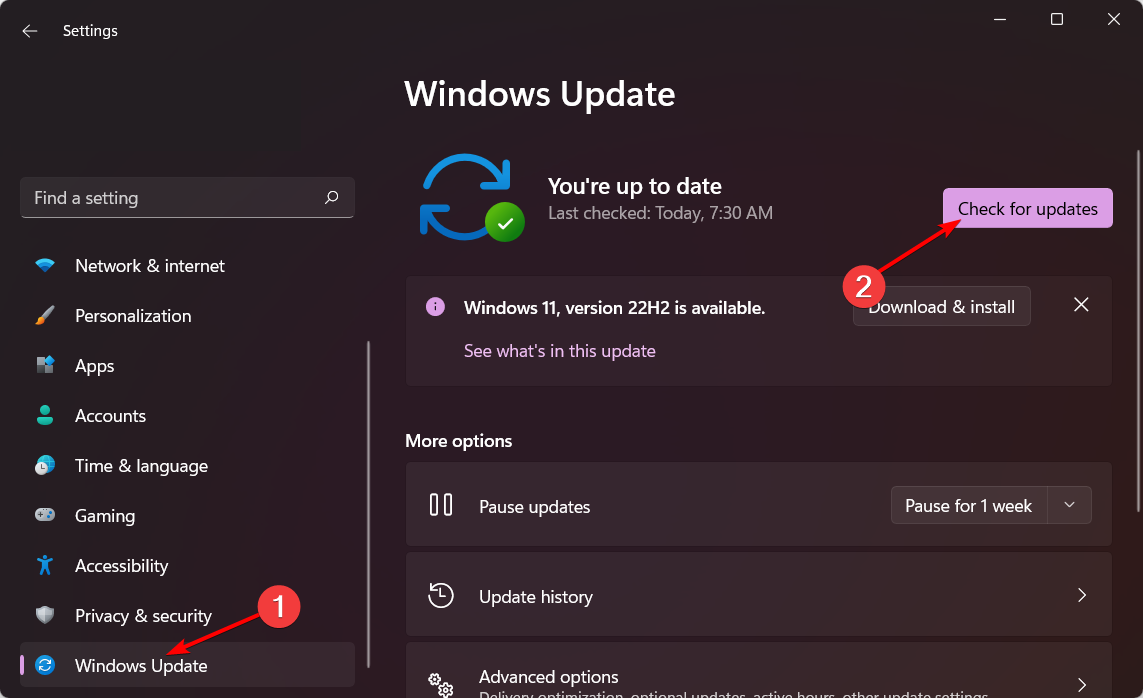
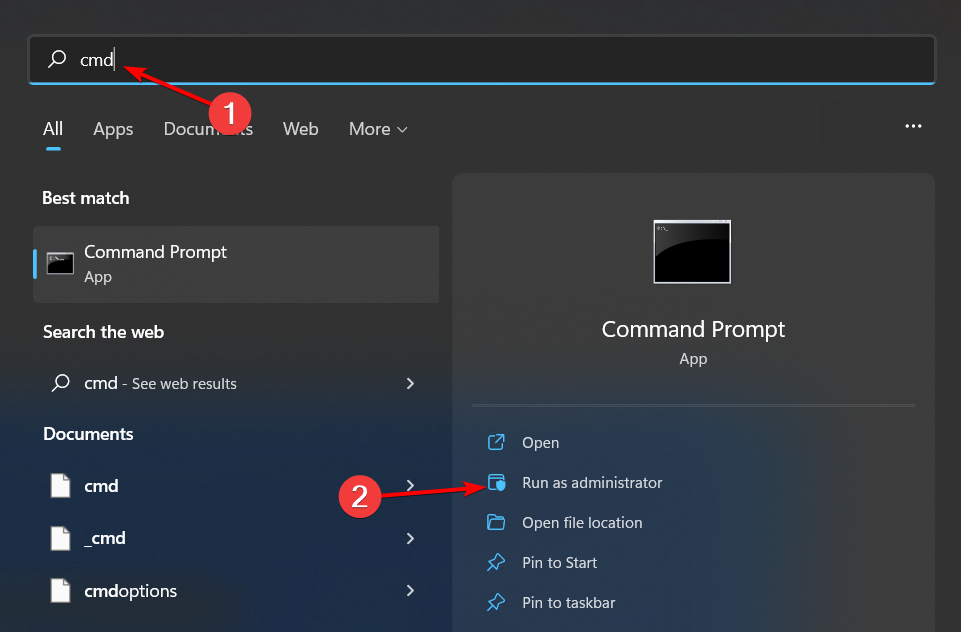

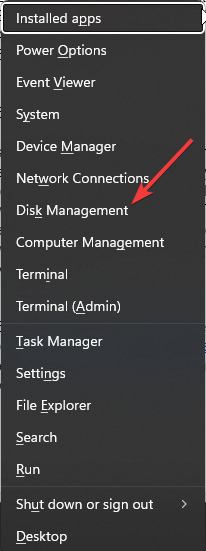

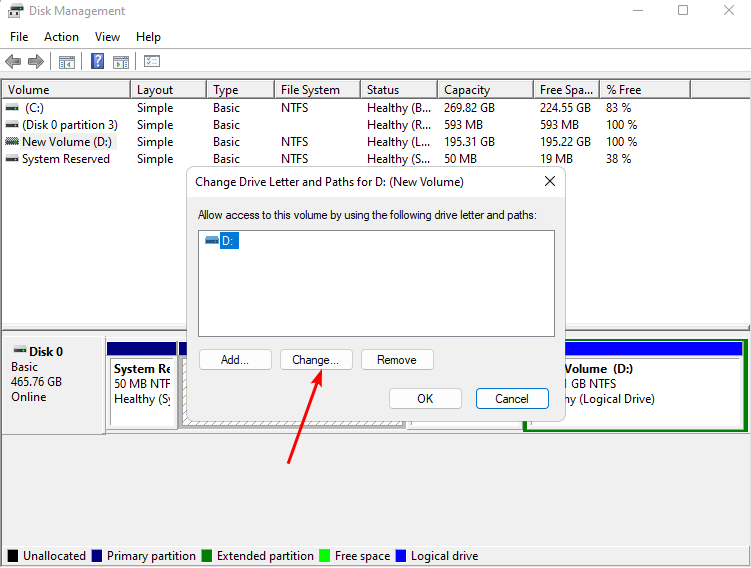

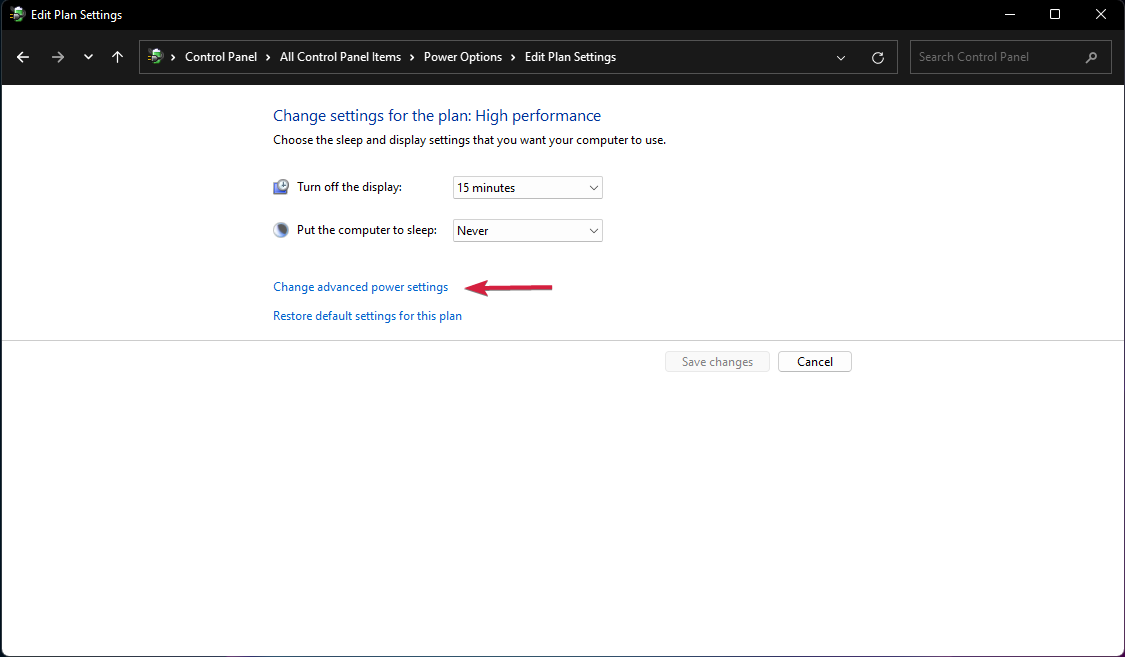


 Update drivers manually