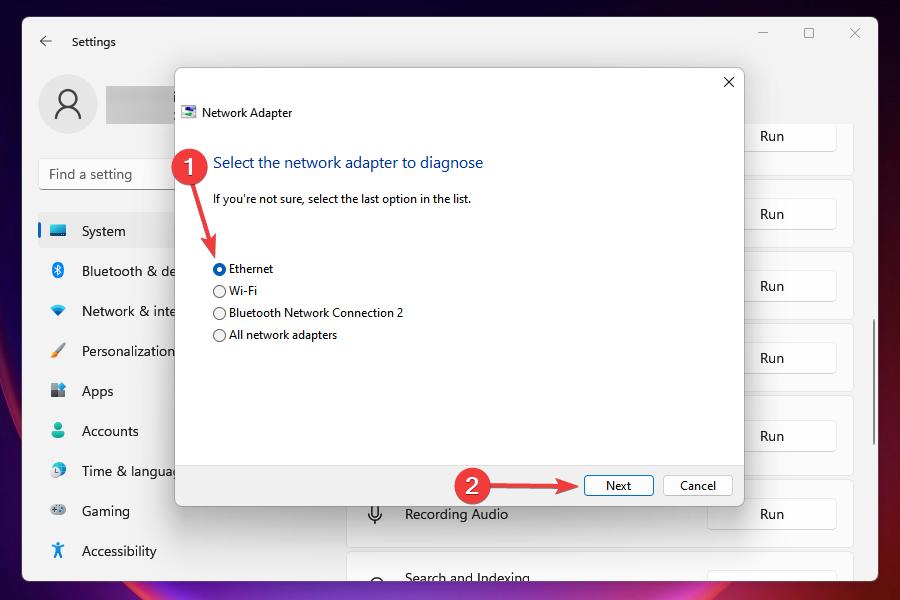
Many reported A network cable is not properly plugged in or may be broken when running the troubleshooter, and this error will prevent you from accessing the Web. Luckily, we have a few fixes that might help you.
Why does it say my Ethernet cable is not plugged in?
This can happen due to network glitches, or outdated drivers. In some instances, your Ethernet cable might be damaged.
How can I fix the a network cable is not properly plugged in or may be broken error?
Before we start, if you’re not actively using an Ethernet connection, try to connect to Wi-Fi network and the error should be gone.
1. Disable the network and hard-reboot the PC
Right-click the network icon on the Taskbar and select the Open Network and Sharing Center.
Choose Change adapter options.
Now, right-click your network connection and select the Disable option.
If you are using a wired connection, you need to remove it and restart your PC.
Now, remove your PC battery or disconnect the power cable for the desktop and wait for close to 10 minutes.
Switch on your computer again and repeat Steps 1 to 3 to enable your network adapter again.
Finally, connect the internet cable again or your wireless network.
2. Update the network driver
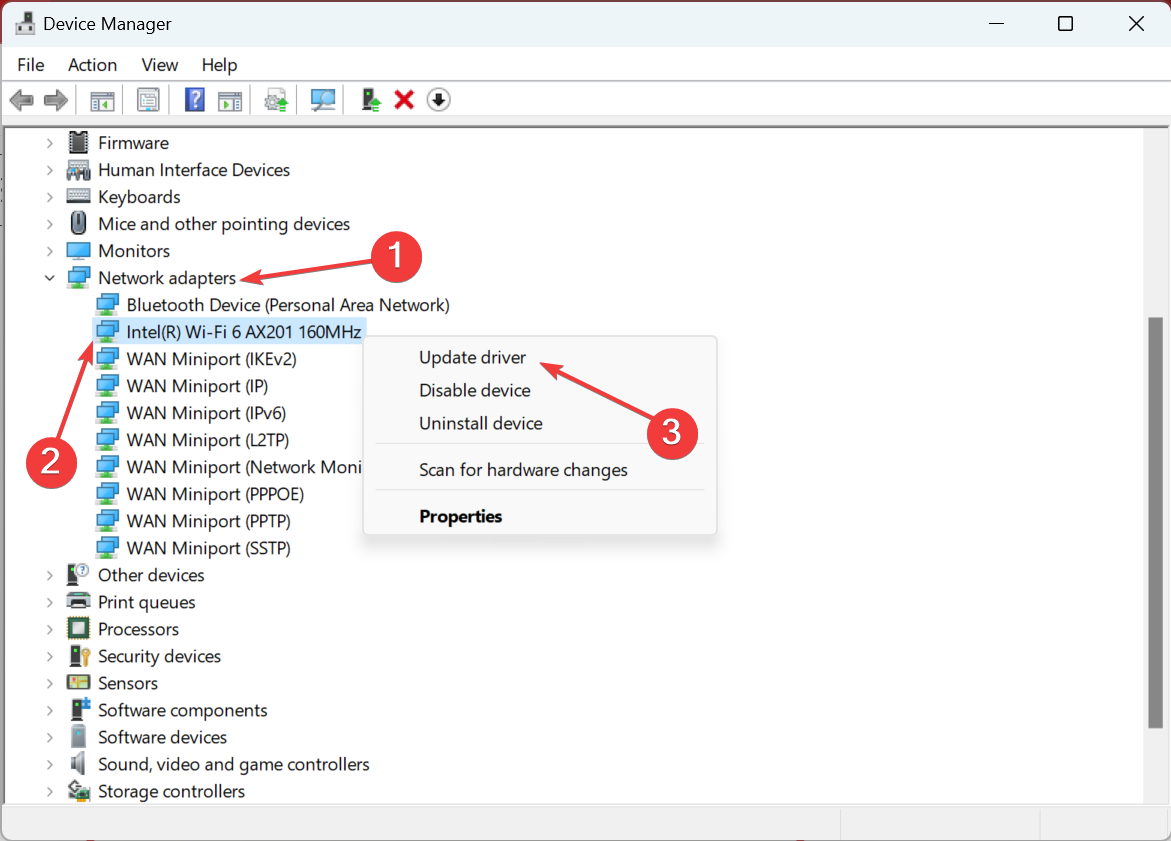
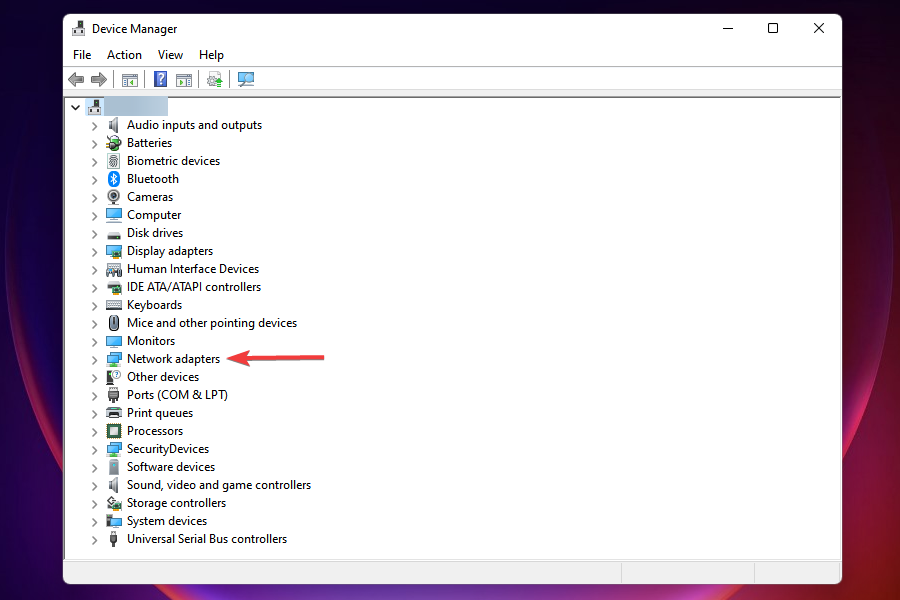
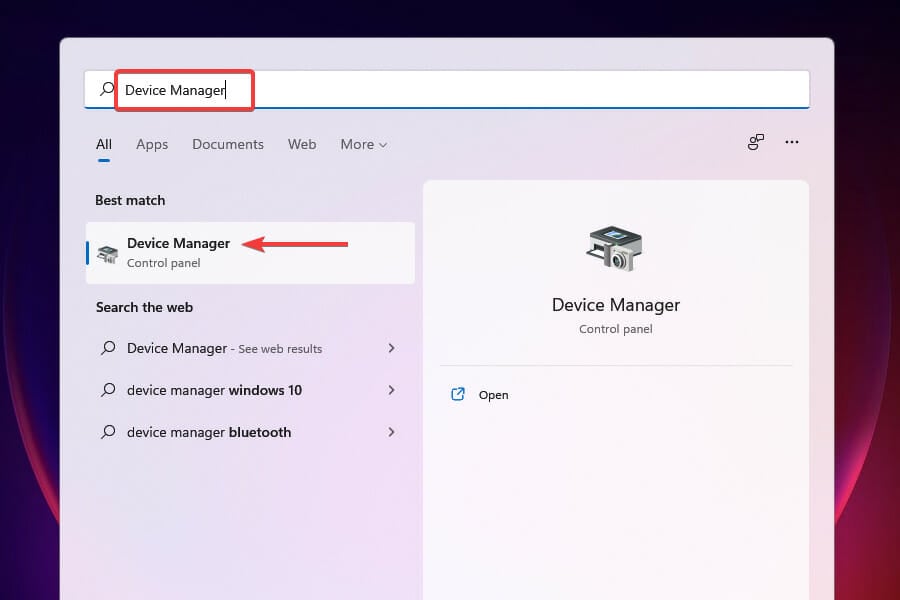
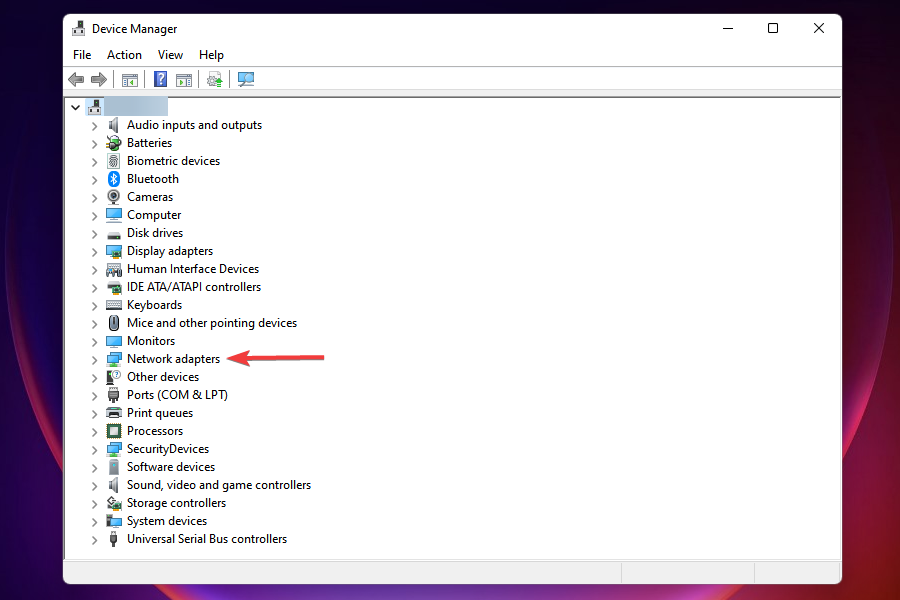
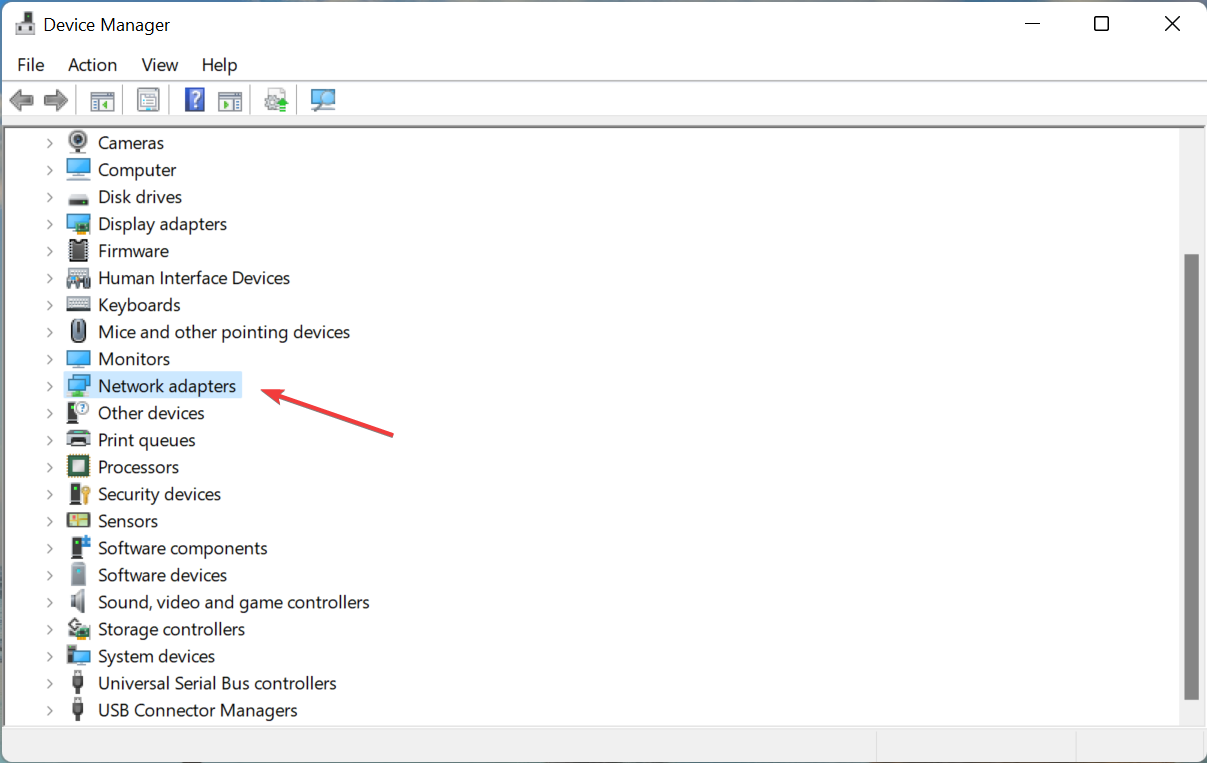
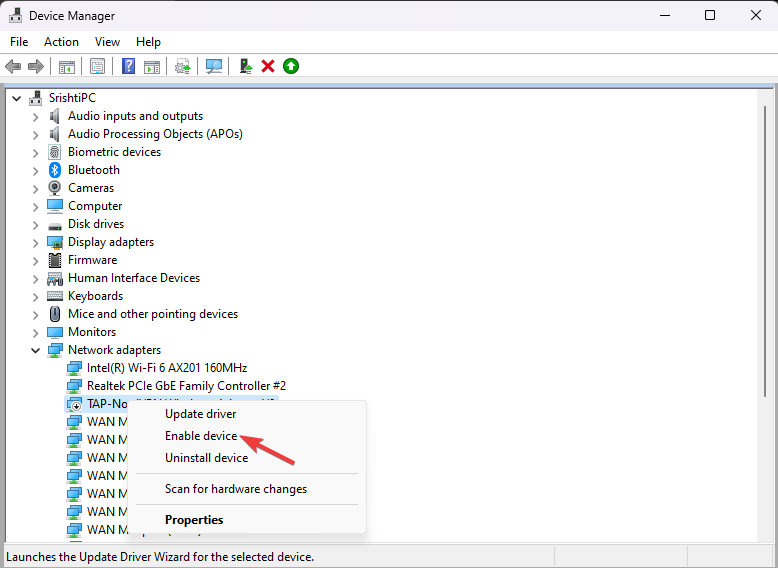
Right-click the Start icon and select Device Manager.
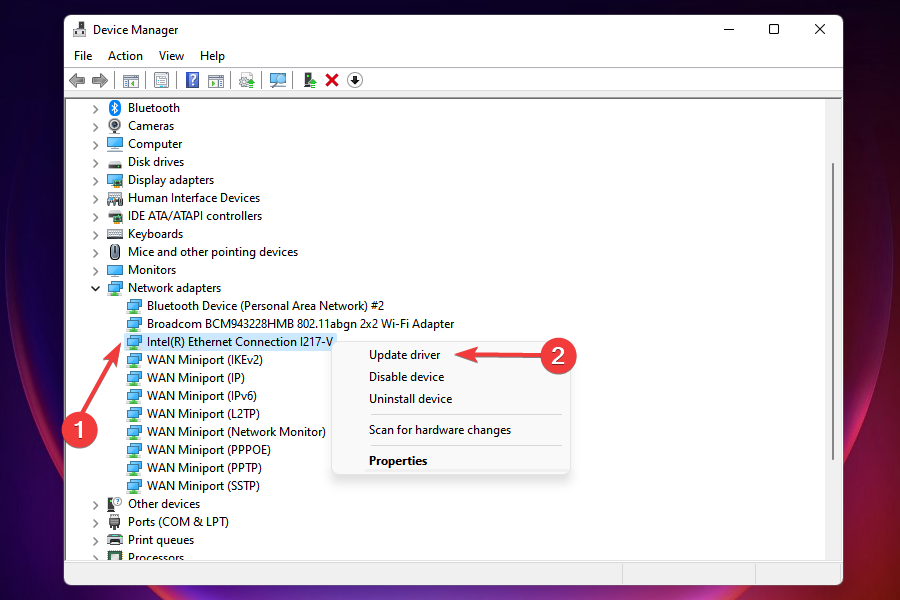
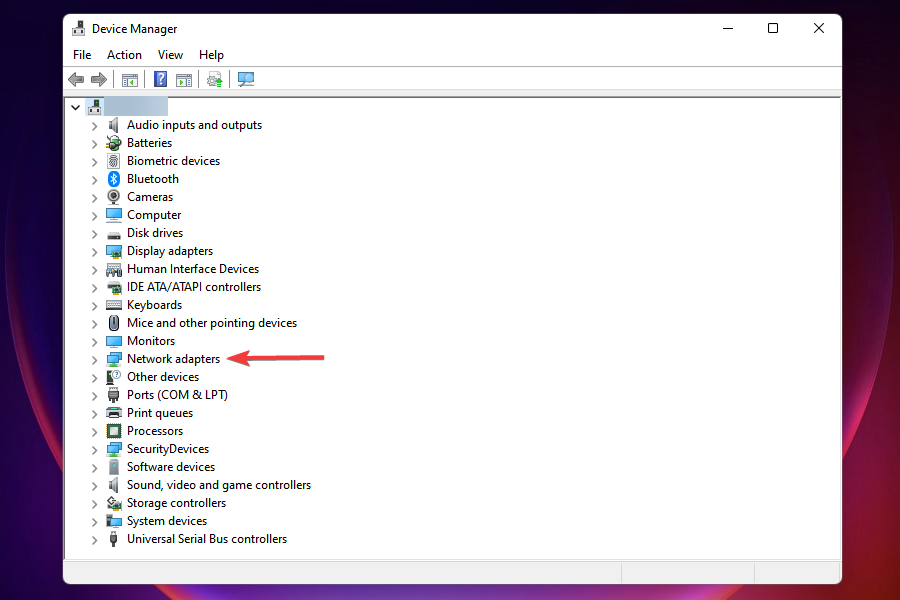
Expand the Network adapter option and right-click the device there.
Now, select Update driver.
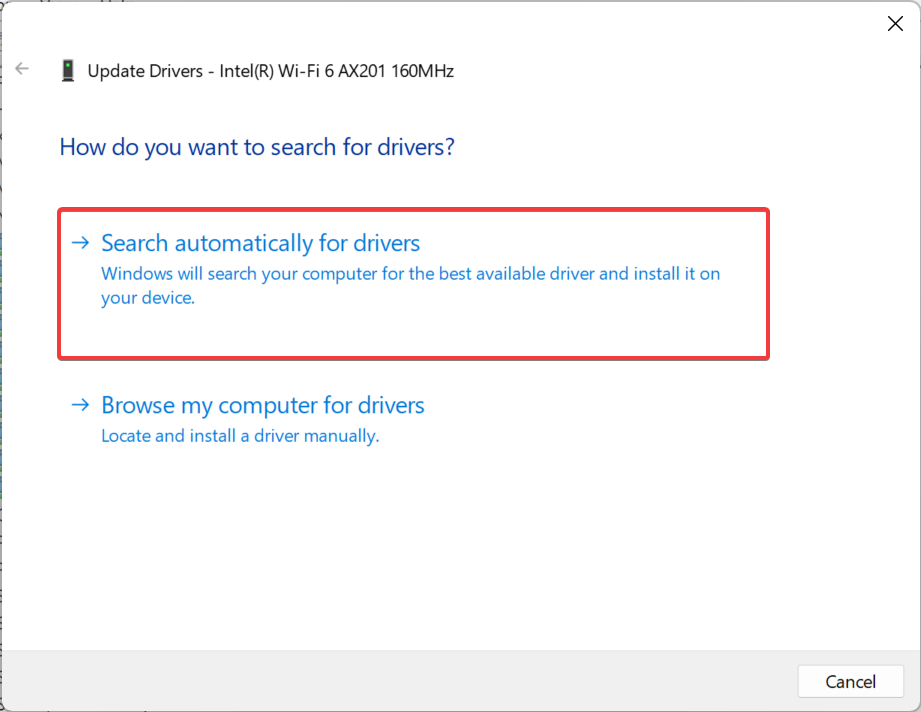
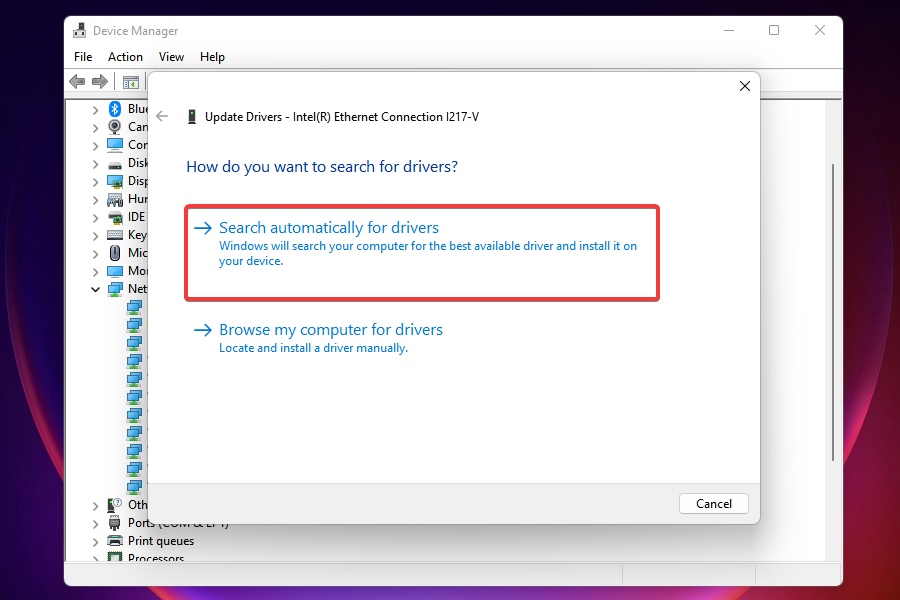
Choose Search automatically for drivers and install the latest drivers.
Alternatively, download the drivers manually from your Wi-Fi adapter manufacturer’s website.
However, the simplest and quickest solution is to use a dedicated third-party driver updater and fixer like Outbyte Driver Updater. It will scan your PC for all drivers, saving you the time you would use to visit each manufacturer by hand.
More so, it can repair the drivers you already have but are broken and filling in the ones that are missing. Most importantly, you don’t need to be an IT expert to use it since the interface is very simplistic and to the point.
Press the Windows key + X and select the Device Manager option.
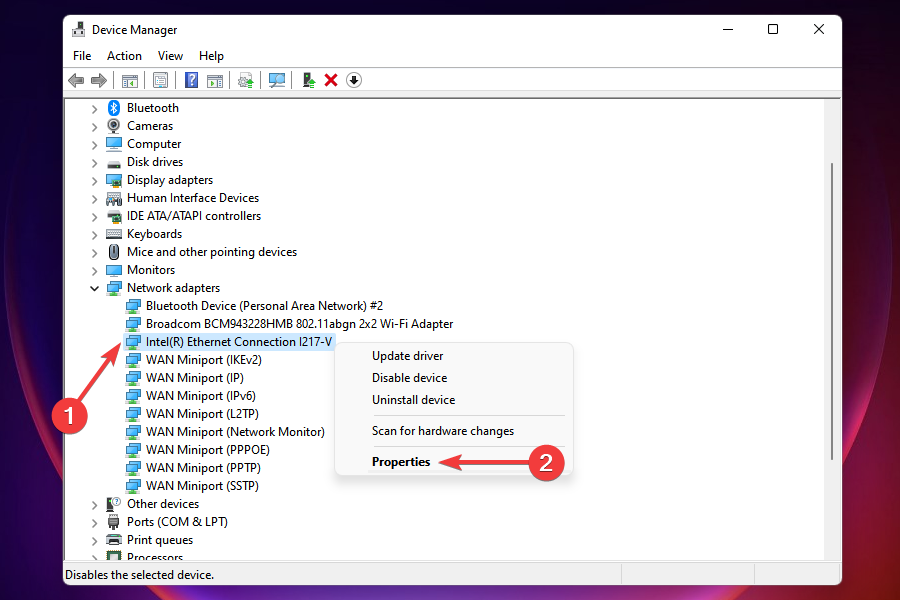
Click the arrow next to the Network adapters option and right-click your network device.
Now, select the Properties option.
Click the Advanced tab at the top.
Select the Speed & Duplex option from here and set its value to 100Mbps Half Duplex.
Finally, click the OK button and restart your PC.
If you are getting the network cable is not correctly plugged in or may be broken error, it might be because your duplex setting is too high. The steps above should help fix this effortlessly.
Launch the Device Manager and expand the Network adapter option.
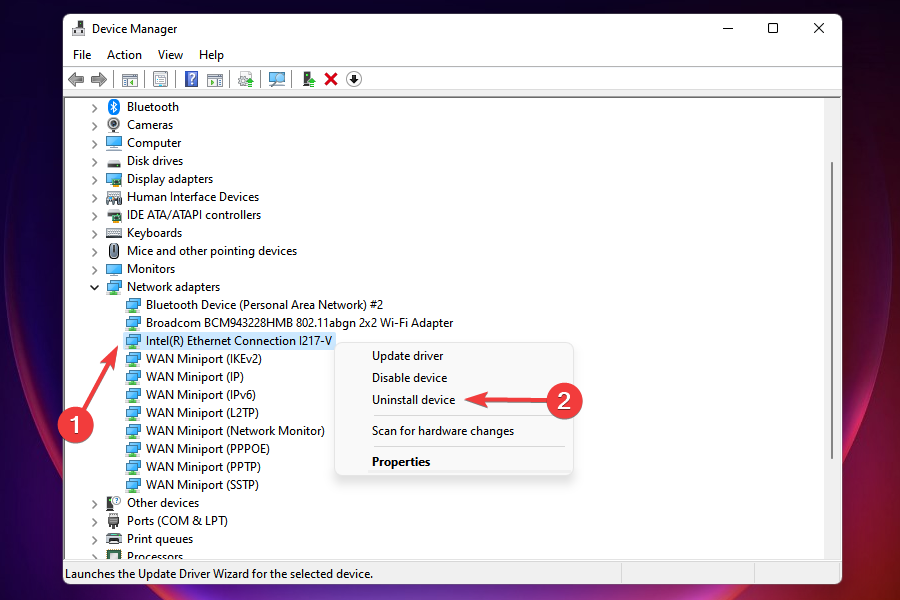
Right-click the network device and choose Uninstall device.
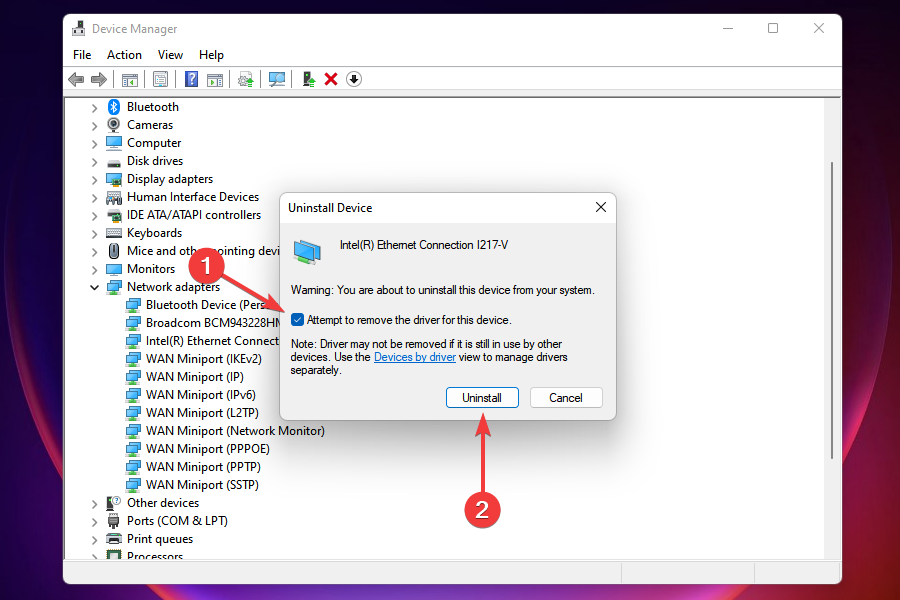
Now, click the Uninstall button.
Finally, click the Scan for hardware changes icon.
If all the solutions above fail to fix the network cable is not properly plugged in or may be broken error, you need to switch to the default network driver.
Different software and hardware problems can result in your HP laptop not connecting to Wi-Fi in Windows 10. Unfortunately, this has been a problem for many users of the Microsoft OS.
It means you may be blocked from using the Internet and some of your favorite online services, which can be frustrating. The problem usually arises out of the blue or after making changes to the computer, and in both cases, it’s easily fixable.
Why my HP laptop is not connecting to Wi-Fi?
We have gathered that a few things may trigger this problem on HP computers. Here are some that you should be aware of:
Driver issues – If you run on outdated drivers, you will likely encounter this error. In most cases, you should pay attention to the wireless drivers.
HP laptop Wi-Fi disabled – Some HP laptops have dedicated keys that enable or disable the Wi-Fi settings. You should make sure this has not been turned off.
Hardware issues – You may also witness this problem due to a bad network card. In this case, replacing it may be the best alternative.
How can I fix an HP laptop that’s not connecting to Wi-Fi?
Before you go into any of the solutions below, we recommend trying the following quick fixes:
Ensure the laptop is placed well within the range of the Wi-Fi router and that there are obstructions in between. Try moving it right next to the router if possible.
Restart both the computer and the router. For the latter, keep it powered off for at least a few minutes.
Check if there is a Wi-Fi switch on the laptop or if a keyboard shortcut that acts as one, and make sure it’s not disabled. For some devices, it’s a Function key, so check that.
Update Windows if there’s a bug in the current version preventing the HP laptop from establishing a Wi-Fi connection.
Verify whether the HP laptop is not connecting to any Wi-Fi network or a particular network. Because if it’s the latter, the problem may lie with the router itself, in which case resetting (or replacing) the router would be a viable solution.
If none of these work, head to the solutions listed next.
1. Scan for hardware changes
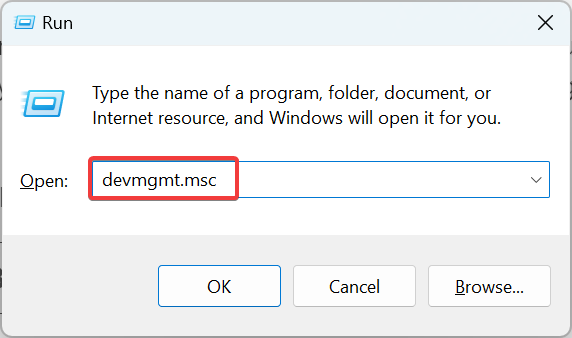
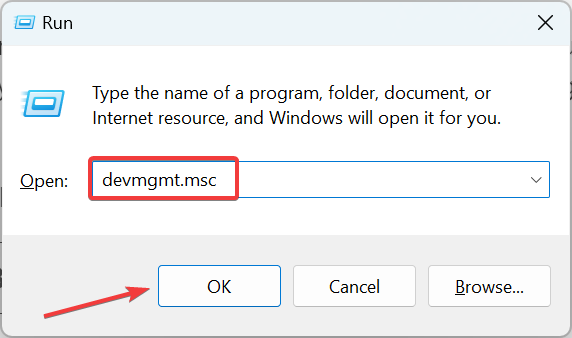
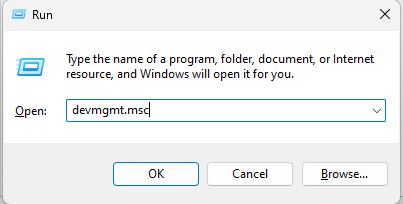
Press Windows + R to open Run, type devmgmt.msc in the text field, and hit Enter.
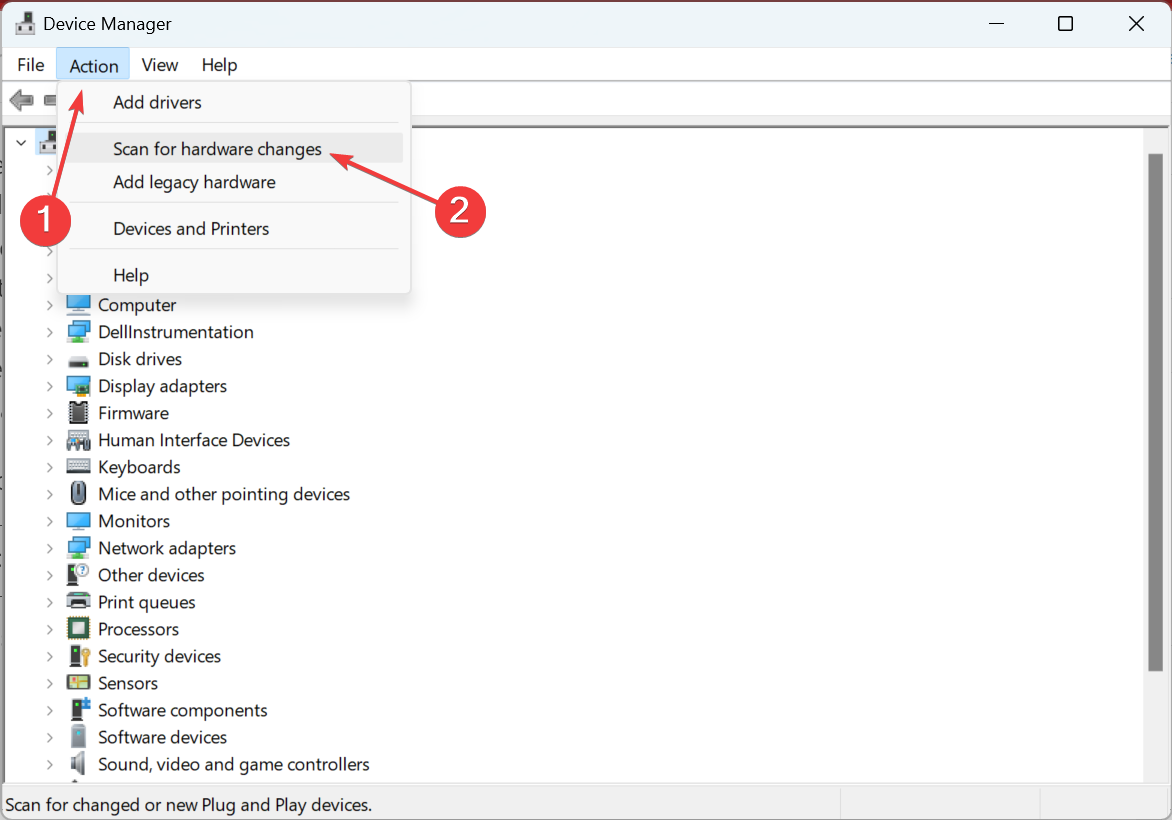
Now, click on the Action menu, and choose Scan for hardware changes from the list of options.
If the Wi-Fi adapter is not listed in the Device Manager and, subsequently, your HP laptop is not connecting to the Internet, scanning for hardware changes might do the trick.
2. Reinstall the Wi-Fi driver
Press Windows + X to open the Power User menu, and choose Device Manager from the list.
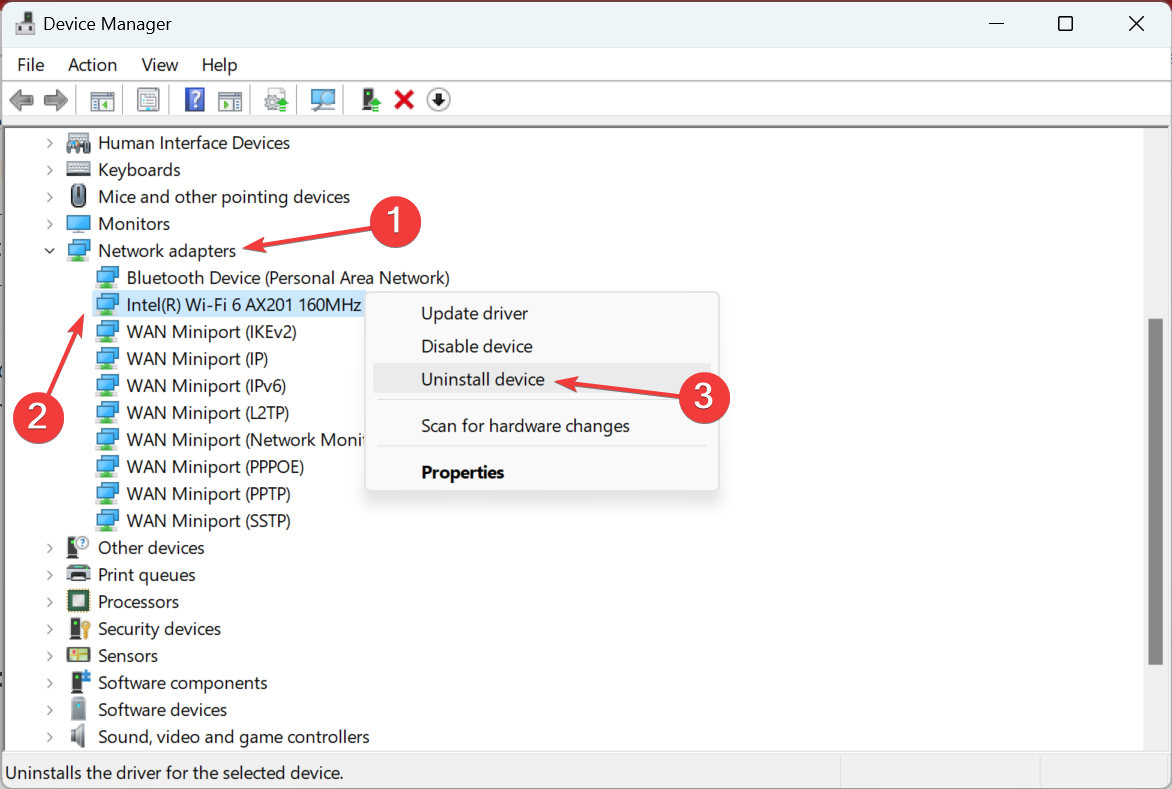
Expand Network adapters, right-click on the Wi-Fi adapter, and then choose Uninstall device from the context menu.
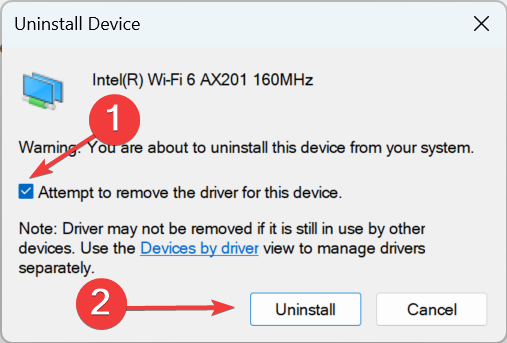
Tick the checkbox for Attempt to remove the driver for this device, and then click on Uninstall.
Once done, restart the device, and Windows will automatically install the best drivers for the Wi-Fi adapter.
Corrupt drivers are just as likely to cause issues and lead to the HP laptop not connecting to Wi-Fi. A simple fix here would be to reinstall the drivers.
3. Run the SFC scan
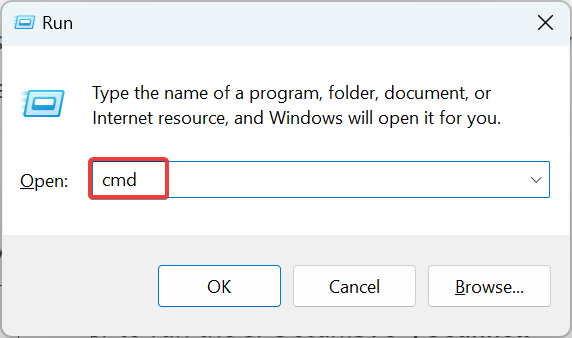
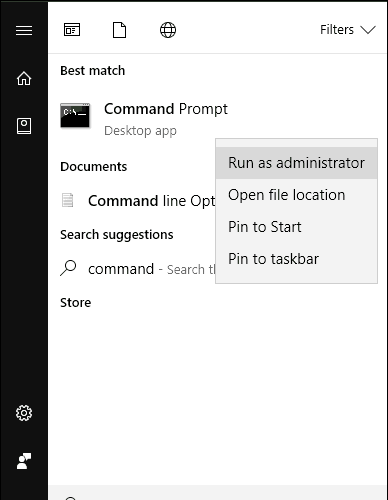
Press Windows + R to open Run, type cmd, and hit Ctrl + Shift + Enter.
Click Yes in the UAC prompt.
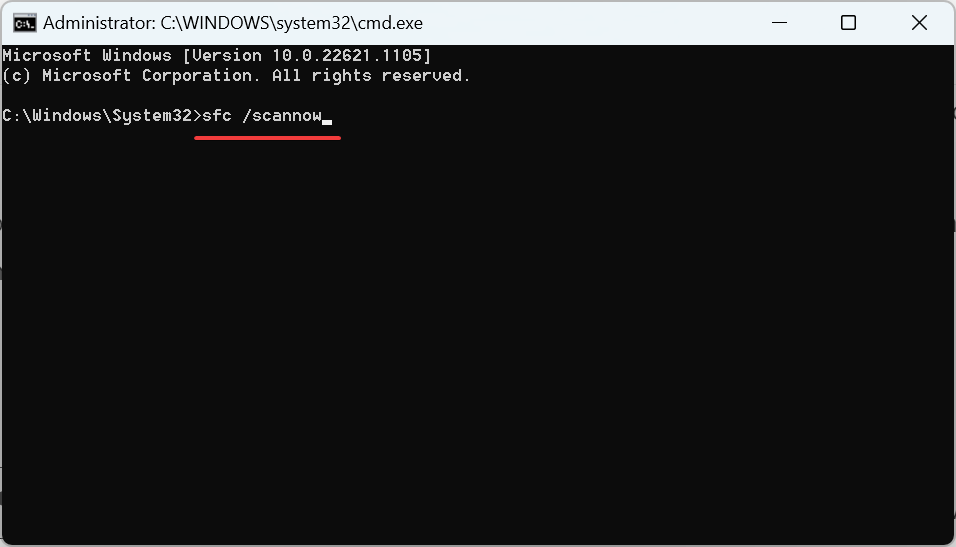
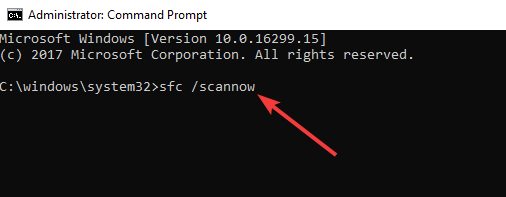
Paste the following command and hit Enter to run the SFC scan:sfc /scannow
An SFC (System File Checker) scan identifies the corrupt system files and replaces them with their cached copy stored on the PC. So, if corrupt system files are why your HP laptop is not connecting to Wi-Fi, running the scan would do.
4. Modify the Power Management settings
Press Windows + R to open Run, type devmgmt.msc, and click OK.
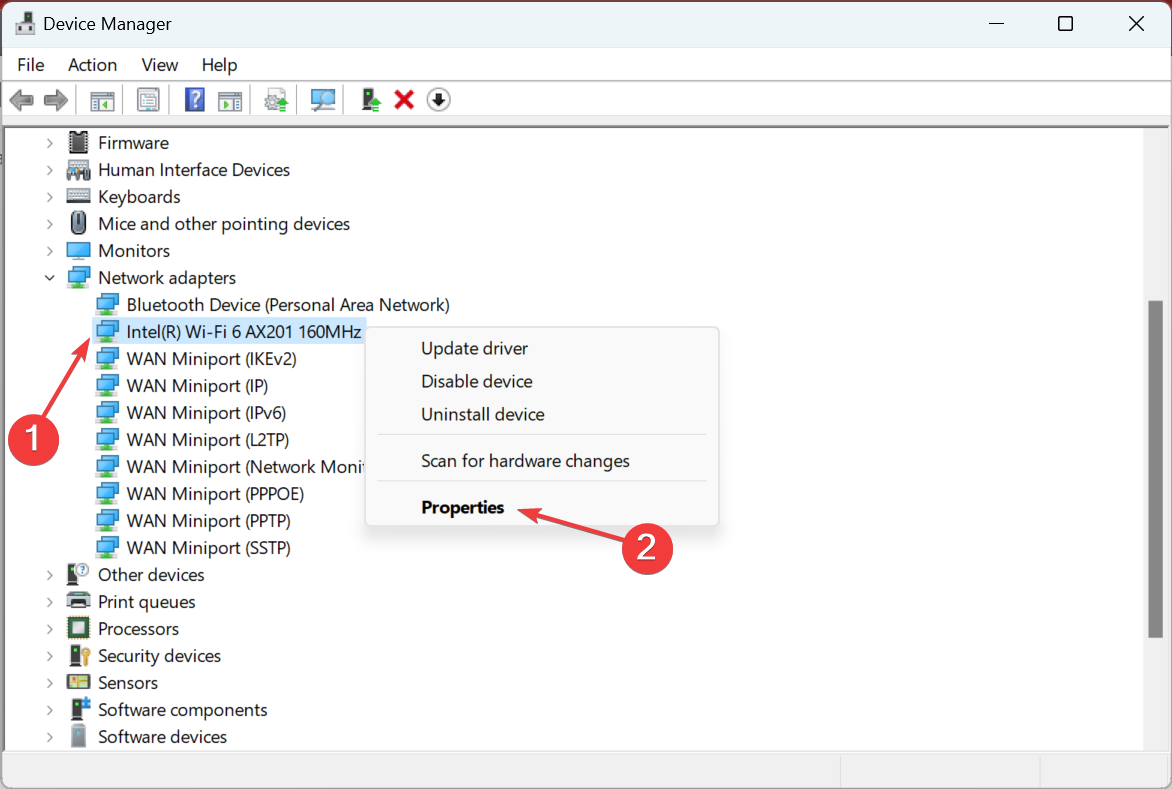
Now, locate the Wi-Fi adapter under the Network adapters entry, right-click on it, and choose Properties.
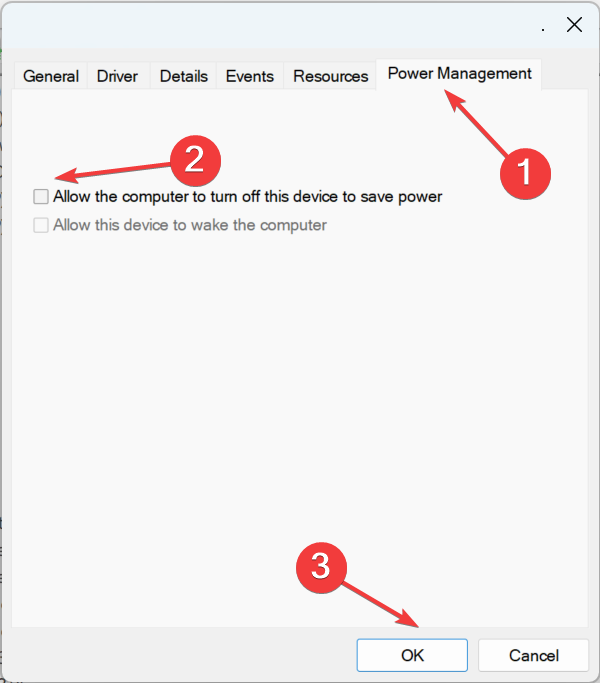
Head to the Power Management tab, untick the checkbox for Allow the computer to turn off this device to save power, and click on OK to save the changes.
Once done, restart the computer, and Wi-Fi should be working.
If nothing so far has worked, you will need to update the drivers. Since Internet connectivity is required for it, we recommend you connect to Ethernet to complete the process.
5.1 Windows Update
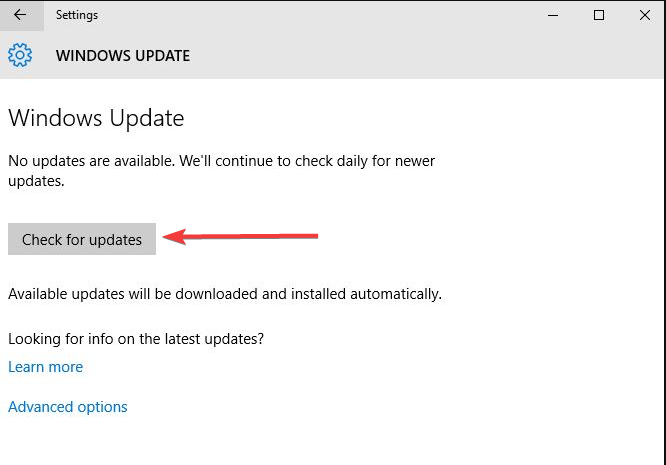
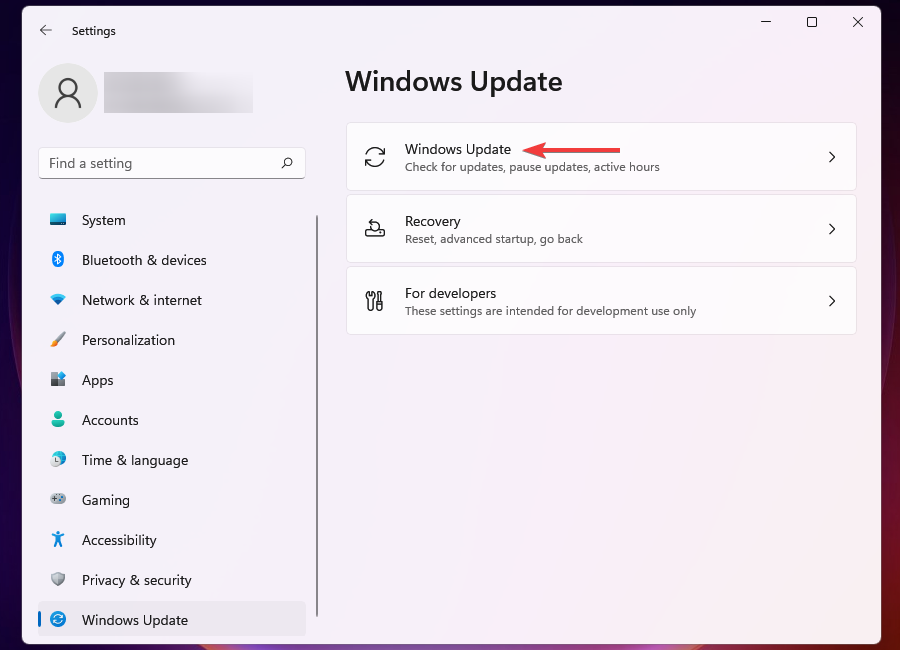
Select the search box, type updates, and select Windows Update settings.
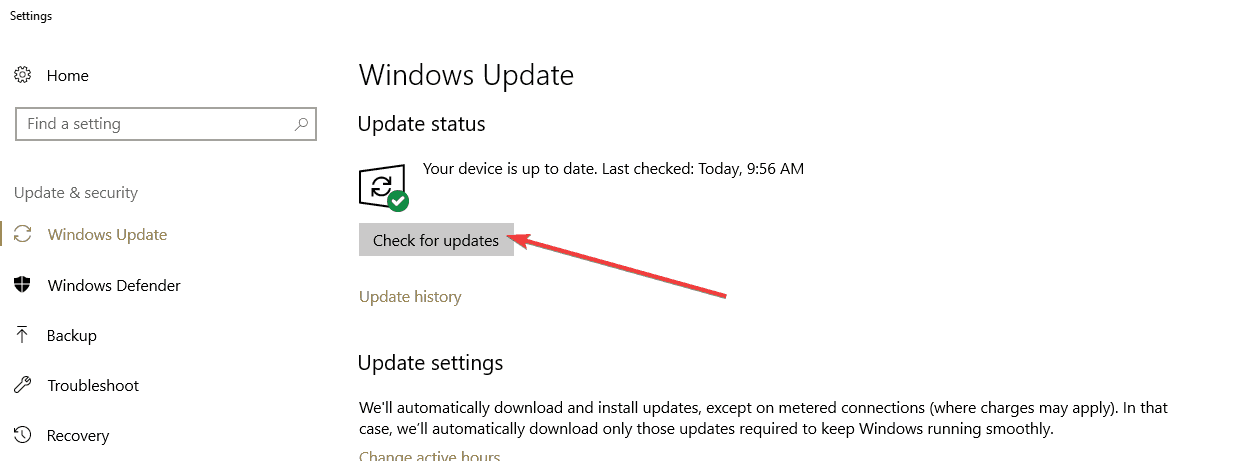
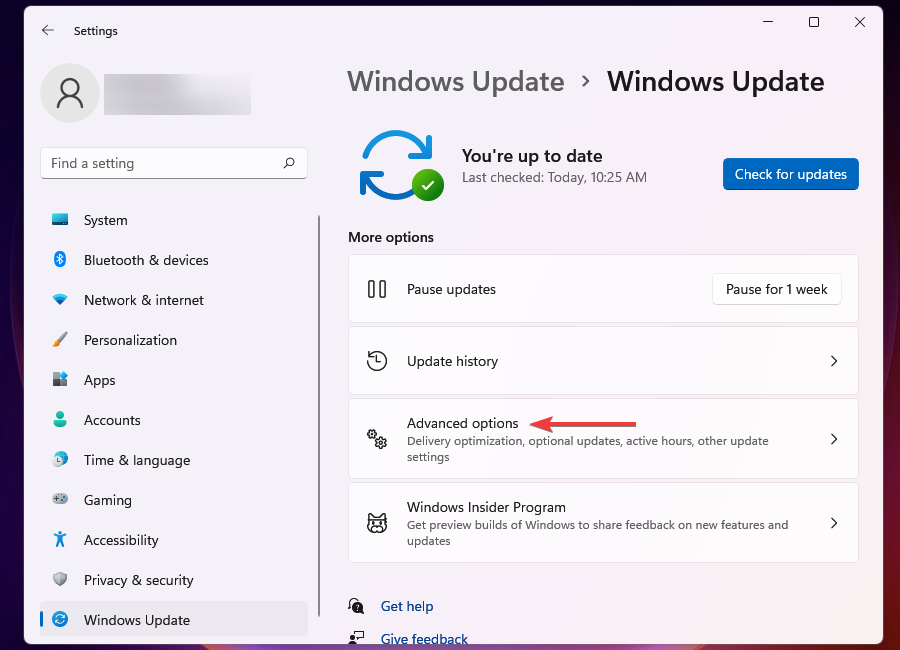
Select Check for Updates.
New updates will be installed, after which you can try connecting to the Internet again.
Windows updates often come with essential driver updates.
5.2 HP Support Assistant
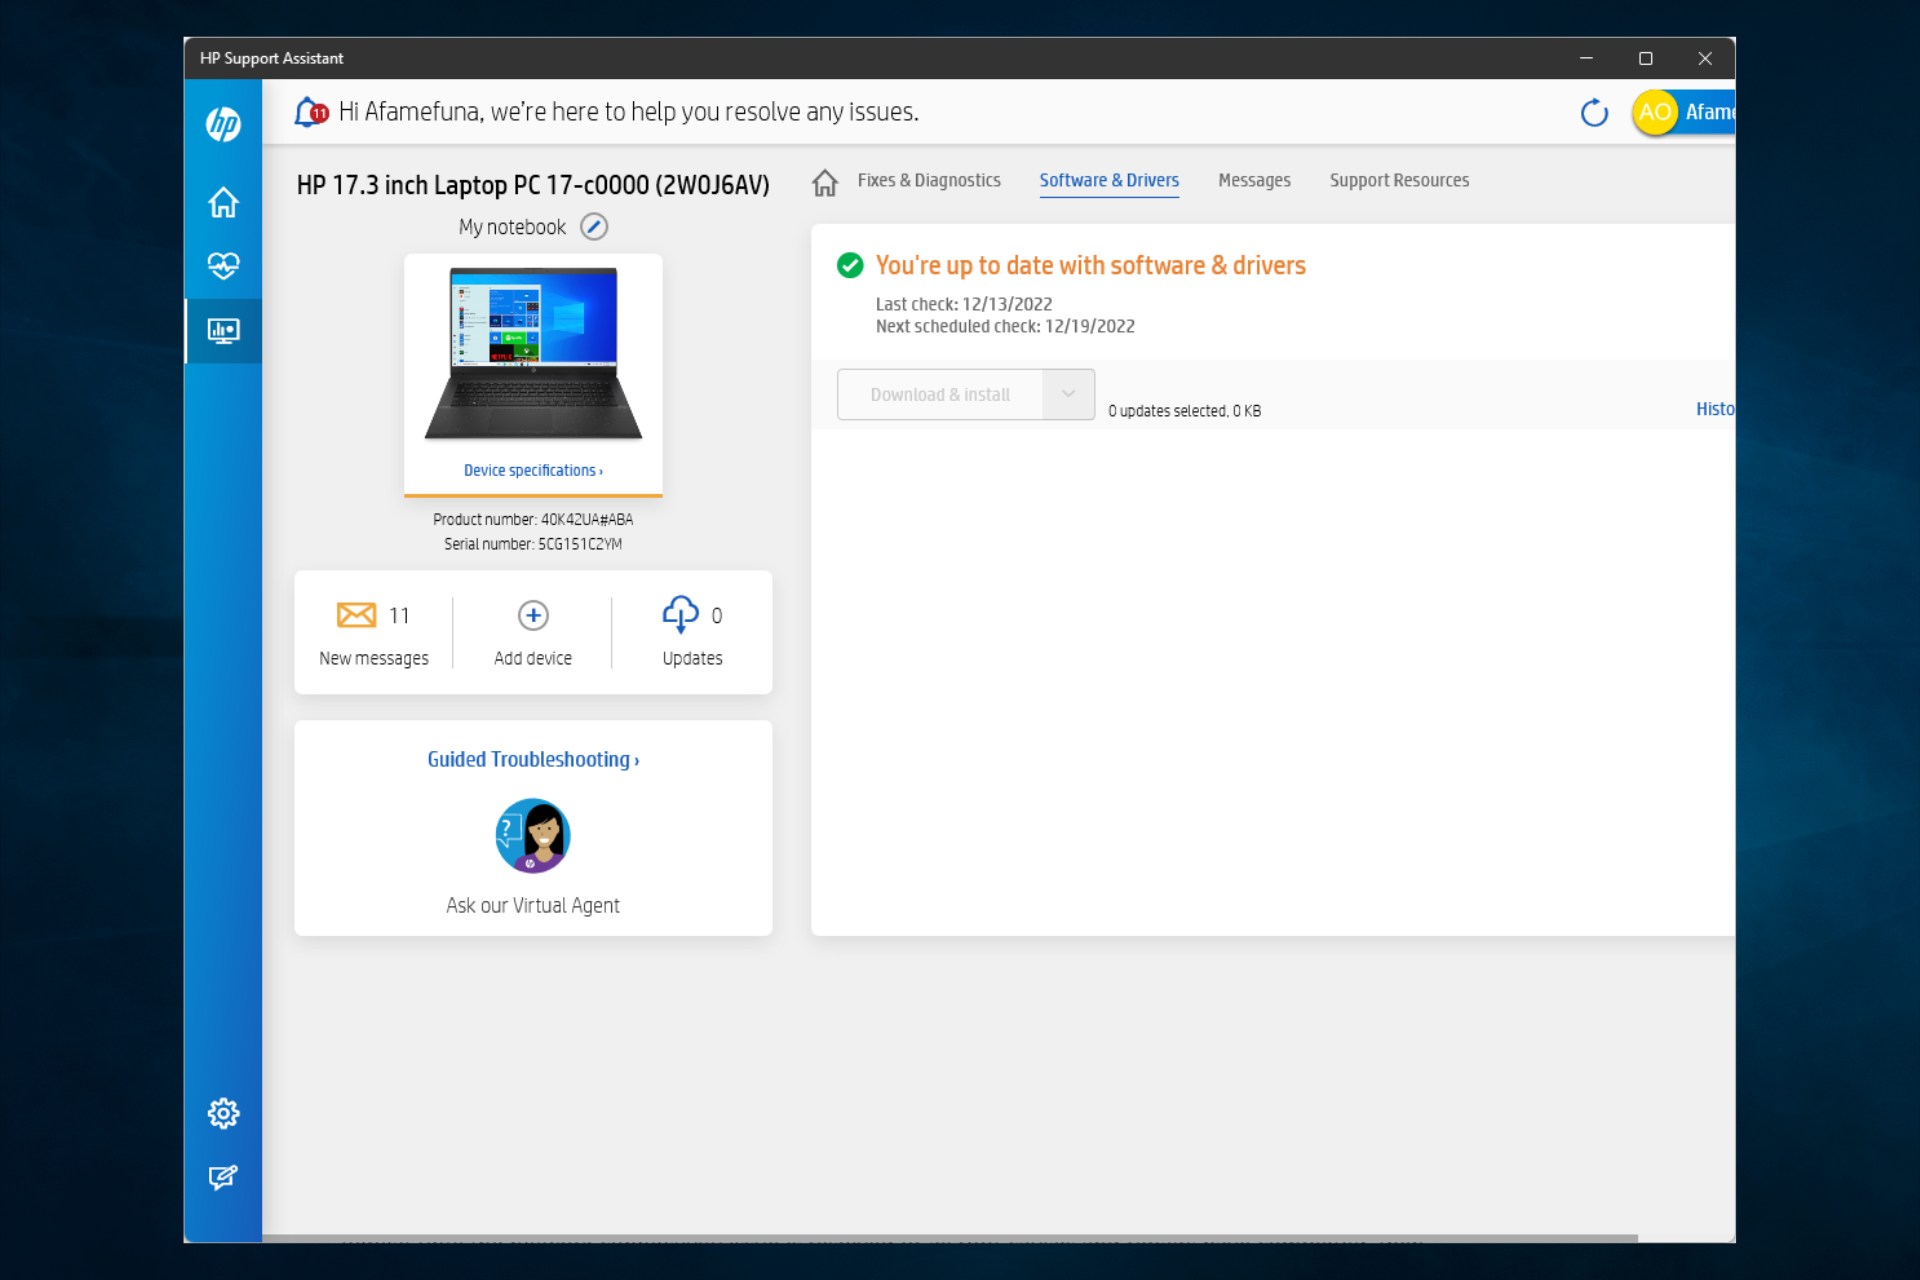
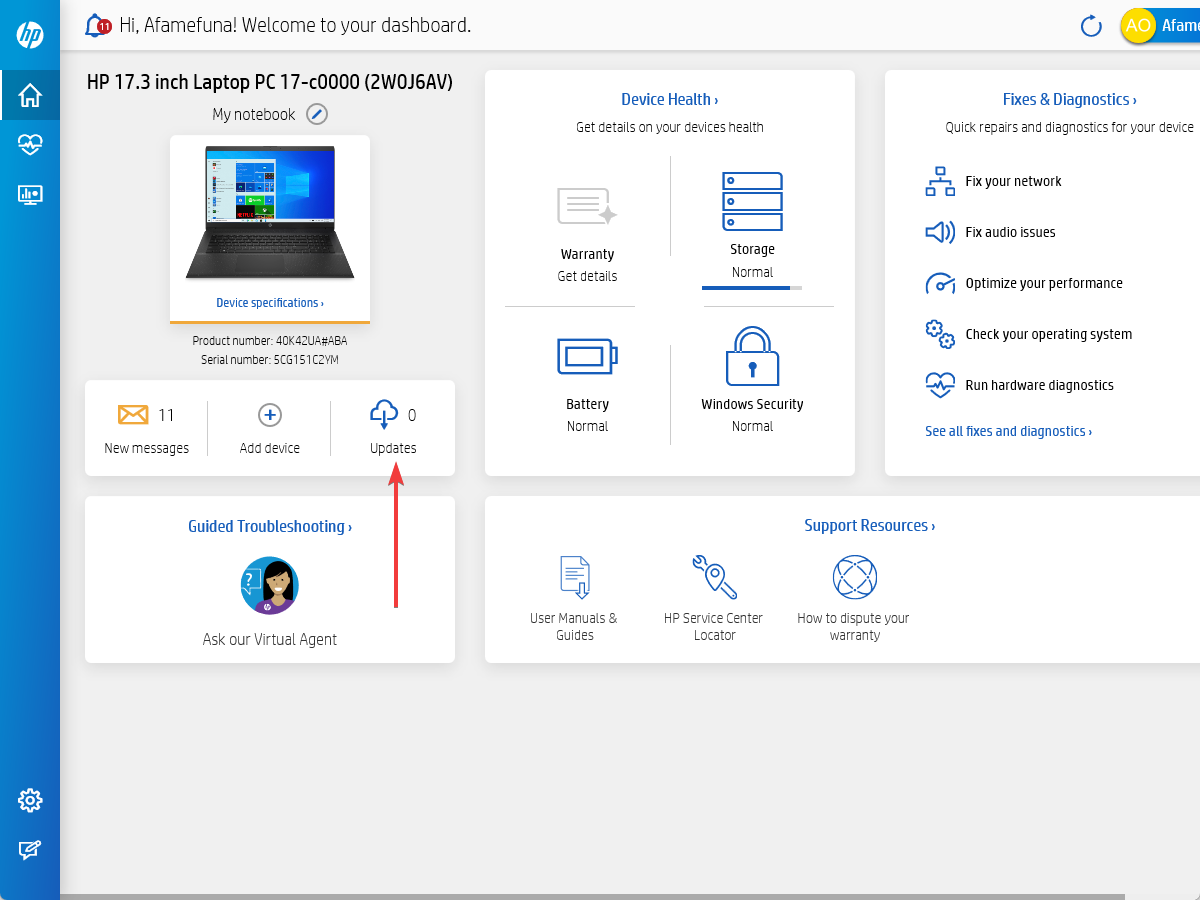
Press Windows + S to open the Search box, type HP support assistant, and click on the app.
If there are available updates, click Updates to view the available ones.
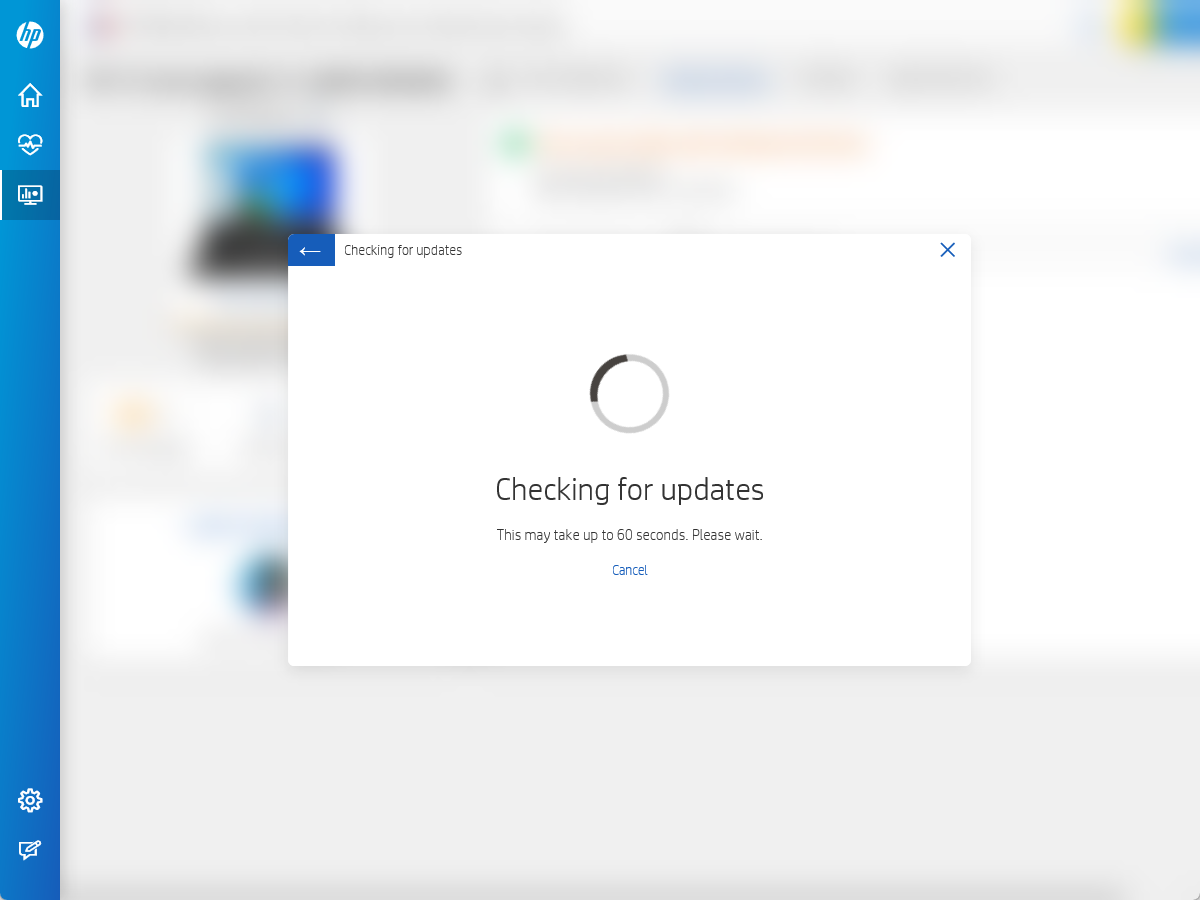
Give it about 60 seconds to check for updates.
Click Install now icon next to the update, and then try connecting to the Internet again.
5.3 Driver updates from Device Manager
Right-click Start and select Device Manager.
Go to Network adapters and click to expand the list, right-click on your adapter, and select Update driver.
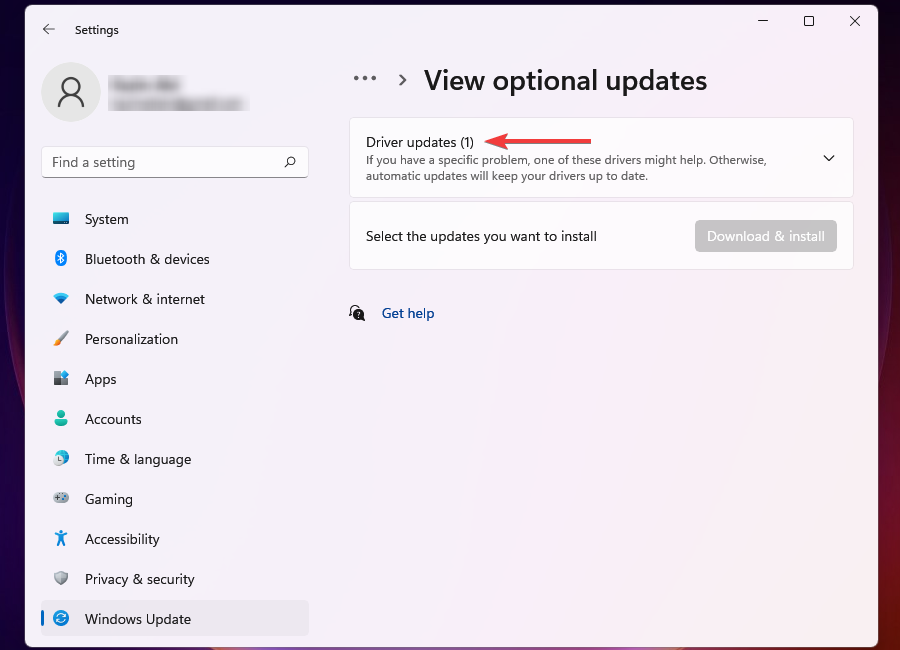
Select Search automatically for drivers, and Windows will install the best available driver.
5.4 Update drivers automatically
6. Use automatic troubleshooting
6.1 Using HP support assistant
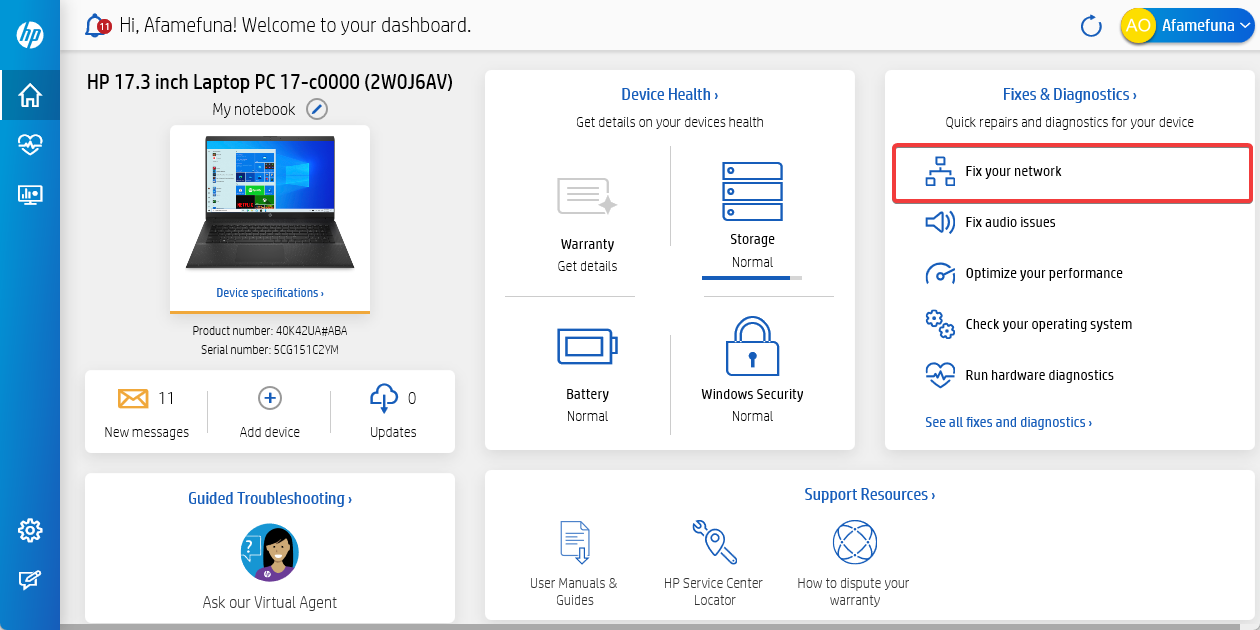
Go to the search box, type HP support assistant, and click on the app.
Click on Fix your network.
This will detect, diagnose, and repair any network errors, including errors of your HP laptop not connecting to the Wi-Fi.
HP Support Assistant is a software support diagnosis and troubleshooting tool that resolves many networks and Internet connection issues, specifically for HP machines.
If you don’t have it, use the automated troubleshooter that comes with Windows 10.
6.2 Using built-in troubleshooter
Enable the wireless signal by turning your computer’s wireless key or button.
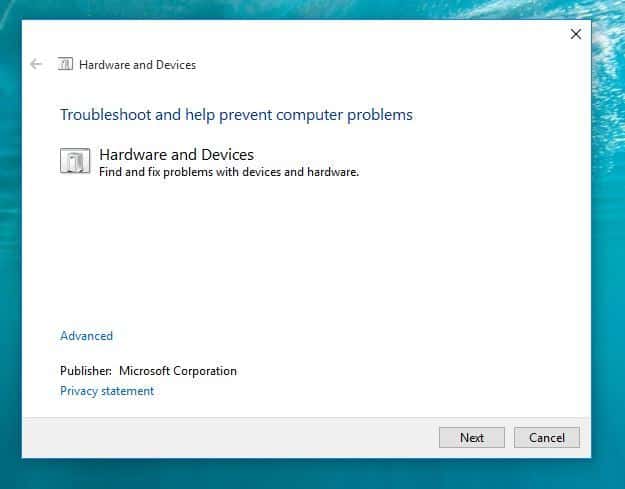
Right-click the wireless connection icon on the taskbar and select Troubleshoot problems.
The Windows Network Diagnostic window will open and begin the troubleshooting process.
After troubleshooting, see the list of problems and what was fixed, plus remedial actions to resolve the issues, and then perform the suggested activities.
Try and reconnect to the Internet again.
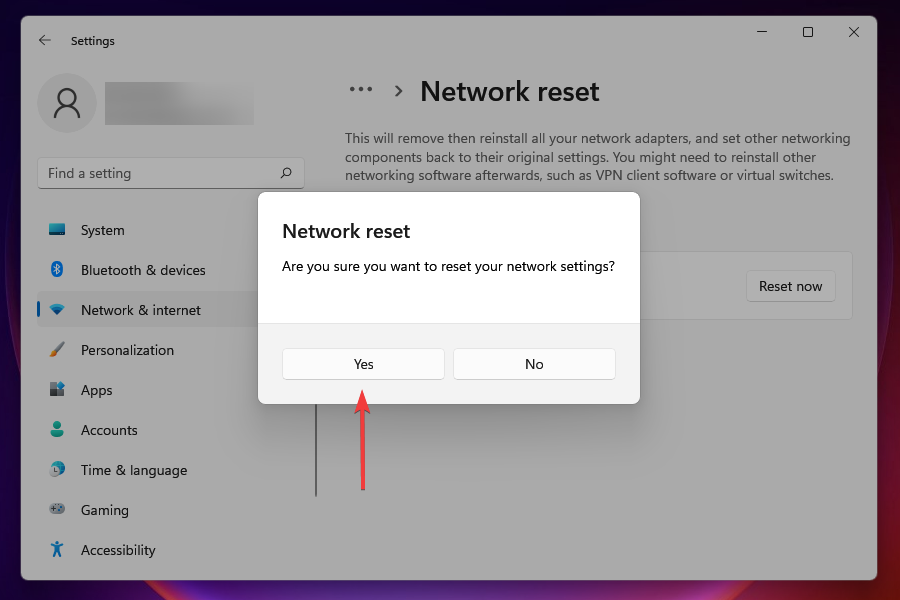
7. Reset the network settings
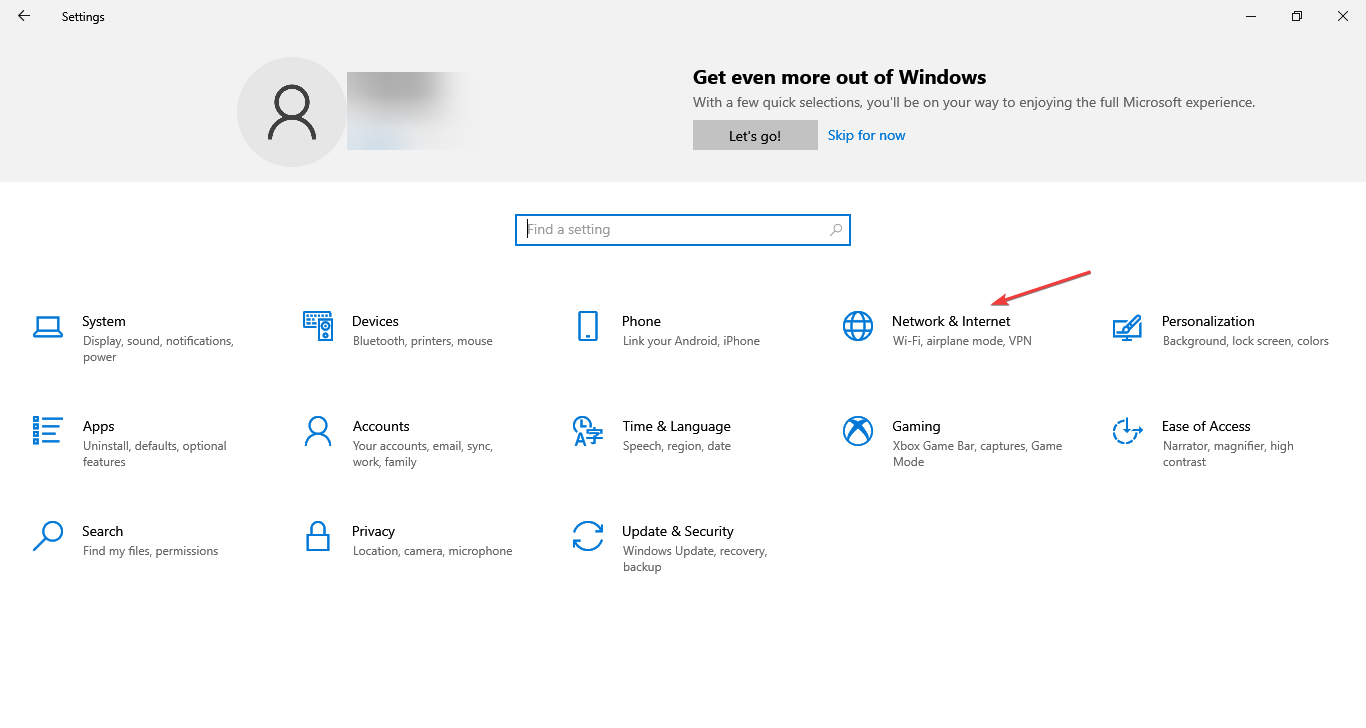
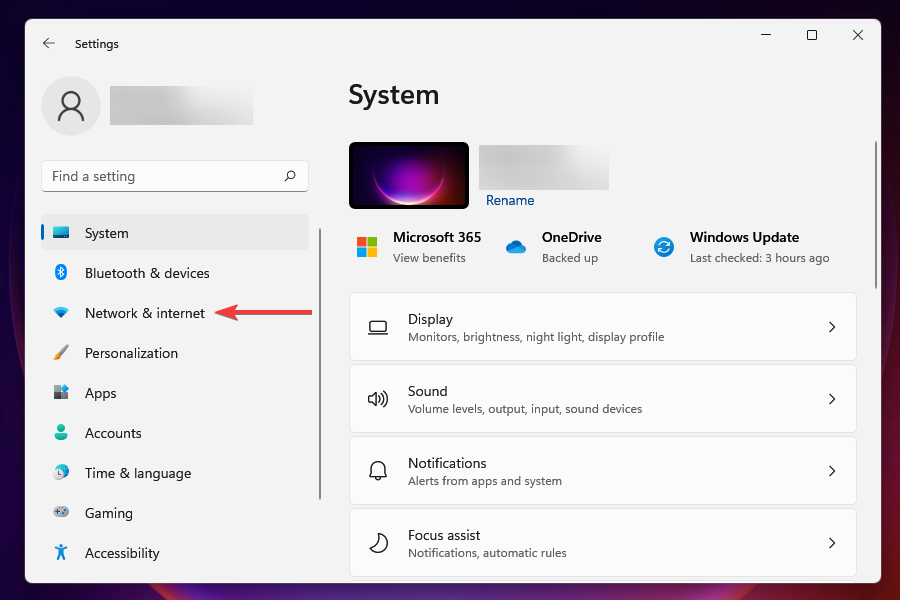
Press Windows + I to open Settings, and click on Network & Internet.
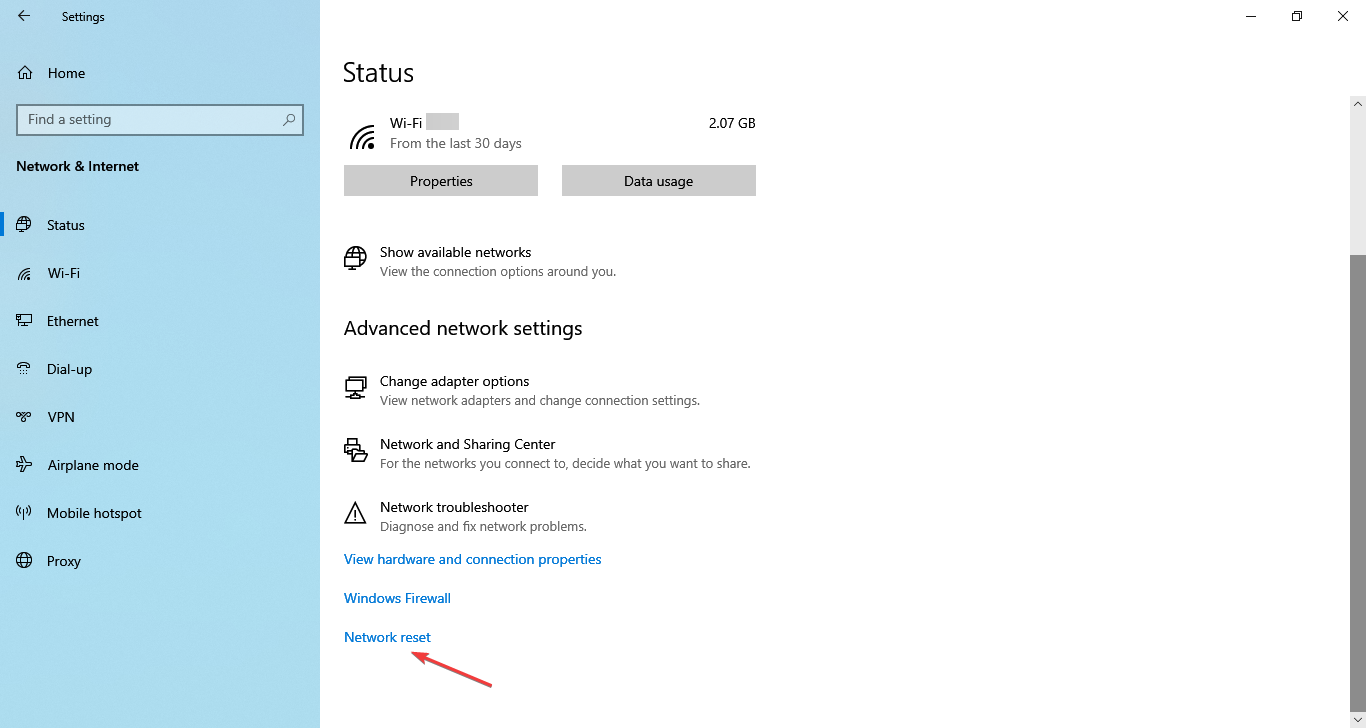
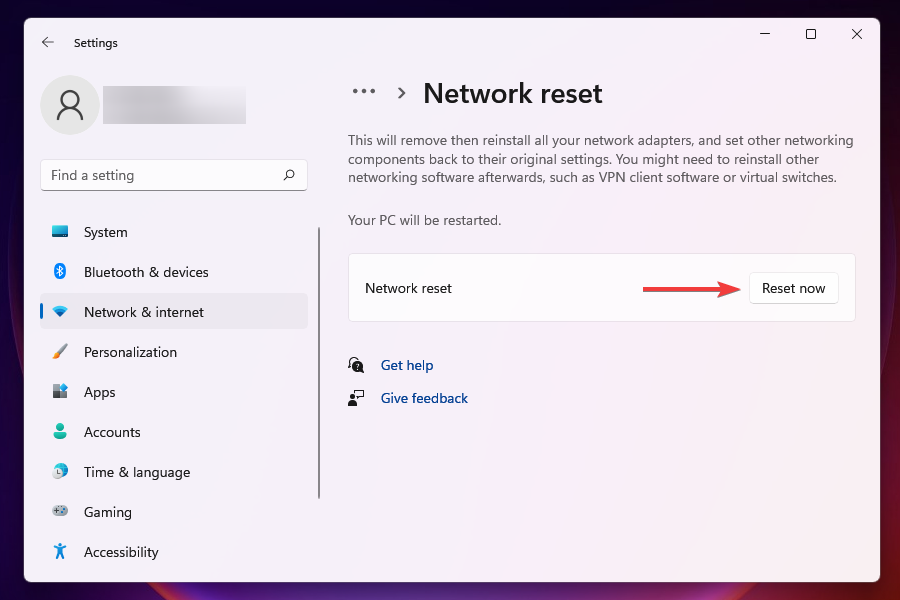
In the Status tab, click on Network reset at the bottom.
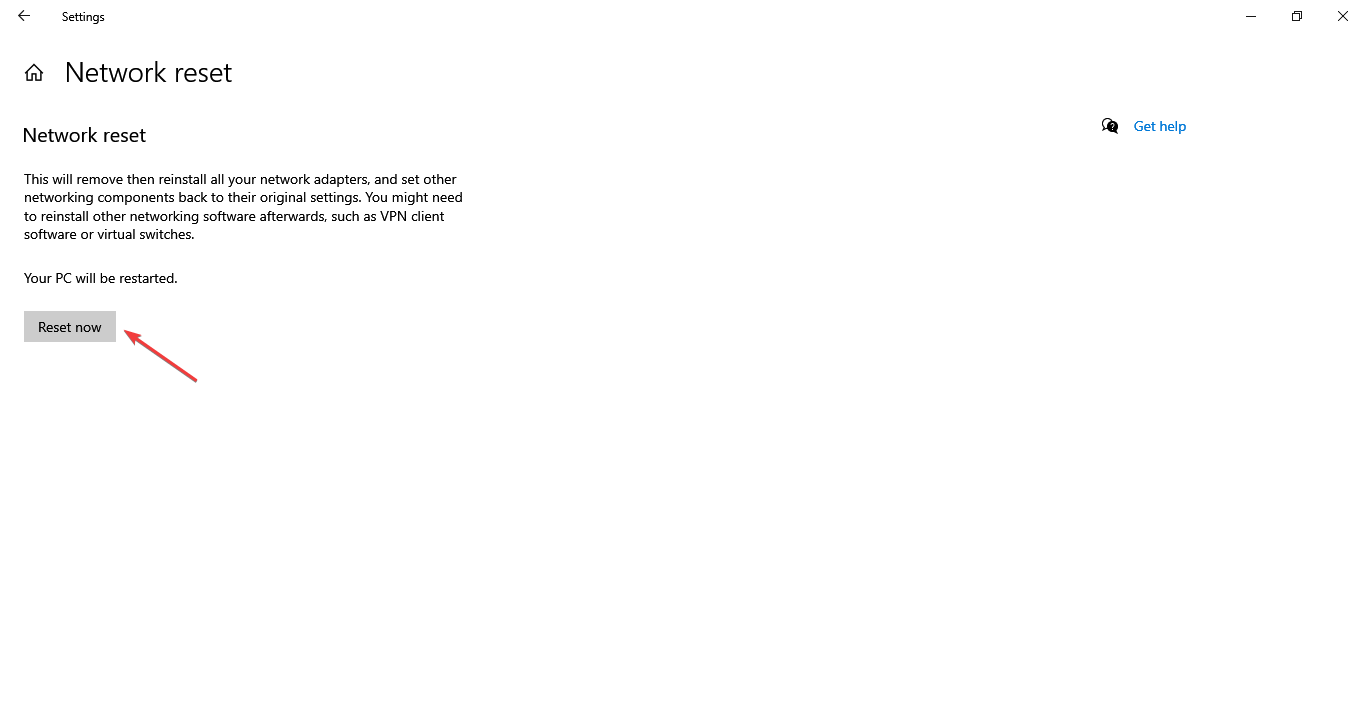
Click the Reset now button to confirm.
There you go! One of these fixes should help resolve issues behind the HP laptop not connecting to Wi-Fi.
Did any of these solutions work for you? Please share with us in the comments section below. Also, leave any other questions, and we’ll check them out.
Trying to delete a file or folder without any success? Unfortunately, it happens to all of us all the time. Unfortunately, some files in your computer are too stubborn and won’t let you clean up the disk and free some space by deleting them.
You can also delete ghost files using the command prompt with a command or by changing the file type.
In this article, we walk you through a few software to delete files that seem undeletable on Windows PC.
How do I delete stubborn files?
Windows have built-in options to help you delete stubborn files. The most common and widely-used method is the DEL command in CMD.
This deletes even ghost files, provided you know their location. However, there are some secured and system files that the built-in option cannot delete. And this is where the use of third-party software comes in.
BitRaser from Stellar is an incredibly versatile and thorough software that enables you to easily remove any unwanted files from your PC without leaving any trace.
Not only can you remove files and folders entirely and permanently, but you can also perform the same actions regarding browsing history, saved passwords, etc.
The easy-to-use interface ensures you don’t need to be a computer pro to use it, but it offers pro-level results in a blink.
BitRaser File Eraser
This easy-to-use and thorough software will always ensure that all traces of unwanted files and folders are gone with a few clicks.
Obliterate files that are tricky to remove without compromising the security of the PC and operating system with Secure Eraser.
Even if data is deleted from a computer, it is not impossible to recover. Confidential information is similar to a memory pattern; it is tough to remove from a system storing it for various purposes.
Secure Eraser uses the most well-known data deletion process, overwriting sensitive data that can never be restored, even with specialized software.
Secure Eraser operates to the tiniest detail and leaves no residues. You can also remove previously deleted files, and this time will be forever gone.
Whenever an action is performed, a clean-up of the hard drive should follow to ensure that it performs smoothly after that.
Since Windows XP, the software has supported all operating system versions, and the Department of Defence of the US and the German industrial standard approves it.
Secure Eraser
Secure Eraser eradicates files, folders, drives, recycle bins or traces of surfing to the tiniest detail.
Easy File Shredder does precisely what its title suggests, cleaning any trace of unwanted files and folders from your PC.
This fantastic app removes the files and ensures no trace remains, making the extracted data unrecoverable.
The features included in this powerful software protect your entire hard drive, and it can be used to extend its capabilities even to USB drivers and SD cards.
Easy File Shredder
Ensure that none of the files and folders you want to be removed from your hard drive or external device leaves any traces behind.
Wise Force Deleter is free software that lets you delete any file on your Windows system (64 and 32-bit). It is designed and tested to run smoothly on Windows operating systems ranging from Windows XP to Windows 11.
Wise Force Deleter has a simple and highly intuitive UI with drag-and-drop functions, making it a breeze for you.
Once you install it, a new Force Delete option will appear in the dialogue box. Right-click a protected file and pick Force Remove, which will open the Wise Force Deleter to unlock and delete it. The file can then be unlocked and removed from your Windows PC in seconds.
You also get a 60-day money-back guarantee and live technical support 24/7.
Wise Force Deleter
Wise Force Deleter allows you to unlock and delete any file in Windows OS without any difficulties.
Malwarebytes is known for its popular Malwarebytes Antivirus solution, which is effective and one of the lightest antiviruses you can install on your PC. But, above all, it works.
This powerful software removes any traces available of the apps and files you’re trying to get rid of, thus making it a viable option.
Besides performing these tasks without problems, it also keeps your computer safe from any malware intrusions while also removing any threats found at this time on your PC.
Malwarebytes
Use this great software to remove traces of malicious files from your computer without any remaining pieces.
IObit Unlocker is a free utility from the developers at IObit. The company makes system utility tools for Windows, Mac, and Android devices.
IObit Unlocker is a free software for Windows devices that can help you to solve error messages while trying to delete files.
The software supports all the versions of Windows since XP. In addition, IObit Unlocker offers multiple ways to manage files, including Delete, Rename, Move, Unlock, and Copy.
You can use multiple files and unlock them simultaneously. Simply click the small + Add button and select any other file you want to unlock or delete.
Once you select the file, you can check the status of the file. Click the small drop-down button beside the Unlock button and select the appropriate action.
IObit Unlocker
IObit Unlocker is a handy tool that gives you full control over the contents of your hard drive.
LockHunter is another free file unlocker software available for Windows computers.
It can help you delete malware-infected or system-protected files with a single click. In addition, all the deleted files are moved to the Recycle Bin, just in case you need to restore an important file after deleting it accidentally.
It shows the process that keeps the file locked, can unload DDLS from the process, supports Explorer menu integration for easier access, and supports both 32-bit and 64-bit edition Windows.
LockHunter also allows you to unlock, delete, copy or rename a locked file, schedule file deletion on the following OS restart and remove the locked process from the hard drive.
Whether you want to deal with a malicious virus-infected file that hides delete and right-click options to a file with permission issues, you can download any of these file unlocker software to get the job done.
Ensure you always create a restore point before making significant changes to your computer, including deleting undeletable/locked files.
Are you looking for a list of the best file recovery software instead? Then, check our detailed guide for the top options available.
Please let us know the software you enjoy using from our list in the comments below.
Many users noticed an unusual file on their PC named MPSigStub. While many are concerned about the purpose of this file, in today’s article we’re going to explain to you what is MPSigStub and how to remove it.
What it MPSigStub?
MPSigStub.exe is an executable file whose role is to extract downloaded Windows Updates. This file is also associated with Windows Defender, so it’s safe to say that this file is perfectly safe and not malicious.
Bear in mind that sometimes you might have several copies of this file on your PC in several random folders and that is in most cases perfectly normal.
How to fix MPSigStub high CPU usage?
1. Wait for Windows update to finish
If Windows is installing or downloading updates, make sure to finish the process.
Once the update process is finished, the CPU usage for MPSigStub.exe should drop.
2. Run a malware scan
Scan your PC with reliable antivirus software.
If you find any malware, be sure to remove it.
If you strongly need a fast and reliable antivirus that offers 100% protection from malware attacks, then you should consider the best antivirus programs on the market right now.
Using a highly effective antivirus you actually invest in the comprehensive protection of your PC. It’s known that you can experience malware issues while browsing online, or even spyware or phishing attacks.
Depending on the type of malware, it can attack your PC and determine high CPU usage all of a sudden. Therefore, with high detection shielding, you will prevent that scenario instantly.
How do I remove MPSigStub from my PC?
1. Run File Explorer as administrator
Press Windows Key + S and enter file explorer.
Right-click File Explorer from the list of results and choose Run as administrator.
After doing that, locate the MPSigStub.exe or its folder and delete it.
2. Use Command Prompt
Press Windows Key + X and choose Command Prompt (Admin) or PowerShell (Admin) from the menu.
When Command Prompt starts, navigate to the directory where MPSigStub.exe is located. You need to do that by using the cd command.
Once enter the directory that holds the MPSigStub.exe, type del MPSigStub.exe and press Enter to remove it.
Alternatively, you can delete the entire folder by running rmdir Folder_Name command. Do not use this command if the file is stored in the System32 directory.
There you go, we hope that you found this article helpful and that you understand better what MPSigStub actually is and how to remove it on your PC.
The solutions and information presented are also useful in these cases:
mpsigstub in random folder – Since the process is related to Windows Updates, it is normal for temporary random folders to be created and find the file in there.
mpsigstub virus – Like we said, some existing malware borrows this name. Perform a quick scan to verify if there is a threat or not.
mpsigstub avast – Avast, as well as many other antivirus programs, can detect the malware that takes this name.
Facing a PC Doctor module with high CPU usage can be quite frustrating. Since it is an essential service for Dell PCs, many users are unsure of how best to approach this problem.
PC Doctor comes with Dell computers and it is a big part of Dell SupportAssist. Its core function is to scan and detect issues affecting your PC and then report to Dell’s technical support for solutions.
The background activities of the PC Doctor module can make your PC very slow. As a result, it can take longer than normal to perform tasks or access programs.
To help you solve this issue, we’ve outlined effective troubleshooting solutions to make PC Doctor use fewer resources on your PC. Before we dive in, let’s take a close look at what the PC Doctor module is and how it functions.
Is the PC Doctor module a virus?
Oftentimes, people get confused about what the exact PC Doctor is and some even call it a kind of virus. PC Doctor is not a virus, nor is it malware that can post destructive threats to your PC. It is a component of what is known as Dell SupportAssist.
Can I end the task PC Doctor module?
Yes, you can. If you have decided to end the PC Doctor Module for causing 100% CPU usage on your computer, you have just two options to choose from:
Disable automatic scan and optimization for the PC Doctor module
Uninstall PC Doctor from Dell PC.
Although it is an automatic assistant created by Dell, there are no consequences for disabling it on your device.
Can I uninstall PC Doctor?
Absolutely yes, you can uninstall PC Doctor. To do this, follow the guidelines provided above and that will be the end of the issue.
How can I fix PC Doctor’s high CPU usage?
1. Disable automatic scan for Dell SupportAssist
Press the Windows key, input SupportAssist in the startup search menu, and launch it.
In SupportAssist, go to schedule Scheduled scan and optimization, and click to open Settings.
Untick Turn on automatic scans and optimizations at.
By disabling automatic scans, your PC will not constantly engage in background searches. Thus, the CPU usage will be minimal.
2. Adjust Dell SupportAssist startup type to manual
Press the Windows Key, input Services, and launch it.
Locate Dell SupportAssist, right-click the service, then Properties.
Adjust the startup type to the manual, then click OK to save the changes.
After this process, the service will stop unless you are manually using it.
3. Uninstall Dell SupportAssist
Press Windows Key + I to open Settings.
Expand Apps and locate Dell SupportAssist.
Select the app and click Uninstall and restart the PC to take effect.
The last option to turn to if none of the above works for you, is to get rid of this Dell SupportAssist.
Why does the PC Doctor use my webcam?
PC Doctor uses a webcam toolbox to run diagnostics. This is to make sure that the webcam functions properly whenever you want to test it. It is relatively safe to allow a PC Doctor to execute this procedure.
If you are wondering what it is, CcmExec.exe is an agent for SCCM, which allows organizations to deploy updates, patches, and install applications to the end user’s computer.
How do if fix CcmExec.exe high CPU usage?
1. Terminate CcmExec.exe from the Task Manager
Press Ctrl + Shift + Esc to open the Task Manager, and navigate to the Details tab.
Locate the CcmExec.exe process, right-click on it, and choose End task.
This will immediately bring the CPU usage under check and should provide some reprieve, even if temporary.
2. Update Windows
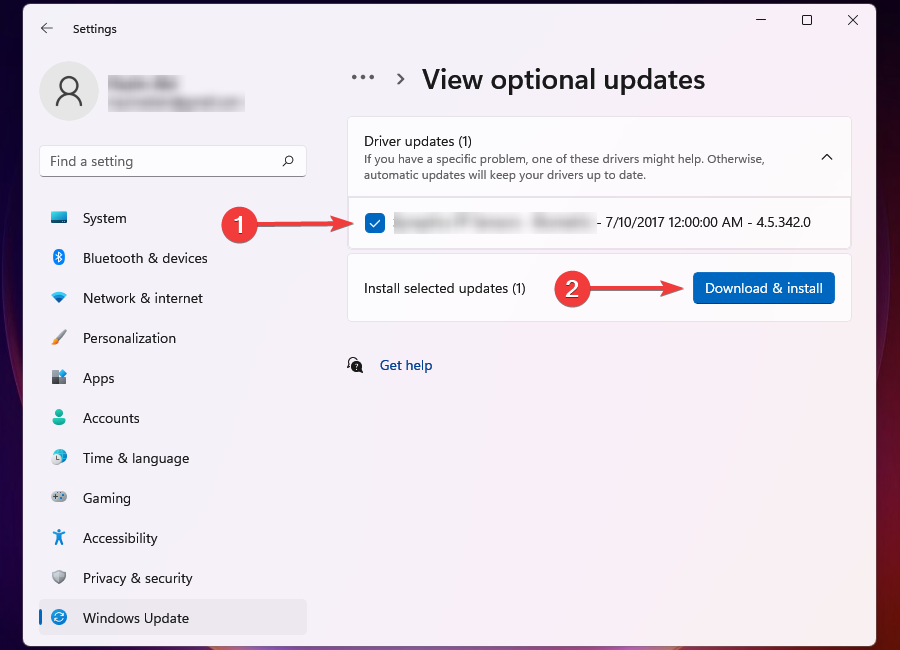
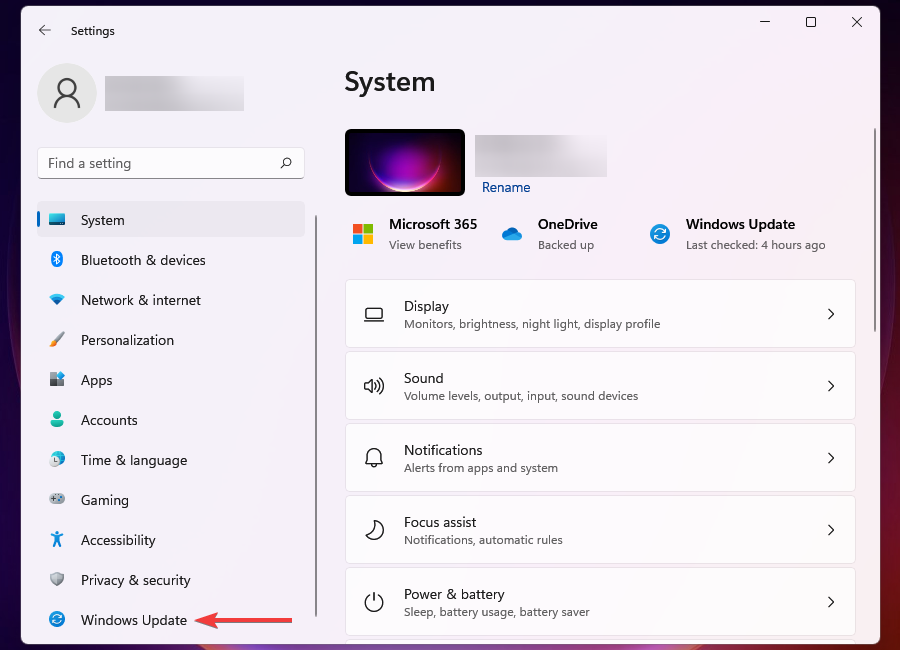
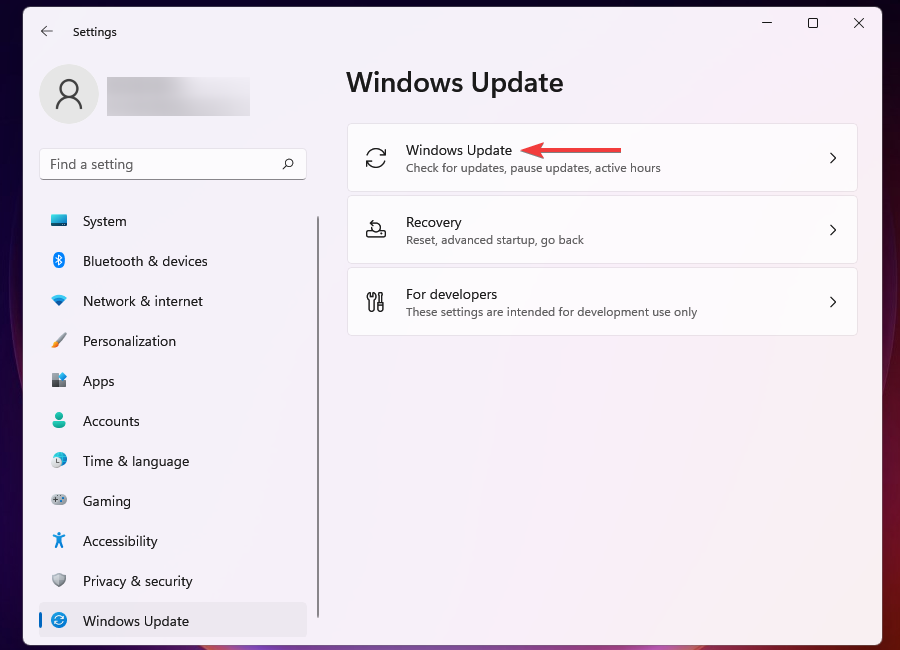
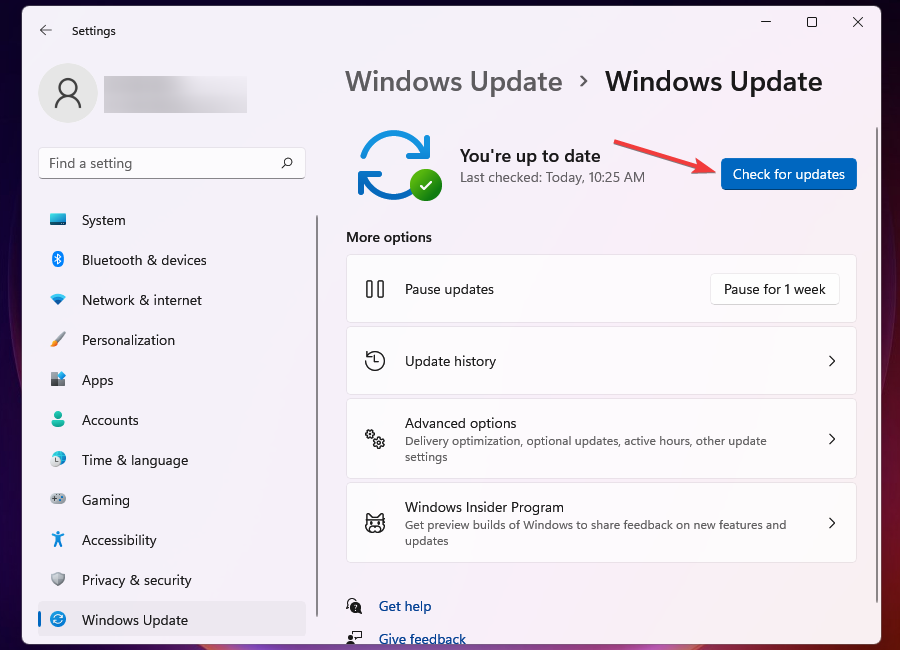
Press Windows + I to open Settings, choose Windows Update from the tabs on the left, and then click on Check for updates.
If an update is listed after the scan, click on Download & install to get it.
After installing all the available Windows updates, restart the computer for the changes to come into effect.
3. Run the Windows Update troubleshooter
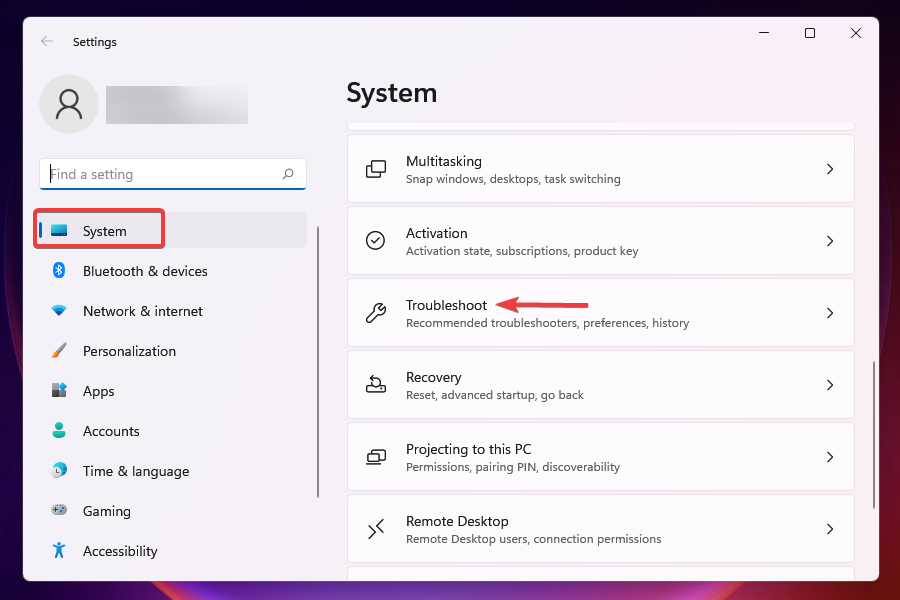
Press Windows + I to open Settings, and click on Troubleshoot on the right in the System tab.
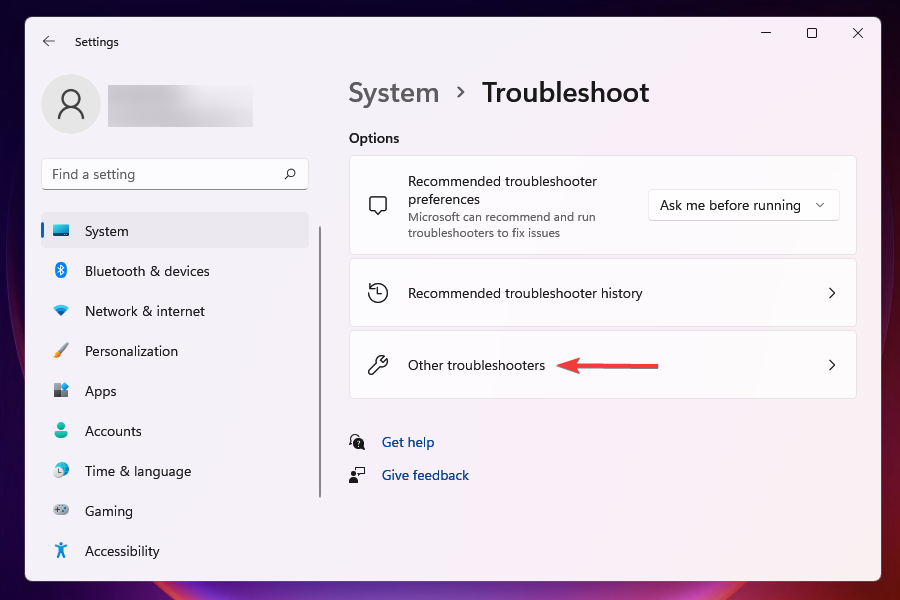
Click on Other troubleshooters.
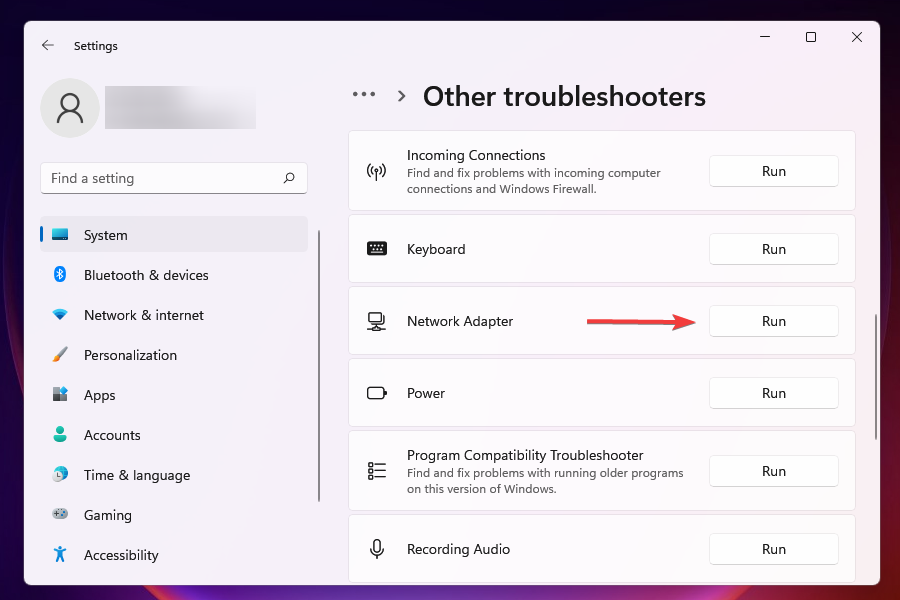
Now, click on Run next to the Windows Update troubleshooter.
Follow the on-screen instructions to complete the troubleshooting process.
A few users reported that running the troubleshooter helped fix things in the case of high CPU usage by CcmExec.exe. Remember, give it a few more attempts if the troubleshooter doesn’t resolve things in the first go.
Press Windows + R to open Run, type appwiz.cpl, and click OK.
Now, locate the installed third-party antivirus, select it, and click Uninstall.
Follow the instructions to complete the uninstall process.
Once done, restart the computer and verify whether the CcmExec.exe problem is resolved.
In many cases, a third-party antivirus interfered with the process and led to high CPU consumption by CcmExec.exe. While you can disable it, uninstalling it provides a better idea and helps effectively identify whether the antivirus is the underlying cause.
Press Windows + R to open Run, type taskschd.msc in the text field, and hit Enter.
Now, choose Task Scheduler Library, expand Microsoft, and choose Windows.
Next, choose Application Experience from the navigation pane, right-click on Microsoft Compatibility Appraiser, and select Disable.
If nothing previously worked, this should fix things when CcmExec.exe uses a high CPU. Also, if other background processes contribute to the error, find out how to fix 100% CPU consumption in Windows. For any other queries, drop a comment below.
Microsoft offers a Windows Media Creation tool that anyone can use to install or upgrade to different Windows operating systems.
The tool can be used to create a bootable USB drive as well. However, the Media Creation toolnot having enough space on C display not enough space error appear for the users that are trying to install the file on C disk partition.
The error occurs irrespective of whether the user has enough space on their hard drive or not.
Plus, this error can occur due to several reasons, and in this article, we have put together multiple solutions to troubleshoot this error on Windows 10 system.
Why does it say I don’t have enough disk space when I do?
When this memory error message appears, it’s usually because your disk space is used by the current Windows OS or any large files and applications on the specific drive partition.
If it seems that it’s not enough disk space but there is plenty, you should double-check your hard drive and get rid of unwanted large files from your storage.
How to fix Windows Media Creation Tool not having enough space on C?
1. Free up storage in C: Drive
An effective and fast workaround to get rid of Windows Media Creation tool not enough space issue is to free the storage on the C: drive.
1. Press the Windows key and type Disk Cleanup. Open the Disk Cleanup utility from the search.
2. Select the C:drive under Drive and click OK.
3. Disk Cleanup will calculate how much space can be freed and a pop-up window will display all the data you can clean up.
4. Select the files you want to delete. Make sure you select the Recycle Bin and the download folder (after taking the backup).
5. Click on the OK button. Click Delete Files if asked to confirm the delete process.
6. The Disk Clean-up tool will delete all the selected files from the system.
To clean install Windows OS, you need to create a bootable USB drive with Windows 10 ISO. We have covered the best tools to create a bootable drive for Windows 10.
Reinsert the USB drive into the system and reboot your PC.
Follow the on-screen instructions to format and Clean Install Windows 10 on your main drive.
3. Choose another drive partition
Download the Media Creation tool ISO from Microsoft website.
Open the ISO file on your PC.
In the open window, check and accept the Terms and Conditions.
Pick the Create installation media for another PC option and click Next.
Choose Use the recommended option for this PC.
Pick the ISO file option.
Select a different disk partition to install the file.
Wait for the installation to complete.
In addition, you should know that an error like this might be encountered in different versions on Windows systems.
For instance, it may appear like we can’t tell if your PC has enough space to continue installation for Windows 10 and stop the process.
It’s worth knowing how much space is recommended for Windows 10 installation media storage. Namely, you need minimum 10GB free space to complete the media creation tool installation.
If some application is using your CPU it will cause it to use more power, produce more heat as well as decrease your performance. Users have reported that Photo Background Task Host is using more and more CPU power over time, so let’s see if we can resolve this issue.
How to fix Photo Background Task Host high CPU?
Solution 1 – Disable Runtime Broker process
Users report that main cause for high CPU usage is the process called Runtime Broker. To reduce the CPU usage, you can always close this process from the Task Manager.
Open Task Manager. You can open it by pressing Ctrl + Shift + Esc on your keyboard.
Locate Runtime Broker process.
Right click it and choose End process.
We have to warn you that turning off Runtime Broker process will prevent Universal apps from working, so if you are using Universal apps regularly you might want to try something else.
Solution 2 – Kill the Photos Background Task Host process
This is also a simple workaround although it’s not a permanent solution.
Open the Task Manager.
Find the Photo Background Task Host process.
Right click it and choose End process.
Solution 3 – Disable your Windows Camera app
You can as well try to disable your Windows Camera app:
Go to Settings and then to Privacy.
Choose Location and scroll down until you find settings for individual apps.
Locate Windows Camera app.
Scroll the slider to No to disable it.
Solution 4 – Turn off Photos in Background Apps
Go to Settings > Privacy.
Next go to Background Apps > Photos.
Turn off Photos, and you problem should be fixed.
Solution 5 – Change Sources for your Photos app
Photos scans your computer for new pictures, but in addition it also scans your OneDrive for pictures from time to time, and this can increase the CPU usage, so the best way is to disable that.
Open Start menu and find Universal title called Photos.
Click it and choose Settings.
Go to Sources and from there turn off Show my photos and videos from OneDrive.
Solution 6 – Reinstall and re-register all Windows apps
And if nothing else helps, you can try with reinstalling Windows app, in case if some of the apps is causing the high usage problem. Here’s how to quickly reinstall your Windows apps:
Open PowerShell as administrator. You can do so by typing PowerShell into the Search bar and right clicking the
PowerShell icon and choosing Run as administrator option.
Enter this in PowerShell and press Enter to run it:
Windows 10 is a highly versatile all-purpose operating system. You can use it to run apps related to education, work, gaming, and pretty much anything that can be used as a program.
Things are no different for Mac users. So, it doesn’t come as a surprise that musicians also utilize Microsoft’s powerful OS and Mac to run virtual piano software.
Why use a virtual piano? Well, it has numerous advantages over a traditional piano.
For one, you don’t have to empty your wallet for a piano or keyboard since piano software for Windows 10 and Mac are usually free.
Furthermore, a virtual keyboard allows you to record your creative pieces easier.
So, if you are an aspiring musician looking for the best piano app for PC, then you’ve come to the right place.
With the help of our list below, finding the right piano program for PC and Mac should be as easy as a walk in the park:
The Grand Piano Keys 5K is an excellent Windows virtual piano program. This application’s instrumentality allows you to enter the realm of the musical piano. Your goal is to start playing beautiful pieces of music.
You may use this program as a regular piano keyboard to perform music – this mode adds one extra option: the ability to record and save whatever you play. Using the MIC button, you may sing and play at the same time.
To view the chords on the keyboard, enable chords mode. Simply tap the lighted keys at the appropriate moment to perform a tune from a training list.
The Grand Piano Keys 5K is a fantastic musical application for piano that includes chords and pre-programmed tunes, as well as a training mode and recording possibilities.
Professional piano keyboard, high-quality sounds, fun popular tunes in learning mode, and special training mode for novices are some of the other wonderful features.
However, you may find it bothersome since when you download it and open it, it immediately goes to full screen and you are unable to modify this setting.
Grand Piano Keys 5K
Play various songs, record your voice, change the piano sound, and save your project with this fun musical tool!
The Virtual Piano platform allows you to quickly play the piano on your computer keyboard, mobile device, or tablet.
This keyboard piano software teaches you how to play a variety of virtual music instruments, allowing you to become an online pianist and produce your own exceptional music.
VirtualPiano.net is the original online piano platform that anybody, anywhere, at any time, may use for free. The best thing is that you don’t even need to know how to read music notation to perform.
The music sheets on VirtualPiano.net employ the plain English alphabet and simple semantics, allowing you to enjoy the sensation of playing a real piano in less than a minute.
One more thing, the music sheets are also free! There are many of them. So go choose a song that moves you, learn, and share it.
Additionally, Virtual Piano provides a selection of other instruments for you to learn to play, all with the same permission terms to use as the piano.
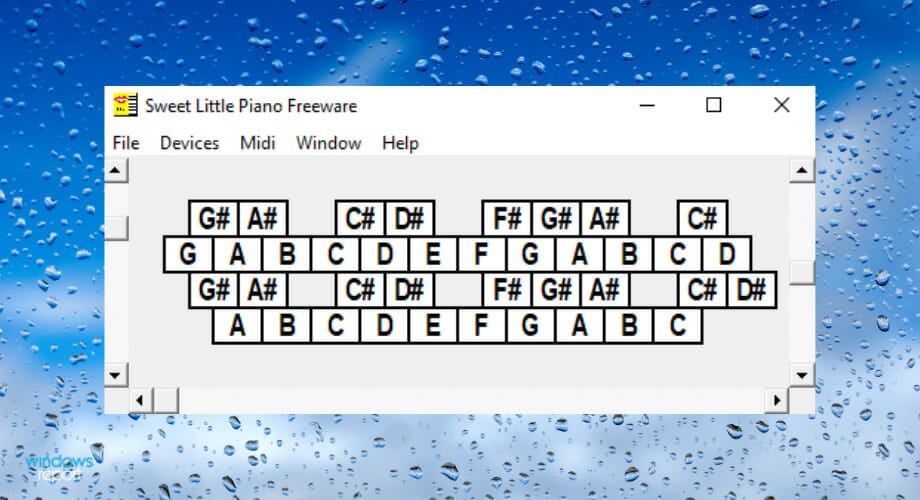
The Sweet Little Piano software is somewhat deceiving because it looks simple but it’s actually feature-rich.
The application is primarily a virtual piano, yet it also can be used as a virtual flute, guitar, accordion, and draw organ.
You can change the user interface and keyboard layout to fit your needs. It’s also possible to change the notes to sharps or flats.
A unique thing about this software is that it has pre-mapped keyboard keys that generate MIDI notes. MIDI audio files are great for musicians, as they can be easily recorded and edited.
All in all, if you are looking for something that is easy to use but still offers a number of features, then you will want to try Sweet Little Piano.
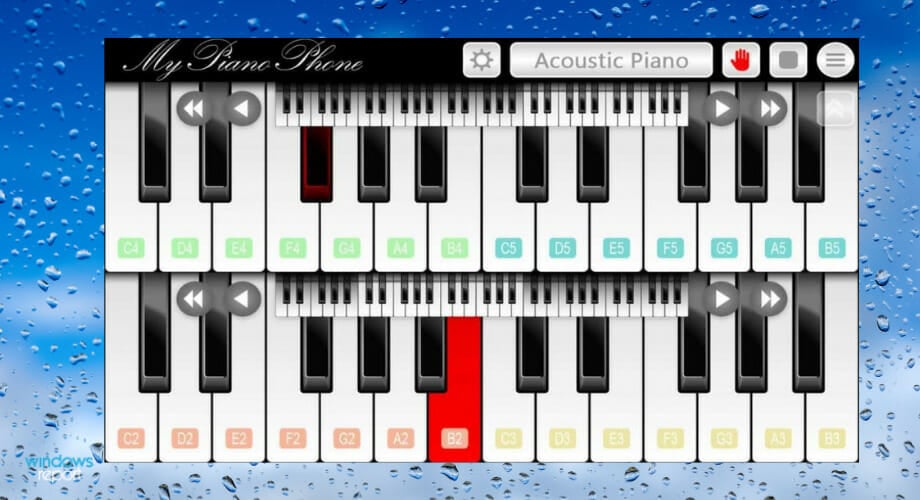
My Piano Phone has a lot of things going for it. For instance, it has a wide variety of integrated songs, which you can use to play and learn.
There is another feature in this app that allows you to use one or two keyboards simultaneously. There is also a drum kit, that you can use to help keep your playing on the beat or to improve the sound of your music.
This application also has other virtual instruments, such as electric guitar, acoustic guitar, trumpet, violin, electric piano, and more.
The only disadvantage of this application is that there isn’t an option for recording. Most users will use this app purely for recreational uses.
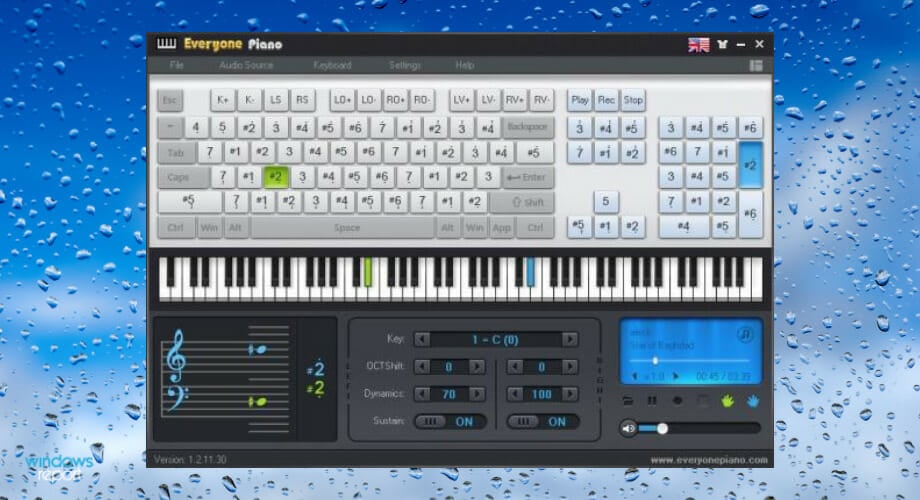
Everyone Piano is capable of producing sounds that accurately simulate a real piano. In fact, the sound from Everyone Piano sounds so authentic, that it even simulates the piano‘s pedal.
In addition to being lifelike, the application allows you to record, and customize your keyboard, playback, music score, play halftone, and more. There are also numerous music scores that you can use to improve your piano skills.
From the official website of Everyone Piano, you have the option to download various plugins that can increase the entertainment and educational value of the application.
There are also downloadable skins that you can use to improve the aesthetics of the user interface. Other features include support for external MIDI keyboards and VSTI.
There are also different modes: Children mode, Adult mode, and Elder Mode. From recording capabilities to teaching materials, Everyone Piano is truly a versatile application.
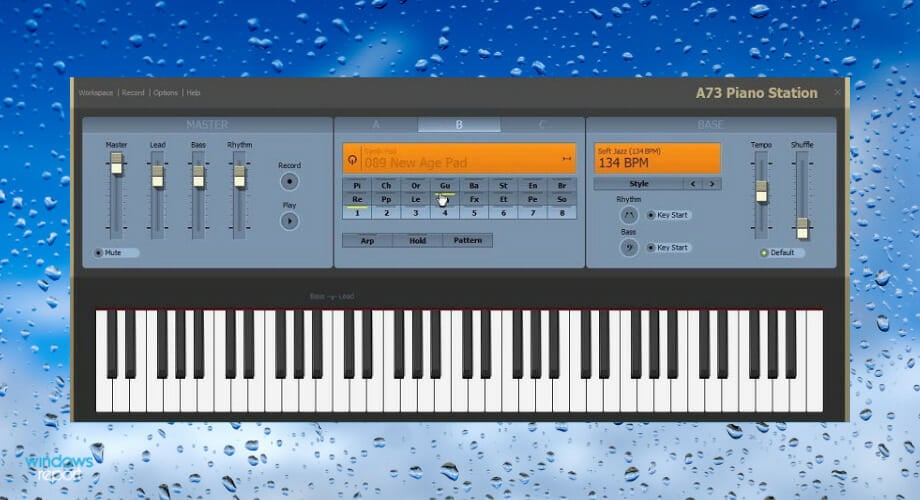
A73 Piano Station doesn’t lack great features, but it does have one that makes the application stand out from the crowd. It has a user interface that is both aesthetically very pleasing and professional.
In fact, it looks exactly like a real-life professional keyboard, complete with information displays and slider controls.
Of course, virtual piano software doesn’t only look good, but it is also packed with amazing features.
For starters, there is a full-sized six-octave keyboard that not only allows you to pump out your creative piano pieces, but also lets you play more than 100 musical virtual instruments, including drums, guitar, and bass.
One of the most useful features of this piano application is that it allows you to play three different instruments simultaneously.
There is also an option to save your projects. This means that you will not have to download third-party programs in order to combine and record your compositions.
There are also detailed documents included in the program that can assist you if you do not know how to operate certain functions of the application.
Overall, the professional interface combined with its numerous features, makes the A73 Piano Station one of the best there is when it comes to virtual pianos compatible with the Windows 10 OS.
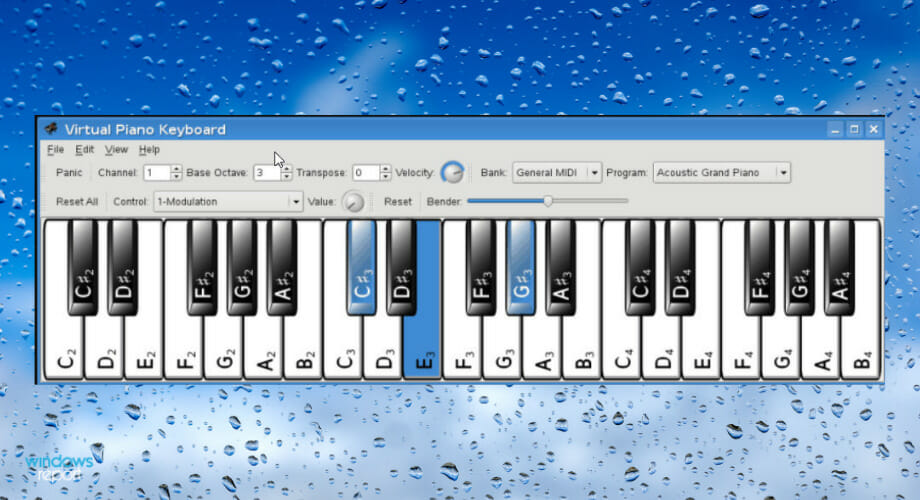
Virtual MIDI Piano Keyboard is ideal for professional piano players or musicians who want a program that is void of any unnecessary functions.
The user interface is certainly not something you will be impressed with, but it is clear and plain. The design obviously favors practicality over aesthetics, which again is ideal for professionals.
It is important to note that the program itself does not produce any sound, rather you will need a MIDI synthesizer to produce music.
Also, can display notes from other instruments that are connected to your computer’s MIDI ports. You can then tweak the sound by adjusting the Transpose and Base Octave options.
Other controls available on this app include phaser depth, expression, and modulation. You will be able to produce a wide variety of sounds, as the application features a number of preset programs such as tango accordion, and grand piano.
All in all, while the Virtual MIDI Piano Keyboard is powerful and versatile, it works best for professionals.
As great as Windows 10 has proven to be, it has flaws. For example, users have recently complained about the Windows Shell Experience Host high CPU usage. It is scary because problems with CPU usage often lead to system crashes.
We have investigated this problem and have come up with some effective resolutions and possible causes so that you may avoid future occurrences.
Why is Windows Shell Experience Host using so much CPU?
From interacting with users who faced this problem, we have gathered the primary trigger, which includes:
Problems with system files – For most users, this will refer to corrupted or bad system files on the computer.
Issues with the graphics driver – This is often because the driver is corrupted or outdated. Whichever it is is dangerous for your computer, and we will explain the best steps in this guide.
OS updates – While these are mainly beneficial, there are a few times when an update may introduce a system bug leading to the Windows Shell Experience Host’s high CPU usage.
Conflicting software – These are often third-party tools that may not best suit your computer.
Desktop Backgrounds – Many users report slideshow background as the main reason for Windows Shell Experience Host causing high CPU usage.
You need not worry because regardless of the cause, we have solutions to help resolve it and make your computer more usable.
What is Windows Shell Experience Host used for?
Its primary function is connected to changing desktop backgrounds in Windows 10 computers. We could say that it provides users with a visual interface on their computers.
This most often includes OS elements like the Search, Start menu, and notification, as well as other aspects that enable you to interact with Windows 10.
If a process uses your CPU more than it should, it can be a problem since your computer will use more power and produce more heat, which is especially bad for laptops. For example, users report that Windows Shell Experience Host uses 30-35% of CPU, which is a lot, so let’s see how to fix that.
How do I fix Windows Shell Experience Host high CPU usage?
Before going into these solutions, we advise that you restart your computer. A reboot helps end troublesome processes and could correct the high CPU usage.
1. Change your desktop to a static background
Press Windows + I to open the Settings app.
Click on Personalization and select Background from the menu on the left.
From the drop-down menu, select Picture.
Save your settings, and Windows Shell Experience Host issues should be resolved.
Users report that this process uses your hardware power if you set your desktop background to a slideshow, so the best solution is to put your desktop to a static picture.
2. Turn off the automatic color changing
Press Windows + I to open the Settings app.
Click on Personalization and select Colors from the menu on the left.
Find the Automatically pick an accent color from my background option and turn it off.
Save your changes.
If changing the background behavior didn’t get the job done, you can try disabling automatic color changing.
3. Update your computer
Press Windows + I, and select Security & Update.
Click on Windows update and click the Check for updates button on the right pane.
Ensure you’re running the latest Windows OS updates on your machine. As you know, Microsoft regularly rolls out system updates to fix various issues and improve Windows 10‘s stability.
It’s possible that the pending updates are actually aimed at focusing on high CPU usage and may quickly fix your problem.
4. Run SFC
Press Windows + R, type cmd, then hit Ctrl + Shift + Enter.
When the elevated Command Prompt opens up, type the script below and hit Enter. sfc /scannow
Wait for the scanning process, and then restart your computer. All corrupted files will be replaced on reboot.
If specific Registry keys have been incorrectly changed or even deleted, you may encounter various issues on Windows 10, including high CPU usage.
Try repairing your Registry to cross this hypothesis off your list. However, remember to back up your registry first in case anything goes wrong.
The safest way to check for system file corruption is to use Microsoft’s System File Checker. With the help of a simple Command Prompt instruction, you can check the integrity of all system files and repair the problematic ones.
You can also repair your registry using a registry cleaner like CCleaner.
Press Ctrl + Shift + Esc to open the Task Manager.
Click on the Details tab and locate Windows Shell Experience Host.
Right-click on it, select Set Affinity, then choose the CPU limit threshold.
You can also manually limit Windows Shell Experience Host’s CPU usage. However, remember that this action may severely impact graphics quality and trigger other graphics-related issues, so proceed at your own risk.
6. Run a virus scan
Type Windows Security in the Search bar, and click on the relevant search result.
Now, click on Virus & threat protection here.
Click on Scan options.
Select Full scan and click the Scan now button at the bottom.
That is all; we hope this article helped you to reduce CPU usage on your Windows 10 computer to normal. If you have any questions, comments, or suggestions, see the comment section below.
Windows users often experience high CPU usage. This issue causes PC performance to slow down, consuming huge chunks of memory.
It is critical to take measures in fixing this issue, as it can bring fatal damage to your PC. In this guide, we will provide you with a series of fixes that should help you out.
What is Sppsvc.exe?
This process enables the download, install,ation and enforcement of digital licenses for all Windows applications and Windows. It is a part of Windows OS, if disabled, it can lead to Activation issues.
All-in-one emulators are nothing but multi-platform emulators that can run games from different platforms from a single source, and here you will find the best of them.
Here at WindowsReport, we have presented many tools that allow you to play games designed for another platform in Windows.
Bizhawk is the best all-in-one emulator with a retro design created by developers at TASVideos. It is free to use and works on Windows OS-running computers.
The core functionality of Bizhawk is to offer users accuracy and power without complicating the working process.
Bizhawk can emulate and run Neo Geo Pocket, Nintendo DS, Sega 32X, PlayStation, Sega Saturn, Sega Master System, Virtual Boy, Uzebox, and ZX Spectrum ROMs on your Windows PC. You may check the full list of compatible ROMs on the official website.
Bizghawk supports full recording and Lua scripting. In addition, it comes with features like full-screen support, controller and hotkey mapping support, gamepad support for game controls, and auto rapid-fire controls function.
Other key features include:
Basic re-recording and bulletproof recording support
Input display
Auto hold
RAM watching and poking tools
Lua scripting
You may need to move some files around to install Bizhawk and run the game ROMs. Check the YouTube video below for the installation procedure:
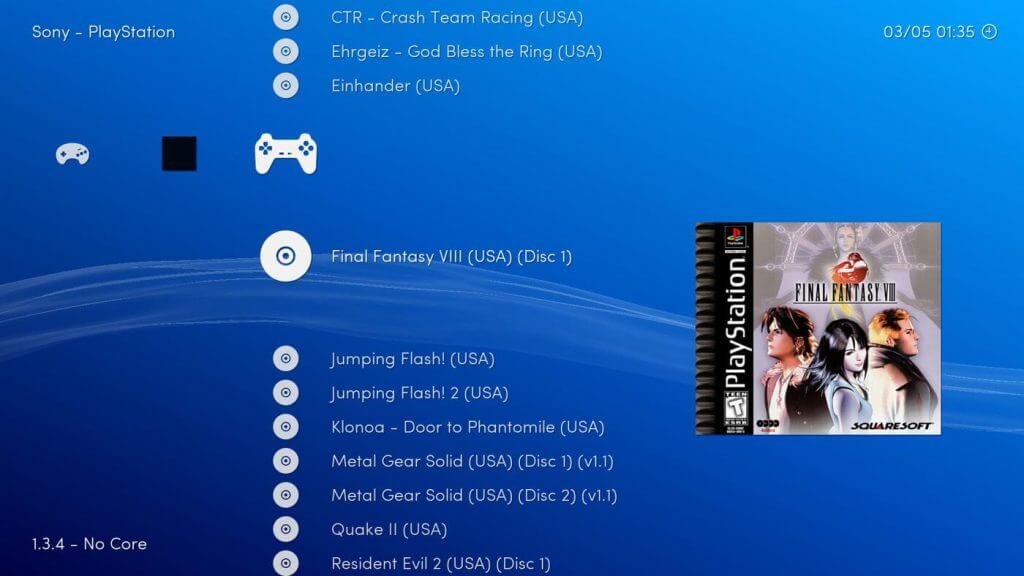
RetroArch is a bit different than Bizhawk. It is a front for emulators, game engines, and media players and allows you to play games from multiple platforms on your Windows computer.
Being an all-in-one Nintendo emulator, RetroArch can run video game ROMs from Nintendo, Super Nintendo, NES, Nintendo 64, and more.
If you don’t have a Windows PC, RetroArch is a cross-platform emulator compatible with Mac OS, Linux, Android, iOS, gaming consoles, and other devices as well.
The user interface is super simple, and you can browse the game collection through the menu. However, the emulator itself is not the easiest to use.
The installation and setup procedure of RetroArch does take some effort and time. But, once you do, the emulator makes up for the effort by allowing you to play retro games from multiple platforms from a single framework.
The highly customizable system allows users to tweak most of the settings for the emulator and the games.
RetroArch uses RertoCores to emulate the games from other platforms. Some of the cores supported by the emulator include Dolphin to emulate Wii and GameCube ROMs, Citra for Nintendo 3DS, Redream to emulate Sega Dreamcast, Open Lara, a Tomb Rider game engine, melonDS, Gameboy, and more.
Mednafen is a multi-system emulator for Windows computers. It is a portable emulator that uses OpenGL and SDL to render games.
Originally, Mednafen was introduced as a command-line-driven multi-system emulator; however, developers have created a GUI tool to make it user-friendly for everyone.
While RetroArch and Bizhawk offer great support for hand-held retro game emulation, Mednafen is preferable for those looking for a PlayStation 1 emulator and support for Nintendo and SNES emulators.
Some of the platforms supported by Mednafen include Apple 11/11+, PlayStation One, Sega Genesis, Master System, Game Gear, Super Nintendo, GameBoy Advanced Neo Geo Pocket, WonderSwam, and more.
Similar to RetroArch, Mednafen does not offer a direct installer. You need to move around some files and folders to get it working. But unlike RetroArch, Mednafen is much easier to install.
The support for ISO files and the ability to emulate TurboGrafx 16-CD / PC Engine CD is what makes Mednafen an excellent choice for playing CD games on your PC. For the frontend GUI, you can use Mednaffe or MedGui.
FB Alpha (popularly known as FinalBurn Alpha) is a multi-system open-source emulator for Windows users.
The purpose of the emulator is to emulate the popular Arcade game system, although, now it has more than just Arcade game support.
The emulator supports all versions of Windows since Vista for both 32-bit and 64-bit editions.
Some of the popular platforms supported by FB Alpha include Capcom CPS-1-3, cave, Irem M62 and above, Konami, Kaneko 16, Neo-Geo, NMK16, Pacman-based hardware, PGM, Sega System 1 & 16 Toaplan 1-2, and more.
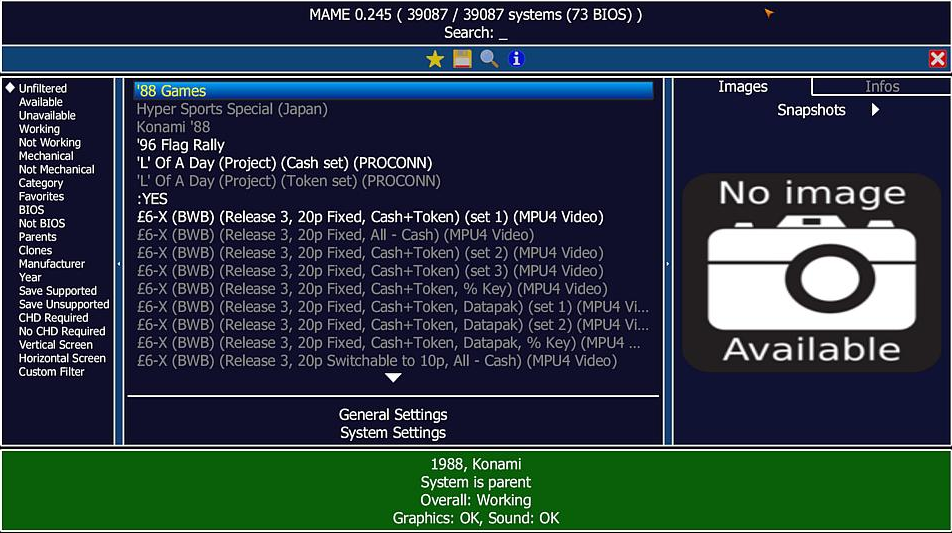
Using the free, open-source MAME (Multiple Arcade Machine Emulator) emulator, you may play arcade games on your computer. It supports a broad range of arcade games, from those in the 1970s to those in the early 2000s.
MAME is renowned for its precision and capacity to play various arcade games. It is also well-known for its features, including netplay, rewinding, and save states.
Despite being a sophisticated piece of software, MAME is relatively user-friendly. The user interface is simple, and you can find many online tutorials to get you up and running. MAME is the appropriate emulator for playing arcade games on your PC.
Other key features include:
Supports a wide variety of arcade machines
Can run a large number of arcade games
Known for its accuracy
Wide range of features, such as save states, rewinding, and netplay
Although both are capable emulators, note that Bizhawk is a lot more straightforward. It simply loads the core that you want and plays your favorite games right there and then.
Retroarch is a lot more complicated, and it will require some knowledge and skills on your part.
This multi-emulator for PC has so many cores and options that you might get easily lost in the menus, but once you master it, the retro gaming world is yours.
Which emulator is best for low-end PCs?
You need to know that running an emulator on your PC means the app simulates another OS running on your machine.
And that virtual machine uses the same resources as your computer, including CPU and RAM so your PC has to handle both under the same roof. However, we have a list of the best emulators that can run on low-end PCs.
Is 2GB RAM enough for the emulator?
Yes, some emulators can run on at least 2GB of RAM. However, this is far less than ideal if you want to run some complex games.
All of these all-in-one emulators for Windows 10 and 11 are free. We have tried only to recommend the emulators that consistently receive updates from the developers.
If you want to play all your favorite games from childhood, these all-in-one emulators support running Nintendo GB Advance, Arcade, SNES, and more emulators on PC.
If RetroArch is not working for you; it could be due to outdated drivers, error downloading cores, or corrupted RetroArch app, read this guide to learn more.
Have you tried any of these emulators before? Then, do let us know your thoughts in the comments below.
You are not alone if you experience lags when playing Cyberpunk and the Task Manager shows high CPU usage. Many users have complained about the issue, which ruins the gaming experience. However, this can be fixed in no time.
In this guide, we will walk you through some of the expert-recommended fixes to resolve the issue. But before that, let us discuss the reasons for the same.
What causes high CPU usage while playing Cyberpunk 2077?
Some of the common reasons for the 100% CPU usage when running Cyberpunk 2077 are :
Outdated version of the app – Another reason could be the obsolete version of the Cyberpunk app. Check for updates and, if available, install it to resolve the issue.
Changes in settings – Cross-check the game settings to ensure you have not disabled any critical feature.
What can I do to fix high CPU usage while playing Cyberpunk 2077
Before trying the detailed troubleshooting steps, try these quick fixes:
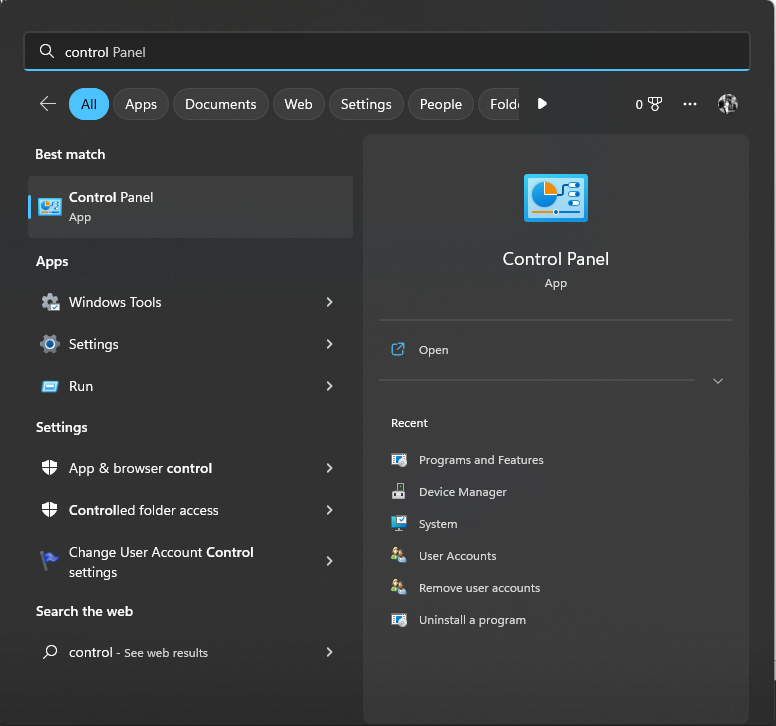
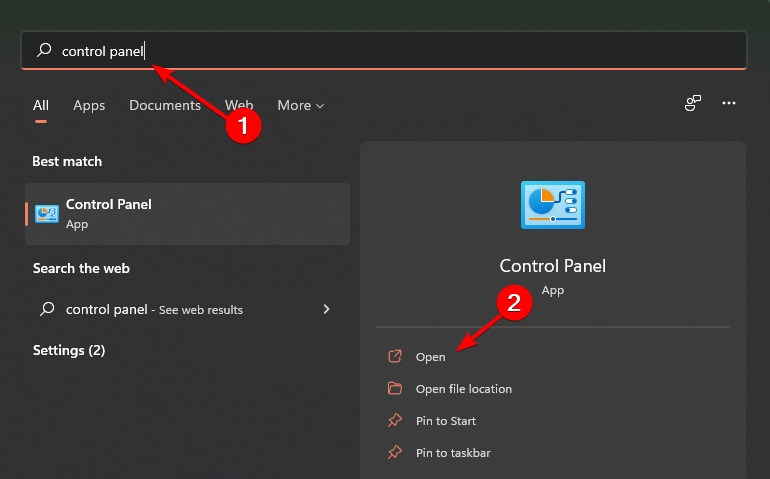
Press the Windows key, type Control Panel, and click Open.
For View by, select Small icons from the drop-down, and then click Power Options.
Go to your current plan and click Change plan settings.
Click Change advanced power settings.
Under the Advanced settings tab, expand Processor power management, and go to Maximum processor state.
Change the value to anything above 90.
Click Apply and OK.
4. Update device drivers
4.1 Use the Device Manager
Press Windows + R to open the Run window.
Type devmgmt.msc and press Enter.
Go to the list of drivers, one by one, select them, right-click, and choose Update driver.
Follow the on-screen instructions to complete.
4.2 Use a third-party driver updater
It is vital to keep your drivers on your computer up to date for smooth functioning. However, doing it manually requires some technical knowledge and is time-consuming. Therefore it is suggested to use a third-party app to get the work done. Outbyte Driver Updater is one such driver updater utility that can help keep your system drivers updated. Follow the below steps to update drivers using the tool:
Click Scan, and it will find all the outdated drivers.
Select the outdated driver, and click Update.
The tool will download the latest available drivers.
Once downloaded, click Install to initiate the installation.
Follow the on-screen instructions to complete.
5. Turn Down Game Priority
Press Ctrl + Shift + ESC to launch the Task Manager.
Go to the Details tab.
Locate and right-click Cyberpunk 2077.exe from the processes.
From the context menu, go to Set priority to Normal.
Is Cyberpunk 2077 a CPU intensive game?
Cyberpunk is indeed a CPU and GPU-intensive game; hence, it is advised to check the minimum system requirements before installing it. If your computer doesn’t have the listed conditions, it might cause many performance issues.
So, these are some recommended methods to fix the high CPU usage while playing Cyberpunk 2077. Try these methods individually, and let us know what worked for you in the comments section below.
For Honor has been around for a bit of time now. And so far, most players agree that the concept is great, but the title is plagued with frequent issues.
Since it’s extremely harmful to Ubisoft to just sit and not do anything, the developer is working on new patches to improve the overall experience and relive original positive critics. However, it seems that something definitely didn’t work out, as patches released by the developer made the game worse for some players by introducing high CPU usage and memory leaks to the title.
This is a serious problem since high CPU usage makes it impossible for some people to play the game. Additionally, memory leaks cause even more problems, like black screen, for example.
How do I lower CPU usage in For Honor?
Luckily, for those experiencing the problem, there are a few solutions that can resolve it. So, check them out below if memory leaks are bugging you.
Set For Honor as Low priority task
The solution that seems to work for most people is moving For Honor to low priority. Here’s exactly what you need to do:
Open Task Manager
Go to the Details tab
Right-click For Honor, and choose Set priority > Low
Now, right-click For Honor again, and choose Set affinity
Untick the last processor core from the list
After performing this action, try running For Honor again. If CPU usage goes back to normal, you’re done. If not, check another solution listed below.
Disable uPNP
Some players suggest that disabling uPNP solves the problem, as well. UPnP stands for “Universal Plug and Play” and takes care of automatically forwarding a port on your router. So, there’s a chance you’re using a wrong port which can cause issues that include memory leaks. Since instructions for disabling uPNP are different depending on routers, we advise you to look online for your particular model.
In case the issue remains unresolved, let us know in the comments. Also, if you have another solution for this problem, please share it with other players!
We can agree that the online gaming is taking over and Xbox Live is the essential part of Xbox ecosystem. And while you can use a wireless connection to play online, it’s still much better to use the ethernet (stable connection, less latency).
However, numerous Xbox One owners had a hard time with the LAN connection while wireless worked just fine. If your Xbox Ethernet is not working, then you have come to the right place.
It could be that your Xbox Ethernet cable is not working, in which case, simply changing the cable should do the trick. However, the problem could be more complicated and require further troubleshooting.
We prepared a few steps which should come in handy. In case you’re unable to resolve the ethernet issues on Xbox One, make sure to check them out below.
What can I do if my Xbox Ethernet is not working?
1. Power cycle the console
The first thing you should always do your Xbox One wired connection is not working is to do a power cycle or also called Full Reboot. This should resolve all minor issues, and there’s a whole lot of those when it comes to an Ethernet connection.
Of course, we don’t count a possible hardware malfunction, which isn’t exactly common. If you’re not sure how to perform a power cycle on Xbox One, follow the steps provided below:
Press and hold the Power button for 10 seconds or so.
Wait until the console shuts down.
After a minute, turn on the console again and look for changes.
Alternatively, you can unplug all cables and plug them in before powering console on.
2. Check your router/modem (connect directly to a modem)
If the issue is persistent even after you followed the previous step, we recommend checking your connection independently of Xbox One. And there are so many options you should go over before we can single out the cause of the problem.
Firstly, try connecting the Ethernet cable to PC to confirm that indeed has a fully functional connection. If it does, continue with the steps. On the other hand, if it doesn’t, troubleshoot the problems by using the PC.
Check out this guide to solve the problems on Windows 10. After you solve them there, you can try to connect your Xbox again.
Also, you may want to upgrade your router’s firmware. To do that, take a look at the steps in this article. The latest firmware could solve some connectivity issues and may help with the Xbox connection.
Try avoiding the router and plugging the Ethernet cable directly from the modem. Some users fixed the problem by simply using a separate modem for Xbox One, avoiding the possible IP conflict in the process.
Another thing is to confirm that there’s only one Xbox system with the wired connection within the same network. For some reason, you can have only one Xbox on wireless and Xbox on Ethernet.
Regardless of the Xbox iteration. In order to make it work on multiple systems, you’ll need to use bridged router settings.
Restarting router and modem rarely provides the resolution but you should give it a try. Some users recommended unplugging the cable, resetting the router and waiting for a minute or so. The issue with Ethernet mysteriously vanished after that for some of them.
And, finally, you should run the Network diagnostic. You can do it on Xbox One by following these steps:
Press the Xbox button to open the Main Menu and choose Settings from the left pane.
Select All settings.
Choose Network and then Network settings.
Tap Test network connection.
After the test ends, reboot the console and look for changes.
If there are any adapter driver errors, you can take a look at this guide that offers multiple solutions to fix them.
3. Reset MAC address and set a static IP
Resetting MAC address and setting a static IP address can help, as well. Even though it’s a long shot, resetting MAC address is proven as a viable solution for various connection-based issues on Xbox One.
If you’re unable to change to a static IP, check out this step-by-step guide on how to do it on Windows 10. After you set up your IP on Windows, the changes will have effect on your Xbox as well.
Furthermore, you won’t lose any data, so it’s a pretty harmless troubleshooting step. Here’s how to reset a MAC address on Xbox One:
Open Settings > All settings.
Choose Network > Network settings.
Select Advanced network settings.
Select Alternate MAC address.
Tap on Clear.
The console will restart.
For troubleshooting purposes, you might want to set an alternate MAC address on Xbox, and we have a guide that shows you how to do that.
Moreover, with static instead of the dynamic IP address, you should avoid IP issues and allow port forwarding. Eventually, you should be able to connect without further issues.
Follow these instructions to set a static IP address on Xbox One:
Open Settings and then All Settings.
Choose Network.
Open Network settings > Advanced settings.
Write down your IP and DNS values (IP, Subnet mask, and Gateway).
Under the Advanced settings, open IP settings.
Choose Manual.
Now, open DNS and write down DNS input you saved just like you did it in the IP settings.
Enter the values you wrote down and confirm changes in the Advanced settings.
Restart Xbox One.
If you have any issues, you can reserve the IP and DNS in the router settings. Find out how to do it and give it a go.
Finally, if none of the previous solutions were helpful and you’re positive that your router and/or modem are working as intended, we can only recommend port forwarding and set Xbox One in DMZ in the router/modem settings.
This should also avoid possible network conflicts and allow you to use the Ethernet in a seamless manner.
Since the procedure for both port forwarding and enabling DMZ differs depending on router’s/modem’s manufacturer, we can only advise to look up your device on the internet and find more.
That’s a wrap-up. In case you have questions or suggestions regarding the Xbox Ethernet not working issue, feel free to tell us in the comments section below. We look forward to hearing from you.
If you’re getting aThe requested URL was rejected. Please consult with your administrator error in your browser, it’s most likely because of your cache and cookies or misconfigured settings.
Below, we’ll give you step-by-step instructions to address all potential causes of this error so you can access any web page you want hassle free.
How can I fix The requested URL was rejected error?
To start off, make sure the page you try accessing isn’t down or under maintenance – just insert the URL into IsitDownRightNow. If it looks like it’s okay, then we’re sure the problem’s from your setup.
Let’s tackle it:
1. Clear the cookies and cache
On Google Chrome
Open Chrome, paste the following path in the address bar, and hit Enter:chrome://settings/content/all
Now, look for the website throwing the error using the search box, and click on the Delete icon next to it.
Next, press Ctrl + Shift + Del, and choose All time from the Time range dropdown menu.
Tick all three checkboxes here, i.e., Browsing history, Cookies and other site data, and Cached images and files, and then click on Clear data.
Once done, relaunch the browser, and you should be able to access the problematic website.
On Firefox
Open Firefox, click on the three-line menu (Open menu) in the top right corner.
Go to Options > Privacy & Security.
Scroll down to the Cookies and Site Data section.
Click on Clear Data.Select Cookies and Site Data and Cached Web Content.
Click Clear.
On Edge
Open Edge, click on the three-dot menu (More) in the top right corner.
Go to Settings > Privacy, search, and services.
.Under Clear browsing data, click on Choose what to clear.
Select Cookies and other site data and Cached images and files.
Click Clear now.
We focused on these browsers because they encounter this issue most frequently, but the same logic applies even if you use a different one.
Press Windows + S to open Search, type Internet Options in the text field, and click on the relevant search result.Properties.
Go to the Security tab, and then click on Sites.
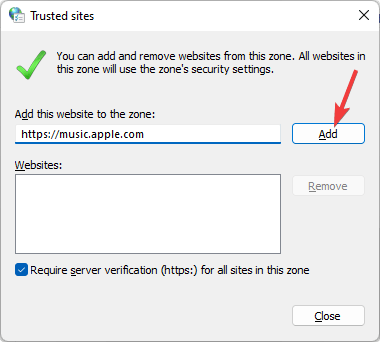
Now, mention the problematic URL to the trusted website list, and click on Add.
Click OK on all windows to save the changes.
Adding URLs to trusted websites is another resolution some users have confirmed fixes The requested URL was rejectederror.
3. Disable extensions
NOTE
A quick way to identify whether an addon or an extension causes the problem is to run the browser in private mode. Then, if you don’t encounter the error, disable/remove the extension. Again, the steps are for Chrome.
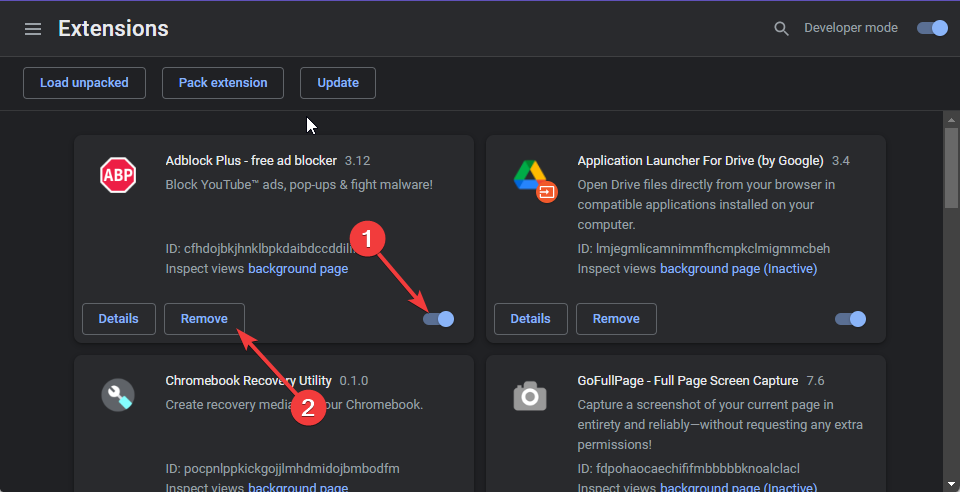
Launch Chrome, click on the Extensions icon, and choose to Manage extensions.
Now, turn off the toggle for individual extensions, relaunch the browser after each, and check whether you can access the website.
As soon as you can, the extension last disabled was the problematic one. So, click on Remove.
Again, click on Remove in the prompt to confirm the changes.
That’s it! Extensions, too, have been reported to be an underlying cause for The requested URL was rejected error, and disabling/removing them did the trick.
4. Reset your browser
On Chrome
Click the three dots in the upper right corner.
Go to Settings > Advanced > Reset and clean up.
Click on Restore settings to their original defaults.
Click Reset settings.
On Firefox
Click the menu button and go to Help.
Select Troubleshooting information.
Click Refresh Firefox.
On Edge
Click on the three dots at the top right corner.
Go to Settings > Reset Settings.
Click on Restore settings to their default values.
Click Reset.
5. Try another browser
If all else fails, try accessing the webpage with a different browser. Just download and install another browser onto your machine and try accessing the sites that lead you to this error message.
A good option that’s stable and pretty much error-free is Opera.
We tested it when we got the Requested URL was rejected error on Apple Music on Google Chrome and it worked perfectly.
Getting hold of the Windows 10 copy is easier than ever. Microsoft’s Media Creation Tool covers every option, including both direct upgrade and creation of the bootable installation media.
And there you can choose between a USB flash stick or DVD ISO which you’ll need to burn to a DVD. The majority of users go for the USB option, but ISO can be of use for some, nonetheless.
However, some users had a hard time trying to download the Windows 10 ISO via the Media Creation Tool. We prepared some solutions for this ache, and you can find them in the comment section below.
Why can’t I download Windows ISO?
Here are a few reasons why you may not be able to download a Windows ISO file:
➡️ The most likely reason is that you are not eligible to download the ISO file. For example, you may need to have a valid license or product key to download the ISO file.
➡️ You may not have enough space on your drive to download the ISO,
➡️ Additionally, you may need to meet certain system requirements, such as having a compatible version of Windows installed on your computer.
➡️It’s also possible that the ISO file you are trying to download is no longer available or has been removed for some reason.
How to download Windows 10 ISO without failing?
1. Check your connection (pre-check solution)
Let’s start with the connection. The Media Creation Tool allows you to download the Windows 10 ISO file and it, obviously, requires an Internet connection.
It doesn’t matter if your bandwidth is slow as long you have a stable connection that allows direct download from the Microsoft servers.
With that in mind, we suggest an inspection of your network and troubleshooting possible issues.
If you’re not sure what to do, here are some steps that might come in handy:
Restart your PC and Wi-Fi router.
Try using a LAN cable instead of Wi-Fi.
Disable Proxy/VPN temporarily.
Disable the Metered connection.
Flush the DNS.
2. Run Disk Cleanup to free up space on your drive (worked for most users ✅)
Press Windows key + S to open the Search bar.
Typedskand open Disk Cleanup.
Choose the system partition and click OK.
Click on Clean system files and choose the system partition again. The calculation can take some time.
Check all boxes and click OK.
If you still don’t have enough space on your drive to download the ISO, we recommend storing some of your data in the cloud.
You can find many free cloud software for Windows that will keep your data completely safe with top-level encryption and password protection.
Cloud software can help you keep your files organized, and create frequent backups and many of them come with unlimited undo options, so you won’t lose any version of your files even if you make changes to them.
On top of that, you will be able to access your files on any device as long as you have an internet connection and your credentials.
Click on the Eject icon at the top of the right pane and open Emulation from the contextual menu.
In the User Agent string section, select Apple Safari (iPad).
The web page should reload and you can select Windows 10 from the drop-down menu. Click Confirm.
Choose the language and architecture.
Choose where to save the file and you’re good to go.
5. Become a Windows insider
Even though Microsoft blocks downloads for the official ISO, there is still insider (beta) system options.
Of course, this stands only if you’re interested in the Windows 10 Insiders program.
Either way, if you’re in dire need of Windows 10 ISO, this is another option we had to mention. Just follow the steps provided on the Microsoft page to become an insider.
When you finalize the sign-up procedure and roll in the beta program, you’ll get the ISO with the latest Insider Preview version of Windows 10.
If you have additional questions or possibly a suggestion on how to resolve downloading issues concerning the Windows 10 ISO, you can post them in the comments section below.
Using multiple monitors with Remote Desktop can seriously upgrade your remote work setup, if you know how to do it right.
Whether you’re managing complex spreadsheets, coding, or juggling windows across two or more screens, having just one display in a remote session can be a pain. This guide walks you through how to get dual or multiple monitors working smoothly with Remote Desktop.
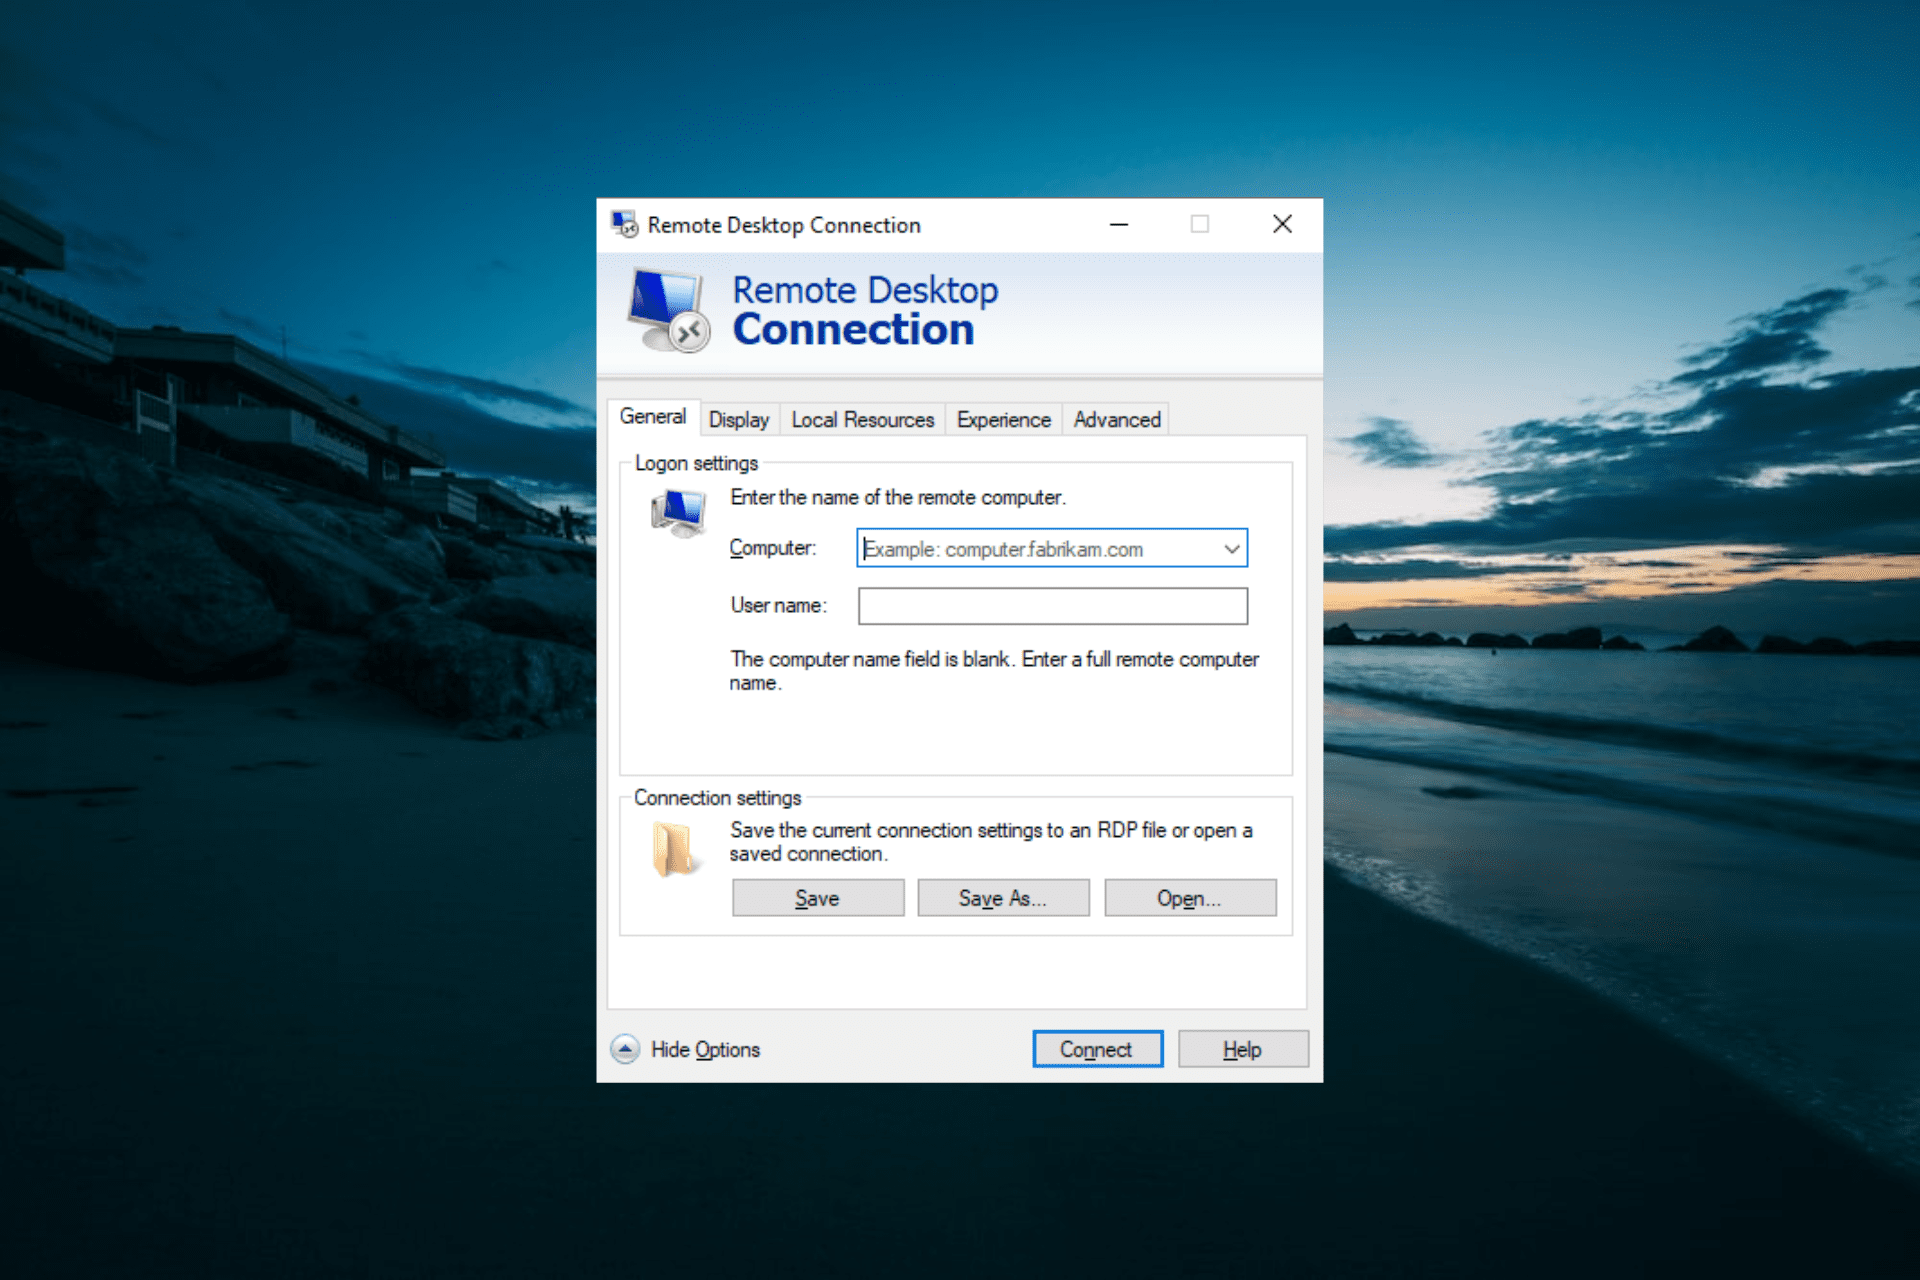
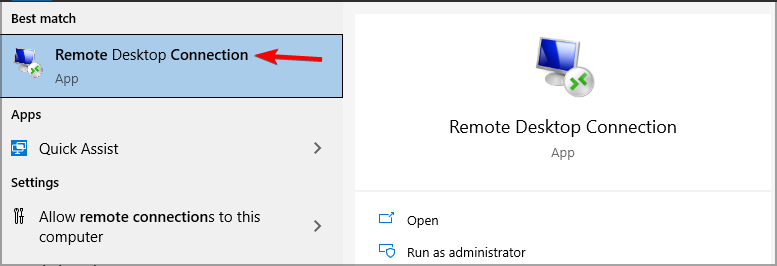
Go to the Windows Search, type Remote Desktop Connection, and open it.
Expand Show options.
Go to Display and check Use all my monitors for the remote session.
Click Connect and proceed to connect to the server like you usually do.
2. Use the Run utility command line
Press the Windows key + S to open Windows Search.
Type Run in the search box and hit Enter.
In the dialogue box, type mstsc.exe -multimon, then hit Enter.
Using this command, the Use all my monitors for the remote session box will be checked automatically.
This is another surefire and fast way to use dual monitors with a remote desktop on Windows 10.
This will open the program without the need to change any settings. The only thing left for you to do is to connect to the server. Note that the computer does not save your settings here automatically.
Hence, you need to repeat the command above every time you want to use the dual monitor set-up.
In the Run command box, type mstsc /span and hit Enter.
Note that this method is not the most popular for using dual monitors with a remote desktop on Windows 10. This is because it requires all your monitors to share the exact vertical resolution.
If this is not the case, some monitors might not work.
Those are the simple methods for dual monitors with a remote desktop on Windows 10. You can see that they only require a few tweaks, and you are set.
In case the presented instructions didn’t work in your case, we recommend TeamViewer as the best-suited solution for dual monitor remote desktops.
Also, if you need multiple choices for third-party software, you can check other remote control software options from our article.
Feel free to share your experience using the remote desktop with a dual monitor set up in the comments below.
Windows 11, the latest iteration in the series from Microsoft, has a lot to offer, both in terms of functionality and design.
However, after the upgrade, many users reported that the Ethernet was not working in Windows 11. Usually, their PCs weren’t connecting to the internet.
On the other hand, for some, Ethernet was connected but no they had no internet.
This poses a significant problem since they have trouble establishing a secure Internet connection. Hence, it becomes imperative that the Windows 11 Ethernet not working error is immediately fixed.
But before we head to the existing solutions, you must first understand the error’s exact causes. This will help you identify the underlying problem in your case and make the troubleshooting simpler and quicker.
What causes the Ethernet not working error in Windows 11?
A bunch of reasons can cause the issue, and we have tried to list them all below:
Outdated or corrupt drivers
Running an older version of the Windows
Issues with the hardware
System infected with malware or virus
The Ethernet adapter is disabled
Misconfigured settings
Conflicting applications
Now that you understand the underlying causes, it’s time we head to the fixes.
Why is Ethernet not working, but Wi-Fi is?
It might be due to connectivity issues if your Wi-Fi is working but not your Ethernet. On the other hand, it might be that the cables are not correctly plugged in or there is some damage to your cable.
Also, it might be due to outdated or corrupt drivers. Lastly, the problem can be because of conflicting network settings.
How do I fix the Windows 11 Ethernet not working issue?
1. Check Ethernet cable connections
When dealing with the Ethernet not working error in Windows 11, your primary approach should be to check if the connections are in order.
It would help if you first verified whether the cables are plugged in firmly. Or, unplug and replug them and ensure they fit perfectly into the port.
Also, check for damages to the Ethernet cable. More often than not, a damaged line is found to be the underlying cause. Check for any significant bends or cuts in the cable; if any are found, replace them.
2. Restart the modem/router
A simple fix for problems encountered when establishing an Ethernet connection is to restart the modem/router. Then, you can either unplug the power cable or check for a power switch to turn it off.
Some newer models have built-in batteries, in which case, these will have to be removed as well to turn off the modem/router.
After turning it off, wait for a minute or two, plug it back into the power source, and check if the Ethernet not working error in Windows 11 is fixed.
3. Restart your Windows 11 PC
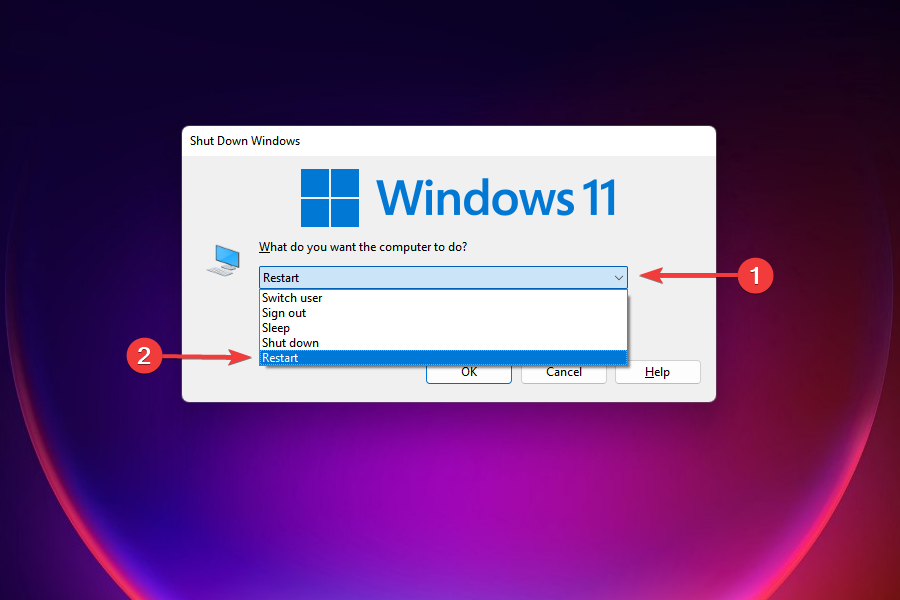
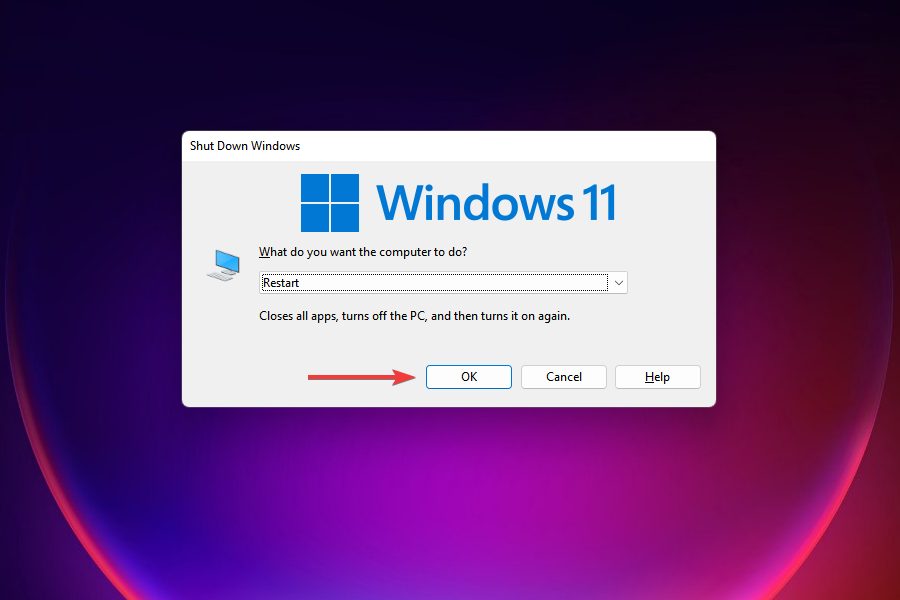
Navigate to the desktop and press Alt + F4 to launch the Shut Down Windows box.
Click on the dropdown menu and select Restart from the list of options.
Click on OK to restart the computer.
In most cases, it’s a trivial bug behind the Ethernet not working error which can be fixed by restarting the computer. When you reboot the Windows, the OS is reloaded, and any bug that crept in earlier will be eliminated.
After restarting the PC, check if you can establish a connection via Ethernet. In case it doesn’t, head to the next fix.
And even if it does, you should execute the remaining fixes since rebooting generally acts as a temporary solution to most problems.
4. Check if the Ethernet adapter is enabled
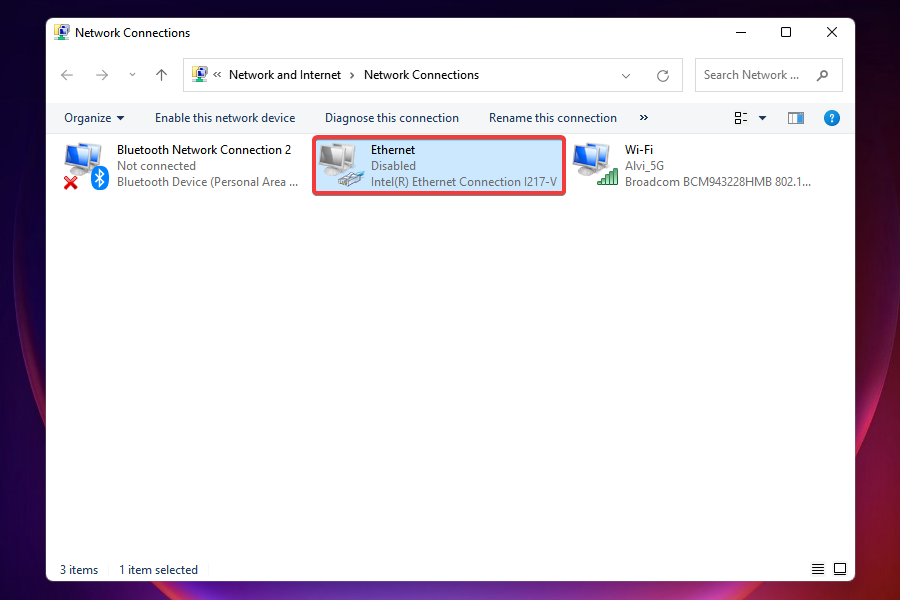
Press Windows + R to launch the Run command.
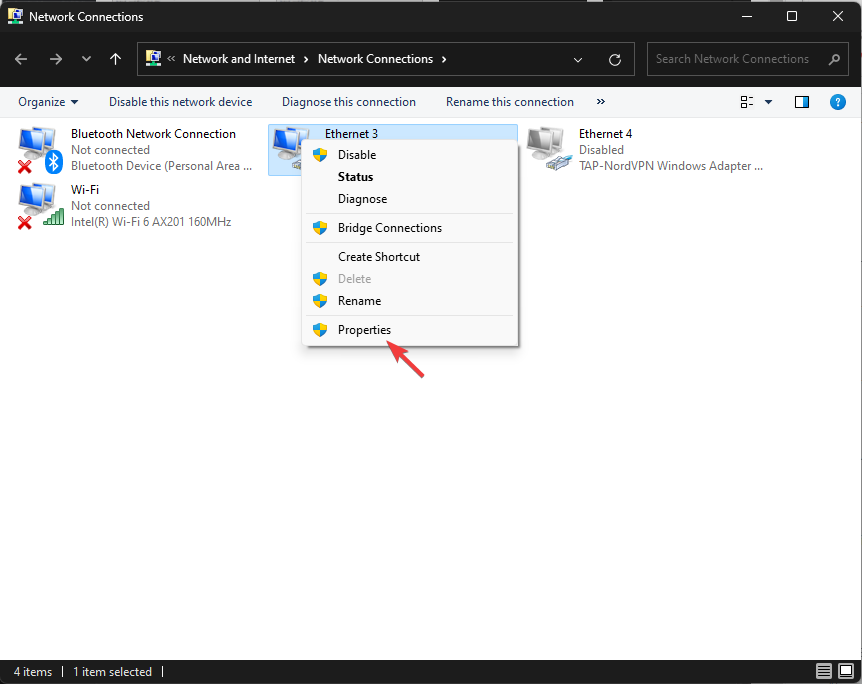
Type ncpa.cpl in the text field, click on OK at the bottom, or press Enter to launch the Network Connections window.
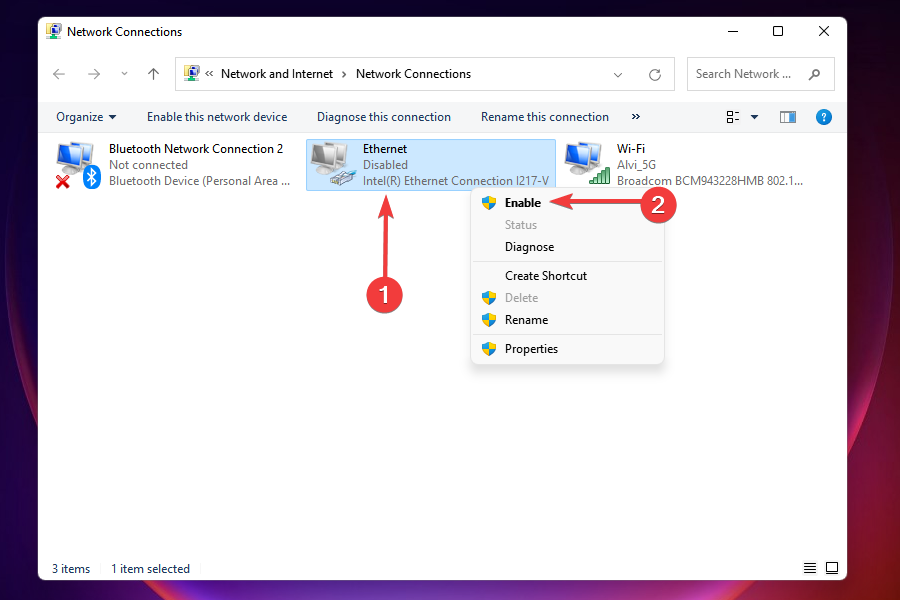
Locate the Ethernet adapter and check if it’s greyed out. If that is the case, the concerned adapter is disabled and will require to be manually turned on.
Right-click on the Ethernet option and select Enable from the context menu.
After enabling the adapter, check if the Windows 11 Ethernet not working error is fixed.
5. Reinstall the Ethernet driver
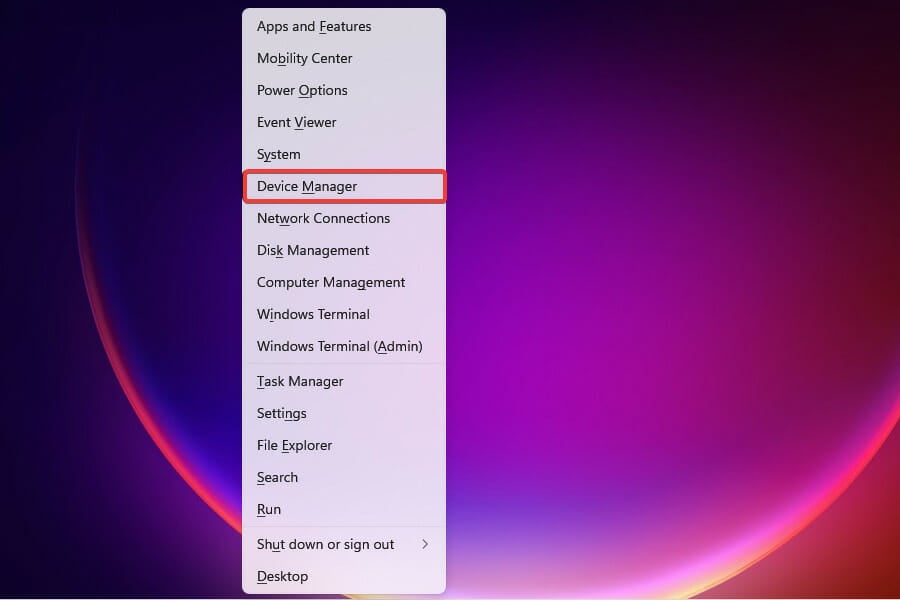
Right-click the Start button in the Taskbar or press Windows + X to launch the Power User/Quick Access menu.
Select Device Manager from the list of options that appear.
Locate and double-click on the Network adapters entry.
Right-click on the Ethernet adapter and select Uninstall device from the context menu.
Next, tick the checkbox for Attempt to remove the driver for this device and click on Uninstall.
After removing the driver, restart the Windows 11 PC.
In many cases, the driver may corrupt over time and lead to various errors with the Ethernet. Here, all you have to do is reinstall it.
Once you restart the computer after uninstalling the corrupt Ethernet driver, Windows will automatically install a fresh copy of it that is not corrupt. This should fix the Ethernet not working error, and the Ethernet doesn’t have a valid IP configuration issue in Windows 11.
6. Update the Ethernet driver
If an outdated version of the driver is installed on the PC, it’s likely to cause many errors, including the Ethernet not working issue. Hence, it would help if you kept the driver up-to-date.
Editor’s tip
Thus, an automated method can be the fastest and safest solution for your device. Outbyte Driver Updater is the top pick in this case because it performs a meticulous scan of your device drivers and instantly finds them the latest update from the online database.
There are three ways you can update a driver in Windows 11: using the Device Manager, Windows Update, and manually downloading the latest version from the manufacturer’s website.
All three methods have been listed to help you update the Ethernet driver.
6.1 Via Device Manager
NOTE
Device Manager can only install driver updates already available on the system. In case you have one downloaded, proceed to the steps listed below. Otherwise, you can head to the following method, i.e., Windows Update.
Press Windows + S to launch the Search Menu.
Enter Device Manager in the text field at the top and click on the relevant search result to launch the component.
Locate and double-click on Network adapters.
Right-click on the Ethernet adapter from the ones listed here and select Update Driver from the context menu.
Next, select Search automatically for drivers, the first option in the Update Drivers window, to let your system scan for the best available driver on the PC and install it.
After the driver is updated, check if the Ethernet not working error in Windows 11 is fixed. If it didn’t help or Windows couldn’t find a newer version on the system, head to the following method to update the driver.
6.2 Via Windows Update
Press Windows + I to launch the Settings app.
Select Windows Update from the tabs listed in the navigation pane on the left.
Next, click on Windows Update on the right.
Locate and click on Advanced options under More options.
Now, locate and select Optional updates under Additional options. At the end of the option, you can find the number of updates available. If there are none available, you can skip the following steps and go to the following method for the update.
Click on Driver Updates.
If there’s an update available for the Ethernet driver, tick the checkbox for it and click on Download & install.
Windows Update is a quick and safe method to update the drivers installed on the system. But, only the drivers that have been submitted to Microsoft and have been certified will be listed here. And the whole process takes time.
This means there’s a good chance of an update on the manufacturer’s website while it is yet to be approved by Microsoft, and these, too, are also safe to install. Hence, it becomes essential to visit the manufacturer’s website.
6.3 Via the manufacturer’s website
NOTE
Before you check the manufacturer’s website for driver updates, it’s essential to find out the current version to identify if a newer one is available.
Launch the Device Manager as discussed earlier.
Double-click on the Network adapters entry.
Right-click on the Ethernet adapter and select Properties from the context menu.
Navigate to the Drivers tab and note the Driver version.
Now, go to Google and search for a driver update with Device Name and OS (Windows 11) as the keywords, followed by Driver Update.
Locate and open the manufacturer’s official website from the search results.
Check for a newer version using the current version you noted earlier.
If there’s an update available for the Ethernet driver, download it. This file will most likely be in .exe format.
Navigate to the folder where the downloaded file is stored, and double-click on it to launch the installer.
Follow the on-screen instructions to complete the installation process.
Sometimes, a driver update may be available on a third-party website, not the official manufacturer’s website. In such cases, it’s recommended that you thoroughly verify the source before proceeding to the download.
After downloading the latest version, check if the Ethernet not working error in Windows 11 is fixed. For automatic scans of missing or outdated drivers, we recommend using a dedicated tool such as Outbyte Driver Updater.
If the error persists, it does not have anything to do with the driver. Hence, move to the next solution.
7. Run the Network Adapter troubleshooter
Press Windows + I to launch the Settings app.
Click on Troubleshoot on the right in the System tab.
Next, click on Other troubleshooters.
Locate the Network Adapter troubleshooter and click on the Run button next to it.
Wait for the troubleshooter to start running, select the Ethernet option when prompted, and click Next.
The built-in troubleshooters offered by Microsoft are one of the best ways to fix an error. And you can use it to improve the Windows 11 Ethernet keeps disconnecting issue.
Just locate the relevant troubleshooter, run it, follow the on-screen instruction, choose the response when prompted, and it’s done.
Select Windows Update from the tabs listed on the left.
Click on Windows Update on the right.
Click on Check for updates to scan for available ones and download them.
Running an older version of Windows is also known to cause many problems, including the Ethernet not working error. Hence, it’s recommended that you keep Windows updated to avoid encountering errors.
Apart from errors, with each update, Microsoft releases a bunch of features and patches for previously known bugs. These are bound to make your Windows experience a lot better and safer.
9. Reset network settings
Press Windows + I to launch the Settings app.
Select the Network & internet tab from the ones listed in the navigation pane on the left.
Click on Advanced network settings from the options listed on the right.
Next, click on Network reset under More settings.
Click on the Reset now button next to Network reset.
Click Yes on the confirmation box that appears.
If the above methods didn’t work, resetting the network settings might fix the Ethernet not working error in Windows 11 or an unidentified network issue. When you reset, the network adapters are reinstalled, and the settings revert to their default state.
Is Ethernet faster than WiFi?
Generally, Ethernet is faster and offers less latency than Wi-Fi. Also, it is usually more reliable and secure.
The speed you also get from Ethernet depends on the cables you are using, with some of the latest producing about 1GB/s. However, Wi-Fi is a more friendly option for mobile users and offers consistent speed.
How do I execute the fixes if an Ethernet connection cannot be established?
If the Windows 11 Ethernet is not working in error, you can try establishing a Wi-Fi connection, if that’s available. However, if you are also facing trouble with that, boot Windows 11 into Safe Mode.
We are going through all this trouble since some of the fixes listed here will require a working Internet connection. Rest assured that these solutions are the critical ones that have a higher chance of resolving the issue.
The debate about whether to use Ethernet or Wi-Fi has been raging for years now, with each offering certain benefits over the other.
But neither is completely free of errors. One of the common ones is Ethernet doesn’t have a valid IP configuration in Windows 11.
The error is not that common, but when encountered, users are unable to access the Internet. Which makes it all the more important to effectively troubleshoot it.
But there is another important question to be answered beforehand, i.e., why Ethernet doesn’t have a valid IP configuration in Windows 11? So, let’s walk you through the answer to it and the most effective fixes for the error.
What do I do if Ethernet doesn’t have a valid IP configuration in Windows 11?
1. Check the connections
The very first thing you should do when encountering the Ethernet doesn’t have a valid IP configuration error in Windows 11 is to check that the connections are in order. Make sure that the cable is properly plugged in at both ends.
Besides, you can remove the cable at both ends, i.e., the computer and the modem/router, blow light air into both ports and then firmly replug the cable. Once done, check if the error is fixed and you are able to connect to the Internet.
2. Restart the computer and your modem/router
Apart from the connections, the problem may also lie with the modem/router or could be a glitch in the OS itself. But, the best part is that most of these can easily be eliminated by a simple restart.
To turn off the modem/router, unplug it from the power source. Also, some may have built-in batteries, so make sure to check and remove them as well. Wait for a couple of minutes and then replug it to the power source.
After restarting both the computer and the modem/router, check whether the Ethernet doesn’t have a valid IP configuration error in Windows 11 is eliminated.
3. Disable fast startup
Press Windows + S to launch the Search menu, enter Control Panel in the text field, and click on the relevant search result that appears.
Click on the System and Security entry.
Next, click on Change what the power buttons do under Power options.
Click on Change the settings that are currently unavailable at the top.
Finally, untick the checkbox for Turn on fast startup(recommended) and click on Save changes at the bottom.
After making the changes, restart the computer for these to fully come into effect.
Fast startup is a feature in Windows that reduces the time required by OS to load when you turn on this computer. This is achieved by keeping certain drivers and related processes running instead of terminating them at shutdown.
But, the feature is often found to conflict with the functioning of connected devices due to improper relay of commands. If that’s the case here, disabling fast startup should fix the Ethernet doesn’t have a valid IP configuration error in Windows 11.
4. Manually choose IP and DNS server
Press Windows + R to launch the Run command, enter ncpa.cpl in the text field, and either click on OK or hit Enter to launch the Network Connections window.
Right-click on the Ethernet entry here, and select Properties from the context menu.
Locate and select Internet Protocol Version 4 (TCP/IPv4), and click on Properties.
Enter the details in the screenshot below for the same entired on your computer after selecting the Use the following IP address and Use the following DNS server addresses options. Once done, click on OK at the bottom to save the changes.
We have used Google’s DNS server in this case since it has helped fix the issue for a lot of users. If that, too, doesn’t help, try the next method.
5. Update the driver
Press Windows + S to launch the Search menu, enter Device Manager in the text field at the top, and click on the relevant search result.
Now, locate and double-click on Network adapters to expand and view the devices under it.
Right-click on the Ethernet entry and select Update driver from the context menu.
Next, select Search automatically for drivers from the two options in the Update Drivers window.
Your system will now scan for the best available drivers for the system and install it for the Ethernet adapter.
The Device Manager method is one of the simplest ways of updating the network driver, but the update doesn’t always go through since it only scans the system for a newer version.
Also, there’s a simpler and more convenient way of updating the drivers, using a third-party app.
We recommend Outbyte Driver Updater, a dedicated tool that will scan every source for the latest version, and keep all the installed drivers up-to-date.
6. Disable IPv6
Press Windows + R to launch the Run command, type ncpa.cpl, and click on OK.
Right-click on Ethernet, and select Properties from the list of options in the context menu.
Untick the checkbox for Internet Protocol Version 6 (TCP/IPv6), and click on OK at the bottom to save the changes.
7. Enable DHCP
Press Windows + S to launch the Search menu, enter Services in the text field, and click on the relevant search result that appears.
Locate and double-click on the DHCP Client service to launch its properties.
Click on the Startup type dropdown menu, and select Automatic from the list of options.
Finally, click on the Start button under Service status to run the service, and then click on OK at the bottom to save the changes.
The DHCP Client is used to automatically allot and configure the various network-related settings on your computer. If it is disabled, by any chance, you may encounter the Ethernet doesn’t have a valid IP configuration error in Windows 11.
8. Reset network settings
Press Windows + S to launch the Search menu, enter Windows Terminal in the text field at the top, right-click on the relevant search result, and select Run as administrator from the context menu.
Click Yes on the UAC (User Account Control) prompt that pops up.
Now, click on the downward-facing arrow at the top, and select Command Prompt from the list options. Alternatively, you can hit Ctrl + Shift + 2 to launch Command Prompt in a new tab.
Now, type paste the following three commands one at a time, and hit Enter each to execute them:netsh winsock resetnetsh int tcp resetnetsh int ip reset
Once done executing the commands, restart the computer.
If none of the methods listed above have worked, you can try resetting the network settings using the three commands in an elevated Windows Terminal. This should eliminate the Ethernet doesn’t have a valid IP configuration error in Windows 11.
Why Ethernet doesn’t have a valid IP configuration in Windows 11?
Every device connected to a network needs an IP address, which acts as its identity here. And if it’s unable to get one when using a wired connection, you will encounter the Ethernet doesn’t have a valid IP configuration error in Windows 11.
There could be a bunch of reasons why you are encountering the error. While some have to do with the hardware, others could be related to the settings and software aspects. Here’s a list of them all:
Improper connections
Problems with the router
Malfunctioning NIC (Network Interface Card)
Outdated or corrupt driver
Misconfigured settings
The solution to most of these issues is rather simple and wouldn’t take more than a few minutes to execute. So, follow the methods above in the listed sequence for quick and effective troubleshooting.
How can I increase the Internet speed in Windows 11?
Once you have eliminated the error, the next major challenge faced by users is to keep the Internet speed stable and increase it to the maximum in Windows 11. It’s quite simple, and a few modifications could help considerably increase the Internet speed.
You can lower the bandwidth for downloading updates, disable apps from running in the background, terminate unnecessary processes that consume too much data, or disable Windows or third-party firewall, though this should be your last resort.
Ethernet, no doubt, offers higher reliability and a stable Internet speed, but oftentimes, you come across errors like Ethernet doesn’t have a valid IP configuration in Windows 11. Also, the mobility of the connected device is restricted in this case.
If you’re unable to install drivers on Windows 10 and get errors like Windows has failed to add and install some of the specified drivers, you’re in the right place.
It’s most likely due to corrupted system files, outdated drivers, missing admin rights, or software conflicts blocking the installation. We’ll show you 6 tested ways to fix it below.
Let’s get right to it.
What can I do if Windows 10 drivers won’t install?
1. Run Hardware and Devices troubleshooter
Right-click Start
Select Control Panel
Go to View by option on the top right corner
Click the drop down arrow and select Large icons
Click Troubleshooting
Click View all option on the left pane
Click Hardware and Devices
Click Advanced
Click Run as Administrator
Click Next
If you can’t install drivers on Windows 10, then run the Hardware and Devices troubleshooter to resolve the issue.
This checks for commonly occurring issues and ensures any new device or hardware is correctly installed on your computer.
2. Update your drivers
Alternatively, you can also try to check whether or not it is a driver issue, as missing, broken, or outdated drivers can hinder the functionality of your hardware components.
While this can be done manually, it can be time-consuming, and that is why we recommend that you try a third-party driver updating utility instead, since it also eliminates the risk of human error. Fortect Driver Updater is excellent for this task, and it will update all your drivers in just a few seconds.
Click Command Prompt in the search results list and type the following:
Dism /Online /Cleanup-Image /ScanHealth
Dism /Online /Cleanup-Image /RestoreHealth
If you still can’t install drivers on Windows 10, run the DISM tool, or Deployment Image Servicing and Management tool.
The DISM tool helps fix Windows corruption errors when Windows Updates and service packs fail to install due to corruption errors, like if you have a damaged system file.
Once the repair is complete, reboot your computer and try to install drivers on Windows 10 again.
If you’re having trouble accessing Command Prompt as an admin, then you better take a closer look atthis guide.
You can also use one of the registry cleaners listed in this article. If you still can’t install drivers on Windows 10, try the next solution.
Most users don’t know what to do when the Windows search box goes missing. Readthis article to learn how you can get it back in just a couple of steps.
5. Perform a Clean Boot
Performing a clean boot for your computer reduces conflicts related to software that can bring up the root causes why you can’t install drivers on Windows 10.
These conflicts can be caused by applications and services that start up and run in the background whenever you start Windows normally.
How to perform a clean boot
In order to successfully perform a clean boot on Windows 10, you have to be logged on as the administrator, then follow these steps:
You will have a clean boot environment after all these steps are carefully followed, after which you can try and check if you still can’t install drivers, or if the problem is gone.
If you want to know how to add or remove startup apps on Windows 10, check out thissimple guide.
6. Perform a System Reset
Performing a reset allows you to choose which files you want to keep, or remove, and then reinstalls Windows. Here’s how to get started:
Click Start
Click Settings
Click Update & Security
Click Recovery on the left panel
Click Advanced options
Click Reset this PC
Click Get started and choose an option either Keep my files, Remove everything, or Restore factory settings
Note: all your personal files will be deleted and settings reset. Any apps you installed will be removed, and only pre-installed apps that came with your PC will be reinstalled.
Sometimes, you want to keep some important files or you just want to back up your data, just to be safe.
Have you tried to install the drivers again after using any of these solutions? Let us know your experience in the comments section.
If you’re trying to exit BIOS mode safely, it can be confusing, especially when your PC seems stuck and won’t leave BIOS no matter what you do.
This usually happens because the system can’t find a proper boot device, a BIOS setting got messed up, or sometimes hardware issues interfere with normal startup.
Whatever the cause, I’ll walk you through how to get out of BIOS on startup, even when it feels stuck, and safely return your PC to normal operation.
What can I do if I can’t get out of BIOS?
To exit BIOS, press the F10 key to save changes and boot your PC. If your model uses a different key, it should appear on the screen. However, if you can’t exit BIOS, follow the troubleshooting steps below:
1. Set BIOS settings to default
Go to the Save & exit tab in BIOS.
Select the Load Optimized Defaults option.
Confirm the change
2. Make sure other components are not damaged
First, check your hard drive, as it’s often the culprit. See if it’s listed as a boot source in the BIOS. If it’s not, ensure the drive is properly connected to the motherboard and power supply.
Next, check your RAM. We suggest you remove and reset the memory modules to make sure they’re properly connected.
Also, try booting with one module at a time to identify the faulty one. If all components seem intact bu the problem persists, try the solutions below.
3. Reset BIOS
NOTE
Resetting the BIOS involves working with hardware components, which can be tricky. If you haven’t done this before or aren’t confident, it’s best to skip this step and seek professional help to avoid any potential damage.
Power off your computer, and unplug it from the outlet.
Open your case.
Find the CMOS jumper. It is located on your motherboard, and is usually labeled with CLEAR, CLR, CLEAR CMOS, PSSWRD, or a variety of other labels.
You’ll notice that there are three pins, and the jumper covers only two. Move the jumper to other two pins. So, if the jumper is covering the first and second pins, move it to the second and third.
Press the power button. Your computer won’t start because the power is off, but this will discharge any remaining power stored in the capacitors. When you do this, your BIOS will reset.
Now, just return the jumper to its original state
Close the case, turn the power on, and start your computer.
You can also reset your BIOS by removing your motherboard battery. Simply locate the battery on your motherboard and gently remove it. Once you remove the battery, try to start your PC without it.
Without the battery, your PC won’t be able to store your BIOS settings and it will revert to default.
4. Disconnect external drives
If you have an external drive connected, your PC might try to boot from it. Since your external drive doesn’t have any bootable files on it, that will automatically start BIOS.
To fix this problem, simply disconnect all external storage, including hard drives and flash drives, and try to boot your PC without them. After doing that, check if the problem still appears.
5. Change BIOS settings
Enter BIOS, go to Security Options and disable Secure Boot. Now save changes and restart your PC.
Enter BIOS again and this time go to Boot section. Disable Fastboot and enable CSM (Compatibility Support Module).
Save changes and restart your PC.
After doing that, your PC should recognize your hard drive and the issue should be completely resolved.
6. Use UEFI boot and check your Boot order
To fix this problem, users are suggesting to switch to UEFI boot. To do that, just enter BIOS, navigate to Boot section, and enable UEFI boot.
In addition, be sure to check the boot order. Set your hard drive or SSD as the first boot device and try to start your PC.
Issues like hardware damage and system failure can prevent your system from booting. However, if you address the issue as explained above you should be able to exit BIOS successfully.
Microsoft Outlook usually offers smooth performance, but at times it does fail. Many users ask for help when the password prompt disappears or doesn’t show at all.
Outlook may prompt you to re-enter the email password for an account established within. The message Need Password is eventually taking the info bar at the bottom of the Outlook window. You click to input your password, but the password dialogue box quickly disappears.
Don’t try rebooting your computer. This apparently solves the issue, but only until the next day. Deleting the Outlook profile doesn’t work either when the Outlook password prompt disappears.
These solutions can help you with most issues of outlook needs password but no prompt appears, so continue reading as this article may be able to help you.
What to do if outlook needs password but no prompt appears?
In the Windows Credentials and Generic Credentials section, click Details.
Click Remove from vault.
Click Yes on the warning box.
Repeat these steps for all stored credentials referencing the Office 365 or ms.outlook email addresses.
Close the Control Panel window.
Then, re-open Outlook.
When using an Office 365 account, your issue might be the result of improperly-formatted credentials stored in Windows Credential Manager.
3. Remove the workplace account
Close down Outlook.
Hold the Windows + I keys at the same time to open the Settings window.
Go to Accounts > Access work or school.
Click Disconnect.
Re-initiate Outlook.
It should now prompt for credentials and connect successfully, with no additional sync-up needed.
Note: You may later connect your workplace accounts from the same path: Setting > Accounts > Access work or school.
If you’re having trouble opening the Setting app, take a look atthis article to solve the issue.
4. Add a DWORD with a value of 1
You could also add a DWORD called DisableADALatopWAMOverride with a value of 1 to the registry in this path: HKEY_CURRENT_USER\Software\Microsoft\Office\16.0\Common\Identity\.
Your next step is to reboot your PC. Open Outlook and check if the issue persists. If it does, remove the registry entry you created earlier and perform a second reboot.
5. Check potential errors with the credentials
Open Settings in Windows 10.
Click System > Shared Experiences.
If the Accounts section shows any error with the credentials, it’s time to input the correct credentials.
Finally, open Outlook and things should work properly now.
Note: Ensure Outlook and any other Office applications are closed before applying the above steps.
Don’t worry any longer when you click the dialog box to enter the password just to flash for less than a second before it disappears. The solutions mentioned here should solve the password prompt disappearing issue, and the Outlook performance will be improved.
This isn’t the only problem, and many reported that Outlook keeps asking for password, so you might want to check that guide as well.
Was this article helpful? If you need further assistance, please don’t hesitate to contact us via the comments section below. We are always open to your questions.
Have you ever put together an Excel formula, but after you click through and apply the formula to your spreadsheet, you’re greeted with an error? This usually states that your formula has returned an incorrect value or 0.
Chances are, if you’re reading this, you’ve encountered the same Microsoft Excel problem. But don’t worry – there are some quick ways to fix this issue.
Why is my formula returning 0 instead of blank?
There are many causes for this error:
Your data isn’t in the expected location – If your formula references cells outside the current worksheet, it will return 0 because those cells don’t exist.
There’s more than one function in your formula – If there’s more than one formula in your function, make sure parentheses surround each one.
You’re referencing a wrong cell – If the formula is correct but returns 0, then the issue is that you are most likely referencing the wrong cell or range, or Excel can’t add new cells.
Wrong formula syntax – It is possible that the formula is correct but crafted in the wrong format. Some of the functions used in your formula require specific formats as inputs.
Punctuation errors – Punctuation marks such as commas or semicolons can cause errors in your formulas.
Text values instead of numbers – When working with formulas, it’s possible to have a value return as text instead of a number.
Copy/pasting values – If you have copied values from another worksheet instead of entering them manually, they could present these problems because they may have their own formulas from their previous sheet.
How do I stop Excel from returning 0?
Before performing any technical processes, check out the following first:
Check your formula and ensure it’s not missing any parentheses.
Ensure you include all the cells in the specified range.
Check whether there is another function defined in the same cell that is causing conflicts.
Make sure you haven’t forgotten to include an important part of your formula in your calculation.
1. Turn off automatic calculations
Launch the Excel sheet and click on Formulas.
Select Calculation Options and click on Manual.
Also, if you’re using data from another source, a from another worksheet, make sure that all of your formulas are referencing the correct cells and that those cells contain values.
2. Repair the Excel program
Right-click the Start menu icon and click on Settings.
Type Control Panel in the search bar and click Open.
Go to Programs and select Uninstall a Program.
Now, click Microsoft Office and select Change.
Finally, click Online Repair, then select Repair.
Once the repair process completes, restart your computer and check whether the issue still occurs or not.
Launch the Excel sheet and select the number of cells that are returning 0 when you apply the specific formula.
Click on the yellow exclamation mark to open the drop-down menu.
Select Convert to Number and apply the function again.
It’s common to use Excel as a database, and in many cases the data you’re storing is text. This can be a problem when it comes to formulas that rely on numeric values because Excel will convert text to 0 if it has no other way of evaluating your formula.
The simplest way to deal with this issue is to make sure that all your data is stored as numbers, not as text values, and this also prevents the # Value error; read this guide to learn more about it.
And it’s a wrap on how to solve the issue of Excel returning the value as 0. Elsewhere, you may find that Excel uses too much CPU, hence slowing down your PC or making it unresponsive. If this is the case, check out our helpful guide on how to fix this issue for good.
You may also be interested in opening multiple Excel files at once, especially if you’re working with parallel documents. In our article, we show you just how easily this can be achieved.
When working in Excel, the #NAME? error can appear for many reasons, such as typos, missing quotes, or unavailable functions. To understand all possible causes and solutions, check this detailed guide on how to fix the #NAME? error in Excel and keep your formulas running smoothly.
We’d love to hear of any other additional methods that may have helped you bypass this error in the comment section below.
Getting the “We can’t set up mobile hotspot” error on Windows 11? Or maybe the option’s grayed out and won’t let you enable it?
If you can’t set up a mobile hotspot, it usually comes down to one of three things: a disabled network adapter, missing sharing permissions, or outdated drivers.
The good news? All of these are quick to troubleshoot, no advanced tech skills needed. Check the steps below to get your mobile hotspot back to working in no time.
How can I fix the we can’t set up mobile hotspot issue?
1. Enable the network adapter
Press the Windows key + X and choose Device Manager.
Locate your network adapter on the list and right-click it. Choose Enable device.
You might have multiple adapters listed, make sure that only the correct one is enabled.
2. Allow network users to connect (using Command Prompt)
Open Search, type cmd and choose Run as administrator.
Run the following command, but replace the name with the desired hotspot name and pw with the hotspot password: netsh wlan set hostednetwork mode=allow ssid=name key=pw
After that, start the hotspot with this command: netsh wlan start hostednetwork
Open search and type view network connections. Select the first result from the list.
Look for a new Local Area Connection. It should have a Microsoft Hosted Network Virtual Adapter in the description. Right-click it and choose Properties.
Go to Sharing and enable Allow other network users to connect through this computer’s Internet connection. You’ll also have to set up the right connection in the Home networking field.
Save changes.
If you encounter any issues, go to the Device Manager, choose View, and show hidden devices. Locate the Microsoft Wi-Fi Direct Virtual Adapter, and disable and enable it.
After that, you should be able to enable mobile hotspot in the Settings app.
3. Update Your Network Adapter Driver (Using Device Manager)
Right-click the Start button and select Device Manager.
Expand the Network adapters section.
Right-click your wireless adapter (usually has “Wi-Fi” or “Wireless” in the name) and choose Update driver.
Select Search automatically for drivers.
If Windows finds a newer version, it will install it automatically.
Restart your PC and try setting up the hotspot again.
NOTE
Want an easier way? Tools like Fortect DriverUpdater can scan your system and update all outdated drivers in just a few clicks, especially helpful if you’re not sure which adapter to pick or prefer a one-and-done fix.
If you have any other questions related to the solutions for the We can’t set up a hotspot error, feel free to leave them in the comments section below.
It is not entirely unusual for printers to cut off the bottom of printed pages. Sometimes the bottom half of lines or footers don’t appear in printed output when printers cannot print below a certain point.
Thus, the whole page isn’t always the full printable area for printers with paper-feeding mechanisms that leave small parts of sheets blank. Consequently, some users need to adjust their print settings to fix printing that cuts out the bottom of the pages.
To avoid the printer cutting off the bottom of the page, check the instructions below.
Why is my printer not printing the whole page?
1. Make Sure the Selected Paper Format Matches the Actual Printing Paper
To select a default paper format for the printer, open the Printing Preferences window. Click the Settings button on the Start menu.
Select Devices and open the Bluetooth and other Devices tab.
Click Devices and printers to open the Control Panel window shown directly below.
Then right-click the default printer and select Printing Preferences, which will open a window like the one in the image directly below.
Then click a Paper tab on that window to configure the default paper options for the printer.
Click Apply and OK after changing the paper options.
This problem is usually caused by Microsoft Word margins issues but the highlighted guide will walk you through on how to fix them.
2. Manually Configure the Page
Users who can’t find a paper format that exactly matches what they’ve loaded in the printer might need to manually configure the page size settings for a document. Then they can set up a page that exactly matches the dimensions of the paper in the printer to ensure nothing gets cut off the printed output.
A lot of office applications include page formatting options that enable users to do that. For example, LibreOffice Writer users can click Format > Page to set up a custom page format by adjusting the Width and Height values.
3. Adjust the Page Margins
Adjusting margins can often fix printing that cuts off the bottom of pages. Reduce the bottom page margin in a document to ensure that the bottom page content does not extend beyond the printing limitations of the printer. Users can adjust margins before printing with applications’ print or page layout settings.
4. Select a Page-Scaling Option
Some software includes page-scaling settings that will fit or shrink page content to a printable area. Those options ensure that printed output fits the selected paper by scaling pages up or down.
So, have a good look for Fit to Printable Area or Shrink to Printable Area option within the applications’ print options.If the required application doesn’t include page-scaling options, convert the document that needs printing to a PDF file.
Then users can open and print the document in Adobe Reader, which includes Fit and Shrink oversized pages settings. Click File > Print in Adobe to select either Fit or Shrink oversized pages before printing.
If you get the error message System Restore did not complete successfully, here is all you need to know.
Windows is a great operating system and has come a long way over the years by correcting all known issues or adding new functionalities to keep up with technology’s constant progress.
Even so, the greatest of investments are not flawless, and Windows makes no exception.
Many users reported being affected by System Restore issues, which happen in all operating system versions, including Windows 10.
The entire error message states that the System Restore did not complete successfully. Your computer’s system files were not changed.
Now let’s explore some possible triggers and solutions.
Why does my System Restore keep failing?
From user experience, we gather a few things that can trigger this error. Here are a few of the top ones:
Conflicting programs – Users have reported that the antivirus may interfere with System Restore and stop it from completing.
Driver errors – Sometimes, it may be because of device driver issues; they may be corrupted or bad.
Startup apps – Users have also reported that, in some cases, improper startup programs or startup scripts may cause this error.
While the System Restore function has been seriously revamped over the years, some unlucky users have reported various problems with this option. If System Restore is not working, regardless of the triggers, you may try the solutions below.
Note that you may have System Restore did not complete successfully with AppxStaging or error codes like 0x80070005, 0x8000ffff, 0x80071ab1, 0x80071ac5.
How can I fix System Restore did not complete successfully?
Sign in using a profile with administrator rights.
Press the Windows key + R on your keyboard to open the Run menu, then type msconfig and hit Enter to open the System Configuration.
Open the Services tab and check the box next to Hide all Microsoft services, then click Disable all.
Next, move over to the Startup tab and select Open Task Manager.
Open the Startup tab in the Task Manager window, then select and Disable each program.
Close the opened windows and restart your computer.
Of course, this is just one way of performing the desired action. You can also boot your system from the Windows Recovery Environment, the Microsoft sign-in screen, or the Settings app.
2. Run the System Restore in Safe Mode and check the issue status
Open the Start menu and click on the Power icon. Now, hold Shift on your keyboard and click on Restart.
When your computer restarts, choose Troubleshoot, Advanced options, Startup Settings, and click on Restart.
Press F5 to select Safe Mode with Networking when your computer restarts again.
After you enter Safe Mode, try to perform System Restore.
If you need more information on this topic, here are the Windows Startup Settings, including Safe Mode.
As time passed, installing Windows became a walk in the park. Does anyone remember Windows XP and the lengthy installation process closely followed by the demoralizing driver’s lookup? Those, luckily, belong to the past.
However, despite the fact that Windows 10 installation is simple, there are some errors, like the A media driver is missing a prompt which prevents users from continuing to the Install now screen.
The USB installation media boots fine, however, the installation fails due to a missing USB hub driver.
We provided some solutions which should help you overcome the media driver is missing Windows 10 USB install problem. Check them out below.
How can I fix the A media driver is missing Windows 10 USB install issue?
1. Make sure you meet the Windows 10 requirements
First things first. Before we move to deal with the steps, we suggest you check the system requirements for Windows 10.
Besides applying this to a standard system configuration, we also recommend updating your BIOS (if updates are available) before you move to a clean installation of Windows 10.
Here are the minimum system requirements you’ll need to meet in order to run Windows 10:
CPU: 1 gigahertz (GHz) or faster processor or SoC
RAM: 1 gigabyte (GB) for 32-bit or 2 GB for 64-bit
HDD space: 16 GB for 32-bit OS 20 GB for 64-bit OS
GPU: DirectX 9 or later with WDDM 1.0 driver
Display: 800×600
Of course, in order to achieve a seamless workflow, it’s better to have at least 2 GB of RAM (3 for the 64-bit version) and much better processing power.
2. Use a third-party driver updater software
Downloading drivers manually may lead to serious malfunctions, because is a process that carries the risk of getting the wrong driver installed.
Using a dedicated tool to find the missing driver for your Windows 10 PC is one of the safest and time-saving solutions. A professional driver updater software will automatically find the missing drivers and install them in seconds.
When running a driver updater, there is no need to upgrade or install drivers separately unless you configure it to do so.
3. Try switching the USB hub midway
This isn’t a new problem. Not by a long stretch. A lot of users experienced the error while clean installing Windows 7 and 8, as well.
Now, it seems that a certain user provided the solution for the Windows 7 installation issue, which can, hopefully, apply to Windows 8 or, in this case, Windows 10.
Namely, he/she was able to go past the error screen with a nifty workaround. Here’s how to do it yourself:
Boot from the drive and wait for the installation files to load.
Choose your preferences and click Install now.
When the error occurs, click Cancel, unplug the USB, and plug it into a different USB port.
Click Install now again and everything should work just fine.
This should work but we must stress that this mostly applies to users who already installed Windows 10 on a given machine before.
4. Try different USB stick and use USB 2.0 port exclusively
For some peculiar reason, not every compatible USB flash stick (6 GB of storage space) will load the installation files.
In case you have an alternative USB flash drive, try re-creating the setup and try installing Windows 10 again. You can use either Media Creation Tool or any third-party application to do so.
Furthermore, if you’ve never installed Windows 10 before on the given PC, chances are that the BIOS won’t load the installation setup if you use a USB 3.0 port.
So, make sure to stick exclusively with the USB 2.0 ports while installing Windows 10. You’ll easily recognize the USB 3.0 port by the blue stripe inside.
5. Set USB option to Auto and disable Legacy USB if available
Disabling/enabling some of the options available in BIOS helped some users circumvent the error.
Firstly, if you’re installing a 64-bit version of Windows 10, we recommend disabling Legacy USB and Legacy BIOS in the BIOS (UEFI) settings.
Also, make sure to enable the AHCI prior to plugging in the flash installation drive.
Some contemporary configurations allow users to enable the USB option to USB 3.0 solely. We suggest setting it to Auto. If you have the option like that in your BIOS/UEFI menu, of course.
6. Try using Rufus instead of the Media Creation Tool or DVD
Finally, if you’re unable to get through with it, starting from scratch with the Rufus might be your way out.
Even though the Microsoft-provided Media Creation Tool usually works just fine, we suggest trying out the alternative.
Also, if you depleted options when it comes to installing Windows 10 from the USB flash, just give a DVD a try.
You can download the ISO file and burn it to DVD by using nothing else but Windows resources. The main condition is that you have a DVD-ROM at your disposal.
Another viable solution is to upgrade to Windows 10 from Windows 7/8.1 with the Media Creation tool through the system and perform a clean reinstallation later on.
That should do it. In case you have an alternative solution for the a media driver your computer needs is missing problem or have questions regarding the enlisted ones, make sure to tell us in the comments section below.
With virtual surround sound software, you can get immersive audio even without complex sound systems. By adjusting presets and volume settings, these tools give you the possibility to get better quality sound.
You can find reliable options below if you want your gaming, movie nights, or music-listening experiences to improve.
What are the best virtual surround sound software?
Boom 3D can automatically calibrate itself based on the type of sound card and audio system you have.
The Boom audio engine offers a 3D Surround Sound and customizable equalizer presets. This lets you easily tweak audio to your own liking.
You have the ability to adjust the intensity of every surround sound channel. You can also toggle individual virtual surround sound speakers on/off, adjust the bass level, and scale the intensity of the 3D Surround Sound effect.
Key features include:
Select audio Output device – system speakers, on/over-ear headphones, in-ear headphones, external speakers, Bluetooth, and USB speakers
Volume booster
Volume controller – adjust specific application volumes
Audio effects – ambiance, fidelity, night mode, spatial, pitch
Quick controls – quickly change common settings without opening the full app
Boom 3D
Enjoy an immersive virtual surround sound experience with this adaptable software!
Created specifically for gaming with headphones, the surround sound algorithms powering Razer Surround create an accurate surround sound environment that allows a gamer to calibrate positional sound.
Razer Surround gives you the chance to go through a series of simple listening tests that will allow you to map the way you listen to your games intuitively.
More than this, your custom settings will be saved in the cloud so that you will immediately be ready to play games no matter if you’re at a friend’s house or a local LAN Cafe.
Key features include:
Bass Boost
Sound normalization
Voice clarity
Voice level
Custom & 11 pre-set equalizer settings
Ability to calibrate your individual preferences
Razer Surround
Razer Surround will blow your mind with its awesome 7.1 virtual surround sound engine for full immersion
SBX Pro Studio is a suite of audio enhancement technologies that was created to bring out the absolute best in your gaming audio.
This tool has seamless controls and a very user-friendly interface. You can take full control of how you want your audio to sound.
The algorithms used by SBX Surround provide audio enhancement to any audio by optimizing the listening experience for both two-channel and multi-channel sources. This feature will automatically adapt and provide the best surround sound experience to fit any of your listening experiences.
SBX Surround consists of two core tech components:
Upmix – It processes both stereo and multi-channel sounds and matches them to the active output configuration.
Virtualizer – It takes the audio that has been processed by Upmix and splits the signal to every speaker connected using head-related transfer function (HRTF) filters.
Equalizer APO is one of the best equalizers for tweaking your audio experience to the smallest detail and works especially well (compared to other EQ software) because it can be used in conjunction with Room EQ Wizard that allows you to easily read its filtered text file format.
It APO can enhance and improve the surround sound quality of your media, and once it’s installed, it can be configured by accessing its configuration TXT file found in the installation folder on your Windows 10 PC.
The app also offers you the possibility to transform its looking by installing Peace GUI, which makes it even easier to use and adds audio mixing tools to your PC.
Here are its key features:
Effects panel – balance, crossfading, delay
Graph window
Save configurations and activating them by a simple click/hotkey or desktop shortcut
Up to 31 gain dB Equalizer sliders per channel/speaker
9 speakers support (all, stereo, 5.1 and 7.1)
Filter frequencies, dB gains, filter qualities can all be changed per slider
Filters: peak, low/high pass and shelf, bend, notch, and all pass
Pre amplifying dB values for volume control (per channel/speaker)
Atmos was developed in 2012 and the new version expands the previous 5.1 and 7.1 setups to include a large number of speakers that you can place around the room. In this way, you’ll create that amazing 3D sound experience.
One of the most important features of Atmos is the concept of audio objects. Before this, sounds were constrained to specific portions of the audio.
This technology is incredibly adaptable, it will give you the same experience no matter if you use it in a cinema setting, or at home with a normal set of speakers.
Home Atmos systems with as little as seven speakers are capable of 128 audio objects but it supports up to 34 speakers.
Key features of Dolby Atmos include:
Object-based audio
Height channels for 3D sound360-degree spatial sound
Compatible with home theaters, soundbars, headphones
Steelseries Sonar is a free app that comes within the bundle offered by the company as support for their peripherals.
The surround effect is very easy to activate and you can also create a different setting based on activity. The app comes with several premade configurations but of course, you can create your own if you feel like none of them suits you.
Sonar can be easily used to enhance your chat over the microphone. It comes with features such as noise cancelation powered by AI, volume stabilizer, and noise gate.
As an answer to Dolby Atmos, Microsoft created Windows Sonic. This app can be found as a default app in Windows 10 that has the Creators Update installed.
Sonic simulates a 3D environment using the audio that comes from your device. It doesn’t work extremely well for movies but it makes up for it in games.
Some motherboards and sound cards may require device software to use the hardware. This type of software usually works in the background without the knowledge of the user. For example, if you are using an MSI motherboard then you may have Realtek HD Audio Manager software installed.
Before you use Windows Sonic, it is recommended that you disable any audio effects previously applied.
Follow these steps to activate and use Windows Sonic:
After you’ve deactivated any sound effects, locate the sound icon on your taskbar, right-click on it and then select Spatial sound.
You then want to select Open Volume Mixer, click the Speakers icon to open Speakers Properties and switch to the Spatial sound tab.
Under the Spatial sound format, click on the drop-down menu and select Windows Sonic for Headphones. Ensure you checked the Turn on 7.1 virtual surround sound option.
Select Apply, and then OK.
That’s it! Now you’re ready to experience the effects of Windows Sonic on your audio.
These are some of the best surround sound software to use on your computer. If you already used some of these tools, do tell us more about your experience in the comments below.
Webex is a powerful video conferencing tool for collaboration. You can share your screen and talk to multiple people at once. But when it comes to sharing your screen, you may encounter a problem: the Share Screen button is greyed out.
These problems with Webex can make the share screen difficult to use and make you think that it is not working. If you have experienced such issues, this article will show you how to fix this issue so that you can share your desktop screen in Webex meetings again.
Why is the share button greyed out in Webex?
Outdated app – If you’re not running the most recent version of Webex, you may be missing out on important updates needed for the program to function properly.
Security permissions – If you have not enabled sharing permissions on your PC, the share screen will not be active.
Outdated OS – If your Windows is not up-to-date, it may not meet the current system requirements of the latest Webex version.
App conflict – If you have another similar app that is running at the same time and using your webcam, Webex may not be able to share the screen.
Browser settings – If you’re using Webex on a browser, it is possible that your browser does not support sharing screens natively or some extensions are blocking the feature.
The host has disabled sharing – If the meeting does not allow sharing of content, you cannot share until the host allows you to.
The meeting is private – If your meeting is not yet public, the Share button will be greyed out. You need to make sure that your meeting is public before you can share it.
How do I fix the greyed out share screen on Webex?
A few basic checks before moving on to the advanced troubleshooting could help remedy the situation:
Make sure that you have enabled the sharing feature.
Log out and log back into your Webex account.
Sometimes Webex permissions can be limited by corporate policies or security software installed on your computer. If this is the case, then make sure that your organization gives you permission to share your Webex screen before making an attempt again.
If you’re using an older version of your browser, note that some older browsers may not work well with Webex and require the latest version to function optimally. For example, here’s how to update Microsoft Edge to the latest version.
Alternatively, you can switch to another browser or the app version to avoid browser limitations that may occur from time to time.
Try restarting your computer. Windows not restarting issues can be caused by broken system files, but you can take immediate action if facing this problem.
1. Check for software updates
Sometimes the issue occurs due to outdated software versions. You can try updating your software to see if it fixes the problem.
If not, try uninstalling and reinstalling Webex Meetings app again. This will ensure that you have the latest version and get rid of the previous one, especially if it was corrupted.
2. Disable browser extensions
If you have any browser extensions enabled, try disabling them and then restarting your browser. This seems to be an issue with certain browsers where extensions aren’t playing nicely with Webex.
If the share screen becomes active after you have disabled the extensions, you can try enabling them one by one until you find the culprit.
Select Windows Update and click on Check for updates.
Download and install if available.
Hopefully, one of these solutions has been able to fix the greyed out share screen on Webex. You may also come across an error where the Webex microphone is not working, so feel free to check out our guide on the same.
A Windows cannot find javaw.exe error message can pop up when you try to launch Java software.
The full error message states: Windows cannot find javaw.exe. Make sure you typed the name correctly, and then try again.
Because javaw.exe is similar to java.exe but runs without a console window, it’s best to keep it running, as it’s typically started by other programs. We’ll show you how to fix any issues without having to remove it.
What can I do if javaw.exe is missing on Windows?
1. Add the Javaw.exe Path to the Environment Variable Path
Press the Windows key + R to launch Run.
Input sysdm.cpl in Run and click OK to open the window shown directly below.
Select the Advanced tab.
Press the Environment Variables button to open the window in the snapshot below.
Click the New button under System variables to open a New System Variable window.
Enter Path in the Variable name text box.
Then, input the exact path of your javaw.exe file. The default javaw.exe path would be something like C:Program files(x86)javajre7bin or C:Program files(x86)javajre8bin on 64-bit Windows platforms.
If you’re not sure what path to enter, press the Windows key + Q hotkey to open Cortana. Then enter java in the search box.
Right-click javaw and select Open file location.
Thereafter, File Explorer will open the folder that includes javaw.exe. Enter the folder path open in File Explorer into the Variable value text box on the New System Variable window.
Press the OK button on the New System Variable window.
Click OK on the Environment Variables window.
The javaw.exe error often arises because Windows can’t find the Java program. So, adding the exact javaw.exe path to system variables often fixes the Windows cannot find javaw.exeerror.
Follow the guidelines above to add a new javaw.exe system variable path.
2. Reinstall Java
Reinstalling Java might also fix the javaw.exe error for users with antiquated Java versions. To reinstall Java, enter appwiz.cpl in Run and click OK.
Select Java and click Uninstall.
Select the Yes option on the dialog box that opens.
Click the Java installer file to open the setup window below.
Press the Install button on that window.
2. Scan for malware
This error can often be resolved by running a full computer scan with your antivirus software. Simply open your antivirus, navigate to the scan option, and initiate a complete scan.
When the process finishes, review the report to see if any threats were found and addressed.
If you don’t already use an antivirus, we recommend TotalAV because it uses multi-layered protection while being very lightweight. It ensure faster detection rates.
TotalAV
Guard your devices with advanced multi-layered protection that keeps all threats at bay.
Solving glitches is our specialty, so bookmark our Windows 10 Errors Hub if you need assistance with other PC-related problems.
Since your goal is to get this result as quickly as possible, apply the same solutions when dealing with the following:
javaw.exe not found – Users say they keep seeing the same message on their computer. Since it cannot find a working Java installation, we can only recommend reinstalling it.
Windows cannot find javaw.exe ASDM—Sometimes, users may not even get the ASDM Launcher login box. If you’re not a stranger to this error, quickly scanning your device is a wise move.
Do you still have problems with jawaw.exe? Let us know in the comments section below.
Let’s take a look at some of the best equalizer settings for games & best software to go with it. With those, you can enhance your gaming experience and get more immersive sound.
For action-paced games, be sure to set a higher value for high-frequency sounds.
If you’re playing more atmospheric games, set low-frequency sounds to a higher value.
In order to hear the footsteps while gaming, try adjusting 2000 or 4000 Hz frequency.
2. Equalizer settings for FPS games
General FPS games
25Hz
40Hz
63Hz
100Hz
160Hz
250Hz
400Hz
630Hz
1kHz
1.6kHz
2.5kHz
4kHz
6.3kHz
10kHz
16kHz
1.8db
1.4db
1.4db
0.6db
0db
-3db
-4.6db
-4.6db
-4.6db
-4.6db
-4.2db
-4.6db
-5.8db
-7.8db
-9db
Call of Duty: Modern Warfare
32Hz
62Hz
125Hz
250Hz
500Hz
1k Hz
2k Hz
4k Hz
8k Hz
16k Hz
-6db
-1db
0db
-4db
-1db
0db
0db
0db
1db
-2db
Call of Duty: Warzone
31Hz
62Hz
125Hz
250Hz
500Hz
1kHz
2kHz
4kHz
8kHz
16kHz
-7db
-7db
-7db
-7db
3db
3db
3db
8db
8db
8db
PUBG
30Hz
60Hz
120Hz
250Hz
500Hz
1kHz
2kHz
4kHz
8kHz
16kHz
1db
8db
6db
6db
0db
0db
4db
15db
10db
5db
Counter Strike: Global Offensive
16Hz
32Hz
63Hz
125Hz
250Hz
500Hz
2kHz
4kHz
8kHz
16kHz
0db
0db
0db
2db
4db
5.5db
8.5db
10db
8db
6db
Razer Nari headset:
31Hz
63Hz
125Hz
250Hz
500Hz
1kHz
2kHz
4kHz
8kHz
16kHz
2db
1db
0db
0db
2db
2db
3db
3db
4db
4db
Enhancements:
Bass Boost
Sound Normalization
Voice Clarity
50
Off
50
3. Use a gaming sound enhancer
If you’re looking to optimize your sound while gaming, then Boom 3D might be the perfect choice for you. It brings virtual 3D surround sound to your speakers or headphones.
As for fine-tuning, the software has a 31-band equalizer and 3D surround capability, so you can optimize the sound any way you like.
Other useful features:
Volume booster
Compatible with all types of speakers/headphones
Built-in audio effects
Improved music player
Ability to individually control the volume of each application
Boom 3D
This audio enhancement software offers a powerful equalizer so you can get the best sound quality.
These settings are sure to deeply enhance your gaming experience. Amongst other things, such settings will make you hear footsteps better, in order to have a quicker reaction in your favorite game.
Finding the best equalizer settings for gaming isn’t as easy, and there are no universal settings, so you’ll have to do a bit of experimenting until you find which values work best for your needs.
If you want to find the serial number on Windows 11, you should know that it’s pretty easy to check. Today, we’ll walk you through a few different ways to do it effectively.
Before that, keep in mind that if you are having issues with your Windows 11, they can easily be solved with the help of specialized repair tools.
Where can I find the serial number in Windows 11?
1. Use the Command Prompt
Go to the Search Bar, and type Command Prompt in the search box.
After Command Prompt opens, type in one of the following command and press Enter: wmic bios get serialnumberwmic csproduct get identifyingnumber
After entering the command, you should get a response with the exact Windows 11 serial number.
If you wish to find out what your PC’s model number is, type in the following command and press Enter: wmic csproduct get name
2. Use Settings
Right-click on the Windows button.
Select Settings from the list.
Go to System > About.
Under Windows specifications, you will see the serial number of your device.
3. Check your UEFI
Restart your device.
Depending on your PC’s manufacturer, you will be briefly asked to press a certain key during the booting process.
Press that key (Usually DEL, F1, F2, and Escape) until you open the UEFI settings.
Once inside the UEFI, look for text containing the Serial number.
You might need to select the category, or you might find the number showcased in the main menu.
4. Check your PC hardware’s box
Locate your motherboard or laptop box.
Look for the sticker with your serial number.
Alternatively, check for other documents you got with your PC for the serial number.
How can I check the serial number on my laptop on Windows 11?
If you are using a laptop, the same methods as above apply to finding the serial number. Many laptops have a serial number sticker on them.
Is the Windows serial number the same as the product key?
The serial number is a unique identifier for your motherboard or laptop. The product key is the number that you use to activate Windows. You can easily get a Windows key with PowerShell, and we have a whole guide that explains how to do that.
Tell us why you need to know the serial number on Windows 11 and whether our solutions helped you do it in the comments section below. Other tips are welcome as well!
There are times when your printer might be printing blurry images. This happens to be a common phenomenon with all printers and is more likely to happen after you start using your printer after a long gap of time.
I changed my ink cartridges and now the printing is blurry and shadowed, despite running the alignment process NUMEROUS times. How do I get my the text to be crisp and clean again?
Why is my printer printing blurry?
There can be a lot of reasons for that happening, the most common ones are dirty print heads, no ink, settings issues or old drivers on your PC.
Nothing to worry though as the issue can be remedied easily. In fact, all printers come with a built-in mechanism to deal with just such a scenario. Read on to find out the solution to the problem!
What can I do if my printer is not printing clearly?
1. Update the printer driver
Type Device Manager in the search box and select it from the search result.
Locate your printer, right click on it and select Update driver.
Choose theautomatic option which is more hassle-free.
If you have manually downloaded the update, you can opt for the second choice, that of manually installing the updates.
If this seems a bit complicated, you can always use third-party tools to update all your outdated drivers with just a few clicks.
2. Check the ink levels
A good first step for you to do will be to see if the printer has enough ink in its repository.
Printers of every kind allow the users to check the ink level, which can be either via PC or straight off from the printer device itself.
Since this process is different for every printer, be sure to check the user manual for specific instructions.
The associated printer app should have the necessary information and will let you know if the ink levels are within normal limits.
This again is something that needs to be done periodically as the nozzles often tend to get choked, more so if the printer has been sitting idle for a considerable period of time.
That is also precisely the reason the printer also comes with a self-cleaning operation to clean choked nozzles.
However, all printers have their own unique ways to initiate the cleaning process, so be sure to check out your printer manual.
However, a general rule of thumb is that the process can be started from within the maintenance section.
Also, it might be necessary for the cleaning operation to be performed multiple times for a good and thorough cleaning job.
4. Check the alignment
The alignment of the print cartridges or toners can also be equally important in determining the quality of the print. So, check to see if the alignment is perfect for the type of print you need.
If need be, perform the alignment operation multiple times until the desired result is obtained.
Refer to the company manual for steps on this though this is another option that is usually found in the maintenance section.
5. Settings issue
Most printers allow the user to set the quality of the print. Those can vary from draft quality to anything resembling the best quality.
Changing the setting to that which offers the highest quality of prints can also solve the issue of blurry prints.
6. Use the right paper
Poor quality of paper used for printing can also lead to blurry prints.
That makes it important that you use paper of the right quality that can be the best match for your printer, or for that matter, the type of ink that the printer uses.
Using the right-sized paper is equally important for getting the best quality prints each time.
However, if your printer is still printing blurry, there might be something wrong with the hardware itself. In that case, it’s best to contact the official repair center.
Looking for the best calculator software for Windows 10? Whether you need scientific features, unit conversions, or just a clean interface, there’s a perfect app out there for you. In this guide, we’ll highlight the top-rated calculator apps for Windows, including free tools, and open source options.
The default Windows Calculator is more than just basic math. With an intuitive layout and various built-in modes, it’s perfect for quick calculations or more complex tasks. You get standard, scientific, programmer, and even date calculation, all seamlessly integrated.
SpeedCrunch is a fast, open source calculator ideal for power users. It supports complex expressions with real-time results and syntax highlighting. No mouse needed—it’s entirely keyboard-driven for efficiency and speed.
Calculator² is a multi-purpose calculator app with a beautiful interface and wide functionality. It covers scientific calculations, graph plotting, unit conversions, and real-time currency rates—all synced across devices.
Scientific, graphing, currency, and unit calculator modes
Supports multiple themes and platforms (PC, tablet, phone)
Wolfram Alpha isn’t just a calculator—it’s a computational powerhouse. You can enter math problems in natural language and get detailed, step-by-step solutions powered by an AI-backed knowledge engine.
Natural language input for complex problems
Step-by-step explanations and real-time answers
Covers calculus, chemistry, physics, stats, and more
RedCrab offers a unique full-screen formula editor that mimics paper-like input. It’s great for handling large equations and visualizing math processes, especially in engineering and science fields.
FX-Calc is a scientific calculator that also allows plotting functions in real-time. It supports user-defined variables, parameter sweeps, and quick previews of results, all from a lightweight interface.
Frink is a powerful unit-aware calculator that automatically handles conversions. Built in Java, it offers scripting capabilities and precise tracking of physical units, ideal for physics and science calculations.
Full support for physical units and conversions
Built-in currency updates and date/time calculations
CalcTape functions like a calculator combined with a digital paper roll. You can annotate your calculations, edit them later, and even reuse older results. It’s ideal for bookkeeping or financial use.
GeoGebra’s scientific calculator is built with education in mind. It supports advanced functions, a clean touch interface, and full compatibility with school curriculums. It’s also ad-free and privacy-focused.
In this guide, we’ll show you how to fix the Red Alert 2 game if it’s not working on your Windows PC.
Whether the game is crashing, lagging, freezing, or running slowly, follow these steps to get Red Alert 2 up and running smoothly again.
How can I fix Red Alert 2 not working on Windows?
1. Open the Program Compatibility Troubleshooter
Enter troubleshoot in the Taskbar and open Troubleshooting settings.
Select Other troubleshooters.
Select the Program and Compatibility troubleshooter.
Press the Run the troubleshooter button to open the window in the snapshot below.
Then select Red Alert 2 in the troubleshooter’s software list, and press the Next button.
Wait for the Troubleshooter to investigate the problem.
Check whether the Red Alert 2 not working issue is gone or not.
2. Run Red Alert 2 in Compatibility Mode
First, open the Red Alert 2 folder in File Explorer.
Then right-click the gamemd.exe in File Explorer and select Properties to open the window.
Select the Compatibility tab in the snapshot directly below.
Select the Run this program in compatibility mode for option.
Then select WinXP (Service Pack 3) on the platform drop-down menu.
Select the Run this program as an administrator checkbox on the Compatibility tab.
In addition, adjust the graphical settings by selecting Reduced color mode and 16-bit color from the drop-down menu.
Then click Apply to confirm the new settings, and press the OK button.
Repeat the above guidelines for every exe in your Red Alert 2 folder, such as Ra2.exe, game.exe, YURI.exe and RA2MD.exe.
Red Alert 2 returns a FATAL String Manager failed to initialized properly error for some players who can’t get the game up and running.
Running RA 2 in compatibility mode is a fix more specifically for that error message. You can run RA 2 in compatibility mode as shown above.
3. Configure the Game’s Resolution
Open the Red Alert 2 directory within File Explorer.
Then right-click the RA2.INI file in the Red Alert 2 directory and select Open with.
Select to open RA2.INI with Notepad.
Then edit the ScreenWidth and ScreenHeight values in the RA2.INI file to match your current display resolution.
In addition, edit the VideoBackBuffer attribute to no value. The attribute should be configured as VideoBackBuffer=no.
Click File > Save to save the RA2.INI.
Make the file Read-Only
Red Alert 2 was designed for lower resolution monitors. Some players have fixed the game by adjusting its resolution to match their current VDU resolutions.
4. Adjust Red Alert 2 Game Settings in Origin
Open Origin in Windows and click My Games.
Right-click Red Alert 2 to select Properties on its context menu.
A window will then open that includes a command-line arguments text box. Enter -Win in the text box.
Select the Disable Origin in Game for this game option on the window, and press the OK button.
If you can’t play any RA 2 multiplayer matches in a local network, check out this page on CnCNet. CnCNet provides a fresh multiplayer client for Red Alert 2 that you can download.
Note that Red Alert 2 is not included with the CnCNet multiplayer client download.
That was all. We hope that your issue with Red Alert 2 not working on Windows 10 or Windows 11 and needing a fix was solved by now.