Microsoft Powerpoint is one of the most powerful tools when it comes to Office Suites. Powerpoint has been one of the most preferred presentation applications for more than a decade.
Users reported that one of the glaring issues was the email notifications/alerts during ongoing presentations. Yet another issue is the screen saver turning on after a few minutes.
What are Windows Presentation Settings?
Unknown to most of us Microsoft has already pondered about the issue and the best part is that they have a feature to make it happen.
The Presentation mode works similarly to the DND mode on your smartphone. With the Presentation Mode switched on, Windows will automatically mute all the alerts and notifications.
Interestingly, the Presentation Settings was introduced with Windows Vista but it has been missing on some of the Windows 10 Versions, for instance, the Presentation Mode is missing from Windows 10 Home Edition.
Another tool that is missing from this edition is the Group Policy Editor. We have a dedicated article on how to enable gpedit on Windows 10 Home Edition that you can check out.
How can I turn on Windows Presentation Mode on Windows 10 desktops?
When the Windows Presentation mode is turned on the laptop doesn’t go to sleep and all the system notifications are turned off temporarily.
Users can also set a particular background and adjust the speaker volume for the Presentation mode. These settings will be applied whenever the Presentation Mode is activated.
We will guide you through the necessary steps required to switch on the Windows Presentation mode through multiple methods.
1. Via Windows Mobility Center
1. Press the Windows Key to open the search box.
2. Type Windows Mobility Center in the search box and then click on the result.
3. Go to the Presentation Settings tab.
4. Click on the Turn on button.
5. Presentation Mode is now enabled on your laptop.
On your laptop, presentation mode can be quickly toggled on or off from the Windows Mobility Center. Afterwards, you will be able to use your laptop without having to worry about any disturbances.
2. Use a desktop shortcut
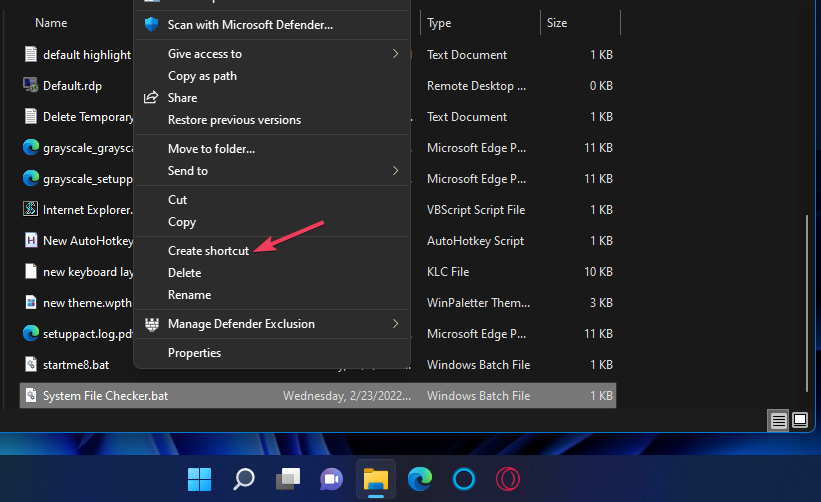
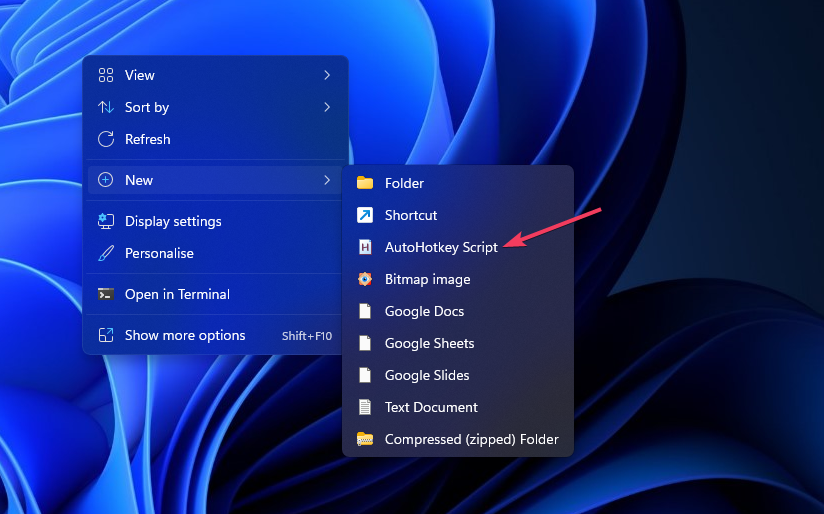
Additionally one can also create a desktop shortcut for the same by using the following path name, “C:WindowsSystem32PresentationSettings.exe”. Alternatively, you can also use the presentationsettings/start and presentationsettings/stop to toggle the settings.
Yet another easy way to access Presentation Settings is by going to the Search Bar and searching for the following terms: Adjust settings before giving a presentation. The Presentation Settings can also be changed from here by toggling it on/off.
4. Turn on Airplane Mode
Well, this method comes with some limitations but it works nevertheless. If you are certain of not using the internet during the presentation simply Switch on the Airplane Mode.
This will ensure that the notifications don’t disturb your presentation. However, this method is not useful against the Windows screen saver which will still appear after a certain period of inactivity.
We hope that our methods helped you enable presentation mode on your laptop. Let us know if you have any questions in the comments section below.
New to mods in The Sims 4? Or maybe you’ve used them for years, and now they’ve mysteriously vanished? Don’t worry,it’s a common issue, and it usually comes down to settings or file placement.
In this guide, we’ll walk you through how to fix broken mods and make sure your custom content actually shows up in the game.
What can I do if the Sims 4 mods are not working?
1. Check if Sims 4 mods are enabled
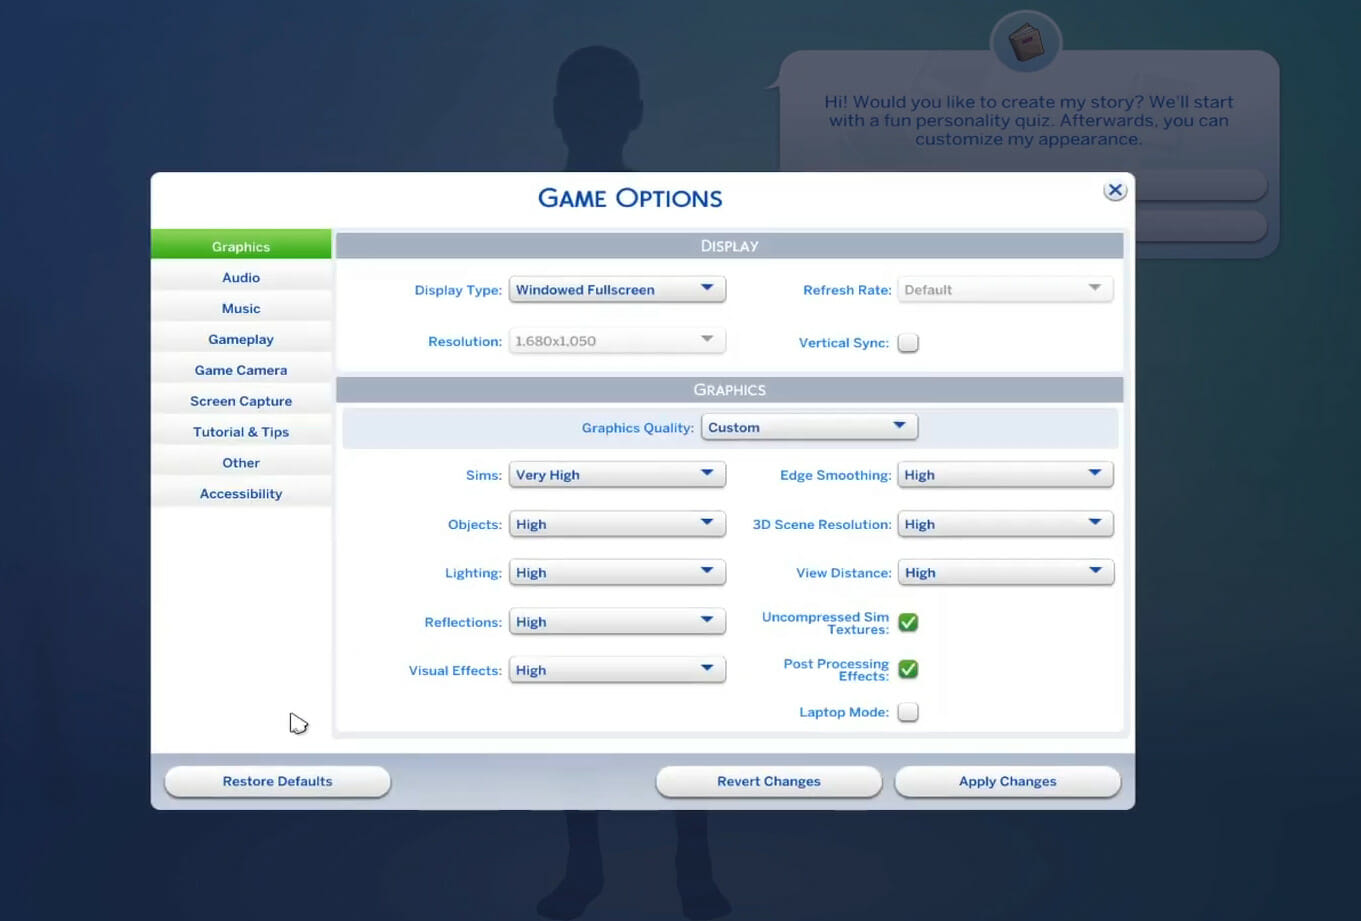
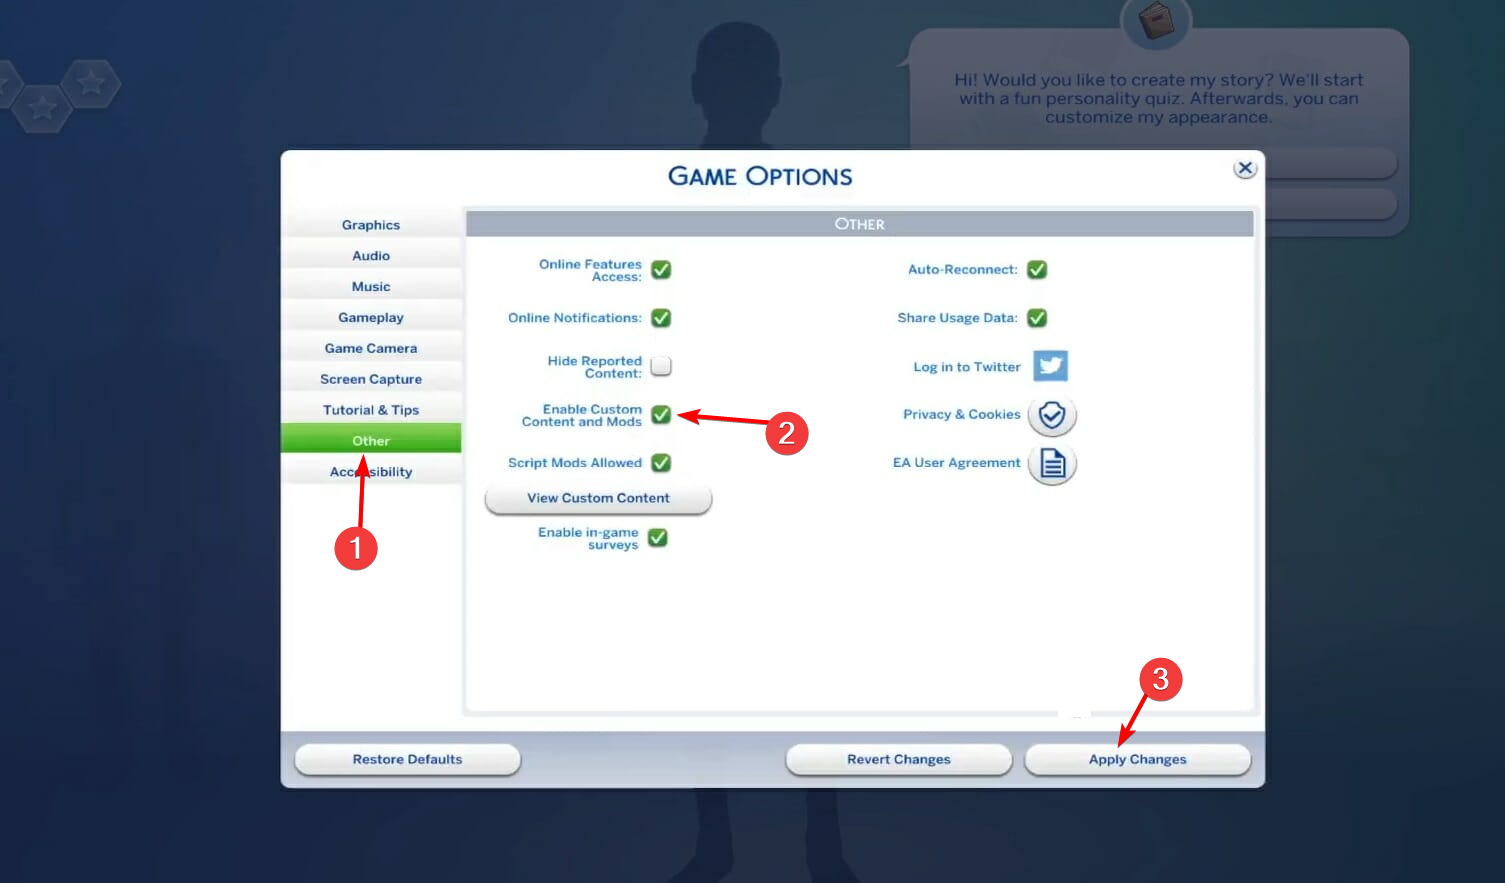
First, run your Sims 4 game and click the game’s menu.
Select Game Options to open the window.
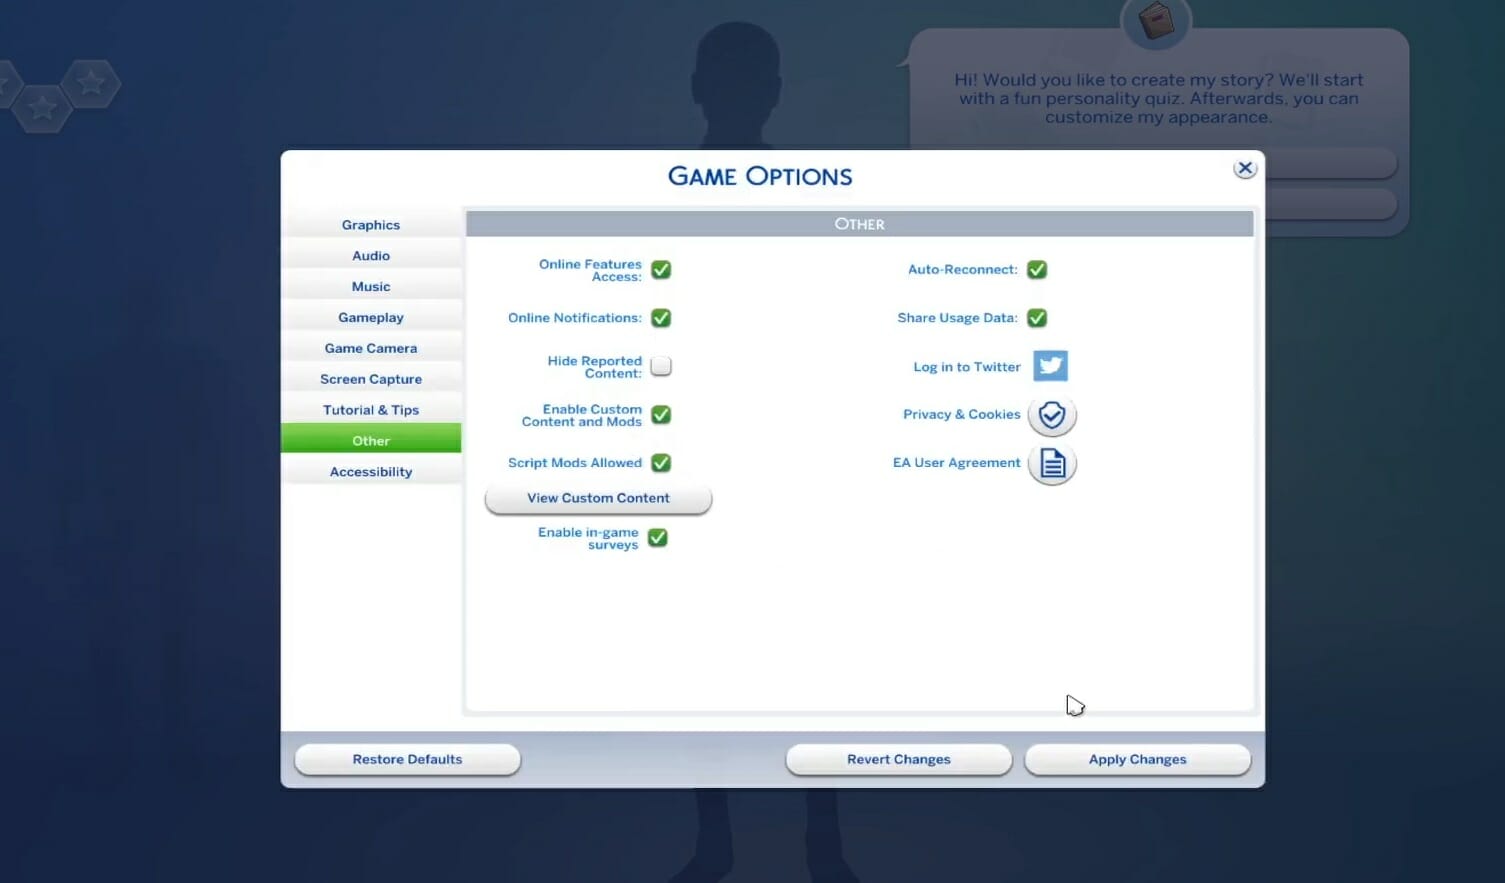
Then select Other to open the options shown directly below.
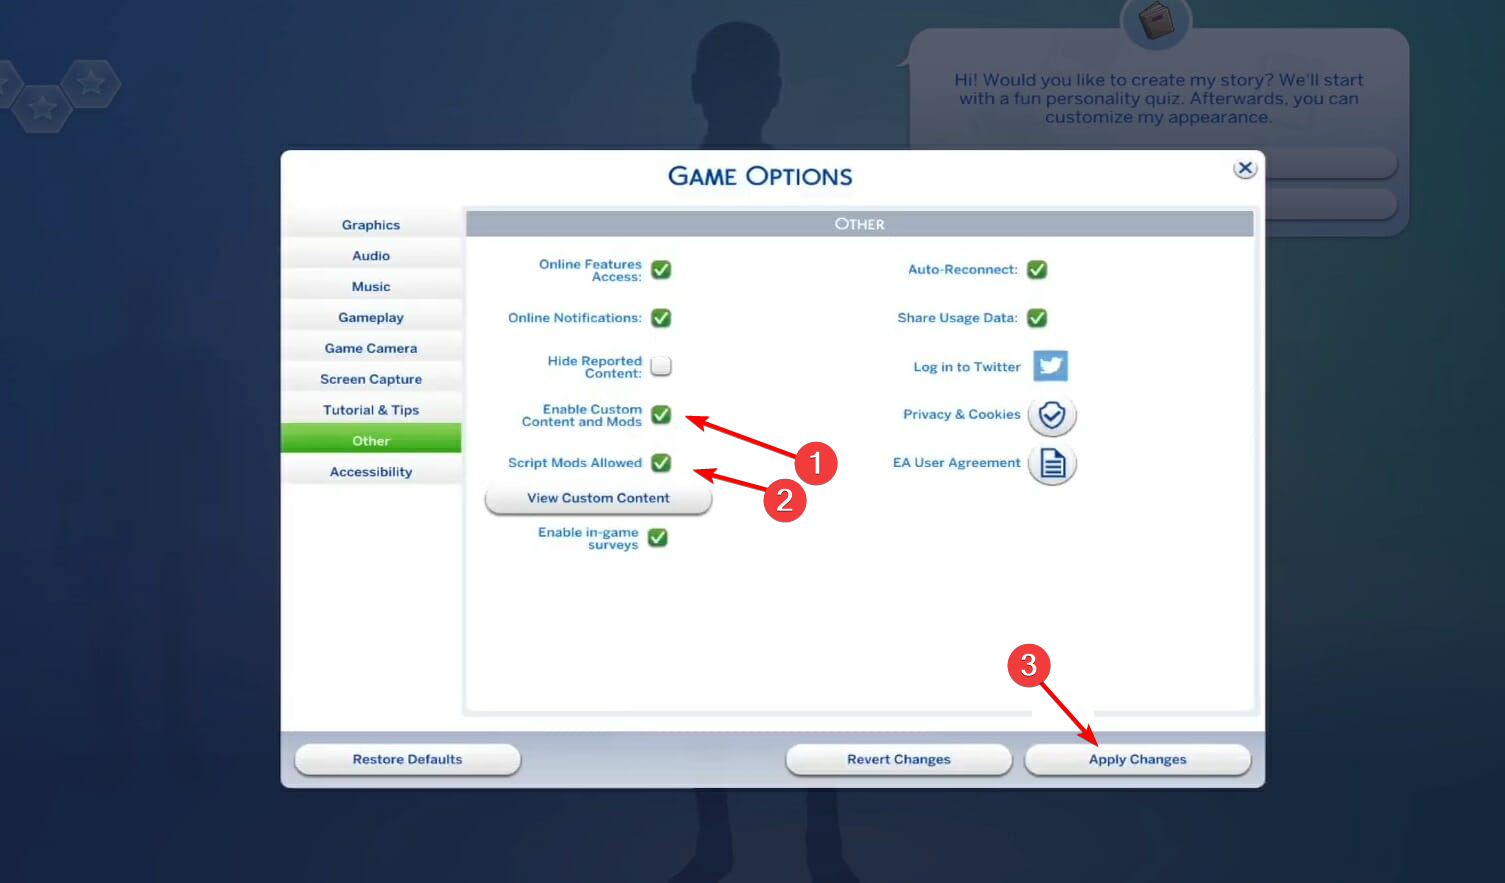
Select the Enable Custom Content and Mods option. Then select the Script Mods Allowed checkbox. Finally, don’t forget to click the Apply Changes button.
Restart the Sims 4 game after changing the settings to check. If mods were not working in Sims 4 after an update, this is the solution you need to apply.
If you haven’t already installed them, check out our guide on installing Sims 4 mods on your device.
If mods are not showing up in Sims 4, double-check that they are compatible with Sims 4.
Older Mods for older Sims games aren’t supported by Sims 4. A downloaded mod might not have been updated for the latest Sims 4 version.
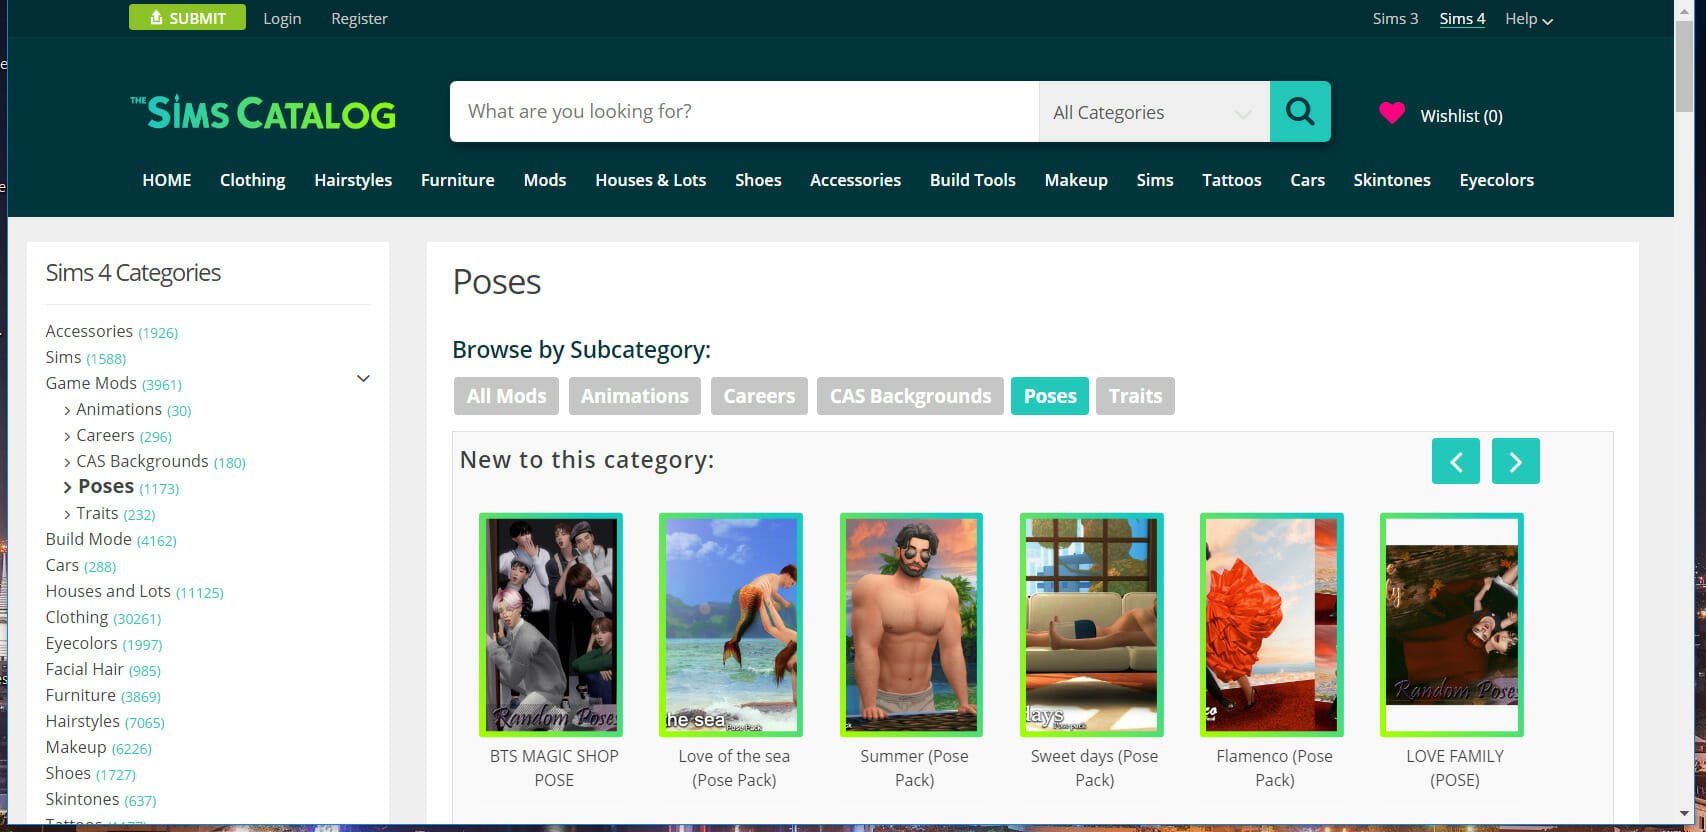
Open the webpage you downloaded a mod from to double-check its compatibility. A mod’s download page should provide sufficient compatibility info for it.
Make sure you’ve downloaded a mod from the right Sims game category, and check a changelog for it if the download page includes one.
3. Unzip mod packages
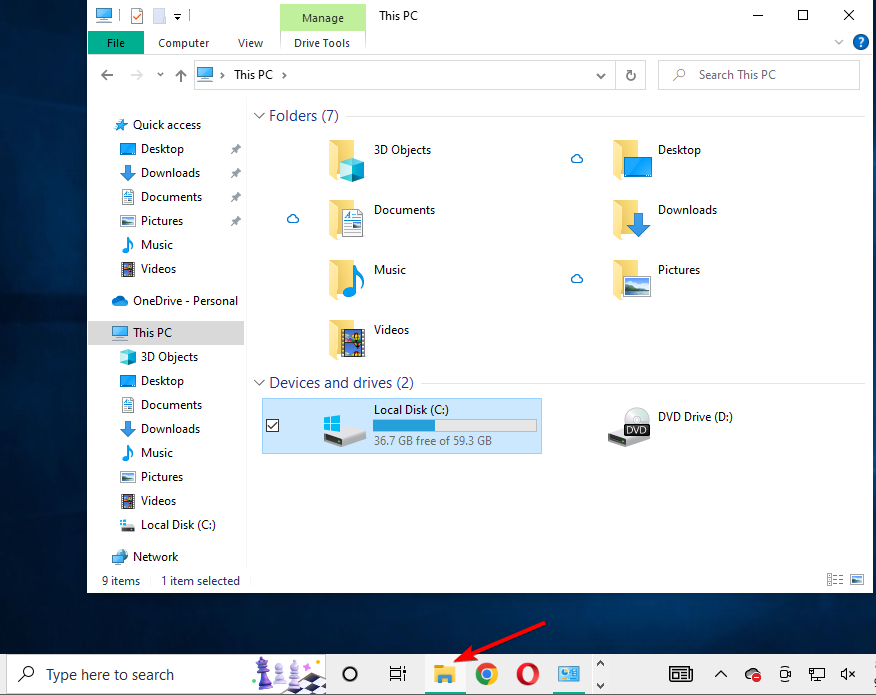
Click the File Explorer’s taskbar button, and then open this folder path: Electronic arts\Sims 4\Mods
Your mod packages need to be unzipped and in standard folder format. If not, you’ll need to unzip a mod by right-clicking it and selecting Extract.
Make sure your mods are in the correct unzipped formats. To do so, you’ll need to check if there are any zipped mods in your Mods folder. If that is the case, then this is the culprit for mods not showing up in Sims 4.
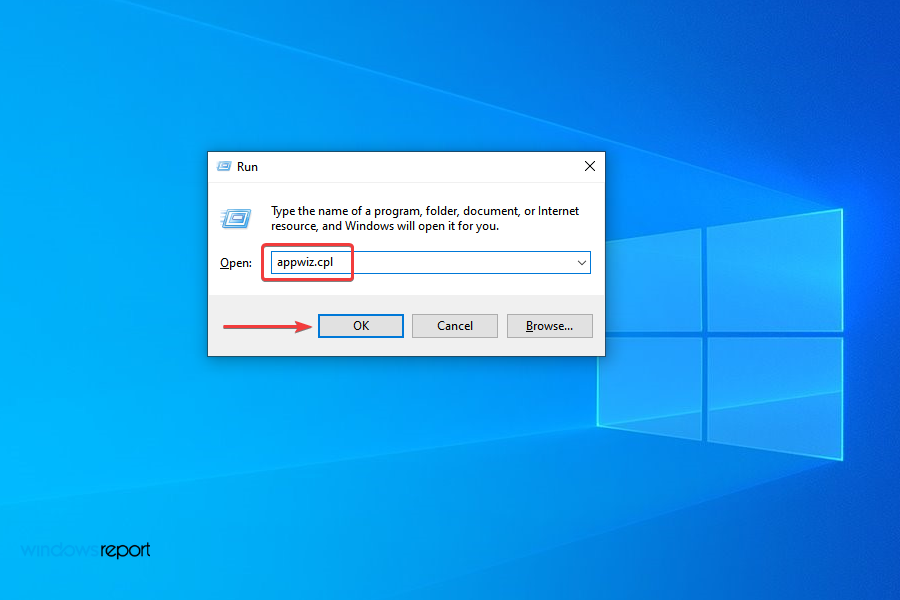
Press Windows + R simultaneously to open the Run Command window.
Write Appwiz.cpl in the search field then press OK and it will open the Programs and Features window.
There, search for Sims 4 in the list, select the game and click Uninstall.
Follow the steps that show up and the game will be uninstalled.
After the game is successfully uninstalled, you can go back to the platform used to play the game and reinstall it just like the first time
Also, you should be careful that the game was completely removed before reinstalling it. For this, we use CCleaner, a free software that will make sure there are no file leftovers on your system.
CCleaner
Thoroughly clean your PC and give it a refresh after getting rid of leftover files in your system.
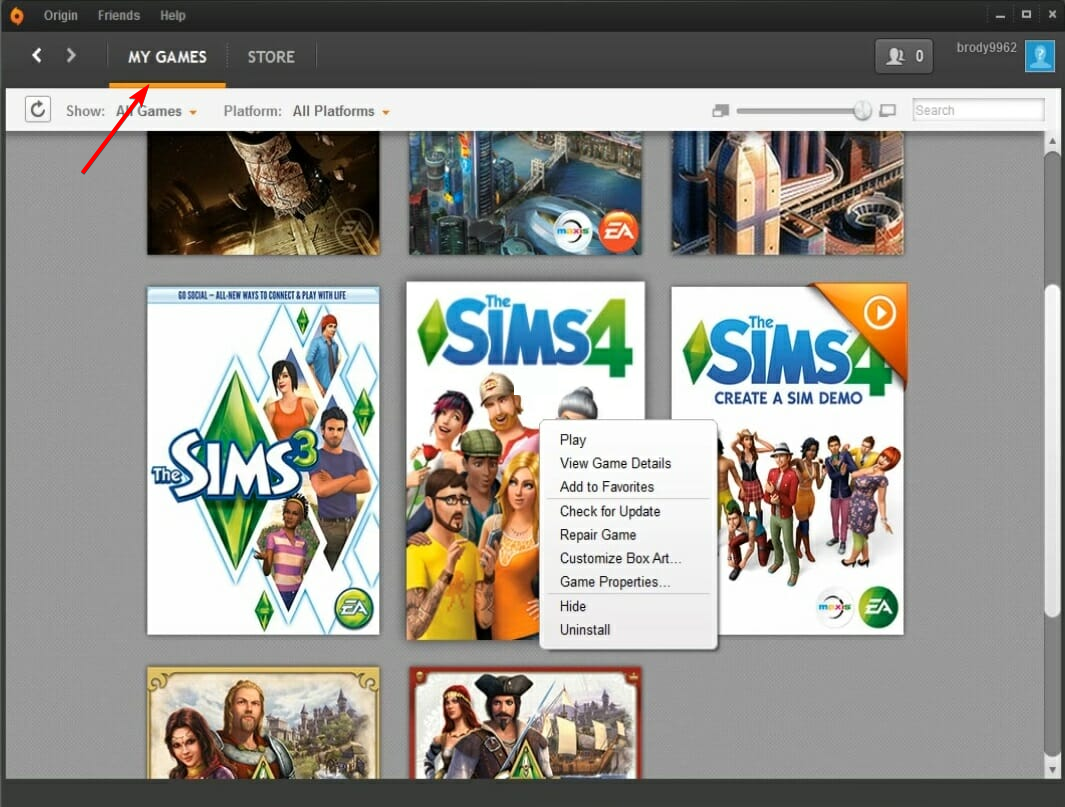
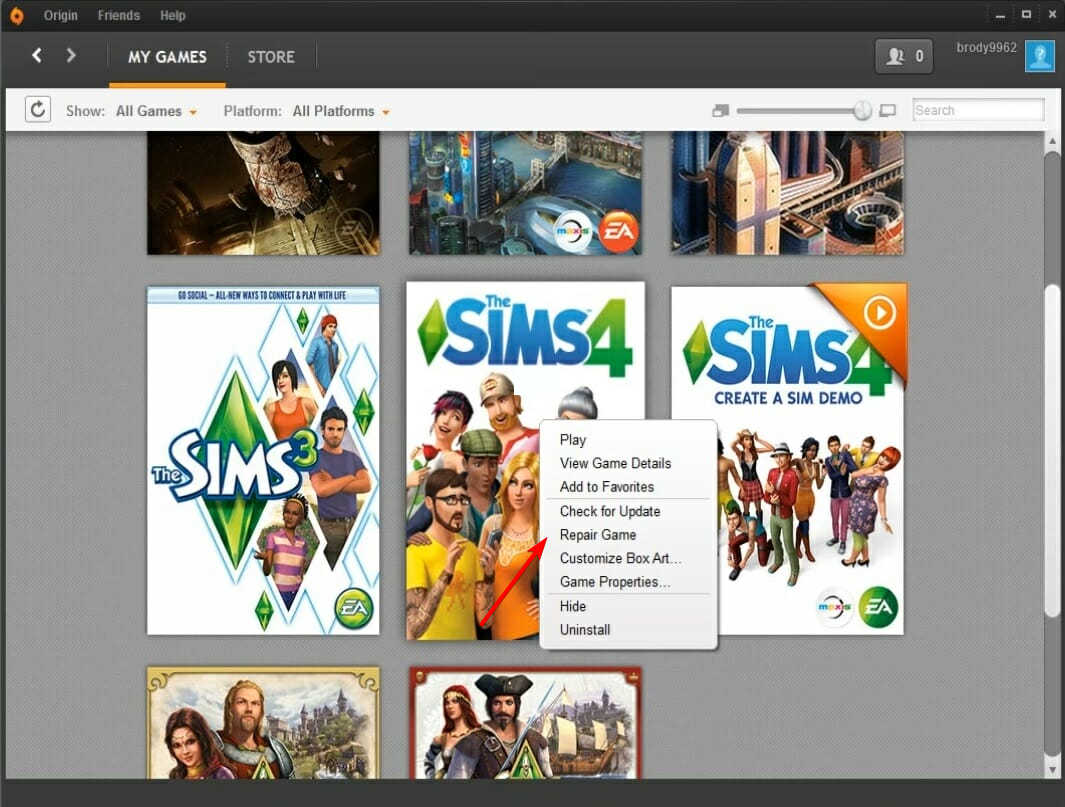
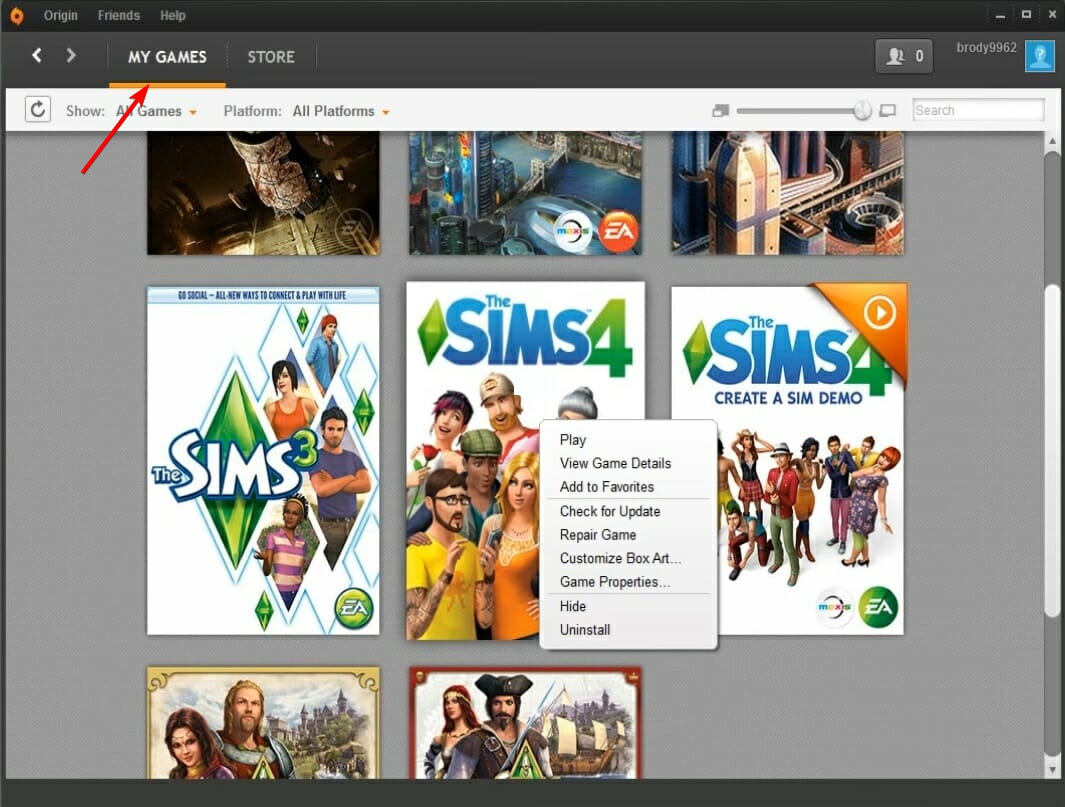
Open your Origin client software, then click the My Games tab.
Right-click your Sims 4 game to open the context menu and select Repair.
6. Update Sims 4
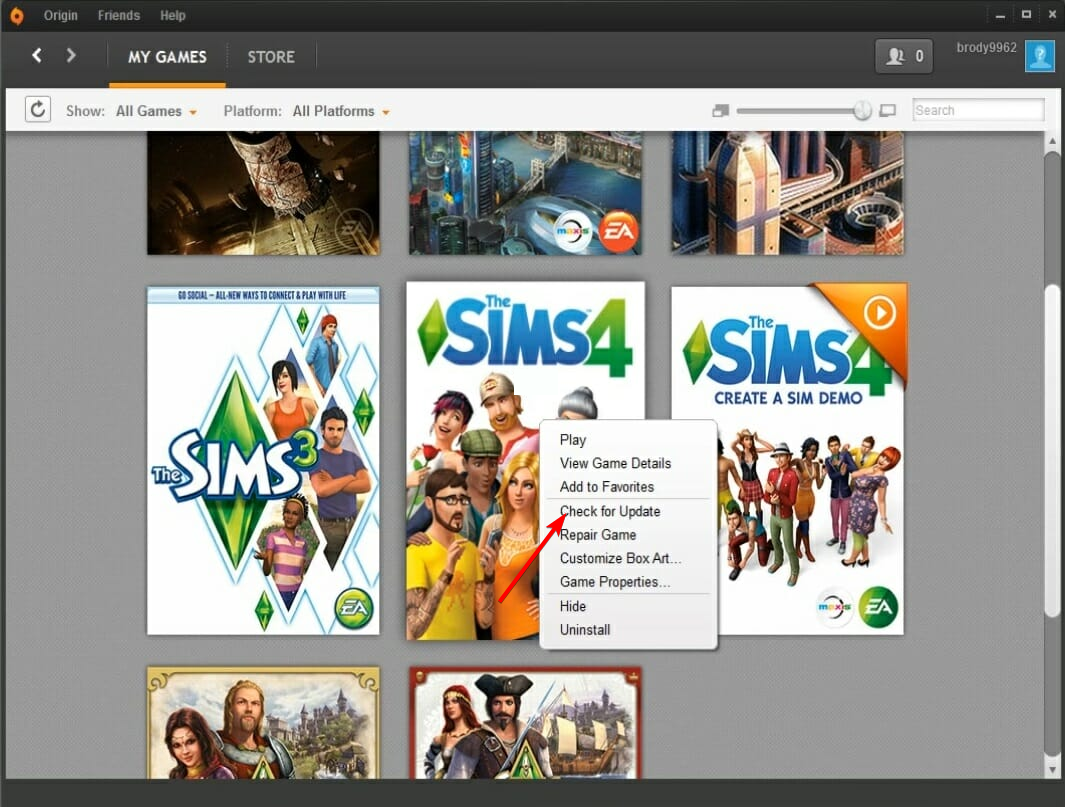
Click My Games in Origin.
Then right-click Sims 4 and select the Check for update option. If a more updated version is available, it will download and install.
Older versions of Sims 4 have stopped supporting mods entirely. Follow the above steps to ensure you’re playing the most updated Sims 4 version.
NOTE
EA updates disable mods. So, you’ll need to enable them as outlined for solution 3 after updating Sims 4.
7. Clear the game’s cache folder
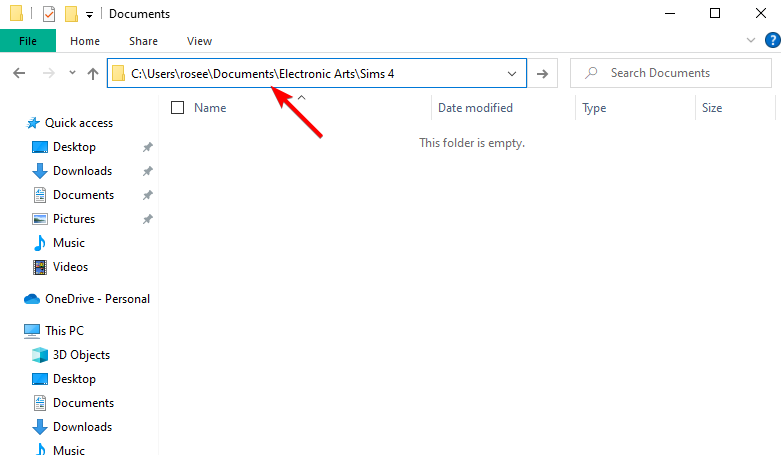
First, open File Explorer, which you can do by pressing the Windows and E keys simultaneously.
Open this folder within File Explorer, and replace the User name with your actual name: C:\Users\*User name*\Documents\Electronic Arts\Sims 4
Next, press the Ctrl key and select the localthumbcache.package, cache, cachewebkit, astcrash.txt, and lotcachedData files and folders. Then right-click them then choose Delete.
How do I make Sims 4 mods work after the update?
Open your Sims 4 game, then click the game’s menu button.
Choose Game Options to open the window.
Select Other from the left side, then select the Enable Custom Content and Mods option. Finally, click Apply Changes, and you’re done!
You will need to manually allow any downloaded custom content or mods via the in-game interface to use them. Unfortunately, you will have to do the above steps to enable CC after any update.
Those are possible resolutions for fixing mods that don’t initialize or appear in Sims 4. For other errors involving DLL files, we have a detailed article on that.
If you encounter issues such as mods not working in Sims 4 at High School, you don’t have the necessary privileges to access them. In this case, the best solution is to contact your teacher and ask for their help.
Otherwise, if further support is needed, click Contact UsEA’s help page for Sims 4 to send a support ticket.
It’s important to keep game updated but if Sims 4 won’t update, this guide will help you fix it quickly.
Speaking of mod issues, we recently covered Nisa error in Sims 4 in one of our other guides, so don’t miss it.
Let us know whether this guide proved to be helpful to you or not when it comes to Sims 4 mods not working or not showing up. Don’t hesitate to share your thoughts and solutions with us. Thanks for reading!
Today, we’ll walk you through exactly how to schedule an automatic shutdown on your Windows 10 computer.
This can be especially useful when you’re downloading or uploading large files, running antivirus scans, or doing any other task that doesn’t need you to be at your desk. With a scheduled shutdown, your PC can turn off safely once the job’s done, no need to wait around.
So, let’s see how to schedule a shutdown in Windows 10.
How can I schedule a shutdown in Windows 10?
1. Use a command in the Run dialog, Command Prompt or PowerShell
To start the Run dialog just press Windows key + R. If you want to run Command Prompt or PowerShell, you can search it in the search bar.
Now, all that you have to do is type the following command into the Run dialog, Command Prompt, or PowerShell and press Enter:
shutdown –s –t 600
We have to mention that 600 represents the number of seconds, so in this example, your computer will turn off automatically after 10 minutes. You can experiment with different values and set the one you want.
2. Use dedicated software to help with the shutdown
Windows Shutdown Assistant is software that allows you to shut down your PC at the set time automatically. You can also set it to shut down in other situations such as system idle, excessive CPU usage, or low battery.
It can also support computer log-off, restart, and lock-up, all automatically. Thus, we recommend you download the free version of the program before deciding whether it’s worth your money or not.
Windows Shutdown Assistant
Set the time when your computer sleeps and shuts down with this amazing tool.
1. Press the Start button on your taskbar or the Windows key on your keyboard to open the search box.
2. Type schedule in the search box.
3. Click on the Task Scheduler result to open the app.
4. When Task Scheduler opens, click on Create Basic Task.
5. Enter the name for your task, for example, Shutdown.
6. Now choose When do you want the task to start. In our case, we’ll choose One time.
7. Now enter the time and date when the task will be executed.
8. Next, choose Start a program.
9. Click the Browse button, go to C:WindowsSystem32 and select a file called shutdown.
10. Afterwards, click Open.
11. Now just in the Add arguments field add -s.
12. Click Next.
13. Now you should see the task information. You can check it one last time, to see if all the settings are right.
14. Click Finish to schedule the automatic shutdown.
You can use the built-in app called Task Scheduler to schedule a shutdown in Windows 10. By configuring time and date settings, you can program the app to automatically shutdown the PC whenever you want.
That’s it, you now know how to schedule a shutdown in Windows 10.In the same vein, you can also check out our guide on how to schedule a restart in Windows 10.
If you have any questions, just reach for the comments below.
Installing and updating drivers are fundamental actions to properly use your devices. So, it is important for all of us to run these indispensable keys with ease and efficiency.
If you ever wondered how to install the Asus monitor driver, you should know that are several ways you can try. With its features, Windows 10 will help you perform a few easy actions. But first, let’s see what that’s all about.
Is there a driver for ASUS monitor?
In order to set up your Asus monitor, you just need an HDMI cable. Connect its extremities into the HDMI (or DisplayPort) port on your monitor, respectively on your PC and you should be set.
Now, Plug&Play monitors don’t generally require any drivers or additional software installations. Nevertheless, you mustn’t ignore drivers when they are offered because they can further improve your viewing experience in terms of color quality, resolution, and so on.
Fortunately, the official Asus website provides a very useful search feature that allows you yo identify the precise driver you need according to your device’s model.
You will also have to fill in some additional details such as the operating system, then simply select the suitable driver, download it, unzip it, and proceed with the installation.
In today’s article, we will show you some accessible steps to run your screen. Thus, you will be able to save precious time.
How can I install the Asus monitor driver quickly?
1. Use the manufacturer’s website
Go to the Asus Support Site, scroll down to Drivers and Manuals, and click on Enter Download Center.
Search for your device model, and select it.
Select Driver & Tools.
Choose your operating system and click on Download.
Unzip the WHQL file.
This option implies the device drivers, which are tested and WHQL certified by Microsoft. So, make sure you should consider it.
2. Use a third-party software
Installing your Asus monitor driver would be far more streamlined with the help of professional driver updating software, such as Fortect Driver Updater.
Not only it will save you much more time, but it’ll also provide you with long-term support with all your device drivers, not only the ones related to your monitor
1. Press the Windows Key and type settings, then click on the result.
2. Go to System.
3. On the left side, click on Display.
4. Scroll down to Advanced display settings.
5. Choose Display adapter properties for Display 1.
6. In the pop-up window, select the Monitor tab, and then click on Properties.
7. Select the Driver tab and click on Update Driver.
8. Choose Browse my computer for drivers.
9. Select Let me pick from a list of available drivers on my computer.
10. Click on Have Disk…, and browse to the location you downloaded these files to.
11. Press on OK, and then select the driver name associated with your monitor.
You can also install Asus monitor driver through the OS’s built-in Monitor Properties Settings. They not only help you tweak the monitor to your liking, but also provide you with the ability to install drivers for it.
This was our suggested list in order to help you install the Asus monitor driver. Of course, there are a few more available options, but make sure our recommended ones are the best.
Also, if you wonder how to update drivers in Windows 10, don’t hesitate to check our full guide. So, you’ll be aware of all the useful options.
In addition, let us know which of the presented suggestion suited you the best, and feel free to comment in the section below.
If you’ve ever tried to sign in to your Windows 11 device using Windows Hello and it just won’t cooperate, you know how frustrating it can be.
Sometimes the facial recognition or fingerprint reader won’t start, or the whole feature seems completely unresponsive. Luckily, there are a few simple things you can try to get Windows Hello back in working order without too much hassle.
Why is Windows Hello not working on Windows 11?
Most Windows 11 errors are associated with different underlying causes; the same goes for Windows Hello. Dealing with this issue as soon as it occurs will ensure that no time is wasted for every startup.
Although the leading cause for your Windows Hello not working is update issues, other possible reasons exist.
Here are the most common causes for Windows Hello to stop working:
PIN login is unauthorized: The PIN login authorization needs to be enabled to use Windows Hello. However, it is possible that you or an application disabled this option, and that’s the leading underlying cause behind Windows Hello not working.
Old drivers for imaging and biometric devices: If the drivers for the devices you need, such as fingerprint sensors, webcams, and iris scanners, are old and outdated, Windows Hello won’t run.
A required device is unavailable: For the biometrics to work, you need relevant devices connected to the computer. For instance, many saw the We couldn’t find a camera compatible with Windows Hello Face in Windows 11 when their camera didn’t support facial recognition.
The biometric device is malfunctioning: When Windows 11 face recognition is not working, you should check whether the biometric device is working fine and if other conditions are favorable. For instance, there should be ambient light for facial recognition to work.
How do I turn on Hello in Windows 11?
Press Windows + I to open Settings and select Accounts from the left.
Click on the Sign-in options on the right.
You can now turn on Windows Hello and set the biometrics or pin.
Now that you know all about the problem and how to turn on Windows Hello, let’s find out what to do when it’s not working in Windows 11.
What can I do if I see the Windows Hello Something went wrong error on Windows 11?
1. Reset the facial recognition and fingerprint options
Press the Win + I key combination to open Settings and go to Accounts from the left tab.
Click on the Sign-in options.
Now locate Facial recognition and Fingerprint recognition.
Choose the one throwing errors (we selected Fingerprint recognition), and click on Remove.
Now click on Set up and follow the on-screen instructions to set up new facial and fingerprint recognition, as the case may be.
When done, restart your computer.
Simply resetting the facial recognition and fingerprint options that constitute the security system of Windows Hello can fix things if it’s not working in Windows 11.
After your computer restarts, check if Windows Hello is working.
2. Reinstall the biometrics driver
Press the Win+X keys and choose Device Manager.
Double-click on Biometric devices to expand this section.
Now right-click on the biometric device, and then select Uninstall device.
Now, tick the Attempt to remove the driver for this device checkbox, and click Uninstall.
At last, reboot your computer, and Windows will automatically reinstall the best driver for the device.
In some cases, especially with Windows 11, Windows Hello isn’t installed. This is when you may need to install Windows Hello using the optional packs.
When your computer restarts, let Windows install the updated Hello drivers. After the installation is finished, you can repeat Step 2 to check whether the driver is successfully installed.
Why does my fingerprint scanner not work on Windows 11?
When this happens, you usually receive the Windows Hello Fingerprint. Unfortunately, this option is a currently unavailable error in Windows 11. In most cases, it’s because the computer doesn’t have a fingerprint scanner, but surprisingly, others have reported receiving the message.
If the fingerprint scanner is not working, it is usually due to dust deposition or the presence of liquid on the scanner’s surface; wiping it with a clean cloth should do the trick. If you are using an external fingerprint scanner, the problem may lie with the connections.
In addition, driver issues, both running outdated versions and corruption with it, can lead to the Your device having trouble recognizing your error in Windows 11.
Wrapping up
After performing the above steps, Windows Hello should be working again in Windows 11 without any more errors.
Internet is a big part of our everyday life, and even though most of us use the Internet on daily basis, many people don’t know how the Internet actually works.
Internet relies heavily on DNS, and in case you’re not familiar with it, today we’ll explain to you want DNS is and how it works.
What is DNS and how does it work?
You might have heard the term DNS before. DNS stands for Domain Name System and it’s a standard used for managing IP addresses. DNS was designed in 1983, and it’s a crucial part of the Internet that allows us to access websites with ease.
Every website has its own IP address, and computers use that IP address to connect to a certain website. If you’re not familiar with IP addresses, we suggest that you read one of our previous articles and learn what is an IP address and how it works.
You can even enter that address in your browser and it will open Google’s website for you. Since every website has its own IP address, it would be quite difficult for humans to memorize the IP address of every website that they want to access, therefore DNS was invented.
To explain it simply, DNS works as a phonebook, it has the names of all websites and their IP addresses, and it allows users to quickly find and access a certain website simply by entering its name instead of using the website’s IP address.
In order for DNS to work, it has to use DNS servers. As we mentioned, DNS servers hold information regarding all websites such as the URL of the website and the website’s IP address.
When you enter a certain URL into your browser’s address bar, you actually contact a DNS server that searches for an IP address that matches that URL.
If the address is found, you are immediately connected to that IP address. If the DNS server doesn’t have that URL and IP address in its database, it will contact a different DNS server and the process will repeat itself until the matching IP address is found.
We have to mention that computers cache DNS responses and your computer should have IP addresses of websites that you already visited, so you’ll be able to access them faster.
Unlike humans, computers use IP addresses to connect to websites. Every website has its own IP address and you can easily find the IP address of any website.
You can easily find the address of the DNS server that you’re using by following these methods.
1. Via Network Connections
Press Windows Key + X and select Network Connections from the menu.
When the Network Connection window opens find your active connection, right click it and choose Status.
Click the Details button.
Locate IPv4 DNS Servers property and you should see the address of your current DNS server.
2. Via Command Prompt
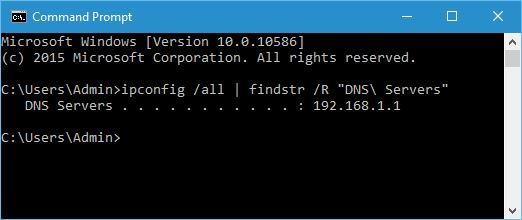
Alternatively, you can see the address of your DNS server by using Command Prompt. To do that, open Command Prompt and enter ipconfig /all | findstr /R “DNS\ Servers”.
If you’re using a router, it’s most likely that the router is forwarding your requests to your ISP’s DNS servers.
Bear in mind that you don’t have to use your ISP’s DNS servers since you can easily change that address to any other DNS server, such as Google’s Public DNS for example.
How can I change my DNS server on Windows 10?
If your ISP DNS servers are slow, you might want to consider using a custom DNS server. You can set your preferred DNS address through the Network Connections settings.
Bear in mind that sometimes custom DNS servers might work slower for you, so if you don’t have any problems with your current DNS server you shouldn’t change it.
1. Press the Windows key and type Network Connections in the search box.
2. Open Network Connections by clicking on the first result and locate your current connection.
3. Right click it and choose Properties from the menu.
4. Choose Internet Protocol Version 4 (TCP/IPv4), and then click the Properties button.
5. Select Use the following DNS server addresses.
6. Manually input the IP addresses you want to change the server address to. For example, Google’s Public DNS addresses are 8.8.8.8 and 8.8.4.4.
7. Press OK to save the changes.
It’s worth mentioning that sometimes malicious software and users can change your preferred DNS server and lead you to scam websites designed to steal your personal information.
If you notice anything strange with websites that you frequently visit, be sure to check your DNS settings.
Don’t know what to play on Game Pass? With literally hundreds of games available on the service across just about every genre imaginable, it can be a daunting task figuring out where to start. Not to worry, though. Because we have you covered with these Game Pass recommendations for all you sports aficionados out there. Here we have put together a list of some of the best sports games on Game Pass right now. So step right on up to the plate and check them out.
Bassmaster Fishing 2022
Bassmaster Fishing 2022 brings the thrill competitive big bass fishing to Xbox Game Pass with fully licensed content from the Bassmaster series including amateur to elite events. You can play as—or against—ten professional anglers from the Elite tour across 8 real-world venues. Earn sponsors as you climb the ranks and come ever closer to becoming the Bassmaster Classic® Champion. Or take to the game’s online multiplayer modes (including cross play modes) and climb the global leaderboards or become champion of the Bassmaster Royale.
This Dual Entitlement contains both Xbox One and Xbox Series X|S versions.
Madden NFL 22
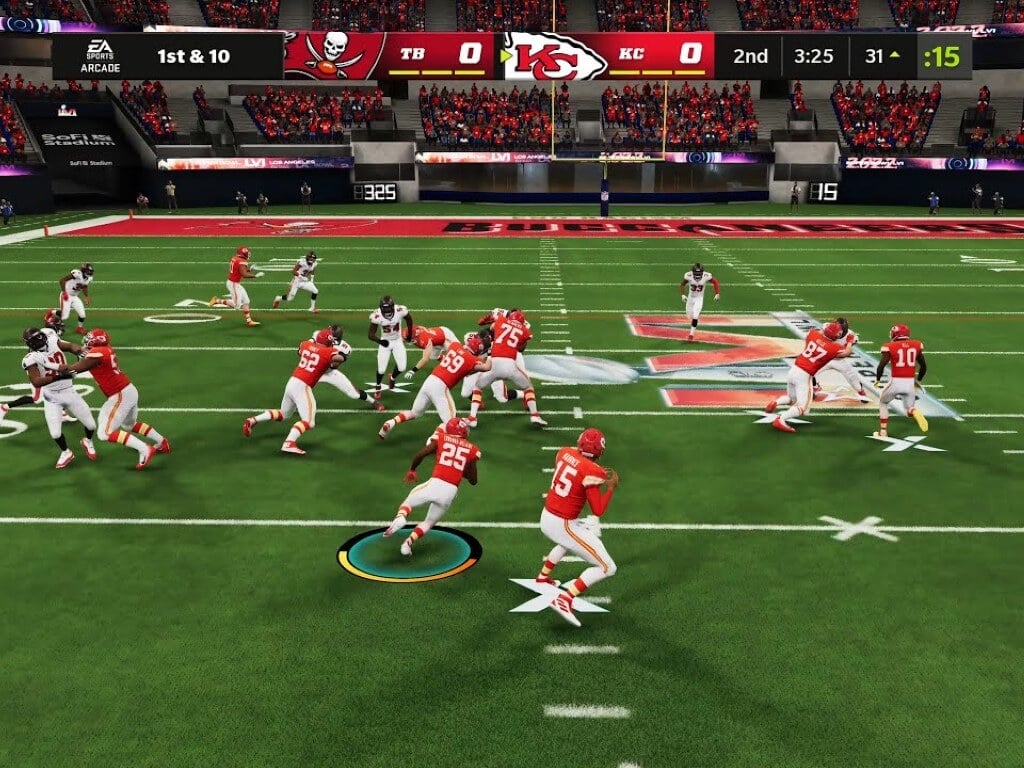
The 2022 installment of the long-running Madden NFL series does little to disappoint. The last Madden NFL to be released before John Madden’s passing, Madden NFL 22 brings several new features and tweaks to gameplay, as in staff management and the skill tree progression system. Madden NFL also features what is considered to be the greatest Madden cover of all time, featuring Tom Brady and Patrick Mahomes. It is only the second time two NFL players have shared a cover for a Madden game.
Engines running: give the green light to the most immersive and authentic MotoGP™ gaming experience ever.
NHL 22
The 31st installment of the premier ice hockey sim, NHL 22 is the first to use the Frostbite game engine and the accompanying next-gen graphics overhaul. The game also introduces Superstar X-Factors—abilities that are unique to superstar players. Also new to NHL 22 are improved gameplay animations including those for reverse hitting, pass and shot blocks, pickups, goalie saves and more. NHL 22 also features women’s national hockey teams, a first for the franchise. The game’s soundtrack features such stars as Machine Gun Kelly, Twenty One Pilots, Imagine Dragons, Jxdn, Volbeat and more.
And that is merely the crème of the sports crop on Game Pass. There are plenty of other sports games worth checking out on the service. It’s no wonder Game Pass is rightfully known as the best value in gaming, and it’s good to see the sports genre so well represented. If you don’t already have a Game Pass membership, you can sign up here. Learn more about the service over on the Xbox Game Pass FAQ page. And don’t forget to check out our other “What to play on Game Pass” posts for other Game Pass recommendations.
There are many difficulties users can encounter while playing the Team Fortress 2 game on their computers. The Team Fortress 2 FPS drops issue is one of the difficulties users complain about with the game.
Team Fortress is a first-person shooter game. It is a multiplayer game that allows players to connect and play in teams.
However, advanced games like Team fortress require a stable and reliable computer to prevent difficulties with the game.
Several things can be responsible for the Team Fortress FPS drops for no reason. It can be outdated graphics driver issues or Windows issues.
However, this article will discuss fixing the Team Fortress 2 FPS drops issue and what to look out for.
Why is my FPS low in Team Fortress 2?
Outdated or corrupt graphics driver: When you run an outdated or corrupt graphic driver on your computer, it can cause the Frame rate to drop drastically. Outdated drivers don’t have the essential update and patches to power games. Furthermore, corrupt graphics drivers can result in the Team Fortress low FPS on high-end PC issues. So, whenever the graphics driver on your computer is outdated, it lacks the essential updates and patches which prompt the FPS to drop.
Interference from the Game DVR: The DVR (Digital Video Recorder) can cause some interference with the computer and the clients running on it. However, it can cause the frame rate to drop or stutter while playing the Team Fortress 2 game. Also, interference with the DVR can prompt the ‘Team Fortress Low FPS after an update issue. Furthermore, the DVR in the game uses lots of system resources and power. So, it can affect how the FPS works.
Outdated Windows: Outdated Windows can cause numerous problems with the computer and its components. It is because its version is no longer recognized and doesn’t have the essential features. However, it can affect games like Team Fortress 2 and results in the FPS drop issue.
Outdated Audio & Network driver: The computer uses many drivers to perform various tasks and actions. When there’s a problem with a driver or some of the drivers, it can affect other components that rely on it. So, outdated audio & network drivers can cause the Team Fortress 2 FPS drop issue.
How do I fix FPS drops in Team Fortress 2?
1. Update the graphics driver
Press the Windows + R simultaneously to prompt the Run window.
Type the following into the search space: devmgmt.msc, and click the OK button.
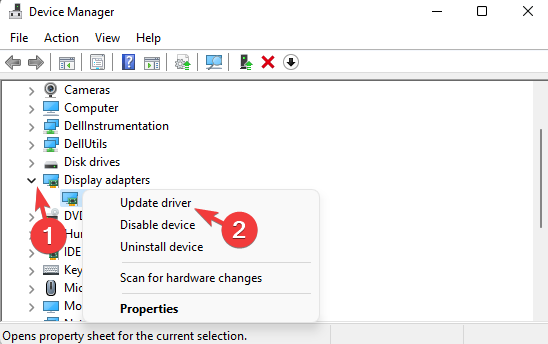
Click on Display adapters from the search results, select the driver from the drop-down, and then right-click on it.
Click the Update Driver option, then select Search automatically for drivers.
Restart your computer after the updating process is complete. It’ll help to sync the changes and update them appropriately. Also, it can fix the Team Fortress 2 FPS drops in combat issues.
Although updating drivers might be time-consuming, we recommend using software that specializes in automatic driver upgrades.
2. Update Windows
Click the Start button.
Select Setting and click on Windows update.
On the Windows update page, select Check for updates.
If there’s an update available, Windows will automatically search for it and install it. We recommend that you restart your computer. Check and see if the issue persists.
3. Disable Game DVR
Press Windows + R to prompt the Run window.
Type Regedit in the search space.
Or press the Ctrl + Shift + Enterkeys to prompt the Registry Editor.
Click on Game DVR, double-click on the AppCaptureEnabled option, and select Modify.
In the Edit DWORD (32-bit) Value tab, change the Value data to 0.
Press Windows + R simultaneously to prompt the Run window.
Type the following into the search space: devmgmt.msc, then click the OK button.
Click on the Audio inputs and outputs option, then right-click.
Select Update driver, then select Search automatically for drivers.
Updating the Audio driver can help fix the Team Fortress 2 stuttering on Windows 10/11 issue.
If you still encounter this issue, there might be another incompatible or old driver that you don’t know about. If you don’t want to manually search for it, check out some third-party driver updater software that will do the job for you.
Press Windows + I simultaneously to prompt Settings.
Select Gaming on the left pane of the screen.
Turn On Game Mode.
It helps your computer to optimize the resources used in the game.
Does lowering resolution increase FPS in TF2?
Generally, Lower resolution increases FPS. Hence, lowering resolution increases FPS in Team Fortress 2. It is because there is a higher pressure when you reduce the resolution. As a result, it prompts the FPS to increase.
Connecting Windows computers to external devices like the printer allow you to do things more conveniently. However, there are several issues you can encounter while trying to collect your computer from external devices like printers. Users complain about the Windows 11 printer access denied error.
Many conditions may be responsible for this issue ranging from hardware issues, driver issues, and lots more. Hence, This article will discuss the causes of the problem and how to fix it.
The Windows 11 printer access denied error prevents you from using the printer for any action on the computer. It indicates that there isn’t a good connection between the computer and the printer.
Likewise, printer errors can result in the Windows cannot connect to the printer access is denied error 0x0000011b. However, it can be due to driver issues, permission not granted errors, and others.
Moreover, this error is prominent in Windows 11 but can be encountered in other devices regardless of the version.
Fortunately, there are some fixes you can use to fix the ‘Windows can’t connect to printer access is denied. So, we’ll guide you through how to fix the error and what to look out for whenever you encounter it.
Why does my printer Say Access Denied?
Faulty connection between the computer and the printer: There are several errors users can encounter with printers, like the access denied when adding a printer from the print server and Windows 11 shared printer access denied. However, these errors can occur due to connection issues while connecting the printer to the computer. However, Windows 11 printer access denied error occurs when there isn’t a smooth connection between the printer and the computer. Hence, preventing it from performing as expected.
Interference from other connected printer devices: Whenever you have many concurrent printers connected to your computer, the Windows 11 printer access denied error could be prompted. This is because one of the connected printers you are not using may impede the connection and access of your printer with the computer. Likewise, these printers install printer drivers on your computer, which is unnecessary. Hence, these drivers may become faulty or corrupt.
Corrupt or faulty printer drivers: Users can encounter many difficulties if the printer drivers are corrupt or old. It impedes the smooth connection between the printer and the computer. Hence, it can prompt the Windows 11 printer access denied error. Also, outdated or faulty printer drivers can cause errors because the computer won’t have the necessary updates and patches to fix bugs on the printer.
Outdated Windows issue: Generally, an outdated Windows is dangerous and can result in countless errors. However, it can be responsible for denying access when adding a printer from a print server error. Furthermore, outdated Windows lacks the essential patches to help fix printer connection issues.
Nonetheless, many other causes of the Windows 11 printer access denied issue exist, but we’ve highlighted the prominent ones above.
How do I fix my printer if it says access denied in Windows 11?
1. Update the printer drivers
Click on the Start button and select Device Manager.
Click on the Print queues drop-down button.
Select your printer and right-click on it.
Select Update driver and Search automatically for drivers.
Wait while Windows installs the update, then restart your computer.
Outdated printer drivers can cause this type of crash. Nonetheless, you can fix this problem by installing the latest driver for your printer.
The easiest way to do this is to use the Device Manager. Windows will try to help by downloading a suitable driver. However, if this doesn’t seem to work, you can download the driver directly from the manufacturer’s website.
2. Update Windows
Click on Start.
Select Settings from the options.
Click on Windows Update, then select Check for updates.
Windows will automatically search and download updates if there are any available.
3. Restart your computer
Click on Start.
Select Power and click on Restart.
Click OK.
Restarting your computer will help it fix issues that may prompt printer errors.
4. Delete unnecessary printer drivers
Press Win + R to prompt Run, then type printmanagement.msc and press Enter.
In Print Management, click on All drivers.
Right-click on the printer driver you aren’t using and click Delete.
Repeat step 3 for other printer drivers you want to delete. Then, restart your computer and see if the error persists.
Select the printer you want to remove and click Remove device.
Click Yes to proceed with the action.
Click on Start and select Settings.
Select Bluetooth & devices and turn it on.
Select Printers & scanners.
Go to Add a printer or scanner and select Add device. (Your computer will scan for nearby printers, select your printer and click on Add device)
6. Tweak Windows Registry
Press Win + R to prompt Run, type Regedit, and press Enter.
In Windows Registry Editor, backup the Windows registry and follow this path: HKEY_LOCAL_MACHINE\SOFTWAREWicrosoft\WindowsNT\CurrentVersion\Print\Providers\Client Side Rendering Print Provider
Right-click on the Client Side Rendering Print Provider and click on Delete.
Restart your computer and see if the windows 11 printer access denied issue still persists.
7. Remove Print Spooler
Press Windows key + R to prompt Run.
Type control printers and press Enter.
On the Devices and Printers tab, right-click on the printer you’re using and click on Properties.
Allow not to use the spooler, then click OK.
Restart your computer and see if the Windows 11 printer access denied error persist.
How do I enable Printers in Windows 11?
Click on Start and select Settings.
Select Bluetooth & devices, and toggle it On.
Select Printers & scanners.
Go to Add a printer or scanner and select Add device. (Your computer will scan for nearby printers)
Select your printer and click on Add device. (Adding the printer enables it in Windows 11)
When applying for a US Visa, you’ll want a browser you can trust. Something that has the best possible security to it, which is why you’ll want something that supports TLS.
TLS stands for Transport Layer Security, a security protocol allowing authentication, privacy, and data integrity between two communicating platforms. It ensures data being sent is encrypted.
You wouldn’t want such valuable information getting into the hands of some bad actors. Most web browsers support TLS, but there are some better than others.
What is the easiest Visa to get for USA?
According to experts online, the easiest Visa you can get for the United States is a Visitor Visa. These types of Visas are only temporary and are nonimmigrant. You’re just staying for a short while.
There are two of them: a Business Visa (Category B-1) and Tourism (Category B-2). Now there are some pre-requisites that you’ll have to meet. These aren’t employment Visas.
Going back to the browsers, there are only a certain amount of browsers that work with the US Department of State’s nonimmigrant Visa page. The few that work are Chrome, Edge, and Firefox.
You can check if your browsers support TLS by going to the search bar and bringing up the Internet Option menu.
Click on the Advanced tab and scroll down until you see the TLS section. You can see which protocols are enabled. To turn one on, click the box and then Apply.
With that said, let’s break down the best browsers when applying for a US Visa.
DS-160 is the application name you’ll have to fill out to get that Visa. Although the website only mentions a few browsers will work, the true number is bigger. Any browser that runs on the Chromium engine works.
If you’re looking for a browser that can be seen as a cross between Firefox and Chrome, look no further than Opera One. The browser is built on the Chromium engine and so it offers great speed.
Opera One comes with great features regarding security. You’ll find already built-in a free VPN and an Ad blocker that also offers tracking protection.
Plus, the Opera One browser also has a built-in crypto wallet, so it’s easier to transfer money to crypto if needed. As a bonus, this browser also comes with a native AI.
Opera One
Opera One comes with excellent no-tracking protection and a no-log virtual private network to boost your browser privacy.
Starting off the list is Microsoft Edge. If you look on the US Department of State’s website, you may come across a notice stating that Internet Explorer 7 to 11 are the most recommended versions.
That should be changed soon because Microsoft no longer officially supports Internet Explorer. Instead, the company supports Edge, which is better than IE, almost daily.
The major security issues that Internet Explorer had and the slow speed are gone. Edge has revamped protection features and the ability to add browser extensions that allow customization.
And if certain websites only work on Internet Explorer, Edge has a special mode that simulates the old browser.
Google Chrome is one of the most popular web browsers in the world, and with good reason. It comes with a ton of features that makes using Chrome very enjoyable, like live captions for video and audio as well as the massive extension library.
The browser has its suite of privacy protections that are among the best in the industry. By default, Chrome sports a sandboxing feature that tests if a page or file it downloaded is malicious.
Better yet, it comes with phishing protections to make sure no one obtains your sensitive data.
Firefox is the only non-Chromium-based browser on this list. Google’s browser engine has essentially taken over the industry because of how well put together it is.
But the problem with Chromium is that it’s a bit of a resource hog. On weaker PCs, it can cause a noticeable slowdown if too many tabs or pages are open. Firefox doesn’t have this problem.
It’s arguably better optimized for web surfing than Chrome and all other browsers that run the same engine. Firefox has better protection as it blocks third-party trackers from following you.
And these third-party trackers may notice you going into the Visa application site.
And Brave is the last recommended browser for filling out Visa applications. Like Opera, Brave is a browser that specializes in privacy and blocking ads. It also has a native ad blocker with it.
Brave can block third-party trackers, which according to the developer website, can drain a computer’s battery life. Cookies and phishing protections are part of the same package.
It even has a unique Tor mode which allows people to route through a network anonymously, thereby adding yet another layer of protection. Unfortunately, bravery can cause a significant slowdown, but the protection you get is worth it.
Why am I not able to retrieve my DS-160 application?
Here are a few reasons you are unable to retrieve the DS-160 application from the official website:
Server issue – If you cannot retrieve the DS-160 application, try again in a while since there could be a server-related problem.
Incompatible browser – When retrieving the DS-160 application, use the updated versions of Chrome or Firefox or choose one of the browsers mentioned above.
The 30-day period is over – Uses can access and complete a partially-filled application within 30 days. That’s why it’s recommended that you download the application to save locally and easily access it later.
Feel free to leave a comment below if you have any questions about other apps or if you have some that you recommend. Also, feel free to leave comments about guides you’d like to see or information on other web browsers.
Early last month, Microsoft listed Qatar on its list of live Datacenters, highlighting that this new region will feature Azure Availability Zones. And yesterday, Microsoft announced the launch of its first global datacenter region in Qatar providing enterprise-grade services mitigating the high demand for “high-performance computing, and fast and reliable access to Microsoft services” in the region.
The project has been in the works since 2019, with the initial launch set for 2021. However, it was not possible to deliver the project within this timeframe because of several impediments. The Qatar datacenter is now up and running with Microsoft Azure and Microsoft 365.
“This journey was inspired by the Qatar National Vision 2030, which aims to establish a diversified and competitive national economy,” highlighted the Minister of Communications and Information Technology, H.E. Mr. Mohammed bin Ali Al Mannai during the launch. Microsoft’s EMEA President further indicated that, “This development will increase opportunities for organizations of all sizes and across all sectors to leverage our trusted cloud to innovate, better serve their customers, and achieve their business goals – ultimately supporting continued economic growth that benefits all residents.”
“According to a recent IDC study, over the next four years, Microsoft, its ecosystem, and cloud customers together could generate approximately $18.7 billion in new revenue and will add over 36,000 jobs to the Qatar economy,” Sam Hartmann told OnMSFT. This comes on top of providing essential cloud services to boost digital transformation as well as advance intelligent cloud adoption of businesses, customers, and partners across Qatar.
Internet Explorer (IE) was Microsoft’s premiere internet browser that was released back in 1995. It enjoyed a long lifespan of 27 years before going out of service in June 2022.
The web browser has a reputation for doing a poor job at surfing the internet and protecting its users. That reputation was further compounded on by superior options like Firefox and Google Chrome.
Since then, Microsoft has moved on to the more recent Edge web browser and recommends that people do so. However, there are some out there who prefer to stick with the tried and true instead of upgrading.
The spirit of Internet Explorer lives on the internet, however. You can still download it, just not officially.
What is the latest IE browser version?
According to Microsoft, Internet Explorer 11 for Windows 10 is the latest version of the internet browser that saw a release and support, but it’s only available for specific versions of the operating system.
The last IE 11 version is available on Windows 10 1903 and 1909. These operating systems also include the more specialized versions like Windows 10 Pro and Enterprise.
Going through that web page, you will also see IE 11 on other versions of Windows 10, plus a version of the browser for Windows Server 2019 and even Windows 7. The reason you see these browsers on that page is that they are the ones that got the most updates.
Windows Server, for those unaware, is a special type of operating system that’s meant for “enterprise-level management, data storage, applications, and communications.” Companies use this for their computer servers.
It’s not something the everyday person can get their hands on. All that said, the question remains: can you still use Internet Explorer in 2022? The answer is yes if you still have a computer with the browser on it.
Microsoft strongly recommends that you upgrade to the newer Edge browser, and so do we. Not because of Edge’s features, but because of protection against malware. Bad actors are out there constantly making new forms of malware and improving upon it.
It’s possible that they’ll create malware that IE 10, for example, can’t protect against, if they haven’t already. Microsoft Edge comes with new security tools and is much better protected against malware
Using an outdated browser that no longer has official support from Microsoft is putting your computer at great risk of getting infected by malware.
Quick tip:
Since IE is quite an outdated browser and has no recent updates, you should think of switching your browser. Opera offers fast performance and has a free VPN where you can browse comfortably with increased privacy and security.
Another appreciable feature is the built-in ad blocker to browse with fewer distractions. On top of that, you can browse with a virtual IP address that helps hide your location and also lets you view the web with amplified online privacy within the mobile and desktop Opera browser.
Opera
Outstanding features to improve your desktop and mobile browsing experience.
Technically speaking, there are 11 major versions of Internet Explorer in the world, assuming there is a very old computer out there running the original IE browser from 1995.
Fantasies aside, the most recently updated versions of the web browser are Internet Explorer 11 for Windows 10, Windows Server, Windows 8.1, and Windows 7, as briefly mentioned earlier. Microsoft also lists Internet Explorer 9 RTM as having gotten an update.
RTM stands for Release To Manufacturing and this version of IE9 is simply the latest release of it. It can be used to block ActiveX controls on all websites you visit. ActiveX is used to render multimedia content but is prone to errors. It’s software that rarely gets updated.
Officially speaking, you cannot download Internet Explorer, only Microsoft Edge. We also don’t recommend downloading any Internet Explorer files you find on the internet.
You may come across a Google Search listing that states you can download IE 11 here. Those websites tend to be filled with malware and downloading a file can get you infected.
Plus, IE 11 for Windows Server isn’t available to the public, and companies that use a web browser utilize Edge instead. Internet Explorer for Windows 7 and Windows 8.1 is available to download. The same goes for Internet Explorer 9 RTM.
Windows 11 doesn’t natively support IE, but there is an option that will be covered later.
Go to the downloaded file’s location and double click to begin installation.
A window may appear asking you if you want to make changes. Select Yes.
A window will appear telling you that Internet Explorer 11 has customized settings. Click Install.
The installation will happened rather quickly. A window will appear telling you that Windows 10 must restart before using it. Click Restart now.
Click on the search bar, bring up Internet Explorer, and click it to open the browser.
2. Activating IE Mode
For Windows 11, open Microsoft Edge and click the three dots in the upper right hand corner.
In the menu that appears, click Settings.
Click the Default browser entry on the left hand side.
In this tab, click the blue question mark to learn more about Internet Explorer mode.
To turn the mode on, click the drop down menu to the right of the page.
You can choose Always, Never, or Incompatible site only. The final choice is for legacy websites that only work on Internet Explorer.
Next, select how and when websites will loaded in Internet Explorer Mode. Click the drop down menu next to Allow sites to be reloaded in Internet Explorer mode.
Select Allow and Internet Explorer mode is now On.
What versions of IE are still supported?
Well, none of them. Microsoft no longer officially supports Internet Explorer anymore and there are no plans to change that. And you also can’t have two versions of Internet Explorer on your computer either, at least not in an official sense.
The download link shown earlier is, so far, the only known safe version of Internet Explorer that you can download in 2022. It’s entirely possible that you can have another, but as mentioned earlier, we don’t recommend it because of the risk of malware.
At best, you can have Internet Explorer and Edge on Windows 10. If you’re curious to know which version of IE you have, follow these instructions.
Click the gear icon in the upper right hand corner.
Click About Internet Explorer in the menu.
The Internet Explorer version will appear in a new popup window.
Feel free to leave a comment below if you have any questions on other apps or if you have some that you recommend. Also, feel free to leave comments about guides you’d like to see or information on other web browsers.
To connect the scanner to your network, enter the SSIDs (network name) and the passwords of your Wi-Fi router and the scanner.
For this, your PC/device must be Wi-Fi enabled so that it can set up the connection. At the same time, make sure that you have installed the scanner software based on the manual.
Best of all, you can also re-install the scanner software and then connect to the network as shown below:
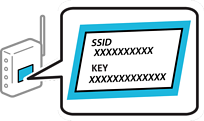
Check your scanner for the SSID and password on its label, and then turn it on.
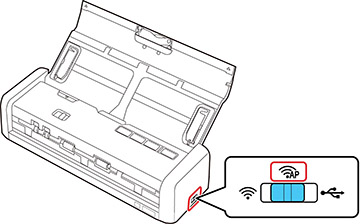
Go to the scanner’s control panel and move the switch on its side to AP mode.
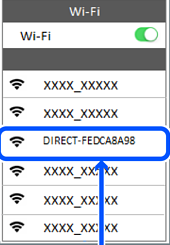
On your PC/device, click on the Wi-Fi icon on your taskbar and open the list of wireless networks.
Select the SSID matching the one on the scanner label and select connect.
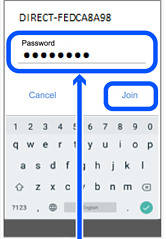
Next, enter the password as it appears on the scanner label. The AP mode light should be blue showing that the AP mode is connected.
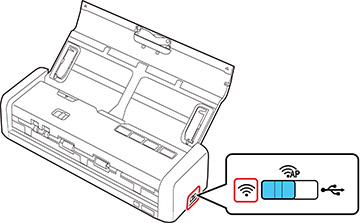
Connect your PC/device to the wireless router, and move the switch on the control panel to Wi-Fi mode.
Now, wait for the Wi-Fi light on the scanner to stop blinking and be stable, signifying that the scanner is now connected to the network.
However, you must set up network scanning next to connect your computer and wireless scanner which we will explain below.
What is the IP address of my Epson scanner?
If you have more than one scanner and wondering how to share the Epson Scanner on the network, you must find out the IP address of the scanner. Here’s how you can:
For Windows 10, click on EpsonNet, and then click on EpsonNet Config
On Windows 8.x, go to the Apps screen and click on EpsonNet Config
For other versions of Windows, click on Start, select All Programs or Programs, and then select EpsonNet.
On Mac, open the Applications folder, select Epson Software, click on EpsonNet, and then select EpsonNet Config
Now, look for your scanner in the list and note down the IP address.
The default IP address setting for the Epson scanner is Auto, Panel, and PING, and the default IP address is 0.0.0.0 to 255.255.255.255.
Want to know how to scan using the Epson Event Manager? You can follow the below instructions to set up network scanning on the utility first.
How do I set up network scanning on the Epson Event Manager?
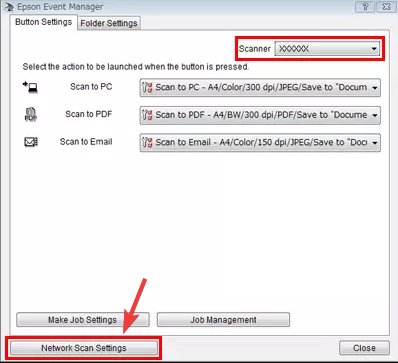
Launch the Epson Event Manager software.
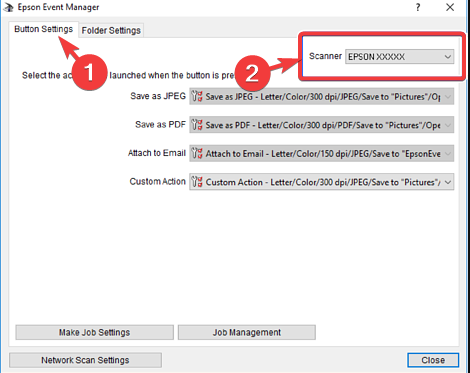
Next, under the Button Settings tab in the Epson Event Manager, go to Scanner and select your scanner model.
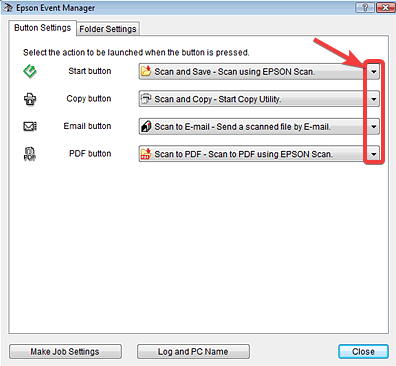
Now, go to the action name and click on the drop-down arrow to select your preferred action. For example, Scan to PDF, Scan to Email, etc.
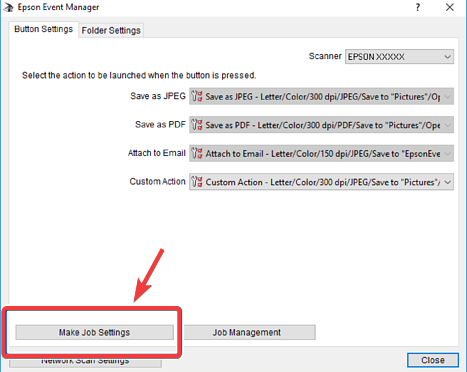
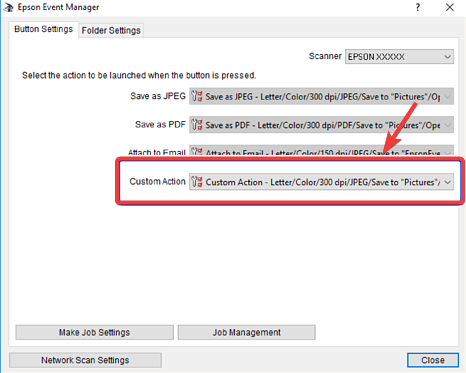
To add the action as a custom scanning option, click on Make Job Settings.
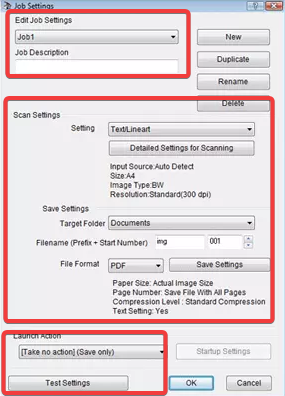
Now, in the Job Settings dialog, add Job Description, customize the Scan settings and press OK to return to the main window.
Here, make sure to select Custom Action.
For All-in-One/wired/wireless networks, click on the Network Scan Settings button below.
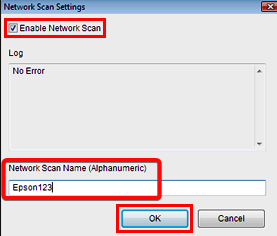
Next, in the Network Scan Settings dialog, check the box next to Enable Network Scan, type the Network Scan Name, and press OK.
Once done, close the Event Manager and you have now successfully set up the Epson network scan settings on your Windows 10/11 PC.
NOTE
At the same time, make sure that the Epson Event Manager icon is displayed on your system tray before hitting the push-scan button. Also, ensure that the Epson Event Manager is ready to scan for the Scan to PC function.
Why is my Epson scanner not connecting to my computer wirelessly?
There could be several reasons why your Epson Scanner may not be connecting to your computer wirelessly, such as:
If the Event Manager utility is being blocked by your firewall or the antivirus software
The Epson Scan function is not started before the scanning
If the device does not support starting a scan with the scanner button wirelessly
When scanning the original file of a high resolution
If the network communication is interrupted while starting Epson Scan
Check the connection setting of your Epson scanner and test the connection using the Scan Settings
The firewall and the anti-virus software on your wireless router or access point are blocking the connection
When there is a communication error between the scanner and the computer
If your network is using IPv6 because Epson Scan does not support the configuration
While adding the Event Manager utility to the Firewall/antivirus exclusions list can fix the issue, using an IPv4 network can also help the scanner connect to your PC wirelessly.
Also, make sure that the Epson device supports the scanner button to start a scan over a wireless network.
Rust is a popular multiplayer survival game created by Facepunch Studios in 2013. The sole goal of the game is to survive, which is harder than it sounds.
However, users have reported having low FPS in Rust even with a good PC. Follow the solutions below to solve this issue.
Why is my FPS low on a good PC?
One of the most common reasons why your PC may have low FPS is from a lack of power or memory to support the task. Insufficient RAM or a weaker graphics card can also lead to low FPS. Frame rate measures output from your graphics card, CPU, memory, and RAM when composing frames.
Games like Rust have a high frame rate to support their performance and realistic graphics. If your computer resources can’t support a high frame rate, then lagging and stuttering may occur, even if you have a good PC.
How do I fix Rust’s low FPS on a good PC?
1. Close background tasks
Click on Start and search Task Manager then hit Enter.
Under the Processes tab, go through and select a program that you don’t need running and click End Task.
Repeat the above step for all unnecessary apps.
Restart your PC.
Apps and programs running in the background can consume the PC resources needed to run your game smoothly, even if you have a good PC. Try closing any unnecessary tasks to fix Rust’s low FPS.
2. Update Windows
Click on Start and open Settings (or press Windows + I).
Go to Windows Update then Check for updates.
If there are any updates available, follow the instructions to install them.
Always be sure you’re using the latest version of Windows to avoid any issues. Keeping up with PC updates will optimize gaming for most Steam games.
3. Update graphics drivers
Click on Start and search Control Panel and hit Enter.
Select Hardware and Sound, then click Device Manager.
Click on Display adapters to reveal the drivers.
Right-click on the NVIDIA graphics driver and select Update driver.
Select Search automatically for drivers.
Follow the instructions to update the driver.
Check if your graphics driver needs to be updated, even if your drivers are set to automatically update. Users can also manually download graphics drivers from the website of their graphics card manufacturers.
If manual updates seem hard for you or still don’t solve the issue at hand, we still have another possible solution for you. Trying third-party software might just automatically solve this error.
4. Adjust in-game graphics
Open Rust and click on the gear icon in the top menu bar.
Select Graphics and disable some image effects like lens dirt and motion blur.
Scroll down to Graphics Quality and adjust the slider from 5 to lower.
Adjust any other quality levels to improve low FPS.
Most games will automatically set the graphic levels to be compatible with your PC power. However, if you’re still experiencing low FPS in Rust, then adjust the quality levels to be lower. The graphics will be less detailed, but your game will be less laggy and improve FPS.
Test the game after making small changes to see if you need to make more adjustments. The Performance tab also offers adjustable quality sliders if you need to lower more graphics quality.
5. Disable fullscreen optimization and high DPI scaling
Open the Steam client and go to your game library.
Right-click on Rust and select Properties.
Go to Local Files then select Browse to go to the file location of Rust.
Right-click on the Rust application and select Properties.
Select the Compatibility tab and check the box next to Disable fullscreen optimizations.
Click Change high DPI settings and check the box beside Override high DPI scaling behavior then click OK.
Click Apply then OK.
Repeat the steps for the RustClient.
Fullscreen optimization may impact Rusts FPS as the feature is meant to enhance gaming performance. Try disabling it and high DPI settings to see if it fixed the issue.
What FPS does Rust run at on PC?
The FPS for Rust varies depending on your CPU and Graphics card and the graphics setting for Rust. However, the average range for the game is between 120 and 160 FPS. With higher graphics quality, Rust will have a higher FPS.
How can I improve my FPS in Rust?
Adjusting in-game performance and quality settings will improve the FPS in Rust. Closing out apps and programs running in the background will also improve FPS. Also, make sure that you meet the PC requirements for Rust.
Hopefully, one of the above solutions helped you fix Rust’s low FPS on a good PC. If you’re interested in our recommendations for the best VPNs to play Rust, we have a guide for that as well. Let us know in the comments which step worked for you.
If you experience your VPN block issues by Windows Firewall, you’re in the right place. Your firewall handles your network security, blocking access to and from suspicious platforms/services. It can sometimes flag your VPN as dangerous, even if it’s not.
Here’s how you can unblock your VPN connection
What can I do if my VPN gets blocked by Windows Firewall?
1. Add an exclusion
Open Windows Defender Security Center
Go to Virus & Threat protection settings
Select Exclusions
Select Add or remove exclusions
Select Add an exclusion and add your VPN client software
Note: Most VPN clients use ports 500 and 4500 UDP, and port 1723 for TCP. If these don’t work, add a new rule to allow them in Windows Firewall Advanced settings.
Adjusting firewall settings will help if you have admin rights to network settings. But if you’re on your school WiFi or work network,you may not be ablet to do it.
2. Allow VPN through firewall settings
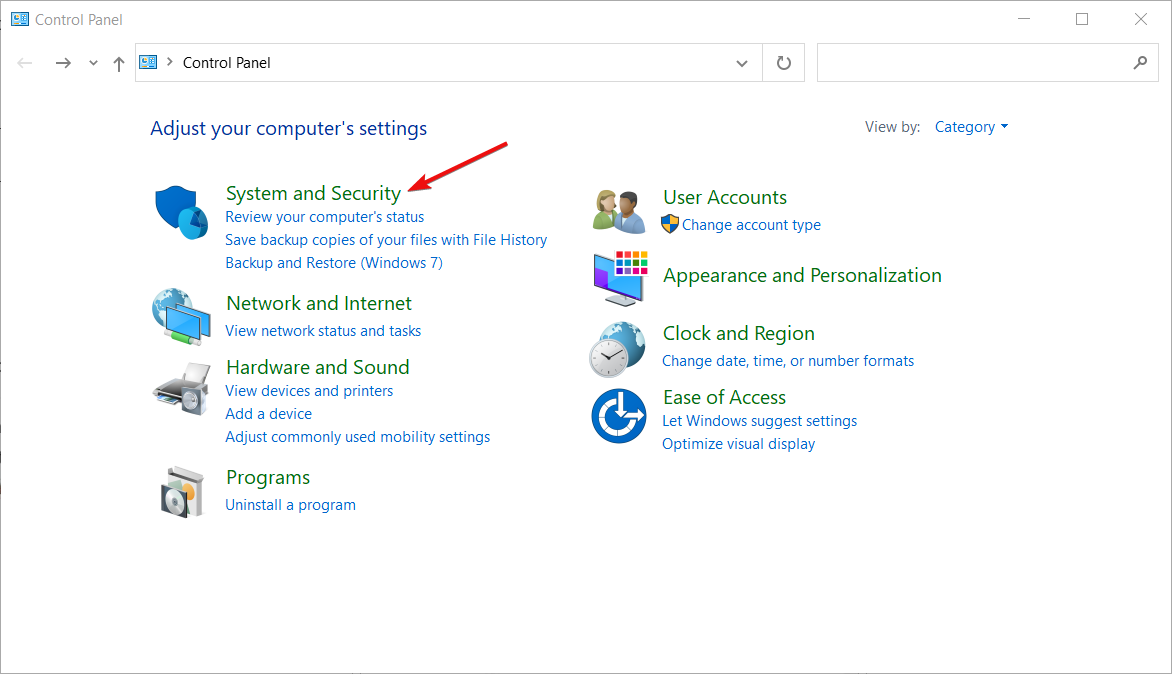
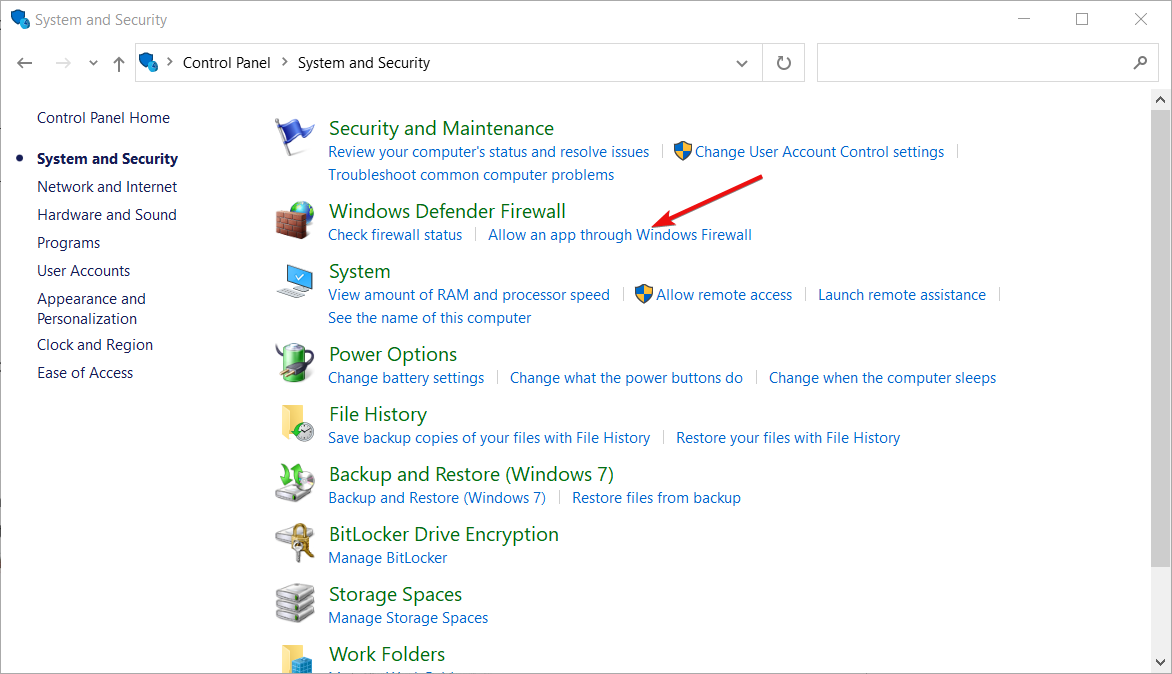
Open Control Panel
Select System & Security
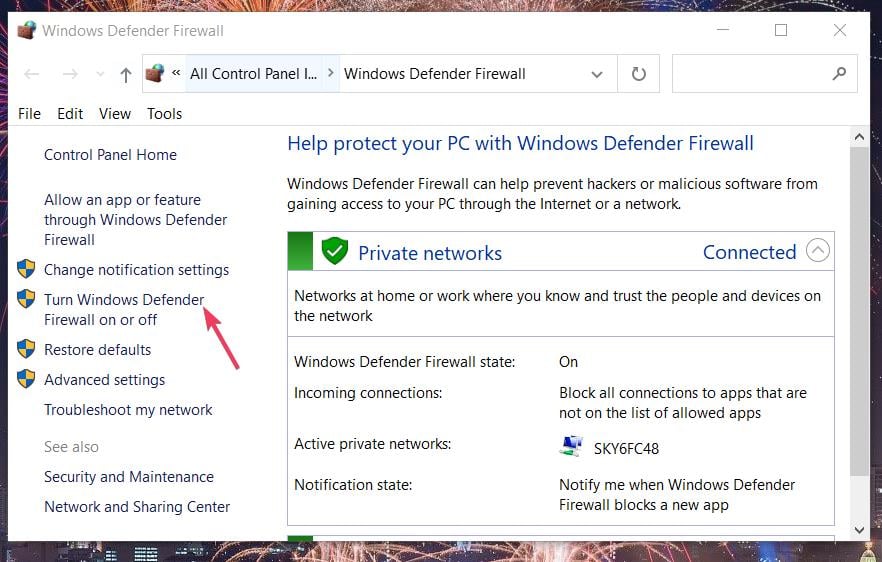
Click Windows Defender Firewall
On the left pane, click Allow an app or a feature through Windows Firewall. A window in which you can allow or prevent any app will display.
Click Change Settings.
Check for your VPN from the list of programs and apps you want to allow through your firewall.
Check Public or Private to select the network type on which you want the VPN to run.
If you cannot find your VPN, click Allow another app.
Select your VPN and then click Add, then click OK.
3. Change adapter settings
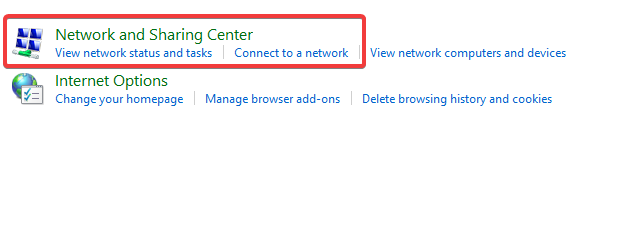
Open Control Panel and select Network & Internet.
Select Network and Sharing Center.
On the left pane, click Change adapter settings
Click File.
Select New incoming connection.
Select all users you want to access your VPN connection.
Check Through the Internet.
Click Next.
From the list of protocols, mark the Internet protocols you want your VPN to connect to.
Double click Internet Protocol Version 4 (TCP/IPv4).
Go to Control Panel again and select Windows Firewall.
Click Advanced Settings.
Click Inbound Rules>Actions.
Click New Rule.
In the Wizard, choose Port and click Next. Most VPN clients use ports 500 and 4500 UDP, and port 1723 for TCP. You can use TCP and insert 1723 in Specific remote ports field.
Click Next.
Select Allow the connection and click Next.
When asked ‘When does this rule apply?’ select all options (Domain, Private, Public) and apply the rule to all.
Choose a name and description to fill the Name and Description.
Click Finish.
4. Create a new inbound rule
Open the firewall settings and click inbound rules on the left.
Click the New rule on the right.
Click Custom rule.
Specify programs or leave as all programs.
Specify ports or leave as all ports.
Click “These IP addresses” under remote IP
Click “This IP address range”.
Type From “10.8.0.1” To “10.8.0.254”.
Close and click Next, then leave as “Allow the connection”.
Apply to all profiles.
Name your profile and click Finish.
You should then be able to connect to your home devices through your VPN
5. Enable rule for PPTP
If your VPN requires PPTP, do the following:
Open Control Panel
Select Windows Firewall
Select Advanced Settings.
Search for the ‘Routing and Remote Access‘ under Inbound Rules and Outbound Rules. For Inbound Rules: right-click ‘Routing and Remote Access (PPTP-In)’, select Enable Rule. For Outbound Rules: right-click ‘Routing and Remote Access (PPTP-Out)’, select Enable Rule.
6. Open ports
In order to allow your VPN traffic to pass through the firewall, open the following ports:
IP Protocol=TCP, TCP Port number=1723 – used by PPTP control path
IP Protocol=GRE (value 47) – used by PPTP data path
Make sure that these ports are allowed on Windows Firewall with corresponding network profile.
DO NOT configure RRAS static filters if you are running on the same server RRAS based NAT router functionality. This is because RRAS static filters are stateless and NAT translation requires a stateful edge firewall like ISA firewall.
In general, VPN error 807 indicates that the network connection between your computer and the VPN server was interrupted. This also can be caused by a problem in the VPN transmission and is commonly the result of internet latency or simply that your VPN server has reached capacity. Try to reconnect to the VPN server.
7. Change your VPN
You can change your VPN and see if it resolves the issue. Normally, an established VPN provider has a good client that will work great together with Windows Firewall.
A great VPN, recommended below, is owned by Kape Technologies and has servers located all around the world.
It supports high data speeds, which makes it a fast VPN for Windows operating system, besides its powerful features and performance.
It is a favorite among the best VPN software for laptops as it not only protects your privacy on a multi-platform privacy solution but also offers reliable connections.
ExpressVPN
Use ExpressVPN to secure your connection without being blocked by the firewall.
Depending on your firewall or security software, there are steps to take to fix VPN blocked by Windows firewall. Here’s what to do if you’re using ESET NOD32 or Kaspersky:
NOD32:
Select Setup
Select Advanced Setup
Select Antivirus and antispyware
Select Web access protection
Select HTTP, HTTPS > HTTP scanner setup, and set HTTPS filtering mode to Do not use HTTPS protocol checking.
NOTE
If HTTPS filtering mode is greyed out, you must first set Antivirus and antispyware > Protocol filtering > SSL to Always scan SSL protocol. Restore this to its previous setting after changing HTTPS filtering mode.
Select Settings
Select Traffic Monitoring panel
Select Port Settings or settings
Select Network
Select Port Settings and uncheck the box for port 443/SSL
Any luck fixing VPN blocked by the Windows firewall using the solutions above? Share with us by leaving a comment in the section below. And if you’re dealing with other restrictions, check out our guide on how to fix VPN being blocked by ISP.
After you whitelist your VPN you should be able to allow PPTP through the firewall.
Many people report having to whitelist VPNs. It seems that you oftentimes have to allow Cisco Anyconnect through a firewall as well as other reputable VPNs:
Surfshark blocked by Windows Defender
Ports required for VPN connections have been blocked by the firewall
There’s a lot of misconception floating around when it comes to VPNs. Some people think that VPNs are used to spy on them, when in fact they do the opposite (keep spies at bay).
Some others strongly believe that VPNs can slow down their Internet speed. While that’s not entirely untrue, a VPN can help you achieve faster Internet speed, especially if you have an abusive ISP that throttles your bandwidth.
All in all, people just assume facts without actually knowing how a VPN works.
How does a VPN work?
A VPN takes your traffic and routes it through its own infrastructure. Let’s say you’re using a VPN on your desktop computer. Thus, the access point, in this case, is the VPN client.
You make a request to an online service (website, online game, mail server), which the VPN client retrieves and encrypts, pushing it forward through a secure, encrypted tunnel.
The request travels through the tunnel and reaches the VPN server, which decrypts it, and pushes it further to its destination. The service then generates a response and sends it back.
The response reaches the VPN server, gets decrypted, goes through the secure tunnel, reaches the client where it gets encrypted once again, and finally, it reaches you.
Throughout the connection, your data stays encrypted. The only two points where it’s not subject to encryption are your PC and the destination service.
And since your ISP can’t access either of those directly (hopefully), it can’t see what you’re doing.
VPN encrypts your traffic
Your default, a public Internet connection is visible to your ISP most of the time. That means that your ISP knows everything you do online: which website you visit, which files you download, which movie you just saw, and you get the picture.
But there are some things that your ISP can’t see. This includes emails, and generally everything you post on HTTPS-encrypted websites.
So, your ISP can still see that you’ve visited an HTTPS website, but can’t grab your username, password, or messages you’ve posted there.
Therefore, your ISP doesn’t get to see encrypted data, we’ve established that.
What a VPN does is take your regular, visible traffic and encrypt it, turning it invisible to ISPs. Thus, as long as your VPN doesn’t leak any encrypted data, your ISP can no longer see what you’re doing.
Can VPN change your IP address?
While you’re connected to a VPN server, your online identity changes. Every online entity you interact with will think that the originating point of your requests is the VPN server.
This entails that your public IP address is replaced by the server’s address so that it seems that all the requests were coming from the server.
But your IP address isn’t the only thing that a VPN can change/mask.
For instance, a (good) VPN also changes your DNS and location. This can come in quite handy, especially if you’re looking for ways to bypass geoblocking.
Does VPN change IP address every time?
Generally speaking, yes. When you connect to a VPN server you have more IP addresses attributed to that server location.
Consequently, it’s possible that you connect to multiple IPs every time you connect to different servers.
Does everyone on a VPN have the same IP address?
It depends on the type of your IP address. If your VPN has shared IPs you will share them with other users.
On the other hand, if you’re using dedicated IP addresses on your servers, you will have the same addresses every time without sharing them with other users.
How to change your IP address with VPN?
Check your public IP address on any IP detection website.
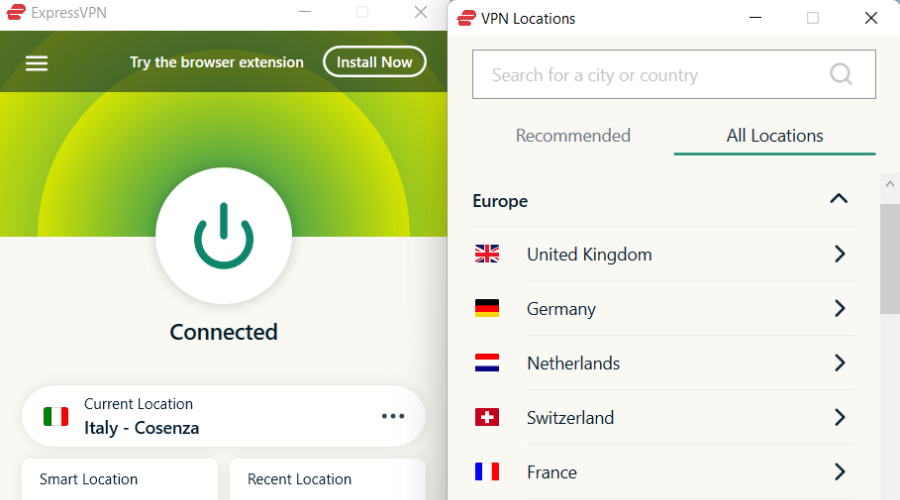
Connect to a server of your choice (location not important).
Check out your new IP address (many VPNs display it in the main window).
Kape Technologies’ ExpressVPN can provide you with a quick, uncomplicated way to change (or rather hide) your IP. All you have to do is connect to any services it provides you with and you’re set.
Indeed, it’s possible to change the IP address in other ways than using a VPN connection. In case you wonder how to manually change my IP address, you can perform it from your device’s settings.
Other methods to change your IP are the following:
Manually change your IP address using Windows Control Panel
Use a proxy server connection
Try the ToR browser
However, VPNs are the easiest way to change your IP address due to extensive server networks with thousands of IPs.
All things considered, it’s safe to say that there’s nothing complicated with changing your IP address with a VPN. You just launch it, connect to a random server, and let the VPN take care of everything.
However, note that while using a VPN, your IP address isn’t the only one that changes. A VPN can also mask your DNS, change your NAT type and assign you a different virtual location, depending on the server you chose.
Check out our best VPNs that can help you spoof your IP easily. Visit our VPN Hub if you want to discover more tools and guides on preserving your privacy.
For some users, especially the ones from countries with limited internet access, a VPN is a must. However, this great rise of Virtual Private Network solutions brought a lot of lackluster applications.
Some of those just won’t work as supposed, while others can invoke serious issues
. One issue goes as far as breaking the system completely, by freezing it in the process. If the VPN froze your PC, follow the steps below to resolve it.
Why does my VPN keep freezing?
The most common causes for your VPN freezing or being stuck on connecting are related to Internet problems. Make sure your network drivers and Internet hardware are in check.
The issue seems to affect users of various types of VPN clients. Most commonly, people report having to deal with:
Windows 10 VPN settings freeze
Remote Desktop connection frozen
VPN causes computers to crash
NordVPN, Surfshark, Forticlient, or even Cisco VPN freezing/crashing
VPN connection keeps freezing
Another common cause that can lead to this type of issue is having an out-of-date or corrupted VPN application. See below how to fix that and other possible causes of this error.
What to do if your VPN is freezing your PC?
1. Use a proper VPN
For many affected users, the VPN tool they were using was subpar in many categories. And that’s something you need to accept if you decide to run a free solution.
What we rather suggest is resetting your PC to factory values and moving to a proper VPN.
The best option in this regard is ExpressVPN because it gets frequent updates
Perfectly crafted to blend seamlessly with any device, any OS, and any browser, ExpressVPN will cover all your VPN needs.
From anonymizing your browsing, hiding your location, unblocking streaming and/or gaming to protecting your online privacy and data traffic from prying eyes, everything’s taken care of.
Plus, thanks to its cross-compatibility, you can be sure it will not inflict any degradation on your PC’s performance or cause it to freeze and/or crash.
You can choose from more than 5 000 servers spread in 90+ worldwide locations and always enjoy ultra-fast and reliable connections.
Your data is protected with the highest degree of encryption and your traffic is routed through secure VPN tunnels.
ExpressVPN
Say goodbye to errors and get unbreakable online privacy with this reputable VPN!
First, we need to make sure that the VPN application is the one that causes this occurrence. The best way to determine whether a third-party app is causing system freezes is to start the given system in Safe mode.
The Safe mode allows you to start the system with just minimal drivers and third-party applications. If Safe Mode is not working, check out the steps to fix it.
Once you’ve run it, you should be able to confirm whether the VPN is the culprit or not. Should the system work in a seamless manner while in the Safe mode, we suggest the following further stages?
On the other hand, if the issue is persistent, try resetting your PC to factory values.
Here’s how to enable Safe mode in Windows 10:
Press and hold Shift.
While holding Shift, click on Start > Power > Restart.
Click Troubleshoot.
Select Advanced Options.
Choose Startupsettings and then click Restart.
Select Safe mode (or Safe mode with Networking).
If your system works without freezing, restart your PC and continue with the troubleshooting.
If the issue persists, we suggest using the Recovery option (Reset this PC) or performing a clean reinstallation.
3. Check drivers
Most of the VPNs will, upon installing, install additional Network drivers and use them to create a virtual network adapter. However, those, as same as accompanying software for other devices, can fail you in various situations.
That’s why we encourage you to double-check the drivers and reinstall them. And we all know that a certain faulty driver can completely disrupt the system’s performance.
The best way to do so is by reinstalling the VPN itself, as the drivers come with the installation exclusively.
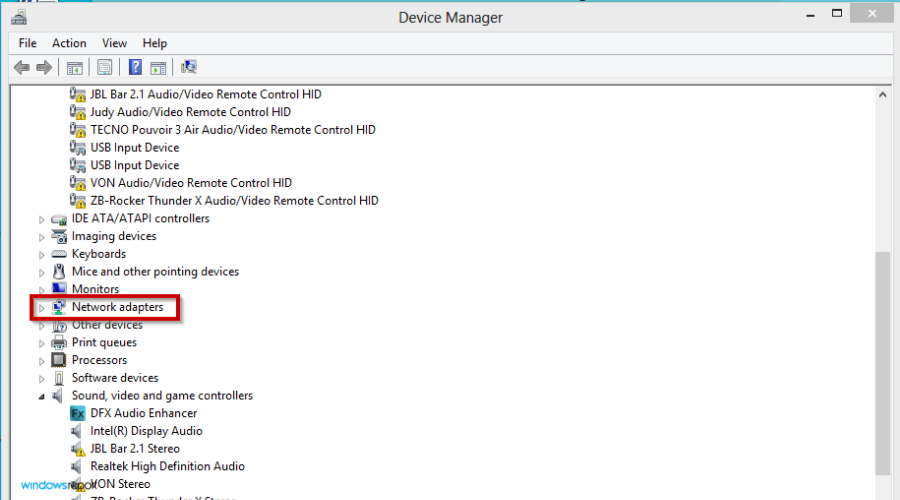
After you’ve done that, the problem should be addressed. For the sake of checking, right-click Start and open the Device Manager.
Once there, expand the Network adapters section. Update or reinstall them.
Since we mentioned reinstallation as a solution for the driver issue, we need to explain how to reinstall VPN cleanly. The standard reinstallation won’t suffice since the VPN integrates into the registry. That’s why some users had issues with PC freezing, even after removing the troubling VPN.
Here’s what you need to do:
Open Control Panel by typing control in the Windows Search bar and selecting it from the list of results.
Click Uninstall a program.
Uninstall VPN.
Download the VPN client again and install it.
So, what you need to do is to remove the VPN cleanly and install it later on. Preferably, you’ll want to use a third-party uninstaller, which will track all associated files and remove them accordingly.
Manually uninstalling a VPN client necessitates technical knowledge and patience. And no one can guarantee that the manual removal will entirely delete the VPN client and all of its data.
As a result, it is advised that you uninstall VPN Client using a trustworthy third-party uninstaller that can scan your system, detect all VPN Client files, and thoroughly remove them for a clean reinstallation.
A professional tool like CCleaner is a lot faster and more efficient alternative to manual uninstalling. After the regular uninstall method, the free version allows you to scan for residual files, directories, and registry entries.
5. Run SFC and DISM
The system freezes are not to be taken lightly. As shown in so many cases, this is just the start of an unrepairable critical error that will eventually force you to use the recovery options or reinstall the system.
But, before we move to firm steps, let’s give the system utilities a try. There are two tools you can utilize through the elevated Command Prompt.
The first is System File Checker and here’s how to run it:
Type cmd in the Windows Search bar. Right-click on Command Prompt and run it as admin.
In the command line, type sfc/scannow and press Enter.
After the scan is finished and there’s nothing to report, try DISM.
The second is DISM (Deployment Image Servicing and Management) tool. Follow these instructions to utilize it:
Open Command Prompt with administrative permissions.
In the command line, type the following commands and press Enter after each:
DISM /online /Cleanup-Image /ScanHealth
DISM /Online /Cleanup-Image /RestoreHealth
This can take a while. After the scan is done, restart your PC and look for improvements.
6. Scan system for malware
One of the essential precaution measures includes scanning Windows 10 for viruses. There’s always a possibility (not so distant, depending on your online habits) that the system is infected with malicious software.
Or, at least the VPN client you’ve been using. For that reason, we encourage you to perform a deep scan for possible malicious presence.
You can do that with any third-party antivirus software, but we’ll show you how to do it with the Windows-native Windows Defender. Follow these steps to scan your Windows 10:
OpenWindows Defender from the notification area.
ChooseVirus & threat protection.
Open Run a new Advanced scan.
SelectWindows Defender Offline Scan and click Scan now.
On that note, we can call it a wrap. If you’re aware of some alternative solutions or have some questions to ask, feel free to post them in the comments section below. We look forward to hearing from you.
Since it was created by Apple, iTunes has changed the way users can organize and play music and videos. iTunes has allowed millions of users to download their favorite tracks, songs, and videos via the iTunes Store.
Thankfully, iTunes has an advanced backup system able to back up and restore important files on iPhones, Ipad, iPods, or Mac computers.
Using iTunes is also possible on computers or other devices running Windows 10. If you are an iTunes user, this article will be useful to you. It will help you to find the iTunes backup location in Windows 10 and how to change it.
What are iTunes backup files?
Backup files are copies of files created with iTunes and stored locally on your computer.
Usually, you do not need to know the exact location of the iTunes backup files, because iTunes itself will show them automatically when needed.
Nevertheless, if you buy a new computer and you wish to transfer iTunes backup files from your old PC to the new one, it is necessary to know the exact location of the backup file, in order to create a copy.
Sometimes the user may need to save space on the computer. So, the best idea could be to delete iTunes backup files or move important backups to another location or drive. In this case, you should also know where the iTunes backup files are stored on your computer.
You have two solutions to find a list of the backups if they are using Windows 10.
Where can I find iTunes backup files on a PC?
1. Check the Backup folder
The various backup files in Windows 10 are located in C: UsersUSERAppDataRoamingApple ComputerMobileSyncBackup. You can navigate here to find the backup files.
2. List all the backup files on your device
Another way to find the list of iTunes backup files is to list all the backup files on your PC. From there you can check the backups for your iTunes files.
1. Click the Search bar next to the Start button.
2. In the Search bar, enter %appdata% or %USERPROFILE% (if you downloaded iTunes from the Microsoft Store).
3. Click on Return.
4. Press on Apple > Apple Computer.
5. Go to MobileSync and select Backup.
6. You should now have the list of all your iTunes files backup.
What to do to avoid ruining your iTunes backup files?
To avoid damaging backup files, it is important to highlight two things:
iTunes saves backups into a folder within the Users folder.
The location of the Backup in Windows 10 is the one already highlighted in the previous paragraph. Although you can copy the Backup folder, you must never move it to a different one, an external drive, or a network drive.
Do not modify, reposition, rename or extract content from your backup files, as these actions may corrupt the files.
For example, to restore a repositioned backup file, you need to put it back in its original location. Otherwise, the file will not work. Backups are a secure copy of your entire device. Therefore, even if you may be able to view the contents of backup files or access them, they are usually not stored in a readable format.
iTunes places all backups into the path shown before (C: UsersUSERAppDataRoamingApple ComputerMobileSyncBackup) and you cannot select to save these backup files to another drive directly.
Nevertheless, changing backup location is possible and it is also quite easy to achieve in a few steps.
1. Create a New iTunes Backup Folder on another drive, for instance, D or E Drive. You can also create the folder in a flash drive, external hard drive, or thumb drive. You can name the folder “iTunes 2.0”, “New iTunes backup”, or with another name able to catch your attention while letting you understand what there is in the folder.
2. Retitle the old iTunes backup folder on the system drive, to make clear the old folder is no anymore the one you want to open to check for your backup files.
3. Change iTunes backup location on Windows PC. This can be done by creating a junction point, also called a symbolic link. The latter is a link to a directory that acts as an alias of that directory.
Despite its almost tautological definition, this junction point will be the one allowing you to change the backup location.
4. After having retitled or renamed the first iTunes backup folder, click on the SHIFT key and right-click on the old iTunes backup file location, you will see appearing a pop-up menu.
5. Pick the Open command window here option.
6. Now, within the window opened, you can manually type in the command where D: (or E: etc.) is the new drive location and “Backup” is the name of the iOS backup folder you moved: mklink /J “%APPDATA%Apple ComputerMobileSyncBackup” “D: Backup“.
7. If everything went smoothly until now, it should appear in the command prompt window with a proper backup junction. The new folder shortcut called “Backup” will appear in the original location.
8. The last step requires deleting the old iTunes backup files existing in the MobileSync folder. In this way, you can connect your iPhone to your PC and back up it with iTunes. You will find the new backups in the new Backup folder.
Even though both hardware and software solutions from Microsoft are state-of-the-art and pretty reliable, there are certain areas where the tech giant is failing.
By saying that we mean that the printing experience on Windows 11, as well as on Windows 10, has not been quite stable or reliable lately.
There was a bug related to USB printing that might cause your printer to malfunction after you restart it or reinstall it.
However, that problem has been dealt with, which is why we’re going to help you figure out another printer-related situation on the latest Microsoft-designed operating system.
So, if your printer redirection is not working, you might want to carefully follow the information in this article and properly fix it.
Why will my printer not allow redirection?
In order to properly troubleshoot this issue, it is important to understand how RDP printer redirection works in Windows 11 to begin identifying reasons why the printer might not be appearing.
Basically, the server first receives a list of local printers that are installed on the remote client, while the server creates the print queue within the remote session as a next step.
When the end user goes to print from the remote client, the server is queried for accompanying printer drivers. All being well, the printer is then redirected.
It’s true that Remote desktop printing can often feel like it’s more trouble than it’s worth, but there are also a lot of benefits to remote desktop protocol (RDP) environments.
Even though it provides a leaner infrastructure and more flexibility, the advantages of RDP environments can also pose serious problems for RDP printing.
Well, according to specialists over at Redmond, the issue is caused if the values of both registry entries below are set to 0:
Let’s get right into it and find out how to properly deal with situations where WVD printer redirection is not working.
How do I make my printer redirect?
1. Enable local printers
Open the Remote Desktop Connection screen.
Under the Local devices and resources section, activate the Printers option.
2. Modify Registry entry values
Search for Registry Editor and open the app.
Navigate to: HKEY_LOCAL_MACHINE\SYSTEM\CurrentControlSet\Control\Terminal Server\Wds\rdpwd\fEnablePrintRDR
Double-click on the file and set the value to 1, then press OK.
As we stated at the beginning of the article, it is important that the values of both the mentioned paths must be modified to 1 if you want to get rid of this problem.
So, please make sure that you changed values from 0 to 1 for both specified registry paths and you will get back to normal in no time.
Expand the Print queues category, select your device, and press Uninstall device.
Right-click on Print queues and choose Scan for hardware changes.
Now, the system will detect the device and automatically install the necessary drivers for it. That being said, if you have the drivers on a CD or a stick, you can install them manually.
What does redirected mean on print server?
Basically, printer redirection enables the users to print to their locally installed printer from a terminal services session.
Know that the Terminal Server client enumerates the local print queues to detect the locally installed printers.
After all this, the above-mentioned list is presented to the server and the server creates the print queue in the session.
Now, all the information you need on Windows 11 RDP printer redirection not working is right here at your fingertips.
So, if your Windows Virtual Desktop printer redirection is not working, simply go through the guide above and get it fixed.
Time is of the essence, so if your Brother printer is not redirecting via RDP, you came to the right place to see it taken care of.
We like to organize our emails just as we enjoy keeping things organized daily.
But sometimes things might go missing, or in this case, that folder that contains your most important emails, and everything seems lost.
Causes can vary from recent changes to your device, such as updates, connection errors, or even corrupted system files.
But there’s a workaround to this problem; we will show it in the text below.
What can I do if my Outlook email folders are missing?
1. Restart Outlook
Sometimes, restarting the application can do the trick. It might sound simple, turning it off and on, but if it works, why not try this first?
Disconnect from your mailbox (you should only do this once).
Reconnect to your mailbox (again, do this once).
Create a new folder(with a different name) in the same folder or sub-folder as the missing folder.
Both folders should appear now.
2. Repair Outlook
If a simple restart did not fix your problem and you need to recover Outlook emails, then you should repair the app. This solution also works well in the event that Windows can’t find the Outlook.exe file.
1. Press the Windows key to open the Start Menu.
2. Select Apps and Features from the menu.
3. Click on Microsoft Outlook and select Modify.
4. It offers two options: clicking on Online Repair then Repair will get everything fixed, while the second option of Quick Repair will scan your application files and replace the corrupted ones.
5. Select your desired option.
6. The system will guide you to the necessary steps you need to follow in order to fix your Outlook.
7. Open the Outlook app again to check if this solution worked.
If you’ve gotten to this point, the first two solutions didn’t work, but worry not, we’ve got more fixes ahead. This third method involves disabling the add-ins.
Launch the run box by pressing Windows + R key.
Type the following command in the run box and press Ok: “Outlook.exe /safe”.
Outlook is now in Safe mode, the next step involves disabling the add-ins, now, you have to click “Go to File” select Option then Add-Ins.
In the Manage section select COM add-ins, select the Go Button, and lastly, clear the add-ins checkbox to disable it.
You’re good to go now.
Also, we are aware that Outlook search is a powerful tool, so you may easily get lost in the depth of its functionality. But with a few quick tricks, you will have things up and running when a folder disappeared in Windows 11.
We hope these fixes helped, and you’ll be able to enjoy further using Microsoft Outlook. If you encounter any issues while following our solutions, let us know in the comments section below.
A keyboard macro is one triggered by pressing a key combination. Windows 11 includes many hotkeys for common tasks (for example Ctrl + C copies text) that can be considered built-in keyboard macros.
Keyboard macros automate repetitive tasks. For instance, if the Ctrl + C keyboard macro (or shortcut) didn’t exist, you would have to select the Copy option in the Edit menus manually.
There are a few ways you may create custom keyboard macros. You can record macros, set up scripts triggered with custom hotkeys, or set up keyboard shortcuts that open programs.
Double-click the TinyTaskPortable file to download TinyTask.
After downloading, double-click the executable file to install the app.
Press the Rec button on the TinyTask toolbar.
Then perform the task you want the macro to do when played. For example, you can open a couple of software packages you want to run at the same time by pressing a hotkey.
Click Rec again to stop recording the macro when done.
Press the default Ctrl + Shift + Alt + P hotkey to play the keyboard macro.
You can select alternative hotkeys for the keyboard macro by clicking Preferences and hitting the PlaybackHotkey. Select a different hotkey for playing the macro from the submenu.
Press Save on TinyTask’s toolbox.
Give the macro a name, select a directory for it, and click Save.
Whenever you want to use the macro, click Open in TinyTask to select it. Then press the key combination for the macro.
2. Set up a keyboard macro (hotkey) for opening a program
Press the StartMenu’s Windows taskbar icon.
Select the All apps option to view your Start Menu’s software shortcuts.
Left click and drag a program to set up a keyboard macro onto the desktop. Then you should see a desktop shortcut for the software.
Click the desktop shortcut for the software with your right mouse button and select Properties.
Then click inside the desktop shortcut’s key box.
Press a key to create a Ctrl + Alt keyboard macro. For example, pressing T will set up a Ctrl + Alt + T hotkey.
Select Apply to set the new keyboard macro and click OK to exit the shortcut’s properties window.
Press your Ctrl + Alt hotkey for your keyboard macro. That keyboard macro will open the software you assigned it to, which will save you manually opening the app from the StartMenu.
3. Set up a batch file keyboard macro
Click the Search icon on your taskbar, type notepad, and click the Notepad text editor app.
Input a batch file script within Notepad.
Click the File menu button at the top of Notepad.
Select that menu’s Save as option.
Next, select the All files option that’s on the Save as type menu.
Erase *txt from the file name box.
Input a title for your batch file in the text box that includes the .bat extension at the end of it. For example, you could enter something like Keyboard Macro.bat.
Choose somewhere to save the batch file.
Click the Save button and close the batch file in Notepad.
Open whatever folder includes your batch file, right-click it, and select Show more options, then select Create shortcut.
Right-click the batch file’s desktop shortcut to set up a hotkey for activating it as outlined in the previous method.
Then press the key combination for the batch file to run its script.
You can set up batch file keyboard macros for automating many tasks in Windows. It’s beyond the scope of this guide to provide details about how to script batch files. However, you can look at many batch script tutorial websites on the internet.
For example, set up a script that opens multiple websites. Input the following batch script into Notepad for step three:
@echo off
start https://www.google.com
start https://www.bing.com
That macro will open the Google and Bing search engines in your default browser when you press its hotkey. You can replace the websites in that script or add new ones to open in additional lines.
Double-click the downloaded AutoHotkey setup file.
Select the Express Installation option and click Run AutoHotkey after installing.
Right-click somewhere on the desktop wallpaper to select New and select AutoHotkey Script.
Enter a title for the AutoHotkey script.
Right-click the AutoHotkey script file to select Open with.
Then select Choose another app and choose Notepad.
Input a hotkey macro script in Notepad. This AutoHotkey help page includes details about how to incorporate hotkeys in scripts.
Then click File on Notepad’s Menu bar.
Click Save as to bring up that window and select the All files option.
Choose a folder location, and click Save.
Double-click the AutoHotkey script file you just set up to run it.
Press the hotkey you incorporated within the script to activate it.
The Autokey website includes a beginner’s guide that explains how you can create macro scripts with that software. You can also get premade scripts at AutoHotkey’s script showcase page.
If you like, you can also add a keyboard shortcut for running the script. To do so, you’ll need to create a desktop shortcut for the script’s file and then add a hotkey to it as covered in the second method.
Can you use macros on any keyboard?
You can set up custom software macros on any keyboard. Software macros are those that are recorded or manually scripted in Windows with hotkeys that activate them.
However, some gaming keyboards have dedicated macro keys. Those are keyboards with an onboard macro recording that enables you to set up custom hardware macros without additional software.
Does Windows 11 have a macro recorder?
The Power Automate app included in Windows 11 is something like a macro recorder with which users can record flow tasks. However, its users can’t assign key combinations (hotkeys) to play flows.
Therefore, Power Automate is not something with which you can set up keyboard macros in Windows 11. However, you can set up keyboard macros in Windows 11 with any of the methods from the solutions above.
How do I automate tasks in Windows 11?
You can automate tasks in Windows 11 with the aforementioned Power Automate app or Task Scheduler. Task Scheduler is a utility with which you can set up scheduled tasks.
However, neither Power Automate nor Task Scheduler includes options for creating keyboard macros. You’ll need to apply the methods above or utilize macro-recording software to set up keyboard macros.
What are the best keyboard macros?
The best keyboard macro is whatever one you find to be most useful. However, many users may find keyboard macros that open multiple programs and websites to be especially handy.
Creating keyboard macros will enable you to automate routine and repetitive Windows tasks. AutoHotkey is a great scripting tool and TinyTask is a simple-to-utilize recording utility for creating keyboard macros.
There are also many other automation programs with which you can set up keyboard macros. Our best programs to automate PC tasks guide tells you about alternative Windows software for creating macros.
Check out our detailed free keyboard macro recorder guide for more software options that make automation easier on Windows.
So, have fun setting up keyboard macros in Windows 11. If you have any questions about setting up keyboard macros, feel free to add them in the comments box below.
If you own a dual-boot Windows 10 computer, then you most likely know that the latest OS versions automatically enable Fast Startup.
In other words, Windows 10 versions will turn on Fast Startup although you disabled the respective setting. There are two main implications of this fact:
The Windows 10 Fast Startup feature prevents you from mounting your NTFS partitions in Linux. This means that you’ll need to reboot from Windows into Ubuntu.
If one of the two partitions is set to automount in /etc/fstab, you will get random black or purple screens after rebooting from Windows to Ubuntu. In this case, you can’t really do anything else but hit CTRL+ALT+DELETE.
Dual-boot system users really hate Microsoft’s strategy, but somehow got accustomed to it since new Windows 10 versions do tend to overwrite previous user settings:
They’re enabling it after every feature update. Infuriating as hell if you rely on Wake on LAN as intel drivers still don’t proberly wake when in the fast startup state.
In the guide below we will show you the recommended method to disable the Fast Startup option.
How can I disable Windows 10 Fast Startup dual boot?
1. Go toStart> typecontrol panel> double click on the first result to launch the Control Panel app.
2. Go to the Search box > type power > select Power Options.
3. Go toChoose what the power buttons do.
4. Enter your administrator username and password if prompted. If not, go to the next step.
5. UncheckTurn on fast startup (recommended).
6. Save changes.
If you want to turn off Fast Startup on dual boot Windows 10 latest versions, you can use the Control Panel. It is a built-in tool which allows you to toggle Fast Startup on and off with a few clicks.
Setting up meetings or booking conference rooms aren’t necessarily activities you enjoy. Outlook has ways to handle this for you, so don’t hesitate to learn how to use Outlook Scheduling Assistant.
Let’s assume you’ve been tasked with planning a meeting with several attendees. You set up the meeting and send it out without having any way to make sure everyone can actually come. What happens next?
Instead of ending up with several responses telling you that either they are unavailable or would like to propose a new time, let the Scheduling Assistant do the heavy lifting.
How can I use Outlook Scheduling Assistant?
1. Plan a meeting
1. Open Outlook on your computer.
2. In Outlook, click on the Calendar section in the bottom left corner of the screen.
3. From theHome tab, at the top left of the screen, click on theNew Meeting icon.
4. SelectNew Meetingfrom the drop-down list.
5. A new window appears next. From the Meeting tab, click on Scheduling Assistant.
6. Now, it’s time to enter adescription of the meetingin theTitle text box.
7. In theRequired text box, enter theemail address of each attendee required to attend the meeting. In Outlook 2016 and 2013 instead, enter theattendeesin theTo fieldand theconference roomyou want to book under theResources field.
8. Then enter the Start and End times. From the Suggested Times list, you can choose the desired time or make adjustments to your time and date to find a time that works for everyone.
9. In theLocation text box, enter theaddressorroom number where the meeting will be held.
10. Up next, in theMessage area, enter anynotesyour attendees will need to know before the meeting such as anyspecial instructionsor theAgenda.
11. When you’re done setting up the meeting, clickSend.
Outlook Scheduling Assistant can be easily used to plan a meeting . You can set up the time, date, location and attendees, as well as create a special note to be sent to them.
When you send a meeting invitation in Outlook, the invitation includes a request for a response and gives the recipient the option to suggest a new time for the meeting.
2. Export the Outlook Scheduling Assistant to Excel
Open Outlook and go to File.
Go to Open & Import and the Import/Export wizard will open.
Select Export to a file.
Click Next to continue.
In the Export to a File dialog, select Comma Separated Values.
Then, click Next.
Now, select Calendar from Outlook Data File.
Click Next once more.
When the Export to a File dialog displays, click the Browse button. Here you can select the file’s destination.
Choose the destination where the file can be saved. Name the file and click OK to close the dialog.
When the Export to a File dialog displays again, hit Next to continue.
Then, click Finish to export your Outlook calendar.
Outlook exports the specified calendar as a CSV file. Open it with Microsoft Excel, and then save the file as a workbook.
If you’re looking for a way to share your Outlook Scheduling Assistant with others, you can export your calendar to Excel, and then import it into others’ Outlook calendar folder by following the above steps.
3. Set a time zone for a meeting or appointment
Note that when you create such new meetings or appointments, Outlook uses the default time zone in your Outlook preferences for Calendar. This doesn’t mean that you cannot specify a different time zone for an event as you are creating it.
To display the Time zone selector, on either the Organizer Meeting tab or the Appointment tab, click Time Zones. There, specify the precise time zone of the event.
If older versions for Outlook for Mac can display only two time zones, in the most recent version of Outlook for Mac for Office 365 and Outlook 2019 no less than three separate time zones can be displayed in the Calendar.
This article showed you how to use Outlook Scheduling Assistant, export it to Excel, and set the time zone for a meeting or appointment in Outlook. Easy, right?
Just remember that instructions apply to Outlook for Office 365, Outlook 2019, Outlook 2016, and Outlook 2013.
If you found this article useful, let us know in the comments section.
Windows 10’s Task Manager utility includes a Startup tab. That is Windows 10’s default startup manager with which users can disable startup software.
However, the Task Manager’s tab doesn’t include any options for users to add programs to the startup. So, some users might look for startup settings on software windows to add new programs to the system startup.
Yet, Windows 10 includes a Startup folder to which users can add programs and files. All software and programs within that folder will run automatically when Windows starts.
What is the Startup folder?
The Startup folder is an in-built Windows feature (first introduced in Windows 95) that allows users to set up those particular apps and programs that will automatically run when Windows starts.
The folder is buried within a series of subfolders and can be hard to find.
How can I manage the Windows 10 Startup folder?
Some users might wonder where is the Startup folder on their PC, how to open it and how to add or remove the software from it. In the text below you will find answers to all of these.
1. Open the Startup folder using File Explorer
For most users, the Startup folder is located at this address:
Users will need to replace USERNAME with their actual user account name, and then enter that path in File Explorer. That path will open the folder shown in the snapshot directly below.
2. Access the Startup Folder using Run
1. Press the Windows key + R hotkey to open the Run dialog.
2. To open the Admin User Startup folder, enter shell:startup in the text box.
3. To open the All Users Startup folder, enter shell:common startup in the text box.
4. Click OK to execute the command.
5. The Startup folder is now opened on your computer.
A quick and easy way to open the Startup folder on your PC is to use the built-in Run dialog. It works as a shortcut and all you need to do is input the appropriate command, then the folder will open.
With the Startup folder open in File Explorer, users can now add new program shortcuts to the system startup. In addition, users can also include file shortcuts within that folder.
Then the files the Startup folder includes will usually open with their default software. This is how users can add shortcuts to the Windows Startup folder.
Right-click an empty space within the Startup folder and select New > Shortcut.
Click the Browse button to open the window in the snapshot directly below.
Select a program or document to include in the startup, and press the OK button.
Press the Next button.
Then press the Finish button. The Startup folder will now include the selected software or file.
The software in the Startup folder will open after you’ve restarted Windows.
4. Remove Software From the Startup Folder
Users can remove programs in the Startup folder by deleting them. To do that, select a program in that folder and click the Delete button. That will probably erase the shortcut to the Recycle Bin.
Users can also press the Ctrl + A keyboard shortcut to select all shortcuts within the Startup folder. Then press File Explorer’s Delete button to erase them.
Task Manager’s Start-up tab in Windows 10 will also list the programs that users have added to the Startup folder.
Therefore, users can disable the programs with that utility by right-clicking the taskbar and selecting Task Manager.
Click the Start-up tab on that utility’s window. Then users can select the required program and click Disable.
Note: Task Manager doesn’t include a Start-up tab in Windows 7. However, Win 7 users can open the startup manager by entering msconfig in Run and clicking OK. Then select the Startup tab on the System Configuration window.
Windows 7 users can uncheck the item checkboxes on that tab to disable programs starting during startup. So, that’s how users can add new software and files to Windows’ Startup folder.
However, filling that folder up will slow down the system’s startup. Lots of startup software will also drain system resources. Therefore, don’t add too many things to the folder.
There you go, these solutions should help you manage the startup folder adequately. Let us know if you found them useful by hitting the comments section below.
There are multiple errors and issues that have been reported by PUBG players. One of which is the PUBG FPS drop problem. There are some reports that claim that the FPS drops when they are near their enemies, while some have reported facing PUBG FPS drop issues when they are changing weapons or items, etc.
It could be quite frustrating to experience an FPS drop and it’s usually connected to big server latency.
How do I fix PUBG FPS drops?
1. Check the game requirements
Before we go with the solutions, one by one, let us first check the minimum requirements that you need to have on your PC to play PUBG, because that is the first thing you should always check when you come across issues such as FPS drop, lag, or stuttering.
If you have a PC that meets either the minimum or recommended system requirements, or falls in between but are still experiencing the PUBG FPS drop issue, then you can now jump right into the solutions.
2. Check your internet connection
Starting off, since PUBG is a game that depends on your processor and a high-speed internet connection, you should make sure that your internet connection isn’t at fault while playing the game.
The choppy internet connection can force the game to throw up errors such as stuttering, lag, or FPS drops. You can make use of websites such as Fast.com or Speedtest in order to know about the current internet speed that you are getting.
In case the internet speed isn’t matching your data plan, you can get in touch with your ISP and get the issue resolved and then check if this fixes the issue or not.
3. Disable fullscreen optimization
Head to the PUBG installation folder in the Steam library.
Right-click TSLGame.exe and click Properties.
Switch to the compatibility tab, and uncheck the box for Disable fullscreen optimization.
Hit Apply.
Press OK.
You will notice that Fullscreen Optimizations is enabled by default. The main purpose of the Fullscreen Optimizations is to provide better gaming and app performance when you run them in fullscreen mode.
However, there are several user reports that fullscreen optimizations don’t always improve gaming and app performance and often are the main reason for FPS drop.
Follow the steps above and disable the fullscreen optimization and run the game. Now you can check if this fixes the FPS drop issue or not.
Press the Win + I buttons to open the Windows Settings menu.
Select System from the left side.
Click on the Display option on the right side.
Select Graphics.
Hit the Change default graphics settings.
Toggle on the Hardware Accelerated GPU Scheduling.
Restart your PC for the changes to take effect.
Windows 11 is optimized for gaming, even better than Windows 10. It comes with multiple in-game settings that you can enable and take advantage of to experience better gaming performance.
Toggling on this in-built option has helped several users fix the FPS drop, stuttering, and lag problem associated with the PUBG game.
Quick tip:
Switching to a more performance-friendly browser can be a great option in this context. Opera GX is a gamer-dedicated browser that offers some great features, including CPU, RAM and Network limiters to give you an excellent gaming and browsing experience.
Not only that you can control your privacy and security thanks to its free integrated browser VPN, but you can also browse and load websites faster with the built-in ad blocker.
Opera GX
A version created for gamers to get the most out of both browsing and gaming experience.
Search for the command prompt and open it as an administrator.
Paste the below code and press Enter. powercfg -duplicatescheme e9a42b02-d5df-448d-aa00-03f14749eb61
Open Control Panel.
Select Power Options.
You will see a new Ultimate performance mode option.
Turn it on and check if this fixes the issue or not.
Turning on the ultimate performance mode is a great solution for fixing FPS issues with games. Because this balances the processor and battery to churn out the best gaming performance out of your PC.
Although your battery might take a hit, you will hopefully not experience any lag or FPS drop with PUBG while playing.
7. Turn Game Mode on
Press the Win + I buttons to open Settings.
From the left-side select Gaming.
Turn off Xbox Game Bar.
Turn on Game Mode.
Turning the Game Mode on your PC forces it to optimize all the resources focused on gaming. If you play games on your PC or use high-end graphics intense software then it is recommended that you turn on this mode to have the best resources at your disposal.
8. Disable Firewall
Open the Start menu.
Search for Windows Defender Firewall and open it.
From the left side, click on Turn Windows Defender Firewall on or off.
For both Private and Public network settings, select the option to Turn off Windows Defender Firewall.
Firewall or antivirus software can interfere with the network connection of your game. In such a case, you can disable the firewall or any other antivirus software and check if this fixes the issue or not.
We have shown the above steps for the inbuilt Windows Defender Firewall, but you get the idea and you can disable your third-party antivirus tool and check if this resolves the error or not.
You can also check out our dedicated guide that lists some of the best antivirus software that you can opt for on our Windows 11 or Windows 10 PC.
How do I increase my FPS in PUBG?
While the above solutions are not only sufficient to fix the FPS drop issue with PUBG, they can help you improve FPS within the game.
However, we would suggest a few of the in-game graphics settings that you can tweak and get the best FPS out of the game. You can change the settings as per your requirements, but on an optimal PC, the below-mentioned settings work great.
Render Scale: 120
FpsCameraFov: 80 (Turning this setting higher can impact FPS a lot. When you turn this setting up, you will see more enemies on your side.)
Overall Graphics Quality: LOW
Anti-Aliasing: ULTRA (Having issues with the edges of the game can also be troublesome for the game to produce the graphics optimally.)
Post-Processing: LOW (Turning this will lower the contrast of the game, but improves FPS.)
Shadows: LOW (Lowering this will turns your shadows a bit blocky but will improve FPS.)
Texture: HIGH (Turn this up to spot enemies more clearly.)
Effects: VERY LOW (Lowering the effects can lower the pressure on the graphics card to produce detailed effects of bullet hits, etc.)
Foliage: VERY LOW (This removes most of the grass and bushes, which are mainly the problems for the FPS issue.)
View Distance: LOW (This determines how far the graphics will render buildings. Setting it to low will help reduce processor usage and result in better FPS.)
Sharpen: DISABLED (
V-Sync: ENABLED
Motion Blur: DISABLED
How to fix other PUBG problems on PC?
FPS drop is not the only issue that you would come across in the PUBG game on your PC. Below are some of the most important issues that has been reported by users and fortunately, we have solutions for them.
That is it from us in this guide. We hope that one of the solutions helped you fix the PUBG FPS drop problem on your Windows 11 PC.
Do let us know in the comments below, which one of the below helped you fix the problem or if you applied a different solution altogether to resolve the issue.
Although Windows 10 is pretty fast, after using a while, it will start to lag, especially when you have many apps and desktop programs installed.
While uninstalling them would make it faster, this is not a good solution, so how could you improve performance in Windows 10?
The short answer is to disable these apps, so they won’t take up precious memory when booting your device.
Today I’ll show you how to close and disable apps in order to improve the performance of your Windows 10 device. It’s quite simple and it offers a visible improvement.
What subjects will we cover?
Your PC performance is rather important, and in this article, we’re going the cover the following topics:
Optimize, boost Windows 10performance – One of the easiest ways to optimize your PC performance is to disable the startup applications. Many third-party apps start automatically with your PC, and they can often negatively impact your performance.
Windows 10 unnecessary services – Windows uses various services in order to work properly, but certain services aren’t necessary. In this article, we’ll briefly mention a few services that you can easily disable.
Improve performance by disabling Windows services – Third-party services can interfere with your system and slow it down, but you can fix that issue simply by finding and disabling the problematic services.
Improve gaming, graphics performanceWindows 10 – Third-party apps can interfere with your gaming and graphics performance. If you’re having any problems, be sure to disable unnecessary apps and services by following the steps from our guide.
Improve, reduce startup time Windows 10 – Many third-party applications tend to start automatically with Windows. If you want to improve your startup time, you just have to find those applications and disable them.
Disable apps on startup Windows 10 – There are several different ways to disable startup apps, and in this article we’ll show you how to easily disable apps to improve your PC’s performance.
Disable unnecessary apps Windows 10 – Your PC can have various applications in startup, and those apps can cause your PC to slow down. However, you can fix this problem simply by disabling unnecessary applications.
How can I disable apps in Windows 10?
The process itself is pretty simple, all you need to know is what to disable and what to keep active. There are two methods by which you can do this.
While the first method I’ll be showing you is the simplest, it is not as thorough as the second one, but at the same time, it is easier and safer to do.
1. Press theCtrl + Shift + Esckeys at the same time to startTask Manager.
Alternatively, you can pressCtrl + Alt + Delkeys and selectTask Managerfrom the list of options.
2. Navigate to the Startup tab. A list of all startup applications will now appear.
3. Find the application you want to disable from starting with Windows and right click it.
4. Choose Disable from the menu.
5. Repeat this procedure for all the applications you want to disable.
This method was used in older versions of Windows to improve performance and it still works pretty good in Windows 10.
While until now you could disable apps on Windows 10 from the msconfig window, Microsoft moved the Startup option to Task Manager.
The Startup tab is rather useful for disabling applications because it shows you the startup impact of each application on your PC.
If you want to improve your startup time, it’s always good to disable apps that have a high startup impact on your PC. In most cases, almost all apps are safe to disable and by disabling them you won’t cause any problems with your PC.
Certain applications, such as Skype, for example, can have a medium impact on your PC, so they are usually okay to be left enabled.
Even though you can disable all startup applications, you probably shouldn’t permanently disable your antivirus from starting with your PC if you want to keep it safe.
If you’re looking for a tool that offers more control over your startup items, we recently covered some of the best tools to manage startup items, so be sure to check them out.
You can also disable apps and improve performance by disabling certain services. Many third-party apps have their own services, and in order to disable those apps from starting automatically, you just have to disable their services.
To see the active services you need to do the following:
Open the Win + X menu and select Computer Management from the list. You can open this menu by using Windows Key + X shortcut or by right-clicking your Start Button.
Select Services from the menu on the left.
If you want to quickly open the Services window you just need to press Windows Key + R and enter services.msc. Now press Enter or click OK.
Using the Services window to disable apps offers users more options, but it is also more dangerous to use and should be attempted only by those who know what they are doing.
Many of these services are used by Windows 10 for normal operations, so closing them might result in an unstable system.
In the Services window, you can see the description, status, and startup type of each service. Thanks to this information you can easily find a service that is running or automatically starting with your PC.
To stop a certain service, you just need to right-click it and choose Disable from the menu. Of course, it’s just as easy to enable any service.
Keep in mind that many services are starting automatically with your PC, and by stopping a service you’ll just end it for this session. Once you restart your PC, the service will be back and running.
By double clicking on a service, you open its Properties, and from the Startup Type drop-down menu, you can select what type you want it to be.
By doing so, you can easily prevent a service from starting with your PC and disable it completely.
However, you better search for what services are safe to disable or modify, so you don’t damage your device. Don’t overlook the description of each one which you should read before making any changes. Here’s a list of some you can modify if you want to try:
Local Services
Diagnostic Policy Service
Security Center
Print Spooler (Only disable this if you don’t have a printer)
Application Experience
Secondary Logon
Program Compatibility Assistant Service
Portable Device Enumerator Service
Offline Files
Remote Registry
Windows Error Reporting Service
Windows Image Acquisition
Windows Search (If you use Search frequently, leave this enabled)
Internet Services
Distributed Link Tracking Client
IP Helper
Computer Browser
Server (Disable this only if you are not connected to the Internet)
TCP/IP NetBIOS Helper (Disable only if you are not part of a workgroup or if you don’t have Internet connectivity)
Windows Time (This service uses the Internet to sync your clock)
If you want to disable all third-party services instantly on your PC, you can do that from the configuration window. This is rather simple and you can do it by following these steps:
Press Windows Key + R and enter msconfig. Press Enter or click OK.
Now navigate to the Services tab. Check the Hide all Microsoft services checkbox and click on Disable all. Click on Apply and OK to save changes.
When the confirmation message appears, click on Restart.
By following this method you’ll disable all non-Microsoft services from starting. Of course, you can always uncheck individual services in order to prevent them from starting.
4. Close Background Apps
[youtube]StRFu2_ONI8[/youtube]
Even if Microsoft is trying to promote leaving apps in hibernation mode when you exit them, it is still a good idea to close them from time to time.
I can attest to the fact that after leaving open about 15 apps, my Windows 10 computer started lagging. After I closed them, everything came back to normal.
In order to close apps, all you have to do is move your pointer to the left side of the screen and open the Last Used Apps panel. From here, you have to open the apps and move your pointer to the top of the screen until it looks like a hand.
When you click and drag the app, it will minimize to a window, just like when you add apps side by side. While keeping the app selected, drag it down to the bottom of the screen and release it.
This is how you close apps in Windows 10.
As you can see, disabling startup apps and improving performance on Windows 10 is rather simple. If you want to improve your startup performance, be sure to try some of the methods from this article.
Extracting your .rar files in Windows 10 can be a task that will take you no more than five minutes of your time but you will have to be aware of the software needed for you to be able to extract your files.
The software available for Windows 10 to extract your files can be free if you use a trial version, or you can buy the full version depending on your needs.
Usually, the best application suitable for Windows 10 is the WinRAR app, which you can buy from any available Windows Store, or you can download the WinZip application.
The guide below also covers some of the following topics as well:
Windows 10 RAR file extractor – All software mentioned in this article can extract RAR files in Windows 10.
Unpack RAR files in Windows 10 – Both WinZip and WinRAR can be used to unpack RAR files in Windows 10
How do I extract RAR files in Windows 10 without WinRAR?
1. Decide what software you will use
If you don’t want to use WinRar to extract files, you can use an alternative solution.
Despite the file format’s name and the fact that we associate RAR files by default with WinRAR, there are certainly better alternatives out there.
While WinRAR is indeed free to use, it is somewhat dated and hasn’t seemed to have evolved past the basic archiving and unzipping phase.
That being the case, and given this guide’s topic, here are two tools that can certainly handle RAR files just as better as WinRAR.
2. Use WinZip
There are plenty of tools out there that can handle archiving, and unzipping files, but few of them are reliable and error-free. As such, we’ve decided to recommend WinZip in the case at hand.
It is a modern file archiver and compressor that is very easy to use. This product offers unparalleled compression capabilities, allowing you to store data and files in a lossless manner at almost half the storage space as other file compression tools.
More so, it runs very fast when it comes to compressing and unzipping large amounts of data. All in all, if you want a tool that will extract RAR and ZIP files fast and efficiently, WinZip is the solution for you.
We will explain how you can use WinZip and get your files extracted in no time. Follow the tutorial below for detailed explanations on how to extract the .rar files in Windows 10.
1. Download and install Winzip.
2. Open the folder where you store your .rar file.
3. Right-click on the .rar file.
4. Hover your cursor over the WinZip option to open the menu.
5. Now, you will have a series of available options to choose from. For viewing the contents of the .rar folder you only have to double click (left click) on the folder.
6. Moreover, if you want to extract the files, you have multiple options at your disposal.
If you want to extract the .rar files to the location you have the .rar folder then you will need to left-click on the featureExtract Here.
If you want to extract the .rar files to your/Downloadsdirectory you only have to left-click on the featureExtract to Downloads.
If you want to extract the .rar file to a specific directory left click on theExtract files…and under theExtract to:feature select the directory you want to copy them to and then left-click on theOKbutton presented in the lower side of the screen.
Note: For viewing the contents of the .rar folder you only have to double click (left click) on the folder.
So now that you have your .rar file extracted, you can go ahead and carry out your work on the Windows 8 and Windows 10 device without any issue.
If you have any questions regarding the extraction of the .rar file, please write us below and we will see what we can do to help you further.
WinZip
Extract RAR files in a fast and efficient manner with the help of this professional compression and unzipping tool, now available at a discount price.
There are other alternatives to WinZip that you can use. For example, you can download Directory Opus, a very powerful file manager for Windows 10.
Many users believe that the best file managers should be versatile and powerful enough to handle any file management needs and requirements that users may have. However, not all file managers can handle archiving and unarchiving files.
Directory Opus brings many useful features and options to your computer and can easily replace WinRAR’s archiving functionality.
Some .rar files may be password protected. The good news is that you can extract them even if you forgot the password.
The easiest way to do that is to download and install a dedicated RAR password recovery tool, such as the RAR Password Genius developed by iSunShare Software.
This small, yet powerful password recovery utility can help you recover lost or forgotten passwords for RAR archives created by various file compression tools.
RAR Password Genius can recover complex passwords within minutes. The tool comes in two versions: a free version and a premium version. You can use the free version to recover passwords of up to three characters.
What to do if I get the access denied error?
Sometimes, even if you have the most reliable RAR extractor and you recovered your password, the error message Access denied occurs.
This issue may be triggered by access permission limitations, among other things. The good news is that you can fix that by taking ownership of the respective folder.
Right-click on the RAR folder > select Properties
Go to the Security tab > click on the Advanced button
Go to the Owner tab in Advanced Security Settings
Select Edit > choose the problematic user account from Change Owner. You may give everyone permission by adding everyone.
Click on Other users or groups > type Everyone in the field provided > hit OK.
Select User/Group > click Apply >OK.
Change the owner name > click OK > exit the Properties windows.
You have now taken ownership of the folder. Now you need to get permission to access it.
Right-click on the folder > select Properties
Select the Edit button > click OK
In the permission windows, select user/group or click Add to add other users
Under Allow > check Full Control to assign full access rights.
Click OK > confirm > exit Properties
There you go, we hope that this guide helped you extract your RAR files. If you’re interested in other file types, we have a guide on how to unzip files on Windows 11.
If you have any questions or suggestions, feel free to use the comments section below.
You’re no stranger to the immediate feelings of regret after sending a Slack message you shouldn’t have. Luckily, by default, all members can edit and delete Slack messages or thread replies.
If you ask us, changing your mind is not a mark of weakness or anything like that. It just happens to send a message and realize that you’ve done it by mistake.
Who can delete messages?
One of the best selling points of Slack remains its versatility. It enables users to delete a message they might have unintentionally sent.
Users can delete their messages one by one, in a manual process.
Workspace owners can also decide who can delete messages. It’s either everyone or only workspace owners and admins.
Assuming no changes have been made by them, follow the steps described here to make the sender’s remorse go away in an instant.
How can I delete Slack messages?
1. Delete a single Slack message
Open Slack in the desktop app.
Click the Sign in button on the upper-right corner of your screen, and sign in to any of your workspaces.
Click a direct message on the left panel.
Hover over the message you’d like to delete in the conversation.
Click the More actions icon.
Click Delete message.
To complete the procedure, finally, select Delete.
Note: If you don’t see the option to edit or delete a message, then contact an owner or admin for help.
2. Delete Slack messages in bulk without a third-party app
Open Slack‘s desktop app on your computer.
You may also open Slack in an Internet browser in case of not having the app.
Type slack.com in the address bar, and hit the ↵ Enter key on your keyboard.
Click the Sign in button on the upper-right corner of your screen.
Now, click the cog (top right).
Choose Additional options to bring up the archival menu.
Select Set the channel message retention policy.
Set Retain all messages for a specific number of days. For example, if you set a retention policy of one week, all messages in the channel or direct messages will be deleted after seven days.
Click Save.
Then, click Apply Settings.
If you are looking to delete multiple or all messages in a Slack conversation, we have a workaround for you. Although bulk deletion is not possible, you may configure the app to automatically delete all messages in a channel after a set period of days.
You’ll never see those 10k limit reached notifications again and that might just be music to your years.
4. Access the channel where you want to bulk delete messages from.
5. Click on the extension’s icon in the upper-right corner of your browser to enable it on the current page.
6. A pop-up window will open and you will be able to choose between Delete MY messages and Delete ALL USERS’ messages from the current channel.
In order to delete all users’ messages, you need to pay for a subscription, but deleting your own messages is free.
7. Make your selection and wait for the removal process to complete. It can take a while, based on how long is the message history on that channel.
If you are looking to perform a bulk deletion of your Slack messages in a conversation or channel, you can use Message deleter for Slack 2.0. It is a Google Chrome extension which you can add to your browser.
That’s it for now. Hope that you successfully followed the steps here and that deleting Slack messages is no longer a mystery. Just remember that you can never restore deleted messages in a chat, so proceed with care.
As for channel messages from bots created for your workspace, these ones can be deleted by workspace owners and admins only.
Are you looking to debloat Windows 11 to improve your computer performance? Among other solutions, you will learn how to use the iwr -useb https://git.io/debloat|iex command.
Debloating is an essential part of improving your computer’s performance. It allows you to get rid of any apps you may find unnecessary, intrusive, and wasteful for your resources.
How do I debloat Windows 11?
1. Use the debloat command in PowerShell
1. Press Windows key + X to open the Power Menu on your PC.
2. Select Windows PowerShell (Admin) from the list.
3. Run the following command: iwr https://git.io/debloat11|iex
4. Now in the Bloatware section, click on Customize blocklist which allows you to pick out specific apps that you will remove while leaving the rest intact.
The Windows debloater might give you the option to remove all bloatware. Avoid this option and opt to manually select what files to remove.
5. Follow the instructions on the screen to complete the removal process.
A great method to remove bloating on your Windows 11 is to use Powershell. It is a buit-in command line tool which allows you to manually remove all the unwanted apps and tools on your PC, including system apps.
2. Use traditional uninstall methods
Press Windows key + X and select Installed apps from the menu.
Go through the list and check which apps you won’t be using.
Click on the three dots next to the app that you want to remove. Select Uninstall.
Click on Uninstall to confirm.
Repeat the last two steps for all apps that you wish to remove.
Sometimes, your operating system will not let you uninstall some apps by greying out the Uninstall option.
These are known as system apps and they come with the OS.
If you have system apps that you would like to get rid of, consider the next option.
3. Use the Windows 11 debloater from GitHub
NOTE
Many reported that Windows Defender SmartScreen blocked this application from running on their PC, so you might encounter issues while starting it.
On your keyboard, click on the Windows + X keys to open the WinX menu.
Select the Windows PowerShell (Admin) option.
Copy and paste this command on your terminal DISM /Online /Get-ProvisionedAppxPackages | select-string Packagename
The script should show you all the installed packages on your Windows 11 computer.
Manually look through the list to see which apps you would like to remove.
Once you locate the app, highlight it and copy it by clicking on the Ctrl + C keys on your keyboard.
Copy this script, and be sure to use the name of the package you want to remove at the end. In our exmple we used Microsoft Zune Music, so be sure to replace it: DISM /Online /Remove-ProvisionedAppxPackage /PackageName:Microsoft.ZuneMusic_11.2204.25.0_neutral_~_8wekyb3d8bbwe
Hit Enter to completely remove the app from your computer.
Using the debloat Windows 11 script is pretty simple, but you’ll need to repeat the process multiple times in order to remove all affected applications. You can also use the Chris Titus tool to achieve the same results.
So, this is how to debloat Windows 11 in just a few minutes. Your Windows 11 will likely come with a bunch of apps that you won’t find useful. What’s worse is that these apps will continually use limited resources, thus making your PC slower.
If you suspect that these issues are brought about by unnecessary apps on your computer, then consider using Windows 11 debloater software.
Also, it is always important to back up your data and to create a Windows 11 restore point before you debloat Windows 11 since this process can go wrong.
If you have another solution that worked for you, feel free to share it in the comment section.
Discord represents a popular VoIP application designed for the video gaming community and it comes with an overlay feature.
While some users may like the extra attributes it offers, some may prefer to disable the Discord overlay to keep it clean.
The Discord overlay feature enables the users to reach other users while playing a full-screen game and perform activities like sending messages, screenshots, and voice chats.
However, because the Discord overlay might be flickering, people are interested in finding solutions to get rid of it. Fortunately, you can disable it for all the games as well as for individual titles.
In this article, we take a look at how to disable Discord overlay entirely and for individual games in Windows 10.
Why would I want to disable the Discord overlay?
This app’s overlay allows you to make voice calls, respond to text chat notifications, and interact with the Discord interface at a greater level than you normally would be able to, whilst still in-game.
Of course, it seems like this isn’t for everyone. Some users can find this feature distracting or immersion-breaking.
If you’re playing a solo game, you do not need the in-game overlay. It will be rather pointless and inconvenient for non-multiplayer games.
Fortunately, Discord’s overlay can be both enabled or disabled with ease. Keep in mind that this can be done either for all games or a few selected games.
That being said, let’s see the options you have to disable the Discord overlay in Windows 10.
How do I turn off Discord overlay in Windows?
1. Disable the overlay for all games
1. Hit the Windows key or press the Start button on your taskbar to open the search box.
2. Type Discord, then click on the first result to open the app.
3. Click the User Settings icon (the gear icon set in the left bottom of the window).
4. Select Game overlay.
5. Toggle the switch to disable the Enable in-game overlay option.
6. Launch any game and check if the Discord overlays are disabled.
If you are bothered by the Discord overlay and want to remove it altogether so that you do not encounter it again in any game, you can do this through the app’s Settings. You can toggle the overlay on and off and the setting will apply to all the games you play.
Disabling the in-game overlay option will turn off the overlay from all games. However, if you only want to disable Discord overlay for a particular game, follow the next set of steps.
Hit the Windows key, type Discord, then open the first result.
Click on the User settings icon (gear icon) next to your profile name.
From the left pane, select again Game overlay.
Make sure the Enable in-game overlay option is turned on.
Open the Activity Status tab.
A list of all the games that are installed on your computer will appear. If the games are not visible, click on Add it.
Choose all the games that you want to enable Discord overlay for.
By default, the overlay is disabled for games.
Click the Overlay icon to enable Discord overlay for that game.
Instead of disabling the overlay feature completely, you can disable and enable the overlay for certain games. This way you can have overlays available for the games where it is useful.
Furthermore, you can also customize the position of overlay or hide them until you want to use them.
What are the most common errors for Discord’s overlay?
Like any other attribute or feature, the Discord overlay can get you into several troubles. Even if this is a great characteristic, it can generate problems if you decide to enable it back.
Discord overlay 404 – Some games are experiencing a Discord 404 error when booting up and this is caused by an in-game overlay glitch on the apps’ end. Remember that the known games on which this was happening ranged from Fortnite to Call of Duty with no apparent similarities.
Discord overlay not working at all – known as Discord overlay not working. The only reason why some people are trying hard to fix this problem is that it restricts users to communicate with their friends during their gaming sessions.
Discord overlay affects FPS – You should also know that Discord overlay may have an impact on FPS as the FPS drops heavily so it’s best to disable Discord overlay.
Discord overlay flickering – A flicker is the appearance of flashing or unsteadiness in an image on a display screen. This particular error can occur when the video refresh rate is too low, other video-related issues, and in some cases hardware issues with the monitor.
By following the steps in this article, you can customize or completely disable Discord overlay in Windows.
Which of the Discord overlay feature do you like the most? Let us know in the comments.
Microsoft just announced that it will be hosting a new digital event for defenders against Ransomware.
On September 15, 2022, Microsoft’s digital event cleverly dubbed Stop Ransomware with Microsoft Security, will be gathering for anyone in charge of or tasked with keep users safe from Ransomware attacks while also a chance for the company to showcase two new security solutions intended to help offer a comprehensive look at present and upcoming security threats.
Executive vp of Microsoft Security Charlie Bell and corporate vp of Security, Compliance, Identity, and Privacy Business Vasu Jakkal will walk attendees through how to stay ahead of Ransomware with proactive approaches as well as introduce Microsoft Defender Threat Intelligence and Microsoft Defender External Attack Surface Management.
The way Defender Threat Intelligence is described by Microsoft as a solution that analyzes signals from across the internet that’s leverage machine learning algorithms to produce insights “relevant to your organization.”
As for Defender External Attack Surface Management, users can locate unknown, unmanaged resources that happen to be visible from access points connected to the internet, essentially giving them the same street view as potential attackers.
Aside from demos and walkthroughs of Microsoft’s latest security solutions, attendees will also have an opportunity to join the following sessions to better equip themselves with the security knowledge to protect their organization data:
Ransomware, threat intelligence, and the state of security: Join Vasu Jakkal and Charlie Bell as they discuss the Microsoft approach to security, including what analysts are seeing in the threat landscape and how threat intelligence can help organizations prepare for the worst.
Unmask adversaries with Microsoft Defender Threat Intelligence: Threat intelligence is the foundation of effective cybersecurity. As threats like ransomware increase in sophistication, it becomes even more critical to understand adversaries and their infrastructure. Learn how threat intelligence can enhance incident response and give your business the insights you need to stay ahead of threats.
Locate and secure your external attack surface: The external attack surface is constantly changing, and unknown, unsecured resources may fall outside your security coverage. Learn how to view your organization from the outside in—the same way an attacker does—and not only locate unmanaged assets but also protect them.
Threat intelligence is the cornerstone of solid security: Explore common use cases for threat intelligence and discover real-world applications to learn how you can enhance your existing security solutions and stop ransomware in its tracks.
Registration is open now and seemingly available for anyone who would like to join.
Minecraft Dungeons is a dungeon crawler game developed by Mojang Studios and Double Eleven and published by Xbox Game Studios.
It is an action-adventure role-playing game that is a perfect treat for a Minecraft fan looking for a new challenge. The game supports up to four players and features different types of weapons, items, and mobs.
Unlike other editions of Minecraft, you cannot mine or build in Minecraft Dungeons because the main focus of the game is an action-adventure. You have to select a hero at the beginning of the game, complete levels, and defeat enemies in Minecraft style.
There are multiple user reports that claim that for them the Minecraft Dungeons game is stuttering or is playable at very low FPS. For some, the game is unplayable because of the problem.
If you are also experiencing the same issues of stuttering and low fps with Minecraft Dungeons and are looking for solutions then you are in the right place.
Because in this guide, we will give you 5 quick fixes that can help you resolve the Minecraft Dungeons low fps issue. Let us get right into it.
Why is my Minecraft Dungeons so low on FPS?
Now the Minecraft Dungeons’ low FPS or stuttering issue can be because of many different reasons.
Here are a few of the common reasons why you are getting low FPS with the Minecraft Dungeons game:
Your PC does not meet the minimum requirements
Minecraft isn’t using the dedicated GPU on your PC
Your graphics driver isn’t up to date
The in-game settings is maxed out
The V-Sync is disabled
There is a RAM allocation issue
The Minecraft game itself has some problems
The cache data is causing problems
Your internet connection is jumpy
These are the most common reasons behind the low FPS issue with the Minecraft Dungeons game. Moreover, these issues are also common for other games as well.
So, if you are experiencing low FPS issues with other games, you can try the above fixes and hopefully fix the problem.
How do I fix low FPS on Minecraft Dungeons?
1. Update the graphics driver
Open the Start menu.
Search for Device Manager.
Expand the Display adapters section.
Right-click on your graphics driver.
Choose the Update driver option.
Select the first option to Search automatically for updated driver software.
If a new update is available, your system will install it right away.
You have the option to update your graphics driver on your PC this manually way. However, there are downsides to this that you have to periodically go through the exact steps to check if a new update is available, in case you haven’t turned on optional updates for your PC.
On the other hand, you can take the help of a recommended third-party software called Outbyte Driver Updater. Using Outbyte Driver Updater, you can install all the latest updates to the drivers on your PC with just a single click.
Not only does it keep your drivers up to date, but it also helps prevent lag, system errors, or even BSoDs and other Windows errors.
Outbyte Driver Updater
Use this simple and user-friendly software that monitors your PC for missing and outdated drivers and lets you easily repair and update them.
Often the low FPS issues arise when there is a discrepancy between the monitor and the graphics card. Thankfully, this can be easily fixed by enabling the V-Sync option within the game.
4. Update Minecraft Dungeons
PlayStation:
Select the game.
Click Options.
Click Check for Update.
Windows:
Open Microsoft Store.
Click the three dots in the top right corner.
Click Downloads and updates.
Click Get updates.
Xbox Series X|S and Xbox One:
Go to My Apps & Games.
Head to Minecraft Dungeons.
Press the Menu button on the Xbox controller.
Select Manage game & add-ons.
Click Updates.
Often the version of the game that you are playing itself comes with some bugs and glitches that trigger multiple errors.
So, it is very important that you are running the latest version of the game, as it not only brings the latest features but also fixes all the bugs that you might experience such as the low FPS issues with Minecraft Dungeons.
5. Allocate more RAM
Launch the Minecraft Client.
Head to the Installations tab from the top.
Select Minecraft Dungeons from the left side.
Click on the 3-dot icon next to Minecraft Dungeons game on the right side.
Select Edit from the drop-down.
Click on MORE OPTIONS.
Under the JVM ARGUMENTS, you will find a line of text.
Change the amount of RAM that Minecraft Dungeon can use after Xmx. For example, Xmx4G means Minecraft Dungeons will use 4GB of RAM.
Click Save and check if this fixes the low FPS issue or not.
How do you get better FPS in Minecraft Dungeons?
Here are some of the best in-game display and graphics settings that you can apply to get better FPS with Minecraft Dungeons.
General Settings
Display Mode: Fullscreen
Resolution: Select a bit lower than your actual resolution of the screen.
Graphics: Fastest
Advanced Settings
FPS Limit: Max
FPS Counter: ON
V-Sync: Enabled
Ambient Occulsion: OFF
Anti-Aliasing Quality: OFF
Shadow Quality: OFF
Particles: Low
Bloom: OFF
Does allocating more RAM increase FPS Minecraft?
No, but sometimes yes. There are instances where when you allocate more RAM to Minecraft, the gameplay becomes smoother as it increases the FPS.
Do note that Game require certain amount of memory to run, and if you are providing more than required then it will have more RAM to properly execute all files.
However, many times allocating dedicated RAM to Minecraft won’t help increase FPS. You can try out upping your PC’s configuration, especially GPU, to increase the FPS though.
That is it from us in this guide. We hope that this guide helped you fix the Minecraft Dungeons low FPS issue. Let us know in the comments which of the quick fixes resolved the problem for you.
If you’re looking for Windows strikethrough shortcuts, you’ve come to the right place.
What does strikethrough mean? Strikethrough is a representation of words with a horizontal line through the center. Here is an example of how this process looks after applying: strikethrough.
When used on a typed text such as Google Docs on a computer or mobile device screen, for instance, striking through text might be used to show text that has been deleted recently.
How do you strike through text? Different word editors have various ways through which you can strike through text. You can also use shortcut software to change the mapping of your keyboard keys.
You need to ensure that your content has meaning and is stricken through the correct text. Let us learn about the keyboard shortcuts for striking through text in different editors.
What is the keyboard shortcut for strikethrough?
1. For Google Docs
Sign in to your Google account. If you do not have one, you can sign up for free.
Launch Google Drive and click on the New button on the top left side of the screen. Next, select Google Docs to open a new document.
You can open an existing document if you have one. If not, you can start typing your content on the new document above.
If you have an Excel sheet that you want to edit, open it. If not, open a new Excel sheet.
Add content to your Excel sheet.
To strikethrough a particular cell, select that cell and press CTRL + 5.
If you want to strike through multiple cells, select all of them and press CTRL + 5.
To strike through part of a text in a cell, select that text and press CTRL + 5.
3. For Word
1. Launch Microsoft Word on your computer.
2. If you have a word document that you want to edit, open it. If not, open a new one. To do this, click on New, then on Blank Document.
3. Add content to your word document and select the text you want to strikethrough. This can be a single word, a sentence, or a paragraph.
4. Press Alt + H + 4 at the same time on your keyboard.
5. The selected text will now have the strikethrough symbol on it.
If you want to strikethrough text in Microsoft Word, you can do this using a keyboard shortcut. All you need to do is to select the text you want to strikethrough and then use the shortcut to insert the symbol on it.
Compose an email and then select or highlight the text you want to strikethrough.
Unfortunately, we will have to add strikethrough via the formatting dialog. First, click on the email body and press CTRL + D. This opens a font dialog box.
Select the checkbox next to strikethrough. This shows you what your text will look like. Click the OK button.
5. In OneNote
Launch OneNote on your machine.
Open if you have an existing OneNote document that you want to edit. If not, open a new one.
Add content to your OneNote document.
Select the text you want to strikethrough.
Press CTRL + Hyphen (-) simultaneously for the OneNote strikethrough shortcut.
6. For Sticky Notes
Launch Sticky Notes on your machine.
Add content to your sticky notes. You can open existing sticky notes if you have any.
Select the text that you want to strike through.
Press CTRL + T.
7. On Mac Notes
Navigate to System Prefs > Keyboard > Shortcuts > App Shortcuts.
Click the + sign at the bottom, select the Notes app from the list of apps, the name of the command you want to add (Strikethrough in this case), and then add the key combination. We will use SHIFT + COMMAND + X. Click the Add button.
After that, launch Mac Notes and use this shortcut when adding strikethrough to text.
Can you cross out text on social media?
Since you can striketh through text on most word editors, it would make sense if you found yourself in a situation where you would like to cross out text on social networks.
Unfortunately, social media platforms such as Instagram, Twitter, and Facebook do not come with a way through which you can cross out text. However, you can use tools such as the Strikethrough Text Generator.
All you need to do is paste the text you want to cross out on this tool, cross it out, and then copy it again and paste it into your social media account. You will have applied strikethrough formatting.
Crossing out text on Discord is, however, easier. You need to add two tilde keys (~) at the beginning and the end of the text that you want to strikethrough. An example would be ~~This is a crossed-out text in Discord~~. On Whatsapp, you add a single tilde key (~) at the beginning and end of the text you want to cross out. For example, ~This is a crossed-out text in WhatsApp~.
As you can see, different word editors have different ways of crossing out text. Moreover, apart from the keyboard shortcuts, some of them come with buttons and editor dialogs for those who do not know about the shortcuts.
We hope that you managed to use the strikethrough shortcuts presented in our article. If you have any questions, let us know in the comments section below.
eBooks are a great form of entertainment and education with Amazon Kindle being the king of online reading. Kindle is by far the largest and most well-known digital book service on the internet. The service has tons of cheap and free books across tons of different genres.
If you don’t want to like or want to use Kindle, there are a lot of eReaders online that you can use instead. The majority of them are free, but there are some with a paid version that adds new features.
As good as Kindle maybe, you can only use ebooks from that service on Amazon allowed devices.
Kindle formats its books on Amazon’s format like AZW and MOBI so they cannot be directly read on an iPad, Book, Sony Reader, or any other device besides a proper Kindle. However, there’s a way around this issue.
Why should I convert a Kindle book to ePub?
Essentially, it comes down to consumer freedom. You are not allowed to use your preferred device because the company won’t allow you.
Purchased Kindle books are protected by Amazon’s DRM or Digital Rights Management, which ensures that those files can’t be used elsewhere.
There are tons of free books out there, but the best ones usually have to be purchased. Lately, Amazon’s DRM is tougher than ever before so this guide will aim to show you the best ways to convert your Kindle book to the ePub format. You can also bulk convert ebooks.
The ePub format is the more widely accepted and supported format for eReaders. With this, you’ll be able to read your book however you want on whatever app you choose.
The guide will show you how to do the reverse: converting ePub files to AZW files so they can run on Kindle devices.
How can I convert Kindle to ePub format?
1. Use Epubor Ultimate
1. Download Epubor Ultimate from their official website.
2. Open your downloads folder and search for the Epubor Ultimate installer.
3. Double-click the file to begin the installation.
4. Follow the installation wizard.
5. Once down, close the final page. Epubor Ultimate will launch automatically.
6. When the Epubor Ultimate’s window appears, click on the Kindletab on the left hand side.
7. You will find the ebooks that you downloaded on Kindle in that list.
8. If you don’t see the ebooks, click on Add.
9. Locate the ebook that you want to add. Click it and select Open.
10. Select the book you want to convert and click double-click it.
11. Epubor Ultimate will begin to remove the DRM and place the book on the right hand side.
12. After you’ve chosen the books you want to convert, select Convert to EPUB.
13. Your Kindle ebooks will be in the Epub format. The word “Succeeded” will appear if it was a successful conversion.
14. You can view the converted ebooks by clicking on the Folder icon in the bottom right hand corner.
15. In the folder, the converted books will be highlighted.
The best and safest method to convert Kindle ebooks to an ePub format is to use the Epubor Ultimate app. The files are carefully converted, so that they look the same on the ePub format as they did in the Kindle one.
NOTE
Epubor Ultimate cannot convert Kindle ebooks if they are downloaded from the Kindle desktop version 1.25 or above. The majority of the time, there should be no problem, but if there is, you will need to downgrade.
2. Downgrade Kindle for Epubor Ultimate
Start by searching for your Kindle app in the Windows 11 search bar.
Click it to launch it.
In the Kindle app, click Tools on top.
Select Options in the drop down menu.
The Options window will appear. Select Registration on the left hand side.
Click on Deregister.
A small window will appear. Tick the box next to I understand that registering will cause all content I have downloaded from the Kindle Store be removed from this device.
Then click Deregister.
Uninstall Kindle for PC by going to the Windows 11 search bar and searching for the app.
When finished installing, click Finish to launch the app.
On the main screen, select Add books on the top tool bar.
Select the book you want to add and click Open.
Click a book you want to convert and select Convert books on the top tool bar.
The conversion window pops up. Ensure that in the top left hand corner the input format reads as AZW, which is Amazon’s own format.
In the conversion window, you can change the metadata as well as change the design and structure of the ebook.
Once done, select OK at the right hand bottom corner.
Once done, select Click to open to see where the files are located.
In this picture, you can see the newly converted Kindle ebook that was made in Calibre.
Are there any Windows 11 news or apps that I should be aware of?
There are several things you should be aware of. If you’re an artist or an aspiring one, you may be interested to learn about the variety of drawing apps on Windows 11. You need to be aware of what kind of app you want first.
It’s not as simple as picking out a random one. Ask yourself if you want to draw casually, draw comics, create pixelated art, or do some light sketching.
Each one has its own sets of tools that come unique to it, Krita is a great one for amateur artists.
You also may be interested to learn about how to install Windows 11 on an unsupported processor. Microsoft made the OS have a strict and high CPU limit that without it you won’t be able to use the system. Fortunately, there is a workaround and it’s easy to do.
We hope that you managed to convert the files to your liking. Let us know in the comments section below if you have any questions.
Microsoft’s Windows 11’s Snap layouts feature and others as well, capture everyone’s attention these days. Since it is designed to improve your PC experience and the way you communicate with others.
The OS comes with dynamic and powerful elements that support your work. Windows 11 packs some interesting features that will make all the difference and a new design that. Among other elements, introduces a taskbar with the Start menu in the center.
In this regard, you’ll benefit from a multitasking feature called Snap layouts. Whereby users who have larger monitors will be able to split them in various ways and organize them as they please.
Firstly, Snap layouts is a feature that helps you arrange the windows on your screen in the best possible way, to help you multitask.
Basically, after you activate the function by using our guide below, when you hover over the maximize icon of any window, you will see multiple options to position it in your layout.
Moreover, the term snap refers to the fact that the window will immediately position itself in the designated spot.
Once you have created these window arrangements with Snap layouts, you can save them in Snap groups. Which will be accessible on the taskbar and which you can access later.
How to use Snap layouts on my Windows 11 PC?
1. Enable Snap Layouts using a keyboard shortcut
1. Press the Windows key on your keyboard or the Start button on the taskbar.
2. Type settings in the search box that opens and click on the result to open the Settings app.
3. Select the Systemcategory, and click on the Multitaskingtab.
4. Toggle the Snap windows button to On. Then check the box next to the Show snap layouts when I hover over a window’s maximize button option.
5. Open the app or program you want to use the tool on and use the shortcut:Windowskey +Z. It will trigger the Snap Layouts option for the current window.
Another method to open the tool is to hover over the maximizebutton of any window, and the snapping option will show up in the corner.
6. Choose from different layout options to arrange your current page with other apps.
The fastest way to use Snap layouts on your Windows 11 is to use a keyboard shortcut. Snap layouts should be enabled by default on most computers, but on some you need to manually enable it.
NOTE
You can choose the layout depending on the width of your display. For a 16:9, 16:10, and 3:2 display you will see a set of 4 layout options, and for wider displays, you will see a set of 6 layout options.
It’s also worth mentioning that Microsoft has announced to users that older monitors with a resolution lower than 1920 pixels cannot fully benefit from this powerful feature.
Furthermore, given the system requirements and specifications of the new Windows 11, we find that a 1080p HD widescreen resolution is required. In order to enjoy the standard look offered by the Snap layouts feature.
First, hover over the maximize icon on the window you want to have to the left and choose the left column in the graphical options that appear (there are 3 custom Windows 11 Snap layouts options for vertical snapping: 2 columns, 3 identical columns, and 3 asymmetrical columns).
Now hover over to the maximize icon of the second window and select the second column from the right.
The two windows will snap vertically. And you will be able to change their width by dragging your mouse from the window’s edge from the middle to each side.
If you choose any of the other vertical layouts, you will just need to select the proper setting for each of the windows in your arrangement. But, as you can see, it’s very simple to do so.
3. Use Snap layouts with virtual desktops
Click on the virtual desktops icon on the taskbar and select the New desktop tab.
Now you can select the new desktop by clicking again on the virtual desktops icon and selecting the new desktop you just created.
Now you can just create a new snap layout just like you’ve seen on the previous solution. We’ve created a random one for you, just so you can see the possibilities.
If you want, now you can toggle between the desktops you’ve created by either clicking on the virtual desktops icon and selecting the one you need or by pressing the Ctrl + Windows + Left or Right.
How to use Snap layouts in Windows 10?
Snapping windows in Windows 10 is not as elegant and straightforward as it is in Windows 11. But you can still do the job with a few additional moves.
Click the Task view option from the taskbar and select New desktop.
Select the Task view icon again and select the second desktop.
Now open a window that you want to snap and press the Windows + Left or Windows + Right to snap the window vertically to the left or right. As you can see from our screenshot, it perfectly snapped to the left, covering half of the desktop.
You can also take the window with your mouse from its title bar and release it close to one edge and it will snap automatically to that edge.
Of course, you can adjust the window dimensions manually, with your mouse, by grabbing an edge with your mouse.
Quick tips on using Snap layouts in Windows 11
Here are some of the most interesting ways of using Snap layouts and groups to improve your multitasking:
➡ Divide work and fun
Note that it’s very important to separate the work-related apps and tabs from the non-work-related ones. And the motive is pretty obvious.
Snap layouts and groups can help you easily do that by grouping the apps and windows in a specific layout. And this is especially useful if you also use the multiple desktop feature from Windows 11.
➡ Looking for flights
We all know how difficult it is to look for more convenient flights and routes looking on multiple websites and apps. Going from one to another can be painstaking.
With Snap layouts, you could just snap up to 4 of them in a window. Then check them easily, without going back and forth to each one.
➡Confronting technical specifications
If you’re planning to buy a product, let’s say, the right Windows 11 compatible laptop, you’re going to check out all the technical specifications for each one, right?
With Snap layouts, you can start 3 browser windows. Snap them in the three-column layout and scroll them down on the same website to spot the differences immediately.
We hope our guide helped you enable the Snap layouts feature. And that our tips gave you some ideas on how to use it. You can finally start creating layouts to your liking, save and access them later in Snap groups.
Whether you’re not used to the new format or it’s a matter of aesthetics, the choice is always yours. If you have any questions or suggestions, please visit the comments section below and drop us a line.
GPT disks have advantages over MBR, and this is why many want to know how to convert MBR to GPT without data loss.
This is relatively simple to do, and today we’re going to show you the best ways to do that.
How do I convert MBR to GPT without losing data?
1. Use MBR2GPT
Navigate to Advanced Startup. To do that, simply open the Start Menu, press the Power button, hold the Shift key, and click on Restart.
Now you’ll see a list of options. Go to Troubleshoot and choose Advanced options. Lastly, select Command Prompt. Now select your user account and enter your password if required.
When the Command Prompt starts, run mbr2gpt /validate
If everything is in order and you didn’t get any errors, run mbr2gpt /convert
According to users, you can use this tool inside the Windows environment, but that’s not recommended since you can encounter various problems. You can do that by starting Command Prompt as administrator and running the following commands:
Extract the software, and start it as administrator. If that doesn’t work, start Command Prompt as administrator, move to the extraction directory, and start the software.
Run the following commands: gptgen.exe \\. \\ physicaldrive1 gptgen.exe -w \\. \\physicaldrive1
NOTE
For this method to work, you need to use diskpart to find the number of your drive for step 3.
This is an advanced solution, and not the most reliable, so it should be used only as a last resort.
How to convert MBR to GPT without an operating system?
You can do that by booting from an installation media, starting Command Prompt, and then running the mbr2gpt command as described in Solution 1.
Does converting MBR to GPT erase Windows?
Depending on the methods used, converting MBR to GPT doesn’t erase Windows. Methods from this guide won’t affect your files or Windows installation at all.
Should I convert MBR to GPT?
In most cases, yes. MBR can handle up to 2TB disks in size and supports up to four primary partitions. GPT doesn’t have these limitations. However, GPT system drives don’t work with 32-bit operating systems and without UEFI.
If you’re on a modern PC and a 64-bit version of Windows, GPT is always a better choice. To learn more about the differences, we have a guide that explains if Windows 11 can run on MBR partition, so don’t miss it. Our latest MBR vs GPT guide can give you more insight, so feel free to check it out as well.
We showed you several methods to convert your MBR disk to GPT without data loss, so feel free to try any of them. If you can’t convert disk to GPT, we have a great guide that will address that.
Keep in mind that some methods will remove all your files from the hard drive, so choose carefully.