Many users are using smart TVs, and they are wondering if it’s possible to install Opera for Samsung TV. In today’s guide, we’re going to answer this question.
How can I install Opera on my Samsung Smart TV?
Download it from third-party source and sideload it
Access the current browser installed on your Samsung Smart TV and search for Opera One TV browser. Note that the browser will work on Android TVs, excluding the ones that run on Web OS.
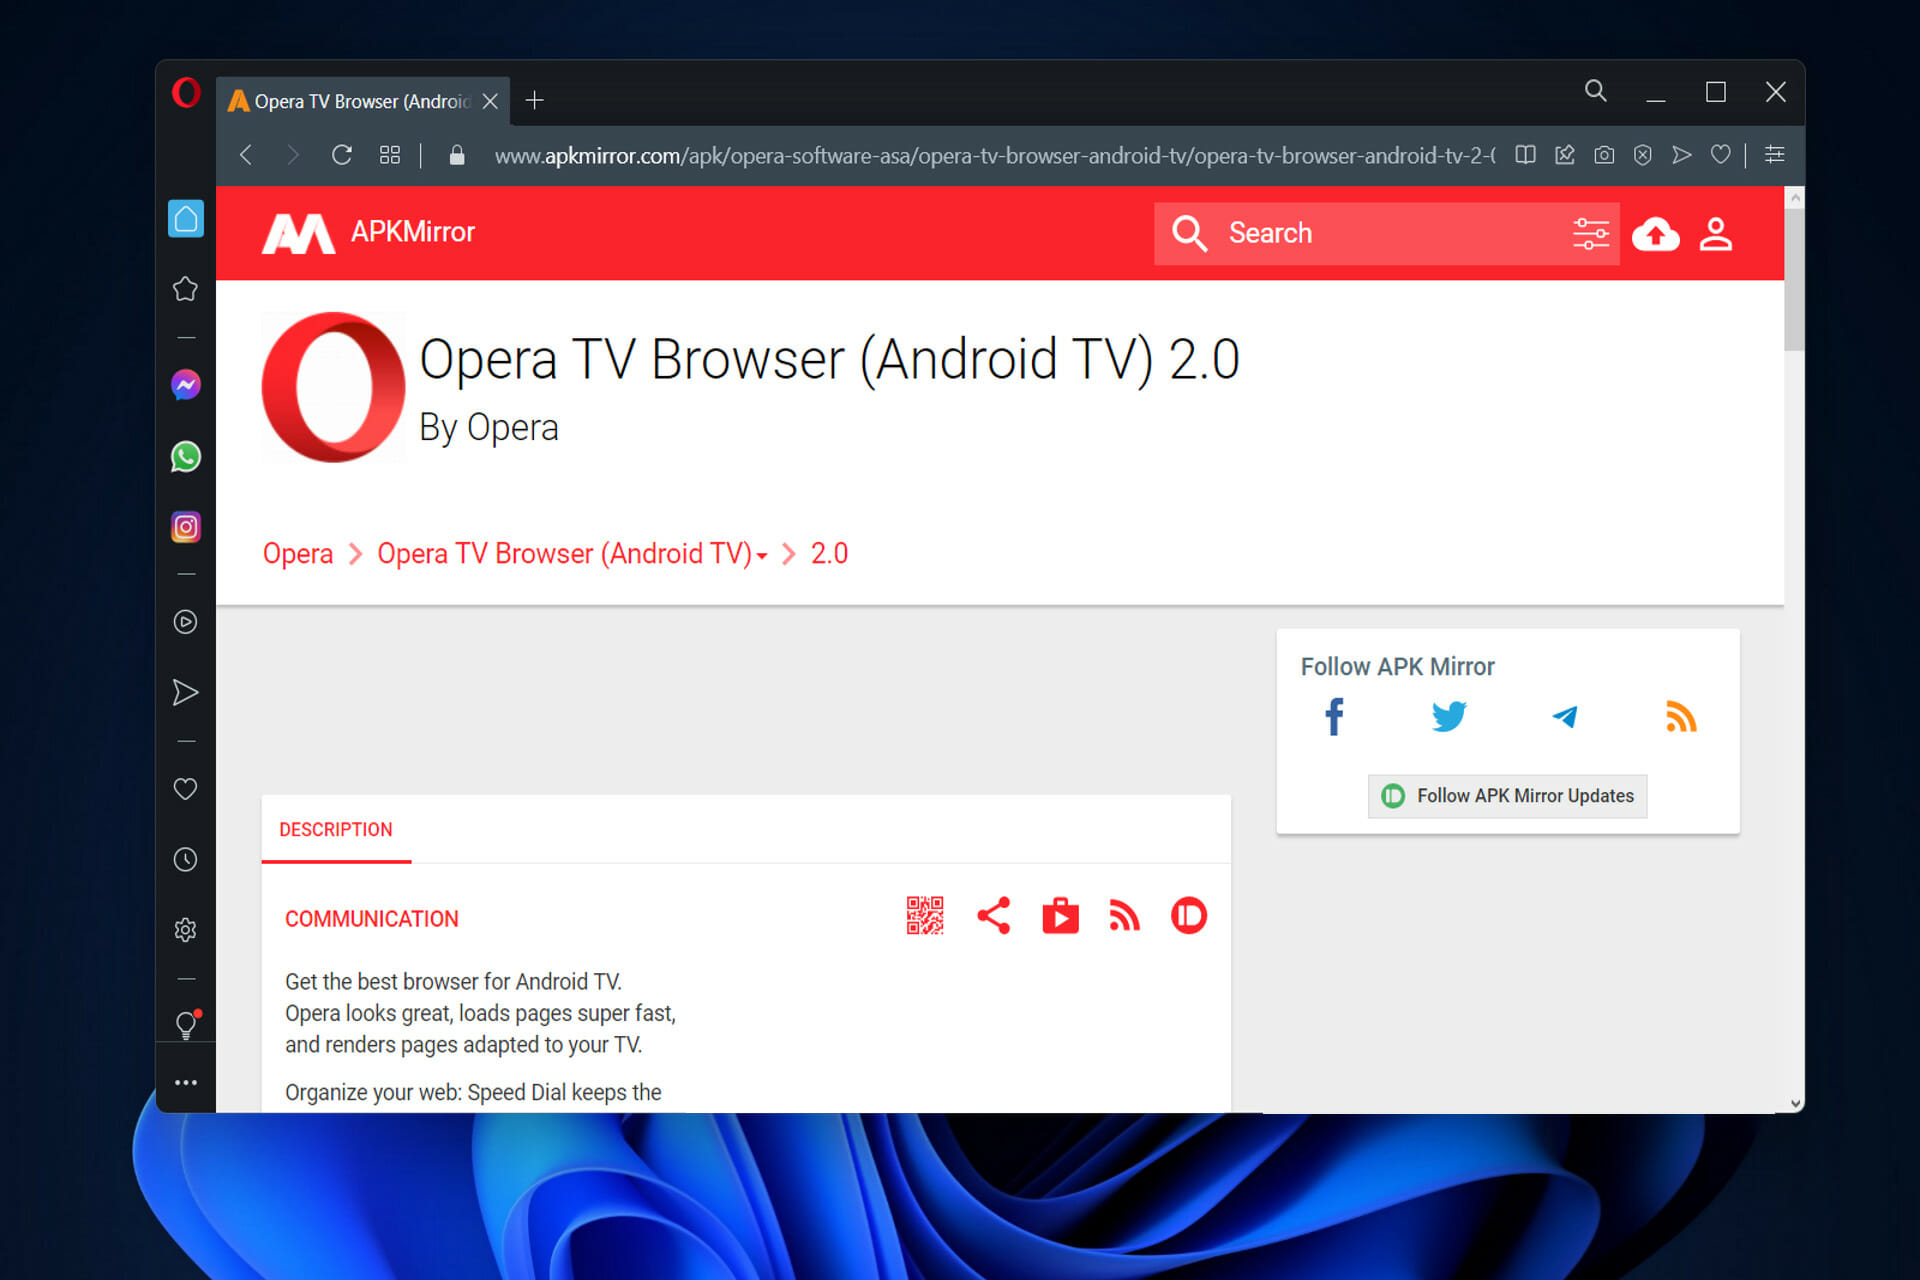
Look for the APKmirror website and enter it.
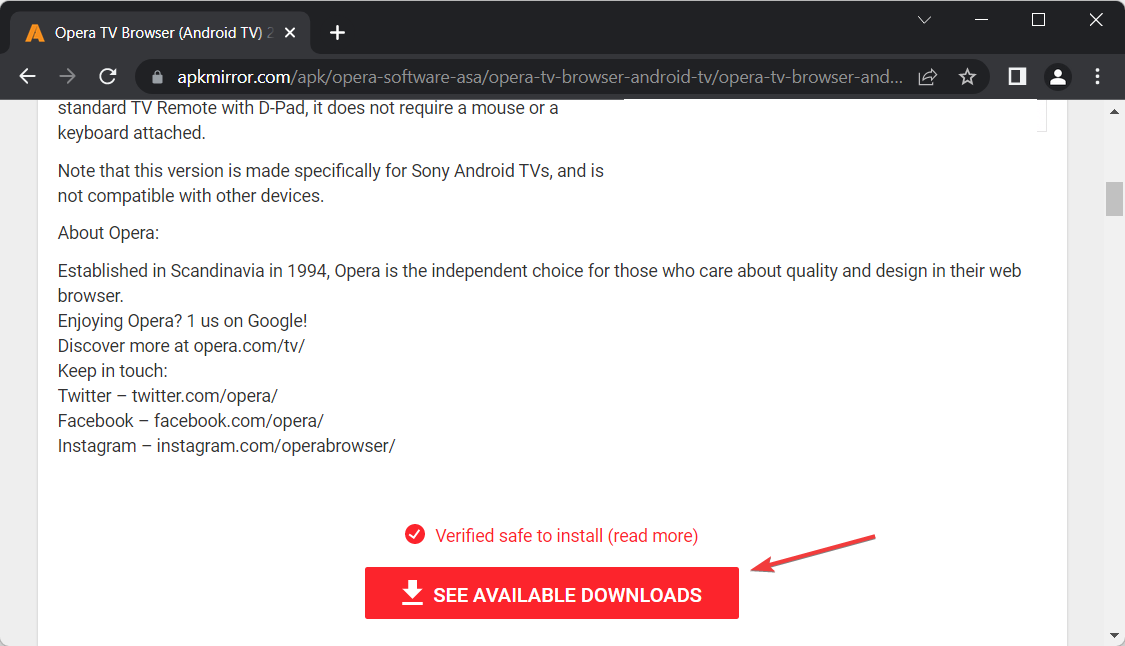
Scroll down to the download button and click on it to start the process.
Once the file is downloaded, you need to enable sideloading on your device, if it supports it, to install the APK.
Keep in mind that Opera doesn’t have a version for smart TVs anymore, so this version is likely outdated, unsafe, and incompatible with your smart TV. And since it comes from a third-party source, it might not be safe to use.
Can I install another browser on Samsung TV?
No, it’s not possible to install another browser on Samsung TV, so you’re forced to use the built-in browser.
Opera used to be available on certain smart TVs in the past, but not anymore, and the company isn’t maintaining or releasing new versions for smart TVs.
If you’re on Android TV, we have a great guide on how to download and install Opera on Android TV, so don’t miss it.
We also have a guide on how to install the Opera browser for Roku, so you might want to check it out.
Was this guide useful for you? Leave us a comment in the section below and tell us what you think. Thanks for reading!
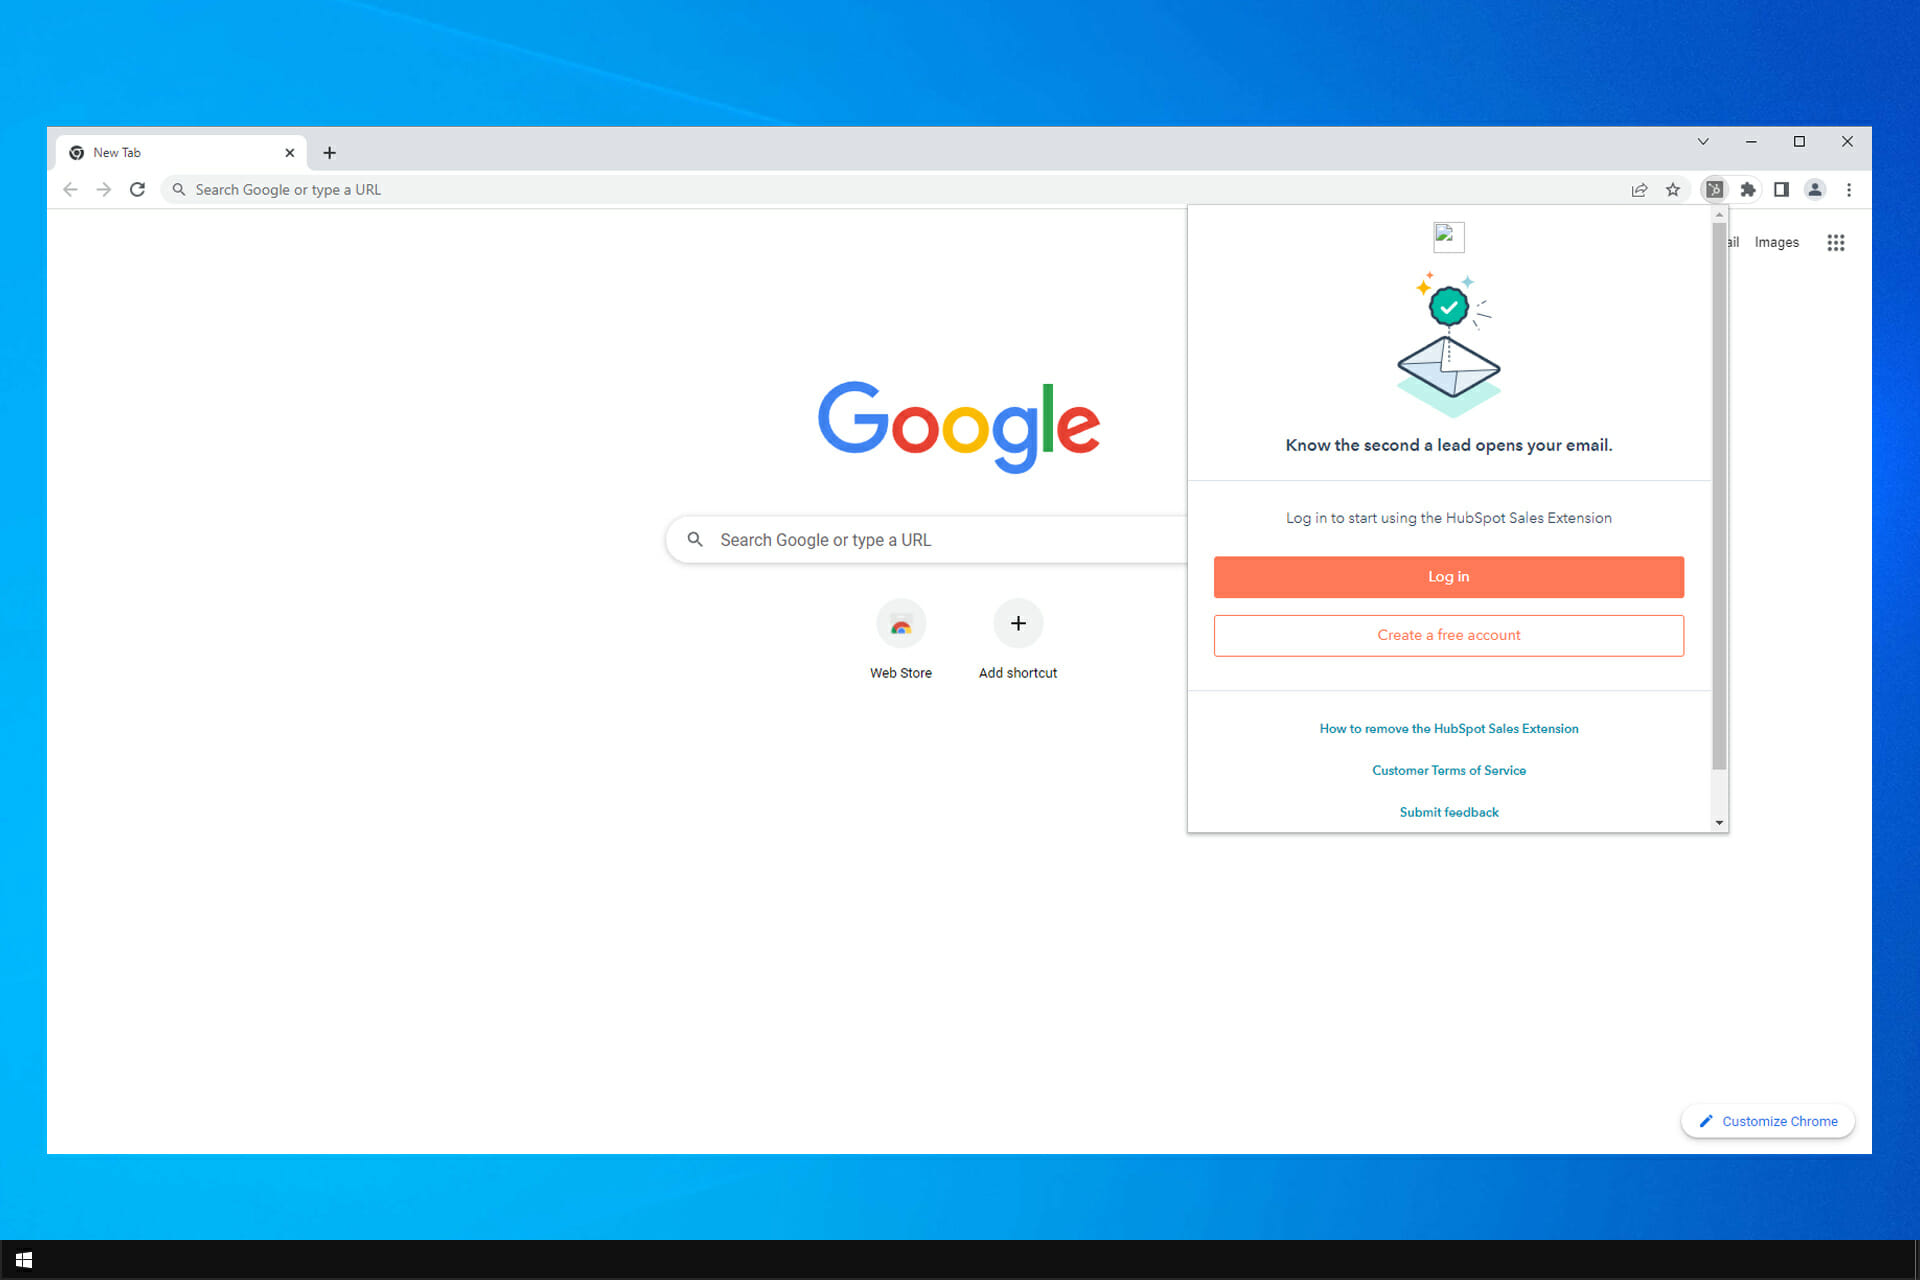
HubSpot is a popular service, and just like many other services, it comes with a browser extension that you can use to quickly access it.
However, many reported that the HubSpot Chrome extension is not working on their PC, and this can be a problem since you won’t have quick access to the service anymore.
Luckily, there are a couple of methods that you can use to fix this problem, and in today’s guide, we’re going to show you how to do it properly.
Why doesn’t my HubSpot extension work in Chrome?
It’s possible that there’s an issue with your cache, so clearing it is the best way to solve the problem. This service is heavily reliant on cookies, so you need to make sure that they are enabled.
There are also reports that certain extensions can interfere with it, therefore it might be necessary for you to find and remove those extensions.
What can I do if the HubSpot Chrome extension isn’t working?
1. Add cookies exception
Open Chrome.
Click the Menu icon in the top right corner and select Settings.
Select Security and Privacyand in the Sites that can always use cookies section select Add.
Now enter the name of the site, check Including third-party cookies on this site, and click on Add.
Make sure to add these three websites: [*.]getsidekick.com [*.]hsappstatic.net [*.]hubspot.com
Many users reported that this method worked for them, so you might want to try it out.
2. Try using a different browser
If you’re having this issue in Chrome, perhaps you might want to consider switching to a different browser, such as Opera One.
The browser is based on Chromium, so all your extensions should work in Opera One as well. Regarding the differences, Opera One has a built-in feature for tab management allowing you to create workspaces for your tabs.
There’s also a built-in ad blocker, VPN, AI, social network and messenger integration, so if you need a reliable and productivity-oriented alternative, Opera One might be perfect for you.
Click your profile icon in the top right corner and select the gear icon.
Now select three dots next to your profile and pick Delete.
Click on Delete once again to confirm.
Do this for all available profiles.
Click on Add and then follow the instructions on the screen.
5. Uninstall the extension and clear the cache
Click the menu icon and navigate to Tools. Now select Extensions.
Locate the HubSpot extension and click on Remove.
Click on Remove again to confirm.
Now press Ctrl + Shift + Del.
Set the Time range to All time and then click on Clear data.
After clearing the cache, install the extension again and check if that solves the problem.
Many reported that this solution worked after removing the problematic profile, so be sure to try that as well.
How does the HubSpot Chrome extension work?
The HubSpot extension allows you to easily keep track and log emails that were sent from Gmail. In addition, it allows HubSpot tools to work in your inbox.
Lastly, it provides your inbox with HotSpot contact database, allowing you to easily find the desired contact and start communicating with them.
These are just some of the solutions that might help you if your HubSpot Chrome extension isn’t working properly. In most cases, the issue is caused by cache or cookies.
We found the best Black Friday & Cyber Monday antivirus deals for 2024, going up to 80% off. So if you want to boost your device security without breaking the bank, stay with us.
We’ll walk you through the best offers and give you quick overviews of the products to help you pick out the best option. Let’s protect your device from malware, hackers, and data theft.
Top antivirus with Black Friday & Cyber Monday deals
Total AV – Save 80% on all-in-one internet security protection
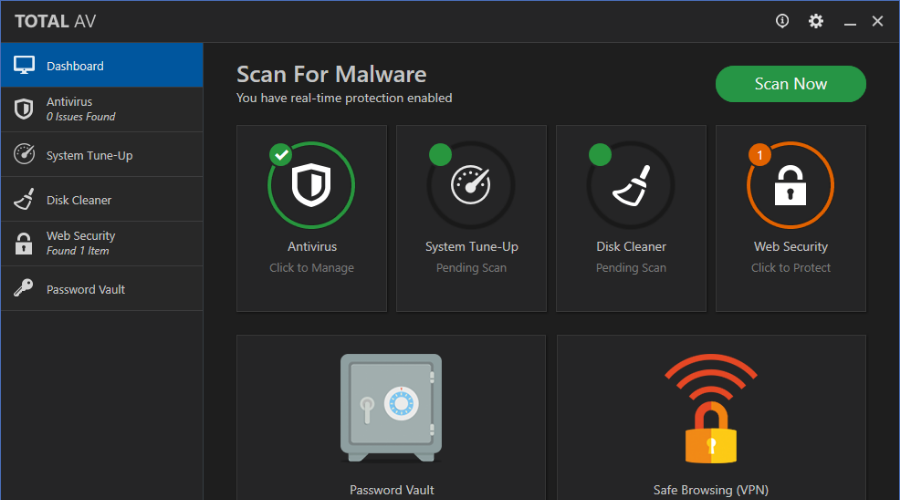
Total AV is an award-winning antivirus tool capable of entirely detecting and removing malware for multiple devices.
With a 1-year plan available for just $19 (was $99), this deal gives you 80% off. It’s a great option for those who want a comprehensive, user-friendly security solution that covers all your devices.
Key features of Total AV include:
Schedule smart scan at any time
Secure 3 devices with one account
Shield for unlimited ads
Data breach tracking
Complete browsing solution
Highly compatible with Windows, Mac, Android, or iOS.
Total AV
Take advantage of this trustful antivirus software that guards you against all types of viruses out there.
Bitdefender – Save 55% and protect all your devices
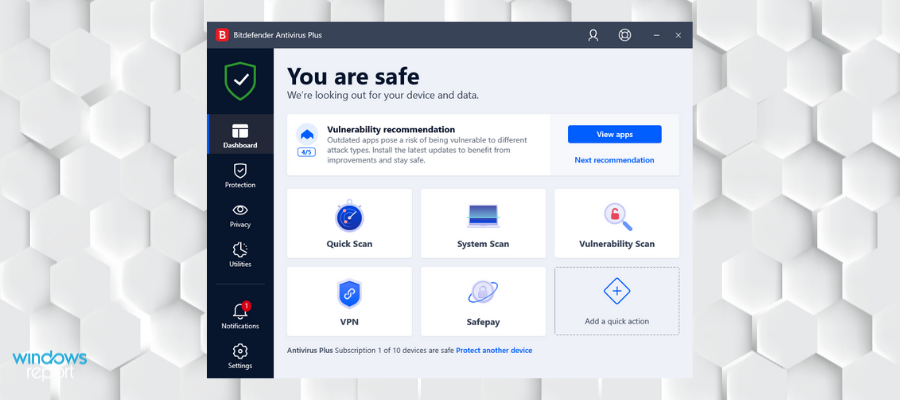
Bitdefender will protect your PC against the latest cyber threats. It has multi-layered ransomware protection, advanced malware detection, and a secure VPN shield.
In addition, this antivirus includes a vulnerability assessment that will scan your system for vulnerabilities and check different software to cover security gaps.
Key features:
Anti-phishing, anti-fraud and anti-theft protection
Bitdefender Autopilot – it automatically takes care of your real-time protection
Game, movie, and work modes so you won’t get disturbed by notifications
VPN for extra privacy
Full webcam protection
Safe online banking
Social platform protection
Password manager
Bitdefender
Unlock top notch security at fraction of the price with this exclusive deal!
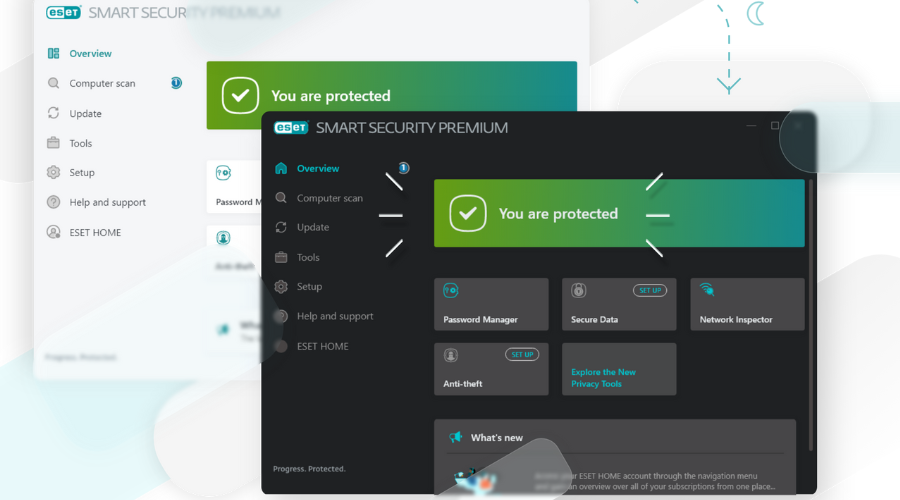
ESET HOME Security Essential has top-level antivirus technology with multi-layer protection against all threats. It ensures safe and private browsing with top-level anti-phishing tools.
This powerful antivirus takes care of you with an advanced firewall and Network Inspector functionality.
It also protects payment data, has a ransomware shield, prevents host-based intrusion and protesct yous webcam and microphone from spying. Furthermore, it has built in parental controls.
Key features of ESET HOME Security Essential include:
Advanced machine learning
Up-to-date ransomware shield
Scans files as they download
Host-based intrusion prevention
Gamer mode
Parental Controls
Security reports
Webcam protection
Antispam support
ESET HOME Security Essential
Get full device protection at less than half the regular price or take advantage of the group discounts.
Panda Antivirus – Save 60% on essential antivirus protection for one device
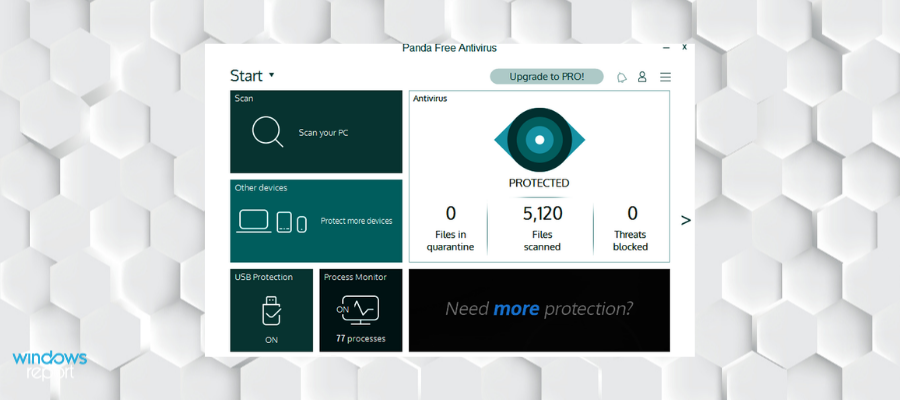
Panda Antivirus is another option of powerful antivirus software that has a deal on Black Friday & Cyber Monday. It comes in four different versions, each suitable for your particular cybersecurity needs.
Choosing this security solution guarantees ransomware and advanced threats protection for multiple devices. You will benefit from a secure Wi-Fi connection and defend your PC from different hacking attempts that may steal your information.
Some of Panda’s top features include:
Customizable and attractive interface
Moderate system impact
3 levels of overlapping protection
Sends suspicious signatures to Panda online lab for analysis
Wifi network protection
Parental controls
Data Shield for data encryption
Password manager
Cleanup tools that speed up your device performance
Panda Dome
You don’t have to pay a premium price for protection. Take advantage of this fantastic deal of panda Dome today.
Norton Security – Save 50% on trusted, essential antivirus protection
Using this highly trusted antivirus offers real-time protection from advanced malware and secures your sensitive financial data every time you require it.
You have firewall support for multiple operating systems like Windows or Mac devices. Thus, you’re covered against malicious software from unsecured websites at any time.
Avast Antivirus – Save 50% on premium protection for your devices
This antivirus software from Avast is another great option that covers all your online security needs.
If you need comprehensive antivirus security, you can monitor all your applications and defend the system against advanced malware or phishing attacks.
Avast Antivirus key features include:
Blocks all webcam hacking
Ransomware protection
Automatic software updater
File shredder
Sandbox capabilities
Firewall
Anti-spam
Browser clean-up
Wi-fi inspector
Game mode
Avast Antivirus
This ultra-powerful antivirus tool also comes with a webcam protection feature called Webcam Shield to further ensure your privacy.
Webroot – Save 25% on fast, lightweight antivirus protection
Webroot is another viable option of antivirus software that is on offer for Black Friday & Cyeber Monday. This program is a cloud-based antivirus which makes it very small (only 15MB).
The fact that is cloud-based makes it very fast when scanning your Windows 10 PC without affecting your computer’s performance.
Other notable features of this cloud-based antivirus include:
Real-time threat monitoring
Ransomware protection
Anti-phishing filter
Firewall
Fast scanning
Webcam protection
System optimizer
Webroot Antivirus
Webroot is a very reliable anti-malware tool, so why not get it now while the price is at an all-time low?
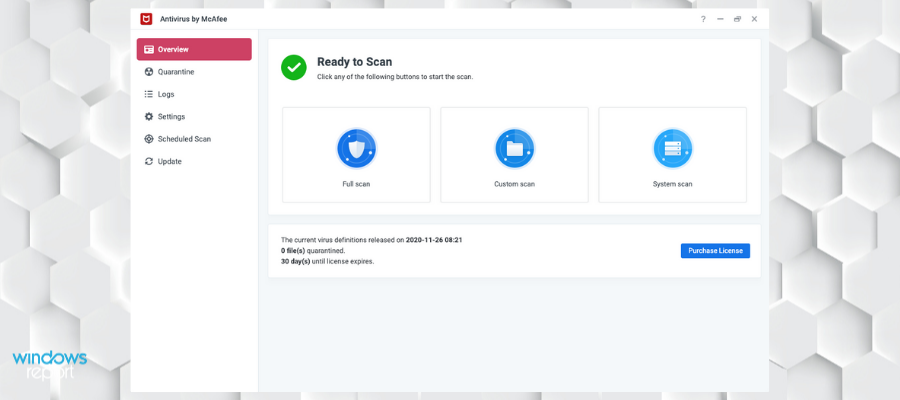
McAfee – Save 55% on all-in-one security for your devices
McAfee is another software that will be on offer on Black Friday & Cyber Monday. This software can easily block viruses, malware, ransomware, spyware, unwanted programs, and more.
McAfee key features:
Easy to manage your devices with True Key Identity Manager
Protection for your home and family networks
Security console and support
Can be used on PC, smartphones, and tablet devices
Firewall
Anti-spam
Parental controls
PC optimization tools
Network Manager
McAfee Antivirus
Premium cyber protection is worth every penny, but if you could spend fewer pennies, why not take the deal?
In this article, we listed the best antivirus software released in 2023 that are available as New year deals. This list includes both free and paid software with strong security capabilities to give you peace of mind while browsing the internet on your Windows 10 PC.
So, which antivirus software are you going to purchase this year? Let us know in the comments below.
In an increasingly visual world, user interfaces have become all the more critical. New users won’t even try your program unless they are met with a beautiful design that will pull them in.
In order for this to happen, developers and web designers altogether should think about visual elements, menus, or functionalities to make the best GUI builder out there.
So, we’ve compiled a list of the best GUI designers. They will make prototyping and building a beautiful UI just a matter of a few clicks.
Technology is moving forward faster and fast as days get by, and if you want your product or services to stand out in any way, you have to make it look good.
For example, in the case of software, sometimes having a great-looking interface can bring you more clients than a program that does a better job. That is why creating a program and giving it special effects can be crucial.
For those kinds of situations, a graphics designing program such as Adobe After Effects can make the difference between a program that looks plain and a program that will catch the eye of any would-be customer.
Adobe After Effects is specialized in creating video content, which in the case of programs can be used for the professional design of GUI animations and special effects.
If you are talking about a game or a multimedia-related product, this may be just what you need in order to make it look more sleek, modern, and powerful.
The interface is quite intricate, but the program comes with extensive documentation. In fact, once you’ve mastered Adobe After Effects, you can pretty much use any other similar product with ease.
Other key features of Adobe After Effects include:
UI animation support for mobile and desktop apps
Plenty of presets and effects
Duration and frame rate adjustments
All things considered, if professional eye-catching designs are what you are looking to create, you need to look no further than this product.
Adobe After Effects
Design beautiful and useful software UIs with Adobe After Effects!
Webflow is a great graphic user interface (GUI) design tool to help you build amazing user experiences without coding.
You can use it to create sketches and mockups and you can continue after by realizing a complete website GUI project.
Users of this tool get a simple drag-and-drop experience that lets them customize and adjust the interface smoothly, easily, and visually.
If you are or plan to become a more advanced user in the GUI domain and do business out of it, Webflow helps you build different database types with dynamic content for online stores.
You can continue customizing the interaction on your interface by continuously experimenting with the visual elements.
The tool lets you connect multiple team members and work together for astonishing final results.
Other key features of Webflow include:
Website builder
eCommerce integrations
Productivity and customer engagement tools
Webflow has a free version as well as subscription-based versions that include additional benefits.
Webflow
Create professional GUI designs and connect with your team with this easy drag-and-drop GUI designer.
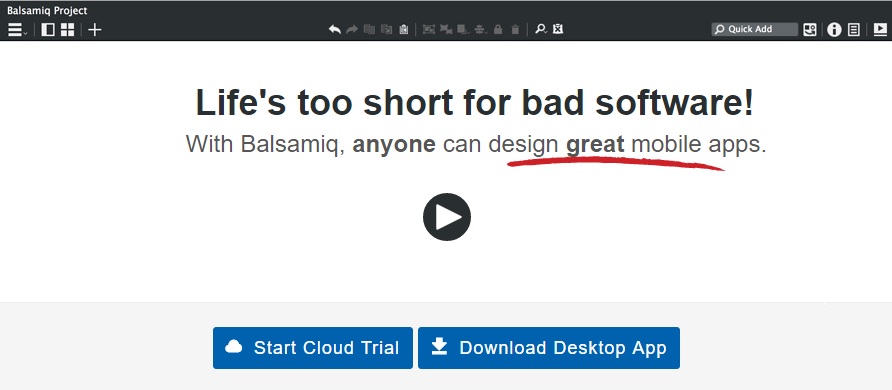
Balsamiq is a rapid wireframing tool. It will help you visualize your ideas with its unique style and a rich set of tools that cover most if not all of the typical software usages.
With its help, you’ll be to weed out the ideas that won’t work and quickly double down on the ideas that show promise. It’s used by more than 500,000 companies such as Apple, Adobe, and Sony.
Balsamiq is available on the Cloud, Windows, Mac, and even Google Drive. That means you can use it almost everywhere.
Balsamiq also gives you access to a resourceful learning platform that teaches you how to wireframe.
The tool also lets you collaborate and create development teams with UX designers, product managers, and developers.
Other key features of Balsamiq include:
Built-in UI controls and icons
Drag-and-drop
Export to PNG or PDF
Not only that, but it begins with a reasonable subscription price, and if you are a teacher or working for a non-profit, you can get it for free.
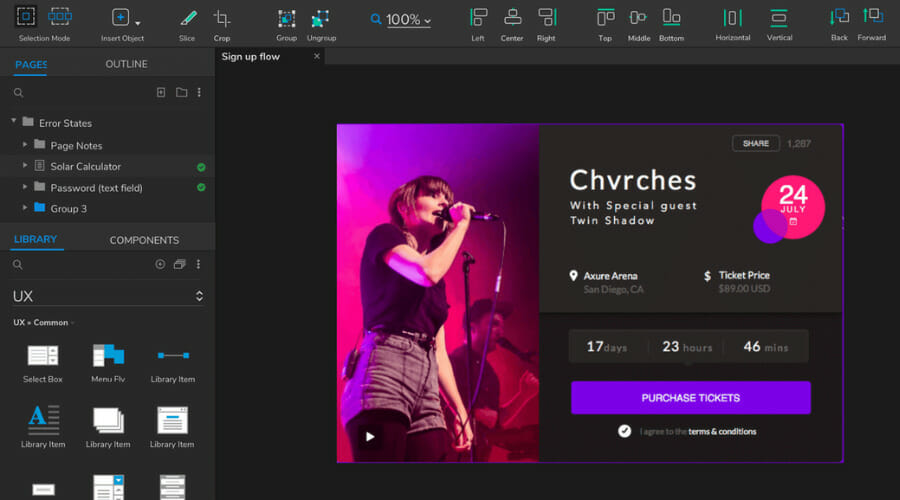
Axure RP is an industrial-grade wireframing, rapid prototyping, documentation, and specification tool that is a great choice for all kinds of users.
With Axure RP you don’t only create your design, but you can also describe and specify the usage of every element.
With its support of animations, conditional flow, math functions, and dynamic content you not only can create an interface but you can also see its function and perform live.
Axure RP while being fully capable of designing because it is not an exclusive tool for only that, its toolkit is not on a par with software targeted specifically to designers (such as Sketch).
With this tool, you can create many different types of UIs, including mobile-friendly applications.
Axure RP offers professional solutions that help the users of your application have an easy and pleasant experience.
These include working text fields, droplists, buttons, multi-state containers, data-driven interfaces, and adaptive views for desktop tablets and phones.
Other key features of Axure RP include:
Flow diagrams
Collaboration tools
Easy to share prototypes
It has a bigger monthly subscription price than other options on the market, but the toolset provided justifies the price and makes the investment worth it.
Most design programs are targeted toward mobile developers, but Altia Design is a different beast. If you are building a UI for an embedded device then this is your program.
Not only will it integrate with Photoshop and provide you with toolkits to build a GUI directly in it, it will also help you export your GUI to C code and run it directly on the embedded device.
That’s right, Altia Design will even generate the code for you, so you don’t need to pay extra for the developers to bring your UI to life.
With its support for animation, its optimized code generation, and extensive toolkit, it is the choice of many embedded software engineers.
Users of this tool are not required to hand-code anything as Altia is able to generate professional-looking prototypes starting from designs made in Photoshop, Illustrator, Maya, and other similar tools.
You can use both 2D and 3D integrated content, implement feedback with fast iterations, prepare the user interface, and more.
Other key features of Alita include:
WYIWYG GUI editor
Design assets optimized for code generation
Comprehensive library of GUI components
Validator to fix errors
Sadly, Altia Design is only for embedded devices. While the program has no set price, you can contact them here, and they’ll provide the price after they get some information about your project.
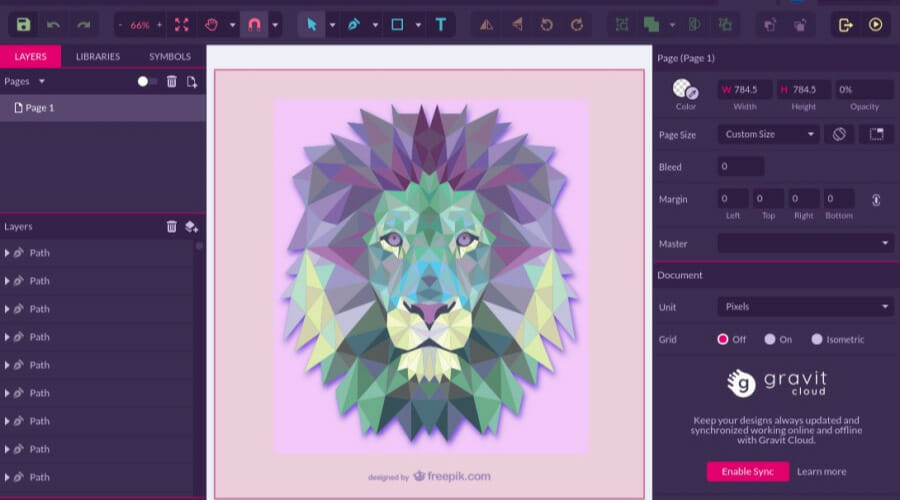
Of course, no list would be complete without free software. This is one of those rare free programs that actually works and works so well you’d not believe you have it for free.
With a set of features that not only lets you design GUIs but also create illustrations and edit them, featurewise, it doesn’t bow down to its competitors.
With Android and IOS versions of the program coming out soon, you can practically use it on every device. It already supports Windows, Mac, Linux, and even ChromeOS.
Not to mention that you can also use the online version that doesn’t lack any offline version features.
Gravit is suitable for advanced and beginner users alike. The tool has a simple and intuitive interface and users can get access to resourceful tutorials and guides.
Professionals will enjoy the complete control offered by this software as it lets you thoroughly tweak and edit every little detail of your design.
For users that need inspiration or want to save time, Gravit offers a comprehensive library of premade design templates. These can help you get started and design a complete product in fewer steps.
Other key features of Corel Vector include:
Compatible with mobile devices as well as pen devices
Vector based engine
Cloud integration
Autosave feature
Garvit offers a free solution to get started with, but it also has a premium version for those who need a more advanced set of features.
We gave you a run-down of the best GUI designers out there. We tried to make a varied list that includes programs utilized for different kinds of situations.
Therefore, there is a suitable program whether you are creating complex Windows programs, mobile apps, or embedded software. We hope you enjoyed the article.
You can tell us in the comments section about your experience using these programs. Did we neglect to mention an amazing program? We are more than happy to read your opinions.
An in-browser map maker can be needed for several reasons. Whether you need to create a real-world map, a fantasy map for a story or DnD campaign, or a mind map, we have some recommendations for you.
Most of the maps on this list have a pro or premium version, but they all have free versions for users to try out. Keep reading to find the best in-browser map maker for your needs.
Which browser is best for map makers?
We recommend Opera One browser because of its optimal productivity and multitasking features. With workspaces and tab islands, users can group relevant tabs together in their own separate spaces to help users stay focused on their tasks.
The built-in functions such as social media, messaging apps and AI are just one click away, in the sidebar of the browser, so you don’t ever need to leave your work to access them.
Opera One
Take advantage of Opera’s features for optimal productivity.
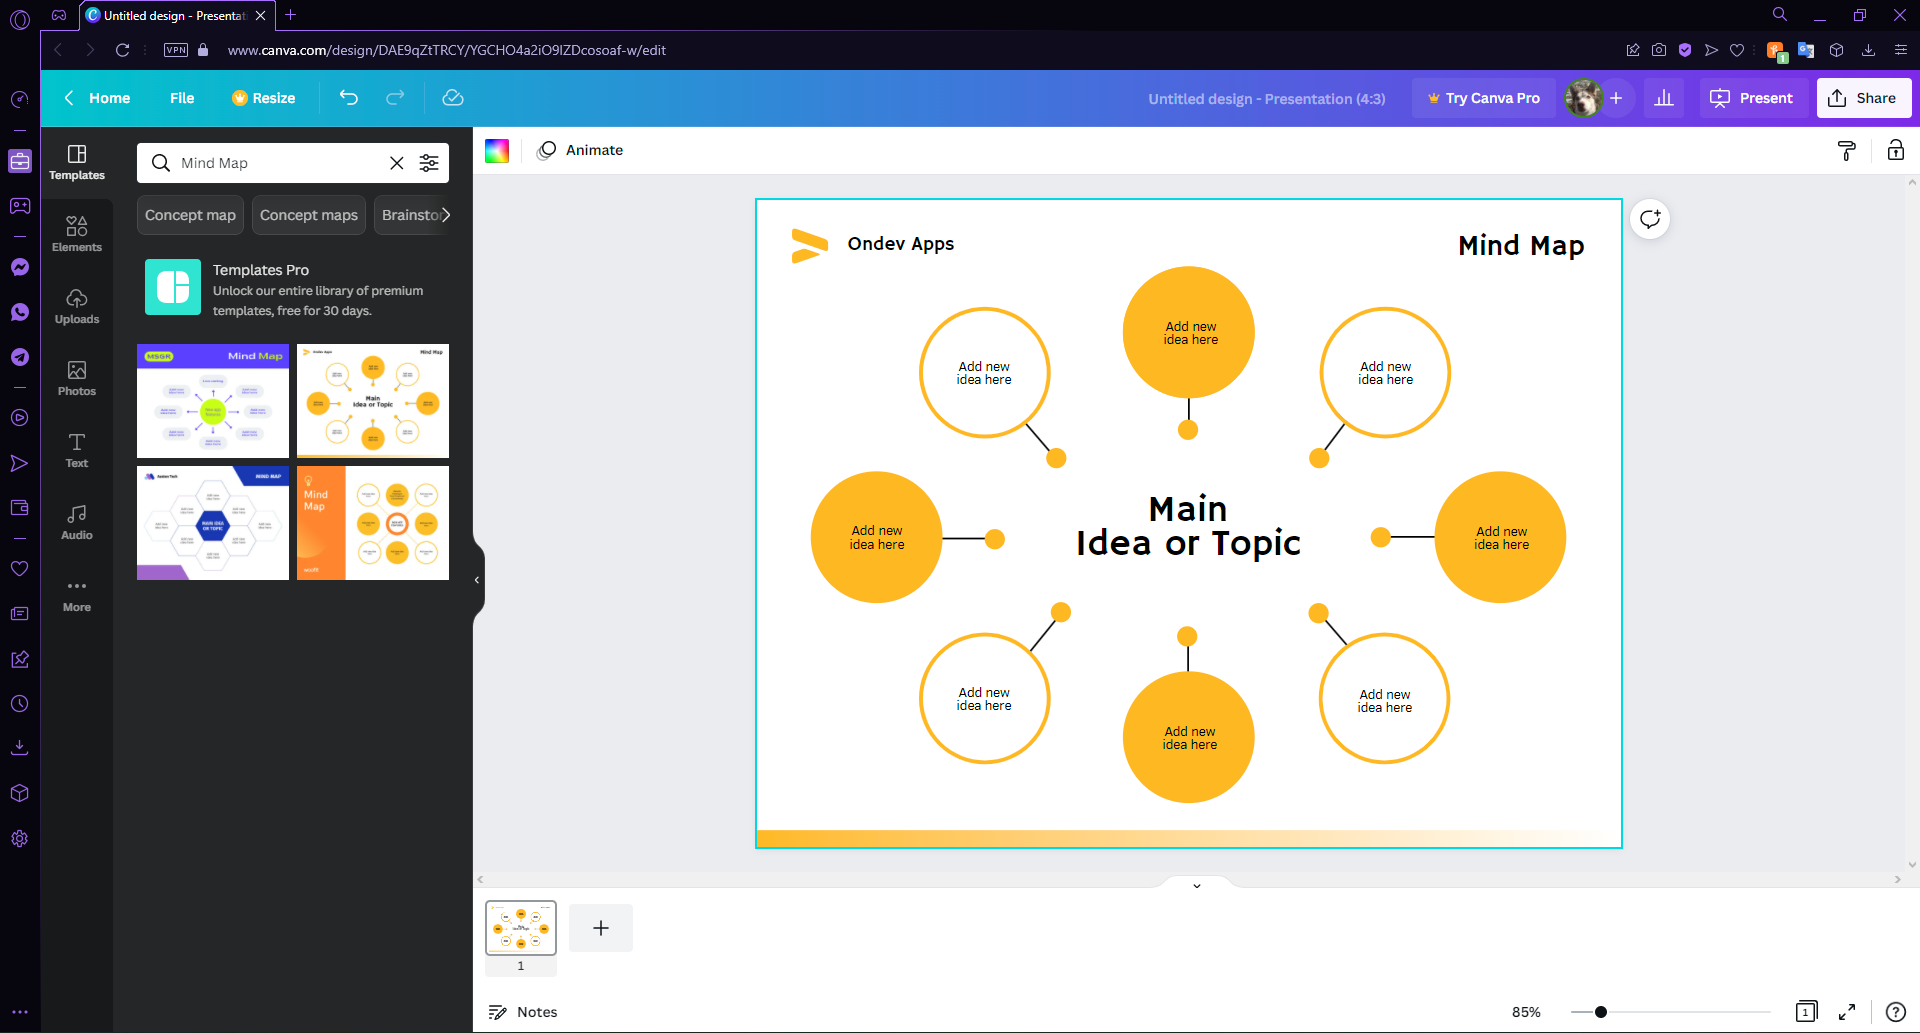
Canva might be a surprise to see on this list for map makers, and while you can’t create traditional or fantasy maps, it’s perfect for making mind maps. Mind maps allow users to visually organize information or ideas in a diagram.
Canva is free to use and offers templates from their library to help users get started. Canva has an extensive library of elements and royalty-free images for users to play around with. While there is a pro version of Canva, the free version still offers a ton of features.
This map maker is perfect for creating fantasy maps for dungeon masters or authors. The interface is simple and easy to use while also offering a lot of customization options.
Users can choose from a selection of styles to help them get started. There is also a catalog of stamps, textures, and brushes that users can use to make their fantasy maps.
Inkarnate does offer a free version, but it has a limited amount of features that users have access to. There is a wider selection of features offered to Pro users.
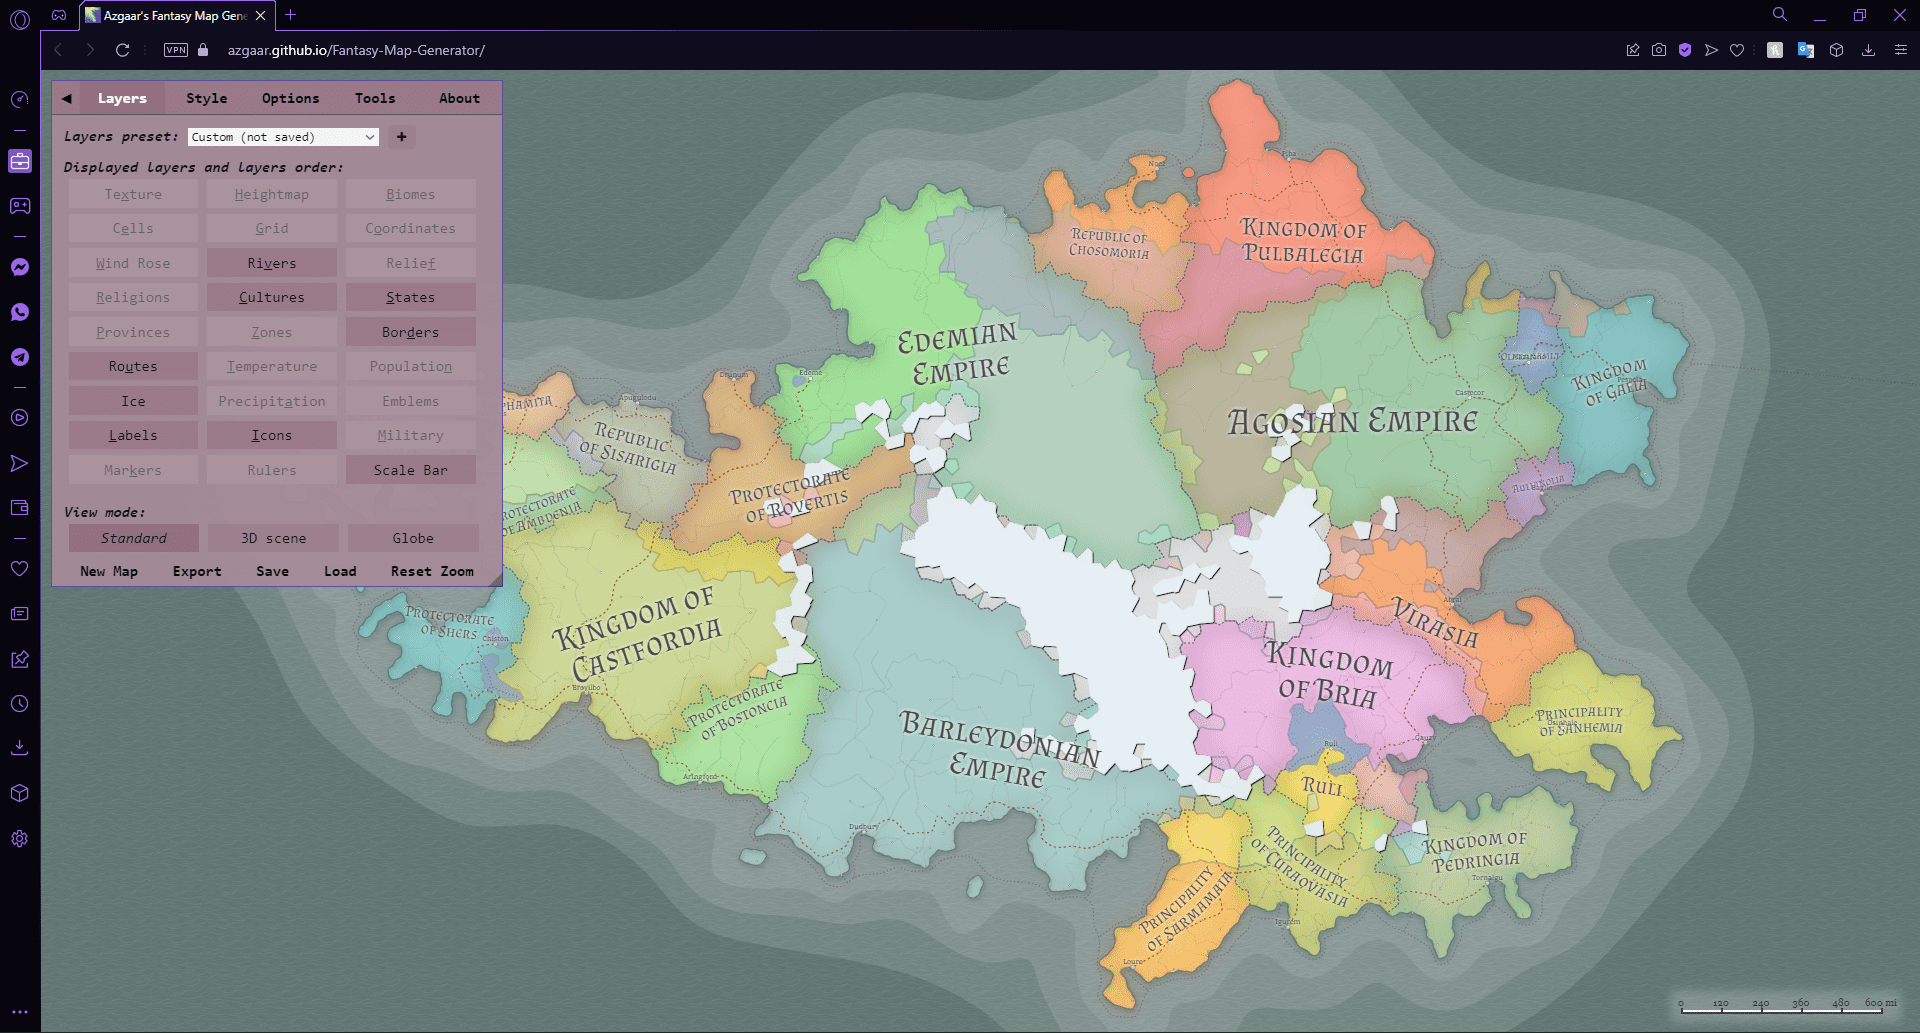
This is one of the easiest and quickest ways to make a fantasy map for free. Azgaar generates a whole fantasy continent depending on your preferences. While it lacks the ability to edit details and has fewer features, it’s a great tool for creating a general map layout.
Azgaar is free to use and doesn’t require signing up. Users can export their map as an SVG, png, jpeg, or tiles. For more advanced map makers, Azgaar offers the option to export maps to GeoJON for GIS compatibility or to JSON as an API replacement.
Dungeon Fog is another great in-browser DnD or RPG map maker; however, it is for maps of indoor spaces. Users can great buildings and customize rooms and features within those structures. This is perfect for DnD campaigns, tabletop games, or stories taking place in an elaborate structure.
This map maker also has a public map library that allows users to map made by others. Users can even copy these maps and use them as a template for their own creations.
While users can access and export their creations for free, Dungeon Fog offers a premium version that gives users access to several exclusive features.
Google My Maps is perfect for users needing to customize a real map. Users can add markers, create routes, and measure distances.
When creating routes, users can adjust between driving, biking, or walking. The measurement tool can also be used to calculate area by making a polygon.
However, this map maker lacks customization options. It’s great if users need to make a route in a specific city quickly, but it doesn’t offer many features beyond that.
We hope this list helped you pick a map maker for your ideas. Whether you’re creating a fictional land or needing to organize your thoughts in a mind map, this list offers the best map makers to get the job done straight from your browser.
Many users complained about constantly receiving the LastPass does not recognize this device or you are at a new location. Please check your email to grant access to your new device or location error.
It just seems that you first need to authorize the device when logging in from a new IP.
Things get complicated when you try to find that email you’re eagerly waiting for. You’ve probably looked everywhere, including spam. There’s literally no received email to help you follow any further instructions.
The even stranger thing is that others see this warning even though they’re at the same location, on the same computer. LastPass also shows ridiculous locations, and it continues to prompt users with such messages.
Are you in a dilemma about how to tackle this issue too? If you would like some help, see the easy solutions below.
Quick tip
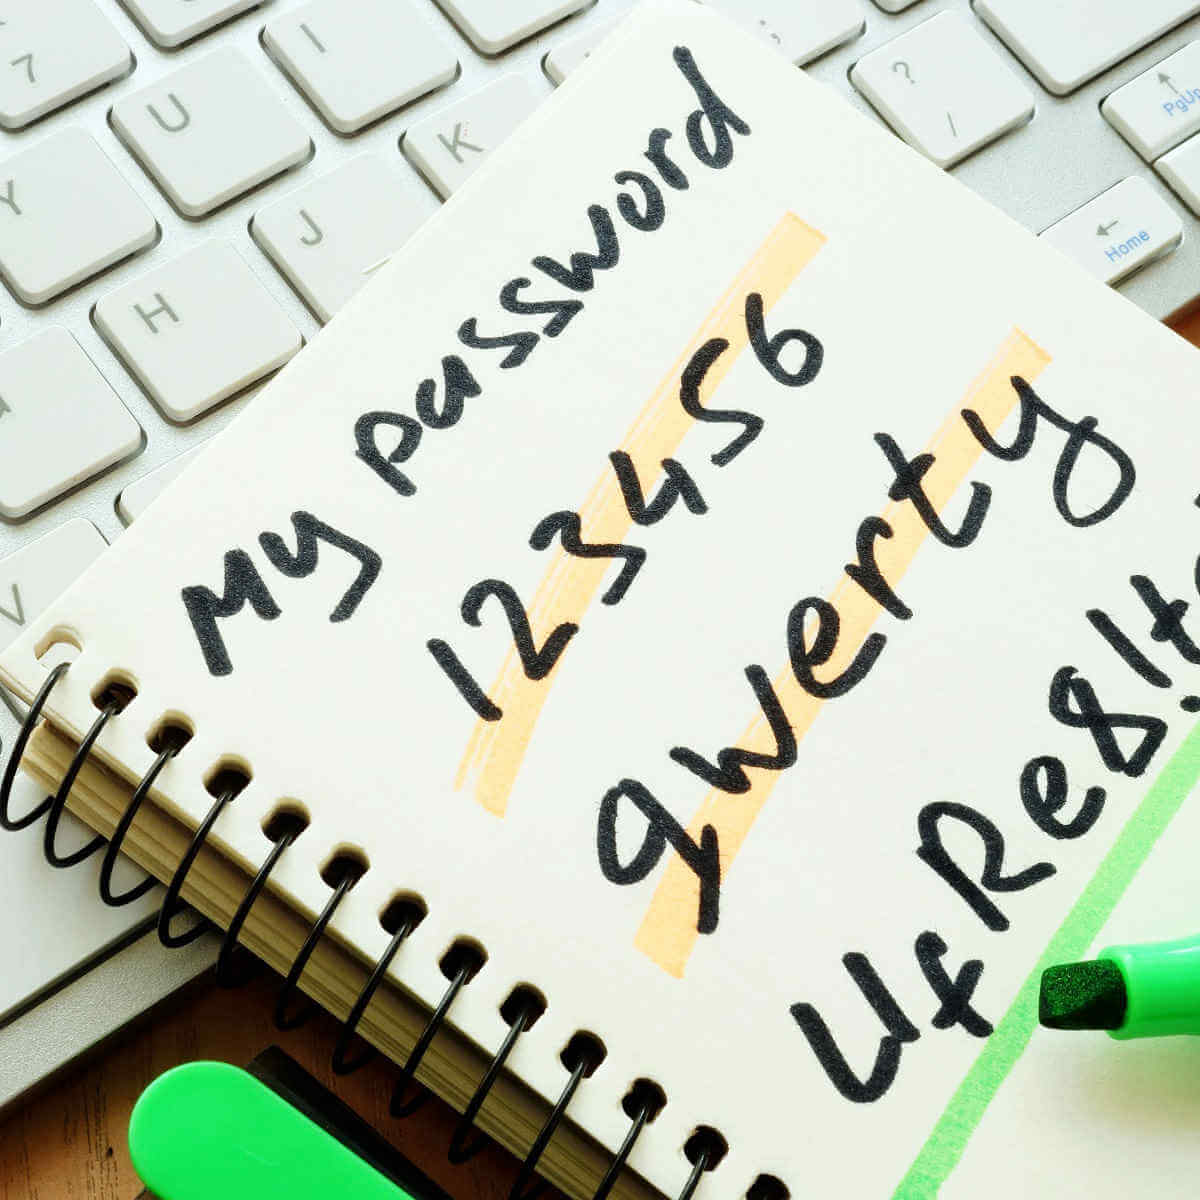
It’s recommended you don’t use the same password or variations of the same password on all your accounts. In case one of your accounts is compromised, all your other passwords are still secure.
You can use a dedicated tool like RoboForm to generate highly secure and unique passwords and store them in a digital vault with next-gen encryption.
RoboForm
Protect your accounts against data breaches with this powerful password management tool.
What can I do if LastPass does not recognize this device?
1. Check your security email address
Many users prefer to safeguard their accounts by adding a secondary security email address. Security notifications are directed there in case your primary account email address is compromised.
Therefore, if you have added a security email address to your account, you should better check that inbox first. If you don’t have such an email, all notifications should go to your primary address.
2. Add LastPass to your email filter’s whitelist
It often happens that emails are being blocked or sent to the Junk folder. Blame LastPass for their spammy-looking content emails for as long as you’d like. This will serve you no good.
To ensure it doesn’t keep on happening to you, just add [email protected] and [email protected] as contacts. Also, add them to your email’s filter whitelist. After that, prompt LastPass again to send you a new email.
3. Try to disable the email loop confirmation
Go to My Vault > Account Settings > General (tab).
Click Show Advanced > Security section.
Disable the option that says Email Verification: Skip email verification of unknown devices and locations.
In case of find it already checked, uncheck it.
Try again to log in.
You might now see the same error, but go on and check it again.
Switching back and forth between the inbox and spam folders for hours is ridiculous. The email verification is often delayed, yet it does eventually arrive for some.
If you’re still in the unfortunate situation of not getting it, try to disable email loop confirmation when logging in from a new device or new location. Follow the path described above.
This clearly doesn’t address the fact that the Email Verification feature is broken. Call it a bug, a glitch, or just poor programming, this is a major problem against comfortably using LastPass.
Verifying the access to your LastPass account by clicking a verification link that is sent to your email address, should be a very easy step to do.
For any more questions or suggestions, don’t hesitate to reach for the comments section below.
Take a look at our Password Manager Hub for many other helpful guides and articles on this topic.
Check out our detailed LastPass pagefor other useful information.
Dying Light 2 Stay Human surely rises to the expectation of highly critical fans, as the title proved to be the sequel everyone was waiting for.
People that bought the game appreciate everything from the story to the visuals. And Dying Light 2 was made specifically to delight the eye and provide an unbelievable experience.
Ever since Techland announced the title, true gamers have been asking the same thing over and over again: Will ray tracing be available?
The answer is yes, the graphics feature has been available for quite some time now, for both the console and the PC version of Dying Light 2.
However, if you are thinking about using such high graphics settings, you better make sure you have a good GPU, as well as a solid processor.
Using ray tracing depends on your device meeting some requirements, so don’t expect it to be available on outdated hardware.
Dying Light 2 really looks amazing on a visual level, and it allows for a ton of helpful graphical options for PC players, with a variety of settings that will allow them to customize their experience.
The game features both Deep Learning Super Sampling (DLSS) and FidelityFX Super Resolution (FSR), in case you were wondering.
We also have to mention that DLSS and FSR serve the same purpose, but for different products. With an Nvidia graphics card, you use DLSS, while with an AMD GPU you use FSR
Dying Light 2 minimum ray tracing PC specs (1080p, 30fps)
CPU – Intel Core i5-8600K / AMD Ryzen 5 3600X
RAM – 16GB
GPU – Nvidia GeForce RTX 2070
OS – Windows 10 or later
Storage space – 60GB SSD
Dying Light 2 recommended ray tracing PC specs (1080p 60fps)
CPU – Intel Core i5-8600K or AMD Ryzen 7 3700X
RAM – 16 GB
GPU – Nvidia GeForce RTX 3080
OS – Windows 10 or later
Storage – 60GB SDD
How do I enable ray tracing for Dying Light 2 on PC?
It’s not a difficult process but, as we said, it all depends if you meet the requirements for ray tracing to even work on your device.
Before we begin, keep in mind that you need to turn on the DirectX 12 Ultimate. Thus, if you don’t have it, you will need to look into it.
1. Update your graphics driver
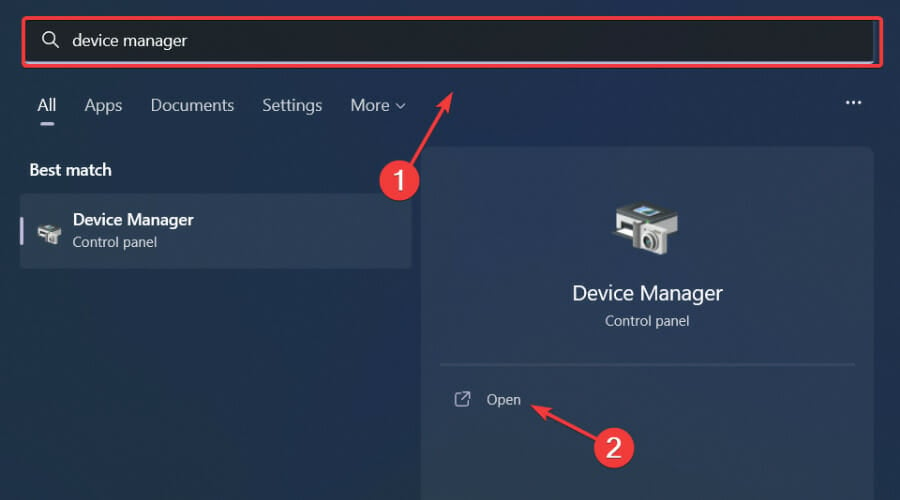
Press theWindowskey, search for Device Manager and click on Open.
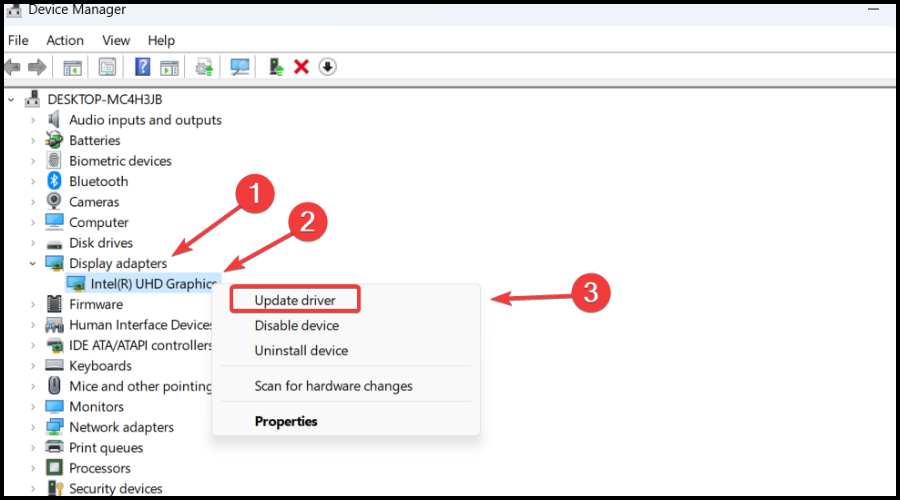
Expand Display Adapters, right-click on your GPU and select Update driver.
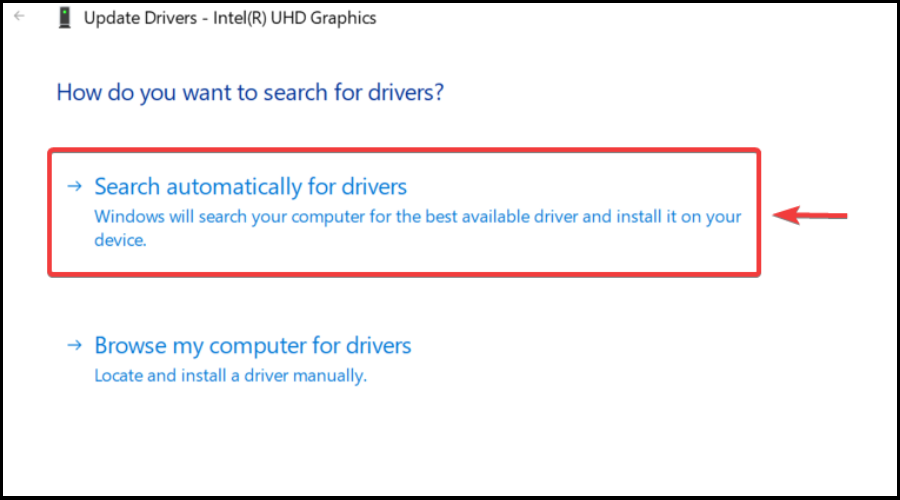
Select Search automatically for drivers.
Gaming can be enjoyed without any crashes, lags, or freezes by keeping all drivers up to date and error-free easily.
Sometimes, manual checks are hard to perform, that’s why we recommend using an automated assistant that will scan for fresh driver versions daily.
In case you’re a beginner, you don’t have to worry! Outbyte Driver Updater is smart, simple, engaging and its user interface was built to make your life easier.
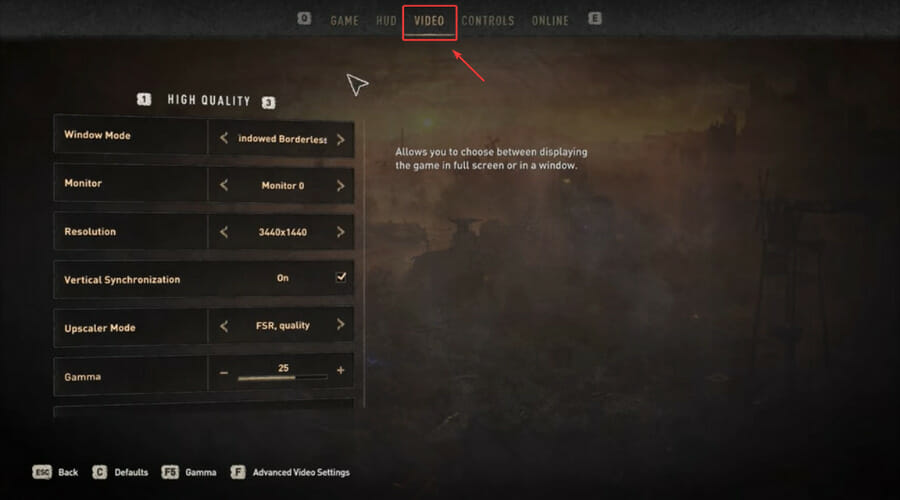
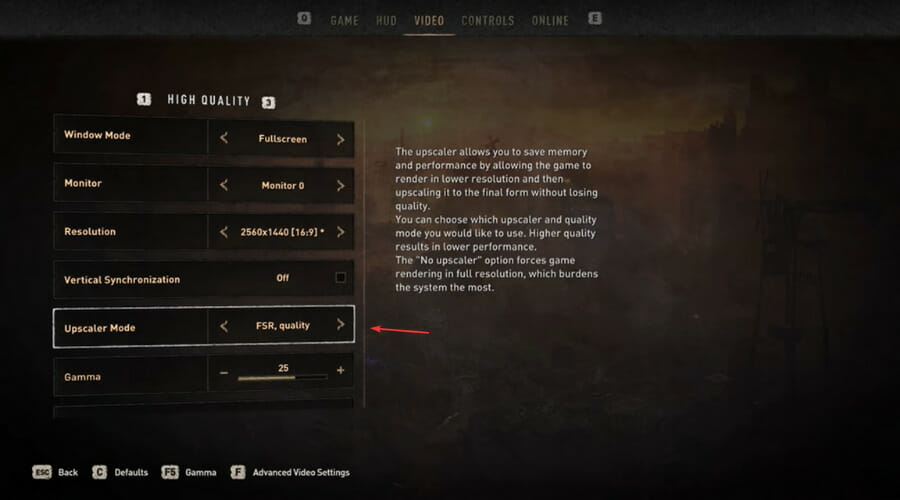
Scroll down to Upscaler Mode and activate DLSS and FSR.
Press ESC, then Enter to save settings and check the performance and FPS.
That is what you have to do if you want to enjoy the full visual experience that Dying Light 2 Stay Huan has to offer to everyone who purchases the title.
Remember that the core of all these visual goodies are the hardware and requirements necessary for such features to work in the first place.
Was this guide helpful to you? Be sure to let us know in the dedicated comments section below.
When monitoring a Windows machine, whether it’s a server or workstation, the key is to avoid installing third-party software on that system.
Everybody knows how to do that by installing an agent and then controlling it remotely from a different station but without it, it’s a lot more difficult.
That’s where WMIC comes into play, a white-hat hacker tool that can become very useful in managing remote Windows systems.
What is WMIC and how does it help?
WMIC or Windows Management Instrumentation Command-line is a tool that uses the Windows Management Instrumentation (WMI) for Windows machines management.
Essentially, it’s how Microsoft combined the Web-Based Enterprise Management (WBEM) and the Common Information Model (CIM) standards.
For short, it’s a tool that will allow you to control and manage Windows systems remotely by using command lines.
It was designed for Windows and it works perfectly in command-line tools but here, we will show you how to install it on a Linux machine.
The Linux client is not as powerful as its Windows iteration because it is limited to a list of possible requests but it can be really handy if you don’t want to start your Windows VM.
Once installed, WMIC provides information about the status of local or remote computer systems.
But you can also perform actions on remote systems like configuring the security settings, changing the system properties, changing permissions for authorized users and user groups, and a lot more.
How do I install WMIC for Linux?
Use the following set of commands to install WMIC for Linux:
$ sudo aptitude install autoconf

$ cd /data/tools/
$ wget https://www.openvas.org/download/wmi/wmi-1.3.14.tar.bz2
$ bzip2 -cd wmi-1.3.14.tar.bz2 | tar xf -
$ cd wmi-1.3.14/
$ sudo make "CPP=gcc -E -ffreestanding"
$ sudo cp Samba/source/bin/wmic /usr/local/bin/
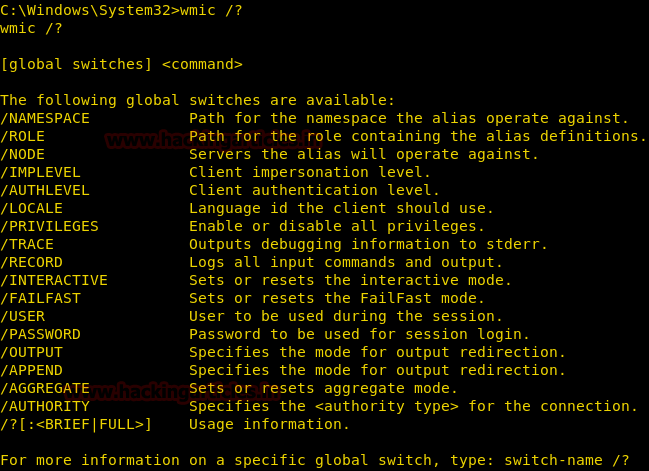
To use WMIC, input this general command: wmic -U user%password //host "query"
Here are the most important WMIC list of options:
Variable
Effect
-?, –help
Show this help message
-A, –authentication-file=FILE
Get the credentials from a file
–delimiter=STRING
Delimiter to use when querying multiple values, default to ‘|’
-d, –debuglevel=DEBUGLEVEL
Set debug level
–debug-stderr
Send debug output to STDERR
-i, –scope=SCOPE
Use this Netbios scope
-k, –kerberos=STRING
Use Kerberos
-l, –log-basename=LOGFILEBASE
Basename for log/debug files
–leak-report
Enable talloc leak reporting on exit
–leak-report-full
Enable full talloc leak reporting on exit
-m, –maxprotocol=MAXPROTOCOL
Set max protocol level
–namespace=STRING
WMI namespace, default to root\cimv2
-N, –no-pass
Don’t ask for a password
-n, –netbiosname=NETBIOSNAME
Primary netbios name
–option=name=value
Set smb.conf option from command line
-O, –socket-options=SOCKETOPTIONS
Socket options to use
–password=STRING
Password
-P, –machine-pass
Use stored machine account password (implies -k)
–realm=REALM
Set the realm name
-R, –name-resolve=NAME-RESOLVE-ORDER
Use these name resolution services only
–simple-bind-dn=STRING
DN to use for a simple bind
-S, –signing=on|off|required
Set the client signing state
-s, –configfile=CONFIGFILE
Use alternative configuration file
–usage
Display brief usage message
–use-security-mechanisms=STRING
Restricted list of authentication mechanisms available for use with this authentication
Several users report that they can’t wake their PC from sleep with a keyboard and mice. Others have experienced the same issue with their laptop touchpad.
Sleep mode is a power management option for a Windows operating system computer. It saves the computer’s current state to RAM and draws less power from its battery or power supply. When a PC enters sleep mode, most of its electrical components are turned off. The display is typically turned off, and some devices, such as hard and optical disc drives, may also be powered down.
There are several reasons Windows won’t wake from sleep with a mouse and keyboard, including a defective keyboard or mouse, outdated drivers, and issues with the USB ports. If you are experiencing the same issue, this guide will surely help you.
How to Wake Windows 11 from sleep with a keyboard or mouse?
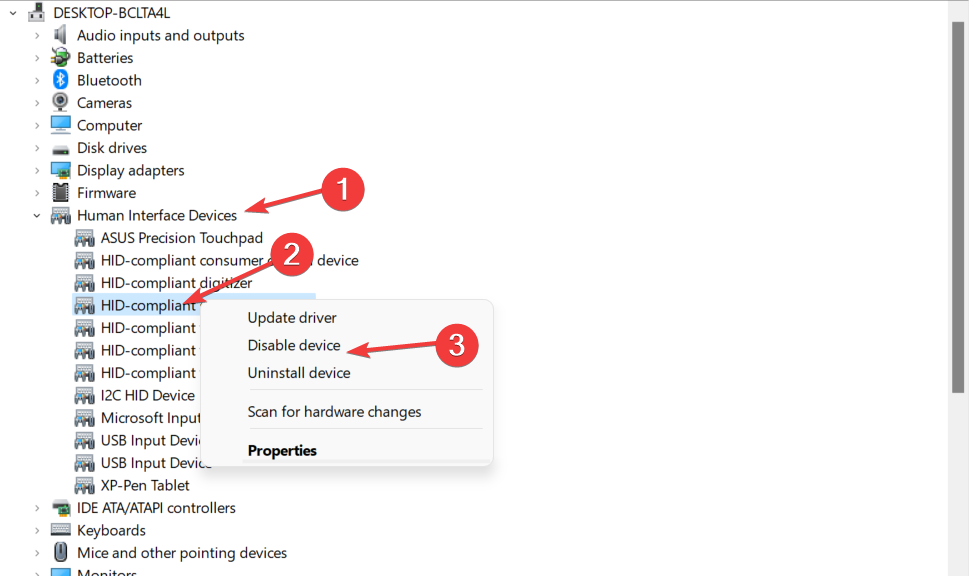
To wake up your PC, a specific option from the Device Manager needs to be activated for both your keyboard and mouse.
Follow the steps below to activate this setting for both your peripherals:
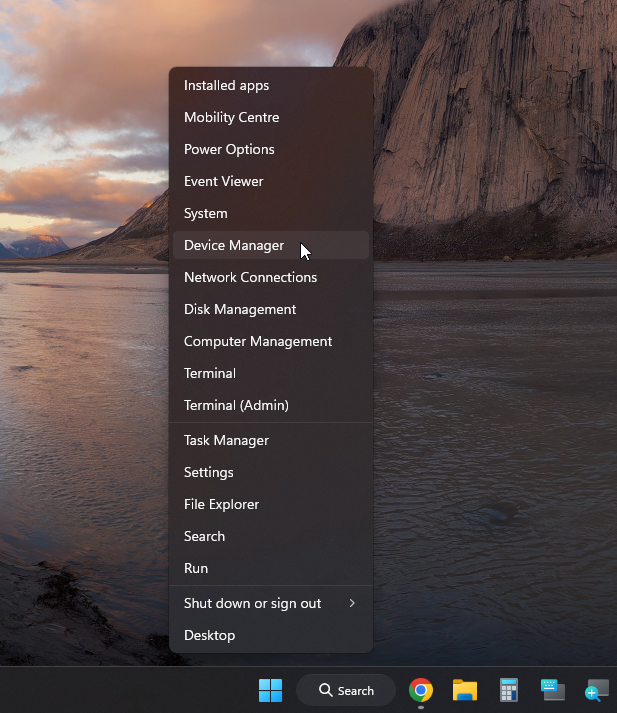
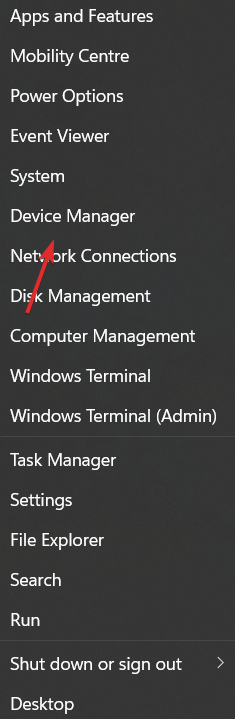
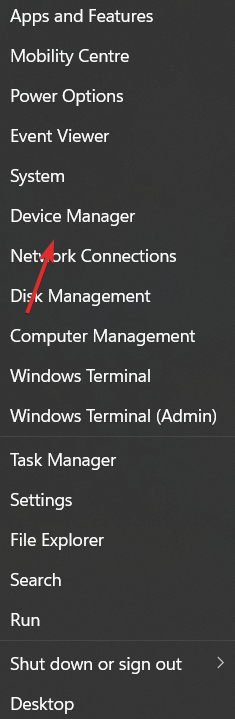
Press the Win + X key combination to open the Start menu (or right-click the Start button).
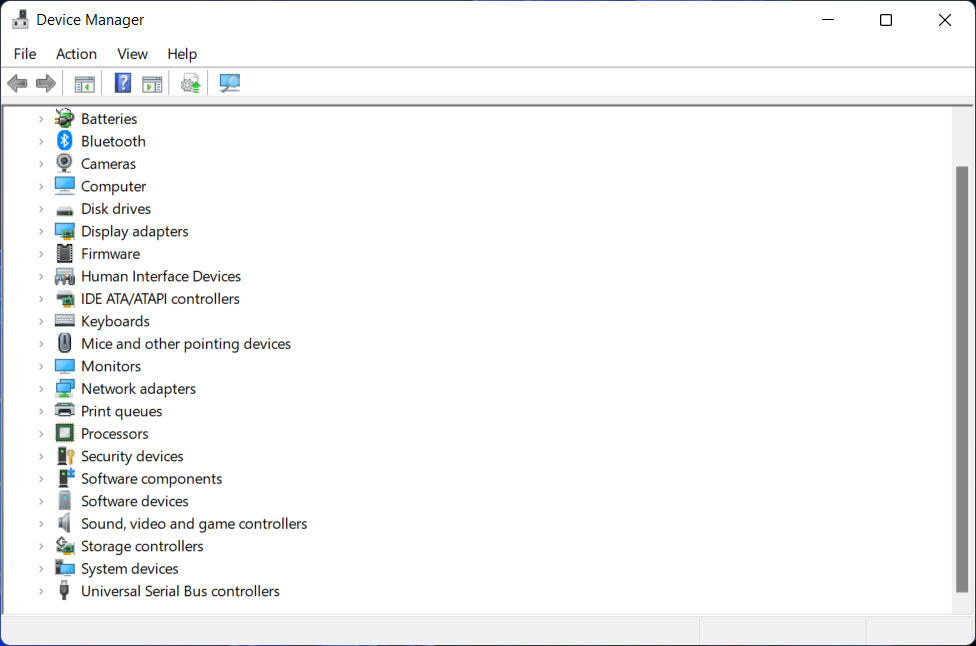
Choose Device Manager from the list that pops up.
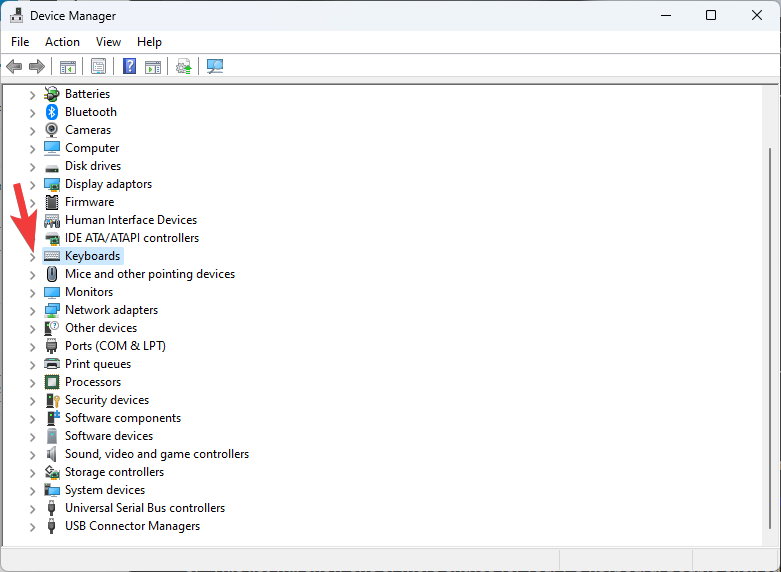
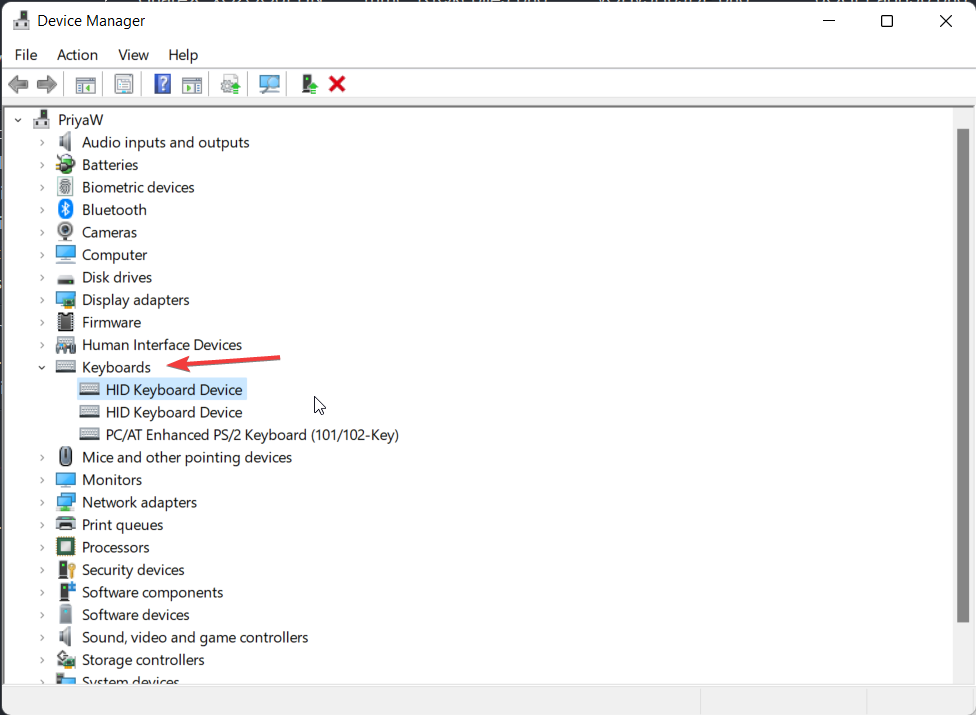
Toggle the Keyboards drop-down menu by clicking the arrow next to it.
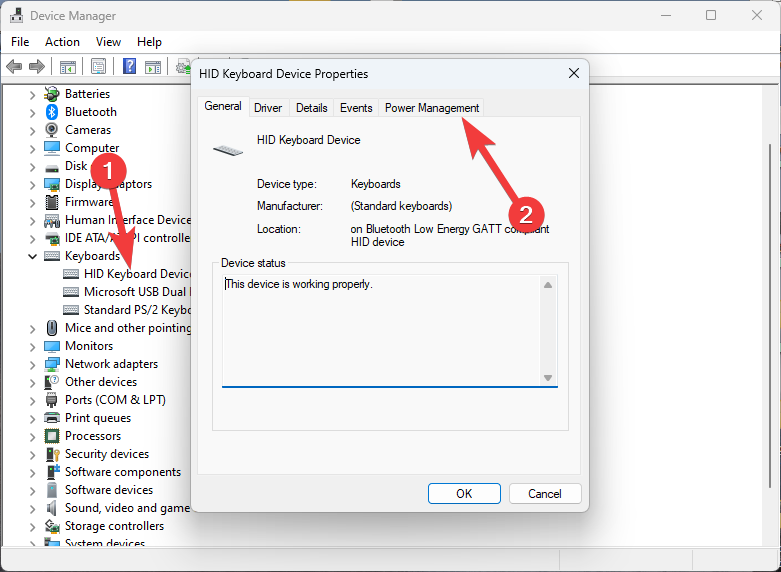
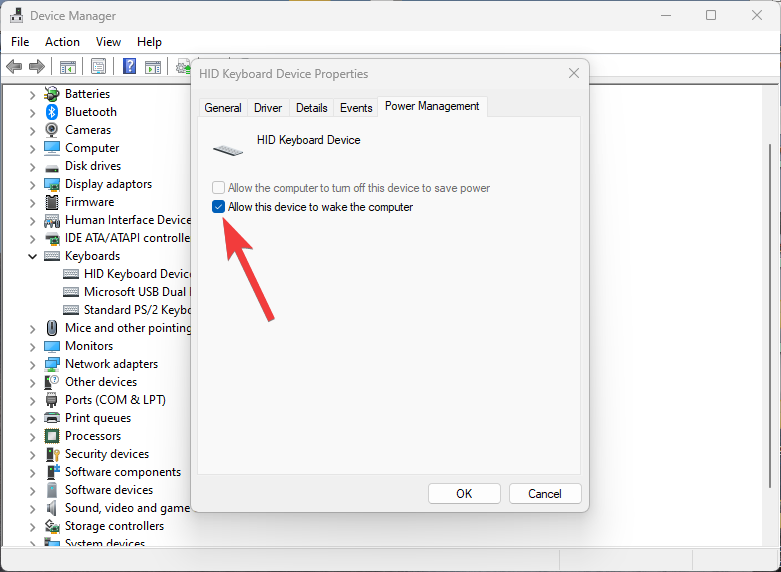
Double-click the first entry in the Keyboards section and select the Power Management tab.
Ensure that the Allow this device to wake the computer option is activated.
Repeat steps 4, 5, and 6 for the rest of the elements found in the Keyboards section.
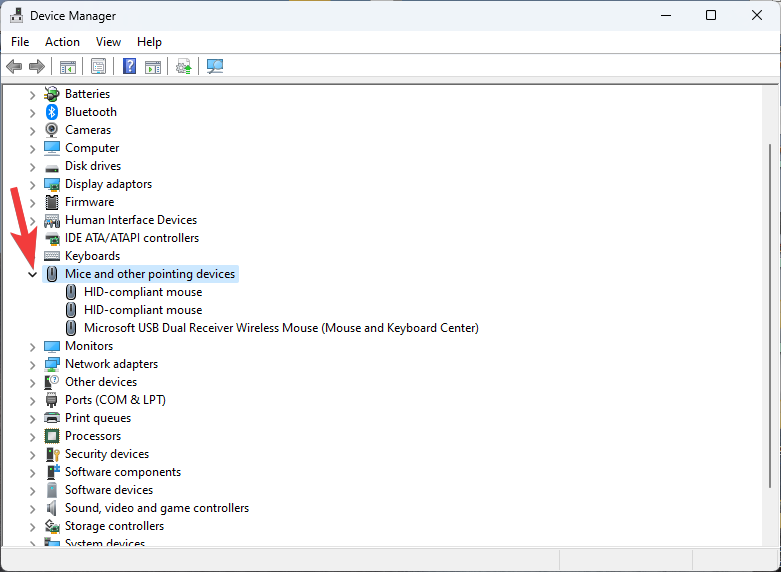
The same method can be applied to your mouse, with the only difference being that you will need to click the Mice and other pointing devices drop-down instead of the Keyboards one.
After all these steps are covered, your PC will surely be able to wake up from sleep whenever moving the mouse or press a key on your keyboard. Don’t hesitate to find out even more by checking our guide on how to restart a laptop from keyboard.
What causes Windows 11 to stop responding after sleep?
The issue might occur for several reasons. Here are some of the most likely ones:
Problems with the hardware: Hardware issues like a loose or broken wire could be to blame
Compatibility issues: Try replacing old drivers with new ones.
Corrupt or outdated drivers: Try updating drivers
Misconfigured settings: You must have these configured adequately for a trouble-free experience
After knowing the causes, it’s time to fix the issue. Apply all the fixes listed below until you finally rid yourself of the error.
What can I do if Windows 11 won’t wake from sleep with a mouse and keyboard?
1. Reconnect the device
If you have trouble waking your computer from sleep with a mouse and keyboard, you can try a few things to help get it working again.
If the issue is hardware-related, it will typically recover after being unplugged and reconnected. Second, check the batteries in your mouse and keyboard.
2. Update mouse and keyboard drivers
Press Windows + R and type devmgmt.msc into the Runwindow.
Click OK, and this will open up the Device Manager window.
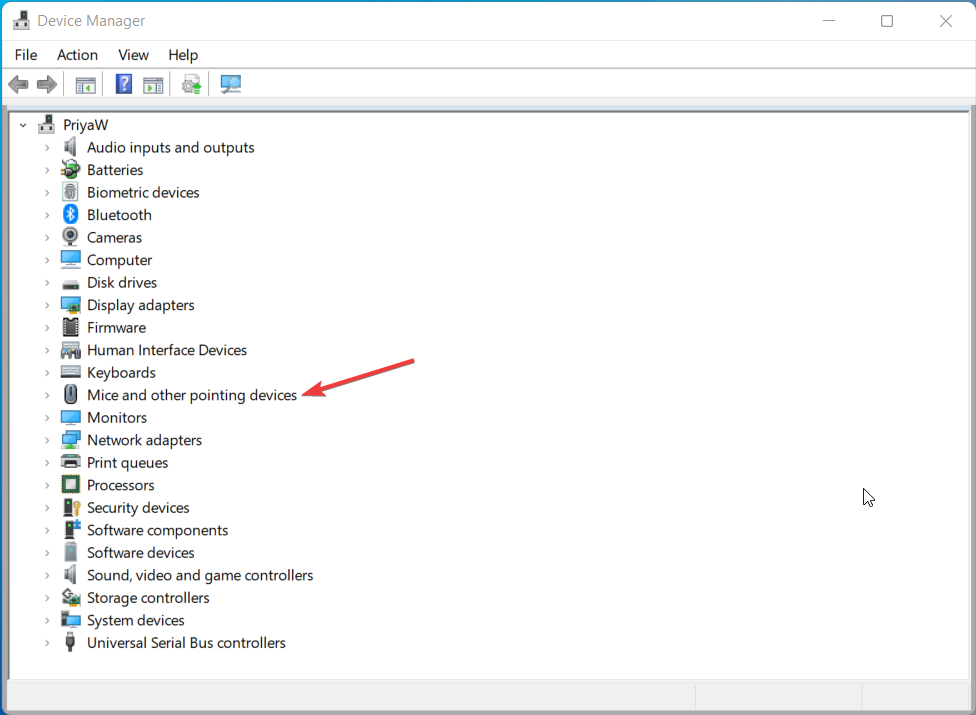
In the Device Manager, expand the Mice and other pointing devices option.
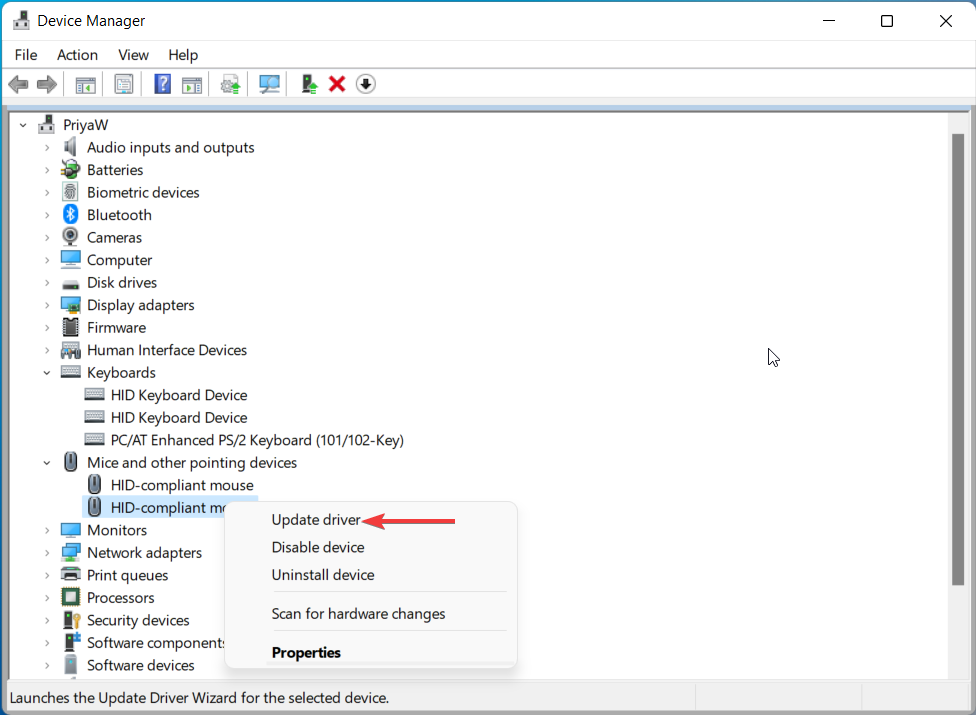
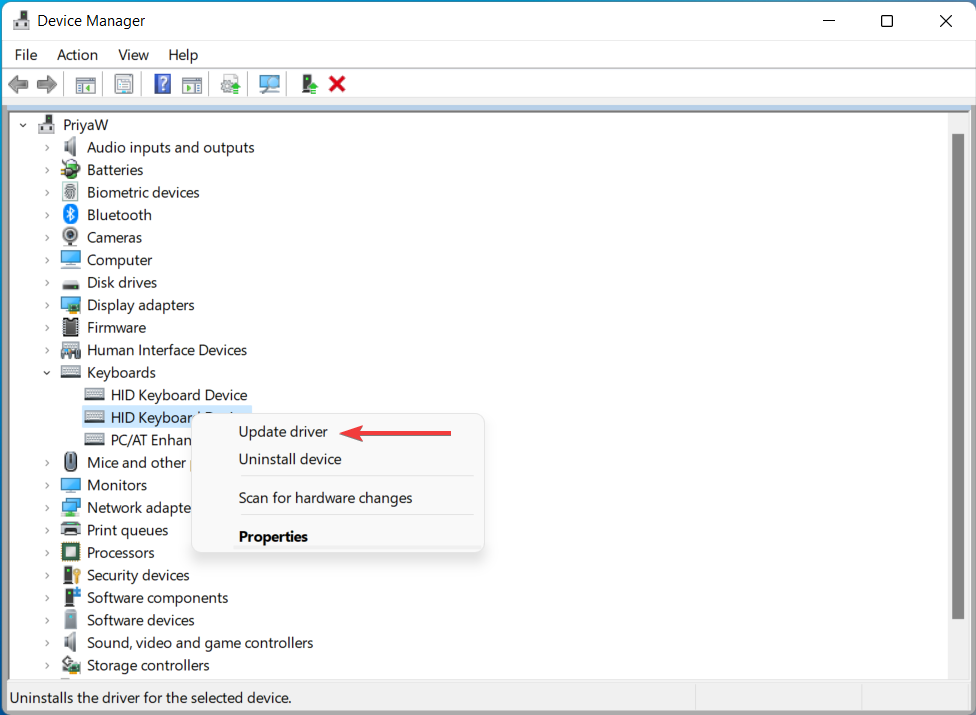
Right-click the device that may be causing the problem.
Select UpdateDriver.
Similarly, expand the Keyboards option to view the devices. Then, update the outdated keyboard byright-clickingit and selecting Update Driver.
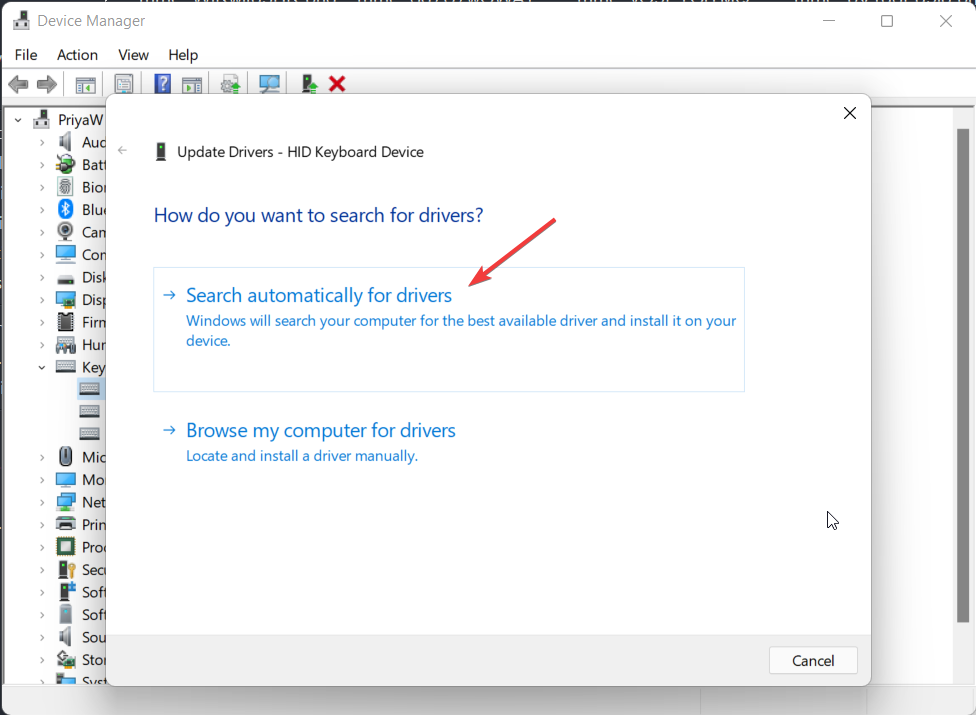
Select Search automatically for driver and click OK.
Once done, restart your PC and check if the issue is resolved.
The goal of installing these updates is to fix any bugs or glitches the old driver version may have caused.
However, if Windows doesn’t find a newer or updated version, it will notify you that the Best drivers for your device are already installed.
You can also update drivers for your mice and keyboard with a specialized tool. It will scan your computer for outdated drivers and provide an option to update them.
Repeat the same steps mentioned above to open Device Manager.
Expand the Mice and other pointing devices option.
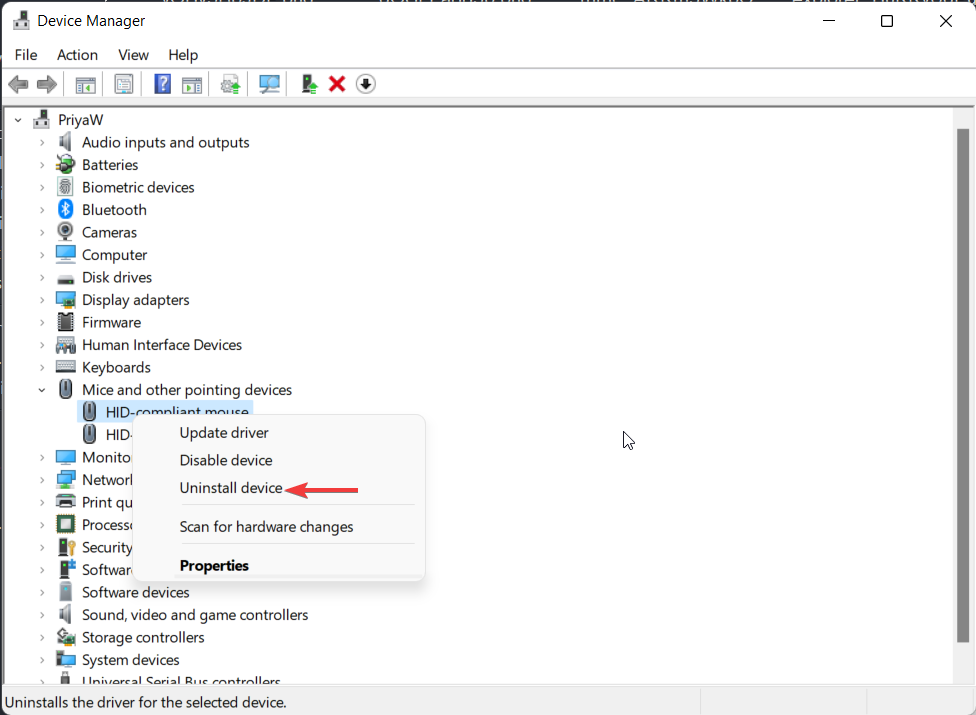
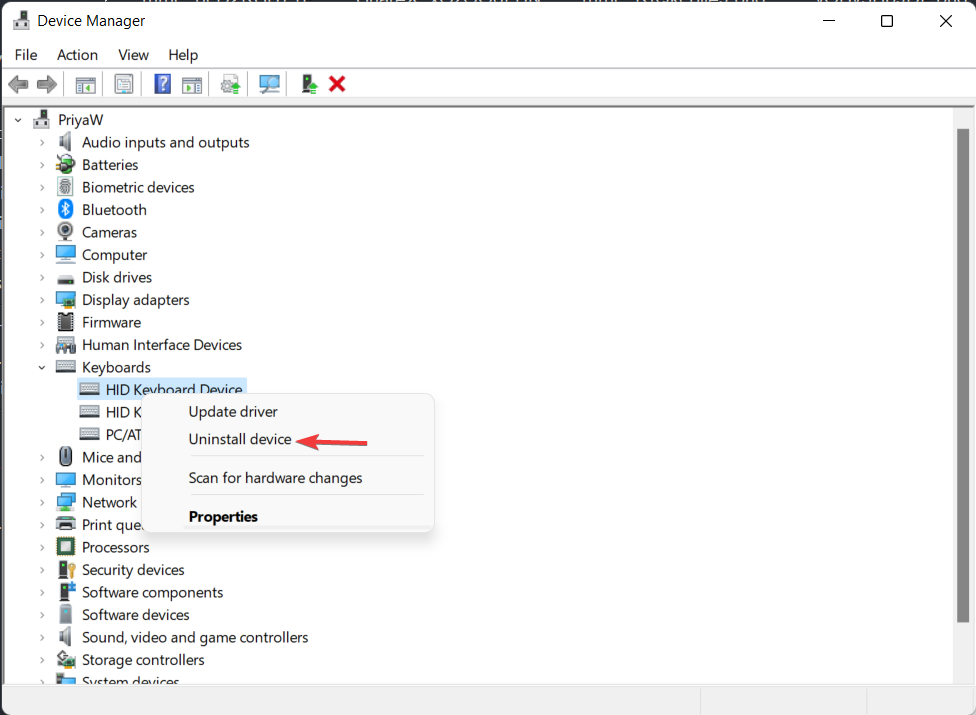
Right-click the device that is not responding.
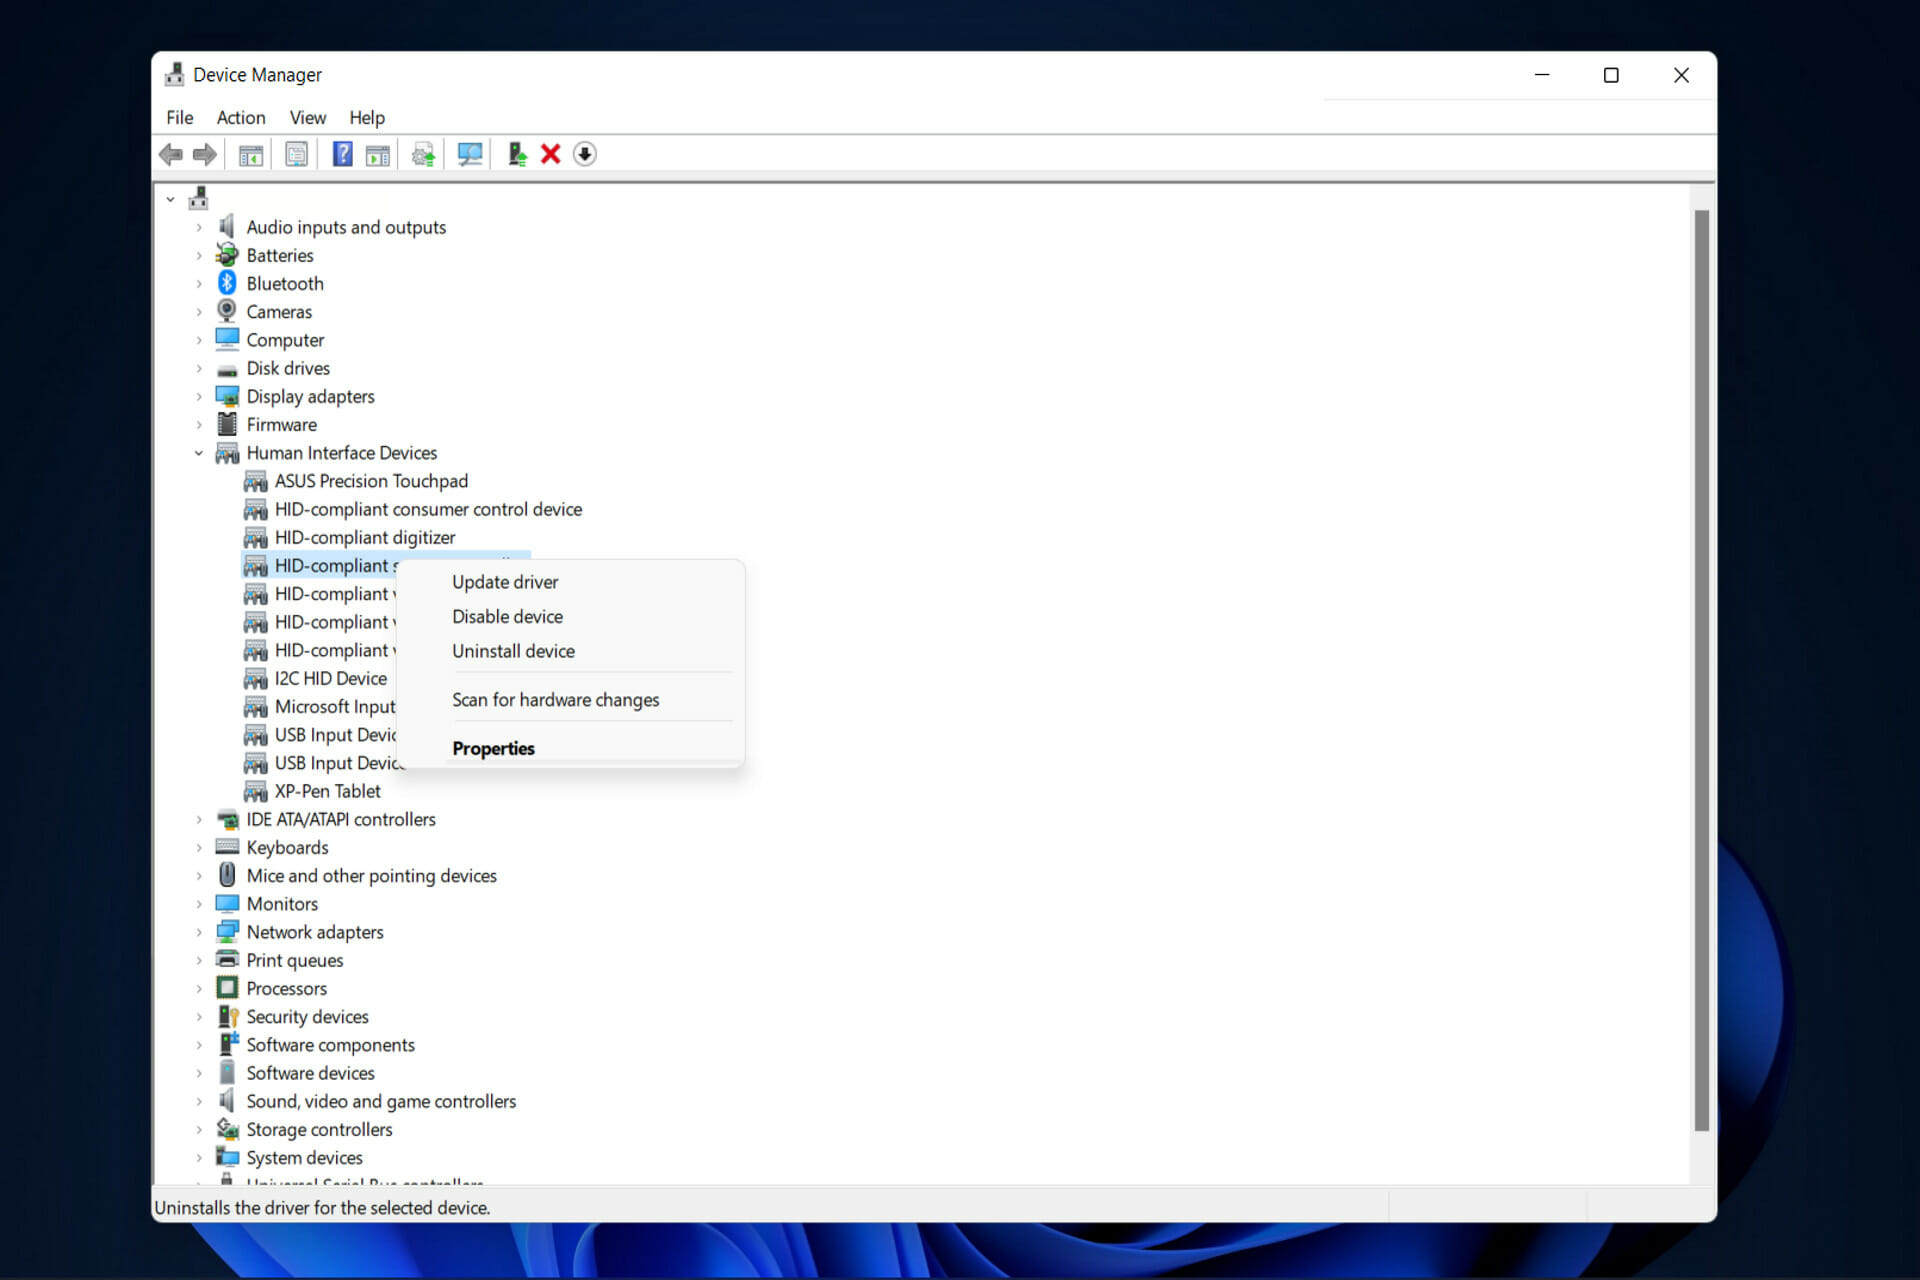
Select Uninstall Device.
Follow the same procedure and expand the Keyboards option.
Right-click the faulty malfunctioning driver and select Uninstall Device.
Windows 11 is a stable operating system, but some users find it hard to wake the computer from sleep mode using the keyboard and mouse. This is either due to faulty drivers or an update causing the problem.
To fix it, try removing the recently installed updates and check whether the issue persists.
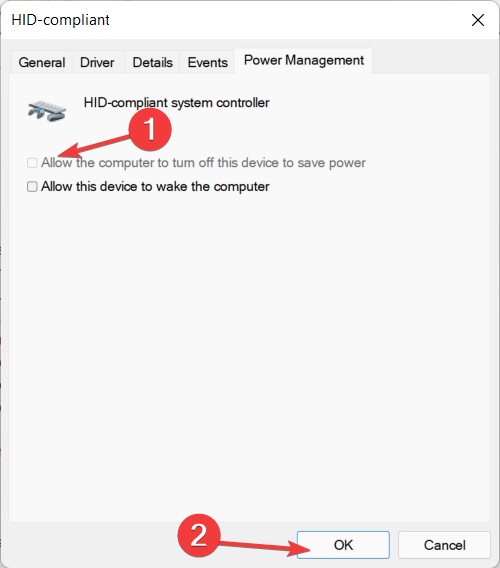
4. Uncheck the Allow the computer to turn off this device to save power option
Follow the same procedure mentioned above to open Device Manager.
Right-click the Mice and other pointing devices option.
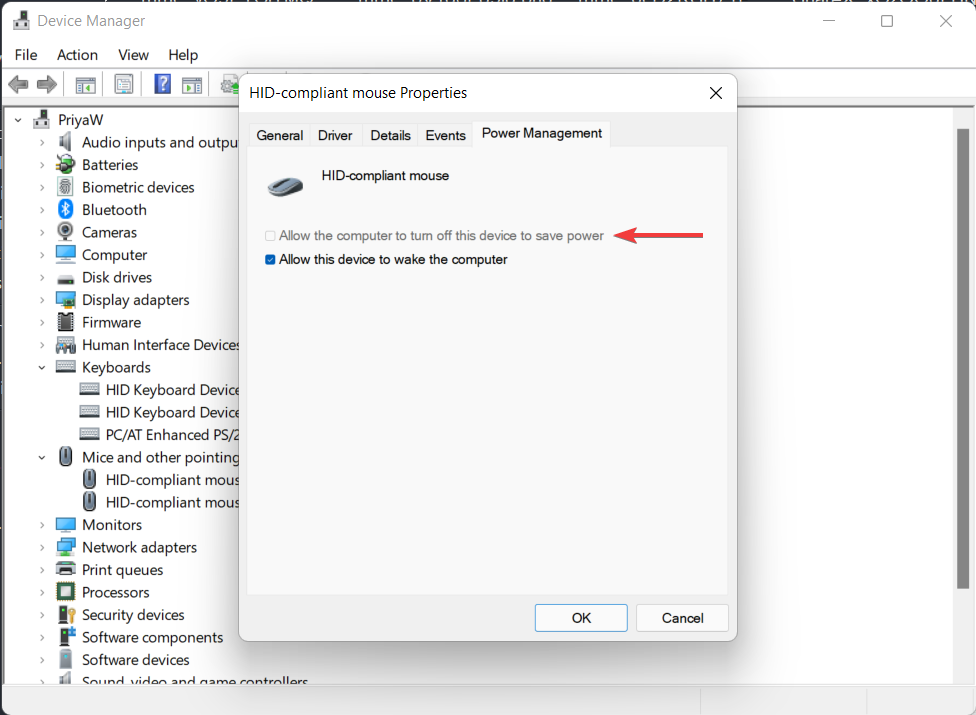
Select Properties and go to the Power Managementtab.
Uncheck the Allow the computer to turn off this device to save power and click OK.
Similarly, right-click the Keyboards option for the keyboard and expand the Power Management tab.
Uncheck the Allow the computer to turn off this device to save power option and click OK.
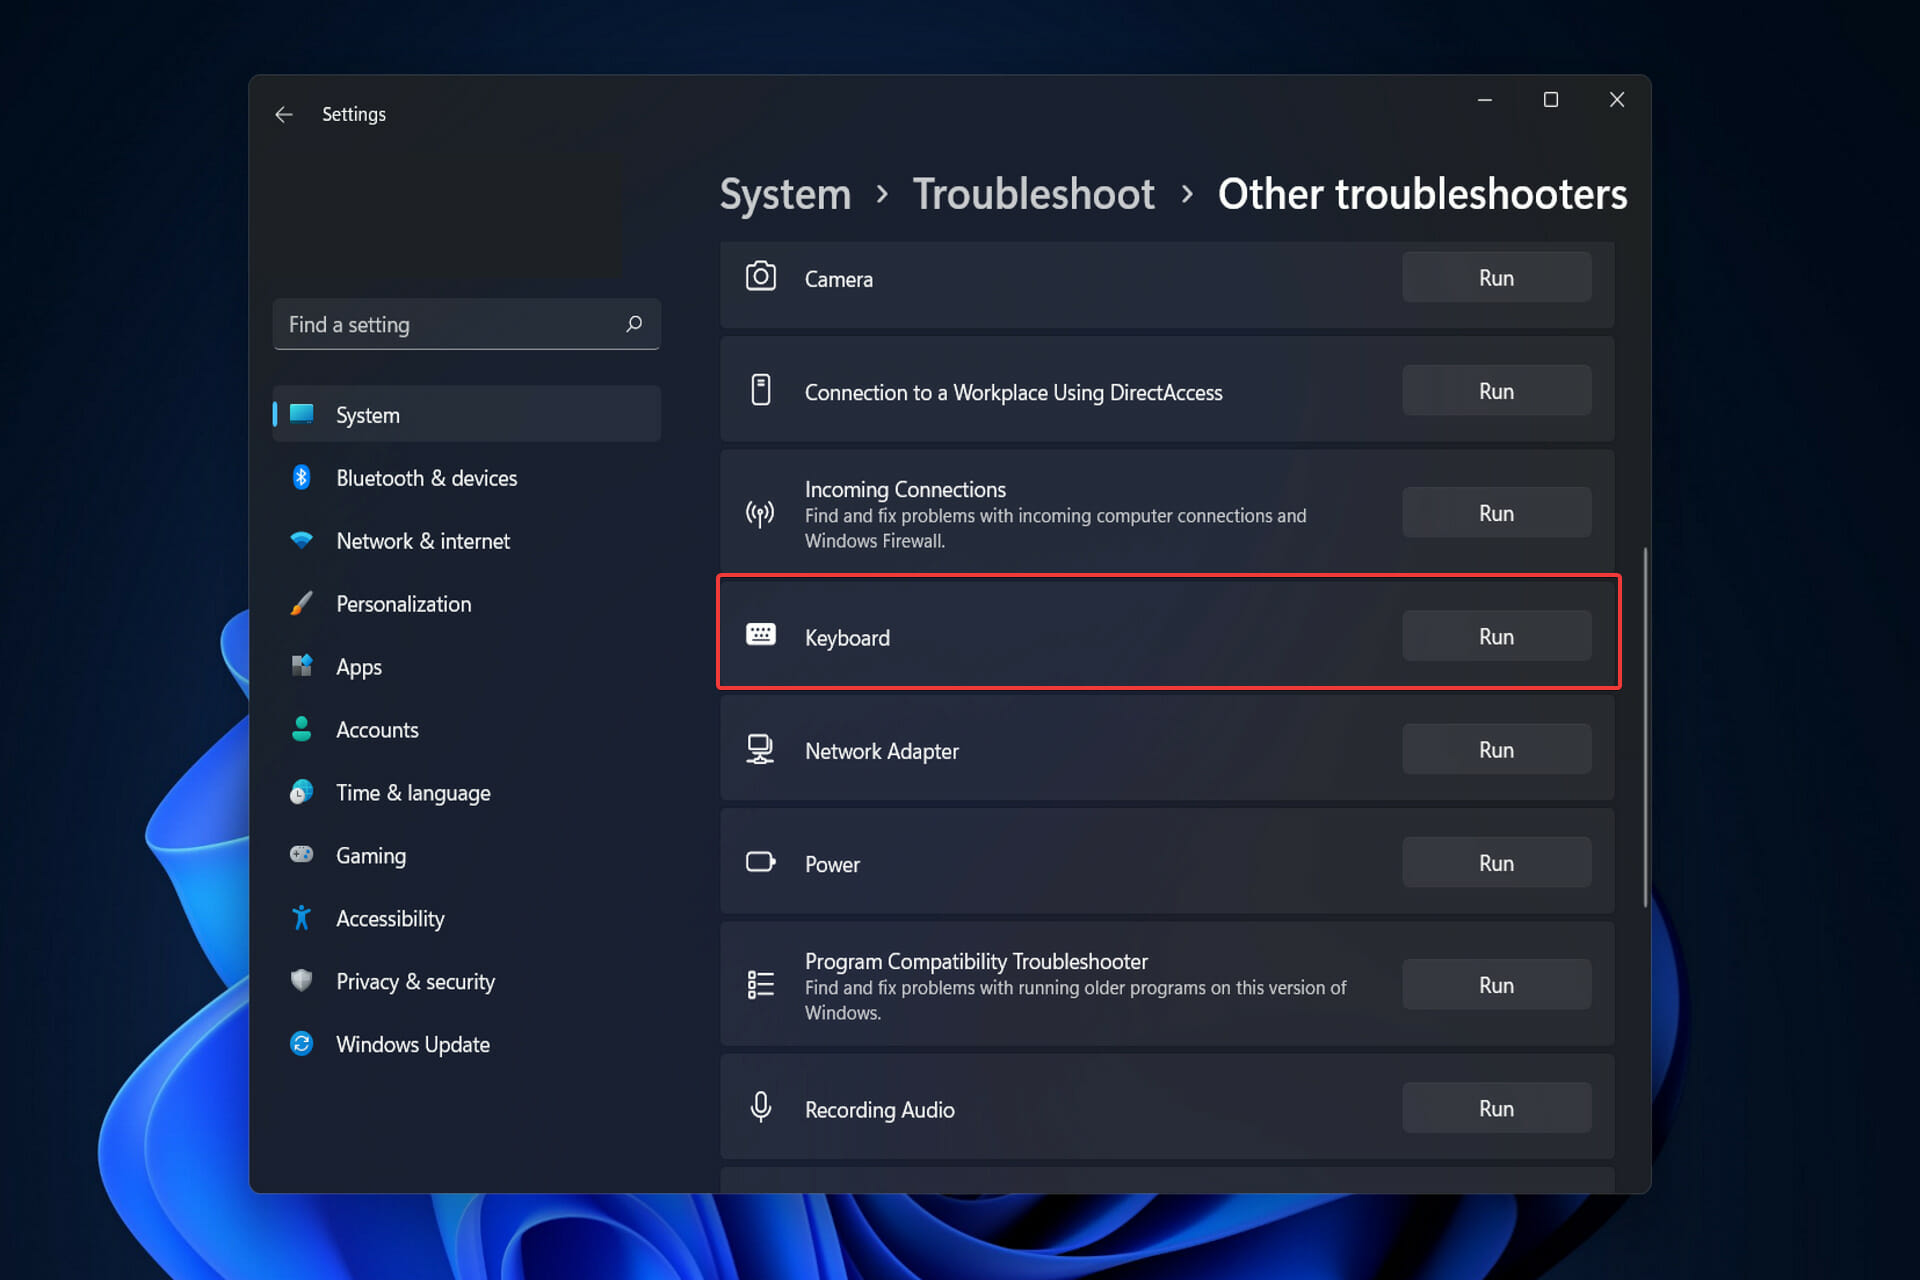
5. Run the hardware and devices troubleshooter using Command Prompt
Press Windows + R simultaneously to open the Run dialog window.
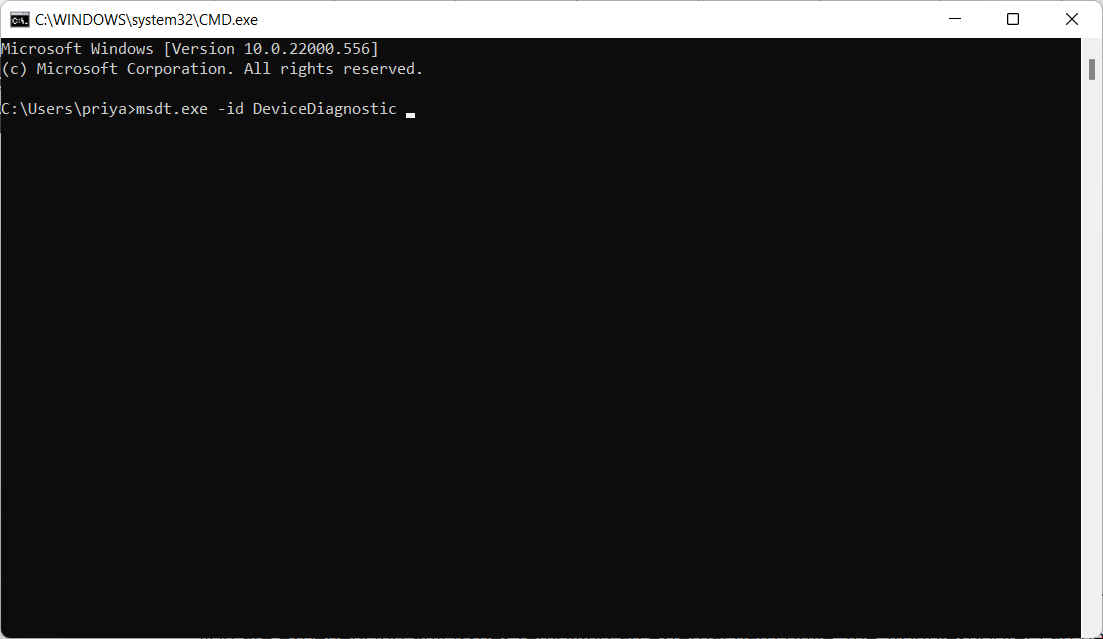
Next, type CMD into the Run window and click OK.
In the Command Prompt window, copy and paste the following and hit Enter: msdt.exe -id DeviceDiagnostic
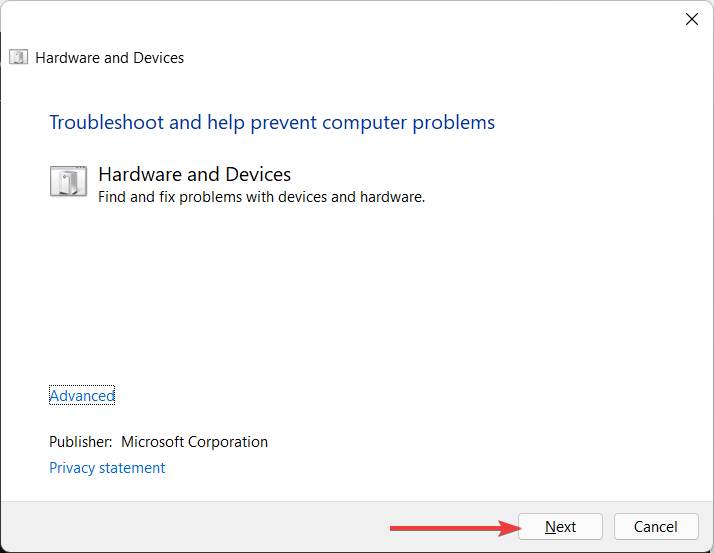
Then, run the Hardware and Devices troubleshooter by clicking Next.
Once the detecting process is complete, the faulty devices will be repaired. Finally, reboot your PC and check if the issue is resolved.
NOTE
If your device is not having problems, the troubleshooter will report back with a confirmation, and you can exit the window.
How is sleep mode different from hibernation mode?
Sleep mode is when a computer is powered on but not actively running software. It’s when your computer goes blank and appears to be off.
It saves energy by putting your computer into a low-power usage state, making it perfect for when you need a few minutes off.
Hibernation mode is the state in which a computer’s volatile memory (RAM) contents are copied to the hard disk drive (HDD) so that the operating system can be shut down safely without corrupting data.
Many Windows users have recently complained that they encountered an Internet Explorer crash ntdll.dll issue. This error occurs for a variety of reasons from compatibility issues to bugs inside the Internet Explorer app.
In Windows, the ntdll.dll file is a Dynamic Link Library type. In most cases, it’s built automatically during the installation of the OS and it is required for the proper operation of it because it provides NT kernel functionality.
Follow along as we will walk you through a comprehensive list of solutions that you can apply to fix the Internet Explorer crash ntdll.dll. And note that even though we will be using Microsoft Edge to depict the steps involved, you can perform them on your browser.
How can I fix the Internet Explorer crash ntdll.dll issue?
1. Run the compatibility troubleshooter
Right-click on the Internet Explorer icon, now known as Microsoft Edge, and select Properties.
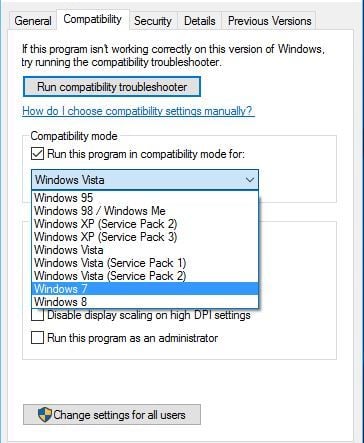
Navigate to the Compatibility tab and click on Run compatibility troubleshooter.
The compatibility problem exists on an application for which a compatible version is expected to be released soon.
2. Use a third-party tool
Dynamic Link Library files, also known as DLLs, can become corrupted or simply deleted in a variety of circumstances. Software failures, memory crashes, and even corrupted registry files are examples of such cases.
Even though DLLs are vulnerable to damage, they are critical components of your system. Having a tool that can detect problems before they affect your system can vastly improve your PC experience.
This time, the large number of updated DLL files in a database’s specific tool will come to the rescue, replacing all of the files that need to be updated.
3. Update your OS and drivers
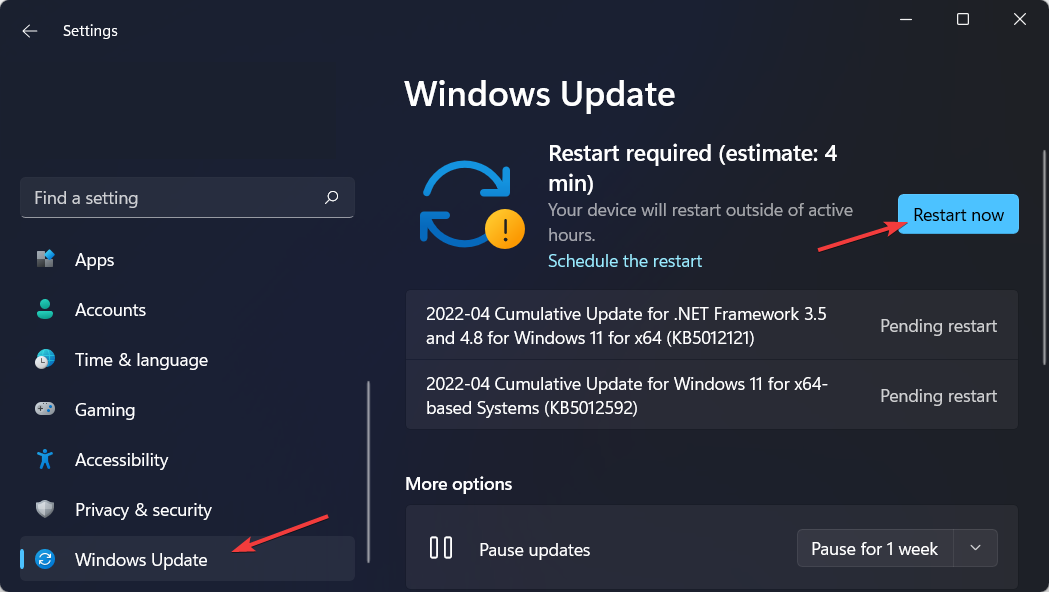
Open Settings and navigate to Windows Update. Here click on the blue button that either says Update now, Restart now or Check for new updates, depending on your case.
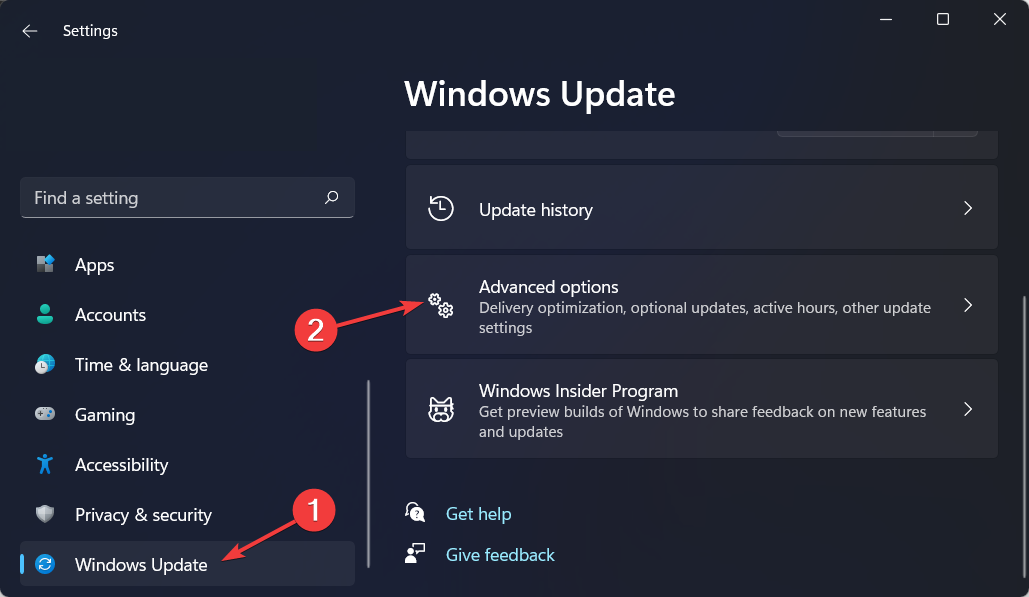
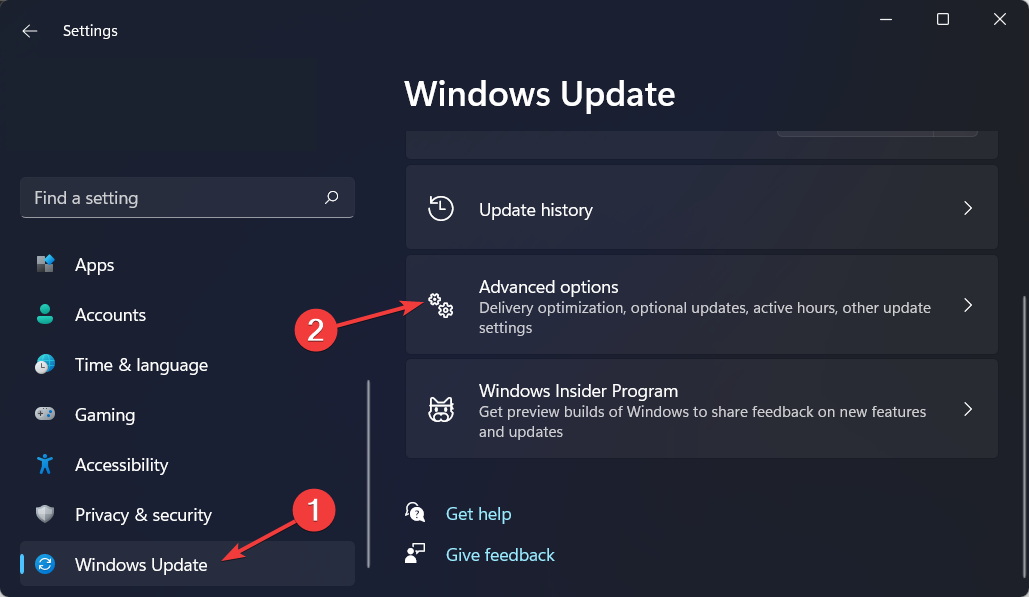
Next, navigate to Advanced options under the same section.
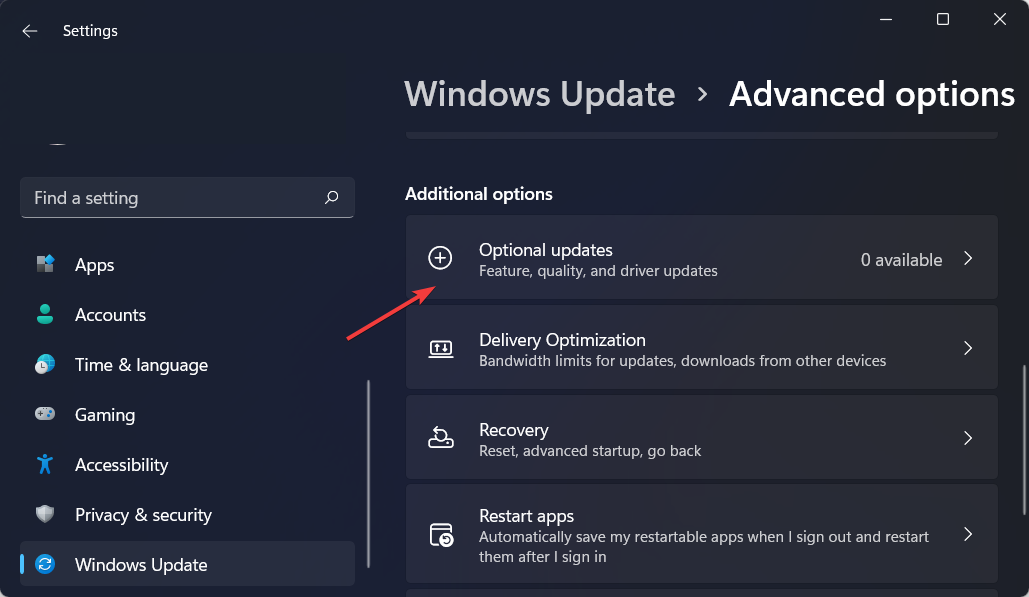
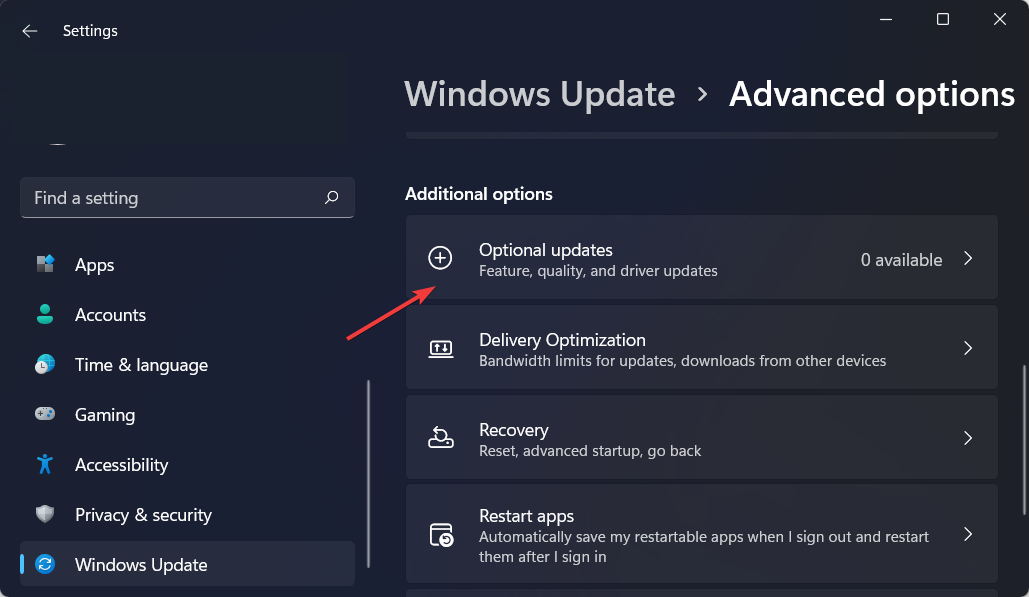
Lastly, click on Optional updates to find all the driver updates available. Make sure to checkmark the boxes next to them and then click on the Download and install button.
Note that instead of manually updating your drivers, you can opt for an automatic way that saves you time in the present and future.
Outbyte solution is a lightweight software program that automatically updates, fixes, and replaces all of your device drivers. It doesn’t need your attendance, and it will help you avoid future crashes such as the Internet Explorer ntdll.dll crash.
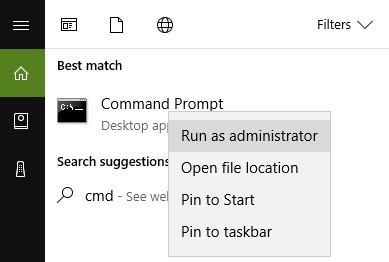
Open the Windows Search function and type cmd. Right-click on the top result and choose Run asadministrator.
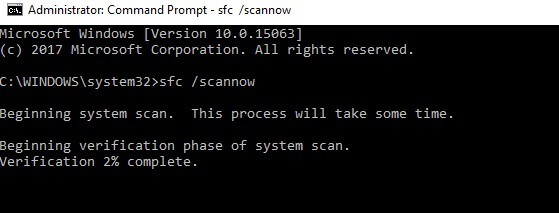
Here, type or paste the following command and press Enter: sfc /scannow
System file check is a utility that is incorporated into the operating system that checks for system file corruption and reports the results.
It is possible to replace erroneous, corrupted, altered, or damaged versions of files with proper versions using the command mentioned.
6. Run the DISM tool
Click on the magnifying glass icon from your Taskbar to open the Windows Search function and type in cmd. Right-click on the topmost result and choose Run as administrator.
Next, type or copy-paste the following command and press Enter after it in order to run: Dism /Online /Cleanup-Image /CheckHealth
If you have used Microsoft servers, chances are you have faced the Remote Desktop Gateway server is a temporarily unavailable error.
Remote Desktop Gateway is necessary to make RemoteApp programs available from the Internet.
It acts as the gateway that RDP connections from an external network used to connect to a remote desktop server (Terminal Server) which is on a corporate/private network.
This article shows you what to do if the Remote Desktop Gateway server is temporarily unavailable.
What is a Remote Desktop Gateway?
Remote Desktop Gateway (RDG or RD Gateway) is a role in Windows Server that establishes a connection to the server encrypted with SSL via Remote Desktop Protocol (RDP).
Microsoft Remote Desktop Protocol (RDP) enables remote desktops to connect to computers. RDP is a widely implemented, easy-to-understand protocol and is a built-in service of most versions of Windows.
However, faulty encryption mechanisms in older versions of RDP and lack of access controls made RDP vulnerable and an easy entry point for malware.
This is why Remote Desktop Gateway improves control by eliminating all remote user access to the system. RDG replaces this access with point-to-point protocol (PPP) for remote desktop connection.
If you do not set everything up appropriately, you might face errors such as the Remote Desktop Gateway server being temporarily unavailable.
What can I do if the Remote Desktop Gateway Server is temporarily unavailable?
1. Turn of Windows Firewall
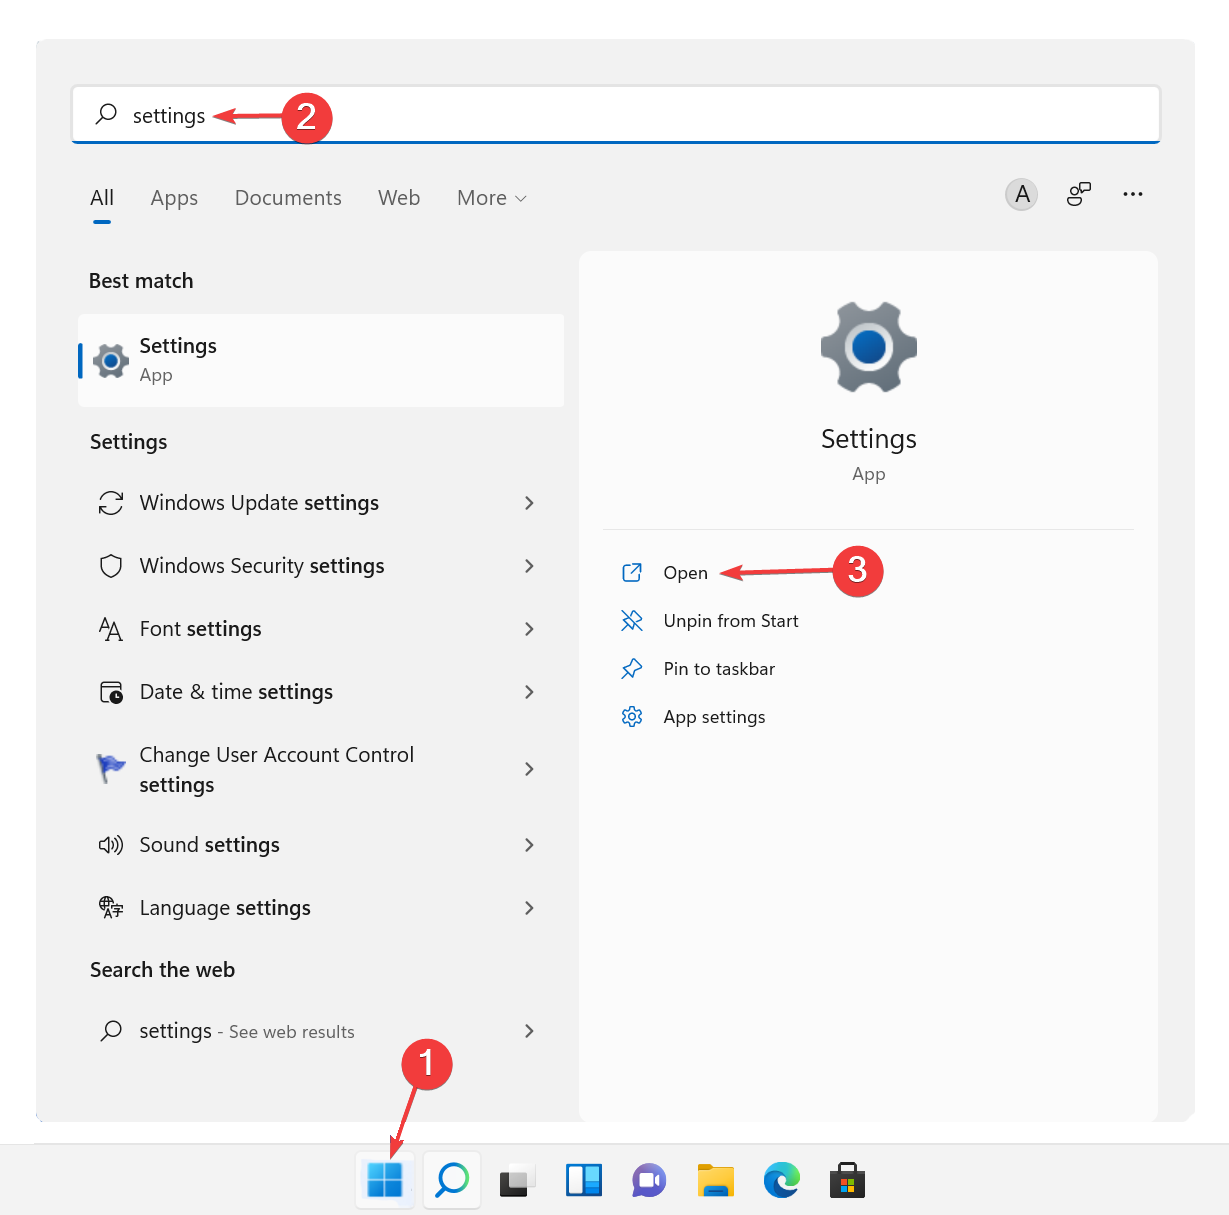
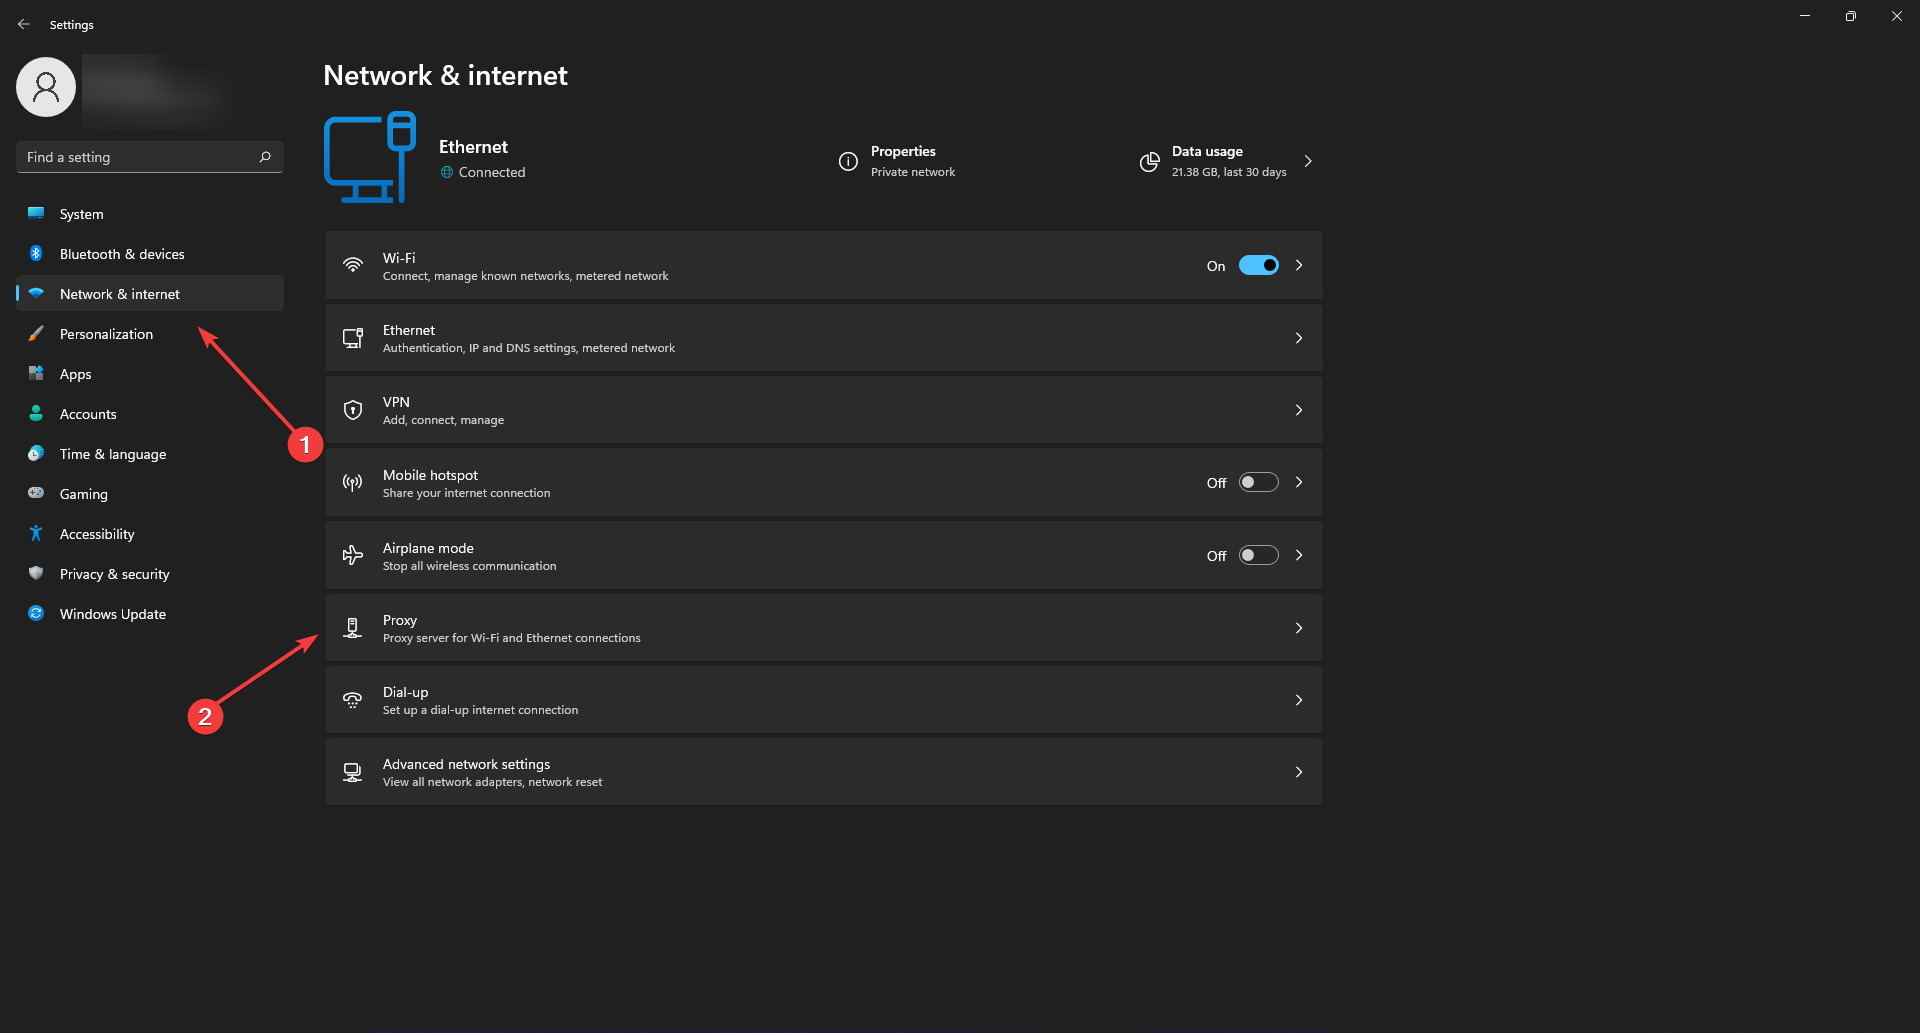
Click on the Start menu, search for Settings then, select the Open option.
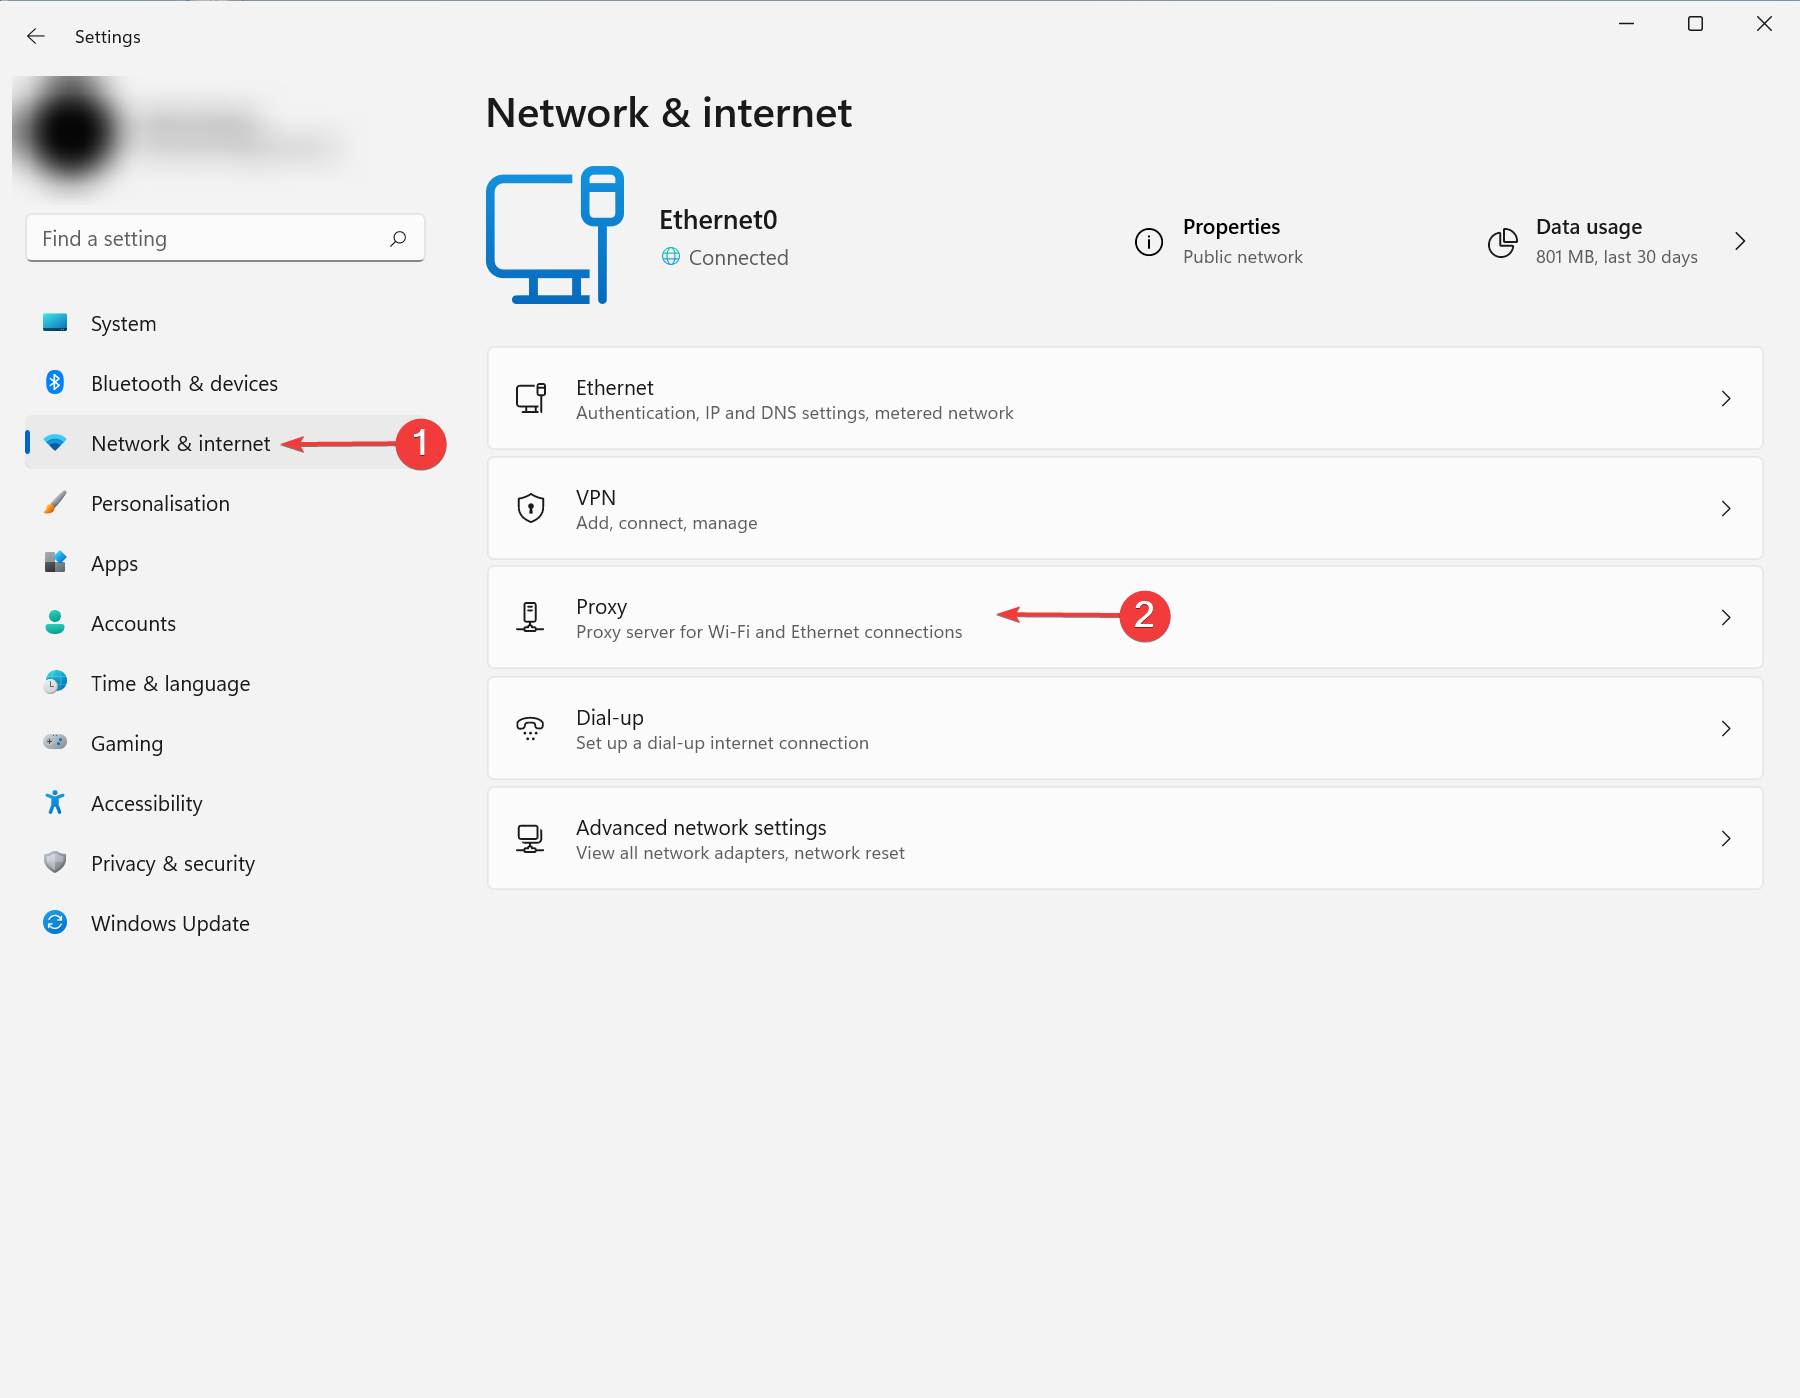
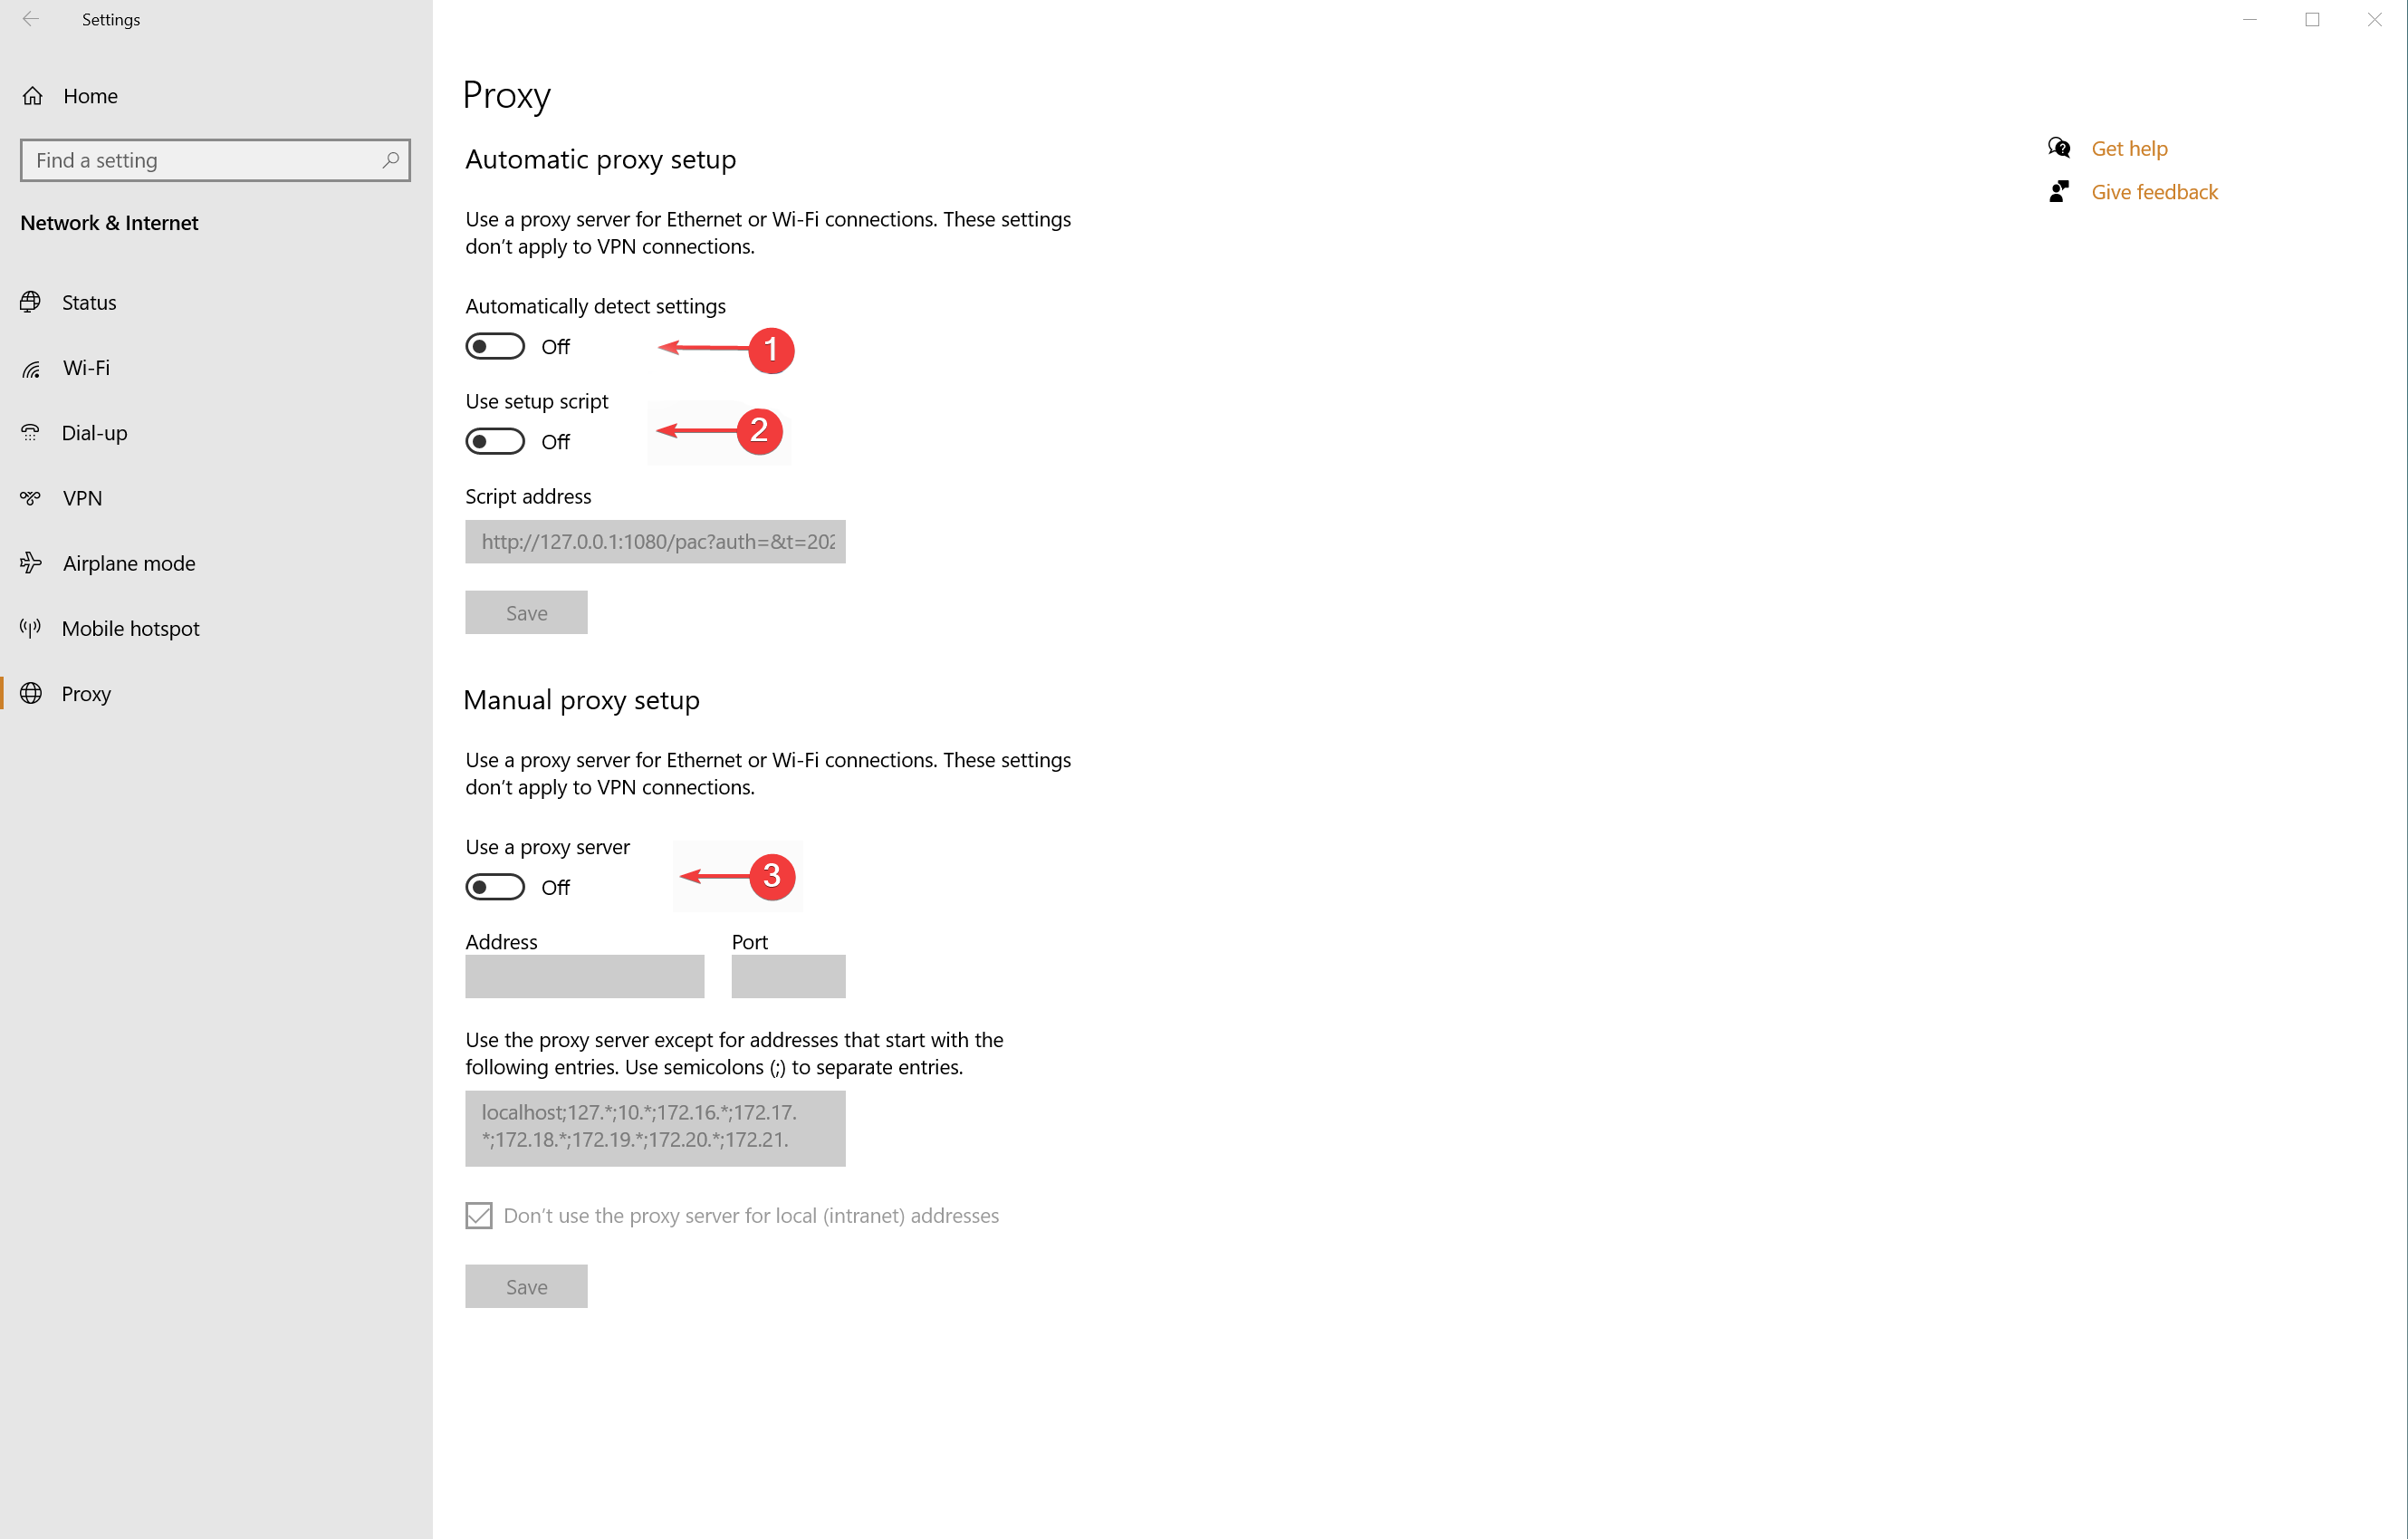
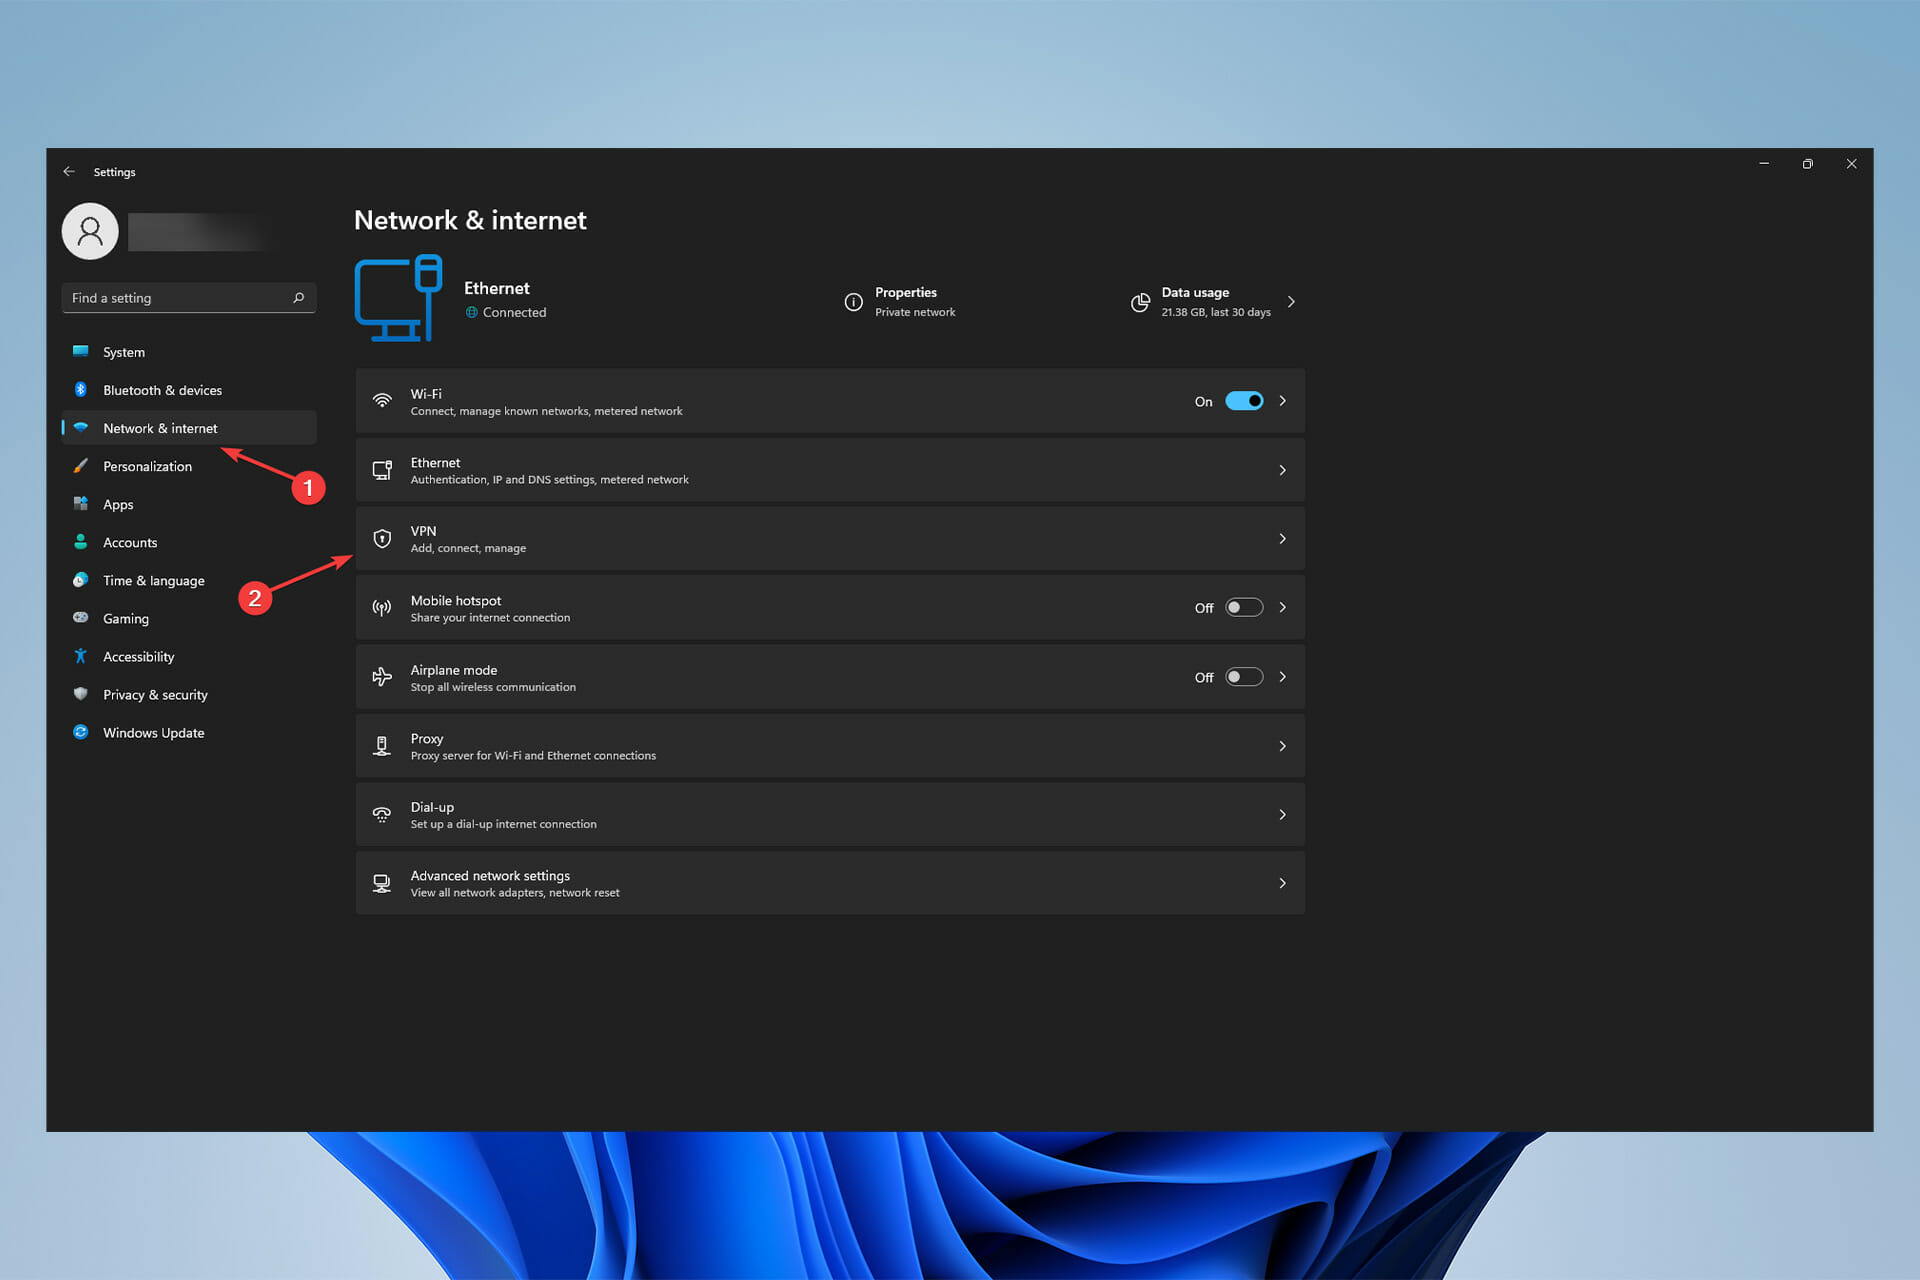
From the left-side panel, choose Network & Internet then click on Proxy.
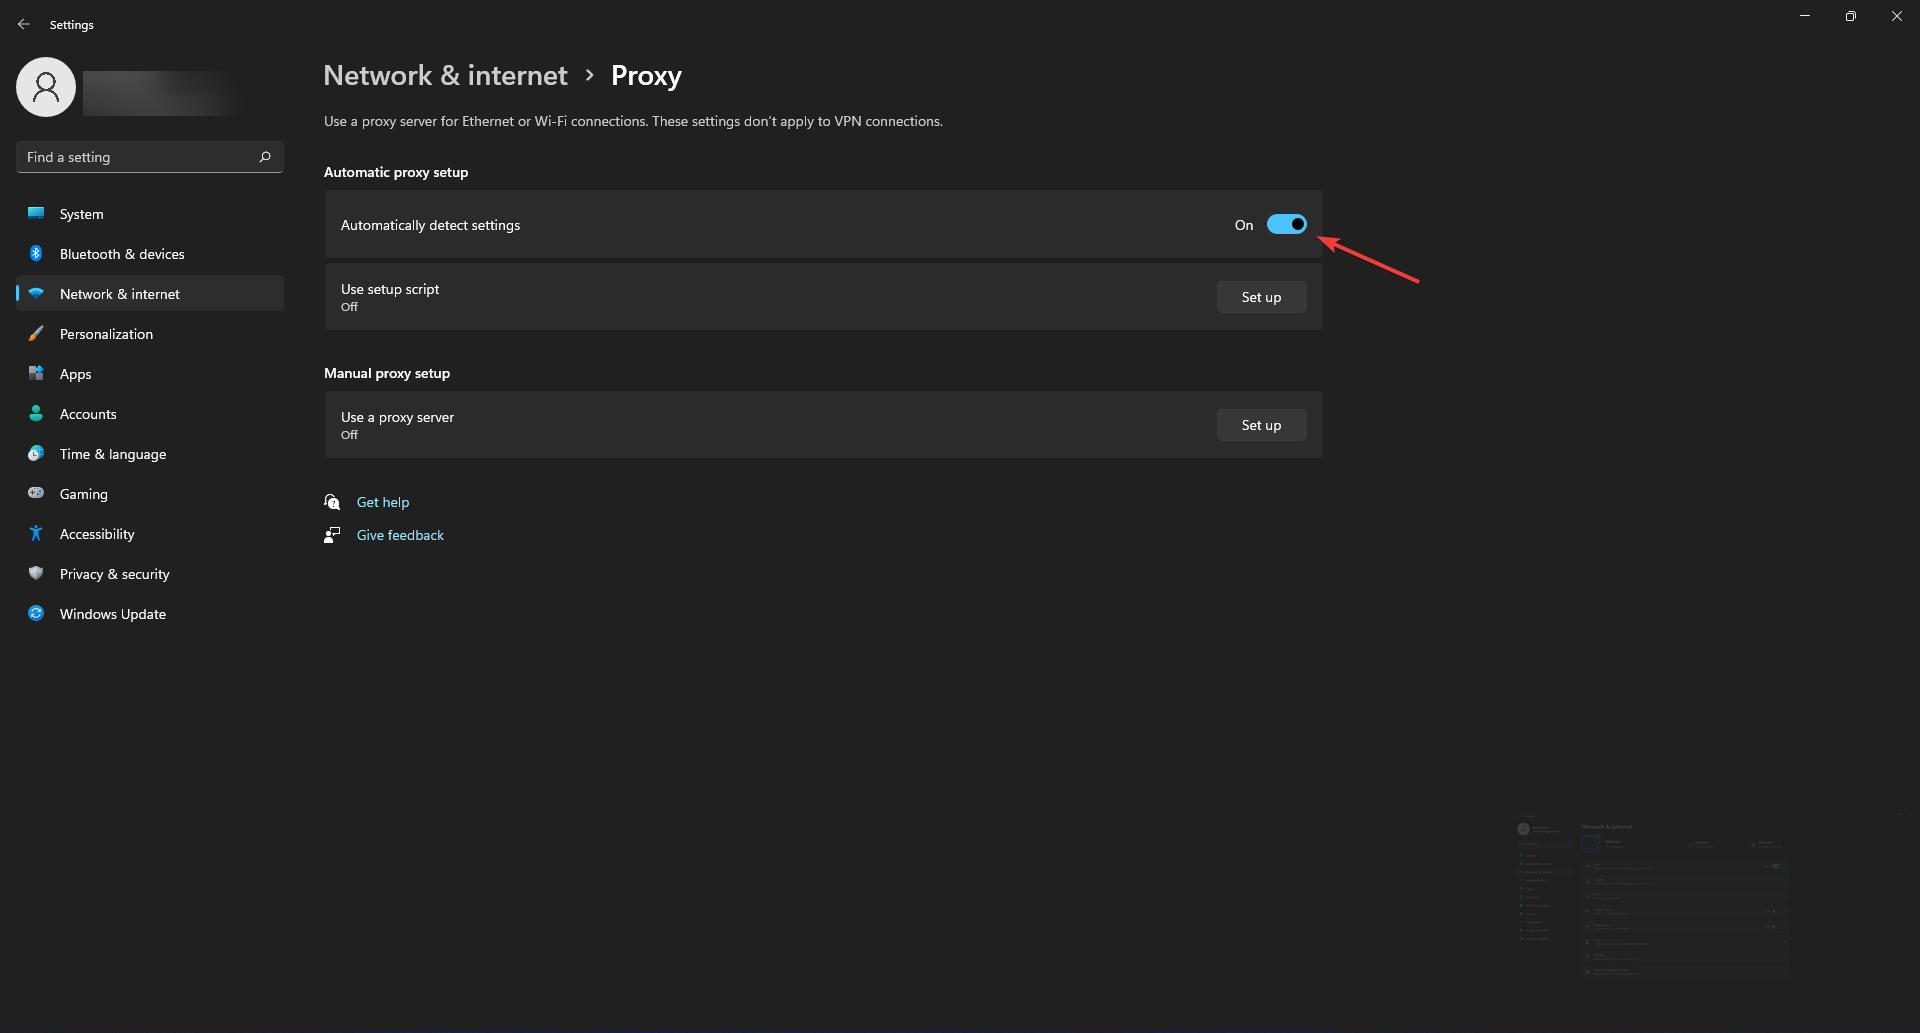
Make sure all settings are disabled.
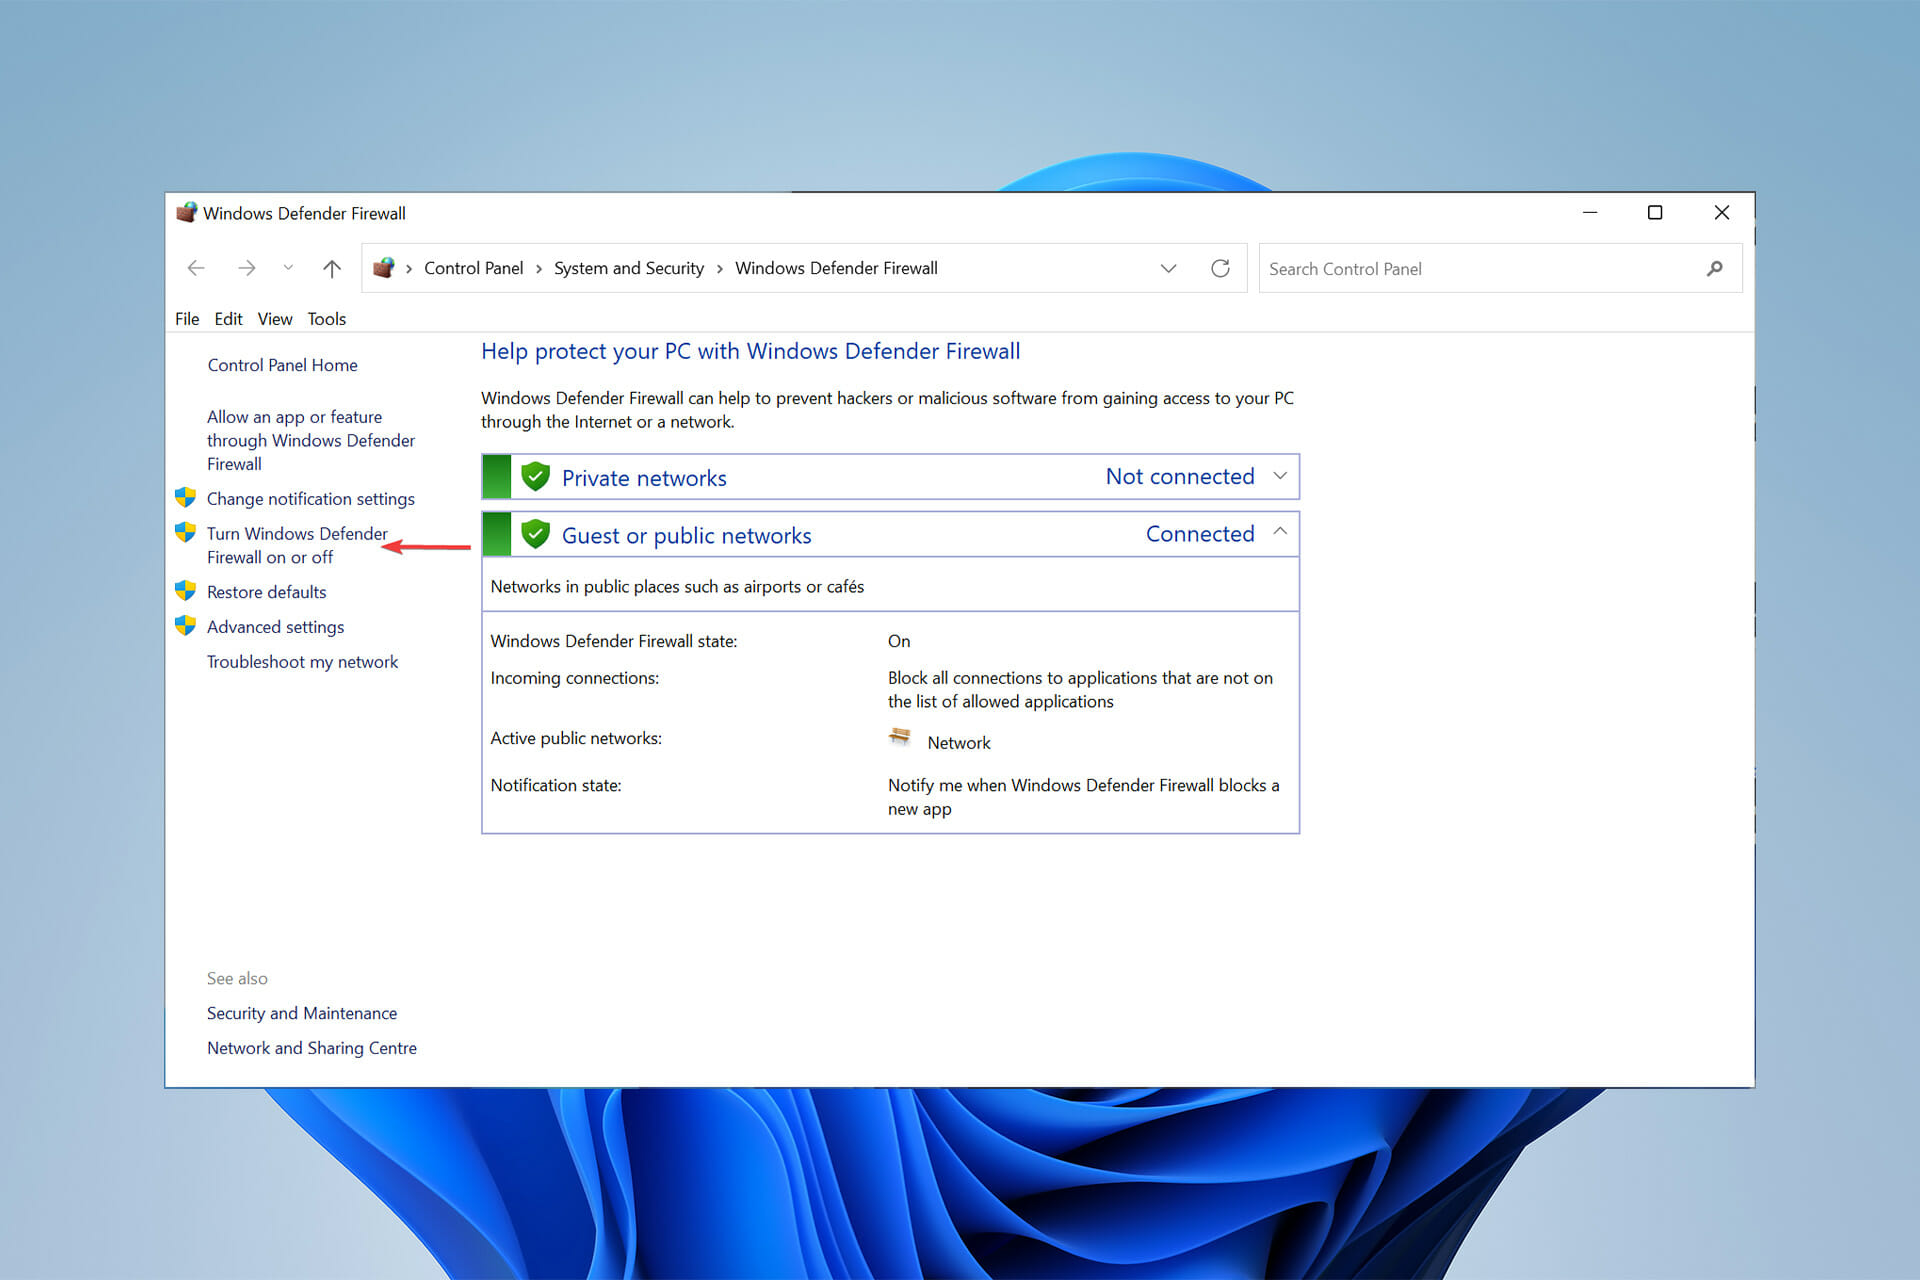
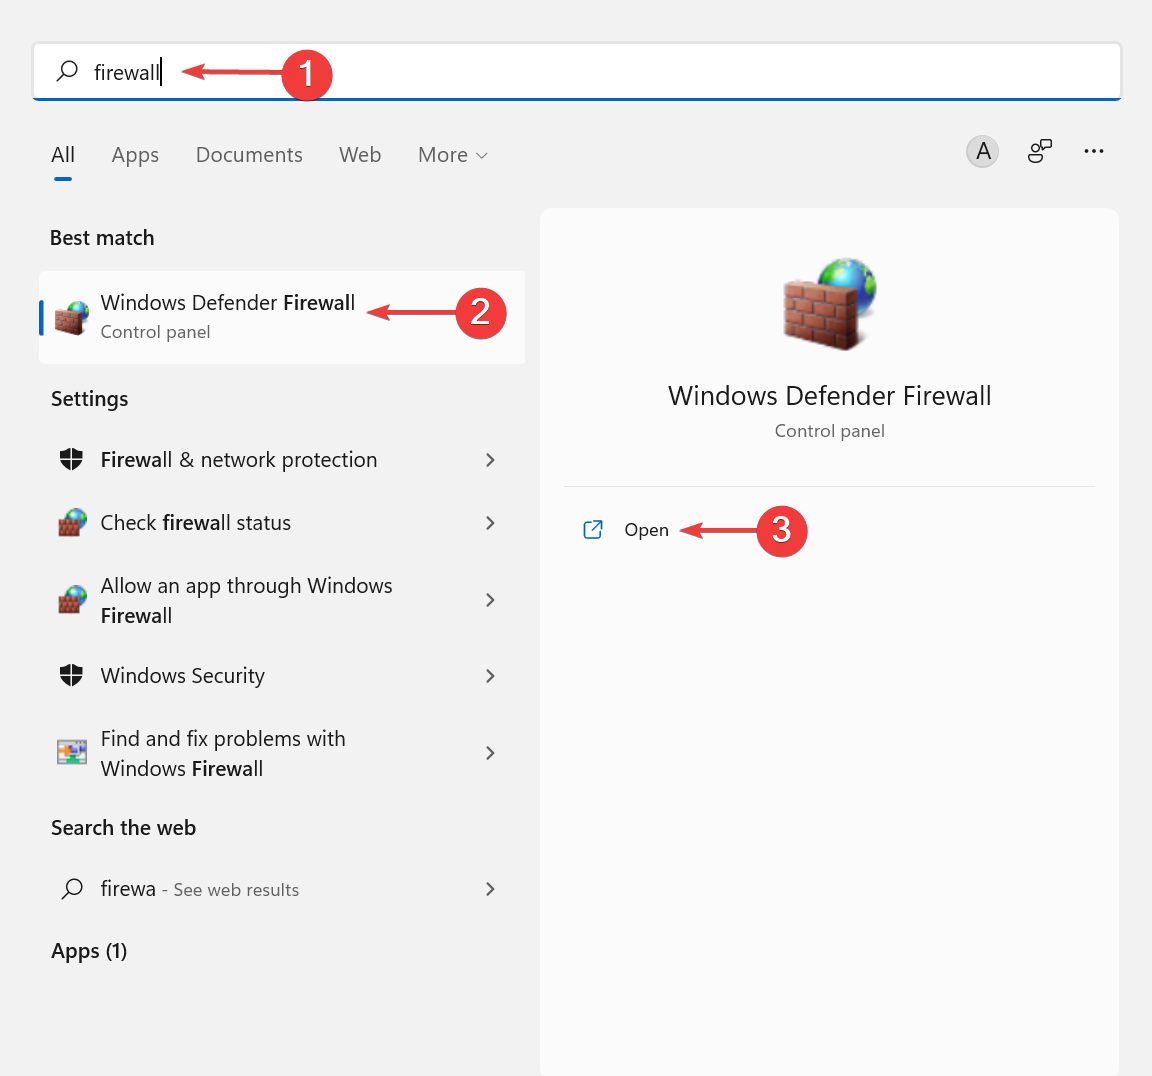
Click on the Start menu, search for Firewall then, click on Windows Defender Firewall.
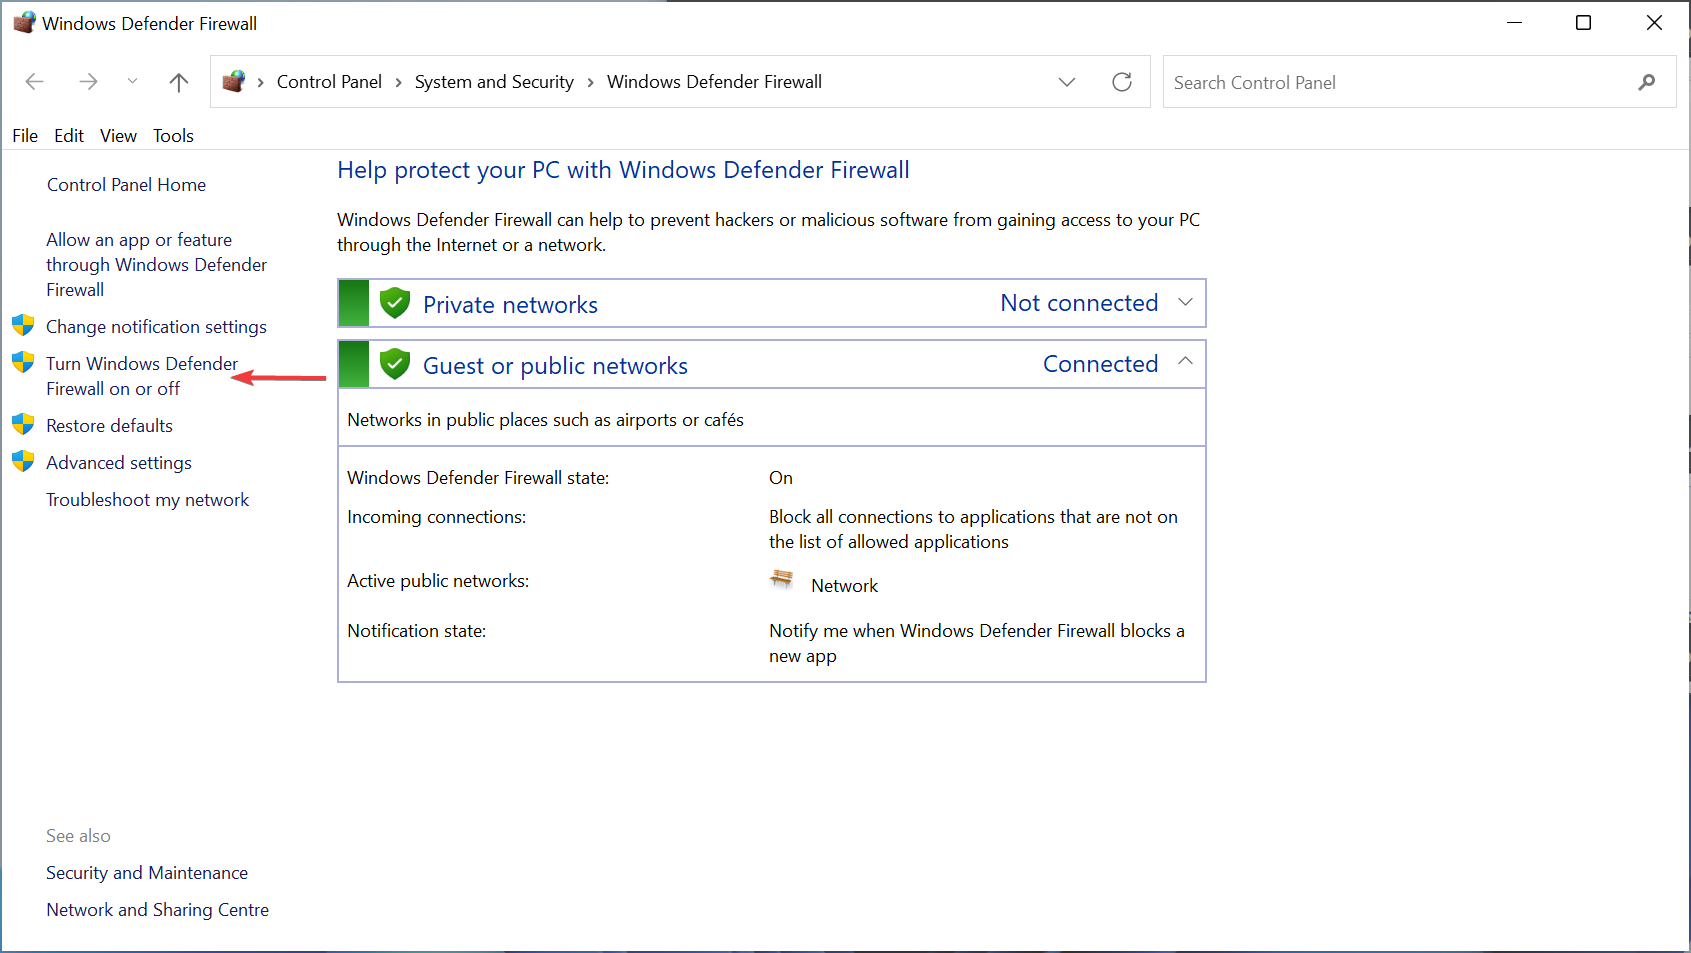
Following that, click on Turn Windows Defender Firewall on or off.
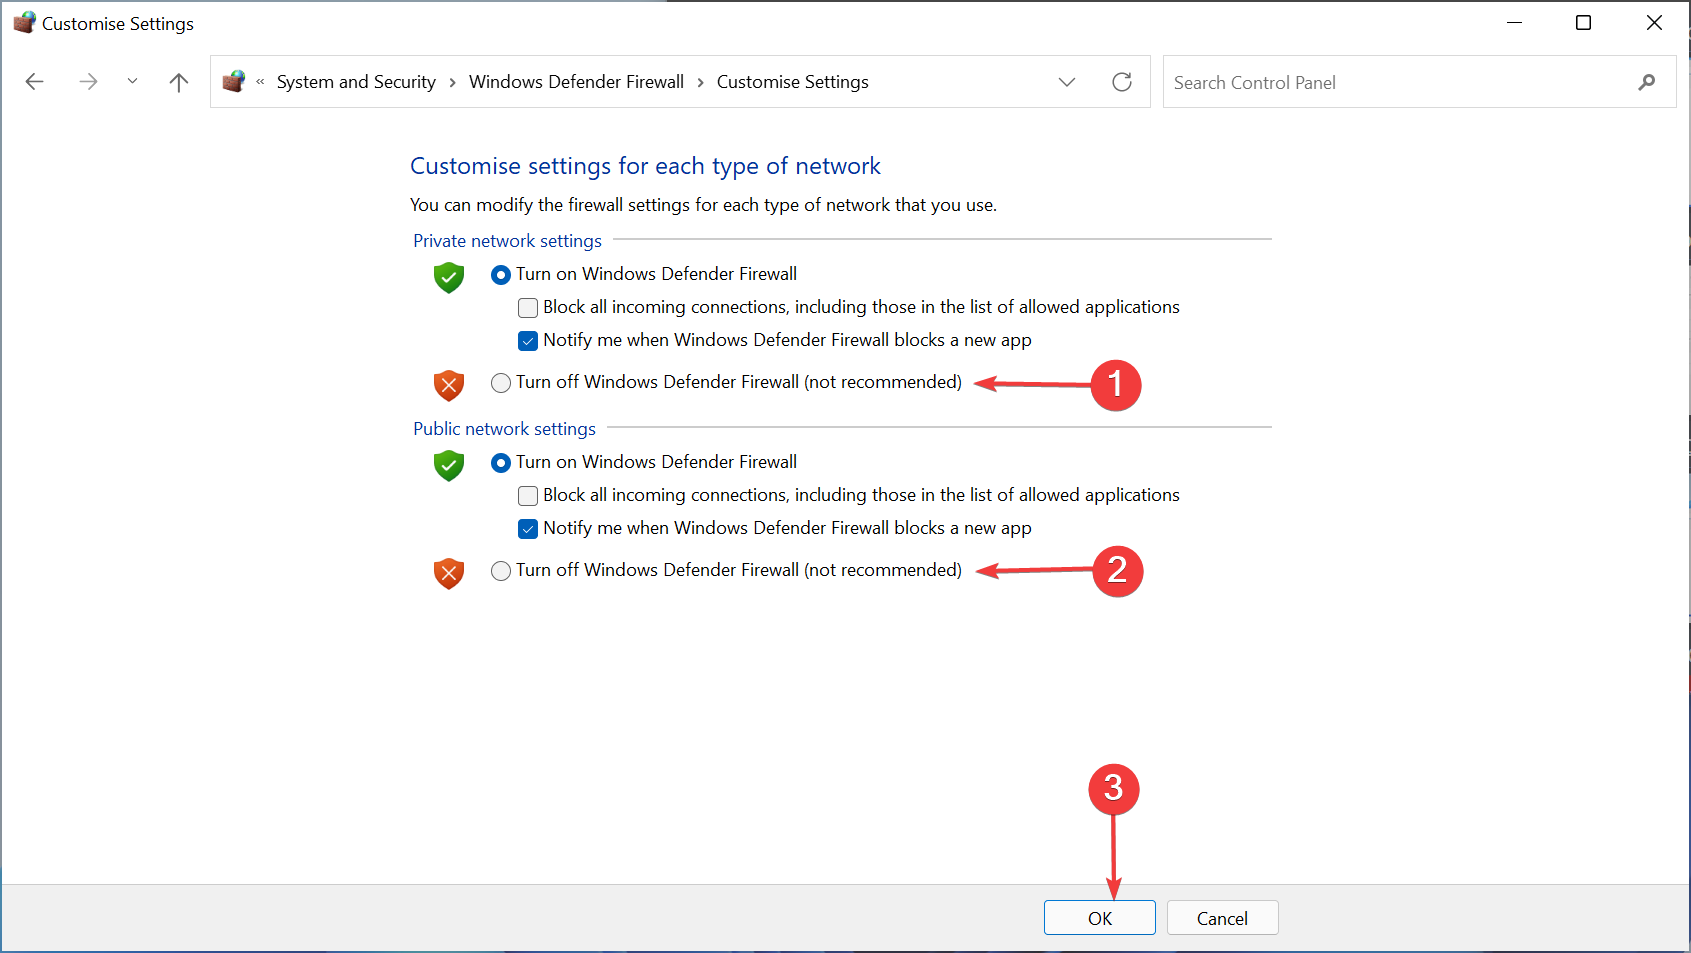
Finally, choose the Turn off Windows Defender Firewall option after that click on the OK button.
Proxy settings, firewall, routing, or DNS issues can block proper communication between client and Remote Desktop Gateway.
Make sure your client and Remote Desktop Gateway can connect effortlessly to avoid facing the Remote Desktop Gateway Server is temporarily unavailable error.
2. Verify that the Remote Desktop Gateway Server’s FDQN resolves to the correct IP
Create the same Internet FQDN in your local DNS record. This way, users can access RemoteApp via the same rdweb internally and externally.
It is also important to keep TCP port 443 and UDP port 3391 open. The packets from the client computer in the other domain must make it to the Remote Desktop Gateway.
Verify that the FQDN for the Remote Desktop Gateway server resolves to the proper IP address for the Remote Desktop Gateway when accessed from another domain.
Run a wireshark or netmon capture on the Remote Desktop Gateway server when you want to connect.
You can also create a forward lookup zone for the Remote Desktop Services (RDS) domain over your domain, and then create the DNS records that are necessary for the FQDN.
The Remote Desktop Gateway server is temporarily unavailable error can be because your server name defaults to a local computer name.
The computer trying to connect must be able to resolve the public name of the RDG server. This may not be the hostname of the server.
3. Check the SSL certificate
RDG uses SSL to securely encrypt the connection. Configurations of your host (Cloudflare, etc.) can mess your SSL certificate up.
Check your SSL certificate and also make sure it is not expired. Sometimes, the Remote Desktop Gateway server is temporarily unavailable error is caused by a faulty SSL certificate.
4. Check for multiple Site Bindings to port 443 in IIS on the Remote Desktop Gateway server
Open IIS Manager.
Head over to the Default Web Site then open Site Bindings on the right-hand menu.
Remove the invalid binding.
How secure is a VPN compared to a Remote Desktop Gateway?
Once set up properly, Remote Desktop Gateway enables remote users to connect to internal network resources outside of your firm. This means that there is no need for a Virtual Private Network (VPN).
Using a VPN connection adds another layer of protection to your RDP connections.
If a criminal penetrates a midway Internet Exchange Point (IXP) and watches every piece of data coming through, all they can access is the encrypted version of the data.
Whilst enhancing security, there are drawbacks of using VPN without any additional access controls.
If an attacker steals a user’s login credentials, they will be able to breach the VPN and then gain access to all the data.
Also, VPNs open up access to a large group of users all at once. However, in practice, IT teams often need to tailor permissions to an individual user. VPNs are not a way of offering granular access control.
If you’re looking for a reliable VPN, check out this article.
The Remote Desktop Gateway server is temporarily unavailable error is one of the errors you might face while using Windows servers.
You might face other errors such as Your computer can’t connect to the remote computer because an error occurred on the remote computer that you want to connect to.
Properly installing and setting up the Remote Desktop Gateway is not something you want to overlook.
If you were able to resolve the Remote Desktop Gateway Server is temporarily unavailable issue, please let us know in the comments section below.
Battery not charging is a typical problem with laptops, and the LG Gram is no exception. While this laptop is famous for its long battery life, users have reported struggling to charge its power storing device.
In this detailed guide, we will show you how to restore normalcy to your PC battery and get it working normally again.
Why is my LG Gram battery not charging?
There are various potential causes of the LG Gram battery not charging issue. Below are some of the notable ones:
Device not plugged in: In some cases, the LG laptop battery might not be charging because the device is not plugged in. The solution is to check if the charger is properly plugged in and working.
Outdated drivers: Sometimes, this issue can be due to an outdated or faulty battery driver. In this case, you need to update your driver to fix this issue.
What can I do if the LG Gram battery is not charging?
1. Make sure the charger is plugged in
Before you do anything, double-check that your laptop’s charger is connected
Double-check that the outlet where you plugged in your charger is operating properly.
If you’re in a hurry, you can make this error, which might generate unnecessary tension.
2. Remove the battery
Unplug or detach the power cable if your laptop is plugged in.
Turn your laptop over and make sure the bottom of your laptop is facing up.
On the bottom of the laptop, look for the battery latch.
Slide the latch switch to the other side and keep it open until the battery is released.
Close the laptop up and press and hold the power button for 15 seconds.
Plug in your laptop’s power cable and turn LG Gram on, then check the battery charging status.
If your device struggles to start up, then the problem is your power adapter and not the battery itself.
First, click on the Start menu, type device manager, then select Device Manager.
Select Batteries.
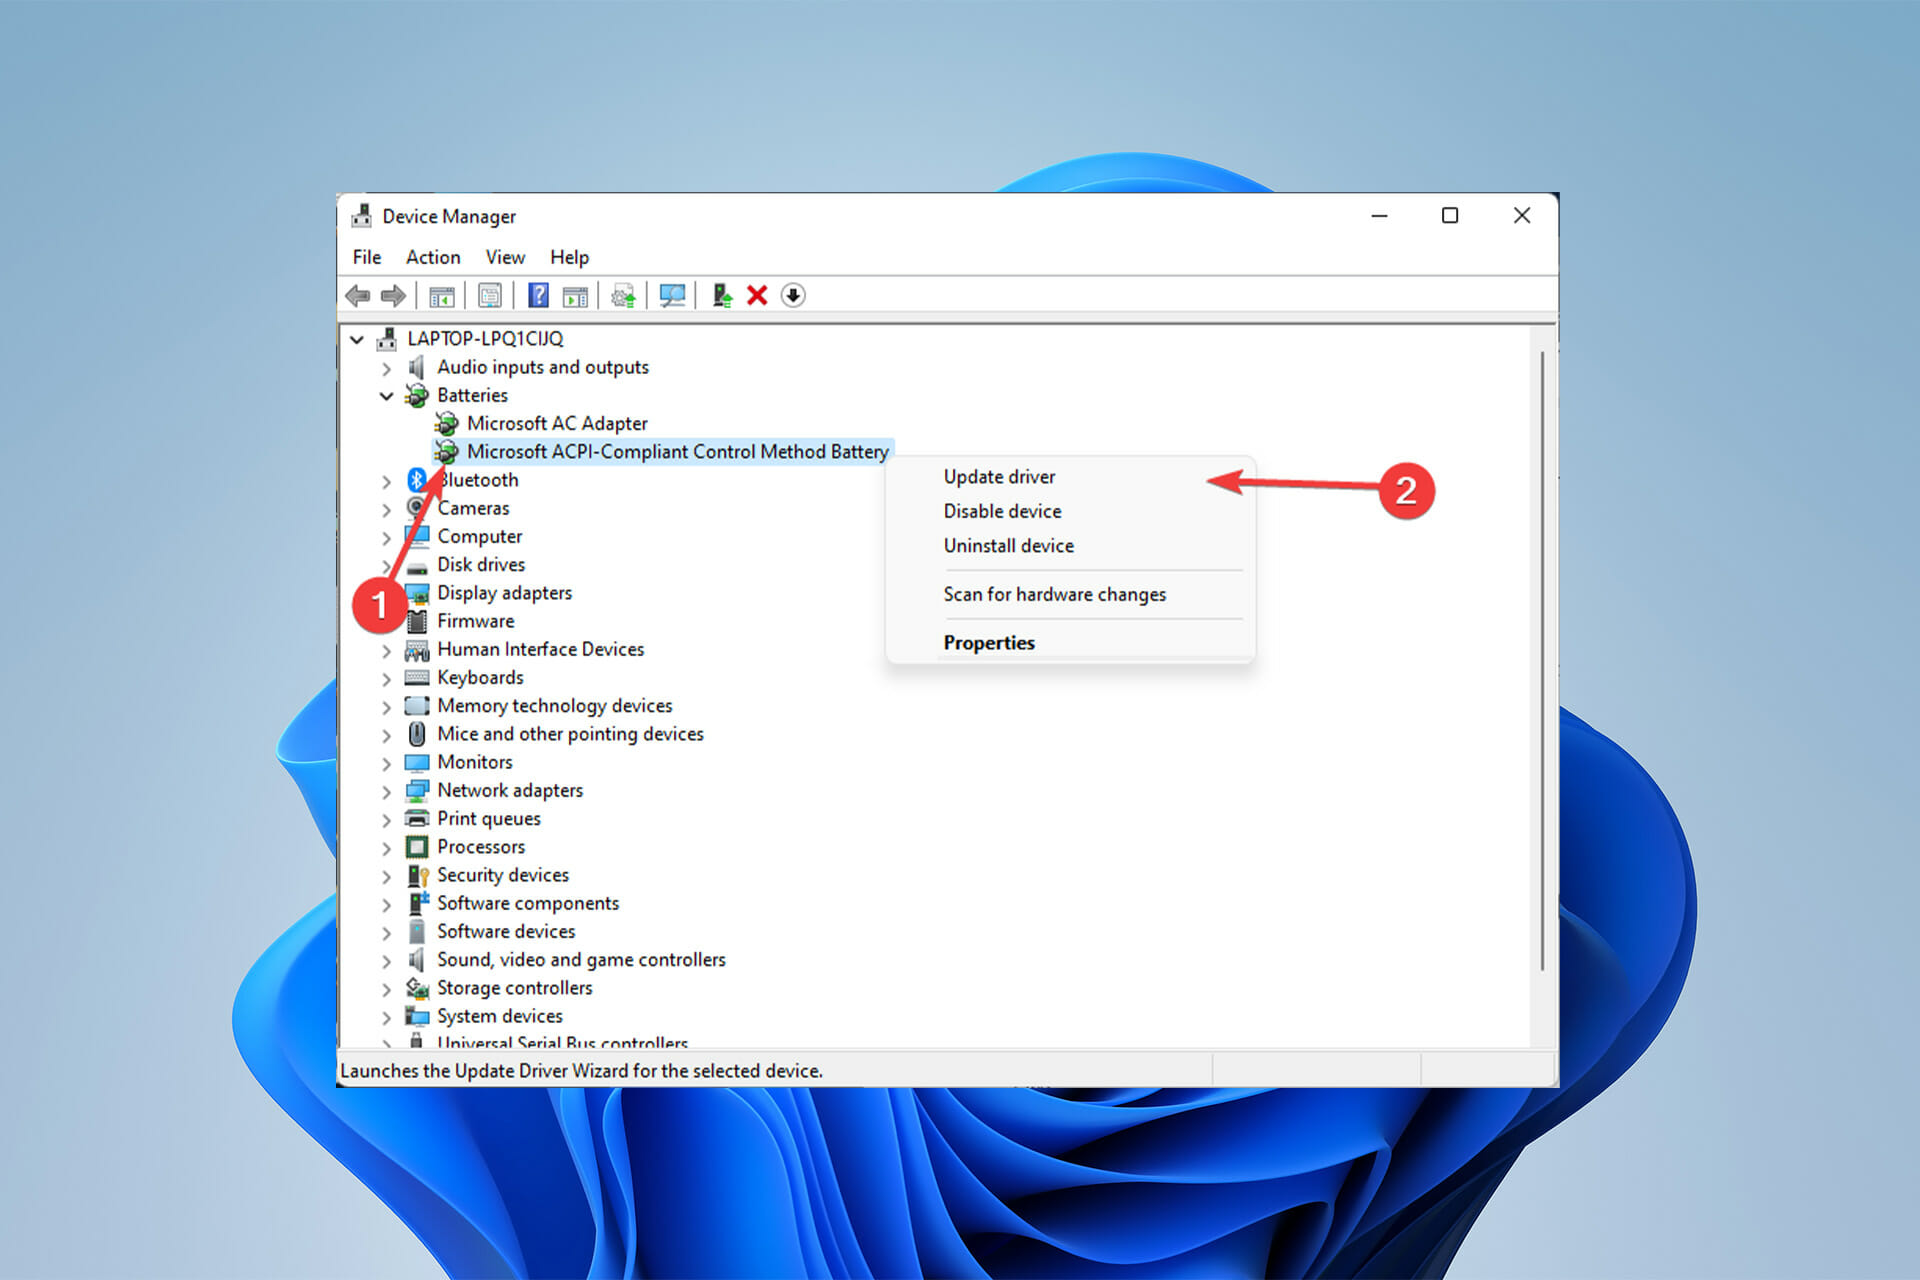
Following that, go to Microsoft AC Adapter, right-click it, and select Update driver from the context menu. Then follow the on-screen instructions.
Right-click on Microsoft ACPI-Compliant Control Method Battery and select Update driver from the context menu when you right-click on it. Then follow the on-screen instructions.
Reboot the laptop.
If you don’t want to do it manually, we recommend installing an application that updates computer drivers automatically.
We offer Outbyte Driver Updater for this reason, which, after installation, performs a deep scan, identifies missing and outdated drivers, and updates them, potentially resolving numerous issues.
First, click on the Start menu, enter the Control panel, then select Control panel.
After that, select Hardware and Sounds.
Select Power Options.
There, select Change plan settings and then see to it that the right settings are applied.
After applying any changes in the settings, click Save changes.
While there are various reasons for the LG Gram battery problem, power surges are often the first to cause damage.
The LG Gram battery not charging issue can be due to power surge problems. This attacks your charger and sometimes your battery. So, check your charger first and your battery.
When accessing a website, it’s fairly uncommon to get an access denied message, and hotels.com is no different.
Finding the ideal hotel for a vacation may be a snap when you have access to hotels.com, but not when you don’t.
A running VPN, proxy, or a busy server could be the source of the access denied message. This guide will show you how to fix it.
What services does Hotels.com offer?
Hotels.com is a premier supplier of hotel accommodations across the world, with a network of localized websites where customers can book rooms.
This website offers one of the most comprehensive selections of lodging on the Internet, with major chain hotels available in hundreds of thousands of locations throughout the world.
How can I fix hotels.com access denied error?
1. Turn off Proxy
Using Internet Settings:
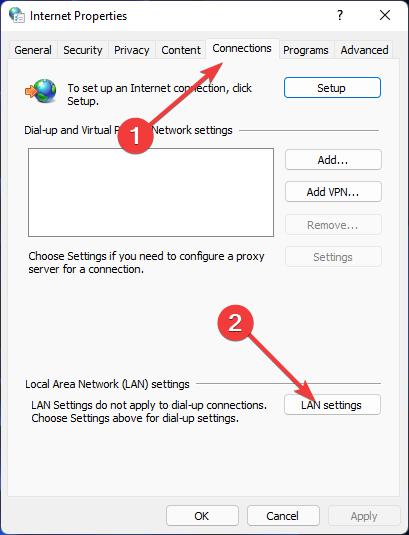
To run Internet Settings, use Windows + R keys, type inetcpl.cpl, and click OK.
On Internet Options, select the Connections tab, then LAN settings.
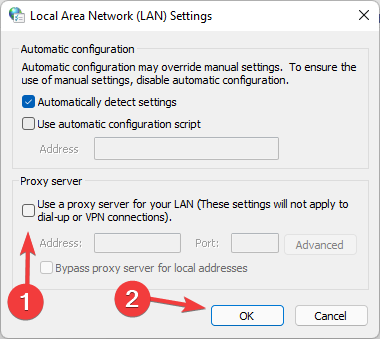
Make sure that Use a proxy for your LAN is unchecked in the settings, click OK to dismiss the Internet properties window.
Using the Settings app:
First, select Settings after pressing Windows + X keys.
Then, click on Network and Internet, then Proxy.
Toggle the off option next to Automatically detect settings under Automatic proxy setup.
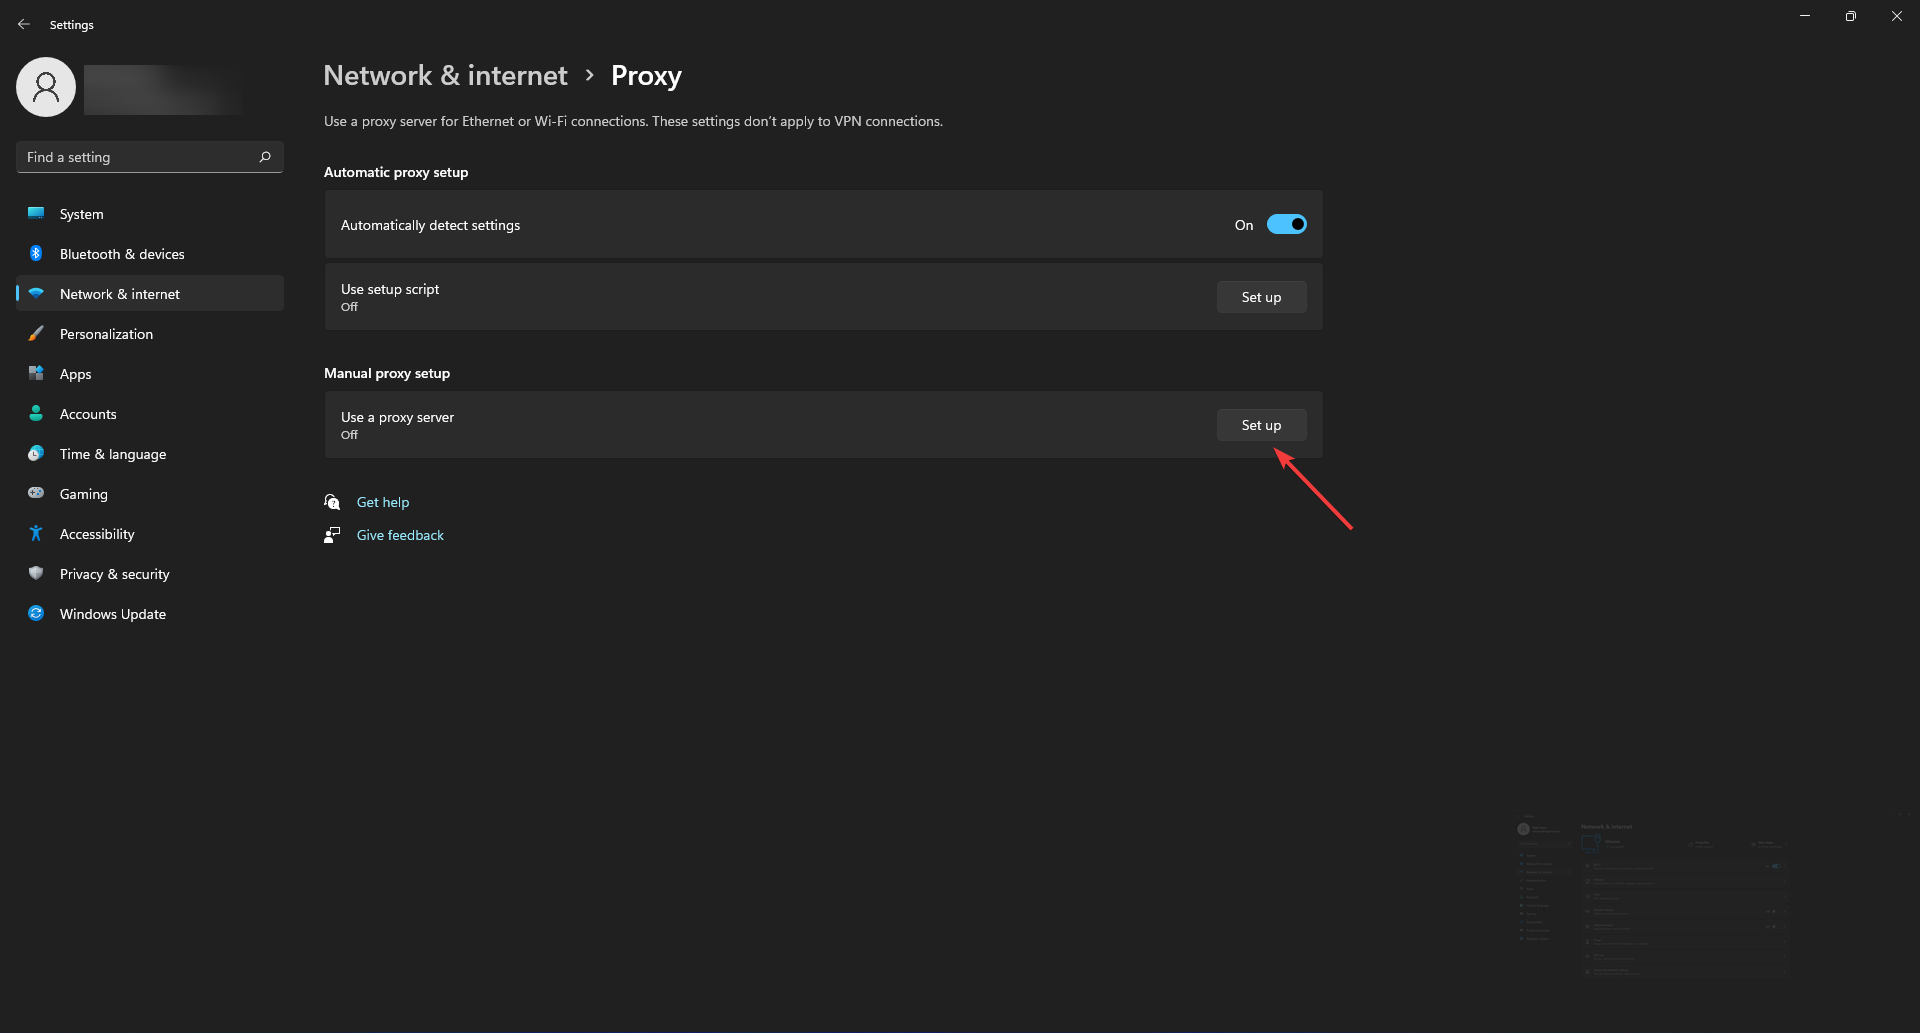
Now click Set up on theUse a proxy serversetting and toggle off the slider.
Some countries may be denied access to the website’s services due to its policy; thus your proxy connection might be the source of the problem.
Because a proxy server can mask your IP address, the web server has no idea where you are physically located, perhaps leading to access denied errors.
Now check to see if the hotels.com access denied issue has been fixed. If not, proceed to the next solution.
2. Turn off VPN
Click on Settings after pressing Windows + X keys.
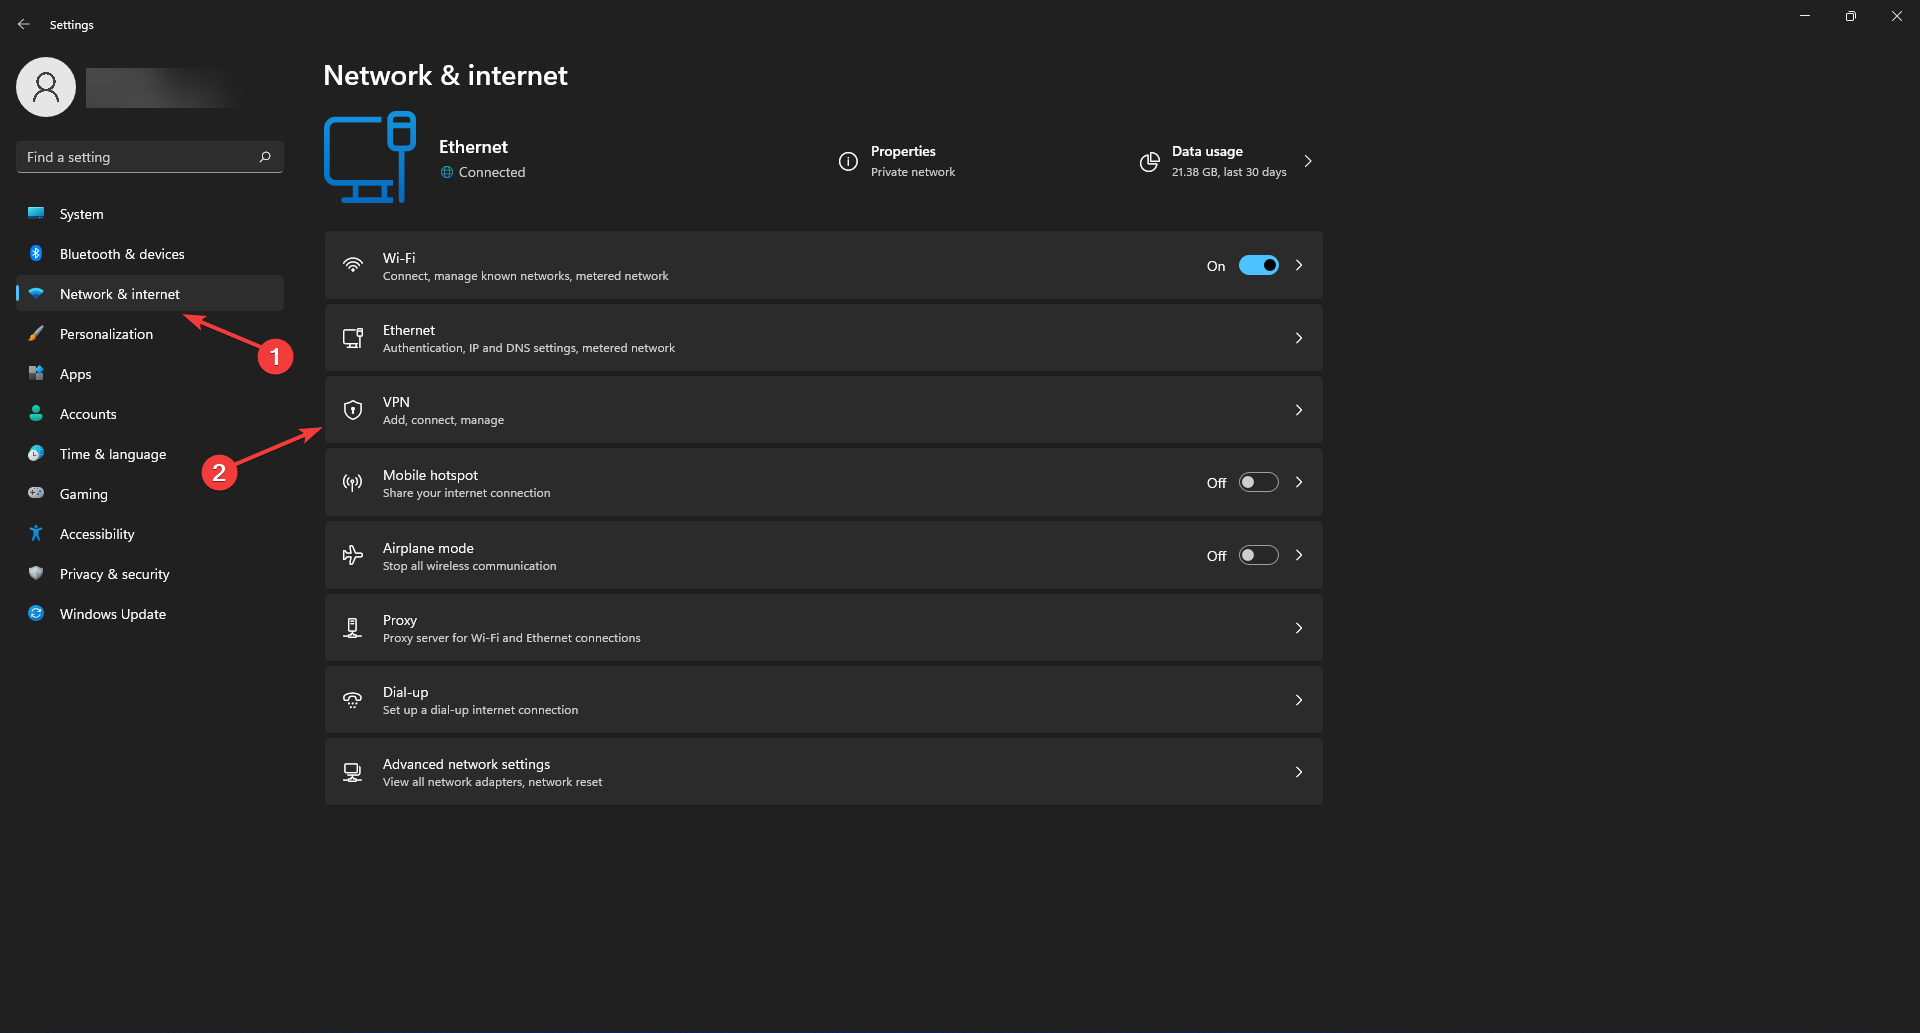
Select Network and Internet, then VPN.
If you have any connected VPNs connected, the services should be visible in this window. Select the VPN connection you want to disable, and click Disconnect.
If you need more details regarding how to turn off VPN on Windows 10/11 temporarily or for good, there is a full guide that could help.
To fix hotels.com access denied issue in Chrome, press F12 to bring up the Developer Tools window on the right side of the screen. The Developer Tools should not be used.
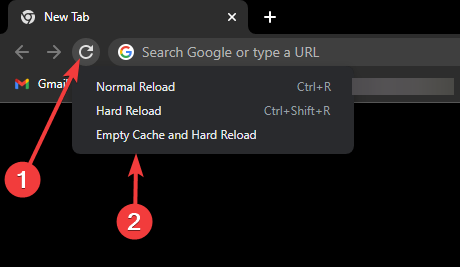
Right-click the refresh circular arrow wheel next to the URL bar and select Empty Cache and Hard Reload.
Firefox:
Press F5 while holding down the Ctrl key or press R while holding down the Ctrl and Shift keys.
Internet Explorer:
Press the F5 key while holding down the Ctrl key.
If the hard reload option wasn’t capable of fixing the hotels.com access denied issue, move on to the next method.
4. Install the Opera browser
Many browsers now come with built-in anti-phishing protection, RSS feeds, and email clients. Opera was the first to bring these features to the market.
In order to access the internet, Opera won’t use a lot of your computer’s resources.
Even on slower connections, it downloads swiftly and doesn’t slow down your computer’s performance because it doesn’t eat up memory or hard drive space.
In this scenario, the problem is not your device but the website’s server capacity, which has a limit on how many people can be active on it at the same time.
Try visiting the website later or on the days when it might be less visited.
Are there any hotels.com alternatives?
There are a million other websites from which you can rent rooms or gather information about the hotels of a location or country.
However, Kayak.com is the best alternative website out of all which you can use to compare hotels and choose the best depending on your situation.
Many websites suffer from inferior servers which are not capable of handling too much traffic on the website; thus busy servers are a somewhat normal phenomenon for popular websites.
Users assume that if there is a problem, it is their fault, but the reality is that websites like this go through maintenance on a regular basis.
Given that websites that are undergoing maintenance become unavailable to users, perhaps the best answer is to wait a while.
However, keep in mind that if you use a VPN or proxy on a regular basis, they could be the root of the hotels.com access denied issue.
When it comes to securing multiple passwords, LastPass is among the best password managers due to its ease of use, security, and freemium plan that’s tough to beat against the competition.
That being said, many LastPass users have been encountering this error message: An error has occurred while contacting the LastPass server. Please try again later.
Now, while there hasn’t been an official solution released yet, we’ve listed a set of troubleshooting tips below that you can use to try and resolve this issue on your own.
Quick tip:
Before going into more depth with fixing this issue, if you keep having trouble with LastPass, then it may be the moment that you try using a different password manager tool.
After carefully analyzing the current tools, we’d recommend that you use NordPass as an alternative password and vault manager, developed by the trustworthy NordVPN.
All data stored in your vault is already encrypted, and only you have access to the contents of your NordPass manager. Your master password, encryption keys, and decryption keys are never sent to the servers, to avoid server fatigue and privacy concerns.
This is the primary reason NordPass does not offer automatic master password recovery through email. Your master password may be retrieved from the password reset screen using the recovery code obtained on the initial sign-in.
NordPass
NordPass safeguards and preserves passwords in a secure digital vault utilizing the most advanced encryption technologies and secure servers.
The error LastPass couldn’t contact the server has been reported in Chrome, Firefox, and Edge as one of LastPass users states:
I get the same red banner with the unable to contact the server message. One of my passwords has expired and I need to update LastPass with the new password, but it can’t get through.
The regular functionality of it filling in existing passwords is working fine, it’s only the password update that is having an issue. I even tried logging into the LastPass website and updating the password there, and I still get the same message on Chrome, Firefox, and Edge.
These error messages are not uncommon, and when having these issues on multiple browsers, there is a clear situation that maybe it’s not actually from the internet connection.
Follow these troubleshooting steps below and you’ll fix the error LastPass couldn’t contact the server as you say LastPass.
How can I fix the LastPass server connection error?
Next, click Advanced and click on Privacy and security.
Choose Site Settings and select Cookies.
Next to Block, Clear on exit, or Allow, select Add to add LastPass as an exception.
Enter the web address: LastPass.com.
To create an exception for an entire domain, insert [*.] before the domain name ([*.]lastpass.com)
Click Add
Exception
Follow Exception steps 1-4.
Instead of step 5, change Allow sites to save and read cookie data to On.
Firefox
To add an exception Open Firefox.
Click the Shieldicon and select Protection settings.
Next, click Privacy and security.
Scroll down to Cookies and Site Data and selectManage Permissions.
Enter the web address Lastpass.com.
Click Allow.
Exception
Follow Exception steps 1-2.
Instead of step 3, under Enhanced Tracking Protection select Custom.
Deselect the Cookiescheckbox.
Internet Explorer
To add an exception open Internet Explorer.
Click Tools and select Internet options.
Select the Privacy tab and selectSites.
Enter the web address LastPass.com.
Click Allow.
Exception
Follow Exception steps 1-2.
Select the Privacy tab and go to Advanced.
Under Third-party cookies select Accept.
3. Disable Extensions
Chrome
Open Chrome.
Click the menu icon and select More Tools.
Next, go to Extensions.
To disable an active extension, click the blue slider icon.
Firefox
Open Firefox.
Click the menu icon and select Add-ons.
ClickExtensions select More icon and Disable.
Internet Explorer
Open Internet Explorer.
Click Tools and select Manage add-ons.
Under Show, click All add-ons.
Click to an extension to highlight it, and then click Disable.
4. Check Date and Time settings
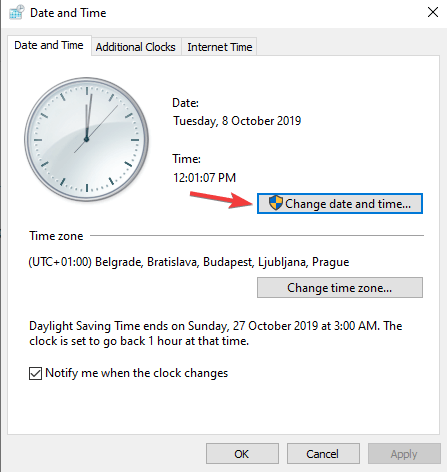
For LastPass to function properly, check your machine’s date and time settings and make sure that they are accurate.
5. Whitelist LastPass in the firewall
Click on Start and select Control Panel.
In the System and Security go toWindows Firewall.
Click Turn Windows Firewall on or off.
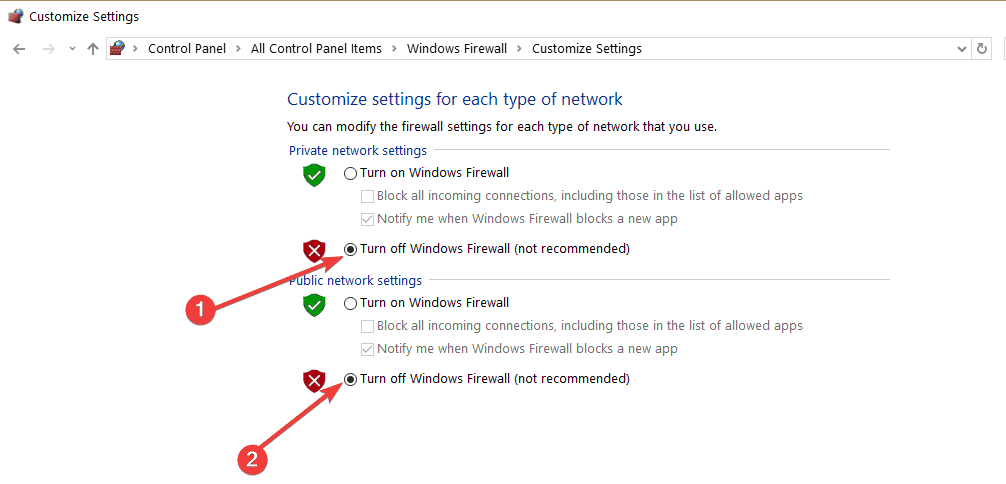
Select the Turn off Windows Firewall option.
6. Clear LastPass local cache
Log in to LastPass, and click the active LastPass icon in your toolbar.
Go to Tools and select Advanced Tools.
Next, choose Clear Local Cache.
Once cleared, log out and log back in.
7. Change where your mobile data is stored
Your LastPass vault data (e.g., URLs, usernames and site passwords, secure notes, form fill items) is kept locally on your device, and the location depends on your operating system and web browser.
If you’re logging on to LastPass via mobile device or tablet, please ensure that the application data is stored in the device’s internal memory and not on external storage such as a MicroSD card.
When you log in to your LastPass account via desktop or mobile device while connected to the Internet, you are producing a locally cached version of your encrypted data on your local storage. When you log in to LastPass while offline, this is the info that LastPass loads.
Tip
You can find more related articles that will help protect your online privacy on our dedicated VPN Hub. Make sure to bookmark our Software Hub for more related articles and guides.
Surprisingly, server connection difficulties are among the most prevalent issues encountered by LastPass clients.
According to other users, it takes time to complete these troubleshooting steps, including time spent going through each step and contacting LastPass if required.
Best of luck, and do let us know whether you were able to address your issue using the information in this article.
If you’re still experiencing the same error and/or you want to share your opinions with us then reach out to us in the comments section below.
If your Dell XPS 13 won’t shut down, you are not alone. This issue has been on for years and it seems Dell has not done anything significant to permanently fix the problem.
Many users across forums especially Dell’s own website bitterly complained about the issue but for an unknown reason, the company usually request users to private chat its support for a guide on how to fix it.
How do I turn off my Dell XPS 13?
1. Disable the fast startup option
Open Windows search by pressing Windows key + Q.
Type control panel. Select Control Panel in the list of results. Click Open to launch.
Type Power in the Search Box. Next, select Change what the power buttons do.
Tick Turn on fast startup (recommended) if not yet selected. After that, Save changes.
2. Turn off Wake on LAN
Open Control Panel by pressing Windows key + R. Then type Control and next, press Enter.
Type network connections. Then click on View network connections.
Right-click on the current network, usually WiFi. Next, right-click on Properties.
With Networking selected, click on the Configure button.
Select Power Management. Make sure the Allow the computer to turn off this device to save power option is ticked. After this, click on OK.
3. Perform a hard reset
Unplug all connected peripherals such as a mouse, keyboard, etc.
If the power plug is connected, unplug it from the unit.
Shut down the computer by holding the Power Button until off. Hold more for 30 seconds to drain any residual power from the motherboard.
Boot system with the Power Button.
Wait until the boot is complete, then try shutting down normally to check if the Dell XPS 13 won’t shut down.
Open Windows Search by pressing the Windows key + Q.
Type troubleshooter settings in the Search Box. Next, select Open.
If no Recommended troubleshooter preferences are displayed, select Other troubleshooters.
Select Run for Windows Update.
5. Tweak the registry
Open Run by pressing Windows key + R. type regedit.
Type the folder below or copy and paste it into the Address Box: HKEY_LOCAL_MACHINE
Click on the small arrow beside the HKEY_LOCAL MACHINE folder. Next, do the same for the SOFTWARE folder.
Find and locate the Microsoft folder. Expand it, and scroll to locate the Windows NT folder. Expand the folder to locate CurrentVersion.
Scroll to find and locate Winlogon. Expand it and at the same time, click on it. This will display new files in the panel on the right.
Check if PowerdownAfterShutdown is listed in the panel.
If not, right-click on an empty space. Choose New. Next, select DWORD. Rename the DWORD as PowerdownAfterShutdown. Double click on the newly created file. Next, type 0 for the Data value.
Exit the Registry.
Restart your system.
By this time, using any of the methods we have taken you through above, the issue with your Dell XPS 13 should have been solved. The system can now be shut down successfully without using the power button to force it.
Those who are experiencing Dell XPS 15 shutdown issues can read our guide to fix it, in case the solutions discussed in this article don’t work for you.
Don’t hesitate to share in the comment section if you are able to solve this problem using another method.
LastPass is a great password manager, but some users reported issues with LastPass and Safari, and it can be quite a nuisance.
According to them, LastPass isn’t working in Safari at all. This can be a major problem, but there’s a way to fix that.
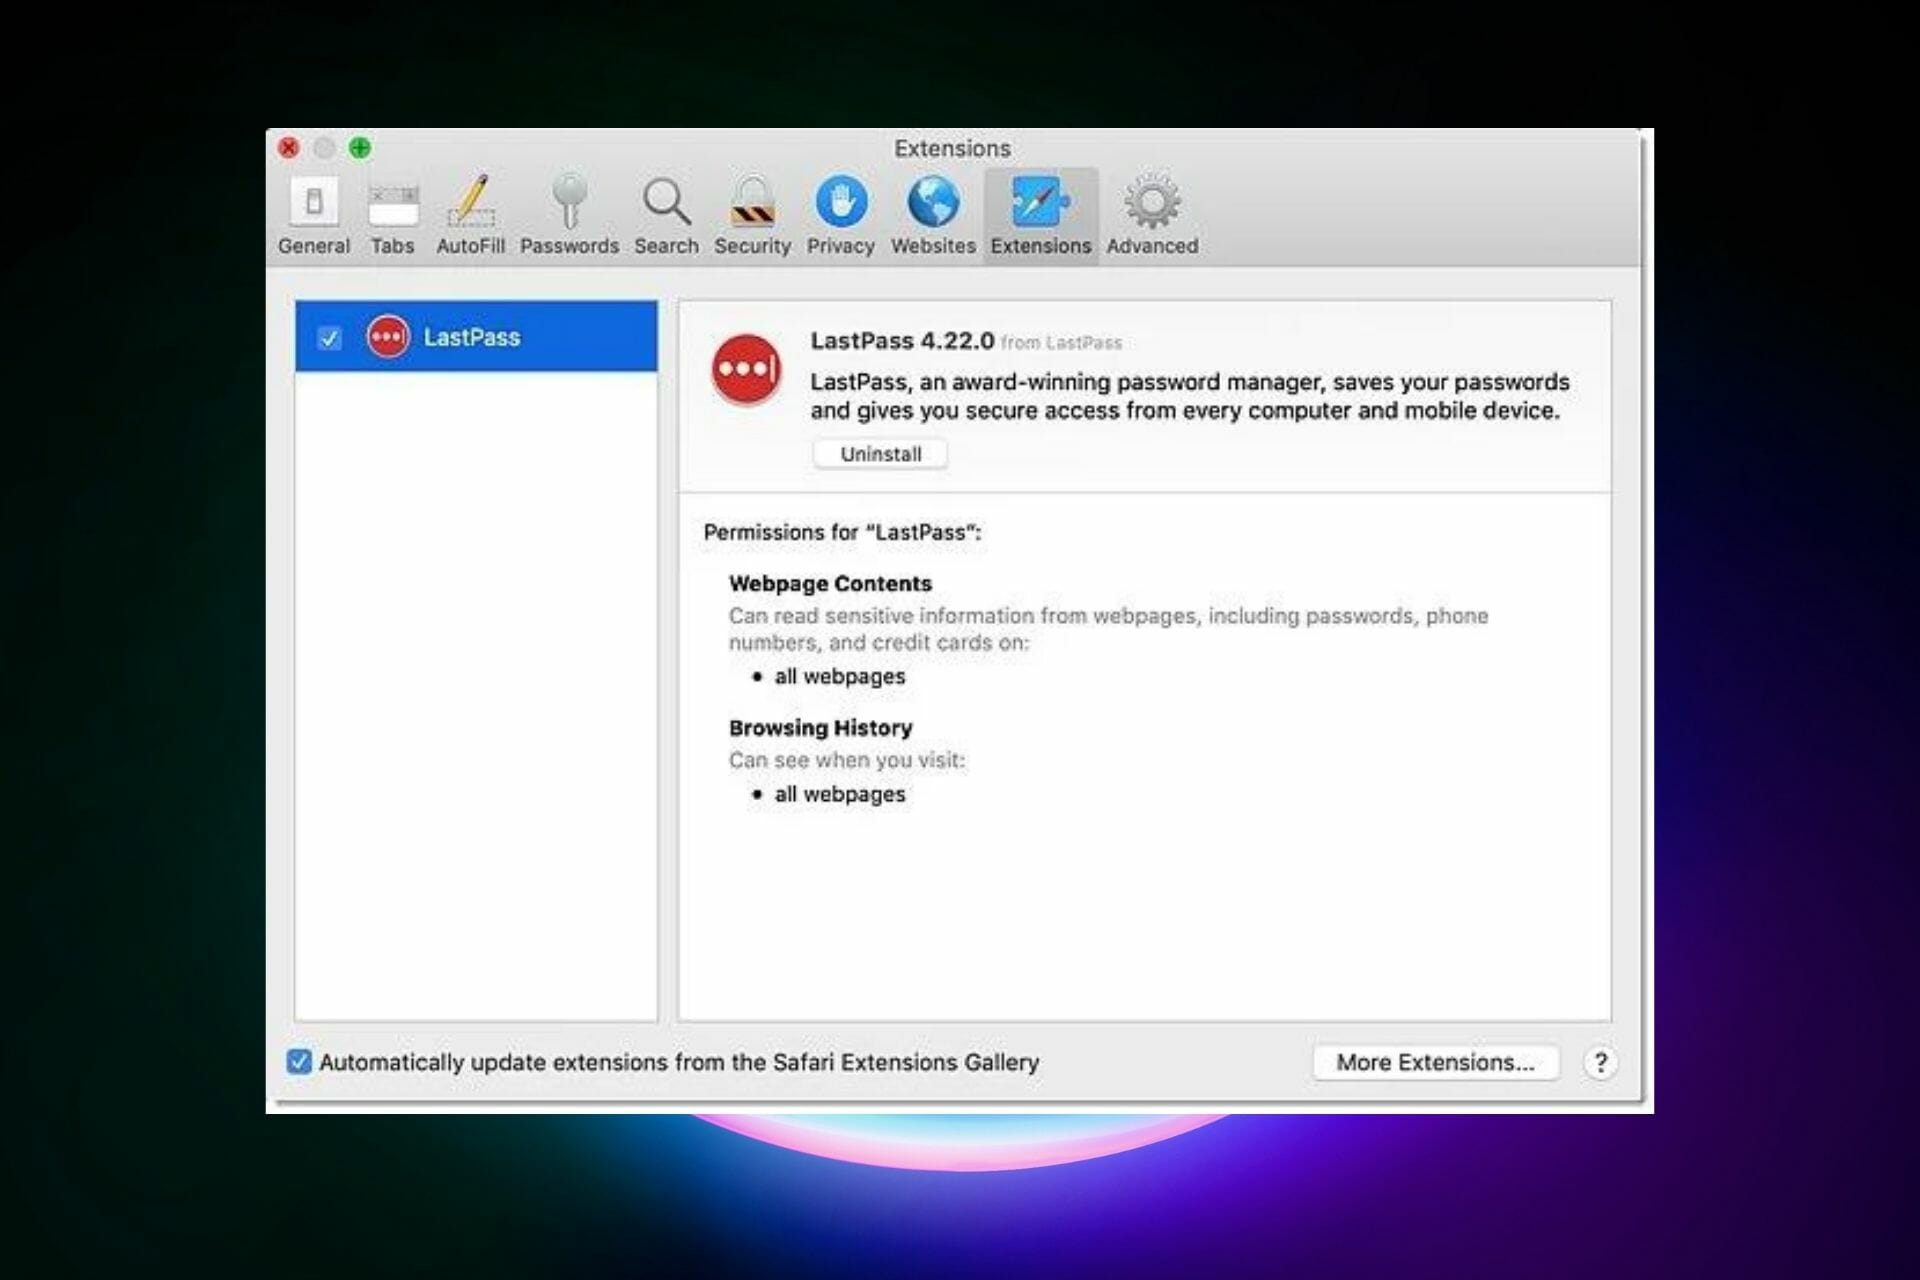
If you check your extensions and notice a warning indicating that the LastPass extension not showing in Safari, it might be due to a recent web browser version upgrade or incompatibility.
An anti-virus tool, security suite, or system maintenance application may prevent LastPass from being seen or from working properly.
It’s okay to include LastPass as a trusted source in your security tool maintenance settings so that it may be accessed at any time without disruption.
Why LastPass Safari extension not showing up?
Why doesn’t LastPass work on Safari or not showing up is a problem that many have faced lately?
You may receive errors while attempting to access your LastPass vault, which might be due to the extension not being enabled.
Quitting Safari and then relaunching the browser to reach the preferences in the menu bar saves you time when checking the extensions tab to see whether it is operating well and displaying your other extensions as well.
In the left navigation bar, there is a little check box for the LastPass option that you may toggle to return the password manager to the light.
It’s important to go over this simply to make sure the password manager extension isn’t deactivated from the start, so you can go on to the next troubleshooting steps.
If you installed the LastPass browser extension and are having problems with it suddenly vanishing or being corrupted, please follow the troubleshooting instructions listed below.
What can I do if LastPass is not working in Safari?
1. Download the latest version of LastPass
Go to the Safari menu.
Choose Safari Extensions.
Locate the LastPass Password Manager.
Download the latest version.
If you previously installed a version of the Safari app extension and are asked that the LastPass.app already exists in the Applications folder, click Replace.
2. Add LastPass to the Login items list
Go to the System Preferences and select Users & Groups.
Next, go to Your user name.
Now select the Login Items tab and click the Plus.
Now add the app to the list. You can find it here:
Most password managers in the top rankings offer relatively comparable quality, but compatibility issues may arise sometimes. If you cannot resolve the issue with LastPass, we recommend that you use RoboForm as an alternative.
You can capture and save passwords while you’re browsing the internet without being required to perform additional steps.
RoboForm keeps your passwords backed up and in sync, covering all your browsers and devices, thanks to its secure cloud.
Furthermore, you can store and classify your passwords in easily-manageable folders and pin your preferred Logins for simple access.
RoboForm guarantees powerful security because it has strong encryption algorithms, such as AES-256-bit with PBKDF2 SHA256.
RoboForm
Security is the main priority for RoboForm when it comes to keeping passwords safe.
Check for updates and install the latest that is compatible with your Mac PC following these steps:
Exit Safari.
Choose the LastPass Menu Bar icon then select Check for updates.
Choose Install Update.
Relaunch the LastPass Safari app extension.
To allow LastPass to update automatically when a new version is available, check the box for the Automatically download and install updates in the future option.
While the Safari Legacy Extension will continue to work on Mac OS X 10.11 El Capitan and older, Apple restrictions will prevent it from receiving updates.
The Safari app extension is compatible with the two most recent major macOS releases, and a 64-bit CPU is necessary.
Go to //Users//yourAccountName//Library//LaunchAgents//com.lastpass.LastPassHelper.plist.
In plist > dict > key[Program] > string replace the REPLACE_HOME token with an absolute path to your home folder, for example, //Users//yourAccountName.
Next, save the changes.
Log out and log back into your Mac OS and the issue should be resolved.
6. Check if LastPass is hidden
The web browser extension icon may be hidden if you have upgraded LastPass and confirmed that it is enabled. Follow these steps to make it visible again:
Go to View
Click on Customize Toolbar
Drag and drop the LastPass icon into your toolbar.
7. Uninstall and reinstall the LastPass extension
To uninstall LastPass from Safari do the following:
Exit Safari.
Close the LastPass Safari app extension.
Go to your Applications folder.
Click and drag the LastPass App icon into Trash.
To reinstall the LastPass Safari browser extension navigate to the LastPass downloads page and select download for Safari, or Quick Install. Click the inactive LastPass icon in the Safari toolbar, enter your email address and master password, and then click log in.
Tip
On our dedicated VPN Hub you can find more related articles that will help protect your online privacy. Make sure to bookmark our Software Hub for more useful articles and guides.
There you go, these are some solutions that might help if LastPass isn’t working in Safari. If you found this article helpful, let us know in the comments section below.
Are you getting the error-saving wireless profile message?
Some Windows users reported getting this error message most especially when trying to see the wireless properties of their network connection.
The error message indicates that: Windows has encountered an error saving the wireless profile. Specific error: the system cannot find the file specified.
However, the reasons for this error message are diverse and include:
Meanwhile, we have come up with a working solution to solve the error-saving wireless profile problem on your PC.
Steps to fix wireless profile save issues
1. Run a full system scan
Go to Start > type ‘defender’ > double click Windows Defender to launch the tool.
In the left-hand pane, select the shield icon.
In the new window, click the “Advanced scan” option.
Check the full scan option to launch a full system malware scan.
Viruses and malware can cause errors in saving wireless profile problems. This malware infects your system file resulting in the error.
Hence, run a full system scan on your PC to remove every possible virus corruption. You can also use Windows’ built-in antivirus, Windows Defender. Here’s how to do this:
Note: There are several third-parties antivirus software around that you may use to run a full system scan. However, if you are done scanning your PC, it is advisable that you remove all detected viruses; the option may be “clean” or “delete” depending on the Antivirus that you are using.
Antivirus software is a memory-resident program. They monitor what is going on in the system, even through a wireless connection.
If malicious activity is detected, you will be notified so that you can remove the virus as soon as possible.
A reliable antivirus solution for prevention, alerts, and removal is essential for trouble-free online activities.
2. Update Network adapter drivers
Press the Windows key + R, type devmgmt.msc, and then hit Enter. (Alternatively you can right-click on Windows key and select Device Manager).
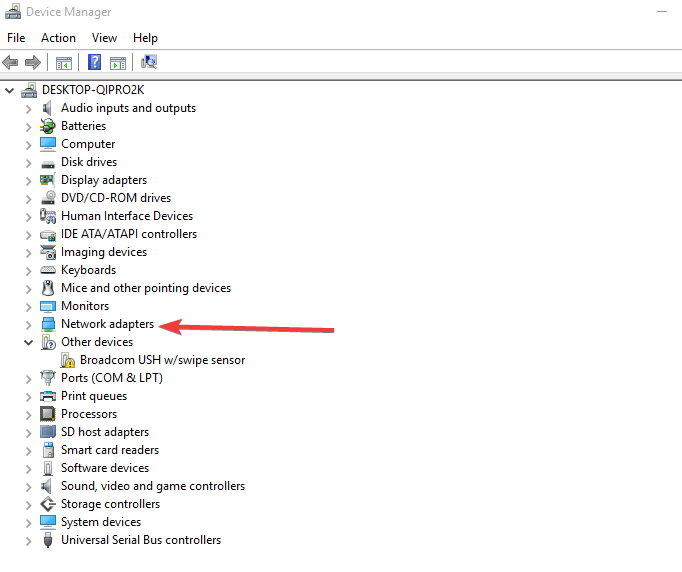
In the Device Manager window, expand Network adapters section.
Then, right-click on your Intel Network Adapter and select Update Driver Software.
Click Search automatically for updated driver software
Once the steps are complete, click Close. After installing the updated driver, click Start > Power > Restart
Some Windows users reported that they were able to fix Windows error-saving wireless profile errors simply by updating their network adapter drivers. Hence, you can update your network adapter to fix the problem.
Here’s how to do this:
Note: If Windows doesn’t find a new driver, visit the device’s manufacturer’s website and download the latest network adapter driver from there. If your computer cannot connect to the internet, download a driver from a different computer, save it to a USB flash drive, then manually install it on your own computer.
Alternatively, you can also uninstall and then reinstall your network adapter device drivers if updating the driver does not fix the issue.
To avoid any further complications with your network adapter drivers, make sure you’re running the most recent versions of your drivers.
There are third-party apps that can perform this automatically and find the best solution for you.
You may rely on Fortect Driver Updater to make such enhancements to ensure a proper update with the most recent network adapter drivers.
A registry cleaner is a utility program that can fix corrupt system files. You can download one of these utilities on your Windows PC and use it to scan, fix, and clean bad system files especially corrupted files responsible for this error.
Keep in mind that a registry cleaner is not used on a daily basis, it’s when you need to make necessary cleaning for a corrupted file, folder, or program.
For more information on the best registry cleaners to install, find the best utility that suits your PC to restore, clean, and optimize it.
4. Repair Windows Registry
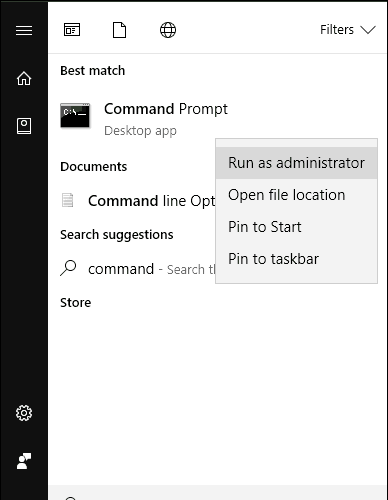
Go to Start > type cmd > right-click Command Prompt > select Run as Administrator.
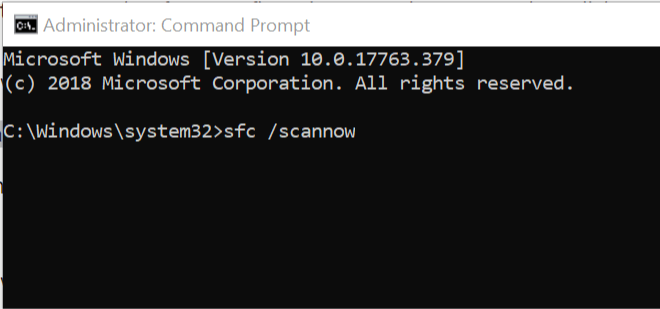
Now, type the sfc /scannow command.
Wait for the scanning process to complete and then restart your computer. All corrupted files will be replaced on reboot.
The simplest way to repair your Windows registry is to use Microsoft’s System File Checker to check for system file corruption.
The utility program verifies the integrity of all system files and repairs files with problems when possible. Here’s how to run an SFC scan on all Windows’ versions:
5. Remove all listed wireless networks
Go to Start > Control Panel
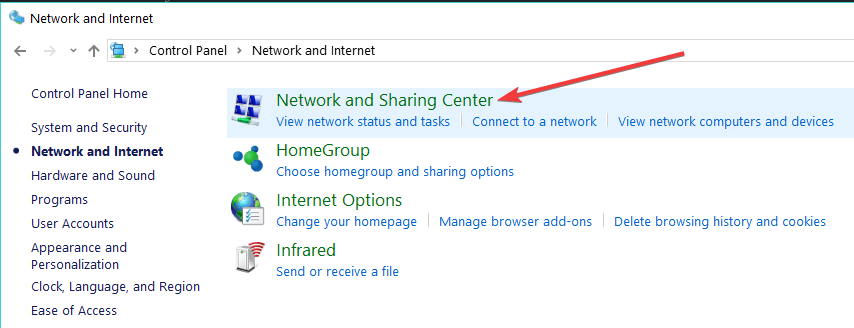
Click on Network and Sharing Center
Open Manage Wireless Networks
Hence, remove all listed wireless networks on the list
Restart your PC, and then reconnect to the wireless network.
Another way of fixing error saving wireless profile problem is to remove all listed wireless networks, and then connect to the desired network afresh. Here’s how to do this:
6. Install Windows Update
Go to Start>type “update” in the search box and then click on “Windows Update” to proceed.
In the Windows Update window, check for updates and install the available updates.
After the update is complete, restart your Windows PC.
Ultimately, you can run Windows Update to fix the error problem. Microsoft constantly releases Windows updates so as to improve the system’s stability and fix various issues and errors on your Windows PC. Here’s how to do this:
We hope that the solutions listed above helped you to fix the error-saving wireless profile problem issue. Comment below if you have any questions.
Private browsing is a browsing mode offered in most browsers that do not save user history and cookies and leaves no trace after closing the window.
This browsing mode is ideal for those who use a shared PC or do not want their browsing data or cookies stored. However, users should keep in mind that private browsing does mean total online anonymity.
Chrome and Firefox are two of the most popular browsers. Keep reading for a head-to-head comparison of their private browsing modes.
Is private browsing mode safe?
Private browsing is designed to allow users to browse and leave no trace behind. User cookies are not carried over in private browsing and their browsing history is not saved. When the private browsing window is closed, any cookies or data will be destroyed.
Many people assume that they are anonymous when in private browsing mode, given that their browsing history isn’t stored. However, private browsing does not hide users’ IP addresses or locations, meaning that websites can still identify users who access their sites.
Most browsers are clear about the extent of the anonymity of private browsing and that it only prevents your history and cookies from being saved. For total anonymity and security, try using a VPN or a browser with a built-in VPN.
Chrome Incognito vs. Firefox private: key differences to know about
➡ Tracking protection
Firefox private browsing has tracking protection which prevents sites and companies from tracking users. Trackers follow users to collect browsing information and habits so they can create targeted ads. This feature also protects against harmful scripts and malware.
Chrome offers users the option to block third-party cookies as soon as an incognito window is opened. When activated, sites cannot track users around the web with cookies.
However, the reason this feature is allowed to be disabled instead of always-on is that it may cause issues with features on some websites.
➡ Interface
The purple mask symbol in the menu bar indicates private browsing in Firefox. Users can easily access it by clicking the three lines in the top right corner. The keyboard shortcut for private browsing in Firefox is Ctrl+Shift+P.
Like Firefox, users can access Incognito mode in Chrome by clicking on the three dots in the top right corner. When in an incognito window, a symbol will be displayed.
Users still have access to their bookmarks from the menu bar and can choose which extensions to be enabled in Incognito mode in settings. The keyboard shortcut for Incognito mode is Ctrl+Shift+N.
➡ Privacy
Google Chrome is very upfront about what private browsing protects. In Incognito mode, Chrome will not save browsing history, cookies, and login information. However, user activity may be visible to websites, employers or schools, and internet service providers.
Chrome also makes it clear that any downloads, bookmarks, and reading list items will be visible in the browser.
Firefox is also straightforward about user privacy, although it’s not as detailed as Chrome Incognito. Firefox clears all search and browsing history after ending a session in private browsing. Tracking protection helps keep users safe, but it does not make them anonymous.
While Firefox private browsing will not save downloaded files, those files will still be visible on your PC.
Both Chrome and Firefox are some of the fastest browsers on the market. Because Firefox has tracking protection, it blocks content and scripts from loading and weighing down browsing speed. For this reason, private browsing in Firefox is faster than in other browsers.
On the other hand, Chrome Incognito also runs fast because it has no extensions turned on. By default, Incognito mode does not enable any extensions, if users want a specific extension they need to manually enable it.
However, if users enable all extensions to run on Incognito mode, it may slow browsing speed down, giving Firefox the leg up when it comes to speed in private browsing.
➡ Add-ons
Firefox private browsing is compatible with extensions and will operate properly. Mozilla has an extension called Firefox Multi-Account Containers which allows users to separate online topics in a color-coded container system.
Cookies downloaded in one container are not accessible in others. This allows users to keep topics and browsing data separated. Users can create a container for private browsing to stay organized.
In Chrome, extensions can work in Incognito mode, but they need to be manually enabled. Users can allow specific extensions to work while browsing privately in the extension settings. Users should know that third-party add-ons may have access to browsing data and history.
Private browsing is a useful feature for many users, especially those with a shared computer. However, users should know that they are not anonymous while surfing the web in private mode unless they are using a VPN in combination with private browsing.
Firefox private browsing offers enhanced tracking protection to protect against harmful scripts and malware. Private browsing in Firefox also appears to be faster because this feature prevents content from weighing down web pages.
Chrome also has a simple interface and is very clear about the extent of anonymity in Incognito mode. Any extensions are disabled by default in Incognito mode to make it run faster. However, if you want to use a certain add-on, it must be manually enabled and might slow down browsing speed.
Firefox private browsing comes out on top with a faster browsing speed, enhanced tracking protection, and the Multi-Account Container add-on. You can also use Firefox incognito shortcut for quick and easy access.
If you want to know more about user privacy, we have a great guide on LibreWolf vs Firefox that will help you find the most private browser for your needs.
Let us know in the comments below your thoughts on private browsing and which browser you prefer to use.
If you had used the tool Powershell Windows Toolbox to install the Google Play Store on Windows 11 when the Windows Subsystem for Android was released, we have a huge warning for you. Spotted by the folks at Bleeping Computer, it turns out that the third-party tool might have actually injected malware into your system.
Once hosted on Github, and since removed, the app promised to debloat Windows as well as install the Google Play Store in a few clicks. However, it turns out that it was actually a virus, that executed hidden PowerShell scrips in the background of Windows 11 and install what’s known as a trojan clicker.
That Trojan clicker then pinged various Cloudflare servers and executed its own commands to pull infected files onto your device or redirect you to scam URLs. This was all thanks to the original instructions and script to launch the tool. It, in fact, did allow the app to do the things it intended, but also created hidden folders in Windows 11 and installed unwanted Chrome extensions.
Bleeping Computer has a great rundown of which folders in C:\systemfile you might want to delete if you were using this app. You also might want to try your luck at clean installing Windows, too, or restoring from a backup that pre-dates when you first installed the tool.
As we say every time, always be careful when you download tools that claim to change Windows. Keep your antivirus up to date, and never download programs that you don’t trust.
The AVM-powered FritzBox is a highly appreciated router and we dare say, it’s for all the right reasons. Smart WiFi-compliant and packed with advanced functionalities, the FritzBox is unfortunately not compatible with commercial VPNs.
But does that mean you cannot use it on Windows 11 PCs, for example? Of course not. In fact, there are 3 methods available:
Set a VPN software on individual devices
Use a second VPN-compatible router behind your FritzBox (dual-router configuration)
Turn your FritzBox router into a VPN server
NOTE
Before we go any further, here are the main takeaways:
➡ The FritzBox cannot act as a client on its own, it is only compatible with IPSec and you cannot flash it with different firmware. Consequently, you will need an additional Tomato or DD-WRT firmware-flashed VPN router with OpenVPN support if you’re going for the second option.
➡ If you’re going for the third option, note that you need a VPN that supports specific protocols such as L2TP/IPSec or PPTP. Also, you will not enjoy the same privacy as this method does not protect you against ISP tracking, for instance.
Whether you choose to install a VPN on individual devices or use a VPN-compatible router, you will need a versatile and capable VPN client that can handle both tasks graciously.
Our recommendation is Private Internet Access simply because it checks all the boxes and more:
Fully compatible with Tomato, DD-WRT, and pFsense firmware (It also has its own routers with pre-installed VPN)
Supports OpenVPN and WireGuard protocols
Cross-platform compatibility (with dedicated versions for Windows, including the latest Windows 11, macOS, iOS, Android, browsers, or gaming consoles)
Advanced features (split tunneling, obfuscation, multi-hop, and more)
Extensive server network (optimized for high-speed and boasting global coverage)
Highly focused on privacy (strict no-logs policy, strong encryption for your data, built-in adblocker)
1 license covers up to 10 simultaneous connections
PIA VPN
Turn your FritzBox into a feature powerhouse thanks to this top-tier Windows 11-ready VPN client!
And since the first option is pretty much self-explanatory – you just need to subscribe to a PIA VPN plan and download the software on your Windows 11 device – we will focus on the second one.
How do I add a VPN to my FritzBox?
Make sure your router supports the VPN client mode with Tomato or DD-WRT firmware compatibility. (If that’s not the case, feel free to explore these high-quality VPN routers and pick the one that best suits your needs).
Download and install the router’s corresponding app (if such is the case).
Next, log in to your PIA account and go to the Downloads section.
Scroll down to the VPN Settings section and click on Go to OpenVPN Generator.
Select the latest OpenVPN version, the Windows platform, respectively the preferred region.
Stick with the recommended UDP port, and press Generate.
Open the router’s app or launch a browser window on your Windows 11 PC and type in the IP address/URL/domain name in order to access the admin interface of your router (Feel free to check your user manual for accurate indications, according to the specific brand and model).
Head over to the VPN-dedicated section and upload the OVPN file you previously generated.
Now, connect the freshly created VPN router to a server.
Plug your FritzBox into the VPN router. Finally, connect your device to the FritzBox via WiFi and that’s it!
The traffic from your Windows 11 PC is now routed through your FritzBox and through the VPN set at the router level so you can enjoy full Internet speed as well as iron-cast privacy!
You’re able to sign in to the Epic Games Store with a variety of accounts. You can sign in with a Facebook account, Gmail, Steam, and even your Xbox Live (XBL) account.
Because Epic Games has so many titles on a lot of platforms, it’s a way to consolidate everything and make it easy to sign to your Fortnite account, for example. However, conflicts may arise from this.
If you try to create a new Epic Games account with your Xbox Live tag, you may get a message that states your XBL profile is already associated somewhere else and you can’t use it.
This guide will show you how to unlink your Xbox Live account from the Epic Games store.
How to unlink your Xbox Live account from the Epic Games store
1. Unlink from the app
Open the Epic Games store app.
Sign in to your Epic account.
After signing in, click on your profile icon in the top right corner. A drop-down menu will appear.
Click on Account.
Clicking the link will open the Epic Games account settings in a web browser.
Click the Connections tab on the left-hand side.
In Connections, click Accounts.
Under Accounts, you will see all of your other accounts connected to the Epic Games Store.
Locate your Xbox Live account and click the Disconnect button.
Once you click the button, a warning will appear telling you what will happen. You will not be able to store your progression in the Epic Games titles on the Xbox.
You will have to click all of the boxes shown. They describe the other type of data that will be removed from your Epic Games account like purchases and shared game progression.
Make your selections and click the Unlink button in the corner to complete the process.
If you don’t tick the boxes signifying that you understand what will happen, you won’t be able to proceed.
In a search engine, search for the Epic Games Store website and click the entry you see in the image.
Click Sign in in the top right corner and log in to your Epic Games account.
Hover over your username to make a drop-down menu appear and click Account.
Like before, click Connections on the left-hand menu.
Go to Accounts and click the Disconnect button.
Follow the same instructions from before of ticking the boxes and click the Unlink button.
What should I do if I run into problems with the Epic Games Launcher?
At times, the Epic Games Launcher will begin to load improperly. This could be caused by server issues or maintenance, but if not, you may need to add the app as an exception to the antivirus or change its properties.
The LG Gram 17 came out in 2021 to critical praise. A lot of people really enjoy its bright Quad HD 17-inch display, a comfortable keyboard, and lightweight design.
It’s a laptop that can do a lot of things from being a strong gaming computer or an all-around work computer. With a computer like this, you may be interested in outfitting it with some accessories.
There’s the usual mouse and carrying bag, but you should also look into getting a docking station. These devices can expand your LG Gram 17’s usability and this guide will show you the three best.
What are the best docking stations for the LG Gram 17?
Starting off the list is the Thunderbolt 3 Dock from StarTech.com. It has seven ports in total: a Thunderbolt 3, DisplayPort, HDMI, VGA, two USB-A, and a gigabit Ethernet. This device does lack the 3.5mm jack and USB-C ports that other docks have, so that’s disappointing.
That said, it can output up to two 4K displays at 60Hz for stunning quality. And if you have older screens, this station supports old formats like VGA. The Thunderbolt 4 Dock can even charge your LG Gram 17 thanks to its 85W power delivery and charging.
If you’re looking for a docking station that’s more affordable and more readily available, you should look into the Dell D6000. The device is great for traveling as it can charge the Gram 17 with 65W of power.
Still powerful, the D6000 comes with 10 connectivity ports: four USB-A 3.0, two DisplayPort, one USB-C, one HDMI, RJ45 Ethernet, and a 3.5 mm audio jack.
What makes it better than the TS3 is that you’re more likely to find one on Amazon and can output up to three different 4K screens, although the third one will only display at 30Hz.
The final entry on this list is the Corsair TBT100 Thunderbolt 3 docking station. The TBT100 connects to the Gram 17 through a single Thunderbolt 3 port and has two USB-A, two USB-C, two HDMI, Ethernet, an SD card reader, and a 3.5mm audio jack.
Those USB ports come with SuperSpeed capability and can charge your LG laptop since it can deliver up to 85W of power via Smart Charging. Its Gigabit Ethernet port allows for lightning-fast connection speeds.
It can even work with Mac OS if you ever need to switch to a Macbook from your Gram 17.
Is there anything else I should know about laptop accesorries?
There are many different ways you can customize your laptop to suit your needs, like a computer mouse. If you’re a big gamer, you should look into getting a specialized gaming mouse from Corsair or Razer.
If you’re interested in something software-related, you should download and install a Rainmeter skin on your laptop to change the look of the screen. You can even add new features that way.
Feel free to leave a comment below if you have any questions about other laptop accessories. Also, leave comments about reviews that you’d like to see or information on other computers and their devices.
Opera launched its cryptocurrency wallet in its Android browser back in 2018 when crypto was on the rise. The goal is to simplify Web 3 and the crypto world to make it more user-friendly. The wallet supports dApps built on the Ethereum blockchain.
MetaMask is one of the most popular crypto wallet extensions for interacting with Web 3 and dApps. It’s a free, open-source wallet where users can store, buy, sell, or trade crypto.
Crypto wallets are designed to make accessing and using decentralized apps (dApps) easier to use and understand. These wallets are beginner-friendly ways to get into cryptocurrency.
Users can use crypto wallets to collect and store their cryptocurrencies which allows them to spend or trade coins in dApps.
What are decentralized apps (dApps)?
Decentralized applications (dApps) are open-source apps and programs that run on a blockchain. This means that dApps operate across a network of computers rather than one, freeing them from being owned or controlled by a single entity.
DApps include platforms designed for gaming, browsing, finances, and even social media. DApps operate on many blockchains, but Ethereum is the most common. If users want to use these apps, they need to connect a wallet so they can access their cryptocurrencies.
Metamask vs. Opera wallet: Which is best?
➡ Features
Opera’s built-in Crypto Wallet offers support for ETH, ERC-20, and ERC-721 tokens. The wallet also supports Ethereum, Bitcoin, Celo, and Nervos blockchains.
Opera has partnerships with popular Ethereum scaling platforms including Polygon, Handshake, NEAR, and Solana. The goal of these integrations is to allow users to access cryptocurrency without the need for extensions.
With Opera crypto wallet, users can exchange fiat money for cryptocurrency via an on-ramp, swap or trade crypto, and send and receive coins.
The Watchlist feature allows users to select coins from an extensive list to keep track of their prices. Users can keep an eye on specific cryptocurrency prices with the personalized watchlist on display on the dashboard.
MetaMask is a crypto wallet available as a browser extension and a mobile app for Android and iOS. This crypto wallet supports ETH and ERC-20 tokens and can interact with dApps.
Like Opera wallet, MetaMask simplifies crypto transactions and dApps. Users can connect their wallets from the extension in their browser. While MetaMask is meant for Google Chrome browsers, it’s compatible with any Chromium-based browser like Opera and Firefox.
MetaMask gives users complete control over their cryptocurrency and exchanges by storing them on local devices. This gives users access to their funds even when not connected to the internet.
With no hidden fees or costs, MetaMask has zero exchange rates. This means users can convert crypto coins to cash without a fee.
➡ Interface
Creating an account with Opera crypto wallet is a simple process. Users make a secure password and then write down the 12-word backup phrase. After that, users are ready to explore Web3 and all it has to offer.
Opera crypto wallet is accessible to people all over the world with the option to change the language. Users can also adjust what currency format they want the wallet to be displayed in.
Seamlessly integrated into the Opera browser, the handy sidebar allows for easy access to the wallet. The simple interface for the Opera crypto wallet has a sleek futuristic feel.
MetaMask has earned praise for its simple and clean interface. There are no unnecessary or confusing features and every function is easy to understand, making it perfect for beginners.
The user interface on the MetaMask mobile app is as simple as the desktop add-on, with the option to change language and currency conversion. Users can also choose between DuckDuckGo and Google as their default search engine when searching using the browser built into the app.
Similarly with the Opera crypto wallet, after providing a username and secure password, MetaMask users will be presented with a 12-word backup phrase. Users must write this phrase down in order. You will need this phrase to recover the wallet if you are unable to remember your login information.
Because user funds are stored on a local device, transactions are protected from malicious attacks or hackers. Financial information on MetaMask is never shared with third parties because there are zero exchange fees.
MetaMask also has a phishing detection feature that will alert users if they are being targeted by phishing domains.
Opera crypto wallet has a built-in secure clipboard that protects and encrypts data when users copy and paste. On mobile, the wallet uses a fingerprint verification or unique pin to ensure extra protection.
If users uninstall Opera or lose their data somehow, the Opera crypto wallet has the ability for users to backup their wallets. Users are presented with a 12-word phrase which can be emailed to users for save-keeping.
Both Opera Crypto Wallet and MetaMask are great for beginners in cryptocurrency with their user-friendly interfaces and mobile compatibility. Getting into crypto can be intimidating and hard to understand, luckily the crypto wallets make it easy for anyone to get started.
Opera wallet’s integration into Opera browsers saves users the need to download a third-party extension and have access to their funds while browsing. However, it doesn’t have a separate app and is only accessible within the browser.
MetaMask has quickly become one of the most popular wallets for interacting with Web 3 and dApps because of its simplicity and security. It can be accessed on any Chromium-based browser, including the Opera browser, or on Android and iOS.
Opera Crypto Wallet
Enjoy a Web 3 and dApps experience with the built-in crypto wallet in Opera!
According to the folks at Neowin, a button was recently incorporated into Microsoft Edge to serve the sole purpose of enabling picture-in-picture (PiP) mode. This comes after, sometime back, Microsoft introduced the picture in picture control, then retracted it shortly after.
It now seems that the control is back in Canary as spotted by Leopeva64. The button now appears at the top of any video, which allows the user to easily access and enable it. Previously, the control was enabled by default and did not provide an alternative to disable it, which was a major concern for users, especially for those that did not make use of it.
Well, that is about to change as the latest Microsoft Edge Canary comes with the option of allowing users to disable the feature. Here’s what you need to do to turn off the feature:
Launch the browser.
Then click on the ellipses at the top right of the page.
Scroll to Content, then select the picture in picture button.
Finally, click on Show Picture in picture control inside video frame to turn it off.
You can choose to open the Settings App and search for Cookies and site permissions, then click on Picture in picture control to disable it. However, note that by disabling the feature will not stop you from playing videos in PiP mode.
In addition to this feature, users on Edge Canary can now also auto-save their passwords now without necessarily receiving the prompt. You can easily enable this by heading over to the password page under the browser’s settings page and clicking on Save passwords automatically option. However, the feature comes automatically enabled and does not provide an alternative to turn it off for users that do not find it useful. The button appears at the top of any video for easier accessibility, rather than having users navigate through the settings to find it.
Thanks to the specially designed touch-optimized apps for the Windows Ink Workspace, Windows 11 is a fantastic platform for touchscreens. Today we will tackle the LG Gram 17 touchscreen not working error so that you can start using the feature back again.
The majority of the issues are caused by incompatibility between the driver and the operating system. The likelihood of this occurring is even greater if the touchscreen has stopped working after updating to Windows 11.
This, as well as other troubleshooting solutions, will be covered in the following sections in order to solve the LG Gram 17 touchscreen not working problem. Follow along as we will first see in more detail what the advantages of using a touchscreen PC are.
What are the advantages of using a touchscreen laptop?
There are numerous factors to consider when shopping for a new laptop. Aside from reviewing its specifications and evaluating its hardware and memory, we must also consider whether we need a standard laptop, an expensive gaming model, or one of the ones with touchscreens.
Touchscreen laptops outperform non-screen laptops when it comes to work and school tasks. You can take better notes because you can draw and write strokes and lines that a non-touchscreen laptop cannot.
Furthermore, a touchscreen display, in a nutshell, makes it easier to interact with your laptop. Using a laptop as a digital whiteboard is a good example of this.
They have the distinct advantage of allowing users to draw directly on the display. This is the primary reason why touchscreen laptops such as the Microsoft Surface Pro 8 are popular among artists. In fact, if you are a graphic designer or even an architect, a touchscreen device is a must.
In the event that your laptop’s keyboard fails, you’ll need to use an external or wireless keyboard. Touchscreen laptops, on the other hand, do not require a keyboard to function properly, as you have the on-screen one.
What can I do if the LG Gram 17 touchscreen is not working?
1. Update your drivers and OS
Open Settings and navigate to Windows Update. Here, click on the blue button that either says Install now, Chech for new updates, or Restart now, depending on your case. Note that updating your OS should be done on a regular basis.
Next, navigate to Advanced options under the same Windows Update page.
Click on Optional updates and checkmark all of the updates displayed then click on Download and install.
If you don’t want to spend time updating your drivers on a regular basis, you can opt for a third-party software, that will automatically update, fix and replace all of your device drivers.
As a result, you will encounter fewer bugs and errors, and the LG Gram 17 touchscreen not working error will be resolved.
2. Reenable your touchscreen driver
Right-click on the Start icon from your Taskbar and choose Device Manager.
Here, expand the Human Interface Devices section, right-click on the HID-compliant touchscreen option and choose Disable device.
Right-click on it again and choose Enable device. This way the LG Gram 17 touchscreen not working error will be resolved.
Here, expand the Human Interface Devices and double-click on the HID-compliant touchscreen driver. Navigate to the Power Management tab and make sure the Allow the computer to turn off this device to save power option is turned off.
Users have been reporting their Microsoft Surface Pro 8 keyboard stopped working properly due to various reasons. Don’t worry as you’ve come to the right place if you experience the same error.
Technical problems with the keyboard are typically caused by issues with communication between the keyboard and the Surface itself, software malfunctions, or inappropriate keyboard settings being selected in Windows 11.
Follow along as we will show you how to fix the Microsoft Surface Pro 8 keyboard not working issue, right after we see the importance of keeping your drivers up-to-date.
Why should I update my drivers?
Always make sure your device drivers are up to date and, if possible, update them on a regular basis. This will not only keep your computer in good working order, but it may also keep it from experiencing potentially costly problems in the future.
It is common for major computer issues to be caused by a failure to update device drivers on a regular basis. Although it is possible to manually update them, as you will see in the following section, it is a time-consuming and exhausting task.
If your computer is running slower than usual, it could be due to outdated device drivers, which you should look into. When they become out of date, computers can get sluggish and exhibit visible performance issues.
Another important advantage of keeping device drivers up to date is the peace of mind that comes with knowing your computer is secure.
Outdated software poses a security risk to your Windows 11 PC and may expose it to attacks from hackers and malicious malware. They indicate serious flaws that any competent hacker will be able to exploit with relative ease.
Device drivers are normally relatively secure when they are first launched and after they have been updated, but after a while, hackers become aware of any vulnerabilities in the software code and begin poking around in it.
This being said, let’s move on to the list of methods in which you can solve the Microsoft Surface Pro 8 keyboard not working error. Note that we will provide you with an alternative to manually updating your drivers.
What can I do if Microsoft Surface Pro 8 keyboard isn’t working?
1. Check your hardware
The first and most important thing to check is that your Microsoft Surface Pro 8 keyboard is in good working shape. Despite the fact that it may seem simple, several users have claimed that keeping the workplace in order has helped them.
Check to see that your power source is functioning properly. Also if you plan to use your battery, be sure it is fully charged.
Users also stated that it is extremely vital to keep your keyboard clean and free of dust and debris. We propose that you utilize pressurized air for this purpose, as it works best.
Alternatively, you might want to consider getting a great mechanical keyboard and bring back the precise and firm keypresses.
Navigate to Settings followed by Windows Update. Here, click on the blue Install now button or its alternatives: Check for new updates and Restart now, in order to update your operating system.
Next, go to Advanced options from the same Windows Update page.
Select Optional updates and checkmark all of the updates shown to you. Click on the Download and install button in order to update your drivers and fix the Microsoft Surface Pro 8 keyboard not working error.
As we have mentioned before, updating your drivers is one of the most important tasks you need to regularly do in order to keep your computer secure and up and running.
A specialized driver updating app will automatically update, fix, and replace all of your device drivers, without needing any of your attendance. You will save time and ensure that your PC is in optimal condition.
3. Run the Keyboard troubleshooter
Open Settings and navigate to Troubleshoot under the System page.
Here, click on Optional troubleshooters then look for the Keyboard troubleshooter and click Run next to it.
The Keyboard troubleshooter will check to see if all of your keyboard settings are correct and have been restored to their default settings.
It will check to see if the Text Services Framework is operating, and if it isn’t, it will take care of the problem for you on its own.
Services such as the input method editor, handwriting recognition, and speech recognition that are dependent on the Text Services Framework will also be tested to ensure that they are functioning properly.
While creating a financial plan, your budget is the ultimate key to success. It allows you to take control of your financial future and be confident about your spending and investments.
However, another key factor to successfully managing your financial progress is using the best net worth tracker
By keeping track of your net worth with a financial app, you can measure your financial progress to determine your current debt and investment status.
Preparing a net worth statement is not just about tracking your finances but has more than one use.
For example, it can help you with the loan application, stay focused and motivated to achieve your financial goals and of course, know when you are ready to take retirement.
Tools to Track Net worth this year
A good number of people use Excel spreadsheets to keep track of their net worth by creating liability and assets columns. While it works, it is not the most efficient way of tracking net worth.
There are a good number of finance tracking tools that not only allow tracking net worth but also manage the budget, investment, and more.
In this article, we take a look at the net worth aggregator to make your personal finance management process simple and efficient.
When it comes to financial management software that offers the tools necessary to review net worth, track all your accounts, and handle loans, bills, budgets, and investments, Moneyspire is definitely a first-class option.
With Moneyspire you can manage either your personal finances, your business’s, or both. The tool is fully customizable to your own needs, so while it has a ton of features, it does not get overwhelming.
The tool is pretty easy to use and set up. When you first install it, you will have to fill in some information about your accounts, choose your currencies, and add your accounts.
If you have used financial software before, you can import the data into Moneyspire. It supports QIF, WMTF, OFX, QFX, and CSV files.
This is one of the top software used in finance because it supports all the currencies of the world, so regardless of what type of account you have and in what currency, Moneyspire can help you manage it.
It also supports all major types of accounts, including bank, credit card, cash, investment, other asset, and other liability.
The tool makes it easy to keep track of all aspects of your financial life. You can use it to create budgets, check your balance, and see reports on how much you spend and how you can adjust that to reach your budgeting goals.
The app can also help you handle taxes. It generates detailed reports on expenses that already contain your tax deductions.
Other key features of Moneyspire include:
Manage small business finance with income and expense reports, track customer invoices, and more
Unlimited number of accounts
Track bill payments with automatic reminders
Print check
Create your own invoices
Fully customizable user interface with categories, data locations,
All these features are included in the premium version. You can try them for free during the 30-day trial period.
The app also has a completely free version, but that’s a bit limited because it only lets you manage one account.
Moneyspire
Keep track of your net worth and handle your finances with this reliable tool that supports all currencies.
With over $8 Billion in assets under management and a 1.9+ Million user base, Empower is a one-stop destination to keep a tab on your finances and manage them.
Empower offers a free finance management dashboard to the user that tracks your investments and automatically updates your net worth periodically. You can also download the app on your Android and iOS devices for easier access.
Empwer has two plans on offer. The free plan is for everyone who wants to track their net worth and acts as an investment aggregator. If you want Empower to manage your finances and investment, you can opt for the premium plan.
The dashboard gives you access to all your linked accounts in one place and gets a real-time view to manage your entire financial life.
The fee Analyzer feature can save you from the hidden mutual fund fees to save money. You can compare your portfolio allocation to the ideal target location using the Investment Checkup tool.
Other key features of Empower include:
Investment checkup
Budgeting assistance
Fee analyzer
Education expenses planner
Last but not the least, the Retirement Planner makes it easy to build, manage and predict your retirement all from one place.
Empower
Keep track of all your income and expenses with this simple app for PC and mobile.
QuickBooks is a well-known suite that helps professionals all over the world in all things related to finance.
Naturally, this software will also be one of the best to keep track of your net worth, due to its long list of financial features that will help you manage your business, expenses, accounting, and many more.
QuickaBooks support multi-currency, meaning you won’t have to use different software if your accounts are split into different currencies.
This tool is also great because you can get bank feeds directly in the app if you connect it to your bank accounts.
The QuickBooks suite also comes with a mobile app from which you can access the most important features so you can always be on top of what is going on within your estate.
Here are some other key features of QuickBooks:
Insights and reports
Inventory management
Capture & organize receipts
Very easy to switch to
Lots of other apps integration
QuickBooks
Keep track and manage your net worth with this amazing complete financial solution.
If you want something more sophisticated and a personal finance management app that allows you to manage your expenses, and track your bills as well as investment, Quicken offers the tools that cater to the needs of starter to advanced users.
You can link all of your bank accounts, credit cards, assets, retirement plans, liabilities, and investments to the software.
Quicken is available for both Windows and Mac users which means it is offline software. The software covers the essential features of a financial management tool including budgeting, bill payment, and investment tracking functionalities.
The latest version of Quicken comes with a Bill Alert feature that notifies of any pending due and makes a payment as well.
The dashboard provides a quick preview of your financial status. You can see what’s coming in and what’s going out. Check balance and receive alerts on the same.
Other features in Quicken include the ability to review your portfolio, monitor performance, create a budget, manage to spend and manage your property.
Unlike other personal finance tools, Quicken offers multiple plans. Users have the possibility to select the features included and thus not pay extra for what they won’t use.
Other key features of Quicken include:
Short and long term planning
Tracks all transactions
Remote accessibility
Clear and secure data protection
Quicken may not sound attractive to an average user looking for personal finance software, but someone requiring tools to fix their complex finance routines will appreciate the depth and feature it has on offer.
Quicken
Monitor your income and take care of your expenses as well as investments with this advanced financial management app.
Tiller Money is a personal finance platform based on spreadsheets that you can integrate into your Microsoft Excel and Google Sheets spreadsheets.
With this tool you can link all your recurring expenses such as subscription plans and bills and the application will automatically fill your spreadsheets with this information.
You can link all your financial accounts and keep track of your whole income information.
Tiller creates specific sheets for different types of financial actions. For your transactions, it will include information regarding the date, category, amount spent, the account that paid for the said transaction, and more.
This keeps you very well organized, offering you a quick but detailed view of all your expenses.
The tool also creates a separate sheet for your balances where you can see daily information about all the accounts linked.
This includes net worth, assets, banking, liabilities, and credit cards. You will be able to see real-time information as well as historical data that can help you better manage your money over time.
Tiller has several pre-made templates for more advanced budgeting and spending goals. For example, it includes a pre-made retirement planner, a foundation template, and more.
Other key features of Tiller include:
Strict privacy policy with powerful 256-bit AES encryption
Powerful auto-categorization rules
Mail notifications about your transactions and balances
Responsive customer support
Easy to share and collaborate on your spreadsheets
Tiller is a paid service, but you can try it out for free with a limited trial.
Tiller
It is easy to manage your net worth with this spreadsheet-based software.
YNAB ( You Need a Budget) is a finance management software to track your spending and budget management. However, you can also use it to track your net worth.
It is a premium service that imposes a monthly or annual subscription fee. You get the best bang for your buck if you pick the annual plan.
However, if you are not sure about the service, you can try it out for free for 34 days. It will give you enough time to assess and evaluate the software to figure out its needs and use.
The app offers tools for monitoring income, expenses, and also instructional support to deal with the issues causing financial mismanagement.
You can use YNAB web-based dashboard or download the app on Android or iOS device to access the YNAB accounts.
YNAB is not as sophisticated as Personal Capital or even Mint for that matter, but for what’s it worth, it gets the job done and well.
Notable features offered by YNAB include budgeting, investment tracking, bill management, reconciling transaction, QFX and QIF file format support and online synchronization across your devices.
You can connect all of your bank accounts to YNAB to keep things up to date. You can access all the information related to your accounts from anywhere and also share the finance plans with your partner seamlessly.
Other key features of YNAB include:
Add-free
Powerful data encryption
2-factor authentication
Real-time sync with all devices
Goal tracking
YNAB does not have a whole lot of features. Then again it does not try to be the jack of all trades but the master of one.
Mint is one of the most popular net worth tracking apps. It is a full finance management suite that is on par with Capital Control.
Mint is free to use and can be accessed from the website on a desktop or through mobile apps for Android and iOS. Mint displays advertisements related to finance and credit cards to keep the service free.
This personal finance program allows you to add new accounts ranging from credit cards to banking and loan quickly and the app downloads all the financial data in no time.
Mint automatically updates and shows the real-time data on the dashboard. The user interface is simple and easy to use with pretty graphs giving it a modern look.
Mint comes equipped with tools to create budgets, define goals and of course financial account aggregation.
Mint really shines when it comes to tracking your expenses and creating a budget. The software auto categorizes the transaction into pre-defined categories. While it works, the software does take some time to learn from your transaction types and put them in the right sections.
You can also use the software to track goals for your investment, debt settlement, and savings. The credit card score tracking feature offers a sneak preview of your credit score along with payment history and credit accounts.
Other key features of Mint include:
Categorize bank transactions
Secure 256-bit encryption and multi-factor authentication
Financial planning educational resources
Mint is an excellent personal finance tool with essential features to track net worth and manage finance on offer.
Every Dollar is one of the well-known software in the personal finance space. It is a freemium app which means while you can use it for free, some features require a premium account.
The major difference between the free and plus version of Every Dollar is that in the free version you need to add the transaction manually while the premium version automates the same process.
Apart from tracking net worth, Every Dollar emphases on budgeting to help you with your spending plan and track your expenses to every last dollar.
It is easy to use and offers a detailed dashboard with all the options made easily accessible to the users.
To start using Every Dollar you need to signup for a free account. It has around eight different spending categories along with an option to create your own.
For each category, you can add details, make notes, track transaction and favorite it in case you are planning to use it on a regular basis.
There is a Funds account feature which is nothing but your saving accounts that you can set up on the software.
Other key features of EveryDollar include:
Debt tracking
Print transaction history
Financial education resources
On the flip side, the software is more expensive than other options on this list. However, just like YNAB, Every Dollar does excel at the features it offers without cluttering your dashboard with too many options.
Next on our list is yet another great personal finance and budgeting software built to provide the resources necessary to manage multiple types of financial needs and goals.
Pocketsmith is compatible with over 12 000 financial institutions across the globe, allowing users to connect all their accounts.
It lets you keep track of all types of financial accounts as well as assets and liabilities. Pocketsmith supports international currencies and includes an automatic conversion feature based on daily rates.
The tool automatically imports transaction history and financial data to keep track of all spending. It gives you the possibility to categorize, label, and annotate your spending.
The tool is also very useful when it comes to budgeting. It gives several options so you can create budgets and plans based on your needs and preferences.
The tool uses automatic algorithms to determine and predict bank balances up to 30 years into the future.
Along with that, it includes what-if scenarios that test hypothetical financial decisions and their outcomes.
This can be of great help as it may showcase results that you may not expect and give you a new perspective on your financial behavior.
Other key features of Pocketsmith include:
Dashboard reporting of all activity
Net worth calculator
Cashflow statement
Email notifications
Compatible with Mint.com
Pocketsmith has a free plan that includes useful personal finance features. It does require manual imports and supports 2 different accounts. For more tools and automatization, you also have the option to get one of the two paid plans.
Life is always good when your expenses are in your control. And these best software to track net worth helps you effortlessly manage your finance and all the other miscellaneous expenses at one place.
To put it in simple terms, your Net worth = assets – liabilities. The net worth is bound to change over time, but tracking net worth allows you to monitor your financial health and keep it healthy.
Our recommended software to track net worth includes multi-purpose software that allows you to monitor your monetary status so that you stop living paycheck to paycheck and save more money while paying off your debt.
Do you use any of this software to track your net worth? Do let us know the personal finance software that has helped you to keep your finances on track in the comments
Uninstalling applications from your PC is usually a simple task, but sometimes you might come across an application that refuses to uninstall.
This can happen for a number of reasons, such as corrupted installation for example.
The task of removing unused programs can become tedious or even frustrating when the applications refuse to uninstall.
In case this problem occurs and you don’t want to waste too much time trying to remove stubborn software on your PC, you might consider dedicated tools that will do the trick.
You have the possibility to uninstall problematic software in the traditional way, with the Programs and Features or Control Panel. Yet, this method can leave file leftovers on your system and take significant storage over time.
If you have some applications that you can’t uninstall, today we’re going to show you some of the best tools to remove stubborn software on Windows 10 and Windows 11.
What are the best tools to remove stubborn software?
For quite some time, CCleaner has provided the ability to remote desktop programs. However, with this upgrade, you may uninstall universal applications.
Mail, Store, Photos, Paint 3D, Photos, included with Windows 10 and 11.
Previously, you had to perform a command in elevated PowerShell to remove default programs in Windows 10, but this is no longer the case.
Starting with version 5.11, CCleaner allows you to remove preinstalled programs as well as apps installed from the Store with a single mouse click.
However, CCleaner does not include Edge and Cortana in the programs list since these preloaded apps cannot be deleted even when using PowerShell.
CCleaner quickly shows a list of your installed programs and allows you to remove entries from the Programs to Remove section.
This is handy if a program was not fully uninstalled from your computer and still displays as a listed application on your system. Deleting an entry does not imply uninstalling a program, and CCleaner is a great tool for removing programs safely.
You may either download the entirely free version and use it for as long as you need to finish the most basic tasks.
However, if you want to test out all tools in the software, you can take advantage of a 14-day free trial or rely on the 30-day money-back guarantee if you are dissatisfied with the program.
CCleaner simplifies app management by showing all of them in one location and allowing you to uninstall them, even if they are built-in.
CCleaner also makes it very simple to manage your startup items. Rather than having to click on each app separately, CCleaner lists them all in one place, for a simple, organized app spot.
CCleaner
A specialized tool that leaves no trace in the removal of any desktop apps and stubborn software.
This is a simple application that can help you remove stubborn software from your PC. It has a modern user interface, so even basic users will be able to use it without any problems.
IObit Uninstaller can speed up your PC by removing problematic applications. In addition to applications, it will also remove any leftover files that might be slowing down your PC.
This tool will also remove any stubborn applications that you were unable to previously remove.
In order to find the desired applications quickly, you can show only recently installed applications. Of course, you can also show only large applications or the ones that you infrequently use.
This is great if you want to remove old applications that you completely forgot about. In addition to removing applications, this tool can also help you remove problematic Windows Updates.
IObit Uninstaller can also help you remove installed web browser plugins. You can simply select your browser from the menu on the left and choose which extension you want to remove.
This is a useful feature because you can easily remove all installed extensions from all browsers in just a few clicks.
If you think that you have a malicious extension installed, this is a feature that you definitely need to try out.
Although this tool works with desktop applications, it can also recognize Universal apps, and you can easily remove them right from this tool.
Since the tool has a search bar available, you can easily locate any application in just a matter of seconds.
IObit Uninstaller also has some additional features such as Force Uninstall. Using this feature you can easily remove stubborn programs from your PC.
Simply locate the problematic application or drag and drop its file or folder to IObit Uninstaller in order to remove it. The tool also allows you to clean files from your PC.
There are just a few options available and you can delete invalid shortcuts, Windows patch cache, or your download folder.
If you want, you can even manage startup applications right from IObit Uninstaller. Lastly, there’s also a File Shredder feature that will permanently delete selected files thus preventing any chance of file recovery.
The tool also allows you to create a System Restore point or to revert to any previous Restore Points. If you want, you can even automatically create a new restore point every time before uninstalling an application.
IObit Uninstaller is a great application that will help you remove stubborn software. It’s worth mentioning that the Pro version is also available.
The Pro version offers a larger real-time database for stubborn programs, but it also allows you to remove adware from your PC.
This version also lets you clean any leftover files left by other uninstallers.
The free version offers all features that basic users need, so be sure to try it or you can buy the PRO edition to uninstall more programs & plug-ins.
IObit Uninstaller 11 Pro
Remove any stubborn software from your PC in a blink of an eye, and retake control of your system just like after a fresh install.
Ashampoo UnInstaller is another tool that you can use to remove unwanted applications. The tool has a simple and attractive user interface, so it should be perfect for basic users.
To make the removal process even faster, there’s a handy built-in search function available. In addition to removing files, you can also use this tool to install files as well.
The tool also has a registry log, so you can monitor registry changes while installing applications.
Ashampoo UnInstaller also allows you to create snapshots that work as inventory lists for your system. By using snapshots you can quickly locate any changes made to your system by comparing two snapshots.
This tool comes with an advanced deletion module that performs a deep scan and finds leftover registry entries and files left by removed programs.
The application also comes with a tutorial system, so even basic users can use it. Ashampoo UnInstaller also comes with a special set of advanced features.
The tool comes with a Drive Cleaner feature that will scan your hard drive and remove any unnecessary and old files thus freeing space on your hard drive.
There’s also a Registry Optimizer tool that removes unnecessary entries from the registry. If you want to clean your browsing history and browser cache, you can do that using the Internet Cleaner feature.
We have to mention that this tool can clean the cache and history for all browsers on your PC. There’s also a Defrag 3 tool that will analyze and defragment your hard drive thus improving its performance.
Ashampoo UnInstaller also allows you to manage startup items and running services. You can even manage fonts, file associations, and System Restore points right from this tool.
The tool can also permanently delete the desired files or folders, or restore the files that aren’t permanently deleted. This tool can also find and remove invalid shortcuts and duplicated files and remove them from your PC.
Ashampoo Uninstaller is a decent tool for removing stubborn software, but it also comes with many useful tools that advanced users are going to use.
This tool is available as a free trial, but if you want to continue using it, you’ll need to purchase a license.
Ashampoo UnInstaller 11
This is more than an uninstaller, it’s a tool that can completely rehaul your drive so give it a try.
Wise Program Uninstaller is a simple and free tool that will help you remove stubborn software from your PC.
The tool comes with a simple user interface, and as soon as it starts you’ll see the list of all installed applications.
In addition to the list of applications, you can also see the total number of installed applications as well as the total disk space used by those applications.
The application comes with a built-in scan engine that will scan and remove any associated files, folders, or registry entries that are left after uninstalling the desired application.
As a result, the selected application will be completely removed from your PC. In some cases, applications can refuse to uninstall, but you can fix this problem by using the Forced Uninstall option.
Wise Program Uninstaller has a simple user interface and you can easily find the application you want to remove. If you want, you can even use the search option to find the desired application in just a few seconds.
Another useful feature of Wise Program Uninstaller is its context menu option.
You can add an uninstall option to the context menu in Windows thus allowing you to uninstall any application without even starting Wise Program Uninstaller.
Wise Program Uninstaller is a simple application with a clean and user-friendly interface. This application doesn’t have any additional or advanced options, so it will be perfect for basic users.
We also have to mention that this application is completely free, so you can download it and use it on any version of Windows without restrictions.
Wise Program Uninstaller
Eliminate persistent software from your PC for good using this high reviewed uninstaller software.
The next uninstalling software suited for users’ needs is Advanced Installer Pro, a free tool that can remove any programs from your PC.
Using this uninstaller will offer a complete security solution to keep your PC clean, erasing unused programs and fragment files kept in the system.
With this tool, you can do much more than completely remove problematic software. It includes virus detection functionality designed to identify online threats and keep you secure from them.
More so, benefit from the file and registry tools functionality to check system files or clean the registry from additional entries left behind by the installed programs.
In case you require a cleaning feature for your browser’s data, you have it. Advanced Installer Pro also offers Internet browser cleaning tools.
Another worth mentioning benefit is the Daily Healthcheck. You have all-rounded support for efficient software uninstalls, virus detection, duplicates and temporary files removal, and so on.
You can as well contact the support team if you require specific answers to technical issues or utilities of this program.
Advanced Uninstaller Pro
Entirely clean your system of unwanted software or registry entries from installed programs with this performant uninstaller.
Revo Uninstaller is a simple tool that can help you remove applications easily. One important feature of this tool is that it can remove stubborn software as well.
Using this tool you can see all installed applications on your PC, and you can easily search for the desired application by using the search bar at the top. Then, you can easily remove it, open its location on the hard drive, or even open its registry location.
The tool also comes with a special feature called Forced Uninstall. This feature will remove any leftover files related to uninstalled applications.
This is perfect if you have partially installed applications or if the software installation is corrupted. Another feature that many will find useful is Multiple Uninstall.
This will uninstall selected programs one at a time, so you won’t have to start the uninstallation process for each program individually.
Another feature that some users might find useful is the Real-Time Installation Monitor. This feature will closely monitor each installation and will detect system changes in real-time.
Using this feature you can easily revert system changes after the program is deleted thus making sure that everything reverts to the way it was.
The tool also allows you to use Logs Database in order to make sure that all files related to your applications are completely removed.
Revo Uninstaller supports a log system, so you can easily track changes on your PC, and you can even export and share your logs with others, thus helping them remove stubborn software from their PC.
Removing certain applications can cause problems on your PC, and this is why Revo Uninstaller creates backup automatically.
The tool will create backups of removed registry keys, values, files, and folders. In addition, the tool will create a System Restore point before each uninstalls along with a full registry backup.
Another interesting feature is called Hunter Mode. You can simply select any open window or desktop icon and uninstall the related application quickly.
If you want, you can also close the selected application or prevent it from starting automatically with Windows.
In addition to removing software, Revo Uninstaller can also remove all sorts of junk files from your PC. The tool will scan your PC and quickly remove junk files created by the Windows application.
Regarding file history, the tool will also remove the history of most recently used Microsoft Office files. Of course, you can also clean file search history, a list of recently opened documents, etc.
Revo Uninstaller also allows you to permanently delete files from your PC using the Evidence Remover and Unrecoverable Delete features.
Even if you empty your Recycle Bin some of your files can be restored, but by using the aforementioned features you’ll make sure that your files remain permanently deleted.
Revo Uninstaller
Don’t leave any traces when you uninstall any program with Revo Uninstaller and benefit from its multi-level backup system.
Another application that can help you remove stubborn software is Your Uninstaller. Once you start this tool the list of all installed applications will appear, and you can easily choose which application you want to remove.
The tool also has a built-in search bar that allows you to quickly find the application that you want to remove. Once you select the desired application you can see its install date and size.
The application also has an Advanced Uninstall mode that you can use to remove any stubborn applications from your PC. If you want to remove applications quickly, you can also use the Quick Uninstall option.
Using this feature the application will be removed and you won’t even have to go through the uninstall wizard. Of course, the System Restore point is created before the application is uninstalled, so you can easily restore it.
The tool also has the AutoFix option that automatically detects and removes invalid installations and unused files. If you have any empty folders or invalid shortcuts, you can also remove them using the Empty Gone feature.
The application also has a Hunter mode that lets you uninstall applications by using the drag and drop method.
Your Uninstaller also has a built-in Rescue Center that lets you create System Restore points and restore your PC to a previous state right from the application.
In addition to software uninstalling, Your Uninstaller also has some extra features. There’s a built-in startup manager and you can use it to control your startup applications.
If you’re low on space, there’s a Disk Cleaner feature that will scan your hard drive and allow you to remove old and unnecessary files.
This tool also has a Start Menu Manager, and you can use it to add additional shortcuts to Start Menu. There’s also a Trace Eraser feature that will clear your browsing history and browser cache.
Unfortunately, it seems that this feature only works with Internet Explorer.
Your Uninstaller also has a File Shredder feature that will securely and permanently delete your files, thus completely preventing their recovery.
Lastly, there’s also a Windows Tools section that works as a shortcut and it lets you quickly access certain Windows tools.
Your Uninstaller is a simple application, but we have to admit that it looks a bit outdated. The application is available as a free trial that lasts for 21 days.
If you want to continue using the application, you’ll have to purchase a license.
If you want to remove stubborn applications from your PC, you might want to consider My Uninstaller Pro.
As soon as you start the application, the list of all third-party applications will appear, and you can easily choose which one you want to remove.
In addition to removing applications, you can also remove browser extensions right from My Uninstaller Pro.
This tool also offers a humble startup manager so you can easily disable or delete applications from your startup list. Lastly, this tool also allows you to clean up your PC.
My Uninstaller Pro has a built-in scanner that will scan and remove obsolete and invalid registry entries, temporary internet files, browsing history, junk files, and invalid shortcuts.
My Uninstaller Pro is a decent tool, but its user interface feels a bit plain. The application is simple to use and the free trial version is available for download.
Another application that can remove stubborn programs from your PC is Mighty Uninstaller. The tool will scan the computer and remove any leftover files, folders, and registry entries after you uninstall an application.
By doing so, this application will ensure that stubborn software is completely removed from your PC.
Mighty Uninstaller also allows you to remove applications simply by locating one of their files on your PC. You can also uninstall programs simply by dragging and dropping them to Mighty Uninstaller.
This tool also offers several additional features, and you can remove junk files easily with this tool.
There’s also a feature called Evidence Cleaner that can delete your browsing history and cache, but it will also remove recently opened files, search queries, and other data from your PC.
Another feature that can be helpful to users is Registry Cleaner and using this tool you can choose what type of registry entries you want to scan and remove.
Mighty Uninstaller also comes with a Strong Remover feature that will forcibly remove desired files from your PC. This is extremely useful if you can’t remove a certain file because it’s used by your PC.
There’s also a File Shred feature that will permanently delete the selected files and prevent their recovery. Another feature that we didn’t expect to see is Program Mover.
This feature will move the selected applications from one hard drive partition to another, and the application should work without any problems after you move it.
This tool also has a PC Devices feature that works like a simplified version of Device Manager. Mighty Uninstaller also has a System Services feature so you can easily view and disable any running services.
Lastly, there’s a Process Manager so you can easily find and end any running process. The tool also has a Startup Cleaner feature that works as a simplified startup manager.
Mighty Uninstaller is a decent application that can remove stubborn software without any problems. The tool also has many advanced features that advanced users will appreciate.
We have to admit that this tool looks a bit outdated, and that can be a flaw for some users. Mighty Uninstaller is a solid application and it’s available as a free trial.
If you want to continue using this application without limitations, you’ll have to purchase the full version.
We have to mention that we had some minor issues with the application that were resolved after starting the application with administrator privileges.
Absolute Uninstaller is a small and simple application that can help you remove stubborn software.
The application comes with a simple user interface and you can search for the desired application by using the search bar in the top right corner.
The tool also allows you to sort your files in order to find the applications faster.
You can show only the recently installed applications or only large programs so you can find the applications that take the most space.
If you want, you can also display rarely used programs and easily delete old applications that you no longer use.
If you want, you can also remove Windows Updates right from Absolute Uninstaller. Another useful feature of this tool is the Batch Uninstall option.
Using this feature you can remove multiple programs. As soon as one program is removed, the uninstallation process for the next one will automatically start, thus making the removal process faster than before.
Absolute Uninstaller doesn’t have any advanced features, but what makes this application great is its simplicity and straightforward user interface.
This might not be the best-looking application on our list, but it will help you uninstall stubborn software.
If you have problems with stubborn software, you might want to consider using Geek Uninstaller. This is a small application that comes with a simple user interface.
The application will list all installed applications, and you can easily remove any application simply by double-clicking it.
After you delete an application, all its associated files and registry entries will be removed as well.
We have to mention that this tool also supports Force Removal, so you should be able to delete stubborn applications without any problems.
In addition to desktop apps, this tool can also detect and remove Universal apps, which is rather useful. The tool also has a handy search bar at the bottom and you can easily find the application that you want to remove.
Using Geek Uninstaller you can also open the registry location or installation directory of every application.
Geek Uninstaller is a free and portable application, so it requires no installation in order to run. It’s worth mentioning that the Pro version is also available.
The Pro version offers a real-time installation monitor, batch removal, startup manager, modern interface, and thorough and complete removal.
Geek Uninstaller is a great application, and the free version will be perfect for most users.
Removing stubborn software from your PC can be hard, especially if the application isn’t properly installed.
For more digital tools, you can head over to the Software section for a plethora of interesting articles.
Windows 10 is the most popular computer OS. You may learn more about it from our Windows 10 Hub.
If you have any problems with stubborn software, be sure to try some of the applications from our list. Do not hesitate to tell us about your experience with the presented programs in the comments section below.
Whether as a result of overuse or natural degradation, that initial out-of-the-box experience can become a distant memory. However, this does not have to be the case, as we will show you today how to speed up Lenovo IdeaPad 320.
There’s nothing quite like the feeling of opening a brand new laptop computer, taking it out of the box, and booting it up for the first time, is there?
Your computer starts up much faster than you could have imagined, and everything from the first time you open the browser to running your favorite programs and watching a DVD happens at breakneck speeds.
It continues to be this way for a while, but over time, it appears that everything has slowed down significantly.
There are numerous quick fixes that even the most inexperienced computer users can perform to get their old PCs running more quickly and smoothly again, just like they did in the past.
In particular, when watching a movie or playing a game, video cards generate a lot of heat, and as dust accumulates on them, it impairs the computer’s ability to maintain a consistent temperature. Consider the prospect of driving a car through the desert with no oil.
Follow along as we will show you how to speed up your Lenovo IdeaPad 320 PC, right after we understand why it is important to update your OS.
Why is updating my OS important?
Security flaws are particularly appealing to hackers. Cybercriminals can exploit vulnerable software that is out of date or incompatible with modern operating systems.
To carry out their malicious activities, the most dangerous malware attacks we see today take advantage of software flaws in commonly used applications, OSs, and web browsers. These are large programs that must be updated on a regular basis in order to remain safe and stable.
Software updates can include more than just security fixes. They can also contain new or improved features, as well as improved compatibility with various devices or applications.
Furthermore, they frequently add new and improved features, as well as speed refinements, all of which contribute to an overall better end-user experience.
Users’ performance can be hampered by out-of-date and ineffective software. They may become fatigued as a result of frequent crashes, affecting their ability to do their jobs. An operating system can be updated to fix bugs and improve performance, allowing users to complete their work faster.
How can I speed up my Lenovo IdeaPad 320 PC?
1. Update your drivers and OS
Open Settings and navigate to the Windows Update section.
Here, click on the blue button that says Install now or Check for new updates, depending on your computer’s state. Wait for the process to complete and reboot your computer.
Next, go back to Windows Update inside Settings, and navigate to Advanced options.
Here, access Optional updates and check all the driver updates you are provided with. Lastly, hit the Download and install button to proceed with the updating process.
As an alternative way to manually updating your drivers, you can use a third-party software, such as Outbyte Driver Updater, that will automatically update, fix and replace all of your device drivers.
It is a lightweight solution for those who don’t want to regularly go to their settings and check for new driver updates. Moreover, future driver-related errors will be avoided by using the software.
2. Disable visual effects
Open the Windows Search function, type View advanced system settings, and enter the most relevant result.
Navigate to the Advanced tab and select Settings.
Add a checkmark next to Adjust for best performance. Below the Custom shown list, check the following settings: Show thumbnails instead of icons and Smooth edgesofscreen fonts. Click on OK to save the changes made and speed up your Lenovo IdeaPad 320.
Although visual effects can help provide a more distinctive visual experience, they consume a significant amount of system resources. In the end, this will cause PCs with outdated hardware to run more slowly.
According to reports, removing visual effects lessens the burden placed on the GPU by around 20%, so don’t be afraid to experiment with this approach as well.
Hold CTRL + SHIFT + ESC together and navigate to the Startup tab inside Task Manager.
Here, click on all of the apps that you don’t want to start whenever you turn on your PC and then choose Disable.
4. Change your PC’s power plan
Open the Windows Search function and type in Edit power plan. Enter it then go back to the Power Options page.
Here, select the High performance plan, however, if you don’t have one listed, click on the Create a power plan option and create a High performance one. After you have created it, select it and save the changes made. Your Lenovo IdeaPad 320’s performance will be sped up.
5. Remove temporary files
Open Settings and navigate to Storage from the right-side panel.
Next, click on Temporary files.
Wait for the scanning process to finish then click on the Remove button to delete unnecessary files. Note that the scan will find important temporary files that are needed by your apps and exclude them from the list of temporary files that can be deleted.
6. Add more RAM
Increasing the amount of RAM or SSD memory will speed up your Lenovo IdeaPad 320 PC in the long run. Although an SSD would load everything faster, RAM will allow you to maintain more tabs open at the same time.
Make sure that when you place the RAM module into the socket, the knobs on the socket’s hinges are in line with the hinges on the RAM module. They will have to be snapped into position.
For further performance enhancement methods, check out our post on how to make Windows 11 faster and more responsive.
In order to improve our future posts, we recommend that you share your thoughts with us in the comments section below. Thanks for reading!
“We can’t sign into your account” is an annoying error that Windows 10 sometimes displays when users try to access their accounts.
The whole error message reads as follows: “We can’t sign into your account. This problem can often be fixed by signing out of your account and then signing back in. If you don’t sign out now, any files you create or changes you make will be lost.”
However, signing out of your Windows account and signing back in doesn’t solve the problem.
Fortunately, there are a series of solutions that you can use to fix this annoying error code.
How to fix We can’t sign into your account error?
1. Delete your profile from the Registry
Log in to the computer as a different administrator
Move the broken user profile folder form C:users to c:Backup
Open the registry editor and go to: HKEY_LOCAL_MACHINESOFTWAREMicrosoftWindows NTCurrentVersionProfileList
Locate the folder that has the ProfileImagePath that points to c:users. It usually ends in “.back”. Delete the entire folder.
Restart your computer and log in with the affected user profile.
2. Refresh the location
Go to This PC > right click on Documents
Click on Properties > select the Location tab
Click on Find Target
Locate the directory where you have your files and click once on it
On the top of the File Explorer, click to the right of the directory list. A text with the directory location will appear C:Users(YourUser)documents
Copy this location text C:User(YourUser)documents > close File Explorer
Paste the location text on the field right above the buttons > click on Apply
Restart your computer.
3. Change the password of the problematic account
Log in using another admin account
Go to Start > type control panel > double-click the first result
Go to Manage user accounts > change the password for the account triggering the error
Log out > log in using the problematic account. Use the new password that you just set instead of the old one.
Should your display go black, open the Task manager and sign out. Wait until you’re signed out and then try to sign in again.
4. Run a System File Check
File corruption may also trigger the annoying ‘We can’t sign in to your account’ error. You can also use Microsoft’s System File Checker to check for system file corruption.
The utility verifies the integrity of all protected system files and repairs files with problems when possible. Here’s how to run an SFC scan:
Go to Start > type cmd > right-click Command Prompt > select Run as Administrator
Now type the sfc /scannow command
Wait for the scanning process to complete then enter the ‘DISM /Online /Cleanup-Image /RestoreHealth‘ command
Restart your computer. All corrupted files will be replaced on reboot.
5. Force user profile in Command Prompt
Go to Start > type cmd > right-click Command Prompt > select Run as Administrator
Type the following command and hit Enter after each one:
net user [insert name] /add Example: net user madeleine /add
net localgroup administrators [insert name]/add
net share concfg*C:/grant:useraccountname,full
net user useraccountname
Restart your PC and log in using the same user name that you used above.
6. Install the latest Windows updates
Restart your computer and hit the Restart button while the booting screen is still available.
Go to Troubleshoot > Advanced Options > Startup > enter Safe Mode
Wait until your PC restarts and enters Safe Mode
As soon as the Safe Mode screen is available, hit the Windows key + R at the same time
Type regedit in the search box > hit Enter > locate the following path:
In the right-hand panel, locate the folder that has the ProfileImagePath key set to the Systemprofile path
Locate the RefCount key > double-click it > edit the value from 0 to 1
Save the changes and restart your PC
Once the reboot cycle ends, go to Settings > Updates and Security > Windows Updates > Check for updates
Wait until Windows installs the updates > restart your computer and sign in again.
7. Use System Restore
If the problem started recently, run System Restore. If this issue occurred after you installed new software on your computer, this tool helps you remove recently added apps and programs.
The System Restore option allows you to restore the previous well-performing system configuration without losing any files, except for a few customizable features and settings.
Windows 10 offers a series of advanced recovery option that allows users to clean install the OS. You can also use ‘Reset this PC’ as a recovery option.
Go to Settings > Update & Security > click on Recovery under the left pane.
Click on Get Started under Reset this PC > choose to Keep your files.
Follow the on-screen instructions to complete the reset.
That’s about it. We hope that one of the solutions listed above helped you fix the annoying ‘We can’t sign into your account‘ error.
Additionally, you can try each one of the described answers in this guide in order to successfully resolve this sign-in problem in your Microsoft account.
As always, if you’ve come across other solutions, you can help the Windows community by listing the troubleshooting steps in the comments below.
The “Fatal error – Exception in exception handler” error is one that occurs for Windows 10 games. Many game players have stated on forums that the error message pops up for Command and Conquer 3 and Rise of the Witch Kings.
When the issue occurs, the games don’t launch and return a Fatal error window stating, “Exception in exception handler.”
This error primarily pertains to laptops or desktops with Intel HDGPUs and is largely due to Intel graphics card drivers. These are a few resolutions that can fix “Fatal error – Exception in exception handler” error messages.
What is the Fatal error exception in the exception handler?
Fatal errors generally appear when you have hardware problems. In this instance, it is likely related to your GPU card. It may have trouble supporting games with high graphical requirements.
A fatal error happens when an application closes unexpectedly, without any warning. When this occurs, any new changes in the application will be lost, so if you were in-game and got this error, chances are you lost your progress as well.
An exception handler is a type of code that should automate what a program should do in case of an unexpected error. When you get the exception exception handler error, it means that that the code didn’t execute as expected.
To fix this issue, you need to make sure that your hardware is in good state, your drivers ar updated and functional, and your system meets the minimum system requirements of the application you want to run. Continue reading to see how to fix this issue and never risk losing progress in the future.
How to fix the Fatal error – Exception in exception handler
Running games in compatibility mode is one fix that some Command and Conquer 3 players have confirmed to work for them. You can do that by opening the game’s folder in File Explorer and right-clicking the game file to open the window below.
Select the Compatibility tab shown in the snapshot directly below.
Then select the Run this program in compatibility mode option on that tab.
Select Windows 8 from the drop-down menu.
Click the Apply and OK button to save the newly selected setting.
2. Configure the NVIDIAOptimusGraphics Settings
Some laptops and desktops have more than one graphics card. Thus, the game might be starting with the integrated Intel graphics card instead of NVIDIA GPU. Many game players have found that switching the graphics card to the NVIDIA alternative fixes the exception handler issue. You can do that by configuring theOptimus Graphics settings as follows.
Right-click the Windows desktop and select NVIDIA Control Panel from the context menu.
Next, expand 3D Settings and click Manage 3D Settings.
Now you can select either the Global Settings or Program Settings tab. Select the Global Settings tab as to apply the new settings to all games.
Select High-performance NVIDIA processor from the Preferred graphics processor drop-down menu.
Press the Apply button to save the newly selected settings.
3. Install the Intel(R) HD Graphics 4400 Graphics Card Driver
Updating graphics card drivers often fixesnumerousgame error messages. However, many Command and Conquer 3 players have fixed the exception handler error by installing previously released Intel graphics card drivers as the issue often occurs with specific Intel drivers.
To be more specific, some have fixed the error by installing the Intel(R) HD Graphics 4400 driver, which you can download from this website page by pressing the Download button for the one compatible with your platform. Then you can install the driver as follows.
3.1. Install your drivers manually
Open Device Manager from the Win + X menu by pressing the Win key + X hotkey.
Click Device Manager to open its window as below.
Double-click theDisplay adapters categoryto expand a list of graphics cards.
Right-click Intel HD Graphics and select Update driver from the menu to open the window shown directly below.
Then select Browse my computer for driver software to open the options below.
Click the Let me pick from a list of device drivers on my computer option to select the device driver.
Press the Have Disk button, and then press the Browse button to select the downloaded driver file.
Press the Open, OK and Next buttons to install.
Thereafter, restart Windows after adding the driver.
Even if installing the Intel(R) HD Graphics 4400 driver does fix the exception handler error, it’s still an outdated driver that might generate other gaming issues andreducegraphical quality.
As such, this is not an ideal resolution. So if you don’tcurrentlyhave the most updated Intel driver, update the graphics card driver to the latest one first. If that doesn’t fix the issue, then install Intel(R) HD Graphics 4400.
3.2. Use dedicated software
Alternatively, if you want to save some time and automate the task, you can install and run a dedicated driver software. This type of tool uses its own database and automatically installs the latest driver versions on your PC.
Using an automated tool eliminates the risk of major system damage that may occur if you install a mismatched driver, so we strongly advise looking into it.
4. Install DirectX End-User Runtimes (June 2010)
It might be the case that the game needs an older DirectX version to run. Furthermore, some players have confirmed that installing DirectX End-User Runtimes (June 2010) fixes the exception handler error. This is how you can add DirectX End-User Runtimes(June 2010) to Windows.
First, open this website page; and press the Download button there.
Deselect theadditionalsoftware check box, and press the No thanks and continue button.
Press the Run button to immediately launch the installation.
Thereafter, you’ll need to unpack, or extract the DirectX Redistributable package to a folder.
Open the folder you extracted it to, and then click DXSETUP.exe.
5. Switch Off the Origin In-Game Setting
If you’re running games via the Origin platform, check the Origin In-Game setting. Switching that setting off, it’scurrentlyon, might also fix the exception handler error. This is how you can adjust that option.
First, open the Origin client software.
Select Applications Settings from the Origin menu.
Then click the Origin In-Game tab.
Switch the Enable Origin In-Game setting off if it’s on.
6. Add a NVIDIA Graphics Card to an Intel HD Desktop
The “Exception in exception handler” error is most prevalent for desktops and laptops with Intel graphics cards. Thus, adding a new NVIDIA graphics card to Intel HD desktops will likely fix the issue. Of course, you can’t upgrade the GPU for laptops; but a new NVIDIA graphics card for desktops will do the trick. If you upgrade the graphics card, you might as well also go for a GPU that really boosts games’ graphics.
If the game returning the handler error message was running fine a few months back, the System Restore tool might come in handy. With that utility, you can restore Windows to a date when the game was working fine, which might fix the error. Restoring Windows will roll back updated drivers and other updates. Note that restoring Windows also uninstalls software installed after the selected restore point. This is how you canutilize System Restore in Windows 10.
Open Run by pressing the Windows key + R keyboard shortcut.
Input ‘rstrui‘ in Run to open System Restore.
Click the Next button, and then select the Show more restore points option.
Choose a system restore point that predates the exception handler error, but not when you first played the game. If there isn’t a restore point that predates the error message, System Restore probably won’t resolve this issue.
Click the Next and Finish buttons to confirm your selected restore point.
Those are a few resolutions for the “Exception in exception handler” error that you can kick-start your games with. If you have any further fixes for this issue, please share them below.
If you tried the solutions above and still have problems with this error, it is perhaps important to check whether your graphic card supports the application you want to open.
Don’t miss our guide on lowLevelFatalError since it can provide you with potential solutions. We also have a guide on Efs Fatal Error, so you might want to check it out.
When was the last time you went out with a grocery list in your hand for shopping and returned home only to realize that you had forgotten a few things from the list? Sounds like a familiar story? We explore some of the best cross-platform grocery list apps in this guide.
The to-do list apps have long replaced paper lists for almost 90% of daily work. If you are not yet using a to-do list app, install a grocery list app for PC and smartphone.
Which is the number 1 grocery app?
There may not be one answer to this question because there are a few factors to consider before choosing the top grocery app, and many of these will come down to individual preferences. However, you may consider the following:
The features it comes with, may include syncing across devices or generating shopping lists based on your recipes, etc.
How easy and intuitive the app interface is during use.
How visually appealing the app is and how easy the navigation appears.
Its price, especially payment and subscription options.
Todoist is a cross-platform task manager app that allows you to plan your day. It lets you keep track of everything in one place and get it done on time.
It comes in both free and premium plans. With the premium plans, you can create your own templates to make repetitive tasks easier, add your own labels, create customer tasks view with filters based on dates, projects, and labels, review all your completed task to check progress, and get an overview of account activity.
Organizing your shopping list using this platform is extremely simple because it has intuitive tools that help you manage grocery tasks on impossible days.
You can use the tool’s features best to organize the day and prioritize essential tasks to save time for unexpected ones. For example, you have the overview for all activities and add new ones with the Quick add button.
Todoist is available for Windows-running computers as well as smartphones. Work through browsers? Todoist got you covered with its Chrome, Safari, and Firefox extension. It also integrates with over 60+ popular apps, including Dropbox, Amazon Alexa, Zapier, Slack, and IFTTT.
Todoist is one of the best to-do list apps on any platform. It is clean, fast, and easy to use.
Some important features of Todoist include:
Intuitive user interface
Easy customization
Collaboration options
Integrations with multiple apps
Todoist
Organize your daily grocery tasks on a whole new level with this platform specially created for busy persons.
Evernote is one of the most popular note-management apps available for all platforms, including Windows, Android, and iOS.
It is a note management app with extensive features to organize detailed notes through titles, pictures, links, and markups.
However, the app also offers a to-do list feature. You can create a to-list, set reminders and deadlines, and share the list via email or other apps online.
Evernote allows you to easily collaborate with your team to manage projects, deadlines, clients, and meetings.
The premium plan offered by Evernote includes unlimited space, searching for text inside PDFs and Office Docs, seeing a version history of your notes, creating a presentation from notes with one click, sharing a notebook with others in your company, Google Drive, Outlook, Slack, Microsoft Team and Salesforce integration and more.
Evernote is an excellent task and note management app. If you don’t want to deal with two apps for two different tasks, Evernote offers everything in one place.
Some important features of Evernote include:
Cross-platform availability
Web clipping
Image recognition
Simple list sharing
Evernote
Have every piece of information noted in this tool so you stay on top of important or small tasks.
Any.do is a clean and well-designed to-do list app that allows you to stay organized and do more in less time. It offers some unique features and some basic yet essential features which are divided across the plans.
Talking about the price, Any.do is free to download and use. You get most of the features in the free plan. You may also get a huge discount depending on when you upgrade.
The Pro users get to enjoy features like the ability to attach notes to the tasks, create their own template for recurring tasks and reminders, and also use location-based reminders, which is new for a to-do list app.
The app allows you to easily break down tasks into subtasks, making tracking progress easier. The collaboration feature lets you share and assign tasks to your team members.
The app can automatically sort and import online recipes based on your list of groceries. You can share the grocery list with your partner and family as well.
You can color and put tags on your shopping lists to set priorities and buy exactly what is needed.
Any.do is a powerful to-do list app with a strong set of free features and some advanced features for Pro users. The location-based reminders and collaboration feature is a nice additional feature, but only available for Pro users.
This platform is what busy people need in their lives, namely the organizing place where they manage time and tasks.
The solution offered by Remember The Milk has all-rounded benefits to help you respect crucial tasks with productive tools designed for time management.
With this tool, you will stay on top of draining tasks or projects, adding every responsibility with the Smart Add feature that helps create practical to-do lists using all properties in just one line.
More so, if you’re usually writing down lists for grocery shopping, this is the fittest place to manage big and small tasks. Using tags, you can group activities and overview your day.
Other helpful tools you should benefit from are reminders from multiple sources, subtasks for time-consuming duties, a search wizard to find tasks instantly, sharing lists tool, and so on.
So you can better manage busy periods by getting all the information on paper and balancing your energy consciously to stay updated with everything.
That being said, clean your mind and get everything done with this tool on almost every device, like PCs or laptops, smart watches, or mobile phones.
Some important features of Remember The Milk include:
Let’s begin with an in-house app from Microsoft. Although one of the newest members of the to-do list market, Microsoft To-do has become one of the most popular apps. It is available for Windows, Android, and iOS devices. You can also access the app from the Web.
The To-do app helps you to manage your day with a My Day feature. You can add all the tasks you expect to complete in the present day to the widget.
To-do’s suggestion feature learns from your task and habits and offers suggestions to help you prioritize your daily tasks from your PC or smartphone.
Users can also add a reminder, due date, and notes to their to-dos to never miss a deadline, irrespective of their personal or professional work.
What’s more? You can share the grocery list with your partner and family, share plans with colleagues and collaborate on projects to get things done faster.
All the to-dos can be personalized with themes and colors to match your mode. Microsoft To-do also supports Outlook integration for better synchronization.
Some important features of Microsoft To-do include:
Trello is more of a task management and collaboration app than a grocery list app. However, the task management and to-do list features help you with work, a side project, and even planning your next family vacation.
You can customize the tasks by adding comments, attachments, due dates, and other information on Trello cards. It can also describe a project plan from beginning to end.
The team collaboration feature allows you to create a board for any project and invite your team members. You can create a workflow, task cards and add details like descriptions, checklists, and comments and move the tasks across the board to show progress.
Trello is a cross-platform app that you can access from your Windows computer, Android, and iOS devices. It is also available on the web if you prefer a web browser. With support for third-party apps such as Google Drive, Dropbox, Slack, and Evernote, Trello lets you keep track of everything and sync.
Trello also offers free and business plans. The premium plan offers 250 MB per file support, custom background, stickers, 2-factor authentication, advanced admin permission, public board management, domain-restricted invites, data export, and more.
Trello is an excellent task management and to-do list app with all the essential features offered in the free plan. The premium plan provides additional features for business users for safe team collaboration and data transfer.
Surprised to see Cortana on the list? That’s right. Cortana is more than just a voice assistant. It can also set automatic reminders, take notes, set location-based reminders, and more. The best part is it comes pre-installed on your Windows computer.
Cortana is a cross-platform app you can download on Android and iOS smartphones.
You can easily add items to the list, check flight information, and do basic arithmetic operations, translation, and currency conversations using Cortana. It also works with other third-party to-do list apps, such as Trello.
Hence, try this AI assistant tool if you need efficient support to manage all the upcoming events or detailed lists for shopping activities.
Whether you want to create a proper grocery list or plan tasks for your vocation, all the apps listed in this article allow you to do more in less time. You can create a to-do list, and tasks, set reminders and due dates, and also share the tasks for easier collaboration.
If you opt for Cortana, you should check out our other guide where we explain how to set reminders with Cortana.
Take these apps for a spin to find the best app that meets your requirement, and also let us know your favorite grocery list app in the comments below.
Windows hosting comes with a host of features and benefits such as simplicity, seamless integration, and ease of use, but most users are also looking for Windows hosting with Plesk.
Plesk is an abbreviation for Parallels Plesk Panel, and this is basically a control panel for web hosting. It is an intuitive and graphical panel from which you can manage your Windows hosting account, whether you’re a novice or a pro at it.
It also eases site management, as well as your databases, email, files, and other components, plus you can use it to automatically install most used software platforms including WordPress, Drupal, or Joomla, among many others.
Having your own control panel within the Windows hosting platform is important as it gives you the freedom to manage your website, plus saves you time and costs if someone else had to do it for you.
For Windows hosting with Plesk, you get a variety of tools and features such as support for MySQL, C#, phpMyAdmin, site builder tools, Power Pack for social media integration, smartphone monitoring, Kaspersky antivirus, and reseller tools, among others.
Plesk can only function online with a working web server, which means if something happens to your site, Plesk will stop working altogether, and you may have a hard time getting back up, thus you need a Windows hosting with Plesk provider, for such difficult times.
Finding a Windows hosting with a Plesk provider isn’t hard because there are many, but choosing the best for your website can be confusing because every one of them seems to have the same thing.
Before settling on a Windows hosting with a Plesk provider, check also the other features you want and those that must be included in the host’s Plesk panel.
We checked out most of the top web hosting names and bring you our top picks for the best Windows hosting with Plesk providers.
This is the only Windows hosting with a Plesk provider that backs the Plesk control panel with 24/7/365 support and full management across dedicated and cloud servers.
Some of the tools you can expect on this user-friendly control panel interface include whole server protection with ServerShield by Cloudflare, protection against brute attacks with Security Core, blocking worms, Trojans, and viruses with the Premium Email antivirus, and fully integrated developer tools including Ruby, Node.js and Git.
You can choose between Web Pro if you’re running a small business or web agency, and Web Host for reseller accounts.
Other features and tools you can benefit from the Plesk panel on Liquid Web host include automated server administration, protection for up to 14 mail accounts, installation, configuration, and management of WordPress from a single interface with control over your server, site development tools, access from other devices, and Multilanguage functionality.
Liquid Web prides itself in being a platinum hosting partner with Plesk so that means they get the latest releases before any other Windows hosting with Plesk provider.
You also get the phone and live chat support, with a guarantee of at most 59 seconds to reach the support team at their data centers.
Liquid Web
Liquid Web is one of the world’s leading web hosting services providers. Try it now!
This web hosting provider isn’t just rated as the top host for its blazing-fast features and fine-tuned servers, but also for extra features such as Windows hosting with a Plesk control panel.
With A2 Hosting, you get a high-performance, Plesk hosting service with blazing fast page load speeds. Your Plesk control panel, sites, files, and databases are hosted on the SwiftServer platform, backed by a 99.9% uptime commitment from the host.
You can choose between three high-speed packages: Lite, Swift, or Turbo, each tailored to suit your needs.
A2 hosting also offers user-friendly, high performance, and reliable Windows hosting with a Plesk environment compared to most competing Plesk hosting providers.
In addition, this hosting service offers efficient domain registrations and management for your websites. It’s possible to create your web domain with various hosting options.
For example, you should best use the super-sonic hosting provided by A2 Hosting and benefit from Plesk hosting or WordPress websites without much effort.
A2 Hosting
Get unlimited data storage and free site migration at a very affordable price.
This hosting service is perfectly created to integrate with Plesk hosting service for managing multiple servers or websites in one view.
With this reliable data center software, you can successfully deploy your hosted apps or websites using Plesk hosting. Plus, with the cloud orchestration tools, you have a complete data center to manage your websites.
Using the intuitive dashboard of Vultr, you assure functional websites and access web statistics or run security updates regularly. Besides, you manage all your websites from a single place.
It’s good to know that you benefit from the flexible license options and deploy three versions of the Plesk service. More exactly, you can deploy Web Admin SE edition, Web Pro edition, or hosting edition using Vultr license activation.
You can thus use Plesk hosting services using Pro or Host licenses for 30 days and manage your web applications without any risks.
Vultr offers qualitative servers management tools and a worldwide network to develop low latency site infrastructure and grow potential business regardless of your location.
In addition, you should create and manage web platforms with Plesk hosting to grow your websites and edit web elements or pages effortlessly.
Vultr
Develop your Plesk-hosted websites using this cloud infrastructure tool and manage multiple web platforms.
Hostgator makes Windows hosting simple and easy for you to use. Its features include the Plesk Control Panel so you can control your hosting account easily (like you would using a WordPress back end).
It offers the Plesk control panel that is developed and maintained by Parallels but is called the PowerUser Panel in HostGator and combines the Admin Panel and Control Panel modes on the hosting platform.
While on Plesk in HostGator, you can see only accounts that are directly under Admin user or added to its web space.
Other features you can find on HostGator for Windows hosting include site-building tools, over 4000 free website templates, MSSQL Server 2008 R2, MySQL, Access Databases, FTP accounts and email addresses, administrative tools, one-click installs, and programming features including ASP and ASP.NET.
You also get a 99.9% uptime guarantee, plus free stuff with each hosting plan including a free website builder from HostGator, 4500 free templates, free website transfer, domain transfer, MySQL transfer, and script transfer, plus 38 free scripts that can be installed on your account instantly.
HostGator
Manage your hosting account simply with this complete web hosting platform for Windows
This is one of the top services and recognized Windows hosting with Plesk providers available in the market.
With OVH, you can build and maintain your websites using the simplest, most intuitive, and graphical control panels – Plesk – that comes pre-installed so you can run and scale your web applications.
You can select from the VPS Classic 1, Classic 2, or Classic 3 options, which come with unlimited Plesk accounts and reseller licenses, or the Pro 1 and/or Pro 2, which also have the same features, but offer unlimited domains as well plus copious storage capacity of up to 800GB.
Manage your web projects without needing a web specialist or developer, or even the need for terminal and command lines to manage websites, databases, or email. All this for just a few clicks.
Other benefits include a user-friendly panel, easy server management, interface customization, and for the reseller option you get customer sub-account management. It also comes with a WordPress toolkit and SpamAssassin software.
Additional services from OVH include unlimited traffic, guaranteed bandwidth, 99.95% uptime, and unlimited domains.
Focus on your business, instead of focusing on your server, by switching to OVH Windows hosting with the Plesk control panel.
This Windows hosting with Plesk provider promises blazing fast hosting, because speed, security, and scalability are a priority.
You get to enjoy the superior performance in an environment that supports the latest ASP .NET framework, Windows Server 2012 R2, and MSSQL server.
Its features include dedicated technical support, daily automatic and constant backups of your site’s database and files with free restoration, up to 20 times faster load time owing to the use of Solid State Drives on all servers, unlimited email accounts, and free Let’s Encrypt SSL certificate installation in one click on your Plesk panel.
It also offers a high level of security updated daily with a web-based firewall to ensure your site is guarded against online threats.
Plus, 99.999% uptime, anti-spam protection, and a dedicated yet isolated VPN for better monitoring, connectivity, and speed.
If you’re looking for the best Windows hosting provider that offers all the features at a comfortable price, this is it.
Its features include the Plesk Control panel, multiple domain hosting and databases, unlimited emails, 24/7 uninterrupted support, unbeatable reliability, and 99.95% uptime needed to run your website at any point in time.
Set up your account instantly with Miles Web and enjoy affordable rates at superfast speeds and the best uptime, which you will need in case your site breaks and Plesk is affected.
Hence, if you want to start an online store or manage a business online domain you should rely on this hosting provider for websites of every size.
If you’re not okay with managing your VPS from a command line, then Blacknight solutions offer you the Parallels Plesk Panel system to help you manage it from an easy graphical interface, with a simple click.
Plesk is the leading multiplatform control panel for a simple, convenient way to manage your web services, and it is available on this web hosting provider with Windows hosting.
Some of the key features you will find with using Plesk on Blacknight include a user-friendly interface, a migration manager to quickly migrate accounts, and a customizable repository of site applications with the ability to add, deploy, configure and remove apps for any domain with one click.
You can also install WordPress or Drupal, and forum software with one click in Blacknight’s Windows hosting with Plesk.
We’d love to hear your thoughts on these Windows hosting with Plesk providers. Which one do you prefer, or which one have you used before? Share with us in the comments section below.
Kaspersky VPN Secure Connection conceals your IP address from your Internet service provider, making it impossible for your ISP and other third parties to obtain access to your personal information. Thus, today we’ll show you how to download and install Kaspersky VPN on Windows 11.
Founded in Moscow, Russia, in 1997 by Dmitry Kaspersky, the company was later relocated to Switzerland and is now controlled by a UK-based holding company. Eugene Kaspersky, the company’s current CEO, was also one of the company’s founding members.
Despite the fact that it has raised a number of political issues, Kaspersky’s headquarters in Russia means that it is outside of the jurisdiction of the Five Eyes.
That means that Russia, or any other country’s government for that matter, will be unable to compel Kaspersky to provide them with information about their customers. This non-membership is required if you want to use a VPN for privacy reasons.
After a few years, it has developed into a global cybersecurity company that currently operates in 200 countries and has 34 offices around the globe.
Follow along as we will first see whether Kaspersky VPN is safe and trustworthy, and then move on to the download and install process.
Is Kaspersky VPN safe?
Perhaps you’re wondering what distinguishes Kaspersky VPN from the competition and why you should select it over other VPN providers.
In the first place, it includes an unlimited amount of bandwidth, allowing you to stream any and all of the content you want without any limitations.
Additionally, because you have the option to connect to any server you want, you can access content from anywhere in the world simply by logging into the server where the content is available.
Furthermore, you can use Kaspersky VPN on as many as five devices at the same time, depending on your needs. It is available on multiple platforms, including Windows, MAC, Android, and IOS, making it extremely user-friendly.
When it comes to virtual private network (VPN) protocols, Kaspersky uses the OpenVPN standard. In other words, it protects your data with the highest level of 256-bit encryption.
Also known as military-grade encryption, which makes it virtually impossible for anyone to gain access to your personal information. As a result, it is a completely safe VPN to use.
Kaspersky VPN also has mobile VPN apps that are compatible with all Android and iOS devices, allowing you to browse the web anonymously from any location at any time.
It is constantly improving, and each new version introduces users to a slew of new and exciting privacy features.
An example of such a feature would be, of course, the kill switch. When a VPN connection is lost or interrupted for any reason, the kill switch automatically shuts down the browser and disconnects the device from the Internet.
Thereby eliminating the possibility of an unprotected connection being made possible. As soon as the Internet connection is reestablished, the device automatically reconnects to the Internet.
Next, click on View products and choose the Windows operating system. Look for the Kaspersky VPN Secure Connection product and click on Learn More.
Choose the plan that you want to buy, and click on the Buy Now button. Note there is an Auto-Renewal box above the button. If you wish to automatically renew your subscription every month/year check it, otherwise uncheck it.
Confirm your payment and then continue with the installation process. The company has made it simple to operate and install, thus you will only need to click a few buttons.
Once it’s done, you will be able to choose your location to connect to and turn the VPN on or off.
If you watch the evening news, you might recognize the name Kaspersky. We weren’t deterred from trying out their VPN despite the fact that they were banned by the United States government.
Kaspersky’s more than 2,000 servers are spread across 49 countries, including France, Germany, Hong Kong, and Japan. This isn’t the world’s largest network of servers by any stretch of the imagination, but it is a significant one nonetheless.
Don’t miss out on Kaspersky’s other products as well. You can browse them in more detail on their View products page.
Kaspersky Antivirus is one of the most powerful antivirus programs available on the market. Despite the fact that it does not include a slew of additional features, it provides excellent protection against all types of threats, attacks, and malicious software.
In fact, even the free version performs significantly better than some paid alternatives in terms of detecting and removing potential threats.
Alternatively, you can take a look at 5+ best free Windows 11 VPN apps on the market, if you are dissatisfied with Kaspersky’s one.
Was this guide useful for you? Don’t hesitate to tell us in the comments section below. Thanks for reading!
E-commerce, which is a shortened tag for electronic commerce, has taken over the global market, as virtually all types of products and services are advertised/marketed and purchased online.
Recent developments have further strengthened this position, as every key aspect of eCommerce, including marketing, purchasing, payments, and even delivery, all have been automated.
With the advent of online stores, anyone from anywhere can purchase anything from any location. This has bridged the distance between countries, and the Internet now serves as the ultimate hub for the global market.
However, prominent eCommerce service providers often find themselves overwhelmed by the number of orders, sales, and payments they have to process on a daily basis.
Hence, to manage this situation and maintain efficiency, automation becomes essential.
This article brings you 7 of the best-automated eCommerce software on the market.
How can an eCommerce platform help grow your business?
eCommerce platforms are helpful regardless of how much experience you have in the business game, but they are especially useful for emerging businesses.
Even if you have a solid knowledge base and skill set in place, these tools come in handy because they integrate pretty much everything you need in just one place.
First and foremost, these tools let you easily create your online shop and build your brand. They offer visual website builders and offer highly customizable pre-made themes to help you start out.
Most of them offer business-specific suggestions, so if you plan to sell shoes, chances are that you will get at least a few ideas on how to get started with your online shoe store. Starting from there, you can personalize and integrate your unique selling points.
They also offer support for one of the most time-consuming and hard to get around aspects of business, namely finances.
You can get specialized help on taxes and full support for secure online payments.
Additionally, it is important to note that these platforms also offer automatically generated reports so you can see how your business is going.
This helps a lot in the long run as it lets you know which implementations work well and where exactly you need improvement.
Make sure to read the suggestions below to see more details on what you can get from an eCommerce platform.
What should you take into consideration when looking for an eCommerce platform?
Ease of use: being intuitive and time-efficient is a key requirement when building your web store
Compliance: professional support to ensure users follow the financial regulatins of the commercial area they operate in
User experience: fast and secure checkout, multiple payment options, customer support solutions
Support for your type of business: many platforms offer ready-made solutions for clothing stores, web applications, and other types of products/businesses
Currency compatibility: supports payments for all commercial areas you are interested in
Extensive library of themes and customization features: to ensure you can create your online shop exactly as you envisioned
Price: see which ones include the features you need at plans that are reasonable for your budget
WooCommerce is a popular eCommerce solution, which is known for its ability to convert WordPress sites into durable online stores.
It is basically a WordPress plugin that can be used to design an eCommerce website or online shopping hub from scratch.
Key features of WooCommerce include pre-installed payment gateways, WordPress integrations, auto-taxes, cart behavior, free shipping, inventory/store manager, default currency setting, cart calculator, reports, flexible shipping, tax calculator, SEO, 24/7 customer support, unlimited extensions, and more.
WooCommerce is available for free, albeit with restricted access and limited features. To unlock the full features, subscribers are required to upgrade to a paid plan and pay add-ons on certain extensions.
WooCommerce offers a mobile app that lets you access helpful insights and manage your business on the go. You get to see real-time statistics, orders status and also add new products.
The tool has multiple extensions and integrations that can also help you grow and promote your business.
You can integrate third-party tools such as Mailchimp or Mailpoet that can help you grow your traffic and increase purchase rates.
It also supports Google Ads and Listings but also offers its own advertisement and branding solutions through product recommendations and product add-ons such as gift wrapping, special messages, and other similar options.
WooCommerce is very versatile and offers support not only for online shops but also for hospitality services. It offers the tool necessary to create appointments and make reservations.
The platform also gives full support for shipping. It can connect you with popular shipping companies and provide tracking information for every order.
Other key features of WooCommerce include:
Open source, fully customizable
Over 400 official extensions
Resourceful guides and tutorials
Support for multiple languages and currencies
There is also a 30-day refund policy for subscriptions canceled within a period of one month (after payment).
WooCommerce
Integrate this plugin to your WordPress website and start managing any type of business from start to finish.
Up next we have a resourceful platform that provides multiple website hosting options, an intuitive and modern website builder, and support for payments, taxes, and promotion.
Squarespace offers time-efficient solutions that let users create professional-looking websites in a very short time.
It has one of the most intuitive builders out there, with tons of inspiring templates that don’t need much adjustment. However, if you already built your website, you can easily migrate it in just a few quick steps.
It offers pre-built layouts for various types of websites including eCommerce. It has various useful extensions that let you closely manage your business.
For instance, the inventory and product extensions let you manage your inventory SKUs, stock level and add or remove products from your website.
Squarespace also gives insightful analytics so you can see in real-time how your business is progressing.
Users get sales by product analytics, purchase funnel, abandoned cart statistics, total spend information about customers, average order value, and more.
Squarespace does not only provide the tools necessary to host and create your eCommerce website, but it also offers support for marketing and promotion
It offers exclusive access to third-party tools so you can determine your customer base and target your advertisements or promotional campaigns toward them.
Regardless of what you plan on selling, know that this platform can take care of the whole process, from start to finish.
Squarespace can also help with shipping, returns, and package tracking, so you and your customers are fully informed about the orders.
Other key features of Squarespace include:
Automatic image scaling
Free custom domain
Multimedia blocks for audio and video content
SEO features
Productivity features for you or a whole team
Custom payment settings
Squarespace is a subscription-based service with multiple plans available. Each plan has the option to charge monthly or annually.
Squarespace
Build and manage your business with modern and intuitive tools that help you grow and assess your business at any level.
Wix eCommerce is another great option for those that want to use an intuitive and visual website builder.
The platform offers over 500 free store templates. You can use them as they are or as a basis to create your own, specifically branded online shop.
On the topic of branding, it is also important to note that Wix offers handy tools such as a Logo Maker, a Business Name Generator, and of course, your custom domain name.
The platform supports the listing of up to 50, 000 products, which is plenty, especially if you are just starting out.
It offers several features that help you manage your products, including inventory management tools, supplier support, and more.
The tool also lets you define your own shipping rules and automates taxes for every purchase.
When it comes to payments, you can use the integrated Wix Payments solution, but you can also pick a third-party method from payment providers such as PayPal.
You can track and view reports on each payment. It offers easy solutions for refunds and gives insightful information about all transactions.
When it comes to shipping, Wix allows you to track the whole process, starting from the purchase. They offer support for shipping, and suppliers, and also let you and your customer track the location of the order once it has been shipped.
Similar to Squarespace, this tool also offers some marketing tools that can help you grow and boost sales. It offers easy solutions that let you create promotional content in just a few minutes.
Along with that, it works with proven SEO patterns and automatically applies them to your website.
Other key features of Wix eCommerce include:
Multilingual and multi-currency support
Support for multi-channel sales
Store subscriptions
Templates for multiple types of stores (fashion, interior design, makeup, etc)
Wix is also subscription-based with three plans available. If you are not satisfied with the service, you can get a refund in the first 14 days of your subscription.
Wix eCommerce
Create and host beautiful and fully functional online stores with this intuitive web app.
BigCommerce is, without a doubt, one of the most popular eCommerce service providers in the world. And it doubles as one of the best-automated eCommerce software.
In short, BigCommercer provides all the necessary tools that your online shop would need in order to drive more traffic, convert customers into sales, and manage the store.
Some of the key features of BigCommerce include site builder, marketing tools, product pages, process orders, optimization for mobile, social media tools & more.
Interestingly, most of the above-outlined features are streamlined and aptly automated, providing you with a seamless flow of transactions, from orders to purchases to payments.
BigCommerce puts forward a straightforward inventory management solution that can be integrated between online and offline channels.
It offers 65 payment integrations for various third-party payment services. BigCommerce doesn’t charge transaction fees and doesn’t place any payment penalty.
BigCommerce strives to provide optimized solutions for the whole purchase experience, so your customers will get the best service possible. It offers simple single-page checkout with secure SSL and mobile support.
It also offers search engine optimization tools such as search-friendly teams, customizable URLs, title tags, and more.
Other key features of BigCommerce include:
Supports on-site blog
Integrates Google Shopping
Personalized audits
Channel integrations for social media
BigCommerce offers an initial 15-day free trial to new subscribers, after which they can subscribe to one of the available paid plans: Standard, Plus, Pro, and Enterprise.
BigCommerce
With BigCommerce you have online store set-up, marketing, purchase, and payment facilitation, all automated!
Mobirise is a renowned site-building software, whose functions can be modified to design an eCommerce/online shopping site for your products/services.
It hosts a user-friendly interface that uses a simple “drag & drop” feature to create websites, without any form of coding.
As such, you can easily adapt this software to create an eCommerce site. However, this automated eCommerce software is compatible with Windows desktop devices, and cannot be used on mobile platforms.
Basically, Mobirise is a mobile-friendly desktop app that can help you build a promotional, marketing, or shopping site, where you can promote, market, and sell your products.
This is done by adding designated “Buy Now” (online purchase) links and “Add to cart” (product order) links to your website. With this, orders and purchases are automatically processed as appropriate.
Also, there are designated eCommerce website building features like “CommerceM4” and “Paypal Cart”. The PayPal Cart facilitates receipts on purchased products via PayPal. These features make Mobirise ideal for designing eCommerce websites or online stores.
Some of the basic features of Mobirise include Unlimited web blocks, eCommerce links, Templates (Bootstrap builder), Code editor, Paypal Cart, Contact forms, Social Buttons, Content slider, Video background, and more.
Other key features of Mobirise include:
Integrates promotional features
Compatible with Mac and Windows
All websites are automatically built to also be mobile friendly
Mobirise’s pricing plans are product-specific i.e. each product/feature has its specific pricing plan.
Mobirise
User-friendly website builder software for your online shop, with all the essential optimization tools.
WebSite X5, just like Mobirise, is a website/online store builder that allows business owners (especially those with no coding skill) to create online shopping stores, where they can advertise and sell their products.
It is equipped with hundreds of templates, to create websites that best suit your desires, or you can do away with the templates and create a site from scratch.
In addition, this automated eCommerce software hosts tons of features, which are all essential for creating websites. However, only a handful of these features are specific to eCommerce website designing/building.
The eCommerce features are what qualify WebSite X5 as an automated eCommerce software.
WebSite X5 e-commerce-related features include Automatic order processing, Amazon Pay, Customer registration, Discount management, Payment gateways (PayPal, credit cards, etc.), Advertising messages, Customer accounts, and more.
These features not only enable you to create an e-commerce site but also automate the “purchase” and “payment” processes.
Other features of this automated e-commerce software include templates, a DPR-compliant security system, customer accounts, contact forms, a graphic editor, multilingual support, a control panel, mobile apps (Android and iOS), and more.
Other key features of WebSite X5 include:
Google AMP posts
SEO and website analytics
Personalized mailbox
WebSite X5 is available in three editions – WebSite X5 Start, WebSite X5 Evolution, and Website X5 Professional.
Website X5
Accessible and affordable website builder for beginners, professionals and successful businesses.
Shopify is one of the most prominent automated eCommerce software in the market. In fact, it is rated as the best eCommerce solution by many websites.
With over 500,000 users across the globe, it has one of the largest client bases in the industry.
Besides that, Shopify basically serves as an eCommerce website builder and a shopping cart software, which provides users with a near-perfect online shopping experience.
Everything is automated, ranging from placing orders to making/receiving payments.
Key features of Shopify include: Website builder, Online store, Multiple payment gateways, Custom branding, Templates, Sales Channels, Customer profiles/accounts, In-depth analytics & reports, Round-the-clock customer support, Shopping cart, Manual order creation, and Abandoned cart recovery.
Shopify offers a fulfilling user experience allowing them to create profiles and accounts, set preferences, and more. Plus, you can make your shop easily accessible from anywhere, as the platform offers full mobile support.
Shopify automated eCommerce software offers four major subscription plans to its users. There is an initial 14-day free trial before a full subscription.
The advent of automated eCommerce software has greatly improved business conduct within the global cyber-space. Online store owners now spend less time, less effort, and less money to process purchases, payments, and product/service deliveries.
While there are many automated eCommerce software in the market, we have listed six of the best for you, to better inform your decisions on which one to adopt for your online stores.
Surely, other tools are necessary for your business, so find more of them in the Business Hub.
In the Optimization Hub, you’ll find tools to tune up your online website for greater loading speeds.
Job hunting is still necessary, but the activity itself has changed significantly throughout time. Now, people search for jobs almost exclusively online as the Internet has become the ultimate medium for data exchange.
This is perfect for both future employees and employers. In this manner, employers get access to tons of Internet users while job hunters browse through thousands of job offers effortlessly.
To exist and to prosper, the online job market requires an essential thing, and this is a useful and reliable job board software.
These tools power every job search website and it’s the crucial element regardless of where you look for jobs (on online job portals or the companies’ websites).
All over the world, there are thousands of businesses that create this kind of software, so it can get pretty complicated and confusing to have a clear view of the job board software market.
The market is also flooded with tons of versions of job board scripts. We’ll help you skip the useless software because it’s not of any interest and we’ll present you with some great solutions that will work for sure job board software below.
This software will help you boost visibility and target the perfect candidates by promoting your job on premium and free job boards with just one submission. A workable extensive job board syndication network will allow you to reach millions of job seekers throughout lots of locations.
Your next employee may already be your top fan, and Workable will make sure that it’s easy to post jobs on Facebook, LinkedIn, and Twitter as well.
The candidate source reports will make sure that you get the best from your ads and will also help you plan the whole recruiting strategy from A to Z.
You can try the software for free right now, as you won’t need any downloads or credit cards.
As we already said, you have two options to post free jobs and premium jobs. Here’s what every option offers you.
Free job boards: you can attract more candidates by posting to free job boards, and you’ll get the following benefits:
Advertise jobs in minutes
No downloads or training required
All posts are optimized for desktop and mobile
Includes the most popular free job boards
Get a free, hosted, branded careers page
Premium job boards: the software partners with the most popular paid job boards and you can create targeted posts to fill your hiring pipeline. You’ll get the following advantages:
Great rates and special offers
National and international job board syndication
A broad range of niche and specialist sites
Integrates with job board recruiter accounts
Post to multiple boards from one platform
All you have to do to post a job is create your account, write your job description and start posting. Give it a try!
LinkedIn is a well-known and popular job searching hub that helps millions of people to match the desired roles in specific work areas.
This online platform is designed like a social media network that provides resourceful tools to find or post a job to connect the employees with the right roles.
Every candidate has the chance to discover his dream job using this highly connected tool, and even more filter job results according to job type, location, or experience.
On the other side, employers can post their hiring positions on their company profile to match the most suited people for those jobs.
You can best use LinkedIn Recruiter to help talent specialists to find and connect with the right employees. The platform offers useful insights regarding candidates and their work experience over time.
Plus, any user can connect with different individuals from around the world and interact to share experiences or job offers. The chat section can be used to approach employees or even companies.
There are other practical features both as an employee and company as well to publish important positions for the right people.
This platform is created for both employees and employers that need to connect in a shared space with millions of opportunities.
With this hiring tool, any job seeker can find a suitable job in the desired company. It’s possible to match your role without thousands of applications.
It’s fairly simple to use this platform to discover the wanted roles. You can start by completing your profile on the platform and transmitting your work portfolio in your personal ways.
From the employee perspective, you will surely meet your goals and discover respected companies in your market.
More exactly, this solution gives reliable support for matching hourly employees with ideal positions in the desired areas of work.
This being said, have a try with this trusted job searching client to match required positions with talented people or find the most suitable job for you.
Create the right connections and discover valuable jobs to fit your skills using this platform.
This is another job board software that will turn out to be more appropriate for running on a general job board website, rather than within an organization.
The software is great, and it includes a smaller number of features, but this is not a minus as it addresses the right job search issues.
While you’re using the software, you’ll be unlikely to lose yourself within tons of features that are not at all helpful for your mission. The tool features some marketing and SEO optimization and some customization options as well.
It also supports mobile technologies and the world’s favorite social networks such as Facebook, Twitter, and LinkedIn.
The software will help you maximize your revenues via various options:
Job postings
Resume access
Sponsored jobs
Featured employees
Job alerts and job slots
Subscriptions
The home page of the software offers a virtual tour of the job portal experience is also an online demo, and this is a great benefit.
Here are the primary downsides of the tool:
You have to send your name, phone number and email address to the developer company before you can take a look at this online demo that we have mentioned before. Unfortunately, this might upset some of the users.
You cannot see the pricing of webJobs, and you have to contact the company for a quote.
These two minuses might discourage some users to try out the software, but we guarantee you that this job board software does its tasks really well and it’s not overwhelming at all.
This is the reason why it may be the ideal solution for lots of users out there.
Using this software, you’ll be able to post to more than 100 job sites in just a few minutes, and you can reach more than 100 million candidates. You’ll get the chance to screen them with the use of the dashboard offered by this tool.
The software promises to be one of the fastest-growing and easy-to-use hiring tools for small businesses. You will not need any copy/paste, or multiple logins and you’ll be able to save your hours of work.
After candidates start to apply from their desktops, tablets, mobile phones, you will receive an email notification, and they’ll come to one central location. All you have to do after that is to just point and click your way to the best hires you’ve ever desired.
Most users have found the following pros and cons for the tool:
Pros – you get a simple and easy to use interface and dashboard; you can like and dislike and then go on to the next resumes.
Cons – some users require the ability to rank the liked applications, and other found some troubles regarding a few applicant errors.
But all in all, the tool is easy to use and it makes reviewing the applicants’ resumes a smooth process overall.
ILance Pro software can transform any website into a complex work and hire marketplace powering search, bidding tool, and request for quote.
Reverse auction for jobs offers you a competitive hiring environment for buyers to seek and match the professionals they need and also experts to find those leads.
Applications are also available to install and increase the marketplace quickly. Other great features of the tool include the following:
It’s SEO optimized for the web.
It is 100% customizable.
It supports more languages.
Here are the advantages of this tool as most of its users describe them:
The price divides the tool into several segments tailored to each user’s needs, so this way everyone gets a choice according to the business development.
Even if the tool requires more learning than any other software of this kind, this only happens because there are lots of variables needed to complete an auction.
The community forum where you can ask questions and discuss all sorts of issues and share suggestions for better development is highly appreciated.
The tool’s downside is the fact that there’s more room for improving documentation and manual guides, to help the tool become clearer and easier to understand.
This is another paid job board software. You’ll have to pay for the Standard version. For the latter, you’ll get a ton of features that have been accumulating for lots of years now, in various versions of this tool.
The current version of the tool is 3.1 JobSite Professional, and it provides lots of useful features such as the following:
Backfill
A mobile version of the software
LinkedIn integration
Unlimited levels front side menu
Facebook connect option
There are more other features, of course, but we have only listed the essential ones.
You also get a few screenshots to understand the software better and so see what it looks like and how it functions. You’ll be able to take a look at the online demo on the website of the software without needing to send data anywhere.
You can also benefit from the company’s professional support offered to its users, and you can send emails, call them on the phone or submit a ticket in case you reach a tech problem.
The company also offers discounts on its job portal software, including this one of course. You can participate in a “buy two get three” campaign. The company also has an affiliate program, so if you’re busy promoting the products, you can also make some significant cash.
This staffing software is built from the ground up for staffing agencies. This is a single, fully-integrated, and back-office solution.
Here are the benefits of using the tool:
The company that developed the tool is a seamless staffing software provider.
You’ll get customized solutions that will address your staffing needs.
The tool is used by hundreds of temporary employment agencies across the nation including services such as payroll processing, payroll funding, and W2 management.
The developer company is committed to the clients’ profitability and to providing them with the lowest cost of ownership.
Most users of this tool have found the company to be the best one that helps their business in achieving the ultimate goals. TeamWorks offered users all kinds of solutions involving database issues, payroll situations, customized reporting, and so on.
This job board software provides flexibility and power thanks to its numerous, efficient, and extensive features. Here are some of the most important ones:
A great content management system
Easy job board administration
Custom e-mail notifications
Multi-language support
The software is built on PHP technology, and it provides an online demo showing you how this powerful job script works in all kinds of scenarios.
The tool is straightforward to use, and in case you run into any kind of issues you can check out the FAQ list offered by the developers. You can also contact the company for more help and support.
The software comes in two main versions: a User version and a Developer version. Both of them can be purchased online after you complete the purchase of the job portal script.
The tool’s primary advantage is a mix of low price, good support, and extensive functionality. All these features make it a great solution that will be efficient in all kinds of circumstances.
The tool is a proven and easy-to-use solution. Users have found it to work great and most of them stated that after much frustration and loss of time trying out other products on the market, this one worked out smoothly and it turned out to be very reliable. Its system is extremely easy-to-use for both the admin and the users.
This is web-based board software. Its most notable features include the following:
Indeed Import
Applicant tracking
Video Articles
Job Import
eCommerce integration
full source code is included with the software license
advanced search and browse for jobs and resumes
Google Maps
Hosting, design, and programming customization services are all available
Of course, there are more job board tools out there on the online market, but the ones that we’ve discussed above will turn out great if you decide to create an online job search website.
Their common advantages include a full list of amazing features and great support as well. No matter which one you decide to try out, we guarantee that you’ll get a great experience using it. Good luck!