June 13 marked Windows 10 version 21H2 end of servicing date. If your device runs on this operating system, you’ll probably need to upgrade to a newer OS. Especially if you want to continue receiving regular security and feature updates.
According to Microsoft:
Starting today, June 13, 2023, Home, Pro, Pro Education, and Pro for Workstations editions of Windows 10, version 21H2 have reached end of servicing. The June 2023 security update – released June 13, 2023 – is the last update available for these versions. Devices running these versions will no longer receive monthly security and preview updates containing protections from the latest security threats.
The following Windows 10 21H2 editions have reached end of servicing:
Windows 10 Home, version 21H2
Windows 10 Pro, version 21H2
Windows 10 Pro Education, version 21H2
Windows 10 Pro for Workstations, version 21H2
Windows 10 version 21H2 started rolling out to users in November 2021. And now, it’s reached its end-of-support date. To continue receiving security and feature updates, you’ll need to upgrade to Windows 10 version 22H2 or even Windows 11 as long as your device meets the set minimum requirements.
Mirror’s Edge is one of those video games that stay with you for a long time after you play it. It was released in 2009, to moderate reception, but its legacy has grown over time. At release, it was available for Xbox 360, PlayStation 3, and Microsoft Windows as well.
And speaking of gameplay, this was the factor that made Mirror’s Edge a cult video game. Aside from its amazing artwork, and overall cyberpunk story, Mirror’s Edge is still played today. It has a strong community online, with people discovering and rediscovering the game.
People everywhere are playing it for the first time, including this Reddit user who wondered how can Mirror’s Edge be played on Windows 11.
And yes, the answer is that you can definitely play Mirror’s Edge on Windows 11, and it runs quite smoothly, according to the other users’ input on the Reddit thread.
Follow along and we’ll show you where to download Mirror’s Edge from and how to install it and play it.
Here’s how to download & play Mirror’s Edge on Windows 11
First, you need to know that you can download Mirror’s Edge from multiple platforms. You can choose to download it from Steam, or you can choose to download it from GOG.COM.
Both platforms work just fine, and there is no difference when it comes to actually playing the game. Of course, you should be aware of the price, but basically, other than the price, this video game will run just fine on Windows 11.
You have two options: you can either buy it one time, or you can download it as part of your Steam subscription.
You should be able to play it without any issues, directly from Steam. However, if any issues come up, note them down, and look for a solution.
On the Reddit thread, some users encountered some issues that prevented them from playing the game on Windows 11. But it’s not a general thing, so your system might as well run it without any problems.
Once you’re on the page, click on Add to cart to buy it.
If you choose to buy it from GOG, the platform will prompt you to install its app, and you can run it from there.
Similar to Steam, running Mirror’s Edge from GOG should be without any issues, as the platform automatically makes older video games compatible with the newer Windows versions. You should be able to enjoy it without being interrupted.
However, if by some means, you do encounter a bug that prevents you from running it, run a compatibility check.
You can do that by right click MirrorsEdge.com, selecting Properties, going to the Compatibility pane, and selecting any previous Windows versions to run this game.
Playing it will be another fun thing to do. You should know that Mirror’s Edge is a first-person platform game, so expect to move a lot, jump a lot, and avoid obstacles and enemies.
You’ll find the story compelling, and the gameplay even more fun.
What do you think? Have you heard of this game? Have you played it before? Be sure to let us know your experience with it in the comments section below.
And we also welcome you on the Nostalgia lane with this one. Have fun!
The Xbox Games Showcase 2023 and Starfield Direct event happened this week, and needless to say, the news is exciting. Starfield is coming to Windows PCs and Xbox, and while the video game will eat a lot of your storage space, it’s actually moderate on the system requirements.
Video games such as Forza Horizon, and the hotly awaited Senua II are also coming to Xbox soon, and on the newly announced Game Pass for NVIDIA GeForce Now. This means you will be able to play them on any device that GeForce Now streams to.
You’ll be able to play video games on low-spec PCs, Macs, Chromebooks, mobile devices, TVs, and more. It would be nice if a new game from the Halo franchise would be there, but no. Unfortunately, at this year’s event, any news from Halo was non-existent.
We’re not the only ones who’ve noticed it, because fans of the beloved franchise are asking themselves the same. Has Microsoft forgotten about Halo? Well, kind of. Not entirely, but kind of.
What are the Halo franchise’s future plans?
As well all know, Halo Infinite was released almost 2 years ago, in 2021, 20 years after the first Halo game. The video game was well received, with some even calling it a return to the form for the series. Commercially, it had a lot of success, and by January 2022, a month after its release, Halo Infinite crossed the 20 million players mark.
Microsoft released a roadmap for Halo Infinite for the Fall/Winter seasons, and they managed to add a lot of new features, new maps, new weapons, and even new story plots in a couple of patches that felt like expansions.
But ever since, there were no news about Halo from Microsoft. With Halo Infinite released, and the new Xbox consoles already out, it’s no wonder people are asking if there is any new Halo game in sight.
And apparently, there is a roadmap for Halo. Xbox CEO Phil Spencer and Xbox Game Studios head Matt Booty were live on a Giant Bomb live stream on all things Xbox, and they actually confirmed something is brewing for Halo.
There’s a pretty good roadmap, you start to think about the future of Halo, what does that roadmap look like.
Matt Booty, Xbox
So, while we don’t know anything yet, it seems a lot of things are coming for Halo. We can only take a guess. However, based on how things look right now, a new Halo game will be similar to Halo Infinite, story-wise.
Can we hope for a remake of Halo: Combat Evolved from Microsoft and 343 Industries? It would be very interesting to see how can they capture the magic and thrill of the first game. Will Bungie join in and work on it too?
Truth is, we can only hope.
What do you think? Are you excited about the future of Halo? Or mad at Microsoft for not focusing on it? Be sure to let us know in the comments section below.
Winbox is used by Windows users to monitor traffic of every interface or firewall rule in real-time. In some cases, the app fails to start and prevents users from accessing Winbox’s features and functionality.
If your Winbox app is not working, stick around; this article will briefly discuss some common causes of the error and provide steps to help you fix it.
Why is Winbox not working on Windows 10?
The following are some of the most common reasons why Winbox is not working on Windows 10:
Outdated software – Winbox like most software is updated occasionally to fix errors and bugs, if you’re running an outdated version of the software, it can prevent the app from working correctly.
Poor network connection – If you have an unstable internet connection, it can lead to errors while launching Winbox.
Multiple Virtual Network Interfaces – If you have multiple network interfaces on your OS, Winbox gets confused and can take a while to connect; this can be the reason triggering the Winbox not working error.
What can I do if Winbox is not working on Windows 10?
Before we proceed with more advanced solutions, here are a couple of quick fixes you can attempt:
Run Winbox as an administrator – Winbox might need admin privileges to perform some actions, if the app doesn’t have such permissions, it can lead to the Winbox not working error.
Ensure Winbox is running the latest version
If the Winbox not working error persists after attempting those fixes, here are advanced troubleshooting solutions to help you fix the error:
1. Disable Antivirus Software
Press Windows + I to open the Settings app
In the Settings app, click Update and Security, and select the Windows Security tab.
Further, click on Virus and Threat Protection, and click Manage Settings.
In the next window, click the toggle button next to Real-Time Protection to turn off the feature. (You can also disable more options in this tab).
Close the Windows Security window and restart your PC to check if the error is resolved.
Antivirus software protects your PC from harmful files and applications but can also infringe on the normal functionality of Windows.
Further, you can temporarily disable your antivirus software to check if it’ll fix Winbox not working.
2. Temporarily Disable Firewall
Press the Windows key, type Control Panel in the search bar, and hit Enter.
In the Control Panel, click on the System and Security tab and select Windows Defender Firewall.
In the next window, click the Turn Windows Firewall On or Off on the left pane.
Then, click Turn off Windows Firewall (not recommended) under the Public Network Settings section.
Then, click OK to confirm your changes and exit the Control Panel.
The Windows Firewall helps protect your PC from harmful connections, but can also restrict the functionality of legit applications. In addition, you can disable the firewall to check if it’ll fix the error, and re-enable it.
Press the Windows key, type Control Panel and hit Enter.
In the Control Panel window, click Network and Internet, and select Advanced network settings on the right pane.
Then, locate the installed Virtual Network Adapters under the Network Adapters section and click the Disable button to turn off the network.
Close the Control Panel and check if the Winbox error is fixed.
Virtual network Adapters are added to your PC when you install virtualization software; however, such Adapters can conflict with Winbox, causing the app to stop functioning. Disabling the Adapters can help fix the error.
Winbox is a very decent traffic monitoring tool utilized by most Windows users. Thus, if the app stops working, it’s most likely you have a faulty internet connection or the software is being blocked by a Windows security feature.
Nevertheless, by applying the steps listed in this article, you should get your Winbox app up and running in no time.
If you’d like to reset Excel to default settings the process is pretty simple, especially if you don’t want to reinstall the app. However, we have the most effective solutions to do that below.
How can I reset Excel to default settings?
1. Reset individual menus
Open Microsoft Excel.
Click on the Tools menu and then click Customize.
Right-click the menu you want to restore and then click the Reset button.
This will restore the menu to its original settings.
Repeat this procedure to reset all the menus which will restore Microsoft Excel to its default settings.
This is the most simple and quick option to reset Microsoft Excel. It is also the most convenient way since you might not want to reset all the Excel settings.
2. Reset the app using the Registry
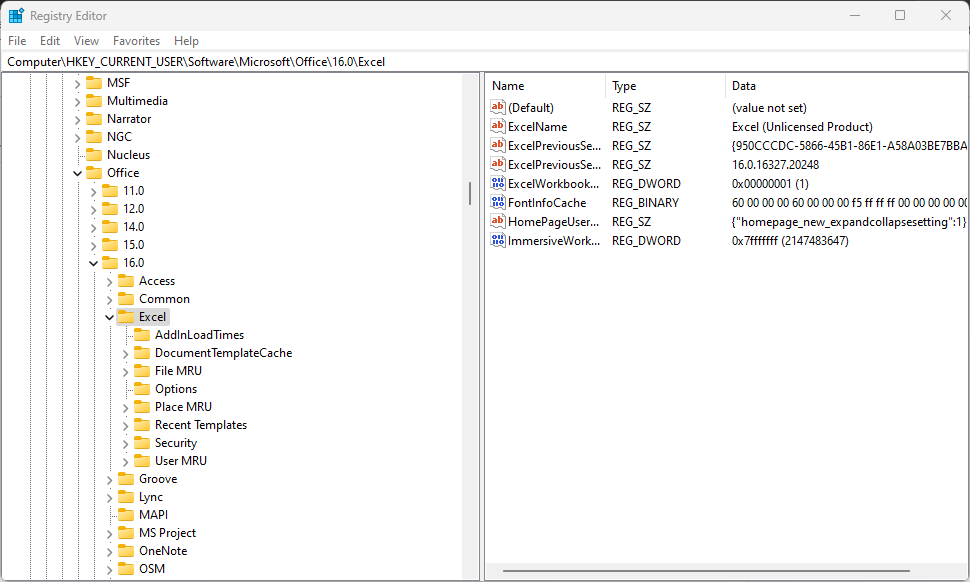
Press the Windows key + R to open the dialog box, type regedit in the search bar, and hit Enter to open the Registry Console.
Navigate to the following registry path HKEY_CURRENT_USER\SOFTWARE\Microsoft\Office\16.0\Excel
It’s important to note that the version number (16.0) varies according to the Excel version installed on your PC. Sometimes, 12.0, 13.0, 14.0, or 15.0.
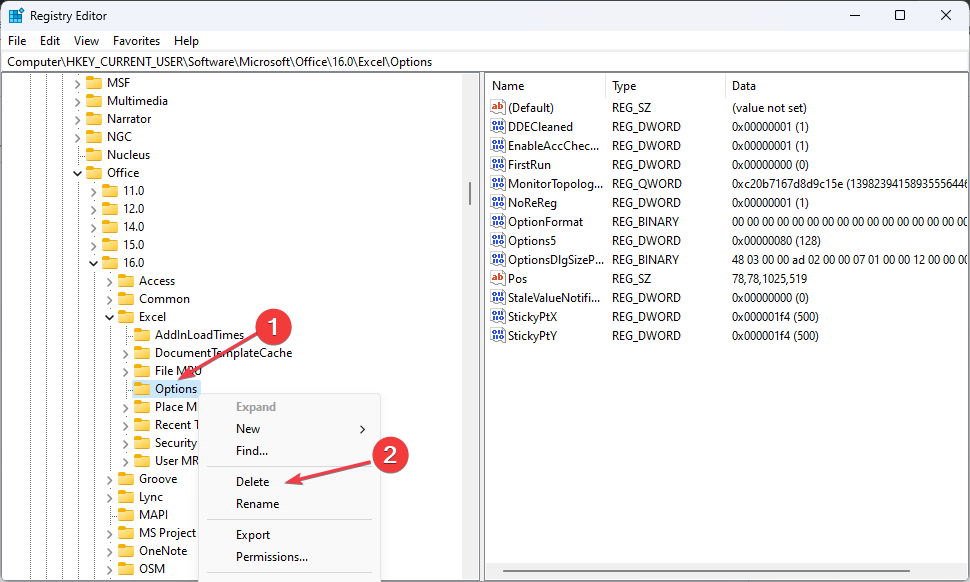
On the left pane, click on the Excel registry key and locate the Options registry key.
Right-click on the options registry key and select Delete.
This registry key stores all the Excel customizations made by the user; deleting the key would remove all customizations made by the user and restore the application to its default settings.
3. Using PowerShell
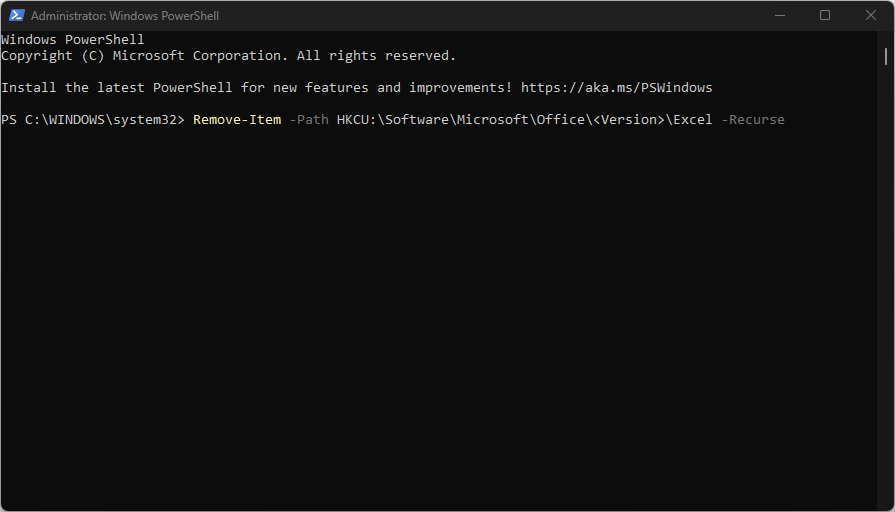
Press the Windows key, type PowerShell in the search bar, right-click on the result, and select Run as Administrator to open PowerShell in elevated mode.
Copy and paste the following command in the PowerShell window and hit Enter: Remove-Item -Path HKCU:\Software\Microsoft\Office\<Version>\Excel -Recurse
However, you’ll have to replace the Version with the actual version of your Office 365 software, i.e., 16.0, 15.0, etc.
Close the PowerShell window and check if Excel is back to default configurations.
4. Repair and Reset Microsoft Office
Press the Windows key + R, type appwiz.cpl in the dialog box, and hit Enter.
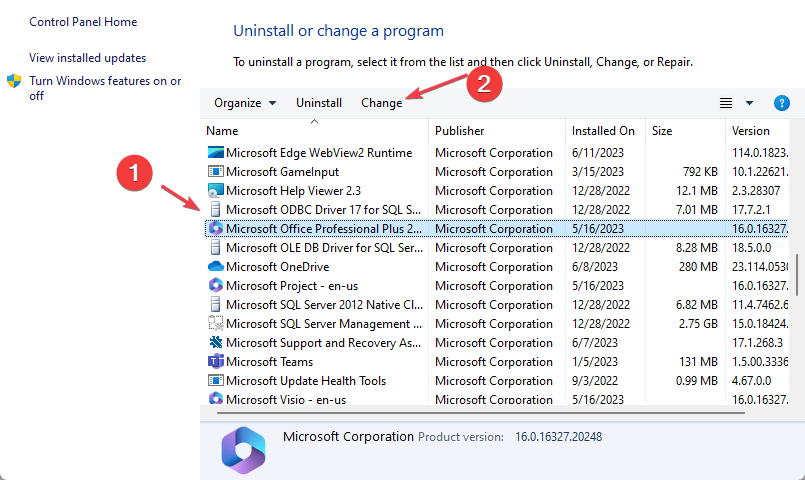
Under the Programs and Features section, locate MS Office, click on it, and select Change.
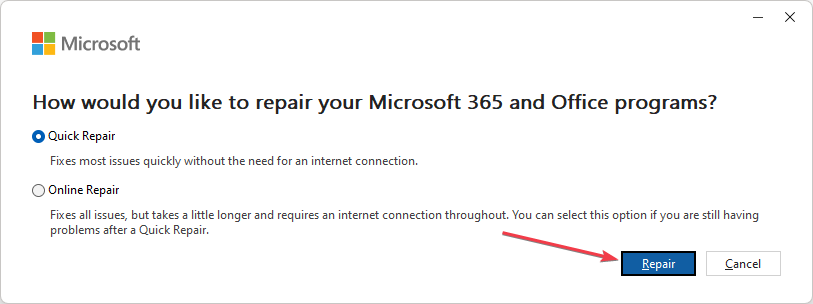
In the popup window, click Quick Repair to restore Excel to default settings.
If Quick Repair doesn’t fix the issue, select the Online Repair option and follow the onscreen instructions to complete the repair.
Another way to reset Microsoft Excel to default settings is to reset the Microsoft Office application. A reset will delete all the stored data and configuration and relaunch the app in its default state.
Once the file is downloaded, double-click the SetupProd_OffScrub.exe file and follow the onscreen instructions to complete the installation.
After the installation, click Yes in the user account control window. The tool will automatically start troubleshooting Microsoft Office in a new window.
In the new window, click the checkbox next to Microsoft Office, and click Next to initiate the installation.
Once the installation is complete, restart your PC.
When your PC restarts, you’ll need to download the Office application from the Microsoft website.
Once the file is downloaded, double-click the .exe file to run the installer and follow the onscreen instructions to complete the installation.
Once the installation is complete, all Office applications will revert to default settings.
Reinstalling Microsoft Excel is usually the go-to option to reset an application to its default state. Once you uninstall the app, all the saved data and configurations are removed, at the next installation, the app will be installed in its default state.
If you’ve made customizations to the Excel app and want to remove them, you’d have to revert the Excel application to its default state. This article has provided the steps to reset Excel to default settings.
OneDrive is one of the most popular virtual file share and collaborative services available to Office 365 users. However, the app is plagued by security and administrative issues, which leads to a persistent sync error.
The 0x8004deea error code prevents users from accessing OneDrive’s syncing functionalities. If you’re currently experiencing this error, read through this article which provides the steps to help fix the 0x8004deea error code.
What causes the Onedrive 0x8004deea error code?
Here are some of the common causes of the 0x8004deea error code:
Inadequate access – Most companies structure their networks in a way that prevents all users from having equal access. The 0x8004deea error can be triggered if you don’t have the right permissions to sync files on your PC.
Faulty software: If your OneDrive software is corrupt or outdated, it can lead to potential operational errors like the 0x8004deea.
Server downtime: During server maintenance, users are unable to access the website or app under maintenance. If you’re getting the 0x8004deea error code, Microsoft’s servers might be under maintenance.
Location restrictions: In very rare cases, users in specific locations have reported that they’re unable to sync files.
How can I fix the Onedrive 0x8004deea error code?
Before we proceed with more advanced solutions, here are a couple of quick fixes you can attempt:
Click on the OneDrive icon at the bottom of the Desktop Taskbar to open OneDrive.
Then, click on Help and Settings and select Settings.
Click on Unlink this PC and repeat the step to relink the PC.
Unlinking your PC will refresh the sync portal with your registry key, allowing you to bypass the sync issue in OneDrive.
2. Reset OneDrive
Press the Windows key + R to open the Run dialog box, type in wsreset.exe, and click OK.
This will open a blank command prompt window; the window will close automatically after about ten seconds.
Check to see if OneDrive is now syncing files.
If the error persists, copy and paste the following into the run dialog box and click OK: %localappdata%\Microsoft\OneDrive\onedrive.exe /reset
Then, press the Windows key, type OneDrive, and hit Enter to launch the app manually.
Resetting OneDrive deletes the DAT file and stores the settings on the disk. Once OneDrive restarts, it checks the registry to see if the reset has occurred and then rebuilds the DAT file. This can help fix errors like the 0x8004deea.
3. Reinstall OneDrive
Press the Windows key + I to open the Settings app.
Click on Apps and select Installed Apps.
On the right pane, click the search bar, and type OneDrive. Click on the displayed result and select Uninstall.
Once the app is uninstalled, press the Windows key, type Microsoft Store and hit Enter.
Then, locate the search bar in the Microsoft Store window, and type in OneDrive.
Now, click on the OneDrive application and click the Get button.
Wait till the app is installed and launch it to check if the error is fixed.
4. Delete the OneDrive registry keyset
Press the Windows key + R, type regedit in the dialog box, and hit Enter to open the Registry Editor.
In the Windows Registry, copy and paste the following command into the search bar of the editor, and hit Enter: HKEY_LOCAL_MACHINE\SOFTWARE\Policies\Microsoft\OneDrive
Click Edit and select New. Click on Key and save the new key name as AllowTenantList.
Once the new Key opens, right-click and select New. Click on String Value, and type out your tenant ID, which can be found on Azure AD.
Then, close the Registry Editor and check if the error is fixed.
If you’re still unable to sync your files due to the 0x8004deea, your last option is to delete the entire OneDrive registry keyset and create new ones. This method is pretty effective and often resolves the error for many users.
If OneDrive can’t sync, the entire app functionality is rendered useless. Luckily, this article has provided the necessary steps to help you resolve the OneDrive 0x8004deea error code.
If you’ve got alternative solutions that helped you fix the 0x8004deea error in the past, please drop them in the comments below.
Mac and Windows users have reported the 0xe0000024 error, which is usually triggered after the OneNote app fails to sync with their notebook, iPad, or iPhone.
The error can be triggered by several reasons, which we’ll discuss briefly, and proffer solutions you can apply to help you resolve the 0xe0000024 error.
What causes the 0xe0000024 error?
Here are some of the common causes of the 0xe0000024 error:
Missing SkyDriveAuthenticationProvider key – Most users reported that they noticed the 0xe0000024 error after installing the Live-ID Sign-In Assistant; it is likely caused by a conflict with OneDrive. If OneDrive and OneNote are not configured correctly in the registry, they’ll be unable to coexist.
Credential conflicts with OneDrive – On Most Windows PCs, especially Windows 10, the 0xe0000024 error is usually caused by conflicts between OneDrive and OneNote. This is because both apps utilize the sync feature and can sometimes clash with each other.
Corrupt or outdated application – The developer releases updates to fix bugs and errors in apps. If the OneNote app is corrupt or isn’t updated to its latest version, it can lead to the 0xe0000024 error.
Intranet site is blocked for security reasons – If you’re trying to sync to a local SharePoint server, you might encounter this error because Windows usually blocks intranet communications.
How can I fix the 0xe0000024 sync error in Onenote?
Before we proceed with more advanced solutions, here are a couple of preliminary fixes you should attempt:
Check if the OneDrive servers are experiencing downtime.
Open the OneNote web client without closing the app.
If the error remains unfixed, the following are more advanced troubleshooting steps to help you fix the 0xe0000024 error:
1. Remove all Generic Credentials
Press the Windowskey, type Credential Manager, and hit Enter.
Click on the Windows Credentials tab at the top of the window, and locate the list of Generic Credentials at the bottom.
Click the down arrow next to OneDrive’s associated credentials, and click Remove to delete the credentials.
Launch the OneNote app by clicking the desktop icon and then press the Shift + F9 keys to sync your notebook.
Stored credentials help users sign in to websites faster; however, if there is a problem with the Credential Manager can prevent OneNote from functioning correctly.
2. Update the OneNote app
Press the Windows key, type OneNote, and hit Enter to launch the OneNote app.
Click on File at the top of the window and select Account on the left pane.
Click Update Options next to Office Updates. Then, select Update Now from the drop-down menu.
Restart your PC and check if the error persists.
Once developers discover a bug in the software, they release a patch to fix it; if a bug causes the 0xe0000024 sync error, updating the OneNote app can help fix it.
3. Add your SharePoint Server to Intranet Sites
Press the Windows key, type Internet Options, and hit Enter.
Then, navigate to the Security tab and select Local intranet under the Select a zone to view or change security section.
Further, click on Sites and select Automatically detect intranet network, and click OK.
Alternatively, click the Advanced button and add your SharePoint URL under Add this website to the zone.
Now, click Add and restart your PC to check if the error is fixed.
If you’re using OneNote on the intranet, a security issue could prevent your files from syncing. Adding your SharePoint server to your local intranet sites can help fix the error.
Then, click the arrow next to your Office version, e.g., 16.0, 15.0, 14.0, etc., then click the arrow next to Common and select Internet.
Right-click on the right pane and hover on New. Select String Value, and name the string SkyDriveAuthenticationProvider.
Then, right-click on the newly created string and select Modify.
Further, type idcrldisable in the Value Data box, and click OK.
Restart your PC, and check if the 0xE0000024 error is fixed.
Installing the Live ID Sign-In assistant can sometimes cause a conflict with OneDrive. To avoid conflicts with OneDrive, you’ll need to create a unique SkyDriveAuthenticationProvider key in the registry editor.
OneNote is an essential application for Windows and Mac users alike. If you’ve been unable to sync with your devices, we hope the steps in this article will help you fix OneNote sync errors.
If you’ve got alternative steps to fix the 0xe0000024 error, let us know by dropping a comment below.
The runtime error 438 error on Microsoft Visual Basic (VBA) is one of the most annoying issues users encounter. Like other runtime errors like 3706, it stops you from executing your code on VBA.
Fortunately, as daunting as the issue looks, it is not the most difficult to fix, as shown in the ensuing sections of this detailed guide.
What does object doesn’t support property or method mean in Excel?
There are different objects you can use in VBA, and they all have properties and methods that are compatible with them.
However, if you try to use a property or method that is not supported by a particular method, you get the VBA runtime 438, which denotes that the property you are trying to use does not apply to the select object.
It must also be noted that this can sometimes be a false positive from a third-party antivirus. So, if you are sure you selected the correct property and method, you might need to disable or uninstall your antivirus.
How can I fix runtime error 438?
1. Use the right properties and methods
The easiest way to fix runtime error 438 is to use the properties and methods supported by the object you are using. If you can’t determine this yourself, press the dot after defining an object.
This will show the list of all properties and methods compatible with it. Another option is to press F2 to bring up the object browser. This will also list the properties that are applicable to an object.
2. Uninstall the Microsoft Works add-in
Press the Windows key + R, type control, and click the OK button.
Select Uninstall a program under the Programs option.
Now, right-click Microsoft Works and select the Uninstall option.
Finally, follow the onscreen instructions to complete the process and try running your VBA code again.
In some cases, the runtime error 438 might be due to issues with some of your Excel add-ins, like Microsoft Works. The best thing to do here is to uninstall these plugins and check if the error persists.
Press the Windows key, type virus, and select Virus & threat protection.
Click the Scan options link.
Now, select your preferred scan option.
Finally, click the Scan now button.
If you are sure that your wrong properties or methods are not the cause of the runtime error 438, then it might be due to the activity of viruses on your PC.
You should use the Full Scan option or Microsoft Defender (Offline) to get rid of them. Alternatively, you can use a dedicated antivirus in TotalAV.
This special software will scan the most hidden corner of your PC and eliminate even the most stubborn malware before it can cause problems.
4. Reinstall drivers
Press the Windows key + X and select the Device Manager option.
Double-click any of the sections to expand it, and right-click each of the devices under it.
Now, select the Uninstall device option.
Finally, click the Uninstall button to confirm the action.
Some users have found this runtime error 438 due to problems with drivers for devices like your display adapter. To fix this, uninstall the affected driver and restart your PC.
5. Uninstall third-party antivirus
Press the Windows key + I and select the Apps option in the left pane.
Select the Apps & features option.
Now, click the vertical dots before the antivirus.
Finally, select the Uninstall option and follow the onscreen instructions to complete the process.
At times, the runtime error 438 might be a false alarm by your third-party antivirus. Also, the security software might be messing with your code for some reason.
In this case, you must uninstall the antivirus and use Microsoft Defender instead.
With this, we can now conclude this detailed guide on the VBA runtime error 438. All that is left for you is to follow the instructions therein, and the issue should be history.
If you are facing other issues like runtime error 3709, check our detailed guide to fix it quickly.
Feel free to let us know the solution that helped you fix this issue in the comments below.
BSoD crashes are pretty common among Windows users. Some of our readers have complained they get the netadaptercx.sys error as the cause of their BSoD crashes.
Hence, we’ve prepared a guide that briefly discusses the netadaptercx.sys file and provide steps to fix the BSoD error.
What is the netadaptercx.sys?
Netadaptercx.sys, also known as a Network Adapter Class Extension for a WDF file, was created by Microsoft to facilitate the development of the Microsoft Windows OS. It is a system driver file usually located in the System32 folder.
The netadaptercx.sys being a system file, is an essential file that helps your PC establish internet connectivity.
How can I fix the netadaptercx.sys?
Before we proceed with more advanced solutions, here are a couple of quick fixes you can attempt:
Restart your PC.
Close unnecessary background applications in the Task Manager.
Update Windows OS.
If the error persists, the following are ways you can apply to fix the netadaptercx.sys BSOD error:
1. Update your drivers
Press the Windows key + S, type in Device Manager, and hit Enter.
In the Device Manager window, scroll through the list of drivers, and check to see if there is a yellow alert symbol next to the option.
Right-click on the driver, and select Update driver.
In the next window, click Search automatically for updated driver software, and follow the prompts to complete the update.
Once you’ve updated all the Drivers, restart your PC and check if the error is resolved.
Drivers are an essential component of the Windows OS; running an outdated version is likely to trigger errors like the netadaptercx.sys BSOD. You can update the drivers using the Windows update tool or download and install them from the manufacturer’s website.
2. Run SFC and DISM scans
Press the Windows key, type in CMD, right-click on the displayed result, and select Run as Administrator.
Click Yes to grant the app administrative access in the User Account Control window.
Once the command prompt opens, type the following, and hit Enter: sfc /scannow
After entering the command, type the following, and hit Enter: DISM.exe /Online /Cleanup-Image / Restorehealth
Close the command prompt and restart your computer.
An SFC scan helps in repairing corrupt or damaged system files. If the netadaptercx.sys error is caused by corrupt system files; you can utilize the System File Checker to fix the error.
On the other hand, it’s more recommended to use a verified PC repair application that can entirely scan your Windows OS and fix problematic files that cause BSOD errors.
3. Scan for Malware
Press the Windows key, type in Windows Security, and hit Enter.
In the next window, click on Virus & Threat Protection, and click Scan Options under the Current Threats option.
Then, select Full Scan from the Scan Options menu and click the Scan Now button to initiate the virus scan.
Further, wait for the scan to complete, restart your PC and check if the error is fixed.
Windows errors are usually associated with viruses and malware; if you’re experiencing a BSOD error, your PC is likely infected with a virus. Also, ensure you utilize the Windows security tool or third-party antivirus software to protect your PC from malicious files and apps.
Left-click the Start menu, type restore and click Create a restore point.
Then, select System Properties and choose System Restore button.
In the Restore Files and Settings box, click Next.
In the next window, select the Restore Point to which you wish to restore your PC, and click Next.
Then, click Finish to complete the system restore.
If you’re about to make a significant change to your OS, it’s recommended to create a restore point you can fall back to in case you run into errors.
Conclusion
Blue Screen of Death (BSOD) errors are common among Windows users and are easy to fix. With the steps listed in this guide, you should be able to fix the netadaptercx.sys BSOD error.
OneDrive allows users to sync their files to the cloud. Users might attempt to move or delete files; this leads to errors as OneDrive prevents users from carrying out file operations during syncing.
If you’re experiencing the 0x8007018b error code on OneDrive, this article will briefly discuss the causes of the error and provide steps to help you fix it.
What causes the 0x8007018b error code?
Here are some of the most common causes of the 0x8007018b error code:
Sync in Progress – Most times, users often trigger the 0x8007018b error if they attempt file operations like deleting, renaming, or moving, during syncing.
Faulty Application – If the OneDrive app is faulty or has corrupt files, it can trigger syncing errors like the 0x8007018b.
How can I fix the 0x8007018b error code in OneDrive?
Before anything, apply the following checks:
Wait for the Sync to complete – Once OneDrive has completed the syncing process, actions such as renaming or file removal can be attempted without triggering the 0x8007018b error code.
The following are a couple of ways you can fix the 0x8007018b error in OneDrive:
1. Reset OneDrive
Press the Windows key + R to open the dialog box, copy and paste the following command, and hit Enter: %localappdata%\Microsoft\OneDrive\onedrive.exe /reset
After a few minutes, relaunch OneDrive by clicking on the Desktop icon.
If OneDrive doesn’t launch, copy and paste the following command in the Run dialog box: %localappdata%\Microsoft\OneDrive\onedrive.exe
Open the app and check if the 0x8007018b is resolved.
Resetting the OneDrive app deletes all the settings and configurations made by the user and restores the app to its default state. If the 0x8007018b error was caused by a faulty OneDrive configuration, resetting the app will help fix the error.
Press the Windows key + I to open the Settings app.
Click on Apps and select Installed Apps.
Click on the search bar on the right pane, and type OneDrive. Select the displayed option in the search results, and click Uninstall.
Once the uninstallation is complete, close the Settings app.
Launch your browser, navigate to the OneDrive webpage, and click Download.
Double-click on the Installer once the download is complete, and follow the onscreen instructions to complete the OneDrive installation.
After successfully installing the app, launch OneDrive to check if the error is fixed.
If the OneDrive app is corrupt, it can lead to several operational errors. However, reinstalling the app deletes all previous app data and restores it to its default state.
OneDrive errors are common among Windows users; fixing the errors is also quite simple and straightforward. With the steps outlined in this article, you should be able to fix the 0x8007018b error.
Feel free to leave questions and suggestions in the comments section if you have any, concerning this guide.
The 0x800b010e is a common error that occurs on Windows. It can be triggered for various reasons, but it is usually attributed to corrupt system files or registry issues.
In this article, we’ll briefly discuss some of the most common causes of the 0x800b010e error and proffer solutions you can apply to fix it.
What causes the 0x800b010e error?
The 0x800b010e error is often caused by:
Registry issues: If you noticed the 0x800b010e error after making changes to the Windows registry, it’s likely you’ve damaged the Windows registry or made some incorrect entries.
Wrong System Configurations: In an attempt to personalize or customize your PC, you’ll tamper with Windows’ default settings, leading to errors if you make the wrong changes.
Corrupt system files: Windows errors are usually attributed to corrupt system files in the OS. If any of your PC’s system files are corrupt, it can cause the 0x800b010e error.
Hardware malfunction: In rare cases, you can experience the 0x800b010e error after a hardware malfunction. If so, you must visit a technician to help fix the damaged hardware.
How can I fix the 0x800b010e error in Windows?
The following are a couple of ways you can fix the 0x800b010e error in Windows:
1. Run an SFC and DISM scans
Press the Windows key, type in CMD, right-click on the displayed result, and select Run as Administrator.
Click Yes to grant the app administrative access in the User Account Control window.
Once the command prompt opens, type the following, and hit Enter: sfc /scannow
After entering the command, type the following, and hit Enter: DISM.exe /Online /Cleanup-Image / Restorehealth
Close the command prompt and restart your computer.
Corrupt system files are some of the common causes of Windows-based errors. Running an SFC and DISM Scan is one of the best ways to fix the 0x800b010e error.
Besides this, there is a specialized PC repair solution you can make use of to solve broken Windows files or registry issues.
2. Run Checkdisk
Press the Windows key, type cmd, right-click the displayed option, and select Run as Administrator.
Click Yes in the User Account Control window to grant administrative privileges.
Type the following command prompt, and hit Enter: chkdsk /r or chkdsk /f /r
Wait till the repair is complete and close the command prompt.
Check to see if the error is fixed.
CHKDSK (check disk) scans your PC for file system errors. If corrupt files are existing on your hard drive, the CHKDSK command will identify and repair such errors.
3. Temporarily turn off the Firewall
Press the Windows key + I to open the Settings app.
Click on Privacy and Security and select Windows Security.
Click on Firewall & Network Protection to open the Windows Security Settings.
Select any of the following network profiles – Domain, Private, or Public.
Under the Microsoft Defender Firewall, click the toggle button to turn it on or off.
Turning off Microsoft Defender Firewall could make your device (and network, if you have one) more vulnerable to unauthorized access.
Press the Windows key + R, type in msconfig, and hit Enter to open the System Configuration window.
In the next window, navigate to the Services tab.
Scroll down and check the box next to the Hide all Microsoft services box, then click on Disable all.
Navigate to the Startup tab, and click on Open Task Manager.
In the Task Manager window, right-click on every available entry, and select Disable.
While in the System Configuration window, navigate to the Boot tab, and check the box next to Safe Boot.
Click Apply and click OK.
Restart your PC and check if the error is resolved.
A clean boot starts up your PC with a minimalist set of drivers, applications, and services; if the 0x800b010e error is caused by third-party apps, a clean boot can help you identify and resolve such errors.
5. Run a System Restore
Left-click the Start menu, type restore and click Create a restore point.
Select System Properties and choose System Restore button.
In the Restore Files and Settings box, click Next.
In the next window, select the Restore Point to which you wish to restore your PC, and click Next.
Then, click Finish to complete the system restore.
If you make constant changes to your OS, you should regularly create restore points in case you accidentally trigger an error. If you noticed the 0x800b010e error after a change in configurations, you could run a system restore to revert your PC to an earlier state.
Hopefully, after reading and implementing the solutions, you’ve been able to solve the 0x800b010e error.
We’d love to know which solutions worked for you; feel free to comment below.
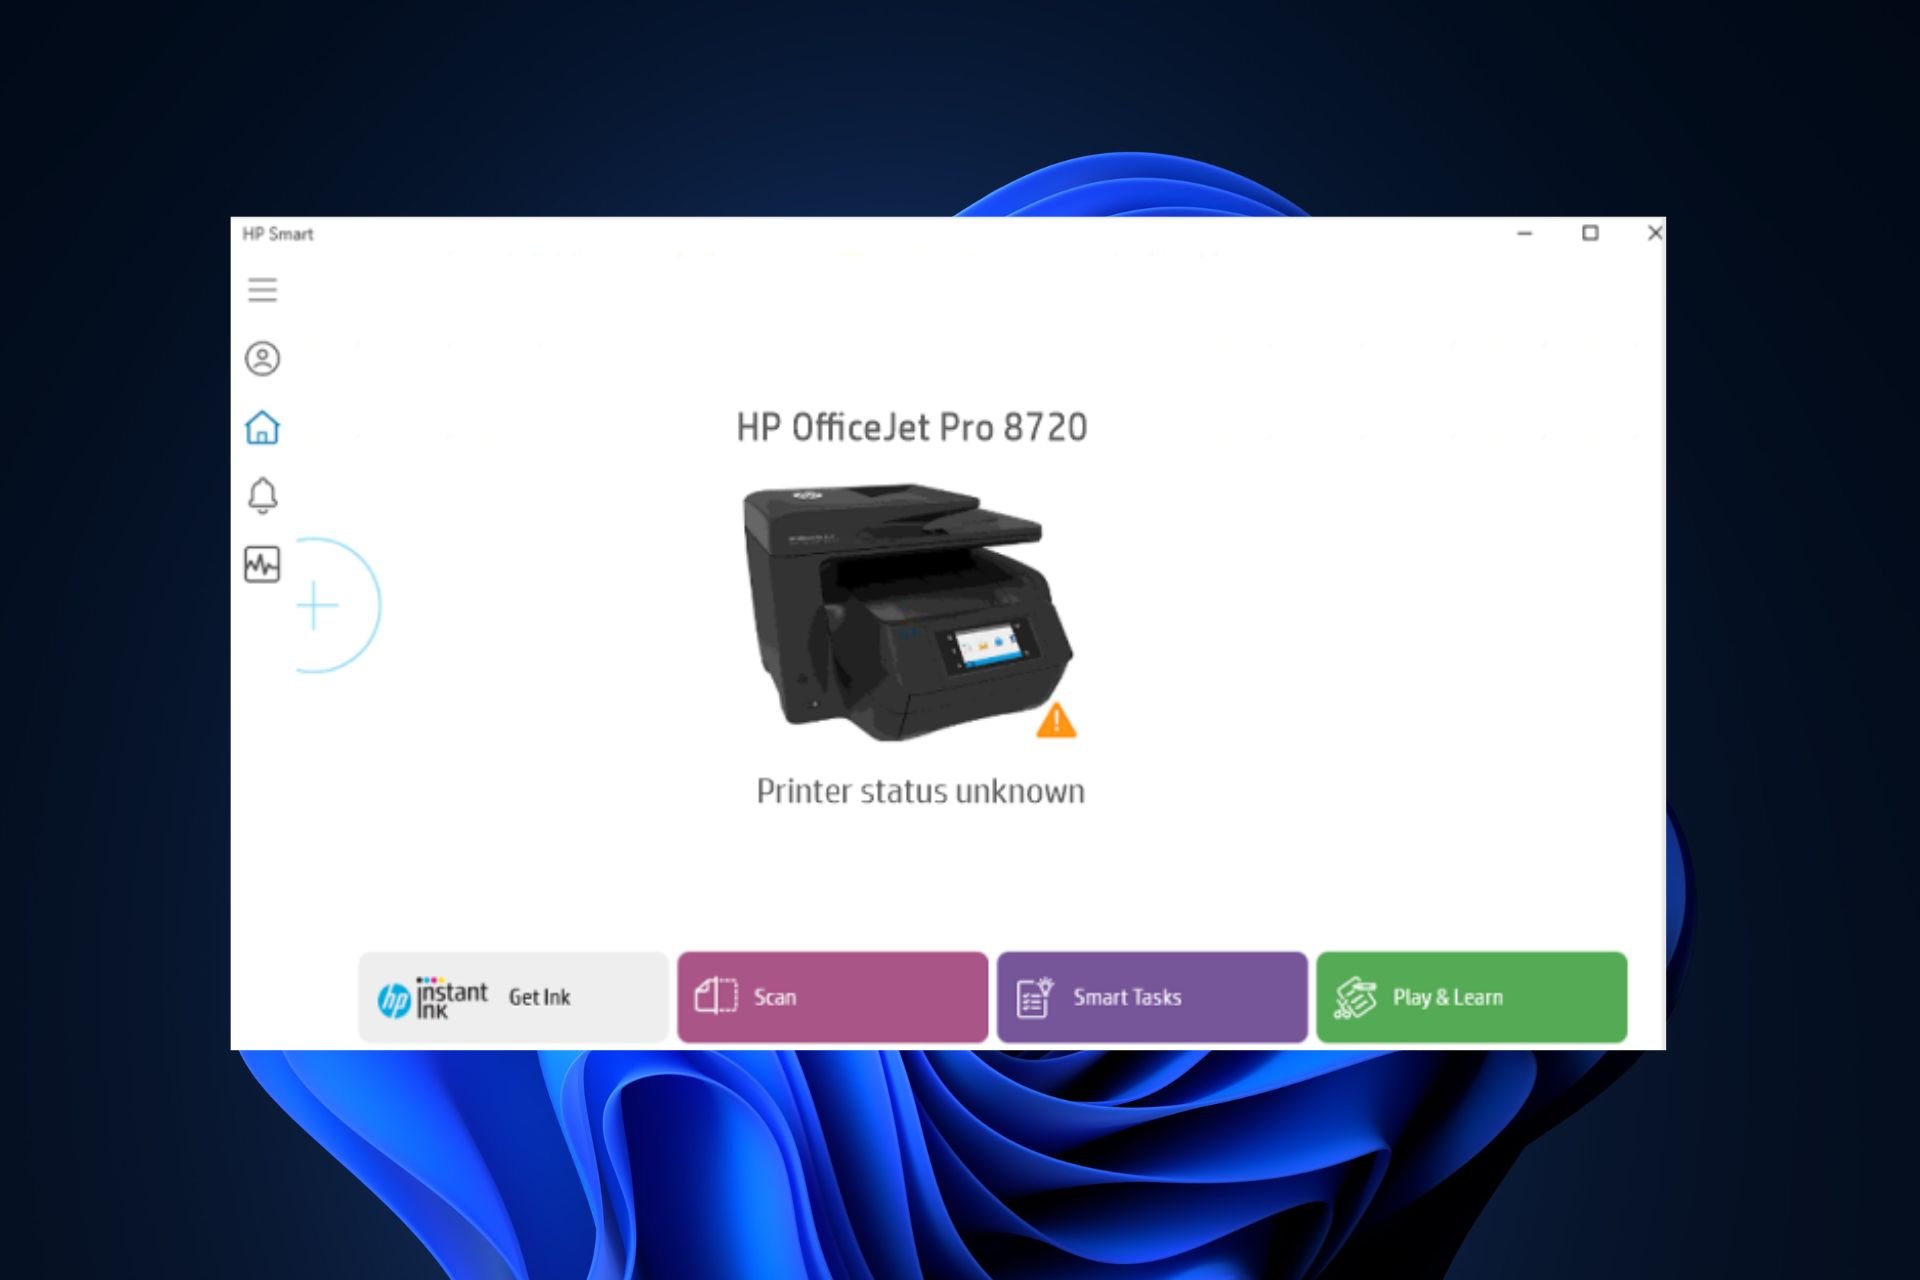
While using your HP printer, you might run into the Printer’s unknown status error. This error is common among Windows users and indicates that the HP Smart app cannot communicate with the Printer.
If you’re currently experiencing the printer status unknown error, stick around. In this article, we’ll provide steps to help you resolve the error.
Why is the printer status unknown?
Here are some of the most common causes of the printer status unknown error:
Windows Updates: Most users have reported several errors after running the Windows update. If you just update your OS, it can lead to several printer errors.
Antivirus Restrictions: Third-party antivirus software often has certain features preventing Windows apps from functioning correctly. If the antivirus app is interfering with the Printer, it can cause the printer status to be unknown.
Outdated Firmware: HP Printers have specific firmware that enables the Printer to communicate with your PC. If the firmware is outdated, it can cause the printer status unknown error.
Corrupt Driver Files: Printers utilize drivers that allow them to function correctly. If the drivers are corrupt, it can lead to printer errors.
How can I fix the printer status unknown error?
Before we proceed with more advanced solutions, here are a couple of quick fixes you can attempt to help you fix the printer status unknown error:
Restart your PC.
Reboot your Printer.
Get your Printer online
Unplug your Printer and plug it back.
1. Update your Printer’s Firmware
Press the Windows key, type the name of your browser in the search bar, and hit Enter.
Type in your Printer’s name or model number in the dialog box, and select Submit.
Click on the Firmware section to expand it, and select the latest version available for your computer.
Press the Windows key + E to open File Explorer.
Locate the newly downloaded file and unzip it. You’ll need extraction software to unzip files in Windows.
In the extracted file, open the attached PDF to learn how to install the firmware upgrade.
HP occasionally releases firmware updates for its printers, fixing errors and bugs and helping you get the most out of your Printer. If the firmware is outdated, it can lead to errors like printer status unknown.
2. Reset the HP Smart app
Press the Windows key + I to open the Settings app.
Click on Apps and select Installed Apps.
Locate HP Smart, click on the displayed result (HP Smart), and select Advanced Options.
In the next window, scroll down to locate the Reset button, and click on it to reset the HP Smart app.
Windows has a built-in repair tool that diagnoses and fixes malfunctioning applications. If your PC doesn’t recognize your Printer, you can fix the error by resetting the app.
3. Reinstall the HP Smart application
Press the Windows key, type HP Smart in the search bar, and select Uninstall below the HP Smart app.
In the popup window, select Uninstall to remove all HP Smart data from your PC.
Reboot your PC and navigate to the official HP website to download the HP Smart Setup file.
Reinstall the app, add your printer to the HP Smart app, and check if the error is fixed.
The HP Smart app is HP’s primary software for managing printer operations. If the app is corrupt, it can lead to the printer status unknown error; reinstalling the app, the app can help resolve the error.
Press the Windows key + I to open the Settings app.
Click Bluetooth and Devices and select Printers and Scanners in the next window.
Click on the affected Printer, select Remove and click Yes in the confirmation prompt.
Press the Windows key + R to open the Run dialog box, type printui.exe in the dialog box, and hit Enter.
Navigate to the Drivers tab, select the Printer’s driver, and select Remove.
In the next window, choose Remove driver and driver package, and select OK.
Click Yes in the popup window to remove the driver packages from your PC.
Press the Windows key + R to open the Run dialog box, paste c:\programdata and hit Enter.
Locate the HP or Hewlett-Packard folders, click on them, and delete the printer subfolder and any related printer files.
Restart your PC and reconnect the printer to your PC.
If the Printer itself is corrupt, e.g., drivers, files, app data, etc., it can lead to printer errors like unknown printer status. In such cases, you’ll have to reinstall the Printer to help you fix the error.
Printer errors can get annoying and frustrating if you don’t know the causes and how to resolve them. Luckily, in this guide, we’ve provided X ways to help you fix the error.
However, if the error persists after attempting all the steps, get in touch with an HP agent or visit the nearest HP service center near you.
Some of our readers recently reported encountering Zoom error code 300 while attempting to sign in to their Zoom account. Other users around the world have reported similar issues in the Zoom forum.
If you have been experiencing difficulties hosting or joining a Zoom meeting due to this Zoom error code 300 issue, we have gathered some potential fixes to troubleshoot the problem in this article.
What causes the Zoom error code 300?
The Zoom error code 300 has majorly been reported to have been caused by invalid login parameters. However, there are still a few other reasons that could have triggered this error message:
Zoom server issues – There’s a possibility that the Zoom server is under maintenance due to server downtime. This may have triggered the Zoom error code 300 message.
Add-in interference – The Zoom app has been integrated with the Outlook add-in. Although this is a great feature, interference from the add-in may have caused the error.
Abrupt shutdown – At other times, this error can be triggered by suspended activities on the Zoom app due to an abrupt shutdown.
Press the Start button, type Zoom in the Search box, and launch it.
Click on the profile icon at the top-right corner of the Zoom app and click on the Sign-Out option in the menu.
Now, quit the Zoom app and relaunch it.
Click on the Sign-in button.
Select the Google option and sign in using your Google credentials.
You can try to sync your account by logging into the Zoom platform and linking your Google account. Re-syncing the account should fix the issue.
2. Clear your Zoom cache and cookies
2.1 Clear Zoom cache and cookies on a Web browser (Chrome)
Open Google Chrome. Click the three dots icon to open the menu, click More Tools, and select Clear browsing data.
Select Cookies and other site data and Cached images and files too. Now, click on Clear data.
2.2 Clear Zoom cache and cookies on Windows
Press the Windows + E keys to open File Explorer.
Now, navigate to the following path: C:/Users/Username/AppData/Roaming/Zoom
Right-click on the data folder and click on Delete.
The Zoom app loads speedily due to cached files. However, this takes up a lot of space on the computer and makes pages take longer to load. To fix the Zoom error code 300, you can delete these files using the steps provided above.
The Teams error CAA30194 is an issue that prevents users from logging in to Microsoft Teams due to connection issues. Several reports have been made in diverse forums including the Microsoft Community forum, yet a lot are stuck with this error.
In this article, we will discuss what causes the Teams error CAA30194 and how to fix it.
What causes Teams error CAA30194?
The Teams error CAA30194 can occur due to a variety of reasons. Below are some of the possible reasons behind this error:
Corrupted JSON files – Information regarding Microsoft configuration, authorization, settings, and so forth are kept in JSON files. If they get corrupted, you may encounter Teams error CAA30194 while logging in.
Connection issues – If there are connectivity problems with your network or you’re using VPN and Proxy servers, it may hinder the connection between the Teams server and your PC.
Installation errors – Sometimes, an error may occur during the installation of the Teams client and this may not be resolved except by reinstalling the app.
Above are some of the possible reasons behind the Teams error CAA30194. Now, let’s proceed to how to fix the issue.
How can I fix the Teams error CAA30194?
Before trying any of the advanced solutions provided for this error, ensure that you perform the following preliminary checks:
Try to sign out of the app and then sign in again.
Restart your PC and then relaunch the Microsoft Teams app. This is to automatically clear temporary bugs in your device.
Clear the Microsoft Teams’ cache.
Use the Web version.
If after attempting the above checks, you are still unable to log into your Teams account, then try the troubleshooting methods provided below.
1. Re-add your work or school account
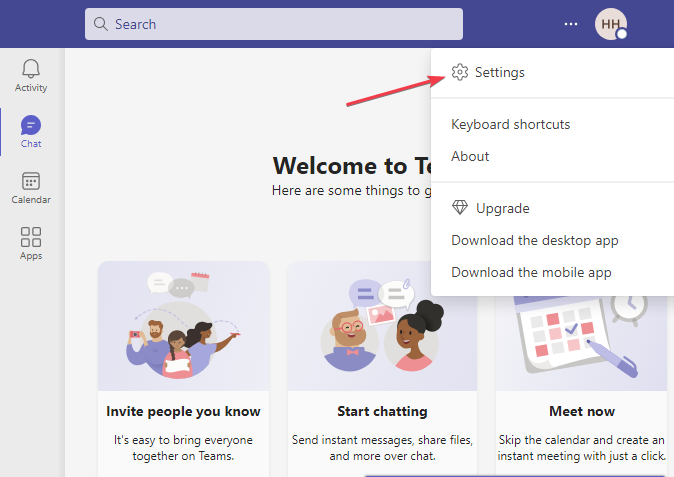
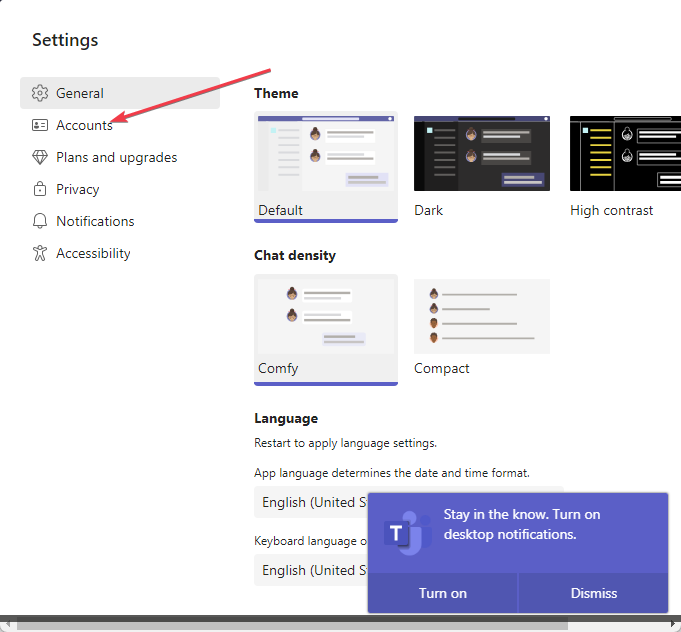
Open the Microsoft Teams app and go to Settings.
Click on Accounts and select Emails and Accounts.
Now, click on Add a Work or School account.
Restart Teams and your PC for the changes to take effect.
Some users have found this fix helpful, so you should give it a try too if you experience the Teams error CAA30194.
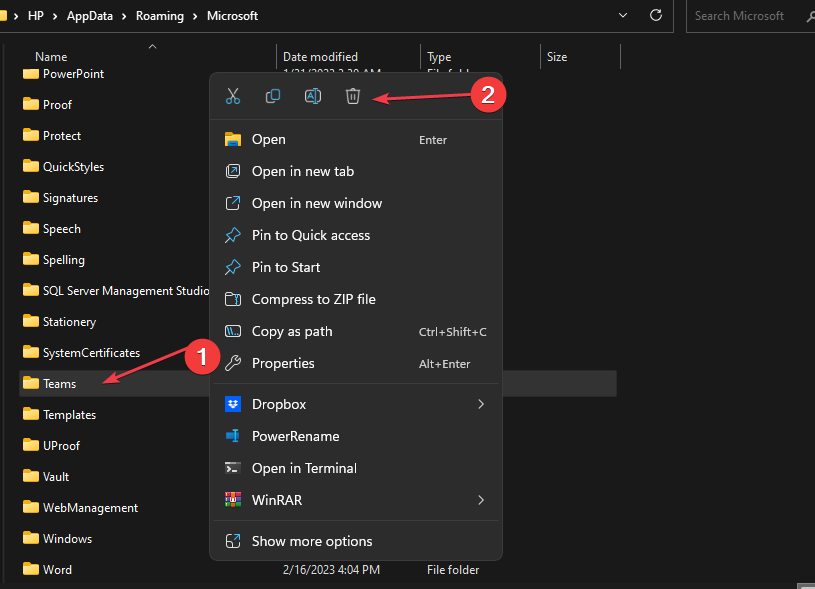
2. Clear Teams cache
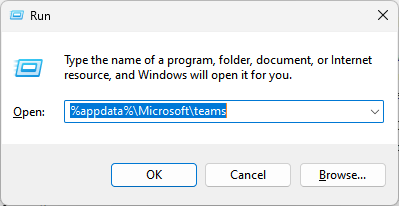
Press the Windows + R keys to open the Run dialog box. Type the following command in the dialog box and press Enter: %appdata%\Microsoft\teams
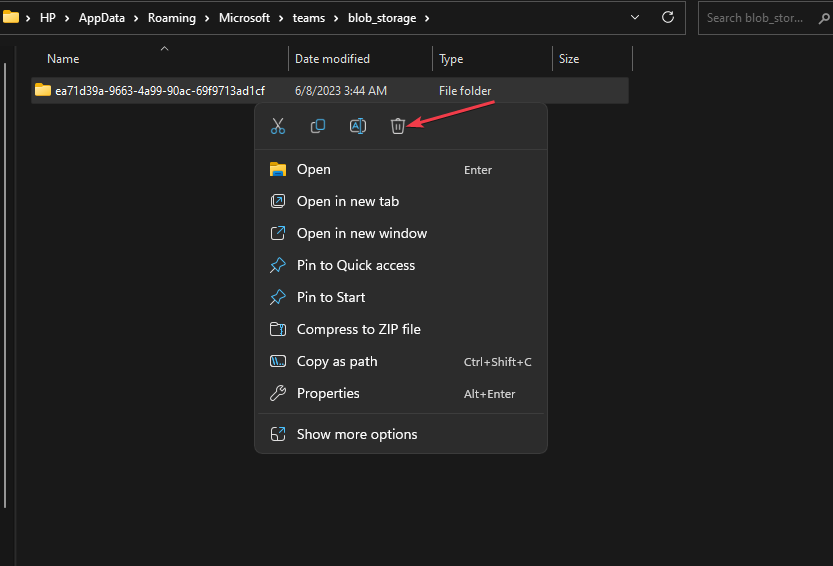
Open the following folders and then clear all of their content.
application cache\cache
blob_storage
Cache
databases
GPUcache
IndexedDB
Local Storage
tmp
Lastly, restart your PC and launch Microsoft Teams.
There’s a tendency that all the apps store caches have gotten corrupted and they can trigger the Teams error CAA30194, hence the need to clear them.
3. Delete the JSON files
Press the Windows + R keys to open the Run command dialog box. Type the following command in the dialog box and press Enter: %appdata%\Microsoft\teams
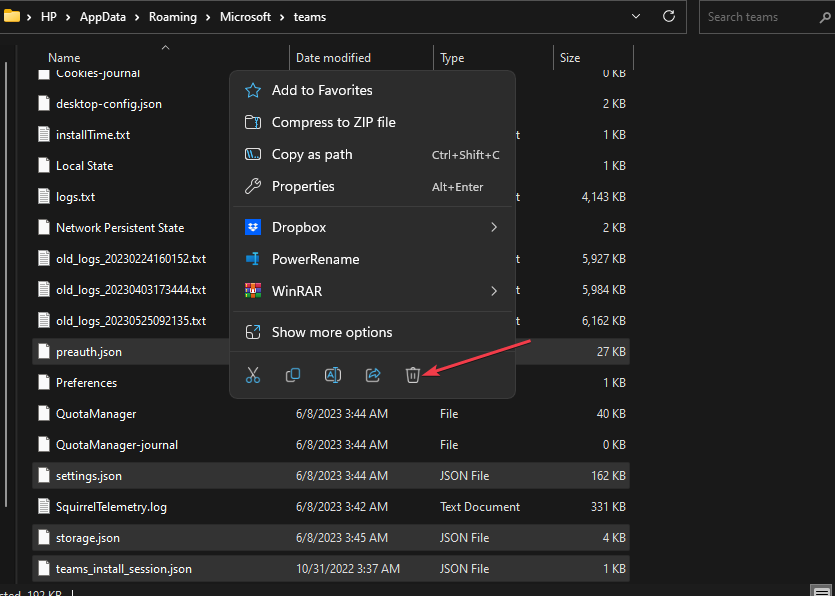
Find and select all the files with the .json extension and then delete them one after the other.
After deleting the JSON files, relaunch the Teams app and it will automatically regenerate JSON files. Now, try to use the app and see if the Teams error CAA30194 persists.
4. Enable the TLS feature in the Internet options
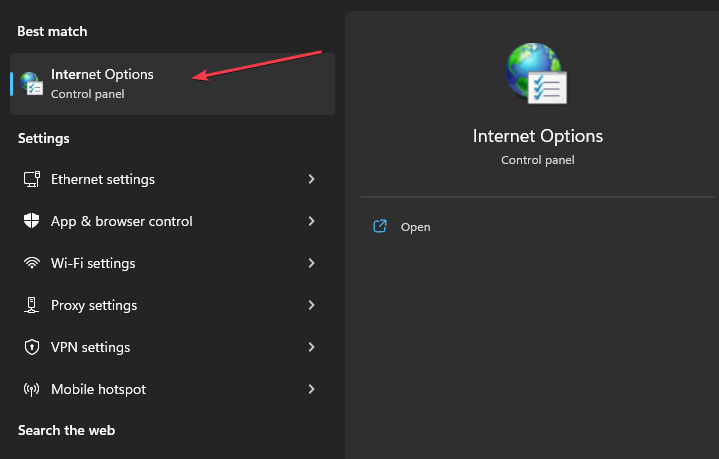
Press the Windows button, type Internet options in the search bar, and launch it.
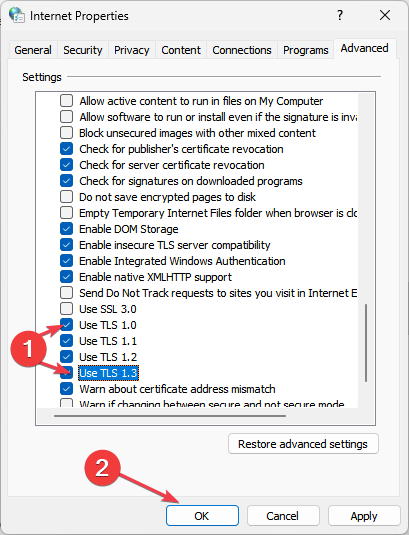
Click on the Advanced tab and navigate to the Security section.
Now, enable TLS 1.0, TLS 1.1, TLS 1.2, and TLS 1.3 if they’re currently disabled. Click on OK to save the changes.
Restart your PC.
Several users have reported that enabling the TLS feature worked for them. You can also follow the steps provided above.
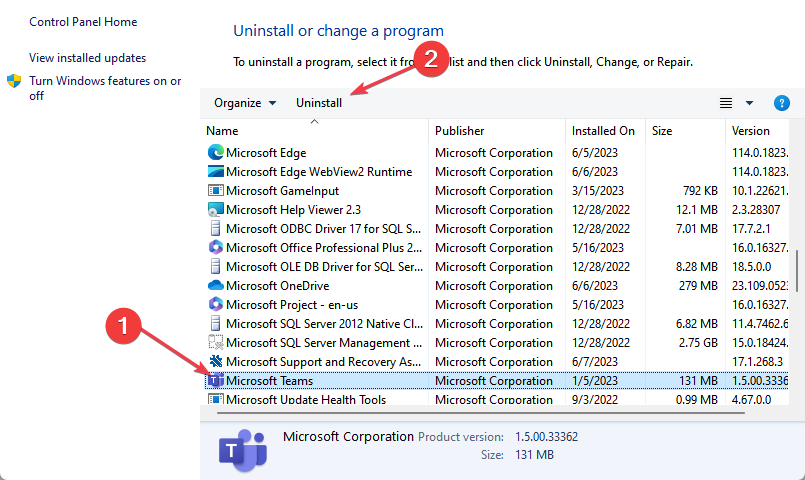
The official Microsoft Teams download website is the safest place to install the app. If the problem lies in the installation, reinstalling the app would be the only solution.
And that’s it on how to fix the Teams error CAA30194. Hopefully, one of the methods provided in this guide will help you fix the problem. However, make sure you work your way through the steps provided.
Spotify is a very useful app for when you’re working, jogging, going to the gym, and even gaming. Its repertoire includes millions of songs, audiobooks, and podcasts you can listen to aside from doing what you are already doing.
However, a lot of users have been complaining that Spotify stops playing when they’re opening and playing a video game. Some of them said that while they can hear the audio from the video game, the audio from Spotify is nowhere to be heard.
To make things even worse, nothing seemed to work. A user said they even reinstalled Windows 11, and nothing changed. And it became an annoying issue, considering the bug happened randomly.
So what do to if you’re dealing with this issue? Well, sure, you can reset your Windows, but there are some quick ways to get right with your Spotify app. Follow along as we tell you how to fix this issue.
Here’s how to fix Spotify from stopping when playing a game
First of all, there are several reasons why your Spotify stops when you’re opening and playing a game. Spotify may enter into a conflict with the game that you’re playing, especially if both apps are trying to access the audio device simultaneously.
Second, you should check your audio settings within the game to make sure that the game is not entirely controlling the audio device, in an exclusive way.
Some video games have this option turned on by default, so make sure to go to the game’s audio settings, and if you don’t find the option right away, look for advanced audio settings.
Now it’s time to see what we can do with Spotify.
Run Spotify as an administrator to make sure it keeps playing even when you open a video game
Find your Spotify on your desktop or Search bar.
Right-click on the icon and select Run as administrator.
This option will give Spotify permission to access any audio files and prevent any conflicts with other apps, such as the video game you’re playing.
Run Spotify in compatibility mode
Right-click on your Spotify icon on the desktop.
Select Properties.
Go to the Compatibility tab.
Once you’re here, check the box for compatibility mode, and choose a previous version of Windows.
This Spotify runs as if it were on a previous Windows version that might be more stable or compatible with both your Spotify and your game.
These solutions should help you fix Spotify while playing the video game, but it’s also good to know that you should keep your audio drivers updated to the latest version. You should also update your Spotify and your Windows, as outdated versions can also cause a lot of conflicts.
If you’re experiencing this issue, we hope these fixes will help you get it right. Be sure to let us know your opinions in the comments section below.
This image cannot currently be displayed error message typically appears when an image fails to load or be rendered on a device or web page. The error is often accompanied by a placeholder or an icon indicating that the image is not available.
Since several of our readers are experiencing this error, we’ve compiled workable methods on how to fix the issue in this article.
What causes this image cannot currently be displayed on the website?
This image cannot currently be displayed error message on a website can occur due to several reasons. Here are some possible causes:
Image file is missing or inaccessible – If the image file is not present on the server or has been deleted, the browser will not be able to display it. This can happen if the image was removed or if there was an issue during the upload process.
Incorrect image URL or broken link – Another possible reason is if there are typos in the URL of the image or the link to the image is broken, the browser cannot locate the image file, resulting in the error message.
Permissions or access restrictions – Some websites have access controls or restrictions in place for certain images. If you don’t have the necessary permissions to access the image, it will not be displayed, and you will see that this image cannot currently be displayed with an error message instead.
Network or connectivity issues – If there are problems with your internet connection or if the website’s server is experiencing issues, the browser may not be able to retrieve the image file.
Above are a few of the possible reasons behind the error. Note that, the specific error message may vary depending on the website and browser being used, so the steps to resolve the issue may also vary.
How can I fix this image cannot currently be displayed on the Website?
Before diving into more detailed solutions for This image cannot currently be displayed on the Website issue, it is a good idea to perform the following preparatory checks:
If after attempting the above checks, the error message persists, you can resort to using the following solutions.
1. Perform a speed test of your network
Visit the official speed testing website by Ookla and click on the Go button to initiate the test.
The speed test will run a series of tests to measure your network connection’s speed and performance.
Once the test is complete, you will see the results displayed on the Website.
Check if the speeds match your internet plan or expectations.
Alternatively, you can make use of fast.com. If the results indicate slower speeds than expected, then the error message is due to network issues. If not, proceed to the next fix.
2. Check the image URL
Double-check the image URL to ensure it is correct and complete.
Then, copy and paste the URL into a new browser tab to verify its accuracy.
If the URL is incorrect or leads to a broken link, correct it or contact the website administrator to obtain the correct URL.
Once you have the correct URL, try to access the image again. If the issue persists, try the next fix.
Open a web browser and navigate to the website where the image is located.
Click on the View site information icon in the address bar, and select Site settings.
Locate the Images option and click on the dropdown menu next to it.
Select Allow from the list of options.
Several built-in browser features prevent page graphics from loading. Therefore, if the website won’t display your image, check for its permissions and enable loading.
If you want to know how to reset the Windows Search settings to default on your Windows PC, in this article you will find the most simple solutions.
Before trying any of the advanced solutions provided below, try to run the System File Checker tool to scan for and repair any corrupted files in your computer and update your Windows to the latest version. Also, make sure you are properly signed in as an administrator.
How can I reset the Windows Search Settings?
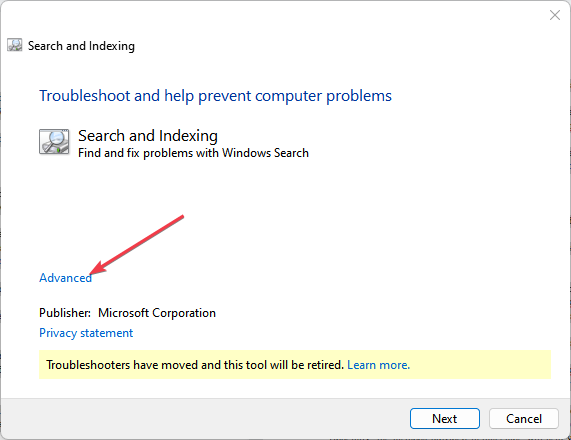
1. Run the Search troubleshooter
Press the Windows + R keys to open the Run command dialog. Type the following command in the dialog box and click Enter: msdt.exe -ep SystemSettings_Troubleshoot_L2 -id SearchDiagnostic
In the troubleshooter window, click Advanced.
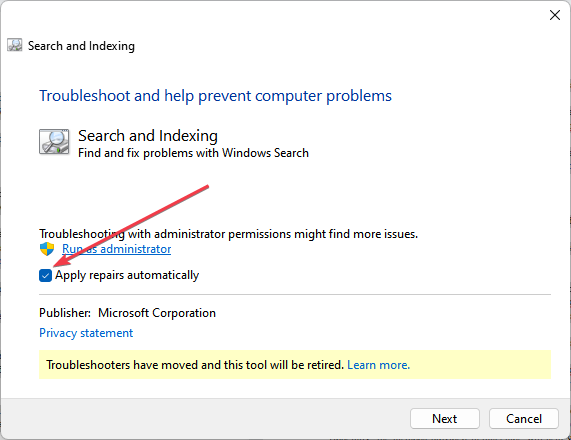
Then, select Apply repairs automatically to make the tool automatically fix your settings.
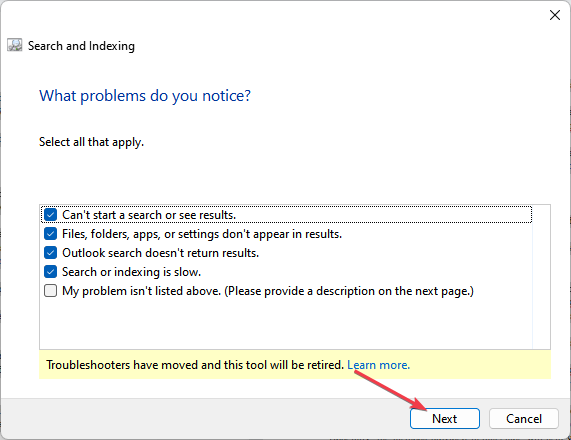
Click on the Next button.
Select all the checkboxes that apply. Click on the Next button and follow the on-screen instructions to complete the troubleshooting process.
The built-in Windows Search Troubleshooter tool will help to automatically reset your Windows search settings.
2. Manually reset Windows search settings in Registry Editor
Press the Windows + R keys to open the Run command dialog. Type regedit in the dialog box and click Enter.
Click Yes to continue when the UAC prompt appears on the screen.
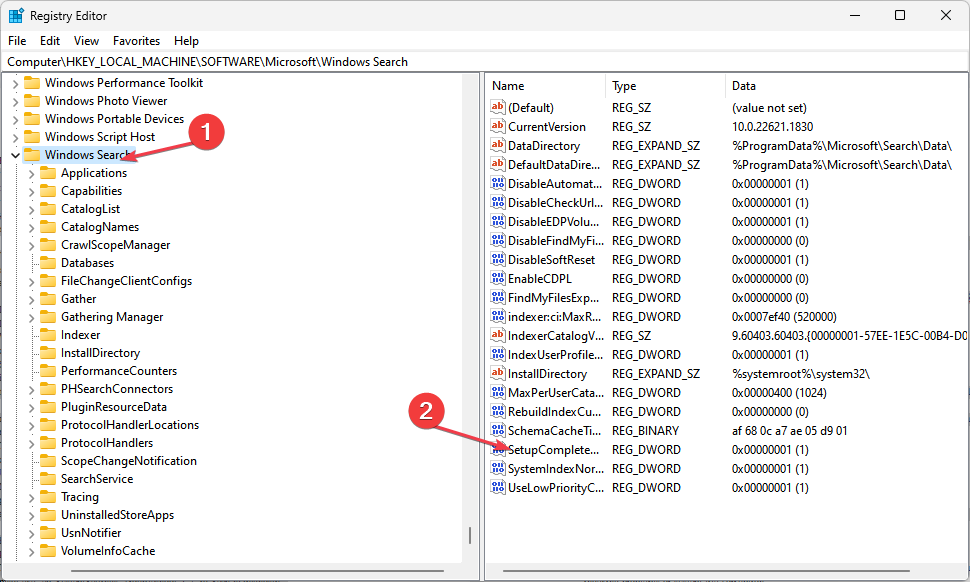
Navigate to the following registry path: HKEY_LOCAL_MACHINE\SOFTWARE\Microsoft\Windows Search
Search for the key named SetupCompletedSuccessfully on the right pane.
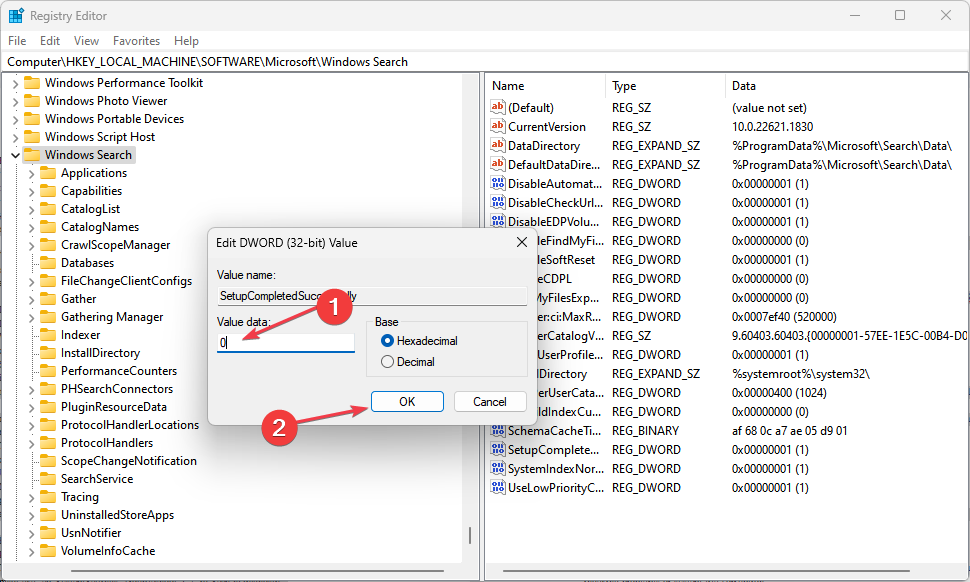
Right-click on the key and select Modify.
Change its Value from 1 to 0 and click on OK to save the changes.
After following the steps above, close the Registry Editor and restart your PC for the changes to take effect.
3. Use PowerShell to reset Windows search settings
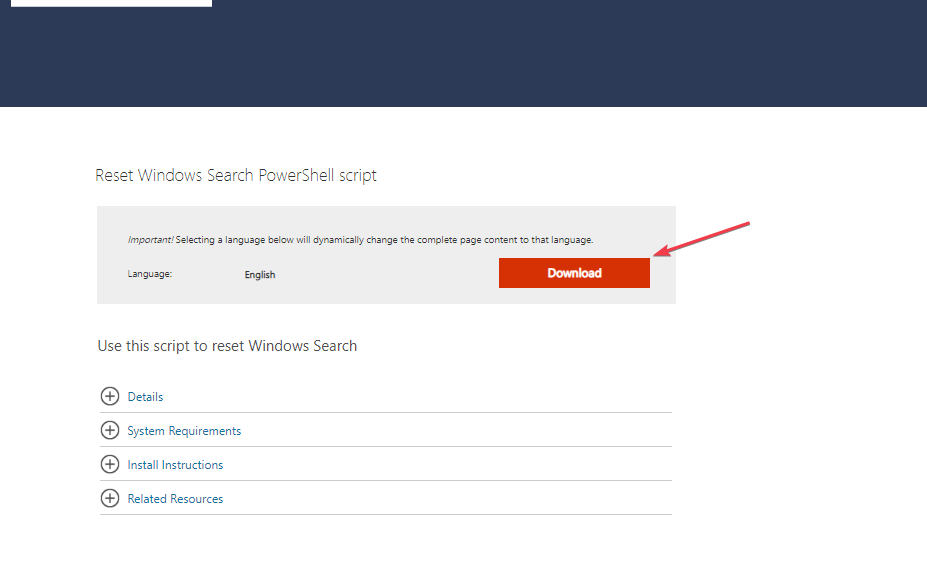
Visit the Microsoft Download page and download the ResetWindowsSearchBox.ps1 PowerShell script.
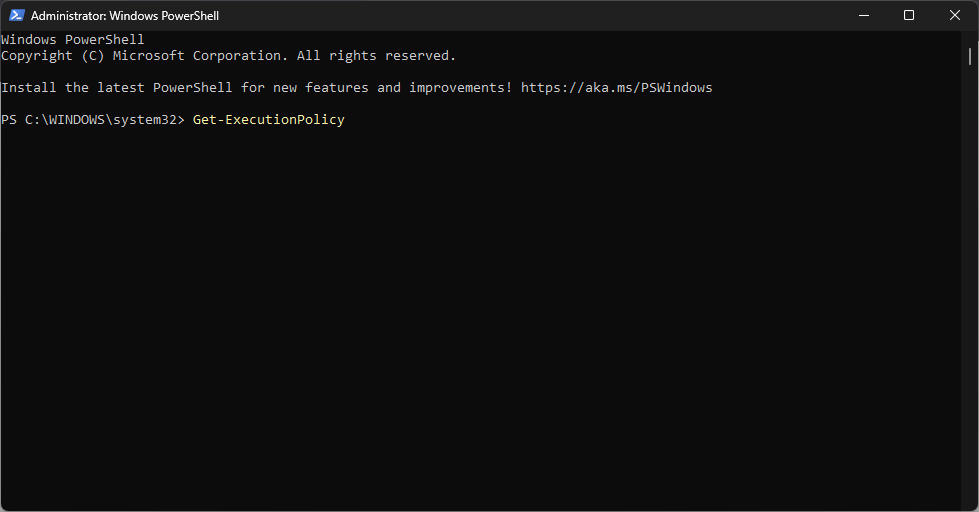
Press the Windows key, type PowerShell, and click on Run as administrator.
Type the following command and press Enter: Get-ExecutionPolicy
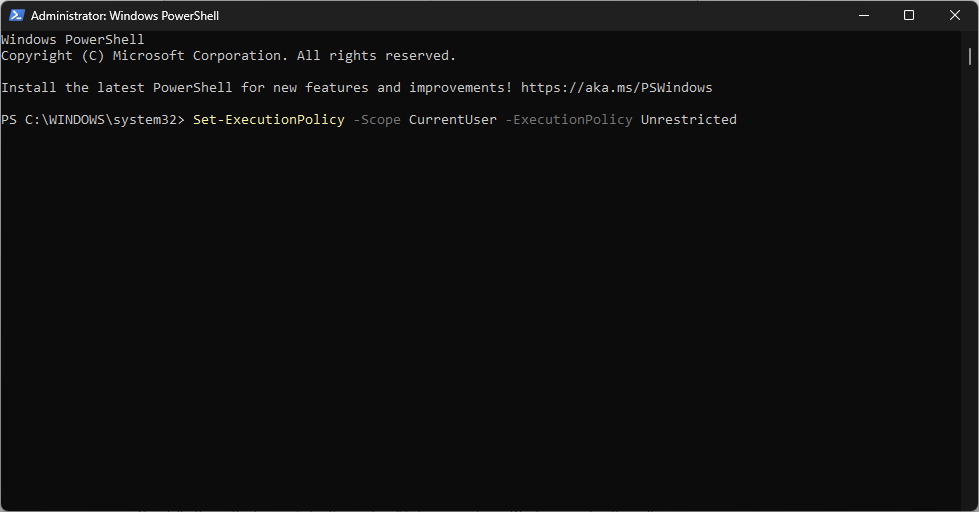
If the output is Restricted, execute the following command to allow PowerShell scripts: Set-ExecutionPolicy -Scope CurrentUser -ExecutionPolicy Unrestricted
Now, try running the ResetWindowsSearchBox.ps1 downloaded file. This resets your Windows search settings to default.
Now, restore the execution policy to its original settings by running the following command in PowerShell: Set-ExecutionPolicy -Scope CurrentUser -ExecutionPolicy Restricted
The PowerShell tool should have reset your Windows Search settings to default by now.
When Windows Search still fails to perform as expected, consider using Agent Ransack for Windows 11. It provides a more powerful and precise file search experience with advanced filters and live previews, helping you locate files instantly even when the native search fails.
Can the Windows search feature stop working?
Yes, the Windows search feature can stop working. Whenever this happens, it is almost always a simple software problem. The system may just need a restart to get it working again. Other possible causes could be:
Indexing problems – Windows search relies on an index database to quickly retrieve search results. If the indexing process is interrupted or corrupted, it can lead to search failures.
Hopefully, the methods provided in this guide will help you reset your Windows search settings. If you have any questions or suggestions, do not hesitate to use the comments section below.
Having Firefox SEO plugin tools installed can accelerate your overall optimization game as they offer all the necessary information at a glance.
Whether you want an overview of your competitor’s site or just want to perform link analysis, these free SEO toolbars for Firefox have got you covered. Simply choose what suits your requirements and you’re good to go!
It’s fast, versatile, and offers extensible customization options to elevate user experience. Users have the liberty to install several plugins and extensions and get things done.
That being said if you’re an SEO professional or a budding blogger who wants to improve the performance of your website, then you can install full-fledged SEO toolbars on your Firefox browser.
Are Free SEO Toolbars for Firefox Helpful?
These add-ons and toolbars offer full SEO metrics and insights so that you can amp up your optimization game and improve some traffic.
Everything is neatly grouped in one place so that you don’t have to install separate extensions to get your task done. We have curated a list of the best extensions for you:
SEOquake – Conducts on-page SEO audit fast
Mangools SEO extension – Offers the results in charts form
Ahrefs SEO toolbar – Best overall extension available on Firefox
Woorank SEO analysis – In-depth website review
Keywords Everywhere – Does keyword research and more
In case you’re using a different browser like Opera, you can still take a look at these SEO extensions as they all are compatible with several popular browsers.
Now let’s highlight why these SEO add-ons available on Firefox are the best out of the lot.
What are the best Firefox add-ons and extensions for SEO?
SEO is an extensive approach but it shouldn’t be an overwhelming task to do. That’s how a plugin like SEOquake comes into play to ease your burden.
The highlight of the extension is that it does on-page SEO audits pretty fast so that you don’t have to do it manually. It’s a free-to-use Firefox extension and gets installed in no time.
Once you install this SEO add-on on the Firefox browser, you will be able to access information like keyword density, internal and external link analysis, and even social metrics. It performs a thorough SEO analysis of any webpage and lets you export detailed metrics in a CSV file.
Additionally, a sidebar section allows you to export and sort the results from the page. You can then use these results to level up your SEO game for your own website.
SEOquake is very easy to install and it’s compatible with several other browsers.
If you love to get the details in chart forms, then the Mangools SEO extension available on Firefox is the best to start with.
Besides that, you will get all the data including the domain and page authority, citation and trust flows, Alexa rank, and even referring IPs. All the information is gathered using the Moz and Majestic tools combined with popularity charts.
An important plus for this extension is the ability to fetch the top-performing keywords of your competitors so that you can build a strong presence on the internet.
This SEO add-on on Firefox is rated as one of the best extensions by SEO professionals. Interestingly, it also offers unlimited page speed checks.
You will also get a keyword density checker, a broken links checker, and a lot more.
Ahrefs needs no introduction when it comes to SEO. Almost every SEO professional swears by it due to the versatility of the tool. Interestingly, Ahrefs’ creators have built a Firefox toolbar as well so that you can access all the necessary SEO metrics quickly.
Ahrefs toolbar for Firefox is a powerful SEO tool that provides valuable insights and data for optimizing your website’s search engine performance. Many website owners, marketers, and SEO professionals rely on it to access important metrics and information directly from the Firefox browser.
Firstly, it offers a quick overview of the website’s domain rating and URL rating, which are some important indicators of authority.
Users can view the organic keywords a website ranks for and their search volumes right from their Firefox browser.
When you’re visiting a web page, just click on the add-on icon from the browser to open the SEO report. With the help of this toolbar, you can also see how many backlinks a website has.
It instantly highlights various on-page elements such as headings, meta tags, and images, enabling users to quickly analyze the areas of optimization.
Also, with Ahrefs SEO Toolbar it’s easy to check the HTTP response headers for the URLs you visit.
Let’s review its top features below:
Visualize Robots Meta Tags, X-Robots-Tag, and canonical tags
Get Open Graph Tags and Twitter Cards
Read all the outgoing links on a page and highlight them based on the filters that you set
For JS-powered websites, you can compare tags in raw HTML and on the rendered version
If you’re really up to improving your website to outrank the competition, Woorank’s SEO Analysis extension is right on the spot. The extension offers a deep review of the website in hand.
And that is because it will tell you all about how to improve your pages in the most comprehensive and friendly way. This SEO extension generates an actionable report and highlights critical information and suggests how to address the identified issues.
You can use these comprehensive findings and make some informed decisions for your website. The information is presented in easy to understand format so that you don’t have to scratch your head.
Woorank’s SEO extension also analyzes mobile-friendliness, backlinks, and even social media. The extension is absolutely free to use by anyone, without any account sign-up, activation, or permissions.
Here comes the last freemium Firefox add-on for SEO. As the name implies, this extension focuses on digging up the keywords to help users in their content creation and optimization strategies.
It identifies long-tail keywords and niche-specific terms. However, this Firefox SEO plugin tool is capable of doing a lot more!
With the help of this tool, users can view important metrics and information related to keywords, such as search volume, cost per click (CPC), and competition.
Additionally, it also displays the SEO difficulty metrics, trend chart, related keywords, PAA questions, trending keywords, and long-tails in widgets on the right pane of Google.
The basic tool is free but it is also available in a paid version that also provides historical data and more.
Take a look at some of its key features:
Displays monthly search volume, and CPC
Access the estimated organic traffic and the top 5000 keywords for all pages and websites on Google
View the Search Insights widget, SERP Metrics, Video Insights, as well as the Tags widget on YouTube
Provides a HashTag Generator on Instagram
View the Search Insights widget, Trend Chart, Related Trends, and Pin Topics finder on Pinterest
So, these were our top 5 Firefox SEO plugin tools that one can use to accelerate their optimization strategy. We recommend trying all of them one by one to know which one suits best your needs.
Every Firefox SEO extension mentioned on the list presents detailed reports and offers in-depth analysis that any marketer will like to have. You can also check out Mozbar extension and see if it suits your needs.
Whether you’ve tested the add-ons or want to recommend better ones, we wait for your insights in the comments section.
One of the controversial topics most Xbox users sort about is whether different Xbox controllers can work with various Xbox consoles. Further, a common one is using an Xbox One controller on an Xbox 360. Hence, this guide will discuss everything you need to know about the controller and the console.
Why is the Xbox One controller not compatible with the Xbox 360?
The Xbox One controller is incompatible with the Xbox 360 primarily due to differences in the hardware and technology used in the two systems.
Here are a few key reasons:
Communication protocol – The Xbox One controller uses a newer wireless protocol called Xbox Wireless. This offers improved wireless range and reduced latency. Meanwhile, the Xbox 360 controller utilizes a proprietary wireless technology specific to that console.
USB connection – You can connect the Xbox 360 and Xbox One controllers to their respective consoles via USB. Although, the Xbox One controller’s USB connection is primarily designed for charging and firmware updates rather than gameplay, which Xbox 360 controller is for.
Button layout – The Xbox One controller has a slightly different button layout. The placement and configuration of buttons, triggers, and bumpers are non-identical, which could lead to compatibility issues with games designed specifically for the Xbox 360 controller.
Software and driver support – The Xbox 360 and Xbox One consoles have different software and driver support for their respective controllers. The Xbox 360 console does not have the necessary software and drivers to recognize and utilize the Xbox One controller.
These notable factors can make the Xbox One controller and Xbox 360 incompatible. You can check our guide for steps to update your Xbox One controller on Windows PCs.
Are Xbox controllers backward compatible?
Yes, Xbox controllers are generally backward compatible. This means that controllers from newer Xbox consoles can often be used on older Xbox consoles.
Thus, here’s a breakdown of the backward compatibility of Xbox controllers:
Xbox Series X/S Controllers – The controllers that come with the Xbox Series X and Xbox Series S consoles are backward compatible with Xbox One consoles.
Xbox One Controllers – Xbox One controllers are also backward compatible with Windows PCs. Also, some Xbox One controllers are compatible with the Xbox Adaptive Controller, a specialized controller designed for individuals with limited mobility.
Xbox 360 Controllers – Xbox 360 controllers can support Windows PCs with the help of a wireless receiver or by connecting the controller via USB.
In summary, while there are some limitations and compatibility differences between different generations of game controllers, Microsoft has tried to ensure backward compatibility to varying extents.
What are Xbox One controllers compatible with?
Xbox One controllers are compatible with various devices and platforms. Here are the main compatibility options for Xbox One controllers:
Xbox One Console.
Xbox Series X/S Console.
Adaptive Xbox Controller.
Windows PCs – Microsoft provides official drivers that allow you to connect your Xbox One controller to a computer using either a USB cable or the Xbox Wireless Adapter for Windows.
Mobile devices – You can connect the controller to your mobile device either via a wired USB connection or Bluetooth. This depends on the specific device and its compatibility options.
Xbox Cloud Gaming (formerly known as Project xCloud) – Xbox One controllers supports Xbox Cloud Gaming on multiple devices. This includes mobile devices, tablets, and supported web browsers.
It’s worth noting that while Xbox One controllers are compatible with these devices, some features may vary.
Features like wireless connectivity and the Xbox Guide button may vary depending on the device’s compatibility options.
The Group Policy Editor is a feature allowing users to adjust some Windows 10 and 11 system settings. However, some of our readers have requested to know how to reset Group Policy settings to default after making certain changes to their Windows PC and are now experiencing problems.
In this article, we will provide you with simplified steps to reset Group Policy settings on Windows 10 & 11.
Why should I reset the Group Policy settings?
Resetting Group Policy settings can be necessary in certain situations to address issues or conflicts that may arise within a Windows environment. Below are a few reasons why you might consider resetting:
Unintended changes – In the case where a misconfiguration or an incompatible combination of settings is causing instability or unexpected behavior in your system, resetting the Group Policy settings can help revert any potentially problematic changes and restore the default configuration.
Troubleshoot errors – If you encounter problems with your Windows system, such as gpedit.msc access denied, issues with application installations, network connectivity, or system performance, resetting Group Policy settings can help to troubleshoot the issue more effectively.
Above are a few reasons why you might want to reset Group Policy settings. However, before doing this, make sure you back up any important configurations, as it can have significant effects on system behavior and configuration.
Is it dangerous to reset Group Policy settings?
Resetting Group Policy settings can have significant effects (positive and negative) on your system, and if not done properly, it can disrupt the normal operation of your computer, alter permission and access rights, or potentially lose customizations.
While it’s not inherently dangerous, it is important to proceed cautiously and take necessary precautions. Now, let’s proceed to safe ways to reset Group Policy settings.
How can I reset Group Policy Settings?
Before attempting any of the methods provided on how to reset Group Policy settings, you need to perform some preliminary checks:
Ensure that your system date and time are correct. If it is off even by a few minutes, it may cause problems with the Group Policy.
Having confirmed the above checks, you can explore the methods provided below to reset it.
1. Reset using Local Group Policy Editor
Press the Windows + R keys to open the Run command dialog box. Type gpedit.msc in the dialog box, and press Enter to open Local Group Policy Editor.
In the Local Group Policy Editor window, navigate to the following location on the left pane: Computer Configuration\Administrative Templates\All Settings
On the right pane, Look for State column on the right side and view only those policies which are only Enabled or Disabled.
In the new window, change the Enabled/Disabled radio button to Not Configured. Then, click on the Apply button and OK to save the changes.
Close the Local Group Policy Editor window.
To make the resetting take effect forcefully, press the Windows + X keys, and select Terminal (Admin).
Type the following and press Enter to execute the command: gpupdate /force
Restart your computer for the changes to apply.
By following the steps above, you will have reset the settings using the Local GP Editor. However, if you have issues running Command Prompt, you can check our detailed guide on how to fix it.
Press the Windows key, type CMD, and select Run as administrator to open an elevated Command Prompt window.
Type the following command and press Enter to delete the Group Policy settings folder: RD /S /Q "%WinDir%\System32\GroupPolicy"
Next, type the following command and press Enter to delete the Group Policy users folder: RD /S /Q "%WinDir%\System32\GroupPolicyUsers"
These changes won’t take effect until the Group Policy is updated.
To update the Group Policy, type the following command and press Enter: gpupdate /force
Now, close the Command Prompt and restart your PC for the changes to take effect.
Unlike the first method, wherein the Local Group Policy Editor is not available in Windows 10 Home, but in Pro, Enterprise, and Education editions, this method is helpful for Windows 10 Home version.
And that’s it on how to reset Group Policy settings on Windows 10 and 11. Hopefully one of the methods provided in this guide will work for you.
If you have any questions or suggestions, or possibly another method on how to reset Group Policy settings on Windows 10 and 11, feel free to drop them in the comment section.
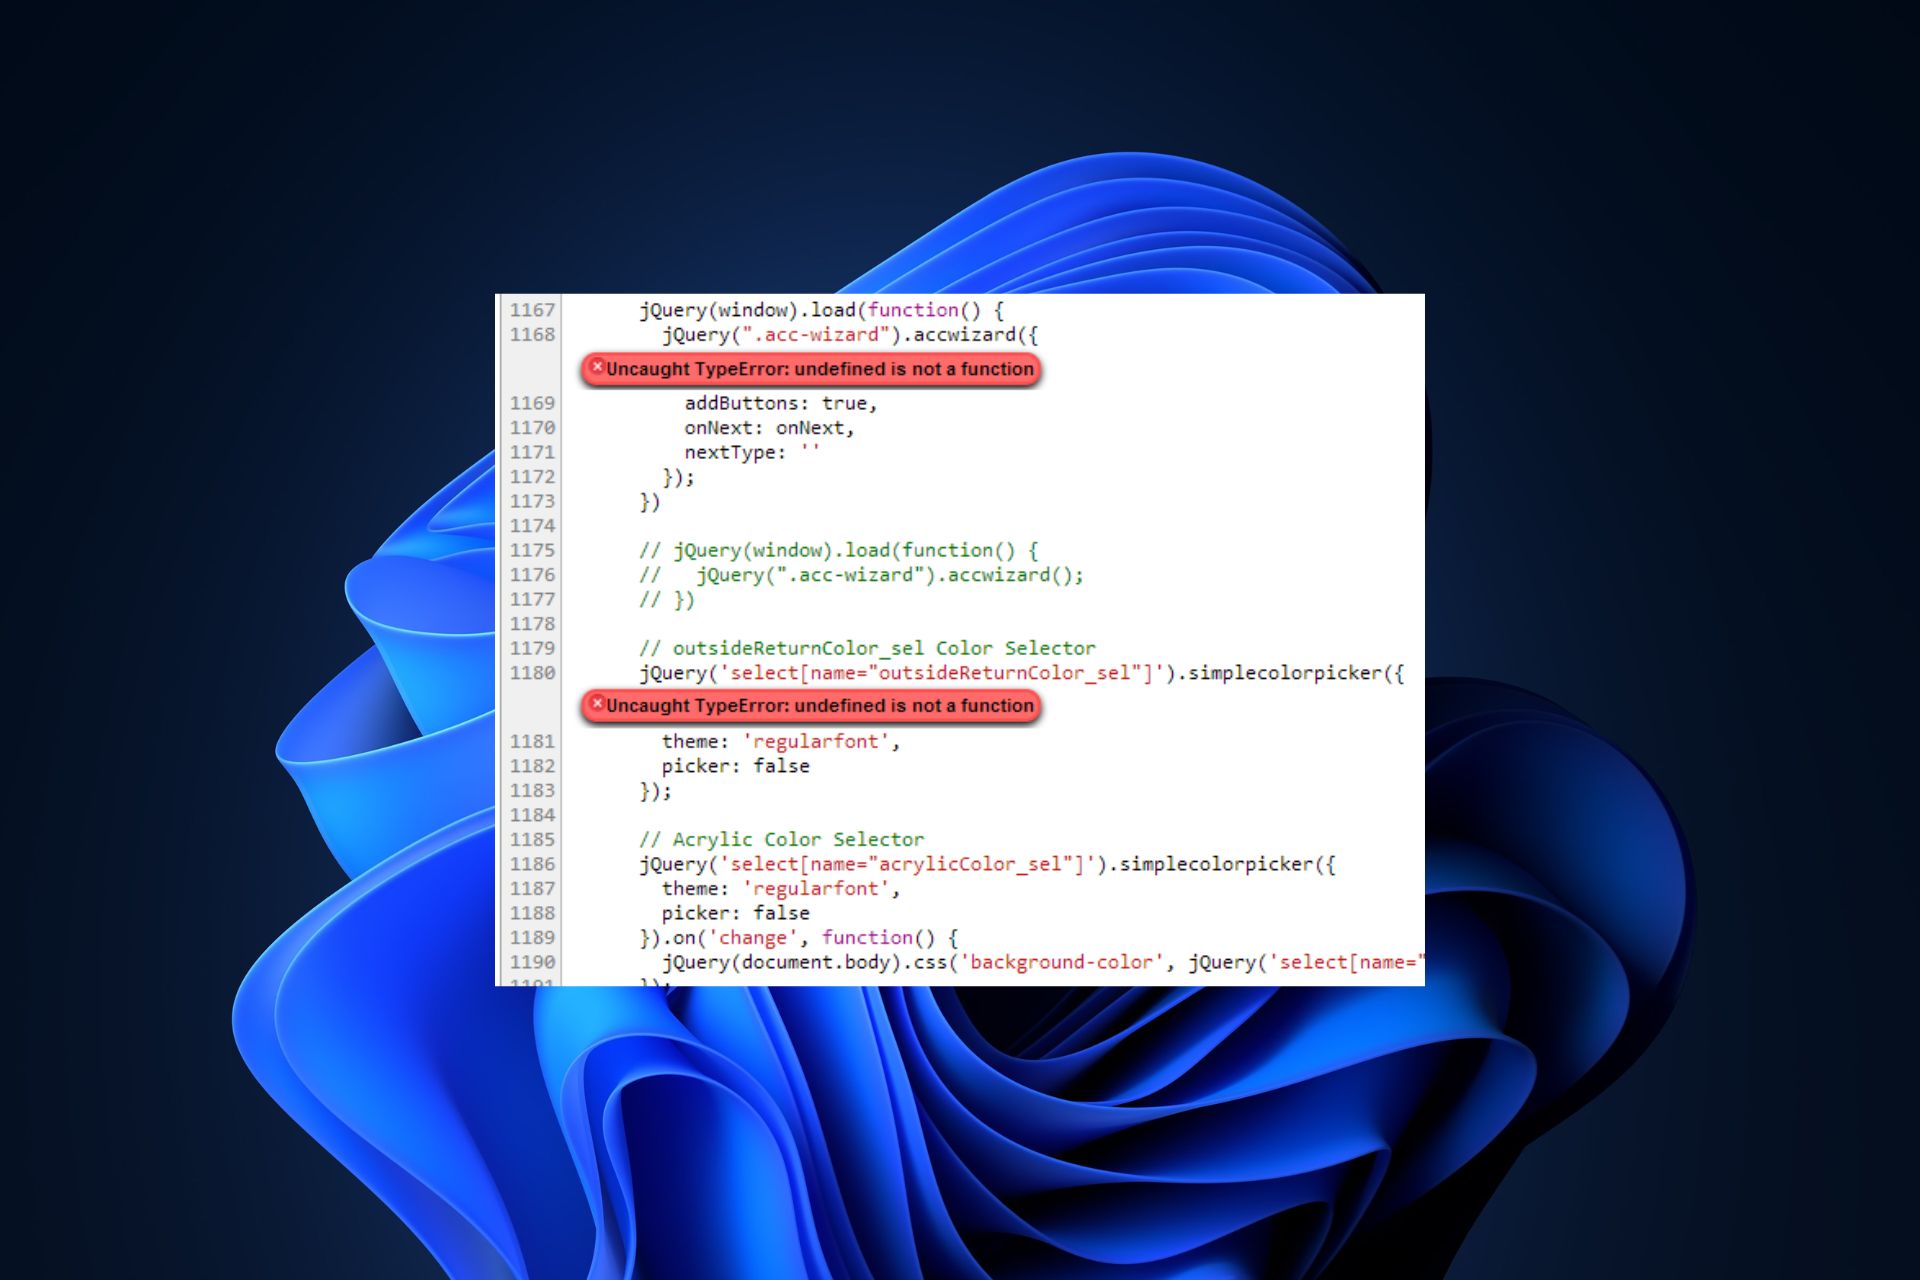
The Uncaught TypeError: $ is not a function error message typically occurs in JavaScript when users try to use the dollar sign ($) as a function, but it is not recognized or defined.
Some of our readers have recently reported that they encounter this JavaScript error. In this article, we will discuss what causes this error and how to fix it quickly.
What causes Uncaught TypeError: $ Is Not a Function?
There are a few common causes for this error as reported by some geeks who have been able to detect what triggers the issue. Below are some of them:
jQuery library not loaded – The dollar sign ($) is commonly associated with the jQuery library. If you’re using jQuery functions or methods in your code, you have to make sure that the jQuery library is properly loaded before your script.
Conflicts with theme or plugins – It’s possible that some plugins or themes contain JavaScript that has been incorrectly programmed and interferes with jQuery’s proper operation or uses the ‘$’ symbol in a way that causes problems with other scripts.
Incorrect script order – The order in which scripts are loaded can also cause this error. If your script that uses the dollar sign ($) is loaded before the jQuery library, it won’t recognize the dollar sign as the jQuery function.
Conflict with other libraries – If you’re using multiple JavaScript libraries on your web page, there might be a conflict between jQuery and another library that also uses the dollar sign ($) as a shortcut.
Now that you know some of these potential causes, you should be able to resolve the “Uncaught TypeError: $ is not a function” error and ensure that the dollar sign ($) is recognized as the jQuery function in your JavaScript code.
How can I fix Uncaught TypeError: $ Is Not a Function?
Before engaging in any advanced troubleshooting or settings tweaks, users should ensure they perform the following preliminary checks:
Ensure that the jQuery library is loaded before any scripts that depend on it.
Use the ‘<script>’ tag to check if the jQuery library has been included in your HTML file.
Verify jQuery inclusion in your HTML file – Make sure you have included the jQuery library in your HTML file. You can do this by adding the above script tag to the head or body section of your HTML file. <script src="https://ajax.googleapis.com/ajax/libs/jquery/3.5.1/jquery.min.js"></script>
In case you need an exemplified guide on how to fix the Uncaught TypeError: $is not a function error, make sure you work your way through the methods provided below.
1. Replace the ‘jQuery’ keyword with the dollar sign ($)
If you encounter the Uncaught TypeError: $ is not a function error while using the $ symbol in functions, you can replace it with jQuery instead. For instance, where you have the following $ symbol function: $(function() { // Your code here });
Replace it with:
jQuery(function() { // Your code here });
Unlike when you used the $ symbol, the jQuery function will not trigger the error message.
2. Wrap the $ code
Alternatively, you can wrap the code in an immediately invoked function expression that contains the jQuery symbol. For instance: jQuery(function ($) { // You can use $ inside the wrapper console.log($('.primary-menu')); });
After making these changes to the code, you can use your browser’s developer console to see if the error persists.
Although the dollar sign $ is the default alias for the jQuery object, you may need to create an alternative alias to avoid conflicts with other libraries that use the dollar sign $. Below is the line of code you need to run:
vvar $d = jQuery;
The above code replaces the default alias $ with $d. It is however not restricted to the above, as it can be changed to anything else you want.
And that’s it on how to fix the Uncaught TypeError: $ is not a function error. Hopefully, the methods provided in this guide will help you fix the issue.
Similarly, some users have also encountered brower.analyze is not a function error. In case you come across similar problems, you can explore our detailed guide to fix them quickly.
Error 0x4004F00C is typically associated with the activation process of Microsoft Office applications. It indicates that the activation server encountered an issue or the product key being used is invalid, expired, or blocked.
Hence, we will outline the likely causes of the error and probable ways to troubleshoot it without hassles.
What causes the 0x4004F00C error?
The error code 0x4004F00C in Microsoft Office activation is typically caused by one or more of the following factors:
Invalid or expired product key – If you are using an incorrect product key or if the key has expired, the activation process will fail, resulting in the 0x4004F00C error.
VPN or Proxy interference – Another possible reason behind the error 0x4004F00C is due to instances where the activation feature on MS Office is sensitive to filtered networks that go through a VPN or proxy server.
Previous Office installations – If you have previously installed or attempted to activate Office on the same computer, residual files or conflicting settings from the previous installation may be causing conflicts during the activation process.
System or software corruption – Corrupted system files or Office-related files can also interfere with the activation process, resulting in the error.
Note that, the reason for the error 0x4004F00C may vary depending on the specific circumstances and configuration of your system. Now, let’s proceed to how to fix the error.
How can I fix 0x4004F00C Microsoft Office error?
Before attempting advanced solutions for the error 0x4004F00C in Microsoft Office activation, you can perform the following preliminary checks:
Restart your computer, because, sometimes, a simple restart can resolve temporary issues with the activation process.
Having performed these preliminary checks, you can rule out common and easily fixable issues that may be causing the 0x4004F00C error. If the error persists, you may need to proceed with more advanced troubleshooting steps.
1. Enter your product key using Command Prompt
Press the Windows + R keys to open the Run dialog box. Copy and paste the following command into the Run dialog box and press Enter: Cscript "%ProgramFiles%\Microsoft Office\Office15\ospp.vbs" /inpkey:<enter your product key>
Replace the <enter your product key> with your actual product key. Make sure to remove the angle brackets (< and >), and also include the dashes in the product key.
Restart your PC and try again.
The command will now run the ospp.vbs script with the specified product key, which will attempt to activate Microsoft Office using the provided key.
Xbox users suspension by the enforcement division of Microsoft can be for several reasons. On the enforcement.xbox.com suspension page, you can see details about it. However, this article will discuss the suspension and how to appeal.
Xbox Enforcement suspension refers to a disciplinary action taken by Xbox Enforcement, a division of Microsoft. It is against users that violate the Xbox Live Code of Conduct or the Xbox Terms of Service.
When a user’s account is suspended, they are temporarily restricted from accessing certain Xbox Live features or services.
Furthermore, enforcement.xbox.com should appear after the suspension. It shows you the length of your revocation. During this period, user can’t access online multiplayer, use certain apps or features, or communicate with other players through messaging or voice chat.
Additionally, Xbox suspensions can occur when a user violates the terms of service or code of conduct established by Microsoft. Here are some common reasons that may lead to an Xbox suspension:
Communication violations – Engaging in harassment, hate speech, threats, or inappropriate communication with other players can result in a suspension.
Cheating or modding – Suspension may occur for using unauthorized software, hardware, or modifications to gain an unfair game advantage.
Piracy – Sharing or using unauthorized copies of games, downloadable content (DLC), or other copyrighted material on the Xbox platform can result in a suspension.
Account theft or fraud – Engaging in fraudulent activities, including stealing accounts, sharing account information, or attempting to deceive others for personal gain, can lead to a suspension.
Inappropriate content – You can also be banned or suspended for sharing or creating content that violates the Xbox community guidelines, such as explicit or offensive material.
Payment issues – Failing to pay for purchases or engaging in fraudulent transactions, such as using stolen credit cards, can result in suspension.
Suspensions are to maintain a safe and respectful gaming environment for all users. Also, it helps to enforce the community guidelines established by Microsoft.
How long does enforcement suspension last?
The duration and severity of Xbox Enforcement suspensions can vary depending on the severity of the violation and the user’s history. Suspensions can range from temporary restrictions, such as a 24-hour or 48-hour suspension, to longer duration. It can last days, weeks, or even months.
Also, severe violations or repeated offenses can result in a permanent suspension, where the user’s profile is not allowed to play on Xbox Live. Microsoft has policies to ensure fair and respectful gameplay, and implementing penalties helps to maintain them.
Moreover, every user suspension comes with a notification or email explaining the reason for the suspension. The message usually accompanies a link that shows the suspension duration.
If you believe that your Xbox enforcement suspension was unjust or an error, or you wish to appeal the decision, you can follow these general steps to initiate an appeal:
Review the suspension details – Carefully read the notification/email you received regarding your suspension or visit enforcement.xbox.com for information about the reason for the suspension and the duration.
Gather information – Collect any relevant evidence or information that supports your case for an appeal. It could include chat logs, screenshots, or any other document showing the suspension was unwarranted.
Contact Xbox support – Reach out to Xbox Support through the official channels. You can visit the Xbox Support website or contact them via live chat or email, explaining your situation clearly and providing any evidence you have to support your appeal.
Follow Support instructions – Xbox Support will guide you through the specific appeals process. They may ask for additional information or documentation or review the evidence you provided.
Await a response – Once you have submitted your appeal, wait for a response from Xbox Support. The response time can vary, so be patient. Check your email or Xbox Live messages regularly for updates on your appeal.
However, it’s important to note that while you can appeal a suspension, there is no guarantee that your appeal will be successful. Xbox Support will carefully review your case, but they have the final decision-making authority.
We are all familiar with the Windows clipboard feature, but did you also know there is a similar feature for Remote Desktops known as the RDPclip.exe?
The clipboard function is a temporary storage area that holds copies of the data you cut or copy from programs. Now, for RDP users, this is an essential Windows service, so we let you in on all things RDPclip.exe in this article.
What is Remote Desktop clipboard?
The Remote Desktop clipboard is a feature of the Remote Desktop Connection that enables you to copy and paste text between your local computer and your virtual session.
You can copy and paste text between your local computer and your virtual session when connected with Remote Desktop. This is done so that you can access your computer from another location.
The copied text is stored in the Remote Desktop clipboard on the server side. You can then paste this information into any program on your virtual session.
It is important to note that this feature is only available when you enable Windows RDP sessions. Some of its functions include:
Cut and paste text between your local and remote computer, as you normally do with a physical clipboard.
Use it as a temporary storage area. This provides a way for you to quickly transfer large amounts of data without worrying about transferring all of it at once.
RDPclip.exe is a legitimate application that doesn’t cause any harm to your computer. However, if it’s found in your Task Manager list with high CPU usage, it could indicate some malware or Trojan infection on your system.
As with any technology, there are disadvantages to using Remote Desktop clipboard with Windows. Most built-in features come shipped with basic functionalities that can sometimes be limited to an average user.
For instance, with the RDPclip.exe, some of its cons include:
You cannot copy text from a website or other remote machine that uses encryption.
You may experience some lag when copying text in real-time over Remote Desktop clipboard. This lag can be minimized by connecting to another computer over an Ethernet connection instead of a wireless connection, but still, the difference will be insignificant.
If you come across any issues with your Windows PC, then the most common solution to fix this issue that you will get suggested is to reset the Windows OS.
There are two ways to do that, i.e., Cloud download and Local reinstall. In this guide, we will share with you all the details between Cloud download vs Local reinstall. Let us check out the guide.
The differences: Cloud download vs Local reinstall
Let us first understand the differences between Cloud download vs Local reinstall and then go onto the details.
Cloud download
When you choose to install the Windows OS via Cloud download, you are basically downloading the files from the official Microsoft servers.
Cloud storage allows the user to securely save their files over the cloud and download them whenever needed. So, this could be handy when you are running out of space. All you need to have is an internet connection.
However, do note that when you do Cloud download, the size of the file that you are downloading may vary and can go up to several gigabytes.
Here, you need to ensure that your internet connection is strong, and you have a data pack supporting the file size that you are downloading.
Moreover, when we talk about installing Windows OS, Cloud download can be a good option in case the PC system files go corrupt, and you have to freshly install them from the cloud.
Local reinstall
When you choose the Local reinstall option, you are essentially using the local files stored in your PC for the purpose.
In the case of Windows reset, you are using the files stored on your PC for the reset process. Windows has to make a bit more work when you select Local reinstall.
Notably, the Windows OS will have to locate the files from the PC and then reassemble them to install a fresh Windows system.
According to Microsoft’s official, the Local reinstall process will take more than 45 minutes to build a new copy of Windows from the existing installation.
This method comes in handy when you are running on a limited data plan or where internet connectivity is unavailable. Moreover, it will keep the latest Windows update that you have installed preserved even after the reset.
Where do I get the Cloud download and Local reinstall options?
Press the Win + I keys to open the Settings menu.
Click on the Windows Update on the left pane.
Select Advanced options on the right.
Click on Recovery.
Select the Reset PC option.
Choose between the Keep my files and Remove everything options.
On the next page, you will see the Cloud download and Local reinstall options.
Do note that the options of Cloud download and Local reinstall are only available on Windows 10 20H1 and later versions. You won’t find them in previous versions.
Let us now understand the pros and cons of Cloud download vs Local reinstall in some points to give you some better clarity on which option to choose between the two.
Cloud download
Pros
Cloud download saves you space on your PC as you don’t have to store the necessary files on your computer. The space can be used for other important things.
You can access the files stored in cloud storage whenever you need them and from wherever you are. All you need to have is a strong internet connection.
You do not need to worry about losing important files from your PC. In case, the files are lost or accidentally deleted from your PC, they are always available in the cloud storage for you to re-download them.
Cons
If the files stored in the cloud storage are of huge size, then you need to have a strong internet connection to download them without interruptions.
You should have an internet plan that suits you to use the cloud download as the files could be in multiple gigabytes.
Some people do not understand the process of cloud download. So, it could be a hindrance.
Local reinstall
Pros
Local reinstall uses the files stored on your PC, rearranges them, and allows you to perform the Windows reset process.
All of your customizations and other personal settings are stored within the local files so that when you reset your PC, all of the personal features are restored.
You do not need to rely on having an internet connection to perform the reset.
Cons
Local files take up the storage space on your PC. So, you might have to make use of external hard drives to store other files.
If you don’t have a backup of the data, then you could lose the files.
If there are any issues with the stored local files, then the entire reinstallation process can break and could be difficult to fix.
Which one to choose? Cloud download vs Local reinstall
For a typical PC, going ahead with either Cloud download or Local reinstall will work. However, there are certain situations where you might have to specifically choose from each other.
If you have access to a strong internet connection, then the cloud download option could come in handy.
In case of a slow connection or limited data availability, you can go for the Local reinstall option.
Many a time, the Local reinstall option could fail as chances are some files are corrupt or missing. In this case, you have to go for the Cloud download.
Also, for Local reinstall to work, you should make sure that you have a backup created on your PC. As this will help you get back the local files. We have a guide that explains how you can create a backup of the system image files on your PC.
So, basically, the choice between Cloud download vs Local reinstall totally depends on you. Whichever scenario suits you better, you can go for that option.
Moreover, if the Local reinstall doesn’t work, then you should not worry, as your system won’t continue the installation with corrupt system files. If the reset process is completed, then there were no issues with the files.
To safeguard your PC, you should always keep at least Windows Security enabled on it. We have a guide that explains how you can reinstall Windows Security, in case you come across an issue with it.
Feel free to drop a comment below and let us know if you learnt something about Cloud download vs Local reinstall in this guide.
In a bid to combat climate change, Microsoft set an ambitious target in 2020 to become “carbon negative” by 2030. The company aimed to achieve this by reducing its carbon emissions by over 50% by 2030, encompassing both direct emissions and those of its entire supply and value chain. However, a recent report from The Verge suggests that achieving this goal may prove more challenging in 2023 than it appeared three years ago.
The Verge conducted an analysis of Microsoft’s top 100 supply chain partners, selecting 27 of them at random to examine their recorded fossil fuel emissions. The findings revealed that a majority of these supply chain companies had actually increased their reliance on fossil fuels and emissions in 2023 compared to their 2020 levels. Shockingly, some of these suppliers did not have a single contract to power their factories with electricity from renewable sources, indicating that all their electricity consumption, a significant source of emissions, was derived from fossil fuels.
While Microsoft, along with tech giants Apple and Google, has made progress in reducing emissions in their direct operations, with all three companies utilizing 100% renewable energy sources, this achievement represents only a fraction of the overall emissions associated with Microsoft’s supply chain partners.
Notably, several of Microsoft’s third-party partners, including major CPU and GPU companies such as AMD, Intel, Qualcomm, and NVIDIA, exhibited increases in emissions during either 2021 or 2022. However, Intel did inform The Verge that it had managed to reduce emissions by 4% from its direct operations in 2022. Similarly, another Microsoft supplier, SK Hynix, stated that it had decreased direct emissions from its operations in 2022. Notably, Microsoft and the other suppliers mentioned in the report declined to comment on its findings.
The report highlights the significant challenges Microsoft faces in achieving its carbon-negative goal by 2030, particularly in influencing and mitigating the emissions of its supply chain partners. While Microsoft’s own efforts in reducing emissions are commendable, the dependency on suppliers with high carbon footprints poses a significant hurdle. Going forward, it is essential for Microsoft to work closely with its supply chain partners, urging them to adopt sustainable practices and transition to renewable energy sources to make meaningful progress toward the company’s carbon-negative vision.
Achieving carbon neutrality requires collective efforts and collaboration across industries, and Microsoft’s experience underscores the importance of engaging suppliers and fostering sustainable practices throughout the entire value chain. As the company continues its sustainability journey, it will undoubtedly face challenges and setbacks, but with perseverance and strategic partnerships, it can work towards a greener and more sustainable future.
The Vssvc.exe program is a process that runs in the background on your computer and uses resources. It is an essential service in Windows as it helps restore data in case it becomes corrupted. However, you may experience some issues with the file or process.
Whereas VSS errors may be common, this is not enough to disable the service permanently. You have to find the problem’s root cause before disabling it. However, if you want to, we show you how in this article.
Vssvc.exe is essential for running the Windows operating system, so you can’t uninstall it without affecting your PC’s performance. However, you can disable it temporarily if you don’t need its functions.
How can I disable the Vssvc service?
1. Restart the Volume Shadow Copy service
Hit the Windows + R keys to open the Run command.
Type services.msc in the dialog box and hit Enter.
Locate Volume Shadow Copy service, right-click on it, and select Properties.
Next to Startup type, click on the drop-down menu, select Automatic, then click on Start.
Click Apply and OK to save changes.
If restarting the service does not improve your PC’s performance, then consider disabling the service. Follow the same steps above. Only this time, set the startup type to disabled.
2. Increase VSS space
Hit the Windows key, type cmd in the search bar, and click Run as administrator.
Type the following command and hit Enter: vssadmin resize shadowstorage /on=c: /for=c: /maxsize=20%
If your main issue was high CPU disk usage, increasing more storage space for VSS can help offload the undue pressure. This, in turn, will have a ripple effect by fixing any performance issues.
For a complete explanation of how to use this tool, read our Vssadmin Commands guide for Windows.
Press the Windows key, search Windows Security, and click Open.
Select Virus & threat protection.
Next, press Quick scan under Current threats.
If you don’t find any threats, proceed to perform a full scan by clicking on Scan options just below Quick scan.
Click on Full scan, then Scan now to perform a deep scan of your PC.
Wait for the process to finish and restart your system.
Perform this step if you suspect the vssvc.exe process is a virus or is consuming an abnormal amount of CPU.
As a practical note, we suggest you use a more reliable antivirus tool for scanning your PC and stopping any dangerous threats from infecting your Windows OS.
Vssvc.exe is associated with Microsoft’s Volume Shadow Copy service for its backup and restore features. As long as this file is located in its default location, there’s no reason to worry about it being dangerous: C:\Windows\System32 directory
However, if you see this file somewhere strange, it might be malicious software trying to steal your information or installing other malware on your system.
Note that vssvc.exe stands for Volume Shadow Copy Service. This Windows feature allows you to create point-in-time snapshots of your physical volumes. As such, you can revert to any previous snapshot.
Vssvc is used to coordinate with other services, such as System Restore, to create point-in-time copies of data stored on local and networked disks. It runs as a background process whenever Windows starts up. Some of its common roles include:
Saves snapshots of your files – When you make changes to a file, VSS creates a snapshot of the original file before it makes any changes. This way, if something goes wrong and you need to restore from a previous point in time, you can go back to when you made those changes and overwrite the changed version with the old one.
Creates backups on multiple drives – If there’s not enough space available on one drive, VSS will use another drive as well. This means that if one drive fails, you won’t lose all of your data since it was backed up across multiple drives.
Recovery from hardware failure – Shadow copies also help you recover from hardware failures, such as hard disk crashes or failed startup attempts.
Integrates with other backup solutions – You can also use VSS with other backup applications to create consistent backups by generating a snapshot of the data in your applications and then creating a shadow copy of the data on disk.
While there are no known problems with the Vssvc.exe file, it is important to note that any time you download a new program from the Internet or install software from an unknown source, your computer could risk becoming infected with malware and other viruses.
It is safe to have this process running on your computer unless it is causing problems, such as slowing down your system or interfering with other programs.
The Nissrv.exe process runs in the background and launches automatically when your computer boots up. It ensures security in your device remains upheld, but some users are having issues with the performance of their devices dropping.
If you’re one of these people with an overheating PC and random shutdowns, you may want to pump the brakes first before you disable it, and here’s why.
What is Microsoft Network Realtime Inspection Service?
Microsoft Network Realtime Inspection Service is a built-in Windows service that runs in the background of your PC. It is used to check for and block malicious content such as viruses, spyware, and hackers.
This service ensures that your computer is protected from threats by analyzing network traffic for specific security threats and blocking them if found. It helps protect your PC from security threats by intercepting and inspecting all incoming and outgoing network traffic.
You may wonder whether it is necessary, especially since you already have Windows Defender. Well, it is. The nissev.exe file is important as it adds an extra layer of protection, and in these times of advanced security threats, we could all use the extra protection.
Some of the benefits you’ll get from the service include:
Provides round-the-clock monitoring of network traffic to help identify malicious or suspicious activity.
Automatically detects new threats as they emerge, so you don’t waste time waiting for updates.
Since it is a Windows file, you’ll most likely find it in either of the following locations, depending on your Windows version: C:\Program Files\Microsoft Security Client\NisSrv.exe or C:\Program Files (x86)\Microsoft Security Client\NisSrv.exe
The file’s location should provide you with more insight into whether it is a malicious file that somehow found its way to your PC. This could be through downloading programs from untrusted sources or a virus changing things around.
Some common problems users had with the nissrv.exe file were performance issues. For instance, from this thread on the Microsoft Windows forum, a user had many issues.
I have an issue with Windows 11 Defender : Microsoft Network Realtime lnspection Service.exe uses 100% of my GPU. It causes my PC to overheat and to shut down because of heat.
The biggest downside to having a program like this running on your computer is that it’s difficult to disable or uninstall unless you know what you’re doing.
Even if you delete the executable file, there’s no guarantee that it won’t just re-install itself as soon as your next scan is scheduled. This has been a common result for most users who went with this route, so let’s look at other viable solutions.
How do I turn off Microsoft Network Realtime Inspection Service?
We recommend that you check the following first before any technical troubleshooting :
Click on the Windows Search icon, type Windows Security, and click on Virus & threat protection.
Under Virus & threat protection settings, click on Manage settings.
Now toggle off the Real-time protection button.
Observe how your PC behaves, then turn it back on. Operating a system unprotected could expose you to risks so ensure it is not turned off for long periods of time.
2. Uninstall recent Windows updates
Hit the Windows key and select Settings.
Click on Windows Update and select Update history on the right pane.
Scroll down, and under Related settings, click on Uninstall updates.
This will take you to the most recent installed updates.
Select the topmost update and click on Uninstall.
Restart your PC and check if the problem persists.
This step is mostly for users of the Windows Insider program. Since their systems are less stable than others, uninstalling the update until it has been stabilized could help minimize GPU consumption by the nissrv.exe process.
Press the Windows key, search Windows Security, and click Open.
Select Virus & threat protection.
Next, press Quick scan under Current threats.
If you don’t find any threats, proceed to perform a full scan by clicking on Scan options just below Quick scan.
Click on Full scan, then Scan now to perform a deep scan of your PC.
Wait for the process to finish and restart your system.
That sums up how to disable the nissrv.exe process. We also have other similar articles, such as the filecoauth.exe. Find out all about it and whether it is necessary on your PC.
Otherwise, for any additional thoughts, leave a comment down below.
The Xbox Games Showcase/Starfield Direct finally livestreamed on Sunday, June 11 after months of anticipation. And it’s safe to say the double feature showcase did not disappoint, with over 25 games featured. Around half of those were from Xbox’ first-party studios—among them titles like Fable, Avowed, Forza Motorsport, Starfield and many more. The lion’s share of the games showcased were day one Xbox Game Pass releases too.
All told, the showcase was exactly what Xbox needed to find its footing again after a shaky few months in April and May. The showcase has been well-received by the gaming public. Read on to see what some are saying about the showcase.
I love seeing game developers reaction to Starfield.
So, quick thoughts on it? Very good. I am very excited to own an Xbox Series X again. I am looking forward to pretty much everything that was shown. Starfield is going to eat away months of my life. This is the point of these showcases; giving us cool things to get excited about and presenting them with confidence and enthusiasm. When showcases are this good, everyone wins. It’s a good time to like video games.—Dom Peppiatt writing for VG247.
Push Square says it was “probably the strongest Xbox Showcase in recent memory”
The curtain has closed on what was, in this author’s partially informed opinion, probably the strongest Xbox Showcase in recent memory. This wasn’t a total knockout on par with some of PlayStation’s best ever E3 presentations – is such a thing even possible now we’ve effectively transitioned from live audiences to trailer montages? – but it was very, very good, filled with an eclectic selection of both first-party and third-party titles, across a spectrum of different genres and themes.
Pure Xbox says “There’s something for everyone at Xbox”
Xbox has to deliver on quality as well as quantity & variety, but we’re set up for an amazing few years on Xbox if the quality comes – and the quality will come from these teams we have no doubt. After a Sony show where fans started to question the company’s direction, Microsoft delivered an all-encompassing showcase that again proved why Xbox is a place for everyone to enjoy games across loads of different genres.
Don’t forget to check out the Xbox Games showcase Extended
That’s right: a follow-up showcase is scheduled for Tuesday, June 13. See here for more info on where to watch. If there are a couple of main takeaways from the Xbox Games Showcase 2023/Starfield Direct, one is that Starfield just might actually live up to the hype judging by what we saw in the deep dive. The second is that Xbox, at least for the time being, is back on track again.
Microsoft, in 2019, made a $1 billion investment in OpenAI, which went relatively unnoticed at the time. However, in the four years since, the market has undergone significant changes, bringing Microsoft’s previously unheralded investment into the spotlight. Today, both venture circles and public shareholders are keenly interested in understanding the implications of this investment for the future valuation of their shares and its impact on the tech world.
The Wall Street Journal has recently released a report discussing the partnership between Microsoft and OpenAI, two major players in the AI industry. According to the report, this union of tech giants has been described as “awkward” due to their atypical arrangement. As both companies continue to drive the AI boom, occasional conflicts may arise as a result, as per the report.
The article sheds light on Microsoft’s investment to gain early access to the generative artificial intelligence technology of OpenAI, a smaller but prominent player in the field. To avoid attracting antitrust scrutiny, Microsoft invested only 49% in the arrangement.
Meanwhile, OpenAI has been providing technology to some of Microsoft’s competitors, while the latter has restricted the potential search-engine customer base for OpenAI. Microsoft has integrated OpenAI’s technology into its cloud service and widely used products, standing out among its industry rivals, including Google.
Individuals familiar with the matter have conveyed that Microsoft insiders have voiced concerns about reduced investments in their internal artificial intelligence projects and OpenAI’s limitations on permitting access to their technology’s underlying mechanisms for most Microsoft staff. It has been observed that both Microsoft and OpenAI’s sales teams have sought out some of the same clients, the WSJ report asserts.
Notably, Microsoft employees were taken aback by the unexpectedly swift launch of OpenAI’s ChatGPT last year, while OpenAI cautioned Microsoft earlier this year against hasty integration of its technology without sufficient training, as per The Wall Street Journal.
Undoubtedly, The collaboration has sparked curiosity in the technology industry. Elon Musk, the owner of Tesla and Twitter, has expressed his discontent towards the recent partnership between Microsoft and OpenAI, as well as OpenAI’s transition from a non-profit to a for-profit company. He has raised concerns over the level of control that Microsoft, as a major investor in OpenAI, may have over the company’s leadership. However, Satya Nadella, the CEO of Microsoft, has refuted Musk’s claims, stating that they are incorrect from a factual standpoint.
.sys are essential system files that store hardware drivers, various system settings, and related Windows functions in Windows and DOS operating systems. One such file is PROCEXP152.SYS.
It is a system driver also known as a Process Explorer file and was developed by Microsoft as an essential part of Process Explorer. This system file falls under the Win64 DLL (Driver) file type category and was first created for Windows 10 operating system.
What does PROCEXP152.SYS do?
PROCEXP152.SYS is a crucial driver file of Windows OS which is a part of Process Explorer, the advanced process management tool that provides you information about which handles and DLLs processes are currently loaded and running.
Despite process explorer being a well-known process management utility, XDR security solution and SentinelOne, an endpoint protection platform misinterprets its PROCEXP152.SYS driver to be vulnerable.
XDR blocks PROCEXP152.SYS under a rule that flags the system files having a vulnerability. Cyber attackers can exploit this vulnerability to gain unauthorized privileges and disable the XDR agent.
Apart from this, some antiviruses even go a step further and wrongly flag this essential driver file to have malicious intent.
If you are looking for ways to prevent the antiviruses and security solutions from blocking PROCEXP152.SYS, try the solutions listed in this guide.
How can I fix PROCEXP152.SYS errors on Windows PC?
Perform the following steps to ensure your system is free from bugs and errors.
Use Windows Defender and any third-party antivirus to scan your PC for viruses or malware.
Uninstall a recently installed application or program.
If these tricks did not do any good, try the solutions below.
1. Repair any corrupt system files
Bring up the Start menu by pressing the Windows key, type cmd in the search bar on top, and select the Run as administrator option from the right section.
Click Yes on the User Action Control prompt to launch the command line tool with elevated permissions.
Now, type or paste the given command and hit the Enter key to initiate the SFC scan. SFC/scannow
Wait for the SFC scan to complete and display the verification 100% complete message. Once done, execute the following command one after another to run the DISM tool: DISM /Online /Cleanup-Image /CheckHealthDISM /Online /Cleanup-Image /ScanHealthDISM /Online /Cleanup-Image /RestoreHealth
After the system files are scanned for errors and corrupt ones repaired, restart your PC and see whether PROCEXP152.SYS-related errors are resolved.
If the Windows commands didn’t solve it, no need to worry. You can approach a reliable solution that offers improved detection tools and repair technology for corrupted files on your Windows PC.
2. Add the file to an antivirus exclusion list
Use the Windows + I shortcut to launch the Settings app.
Choose Privacy & security from the left navigation menu, followed by Windows Security from the right section.
Click the Virus & threat protection tile on the right side of the Windows Security app.
Next, choose the Manage settings option located under the Virus & threat protection section.
Scroll down and click Add or remove exclusions located under the Exclusions section.
Click Yes on the User Action Control Prompt to allow Windows Security to make changes on your PC.
Press Add an exclusion button on the next window and select File from the drop-down.
Browse to the following location and add PROCEXP152.SYS file to the exclusion list.
The procedure of adding a file or folder to the exclusion list of the third-party antivirus software varies depending on the specific security program you are using.
3. Perform System Restore
Press the Windows key to bring up the Start menu, type create a restore point in the search bar, and click the relevant search result.
Press the System Restore button located under the System Protection tab located under the System Properties window.
Choose a suitable restore point to which you want to revert your PC and press Next. If required, press the Scan for affected programs button on the bottom right to view the changes made to the system after the creation of this restore point.
Finally, press the Finish button on the Confirm your restore point window to initiate the system restoration process.
Restoring your system to an earlier point in time will roll back all the changes made in your computer, which may be the reason for the PROCEXP152.SYS file-related errors.
That’s all in this guide! Hopefully, the solutions worked and the issue at hand has been resolved.
Before you leave, you may want to check out the guide to fix the jraid.sys related errors on Windows PC.
In case you need further help with regard to this problem, feel free to drop us a comment below.
In today’s fast-paced and competitive job market, having a stellar LinkedIn profile is essential for professionals looking to make their mark and attract the right opportunities. LinkedIn has become a powerful platform for networking, job hunting, and personal branding. However, if you are a professional seeking a new job on LinkedIn, simply having a profile is not enough.
With millions of users and countless opportunities, it’s crucial to have a standout LinkedIn profile that captures the attention of recruiters and hiring managers.
In this post, we will explore 10+ practical and actionable LinkedIn profile hacks to transform your profile from ordinary to extraordinary, helping you attract the right job opportunities and take your career to new heights.
#1. Complete Your Profile: The Power of First Impressions
Imagine stumbling upon a profile that’s half-empty or missing crucial information. It doesn’t leave a great impression, right? Make sure to fill out all the sections, including your headline, summary, experience, education, and skills.
By providing comprehensive information about your professional background, achievements, and qualifications, you help recruiters understand your expertise and increase your chances of being noticed. A complete profile not only provides a comprehensive snapshot of your professional journey but also boosts your visibility in search results.
#2. Make Use of the Background Image: Showcase Your Personal Brand
Your LinkedIn profile’s background image is like a digital billboard that can convey your personal brand. Instead of leaving it blank or using a generic image, take the opportunity to stand out. Choose a high-quality image that aligns with your professional goals or represents your industry.
Whether it’s a photo of you speaking at a conference or an image related to your field of expertise, a visually appealing background image can capture attention and leave a lasting impression on visitors to your profile. You can also create a custom banner that includes your logo, tagline, or key achievements.
#3. Spread Keywords across Your Profile: Get Found by the Right Employers
Recruiters often use keywords to search for potential candidates. To increase your visibility, strategically sprinkle keywords relevant to your profession throughout your headline, summary, job titles, and skills section. Consider the industry-specific terms, certifications, and job titles that recruiters might be looking for.
By optimizing your profile with keywords, you enhance the likelihood of appearing in relevant search results and capturing the attention of recruiters. For example, if you are a technical writer, you must include the terms “technical writer,” “tech writer,” “technology writer,” and more, judiciously wherever possible. Ensure that you don’t overdo it.
#4. Avoid Jargon and Buzzwords: Be Clear and Authentic
While showcasing your expertise is important, using excessive jargon and overused buzzwords can make you seem impersonal or unprofessional. Avoid using clichéd jargon and buzzwords that add little value to your profile. Instead, focus on highlighting your specific skills, achievements, and experiences using clear and concise language.
This will help recruiters and employers understand your capabilities and differentiate you from other candidates. Remember, the goal is to connect and engage, not to confuse or alienate your audience.
#5. Keep the Current Company/Client on the Header: Signal Your Relevance and Activity
The header section of your LinkedIn profile is prime real estate that shouldn’t be wasted. To showcase your current professional status prominently, make sure to update the header section of your profile with your current company or client’s name.
Keeping this information up to date ensures that recruiters and potential connections can immediately understand your current employment situation and professional focus. This also shows potential employers that you are active and relevant in your field, increasing your chances of catching their attention.
#6. Choose Connections Wisely: Quality over Quantity
Networking is a crucial aspect of LinkedIn, but it’s important to be selective when accepting connection requests. Prioritize quality over quantity by connecting with individuals who align with your professional goals, industry, or shared interests. You can also connect with profiles that inspire you.
Meaningful connections can lead to valuable opportunities, collaborations, and insights. Regularly engage with your connections by interacting with their posts and offering support or insights when appropriate. Building a strong network of relevant connections enhances your visibility and opens doors to potential career advancements.
#7. Be Precise While Adding Skills: Highlight Your Key Strengths
LinkedIn’s skills section allows you to showcase your expertise but be selective and precise. Avoid adding a long laundry list of skills. Instead, focus on a concise selection that truly represents your professional capabilities.
Be specific and prioritize the skills that align with your career goals. By limiting the number of skills you list, you can highlight your core competencies and expertise. This will position you as a focused and highly skilled professional.
While engaging with others on LinkedIn is important, you may not want every action you take on the platform to be visible to your connections. If you’re discreetly exploring job opportunities, consider hiding your LinkedIn activity status. By default, LinkedIn displays your activity when you are active on the platform.
Hiding your activity status allows you to make updates or engage with content privately without alerting your current employers. This gives you the freedom to explore opportunities without raising eyebrows.
#9. Consistently Create and Share Content: Establish Yourself as a Thought Leader
One of the best ways to stand out on LinkedIn is by establishing yourself as a thought leader by consistently creating and sharing valuable content. Write articles, share industry insights, and participate in relevant discussions. This not only showcases your expertise but also engages your network and attracts new connections.
Be active, responsive, and contribute meaningfully to conversations. By consistently providing valuable content, you position yourself as a knowledgeable professional and increase your visibility within your industry.
#10. Monitoring and Leveraging Analytics: Fine-tune Your Approach
LinkedIn provides valuable analytics about your profile’s performance. Monitor these metrics to gain insights into your audience, content engagement, and profile visibility. Pay attention to engagement levels, views, and clicks to understand what content generates the most interest and adjust your content strategy accordingly.
By leveraging analytics, you can fine-tune your approach, maximize your profile’s impact, and stay ahead of the competition.
#11. Seek Recommendations and Endorsements: Boost Your Professional Reputation
Don’t underestimate the power of recommendations and endorsements. Request recommendations from colleagues, clients, or supervisors who can vouch for your skills and work ethic. The more endorsements and recommendations you receive, the more credibility and trust you build.
Additionally, endorse the skills of your connections to encourage reciprocation. These endorsements and recommendations act as social proof, enhancing your professional reputation and making you stand out from other candidates.
Follow these LinkedIn profile hacks
Landing your dream job through LinkedIn requires more than just having a profile. By implementing these 10+ LinkedIn profile hacks, you can transform your profile into a powerful personal branding tool. From optimizing your profile to establishing yourself as a thought leader, each hack plays a crucial role in attracting the attention of recruiters and securing job opportunities. So, take the time to polish your LinkedIn profile, and watch as doors open, connections grow, and your career takes off. Happy job hunting!
Many of our readers have reported that when they try to use their printers and send it a command, it shows a Printer not activated error code 41 message.
In this guide, we have listed some solutions that will help you resolve the Printer not activated error code 41 message. Let us get right into it.
What causes the Printer not activated error code 41?
We did some research and found out the most common reasons that could trigger the Printer not activated error code 41 on your computer. Some of them are listed below:
Outdated drivers – Chances are the printer driver that you have installed currently is out of date and causing the issue.
The printer service isn’t running – You should make sure that the printer services necessary for the drivers are running on your PC to avoid such errors.
The network driver isn’t working properly – Your PC might be trying to connect to the network driver which is not working properly anymore.
The printer isn’t selected as default – The printer that you are trying to print isn’t selected as the default printer on your computer.
Let us now take a look at the solutions that will help you resolve the Printer not activated error code 41.
How can I fix the Printer not activated error code 41?
Before starting any complicated troubleshooting, let’s make some quick adjustments:
Restart your PC and the printer. Sometimes, this can solve the issue.
Ensure that the printer is correctly connected to the PC and replace the cable if you see wear and tear signs that might cause it to malfunction.
If these methods didn’t fix the problem, proceed with the solutions below.
1. Reinstall the printer driver
Press the Win key to open the Start menu.
Type Device Manager and open the top result.
Expand the Printer section.
Double-click on your printer to open it.
Switch to the Driver tab.
Click on the Uninstall driver button.
Visit the official website for your printer and download the appropriate driver.
Install it and perform a restart.
If updating doesn’t work, then we would suggest you reinstall the printer driver, as the chances are there might be some important files that are missing from your PC related to the printer.
To perform this task securely, we advise you to utilize a specialized solution for driver cases. For instance, the application below will install all your drivers automatically and 100% securely.
Follow the on-screen steps to troubleshoot the printer.
Apply the prompted fixes.
Reboot your PC for everything to take effect.
You should make use of the troubleshooter that comes built-in with the Windows PC. This lets you troubleshoot various glitches and bugs causing problems with your drivers.
Scroll down, locate Printer Spooler, and double-click on it.
Select Automatic in the Startup type drop-down.
Hit the Start button under the Service status section.
Click Apply and OK to make the changes.
Restart your computer.
The print spooler service for some reason can misbehave and stop its services. You should make sure that the print spooler service is running on your PC.
This makes sure that your PC is running smoothly and hopefully will resolve the Printer not activated error code 41.
4. Reset Print Spooler via CMD
Open the Start menu by pressing the Win key.
Type Command Prompt and run it as an administrator.
Type the below commands and press Enter after each one. net stop spoolerdel %systemroot%\System32\spool\printers* /Q”net start spooler
Restart your system to make the changes.
The above commands will help you reset or clear the Print Spooler. This has helped several users fix the Printer not activated error code 41 problem. You can also try the above solution and hopefully fix the issue.
5. Reinstall the network driver
Press the Win key to open the Start menu.
Type Device Manager and open the top result.
Expand the Network adapters section.
Double-click on your network driver to open it.
Switch to the Driver tab.
Select Update driver.
Choose Search automatically for drivers option.
Install the latest update and restart your PC.
Reinstalling the network driver has helped multiple users resolve the Printer not activated error code 41 problem. You can also try that and hopefully resolve the problem.
That is it from us in this guide. Feel free to let us know in the comments below, which one of the above solutions resolved the Printer not activated error code 41.
Several SQL Server users have been encountering the SSPI handshake failed with error code 0x8009030c, state 14 while establishing a connection with integrated security; the connection has been closed. on Windows PCs relying on Windows authentication to connect to a SQL Server.
This SQL server error happens due to Kerberos failure as a result of which the user authentication is unsuccessful.
Why do I get the SSPI handshake failed with error 0x8009030c?
The error code 0x8009030c generally shows up due to the Active Directory and network-related issues. Some of the other reasons are as follows:
Domain account issues – The domain server account operating the SQL Server engine account may be locked when the connection setup is attempted.
Authentification problems – Kerberos Authentication to connect to SQL Server is not successful.
Expired password – On a remote PC, the SSPI handshake failed with error code 0x8009030c can also occur when the password expires for the current session.
Firewall block – A virtual firewall between the app servers and domain controller may block the higher RPC dynamic port range.
Time synchronization issue – SSPI handshake errors can also trigger because of the time difference between the client and server clock.
If you are looking for effective solutions to easily get past the SSPI handshake failed with error code 0x8009030c, this guide has got you covered.
How do I fix the SSPI handshake failed error code 0x8009030c?
1. Restart the SQL server browser services
Press the Windows key on the taskbar to bring up the Start menu, and type sql in the search bar.
Right-click the SQL Server Configuration Manager in the search results and select Run as administrator.
Click Yes on the User Action Control prompt window.
Choose SQL Server Services from the left navigation panel of the SQL Server Configuration Manager.
From the expanded list of services, right-click SQL Server Browser, and then choose Restart from the context menu.
If the SQL Server Browser service running in the background encounters a problem, a problem in establishing the connection may occur, causing the SQL 0x8009030c error; restating it will flush out the underlying cache fixing the issue.
2. Modify the registry
Press the Windows key to launch the Start menu, type registry editor in the search bar and choose the appropriate option from the result section.
Enter the following key address to access the following registry key in the registry editor. HKLM\System\CurrentControlSet\Control\LSA
Now right-click anywhere on the right section of the registry editor and select New followed by DWORD (32-bit) from the context menu.
Next, rename the newly created DWORD as DisableLoopbackCheck.
Right-click DisableLoopbackCheck and choose Modify from the context menu.
Set the value to 1 and press the OK button.
Now exit the registry editor and reboot your Windows PC to apply the changes.
Loopback check is a security feature on your OS that restricts access to web applications via a fully qualified domain name (FQDN) if the access attempt was from the system hosting the application.
As reported by several SQL users, disabling the Loopback check option helps resolve the SSPI handshake failed error with error code 0x8009030c.
Press the Windows key to launch the Start menu, type sql in the search bar, and choose SQL Server Management Studio from the search results.
Click the Plus sign in the object explorer to expand the server on which you want to sync the target server clocks with the master server clock.
Right-click the SQL Server Agent, select Multi Server Administration from the sub-menu, followed by Manage Target Servers from the sub-menu.
Next, click Post Instructions in the Manage Target Servers dialog box.
Select Synchronize clocks from the Instruction type list.
Click the All target servers to synchronize all target server clocks with the master server clock option under the Recipients section.
4. Allow RPC dynamic port range through the Firewall
Press the Windows key, type group policy editor, and choose the relevant option from the search results.
On the left pane of the Group Policy Editor window, expand the Computer configuration option.
Now, go to to the following path: Policies\Windows Settings\Security Settings\Windows Firewall with Advanced Security\Windows Firewall with Advanced Security - LDAP\Inbound Rules
Right-click Inbound Rules and choose New Rule from the context menu.
Choose Custom and click Next.
Choose All programs and click Next.
Assign TCP as the Protocol type and RPC Dynamic Ports as the Local Port and click Next.
Specify the IP address of the scan node on the remote IP addresses list and click Next.
Select Allow the connection and click Next.
Select the checkboxes that fulfill the machine connection conditions and click Next.
Specify Radar RPC Dynamic Ports as the name and click Finish.
That’s all about it! We’re hopeful that the SSPI handshake failed with error code 0x8009030c error will be easily resolved by applying the solutions listed in this guide.
On Windows 11, the WSL2 or the Windows Subsystem for Linux will get updated when you install the latest update. Hence, it is a part of the Windows update.
However, if the automatic update fails, you must do that manually. In this guide, we will show you how you can update WSL2 Kernel on Windows 11. Let us check out the guide.
Why do I need to update WSL2 Kernel on Windows 11?
Why must you update the WSL2 Kernel on Windows 11 if the Windows update will update it manually?
The main reason behind this is that the Linux distro you are using might need something in the latest WSL update, and the Windows update might not have arrived.
The lag can be a big hurdle for you to run the Linux distro smoothly on your PC. So, you need to manually update the WSL2 Kerner on Windows 11.
Notably, you can force update the WSL2 Kernel from the command line itself. Note that this method isn’t similar to upgrading from WSL to WSL2.
How can I update WSL2 Kernel on Windows 11?
Press the Win key to open the Start menu.
Type Command Prompt and run it as an administrator.
Type the below command and press Enter to confirm the current Windows Subsystem for Linux version. wsl --version
To update the WSL2 on your computer, type the below command and press Enter. wsl --update
In order to confirm the update has been installed, type the below command and press Enter. wsl --version
In case the update is available, the command line will download the update.
Do note that there is a lag between the update becoming available through Windows update for Windows Subsystem for Linux and Microsoft releasing a new kernel to GitHub.
So, the version available via the Windows Update may not match the version you installed manually.
Toggle on the Receive updates for other Microsoft products option.
Restart your computer to apply the changes.
When you toggle on the above option, you will start receiving updates for the WSL2 Kernel automatically, and your PC will install the latest updates without your input.
This way you don’t have to worry about manually installing the WSL2 Kernel update on your Windows 11 PC. However, you should make sure that the Windows updates are installed regularly.
How can I roll back the WSL2 Kernel to the previous version?
Press the Win key to open the Start menu.
Type Command Prompt and open it as an administrator.
Type the below command and press Enter. wsl --update --rollback
After the process completes, type the below command and press Enter to check the version. wsl --version
Often, you might need to roll back to the previous version of the update in case there is something problematic with the current version. Following the above steps, you can easily roll back to the previous WSL2 update on your Windows 11 PC.
How do I install a specific WSL2 distro?
Press the Win key to open the Start menu.
Type Command Prompt and open it as an administrator.
Type the below command and press Enter to view the list of available WSL2 distro on Windows 11. wsl --list --online
Execute the below command to install the WSL2 with a specific distro on your Windows 11 computer. wsl --install -d DISTRO-NAME (Replace the DISTRO-NAME with the distro you want to install)
Reboot your computer and continue with the distro setup.
How can I enable Windows Subsystem for Linux?
Press the Win key to open the Start menu.
Open the Control Panel.
Select Programs and Features.
Click on Turn Windows Features on or off from the left pane.
Scroll down and check the box for Windows Subsystem for Linux and press OK.
Following the above steps, you will be able to enable the Windows Subsystem for Linux on your Windows 11 PC.
That is it from us in this guide. If you are getting the WSL Something Went Wrong: Please Restart error, then you should apply the fixes mentioned in our guide to resolve the problem.
We also have a guide explaining how to uninstall WSL in Windows 11. Following the steps, you will remove all remains of WSL from your PC.
For users who are coming across the WSL2 stopped working error on their Windows 11 PCs, we would suggest you apply the solutions to resolve the problem.
It seems that the app is causing a lot of issues when it comes to using a Team account for several organizations. One such issue, in particular, can somehow link an account to an organization, and it can be quite hard and frustrating when you want to use that account for another organization,
A lot of users in the Microsoft community are dealing with this specific issue, after linking their accounts to an organization. Whenever they try to start a Teams meeting now, via a link that someone sends to them, it automatically sends them back to the linked organization.
So what can you do if you are in this frustrating situation? Delink your account. Sure, but how? Follow our guide below to find out.
How can I unlink an old Teams account
First things first, you need to know that you can delink an old Teams account by signing out, and then removing the account from the devices you were logged in.
To do that click on your Teams account profile picture and select Sign out.
To sing out from devices, you need to do the following:
Go to Settings.
Click on Account.
Scroll down, until you find Access work or school.
Access the pane, and then select Disconnect from your preferred devices.
On the upper left, click on the upside-down arrow, then choose My Account.
Here click on Organizations. Find the listing of your organization, select it, and click on Leave.
These solutions will get disconnected from your old organization and you will be able to join other Teams meetings without login into them.
You can also opt to delete your Microsoft Teams account, especially if you don’t use it anymore to prevent issues of an unknown user appearing in meetings.
We hope these solutions will help you. If you’re dealing with this issue currently, be sure to let us your opinions and experiences in the comments section below.