Accessing webcam settings may not be as intuitive as you’d think, but we’ll walk you through all the steps.
Where are my webcam settings?
The webcam settings in Windows 11 are available in the Camera app on the PC. It offers a bunch of customizations to users, including the ability to change the Video Quality and Flicker Reduction.
Camera app
The camera app comes preinstalled on the PC and helps you capture pictures and record videos. Also, it’s a great tool for modifying the camera settings. However, several users go with third-party apps to access more customizations and modifications.
How can I access the webcam settings on Windows 10?
1. Acces the camera from the Start screen
Click the Start button, type camera, and select the app from the results.
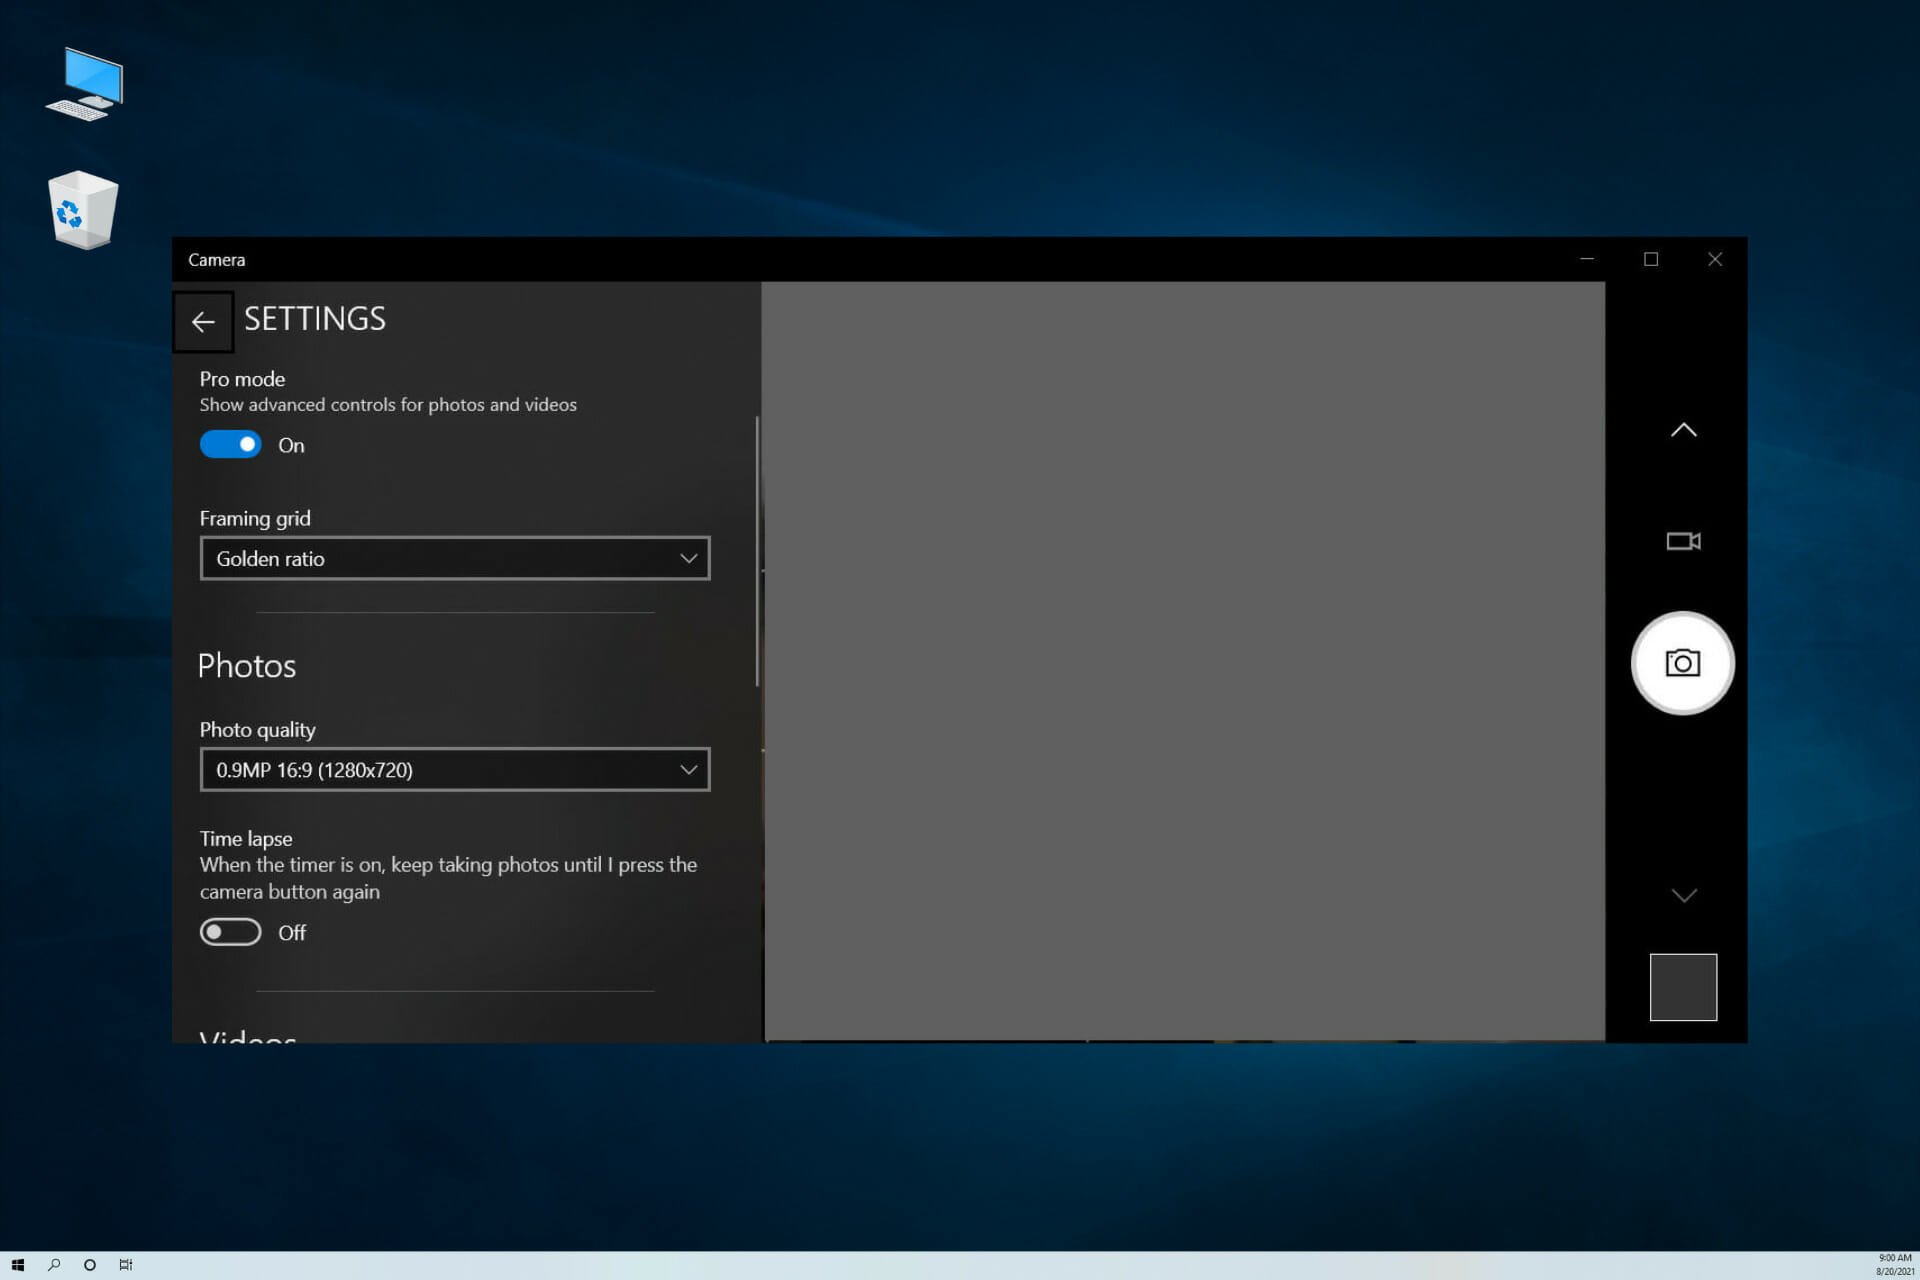
Select the cogwheel button to open Settings.
Now, from the panel on the left, you can do a lot of adjustments like the resolution for photos and videos, time lapse settings, framing grid, and more.
These settings might differ depending on what your webcam is able to do for example your webcam might not support the Spot adjust option, therefore, you won’t have it in the Settings menu.
Go to Microsoft Store and download a webcam app. We discovered Webcam Pro, but you can go with any other app you desire. Just click the dedicated button to get it.
After you install it, you need to select the webcam you want to use. In our case, it’s the integrated laptop webcam, but if you have multiple cameras, you can select the one you prefer.
The next step is to acknowledge that the app can access the webcam.
Now, to access the camera settings, click on Configuration. You will notice a rich pannel of possible camera settings, from brightness and contrast to zoom and roll.
This particular app can handle up to 3 webcams at the same time. You can click the Add webcam button and select them one by one.
We just gave you an example of an application that you can use to access the camera settings. As you can see, it has more options than the Windows Camera app that comes with your OS. Here are some of the additional features you get with webcam software in Windows 10:
What if you don’t want one or more apps to access your camera? Well, you can restrict all desktop apps from using your camera. Or, you can select them from a list with just a few steps:
Click the Windows button and then select Settings.
Next, click on Privacy.
Select Camera from the left pane.
Now, the first decision you can take is to turn off all apps access to your camera by clicking the switch right below Allow apps to access your camera.
If you scroll down in the right pane, you will see that all Microsoft Store apps and desktop apps now have restricted access to your webcam.
However, if you keep the Allow apps to access your camera on, you can only turn off the access to Microsoft Store apps or desktop apps by toggling their individual switches to off. This will allow you flexibility in choosing the apps to restrict from accessing your webcam.
How do I enable or disable the camera access for the users?
If you have more than one account or user on your PC or laptop, it’s good to know that you can change their access to the camera and the apps using it.
As an administrator, you can simply block their access, and that would be a good measure to protect them. Here’s how to do that in Windows 10:
Click the Windows button and select Settings.
Select Privacy.
Now click on Camera from the left pane and check the current status for the camera access. Our camera access is turned on.
If you want to change that, just click the Change button, and it will show you the switch to change this setting.
By turning the switch off, we prevented other users from accessing it. Of course, if you want, you can switch it back at any time by following the same steps.
We have to mention that by blocking the user access to the camera, you are also blocking any apps from using it.
Now that you know how to grant or block camera access for other users, you have a few different methods to open the camera app and change its settings.
If your PC doesn’t have an integrated webcam, find out the best 4K webcams available right now.
Don’t hesitate to leave any other questions in the comments section below if you want to know more about the subject.
If your PC feels sluggish and you’re noticing unusually high memory usage, you’re not alone. Many users have reported Windows 11 using 10GB of RAM or more with minimal activity. In this guide, we’ll help you get to the bottom of why your RAM usage is so high in Windows 11 and walk you through practical steps to fix RAM usage issues and optimize performance.
Whether Windows 11 is using too much RAM due to background apps or misconfigured settings, we’ll show you exactly how to take control and free up memory.
How do I fix high memory usage in Windows 11?
1. Check the RAM usage in the Task Manager
To check the RAM usage in Windows 11, go to the Windows search box. Type in Task Manager and select it.
Click on More Details to expand the list.
In the Processes tab, check the programs using too much memory.
Right-click on the ones you wish to terminate and select End task.
Close the Task Manager.
High RAM usage is usually caused by software acting up or glitching out. The best way to deal with this is to go into the Task Manager and terminate that task.
Click on the Windows Search Bar and select Task Manager.
In the Task Manager, go to Startup, right-click on an app, and then select Disable.
Close the Task Manager.
Startup programs will cloud your PC and use up lots of resources. Nowadays, most of the software you install will start with your Windows.
Disabling all unnecessary startup programs and only keeping those crucial to your system will keep things running optimally.
You can also optimize and clean your system, fast and easy, with the help of professional repair software.
3. Disable the SysMain service
Open the Windows Search Bar and type in Run.
In the Run box, type services.msc then press Ok.
Under the services tab, search for Sysmain, right-click on it and select Properties.
In the new window, set the Startup type to Disabled.
Then, go to Service Status, select Stop, and click Ok.
The SysMain service preloads software that you frequently use to the RAM to access quickly. First, try disabling the feature to see if it fixes the issue.
4. Defragment your hard drive
Open the Windows Search Bar, type in Defragment and Optimize Drives.
Choose the drive you wish to defragment and click Optimize.
Wait for the process to finish.
If you’ve been using your device for a long time before finally upgrading to Windows 11, your disk might need to be cleaned and optimized.
Thankfully, you can quickly fragment your hard drive without needing to install any third-party software.
Open the Windows Search Bar and type in Windows Security.
Select Virus & threat protection.
Next, click on Turn on.
Afterward, choose Quick Scan.
Wait for the system to finish scanning.
The Windows Firewall malware database gets updated every week, but the idea of a virus breach is not out of the question.
If you tried scanning your computer and nothing bad came out, you need to use something better to eliminate the malware.
Many tools can thoroughly scan your device for the newest malware and take action against any threats, including spyware, adware, and other cyber attacks. TotalAV is an excellent example in that regard.
TotalAV
Excellent software that offers protection for your device against malware thanks to its good range of features.
If you keep running low on RAM while using Windows 11, your system might not be good enough to handle the operating system.
You need at least 4 Gigs of RAM to run it, but for the OS to run well, you need 8 GB, or 16 if possible. Check out our detailed post on Windows 11’s system requirements to find out more.
NOTE
Official Windows 11 system requirements include: – 1 gigahertz (GHz) or faster CPU with 2 or more cores – 4 GB RAM – 64GB or larger storage – UEFI, Secure Boot capable device – TPM 2.0 – GPU compatible with DirectX 12 or later with WDDM 2.0 driver
While it is the minimum to operate Windows 11, you will need 8GB of RAM for better performance.
Does Windows 11 eat more RAM?
There are several reasons why Windows 11 could utilize more RAM than previous versions. The most important one is that it significantly improves Windows 10 in many ways.
It is a powerful operating system that provides a wealth of features but places a significant demand on the device’s hardware.
If you notice that your RAM usage is about 80% or more, you shouldn’t be concerned immediately. All the currently running software will most likely use your RAM.
For example, if you are using Google Chrome and have multiple opened tabs, your RAM usage will naturally skyrocket, and it’s not concerning.
High RAM should never be considered a problem unless no apps are opened, and the computer is experiencing this while idle; in this case, there are many reasons.
Users reported a plethora of similar issues that we will be addressing below. First, however, here are the most common ones:
DWM high memory usage in Windows 11 – The issue of excessive memory utilization is brought on by Desktop Window Manager for a variety of reasons; the most common of which are problems with the performance of Windows.
Windows Explorer high memory usage in Windows 11 – One of the most common causes is the utilization of obsolete graphics card drivers.
High RAM usage in Windows 11 when idle – You are opening an excessive number of applications or services; which is one of the primary causes of Windows 11’s high memory utilization.
High memory usage in Windows 11 when nothing is running – Put an end to pointless applications running in the background.
Vmmem Windows 11 high memory usage – You can terminate any applications or services that aren’t essential by using Task Manager.
OneDrive high memory usage in Windows 11 – To solve this problem, the most effective solution is to modify your virtual machine to prevent it from using a significant amount of the system’s resources.
Windows 11 memory leak – Stop using the app that’s causing the problem in order to fix the memory leak in Windows 11.
How do I clear my RAM cache?
You could use the Windows Refresh tool that Microsoft provides; this tool removes all applications from your computer and leaves it in a new state.
However, other tools are more powerful and designed solely to assist your computer in regaining its groove and functioning as though it has recently been subjected to a factory reset.
Memory cleaners are programs that scan your computer and fix any issues that they find. They do this by defragmenting your hard drive, repairing the registry, and freeing up your computer’s memory by removing unnecessary or duplicate items.
However, some memory cleaners go above and beyond this essential function. So are these 7 memory cleaner software that we have hand-picked for you to try out.
Is 40% RAM usage normal?
Any amount close to 40% of your total RAM usage is considered normal because your Windows are actively using it.
Of course, the percentage will be lower if you have a high amount of RAM. So, for example, you won’t get 40% RAM usage while idling with 32GB of total available memory.
Since we are talking about efficiency and system resources, why don’t you check this article about enabling efficiency mode on Edge to make the best of your device?
High RAM usage on Windows 11 will negatively affect your system’s flow, so solving this problem is mandatory. Let us know in the comments area below if you managed to do so.
LastPass and Dashlane are two of the popular password management software that is available for web browsers as well as desktop clients.
However, after the recent security concerns with LastPass, you may consider moving to Dashlane. If so, you might be wondering how to migrate from LastPass to Dashlane.
It is a simple process because everything you save in LastPass can be imported into Dashlane.
To make it simpler, in this article we have listed all the steps you need to follow to migrate from LastPass to Dashlane successfully.
Quick tip:
While Dashlane is a great password manager, we prefer using RoboForm since it’s got more security features.
RoboForm offers unlimited storage with two-factor authentication passwords for an extra layer of security. In addition, it backs up and syncs your passwords across all your platforms.
RoboForm
Keep all your passwords safe in one place for quick access with RoboForm.
Press Ctrl + S. Enter a name for the file but make sure the extension is .CSV. To do this, click the Save as drop-down menu and select All Files.
The file name, for example, will look like Passwordsfromlastpass.csv.
This step is only for that user who is unable to save the LastPass data directly from the extension. If you were able to save the export file from the extension, you don’t need to follow the above steps.
3. Importing data to Dashlane
Now that you have the exported CSV file, here is how to import it into Dashlane.
Open Dashlane application and click on File.
Go to Import Passwords > LastPass.
Select the imported CSV file and click Import.
Once the import process is successfully Dashlane will display how many passwords and other data have been imported. You can view the relevant data by clicking the appropriate section.
To view the password, click the Password section, and for credit card information click the Payment section. Make sure you delete the .csv file once the import process is over.
4. What to do if Dashlane fails to import any data?
Make sure all the password have site address in the csv file. Any password that does not have a site address will not be imported by Dashlane.
Open LastPass again and check if all the passwords have a site address. If not, add the site address for the password in LastPass and go through the import process again.
Alternatively, you can also add the site address to the passwords manually in the CSV file.
Migrating from LastPass to Dashlane is as easy as importing and exporting a .CSV file.
By following the steps in this article you can import all your data from LastPass to Dashlane with ease and keep your data safe.
If you have any more questions or suggestions, leave them in the comments section below and we’ll be sure to check them out.
The remote connection feature means users can access another desktop without being present. Hence, we’ll discuss Windows 11 multiple remote desktop sessions and how users can enable it.
The RDP (Remote Desktop) is an operating system feature or software that allows users to connect and interact with a computer in another environment.
It permits you to run a personal computer in an environment and remotely access it on a different client computer in a separate location. In short, it allows a computer (client) to connect to another computer (host) from a different environment.
Furthermore, the multiple Remote Desktop sessions can vary according to the software or operating system.
However, the limit of RDP sessions that can run simultaneously is one. Likewise, Windows 10/11 only allows the establishment of a single Remote Desktop session (RDP) on one computer by default.
It means that Windows will disconnect the current Remote Desktop session if there is any attempt to establish a second connection.
Can you have multiple RDP sessions?
Windows allows users to establish only one Remote Desktop session between the client and the host by default.
Nonetheless, there are some ways you can have multiple Remote Desktop sessions without encountering difficulties. However, having more than one Remote Desktop session can vary depending on your project or program.
The maximum number of Remote Desktop connections a server can handle is two simultaneous connections, according to Windows.
However, some programs allow you to set the Remote desktop multiple logins to about 50 users per Windows Server. Also, some users claim that it is possible for 100 concurrent connections to both RemoteApps and Remote Desktop Session Host.
Nonetheless, some factors may determine the limitations of what the hardware and the server can handle.
Some of these factors are speed and type of CPU installed on the server, amount of RAM installed in the Session Host (remote desktop) server, and lots more.
Quick tip:
Using a software that provides you access to applications and desktops can be very helpful. We recommend Parallels Remote Application Server (RAS) because it offers an excellent and intuitive experience.
You can have easy remote access across devices and networks to maximize your productivity and efficiency. You can also convert raw data into custom visual reports to reveal traffic and resource usage from your network infrastructure.
Parallels Remote Application Server
Manage your applications with centralized controls and permissions with this outstanding software.
How can I have multiple remote desktop sessions in Windows 11?
1. Download and run RDP Wrapper
Go to GitHub Stascorp and download the RDP Wrapper from the GitHub Repository.
Open the file and unzip the RDPWrap-v1.6.2.zip file.
Run the install.bat file.
Go back to the RDPWrap-v1.6.2.zip file in downloads and run the RDPConf.exe (RDP Wrapper configuration utility) file.
In the Diagnostics window, ensure that the Wrapper, Service, and Listener states are all green.
Run the RDPCheck.exe file.
Connect multiple RDP sessions from remote computers and see how it works. However, Windows will allow users to access various RDP sessions simultaneously.
Likewise, using the RDP Wrapper to enable multiple RDP sessions allows you to do it without altering the termsrv.dll file.
To learn more about this file, don’t miss our dedicated termsrv.dll article.
3. Modify local group policies
Click Start and type gpedit.msc, then press Enter to prompt the Local Group Policy Editor window.
Go to: Computer Configuration > Administrative Templates > Windows Components > Remote Desktop Services > Remote Desktop Session Host > Connections
Disable the Restrict Remote Desktop Services user to a single Remote Desktop Services session policy option.
Go to the Limit number of connections tab and enable it.
Navigate to the RD Maximum Connections allowed tab and set it to 999999.
Click OK to apply the changes.
We recommend that you restart your computer to sync the changes properly.
How do I switch between two RDP sessions?
Users can use some Remote Desktop Service shortcut keys to perform functions like switching between two RDP sessions.
However, the Alt + PAGE DOWN keys combination can help users switch between programs running on the Remote Desktop from right to left.
Likewise, ALT + PAGE UP is another shortcut users can use to switch from left to right between RDP sessions. Also, the ALT + INSERT keys combination is a way of switching between the running programs.
Every PC user has accidental edits at one point or another. Either you or a colleague makes undesirable but irreversible changes to a mission-critical photo, PDF, CAD, or any other file type on OneDrive.
If you cannot find the original file, you may have to create it from scratch, again. That can be time-consuming, not to mention expensive, depending on the nature of the lost details or data.
How do I restore a OneDrive file to a previous version?
1. Use OneDrive Sync Version History
Open File Explorer.
Right-click the file in question and choose View version history. Doing this reveals all previous versions of the file. It also indicates the modification date and the user who modified the file.
Select the version you want to recover: Your options here include restoring or deleting the selected file.
Choose to Restore to replace the unwanted file with the selected previous version.
You can access OneDrive Sync Version History via File Explorer’s context menu to recover any file.
Windows 10 and macOS users can recover previous versions of edited files using OneDrive Sync Version History. The feature enables the synchronization of your PC and OneDrive files.
As such, it lets you track older versions of files within your desktop environment, enabling the recovery of items edited by mistake.
2. Restore previous OneDrive versions on the web
If you’re looking to restore a previous version of a OneDrive document, you can also do this via the web version of the app. From the OneDrive.com page, you can see all the previous versions of a file, as well as all of the modifications that were done to it.
Moreover, after you restore your document to a previous version, the current one becomes a previous version itself, for future use.
1. Open your preferred browser.
2. Go to OneDrive.com.
3. Locate the file you wish to restore to a previous version and right-click it.
4. Select Versionhistory: This reveals the modification record of the particular file. It also indicates the date of all previous versions alongside the names of users who made the changes.
5. Choose the desired version and click Restore on it.
Just in case you need to confirm the contents of the file before doing anything else, click Open File. There is also the option of downloading the preferred file version from OneDrive to your PC.
These are some quick ways to restore a OneDrive file to a previous version. Be sure to follow all the steps and you should be able to do it yourself in no time.
If you have any other questions or suggestions, don’t hesitate to leave them in the comments section below.
Although Steam is a popular service among gamers, it still has its fair share of issues now and then. One of the most frequent issues that still surprises us is the Steam access is denied error.
Many users complained that this error might sometimes linger and can be a pain to get rid of, no matter what you try.
Therefore, we compiled a list of the most effective (tested) methods you could apply to eliminate this annoying issue.
In addition, we consider properly presenting a list of the most common reasons that explain this irritating error, so make sure you read them carefully.
Why am I getting the Steam access denied error?
Even if this problem can happen all of a sudden, and most of the time, it goes away after simply refreshing the page or restarting the app; there are several other reasons you should be aware of:
Access restricted from certain IP addresses – In this case, we strongly recommend switching your IP address by using specialized software and we’re going to recommend the best on the market.
DNS cache – These might generate security or Internet connectivity-related problems that are also some of the most important causes of the Steam access denied error. Flushing DNS will clear your cache’s IP addresses or other DNS records. In addition, you can also try to change your DNS. It is a simple process, and we’ll show you how to perform it efficiently.
Integrity of files – The Steam access denied error could also occur due to missing textures or other content in-game, so you’ll have to verify if the Steam game’s files are installed correctly.
Antivirus software – Some antivirus software might have set some too protective rules blocking your access on Steam. In this particular situation, it’s best to manage them according to your needs.
Our guide will cover the entire spectrum of issues mentioned above and give you access to a quick and efficient solution for each situation. Make sure to follow them strictly to avoid causing any other problems.
Moreover, users reported similar issues that can also be fixed with the solutions below. Here are the most common ones:
Steam Access denied 0x5 – It could help to run Steam in administrator mode.
Reference 18 Steam Access Denied – Check if the servers are working correctly.
Steam access denied 15 – You may obtain this outcome while submitting, accepting, refusing, or canceling a trade offer.
Steam end process access denied – Check the game files to ensure they are intact.
GeForce Now Steam access denied – In order to play games from their Steam library, users of Steam will need to download the GeForce Now software and connect their Steam account to the GeForce Now service.
Steam app access denied – Sometimes, because of lengthy activity on the Steam account and changes in system security settings during that time, your action may be viewed as interrogative, which will result in a Steam Access Denied message.
Let’s jump into the list of solutions to the Steam access denied issue without further ado. Follow along!
How can I fix the Steam access denied on this server error?
1. Check if the servers are down
If it’s a service-wide error that affects all Steam users, you can be sure that Valve already knows about it and is doing its best to solve it quickly.
We’ve briefly mentioned at the beginning of our guide that most of the time, the Steam access denied error seems to sort itself out.
Therefore, if you’ve already tried all of our suggested fixes and nothing seems to work, the problem may be on Steam’s side.
In this case, your best course of action is simply waiting for Valve to take care of this situation. In the meantime, you can check the Steam server situation.
2. Use a specialized VPN
It’s not unheard of that sometimes; Steam might temporarily restrict access from certain IP addresses.
This is precisely why an issue such as the Steam access denied error exists. Maybe there were too many requests from your IP address; who knows?
To rule out an IP block, even a temporary one, you can try changing your IP address and see if you’re still getting the error message.
VPNs such as Private Internet Access are one of the most effective ways to change your IP address since they encrypt traffic and spoof your location.
Private Internet Access has an extremely user-friendly interface, being one of the most easy-to-use and popular VPNs around the world.
It offers thousands of servers located in more than 70 countries. Plus, with its ultra-strong encryption generated with the AES-256 bit model, this VPN will always make sure that user data stays safe and is not discovered by cyber-criminals.
PIA’s manufacturers have started offering dedicated IP addresses to customers. By this, you have to consider having the same public IP address every time you connect to the VPN.
Also, Private Internet Access includes a multi-hop feature that routes your traffic through two VPN servers instead of just one.
Check out Private Internet Access’s most important features:
Tons of servers in worldwide locations
AES-256 bit encryption
Multi-hop features
Private Internet Access
Try PIA if you want to hide your IP address and encrypt your online traffic while running Steam.
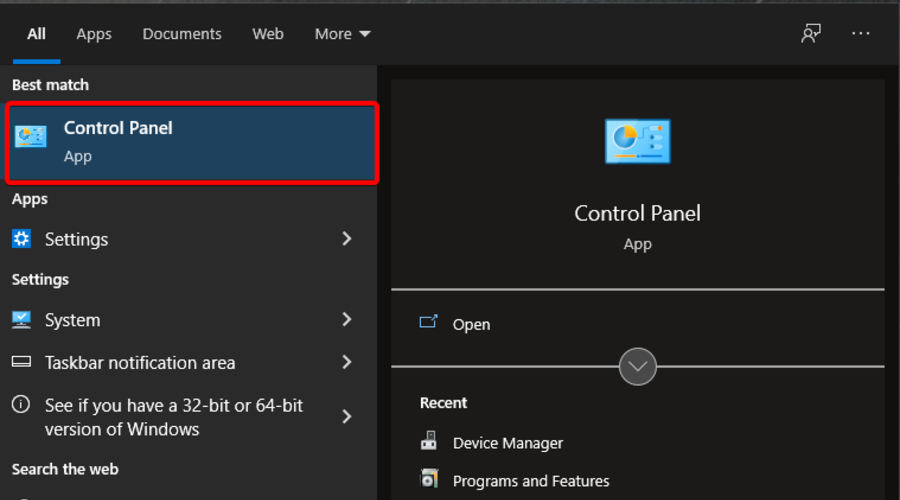
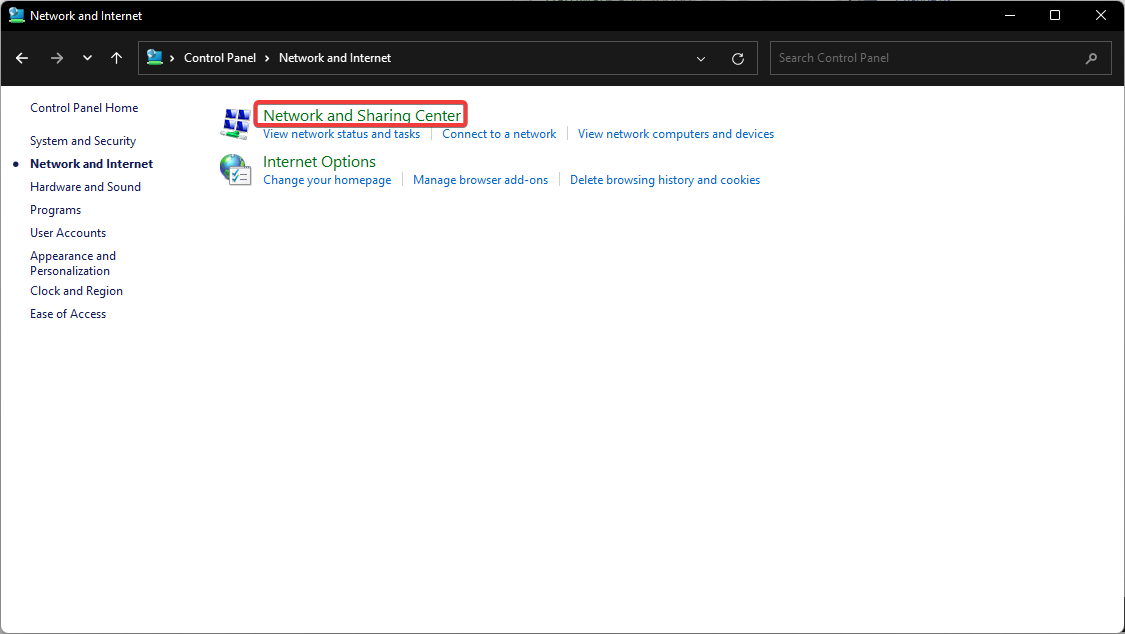
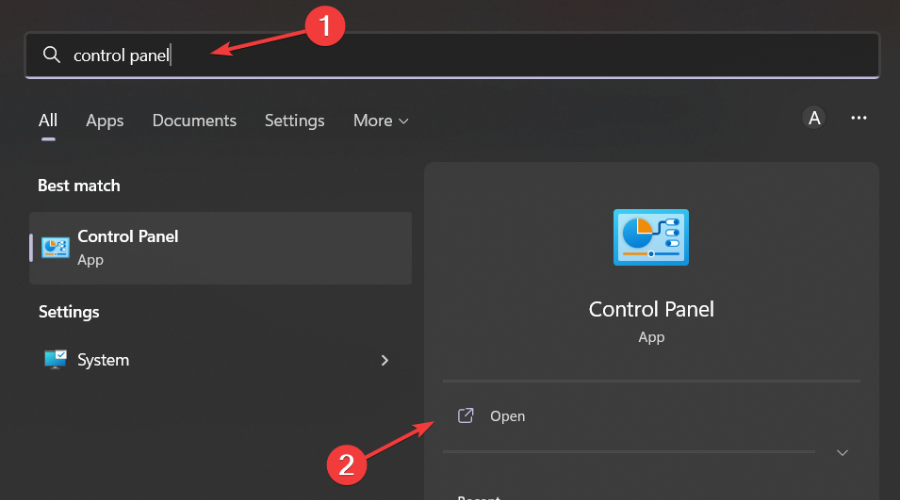
Press the Windows key on your keyboard. Type controland press Enter key to open the Control Panel.
Select Network and Internet.
Go to the Network and Sharing Center.
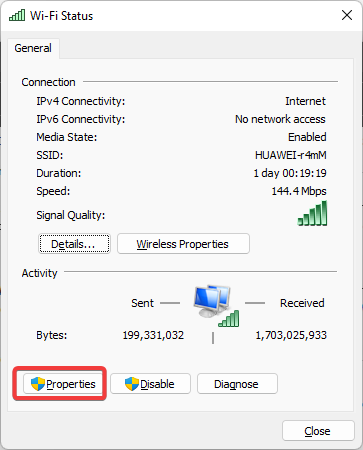
Select the Change adapter settings option.
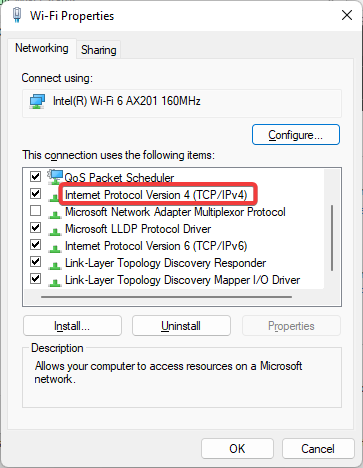
Right-click your active network and select Properties.
Locate and select Internet Protocol Version 4 (TCP/IPv4), then click on Properties.
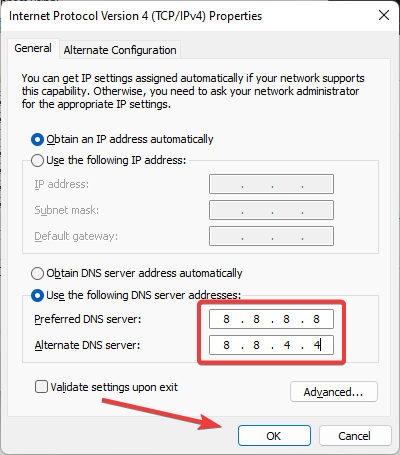
Select the Use the following DNS server addresses option.
Type the following values in the appropriate fields: Preferred DNS Server: 8.8.8.8Alternate DNS Server: 8.8.4.4
Click OK to save the changes
A limited DNS server can cause various connectivity issues or conflicts with the Steam client.
With that in mind, you may want to try to switch to a better DNS alternative other than your ISP-assigned one.
There are various free public DNS servers you can use, and we’ll teach you how to perform this configuration safely.
Keep in mind that you can use any third-party DNS server you prefer. The one we used in our example is Google’s public DNS, and it works great.
5. Verify Integrity of Steam Files
Hit the Windows key, search for Steam, then open the app.
If you’re not logged in, input your credentials, then click on Log In.
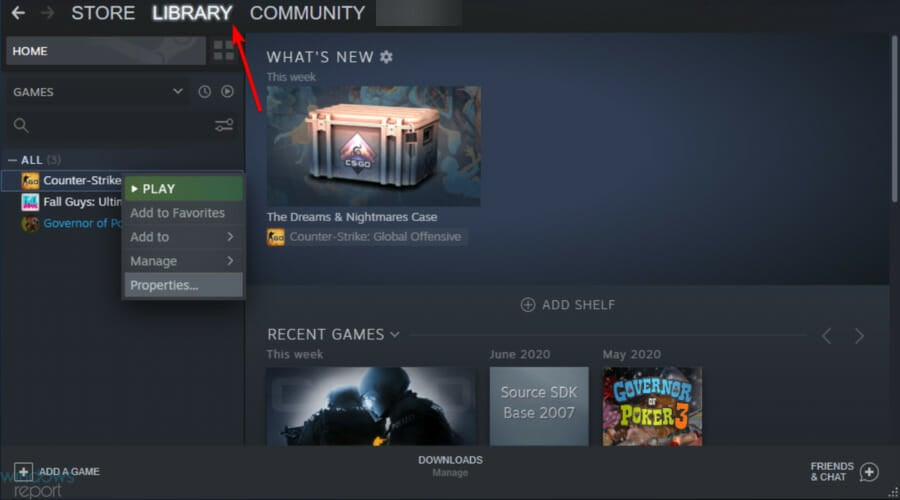
Now, from the main menu, click on Library.
Right-click the affected game and select Properties.
Go to the Local Files tab.
Click on the Verify Integrity of Game Files button.
Wait for the file validation to come to an end.
If the error is occurring while accessing a specific game, you may want to verify the integrity of files to check if the files are installed correctly. Steam offers a built-in solution to do the same. Here is how to do it.
Steam will scan the files for the game you selected and will try to validate them.
If you receive a success message at the end of the scan, your game files are correctly installed. Thus, the issue was not caused by the game files.
6. Manage antivirus/firewall rules
Checking security software on your computer for rules against certain services is always a good start when encountering connection issues.
For instance, if your firewall blocks traffic to and from specific apps, such as Steam, they might not work as intended.
In turn, you may encounter error messages such as the Steam access denied one. The same goes for antivirus/antimalware software that you installed on your PC.
If security software has decided that Steam or some of its services are bad for your PC and should be blocked, you may encounter connectivity issues.
Can’t connect to Steam even though I have Internet?
Sometimes, problems with a network may be traced back to a piece of malfunctioning hardware, such as a router or a switch. Or by usage behaviors that were not expected. Such are spikes in the network’s available bandwidth and variations in the application’s setup.
However, the error that is being issued by Steam might also be the result of problems with their systems or security breaches that they have had.
You should know that the Steam access denied error is not the only one that might occur while running this app. Because it is important to be aware of and prevent all the threats that you might face, take a look at the following list:
AppHangB1 error on Steam – This usually causes your PC to become unresponsive or extremely slow, so it can be extremely annoying. Fortunately, we’ve prepared some solutions that will certainly solve this issue.
Application load error 65432 on Steam – It seems like this error message pops up for some players when they try to launch Skyrim and other Bethesda games.
Application load error 5:0000065434 in Steam – According to some users, this error appears when they start the game from Nexus Mod Manager. However, it also loads fine if they start it from Steam. If you’re curious about solving this annoying problem, make sure you check our dedicated guide.
General Steam errors on Windows 10 – We’ve also compiled an article that indicates the most popular Steam errors on Windows 10 and their easiest fixing solutions. We strongly recommend saving this guide somewhere for bad days.
All things considered, if you’ve experienced the dreaded Steam access denied error, there are some ways that you could fix it.
However, sometimes the issue may be on Steam’s side, in which case you should just wait for Valve to sort things out.
In case you encounter additional questions regarding today’s subject, feel free to use the comment section below.
We’re sure you are pretty excited about owning a Steam Deck, so we’ll take a closer look at this fantastic gaming device.
Remember that Valve’s handheld gaming PC has been released to the general public on February 25, 2022, but buyers had to wait a lot for their devices to be delivered.
If you got one, or you’re ordering one, you might want to know how to change Steam Deck’s resolution or what are the best Steam Deck verified games. And, if you are curious about the whole BIOS environment for the Steam Deck device, you came to the right place.
Does Steam Deck have BIOS?
Remember that even though Valve’s Steam Deck runs a modified Arch Linux operating system called SteamOS v3.3, you can also install Windows 11.
The new handheld gaming PC is said to have a lot of exciting features, and it is also highly customizable in terms of software.
To answer your question, yes, the Steam Deck has a BIOS, and today we will show you everything you need to know about it.
How do I enter BIOS on Steam Deck?
The process of entering this gaming device’s BIOS mode starts with powering the device off. Afterwards, you can enter Steam Deck’s built-in Settings to access BIOS.
1. Hold the Power button on your Steam Deck.
2. Turn off your Steam Deck by selecting Shut Down from the options that appear on the screen.
3. Press and hold the Power and Volume Up buttons until you hear a beep.
No, unfortunately, you don’t have a factory reset option within the Steam Deck’s BIOS if that’s what you were after.
Instead, you can bring back the device to its original settings by going to the Settings menu and selecting this option. We have a dedicated guide on how to reset Steam Deck to factory settings that you can check out.
This is the situation for the time being as far as Steam Deck BIOS settings go, and you will not get different settings depending on your device’s BIOS version.
Don’t be disappointed, as we’re sure that the lack of a BIOS factory reset option does not make the Steam Deck less than it is.
Steam Deck BIOS update – How to do it?
Even though your average Steam Deck user shouldn’t have to worry about such things in the first place, if you really must know, the BIOS is updated when you update the device’s firmware.
Now, this is an entirely different story if you are asking where to find it because it’s as easy as saying Steam Deck.
How do I update my Steam Deck’s firmware?
Access Settings.
Navigate to the System tab and click on Apply to install the updates.
Now you better understand the device’s BIOS files and what it’s like dealing with this part of the OS on this handheld gaming rig.
We’ve shown you how to do the Steam Deck BIOS boot as well, so you are more than prepared to go forth with whatever you want.
After you receive the Valve gadget, take your time and carefully go through the Steam Deck initial setup for everything to run smoothly. However, you will find out that on rare occasions when there are errors on the device, fixing it is pretty simple.
Many users tend to use two or more monitors on their computer to get more workspace and improve their productivity.
However, it seems that there are some issues with Windows 10 with users complaining that the dual monitor is not extending, among other problems.
Now, some people are complaining that Windows 10 only detects one of the two monitors that are plugged in.
Windows not being able to detect a second monitor can be a big problem, but it is not the most difficult issue to fix. And we will show you how to do it in this guide.
Why is my second monitor not detected?
The second monitor not detected issue has different variations, as reported by users. Below are some of the common ones and their causes:
Windows 10 can’t detect the second screen: This is a just a variation of this problem, and if you’re having issues detecting a second screen, you might want to try some of our solutions.
Windows 10 can’t detect HDMI, VGA monitor: If your monitor can’t be detected by Windows 10, that can be a big problem. According to users, these types of problems usually appear while using HDMI or VGA monitor.
Second monitor not recognized Windows 10: Many users reported that Windows 10 can’t recognize the second monitor. This is a common problem, but you should be able to fix it by using one of our solutions.
Windows 10 second monitor not working: This is a common problem that can occur with dual monitor configurations. Many users reported that second monitor isn’t working on their Windows 10 PC.
Windows 10 can’t find my second screen: Issues with dual monitor setups are fairly common, and many users reported that Windows 10 wasn’t able to find the second screen.
Second monitor flickering Windows 10: This is another problem that can appear on dual monitor configurations. Many users reported that the second monitor is constantly flickering.
Windows 10 second monitor goes black – If you’re using a dual monitor setup, you probably encountered this issue before. According to users, their second monitor goes black or to sleep for unknown reason.
Windows 10 second monitor keeps turning off – This is another relatively common problem on dual monitor configurations. However, this isn’t a serious issue, and you should be able to solve it by using one of our solutions.
These issues are commonly caused by display drivers but don’t worry, there are a few simple solutions that can help you out.
How do I get my computer to recognize a second monitor?
1. Update your display driver
1.1. Update drivers manually
Right-click the Start button and select Device Manager.
Double-click the Display adapters option to expand it.
Choose Update driver.
Select Search automatically for drivers.
Wait for the search to complete and install the updates.
Aside from using the built-in Windows built-in updater, you can also go to your graphic card manufacturer’s website, find your graphic card, and download drivers for it.
While searching for drivers, make sure that you download the latest drivers, preferably ones for Windows 10.
1.2. Update drivers automatically
Downloading drivers manually is a process that carries the risk of getting the wrong driver installed, which may lead to serious malfunctions.
The safer and easier way to update drivers on a Windows computer is by using an automatic tool such as Outbyte Driver Updater.
This awesome tool automatically identifies each device on your computer and matches it with the latest driver versions from an extensive online database.
First, you need to download and install Outbyte Driver Updater. After installing, the software will start running automatically and identifying any driver problems on your system.
After a few seconds, you will get the full report and a list of potential drivers to install. The only clicking required is on the Update all button that you will see on top of the list.
You can also update individual drivers by checking their corresponding boxes on the left and pressing their update buttons from the right.
Outbyte Driver Updater
This excellent light tool will update your drivers automatically, with minimum effort and time.
Press the Windows key + X and select Device Manager.
Double-click on Display adapters.
Right-click your driver and select Uninstall device.
Now, check the box for Delete the driver software for this device.
Finally, click the Uninstall button.
After the uninstall process is complete restart your computer and you’ll have your default driver installed.
4. Use specialized software for multimonitor setup
DisplayFusion is a great tool for Windows that is specialized in setting up your multi-monitor setup. It’s easy to use although it comes with complex features that will transform the multiple monitor management process into a breeze.
DisplayFusion can also be controlled with hotkeys and the experience is customizable by using Power User Menu, TitleBar Buttons, to your own liking.
This awesome tool also offers an impressive library of wallpapers and screen savers to choose from and multi-monitor taskbars to help you keep your windows organized.
You don’t need to commit to it from the start. You can still test it under a free trial period.
Press the Windows key + I to open the Settings app.
Select the System option.
Scroll down to the Multiple displays section and click Advanced display settings.
Click the Display adapter properties for Display 1.
Select the Monitor tab and set the Screen refresh rate to 60 Hertz.
Click on Apply and OK to save the changes.
After doing that, you should be able to use your second monitor. Keep in mind that not all frequencies are compatible with your monitor, so if you want to avoid causing damage to your display, use the frequencies recommended by the manufacturer.
If you’re using driver software such as Nvidia Control Panel or Catalyst Control Center, be sure to change your monitor frequency using these tools as well.
Can’t open Nvidia Control Panel on Windows 10? Don’t worry, we’ve got the right solution for you.
7. Temporarily switch only to the first monitor
Navigate to the Settings app and go to the System section.
In the display settings select Show only on 1 option (By doing that the picture will be displayed only on your main monitor).
Save the changes.
Change your monitor settings to Extended and save the changes once again.
This is a small glitch that can occur, but you should be able to solve it by using this workaround.
According to users, this glitch appears frequently while starting your PC, so you’ll have to repeat this workaround whenever the issue occurs.
8. Install Windows updates
Open the Settings app and navigate to Update & security.
Now, click on Check for updates button.
Finally, click the Install now button to install all updates available.
Windows will now check for available updates. If updates are available, Windows will download them automatically in the background and install them once you restart your PC.
Windows 10 is a solid operating system, but sometimes you might find a certain bug.
Microsoft is working hard to fix all Windows 10 bugs, and the simplest way to keep your PC bug free is to install Windows updates.
Several users reported that Windows 10 can’t detect the second monitor, but they solved the issue by installing the latest updates for Windows.
By default, Windows 10 automatically downloads the updates in the background, but sometimes you might skip an important update.
After installing the necessary updates, the issue should be resolved completely.
9. Connect your monitors while the PC is running
Many users reported that Windows 10 can’t detect the second monitor.
According to users that use dual monitor setup, both monitors work but the second one is always mirroring the first monitor.
To fix the issue, you might want to try connecting your monitors to your PC while it’s running. If you can, try to switch the cables while your PC is running.
For example, if you’re using a DVI cable for the first monitor and HDMI cable for the second, try using the HDMI cable for the first and a DVI cable for the second monitor.
By connecting both monitors while your PC is running, you’ll force the PC to recognize both of them.
10. Set the Project mode correctly
Press the Windows key + P to open the Project mode menu.
Select either the Extend or Duplicate option.
Now, check if the issue is fixed.
Sometimes this problem can occur simply because you didn’t use the correct Project mode.
According to users, their Project mode was set to the Second screen only, and that caused the problem to appear. With this solution, the issue should be fixed.
Several users reported that Windows 10 can’t detect the second monitor on their laptops.
According to the users, this issue was caused by IDE ATA/ATAPI driver and in order to fix it, you need to remove the problematic driver.
We have already shown you how to uninstall a driver in Solution 3, so be sure to check it for detailed instructions.
After removing the problematic driver, restart your PC and your problem should be resolved.
This issue appeared on a HP Envy laptop but it can also appear on other laptops as well.
12. Adjust your resolution
Right-click your desktop and choose Display settings.
Locate the Resolution section and lower your resolution.
Keep lowering your resolution until the external display starts working.
Sometimes it’s necessary to adjust your resolution in order to fix your problem.
If your external display is using lower resolution than your PC, you might have to lower your resolution before you can use the second display.
If this solution works for you, you’ll have to readjust your resolution every time you want to use an external display.
13. Adjust Sleep Mode/close laptop lid
Press the Windows key + R, type control, and click OK.
Choose the Hardware and Sound option.
Select Power Options.
Click Change plan settings under the Selected plan.
Set all monitor-related settings to Never.
According to users, you can fix the problem with a second display simply by closing your laptop lid. As a result, your second display will become the main one and the issue will be resolved.
Keep in mind that this is just a workaround, so you’ll have to repeat it every time you want to use a second display.
Also, some users complained that their second monitor was not detected after waking up from Sleep mode. With the solution above, you should be able to prevent that.
14. Check if Extended desktop is enabled in AMD Control Center
Many AMD owners reported this problem on their PC. If Windows 10 can’t detect the second monitor, the cause might be AMD Control Center.
This software allows you to control various settings, but sometimes the Extended desktop feature might be disabled in Control Center.
To fix this problem, open AMD Control Center and navigate to the Displays Manager section.
From there make sure that the Extended desktop feature is enabled.
After enabling this feature, the problem should be resolved and both your displays should start working.
Keep in mind that this problem can also appear if you’re using an Nvidia graphics card.
If so, you’ll need to open Nvidia Control Panel and check if multiple displays are configured properly.
15. Update DisplayLink to the latest version
If you’re using DisplayLink to connect two monitors to your PC, you might experience this problem. To fix the issue, be sure that DisplayLink is updated to the latest version.
After updating DisplayLink, the problem should be completely resolved.
16. Enable Scale to the full panel size option
Open Catalyst Control Center.
Navigate to My Digital Flat Panels and selectProperties in the menu on the left.
Select your monitor and locate the Image scaling preferences section.
Select Maintain aspect ratio and click on Apply to save changes.
The problem should be resolved. Now you can use switch to Scale image to full panel size option if you want.
Users reported that using the Maintain aspect ratio option fixed the problem, so be sure to try it. After enabling this option, you’ll be able to switch to any other mode without issues and both monitors will keep working.
Why won’t my dual monitors extend?
The major reason your dual monitors are not extending is the wrong settings. If you have not enabled the Extend feature in the Project menu, your monitors might not extend.
Another reason for this issue is outdated drivers. We have shown how to do this in this guide.
Additionally, this guide may be useful if you’re wondering how to solve the unexpected resolution issue in Windows 10 and 11.
We hope that our complete guide helped you detect and set up your second monitor. For any suggestions, leave us a comment in the dedicated section below.
Your PC’s hard disk stores all of your relevant data, and any potential damage to the device has the potential of endangering your data, as well, unfortunately.
On the other hand, a hard disk has a limited lifespan, and it will eventually experience corruption sooner or later. Therefore, letting your data depend on it is not the best option we recommend.
If you are not aware of the condition of your hard drives, you may not be able to save your essential data before it’s too late.
You have to become conscious of the fact that not all hard drive crashes are random, and this is why you have to know when it’s time to back up your data before it fails beyond return.
You really have to make sure that all your essential information is backed up before anything nasty might happen to your hard disk.
A recommended solution is keeping tabs on your hard drive’s health so, in case something goes wrong, you will quickly be able to back things up.
Can you check the health of HDD?
Over time, your computer will become slower depending on how often you use it and what kinds of applications you install. After a clean installation of Windows, it may be challenging to get it back up and running in the same efficient manner in which it previously functioned.
In spite of this, you have the option of utilizing specialized hard drive software that will check the health of your HDD. Such as those listed below.
Additionally, not only HDD health check is essential for a well-functioning PC, but you should also use performance monitoring software to be conscious of the system components.
We gathered a list of the top 3 tools for checking your HDD’s health, as well, as they can best predict and protect from the unavoidable circumstances of a hard drive failure.
Industry-leading PRTG is a powerful and easy-to-use solution trusted by 200,000 users worldwide, especially if you are looking for a hard disk health check.
Highly versatile and complex, this tool has your back for every system you can think of, starting with devices, traffic, and apps. Plus, you can extend its benefits through the customizable HTTP API. Thus, it is another best HDD health check software.
PRTG monitors bandwidth, database, apps, cloud storage, all the way to servers, and the entire local network, including your workstations, routers, switches, servers, and printers.
Let’s quickly look at its key features:
Monitor bandwidth, database, apps, cloud computing services, servers, and LAN
Free download of the HDD health check software
SSH, SNMP, WMI, and Windows Performance Counters technologies
Real-time maps with live status (300 map objects: device and status icons, traffic charts, top lists, etc.)
Comprehensive dashboards and in-depth reporting
Flexible alerting that you can schedule
Native mechanisms for notifications (email, push, or HTTP requests)
Hard Disk Sentinel is one of the best SSD and HDD monitoring and analysis software that can monitor and diagnose hard disk drive problems and test and repair them.
The tool reports and displays SSD and HDD health and performance degradation so that you can take the appropriate action to avoid disk failure and data loss.
Compared to the traditional method of SMART checking, the Sentinel proves its value by being more sensitive to disk failures and displaying more relevant and detailed information about the problems found (if any).
Speaking about data loss, if you got to this post a moment too late and are already battling with HDD failure, don’t panic. We have the best recovery software for your HDD right here.
Let’s quickly look at its key features:
Comprehensive alerts and reports, ensuring maximum safety of your valuable data
Sophisticated detection algorithms
Inspect internal hard disks, external hard disks, SSDs, SSHDs, NAS drives, micro SD cards, and eMMC devices with one single software
Monitor status including health, temperature, disk transfer speed in real-time, and all S.M.A.R.T. values for all HDDs
Scheduled and automatic disk backup options to prevent data loss
It is a significant sign that the hard drive is failing if the name of a file or folder on that particular hard disk begins to get garbled or if you cannot open it.
In addition, any damaged data or data that has been removed are also indicators of the problem.
If you have any of these issues, it is a warning indication that your hard drive may not have much longer to live.
Solutions & alternatives for monitoring your hard drives
Here are your solutions and options for keeping an eye on your HDD’s health:
All last-gen drives come with a monitoring technology called S.M.A.R.T. (Self-Monitoring Analysis and Reporting Technology). This tool is targeted at continuously monitoring a certain number of parameters on a hard drive.
Various parameters can be efficiently monitored using S.M.A.R.T., including reading and write error rates, spin-up time, seek error rates, temperature, and more essential elements.
To warn you when some of these crucial parameters are degrading or reaching their threshold, you need a program that can track down all these changes and show them to you.
You must get the opportunity to test and see whether your hard drive can safely store your data, have enough time to back up essential files and start looking for a replacement if it becomes necessary for various reasons.
A monitoring program alone may not be fully capable of showing you whether the integrity of your files can be preserved on a particular hard drive.
It’s an excellent idea to scan for an unreadable or lousy block of data with available tools at least once a month to ensure that your drive is not degrading and your data is not being lost.
S.M.A.R.T. for checking your HDD’s health
S.M.A.R.T. is the embedded monitoring system implemented in most modern HDDs or SSD. Still, unfortunately, it will only let itself be known to users when imminent hardware failure is on its way.
All the leading HDD manufacturers recommend an occasional check of your disk status and running some surface tests and benchmarks.
Finally, you should know that your Windows PC also has a built-in tool that can be up for this job; however, if you want more advanced results, a third-party hard disk health checking tool will be your best bet.
You can choose any of the tools mentioned above or share other suggestions with us via the comments section below.
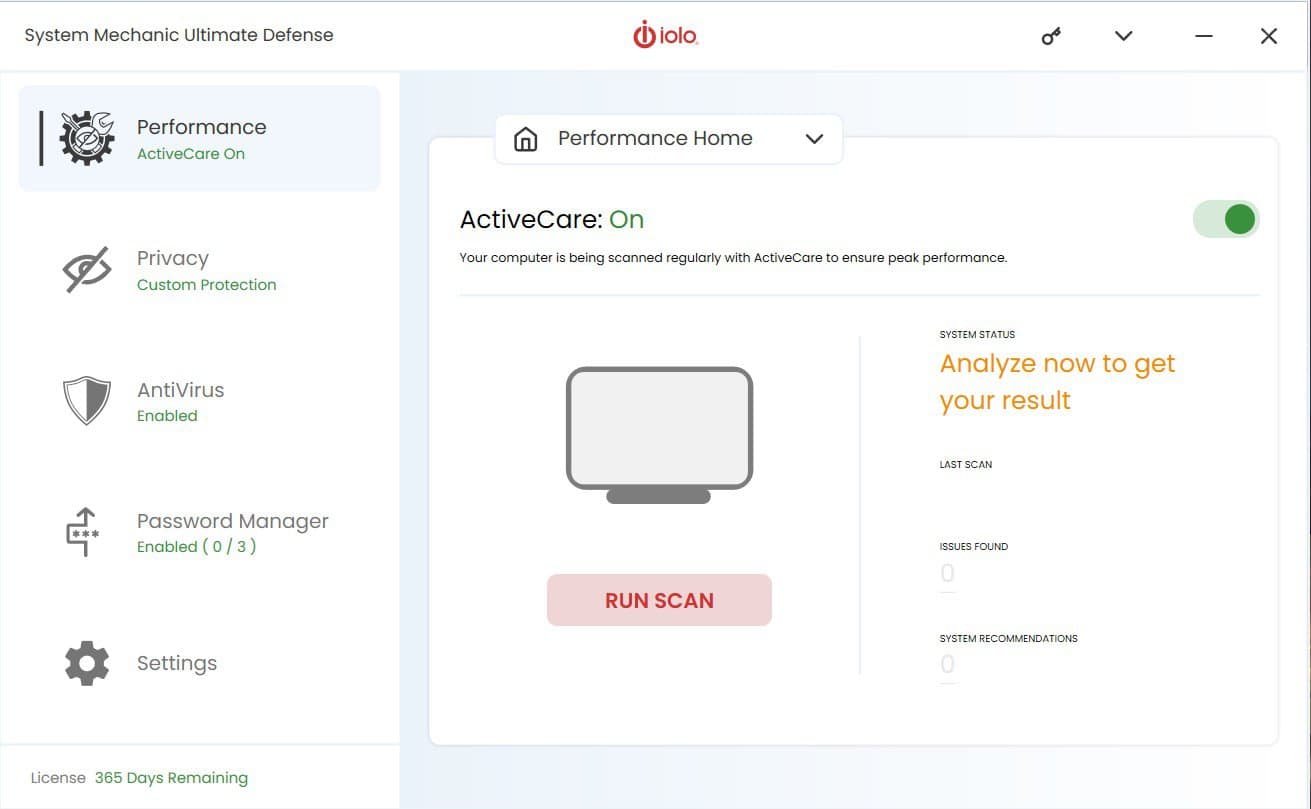
This tool is extremely efficient in maintaining your system healthy. You can run a bunch of scans to see how your hardware is doing, but also fix a lot of errors.
Talking about HDD, System Mechanic keeps it safe via its different tools and provides you with a maximum of information about it.
You don’t have to bother about taking any actions – the paid version not only scans and provides you information about the errors but also fixes them.
Iolo System Mechanic is one of the 7 software products included in the comprehensive security, privacy, and optimization package Phoenix 360, that offers hard disk health check and repair possibilities.
Let’s quickly look at its key features:
Detect startup apps and disable the ones you don’t really need (can improve the Windows boot time)
Perform quick or in-depth scans of your computer
Kill resource-draining background services and processes
Boost the performance and stability of your processor, memory, and hard disk
Clean up junk files and remove cache files that clutter your hard drive
Wipe chat and Internet history to protect your privacy
Defragment, optimize, and back up your system registry
Iolo System Mechanic
Iolo System Mechanic helps you optimize your PC, improve computer speed, and fix crashes.
Tom Clancy’s Rainbow Six Siege is a tactical player-verses-player shooter game. However, users have received the error code 6-0x00001000 when using the multiplayer matchmaking service in Rainbow Six Siege.
Rainbow Six Siege is available on PlayStation, PC, and Xbox consoles. The game follows an attack and defense model, allowing users to team up with friends to battle other players.
If you’re receiving the error code 6-0x00001000, follow the solutions below to solve this issue quickly.
How do I fix error 6-0x00001000 on Rainbow Six Siege?
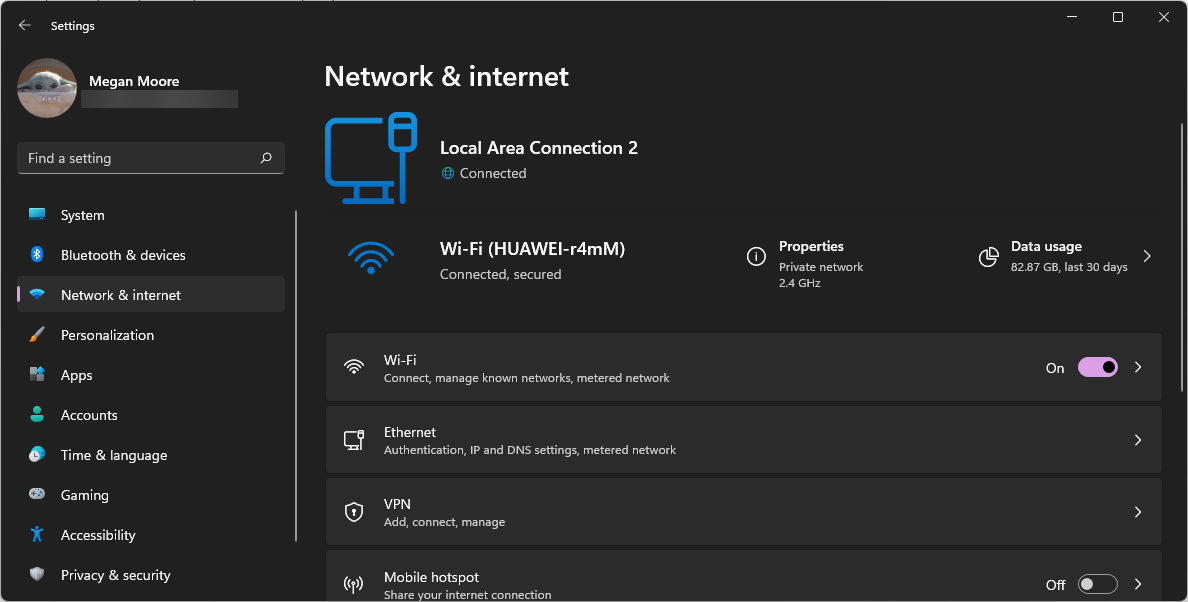
1. Check the network connection
This may seem like a simple solution, but if your internet connection is weak or limited, then that is most likely why you’re receiving error code 6-0x00001000 in Rainbow Six Siege. Check your internet’s performance on another device to see if it’s unstable.
Users can also power cycle their router by turning it off and removing all cables. After holding the power button for about 10 seconds, users should wait around five minutes, then hook everything back up and power on the router.
2. Check server status
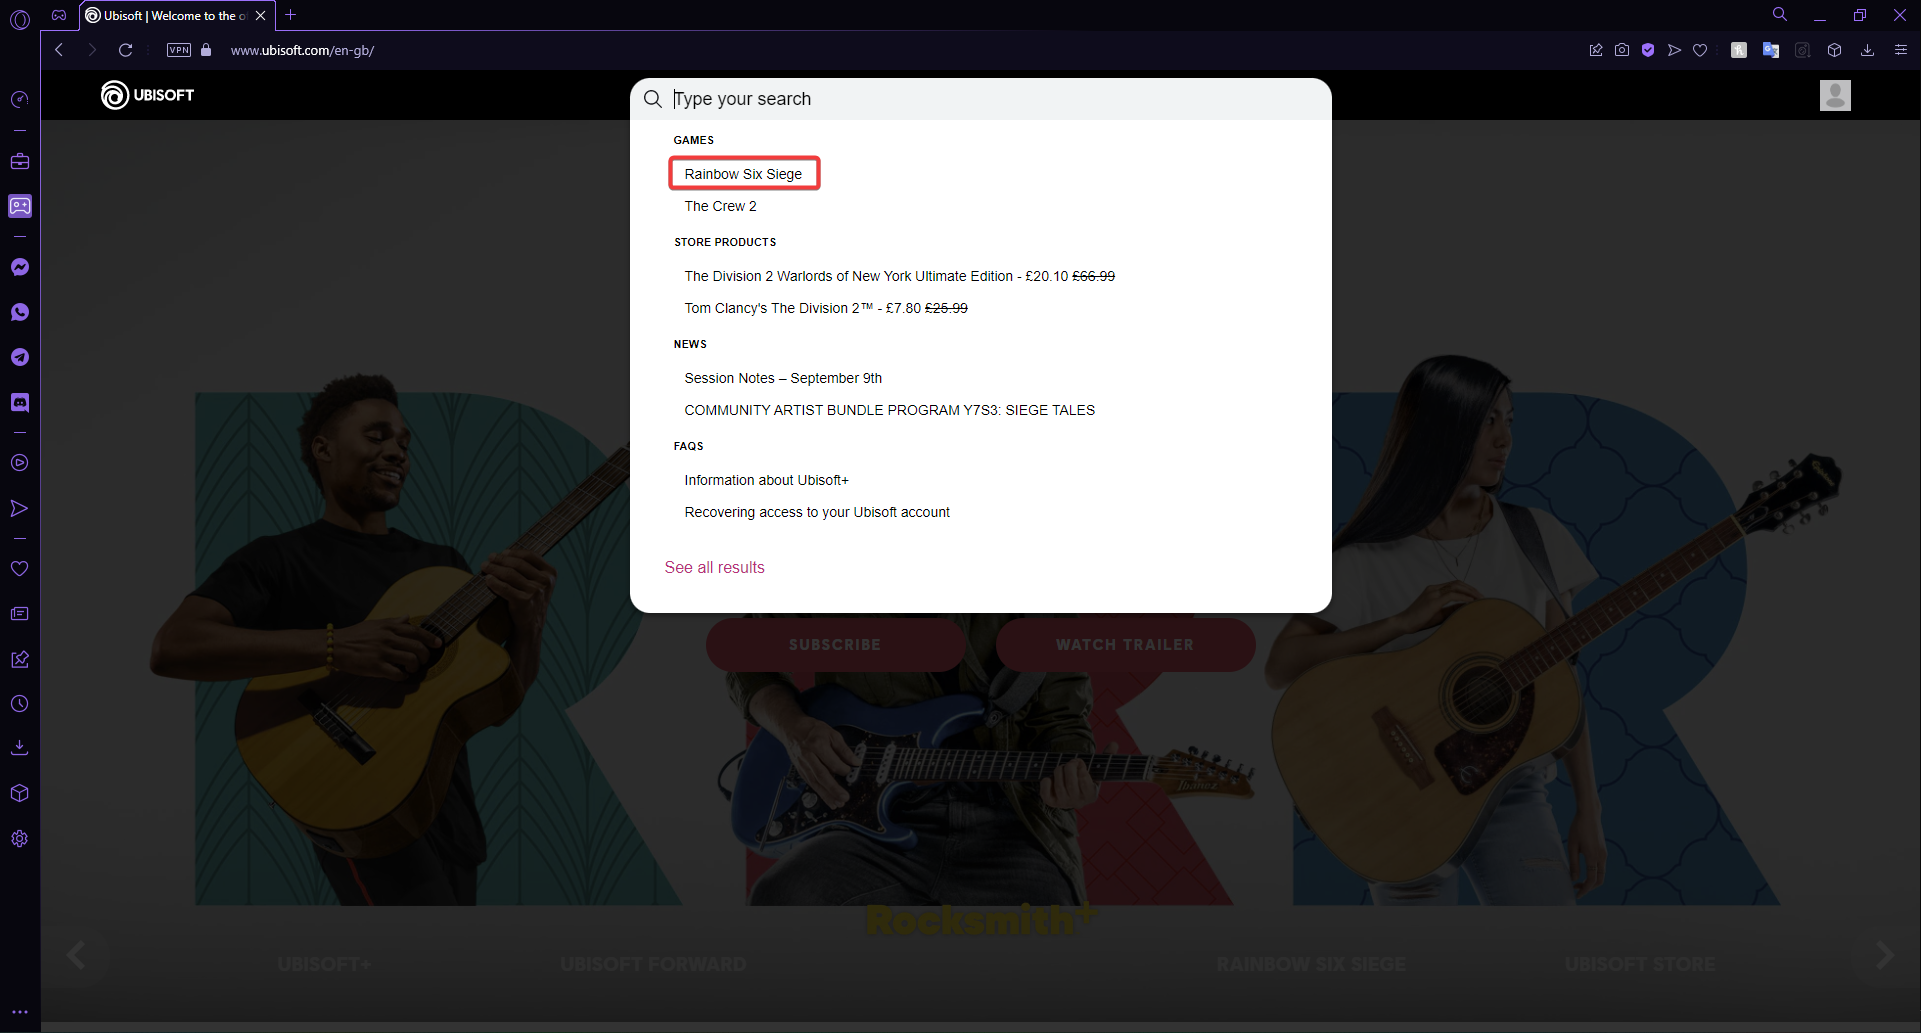
Open a browser, go to the Ubisoft official website, and search for Rainbow Six Siege in the menu bar.
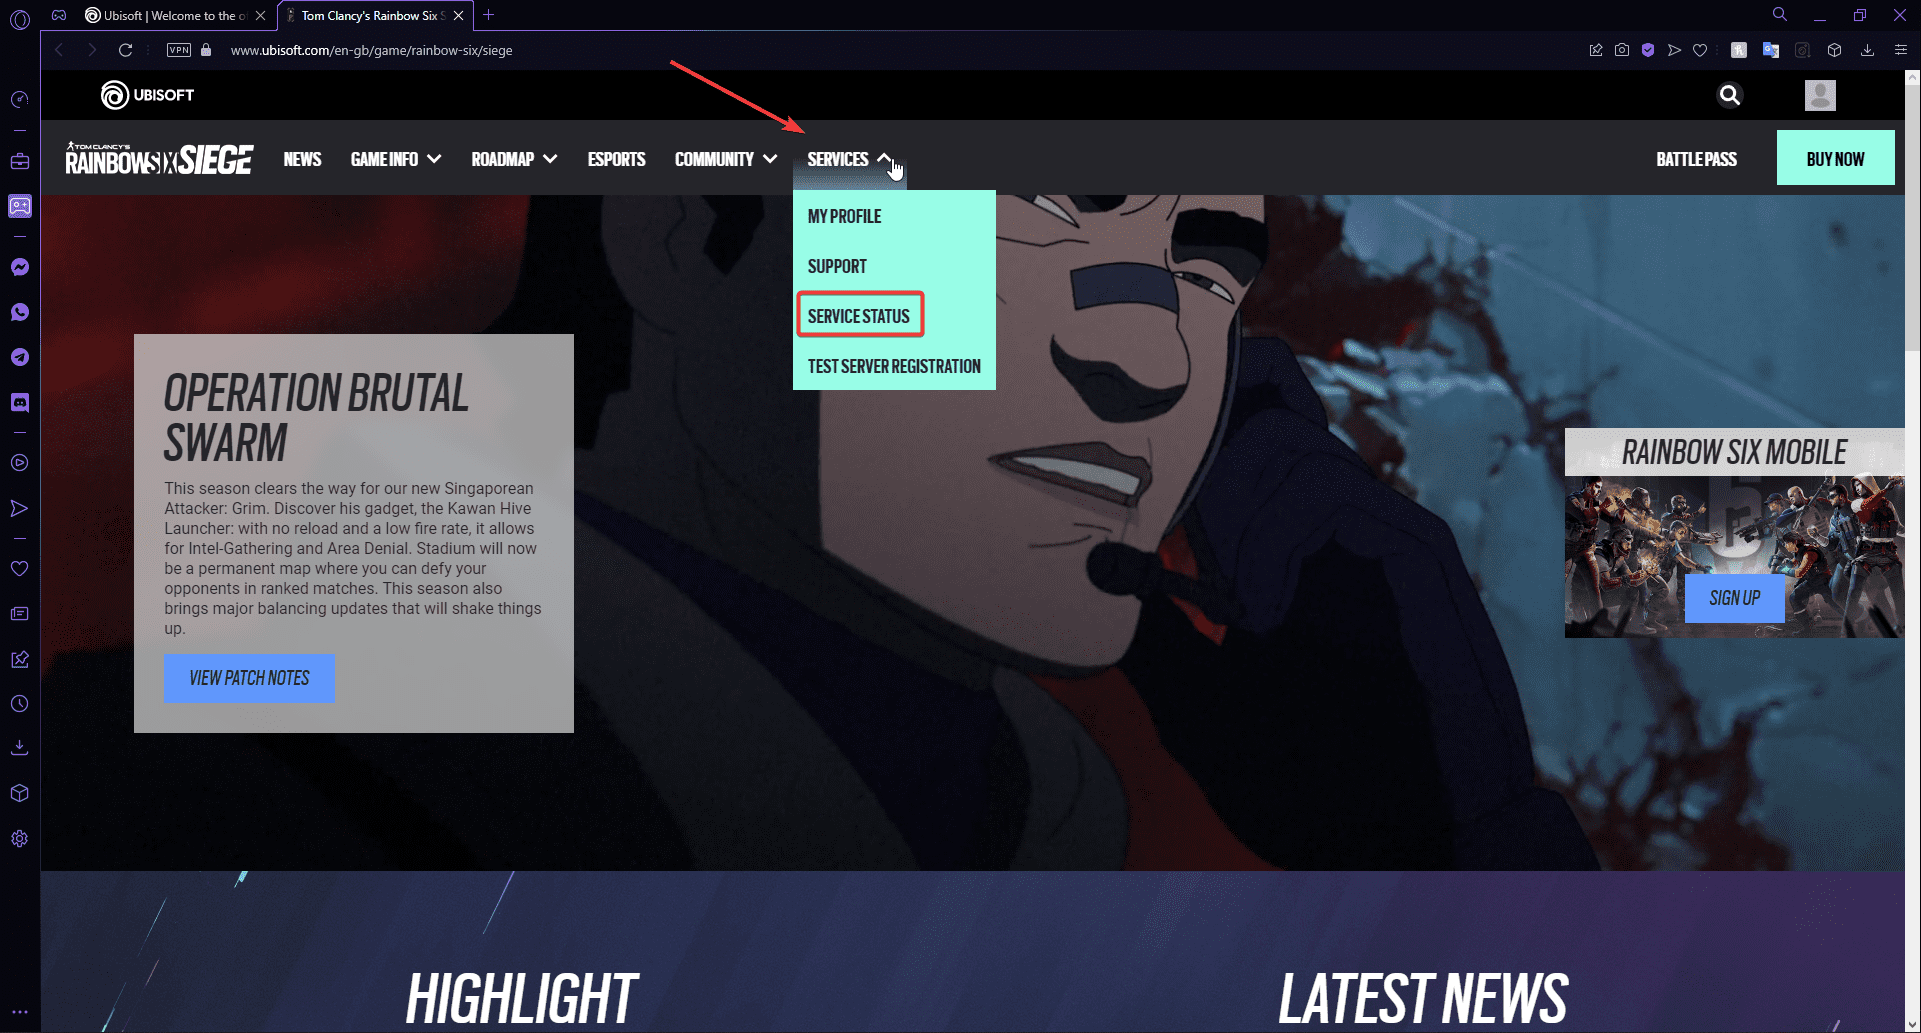
Under Services, select Server Status.
Check if the servers are operational for your device.
If the servers are down for maintenance or issues, the status will be indicated on the server status page for Rainbow Six Siege. If everything is operational, then move on to the next solution to solve error code 6-0x00001000.
3. Clear DNS cache
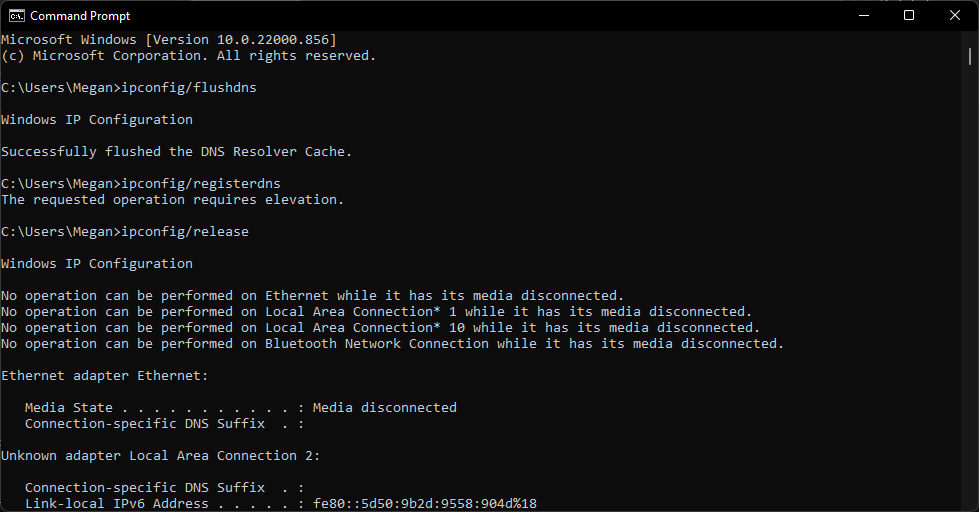
Click on Start and search Command Prompt, then hit Enter.
Enter the following commands into Command Prompt, pressing Enterafter each entry, then exit:
Ipconfig/flushdns
Ipconfig/registerdns
Ipconfig/release
Ipconfig/renew
Clearing the DNS cache will remove any corruption that might be causing issues in Rainbow Six Siege. Doing this will not impact the performance of the game.
Click on Start and search for Control Panel then hit Enter.
Select Network and Internet then click on Network and Sharing Center.
Under View your active networks, click on the network you are currently connected to.
Click on Properties.
Locate Internet Protocol Version 4 (TCP/IPv4) and double-click on it.
Select Use the following DNS server addresses and enter 8.8.8.8 next to Preferred DNS server and 8.8.4.4beside Alternate DNS server.
Press OK.
Domain Name Systems (DNS) allow websites and programs to reach your computer via the Internet. If the DNS is unstable or not working, Rainbox Six Siege serves will not be available, leading to the error code and others like 3-0x000c0054.
5. Update network drivers
Click on Start and search Control Panelthen hit Enter.
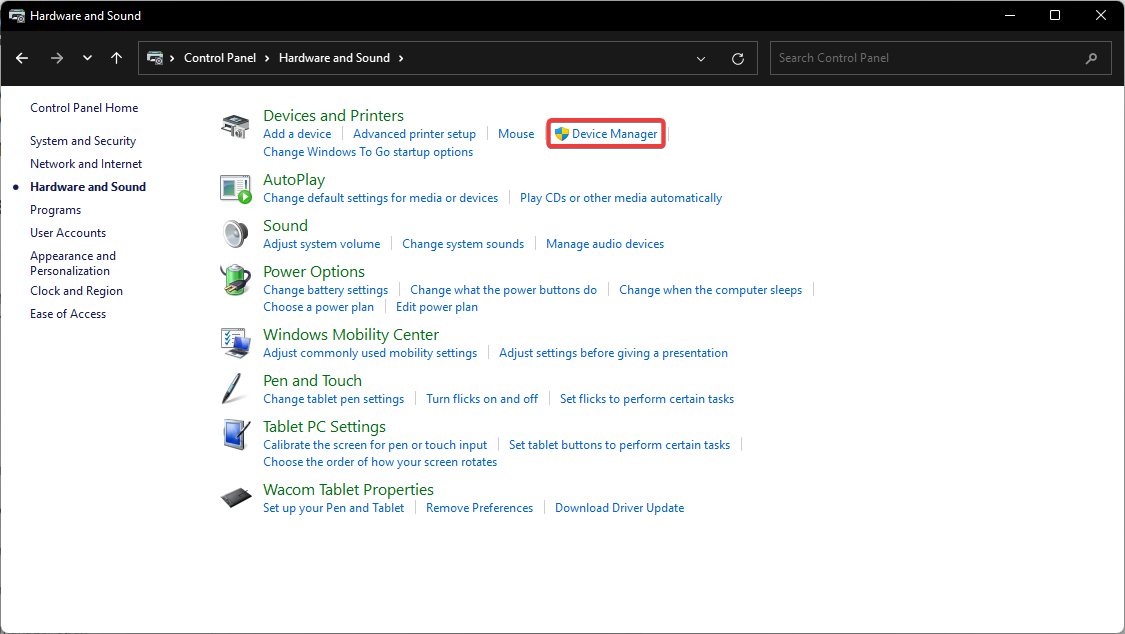
Select Hardware and Sound, then click on Device Manager.
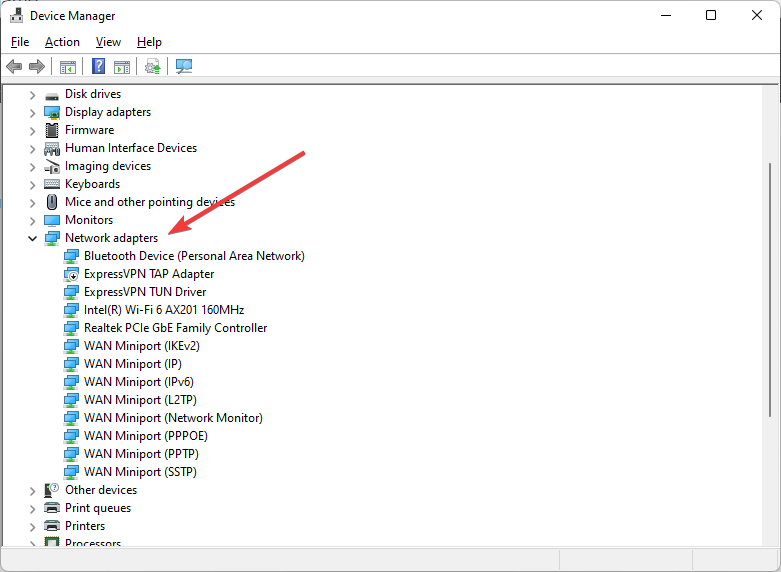
Open the dropdown menu next to Network adapters.
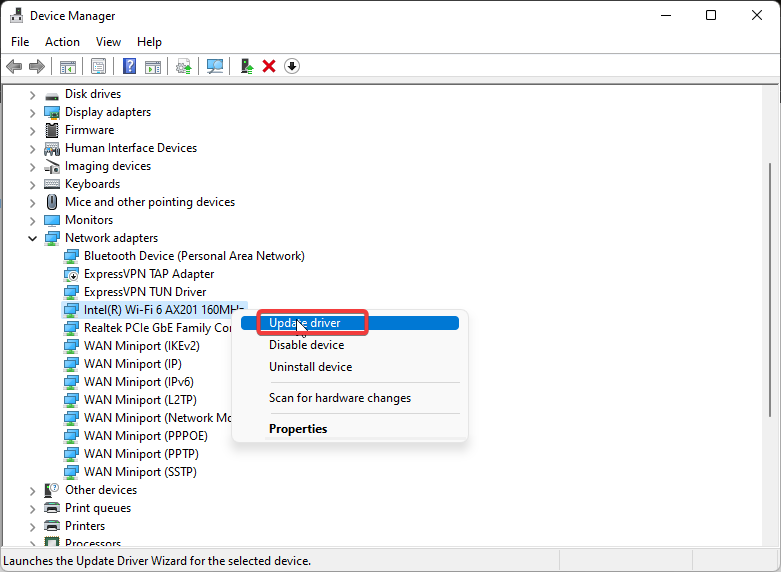
Locate your Wi-Fi driver and right-click on it and select Update driver.
Click Search automatically for drivers in the pop-up.
If your Wi-Fi drivers haven’t been updated in a while, then there is a chance that it is causing problems in Rainbow Six Siege. Check to see if the error code disappears after updating your internet driver.
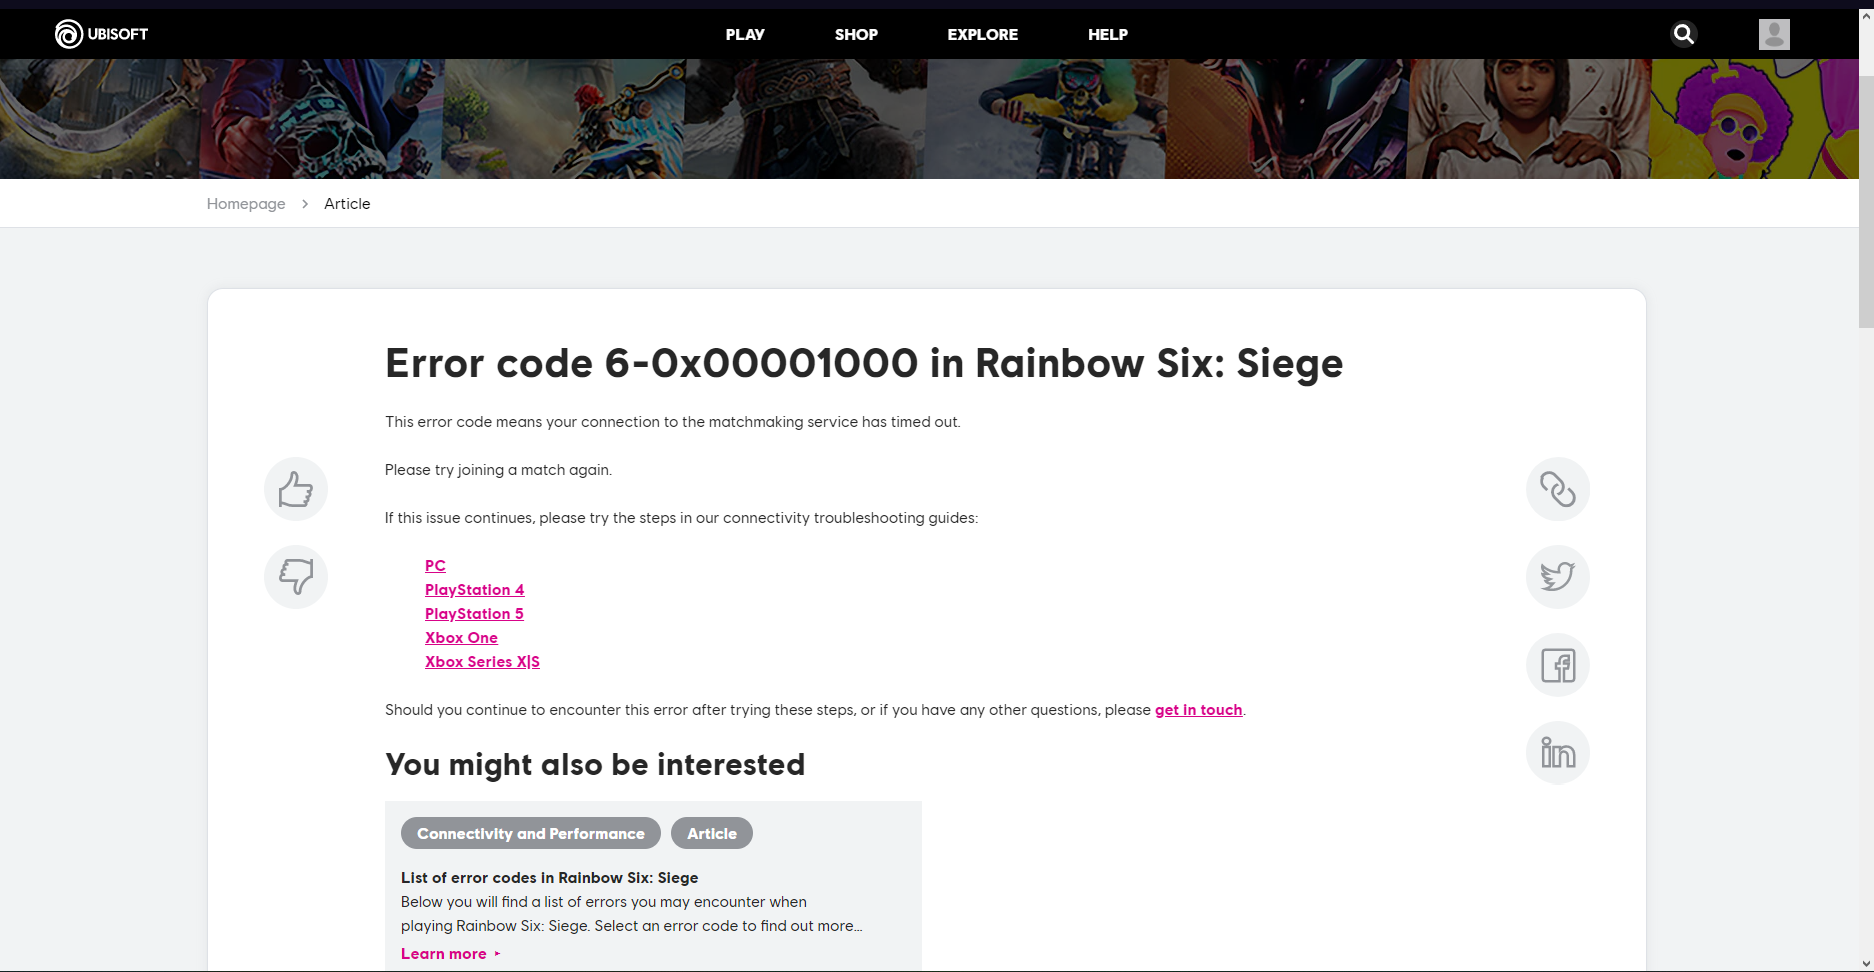
Also note that users report encountering error code 6-0x00001000 when using the matchmaking feature for multiplayer games. The error means the matchmaking service timed out due to a poor connection.
The number one cause of this issue is a weak or unstable internet connection. Another common cause of errors in Rainbow Six Siege is that your game is out of date and needs to be updated. The server may also be undergoing maintenance at the time.
What are the most common Rainbow Six errors?
Some of the most common Rainbow Six errors occur due to poor server connection. This can happen if a weak network connection or servers are down. We have a guide if you’re experiencing connection errors in Rainbow Six Siege.
We hope one of the above solutions fixes error code 6-0x00001000 in Rainbow Six Siege. In the comments below, let us know which step worked for you or if you have a suggestion for another solution.
Is Paradox Launcher not working on your computer? If yes, we have the solutions to fix the most common PDX Launcher issues. This article will describe them one by one.
This game launcher is required to play some specific games from Paradox Interactive. It doesn’t matter from where you have purchased such titles; you will need PDX Launcher to run them. If you are interested, you can read the Paradox Launcher review.
The problem begins when you face issues while opening or using the Paradox Launcher. Don’t worry. After doing some analysis, we have found some of the most common problems with this application.
This article contains the most effective solutions for each of these problems.
Why is Paradox Launcher not working?
PDX Launcher may not work correctly for various reasons. It includes the following:
Active background process running a different version of this launcher: Such processes often conflict with the launcher, so check for these and terminate the process.
Third-party service or application: Some third-party programs are found to prevent the Paradox Launcher from running.
Firewall or antivirus program: Your third-party antivirus or firewall or firewall could be blocking the attempts by Paradox Launcher.
Corrupted components: If the relevant files required to run the installer or the ones that provide the optimal environment are missing, you may encounter issues running the Paradox launcher.
How do I fix Paradox Launcher when it’s not working?
1. Paradox Launcher V2 installer is no longer responding
1.1 Exit a background process
Press CTRL + Alt + Del on the keyboard and go to Task Manager.
Click on the Paradox Launcher process and then click on End task.
A restart is a good way to fix common issues on a computer. To do this, do not hesitate to follow the steps of method 1.2.
2.2 Install in clean boot mode
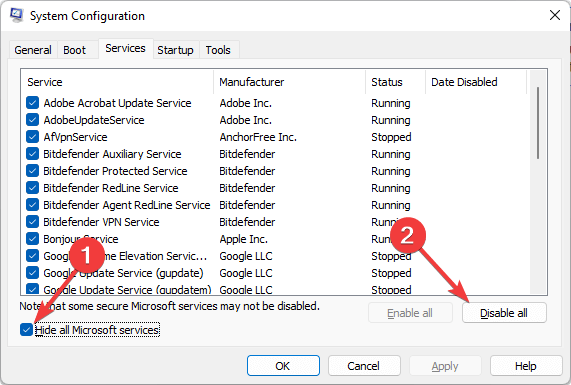
Open the Start Menu, type MSConfig and hit Enter.
Go to the Services tab.
Check Hide all Microsoft services and click on Disable all.
Click on Apply and OK.
Restart your computer.
Try to install the Paradox Launcher V2.
After installation, undo the changes you have made.
3. Paradox Launcher V2 not opening
3.1 Close any other active game/launcher
If you have games or other launchers running in the background, that may prevent Paradox Launcher from working properly. So, before opening this app, you should close any other game launchers and games.
3.2 End PDX Launcher-related background process
If there are existing background processes related to this launcher, you may have difficulties opening it. So, make sure no related services are actively running in the background.
To stop any services, follow the same steps as shown n method 1.1.
3.3 Uninstall any games that contain PDX Launcher built-in
Open any game launchers like Steam.
Right-click on the installed game and choose Uninstall.
If you have games on other platforms like Steam that have a PDX launcher built-in, keep in mind that that version of the launcher is different. However, if that has an active process in the background, the main PDX Launcher will show you various problems.
So, to fix Paradox Launcher not opening or working, you should uninstall these games.
If the PDX Launcher is no longer responding, you should restart your computer and see if it helps. Also, consider opening it in the clean boot mode as shown in method 2.2 If necessary, you also can re-install the game with the latest version.
Now, in the Games tab, you should see all the games. If not, there is something wrong.
If you don’t see your games on the PDX web, it may be because you are using a different account. Try to check it. You can contact the Paradox Launcher support team if it is the same account.
5.3 Wait
Sometimes, newly purchased games may not appear in both the launcher app and the web. You may need to wait for 24 hours if the server is busy. So, keep patience and see what happens.
6. Paradox Launcher can’t update
6.1 Restart the application
If update-related problems appear on PDX Launcher, the first thing is to close the launcher. Then, open it again. Then, try to update and see if it helps.
6.2 Disable Firewall
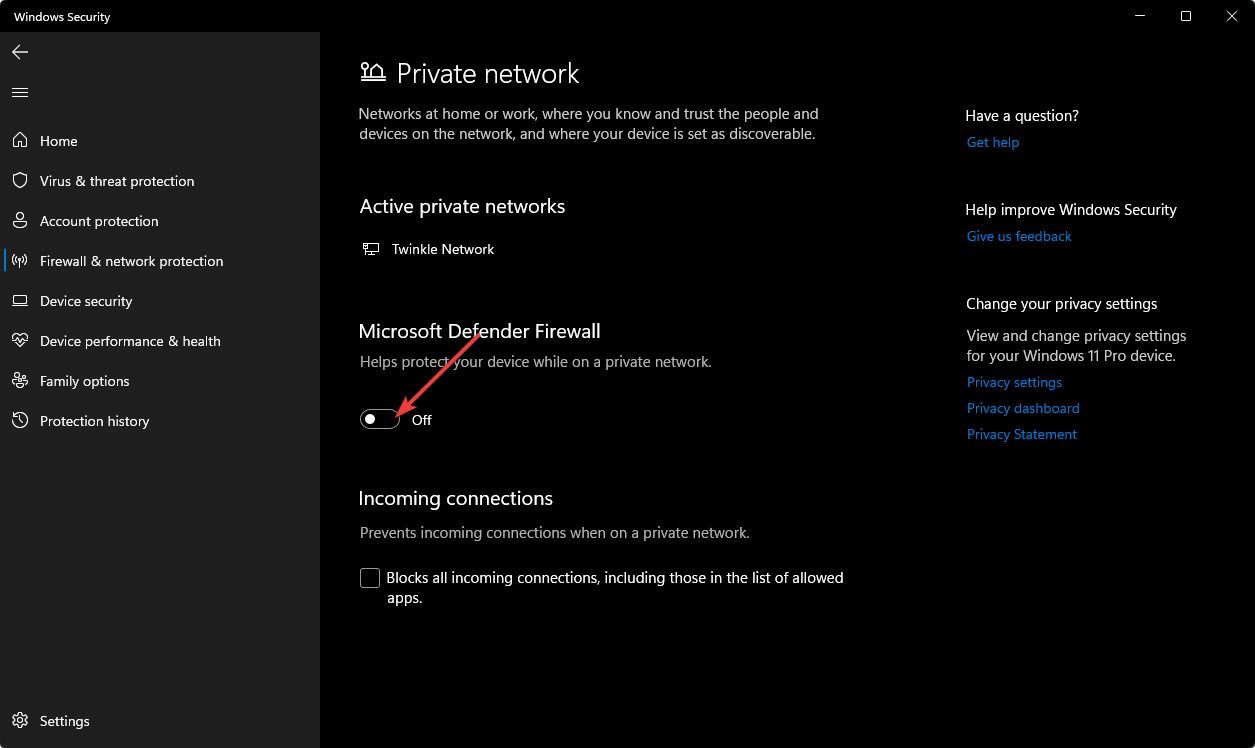
Open the Start Menu, search for Windows Security or Windows Defender Security and open it.
Go to Firewall & network protection tab.
Go to Private network.
Turn off the Firewall as shown in the screenshot.
Go back and do the same for the Public network as well.
6.3 Re-install with the latest version
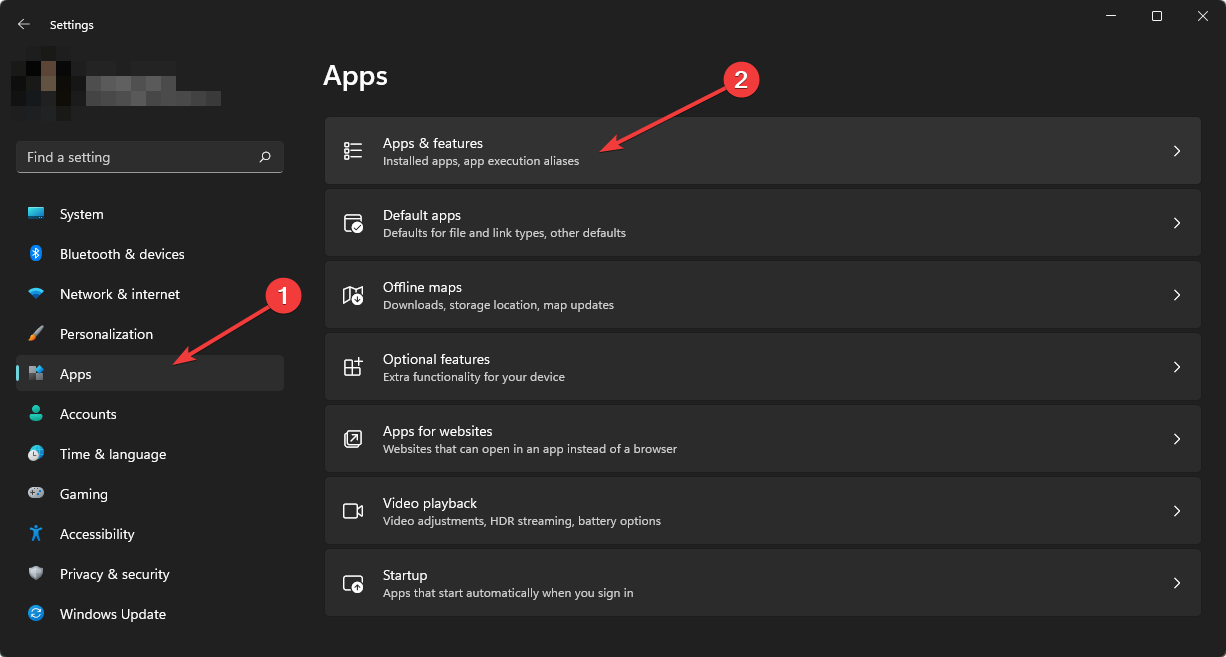
Press Win + I to open the Windows Settings.
Go to Apps and click on Apps & features.
Search for the Paradox Launcher.
Click on the three vertical dots and then choose Uninstall.
Now, download and install the latest PDX Launcher as shown in method 1.3.
To uninstall Paradox Launcher completely and remove any leftovers, we suggest you useCCleaner. It can do even more things like fixing the registry, removing temporary files, and boosting PC performance.
7. Paradox Launcher freezing
7.1 Update
Open Paradox Launcher.
Go to Settings.
The update should start automatically.
After the process is done, click on Restart to finalize the update.
If you face a problem updating this app, you can follow the steps shown in method 2. Updating will fix any known bugs that will solve the freezing issue.
7.2 Try in clean boot mode
Often third-party services may interfere with the update process. So, trying to update in clean boot mode may help. For details, you can follow method 2.2
7.3 Re-install
If the problem persists, you can consider re-installing the launcher with the latest version.
8. Paradox Launcher update is being downloaded
This problem is similar to the problem mentioned in method 6. So, the steps shown in that method also apply to this problem. In addition, you can disable the Firewall.
9. Paradox launcher uncaught exception
If an uncaught exception occurs in Paradox Launcher, we suggest you re-install it with the latest version. However, make sure to uninstall any games installed with this launcher before proceeding.
How do I bypass Paradox Launcher?
If you want to play games on Steam or other platforms by not opening the Paradox Launcher, it is possible by following some technical steps.
To bypass Paradox Launcher, you need to follow specific steps for specific games. But, the first thing is to uninstall the PDX Launcher from your PC.
After that, you can browse the game folder, create a batch file, and input specific commands there. To such a file, you can create a new text file and change the file extension. For example, file.txt to file.bat.
The batch file name should match the game name for your convenience. This command may vary for different games. Usually, the command may be like the following:
game.bat %command%
You must replace the game.exe with the game file name like Cities.bat, Aftermath64.bat, etc.
Once you are done, you must integrate the batch file with Steam. The whole process may seem very complicated, but it’s not.
And, before you leave, check some quick tips and tricks to optimize Windows for gaming and get the best experience.
If you have any opinions, let us know in the comment box.
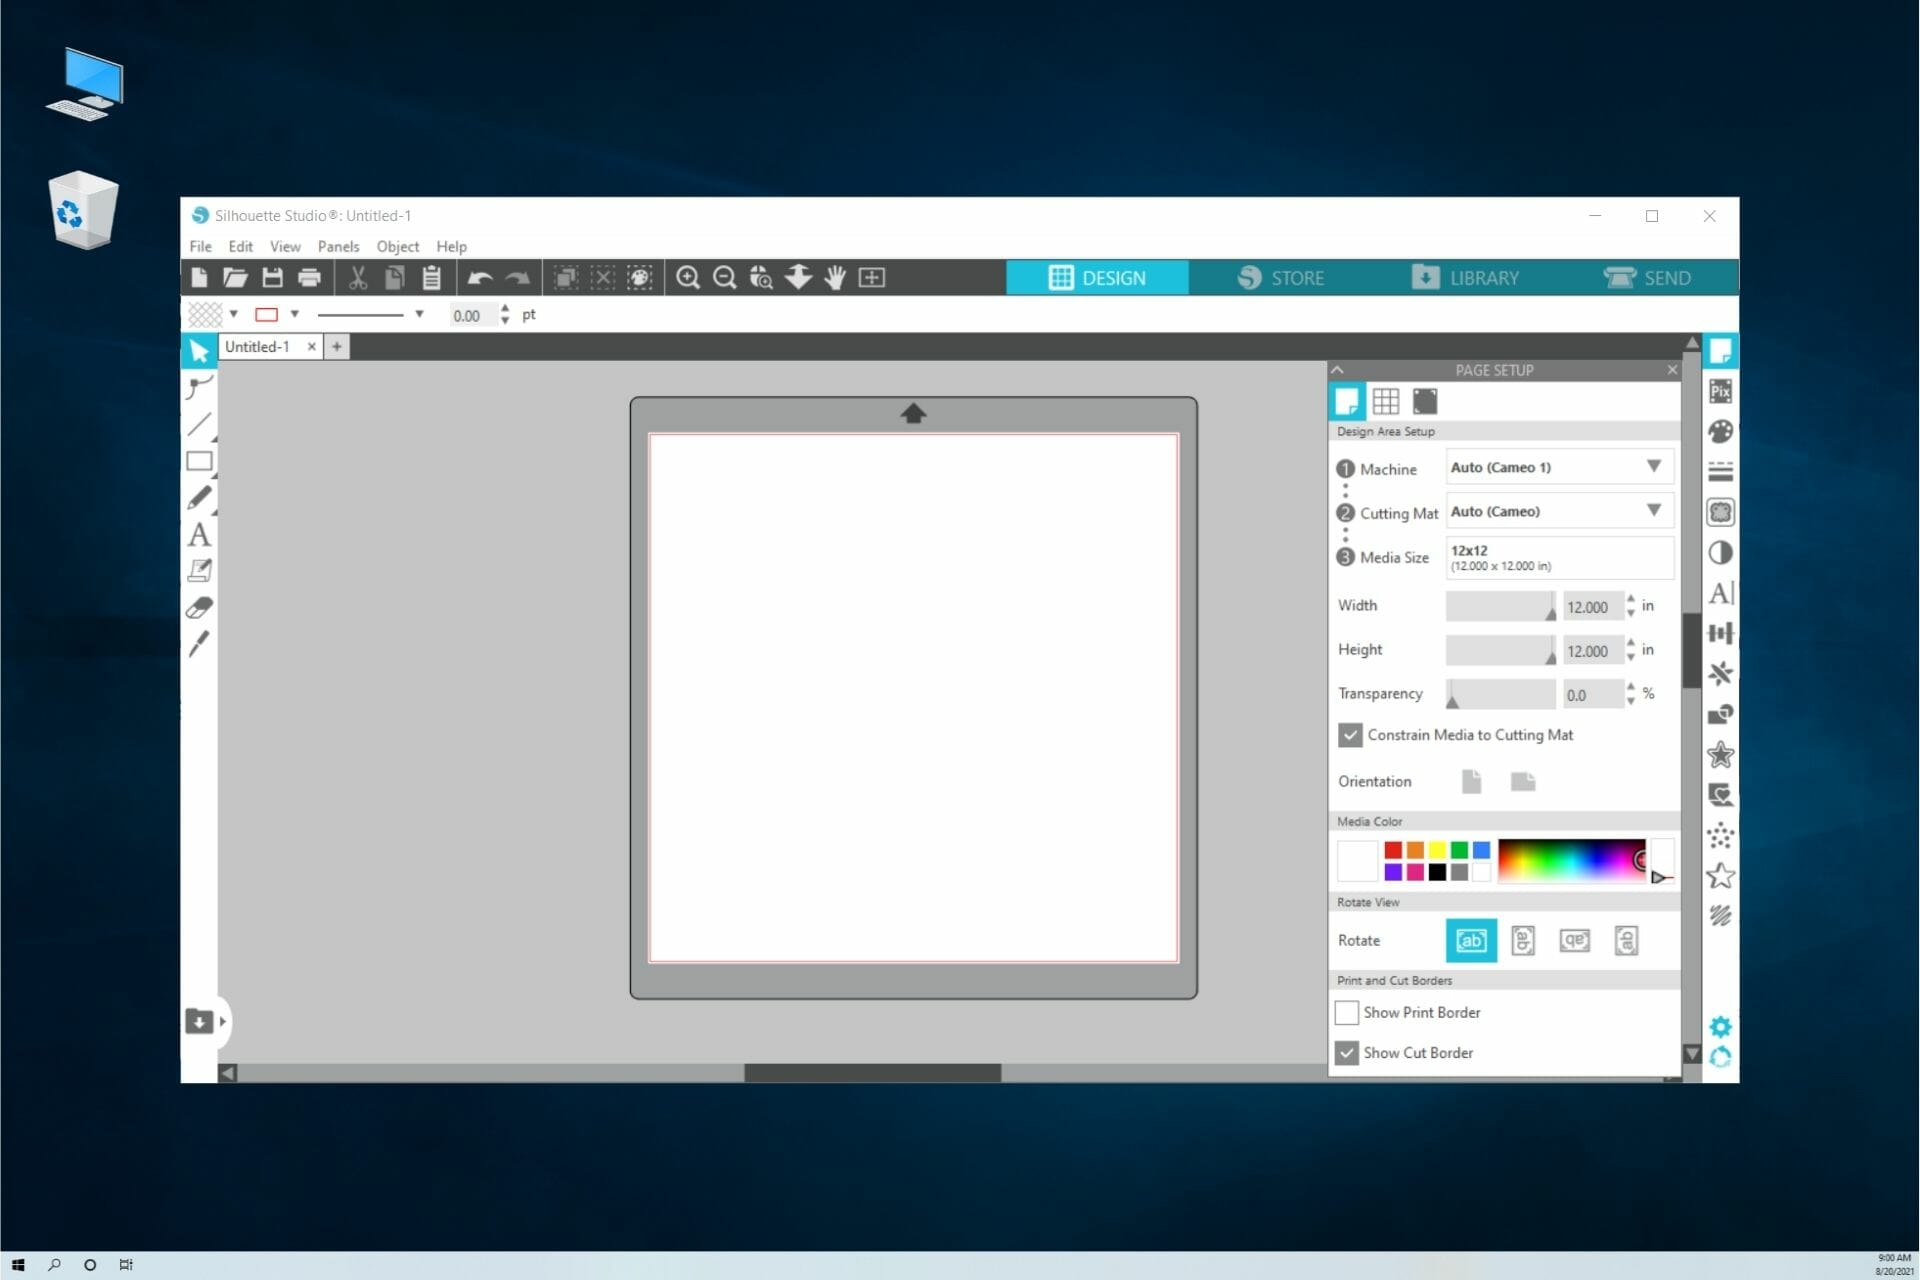
You have found this article because Silhouette Studio is not responding. Sadly, you are not alone, as many users have reported that Silhouette Studio keeps freezing when they try to work with this software.
This issue can prevent you from fully accessing your projects and stop you from creating new ones. This can be highly frustrating, especially if you are pressured by a deadline.
For the reasons mentioned above, in this article, we will explore some of the best troubleshooting methods to deal with Silhouette Studio freezing while in use.
Additionally, the solutions below will help if Silhouette Studio keeps crashing in Windows 10 or 11, so read on.
Why does Silhouette Studio keep not responding?
Like any other app, Silhouette Studio can suffer from varying problems. A few triggers for Silhouette Studio not responding are incomplete installation, missing files, and compatibility issues.
There can also be the case of file corruption or simply that it wasn’t updated to the latest version for some reason.
Luckily, our guide below will tackle all the possible causes and provide you with the proper solutions to fix them.
If you face the error message Silhouette Studio has encountered an error and must quit, Silhouette Studio is stuck on processing, Silhouette Studio 4.4 problems, or Silhouette Studio crashing on startup; you will find these solutions helpful.
Please follow the steps presented in this article in the order that they were written to avoid any unnecessary complications.
How do I fix Silhouette Studio not responding?
1. Run Silhouette Studio in Compatibility mode
Right-click on the Silhouette icon on your desktop and select Properties.
Inside the properties window, click on the Compatibility tab.
Select the box for the Run this program in compatibility mode for and click on Windows 7 from the drop-down menu.
Click Apply and try rerunning Silhouette.
If Silhouette Studio is not working on Windows 10, running it in Compatibility mode should do the trick and make the app run again.
This solution can also be helpful if Silhouette Studio is running slow, although there are many other possible causes for that problem.
2. Update to the latest version of Silhouette Studio
Run and follow the on-screen instructions to install the software on your PC.
Run Silhouette and see if the app keeps freezing.
Normally, Silhouette Studio should automatically download new updates, so you don’t need to do this manually, as we explained above.
However, this solution will work even if it doesn’t do that.
3. Clear Silhouette Studio preferences
Make sure that Silhouette Studio is closed.
Press the Windows + R keys on your keyboard.
In the Run window, type in %appdata% and press Enter or click OK.
Search for the folder named com.aspexsoftware.Silhouette_Studio, and delete it, including all subfolders.
Empty Recycle Bin.
Try to see if the issue persists by opening Silhouette Studio again.
This solution is also great if Silhouette Studio won’t open, so follow the easy steps above to finish it in no time.
4. Restore your Silhouette Studio to factory settings
NOTE
Note: Please make sure to back up your library and files to an external drive before attempting this, as this option will delete all the data you stored.
Open Silhouette Studio.
Inside the Edit menu, select Preferences.
In the options window, select Advanced.
Click on the Restore Factory Defaults button and confirm your choice.
Check to see if the issue persists after this process is completed.
Why won’t my Silhouette studio open on my computer?
If you can not get the program to open on your computer, the Program file may be corrupted. You may have to get a fresh copy and reinstall it. Alternatively, you may run an SFC scan on the command prompt.
Also, you may have too many programs already running on your computer. This will make your computer very slow or responsive. It would help if you waited for it to start responding; then, you must shut down some programs or force-end them from the Task Manager.
Furthermore, there are situations when a program won’t launch because a previous instance is still active and improperly exited in the background.
How to fix Silhouette Studio issues on Windows 11?
Luckily, all the solutions we applied for Windows 10 above will also work on the new OS. Therefore, the software looks the same, and you will find that the menus are identical.
The only differences will appear in the design of the windows but not in their placement or location so that you will find them easily.
The only notable distinction is the File Explorer, which you will need to use in Solution 3 from this guide, and it looks a bit different.
How to set up the auto-update option in Silhouette Studio?
Click on Edit from the top menu and select Preferences.
Navigate to the Updates tab.
Click on the Check for Updates tab and set it to Daily from the list of options.
Now hit the Apply and OK buttons to confirm the setting.
If the update recurrence was set to Never, that most likely means you are running an old version that obviously can cause all sorts of issues.
As we’ve mentioned, the app has a built-in auto-update feature, but if that is not working, you may be stuck with an old version that can cause problems.
That’s why we need to ensure that the function works correctly, and we’ve shown you how to do that.
This article explored some of the best troubleshooting methods for dealing with Silhouette Studio not responding. Furthermore, the solutions should work for freezing, crashing, and not opening issues.
We hope our solutions helped you fix the app, and now you are running it on Windows 10 or Windows 11 seamlessly.
Also, we hope you follow the guide from the first solution since we have prepared them according to what should be most effective.
Lastly, please let us know if this guide worked for you by using the comment section found below this article.
Our friends over at Cloud Wars recently posted an interesting prediction about Microsoft’s cloud growth in 2022 with the belief it could “top $100 billion,” by the end of the year.
During its earnings call last quarter, Microsoft missed its own lofty projections of revenue growth by a hair, and while most investors still seemed relatively pleased with the net results, other bullish ones were quick to point out the slowing growth the company’s cloud division was experiencing year over year.
The cloud services market hasn’t reached saturation just yet, but competition is calcifying among a handful of known players that includes AWS, Google, Microsoft, Oracle, and IBM, and the range between unincumbered competitor growth is shrinking.
The folks over at Cloud Wars monitor the minutia of the cloud industry and believe that Microsoft could finish the calendar year of 2022 with a 25% larger cloud business than its next closest rival Amazon.
Before the pedantic crowd starts crowing, Amazon is still the largest cloud services provider in the sector. Author Bob Evans, is distinguishing the company’s predicted growth between calendar year and fiscal year for Microsoft which normally runs from July 1 and ends June 30.
Evans lays out a simple and feasible plan that could lead Microsoft to a $100 billion plus year with the following:
For the quarter ended March 31 (Microsoft’s FY22 Q3), its cloud revenue was $23.4 billion, up 32%; and
For the quarter ended June 30 (FY22 Q4), cloud revenue was $25 billion, up 28%.
That adds up to $48.4 billion for the first half of calendar 2022, meaning Microsoft has to generate second-half cloud revenue of $51.6 billion to reach $100 billion for the year. That’s an average of $25.8 billion per quarter. While it would be foolish to say that achieving such volume is in the bag, I do not recall Microsoft’s cloud revenue going down in sequential quarters for the past handful of years. So, the fact that Microsoft hit $25 billion in the second calendar quarter means it has a very good chance of bumping that up to at least $25.8 billion in each of the next two quarters.
As mentioned, Cloud Wars does keep a meticulous eye on the cloud sector and Evans backs up his claims with additional details outlined in seven primary factors that have already leading to revenue growth by Microsoft’s cloud services that include an expanding product line, aggressive end-to-end security solutions, commitments to low-code/no-code developer tools, existing and future multi-year and multi-billion dollar contracts and growing collaborative and customer-centric ethos at the company.
There is still plenty of room for cloud services growth in the general market, but with its relatively late start, the revenue gains Microsoft continues to clock quarter over quarter is still fairly impressive and bodes well for the company’s diversified product portfolio.
Many reported that the Kindle PC app is not syncing for them, and that can be a problem since you won’t be able to access your books or continue where you left off.
Luckily, a couple of solutions might be able to help you with this problem, so be sure to keep reading.
Why is my Kindle not syncing with my computer?
Firstly, Kindle can’t sync books that aren’t purchased from Amazon, so if you try to do that, the sync feature won’t work. Also, you can sync collections that you made on your PC.
Other issues can be related to temporary glitches with the sync feature.
What can I do if the Kindle PC app is not syncing?
1. Sync manually
Close the book that you’re reading.
Next, click on Sync. Do that while on Wi-Fi.
Switch to the device that you want to sync to and make sure you’re connected to Wi-Fi.
Tap on Sync.
Open the book and you should be able to continue where you left off.
Sometimes you will have to use Sync feature several times in order for it to work properly.
Open the Kindle app and select Tools located at the top of the bar.
Select Manage Your Content and Devices in the context menu that appears.
Sign into your Amazon account if asked on the web browser.
Select Preferences at the top bar.
Scroll down until you see Device Synchronization (Whispersync Settings).
Click the arrow on the far right side.
You will a button for Whispersync Device Synchronization. Turn the feature on if it was off.
Close the browser and return to the Kindle app. It should be synchronized at this point.
Why is my Kindle app not syncing to the furthest page read?
There are several reasons for this, most likely temporary sync glitches. If Whispersync isn’t enabled, you can also experience this issue.
If the Kindle PC app is not syncing, ensure you’re trying to sync only content you’ve bought from Amazon. Also, don’t forget that collections can’t be synced. In most cases, these problems can be fixed with manual sync.
Feel free to leave a comment below if you have any questions regarding the above process. Also, do not hesitate to comment about guides you’d like to see or information about any other app on whichever platform.
An eSIM allows you to connect to the internet using a cellular data connection. An eSIM profile is the software you must download to your device to access the carrier’s mobile network.
In this guide, we will show you how to check if you Windows PC has an eSIM in it to use to connect to the internet when the Wi-Fi is poor.
Does my device have eSIM support?
If you want to see if your device has eSIM, here’s what you need to do.
1. Open Settings
2. Go to Network & internet > Cellular
3a. On Windows 10 (Version 1703 or later): Under Cellular, if you see a Manage eSIM profiles setting, then your PC has an eSIM.
3b. On Windows 11: Under Cellular, look for the Use this SIM for cellular data with a dropdown menu. Click the dropdown menu to see if an eSIM is an option; eSIM may also be labeled as SIM 1 or SIM 2.
Some people may be wondering if their device has eSIM support on their device, but you can also check cellular settings in Windows. Another clear indication that your device doesn’t have eSIM support is that you don’t even have a “Cellular” option available in Settings.
Remote Assistance for Windows is a feature that enables users to request assistance from other users when they’re having trouble with their computers.
It can help fix problems or assist when a user needs to perform a task on another computer. On the recipient’s side, they only need to accept your help. Remote assistance is enabled by default, but it’s easy to turn off if you don’t need it.
Quick Assist and Remote Assistance are similar Windows features that can help you troubleshoot a PC or get support from someone else. They all use the RDP protocol so it would help if you enable Remote Desktop.
How do I send a remote assistance invitation in Windows 11?
You can send an invitation to someone you want to help you with your computer. They will receive a link that allows them to connect via the Remote Assistance tool.
To do so, follow the steps below:
Hit the Windows + R keys simultaneously to open the Run command.
Type in msra in the dialog box and press Enter.
Select Invite someone you trust to help you.
Click on Use e-mail to send an invitation.
The other party will receive an email invitation to join.
How do I enable or disable Windows Remote Assistance?
1. Enable or disable Windows Remote Assistance via Run
The first recommended method to try out if you want to manage Windows Remote Assistance is to access it through the Run feature. It is built-in on your Windows device and safe to use.rnrnThrough a simple command inserted in the Run dialog, you can allow or prevent Remote Assistance connections to your PC.
1. Hit theu003cspanu003e u003c/spanu003eu003ckbdu003eWindowsu003c/kbdu003eu003cspanu003e u003c/spanu003e+u003cspanu003e u003c/spanu003eu003ckbdu003eRu003c/kbdu003eu003cspanu003e u003c/spanu003ekeys simultaneously to open theu003cspanu003e u003c/spanu003eu003cstrongu003eRunu003c/strongu003eu003cspanu003e u003c/spanu003ecommand.
2. u003cspanu003eType u003c/spanu003eu003cemu003eSystemPropertiesAdvancedu003c/emu003eu003cspanu003e in the dialog box then press u003c/spanu003eu003ckbdu003eEnteru003c/kbdu003eu003cspanu003e or click on u003cstrongu003eOKu003c/strongu003e.u003c/spanu003e
3. u003cspanu003eNavigate to the u003c/spanu003eu003cstrongu003eRemoteu003cspanu003e u003c/spanu003eu003c/strongu003eu003cspanu003etab.u003c/spanu003e
4. u003cspanu003eUnder u003c/spanu003eu003cemu003eRemote Assistanceu003c/emu003eu003cspanu003e, you can choose whether you want to enable or disable this feature on your Windows PC.u003c/spanu003ernrnu003cspanu003eCheck u003c/spanu003eu003cstrongu003eAllow Remote Assistance Connections to this computeru003c/strongu003eu003cspanu003e to enable the setting.u003c/spanu003e
5. Uu003cspanu003encheck it to disable Remote Assistance.u003c/spanu003e
6. u003cspanu003eAfter you make your selection, pressu003c/spanu003eu003cemu003eu003cspanu003e u003c/spanu003eApplyu003c/emu003eu003cspanu003e and u003c/spanu003eu003cstrongu003eOKu003c/strongu003eu003cspanu003e to save the changes.u003c/spanu003e
2. Use Control Panel to manage Remote Assistance settings
Hit the Windows key, type in Control Panel in the search bar and click Open.
Navigate to System and Security.
Click on Allow remote access.
Navigate to the Remote tab.
Under Remote Assistance, check Allow Remote Assistance Connections to this computer to enable and uncheck to disable then press Apply and OK to save changes.
3. Tweak the Registry to allow or prevent Remote Assistance connections
Hit the Windows + R keys simultaneously to open the Run command.
Type regedit in the dialog box then hit Enter.
Navigate to the following location: HKEY_LOCAL_MACHINESYSTEMCurrentControlSetControlRemote Assistance
Double click on fAllowToGetHelp to edit the DWORD and change its Value Data to 1 to enable and 0 to disable.
What is the difference between Remote Assistance and Remote Desktop?
Remote assistance is a feature that allows you to share your screen with another person so they can assist you in troubleshooting a problem. It is a feature included in Windows that allows another user to view your screen and control your mouse and keyboard.
Windows 11 Remote Assistance uses the Remote Desktop Protocol (RDP) to connect to the remote computer. This feature can be useful when troubleshooting problems with your PC or helping users navigate around Windows.
Remote Desktop is another technology that allows you to connect to a computer remotely. However, with Remote Desktop, you have complete access to the remote system, including full access to all files and programs on that system.
Windows 11 has a built-in Remote Desktop, but if you prefer more features and functionality, you can install Remote Desktop software.
Remember, when using RDP connections, your IP address is exposed to cyber criminals, and your system could be vulnerable to attacks if you have a weak password. It is essential to use a VPN with Remote Desktop to secure your connection and mask your identity.
You will also need an efficient antivirus program if you frequently use Remote Desktop and Remote Assistance.
If you need a simpler tool, we have a guide on how to download Quick Assist, so don’t hesitate to use it. Keep in mind that Quick Assist is not working properly for some users, but we have a guide that can help you address that.
Let us know your experience with Remote Assistance if you have used it in the comment section below.
Some of our readers told us that their all-in-one Canon printers don’t scan after they upgrade to Windows 10.
One of the readers said that when he accesses the scan preview, it works fine, but when he clicks the Scan button, the scanner gets to 28% of the process and stops.
If your Canon printer & scanner don’t scan after upgrading to Windows 10, these resolutions might fix it.
If you’ve never done any scanning with the Canon scanner in Windows 10 before, check the printer’s compatibility with the platform.
You can check Windows 10 compatibility for a range of Canon printers and scanners on this page. There you can click your printer’s series to expand its list of models as in the snapshot directly below.
Note that the model lists include Windows 10 and Windows 10 S columns. Canon printer models are generally compatible with Windows 10 but not Windows 10 S.
Thus, some Windows 10 S users might need to switch to an alternative Windows 10 edition to scan with Canon printers.
2. Use the Printer troubleshooter
Click the Start button type troubleshooter and click on Troubleshoot settings.
Now, select Aditional troubleshooters.
Select Printer and click on Run the troubleshooter.
Follow the instructions on the screen to fix any printer and scanner issues.
Windows includes the Printer troubleshooter that might fix an all-in-one Canon printer that isn’t scanning.
3. Update the printer driver
Canon users have also confirmed that driver updates for their devices fixed mid-scan hangs. So, updating the driver for your Canon printer/scanner might also get it scanning.
You can also quickly update drivers with the Canon Drivers Update utility. Click Download on this webpage and open the utility’s installer to add the software to Windows.
Then open the utility’s window and press the Start Scan button. The utility will list outdated Cannon drivers and the most updated ones, which you can then install by clicking Install.
Tip
You can also choose and use an automatic solution. This can ease and finish the process successfully. Outbyte Driver Updater is a specialized tool that scans your PC and provides you with a thorough report of your drivers. After that, it offers the latest updates for your drivers and keeps them updated constantly. ⇒ Get Outbyte Driver Updater
4. Select the Power Saver option
Enter power saver in the Windows Search box and select Choose a power plan.
Then you can select the Power saver option. Alternatively, you might also find the printer scans when you unplug your laptop.
Some users (with laptops) have fixed Canon printers that hang when scanning by selecting the Power saver option in Windows 10.
Download Canon MF Toolbox 4.9, unarchive it, and double-click its executable file to install.
After finishing the installation, right-click its exe file or desktop shortcut and select Properties to open the window shown directly below.
Select the Compatibility tab, then slick the Run this program in compatibility mode for check box.
Select Windows 8 from the platform drop-down menu.
Press the Apply button to confirm the new settings, and then click OK to close the window.
Then open the MF Toolbox toolbar and click Scan-1 to scan.
The MF Toolbox 4.9 is a Canon alternative to the Windows Fax and Scan utility.
Some Canon printer users have stated in forums that their printers scanned when they utilized MF Toolbox 4.9 instead of Windows Fax and Scan.
So, that’s how you can fix an all-in-one Canon printer that doesn’t scan. Canon PIXMA MP160 users can also check this article for further scanner fixes.
We also do recommend trying some manipulation to be sure the problem is fixed. You can also try to use scanner software in order to maximize the tests.
Don’t hesitate to use the comments section below for any questions or other suggestions to fix the problem.
Launchers essentially let you change how Android feels on the phone without needing to root or go through complex settings. Today we take a closer look at Microsoft Launcher, focused on productivity and integration with their other products.
Get Started with Microsoft Launcher
Immediately after installing Microsoft Launcher, the wallpaper menu greets us. You can either keep it default or go with the Bing wallpapers. Select the latter and get new wallpapers delivered daily to your phone.
Afterward comes the login through a Microsoft account, which is optional but would be good to sync every service. Sign in and synchronize calendars, sticky notes, etc., across all your Microsoft-based devices, primarily focusing on Windows.
What stands outs
Let us shed some light on a few of the Microsoft launcher’s features that stand out.
Universal Search
Swipe down, and the search bar appears along with the keyboard on the screen. You will find this feature on Xiaomi’s MIUI and some iterations of the ColorOS by Oppo. It lets you use the smartphone with a single hand.
This comes in handy when phone displays keep getting bigger and becoming difficult to use with one hand. The search is faster than the Google search widget on our tested phones.
The search displays result from web search, apps, settings, sticky notes, contacts, calendar, launcher, and system settings. Toggle the filters to show results from specific categories. Like Google lens, you can search for objects through the photo search button powered by Bing.
Tap on web results, and it will search in the preferred browser through the selected search engine. It is set to Bing by default but can be changed to one of the dozen options and includes Google, Baidu, DuckDuckGo, etc.
Productivity Panel
Microsoft offers a customized feed when you swipe right from the left side of the screen. It houses glance with customizable panels and a personalized news feed. The Glance feed contains sticky notes, calendars, to-do lists, documents from OneDrive, and the most used apps.
Sticky notes have seamless synchronization across all Microsoft devices. Jot down something important on your Windows PC, and later go out, access it by swiping right on the phone’s home screen.
You can shuffle between calendars from Google, Outlook, Microsoft 365, and the phone’s default variant. Make sure to select the correct email account for adding an event, reminder, or task to the calendar.
The screen time app in the panel stands out. It takes data directly from Digital Wellbeing and briefly shows all the stats on the panel. Tap to find more information, such as average time between screen unlock, daily usage pattern, and other stats. Screen time has a widget that you can anywhere on the home screen.
Pin Searches
Do you frequent search engines to search for particular things? It can be upcoming dates for an event, the status of a flight booked last month, or anything found only through an internet search.
Pin these frequent search terms to the launcher box and tap them to perform the search in the preferred browser. Tap on the upward arrow to turn on search engine suggestions and select one to open them in the browser.
One Tap Wallpaper Change
Looking at the same wallpaper every day becomes monotonous and boring. We change them through settings or via a third-party app. Do one better through a single tap on the launcher’s widget button and change it instantly.
All the wallpapers are sourced from Bing’s endless photos library, and you can select from the set of a dozen, refreshed daily. It changes both the home screen and lock screen simultaneously.
What could be better
Everything looks good but there is always room for improvement. Here is how Microsoft launcher can get even better.
Pinned Apps
The frequently used app is a good touch but sometimes feels inadequate. There are a few apps, such as authenticator, and password managers, while essential but used occasionally. Just like searches, the launcher could use pinned apps as the home screen gets crowded over time.
Dark mode can be improved
We tried the launcher on three phones, one budget, one mid-range, and a flagship. Two of them had text visibility issues in dark mode, which could be solved by tweaking. Dark mode users are growing, and Microsoft should address this minor issue as a priority.
Earlier this year, during Microsoft Inspire 2022, Microsoft launched Excel Live, a feature that lets Microsoft Teams meeting attendees collaborate on Excel workbooks in real time. With this feature in place, the user will no longer need to share their screen during meetings which at times disrupts the orientation.
With Excel Live now generally available, Teams users will now be able to collaborate on Excel files directly within the meeting window as it supports Sheet Views. “The workbook loads for each participant at the optimized zoom level with flexibility to adjust zoom based on their preferences”.
However, Excel Live comes with three known limitations. First up, the feature can only be used in meetings with up to 25 attendees and they must all come from the same organization. Secondly, recordings can only be made in audio format, you cannot make Excel Live meeting video recordings. And finally, Web support to start sharing will work only in Public Preview, it will not be available for general release.
To access the feature, launch Microsoft Teams and join the meeting, select the Share option, then head on over to the Excel Live section. From this point, select the spreadsheet you want to share with meeting attendees. And finally, click on the Share button to share the spreadsheet. You will however need to have full sharing permissions.
During Inspire 2022, Microsoft Viva expanded with a new Engage module designed to build community and connections. The module also featured Storyline and Stories, both integral parts of the platform, in place to help users express themselves and inform people more about themselves.
Microsoft has announced that the Storyline feature is now widely available across Teams, Outlook, Yammer, and Microsoft Viva. With this feature, communication is enhanced across your organization, in that both employers and employees get to share real-time updates and experiences.
To access the feature, admins will have to enable it by choosing the Manage storyline option either on Yammer.com or the Viva Engage app. Then, internal users will gain access to the feature, allowing them to see, react, and respond to others’ storyline posts. However, guest users will not have access to Storyline. As for the Stories feature, it is also set to reach public preview soon.
In this guide we’ll show you the best Ethernet settings so you no longer have to deal with constant lagging when you play games online. Even if you don’t have the best gaming PC or the fastest network, you can optimize what you have.
How do I optimize my Ethernet settings for gaming?
1. Disable IPv6
Right-click on the network icon on your taskbar.
Select Open Network & Internet settings.
Click on Change adapter options under the Advanced network settings section.
Right-click on your Ethernet connection and select Properties.
Unmark the Internet Protocol Version 6 (TCP/IPv6) option.
Hit the OK button.
Disabling IPv6 is one of the best Ethernet adapter network settings for optimizing your gaming performance to the maximum on Windows 10/11. With this feature disabled, you should notice improved performance.
2. Disable Ethernet adapter components
Right-click on the network connection icon on your taskbar.
Click on the Open Network & Internet Settings button.
Select Change adapter options.
Right-click on the connection you want to modify.
Select Properties from the context menu.
Click on the Configure button.
Switch to the Advanced tab.
Find and click on Interrupt Moderation from the list here.
Disable the selected option from the dropdown under Value on the right-hand side of the screen.
Repeat steps 8 and 9 for the following options:
Flow Control.
Receive Side Scaling.
TCP Checksum Offload (IPv4).
UDP Checksum Offload (IPv4).
3. Ethernet advanced settings gaming optimization
Press the Windows key + R and type devmgmt.msc in the run box.
Click the OK button to open Device Manager.
Double-click the Network adapters option to expand it.
Right-click on your network adapter and select Properties.
Switch to the Advanced tab.
Select the ARP offload for WoWLAN option.
Now, click the dropdown under Value and select Disabled.
Select the properties below and disable them too:
NS offload for WoWLAN.
Interrupt Moderation.
Flow Control.
Receive Side Scaling.
Adaptive Inter-Frame Spacing.
Enable PME.
Packet Priority & VLAN.
Jumbo Packet.
In addition to these settings, you can also ensure that your PC isn’t running on Power Saving mode. You want to use all your resources for the game.
4. Disable power saving for the network adapter
Click the Windows key + X and select Device Manager.
Double-click the Network adapters option to expand it.
Right-click on your Ethernet adapter and select Properties.
Click the Power Management tab.
Uncheck the Allow the computer to turn off this device to save power option.
Click on the OK button.
The power management settings help to save energy on your PC. However, it can cause your game to slow down by turning off your driver when it needs to save power. Disabling this feature allows your network drivers to work constantly.
Sometimes the network drivers can cause issues with your Ethernet connection. You can keep them in check with the help of specialized driver updaters.
Should I disable Energy Efficient Ethernet for gaming?
Energy Efficient Ethernet reduces the power consumption of some components in times of low link utilization. This helps to save energy on your PC.
However, this affects your gaming as the primary aim is to save energy. So, you should disable this setting to optimize gaming.
Wrapping up
These are the best Ethernet settings for gaming and improving your network throughput. However, ensure that your network drivers are updated. Running outdated network drivers will take a toll on your gaming performance.
We also have a complete guide on how to set up your PC for gaming with more settings to speed up your computer.
If you’ve followed all of the steps in this guide but still experience lagging when you game, disable your antivirus.
Feel free to let us know if the tips above helped optimize your gaming in the comments below.
FAQs
How do I make my Ethernet faster for gaming?
Disable energy-saving and offloading features, switch to 1.0 Gbps full duplex, and use a low-latency DNS.
What are the best Ethernet adapter settings for gaming on Realtek?
Turn off Interrupt Moderation, Large Send Offload, and Green Ethernet. Set Speed & Duplex to 1 Gbps Full Duplex.
Is Ethernet better than Wi-Fi for gaming?
Yes. Ethernet provides lower latency, less packet loss, and more consistent speeds, especially during online gaming.
What Ethernet speed is ideal for gaming?
1 Gbps is more than enough. Prioritize low ping and stable latency, not just download speed.
If you’re looking for a way to add some personality and flair to your PC setup, RGB lighting can go a long way. To unlock the potential of your hardware, you need good tools to sync lights. Whether you’re on Windows 10 or Windows 11, choosing the best RGB software can make all the difference.
With so many options available, from RGB software for Gigabyte to the best universal RGB software, finding one that fits your setup can feel overwhelming.
But here ends your search because we looked into it and found the best options.
What is the best RBG software to control PC lighting?
With Corsair iCUE, you can regulate fan speed, keyboard key function, mouse DPI settings, and lighting.
There are numerous preset lighting effects by default. You may also set complex keys, manage key mapping, and create profiles for particular programs. You can handle all Corsair items from this program.
The primary disadvantage is that this software can only control Corsair devices such as Corsair keyboards. Besides this, it’s a fantastic app to use.
OpenRGB is compatible with all RGB devices because it is independent of the manufacturer’s software.
Your RGB can all be controlled by third-party software thanks to OpenRGB’s network-based Software Development Kit.
This makes it possible to integrate games, visualize the music, change the lighting, and do anything else you can think of. The wide functionality of OpenRGB is one of its benefits.
3. Signal RGB – Best for immersion by synchronizing
SignalRGB supports numerous games, creating a more immersive experience. This includes Forza Horizon 5, Halo, and Apex Legends.
It is available in two versions from WhirlwindFX. The free version offers complete hardware compatibility, lighting effects, and mouse CPI control.
SignalRGB is meant to allow adding lighting effects to supported hardware straightforwardly. So, open the app, find a pleasing effect, install it, and use it with your compatible hardware. It’s that simple!
JackNet RGB is a free app that’s great for managing all of the RGB devices in one location. It can identify every RGB component, which is more practical for users.
This program is simple to install, and its streamlined user interface makes it easy to handle any RGB device. It allows you to apply numerous RGB effects and synchronize them with various devices.
Additionally, you can give effects to specific components. To utilize this app, you must install and launch the manufacturer’s software.
The company’s mice, keyboards, headphones, laptops, mousepads, microphones, speakers, and external GPU enclosures come in Razer Chroma. Additionally, certain non-Razer peripherals have it.
The range of colors supported by Razer Chroma is up to 16.8 million, making it one of the best PC lighting software.
This has a more striking sound, but it has about the same number of colors as RGB lighting environments.
HyperX’s RGB lighting system is named NGenuity, one of the best PC lighting software. On HyperX mice, keyboards, headphones, and memory modules, you can get NGenuity.
Although it has been more popular recently, HyperX’s lighting technology isn’t as prevalent because it competes in fewer categories than well-known brands like Razer or SteelSeries.
A spectrum of up to 16.8 million colors is supported by the HyperX NGenuity lighting system, which puts it roughly on par with most of the competition.
It also supports game profiles, macros, per-key customization, and lighting preset sharing.
The RGB lighting system used by Logitech G is known as Lightsync and can be used on Logitech G mice, keyboards, headphones, and speakers. Logitech G Lightsync provides a spectrum of up to 16.8 million colors.
It enables sharing your lighting settings, per-game profiles, macros, and per-key customization just like NGeunity does. It is both affordable and comfortable to use.
From RGB software that controls everything to more focused solutions like addressable RGB software and RGB fan control software for PC, there’s something here for every kind of build. Prefer open tools? We’ve also included the best open source RGB control software to give you full flexibility.
Have you tried any of these? If not, feel free to try one of them, and then let us know about your experience in the comments section below.
The Amazon Kindle app for PC is a great way to read your favorite digital books. You have access to a massive library that houses every kind of genre imaginable.
And as with any desktop app, there will be a software update every now and again which tends to happen automatically. But sometimes the update doesn’t download automatically and you’ll have to do it manually.
This guide will show you how to update the Kindle app on both Windows 10 and Windows 11.
Is Kindle for PC no longer available?
Actually, there is a Kindle app available for PC and Mac computers. This question refers to the old Kindle app that was discontinued back in October 2016.
Amazon got rid of the old app and replaced it with the current version. It’s also possible that people may be thinking of the Kindle on Windows 7. On that particular OS, Kindle is no longer receiving official support.
Instead, Amazon is focusing its resources on the Windows 10 and 11 versions of Kindle which will be covered here in this guide. The process is the same on both operating systems, although the windows may look slightly different.
How do I update the Kindle app on Windows?
Most of the time, the Kindle app for PC will update automatically. But in case there was some error or you simply want to do it manually, you can accomplish this via the official Kindle website.
What you need to do is download the latest version from the website. This ensures that your Kindle app is completely safe and secure, and will run the best it can with the latest updates.
Can you read Kindle books on a PC without the app?
Yes, you can read books with Kindle Cloud Reader, and you can also follow this step by step guide to read Kindle on PC for offline access and customization.
All you have to do is go to the Kindle Cloud Reader website, sign in with your Amazon account, and you’re ready to read.
Feel free to leave a comment below if you have any questions regarding the above process. Also, do not hesitate to comment about guides you’d like to see or information about any other app on whichever platform.
Are you one of those who think it’s your right to decide what you want to see? Are you tired of Vodafone blocking websites?
Currently, Vodafone is deciding what content it thinks you should see (Yes, they are blocking some content like IPTV).
This might not bother you if you are not interested in watching that specific content, but it’s time to find ways to solve this problem if they are blocking your favorite show.
Does Vodafone block some websites?
Vodafone has been in the internet business for a long time. They use a specific algorithm called DPI filtering to detect and block specific types of traffic.
This includes specific protocols like BitTorrent and P2P, as well as IPTV services. Vodafone services are available in the following countries.
What are the countries where Vodafone provides IPTV?
However, in some regions, IPTV is blocked by Vodafone at certain times (and in some regions, the ban is permanent).
Vodafone services are available in the following regions.
Africa: Egypt, Ghana, Kenya, DR Congo, Tanzania
Asia: India, Turkey
Europe: UK, Spain, Romania, Albania, Greece
In most cases, Vodafone blocks websites because it has incorrectly flagged them as malicious or inappropriate. It is also possible that Vodafone is deliberately blocking a website that violates its terms of service.
Here are the 7 best ways to unblock a site on Vodafone.
Run the app, choose a location where Vodafone is not blocking IPTV, and turn the VPN to ON.
This is the simplest and most effective way to unblock a site on Vodafone is to use a VPN because it encrypts your traffic and routes it through a server in another country, making it appear like you are accessing the internet from that location.
ExpressVPN
Enjoy all online content without being restricted to country-specific websites and videos.
This allows you to bypass Vodafone’s filters and access blocked websites.
2. Use a proxy server
Click the Start button, type internet options and click on Internet Options from the results.
Click on the link that says Open your computer’s proxy settings under the System label after scrolling down the page. The Internet Properties dialog box appears.
Click on the Connections tab in the dialog box.
On the connections page, click on the LAN settings button.
You can use a proxy server for your LAN by checking the Use a proxy server for your LAN label.
Enter the address and port of the proxy server you wish to use and save the settings by clicking OK!
That’s all! Your proxy server has been configured. You can now access the internet anonymously.
A proxy is similar to a VPN but does not encrypt your traffic. This means that it is not as private or secure as a VPN but faster and easier to set up.
Another advantage of using a proxy is that it can bypass Vodafone’s filters without having to route your traffic through another country.
3. Change your DNS
Click on the Start button and select Settings.
Next, select Network & Internet.
Click Change adapter options. This can be found under Advanced network settings.
Select Properties from the menu.
The next step is to select Internet Protocol Version 4 (TCP/IPv4). If you don’t see this option, use your mouse to scroll up and down.
After that, click Properties.
Replace the Preferred DNS server with 8.8.8.8 and the Alternate DNS server with 8.8.8.4.
Finally, click OK to save the settings.
DNS is a protocol that converts website addresses (like www.windowsreport.com) into IP addresses (like 74.125.239.16).
By changing your DNS settings, you can force Vodafone to use a different DNS server that does not block the website that you want to access.
In this case, the Google server addresses work pretty good but if you have any others in mind, do try them.
Find the extension that you want and select it. For instance, we tried Zenmate, and it worked pretty well.
If certain permissions or data are needed, some extensions will notify you. Click the Add to Chrome button to approve it and you are good to go.
Several browser extensions can bypass Vodafone’s filters and allow you to access blocked websites. The most popular ones are Hola, UltraSurf, and ZenMate.
The benefit of using a browser extension is that it is easy to set up and does not slow down your connection like Tor Browser or proxy.
6. Load the website from the cache
Start by searching for the page you are looking for on Google.
Click on the three dots next to the URL of the site in the search results.
Then select Cached. You will see the cached version of the page.
A web cache is a copy of a website that is stored on a server. When you access a website, your browser first checks if there is a cached version of the site before it sends a request to the server.
If the website is cached, your browser will load the cached version instead of the live site.
This can be useful for accessing a blocked website because the cached version is usually not blocked. You can use Google’s cache: operator to find a cached website version.
For example, if you want to access the cached version of www.windowsreport.com, you will enter cache:www.windowsreport.com in Google’s search bar.
This way, you can easily access Vodafone-blocked websites and enjoy your content.
7. Unblock the streaming address from Windows Firewall
Click on the Start button type control panel and then select Control Panel from the results.
Then, click on the Windows Firewall option.
Click on Advanced settings.
First, click on Outbound Rules in the left-side panel and then click on New Rules on the right-side panel.
Click on Custom and press the Next button.
Check These IP addresses and click the Next button.
After adding the address, click Add and press Next.
Check Allow the connection if it is secure and press Next.
Put any name and press Finish.
You are good to go now because there is a possibility that Windows Firewall is blocking your service, not Vodafone.
How do I check if my ISP is blocking streaming?
There are many reasons why an internet provider might block a website. One possibility is if it breaks the law, but this can vary by country, so check before trying anything illegal on your network.
Some websites also get censorship from large corporations, which prevents users from accessing certain sites without permission.
Due to their content being considered unfit for public consumption or opposed political views (depending upon who runs them).
ISP could be another big reason you cannot stream videos on your phone or desktop. It’s worth checking if your ISP is blocking streaming traffic on specific ports that services like Netflix use.
To check this, we recommend using Port Check Tool. This website will tell you if your testing port is open or closed. If it’s closed, that means your ISP is likely blocking it.
Here are the ports that widespread streaming services use:
Netflix: TCP 80, 443
Hulu: TCP 80, 443
Amazon Prime Video: TCP 80, 443
Sling TV: TCP 5001-5999, 6001-6009, 8080
YouTube: TCP 80, 443, 8080, 8443
You can use many methods to access Vodafone-blocked websites; a good VPN likeExpress VPN will help you stream your favorite videos without interruption and let you enjoy the internet with no restrictions.
Now that you have unblocked IPTV, why not check our guide on the best IPTV UK providers and find one that works for you? Besides, if you are getting Vodafone Error 69, change the SMSC number.
Ensure you are not trying to access any illegal website using a VPN or unblocking service.
For any suggestions or questions, feel free to use our comments section and let us know about them.
Do you know the steps to use the Steam Deck adaptive brightness feature? This article will help you with this.
Steam Deck is the newest edition in the game console world. With a lot of potential, it is probably going to dominate the market. There are already many Steam Deck verified games available.
As it is a new product, you may not know the usage of many of its features well.
The adaptive brightness feature is one of them. It helps to give you a convenient gaming experience on Steam Deck.
But, in some cases, you may want to keep it disabled for your convenience. So, this article will help to know how you can enable or disable this feature.
What happens when adaptive brightness is enabled?
When you enable the adaptive brightness on Steam Deck, it helps to see contents better by lowering or increasing brightness based on the light intensity in your environment.
If your room or surrounding has too much light, you will need more brightness on the screen to see the content correctly. In a dark room, too much brightness can hurt your eyes.
Even though you can increase or decrease the level manually, it will happen automatically when adaptive brightness is enabled.
How do I enable or disable adaptive brightness on my Steam Deck?
You can manage the settings for adaptive brightness via your Steam Deck’s built-in Display Options. From there, you can toggle adaptive brightness on and off with a simple click.
1. Press the Steam button to open the Menu.
2. Go toSettings.
3. Navigate to Display.
4. Now, toggle the switch on or off next to the Enable Adaptive brightness to enable or disable it.
5. If you don’t like the setting you just chose, you can simply press again on the toggle button to change it.
In display settings, there are other related options, like Night Mode, Display Scaling, etc.
Should I turn on adaptive brightness on the Steam Deck?
The answer depends on the situation. If you mostly play in indoors on a steady brightness level, you can disable this feature to avoid unwanted interruption.
However, suppose you often go outside and use Steam Deck. In that case, the adaptive brightness feature comes in handy as the level of brightness is dynamic outside, and you may feel uncomfortable when there is too much light, but the screen brightness is very low or vice versa.
But, for best, we suggest you test this feature and determine if it is useful for you or not. Then, you will understand whether you should turn on adaptive brightness on Steam Deck or not.
There are other interesting features you can use on Steam Deck, such as playing games offline on it. If you want to find out more about this, check out our dedicated guide on using the Offline Mode in Steam Deck.
What can I do if Steam Deck adaptive brightness is not working?
If you notice that the brightness level is not changing depending on the ambient brightness even after the feature is enabled, it means there is something wrong.
This problem may come due to a hardware fault or a software bug. If the sensor is faulty, the problem may appear. In this type of situation, check for software updates, and restart the Steam Deck.
If nothing fixes the Steam Deck adaptive brightness not working issue, you can go and claim your warranty.
This article has explained how you can use the Steam Deck adaptive brightness feature. If you have any opinions, let us know in the comments box.
Now, circling back to why we’re here, when you are visiting Omegle, the website is always going to require you to deal with Captcha, so we’re going to show you what to do in this case.
Why is Omegle always asking for Captcha?
Well, you should know that Omegle, like other websites, primarily uses CAPTCHAs to limit bot access to its site.
Website creators strongly believe that bot interactions aren’t in the best interest of the user experience, and try to prevent them.
As you know, bots are software that runs automated tasks such as spamming random text, and sending the same messages over and over again, often used by scammers to send you links to phishing websites.
So, each time you see a captcha appear on Omegle, it means that the computer program is confused about whether you’re a real person or a bot.
Thus, if Omegle keeps asking for Captcha every time, we recommend following the guide below for a quick fix.
How do I stop Omegle from always asking for Captcha?
1. Restart your router
One of the most effective, and at the same time simplest solutions that we can offer you for this annoying problem is to actually reset the Internet router.
You might go thinking that such a simple measure couldn’t have the desired effect, but in fact, users have reported it doing the trick.
So, before we get further into it, make sure that this is the first thing you try when Omegle keeps asking for Captcha.
2. Clear the browser’s Cookies and Cache
Open Chrome.
Click on the Customize and Control Google Chrome button, then select History.
Click the Clear browsing data button.
Select Cookies and other site data and Cached images and files, then select Always, and press Clear data.
3. Scan your PC
Search for Virus & threat protection and open the app.
PIA is a trusted VPN provider that offers multiple layers of protection from online threats. It has built-in anti-malware, keeps no logs with a no-logs policy, and is one of the fastest VPNs on the market.
Private Internet Access
Your own web companion to aid web surfing and protect you against any threats.
Yes, it actually is. It’s a rule that site developers have agreed on enforcing in order to try and limit the number of fictitious accounts.
That being said, there are services out there that let users bypass the Captcha. This service integrates a bot into your browser’s code so you can automatically bypass Captcha easily every time.
And, since Captcha was created to filter out bots from humans, the above process is actually similar to cheating because you’re letting software integrated into your browser code to help you bypass this security feature.
There you have it! There isn’t much to it for those situations when Omegle keeps asking for ReCaptcha, and now you know all you have to do.
Was this article helpful to you? We would appreciate it if you would let us know in the comments section located below.
There are so many video games out there that will surely satisfy all needs and demands of everyone that is even remotely into gaming.
From pixelated old-school arcade games to the latest triple-A titles with enhanced graphics, all you have to do is want to play something and you will surely find what you are looking for.
But, as all gamers will tell you, video games can sometimes drive us to the brink of insanity, as they can be full of bugs, laggy, or incompatible with the right we are trying to play on.
That’s why, in order to help you have a more pleasant experience, we can show you the best browsers for gaming.
Also, seeing how not all gaming is done on PCs and laptops, make sure to check out what is happening in the console gaming market.
Now, coming back to why we are here, we’re going to show you how to improve your MapleStory experience, in case it is laggy, or has FPS drops.
If you are playing MapleStory, the 64-bit version, and you have lag, what you need to do can be found in the rows below.
Why am I having FPS drops on MapleStory?
In general, FPS drops can occur if you have problems with your connection or the servers are too busy, or it might also be some system configuration issues.
That’s why, whenever you start experiencing, you will first need to check if everything is running optimally, and then gradually move on to updating drivers.
So, in case your MapleStory is stuttering, or your MapleStory has lag when attacking, this guide will show you what you need to do.
How do I fix lag & FPS drops on MapleStory?
1. Check system requirements
First of all, when we are dealing with video games, we first need to ensure that the specific title can run properly on your PC.
If your rig isn’t powerful enough to run MapleStory, you will start experiencing lag, stuttering, or major FPS drops.
We’re going to have a look at the system requirements for MapleStory, so you can make sure that you can play it properly.
2. Update video driver
Search for Device Manager and open the app.
Expand Display adapters, right-click on the one you are using and select Update driver.
Select Search automatically for drivers.
Updating your drivers manually can be a bit challenging, therefore a specialized tool, such as Fortect Driver Updater can perform this process in a much easier and safer way.
Taking into consideration that MapleStory is a free-to-play, 2D, side-scrolling massively multiplayer online role-playing game, a steady and reliable Internet connection is a must.
We’re not saying that a wireless connection is not good for playing your favorite game, but we strongly recommend switching to a wired connection for online games.
Having slow internet can cause stuttering, lag, and FPS issues, so keep that in mind the next time you are in such a predicament.
Thus, in case of MapleStory is stuttering, or lags on Windows 10/11, make sure you go through the troubleshooting process above.
Has this guide been useful to you? Make sure to let us know in the comments section located below.
If you are a professional who loves to use Streamlabs for content creation, and your webcam is not working, it can be frustrating.
Previously known as the Streamlabs OBS, the Streamlabs desktop is a free and open-source streaming software that allows you to stream Twitch, YouTube, and Facebook in a jiffy.
However, like any other tool, it’s prone to common issues and one of them is the webcam not showing up on the Streamlabs app.
Webcam not working on Streamlabs OBS is nothing new and it usually shows up due to the below reasons:
Outdated Webcam drivers
More than one Webcam Source in your editor
Inaccurate Settings
The app does not have camera access permission
An antivirus software blocking the program
However, we have got you covered here with some quick workarounds below that can help you fix the issue in the blink of an eye.
But, before you proceed with the below fixes, make sure that you allow apps to access your camera, or try disabling and enabling the camera as explained in our detailed post here.
At the same time, check if the Webcam is not being used by any other apps apart from Streamlabs. This is one of the major reasons why it may fail to work.
This will not just help the Webcam to work again but will also fix the issue if the Streamlabs Webcam goes black.
How do I get my webcam to work on Streamlabs?
1. Update or re-install the camera driver
1.1 Update the camera driver
Right-click on Start and select Device Manager.
Expand the Cameras section, right-click on Integrated Webcam and select Update driver.
Next, in the Update Drivers window, click on Search automatically for drivers.
Now, wait till Windows detects the latest driver and applies the update automatically.
Once done, close the device manager and check if the webcam in Streamlabs is working now.
1.2 Re-install the camera driver
Go to Start, right-click on it and click on Device Manager.
In the Device Manager window, go to Cameras, right-click on Integrated Webcam and select Uninstall device.
Click on Uninstall again in the Uninstall Device pop-up to confirm.
Once the device is completely uninstalled, close Device Manager and restart your PC.
You can then head over to the manufacturer’s website and download & install the latest webcam driver.
Now, open Streamlabs OBS and check if the webcam not working issue is resolved.
2. Make sure your device supports custom resolution settings
Open Streamlabs and double-click on the Video Capture Device/Webcam under Sources.
Now, in the Settings window, set the configuration to Custom anda make sure to enter the correct settings for your webcam. Here’s an example below for the Logitech c920 webcam:
Below is another example of correct settings for the Logitech c922 webcam:
However, if you are using any other brand of webcam, or if you don’t know the correct settings of your webcam, you can refer to its manual, or visit the manufacturer’s webpage to get the details.
Incorrect settings may trigger the webcam issue in the Streamlabs OBS app.
3. Deactivate OBS scenes
Launch Streamlabs, navigate to Scenes, and select the first scene.
Double-click on the webcam under Sources to open its settings.
Under the Settings window, check the Deactivate When Not Showingoption.
Repeat steps 1 to 3 for all the others scenes in the app, and make sure that you turn on this option on your other sources also.
Now, check if the webcam is back up and running for the Streamlabs OBS.
4. Change the webcam video format
Open the Streamlabs OBS app, go to Sources, and double-click on the webcam to open its Settings window.
Here, scroll down towards the bottom and click on Video Format.
Now, from the drop-down, select MJPEG.
You can now check if the web camera is working. Besides, this method is also applicable if the camera is lagging on Streamlabs.
Launch Streamlabs and click on Settings (gear icon) on the bottom left.
Click on Video on the left.
Next, on the right, check the Common FPS Values field where it’s set at 60fps.
Click on Done to exit the Settings window.
Now, double-click on the Webcam to open its Settings page.
Here, go to FPS and set it to 30.
Close the window and the Webcam not working issue on your Streamlabs app should be fixed. This method also works if the Streamlabs camera zoom is not working.
Where are the camera settings on Streamlabs?
If you want to choose the best Streamlabs camera settings for an enhanced experience, here’s what you can do:
Launch Streamlabs Desktop and select the 1st Scene under the Scenes tab.
Now, go to Sources, and double-click on Webcam to open the open Settings for Video CaptureDevice.
Here, you can select the Device, and set the Resolution Type, FPOS, Video Format, etc.
Alternatively, you can also remove any duplicate webcam sources or any other webcam sources from any other scenes.
It may also be possible that antivirus software on your PC may be blocking the webcam and hence, it’s not working on Streamlabs.
In such a case, you can either try and remove the block from the antivirus settings, or turn off the software temporarily.
If none of the above methods work, you can uninstall the Streamlabs OBS and reinstall it to check if it helps fix the issue.
But, if you are using the OBS app and it keeps crashing, you can follow our detailed guide on how to fix the issue on Windows 10 & 11.
If you have more queries on the Streamlabs OBS app, you can leave a message in the comments box below.
Printers have unique IP address numbers for connecting to networks. Users can set up wireless printers with those IP addresses for network printing.
Windows 11 has a WSD (Windows Service Demand) port for connecting printers, which can be unreliable. Some users may prefer to set up printers with IP addresses in Windows 11.
Can you add a printer by IP address?
Setting up a printer in Windows 11 with its IP address is relatively straightforward. Here, we’ll look at how to add a printer by IP address on Windows 11 PCs.
You can set up a printer by IP address with Windows 11’s Add Printer wizard as outlined in the instructions below.
That wizard includes an option for adding printers with TCP/IP protocols, so read on to find out more.
What is my IP address?
Many printers have small LCD screens on which you can find their IP address details. Look through the network setup section in your printer’s display screen to find the IP address.
If your printer doesn’t have a display screen, try printing its configuration page, which includes the IP address.
You can often print such pages by holding the printer’s power buttons for a few seconds. Read the instructions in the manual to find out how to print the test page.
How do I add a printer by IP in Windows 11?
1. Press the Windows + I key combination to open Settings.
2. Select Bluetooth & devices and choose Printers & scanners.
3. Click the Add device button.
4. Then click the Add manually link to bring up the wizard.
5. Select the Add a printerusing an IP address or hostname option and click Next to view IP settings.
6. Click the TCP/IP Device option on the Devicetype drop-down menu.
7. Input your printer’s IP address within the Hostname or IP address box.
8. Enter the same IP address in the Port name field.
9. Make sure the Query the printer checkbox is selected.
10. Click Next for Windows to locate the printer.
11. Then you’ll see a message informing you that you’ve added the printer. You can change the printer’s name in the text box or leave it as it is.
12. Press Next to view printer sharing options.
13. If you want the printer shared with other devices on your network, select the Share this printer option. If not, click the Do not share radio button.
14. Select Next again to reach a Print test page button, which you can click if you wish.
15. Press the Add Printer wizard’s Finish button to complete the setup.
You can add a printer by IP address via Printers & scanners settings, with the Add Printer wizard. This option is recommended if your printer is not automatically detected.
After you add your printer, you can customize its name and other settings. Moreover, you can press the Windows Update button in the wizard to select your printer’s brand and model for driver installation.
To share a printer on a home network, Windows 11’s network discovery and printer sharing features need to be enabled. This is how you can set up a network printer for sharing:
1. Enable network discovery
Press Run’s Windows + R key combo and input this text in the Open box: control.exe /name Microsoft.NetworkAndSharingCenter
Click OK to open the Network and Sharing Center.
Select the Change advanced sharing settings navigation option.
Then select the Turn on network discovery radio button if that option is disabled.
Click the Turn on file and printer sharing option.
Press the Savechanges button.
2. Select a printer to share
When you’ve enabled network discovery and printer sharing, type printers and scanners in the Start menu’s search box. Select Printers and scanners to open the Settings page.
Select a printer to share.
Click the Printer properties option.
Select the Share this printer checkbox on the Sharing tab.
Press Apply to share the printer.
After adding a printer with an IP address, you can start printing from any device on your network. Further, to improve your workflow, you can go ahead and rename your printer for easier identification.
Note that the guidelines here apply to Windows 10 since that has the same Add Printer wizard. So, you can add printers by IP addresses and share them in Windows 10 much the same.
Epson as a brand name for printers needs no introduction. It’s one of the world’s biggest manufacturers of computer printers and shows no sign of slowing down.
But like with a lot of tech out there, Epson printers are often victims of some kind of error or malfunction. Be it paper getting stuck, the ink not coming out correctly, or in the case of this guide, scanning problems.
There have been reports of the Event Manager button setting not working properly. This guide will help you troubleshoot and fix those problems.
Why can’t I get my Epson printer to scan to my computer?
Well, there is a multitude of reasons why your Epson printer won’t scan your computer. According to Epson itself, there may be a problem with one of the cables not being properly connected to either the computer or printer.
In other cases, it could be that Epson Scan isn’t selected in the scanning problem. It’s also entirely possible that the printer is in some kind of power-saving mode like Sleep or Standby. In that case, wake up the printer and restart it.
All that said, follow these instructions if you’d like to know how to fix your Epson printer not scanning.
What can I do if Epson Event Manager button settings are not available?
1. Update drivers
The first thing you should immediately do is update your drivers.
Open the search bar on your Windows computer and search for the Device Manager. Click the first entry you see.
In the Device Manager, click Printers.
Right-click the Epson printer that appears and selects Update drivers in the window that appears.
In the new window, select Search automatically for drivers.
Your computer will automatically install Epson printer drivers. If the drivers are already installed, the window will let you know.
Updating drivers manually is a good option, but sometimes, doing this by yourself can be challenging. In this case, we feel like an automatic driver monitoring tool is much easier.
2. Check Windows Image Acquisition
Click on the search bar and type in Services.
Click the Services entry that appears.
In Services, scroll down to Windows Image Acquisition (WIA).
Right-click it and select Properties.
Ensure that the Startup type is set to Automatic.
Make sure that the Service status reads Running. You can activate it by clicking the Start button.
Click Apply on the bottom, then select OK.
3. Add permissions to Windows Defender Firewall
In the Windows Search bar, bring up the Windows Defender Firewall.
Click on the entry as shown in the image.
Click Allow an app or feature through Windows Defender Firewall in the new window.
Click Change settings in this new window.
Click Allow another app.
Click Browse.
Search for the Epson Event Manager app. Click Add.
The Event Manager app now has Firewall permissions.
But the short end of it is that you’ll have to assign the program that you want to configure in the Epson Event Manager. You select the action that you’d want to assign to the button. Click Close and you’re done.
Feel free to leave a comment below if you have any questions. Also, leave comments about guides you’d like to see in the near future.
Microsoft news recap is a weekly feature highlighting the top Microsoft news stories of the past week. Sit back, grab some coffee, and enjoy the read!
Xbox to launch brand new Home UI in 2023
A new Home UI is being worked on, due for launch in 2023, on Xbox consoles. A random set of Xbox Insiders who are part of the Alpha Skip-Ahead Ring have started testing the new UI this week, so that feedback can be collected on the experience.
Xbox Insiders in the Alpha Skip Ahead Ring – tomorrow our goal with a new 2308 build is a subset of users will see the new Home Experience – Stay tuned for build plans tomorrow – in the meantime we have plans today for 2209!
Had good calls this week with leaders at Sony. I confirmed our intent to honor all existing agreements upon acquisition of Activision Blizzard and our desire to keep Call of Duty on PlayStation. Sony is an important part of our industry, and we value our relationship.
Microsoft Advertising launches a newly redesigned Smart Campaigns experience to help SBMs optimize their operations
A new Smart Campaigns experienced has been released to Microsoft Advertising in the US, making it efficient and reliable for small and medium businesses to get up and running with online advertising, and now also assists in setting up ads across multiple platforms.
That’s it for this week. We will be back next week with more Microsoft news.
Usually, Windows 11 Widgets will open links in the default browser, which is Microsoft Edge. However, not everyone enjoys Edge as their default browser. This is especially annoying if you prefer another browser, like Firefox, Opera One, or Chrome.
Windows 11 widgets are cool. They help you do things like research flights, check your calendar, and send emails right from a panel on your Windows desktop.
If you don’t have a use for them, you can disable widgets, but if they make your life easier, this article is for you to help open them in your browser of choice.
Why aren’t Windows 11 widgets opening in my browser?
If you click on your widgets but are always directed to a blank page, below are some possible causes:
Firewall/Antivirus – If you use a firewall or anti-virus program, it might have blocked access to the web pages where your widgets are hosted. Check that any antivirus software on your PC isn’t blocking access by temporarily disabling it.
Outdated browser – You may have an outdated version of your browser installed on your computer that needs to be updated.
Incompatibility issues – Windows 11 widgets are compatible with only certain browsers. If you use any other browser, the widget might not open properly or get stuck on a blank page.
You have pop-up blockers enabled – If you want to open widgets in your browser, you’ll need to allow pop-ups.
If you encounter any of the above issues, there is a way to open widgets in your favorite browser, as detailed below.
Quick Tip:
Since we use more and more add-ons and extensions in our browsers, using additional widgets might create issues and make them open in Windows’s default browser, Edge.
Switching to a different browser that has most features you use already installed can be just the right solution. Opera One has already built-in things like VPN, Ad Blocker, AI, social media and messaging apps.
Opera One
With all the built-in apps, Opera One is ideal for your day-to-day browsing!
How do I change the default browser for widgets in Windows 11?
1. Set your preferred browser as the default
When you download and install a new browser, you will always get a prompt asking you to set it as your default browser.
This is useful if you’re trying out a new browser and want to use it for all your browsing without changing anything manually.
2. Disable Microsoft Edge
Disabling an app is a way of preventing the app from running on your PC. It is different from uninstalling or deleting it. This is useful if you want to remove an app causing problems on your device.
When you disable an app, it won’t be able to access your location or other information and features. It can temporarily remove it from your device without deleting it. This will not affect any of your data or information stored within the app, and you can enable it again at any time.
2. Double-click on the downloaded file to start the installation wizard, then click on Install.
3. Click on I accept this license then hit Next to continue with the installation.
4. Select Service Mode then click on Next.
5. Launch the app, then click on Start Service Mode With Windows and Windows Store Apps, then hit Install.
If your Windows 11 widgets keep getting redirected from your default browser to Microsoft Edge, it might be time to use a third-party app to stop this from happening.
We recommend MSEdge Redirect, which is an open-source tool available for free on Github. The tool will ensure your widgets use the browser you set as default, instead of Edge, via Settings.
4. Change the browser manually
Hit the three horizontal ellipses next to your selected widget.
At the bottom, you will see Powered by Weather (In this case the weather widget).
Now proceed to Settings, select Apps then click on Default Apps.
Select a browser of your choice as the default.
Since each widget is related to an app or service, you first need to find the app and then manually set the default browser to your preferred one.
What is the default browser in Windows 11 widget?
The default browser in Windows 11 widgets is Microsoft Edge, and though it can be switched for some, the changes don’t really reflect in all widgets and some links in the Settings app.
A few of these will always open in Edge, no matter what you do, which is Microsoft’s way of pushing the browser.
Will uninstalling Microsoft Edge cause problems?
Microsoft Edge is a web browser built into Windows 11, but it’s not the only browser available. The most common reason people want to uninstall Microsoft Edge is that they don’t like it.
If you’re unhappy with how Microsoft Edge works or looks, then there’s no point in keeping it on your computer, and you can switch to Opera Oneor Chrome. You may find that there are better browsers available that do everything that you want them to do in a more efficient manner.
Uninstalling applications from your system can cause problems because they use parts of your operating system and other applications installed on your computer.
When you remove an application, these components may remain on your system and cause issues with other programs or even prevent them from working properly.
While all browsers have their advantages, there are some built-in OS functions and features that are exclusive to Microsoft Edge on Windows 11. If you uninstall this browser, you may lose access to these functions.
YouTube TV is an excellent option for watching TV series on compatible platforms such as Android, smart TVs, Xbox gaming consoles, etc.
The best part is that users do not require a cable set-up box to watch TV episodes or channels.
Many people are now experiencing this issue while attempting to watch YouTube TV on their devices. When they tried to start YouTube TV, it displayed the error code 3 on the device’s screen.
They were unable to stream any of the videos nor open the app. Some users who could launch YouTube TV got playback errors on their devices.
Why does my YouTube TV keep saying error 3?
When our readers attempted to start YouTube TV on a compatible device, it failed to launch correctly, and they could not watch any content.
Instead, error code 3 appears on the screen. Some reasons why YouTube TV keeps displaying error 3 are listed below.
An issue with the YouTube TV app – Restarting the YouTube TV app many times may help
Poor Internet connection – An inconsistent Internet connection may be the cause of this error.
The YouTube TV app server is down – The YouTube TV app server may be temporarily unavailable during maintenance; waiting a couple of minutes may solve the issue.
A problem with the device – If the device is damaged due to some obvious reasons, this could lead to errors discussed above
Your device is unsupported – The YouTube TV app and its content are available on compatible devices such as Smart TVs and PC web browsers; such issues emerge when a user attempts to launch the YouTube TV app on an unsupported device.
Don’t worry if you’re experiencing a similar problem! Here are some ideas to get you started.
How do I fix YouTube TV error code 3?
1. Check the Internet connection
When users have an unreliable internet connection, it frequently causes the issues mentioned above and problems.
After removing the internet connection from the system, we recommend that users restart the router. Wait a few minutes before reconnecting the connection to the system.
If you use an Ethernet connection, please detach it by removing its cable wire from the system and reconnecting it after some time.
Even after this, if your internet connection is inconsistent, contact your internet service provider to acquire a steady connection!
2. YouTube TV app technical glitch
Because of a technical problem related to the YouTube TV app, this error can occur on any system.
It is simple to fix, just relaunching the application after shutting it. Restarting the device on which the user is attempting to stream the YouTube TV app is also recommended.
3. Close the background apps
Press the Ctrl + Shift + Esc keys simultaneously to open the Task Manager window.
Click the Processes tab, right-click on the unnecessary application that is currently running, which might be causing this error, and choose End task from the context menu.
Now repeat the same procedure to end all the unwanted apps listed under Background Processes.
Once done, you may close the Task Manager window and try to open the YouTube TV app to see if you have any errors.
4. Clear the browsing history and other data
Open the Chrome browser on the system.
In a new tab, type the following line in the address bar and press Enter key:chrome://settings/privacy
Under the Privacy and security page, click Clear browsing data.
Now, select Browsing history, Cookiesand other site data, and Cached images and files checkboxes and hit the Clear data button.
This starts clearing all the browsing history and other data selected for the Chrome browser.
You can do the same with other major web browsers to clear browsing data and cache.
5. Check if the YouTube TV server is down
These issues are unavoidable when the YouTube TV app server is turned off. YouTube TV has regular maintenance tasks, during which the server will be unavailable.
In addition, the server is shut down due to many requests from millions of users. This may be determined by checking the status of YouTube TV.
Why won’t my YouTube connect to my TV anymore?
The reason why YouTube cannot connect to the TV is that the YouTube TV app might be outdated, or the TV needs a software upgrade. It could also be possible that the TV is not connected to the Internet.
If you are annoyed by the ads coming up on your TV, here is the guide on how to block the ads on a smart TV.
Google Play Games is an online multiplayer gaming service that allows you to compete against other players on your device or computer.
The service allows you to save your progress from one device and continue it on another, and it offers achievements, leaderboards, and cloud saves for all games.
Android is the most popular mobile operating system in the world. And it’s also the most versatile one. It, therefore, doesn’t come as a surprise that gaming fanatics would want to play Android games on Windows PCs.
Can you download Google Play Games on Windows 10?
Unfortunately, there is no official version of Google Play Games for Windows 10 because the developers made it for Android and iOS devices. So if you want to use it on a PC, you’ll need to find alternative ways to install it.
Using an Android emulator is one of the most efficient ways to download Android apps on your PC. This is because you can run Android apps directly without needing to root your device or install anything else on your phone or tablet.
How do I download and install Google Play Games on my PC?
Use an Android emulator
Download or launch your favorite emulator (in this case Bluestacks).
Go to the download folder, locate the file and select Open with Bluestacks.
Open the app.
How can I download Android games on a PC?
There are many methods available through which you can download any kind of app or game on your PC but not all are safe or secure. You can use Google Play Store, but it’s not always possible because there are some countries where Google Play Store is not available.
In such cases, you can install a VPN that will mask your IP address and allow you to select another region where the application is allowed.
Another safe method to download Android games on your PC by using an Android emulator. An Android emulator is software that allows you to run Android apps on your computer.
What are Google Play Games PC system requirements?
The system requirements for Google Play Games are not strict, but there are some things that you need to take into account before installing the app on your computer. Here is what you need:
A Windows 10 (v2004) or later operating system
At least 8GB of RAM
An SSD with at least 10GB of available storage space
Intel UHD Graphics 630 processor or comparable
You can check for the detailed minimum system requirements from the official page to ensure your PC is compatible.
As always, remember to install an antivirus program when downloading applications from third-party sites. They could come bundled up with malware and put your system at risk.
Windows 11 has several features that make it easier to share your PC with family members or co-workers. One of the most useful ones is that you can set up multiple users on a single PC.
If you’ve got a lot of family members who need to get on your computer, setting up Windows for each person can be a pain, especially with the high cost of new PCs that meet the stringent Windows 11 system requirements.
As such, creating different accounts for every user comes in handy. This can keep them from accessing your files and settings, which will protect your privacy and prevent them from accidentally deleting or modifying important information.
Does Windows 11 allow multiple users?
Yes, Windows 11 allows multiple users. One of the biggest changes in Windows 11 is that you can now have several profiles on the same computer. The new features allow you to have different accounts for different people and even create separate accounts for kids.
You can set up different accounts for each family member, friend, or employee who uses it. Each account will have its own unique login details and settings, so you can customize the experience for each person.
The default user is called Administrator. As the administrator, you can change the name of your main user to anything you want. You’ll also be able to create additional users with different privileges so that you can share your computer with other people without worrying about them messing things up.
Can two users use the same computer at the same time?
Yes, two users can use the same computer at the same time. A virtual desktop is a tool that allows you to use a Windows 11 multi user environment. These virtual desktops can be accessed from any device that has internet access, including phones, tablets, and laptops.
You can also use this program if you want to share your computer with someone else or if you have multiple monitors and want to share them with other users as well.
If your activities are not extensive, the built-in TaskView will do but if you are looking for more features such as syncing and overall security, you are better off installing Virtual Desktop software.
Some companies allow employees to work from home while they are logged in to an office computer. This means that they would have access to the same files and programs that other employees would use if they were in the office.
Each desktop can have its own wallpaper, background music, and even different programs running on it. In addition, you will also need the Remote Desktop feature such that each user will have a separate monitor to access their desktop.
How do I set up multiple users at the same time on Windows 11?
In order to add multiple users to a single Windows 11 device, all you need to do is manually create them from the User Accounts menu.
You may add as many local users as you want to a device, each with their own separate account.
1. Hit the Windows + R keys to open the Run command.
2. Type netplwiz and press Enter.
3. ClickAddin theUser Accountswindow.
4. Select Sign in without a Microsoft account (not recommended).
5. Click on theLocal accountbutton.
6. Enter a username and password (optional) for the new user account, and a hint, in case you set a password. Once done, click on Next.
7. Click on Finish to create the Local account.
8. You can repeat these steps until you have created as many users as you wish on your PC.
9. Now select a virtual desktop to use and get started.
How many simultaneous users can access a Windows computer at a single time?
The number of simultaneous users who can connect to the main computer depends on the remote desktop software you are using and the server configuration. Most of them have a limit on the number of simultaneous users that can connect to a single computer.
Some require that you purchase a Pro or Premium account to increase the limit. In case you are using the built-in Remote Desktop feature, you can connect only one user at a time.
We have a rich collection of free Remote Desktop software if you are in the market for one. As a precaution, always switch off your Remote Desktop when not in use to prevent cyber criminals from accessing your data.
It is also recommended to keep your OS updated, limit the number of users who can access Remote Desktop, and use a reliable VPN service.
Have you set up multiple accounts on your Windows PC? What is your experience? Let us know in the comment section below.
When using a USB hub to connect your USB devices like a webcam with your computer, you realize that it’s not working.
This is a common situation and apparently, it may occur due to corrupt or outdated USB drivers. You may also encounter this issue if you are not using a powered hub.
Also, because certain external hard drives like webcams or flash drives are high-powered devices, they would need a powered hub. Otherwise, they may fail to work.
But if there’s a power surge in the USB port that’s preventing the webcam to work, you can follow our detailed guide for more details.
Why is my webcam not being detected through a USB hub?
If you are using a USB webcam and you realize that it’s not being recognized by the USB hub, then it could be because:
the USB webcam/USB hub is not connected properly
the camera/USB drivers are corrupt/outdated
you are not using a powered USB hub
There’s a glitch in the OS or with the USB port itself
So, if your webcam is not working with the USB hub, we have some effective tips on how to fix the issue.
What can I do if my webcam is not working with a USB hub?
1. Disconnect & reconnect USB devices
Disconnect the webcam from the computer.
Now restart your PC without the USB devices.
Once the PC has restarted, attach the webcam back.
Now, check if the webcam is working with the USB hub and if you are facing any other issues.
2. Update and reinstall the webcam software & USB drivers
Press the Win + R keys simultaneously to launch the Run console.
In the search bar, type devmgmt.msc and hit Enter.
Expand the Universal Serial Bus controllers section, right-click on the USB device, and select Update driver.
Next, in the new window, click on Search automatically for drivers. Now, wait till Windows detects and installs the latest drivers automatically.
Now, expand the Cameras section and repeat steps 3 and 4 for the Integrated Webcam as well.
Once done, exit Device Manager and restart your PC for the changes to be effective. Now, the webcam is not working with the USB hub issue should be fixed.
This method is also effective if your USB camera is not detected on your computer.
NOTE
You can also uninstall the device, and then visit the manufacturer’s website to reinstall the latest software and check if it resolves the issue.
Another option you should try is using specialized software because it scans your entire PC and searches for any error that could be an impediment to its performance. After it founds the issue, it can automatically repairs or replaces the damage.
3. Run the built-in camera troubleshooter
Press the Win + I keys together to launch the Windows Settings app.
Click on System on the left of the Settings window.
Now, on the right, click on Troubleshoot.
Next, under Options, click on Other trouble-shooters.
On the right, under the Other section, go to Camera and click on Run.
Now, wait for the troubleshooter to detect and fix the issue automatically.
You can now restart your machine and check if the webcam not working issue with the USB Hub is resolved.
To check if your USB hub is powered, you can confirm the power output of USB ports as shown below:
Press the Win + R hotkeys to open the Run console.
Type devmgmt.msc in the search field and hit Enter.
Next, expand Universal Serial Bus controller, right-click on USB Root Hub, and click on Properties.
Select the Details tab and in the Property field, select Power data.
Under Value, you will see something like D0.
The higher the number, the lower the power output of your USB Device. For example, here we see D2, which is somewhere in the middle.
Do I need a powered USB hub for a webcam?
While the powered USB hubs draw their power from an electrical outlet, the non-powered USB hubs draw their power from the computer connection.
USB hubs are perfect for low-powered devices like mice and keyboards. But for high-powered devices like webcams and flash drives, it may not work properly.
You can also use multiple webcams with powered USB hubs, and divide the available bandwidth across three cameras.
However, if none of the above methods work, you can create a system restore point on Windows 11 and perform a system restore to go revert your PC to a previous working state.
If this does not help, you can also reset your Windows 11 PC and check if this helps fix the webcam not working with the USB hub issue.
For any other queries related to the webcam or the USB hub, you can leave a message in the comments box below.