7 best software to track sales and improve cash flow

Sales tracking software tools help with forecasting, workforce scheduling, optimization, and determining pricing and strategy plans for the company.

There’s a large percentage of companies that still rely on manual methods of tracking their sales like spreadsheets or paper, or even whiteboards.

While this may work with offices that get very low sales volumes, it is still not ideal. Using traditional ways of tracking sales can lead to poor performance.

Poor customer experiences, inefficient and ineffective use of sales staff and their time, fewer deals closed, and lower revenue with each deal are all the results of that.

Thankfully, technology has sorted out all these hassles by providing software to track sales. These manage, track, and guide each aspect of the sales process.

That’s possible thanks to a set of workflows that let the sales staff know where each prospect is at any time, and what steps they should take next.

Today, however, with better integrations and machine learning, some software to track sales can recommend the best follow up actions.

Even more, sales teams can get insights into the status and health of their department generally.

Some features you will find with popular sales tracking software include pipeline and cycle management, dashboards, and the next best actions.

There are also pipeline editors, web-to-lead features, social media integrations, collaboration tools, and basic content management functions.

Here are the top six software tools to track sales.

What’s the best software to keep track of sales?

Monday.com – Best overview and detailed reports

Monday.com is an all-in-one type of software specialized in business management for every department, from IT to sales and HR.

This software helps you keep track of all expenses to the very last dime. Customizable dashboards will keep you updated with all the costs in real time.

Monday.com also provides the user with interactive Gantt charts to check budgets, track progress on projects and see how much work has already been done, everything to keep everything on track.

Easily get the full picture of sales, a specific deal or just taxes for the last trimester. By having detailed access to all types of data, you ensure that all goals and sales targets will be achieved in time.

Monday.com also provides automation for repetitive processes as well as ways to facilitate workflow. See sales retrospective for every month, check how revenue increased or decreased and set notices if something is off track.

The main key features of Monday.com are:

  • Brilliant sales management and expense tracking
  • Centralized projects management with great workflows
  • Simple decision-making with real-time updated dashboards
  • Smart automation of repetitive processes and workflows
  • Integrations for great communication and collaboration
  • User-friendly interface with great capabilities

Save time by having detailed access to all expenses and boost efficiency when it comes to setting future targets and goals.

Monday.com

Never miss a thing between pre-sales and post-sales and manage all expenses from one OS.
Free Download Visit Website

Bitrix24 – Best for communication and collaboration

try out Bitrix24

Even profitable companies can experience cash flow problems. Get ready to leave them all behind with the help of Bitrix24. Over 7.000.000 businesses have already done that!

Bitrix24 is actually a collaboration app with complete tools for sales management and communication.

It comes as a united platform for your tasks, contacts, and projects. What’s more interesting is that you can use the self-hosted version of Bitrix24 to run on your server.

This means that you’ll enjoy full control over data and source code access, along with countless integration and customization options.

Key features that Bitrix24 brings to the table:

  • Unified workspace to easily handle daily operations
  • CRM to quickly grow your sales
  • Efficiency guaranteed by millions of Bitrix24 CRM users worldwide
  • Convenient group chat
  • Intuitive e-learning tools
  • Useful helpdesk tools for small and mid-scale businesses

Bitrix24

Great CRM tool, with plenty of features to facilitate sales management.
Free Download Visit Website

Pipedrive – Best for business pipelines

try out Pipedrive

Pipedrive is a web-based software tool to track sales and manage your business pipeline by planning your sales activities and monitoring deals.

It is built with activity-based methodology and streamlines each sales action that goes into converting a lead or prospect into a successful sale.

Being cloud-based, the sales team and other staff involved can access it from any location and at any time, with any browser or mobile app dedicated to the same.

It also gives full visibility of the different pipelines, through its robust interface which has details of the progress stages per deal and actionable points.

One of its strong features is the activity and goal tool that lets sales teams track pending activities in the pipelines, and gives custom sales reports to monitor single or group level targets, analyze sales data and generate reports that can be used for decision making.

The mailing system is easily and seamlessly integrated with many email providers such as Outlook, Gmail, and Yahoo, among others.

So, your team can send and receive email messages from different accounts using their Pipedrive account.

It also integrates with other leading sales tracking and customer relationship management tools for easy transfer and sharing of contacts, as well as with MailChimp, Zapier, Trello, and Google Maps.

⇒ Get Pipedrive here

Salesforce – Best at workforce management

try out Salesforce

Salesforce is an on-demand software to track sales that is available for use by small, medium, and enterprise organizations.

Its focus is on sales and support, with capabilities such as sales management, marketing automation, customer service, and relationship management amongst partners.

It helps you manage your customer accounts, track leads, conduct, and monitor campaigns, and provide after-sales service.

When used with Outlook, users can synchronize contacts, calendars, emails, and tasks in both the email app and Salesforce.

Small businesses can also manage their contacts, track sales and deals, manage events, and their own sales tasks, and get more leads while tracking performance.

The enterprise tool includes more features such as team-selling, business workflow, setup approval and automation, API integrations, and call scripts among others.

⇒ Get Salesforce here


 Looking for the best SEO software to boost your search rankings? Here you’ll find our top picks.


Zoho CRM software – Great CRM features

install Zoho

Zoho is a well-known brand in business software and this particular software to track sales is a cloud-based CRM tailored to suit small and medium-sized businesses.

Its interfaces include tools such as customer support, sales tracking and marketing automation, product configuration, reporting, and customer analytics.

With this software, you can use the multichannel support to connect with your customers and prospects via email, live chat, phone, or even social media.

It also has a gamification feature through which you can gamify the sales process while rewarding active and achieving sales staff who meet and/or surpass their targets.

The mobile app lets you access sales activities and information on customers from any iOS or Android devices, while its Blueprint feature helps automate sales processes through workflow and macros definition for regular tasks.

It integrates with existing software such as Google Docs, Microsoft Office and Sharepoint, with add-on apps for specialized business, collaboration, and productivity requirements.

⇒ Get Zoho CRM software here

Hubspot CRM software – Great CRM tracking

install Hubspot

Hubspot is another popular marketing and CRM software solution, but this particular one is cloud-based and helps companies track and nurture leads, and perform business metric analysis.

It is available for free and suitable for any business type in various segments such as accounting, construction, and others, offering a real-time view of the whole sales funnel while tracking customer interactions automatically via email, social media or phone.

With this software to track sales, you can create and manage email templates and track their performance, plus send out real-time notifications on events like when a contact opens the email or downloads any attachments.

You can add up to a million contacts, with unlimited users and your free access has no time limit, however, the contacts added may be added to the Hubspot Marketing Hub if used together.

Once you start using it, you’ll also find some free versions available in the paid marketing and sales software so this tool goes over and above what a typical CRM does, so you can improve your sales processes.

It integrates with email providers such as Gmail, GSuite, and Outlook.

⇒ Get Hubspot CRM software here


Don’t know the best software for selling online and drawing customers’ attention? It’s time to change that!


Infusionsoft – Good for small businesses

get Infusionsoft

This is another cloud-based sales and marketing solution that offers CRM, e-commerce, and marketing automation features in a single suite.

It helps small businesses in different industries deliver on their sales volumes and customer support experiences.

With this software to track sales, you can segment contacts, track customer interactions, send email messages, and run marketing campaigns based on email opens.

Even more, it lets you manage your e-commerce from inventory, payments, and purchases, plus setup online shopping carts while tracking activity from the online store.

It has reporting and analytics tools that help you analyze variables like emails and campaigns, sales, revenue projections, and others to track the return on investments of your sales activities.

You can also use it remotely as it is cloud-based, with your android or iOS smartphone or tablet, and it integrates with apps such as QuickBooks, Salesforce, Outlook, and Gmail.

⇒ Get InfusionSoft here

Is there a software to track sales that you find very useful and that isn’t mentioned here? Share with us in the comments section below.

No less important, you should always rely on dedicated scheduling tools to keep your agenda organized.

[wl_navigator]

Windows Update High CPU Usage: 7 Solutions That Work

We have seen more users complain about the high CPU usage on Windows Update.

It’s not unusual for some third-party apps to hog your CPU in the background. But what happens when this unwelcome occurrence appears to be inflicted by none other than one of Windows’ essential processes?

That’s what many users reported to be the issue, with wuauserv taking up to 60% of CPU, even in idle mode, which is preposterous. For some, even Windows update 100% CPU was the case.

For that purpose, we enlisted some solutions that should come in handy and, hopefully, relieve you of this annoyance. If you can’t deal with the service host Windows Update’s high CPU usage on your own, check out the troubleshooting steps below.

Why does Windows Update take so much CPU?

There are a few reasons your computer is significantly tasked during Windows Update. If this has bothered you, then you should consider the following reasons:

  • Low system capacity – To summarize, you may use an old PC, and new updates and software may be too much. In this case, you will constantly have Windows Update high CPU usage.
  • Insufficient RAM – You may also be low on RAM, which will mean that your system’s memory is easily congested.
  • Multiple concurrent updates – You should disable P2P update distribution in this case.
  • Conflicting applications – In most cases, the conflicting applications will be antivirus software, and you may need to disable or uninstall them altogether.

Many users have noticed this problem in the following variations:

  • Windows update using CPU
  • wuauserv high CPU
  • Windows update high disk usage
  • Windows modules installer worker high CPU

Regardless of your situation, trying the fixes below would help.

What can I do if Windows Update causes high CPU usage?

1. Restart the Windows Update service

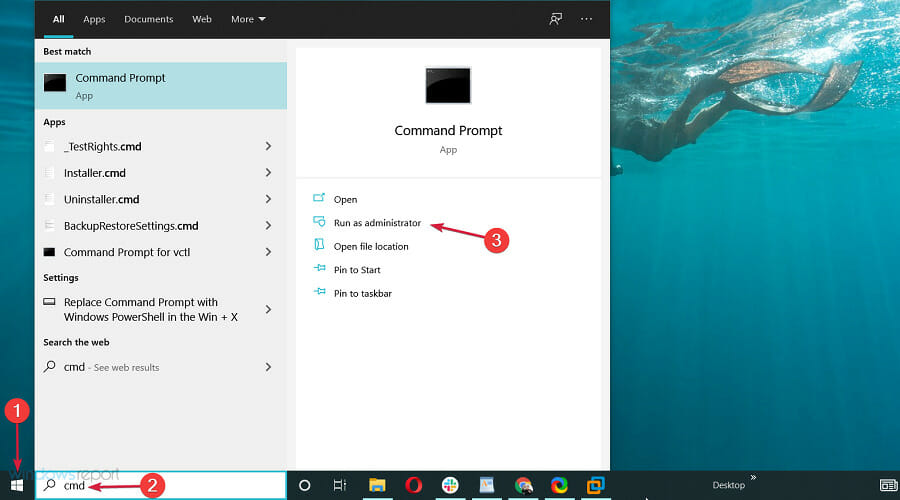
  1. In the Windows Search bar, type cmd, and select Run as administrator from the results.
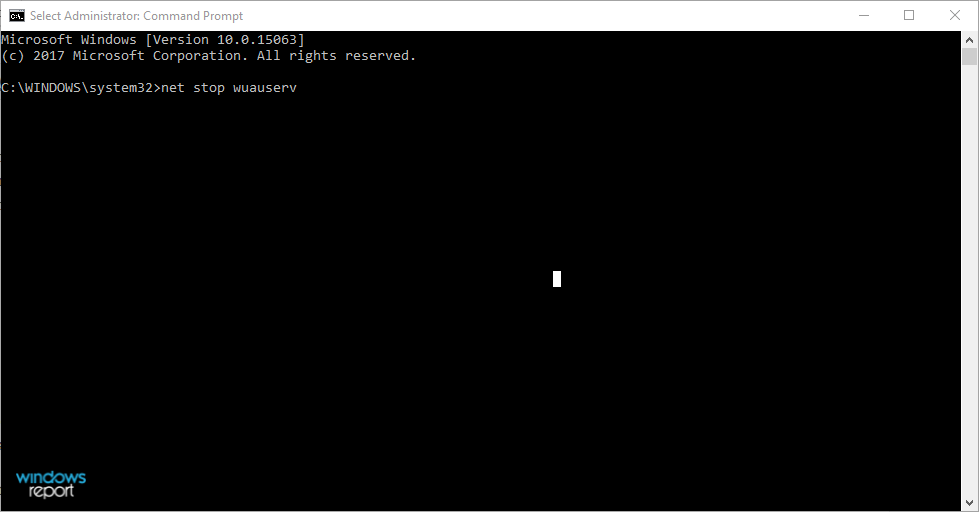
  2. In the command line, type the following commands and press Enter after each.
    net stop wuauserv net stop bits net stop cryptsvc Ren %systemroot%SoftwareDistributionSoftwareDistribution.bak Ren %systemroot%system32catroot2catroot2.bak net start wuauserv net start bits net start cryptsvc
  3. Close the Command Prompt and navigate to Task Manager again to ensure that abnormal resource consumption of the Windows Update service is reduced.

Service host Windows Update high CPU usage and issues of Windows Update running on 100 percent CPU should be resolved after restarting the related services.

2. Run the Windows Update troubleshooter

2.1 Update troubleshooter on Windows 10

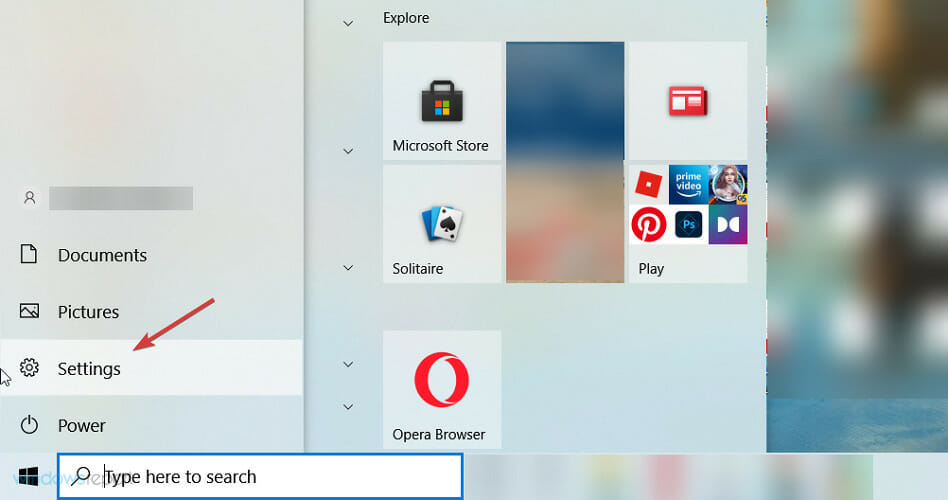
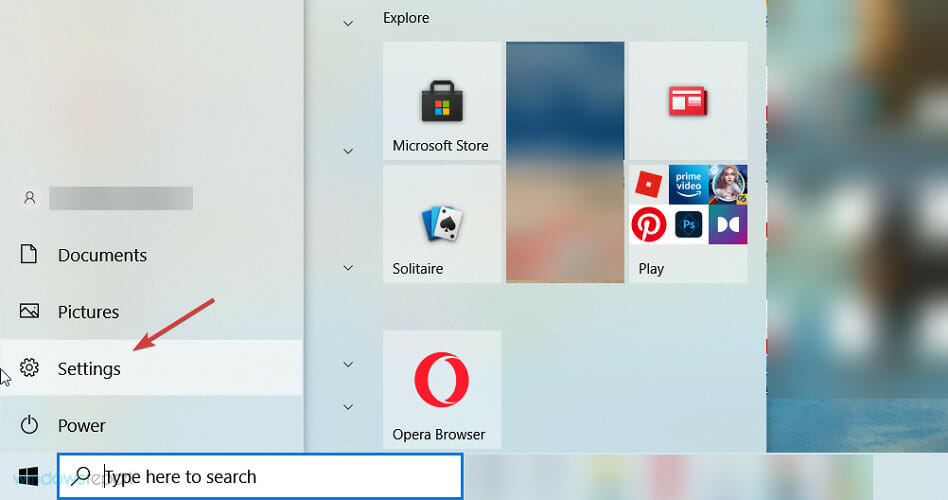
  1. Press the Start button and open the Settings app.
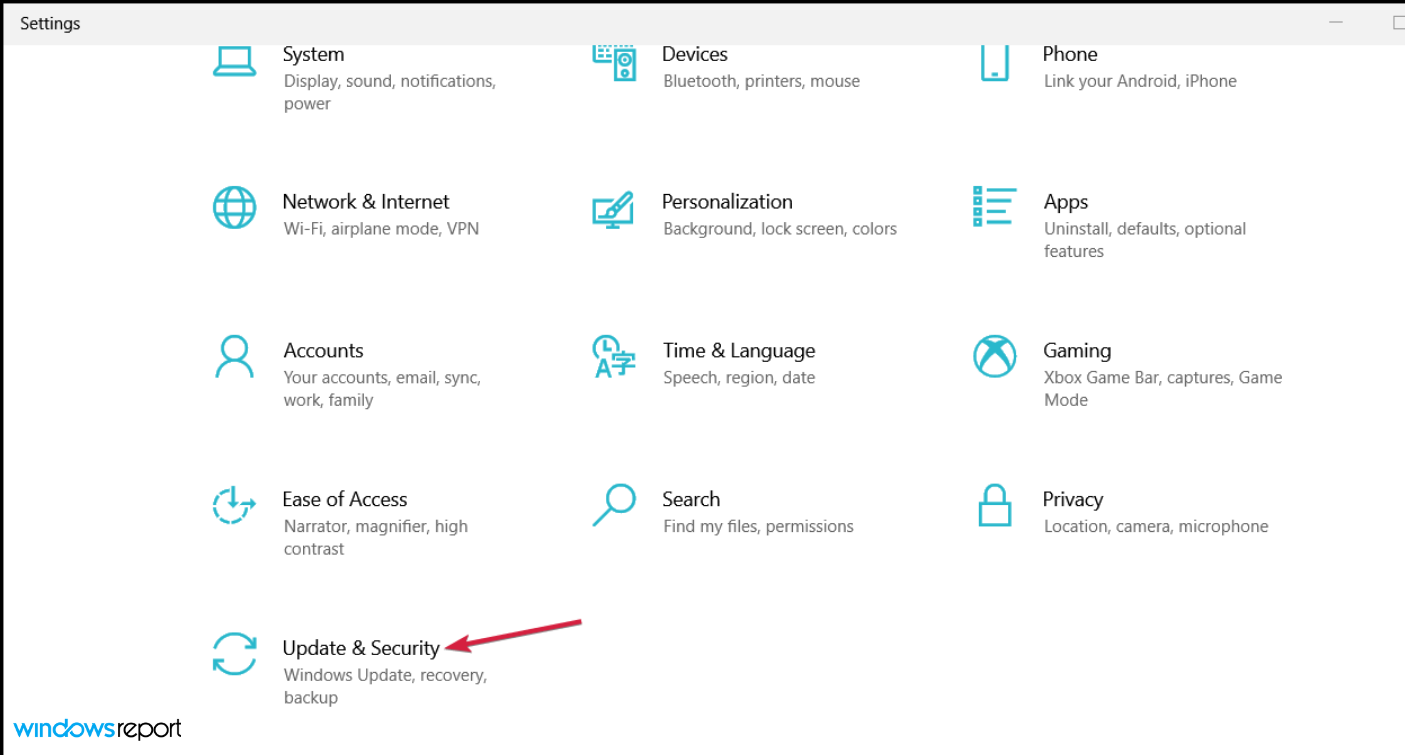
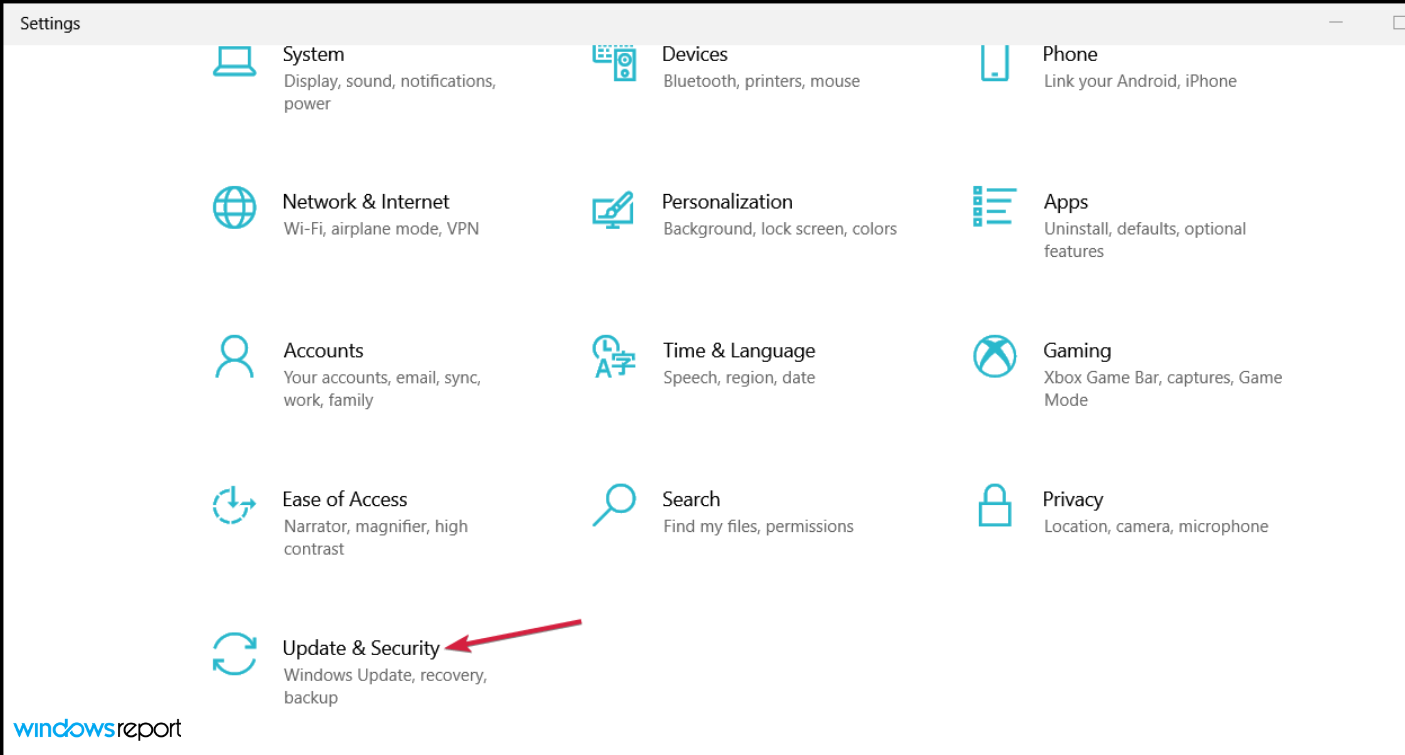
  2. Open Update & Security.
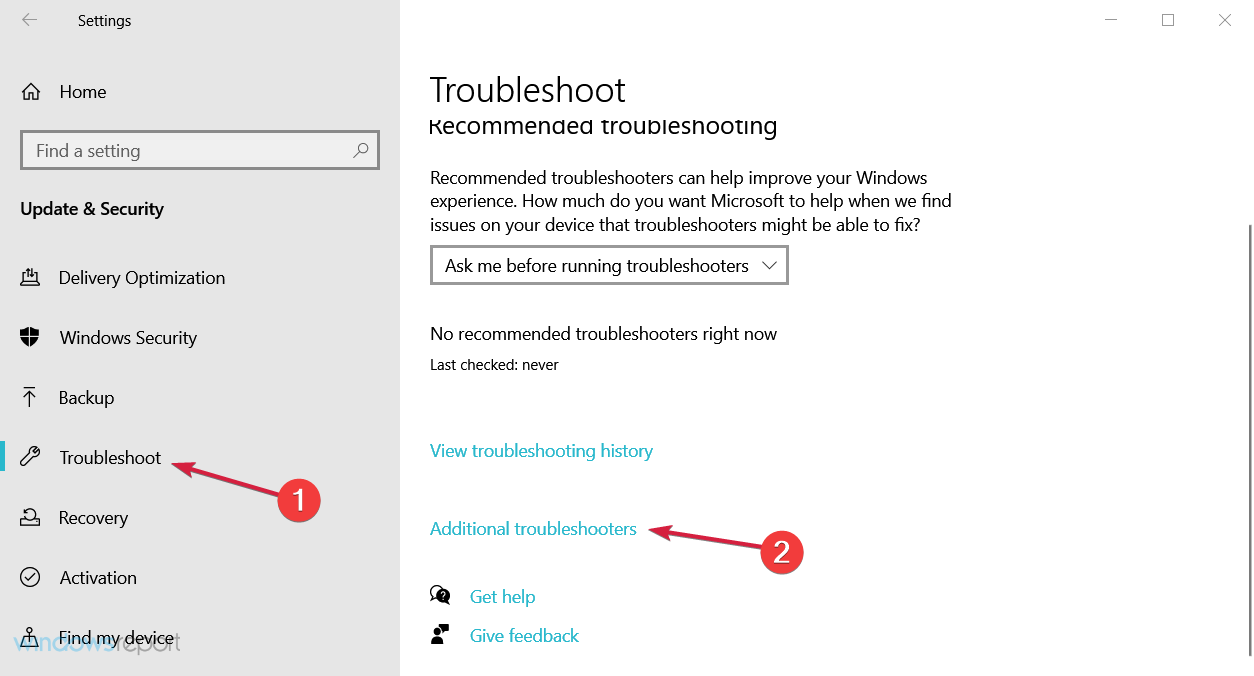
  3. Click on Troubleshoot under the left pane and select Additional troubleshooters from the right.
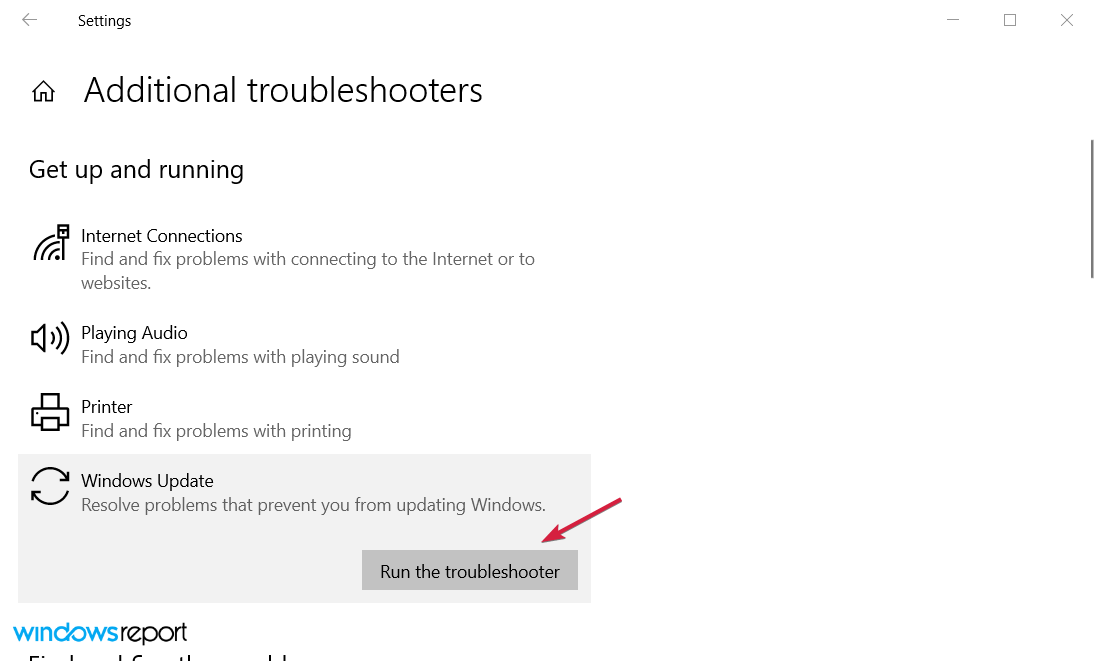
  4. Click on Windows Update to expand it, then hit the Run the troubleshooter button.
  5. After the procedure ends, right-click on the Taskbar and open Task Manager.
  6. Look for changes in wuauserv service behavior.

2.2 Update troubleshooter on Windows 11

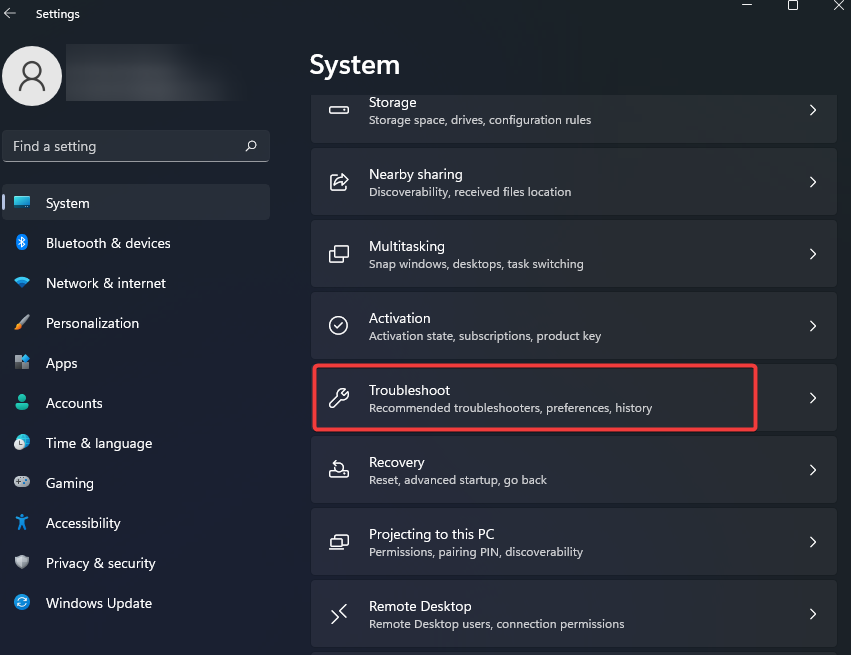
  1. Open the Settings app and on the right pane, click on Troubleshoot.
    Windows update high CPU
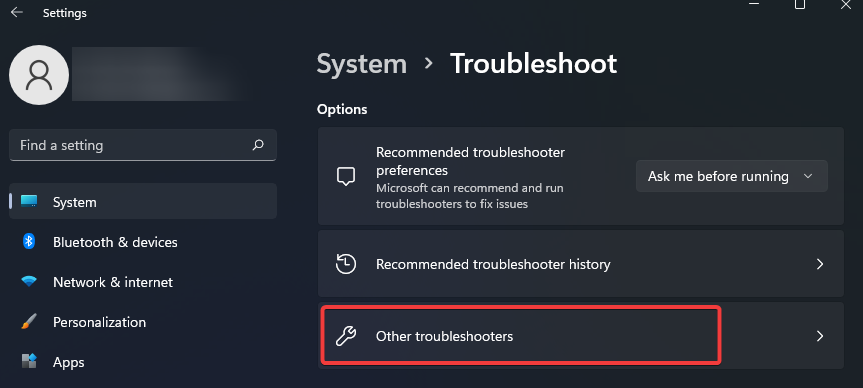
  2. Click on Other troubleshooters.
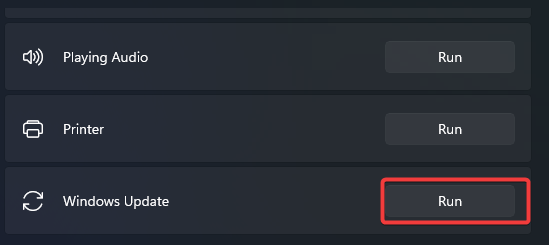
  3. Under Windows Update, click Run.

The dedicated troubleshooter will solve the Windows Update service high CPU issue, and if you look into Task Manager, all should be normal again.

3. Disable the third-party antivirus

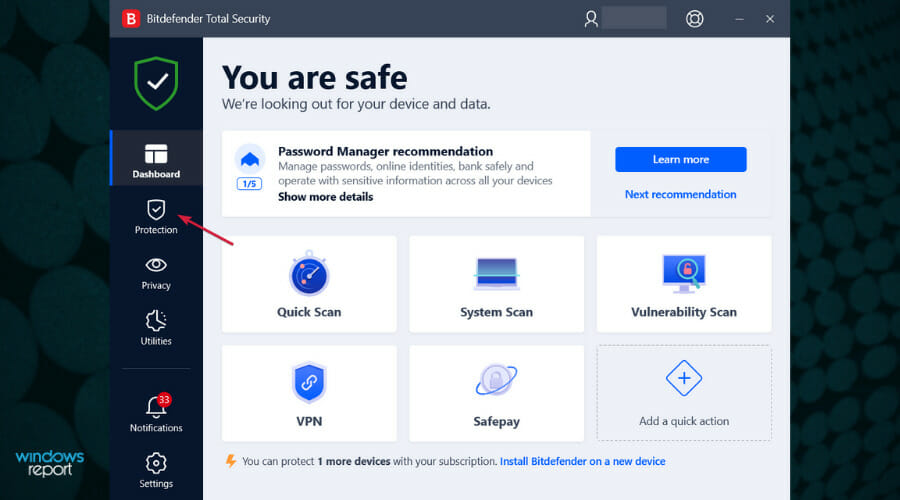
  1. Open the third-party antivirus and access the Protection or Security menu. We offer Bitdefender as an example, but all antiviruses can be disabled from their menus.
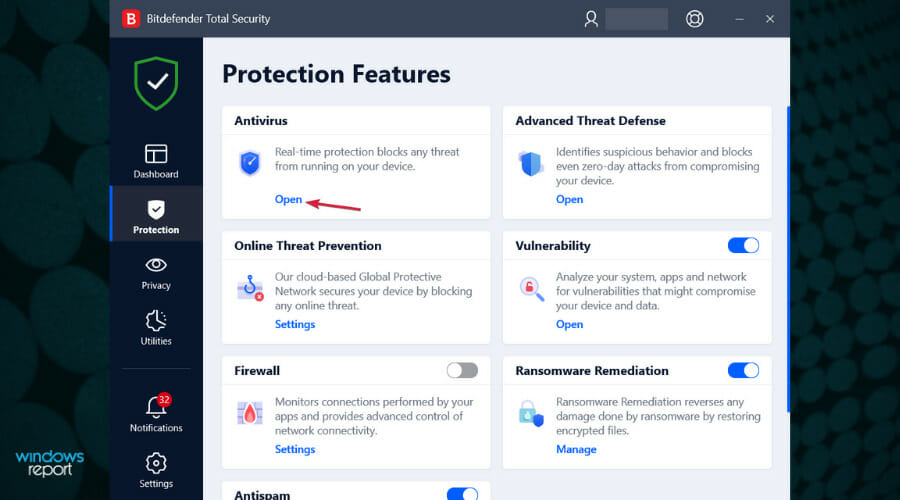
  2. Click the Open button under Antivirus.
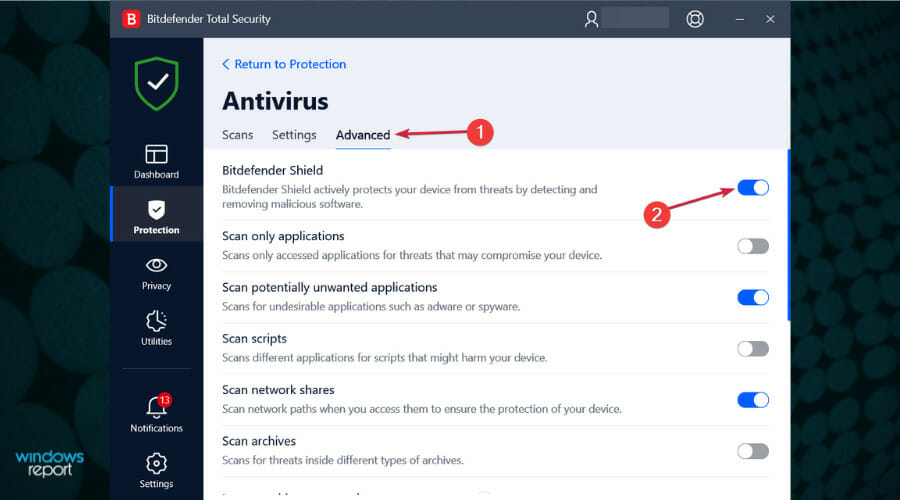
  3. Lastly, select the Advanced tab and click the switch to turn off Bitdefender Shield.

The beef between Windows and specific third-party solutions is already a known fact. However, that doesn’t mean you’ll need to ditch your antivirus when the system behavior takes the wrong turn.

Just disable it for the remainder of updating. Then, once the Windows Update service locates and downloads all updates, you can enable it again.

If you discover that the antivirus is causing this problem, you may consult our list of the best antiviruses and get a better one.

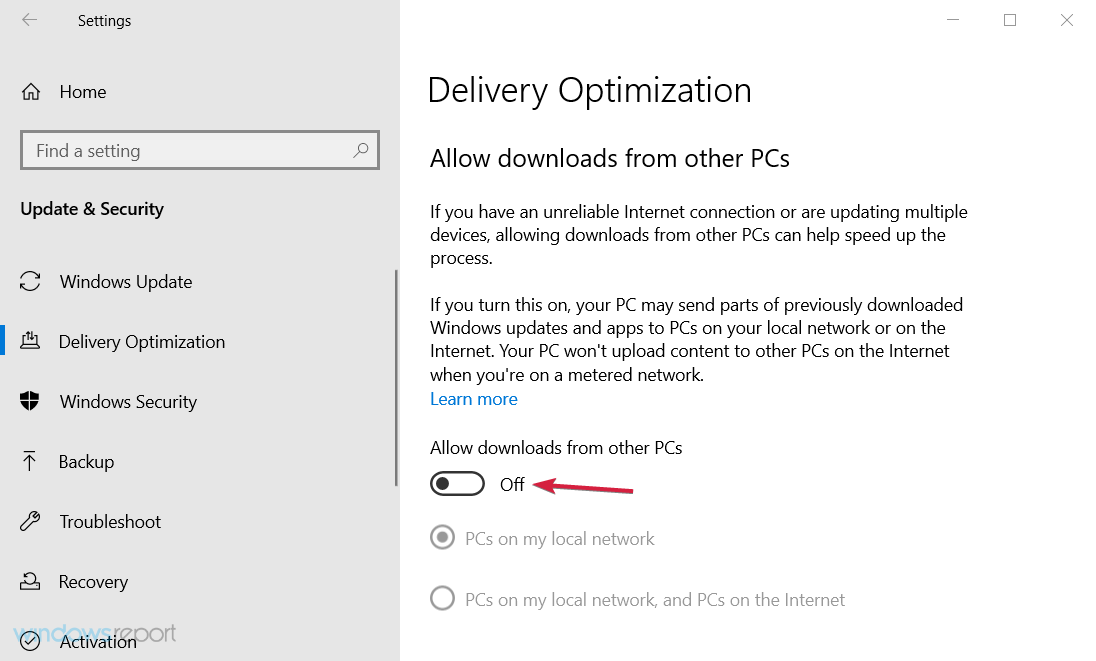
4. Disable P2P update distribution within the local network

4.1 Disable P2P update distribution Windows 10

  1. Click the Start button to access the Settings app.
  2. Open the Update & Security section.
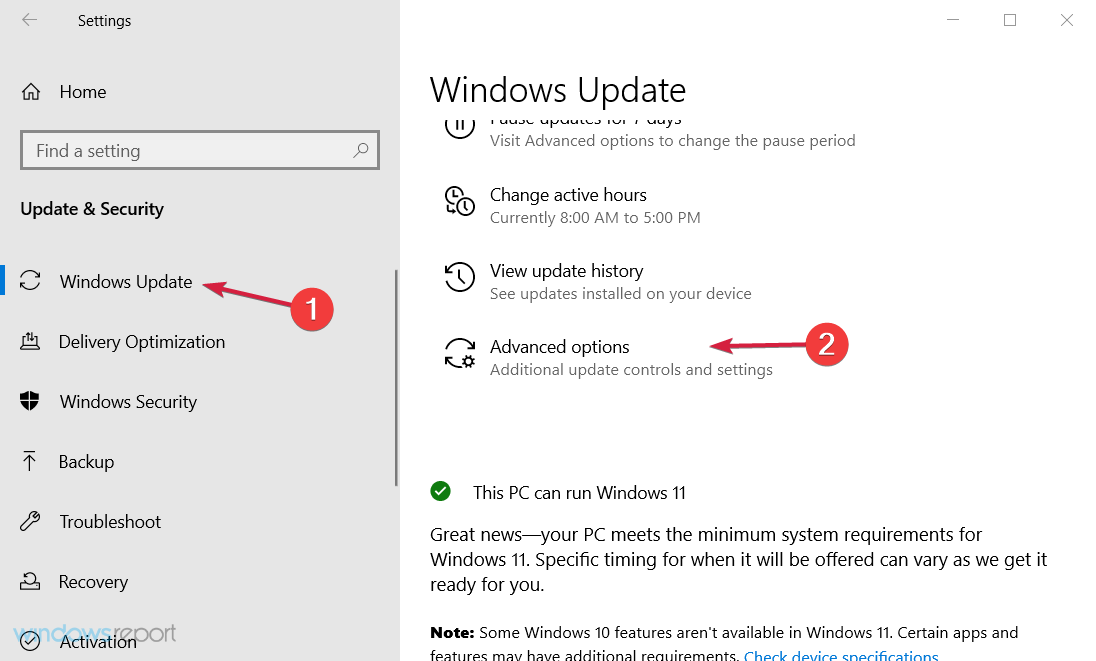
  3. Select Windows Update from the left pane and click on Advanced options.
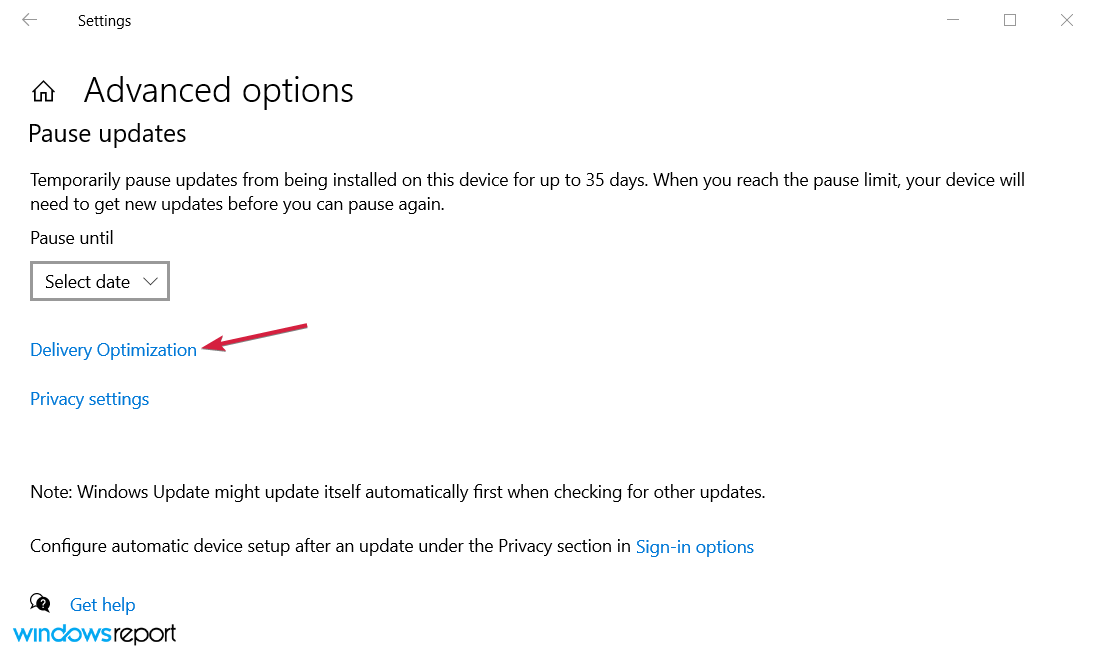
  4. Scroll down and click on Delivery Optimization.
  5. Turn this feature off and restart your PC.

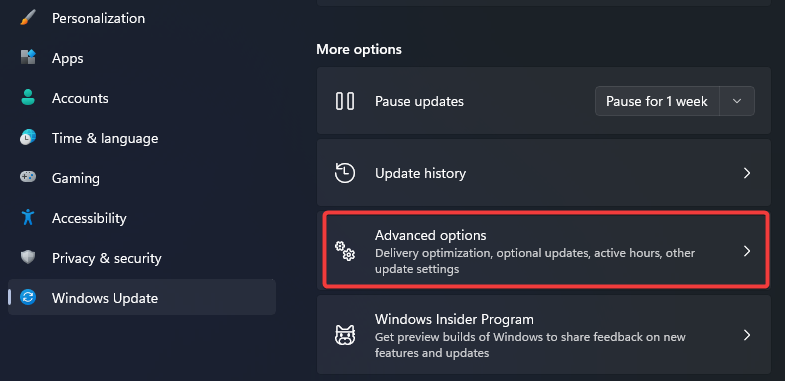
4.2 Disable P2P update distribution Windows 11

  1. Open the Settings app.
  2. Click on Windows Update on the left pane, and select Advanced options on the right.
    Windows update high CPU
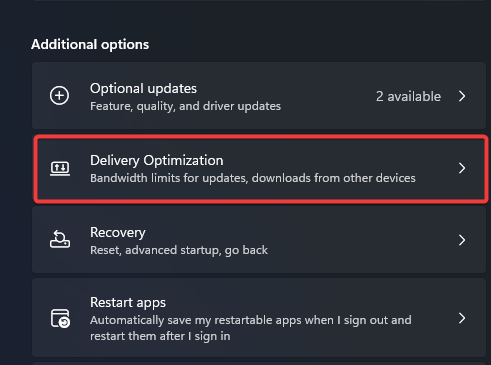
  3. Scroll down and click on Delivery Optimization.
    Windows update high CPU
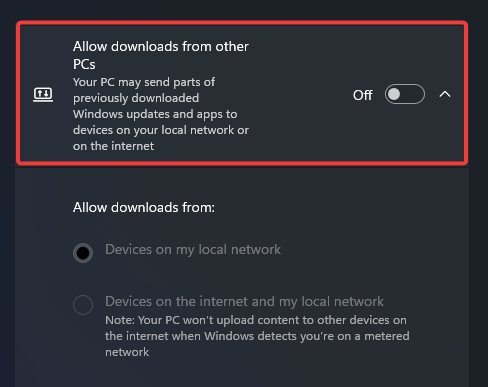
  4. Toggle off the switch to Allow off downloads for other PCs.
    Windows update high CPU

With the introduction of the Windows update feature, users can update multiple PCs in one local network with the P2P update distribution. At first glance, this sounds great, as it should substantially speed up the update process.

However, there are some flaws in this update approach, and they can, eventually, result in a constant, never-ending update cycle.

In that case, your Windows Update service will continuously run in the background and hog your system resources.

5. Pause Windows updates

5.1 Pause updates on Windows 10

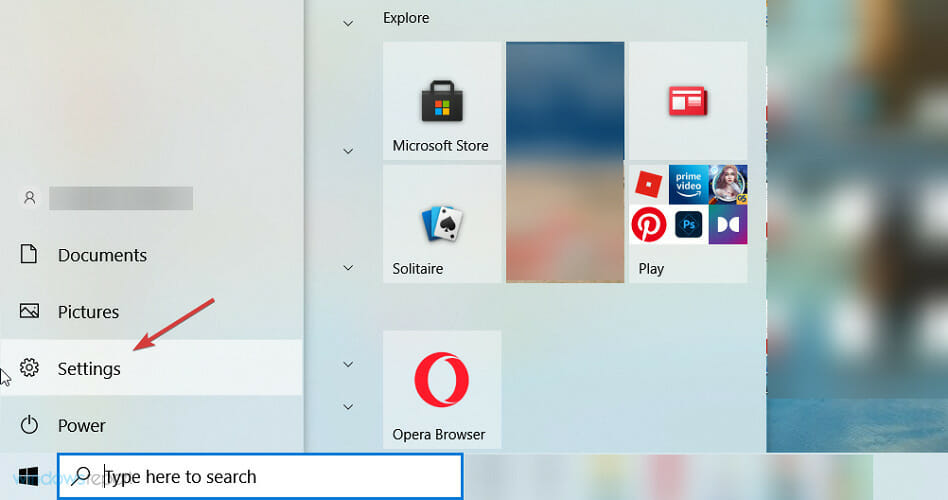
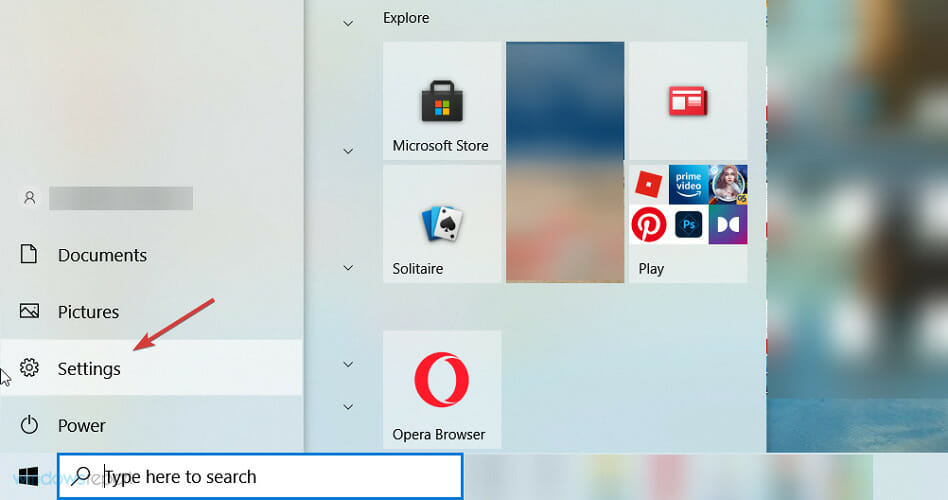
  1. Select the Start button, then click on Settings.
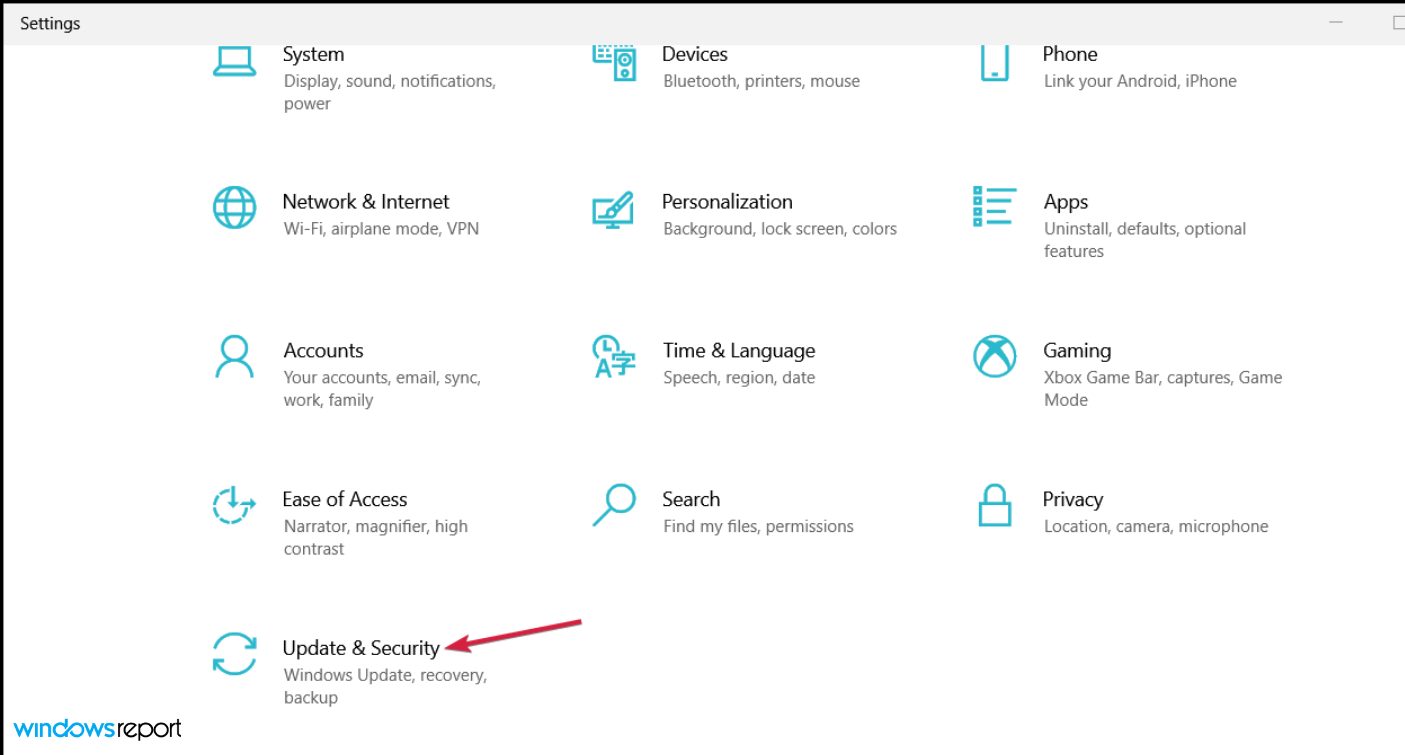
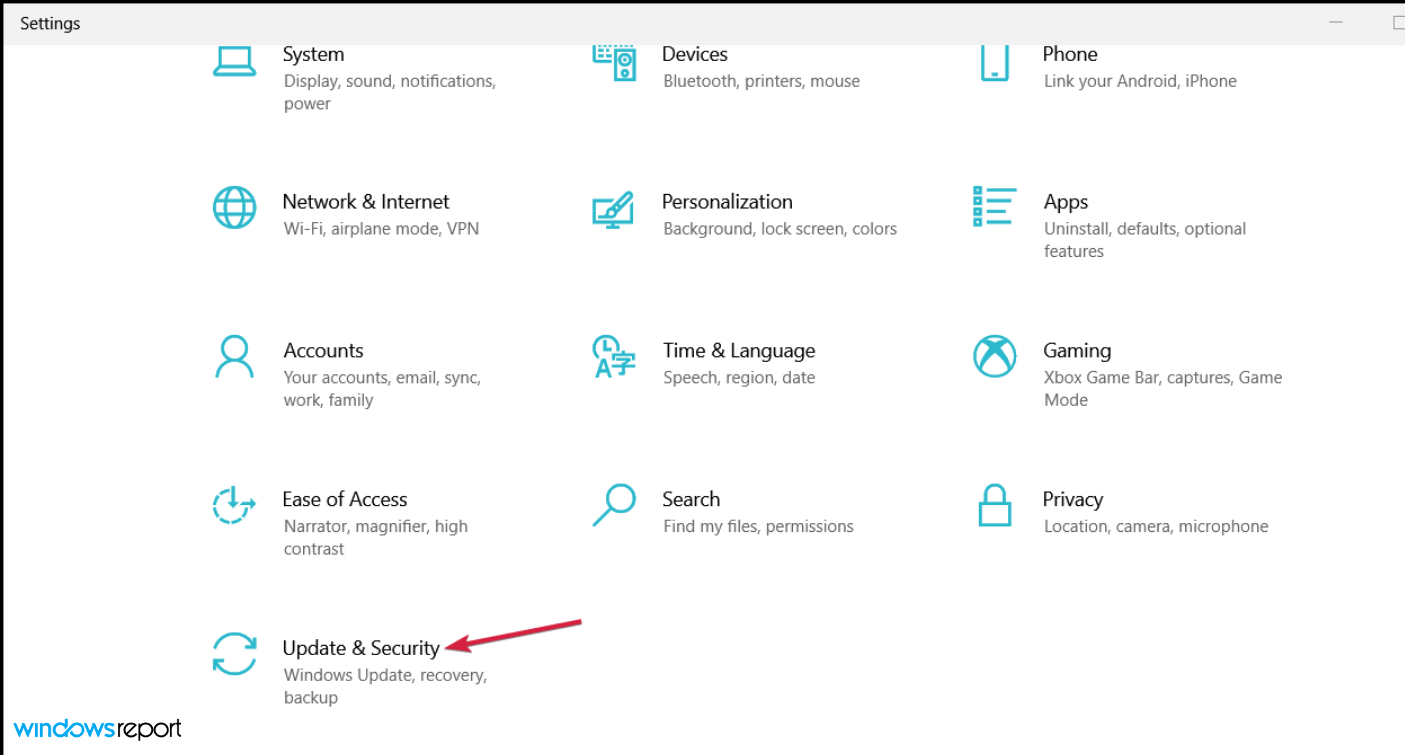
  2. Choose Update & Security.
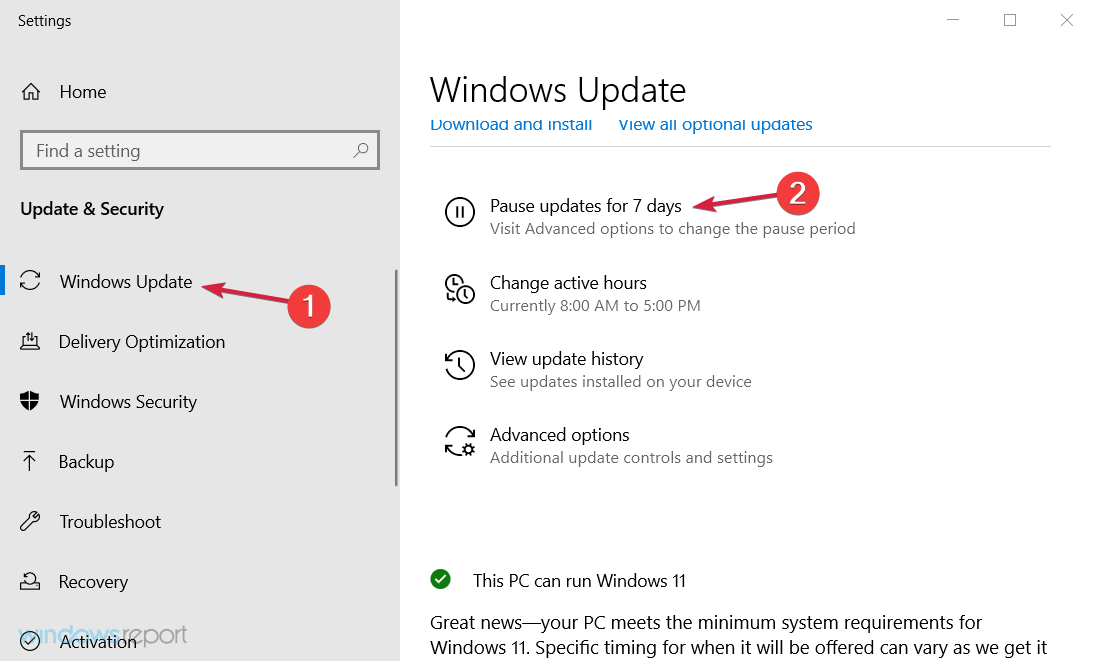
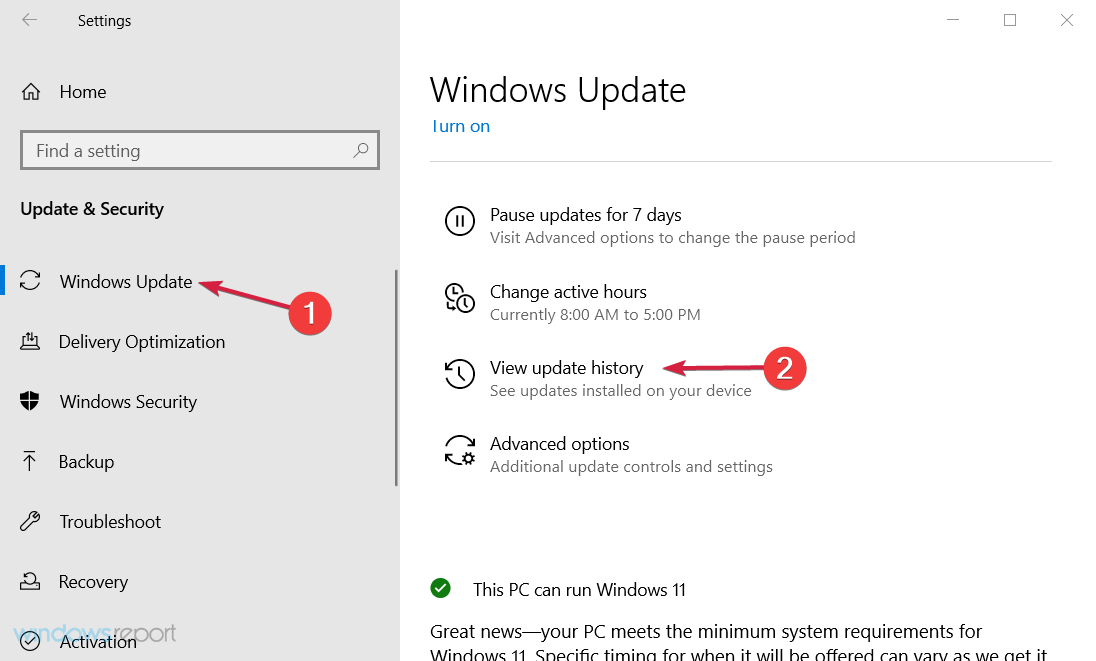
  3. Click on Windows Update from the left pane, then scroll down on the right and select Pause updates for seven days.
  4. Restart your PC.

5.2 Pause updates on Windows 11

  1. Open the Settings app.
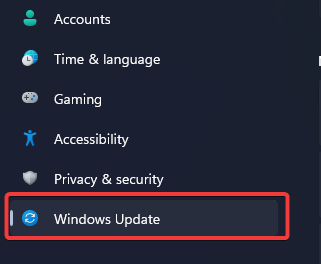
  2. Click on Windows Updates.
    Windows update high CPU
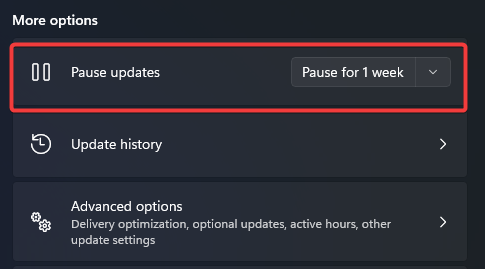
  3. Select the Pause updates option on the right pane.
    Windows update high CPU

Pausing the updates for a while can fix the problem, but only temporarily. So it’s imperative to install your updates to keep your system safe, so don’t abuse this feature.

6. Uninstall recent updates

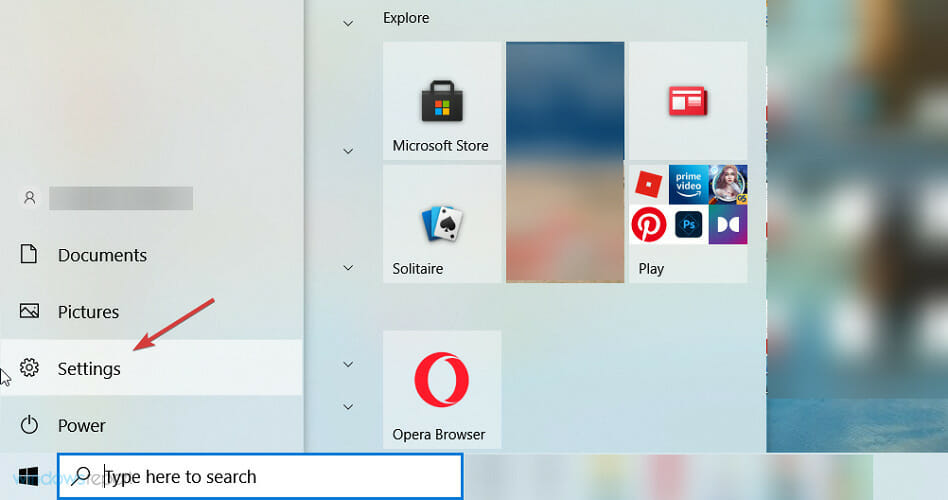
  1. Click Start and then on the cog-like icon to open Settings.
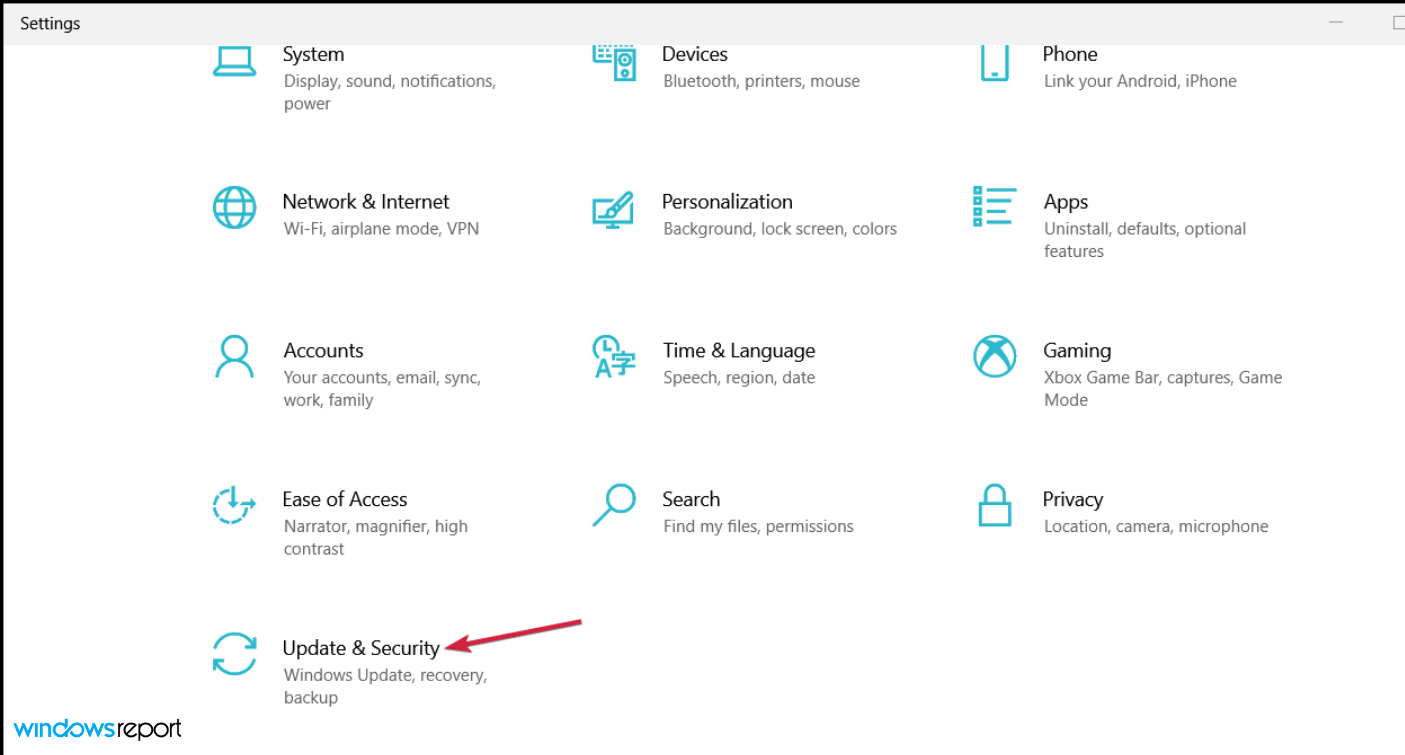
  2. Select Update & Security.
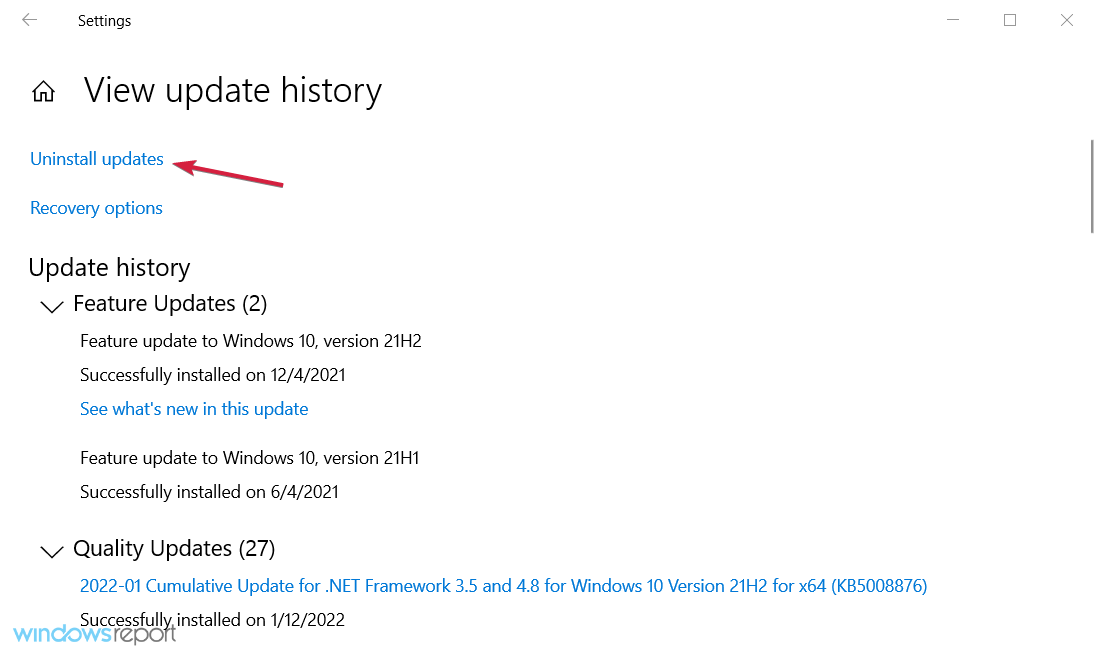
  3. Highlight Windows Update in the left pane and click on View update history.
  4. Choose Uninstall updates.
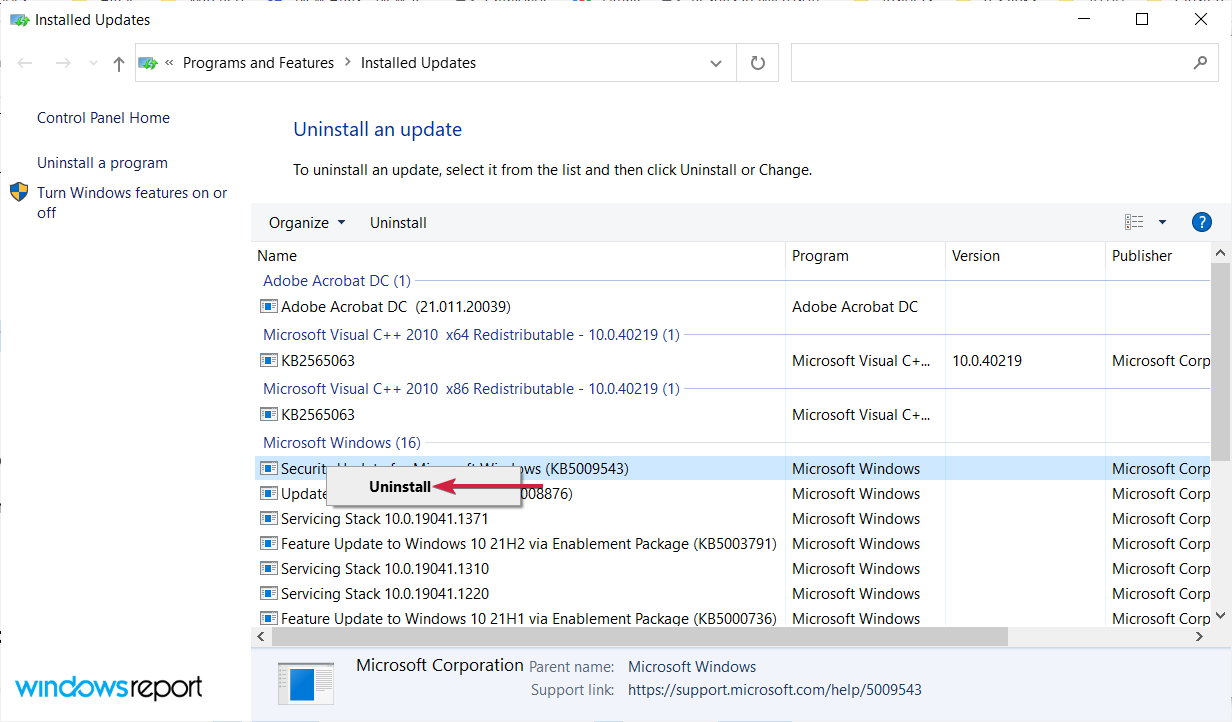
  5. Please right-click on the most recent update and uninstall it.
  6. Restart your PC and look for changes to Windows Update high CPU.

Furthermore, specific updates can provoke a malfunction within the updating procedure and prevent the Windows Update feature from looking for new updates or downloading already queued updates.

Even though this is rare, it might just be the case. Therefore, it’s a viable solution to uninstall recent updates and move from there.

7. Reset Windows to factory settings

  1. Click the Start button and select Settings.
  2. Select the Update & Security section.
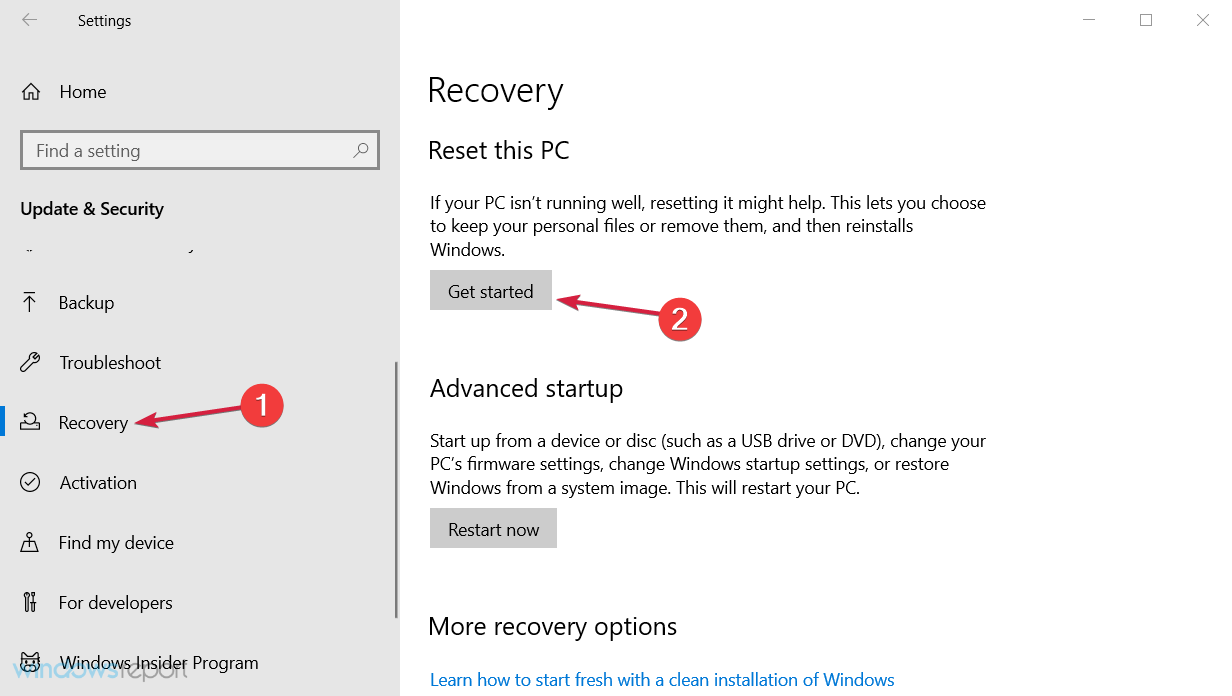
  3. Click on Recovery from the left-side pane, then, under the Reset this PC option, click on Get started.
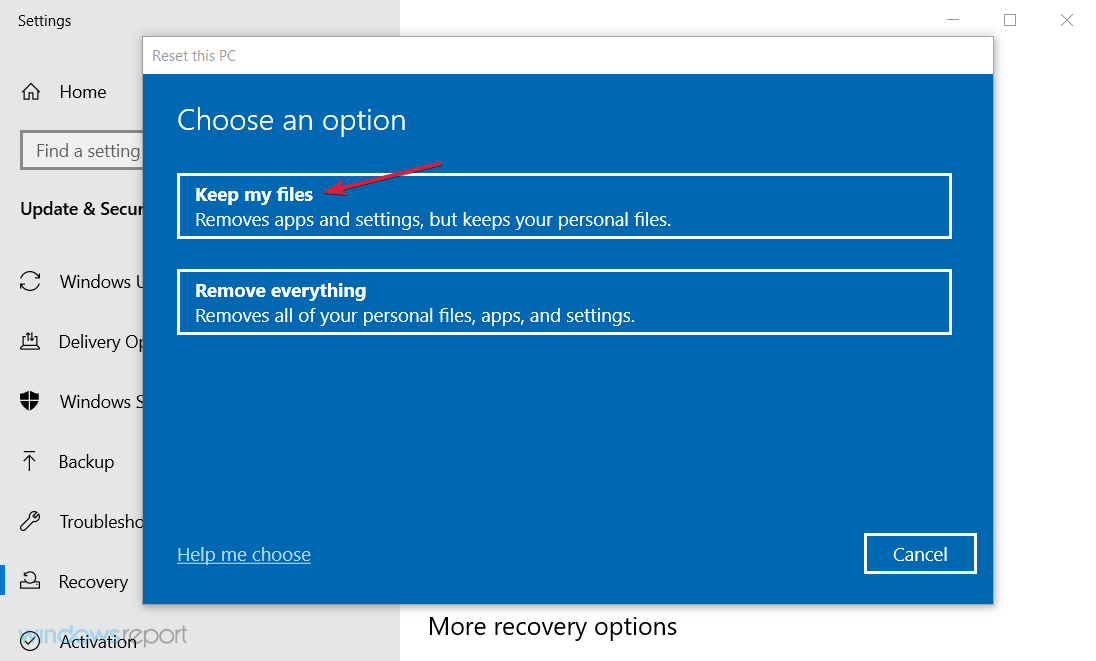
  4. Choose Keep my files.
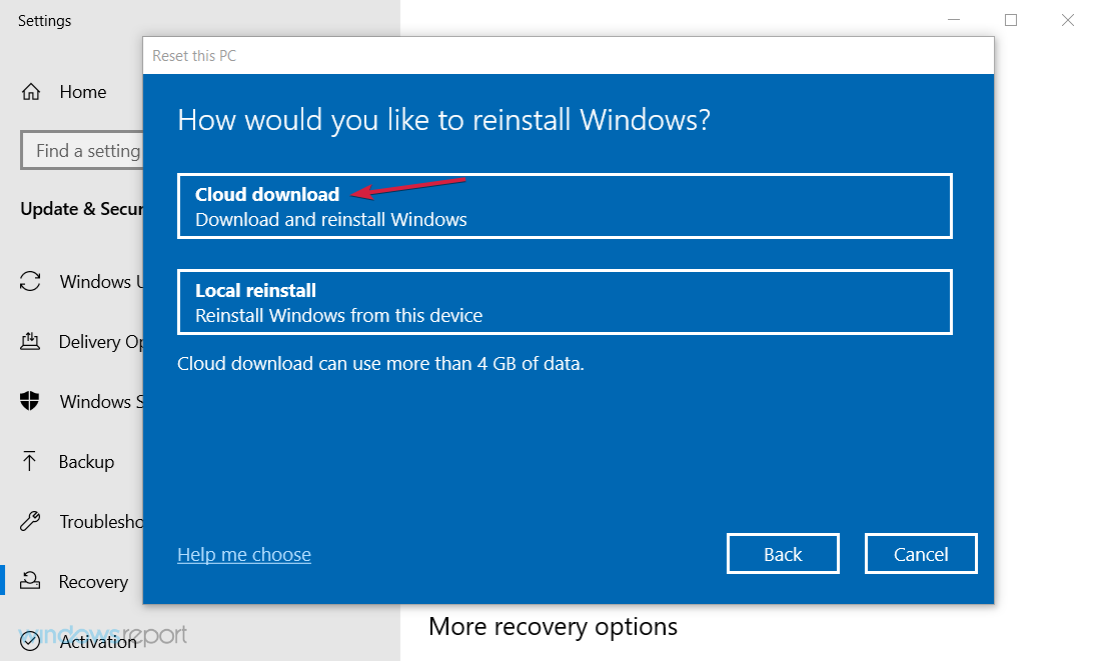
  5. Click Cloud download and then Reset.
  6. This procedure will eventually restore your PC to factory values.
  7. Finally, check if the Windows Update high CPU usage is resolved.

The last place on the list is reserved for the painful but sometimes needed recovery options. More precisely, the Reset this PC feature enables you to reset your PC to factory settings.

In a system shell as complex as Windows, many things can go south for you, especially if you decide to upgrade your system rather than perform a clean reinstallation.

Luckily, Windows has an advanced recovery option that enables you to restore default system values but keep hold of your files.

On the other hand, if clean reinstallation is your cup of tea, learn how to perform a clean reinstallation of Windows 10.

That should do it. These solutions will fix high CPU usage in Windows 10 and 11 updates and some cases, even when nothing is running.

If you have questions regarding the enlisted solutions or additional solutions you are aware of, feel free to tell us in the comments below.

HBO Max Not Working on VPN? Try Out These Solutions

HBO Max, like Netflix and other streaming media, usually blocks VPNs from accessing its content.

It’s problematic for those who use VPNs for HBO Maxto watch streaming movies and TV shows from any location.

When you experience HBO Maxissues on VPN, restart your computer or your VPN service. However, if this doesn’t work, try the solutions we listed below.

Why is HBO not working with my VPN?

Any user can encounter functionality problems on HBO Max due to multiple reasons. Most probably, it’s related to your VPN configuration or the streaming client detection algorithm.

Let’s see what are the key reasons why you can’t access your HBO account using the VPN:

➡️ The streaming service has blocked your VPN IP address

➡️ Your VPN is not configured correctly

➡️ The HBO Max service is not available in your server’s location

➡️ The VPN can’t bypass the geo-blocking rules from HBO

➡️ There might be a problem with your browser cache

Generally speaking, these situations are the most probable to happen if your VPN is not able to access HBO content library.

What can I do if HBO Max won’t work on VPN?

There are plenty of solutions you can apply in order to resolve this unpleasant issue on this movie platform.

Hence, you should carefully follow our complete guide on how to fix your VPN issues on HBO Max.

1. VPN won’t connect

1.1. Check that you’re online

This is one of the simplest things to overlook, but it affects your VPN connection. Try and open a site without connecting through VPN and check if you’re online.

If not, restart your router and if your internet is still not working, contact your Internet service provider.

You can also check your VPN provider’s website to ensure the server is not down, because once in a while, VPNs go off for maintenance.

1.2. Make sure your username and password are correct

There are many cases where login credentials have hindered users from connecting with their VPNs, hence they cannot watch HBO Max. Sometimes their account has expired, so they cannot connect.

Always check if you keyed in the correct username and password, or try to reset and reconnect.

1.3. Change ports

Some ISPs and networks block traffic on particular ports that can deny access to your VPN’s connection request, so check your VPN’s documentation if it requires connections on specific ports.

1.4. Try connecting on a different network

If the problem is with the VPN, try to join a different network to see if it helps. If you can connect to the other network, then your own network is the problem, so check Wi-Fi and Internet settings to see what is preventing the connection or sign in.

If you just want to browse or use HBO Max anonymously, with no geo-restrictions or censorship, then a VPN that doesn’t connect you is such a pain. But you can try the above quick fixes.

2. Go for a streaming-optimized VPN

Find a VPN that will replace IP addresses as soon as HBO Max blacklists them.

Some time may pass between when the IP address was banned and when the VPN provider changes it, and this can be a few days up to several weeks.

In this case, disconnect and then connect again, and try until you find an IP and servers that work.

Good VPN providers like the ones below work best with HBO Max, and it is the best solution for privacy. The VPN recommended below is a US-based VPN owned by Kape Technologies.

Having hundreds of servers in 94 different regions, you can enjoy streaming HBO Max content, whether the services are blocked or not where you reside.

Its unblock streaming feature lets you access many popular streaming services without testing servers manually.

Features include hiding of IP, IP sharing as an additional security layer, and DNS leak Protection for each server, plus strong tools against geo-restrictions.

Once connected to the server, the VPN sends feedback about the website you’re connected to and want to watch, the current server location, and the protection status.

ExpressVPN

Enjoy HBO’s captivating titles using this VPN that enables free streaming anywhere.
Check price Visit website

3. VPN keeps disconnecting

Nothing can be more irritating than not being able to connect to your VPN, or even connecting and then it drops out over and over. Here’s what you can do to resolve this:

3.1. Temporarily disable your firewall

Firewalls are important as security measures, but they can also cause some problems with VPNs like slowing down your connection, and, in extreme cases of very slow speeds, the VPN connection may just shut down.

Firewalls scan incoming and outgoing data within the network, so if it finds something that isn’t supposed to be there, it prevents its transmission.

Other firewalls just cannot keep up with VPN traffic, so they hinder the connection.

3.2. Connect to a nearby server

If your VPN’s server(s) is not behaving in the usual way, you may get disconnected from time to time, so try to connect to a nearby server and check if it helps the connection.

3.3. Change protocols

Certain VPN protocols may not be able to hold a strong connection. If you’re on OpenVPN, try to connect over L2TP/IPSec. However, if you use L2TP, try using the OpenVPN protocol instead.

PPTP is also an option, but it isn’t as ideal as the other two. OpenVPN is the most secure of the three protocols. Changing from UDP to TCP (or vice versa) can also help.

3.4. Connect via Ethernet

Sometimes your router may cause connection issues with your VPN. Try and plug directly into the cable jack with an Ethernet cable to resolve this.

The problem lies in the double NAT, which may happen if you have one router behind another one, or you have different routers for different devices or a router connected to your ISP-provided router.

In this case, enable bridge mode to make multiple routers work together, but check your router documentation for instructions on this.

4. Change the DNS servers

  1. Press the Windows Key + X, and choose the Network Connections option.
  2. Locate your connection, right-click it and choose Properties from the menu.
  3. Select Internet Protocol Version 4 (TCP/IPv4), and click the Properties button.
  4. Select Use the following DNS server addresses option.
  5. Enter 8.8.8.8 as Preferred DNS server, and 8.8.4.4 as Alternate DNS server.
  6. After you’re done, click OK to save changes.

This can help you stay connected, but most VPN services have their own DNS services for extra privacy, which can sometimes hinder your connection.

Some VPNs have different steps for changing DNS servers with the option to only using VPN DNS servers while connected, so you have to turn this option off.

This may lead to DNS leaks, but you might want to use it if your connection keeps dropping.

Speaking of DNS issues, check out our comprehensive guide more useful tips to troubleshoot and fix whatever comes your way, just like a pro.

5. VPN crashes

5.1. Get the latest software version

VPN providers are constantly trying to ensure their software is as stable and effective as possible, hence they’re forever working with developers to make this possible.

If you don’t have the current or most recent update of your VPN, then it may cause instability or HBO MaxVPN not working error.

Allow automatic updates to your VPN, and check with your VPN client if such settings are possible, then keep checking for updates on a regular basis.

5.2. Close the other apps

If there are many other apps open on your computer, they can cause issues with your VPN client, especially with old PCs or laptops, so close to what you don’t need or aren’t using then try connecting again.

5.3. Reinstall the VPN Client

  1. Right-click Start, and select Programs and Features.
  2. Find your VPN from the list of programs and select Uninstall.
  3. In the Setup Wizard, click You’ll get a notification after a successful uninstall, so click Close to exit the wizard.
  4. If your VPN is still listed as available after uninstalling it, right-click Start, and select Run.
  5. Type ncpa.cpl, and press Enter to open the Network Connections window.
  6. Right-click on the WAN Miniport labeled your VPN, and select Delete.
  7. Click Start, and select Settings.
  8. Select Network & Internet, and choose VPN.
  9. If you see your VPN as available, delete it.

If nothing helps at all, delete and reinstall your VPN client, by following the above steps.

6. Other aspects to consider

6.1. Date and Time settings

Sometimes you find HBO Max VPN not working because your system’s date and time settings are incorrect, so check for the correct settings and apply them, then try connecting to HBO Max with your VPN again.

6.2. IP address

If your VPN won’t work with HBO Max, check your IP address for information such as your city or region (country) next to the location you selected when you connected with the VPN.

If it shows a location near you, it means you’re not connected to a server location associated with your VPN, so try connecting again.

6.3. Run Windows Update

You can also fix the HBO Max VPN not working problem by updating your OS to the latest version, which in turn improves your system’s stability and resolves other issues, including VPN problems you may come across.

A VPN just like any other software is likely to crash, so if this happens, which is quite rare, it is nothing to cause much alarm or worry.

However, constant VPN crashes may disrupt your HBO Max streaming and browsing experience, so you may want to try the above actions to fix it.

Let us know if any of these solutions helped fix the HBO Max VPN not working problem, by leaving a comment in the section below.

Windows 11 Touch Screen Not Working: Tested Fixes Step-by-Step

Having trouble with Windows 11 touch screen not working? We’ll help you fix that.

This issue is pretty common, whether you use Microsoft Surface 2-in-1 hybrid Windows PCs, HP, ASUS, Lenovo, or other laptops with touch screens.

Since touchscreens are complex, many factors can cause errors in Windows 11 and beyond. We identified common culprits and solutions. So all you have to do is follow the step-by-step instructions below.

How can I fix the touchscreen not working in Windows 11?

First and foremost:

  • make sure your screen is clean
  • remove the screen protector to see if the touchscreen works better without it and consider replacing it

Still, having issues? Let’s try more advanced fixes:

1. Run the Hardware and devices troubleshooter

  1. Right-click Start and select Run.
    Run shortcut Windows 11 touch screen not working
  2. To open Command Prompt, type cmd in the text and click OK.cmd
  3. Then input the following command and hit Enter:msdt.exe -id DeviceDiagnostichardware and devices troubleshooter to fix windows 11 touch screen not working
  4. Press Enter to open the Hardware and Devices troubleshooter.
    Hardware and Devices troubleshooter Windows 11 touch screen not working
  5. Then click Next to go through that troubleshooter’s potential fixes.

2. Check for Windows 11 updates

  1. First, click Start on your taskbar.
  2. Then select the Settings app pinned to the Start menu.
    The pinned Settings app Windows 11 touch screen not working
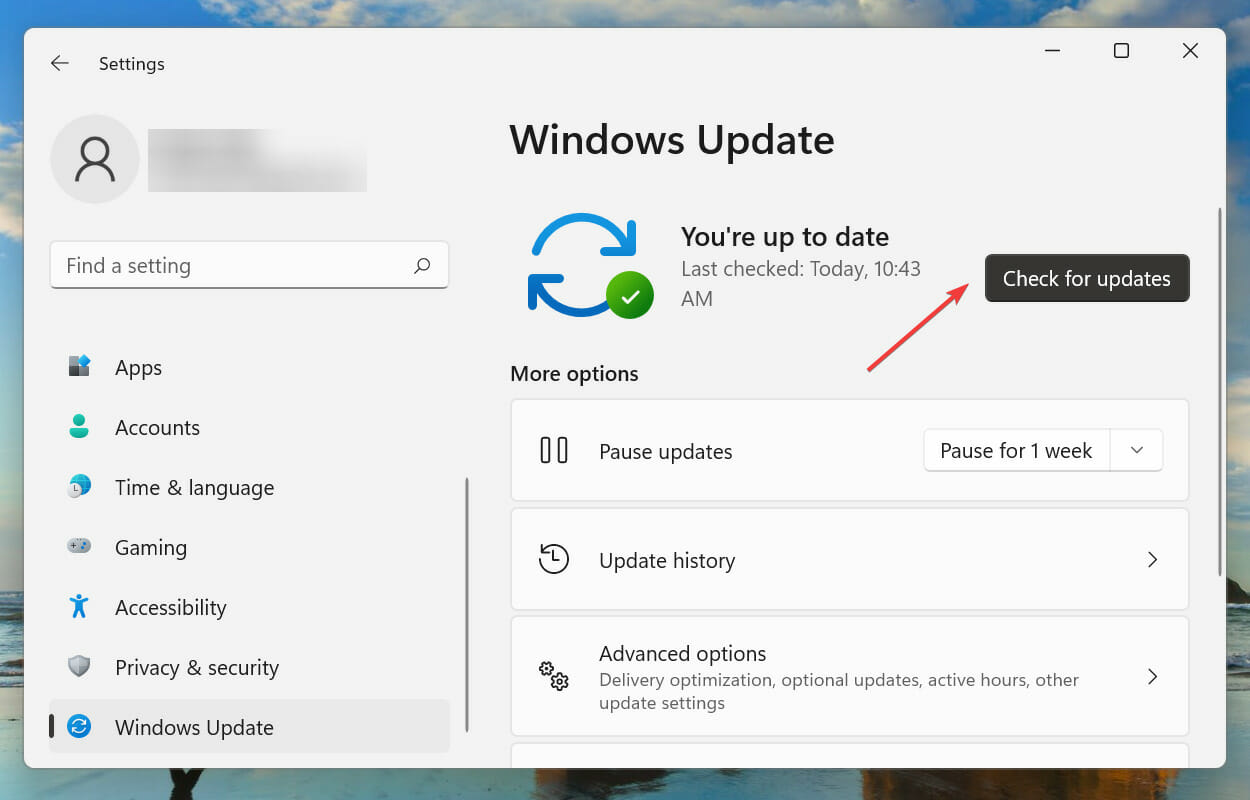
  3. Select Windows Update from the left, and click on Check for updates.
    The Check for updates button Windows 11 touch screen not working
  4. Download and install any Windows 11 patch updates.

3. Verify that the touchscreen is enabled

  1. First, right-click the Start menu’s button to open a handy shortcuts menu, and select Device Manager.device manager
  2. Double-click the Human Interface Devices category.human interface devices
  3. Right-click the HID-compliant touch screen and select Enable device if it’s disabled.enable device

Once done, restart the computer and check if the Lenovo Windows 11 touch screen is not working issue is resolved.

Note icon NOTE
If the HID-compliant touch screen is already enabled, try re-enabling it by selecting Disable device and then Enable again.

4. Adjust the power setting for HID-compliant touch screen

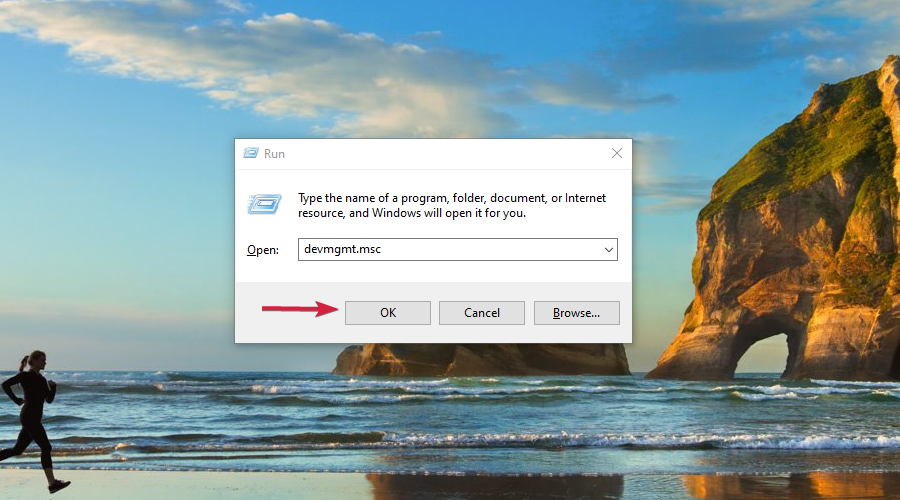
  1. Press Windows + R to launch the Run command, enter devmgmt.msc in the text field, and click OK.devmgmt.msc
  2. Then expand the Human Interface Devices category by double-clicking it.
  3. Right-click the HID-compliant touch screen to select a Properties option.
    The Properties option Windows 11 touch screen not working
  4. Head to the Power Management tab in the properties window. Then, uncheck the Allow this computer to turn off this device to save the power option to disable the setting.
    The Allow the computer to turn off this device to save power option Windows 11 touch screen not working
  5. Click the OK button on the properties window.

Once done, restart the computer and verify if the Windows 11 touch screen is not working after the sleep issue is resolved.

5. Update the touchscreen driver

  1. Open the Device Manager window and double-click on Human Interface Devices to expand and view the entries under it.
  2. Right-click the HID-compliant touch screen device and select Update driver.
    Update driver option Windows 11 touch screen not working
  3. Then choose the Search automatically for drivers option within the Update Drivers tool.search automatically for drivers
  4. Restart Windows after installing a new touchscreen driver.

Alternatively, you can try updating the touchscreen driver with reputable third-party driver updater software.

6. Reinstall the touchscreen driver

  1. Press Windows + S to open the Search menu, enter Device Manager in the text field, and click on the relevant search result.device manager
  2. Extend the Human Interface Devices category. 
  3. Right-click the HID-compliant touch screen and select Uninstall device.
    The Uninstall device option Windows 11 touch screen not working
  4. Select the Uninstall option. 
    Uninstall button Windows 11 touch screen not working
  5. To reinstall the touchscreen driver, click the Action menu and select the Scan for hardware changes option. Or, you could restart the computer.

7. Remove recently installed software

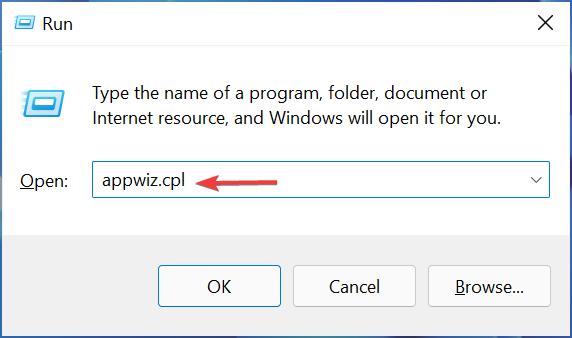
  1. Press Windows + R, and type appwiz.CPL in the text field, and click OK.appwiz.cpl
  2. Click the Installed On option in the third column to rearrange the listed software so that the most recently installed programs are at the top.installed on
  3. Select the software you installed shortly before the touchscreen stops working, and then click Uninstall.uninstall
  4. Follow the on-screen instructions to complete the process.

8. Roll back Windows 11

Note icon NOTE
Rolling back Windows 11 removes software installed after selected restore point dates. If you want to check what programs a chosen restore point removes, click the Scan for affected programs button.
  1. Launch Run with the Windows + R hotkey, enter rstrui, and click OK to open System Restore.system restore
  2. If System Restore displays a Choose a different restore point option, select that radio button, and click Next.
    Choose a different restore point option Windows 11 touch screen not working
  3. You might be able to select a Show more restore points checkbox. If so, choose that option to expand the list of restore points.
  4. Then choose a restore point that will roll Windows 11 back to a date when the touchscreen was working on your PC. Alternatively, select the oldest restore point listed there.
    Restore points Windows 11 touch screen not working
  5. Click Next to proceed to the confirmation step.
  6. Select the Finish option to start the system restoration.

This will remove recent software that might interfere with your touchscreen and lead it not to work in Windows 11. Just make sure the data removed is backed up so you won’t lose any valuable info, files, or apps.

9. Roll back Windows 11 updates

  1. Type Windows key + I to open Settings.
  2. Scroll down to Windows Update and open it.windows update section
  3. Select Update history.update history in windows settings
  4. Scroll down to Related settings and select Uninstall updates.windows 11 uninstall updates
  5. Check the date of installation to identify an update that coincides with the time when your touchscreen stopped working and select Uninstall.uninstall windows 11 update

This will help fix the issue if you had no prior issues, but Windows 11 touch screen started not to work after an update. After rolling back the updates, check if your touch screen is any better.

You can always re-install them from the same settings menu.

How do I fix ghost touch on Windows 11?

Ghost touch has been a major problem for those using a touchscreen-enabled Windows 11 laptop. But, it’s easily fixable, given you follow the right approach and understand what’s causing the issue.

For instance, high humidity, water droplets on the screen, or devices that can affect touchscreen functionality placed near the laptop are also possible causes.

So, clean the screen, minimize the influence of other factors if not possible to eliminate them, and then restart the computer. In case this doesn’t work, you may update the drivers in Windows 11.

If nothing works, it’s likely a hardware issue, and taking your computer to a certified repair shop would be the best choice.

Does Windows 11 have any new touchscreen features?

Microsoft has enhanced Windows 11’s touchscreen optimization in a few ways. First, the new desktop platform’s UI automatically adjusts whenever you detach or attach a keyboard. So, for example, the taskbar icon spaces will increase when detaching a keyboard.

That means Windows 11 automatically turns tablet mode on and off when you detach or attach keyboards. Unfortunately, the new desktop platform doesn’t include a Tablet mode setting like Windows 10.

Windows 11 also includes a variety of touch keyboard themes for you. You can change the touch keyboard’s color scheme by clicking Personalization, then Touch keyboard in Settings. Up next, choose a new theme from there.

Touch keyboard themes Windows 11 touch screen not working

How come the touchscreen isn’t working in Windows 11?

Windows 11’s touchscreen mode can stop working for similar reasons as in Windows 10. Again, it can often be a driver-related issue.

However, this problem can also arise because of power management system settings, conflicting software, manually adjusted calibration, and maybe even registry errors.

Also, changes made to the BIOS can often affect the functionality, and you will notice that Dell Windows 11 touch screen is not working.

How can I check if my PC is touchscreen compatible?

You should see an HID-compliant touchscreen device within Device Manager. Next, click Action in Device Manager, and select the Scan for hardware changes option.

If you can’t see a touchscreen device in Device Manager after selecting that option, then your PC isn’t touchscreen compatible. If you do, quickly enable your touch keyboard on Windows 11.

Should I reset Windows 11 when the touchscreen is not working?

That’s a drastic resolution for fixing any Windows issue, but it often works. If you don’t mind that you’ll have to reinstall third-party software after resetting the platform, by all means, give that potential resolution a try.

You can easily reset Windows 11 to factory settings, and the process shouldn’t take very long.

However, try applying all the potential fixes before resetting Windows 11. We don’t promise they’ll work for everybody, but there’s a good chance they’ll resolve the issue.

If you still need extra help, consider contacting Microsoft’s Windows support service. You can do so by clicking the Get support link on the Contact Microsoft Support page or posting on the big M’s support forum.

Even more, check out what to do for the Lenovo touchscreen not working issue. As strange as it may sound, many users confirmed that holding the Power button for one minute did the trick.

Feel free to ask questions about troubleshooting Windows 11’s touchscreen in the comments below. In addition, users who have found other ways to fix the issue are also welcome to share their resolutions below.

7 Ways to Fix Verizon Fios When It’s Not Working [WiFi issues]

Verizon Communications released Verizon Fios in 2005, which works within the USA, and the service was given over an optical fiber network.

This is the best possible network service provider since optical fiber is faster than cable-wired networks.

Many Verizon Fios users are experiencing this issue with their network, where they cannot access any of its services. Suddenly, it stopped working, and they were unsure why and how it happened.

Some also got error codes while trying to access the Verizon Fios network on their system, and here is the guide on how to quickly fix them.

How do I find out if there is a Verizon outage in my area?

To know whether there is a Verizon outage in your area, sign in to your Verizon account first. Then, you might see an alert notification icon at the top of your home page.

You can type and enter network outage in the Chatbox to get more information.

Why is my Fios not working?

Many Fios users are facing problems while using the Fios network connection on their system. The potential reasons for causing the problem are listed down:

  • Fios router – If the router has some internal faults or physical damage, it might cause Fios internet not to work on the system.
  • Ethernet cable – When the cable wire that connects the network to the Fios router gets broken, which can also be the reason for such problems.
  • Outdated router firmware – Outdated router software can create many issues with the router, contributing to a problem discussed above.
  • Data pack – If the data pack for your Verizon Fios account gets lapsed or expires, you might need to renew it again for the Fios network to work.
  • Problem with the system/device – If the Windows system is outdated, Fios internet problems may occur.
  • Verizon outage – Due to some technical faults or disturbances, Verizon Fios outage happens in certain areas, leading to problems like the internet not working, etc.

How do I fix Fios if it’s not working?

1. Restart the router

When the router gets stuck, it creates problems like the internet signal is not accessible. So, switch off the router’s power, and the router gets turned off. Wait for a few minutes, then check the router device to see if this works.

In addition, you can try resetting the router device by pressing the reset button at the rear of the router. Unfortunately, this will clear all the router data, and you may have to re-login with your credentials.

2. Change the DNS server address

  1. Press the Windows key and type view network connections.
  2. Select View network connections from the search results.


  3. Once the Network Connections page is open, right-click on the network and select Properties from the context menu.


  4. Choose Internet Protocol Version 4 (TCP/IPv4) from the list of items and click Properties.


  5. In the Properties window, select the following DNS server addresses radio button.
  6. Enter 8 8 8 8 in the Preferred DNS server and 8 8 4 4 in the Alternate DNS server, and then click OK.


  7. Close all other open windows.

3. Check the cable wire

This happens rarely, but there is a chance that the cable wire that connects the network to the router that emits the internet network signal gets broken or damaged.

So we advise you to check for the cable wire, and if it is broken, replace it with the new one.

4. See if there is a Verizon outage

  1. Open the web browser app on your system.
  2. Visit the Verizon service outage support page.
  3. Click Sign in to open the sign-in page.


  4. Enter the User ID and Password and then click the Sign in button.


  5. You should now see the service outage notification alert icon on the top of the page. This means you have a Verizon Fios outage in your area.
  6. You can then raise a ticket regarding this issue, and they will provide you with the estimated time within which the outage problem shall be resolved.

5. Renew the data pack

When Verizon Fios’s data pack for your account expires, Verizon forbids users from accessing the internet service they provided.

Therefore, we suggest you sign in to your Verizon Fios account and check for the data plan. If the data plan is expired, please renew it to access the internet.

6. Perform the DNS Flush

  1. Press the Windows and R keys together and type cmd.

    cmd-run ark unable to query server info for invite
  2. Next, you must simultaneously press the Ctrl, Shift and Enter keys on your keyboard.
  3. This prompts the UAC console on the screen, which you must accept by clicking Yes.
  4. Once the Command Pompt window is open, execute the below commands one by one:

    ipconfig /flushdns

    ipconfig /release

    ipconfig /renew


  5. After the commands are executed successfully, close the Command Prompt window.

7. Check for Windows updates

  1. Press the Windows and R keys together, which opens the run box.
  2. Type ms-settings:windowsupdate and press Enter.

    Run Windows Update
  3. This opens the Windows Update page on the system.
  4. Click Check for updates which you can find on the top right corner of the Windows Update page.

    unexpected store exception windows 11
  5. It then starts checking for any new updates for your Windows system.
  6. If there are any new updates, please download and install them all.
  7. Once done, close the Windows Updates page and reboot your system.

What lights should be on Fios ONT?

The color of the lights on Fios ONT represents the status of the Fios internet network. Therefore, analyzing the Fios ONT lights is very important. Here is the meaning of each of the colors:

  • Green – Fios network is NORMAL, and if the light is flashing, it’s on battery mode.
  • Red – You have to contact the carrier and get it fixed immediately.

How do I report no service to Verizon?

You can visit the Verizon contact us page and contact them by clicking on the Chat now button and dropping a message reporting no service in your area.

Alternatively, you can call them at 1.800.VERIZON (1.800.837.4966). You can also ask one of their representatives to call you back by scheduling it on the Verizon homepage after signing in using your credentials.

We hope you found this article informative. Please leave us a message below.

Change Windows 11 Taskbar Size: 3 Easy Ways Reviewed in 2026

In this piece, we’ll show you how to change the Windows 11 taskbar size so you can adjust it to your needs. If you are a multitasker, you may want to be able to add more apps to it.

The same goes if you are a minimalist and want a more discrete scaling. Regardless of what you aim, the guidelines below explain all you need to know about resizing Windows 11 taskbar.

How can I easily resize Windows 11’s taskbar?

1. Use the Registry Editor

Tip icon Tip
The method no longer works in Windows 11 22H2, build 22621.1413. If and when a new method to change the Taskbar size via Registry is available, we will update the information. Until then, you can use the other method listed below.

  1. 1. First, click the taskbar’s magnifying glass button.

  2. 2. Type regedit in the search utility’s text box.

  3. 3. Select the first result to open the Registry Editor tool.

  4. 4. Next, open this key within the Registry Editor window: HKEY_CURRENT_USER\Software\Microsoft\Windows\CurrentVersion\Explorer\Advanced

    windows 11 registry editor advanced
  5. 5. Right-click on the Advanced option and then select New.

  6. 6. Choose DWORD (32-bit Value) from the context menu that has just opened.

    dword 3d windows 11
  7. 7. Enter TaskbarSi to be the new DWORD’s title.

    dword taskbarsi windows 11
  8. 8. Next, double-click on TaskbarSi to bring up the window in the screenshot directly below.

    dword value windows 11
  9. 9. Then input either 0 (for small taskbar) or 2 (big taskbar) within the Value data box.

  10. 10. After you make your selection, click the OK option on the Edit DWORD window.

  11. 11. Thereafter, restart your PC.

Note icon NOTE
You can restore the default taskbar size by entering 1 within TaskbarSi’s Value data box. Alternatively, right-click TaskbarSi and select Delete.

You can easily adjust the taskbar size on your Windows 11 device using the built-in Registry Editor tool. This key can also be used to fix the Taskbar thumbnail preview disappear too quickly issue; read this guide to know the process.

Through it, you can set a small or a big taskbar by editing the DWORD value. The result will be a Windows 11 small taskbar.

2. Adjust the scaling settings

  1. Right-click Windows 11’s desktop to select Display settings.
    The Display settings option change taskbar size windows 11
  2. Then click the Scale selection box.
    The Scale box change taskbar size windows 11
  3. There you can select a 125% scaling option, which will expand the taskbar’s scale.
  4. Alternatively, click the small arrow on the right of the Scale box to bring up the option below.
    Custom scaling box change taskbar size windows 11
  5. Click in the Custom scaling box to enter a value there.
  6. Then press the tick button to confirm.
  7. Sign out of Windows 11 (or restart) to apply the custom scaling.

If you were wondering how to make the taskbar smaller in Windows 11, changing the Scaling settings is an effective trick. The best part is that this will also change the size of the Windows 11 taskbar icon.

3. Use Windows personlaization settings

Most taskbar options can be found within Settings. The quick way to open those options is to right-click the taskbar and select Taskbar settings to bring up the window that you can see below:

Taskbar options change taskbar size windows 11

Click Taskbar items there to expand the options for toggling items on-off. There you can select to remove Windows 11’s feature buttons from the taskbar. 

Below that, you can click both Taskbar corners icons and Taskbar corner overflow options categories. Those settings enable you to toggle the taskbar corner icons on and off. 

If you want to restore the left icon taskbar alignment from the previous OS, click Taskbar behaviors. Then click the Taskbar alignments drop-down menu to select Left. 

Taskbar alignment options change taskbar size windows 11

Even though the current Windows 11 taskbar may not be to everybody’s liking, you’ve still got to make the most of it. Try to change the taskbar size in Windows 11 to better suit your preferences with the above settings and methods. 

Windows 11 vs Windows 10 Taskbar – main differences

The most obvious change from its predecessors is the Windows 11 taskbar’s centralized icons. In previous platforms, icons ran from left to right along the taskbar. All the Windows 11 taskbar shortcuts are positioned from the center.

There’s also a widget icon that opens up a widget feature – a throwback at Windows Vista perhaps.

There’s also a Snap Group feature that enables you to set up snap layouts for grouped app windows. The Windows 11 taskbar displays thumbnail previews for Snap Group layouts that users can click to open.

Snap Group change taskbar size windows 11

As mentioned, some have lamented what the new taskbar has lost. The resize functionality is one thing missing. Furthermore, users can’t drag-and-drop shortcuts onto the taskbar to add them there.

Others might also notice that the right-click menu for the Windows 11 taskbar only includes a Taskbar settings shortcut.

Windows 10 options for locking the taskbar, opening Task Manager, adding toolbars, and configuring buttons are all missing now.

windows 11 taskbar settings

Therefore, the revamped taskbar in Windows 11 has disappointed some early users. However, those have only seen pre-release versions of the platform. Microsoft might restore missing Windows 10 taskbar features in post-release builds.

Final words

For more customization options, read our article on how to make the taskbar transparent on Windows 11. Also, find out how to change taskbar position in Windows 11.

We also have a guide on how to set a vertical taskbar on Windows 11, so don’t miss it.

Let’s hope Microsoft restores the taskbar resize feature in future Windows 11 post-release versions. Until that happens, you can resize the taskbar and get a small taskbar icon in Windows 11 with the methods above.

3 Best Yahoo Mail Supported Browsers To Use In 2026

Not all browsers are created equally; some are very fast but lack security, others are slower but too clogged with features, and others take a century to load a simple page.

In this article, we’re discussing the best browser for Yahoo Mail service, and we’re sure our list will cover all your online needs.

Every option found in this top 3 is versatile enough to use in other situations as well.

We will explain why every option presented in this guide made the list and details about their features.

If you use Yahoo mail, you may need to know the best browsers for Outlook 365 that are fully supported.

Which browser is used for email?

Almost all modern browsers can be used for email; however, not all are perfect fits. You will need some of the biggest browsers to accommodate all the complexity of an email client.

That said browsers like Opera One and Google Chrome easily stand out. Chrome especially because it belongs to the Google family and is many tools and applications with one email to rule them all.

Can I use a Yahoo account on Google Chrome?

Yahoo users may now check in to Google using OpenID. This simplifies the sign-up procedure for Yahoo users who wish to test Calendar, Google Docs, or Reader. But that is as far as it goes.

On your Chrome browser, you will be able to create a profile solely with a Gmail account.

What is the best browser to use with Yahoo Mail?

Opera One – Best for social integration

Opera One is the best Yahoo Mail browser option on your Windows PC. It’s lightning-fast, has many features, and is low resource-consuming.

The built-in ad blocker clears away any distractions and the included VPN service will protect your privacy even if you check your Yahoo email while you’re connected to a public network.

Another benefit for your peace of mind is that Opera One blocks online trackers such as analytic scripts and tracking pixels that some websites use to collect data.

Some of the most notable features of the Opera One Browser include a large collection of add-ons and extensions and a password manager so you never lose access to your accounts.

With an incorporated snapshot tool that allows you to take a screenshot at any point and a built-in pop-up blocking that protects you from harmful ads, this browser is definitely a great choice.

Additional features:

  • Search in tabs
  • Workspaces
  • Snapshot tool

Opera One

Opera One provides the best security and privacy possible even if you’re connected to a public network.

UR Browser – Most lightweight

best browser for yahoo mail

UR Browser is also a good choice to use with Yahoo Mail. It loads pages quickly and allows you to control and manage your online experience’s security aspects.

It provides a built-in VPN service that allows you to keep your anonymity online without the need to install other third-party software.

This browser offers three levels of online security: Low, Medium, and High, and with an integrated virus scanner, any files you download are scanned automatically.

It also offers lightning speeds for downloads and automatically blocks all third-party cookies and trackers.

Additional features:

  • Ad blocker
  • Invisible tracker blocker
  • Virus scanner

UR Browser

With antivirus protection and built-in VPN, UR Browser makes you feel secure and protected.

Google Chrome – Most expandable

best browser for yahoo mail

Google Chrome is one of our best browser options for Yahoo mail. This browser is one of the most used worldwide and has good features.

Even though Google Chrome falls behind Opera One in this rating, it is still an excellent software option regarding speed and privacy.

Some of the best features include good loading speeds, instant sync with all your Google accounts, and incognito browsing, so you can browse the internet and leave no tracks in your history.

Google Chrome also includes a task manager that shows you how much of your computer resources are used by the browser.

It also offers excellent tab features that allow you to drag and drop tabs in different windows.

Additional features:

  • Task Manager for website
  • Visual browser history
  • Quick launch bar

⇒ Get Google Chrome

How do I fix the Yahoo Mail browser not supported error?

Our readers reported that when using the latest version of Firefox, they get the following message while trying to use Yahoo Mail:

The latest version of Yahoo Mail is not supported on your browser. Please use a supported browser below or use basic Mail.

This issue is usually caused by the Avast Anti-Track extension. The only solution, in this case, is to disable the Avast Anti-Track extension in your browser or use a different browser.

In this article, we analyzed which is the best browser for Yahoo Mail available on the market.

If you want a powerful all-around browser, Opera One is a top recommendation. The complete package of privacy, speed, and online security makes this software stand out.

You should also check our list including the best browsers for email and get other suggestions if needed.

Please let us know what browser option you chose from the list or if you have any suggestions. You can do that by simply using the comments section below.

How to Copy a Profile to a New User Account in Windows 11

There are a lot of instances that require you to migrate your Windows 11 user profile to a new user account.

You may want to perform the Windows 11 copy profile to new user task because you have lost your PC, or you are just upgrading from an old PC to a new one.

How to copy and transfer user profile in Windows 11

1. Backup the profile

  1. Open the Start menu.
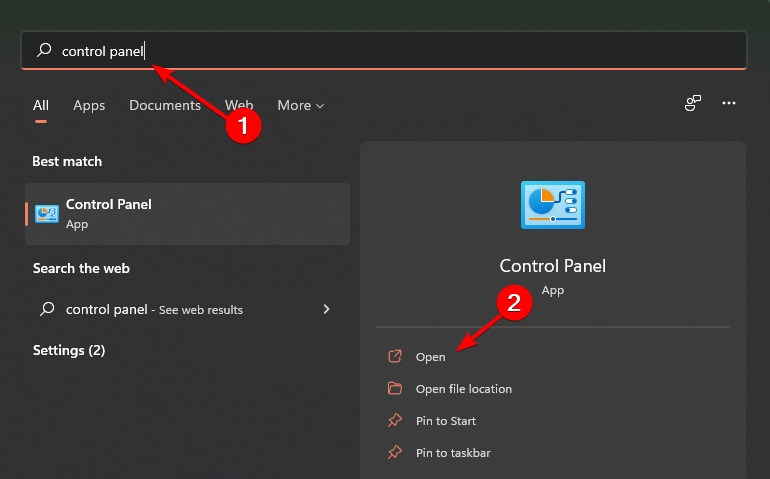
  2. Search for Control Panel and open it.
  3. Click on System and Security.
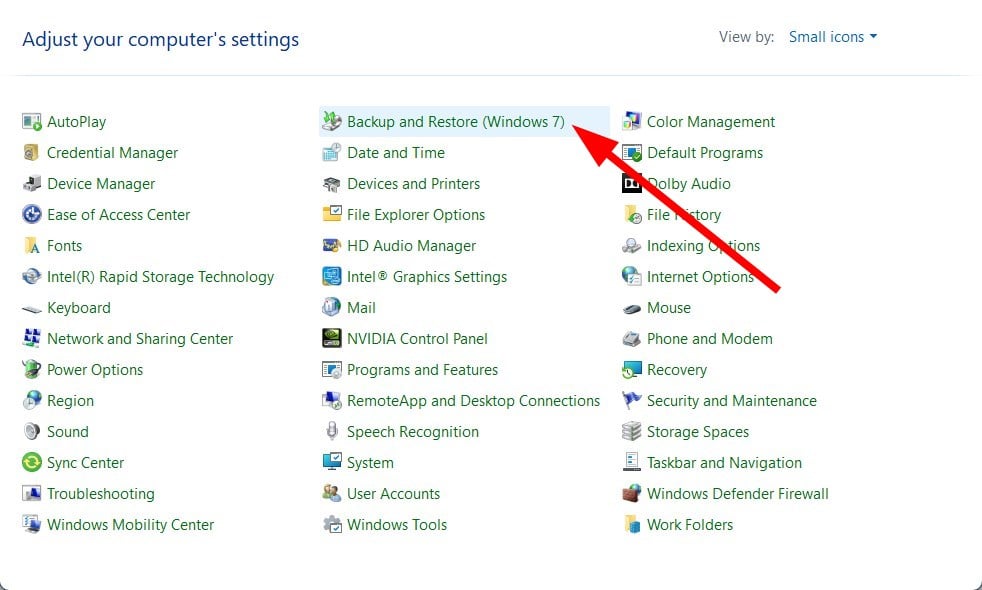
  4. Select Backup and Restore (Windows 7).
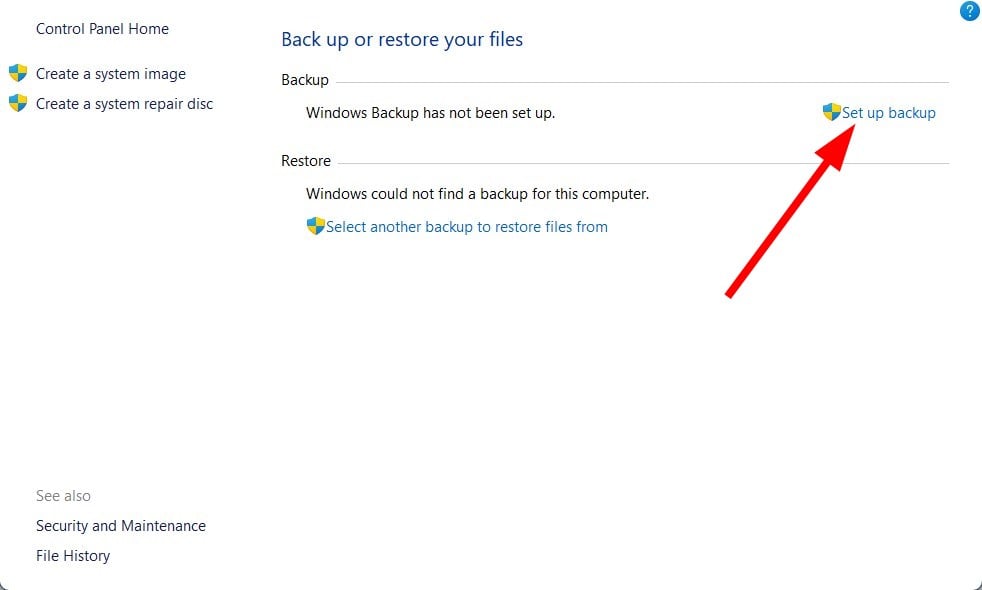
  5. Click on Set up backup.
  6. Select the location to save the Windows user profile backup.
  7. Click on Next.
  8. You can also back up your Windows profile on an external disk by selecting the option to select the external drive.
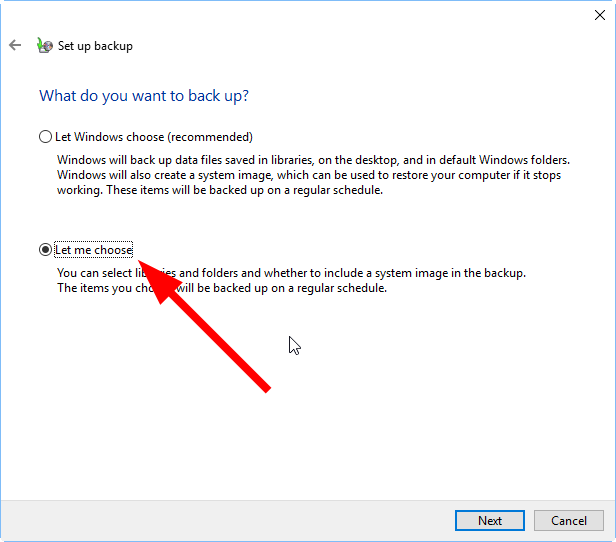
  9. In the new window that pops up, select Let me choose.
  10. Click Next.
  11. Since we are going to back up only the Windows profile, uncheck the option Include a System Image.
  12. Click Next.
  13. Save settings and run the backup.

The above steps save a backup of your Windows profile to the selected location. In case your profile gets corrupt, you can open the Backup and Restore option and revert back to the date when everything was normal.

And if you are only looking to copy your Windows profile to another hard drive, then you can follow the below steps.

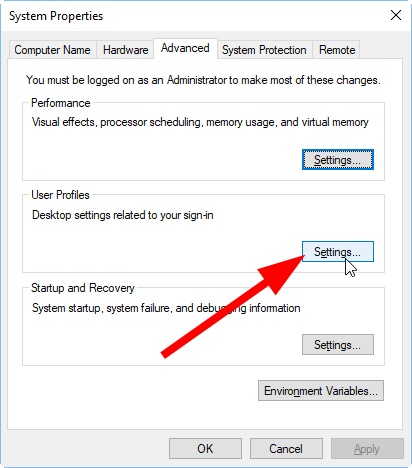
  1. Right-click on This PC.
  2. Select Properties.
  3. Click on Advanced system settings.
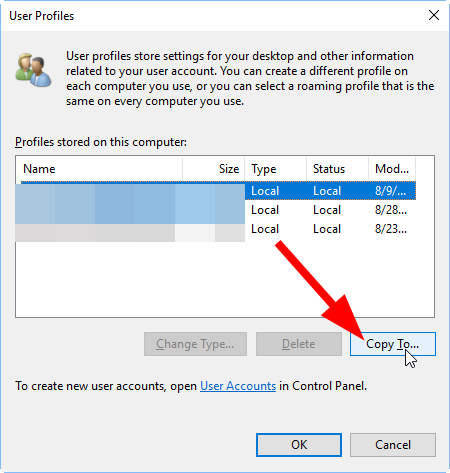
  4. Click on Settings under User Profiles.
  5. Select your user profile from the list that appears.
  6. Click Copy To.
  7. Connect your hard drive and select it to start copying your user profile.

2. Transfer with Microsoft accounts

One of the best ways or rather easiest ways to transfer a Windows 10 profile to a new user or a PC is to switch to a Microsoft account.

Notably, if you have signed up for a Microsoft account and use it on your PC, then you can sync your profile into another PC just by signing into it.

Microsoft account is free to register and this process will only replicate your Windows 10 user profile, not your files and programs.

3. Use TransWiz

  1. 1. Download TransWiz.

  2. 2. On your PC, if you only have one profile, create a new profile with admin rights.

  3. 3. Switch over to the newly created profile.

  4. 4. Launch TransWiz.

  5. 5. Select the option I want to transfer data to another computer.

    user profile transfer wizard selection
  6. 6. Click Next.

  7. 7. Choose the profile you want to transfer.

    copy profile to new user select
  8. 8. Click Next.

  9. 9. Choose the external hard drive as your location and hit Next.

  10. 10. Click OK.

  11. 11. TransWiz will create a ZIP file on your external hard drive.

  12. 12. Connect it to your new machine and launch TransWiz.

  13. 13. Choose the Restore data option.

  14. 14. Select the ZIP file and TransWiz will do the rest.

  15. 15. TransWiz will restore your profile.

  16. Although Windows 11 does not have a built-in option that allows you to transfer profiles, there is specialized third-party software that can do just that.

    TransWiz is our recommended choice, given that it’s free and easy to use. It is a domain migration tool that can copy your data from one user profile to another in a few minutes.

Does Windows 10 have a profile transfer wizard?

There isn’t any such profile transfer wizard available on Windows 10 or higher versions. However, there are several third-party tools that you can use to perform the exact task.

Moreover, if you are using a local account on your Windows 11 or Windows 10 PC then you may want to convert it into a Microsoft account.

This will help you to transfer your Microsoft account to the new PC from an old PC simply by a sign in.

Prefer a dedicated migration utility that preserves settings and permissions, try User Profile Wizard to copy a Windows 11 or Windows 10 profile to a new account or PC with minimal setup.

How to fix the Windows 10 copy user profile greyed out problem?

There are a few fixes that you can apply to resolve the Windows 10 copy user profile greyed out problem:

  • Check if you are not logged into the same account which you wish to copy
  • If you don’t have a second administrator account, then you need to create one in order for the Copy user profile option to work
  • Restart the computer by logging out of your account, and then logging back in
  • Log into a new account and check if the problem resolves or not

We hope that this guide helped you with how you can copy a user profile to a new user account in Windows 11. The process is the same for Windows 10 PCs as well.

Let us know in the comments below if you come across any issues while following the above guide.

Monitor all Your Networking Assets with NetCrunch Software

NetCrunch is a top agentless monitoring network software with over 650 ready-to-apply monitoring templates for various types of hardware and applications.

This solution also offers support for monitoring the configuration changes of over 180 popular devices, including scientific devices and sensors.

In this article, we talk about the new features of NetCrunch 12 as well as how to get and install it.

Your network and the assets connected to it are the backbones of your business and NetCrunch is one of those solutions that helps you sleep better knowing that everything is all right.

Nowadays, it’s not enough to keep an eye on your servers and endpoints. That’s because you might be having virtual components and networking devices that can also be exploited.

That’s why here we’re going to talk about a software with a wide range of monitoring tools with capabilities that go outside typical network equipment.

How can NetCrunch 12 help me monitor my network?

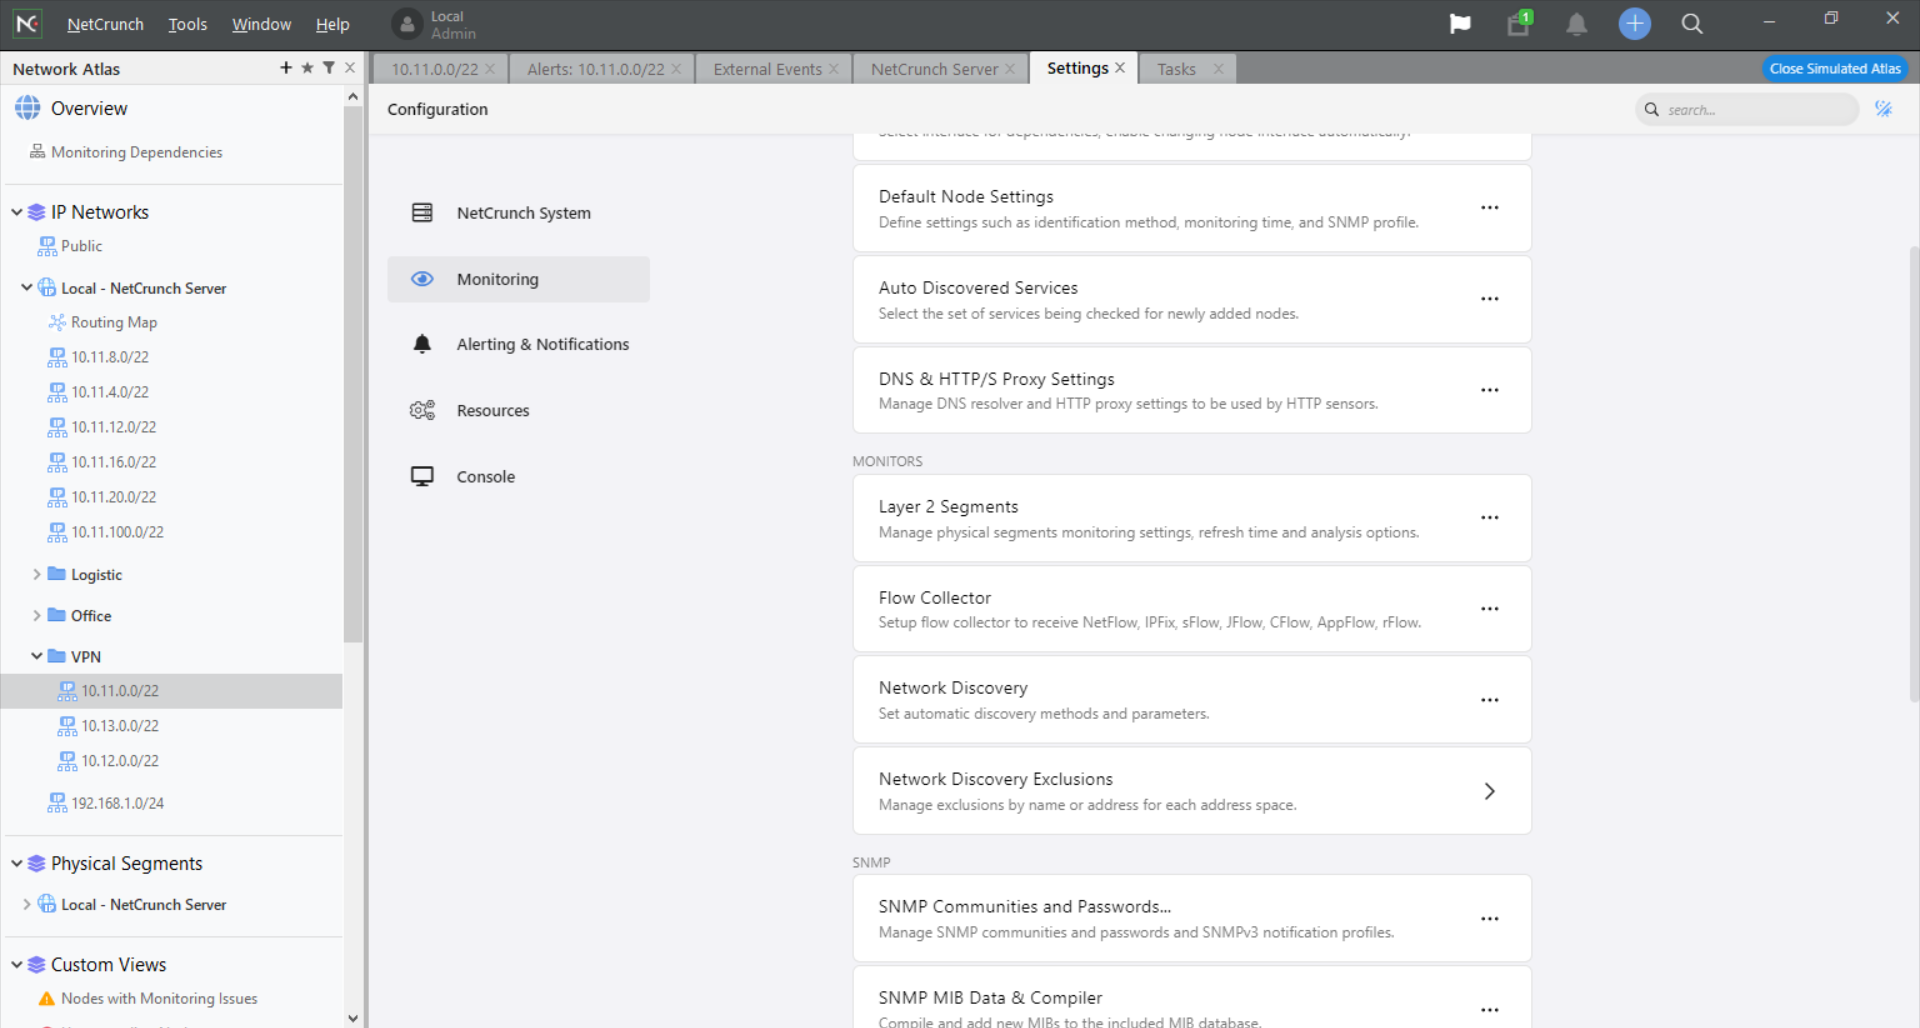
NetCrunch is a modern, sleek tool for agentless monitoring and alerting computer networks,
traffic, and any device, sensor, service, or application that is part of such network.

Beautiful network visibility that can be easily customized and extended. Predefined, ready-to-use
monitoring templates for over 650 devices and applications.

This solution offers more than 20 integrations with the most popular helpdesks and collaboration tools for easy data sharing.

The software can monitor anything connected to an IP and it starts collecting data in just a few minutes because the setup is simple and agentless.

All you need to do is set up policies and alerting conditions so it can warn you of any possible issues.

The new, NetCrunch 12 version offers a lot of new features and capabilities. Let’s look at some of them below.

What are NetCrunch 12’s best features?

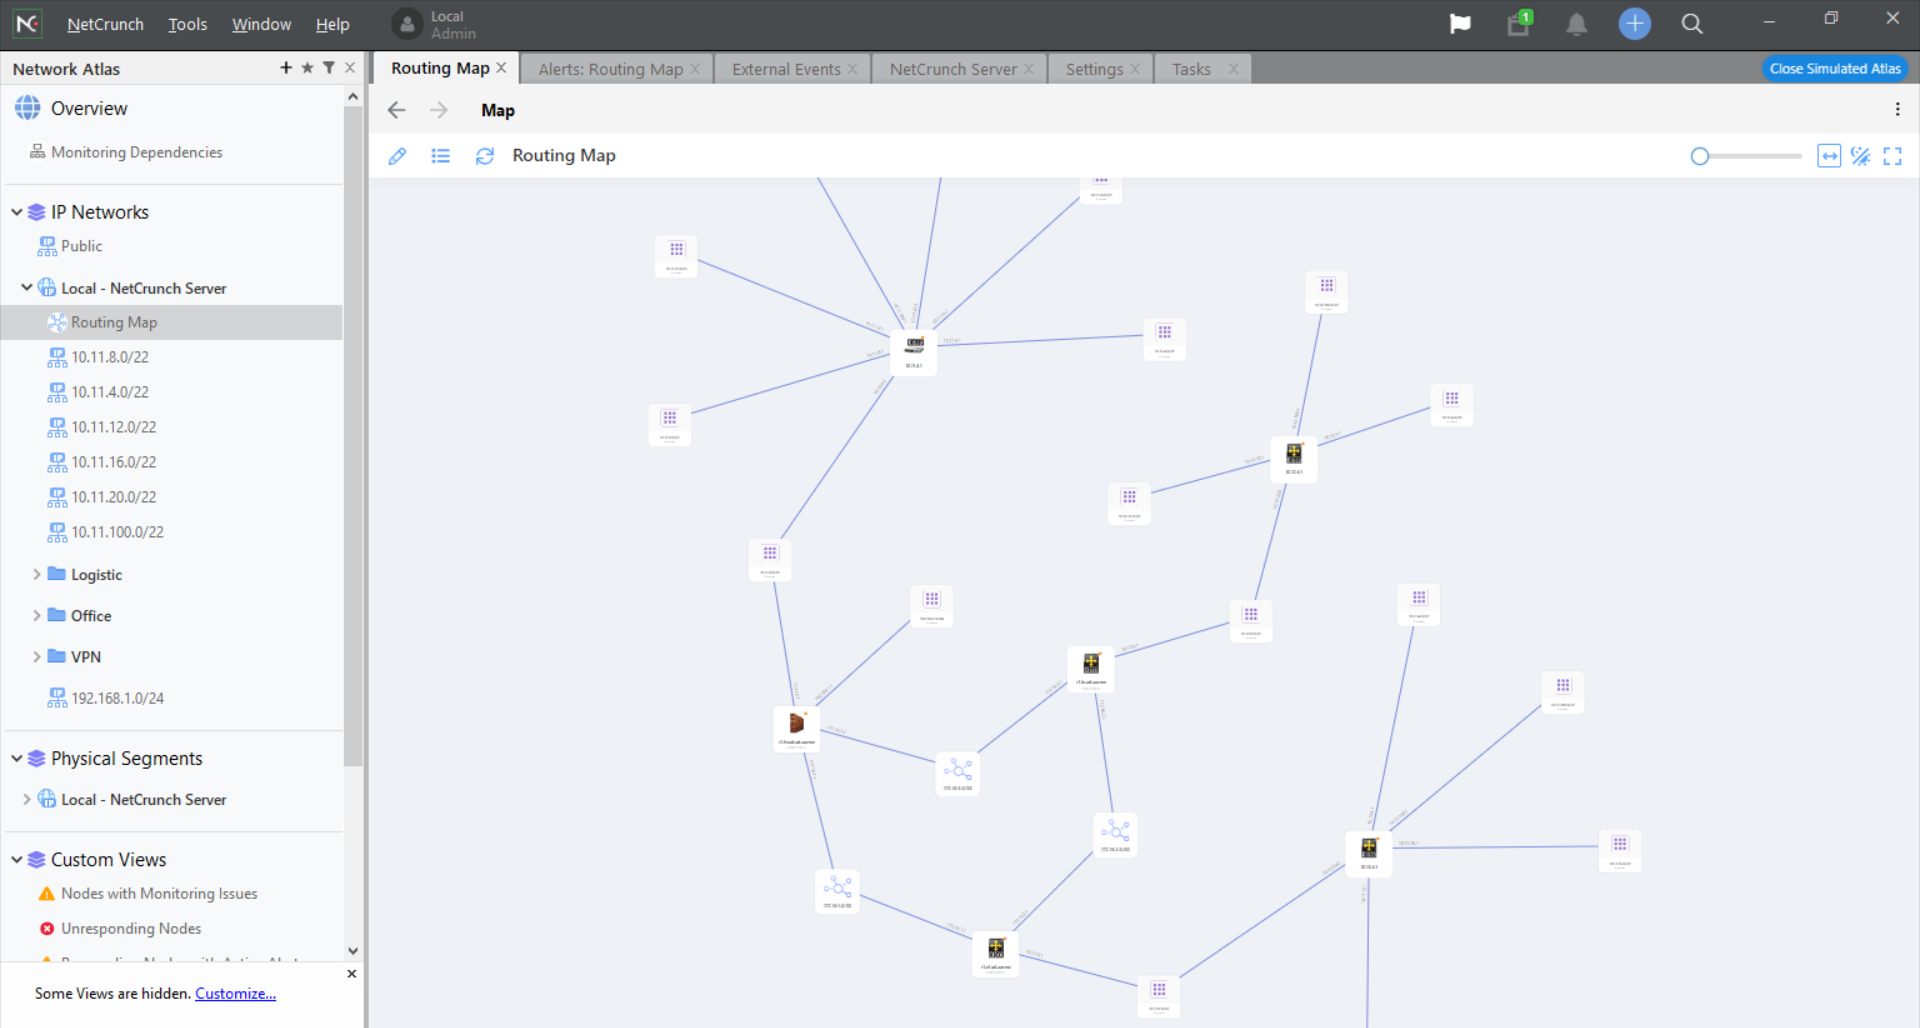
1. Redesigned and improved network maps and views

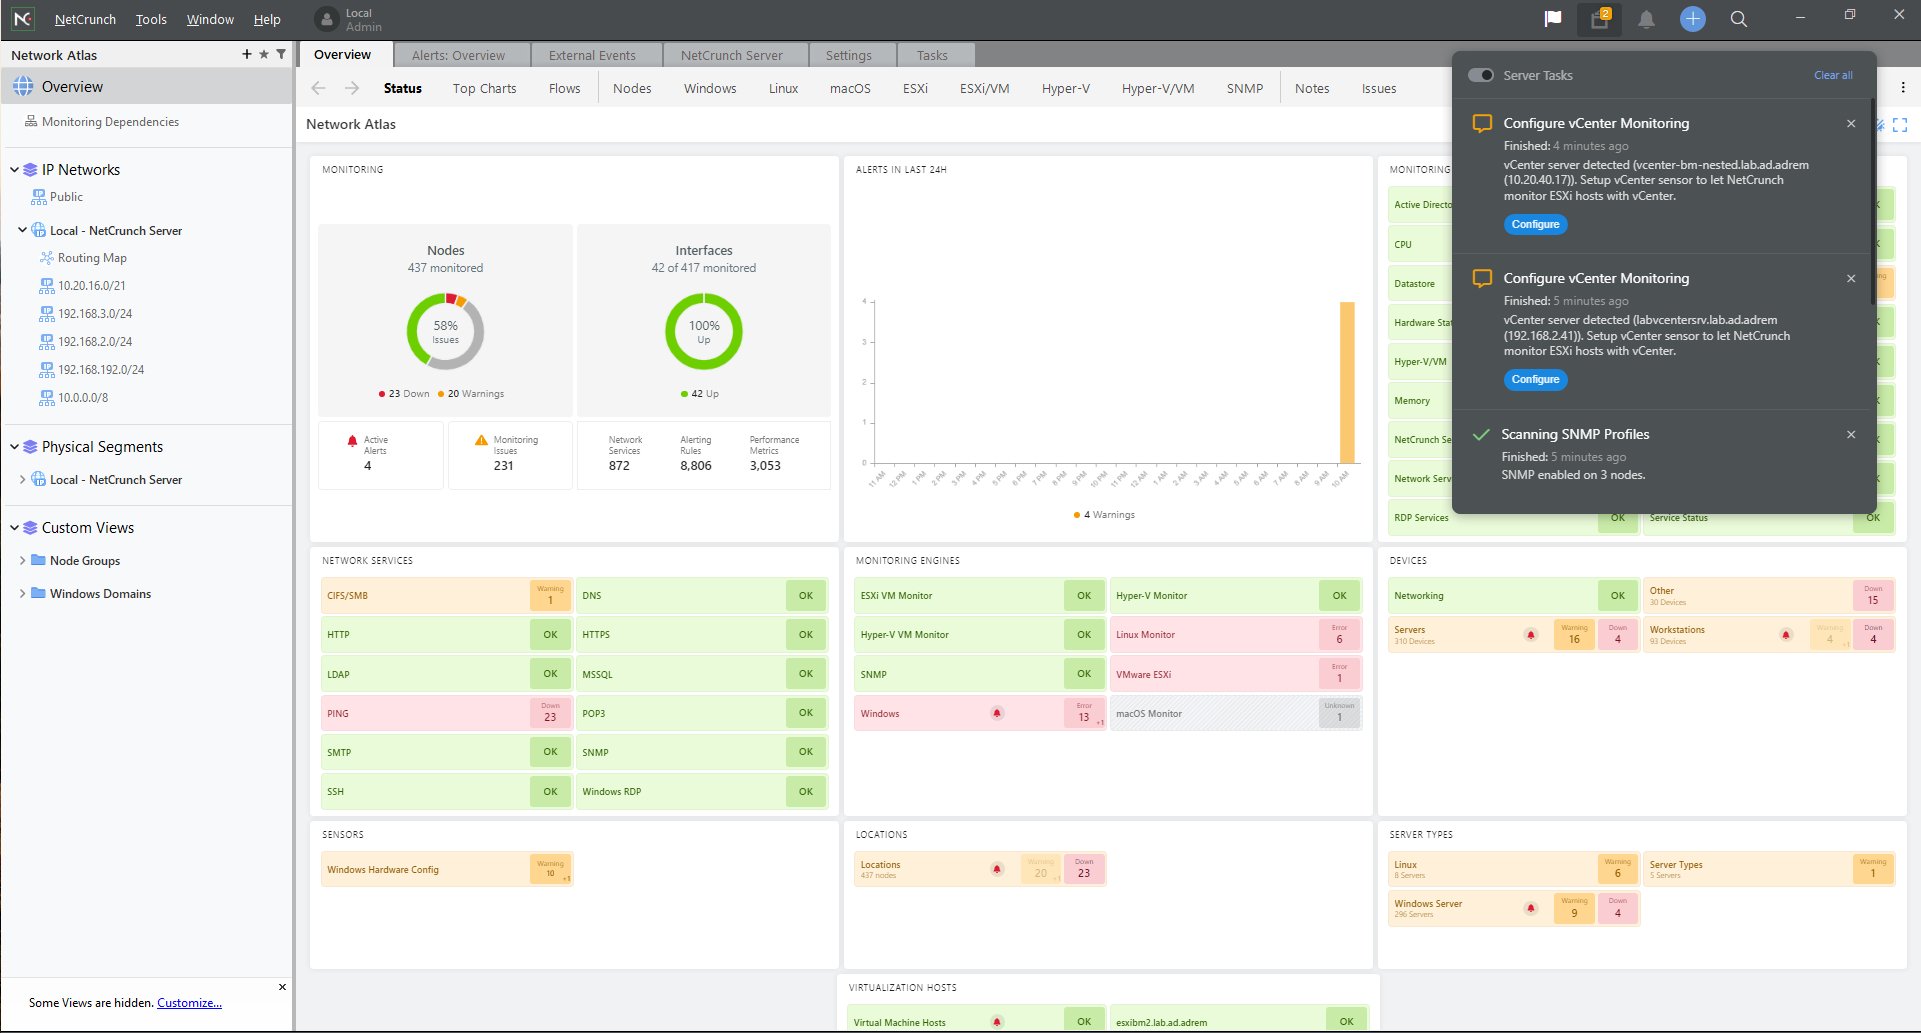
NetCrunch now shows you automatic network topology maps and routing maps that can be edited easily with your mouse.

It also has new dashboards and diagrams, new custom views with widgets, diagrams, and stats, all in a new modern look.

You can visualize any process that is part of your network and make a view of elements relevant for a specific admin job or location. And yes, there is also a dark mode for any views.

We know how important is to explain the situation and how you handle it. But NetCrunch provides all the tools to create an accurate and comprehensive report as well.

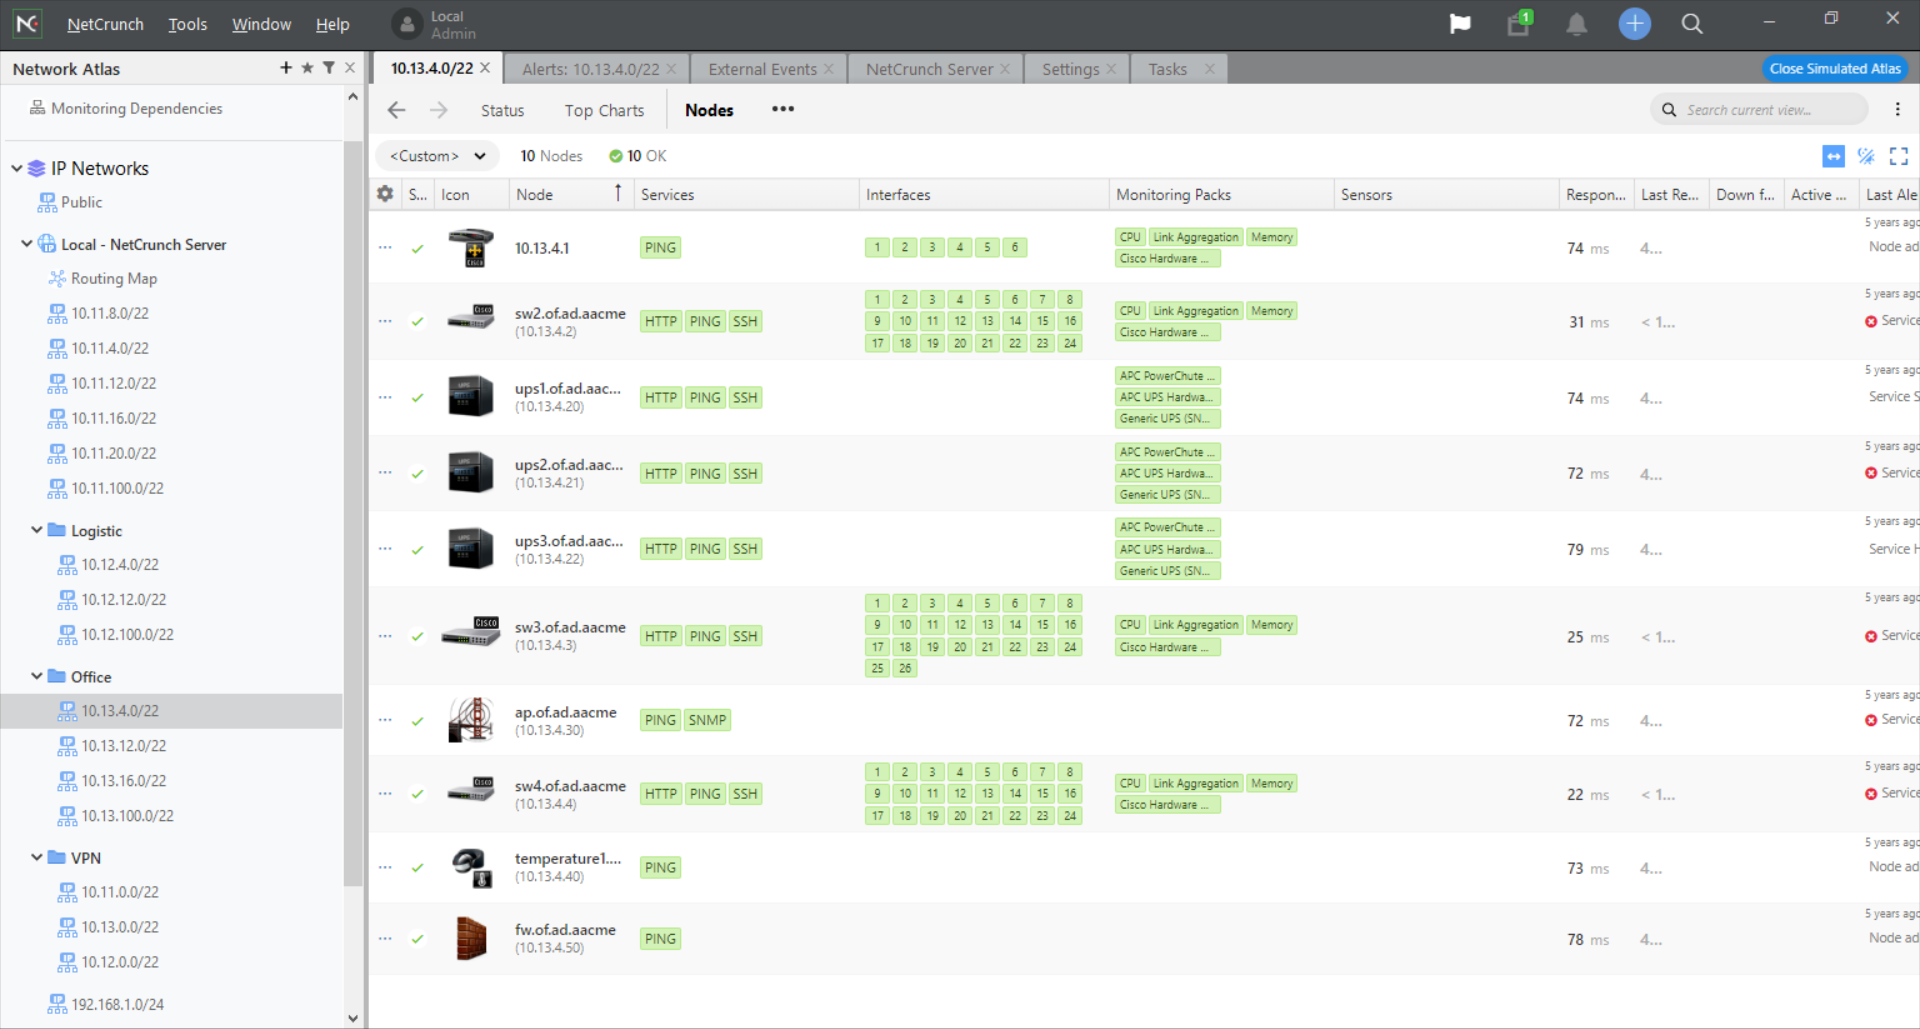
2. Revamped Network Services Status panel

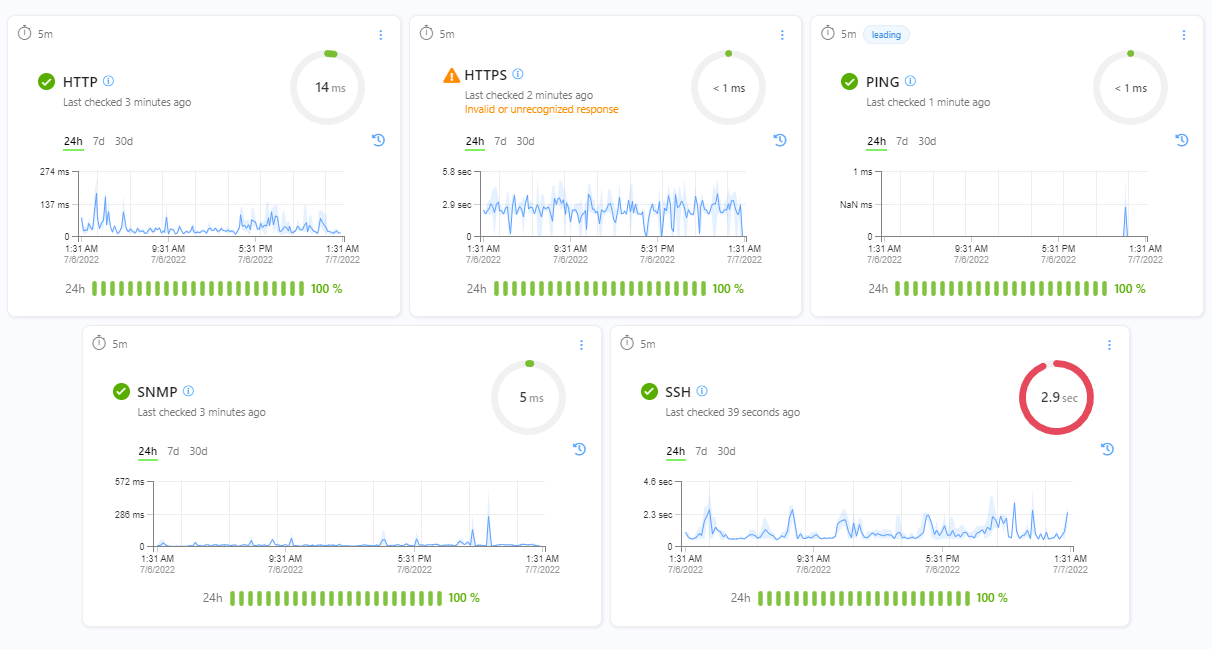
The new 2. Revamped Network Services Status window takes a cleaner approach to present network metrics.

Here, you will see all the services, their performance, and availability (uptime) status, all the data you need.

3. New device config monitor

The new device config monitor helps you track configuration changes to detect unauthorized
operations or mistakes and prevent resulting downtime.

It features over 180 profiles out-of-the-box for the most popular devices, plus an easy editor to define new profiles when needed.

In other words, if any of your devices changes its configuration or it’s tinkered with by someone, you will know immediately.

4. New templates for over 30 cloud services

That’s right! Not only you can monitor your physical devices but also provides tracking the performance
of key cloud services used by your business.

That includes Azure and AWS services but also cloud drives, Google Analytics, Microsoft 365 services, and even Zoom.

Basically, NetCrunch provides the best hybrid network agentless monitoring for on-premise local networks and cloud services.

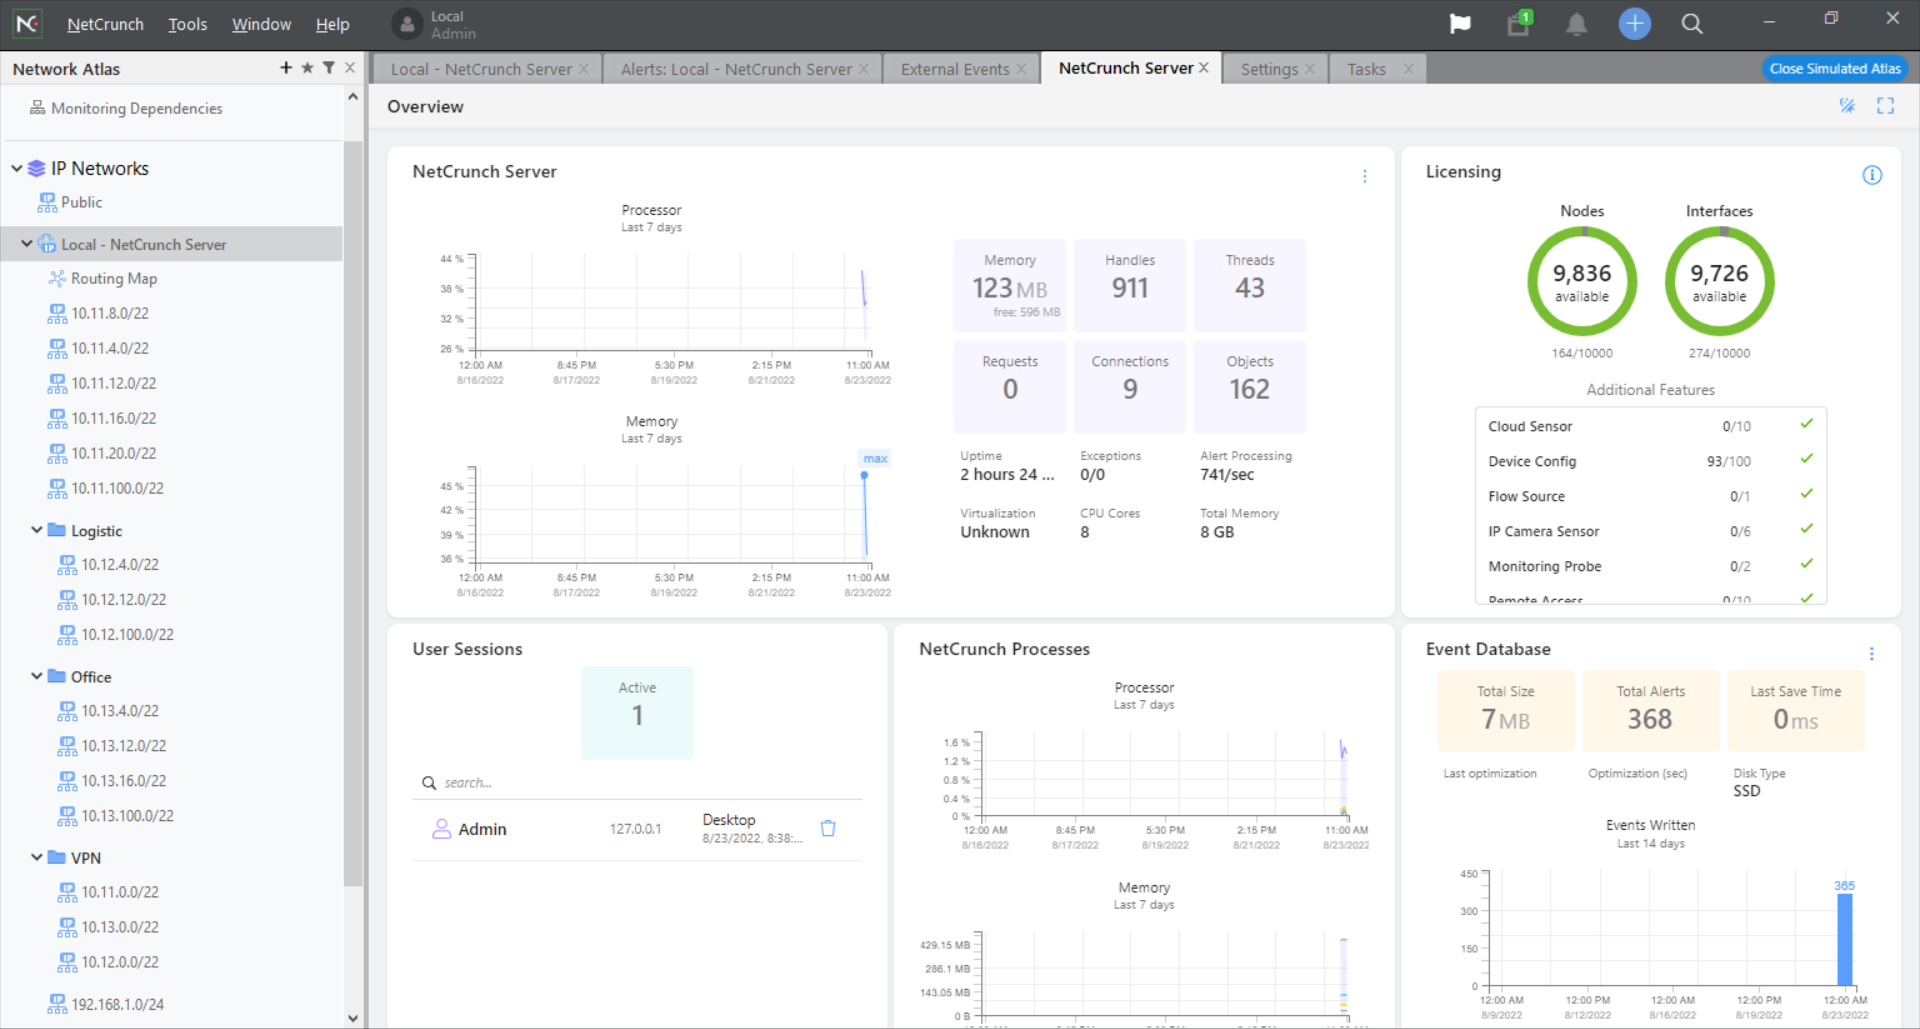
5. New server dashboard

The server dashboard from NetCrunch offers the cleanest and most comprehensive view of any aspect of your monitoring server to make sure that you have allocated sufficient resources to collect and process all your monitoring data.

Of course, the most important part is showing the level of resource usage, including the nodes and interfaces you’re monitoring.

However, the dashboard also shows the event database and if you scroll down, you will also see all the logs.

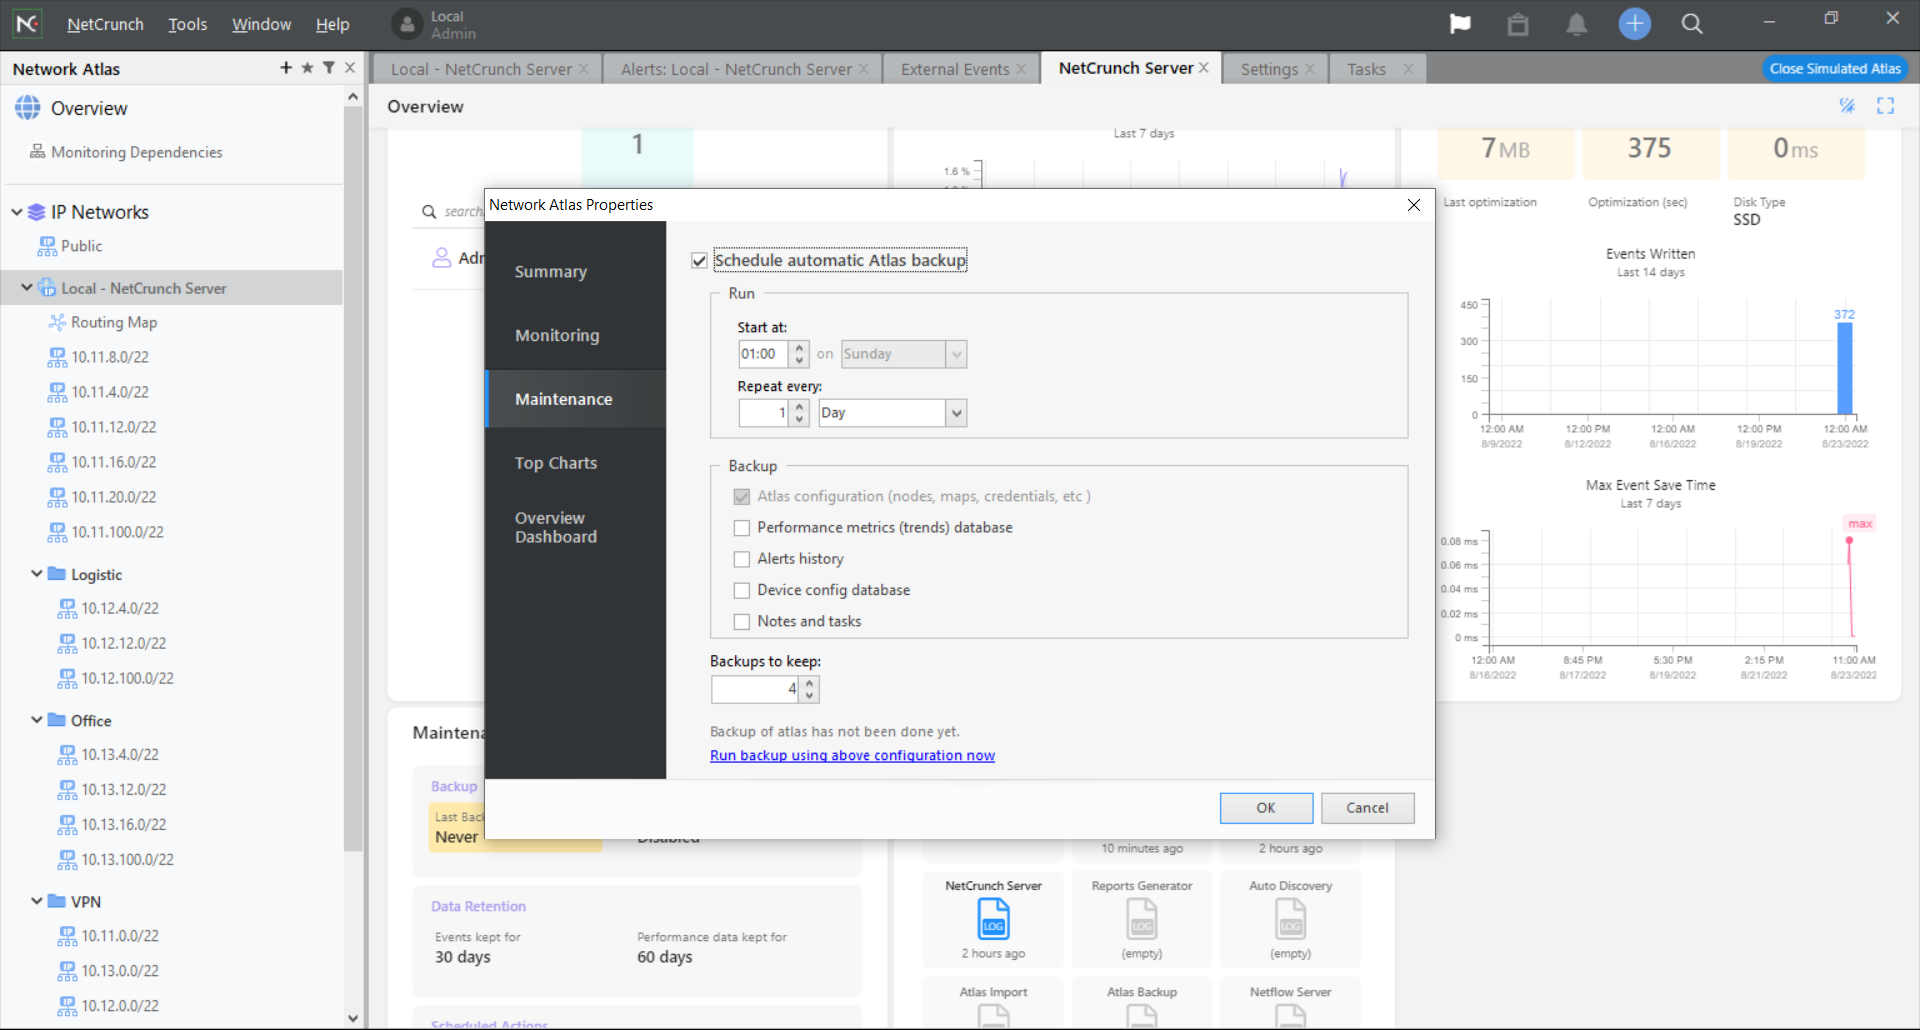
5. Backup and restore

After you configure everything, you may also schedule an automatic backup of the Atlas server.

The backup can be as frequent as hourly and you can choose exactly what to save and how many copies to keep.

In case of a problem, it’s easy to restore the server immediately and have it back as good as new, whenever you want.

How can I install and set up NetCrunch 12 quickly?

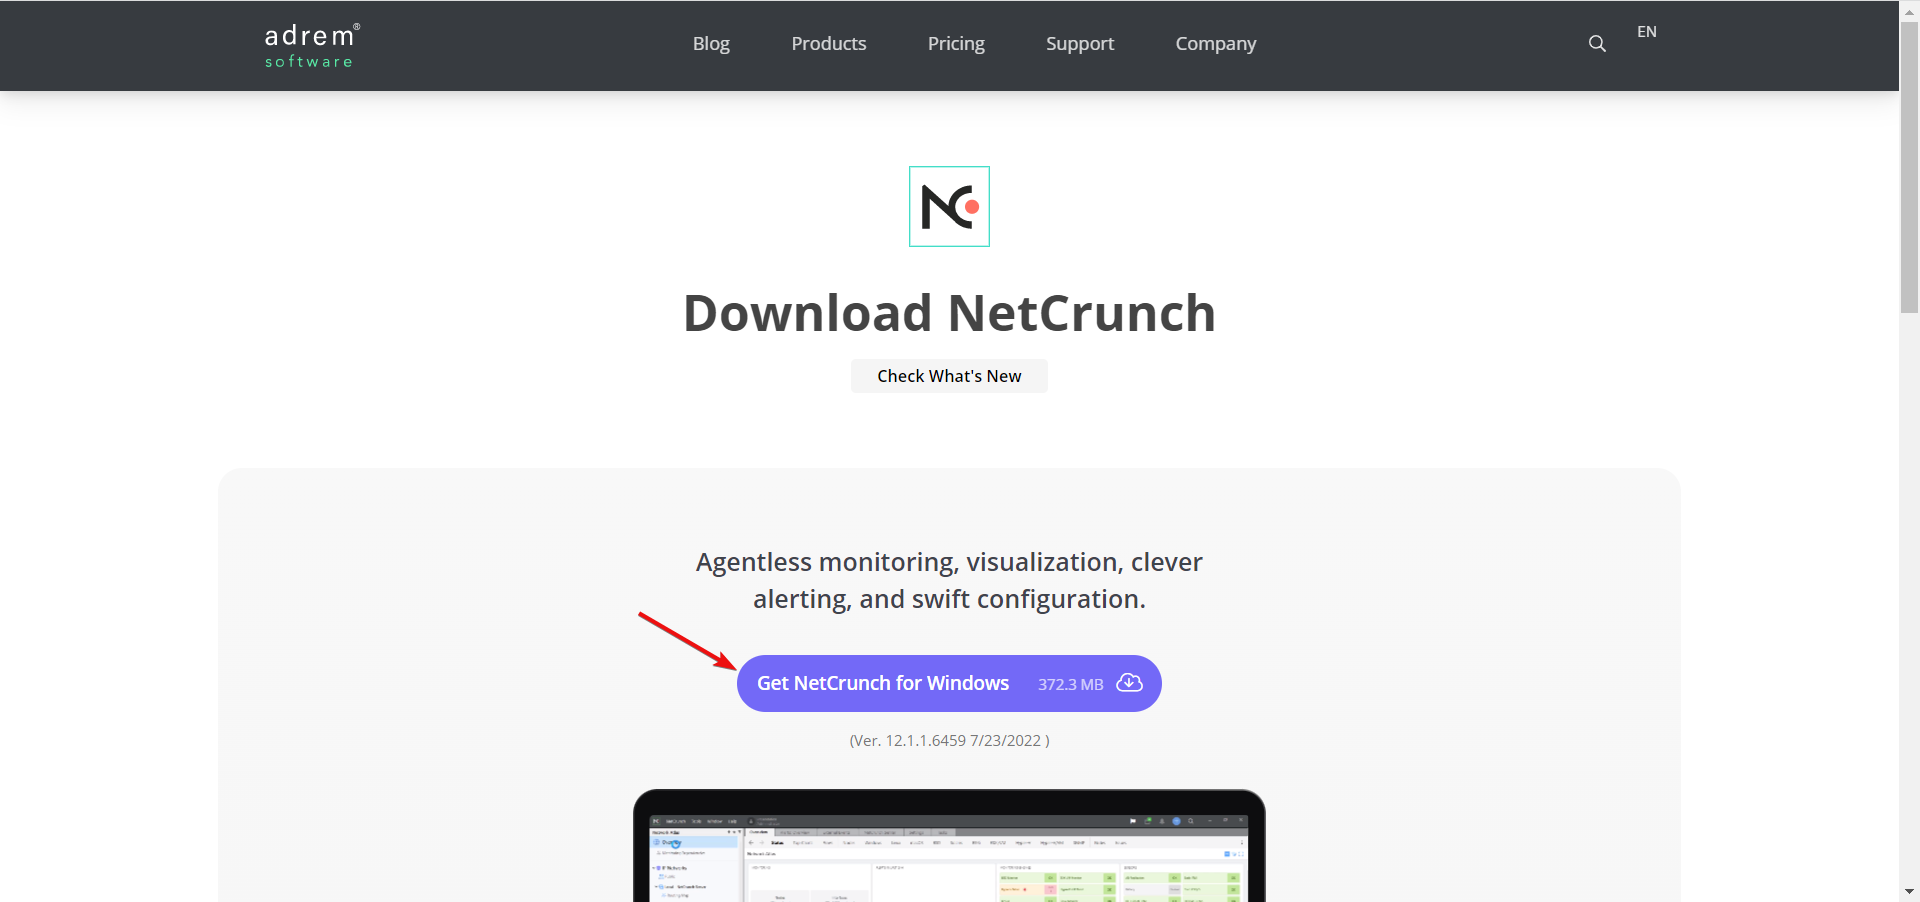
  1. After you visit the NetCrunch download page and download the software, you can start the installation.
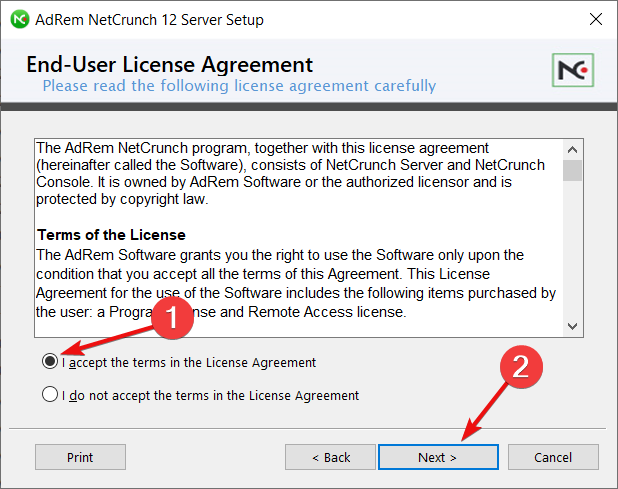
  2. Read and accept the license agreement, then hit Next.
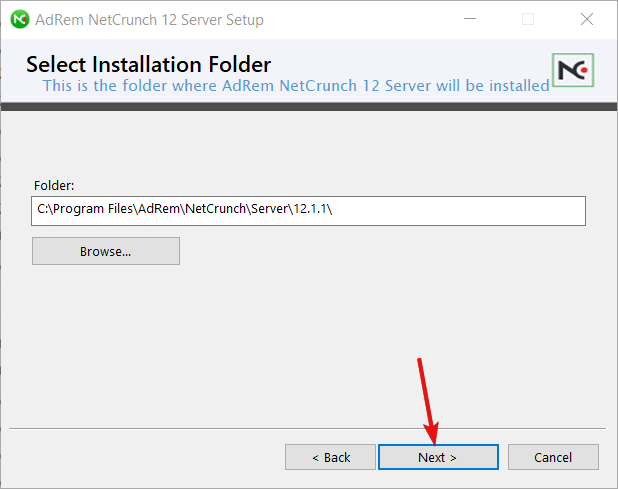
  3. Choose the path of the installation folder, then click Next.
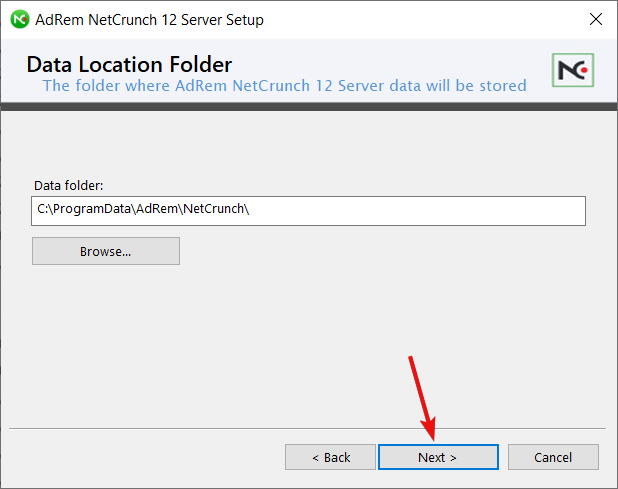
  4. Now, select the folder where you want to store the server data. By default, the software suggests the ProgramData folder but you can change it with a location on a separate drive.
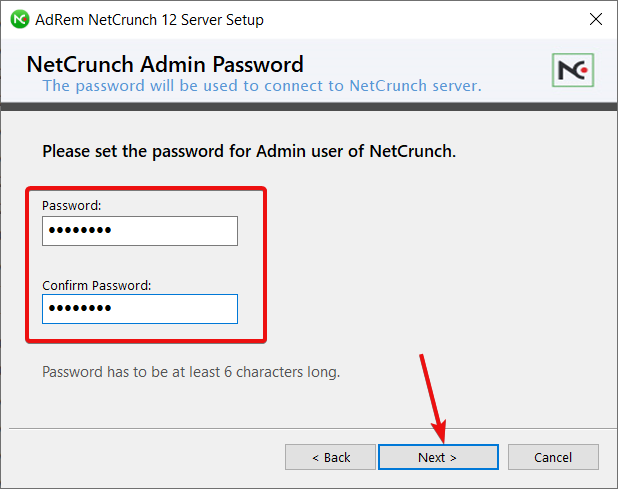
  5. Next, select a password for the NetCrunch server and hit Next.
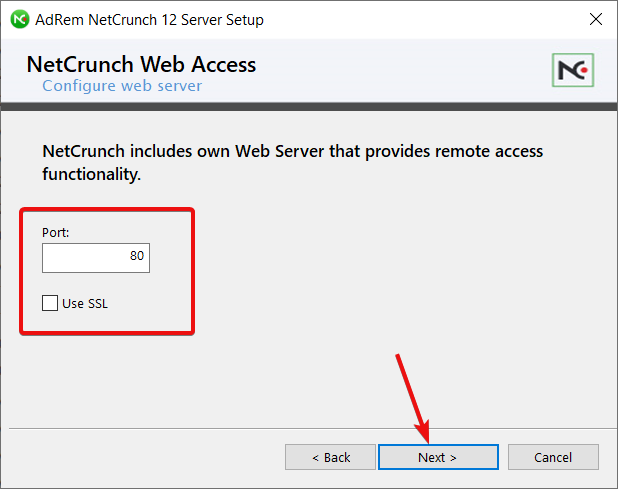
  6. Select the port for the web server and check the Use SSL box to keep the Internet connection secure.
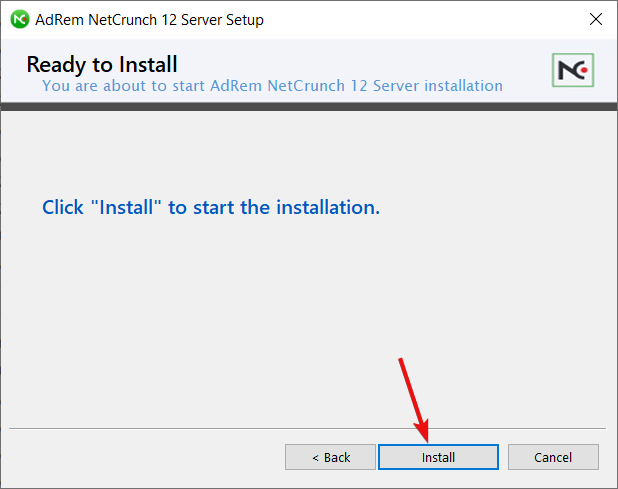
  7. Finally, hit the Install button to start installing the Atlas server.
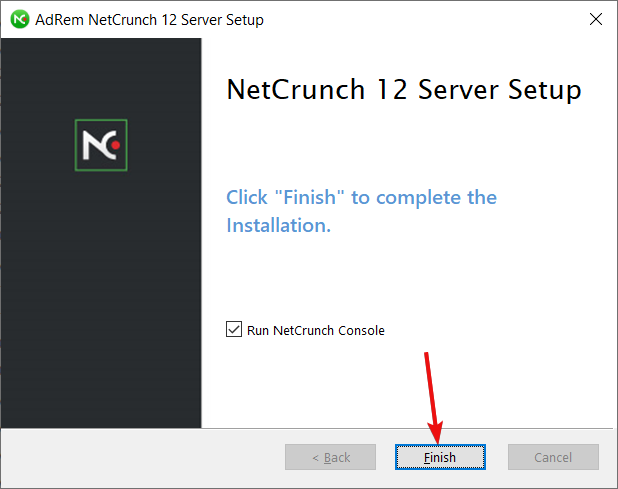
  8. After a few minutes, the server will be installed. Clicking on Finish will start the NetCrunch Console.
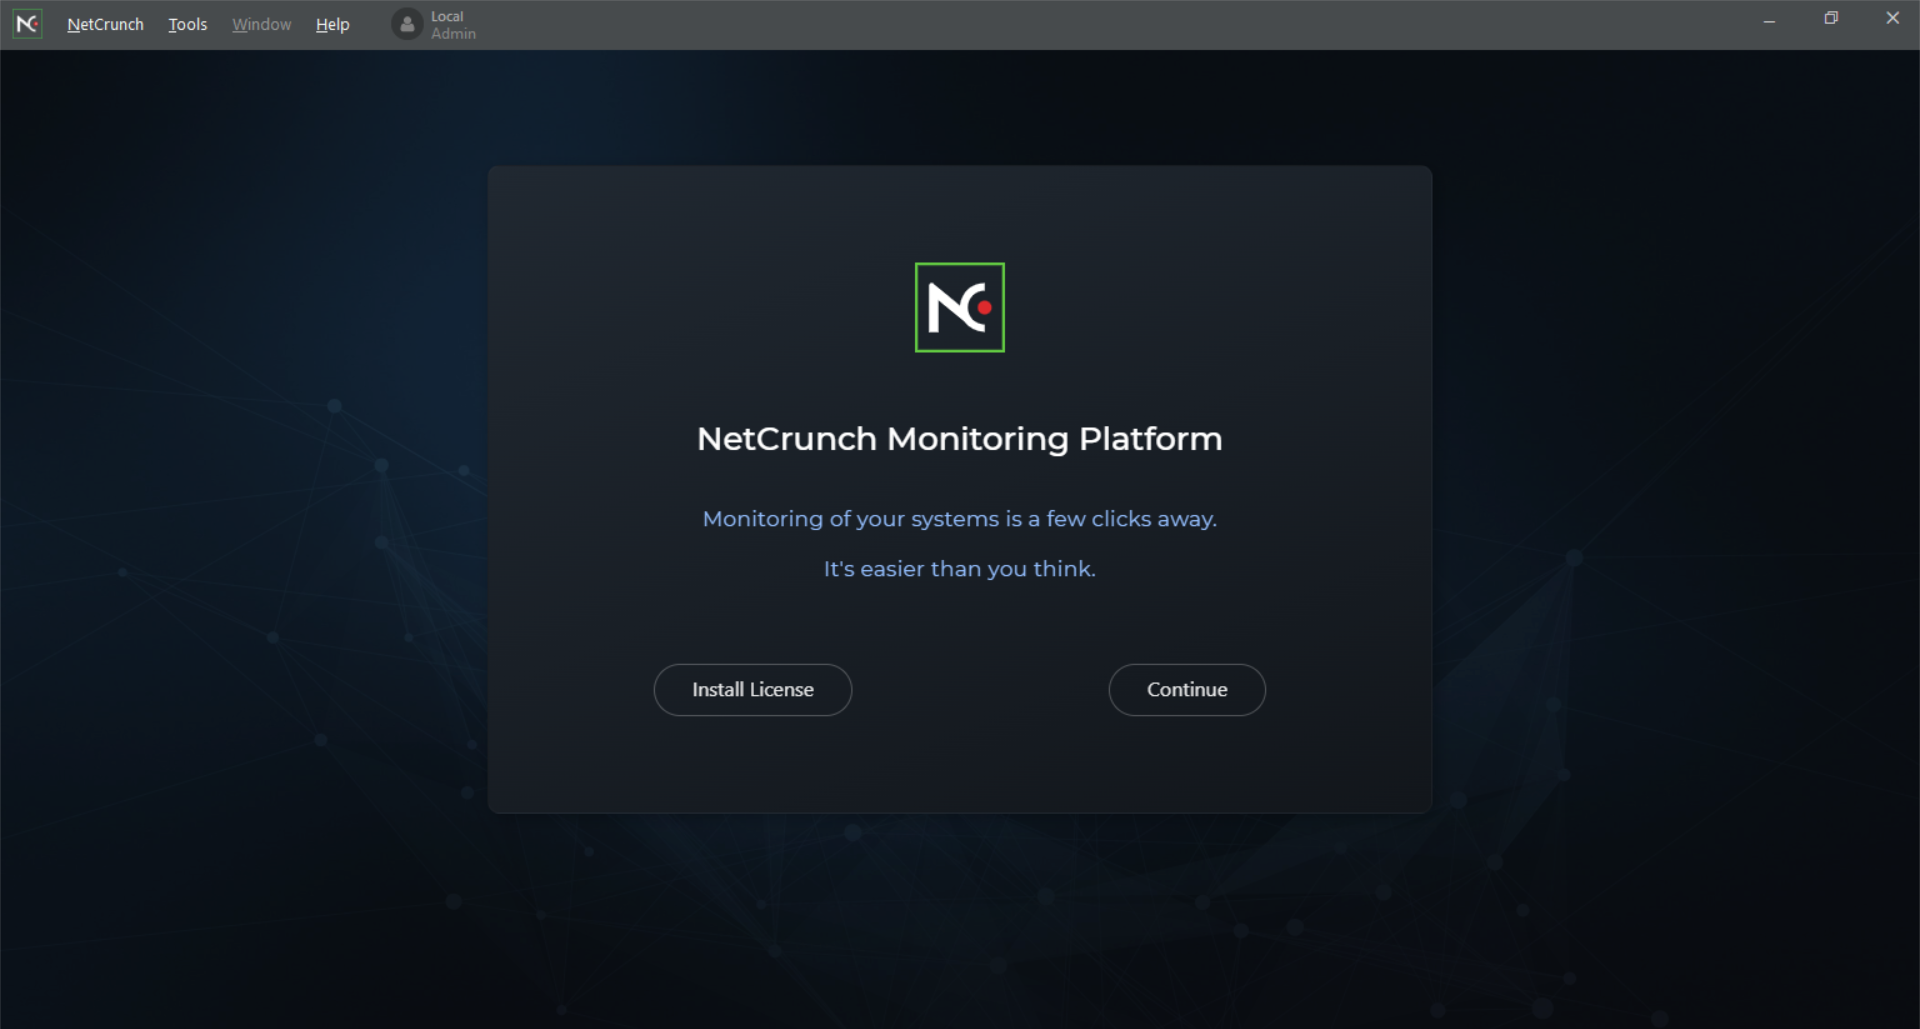
  9. Now, you can either install a license if you already bought one or hit Continue.
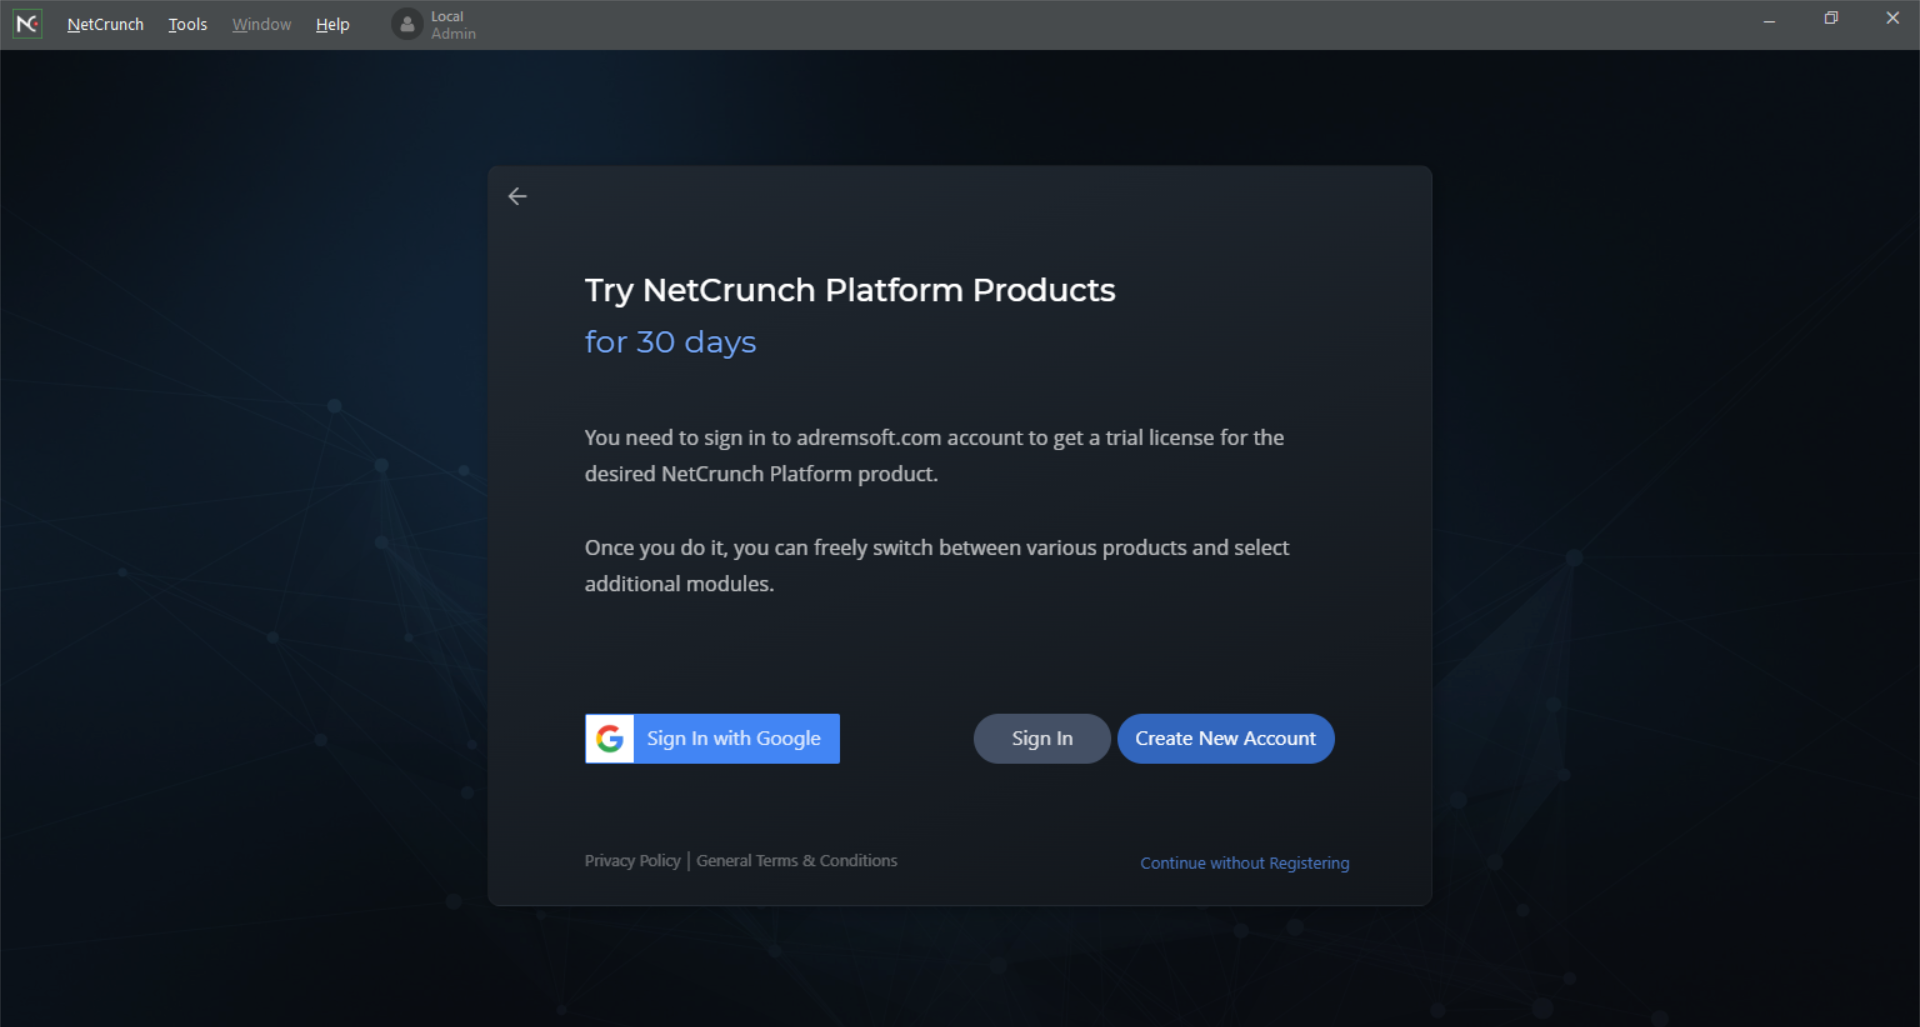
  10. If you went with the second option, you need to create a new account or sign in with your Google account.
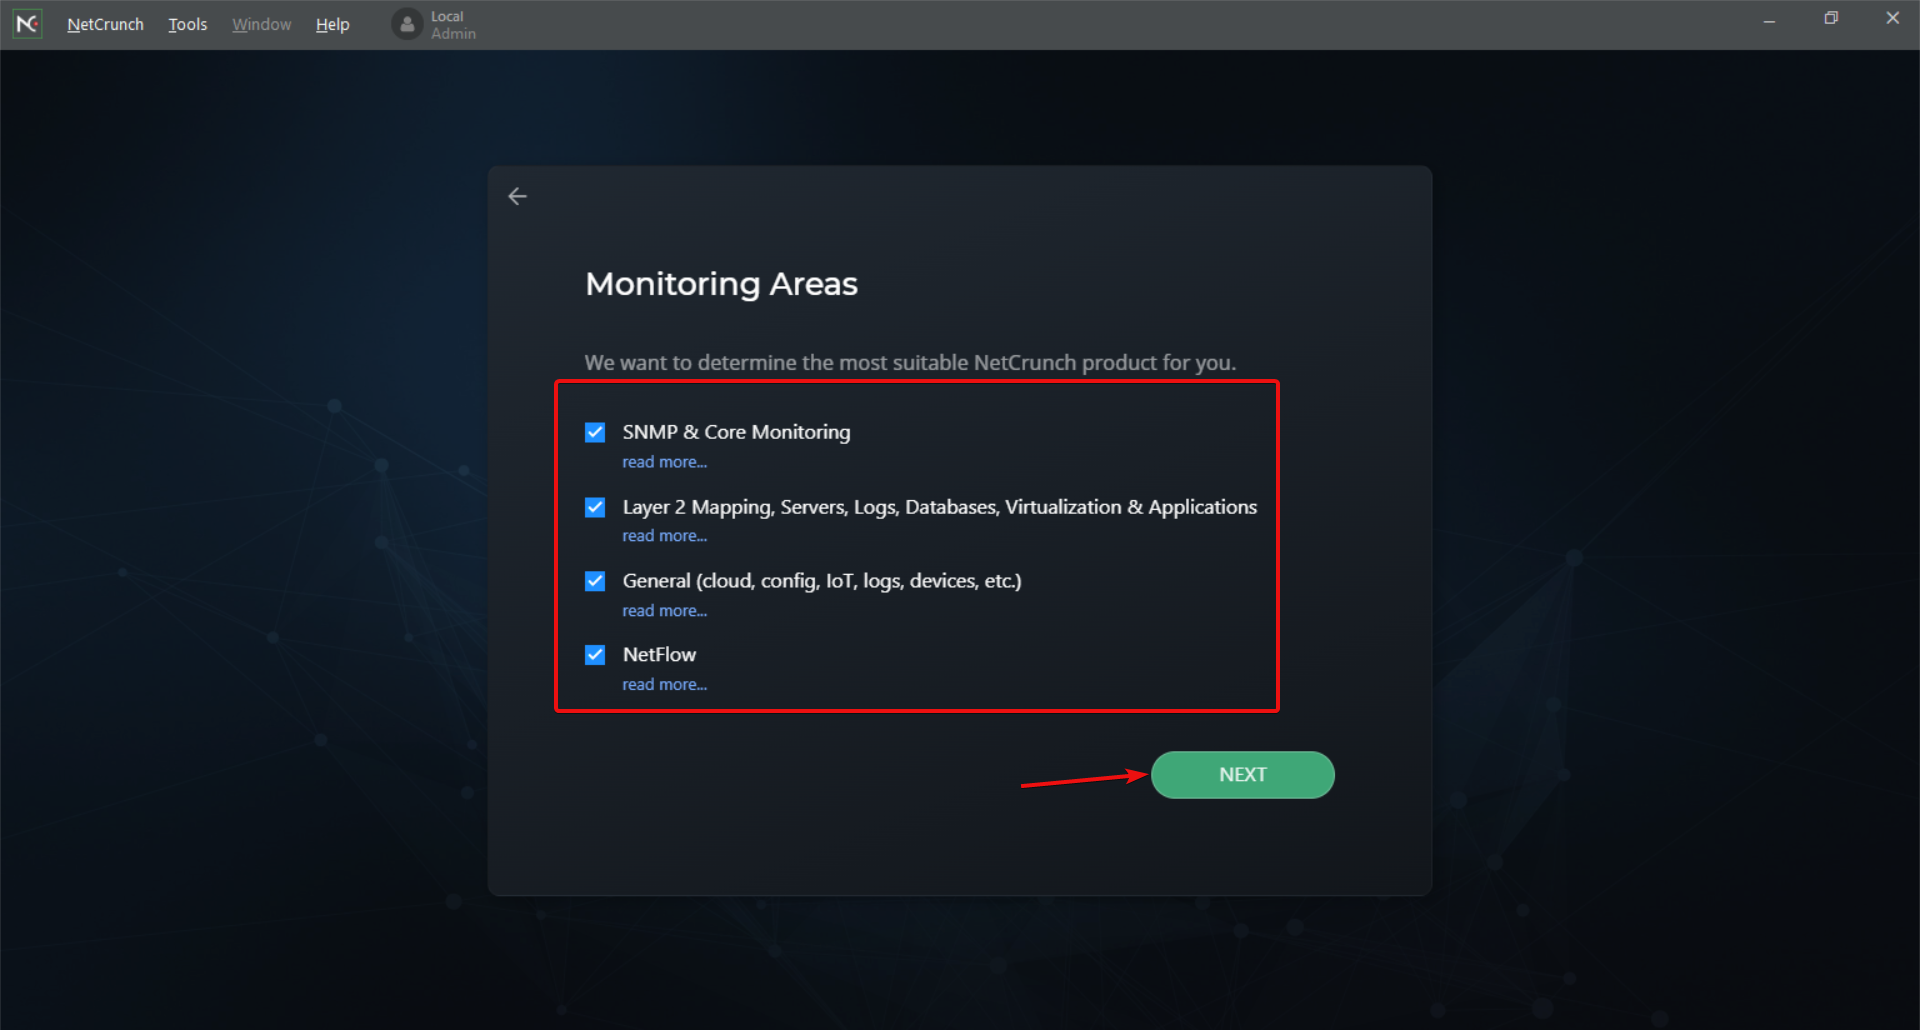
  11. Now, you will be asked to check which areas you need to monitor.
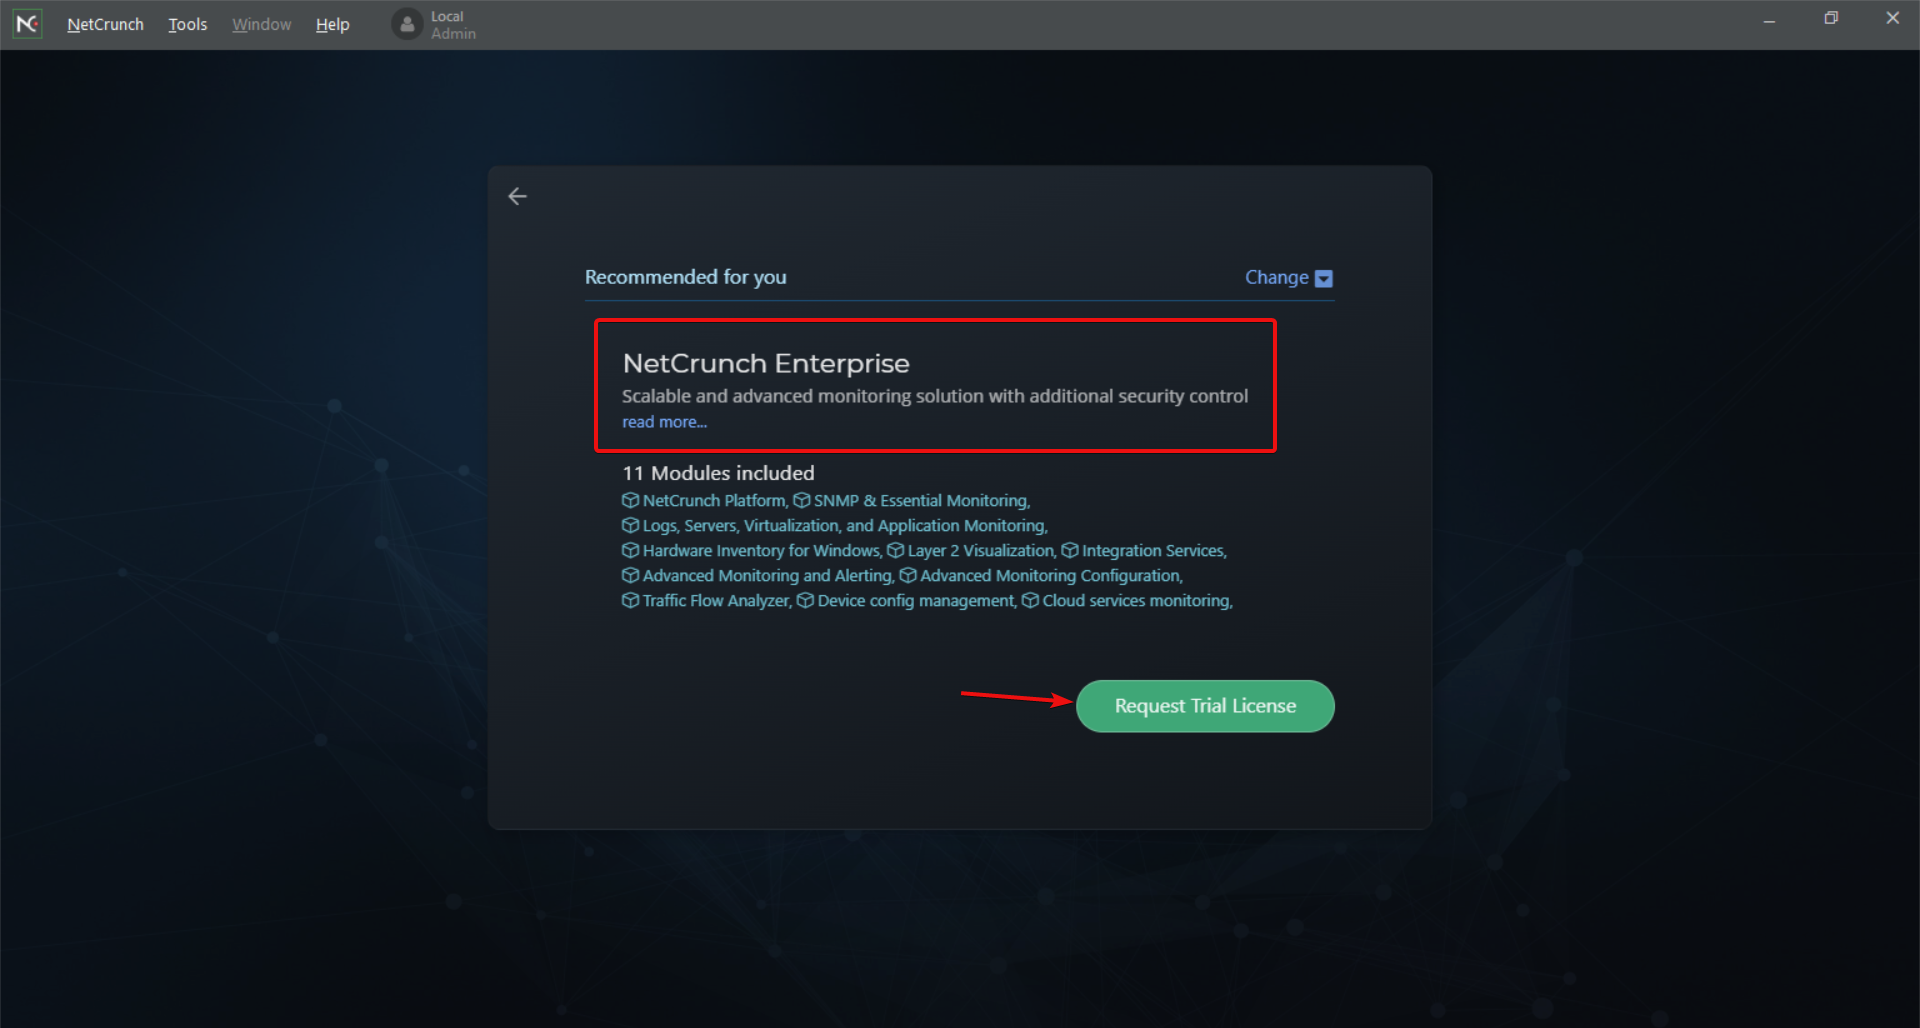
  12. Based on your selection, you will be recommended a NetChunch plan that suits you better. Because we’ve chosen all the features, we’ve got to test the NetCrunch Enterprise option.
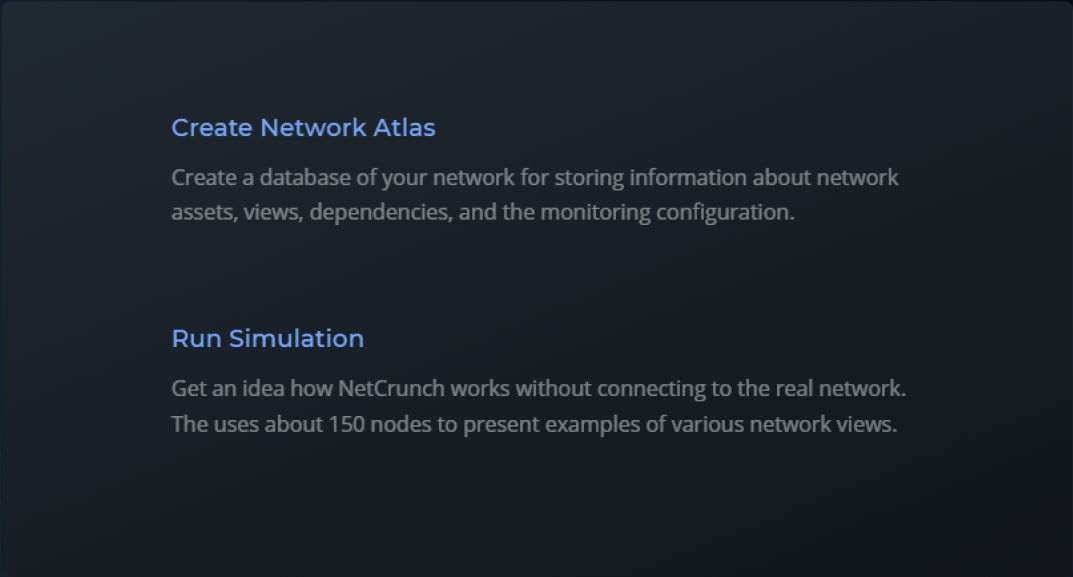
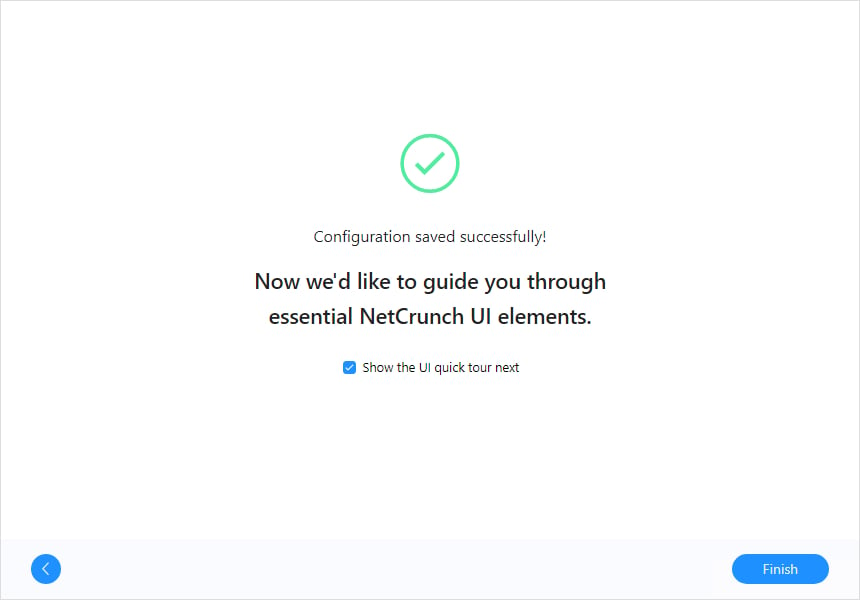
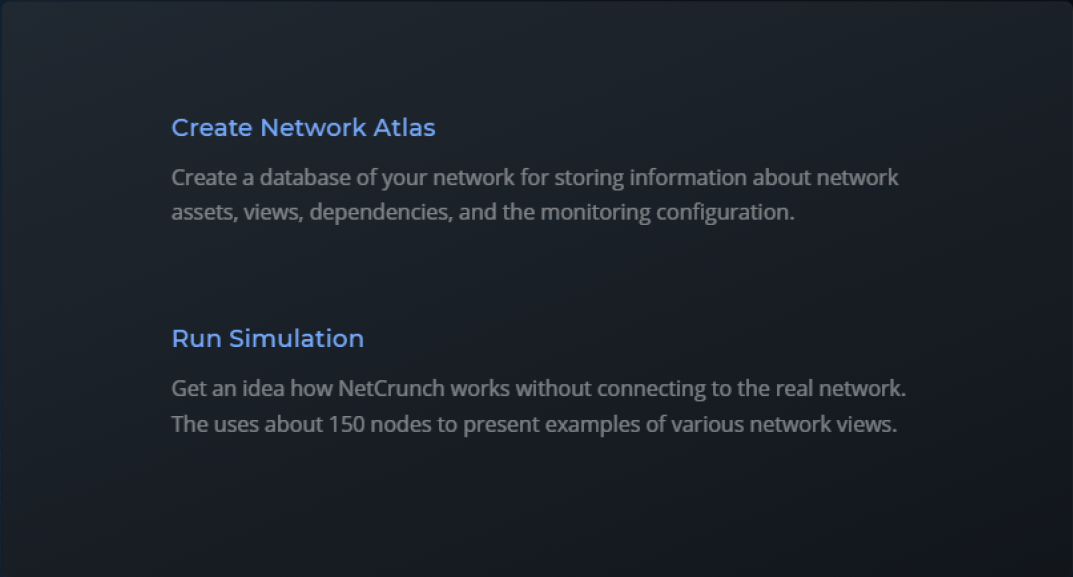
  13. After a few seconds, the trial license will be activated, and you can now create your own Network Atlas or select Simulated Atlas to open a demonstration Atlas.

How can I create a network Atlas?

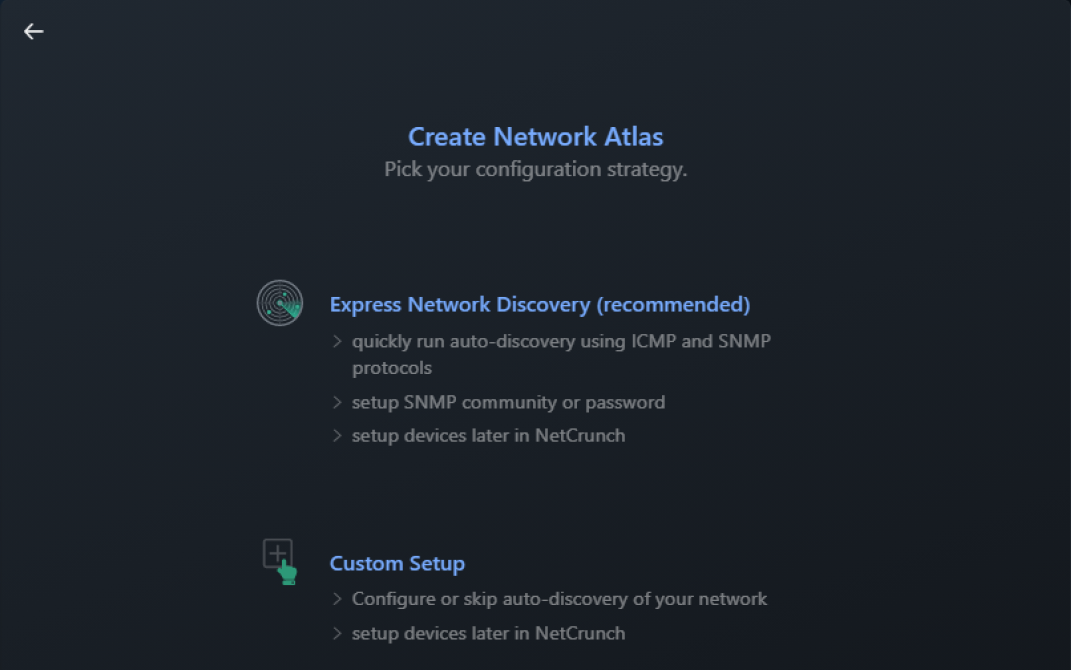
  1. There are two ways of instructing NetCrunch on which elements of your network you would like to detect, add and start monitoring.
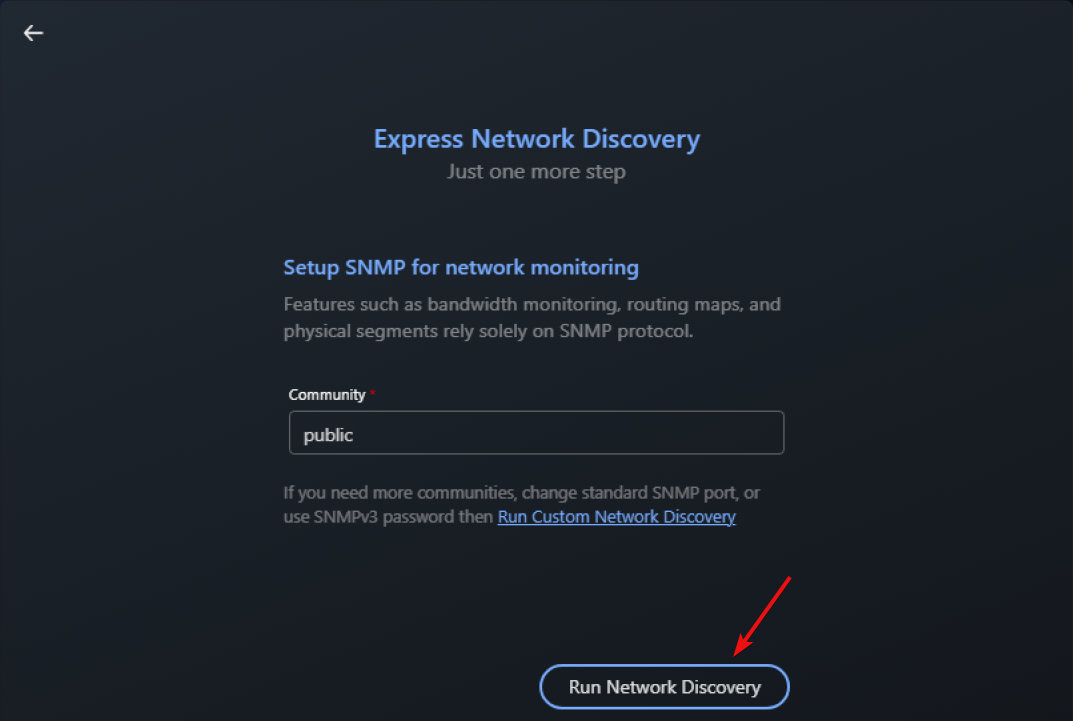
  2. Network scanning in this option is performed using ICMP and SNMP protocols. Click on Run Network Discovery.
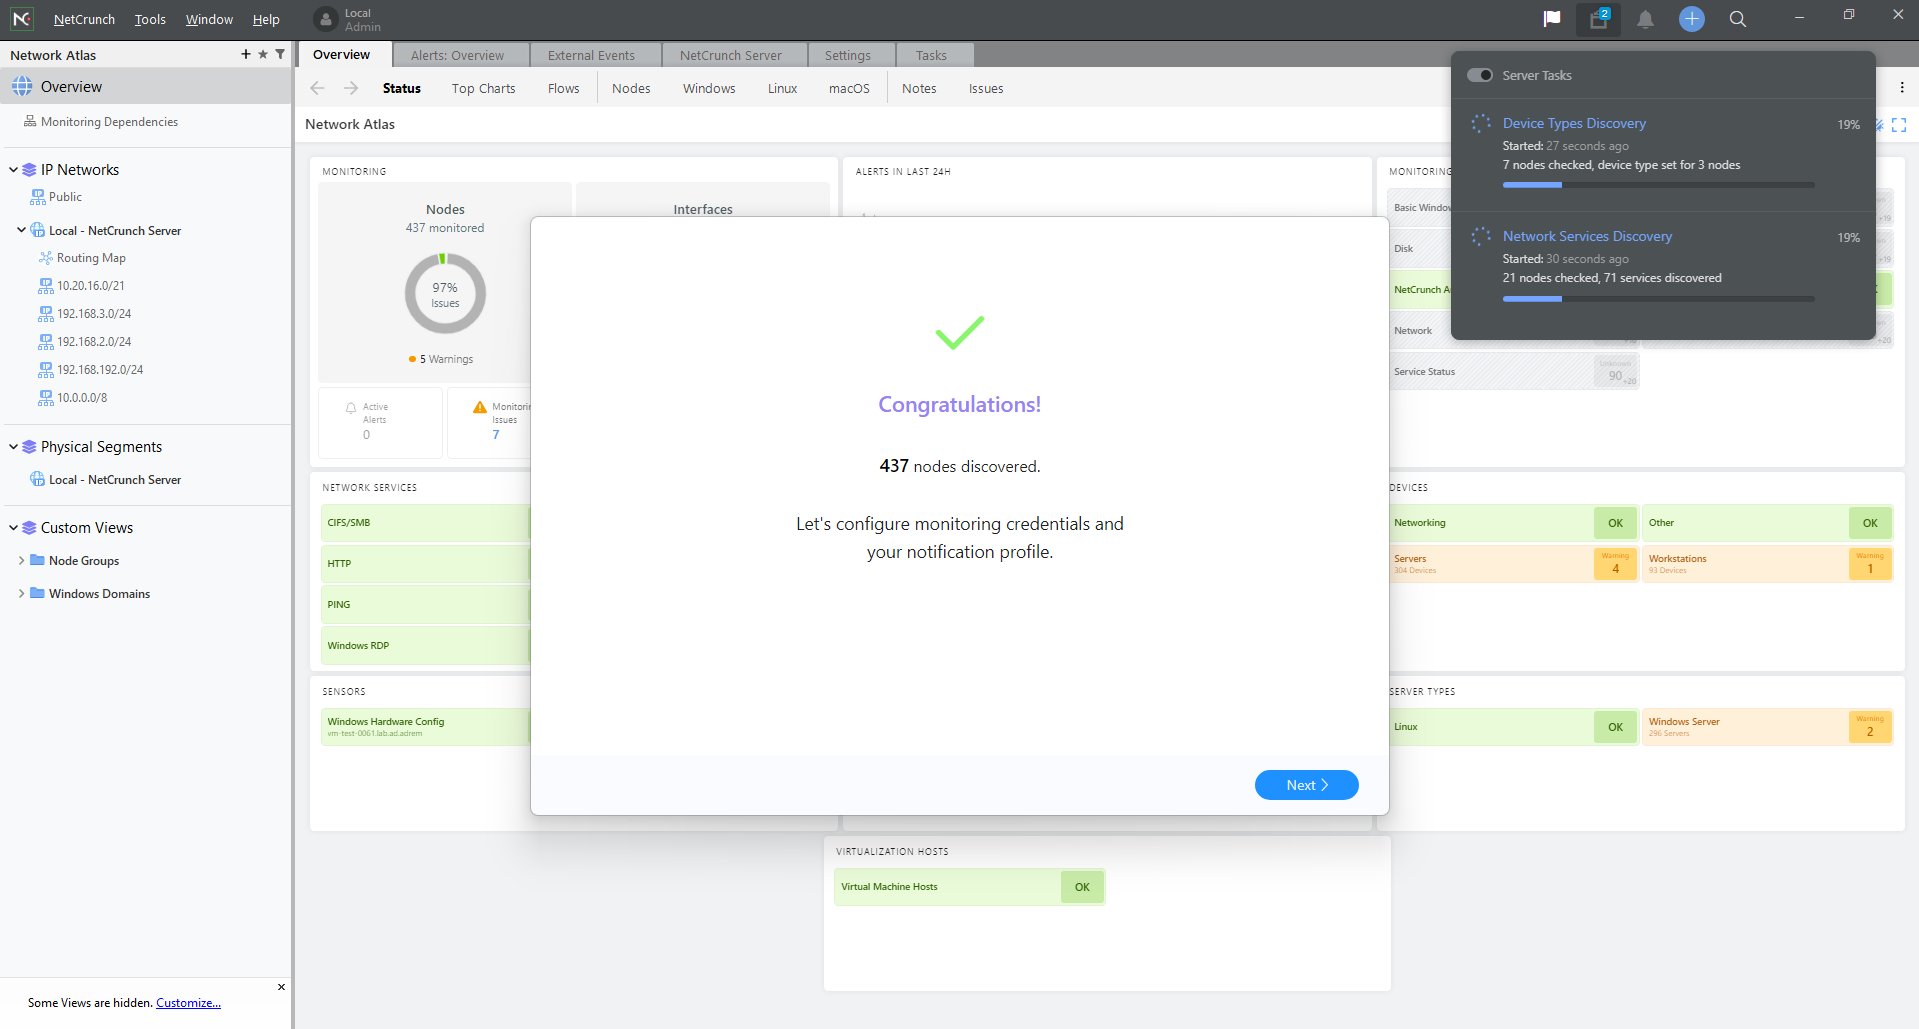
  3. Initial scanning may take around 1-2 minutes (in our case discovering around 430 devices took 45 s).
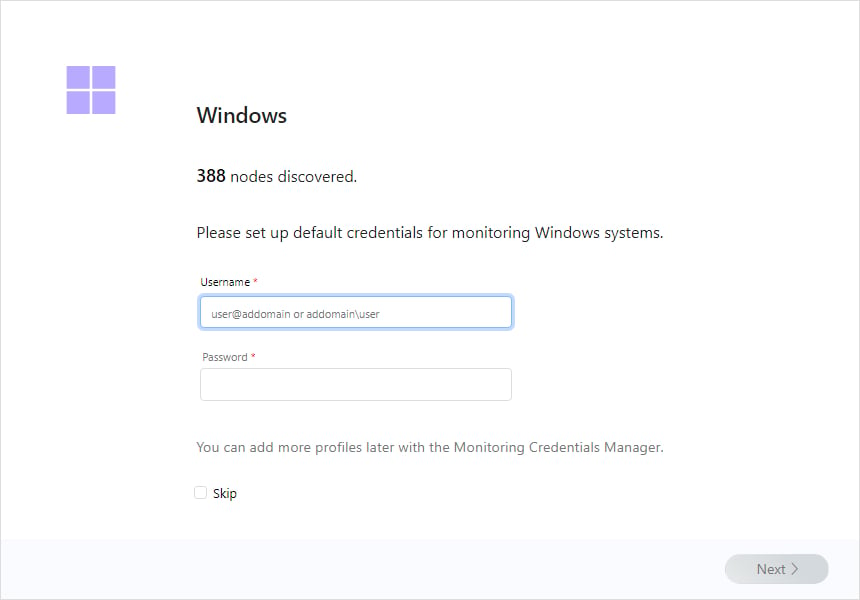
  4. The next step is to enter credentials to the detected operating systems so that NetCrunch can monitor them.
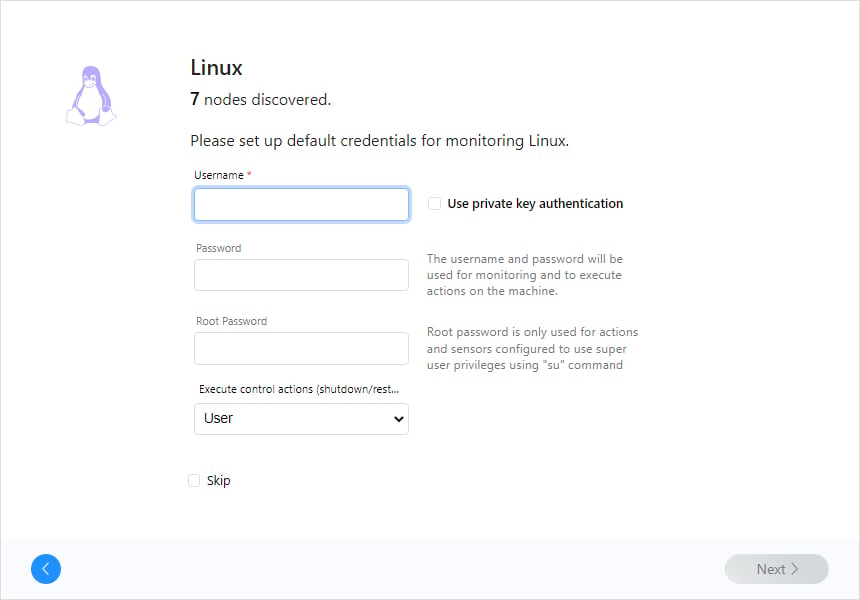
  5. And if it finds Linux nodes, you will need to do the same for those.
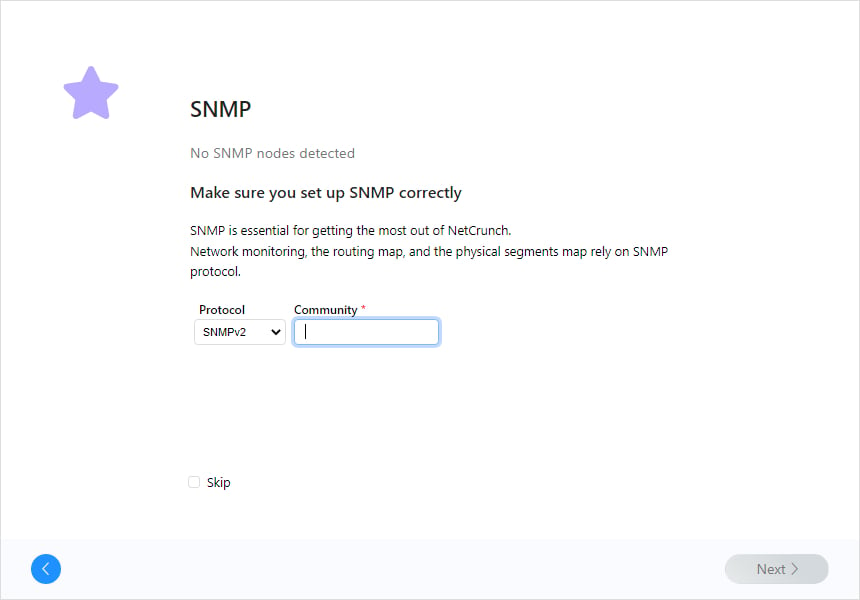
  6. SNMP is important for monitoring network devices – it is recommended to enter all SNMP communities that are used as it is the fastest way to start monitoring all of them.
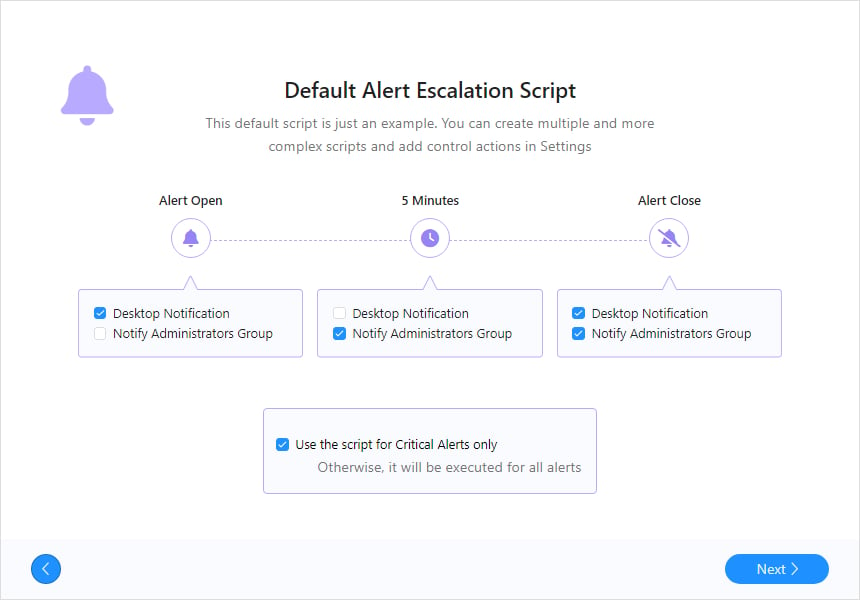
  7. The final step is to confirm the default alerting script that will be used by NetCrunch in response to any event that you want to track in your network. All events are by default saved to the database and as you can see below, it will display the desktop notifications for critical alerts only.
  8. Click Finish and it is done.
  9. Now the network is being monitored, metrics are collected and alerts are generated.
  10. But you can test NetCrunch even if you are not connected to any network by selecting the Run Simulation option when you start NetCrunch Console.

For example, if you are at home or traveling and want to experience what it is like to use NetCrunch for monitoring – you can switch to the Simulated Atlas mode.

It includes a simulated network with devices, traffic, and alerts happening – you can test it, change the configuration of alerts, and tweak anything without worrying that you can damage anything in the real network.

You can close Simulated Atlas if you want to switch back to the real network. You can test NetCrunch in your network for 30 days, but the trial can be extended on request by AdRem.

As you have probably noticed, for a complex monitoring solution like NetCrunch, the installation was a breeze.

Anyway, NetCrunch 12 brings a lot of new features and fixes. We’ve only highlighted a few of them but you can check the full release notes and check out all the new improvements.

We want to add that NetCrunch uses an embedded SQL database for events, so no additional server is required. It also uses separate file-based stores for trends and the program state.

What is the NetCrunch pricing?

Based on the number of nodes and interfaces but also on services, there are three flexible plans:

➡ NetCrunch Essentials

This plan is tailored for clients who need to monitor services uptime, bandwidth, and any SNMP device.

Here are some of its included features:

  • Bandwidth Monitoring
  • Routing Map, VLAN & Port Mapping
  • SNMPv1,2c,3, MIB database & compiler
  • 110+ Monitoring Packs
  • Uptime monitoring, Cisco IPSLA
  • 1 Year Data Retention
  • 1 Year upgrades and standard support
  • 3 Remote Access Connections

➡ NetCrunch Professional

This is a comprehensive package with hundreds of monitoring targets for your extensive needs.

Here are some of its included features, on top of the essentials:

  • Servers & Virtualization Monitoring
  • Layer 2 Maps
  • Log Monitoring (Text, Syslog, Traps, etc.)
  • 260+ Monitoring Packs
  • 130+ Sensors (WMI, IPMI, SQL, etc.)
  • Advanced Conditional Alerts
  • Active Directory Integration
  • 1 IP Camera Sensor

➡ NetCrunch Enterprise

It is the complete plan, with all the services needed for organizations. It features additional security control and support.

Here are some of its included features, on top of the ones in the Professional license:

  • Flow Analyzer (NetFlow, sFlow, etc.)
  • Log Analytics
  • Activity Log
  • Smart Monitoring Templates
  • Business Status Node
  • Unlimited Data Retention
  • 1 Monitoring Probe
  • 10 Remote Access Connections
  • 10 Cloud Sensors
  • 100 Config Sensors

All you need to do is to figure out what are your exact needs and choose the right plan for your business.

⇒ Get NetCrunch

Pros
Simple and comprehensive user interface
Over 650 monitoring templates
Monitors all your networking and cloud services
One dashboard for all networking activities
Easy to install and set up
No need to install monitoring agents
Backup and restore your Atlas server
Cons
No cloud-based app

Closing notes

NetCrunch is by far the best network monitoring tool we’ve come across until now. And that’s mostly because it does the mapping and monitoring without any need for agents.

Most other such solutions are time-consuming just because you need to install monitoring agents on your devices.

Not only that, but NetCrunch offers unparalleled support for any device with an IP but also cloud services.

And in its latest version, NetCrunch 12 offers support for over 180 popular devices, all ready to use.

To top it all, the backup and restore feature ensures that all your rules, policies, and settings are stored safely every time.

That being said, we recommend testing this tool for 30 days without any credit card required and convincing yourself.

You might also be interested in our list including the best network log event viewer tools to get other suggestions.

Did you try NetCrunch already? Tell us about your experience in the comments section below.

Windows 11 Keylogger: How to Detect & Disable it

Windows 11 has a built-in keylogger feature that tracks your keystrokes in order to predict your text or spell-check it. It has been implemented on Windows OSs since the April update for Windows 10.

Your typing information is collected and transmitted to Microsoft in order to improve its services and provide a better user experience.

Although text prediction can come in handy in many cases, some users feel the need for more privacy when it comes to their data.

Can you stop a keylogger?

Fortunately, keyloggers can be stopped on your device. You can opt out of having your data collected by manually disabling the keylogger in Windows 11 through your PC’s settings.

We will present to you in this guide two solutions to easily disable the keylogger, so that you may use your PC in privacy.

How can I disable the keylogger on Windows 11?

1. Turn off inking and typing personalization

  1. 1. Press the Windows key on your keyboard to open the Start Menu. Alternatively, you can press the Start button on your taskbar.

  2. 2. Type privacy in the search bar. Click on the result for Privacy Settings.

    keylogger windows 11 privacy
  3. 3. Select Inking & typing personalization from the list of options.

    disable keylogger windows 11 typing settings
  4. 4. Here you can find the Getting to know you setting. When it is enabled, Microsoft collects data from your device.

  5. 5. Toggle the Getting to know you setting off. This will clear all the collected data on your device and reset the local user dictionary.

    how to disable keylogger windows 11 inking
  6. You can easily turn off the speech and typing data collection option via Privacy Settings on your PC. The keylogger will be disabled and your data will be protected.

    The typing suggestions will still be enabled, but will only use the standard default dictionary and won’t be based on your data.

2. Select how much data is collected

  1. Open the Start Menu by pressing the Windows key.
  2. In the search box, type privacy. Select Privacy Settings from the list of results.
  3. Click on Diagnostics & feedback.diagnostics and feedback privacy settings
  4. Select Required diagnostic data from the options. By choosing this setting, you ensure that only the necessary data regarding your PC’s functionalities is being sent to Microsoft.disable keylogger windows 11 diagnostics and feedback

Selecting the required diagnostic data setting automatically turns off Improve inking and typing.

The setting is located in the same menu as the other one. It can only be turned on if you choose to send optional diagnostic data in the previous setting.

This is a great method for those who want to go above and beyond to protect their privacy. Not only will your typing information be private to you, but so will your website and application usage.

Is this keylogger spyware?

Microsoft’s decision to implement a built-in keylogger on Windows 10 and 11 was not well received by all users. Some may feel that the tool is spyware, given the fact that it collects their data.

However, the keylogger set on by default on your computer is not malware. Being implemented by Microsoft, it is a safe tool, and your data is only sent to them.

Nobody else other than Microsoft has access to your speech and typing data which is being collected from your PC. If you want to ensure that not even Microsoft does, then follow the guides above.

If you are looking to find out how to disable the keylogger on Windows 10, you should know that the process is very similar to the one depicted in this article.

We hope our solutions helped you disable the keylogger in Windows 11 without any issues. Let us know which method you prefer and write down in the comments section any questions you have about this topic.

3 Cheap Ways to Watch Lord of the Rings: The Rings of Power

The first two episodes of the much-awaited television series The Lord of the Rings: The Rings of Power are all set to premiere tonight. The rest of the episodes are scheduled to be released every Friday from September 9 to October 14. The Lord of the Rings fans were eagerly waiting to binge-watch the series and now can’t watch to watch it.

The only obstacle they have is The Rings of Power is exclusively available on Prime Video. Although most households in the United States have an Amazon Prime subscription, not everyone has subscribed to it. But don’t worry; we will help all of you with the cheapest ways to watch The Lord of the Rings: The Rings of Power.

The official way to watch The Rings of Power

Before we move ahead with the guide, let’s make it very clear. There is no other way to watch The Rings of Power except Prime Video. Amazon purchased The Lord of the Rings TV rights in 2017 by spending $250M. The e-commerce giant announced The Rings of Power Television series right after it.

So that being said, let’s know about the official way to watch The Rings of Power. You can watch The Rings of Power on Prime Video. The video streaming service is available in 200+ countries.

You can access it from:

  • Web Browser
  • iOS
  • Android smartphone
  • Amazon Fire TV
  • Roku Devices
  • Xbox
  • Play Station
  • Smart TVs

If you already have Amazon Prime subscription, it already bundles the Prime Video subscription. Suppose you don’t have Amazon Prime; you can sign up for Prime Video as a standalone service. It will be cheaper and cost you only $8.99 per month.

On the other hand, the Amazon Prime subscription costs $14.99 per month or $139.99 per year. As a new subscriber, you will get a 30-days free trial.

Below are the steps to sign up for an Amazon Prime free trial and watch The Rings of Power.

What is the cheapest way to watch The Rings of Power?

  1. Using a free trial
  2. Using a VPN
  3. Using a student card

Until now we have discussed the official ways to watch The Rings of Power, but that’s not what you are most interested in.

You are here to know the cheapest ways, including the free ones. Now let’s move toward the most affordable ways to access Prime Video.

1. Use a free trial

    We know you guys to be most interested in free options. You may be thinking, is there even a free way to watch The Rings of Power? The answer is partial yes. It involves the old-school formula of signing up for a free trial.

    As you might know, Amazon offers a 30-day free trial for new customers signing up for Amazon Prime. If you haven’t consumed your free trial, you can sign up for the free trial and watch at least six episodes of The Rings of Power as it gets released.

  1. 1. Open any Web Browser on your Smartphone or computer.

  2. 2. Head over to the Prime Video Rings of Power page.

  3. 3. On the landing page, click on the Start your free 30-day trial button.

    free trial amazon prime
  4. 4. If you are not logged into your Amazon account, you will be asked to enter your login details.

  5. 5. Follow the on-screen instructions to complete the trial sign-up process.

  6. 6. After signing up, visit the Rings Of Power page and click on the Play button to start viewing the series.

2. Watch The Rings of Power cheaper using a VPN

The way mentioned above will work as long as you have not signed up for Amazon Prime free trial in the past. But what if you have already consumed your free trial? You are out of luck.

Still, there is a way to watch The Rings of Power not entirely free but very cheaply using Express VPN (we chose this VPN because it has very good servers).

express vpn logo

As mentioned above, Prime Video is available in more than 200+ countries. It means there will be different pricing in different regions. The service is priced very cheaply in many countries. Let’s take the example of India.

The Amazon Prime subscription costs only 179 Indian Rupees per month, a little above $2. You can use a VPN to connect to one of the servers in India and sign up for a monthly Amazon Prime subscription. Of course, you will need a strong VPN service with a faster server in India.

You can try this method now if you already have a VPN subscription. If not, you can sign up for a VPN service. If you ask us, our recommendation will be Express VPN. In our testing, we find it the best VPN service to offer a reliable server in India. Once you have the subscription, you can watch the Rings of Power.

ExpressVPN

Unblock Prime Video in any country and enjoy The Rings Of Power
35% Off! Get it now

3. Watch The Rings of Power at a discounted price

Suppose you don’t want to go through the hassle of using a VPN service and signing up for Amazon Prime in a country where the service is priced cheaper.

You still have a way to get discounted prices in the United States. The only cache is, It only applies to EBT and select government assistance recipients and Students.

Coming to the best part, if you are a Student, you can get a six-month free trial of Amazon Prime. Even if you are not a student, someone in your family is.

You can grab this benefit and watch all eight episodes of The Rings of Power for free. If you are a student, you can access the Amazon Prime Student here.

amazon student prime account

Amazon offers 50% off to EBT and select government assistance recipients that lower the price of an Amazon Prime subscription to just $6.99 monthly. The pricing for Students is just $7.49 after the six months trial they get.

start prime student trial

Frequently Asked Questions

Is Lord of the Rings free on Amazon Prime?

No, Lord of the Rings is not free on Amazon Prime. You will need a Prime Video or Amazon Prime subscription to watch all the three Lord of the Rings movies and the newly released The Rings of Power TV series.

Is The Rings of Power free on any streaming service?

Unfortunately, The Rings of Power is unavailable on other streaming services. It is exclusively available on Prime Video. However, there is a way to watch it for free, which we have described above in the article.

Is LOTR free on Netflix?

LOTR is no longer available for streaming on Netflix. It is exclusively available on Amazon Prime Video.

Final Words

The excitement of Lord of the Rings fans is at a different level. Now they can binge-watch the Amazon-produced The Rings of Power series and go back to the second age of Middle earth. The series is already streaming on Prime Video, with new episodes releasing every week.

Everything is good until you find that access to Prime Video isn’t cheap. Don’t fret. You can still get the service cheaply with the help of the ways provided above in the article. Which method are you going to try? Will you sign up for the free trial, use a VPN, or use the discounted price benefits? Let us know in the comments.

5 Ways to Fix OneNote’s Saved Offline Error [Sync Problems]

If you are interested in note-taking applications, OneNote is one of the best and oldest at the same time. On top of that, Microsoft offers this useful software on all platforms for free.

Another advantage of OneNote is that it uses Microsoft’s OneDrive cloud platform to sync the notes among all devices so that you will have access to your notes everywhere and every time.

In addition to the app’s many benefits, there are a few drawbacks, and one of them is OneNote’s saved offline error. However, this article is going to help you to fix it.

Why does OneNote keep saying saved offline?

The online sync feature sometimes becomes a disadvantage and can get you in trouble such as sync problems.

There are multiple factors resulting in OneNote not syncing which Internet connection, outdated OneNote version, not enough space, server errors, service not available, and misplaced sections in OneNote are among them.

Now, let’s dive into the solutions.

How do I fix OneNote offline error?

1. Check Notebook on the web

  1. Open your notebook in the OneNote desktop app.
  2. Go to File and then select Info. Then copy the Notebook path located under the notebook name.copy file path in onenote
  3. Open a web browser and paste the link into the address bar.go to file path in web browser
  4. Check if the Notebook is opening on the web, then the issue is with the installed app on the devices.

To fix OneNote saved offline error on Mac, open a Notebook, head to the Notebook section on the ribbon, select Copy Link to this Notebook, and repeat Step 3.

2. Check service status

If your try for the first method was unsuccessful, you need to make sure about the server connection because there is probably a problem with the OneDrive service.

Using Internet Explorer or Microsoft Edge, you can quickly see the service status using the Downdetector website.

Some errors such as OneNote saved offline error e0001462, E000145C, 0xE40200B4, 0xE401065D, 0xE000145C, or 0xE4010640 appear when syncing notes in OneNote are temporary and occur when the servers are experiencing high traffic and are under load.

3. Sync your notebook manually

OneNote saved offline error on Windows 10/11 can easily be fixed by syncing your Notebook manually.

To do this, on the OneNote desktop app, right-click on your notebook and select Sync this notebook Now. You can do the same by using the Shift + F9 keyboard shortcut.

The trick for the MAC OneNote app is the same: Right-click on the notebook and select sync in this notebook or use the command + S keyboard shortcut.

4. Check storage space and optimize files

  1. In the OneNote app, click File and choose Options.
  2. Now navigate to Save & Backup.
  3. Click Optimize All Files Now under the Optimizing files section. It may take several minutes to do that.optimize file in onenote
  4. Hold Windows + R keys to open the Run dialog. Type %localappdata%\Microsoft\OneNote\ in the box and click OK. delete backup files of onenote
  5. In the pop-up window, double-click the folder that matches the version number you have installed, 16.0 stands for OneNote 2016 and 15.0 for OneNote 2013. Then navigate to Backup folder to continue.
  6. Delete the file folders you do not want to save.

Lack of free space in both local and cloud space may cause sync issues. To resolve this problem, you can delete the OneDrive storage or opt for the Microsoft 365 subscription with 1TB of OneDrive space.

For local storage, you need to optimize files or remove unnecessary backup using the abovementioned steps.

5. Move to a new section

  1. On the OneNote app, click the Create a New Section shown by a plus sign.
  2. Type a name for the new section.rename new section in onenote
  3. In the section with the sync problem, right-click each page, and select the Move or Copy option.move or copy section in onenote
  4. Choose the newly created section as the destination and click Copy.

Most of the time, these five methods can address errors due to OneNote sync problems. However, no worries if they disappointed you because there are some alternatives.

For example, you can empty OneNote Recycle Bin by navigating to the History tab, then selecting Empty Recycle Bin under the drop-down menu.

Also, you can address the conflict issues arising from editing the same part of a page at the same time by another user.

To do this, refer to the yellow information bar at the top of the page and simply delete the page responsible for the error. Updating OneNote to the latest version is always a good idea.

In the comments section below, let us know if you were able to successfully fix OneNote saved offline error.

How To Change The Download Bandwidth Limit On Steam

While using Steam, sometimes you may struggle with the Internet speed for other tasks. In such a case you can change the download bandwidth limit on Steam.

This usually occurs when Steam uses up most of your Internet speed for downloading.

Steam allows you to download games at full speed most times, on high-speed Internet. But if the connection is not so good, you may not be able to use it for other tasks at the same time.

But if you are facing an issue like the Steam download keeps restarting, you can refer to our detailed post for solutions.

Does Steam have a cap on download speed?

While the Steam download rate does not have a limit, it does get confined by the bandwidth of the server you are downloading from and the speed of your hard drive.

So, while your download speed will not exceed the sender’s upload speed, Steam also limits your download speed based on your hard drive’s write speed.

You can check the average download speed per country on the Steam Download Stats page along with the amount of bandwidth used by each country.

So, how do you change the download bandwidth limit on Steam? Here we have a quick guide to help you cap the download speed on Steam.

Quick tip:

Opera GX is a specially tuned version of the Opera Browser with new and distinctive features and design meant for people who like playing computer games. This browser version can let you limit the network bandwidth used by your browser to speed up your gaming and streaming experience.

Streaming music while playing a game or streaming the gameplay in parallel can require a lot of bandwidth. The network limiter solves that issue by allowing you to set maximum limits on how much of your network’s bandwidth you would like to allocate to your browser.

Opera GX sticks to that limit, which signifies that your game or streaming service outside of the browser will run more smoothly.

cta opera logo

Opera GX

A browser specifically built for gamers including unique features to help you get the most out of gaming and browser experience.

How do I change the bandwidth limit on Steam?

  1. 1. Launch the Steam application.

  2. 2. Go to the top left and select Settings from the Steam drop-down menu.

    steam settings
  3. 3. Next, click on the Downloads tab on the left of the Settings window.

    Steam download settings
  4. 4. Now, go to the right side of the screen and under Download restrictions, make sure that the Throttle downloads while streaming option is checked.

    Throttle downloads while streaming
  5. 5. Check the box next to the Limit bandwidth to: option.

  6. 6. You can now set the limit you would want. Under the Enter a new value below box, set the bandwidth value.

  7. 7. This value is in KB/s, so, if you want to set it to MB/s, remember that 1000 KB/s = 1 MB/s. For example, 8000kbps=8Mbps and so on.

    limit bandwidth Steam
  8. 8. Press the Apply button below. Once done, click Ok to save changes and exit.

  9. You can modify Steam’s bandwidth limit via its built-in Settings menu. From there, you can manually input a desired value to be the download limit. However, do keep in mind that the value you input needs to be in KB/s format.

Why is Steam not using my full download speed?

There can be two possibilities why Steam is not hitting full download speed as below:

  1. MB/s is not the same as Mb/s because there is an 8x difference, for eg. (1MB/s = 8Mb/s). While most of the network speeds are recorded in Mb/s, hard drives and other storage devices are listed in MB.
  2. Besides, sometimes, the download speed is also affected by the speed of the Steam server, which is often slower during busy hours.

In this case, clearing the download cache, or changing the download region may help fix the slow Steam download speed.

But if it does not work, you can also try the below solutions to make sure Steam uses full download speed:

1. Remove the bandwidth limit

  1. Launch the Steam client, click on the Steam menu on the top left, and select Settings. steam settings
  2. Now, on the left side of the pane, click on Downloads.Steam download settings
  3. Next, under Download Restrictions, uncheck the box next to the Limit bandwidth to: option.uncheck Limit bandwidth to
  4. It will show No Limit automatically. Press OK to save the changes and exit.

You can now resume your download and Steam will utilize the full download speed.

2. Add an exclusion

  1. Go to your taskbar, click on the system tray, and click on the Windows Security icon. windows security icon
  2. On the Windows Security screen, click on Virus & threat protection on the right. Virus & threat protection
  3. Next, go to Virus & threat protection settings and click on Manage settings. manage Virus & threat protection settings
  4. On the next screen, scroll down and under Exclusions, click on Add or remove exclusions. Add or remove exclusions
  5. Next, under Exclusions, click on Add an exclusion and select Folder. Add an exclusion
  6. Now, navigate to the Steam folder location, select it and click on Select Folder. select Steam folder

You have successfully added the Steam folder to the exceptions list and you should experience the full download speed now.

Downloading and playing games on Steam is usually a pleasure, but it’s also known to utilize all your Internet bandwidth to download files.

While downloading the files on Steam becomes easier, it can affect your network speed for other online tasks.

Therefore, the above guide can help you to throttle the Steam download speed so that you can make the most of the Internet speed and multi-task at the same time.

But if your Steam download is stuck at 100%, you can find some effective troubleshooting methods in our detailed guide here.

For any other queries related to Steam errors or any download issues, do let us know in the comments box below.

Windows 11 Roaming Profile: What is it & How to Disable it

Disabling roaming profile in Windows 11 has some positives and negatives. Roaming profile on Windows allows you to use the same environment settings on every device you log on to. It contains the profile that synchronizes your settings to log on to any Windows domain.

However, it helps users with several devices have a consistent environment across the devices. Also, some disadvantages come with using the same environment profile for all of your devices.

Furthermore, enabling the roaming profile in Windows 11 has advantages like helping you use a consistent environment and roaming profile across your devices. Users can migrate the roaming profile from one computer to the other.

Nonetheless, there are lots of disadvantages that come with it. Some disadvantages are downloading profile files every time the user logs in, which increases network traffic.

Also, it can take a long time before the file download completes because the more file you have, the more time it takes. However, it depends on the roaming profile AppData.

How do I know if my roaming profile is enabled?

  1. Click on Start and select the Control Panel.
  2. Select System and Security.chrome system and security
  3. Click on System, then select Advanced System Settings.advanced settings
  4. Click on Settings in the User Profiles tab, then check if there’s Roaming in the Type column.

However, if you see Roaming in the Type column, it indicates that the user profile is roaming.

What is the difference between a Roaming profile and a Local profile?

A roaming profile is a type that can be transferred from one computer to another. It allows you to use a consistent environment across all your devices.

AppData is downloaded to another device to help it use the app. However, the roaming data synchronizes with the server to update the profile when you log off.

Conversely, a local profile is a user profile you can only access on a specific computer.

Unlike a roaming profile, it can’t be downloaded or synced into the server to be used on another computer. Hence, it is functional only for the computer you set it for.

How do I disable my roaming profile in Windows 11?

  1. 1. Click on Start and select Administrative Tools.

  2. 2. Select Group Policy Management from the list.

  3. 3. Go to Computer Configuration and select Administrative Templates.

  4. 4. Click on System User Profiles.

  5. 5. Enable the Only allow local user profiles and Prevent Roaming Profile Changes from propagating to the server options.

    change policy definitions
  6. The above steps help to disable roaming profiles on Windows 11. It means the roaming profile AppData won’t synchronize with the server. Hence, preventing the update of roaming profile changes to the server.

What are the disadvantages of using a roaming profile?

  • Increase in network traffic: Due to the need for the roaming profile to download AppData from the server at every login session, the network traffic will increase. Unfortunately, companies or users with many devices will find it challenging to access the roaming profile because multiple devices store their data on a local server.
  • Longer download time: The size of the files stored in the roaming profile will determine how long it will take to download them. Hence, users with lots of files can take a long time. This is a disadvantage because it can slow down the loading speed.
  • Possibility of file corruption: Storing many files in the roaming profile can lead to some files getting corrupted. It can affect all the files, and it will be unfortunate if you don’t have a backup.

What happens when you remove the roaming profile?

Removing the roaming profile file enables the local profile on your computer. Hence, you can’t access it on any other device.

Nonetheless, depending on their needs, the roaming profile can still be appropriate for some users. Hence, we recommend that you read through our article about what to do if the roaming profile was not completely synchronized.

Kindly leave your suggestions and comments below if this guide has been helpful. We’d like to hear from you.

Printer is Greyed Out? How to Fix it in 7 Steps

Are Windows 11 printers greyed out on your computer? Since you want to overcome this situation, this article will help with the most effective solutions.

This OS comes with excellent compatibility with modern devices, particularly printers. Windows 11 users may encounter many types of printer problems.

However, you may notice that you are not being able to print anything suddenly. This is one of the most common issues.

While investigating, you may end up finding that the printer you are going to use is greyed out or offline. Even though this is not a new problem, many Windows 11 users have been encountering it and are unable to fix this issue.

Why are all my printers greyed out in Windows 11?

Your printers may be greyed out on Windows 11 or 10 for the following reasons:

  • The printer device was disabled
  • Connection problem
  • Incompatible printer driver
  • Physical fault

Else, any external or internal issues also cause this problem.

Why is add printer greyed out?

Usually, the Add printer button should be available at all times. But, if any modification by the computer administrator happens, that may prevent you from adding printers.

Another thing is if any relevant service related to the printers is disabled, you may find that the Add printer button is not clickable. Else, corrupted system files can be another reason for this issue.

How do I fix my printer that is greyed out?

1. Check both physical and wireless connection

If it’s connected using a wire with your PC, you should make sure the printer is turned on and is connected to the correct port. If necessary, you should try another USB port to make sure everything is in the right state.

For the wireless printer, make sure both your PC and the printer are connected to the same local network.

2. Make sure the printer has been shared correctly

  1. Press Win + I on the keyboard to open Windows Settings.
  2. Click on Bluetooth & devices and then on Printers & scanners.going printers and scanners windows 11 settings
  3. Go to the printer you want to share.clicking on HP printer Windows 11 settings
  4. Click on Printer properties.going printer properties
  5. Go to Sharing tab.
  6. Click on Change Sharing Options.
  7. Tick Share this printer.
    enabling share this printer windows 11

If it’s a printer shared from another computer, you must verify that it has been shared correctly. If there is a printer sharing problem on Windows 11/10, on another computer, the printer may appear as greyed out.

You should make sure that there are no such problems. Otherwise, no other solutions will fix the Windows 11 printer’s greyed out problem.

To make sure you have shared the printer correctly, do the following things from another PC where the printer is connected.

Now, if the problematic device is connected to the same local network, the offline or greyed-out issue should no longer appear.

If you face a problem while following the above steps, learn how to fix printer sharing not working issues on Windows 11.

3. Update the printer driver

  1. Open the Start Menu, type device manager, and hit Enter to open it.opening device manager windows 11
  2. Find the printer driver, right-click on it and choose Update driver device.updating printer windows device manager
  3. Follow onscreen instructions to complete the update.

Alternatively, you can use a tool that will scan your computer, find all outdated drivers and automatically update them. By using third-party software, you ensure that the installation will be safer and faster.

4. Enable offline printing

  1. Go to your preferred printer settings like before.
  2. Click on Open print queue.clicking open print queue
  3. Click on Printer from the menu and select Use printer offline.enabling use printer offline

Now, check and verify if it has solved your problem or not.

5. Make printer available for all time

  1. As shown in method 2, go to Printer Properties.
  2. Go to the Advanced tab.
  3. Check Always available.
    making printer always available windows
  4. Click on Apply and OK.

6. Re-install the printer

6.1 Uninstall printer software

  1. Open Windows Settings.
  2. Go to Apps and click on Apps & features.going apps & features Microsoft windows 11
  3. Search for the printer software.
  4. Click on the three vertical dots and choose Uninstall.uninstalling hp printer software windows 11

6.2 Uninstall printer driver

  1. Open the Device Manager like before.
  2. Find the HP printer, right-click on it and choose Uninstall device.uninstalling HP Printer driver windows
  3. Check Attempt to remove the driver for this device and click on Uninstall.

6.3 Delete the printer

  1. Go to Printers & scanners like before.
  2. Click on your preferred printer.
  3. Next, click on Remove.removing hp printer windows 11 settings
  4. Do this for any other printers one by one.
  5. Restart your computer.

6.4 Install again

  1. Download the official printer software from the printer manufacturer’s website.
  2. Install it on your computer.installing hp printer software

If you notice that the printer greyed out issue has appeared, update installing the new driver, you may consider using an old driver software and see if it helps.

7. Check for hardware fault

If you are unlucky, the problem may be related to the hardware. So, make sure the printer you are trying to use is in good condition and doesn’t have any physical damage.

If a physical problem exists, trying out the above solutions, including inserting printer cables in different ports, etc., will not help, and there will still be the greyed-out issue on Windows 11/10.

You can connect it to another PC and see if it works there or not. In this way, you can understand the actual issue. If you see the printer has physical damage, repair it or buy a new one.

Do all printers work with Windows 11?

Yes. All modern printers work with Windows 11 without any problem. However, if you have a very old printer that reached its end of the software support life cycle years ago, it may or may not work with this OS.

These are the most working ways to fix the Windows 11 printers greyed out problem. If you know any better method, feel free to let us know in the comment box.

3 Best Split Screen Chrome Extensions To Use In 2026

Today we’ll show you the best split-screen Chrome extensions and explain how they work and what you can expect from them.

What are the best split screen extensions for Chrome?

Dualless – Ideal choice

dualless logo

Dualless allows users to split the Chrome screen into two and offers a range of preset layout options to choose from.

You can split either horizontally or vertically.

⇒ Get Dualless

Split Screen for Google Chrome – Offers a range of layouts

Split Screen for Google Chrome lets you split the screen into up to 4 and offers a few presets, as you can see in the screenshot above.

It allows easy adjustment of layout ratios for dual-window setups, perfect for multitasking during presentations or screen sharing.

⇒ Get Split Screen for Google Chrome

Tile Tabs WE – For Chrome and Firefox

tile tabs chrome extension logo

The Tile Tabs Chrome extension will be a great addition if you prefer sorting tabs as separate tiles. 

You can also drag the border and resize the various tiles with ease.

⇒ Get Tile Tabs

    How to split screen on Chrome?

  1. 1. Launch your Chrome browser and type Chrome Web Store in the search field.

  2. 2. Access the Chrome Web Store and search for the Split Screen extension.

    chrome web store split screen
  3. 3. Select the extension named: Tab resize – split screen layouts.

    tab resize split screen download extension
  4. 4. Click on the Add to Chrome button.

    button add extension to chrome
  5. 5. Now, click on Add extension.

    adding extension popup confirmation box
  6. 6. Press on the extension button, choose your desired format, and split your screen.

    tab resize chrome confirm selection

Using the Tab Resize – split screen layouts extension is the recommended way of splitting your PC’s screen. As its own description says, this extension really is Split Screen made easy. You can use it for both resizing a tab or splitting the screen, as the extension can do both things.

When you find it on the Chrome Store, you will also see that it has multiple monitor support, in case that is something you were also looking for.

This is all you need to know to split your screen in Chrome. Now you can view and access multiple pages simultaneously.

Was this article helpful to you? Share your experience with us in the comments section below.

Screen Goes Black in No Man’s Sky: 5 Quick Ways To Fix It

No Man’s Sky screen goes black problem is a very common one among some gamers. This article will describe the steps to fix it.

It doesn’t matter what type of game you prefer; No Man’s Sky is a very appealing choice for any type of gamer. In recent years, it has gained enormous popularity among the community.

Problems related to this game also have been popular. The black screen issue is indeed the most common one.

Sometimes, you may notice that No Man’s Sky is stuck on a black screen during gameplay or startup. The problem may come suddenly without showing you any symptoms. The good news is there are solutions.

 Why has my No Man’s Sky screen gone black?

This problem may appear due to some specific reasons. These are:

  • Graphics card problems
  • GPU driver issues
  • Incorrect graphics settings
  • Third-party software
  • Incompatible version of OS

The problem may come in different ways. For example, No Man’s Sky may show you a black screen randomly, but with the sound of the game. Sometimes, you may encounter this before the game is fully launched. Sometimes, the whole screen may get stuck and becomes unresponsive.

No matter what, the reasons are very specific. So, fixing this problem is also not a very big deal.

How do I fix a black screen in No Man’s Sky?

1. Update graphics card

  1. Open the Start Menu, type device manager, and hit Enter to open it.
    opening device manager windows 11
  2. Find the graphics card driver, right-click on it and choose Update driver.
    clicking update driver on graphics card on windows device manager
  3. Click on Search automatically for drivers.
  4. Go ahead and finish the update process.

Graphics cards are more pretentious when it comes to their drivers and windows might not find their latest driver for some reason. That’s why we recommend trying a specialized tool to search and update all drivers automatically.

2. Disable HDR

  1. Press Win + I to open Windows Settings.
  2. Go to System and click on Display.
    going display settings windows 11 settings
  3. Click on HDR.
    going hdr settings windows 11
  4. Disable Auto HDR.

For some users, the No Man’s Sky black screen error may occur only when HDR is enabled. Doing the above steps will work for them.

3. Tweak in-game graphics and video settings

If you go to Video Settings as well as Graphics Settings of this game, you will get plenty of options. You must tweak them to improve performance and verify if it helps to get rid of the No Man’s Sky black screen problem or not.

Usually, on video settings, disabling V-Sync, Vignette & Scanlines may help. Else, you can tweak some graphics settings too. In some forums, we have seen some users were able to fix this problem by disabling full screen or tweaking the relevant settings.

So, we also suggest you do the similar.

If the black screen is gone but your gamepad still won’t respond, use our step-by-step guide on No Man’s Sky controller not working to restore input.

You can also face detection issues, and if that happens, you can follow this detailed guide on No Man’s Sky not detecting controller to restore full input functionality.

4. Uninstall GPU tweaker tools

  1. Go to Windows Settings like before.
  2. Go to Apps and click on Apps & features.
    going apps & features Microsoft windows 11
  3. Search for the graphics tweaking software.
  4. Click on the three vertical dots and choose Uninstall.
    uninstalling graphics tweaker software windows 11

Software like RivaTuner, MSI Afterburner, ASUS GPU Tweaker, and any tools that can overclock a GPU should not be used unless it is very necessary. Removing them may help to fix the No Man’s Sky screen going black issues.

5. Update the Windows version

  1. Open Windows Settings.
  2. Go to Windows Update and click on Check for updates.
    check for updates windows 11 settings
  3. Install any available ones.

Keep in mind that if you use a very old version of Windows 10 or 11, you should update it to the latest version. Otherwise, no other solutions may work to solve the black screen issue with No Man’s Sky.

How do I prevent my screen from going black?

The process is straightforward. You can always keep your GPU driver and Windows up to date. Stop unnecessary background processes. Also, consider uninstalling any GPU tweaker software or keeping them with default settings.

Another thing is if you use the genuine version of the game, you are less likely to encounter a problem. So, this is another way to prevent the black screen from coming back.

This article has explained the ways to fix the No Man’s Sky screen goes black problem. If you know of any other better solutions, feel free to let us know in the comments box.

If the game still will not start after these fixes, see our complete guide to No Man’s Sky not launching for additional startup solutions.

4 Ways to Fix Ventoy if It’s Not Working [Booting Issues]

Ventoy is open-source software that allows users to create ISO, WIM, IMG, VHS(x), and EFI files onto a bootable USB drive.

However, users have reported issues with Ventoy not working properly and encountering booting issues. Follow the guide below to quickly find a solution.

Why is Ventoy not working?

Users may run into issues with Ventoy not working because of corrupt ISO files, which will create problems when booting an image file. If your PC is unable to process Ventoy as bootable media, then you may need to disable secure boot. Keep reading to find out how to do this.

Ventoy not working.

Can Windows 10/11 boot to Ventoy?

Ventoy does support Windows 10 and 11 and users can bypass the Windows 11 hardware check when installing. However, Ventoy can be affected by anti-virus software and protection programs. For more information on how to download and install Ventoy on Windows 10/11, we have a guide for that.

Does Ventoy work with UEFI?

Yes, Ventoy does work within UEFI mode and offers a default secure boot feature. Ventoy also supports BIOS Legacy. However, some ISO files don’t support UEFI mode so booting those files in UEFI will not work.

How do I fix Ventoy when it’s not working?

1. Update Ventoy

Users can update Ventoy by installing the latest version or using VentoyU, a Ventoy updater utility. VentoyU allows users to update and install ISO files on the USB drive.

update ventoy if not working.

Keeping Ventoy and ISO files updated can help avoid any future booting issues with Ventoy. Try updating it and see if that fixes the issue.

2. Remove Ventoy secure boot key

  1. Download ventoy-delete-key-1.0.iso and copy it to the Ventoy USB drive.
  2. Reboot your computer and select ventoy-delete-key-1.0-iso. Select ventoy-delete-key
  3. After the reboot, select Delete MOK and click Continue. Delete MOK.
  4. When it asks Delete the key(s), select Yes. Delete the key if ventoy not working.
  5. In the Password popup, enter 123 then hit Enter.
  6. Select Reboot.

By default, secure boot is enabled since version 1.0.76. While Ventoy is designed to boot in with secure boot enabled, if your computer does not support the secure boot feature, then an error will result. Delete the Ventoy secure boot key to fix this issue.

3. Test USB stick

  1. Plug in your USB and open File Explorer then right-click on the drive and select Properties.
  2. Under the Tools tab, click on Check. Check USB stick if ventoy not working.
  3. Click Scan and repair drive. Scan USB drive if ventoy not working.
  4. Allow the USB drive to be repaired.

If you have a faulty USB stick, then you’re likely to encounter booting issues. Perform a scan to check if there are any existing errors on the USB. You can repair the drive or replace it. There are also third-party tools that can be used to check faulty or fake USB sticks.

4. Bypass Legacy BIOS Range Limitation

  1. Open the Ventoy installer and click on Option.
  2. Select Partition Configuration (-r option on Linux). partition configuration.
  3. Check the box next to Preserve some space at the bottom of the disk and enter the amount of GB, then click OK. Preserve space if ventoy not working.

This solution is only for Legacy BIOS, not UEFI. Some Legacy BIOS has an access limitation and won’t read a disk that exceeds the limitation.

What file formats does Ventoy support?

Ventoy supports ISO, WIM, IMG, VHD(x), EFI files using an exFAT filesystem. This filesystem offers better compatibility with Window OS, macOS, and Linux.

Hopefully, one of the above solutions help you fix Ventoy if it’s not working, or you’re experiencing booting issues. Let us know in the comments which solution worked for you.

How to Repair Corrupted CBS.log in 5 Simple Steps

Corrupt files should be fixed ASAP, and in this guide we’ll show you how to repair the CBS.log file in just a few simple steps. This file is important, as it stores information about changes made during updates and SFC scans.

So don’t overlook it because it’s essential for troubleshooting. Just follow the steps below to address CBS.log corruption.

How do I fix a corrupt CBS log file?

1. Scan for malware

  1. Press Windows then enter Windows Security in the search bar and click on the relevant search result.
  2. Choose Virus & threat protection.Virus & threat protection
  3. Click on Scan options.scan options to fix fix corrupt cbs.log
  4. Select Windows Defender Offline Scan, and then click on Scan now.Microsoft Defender Offline Scan
  5. Make sure to save everything you’re doing, as this mode will restart the PC.

When the CBS.log file is corrupted, we strongly encourage you to scan for malware. This might be a false positive or the result of a system infected by malware. So run a scan and remove any identified threats.

We use Windows security, but any reliable third-party antivirus should do. Before you start repairs, get a quick primer on what a CBS log file is so you understand what it records during updates and SFC scans and why corruption appears.

2. Use a reliable PC repair tool

You can install third-party software designed to fix corrupted system files without harming your user data. These tools can perform a complex scan and detect every damaged Windows file, malware, or compromised settings.

They will repair every corrupted file and restore the registry values to their default version within seconds.
Reboot your computer after using the program to complete the OS recovery process.

3. Run DISM

  1. Press Windows then type cmd and open the Command Prompt result as an administrator.cmd-run-admin 0x80070002 windows update
  2. Click Yes in the UAC prompt.yes
  3. Type the following command and press Enter:sfc /scannowsfc scan to fix fix corrupt cbs.log
  4. Similarly, paste the following commands individually and press Enter after each:dism /online /cleanup-image /checkhealth dism /online /cleanup-image /restorehealth
  5. Reboot your PC when everything ends.

If your PC is malware-free, but you’re still stuck with the same error, we suggest running DISM alongside the System File Checker (SFC) utility.

The Deployment Image Servicing and Management (DISM) tool should fix all system corruption with ease. Once done, verify if this works as a fix for the corrupt CBS.log error.

4. Check for issues with the disk

  1. Press Windows + E to open the File Explorer, select This PC from the left, right-click on the C: drive, and select Properties from the context menu.Properties
  2. Navigate to the Tools tab.tools
  3. Click the Check button under Error checking.check to fix corrupt cbs.log

A corrupt CBS.log file could also result from issues with the hard disk, and to fix things, scan it using the built-in Check Disk tool.

5. Reset your PC to factory settings

  1. Press Windows + I to open the Settings app and choose Update & Security.Update & Security
  2. Select Recovery from the left pane, and click on Get started under the Reset this PC option.scan

If you still find the corrupt CBS.log file, resetting Windows should fix things. This should eliminate the error for all users. This operation will relieve you of all installed applications, but the personal files won’t be affected.

Another thing you can try is reverting to a previous restore point when the CBS.log file was not corrupt.

Is it OK to delete CBS logs?

It is imperative that you have the CBS.log file on your computer because each time you install a new Windows Update, it writes to the CBS.log file.

On the other hand, if you believe that it is eating up a significant portion of the space on your hard drive, you are free to remove it because doing so will not have any negative impact on your computer.

Before you proceed, make sure that you have disabled the Windows Update service from the Services menu (that you can launch from the Start Menu). At this point, you may remove the CBS.log file, and you won’t see any problem messages after doing so.

For more solutions, you can find out how to fix corrupted files in Windows 10/11 by following the article linked.

Don’t forget to tell us whether these helped you or not in the comments section below.

7 Fixes: Kernel Auto Boost Lock Acquisition with Raised Irql

Many Windows users have already switched to Windows 10, and although most of them are pleased with it, some are experiencing errors. One of them is the BSOD Kernel Auto Boost Invalid Lock Release.

There are two possible causes for this error, one is your Bluetooth device and the other is your wireless adapter, so let’s see if we can fix this problem.

What does Kernel Auto Boost Lock Acquisition with Raised Irql mean?

If you get the Kernel Auto Boost Lock Acquisition With Raised Irql BSoD, it means that either your Bluetooth device or your wireless adapter had a problem.

It has come to our attention that some users have been successful in avoiding the starting error by turning off the Bluetooth feature of the Bluetooth device.

Users who were experiencing the same issue have reported success in resolving the BSoD crash by removing the driver for the external hard drive and then unplugging it from the PC.

Follow along as we will be walking you through the most efficient and effective solutions that you can implement to fix the Kernel Auto Boost Lock Acquisition with Raised IRQL Windows Server 2016 error. Keep on reading!

How can I fix the Kernel Auto Boost Lock Acquisition error?

1. Disable your wireless adapter

  1. Go to Device Manager. You can do so by right-clicking on the Start icon and choosing Device Manager from the menu.device-manager-w10 amd driver install problems
  2. In Device Manager expand the Network adapters section then right-click the wireless adapter and select Disable device.disable-device  kernel auto boost lock acquisition with raised irql

If this works for you, you might have to use the Ethernet connection instead of wireless.

In addition, you might want to remove your wireless adapter if you know how to do it and if your computer isn’t under warranty, or temporarily use a different wireless adapter.

This isn’t necessary, disabling the adapter should do the trick. As far as we know Atheros AR928X Wireless network adaptor is causing the issues, but other models might have an issue as well.

Some users also advise uninstalling your Wireless adapter drivers and allowing Windows 10 to find them on its own. To uninstall drivers select Uninstall device instead of Disable device.

Check Delete the driver software for this device and click OK. After you restart your computer Windows 10 should install the default drivers on its own. The Kernel Auto Boost Lock Acquisition with Raised IRQL server 2016 error will be solved afterward.

2. Use a system repair software

Since repairing system files is a delicate process, it is never a bad idea to employ the help of dedicated repair tools. Professional software can scan for, identify, and replace any broken files with fresh and genuine files from its database.

3. Disconnect your Bluetooth devices

Before turning on your computer make sure that you disconnect all Bluetooth devices from your computer.

If the problem still persists, you can try uninstalling and disabling the Bluetooth driver in a similar way as we mentioned in the previous solution.

Speaking of Bluetooth drivers, if you have any problems check our complete guide on how to fix Bluetooth issues in Windows 10. The Kernel Auto Boost Invalid Lock Release issue will not bother you afterward anymore.

4. Remove NDAS device from your system

According to users, Ximeta won’t develop new drivers so your best solution is to remove NDAS device from your system. After doing that the BSOD error should go away.

As you can see, this issue is annoying but we expect Microsoft to fix it with the latest Windows 10 patch, so make sure that you keep your Windows 10 up to date with the latest patches.

5. Check your disk for errors

  1. Press Windows then type cmd and select the Run as administrator option.cmd-run-admin 0x80070002 windows update
  2. Type the following command then hit Enter. Replace C with the letter of your hard drive partition. As you can see in the screenshot below, we replaced C with D: chkdsk C: /fchdsk-D kernel auto boost lock acquisition with raised irql
  3. Keep in mind that if you do not use the /f parameter, chkdsk displays a message that files need to be fixed, but it does not fix any errors. The Kernel Auto Boost Invalid Lock Release issue will be fixed.

The quickest way to check your disk for errors on Windows 10 is by using Command Prompt. The chkdsk D: /f command detects and repairs logical issues affecting your drive.

6. Update the BIOS

Some users confirmed that they fixed this ugly BSOD error by updating their BIOS. This is a powerful solution that can fix compatibility issues, boost your system’s performance, and more.

However, it can also make your computer completely unusable if you do it the wrong way, so proceed carefully.

If you don’t feel conformable doing this, it’s best to simply go to the next solution or ask for a specialist’s help.

For more information on how to update your BIOS check out our dedicated step-by-step guide.

7. Disconnect your external hard drive

If you use an external hard drive, try disconnecting it from your computer as this simple action may fix the problem for you.

External devices can often cause several issues, including BSoD errors, due to corruption or incompatibility with your system. You can try to connect it to another PC and check if the error persists.

If yes, copy the content you need and format the external hard drive. You can also try to go to a computer service with your HDD if the errors persist.

How can I fix Kernel Auto Boost Invalid Lock Release on Windows 11?

  1. Press Windows + I then go to Windows Update.windows-update kernel auto boost lock acquisition with raised irql
  2. Here, click the Check for updates button in order to bring your OS up-to-date.check-updates-w11 kernel auto boost lock acquisition with raised irql

For more potential solutions, check out our post on what to do if you get a BSoD in Windows 11.

That would be all if you have any questions or comments, or you maybe have some other solution for this problem, just reach for the comment section below.

If you still need help concerning a particular BSOD issue, tell us more about the problem that you’re experiencing and we’ll try to find a solution as soon as possible.

War Thunder Crashing: Helpful Tips to Fix it Quickly

Certain games have issues with modern operating systems, such as Windows 10. For example, if you’re a fan of aerial warfare, you are probably familiar with a game called War Thunder.

Some fans of this game have problems like the War Thunder video driver hanging and restarting on Windows 10, among others. So, without further delay, let’s see how to fix some well-known issues with the game.

War Thunder is a rather popular multiplayer game with specific issues. Speaking of War Thunder and its issues, many users reported the following problems:

  • War Thunder, no sound: If you have no sound while playing War Thunder, check if your game is up to date. In a worst-case scenario, you might have to reinstall the game to fix the issue.
  • War Thunder crashes: If the game frequently crashes on your PC, you might be able to fix the problem simply by changing the graphics quality or changing the render options.
  • War Thunder crash on startup: Several users reported that War Thunder crashes on their PCs right on startup. If this happens, be sure to check the integrity of the game cache.
  • War Thunder crashes when connecting to the server: This is another common problem with War Thunder. Again, your firewall or antivirus can cause this issue, so be sure that War Thunder isn’t on the block list.
  • War Thunder is freezing: The problem might be your resolution if the game frequently freezes on your PC. However, you should be able to fix this issue using one solution.
  • War Thunder FPS drop, lag: FPS drops and lag can be a big problem in a multiplayer game. However, you should be able to fix the issue by changing the game’s configuration file.
  • War Thunder black screen: This is another frequent problem with War Thunder. If you’re having this issue, try running the game in Windowed mode and check if that helps.

Why is War Thunder so glitchy?

One of the reasons War Thunder can be glitchy is outdated drivers. The game will not run smoothly if your graphic driver is obsolete or broken.

Also, a weak network connection can cause problems on War Thunder. So, ensure your internet speed is excellent and stable.

Why does War Thunder keep crashing?

While there can be numerous explanations, War Thunder problems are frequently triggered by the following scenarios:

  • Malware or virus infection
  • Incompatible, missing, outdated, or otherwise compromised graphics card drivers
  • Low or full memory
  • Missing game updates (that can translate to missing or corrupted game files)
  • Hardware failure
  • Excessive visual settings setup (HD res, incompatible graphical settings, and so on)

How do I fix War Thunder problems on Windows 10?

Fix War Thunder: no sound problems

1. Update your drivers

  1. Press the Windows key + S  and type Device Manager.
  2. Select Device Manager.
  3. Click on the Sound, video, and game controllers option.
    sound adapter war thunder problems
  4. Right-click on it and select Update driver.
    update driver
  5. Select Search automatically for drivers.
    search auto
  6. Wait for the search to complete and install the available updates.
  7. Repeat for all the drivers you’d like to update.

With these simple steps, you can fix many War Thunder problems. These steps can also be used to update your graphics driver manually to solve fps and display issues on your game.

However it is worth noting that updating your drivers with the Device Manager is a tedious task, and the system’s database is not always up to date with the latest compatible versions.

Fix War Thunder connection issues

2. Disable Antivirus or Firewall

Sometimes, War Thunder network connection problems can be caused by your antivirus software or firewall.

To solve this issue, ensure your antivirus software or firewall isn’t blocking War Thunder.

If your security software doesn’t block the game, you might temporarily have to disable your antivirus or firewall while playing War Thunder.

In addition, make sure that no unnecessary applications are running in the background.

Sometimes to fix this problem, you need to uninstall your antivirus. If removing your antivirus solves the problem, you might consider switching to a different antivirus solution.

Currently, many excellent antivirus software like ESET NOD 32 are on the market. So, we strongly suggest switching to this gem of software, as it protects you online and offline without causing additional problems.

Fix War Thunder crashes

3. Change the render option to OpenGL

Users have reported frequent crashes while launching War Thunder. A common error is a mismatch between the game version and server one. According to them, the collision occurs just a few seconds after they log in. Unfortunately, this makes the game unplayable, but there’s a fix available.

It has been reported that changing the render option from Auto to OpenGL fixes War Thunder crashes on Windows 10. At the same time, some users say that using OpenGL gives them better performance.

If you are experiencing any crashes, set render mode to OpenGL from the launcher options.

4. Start the game directly

A simple workaround for War Thunder crashes to launch the game directly from its installation folder. To do so, navigate to the game’s installation directory and run aces.exe.

As you can see, this is a relatively simple solution, but it might work for you, so feel free to try it out.

5. Delete cache and compiledShaders folders

  1. Go to Steam’s installation directory.
  2. Navigate to steamapps > common > warthunder folder.
  3. Once you’ve opened the Warthunder folder, delete cache and compiledShaders.
  4. Start Steam.
  5. When Steam opens, navigate to your Library.
  6. Find War Thunder and right-click it.
  7. Choose Properties from the menu.
  8. When the Properties window opens, go to the Local files tab.
  9. Click the Verify the integrity of game cache button.
  10. Be patient and wait for the process to complete.

If you’re experiencing War Thunder crashes and using the Steam version of the game, you might want to try verifying the integrity of your game’s files.

6. Set render to DirectX 9 and turn on Vsync

Users have reported War Thunder crash problems when launching the game, and render options seem to cause these crashes.

If War Thunder is crashing on your Windows 10 computer, you might want to set render to DirectX 9 from the launch options.

Users have also reported that turning on Vsync fixes issues with crashing.

7. Remove DisplayLink driver

If that’s the case, you should remove the DisplayLink driver from your computer by following these steps:

  1. Open the Settings app.
  2. Go to System and then navigate to the Apps section.
    War Thunder crash on startup
  3. Locate DisplayLink software on the list and click Uninstall.
    War Thunder crashes when connecting to server

It has been reported that the DisplayLink driver can sometimes cause War Thunder crashes on Windows 10.

Remember that sometimes you might have to remove all files associated with DisplayLink software to fix this problem.

Before using any third-party driver uninstaller application that removes leftovers, make a System Restore Point and image backup your hard disk with Windows before attempting to delete DisplayLink drivers since eliminating it may cause other problems.

This can be a complicated process if you’re doing it manually. But there’s a simple way to uninstall an application using third-party apps such as CCleaner.

8. Switch to Windowed mode

  1. Launch War Thunder through Steam.
  2. The game’s launcher will open up.
  3. Click the cog icon on the top right side.
  4. You’ll see an option saying Fullscreen, which you’ll need to change to Windowed.

If you’re experiencing War Thunder crash problems, it’s advised that you switch between loading modes from fullscreen to windowed mode. Then, just be sure to set the game’s resolution so it matches your desktop resolution.

Fix War Thunder freeze

9. Change game resolution

Your graphical settings can cause War Thunder freeze problems, so you’re advised to lower them. If you’re using HD resolution, we recommend you switch to a lower resolution and run the game in windowed mode.

10. Run the game in Compatibility mode

  1. Go to the game’s installation directory.
  2. Locate aces.exe and right-click it.
  3. Choose Properties from the menu.
    War Thunder black screen
  4. Navigate to the Compatibility tab.
  5. Check Run this program in compatibility mode and choose one of the older versions of Windows.
  6. Some users suggest Windows XP Service Pack 2, but you can also experiment with other versions.
    War Thunder FPS lag
  7. Click Apply and OK to save changes.

If you’re experiencing War Thunder freezes on your computer, you might want to try starting the game in Compatibility Mode.

11. Perform a file check

Some users suggest performing a full file check to fix War Thunder freeze problems. To do that, you need to press the gear button next to graphic settings and click the Check files button.

This process might take a while, so we encourage you to be patient.

Fix War Thunder fps drop

12. Edit config.blk file

  1. Go to the game’s installation directory. It should be in the path below by default: C: Program Files SteamsteamappscommonWar Thunder
  2. Locate the config.blk file and open it with Notepad.
  3. Locate the following lines and change them to: renderer2:t="dx11" disableFlipEx:b=no driver:t="dx11" d3d9ex:b=no
  4. Save changes and right-click config.blk, then Choose Properties.
  5. Go to the General tab and make sure to check the Read-only option.
  6. Click Apply and OK to save changes.
  7. Start the game. If you get a notification saying that you can’t save settings, click Yes.

If you’re getting low performance and fps drop problems in War Thunder, you might want to change a few of the game’s hidden settings.

Users have reported that this solution fixes War Thunder fps drop and performance issues, but there’s also one downside.

With this solution, you won’t be able to change your settings; instead, you’ll have to adjust them manually from config.blk file.

13. Use Command Prompt

  1. Make sure that your game is closed.
  2. Press Windows key + X and choose Command Prompt (Admin) from the menu.
    War Thunder freezing
  3. When Command Prompt opens, enter the command below and press Enter: bcdedit /deletevalue useplatformclock
    War Thunder FPS drop
  4. Restart your computer and try rerunning the game.

Fps drop problems can make War Thunder almost unplayable. To fix this problem quickly, you can use the command prompt, as shown above.

14. Set your power plan to High Performance

  1. Press Windows key + S and type power.
  2. Select Choose a power plan from the menu.
    War Thunder no sound
  3. When the Power Options window opens, make sure that you select High performance from the list of results.
    War Thunder crashes

If you’re playing War Thunder on a laptop, you might have noticed fps drop problems when your charger isn’t connected.

This is perfectly normal. However, you’ll have to change your power plan to play the game without fps drop.

We have to point out that setting your power plan to High performance will drain your laptop battery faster. So, keep that in mind.

Fix War Thunder black screen issues

15. Turn on Vysnc and use DirectX 9 render

If you’re having black screen issues with War Thunder, it’s advised that you turn on Vsync and use DirectX 9 render. Users also reported a black screen while using OBS (Open Broadcaster Software).

If you’re experiencing black screen problems, you might want to try running the game in windowed mode since your current resolution scaling might interfere with the game.

This is usually easy to solve, as it can be a game glitch. Therefore, you should also restart the game if this happens.

Why is my War Thunder FPS so low?

If you are experiencing low FPS on War Thunder, it might be because of an outdated or faulty graphics driver. As shown earlier, you can fix this quickly by updating your drivers manually or automatically.

Also, the problem can be down to your power plan. We have shown how to adjust the settings in this guide.

These are some common War Thunder problems that users have reported. We believe you should be able to fix these issues with the solutions provided in this guide.

If you need a list of VPNs to fix War Thunder high ping and ping spike issues, check our detailed guide for the best options.

Feel free to let us know your problem and the solution that helped you fix it in the comments below.

FTDI Driver for Windows 10 & 11: How to Download & Install

Many of us have that old computer that we just can’t let go of because it has some important files on it. It’s possible to save those old files and bring them into the modern day, but sometimes it’s tricky if it uses an old RS-232 connector.

Fortunately, there are options out there and one of those is the company known as FTDI. This company provides the hardware and, for the purposes of this guide, the software required to save those old devices.

How do I download & install FTDI drivers on Windows?

1. Update via Device Manager

  1. The first thing that you should do is the tried and true method of updating drivers via the Device Manager.
  2. On Windows 10, click the search bar and type in Device Manager. Click the first entry you see.
  3. Click Ports in the Device Manager.
  4. You can also click Universal Serial Bus controllers at the bottom of the window if you connected your FTDI device to the USB port.
  5. Either way, right-click the device and select Update driver.
  6. Click Search automatically for drivers in the new window that appears.
  7. Your computer will automatically update the FTDI drivers.

On Windows 11, the process is similar:

  1. Bring up the Device Manager on Windows 11.
  2. Click the location where the FTDI drivers can be found.
  3. Right-click the device and select Update Drivers.
  4. Like before, your computer will automatically download and install the FTDI drivers. If they’ve already been downloaded, you will get a window that informs you of this.

2. Update via the manufacture’s official website

Note icon NOTE
The process to download FTDI drivers manually is the same for Windows 10 and Windows 11.
  1. Start by going to the FTDI driver download center.
  2. Click the link shown in the image to download the FTDI driver installer for Windows.
  3. This file that you will be downloading is a package that contains all of the drivers for FTDI VCP and D2XX drivers. If you don’t want to download drivers file by file, this method is highly recommended, especially if you have multiple FTDI devices.
  4. Go to the downloaded file’s location and double-click it to begin the installation.
  5. Click Extract in the installation wizard.
  6. Click Next on the installation wizard.
  7. Follow the instructions on the installation wizard and click Finish.

Having trouble with the D2XX runtime? See our guide to fix FTD2XX.DLL errors on Windows for quick steps.

3. Update automatically with a specialized tool

Sometimes, the most reliable option to download and update FTDI drivers, it’s to use specialized software that scans, finds, and brings up-to-date any outdated drivers on your device. We prefer this solution since it’s safer and faster than manually installing drivers.

What is an FTDI driver?

FTDI stands for Future Technology Device International Limited and is a Scottish semiconductor device company that specializes in USB technology. It develops and creates devices and cables that convert old communication standards, like RS-232, into more modern USB signals.

The company provides a lot of legacy support for modern computers so that the machines of the past don’t lose their files. In order to have that support, you’ll need to download a driver from FTDI’s database.

FAQ

What is the FTDI driver used for?

The FTDI driver allows your computer to communicate with USB-to-serial converter devices. It’s often used for programming cables, embedded systems, and other hardware interfaces.

How do I install the FTDI driver on Windows?

You can install the FTDI driver by downloading it from the official FTDI website and running the setup file. Windows Update may also install it automatically once the device is connected.

Why is my FTDI device not detected?

If your FTDI device isn’t detected, the issue could be an outdated driver or wrong COM port configuration. Reinstall the driver, try a different USB port, or check Device Manager for hardware conflicts.

Can I use FTDI drivers on Windows 11?

Yes, FTDI drivers are compatible with Windows 11. Always download the latest version from the FTDI website to ensure stability and avoid unsigned driver errors.

How do I use FTDI drivers on Windows 10/11?

Once you download the FTDI drivers, you don’t have to do anything. The purpose of these drivers is to ensure that your FTDI device works properly. In this case, then you don’t have to do anything else.

If there are problems with the device, we recommend uninstalling the driver and reinstalling it. That, and reboot your computer.

Feel free to leave a comment below if you have any questions regarding the above process. Also, do not hesitate to comment about guides you’d like to see or information on other web browsers.

8 Ways to Stop Your Mouse from Auto Scrolling in Windows 11

Over the years, Windows has gone through several upgrades and improvements. Microsoft makes it easier for people to interact with their computers without stress because of their advanced implementations in recent Windows devices.

However, implementing these features can cause some issues with computer productivity. Furthermore, Windows 11’s mouse auto-scrolling is one of the issues users complain of.

Mouse auto-scrolling in Windows 11 operates without the intervention of the user. However, seeing your computer do things you don’t permit it to do from the start can be annoying. Consequently, it can cause Windows 10/11 to scroll down automatically, and Windows automatically scroll to the top issues.

Many things can be responsible for this issue. However, the case may be different on various Windows computers. Some are connection issues with the mouse, update or driver issues and lots more.

Fortunately, this article will discuss the causes of the mouse auto-scrolling issue in Windows 11 and some fixes you can use to solve the problem.

Why is my mouse scrolling automatically?

  • Issues with the mouse connection: Many things can go wrong if there are difficulties with your computer and the mouse, irrespective of the connection mode. Some mice use wireless connections, while some are connected via USB cords. However, the connection can be faulty. So, it can affect how the mouse functions on the computer and can result in the mouse scrolling on its own Windows 11.
  • Battery problem in the wireless mouse: Wireless mice are prone to develop issues and malfunction when there is a problem with the battery. Sometimes, powering the mouse with a faulty battery can result in some parts of the mouse performing out of scope.
  • Low battery charge on the mouse: Users can encounter some difficulties with the mouse if it is not properly charged. Likewise, not charging a wireless mouse properly before using it can affect the battery life and cause damage earlier.
  • Outdated Windows: Most users ignore the number of difficulties outdated Windows can cause on their computers. It affects the way components of the computer work, and it can result in Windows 11 mouse auto-scrolling. Windows releases updates and patches to fix the bugs affecting the previous version on the computer. So, if the system is not up-to-date, it’ll lack essential updates.
  • Allowed auto scroll in Settings: Users may encounter the Windows 11’s mouse auto scrolling issue if some features are turned on in the device’s Settings. Features like scrolling inactive windows when I hover over them automatically allow the mouse to perform actions without your intervention.
  • Issues with the Mouse: There may be several issues with the mouse that the user is not paying attention to. However, when your mouse falls, it can damage its parts and cause some problems.

How do I stop my mouse from scrolling automatically?

1. Unplug and plug in the mouse

Unplugging the mouse from the USB port connected will help it refresh and rest. However, you can plug it back into a different USB port after some seconds. It should help fix any connection issues with the mouse.

2. Update the mouse drivers

  1. Firstly, open the Run command windows by pressing Windows + R simultaneously.
  2. Then, in the opened window type: devmgmt.msc and press OK.
  3. Now find Mice and other pointing devices, expand it, find your mouse, right-click on it and click Update driver.mouse driver
  4. Click on Search automatically for updated driver software and let Windows do the rest for you.mouse driver update

Otherwise, you can use specialized software which will save you time and will do the work on your behalf.

If you are facing problems with the mouse itself, and updating the driver seems impossible, we highly recommend checking also our guide on how to install mouse drivers without a mouse.

3. Disconnect the mouse and reconnect it (for wireless connection)

  1. Click start on your computer and select Settings from the drop-down.
  2. Select Devices and click on Bluetooth & other devices.
  3. Go to paired devices and click on the mouse name.
  4. Click on Forget device, then OK.
  5. Close the Settings windows.
  6. Repeat steps 1&2.
  7. Go to Bluetooth, and toggle it On.
  8. Then click the + button to add a device.
  9. Select Bluetooth on the Add a device window.
  10. Press and hold the pair button on the mouse.
  11. Select the mouse from the Discovered devices and click on connect.

Disconnecting the mouse will help fix wireless mouse connection issues.

4. Restart your computer

  1. Click on Start.
  2. Select Power and click on Restart.
  3. Click OK.

Restarting your computer will help fix issues that may prompt the mouse not to respond to clicks or the laptop to scroll down automatically.

5. Update Windows

  1. Click on Start.
  2. Select Settings from the options.
  3. Click on Windows Update, then select Check for updates.

Windows will automatically search and download updates if there are any available.

6. Change the mouse settings on your computer

  1. Click on start on your screen, and select Settings.
  2. Click on Bluetooth and Devices and select the mouse on the left side of the screen.
  3. Turn Off the Scroll inactive windows when I hover over them.

Restart your computer and see if the Windows 11 mouse auto-scrolling issue persists.

7. Switch to another mouse

Switching to another mouse can help you discover exactly where the problem is coming from. Get a perfectly working mouse and connect it to your computer (wirelessly or plugged).

If the laptop scrolling down/up automatically issue does not persist, then you should change your mouse. Likewise, if the issue persists, the problem is coming from your computer.

8. Uninstall recent updates

  1. Click on Start on your screen, select Settings, or press Windows + I.
  2. Click on Windows Update and select Update history.
  3. Go to Related settings and select Uninstall updates.
  4. Right-click on the update and select Uninstall.

How do I open mouse properties in Windows 11?

  1. Press Windows + I to open Settings.
  2. Click on Devices.
  3. Select Mouse from the left pane.
  4. Click on Additional mouse settings.

Or

  1. Press Windows + R keys to prompt the Run window.
  2. Type main.cpl in the search box and press Enter.

It will open Properties.

However, you can read about other difficulties people have encountered with their mice and the guides to solve them here. Mouse keeps clicking on Windows 10/11 – that’s one of the concerns users complain about, and our article should help out.

Also, you can check out this article to efficiently fix the lagging mouse in Windows 10/11.

If you have further questions and suggestions, leave them in the comments section. We’d love to hear from you.

Brother Scanner is Not Working in Windows 11: 5 Ways to Fix It

Brother scanner has become an industry household name in the market. They produce quality scanners that offer seamless quality. However, many users have complained about the Brother scanner not working on Windows 11.

This might seem puzzling, but the scanners are encountering difficulties with the latest Windows OS.

Since most users do not understand the causes of this error, this article will address that. We will provide a detailed guide on why the Brother printer is not working in Windows 11 and how to fix it.

Why is my Brother scanner not working in Windows 11?

  • Missing/corrupt scanner drivers: The primary cause of this issue is traceable to outdated or missing scanner drivers. In general, unavailable drivers often adversely affect your device’s overall functionality. Whatever the reason is, if the scanner drivers are corrupt, it will lead to the Brother scanner not working correctly.
  • Connection issues: Any slight problems with the connection will adversely affect the Brother scanners. Ensure that the scanner and the device are on the same connection to get an optimal result when using a shared connection.
  • Outdated Windows: Outdated Windows is more harmful to the computer than anything else. This often leads to the malfunctioning of most devices and drivers. In this case, the Brother scanner is also among and can impact the performance. It usually affects the compatibility of the computer with other devices.
  • Third-party app influence: If the Firewall is on, there’s a high chance it could be responsible for Brother scanner issues on Windows 11. Also, the Firewall defender can cause this issue.

How do I get my Brother printer to scan to my computer in Windows 11?

1. Update Printer drivers

  1. Click on the Start button and select Device Manager.
  2. Expand the Print queue and select the driver you need to update.
  3. Right-click on it and choose Update driver.
  4. Choose Search automatically for drivers.

The Brother control center 4 Windows 11 should be accessible by updating the driver.

However, if you want to download updates for all the outdated drivers, you can use Outbyte Driver Updater. It will automatically download and update all Windows drivers rather than going through each process.

2. Update Windows

  1. Click on the Start button.
  2. Select Settings from the options.
  3. Click on Windows Update, then select Check for Updates.

Windows will automatically search and download updates if there are any available.

3. Check your connection

  1. Double-click on Brother iPrint&Scan.
  2. Click Select your Machine to search for it and reconnect.

If your machine is not found, make sure your computer is on the same network as yours and disconnect the Brother machine from the power outlet. Wait about 15 seconds, and then plug it back in.

4. Disable Windows Firewall Defender

  1. Click the Start button, search for Windows Defender Firewall, and launch it.
  2. Select Turn Windows Defender Firewall on or off.
  3. Check the two boxes to Turn off Windows Defender Firewall.
  4. Click OK to save changes.

Disabling the Firewall will fix the Brother scanner not working on Windows 11. But ensure to turn them back on after you are done to avoid leaving your PC unprotected.

5. Scan from another network-connected computer

Attempt to scan using another network-connected computer to see if this computer is the cause of the problem. Remember, the computer must be on the same network as the Brother scanner.

Why is my Brother scanner not detected?

Check if the cable between the scanner and your computer is firmly plugged in at both ends. If possible, try switching to a different cable to test for problems with the existing one. You can also switch to a different USB port on your computer to check if the issue is a faulty port.

If the Brother scanner is still not detected, you need to install the scanner driver as suggested in the final solution of the previous section.

How do I add a Brother printer to Windows 11?

  1. Connect the appropriate cable to the PC and the Printer ports.
  2. Press the Windows + I keys to launch the Settings app.
  3. Select Bluetooth & devices and click Printers & Scanners.
  4. Identify your Printer and connect it.

These are the best fixes for Windows 11 Brother scanner not working problem. Ensure to follow all the steps strictly to get optimal results.

However, if the Brother printer won’t scan on Windows 10/11, you can check out our guide to learn how to fix them.

Also, installing the Brother scanner driver can be pretty stressful. So, we have a step-by-step guide to walk you through it.

In conclusion, you can also check out our list of the best Brother printer scanner software for PC users.

Please leave your questions and suggestions in the comments section. We want feedback from you.

Windows 11 Network Profile Type Missing? Fix it in 5 Steps

Windows allows you to set different network profile types for your connection to the BSS (Basic Server Set). Generally, network profiles entail XML data fragments. However, users can encounter issues like missing profiles while changing the network profile type, particularly on Windows 11.

Hence, we’ll discuss the missing Windows 11 network profile type and the causes of this issue. Likewise, we’ll take you through how to fix Windows 10/11, which can’t change network to private or public, and other network profile type issues.

Why is my network profile type missing in Windows 11?

  • Outdated device drivers: Running outdated drivers on your computer can result in several difficulties, like missing the Windows 11 network profile type. It impedes the smooth performance of your computer. However, the system lacks the essential updates to help it run smoothly. Likewise, the Windows 11 network profile type missing issue indicates that some updates should be installed but are not available. Hence, the unavailability of these device drivers can lead to some computer components, like the network misbehaving.
  • Outdated Windows: Most users ignore the difficulties that outdated Windows can cause. Outdated Windows can result in the Windows cannot find the local profile issue. However, the computer lacks the necessary updates to run its components and fix bugs. So, it prompts errors like this.
  • Issues with the Network Adapter: Users may run into problems with the network connection on their PC if there are issues with the network adapter. The network adapter controls how your computer’s network connections are established and how they perform. Hence, the can’t see network profile on Windows 10/11 issue may occur if the network adapter isn’t functioning properly.

How do I change my network type to private in Windows 11?

Change the network type to private for Ethernet

  1. Click on Start on your screen and select Settings from the drop-down.
  2. Select Network and Internet.
  3. Click on Ethernet and go to the Network profile type tab.
  4. Click on the box for Private.

Change the network type to private for Wi-Fi

  1. Click on Start on your screen and select Settings.
  2. Select Network and Internet.
  3. Click on Wi-Fi, then Manage known networks.
  4. Choose the wireless connection and go to Network profile type.
  5. Click on the box for private.

You can change your network type from private to public or vice versa, depending on the environment setting for security purposes.

How do I fix the network profile type missing in Windows 11?

1. Restart your computer

  1. Click on Start.
  2. Select Power and click on Restart.
  3. Click OK.

Restarting your computer will help it fix boot errors that may prompt the issues.

2. Update device drivers

  1. Press Windows + R keys simultaneously to prompt Run.
  2. Type in devmgmt.msc and click Enter to prompt the Device Manager.
  3. Please select a device to update and right-click on it.
  4. Click on Update device and choose Search automatically for drivers.

Restart your device to sync the update correctly.

If you want to create a detailed report of all your current and obsolete devices, you can easily achieve this using Outbyte Driver Updater. We recommend this software because it will scan your PC for missing and out-of-date device drivers.

Outbyte Driver Updater

Use this efficient and friendly tool specially designed to keep your PC in pristine condition.

3. Update Windows

  1. Click on Start.
  2. Select Settings from the options.
  3. Click on Windows Update, then select Check for updates.

Windows will automatically search and download updates if there are any available.

4. Troubleshoot Network Adapter

  1. Press the Windows key, type in Troubleshoot settings, and launch it.
  2. Click on Additional troubleshooters and select the Network Adapter.
  3. Click on Run the troubleshooter.
  4. Select a network from the Select the network adapter to diagnose tab, then Next.
  5. Wait while it runs. Check the diagnosis and see if it identifies the problem.

However, the diagnosis will point you to where the issue comes from: peradventure, the Network adapter is faulty.

5. Restart the router/network

Re-establishing the network connection can help fix the missing Windows 11 network profile type. Hence, perform a power cycle on your router to help it achieve better.

How do I change network 2 to network 1 in Windows 11?

  1. Press the Windows + X keys to prompt the Quick Link menu.
  2. Select Network Connections from the menu.
  3. Press ALT on your keyboard and click Advanced.
  4. Select Advanced settings.
  5. Select the network connection you want to give priority to, then click the arrows to move it up.
  6. Click OK to save the changes.

However, your computer will follow the order when connecting to available networks.

Nonetheless, users can read our article about the technical fixes for Windows that doesn’t have a network profile for this device issue. Likewise, you can check for more information about how to change Windows 10 network settings to private.

Kindly leave your suggestions and questions below if this guide has been helpful to you. We’d like to hear feedback from you.

5 Most Common Cox Error Codes & How to Quickly Fix Them

Cox cable offers one of the most seamless services these days. However, one of the inevitable things with it is encountering the Cox error codes. It is all a matter of when and not if.

Often, the error codes appear at the worst possible times. Hence, most users are left frustrated when their favorite moments are cut short due to Cox cable problems.

Although, most of the errors can be fixed with minor tweaks to your Cox Contour DVR, Mini box, or the internet.

Also, the most recurring issues are usually related to internet outages, phone issues, and Wi-Fi issues.

Hence, this guide will identify the prominent Cox error codes, discuss them, and provide possible solutions to fix them.

Why am I getting an error on Cox?

  • Cable connection issues: This is one of the most prominent causes of the Cox error codes. Sometimes, it is inevitable to tamper with the connection settings of the cable. Maybe the cord is loose or removed accidentally, which will affect the performance of Cox. Hence, it could prompt an error code.
  • Wireless Router issues: Cox offers wireless unit routers to boost the performance of their gadgets. An issue with the router’s settings could distort the connection with other units. Since the network is essential for Cox to function, this will undoubtedly prompt error codes when you attempt to use Cox services.
  • Server issues: Sometimes, the cause of the error codes may then be due to a down server. Although this is quite rare, you cannot discard its possibility. Users must understand when a server issue affects all users by checking dedicated channels or with Support.
  • Mini box problems: This is a prominent cause of issues amongst Cox users. The problem here is often down to his configuration and connection of the cables. Once there’s an issue with that, the Cox Mini box will constantly prompt error codes.

Quick tip:

In this situation, a VPN software can be beneficial. Private Internet Access (PIA) has a Digital Privacy feature that can help you with unrestricted access to worldwide servers.

It lets you access a fuller, unconstrained internet to get content from anywhere in the world, free from censorship or geographic limitations. It also has a strict no-logs policy and a ton of customizable privacy features to protect all of your data.

Private Internet Access

Outstanding software that lets you access geo-locked content with a blazing-fast speed.
Check price Visit website

How do I fix the most common Cox errors?

1. Cox error code 107

The error code 107 means your account does not meet the minimum eligibility requirements to connect to the server. It also comes up when something on your account isn’t suitable for the TV. Also, it could be that your device is jailbroken.

To fix this, you need to call customer service and require help to bypass the jailbreak detection that causes the error code.

2. Cox error code 012

This error happens when there’s an issue with the Ethernet cable connection between the router and TV. Often, you will see a black, tiled, fuzzy, or blue screen.

Rebooting the cable box or tightening the cable connection will quickly fix this problem.

3. Cox error aaa-200

  1. Log in to your Cox account.
  2. Select My Profile and locate User accounts.
  3. Choose Manage Users.
  4. Select Secondary User and click Add User.
  5. Generate User ID & Password and fill in other credentials.
  6. Click Add Secondary User.

This Cox error code means there is a Panoramic Wi-Fi problem. The aaa-200 unexpected error usually occurs due to a breach per user account’s device limit.

The hotspot is limited to three devices per user. Hence, you need to add more users to the account to fix it.

4. Cox error app 1a09

Perform a long power cycle

  1. Power off the router and disconnect the cords.
  2. Unplug the modem and router from the power source for up to five minutes.
  3. Plug them back and restart.
  4. If there’s a reset button, press it before restarting your devices.

Contact Support

It is advisable to call in or reach out to the Support service for Cox to know if there are coverage problems. If that’s the case, your network issue is general. If there’s a temporary outage, they will give you a duration to fix it.

The error app 1a09 is one of the most popular errors on Cox. It pops up when there’s no network connection at all. It can also manifest itself as a Cox cable box error code on boot.

5. Cox error 15

Set the correct time and date

  1. Press the Windows+ R keys, input timedate.cpl, and click OK.
  2. Select the Internet Time tab and choose Change settings.
  3. Check the Synchronize with an internet time server, and change the server to time.windows.com.
  4. Select the Date and Time tab, and click Change time zone to ensure it is correct.

Contact Support to pre-authorize the device

If accessing Cox from blocked geolocation, this error might come up. Hence, you need permission before traveling so they will not bar your access.

Cox error 15 pops up when your request to the cox server is blocked. Often, this occurs when trying to access it from blocklisted geolocation. Also, if the request is considered malicious, access can be stopped.

How do I troubleshoot Cox cable?

  1. Power off the cable box and unplug it from the wall outlet.
  2. Leave it for 30 seconds to a minute.
  3. Plug them back and restart.

Is there a reset button on the Cox cable box?

No, you can only use the reset button on the Panoramic modem. The main Cox cable box does not have a reset button.

These are the most common error codes and their fixes on Cox cables. Always contact Support if there’s an issue, especially if the fix has failed.

For further reading on Cox, check out our article on the two quick methods to stop Cox browser alerts. Also, we have a guide for gamers to select the best cable modem for gaming to buy in 2022.

In conclusion, our guide to solving broken or not properly plugged-in network cables might also come in handy.

Leave your suggestions and feedback in the comments below. We’d love to hear from you.

Microsoft news recap: Xbox Game Pass Family & Friends launches in 2 countries, Adoption Score launched for Microsoft 365, and more

Microsoft news recap is a weekly feature highlighting the top Microsoft news stories of the past week. Sit back, grab some coffee, and enjoy the read!

Microsoft likely bringing Overwatch, Diablo, and Call of Duty to Game Pass

In a statement responding to a UK regulator’s plan to look at Microsoft’s Activision Blizzard acquisition more closely, Phil Spencer noted that titles such as Overwatch, Diablo, and Call of Duty, would come to Xbox Game Pass, as it’s Microsoft’s intention to do so.

Xbox Game Pass

Xbox Game Pass Friends & Family launches in 2 countries

The Friends & Family Xbox Game Pass plan has launched in 2 countries this week. Available in Ireland and Columbia, it allows 5 individual people access to the subscription, representing good value when compared to the cost of 5 separate subscriptions.

Xbox Game Pass Friends & Family

Xbox’s Phil Spencer releases statement addressing UK regulator’s Activision Blizzard acquisition concerns

As noted earlier, Phil Spencer released a statement in response to the UK’s competition regulator, the CMA, saying it may look at the Activision Blizzard acquisition more closely after raising concerns. Spencer said:

We are expanding choice in two ways: through the creation of Game Pass, which gives players a subscription option; and by bringing more games to mobile platforms.

Bringing more games to mobile platforms, however, requires new capabilities. The expertise that the teams at Activision Blizzard bring in developing games for mobile platforms will help us understand how to create games that engage players around the world.

Microsoft launches Adoption Score to help customers optimize Microsoft 365 subscriptions

To help IT admins understand adoption of their Microsoft 365 subscriptions across their organisation, Adoption Score has been launched, designed to help highlight anonymised metrics showing usage patterns, to provide data to encourage organisations to make use of their subscriptions to the full extent possible.

Microsoft launches Adoption Score to help customers optimize Microsoft 365 subscriptions - OnMSFT.com - August 30, 2022

That’s it for this week. We will be back next week with more Microsoft news.

5 Ways to Fix Epson Event Manager When It’s Not Working

While the Epson Event Manager is an essential utility for your scanner/printer, you may sometimes experience a situation when it’s not working.

It’s a common error that could occur with the Epson printer or scanner and the Event Manager stops working completely.

This is when you may often come across different errors, for eg, Epson Event Manager cannot find the scanner driver, Cannot connect to a scanner check the scanner connection, etc.

However, if you are experiencing Epson scanner problems in Windows 10/11, then you can refer to our detailed post for quick solutions.

Why isn’t Epson’s Event Manager working?

There could be quite a few reasons behind why your Epson Event Manager has stopped working:

  • The Event Manager is blocked by a Firewall
  • It’s not properly installed or not ready to scan
  • The network scanning settings are not set correctly
  • Corrupted system files
  • Outdated scanner drivers

It could also be possible that the Epson Event Manager is not working due to a network communication error, or if there’s a problem with the Epson scanner itself.

Do I need Epson Event Manager on my computer?

The Epson Event Manager is a crucial application that’s often required for essential activities by the scanner.

It’s known to support different Epson scanners and facilitate functions like Scan to Email, Scan as PDF, Scan to PC, etc.

How do I fix the Epson Event Manager if it’s not working?

1. Add Epson Event Manager to exclusions

  1. Expand the system tray on the taskbar and click on the Windows Security icon. windows security icon
  2. On the Windows Security page, click on Virus & threat protection. Virus & threat protection
  3. Next, go to Virus & threat protection settings and click on Manage settings. manage Virus & threat protection settings
  4. On the next window, scroll down, and under Exclusions, click on Add or remove exclusions. Add or remove exclusions
  5. Under Exclusions, click on Add an exclusion and then select Folder. Add an exclusion
  6. Now, select the EventManager Application folder to add to the exclusion list.

You have now successfully added the utility to the exclusions list and the problem should be resolved now.

2. Update the scanner driver

  1. Visit the official Epson support page, enter the product name and click on Search.
  2. Select your scanner model from the list. search epson product name
  3. Next, click on the blue Download button. click to download
  4. Now, follow the on-screen instructions to finish installing the driver.

You can also follow our detailed guide on how to install the Epson scanner driver for more solutions.

Once done, the Epson Event Manager cannot communicate with the scanner issue should be fixed.

If you are looking for a quicker and safer solution to update your scanner driver, you can fully rely on Outbyte Driver Updater an automated tool which will check, find and replace any available driver on your device.

3. Perform a clean install for the scanner

  1. Press the Win + I keys simultaneously to open Windows Settings.
  2. On the Settings screen, click on Apps on the left. click on Apps in settings
  3. Now, go to the right and select Apps & features. Click on Apps & features in the Settings app
  4. Next, go to the App list, look for the Epson scanner, click on the three dots next to it and select Uninstall. uninstall epson scanner
  5. Once the uninstallation is complete, press the Win + R shortcut keys to open the Run console.
  6. Type control printers in the search bar to open the Drivers and Printers window. control printers command
  7. Here, select the scanner and hit Delete.
  8. Once the scanner is completely deleted from the system, restart your PC and visit Epson’s official support page. search epson product name
  9. Here, look for the product name and download and install the complete software package for the scanner model. download epson event manager

You can now open the Epson Event Manager and it should be working now.

4. Run the system file checker

  1. Open the Run console by pressing the Win + R keys together.
  2. In the search box, type cmd and press the Ctrl + Shift + Enter keys simultaneously to open the elevated Command Prompt. open elevated command prompt by pressing Ctrl + Shift + Enter together
  3. Run the below command in the Command Prompt (Admin) window and hit Enter: sfc /scannowrun command sfc /scannow
  4. This process takes a while, so wait patiently till it’s over and you see the success message.

Once done, restart your PC and now check if you see an error like Epson Event Manager cannot find scanner driver.

A good alternative is a system repair and malware removal tool for Windows devices.

They promise fast and detailed system analysis. As a result, users can expect robust system optimization, no more spyware viruses, and a tidy device.

5. Allow scanning via a network

  1. Click on Start and type Epson in the Windows search bar. search for epson
  2. Open the Epson folder and select Epson Scan Settings.
  3. Next, select your scanner from the Select Scanner list.
  4. Now, click on the Network setting and click Add. select scanner, network, add
  5. It will now start scanning for an IP address.IP address search

This method is applicable if the Epson scanner is not working and causing an issue with the Event Manager.

How do I connect my Epson printer to the Event Manager?

Before you proceed to download and install the utility, and connect it to the printer, make sure you disable any firewall/antivirus to avoid communication block between the printer and your PC.

Now proceed to install and connect the Event Manager with the Epson printer:

  1. Visit the official download page for the Epson Event Manager and download the utility for Windows/Mac. download epson event manager
  2. Click Next on the Epson Event Manager setup wizard and follow the on-screen instructions to finish the installation. event manager installation
  3. Make sure to check the box next to Allow communication through Windows Firewall in the end.
  4. Open the Event Manager and under the Button Settings tab, select your Epson product from the drop-down next to Scanner. select scanner in epson event manager
  5. Next, press the Win + R keys simultaneously to open the Run console.
  6. In the search bar, type control printers and hit Enter. run control printers command
  7. On the Devices and Printers window, right-click on your Epson printer/scanner and click on Printer Properties. select printer properties
  8. Next, in the Properties dialog, click on the Events tab, and Select an event from the drop-down next to it.
  9. Under Actions, select Epson Event Manager to Start this program.select epson events manager to start the program
  10. Click Apply and OK.

However, if your Event Manager is still not working on Windows 10/11, refer to the user manual that came with the printer and contact Epson tech support if the device is still under warranty.

But if your Epson scan is not working on Windows 11, then you can read our troubleshooting guide for more information.

For any other queries related to the Epson printer or scanner, you can let us know in the comments box below.

5 Ways To Fix Lost Ark’S Low FPS On A High-End PC

If you’re playing a game on a high-end PC, you expect a smooth, responsive experience. But if your FPS is low or just plain poor in Lost Ark, it can ruin the entire experience. And with higher-end systems costing more than ever before, low FPS isn’t something anyone wants to have to live with.

FPS measures the speed of your computer’s graphics card. FPS counter software can also help you keep track of the strain in your game. The higher the FPS, the smoother your game will look and feel.

High-end PCs are designed to run games smoothly. The problem is that if you have a high-end PC, but you’re not getting the performance you thought you would, there may be some settings you can change to improve things.

But what causes low FPS in the first place? There are many factors that determine how well your system can run a game and most of them are completely out of your control. However, there are ways for you to improve your frame rate and make sure that it stays at an acceptable level.

Why is my FPS so low on a high-end PC?

So, you’ve got the best graphics card money can buy, a top-end processor, and a high-end monitor. But for some reason, you’re still getting low frame rates in your favorite games. Here is why:

  • System requirements – The first thing to check is the minimum and recommended system requirements for the game. These can be found on the game’s Steam page or in its store listing. If your PC isn’t meeting these requirements, it’s not going to run well even if it is a high-end PC.
  • Outdated OS – Using an outdated operating system can cause decreased performance because there are fewer resources available and the OS is not optimized for your hardware.
  • Hardware failure – One of the biggest reasons for low FPS is hardware failure. If your graphics card or CPU has been overheated for too long, it’s possible that they’re damaged beyond repair and need replacing as soon as possible.
  • Outdated drivers – Your drivers might be outdated or corrupted in some way; this could cause problems with your hardware not working properly or not being able to work with certain programs/games properly. 

Sometimes, Lost Ark just can’t connect to the server so you can decide to wait it out or attempt to resolve the issue.

How do I fix low FPS in Lost Ark?

1. Verify game files

  1. Launch Steam on your PC.
  2. Click Library in Steam.
  3. Right-click on Lost Ark, then select Properties.
  4. Select the Local files tab then hit Verify integrity of game files.
  5. Restart Steam.

2. Update your graphic drivers 

  1. Press the Windows key, type Device Manager in the search box, and click Open.device manager
  2. Navigate to Display adapters and find your graphics card.
  3. Right-click on your graphics card and select Update driver.update graphics driver
  4. Select Search automatically for drivers.

Although you can follow the manually steps mentioned above, a safer process would be using Outbyte Driver Updater because it is an adequate driver tool that will easily monitor your device drivers.

Therefore, it can be a great choice in this situation thanks to its automatic scans and updates. This is an excellent option for finding the most appropriate updates for all of the drivers on your PC. No matter what type of hardware that you use or the brands that your prefer, Outbyte will find the right drivers for all of them.

3. Disable the firewall temporarily 

  1. Hit the Windows button, type Windows Security in the search bar, and click Open.
  2. Click on Firewall & network protection then select Public network.league of legends black screen after champion select
  3. Locate Microsoft Defender Firewall and toggle the off button.league of legends black screen after champion select

4. Check for Windows updates 

  1. Hit the Windows keys, type Check for updates on the search bar, and click Open.
  2. Click on Check for updates and install if there are any updates.

5. Play with admin rights

  1. Press Windows + E keys simultaneously to open File Explorer.
  2. Navigate to the following location Program Files/ Steam/Steamapps/common/Lost Ark/Binaries/Win64
  3. Locate the LOSTARK.exe file, right-click on it and select Properties.
  4. Click on the Compatibility tab then select Run this program as an administrator.

How do I maximize my FPS in Lost Ark? 

Lag and frame drops are caused by two things: CPU usage and GPU usage. If either one of these things goes over 90%, then you will start to experience a lag in your game or even worse, complete freezes while playing.

Nevertheless, you can still get the most out of your game with a few tricks. Here are some:

  • Make sure your PC has enough RAM installed.
  • Set your graphics settings to the lowest possible.
  • Make sure you have the latest graphics card drivers installed.

What can I do if Lost Ark FPS capped?

Lost Ark caps its FPS at 60, which is pretty standard for most games these days. That said, if you have a powerful PC with a high refresh rate monitor, you may want to get rid of this cap so that you can enjoy the game at its true frame rate.

To remove the FPS cap in Lost Ark and allow your PC to operate at its full potential, follow the steps below:

  1. Launch the game and go to Settings.
  2. Navigate to Video, set the Screen to Full Screen, and press OK.

If you decide to uninstall and reinstall the game but have problems installing Lost Ark again, refer to our comprehensive guide for a quick fix. You can also fix the Lost Ark insufficient disk space issue by checking out our detailed guide.

Let us know of any other workarounds not mentioned here that may have worked for you in the comment section below.

Fix: Epson Event Manager The Selected Device is Read Only

Epson Event Manager is a software released by the Seiko Epson Corporation. This software needs to be installed on the Windows system in order to manage all the scanning tasks performed by the Epson scanners.

The Epson scanners need to be connected to the Windows system for getting detected by the Epson Event Manager software. After this gets detected, users can scan as many documents using this software.

It also allows users to scan multiple pages into a single PDF file for better convenience.

These days many users who scan originals using the Epson scanner have noticed an unusual error while trying to connect to the selected device on the Epson Event Manager app.

The error says The Selected device is read-only and does not proceed from there.

Why am I getting the selected device is read only in Epson Event Manager?

When users try to connect to the scanner device using the Epson Event Manager app, it throws an error message we discussed above in this article.

Here are the reasons for this error message to occur on any Windows system while using the Epson scanner:

  • Write permission security – The main reason is the disabled write permission security of the user profile on the Window system; try giving the write permissions to the user profile.
  • Outdated scanner device’s driver – When the scanner device’s driver is not updated regularly, it throws errors like mentioned above; so, update the scanner device’s driver on the system.
  • Event Manager app compatibility mode – If the Epson Event Manager app is not compatible with the Windows version and runs as an administrator, it might cause such problems.
  • Windows Image Acquisition Service – When the Windows Image Acquisition service is stopped, this also might create issues like The selected device is read only.

Don’t worry if you are facing this kind of issue. This article guides you on how to resolve the error and continue scanning the documents without any problems.

How do I fix Epson Event Manager the selected device is read only error?

1. Check the Windows Image Acquisition service

  1. Press the Windows and R keys together to open the Run box.
  2. Type services.msc in the textbox of Run and press the Enter key.
  3. This opens the Services app window on the system.
  4. Locate the service called Windows Image Acquisition by scrolling down the list of services to the bottom.
  5. Right-click on the Windows Image Acquisition service and click Properties from the menu.
  6. Once the Properties window appears, ensure you are on the General tab.
  7. Select Automatic from the Startup type dropdown and, if the service has stopped, click Start.
  8. This will start the Windows Image Acquisition service on the system.
  9. Once done, click Apply and OK on the Properties window.
  10. Restart the system and check if this resolves the issue.

2. Update the scanner device’s driver

  1. Press the Windows and X keys together and then press the M key on the keyboard to open the Device Manager app on the system.
  2. Once the Device Manager window opens, locate the Print queues from the list of device categories.
  3. Double-click on the Print queues option to expand it.
  4. Then right-click on the Epson scanner device from the list and select Update driver.
  5. Click the Search automatically for drivers option to start updating the device’s driver.
  6. Follow the onscreen instructions and, once done updating, close the device manager app.

If the manual update didn’t work out, you can use a software that automatically finds updated drivers and update them. We recommend Outbyte Driver Updater for this.

Outbyte Driver Updater is a tool that scans your system and updates any out-of-date driver. It’s faster because it updates all of them simultaneously and it’s a lot safer because it uses its own database for driver files.

Outbyte Driver Updater

Update all your drivers automatically faster and safer with this amazing tool.
Free Trial Download

3. Run the Epson Event Manager app as an administrator

  1. Press the Windows key and type event manager.
  2. Then right-click on the Event Manager app from the search results and select Open file location from the context menu.
  3. This opens the Event Manager app folder on the system.
  4. Right-click on the Event Manager shortcut icon in the folder and select Properties.
  5. In the Properties window, go to the Compatibility tab.
  6. Under the Compatibility tab, check the Run this program in compatibility mode for under the Compatible mode section.
  7. Then select Windows 8 from the dropdown list.
  8. Under the Settings section at the bottom, check the Run this program as an administrator option by clicking on it.
  9. At last, click Apply and OK.
  10. Restart the system and see if this worked.

4. Give the write permissions to the user profile

  1. Press the Windows and R keys together and type C:\users in the run box that appears on the screen and then press the Enter key.
  2. Locate your user profile folder, right-click on it, then click Properties from the context menu.
  3. In the Properties window, click the Security tab and then click Advanced at the bottom.
  4. This opens the Advanced Security Settings window.
  5. Click the Permissions tab, and under this tab, click Continue.
  6. At the bottom, check the Replace all child object permission entries with inheritable permission entries from this object checkbox by clicking on it.
  7. After that, click Apply and OK.
  8. Now you can close the Properties window of the user profile folder also.

Why won’t my Epson printer scan to my computer wirelessly?

Many Windows users have reported that they were unable to scan any documents wirelessly. There may be many factors responsible for this issue.

One of the reasons could be that the computer system itself is rejecting the network channel which receives the instruction from the scanner.

Another reason is that the scanner device is not able to communicate with the system’s network interface when there are many other wireless network interfaces present.

Some users also had issues where the scanner was not being detected on their Windows 11 system.

Hope you managed to resolve the issue using the fixes explained in this article. Please let us know in the comments section below!

How to Turn on Your Wi-Fi when The Function Key is Not Working

It can be very annoying to encounter the laptop’s Wi-Fi Function key not working issue, especially if the mouse is not working. In laptops, the function keys are available to make a few changes to the PC.

These keys can either mute or unmute, increase or decrease the laptop volume, increase or decrease the display brightness, or toggle on and off the wireless connection.

Users have reported that there are times when some of these keys do not work well as expected. Amongst these queries is that using the Function key to turn on Wi-Fi in Windows 10/11 has not been productive

We have hence provided fixes to Wi-Fi button not working on your laptop. You can work down the solutions to know which applies best to you.

Why is my Wi-Fi Fn key not working?

The reason some people face the issue of their Wi-Fi function key not working can be diverse. The following are some of the reasons for the laptop wifi Fn key not working:

  • The keys are locked: One of the reasons the Fn keys stopped working is that someone accidentally pressed the Fn lock key. The Fn lock key does not work for the Wi-Fi toggle key alone; it impacts other toggle keys such as Caps Lock or Num Lock, thereby making it easy to find out if the Fn keys are locked. If this is the case, you need to toggle on your Fn lock key to enable Wi-Fi access. This detailed guide can check how to locate your Function lock key.
  • Check your Keyboard for Dirt and Grime: The reason your Wi-Fi Fn key is not working may not be far-fetched. It could be because you have not cleaned your Keyboard for a long time, thereby allowing dust to accumulate in the key space. You can check our guide on how to clean your Keyboard carefully.
  • Outdated keyboard drivers: If the Fn key stopped working due to an outdated, damaged, or corrupted driver, in this case, updating your keyboard driver should be a positive fix for your Wi-Fi Fn key.
  • Damaged key mechanisms: If you press your Wi-Fi Fn key, but it is not responding, it could mean the keys are damaged. We advise that you seek professional assistance to fix and replace your keyboard panel.

How do I turn on Wi-Fi if the Fn key is not working?

1. Locate and unlock your Fn keys

  1. Look for an Fn, F lock, or a keypad icon key to identify yours.
  2. Hold the Shift key and press the Function key at the same time.

This should unlock your Wi-Fi Fn key and fix the laptop’s Wi-Fi function key not working problem. If this does not work, check out the next fix.

2. Use your On-screen Keyboard

  1. Click the Start button and select Settings.
  2. Select the Ease of Access option.
  3. Locate and click on Keyboard, then toggle the switch to enable the On-Screen Keyboard.
  4. The On-screen Keyboard will appear on your screen, and then you can size and position it where it suits you on the screen.
  5. You can then locate the Fn key on the On-screen Keyboard and use it to access your Wi-Fi.

3. Use the Taskbar Wi-Fi settings

  1. Click on the Wi-Fi icon on the bottom right corner of the Taskbar menu.
  2. Select the Wi-Fi option and wait a few seconds to turn blue.

This should immediately power your Wi-Fi and provide the various options to connect to.

If none of the solutions above worked for you, we recommend you use a USB or a Bluetooth keyboard. This would be your alternative until you can contact the repair shop to diagnose and fix the problem with your laptop for you.

You can check our article on selecting the best Windows keyboard to provide an efficient temporary solution.

We hope the solutions provided have helped you fix the issue with your laptop’s Function key not turning on Wi-Fi in Windows 10/11. You can also check our detailed guide on how to fix your laptop keyboard if it’s not working on Windows 10.

Do not hesitate to use the comments below for further suggestions or questions.

5 Quick Ways to Fix The Internal Server Error 500 on Twitch

Internal server errors are always annoying because they can be tricky to tackle as an internet user. Users may encounter internal server errors while accessing a webpage on their browsers.

However, the Twitch 500 internal server error is one of the most frustrating issues you can encounter while using the Twitch web app.

Fortunately, there are ways to fix this error without much effort or time. Likewise, we’ll discuss why you may encounter an internal server error.

Some notable causes of the Twitch 500 internal server error are server issues, network issues, old or corrupt cookies and caches, and others.

However, the error is not delicate and can easily be fixed by tweaking some things in your browser.

What do 500 internal errors on Twitch mean?

The Twitch 500 internal server error indicates that there is temporarily an issue with the website’s Server. However, it means that the Server encountered difficulty connecting to the Server, preventing it from fulfilling the request.

It can also prompt the streaming server not to respond to errors in other streaming web apps like OBS and Discord.

Furthermore, the 500 internal error on Twitch shows that your web server is having trouble accomplishing your requests.

However, the error message won’t indicate the cause of the error. So, we recommend you go through this article’s end to know the reasons and how to fix them in detail.

Why do I get an internal server error?

  • Network connection issues: Users can encounter an internal server error if the internet connection is unstable and slow. Furthermore, connecting to the web servers like Twitch requires a fast and stable internet connection. So, if you have a poor network connection, it can prompt errors like the failed to fetch settings from Twitch. Likewise, a cable network connection to Windows 10 can impede the connection between the browser and web page servers.
  • The client’s Server is down: Another reason you may encounter an internal server error is if there’s an issue with the client’s Server. It can prompt the 500 internal error on Twitch. Furthermore, some users don’t usually consider server issues as the probable cause of internal server errors. Hence, we advise that you see it as one.
  • Old/corrupt caches and cookies: Browsers collect browsing data and store them in caches and cookies to help you load websites faster and smoothly. However, they can become old or corrupt and affect your browsing activities.

How do I fix a 500 internal server error on Twitch?

1. Reload the Twitch page

On the Twitch error message tab, go to the top of the screen and click the reload button (a circular button). Refreshing the page can fix the internal server 500 error on Twitch.

2. Check your network connection

Web apps like Twitch require a stable and fast internet connection. So, performing a power cycle on your router can help you fix any network issues.

Likewise, we recommend you switch to a wireless network if connected through a LAN network. Cable networks can be slow and unstable.

3. Clear browser cache and cookies

  1. Launch the Chrome browser, then click the Menu button.
  2. Select More tools and click on Clear browsing data.
  3. Select the Advanced option.
  4. Choose the time range you want to clear.
  5. Check the boxes for Cookies and other site data and Cached images and files.
  6. Then click Clear data.

Relaunch your browser and check if the error persists.

4. Check if there’s a server breakdown

Users should check for any information about maintenance or server issues on social media platforms like Twitch’s Twitter page. However, the solution to server issues is to wait while they resolve them.

5. Login with another account

Sometimes, it could be that the error is tied to only your account. Hence, try to use other accounts if you have one or use your friends’ accounts to be sure. If it works, reach out to their support team for clarification on the cause of the error on your account.

Internal server error 500 variations

There are other platforms with the internal server error 500. Platforms like YouTube and Discord also experience the error.

Likewise, Streamcord’s internal server error is also a server error that plagues the Streamcord streaming platform. Also, the failure to connect to server error in OBS is a variation of the internal server error 500.

Nonetheless, following the fixes above can help fix the internal server error 500 error in the platforms mentioned above.

However, users can read through our guide on how to fix the Internal server error 500 on YouTube.

Conclusively, users can alternatively switch to another browser. Hence, you can check through our list of the ten fastest and safest browsers for Windows 11.

If this guide has been helpful, kindly leave your suggestions and feedback in the comments below.

Windows 11 Themes Not Syncing? How to Get it to Work

Syncing your Windows 11 settings and preferences is a good way to have all the same settings across your Windows devices.

However, users have reported having issues with their Windows 11 theme not syncing across their devices.

Why is my Windows 11 theme not syncing?

There are a number of reasons why your Windows 11 theme is not syncing. One of which could be that the administrator of your PC has disabled syncing settings. Your Microsoft account may not be verified, or some account information is incorrect.

Windows 11 theme not syncing.

Corrupted system files may also cause this error to happen. Try the solutions below to quickly solve this issue.

How do I get my Windows 11 theme to sync?

1. Verify your account

This may seem like an obvious solution, but double-check that your Microsoft account is verified. You can do this by logging into your Microsoft account on any browser. If there is a link asking you to verify your account, proceed to do so.

Verify Microsoft account to fix Windows 11 theme not syncing.

If your Microsoft account is not verified, then syncing preferences like themes across devices won’t work properly. After verifying your account, restart your device and enable syncing in settings.

2. Turn sync off then back on

  1. Click on Start and open Settings (or press Windows + I).
  2. Go to Accounts then Windows backup. Accounts open Windows backup.
  3. Toggle Remember my preferences to Off and restart your PC. Turn Remember my preferences off and restart to fix windows 11 theme not syncing.
  4. Return to Windows backup and turn Remember my preferences to On. Turn remember my preferences back on.

Sometimes a good reset of syncing settings does the trick. You may need to give some time between turning sync back on for it to work properly.

3. SFC Scan

  1. Click on Start and search Command Prompt.
  2. Right-click on Command Prompt and select Run as administrator. Run command prompt as admin.
  3. Type in the following command and hit enter: sfc /scannow
  4. Wait for the scan to complete then restart your PC. SFC scan if windows 11 theme not syncing.

The System File Checker (SFC) scans your PC for any corrupted systems files which could be the reason your Windows 11 theme is not syncing.

4. Disconnect then re-connect account

  1. Click on Start and open Settings (or press Windows + I).
  2. Click on Accounts then select Email & accounts. Open email and accounts.
  3. Locate the Work or school account and select Manage. Manage windows 11 account.
  4. In your account overview, click Sign out everywhere. Sign out to fix windows 11 theme not syncing.
  5. Click OK then restart your PC.
  6. Re-enable your Sync settings and re-connect the Work or school account.

Please note that it may take an hour or so for your Work or school account to disconnect from all of your devices. Once it’s fully disconnected, go ahead and re-connect it and enable syncing.

5. Via Registry Editor

  1. Right-click on Start and select Run (or press Windows + R).
  2. Type regedit and click OK. Type regedit then ok.
  3. Open the HKEY_LOCAL_MACHINE folder then open the SOFTWARE folder. open software under local machine.
  4. Locate the Microsoft folder and open it, then open Windows.
  5. Navigate to CurrentVersion and open it and scroll to the Policies folder and open System. Find the policies folder under currentversion.
  6. Make a backup of the System folder by selecting it then click on File and Export. Save the file as System-backup.
  7. With System selected, right-click near it and click on New, then DWORD(32-bit) Value. create new DWORD 32bit value.
  8. Name the new value NoConnectedUser then double-click it.
  9. Ensure that the value data is set to 0 and click OK. Set value to 0 to fix windows 11 theme not syncing.
  10. Restart your device.

This should enable sync from the Registry Editor. Because it’s crucial not to make any mistakes when making changes in Registry Editor, always make a backup of the folder you’re altering.

How do I sync my Windows background?

  1. Click on Start and open Settings (or press Windows + I).
  2. Select Accounts, then Windows backup. Accounts open Windows backup.
  3. Open the dropdown menu next to Remember my preferences and check all of the preferences, then ensure Remember my preferences is toggled to On. Enable syncing preferences.

Your passwords, themes, language preferences, and more should now be synced across your devices logged into your Microsoft account.

We hope one of the above solutions helped you fix the issue of the Windows 11 theme not syncing. If you are having issues with OneDrive not syncing in Windows 11, we have a guide for that as well. Let us know in the comments which solution worked for you.

7 Ways to Fix CS GO if Your FPS Drops When Shooting

CS: GO is a fast-paced first-person shooter game in which you compete with other players online. It’s one of the most popular multiplayer games around and has been played by millions of people worldwide since it was launched.

The game is known for being very demanding on your graphics card, so if you have low FPS (frames per second) or find that your CS: GO FPS drops when shooting, then you need to make sure that your computer is up to the task. 

If you’ve ever noticed that your game looks choppy or slow, it’s probably because your FPS is lower than it should be. A drop in FPS can be a serious problem. It can cause lag. 

The most common form of lag occurs when your computer cannot process all of the information it receives from the server in time.

First, you need to check whether your computer’s hardware meets the minimum requirements for the game. If it doesn’t, then the game will run poorly.

Why is my FPS dropping in CS: GO? 

If you’re experiencing a sudden drop in FPS in CS: GO, then this could be due to several reasons:

  • You have an old processor – If you have an old GPU and play on high settings, then it’s possible that your computer just doesn’t have enough power to run the game smoothly. CS: GO FPS also tends to drop on high-end PCs. You might have hit the CPU and GPU limits of your system. 
  • Too many applications open at once – Some programs use more resources than others. You’ll find that CS: GO FPS drop every few seconds. In such a case, disable any non-essential programs that are not being used for gaming purposes.
  • Insufficient memory – It’s important to remember that CS: GO is a very intensive game that requires a lot of resources from your computer to run smoothly. Low RAM can cause lag and slow down your overall performance. This can cause stuttering and a general lack of smoothness when playing games. 
  • Outdated graphics drivers – Drivers often cause performance issues if they are not compatible with your operating system. Ensure they’re up-to-date before playing games that require high framerates.
  • Graphics settings – If you’re playing on low-end hardware or an older OS, try tweaking some settings such as lowering your resolution. The higher the resolution of your display, the more work your computer has to do to render it.
  • Virus/malware infection – Malware can slow down your PC or even cause crashes – so if you suspect that there might be some malware on your system, run a virus scan or install an antivirus program if you don’t already have one.

There are also many other factors that can affect your FPS in CS: GO, such as internet connection speed or whether you’re running background applications while playing.

How do I fix FPS drops when shooting in CS GO? 

1. Close unnecessary programs 

One way that games like CS: GO can slow down is by having too many other programs open while playing. Closing such programs will ensure that your computer isn’t being bogged down by other programs that are running in the background. 

Having multiple programs open at once uses up processing power, which means your computer has less processing power left over for the game itself — which leads to lower FPS rates and lagging issues.

2. Lower your graphics settings

  1. Launch Steam and open Settings in CS: GO.
  2. Click on Options then select Video Settings.
  3. Navigate to the Advanced Video section and, set the following settings to Low: Global Shadow Quality, Model / Texture Detail, Effect Detail, Shader Detail.

3. Update your drivers

  1. Press the Windows key, type Device Manager in the search box, and click Open.device manager
  2. Navigate to Display adapters and find your graphics card.
  3. Right-click on your graphics card and select Update driver.update graphics driver
  4. Select Search automatically for drivers.

In this case, a faster and safer option is using Outbyte Driver Updater. This software offers great features such as automatic scans and updates for all of your drivers.

Although it provides a free version, if you want to unlock all the smart features including the one-click update feature, then we recommend upgrading to its premium version.

4. Clean up disk space

If your PC is running low on hard drive space, it will be forced to use virtual memory (your RAM) instead of real memory (your hard drive). This causes significant performance degradation, which can make even simple actions like opening a menu feel laggy and unresponsive.

To fix this issue, you’ll want to clean up the files that are taking up a lot of space on your computer by clearing out your trash, deleting old documents and photos, and defragmenting your hard drive. 

5. Verify integrity of game files

  1. Launch Steam on your PC.
  2. Click Library in Steam.
  3. Right-click on CS: GO, then select Properties.
  4. Select the Local files tab then hit Verify integrity of game files.
  5. Restart Steam.

6. Uninstall recent programs

  1. Hit the Windows key, search Control Panel and click Open.
  2. Under Programs and Features, select Uninstall a program.
  3. Navigate to the latest installed program/app, right-click and select Uninstall.

7. Scan for viruses

  1. Press the Windows key, search Windows Security and click Open.
  2. Select Virus & threat protection.
  3. Next, press Quick scan under Current threats.
  4. Wait for the process to finish and restart your system.

How can I improve my FPS in CS GO? 

CS: GO is a very demanding game, and if you don’t have a good computer it can be hard to maintain a decent frame rate.

Many people who play CS: GO have the same problem. They want to enjoy playing their favorite game, but the FPS is too low for them. A few tweaks here and there could help with the overall performance such as:

  • Look for PC requirements – Make sure your computer meets the minimum requirements for CS: GO.
  • Have enough RAM -Ensure you have at least 2GB of RAM free on your system drive. This will ensure that Windows does not swap out memory pages during gameplay which leads to significant performance degradation.
  • Adjust your graphics settings – If your PC is already struggling with the current settings, then it’s better not to turn on any additional features or effects.
  • Update your drivers regularly – These updates often include bug fixes and optimizations which will help with overall performance.
  • Avoid mods – Mods can be very useful for tweaking your CS: GO experience, but they come with a cost. They can cause errors or bugs that may reduce your FPS.

If none of these solutions work and you are still experiencing FPS drops, it may be time to upgrade to a laptop or PC for CS: GO. 

By upgrading the RAM on your computer or purchasing a new graphics card and installing it into your computer, you could significantly improve your gaming experience in CS: GO and other games as well.

You can also check out our recommended VPN options for CS: GO if you experience packet loss or extreme lagging.

If you’re experiencing FPS drops in other games or scenarios on Windows 10, you might want to check out these solutions to fix high FPS drops on Windows 10.

We’d love to hear about your experience and how your FPS is performing in CS: GO in the comment section below.

5 Ways to Fix The Files Download Error on Genshin Impact

Genshin Impact is a beautiful video game based on animation, and this is a role-playing action game.

Genshin Impact is free to play, but gamers must pay for additional in-game items such as new, better weapons or characters.

Many gamers have been having difficulties downloading the Genshin Impact game on the Windows system.

When they try downloading the game, it throws a Genshin game files download error: Check your network settings and stop the downloading process.

They cannot download and install this game on the system, which disappointed them. Some gamers also have issues like lag while playing the game.

Why does Genshin keep failing to download?

When gamers tried downloading or updating the game files, they got a file download error on their system. Here are some of the potential causes for this error:

  • Network settings – A downloading error usually occurs when the network settings get corrupted; therefore, resetting the network settings might help.
  • Antivirus software – As an extra layer of security, some antivirus software or the in-built antivirus tool on the Windows system prevents downloading the game files and hence the error
  • Corrupt game files – This kind of issue arises mainly because of corrupt game files, so reinstalling the game might solve it.
  • Change in DNS settings – If the DNS settings are changed unknowingly, this might be responsible for this game file download error, so try using Google DNS to fix this error.
  • Internet connection – The fluctuating Internet connection on the system can cause various problems, including the one mentioned above.

In the article below, you will find five quick solutions for resolving this error and enjoying the game.

Quick tip:

Switching to a new browser can be a great step in this process. Opera GX is a special version of Opera Browser specifically created for gamers. This browser includes distinctive features such as CPU, RAM, and Network limiters to help you get the best gaming and browsing experience.

Opera GX prioritize privacy, therefore it comes with a built-in VPN that safeguards your online privacy and limit what websites can access. In addition, you can also block trackers and ads and customize your privacy and security settings to have more control over your browsing data.

Opera GX

A special version that brings speed, customization, and privacy to desktop and mobile browsers.

How do I fix the file download error on Genshin?

1. Reset the network settings

  1. Open the Settings app on the system by pressing the Windows and I keys together.
  2. Select the Network & Internet option on the left menu and click Advanced network settings.
  3. Scroll down the page and click the Network reset option.
  4. Then, click Reset now.
  5. Finally, click Yes in the small pop-up window to confirm the network settings reset.
  6. After the network settings are reset, close all the windows, and you might be required to sign in to all the necessary networks, like VPN clients or other virtual switches.

This also helps with Genshin Impact’s Error Code 4201.

2. Turn Off Virus & threat protection settings

  1. Press the Windows key and type windows security.
  2. Select the Windows Security app from the search results.
  3. Select the Virus & threat protection option on the left-hand side menu, then click Manage settings.
  4. Please turn off the Real-time protection by clicking the toggle button to disable it.
  5. Once it is disabled, close the Windows Security app and restart it.

This solution will also help you clear the Genshin game files verification error on Steam, so try it out.

3. Reinstall the Genshin Impact

  1. Press the Windows and R keys together to open Run, then type appwiz.cpl and press Enter to open the Programs and Features wizard.
    Type appwiz.cpl in Run dialog box
  2. Now locate the Genshin Impact game from the list of programs and select it by clicking on it once.
  3. Then click Uninstall/Change button on the top for uninstalling the game.
  4. Once the game installs, close the Programs and Features wizard.
  5. Visit the Genshin Impact game website’s download page and click on Windows to download the game installer file for your Windows system.
  6. Go to the Downloads folder on your system and double-click on the GenshinImpact_installer.exe file.
  7. This opens the launcher window and starts downloading the game.
  8. Follow all the onscreen instructions from here onwards to finish installing the game.

4. Change DNS to Google DNS

  1. Open the Run box by pressing the Windows and R keys together.
  2. Type ncpa.cpl and press the Enter key.
    Type command ncpa.cpl in Run and press Enter
  3. This opens the Network Connections page on the system.
  4. Right-click on your connection and click Properties from the context menu.

  5. Select the Internet Protocol Version 4 (TCP/IPv4) option and click Properties just below it.
  6. Now select the Use the following DNS server addresses radio button.
  7. Enter the Preferred DNS server as 8 8 8 8 and the Alternate DNS server as 8 8 4 4, respectively.
  8. Finally, click OK to close the window.
  9. Restart the system and check if the problem still occurs.

5. Perform Disk Cleanup

  1. Press the Windows key and type disk cleanup.
  2. Select the Disk Cleanup app from the search results.
  3. Select the drive where the Genshin Impact game files are present and click OK.
  4. Click all the checkboxes under the Files section to delete and click OK.
  5. In the small pop-up window, click Delete files to clean the disk by deleting all the selected files.
  6. Once done, you can try downloading the game without any issues.

Why is my Genshin stuck on downloading resources?

When the Genshin Impact downloads get stuck, this could be because the Genshin Impact game server is down for routine maintenance or due to request overload.

There is also a possibility of the Internet connection on the system getting unstable. So, contacting your service provider for a stable internet connection might fix this problem.

Also, some users managed to resolve the failure to check for updates error on the Genshin Impact game.

Did you manage to resolve the Genshin Impact launcher game files download error? Do not hesitate to let us know about it in the comments below.

Windows 11 Terminal Themes: Download & Install

Windows 11 brought lots of advanced features to the computer system. One of these features is the Windows Terminal. However, this article will discuss downloading and installing Windows 11 Terminal themes.

Windows Terminal is an emulator built by Microsoft for Windows 10. However, it is a multi-tabbed terminal emulator that now serves as a replacement for Windows Console.

So, Windows 11 has a built-in command-line tool dubbed Windows Terminal. Furthermore, the Windows Terminal allows you to run any command-line app in a separate tab. Likewise, it has been designed to run PowerShell, Command Prompt, WSL, SSH, and Azure Cloud Shell Connector.

However, users can change the appearance of the Windows 11 Terminal to suit their taste. Hence, it is essential to get themes that can fill the space and change the Windows 11 Terminal color scheme.

The Windows Terminal makes use of the default theme, and it makes the appearance less intriguing. Likewise, customizing your terminal appearance allows you to set different visual themes for each shell.

Moreover, utilizing the Windows 11 Terminal color scheme allows you to customize your color scheme and define the appearance of the terminal.

However, you can do this using the built-in preset schemes or download new terminal themes.

Does Windows 11 Terminal have themes?

Windows 11 Terminal comes with a preset color scheme that allows users to change the display’s appearance. However, the Windows11 Terminal has a couple of built-in themes that users can switch between to achieve their visual goals.

Some built-in themes in the Windows 11 Terminal are Campbell, Campbell PowerShell, Vintage, One-Half Dark, and others.

However, users can change from one appearance to another by simply making amendments to the settings.json file. We’ll discuss it more as we go further into the article.

How do I change the terminal theme in Windows 11?

  1. Launch a browser on your computer and go to any Windows Terminal themes repository like github.com.
  2. Scroll through the repository and click on the terminal theme you want to download.
  3. Go to the theme display sample and click on the three dots in the right-hand corner.
  4. Click on Download. (Downloading the theme gives you access to the theme configuration and allows you to download other resources like background images for the theme.)
  5. Click Start on your screen.
  6. Select terminal from the drop-down.
  7. Select Settings from the options to prompt the settings.json file or press the Ctrl + to access Settings directly.
  8. In the settings.json file, select Profiles and go to the colorScheme bracket “[]” under the list.
  9. Edit the colorScheme property and input the theme name you just added to your file.
  10. Save settings and refresh your terminal.

How do I change the color of my theme in the terminal?

  1. Click Start on your screen.
  2. Select Windows Terminal from the drop-down.
  3. Click the Menu button and select Settings from the drop-down options.
  4. Click on Color Scheme, then tap on the Add new button.
  5. Select the Rename option, input a name for the scheme, and click the Accept rename button.
  6. Go to Terminal Colors and select the colors you want for the System Colors panel on the right side of the screen.
  7. Click on Save to implement the changes you sent.

To explore more about Windows Terminal features, including customization options and advanced tools, check out our detailed guide on Windows Terminal Features.

In addition, for users who own Windows XP, it may be helpful to know how to download and install HyperTerminal for Windows 10 & 11.

What can I do if Windows Terminal theme is not changing?

There can be various reasons why the theme of the Windows Terminal is not changing. However, restarting your PC is the easiest way to fix the problems. Also, downloading and installing another theme to test if there’s a problem with the theme in question can help.

Nonetheless, there are many Windows 11 Terminal emulators you can install in 2022. They allow you to communicate with various systems and servers remotely.

Let us know you choice in the comments area below.