We are well aware of the fact that Microsoft Windows 11 is an operating system that is packed with functionality and has an appealing design. However, users have been demanding a Windows 11 Lite version.
Despite the significant improvements it delivers, Windows 11 is a resource-hungry operating system that may soon clutter up an older machine to the point where it is impossible to operate it smoothly.
This article will address your most asked questions about whether there is a Windows 11 Lite version and whether it is safe to download. Follow along!
Is there a Windows 11 Lite version?
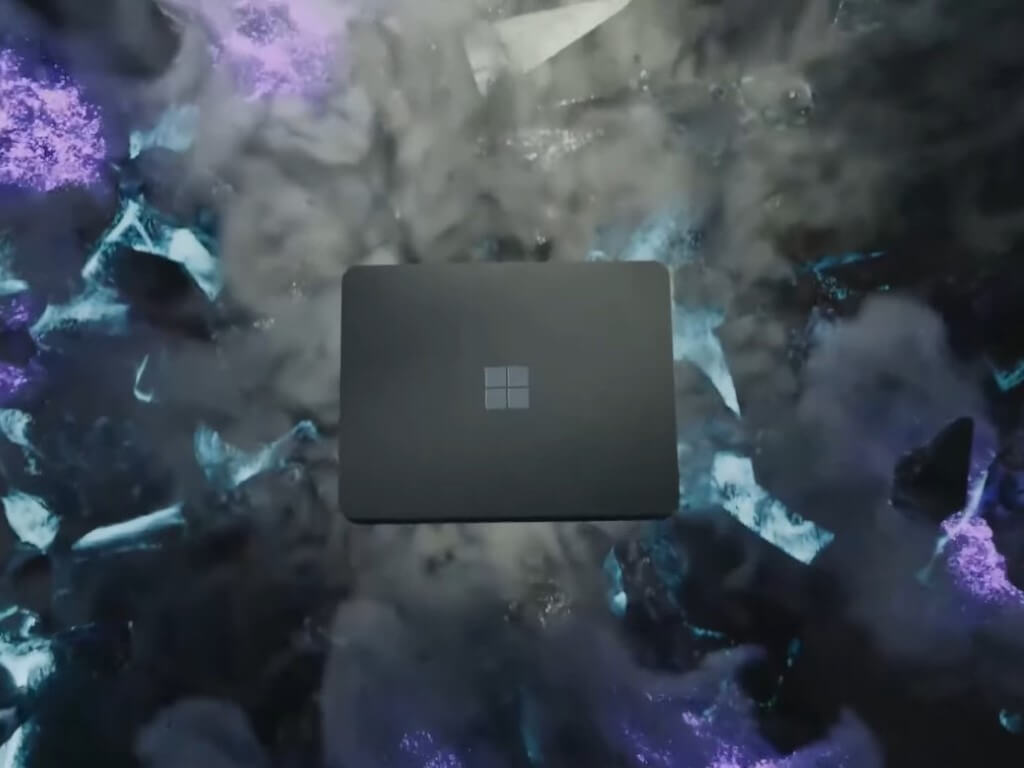
The Windows 11 Lite 21H2 build that we are talking about, was developed by Neelkalpa’s Tech, a channel that used to exist on Youtube. However, as of late, the channel has been banned due to multiple violations.
This build of Windows 11 is essentially a streamlined version that only includes the fundamental files that are required for the operating system to function properly.
The fact that this version can function on computers with as little as 256 megabytes of random access memory (RAM) and as little as 10 gigabytes of storage space is absolutely ridiculous and attracted many users.
On the other hand, as you might anticipate, the majority of the resource-intensive effects have been taken out of this version of OS. This includes the quick animations that are enjoyed by certain users.
Other regular Windows applications, such as the Microsoft Store, Windows Defender, and Xbox Services, to mention a few, are not included in this download.
However, eliminating them has also resulted in Windows 11 Lite being optimized to run more quickly and consume less power than its predecessor.
Is Windows 11 Lite safe?
Windows 11 Lite is not a Microsoft official product, so you need to make sure the download file is not full of malware ready to take over your computer. Moreover, there are no details from Microsoft regarding a potential Windows 11 Lite build.
Until recently, there was a link to download Windows 11 Lite, however, it can’t be found anymore. This might indicate that the third-party OS was lacking security.
We recommend that you stay away from any type of Windows operating system that is not officially released by Microsoft. Or at least, try the third-party OS on a virtual machine rather than on your computer directly.
Is Windows 11 Lite suitable for gaming?
Many of you have been wondering whether Windows 11 Lite is suitable for gaming. However, as we have previously stated, it is not available on the market.
In case a version of Windows 11 Lite 32 bit or Windows 11 Lite 64 bit will appear in the future, they probably won’t be optimized for gaming, since they will only include the basic functionalities of Windows 11.
This being said, Windows 11 gets rid of the historical baggage left behind by earlier iterations of Windows, while also introducing new gaming features to PC that had previously only been seen on Xbox consoles.
Game Pass is unquestionably Microsoft’s premier gaming product because it provides access to first-party games on the release day as well as a vast library of third-party titles that are updated regularly.
It is an experience that is wonderfully integrated and works effortlessly on Xbox platforms.
Along with other Windows 10 users, we have seen a number of defects and issues that are connected to damaged game files, weird problems with Windows Store integration, and botched game uninstallations that do not return the space that was previously used by the game.
Moreover, Windows 11 comes with a helpful utility feature called the Xbox Game Bar already installed and ready to use. As was the case with the first-generation Xbox, the major goal of this function is to make it possible for users to record and share gameplay footage from their favorite video games.
It is a really helpful tool that can be used to record not just games but other programs as well.
Destiny 2 is a popular free-to-play online multiplayer first-person shooter video game on multiple platforms. However, several users reported the error code Buffalo when launching the game.
According to the developer, this error can occur if the user is not signed into their account. However, the reasons can vary depending on the platforms and devices used.
Destiny 2 services may be taken offline occasionally for scheduled or emergency maintenance or to update the game to solve gameplay bugs or add in-game features. Hence, you may need to check the Destiny 2 server status before digging into the troubleshooting process.
How do I fix the Destiny 2 error code Buffalo?
1. Delete the cvars.xml file
Press Windows Key + R to open Run.
Type %appdata% and click OK. This will open the App Data folder.
Scroll down and open the Bungie folder.
Now go to DestinyPC > Prefs folder.
Locate and right-click on cvars.xml file and click Delete.
Once deleted, close File Explorer.
Relaunch Destiny 2 and check if the error is resolved.
The cvars.xml file holds some key game settings in the installation folder. Deleting the file can help you resolve the error code buffalo error in Destiny 2.
2. Sign out and sign in
If you haven’t tried already, a simple log out and login can help you fix the Destiny 2 error.
Open the Steam Desktop app.
Click the Log Out option.
Click Yes to confirm the action.
In the new window, enter your user credentials and log in to the Steam account again and check for any improvements.
2.1 Log out of the computer
If you access Destiny 2 from multiple computers, it may trigger the error as the game does not allow the users to be logged in on two different computers simultaneously.
Ensure you are logged out of your secondary/idle computer before logging in to your current system.
If you don’t remember whether you have logged in to other computers, use the Log out of all logged-in devices option.
2.2 Keep trying to connect
At times, the issue may be with the Destiny 2 server. If the servers are witnessing high traffic, the game may fail to connect to the server. Several users have reported that after multiple attempts, they can connect to the server. This often works for Destiny 1 error code Marionberry.
Using a VPN can help resolve the issue if the error is occurring on a specific server or region. We recommend using a fast and reliable VPN, such as ExpressVPN.
Change the current region to your desired region using the drop-down list under the Play button.
Once set, open Destiny 2 and check for any improvements.
Some users were able to resolve the issue by changing the server region in the Steam desktop application. Changing the server region can resolve the error if the issue is specific to Bungie servers.
5. Set LAN setting to automatic
Press Windows Key + R.
Type inetcpl.cpl. This will open the Internet Properties window.
In the Internet Properties window, open the Connections tab.
Under Local Area Network settings, click the LAN Setting button.
Now, set all the LAN settings to Automatic.
Click Apply and OK to save the changes.
Restart your computer and launch Destiny 2.
6. Disable antivirus programs
If you have third-party antivirus software installed, try disabling it temporarily.
Right-click on the antivirus icon in the taskbar.
Select Disable temporarily or similar options.
Once the antivirus is disabled, try launching Destiny 2.
How do I check my Destiny 2 server status?
Destiny 2 is occasionally scheduled for all-day backend maintenance, which occurs about once a week. Backend maintenance validates Destiny 2 login details and confirms account integrity with any information a user provides into the databases.
The problem is that when you log back in, there should be no more interruptions, yet that’s exactly when this Buffalo error occurs.
This is standard for any live service launch, but there are several ways to check your Destiny 2 server status.
➡️ The official Destiny Server and Update Status homepage will notify you of any planned maintenance, so check there first if you’re having issues. ➡️ It’s possible that there’s a network issue; therefore checking the quality of your internet connection might get you back on Destiny 2. ➡️ Check the gaming platform you’re playing on for network-related issues or missing updates and patches. ➡️ The Buffalo error can also occur when the account is logged in on many devices at the same time, whether it’s an Xbox, PlayStation, or PC.
If the error Destiny 2 error code buffalo is resolved after disabling antivirus, try adding the game to the exception or whitelist.
Server and network difficulties are two of the most serious drawbacks of current online games. They’re in every game, and Destiny 2 is no exception whatsoever. Nothing is more frustrating than expecting to complete the weekly challenge or join the arena only to be faced with a Buffalo error.
The Destiny 2 error code buffalo error can occur due to many reasons. Follow all the steps in this article individually to find the fix that works for you. And remember, a similar approach also helps with another network-related problem, the Destiny 2 error code weasel.
Microsoft is preparing for the new fiscal year, and according to a report from Bloomberg citing an internal email, the company is making moves to slow down hiring. This impacts three core areas of Microsoft’s operations, including Windows, Teams, and Office.
Per the report, hiring across these three Microsoft groups must now be approved by the leadership team that falls under Rajesh Jha. Additionally, the move comes because all three of these groups have recently expanded and Microsoft wants to “make sure it’s making the right hires in the right places.” This is not a company-wide slowdown, however. Microsoft’s full statement on this matter is seen below.
As Microsoft gets ready for the new fiscal year, it is making sure the right resources are aligned to the right opportunity. Microsoft will continue to grow headcount in the year ahead and it will add additional focus to where those resources go.” The company’s fiscal year starts July 1
This news comes after it was revealed that Microsoft has a new stock-based compensation package that aims to keep employees satisfied. With this package, the goal was to prevent employees from moving to rival companies like Salesforce and Meta. Even so, those companies, and even Nvidia, have announced several hiring slowdowns due to the economic impacts of the COVID-19 pandemic.
Chrome JavaScript not working problem happens often, and many users have faced this issue unaware of the easy fixes that may apply.
JavaScript is a programming language used by websites like Google Chrome to create dynamic interactions and functions.
Because of the vast number of dynamic interactions accessible on YouTube, turning off the JavaScript function in your Chrome browser will make it nearly difficult to utilize the website.
All that is necessary is a PC/laptop running a Google Chrome browser to follow the instructions given in this post to enable JavaScript on your browser.
Does JavaScript still work on Chrome?
Google Chrome features JavaScript, which is triggered to show specific features or interactive components like ad banners on Java-based websites.
All the latest browsers come with built-in support for JavaScript, but users might encounter the Chrome JavaScript not working problem often.
You need to enable it in the browser to run the related processes, although there are certain frequent issues that may arise when dealing with JavaScript on chrome:
DOM-related issues
Syntax-based errors
Undefined methods
How do I enable JavaScript on Google Chrome?
1. Via Chrome settings
Open the Chrome application on your computer.
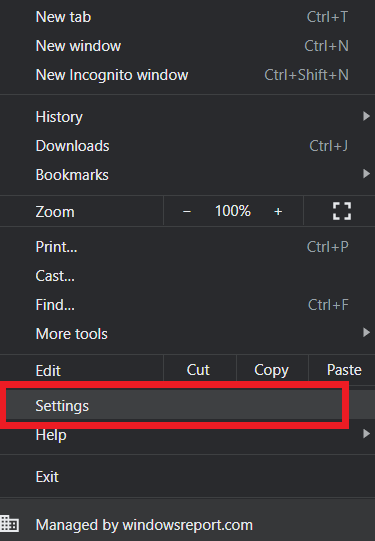
Click the three-dot icon on the upper right corner, then select Settings.
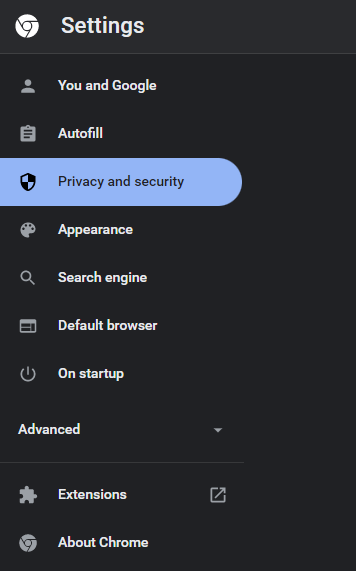
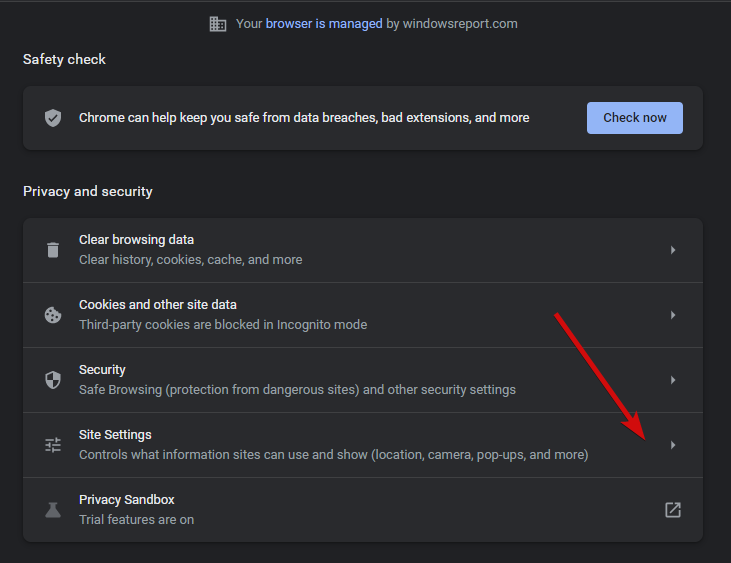
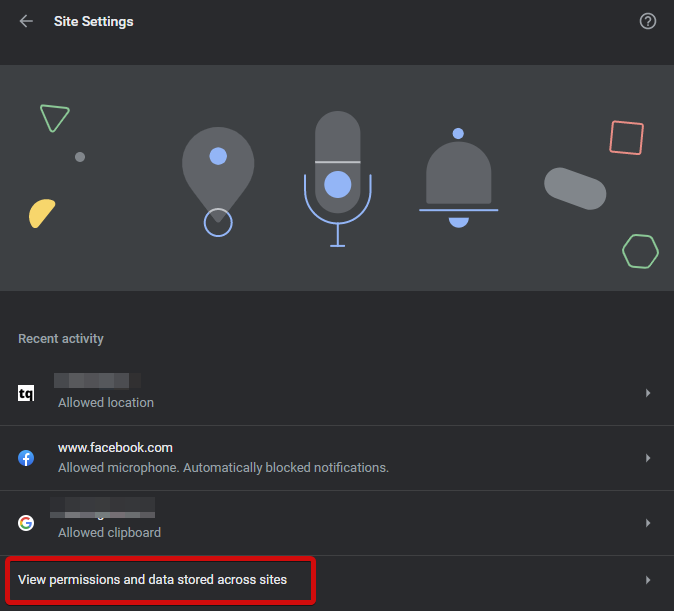
Select Security and Privacy and then choose Site Settings.
Click JavaScript.
Select Sites can use JavaScript.
Browser updates, security software, or patches may affect your browser’s JavaScript setting. Therefore after browser updates make sure that your JavaScript feature is still activated.
2. From Chrome DevTools
Right-click on the page and select Inspect.
Press Control+ Shift+ P to open the Command Menu.
Type javascript, select Enable JavaScript, and then press Enter to run the command.
JavaScript will stay enabled in this tab so long as you have DevTools open. If you want to enable this feature for one single website, then you may use this technique.
After the download is complete, it will be added automatically to the extension list of Chrome.
Select the puzzle piece icon in the Chrome browser and select Run JavaScript.
A console window will pop up where you can run the custom codes of JavaScript.
This JavaScript Chrome extension is especially beneficial to web developers and others who want to mess with websites they visit by injecting extra JavaScript to modify the DOM.
You may put in whatever JavaScript you desire and it will automatically be run whenever you visit the page in the future.
Why is JavaScript not working in HTML?
First things first you need to check the DevTools to see if there are any issues, if there are then you will get an indication of why the JavaScript codes are not functioning.
The next major problem might be that JavaScript is disabled on your browser, hence try to activate it. Numerous methods can be used to enable JavaScript on Windows 10 or any other operating system.
The best option to fix the Chrome JavaScript, not loading problems depends only on the way you want your current browser to apply JavaScript on websites.
This option can be enabled for the settings to include all the websites or from DevTools to apply on specific websites you want to work on.
Overall, enabling it for all the websites will give you a better experience when surfing the web or trying to watch content on streaming services.
In this article, we will be making a TPU vs. GPU comparison. But before we delve into it, here is what you must know.
Machine Learning and AI tech have accelerated the growth of intelligent apps. To this end, semiconductor firms are continually creating accelerators and processors, including TPU and CPU, to deal with more complex apps.
Some users have had issues understanding when it is recommended to use a TPU and when to use a GPU for their computer tasks.
A GPU, also known as a Graphical Processing Unit, is your PC’s video card to offer you a visual and immersive PC experience. For example, you could follow easy steps if your PC is not detecting the GPU.
To better understand these circumstances, we will also need to clarify what a TPU is and how it compares to a GPU.
What is a TPU?
TPUs or Tensor Processing Units are specialized integrated circuits (ICs) for specific applications, also known as ASICs (application-specific integrated circuits). Google created TPUs from scratch, beginning to use them in 2015, and opened them to the public in 2018.
TPUs are offered as minor chip or cloud versions. To speed machine learning for a neural network using the TensorFlow software, cloud TPUs solve complicated matrix and vector operations at incredible speeds.
With TensorFlow, the Google Brain Team-developed an open-source machine learning platform, researchers, devs, and enterprises can construct and operate AI models using Cloud TPU hardware.
When training complex and robust neural network models, TPUs reduce the time to accuracy value. This means that deep learning models that may have taken weeks to train using GPUs take less than a fraction of that time.
Is TPU the same as GPU?
They are architecturally highly distinct. A Graphical Processing Unit is a processor in and of itself, albeit one that is piped toward vectorized numerical programming. GPUs are, in effect, the next generation of the Cray supercomputers.
TPUs are coprocessors that don’t execute instructions by themself; the code is executed on CPUs, which feeds the TPU a flow of small operations.
When should I use TPU?
TPUs in the cloud are tailored to particular applications. You may prefer to execute your machine learning tasks using GPUs or CPUs in some instances. In general, the following principles may help you evaluate if TPU is the best option for your workload:
Matrix computations are dominant in the models
Within the model’s main training loop, there are no custom TensorFlow operations
They’re models that go through weeks or months of training
They are massive models that have extensive, effective batch sizes.
Now let’s jump into some direct TPU vs. GPU comparison.
What are the differences between GPU and TPU?
TPU vs. GPU architecture
The TPU isn’t highly complex hardware and feels like a signal processing engine for radar applications and not the traditional X86-derived architecture.
Despite having many matrix multiplication divisions, it’s less of a GPU and more of a coprocessor; it merely executes the commands received given by a host.
Because there are so many weights to input to the matrix multiplication component, the TPU’s DRAM is operated as a single unit in parallel.
Additionally, because TPUs can only conduct matrix operations, TPU boards are linked to CPU-based host systems to accomplish tasks that the TPUs can’t handle.
The host computers are in charge of delivering data to the TPU, preprocessing, and fetching details from Cloud Storage.
GPUs are more concerned with applying available cores to work than accessing the low-latency cache.
Many PCs (Processor Clusters) with multiple SMs (Streaming Multiprocessors) become a single GPU gadget, with layer one instruction cache layers and accompanying cores housed in every SM.
Before data extraction from global GDDR-5 memory, one SM typically utilizes a shared layer of two caches and a dedicated layer of one cache. The GPU architecture is memory latency tolerant.
A GPU operates with a minimal number of memory cache levels. However, because a GPU features more transistors devoted to processing, it is less concerned with its time to access data in the memory.
The possible memory access delay is hidden as the GPU is kept occupied with adequate calculations.
TPU vs. GPU speed
This original TPU generation targeted inference, which uses a learned model rather than a trained one.
The TPU is 15 to 30 times faster than current GPUs and CPUs on commercial AI applications that use neural network inference.
Furthermore, the TPU is significantly energy-efficient, with between a 30 to 80-fold increase in TOPS/Watt value.
Hence in making a TPU vs. GPU speed comparison, the odds a skewed towards the Tensor Processing Unit.
TPU vs. GPU performance
A TPU is a tensor processing machine created to speed up Tensorflow graph computations.
On a single board, each TPU may provide as much as 64 GB of high-bandwidth memory and 180 teraflops of floating-point performance.
A comparison between Nvidia GPUs and TPUs is shown below. The Y-axis depicts the number of photos per second, while the X-axis represents the various models.
TPU vs. GPU machine learning
Below are the training times for CPUs and GPUs using different batch sizes and iterations per Epoch:
Iterations/epoch: 100, Batch size: 1000, Total epochs: 25, Parameters: 1.84 M, and Model type: Keras Mobilenet V1 (alpha 0.75).
ACCELERATOR
GPU (NVIDIA K80)
TPU
Training Accuracy (%)
96.5
94.1
Validation Accuracy (%)
65.1
68.6
Time Per Iteration (ms)
69
173
Time Per Epoch (s)
69
173
Total Time (minutes)
30
72
Iterations/epoch: 1000, Batch size: 100, Total epochs: 25, Parameters: 1.84 M, and Model type: Keras Mobilenet V1 (alpha 0.75)
ACCELERATOR
GPU (NVIDIA K80)
TPU
Training Accuracy (%)
97.4
96.9
Validation Accuracy (%)
45.2
45.3
Time Per Iteration (ms)
185
252
Time Per Epoch (s)
18
25
Total Time (minutes)
16
21
With a smaller batch size, the TPU takes much longer to train, as seen from the training time. However, TPU performance is closer to the GPU with increased batch size.
Hence in making a TPU vs. GPU training comparison, a lot has to do with epochs and batch size.
TPU vs. GPU benchmark
With 0.5 watts/TOPS, a single Edge TPU can execute four trillion operations/per second. Several variables influence how well this translates to app performance.
Neural network models have distinct requirements, and overall output varies depending on the host USB speed, CPU, and other system resources of the USB accelerator device.
With that in mind, the graphic below contrasts time spent making single inferences on an Edge TPU with various standard models. Of course, all models running are the TensorFlow Lite versions for comparison’s sake.
Please note that the given data above show the time it takes to run the model. However, it excludes the time it takes to process the input data, which varies by application and system.
The results of GPU benchmarks are compared to the user’s desired gameplay quality settings and resolution.
Based on evaluating upwards of 70,000 benchmark tests, sophisticated algorithms have been meticulously constructed to generate 90 percent reliable estimations of gaming performance.
Although the performance of graphics cards varies widely across games, this comparison image below gives a broad rating index for some graphics cards.
They have a significant price difference. TPUs are five times more costly than GPUs. Here are some examples:
An Nvidia Tesla P100 GPU costs $1.46 per hour
Google TPU v3 costs $8.00 per hour
TPUv2 with GCP on-demand access $4.50 per hour
If optimizing for cost is the aim, you should go for a TPU only if it trains a model 5X the speed of a GPU.
What is the difference between CPU vs. GPU vs. TPU?
The distinction between the TPU, GPU, and CPU is that the CPU is a non-specific purposed processor that handles all of the computer’s computations, logic, input, and output.
On the other hand, GPU is an extra processor used to improve the Graphical Interface (GI) and do high-end activities. TPUs are strong, specially made processors used to execute projects developed using a particular framework, such as TensorFlow.
We categorize them as follows:
Central Processing Unit (CPU) – Control all aspects of a computer
Graphics Processing Unit (GPU) – Improve the computer’s graphics performance
Tensor Processing Unit (TPU) – ASIC explicitly designed for TensorFlow projects
Does Nvidia make TPU?
Many people have wondered how NVIDIA would react to Google’s TPU, but we now have answers.
Rather than being concerned, NVIDIA has successfully de-positioned TPU as a tool it can utilize when it makes sense but still keeping its CUDA software and GPUs in the lead.
It keeps a control point for IoT machine learning adoption by making the tech open source. However, the danger with this method is that it may provide credence to a concept that might become a challenge to the long-term aspirations of data center inference engines for NVIDIA.
Is GPU or TPU better?
In conclusion, we must say that although developing the algorithms to enable the effective use of a TPU costs a bit extra, the reduced training costs generally outweigh the additional programming expenses.
Other reasons to choose a TPU include the fact that the v3-128 8’s G of VRAM surpasses that of Nvidia GPUs, making the v3-8 a better alternative for processing large datasets associated with NLU and NLP.
Higher speeds may also lead to quicker Iteration during dev cycles, leading to faster and more frequent innovation, increasing the likelihood of success in the market.
The TPU outperforms the GPU in terms of speed of innovation, easiness to use, and affordability; consumers and cloud architects should consider the TPU in their ML and AI initiatives.
The TPU from Google has plenty of processing capacity, and the user must coordinate data input to make sure there is no overloading.
There you have it, a total TPU vs. GPU comparison. We would love to know your thoughts and see if you have done any tests and what results in you received on TPU and GPU.
One of the big consumer highlights from Build 2022 is the fact that Microsoft is giving developers the chance to build third-party widgets on Windows 11. The company was pretty brief about it, mentioning it being powered by Adaptive Cards, and promised more details will be coming later this year. Yet, during a keynote on the matter, we noticed something bigger. It seems as though the company might have teased a Teams widget for Windows 11.
If you’re curious about our hunch, we invite you to watch the “Building great apps with the open platform of Windows,” featuring Kevin Gallo. If you fast forward in this session to around the 41:20 mark, you’ll hear Gallo talk about a non-existing Teams widget in Windows 11 in the present tense. The Microsoft CVP mentions “For example, the Teams widget shows where your next meeting is, so you can quickly join in with a single click.” He then goes on to talk about how Microsoft is exploring other places where widgets can appear in Windows, and how easy it is for widgets to allow someone to launch into an app’s full experience.
As far as we know, this Teams widget does not yet exist in Windows 11, at least publicly. Yet, Microsoft did seem to provide another tease for the said widget. If you look at the graphic to the right of Gallo during the presentation, you’ll see what can be presumed to be some third-party widgets. For the most part, these aren’t branded widgets, but rather, generic mockups. Most have the word “Text” and generic photos on them. However, there seem to be multiple Teams widgets on that sample widgets board.
Again, this is just our hunch, and it isn’t official, but we can see one widget that has some sample Teams chat messages, with a list of people, as well as another one, where an “@ mentioned you” for a Team weekly sync Teams channel is listed out. There’s also a third one for what could be a recently accessed Teams document. We also believe there could be a Pinterest widget on the bottom left, too, but that’s just speculation.
It’s definitely odd to hear Microsoft talk about what could end up being a massive first-party widget for Windows 11 in this way, but we could see where a Teams widget can come in. Since Teams is a Win32 app, Microsoft could eventually use the Teams widget as a way to showcase Win32 app developers about how Adaptive Cards can be used to create their own widgets for Windows 11. We’ll have to wait and see, but for now, this definitely seems to be Microsoft’s best-kept secret of Build 2022.
Roku TV is one of the best devices for streaming content on TV. This explains why it comes with thousands of streaming applications and an app store for users to install those not yet established. Users can also expand the versatility and functionality of their Roku devices in different ways. However, can you get a web browser on Roku TV?
The popularity of this device comes from its affordability and the convenient options available for those who would like to stream content on their TVs. But, first, you need to plug your Roku device into your TV, ensure that it is connected to the internet, and set up your account.
Even though using the internet on Roku TV is fantastic, it is essential to note that this option is not built-in with the device. You can only get it as a third-party service. For instance, you do not get the privilege to directly use a web browser even though it comes with some channels that might act as web browsers.
Unfortunately, these channels do not have the full functionality you get from using a web browser on your computer or mobile device. However, some browsers such as Web Browser X and Poprism work on Roku TV. Can you install Web Browser X or Poprism on Roku TV?
Well, these browsers were poor and did not support most browser functionalities. That notwithstanding, they no longer work with Roku TV. Fortunately, you can use other browsers such as Opera One on Roku, but how do you do that?
Can I Install Android Applications on Roku TV?
Roku TV comes with more than five hundred thousand channels, meaning that users can set up their favorite tracks anytime. Unfortunately, none of these channels are browsers, and those that have browser functionality are pretty poor. This makes users want to install Android applications such as browsers on Roku TV instead of casting their Windows machines on Roku.
Unfortunately, you cannot install Android applications on Roku TV. This is because the TV comes with an Operating System based on Linux. Linux is an open-source Unix operating system based on the Linux kernel. This means that Roku’s operating system differs from that used by Android. The two also use different base kernel versions.
This makes it impossible for you to install Android applications on Roku TV. However, there is some good news for software developers. Roku provides an SDK platform for developers to build their applications. You will need coding knowledge to do this, something that just a small number of people have.
That notwithstanding, Roku TV offers its viewers several advantages that make it one of the best streaming services we have today. Some of them include;
Access to catch-up TV channels such as BBC iPlayer and STV player
Free access to media such as BBC Sports, Sky News, TV Player, and YouTube
Access to popular music channels such as TuneIn, YouTube, VEVO, and Deezer
Access to TV Shows and Movies from media such as Google Play, Sky, Amazon Video, Netflix, Rakuten TV, and NOW TV
Most streaming devices do not have a wide range of choices, making Roku TV stand out from the rest. So, what do you have to do to get or install a web browser on your Roku TV for the ultimate browser experience? There are different ways for you to do that.
Can I get a web browser on Roku TV?
1. Cast a web browser from your smartphone
Launch the Apple App Store if using an iPhone or the Google Play Store for those using an Android device. We are going to use an Android device in this case.
In the search box at the top, type Web Video Cast.
Tap the Install button on the top right and wait for it to download and install.
Launch the app on your Android device, then navigate to a website you would like to browse on Roku TV.
Look for a cast button at the top right of the screen and tap on it.
From the list of options that come up, tap on Roku.
Add Roku’s IP address to connect. You can find the IP address of your Roku device by going to Settings > Network > About.
You will now view the browser on your Roku TV and can browse from your smartphone.
To change anything on the website, you will have to do that from your smartphone.
2. Cast a web browser from your computer
Click the network icon on the button left for those using Windows 10 and connect to a Wi-Fi network.
Connect your Roku device to the same network as your computer.
Follow the steps provided for Chrome and Opera One below to cast it on Roku TV.
Open the desired page you want to cast from Opera One to Roku TV.
Right-click anywhere on the page and click Cast.
From the displayed found devices select Roku and enjoy the streaming.
If you want to navigate on different pages, you will need to do it from the PC.
2.2. Cast from Google Chrome
Install Google Chrome on your computer if you do not have it already installed. You can do that by visiting the official Google Chrome site, downloading, and following the screen prompts to install it.
Launch Google Chrome and visit the website you would like to browse on your Roku TV.
At the top right of the browser, click the three vertical buttons to get a dropdown menu.
Click Cast on the menu and then wait to see Roku appear.
Select Roku. You will now be able to view the browser on your Roku TV. To change anything on the website, you will have to do that from your computer.
Ensure that you have a laptop or desktop running Windows 10 and above. If not, you can download and install Windows 10/11 easily.
Click the network icon on the button left for those using Windows 10 and connect to a Wi-Fi network.
Connect your Roku device to the same network as your computer.
NOTE
In order to cast your PC, you need to download and install Opera One browser or Google Chrome. If you’re wondering why we chose one of these two, it’s because we tried Roku TV with them and ensure you won’t be disappointed.
Navigate to system settings on Roku, select screen mirroring, and then always on to start the connection.
On your computer, click the start button and type devices.
Select Bluetooth and other device settings.
Click on Add Bluetooth or other devices.
Select the second option that reads Wireless Display or Dock.
Wait for your computer to search for the available devices for connection. For example, you should see your Roku TV device, click on it and wait for a link to be established. Your Windows screen will now be mirrored on your Roku device.
Click the small notification icon at the bottom right corner in Windows 10 to choose how you want to project your Windows screen on Roku TV.
Click on the Project icon as shown below.
Select how you want to project your screen. For example, duplicate shows the same screen, extend makes your Roku TV act like a second monitor, while the Second screen only lets you use the Roku TV alone.
4. Cast your smartphone on Roku TV
Connect your smartphone and Roku TV to the same Wi-Fi network.
Launch the Apple App Store if using an iPhone or the Google Play Store for those using an Android device. We are going to use an Android device in this case.
In the search box at the top, type Cast to TV and tap on Cast to TV & Screen Mirroring on the list after the search.
Tap the Install button on the top and wait for it to download and install.
Navigate to your apps menu, launch the Cast to TV & Screen Mirroring app after installation, and select screen mirroring.
Wait for the app to search for the available devices, then select your Roku TV device to connect.
Launch a web browser on your phone, and you will see it on your Roku TV.
Does Roku TV have its web browser?
Some people might not believe that the company has not yet developed its web browser since Roku TV was launched. Even though some developers have tried creating web browsers for Roku TV, they have not met expectations. Some of the browsers developed before include the Web Browser X and Poprism Web Browser.
Even though they do not work anymore, Web Browser X requires users to pay a monthly fee for its usage. This browser could only be used to surf the internet but with a poor design. In addition, it did not support the extended functions supported by other browsers such as Google Chrome.
The Poprism Web Browser was a free web browser for Roku TV but no longer worked. While you might think that this browser was better than the one discussed above, it was worse. This is because the Poprism Web Browser could only let users read text. You could not see any images, meaning GUIs, JavaScript, or CSS were not supported.
What does this mean? If you want to access the best streaming services using a web browser on your Roku TV, you might fail miserably. This, however, is an exception for those who are okay with casting their smartphone or computer screens using the best screen mirroring software.
There are different streaming devices available in the market today. Others, such as Microsoft’s cloud streaming stick, are expected to launch soon. Before purchasing one, make sure that you have evaluated your requirements to see if the one you choose can meet them. For example, if you want to use a web browser, select an option that allows you to do so.
Should I have an Internet connection to cast a web browser on Roku TV?
Looking at the options discussed above, it is clear that you can only mirror content from other devices. We still do not have a dedicated web browser that you can use directly on Roku TV.
Even if you got a dedicated web browser, using it on Roku TV without a mouse and a keyboard would be challenging. It is, however, essential to note that we have modern keyboards that can be used on smart TVs, making typing easier.
That notwithstanding, casting your browser’s screen on your smartphone or computer is the easiest way for you to get a web browser on Roku TV. This rarely fails as long as both devices are connected to the same network. In addition, you can find fixes for devices not supporting Miracast.
It is important to note that you will need to use your smartphone or computer whenever you want to change something on your browser. For example, if you have visited the Windows Report homepage and would like to navigate to Windows 10 System Errors at the footer, you will have to do this from your smartphone or computer.
Is there any other downside to Roku TV?
Roku TV is one of the best options for streaming content on TV. It comes with many streaming applications ensuring that viewers have a wide range of options. In addition, Roku TV is the most effective, affordable, and reliable choice for streaming content compared to other streaming devices.
The only problem is when a user wants to get a web browser on Roku TV. Since it uses its operating system, it cannot support web browsers from popular operating systems such as Android from Google. So instead, as discussed above, it uses a Linux-based operating system.
This leaves users with no option but to try one of the methods discussed above if they want to get a web browser on Roku TV. Even though some of these methods are not so effective, they are the best options available.
Fortunately, software developers can develop their web browsers for Roku TV since the company provides an SDK platform for developers. However, this requires a skilled software developer and might take time.
The best Roku web browser hack is to screen share your Windows machine. You can extend your display to Roku TV and use it as an additional monitor. By just dragging a web browser to the second monitor – the Roku TV – you will be able to browse the same way you do when using your computer.
In this article, we explore ways to correct the problem of Twitch Emotes not uploading.
First, you should note that an Emote on Twitch is akin to an instant messaging emoji, with the only difference being that they seem to have taken on a new life.
These Emotes are used in Twitch chat windows as a way of expression or reaction. Channel owners or streamers frequently build these and provide them to viewers for use in conversation while watching a broadcast.
Emotes are often exclusively available via partners and affiliates. In addition, many Emotes are created due to a meme or trend that spreads via other channels, the internet, or social media.
Users have also experienced sign-up errors, so you could take any of these steps if Twitch won’t let you sign up.
Why are my Twitch Emotes not uploading?
Emotes are occasionally penalized for violating Twitch’s Emote standards. If your Emote has been reported, it will be marked and must be assessed by a Twitch staff member before it can be used again.
This is an uncommon occurrence, but it might cause someone to have problems employing one of your more disputed Emotes.
Secondly, streamers may accidentally delete emotes from broadcasts, whether they are sub-Emotes or a BTTV Emote.
Fortunately, this isn’t the end of your career. As long as your BTTV and sub-Emotes remain in your Twitch library, you can always re-add them.
Additionally, viewers would not have access to Emotes acquired from Twitch bit donations or your sub-Emotes for a lost Twitch affiliate.
In this case, your donors and subscribers can still use the FFZ and BTTV Emotes on the channel but will no longer be able to use those related to being a subscriber or contributing bits.
Furthermore, if Twitch does not yet authorize an Emote, it will not function.
Users have asked how long it takes to upload an Emote to Twitch? Note that you should give between 8 and 24 hours to be authorized. But if your Twitch Emote upload took too long, you should try again or contact support.
Finally, please note that to use specific Emotes, your channel viewers must be subscribers or must have given a minimum quantity of bits.
What should I do when Twitch Emotes are not uploading?
1. Try another browser
An option is to use a separate device or browser to submit your Twitch Emotes. Switching browsers may fix the issue if your current one doesn’t support all of the Twitch features being used. However, it would be best to try using a few different browsers to find which works best.
We love to recommend Opera GX. It is built on Chromium and is a very robust browser. With a unique integration for services like Twitch and Discord, you will find streaming and the use of other features very comfortable.
It also has a vast repertoire of plugins, which means that most users will be able to add customizations for their specific needs.
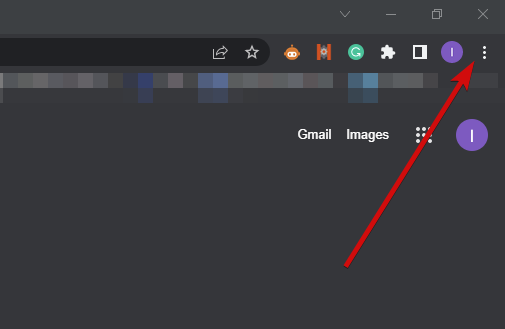
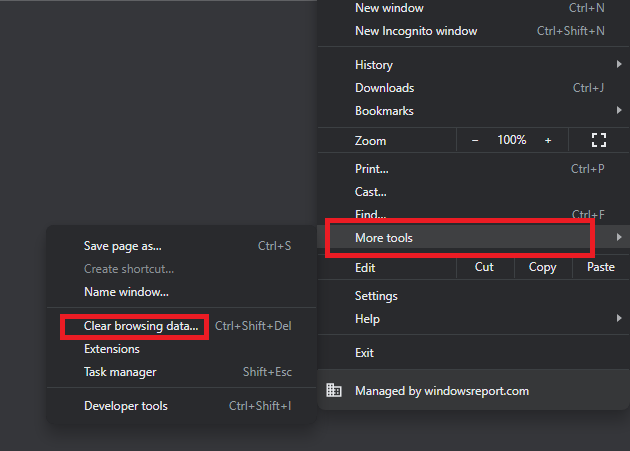
Click on the menu at the top right, expand the More tools option, and click on Clear browser data.
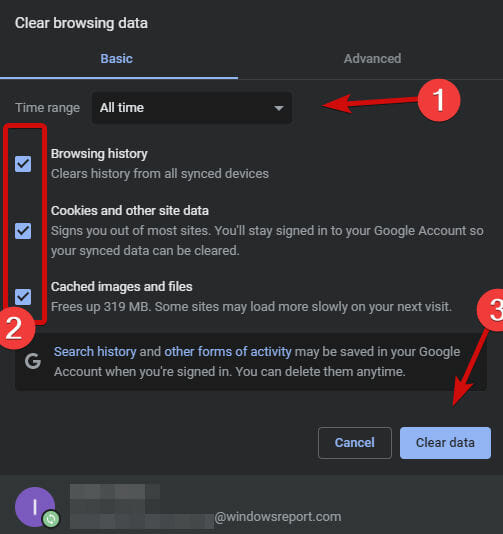
Click on the Basic tab, select a Time range, check the options for Browsing history, Cookies, other site data, and Cached images and files, then click on Clear data.
Finally, reload the browser and see if you have access to Emotes.
Twitch will not upload or display your Emotes if you have not installed appropriate emotes plugins. The right plugins will upload the correct Twitch Emote format and reduce the chances of having your Twitch Emote rejected.
So make sure you have the relevant plugins installed on your PC. Above, we have the BettertTV and the FrankerFacez plugins as examples.
There you go; you should now be able to enjoy using Emotes on Twitch without any hassle. While we have not written these solutions in any particular order, we like to emphasize that using the right plugins is necessary to avoid complications on Twitch.
For many users, CCleaner is a personal favorite when it comes to decluttering and cleaning Windows and other systems. However, quite a few of them complained about CCleaner not clearing the cache on Android.
CCleaner is a cross-platform cleaning tool, and you can use it on Windows, Mac, mobile platforms, or browsers.
Now, some of you might question the utility of such apps in the first place. Instead of constantly wondering, we encourage you to see for yourself how safe and useful CCleaner really is.
There is nothing excessively complicated about clearing the cache on Android.
However, it is time-consuming and tedious. This is where CCleaner, the best app to clean hidden cache on Android, comes into play.
But what do you do when your cache won’t clear even with CCleaner?
What do I do when my cache won’t clear with CCleaner?
1. CCleaner not working on Android, PC, browsers
1.1. Force clear cache on Android
Launch the CCleaner app on your Android device.
Tap Analyze disk. Once analysis is completed, tap Show results.
Make sure you select Hidden Cache from the list of items and tap Finish cleaning.
Then, check Enable in the new dialog box.
Slide down to the Services section, select CCleaner, and switch it to On.
Alternatively, you can simply tap Allow when CCleaner asks permission to access the files on your device.
Return to the cache clearing screen to confirm the action was performed properly.
One of the major culprits behind CCleaner not clearing the cache on Android is no other than the hidden cache.
Apps like YouTube or Spotify store data packages such as image thumbnails to retrieve information quicker and load faster, rather than download it repeatedly. However, they are stored in a hidden place.
Why can’t I clear cache on my Android with CCleaner?
Starting from Android 6, apps like CCleaner require permission in order to access specific parts of your internal cache.
Unless you grant these rights, CCleaner won’t be able to fully clean your device, including the hidden cache.
Finally, you can also manually delete the thumbnails on your device.
How do I clear the cache on my Samsung Android?
Open Settings and go to Storage or Internal storage.
From the list, select Apps and open each item for which you want to clean the cache.
From the App info screen, select Storage.
At the bottom of the screen, you will see 2 options: Clear data and Clear cache.
Tap Clear cache and repeat the process for every other app whose cache you want to remove.
1.2. Fix CCleaner not working on Windows 10/11
Press Windows + I to launch the Settings app.
Select System and navigate to Storage.
Click on the Temporary files option, and the various cache files will now be listed.
Select the files that you want to delete, and click on the Remove files button.
Click on Continue to complete the process.
Clearing the temp files is important as they can disrupt the performance of CCleaner.
Here are more useful tips to help you deal with CCleaner not working on Windows 10:
Run CCleaner with admin privileges.
Make sure you select the precise items you want to remove otherwise the app will skip them.
Run CCleaner in Safe Mode for a couple of minutes, then in regular mode again.
If you’re struggling with different kinds of issues in connection to this app, check out these useful tips on how to fix common CCleaner bugs on PC.
1.3. CCleaner not removing cache in browsers
CCleaner not cleaning Chrome (cookies, cache)
Launch Chrome.
Click on the three vertical dots, and select Settings from the options listed.
Click on Sign in to Chrome and fill in your details (email address, respectively password).
From there, simply press the Turn off button under the You and Google section to disable synchronization.
While you’re at it, go back to the Settings screen and select Advanced from the left pane.
Scroll down to the System section and uncheck the boxContinue running background apps when Google Chrome is closed.
Run CCleaner again to see if the issue is solved.
Why is CCleaner not cleaning Chrome?
Sometimes, CCleaner is unable to remove the browser cache because it simply cannot access it. Since Chrome is usually synced to your Google account, you need to disable syncing.
Alternatively, you can manually delete the browser cache from Chrome directly.
CCleaner Edge Chromium skipped
Launch Edge.
Click on the Settings menu at the top right of the screen and select Safety.
Select Clear browsing data and check all boxes except for Form data and Passwords.
Click on Delete at the bottom of the dialog box.
In previous versions of CCleaner (such as 5.22, but not only), a recurrent glitch made the app freeze when analyzing Microsoft Edge.
It should no longer be the case. However, if you feel that CCleaner is taking too long to scan, you can either select fewer categories or proceed with the manual removal of the cache, as shown above.
If you struggling to declutter your current browser, it might be a good idea to look for a better one.
➡ Switching to Opera makes perfect sense as it not only works seamlessly with CCleaner but boasts tons of space and memory optimization features. ➡ What’s more, you can easily switch between platforms and import your preferences without hassle as Opera works seamlessly across Android, Windows, and Mac devices.
2. Uninstall and reinstall CCleaner
Press Windows + E to launch the File Explorer.
Navigate the path using the following: C:\Program Files\CCleaner
Locate uninstaller, open it and follow the prompts to uninstall the current version of CCleaner.
Follow the on-screen prompts to complete the installation.
Having reinstalled the CCleaner application, all the functionalities should be restored. Hence, issues like CCleaner not clearing cache should be sorted. On Android, it’s even simpler.
Uninstall the app and then, download and install it again from the Google Play store.
Dropbox is an incredibly popular cloud storage service that allows users to upload files from their computers, and then access them from anywhere else. However, sometimes users encounter errors when trying to use it.
One such problem is the Dropbox error 5xx. According to users, a myriad of issues are cropping up when faced with the error. They are unable to login into their accounts, others’ Dropbox is not syncing while the rest are complaining of extremely slow loading of files.
The problem could be anything from an incorrect password to having two-factor authentication enabled but not providing the correct code when requested by Dropbox servers.
One of the easiest methods that you can try to fix the Dropbox error 5xx problem on your own is to restart your PC. Check whether this issue still persists or not.
What does the error 5xx mean?
Dropbox error 5xx is one of the most common errors for Dropbox users. The problem is that when this happens, users are usually unable to access their files and folders. This can be a serious problem if you have important documents stored in your cloud storage.
When this happens, Dropbox may fail or crash preventing you from accessing your account or any files. You will also not be able to upload or download any files.
So, how long does a 5xx error last? It depends. If it is a server issue, the Dropbox team may take up to 24 hours to fix it or respond with a workaround.
If the issue is a problem with your devices such as network issues or firewall settings, as soon as you tweak the settings, your Dropbox account will be up and running in no time.
Why am I getting a 5xx error?
Sometimes, when the Dropbox error 5xx occurs, you can wait it out for a few minutes and the service may resume normal operations. Other times it could be a serious underlying issue.
Reasons why you are getting the 5xx error include:
Network problems – If you’re having problems with Dropbox, the first thing you should do is check whether it’s a problem with your internet connection. Make sure that there isn’t anything wrong with your router or modem.
Corrupted files – If there are any corrupted files in your Dropbox account, the server will try to repair them automatically. However, if the corruption is too severe, it may fail to repair them and return an error message instead.
Firewall settings – Firewall settings and other security software can block access to your files. This can happen if you’re using a personal firewall or antivirus software that’s blocking Dropbox from accessing your files. Try disabling the firewall and see if it works.
Outdated software – Outdated software such as Internet browsers or video drivers can also cause Dropbox error 5xx when trying to login into your account online.
Virus or malware attacks – This is one of the most common causes of this error. If you are experiencing this problem, it is advisable to scan your computer with an antivirus program and remove any detected viruses or malware. You can also try another browser to ensure that it is not a browser-related issue.
Should you encounter any of these issues, [proceed to our advanced troubleshooting methods.
How can I fix error 5xx on Dropbox?
1. Close programs in Task Manager
Press the Windows key, type Task Manager in the search bar and click Open.
Select the Processes tab and End Task for all programs you are not using.
Check if the error persists.
2. Scan for malware
Press the Windows key, search Windows Security and click Open.
Select Virus & threat protection.
Next, press Quick scan under Current threats.
Wait for the process to finish and restart your system.
If you want a more thorough scan, use an antivirus that can identify other threats like ransomware, spyware, script-based attacks, and viruses. We suggest TotalAV. It can detect and remove all types of attacks.
3. Uninstall the latest Windows Update
Press the Windows + I keys simultaneously to open Settings.
Navigate to Windows Updates and go to Update history.
Click on Uninstall updates.
Select the most recent update then click Uninstall.
Press Windows + E keys simultaneously to open File Explorer.
Select the drive you wish to clean, right-click on it and select Properties.
Click on Disk Cleanup then press OK.
Check the boxes of the files you wish to delete and press OK.
5. Switch to another Cloud Storage
If none of the solutions mentioned above somehow don’t work in your situation, we have one last alternative to try.
Switching to a new Cloud Storage as the Sync program is a great option because it is a straightforward app with management tools that help you easily reset passwords if you encounter various issues.
It allows you to share and collaborate privately and authorize team access to unified shared folders, documents, and other important files without the effort of using file servers or email.
Moreover, you can protect your files from ransomware, hardware malfunctions, or even human error, and safely restore your files to any previous date.
Sync
Keep your documents and files safe and secure, and try the Sync platform.
The 5xx error is just one of the many Dropbox errors you may encounter. Other common problems include:
503 Service Unavailable – The server can’t handle the request at this time due to maintenance or capacity problems. You can refer to our guide on how to fix the error 503.
504 Gateway Timeout – The server didn’t send a reply in time, possibly because it was down for maintenance or was overloaded with too many requests. You can try restarting Dropbox again or wait a few minutes before logging in again.
508 Request Timeout – The server didn’t receive a response before its time limit expired. This could mean that your browser is taking too long to load all the resources required to display the page correctly, but it could also indicate that there’s an error on the page itself, such as broken links or missing images. Try a different browser or connect an ethernet cable to your PC.
We hope that the solutions listed above were helpful and you were able to bypass the error. Aside from the 5xx error, we also have an expert guide when Dropbox keeps crashing so be sure to check that out.
The EA error code 770 is a common occurrence for most gamers. It happens mostly on the Star Wars Battlefront 2 game.
Because Battlefront 2 is such a popular game on Xbox, PC, and PS4, it is no surprise that a lot of users are complaining about the error.
If you are experiencing issues when trying to play or access content on EA servers, they could be down so try refreshing and see if the issue persists.
Error code 770 is a common error that occurs when trying to play a game on your PC, Xbox One, and PS4. It can also be caused by corrupt or damaged files in your game’s installation folder.
When you encounter the error, you cannot play the game. The most common cause of this error is a connection issue between your console and EA’s servers.
Sometimes your VPN may also be blocking you from connecting to the EA servers. If you are experiencing this issue, try restarting your router or modem and testing the connection again.
Why can’t I connect online in Battlefront 2?
Star Wars Battlefront 2 Error code 770 is quite common given the popularity of the game. If you are having trouble connecting, it could be because of the one or more of the following reasons:
Poor internet connection – Make sure that your computer/console is connected to the internet and that it is not experiencing any problems such as low bandwidth. If you are using a wireless connection, make sure that you are not too far away from your router/modem.
Firewall settings – Some firewalls may block the game from accessing certain ports or IP addresses, which prevents it from connecting online properly. You will need to disable your firewall temporarily to see if this fixes the problem.
Server issues – The EA servers may just be experiencing downtime and will be back soon. You can check the official page to see if there are any scheduled downtimes or email them directly.
Oftentimes, you can always restart your console to fix the issue but if that doesn’t work, proceed to more advanced troubleshooting.
How can I fix error code 770?
1. Check internet connection
The strength of your internet plays a huge role in your connection to playing the game. If it is not strong, you will keep getting disconnected. Check whether there is enough bandwidth and disconnect any other devices that may be hogging your bandwidth.
You can also connect an ethernet cable directly to your console or PC for a more stable internet connection.
2. Change to a static IP
Press the Windows + I keys combination to open Settings.
Navigate to Network & internet.
Click on Wi-Fi and find your current connection.
Select Edit IP settings and click on Manual settings.
Toggle on the IPV4 button and enter your IP address under Preferred DNS to set a Static IP.
3. Set up port forwarding
Navigate to your web browser and log in to your router.
Locate the Forwarding section.
Fill in the relevant IP Address of your PC or gaming console in their prescribed sections.
Enter the TCP and UDP Ports in their sections.
Reboot your router for the settings to take effect.
4. Set up DMZ
Navigate to your web browser and log in to your router to access settings.
Locate the Demilitarized Zone setting and enable it.
Enter your console’s IP Address in the prescribed path.
Click Save to effect the changes made.
The EA error code 770 is just one of the many Battlefront 2 error codes that you may have come across. We also have a guide on a bunch of Battlefront 2 error codes and corresponding fixes that you can check out.
When it comes to connecting with your friends, if the Steam friend list keeps disconnecting while you are having fun chatting or in the middle of a heated game, it can be quite frustrating.
If you’re not getting notifications from friends or don’t see people on your friend list, it may be because Steam is having trouble connecting to the Steam servers. Other reasons may include a poor internet connection, incorrect firewall settings, or you’re using a beta version of Steam.
How can I fix disconnected friends list on Steam?
1. Restart Steam
Restarting Steam will fix most issues related to your friends’ list. Sometimes, Steam being down means you just have to log out of it completely and then relaunch it.
The server may be busy at the moment and you will have better luck connecting when fewer people are trying to use it at once. Sometimes, Steam may just be having issues and a simple restart will do the trick.
2. Clear cache and cookies
Launch Steam and click on Settings.
Click on Web Browser, select delete web browser cookies and delete all browser cache then click OK.
Exit and restart Steam again.
Manually clearing cookies and cache from Steam can be a time-consuming task, therefore we recommend utilizing a dedicated tool to handle it.
The Intelligent Scan tool in the CCleaner allows you to save data from certain websites that you often visit, such as the Steam platform login credentials. CCleaner will properly clear all of your PC’s unnecessary cache and cookies.
Make sure that your computer has an active internet connection. If not, try restarting the router or modem and check if it works after a few minutes.
If there are no problems with the internet connection on your computer, then try connecting another device (iPhone/Android phone) to the same network and see if they work properly.
If you are a lover of Roblox and find yourself visiting the website on a daily basis, you have probably heard about BTRoblox. Users have been fond of it, however, they have recently reported that their BTRoblox extension is not working as it should.
The term, which stands for Better Roblox, refers to the fact that the site’s appearance may be altered. And that users can also modify a variety of the items they see.
Not only does BTRoblox alter the appearance of Roblox.com as a whole, but it also adds some features that you may have wanted for a very long time.
There are a variety of options that pertain to the Navigation, Profile, Groups, Inventory, and Catalog. As well as Item Details, in addition to General settings.
It is stated in the Privacy Practices that have been provided by the publisher that this extension will not collect or make use of any of your data in any way.
Is BTRoblox allowed on Roblox?
Downloading and using Better Roblox is completely risk-free, and it is allowed by Roblox itself. Because it is a piece of open-source software (OSS), the BTRoblox browser extension allows anybody to inspect the program’s source code. And thus confirm that it does not include any dangerous code.
There are a lot of individuals on BTRoblox, as the platform has well over 1,000,000 members. The Better Roblox internet browser extension would suffer irreparable damage to its image if even a single user had difficulties caused by the fact that the software was not secure.
Is BTRoblox an extension?
Yes, it is an extension that stands for Better Roblox. It is designed to improve Roblox’s website by altering its appearance and contributing to the website’s fundamental operation by providing a variety of brand-new features.
Check out our list of the best Discord extensions for you to have in order to boost up your multiplayer gaming experience.
Which browser is best for Roblox?
The gaming-oriented web browser known as Opera GX is a variant of the Opera One browser that is perfect for Roblox.
Opera GX may be downloaded separately from your primary web browser if you so want. You can also set it as the default search engine. And the superb RAM and CPU limiter features allow you to choose how much of your computer’s capacity you want the browser to use.
In addition, the integration of Discord ensures that you will always be able to communicate with your other gamers, which is a huge benefit.
For more information on Opera GX and alternative browser choices, check out our post on the seven best browsers to play Roblox on and enjoy it to its fullest.
On what browsers did BTRoblox stop working?
Not only did the BTRoblox stop working on let’s say Chrome, but it also proved to be malfunctioning on a plethora of other browsers. Some of these are the following:
BTRoblox extension not working on Firefox – Firefox users can try to update their browsers before giving up completely.
BTRoblox extension not working on Chrome – If you are on Chrome, the best solution is to uninstall and reinstall the extension on your browser.
BTRoblox extension not working on Opera One – Same goes for Opera One users. Moreover, we recommend that you switch to Opera GX since it is gaming optimized.
BTRoblox extension not working on Edge – Edge users might want to switch their browser to an alternative one. We have linked above, our post with 7 alternatives to try.
This being said, let’s jump into the list of solutions to fix the BTRoblox extension not working issue on your PC. Follow along!
How can I fix BTRoblox if it’s not working?
1. Reinstall it on your browser
Open your browser’s Settings menu. Below, we have used Chrome to showcase the process, but it should be similar no matter what browser you are using.
Next, click on the Extensions option in order to see all the installed ones.
Find the BTRoblox extension and click Remove under it.
Next, head to Chrome’s webstore for extensions and click on Add to Chrome next to BTRoblox. That’s it! The BTRoblox extension not working issue will be solved in no time.
2. Use an alternative browser
Thanks to other Roblox users, we found that changing your current browser before accessing the BTRoblox extension, proved to be one of the best solutions.
For best performance, we suggest you get a browser that’s constantly updated. Also, if you regularly access in-browser games, it’s just as important to focus on how well the browser performs.
Opera One is a lightweight browser that supports Roblox and has its dedicated add-ons in its Web Store.
Opera One has tons of performance-oriented features that can improve your Roblox experience. These include a built-in ad blocker, a battery-saving feature, and a free, unlimited VPN.
The browser is also great for quick access. Add your favorite social media platforms and use them directly from the sidebar. No need to open a different tab or window.
Here, type update in the Search bar and check whether it says your browser is up to date or not. If it isn’t make sure to click on the Update now button.
When it comes to fixing defects, programmers need to be at the top of their game, especially once the product has been made public and users have been actively using it.
We are all familiar with the word bug, which refers to a fault or malfunction in the programming of a piece of software or a system that causes problems.
As a final solution, we recommend that you wait for an extension update. A hotfix is a cumulative package that comprises information that is used to remedy an issue in a software product. Or a quick-fix engineering update (i.e., a software bug).
If Chrome still gives you headaches, check out our article on the seven best browsers to play Roblox on and choose an alternative browser to use instead of your current one.
Alternatively, take a look a the five best browsers for gaming if you don’t like any of the aforementioned options. These include gaming-oriented optimization features, so they’re certainly worth a shot.
We hope our guide proved to be helpful for you. Don’t hesitate to tell us what you think as well as whether you have more solutions in mind. Thanks for reading!
Lately, users have been reporting that iCUE is not detecting any devices in Windows 11. You’ve come to the right place as we will show you how to troubleshoot the issue in five easy methods.
It may happen for a number of different reasons, and in order to get all of the peripherals back to working properly, the problem has to be fixed.
There is no question that iCUE, also known as the Corsair Utility Engine, is among the most reliable software for managing devices that is currently available on the market.
Moreover, it is a comprehensive tool that can monitor and alter the performance of all of the peripheral devices that are connected to your computer, such as your keyboard, mouse, audio headsets, and so on.
Why are my devices not showing up in iCUE?
It is possible that there is a compatibility issue between your Corsair device and the version of iCUE that you are now using, which would explain why your devices are not being identified.
Thus, it is necessary to upgrade iCUE to the latest version available in order to fix the unrecognition issue.
Is iCUE compatible with Windows 11?
If you have upgraded your iCUE software to version 4.16.187 or later, your program is completely compatible with Windows 11.
However, there are certain items on the market that are only compatible with iCUE version 3, as a result of the significant modification that occurred between iCUE version 3 and 4. Thus you won’t be able to personalize certain devices in Windows 11.
What devices aren’t showing up in iCUE?
Users have been reporting different devices and peripherals that fail to be detected by the Corsair iCUE app. Some of them are the following:
Corsair keyboard not showing up in iCUE – If iCUE is not detecting your keyboard, try to unplug it and hold down the ESC button while plugging it back in.
Corsair fans not showing up in iCUE – After restarting your computer, if iCUE is not detecting any fans, the problem may be caused by a conflict between software components. Make sure to uninstall other software that controls RGB components.
Corsair mouse not showing up in iCUE – If iCUE is not detecting your mouse, try to upgrade the software to the latest version on the market.
iCUE not detecting RAM – You might need to go to the RAM settings inside iCUE and perform a force update.
iCUE not detecting headset – As before, software incompatibilities are the main lying cause behind the detection issues. Try to upgrade iCUE and restart your computer.
iCUE not detecting CPU cooler – Get rid of any other third-party components manager as it might interfere with iCUE.
In the following section, we will address all of these scenarios with our comprehensive list of five solutions to the iCUE not detecting devices in Windows 11 error. Keep on reading!
How do I fix Corsair iCUE not detecting devices?
1. Update your drivers
Right-click on the Start icon from your Taskbar and select Device Manager from the menu.
Here, expand the Keyboards section if your iCUE is not detecting your keyboard, then right-click on the keyboard device and choose Update driver.
Repeat the same step for any other device or component that is not detected by the software.
If you’ve noticed that your computer is performing slower than normal, or that your peripherals are misbehaving, the issue can be caused by out-of-date device drivers.
Device drivers are an essential component of any piece of software that assists in the proper operation of various pieces of hardware within a computer system.
Your computer will function without any hiccups after these drivers have been brought up to date. Nevertheless, once they have reached their expiration date, they might begin to cause difficulties that are certain to aggravate.
Select the device that presents issues and then select the Force update option. Do this for all the devices that you encounter problems with.
4. Change the BIOS switch
You should be able to discover a switch that is labeled BIOS on the other side of the device. Change the mode of the switch and then try to reconnect the device.
Check whether the peripheral is recognized this time. If it isn’t, change the BIOS switch to another mode once again.
5. Update Windows
Open the Settings app by holding Windows and I simultaneously, then navigate to Windows Updates.
Here, click on the blue button from the right side that either says Install now, Check for new updates or Restart now. Wait for the process to finish and then reboot your computer.
Installing the latest security updates is absolutely necessary in order to defend your computers from malicious assaults.
In the long run, it is needed to install software updates, not only to get access to new features but also to be on the safe side in terms of security loopholes that are identified in obsolete programs.
The Core Engine Utility is one of the most significant developments for gamers in the current era. We really hope that you found this article to be informative and that it assisted you in resolving the iCUE not detecting devices in Windows 11.
Don’t hesitate to tell us what you think as well as whether you have more solutions in mind. Thanks for reading!
There have been several complaints from users about Wundermap not working in Chrome, even though Google Chrome is one of the most popular web browsers in the world.
Although quite popular, it also has some flaws. For instance, Chrome has been widely known for its performance issues because it has a habit of hogging system resources, particularly memory which can sometimes cause an annoying lag.
Wundermap (Weather underground map) is a commercial weather service that provides real-time weather information over the Internet. It puts you in complete control of your weather information.
The interactive weather map on the Wundermap lets you access various weather information, including temperature, wind speed and direction, dew point and humidity, and precipitation.
You might have tried other weather stations such as; AccuWeather, The Weather Channel, Dark Sky, and some others, which are viable weather stations too, but in terms of getting access to specific weather stations, Wundermap is second to none.
You probably may be experiencing this same issue or someday will (not trying to be pessimistic, though). Not to worry, this article has prepared about three possible fixes should in case Wundermap fails to work in your Chrome.
Quick Tip! Wundermap has dedicated add-ons and extensions for other browsers. If you find it difficult to access it on Chrome, try using Opera One. It’s secure and gives a similar user experience.
Opera one is also faster and more stable due to features like Ad blocker and VPN being built-in. The browsing experience can be further enhanced with the built-in AI
Opera One
ImGet a fast and customizable browsing experience with this performance-oriented browser that’s perfect for Wundermap.
Click in the box labeled Search Locations at the top right corner.
Type in the name of the city, state/province, country, a nearby airport, or a postal zip.
Wunderground will display the weather information for the area you’ve selected.
Click Change Station to get readings for a different location.
On the right side of the screen, you can click the three tabs on the map to get different meteorological views of your current area. Radar shows you the type and amount of precipitation, Satellite shows you temperature and clouds, and Webcams show you live shots of existing conditions.
Click on the Descriptive mode tab to view the weather forecast more straightforwardly.
This is a quick guide on using Wundermap and how to explore the basic features for accurate weather information. However, the information provided may be overwhelming for an average user.
What can I do if Wundermap is not working in Chrome?
1. Enable Hardware Acceleration in Chrome
Press the Windows key, input Chrome, and launch it.
Click on the three dots icon at the top right corner and select Settings from the options.
Locate the Advanced tab on the left pane, expand it and choose System.
Toggle Use hardware acceleration when available to enable it.
Click to relaunch Chrome to effect the changes.
Mapbox, an essential component of Wundermap, might have been disabled, and to function well, Mapbox requires access by enabling the hardware acceleration when available on Chrome. Now try to reaccess your Wundermap after this; if the problem persists, you can try the next fix.
Press the Windows key, input Chrome, and launch it.
Press the F12 key on your keyboard.
Go to the Console tab and see if any network requests/resources are blocked.
Press CTRL + H to open the history tab and clear browsing data.
Select All time and check all three options of clearing the browsing history, Cookies, and Cache.
Some corrupt files on Chrome may block the network connection. Hence, it may cause Wundermap not to work on Chrome. However, once they are cleared, everything should function normally.
3. Reset Chrome to Default
Press the Windows key, input Chrome, and launch it.
Click on the three dots icon at the top right corner and select Settings from the options.
Locate the Advanced tab on the left pane, expand it and Restore settings to their original defaults.
Select Reset settings.
We believe that applying all the above fixes should sort out the issue of Wundermap not working on Chrome.
Transforming your Windows 10 PC into a VPN server to setup a VPN at home is an excellent way to stay in touch with your files and applications, no matter where you are.
For example, you can access files through the VPN from the office if you forgot to copy an important work document or need to check up on torrent downloads. It’s equally important to share files from your office to your home PC or laptop.
More importantly, it’s a much safer option than resorting to remote access software tools, which are susceptible to various vulnerabilities.
Our step-by-step guide below shows you the exact steps to setup a VPN at home on Windows 10. The best part about it is that you don’t need to install any additional software programs to make everything operational. You just need a router that supports port forwarding.
Is the Windows built in VPN free?
The Windows built-in VPN is pre-installed on Windows 10 and Windows 11 PCs. To configure it, you need to enter network information and configure your ports.
How do I setup a VPN server on Windows?
To set up a VPN server on your Windows PC, you can use the in built Network Adapters configuration panel. You can also configure your router.
1. Accept incoming connections on your home PC
Right-click the Windows 10 Start button.
Go to Network Connections > Change adapter settings.
Press Alt key, open the File menu, and click New Incoming Connection.
Select the users you want to have VPN access to your PC. To create a new profile select Add someone and pick a username and password. Click Next.
Select Thorugh the Internet and click Next again.
Click on Internet Protocl Version 4 (TCP/IPv4) and then on Properties.
Check the Allow callers to access my local area network box and click ok.
Click Allow Access and close the panel.
Although Windows 10 provides you with the hostname and recommends making a copy of it, this won’t be necessary for remote connections over the Internet (only for LAN connections).
If you made any mistakes during the setup, you can edit the connection properties by right-clicking Incoming Connections and selecting Properties. For example, you can go back anytime to allow more user accounts or remove the permissions of existing users.
*To ensure your computer’s security, it’s recommended to create a new user account that only you will know. Make sure to generate a random and secure password that can’t be hacked. To easily keep track of your user credentials, use a password manager.
2. Configure router settings
Press Ctrl + R, type cmd, and press Enter to open the Command Prompt.
Type ipconfig and hit Enter.
Select your IPv4 address and press Enter to copy it.
Press New Rule in the Actions panel on the left side.
Set Rule Type to Port and select TCP.
Select Specific local ports and write 1723.
Make sure to Allow the connection.
Set any rule name and press Finish.
4. Use the Windows built-in VPN to create a new network
Type settings in the taskbar and open the Settings app.
Select the Network & Internet category.
Select VPN, then Add a VPN Connection.
Select Windows (bult-in). Fill in the form with your preffered connection and server name, and VPN type. Select how you want to connect and hit Save.
This method lets other devices to connect to your VPN network. Using the same credentials you provided, try to connect to this network from a different device.
To make sure other devices have access to your network, right click on it in the Network Connections panel and hit Properties.
Tick the box next to Allow other network users to connect through this computer’s Internet connection. Hit ok.
Once you’re in, you can access files through the VPN, copy, edit or rename data, and more.
5. Enable Network Discovery to allow access to your VPN server
Open Settings> Network & Internet.
Open the Network Sharing Center and click on Advanced Sharing Settings.
Under Network Discovery, enable Turn on Network Discovery and Turn on file and Printer Sharing. Click Save changes.
At this stage, you should be able to connect to the VPN and share data on your network. If you encounter any problems, consider our troubleshooting tips for Windows 10 PPTP VPN not working.
In conclusion, figuring out how to set up a VPN at home on Windows 10 is the first step toward turning your home PC into a VPN server. It enables you to remotely connect from any computer and gain access to your personal data.
It’s not necessary to install additional software. However, PPTP is a weak protocol with low security. We suggest upgrading to router firmware that supports OpenVPN configurations. Then you can install a free OpenVPN client on any device to remotely access your home VPN server.
To learn all the tips and tricks of Microsoft’s OS, visit our Windows 10 area. We give insightful tips and tricks that will improve your Windows experience.
Check out our VPN Troubleshooting Hub to fix any VPN problems. Here you can find suggestions and solutions for most VPN issues, both for in-built and third-party VPNs.
If you want to correctly install Razer mouse drivers on your Windows 10 PC, follow along. The job is not difficult at all, but there are some things you need to consider.
Windows 10 and third-party drivers (especially the obscure ones) are having issues since day one. Many users reported issues with printers and outdated (support-wise) hardware, but it seems that the problem applies to top-notch Razer mice which are fairly new and well-supported.
Namely, either the affected owners of a Razer mouse are unable to use it at all, or the driver breaks and renders the device unusable after every Windows 10 update.
Most frequent models that cause problems installing are Razer Mamba, Razer Deathrade and Razer Ripsaw. If you can’t install these Razer drivers, we are going to show you exactly how to do it.
Do Razer mice need drivers?
To make sure your Razer mouse runs properly, it’s recommended you install a driver. Windows has a generic driver pre-installed. This means that you should be able to use a mouse as soon as you connect it to your PC.
That being said, given the fact that Razer mice do generally have more features than a basic mouse has, it’s best you install their dedicated drivers.
How do I get Razer Drivers? You have several options. You can install Razer Synapse 2.0 on your PC. It’s a configuration tool that helps you install, update, and maintain all Razer products.
You can also manually install the drivers from the Razer support site. Just find your model and follow the installer prompts. A simpler option would be to use a dedicated driver updater tool.
How do I update my Razer mouse driver? The easiest way to update your Razer mouse driver is directly from the Synapse app. Just click on Check for Updates. If any are available, you can download them and the app will automatically install them.
You can also keep checking the support site for a new release. That however can be more time-consuming. If you don’t want to miss out on new versions, use Outbyte Driver Updater, it automatically adds all new drivers to its database.
Keep in mind that the automatic driver updates in Windows will only update the generic mouse driver. So it’s best you turn them off to avoid any conflict.
How to install Razer mouse drivers in Windows 10?
There are three simple steps to securely install your Razer mouse drivers to your Windows 10 PC. To make sure you do it properly, follow these guidelines:
The first thing we’ll need to do is to remove the faulty generic driver which is automatically installed. Some users managed to make Razor work in a matter of seconds on various different PCs, but that one Windows 10-powered PC just can’t cut out.
In order to resolve this, removing the generic driver (including secondary drivers) is paramount. To make your job easy and quick, you can use software that automatically detects drivers and boost your computer.
This procedure is fairly simple, you’ll just need to get an alternative USB mouse to follow the steps below:
Unplug the Razer mouse and Wi-Fi receiver.
Right-click Start and open Device Manager.
From the Main Menu, select View > Show hidden devices.
Expand Mice and other pointing devices.
Right-click on your Razer mouse and uninstall it. Also, uninstall all hidden supporting drivers.
2. Download the proper driver
Now, once we have dealt with the inappropriate drivers, we can move on to obtaining the ones which should work without issues. The Razer Synapse 2.0 cloud-based configuration tool covers software support for all mice offered by the renowned OEM. And, which is more important for this scenario, it covers all versions of Windows 10. The only requirement is running 64-bit Windows 10.
Here’s how to download the proper Razer mice driver for Windows 10:
Run the Synapse client and locate your exact mouse on the list.
Install drivers and plug in the mouse.
Or you can locate the exact device and download the legacy driver. This, of course, still requires disabling the driver updates. On the contrary, Windows 10 will change them to the latest version and you’ll again bump into the same problems.
If the mentioned solution doesn’t work for you, we recommend you a third-party tool that you can use to automatically install the latest drivers on your Windows 10 computer. A professional driver updater tool is one of the most efficient options to take into consideration.
You need to know from the start that a professional tool makes updating drivers simple even for newbies. More precisely, the tool runs automatically to find outdated drivers in seconds.
In order to update any driver accordingly and without causing other system errors, it is more beneficial to use dedicated tools that can provide automatic support.
Finally, what only remains is to disable the automatic installation of drivers in Windows 10 through Windows Update. This is the most common cause of the issues with Razer mice on Windows 10.
Generic mice can work with the generic drivers imposed by the system upon the PnP. However, wireless and even wired but multifunctional precision gaming mice thrive only with appropriate drivers.
There are two ways to disable further updates of drivers. One completely kills drivers updates for all devices (not recommended) and the other allows you to pinpoint one driver which is out of the boundaries.
Here’s the first way:
In the Windows Search bar, type Advanced and choose View advanced system settings.
Under the Hardware tab, choose Device Installation settings.
Choose No and confirm changes.
And here’s the second:
Download Show or hide updates troubleshooter, here.
Run it and hide all Razer-related devices.
Close the tool and you’re good to go.
That should do it. In case you have an alternative solution or questions regarding the workarounds we provided, make sure to tell us in the comments section below.
After installing, if you experience any difficulties in using the mouse, check our comprehensive guide that will help you fix the most common Razer mouse errors.
Don’t stop there! Tackle drivers issues with expert confidence thanks to our Driver Errors Troubleshooting Hub. Visit the Razer section as well to learn more about your favorite accessories.
Amazon S3 is essential for organizations or businesses to have backups of their work data constantly. This process ensures good continuity as well as accountability.
An efficient idea to see this is through Amazon Simple Storage Solution (Amazon S3). It is an excellent service, which presents a massive remote storage service for saving your system’s data.
This article presents you with best practices to upload large files to S3 from the browser in the remotest way possible.
These practices cut across optimization of files to S3; how to upload files more significant than 100 megabytes and means to upload your files at a maximum speed, all via the use of Amazon S3. However, it is all very straightforward if you follow the laid down rules here.
How can I optimize uploads of large files to Amazon S3?
1. Install and configure the Amazon AWS CLI
Visit this page to find Amazon‘s detailed installation instructions.
Configure the access ID, user profiles, and key using the following command:
AWS configure
AWS Access Key ID [None]: <AccessID>
AWS Secret Access Key [None]: secretkey
Default region name [None]: us-east-1
Default output format [None]: json
If you’re using the AWS Command Line Interface (AWS CLI), customize the configurations to ease the faster upload of large files to S3 from browsers.
Press the Windows key, input Notepad, and launch it.
Enter the following line of command into the blank Notepad file: aws s3 sync"C://Desktop/backups/"s3://your-bucket
Press theCTRL + S and save the file with the .BAT extension.
Next, click on the Start Menu button and search for the task scheduler.
Open Task Scheduler. (If it fails to open, fix it with this guide)
Click on the Actions menu, choose to Create Task, edit the Name, and describe the new task.
Choose a one-time, daily, weekly, or monthly trigger.
Click on the Actions tab and Create basic task from the resulting dropdown menu.
Find the batch file you created in step 3.
Save the task.
After successfully saving the newly created task, you no longer have to back up your data to Amazon S3 manually because the Task Scheduler will do it for you at the configured interval.
How do I upload a file greater than 100 megabytes on Amazon S3?
The maximum file size that you can upload by using the Amazon S3 console is 160 GB. The S3 would then lead us to provide means to upload files greater than 100 megabytes on Amazon S3.
Run a high-level (aws s3) command
Place the file in the same directory as where you are running the command from.
Run the following cp command: aws s3 cp cat.png s3://docexamplebucket
Amazon S3 automatically performs a multipart upload for large objects.
How to upload your files at the maximum speed
Use a multipart upload. A large file is split into multiple parts in multipart upload and uploaded separately to Amazon S3.
After uploading the parts, Amazon S3 combines the elements into a single file. This multipart upload will result in faster uploads and lower chances of failure with large files.
The tips highlighted above are the best practices to keep in mind to upload large files to s3 from the browser effectively.
Amazon S3 storage is excellent, and to access it quickly, and you’ll need appropriate software, such as the S3 browser application. Moreover, several applications work with S3. You can check for the best S3 browser software here. You can also safeguard your Amazon AWS data with a suitable antivirus.
Should you have further suggestions, questions, or possible ways to upload your files on Amazon S3, kindly drop them in the comment section below.
Pop-up blocker Internet Explorer 11 is usually not easy to activate for some users. The feature helps to reduce small pop-up windows from displaying in your web browsing.
Most of the time, these pop-ups are advertisements on websites you are browsing. There are also cases of them triggering the installation of malware on your device without prompting you.
In this article, we will be discussing how you can get rid of them in your Internet Explorer. Since they are needed to complete actions on some sites, we will also highlight how to enable them.
Where can I find the Pop-up Blocker?
The pop-up blocker is enabled by default in Internet Explorer 11. Majorly, it can be found under the Privacy settings in the browser itself. Aside from here, you can also find and tweak its activities in other places like:
System Registry – It is like a database of configuration information for applications and preferred settings for users of a PC. The Internet Explorer Pop-up blocker can be enabled or disabled from here (more on that later).
Group Policy – Administrators of a PC can manage settings for applications here. It allows you to specify configuration for users connected to the system.
How do I check if pop-ups are blocked?
Launch Internet Explorer and click on Tools or press Alt + X. Next, select Internet Options.
Choose the Privacy tab and look at the Pop-up Blocker section. If it is checked, then Pop-up is blocked. uncheck it and select Apply to unblock.
How do I enable the Security tab in Internet Explorer 11?
Open Internet Explorer and press Alt + X to open Tools. Next, choose Internet Options.
Now click on the Security tab in order to launch it.
How do I allow Pop-ups on Internet Explorer 11?
Press the Windows key + R to open Run and type the command below and press Enter: iexplore
Tap Alt + X to display the Tools and choose Internet Options.
Click on the Privacy bar and uncheck the box behind the Pop-up Blocker.
Select Settings to open the Pop-up Blocker Settings dialog box.
Enter the Address of the websiteto allow then click Add. Finally, click on the Close button.
Click the OK button to apply the changes made and close the Internet Options dialog box.
How to enable the Pop-up Blocker in Internet Explorer 11?
You don’t need to do anything if you’ve never tampered with the computer’s Internet Explorer settings. This is because the Pop-up Blocker is expected to be enabled by default.
In case you’ve disabled it and would like it enabled, use any of the steps highlighted above to locate the Privacy settings where you can check the Pop-up Blocker box to enable it.
How do I turn off Pop-up Blocker in Internet Explorer 11?
1. Use Registry
Tap the Windows key + X to open the Quick Link Menu and select Run.
Type the command below and press Enter: regedit
Search for the folder path below in the Registry Editor: Computer\HKEY_LOCAL_MACHINE\SOFTWARE\Microsoft\Internet Explorer\Main\FeatureControl\FEATURE_WEBOC_POPUPMANAGEMENT
Double-click on iexplore.exe to change the Value data to 0. This is how to disable Pop-up Blocker Internet Explorer 11 in Registry.
The Windows Registry is a hierarchical database that contains low-level settings for apps that choose to use the registry. As well as for the Microsoft Windows operating system itself.
Launch Run by pressing Windows + R then type the command below and press Enter: gpedit.msc
Select Computer Configuration followed by Administrative Templates and Windows components.
Scroll to find Internet Explorer. Click on it and then choose Internet Control Panel followed by Security Page.
Pick Internet Zone followed by Use Pop-up Blocker.
Select the Enabled option then click OK. This is how to disable Pop-up Blocker Internet Explorer 11 in Group Policy.
What to do if the Pop-up window is not opening in Internet Explorer 11?
Open Internet Explorer 11 then click on Tools to select Internet options.
Next, navigate to the Security tab and add the site where the Pop-up window is not opening to. And finally set the security level to medium or low. That’s it!
There you have it all. We hope you can play around with your browser settings whether to block pop-up Internet Explorer 11 or turn off the Pop-up Blocker from Internet Explorer 11 in GPO.
Let us know in the comments section whether this guide proved to be helpful to you. If you have any suggestions or tips on solving related issues, don’t hesitate to share them with us.
This one is for all the update-hungry users out there, as we know that you are eagerly awaiting new software from Microsoft on a regular basis.
The Redmond-based tech company has released optional cumulative update previews for Windows 11, Windows 10 version 1809, and Windows Server 2022, with fixes for Direct3D issues impacting client and server systems.
These updates are part of the April 2022 monthly C updates, which allow Windows users to test the fixes released on June 15th as part of next month’s Patch Tuesday.
If you are also looking to refresh your memory on the May 2022 Patch Tuesday rollout or download any updates, we got you covered.
What does KB5014019 bring new to the table?
As you most likely know by now, these scheduled non-security preview updates are entirely optional, so don’t feel obligated to install them if you choose not to.
They are issued to test bug fixes and performance improvements before the general release, and they don’t provide security updates.
Through this latest rollout, you can find updates such as KB5014019 for Windows 11, KB5014022, for Windows 10 version 1809, and KB5014021, for Windows Server 2022.
For starters, let’s look at the highlights for this Windows 11 release and see what new features we can expect from it.
Highlights
Improves the Family Safety verification experience for a child account when you send a request for additional screen time.
Windows spotlight on the desktop brings the world to your desktop with new background pictures. With this feature, new pictures will automatically appear as your desktop background.
Addresses an issue that fails to maintain the display brightness after you change the display mode.
Addresses an issue that affects the IE mode window frame.
Addresses an issue that prevents internet shortcuts from updating.
Addresses an issue that causes an Input Method Editor (IME) to discard a character if you enter the character while the IME is converting previous text.
Addresses an issue that causes Widgets to appear on the wrong monitor when you hover over the Widgets icon on the taskbar.
Adds animation to the Widgets icon when you click or tap the icon and the taskbar is aligned on the left.
Addresses an issue that affects the rendering of the default Widgets icon on a taskbar that is aligned in the center.
Addresses an issue that causes blurry app icons in Search results when the display’s dots per inch (dpi) scaling is greater than 100%.
Addresses an issue that causes file copying to be slower.
Addresses an issue that fails to automatically give the search box input focus when you select the Start menu and start typing.
Fixes
Addresses an issue that causes the Input (TextInputHost.exe) app to stop working.
Addresses an issue in searchindexer.exe that affects the search for shapes in Microsoft Visio.
Prevents users from bypassing forced enrollment by disconnecting from the internet when they sign in to Azure Active Directory (AAD).
Addresses an issue that might run an AnyCPU application as a 32-bit process.
Addresses an issue that prevents Azure Desired State Configuration (DSC) scenarios that have multiple partial configurations from working as expected.
Addresses an issue that affects remote procedure calls (RPC) to the Win32_User or Win32_Group WMI class. The domain member that runs the RPC contacts the primary domain controller (PDC). When multiple RPCs occur simultaneously on many domain members, this might overwhelm the PDC.
Addresses an issue that occurs when adding a trusted user, group, or computer that has a one-way trust in place. The error message, “The object selected doesn’t match the type of destination source” appears.
Addresses an issue that fails to display the Application Counters section in the performance reports of the Performance Monitor tool.
Addresses an issue that fails to maintain the display brightness after you change the display mode.
Addresses an issue that might affect some apps that use d3d9.dll with certain graphics cards and might cause those apps to close unexpectedly.
Addresses an issue that affects the IE mode window frame.
Addresses an issue that affects Group Policy templates.
Addresses an issue that prevents internet shortcuts from updating.
Addresses an issue that causes some users to see a black screen when they sign in and sign out of Windows.
Addresses an issue that causes an Input Method Editor (IME) to discard a character if you enter the character while the IME is converting previous text.
Addresses an issue that affects the Desktop Duplication API, which affects display orientation and causes a black image to appear on the screen.
Addresses an issue that causes print failures when a low integrity level (LowIL) application prints to a null port.
Addresses an issue that prevents BitLocker from encrypting when you use the silent encryption option.
Addresses an issue that leads to a false negative when you run scripts while Windows Defender Application Control (WDAC) is turned on. This might generate AppLocker events 8029, 8028, or 8037 to appear in the log when they should not .
Addresses an issue that occurs when you apply multiple WDAC policies. Doing that might prevent scripts from running when the policies allow scripts to run.
Addresses an issue that affects the Trusted Platform Module (TPM) driver, which might increase the system’s startup time.
Addresses an issue that might cause the Remote Desktop client application to stop working when you end a session.
Addresses an issue that affects the behavior and shape orientation of a mouse cursor for Microsoft Defender Application Guard (MDAG), Microsoft Office, and Microsoft Edge. This issue occurs when you turn on a virtual graphics processing unit (GPU).
Addresses an issue that causes Widgets to appear on the wrong monitor when you hover over the Widgets icon on the taskbar.
Adds animation to the Widgets icon when you click or tap the icon and the taskbar is aligned on the left.
Addresses an issue that affects the rendering of the default Widgets icon on a taskbar that is aligned in the center.
Addresses an issue that fails to make the options Run as administrator and Open file location available for certain results when you search from the taskbar.
Addresses an issue that fails to automatically give the search box input focus when you select the Start menu and start typing.
Addresses an issue that causes blurry app icons in Search results when the display’s dots per inch (dpi) scaling is greater than 100%.
Addresses an issue that causes file copying to be slower because of a wrong calculation of write buffers within cache manager.
Addresses an issue that might cause a system to stop responding when a user signs out if Microsoft OneDrive is in use.
Addresses a known issue that might prevent recovery discs (CD or DVD) from starting if you created them using the Backup and Restore (Windows 7) app in Control Panel. This issue occurs after installing Windows updates released January 11, 2022 or later.
Addresses a known issue that affects certain GPUs and might cause apps to close unexpectedly or cause intermittent issues that affect some apps that use Direct3D 9. You might also receive an error in the Event Log in Windows Logs/Applications, and the faulting module is d3d9on12.dll and the exception code is 0xc0000094.
As we mentioned, the latest Windows optional updates come with fixes for issues that might cause some applications to crash or trigger various problems.
KB5014019 addresses an issue that might affect some apps that use d3d9.dll with certain graphics cards and might cause those apps to close unexpectedly.
Furthermore, this update also fixes a known issue affecting specific GPUs and could “cause apps to close unexpectedly or cause intermittent issues that affect some apps that use Direct3D 9.
The issue that might cause file copying to be slower and another one preventing BitLocker from encrypting when using the silent encryption option has also been dealt with.
Known issues
After installing this update, some .NET Framework 3.5 apps might have issues or might fail to open. Affected apps are using certain optional components in .NET Framework 3.5, such as Windows Communication Foundation (WCF) and Windows Workflow (WWF) components.
Have you discovered any other issues after installing KB5014019? Share your experience with us in the comments section below.
Many T-Mobile users have reported network issues while using their devices. Among these, T-Mobile error 2 or SMS not working has been predominant.
Although T-Mobile is the second-largest wireless data and voice services provider in America, with more than 108 million customers, this has not stopped network issues from piling up.
Consequently, users struggle with constant T-mobile network error messages. Now, these glitches reflect differently depending on the device you’re using.
They range from T-Mobile not receiving texts, texts not sending T-Mobile, messages failing temporarily, and eventually going through or not.
T-Mobile SMS not working on cellphones is one thing (and it can happen on both Android and iOS), but T-Mobile error messages can impact even more platforms.
Speaking of errors, let’s see some examples of what you might encounter.
What are the most frequent T-mobile error codes?
T-mobile US error 2 (This is the most frequent one and the mistake we will try to solve today. T-mobile error 2 prevents users from sending messages, but you can also find it on other platforms under this variant: T-mobile TV error 2.)
T-mobile error 28/2112
Server error code 255 T-mobile (also known as T-mobile unlock error 255 or T-mobile server error 255)
T-mobile error 1/111 (connection problems trigger T-Mobile error 111, and it can prevent you from texting and using the Internet.)
Finally, there’s just one more thing we’d like to tackle before digging into the troubleshooting steps. Since we mentioned triggers, let’s look at the potential culprits behind the T-mobile error 2.
Why are my texts not sending in T-Mobile?
Incorrect phone settings (such as time and SMS service center number or Airplane mode)
Outdated software or pending updates
Specific features such as Message blocking or Family Allowance
Recipient numbers blacklisted on your device
Third-party messaging apps that interfere with the Messages app. This is also the reason behind EE error 0.
Insufficient storage space
Insufficient or low prepaid account balance
If you are experiencing such problems, especially T-mobile error 2, this article will provide the best fixes. Follow the instructions below to see which one works best for your mobile device.
What can I do when SMS doesn’t send with T-mobile?
1. Restart your device
Depending on the type of phone you use, initiate the restart process. After turning off your phone, please wait for minutes before turning it on. This can help restore your SMS functionality.
Regular restarting your phone can make a massive difference by addressing all kinds of anomalies such as slow WiFi/data connectivity, battery drainage, overheating, performance issues, texting difficulties, and more.
Tip
➡ If you can’t send messages with T-mobile error 2, we recommend you reboot your phone at least twice. ➡ While a single restart usually does the trick for most carriers, the reboot success rate is significantly higher among T-mobile users, having performed this operation a couple of times.
2. Switch On and Off Airplane mode
Go to the control center or notification panel on your home screen and swipe to expand it.
Next, tap on Airplane mode.
Waiting for a few minutes before tapping on it again to switch it back On/Off.
This should help sync your phone network functions after the service provider’s network is restored on your device.
Try to resend an SMS to see if the T-mobile error 2 is still there. Suppose that is the case, head over to the next solution.
3. Switch off Message Blocking & check blocked contacts
To contain fraud attempts and spamming, T-Mobile introduces two features designed to help you deal with unwanted messages better.
Both Message Blocking and Family Allowance qualify as potential culprits behind the T-mobile error 2 as they not only block commercial messages but can also block messages from a specific number.
These options act as filters preventing specific numbers from sending SMS or recipients receiving incoming texts.
We suggest you switch these settings off (if possible) or contact T-mobile customer support to remove the services at their end.
Furthermore, your phone message settings allow you to block specific contacts. Therefore, it might be worth checking and unblocking a vital number you may have stopped by mistake.
Check your block list of contacts and/or messages, and make sure to unblock the numbers blacklisted on your device if they appear there.
4. Clear Messages & Carrier Services apps cache
Go to Settings on your phone.
Next, locate Apps (Default apps + App settings) and tap to select it.
Select the Messages from the Apps list.
Next, tap the Storage option.
Finally, tap Clear data, respectively Clear cache.
Now, let’s quickly see the necessary steps for clearing the Carrier Services app cache.
Open the Settings menu and go to Apps, just as before.
From the list, open the Carrier Services app.
Now, tap to select Storage.
Finally, select the options at the bottom of the page: Clear data, respectively Clear cache.
Tip
➡ Before launching any of these procedures, we strongly advise you to back up all data in the Messages app and the general information stored on your phone to avoid data loss. ➡ As you’re about to discover, you will be instantly reminded that erased data is beyond retrieval upon tapping the Clear Data option. Hence, the right time to take precautions is before starting the cleaning process. ➡ Acronis Cyber Protect Home Office is one of those few programs that work seamlessly across all infrastructures, so you needn’t worry about compatibility issues regardless of your OS, Android, or iOS. ➡ Should you wish to explore more options, check out these cross-platform backup tools for PC and phones.
As the Messages app comes as default in your phone software to facilitate SMS services through any carrier, clearing the app cache might do the trick for you. Clearing the cache also helps fix Vodafone Error 69.
Before you try anything else, try to force stop and restart the Messages app.
Open the Settings, then Apps, and select Messages from the list of apps.
In the App Info screen, you will notice three options: Open, Uninstall, and Force stop.
Tap Force Stop and restart the app.
Upon restart, open the Messages app again and choose Set as default.
If the Messages app is not declared as the default app or if you’re using a third-party messaging app, it’s likely to get the T-Mobile error 2 due to software conflict.
Thus, if you can’t send messages with T-mobile error 2, we suggest you uninstall any downloaded messaging apps and set Messages as your default app.
Tip
➡ While you’re at it, you might want to look out for the Advanced Messaging option since it is known to create interferences and generate SMS errors. ➡ open the Messages app and go to Settings. If the Advanced Messaging feature is on by any chance, feel free to toggle it to Off and check if it has solved the issue.
6. Free up space on your phone
Go to My Files and locate Internal storage.
Next, tap on the 3 vertical dots in the top-right corner and select Analyse storage.
Delete unused apps and/or large media files (that are no longer relevant).
It is possible that messages are not delivered to your phone because the storage space on your device is complete.
The Messages app requires a minimum of 15% free storage to work without hassle. However, you might be able to eliminate bottlenecks by freeing up your device and deleting irrelevant media files, unused apps, or even old messages.
There is a more straightforward, faster, and better way if you don’t feel like randomly chasing for extra items to delete. Use a professional tool such as CCleaner that can handle decluttering for you.
You can download CCleaner for Android directly from the Google Play store and use it to optimize your device and eliminate errors such as the T-mobile error 2 in no time.
7. Update your phone’s software
As with any other device, keeping your phone up to date guarantees better performances, fewer vulnerabilities, and overall streamlined functionality.
On the other hand, outdated software can trigger errors on Android and iOS alike. It can also affect your ability to send or receive SMS messages with errors such as T-mobile error 2 popping out frequently.
Open the Settings, select General, and tap Software update. While you’re at it, make sure the time and date on your device are updated and that the auto-update function is enabled.
More tips to fix T-mobile not receiving/sending texts
Ensure the recipient number is correct (including the country code for international communications.)
Disable Do not disturb mode to get notifications about incoming SMS.
Make sure you declare the correct SMS message Center number (SMSC) on your device (For Android, it’s usually +12063130004.)
Verify that you’re using the T-Mobile network data (especially after a restart) and that your mobile phone is not connected to the WiFi.
Check your prepaid account balance and add credit (T-Mobile only allows you to send text and picture messages if your balance is positive.)
Check the carrier’s site or reach out to customer support for service outage announcements (also, check the signal bar at the top of your phone screen).
If you can’t send messages with T-mobile error 2, try these fixes and let us know how it went. We’re confident that the answer you need is no further than a click, a tap away.
Subtitled Nintendo, Sony, Microsoft, and the Billion-Dollar Battle to Shape Modern Gaming, the book sheds light on how Spider-Man’s PlayStation exclusivity came to be. Apparently Marvel execs, looking to reinvigorate their videogame IPs to rival the popular Batman Arkham series, had approached both Microsoft and Sony at around the same time.
The Ultimate History of Video Games Volume 2 details how Microsoft passed on an offer to make exclusive Marvel games.
According to then-executive vice president of Marvel Games Jay Ong, “I pinged both sides, both Xbox and PlayStation, and said, “We don’t have any big console deals with anyone right now. What would you like to do?” Microsoft’s strategy was to focus on their own IP. They passed.” This information and more has been shared over on resetera.com.
Instead Sony took the offer and the rest, as they say, is history. Insomniac Games (creators of the Xbox-exclusive Sunset Overdrive) was tapped to develop the new Spider-Man game, which would go on to become one of the best-selling PS4 games of all time and net Sony over $100 million. The much-anticipated sequel is set to release on PlayStation 5 sometime in 2023.
Issues related to the WWE 2K22 update could make a player switch from loving the game to being annoyed. Some gamers have experienced the errors with messages like You need to have the latest version of WWE Live error.
Meanwhile, lovers of the game across the world after a long time wait and doubt on whether there is going to be a WWE 2K22 or not are still giving it fantastic reviews. Unfortunately, problems with the WWE 2K22 don’t disappear with positive ratings.
Considering the fact that it is recently launched, gamers can cut the developers some slack while they work tirelessly to fix different bugs at their end. Meanwhile, you don’t have to wait till patches are released before you can enjoy the game on Steam.
Tag along as we highlight the various issues popular among players and how you can resolve them with ease.
Why does WWE 2K22 keep crashing?
The reason for the WWW 2K22 crash varies and it is peculiar to each player. This simply means the trigger on a computer may be different from that of another. Below are some of the things that could result in WWE 2K22 crashing:
Unnecessary background tasks – These apps can consume a considerable amount of the computer’s resources making it difficult for the game to function.
Windows firewall interference – Sometimes, your PC antimalware could sense the game as a virus. This is called false positive and would interfere with the game operations; the reason WWE 2K22 keeps crashing.
Issues with DirectX – This software is designed by Microsoft to handle executions related to rendering graphics, 3D gaming, and other multimedia experiences. Different games require a specific version of it to function. WWW 2K22 may crash if you have an outdated version of the DirectX installed.
Virus – Generally, games on a PC may generate an error or crash halfway into play when the computer is infected by a virus. An outdated antivirus might have exposed the system. This can be easily fixed using any reputable antivirus software.
Outdated drivers – Drivers are like the middlemen between your computer and peripheral hardware. Graphic drivers control the graphic cards. The game may crash if the drivers are outdated.
Microsoft Visual C++ Redistributables errors – Playing WWE 2K22 on Stream requires files from the Visual C++ Redistributable, a Dynamic Link Library (DLL). When any of the required files are missing or the DLL is corrupted, it could result in WWE 2K22 not working.
System Requirements – The WWE 2K22 is designed to operate on Windows 10 and above, with free space up to 60GB among other requirements. It would continually crash if your PC lacks the specified resources.
What can I do if WWE 2K22 update is not working?
1. Check server status
WWE 2K22 is a new game, so it is forgivable if its server is down. Virtually all games are prone to experience such issues.
When the server is down, you will be unable to connect and play. To check the server status, take a look at the developer’s social media handles for possible updates or visit your favorite gaming forum. Players are likely to be commenting about it.
2. Restart the game
This is recommended before trying a more sophisticated fix for the issue. You might be facing it because of a slight bug. Restarting the WWE 2K22 or restarting the system itself may be able to fix it.
Some users have testified to its effectiveness. It may also be able to fix server errors especially if it is peculiar to you.
3. Close unnecessary background tasks
Press Ctrl + Shift + Esc to open Task Manager.
Right-click on any task you want to close.
Choose End task.
This method allows the computer to provide additional resources for the 2K22 optimal operation. We recommend excepting certain programs such as antimalware to avoid exposing your system to attack.
Right-click on This PC. After this, select Properties.
Check and compare the displayed properties.
Tap Ctrl + R to open Run.
Type the command below into the Open box: dxdiag
When the DirectX Diagnostic Tool asks Do you want to check if your drivers are digitally signed?, pick Yes.
See the DirectX version and compare with the minimum version stipulated for WWE 2K22.
5. Verify the integrity of the game files
Open Steam. Go to the Library section.
Find WWE 2K22. Right-click on it to select Properties.
Select Local files in the left Window pane.
Pick Verify Integrity of game files…
Wait for the process to complete. After that, restart your PC.
6. Update DirectX to a compatible version
Open Settings by pressing Windows key + I.
Choose Windows Update. Click on Check for Updates.
Select Download now if any update is available.
After this, restart your PC to install the update(s).
7. Update graphic drivers
Press Windows key + R to open Run.
Type the command below and press Enter: devmgmt.msc
Click on the drop-down arrow beside Display adapters. Right-click on the GPU driver, then choose Update driver.
Pick Search automatically for drivers.
The system will automatically download driver updates if available. After this, restart the PC to effect the changes.
8. Uninstall and reinstall the game
Open the Quick Link Menu by tapping Windows key + X.
Choose Settings.
Click on Apps, then go to Apps & Features.
Scroll or type WWE 2K22 in the Search apps box to locate the game.
Select the three-dot beside the app then choose Uninstall.
Additionally, you have CCleaner optimizing software that is capable to remove any applications with all their temporary files or residual files. This way, you can efficiently reinstall WWE 2K22 gameplay on your PC.
That is if for now. While some lags in the game can only be fixed with future patches released by 2K, issues related to WWE 2K22 update not working can be fixed using any of the methods discussed above.
Gamers are always in search of answers on how to fix WWE 2K22 when it won’t start. There are also comments on 2K’s support replying too late almost a month after the message was sent.
While 2K may delay response, we will always try our best to provide easy fixes for most of your problems. Feel free to comment below about your experience trying the tips in this article.
The report details allegations against three Microsoft executives or former executives: Alex Kipman, head of the HoloLens effort at Microsoft, former head of Windows Terry Myerson, and Tom Keane, an Azure executive who directed the $10 billion deal with the US Department of Defense. It also reveals an aversion to conflict by CEO Nadella, with a former executive Business Insider talked to characterizing Nadella’s approach as “(w)hat’s something we can do to make it go away without making hard decisions?”
In the report, BI details an incident with Kipman where in a management session that included women, the HoloLens exec demoed a Mixed Reality program in VR, watching on his headset as the others in the room saw what he saw on a nearby monitor:
In the video that filled the screen, several young women in skimpy clothing frolicked on a bed; an overtly sexualized pillow fight ensued. An employee who was present, speaking with Insider later, described the scene as “VR porn.” The assembled staffers exchanged confused glances, and a couple of them walked out.
Kipman remains in his job, even after multiple other complaints of “inappropriate touching and comments.”
For Terry Myerson, the complaints revolved around his abusive and belittling behavior:
But employees told Insider that there was a dark side to his tenure. A person who worked directly for Myerson for years said he was known throughout his career for “abusing, berating, and belittling” employees. Another person who worked closely with Myerson described him as “bullying, extremely abusive, angry.”
Myerson enjoyed a protected status at the company for years, insiders said. But shortly before he left the company in early 2018, he “had a complete meltdown” backstage at a Microsoft event, according to a person who witnessed the incident. “He yelled at everyone and proceeded to berate them in a very public forum.”
Myerson left the company shortly afterward, leaving on “great terms,” but BI talked to three people familiar with the meltdown saying it “played a major role” in his departure.
The report goes on to detail the abusive behavior of another “golden boy” executive at Microsoft, Tom Keane, who reportedly “cut people down to pieces” for years:
“I’ve seen him reduce people to tears,” the former executive said.
Two insiders say Keane earned the nickname “King Tom” because employees were expected to be at his “beck and call” and obey him without question, or suffer his wrath. “People have to say the right thing and kiss the ring for King Tom,” one said.
Keane took an unexplained 30 day hiatus this January, and was reassigned a “special projects” role, but he still oversees hundreds of people, according to the report.
Microsoft is in the “beginning of the middle” of negotiations to complete a $68 billion acquisition of Activision Blizzard, a company with a reputation for an even more toxic culture. Some Microsoft employees have voiced dismay over the company’s attempt to absorb the problems at Activision: “We can’t even take care of our own house,” one Microsoft employee told Insider. “And now we just bought one in worse condition.”
Part of the terms of the deal with Activision initially said that CEO Bobby Kotick would assume a role at Microsoft, but a recent filing by Activision now says that his employment at Microsoft hasn’t been finalized.
Microsoft has a lot of work to do to both address the problems detailed by Business Insider and those stemming from a look the other way culture led by Nadella, especially with the scrutiny that the Activision acquisition is sure to bring.
If you are just getting started with Xbox, you may want to know, what batteries do Xbox controllers use?
Xbox offers two different options for batteries to use with its wireless controller, including the AA (LR6) batteries or the rechargeable batteries.
Having said that, there are different types of Xbox controllers, and Microsoft offers only wireless ones.
Post the launch of Xbox One, Microsoft released an impressive range of Xbox One controllers.
By default, the Xbox controller is compatible with Windows 10 and Windows 11. Best of all, it also works with iOS, albeit, only on Bluetooth.
Moreover, with Android devices, it connects only on Bluetooth on version 5.1.1 or later. For more options, read our detailed guide on the best gaming controllers for a perfect play.
Here’s a quick list of all the controllers, after which we will address the query on what batteries Xbox controllers use.
Different types of Xbox controllers and cross-compatibility
Microsoft Xbox controller, with three discrete settings; adjustable-tension thumbsticks; wrap-around rubberized diamond grip; 3 custom profiles and 1 default profile; haptic feedback
Xbox Series X Xbox One Windows 10 PCs
Internal, rechargeable battery with up to 40 hours of battery life per charge.
This controller by Razer, offers interchangeable thumbsticks and two interchangeable D-Pads; extra buttons for advanced gaming; remapping function; lighting effects, and more
Hyperkin offers an original Xbox animated startup screen; vibration feedback; classic X, B, A, Y, LT, RT, Black (RB), and White (LB) button layout
Xbox One/ Windows 10 PC
No batteries needed
The above list is created based on how comfortable is the layout, grip, and control for the gamer, and if they are compatible with major platforms.
This list consists of some of the best Xbox controllers, whether Microsoft patented, Microsoft licensed, or from a 3rd party.
You can make your pick based on whether you want a wired or wireless option, with or without batteries.
What batteries can I use in my Xbox controller?
While the Xbox controller is shipped with a pack of AA Duracell batteries, you can also use rechargeable batteries.
However, the rechargeable batteries must be bought separately.
So, if you are wondering what batteries Xbox series X controllers use, it’s the same battery for all.
You can use AA batteries and rechargeable batteries from any brand, charging solutions (preferred from partners), or a USB-C cable.
The battery pack that’s shipped with the Xbox controller, comes with the Xbox One Play And Charge Kit. It can be recharged using virtually any Micro-USB.
Therefore, you can power the Xbox controller using the USB connection to your console. This will transform the device into a wired controller.
Can you use regular AA batteries in Xbox One controller?
Yes, you can use the AA batteries and the rechargeable batteries from any brand.
They can be disposable AA batteries, rechargeable AA batteries, rechargeable battery packs, or you can use a wired connection to a console or USB port.
If you want to use the AA batteries outside the Play & Charge kit battery pack, look for the LR6 designation for alkaline batteries. These are the best batteries for Xbox one controller.
How do you use AAA batteries in Xbox One controller?
You must place them with their positive (+) and negative (–) ends positioned in the manner, as indicated in the battery compartment.
You have to charge these rechargeable batteries separately as they do not charge in the controller. Follow the manufacturer’s instructions to recharge the batteries.
Why do Xbox controllers use AA batteries?
Xbox controllers use AA batteries because it allows you to pick what power option to use, contrary to their competitors who offer only rechargeable batteries in their controllers.
Also, the use of batteries ensures longer shelf life for the controller, as these can be easily replaced while internal cell units used by competitors, tend to wear out soon.
How long do the Xbox controller batteries last?
If you are using the rechargeable batteries for the Xbox controller, it will stop charging as soon you remove the battery pack.
This is because it’s the battery pack that gets recharged and not the controller itself.
However, there will be a point when you would need to replace the AA cells so you can continue gaming with the same energy efficiency.
How to charge the Xbox One controller without batteries?
You can charge the controller using the USB cable connected to the Xbox console.
That is to say, the controller will stay powered till the time the USB cable is plugged into your Xbox. Nevertheless, the controller will power off, as soon as it’s unplugged.
The rechargeable battery offered by Microsoft is a 1,310mAh lithium-ion cell which belongs to the premium category.
According to the company, unlike the cheaper alternatives, their rechargeable battery is fully charged in less than four hours.
The Xbox controllers are known for their comfortable triggers and analog sticks, alongside a design that allows you to play games for weeks without having to change your batteries.
Therefore, you can continue with your favorite game without worrying about the Xbox controller battery life.
If you want to buy batteries from a 3rd party manufacturer, look for the ones matching the required size, and specifications to ensure the best performance out of your Xbox controller.
While the use of different features and UI does provide some variation, it’s easy to mix things up. Follow this guide to learn how.
Sync Outlook and Google Calendar
There are two ways to sync both calendars. First off, you can try to sync your Google Calendar to Outlook. Or, alternatively, you can sync Outlook to Google Calendar.
Let’s first take a look at how you can sync your Google Calendar and Outlook.
From there, click on View all Outlook settings at the bottom.
On the next menu, click on Calendar.
Click on Shared Calendar from there.
Scroll down to Publish a calendar, select drop-down menu and select Calendar.
In Select permissions and click on Can view all details.
Finally, click Publish.
Now, copy the ICS link and head to Google Calendar. In the Google Calendar menu, click on the Plus symbol in front of the Other calendars. From there, select From URL.
Paste the ISC URL you copied earlier from Outlook, and click on Add Calendar.
And that’s all. Your Outlook Calendar will get synced with your Google Calendar. To delete the Calendar, simply click on the cross symbol (X) in front of your Outlook Calendar and it will be deleted.
Sync Outlook and Google, and vice versa
As you can see, the whole process of syncing two calendars is super easy. All you’ve to do is go to the individual calendars for both services, copy the ICS links to the appropriate calendars and paste them in the Calendar option of the respective calendars, and you’re done!
Also known as broken connection, the Overwatch login error bc-101 appears when a player tries to log in to their account after launching Overwatch.
This error signals that the client has failed to connect to the server, and thus results in an inaccessible profile.
Why can’t I connect to Overwatch servers?
The majority of user complaints have come from Play station 4 and Xbox console players. The main cause of this problem is server connectivity issues.
As always, connectivity issues can be caused by a variety of factors, with the possibility of being an internal error on your device, or simply an issue with the company’s servers.
While it can be quite frustrating to encounter such an error, knowing how to troubleshoot it can be helpful. Hence, the following fixes are the best solutions for Overwatch login error BC-101.
How can I fix the Overwatch BC-101 error code?
1. Disconnect the AC adapter
Completely disconnect your device’s power source.
Unplug every external gadget plugged into it.
After a few minutes, plug your device back into a power source and turn it on.
It is possible that you have overworked your device or there’s been a workload on it. So, giving it time to rest will help it work better and sync faster. It should easily solve the problem.
This process is similar to rebooting but it goes deeper by making your ps4 or Xbox free of external devices.
2. Test the Internet connection
Go to Settings.
Select Network.
Click the Test internet connection option.
Checking the state of your internet connection will help you detect if there are any issues with it. These connection issues can be the cause of Overwatch login error bc-101.
Especially, if your connection is wireless, it could be prone to interference by different gadgets or some other devices. Thus, causing a broken connection while trying to play Overwatch. So, it is advisable to switch to a wired connection.
3. Reset the time and date on the console
➡ PS4
Go to settings from the Home Menu.
Tap on the date and time.
Disable auto-update time and date.
Set the correct time zone, month, day, year, and time.
Reboot your ps4 and see if the changes made had any positive impact.
➡Xbox
Select settings from the Home Screen.
In the left-pane menu of settings, choose a system.
Select the time menu.
Change auto settings for time and date.
Save and reboot.
It has been confirmed by some ps4 owners that resetting the time and date of your device can help fix Overwatch login error bc-101.
It’s been reported by some gamers that installing overwatch while having Overwatch beta on your device can cause an Overwatch login error bc-101.
This means that these two app versions (Overwatch and Overwatch Beta) are not suitable for being installed together on a device. Uninstalling Overwatch Beta should fix the error problem.
5. Factory reset your device
Go to the settings icon in the menu.
Tap the initialization menu and press the X button.
Select initialize ps4, then press the X button
Choose the full option to reset settings, apps, and data.
Press X when a confirmation menu pops up to confirm the factory reset process.
After the reset procedure is done, reinstall your game
Trying some of these fixes should solve the problem of overwatch login error bc-101. Try all the fixes here till you see the one that works for you.
Meanwhile, performing a factory reset in your console should be the last option when all has failed. The reason is that you will lose all data and have to install your games all over again.
The game in question is Orcs Must Die which originally came out on the Xbox 360 console back in 2011 and is now playable on both Xbox One and Xbox Series X console generations via backwards compatibility.
It seems as if this random addition to Games With Gold is available in the US and UK though other countries, such as Australia, are just seeing it as being for sale like usual. You can check to see if Orcs Must Die is free for you by checking out its product listing here on the Xbox website.
Is Orcs Must Die showing up as free for you? If so, what region are you in? Let us know in the comments below.
With the best extensions, you can transform Opera GX in your go-to browser not only for gaming but also for streaming and even task management.
Today, we’ll show you the best options that’ll power up your browser. From VPNs, adblockers, and web clippers, to productivity tools, you can find all you need to build a strong arsenal.
Opera VPN is the free, built-in virtual private network on Opera GX. It allows you to browse the internet with a virtual IP address that hides your location.
With it, you can access location-restricted content without being noticed. It also protects you from identity and data theft online. No wonder it is regarded as one of the best browser VPNs available.
This is the built-in ad blocker extension for Opera GX. It is a privacy-focused and speed-enhancing addon that does not slow down your PC.
It removes even the most stubborn of ads and banners. As it is already on your Opera GX browser, you only need to enable it in the extension manager to get going.
It’s common knowledge that you can’t download videos from YouTube. With this extension enabled on your browser, you can download any YouTube video of different quality.
It is also not limited to YouTube, as you can download videos from sites like Facebook and Instagram. It just ensures no video gets away from you.
Other features:
On click download from more than 40 websites
Faster download to your device
Supports different video, audio, and image files format
Don’t want to lose track of anything as you browse? Evernote helps you clip web pages and stay organized.
With this extension, you don’t need to open endless tabs when you don’t want a piece of information to get away from you. It allows you to clip, save, and highlight anything you see online.
Other features:
Allows saving brief excerpts or all the contents on a page
When was the last time you left a website because it was written in a foreign language? This addon offers instant translation of web pages or selected parts.
It auto-detects the content on a web page and prompts you to translate it into your preferred language. It is everything you need to communicate with anyone from any part of the world.
Pocket helps you save contents to be accessed later on the web. You can save everything with this extension from videos and audio to images and social media posts.
What’s more, you can access all your saved content later without an internet connection—all with just a mouse click.
AtaviBookmark is a free Opera GX extension that provides options to customize your bookmarks. It makes the task easy by allowing access to your data on any device after logging in.
What’s more, it is compatible with a host of devices, as it can be used on your smartphone or PC. It just makes bookmarks management super-easy.
8. Similar Web – Free tool for complete website data
Want quick data about any website? Install the Similar Web extension on Opera GX, and you’d get more than you asked for.
It shows you the keywords, traffic data, ranking statistics, engagement sources, and info that makes a website. It is one of the best productivity extensions you don’t want to miss out on in Opera GX.
Search by Image is an easy-to-use extension to conduct image searches on the internet. It helps users verify the authenticity and source of images.
It accesses your search result page and allows you to pick pictures for search from your device. This extension also supports searching for screenshots of web pages.
Other features:
Search images from the context menu and your browser toolbar
Opera extensions are verified by Opera, so they are perfectly safe. To be on the safe side, always use extensions from reliable developers with good ratings.
There you have it: an extensive and in-depth guide on the best Opera GX extensions. These are just extensions from Opera’s store, but you can just as easily install Chrome extensions in Opera.
We all need to check the weather forecasts now and then, right? There are many ways you can check weather details for your location on a Windows 11 PC. Most users will probably look at online forecasts or the Weather app that comes with Windows.
However, you can also add weather details to Windows 11’s taskbar with its Weather widget and the Weather Bar app. By doing so, you’ll be able to view weather info for your location from the taskbar and its system tray area. This is how to add weather info to Windows 11’s taskbar.
How do I get the weather forecast on my taskbar in Windows 11?
1. Enable Windows 11’s Weather widget
First, right-click the Windows 11 desktop to select the Personalize option on its context menu.
Select Taskbar to view the options in the screenshot directly below.
Turn on the Widgets option if it’s disabled.
Click the Widgets button on Windows 11’s taskbar.
Select the + Add widgets button shown directly below.
Then select the Weather widget.
Selecting the Weather widget adds a forecast icon to the taskbar as shown directly below. Hover your cursor over that icon to view weather info for your area. You can view more detailed forecasts for your region by looking at the widget panel.
NOTE
Windows 11’s Weather widget won’t show any weather info on the taskbar if your PC hasn’t received the KB5010414 update. You can download and install that update from its Microsoft Update Catalog page. Alternatively, check for new updates via the Windows Update tab in Settings.
How do I change the weather language on Windows 11?
You can change the display language of the Weather widget, and others, in Windows 11 by configuring language and region settings. Settings include a Windows display language option with which you can change the language for features. This is how to change the Weather widget’s language in Settings:
Press the Windows + I keyboard key combination to view Settings.
Click Time & language > Language & region in Settings.
Select the Add & language option.
Input a language in the search box, and then select the one you want.
Click Next and Install to add the language.
Then select the language you just added in the Windows display language drop-down menu.
Click Sign out to apply the new language settings.
How can I fix the Windows 11 weather in the taskbar not updating?
Some users have said in forum posts that the temperature in Windows 11’s Weather widget not updating. Consequently, that widget always displays the same temperature and weather info (even after restarting Windows). If the same thing happens for your Weather widget, try restarting its process.
Press the Windows + X keyboard keys, and select the Task Manager menu option.
Click the Processes tab if it’s not already selected.
Scroll down to and select Windows Widgets.
Press the End task button.
Click the Widgets taskbar button to restart the process.
How do I turn off the weather info in Windows 11’s taskbar?
You can turn off the taskbar’s weather info by unpinning the Weather widget. Click the Widgets button to open its panel. Then click the More options button at the top right of the Weather widget to select Unpin widget. The original Widgets button will be restored after restarting Windows.
Both the Weather widget and Weather Bar will display current weather info for your location along the taskbar. You can click their icons to quickly check forecasts for upcoming days. Both taskbar additions make weather info more directly accessible in Windows 11.
So, you won’t need to open your browser to check weather forecasts ever again with the Weather widget enabled or Weather Bar installed. Do you prefer Weather Bar or the Weather widget? Let us know which one you prefer in the comments section below.
Let’s explore the Rust Console integration on Discord, but first here is what you need to know about the game.
Rust was among the first breakthrough survival hits on Steam when it was launched in 2013. There have indeed been games like it, but few have been in the limelight as long as it has.
In 2021 it launched a console version of the game, and with the hype of Rust, many players were eager to play the Rust Console version.
In this complete guide, we love to explore the Rust Console Discord and let you know all there is to it. You should stick around if you play Rust on PS4, Xbox, or even PC.
Users also complained of some errors in settings, but any of these 3 fixes will resolve errors with saving settings.
What is the Rust Console?
Facepunch Studios created Rust, a multiplayer-only survivalist video game initially made available in December 2013, with a full release in February 2018.
Rust began as a replica of DayZ, a successful ARMA 2 mod featuring crafting mechanics similar to those seen in Minecraft.
The game is compatible with both macOS and Windows, and the Xbox One and PlayStation 4 console versions, created in collaboration with Double Eleven, were published in May 2021.
Rust’s goal is to survive in the woods by stealing or gathering things, and you risk death if you can’t effectively control your health, thirst, as well as your hunger.
However, despite dangerous creatures such as wolves and bears, your primary threat is other players owing to the game’s multiplayer nature.
What do I need to know about Rust Discord?
➡ Does Rust Console have a Discord?
Rust Console Edition gamers may join an active Discord channel to talk about the game and meet friends.
However, when you join this official Discord server, you are expected to treat fellow players and the broader community with respect.
While the game requires players to murder each other for survival, the Discord server is a friendly community of like-minded gamers.
Lastly, It has highly effective moderators, and anybody who breaks any of the rules is quickly blocked.
On the Discord app, click on Verify on the left panel, then Verify on the right pane under the Verification required menu.
Click on the captcha link under the chatbot menu.
On the new tab, click on Login to access the captcha.
Click on Authorize to give Captcha access to your account.
Select images to pass the captcha test.
Click on the Open Discord button.
Visit the #rules channel.
At the bottom of the rules, click on the green checkmark.
Now you are in and can chat and meet fellow Rust lovers.
➡ Will private servers come to Rust Console?
The great news is that the game’s console version will allow players to create Private Servers on Xbox One and PlayStation 4, but the unfortunate thing is that this feature is currently unavailable.
However, on either the Playstation 4 or Xbox One versions of Rust, players who attempt to create a Private Server will receive a ‘Coming Soon’ message.
Unfortunately, operating servers costs money, so be prepared to part with some of your Xbox Live or PlayStation 4 money if you decide on this.
Looking on the bright side, the fact that several gamers are interested in Rust is fantastic, particularly considering the game’s age.
And lastly, it’s reassuring to see the game still has a solid fanbase, particularly on current consoles, given how many players have created memes about the survival game.
Install the plugin by adding it to this server location: oxide/plugins
Visit Discord applications and click on New Application at the top right side of your browser.
Please give it a name and click on the Create button.
On the left pane of Discord, click on Bot, then click on the Add Bot button on the top right to create a new Rust Discord bot.
Click the Copy button to copy your token API.
Open your configuration file for Discord Core and paste the API between the parenthesis of the Discord API Key value.
Go back to your discord bot page. Here, click General Information on the left pane, then click the Copy button of Application ID. Lastly, save the copied ID for step 15.
Open your browser and paste the below code: https://discordapp.com/oauth2/authorize?client_id=482577811954049558&scope=bot&permissions=8
Replace 482577811954049558 with your application ID and press enter.
Click the dropdown box to select what discord server you want to invite the bot to, then click Continue.
Right-click on the channel for chats (this could be any channel you want), and click the Copy ID button.
Navigate to your config folder. oxide/config
Paste the copied link as the value for the Chat Channel name or id.
Copy the Channel ID and paste it as the value of the Join / Leave Channel name or id.
Now you can start Rust, and your chats will be displayed on your Discord channel.
If you’ve read this far, you probably have been able to configure your Discord server to work with Rust chats.
In conclusion, with this connection, you will be able to communicate more with your community while enjoying Gameplay. We advise that as it’s the case with all internet connections, you use the best VPNs to play Rust.
In the article, we explore the problem of Firefox not updating passwords. But firstly, you should know that Firefox has been the browser of choice for many users for years. Its numerous features ensure there is something for every kind of user.
The browser is a fine blend of good security, solid privacy protection functionality, frequent updates, and an active development team.
Features like anti fingerprinting help you maintain privacy and make sure your data does not fall into the wrong hands, which has been the draw for many users.
Furthermore, the browser boasts of an advanced passwording system. With the introduction of official add-ons like Firefox Lockwise, you can sync encrypted passwords across different devices.
There are a few practical ways you can utilize in order to save your passwords safely in the Firefox browser without losing any of them.
So follow along with these step-by-step solutions if you need to resolve this password updating issue.
How to save passwords in Firefox automatically without asking?
Click on the three horizontal lines at the top-right corner of your browser.
Select the Password option, or simply type the below code in the address bar: about:logins
Click on the login menu, the three dots at the top right corner, then select Options. This will open the Logins and Password options.
Check the box beside the Ask to save logins and passwords for the websites option. Also, check the option to Autofill logins and passwords.
Once this is completed, you will always receive a password prompt after you have used a new password.
It’s worth noting that the password field’s length on certain websites is limited. If you autofill or paste very lengthy data, you may trigger a prompt that directs you to reduce the text. In such cases, you will need to use shorter passwords.
Configuring this setting is a great way to guard against sync issues including Firefox iOS not syncing passwords. If a Firefox update lost passwords, this will also be a preventive measure.
How can I force Firefox to update a password?
1. Remove the website from your never saved list
Launch the Firefox browser.
Click on the three horizontal lines at the top-right corner of your browser.
Select the Settings option.
On the sidebar, select Privacy & Security.
On the right, scroll to Logins and Passwords, then select Exceptions.
Click on the site from the Website section, then click on the Remove Website option.
Lastly, click on the Save Changes button.
You should first determine if the problem is restricted to a few websites or every site you visit. If the former is the case, you probably have elected not to remember the passwords for these websites.
Therefore, your browser will not prompt you to store the login information again until they have been removed from the list of your password exceptions.
Click on the three horizontal lines at the top-right corner of your browser.
Select the Settings option.
On the sidebar, select Privacy & Security.
On the right, scroll down till you get to the Cookies and Site Data menu, then select the option to Clear Data.
Lastly, tick the checkbox for Cookies and Site Data as well as that for Cached Web Content, then click Clear.
While Firefox is a great browser choice, we often recommend the Opera browser. It gives an excellent customization range and ensures users can select security features that work best for them.
Furthermore, it is built on Chromium and affords users a vast library of plugins, many of which are used to enhance user privacy and security. Clearing the browser data is also a useful solution for cases where your Firefox on Android is not syncing passwords.
3. Disable most recently added extensions
Launch the Firefox browser.
Click on the three horizontal lines at the top-right corner of your browser.
Select Add-ons and themes.
Finally, under the list of enabled add-ons, toggle off the switch to disable any recently added extension.
Remember that you should only adopt this solution if the problems start after installing new extensions. It, however, could be a helpful fix if some extensions have become corrupted.
There you have it; the best fixes if Firefox is not updating passwords. The best part is that for most of these, you don’t need a Firefox account.
We have made these solutions in no particular order but recommend that as a best practice, you should restart the browser and also restart your PC before trying any other fixes.
A restart gives your computer time to reset and fix some issues on its own, and it is also a great way to make sure stubborn programs are forced to shut down.
This and other browser issues like errors due to no compatible sources can be fixed in a few steps on the Firefox browser.
In this article, we help you resolve any problems of Reddit not loading in Chrome. But before we get into it, here is what you should know about Reddit.
It is a platform that mixes a forum, social news, online content, and a social network into one massive social network. Users may add data to the platform in the form of videos, photographs, text, and links. Other registered members may vote down or upon any material on the site.
Interesting stuff climbs to the top, while dull information sinks. As a consequence, most viral phenomena and online memes originate on Reddit.
It’s fantastic because the network is a meeting point for media, trends, micro-cultures, micro-communities, and inside jokes.
Before jumping into this Chrome issue with Reddit, note that some fixes in this article may also be helpful if you have a Reddit Unauthorized Error 401.
What is the Reddit Enhancement Suite?
Reddit Enhancement Suite (RES) is the unofficial Reddit browser add-on created by the community. It’s a collection of modules designed to improve the experience while browsing Reddit.
Chrome, Safari, Opera One, and Firefox are all compatible with the Reddit Enhancement Suite add-on. If you believe you can do without it, consider the following characteristics, which will persuade you to install it right now.
It blocks NSFW information – Although Reddit includes a built-in setting that asks whether you want to see not safe for work (NSFW) material, it’s not very good at screening it out. The NSFW filter tool excels at this.
It shows images and videos – One of its most valuable characteristics is the ability to let you open and view videos and pictures directly on a page, rather than needing a new tab.
RES features essential keyboard shortcuts – For easy navigation and activities, it offers shortcuts. By default, you may downvote a post with the Z key and upvote a post with the A key.
Switch between accounts – If you have different accounts split between your interests, then RES quickly helps you switch in and out of them.
What can I do if Reddit is not loading?
1. Check your internet connection
This should be your first call. Reddit and other resources will not respond if you have a faulty or wrong internet connection.
You may verify this by using any other internet service or visiting other websites. If you are not able to access them, then you may just be having an internet connection issue. In this case, the Reddit app not working on wifi may have nothing to do with the Reddit service itself.
Simply restart your router or wait for service to be restored by your ISP.
Use hotkeys Fn + F5, on some computers, you just use the F5 key to refresh the page.
If Reddit’s servers are not offline, you may only need to restart your browser. Close and reopen the browser to check whether the issue is resolved. Even if you are experiencing the Reddit app not loading on Android or iPhone, closing and relaunching the app will still come in handy.
Right-click on the Start menu, then select Task Manager.
Click the Processes tab, then from the list of processes, right-click on Google Chrome and select End task.
Relaunch the browser and navigate to Reddit.
With Google Chrome not loading Reddit ending the process will trigger a forced stop and a complete restart at launch.
4. Clear the browser cache
Launch your browser, click on the menu, expand More tools, and select the option to Clear browsing data.
Select the Basic tab, pick a Time range of your choice, and mark the checkboxes for Browsing history, Cookies and other site data, and Cached images. Then at the lower right corner, click the Clear data button.
When you visit a website, the web browser saves information like the site’s location and previous versions of forms. However, your web browser may continue to utilize outdated files even after being updated on the website.
You could continue to see outdated forms if you don’t delete your browser cache, which may create access or display issues, and may be a reason for your Reddit app not loading images. This also helps with the Reddit user agent error.
To efficiently resolve the browser cache problems, there is a cleanup software like CCleaner that performs this task and many others to optimize your PC and delete browsing data automatically.
With these simple fixes, you should be able to correct any issues stopping Reddit from loading in Chrome. While we have not written them in any particular order, we always encourage you to start by reloading the browser. This easy fix may save you the trouble of more complex solutions.
One of the things gathering attention at Build 2022 is Project Volterra. It’s a new ARM-powered PC that’s specifically made for Windows developers. Microsoft wasn’t very specific on the details of the actual hardware, but they did share a Surface-like teaser video for the upcoming device.
From the roughly minute-long teaser, we can see a couple of different things about the device. First of all, we can see that it looks a lot like the base part of a Surface Studio, but without the display mechanisms. Microsoft also shared that it is made of recycled ocean plastic, hinting that this could be an all-plastic developer device, much like the Snapdragon Developer Kit from 2021. This gives it a very Mac-mini-like compact shape, with Microsoft even showing how the device could be stackable for desktops as well as rack deployment.
Other than that, we can see the insides at one point, with Microsoft showing off a single fan, as well as the internal SoC. Microsoft even goes as far to mention the ports, though sparing technical details. We can make out a power jack, ethernet port, mini display port, as well as USB-A ports on the back. As for the sides, there look to be two USB-C ports and three additional buttons.
Again, we’re just speculating what we’re seeing based on the video. The video doesn’t represent the final hardware, as far as we know. Microsoft still promises that it will share more “at a later date.” We were involved in a Twitter thread that asked about the hardware. Microsoft’s Rich Turner tells us, and other writers, that they’ll be sharing more details later in the summer once they’re more certain about actual availability.
We'll be sharing much more detail later in the summer once we're more certain about actual availability, etc. Turns out that building and shipping a new device during a pandemic & world-wide component and shipping issues is … challenging ????
According to Windows Central, however, it does look as though the Surface team was involved in this design, in partnership with Qualcomm. They also believe that it will ship with a “flagship SoC.” It’s unknown at this point what this could be, as the Snapdragon 8cX Gen 3 is the latest flagship SoC from Qualcomm. But even if it is a flagship, it would be very much different in terms of performance from the entry-level 7c chip inside last year’s Snapdragon Developer Kit. This makes total sense, as Microsoft is targeting this for development on ARM with optimized apps like Visual Studio, .Net 6 and Java, Classic .Net, and even the Windows Terminal WSL / WSA.
What we also do know about is the Neural Processing Unit or NPU inside Project Volterra. The NPU is “an “accelerated runtime for the execution of deep neural networks.” This can help developers explore AI scenarios in their apps for AI- and machine learning-specific workloads without comprising performance, as well as battery life.
All that said, Project Volterra is a developer PC and isn’t targeted at consumers. It still, though, seems like an attractive PC for Windows and Surface fans, as it could shape up to be the first desktop PC from Microsoft, Surface-branded or not.
Who says that you need to be a designer to create professional gift certificates for your business? Think twice before agreeing to this statement.
In fact, don’t answer before taking a look at some of the best gift certificate template makers available today.
These certificates remain an inspired marketing tool for small and large companies alike when trying to reach consumers, encourage traffic to the store, increase sales, and gain credibility.
Your trust account may hold greater importance than your bank account. Moreover, with all your passion for graphics and design, you can’t go wrong with any of the below gift certificate template software tools.
What should I look for in a gift certificate template app?
If you are an experienced graphics designer, you already know how to create a gift certificate by using a dedicated professional tool.
But if you’re new to graphics and you just started your business, some of the tools on our list below will help you a lot.
That’s because most of them include lots of templates for many marketing artworks that not only will inspire but also help you get the job done in only a few minutes.
So, here’s our selection of the best gift certificate maker tools
What’s the best gift certificate template software to get?
No graphic editing experience is needed when choosing Adobe Photoshop. After all, this is the most popular imaging and graphics software of the moment for a good reason.
All of us know that a good desktop image editor is one that not only comes with professional templates but also offers almost endless creative possibilities.
There’s no reason to doubt that Photoshop can’t outshine the competition in terms of gift certificate creation. Before going any further, we shall state a few of the Photoshop characteristics that you should consider.
Well, keep in mind that the software enables you to edit graphics and texts across desktop and iPad with ease. Moreover, it allows you to refine your work and play with colors and effects.
Refer to these key features for further details:
Improved Content-Aware Fill to fill multiple areas of an image without leaving the window
Incredible Warp tool to add control points and divide images with a customizable grid
Impressive gradients, swatches, layers, patterns, and styles to choose from
Lens Blur feature for a more natural look when blurring objects
Exciting features are rolled out regularly
Adobe Photoshop
Pick this professional photo editor to design eye-catching gift certificates that will generate applause.
Adobe Creative Cloud Express is a powerful free design tool you should also take into consideration. Unlike Photoshop and Canva, it does not have an extensive set of features.
However, a decent amount of design customization options is part of the package.
This will most likely sound like music to your ears, especially if don’t have professional experience and feel less comfortable using high-tech tools.
Another great fact about this software is that it comes from Adobe. Therefore, you know from the start that it has great customer support.
Refer to these key features for further details:
A generous selection of printable gift certificates to choose from
A broad set of lettering choices to express the very essence of your business
You need to know from the start that Canva has a seemingly endless collection of templates and layouts. However, don’t look at this in the wrong way.
If you fear seeing the same graphics over and over, keep in mind that this tool provides you the complete liberty of expressing yourself.
With impressive illustrations, stock images, vectors, and icons at your disposal, not to mention Canva’s efficient design editor, you may literally accomplish graphics in minutes.
Refer to these key features for further details:
Numerous design types for social media posts, letters, presentations, and more
Professional layouts to select for all your future projects
An impressive selection of fonts
Thousands of elements for your designs at your disposal (you may also upload your own)
Canva
Using Canva to create business papers or documents is the right choice for making inventive gifts.
If you want to feel like an already professional designer without spending a fortune on high-tech software to create relevant content, then Edraw Max is an inspired choice.
This program promises more than a few gift certificate templates. Chances are you’ll find it appealing that they are customizable, while the intuitive interface resembles the Microsoft Office interface.
On top of that, this software makes it incredibly easy to create more than 280 sorts of diagrams, from the technical diagrams that we all know so well to the impressive infographics that would amaze your audience.
Refer to these key features for further details:
Comprehensive gallery, with thousands of our professionally designed templates
Editing tools to insert graphics, change the font, re-edit texts, and more
High-quality vector graphics to decorate your gift certificates
Export formats include Word, PDF, PPT, JPG, Html, SVG, and more
EdrawMax
This multi-area software can provide free support for anyone who needs impressive certificates to offer.
Lucidpress is an interesting web-based desktop publishing software application designed by Lucid Software.
You’ll most likely appreciate the custom-made gift certificates from Lucidpress. To be more precise, different stylish templates and an extremely intuitive editor are available from the program.
Then, delivering a gift certificate couldn’t get any easier. You may share via email in an instant or post it on social with only a few clicks.
You also have the option to do it the old-fashioned way and download your gift certificate as a high-quality PDF, JPG, or PNG.
Refer to these key features for further details:
Very friendly and simple user interface
Numerous customizable templates to help you shape most of your dreams
Useful drag-and-drop editor
Intuitive keyboard shortcuts to save you precious time
With these options available for gift certificate making, you’re sure to find a good fit with your company’s goals. You don’t need to settle for one choice only.
No one is stopping you from giving a try to two or even more programs to find the one that returns the desired results.
So, we can only invite you to take a closer look at our list including the best logo design software.
Let us know if you’ve found your top certificate template software in the comments section below.
Chrome Storage is one of those power features that make this staple browser so appealing for many. Now, local storage is supported by most modern browsers, it’s Chrome Storage Sync that takes it up a notch.
And what better way to make the most of these capabilities than by using APIs?
Here’s the twist, the Chrome Storage API works better and faster. On the one hand, it allows users to store data as objects (as opposed to the localStorage API that operates only with strings).
Furthermore, it’s asynchronous, which enhances speed and responsiveness. Then there is also Chrome Storage Sync. This API enables synchronization between devices running the same app.
Here’s the big question: Does Chrome sync local storage? Storage.sync allows users to seamlessly access, store, and share data across devices under the following conditions:
The user has to be logged in to the Chrome browser via a Google account
Chrome must be online (connected to the Internet)
The sync feature needs to be enabled
Should Chrome be offline for whatever reason, the data will be stored locally and synced later on when the browser is online.
The same goes for disabling the Chrome Storage Sync feature. Should you choose to deactivate it, the API will simply act as a localStorage API.
As you can see, the Chrome Storage API is ideal for storing, retrieving, and tracking changes to user data. However, setting it up properly is essential and so is knowing how and when to remove the stored data.
How do I set and use local storage data in Chrome?
As always, the syntax is key. So here’s how to deal with the different keys, values, and arguments in Chrome Storage:
localStorage. getItem() – This is used to check if a specific value is listed in the local storage. You can use it to read or retrieve specific items from localStorage.
localStorage.setItem() – This is used to add items (such as keys or values) or simply to save data to Local Storage.
localStorage.removeItem() : The command removes a specific item (key) from local Storage.
localStorage.clear() – This command removes or clears all the items for this domain.
Tip
➡ Chrome provides chrome.storage.local.remove to help you identify the keys you want to remove, and chrome.storage.local.clear to allow you to remove all data from the local storage. ➡ However, items from the Sync Storage area are synced via the Chrome Sync feature. ➡ If joggling with all the different APIs seems a bit overwhelming, you can always switch to Opera One.
You don’t have to worry about syncing issues as Opera One allows you to easily export bookmarks from Chrome along with other preferences and settings so that you can enjoy browsing without skipping a beat.
What is the difference between chrome.storage.sync and chrome.storage.local?
Chrome.storage.sync operates asynchronously, making the app more responsive and faster than the Chrome.storage.local API.
In Chrome.storage.sync, data is automatically synced, and you can access it on any other device. As for Chrome.storage.local, the information is stored locally on the machine where the browser is installed.
Chrome.storage.local stores data in strings, which makes it more difficult to manage the keys. On the other hand, Chrome.Storage.Sync operates with objetcs.
Finally, Chrome Storage Sync allows preserving extension settings even when using incognito mode.
In conclusion, Chrome storage sync enables files on any local storage device to be synced. Thus, you can easily store, share, and access files across storage systems and the cloud.
What is the difference between local storage and cookies/cache?
Item
Use
Size
Security
Storage vs Cookies
➡ Cookies convey data to the server through HTTP requests. ➡ Local storage is intended for the client reading only. ➡ The latter will confine data at the browser level without it reaching the server.
➡ Clearly, localStorage provides a much larger capacity than cookies. ➡ In fact, the max size of a cookie is around 4 KB. ➡ This makes local storage more suitable for storing any data that you would later want to have in your browser.
➡ Cookies are generally perceived as a safer alternative. ➡ However, vulnerabilities exist on both sides. ➡ They are both prone to XSS attacks, for instance.
Storage vs Cache
➡ The cache is a temporary backup of in-use data (accelerate access for URLs). ➡ Storage is a long-term retention solution. ➡ It does not expire and it only disappears if you clear the cache.
➡ Cache operates with bytes, while local storage deals with blocks of data. ➡ This is relevant in order to determine the actual storage capacity. ➡ Cache is mostly used for small amounts of data as opposed to local storage.
➡ Just like local storage, the cache can be hacked through malicious scripts that steal your data. ➡ LocalStorage allows you to set additional encryption methods. ➡ However, we suggest you avoid storing confidential or sensitive information.
How do I manage my Chrome Storage?
1. Clear browsing data
Open Chrome on your computer.
Click on the vertical three dots at the top-right corner to reveal More.
Next, click More tools and select Clear browsing data.
In the basic tab (the default one), choose a Time range.
Select the types ofinformation you want to remove (Browsing history, Cookies and other site data, respectively Cached images and files).
Click Clear data.
Chrome Storage Sync set is not that difficult to manage. However, you might want to clear your browser storage space every now and then. This is one way to do it.
You can also use the CTRL + Shift + Delete shortcut on your keyboard to perform the action quicker.
Alternatively, you can download CCleaner and with a single push of a button you can wipe clean all the piled files that occupy space, eat up memory and slow down your navigation.
2. Clear storage data
Open Chrome on your computer.
Click on the vertical three dots at the top-right corner to reveal More.
SelectSettings from the list of options.
In the left pane, select Privacy and security.
Now, choose Site Settings from the list.
Open the View permissions and data stored across sites section.
Press theClear all data button.
In the new window, click on the Clear button once again to confirm the action.
Optionally, you can free up your browser storage by also tweaking your cookie permissions.
Repeat steps 1-4 as described above.
Instead of Site Settings, select Cookies and other site data.
Toggle the switch next to Clear cookies and site data when you close all windows to On.
Alternatively, you can define individual settings and customized behaviors for Sites that always use cookies, Always clear cookies when windows are closed for specific sites, and Sites that can never use cookies.
3. Clear local storage
Open the extension’s background page.
Next, open Chrome’s menu and select More tools, then Developer Tools.
Select the Application tab from the menu.
Next, expand the Local Storage section in the right pane.
Right-click your site(s), then click Clear to delete the local storage.
This is how you open localStorage in Chrome and also how you can clear localStorage after some time. Now you might also be wondering about the storage path.
Where is local storage stored Chrome? Google Chrome stores web data in your user profile.
The location on Windows can usually be found by following this path: AppData\Local\Google\Chrome\User Data\Default\Local Storage
What can I do if the Chrome.storage.sync.set is not working?
Chrome.storage.sync.set not working issues are more common than you think.
Thus, you might experience problems with Chrome.storage.sync.set not saving values or not returning them directly, getting out of sync, and so on.
Depending on the specific situation, here are a few useful tips for you to try:
Make sure you declared the storage permission in the extension manifest in order to be able to use the storage API.
Use the callback method to get notified when the asynchronous function is completed. Also, you can use the Promise API to solve the asynchronous issue.
When values do not save in chrome.storage.sync.set, you might be using the wrong method to set them. Try using a variable key instead.
You can re-run your account and try setting values with the same codes you used in the sync.set.
Remember that you cannot select multiple values in chrome.storage.sync.set. Instead, set a single one with subsequent statements.
Use clear() and removeItem() to empty the entire local storage object for the domain you are on.
Grant storage permission to Chrome via Windows Settings, and Apps. Select Chrome, then choose Permissions and allow Chrome to access storage.
This is our take on how to properly set your Chrome Storage Sync and respectively, address Chrome.storage.sync.set not working instances. Feel free to try them out and see what works best for you.



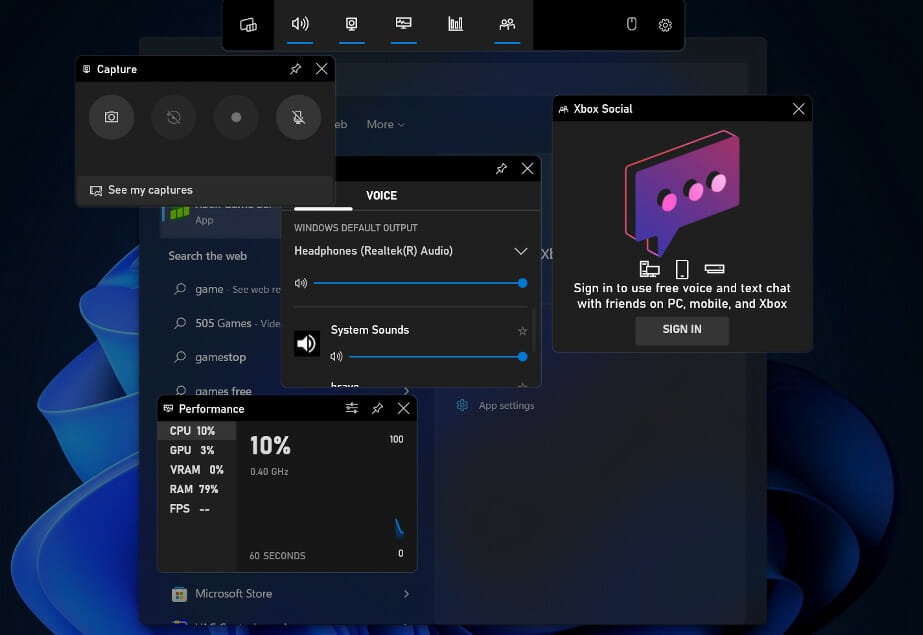

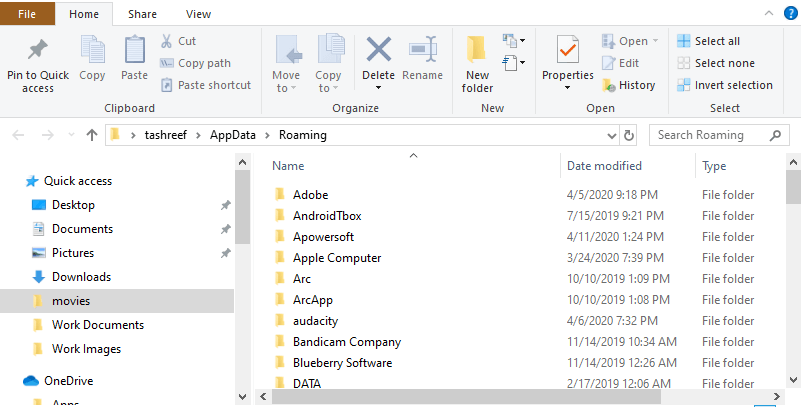
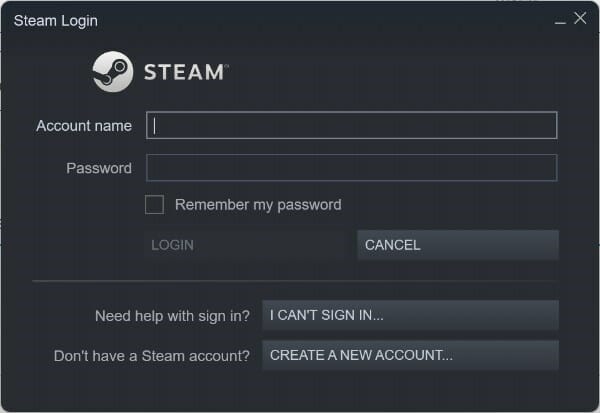



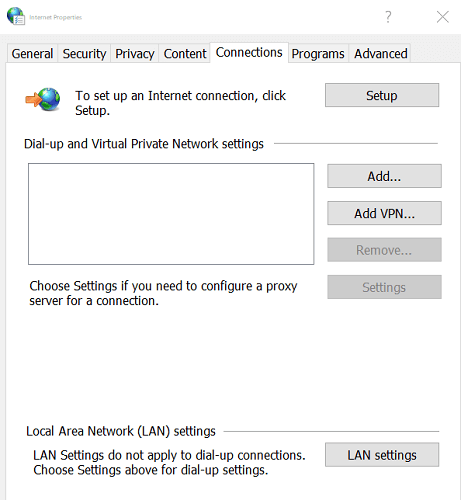
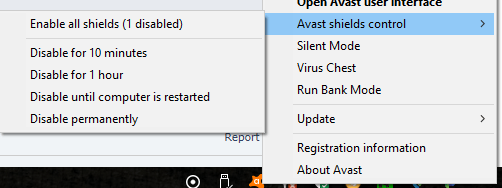

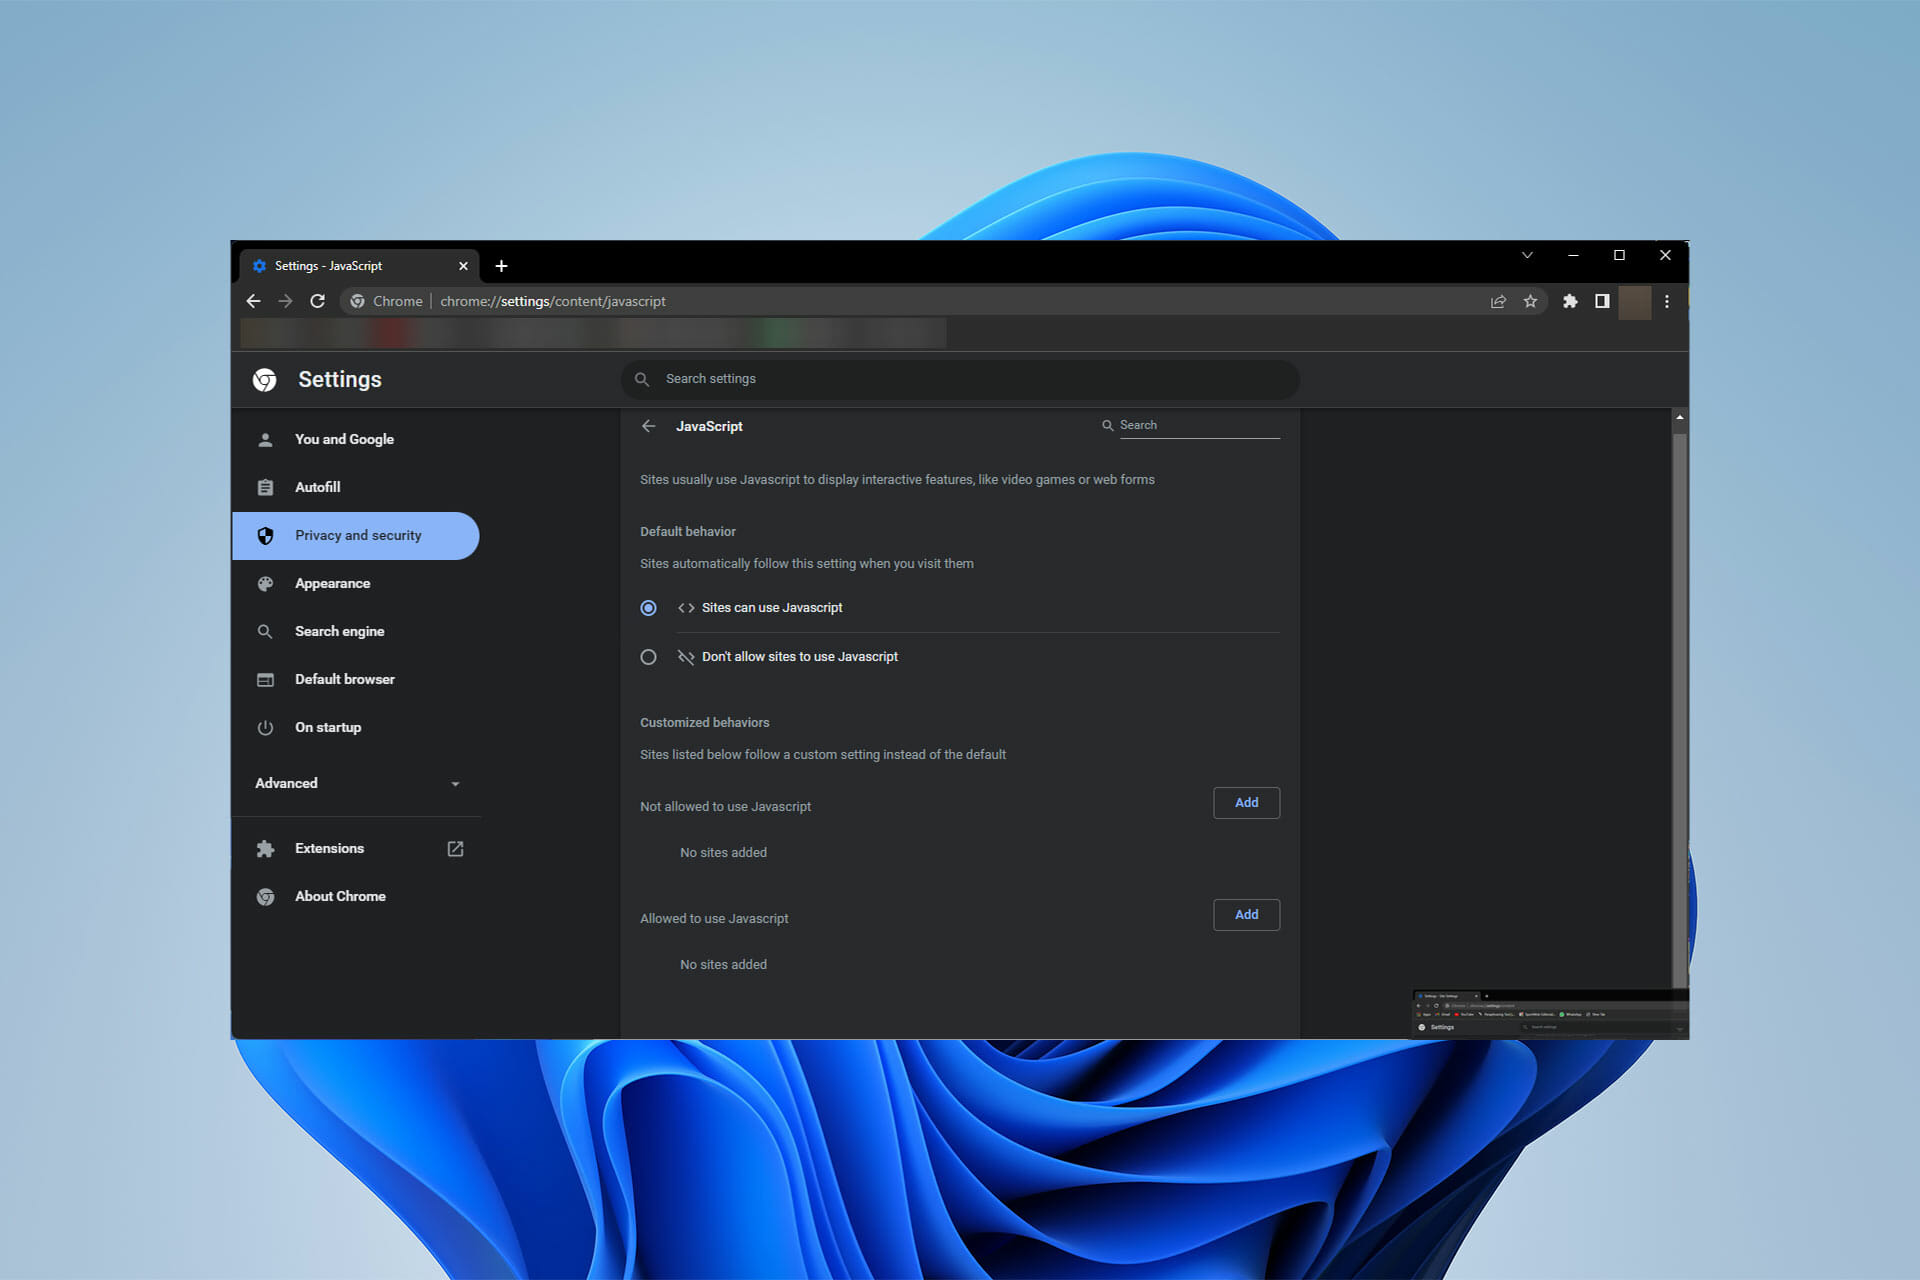
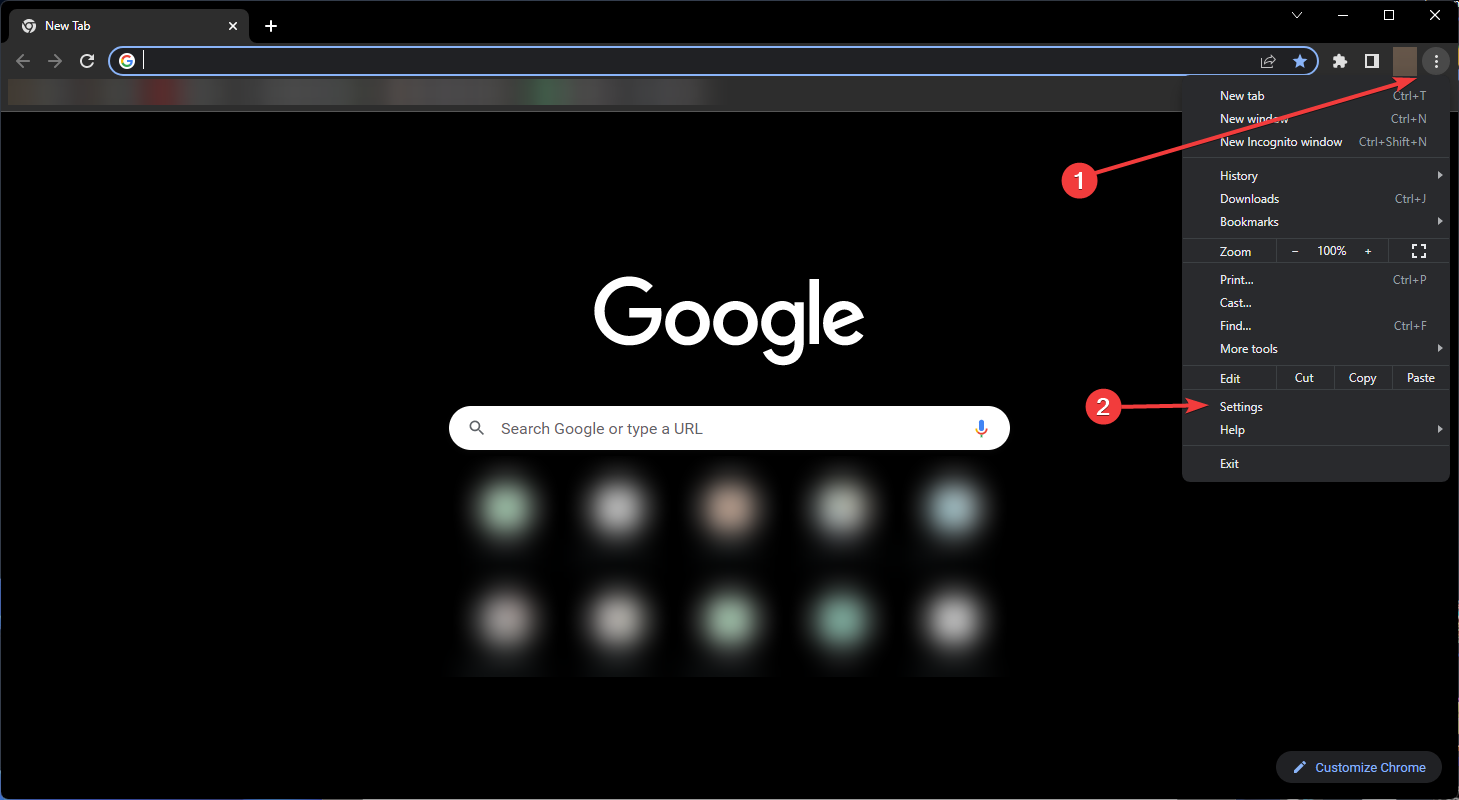


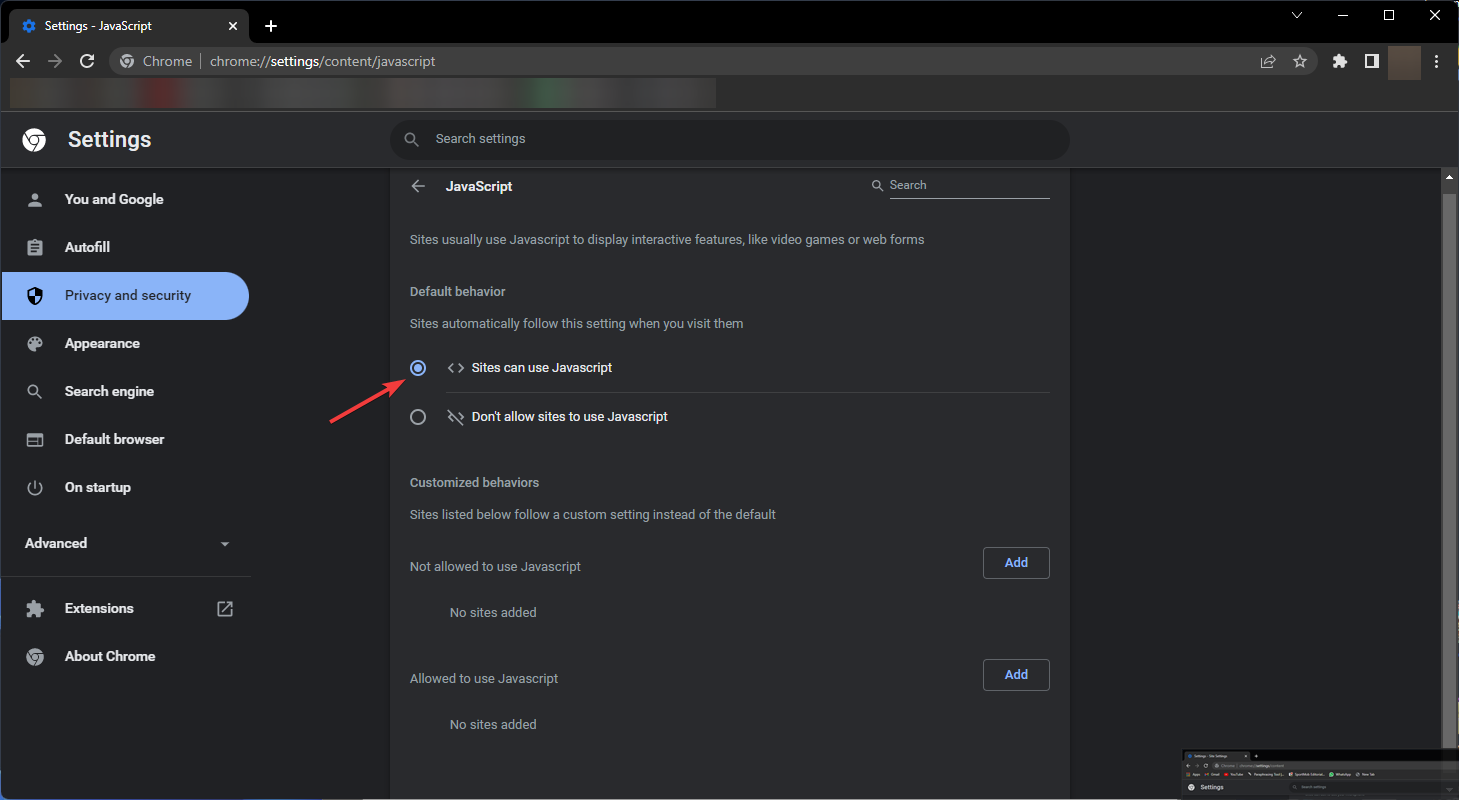


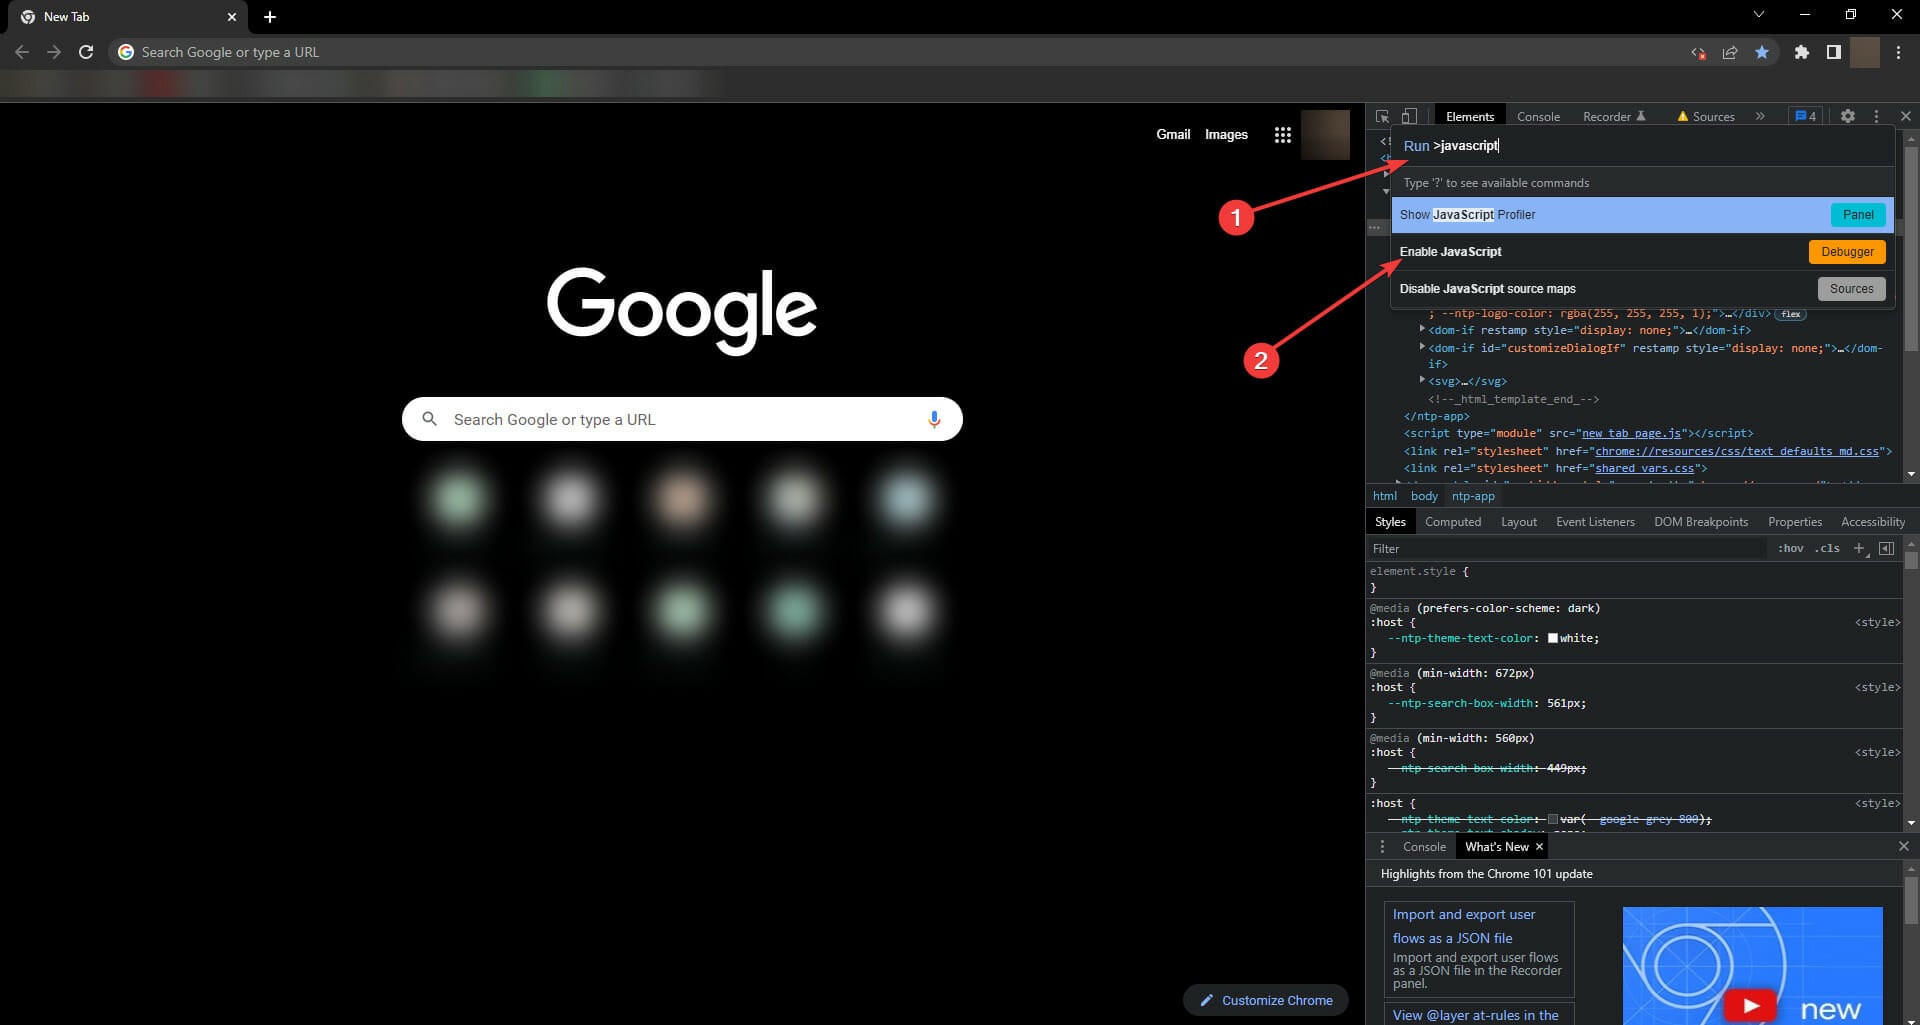
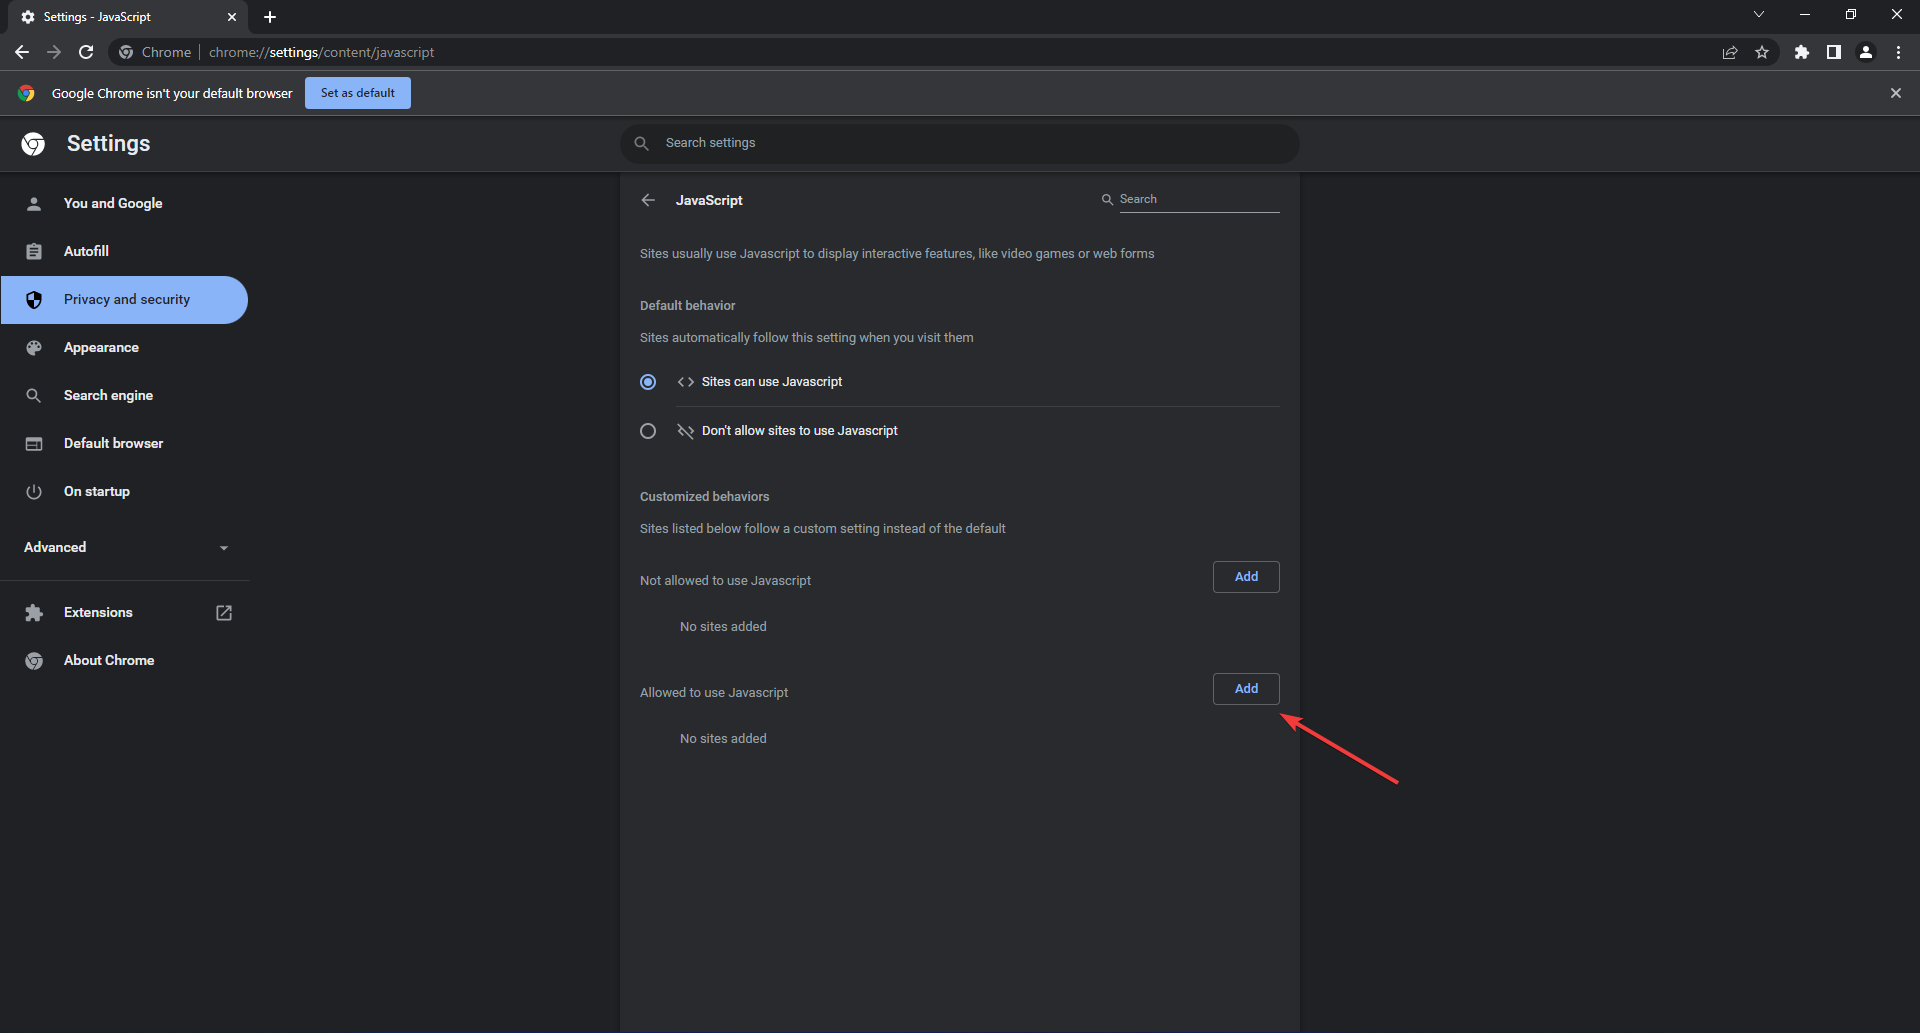
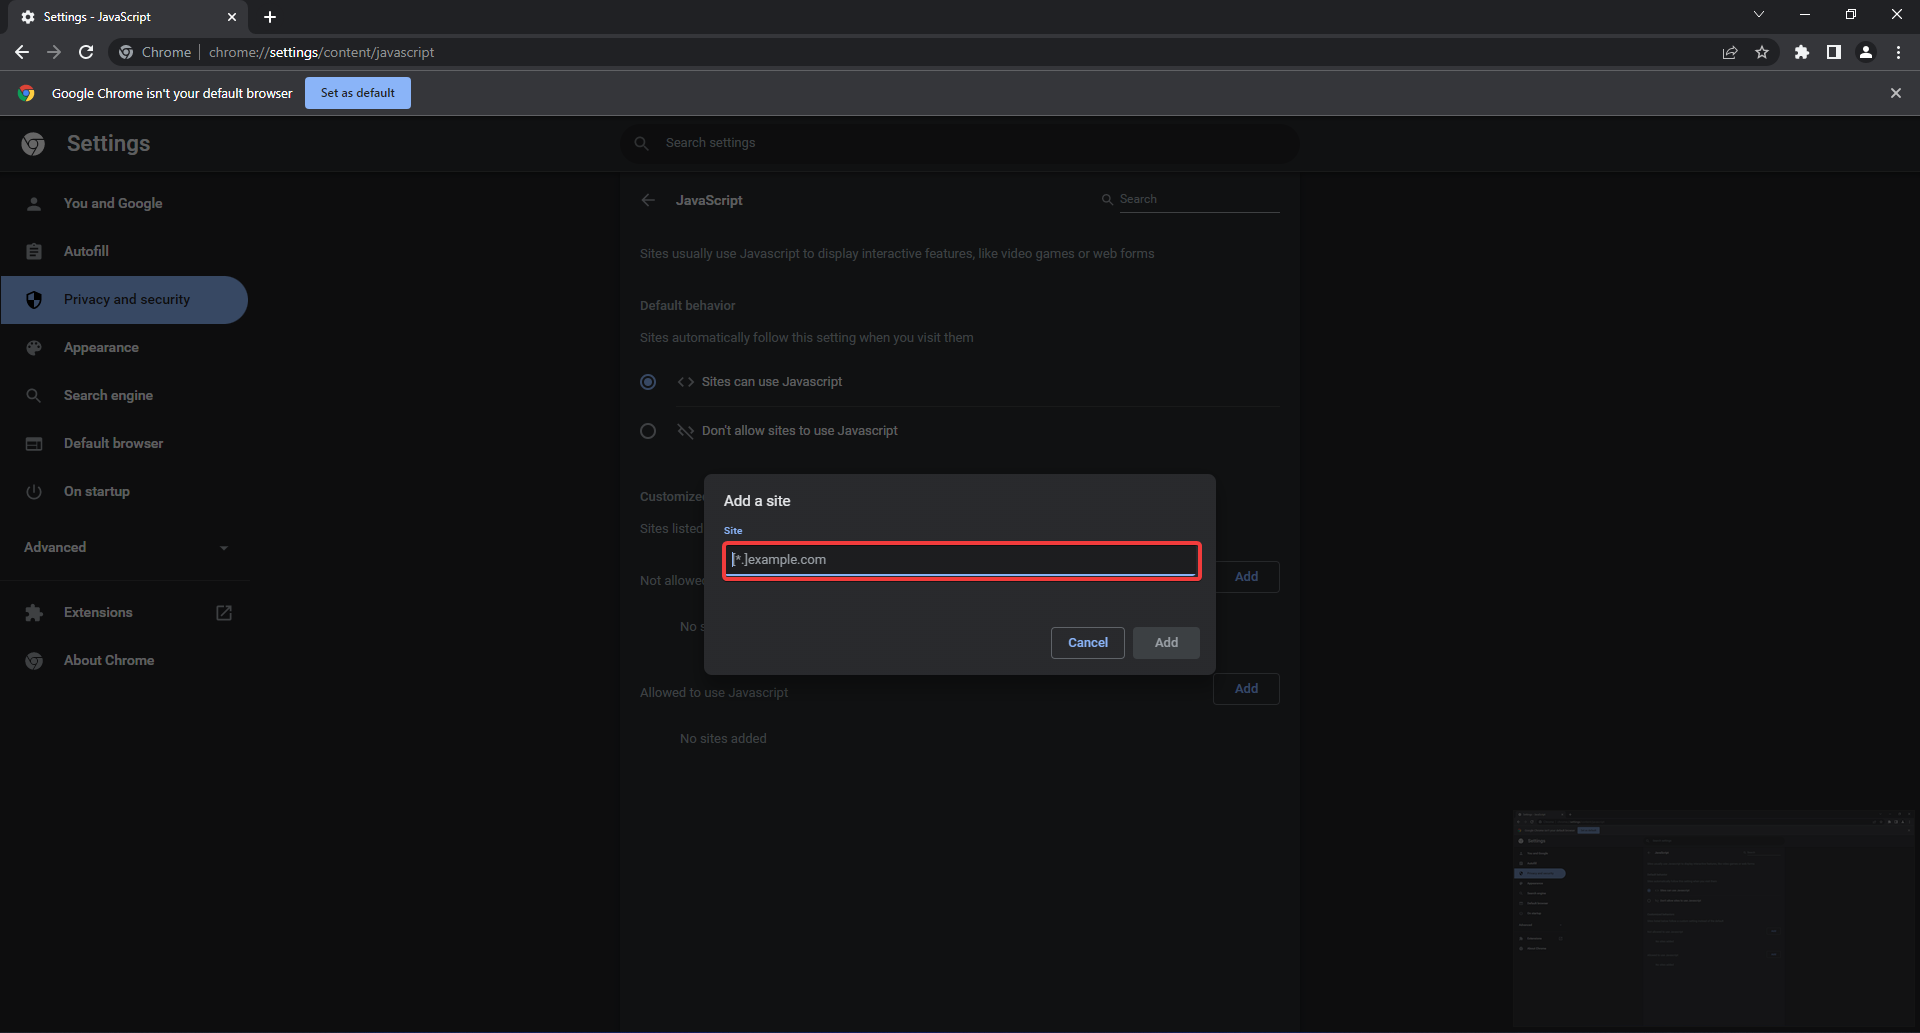

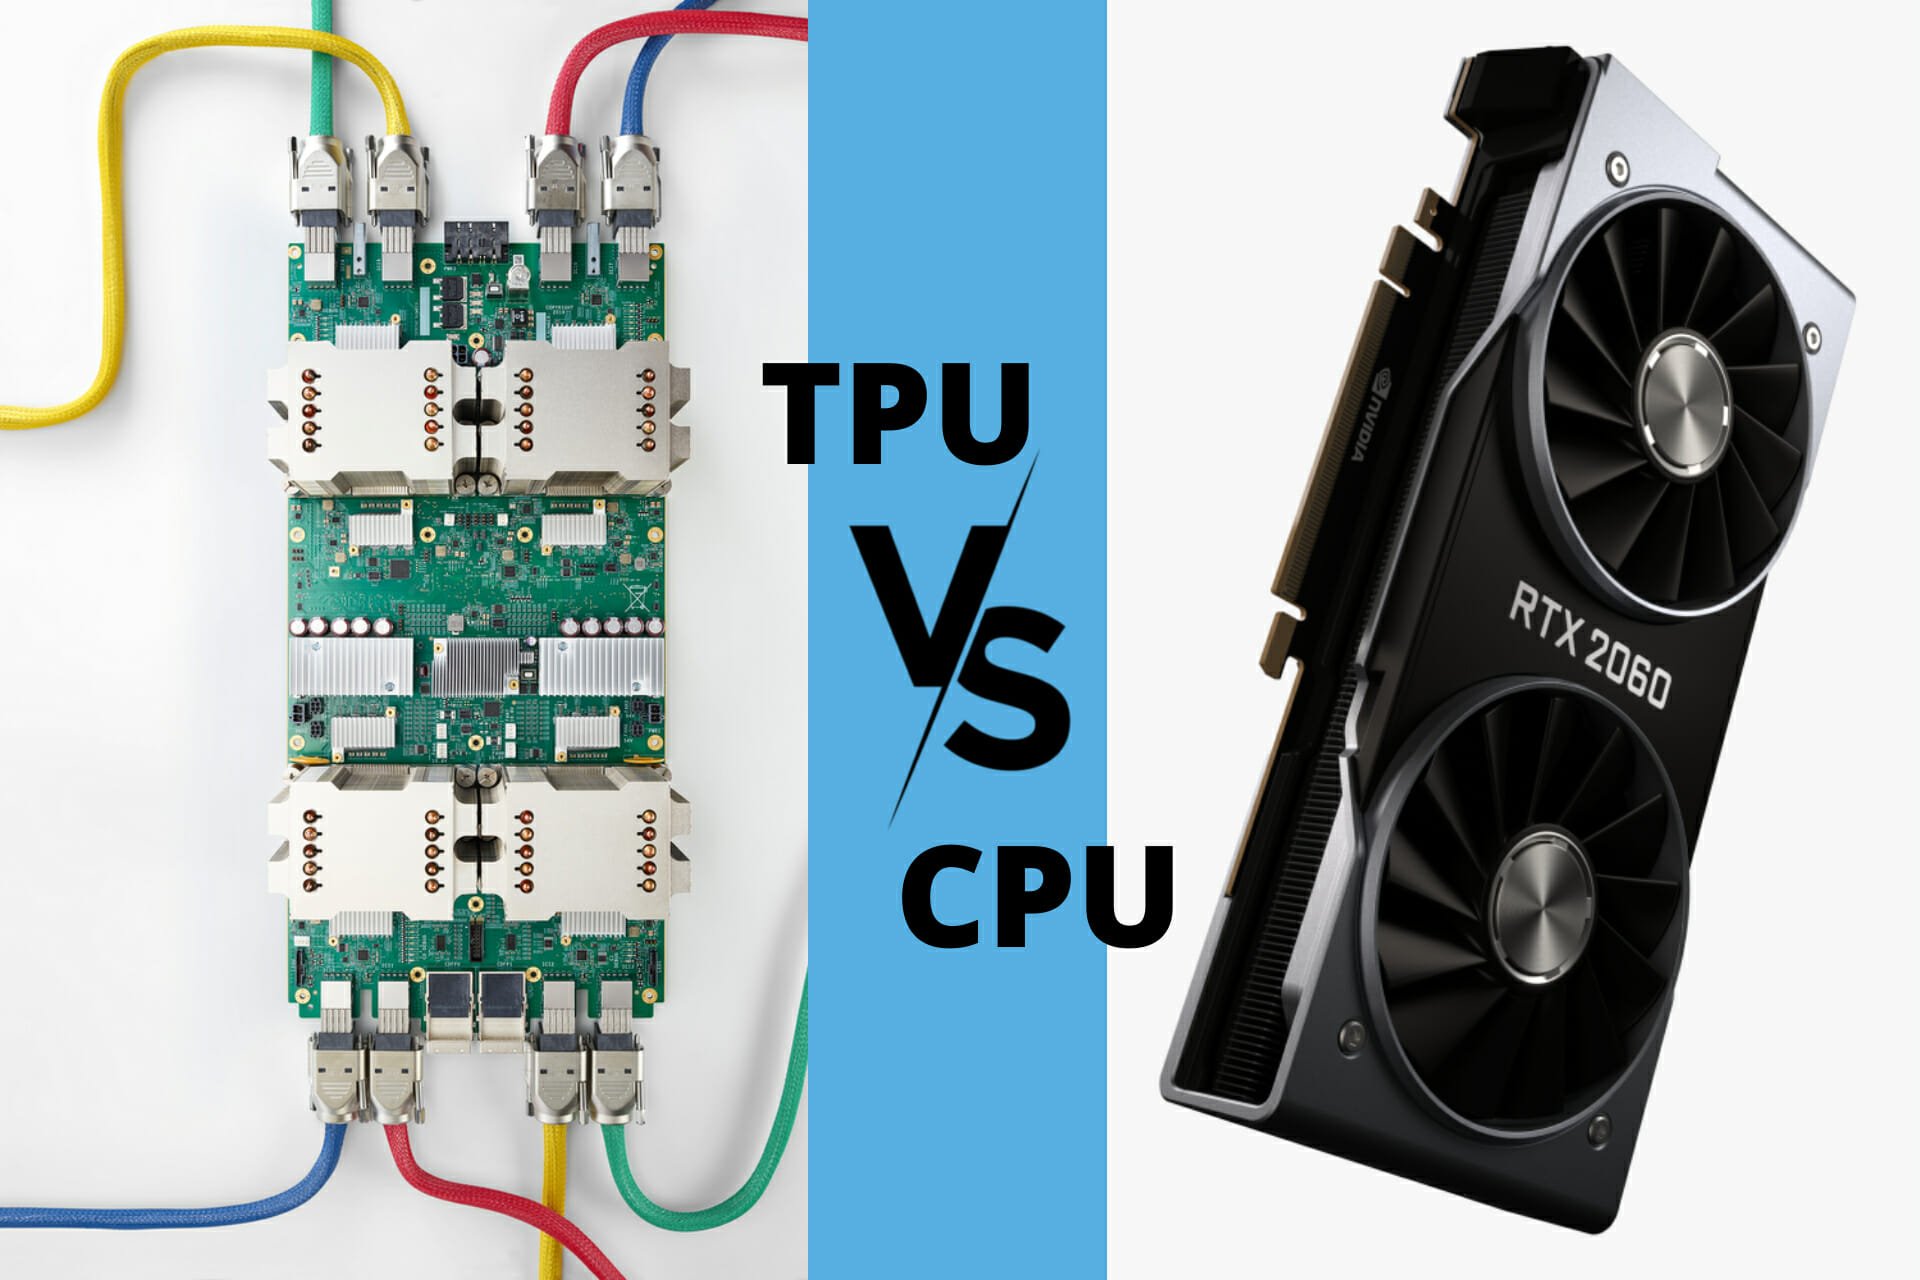
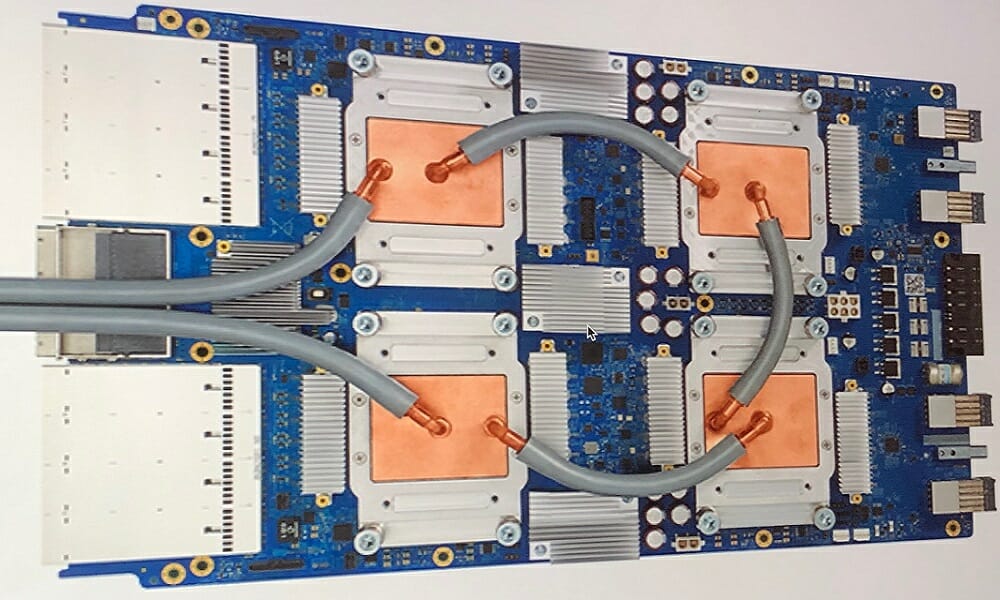
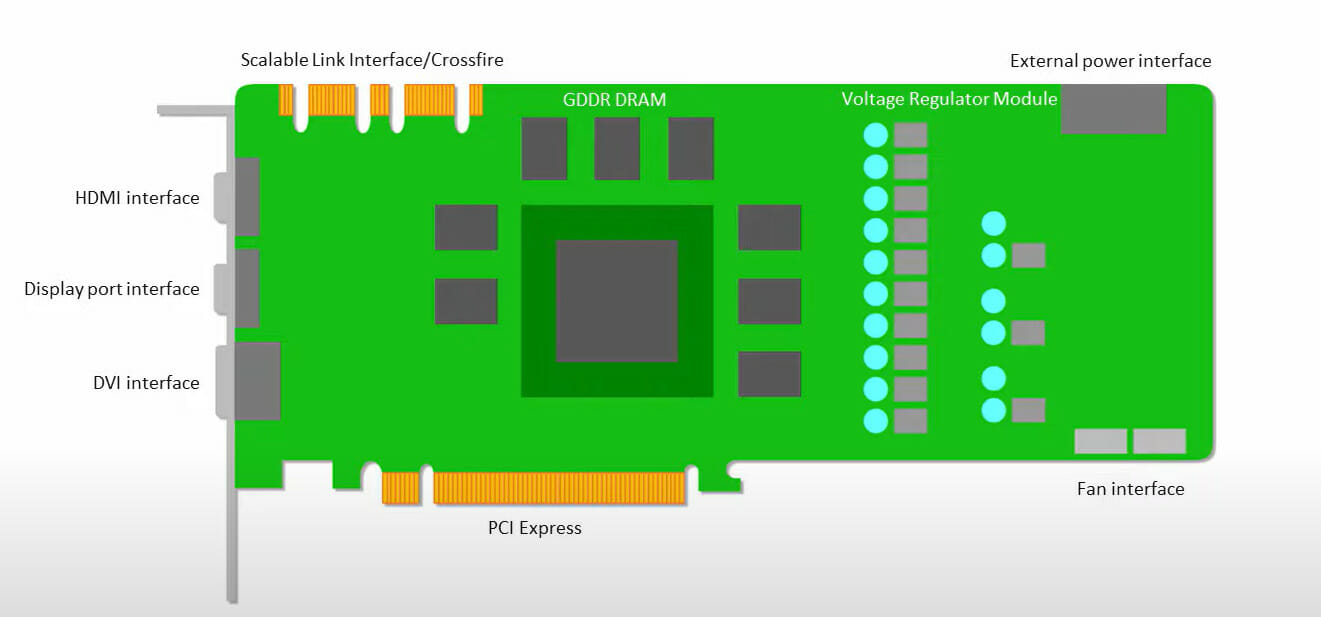
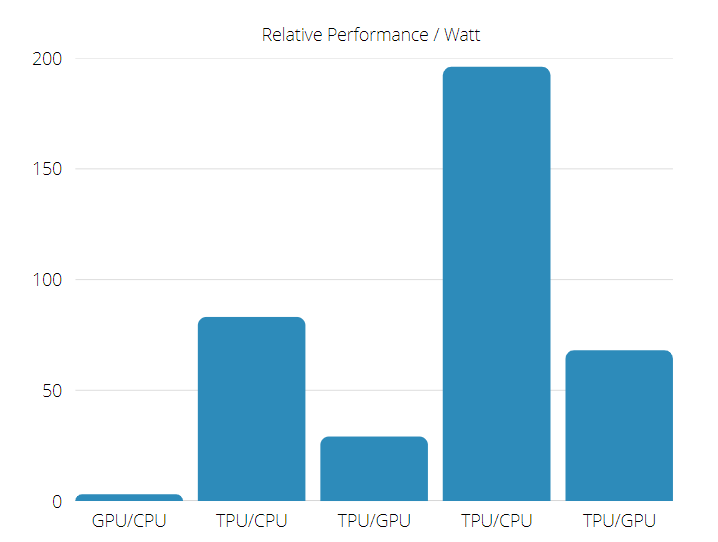
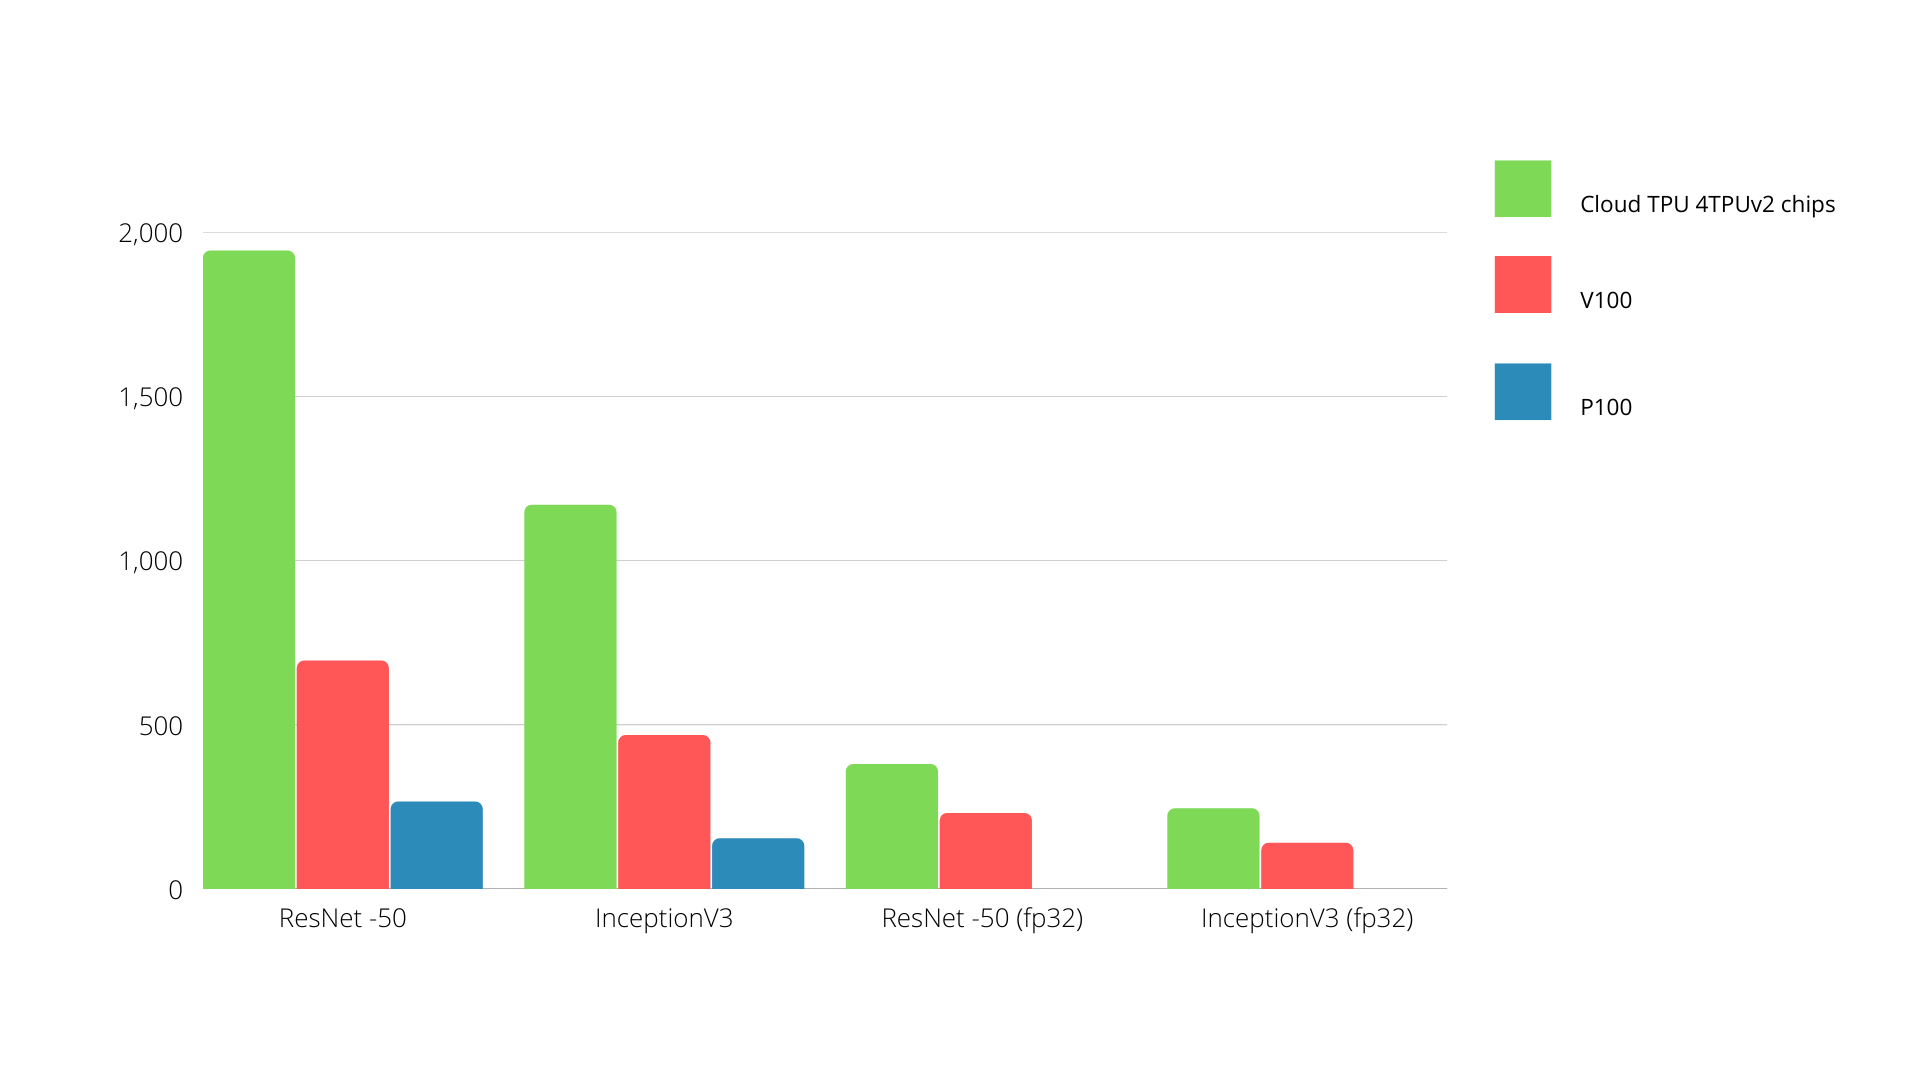
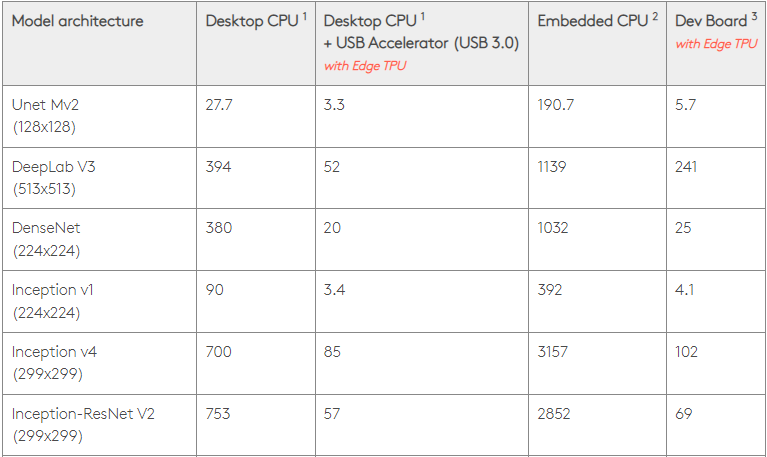
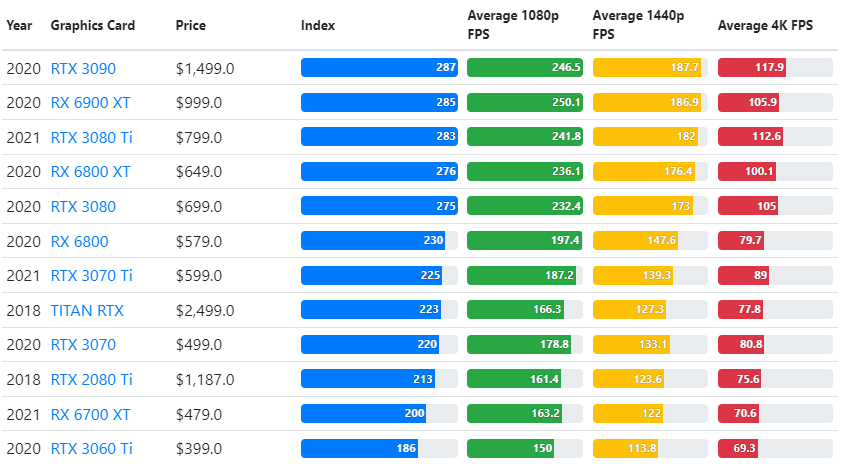
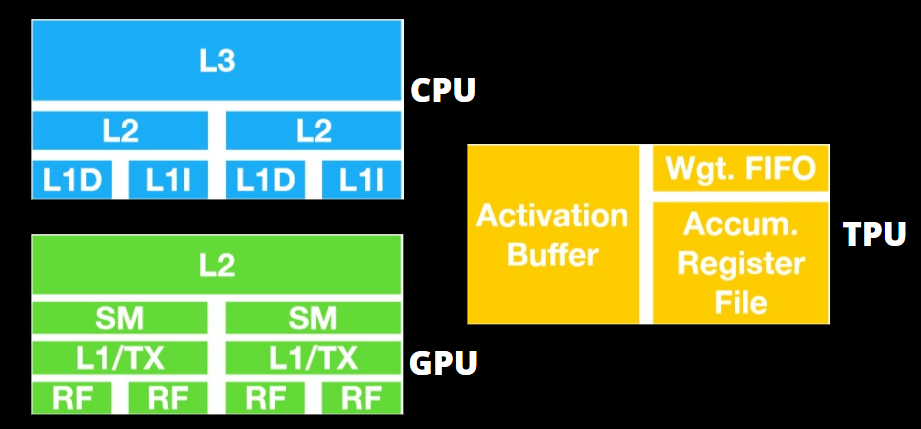

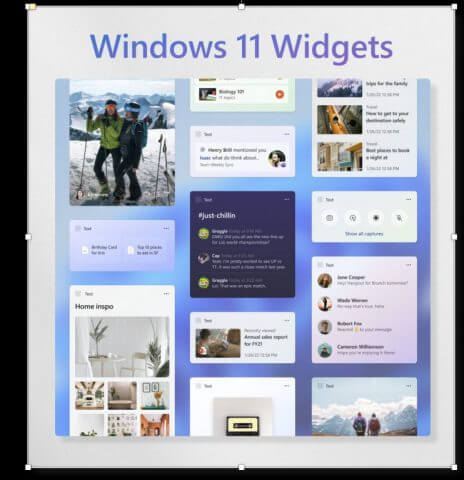


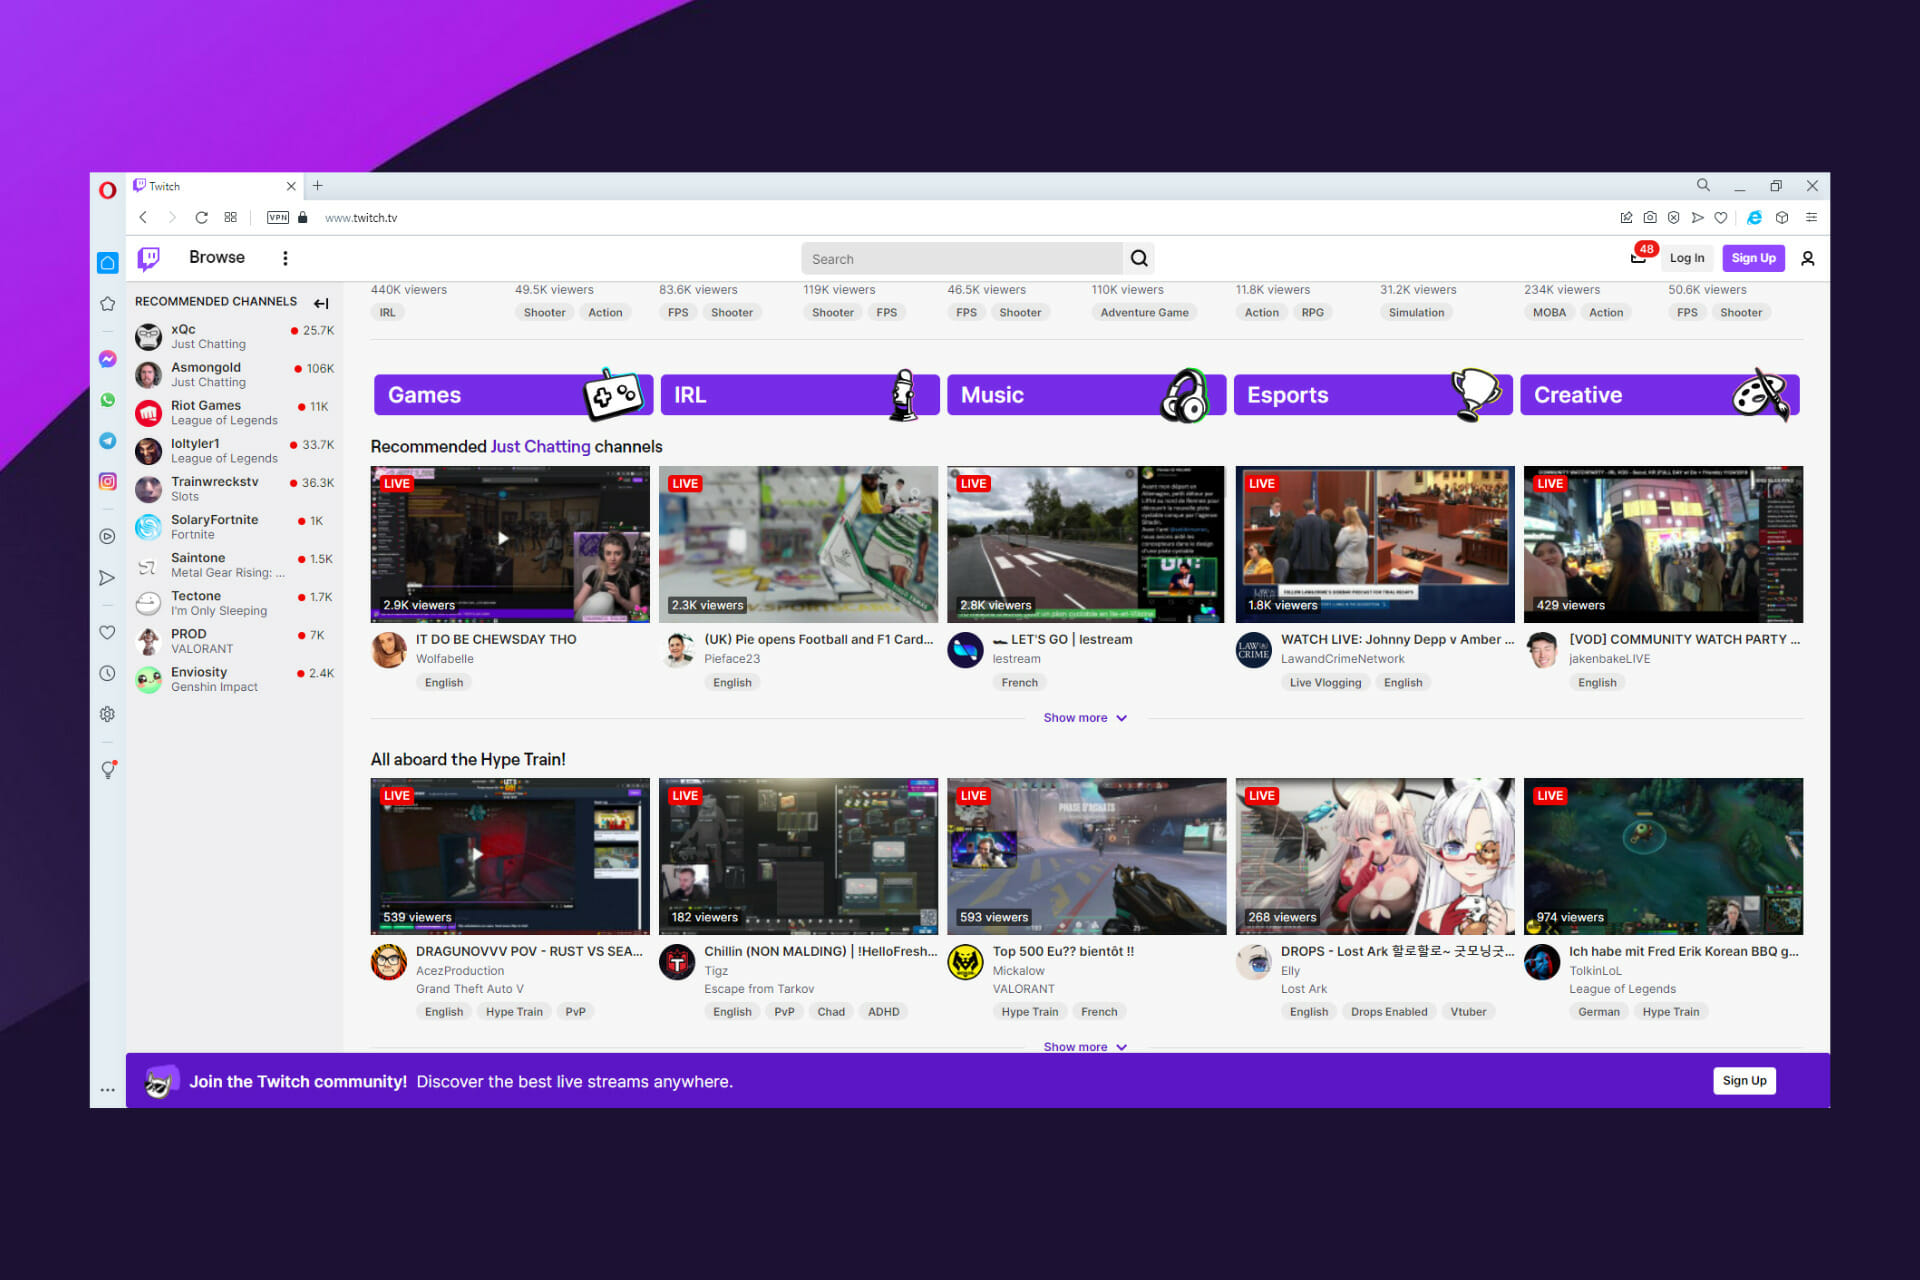



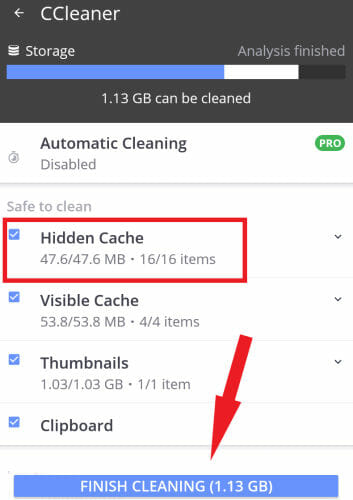
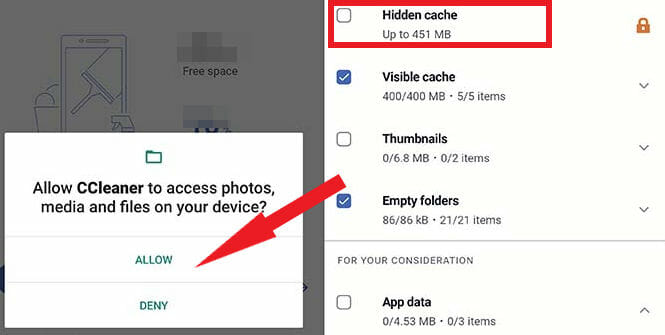
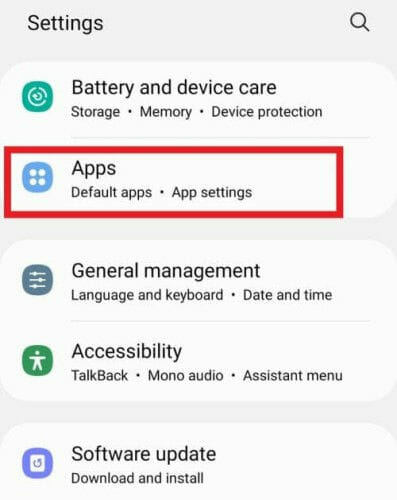
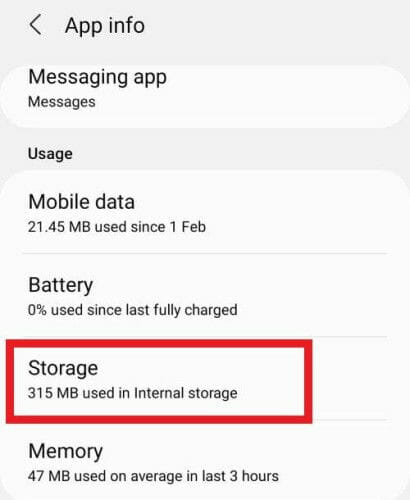
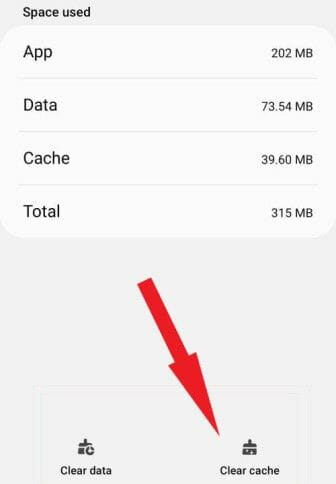
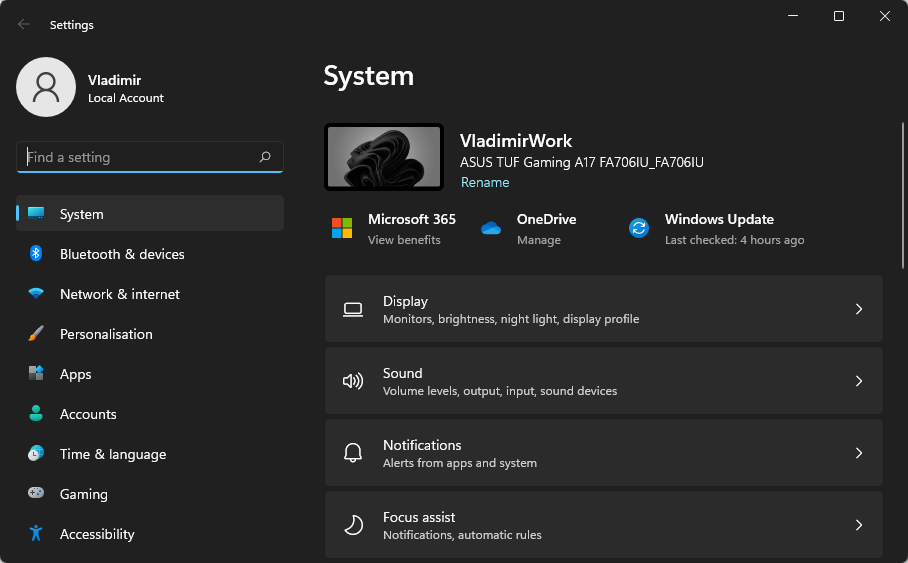
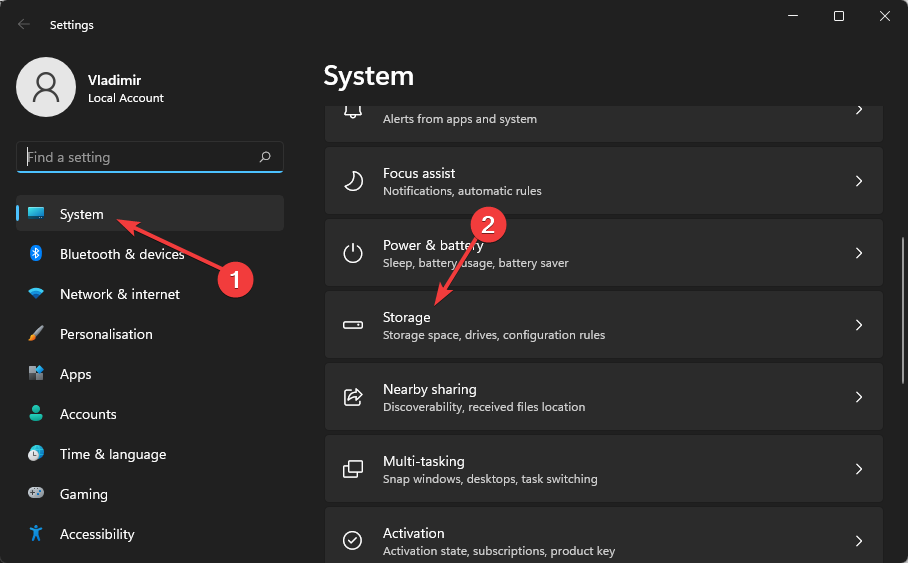
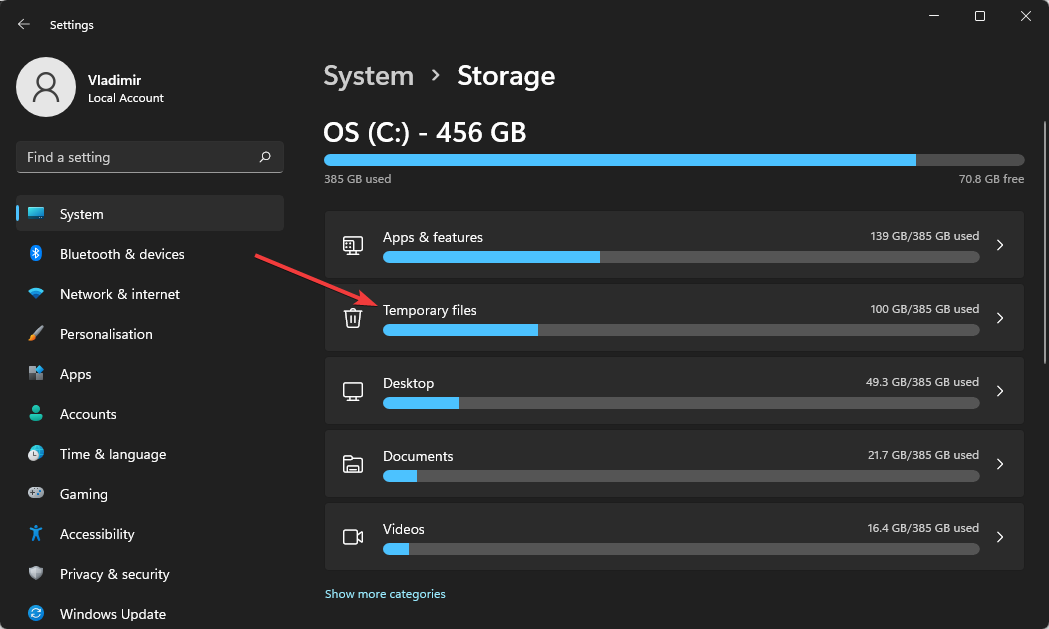
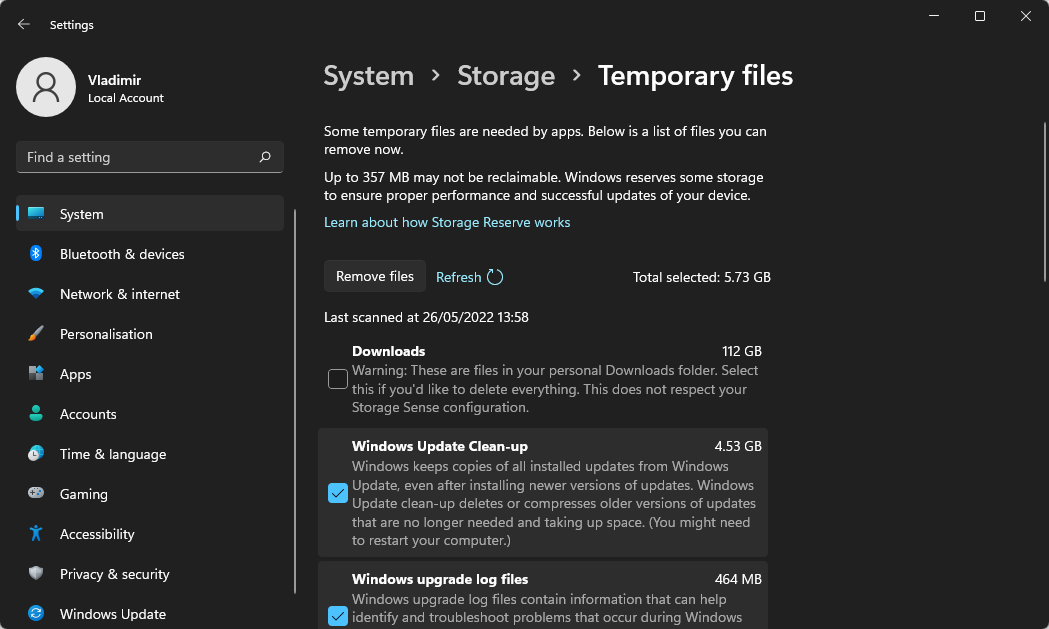

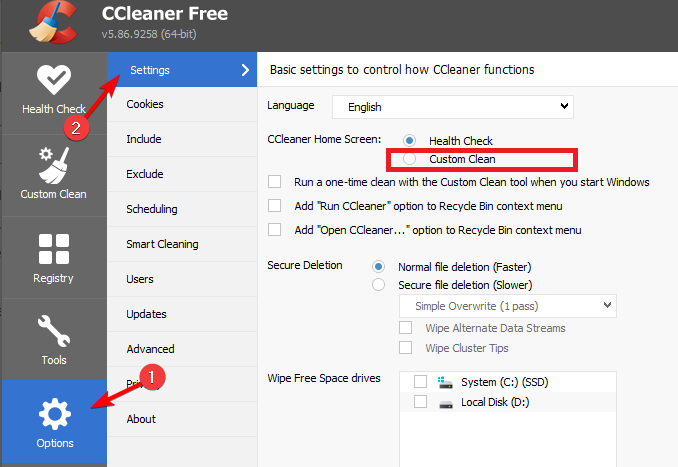
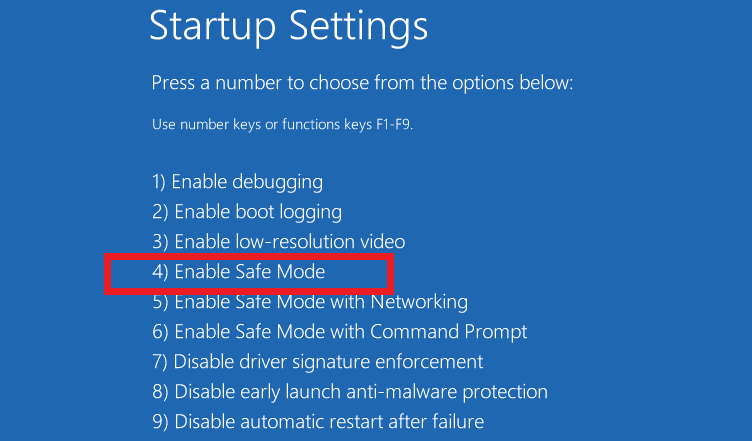
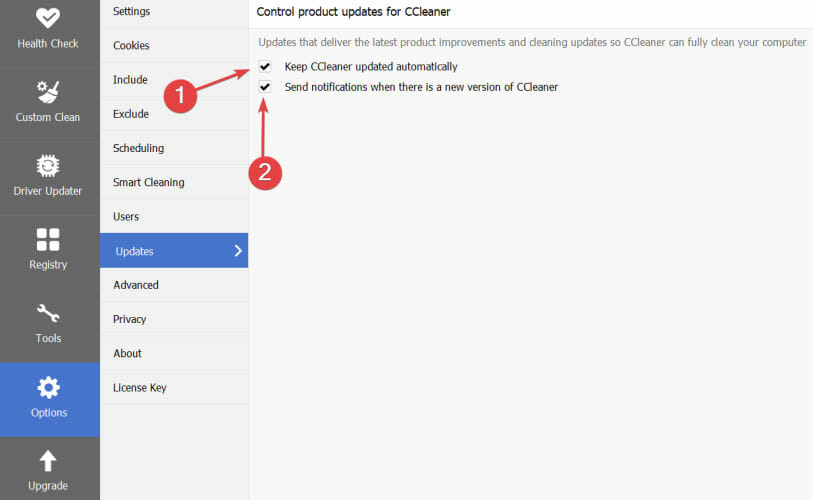
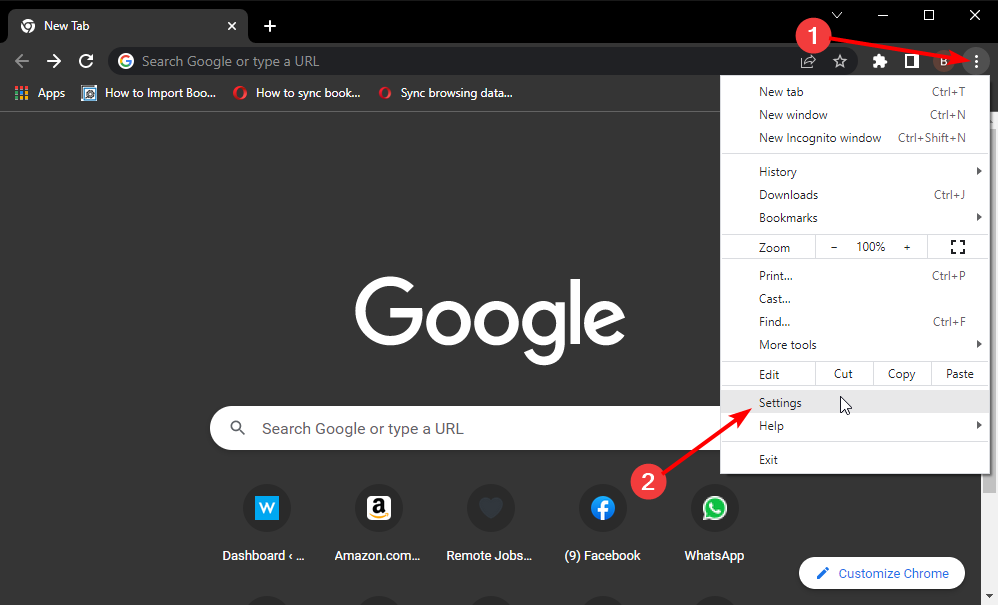
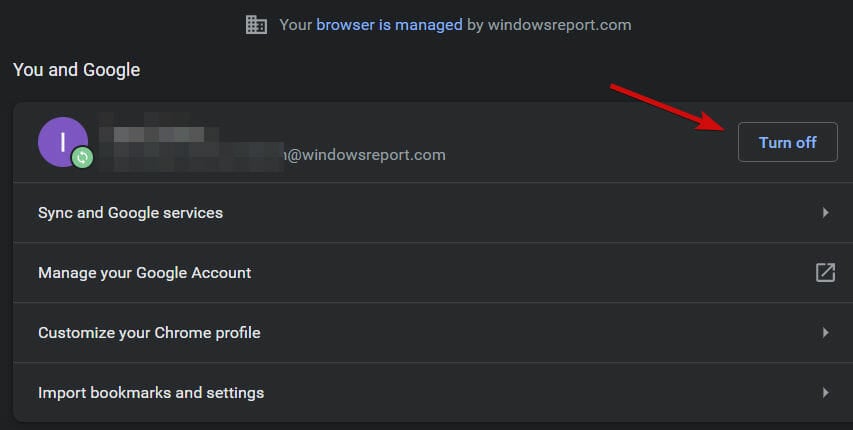
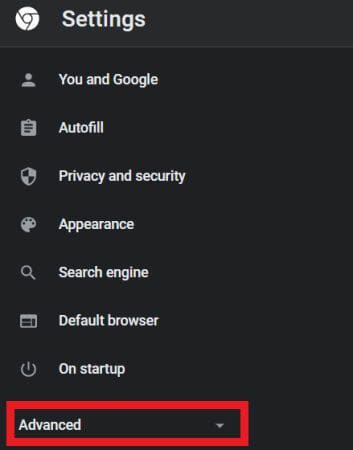
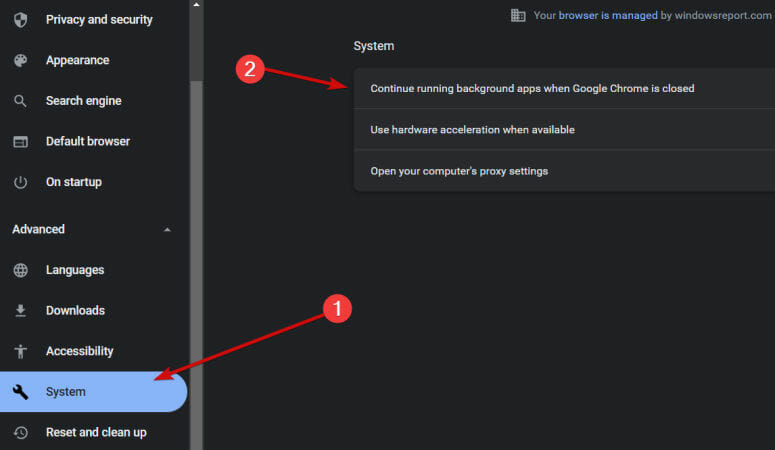
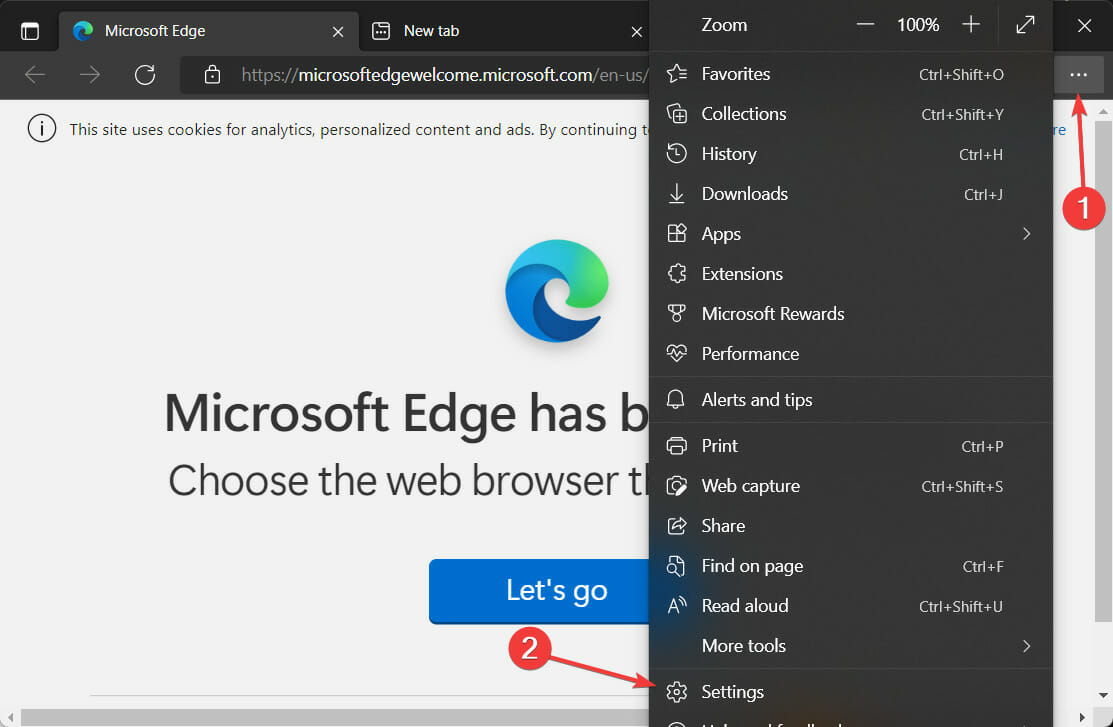
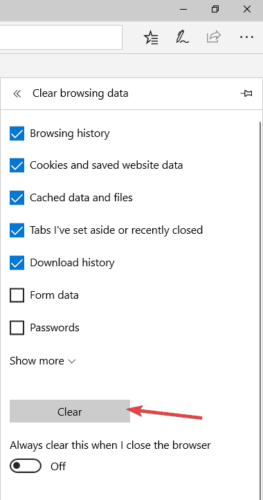
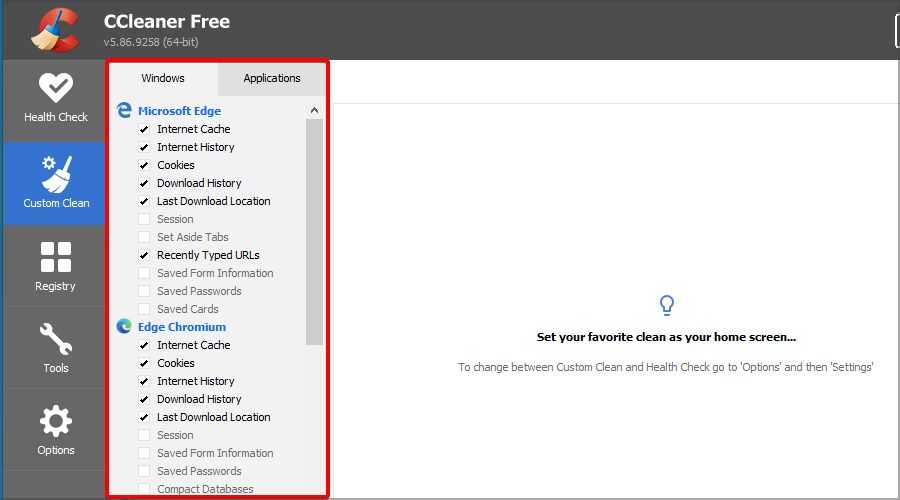
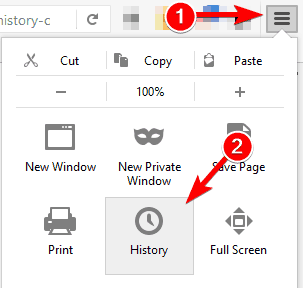

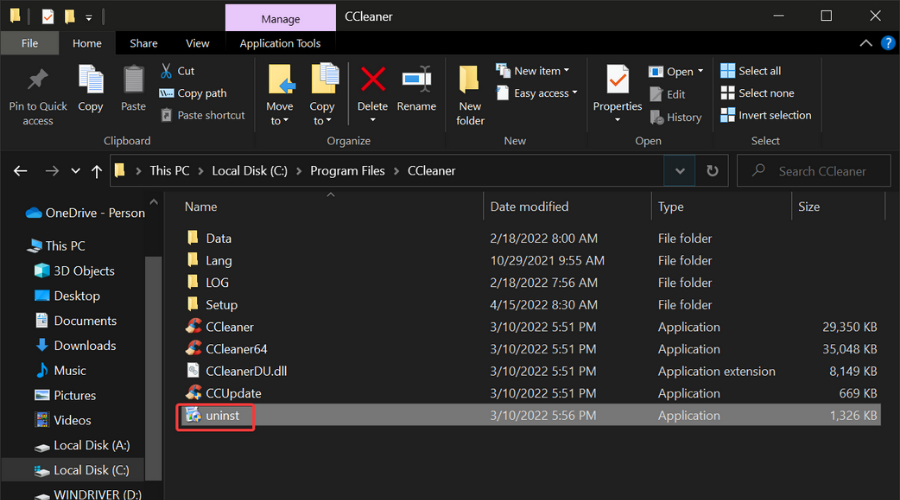

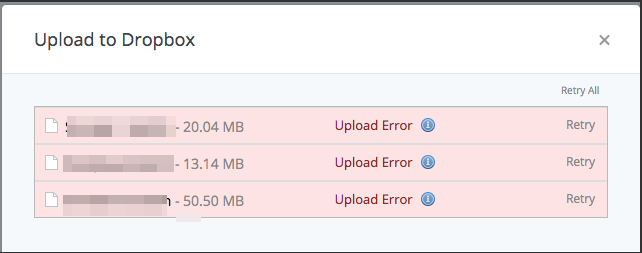
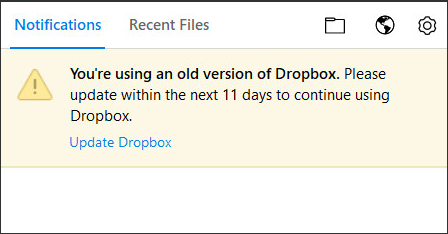
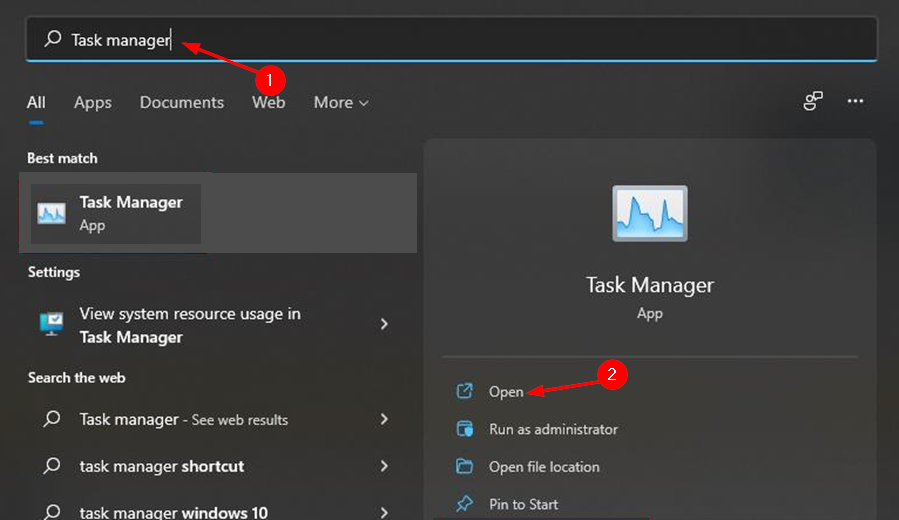

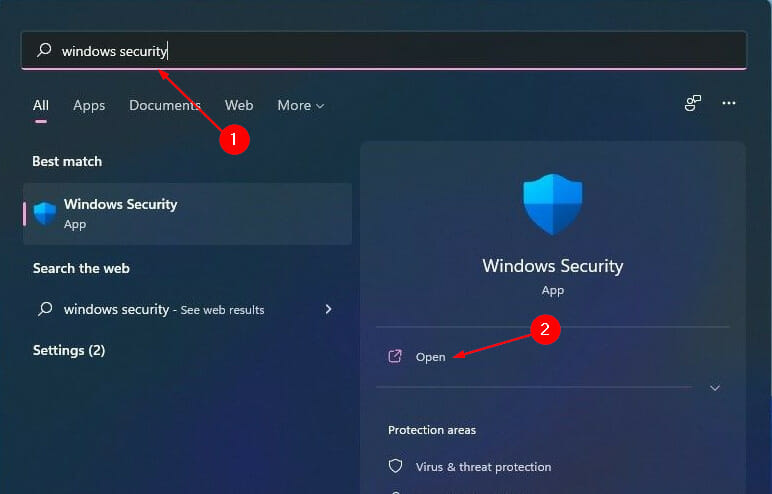
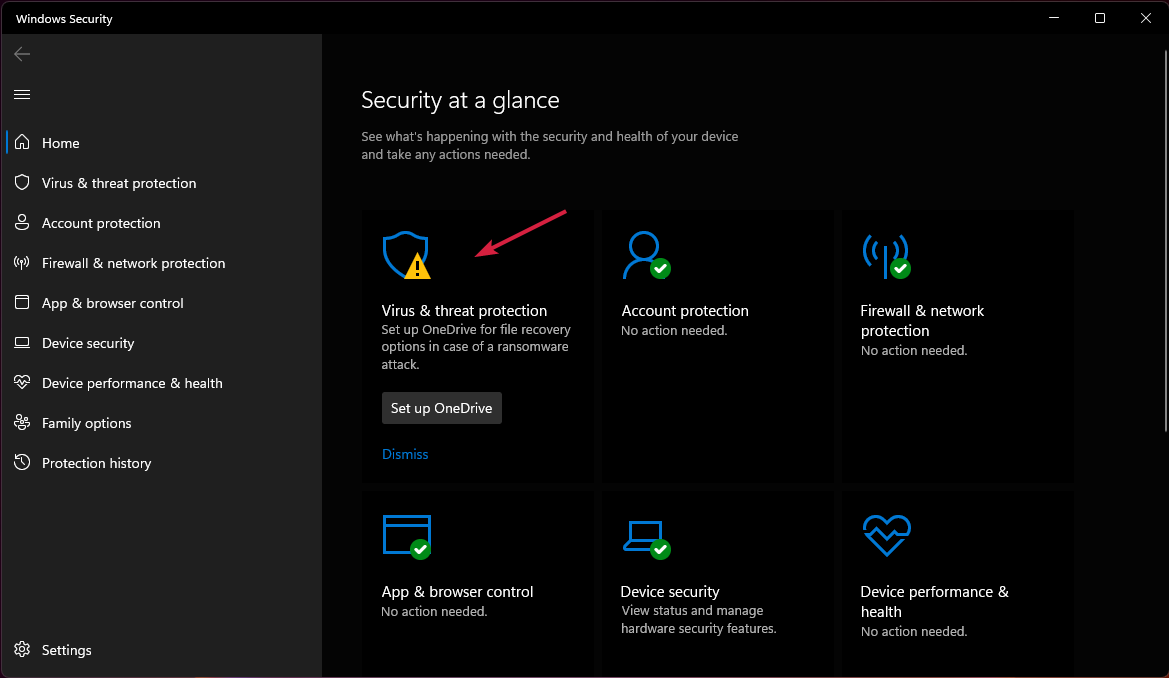
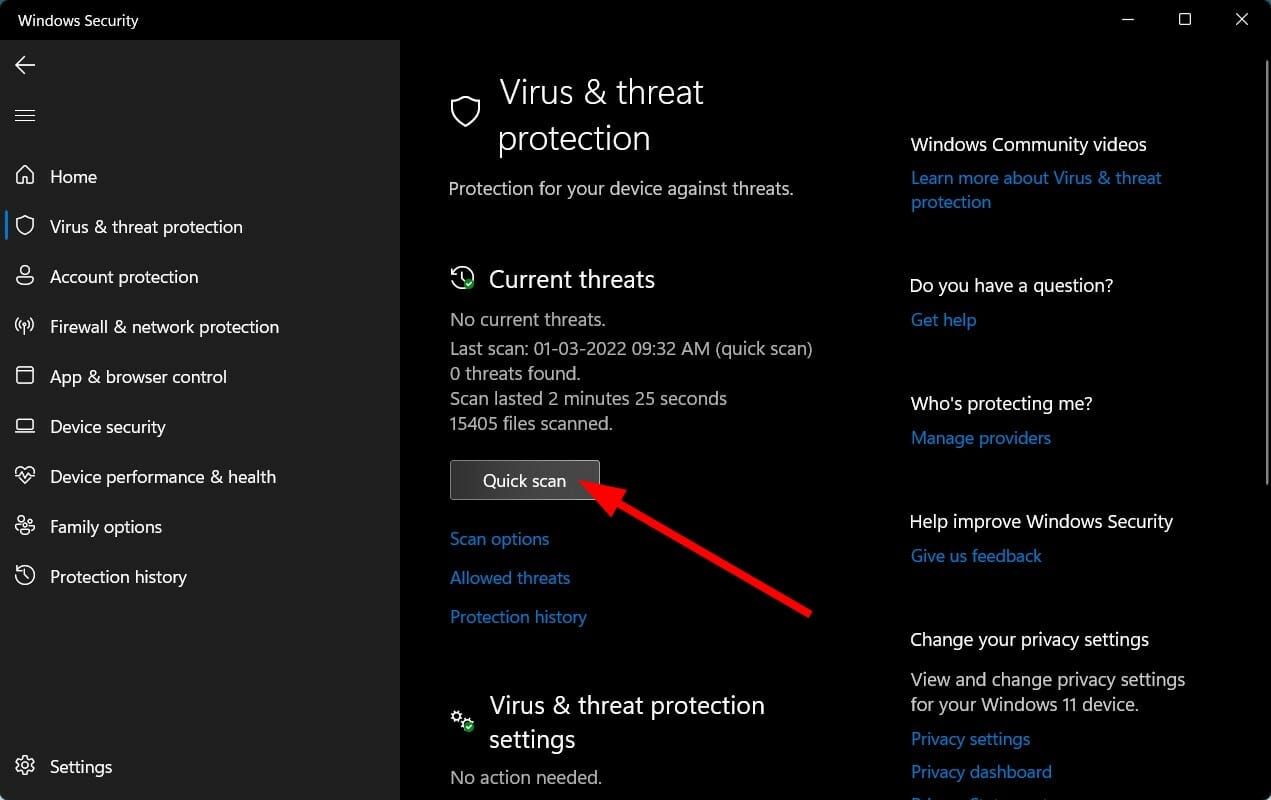





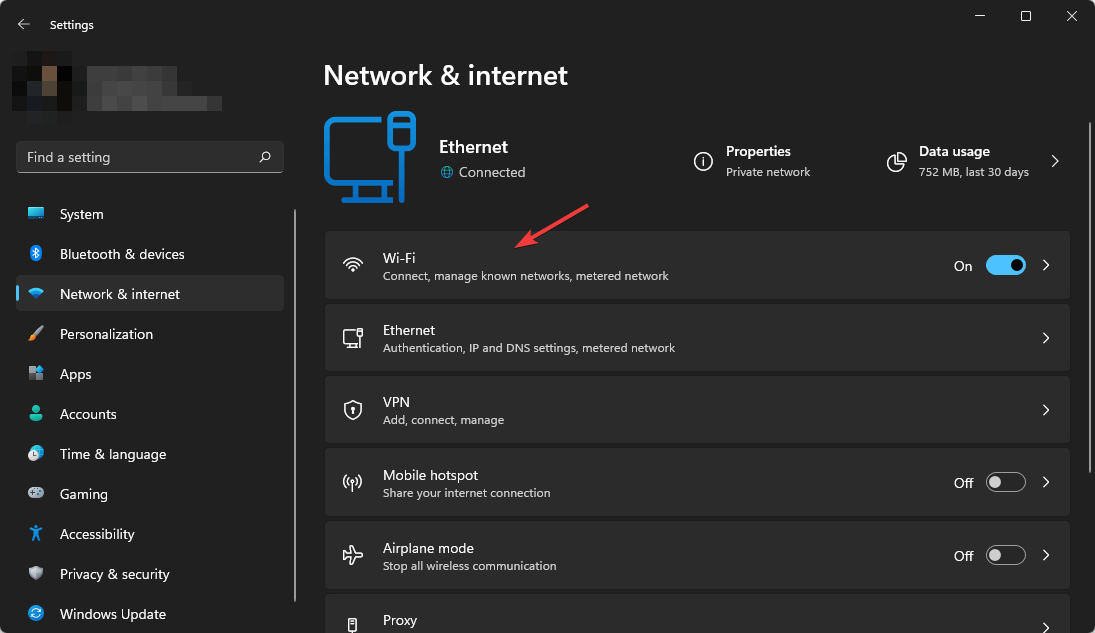

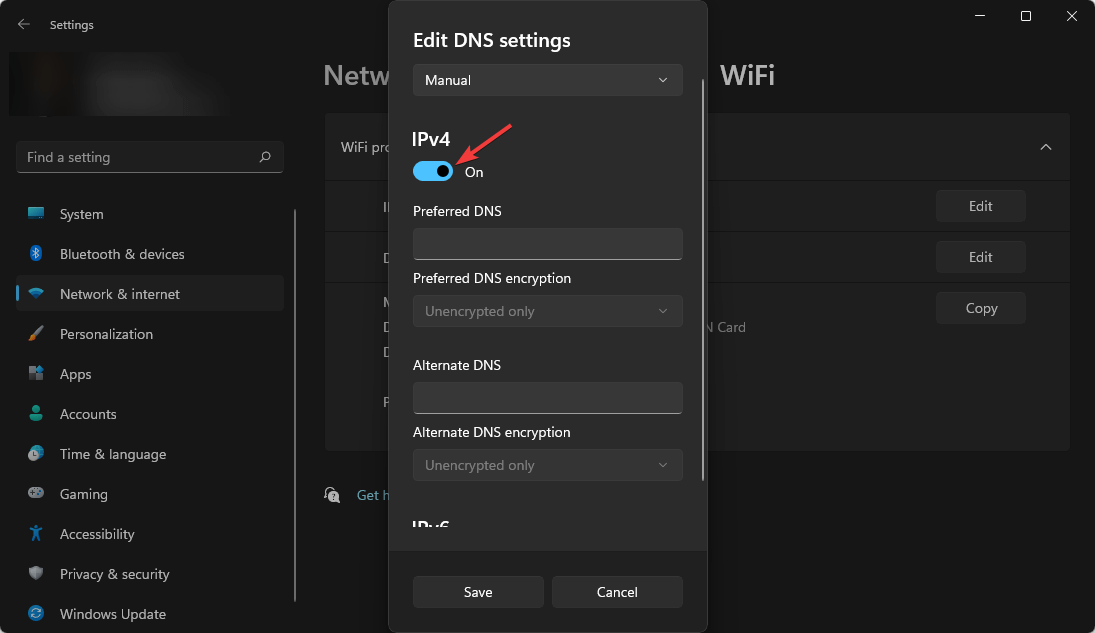


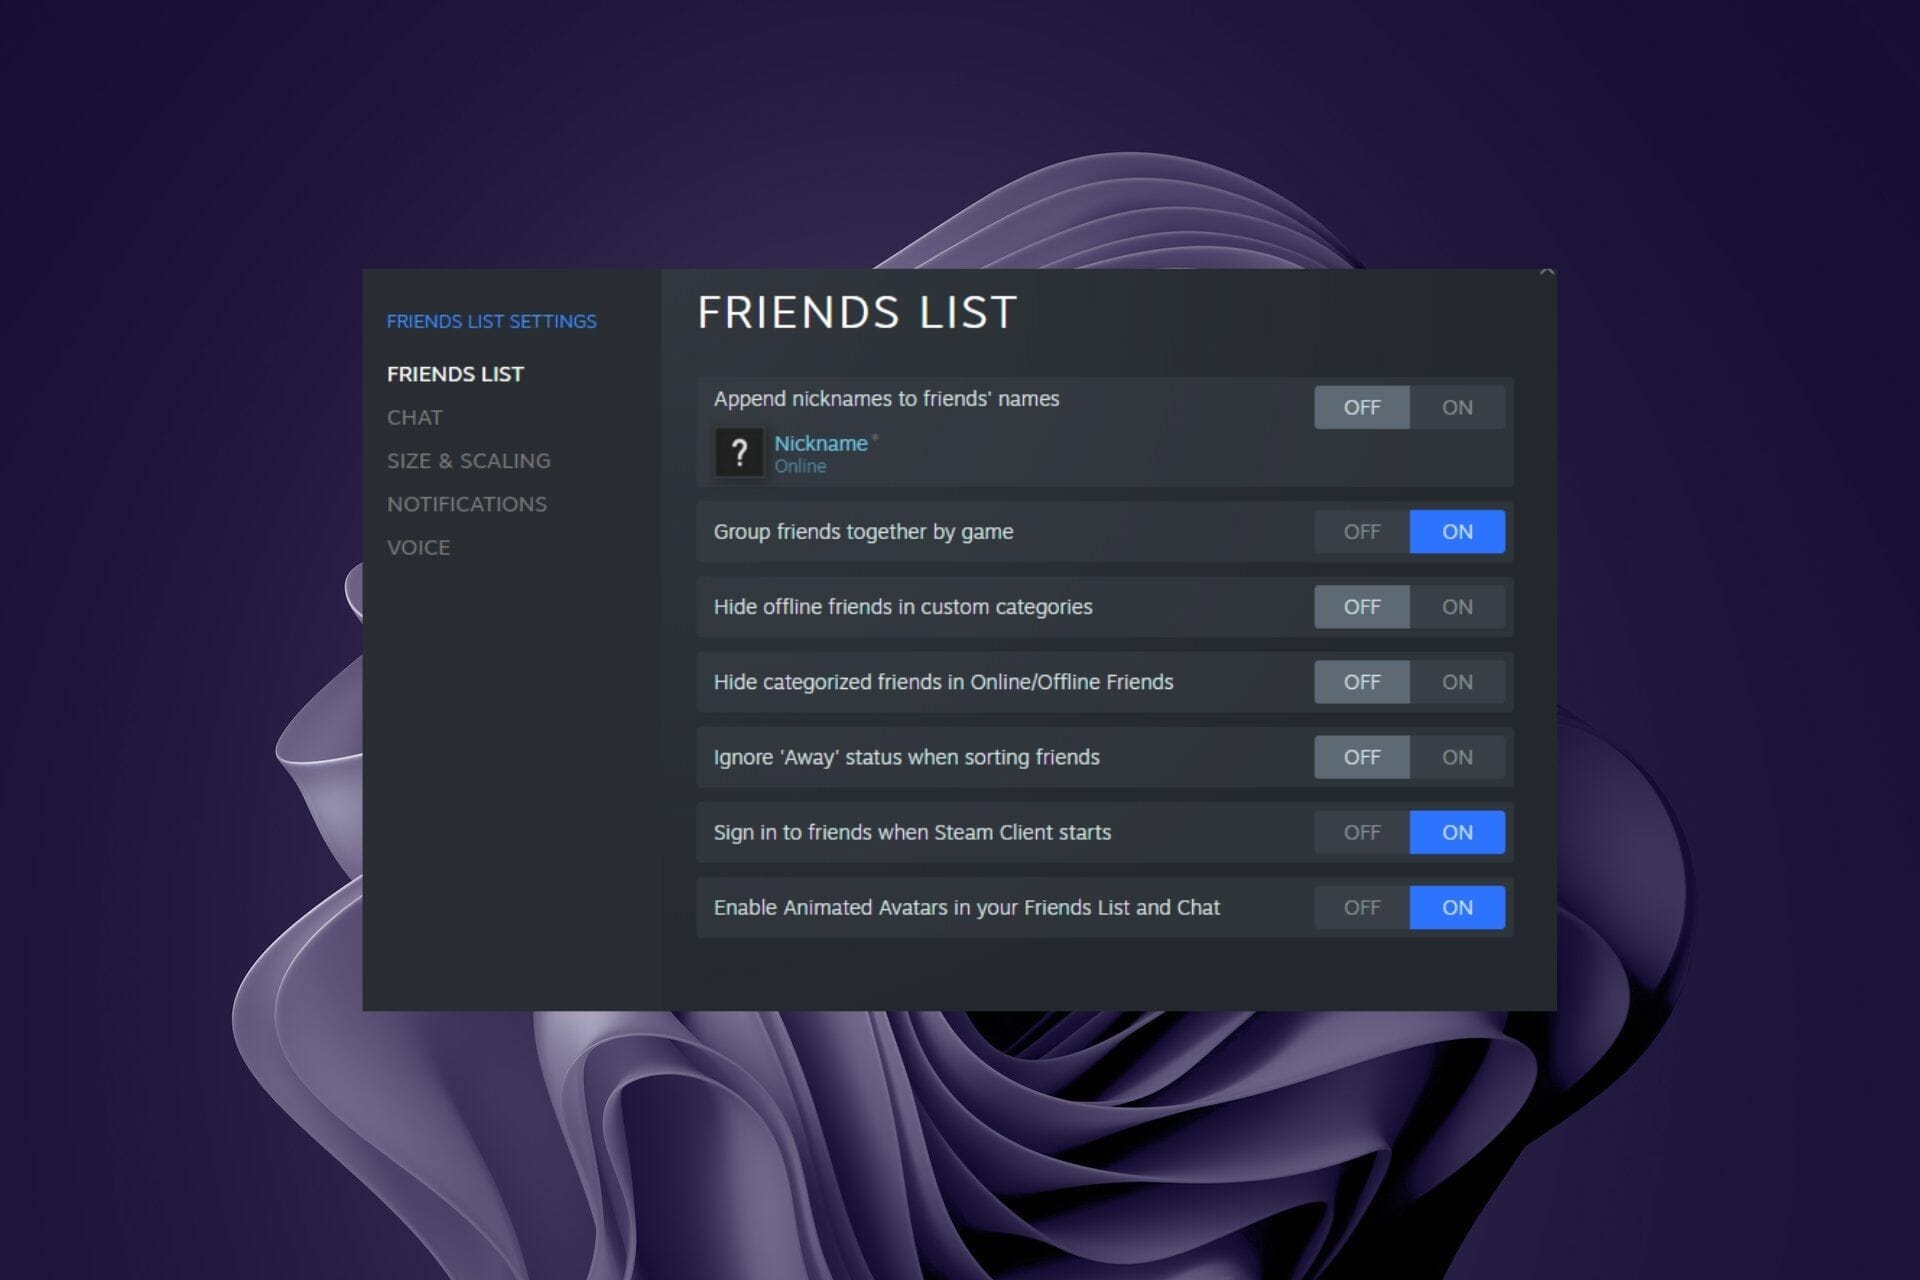
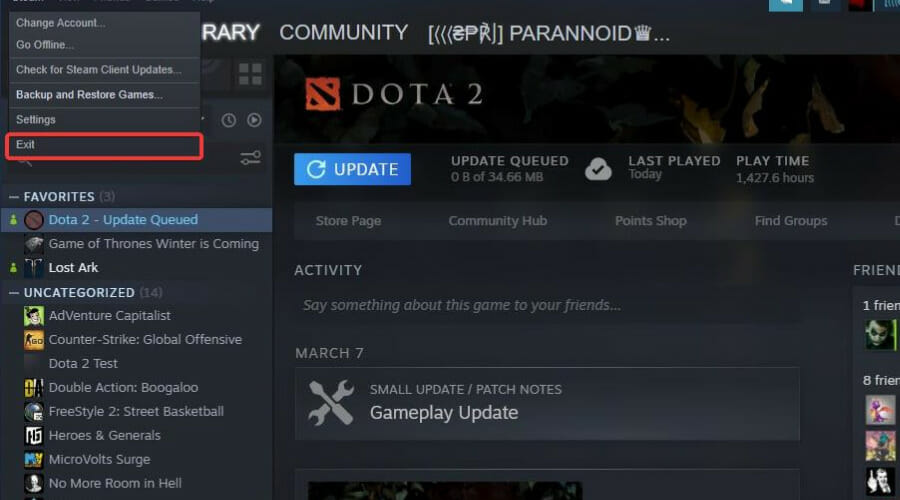
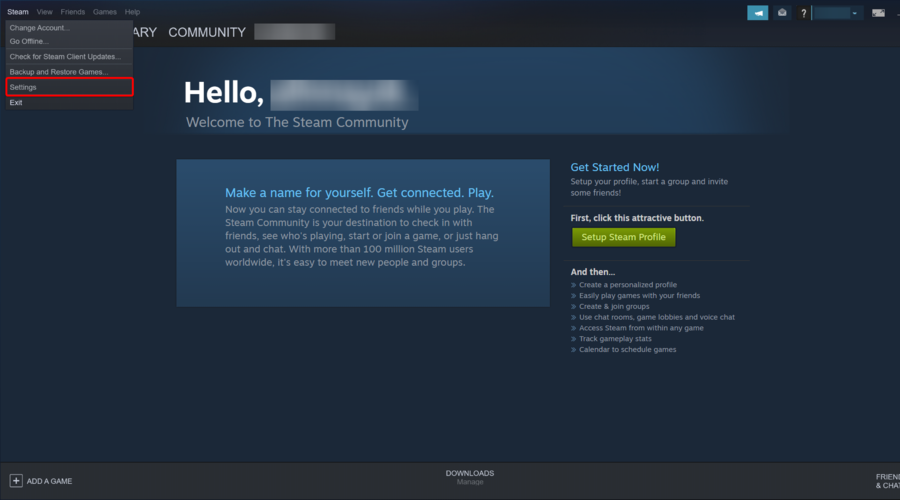
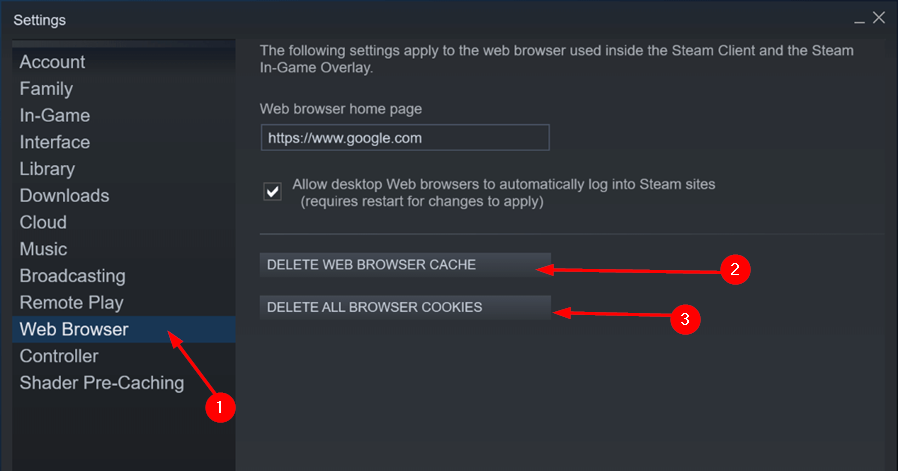


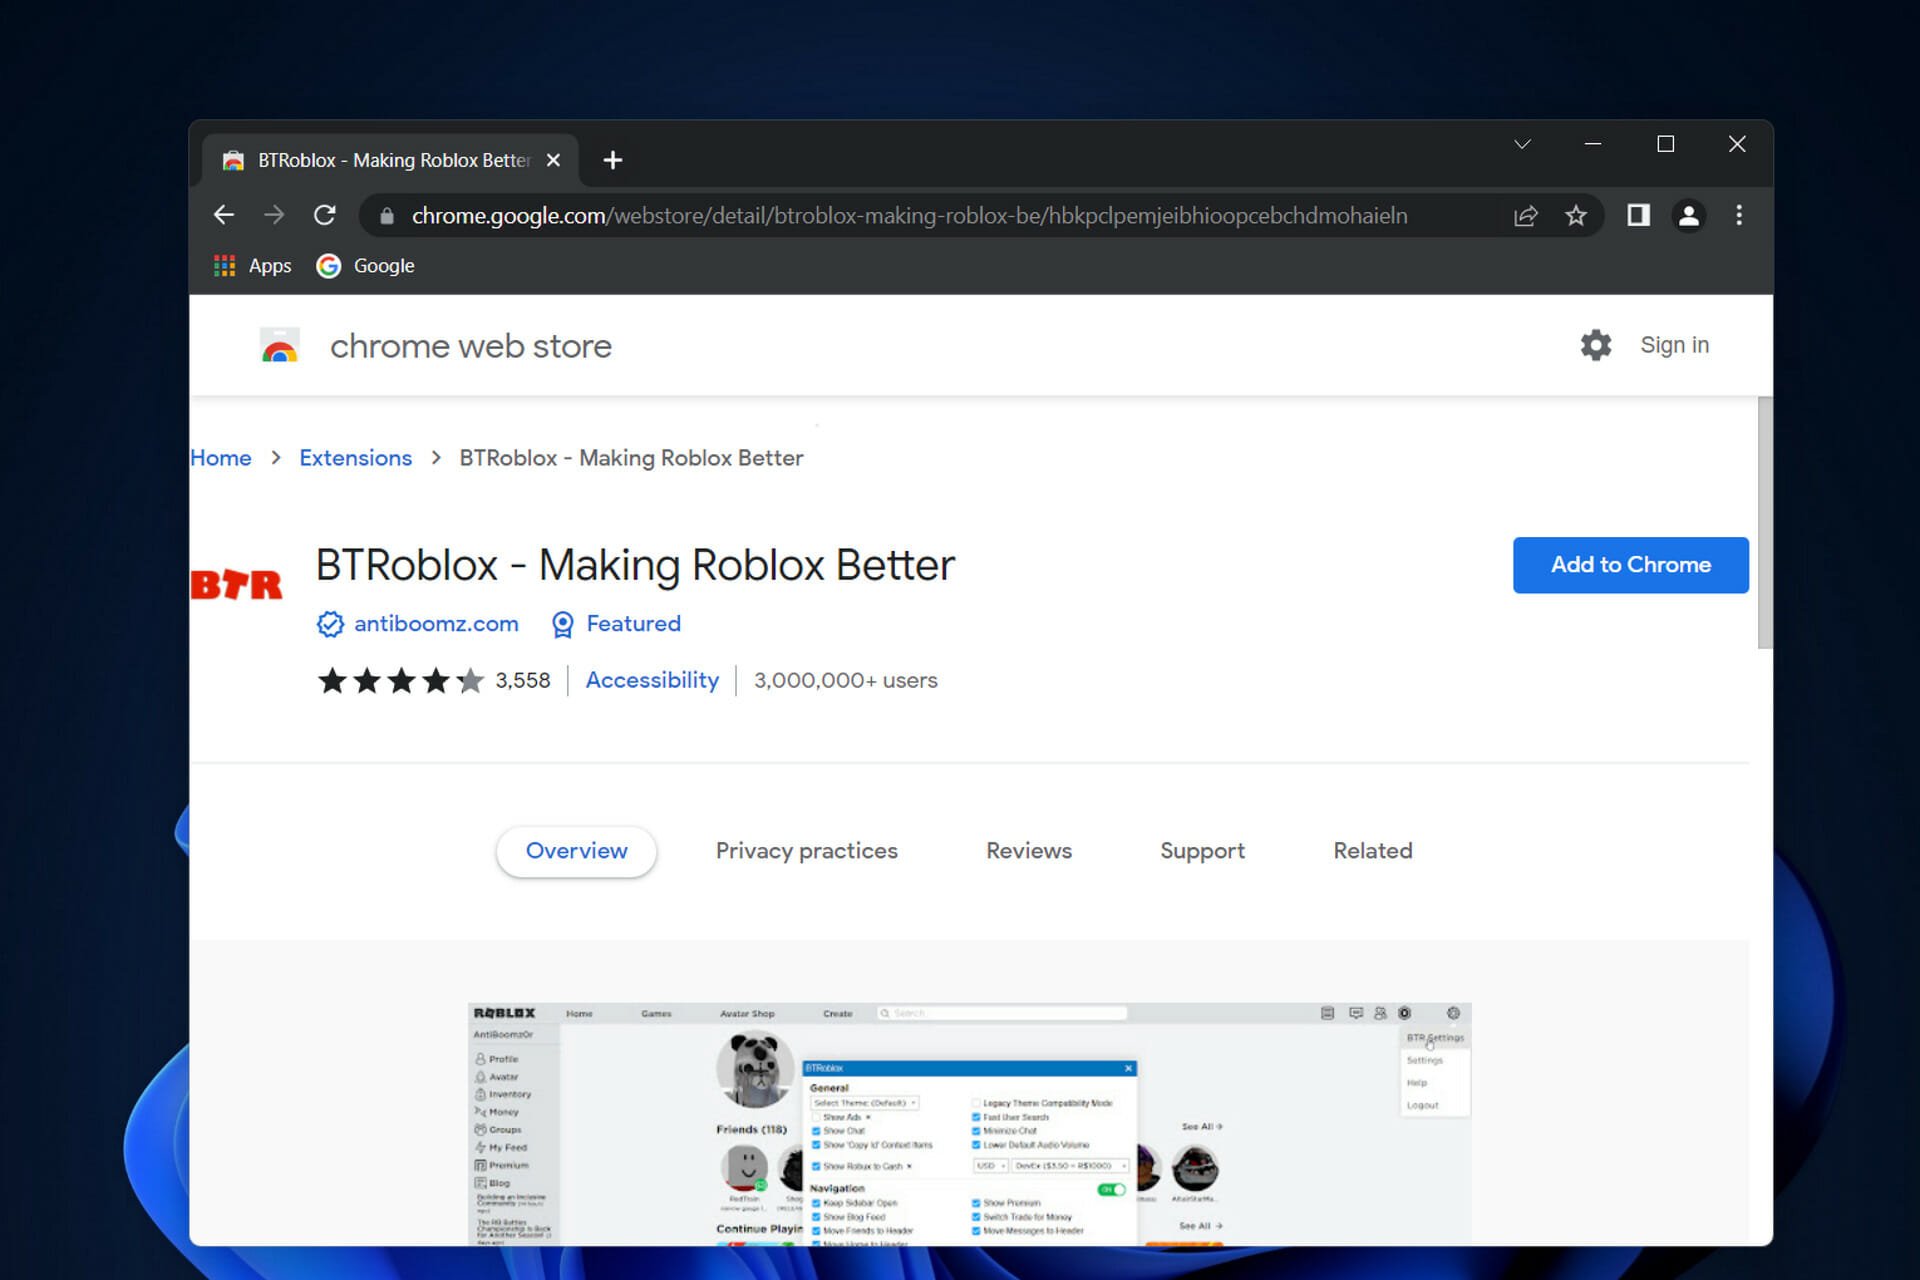





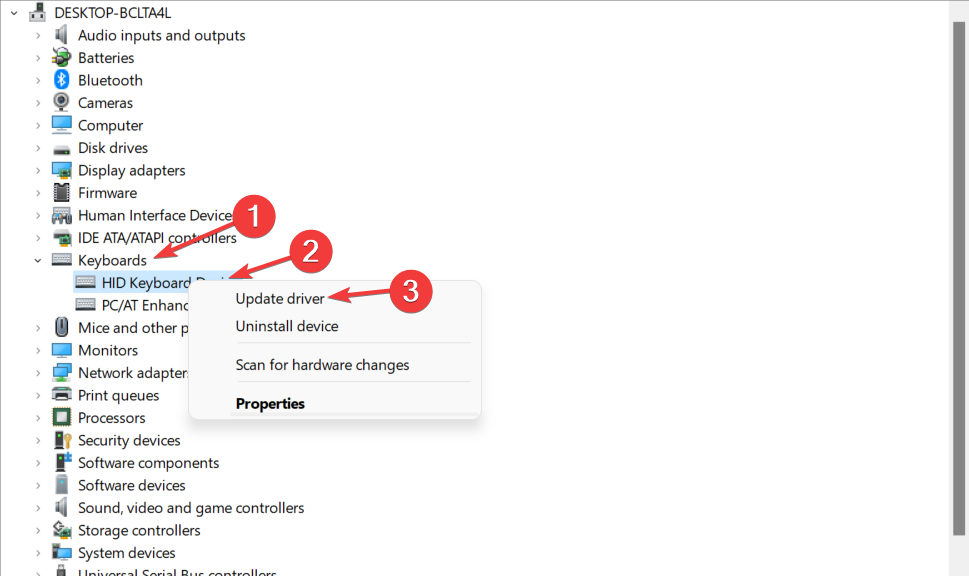

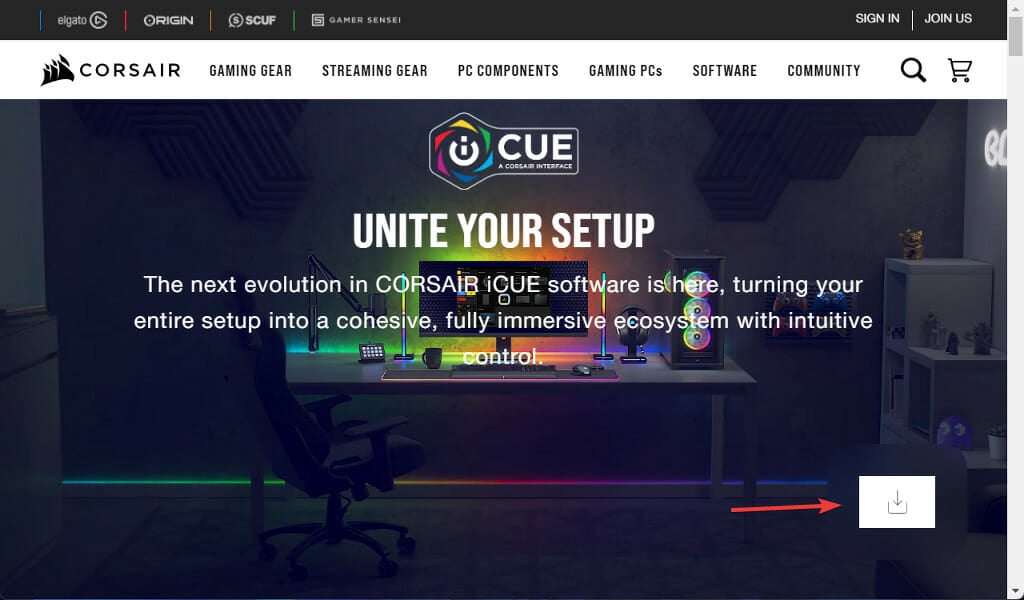
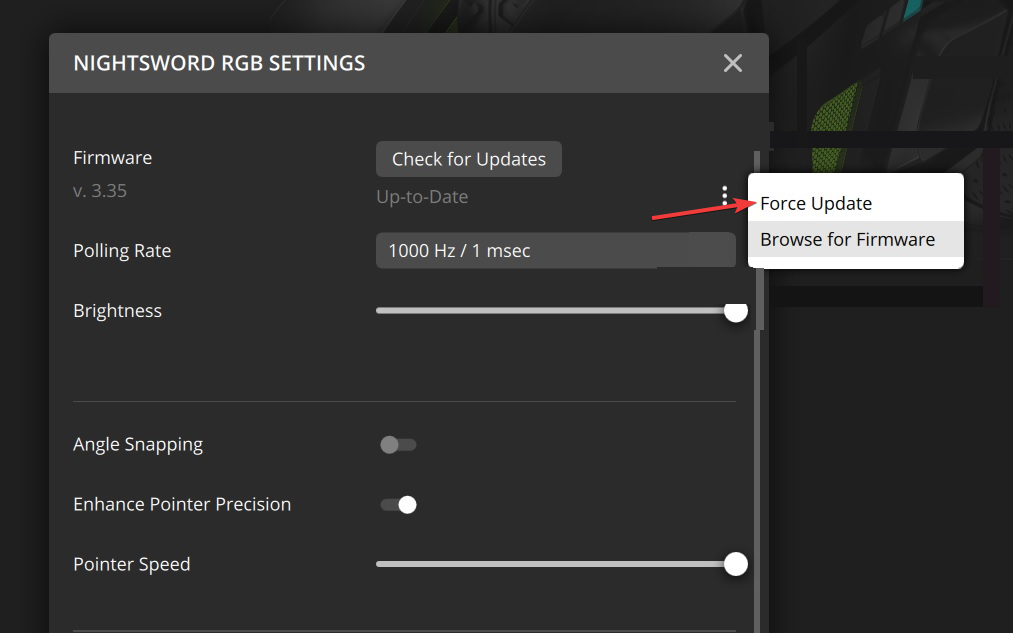


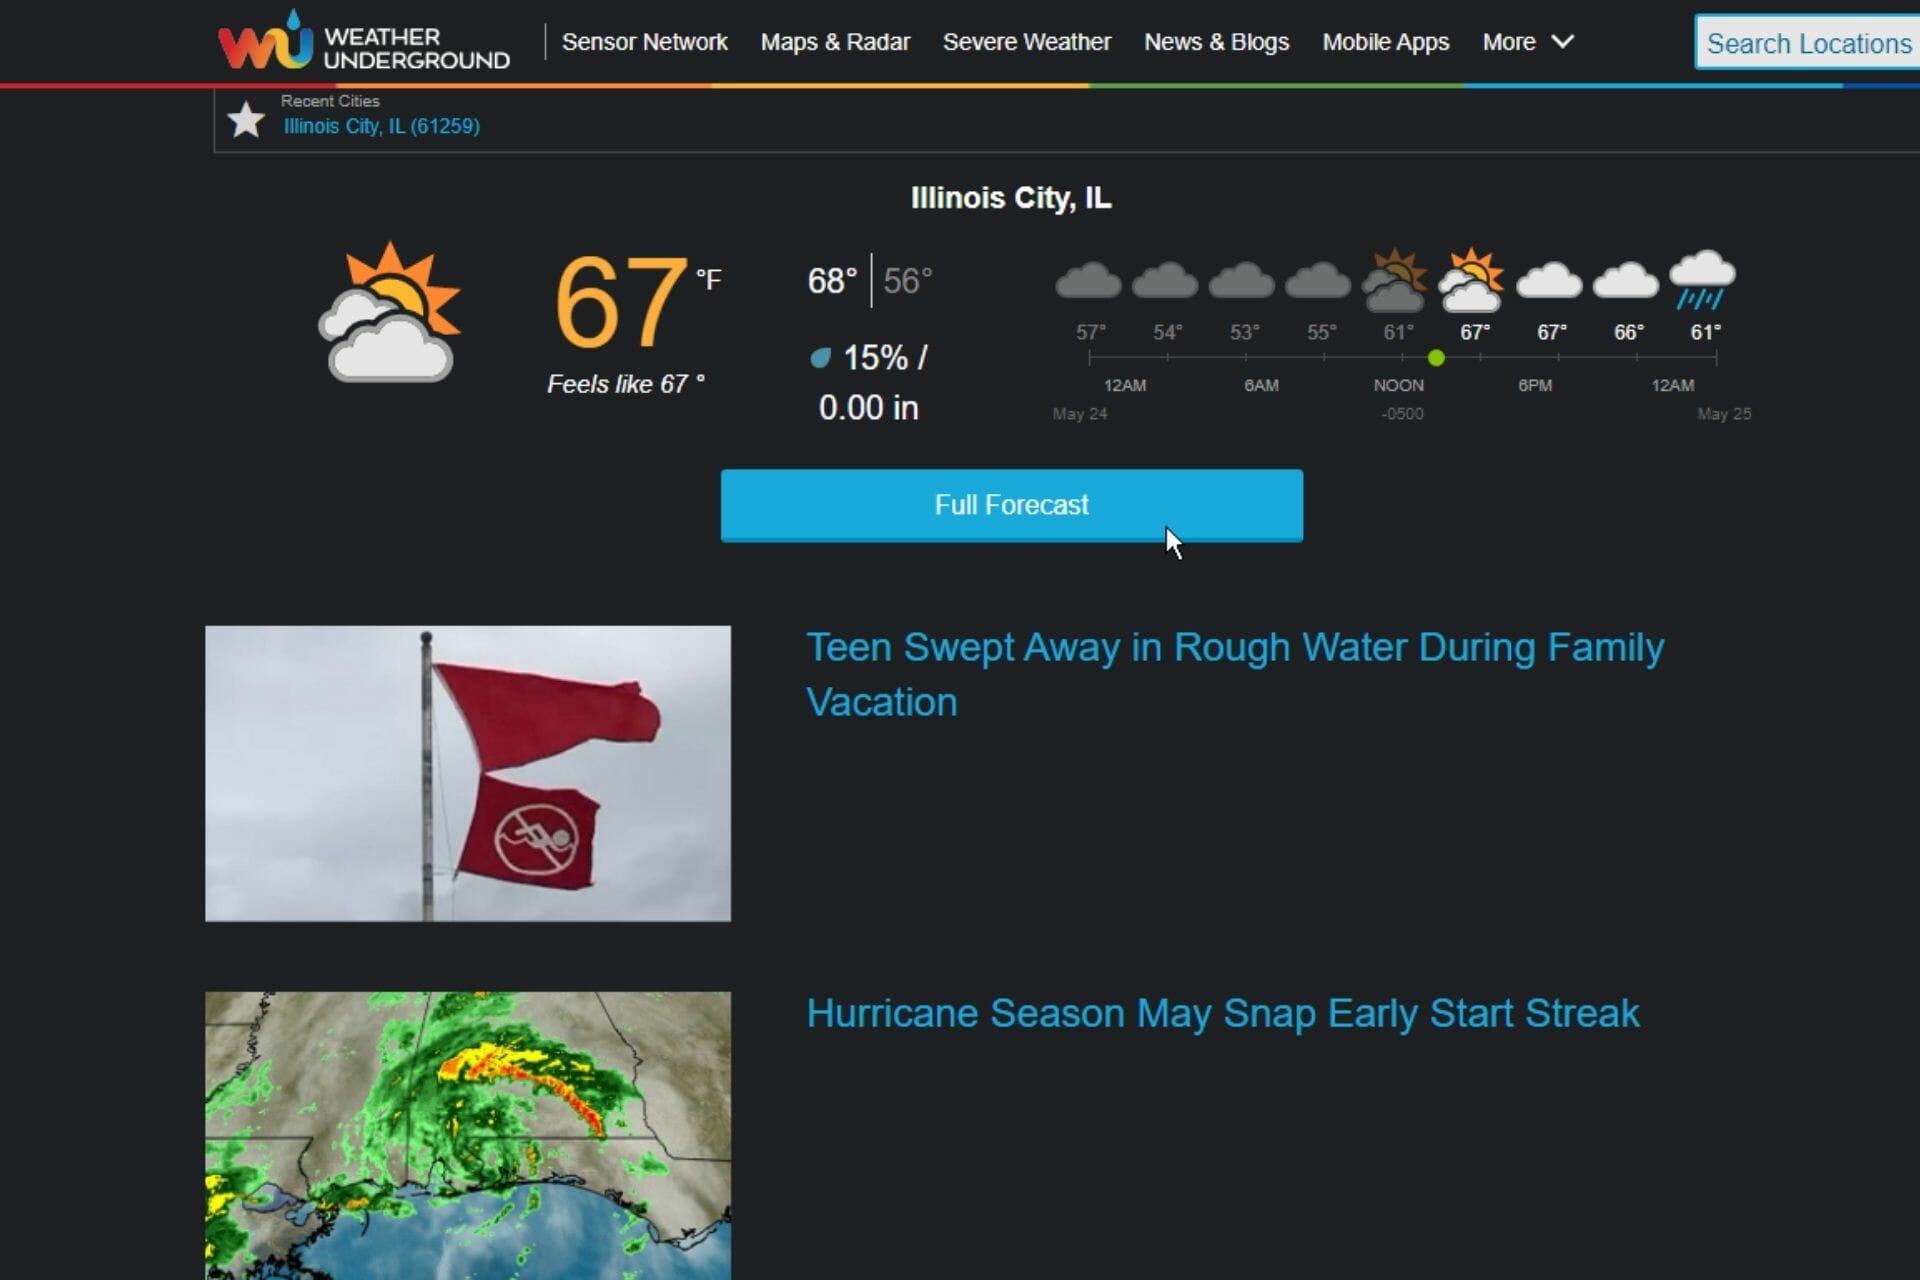


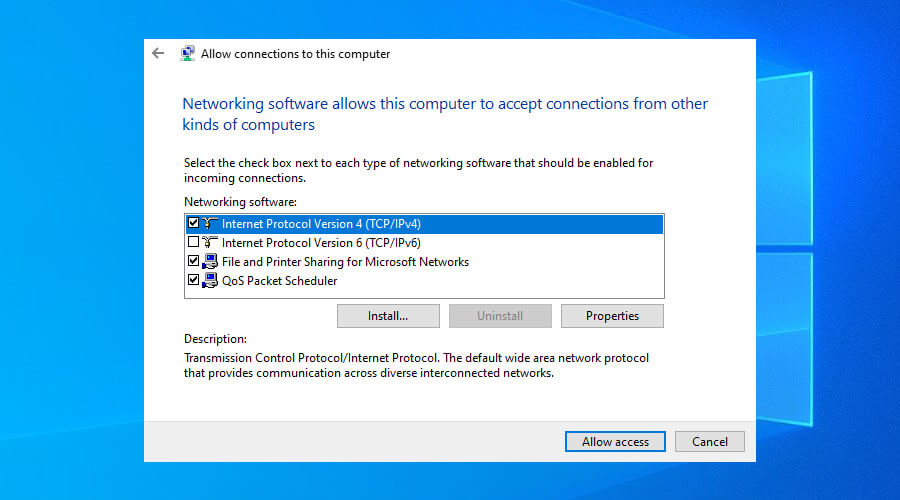
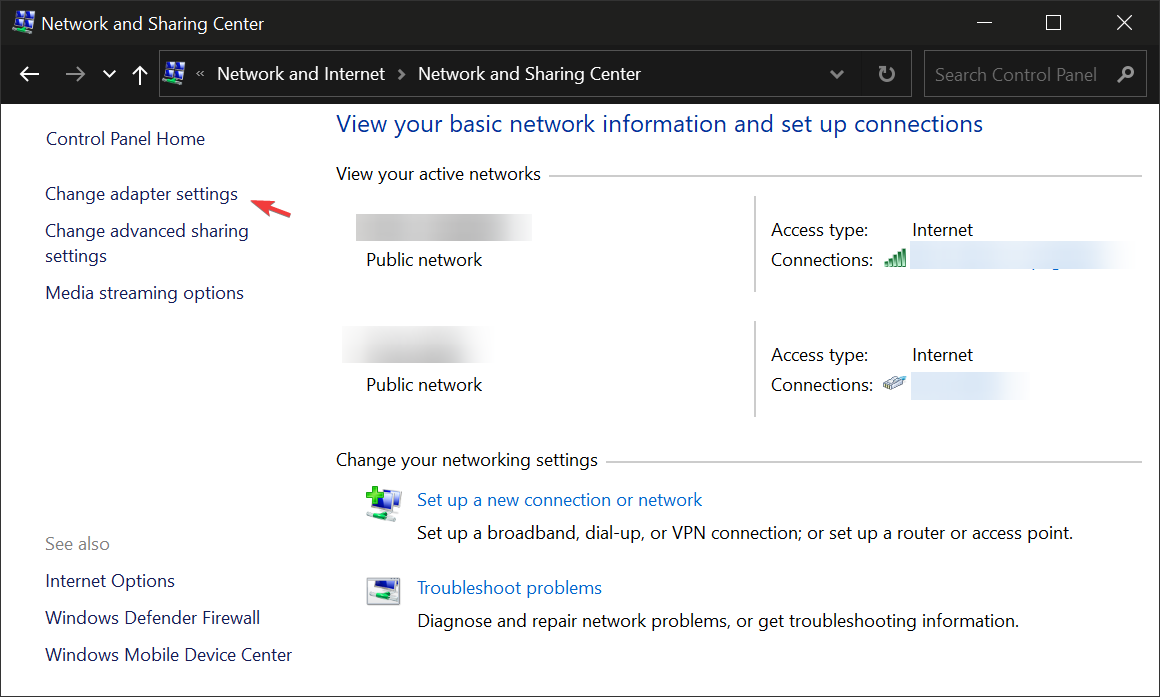
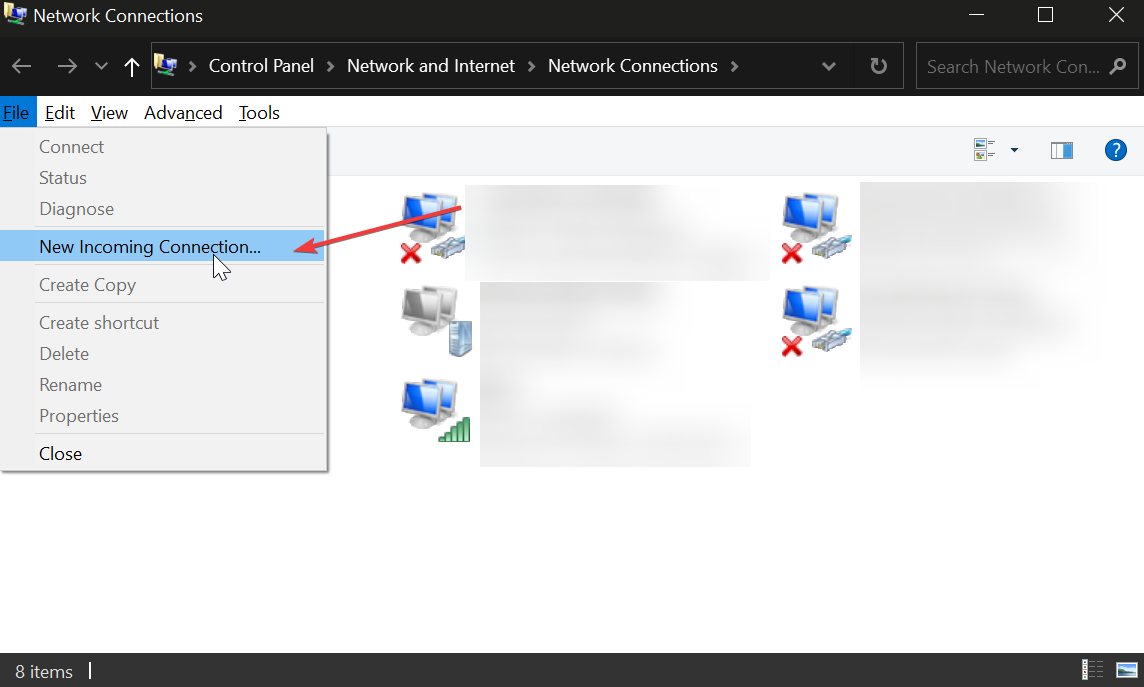
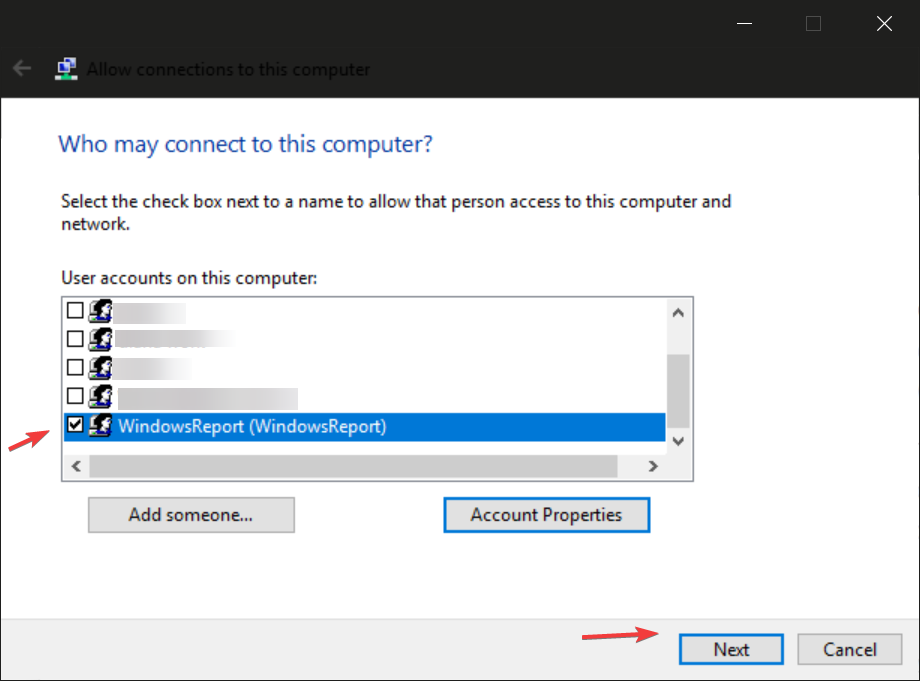
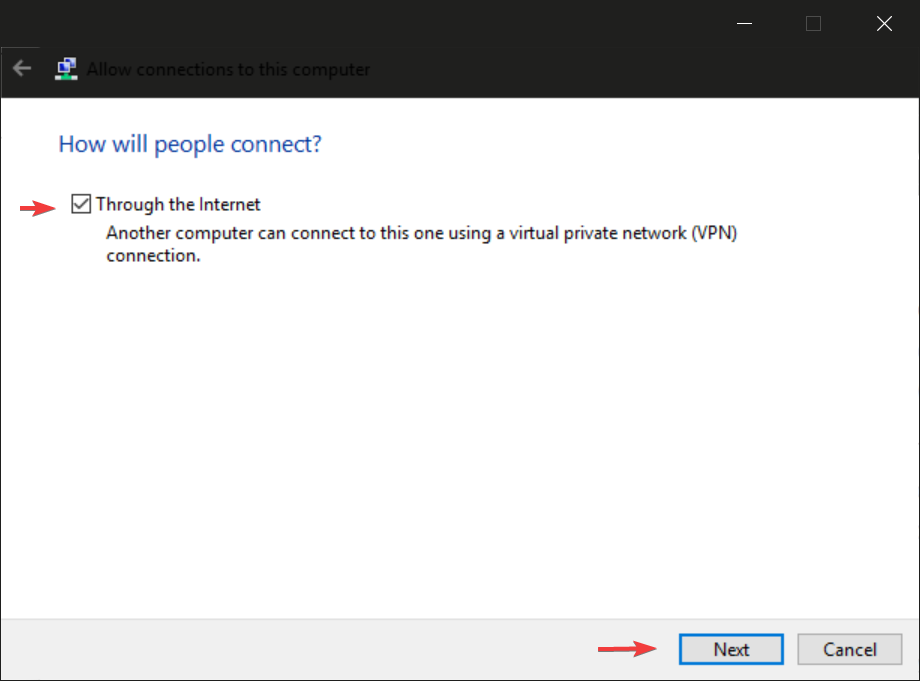
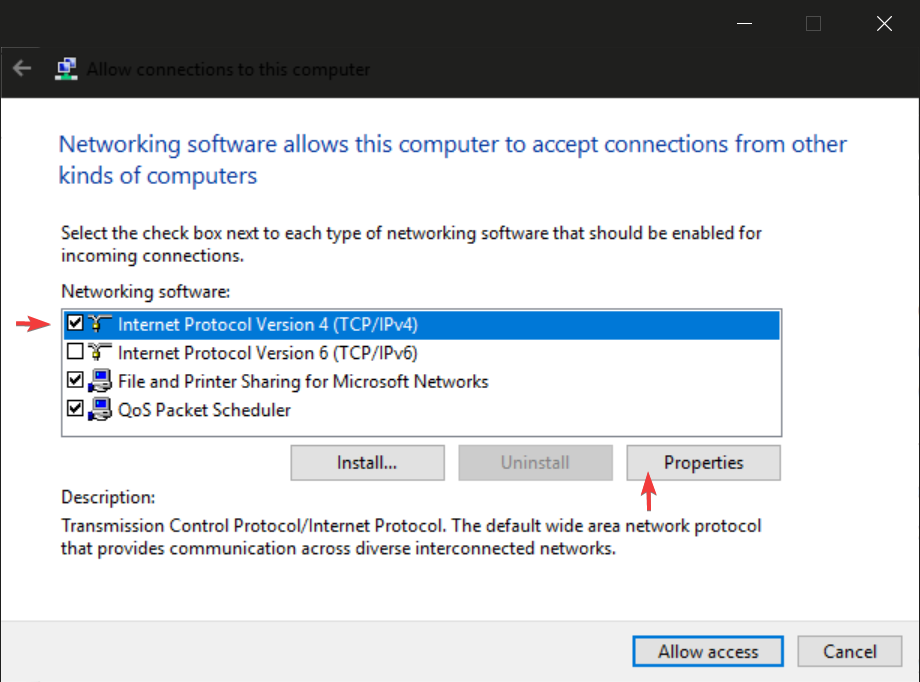
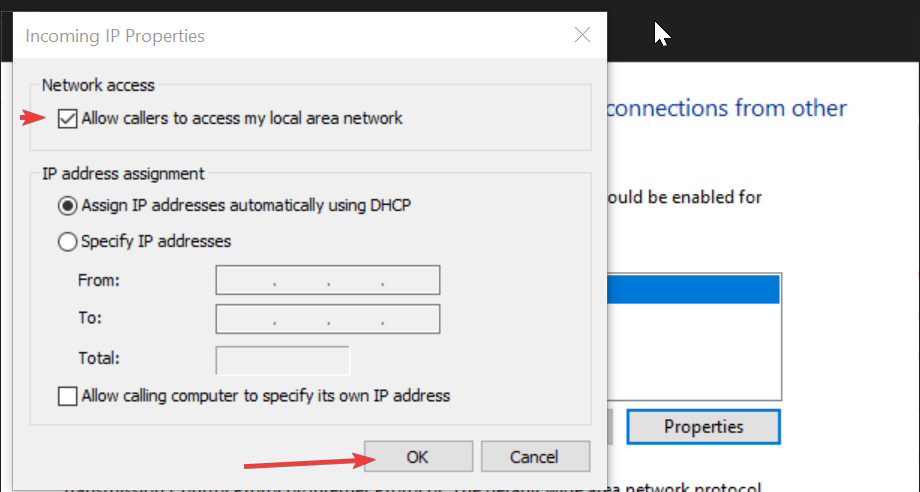
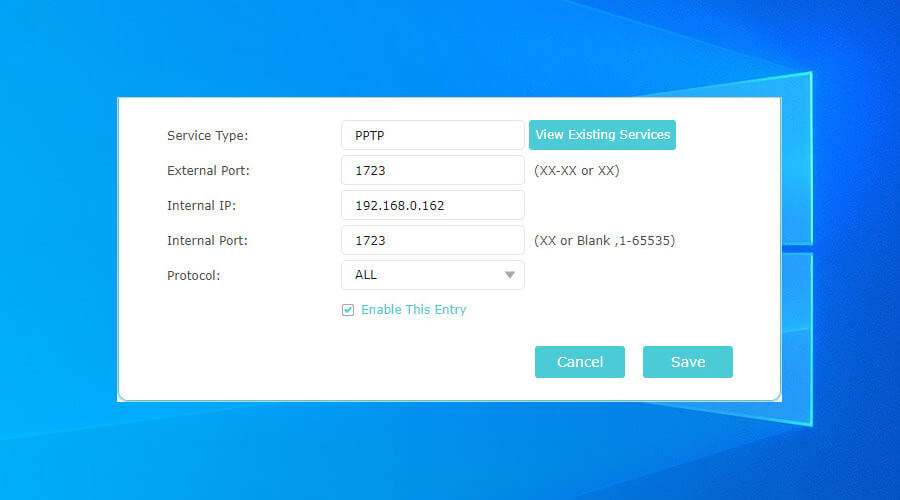
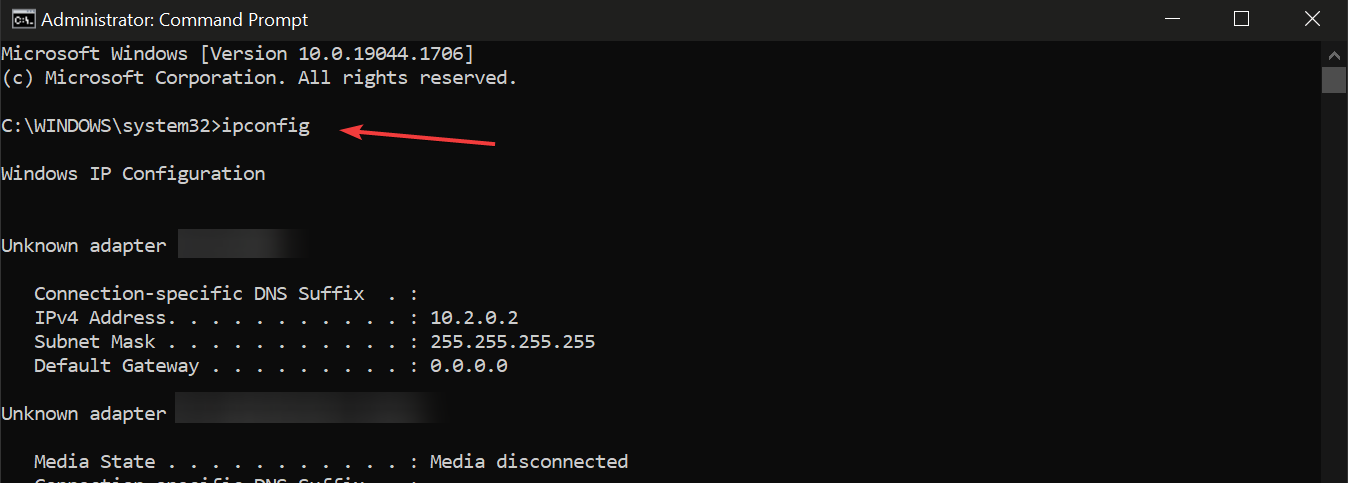
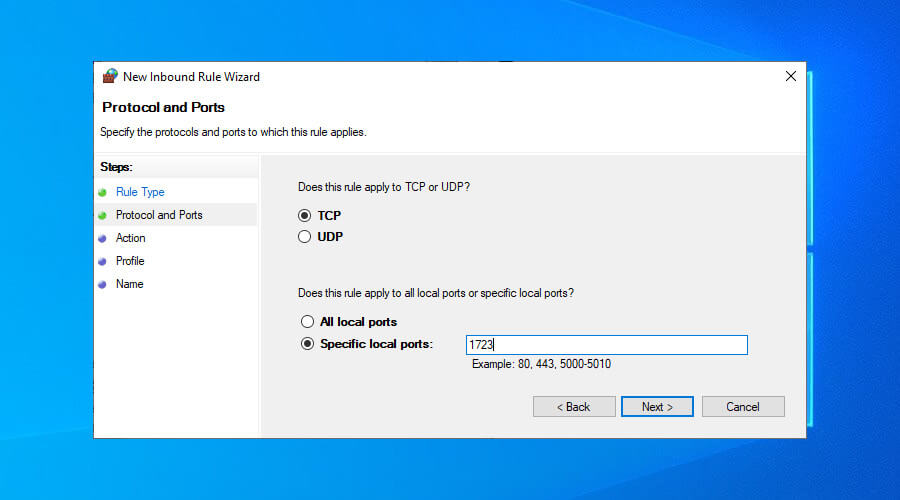
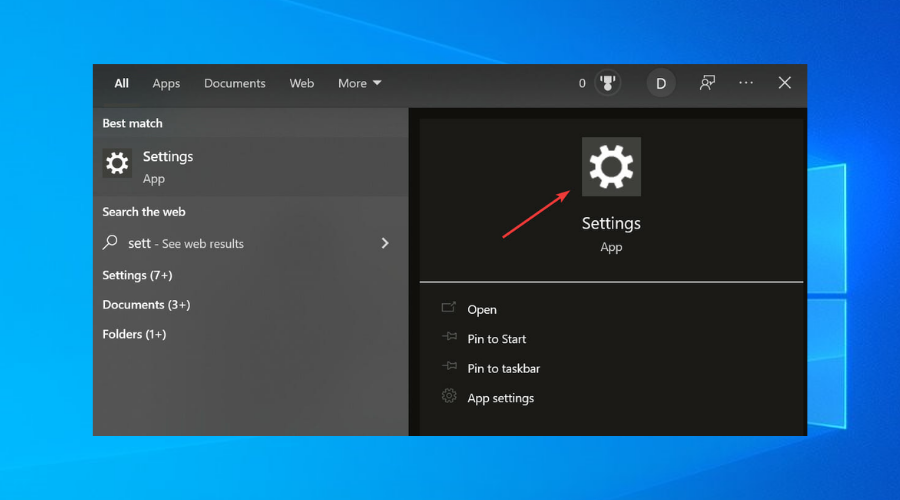
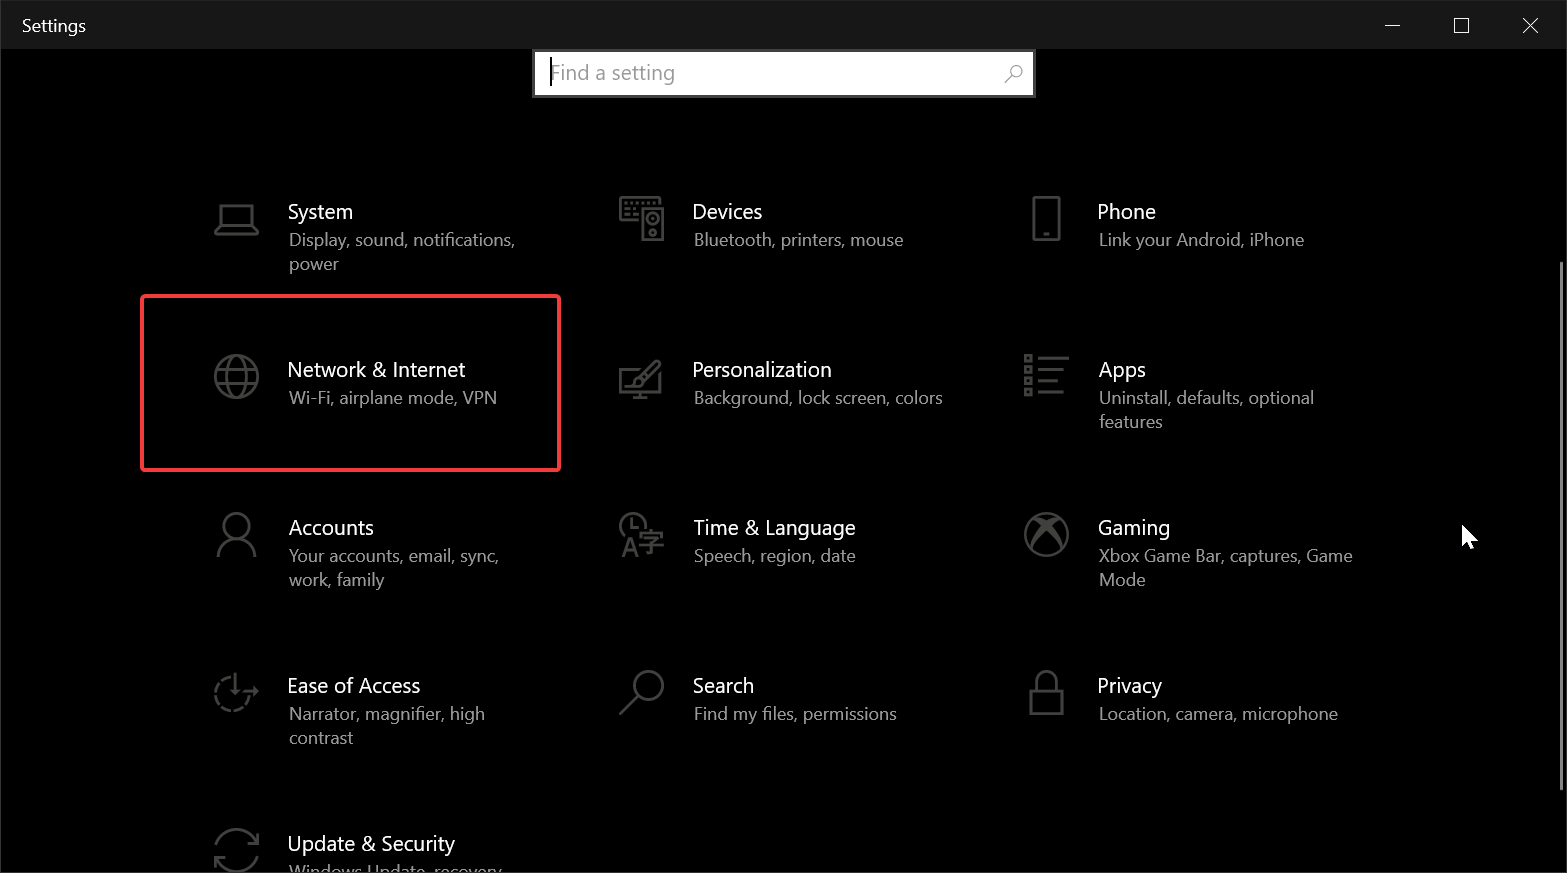
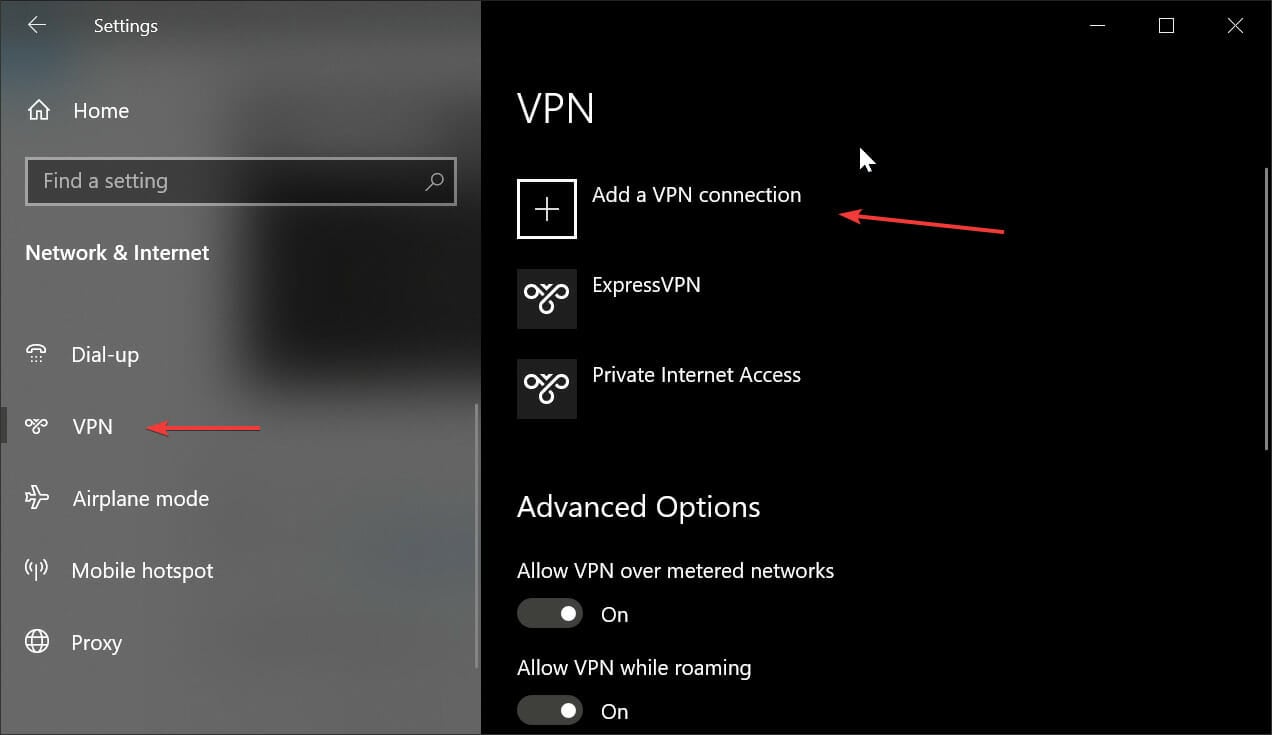

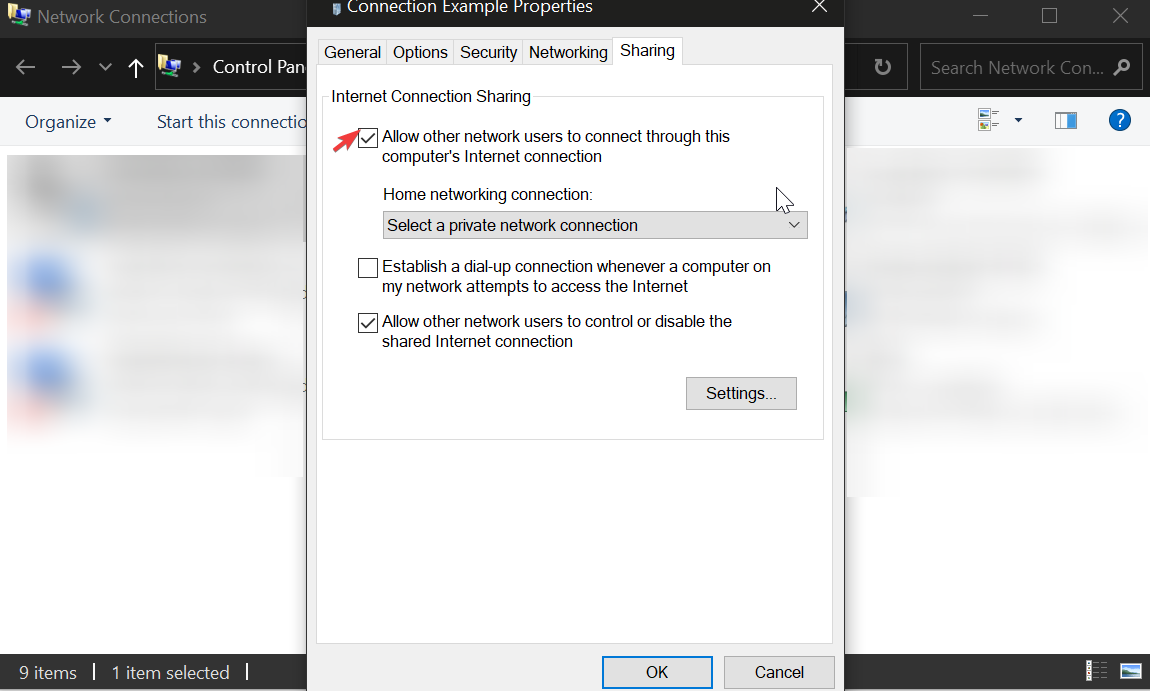
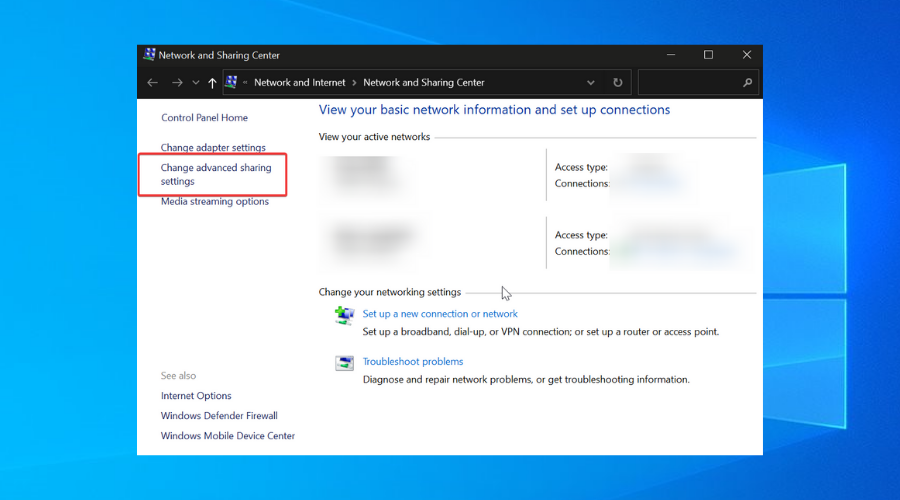
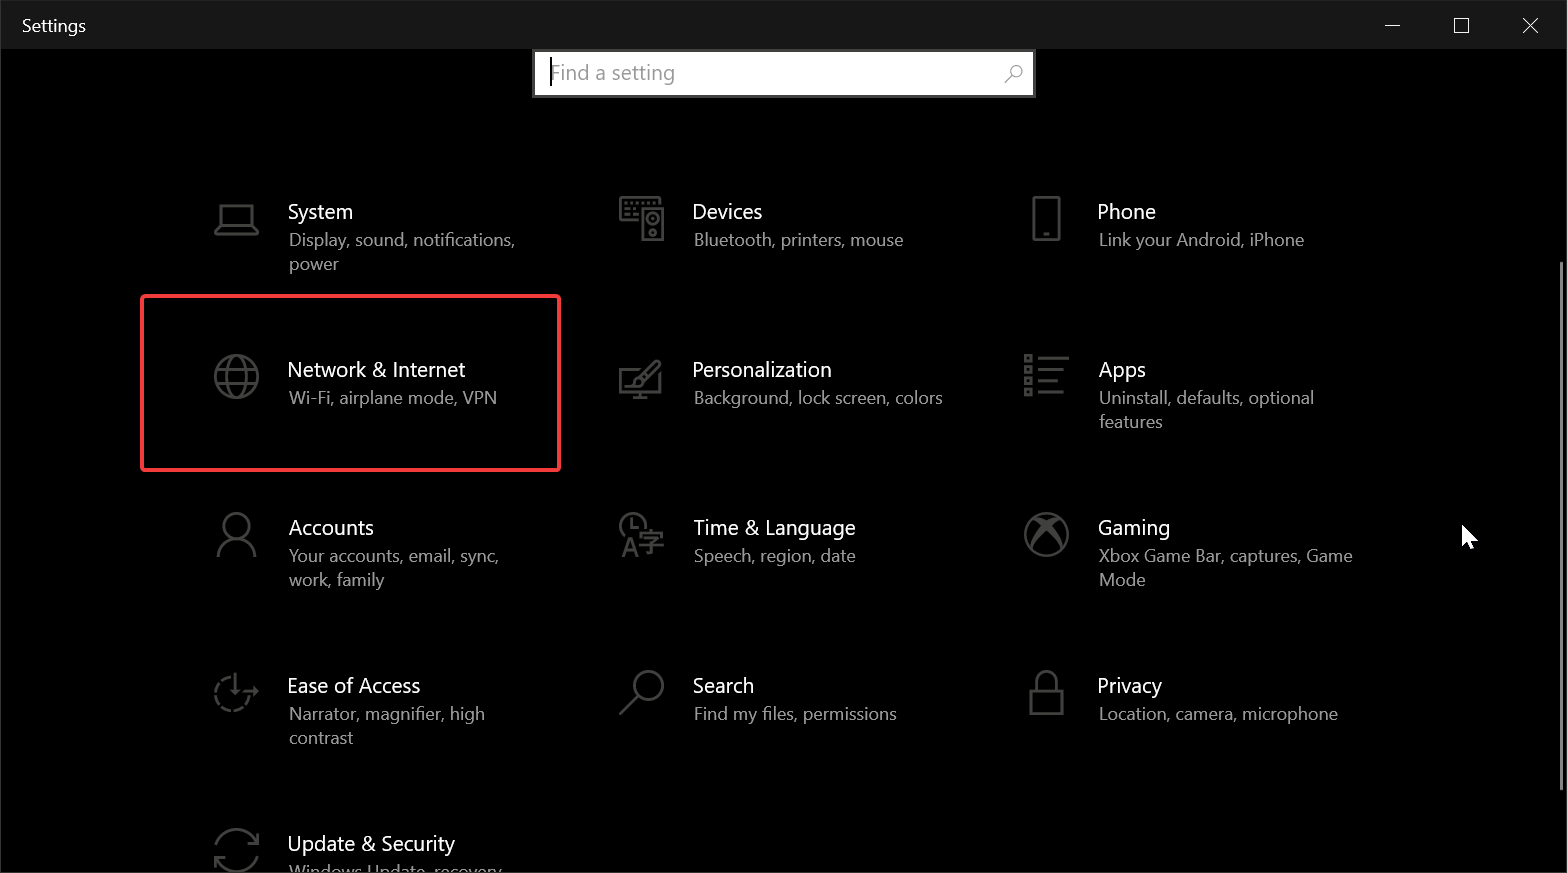
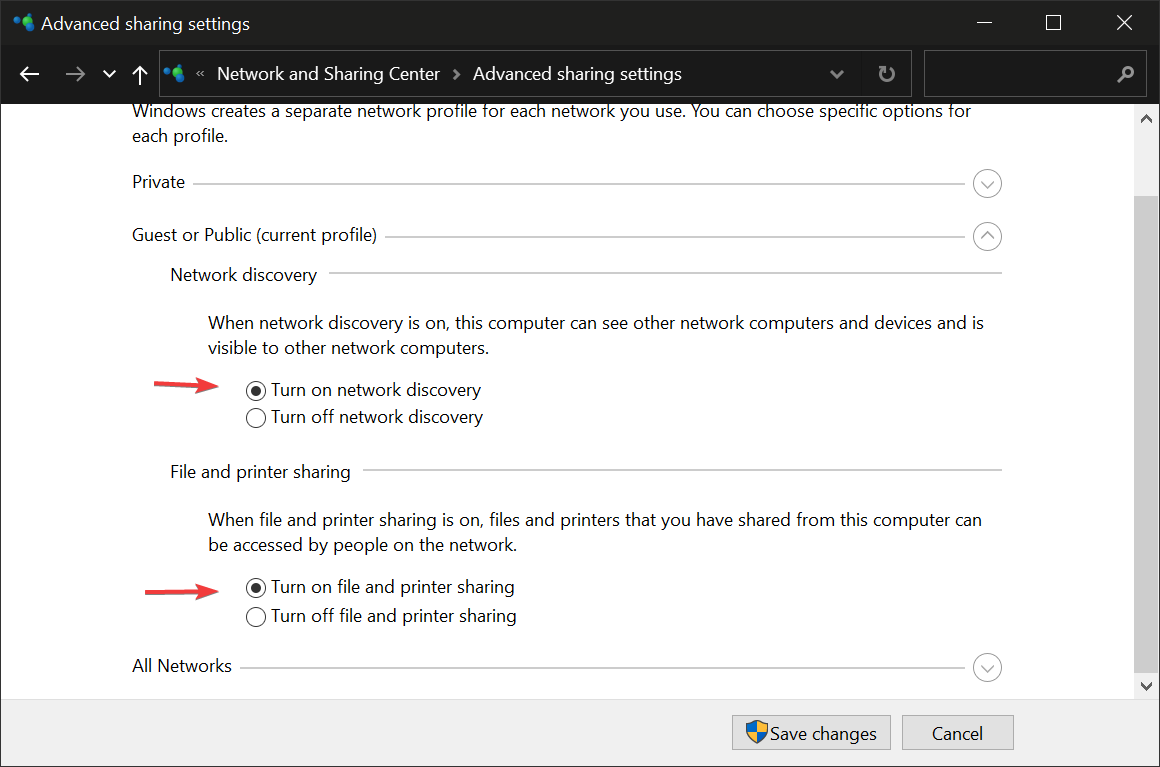

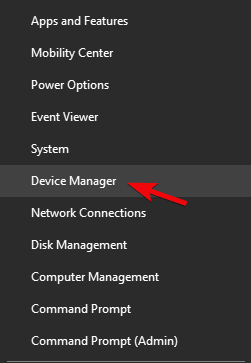
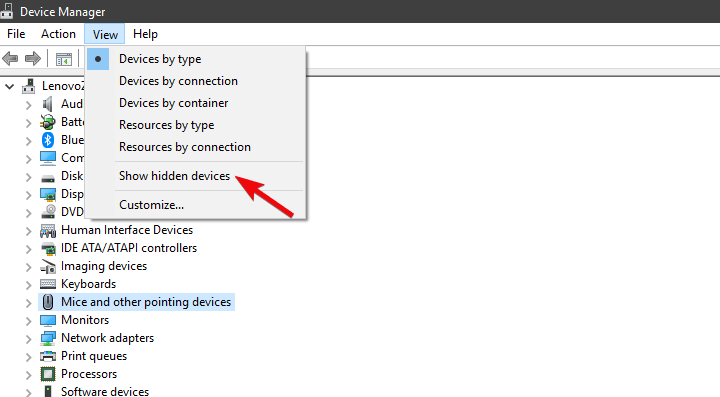


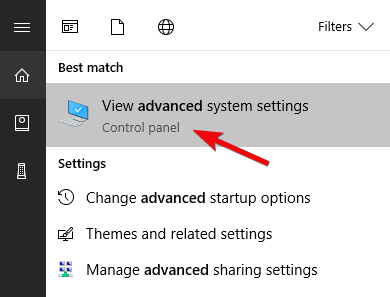

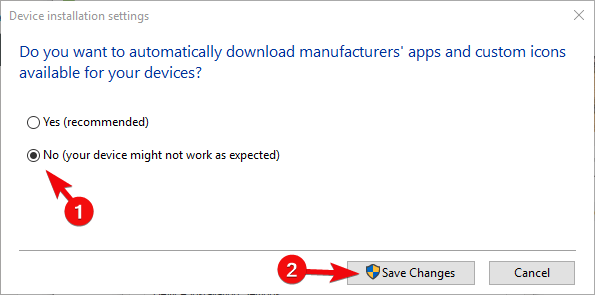
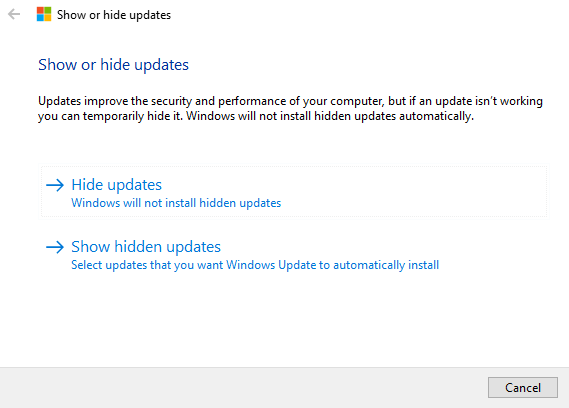

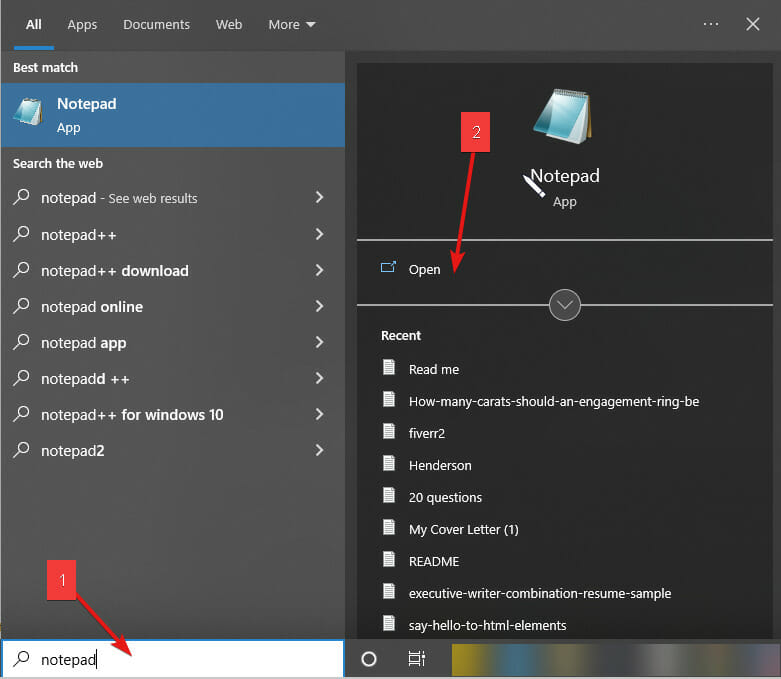
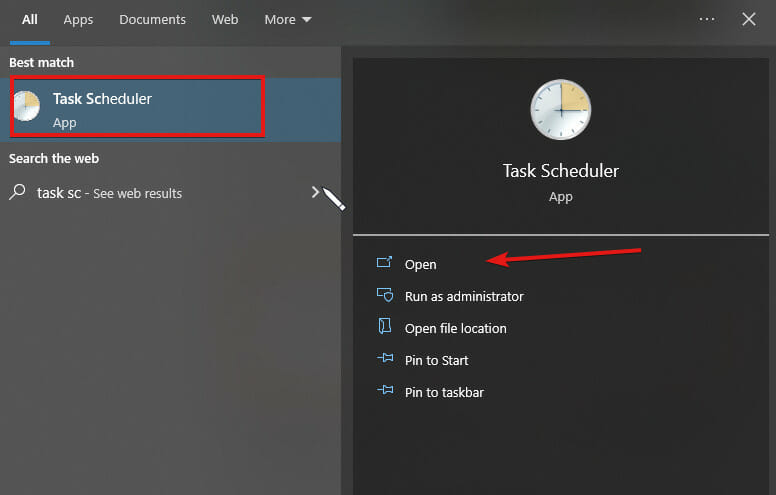
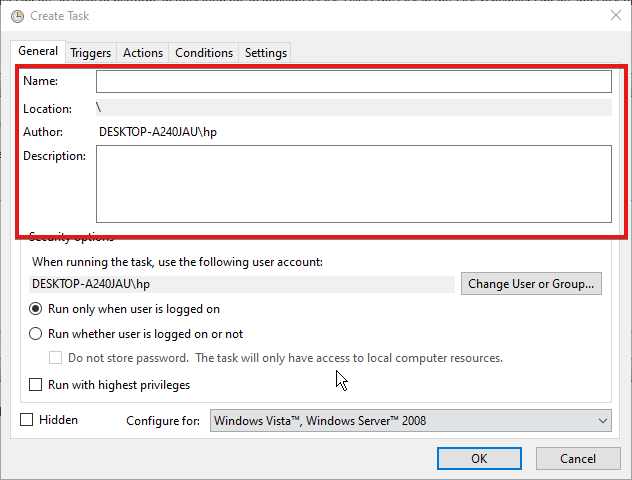
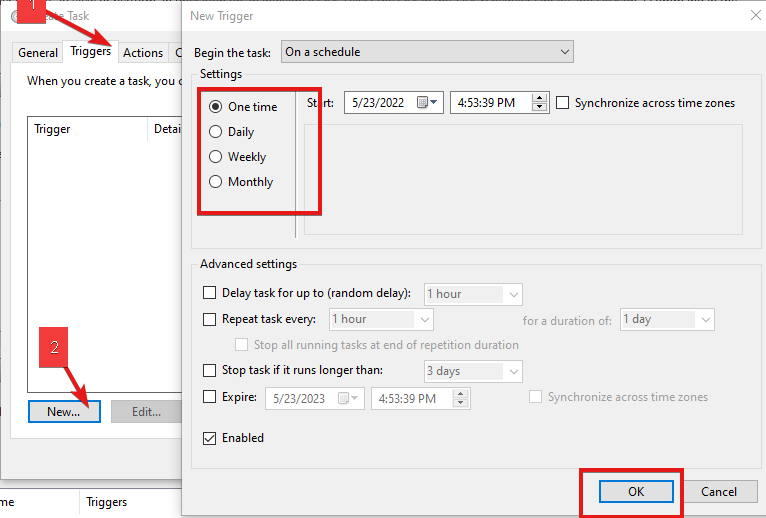
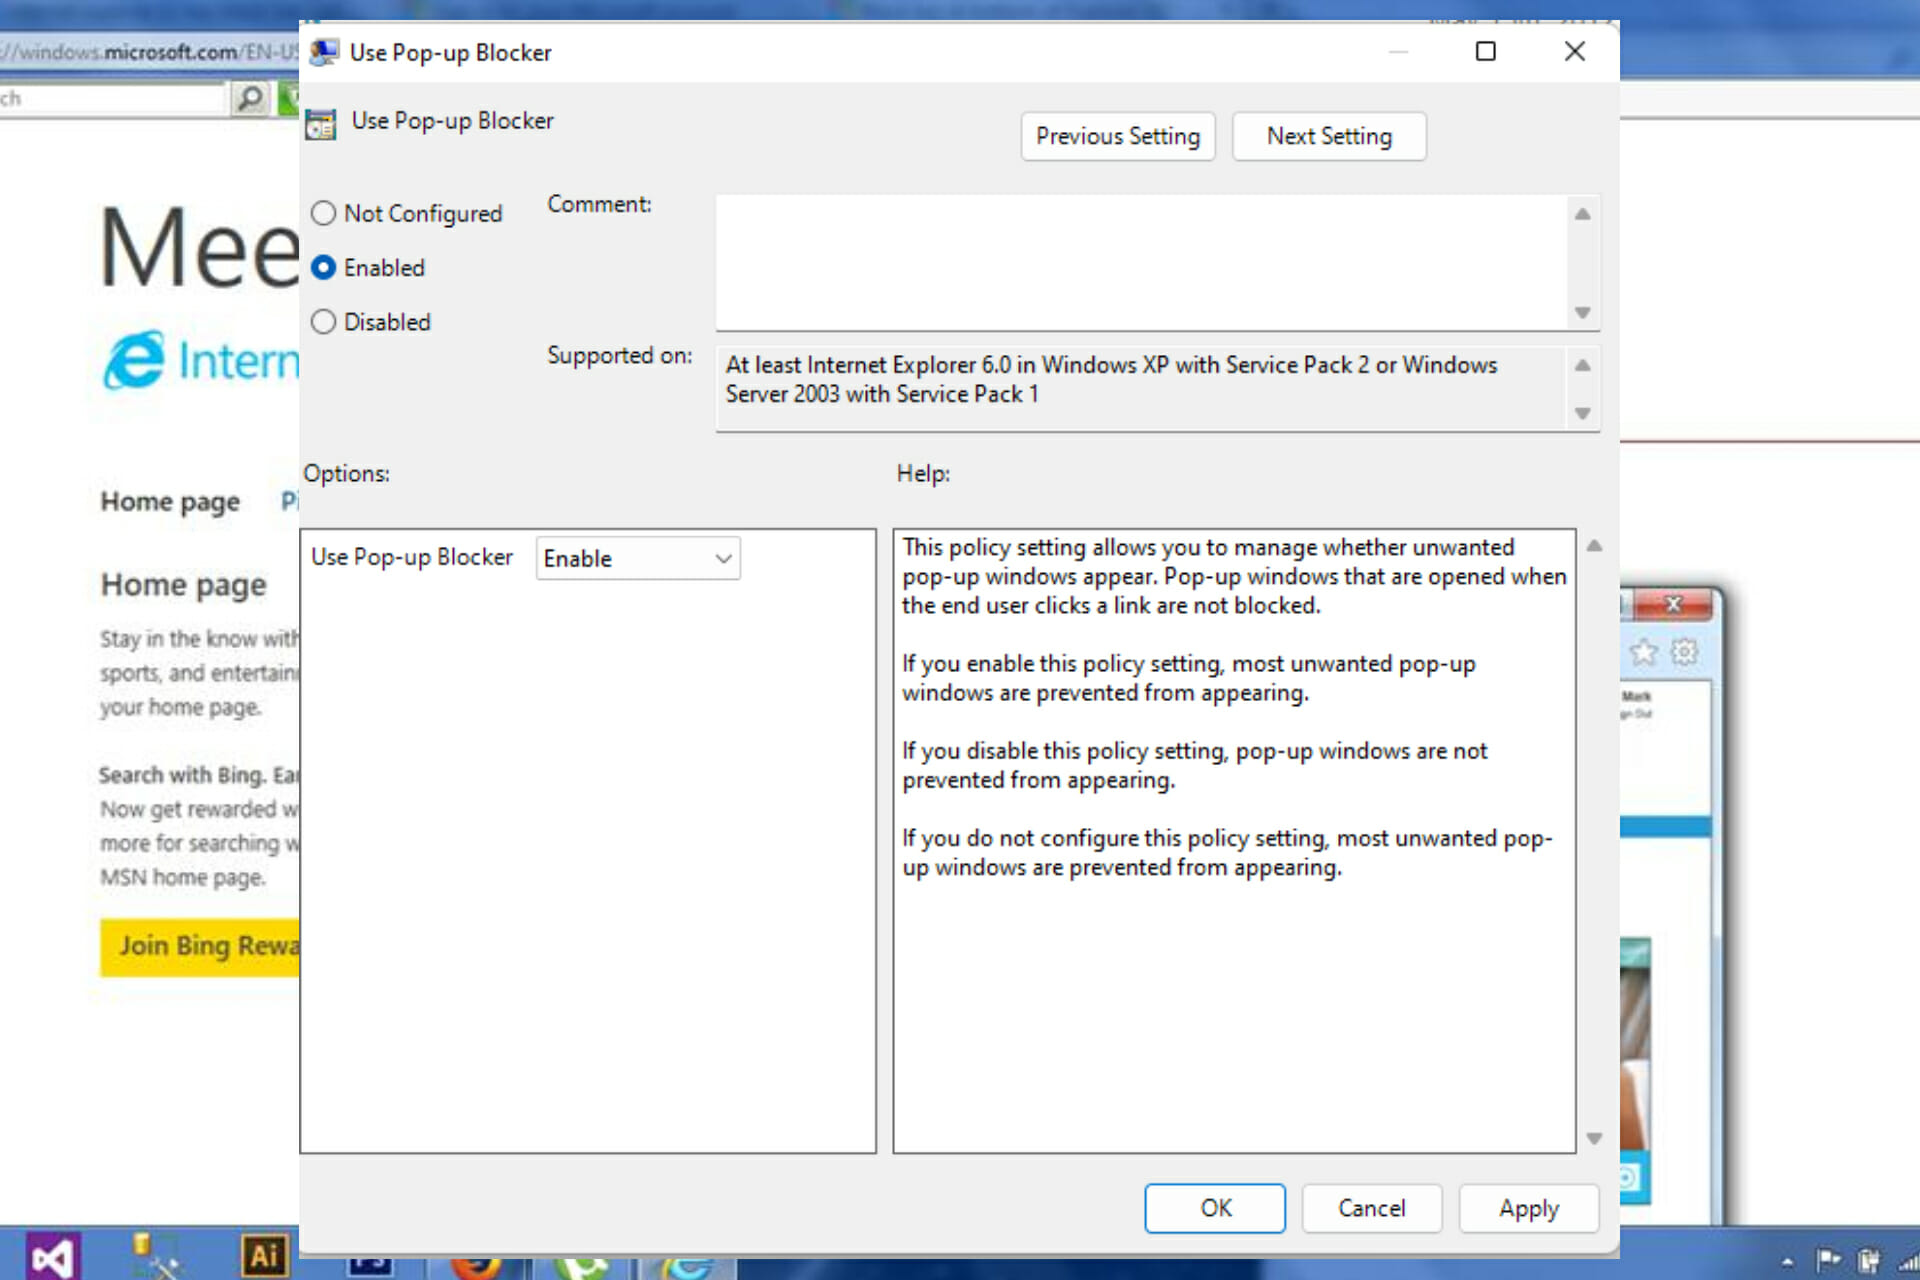




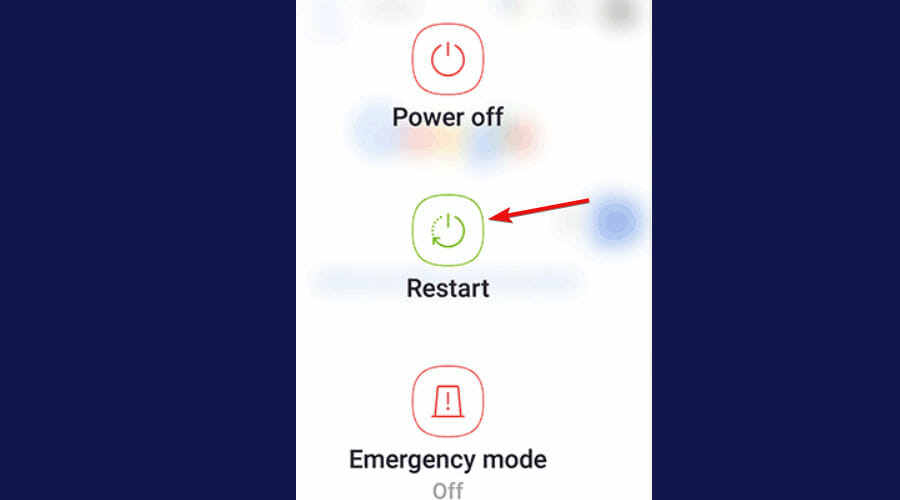

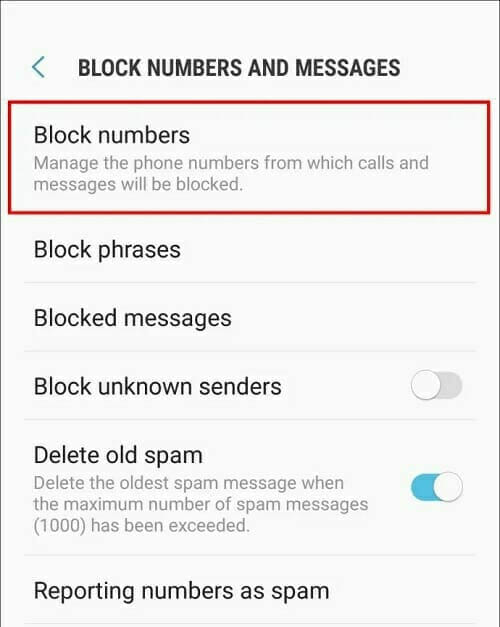


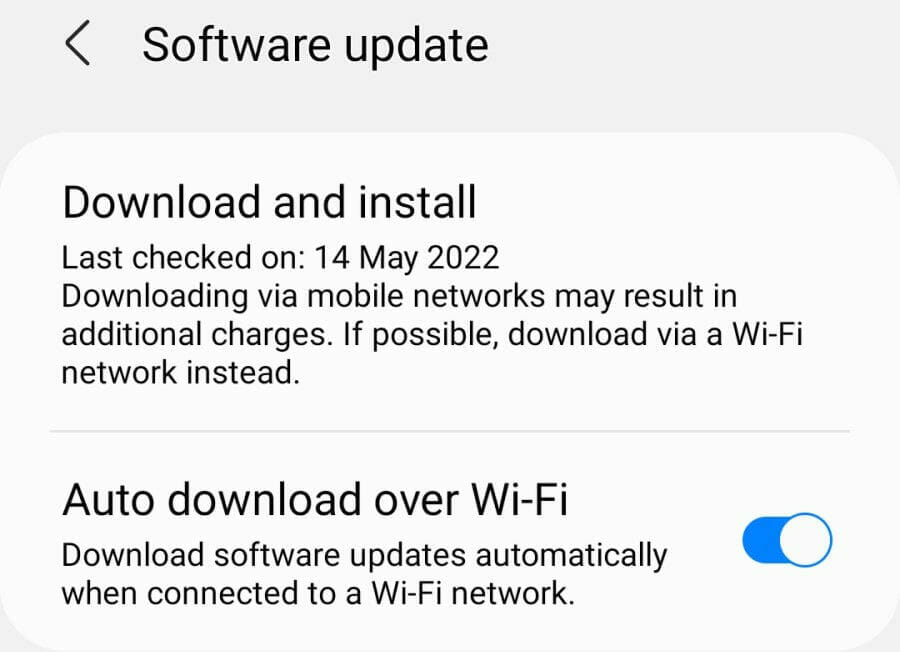








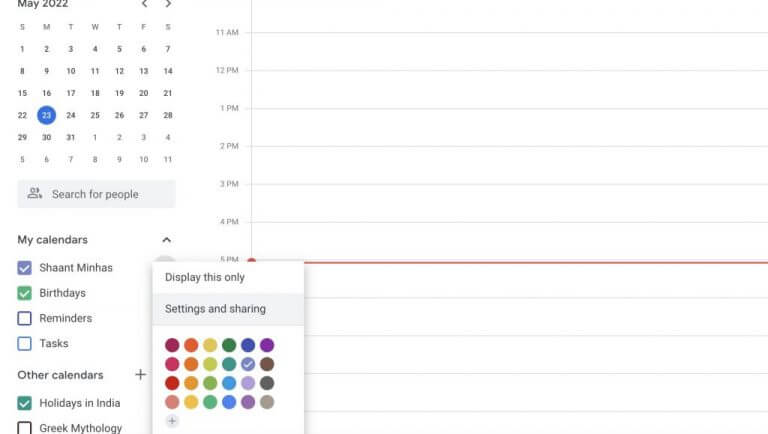 Then, in the My calendars section, click on the three dots in front of the calendar you want to sync.