How to Make a Program Available to All Users on Windows 11

If you want to share an app between user accounts on Windows, keep reading. But, shouldn’t programs installed on one account be available to all users automatically? Sadly, that’s not the case with Windows.

But you can work around that.

How do you see if a program is installed for all users?

To verify whether a program is installed for all users or the current account, check the installation path. If it’s available under the Program Files or Program Files(x86) folder, the program should be accessible on all user accounts.

However, programs saved in the AppData folder of a specific account are accessible only to that user. Remember, it doesn’t matter whether you are the administrator or a standard user in this case.

How do I make apps available for all users in Windows 11?

1. Move the program and configure permissions

1.1 Move the program

  1. Press Windows + E to open File Explorer, paste the following path in the address bar and hit Enter: %APPDATA%\Microsoft\Windows\Start Menu\Programspath
  2. Locate the app’s shortcut, and press Ctrl + C to copy it.
  3. Now, navigate the following path or use the address bar like before: C:\Users\Public\Public Desktop 
  4. If you can’t find the folder, enable hidden items in Windows 11.
  5. Once in the Public Desktop folder, press Ctrl + V to paste the shortcut.paste

1.2 Set read and write permissions for everyone

  1. Now, right-click on the shortcut, and select Properties.
  2. Go to the Security tab, and click on Advanced.advanced to make make a program available to all users windows 11
  3. Click the Change button next to Owner.change
  4. Enter Everyone in the text field, click Check names and then OK.everyone to make make a program available to all users windows 11
  5. Click Apply and OK to save the changes.
  6. Now, click the Edit button in the Security tab.edit
  7. Click on Add.add
  8. Again, type Everyone in the available field, and click Check names and OK. 
  9. Select Everyone from the list of user profiles, tick the checkboxes for all permissions, and then click Apply and OK to save the changes.all permissions to make a program available to all users windows 11
  10. Similarly, locate the program’s actual folder and allow full permissions to Everyone as you did earlier. For Zoom, it’s: C:\Users\<Username>\AppData\Roaming\Zoom

Now, the program is shared between users on Windows 11, and when you sign in to the other user account, it will be listed on the desktop.

Remember, if you just add the application to the Public Desktop folder, it will throw an error when launched. You will have to grant both read and write permissions to the other user for the program’s .exe file in the Public Desktop folder and the program’s base folder.

Don’t want to go through all the trouble, simply run the program as a different user.

2. Install a program for all users on Windows 11

Some programs are designed to be installed across user profiles. So, when you run the setup, there are separate options to install it for the current user account or all of them. If one is not available, change the installation path to Program Files or Program Files (x86).

For a few, you can make the program available to all users in Windows 11 without any modifications. They automatically get installed across the different accounts. 

If you didn’t do that earlier, uninstall the app, and then run the setup all over again. In case you are asked to sign out other users, make sure to do so before proceeding with the installation!

3. Use the Family feature by Microsoft

Microsoft also allows users to share applications downloaded from the Microsoft Store between user accounts. For instance, you can purchase Minecraft from one account and share it with others. You just need to create a family of Microsoft accounts and share the app.

Besides, with the Family feature, you all don’t necessarily need to be sharing the same device. Even family Microsoft accounts on different devices will show all the Microsoft apps.

How do I restrict access to a program in Windows 11?

You can easily restrict access to specific programs using the Registry Editor or the Local Group Policy Editor. The former is the preferred approach, but if you are running Windows 11 Home and want to use the latter, manually install gpedit.msc.

With the Registry, you just need to add a DisallowRun key under Explorer, create a DWORD for the application you want to restrict access to, and it won’t open anymore.

Remember, it is not advisable to make every program available to all users in Windows 11. The critical ones should be limited to the current user.

Also, from the parental guidance point of view, restricting some programs from child users makes sense. And if they have already got any, you can even uninstall Windows 11 default apps using PowerShell.

For any queries or to share which method worked best for you, drop a comment below.

How to Fix The Term is Not Recognized as The Name of a Cmdlet Error

The term is not recognized as the name of a cmdlet error message that will prevent you from running scripts in PowerShell, and that can be a major problem if you’re maintaining a server or multiple systems.

It’s usually caused by the following:

  • Calling a module that isn’t installed in your script will lead to this error.
  • Syntax or spelling errors will prevent your code from running and give you an error message.
  • Path errors, incorrect paths, and problems with the PATH variable can lead to this issue.

Here’s how you can fix it:

How do I fix The term is not recognized as the name of a cmdlet?

1. Use the . before starting the script

  1. Open PowerShell, Command Prompt, or any other command line utility and enter the command to run your script.
  2. If the script requires to have . before it, add another one, like this: .. \myscript.ps1
  3. Run the command and check if the issue is still there.

2. Make sure you have the required module installed

  1. Check the error message and see if it specifies a specific term.
  2. If it does, it means that the script has difficulties finding that module.
  3. Do a quick research and try to determine the module that is associated with the term.
  4. Next, run the Get-Module -Name YourModuleName -ListAvailable
  5. If you get any information, it means the module is installed. If not, you need to install it properly.

3. Check the code for missing quotes

  1. Examine your script file.
  2. Make sure that there are no missing quotes or improperly closed quotes.
  3. If you notice any errors, correct them and check if it solves the problem.

Tips to keep in mind when fixing the error

  • Make sure that PowerShell is up to date since certain commands won’t work in older versions.
  • Examine your code thoroughly, and look for any code errors.
  • Inspect your paths, and path environment variables and ensure that they are correct.
  • Make sure that all necessary modules are imported properly.
  • Always consult with official documentation.

The term is not recognized as the name of a cmdlet is a coding error, and as such, fixing it requires in-depth research and analysis from the user. Speaking of PowerShell errors, in the past, we covered PowerShell is not recognized error, so be sure to check it out.

Other components can be affected by this issue, and we wrote about Java is not recognized and PIP not recognized in our previous articles.

Did you manage to fix this problem on your own? If so, don’t hesitate to drop your solution in the comments section!

How to Download & Install Microsoft LifeCam Drivers on Windows 11

Everyone knows how to use a webcam, but what they might not know is that there are different models of webcams with different features and functionalities. The drivers for these webcams can come in very handy as they allow for a cleaner connection to the internet and more functionality with programs.

Microsoft LifeCam drivers are required to allow your computer to communicate with the camera and if you don’t have them installed properly, your PC may not recognize the device. Fortunately, there are plenty of ways that you can get these drivers so that everything can work as expected again.

USB Port Requirements

Incompatible USB ports may fail to recognize or detect the camera or disconnect while you’re in session. The software uses a USB 2.0 port to connect to your webcam and this is required for proper operation.

If you do not have one, then you need to use a USB hub or buy an additional device that will allow you to plug in your webcam.

How do I download & install LifeCam drivers in Windows 11?

1. By using an automatic driver updater

The best way to install Microsoft LifeCam drivers for your Windows 11 is by using dedicated software. Downloading integrated camera drivers may work, but non-system drivers may present some issues.

The steps are pretty much standard, and anyone who knows how to download software from the internet should be able to do it with no difficulty.

Once you’ve downloaded one of these specialized driver updating tools, you can sit back as they will automatically detect your operating system and find all outdated, missing, or corrupted drivers for you.

2. By using Windows Update

  1. Press the Windows key and click on Settings.settings windows 11
  2. Navigate to Windows Update, and click on Advanced options.
  3. Now, click on Optional updates.
  4. Tick the checkboxes for all the available updates under Driver updates, and click on Download & install.

3. By using the Device Manager

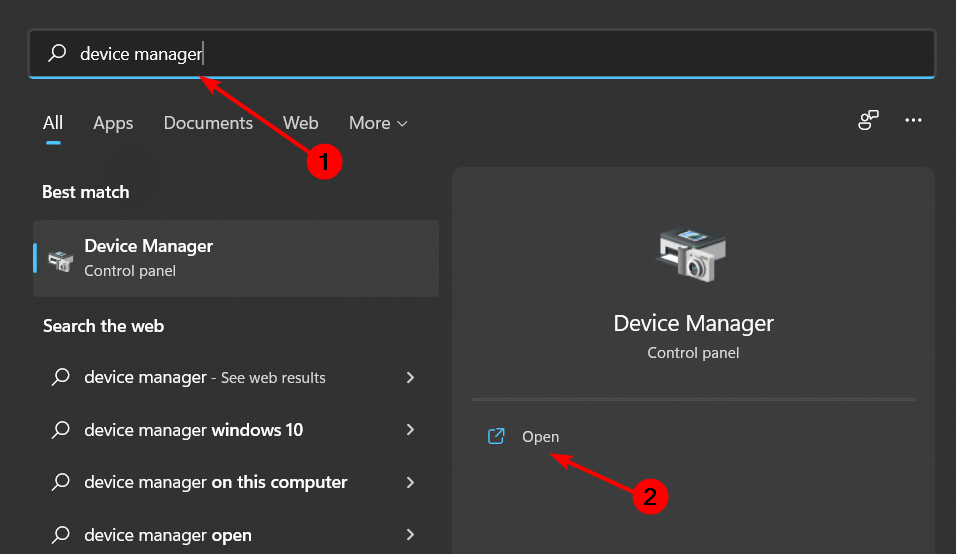
  1. Hit the Windows key, type Device Manager, and click Open.device manager w11
  2. Locate the LifeCam Studio. It should be either under Camera or Imaging devices entry.
  3. Once found, right-click on LifeCam Studio and select Update driver from the context menu.
  4. Select Search automatically for drivers and wait for Windows to update the drivers.

Because sometimes Windows may match you with an older version of a driver, you’ll find that your LifeCam Studio is not working. This will require you to download from the official site.

4. By downloading from the Manufacturer’s site

The LifeCam drivers have been incorporated into Windows 10 and 11 and have native support. However, some users may still need to download and install these drivers for their camcorder.

This could be because they have not been updated properly after installation or deleted from their computer. You can still find them in the Microsoft Update Catalog. You just need to be extra careful and enter your hardware information to download the correct driver.

What are some common problems when using Lifecam Studio Webcams?

  • Webcam not working – The webcam may not be working because it is not recognized by Windows. This could be a compatibility issue with Microsoft’s drivers for your webcam.
  • Video quality issues – This could be because your computer is running other CPU-intensive programs. Clearing superfluous background processes could remedy the situation.
  • The camera is not detected – This frequently happens when you have a problematic port, or you’re using a USB hub. Ensure the camera is connected directly to an available USB port on your computer.
  • The camera keeps disconnecting and reconnecting – This is usually due to connection issues. Ensure you are in range of your router and remove any unnecessary devices hogging the bandwidth.

By doing this, you will be more likely to have a smooth-running camera. It is recommended to update the drivers every couple of months. This will keep your computer safe and secure.

We hope that you found our article helpful and that it was a pleasant experience finding the drivers for your device. If you have any questions at all, we’d love to hear them in the comments below.

How to Quickly Turn Off Accents on Keyboard in Windows 11

Accents or diacritic marks can be useful in determining phonetic clarity, language differentiation, and other popular contexts. However, sometimes, it can cause unnecessary hindrances due to accidental inputs.

In this guide, we will walk you through simple methods to turn off accents on the keyboard in Windows 11 to fine-tune your writing preferences.

How do I turn off accents on my Windows 11 keyboard?

Before moving to steps to turn off the special characters on Windows 11, make sure you perform the following checks:

  • Ensure you don’t have a third-party keyboard app installed.
  • Verify if you have admin access to your computer.
  • Make sure you have the updated version of Windows.

1. Using the Language & region option

  1. Press Windows + I to open the Settings app.
  2. Go to Time & language and select Language & region.Time & language and select Language & region -turn off accents on my Windows 11 keyboard
  3. Locate Preferred languages; locate the language for which you want to change the keyboard settings, usually, it is English (United States).
  4. Click the three dots next to it, and choose Language options. Preferred languages; locate the language for which you want  -Language options.
  5. On the Options page, under Keyboards, locate the keyboard other than English (United States), click the three dots next to it, and select Remove. Keyboards, locate the keyboard other than English (United States), click the three dots next to it, and select Remove

You can use the same steps to remove other unwanted keyboard layouts from your Windows to streamline your typing experience.

2. Modify the Advanced keyboard settings

  1. Press Windows + I to open the Settings app.
  2. Go to Time & language and select Typing.Time & language and select Typing - turn off accents on my Windows 11 keyboard
  3. Click Advanced keyboard settings.Advanced keyboard settings.
  4. For the Override for default input method option, select the preferred language from the drop-down menu.Override for default input method option -turn off accents on my Windows 11 keyboard

3. Using the PowerToys app

  1. Press the Windows key, type powertoys, and click Open.Powertoys - turn off accents on my Windows 11 keyboard
  2. On the PowerToys window, locate Quick Accent from the left pane and click Open Settings.
  3. Toggle off the switch next to Enable Quick Accent to disable accents on Windows 11.Toggle off the switch next to Enable Quick Accent

4. Using the Registry Editor

  1. Press Windows + R to open the Run dialog box.Regedit RUN COMMAND- turn off accents on my Windows 11 keyboard
  2. Type regedit and click OK to open Registry Editor.
  3. First, let us back up your Registry entries; for that, go to File> Export. Save the .reg file in an accessible location.File - export
  4. Copy & paste these paths into the address bar one by one and press Enter:Regedit1
    • Computer\HKEY_USERS\.DEFAULT\Keyboard Layout\Preload
      Computer\HKEY_CURRENT_USER\Keyboard Layout\Preload
      Computer\HKEY_USERS\.DEFAULT\Control Panel\International\User Profile
      Computer\HKEY_USERS\.DEFAULT\Control Panel\International\User Profile System Backup
  5. Locate the unwanted keyboard identifier among the list of Keyboard Identifiers in the right pane and delete the one you don’t want.
  6. Close the Registry Editor and restart your PC.

5. Uninstall the display languages

  1. Press Windows + R to open the Run dialog box.Lpksetup run command
  2. Type lpksetup and click OK to open the Install or uninstall display languages wizard.
  3. Select the Uninstall display languages option from the next window.lpksetup_turning off accents on keyboard on Windows 11
  4. Follow the onscreen instructions to delete display languages so they can’t add themselves to the keyboard layout.

Troubleshooting tips for turning off accents on keyboard on Windows 11

  • First, ensure you have logged in with a user profile with administrative rights.
  • Always reboot your computer after making the changes.
  • Use Time & language>Language & region>Remove all the languages and keyboard layout, then re-add the ones you need to remove the conflicts between languages.
  • If the above steps don’t work, make the changes using a local user profile and check if the special characters are disabled.
  • Disable or uninstall any third-party keyboard-related software that you think might conflict with default settings.
  • Keep your keyboard driver updated to prevent issues like typing double characters when inputting single.

You can also use the Language & region option to add a new preferred language, keyboard layout, and type accents on Windows.

Did we miss a step that helped you turn off the special characters? Don’t hesitate to mention it in the comments section below. We will happily add it to the list.

GitHub Copilot for Business: How to Set Up & Use

GitHub Copilot for business, as the name suggests, is tailored specifically for business use. This tool leverages artificial intelligence to strengthen code creation, streamline processes, and increase productivity.

In this guide, we will discuss steps to set up and use this cutting-edge artificial intelligence tool to optimize your coding experience and drive your business to new heights.

Can I use GitHub Copilot in my company? You can use organization or enterprise accounts to use GitHub Copilot for your company. However, if you have an individual account and your employer allows you to use it for the company’s work, you can utilize it as well.

How do I set up & use GitHub Copilot for Business?

1. Setup & purchase the subscription

  1. Go to the GitHub Copilot for Business signup page.Sign in - GitHub Copilot for Business
  2. Sign in with your GitHub credentials and verify with a code if prompted.
  3. Now, you will be presented with two options:Enable GitHub Copilot in an organization
    • Enable GitHub Copilot at an enterprise level – To activate this, you must be an enterprise administrator.
    • Enable GitHub Copilot in an organization – To choose this option, you need to be a GitHub organization administrator.
  4. Select the option that suits you and click Continue.
  5. Choose the organization name and click Continue.organization name and click Continue
  6. Now enter the billing information for your Copilot subscription and associated payment method, then click Save.enter the billing information for your Copilot subscription and associated payment method and click Save.
  7. Once you have saved the details, on the Select your organization preferences page, use a drop-down menu to choose how GitHub Copilot should be configured and whether it should allow or block suggestions that match a public code, then click Save and continue. Save and continue.
  8. Select the desired number of users on the Assign seats page and click Save and finish.Assign seats page and click Save and finish. - GitHub Copilot for Business

2. Configure policies & use the tool on an editor

  1. Click your profile image and select Your organizations.Your organizations.
  2. Select Settings next to your organization’s name.Settings next to your organization’s name. - GitHub Copilot for business
  3. Under Code, planning, and automation, locate Copilot & select Policies and features to change the configuration.Code, planning, and automation, locate Copilot
  4. Next, to see the number of seats assigned, go to the Billing and plans option on the Your Organization page, locate Add-on, and under GitHub Copilot, you will get the details.go to the Billing and plans option on the Organization page, locate Add-on, and under GitHub Copilot,

Once you have completed the setup and assigned seats to your team members, every added member will receive an email notifying them that they can integrate GitHub Copilot into Visual Studio Code, Visual Studio, JetBrains, and Neovim. To start using it, ask them to follow these steps:

  1. Open any of the mentioned coding apps, and click Extensions.
  2. Search GitHub Copilot and click Install to add it to the editor.Extensions. Search GitHub Copilot business and click Install to add it to the editor. -
  3. Once it is installed, click Enable Gloablly to use it all over the editor.

If you want to learn how to set up and use GitHub Copilot in Visual Studio, we have an interesting article covering all the steps in detail.

GitHub Copilot for business vs. individual

CategoriesGitHub Copilot for BusinessGitHub Copilot for Individuals
License & pricing$19 per user per month $10 per month/$100 per year
Types of GitHub accountsOrganization or enterprise accountsPersonal accounts
TelemetryDoesn’t collect, measure, or analyze dataCollects, measures, and analyzes data on how the tool is used
Blocks suggestions matching public codeComes with an option to configure the policies to block suggestionsAllows you to block suggestions
Offers multi-line function suggestionsCan generate entire functions or code blocks that span multiple lines of codeCan suggest complete functions or code segments that extend across multiple lines of code.
Organization-wide policy managementCan manage policies using the administrator accountSubscription doesn’t have this feature
Audit logsAllows you to keep the usage activities and logs Doesn’t keep logs
HTTP proxy support via custom certificatesCapable of working through an HTTP proxy using custom or user-provided SSL/TLS certificates.Doesn’t include the feature

In case you want to try GitHub Copilot for free, GitHub Copilot for Individuals comes with a trial version. However, if you want it entirely free, you need to sign up as a student or teacher.

Exploring the features of GitHub Copilot for Business

  • An extensive library of code snippets that allows you to quickly insert pre-written, commonly used code segments into your projects, thereby boosting the development process & maintaining code consistency.
  • Keeps the proprietary code secure and protected, gives code suggestions, and seamlessly integrates with several code editors, enhancing the overall coding experience and providing effortless collaboration within private repositories.
  • Seamless integration with enterprise-level GitHub accounts, catering to their needs and supporting various programming languages, making them flexible.
  • Provides admin access & tailored features for different team members and allows customization & management of user settings as per preferences.
  • The tool should be used with caution when it comes to non-GitHub repositories.
  • Ensure you respect intellectual property rights and licenses to avoid copyright infringement.
  • Use a Public code filter to avoid suggestions from public repositories.
  • Always double-check the code sources to minimize risks.

Optimizing your workflow with GitHub Copilot for Business

  • Use code suggestions to enhance productivity, streamline your coding processes, and maintain code consistency on all projects.
  • You can assign seats to individual users and leadership roles, which can help in managing the volume of code, making it useful for stakeholders, irrespective of their position in the company.
  • Manage your codebase to make sure it aligns with your organization’s guidelines.
  • Useful in writing safe and reliable code, resulting in a secure development process.

GitHub Copilot is coming with a newer version named Copilot X, which will powered by the Open AI GPT-4 model; to learn more about it, read this guide.

Microsoft has also added Copilot to Outlook and Windows & will soon add it to more of its products; to learn how to add it to Outlook, read this guide. You can also check out this GitHub Copilot vs Microsoft Copilot comparison if you’re unsure which tool to use.

After configuring policies and enabling the extension in your editor, it is useful to know how to clone a repository in GitHub so your team can bring codebases into their environment and start collaborating effectively.

Do you think GitHub Copilot for Business can help you elevate your business? Mention your thoughts in the comments section below.

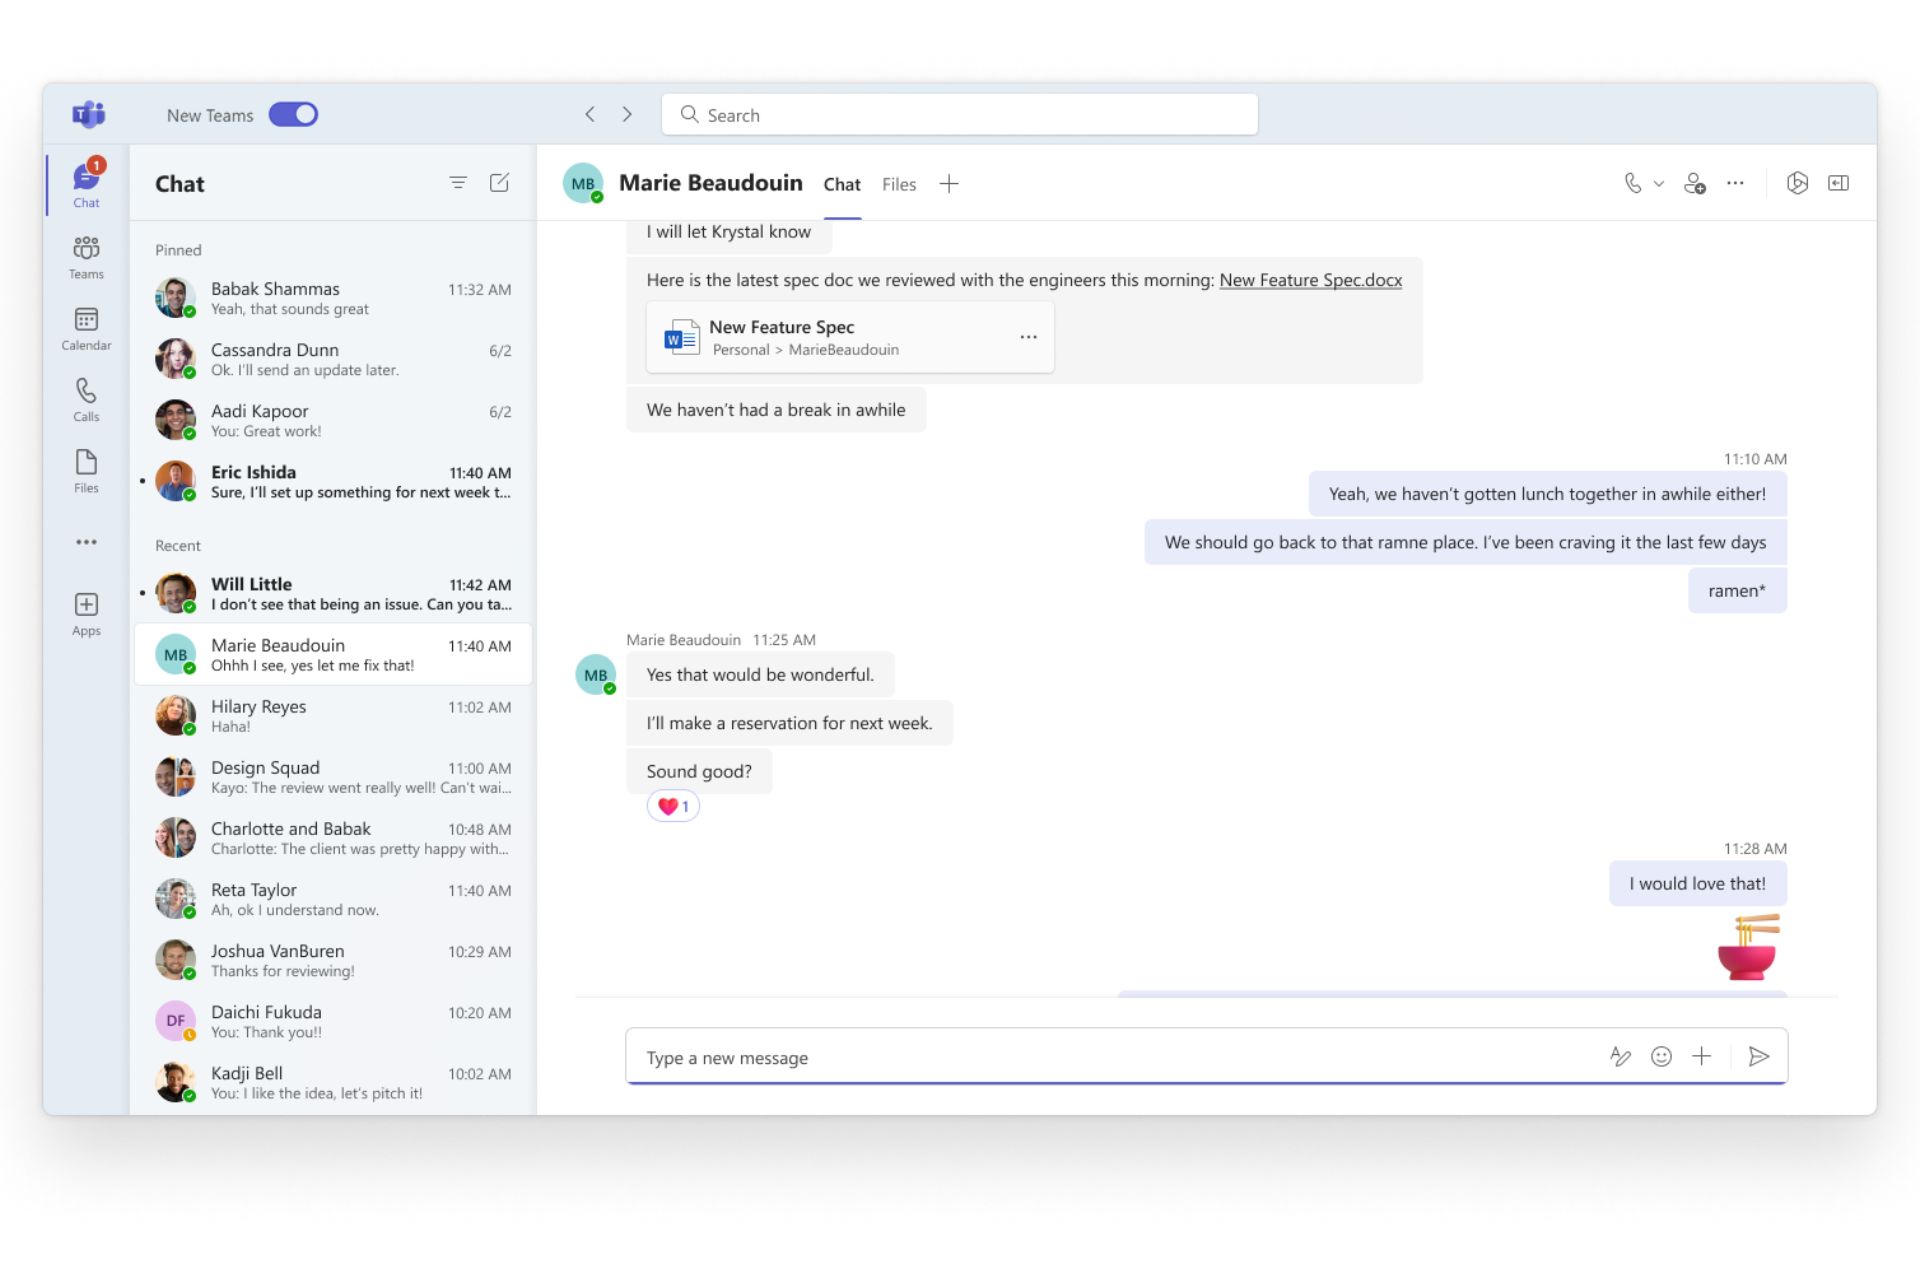
Teams 2.0 is here on Windows: A complete guide on the new Teams

It’s official: Teams 2.0, or the new Microsoft Teams is finally available to everyone on Windows and Mac, according to Microsoft’s latest announcement.

The newer generation of Teams has been in the works for quite some time, and selected users were able to try it in a preview when Microsoft released it in a private preview earlier this year. It was collectively dubbed “Teams 2.0” at that time, and it came with a lot of improvements like a shorter loading time by 50% and more efficient energy consumption.

However, Teams 2.0 released on October 5 brings even more improvements to the platform, as Microsoft notes.

We have made notable progress since the launch of new Teams in public preview. New Teams now has full feature parity for almost all features including custom line-of-business apps, third-party apps, breakout rooms, 7×7 video, call queues, PSTN calling, contextual search in chats and channels, cross-post a channel conversation, and more. We have focused on providing high-quality performance and enhancing the basics in areas such as reliability, security, and IT management to make sure that new Teams meets the evolving requirements of your organization.

Microsoft

Plus, you should know that starting today, new features and enhancements will be exclusively available to Teams 2.0. That means that the classic Teams will only get improvements, so your organization should be thinking about moving to the new Teams as soon as possible, for security reasons. Below you’ll find a guide on how to do it.

How to download/switch to Teams 2.0?

To download Microsoft Teams, you just need to access the official website and download it to your preferred Windows device.

If you already have Microsoft Teams on your Windows device, you’ll need to:

  1. Open your Microsoft Teams app on your Windows device.
  2. Turn on the Try the new Teams toggle at the top of Teams. microsoft teams 2.0 download
  3. Select Get it now from the pop-out dialogue, to install the new Teams.
  4. When it’s done, Teams will automatically reboot with its new version.

With that said, however, not everyone will be happy with the new Teams, at least the version that still needs to be polished before general release. We’ve also covered how to revert to classic Teams if this case applies to your situation.

Important note: Microsoft is making Microsoft Teams 2.0 the default client on Windows starting October 3. This means your device will have the newer Teams 2.0 installed instead of the old Teams version.

Teams 2.0 availability

The new Microsoft Teams is now available to Windows and Mac desktop devices only for now, according to the following plan.

Update channelDate
Teams Public PreviewOctober 2023
Targeted Release ChannelOctober 2023
Current ChannelLate October 2023
Monthly Enterprise ChannelDecember 2023
Semi-Annual Enterprise Channel (Preview)November 2023
Semi-Annual Enterprise Channel, Semi-annual Extended, LTSC, and remaining channelsJanuary 2024
Government Cloud (GCC, GCC High) PreviewMarch 2024
Government Cloud (DoD) PreviewMarch 2024

When it comes to the Web version, Microsoft has in plan the following roadmap.

BrowserDate
R4, Chrome/Edge, Non-EDUMid-November 2023
Chrome/Edge, EDUNovember 2023
Safari/Firefox (target date)March 2024
Gov/Special CloudsMarch 2024

What features are changing in the new Teams?

Classic TeamsNew Teams
Purple toast notificationsYou’ll no longer see the purple “toast” notifications, and the taskbar icon will behave a little different. Notifications are via Windows native notifications to provide a consistent experience.
Adding a Wiki to a channel tabYou’ll no longer see a Wiki app. Instead, select the Notes app.
Adding third-party cloud storage service from the Files app and Files tab in channelsYou’ll no longer see the “Add cloud storage” in the Files app on Teams’ left navigation bar and within the Files tab in Teams channels. Now, you can add the third-party storage app directly from the Teams App Store.
Look up an organizational chart while in a 1:1 chatSelect a user’s avatar or profile photo anywhere in Teams and navigate to the organizational chart within the profile card.
Look up LinkedIn while in a 1:1 chatSelect a user’s avatar or profile photo anywhere in Teams and navigate to the LinkedIn tab within the profile card.
Adding a document library (DocLib) app to a tab in channelsUse the Sharepoint app instead. Then, add the document library from there as a tab to the channel. Existing document libraries will automatically convert to a SharePoint document library on first use.
Activity tab in chatNo longer available.
Ability to save messages and files in TeamsNo longer available. Will be replaced later this year by a similar feature.
Allow users to follow another user’s presence, then notify them of availabilitySelect a user’s avatar or profile photo anywhere in new Teams to quickly get an overview of their online status, next available calendar slot in Outlook, work hours, local time, and work location (remote or office).
Ability to sign out from the notification area at the far right of the taskbar (system tray).No longer available.
Settings dialogSettings is now an app accessed from the More options menu (…) in the title bar.
About links in the More options menu (…)About links are now in the Settings app under the About Teams category.
Help in the app barThe Help entrypoint, including Help links and Give Feedback is now located under the More options menu (…) in the title bar.
Ability to build Teams personsal apps usings Adaptive cardsNo longer available.
General appearance changesColors, tooltip styles, and general appearance have been updated.
Ability to use tags in the “Add member” dialog.There is now an advanced flow for tags.

Copilot is coming to the platform

As with multiple Microsoft 365 apps, the new Teams is getting the Copilot treatment. Users will be able to work alongside this AI tool to get work done faster, and more efficiently.

Among the features, Copilot is bringing to Microsoft Teams 2.0, the tool will also help customers look for hard-to-find information across Teams files and documents. You can read more about Copilot in Microsoft Teams here.microsoft teams 2.0

Further, aside from the newly revamped interface, you can go ahead and get Teams Exploratory to experience all the features of the premium version at no additional cost!

If you want to install the Teams app for all user profiles on a computer, read this guide to learn the detailed steps. Lastly, be sure to read about hacking Microsoft Teams idle time with 7 effective methods.

What do you think about the new Teams? Let us know your thoughts in the comment section below.

New Microsoft Teams for Education now available for Windows

Microsoft has released a new Microsoft Teams for Education, and the platform is now available for Windows and Mac, according to their announcement.

This is all part of the newer Microsoft Teams, or Teams 2.0, release plan, announced by the Redmond-based tech giant earlier this year. However, back then, Microsoft gave the option to customers to switch between the classic Teams and new Teams. Now, the new Teams is the default desktop client for Windows and Mac.

The new Microsoft Teams for Education is based on Teams 2.0, but Microsoft says this version is more suitable for education environments.

To ensure Teams continues to meet the evolving requirements of educational institutions, here’s a quick look what users can expect from new Teams:

  • Higher overall performance with enhancements in core areas such as reliability, security, and IT management
  • Seamless collaboration across multiple organizations or accounts, ensuring no disruption to your workflow
  • More reliable, improved security, and better manageability – using trusted types, stringent CSPs, and integration with MSIX
Microsoft

However, the new Microsoft Teams for Education is only available for Windows and Mac, and its web version will only be available for Edge and Chrome, at first. But, Microsoft will bring additional browser platform availability in early 2024.

The new Microsoft for Education: everything you need to know about it

  1. Educators and teachers will be able to easily get started with the new Teams. Microsoft has prepared a guide for them to easily transition between the old version and the new version.
  2. The transition to the new Teams will not affect any of the activity currently happening in the old Teams for Education. According to Microsoft, users will be able to pick up where they left off after they’ve upgraded to new Teams.Microsoft Teams for Education
  3. Starting January 2024, Microsoft will be setting “New Teams as default” for all Education users.
    • In early January, for tenants and users still using classic Teams, Microsoft will set new Teams as the default Teams client. Administrators will still have the option to set classic Teams for their users via policy, should they choose to upgrade their users to new Teams on a different schedule.
    • Starting June 2024, all new features and enhancements will be available exclusively as a part of new Teams. To ensure our users can take advantage of latest Teams innovation, all remaining classic Teams users will be automatically upgraded to new Teams at this time.

What are your thoughts on the new Teams for Education?

OneDrive for Web will add individual file shortcuts

OneDrive has been getting a lot of love recently. Earlier this week, at the Microsoft OneDrive Event, the Redmond-based tech giant finally revealed that OneDrive is the latest Microsoft app to get a plethora of AI features.

We’re talking about Copilot in OneDrive, a new and upgraded OneDrive design, and an improved search, which is AI-based and it will let customers look for files and photos using natural language.

And now, according to the latest entry in the Microsoft 356 Roadmap, OneDrive for Web is getting an option that will allow users to add individual file shortcuts.

Users will be able to make shortcuts to files from another user’s OneDrive, and it will allow them to organize these shortcuts so they can access the files faster.

This feature will let you create a shortcut to files stored in other people’s OneDrive and document libraries to be able to easily find it within your OneDrive.

Microsoft

How to use a OneDrive file shortcut

Users will be able to make a OneDrive shortcut the same way they do other usual shortcuts, as long as they know the path of the files. Microsoft says that these shortcuts will be manageable as per the user’s options, without impacting the source content.

For example, a file shortcut in OneDrive can be moved, renamed, or deleted and these actions will not change the original file’s content. onedrive file shortcut

Once created, the shortcuts will appear pretty much everywhere in OneDrive, and across devices too. If you create one on OneDrive for the Web, it will appear on OneDrive for Android and iOS, and sync client endpoints everywhere.

Plus, the ability to document them in libraries will allow users to easily keep track of them when they need them. This makes this feature incredibly useful in dynamic situations, such as meetings, interviews, and other similar contexts.

The feature is coming to OneDrive this month, in October and it will be available everywhere.

Copilot is coming to Microsoft Teams in November 2023

At the Microsoft Surface Event, back in September, the Redmond-based tech giant revealed that Copilot will be coming to Microsoft 365. However, Microsoft didn’t specify an exact release date for each Microsoft 365 app.

But, according to the latest entry in the Microsoft 365 Roadmap, it seems that Copilot will be coming to Microsoft Teams in November. This means that while Copilot is going to be released to 365 apps in November, each 365 app might actually get the AI tool at a different date over the month.

This would make sense, as each 365 app will integrate Copilot in a different way. There has to be an accommodation period for those customers who use all the Microsoft 365 apps within their work.

According to Microsoft, Microsoft 365 customers will be able to use the AI tool to organize their files, work projects, meetings, calls and even ask for useful insights, such as meeting summaries, or suggested tasks.

Copilot in Microsoft Teams helps users stay organized and on top of all their information in chat, meetings, and calls, with the ability to ask Copilot any question and discover insights. Use one of the suggested prompts or enter a free text question of your own.

Microsoft

Copilot in Microsoft Teams: what can you do with it

For starters, Copilot will come as a free-to-use AI tool inside Microsoft 365. While for each 365 apps, Copilot will come differently, for Teams, this AI assistant will do everything from organizing files to simply having a chat with you on different topics when you want to relax.copilot microsoft teams

Microsoft Teams already has some AI capabilities that are quite useful. For example, earlier this year, Microsoft introduced Intelligent Recap to Teams, an AI feature that summarizes Teams meetings, and it comes with suggestions and recommended tasks for each member involved.

Copilot, however, might integrate capabilities from other apps, such as coming up with reply suggestions on Teams chats, or even preparing entire emails for customers.

To learn more about Copilot, our 2024: The year of AI computing with Microsoft’s Copilot article has all the information you need.

Are you excited about it? Let us know in the comments section below.

How to Fix “Software Center Stuck Installing” Issue

The “Software Center stuck installing” problem can be resolved through a series of steps including checking internet stability, refreshing the Software Center, clearing cache, and seeking technical support if necessary. Read below to find more solutions/

Diagnosing the “Software Center Stuck Installing” Issue

Understanding the root causes can help in troubleshooting:

Network Glitches: Installation can falter due to unstable internet connections. Learn more about resolving network issues.

Server Traffic: High server traffic can lead to delays. Check the server status before installation.

Corrupted Cache: Cached data can corrupt over time, affecting installations. Dive deeper into the importance of cache.

Software Conflicts: Other active programs can interfere with the Software Center’s processes.

Steps to fix “Software Center Stuck Installing”

1. Ensure Stable Internet

  • Confirm that you’re connected to the internet.
  • Check the Wi-Fi signal strength; if weak, consider a direct cable connection or reposition closer to the router.

2. Refresh the Software Center

  • Close the Software Center completely.
  • Press Windows key + S. In the search bar, type “Software Center”.
  • Select the Software Center from the results and reopen it.

3. Clean the Cache

  • Open File Explorer by pressing Windows key + E.
  • Navigate to the path C:\Windows\ccmcache.
  • Select all files (by pressing Ctrl + A) inside the ccmcache folder and delete.
  • Restart your computer and retry the software installation.

4. Close Interfering Software

  • Press Windows key + S and type “Task Manager”.
  • Open Task Manager, and under the Processes tab, identify potential conflicting software.
  • Select the software and click “End Task”.

Proactive Steps to prevent it from happening

To minimize recurrence in the future, you need to do the following:

  • Clear cache periodically.
  • Always ensure a stable internet connection prior to installations.
  • Update Software Center when new versions are available.
  • Avoid simultaneous installations.


Addressing the “Software Center stuck installing” issue requires a systematic approach. By pinpointing the root causes and following the solutions outlined, you can streamline your software installations. Always prioritize regular system checks and maintenance for optimal performance.

How to Download Video from Facebook on PC

Unfortunately, there is no official way to download video from Facebook on a PC or any other device for that matter. However, we will show a few methods on how to download videos from Facebook on PC.

Can I download my videos from Facebook? Of course you can. Just log into your Facebook account, open the video you want to download, click on the three dots button from the top-right corner, and select Download video from the options.

How do I download video from Facebook on PC?

1. Download the Facebook video manually

  1. Go to Facebook, find a video you want to download, and copy the link.
  2. Now, paste it into another tab and replace the https:// part with basic. So, your link will look like mbasic.facebook.com/.
  3. Next, right-click on the video and select Open video in new tab.
  4. Finally, now, if you right-click on the video in the new tab, you will see the option to Save video as and you will be able to download it as an MP4 file on your PC.

2. Use a dedicated app

  1. Get the latest version of 4K Video Downloader.
  2. Launch the installer and after the setup and short guide, you will get to the main screen.
  3. Now, paste the Facebook link of the video into the internal browser, and click on Go. You will need to log into your Facebook account but after that, you can just click the Download button below.
  4. And BOOM, in a couple of seconds, depending on the size of the video, it will be on your device.
  5. As you can see, you also have the option to go straight to the download folder.
  6. You don’t even need the link to the video, you can search for clips on any of the most popular streaming services like YouTube, Soundcloud, Vimeo, TikTok, Twitch, and many others.

With 4K Video Downloader+ you can download videos of up to 8K and 240 fps which is mesmerizing.

Another interesting feature is that you’re not limited to MP4. You may save the videos as MKV or set the app on automatic, to save it in the original format. Also, you can download up to 6 files simultaneously.

With the free version of 4K Video Downloader+, you have 30 daily downloads. If you want unlimited downloads, you can go for a 1-year license or pay a fixed amount to unlock it forever.

3. Download the Facebook video using a website

  1. Log into your Facebook account on the browser of your choice.
  2. Find the video you want to download and copy its link.
  3. Go to the FDOWN website, paste the URL into the dedicated bar, and hit the Download button.
  4. Finally, click again on the download button to get the MP4 video on your device.

That being said, we hope that our guide on how to download video from Facebook on PC provided you with the necessary information on the subject.

You might also be interested in checking our guide on how to extract audio from Facebook video.

For any questions or suggestions, feel free to access the comments section below.

8 Best Ethernet Cable Tester Tools [Hardware & Software]

Navigating the complexities of network infrastructure necessitates a robust toolkit. In my extensive experience, the right Ethernet cable tester tools and software aren’t just a luxury; they are indispensable for diagnosing and resolving network issues. This guide lays down a curated list of hardware and software assets that I’ve found to be reliable in ensuring the optimal functionality of Ethernet cables. Through rigorous testing, these tools have proven their mettle, offering precise insights and solutions to common and complex networking problems.

5 Best Ethernet Tester Hardware Tools

The hardware tools delineated below are more than just gadgets; they are your first line of defense against network anomalies. Their build quality, user interface, and real-time diagnostic capabilities make them a quintessential part of any network administrator’s arsenal.

  1. iMBAPrice RJ45 Network Cable Tester:
    • The iMBAPrice RJ45 Network Cable Tester is an essential tool for testing both LAN and telephone cables. It quickly identifies short circuits, open circuits, and cross lines with a straightforward LED light display. The tester supports remote testing, making it a handy tool for professionals dealing with network and telephone cables on a daily basis.
  2. Klein Tools LAN Explorer Data Cable Tester:
    • Klein Tools is a reputable brand, and their LAN Explorer Data Cable Tester lives up to the expectations. It’s designed for easy identification of common cable faults, making network troubleshooting a breeze. The tester is known for its reliability and user-friendly interface, ensuring a seamless experience even for those new to cable testing.
  3. Fluke Networks MS2-100 Network Cable Tester:
    • Fluke Networks is a name synonymous with precision and reliability in the network testing domain. The MS2-100 Network Cable Tester is no exception. It provides accurate results and is capable of identifying a wide range of cable faults, making it a valuable asset for network maintenance tasks.
  4. Noyafa Advanced Multi-functional Cable Tester:
    • The Noyafa Advanced Multi-functional Cable Tester is a versatile tool that excels in diagnosing and resolving issues related to both telephone and network cables. Its user-friendly design coupled with a range of testing capabilities makes it a favorite among professionals and DIY enthusiasts alike.
  5. Tempo Communications PA1574 Network Cable Tester:
    • The PA1574 Network Cable Tester from Tempo Communications is a professional-grade tool known for its accuracy and reliability. It’s designed to provide clear and precise results, making the task of network troubleshooting and maintenance straightforward and efficient.

3 Best Ethernet Tester Software Tools:

Software tools provide a digital solution to network testing, offering detailed insights and data analytics for in-depth network analysis and troubleshooting.

  1. Cable-eye PC-based Cable Tester Software:
    • Cable-eye PC-based Cable Tester Software is an innovative solution designed to scan and evaluate cables with up to 192 test points. Its intuitive interface makes identifying and resolving cable issues a simplified process, making it a valuable addition to the toolkit of network administrators and technicians.
  2. CableIQ Reporter Test Management Software by Fluke Networks:
    • CableIQ Reporter Test Management Software is a comprehensive program that helps in organizing, customizing, printing, and saving twisted pair and coaxial test records. It is designed to work on various Windows operating systems, offering a user-friendly interface for managing and analyzing cable test records.
  3. Network Testing Tools (a collection by Guru99):
    • Guru99’s collection of Network Testing Tools is a comprehensive suite of software designed to measure various aspects of a network. It includes tools ranging from ping monitoring to SNMP ping tools, providing network administrators with a robust set of resources for ensuring optimal network performance.

Sources I used in my article:

  1. Robots.net​
  2. GalvinPower.org​
  3. CablingInstall.com​
  4. FlukeNetworks.com​
  5. Guru99.com​5

Character AI Please Try Again Error: How to Fix This Network Error

Character AI is a chatbot service that allows users to create private characters or use the ones available publicly. But, while generating responses, Character AI tends to throw a network error.

The error message reads, Network error – click to refresh chat. For a few users, it’s encountered after every few responses, making the service practically impossible to use. And while there are no sure-shot fixes, a few solutions and workarounds might help improve the situation. 

Why does Character AI keep saying network error?

Character AI’s network chat error is usually encountered when the servers are heavily loaded or facing downtime. As per reports, users across the globe are facing it.

But in some cases, a poor Internet connection, browser extension conflicts, installed antivirus software, or even network connectivity issues can trigger the Character AI app network error.

How do I fix Chat Error: Please Try Again on Character AI?

Before we start with the slightly complex changes, try these quick ones first:

  • Check the Character AI server status and make sure it’s running. You can use a third-party service to verify this. If it’s down, wait for a few hours and try again.
  • Sign out and then log back into the website or app. Also, you can restart the device used to access Character AI.
  • Check if your Internet disconnects frequently and fix that. You can contact the Internet service provider for more support. Also, try connecting to a mobile hotspot or use Ethernet.
  • Disable any third-party security software or firewall running on the device and check if the Character AI error message disappears.
  • Try initiating a conversation with another character, one available publicly. Sometimes, temporary glitches are limited to private characters.

If none work, head to the fixes listed next.

Tip icon Tip
All the browser-based solutions listed here are for Google Chrome. If you are using another browser, the process are similar, but you could check the manufacturer’s website for the exact steps.

1. Clear the browsing data

  1. Launch the browser, and press Ctrl + Shift + Delete to open the Clear browsing data window.
  2. Select All time from the Time range dropdown menu, tick the checkboxes for Cookies and other site data and Cached images and files, then click the Clear data button.clear data to fix character ai network error
  3. Once done, relaunch the browser and check whether Character AI starts working.

2. Disable browser extensions

  1. Open the browser, click the ellipsis near the top right, hover the cursor over Extensions, and then select Manage Extensions from the flyout menu.manage extensions
  2. Disable the toggle for all the extensions listed here.disable
  3. If the Character AI Please try again message disappears, re-enable the extensions one at a time, wait for the error to reappear, and as soon as it does, the extensions enabled last is the problematic one.
  4. Finally, click the Remove button under that extension and confirm the change.remove

When Character AI is not working or throws a network error, this could be linked to a conflicting extension, one that modifies the connection parameters or blocks traffic.

3. Reinstall the Character AI app (mobile devices)

If you are getting the Character AI network error on Android or iOS, reinstalling the app might help. This works when the previous app installation has gone corrupt or is missing critical files.

Besides, you could try clearing the app data first, but it’s less likely to work.

4. Enable/disable the VPN

As surprising as it may sound, both enabling and disabling a VPN can help get rid of network and chat errors on Character AI. If it’s turned on, disabling the VPN might help fix an unstable Internet connection.

There’s also the possibility that server downtime is limited to a specific region, and using a server based in another country might do the trick! 

So, try out both and see what works. And while you are at it, we recommend using only the most reliable VPN software.

5. Contact Character AI support

If nothing else works, you can report the issue to the Character AI support team. Submit a ticket and wait for a response!

Also, you could check the FAQ section and guides, or look through the dedicated forum for more help.

You now know why Character AI is saying network error and that fixing the Internet connection or switching the network type will help.

And if you are an avid user, the Rate exceeded error on Character AI can be quite problematic, but upgrading the plan will do the trick! On the other hand, Internal server error 500 in Character AI, might not be as easy to fix, but we still have a guide that might help you.

For any queries or to share what worked for you, drop a comment below.

CredentialUIBroker.exe Error: How to Fix it on Windows 11

When you use the Windows operating system, you may experience a few error messages that can’t be explained fully unless you investigate for yourself. 

You might have noticed an unfamiliar process called CredentialUIBroker.exe among all the processes running on your computer. This post will help you determine whether this program is safe and the subsequent steps to remove it if found malicious.

Causes CredentialUIBroker.exe Error?

  • It might be due to an outdated or corrupted driver or software conflict.
  • Your computer may have been infected with a virus or malware.
  • You may be running an older version of Windows that doesn’t support recent hardware.
  • If there are any corrupt or damaged files, they will cause problems with your system’s performance.

How do I fix the CredentialUIBroker.exe Error on Windows 11?

Below are a few suggestions which might help you in fixing this problem before any advanced troubleshooting:

1. Run DISM and SFC scans

  1. Hit the Start Menu icon, type cmd in the search bar, and click Run as administrator.cmd-run-admin-w11 unexpected kernel mode trap windows 11
  2. Type the following commands and press Enter after each one:DISM.exe /Online /Cleanup-Image /Restorehealth sfc /scannow

2. Scan for viruses

  1. Press the Windows key, search Windows Security, and click Open.
  2. Select Virus & threat protection.
  3. Next, press Quick scan under Current threats.
  4. If you don’t find any threats, proceed to perform a full scan by clicking on Scan options just below Quick scan.Scan options
  5. Click on Full scan, then Scan now to perform a deep scan of your PC.Full Scan Scan Now
  6. Wait for the process to finish and restart your system.

CredentialUIBroker.exe is a legitimate process file belonging to Microsoft Corporation, but it may be hijacked by malware or viruses to cause them to do their dirty work. An obvious tell-tale sign would be high CPU usage for this process or checking the digital signature.

Windows Defender may not have enough power to weed out such stubborn viruses if this is the case. That’s why a third-party antivirus solution should be your next bet. TotalAV is a good option owing to its multi-layered protection technique.

⇒ Get TotalAV

3. Download the file manually

If, for some reason, the file is corrupt, you can download it from third-party sites. Ensure you have an active and up-to-date threat protection tool to scan for malware lest you inject more problems into your system.

Once downloaded, delete the original file, then copy and replace the downloaded one in the same location.

Note icon NOTE
The Exefiles.com site is not an official source, and WindowsReport is not affiliated with it in any way. If you download the file, be sure to run an antivirus check.

4. Disable your firewall temporarily

  1. Hit the Start menu icon, type Windows Security in the search bar and click Open.
  2. Click on Firewall & network protection, then select Public network.league of legends black screen after champion select
  3. Locate Microsoft Defender Firewall and toggle the off button.turning off Microsoft Defender Firewall Windows

If the error disappears when your firewall is off, it means the associated application is being flagged off as a risk to your system. You should allow the program through your firewall provided you’ve verified its digital signature, as turning off your antivirus for long periods is not recommended.

5. Update your PC’s BIOS

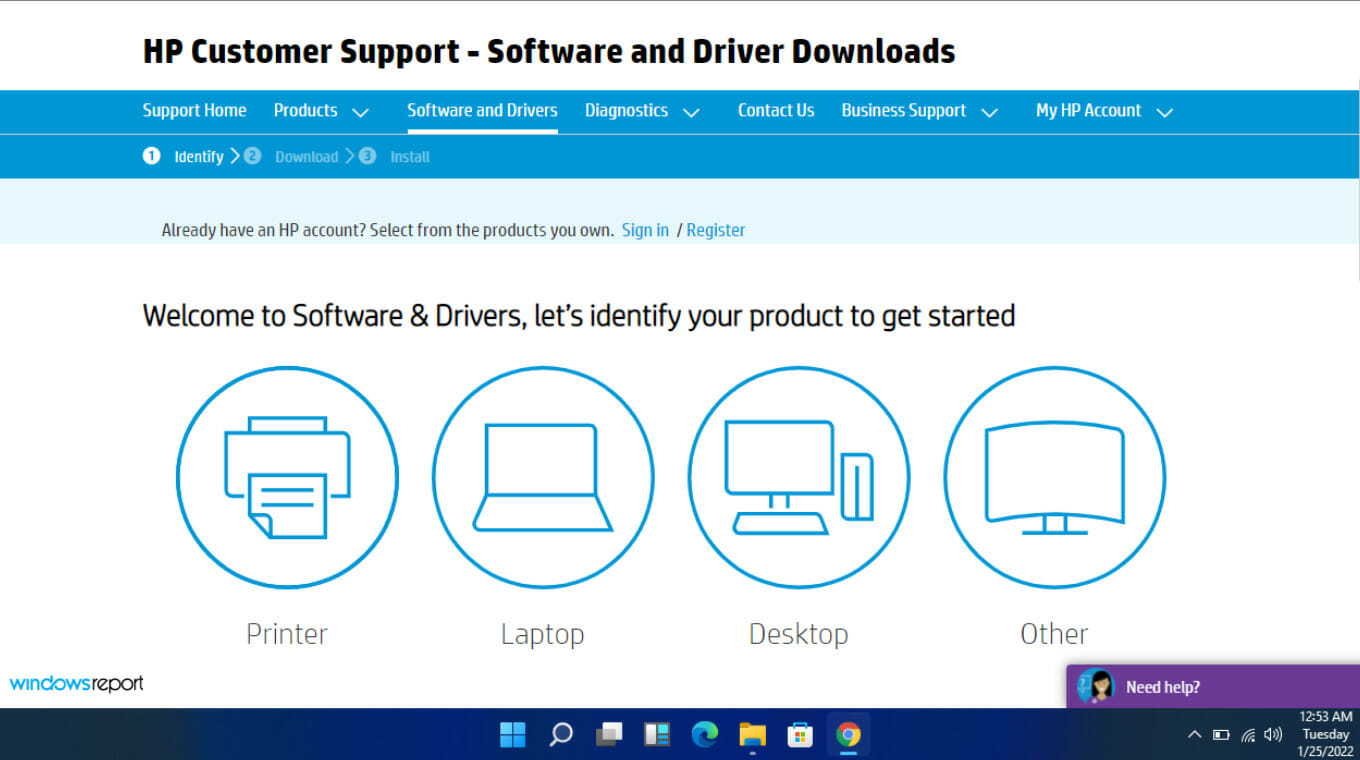
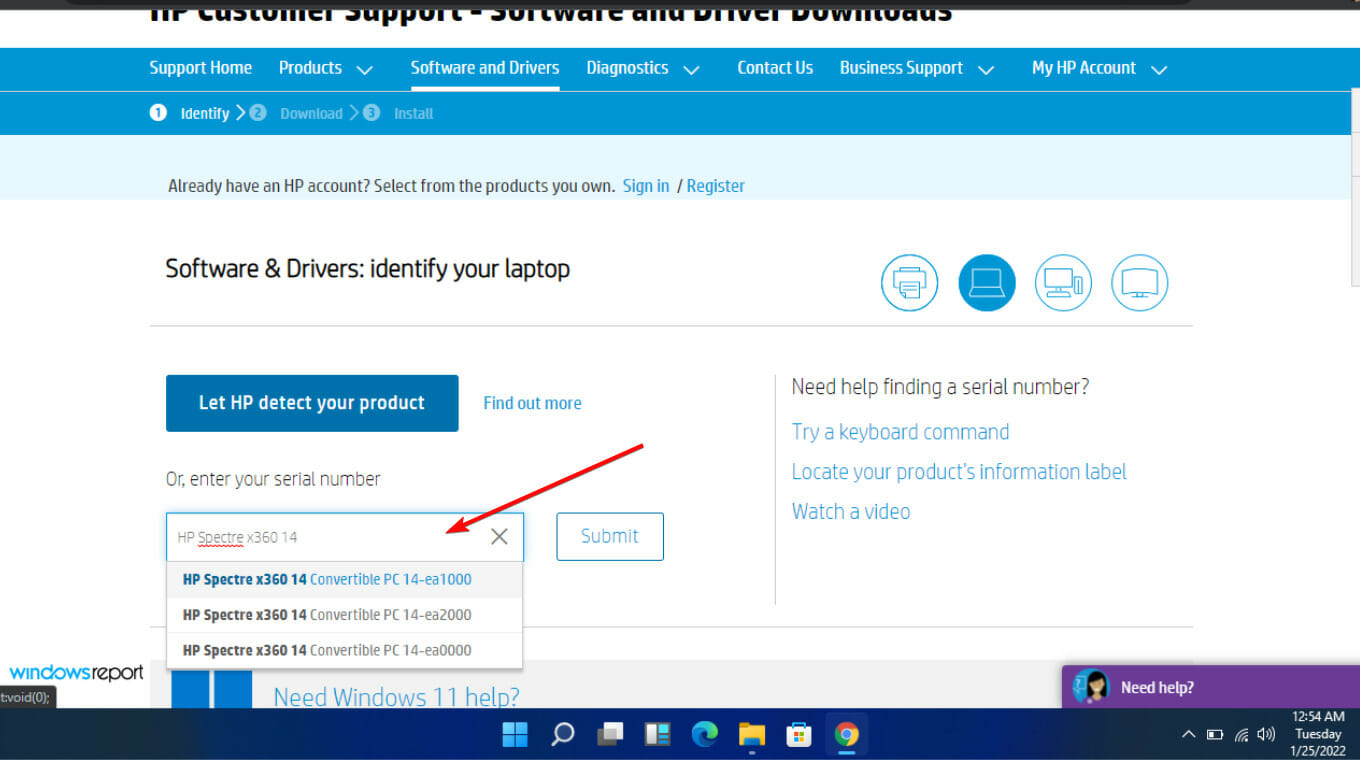
  1. The process of updating BIOS will differ depending on your motherboard. For this step, we shall be updating the HP motherboard.
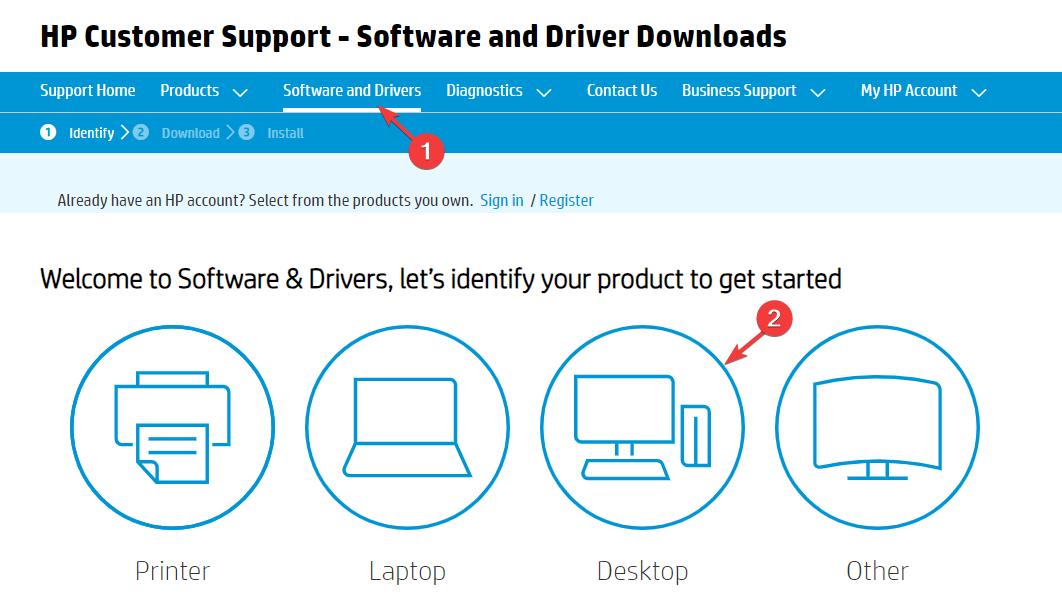
  2. Navigate to the HP driver and software download website.
  3. Choose laptop or desktop, depending on the type of computer you’re using.
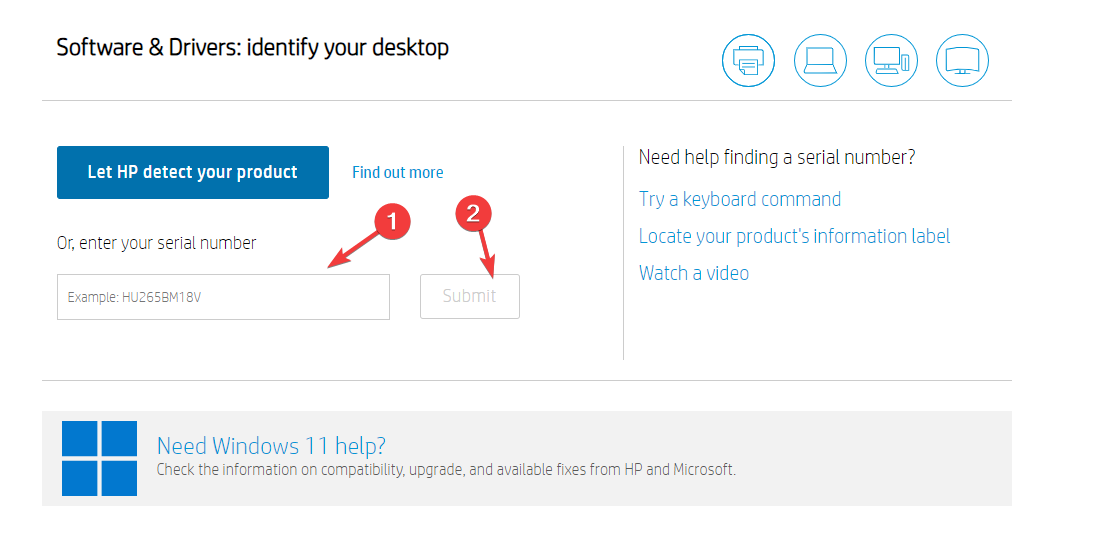
  4. Enter your exact serial number or your exact computer model.
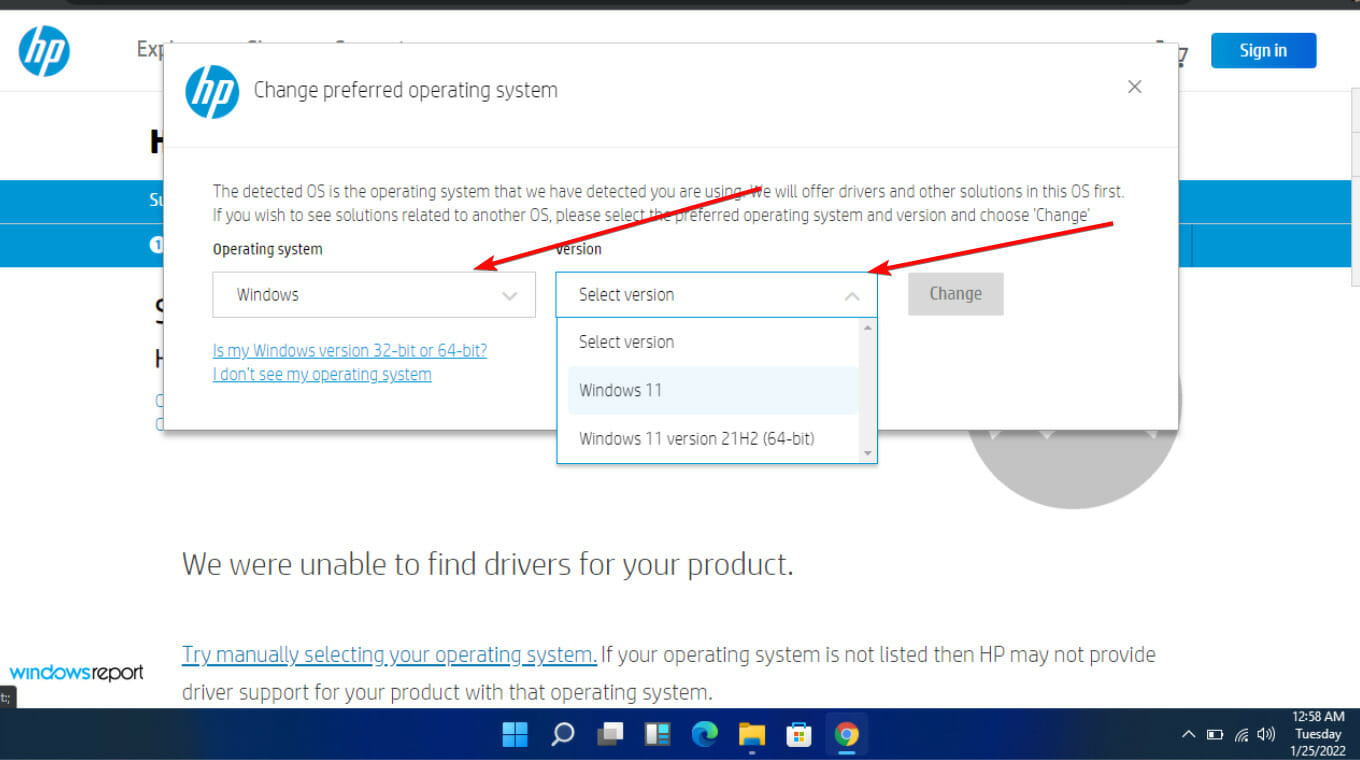
  5. Select your OS and OS version, then click Submit.
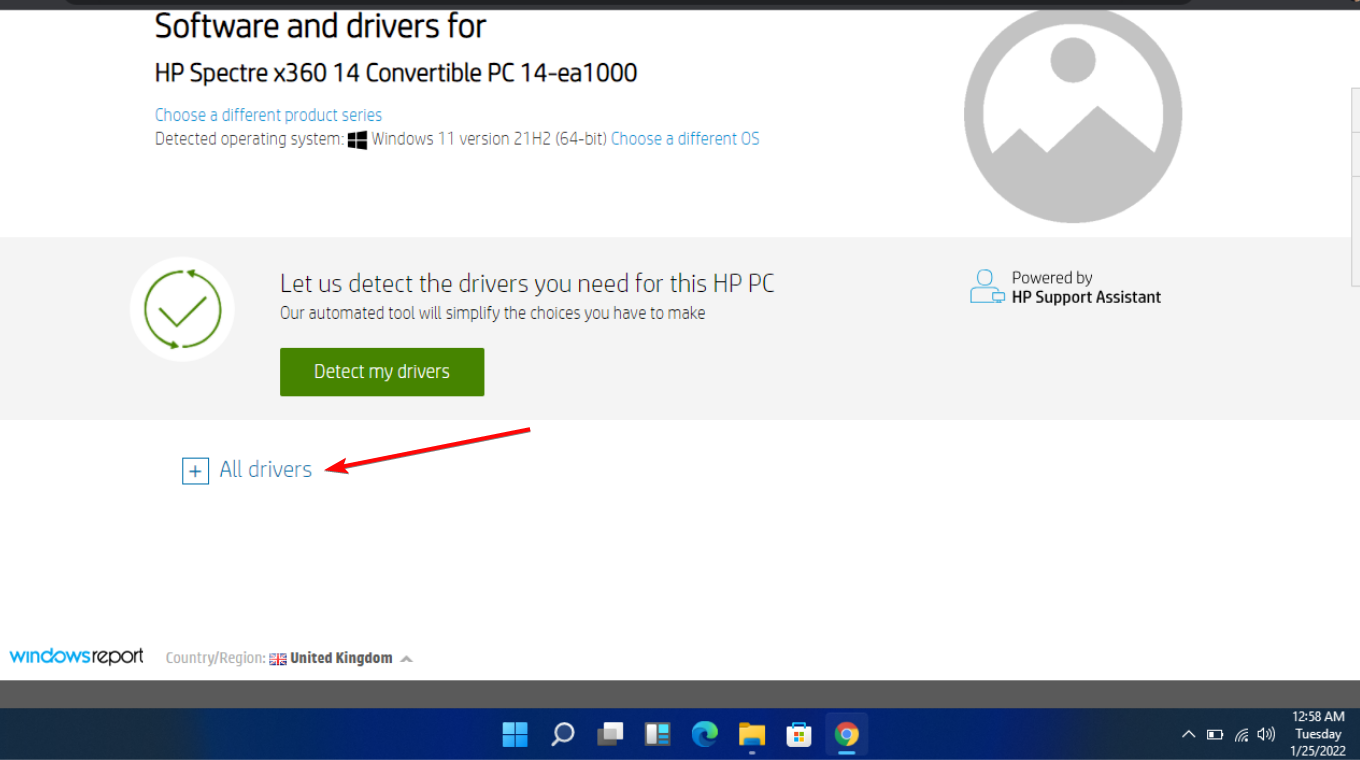
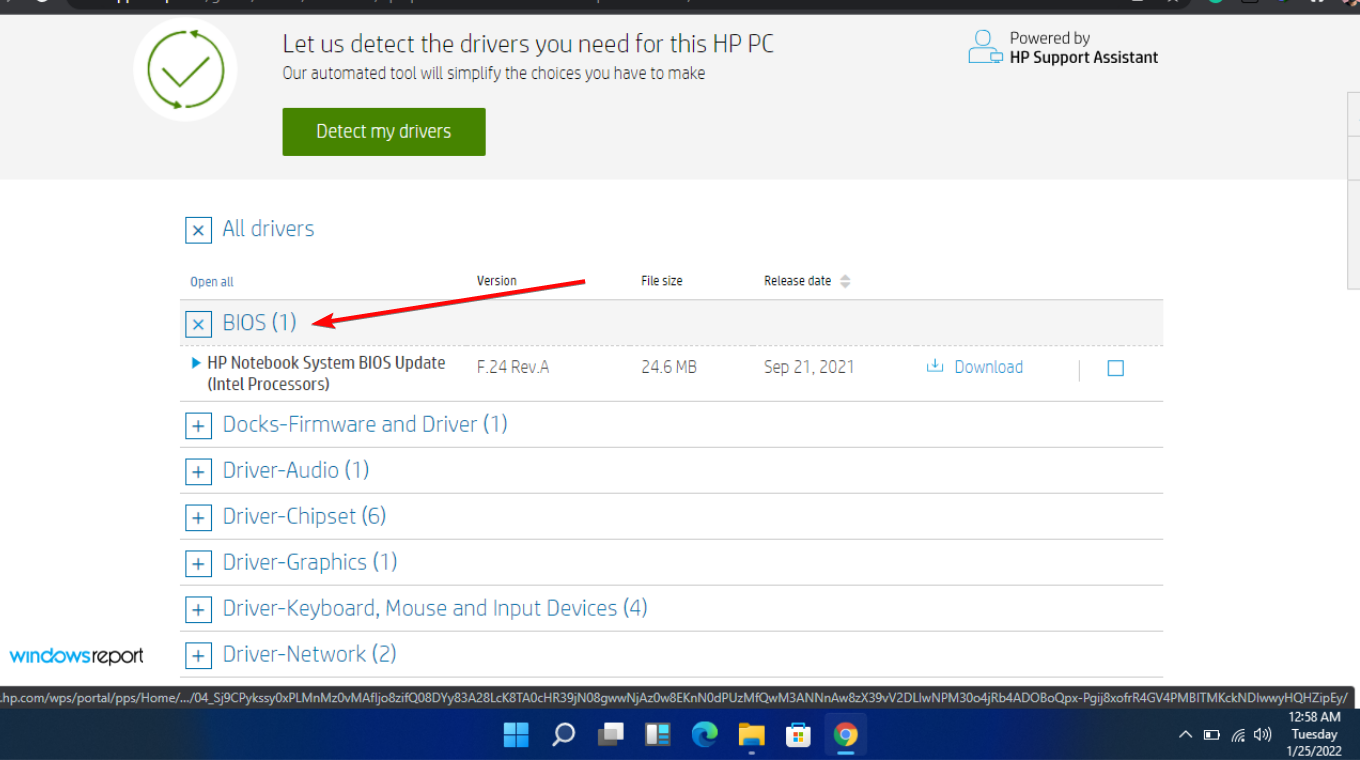
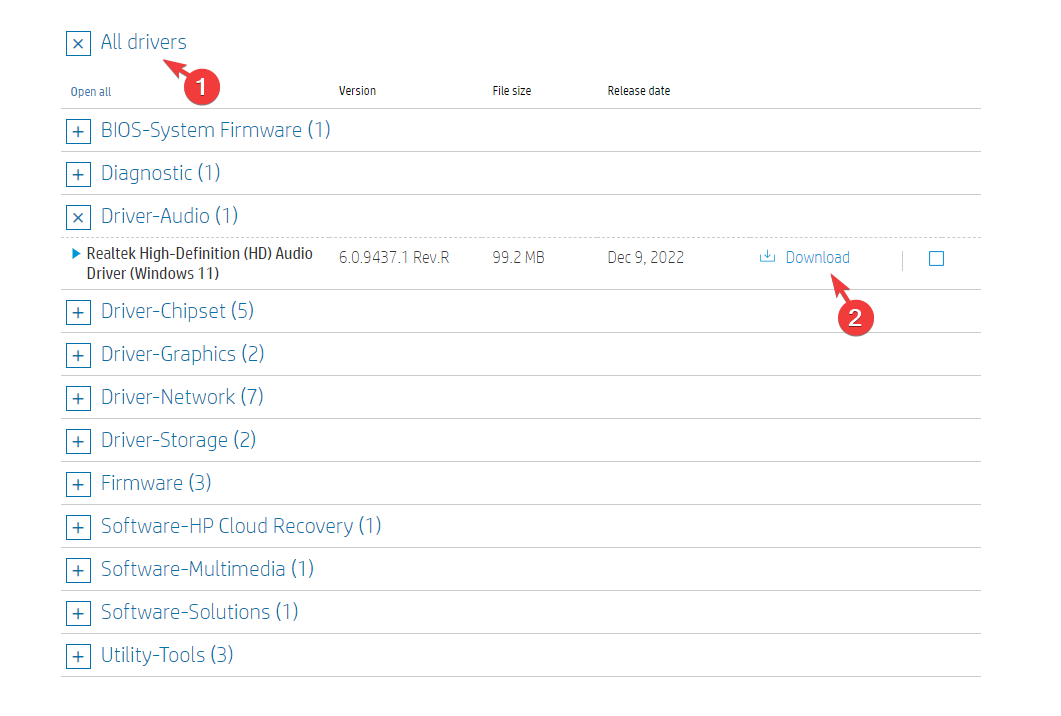
  6. Click on All drivers and then expand BIOS to see available updates.
  7. Click the download icon.
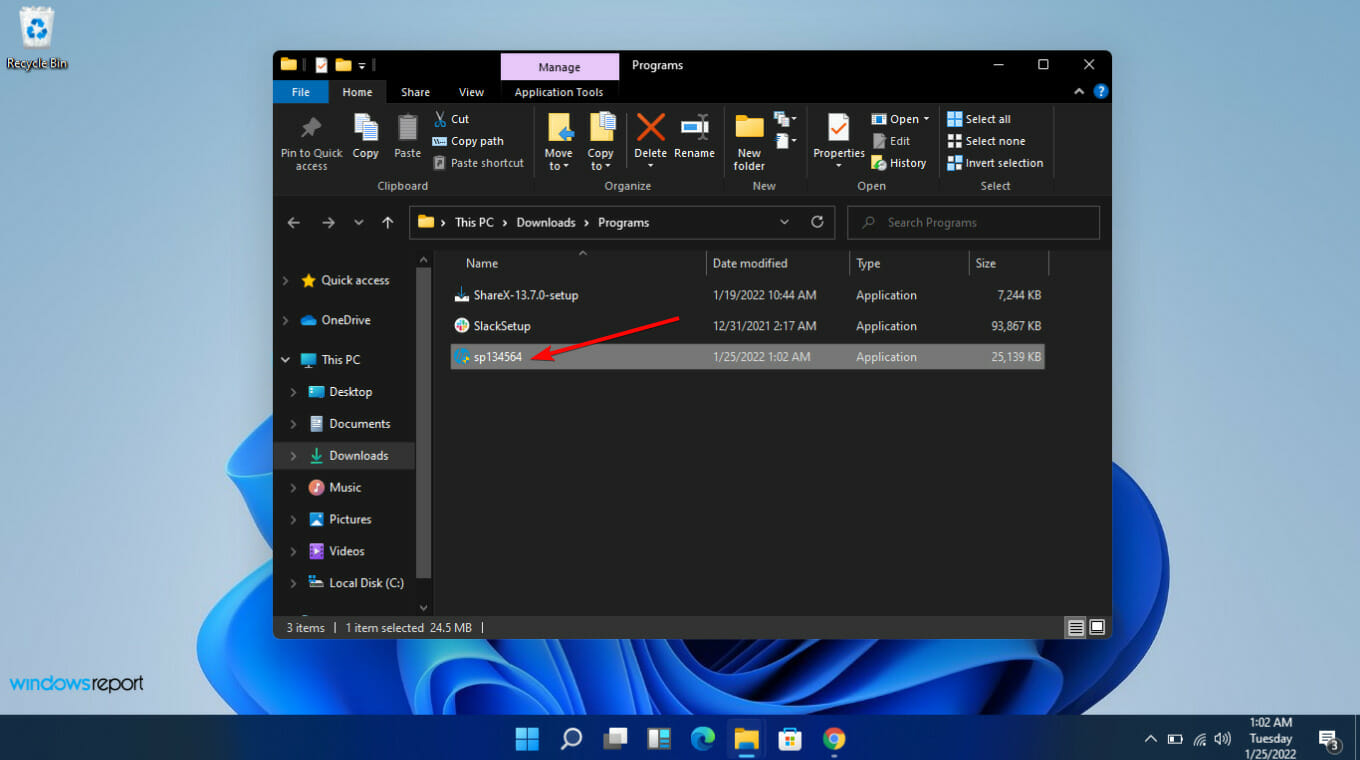
  8. Install the .exe file, following the on-screen instructions.
  9. Restart your PC.

6. Perform a System Restore

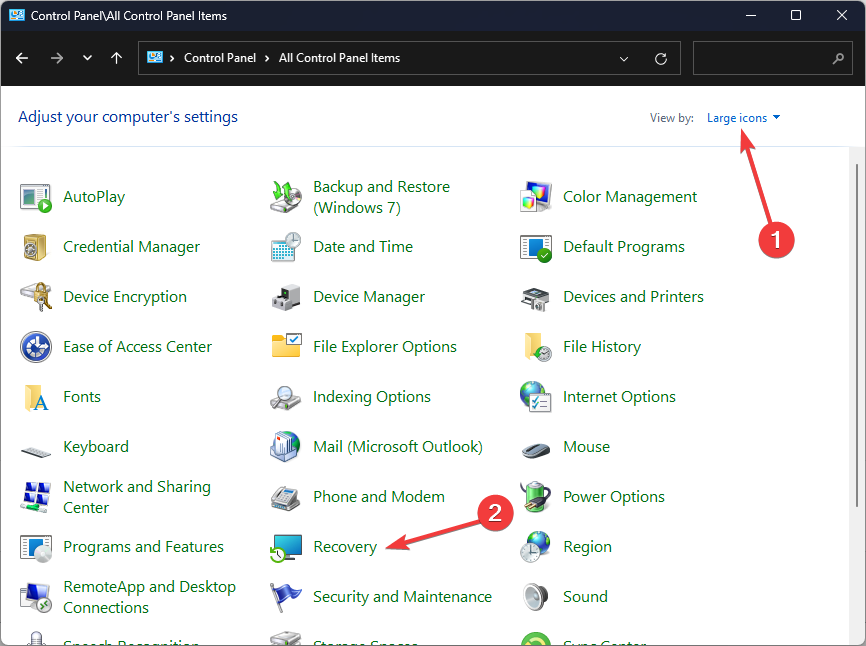
  1. Press the Windows key, type Control Panel, and click Open.control-panel-search fallout new vegas runtime error
  2. Select Large icons as View by and click Recovery.Recovery Control Panel Advrcntr6.dll
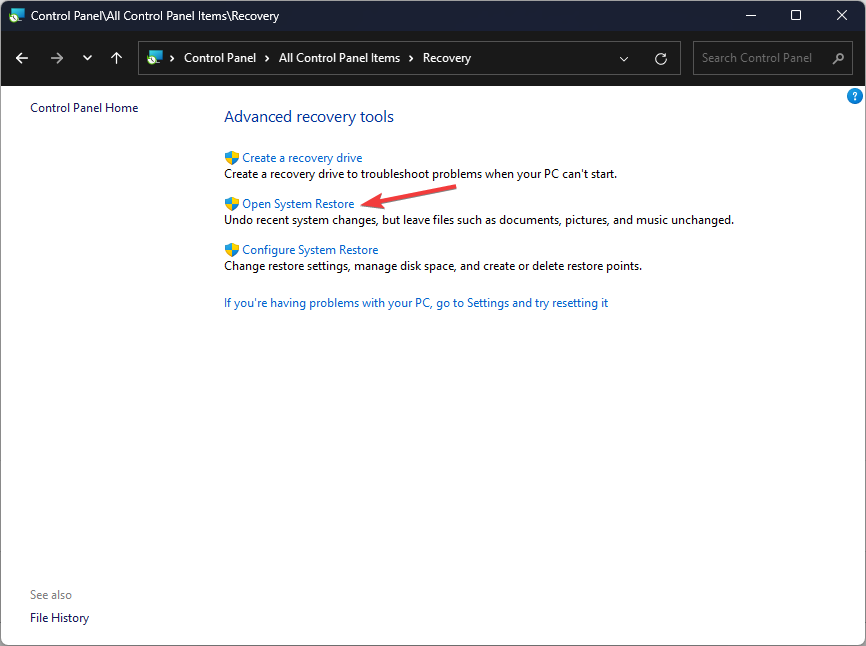
  3. Click Open System Restore.Open system restore
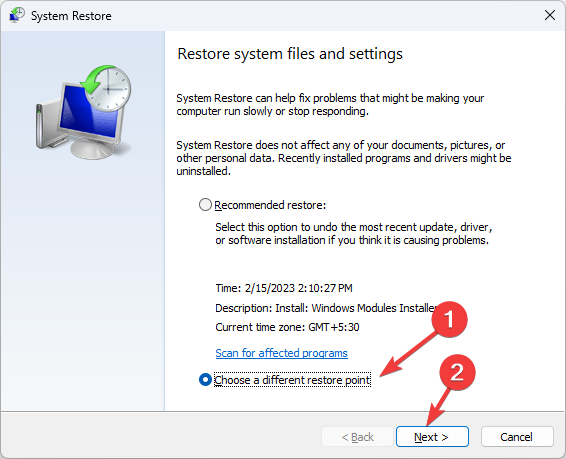
  4. Select Choose a different restore point and click Next.Next Choose a different restore point
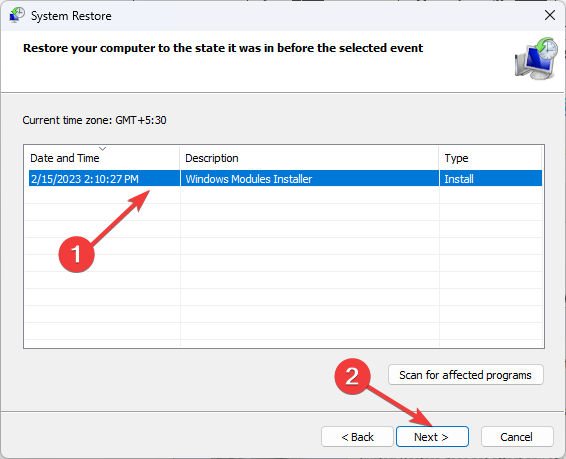
  5. Now select the restore point and click Next. Choose a point
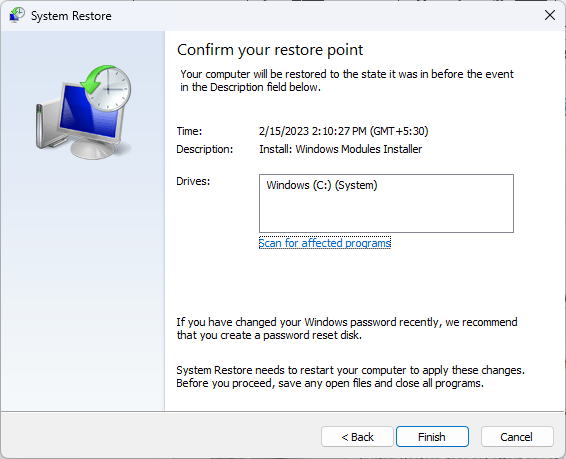
  6. Click Finish to restore the previous settings, and Windows will restart.Finish Restore point

If you’re finding a variation of these errors popping up, establish if any sort of pattern is occurring. For example, do the errors occur after logging in? Are you seeing the error when you open a program?

If so, you may want to look at changing your login settings or try reinstalling the associated program or updating it. It could also be your Credential Manager that is not working, and if so, you need to get to the root of the problem.

Hopefully, these fixes for the CredentialUIBroker.exe error will help you avoid the frustration of dealing with this error in the future. Also, check out how to address other like issues, such as the mmc.exe error.

Let us know if you find other solutions that work or think something needs adjustment in the comment section.

Where is the Control Panel in Windows 11?

Wondering where the Control Panel has gone in the shiny new world of Windows 11? While the Settings app takes center stage in the latest Windows edition, the classic Control Panel hasn’t been retired. For example, some of our seasoned software testers from the Windows Report lab prefer using it over the Setting app.

That’s why our experts have tinkered with the Control Panel on Windows 11, testing it in tens of different scenarios, trying to guide you through the various methods to locate and open the Control Panel, and discuss why you might want to use it instead of, or along with, the Settings app.

The Unchanged Legend: Control Panel in Windows 11

Contrary to popular belief, the Control Panel still exists in Windows 11. Microsoft has focused on streamlining the user experience via the Settings app, but for those who still want to utilize the Control Panel, it’s accessible.

Unlike some of its other older staple programs & apps, Microsoft decided to keep the Control Panel in Windows 11, and who knows, maybe it will still be here in Windows 12 as well. Note that it was part of Microsoft Windows since Windows 1.0, gathering new applets with each newer version.

Multiple Paths to Control Panel in Windows 11

You’re not limited to just one way to open the Control Panel in Windows 11. Here are some methods:

  • Search Bar: Type Control Panel in the search bar next to the Start menu and hit Enter.
  • Run Dialog: Press Win+R to open the Run dialog, type Control Panel, and hit Enter.
  • Windows Terminal: Open Windows Terminal and type start control, then hit Enter.
  • File Explorer: Navigate to C:\Windows\System32\, find the control.exe (you can search for control in the top right) file, and double-click it.

When the Control Panel is Playing Hide and Seek

Some users have reported difficulties in finding the Control Panel. If you’re experiencing this, it’s likely due to user restrictions or specific software configurations that hide or disable access to the Control Panel. Consult with your IT department or administrator if you encounter this issue.

Also, check the software configuration; some third-party software might affect your system settings. If you’ve installed a recent app that’s making some of your usual settings or apps act up, that might be the reason behind not finding the Control Panel. If so, uninstall the app, and things should return to normal.

Why is the Control Panel Not Opening: Possible Roadblocks

If you’re unable to open the Control Panel, consider these potential issues:

  • Administrative Restrictions: Your account may lack the necessary permissions.
  • Corrupt System Files: A system scan to repair corrupt files may be needed.
  • Malware Infection: Perform a comprehensive malware scan if other options don’t resolve the issue.

There might be other specific issues that prevent you from opening the Control Panel; that’s why we’ve made this easy-to-follow guide to help you get to it in just a couple of steps.

Control Panel vs. Settings App: A Tug of War

Why use the Control Panel over the Settings app, or vice versa? Here’s a quick breakdown:

  • Control Panel: Offers a more detailed array of options, essential for IT professionals and power users.
  • Settings App: Designed with a user-friendly interface, offering a more straightforward, intuitive user experience.

There are a lot of Windows users on both sides, but there’s no wrong choice here. If you want to learn more about the differences, similarities, and use scenarios, check out our in-depth comparison of Control Panel vs. Settings app.

In Summary

Yes, the Control Panel is alive and well in Windows 11, with multiple avenues to access it. Whether you’re a fan of the classic utility or prefer the modern Settings app (as some of our writers do), Windows 11 gives you the flexibility to choose.

Armed with this guide, you can now easily navigate to the Control Panel and make informed decisions about its usage. Don’t forget to tell us why you prefer using the Settings app or Control Panel in the comments section below.

Microsoft Authenticator App: Download & Install

Two-factor authentication will protect your accounts from unauthorized access and enhance your security, and that’s what Microsoft Authenticator app is all about.

The tool enhanced security since all login attempts require a unique code generated by the app on your phone. It also offers offline support to generate codes even when offline and additional protection against phishing attacks.

How do I download & install the Microsoft Authenticator app?

1. Where to download the app?

The app is available for both Android and iOS platforms, and you can download it from the following locations:

1. Install Microsoft Authenticator on Android

  1. Open the Microsoft Authenticator download link.
  2. Tap on Install.
  3. Wait while the app is being downloaded and installed.

2. Install Microsoft Authenticator on iOS devices

  1. Locate Microsoft Authenticator on the App Store.
  2. Tap Get and then Install.
  3. Wait while the app is installed in the background.

3. Step-by-step guide to set up login with Microsoft Authenticator app

  1. Open the service that you want to use with Microsoft Authenticator. Go to its security settings and look for the authenticator option. You should now see a QR code on your screen.
  2. Start the app on your mobile device, tap on Accept, and then Continue.
  3. Tap on Sign in with Microsoft if you want to sync your data online and enter your username and password.
  4. Next, tap on Add account.
  5. Choose what type of account you want to add.
  6. Scan the QR code and approve the login request.

Features of the Microsoft Authenticator app

  • Generation of one-time passwords and two-factor authentication.
  • Cloud support that allows you to easily transfer saved data and configuration.
  • Support for verified IDs.
  • Can work as a password manager and store your passwords and payment details.

If you’re not using two-factor authentication, you should download the Microsoft Authenticator app and protect all your important online accounts. Do keep in mind that a few users reported issues with the wrong code in Microsoft Authenticator, but that can be easily resolved.

To secure your PC and online accounts even further, be sure to read about Windows 11 multi-factor authentication. Sadly, Microsoft Authenticator for Windows 11 or 10 isn’t available, and you can’t download it for Mac either.

You can check this guide to Google Authenticator for Windows to see a reliable alternative that works on desktop through compatible TOTP apps.

A few users reported issues with wrong codes in Microsoft Authenticator. If the app stops working entirely, check this guide on how to fix Microsoft Authenticator app not working.

Have you ever used Microsoft Authenticator? Share your experiences with us in the comments section!

Can Windows 11 Run Fortnite & is it Good For Gaming

Many are wondering can Windows 11 run Fortnite, and while the answer is yes, there are a few things that you should know.

Can I run Fortnite on Windows 11?

Windows 11 and Fortnite: A Match Made in Gamer’s Heaven

Absolutely, Windows 11 can run Fortnite. Epic Games ensures its flagship game, Fortnite, remains compatible with the latest operating systems, including Windows 11.

Even more, the game isn’t as power-hungry as you might think, and most newer systems can run it comfortably. Our gaming testing team also found that older systems can run it almost as well, thanks to Windows 11’s optimizations and gaming features. So, rest easy and prepare for those Victory Royales!

Windows 11 vs. Windows 10: Which Offers the Better Fortnite Experience?

The foundational architecture between Windows 10 and 11 remains similar, so Fortnite’s performance is broadly consistent. However, with Windows 11’s enhanced gaming-centric features, such as Auto HDR and DirectStorage, some players may notice quicker load times and crisper visuals, granting a slight edge to the newer OS.

Windows 11: Leveling Up the Gaming Landscape

Gaming on Windows 11 is a treat. Microsoft has made concerted efforts to optimize the gaming experience, integrating features like DirectX 12 Ultimate, better virtualization for developers, and an improved Xbox Game Bar. All these features aim to make gameplay smoother and more immersive, placing Windows 11 as a worthy contender in the gaming realm.

Besides that, there’s a plethora of settings that you can alter to improve and cater the experience to your own liking. And if you ever bump into any issues, our dedicated gaming guides on errors should help you pass them quickly.

Optimized for Victory: System Requirements for Fortnite on Windows 11

For a seamless Fortnite experience on Windows 11, your system should ideally meet the following requirements:

  • Processor: Core i5 2.8 GHz
  • Memory: 8 GB RAM
  • Graphics: Nvidia GTX 660 or AMD Radeon HD 7870 equivalent DX11 GPU
  • DirectX: Version 11
  • Storage: 20 GB available space

Common Fortnite Hurdles on Windows 11 and Their Fixes

While Fortnite typically runs smoothly on Windows 11, a few issues might pop up:

Landing on Windows 11: Downloading and Installing Fortnite

Jumping into the Fortnite action on Windows 11 is straightforward:

  1. Visit Epic Games: Navigate to the Epic Games official website.
  2. Get the Launcher: Click on the Download button at the top-right.
  3. Install the Launcher: Run the downloaded installer and follow the prompts.
  4. Open and Search: Launch the Epic Games Launcher and search for Fortnite.
  5. Download and Play: Click Install under Fortnite, and once downloaded, hit Launch.

You can also download the Epic Games launcher from the Microsoft Store in just a couple of steps.

Fortnite players can rest assured; Windows 11 is primed and ready to support your Battle Royale ambitions. With an array of gaming-centric features and an easy installation process, Windows 11 ensures you’re geared up for the game. Now, all that’s left is to strategize, team up, and aim for that Victory Royale!

Fix: A Router/Access Point Channel Conflict Has Been Detected

You probably installed your wireless router and joined a local network just fine. But now you are getting an odd error message that an access point conflict has been detected.

Wireless network conflicts happen way more often than you think, but fortunately, they are generally easy to remedy.

What is a Router/Access Point Channel Conflict?

A router or access point sends and receives data packets using radio frequencies. The two most common frequencies for networking are 2.4 GHz and 5 GHz bands. Because these frequencies overlap, two devices on the same network can simultaneously use the same frequency channel.

When this happens, it can cause interference with the signal and make it hard for devices like your printer to stay connected and reduce the overall performance of your network connection.

How do I fix a router/access point channel conflict?

Attempt the following basic fixes before you move to the technical steps:

  • Look for signs of interference from other devices and move these devices away from your router until you get better reception or switch to an Ethernet cable.
  • If you have multiple Wi-Fi networks within range of each other, try changing the name of your network to something unique.
  • Update your router’s firmware to the latest version available for your model number.
  • Power cycle your router by turning it off, waiting 30 seconds, then turning it back on.

1. Change your router’s channel

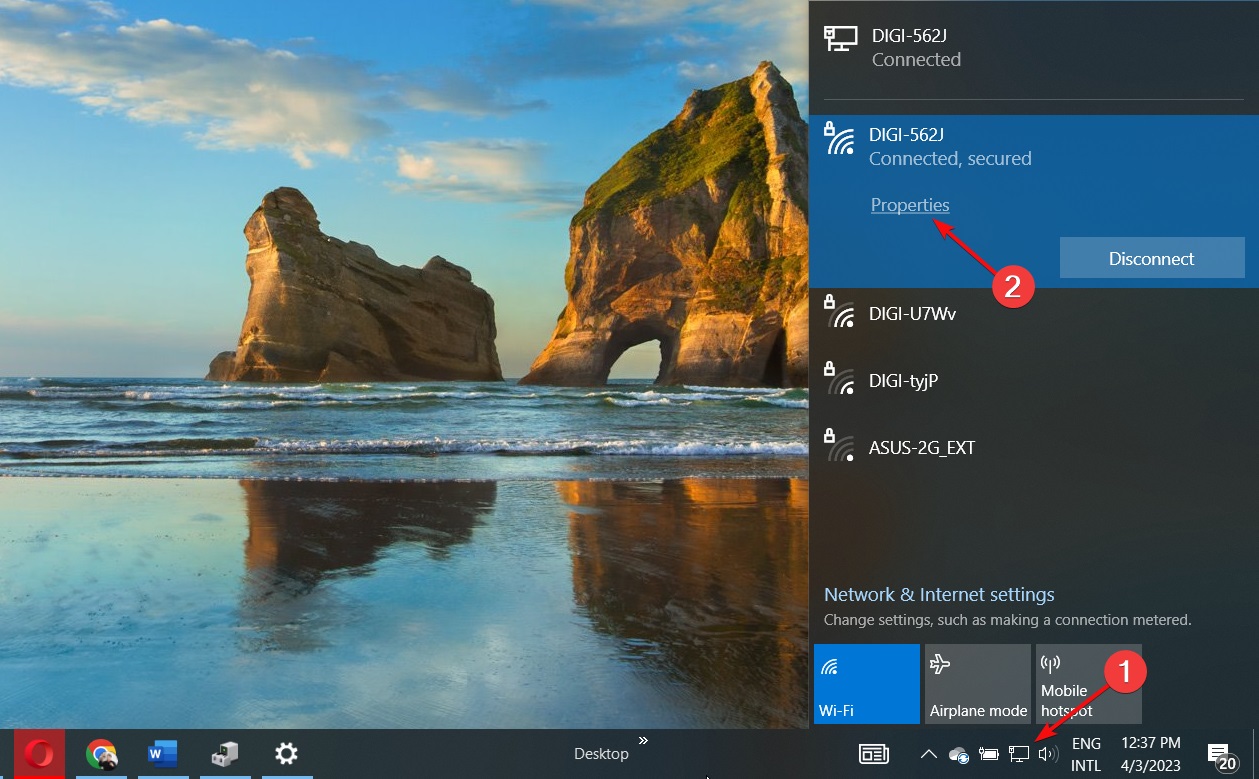
  1. Click on the Network icon on your taskbar, select your Wi-Fi connection, and click on Properties.
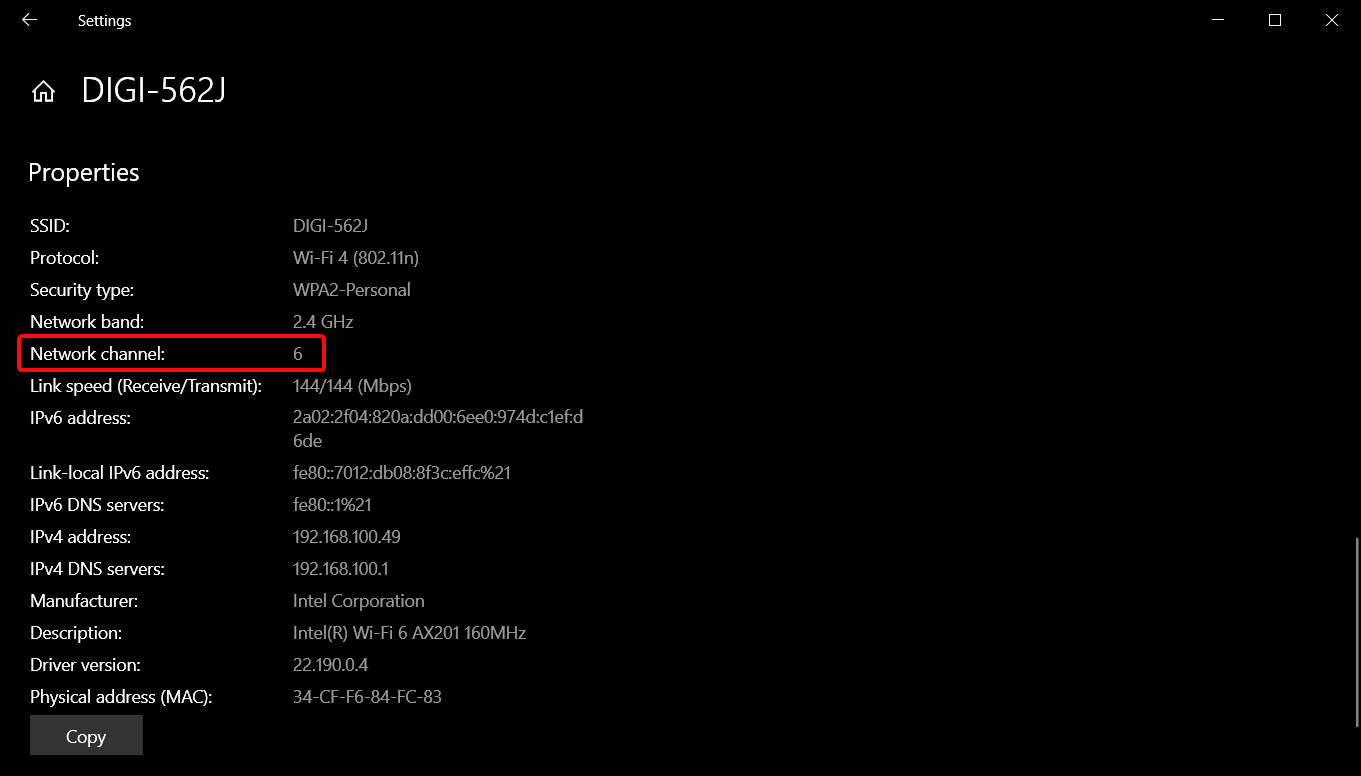
  2. Now, scroll down and you should see the Network channel for your Wi-Fi connection.
  3. Navigate to your browser and log into your router with the correct credentials. You can find that info on the router itself or on the manual of the router.
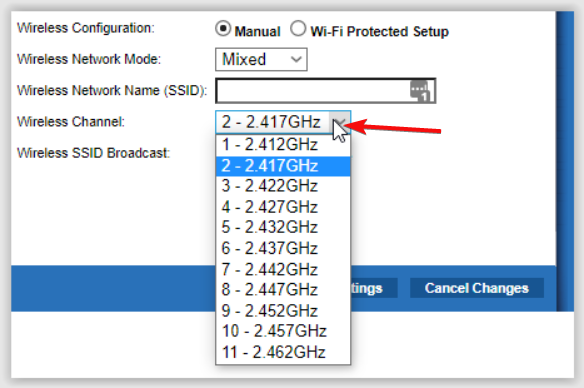
  4. Go to the Wireless settings of your router and change the router channel to a different one from the default. If you’re using a dual-bound router, make this setting for both bands (2.4GHz and 5GHz).

Alternatively, you can let an automatic tool do this work for you. Setting your Wi-Fi channel manually doesn’t guarantee you’re switching to the best option and can sometimes cause more problems, like your PC not connecting to your printer anymore.

However, a Wi-Fi channel scanner can analyze your wireless network, detect the most efficient channel, and connect your router to avoid overloading and overlapping.

2. Enable auto channel selection

  1. Hit the Windows key, type Control Panel in the search bar, and click Open.control-panel-search fallout new vegas runtime error
  2. Click on Network and Internet.
  3. Select Network Sharing Center, then click on Change adapter settings.
  4. Locate the Network adapter you’d like to change network priority, right-click on it, and select Properties.
  5. Click the Configure button.
  6. Go to the Advanced tab.
  7. Locate 802.11n Channel Width for band 2.4 and set it to Auto.
  8. Click OK to save changes.

3. Change your network band

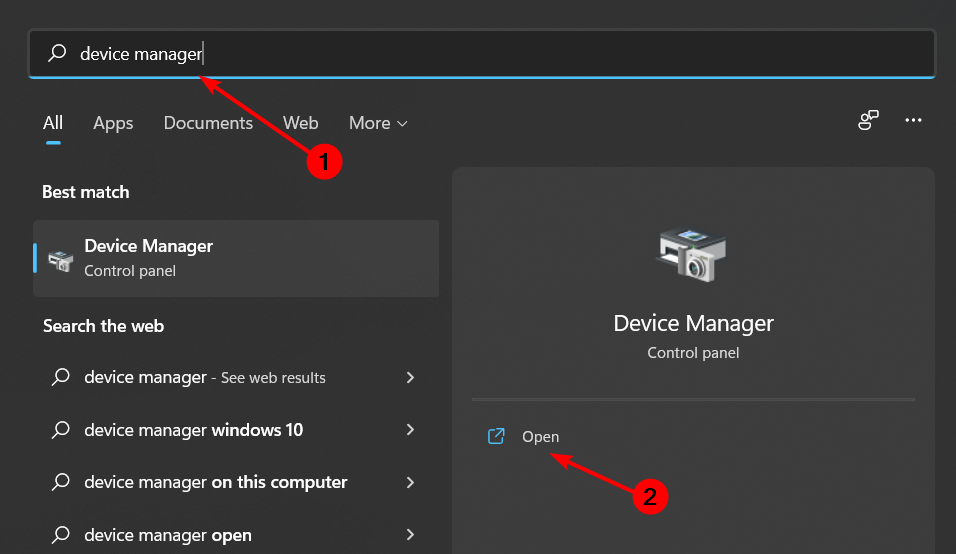
  1. Click on the Start Menu icon, type Device Manager in the search bar, and click Open.
  2. Navigate to Network adapters and double-click to expand.
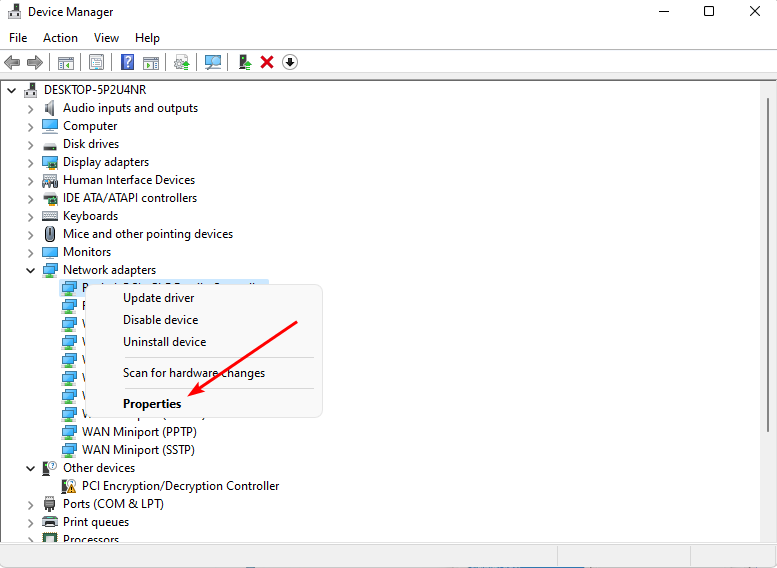
  3. Right-click on your network adapter and select Properties.
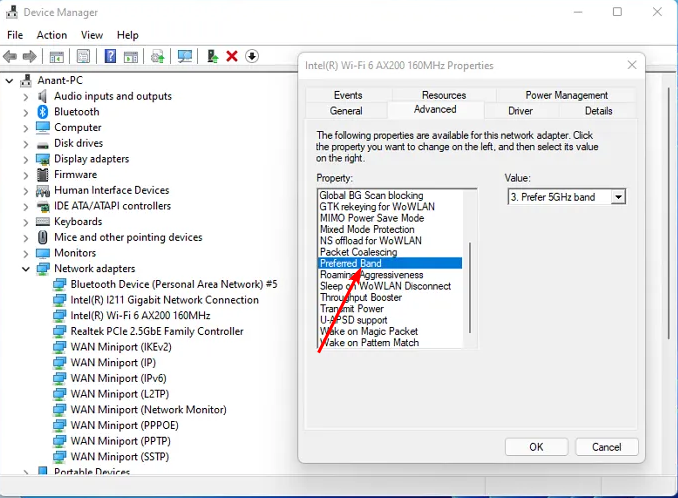
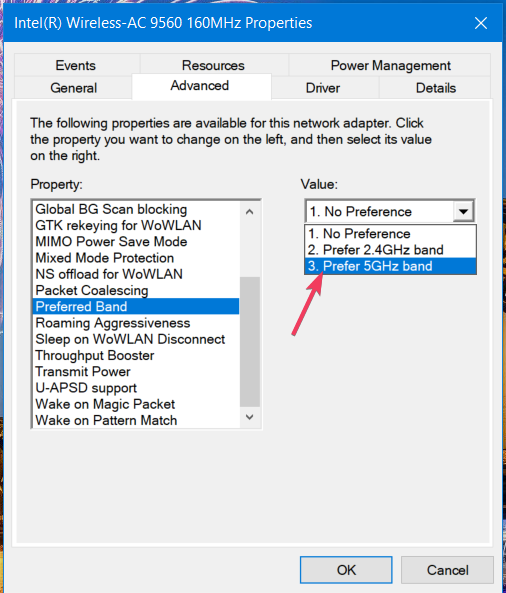
  4. Click on the Advanced tab and locate the Preferred Band.
  5. In the Value drop-down menu, select Prefer 2.4GHz band then hit Enter.
  6. Restart your PC.

4. Update your Network driver

  1. Hit the Windows key, type Device Manager in the search bar, and click Open.device manager w11
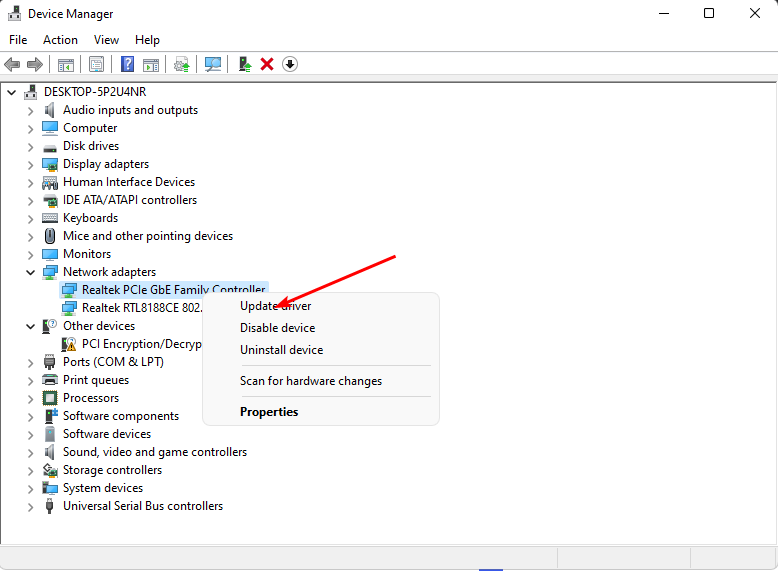
  2. Navigate to your Network adapter, right-click on it, and select Update driver.
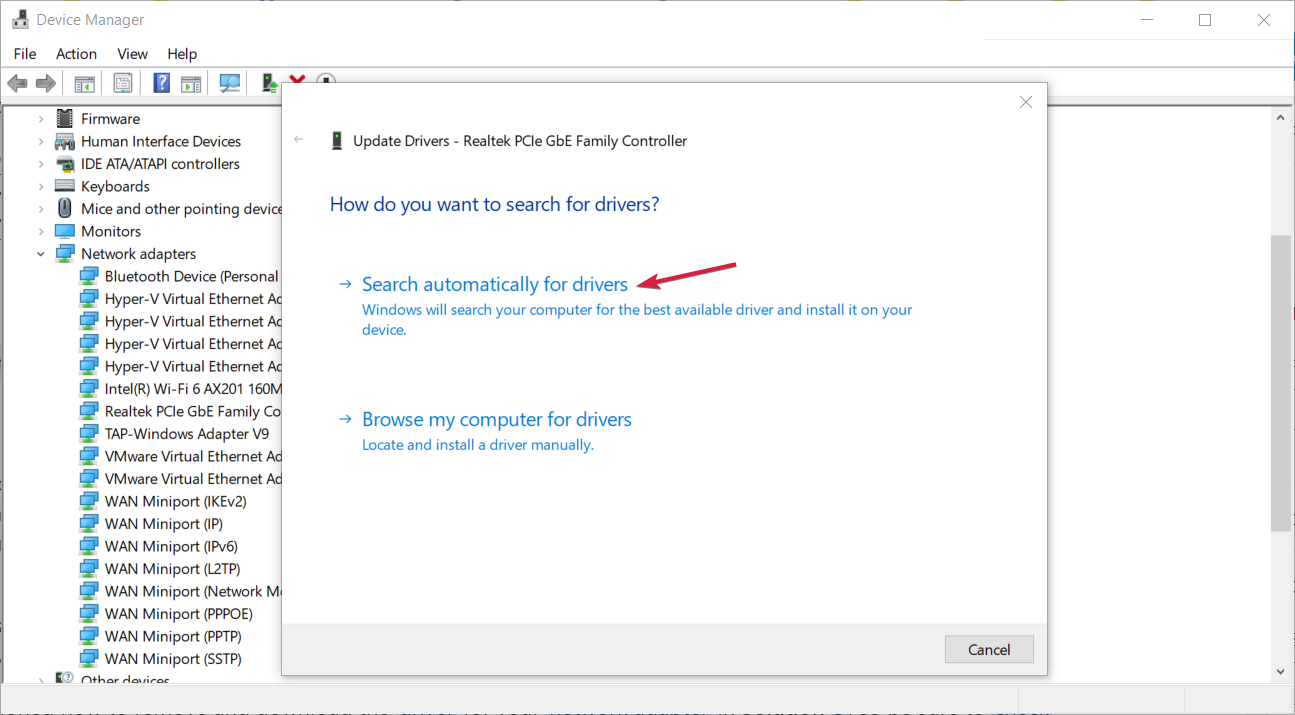
  3. Select Search automatically for updated drivers.

Updating your network drivers will fix many issues, including problems with your access points, and is a prerequisite to connecting an access point to a wireless router without cable.

5. Reset your network

  1. Hit the Windows key and click on Settings.settings windows 11
  2. Navigate to Network & internet.
  3. Select Advanced network settings.going advanced network settings win11
  4. Click on Network reset.Network Reset 1
  5. Next, hit the Reset now button.Network Reset now

Still, wireless adapters vary widely in how they handle channel conflicts. You may have adjusted your router settings, but you get another access channel point is full error, or a printer won’t recognize your router. If so, you should consider getting a dual-band or tri-band router.

Other times, you may have set up your access point to have a similar SSID to your router, which brings about the conflict.

We hope this article has been illuminating and you’ve figured out your network connection issues. Ultimately, the best thing you can do to avoid problems with your routers is to prevent them from happening in the first place.

Regular power cycling your router, updating its firmware, and minimizing interference is a good start.

We’d love to hear your feedback, and if this guide was helpful, please let us know as well.

Fix: Payroll Service Connection Error on QuickBooks

The QuickBooks Payroll Service Connection Error usually appears when sending the payroll data or using the direct deposit service. This article will tackle the QuickBooks online payroll issues to help you fix the problem.

What are the causes of the Payroll Service Connection error?

  • Incorrect Security Certificates
  • Invalid Firewall Settings
  • Temporary Internet Files
  • Incorrect Internet Connection Settings
  • Corrupted Tax Table

How do I fix the Payroll Service Server Error on QuickBooks?

Before going into more complex solutions, try the following workaround methods first:

  • Check if you have a stable internet connection to avoid the payroll server error.
  • Restart the app and the computer.
  • Check if the Firewall is blocking the app or the browser if you’re using the online version. You may also disable the third-party antivirus software temporarily if you are using one. 
  • Visit the QuickBooks status page to see if the services are working fine.

1. Verify the Security Certificate information (for QuickBooks Desktop)

  1. Locate the QuickBooks app executable file using File Explorer (Win + E). By default, the software is installed in the following possible locations:
    • C:\Program Files (x86)\Intuit\QuickBooks 20XX
      C:\Program Files (x86)\Intuit\QuickBooks Enterprise Solutions XX.0
  2. Right-click the .exe file and select Properties.
  3. Now, go to the Digital Signatures tab, select one of the signatures, and click on Details.
  4. On the Digital Signature Details window, select View Certificate.
  5. Under General tab, on the Certificate window, select Install Certificate.
  6. Now, if the certificate is fine, move to the next solution. If you see a message saying that the certificate is not trusted or was revoked, you have the option to Import certificate.
  7. Set the Store Location as Current User and click Next, then follow the on-screen instructions to install the new certificate.

The QuickBooks Payroll Service Connection error may be caused by invalid security certificates but this solution will fix the problem quickly.

 2. Update the QuickBooks app (for QuickBooks Dektop)

  1. Launch QuickBooks, click on the Help tab and select Update QuickBooks Desktop.
  2. Select Update Now and click on Get Updates.

3. Clear the Temporary Internet Files (for QuickBooks online)

  1. Open Google Chrome, click the Menu button, and select Settings.
  2. Go to Privacy and security and click on Clear browsing data.
  3. Now, select the time range, check all boxes, and click on Clear data.

We have shown you how to clear the cache and cookies from Chrome because it’s one of the most popular, but the procedure is very similar on other browsers. 

If you are still using Internet Explorer, open Control Panel > Internet Options and delete the Temporary Internet Files from there to get rid of the error message. 

We also have a guide on how to fix the Something went wrong error in QuickBooks online version.

4. Re-download the Tax Table file

  1. Go to Employees, then select Get Payroll Updates.
  2. Check the tax table version and payroll version, check the Download Entire Update box, and then click the Download Latest Update button.

5. Flush the DNS on your system

  1. Click the Start button, type cmd, and click on Run as administrator to start Command Prompt with full privileges.
  2. Type or paste the following command and press Enter to reset your internet settings: ipconfig /flushdns

Try to use the Payroll Service and see if you still get connection errors or if QuickBooks Payroll is not sending. Our guide on fixing QuickBooks Tools Hub connection error will offer more information about this problem.

This issue might appear while you’re using the Multi-User Mode. Try switching to Single-User Mode and see if the problem persists.

Hopefully, our solutions helped you fix the QuickBooks Payroll Service Connection error code and now you can resume the payroll operations. The solutions above work for Windows 10 and Windows 11 as well.

You might also be interested in reading our guide on what to do if QuickBooks keeps crashing.

For any questions you might have, scroll down to the comments section and leave us a note.

Fix: There Was a Problem Processing Game Logic Error on Apex

Apex Legends, though a popular title amongst gaming enthusiasts, continues to be plagued with issues. Recently, users again came across the There was a problem processing gaming logic error in Apex Legends on the PC.

It appears when launching Apex Legends or logging in, and the loading screen leads to the error message. Remember, the developers have acknowledged the issue, and a patch should be out soon!

What is Game Logic Error?

The game logic error appears when the servers can’t verify your account. It could be the game files to blame or an issue with the server itself. And remember, the Processing game logic Apex error is encountered across platforms, be it PC, PS4 or Xbox.

Types of game logic errors:

  • Navigation issues
  • Fading issues
  • Necrotic damage issues
  • Radiant damage issues

How can I fix the game logic error on Apex Legends?

Before we start with the slightly complex changes, try these quick solutions first:

  • For Apex game logic error on PC, terminate the program and relaunch it. You may have to do it a couple of times.
  • Sign out and then log in to the game. Some users suggested logging into a different account and then getting back to your account as a workaround.
  • For Apex Legends Problem processing game logic error on PS4 or Xbox, restart the console.
  • Check for any available updates for Apex Legends and install them.
  • Leave your club, if you are a part of one, and check for improvements.

If none work, head to the fixes listed next.

1. Change the data center

Tip icon Tip
The steps to change the data center vary on PCs and consoles. But the interface remains the same. On PC, you need to click on the entries, while for PS4 and Xbox, you will need to press the dedicated buttons on the controller.
  1. Launch Apex Legends, and when you find the Continue button, select Data Centers near the bottom-left corner.
  2. Now, select another data center from the list, one with a relatively similar ping and minimal packet loss.change data center to fix apex game logic error
  3. Finally, save the changes and then check whether the multiplayer game launches without throwing an error.

2. Clear the game file

  • On PC: Go to the Program Files folder in the C: drive > select Origin or Steam, depending on the platform used to download the game> locate Apex Legends > delete the game data and cache (not the game files).
  • On PS: Open System Settings > select Application Saved Data Management > choose Saved Data in System Storage > select Delete > choose Apex Legends > select the 3.5 MB game file > delete it.
  • On Xbox: Hit the Xbox button on the controller > go to My Games & Apps > select Apex Legends > press the Menu button > select Manage games & add-ons > choose Saved data > select the data for your gamer tag > delete it from the console (not the cloud).

3. Repair the game files

  1. Launch Origin on the PC, and select My Game Library from the navigation pane.my games library
  2. Right-click on Apex Legends, and then select Repair from the context menu.repair to fix apex game logic error
  3. Wait for the repair to complete, then restart the computer and launch Apex Legends.

Often, missing game files can trigger the Apex processing game logic error in Windows. Repair the game file, and you should be good to go! It also helps when Apex Legends won’t launch, or you get the Game Security Violation Detected error.

4. Reinstall the game

  1. Press Windows + R to open Run, type appwiz.cpl in the text field, and hit Enter.appwiz.cpl
  2. Locate Apex Legends from the list of programs, and then click Uninstall.uninstall
  3. Follow the on-screen instructions to complete the uninstall process.
  4. Once done, restart the computer and then reinstall the game.

If it’s an issue with the initial installation, the only solution is to uninstall the game and then download it from an official source. Remember, you may have to reinstall Origin as well.

We recommend using a third-party uninstaller tool to get rid of any leftover files and Registry entries that might trigger conflicts. It will also help when Apex Legends has high CPU usage.

5. Contact support

When nothing else works, it’s likely an issue at the server’s end. So, contact support, and they should be able to provide you with a timeline as to when the game will be up and running. 

One of the solutions should have helped fix the Apex Legends Problem processing game logic error. If not, try switching to another platform since the error is most commonly faced by PlayStation users.

Besides this, a few users reported high lag or spikes in Apex Legends, which can be fixed by updating the drivers and changing the location.

For any queries or to share what worked for you, drop a comment below.

Can Windows 11 Run Steam? We’ve Tested it

Steam works like a charm (mostly) on Windows 10, but how does it work on Windows 11? Over time, we’ve used our WindowsReport software lab to test various software, including Steam. Our gaming experts reviewed its compatibility with Windows 10, Windows 7, and other OSs and checked for differences, install requirements, and features.

We did the same for Windows 11, focusing on reliability and stability. Let’s dive right into the compatibility of Steam on Windows 11, the broader gaming landscape, and any pitfalls you might encounter.

Steam on Windows 11: A Seamless Experience?

By and large, yes! Steam operates on Windows 11 just as smoothly as on Windows 10. Microsoft has ensured that popular applications and platforms like Steam remain compatible with their newest OS. Gamers using Windows 11 can continue to access, download, and play their favorite games from the Steam library without any significant issues.

Why Might Steam Not Run on Windows 11?

While Windows 11 is designed to support Steam, there can be isolated issues, primarily:

Windows 11: The New Gaming Champ?

Microsoft has amplified its focus on gaming in Windows 11. Features like Auto HDR and DirectStorage promise faster load times and better graphics, enhancing the gaming experience.

However, it’s essential to note that while Windows 11 brings many gaming benefits, its stringent hardware requirements may be a barrier for older machines. Don’t worry, tho, because we’ve written a guide on how to play old games on Windows 11 seamlessly.

Games That Don’t Play Well with Windows 11

While most games run smoothly, some older titles might face compatibility issues. It’s advisable to check specific game forums or Steam community pages if you encounter problems with a particular game. Also, remember that Windows 11 does offer compatibility modes to help older games run better.

Our gaming residents tested over 500 games in different environments with no real compatibility issues, especially for triple-A titles. While some older titles didn’t work from the get-go, running them in compatibility mode immediately solved that. If you bump into any other problems with Steam on Windows 10 or 11, you can check out our detailed guide on how to fix the most common ones.

How to Get Steam Rolling on Windows 11

Getting Steam up and running on Windows 11 is a straightforward process:

  1. Visit the Official Site: Go to the Steam official website.
  2. Download the Installer: Click the Install Steam button in the top-right corner.
  3. Run the Installer: Once downloaded, double-click the installer and follow the on-screen instructions.
  4. Launch and Login: Open Steam, log in to your account, and you’re set!

Wrapping It Up

For those eager to jump into the gaming world, Windows 11 has your back. Not only does it support the vast realm of Steam, but it also introduces enhanced features that promise to elevate your gaming experience. Whether you’re a casual player or a gaming aficionado, Windows 11 is set to be a worthy playground. Happy gaming!

Fix: XP-Pen is Detected as a Keyboard on Windows 11

The XP Pen graphics tablet is a top-of-the-line product offering an easy-to-use interface. While it has maintained a steady user base over the years, a few found their XP Pen detected as a keyboard, and they couldn’t use it as a graphics drawing tablet.

The problem is faced across models of the Artist series, be it XP Pen Artist 10, XP Pen Artist 12, or XP Pen Artist 22E Pro, amongst others. The drawing tablet was recognized as a keyboard when plugged in the first time. And reconnecting it didn’t help in most cases!

Why is my XP-Pen recognized as a keyboard in Windows 11?

  • The dedicated power button is not turned on
  • An incompatible cable is used
  • The tablet drivers are missing
  • The system has corrupt or outdated drivers

What can I do if my XP-Pen is detected as a keyboard on Windows 11?

Before we head to the slightly complex changes, try these quick solutions first:

  • Turn on the dedicated power button on the tablet. Many who had previously used a non-display drawing tablet don’t know about the power button that extends the display and makes the XP Pen a second monitor.
  • Ensure you are using the USB cable that came with the tablet. Plug it into different ports and remove any extenders or hubs.

If none work, move to the fixes listed next.

1. Install the device drivers

  1. Go to XP-Pen’s support page, and select your model from the list.tablet 
  2. Locate Software and Drivers on the right, then click the Download button next to the most recent driver for Windows.driver to fix xp pen detected as keyboard
  3. Right-click the downloaded file and select Extract All from the context menu.extract all
  4. Choose the location of the extracted files and then click the Extract button.extract
  5. Similarly, extract any other sub-folders you come across and then run the setup.setup
  6. Click Yes in the UAC prompt.
  7. Follow the on-screen instructions to complete the driver installation.install to fix xp pen detected as keyboard
  8. Restart the computer, then plug in the XP-Pen drawing tablet, and it shouldn’t be recognized as a keyboard anymore.

If this doesn’t work, check out other ways to update the XP Pen drivers from our expert article. Installing the latest drivers helps when XP-PEN pressure is not working in Photoshop.

2. Update the PC drivers

When the XP Pen is detected as a keyboard, you must also update the hardware drivers, especially the ones for the processor and USB ports.

If your manufacturer offers an auto-update utility, download it and let it check for missing, outdated, or corrupt drivers. Even when Wacom pen pressure is not working, a driver update helps.

Besides, you could use a third-party driver updating tool to automatically identify any problematic drivers on the PC and download an updated copy of each. The tools helped many who found the Surface Pen not working.

As a suggestion, we guarantee a driver update solution optimized for PCs that will detect all outdated drivers. Namely, Outbyte Driver Updater is the most efficient tool for driver issues.

3. Perform a system restore

  1. Press Windows + S to open Search, type Create a restore point in the search bar, and click the relevant result.
  2. Click the System Restore button.system restore to fix xp pen detected as keyboard
  3. Select Choose a different restore point, and click Next to proceed.
  4. Pick the oldest restore point from the list, and click Next.restore point
  5. Verify the restore details and click Finish.restore

If the XP Pen graphics tablet worked fine previously and is detected as a tablet the first time, the recent changes could be blamed. Revert the system configuration using a restore point, and things will be up and running!

It works for all recent issues, including when Hunion pen pressure is not working.

4. Contact the manufacturer

If none of the solutions work, it could be a problem with the device or the installed firmware version. In this case, it’s best that you contact XP Pen support. 

For device-specific problems, they can provide a relevant fix or a timeline for when things will be up and running.

The XP Pen tablet is a great accessory, and its issues are easy to fix. Before working with the XP Pen display tablet, please read the manual to understand it and avoid encountering problems. And if XP-PEN is not working, uninstalling a Windows update may work.

Lastly, users reported issues where the tablet menu didn’t appear, usually when the devices were disconnected. In some instances, your XP-PEN tablet is not detected, due to issues with cables or drivers, but that can be easily fixed.

Sadly, even if your device is detected, sometimes XP-PEN calibration is not working, but we have a guide that addresses that issue.

For any queries or to share more fixes with us, comment below.

How to Find Restored Files From Recycle Bin on Windows 11

Accidentally deleting a file happens to the best of us, but we can always recover it. If you are wondering how to find the restored files on your Windows 11 Recycle Bin, this guide can help!

Where do I find restored items from Windows 11’s Recycle Bin?

When you restore files from Recycle Bin, they typically end up in their original location or folder they were before being deleted.

If you are uncertain about the location, make sure you check the Original Location column in the Recycle Bin window before proceeding to recover the files.

How do I find restored files from the Windows 11 Recycle Bin if they’re missing?

Before proceeding with any steps to find the recovered files, go through the following preliminary checks:

  • Ensure you have logged in using a user account with administrator access.
  • Verify if the Recycle Bin is corrupted.
  • Press Windows + E to open File Explorer, and type the file name in the Search bar to find it.
  • If you know the original location, manually navigate to it and look for the file.

1. Check the hidden files

  1. Press the Windows key, type control panel, and click Open.Control Panel start menu -Find Restored Files From Recycle Bin on Windows 11
  2. Select Small icons for View by and click File Explorer options.Small icons for View by and click File Explorer options.
  3. Go to the View tab, under Advanced settings, locate Hidden files and folders, and select Show hidden files, folders, and drives.View tab, under Advanced settings, locate Hidden files and folders,
  4. Click Apply, then OK to confirm the change.

2. Restore files from previous versions

  1. Press Windows + E to open File Explorer.
  2. Go to the folder where the deleted file was stored, right-click it, and select Properties from the context menu.Properties
  3. Switch to the Previous Versions tab, under Folder versions, look for the one that had the file you deleted, select it, and click Open to ensure you are restoring the correct one.
  4. Once you are sure, click Restore.select Properties from the context menu - find restored files from the Windows 11 Recycle Bin if they’re missing
  5. When the file is restored, click OK to close the window.

3. Using the Windows File Recovery tool

  1. Press the Windows key, type store, and select Microsoft Store to open it.Microsoft Store -find restored files from the Windows 11 Recycle Bin if they’re missing
  2. Type Windows File Recovery in the search box and click Install.Windows File Recovery in the search box and click Install
  3. Press the Windows key, type file recovery, and click Open to launch Windows File Recovery.
  4. Click Yes on the UAC prompt.CMD
  5. It will open the Command prompt with admin rights, copy and paste the following command after source-drive with the drive where the file was before getting deleted, destination folder where you want to save the recovered file, mode with regular or extensive, switches with additional information like file path, file type or filename and hit Enter: winfr source-drive: destination-folder [/mode] [/switches]
  6. Wait for the scan to complete; a directory named Recovery_[date and time] will be saved on the destination folder or drive.

4. Using the System Image Recovery

  1. Press Windows + I to open the Settings app.
  2. Go to System, then click Recovery.System - Recovery Windows 11 -find restored files from the Windows 11 Recycle Bin if they’re missing
  3. Locate Advanced startup, and click Restart now.Recovery Advanced Startup
  4. On the Choose an option screen, select Troubleshoot.Troubleshoot  -find restored files from the Windows 11 Recycle Bin if they’re missing
  5. Now select Advanced options.Troubleshoot WITH AO selected
  6. From the Advanced options window, click See more recovery options.See more recovery options.
  7. Select System Image Recovery.System Image Recovery
  8. Now select your system image backup to recover lost files.

This method will only work if you have already set up the backup for your device via the Backup and Restore feature in the Control Panel.

5. Using the File History option

  1. Press the Windows key, type control panel, and click Open.Control Panel start menu -Find Restored Files From Recycle Bin on Windows 11
  2. Select Category for View by and click System and Security.System and Security
  3. Click File History.File history
  4. If it is enabled, click Restore personal files.restore-personal-files-option
  5. Locate the folder where the deleted files were stored, select the files, and click the Green button to get back the lost files.

This method will only work if you have the File History option enabled and if you are looking for a file stored in standard Windows libraries, like Desktop, Documents, Downloads, Contacts, Music, Pictures, Links, Searches, and more.

6. Perform a system restore

  1. Press Windows +R to open the Run dialog box.rstrui command Restore point -Find Restored Files From Recycle Bin on Windows 11
  2. Type rstrui.exe and click OK to open the System Restore window.
  3. On the System Restore window, select Choose a different restore point and click Next.Next Choose a different restore point
  4. Select the desired restore point and click Next.Choose a point
  5. Click Finish to initiate the process.Finish

Your computer will restart, and try to restore your system to the selected version. In case you get the System Restore did not complete successfully message, read this guide to know the solutions.

Can I recover deleted items after the Recycle Bin has been emptied?

Yes, you can recover deleted files even after the Recycle Bin has been emptied. The deleted items are not permanently erased from your disk space until new data overwrites it.

To recover that data, the first step is to stop using the computer & avoid creating or saving any new files on the drive where the deleted files were located. You can use reliable data recovery software to restore the files.

You can also simply hide the Recycle Bin from your Desktop to avoid emptying it in the future, and it also lets you customize your desktop just like we used to do on Windows 7.

Remember to always double-check a file before deleting it and verify its original location before restoring it to avoid any hassle.

Another thing to keep in mind is to ensure the Remove files immediately when deleted option is disabled. To learn how to check the settings and customize other Recycle Bin settings, read this guide.

Did we miss a step that works for you? Don’t hesitate to mention it in the comments section below. We will happy add it to the list.

Fix: Can’t Turn Off Real-Time Protection on Windows 11

Many users have complained that they couldn’t keep the real-time protection turned off on Windows 11. It could be very frustrating as it can impact system performance, cause compatibility issues, and disrupt workflows.

This guide will explore possible reasons for the issue and discuss practical solutions to address it effectively.

Why you can’t turn off real-time protection on Windows 11?

  • The Tamper Protection feature is enabled.
  • Have an expired or outdated security software.
  • If you have recently installed a security update for Windows.
  • Don’t have any other antivirus software in place.

How do I fix real-time protection not turning off in Windows 11?

Before moving to the detailed troubleshooting steps, make sure you follow these preliminary checks:

1. Disable the Tamper protection feature

  1. Press the Windows key, type windows security, and click Open.Windows Security open Windows key -Can’t Turn Off Real-Time Protection on Windows 11
  2. On the Windows Security app, click the Virus & threat protection option from the left pane.
  3. Select Manage settings under Virus & threat protection settings.Manage settings
  4. Ensure Real-time protection is turned off.
  5. Scroll down and toggle off the switch next to Tamper Protection.Real time protection off and Tamper Protection Off
  6. Click Yes on the UAC prompt.
  7. Restart your PC to save the changes and check if the real-time protection is disabled.

2. Using the Registry Editor

First, ensure you disable Tamper Protection from Windows Security, then boot your computer into safe mode; to do that, follow these steps:

  1. Press Windows+ R to open the Run window.Msconfig - Can’t Turn Off Real-Time Protection on Windows 11
  2. Type msconfig to open System Configuration.
  3. Switch to the Boot tab, locate the Boot options, and place a checkmark next to Safe boot and Minimal.Safe Boot Minimal
  4. Click Apply and OK.
  5. Now select Restart to reboot your PC in safe mode.Restart clean boot

Once your system starts in Safe mode, you need to edit a few registry entries; for that, follow these steps:

  1. Press Windows + R to open the Run dialog box.Regedit RUN COMMAND -Can’t Turn Off Real-Time Protection on Windows 11
  2. Type regedit and click OK to open the Registry Editor.
  3. First, create a backup of registries; for that, go to File, then select Export. Save the .reg file at an accessible location.File - Export
  4. Go to the address bar and copy & paste these paths one by one, and for the DWORD Start, change the Value data to 4 and click OK to disable Windows Defender permanently.regedit_
    • Computer\HKEY_LOCAL_MACHINE\SYSTEM\CurrentControlSet\Services\Sense
      Computer\HKEY_LOCAL_MACHINE\SYSTEM\CurrentControlSet\Services\WdNisDrv
      Computer\HKEY_LOCAL_MACHINE\SYSTEM\CurrentControlSet\Services\WdNisSvc
      Computer\HKEY_LOCAL_MACHINE\SYSTEM\CurrentControlSet\Services\WdBoot
      Computer\HKEY_LOCAL_MACHINE\SYSTEM\CurrentControlSet\Services\WinDefend
      Computer\HKEY_LOCAL_MACHINE\SYSTEM\CurrentControlSet\Services\WdFilter
  5. Close Registry Editor.

Next, reverse engineer the steps above for a safe boot to restart your computer in normal mode.

3. Using the Group Policy Editor

Note icon NOTE
The Group Policy Editor doesn’t come preinstalled on the Home edition of Windows. So, if you can’t find it, check your Windows edition. However, you can manually install gpedit.msc in no time.
  1. First, ensure Tamper Protection is off, then press Windows + R to open the Run dialog box.gpedit.msc and click OK to open the Group Policy Editor. - Can’t Turn Off Real-Time Protection on Windows 11
  2. Type gpedit.msc and click OK to open the Group Policy Editor.
  3. Navigate to this path: Computer Configuration\Administrative Templates\Windows Components\ Microsoft Defender Antivirus
  4. Locate the Turn off Microsoft Defender Antivirus option and double-click it.Turn off Microsoft Defender Antivirus
  5. Select the radio button next to Enabled, click Apply, then OK.Enabled
  6. Close Group Policy Editor.

4. Disable the Windows Updates

  1. Press Windows + R to open the Run window.Services RUn command -Can’t Turn Off Real-Time Protection on Windows 11
  2. Type services.msc and click OK to open the Services app.
  3. Locate the Windows Update option and double-click to open the properties window.Windows Update - Can’t Turn Off Real-Time Protection on Windows 11
  4. Navigate to Startup type and select Disabled from the drop-down menu.Startup type and select Disabled from the drop-down menu.
  5. Click Apply and OK to save changes.
  6. Restart your computer.

This will disable Windows Update, and it won’t run and install updates until you enable the service again. However, disabling this service might make your system vulnerable, so proceed with this method after calculating the risks.

Additional tips to keep your system secure while turning off real-time protection

  • Make sure you are using a premium version of the VPN.
  • Enable BitLocker to encrypt your hard drive if available.
  • Use strong passwords, avoid visiting suspicious websites, clicking unknown links, or downloading files from unreliable sources.
  • Regularly backup your important data to a cloud or an external drive.
  • Keep your third-party antivirus program current and enable all its security features.
  • Use Safe Boot while applying major changes to your Windows.

That being said, disabling real-time protection should always be exercised with caution and done when necessary.

Finding a balance between addressing specific needs and maintaining security standards is key for a safe and customizable computing experience.

On the contrary, if you want to turn on Windows Defender real-time protection but it keeps turning off, it could be due to corrupted system files; read this guide to know more.

Besides, if you can’t turn on Tamper Protection, it’s just as easy to fix!

If you have any questions or suggestions, don’t hesitate to mention your thoughts in the comments section below.

Fix: Set Time Zone Automatically Defaults to Wrong Time Zone

According to reports in forums, the set time zone automatically defaults to the wrong time zone in Windows 11. It’s not a recent problem, but affects all iterations of the OS.

The issue often arises after a Windows update or when users make changes to the PC. Remember, for problems like this, there’s no universal fix! You have to identify the underlying cause and execute the relevant solution.

Why is automatic time zone wrong on Windows 11?

  • The system files are corrupt
  • A bug in the installed version of Windows
  • The related services are not running
  • Issues with the user profile
  • Missing location access

How do I fix automatic time zone if it’s wrong in Windows 11?

Before we head to the slightly complex solutions, try these quick ones first:

  • Check for any pending Windows updates and install them.
  • Re-enable the toggle for Set time zone automatically in Settings.
  • Force sync Windows time and check for improvements.
  • Scan the PC for malware using the built-in Windows Security or an effective third-party antivirus.

If none work, move to the fixes listed next.

1. Enable the Windows Time service and change its properties

  1. Press Windows + R to open Run, type services.msc in the text field, and hit Enter.services
  2. Locate the Windows Time service, right-click on it, and select Properties.
  3. Select Automatic from the Startup type dropdown menu, click the Start button under Service status, and then on Apply to save the changes.windows time service to fix set time zone automatically wrong
  4. Now, go to the Log On tab, select This Account, then enter NT AUTHORITY\LocalService in the text field while leaving the password fields blank, and click OK to save the changes.log on

If the time zone or Windows time keeps changing, you just need to enable the Windows Time service and configure it to load automatically at startup.

2. Turn on location access

  1. Press Windows + I to open Settings, navigate to Privacy & security from the left pane, and click on Location under App permissions.location
  2. Now, enable the toggle for Location services.location services to fix set time zone automatically wrong
  3. Finally, restart the computer and check for improvements. 

2. Set the default location using Maps

  1. Press Windows + S to open Search, type Maps in the text field, and click the relevant search result.
  2. Click the ellipsis near the top right, and select Settings.settings
  3. Scroll down and click the Change default location button.change default location to fix set time zone automatically wrong
  4. Click on Set default location.
  5. Enter your precise location in the text field, and select the relevant entry from the dropdown menu.default location
  6. Once done, restart the computer and check Windows now picks the correct time zone.

When Windows can’t access your location or time zone, it relies on the default location set in the built-in Maps app.

4. Enable daylight savings

  1. Press Windows + I to open the Settings app, go to Time & language from the navigation pane, and then click Date & time on the right.date & time
  2. Now, enable the toggle for Adjust for daylight saving time automatically.daylight savings

5. Repair the corrupt system files

  1. Press Windows + S to open Search, type Command Prompt in the search bar, and click on Run as administrator.command prompt
  2. Click Yes in the UAC prompt.
  3. Now, paste the following DISM commands individually and hit Enter after each: DISM /Online /Cleanup-Image /CheckHealth DISM /Online /Cleanup-Image /ScanHealth DISM /Online /Cleanup-Image /RestoreHealth
  4. Similarly, execute this command to run the SFC scan: sfc /scannowsfc scan to fix set time zone automatically wrong

If the set time zone automatically changes to the wrong one or you can’t change the time zone, it could be corrupt system files to blame. And an effective fix against it is to run DISM commands and the SFC scan!

6. Manually change the time zone

  1. Press Windows + R to open Run, type control panel in the text field, and click OK.control panel
  2. Click on Clock and Region.
  3. Now, click on Date and Time.date and time
  4. Click the Change time zone button.change time zone to fix set time zone automatically wrong
  5. In the Time Zone Settings window, select your zone from the dropdown menu, and click OK to save the changes.time zone
  6. Now, go to the Internet Time tab, and then click on Change settings.
  7. Select time.windows.com from the Internet time server dropdown menu, click on the Update now button, and then OK.time.windows.com
  8. Restart the computer and check if the correct time zone is showing.

7. Uninstall conflicting apps

Third-party apps can also automatically change the time zone in Windows. To identify one, check the error logs. Filter them for Event ID = 1 or Source = Kernel-General. A user reported that MaxproVideoGuardAgent.exe changed the time zone on their PC.

Once you have found it, uninstall the app. If things still don’t work out, download a reliable software uninstaller tool, and use to delete all leftover files and Registry entries created by the program.

8. Perform an in-place upgrade

  1. Go to Microsoft’s official website, select the edition and product language, then download the Windows 11 ISO.windows 11 iso to fix set time zone automatically wrong
  2. Double-click the ISO file once downloaded, and choose Open in the confirmation prompt.
  3. Run the setup.exe file.setup.exe
  4. Click Yes in the UAC prompt. 
  5. Click on Next to proceed.
  6. Review Microsoft’s license and terms, and then click Accept.accept
  7. Finally, verify that the setup reads, Keep personal files and apps, and click Install.in-place upgrade to fix set time zone automatically wrong
  8. Wait for a few hours for the process to complete, and the set time zone shouldn’t change to a wrong one automatically.

9. Create a new user account

If nothing else works and Windows still shows an inaccurate time zone or the time zone option is greyed out, maybe it’s the user profile corruption to blame. In this case, simply create a new local account.

To make sure you don’t run into issues with permissions, switch to an administrator account for maximum privileges.

Why does my time zone keep changing by itself?

When the time zone keeps changing or never picks the current location, it’s the permissions, corrupt system files, or misconfigured settings to blame. Besides, if you are a frequent traveller and Windows is set to automatically detect the time zone, a few issues may arise.

The best option here is to enable Location services, repair the corrupt files, or manually set the correct system time zone, and it won’t change automatically.

You now know why the automatic time zone is set wrong in Windows 11 and the fixes that work in every case. A few users also found that the PC stops updating time and shows an incorrect time, but that’s easy to fix!

Remember, it’s best to let Windows handle all time and time zone-related tasks. Just make sure the OS is up-to-date, and you shouldn’t face problems!

For any queries or to share which fix worked for you, drop a comment below.

0X8007013 Install Error: How to Quickly Fix it

0X8007013 is a common update error message that Windows users may encounter while trying to install or update their Windows operating system

Since the concerned updates are part of the optional updates, you can easily ignore them as long as your drivers are up-to-date.

Why am I getting the 0X8007013 install error on Windows 11? 

  • If a virus has infected one of the files that Windows needs to install new updates, you will get this error message.
  • Some drivers may be incompatible with the new version of Windows, or there may be an issue with how they were installed on your computer during setup.
  • The Windows Update service may have stopped unexpectedly without your knowledge.
  • There may be incompatibility between hardware and software components on your system as a result of corrupted system files.

How do I fix the Install Error 0X8007013 on Windows 11?

Conduct the following preliminary steps before applying the solutions below:

1. Hide the Windows update

  1. Download the Troubleshooting tool.
  2. Click on the download and let the tool scan for the available updates.
  3. If there are available updates, you can choose whether you want to hide them or not.
  4. Click on an update to hide.
    windows 10 disable driver update for specific device
  5. When the next update occurs, selected updates will be skipped.

2. Run the Windows Update troubleshooter

  1. Hit the Windows key and click on Settings.settings windows 11
  2. Click on System and select Troubleshoot.Open system troubleshooter
  3. Navigate to Other troubleshooters.other troubleshooters
  4. Click the Run option for the Windows Update troubleshooter.windows-update-run-troubleshooter runtimebroker.exe error

3. Restart the Windows Update service

  1. Hit the Windows + R keys to open the Run command.
  2. Type services.msc and hit Enter.run services.msc command
  3. Locate Windows Update service, double click on it and select Properties.
  4. Navigate to the General tab, under Startup type, select Automatic from the drop-down options, and click on the Start button.
  5. Next, click Apply and then OK.

4. Run DISM and SFC scans

  1. Hit the Start Menu icon, type cmd in the search bar, and click Run as administrator to open an elevated Command Prompt.cmd-run-admin-w11 unexpected kernel mode trap windows 11
  2. Type the following commands and press Enter after each one:DISM.exe /Online /Cleanup-Image /Restorehealth sfc /scannow

5. Update your Realtek driver

  1. Click on the Windows button, type Device Manager in the search bar, and click Open.
  2. Navigate to Sound, video, and game controllers to expand, right-click Realtek High Definition Audio and select Update driver.
  3. Select Search automatically for drivers.search auto realtek hd audio manager not opening

Alternatively, you can get the same directly from the Realtek website, but this too, is not a guarantee that you’ll end up with the right driver, given the vast number of drivers available for different versions of Windows.

In such a situation, we recommend using an automatic third-party program. Outbyte Driver Updater is a free driver updater software that automatically scans your system for corrupt, missing, damaged, or outdated drivers and replaces them with the correct ones.

➡️ Outbyte Driver Updater

6. Disable your Realtek driver

  1. Click on the Windows button, type Device Manager in the search bar, and click Open.
  2. Navigate to Sound, video, and game controllers to expand, right-click Realtek High Definition Audio, and select Disable device.

For most install errors like 0x80242fff, you can check the corresponding app or driver causing the problem then disable or uninstall it.

7. Scan for viruses

  1. Press the Windows key, search Windows Security, and click Open.
  2. Select Virus & threat protection.
  3. Next, press Quick scan under Current threats.
  4. If you don’t find any threats, proceed to perform a full scan by clicking on Scan options just below Quick scan.Scan options
  5. Click on Full scan, then Scan now to perform a deep scan of your PC.Full Scan Scan Now
  6. Wait for the process to finish and restart your system.

8. Perform a System Restore

  1. Press the Windows key, type Control Panel, and click Open.control-panel-search fallout new vegas runtime error
  2. Select Large icons as View by and click Recovery.Recovery Control Panel Advrcntr6.dll
  3. Click Open System Restore.Open system restore
  4. Select Choose a different restore point and click Next.Next Choose a different restore point
  5. Now select the restore point and click Next. Choose a point
  6. Click Finish to restore the previous settings, and Windows will restart.Finish Restore point

The System Restore option should be temporary as you wait for a new Windows Update or a newer driver version that could fix the bug.

Hopefully, this article has been able to provide some perspective on the 0x8007103 error and how you can make things work. There are a lot of issues that will eventually need to be fixed by Microsoft, but for now, these solutions will get you up and running in no time.

Still, on the issue of install errors, be sure to check out our detailed articles on errors 0x800f081f and 0x800f0988 for quick fixes.

We appreciate your feedback, so feel free to let us know what solution worked out for you in the comment section below.

DTS Audio Processing Settings Are Unavailable: How to Fix

If you are encountering the DTS Audio Processing settings are unavailable as audio service connection is lost error message upon launching DTS, this guide can help!

We will explore the expert-recommended solutions with step-by-step instructions to fix the issue right after discussing the causes of the same

How do I fix DTS audio processing settings are unavailable?

First, restart your PC to fix the basic software glitches. Also, ensure your PC is up to date and disable audio-enhancing software. With those out of the way, let’s move on to more advanced options:

1. Run the built-in audio troubleshooter

  1. Press Windows + I to open Settings.
  2. Go to System, then click Troubleshoot.System troubleshoot  -DTS Audio Processing Settings are Unavailable
  3. Click Other troubleshooters.Other Troubleshooters
  4. Locate Audio and click Run.Audio Run
  5. Follow the onscreen instructions to fix the audio devices related issues.

Running an audio troubleshooter can help you fix other common DTS issues like DTS:X Ultra not working issue; read this guide to learn in detail.

2. Restart the DtsApo4Service

  1. Press Windows + R to open the Run dialog box.Services RUn command - DTS Audio Processing Settings are Unavailable
  2. Type services.msc and click OK to open the Services app.
  3. Locate DtsApo4Service, right-click it, and select Properties from the context menu.DtsApo4Service, right-click it, and select Properties  -  DTS Audio Processing Settings are Unavailable
  4. Under Service status, select Start if the service is stopped.Service status, select Start
  5. However, if it is already running, select Stop, then let the service stop and click Start to restart it.
  6. Click OK to close the window.

3. Re-enable the playback multi-streaming feature

  1. Press the Windows key, type dts, select DTS Audio Control, and click Open.
  2. Go to Advanced Settings.
  3. Locate Enable playback multi-streaming, and click the Disable button.Advanced Settings. Locate Enable playback multi-streaming, and click the Disable button. - DTS Audio Processing Settings are Unavailable
  4. Wait for a while, then click the Enable button to turn on the audio setting.

4. Run SFC & DISM scans

  1. Press the Windows key, type cmd, and click Run as administrator.CMD elevated -DTS Audio Processing settings are unavailable
  2. Copy & paste the following commands to repair the system files integrity & restore Windows OS image files one by one and hit Enter after every command:cmd_DTS Audio Processing settings are unavailable
    • sfc/scannow
      Dism /Online /Cleanup-Image /CheckHealth
      Dism /Online /Cleanup-Image /ScanHealth
      Dism /Online /Cleanup-image /RestoreHealth
  3. Once the commands have been executed successfully, restart your computer to let the changes take effect.

If you want to solve this issue within seconds and prevent other errors from occurring, we suggest a specialized repair tool.

5. Reinstall the DTS Audio processing app

  1. Press Windows + I to open the Settings app.
  2. Go to Apps, then Installed apps.Apps - Installed apps -DTS Audio Processing Settings are Unavailable
  3. Locate DTS Audio processing, click the three dots, and select Uninstall.DTS Audio processing, click the three dots, and select Uninstall -DTS Audio Processing Settings are Unavailable
  4. Go to this DTS Audio processing app link and select Get in Store app.
  5. It will launch the Microsoft Store app and click Get to download & install the app.

6. Reinstall the audio driver

  1. Press Windows + R to open the Run dialog box.Device Manager Run command -DTS Audio Processing Settings are Unavailable
  2. Type devmgmt.msc and click OK to open the Device Manager.
  3. Click Sound, Video, and game controllers to expand the section.Uninstall device -  DTS Audio Processing settings are unavailable
  4. Right-click the audio driver and select Uninstall device from the context menu.

Next, let us visit the device manufacturer’s website to download & install the latest driver; here, we took an example of HP devices.

  1. Locate Software and Drivers, then select the device from the list.Software and Drivers - DTS Audio Processing settings are unavailable
  2. Enter the device’s serial number and click Submit.Select the Serial Number
  3. Select the OS installed on your computer. Click All drivers and locate Driver-Audio; click Download to get the driver.Download Driver
  4. Double-click the downloaded file and follow the on-screen instructions to complete the process.

If none of these solutions worked for you and there is no audio service connection, we suggest you contact the DTS support team or your device manufacturer’s support for further assistance.

Did we miss a solution that works for you? Don’t hesitate to mention it in the comments section below. We will happily add it to the list.

Is Windows 11 Faster Than Windows 10?

You’re sitting there, staring at your Windows 10 computer, contemplating the upgrade to Windows 11. A nagging question arises: Will my computer be faster if I upgrade? It’s a valid concern, and today, we’re going to pull back the curtain to reveal where each OS stands in terms of speed, performance, and whether making the jump to Windows 11 is worth it.

Windows 11: The Speedster or Not?

First, let’s tackle the big question: Is Windows 11 faster than Windows 10? The answer is a nuanced yes and no. On one hand, Windows 11 comes with several optimizations that make it feel snappier and more responsive. For example, it has better touch, pen, and voice inputs, providing a smoother user experience on compatible devices.

And if you want to dabble a bit, you can make it even faster with our dedicated optimization guide. This way, you’ll get the best outcome from both the interface and demanding apps.

Windows 10: The Reliable Workhorse

Windows 10, however, is like that trusty old car you’ve had for years. It’s reliable and does the job well, but it lacks some finesse and polish that the newer models come with. It may not have the aesthetic appeal of Windows 11, but it often delivers consistent performance.

It still has some glitches and bugs here and there, but the feedback over the years has made it a lot more stable and easy to fix. But that’s the case with experience: everything becomes steady as a rock with time.

Advantages and Disadvantages

Each version has its pros and cons:

  • Windows 11 Advantages: Enhanced multitasking, improved touch input, better integration with Microsoft services.
  • Windows 10 Advantages: Wider compatibility, tried-and-tested reliability, less steep hardware requirements.
  • Windows 11 Disadvantages: Requires more modern hardware, fewer customization options.
  • Windows 10 Disadvantages: Missing out on the latest features, less optimized touch input.

But when considering one over the other, the features are only one side of the story as the requirements for each are the other. For example, Windows 10 has straightforward system requirements that most modern PCs easily meet.

On the other hand, Windows 11’s system requirements aren’t much higher, but there’s a catch: it comes with feature-specific requirements that your computer must also meet. Read more about this on Microsoft’s official page.

Performance Gains from Windows 11

If you’re a power user who leans on virtualization and enjoys a streamlined user interface, Windows 11 has tangible performance gains. However, if you have older hardware, these improvements might not be enough to justify the upgrade.

Remember that if you’re a gamer, FPS data shows that Windows 11 is great for that. But don’t go upgrading just yet; not before reading our comprehensive guide about all the most significant Windows 11 disadvantages.

Is it Worth Upgrading?

The answer depends on your unique needs. If you’re looking for a fresher design and can take advantage of the new features and optimizations, upgrading to Windows 11 may be a wise choice.

But if your machine is older or you’re comfortable with Windows 10, staying put is a reasonable option. Well, until its end of life, because afterward, the risks involved are way too significant to make it worth it.

In a Nutshell

Regarding speed, Windows 11 edges out its predecessor in select areas, offering a more fluid experience for modern hardware and power users. However, Windows 10 remains a solid choice for those prioritizing reliability and compatibility. Ultimately, the “speedier” OS will depend on how you intend to use it, so choose wisely.

How to Change the Icon Size on Windows 10

Whether you’re bored with the looks of your icons or you’re doing it out of necessity, in this article, we’re going to present several ways to change the icon size in Windows 10.

The easiest way to change the desktop icon sizes on Windows 10 is to hold the Ctrl key while moving your scroll wheel up or down to increase or reduce their sizes.

However, read our guide below to find all the methods to change icon sizes on Windows 10.

How do I change the size of an icon on Windows 10?

1. Change the desktop icon size

  1. Right-click on an empty space on your desktop.
  2. Hover with your mouse over the View menu and choose from the right whether you want Small icons, Medium icons, or Large icons.desktop icon size selection

Apart from the Ctrl + mouse wheel method, this is the easiest way to change the icon sizes on your desktop.

For a complete walkthrough, check this detailed guide on how to reduce desktop icon size in Windows 10.

2. Resize the icons in File Explorer

  1. Press the Windows + E keys to launch File Explorer.
  2. Click on the View tab, then choose the size of the icons and information layout.icons size explorer
  3. You can hover with your mouse over each option to get a preview and see which one is better for your needs.

3. Change the display layout settings

  1. Right-click on an empty space on your desktop and select Display settings.
  2. On the right pane, find the Scale and layout section, click on the drop-down menu, and select the right scaling for you.scale and layout change
  3. However, this will not only change the icon sizes but also all the text and other items.

4. Change the taskbar icons sizes

  1. Right-click on an empty space on your desktop and select Personalize.
  2. Now, select Taskbar from the left and turn on the Use small taskbar buttons option under the Taskbar section.
  3. While you are here, you can scroll down more and click on the Select which icons appear on the taskbar option to enable only the ones you need.select the taskbar icons

Note that the change icon size Windows 10 taskbar option only works to make them smaller, not bigger.

If the Windows 10 icons are still too big, the highlighted guide will help you restore them quickly.

Advanced tips for working with icon sizes on Windows 10

  • Making taskbar buttons smaller or larger – This can also be done quickly by adjusting the scale and layout just as we highlighted in Solution 3.  We also have a dedicated guide on how to make the taskbar items bigger. 
  • Utilizing a scroll wheel to change icon sizes – Ctrl + scroll wheel is the quickest way to change the icon size on a desktop but it works as well in most applications such as Microsoft Office, browsers, and more.
  • Working with medium and large icon sizes – The standard Windows icon sizes for ICO format are 256×256 pixels, 48×48 pixels, 32×32 pixels, and 16×16 pixels, all in 32-bit format. Obviously, the medium and large icons will cover more screen real estate but they are much more visible. 

Troubleshooting common issues with icon sizes in Windows 10

  • The desktop icons are not showing – Right-click on the desktop, hover with your mouse over View, and check the View desktop icons is checked. Our guide on how to get back your icons on the desktop will offer more information.
  • Blank space on your desktop after adjusting icon size – To fix this problem, change the display layout settings to the recommended percentage using Solution 3 above, then restart your computer. We also have a full guide to fix the Windows 10 icon spacing problem.
  • The icons are shattered all over the desktop – Right-click on the desktop, hover over View with your mouse and check the options Auto arrange icons and Align icons to grid.

Hopefully, our guide helped you change icon size on Windows 10 and provided the needed information to tackle the most common problems with them.

The size of desktop icons or the ones from your taskbar really depends on your preference and viewing acuity.

If you upgraded to the latest OS, here’s how to change desktop icon size on Windows 11 as well.

For any other questions you may have, feel free to use the comments section below and let us know.

Fix: Internet Keeps Disconnecting When Playing Games on Windows 11

While Windows 11 serves as a viable gaming platform, problems with the network connection tend to affect the experience. A few users reported that the Internet disconnects when playing games in Windows 11. It affects both online games and the ones downloaded on the PC.

The issue was reported in Steam games as well. For some, the Wi-Fi icon itself disappeared every time the Internet disconnected and restarting the computer brought it back.

Why does my Wi-Fi disconnect when I play a game?

  • Outdated, corrupt, or incompatible drivers
  • Misconfigured network settings
  • A buggy Windows update
  • Issues with the network card or adapter
  • Unstable Internet connection

How do I stop Internet from disconnecting when playing games on Windows 11?

Before we head to the complex changes, here are a few quick ones to try:

  • Make sure the device is placed within the range of the router. Reset the router if required.
  • Use an ethernet cable or a mobile hotspot to ascertain whether the problem lies across adapters and ISPs, or just the Wi-Fi. Or if the Ethernet disconnects when playing games, switch to Wi-Fi.
  • Turn Flight mode (Airplane mode) on for a few seconds and then disable it if the Wi-Fi icon disappears in Windows 11.
  • Check for available Windows 11 updates and install them. Also, repair the corrupt system files using the DISM commands and the SFC scan.
  • Scan the PC for malware using the built-in Windows Security or a reliable third-party antivirus solution.

If none work, move to the fixes listed next!

1. Run the network troubleshooter

  1. Press Windows + I to open the Settings app, and click on Troubleshoot on the right in the System tab.troubleshoot
  2. Click on Other troubleshooters.
  3. Click the Run button next to the Network and Internet troubleshooter.troubleshooter to fix internet disconnects when playing games windows 11
  4. Follow the on-screen instructions to complete the process and apply the suggested fixes.

2. Perform a network reset 

  1. Press Windows + S to open Search, type Command Prompt in the search bar, right-click on the relevant result, and select Run as administrator.cmd
  2. Click Yes in the UAC prompt.
  3. Now, paste the following commands individually and hit Enter after each: netsh winsock reset netsh int ip reset ipconfig /release ipconfig /renew ipconfig /flushdnsreset network to fix internet disconnects when playing games windows 11
  4. Finally, restart the computer and check for improvements.  

3. Roll back driver update

  1. Press Windows + X to open the Power User menu, and select Device Manager from the list.
  2. Expand the Network adapters entry, right-click the affected adapter, and select Properties.properties
  3. Go to the Driver tab, and then click the Roll Back Driver button.roll back driver
  4. Select a reason for roll back or manually enter one, and click Yes to confirm.

When the Wi-Fi automatically disconnects in Windows 11 while playing games, and you lose Internet connectivity for a few seconds, it could be a problematic driver to blame. In case you recently updated it, roll back to the previous driver version.

4. Update the network driver

  1. Press Windows + R to open Run, type devmgmt.msc in the text field, and hit Enter.device manager
  2. Double-click the Network adapters entry, right-click the adapter that keeps disconnecting, and then select Update driver.update driver to fix internet disconnects when playing games windows 11
  3. Click on Search automatically for drivers and wait for Windows to install the best one from the PC.choose automatically
  4. If that doesn’t work, choose Browse my computer for drivers > Let me pick from a list of available drivers on my computer > select one from the list > click Next.
  5. Finally, restart the computer for the changes to apply.

Often, updating the network driver helps if the Internet disconnects when playing games in Windows 11. And in case Steam goes offline when playing, make sure to enable overlay.

5. Modify the Registry Editor

  1. Press Windows + R to open Run, type regedit in the text field, and click OK.
  2. Click Yes in the prompt that appears.
  3. Navigate the following path or paste it in the address bar and hit Enter: HKEY_LOCAL_MACHINE\SOFTWARE\Policies\Microsoft\Windows\WcmSvc\GroupPolicypath
  4. Right-click on the empty portion, hover the cursor over New, select DWORD (32-bit) Value, and name it fMinimizeConnections.fMinimizeConnections
  5. Double-click the DWORD, enter 0 under Value data, and click OK to save the changes.modify to fix internet disconnects when playing games windows 11
  6. Similarly, create another DWORD named fSoftDisconnectConnections and also set its Value data to 0.
  7. Finally, restart the computer.

If the PC or laptop keeps disconnecting from Wi-Fi it could be due to a known bug in Windows, wherein the Wi-Fi disconnects every time the Internet drops. Creating the Registry entries will eliminate the problem!

6. Uninstall recent Windows update 

  1. Press Windows + I to open Settings, go to Windows Update from the navigation pane, and click on Update history.update history
  2. Scroll down and click on Uninstall updates.
  3. Identify the update installed around the same time the error first appeared, and click Uninstall.uninstall updates to fix internet disconnects when playing games windows 11
  4. Again, click Uninstall in the confirmation prompt.

7. Perform an in-place upgrade

  1. Go to Microsoft’s official website, select the product language and OS edition, and then download the Windows 11 ISO.
  2. Run the ISO file and click Open in the prompt. 
  3. Launch the setup.exe file.setup.exe
  4. Click Next to proceed.
  5. Review Microsoft’s license terms and click Accept.accept license terms
  6. Make sure the setup reads, Keep personal files and apps, and click Install.in-place upgrade to fix internet disconnects when playing games windows 11
  7. Wait for the in-place update to complete. It may take a few hours.

As a last resort, you can perform an in-place (repair) upgrade if the Internet keeps disconnecting when playing games in Windows 11. Whether Wi-Fi disconnects frequently or at an interval, this would work as long as the underlying cause is linked to the OS.

WiFi driver gets disabled when playing games on Windows 11

When the Wi-Fi driver gets disabled, the adapter’s Properties window reads, Currently, this hardware device is not connected to the computer. (Code 45). You can fix the problem by re-enabling the adapter or updating the Wi-Fi driver.

Another option is to switch to an Ethernet connection. Wired connections are usually more reliable and result in fewer drops.

By now, you should have fixed things when the Internet disconnects while playing games in Windows 11. In case the problem persists, check the network resources and blacklist any program or device consuming resources beyond the available bandwidth.

And while we are talking of network issues, do try some quick tips to increase the Internet speed in Windows 11.

For any queries or to share which fix worked for you, drop a comment below.

Fix: Can’t Disable Background Blur on Windows 11

Since the Windows 10 1903 version, the login screen background image appears to be blurred; the feature was added to create a visually appealing and is called the Acrylic Blur Effect.

However, if you don’t like it and can’t figure out a way to disable background blur on Windows 11, this guide can help!

Why is my background blurred in Windows 11?

  • If the Transparency effects option under Colors is turned on, you may see the blurred background when you log in.
  • If you see a blurred background when you press Alt + Tab or Windows + Tab, you have the Transparency effects option under Visual effects turned on.
  • Try using high-resolution wallpaper and check if the recommended screen resolution is selected.

How do I disable background blur in Windows 11?

Before moving to the detailed steps to disable blurred background, you should consider performing the following checks:

  • Ensure you have selected the recommended display resolution and verify if the cables are properly connected.
  • Try selecting a high-resolution wallpaper and check if the background is blurry.
  • Ensure there are no pending Windows updates.
  • You can also try changing the DPI settings as it is known to fix similar issues like Microsoft apps are blurry.

If none of the above steps helped, then you might have the Acrylic Blur Effect enabled for the login screen on Windows 11. To disable it, follow these steps:

1. Using the Settings app

  1. Press Windows + I to open the Settings.
  2. Go to Personalization, then select Colors.Go to Personalization, then select Colors - Can’t Disable Background Blur on Windows 11
  3. Locate Transparency effects and toggle off the switch next to it.Transparency effects

2. Using the Registry Editor

  1. Press Windows + R to open the Run dialog box.Regedit -Can’t Disable Background Blur on Windows 11
  2. Type regedit and click OK to open the Registry Editor.
  3. First, create a backup of the registry; for that, go to File, then click Export. Save the .reg file to an accessible location.File- Export to save .reg file
  4. Navigate to this path: Computer\HKEY_LOCAL_MACHINE\ SOFTWARE\Policies\Microsoft\Windows
  5. Locate System. If you can’t find the key, right-click the Windows key, select New, then choose Key.select New, then choose Key -Can’t Disable Background Blur on Windows 11
  6. Next, right-click the newly created key, select Rename, and name it System. select Rename, and name it System
  7. Right-click System, select New, then choose DWORD (32-bit) Value.System, select New, then choose DWORD (32-bit) Value.
  8. Now rename the DWORD as DisableAcrylicBackgroundOnLogon.
  9. Double-click DisableAcrylicBackgroundOnLogon, change the Value data to 1 and click OK to save the changes to remove the Acrylic Blur Effect.regedit_ DisableAcrylicBackgroundOnLogon, change the Value data
  10. Restart your PC to let the changes take effect.

3. Using the Group Policy Editor

  1. Press Windows + R to open the Run dialog box.GPEDIT MSC RUN -Can’t Disable Background Blur on Windows 11
  2. Type gpedit.msc and click OK to open the Local Group Policy Editor.
  3. Go to this path: Computer Configuration\Administrative Templates\System\LogonLocate Show clear logon background
  4. Locate Show clear logon background, double-click it, and select Enabled.Locate Show clear logon background - Enabled -Can’t Disable Background Blur on Windows 11
  5. Click Apply, then OK to confirm the changes.

How can I remove the Alt + Tab blur background in Windows 11?

  1. Press Windows + I to open Settings >go to Accessibility, then click Visual effects.
  2. Navigate to Transparency effects and toggle off the switch next to it.Transparency effects

This will disable the blurred background effect that appears when you press Alt + Tab and Windows + Tab.

How can I fix the camera blur issue on Windows 11?

  1. Press Windows + I to open Settings>select Apps, then Installed apps.Apps, installed apps -Can’t Disable Background Blur on Windows 11
  2. Locate the Camera app, click the three dots> select Advanced options> then click the Reset button.Reset button.

If this doesn’t fix the camera blur issue, try reinstalling the Camera drivers to ensure proper functionality and clarity in your camera feed.

If you are facing similar background issues on Microsoft Teams, first check the Camera settings on your PC, then check out this guide to find solutions.

In case you have questions or suggestions about the subject, feel free to mention them in the comments section below.

Are Windows 11 Product Keys Backward Compatible?

Thinking of upgrading to Windows 11? Or maybe you’re planning to switch back to Windows 10 for some reason. Either way, you’re probably wondering if you can use your old Windows product key. Today, we’ll dig into this common yet often confusing question about the backward compatibility of Windows 11 product keys.

Can You Use a Windows 10 Key for Windows 11?

Good news! Windows 11 is quite forgiving when it comes to product keys. If you have a genuine Windows 10 product key, you can use it to activate a fresh Windows 11 installation. Microsoft allows this to nod their commitment to smooth transitions between their operating systems.

What About Older Versions? Can You Use a Windows 7 Key?

Now, if you’ve held on to a Windows 7 key, it’s less likely to work for activating Windows 11. Microsoft has primarily phased out support for Windows 7, and its keys are not designed to function with the newer OS versions. Nonetheless, you could try to activate a copy of Windows 10 with a Windows 7 product key by following the steps in this guide.

Transferring Windows 11 License from a Dead Computer

Say your old computer gave up the ghost but had a Windows 11 license. Can you transfer it? Typically, yes, if you have a retail license. Microsoft’s license agreement usually permits transfers to a different machine, but you’ll need to deactivate the key on the old computer first, if possible. Follow these steps to do so:

  1. Contact Microsoft Support: Explain your situation and ask them to deactivate the product key from the old machine.
  2. New Installation: Use the deactivated key during the Windows 11 setup on the new computer.
  3. Activate: Once installed, go to Settings > System > Activation and input your key.

Can I Transfer My Windows 11 License to a New Computer?

Transferring your existing license is relatively straightforward if you upgrade your hardware but want to stick with Windows 11. Just ensure you deactivate the key on the old computer first, then apply it to the new one by following the steps above.

For more detailed steps and some tips & tricks, you can check out this handy guide suited for Windows 10 and 11.

Also, here’s our guide on how many times can you use a Windows 11 key for more information.

Will a Windows 11 Key Work for Windows 10?

Now, let’s flip the script. If you’ve got a Windows 11 key, can you use it on a Windows 10 machine? The answer is generally no. Windows 11 keys are forward-looking and aren’t designed to be applied to older versions of the OS.

In a Nutshell

The critical takeaway here (pun intended) is that Windows 11 offers some flexibility regarding product keys, especially if you’re moving from Windows 10. But it’s less lenient with older versions like Windows 7 and isn’t designed to work backward to activate Windows 10.

So, whether you’re jumping ahead or stepping back, knowing your key’s compatibility can save you from unexpected hitches.

Fix: Monitor is Stuck at 60Hz on Windows 11

If your Windows 11 is stuck at 60Hz, that can be a big problem, especially when gaming, since you won’t fully utilize the power of your hardware and experience maximum performance.

Luckily, this problem can be easily fixed, and today, we will show you a couple of solutions you can use to fix this issue on your PC.

Why am I stuck on 60Hz if my monitor is 144Hz?

  • Your cable might not support higher refresh rates.
  • The necessary driver software isn’t installed, or G-SYNC is enabled.
  • Your monitor or the game isn’t configured to run at higher frequencies.

What can I do if my monitor is stuck on 60Hz in Windows 11?

Before we start fixing the issue, there are a few preliminary checks you can perform:

  • Use a compatible cable. Many reported that DVI-D Dual link cable worked for them. This is also the reason users get a black screen after changing the refresh rate.
  • Check the game video setting and ensure the framerate isn’t locked at 60.
  • Press the Menu button on the monitor and make sure that your monitor is configured to run at 144Hz.
  • Make sure you have all your GPU drivers and necessary software, such as GeForce Experience installed.

1. Reinstall the monitor driver

  1. Press the Windows key + X and choose Device Manager.
  2. Locate your monitor driver on the list, right-click it, and choose Uninstall device.
  3. Click on Uninstall to confirm.
    facial-recognition-not-working-windows-11
  4. Lastly, restart your PC.

2. Ensure that integrated graphics is enabled

  1. Open Device Manager.
  2. Locate your integrated graphics.
  3. Right-click and choose Enable.

If you’re using a laptop or a PC with dedicated and integrated graphics, both need to be enabled from the Device Manager.

3. Disable G-Sync in Nvidia Control Panel

  1. Open the Nvidia Control Panel.
  2. Navigate to Set Up G-SYNC.
  3. Uncheck Enable G-SYNC, G-SYNC Compatible, and click on Apply.

If you’re using AMD graphics, you must disable FreeSync using similar steps.

If Windows 11 is stuck at 60Hz, the problem is usually related to your drivers or monitor configuration. Sometimes, features such as Variable refresh rate can cause this problem as well. This feature has its share of issues, and many reported that the Dynamic refresh rate is not showing on Windows 11.

Often, the issue is caused by monitor configuration, and we have a unique guide that can help if you can’t change your monitor refresh rate. This can be a big problem in games, and many reported that League of Legends is capped at 60 fps.

Did you find a different solution for a 144Hz monitor being stuck at 60Hz on Windows 11? If so, let us know in the comments section.

How to Type Accents on Windows 11

When you’re writing in English and have an English keyboard, every character you’re using is right there but if you want to type accents or special characters in other languages such as French or Spanish, things are a bit more complicated.

A Windows 11 special characters keyboard is the emoji board that you can also use for inserting kaomoji symbols and special characters.

The article below will show you a lot of options to type accents on Windows 11 and how to add any special characters you may need.

How do you type special characters on Windows 11 keyboard?

1. Using the Emoji Panel

  1. Press the Windows key + . on your keyboard to open the Emoji Panel.
  2. Click on the Symbols icon.
  3. Now, scroll to the right and select Latin symbols.
  4. You will find all the symbols and accents from the Latin languages, including the French accents.
  5. If you need to repeat the action, you will find that certain letter in the Recent field and you won’t need to navigate that far.

We chose the Latin symbols category, but you may also select punctuations, currency symbols, geometric symbols, math symbols, and other special language symbols, etc.

If you just want to add some French accent letters in Windows 11, the emoji keyboard might be the quickest way, without installing any software or update. However, if you’re looking for other ways how to type French accents on Windows 11, continue with the solutions below.

2. Using the virtual keyboard

  1. Right-click on the taskbar and select Taskbar settings.
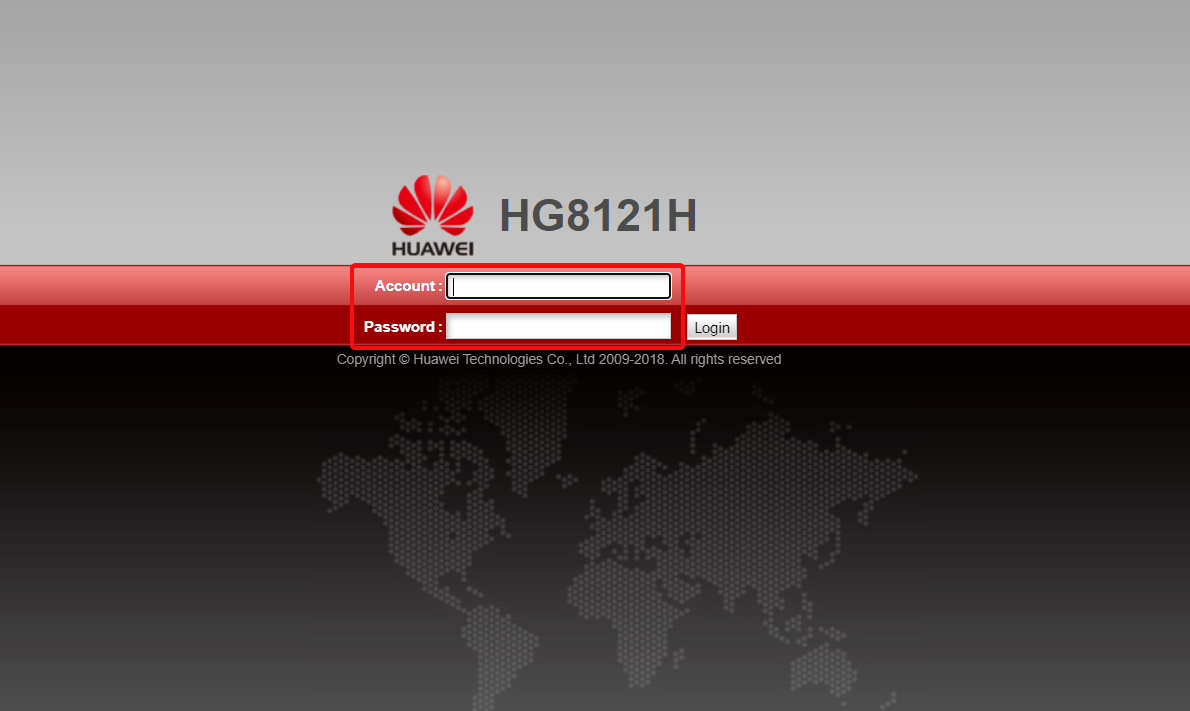
  2. Scroll down to locate Touch keyboard, click on the menu to its right, and select Always.
  3. Now, a keyboard icon has appeared in your status bar on the bottom right and if you click on it, the virtual keyboard will appear on the screen.
  4. Right-click long (or long tap if you have a touchscreen) on a letter from the keyboard to see all the special characters associated with that key.
  5. When you select it, it will appear in your text app or field.

For instance, right-clicking and holding on the letter n is how to type ñ in Windows 11. There are a lot of special language characters, symbols, and letters with diacritical marks on the screen keyboard but not all of them have some.

3. Using the character map

  1. Click the Search bar, type character map, and open Windows Character Map.
  2. Now, you can look for a specific font, or just scroll down to find and select the special character you want to insert.
  3. Then, copy the symbol and paste it wherever you need it.

4. Install a different keyboard layout

If you need to write a lot in other languages such as French, Spanish, German, or even Chinese, you need to install its keyboard layout and the language.

We have a complete guide on how to install a new keyboard layout on Windows 11 and new languages that will help you with that.

After you install the language and keyboard, you’re still stuck with your English physical keyboard but on it, you will find the special character from the new keyboard layout.

For instance, probably the most annoying part when you install a French keyboard layout on an English physical keyboard is that the letters Y and Z are in reversed positions.

Common Spanish accents on Windows 11

If you want to know how to type Spanish ñ on Windows or letters with a circumflex accent, note that you can also do so with shortcuts on your keyboard:

  • Capital letter + circumflex accent: Letter + Shift + ^ (caret key) – Â, Ê, Î, Ô, Û
  • Letter + tilde: Letter + Shift key + ~ (tilde key) + Alt key – õ, ñ, ã
  • Capital letter + tilde: Letter + Shift key + ~ (tilde key) – Õ, Ñ, Ã

Common French accents on Windows 11

  •  Small letter with acute accent or cedilla for c – Letter + ' (apostrophe key) – á, é, í, ó, ú, ç (add Shift key for capital letter)
  • Small letter with grave accent – Letter + `(accent grave key) – à, è, ì, ò, ù (add Shift key for capital letter)

The circumflex French accent is identical to the one from Spanish, presented above.

We also have a very useful article listing a lot of Windows 11 keyboard shortcuts you may use.

Typing accents using their Alt codes on Windows 11

Above, in Solution 3, we explained how to add the special characters from the Character Map.

However, if you noticed, every character has its own Alt code. That means you can add it directly by pressing the Alt key and typing the code fast on your numeric keypads. 

For instance, to type à from French, you may also press Alt + 0224. This way, you can learn the key codes for some of the special characters you are using more often and insert them directly from your keyboard.

We conclude here and we hope that our guide helped you learn how to type accents on Windows 11 and a lot more.

You may also be interested in reading our guide on how to type accents in Windows 10.

If you have any questions or might want to suggest different approaches, the comments section below will help you leave us a note.

Are Windows 11 Bugs Fixed? A Look at Its Journey to Stability

You’ve probably heard the buzz about Windows 11, the sleek successor to Windows 10. But like all new software, it had its growing pains. From its grand debut, people have asked: Is Windows 11 stable? Are the bugs sorted out? If you’ve been holding off on upgrading, let’s take a stroll through Windows 11’s journey and see where it stands today.

The Dawn of Windows 11: Early Hiccups

When Windows 11 first hit the scene, there was a mix of excitement and trepidation. Excitement for its fresh design and trepidation because, well, new software can be like freshly baked bread – it needs some time to settle.

In its early days, users reported various glitches. These ranged from compatibility issues with older hardware and unexpected system crashes to minor annoyances with the new interface. It is typical for newborn software but understandably frustrating for users.

The Growth Spurt: Patching Things Up

Responding to feedback (and a few grumbles), Microsoft rolled up its sleeves. Over time, they released a series of updates and patches. These weren’t just fancy new features but fixes aimed at those pesky bugs users pointed out. Think of it as refining the edges of a sculpture. With each update, Windows 11 became more stable and user-friendly.

Windows 11 Today: Standing Tall and Steady

So, where are we now? Is Windows 11 a rickety bridge or a sturdy platform?

Good news! Most of the significant bugs that cropped up in Windows 11‘s early days have been addressed. While no software is entirely free of issues, the consensus is that Windows 11 has matured beautifully. It’s like that initial loaf of bread, now settled and perfect for making a tasty sandwich.

Still, it’s always a good idea to keep an eye out for updates. Not only do they address any lingering minor issues, but they also bring along security enhancements to keep your computer safe.

In Conclusion

If you’ve been on the fence about upgrading to Windows 11, now’s a pretty good time to consider it. While its debut had a few stumbles, today’s Windows 11 stands as a testament to the power of feedback and continual improvement. It’s come a long way, proving that even in the tech world, growing pains lead to growth. So, whether you’re tech-savvy or just someone who loves a smooth computer experience, Windows 11 is ready to impress.

If you’re still using Windows 10, we’ve prepared a comparison with Windows 11 to understand better whether it’s worth your upgrade. The same goes for Windows 7.

What’s your take on the stability of Windows 11 right now? Tell us in the comments section below, and we’ll continue the discussion.