Fix: Wired Access Point is Slower Than Router (Wi-Fi)

If you are surrounded by questions like does access points reduce speed or why is my Wi-Fi faster than wired, then this guide can help!

We will discuss the possible reasons and practical solutions to fix the wired access point slower than the Wi-Fi router issue.

Why is my Wi-Fi faster than my wired connection?

  • Faulty ports or cables.
  • Outdated network drivers.
  • Router configuration or hardware limitations.
  • The ethernet cable is of a lower category and might have a lower data transfer cap.

How do I speed up my wired access point speed?

Before engaging in advanced troubleshooting steps to fix the slow internet connection via a wired access point, you should consider performing the following checks:

  • First, check your ethernet cable for damage or verify if it is properly connected to both the access point and the device.
  • Try using different ethernet ports to rule out the faulty port issue.
  • Ensure you have an updated version of Windows and run a deep malware scan using a reliable security tool.
  • Check the ethernet cable’s category from the outer layer of the cable; it should be above CAT3.
  • Also, check if the AP ports are limited to a certain speed from the router manufacturer’s website and update your router’s firmware.

1. Reset your router

  1. Unplug all the wires from your router and modem, and remove the power plug from the socket.Unplug router -wired access point slower than router
  2. Wait for a few minutes, then plug everything back and restart your modem and router.
  3. Once everything is up, test the speed again to check if the access point is slowing down the network.

2. Run the Network troubleshooter

  1. Press Windows + I to open Settings.
  2. Go to System, then click Troubleshoot.troubleshoot - wired access point slower than router
  3. Select Other troubleshooters.Other troubleshooters
  4. From the list of troubleshooters, locate Network and Internet and click Run.Network & Internet - Run
  5. Follow the onscreen instructions to complete.

Running a Network troubleshooter can help you fix other network-related issues like Wi-Fi slower than ethernet connection; read this guide to know more.

3. Update/reinstall your network drivers

  1. Press Windows + R to open the Run dialog box.Device Manager Run command -wired access point slower than router
  2. Type devmgmt.msc and click OK to open the Device Manager app.
  3. Locate and double-click the Network adapters to expand it.
  4. Right-click the affected USB driver and choose Update driver from the context menu.Network adapters - Update drivers
  5. Click Search automatically for drivers.Update driver 2
  6. If an update is available, follow the on-screen instructions to complete the process.

Restart your computer and check the internet speed now. Updating drivers can help you fix similar issues like different internet speeds on computers. To know more, read this guide.

If it is still the same, follow the below-mentioned steps to reinstall the driver:

  1. On the Device Manager app, locate and double-click the Network adapters to expand it.
  2. Right-click the affected USB driver and choose Uninstall driver from the context menu.Update driver- wired access point slower than router
  3. Next, go to Action, then select Scan for hardware changes.Action scan for hardware changes
  4. Wait for a couple of minutes; the driver will be reinstalled.

4. Reset your network settings

  1. Press Windows + I to open the Settings app.
  2. Go to Network & Internet and select Advanced network settings.Network & Internet -wired access point slower than router
  3. Click Network reset.Network Reset 1
  4. On the next page, click the Reset now button next to the Network reset option.Network Reset now
  5. Click Yes on the Network Reset warning dialog box.Network reset
  6. Reboot your PC to confirm the changes.

5. Re-enable the connection

  1. Press the Windows key, type control panel, and click Open.Control Panel start menu - wired access point slower than router
  2. Select Category as View by and click Network and Internet.Network & Internet CP -wired access point slower than router
  3. Click Network and Sharing center.Network and Sharing center
  4. Click the Change adapter settings link.Change adapter settings link.
  5. Locate & right-click the ethernet connection and select Disable from the context menu.Disable from the context menu.
  6. Wait for a while, right-click it again, and select Enable.select Enable.

6. Check your network adapter settings

  1. Press the Windows key, type control panel, and click Open.Control Panel start menu - wired access point slower than router
  2. Select Category as View by and click Network and Internet.Network & Internet CP -wired access point slower than router
  3. Click Network and Sharing center.Network and Sharing center
  4. Click the Change adapter settings link.Change adapter settings link.
  5. From the Network Connections window, locate & right-click the ethernet connection and select Properties from the context menu.Network Connections window, locate & right-click the ethernet connection and select Properties
  6. Click Configure.Configure
  7. On the Properties window, switch to Advanced; under Property, look for Speed and Duplex.Speed & Duplex
  8. For the Value drop-down, either select Auto-Negotiation or a value higher than the wireless network upload or download speed and click OK.

How does a Wired Access Point affect the Internet speed?

The Wired Access Point doesn’t affect the internet speed provided by your Internet Service Provider (ISP), but it has a crucial role in how the internet is distributed to the devices connected via a wired network.

It provides a direct & stable connection, enabling efficient & high-speed data transmission between the devices & network, and as they have different paths, it can reduce network congestion as well.

So, to combat slow internet speed issues on your devices, ensure you are running the latest version of the operating system and driver.

Furthermore, to avoid the wired access point being slower than the router issue, ensure the ethernet cable you are using is of a higher category, like CAT6, and always stick to simple router settings, which gives you consistent speed.

If you have any suggestions on how you have conquered this slow network connection situation, feel free to mention them in the comments section below.

Fix: All USB Devices Disconnect and Reconnect on Windows 11

If your USB devices keep disconnecting and reconnecting themselves on your Windows 11 computer, this guide can help!

We will discuss the common causes behind the issue along with the expert-recommended solutions to fix it in no time.

Why do all my USB devices keep disconnecting and reconnecting?

  • Loose or damaged USB cables/ports or USB drives with bad sectors.
  • Outdated or corrupted USB drivers could cause connectivity issues.
  • Insufficient power supply.
  • Third-party apps or corrupted system files may conflict with USB devices.

How do I stop my USB devices from disconnecting and reconnecting in Windows 11?

Before engaging in advanced troubleshooting steps to fix the USB hub keeps disconnecting and reconnecting issue, you should consider performing the following checks:

  • Shut down your PC, unplug the power cables, press & hold the Power button for 30 seconds, plug in the power cables, then restart your PC.
  • Ensure the USB port works fine & verify if the the USB drive is compatible with your device.
  • Check for Windows updates, and update your BIOS firmware.
  • Connect the flash drive or external disk to another port or computer to ensure they are not causing the issue.
  • Perform a clean boot and check if you can single out the app causing the issue.

1. Run the Hardware and Devices troubleshooter

  1. Press Windows + R to open the Run dialog box.All USB Devices Disconnect and Reconnect on Windows 11 - hardware and drivers
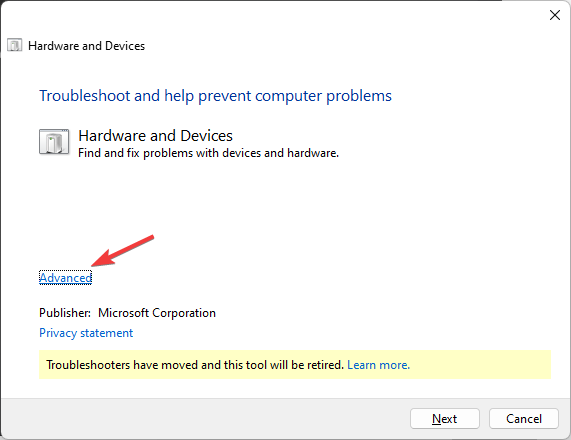
  2. Type the following command and click OK to open Hardware and Devices troubleshooter: msdt.exe -id DeviceDiagnostic
  3. Click Advanced.Advanced -  Hardware and Devices troubleshooter:
  4. Place a checkmark next to Apply repairs automatically and click Next.Apply repairs automatically
  5. Select the device from the list.
  6. Click Apply this fix.Apply this fix
  7. On Restart your PC screen, click Next. Your computer will reboot, so make sure before you click Next save up all your work to avoid losing any data.

Running the Hardware and Devices troubleshooter is the quickest way to fix similar issues like the USB port not working after a power surge.

2. Check the Power Management settings

  1. Press Windows + R to open the Run dialog box.Device Manager Run command - USB devices from disconnecting and reconnecting in Windows 11
  2. Type devmgmt.msc and click OK to open the Device Manager app.
  3. Locate and double-click  Universal Serial Bus controllers to expand it.
  4. Right-click the affected USB driver and choose Properties from the context menu.USB driver and choose Properties - stop my USB devices from disconnecting and reconnecting in Windows 11
  5. On the Properties window, switch to the Power Management tab and remove the checkmark next to the Allow the computer to turn off this device to save power option.Properties window, switch to the Power Management tab and remove the checkmark next to Allow the computer to turn off this device to save power.
  6. Click OK, then restart your computer to confirm the changes.

If you have multiple USB devices connected, repeat the steps for all of them to disable the power-saving option.

3. Update/reinstall the USB driver

  1. Press Windows + R to open the Run dialog box.Device Manager Run command - USB devices from disconnecting and reconnecting in Windows 11
  2. Type devmgmt.msc and click OK to open the Device Manager app.
  3. Locate and double-click  Universal Serial Bus controllers to expand it.
  4. Right-click the affected USB driver and choose Update driver from the context menu.Update driver
  5. Click Search automatically for drivers.Update driver 2
  6. If an update is available, follow the on-screen instructions to complete the process.

Restart your computer and plug in the USB to check if it is still disconnecting and reconnecting on your Windows 11 computer. If yes, then follow these steps to reinstall the device:

  1. On the Device Manager app, locate and double-click  Universal Serial Bus controllers to expand it.
  2. Right-click the affected USB driver and choose Uninstall device from the context menu.Uninstall driver
  3. Next, go to Action, then select Scan for hardware changes to reinstall the driver.Action scan for hardware changes

As per our WR experts, reinstalling the USB drivers can fix various USB-related problems like PC shuts down after connecting a USB device; read this guide to know more.

4. Disable the USB selective suspend setting

  1. Press the Windows key, type control panel, and click Open.Control Panel start menu
  2. Select Large icons for View by and click Power Options.explorer_PSelect Large icons for View by and click Power Options - All USB Devices Disconnect and Reconnect on Windows 11
  3. Click the Change the plan settings link.Change the plan settings link
  4. Click Check advanced power settings.Check advanced power settings.
  5. On the Power Options window, locate and click USB settings to expand it.
  6. Click the USB selective suspend setting and select Disabled for On battery and Plugged in.Disable USB selected
  7. Click Apply, then OK.
  8. Reboot your PC to let the changes take effect.

5. Run SFC & DISM scans

  1. Press the Windows key, type cmd, and click Run as administrator.CMD elevated -All USB Devices Disconnect and Reconnect on Windows 11
  2. Type the following command to scan & verify the integrity of system files and replace the corrupted ones with backup copies stored in a local cache, then hit Enter: sfc/scannowSFCSCANNOW CMD
  3. Copy & paste the following command to restore the system image for Windows OS and press Enter: Dism /Online /Cleanup-Image /RestoreHealthRestore health
  4. Restart your computer to save the changes.

6. Perform an in-place upgrade (Last resort)

  1. Go to the Windows 11 official website and under the Download Windows 11 Disk Image (ISO) for x64 option, select Windows 11 (multi-edition ISO) and click Download Now.Download now ISO
  2. Next, choose language from the drop-down, click Confirm, then click the Download button.
  3. Once downloaded, locate the ISO file, right-click, and choose Mount from the context menu.Mount All USB Devices Disconnect and Reconnect on Windows 11
  4. Now double-click setup.exe file to open the Windows 11 Setup wizard and click Yes on the UAC prompt.Setup file
  5. On the Install Windows 11 dialog box, click Next.
  6. Click on Accept on the license terms page.Accept Setup Windows 11 step1
  7. On the Ready to install page, ensure the Keep personal files and apps option is checked to keep your files. If it is not selected, click Change what to keep and choose to keep files.
  8. Next, click Install.Install

Your computer will restart a few times to complete the process. Once done, you will be greeted with the login screen. Enter your password, reconnect all USB drives, and check if they keep disconnecting.

To conclude, keeping your USB drivers updated, disabling the power saving option, and running SFC & DISM scans can help you resolve the problem, and similar ones like the USB Wi-Fi adapter keeps disconnecting.

Did we miss a method that helped you? Don’t hesitate to mention them in the comments section below. We will happily add them to the list.
Zeus Malware: What is & How to Prevent or Remove it

You’ve probably heard of or encountered malware before, but none comes close to Zeus malware.  For over a decade, this has been one of the deadliest trojans to infect Windows PCs.

In this article, we will explain in detail what Zeus malware is and how to remove it from your computer.

What is Zeus malware?

Zeus malware is a sophisticated piece of software that allows cybercriminals to steal your personal and financial information. It has been prevalent since 2007, and it has evolved over time to become even more dangerous.

How does Zeus malware work?

1. Infection stage

The Zeus malware works by infecting computers through various methods. It can be introduced into systems through email attachments and websites infected with malicious code.

All these entry methods are done unknowingly, as most are camouflaged as legitimate sites and do not need any action from the user. A simple website visit or click on a phishing email will have already introduced malware into your system.

2. Configuration

This is the stage where the malware changes the settings in your system. It can also be referred to as stealth mode since it creeps in quietly and secretly and ensures your antivirus does not flag it off.

Here, the malware also positions itself to control the infected computer and use it to perform distributed denial-of-service (DDoS) attacks on websites or launch other types of cyberattacks.

When the cycle of attacks is launched, it results in the birth of the botnets. The Zeus botnet consists of tens of thousands of infected computers that have been taken over by hackers.

These compromised devices can now perform the attacks on a larger scale. They send spam messages on behalf of criminals who control them remotely through the malware installed on their machines.

3. Data collection

Once installed on your computer, the Zeus malware will begin scanning all of the files in order to determine what type of data it should collect from the infected computer.

The malware does this by recording what you type into your browser and sending this information back to the attacker. This allows them to see when you log into your bank account and what password you use for each account.

Zeus also records which websites you visit. It then uses this information to target new malware by hijacking the site. 

4. Transmission and command execution 

With the data collected, the Zeus malware will transmit this information back to its command-and-control (C&C) server. 

The C&C server then tells the malware what commands to run on the victim’s computer, such as stealing passwords or banking details.

When this occurs, Zeus can intercept a transaction, and the attackers can transfer funds into their own accounts before they reach their intended destination.

The C&C server can also send data back about any new infections it finds on other computers in its network so that the malware creator can use it for future attacks against those machines too.

What are the different types of Zeus Malware?

  • Source code version – Since Zeus is an open-source type of malware, it is made available on the Internet for anyone to download and use. It can be used to create new malware variants or modify existing ones. 
  • Zeus Trojan (Zbot) – This is an older and well-known type of malware that has been around since 2007. It is a banking trojan similar to the Nukebot trojan that steals information from your computer and transfers it to a remote location where the criminals can use it for their own purposes.
  • SpyEye – This version is similar to Zbot in that it also uses keylogging to steal login information from browsers and email programs. In contrast to other Zeus variants, SpyEye doesn’t require its victims to install anything on their computers. 
  • Gameover Zeus (GOZ) – Also known as P2P Zeus, is one of the most successful pieces of malware ever created because it was hard to track. This is because it uses peer-to-peer networks to communicate with its command-and-control servers.
  • Ice IX – Uses two different methods to infect computers: phishing emails or drive-by downloads on websites. It was also multi-purpose as it could launch botnets and still intercept and steal online credentials.

Although there were other types of Zeus malware, like Shylock, and Carberp, they weren’t as predominant as the highlighted ones.

What is the impact of Zeus Malware?

1. Infected computers worldwide

Zeus infected millions of computers worldwide, including banks, government agencies, and many other businesses. According to researchers, as of 2014, up to 1 million devices were infected with Zeus’ most dangerous variant-Gameover Zeus (GOZ).

The United States accounts for a large portion of infected computers, with a whopping 25% of the overall numbers. This is likely due to the popularity of Windows XP, which was being widely used at the peak of Zeus penetration.

When you think of how many computers there are in the world right now compared to back then, it puts these numbers into perspective. 

2. Banking credentials stolen

The Zbot was notorious for attacking banking credentials. According to reports, 74,000 FTP credentials were compromised. Top industry names such as Amazon, Oracle, and ABC among others were hard-hit.

What’s more, a lot of people share computers especially at work and businesses were topping the list of compromised devices. This means it was a double hit as individuals accessed both personal and business accounts.

Once a victim’s banking credentials are compromised, the criminal can log in to the victim’s account. Here, they can intercept all transactions and transfer money to their own accounts.

Other than transferring huge sums, they can also change passwords without permission to other related accounts and apply for new credit cards or loans in your name.

3. Millions in funds transferred unlawfully

Zeus has been responsible for stealing funds from both individuals and businesses worldwide. According to court documents filed in the United States, although there’s no exact figure of the amount of money stolen from the compromised accounts, the number is in millions of dollars.

These fraudulent activities have an impact on the economy as individuals and businesses are set a few steps back. Some are still in debt to date as a result of the Zeus malware.

How was the Zeus botnet created?

Zeus botnets are a collection of compromised computers. The attacker uses these infected computers to perform a wide range of tasks on your computer without your knowledge or permission. This is unlike the MEMZ virus that renders your PC inoperable.

1. Drive-by download attack

A drive-by-download attack is a type of attack that occurs when a user visits a website that contains malicious code. It’s infamously known as a drive-by because malicious code is embedded in an otherwise legitimate website.

The user does not have to click on anything in order for an infection to occur. It just happens automatically. The attack can be carried out by exploiting vulnerabilities in web browsers and browser plugins.

Once the Zeus malware has been downloaded, it can run various actions on your computer, such as installing malware, capturing keystrokes and passwords, or changing your browser settings.

2. Outdated software & weak passwords used

This is by far one of the easiest ways to launch an attack. Using weak passwords that anyone can easily figure out and not updating your software poses security risks.

The Microsoft Windows operating system is still the world’s most widely used operating system to date. Because of its widespread numbers, Zeus was able to take advantage of the users who do not take seriously the associated risks with running an end-of-support Windows system.

Hackers leveraged these security vulnerabilities and took control of PCs remotely. Using these techniques, they were able to install malware onto computers without their owners knowing about it

3. Phishing emails & legitimate websites hijacked

Attackers use phishing emails to trick users into downloading malicious software. The emails are usually disguised to come from someone you know or a trusted company. They often include links to websites that look like legitimate sites, such as your bank.

Once the victim clicks on the attachment or link, their computer will be infected with malware from a remote server. The hacker would then use this computer as part of their botnet to send out more phishing emails or steal information from other people’s computers.

How can I prevent or remove a Zeus Trojan?

The Zeus malware is not only a threat to your credit cards and personal identity but also can lead to further damage across connected networks.

Due to its reach and ability to prey on unsuspecting users, the consequences can be severe if an infected machine has access to your router or other devices on your local network.

The best course of action for most PC users is to use common sense and follow the rules regarding internet safety. However, the problem is that so many users ignore basic security principles and maintenance practices.

So, if you’re careless, at least install comprehensive antivirus software on your computer. If you already have antivirus software installed, ensure it’s up-to-date. You can always double-check before opening any email attachments or websites to ensure maximum protection against viruses and Trojans.

For a more proactive approach to getting rid of the Zeus virus and other like malware, check out our detailed article.

Knowing what you do now about the Zeus malware, what steps toward safeguarding your device have/will you take to ensure you’re not a victim? Let us know in the comment section below.

Solved: App is Opening on the Wrong Monitor in Windows 11

If you are working with a multi-monitor setup and your app keeps opening on the wrong monitor in Windows 11, this guide can help!

We will discuss a few practical methods to turn off multiple displays on Windows so that your app opens on the primary display.

Why are programs opening on my second monitor?

  • Previously used the program on the second monitor & closed it while the app was on it.
  • Display settings in the OS might be configured to open new programs on that screen.
  • Reconnected the secondary monitor or changed the monitor configuration.
  • Some apps have glitches or bugs, which could cause them to open on a wrong monitor, irrespective of the settings.

How do I make a program open on a specific monitor Windows 11?

Before engaging in advanced troubleshooting steps to turn off multiple displays and focus on the preferred one, you should consider performing the following checks:

  • Set up & reconnect the monitors to your computer and ensure your Windows version and drivers are up to date.
  • Ensure you have signed in as an administrator.
  • Press Windows + Shift + Left/Right to move the open windows to different monitors in the same position.
  • Open the app, drag or move the app to the primary monitor, then click the red cross to close the app. Now reopen the app.
  • Press Windows + P and select Second screen only; once the app is on the specified monitor, press Windows + P again, then select PC screen only.

1. Modify the display settings

  1. Press Windows + I to open Settings.
  2. Go to System, then click Display.System display -app is opening on the wrong monitor
  3. Locate Multiple displays and click the drop-down to get more options.
  4. Place a checkmark next to Remember window locations based on monitor connection.Remember window locations based on monitor connection.
  5. Next, click Identify to know the screen number and choose Show only on 1 or Show only on 2 according to the number displayed for the desired monitor.click Identify to know the screen number and choose Show only on 1 or Show only on 2
  6. Disconnect the cable of the secondary display and connect again.

Checking the display settings could also help you fix issues like Windows 11 thinks you have two monitors; read this guide to learn more about it.

Checking your display adapter driver is also a good idea in this case, and it can be easilydone with the help of a professional driver updater.

2. Disable the Remove a display from desktop option

  1. Press Windows + I to open the Settings app.
  2. Go to System, then click Display.System display -app is opening on the wrong monitor
  3. Go to the Advanced display option.Advanced display - App is Opening on the Wrong Monitor
  4. Locate Select a display to view or change its settings, and choose the monitor that you want to remove or restore.Select a display to view or change its settings, and choose the monitor that you want to open the app on.
  5. Next, you can also locate the Remove display from desktop and turn it on if you have Enterprise and Pro editions for Windows.

2. Resize method

  1. Launch the app and use the Restore button to put the app in the windowed mode (not maximized or minimized).use the Restore button to put the app in the windowed mode - App is Opening on the Wrong Monitor in Windows 11
  2. Drag and drop the application to the primary monitor or the monitor you want.
  3. Next, without minimizing or maximizing the app, close it and ensure the app is not running in the background.
  4. Now, relaunch the app to see if the issue persists. If it is still there, repeat Steps 1 and 2, and while closing the app, hold the Ctrl key. Now, check if the app opens on the correct monitor.

3. Re-enable the secondary monitor

  1. Close the app, and press Ctrl + Shift + Esc to open Task Manager, locate and right-click any process related to the app, then select End process.Task Manager, locate and right-click any process related to the app, then select End process - App is Opening on the Wrong Monitor in Windows 11
  2. Press Windows + K to access the Cast options.
  3. Locate the display, click Disconnect, then reboot your computer.Disconnect - apps opening on the wronmg monitor on windows 11
  4. Once your computer is up, relaunch the app on the specific monitor, then exit the app.

Now, check if the app is opening on the preferred monitor, and if not, then you need to remove the secondary monitor again; follow these steps to remove all the monitors:

  1. Press Windows + R to open the Run dialog box.Device Manager Run command -App is Opening on the Wrong Monitor in Windows 11
  2. Type devmgmt.msc and click OK to open Device Manager.
  3. Go to View, then click Show hidden devices.View, then click Show hidden devices.
  4. Locate Monitors and double-click to expand.
  5. Right-click the monitors listed one by one and select Uninstall device except for the primary monitor.App is Opening on the Wrong Monitor in Windows 11
  6. Restart your computer to reinstall the device and launch the app to check if the issue persists.

4. Make the preferred monitor your primary display

  1. First, exit the app and close the processes related using Task Manager. Press Windows + I to open the Settings app.
  2. Go to System, then click Display.System display -app is opening on the wrong monitor
  3. Click the specific monitor on the Display page to select it, then go to Multiple displays and expand it, then place a checkmark next to Make this my main display. Display page, then go to Multiple displays and expand it, then place a checkmark next to Make this my main display.
  4. If you want to choose primary display, the option for it is already selected and grayed out by default. However, if you are choosing the secondary monitor as the preferred one, make sure you select it.

This can allow you to choose the primary monitor to prioritize the screen for your apps; read this guide to know more.

5. Customize the Taskbar settings

  1. Right-click anywhere on the desktop and select Personalize from the context menu.Persoanlize - open all apps on wrong monitor on Windows 11
  2. Select the Taskbar option.Select the Taskbar option
  3. Click Taskbar behaviors to expand it, and for the When using multiple displays, show my taskbar apps on option, select Taskbar where window is open from the drop-down list.select Taskbar where window is open from the drop-down list

6. Use PowerToys

  1. Press the Windows key, type microsoft store, and click Open.Microsoft Store -App is Opening on the Wrong Monitor in Windows 11
  2. Locate PowerToys and click Install.Click Install
  3. Launch PowerToys, go to FancyZones, then select Launch layout editor.PowerToys.Settings_PowerToys, go to FancyZones, then select Launch layout editor.
  4. On the FancyZones Editor window, select the specific monitor, configure the layout as a column or row as per your needs.select the specific monitor, configure the layout as a column or row as per your needs
  5. Now drag the PowerToys Settings to every monitor and follow Steps 3 & 4 for all monitors.
  6. Next, locate Windows; under Windows behavior, place a checkmark next to the Move newly created windows to their last known zone option. Windows; under Windows behavior, place a checkmark next to the Move newly created windows to their last known zone
  7. Now drag the app to the desired screen and press and hold the Shift key to assign it when you are on that screen, then release the window into that screen.

Now, when you close and open the app, it will open into the last zone you have assigned it to, which in this setup is your screen.

 If you want to move apps to another screen in Windows 10 when using multiple screens, read this guide.

To conclude, once you connect a secondary monitor, you must check the display settings to ensure you have the preferred screen selected to open apps or perform certain actions.

Also, you can always press Windows + K to open Cast options and click Disconnect to turn off multiple displays on Windows 11.

And if you are a passionate gamer worried about the same problem, don’t hesitate to resolve game opening on the wrong monitor issue right away as well.

We hope the solutions in this article helped you with the apps opening on the wrong monitor on Windows 11 issue. Feel free to mention your thoughts in the comments section below.

AI-powered Skills is coming to Microsoft Viva: Top 3 features

Microsoft is releasing a new service to Microsoft Viva, AI-powered Skills. The new Skills service is aimed at HR departments and organizations looking to hire fresh talent, help them grow, and manage them.

In today’s fast-paced talent marketplace, the ability to identify dynamic skillsets (a set of abilities that is adaptable, flexible, and continually evolving) gives companies a more robust picture of the talent profile, going beyond the traditional norms of job title and resume data. However, this transition to a skill-based organization can be challenging, often hindered by low employee engagement in building and updating skills. Recognizing these obstacles, we are excited to introduce Skills in Viva, a new AI-powered service included in the Microsoft Viva Suite to help organizations grow and manage talent.

Microsoft

Skills will come to Microsoft Viva at the end of 2023, at no additional cost, and the service will make use of AI to scout, and look up for individuals that fit a company’s needs. More specifically, it will harness the power of Microsoft Graph, the capabilities of the Viva platform, and LinkedIn Skills Graph to:

  • Create real-time signals from 148 industries and over 200 countries.
  • Map the global skills landscape, including how 39,000 unique skills relate to each other, to jobs, and to learning content.

Microsoft Viva Skills: Top 3 features

Microsoft revealed that Viva Skills will focus on 3 core scenarios in its initial phase:

  1. Strategic Workforce Planning: HR departments and CEOs can use this Skills-powered planning to seek and employ individuals that best fit the company’s goals. Via Viva Insights, Skills will be able to provide multiple metrics, including skill strengths and weaknesses across the organization, to come up with the best strategic planning for employment.
  2. Upskilling and reskilling: the new service will allow individuals from an organization to keep track of their skills, and learn new ones proactively. The AI-powered features will help them search for new courses and learn new abilities in a personalized manner.microsoft viva skills
  3. Skill Discovery in the Flow of Work: AI will suggest skill recommendations based on the current projects an individual is working on. When suggested, the employee can confirm them, add them to their bio, and manage them further. All of these skills will then appear in the individual’s Microsoft 365 profile.

Speaking of Microsoft 365, Copilot is making its way there, starting this November. And the AI tool will also come to OneDrive, Microsoft Teams, and OneNote too. So it shouldn’t be a surprise Microsoft Viva is getting an AI-powered service too.

But what do you think about it? Is AI the best assistant someone in the workforce can have at the moment? Let us know your opinions.

How to Use iPad as Second Monitor on Windows 11

Devices running the iPadOS are not meant to natively connect to Windows as extended displays. And that’s where third-party apps come into the picture. The experience won’t be as seamless as a Windows-compatible monitor, but it’s doable.

If you want to transfer data between an iPad and Windows 11 PC, use the lightning USB cable that came along with the former. The same goes for an iPhone. You may be asked to confirm data sharing on the Apple device. Tap on Trust or Allow in the prompt, and you are good to go!

How do I use my iPad as a second monitor for my Windows 11 computer?

1. Try Splashtop’s Wired XDisplay (for wired connection)

Tip icon Tip
You will need the original Apple lightning cable to set up a connection. Issues may arise when using one manufactured locally. 

1.1 Install Splashtop in Windows 11

  1. Go to Splashtop’s official website, and download the Wired XDisplay tool for Windows.Wired XDisplay
  2. Run the downloaded setup and follow the on-screen instructions to complete the installation.
  3. Once done, run the app on the Windows 11 PC.Wired XDisplay

1.2 Download Splashtop on iPad

  1. Open the App Store on your iPad, and search for Splashtop Wired XDisplay HD.
  2. Tap on Get to download the app.wired xdisplay to use ipad as second monitor windows 11
  3. Once done, tap Open to run the app.

1.3 Use iPad as the second monitor

  1. Make sure the Wired XDisplay app is running on both devices.
  2. Now, connect the two using the original USB cable that came along with the iPad when the screen reads so.connect

This way, you can use the iPad as a second monitor in Windows with a cable and absolutely free of cost. The Wired XDisplay tool is a lifetime-free option, but the performance is not as good as Duet Display (next method). Besides, it misses the ability to connect to the iPad wirelessly.   

Remember, Wired XDisplay works more as a mirroring software and won’t extend the display. So, anything on the PC will be available on the iPad, but you won’t be able to use the latter as an extended display.

2. Use Duet Display (for wireless connections)

Note icon NOTE
Duet Display is a paid app, but there’s a free 7-day trial available. We will be using it for the purpose of this guide.

2.1 Install Duet Display on Windows 11

  1. Go to Duet Display’s official website and download the tool. Even for the free version, you will be asked to create a Duet account and provide the card details. Though you won’t be charged for the first 7 days.
  2. Once downloaded, run the Duet Display setup.duet display to use ipad as second monitor windows 11
  3. Click Yes in the UAC prompt.
  4. We recommend you go with the default path and follow the on-screen instructions to complete the process.setup
  5. Run the application, and allow it network access through the firewall.
  6. Sign in to your Duet account.

2.2 Get Duet Display running on iPad

  1. Open the App Store from your iPad’s home screen.app store
  2. Search for Duet Display.
  3. Now, tap the Get button to download the app. If asked, enter the Apple ID password to confirm.get
  4. Once done, run Duet Display on the iPad, and allow it to connect to devices on your local network.
  5. Follow the on-screen prompts, and when asked to create an account, go with Tap here if you already have an account.already have an account
  6. Next, tap on Sign In.sign in to use ipad as second monitor windows 11
  7. Sign in with the credentials you created earlier on the Windows 11 PC.
  8. Again, follow the prompts to complete the initial setup, until you reach the Connect to Your Mac or PC page.

2.3 Set up iPad as the second monitor

  1. Make sure the two devices are on the same network and that Duet Display is running on both.
  2. Go to the application on your iPad and navigate to the Available Desktops tab, denoted by a network icon.network
  3. Identify the available PC, and choose either Mirror or Extend from underneath.extend to use ipad as second monitor windows 11 
  4. It will take a few seconds for things to set up. Windows may lose focus for a while, and you will receive a notification from Duet Display reading, A remote desktop connection has been started.notification
  5. The iPad will now mirror or extend the display. Change the configuration or rearrange the display if required in the Settings app.rearrange display
  6. To turn off the connection, tap the Duet icon on the iPad screen, and then select Disconnect from the list of options.disconnect

This way, you can easily use your iPad as a second monitor in Windows 11 without Sidecar, a feature native to the Apple ecosystem to mirror or extend a Mac’s display to an iPad.

Remember, Duet Display is your best available option when setting a remote desktop connection or extending display in Windows, Mac, iPad, or Android. Also, you can similarly use the iPad as a second monitor in Windows 10.

Why won’t my Windows computer recognize my iPad?

When Windows is not recognizing your iPad, make sure you have tapped on Trust or Accept in the confirmation prompt that appeared on the Apple device. If not, reconnect the two and confirm it this time.

In case that doesn’t work, you will need to update the iTunes software, connect to a different port, or replace the cable altogether. 

Once things are up and running, get a reliable iPad file Manager for Windows to ensure seamless data transfer.

Also, you can mirror your iPad (or iPhone) screen to Windows. Do try it out if you haven’t yet!

For anyone wondering how to use the iPad as a second monitor in Windows 11 without an app, there is no option available. But many were surprised to know that you can use an iPhone as webcam in Windows 11. 

And that’s not all! Users on the Android ecosystem can use the phone as a keyboard for PC or use your tablet as a drawing pad.

While this brings us to the end of the guide, we know there will be more questions. Drop a comment below, and we will respond to each at the earliest.

Fix: XP-PEN is Not Working With Windows 11

While compatibility is often a problem when we connect two devices, the number of users reporting that XP PEN is not working in Windows 11 is staggering. For some, the XP-PEN screen is not working, while others have trouble with the stylus.

Based on our research, more often than not, the problem lies at the user’s end. And it’s easy to get things up and running!

Why is my XP-PEN not working with Windows 11?

The most common underlying cause is corrupt or outdated hardware drivers. It includes both the XP-PEN drivers and the one for the USB port it’s connected to.

Also, outdated firmware, issues with the connection, or recent changes to the PC can lead to XP-PEN not being detected in Windows. Besides, a few found the problem to appear only after the computer wakes up from sleep, which should be addressed in future updates.

How do I get my XP-PEN to work with Windows 11?

Before we start with the slightly complex solutions, try these quick ones first:

  • Restart both the computer and the XP-PEN graphics tablet.
  • Check for all available Windows and XP-PEN firmware updates and download them. You may have to request XP-PEN support for the latest firmware version, in case one is not available yet.
  • Lower the XP-PEN drawing tablet’s resolution. For a few, setting it to 720 did the trick!
  • Check for improper connection. If connecting wirelessly, re-establish the connection. Also, you could use the USB cable if one came along with the tablet. Connect to a USB 3.0 port.

If none work, move to the fixes listed next.

1. Update the tablet drivers

  1. Disconnect the XP-PEN device from the PC.
  2. Head to XP-PEN’s driver download page, and select your drawing tablet from the list.driver download
  3. Click the Download button for the latest version under Windows drivers. The driver version will be different depending on the model and time of download.download driver to fix xp pen not working windows 11
  4. Right-click on the downloaded file, and select Extract all.extract all
  5. Go with the default path, or click Browse to choose another one, and then click Extract.set path
  6. From the extracted files, run the driver setup.
  7. Click Yes in the UAC prompt.
  8. Follow the on-screen instructions to complete the installation process. Though there’s the option to customize, we recommend going with the default installation settings.install driver to fix xp pen not working windows 11
  9. Once done, restart the computer, connect the XP-PEN tablet, and check whether the problem is resolved.

When XP-PEN is not working in Windows 11, it could be the outdated or corrupt drivers to blame. All you need to do is install the latest correct drivers for XP-PEN1!

If that manual method doesn’t work, use an effective driver update software, such as Outbyte Driver Updater, that can identify all available devices and automatically download the latest drivers.

2. Change XP-PEN’s power management settings

  1. Press Windows + X to open the Power User menu, and select Device Manager from the list of options.
  2. Expand the Human Interface Devices entry, right-click on the XP-PEN tablet, and select Properties.properties
  3. Now, go to the Power Management tab, untick the checkbox for Allow the computer to turn off this device to save power, and click OK to save the changes.change power settings to fix xp pen not working windows 11

3. Prevent the computer from going to sleep mode

  1. Press Windows + S to open Search, type Control Panel in the search bar, and click the relevant result. 
  2. Click on System and Security.system and security
  3. Now, click Change when the computer sleeps under Power Options.change when the computer sleeps
  4. Select Never from the dropdown menu for Put the computer to sleep under both On battery and Plugged in, and then click on Save changes.disable sleep to fix xp pen not working windows 11

4. Disable Windows Ink Workspace

  1. Press Windows + R to open Run, type regedit in the text field, and hit Enter.regedit 
  2. Click Yes in the prompt that appears.
  3. Go to the following path or paste it into the address bar and hit Enter: HKEY_LOCAL_MACHINE\SOFTWARE\Policies\Microsoftpath
  4. Right-click on the Microsoft key in the navigation pane, select New, choose Key from the flyout menu, and name it WindowsInkWorkspace.key 
  5. Right-click on the empty portion, hover the cursor over New, choose DWORD (32-bit) Value, and name it AllowWindowsInkWorkspace.
  6. Now, double-click the newly created DWORD.
  7. In the Value data field, enter 0, and click OK to save the changes.0 to fix xp pen not working windows 11
  8. Restart the computer and check whether XP PEN now starts working in Windows 11.

5. Uninstall the problematic Windows update

  1. Press Windows + I to open Settings, go to Windows Update from the left pane, and click on Update history.update history
  2. Scroll to the bottom and click on Uninstall updates.
  3. Click the Uninstall button next to the update that first triggered the issue.uninstall to fix xp pen not working windows 11
  4. Again, click Uninstall in the confirmation prompt.

Several users found out that the KB5006363 update leads to XP PEN not working in Windows 11. And uninstalling the update works!

This also helps when XP-PEN is detected as a keyboard.

6. Perform a system restore

  1. Press Windows + R to open Run, type rstrui.exe in the text field, and click OK.
  2. Select Choose a different restore point, and click Next to proceed.restore point
  3. Pick a restore point created before the problem first appeared, and click Next.restore
  4. Verify the restore details, and click Finish to start the process. 
  5. Wait for the restore to complete. It may take an hour or more.
Tip icon Tip
Though not the most viable solution, if you recently upgraded to Windows 11 and have been facing problems ever since, roll back to Windows 10. This has worked well for users, but we wouldn’t recommend downgrading to the previous iteration. 

Remember, when XP-PEN is not working in Windows 11, it’s usually the device driver, conflicting components, misconfigured power settings, or compatibility issues to blame. And they are all easy to fix!

Once you have things up and running, start using an XP-PEN drawing software for Windows to get the best experience!

For any queries or to share what worked for you, drop a comment below.

Access Point Temporarily Full: What it Means & How to Fix

If you’re having trouble connecting to a wireless access point, or it seems like the signal is weak or, the access point may be temporarily full. This can happen if the AP is overloaded with too many clients or taking too long to process packets from existing clients. 

Here’s how to fix it:

How do I fix the router access point temporarily full error?

Before you dive into troubleshooting, try the following: disconnect unnecessary devices from the router, check with your ISP about your modem’s IP, power cycle the router, and update its firmware while plugging in via Ethernet.

1. Raise the device limit

If too many devices are trying to access the same network, it’s easy for your access point to reach its capacity quickly. This is most common with older routers and modems because they typically only support a handful of clients.

However, be cautious: adding more devices on a weak connection can severely degrade your Wi-Fi performance, leading to connection issues.

2. Change your router’s channel

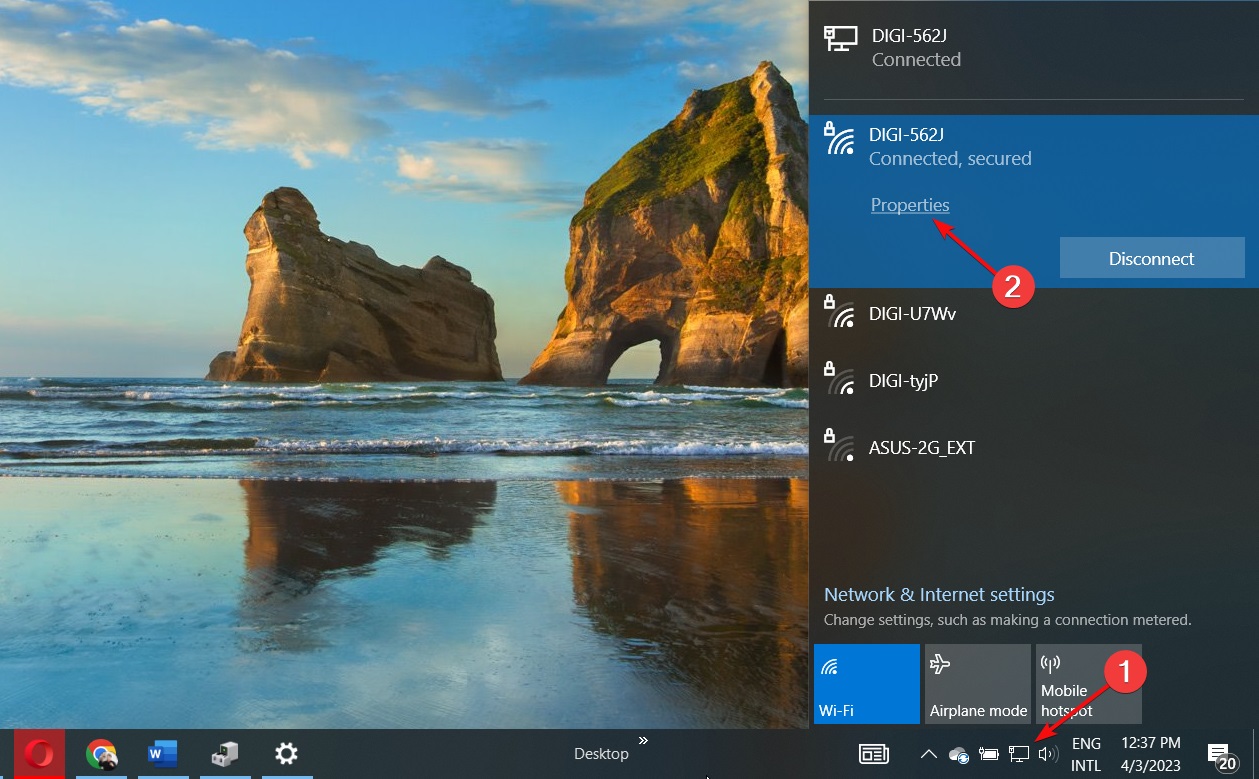
  1. Click on the Network icon on your taskbar, select your Wi-Fi connection, and click on Properties.
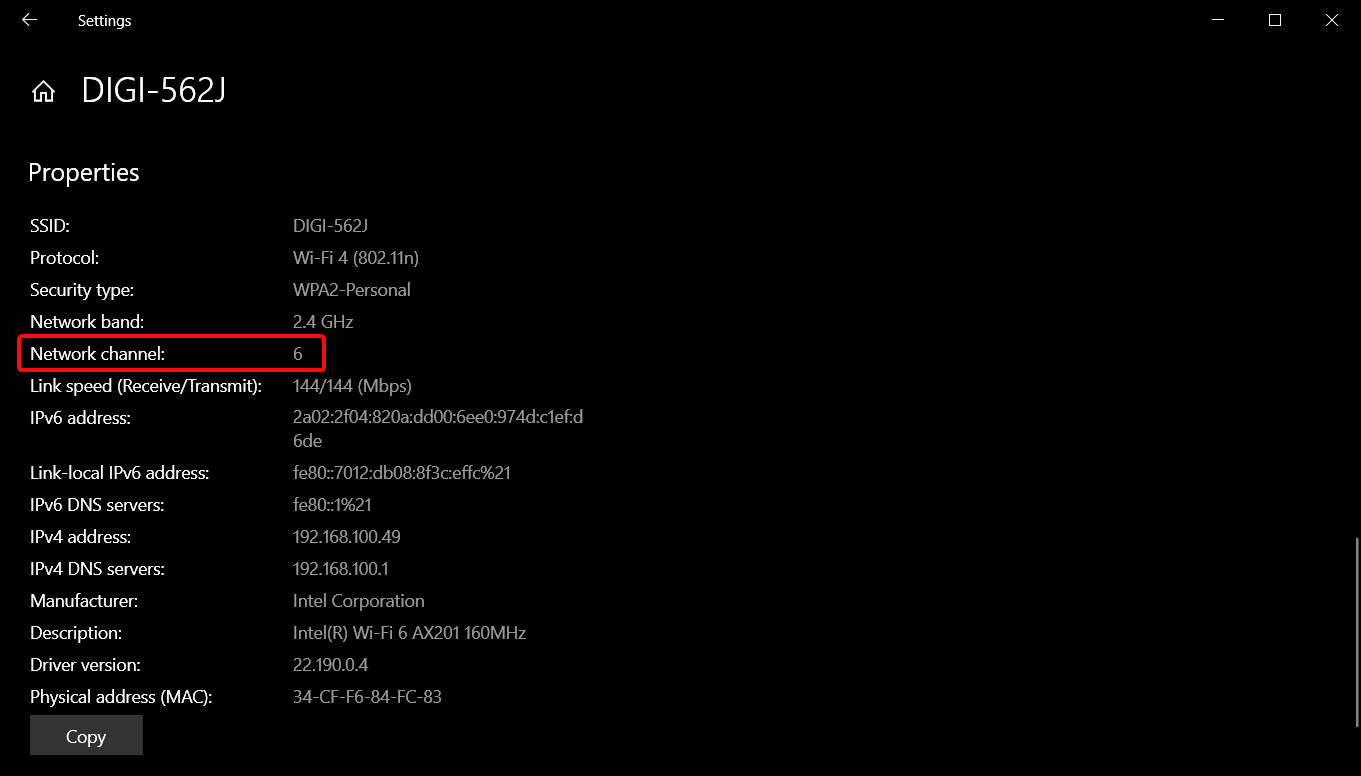
  2. Now, scroll down and you should see the Network channel for your Wi-Fi connection.
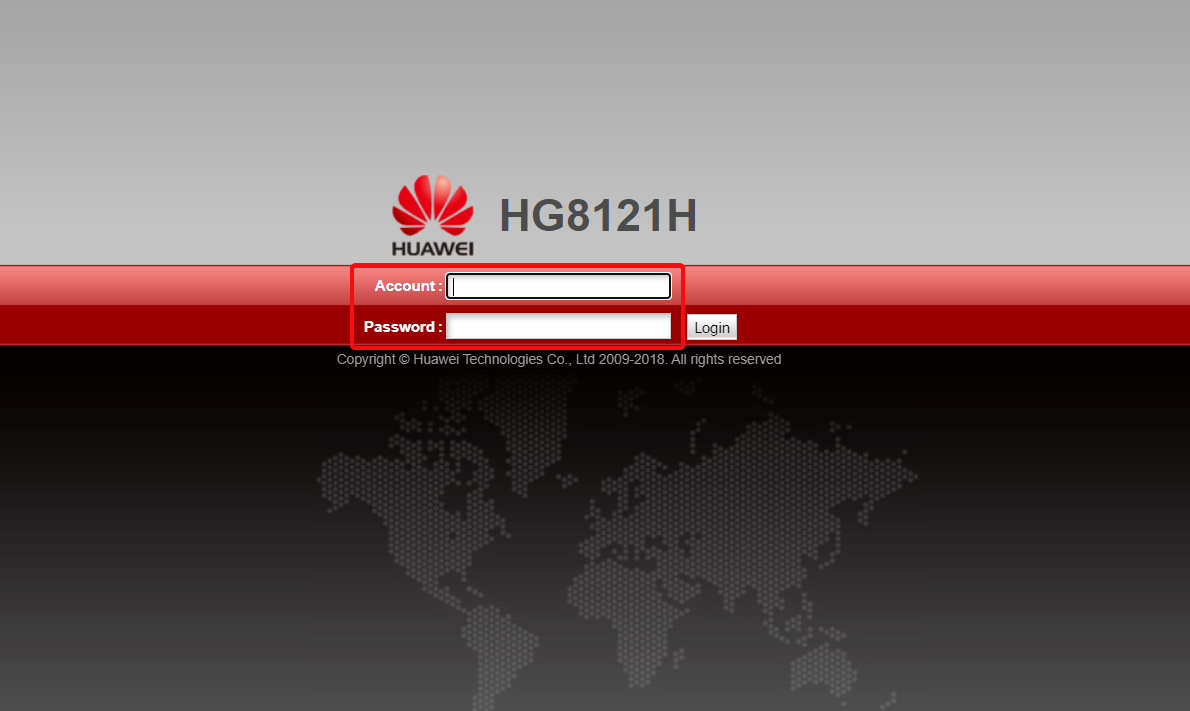
  3. Navigate to your browser and log into your router with the correct credentials. You can find that info on the router itself or on the manual of the router.
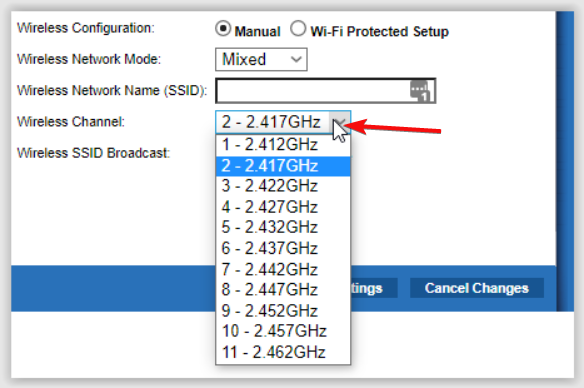
  4. Go to the Wireless settings of your router and change the router channel to a different one from the default. If you’re using a dual-bound router, make this setting for both bands (2.4GHz and 5GHz).

New devices may flock to the only available channel if it is saturated and can’t accommodate more clients. This can easily cause an overlap and create a channel conflict.

3. Change your network band

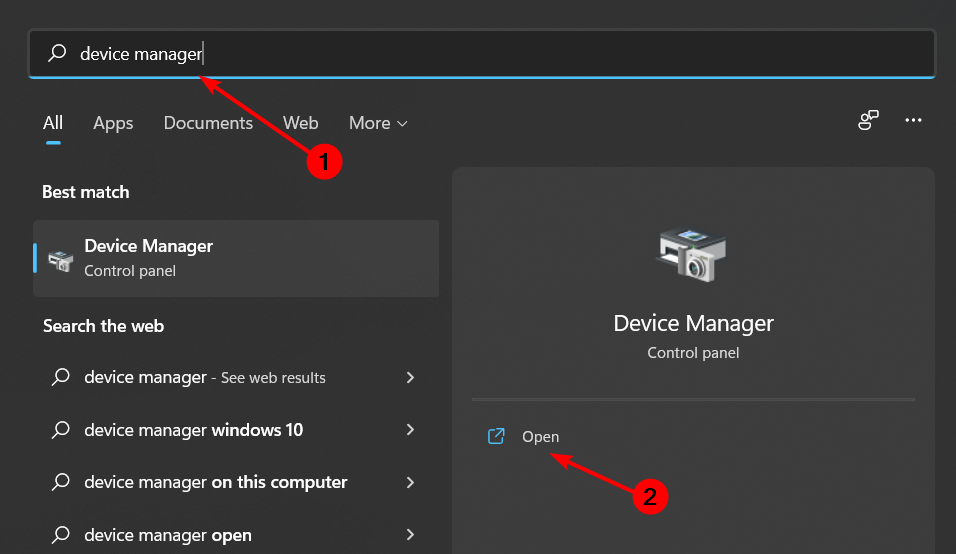
  1. Click on the Start Menu icon, type Device Manager in the search bar, and click Open.
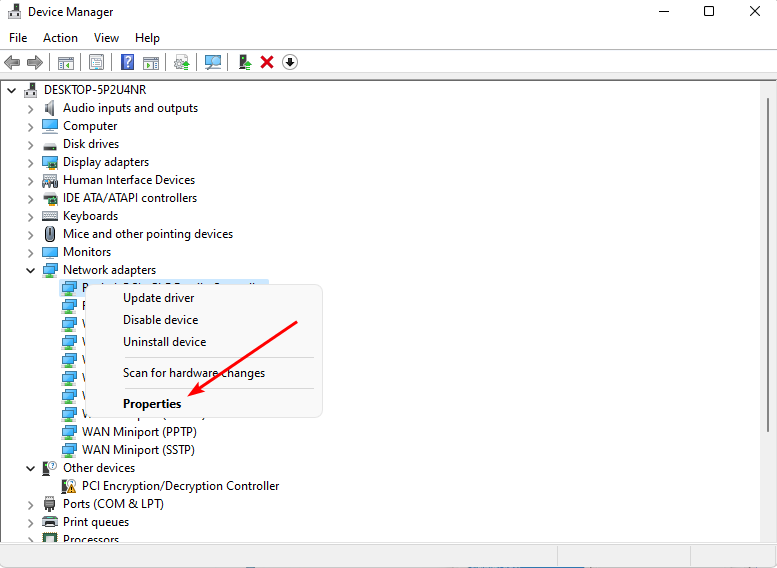
  2. Navigate to Network adapters and double-click to expand.
  3. Right-click on your network adapter and select Properties.
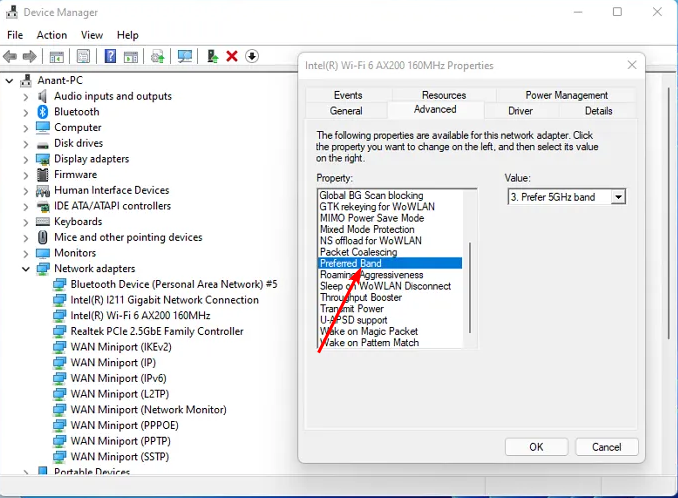
  4. Click on the Advanced tab and locate the Preferred Band.
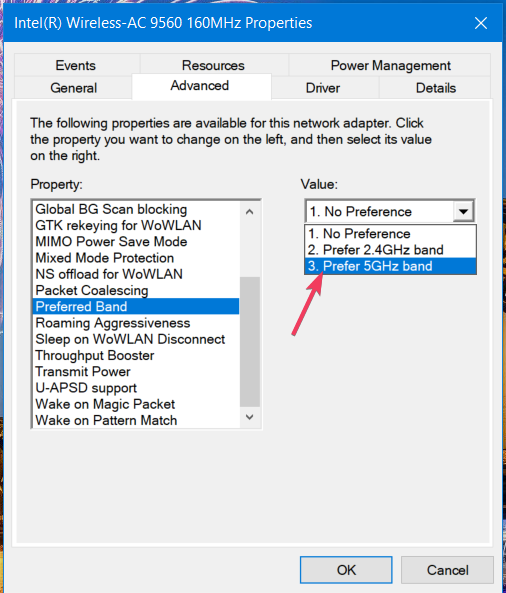
  5. In the Value drop-down menu, select Prefer 5GHz band or the 2.4GHz band then hit Enter.
  6. Restart your PC.

4. Set a static IP address

  1. Start by finding your device’s IP address.
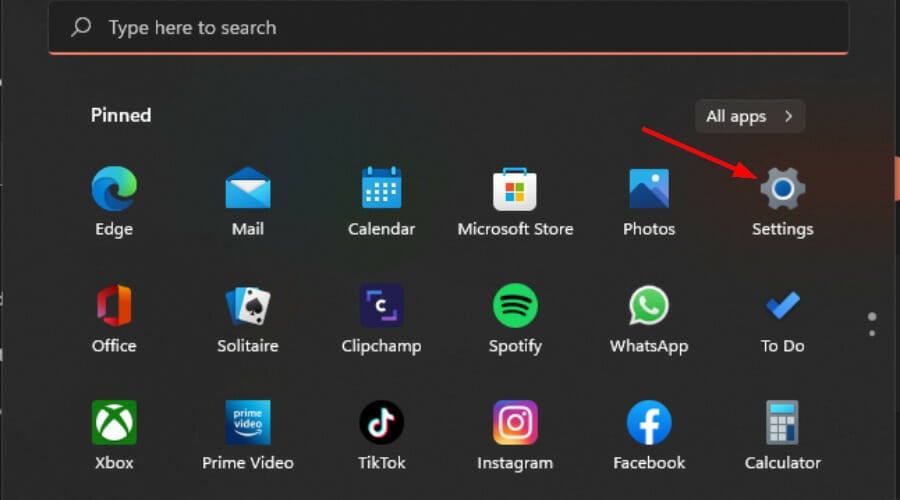
  2. Press the Windows key and click on Settings.settings windows
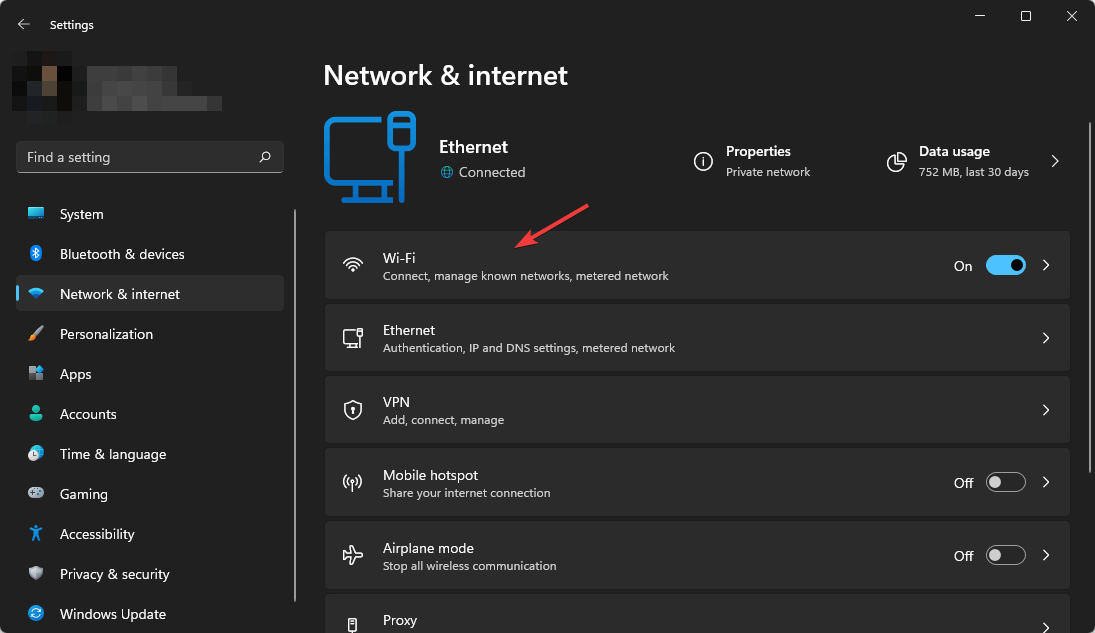
  3. Navigate to Network & internet.network and internet settings
  4. Click on Wi-Fi and find your current connection.clicking wifi settings win11
  5. Click on Edit IP settings and select Manual settings.edit IP settings windows
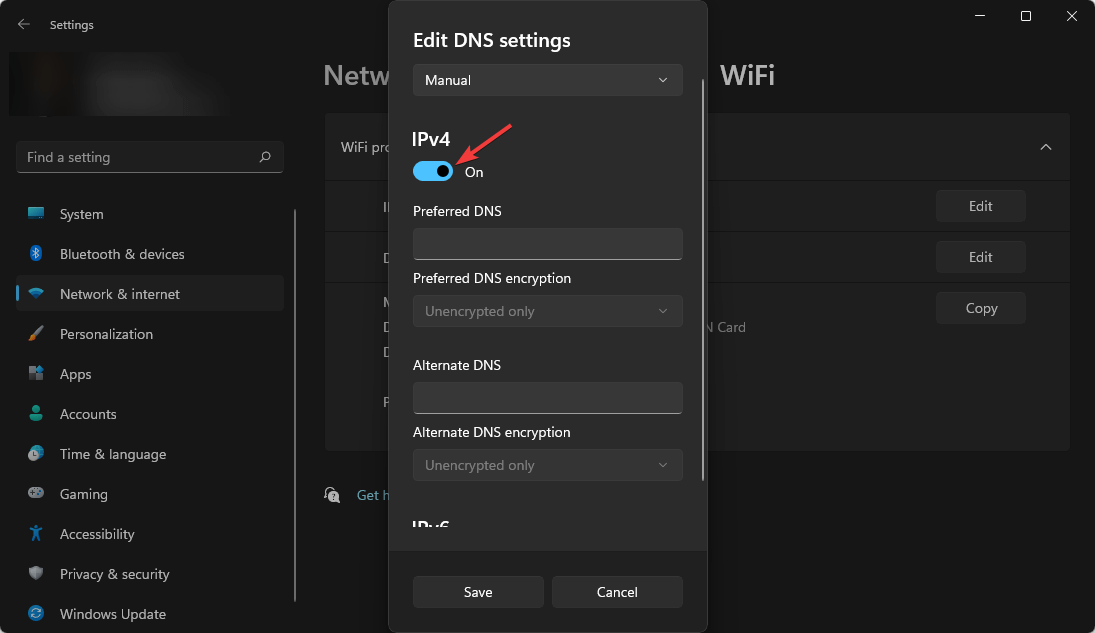
  6. Toggle on the IPV4 button.enabling ipv4 dns win11
  7. Set a static IP address as found in 1 above and click the Save button.

When you configure devices on your network to use specific IP addresses, they can always connect even in times of unexpected power outages.

5. Increase security

If you’re using an open network, the best way to block all outside traffic is to prevent clients from accessing the Internet. This can be done by adding a password, MAC filtering, and/or enabling encryption.

If that’s not enough, consider installing a firewall to block unauthorized access attempts.

The lifespan of a wireless access point varies based on usage, manufacturer quality, and environment. High-quality APs can last up to 5 years, while lower-quality models may only last a year or less.

If your access point is reaching the end of its life, you might experience connection issues. If that’s the case, consider getting new ones.

And if the access points are proving to be a hard nut to crack, consider a Wi-Fi mesh. Nevertheless, for problems that aren’t related to the age of your hardware, the troubleshooting steps above should help you fix it.

Have you managed to fix this error? Let us know which solution worked best for you in the comment section below.

Solved: Microsoft Designer Keyboard Not Pairing

Some of our readers complained about the Microsoft Designer Keyboard not pairing with their devices. In this article, we will go through all the methods tested by the WR hardware specialists to fix this problem quickly.

Why is my Microsoft Designer keyboard not connecting? 

  • The Fn key is locked, and you can’t access the Bluetooth function on the keyboard.
  • Wireless keyboards have rechargeable or replaceable batteries and if the Microsoft Designer Keyboard doesn’t have enough power, it won’t pair.
  • You already paired the keyboard to 3 devices and can’t use it on one more.
  • The Bluetooth version on your device is lower than 4.0 so the keyboard is not compatible with it.

What can I do when my Microsoft Designer keyboard is not pairing?

First, try performing several troubleshooting steps to exclude some potential problems:

  • Make sure that the keyboard has enough power. Microsoft Designer Compact Keyboard is powered by four coin-cell (C2032) batteries. You can replace them if they are depleted.
  • Check if you paired it with other devices and unpair it from at least one of them.
  • Verify if the keyboard doesn’t have any hardware issues and keep it close to the device you are trying to pair it with.

1. Make sure you are following the right pairing instructions

  1. Turn on the power button under the Microsoft Designer Keyboard.
  2. The keyboard should be in pairing mode, but if it’s not, press the Bluetooth key (the F1 key is the pairing button) on the keyboard for 5 seconds. The Bluetooth light will start blinking, meaning the keyboard is in pairing mode.
  3. Now, on a Windows 11 PC, go to Settings > Bluetooth & devices and ensure Bluetooth is turned On, then click on Add device.
  4. On a Windows 10 PC, go to Settings > Devices, turn on Bluetooth, and click on Add Bluetooth or other device.
  5. Select Microsoft Designer Keyboard from the list to complete the pairing.

From the tests that our Windows Report hardware specialists performed, following the pairing procedure from the instructions manual worked flawlessly.

However, if you have paired the keyboard to 3 devices already, that’s the maximum you get so you need to unpair it from one of the devices if you want to pair it with a new one.

2. Disable the Fn key

Another problem that our colleagues at Windows Report found is that the Microsoft Designer Keyboard won’t pair if the Fn key is activated (the button is lit) because the pairing button won’t work anymore.

So, disable the Fn key by long pressing it or hold the Fn key pressed and press Caps Lock until it’s no longer lit and try pairing the keyboard again. 

3. Use the Mouse and Keyboard Center app

  1. Go to the Mouse and Keyboard Center download page and get the right version for your OS.
  2. Install the app and make sure to include the diagnostics because it may help you troubleshoot the problem.
  3. The app supports Microsoft Designer Compact Keyboard, and if the device is set on pairing mode, the app will identify your keyboard.
  4. You may also map some of the keys and functions of the keyboard.

Keyboard Center will also provide you with a list of devices that you have paired it with so you can check if you are using it on 3 devices already.

Other Microsoft Designer Keyboard problems you may encounter

  • The PC is pairing with the mouse but not the keyboard – If the Microsoft Designer Keyboard is not working check if it’s turned on, check its batteries, and make sure that the Fn key is not lit.
  • Microsoft Designer Keyboard not discoverable – If you’re using a USB receiver, try removing it and pair it without it on another device. If you succeed, then check if the Bluetooth receiver is compatible and replace it with a Bluetooth 4.0 one.
  • Microsoft Designer Keyboard is not switching between devices – To switch Microsoft Designer Keyboard between devices, you need to press Fn + F1, but if the Fn key is lit, the hotkey won’t have the desired effect. Unlock the Fn key by long pressing it or press Fn + Caps Lock to unlock it first, then try again.

Can I reset the Microsoft Designer Keyboard?

To reset Microsoft Designer Keyboard, turn it off, from the power button on the bottom, take out the batteries, and press some keys to drain off the residual power.

Leave it like that for 10 minutes, then insert the batteries (new ones if available) and turn on the keyboard. It should start in pairing mode.

To summarize our guide, our WR test team managed to pair the Microsoft Designer Keyboard just by following the right pairing procedure. However, make sure that the device you’re pairing has a working Bluetooth 4.0 connection, the keyboard is powered and the Fn key is not lit.

Also, like any other Bluetooth device, Microsoft Designer Keyboard has a short range of action so before hitting that pairing button, make sure it’s close to the device you want to pair it with and with no obstructions between them.

That’s it, and we hope that our guide helped you fix the Microsoft Designer Keyboard pairing problem.

We also have a complete guide on how to fix Bluetooth keyboard pairing issues that might also help.

If you have any other questions or suggestions, feel free to use the comments section below and let us know about them.

Wacom vs XP-PEN: Which One’s Better and Why?

Wacom vs XP-PEN, that’s the question on everyone’s mind. Given the two are significantly different in some aspects, the question makes all the more sense. And what’s best for a rookie vs someone who is into graphic designing full-time?

While Wacom is the undisputed leader in the market, with a market share of 57% as per the last available reports, that seems to be changing with players like XP-PEN, Huion, Xencelab, Samsung, and PenPower fast closing in. Wacom and XP-PEN still remain the most popular choices!

Which is better XP-Pen or Wacom?

Design

When it comes to design, both Wacom and XP-PEN graphics tablets are user-friendly. And there’s not much difference between the two in general unless we scrutinize specific models. 

Wacom tablets usually have an all-screen front, while XP-PEN adds buttons and dials for enhanced control. At least that’s the case with the newer models, but the Intuous Pro series still features buttons.

The Wacom Intuos Pro series has 6-8 customizable express keys, a touch ring, and side switches on the pen. While XP-PEN Artist Pro 16 (Gen 2) has an all-display front with a separate X remote control. And they both perform well in their segment and price range.

The appearance, physical and programmable buttons, and size vary across models for both Wacom XP-PEN, and one must choose what suits their needs.

But in terms of overall build quality, Wacom has a clear lead. The tablets feel sturdy, though it’s a little heavier. Remember, the tablet’s weight is also proportional to its size.

When talking about XP-PEN Artist Pro vs Wacom Cintiq 16, if you are looking for a more pen-paper feel while designing, go with the latter. With XP-PEN, users reported that it was more of a glassy finish, and the screen protector got torn off quickly.

Performance & Functionality

In terms of levels of pressure sensitivity, XP-PEN seems to beat Wacom. The Artist Pro 16 (Gen 2) has 16K pressure levels compared to 8,192 levels for the Wacom Cintiq Pro 16. That’s the general trend.

Even for the Deco series, the pressure level is 8192, while for Intuos, it is 4096. So, when it comes to Wacom Intuos vs XP-PEN Deco, the latter has a clear lead in terms of available pressure levels.

Theoretically, it does sound like a major difference, but when coupled with other features, things sort of even out.

Though more critical parameters when discussing drawing tablets are the pressure range and Initial Activation Force (IAF). Wacom is ahead of XP-PEN in both. It has low IAF and offers a wider pressure range.

All newer models of Wacom and XP-PEN tablets support tilt functionality, but performance-wise, Wacom beats not just XP-PEN but even other players in the market. The pointer doesn’t shift off-center (offset) when used at an angle. Besides, several Wacom stylus have an eraser, a feature missing in XP-PEN.

Price & Value

When it comes to pricing, we all know XP-PEN is the more pocket-friendly option. Wacom has emerged as a premium pen display brand, and based on our research and user reviews, it’s worth the price. Wacom is a value-for-money product!

But, as a consumer, you must identify the VALUE before purchasing a product. Answer these questions before choosing between XP-PEN and Wacom:

  • What screen size works best for you?
  • How much workable space do you need?
  • Do you require additional controls on the tablet?
  • Is touch functionality a must? Letting go of this can help you save a significant amount.
  • What pressure sensitivity do you require? Higher pressure levels don’t necessarily translate into better performance.
  • Are you purchasing a tablet for personal or work use?
  • How much time do you spend on the drawing tablet?

The choice won’t be that simple because there’s also the consumables aspect that you can’t ignore. Pen nibs are costly, especially for Wacom. A long-lasting Wacom pen nib will cost you in the range of $5-10 for a standard pack of five. In comparison, XP-PEN nibs are relatively cheaper and priced at $9.99 for 50 pieces.

Image Source: XP-PEN Store

Then comes the protective sheet. They are not absolutely essential, but anyone spending too much time on the drawing tablet should get one.

Here, the cost depends on the screen size. For XP-PEN, you will find an official one in the range of $10-40, while for Wacom, it’s $5-30, though these are manufactured by third parties.

Once you have the answer to these questions and identify how much the consumables will cost in the long run, you can put the Wacom vs XP-PEN debate to an end.

Is Wacom or XP-PEN better for beginners?

For beginners, XP-PEN is undoubtedly the best choice. It offers pocket-friendly options without compromising too much on the quality. You will still get a decent drawing experience and, more or less, every functionality included in a Wacom tablet.

But if choosing for the long run, Wacom would be a better option. It doesn’t wear out with time, and performance-wise, it remains as good as new. 

When talking about Wacom vs XP-PEN in 2023, the former still remains an unformidable force and market leader but is facing stiff competition from the latter.

XP-PEN has released some brilliant products that are sure to change the market dynamics. Couple it with a XP-PEN drawing software, and you are in for an amazing experience!

If you are still unsure which to go for, check out our curated guide listing the best drawing tablets for Windows.

For any queries or to share which one you would choose between Wacom, XP-PEN, and Huion, drop a comment below.

Get Office 365 Lifetime Subscription: How it Works

If you want to get an Office 365 Lifetime subscription, it’s better if you can get a lifetime deal, and we’ll offer some advice on how to go about it.

How do I get an Office 365 Lifetime subscription?

Office 365 is a subscription-based service, meaning you must pay for your license every month or year. The subscription cost depends on your chosen plan and how long you want to subscribe.

With the Office 365 Lifetime subscription, this one-time purchase gives you lifetime access to Office apps, including Word, Excel, and PowerPoint. Office 365 also includes cloud storage for your files, unlimited online meetings, extra security features, and more.

The only issue is that these subscriptions tend to have end-of-life support and cannot be referred to as a Lifetime license. This is because there will come a time when they will no longer receive new security updates or features.

While you can continue using the products and services after the due date, it will increasingly become risky to your device as it becomes more vulnerable to security risks.

The most appropriate term would be perpetual licenses. A perpetual license allows you to use a piece of software indefinitely. They are more expensive than subscription-based or annual plans because they don’t require recurring payments or include usage limits.

That being said, Microsoft does not offer Lifetime subscriptions but perpetual licenses. You can still get the Lifetime license deal from non-Microsoft sites, and they’ll probably work, but only if it’s a risk you’re willing to take.

And if you do, ensure you also have an antivirus with lifetime validity to monitor any arising threats.

What are the features of an Office 365 Lifetime subscription?

  • Offline access – You can access your files without needing an Internet connection.
  • Online backup – You can keep your files safe in the cloud with 1TB of storage space in OneDrive for each user.
  • Office Online – Work on documents at home or on the go using any device with an Internet connection.
  • File protection – You can rest assured that your files on the cloud are safe with the OneDrive ransomware protection.
  • Identity theft monitoring – Microsoft monitors your account with proactive security measures. This ensures that your device and account are kept safe from cybercriminals.
  • Multiple device support – You can use Microsoft 365 on up to five devices, including PCs, Macs, Androids, and tablets.
Note icon NOTE
Note that the identity theft monitoring feature is only available in US territories.

Can you upgrade your Office 365 account?

If you’re already an Office 365 user and have an active subscription plan, you can upgrade your account by paying a monthly subscription fee. You can also upgrade your account if you’re on a free trial or have a free version of Office 365.

The reasons for upgrading your Office 365 account may be to bump up your online storage or you want to use the Office suite on multiple devices.

What are the different pricing options?

1. Microsoft 365 Family

This is considered the best value for your money because of the number of users and the available space. What’s more, you also get a free trial month to get a feel of the features before you can fully commit.

To get this package, you can either pay a monthly subscription for $9.99 or $99.99 annually.

2. Microsoft 365 Personal

This plan is similar to the family one in all aspects, but the only difference is that it is for an individual user. This means the subscription is slightly lower, with a monthly plan setting you back $6.99 and $69.99 for a year.

3. Office Home & Student 2021

Office Home & Student 2021 is the most affordable way to get the latest version of Microsoft Office. It gives you access to Office applications such as Word, Excel, and PowerPoint and works with Windows and Mac computers.

The subscription is a one-off $149.99, which is a lifetime subscription. Its features are limited compared to its counterparts, but since it is specifically tailored for students, you will rarely ever need the other missing features.

If you find the monthly or annual subscriptions too costly, instead of opting for suspicious offers, you’re better off trying Microsoft Office alternatives. Most are free, offer similar features, are compatible with most OSes, and documents can be converted into other formats.

What does the Office 365 Lifetime subscription for five users mean?

The Office 365 for five users Lifetime subscription provides five users access to the full power of Office 365. This means you get an active license for each user or device.

You can install and use the Office apps on up to five devices and use them simultaneously. The subscription includes 1 TB of storage per user, with the ability to add more.

As you should realize by now, it would be too good to be true to secure a no-strings-attached lifelong free subscription to Microsoft Office 365.

To sum it up, if you’re looking to sign up for the Office 365 Lifetime subscription, this is a great deal but a gamble in equal measure.

On the prices subject, you could end up losing money, so if you’re not up to take the risk, consider getting Microsoft 365 at a cheap price. It may not have all your desired features, but it’s better than nothing.

In case you are a regular Microsoft Office user, you may also want to learn how to install Office 365 on a Windows computer.

Would you consider subscribing to the Office 365 Lifetime subscription? Share your thoughts with us in the comment section below.

Opera’s AI browser, Aria gets 5 new exciting features

Opera has released 5 new exciting features to its AI browser, Aria, according to the company’s latest blog post. The Norway-based company debuted AI-enhanced features that will greatly help users organize their experience navigating the web on Aria.

Released earlier this year, Aria is both an AI tool and a way to navigate the internet. It came on Opera One, the newer version of Opera and it promises to help users get work done faster, look for interesting facts online, and even get suggestions when gaming. Like all the other AI tools around, it uses the OpenAI technology, ChatGPT.

And now, Opera comes with 5 brand-new features that will change the way Aria interacts with users.

This year, we redesigned our browser to make Opera users’ interaction with AI better. With this release, we are improving their experience in places where it matters the most: queries and content creation. What people want is to create the content they need or get the best possible query results as fast, as accurately, and with as little effort as possible. With this update, we are making that happen.

Opera

Opera’s Aria AI new features: All the details

  1. Refine the browser AI’s output without having to provide context: according to Opera, this feature has 2 tools, Reuse and Rephrase. With them, users will be able to create a new prompt that will use the elements they previously selected to generate a new reply.
  2. Make the AI rephrase a specific part of its answer, with the Rephrase option.
  3. Compose with ease: Aria will compose the texts for users now. You’ll only have to select the type of content you want to write from the TASK section. Provide a topic and a little more context in the DESCRIPTION field. Choose the length, as well as tone: formal, informal, neutral, academic, business, or funny.
  4. Aria will be able to emulate the user’s writing style, now. Opera has introduced a new option, Define my style, which Aria will use to copy the user’s style and write just like them.opera aria ai
  5. Finally, users will be able to prompt in shortcut commands whenever they want to talk to Aria AI: Ctrl+/ or cmd+/.

Plus, all of these features are also coming to Opera GX.

Are you excited for them? Let us know in the comments section below.

Fix: Tamper Protection is Not Turning On in Windows 11

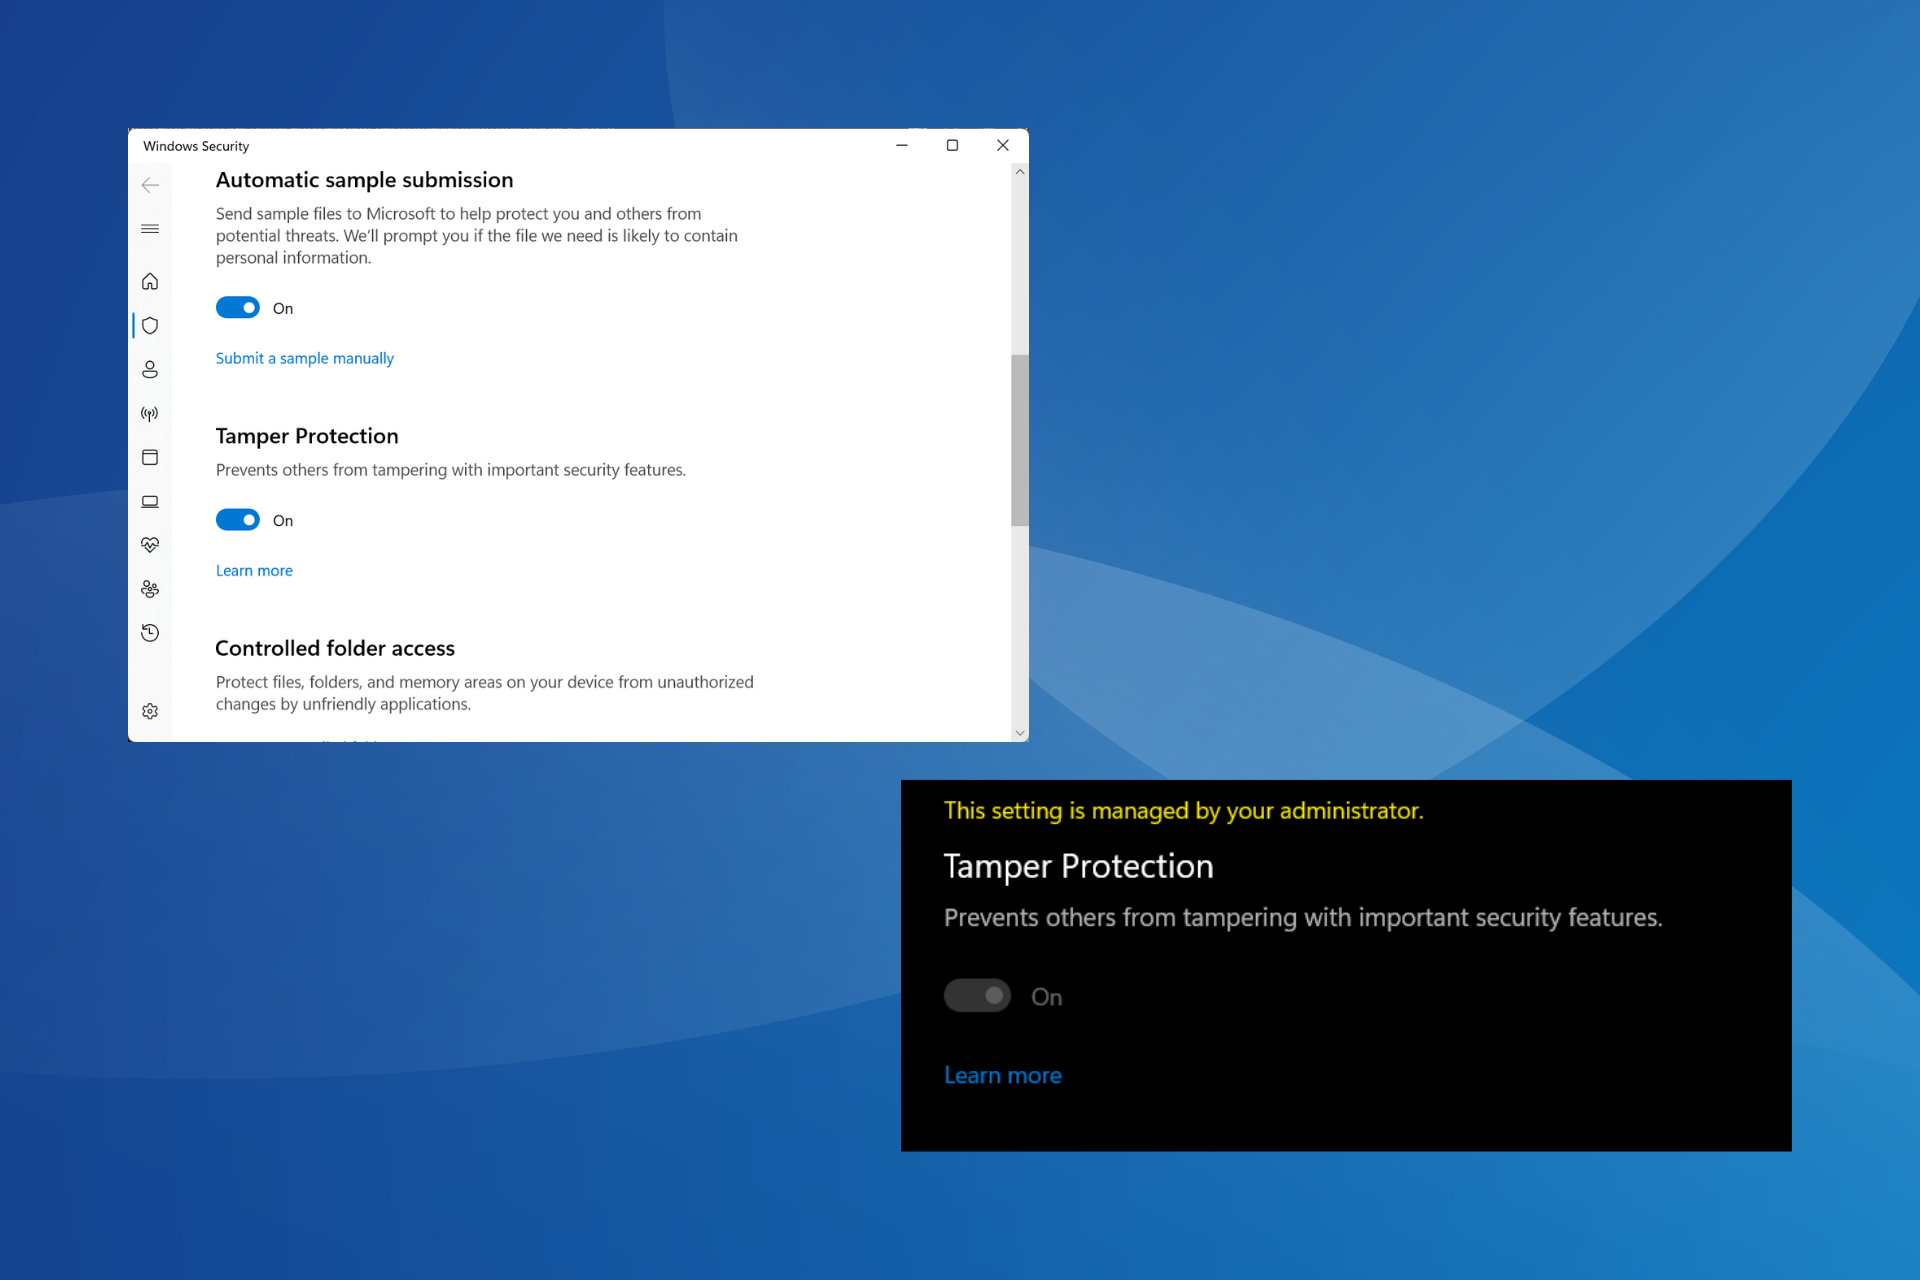
Tamper Protection is a critical built-in feature in Windows, but for a few users, it’s not turning on. The feature prevents outside applications from making unauthorized changes to the security settings, which may put the PC at risk.

As reported in forums, for some, the Windows 11 Tamper Protection is greyed out, and it reads, The setting is managed by your administrator. The problem was also reported on Windows 10.

Why can’t I turn on my tamper protection in Windows 11?

  • Your active user account doesn’t have the required privileges
  • The current security settings are misconfigured
  • System files are corrupt
  • A third-party app conflicts with Windows Security
  • You have a work or school account connected to the PC

How do I turn my tamper protection back on in Windows 11?

Before we start with the slightly complex solutions, try these quick ones first:

  • Check for any pending Windows updates and install them all, especially the security updates.
  • Scan the PC for malware using the built-in Windows Security. To do that, open Windows Security > click Virus & threat protection > select Scan options, choose Full scan > click Scan now.
  • If you have any third-party antivirus running on the PC, uninstall the program, and then verify whether Tamper Protection is still not turning on.
  • In case the PC is a part of the domain or an organization, Tamper Protection is managed by the administrator. So, ask them to enable Tamper Protection on your device.

If none work, head to the fixes listed next.

Tip icon Tip
The first three solutions here required modifying the Registry. Be careful because any mistake can render the PC unusable. It’s recommended that you create a restore point beforehand.

1. Delete any set security policies in the Registry

  1. Press Windows + R to open Run, type regedit in the text field, and hit Enter.regedit
  2. Click Yes in the UAC prompt.
  3. Navigate the following path or paste it in the address bar and hit Enter:Computer\HKEY_LOCAL_MACHINE\SOFTWARE\Policies\Microsoft\Windows Defenderpath
  4. Now, right-click on the Windows Defender key in the navigation pane, and select Delete.delete key to fix tamper protection not turning on
  5. Click Yes in the confirmation prompt.

2. Turn on Tamper Protection in the Registry Editor

  1. Press Windows + S to open Search, type Registry Editor in the search bar, and click the relevant result.
  2. Click Yes in the prompt. 
  3. Now, go to the following path using the navigation pane or the address bar: HKEY_LOCAL_MACHINE\SOFTWARE\Microsoft\Windows Defender\Featurespath
  4. Double-click on the TamperProtection DWORD on the right.tamperprotection
  5. Make sure its Value data is set to 5, and click OK to save the changes.modify to fix tamper protection not turning on

When the Virus & threat protection settings don’t allow you to enable Tamper Protection, you will need to modify the relevant Registry entries. Users who cannot edit the Tamper Protection registry will have to take full control of the key before being able to change the Value data.

Setting the DWORD’s Value data to 0 will disable Tamper Protection in Windows.

3. Change the HypervisorEnforcedCodeIntegrity DWORD’s value

  1. Press Windows + R to open Run, type regedit, and click OK.
  2. Click Yes in the UAC prompt that appears.
  3. Go to the following path: HKEY_LOCAL_MACHINE\SYSTEM\CurrentControlSet\Control\DeviceGuard\Scenarios\HypervisorEnforcedCodeIntegrityregistry
  4. Now, double-click the Enabled DWORD on the right.
  5. Under the Value data field, enter 0, and click OK to save the changes.value data

4. Repair the corrupt system files

  1. Press Windows + S to open Search, type Command Prompt in the search bar, right-click the relevant result, and select Run as administrator.command prompt
  2. Click Yes in the prompt that appears.
  3. Now, paste the following three DISM commands individually and hit Enter after each: DISM /Online /Cleanup-Image /CheckHealth DISM /Online /Cleanup-Image /ScanHealth DISM /Online /Cleanup-Image /RestoreHealth
  4. Once done, similarly execute the following command for the SFC scan: sfc /scannowsfc scan to fix tamper protection not turning on
  5. Finally, restart the computer for the changes to apply.

If it’s the corrupted system files to blame when Tamper Protection is not turning on, running the DISM commands and the SFC scan will do the trick. Another option would be a third-party tool if you want to replace automatically corrupt files with healthy replacements.

5. Terminate and reset the Windows Security app

  1. Press Windows + I to open Settings, go to Apps from the navigation pane, and click on Installed apps. 
  2. Locate Windows Security from the list of applications, click the ellipsis next to it, and select Advanced options.advanced options
  3. Click the Terminate button to kill all app processes.terminate
  4. Now, click the Reset button.reset to fix tamper protection not turning on
  5. Again, click Reset in the confirmation prompt.
  6. Finally, restart the computer and check for improvements. 

6. Remove all additional accounts from the PC

  1. Press Windows + I to open Settings, navigate to Accounts from the left pane, and click Access work or school.access work or school
  2. If you find any accounts listed here, remove them from the PC.
  3. Now, head to Other users under Accounts settings.
  4. Expand any accounts that are listed here, and click the Remove button.remove to fix tamper protection not turning on
  5. Click on Delete account and data in the confirmation prompt.delete account
  6. Restart the computer and verify whether you can finally turn on Tamper Protection.

Often, work, school, or even private accounts can make the OS believe that the PC is linked to an organization and has another administrator. So, remove all user accounts on the PC, except for the current user profile.

7. Factory reset the PC

When nothing else works, resetting the PC to factory defaults will get things running! Remember, this will wipe out all the data, so make sure to back up critical files using an external storage or a reliable data backup solution.

Besides, if that too fails, simply create a bootable Windows USB, and reinstall the OS. 

How can I fix tamper protection This setting is managed by your administrator?

To fix things, you will need to either contact the administrator, if the account is linked to an organization. They will use Intunes to enable Tamper Protection.

Or, if it’s a personal PC, remove all other accounts, including the ones listed under work or school. 

If you had trouble turning on Tamper Protection, that shouldn’t be the case anymore. Some users also reported similar issues where Real-time protection won’t turn off, and it can be fixed just as easily!

Besides, if you plan to switch to another antivirus software, it’s recommended to disable Windows Defender to avoid conflicts between the two.

For any queries or to share which solution worked for you, drop a comment below.

How to Easily Switch Users on Windows 10

If you share your PC with others or have both a regular and administrator account, it’s important to know how to switch users on Windows 10.

This is an essential and pretty useful skill, and in today’s guide, we will show you how to do that on your PC properly.

What is the fastest way to switch users in Windows 10?

The fastest way to do this is by using the Windows key + L shortcut. That will instantly lock your account and allow you to switch users on Windows 10 from the lock screen.

How do I switch users on Windows 10?

1. Use the keyboard shortcut

  1. Press Windows key + L to lock your current user account.
  2. Locate the desired user account in the bottom left corner of the login screen.
  3. Click on it to switch to it.
  4. If the account is password protected, you’ll need to enter the password beforehand.

2. Use the Start menu

  1. Open the Start Menu.
  2. Next, click on your user account.
     
  3. Lastly, select the account you want to switch to.

3. Use Ctrl + Alt + Del shortcut

  1. On your keyboard, press Ctrl + Alt + Del.
  2. Next, choose Switch user.
  3. Select the desired account from the lock screen.

4. Use Alt + F4 shortcut

  1. Go to your Desktop and press Alt + F4.
  2. From the dropdown menu select Switch user and click on OK.
  3. Select the user account you want to switch to from the sign-in screen.

5. Use the command line tool

  1. Press the Windows key + X and select PowerShell (Admin).
  2. Next, run the following command: tsdiscon
  3. Select the account you want to switch to.

Keep in mind that you don’t need to use PowerShell to do this, and you can switch user on Windows 10 with cmd using the same command.

How do I switch users on a locked computer?

  1. Press Windows key + R and enter gpedit.msc.
  2. Next, select Hide entry points for Fast User Switching. You can find it at the following location: Local Computer Policy\Computer Configuration\Administrative Templates\System\Logon
  3. Set it to Not Configured or Disabled and save changes.

After doing that, you should be able to switch users using any of the methods from this guide.

Why can’t I switch users on Windows 10?

  • This feature is disabled on your PC, and you need to turn on Fast User Switching.
  • Your installation or user profile might be corrupted.

This issue appears on other versions as well, and if you’re on Windows 11, check our guide on what to do if the switch users option is missing on Windows 11.

As you can see, it’s pretty simple to switch users on Windows 10 with a shortcut, but you can use any other method from our guide. To learn more about user management, we suggest reading our guide on how to manage users and groups on Windows 10.

Did we miss your favorite method for switching users? If so, don’t hesitate to share it with us in the comments section.

Fix: Alt + Shift Not Changing Language on Windows 11

When Alt + Shift is not changing the language on Windows 11, you can use Win + Spacebar for the same effect. Also, make sure to use the Left Alt + Shift not the ones from the right of your keyboard.

Why is Alt + Shift not working to change language?

  • You don’t have more languages to choose from.
  • The input language hotkeys have been changed.
  • A bug in the latest Windows Update prevents you from changing the keyboard language. Uninstall the latest update to fix this issue.
  • You are in an active window of an app that is using the same hotkeys for another action.

How do you change the language on Windows 11 with Alt Shift?

1. Use the correct sequence of key presses

First of all, make sure you are using the correct method of using the Alt + Shift combination. Press and hold the Left Alt key, then press the Left Shift key. It won’t work with the Right Alt and Right Shift.

If you look at the keyboard language selection, that will be changed, but only if you have other languages available.

Now, if you release the Shift key and keep the Alt key pressed, you will also see the pop-up prompt showing you the change, and pressing the Shift key while still keeping Alt pressed will continue to switch between them.

If you press both left Alt and left Shift together and release them at the same time, the language will change, but you won’t see the prompt on the screen.

2. Set Alt + Shift as the input language hotkeys

  1. Click the Start button and select Settings.
  2. Go to Time & language on the left pane and click on Typing from the right.
  3. Now, select Advanced keyboard settings.
  4. In the next window, choose Input language hot keys.
  5. Make sure that the Left Alt + Shift is the hotkey. If not, click on Change Key Sequence and select if from the list of options.
  6. You will also notice that you may also change the keyboard layout with the Ctrl + Shift key combination.

Please note that the input language is not the same as the keyboard layout. While the input language changes the language you’re using while typing, the keyboard layout will remap the keys on the keyboard to match the standard layout of the keys for a language.

3. Make sure that the keyboard language is not hidden

  1. Click the Start button and go to Settings.
  2. Select Time & language from the left and choose Typing from the right.
  3. Next, select Advanced keyboard settings.
  4. Now, make sure that the Hidden option and the Show the Language bar as transparent are not checked. If so, uncheck them.

The reason you can’t change the keyboard language in Windows 11 might be just because you can’t see the change. If the keyboard language bar is hidden or transparent when inactive, you might simply not notice it.

If that’s not the case, we also have a dedicated guide on what to do if the language bar is missing on Windows 11.

Other methods to change the language on Windows 11

  • On Windows 11, you can also change the language by using the Win + Spacebar hotkey.
  • Another way is to simply click on the language bar and select the language from the available options.
  • You may also activate the on-screen keyboard and click the language option from the bottom-right corner of the virtual keyboard to change it.

Now that you know how to change on-screen keyboard language on Windows 11, you might also be interested in the most useful shortcuts on the latest OS.

Here we conclude our guide on what to do if Alt + Shift is not changing the language on Windows 11 and we hope that now everything returned to normal.

If you still can’t change the display language, you should consider the possibility that one of the Alt or Shift keys is stuck or malfunctioning.

One last advice is to minimize all the apps that are opened on the screen and try the Alt + Shift combination. An active app may circumvent the shortcut for another action with the same hotkey.

Before you go, don’t miss our guide on Alt F4 not working, since it can provide you with more potential solutions.

For any other suggestions on better ways to fix this problem, use the comments section below.

XP-Pen Driver for Windows 11: Download & Install

The XP-Pen driver is the software that allows you to connect your pen tablet to your computer and use it as a normal input device.

Eventhough connecting the pen to your PC should automatically match you with the right drivers, this doesn’t always happen, so here’s how you can download and install the correct drivers.

Is XP-Pen Compatible with Windows 11?

XP-Pen has a wide range of pen tablets compatible with the Windows operating system. You just have to download the latest drivers for your specific model for them to work seamlessly, and you can start drawing right away.

How do I download & install XP-Pen drivers on Windows 11?

1. Download from the official manufacturer

  1. Go to XP-Pen’s support page, and select your model from the list.tablet 
  2. Locate Software and Drivers on the right, and then click the Download button next to the most recent driver for Windows.driver to fix xp pen detected as keyboard
  3. Right-click the downloaded file and select Extract All from the context menu.extract all
  4. Choose the location of the extracted files and then click the Extract button.extract
  5. Similarly, extract any other sub-folders you come across and then run the setup.setup
  6. Click Yes in the UAC prompt.
  7. Follow the on-screen instructions to complete the driver installation.install to fix xp pen detected as keyboard

2. Use Device Manager

  1. Hit the Windows key, type Device Manager, and click Open.device manager w11
  2. Locate the XP-Pen Driver. It should be under Human Interface Devices.
  3. Once found, right-click on it and select Update driver from the context menu.
  4. Select Search automatically for drivers and wait for Windows to update the drivers.

3. Use a driver updater tool

Although you can easily download drivers without third-party tools, an automatic tool is so much easier because even the not-so-tech-savvy users are guaranteed the right drivers.

4. Use Windows Update

  1. Press the Windows key and click on Settings.settings windows 11
  2. Navigate to Windows Update, and click on Advanced options.
  3. Now, click on Optional updates.
  4. Tick the checkboxes for all the available updates under Driver updates, and click on Download & install.

What can I do if my XP-Pen driver is not working?

  • Reset the pen – Press the button on top of it (depending on your model) for 5 seconds then turn off your tablet and leave it for at least 10 seconds before turning it back on again.
  • Reinstall your drivers – If an update doesn’t solve your problem, try reinstalling the device drivers software for your tablet device.
  • Roll back a previous driver update – The current drivers may not be working because they’re corrupt. Such cases may bring up errors like your XP Pen being detected as a keyboard. You can go back to a previous working version as you wait for a bug fix.
  • Update your OS – Drivers may fail to install on your computer if they’re incompatible with your system. To fix this issue, make sure that your operating system is up-to-date.
  • Perform a System Restore – Performing a System Restore will allow you to go back to the state where your computer was working properly and your XP-Pen driver was up to date.

The XP-Pen driver for Windows 11 is extremely important if you mainly use the pen to create designs and want to achieve crisp drawings. To further enhance its capabilities, you should also consider getting XP Pen drawing software and take your artwork to greater heights.

To sum up, the XP-Pen driver is a crucial component for setting up and using your XP-Pen tablet monitor on a Windows computer. Using an older version of the tablet driver will often result in compatibility issues, whereas using a new version is bound to provide greater functionality.

Did you manage to get the right XP Pen driver for your Windows 11 device? Which method did you go for and why? Let us know in the comment section below.

Fix: Stuck at CHKDSK is Verifying USN Journal

While Check Disk is a viable utility that helps fix several drive-related problems, users often find it stuck at CHKDSK is verifying Usn journal. First things first, what is the USN journal? The USN journal stores a log file of all the changes made on a specific volume.

This data is often referred to by programs to understand how the files were modified over the course of time. It comes under Stage 3 of the checks, when the Check Disk is examining security descriptors.

That’s where you see the message, or it could read, CHKDSK is resetting Usn information, when Windows can fix the problem. It may even ask you to run another Check Disk command.

What causes CHKDSK to hang at CHKDSK is verifying Usn journal?

  • Bad sectors or a failing hard drive
  • The USN journal is corrupt
  • Issues with the system files
  • Another program is accessing the USN journal at the same time
  • A bug in the recent Windows update

How do I get past CHKDSK is Verifying USN Journal?

Before we start with the slightly complex solutions, try these quick ones first:

  • Wait for a while. For those wondering how long Chkdsk is verifying usn journal takes, it could be anywhere between a few minutes to up to 24 hours. So let it run interrupted.
  • Verify if the Check Disk utility was initiated manually or automatically by Windows on identifying disk errors. In the case of the latter, you need to be more vigilant. For the former, you may ignore the issue as long as the system works fine.
  • Abort the disk check, restart the computer and again run the same Check Disk command.
  • If CHKDSK is stuck on an external hard drive, connect it to another PC and then run the built-in utility.

If none work, head to the fixes listed next.

Tip icon Tip
For some of the solutions here, you will need to access Windows in normal mode. If that can’t be done, boot into Safe Mode and then execute the fixes.

1. Run Check Disk from the Recovery Environment (Windows RE)

  1. Turn off the computer, then power it on, and as soon as the display appears, hold the Power button to shut down. Repeat this thrice.
  2. On the fourth attempt, the OS will launch an Automatic Repair, believing that Windows can’t boot. If it doesn’t find any issues, click on Advanced options.
  3. Now, click Troubleshoot.troubleshoot
  4. Again, select Advanced options.advance options
  5. Click on Command Prompt.command prompt
  6. Select your user account and enter the password for it.
  7. Now, execute the Check Disk command you had run earlier.

2. Repair the corrupt system files

  1. Press Windows + S to open Search, type Command Prompt in the search bar, right-click on the relevant result, and select Run as administrator.command prompt 
  2. Click Yes in the UAC prompt.
  3. Paste the following DISM commands individually and hit Enter after each: DISM /Online /Cleanup-Image /CheckHealth DISM /Online /Cleanup-Image /ScanHealth DISM /Online /Cleanup-Image /RestoreHealth
  4. Now, execute this command to run the SFC scan: sfc /scannowsfc scan to fix chkdsk is verifying usn journal stuck 
  5. Once done, restart the computer for the changes to come into effect. 

Corrupt system files are known to trigger issues with the built-in utilities. Running the DISM commands and SFC scan will replace these files with the cached copy stored on the PC.

Furthermore, if you’re looking for a faster method, we suggest you use specialized repair software to find healthy replacements automatically for all corrupt system files found.

3. Uninstall recent Windows update

  1. Press Windows + I to open Settings, go to Windows Update from the navigation pane, and click on Update history.update history
  2. Scroll to the bottom and click on Uninstall updates.
  3. Click the Uninstall option next to a recently downloaded update, after which the problem first appeared.uninstall updates to fix chkdsk is verifying usn journal stuck
  4. Again, click Uninstall in the confirmation prompt.
  5. When the computer restarts, verify whether it goes past the CHKDSK is verifying Usn journal stage or is still stuck.

4. Update the drivers

  1. Press Windows + X to open the Power User menu, and then select Device Manager from the list of options.
  2. Expand the Disk drives entry, right-click on the one that’s stuck on Check Disk, and select Update driver.update driver to fix chkdsk is verifying usn journal stuck
  3. Click on Search automatically for driver and wait for Windows to install the best locally available version.search automatically
  4. Finally, restart the computer and check for improvements.

When the utility is stuck at CHKDSK is verifying Usn journal, it could indicate the inability to read data on the drive, which often arises due to outdated or corrupt drivers. So, update the disk drivers.

And if Windows can’t find one, you will need to visit the manufacturer’s website, locate the latest version, download it, and then manually install the driver.

5. Delete the USN Journal file and create another one

Tip icon Tip
You should delete the USN journal only if Check Disk can’t get past it after repeated attempts and even in the Recovery Environment.
  1. Press Windows + R to open Run, type cmd, and hit Ctrl + Shift + Enter.cmd
  2. Click Yes in the prompt that appears.
  3. Paste the following command and hit Enter to delete the USN journal in the C: drive: fsutil usn deletejournal /d c:delete journal
  4. Now, execute this command to create a new USN journal on the C: drive: fsutil usn createjournal m=1000 a=100 c:
  5. Restart the computer and run the Check Disk tool again.

6. Disable Check Disk (CHKDsK) from running at boot

  1. Launch the Command Prompt with administrative privileges.
  2. Now, paste the following command and hit Enter to disable Check Disk from running at boot for the C: drive: chkntfs /x c:disable check disk to fix chkdsk is verifying usn journal stuck
  3. To disable Check Disk for more drives, add thoose to the command. For instance, for both C: and D: drives, the command becomes: chkntfs /x c: d:

7. Check the drive for issues

When nothing else works, and Check Disk is stuck, it’s most certainly a drive malfunction or failure to blame. Hard drives usually have a life of 5-8 years, depending on whether they are attached to a laptop or a desktop respectively

Use an effective disk repair tool to identify and eliminate any problems with it. And for a failing hard drive, you will need a data backup solution so as to not lose any critical files.

The last resort is to replace the hard drive and get a new one, if it’s way beyond the average working span and exhibits performance issues as well.

Remember, the CHKDSK is verifying Usn journal stuck issue can mostly be resolved, but there are situations where replacing the drive is the only solution. It is recommended you contact the system manufacturer or a local service center and get the disk inspected before replacement.

Also, a few users reported the Windows can’t check the disk while it’s in use error, and a clean boot usually helped fix the problem!

For any queries or to share what worked for you, drop a comment below.

Windows Terminal Canary is now available to users everywhere

Windows Terminal is a modern, fast, efficient, powerful, and productive terminal application for users of command-line tools and shells like Command Prompt, PowerShell, and WSL. Microsoft announced recently that a Canary version of Windows Terminal is coming, where users will get the latest experimental features.

Windows Terminal is distributed in a variety of formats. We are thrilled to announce that we are adding it to the Windows Terminal family. Windows Terminal Canary is a new canary build that includes “hot off the presses” experimental features (including our AI chat feature).

Microsoft

And now, the channel is finally here, and users can download it on GitHub. But if you want to get accustomed to Windows Terminal first, before diving into the Canary version, you might want to start playing with it on Windows 11. Plus, we have a comprehensive list of shortcuts for you to use.

Windows Terminal Canary will introduce many experimental features, so if you join it, expect it to be highly unstable.

Windows Terminal Canary: Everything you need to know

  • The channel will release builds nightly. According to Microsoft, every Terminal Canary user will have the chance to discover new bugs.
  • The Terminal Canary installer on GitHub only works for Windows 11, for now, but a Windows 10 version is coming. However, according to developers, it is an evergreen, architecture-independent application installer that supports automatic updating.
  • There is also a portable ZIP that works with Windows 10. However, the portable ZIP does not offer automatic updates, or automatic checking for updates.windows terminal canary
DistributionArchitectureLink
App Installerx64, arm64, x86download
Portable ZIPx64download
Portable ZIPARM64download
Portable ZIPx86download

Prepare for multiple experimental and very unstable features coming to Windows Terminal Canary. These features will also break the channel from time to time, so be aware of it before joining it.

Will you try it?

Here’s how you can insert a checkbox in Excel

You have asked and the Microsoft gods answered: you can finally insert checkboxes in Excel, now, according to the Redmond-based tech giant’s latest blog in the Microsoft 365 Insider.

Microsoft says users will be able to visualize and set TRUE and FALSE values in a cell using checkboxes. The feature was long requested by Excel users everywhere, and it’s something other sheet data apps, such as Google Sheets, already have.

And if October is already a big month for Microsoft 365, with the new Teams coming, along with a lot of new changes to OneDrive, then the other apps, such as Excel, needed some love too.

So, Microsoft added a new ribbon group called Cell Controls. This new pane will introduce checkboxes to Excel. However, this is the first feature of many, as Microsoft promises there will be more.

How to insert a checkbox in Excel

  1. Open your Excel.
  2. Create a workbook, or open an existing one.
  3. Go to the Insert tab, and select Checkbox in the Cell Controls group. insert checkbox in excel
  4. Now put the checkbox wherever you want, and that’s it.

In the image above, you can see the checkboxes in the selected cells. The blank cells are automatically set to FALSE.

Microsoft says that checkbox formatting only works with Boolean values and blank cells. Any other values, such as number and text, are ignored. And, if the active cell has a checkbox, you can toggle the values of all selected checkboxes by pressing the space bar.

However, for now, users won’t be able to directly remove checkbox formatting in a cell. Instead, you’ll need to select Home > Clear > Clear Formats.

For now, this feature is available to Beta Channel users running Version 2310 (Build 196924.2000) or later, but it will come to the Excel Stable Channel in the following weeks.

Are you excited about inserting checkboxes in Excel? Let us know your thoughts in the comments section below.

SciSpace Copilot: What is it & How to Use

If you’ve ever encountered a topic you didn’t understand, SciSpace Copilot can help you break down its complexities with simple explanations.

So, if you’re looking to have a more fun and meaningful science experience, take a look at SciSpace Copilot and how you can use this resource to your advantage.

What is SciSpace copilot?

SciSpace is not your ordinary AI research assistant. Hundreds of AI software and AI websites are available, but SciSpace goes above and beyond to unpack and explain complex research papers in less technical jargon.

The goal is to enable people without a background in science or mathematics to read scientific articles and understand their main concepts easily. You can scan articles using Google Scholar and use SciSpace to break it down.

How do you use SciSpace Copilot?

1. Setting up SciSpace Copilot

1.0 Creating an Account with SciSpace Copilot

  1. Launch a browser of your choice and navigate to the SciSpace Copilot website.
  2. Hit the Sign up button at the top-right corner of the page.
  3. Fill in the required credentials: email address and password, then hit Sign up.
  4. Enter your Background and Field of study, then click Done. 
  5. Go to your email and click the verification link to confirm your account, and you’ll have logged in.

1.1 Navigating the User Interface

  • Search bar – This is centered where you can upload papers and get insights directly either from SciSpace’s repository or from your own Library that you may have created.
  • Chrome extension – On your homepage, you will see a Chrome extension. Click on it, and you’ll be directed to the Chrome webstore. Add the extension, and now, you won’t have to open SciSpace whenever you want to research a paper.
  • SciSpace menu – The menu will pop up on the left-hand pane when you hover your mouse. Here, you will discover your Library and other tools to make your work easier.
  • Popular papers – As you scroll down, you’ll get a collection of papers based on your field of expertise or the various areas you selected when signing up.
  • SciSpace help – You’ll get the SciSpace chatbot at the bottom left corner. If you have any issues with the tool, you can get answers by chatting with the bot.

1.2 Customizing Settings and Preferences

  • Language preferences – SciSpace is available in multiple languages. If you have a research paper and want it explained in a different language, you can tweak your settings. Simply click on your Library and expand Copilot at the bottom right corner. Now select your selected language from the drop-down menu. Once you highlight the text you want explained, Copilot will explain it in your chosen language.
  • Bookmark articles – If you’d like to save an article for later use, you can bookmark it. Simply open the research paper and, just above the title, click on Save. You’ll be prompted to create a collection. Here, you can give your collection a new name and save like papers under that new collection. You can also create as many collections as you like, and they will be saved in your Library.
  • Share articles – If you’d like to share the research paper with other people, click on the Share icon, and in the drop-down menu, select the mode of sharing you prefer.

2. Using SciSpace Copilot Features

  • Finding technical terms and explanations – If you come across an unfamiliar term and don’t have time to go to the dictionary, simply highlight that word and select Explain. SciSpace will define the technical term. 
  • Generating follow-up questions – If after the technical term has been explained, but you still don’t understand, you can click on Follow up. This allows you to get more insight and helps you better understand the context.
  • Accessing native language explanations – This can be done just as mentioned above in the language preferences section.
  • Giving feedback – You can also leave feedback on SciSpace answers. If you feel the answers have been sufficient or need more depth, you can leave remarks for future improvement.
  • Citation generator – If you don’t have time or don’t know various citation formats, this tool can help you generate them. You can paste a URL or add text manually.
  • Utilizing AI-powered tools and Chrome Extensions – The tool has an AI detector, and Copilot read with AI. The former helps you create AI-free content by analyzing and scanning the content. Copilot read with AI helps you scan hundreds of pages and come up with summaries or a general overview of the paper without having to scan through pages.
  • Analyzing scientific papers and articles – SciSpace can analyze a paper in seconds by giving you a concise explanation. With the preset questions, you can easily go through the important parts and move on swiftly.
  • Paraphrase – If you’d like to create content, the tool can help you paraphrase text and humanize it so that it doesn’t sound robotic. However, you’re better off using open-source AI content generators as they are more reliable.

Is it safe to use SciSpace?

It is completely safe to use SciSpace and even encouraged. The tool’s main purpose is to simplify the technical terms used in scientific literature so that you can get simpler explanations.

Furthermore, additional tools, such as AI detector help you avoid academic dishonesty by producing AI-free content. It becomes problematic when you use the paraphrasing tool and fail to credit the original authors.

Such anomalies can easily be detected using essay grading software as they have built-in features to detect plagiarism. You’d rather use a powerful AI tool such as Caktus AI to help you refine your writing skills and produce quality content.

And that’s about it on how to use SciSpace. We’d love to get your opinion on this tool and your experience if you have used it. Do you think it’s a necessity or just another tool to perpertuate laziness? Let us know your thoughts in the comment section below.

The Windows 11’s weather widget now offers a detailed weather forecast

Windows 11’s weather widget got a detailed weather forecast with the 23H2 release, back in September. Spotted by Windows enthusiast, @XenoPanther, the weather widget now shows the time until a certain weather condition happens.

For example, the weather widget will tell you that you should expect rain in your area today, but you generally have no idea when, or the time is not specific. However, now the Windows 11’s weather widget will tell you exactly when it will happen: in 2 hours or 45 minutes.

However, it seems that the widget is also continuing to show detailed forecasts some days ahead, according to the same Windows enthusiast. Users are now able to see messages such as Temps to drop Wednesday on the updated Weather widget.

The feature is now live for Windows 11 users everywhere. So you’re now able to get a detailed weather forecast and plan your day accordingly. Or, at least, you’ll know not to go to those sudden shopping sessions, as there will be rain in 30 minutes.

You won’t have to do anything to enable the detailed weather forecast in Windows 11, as it is part of the widget. For a more handy situation, you might want to place the weather widget on your taskbar so that you won’t miss any information.

Windows 11 gets a detailed weather forecast

If you’re not part of the Windows Insider Program, you shouldn’t worry. This feature is now available in Windows 11. It was released in the 23H2 package, last month.detailed weather forecast windows 11

The release will also bring the now-famous Windows Copilot. And if you don’t trust the Windows 11’s weather widget, you can always ask Copilot to tell you the weather of your area for the next hours.

However, as Copilot will use the internet, and is based on Bing, it will tell you the same thing the weather widget tells you.

So you might just use the weather widget.

How to Delete Documents in Microsoft 365

You often need to delete documents and files in Microsoft 365, both stored online and offline. And users who are new to the editor suite may face issues with it!

While some found the Delete option missing, others encountered an error in the process. But it shouldn’t be as difficult, right? So, let’s get straight to it and walk you through how to delete files in Microsoft 365 and OneDrive.

How do I delete files from Microsoft 365 online?

1. Delete files in Microsoft Word, Excel and PowerPoint

Tip icon Tip
The steps listed here are for Microsoft Word, but it works the same way on PowerPoint and Excel. To delete files on these two, open them instead.

1.1 Stored locally

  1. Press Windows + S to open Search, type Microsoft Word in the text field, and click the relevant search result.
  2. You will now see a document list of recent items. Right-click on the one you want to remove, and select Delete file.delete documents in microsoft 365
  3. Click Delete in the confirmation prompt that appears.delete
  4. If the document doesn’t appear in the files list, scroll down to the bottom and click on More documents.more documents to how to delete documents and files in microsoft 365
  5. Identify the file here and remove it, or select Browse from the navigation pane to manually locate and delete it.

1.2 Stored on OneDrive

  1. Launch Microsoft Word, scroll to the bottom and click on More documents.
  2. Now, select OneDrive from the left pane.onedrive
  3. Identify the document file you want to remove, right-click on it, and select Delete from the context menu.delete

Depending on where it is stored, be it locally or on OneDrive, you can easily delete a Word document or Excel file in Microsoft 365. Remember, you may have to clear it from both locations if OneDrive stores a copy of the document. Otherwise, the deleted document will keep reappearing. 

And, for a cleaner user interface in Microsoft 365, many users prefer to remove recommended items!

2. Directly delete files from OneDrive

2.1 OneDrive web 

  1. Go to OneDrive’s official website, and sign in with your Microsoft account credentials.
  2. Now, locate the file you want to remove, right-click on it, and select Delete.delete documents and files in microsoft 365 OneDrive
  3. To remove multiple OneDrive files at once, tick the checkboxes before them, and click on Delete in the menu bar.

2.2 In File Explorer

  1. Press Windows + E to open File Explorer, and select OneDrive from the navigation pane. It’s usually listed with your name and a cloud icon.OneDrive
  2. Identify the document you want to remove, right-click on it, and click the Delete icon.delete file

Be it via the official website or File Explorer, you can easily delete documents in Microsoft 365 online. The changes are reflected throughout! 

Also, if you are using the online version of Microsoft Office and it only shows the hide files option, delete it from the OneDrive section in File Explorer. Or if you don’t want the files or associated apps altogether, there’s always the option to delete the Microsoft account. 

3. Manually delete Microsoft 365 files

Besides deleting documents and files through Microsoft 365 apps, you can remove them directly via File Explorer. Simply locate the file, select it, and hit the Delete key. To clear multiple documents at once, hold the Ctrl key, select as many, and then hit Delete. Also, make sure to clear the Recycle Bin.

Remember, if the deleted file has a OneDrive (cloud) icon under the Status column, it’s online-only, meaning that the file occupies no space on your PC. You will have to delete the backup as well.

Why can’t I delete a file in Microsoft 365?

If you can’t delete a file in Microsoft 365, it’s likely that the file is currently open. Terminate all instances of the suite and then try deleting it.

Besides, corruption is a major reason you can’t delete files. File deletion is a task handled by the OS and not Microsoft 365. So, you should check the path and file properties for more details and to troubleshoot things.

You now have a fair understanding of how to delete documents in Microsoft 365. And if you ever delete a file by mistake, there’s always the option to recover deleted files in Windows.

Lastly, before you leave, find out how to efficiently use Microsoft 365 web for better file management and to perform all actions seamlessly!

For any queries or to share an issue you faced with the process described here, drop a comment below.

Freevee Error Code ITV-101: How to Fix it

The error code ITV-101 with the message Failed to load Watch may appear on your Freevee app when you attempt to stream content. Like many such errors, it can be an internet-related or service-provider issue.

Whatever the case, the resolution is fairly easy, and you should be able to get back to enjoying premium content on your TV once again.

What is Error Code ITV-101 on Freevee?

This error code can occur on your TV, Roku device, or Firestick when you attempt to stream content on the Freevee application. Usually, it can be caused by geographical restrictions that prevent you from accessing content.

How do I fix Error code ITV-101 on Freevee?

Begin by checking off the following prerequisites:

  • Ensure that you are using the latest version of the Freevee app and your country is set correctly.
  • Test your Internet connection and ensure its speeds are at optimal levels, and power cycle your modem if necessary.
  • Check all physical ports for loose connections, obstructions, or damage to cables/connectors.
  • If you are using Freevee with a Wi-Fi connection, switch to an Ethernet cable for better and stable connectivity.

1. Update your TV firmware

  1. For this solution, we shall be using the TCL model.
  2. On your TV, find your Settings.
  3. Go to System.
  4. Click on About then select Software update.
  5. Select Network update and click on System update.
  6. Now click on Check Update. Your system will scan for any available updates.
  7. You’ll either start downloading updates or get a message that your TV is already up to date.

2. Clear your device’s cache

  1. Hit the Windows key, then click on the Settings menu.settings windows 11
  2. From the left window pane, select System, then, from the right window side, navigate to Storage.
  3. Wait for your OS to scan and assess the temporary cache files stored on your system.
  4. Click on the Temporary files option.
  5. The various cache files will now be listed.
  6. Scroll down, then select the files that you want to delete, and click on the Remove files button.
  7. In the pop-up window, click on Continue to complete the process.
  8. Now your selected files are deleted.

3. Update your display drivers 

  1. Hit the Windows key, type Device Manager in the search bar, and click Open.device manager w11
  2. Navigate to Display adapters to expand, right-click on your graphics card, and select Update driver.Graphic Driver Update
  3. Select Search automatically for drivers.

4. Disable/Enable your VPN

  1. Press the Windows key and select Settings.settings windows 11
  2. Next, select Network & internet and click on VPN in the right-side menu.
  3. Select the VPN connection you want to disable, click on the drop-down, and select Remove.
  4. To add, follow similar steps.

In some cases, some apps like Freeview Play may not work even with a VPN. Usually, the issue is you’re using a free VPN. We’ve already covered reasons why a free VPN cannot be trusted, so you’re better off getting a paid VPN service that is much more efficient.

5. Disable your Proxy

  1. Press the Start Menu icon and select Settings.settings windows 11
  2. Click on Network & Internet on the left pane, then scroll down and click Proxy on the right pane.Network proxy settings
  3. Select Edit next to Use a proxy server option in the Manual proxy setup section, toggle off Use a proxy server and click on Save.Disable proxy server

6. Reset your Network

  1. Hit the Windows key and click on Settings.settings windows 11
  2. Navigate to Network & internet.
  3. Select Advanced network settings.going advanced network settings win11
  4. Click on Network reset.Network Reset 1
  5. Next, hit the Reset now button.Network Reset now

7. Repair/Reset Freevee app

  1. Hit the Start Menu icon on the Taskbar and click on Settings.settings windows 11
  2. Click on Apps on the left pane, then select Apps & features on the right pane.
  3. Navigate to Frevee app, click on the three ellipses, and select Advanced options.
  4. Scroll down and select Repair.
  5. If it doesn’t get rid of the error, go back and select Reset.

8. Reinstall FreeVee

  1. Hit the Start Menu icon on the Taskbar and click on Settings.settings windows 11
  2. Click on Apps on the left pane, then select Apps & features on the right pane.
  3. Navigate to Frevee app, click on the three ellipses, and select Uninstall.
  4. Launch the Microsoft Store, search for the Freevee app and click Get.
  5. Follow the on-screen prompts and try again.

What are some troubleshooting tips for resolving error codes on Freevee devices?

  • Enable automatic firmware updates to avoid compatibility issues, as the Freevee app gets updates frequently.
  • Ensure all cables are connected properly from HDMI, Ethernet, and USB. If cables are not connected properly, then this could cause communication issues.
  • Always check for hardware compatibility, especially for HDMI cables and ports. For instance, Freevee requires HDCP-compliant cables.
  • Regularly clear cache and cookies on your browser and any other apps that might be causing interference with your streaming app.

Aside from the error codes like this and Amazon code 2063, you may also get tired of the unskippable ads. Of course, it’s the price you have to pay for watching content for free but if you’ve had enough of them, you can always block ads on your smart TV.

This concludes our guide to Freevee Error code ITV-101. Before you go, you might be interested in our F1 TV BM1300 error guide as well.

If you have tried any other solutions that worked for you, please feel free to share them with us in the comment section below.

How to Unzip Files on Windows 11

If you don’t know how to unzip files on Windows 11, you might not be able to install certain software or view files sent to you by others in archive format.

This process is incredibly simple to perform, and in today’s guide, we’re going to show you the best ways to do it on Windows 11.

How do I unzip files in Windows 11?

1. Use the context menu

  1. Locate the zip file on your PC and right-click it.
  2. Next, select Extract all.
     
  3. Choose the extract location and click on the Extract button.
  4. Wait for Windows to extract files.

This is a built-in method to decompress files on Windows 11, but it works on other versions of Windows.

2. Use third-party tools

  1. Download WinZip and install it.
  2. Double-click the zip file you want to extract.
  3. Now click on Unzip to and select the destination folder.

3. Use File Explorer

  1. Double-click the zipped file you want to extract.
     
  2. Select all files and drag them to the desired location.
  3. Alternatively, click on Extract all and choose the extraction directory.

4. Unzip using the command line

Use Command Prompt

  1. Press the Windows key + S and type cmd. Select Run as administrator.
  2. Navigate to the directory that holds the zip file using the cd command.
  3. Run the following command: tar -zxvf WindowsReport.zip -C C:\Users\WindowsReport
  4. This will extract the file to the WindowsReport directory, however, you can change the extract file path as you wish.

Use PowerShell

  1. Press the Windows key + S and enter powershell. Select Run as administrator.
  2. Navigate to the path that has your zip file with the cd command.
  3. Run the following command: Expand-Archive -Path WindowsReport.zip -DestinationPath C:\Users\WindowsReport
  4. Wait while Windows processes the compressed file.

These are advanced methods to decompress files on Windows 11, but they can be useful if you’re automating the process via scripts.

Why can’t I extract a ZIP file on Windows 11?

  • Your archive might be corrupted or improperly downloaded.
  • The destination location might be inaccessible or too long.
  • Temporary bugs with File Explorer.

To see how to fix this problem, visit our guide on what to do if you can’t extract a ZIP file on Windows.

Working with archive file formats other than ZIP

Microsoft is working hard to bring support for other archive formats, including RAR, 7Z, TAR, and more. Support for these file types is available to Insiders, and we expect to see it available to the public soon.

For the time being, for best compatibility, you need to use third-party apps for archiving.

You can natively unzip files on Windows 11, however, the support is currently limited, but that will change soon as Windows gets native support for other file archive types.

Need to extract image-based archives? Learn how to unzip ISO files on Windows 11 to access their contents without mounting them. You can also package files into a standalone EXE by creating a self extracting archive, and you can learn the steps in this guide on how to create a self extracting archive.

FAQs

How do I unzip files on Windows 11 without any software?

Right-click the ZIP file, choose Extract All, select a destination folder, and click Extract. Windows will automatically unpack the files for you.

What tool can I use to unzip files on Windows 11?

You can use built-in File Explorer or third-party apps like WinZip, 7-Zip, or WinRAR to open and extract compressed files easily.

Why can’t I extract a ZIP file on Windows 11?

The file may be corrupted, incomplete, or stored in a path that’s too long. Restarting File Explorer or re-downloading the archive often fixes the issue.

Does Windows 11 support RAR and 7Z files?

Native support for RAR, 7Z, and TAR formats is rolling out gradually. Until then, you’ll need a third-party tool like 7-Zip to open those archives.

If you want to take your skills to another level, check our guide on how to extract multiple Zip files. In case you need to work with other file types, our guide on how to open RAR files without WinRAR will provide you with useful information.

We also have a great guide on how to unzip GZ file in Windows, so don’t miss it.

 Did we miss your favorite method of unzipping files on Windows 11? If so, share it with us in the comments section.

Microsoft Teams Halloween Backgrounds: 10 Best to Get

The autumn celebration is around the corner, so you’re hunting for Microsoft Teams Halloween backgrounds to amaze everyone in your meetings.

In this article, we gathered the best Microsoft Teams Halloween backgrounds and explained how to use them and apply them in your app.

You should know that you need a 1920×1080 pixels image (16:9 aspect ratio) for the desktop app in the JPEG, BMP, PNG, and JPG formats.

How do I get more backgrounds on Microsoft Teams?

Besides the virtual backgrounds you find within Teams, Microsoft also has a dedicated Teams Backgrounds website where you can download new ones. However, at the moment when this article was published, we didn’t find any Halloween-themed background within the selection.

But, as we highlighted above, you can use any image with a resolution of 1920×1080 pixels or higher, respecting the 16:9 aspect ratio. Below, we have recommended a lot of premade Teams Halloween backgrounds, but also some tools you can use to customize them from available templates.

Of course, you may also browse through our selection of the best Microsoft Teams backgrounds as well.

Types of backgrounds available

1. Premade backgrounds

There are plenty of Hallowing Teams backgrounds online to choose from. We have made a selection for you and provided the links so you can download the 1920×1080 version perfect to upload in Teams.

1. Halloween Pumpkin

⇒ Get 1920×1080 pixels version

2. Girl with Pumpkin

⇒ Get the 1920×1080 pixels version

3. Pumpkin Trick or Treat

⇒ Get the 1920×1080 pixels version

4. Jack O Lanterns

⇒ Get the 1920×1080 pixels version

5. Haunted House

⇒ Get the 1920×1080 pixels version

6. Goofy Pumpkins

⇒ Get the 1920×1080 pixels version

7. Pumpkin Truck

⇒ Get the 1920×1080 pixels version

8. Witch Sign

⇒ Get the 1920×1080 pixels version

9. Halloween Dogs

⇒ Get the 1920×1080 pixels version

10. Halloween Cat

⇒ Get the 1920×1080 pixels version

2. Customizable Halloween Backgrounds

If none of the images above or the ones you have found online don’t suit your needs or liking, you may opt to create your own background or customize an existing one. 

2.1 Customize Teams backgrounds using Adobe Express

Adobe Express has a lot of Halloween templates that you can customize to your requirements. You can change the messages, add or remove images, change the fonts, and many more.

Of course, after you’re finished, you can download the image and upload it as a background on Microsoft Teams.

⇒ Get Adobe Express templates

2.2 Customize Teams backgrounds using Canva

We also found many customizable Teams backgrounds on Canva. Some of them are free and some cost a few bucks, but they are all fully customizable.

You can add or remove images, shapes, graphics elements, and text, change the fonts and you can perform many other tweaks. For instance, you can slap your logo while you’re at it.

When you’re done, you may download the background to your PC and upload it to Teams right away.

⇒ Get Canva templates

2.3 Customize Teams backgrounds using PosterMyWall

PosterMyWall is another free editor you can use to create and customize any images, including Teams backgrounds.

This tool even allows you to create short-moving images, but unfortunately, you can’t load those into Teams. You just need to save a plain image, but there are a lot of customization options available, just like with Adobe Express and Canva.

There are plenty of Halloween images to tweak; some are free, so try it out.

⇒ Get PosterMyWall templates

Essentially, any photo or image editing tool can help you create Halloween Teams backgrounds, but the ones you can find online usually have a lot of seasonal backgrounds to start from.

How to Set Up a Halloween Background on Microsoft Teams

1. Add a background before the meeting

  1. Open Teams and log into your account.
  2. Click on the camera icon and select Start meeting.
  3. Turn on the camera and click on Background filters.
  4. From here, you can change the background but to add a new one, click on Add new.
  5. Locate the image on your hard drive, and after you select it, the background changes immediately.

We also have an article on how to use the background effects in Microsoft Teams that will offer more information.

Furthermore, here’s a complete guide on how to change the Teams background before the meeting.

2. Add a background during a meeting.

  1. While you are in the meeting, click on the More button and select Background effects.
  2. Now, click on Add new, just like in the previous solution, and indicate the location of the background image to use from your device.
  3. The only difference is that during the meeting, you can click the Preview button to see how it looks before hitting the Apply button below.

If you’re interested, here’s how to change the Teams background on an Android smartphone.

3. Add Teams backgrounds in bulk

  1. Press the Win + E keys to open File Explorer.
  2. Type or paste the following line in the search tab and press Enter to get to the Backgrounds folder in Teams: %APPDATA%\Microsoft\Teams\Backgrounds
  3. Now, access the ConsumerUploads folder and paste the images you want to use as backgrounds.

This option is a lot more convenient if you have gathered more backgrounds and you want to upload all of them in a single action. You will see all the images when you open the Background effects now.

Best places to find Microsoft Teams Halloween backgrounds

Google is the limit if you’re looking for images you can use for personal use. Just look for Halloween Teams backgrounds, and you will find many images to download. And if the resolution is different, you can use a built-in image editor such as Photos, or a third-party tool to resize it to 1920×1080 pixels.

In case you want to use the image for commercial purposes or in corporate meetings, you need to look for free copyright image databases. Pixabay and Unsplash are the most popular, but there are a lot of them online. Of course, you can also opt for buying a photo with the rights to use it from a database such as Shutterstock and eliminate any problem with digital rights.

Looking ahead to the holiday season? Check out the best Christmas themes for Windows 10 and get your PC ready for festive fun.

Tips for making the most of your Halloween-themed meeting with Microsoft Teams

  • Look for colorful and eye-catching images for the background.
  • Make sure that your image in the camera doesn’t obscure important elements in the image.
  • Choose the right Teams background according to the circumstances. Usually, funny or goofy images will work a lot better.
  • Make sure to resize the image to 1920×1080 pixels. Otherwise, you may have issues. The image may not show up and a smaller one will appear pixelated.

It’s important to know that the Teams backgrounds may also be used as Zoom backgrounds as well.

That’s it! We hope that now you have the best selection of Halloween Teams backgrounds, and you know exactly how to apply them in the app.

Ultimately, you can just forget about changing the background and just blur it instead by using this guide. Or instead of a static background, you can always set animated backgrounds in Teams.

Once you’re done trying spooky setups, you can also explore these funny Teams backgrounds for a lighter touch. They’re perfect if you want to switch from a scary theme to something that makes your meetings more entertaining.

For any other questions or suggestions, let us know about them in the comments section below.
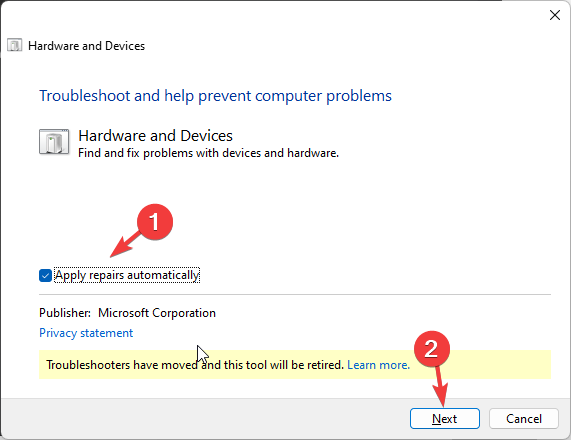
Controller Only Works in Steam? Here’s What to do

Many have reported that their PS (DualShock) or Xbox controller works only in Steam and not with other games installed on the PC. While some managed to find a solution, others were forced to replace the controller. However, before you get a new one, remember the problem is fixable!

For a few, the controller only worked with the gaming client in Big Picture mode and not during the gameplay. And in most cases, it turned out that the Steam client was at fault.

Why is my controller working only in Steam?

  • Another device, a gamepad or controller, conflicts with the setup
  • Problems with the wireless connection
  • You are running an outdated Steam client, or there’s a bug in the installed version
  • A corrupted or outdated controller driver is installed
  • The affected game was not installed properly

How do I get my controller to work on non-Steam games?

Before we head to the slightly complex changes, try these quick solutions first:

  • Disconnect the controller and then plug it back in. Also, if you have a gamepad connected, unplug it. A user found that removing Tartarus Pro during the Windows boot process gets the controller to work in non-Steam games.
  • Use a wired connection instead of wireless. And make sure to use the USB cable that came along with the controller.
  • Reset the controller. To reset a DualShock controller, unplug it and use a pin to hold the reset button on the backside for 5 seconds. For Xbox controllers, remove the battery for a minute.
  • Check for updates and install them, both for Steam and the affected game(s).

If none work, move to the fixes listed next.

1. Terminate the Steam process

  1. Press Ctrl + Shift + Esc to open the Task Manager.
  2. Locate the Steam process, select it, and click on End task.end task
  3. Now, relaunch the game you were facing issues with and check for improvements.

Often, users found that the Steam client conflicted with the controller settings, and subsequently, the latter only worked with Steam games. Terminating the gaming client will help get the controller to work!

Also, if Steam automatically loads at boot, disable the startup app. 

2. Reconfigure the Steam controller settings

  1. Launch the gaming client, click the Steam menu near the top left, and select Settings.settings
  2. Go to the Controller tab from the navigation pane, and turn off the toggle for Enable Steam Input for Xbox controllers, Enable Steam Input for PlayStation controllers, or Enable Steam Input for Switch Pro controllers, depending on the controller you are using.disable input to fix controller only works in steam
  3. Once done, restart the computer, and then check whether the controller is still not working.

3. Update the controller driver

  1. Press Windows + R to open Run, type devmgmt.msc in the text field, and hit Enter.devmgmt.msc
  2. Expand the Human Interface Devices entry, right-click on the controller, and select Update driver.update driver to fix controller only works in steam
  3. Click on Search automatically for drivers and wait for Windows to install the best locally available version.search automatically
  4. Finally, restart the computer.

If the controller is not working with games, make sure the drivers are up to date! Start with the controller, and then get the latest Bluetooth drivers.

In case the problem remains unresolved, check the manufacturer’s website, download the latest version, and manually install the driver.

4. Add the game to the Steam library

  1. Open Steam, click the Games menu at the top, and select Add a Non-Steam Game to My Library.add non-steam game to fix controller only works in steam
  2. Tick the checkboxes for the affected game from the list, and click on Add Selected Programs.select game
  3. If the game is not listed here, click on Browse, locate the game launcher, select it, click Open, and then click Add Selected Programs.

When the Xbox controller only works on Steam, an easy solution is to add the Xbox game to the Steam library. It has worked for several users, but should be used as one of the last resorts!

5. Switch to Steam Beta client 

  1. Launch the client, click the Steam menu, and select Settings from the list of options.
  2. Go to the Interface tab, and select Steam Beta Update from the Client Beta Participation dropdown menu.steam beta to fix controller only works in steam
  3. Click Restart Now in the prompt that appears.restart now
  4. Wait for Steam to relaunch and download the beta updates.

If the controller works in Steam but not in game, you could opt for Steam Client Beta and get the latest updates earlier than others. This will eliminate any bugs in the installed version sooner!

When your controller only works in Steam, things are easy to fix! But there are also cases where the controller is detected but not working, and you will then have to look for game or controller-specific solutions.

Besides, if you are facing any Xbox Cloud Gaming controller issues, charging it or updating the firmware will do the trick!

For any queries or to share more solutions with us, drop a comment below.

How to Use a Whiteboard in Microsoft Teams

Collaboration is important for any type of team, and using a digital canvas such as the Microsoft Teams Whiteboard is one of the most versatile ways of collaborating in a meeting.

If you’ve been wondering how to use this feature in your Teams meeting, we share the tips to get you started.

How do you use Whiteboard on Microsoft Teams?

Before you start using Microsoft Teams Whiteboard, ensure you meet the following prerequisites:

  • Ensure you have an active Microsoft 365 subscription with Azure Active Directory.
  • Collaboration can only be done with users in the same Microsoft tenant.
  • Check that your organization has enabled Microsoft Whiteboard from the admin center.
  • Ensure you allow Whiteboard.ms, whiteboard.microsoft.com, and wbd.ms in your firewall settings.
Note icon NOTE
Microsoft 365 Germany does not support the Whiteboard feature
  1. Log into your Microsoft Teams account on your desktop or web browser.
  2. On the top right corner, select the Share icon and select Microsoft Whiteboard.
  3. Choose a pre-existing board or create a new one, then begin sketching.

Can I set up a Whiteboard in Teams before the meeting?

Yes, you can. This can be useful if you want to save time. You can outline the agenda for your meeting or if you want to create a template for other people to use before they join the meeting.

You can also continue working on a Whiteboard after the meeting.

What are some Microsoft Teams Whiteboard features?

  • Sticky Notes – These are a great way to jot down quick notes, reminders, or updates on the Whiteboard that can be shared with others. This can come in handy when playing Teams games.
  • Share Tray – This feature allows you to share the Whiteboard link with other users with a Microsoft account.
  • Annotations – These make collaboration much easier as everyone can add or make comments, and changes can be easily tracked from the collaborative cursors.
  • Lock feature – If you wish to keep your changes on the Whiteboard, you can lock them in so that they don’t get moved around by other users.
  • Export feature – You can save whiteboard content as images or PDFs so others can see it outside of Teams meetings or just keep a copy of a previous Whiteboard.
  • Multiple devices – Users can take advantage of the Whiteboard feature available on a wide range of devices to work on the same project from anywhere.
  • Blank Whiteboard – This is a blank canvas where you start from scratch and can customize it as per your liking.
  • Effective Meetings – The Whiteboard Integration into Teams allows for real-time collaboration, ensuring participants are up-to-date with the changes made.
  • Templates – If you’re not sure where to begin, try using one of the many templates that come with the app.

Microsoft Teams Whiteboard has been around for a while, but adoption is still relatively low. This could be mainly due to users being unaware of the innovative features. It could also be due to how unstable apps can be. Sometimes, you may find that Whiteboard is not working. 

Nonetheless, it is still a welcome feature. This holds true especially when compared to the Teams remote control. You had to access another user’s screen to control shared content. Now, all you have to do is collaborate on online meetings.

You can also learn about direct routing to integrate your existing telephony with the platform.

Have you started using the Microsoft Teams Whiteboard feature? There’s a lot of great functionality you may not have realized existed. Let us know some of your favorites in the comment section below.

Google Earth for Windows 10: How to Download & Install

While many use Google Maps, some users prefer a more detailed view of Earth, and if you’re one of those users, you might want to download Google Earth for Windows 10.

The process is rather simple and it only takes a few minutes, so in today’s guide, we’ll give you step-by-step instructions on how to do this properly.

Benefits of using Google Earth:

  • Provides users with a 3D representation of Earth.
  • It offers important geographical information such as maps, satellite imagery, and terrain data.
  • Useful for educational purposes and travel planning.

How do I download Google Earth for free on Windows 10?

Requirements for Installation

MinimumRecommended
OSWindows 7Windows 7 or newer
CPU1 GHz2GHz dual-core or faster
RAM2 GB4 GB
Storage2 GB4 GB
GPUDirectX 9 or OpenGL 1.4 compatibleDirectX 11 or OpenGL 2.0 compatible
Internet connectionYesHigh-speed

Downloading process

  1. Visit the Google Earth download page.
  2. Click on Download Earth Pro on desktop.
     
  3. Next, click on Accept & Download.
  4. Wait for the setup file to download.

Installation process

  1. Run the GoogleEarthProSetup file.
  2. The download and installation process will now start.
  3. The process is fully automated and it doesn’t require user interaction.

Exploring the features of Google Earth for Windows 10

Advanced tools & historical imagery

  1. In the top menu, click on Show historical imagery.
     
  2. A new slider will appear.
  3. Adjust the slider to see how the location has looked over the years.

Hundreds of cities in 3D terrain

  1. In the layers pane, locate the 3D Buildings option and check it.
  2. If 3D buildings are available, they will appear on the map.
  3. Note: Depending on your Internet speed, it might take a bit for the 3D buildings to render properly.

This feature is available to hundreds of major cities worldwide, and more cities are constantly being added.

High-resolution satellite imagery

Google Earth uses high-resolution satellite imagery, allowing you to view images in 8192×4764 resolution. All images can be downloaded in maximum resolution, allowing you to zoom in and view the details as you please.

Mapmaking tools & measurement tools

 In the menu on the top, you’ll find various mapmaking tools including the following:

  • Placemarks
  • Polygons
  • Paths
  • Image overlays

You can customize the color or opacity of each element or assign links or images that provide more information to users once they click it.

As for measurement tools, you can use them as follows:

  1. Click the ruler icon in the menu.
     
  2. Choose the desired ruler type.
  3. Use your mouse to create it and you should see the measured distance on the screen.
  4. If needed, you can change your measuring units.

Interactive tours and sharing

  1. In the top menu, click on Add and select Tour.
     
  2. Click the record button and record your tour.
  3. After you’re done, you’ll see a playback option, use it to preview your tour and ensure everything is in order.
  4. Click the Save icon if you wish to save your tour.

As for sharing, you can do it as follows:

  1. Click the Email icon in the top menu.
     
  2. Select what you want to share.
  3. Lastly, pick your email client.

Alternatively, you can open this location in Google Maps by clicking its icon and then share the link manually.

You can download Google Earth for Windows 10 in 64 or 32-bit versions, and while it has an abundance of features, its sharing options leave a lot to be desired.

This software is available on almost all versions of Windows, and we have a guide on how to download Google Earth for Windows 11. Do keep in mind that the software has its share of problems, and we already wrote a guide on what to do if Google Earth is not working.

In case you want something simpler, we have a guide on how to download Google Maps for Windows, so be sure to check it out.

How often do you use Google Earth? Let us know in the comments section below!

Surface Go 3 Black Screen: How to Fix it

Surface Pro 3 black screen is a common problem, and it’s prevalent across the Surface series and even computers in general. The error arises due to several reasons, but more often than not, users see a black screen on Surface 3 after login.

The desktop icons don’t show up, though the Task Manager and File Explorer are accessible in most cases, even if for a small period. The Microsoft Surface black screen of death requires some effort to troubleshoot and won’t go away on its own!

Why is my Microsoft Surface Go 3 stuck on a black screen with a cursor?

A Surface Go 3 black screen issue with cursor or without one is usually caused due to issues with the battery or the power plan. If the battery has been exposed to a cold climate, it won’t hold charge.

Other than that, you will come across a Surface Go 3 black screen with logo if outdated, corrupt, or incompatible graphics drivers are installed. Lastly, we cannot ignore the possibility of conflicting programs and hardware issues.

How do I fix a black screen on my Surface Go 3?

Before we start with the slightly complex solutions, try these quick ones first:

  • Hold the Power button on the device for 15-20 seconds until the Windows logo appears, then release it and let the Surface Go 3 start normally. This also helps with the Surface Pro 4 black screen of death. 
  • Connect the keyboard and press Ctrl + Shift + B to reset the graphics. Also, disconnect any USB-C or other peripherals.
  • In case Surface Go 3 blacked out in the middle of work, charge the device for some time. While Windows may show that the battery is sufficiently charged, keep the power cord connected and then turn on the device.
  • Check for any pending Windows updates and install them.
  • Warm up Surface Go 3 using a mild blower or hair dryer. We recommend you be cautious with it and not expose the device to too much heat.

If none work, head to the fixes listed next.

Tip icon Tip
If the Surface Go 3 device doesn’t turn on at all, and you are faced with a black screen, boot Windows into Safe Mode and execute the solutions listed below.

1. Uninstall conflicting programs

  1. Press Windows + I to open Settings, go to Apps from the navigation pane, and click Installed apps on the right. installed apps
  2. Click the ellipsis next to any recently installed app, and select Uninstall from the flyout menu.uninstall to fix surface go 3 black screen
  3. Again, click Uninstall in the confirmation prompt.

When faced with a Surface Go 3 black screen with cursor, it’s often an installed problematic app to blame. Here are a few that were reported to trigger the problem: 

  • Explorer Patcher
  • WSE Vosteran
  • Search Protect

2. Update the graphics driver

  1. Press Windows + R to open Run, type devmgmt.msc in the text field, and hit Enter.devmgmt.msc 
  2. Expand the Display adapters entry, right-click on the in-use adapter, and select Update driver.update driver to fix surface go 3 black screen
  3. Now, click on Search automatically for drivers and wait for Windows to install the best available version stored locally.search automatically
  4. Restart the device in normal mode and check if the Surface Go 3 black screen goes away.

When you find the Microsoft Surface screen black, but the keyboard lights up, it could be the graphics to blame. Update the graphics driver, and things should be up and running!

If that doesn’t work, head to the manufacturer’s website, download the latest version, and manually install the driver. Or you could check Intel’s official website for the driver.

3. Set the device to sleep instead of hibernation 

  1. Press Windows + S to open the Search menu, type Control Panel in the text field, and click the relevant result.
  2. Select System and Security.system and security
  3. Now, click on Power Options.
  4. Click Choose what closing the lid does from the navigation pane.choose what closing the lid does 
  5. Select Sleep mode in all the dropdown menus if Hibernate is the current configuration, and then click on Save changes.sleep mode to fix surface go 3 black screen

4. Reset the power plan

  1. Press Windows + R to open Run, type control in the text field, and click OK.control panel
  2. Now, click on System and Security. 
  3. Select Power Options.power options
  4. Click on Change plan settings next to the selected power plan.change plan settings
  5. Next, click Restore default settings for this plan.restore defaults to fix surface go 3 black screen
  6. Click Yes in the confirmation prompt that appears.

5. Reset the device

If the Surface Go won’t turn on or shows a black screen and nothing else works, the last option is to reset the Windows device.

This will wipe out all the data, so it’s recommended that you back it up using an external storage device or a reliable data backup solution.

When faced with the Surface Go 3 black screen of death issues, it’s often the power supply, settings, drivers, or defective hardware components to blame. For problems with the power supply, you may face charging issues on the Surface device. But it’s all fixable!

Lastly, you may contact a local service center or Microsoft support for more help.

For any queries or to share what worked for you, drop a comment below.

High GPU Usage but Low FPS: 9 Ways to Fix This Issue in 2026

If a game hasn’t been properly optimized for your hardware, you may experience a case of high GPU usage with low FPS. This can be the case even with decent specs.

In such cases, your graphics card is usually working harder than it should be. In the event that this happens, it can lead to several issues such as game lagging or freezing, but not to worry as you can easily resolve this issue.

What causes low FPS despite high GPU usage?

  • Your game might be using more CPU resources than you have available.
  • The game may not be optimized for your hardware because your PC doesn’t meet the minimum system requirements.
  • Your game settings may be too high, especially if you have an old or underpowered CPU hence more strain on your GPU and CPU.
  • Your graphics card may be running hot, making it struggle to maintain its peak performance levels.

How do I fix low FPS despite high GPU usage?

Below are some preliminary steps to make sure your computer is ready for the process of optimizing GPU usage and FPS:

1. Lower in-game settings

It’s possible that your game has been optimized for newer computers and lowering some of the game’s settings will help it run smoother on your PC.

For instance, if you are playing a game on High settings and are having problems with high GPU usage and low FPS, try changing the graphics settings to Medium instead. This will decrease the load on your graphics card, allowing it to run more smoothly without sacrificing visual quality too much.

2. Uninstall GeForce Experience

  1. Press the Windows key + R, type appwiz.cpl, and click OK.
    appwiz
  2. Right-click the NVIDIA GeForce Experience option and select the Uninstall option.
    uninstall nvidia geforce experience not starting with windows
  3. Now, follow the onscreen instructions to complete the process.

GeForce Experience could affect your GPU’s performance, so it’s best to uninstall it and find other ways to optimize your game.

3. Adjust Power Management Settings

  1. Click on the Start button, type power plan, then select Choose power plan.
  2. Checkmark the High Performance section, then select Change Plan Settings.
  3. If you can’t see it on the list of plans, click on Show additional plans.
  4. Click on Change Advanced Power Settings.
  5. Go to Processor Power Management and make sure the minimum and maximum processor state is 100%.

4. Update your graphics card drivers

  1. Hit the Windows key, type Device Manager in the search bar, and click Open.device manager w11
  2. Navigate to Display adapters to expand, right-click on your graphics card, and select Update driver.Graphic Driver Update
  3. Select Search automatically for drivers.

Often, Windows may fail to match your PC with the correct drivers. As such, a driver updater utility can come to your rescue in such situations. Outbyte Driver Updater does a good job at detecting damaged, missing, corrupted,, and outdated drivers and then replacing them with the correct ones.

5. Rollback the previous driver version

  1. Click the Search icon, type Device Manager in the search bar, and click Open.device manager w11
  2. Navigate to Display adapters to expand, right-click on your graphics card, and select Properties.properties
  3. Click on the Driver tab, and select Roll Back Driver.Roll back graphics driver
  4. Select a reason for rolling back in the next prompt, then click Yes.
  5. Restart your PC, and the previously installed drivers for your device will be loaded.

6. Clean up your PC from malicious software

  1. Press the Windows key, search Windows Security, and click Open.
  2. Select Virus & threat protection.
  3. Next, press Quick scan under Current threats.
  4. If you don’t find any threats, proceed to perform a full scan by clicking on Scan options just below Quick scan.Scan options
  5. Click on Full scan, then Scan now to perform a deep scan of your PC.Full Scan Scan Now
  6. Wait for the process to finish and restart your system.

7. Increase CPU cooler performance 

If your CPU is running hot, the CPU will automatically reduce its clock speed in order to prevent damage from overheating. This in turn causes throttling.

And if your computer is throttling because of a poorly cooled CPU, you’ll continously encounter dropped FPS levels. Increasing the fan speed or replacing or using a better cooler will help keep your CPU running at optimal temperatures so that it doesn’t overheat and become damaged.

8. Enable Power-Preserving Modes on Single Threads and CPUs

  1. Enter into your PC’s BIOS settings.
  2. Navigate to the Advanced tab and click on CPU Configuration. 
  3. Locate C-States Control option and Disable it. 
  4. Save the changes and exit the BIOS setup utility.

This feature can be useful in scenarios when you want to reduce your CPU’s power consumption while still maintaining excellent performance.

9. Overclock your GPU

Overclocking can help boost your gaming performance by increasing the clock rate of some components inside the GPU but it also increases heat output and power consumption significantly.

If you go this route, ensure you enable overclocking monitoring software and a reliable cooling solution. This will ensure you don’t end up with high temperatures and poor cooling solutions that fail to keep up with the increased load from overclocking.

Why is my FPS so low when I have a good GPU? 

You probably have too many background processes on your computer, which use up your CPU power. And if your PC doesn’t have enough RAM or processing power to run your games smoothly, it won’t be able to produce enough frames per second (FPS) for a good experience.

Your graphics settings could also be too high for your hardware or vice versa. If that’s the case, performance will suffer greatly as heat generation limits how fast it can run at full power. You’ll need to invest in a good CPU cooler.

Ultimately, there are definitely some steps you can take to improve your FPS and GPU load. Some may require only minor tweaks and adjustments, while others where the CPU usage is high with low GPU may involve the need for a new graphics card or CPU.

However, before you make hasty, expensive decisions, try proactively tracking metrics related to performance. You can continually tune visual quality to increase FPS and ensure that your game performs well across a wide variety of hardware configurations and settings.

Please let us know in the comments below how these worked out for you, and what other methods you’ve tried. We’d love to hear from you.

Teams Machine Wide-Installer: What is it & How to Set it Up

Microsoft Teams is one of the popular collaboration tools that also comes with Machne Wide Installer, which can help streamline deployment across organizational systems.

In this comprehensive guide, we will discuss the step-by-step process to harness the power of this installer, ensuring Microsoft Teams’ smooth integration across all user profiles on a computer.

Benefits of installing Teams machine wide-installer

  • Streamlines the deployment process of Microsoft Teams across multiple user accounts, saving time & effort in installation.
  • Centralized installation and management of Microsoft Teams using the machine-wide installer, simplifying administrative tasks like overseeing and updating the app.
  • Updates and patches are installed uniformly across all the profiles in a computer, reducing potential security risks.
  • Provides a standard user experience due to a uniform configuration of Microsoft Teams settings across all users on a machine.
  • Auto-install approved apps in Microsoft Teams.

What is Teams machine-wide installer, and do I need it?

The Microsoft Teams machine-wide installer is an MSI-based installation method for Teams that allows mass installation and updates of Teams via SCCM or Microsoft Endpoint Configuration Manager across all user accounts on a computer.

If you have a powerful centrally managed endpoint solution like SCCM, you can use this method to streamline deployment and make sure Teams is available & updated as soon as a new user signs in.

Preparing for Teams installation

Check Requirements and System Compatibility

ComponentRequirements
OSWindows 11, Windows 10 (excluding Windows 10 LTSC for Teams desktop app), Windows 10 on ARM, Windows 8.1, Windows Server 2019, Windows Server 2016, Windows Server 2012 R2.
Computer and processorMinimum 1.1 GHz or faster, two-core
Memory400 GB RAM
Hard disk3.0 GB of available disk space
Display1024 x 768 screen resolution
Graphics hardwareWindows OS: Graphics hardware acceleration requires DirectX 9 or later, with WDDM 2.0 or higher for Windows 10
.NET version .NET 4.5 CLR or later
VideoUSB 2.0 video camera
DevicesStandard laptop camera, microphone, and speakers
Avatars for Teams appTo get the best experience when using avatars, it is recommended to have a computer that has a four-core CPU with at least 8GB of RAM.
  • Set up Admin Credentials in Active Directory and Registry Key – Configure the essential admin credentials in the Active Directory and set up registry Keys with suitable permissions to ensure smooth installation and updates.
  • Update Channel Selection & Default File Format Pop-Up Page – Verify and configure the suitable update channels for the app to make sure it gets regular updates and features.
  • Designate User Profiles, Accounts, and Experience – Define user profiles and accounts for accessing and using the software and check for proper permissions & roles according to their job roles.
  • All users must have an Office 365 or Microsoft 365 account.
  • Check the installation status of the Microsoft Teams app – Press Windows + I to open Settings>Apps>Installed apps. If Microsoft Teams is already on the list, remove it.

How can I install Teams using Teams Machine Wide-Installer?

  1. Download the Microsoft Teams MSI file in 32-bit or 64-bit according to your system architecture.
  2. Once the installer is downloaded, press the Windows key, type powershell, and click Run as administrator.
  3. Copy & paste the first command for 32-bit and the second command for 64-bit architecture computer, and hit Enter:powershell_Teams Machine Wide-Installer: What is it & How to Set it Up
    • msiexec /i Teams_windows.msi ALLUSERS=1
      msiexec /i Teams_windows_x64.msi ALLUSERS=1
  4. ALLUSERS=1 in the commands make sure the Teams Machine-Wide Installer appears in the Programs and Features list on the Control Panel or Installed apps list on the Settings app.
  5. Once done, the Teams machine-wide installer will store the app in C:\Program Files\Teams Installer or C:\Program Files (x86)\Teams Installer 
  6. As soon as a new user logs on to the computer, the installer will automatically install Microsoft Teams to the user’s folder under C:\Users\userprofile
  7. To verify if the Teams installation is successful, type the following command and press Enter: Get-AppxPackage -name '*teams'powershell_Teams Machine Wide-Installer:

How do I update the Teams client to the latest version?

Microsoft Teams desktop app can install updates automatically with the help of its own proprietary update engine. The updates are released every two weeks and usually on Tuesdays.

The administrators can’t modify or interrupt the whole process, however, users can always check for updates manually. All they need to do is click the profile icon>select Settings>About Teams. You will get the version of the app.

To update the Microsoft Teams machine-wide installer, you can also download the latest version of MSI installer & use the same steps mentioned above to install it.
However, this will not upgrade the existing version but will update the version installed for the next user logins on PCs.

Can I remove the Teams machine-wide installer?

  1. Press Windows + I to open the Settings app.
  2. Go to Apps, then click Installed apps.Apps, installed apps -Teams Machine Wide-Installer:
  3. Locate Teams machine-wide installer, click the three dots, and select Uninstall.Uninstall - Teams machine-wide installer
  4. Click Uninstall again to confirm the choice.
  5. Press Windows + E to open File Explorer; navigate to this path: %LocalAppData%\Microsoft\Teams\Delete Teams folder
  6. Delete the Teams folder.

You can also use Control Panel> Programs and Features to remove the app. Repeat these steps for all the user profiles on your computer to completely remove the app and stop it from installing again.

In case you can’t uninstall Microsoft Teams, restart your PC & try again; if the issue persists, check this guide for other solutions.

Just like other Microsoft products, the Teams newer version, Teams 2.0, will also get AI assistant Copilot and a revamped interface; read this guide to know more.

If you have any questions or suggestions about the subject, don’t hesitate to mention them in the comments section below.
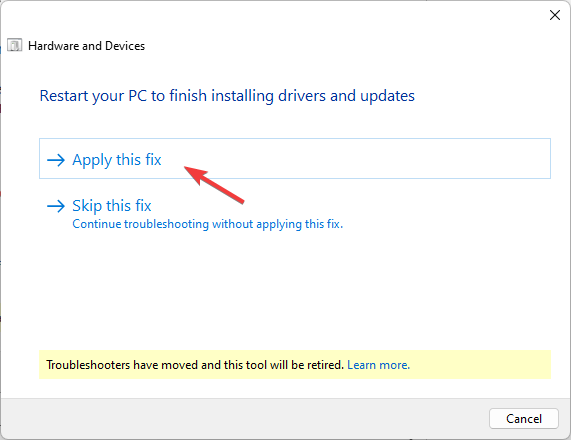
Xbox Error Code 80151912: How to Fix it

Xbox error code 80151912 will prevent you from accessing Xbox Live, and this means that you won’t be able to play your favorite games online with your friends.

It’s possible to fix this issue, and in today’s guide, we’re going to show you a couple of solutions that can help you with this error message.

What is error code 80151912 on Xbox?

This is one of many Xbox errors you can encounter, and this particular issue is caused in most cases by server issues.

Users reported this problem while trying to connect Xbox 360 to Xbox Live or when running Xbox 360 games on Xbox Series X/S.

How do I fix Xbox Error Code 80151912?

1. Check the server status

  1. Go to the Xbox Live Status page.
  2. Check if there’s any outage.
    Xbox server status
  3. If there are issues, your only option is to wait it out for Microsoft to fix the problem.

2. Switch to the wired connection

  1. Open Settings.
     
  2. Next, navigate to Network settings.
  3. Choose Disconnect wireless to disable your wireless Internet connection.
  4. Lastly, connect the Ethernet cable to your console.

3. Connect Xbox to a mobile hotspot

  1. Start a mobile hotspot on your phone.
  2. On your Xbox, go to Network settings.
  3. Select Set up wireless network.
  4. Next, choose your mobile hotspot and enter its password if necessary.
  5. After connecting to a mobile hotspot, try to log in to Xbox Live.
  6. If it works, switch back to your home network.

Xbox error code 80151912 is usually caused by technical issues on the server, but you might be able to fix it with our solutions.

Unfortunately, these aren’t the only errors you can experience, and many reported error 0x87e50007, 0x80270254, and Xbox error 0x87e30064. We also covered Xbox errors when redeeming codes in one of our separate guides, so don’t miss it.

Roblox Error Code E01: How to Quickly Fix it

If you’re playing Roblox and you’re suddenly kicked out with the Roblox Error Code E01, or you can’t join a game, sometimes you also get the message Disconnected from Game, Please Reconnect Error. In this article, we’re listing the best solution to fix error code E01 in Roblox.

What is Error Code E01? Roblox Error Code E01 is usually due to server issues, but a problematic graphics driver or local internet problems may also cause it.

How do I fix Roblox Error Code E01?

Before applying more complicated solutions, here are a few quick possible fixes:

  • Check if the servers are working fine by visiting the Roblox Status Page.
  • If the servers are fine, check your internet connection and make sure it’s stable. It’s a good idea to reset your router and see if that solves the problem.
  • Make sure that Roblox is up to date, and also install any Windows pending updates.
  • If you’re playing the game on a browser, delete its cache and cookies or try another browser. 

1. Clear the Roblox cache

  1. Press the Win + R key combination to start the Run console.
  2. Type or paste the following line and press Enter: %localappdata%\Roblox\logs
  3. This will open the cache location of Roblox. Press Ctrl + A to select all files and press the Delete button.

Make sure you’re not logged into Roblox on multiple devices because that can also trigger disconnections.

If Roblox loads properly after clearing the cache but you still cannot use voice chat, check out this detailed guide: Roblox mic not working.

2. Update the graphics card driver

  1. Right-click the Start button and select Device Manager from the list.
  2. Expand the Display adapters section, right-click on the driver, and select Update driver.
  3. Choose to Search automatically for drivers, and if the system finds a new one, install it.

A corrupted or outdated driver might cause the Roblox E01 error code, so updating it can fix the issue right away. We also have a full guide on how to update the graphics driver if you need more information. 

If the problem started after updating your graphics card driver, try to roll back your driver to the previous version and see if that fixes the issue. 

However, you can completely optimize your PC and update drivers automatically in a blink of an eye. The software will diagnose your system and update problematic drivers immediately.

➡️ Get Outbyte Driver Updater

3. Reinstall Roblox

  1. Click the Start button and select Settings.
  2. Choose Apps from the left and select Apps & features from the right pane.
  3. Look for Roblox in the list of apps, click the three dots button from the right, and select Uninstall.
  4. After the process is finished, go to the Roblox website, download the latest version of the game, and reinstall a fresh copy.

Reinstalling the app is a common fix for this issue and others like Roblox error code 524; read this guide to learn about other solutions.

E01 is one of the most unusual Roblox error codes because it doesn’t provide too much information. It’s not as devious as Roblox Error Code 280, but it’s pretty close.

Note that a problem with the server usually causes Error Code E01 in Roblox, and most of the time, you just need to wait out. However, we hope the solutions we provided in our guide will help you fix it, and you can now play Roblox without any issues.

Another problem caused by connection issues is Roblox Error Code 901, but the solutions in this article will help you fix it.

If Roblox is not starting at all, we’ve got the right guide to fix this problem for good.

For any other questions, we recommend using the comments section below to leave us a note.

Discord Error 1105: How to Fix it [2026 Guide]

The Discord Error 1105 prevents users from accessing their accounts and is usually limited to a region when there’s a server outage. But, users sometimes reported encountering it for extended periods and had to troubleshoot things manually.

The Discord error code could arise due to a problem at your end or a server error. Let’s find out all about it!

What is Discord Error 1105?

Discord Error 1105 indicates a server issue that prevents a connection between the device and Discord. It usually appears on a restricted network, say a school network. Problems with the Discord app or the stored data can trigger it on a home network.

The error message typically reads one of the following:

  • Error 1105: Temporarily unavailable. You requested a page on a website (discordapp.com) that is on the Cloudflare network. The page could not be rendered due to a temporary fault.
  • Error 1105: You are being rate limited. The owner of the site has temporarily banned you from accessing the website

How do I fix Error 1105 on Discord?

Before we move to the slightly complex solutions, perform these quick checks first:

  • Make sure both the CloudFlare services and Discord servers are up and running. You can also use a reliable service like Downdetector to verify the same. If the services are down, wait for an hour or two and try again.
  • Restart both the computer and the modem/router. This also helps with Discord’s Temporary Network Error.
  • Check if the issue is limited to the website and the desktop app or Discord is inaccessible on mobile as well. In most cases, the mobile app worked fine.
  • Switch to another network. If the mobile app works fine, use a mobile hotspot to access the Internet on the computer.

If none work, head to the fixes listed next.

1. Change the DNS server

  1. Press Windows + R to open Run, type ncpa.cpl in the text field, and hit Enter.ncpa.cpl
  2. Right-click on the active network adapter, be it Wi-Fi or Ethernet and then select Properties.
  3. Choose Internet Protocol Version 4 (TCP/IPv4) from the list, and click the Properties button.IPv4
  4. Select Use the following DNS server addresses, and enter the following values in the text field:
    • Preferred DNS server: 8.8.8.8
    • Alternate DNS server: 8.8.4.4change DNS server to fix discord error 1105
  5. Once done, click OK to save the changes.

2. Delete Discord’s app data

  1. Press Windows + E to open File Explorer, paste the following path in the address bar and hit Enter: %AppData%appdata
  2. Locate and open the Discord folder, then press Ctrl + A to select all the files and Delete to remove them.delete files to fix discord error 1105
  3. Similarly, go to the following location and delete all the files in the Discord folder:%LocalAppData%

Clearing the app data is also an effective measure against the This interaction failed error in Discord, or when the program window reads, An unknown network error has occurred.

3. Use a VPN service

  1. Download and install ExpressVPN on your device.
  2. After this, launch the software and log in.
    ExpressVPN-iniciar-sesión
  3. Connect to another server address by accessing All locations.
  4. Once connected, open the Discord app or in the browser.
  5. If the error stops appearing, keep the VPN connection on.

Discord users faced with Error 1105 can bypass any local limitations on a restrictive network using VPN software.

The VPN support can help you by rerouting the IP address of your device and connecting it to another IP localized in a different location. Besides, if the server issue is localized, you can connect to a server in another region and access Discord.

So, get a reliable VPN solution, choose a server that doesn’t adversely affect the Internet speed, and it should do the trick.

4. Flush DNS and reset Winsock

  1. Press Windows + S to open the Search menu, type Command Prompt in the text field, right-click the relevant result, and select Run as administrator.command prompt
  2. Click Yes in the UAC prompt.
  3. Now, paste the following two commands individually, and hit Enter after each: ipconfig /flushdns netsh winsock resetflush dns
  4. Once done, restart the computer and check whether the Discord Error 1105 is fixed.

Resetting the network configuration helps get rid of several Discord error codes, including Discord awaiting endpoint.

5. Contact the ISP to change the IP address

You could ask the Internet Service Provider (ISP) to change the IP address when nothing else works. Users who faced Error 1105 in Discord found that the servers blocked their IP address.

If using a VPN doesn’t make sense in the long term, a new IP address will be a viable solution!

If these solutions don’t work against Discord Error 1105, you can reinstall the app on a PC or mobile device. But it shouldn’t come down to that, and using a VPN or changing the IP address will work in most cases!

Besides, several users have recently reported coming across Bad Activity Result code 96 when cropping a profile picture. Find the solutions beforehand, so that it doesn’t hamper your experience.

For any queries or to share what worked for you, please comment down below.

Cash App Error Domain 400: How to Quickly Fix It

Cash app error domain 400 will prevent you from logging in to your account and make your funds inaccessible.

This can be a big problem since it will make the service unusable, but there are a couple of solutions that can help you fix this issue, and today, we’re going to take a closer look at them.
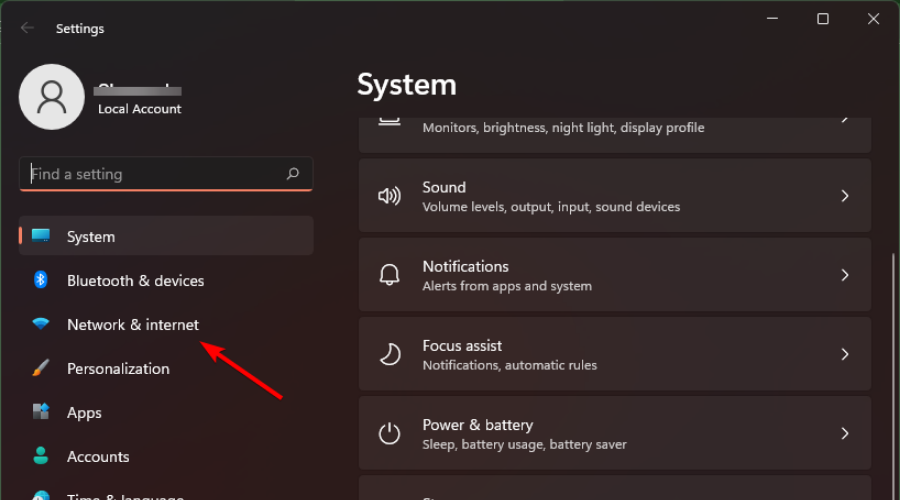
What is Error 400? Error 400 is a bad request error similar to Cash App error 503, and it appears when the request sent to the service is invalid or corrupted. The causes for this error in Cash App are the following:

  • Issues with the app, such as corrupted files or cache.
  • Bugs with the applications.
  • Poor Internet connection, connection errors, or server issues.

How do I fix the Cash App session error domain 400?

Make sure to perform these preliminary checks:

  • Ensure that you have a stable Internet connection. If you’re on a bad Internet connection, try switching to a different one.
  • Check the Cash App server status and ensure there aren’t any temporary glitches.
  • Keep the app updated since outdated versions might have bugs.
  • If you have a VPN or if you’re using a proxy server, turn it off.

1. Restart the app

  1. Locate the app and press and hold its icon. Select the Information icon from the menu.
  2. Next, tap on Force stop.
     
  3. Confirm that you want to stop the app by tapping OK.
  4. Start the app again and check if the error is still on your mobile device.

2. Clear app data

  1. Open the Cash App info page on your phone.
  2. Navigate to Storage.
     
  3. Tap on Clear cache.
  4. Next, tap on Clear data.
  5. Tap on Delete to confirm.
  6. After clearing the data, start the app again log back in, and check if session error domain error 409 in Cash App is gone.

This also helps with the GB WhatsApp’s An unexpected error occurred issue.

3. Reinstall Cash App

  1. Press and hold the Cash App icon on the home screen.
  2. Select Uninstall.
  3. Next, tap OK to remove it.
  4. Once removed, go to the Google Play Store and download it again on your Android device.

Cash App error 400 is often caused by temporary issues with the service itself, so if these guidelines don’t work for you, it might be best to contact customer service if Cash App is not working for you or if you’re dealing with a server-side error.

This isn’t the only service affected by this issue, and many reported DoorDash error code 400 on their devices. Did you find a different way to fix the Cash App session error domain 400 or 500? If so, let us know in the comments section.

Fix: Cyberpunk 2077 Corrupted or Missing Scripts File Error

Many gamers encountered the Cyberpunk 2077 corrupted or missing scripts file error when trying to start the game. The full message reads Cyberpunk encountered an error caused by a corrupted or missing scripts file and will now be forced to close.

What causes the corrupted or missing script file error in Cyberpunk 2077? Actually Cyberpunk 2077 encountered an error caused by corrupted mods so, actually, the culprits are Red4ext, TweakXL, and ArchiveXL. That is why, Cyberpunk 2077 doesn’t start.

How do I fix the corrupted or missing scripts file error on Cyberpunk 2077?

Before doing anything complicated, make sure to perform a few important actions:

  • Back up your saved games. You should find them here: %userprofile%\Saved Games\CD Projekt Red\Cyberpunk 2077\
  • If you have the Cloud Saves feature enabled, disable it from Cyberpunk 2077 if possible.

1. Uninstall Cyberpunk 2077

  1. Click the Start button and select Settings.
  2. Click on Apps from the left pane and choose Apps & features from the right.
  3. Look for Cyberpunk 2077 in the list of apps, click on the three dots button from its right, and select Uninstall.
  4. Wait for the process to finish, then restart your PC.

If you are using clients such as Steam, GOG Galaxy, or EGS, you can also use them to uninstall Cyberpunk 2077 and get rid of the error message.

2. Delete Cyberpunk 2077-related folders

  1. Press the Win + E key combination to start File Explorer.
  2. In case you’re using Steam, GOG, or EGS, go to the Cyberpunk 2077 folder in the respective apps and delete it.
  3. Go to the following location and delete the Cyberpunk 2077 folder as well: %userprofile%\Saved Games\CD Projekt Red\
  4. Navigate to the following location and delete the REDEngine folder and the CD Projekt Red folder if present: %userprofile%\AppData\Local\

3. Reinstall Cyberpunk 2077

  1.  Finally, launch your client, whether it’s Steam, GOG, EGS, or another game client, and reinstall the game without any corrupted files.
  2. Preferably, you should install it on an SSD and make sure that the game is not blocked by permission settings.
  3. Copy back the saved games into the new Cyberpunk 2077 game folder.

If you stumble upon the Cyberpunk 2077 key binding failed error, the highlighted guide will provide all the solutions you need to fix it.

4. Verify the integrity of the game files in Steam

  1. Launch Steam, go to the Library, right-click on Cyberpunk 2077, and choose Properties.
  2. Navigate to Local Files from the left and click on Verify integrity of game files.
  3. Hopefully, the missing files will be installed right back, and the game will start working again.

Using the Steam client to check the game files has proved successful many times before to fix corrupt game files so you should try that as well.

Can I just download the missing files in Cyberpunk 2077? You can try, but many of our readers tried that with no results. Moreover, if you download the files from an untrusted source, the file may be infected, thus infecting your PC in the process.

The fresh install of the game has worked for everyone and although it takes a bit more time, at least you fix the problem.

Hopefully, our guide helped you fix the Cyberpunk 2077 corrupted or missing scripts file error and now you’re back in play.

If you can’t save the game in Cyberpunk 2077, click on the highlighted link to get the right solutions to fix it.

For any solutions we might have missed, leave us a note in the comments section below.