7 Best ER Diagram Software for Windows 10/11

No matter what role you cover in an enterprise, if it regards intellectual work, at some point, your boss could ask you to design an ER diagram for the company.

If you want to be ready for this task, it’s important to have this article saved somewhere on your laptop. In this guide, we’ll show what software solutions you can use to create ER diagrams.

Before listing the tools, it’s important to offer you some background information.

What is an ER Diagram? According to the definition within the LucidChart website, an ER Diagram is:

a type of flowchart that illustrates how “entities” such as people, objects or concepts relate to each other within a system.

Those specific flowcharts can have several sets of symbols. They are also useful to manage and show databases in many fields from research to software engineering.

Now that we have provided you with a definition, let’s dive right in and describe the different software solutions available on the market.

Where can I draw an ER diagram online?

You can draw ER diagrams in many programs that have online platforms, such as Adobe Illustrator, Lucidchart, Canva Diagram Maker, and many others that you will find mentioned below as solutions.

ER diagrams tools help you create and design your diagrams with ready-to-use templates, drag-and-drop symbols functionalities, shapes libraries, and other specialized features.

What are the best ER diagram tools to use on PC?

Illustrator – All-in-one tool for your chart

Adobe Illustrator is an excellent tool for creating ER diagrams although most users utilize it to create icons, logos, illustrators, and other graphic design elements.

Creating an ER diagram in Illustrator is as simple as a walk in the park. All you need to do is draw some squares or other shapes that will serve as blocks of information.

You can then use straight lines and arrows to connect these blocks of information and describe the relationship between them. To insert shapes, you can use the built-in Shape tools.

To highlight particular blocks of information, you can also color them. Even if you haven’t used Illustrator before, you’ll be able to sketch your ER diagram within minutes thanks to the intuitive UI.

The best part is that you can take your ER diagrams to the next level once you’ve become familiar with Illustrator. You can use the built-in editing tools to play with colors, and textures, insert icons, and much more.

With this tool, you can reconstruct complex data into basic graphics with illustrations tools which makes it easier to learn insights and make clever decisions.

The Illustrator app also provides you with faster feedback and sharing features because you can organize memos and comments, making your reviewing task more efficient.

Adobe Illustrator

Try Adobe Illustrator to create flowcharts and ER diagrams for both personal and professional use.
Free trial Visit Website

Lucidchart – Team feature integrated

Lucidchart is a simple and well-designed online platform for ER Diagrams. It’s a complete tool to design captivating charts for your personal use or professionally for your business.

By using this program, you can envision your database design before you create it, such as the general structure and different kinds of data interaction.

Thus, you can design, patch, or debug relational databases by creating ER diagrams to conceptualize easily your projects while finding faulty information in time.

Lucidchart successfully simplifies designing databases with shape storage and drag-and-drop symbols functionality.

It includes tables, fields, and primary or foreign keys that connect each entity with individual crow’s foot notations to show the cardinality and ordinality of each one.

Therefore, Lucidchart helps you differentiate in a matter of seconds relationships, entities, and their attributes.

Moreover, you can save time creating your ER diagrams because this tool has an automatic generator of models and connections using its data import feature to build your database tables and plans right onto your canvas.

Lucidchart

Save time creating your ER diagrams and use Lucidchart’s automatic template generator.

Canva Diagram Maker – Awesome templates

If you want to make free charts online, you can also choose to use the famous Canva software. To use it, simply register, select one of the ready-to-use templates and modify it according to preference.

This free online service (also available as an app for Android and iOS devices), allows creating lots of graphic works in an extremely easy and fast way.

Once arrived there, select one of the options in the box First time on Canva? Subscribe! to specify the personal or professional reason to use the service.

The site will require you to register via an e-mail address, Facebook account, or Google account, by pressing the appropriate buttons.

When registered, start creating the ER Diagram or organization chart. At this point, you have to select one of the templates listed under the Canva Layout entry.

You should also modify the organization chart replacing the example text with the names and positions of the people that make up the team.

If other graphics elements need to be added (eg shapes, logos, illustrations, etc.), text, or upload new images, you can pick the options on the left sidebar.

When the work is finished, download the project by pressing the Download button at the top right, selecting the format in which to save the output file, and pressing again on the Download button to complete the procedure.

Canva Diagram Maker

Try the popular Canva app to create your ER diagrams with ready-to-use templates.

LibreOffice – Open Source

If you are looking for programs to create remarkable free charts and ER diagrams, you should consider trying LibreOffice. This is one of the best free and open-source alternatives to Microsoft Office.

This software also allows you to create organizational charts but not for free. It includes applications for Word processing, spreadsheet processing, database management, and drawing.

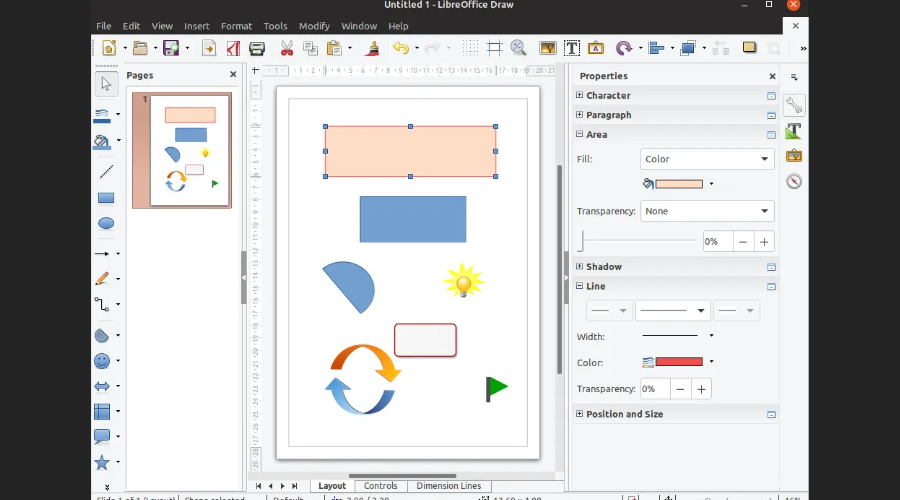
The application designed for drawing – LibreOfficeDraw – allows you to create diagrams, organization charts, and other graphs in an easy way.

The entire LibreOffice suite is available for all major operating systems: Windows, macOS, and Linux.

To download LibreOffice on Windows, you should connect to the program’s website, press the green button to download the tool, and wait for the installation to complete.

If you need to add lines and/or arrows, to connect the various elements of the organization chart, you can press the appropriate items always from the sidebar.

To add text, instead, you can select one of the shapes drawn and type the text desired, to insert it. Once the work is completed, click on the Save item in the File menu to save the changes made.

⇒ Get LibreOffice

Xmind ZEN – Limited features

Xmind ZEN is one of the most complete solutions for creating ER diagrams, organization charts, concept maps, and other types of graphs. It is characterized by a very attractive and user-friendly user interface.

It also includes a wide range of pre-set templates from which you can start to create your own graphics. So, it is very intuitive even for less experienced users.

The program is available in various versions: the free version has no major limitations and allows the user to share projects online. It is important to highlight that the software provider applies a watermark to the work.

You can remove this watermark by subscribing to the Premium version. The software is available for Windows, macOS, and Linux and in the form of apps for Android and iOS.

To create free organization charts with Xmind, you must first download the program on a computer. Therefore, you should connect to the online software page and press the Free Download button.

When the download is complete, follow the steps and install the software, then you’re good to go. Thankfully, the software’s interface is easy to follow for anyone.

Note: It is important to remind that the trial version of the program applies a watermark to the works. This watermark is removable only by subscribing to the Premium version.

⇒ Get Xmind Zen

Diagram Designer – Basic interface

As its name suggests, Diagram Designer is a program that allows you to create ER diagrams, organization charts, and other graphs. It does that through a “spartan” user interface but is rather simple to use.

It includes a wide range of pre-set templates for shapes and arrows, allowing users to create various types of diagrams and graphs very quickly. The program is free and perfectly compatible with Windows.

To download Diagram Designer, go to the software homepage. Then, press the link Download installer and, on the page that opens, click on the Diagram Designer Windows Installer link. The latter is located under the heading “Download”.

When the download is complete, open the .msi file that appears, and press the Next button twice in a row. To end the procedure, press the Install button and, then, Yes and Finish.

At this point, you have only to shape the ER diagram, “fishing” the various elements you want to compose from the menu on the right.

Keep the left mouse button pressed on one of the objects in question (shapes, connectors, etc.), drag it to the work area, and change its position and size using the appropriate indicators.

To edit the text in one of the organization chart nodes, double-click on it, type the desired text in the Insert text field in the object, and press the OK button to apply the changes made.

When the work is finished, open the File menu and select the Save As entry from the menu that opens. This will allow you to save the document in the format and position you prefer.

⇒ Get Diagram Designer

Smartdraw – Online diagram tool

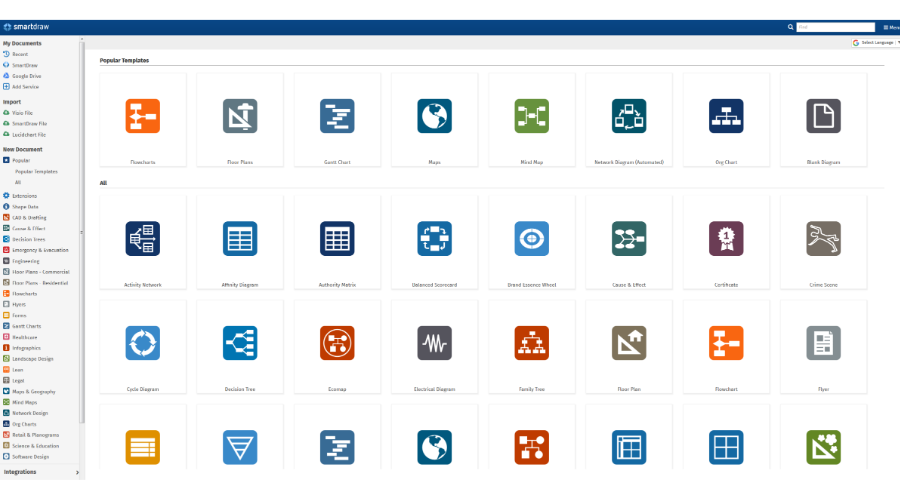
Another excellent online option is Smartdraw. This program is easy to use and really comprehensive, not requiring any setup to use. You can simply choose from over 70 templates.

Besides that, the software also has integration with most Google products, so you can easily tie your work to your excel and other software that uses such file formats.

You can automatically create an ER diagram, by just putting the data available, without using a time drawing thanks to its True Automation feature.

It has Intelligent Formatting with which you can add or remove more than one shape, and the program will be able to realign and arrange all the ERD elements.

Furthermore, the platform provides professionally-designed ERD examples and other software design diagrams, such as Quick-Start templates.

Smartdraw has free Support, and many users have reported effective customer service online, carried out via live chat or email.

⇒ Get Smartdraw

Not satisfied with the software solutions listed above? You did try them, but you want to test other software?  You can try as well ERD Plus, ER Diagram Tool, Draw.io and Creately.

This article gave you a glance on the hottest software able to create the best ER diagrams. Let us know which software suits your needs best in the comment section below.

How to Bulk Download TikTok Videos: 3 Fastest Ways

TikTok is a video-making and-sharing social media platform. However, there are endless videos to be found, covering a wide range of themes. There are funny sketches, DIY and craft films, and everything else you can imagine.

If you have difficulties changing your TikTok profile picture, you could try any of these six methods. So now, let’s look at how to download videos in bulk on TikTok.

How can I download TikTok videos without the app on a PC?

1. Use the TikTok web platform

  1. Navigate and log in to TikTok web.
  2. Right-click on any video you want to download and select the Save video as option.
    batch download tiktok videos
  3. Name the file and click on Save.

2. Use a dedicated browser extension

  1. Open your browser’s extension store page. We used Opera‘s because the browser is lightweight and supports watching the demanding multimedia content on TikTok on pretty much any device.
  2. Download the TikTok download extension. Just click on Add to Opera and wait a few seconds. Its button will appear in the top right corner of your browser, next to your other extensions.batch download tiktok
  3. Open TikTok in your browser and find the video you want to download. Click on it to open from the For You page. Now click on the TikTok download button in the right corner of your browser.batch download tiktok videos
  4. This will open a new tab in your browser. You will have to wait a few seconds, and then you’ll get a Save Video link. Click on it to start the download.batch download tiktok
  5. Select the location on your PC where you want to save the Tiktok and click on Save.

3. Use online services

  1. Copy the video address of the TikTok video you wish to download by clicking on the share button and the Copy link icon.
    batch download tiktok videos
  2. Navigate to the savett website.
  3. Paste the link in the textbox and hit the Search or Enter key.
  4. Click on Download and save your video in a location of your choice.
    batch download tiktok videos

Can you save TikTok videos without posting them?

You can. TikTok offers several ways to download videos, and you are not obligated to post them after they have been downloaded.

One of the download options available is batch download. This means downloading multiple videos at once.

Let’s show you how it is done.

How do I bulk download TikTok videos?

1. Use 4K TokKit

  1. Download and install the 4K TokKit Windows or Mac app.
  2. Launch the application and enter the TikTok username or hashtag in the address bar.
    batch download tiktok videos
  3. Click on the download button to the top right.

And that’s it. You will have all the videos from that account downloaded on your computer.

2. Use EaseUS Video Downloader

  1. Download and install the EaseUS video Downloader app.
  2. Launch the app and click on the TikTok option on the interface.
    batch download tiktok videos
  3. Click on the Add URLs button at the top right, paste as many as 50 different URLs in the text field provided, then click on the Confirm button.
  4. Wait for the tool to analyze the videos, then click the Download button.

Once you do this, your videos should successfully download.

3. Use Qoob Clips

  1. Download and install Qoob Clips.
  2. Launch the app, paste a name of a Tiktok user, hashtag, or URL into the dedicated space and click Download.
  3. If you access a user, it will download all the clips in his feed. However, the tool only lets you download 50 per day with the free version.

These methods listed in the article will be effective even if you are looking to batch-download TikTok videos without a watermark.

Now you should be able to download in batch. The only difference between the two tools is that 4K TokKit allows you to download from one account. At the same time, EaseUS Video Downloader enables you to download from multiple accounts in a batch.

Let us know if this article has been helpful, and you can download and install the TikTok app on Windows 10 and 11 in a few steps.

If you have other suggestions, do let us know about them in the comments section below.

How to Connect Windows 11 to A Projector?[Easy Setup]

You can connect your computer to a projector if you want to share your screen while giving a presentation at work or watching a movie on a big screen. Connecting Windows 11 computer to a projector is a simple process and can be done in a few steps.

This guide will walk you through the Windows 11 projector settings for a seamless setup. Let’s get started.

How can I connect Windows 11 to a projector?

Before moving to the actual steps, make sure you go through these preliminary checks:

  • It would be best if you had a compatible cable that could be used to connect the two devices. The standard wires used are USB-C, HDMI, and VGA.
  • Check that your computer operating system and projector are compatible to accept the input from the cable.
  • If you connect wirelessly, you must have a wireless adapter compatible with your computer and projector.
  • Check if you have the latest drivers and software for the projector on your computer.
  • Read the projector manual and the computer’s technical specifications so that both devices support the resolution and refresh rate for a smooth display.

1. Connect with a cable

1.1 Choose a suitable cable

You need to check if you have HDMI, VGA, or USB-C port on your computer and check the projector for HDMI, VGA, or USB-C input. Once established, choose the compatible cable and connect your computer to the projector.

 1.2 Customize your projector display

  1. Press Windows + P to get options for the projection menu of Windows.
    Windows Display -connect windows 11 to projector
  2. Select the projection settings from the following options:
    • PC screen only -this option is not for the projector.
    • Duplicate – It will show the same thing as your laptop screen.
    • Extend – The projector will be the second monitor.
    • Second screen only – Your computer screen will shut off, and the projector image will act as the main screen.

1.3 Change the display settings on your PC

  1. Press Windows + I to open Settings.
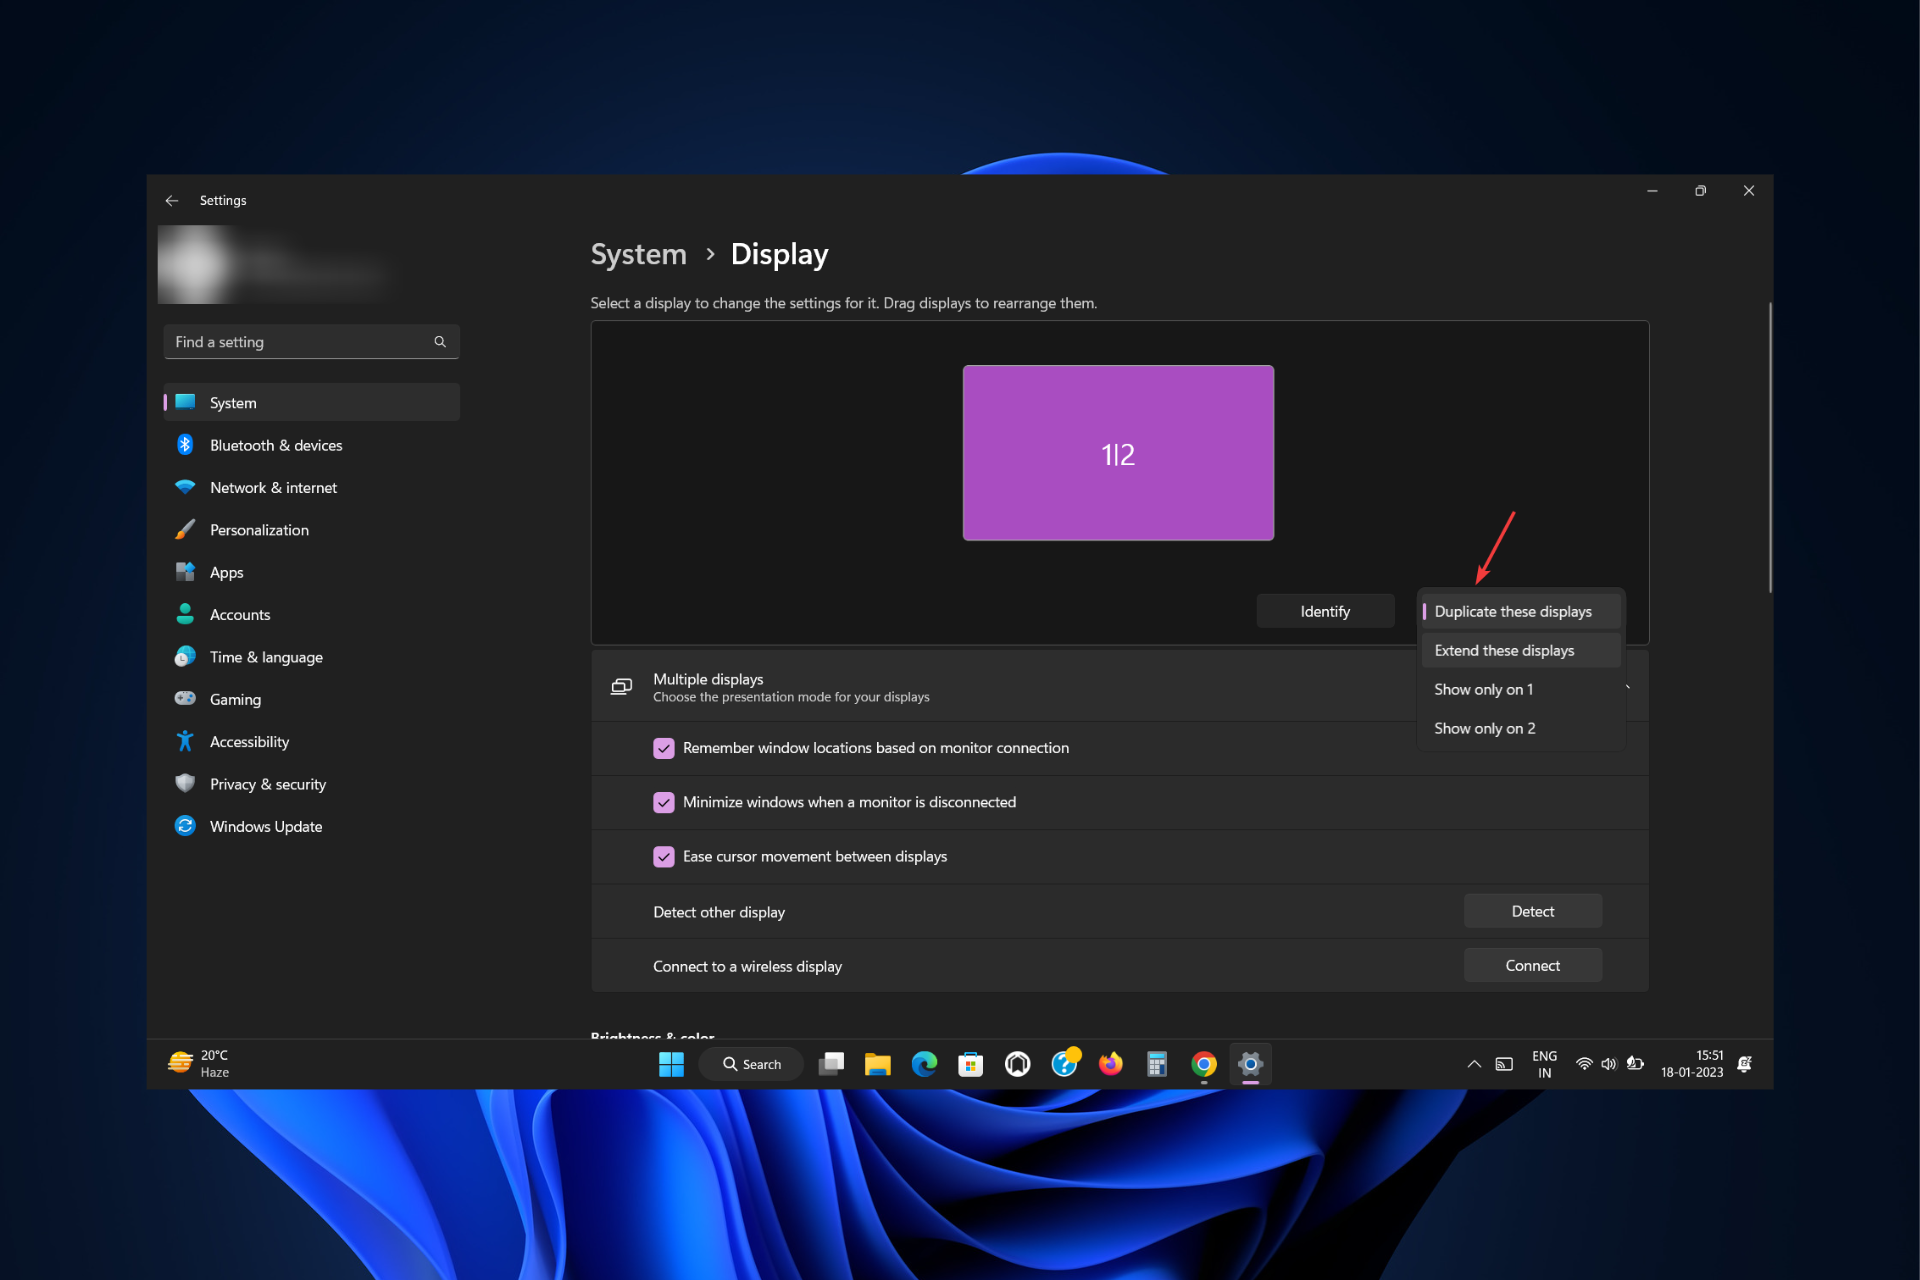
  2. Go to System, and click Display.
  3. Select any of the options from the drop-down.
    Display Disconnect -connect windows 11 to projector
    • Duplicate these displays – Shows the same image on your laptop and projected screen.
    • Extend these displays – Stretches Windows to fit across both laptop and projected screen.
    • Show only on 1 – Choose this before you are ready to present, then switch to Duplicate these displays.
    • Show only on 2 – This shows the second display, which is useful when you connect a tablet to a TV for watching movies.
  4. On Keep these display settings window, click on Keep changes. You need to select the option in 15 seconds. Otherwise, the settings will revert.   
    Keep your changes

1.4 Optimize the image quality

  1. Press Windows + I to open Settings.
  2. Click System, then click Display.
    System connect windows 11 to projector
  3. Under Scale & layout, adjust Scale, Display resolution, and Display orientation.
    System - Display scale
  4. On Keep these display settings window, click on Keep changes. 

2. Connect Wirelessly

2.1 Download the Wireless adapter feature

  1. Press Windows + I to open Settings.
  2. Go to System, then click Projecting to this PC.
    Projecting this PC -connect windows 11 to projector
  3. Click Optional features.
    Optional features
  4. Next to Add an optional feature, click View features.
    View Features
  5. On the Add an optional feature window, search Wireless Display. Select Wireless Display and click Next.
    Optional features Wireless display
  6. Click Install and restart your PC.

For additional guidance on how to share your Windows 11 screen to a TV, check out this helpful guide on how to screen share Windows 11 to a TV.

2.2 Connect to the projector

  1. On the Settings window, go to System, then click Display.
  2. Under Multiple displays, click Connect next to Connect to a wireless display option.
    Multiple displays -connect windows 11 to projector
  3. It will search for the Available displays and click on the option to connect to your projector.

If both devices support Miracast, you can connect your PC and projector by pressing Windows + K and choosing the projector. You can adjust the display settings as mentioned in method 1. To stop projecting your screen, press Windows + K again and click Disconnect.

So, these are the steps you need to follow to connect Windows 11 to the projector to establish a successful connection and display the content on a larger screen. If you have questions or concerns, please mention them in the comments section below.

Device Descriptor Request Failed on Windows 11 [Fix]

We all know how handy it is to have a USB drive or stick to transfer our data between two devices.

They are so convenient and easy to use that it’s our first choice for the job but sometimes, the system doesn’t recognize your USB device and the story could end right there.

Many of our readers received the USB device not recognized message and when they checked Device Manager, they encountered a device listed as Unknown USB Device (Device Descriptor Request Failed).

Some of our readers also received the message A request for the USB Device Descriptor Failed accompanied by the error code 43.

Obviously, Windows didn’t identify the device. Don’t worry because we can fix this easily but first, let’s see why this is happening in Windows 11.

What causes device descriptor request failed?

This is a problem that may occur on all Windows OSs and doesn’t refer strictly to Windows 11.

There are multiple reasons for this error, but it has two main causes: outdated or corrupted drivers and hardware malfunctioning.

Also, if you have a USB 1.0 old device, the system probably didn’t find a driver for it. The issue may be also produced by system corruption but it’s less likely.

How do I fix device descriptor request failed Windows 11?

1. Enable the Enhanced Power Management

    This valuable solution can be the way to fix this request failed error for your removable devices in a few clicks. Thus, carefully apply the steps below to repair the USB issues.

  1. 1. Click the Search icon on the taskbar, type device manager, and click on the app from the results.

    device-descriptor-request-failed-windows-11
  2. 2. Go to the USB controllers section, right click the problematic driver and select Properties.

    device-descriptor-request-failed-windows-11
  3. 3. Navigate to the Details tab, select Device instance path and in the Value section, highlight the value, right-click it and select Copy.

    device-descriptor-request-failed-windows-11
  4. 4. Now, press the Windows key + R to start Run, type regedit and press Enter or click OK.

    device-descriptor-request-failed-windows-11/
  5. 5. Navigate to the following path and replace <device instant path> by pasting the actual path you copied in step 3: HKEY_LOCAL_MACHINE\SYSTEM\CurrentControlSet\Enum\<device instant path>\Device Parameters

    device-descriptor-request-failed-windows-11
  6. 6. In the right pane, right-click and select New and select DWORD Value and name it EnhancedPowerManagementEnabled.

    device-descriptor-request-failed-windows-11
  7. 7. Double-click the new key and set the Value data to 0, then click OK.

    device-descriptor-request-failed-windows-11/
  8. 8. Now, close Registry Editor, unplug the USB device and reboot the PC.

  9. 9. After restart, connect the USB device and the issue should be resolved.

2. Update USB device drivers

Update with Device Manager

  1. Right click on the start button and open Device Manager.
  2. Under Universal Serial Bus Controllers, find the Unknown USB Device.
  3. Right-click on it and select Update.

Windows should now scan and install the latest driver version for your USB device. Sometimes, however, it may not be able to detect the best version, in which case we recommend you use a dedicated driver updater.

Update with dedicated software

To update your USB drivers automatically, without much hassle, we suggest you use a specialized driver updater as it is one of the simplest and most reliable options.

These tools can scan your PC and detect any driver problems. It gives you a quick report and updates and repairs all of your drivers in just a few minutes.

3. Use the Hardware and Devices troubleshooter

  1. Click the Search icon from the taskbar, type cmd, and select Run as administrator from the results.
  2. Type or paste the following command and press Enter to run it: msdt.exe -id DeviceDiagnostic
  3. Now, click Next to start the Hardware and Devices troubleshooter.
  4. If the system finds a solution, click on Apply this fix.
  5. In the next window, click Enable to allow Windows to check for drivers when a new device is installed.

The Hardware and Devices app was removed from the troubleshooting settings a long time ago by Microsoft but you can still run it, even on Windows 11.

And as you can see, it can be pretty effective in this kind of situation when the USB device is not recognized by the system.

4. Uninstall the device

  1. Select the Windows Search icon on the taskbar, type device manager, and click on the app from the results.
  2. Look for the problematic driver in the USB controllers section, right click on it and select Uninstall device.
  3. Remove the device from the USB port, reboot your PC and after the system loads, insert the device once again.

If the USB device is older but it came with its own dedicated driver, use that software to install your device properly.

You may also try visiting the manufacturer’s website and see if it provides the proper drivers for your system.

How can I avoid the Device Descriptor Request Failed error?

This is a common problem that may occur any time you plug in a new USB device to your PC, but there are a couple of things you can do to prevent it.

➡ Connect the device directly to the PC

We know that a PC or laptop never has enough USB ports to go with all your devices and sometimes it’s necessary to use USB extenders or hubs.

However, these can often malfunction or not be compatible so it’s important to connect your USB device directly to an empty port on your machine.

➡ Use the correct port

Although USB ports are backward compatible, your device, especially if it’s very new or very old, may not be so adaptive.

That’s why you should try connecting your gadget to the right socket so it can be recognized quickly and function properly.

➡ Change the port

Although it doesn’t happen that often, USB ports can malfunction sometimes, or maybe they just accumulated some dust and cannot ensure the proper contact.

So, the right thing to do, apart from trying to gently clean the port and connector with a soft brush, is to try plugging your device into another one and see what happens.

But if that’s the case, read our article on what to do if the USB ports are not working and solve this issue right away.

That being said, we conclude our guide on how to fix the Device Descriptor Request Failed issue in Windows 11. You can find out more in our article about USB Device Descriptor Failure error in Windows 10/11.

We hope that our solutions helped you fix this problem and now you can use the USB device as it was intended.

If you have any suggestions or other helpful solutions, don’t hesitate to leave us a note in the comments section below.

Get “Compile Error in Hidden Module” Fixed in Excel or Word

Compile error in hidden module is an error message that might pop up for some MS Word and Excel users.

The error message is generally triggered when Office users open Word or Excel. Consequently, neither application isn’t launching.

How to fix compile error in hidden module?

Does the Compile error in hidden module error message pop up when you open Excel or Word? If so, these are a few resolutions that might fix it.

1. Update Adobe Acrobat

The Compile error in hidden module error can be due to two Adobe Acrobat template files in MS Office folders. As such, updating Adobe Acrobat is one potential resolution for the issue.

It’s also of utmost importance to run software that comes from a trusted source, which is why we strongly recommend you only install Acrobat from its official website.

As a powerful editing suite that is closely connected to Microsoft Office file formats, Acrobat delivers an all-digital document experience.

In fact, there is no need to start over if you happen to run into an error, you can quickly export PDFs into other Microsoft 365 such as Word, Excel, or Powerpoint.

1.1. What does Adobe Acrobat provide?

Let’s quickly look at its key features:

  • Simplified workflows across any platform from desktop, to mobile and web
  • Convert a PDF to Microsoft 365 formats
  • Enhanced collaboration tools to share, review, and sign documents across devices
  • Edit data in scanned tables and convert forms to fillable forms
  • Powerful editing toolkit (merge, convert, delete, rotate, crop and more)

To manually check for Adobe updates, click Help on Acrobat’s window.

Select Check for Updates to open the updater window. Then you can press a Download and Install button if there are updates for it.

⇒ Get Adobe Acrobat

2. Move Pdfmaker Files to Another Folder to fix the compile error

Pdfmaker.xla and Pdfmaker.dot are the two Adobe Acrobat files linked with the Compile error in hidden module issue. As such, moving those files out of their MS Office folders might also fix the error.

This is how you can move those files to an alternative folder in Windows 10.

  1. Press the Type here to search button to open Cortana’s search box.
  2. Enter Pdfmaker.xla in the search box to search for that file.
  3. To search for Pdfmaker.dot, enter that file title in the search box.
  4. Then right-click the files and select Open file location to open their folders in File Explorer.
  5. If you can’t find those files with the search tool, open the MS Office Startup and Xlstart folders in File Explorer. The Startup folder includes Pdfmaker.dot, and the Xlstart directory includes Pdfmaker.xla.
  6. To move the Pdfmaker files to the desktop, right-click them in File Explorer and select the Cut option.
  7. Right-click another folder (or Windows desktop) to move them to and select Paste.

3. Update the Norton Antivirus Software to fix the Compile error in hidden module

Norton Antivirus is also linked with the Compile error in hidden module error. If Norton AV is on your desktop or laptop, updating that software might fix the issue.

You can check for updates by pressing the Update Me Now button on this webpage. Alternatively, right-click the Norton Antivirus system tray icon and select Norton LiveUpdate.

4. Uninstall Norton Software to fix the hidden module error

  1. If updating Norton Antivirus doesn’t fix the hidden module error, consider uninstalling your Norton software. To do that, press the Windows key + R keyboard shortcut.
  2. Enter ‘appwiz.cpl’ in Run, and click the OK button.compile error in hidden module excel uninstall norton
  3. Select the listed Norton Antivirus software, and press its Uninstall button.
  4. Then click Yes to remove the software.

5. Run Stellar Repair for Excel

No error is a match for this powerful tool and the compile error in hidden module makes no exception. Stellar Repair is the ultimate repair software for Excel protecting your workbook data from corruption and permanent loss.

Stellar Repair for Excel fixes severely corrupt .XLS/.XLSX files, with the highest degree of precision, and restores all data to its original state while preserving all properties and formatting.

Let’s quickly look at its key features:

  • Repair corrupt Excel files and restore original formatting, layout, and specifications
  • Uncluttered, intuitive UI with an integrated step-by-step wizard and repair recommendations
  • Easy Find and Search options to quickly track down your files and folders
  • Real-Time Pre-recovery Preview feature
  • Fully compatible with Windows 10, 8.1, 8, 7, Vista, and, XP
  • Supports Microsoft Excel 2019, 2016, 2013, 2010, 2007, 2003, and 2000 versions
  • Powerfully data recovery toolkit (including tables, charts, cell comments, formulas, and filters)

⇒ Get Stellar Repair for Excel

6. Re-register OCX files

  1. 1. Press the Windows key + X hotkey to open the WinX menu.

  2. 2. Select Command Prompt (Admin) from the list.

  3. 3. For a 32-bit Windows platform, input the following commands in the Prompt and then hit Enter, one by one: regsvr32 -u c:windowssystem32mscomctl.ocx
    regsvr32 c:windowssystem32mscomctl.ocx

  4. 4. On 64-bit Windows platforms, input these commands one by one and press Enter after each one: regsvr32 -u c:windowssyswow64mscomctl.ocx
    regsvr32 c:windowssyswow64mscomctl.ocx

  5. 5. The compile error in hidden module is now solved.

  6. The Compile error in hidden module error can also be the side effect of Windows updates. As such, registering a mscomctl.ocx file using cmd might also fix the issue. 

One of these resolutions for the Compile error in hidden module error might kick-start Word or Excel so that you can launch them again.

Some of the more general tips in our post for fixing MS Office applications that don’t open might also come in handy for fixing the hidden module issue.

Let us know which one worked for you in the comments section below.

HP Envy x360 Stuck in Sleep Mode? 5 Tips if It Won’t Wake Up

So, your HP Envy x360 won’t wake up, or it’s stuck in sleep mode? Don’t fret. There are lots of users like you. Laptops with this kind of issue usually would only go to sleep when you force shutdown.

Although there are numerous solutions for problems related to this on the internet, there is a dearth of those that are specially compiled for the HP Envy x360.

My HP Envy x360 (m6-w103dx) will not turn on, why?

Here are a few reasons you might be encountering the problem:

  • Misconfigured power settings: If you have incorrectly modified the power settings, chances are that’s what is responsible for your HP Envy being stuck in sleep mode.
  • Corrupt graphics drivers: Graphics drivers are an integral part of the PC, and issues with them can trigger a range of problems.
  • Incompatible hardware connected: Incompatible hardware will affect the core functioning of the OS and, in some cases, lead to HP Envy being stuck in sleep mode.

What can I do if my HP Envy is stuck in sleep mode?

Before trying the slightly complex solutions, here are a few quick ones you can try:

  • Restart the computer. For laptops, remove the battery, hold the Power button to drain any excess charge, plug the battery back in, and then power it on. In most cases, the problem shouldn’t reappear from now on.
  • Disconnect any new peripheral connected to the computer around the same time the problem first appeared and verify whether things work now. For one user, it was a card reader plugged in via the USB port.

If these two don’t work, head to the solutions listed next.

1. Reinstall the graphics drivers

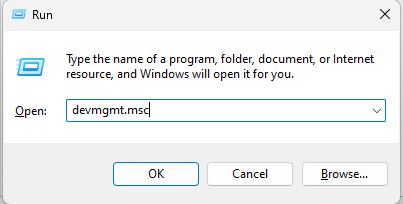
  1. Press Windows + R to open Run, type devmgmt.msc in the text field, and hit Enter.device manager
  2. Expand the Display adapters entry, right-click on the graphics adapter, and choose Uninstall device.uninstall device to fix hp envy stuck in sleep mode
  3. Now, tick the checkbox for Attempt to remove the driver for this device, and then click on Uninstall.attempt to remove the driver for this device
  4. Similarly, uninstall the drivers for the other graphics adapter as well.
  5. Once done, restart the computer for the changes to come into effect.

In some cases, the graphics drivers were corrupted or outdated, which led to the HP Envy being stuck in sleep mode, as reported by users. And reinstalling it usually does the trick. If that doesn’t work, you can try updating the graphics driver.

2. Enable keyboard to wake up computer

  1. Right-click on the Windows logo in the Taskbar or press Windows + X, and select Device Manager in the list of popped-up options.
  2. Click the drop-down arrow beside Keyboards. Right-click on the connected keyboard. Next select Properties.
  3. Select Power Management. Then check, Allow this device to wake the computer.
  4. Click OK and after that, restart the system to effect changes and observe if the HP Envy remains stuck in sleep mode issue is resolved.

3. Run the power troubleshooter

  1. Launch Windows Search by pressing Windows + Q, type control panel, and select Control Panel in the displayed results.
  2. Type troubleshoot in the Search Box. Click on Find and fix problems.
  3. Select Other troubleshooters.
  4. Scroll until you find Power. Next, select Run.
  5. Follow the prompt to fix any problem discovered by the system. Next, restart the PC to see if it solves the HP Envy stuck in sleep mode problem.

4. Reset power plans to default

  1. Open Command Prompt by looking for it in Windows Search. When located, Run as administrator.
  2. Type the command below or copy and paste:
    powercfg –restoredefaultschemes
  3. Close the Command Prompt. After this, restart your computer.

5. Set the PC to never go to sleep

  1. Press Windows + R to open the Run command, type Control Panel, and click OK.control panel
  2. Click on System and Security.system and security
  3. Now, click on Power options.power options to fix hp envy stuck in sleep mode
  4. Choose the Change plan settings option.change plan settings
  5. Click on Change advanced power settings.change advanced power settings
  6. Finally, set the Sleep settings to Never on Battery and Plugged in, and then click on Apply and OK to save the changes.never sleep to fix hp envy stuck in sleep mode

That’s it! One of these methods should help you get things up and running when HP Envy is stuck in sleep mode. And to execute most of the solutions here, you will have first to press and hold the power button to turn on the computer.

If you have tried all of these methods but still experiencing the issue, you may need to update your BIOS. Check our guide on how to do that.

For Windows 10 users, we have a guide tailored to suit your screen display. Learn what to do if the computer monitor won’t wake up from sleep and rest assured that some of these tips may be applied by Windows 11 users as well.

Share your experience after trying these methods or comment on the solution that works for you.

Excel Formula is not Auto Calculating? Here’s what to do

Excel is essentially one big calculator that can also display numerical data in the form of spreadsheet tables and graphs. Formulas (or functions) are the cornerstone of Excel that perform a multitude of calculations and display them within spreadsheet cells.

Excel’s formulas make it one of the most essential MS Office applications.

However, sometimes Excel might not always calculate formulas automatically. When that happens, the formulas don’t automatically update when users change the values they’re based on.

Alternatively, sometimes Excel might just display the formulas within cells instead of their results. If either of those scenarios sounds familiar, check out some of the resolutions for them below.

What can I do if an Excel spreadsheet is not auto calculating?

1. Select the Automatic Calculation option

  1. If Excel functions don’t auto-calculate when you modify the values they’re based on, the default automatic calculation mode probably isn’t enabled. Click the File tab at the top left of Excel.
  2. Click Options, which opens the Excel Options window.
    Excel Options window excel spreadsheet not automatically calculating
  3. Click the Formulas tab on the left of the window.Formulas tab excel spreadsheet not automatically calculating
  4. Is the Manual option there selected? If so, select the Automatic setting.
  5. Click OK to close the Excel Options window.

2. Turn off Show Formulas

If an Excel spreadsheet displays all its formulas within cells, the Show Formulas option is probably enabled. To disable that option, click the Formulas tab in Excel. Then click the Show Formulas button on that tab.

You can also press the Ctrl + ` hotkey to toggle the Show Formulas button off/on.

Show formulas button excel spreadsheet not automatically calculating

3. Check the cell format for formulas

Excel will also display formulas instead of calculated output in cells when the cells have a text format. To check if that’s the case, select a spreadsheet cell that’s displaying a formula.

You might see <strong>Text in the format drop-down menu shown in the snapshot directly below. Select General on the drop-down menu. Then the cell will display calculated output when you click within the formula bar (with the cell selected) and press the Return key.

A Text format cell excel spreadsheet not automatically calculating

4. Check you’ve entered the formulas correctly

Excel won’t automatically calculate formulas when they haven’t been entered correctly. One of the things hardest to spot is a space in the formula just ahead of the equals (=).

When there’s a space right at the beginning of the formula, its cell will display the function instead of a result for it. So, make sure there aren’t any spaces at the start of functions. If the formula contains spaces anywhere else, Excel will display #Name? in its cell.

An Excel formula excel spreadsheet not automatically calculating

So, that’s how you can fix an Excel spreadsheet that doesn’t automatically calculate its formulas. Thereafter, the spreadsheet’s cells will automatically display the results for formulas as expected.

For any other questions or suggestions, feel free to reach for the comments section below.

RELATED ARTICLES TO CHECK OUT:

Can’t Edit the Registry in Windows 10: How to Gain Full Permissions

You found this article because you can’t edit the Registry in Windows 10. So, here is all you need to know.

The Registry is a database that stores Windows operating systems and application settings. Sometimes, you need to change those values manually.

Can’t edit Registry is an error you’ll face when you try to edit a key in Registry but cannot edit the registry.

This unpleasing issue can affect your operating system and stop necessary processes, including that you cannot create value error writing to the registry.

Why can I not edit the registry?

In some cases, users may be unable to make changes to the Registry. This could happen because of a host of reasons, including the following:

  • Lack of permissions – The user account may not have the necessary permissions to access and edit the registry.
  • Group Policy restrictions – An administrator may have implemented group policy restrictions that prevent certain users from editing the registry.
  • Third-party software – Third-party software may have been installed that blocks access to the registry for security reasons.
  • Malware – Malware or other malicious software may have infected the system and prevented access to the registry.
  • System protection – The system may have been set up with a feature such as System Protection that prevents changes to the registry.

Before you follow the step-by-step guide to gain permission, you should know that editing the Registry is a very dangerous thing to do.

You can break your computer if you edit it without knowing precisely what to do. You must create a restore point, backup your Registry, and edit with extreme caution to not cause corrupt registry errors.

So now, if you can’t edit the Registry on Windows 10, let us consider a valid solution.

What should I do if I can’t edit the Registry on Windows 10?

  1. Search for Regedit in Start and right-click on it, and from the menu, you should click on Run as administrator.
    can't edit registry windows 10
  2. Navigate to the folder you want to edit.
  3. Right-click on the folder and then click on Permissions.
  4. The Permissions window will open; click on the Advanced button near the bottom-right corner.
    can't edit registry windows 10
  5. At the top of the window, you’ll see Owner:  [name], where [name] is most likely the name of the program that created the folder. Click on the Change Link.
    can't edit registry windows 10
  6. In the Select User or Group form, under Enter the object name to select, provide your username on that computer or your Microsoft email address if it is associated with your computer. You then have to click on Check Names.
  7. Click OK on the Select User or Group window and the Advanced Security Settings window.
  8. Before closing the Permissions Window, select Users from the Group or user names list and check the box under allow for Full Control. After that, close the window by clicking OK.

If you can’t edit the Registry on Windows 10, you should have full access to the folder after these steps. More specifically, the current user has full control.

If you use more than one user on your computer, you must repeat these steps every time you access a folder that a program or the other user owns.

Plus, you can change the Registry keys or folder owner to yourself. This will allow you to edit, delete, or insert keys in the folder.

The only downfall of this method is that you have to repeat the steps for each folder you want to edit.

In this article, we explained what Registry is and why you face a can’t edit Registry error. Note that you must be logged into the device as an administrator; if not, these steps will not work.

We looked at how you can fix it by gaining full access to the folder you want to edit and manipulating it as you wish.

Lastly, tell us in the comments section if this method worked for you.

Fix Address not Found in Gmail & Get Your Email Recognized

While using the Gmail web app or desktop client to compose an email is easy, you can sometimes stumble upon the address not found error in Gmail.

Several users have reported a similar error in the Google community and Reddit forums.

Upon sending an Email Gmail says address not found
This happens every email, to every adrress (they are all right, no typos etc) Also my storage isnt full either (4% occupied) Any ideas?

As the user describes, this error occurs with a specific account and not all. Google usually sends an automatic reply to messages that are not delivered due to the email being deleted.

And speaking about errors, let’s quickly review some of the most common ones:

  • Address not found Gmail domain – In this case, Gmail is not recognizing the email address.
  • Gmail address not found or unable to receive mail – This means that Gmail is not receiving emails.
  • User with this email address not found
  • Address not found your message wasn’t delivered to
  • Mail delivery subsystem address not found

What is the meaning of an address not found in Gmail?

When an address is not found in Gmail, your email cannot and it did not go through. There are various possible reasons for this and we’ll start listing them below, starting with the most common one:

  • Spelling errors or missing characters in the recipient’s email address, causing it to be invalid or illegitimate
  • The recipient’s email address was deleted and is no longer available
  • The Gmail account to which you are trying to deliver a message is protected or has blocked you as a sender
  • Temporary glitches on Gmail’s side (For instance, servers might be down. If a Gmail server error occurred, your email won’t get sent. In addition, you’re likely to encounter the Gmail account is temporarily unavailable error.)
  • Problems with the recipient’s email service

If you are also troubled by the address not found error in Gmail, here are a couple of troubleshooting tips to help you out.

How do I fix the address not found in Gmail?

1. Check the recipient’s email address

  1. One common reason for the address not found in Gmail is an incorrect recipient email address.
  2. Check the recipient’s email address for any missing characters or numbers.
  3. If the issue persists, ask the recipient to send the email address again.
  4. Copy and paste the address into Gmail and send the email again.

2. Check if the email is deleted

  1. Another reason why the emails may bounce is non-existent email accounts.
  2. Make sure the email address you are sending emails to is active and not deleted.
  3. To make sure it is an active email address, do the following.
  4. In your Chrome browser, press Ctrl + Shift + N. This will open a new Incognito window.
  5. Go to the Gmail sign-in page.
  6. Enter the email of the recipient (not your email, the recipient’s email) and click on click Next.
  7. If the message says this account has recently been deleted and maybe recovered, it means the recipient’s email address is probably not active anymore.

3. Check the email service

  1. Log into your Gmail account.
  2. Click on Compose and write your email.
  3. Instead of clicking on Send, click the small drop-down menu beside the Send button.
  4. Select Schedule Send and click on the Select date and time option.
  5. Specify the time and date and click on Schedule.
  6. On the left pane, click on the Scheduled option to view the scheduled email. You have to click on More to see the option.

If you are trying to send the email to a custom email address, it is possible that the domain or the server is down for Maintainance.

Moreover, you should contact the recipient to check the email service. If the service is down, use the Schedule feature in Gmail to send the email at a specified time and date.

The address not found Gmail error usually occurs if the recipient’s email address is deleted or invalid. Follow the steps in this article to verify the account status and fix the error.

How to Empty the Recycle Bin for All Users in Windows 11

The Windows Recycle Bin can be considered the last bastion of your computer’s files. It’s the final opportunity where users can undo mistakes and restore files before they’re gone forever.

Emptying the Recycle Bin on Windows 11 is something that should be done regularly, but what if you have multiple users on your computer? Can you wipe out various Recycle Bins? Yes, you can.

Why would I want to empty out other Recycle Bins?

The main reason to empty out a Recycle Bin is to free up space on your hard drive which is particularly helpful if you have a computer with multiple users. Bins can get full pretty quickly.

But there are other reasons to do so. Below is not an extensive list, but it does cover the more critical reasons why you should empty the Recycle Bins of all users:

  • Emptying the Recycle Bin can improve computer performance: Deleting files can make your computer faster because you’re getting rid of that extra burden from the system.
  • It deletes files with important information: It’s important to protect your computer’s files from bad actors. Having documents in the Recycle Bin can be dangerous.

How do I empty the Recycle Bin of all users?

There are multiple ways you can delete the Recycle Bin for multiple users on your Windows 11 computer; both manually and automatically. This guide will show you how to do both.

  • You can certainly go into each individual user’s account and empty the Recycle Bin one by one, but that may take a while. Especially if you have a ton of people.
  • There are special cleaner apps that can do the job for you automatically. Be sure to check out Window Report’s guide on the best Recycle Bin cleaning apps for Windows 11.
  • You can also use the Disk Cleanup tool to empty out the Recycle Bin and other unnecessary, temporary files.

1. Use Command Prompt

  1. Bring up the Command Prompt on the Windows 11 Search bar. Click Run as administrator when it appears.
  2. If a User Account Control appears asking if you want to make changes, select Yes.
  3. Type the following into the Command Prompt and hit Enter on your keyboard: rd /s c:\$Recycle.Bin
  4. If the Command Prompt asks you to confirm the action, press the Y key and hit Enter on your keyboard again.

The “c” in the command corresponds to the drive that’s being cleaned out. If you have other external hard drives connected, switch the “c” for the letter of that particular drive.

For example, insert “d” to clear out the Recycle Bin on your D:\ hard drive, “E” for the E:\ drive, and so on.

2. Use PowerShell

  1. Bring up Windows PowerShell on the search bar and select Run as Administrator.
  2. If a User Account Control page asks if you want to make changes, select Yes.
  3. Enter the following in PowerShell, then press Enter on your keyboard: Clear-RecycleBin
  4. Press A on your keyboard to erase all of the contents in your Recycle Bin.
  5. If you want clear out a specific hard drive on your computer, type in the following command and then the corresponding letter for the drive: Clear-RecycleBin -DriveLetter C
  6. Press Enter on your keyboard, and like before, press A on your keyboard to wipe out everything.
  7. If you don’t want to prompt the confirmation, type in the following then press Enter on your keyboard: Clear-RecycleBin -Force

If you’re using Windows Server 2016, using the PowerShell method to clear out the Recycle Bin is the best way to do it.

3. Set Recycle Bin to delete automatically

  1. Right-click the Recycle Bin desktop icon and select Properties.
  2. Set the custom size to a smaller quantity in megabytes. For example, 5,000 MB which is 5 GB.
  3. Click Apply then OK to close the window.

You should do this on all the different drives connected to your computer.

4. Configure Task Scheduler

  1. Launch the Notepad app, and in it, type the following command: rd /s \q C:\$Recycle.bin
  2. Do this for all the different drives you have on your computer.
  3. Click File, then Save as, and name it EmptyRecycleBin.bat.
  4. Now open the Task Scheduler app, right-click Task Schedule Library, and select Create Task.
  5. Go to the Triggers tab and select the New button on the button.
  6. Set a start date for when you want your computer to start automatically emptying the recycle bin and how often. Click OK when finished.
  7. Now go to the Actions tab and click New.
  8. Set the Action to Start a program.
  9. Click the Browse button and locate the .bat file you created earlier. Then select OK.
  10. Select OK on the final page to finish setting up Task Scheduler.

Can I restore deleted files on my Windows 11 computer?

We all make mistakes, and that extends to accidentally emptying out the Recycle Bin when there was something important in there. But don’t worry because it’s possible to restore those files.

Just because something was deleted doesn’t mean it’s gone. On Windows 11, you can use data recovery software like Stellar Data Recovery to bring back deleted files.

If you own a Windows 10 computer, you can also use data recovery software or utilize the system’s Windows File Recovery tool. This also works with Mac computers.

We also have a guide on how to use Recycle Bin on Windows 10, so be sure to check it out to learn more about this feature.

Emptying the Recycle Bin frequently will help you clean the C drive without formatting and save storage space, so use it frequently.

Feel free to leave a comment below if you have any questions about the Recycle Bin. Also, leave comments about reviews that you’d like to see or information on other Windows 11 features.

Your Excel filter is not working correctly? Use These Fixes

Most Excel users probably set up data tables within that application. Users can filter data in their tables with Excel’s filtering tool. However, sometimes Excel spreadsheet tables might not filter the data correctly.

If you need to fix Excel’s table filtering, check out some of the potential resolutions below.

How can I fix Excel table filtering?

1. Select the whole column to apply the filter to

    If Excel is not filtering the whole column in a spreadsheet, you can manually configure it to do this. What you need to do is select the column and tweak its filter settings.

  1. 1. Launch Microsoft Excel.

  2. 2. Open the file where the filter is not working.

  3. 3. Select the table’s whole spreadsheet column by clicking the column’s letter.

    microsoft excel select all columns
  4. 4. Navigate to the Data tab.

  5. 5. Then click the Filter button to apply the filter to the whole column.

  6. 6. Click the cell filter arrow button to open the filtering options shown directly below.

    excel cell filter options
  7. 7. Uncheck the Blanks checkbox. This setting will ensure that blank cells will not be filtered.

  8. 8. Click on OK to apply the changes.

2. Delete blank cells from the table’s column

Alternatively, you can erase blank rows from a table’s column to include values below the empty cells within the filter.

Select all the empty cells’ rows by holding the Ctrl key. Then right-click and select the Delete option.

Delete option excel spreadsheet not filtering correctly

3. Ungroup sheets

The Filter option will be greyed out when your sheets are grouped together. Thus, you can’t filter spreadsheet tables in grouped sheets. To fix that, right-click the grouped sheets at the bottom of Excel and select Ungroup sheets.

Ungroup Sheets option excel spreadsheet not filtering correctly

4. Unprotect the worksheet

  1. Select Excel’s Review tab.
  2. Press the Unprotect sheet button.Unprotect Sheet button excel spreadsheet not filtering correctly
  3. If an Unprotect sheet window opens, enter the password for the worksheet in the text box.
  4. Click the OK button.

5. Unmerge cells

  1. Press the Ctrl + F hotkey.
    Find and Replace window excel spreadsheet not filtering correctly
  2. Click the Format button on the Find and Replace window.
  3. Click Merge cells on the Alignment tab shown directly below.The Merge cells setting excel spreadsheet not filtering correctly
  4. Press the OK button.
  5. Press the Find All button.
    • Thereafter, the Find and Replace window will list all cell references with merged cells.
  6. To unmerge merged cells, select a merged cell.
  7. Click the Merge & Center option on the Home tab.
  8. Select the Unmerge cells option.Unmerge Cells option excel spreadsheet not filtering correctly

6. Set up a new filter

  1. If there are rows in your table that don’t get filtered, try setting up a new filter. To do so, select the Data tab.
  2. Click the Clear button within the Sort & Filter group.
  3. Then select the table’s full column range with the cursor.
  4. Click the Filter button on Excel’s Data tab.
The Filter option excel spreadsheet not filtering correctly

Those are some of the resolutions that might get your Excel table filters fixed. In most cases, reapplying filters or clearing them to set up new filters will often resolve Excel filtering issues.

Which of the solutions solved the pro-Excel filtering issue for you? Let us know by leaving a message in the comments section below.

RELATED ARTICLES TO CHECK OUT: 

BAD POOL CALLER Error Code On Windows: 11 Ways To Fix It

BAD POOL CALLER is a Blue Screen of Death error, and just like many other BSoD errors, this one will crash Windows 10 and restart the PC.

The error is encountered on all iterations of the OS, including the two most extensively used ones, Windows 10 and 11.

These errors can be troublesome; therefore, today, we’ll show you how to fix the BAD POOL CALLER error in Windows.

What does BAD POOL CALLER mean?

It’s possible that it’s pointing to a scenario in which a piece of software is attempting to use a processor thread that isn’t available because another piece of software is currently utilizing it.

It’s also possible that the thread it was looking for doesn’t even exist anymore which results in a bad request.

What causes BAD POOL CALLER blue screen?

Similar to the Bad Pool Header error, this is a BSOD error, and it’s caused when your system encounters a fatal error and can’t operate normally.

Like the Bad System Config Info error, this one can be caused by overclocking or even by incompatible hardware.

Third-party applications can also cause this issue, so keep an eye out for all potentially problematic software.

BAD POOL CALLER can cause many problems on your Windows 10 PC, and in this article, we also covered the following issues:

  • BAD POOL CALLER crash – Many users reported that this error comes with a blue screen followed by a crash. This can be a big problem, but you should be able to fix it using one of our solutions.
  • BAD POOL CALLER overclock – To get maximum performance, many users overclock their hardware. However, overclocking can cause various issues, such as this one, to appear. To fix the problem, you need to remove all your overclock settings.
  • MSDN nugcheck bad_pool_caller – Sometimes, third-party applications can cause this error to appear. Many users reported that uTorrent was causing this problem, but the issue was resolved entirely after removing it.
  • BAD POOL CALLER uTorrent, ESET – Avast, AVG, Kaspersky, McAfee – Antivirus software can also cause this issue. Many users reported problems with ESET, Avast, AVG, and Kaspersky tools.
  • BAD POOL CALLER RAM – Hardware issues can also cause this problem to appear. The most common cause is your RAM; after replacing it, the issue should be resolved.
  • BAD POOL CALLER rdyboost.sys, rdbss.sys, tcpip.sys, tdica.sys, usbport.sys, usbstor.sys, usbhub.sys, iusb3xhc.sys, igdkmd64.sys, picadm.sys – Often, this error message will tell you which file caused the PC to crash. Once you know the file name, you just need to find the device or application that is associated with it and fix the problem.
  • BAD POOL CALLER when inserting USB drive – Several users reported this error only after inserting a USB drive. This can occur if your USB drive is faulty or you have a problem with your chipset drivers.
  • BAD POOL CALLER on startup – Many users reported this error occurring right on startup. This can be a big problem since your PC can become stuck in a loop. In some more severe cases, your PC won’t boot at all.
  • BAD POOL CALLER page fault in nonpaged area – This is a variation of this error, but you should be able to fix it by using solutions from this article.
  • BAD POOL CALLER Windows 11, 10, 7, 8, XP – The solutions below are applicable to all Windows iterations, so make sure to follow them.
  • BAD POOL CALLER Windows 11 HP, Dell, Lenovo – By using a specialized software option, you can fix this error in no time.

Without further ado, let’s just jump right in!

How do you fix a BAD POOL error?

1. Use specialized repair software

Errors such as BSOD BAD POOL CALLER can be tough to fix, especially if you’re not an advanced user.

However, there are specialized tools that can analyze your system and help you fix these types of errors with relative ease.

2. Update Windows 10

  1. Press Windows + I to open the Settings app, and click on Update & Security.update & security
  2. Now click on the Check for updates button.check for updates
  3. If an update is listed after the scan, click on Download and install to get it. The stop code bad_pool_caller will be fixed.download & install to fix bad pool caller windows 10

After installing the updates, check if the BAD POOL CALLER error in Windows persists and your PC won’t boot.

Blue Screen of Death errors such as BAD POOL CALLER can arise due to hardware or software incompatibility. To be sure that your hardware and software are fully compatible with Windows, we strongly advise you to download the latest Windows patches.

Microsoft is frequently releasing newer versions through Windows Update, and many of these address various hardware and software issues. So, download them if you want to keep your PC error-free.

3. Update the drivers

  1. Press Windows + X and select Device Manager from the list.
  2. Now, expand the category for the driver you intend to update. We will go with the graphics driver since it’s the most critical one.
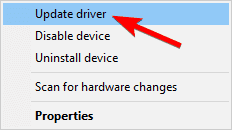
  3. Right-click on the device, and then select Update driver.update driver to fix bad pool caller windows 10
  4. Next, select the Search automatically for drivers option.
  5. The system will download and install the compatible drivers for the hardware component, assuming that you don’t already have them.
  6. Similarly, perform the same operation for all problematic drivers.

Outdated or incompatible drivers can lead to the BAD POOL CALLER Blue Screen error in Windows 10. So, it’s best to keep them up-to-date.

We recommend you easily update your drivers using a dedicated tool that can automatically update drivers.

This solution is specialized in driver updates for your PC. With a quick scan, it will find all outdated drivers and update with one from its extensive driver files database. The installation is safe and fast, so you can stay worry-free.

⇒ Get Outbyte Driver Updater

4. Run the BSOD Troubleshooter

  1. Enter Troubleshoot settings in the Search bar, click on the relevant search result, and then go to Additional troubleshooters.troubleshoot settings
  2. Select Blue Screen from the right pane and click on Run the troubleshooter.run the troubleshooter
  3. Follow the instructions on the screen to complete the troubleshooting.

The built-in troubleshooter is one of the easiest ways to identify and eliminate computer issues. And in this case, the Blue Screen troubleshooter will come to your aid and fix the BAD POOL CALLER error in Windows 10.

5. Run the SFC scan

  1. Press Windows + S to open the Search menu, enter Terminal in the text field, right-click on the relevant search result, and select Run as administrator.terminal
  2. Click Yes in the UAC prompt that appears.Yes
  3. Press Ctrl + Shift + 2 to open Command Prompt in a new tab.
  4. Paste the following command and hit Enter:sfc/scannowsfc scan to fix bad pool caller windows 10

The System File Checker is a command-line tool that scans all the system files for potential issues. So, if a corrupt system file is behind the BAD POOL CALLER error in Windows 10 on HP, the SFC scan will likely resolve it.

6. Run DISM

  1. Open Terminal with administrative privileges, click on the downward-facing arrow at the top, and select Command Prompt.command prompt
  2. Paste the following command and press Enter:DISM /Online /Cleanup-Image /RestoreHealthDISM to fix bad pool caller windows 10
  3. Restart your computer and try updating again.

The DISM tool re-deploys the system image and resolves potential issues along the way. So, it’s possible that running DISM will also resolve the BAD POOL CALLER error in Windows 10 on Dell.

7. Check the hard drive

  1. Launch Terminal as an administrator, and open the Command Prompt tab.
  2. Now, paste the following commands one at a time, and hit Enter after each:bootrec.exe /rebuildbcd bootrec.exe /fixmbr bootrec.exe /fixboot
  3. Next, you need to run the Check Disk scan by executing the following command while replacing the drive letter with the one in your case:chkdsk /r c:check disk

Issues with your hard drive can cause BSOD errors, and to fix this issue, it’s advised to run the Check Disk scan.

8. Remove your antivirus/firewall

Antivirus software can also cause Blue Screen of Death errors to appear, and to fix them, you have to remove the installed antivirus or firewall.

Bear in mind that your PC won’t be completely defenseless even if you remove your antivirus since Windows 10 already comes with Windows Defender, which serves as a default antivirus.

According to users, they had issues with McAfee, Malwarebytes, ESET, Trend, and Comodo Firewall, and if you’re using any of these tools, we urge you to remove them from your PC in order to fix this error.

Keep in mind that almost any antivirus program can cause these types of errors, so be sure to remove all third-party antivirus programs from your PC.

If you’re using any antivirus solution and you want to altogether remove it from your PC, a reliable uninstaller software will come to your aid. It will remove all the leftover files and the registry keys created by the app when you uninstall it.

9. Uninstall problematic applications

Certain third-party applications can cause these types of errors to appear. Therefore, we strongly recommend you find and uninstall the problematic application.

If you installed or updated any applications recently, be sure to uninstall them or revert to the older version.

Users reported that tools such as Hotspot Shield tend to cause these types of errors, so be sure to remove Hotspot Shield to fix the BAD POOL CALLER error in Windows 11 on your Dell device.

10. Check your modem

A few users reported issues with Huawei modems, and according to them, the modem was set to work as a network adapter, and that was causing the BAD POOL CALLER BSoD error.

check modem bsod bad pool caller

In order to fix this problem, you need to set your modem to work as a modem by using its software. Simply change the connection from NDIS to RAS, and you should be able to fix this problem easily.

11. Check your hardware

These types of errors are often caused by hardware issues. If you’re getting a BAD POOL CALLER Blue Screen on Windows 10, be sure to check your hardware.

Users reported that this issue was fixed after finding and replacing the faulty hardware, and in most cases, the problematic hardware was RAM or motherboard.

Bad pool caller RAM motherboard

Checking your RAM is rather simple, and in order to do that, you just need to test RAM modules one by one until you find the faulty one. In addition, you can also use tools such as MemTest86+ to perform a thorough scan of your RAM.

Any hardware component can cause this error to appear. If you installed any new hardware recently, be sure to remove or replace it to eliminate compatibility issues.

How can I fix BAD POOL CALLER BSoD error on Windows 11?

Fixing the BAD POOL CALLER error in Windows 11 is very similar to that on the previous iteration. You just need to identify the underlying cause and look for ways to eliminate it.

And, it’s usually incompatible hardware or a third-party application creating conflicts. Keep an eye for these, and you will be able to fix the error in no time.

Does BSoD damage your computer?

BSOD doesn’t generally damage the hardware but can seriously mess things up with the OS.

A BSOD is an indication that something is wrong with the computer, which is causing the OS to crash.

If that underlying cause has to do with a faulty external device, it could damage the other components, though that’s a very unlikely scenario. But, BSOD can break the OS, if not fixed initially.

Even if we were to overlook the damage caused, if any, BSOD would affect the progress and leads to loss of data. This very aspect in itself highlights the importance of troubleshooting Blue Screen of Death errors.

By now, you would have fixed the BAD POOL CALLER error in Windows 10 and should have your PC up and running like before.

Also, find out the best tools to automatically fix BSOD errors with minimal effort from your end.

If you have any other questions or suggestions, feel free to leave them in the comments section below.

Dell Fingerprint Sensor Not Working: 3 Ways to Fix it

The fingerprint is probably one of the most convenient and secure sign-in options. Most laptops released in the last few years come with a scanner. But for some Dell users, the fingerprint reader is not working.

In this article, we will present how you can fix things when the Dell XPS fingerprint sensor is not working. Keep on reading!

Why my fingerprint sensor is not working Dell laptop?

Problems with the fingerprint reader generally arise due to issues with the driver, particularly after an update. Also, it could be a misconfigured BIOS or the current data set may have gone corrupt.

Moreover, our users reported other related issues, which can also be fixed by following the methods below. Some of the most common ones are the following:

  • Dell XPS fingerprint reader not working after sleep – By attempting to reinstall the drivers, you can fix this particular issue.
  • Windows 10 Dell XPS fingerprint reader not working – The solutions below can apply to Windows 10 and 11.
  • Windows 11 Dell XPS fingerprint reader not working – You can try to update your OS to bring it up-to-date.
  • Dell XPS 13 9380 fingerprint reader not working – Navigate to the BIOS Adjustments menu, ensure that Software Guard Extensions (SGX) is set to Software Controlled, then save the settings.
  • Dell XPS 13 9370 fingerprint reader not working – Just like before, you should check your BIOS settings.

Fear not, as all of these cases are solvable, and the solutions are straightforward to apply.

Where is Dell XPS 13 fingerprint sensor?

You’ll find the fingerprint reader on the button that controls the power. You can place your finger on it to detect your fingerprint.

However, if it doesn’t work, you can follow the steps below to fix this issue. At the end of the article, we will provide even more potential solutions in case the error is still not solved. Follow along!

What do I do if Dell fingerprint sensor is not working?

1. Reinstall the driver

  1. Press Windows + S to launch the Search menu, enter Device Manager in the text field at the top, and click on the relevant search result.Device Manager to fix dell xps fingerprint reader not working
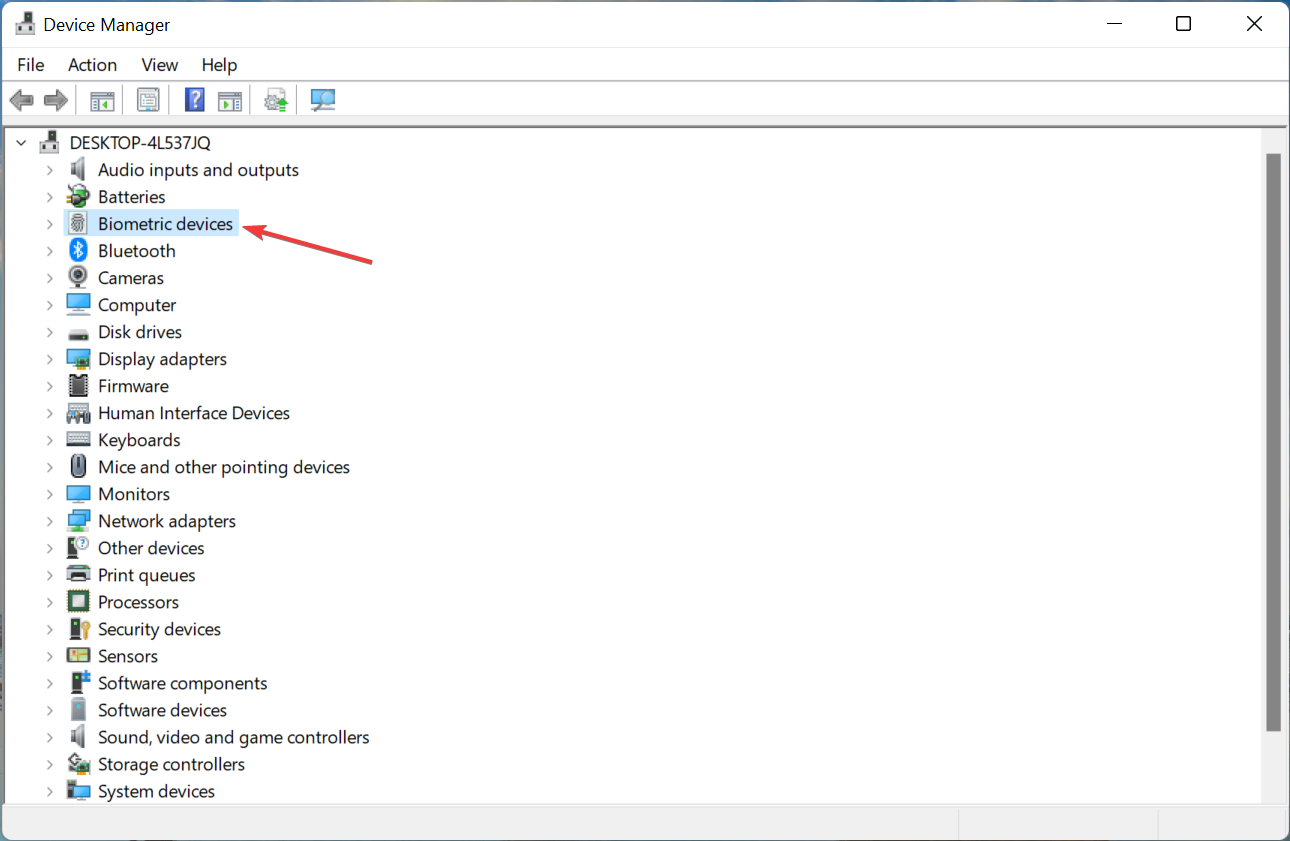
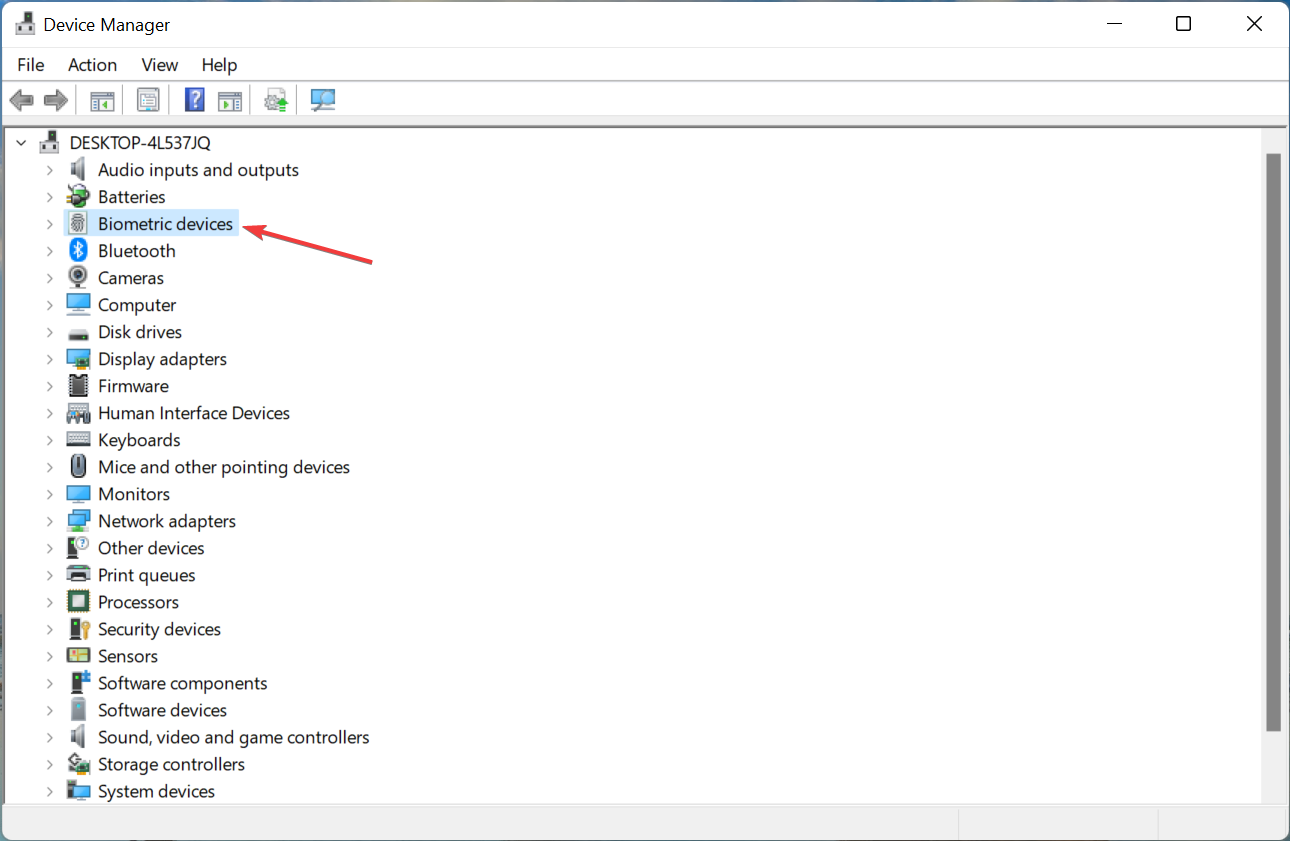
  2. Double-click on Biometric devices to expand and view the devices under it.Biometric devices
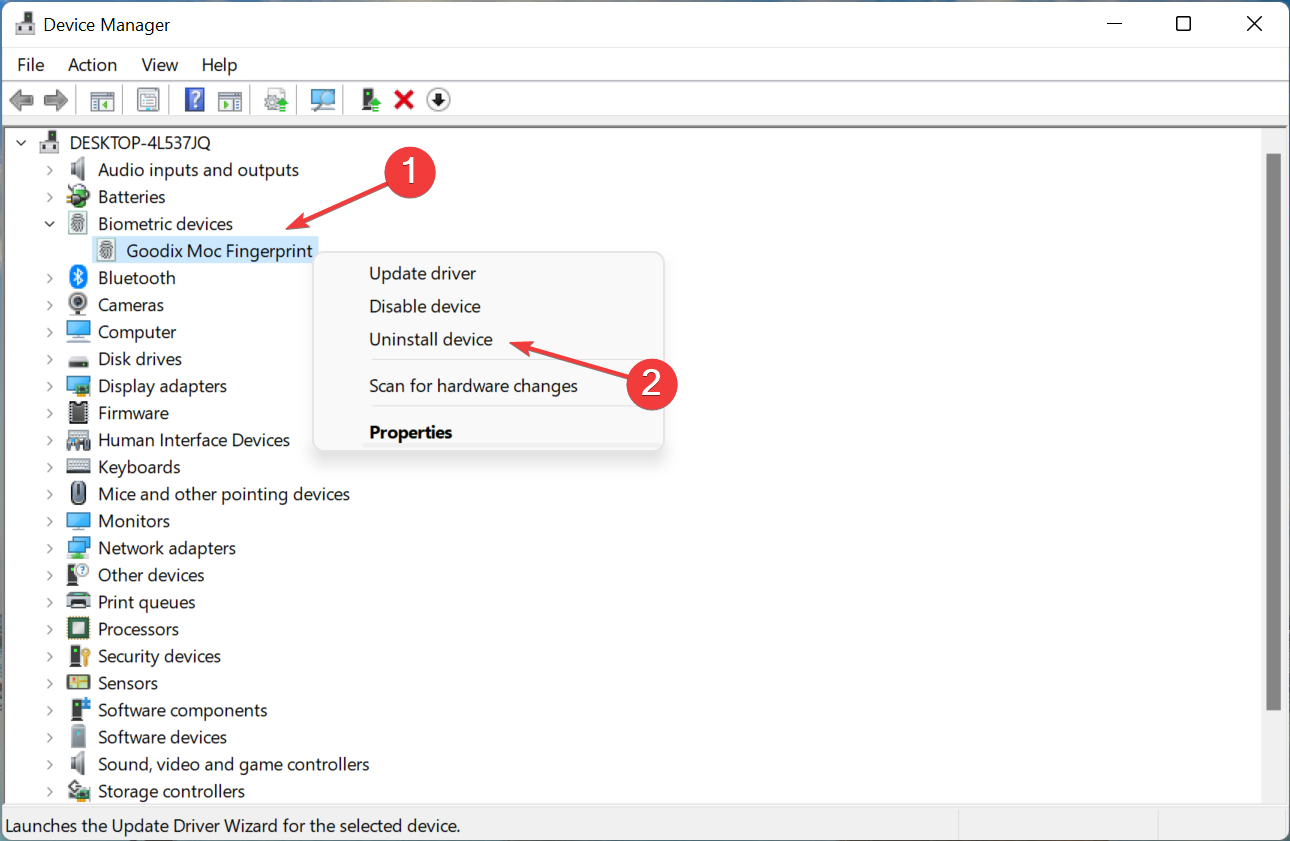
  3. Right-click on the fingerprint reader, and select Uninstall device from the context menu.Uninstall device to fix dell xps fingerprint reader not working
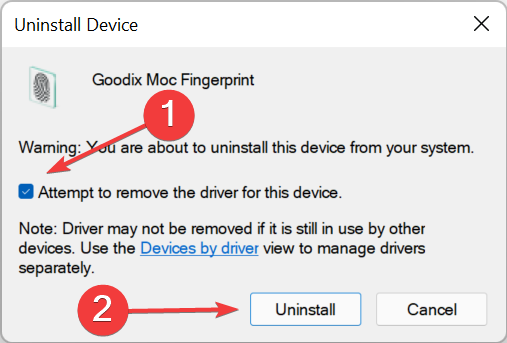
  4. Tick the checkbox for Attempt to remove the driver for this device, and click Uninstall at the bottom.Attempt to remove the driver for this device
  5. Once done, restart the computer, and Windows will automatically install a fresh driver for the reader.
  6. If a fresh driver is not installed, open the Device Manager and click the Scan for hardware changes button.

A corrupt driver is a major issue and can cause the device to malfunction or stop working at all. Reinstalling the corrupt fingerprint reader driver did the trick for most users. To identify one, look for a warning sign near the corner of the device icon.

2. Roll back driver update

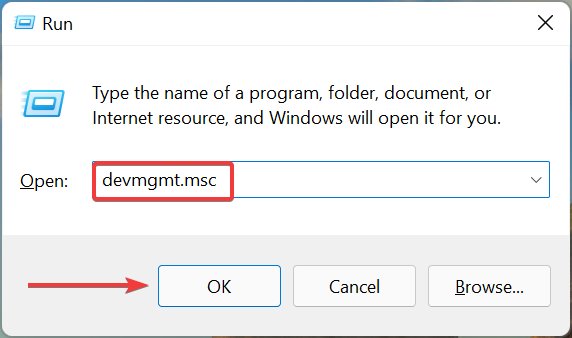
  1. Press Windows + R to launch the Run command, enter devmgmt.msc in the text field, and either click OK or hit Enter to launch the Device Manager.Device Manager
  2. Next, double-click on Biometric devices.Biometric devices to fix dell xps fingerprint reader not working
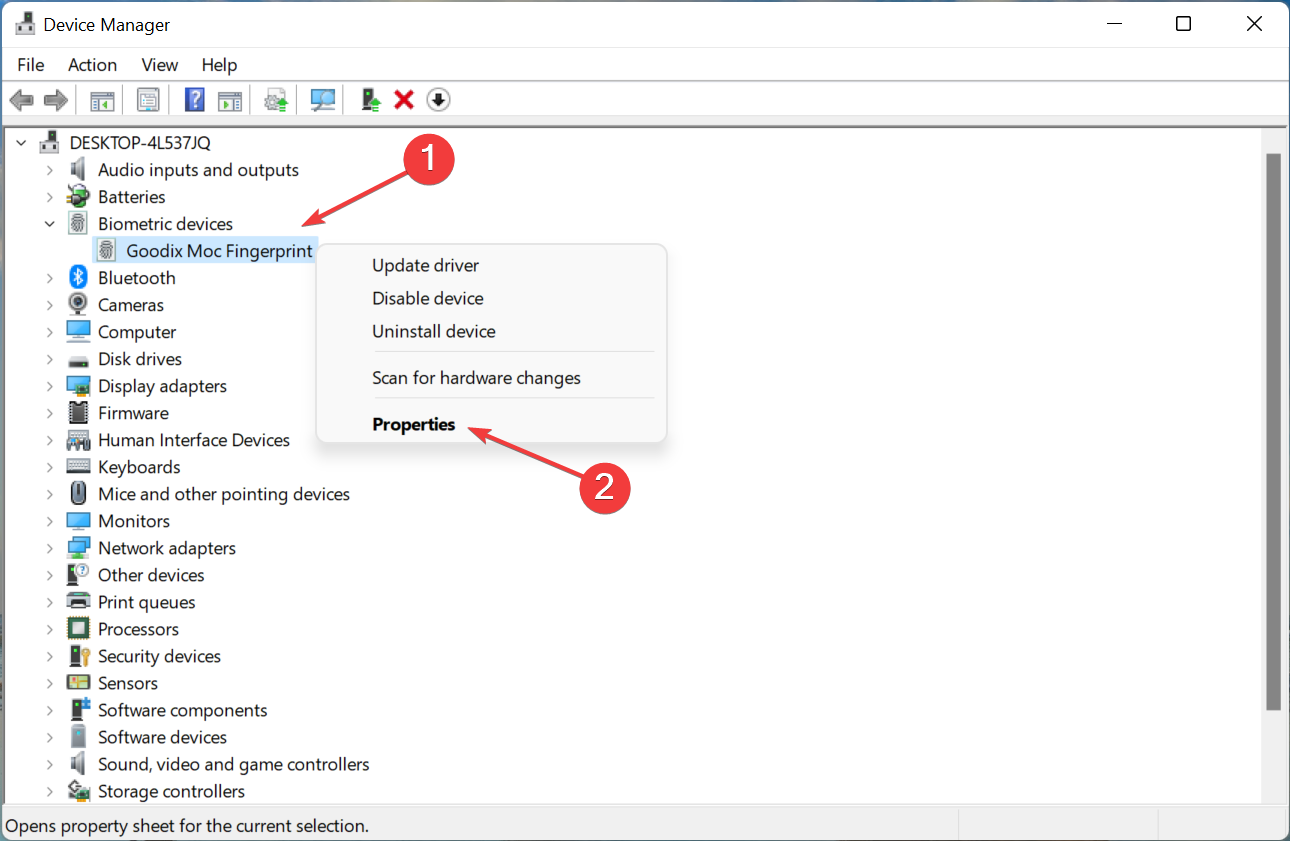
  3. Right-click on the fingerprint reader, and select Properties from the context menu.Properties
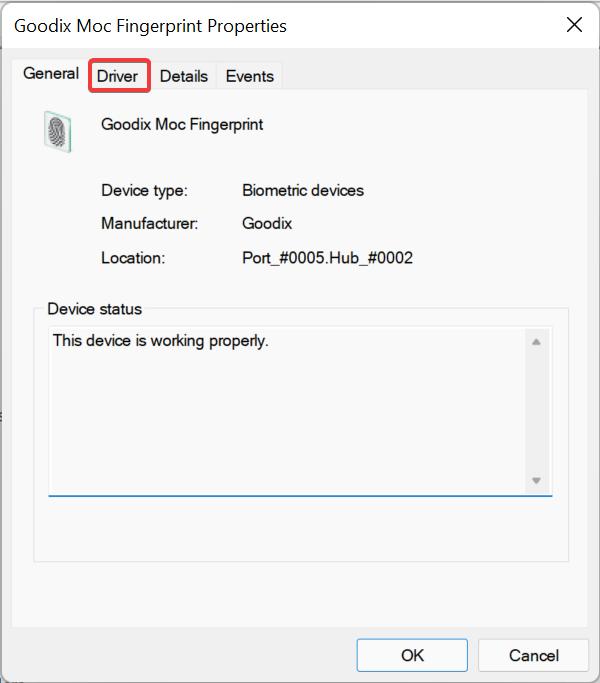
  4. Navigate to the Driver tab.Driver tab to fix dell xps fingerprint reader not working
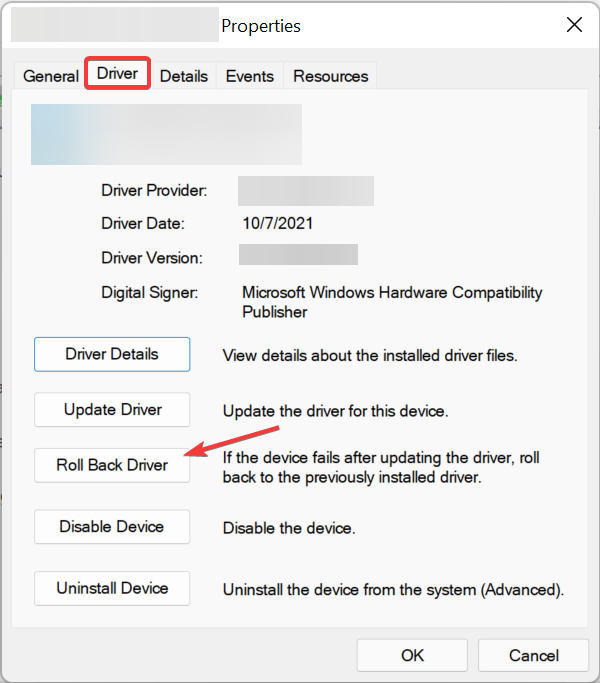
  5. Click on the Roll Back Driver button.Roll back driver to fix dell xps fingerprint reader not working
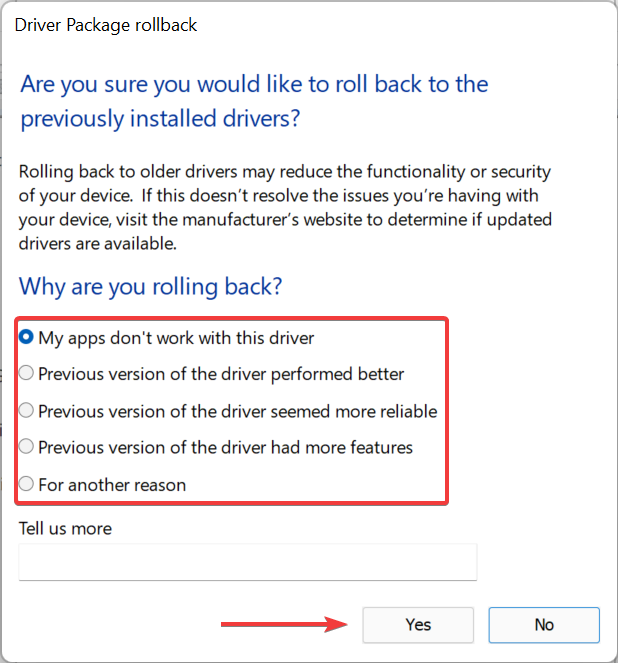
  6. Now, select a reason for rolling back the driver version, and click on Yes at the bottom.select reason
  7. After the uninstall is complete, restart the computer for the changes to come into effect fully.

If you started encountering the problem after updating the driver, either manually or via Windows Update, reverting to the previous version should fix the fingerprint reader not working problem in Dell XPS.

Also, you can use a reliable third-party app to reduce the chances of encountering such errors by installing only the right drivers. We recommend Outbyte Driver Updater, a dedicated tool that will automatically update all the drivers and only install the best available version.

Outbyte Driver Updater

Update and repair any corrupted drivers with this great tool.
Free Trial Download

3. Remove the current fingerprint and add a new one

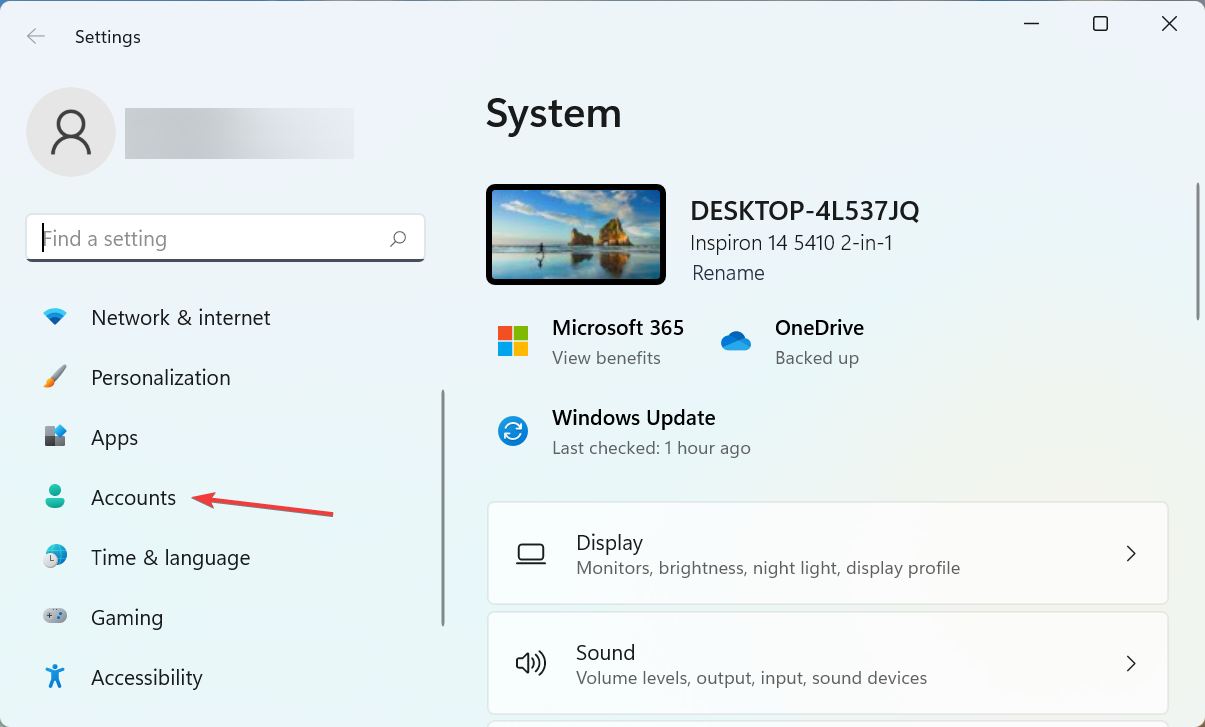
  1. Press Windows + I to launch Settings, and select Accounts from the tabs listed in the navigation pane on the left.Accounts
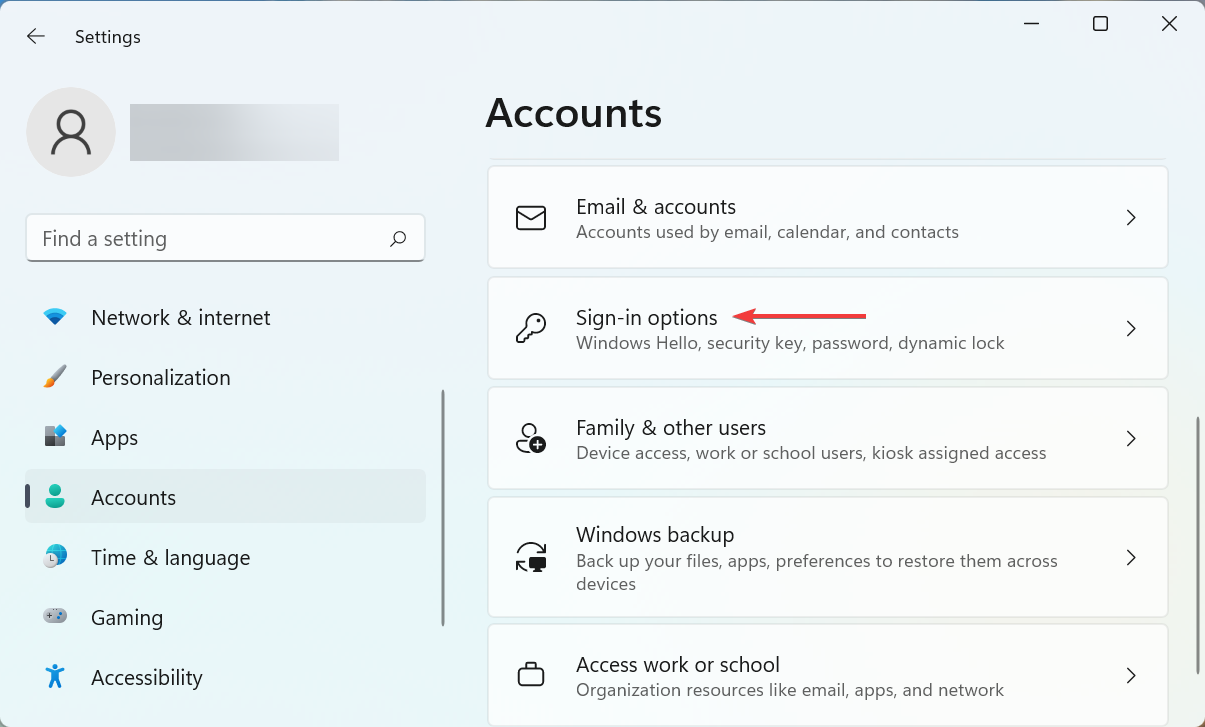
  2. Next, click on Sign-in options on the right.Sign in options to fix dell xps fingerprint reader not working
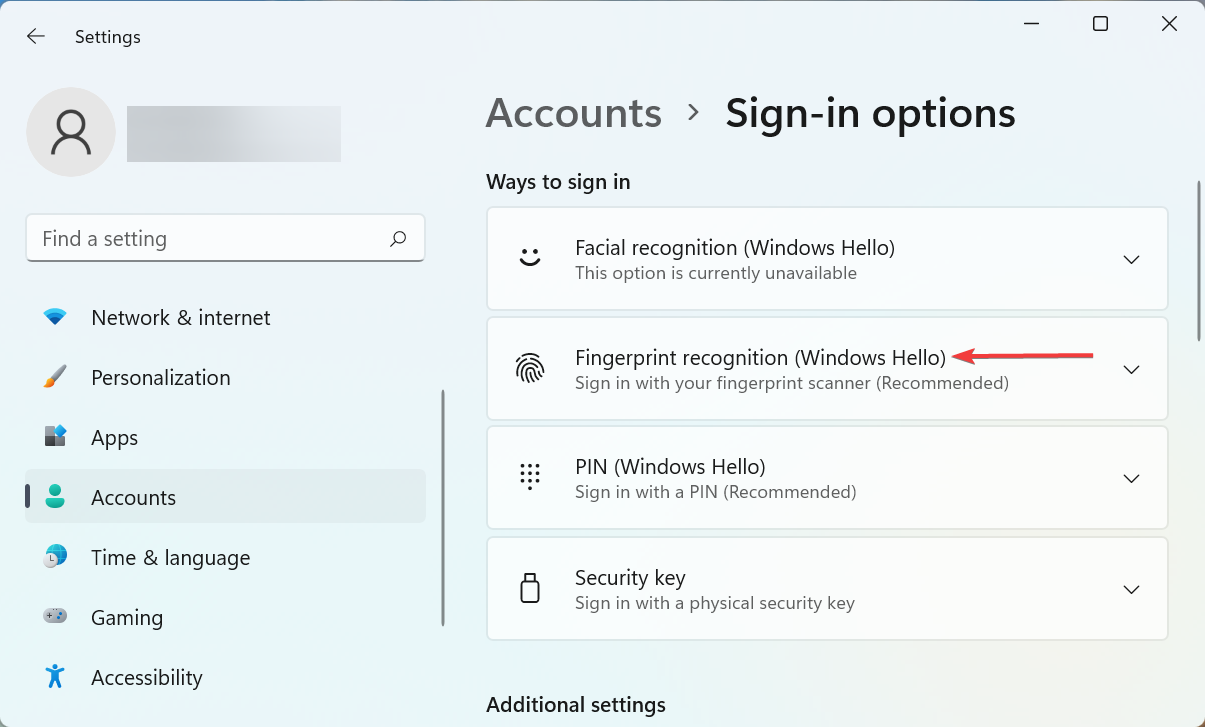
  3. Click on Fingerprint recognition (Windows Hello).Fingerprint recognition
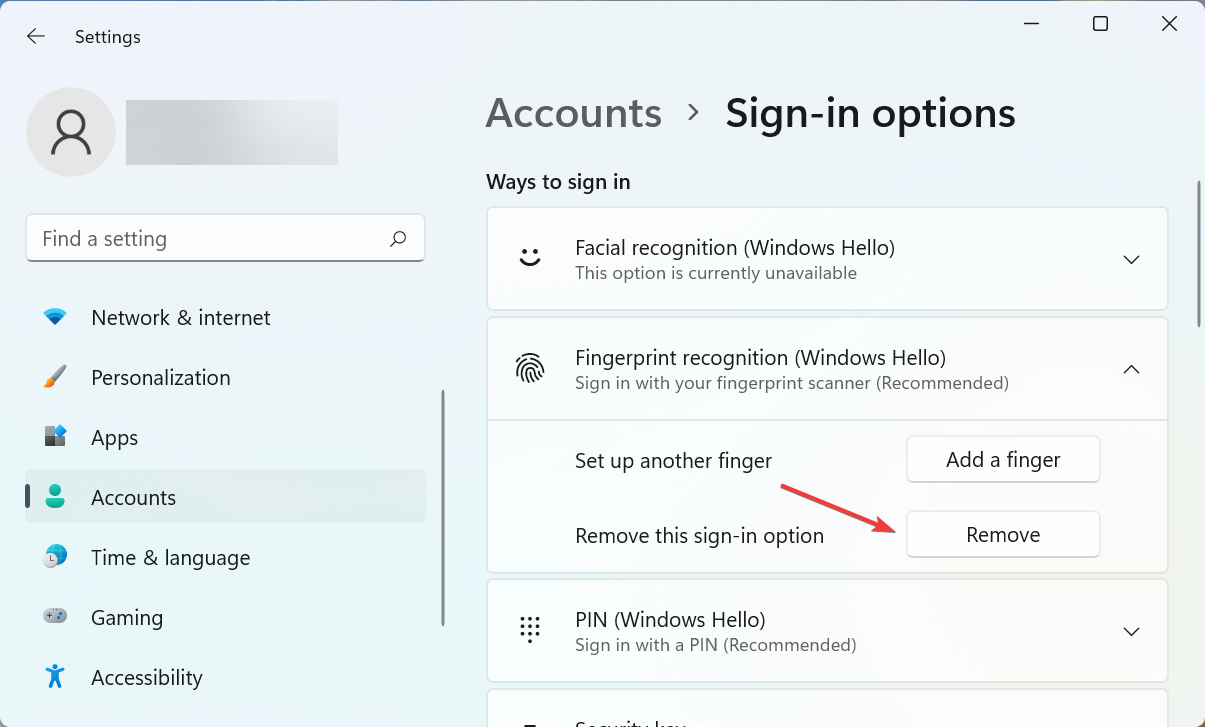
  4. Now, click the Remove button to delete the currently set fingerprint.Remove to fix dell xps fingerprint reader not working
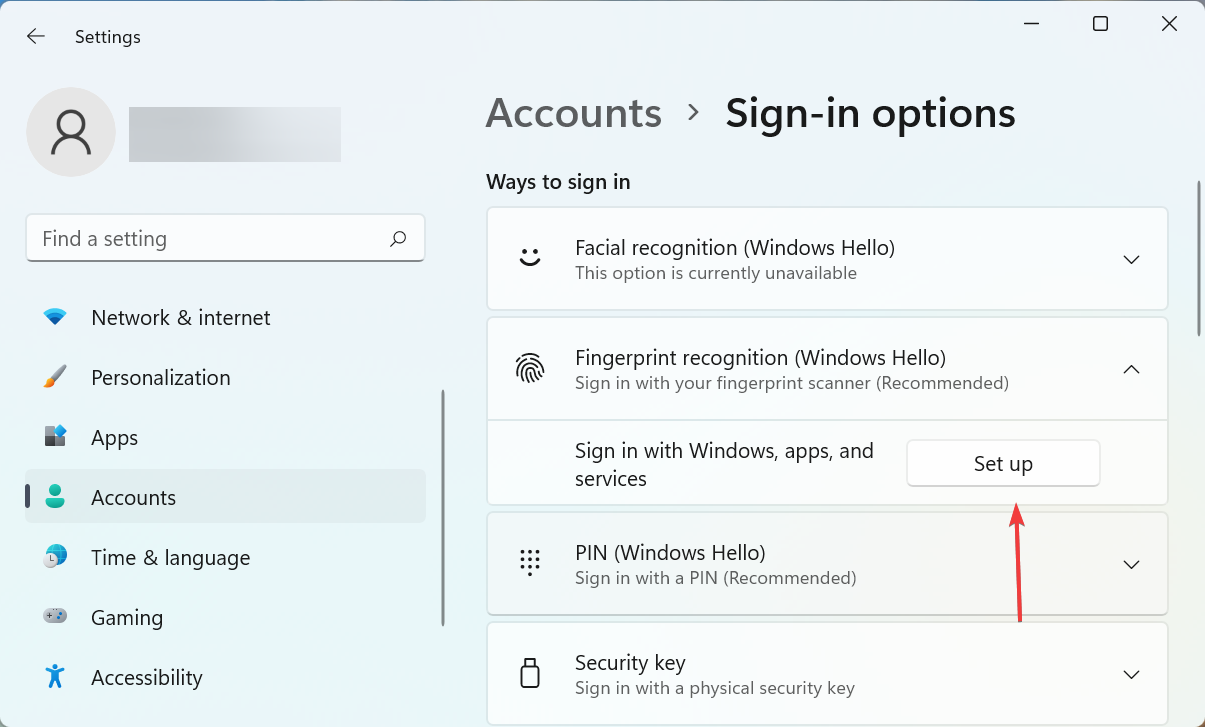
  5. Once done, click on Set up to add a new fingerprint.Set up
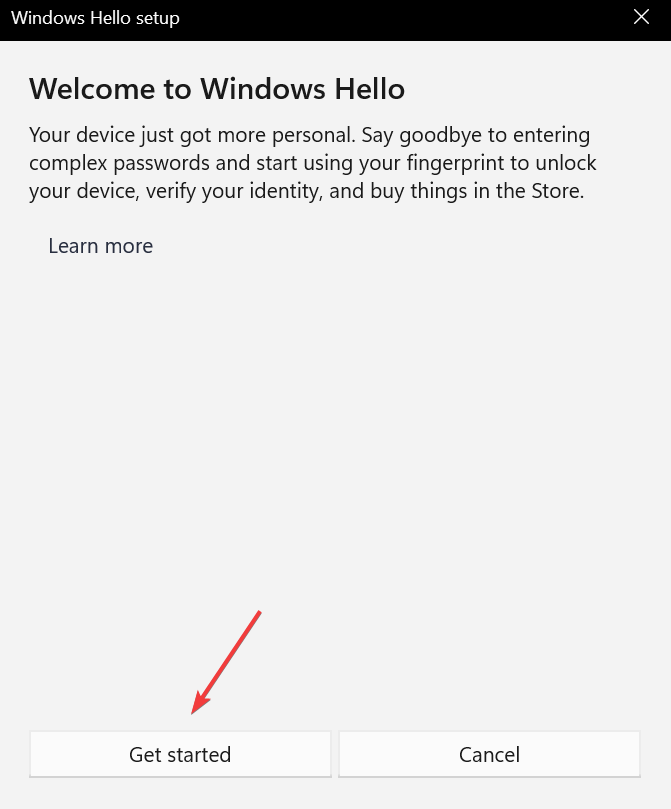
  6. Click on Get started and follow the on-screen instructions to complete the process.Get started

If there are issues with the currently set fingerprint, it would appear as if the fingerprint reader in Dell XPS 13 is not working. So, remove the current one and add a new fingerprint instead.

These are all the ways you can fix the Dell XPS fingerprint reader not working issue and use it to log in to Windows from now on.

Why did my laptop fingerprint scanner stop working?

Your fingerprint reader will malfunction if the associated drivers are corrupted, out of date, or incompatible. Moreover, it may be that some system files are corrupted, which will prevent you from using the fingerprint reader.

Make sure your fingerprint reader has no potential hardware problems, such as scratches, dust, or grease on any of its components.

If these methods don’t work, which is highly unlikely, try some general troubleshooting to fix issues with the fingerprint sensor in Windows 11.

Also, you may perform a system restore since this can eliminate many issues and take your system back to a relatively healthy state.

If you have any other queries or know of a fix not listed here, drop a comment in the section below.

ADB Command or Not Found: 5 Ways to Enable it

Have you ever received an ADB command not found error message when you were trying to connect your smartphone to your personal computer? This error prevents you from running developer commands on your phone, but it can be easily fixed.

How can I fix the ADB command not found error?

1. Select Media Transfer Protocol on your phone

  1. The first thing that you will have to do will be to check if your smartphone is plugged in correctly.
  2. After this, you will have to select the USB connection notification on your phone.
  3. Then, you will have to select MTP to be your connection mode.

2. Update ADB Interface

  1. Open Device Manager.
  2. Right-click on the Android ADB Interface or Android Phone option, under Other Devices, and select Update driver.
  3. Select Browse my computer for driver software.
  4. Now, select Let me pick from a list of device drivers on my computer.
  5. Now, a window dialog will show up on your screen with the text Show all devices, click Next.
  6. Click Have Disk.
  7. After this, go to the location where you have installed the SDK. Usually is C:\Program Files\Android\android-sdk\extras\google\usb_driver
  8. Then you will have to double-click on android_winusb.inf and select Android ADB Interface.
  9. Now, click on Yes, followed by Install.
  10. After the process is complete, you will have to close the window.

For more information, we have an in-depth guide on how to download ADB drivers for Windows 11.

3. Enable USB Debugging and Developer Options

  1. The first thing that you will have to do will be to go to your phone Settings and Select About.
  2. Here, tap the Build number seven times to enable Developer Options.
  3. Then, you will have to go back and select Developer Options.
  4. Now, scroll down and tap on USB Debugging.

This can help you if zsh: command not found: adb error appears, so be sure to try it.

4. Run ADB command from the installation directory

  1. Open Command Prompt.
  2. Navigate to the directory where Android SDK is installed in Command Prompt. By default, it should be one of the paths below: C:\Program Files (x86)\Android\android-sdk\tools C:\Program Files (x86)\Android\android-sdk\platform-tools
  3. Try running the ADB command from these directories.

Alternatively, you can open Command Prompt in the Android SDK directory by doing the following:

  1. Open the Android SDK installation directory.
  2. Press and hold the Shift key, and right-click the space inside the directory. Choose the Open PowerShell window here option.
    open powershell window here ADB command not found
  3. Once the PowerShell window opens, try running the ADB command.

5. Create a user or system variable path for ADB or fastboot

  1. Press the Windows key, type advanced system, and choose View advanced system settings.
    advanced adb command not found
  2. Click on the Environment variables button.
    environment
  3. Now, select any item under the System or User variables sections, and click the New button.
    new
  4. Type Path as the Variable name.
  5. Next, click the Browse Directory button, select platform-tools, and click OK.
    path
  6. Finally, click the OK button to confirm the changes, and remember to click the OK button on the Environment variables button.

We hope this article and our solutions helped you fix the ADB inaccessible or not found message.

If you encounter the ADB reboot bootloader is not working on your PC, check our detailed guide to fix it quickly. Many also reported that ADB is not recognized in Windows 11, but we have a guide that addresses that.

For some users, the ADB driver is not installing, but our dedicated article should help you fix that.

Feel free to let us know the solution that helped you fix this issue in the comments below.

Can’t Sign into Minecraft? Fix Minecraft Login Issues Easily

Minecraft requires the users to log in to the account or server before playing the game. However, some users have reported that they can’t sign into Minecraft and other Minecraft login issues when attempting to do so.

One Reddit user reported a similar issue in the community forum.

So I’ve had Minecraft Java edition for a long time now and I’m having a problem with logging in. Everytime I try to login in the launcher, I put in my information and all but all it’s saying is that it cannot connect to server.

But that’s far from being over. Users reported even more Minecraft login problems, as follows:

Why can’t I sign into Minecraft?

  • Server outages or maintenance
  • Connection issues on your side (It may be your DNS, your router, or even broader issues on your ISP side)
  • Firewall or other security features blocking access to Minecraft servers
  • Your game version is not up to date

These are all possible reasons that could explain the Minecraft login issues. On the other hand, Minecraft Microsoft account problems are more particular.

If you recently changed your username, Mojang servers are likely to reject your login attempts. But Microsoft can also lock your account for security reasons whenever suspicious activity is detected.

In this case, you may need to unlock your account and change your password. Don’t worry, we’ll show you how to fix you are not logged into your Minecraft account issues for good.

What can I do if the Minecraft login is not working?

Before you dig, here are a few quick steps you can try:

  • Restart your router or modem
  • Open the Microsoft Store app and check for game updates for Minecraft
  • Run the built-in troubleshooter for Store apps and/or use the Windows Settings to Repair or Reset Minecraft via Apps & Features

1. Check for server issues

minecraft login not working
  1. One of the common reasons for the Minecraft login not working issue has to do with Minecraft servers being down for maintenance.
  2. Before proceeding with any other steps, check if the Minecraft server is down.
  3. Check Reddit and Minecraft.net forums and see if other users are reporting similar issues.
  4. In the case of server issues, you can do nothing but wait for the developer to fix the issue.

According to Minecraft’s official page, errors like Login failed, invalid username and password can be temporary issues and will automatically resolve after an hour or so.

Additionally, if you got the account username and password from a third party, check for the validity of the user credentials for the Minecraft account.

Do not try to log in repeatedly as it can get your account locked for 24 hours.

2. Reset the Minecraft account password

minecraft login not working
  1. Open the Minecraft forgot password page.
  2. Log in with your email address and click on the Forgot password option.
  3. Minecraft will send a link to reset your password to your email address.
  4. Open the email and click on the link.
  5. Reset the password.
  6. Launch Minecraft and try to log in again and check for any improvements.

3. Try a different browser

  1. If you are trying to log in to Minecraft.net and experiencing the login not working issue, try using a different browser.
  2. For instance, you can switch to Opera.
  3. Open Minecraft.net and enter your login credentials.
  4. Check if you can log in to your account successfully.
  5. If the login is successful, try clearing the browser cache and cookies on your primary browser or stick with the newly installed one.

4. Flush DNS configuration

minecraft login not working
  1. Press Windows Key + R to open Run.
  2. Type cmd and click OK to open Command Prompt.
  3. In Command Prompt, enter the following command and hit enter: Ipconfig /flushdns 
  4. Wait for the success message and close the Command Prompt.
  5. Launch Minecraft and try to log in.

Flushing the DNS  removes all the network information stored in the cache and forces the computer to find new DNS information.

If you want to play single-player games, you need to log in using your Microsoft account as a form of verification. You also need it if you want to create a server for yourself and your friends.

The Minecraft login not working issue can occur if the Minecraft servers are facing technical issues. It may also be the reason your purple heart cape is not showing up. Most of the time, waiting for a couple of hours or even a day can automatically fix the issue.

Our recent Minecraft error code Obsidian covers a similar issue, so you might want to visit it for more solutions. We also have a guide on Failed to get Minecraft access error transferring server message, so don’t miss it.

However, if the issue did not resolve automatically, try the steps listed in this article one by one.

Can’t Install Hyper-V in Windows 10: 7 Fixes that We Tested

Windows 10 supports client Hyper-V, a robust, high-performance, and flexible client virtualization tech that allows users to run multiple operating systems simultaneously on their Windows computer.

You can enable the Hyper-V feature from the Turn Windows Feature on or off your desktop. You can also enable it from the Windows PowerShell and the Command Prompt.

At times you may encounter problems when installing Hyper-V in Windows 10. We will tackle this problem in the guide.

Why can’t I install Hyper-V on Windows 10?

There are a few reasons you may be unable to install Hyper-V on Windows 10. A few include the following:

  • PC support – One possibility is that your computer’s CPU does not support virtualization, a feature required for Hyper-V to work. 
  • Disabled virtualization – Another possibility is that the feature is not enabled in your computer’s BIOS or UEFI firmware. 
  • No OS hyper-V compatibility: You might not be running a version of Windows 10 that includes Hyper-V, such as Windows 10 Home. You must also check if your device is running at least a 64-bit version of Windows 10 Pro, Enterprise, or Education.

Hyper-V is a great feature, but sometimes you might encounter issues while installing it. Regarding the issues, here are some common problems that users encountered:

  • Failed to enable Hyper-V in Windows 10 – This is a common problem with Hyper-V on Windows 10. To fix this issue, check if your PC meets the hardware requirements.
  • Can’t enable Hyper-v in Windows 10 – Many users reported that they couldn’t enable Hyper-V on their PC. This can occur due to third-party software, and the issue will be resolved after removing the problematic software.
  • Windows 10 Hyper-V won’t install – If Hyper-V doesn’t install on your PC, specific settings may interfere with it. However, you can fix these settings by running a few commands in Command Prompt.
  • Can’t install Hyper-V platform, integration services – Sometimes, you won’t be able to install Hyper-V due to specific issues on your PC. However, you should be able to fix this problem using one of our solutions.

Let us introduce you to some installation solutions. However, note that this installation issue may also occur on Windows 11.

What do I do if I can’t install Hyper-V on Windows 10

Before trying these fixes:

  • Ensure you are not on the Home version. As you know, different versions of Windows 10 are available, and each has a different price and features. Unfortunately, Hyper-V isn’t available in the Home versions of Windows 10, so if you’re using the Home version, you’re out of luck. The only way to use Hyper-V is to switch to a Professional, Education, or Enterprise edition.

1. Check the hardware requirements

  1. Press Windows Key + X . Choose Command Prompt (Admin) or Powershell (Admin).
    Windows 10 Hyper-V won't install
  2. Now type the command below and hit Enter.
    systeminfo.exe
    Can't install Hyper-V integration services
  3. The results should appear as shown below.

If all entries in the Hyper-V Requirements section say Yes, your PC can support and use Hyper-V. On the other hand, if certain features aren’t available, you’ll need to enable them in BIOS.

Data Execution Prevention Available and Virtualization Enabled in Firmware features can be enabled in BIOS. On the other hand, VM Monitor Mode Extensions and Second Level Address Translation features are related to your hardware. You’ll need to upgrade your CPU if these features aren’t available.

Hyper-V is a great feature, but if you want to use it, you must first meet specific hardware requirements. To use Hyper-V, your PC needs to meet the following requirements:

  • 64-bit Windows
  • 4GB RAM
  • Second Level Address Translation (SLAT), also known as Rapid Virtualization Indexing (RVI)

2. Update your system

  1. Locate the Windows ISO file which you used to install the operating system. Right-click on it and select Mount.
  2. Decompress the ISO file and locate the SXS folder in the Sources directory. Copy this folder to any drive which is not the system root drive, e.g., F: drive.
    install Hyper-V
  3. Now open Windows PowerShell or administrative Command prompt and type the following command:
    dism /online /enable-feature /featurename:Microsoft-hyper-v-all /All /LimitAccess /Source:<SXS Folder location>
  4.  Once prompted, restart the system. The Hyper-V feature will be ready to use after rebooting.

This solution is important if Hyper-V cannot be enabled even after performing a clean install of Windows 10 builds 10049 or after upgrading from a build that did not have Hyper-V enabled.

You may experience the problem because your hardware is not supported or the wstorvsp.inf was not properly added to the driver store during online driver servicing.

3. Remove third-party software

Hyper-V is a built-in virtualization software in Windows 10, but unfortunately, it doesn’t work well with some third-party applications. Sometimes third-party software can install drivers that can interfere with Hyper-V.

If Hyper-V can’t install, remove all third-party virtualization software from your PC. Many users had issues with VirtualBox, but it was resolved after removing it. Additionally, to VirtualBox, users reported issues with Check Point Endpoint Security VPN, so if you’re using this application, remove it.

We recommend using an uninstaller software, to make sure no remnants will stay on your PC.

These applications will remove all files and registry entries associated with the application, ensuring that it’s completely removed from your PC.

One of the top picks we recommend you try is IObit Uninstaller because it is specially created to remove any unwanted programs with all their associated files to improve your computer’s health and speed scores.

IObit Uninstaller

Get rid of all the stubborn applications within seconds and try using IObit Uninstaller.

4. Use Command Prompt

  1. Press Windows Key + X and choose Command Prompt (Admin).
    Windows 10 Hyper-V won't install
  2. Type the script below and hit Enter:
    SC config trustedinstaller start=auto
    Can't enable Hyper-v Windows 10

After the command is executed, restart your PC and try to install Hyper-V again.

If you can’t install Hyper-V on your Windows 10 PC, there might be a minor glitch on your system that’s preventing you from installing it. Several users reported that they fixed this glitch simply by running a single command in Command Prompt.

5. Modify your registry

  1. Press Windows Key + X and choose Command Prompt (Admin).
    Windows 10 Hyper-V won't install
  2. Now type the following command, hitting enter after each one:
    reg delete HKEY_LOCAL_MACHINESYSTEMCurrentControlSetControlDeviceGuard /v EnableVirtualizationBasedSecurity
    reg delete HKEY_LOCAL_MACHINESYSTEMCurrentControlSetControlDeviceGuard /v RequirePlatformSecurityFeatures
    bcdedit /set {0cb3b571-2f2e-4343-a879-d86a476d7215} loadoptions DISABLE-LSA-ISO,DISABLE-VBS
  3. Exit the command prompt and reboot.

Several users reported that the EFI system with the Secure Boot feature enabled could cause issues with Hyper-V and prevent it from installing. However, you might be able to fix this issue by running a couple of commands in Command Prompt.

Remember that these commands will modify your registry, but if you’re not comfortable with that, you might want to skip this solution.

6. Install Hyper-V components separately

  1. Press Windows Key + S and enter windows features. Then select Turn Windows features on or off from the menu.
    Failed to enable Hyper-V Windows 10
  2. Windows Features window will now appear. Expand the Hyper-V section. Check Hyper-V Platform first and click OK.
    Can't enable Hyper-v Windows 10
  3. Once your PC restarts, repeat the steps from above, but this time install Hyper-V Management Tools.

After your PC restarts again, the problem should be completely resolved, and Hyper-V will be installed on your PC.

According to users, if you can’t install Hyper-V on your PC, you might be able to circumvent the issue simply by installing Hyper-V components separately.

7. Perform a fresh start

  1. Press Windows Key + I to open the Settings app. Navigate to Update & Security section.
    Windows 10 Hyper-V won't install
  2. Go to the Windows Security section in the left pane. In the right pane, click Open Windows Defender Security Center.
    Failed to enable Hyper-V Windows 10
  3. When Windows Defender opens, go to Device performance & health section.
    Can't enable Hyper-v Windows 10
  4. Scroll down to the Fresh start section and click Additional info.
  5. Click the Get started button.
    Can't install Hyper-V platform
  6. Now follow the instructions on the screen to complete the process.

Once the process is finished, you’ll have a fresh installation of Windows 10, and Hyper-V should be able to install it.

Windows 10 has a helpful feature called Fresh start that allows you quickly and easily reinstall Windows 10. Before you perform a Fresh start, it’s advised to back up your files to avoid losing them. This process will remove your installed applications, so you’ll have to install them again manually.

Not being able to use Hyper-V can be a big problem for some users, but we hope you managed to fix this issue using one of our solutions.

Remember, we have not written these solutions in any particular order. So it would be best if you tried what seems most relevant to your case.

Let us know in the comments below what worked for you.

Fix: We Had a Problem Installing your Office Program

Multiple user reports confirm a new Office error, i.e., We had a problem installing your Office program error. Here is what the entire error message reads;

We are sorry, we had problems installing your Office program(s)
Is your internet connection working? Do you have enough free space on your main HDD?
Please try installing again after you have checked the above

If you also get this error, you are in the right place. In this guide, we will share with you a few effective solutions that have worked well for others and resolved the We had a problem installing your office program error. Let us check them out.

Why am I getting We had a problem installing your Office program error?

  • The previous version of Office is causing issues: If you already have an older version of MS Office installed on your PC, then it could conflict with the installation.
  • Proxy settings: One of the most common reasons that triggered this error is due to misconfigured proxy settings.
  • Antivirus is blocking the installation: Often aggressive antivirus settings can come in the way of installing important applications.
  • There isn’t sufficient space available: Chances are there isn’t much space left for the installation to complete on your PC.

How can I fix We had a problem installing your office program error?

Before you jump to the advanced troubleshooting solutions, try restarting your PC and make sure that you have installed the correct and complete installation file for MS Office.

1. Use the registry editor

Note icon NOTE
Make sure to back up the registry before tweaking as it could crash your PC and cause other problems. We have a guide that will help you restore the registry without having a backup.
  1. Press the Win + R keys to open the Run dialogue.
  2. Type regedit and press Enter.
  3. Navigate to the below path. HKEY_LOCAL_MACHINE\SOFTWARE\Microsoft\Office\15.0\Click-To-Run
  4. Delete the Click-to-Run key.
  5. Restart your PC.
  6. Run the installation and see if this fixes the We had a problem installing your office program error.

2. Clear space on your PC

  1. Open the Start menu by pressing the Win key.
  2. Type Disk Cleanup and open it.
  3. Select the drive.
  4. Click OK.
  5. Check the boxes for the folders that you wish to clear out.
  6. Click OK.
  7. Select Delete files in the prompt that appears.
  8. After the process completes, restart your PC.
  9. Try installing MS Office again.

You should ensure that you install the MS Office suite in the drive where sufficient space is available.

3. Uninstall the previous version of Office

3.1 The usual way

  1. Open the Start menu by pressing the Win key.
  2. Open Control Panel.
  3. Click on Programs and Features.
  4. Select MS Office and hit the Uninstall button at the top.
  5. Follow the on-screen prompts to uninstall the program from your PC.
  6. Restart your PC.
  7. Try installing the program back again.

This is the usual way of uninstalling programs from your PC. However, we have a guide that will help you uninstall programs that are sticky and leave residue even after uninstalling. This guide contains a list of the best tested uninstallers to help you.

3.2 Use the Microsoft Office uninstaller tool

  1. Download the MS Office uninstaller tool.
  2. Launch the program.
  3. Follow the on-screen prompts to install Microsoft Support and Recovery Assistant.
  4. Agree to the terms and conditions.
  5. The Microsoft Support and Recovery tool will begin scanning your PC.
  6. Select MS Office and click on Next.
  7. Check the box that you have saved all your work and hit the Next button.

This will remove the MS Office from your PC so that you have a clean slate to install Office programs without any issues. Alternatively, you can use the Microsoft Support Assistant and Recovery tool to diagnose the installation problems.

4. Disable proxy settings

  1. Press the Win + I keys to open the Settings menu.
  2. Click on Network & Internet from the left pane.
  3. Select Proxy.
  4. Under Manual proxy setup hit the Set up button.
  5. Toggle OFF Use a proxy server option.

5. Disable Firewall

  1. Open the Start menu by pressing the Win button.
  2. Type Windows Defender Firewall and open it.
  3. Click Turn Windows Defender Firewall on or off.
  4. Select the Turn off Windows Defender Firewall radio buttons for both Public and Private networks.
  5. Click OK.

We have shown the above steps for the Windows Defender Firewall. But you do the same with the third-party antivirus software and check if this resolves the problem.

That is it from us in this guide. Several users have reported that they cannot open MS Word, Excel, or PowerPoint. For them, we have a guide that will help them fix the problem.

If you are not able to zoom in MS Word, then you can refer to our guide. For users, who are confused about which version of MS Office will work on their Windows 11 PC, then they can check out our guide and get their confusion out of the way.

If MS Office disappeared from your PC, then our guide will help you resolve the issue. We also have a guide that will help you fix one of the most burning issues of Olicenseheartbeat.exe stopped working.

For users facing product activation failed error, we have a list of solutions that will help you resolve the error in no time.

Feel free to let us know in the comments below, which one of the above tips resolved the We had a problem installing your Office program error.

How to Play Old PC Games on Windows 11

As most of you know, Windows 11 is here and has some great new features and improvements. After conducting a series of research, we discovered that some of you want to discover how to play old games on Windows 11.

Fortunately, consider that most of your games will work without any problem on the newest OS, and you can run them not so different from how you used to in Windows 10.

For more information on how to play old PC games on Windows 10, check out our dedicated article. To find out the best options for Windows 11, make sure you go through all the presented information.

What do old games look like on Windows 11?

Considering its gaming improvements, Windows 11 offers you a chunk of new visual features, which are a bit more different than what we were used to in the previous Microsoft versions.

Thus, Windows 11 changes show rounded corners across most UI elements. Moreover, you can benefit from a much more lively user interface.

Not to mention its lots of animations and sounds, which will surely make a massive difference in your virtual environment.

From what producers say, the mission of Windows 11 design is to create a great gaming experience.

How do I know if I can run my old games on Windows 11?

Windows 11 has a similar foundation to Windows 10. Thus, those game platforms compatible with the previous will definitely work on the newest version.

If you were running the Windows 10 version before, with the latest OS update, you’ll be able to use apps like Steam, Microsoft Store, and Epic Games Store without any problem.

However, some users were utilizing older operating system designs. For those of you who are still using Windows 7 and playing old legacy titles, you might encounter some minor issues.

How can I play old games on Windows 11?

1. Use the compatibility mode

  1. 1. Right-click the icon of your game on the desktop (or the installation folder), and choose Properties.

    right click and choose properties
  2. 2. Click the Compatibility tab.

    compatibility section
  3. 3. Choose the Run the compatibility troubleshooter button for an automated change.

    run in compatibility mode old game windows 11
  4. 4. For a manual selection of a specific OS, tick the box next to the Run this program in compatibility mode for option.

    run this program in compatibility mode for
  5. 5. Using the drop-down list, choose a specific OS you would like to be emulated.

    choose the desired compatibility mode
  6. When you want to play old games on your Windows 11 PC, you may try launching them in compatibility mode for a previous OS. This may ensure that your PC can run the game without issues.

2. Try Microsoft Store

  1. Press the Windows key, type Microsoft Store, then click on it.
  2. Type the game’s name needed.
  3. Click on the Download button.
  4. Follow the on-screen instructions to install the game.

Windows 11 allows you to easily access the newest and improved Microsoft Store which has effectively replaced their old gaming platform Games for Windows Live. We strongly recommend you try it before anything else.

3. Go to the manufacturer’s website

  1. Open any web browser.
  2. Search for your game’s manufacturer’s download center.
  3. Access the first link, find the Download button, then click on it.
  4. Follow the on-screen instructions to install the game.

4. Try third-party game platforms

You can also download and install old games in Windows 11 from dedicated game platforms.

Such third-party support will offer you trusted certified compatibility, so your games won’t run into trouble.

If you are considering using this platform, look at the list below. You’ll find some of the most popular ones:

  • G2A – This is a globally recognized intermediary between the seller and buyer. It offers you fast and easy access to plenty of cool products at convenient prices.
  • Green Man Gaming – It is an online video game retailer, distributor, and publisher which allows you to find your favorite next game, especially if you’re looking for a deal.
  • Kinguin – This is another huge e-commerce marketplace which delivers verified video games, software licenses, and other digital assets, requiring easy and cheap transactions.

What can I do to ensure that old games won’t crash in Windows 11?

1. Verify if the game is properly installed

Some old games may crash or even not open at all due to specific reasons related to an incorrect installation.

The most common issues are purple checkerboards, weapons, or missing world models. Moreover, remember that you can experience different crashes while playing a game.

To prevent this trouble, you should verify if your old games are installed correctly on Windows 11. Thus, consider looking for the integrity of game files (this option will work especially for your Steam games).

2. Constantly update graphics drivers

Our second recommendation is to update graphics drivers constantly. As you probably know, drivers are the most important pieces of software which allow your digital environment to work in proper conditions.

Graphics drivers are a part of your PC that controls and enhances how your computer screen is displayed.

By graphics, we mean pictures, videos, programs, animation, or 3D. For automatic scans of outdated or missing drivers, do not hesitate to use a dedicated tool such as Outbyte Driver Updater.

3. Disable antivirus and other extraneous software

Like any other program or app, antiviruses or extraneous software may come up with random bugs that interfere with legitimate games. It is just about digital confusion, so we do not have to blame it.

This kind of program may have an impact on the overall speed of your device. However, to avoid such situations, it is not necessary to uninstall them. You should try turning them temporarily off.

These were some of the most helpful information if you consider playing old games on Windows 11. Also, look at the 5 best Windows games under 1GB you should download today.

You’ll find there the most popular and less-consuming storage space games, also released about 15-20 years ago.

For those who are more familiar with the previous aspect, do not hesitate to make Windows 11 look like Windows 10 again.

Since your opinion is important, share your thoughts in the comments section below.

Fix: Computer Won’t Turn On After Power Outage [8 Ways]

A power outage is one of the most dreaded moments in the life of any computer user. Though you can improve your battery life, it does matter when a power outage occurs, as your computer just turns off.

To compound the problem, your computer might not turn on for moments after the power outage. If this problem sounds familiar to you, we have prepared some working solutions in this guide to help you get your computer back up and running.

How do you fix a computer that won’t turn on after a power outage?

1. Check whether power plug is connected after a power outage

Sometimes after a power outage, the first tendency is to unplug the power cable to prevent a sudden surge when it is restored.

Check whether your power cable is properly plugged in. If it is, you can now try to switch on your computer.

You can also try disconnecting everything (power plug and peripherals). You can now press & hold the power button for some time to remove all remaining charges.

2. Unplug your computer and remove the battery

This is a sort of first aid for your computer. Simply unplug from any power sources, then remove your computer’s battery (or laptop).

After about five minutes or so, return the battery back and hold down the power button for about 10 seconds (power still unplugged). Now, you can plug it back into the power source.

3. Check your power supply source

power supply outage

If your computer is plugged into a surge protector with a circuit breaker, it probably tripped during the power outage.

If your surge protector has no circuit breaker, the power surge has probably burned it out.

In this case, reset the circuit breaker, or replace the surge protector. This is because it cannot be reused. If your surge protector has the circuit breaker and tripped, reset it.

You can check our detailed guide to know how to fix power supply issues on your PC.

4. Check your computer fans

fan

If you try turning on the computer and the fan doesn’t come on with the power supply turned on, then either your power supply isn’t working and needs replacing, or the whole case and your power supply.

If the case is available and you start your computer, and the cooling fan doesn’t run, the problem may be power to the board. Thus, you may have to replace the motherboard, your CPU – or both.

If your drives run when your CPU is off, then your computer’s motherboard, CPU, or other vital elements may have been affected.

5. Check your hard drives after a power outage

hard drive

If your computer doesn’t switch on after a power outage, you can remove the hard drive and place it in another computer.

But you need a qualified person to do this regarding re-registering your operating system. In case your hard drive is damaged, you need to get a new drive for your PC to work normally.

6. Perform a POST test

Computers come with speakers. If yours are built-in speakers, try to perform the POST test, which will play some beeps when the computer starts up.

The pattern of these beeps will let you know what has gone wrong with your machine. When all is well, the normal startup sound resumes.

7. Check your CPU

cpu power outage

You can do this by checking on the vents on the side of your machine while the power is on. A green lamp glows on the motherboard.

If this isn’t visible, the issue is probably with your Switch Mode Power Supply (SMPS) unit on the back of the CPU.

One of the likely causes is the SMPS fusing owing to the power outage or sudden surge of power (on/off). In this case, replace it.

A flashing green LED light means you need to reset your PSU, after which your computer should start up normally.

8. Get a technician to check it

If the other solutions don’t work, get a technician from your device’s manufacturer to check it.

We have concluded this guide on what to do if your computer won’t turn on after a power outage. We believe you now have everything needed to tackle the issue successfully, and you only need to follow the instructions carefully.

If you are facing other issues like Windows 10 low battery notification not working, check our detailed guide to fix it quickly.

Feel free to let us know how you fixed this issue in the comments below.
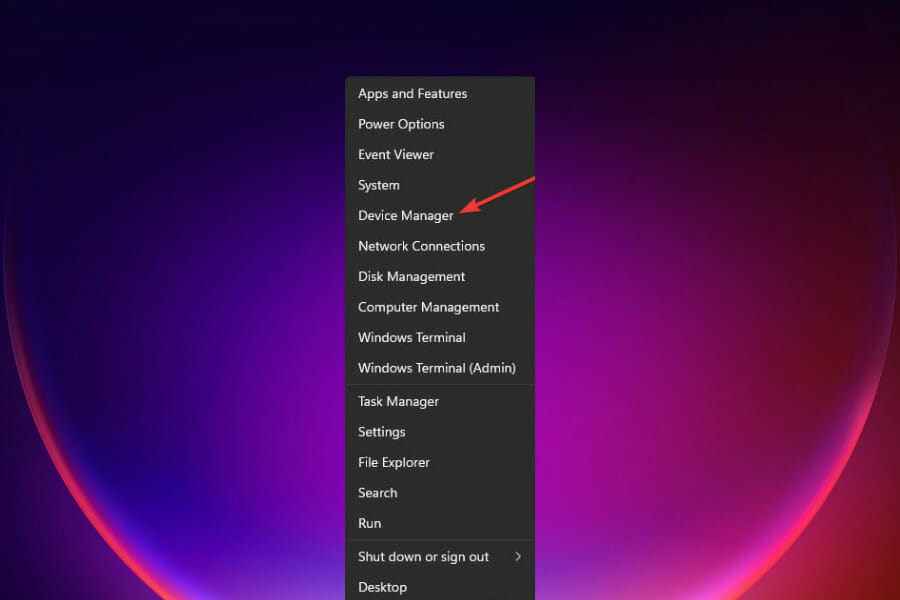
Azure Quota Exceeded Error: What Does It Mean & How to Fix It?

Azure is a cloud computing platform and is one of the popular choices for organizations moving their operations to the Cloud. However, no platform is free from errors. One common error is Azure Quota Exceeded error.

In this guide, we will discuss the error along with the causes of its occurrence and ways to fix the issue. Let’s get started! 

What is a quota exceeded error in Azure?

This error comes up when an app or user reaches the Azure subscription resources limit. Simply put, the application or user has exceeded the maximum number of resources allowed in the subscription. The issue can occur with databases, virtual machines, or storage accounts. This error can frustrate users as it stops them from completing their projects. 

What causes the quota exceeded error in Azure? 

The quota exceeded errors can occur due to several reasons. Some of the popular ones are:

  • User reaching the subscribed limit – If you are allowed to run five virtual machines on a current subscription, and all are already running them, you can’t run another one until you delete any of the existing five. 
  • Exhausted max. no. of resources in a specific region – If you have a subscription that allows you a certain number of VM in the West region of the country, and you have already exhausted the number, then you need to remove or move some of the current ones to add new ones.
  • A resource is not allowed to use – If you try to create a resource that is not allowed in your subscription, you might get this error. 

How do I increase my Azure quota limit?

1. Determine the cause of the error 

azure quota exceeded

Take a look at the error message displayed, as the error message will point you toward the resource which is causing the problem. Also, the message will denote the number of allowed resources under your subscription. 

2. Check for unnecessary resource 

Once you have identified the resource, check if the resource is needed or not. If you no longer need that resource, you can delete it to free up resources.

3. Find a way to reduce resources

If there are no unwanted resources, then we need to find a way to reduce the number of resources required. For example, if the error says you have a lot of virtual machines, consolidate the virtual machine to reduce numbers. To do that, follow these steps:

  1. Right-click on the Virtual Machine and select VM.
  2. Now, select Actions, then click Snapshot.Consolidate -azure quota exceeded
  3. Select Consolidate.

4. Use a different region for a resource 

Azure exceeded quota

  The issue could be caused due to exceeding the number of resources available in a particular area. Here, the user should think of creating resources in a different region. However, two resources from different areas might not be able to communicate with each other. 

5. Request a quote increase 

If none of the above working conditions apply to you, then it’s time for you to consider requesting a quote increase from the portal. Follow these steps to do so:

  1. Go to the Azure portal.Sign in Azure -azure quota exceeded
  2. Locate the search box and type Subscriptions. Subscriptions
  3. Choose the Subscription for which you want to request an increase in quota. Add subscriptions
  4. Select Usage + quotas.select-usage-quotas
  5. Click Request increase.request-increase
  6. Fill out the form on the following page and click Next.Click NEXT

So, these are steps that you need to follow to fix the Azure quota exceeded error. To keep working on Azure smoothly, it is advised to use Azure Monitor. It allows you to track, visualize and analyze the health and performance of your resources in real time. This will help you avoid this issue and plan. 

If you have any questions or concerns, feel free to mention them in the comments section below. We will be happy to help!

FIX: Sorry, Excel cannot open two workbooks with the same name

The error Sorry, Excel can’t open two workbooks with the same name occur when you try to refresh a workbook containing Quick reports and or Time series. This error can also occur when launching Microsoft Excel with a blank page.

This error usually occurs if there is a conflict between 2 versions of the Excel add-in. If you have set up an add-on that loads when launching the Excel app, check the app for any conflicts.

In this article, we explore a few troubleshooting steps to help you resolve the Sorry, Excel can’t open two workbooks with the same name error when using Microsoft Excel.

How do I fix the Sorry, Excel can’t open two workbooks with the same name error?

1. Rename the file 

Sorry, Excel can't open two workbooks with the same name
  1. Open the folder where you have saved the file using File Explorer.
  2. Right-click on the file and select Rename. 
  3. Enter a unique name for the file and save the changes.
  4. Try opening the Excel file again to see if the error is resolved.

Alternatively, try starting a new instance of Excel and check if that resolves the error. Here’s how to do it.

Sorry, Excel can't open two workbooks with the same name
  1. Right-click on your Excel icon on the taskbar or desktop.
  2. Press and hold the ALT key on your keyboard.
  3. Click on the Excel icon to start the app.
  4. You will be prompted with a Do you want to start a new instance of Excel message Click Yes.
  5. Open the file and check if the error is resolved.

2. Check for multiple add-on installation 

Sorry, Excel can't open two workbooks with the same name
  1. Open File Explorer and navigate to the following location:
    C:\Users\Administrator\AppData\Roaming\Microsoft\Excel\XLSTART
  2. Check if any add-ons exist in the location.
  3. Next, launch Microsoft Excel.
  4. Go to File and select Options.
  5. Next, select Addins.
  6. Uncheck all DLL add-ins.
  7. Save the changes and exit the Options window.
  8. Launch Microsoft Excel and open the file to see if the error is resolved.

You may encounter issues if you have installed an add-in with the same name from two different sources even if the add-ins are in different formats like DLL, and XLSM, the issue can still occur. Disable the add-on to fix the error triggered due to a conflict.

Alternatively, if you know which add-in is causing the error, navigate to C:\Users\Administrator\AppData\Roaming\Microsoft\Excel\XLSTART and then delete the .xla file related to the add-in.

3. Repair Excel installation

Excel workbook add-on error
  1. Press the Windows key + R.
  2. Type control and click OK.
  3. Click on Uninstall Programs under Programs.
  4. Locate and select Microsoft Office from the list of installed apps.
  5. Click on Repair/Change from the top menu. Click Yes when prompted by UAC.
  6. In the Setup menu, click on the Repair button. 
  7. Next, you will see two repair options. Select Quick Repair first and follow the on-screen instructions.
  8. Once the repair is complete, reboot the PC and check for any improvements.
  9. If the issue persists, select Online Repair and follow the on-screen instructions. The Online Repair option may take some time and also requires an active internet connection to work.

After the repair is finished, open Microsoft Excel and check if the error is resolved.

4. Update/ Reinstall Microsoft Officer 

Update the Office app

Sorry, Excel can't open two workbooks with the same name
  1. Open the Excel app.
  2. Go to File and select Account.
  3. Under Product Information, click on Update Options.
  4. Choose Update Now.
  5. Microsoft Office will download and install any pending updates for the app.
  6. After the update is installed, reboot the computer and check for any improvements.

If the error persists, try reinstalling the app to fix any issues that may occur due to file corruption or a glitch.

Uninstall Microsoft Office

Excel workbook add-on error
  1. Press the Windows key + I to open Settings.
  2. Select Apps.
  3. Search for Microsoft Office.
  4. Select the app and click on Uninstall. Click Yes if prompted by UAC.
  5. Once uninstalled, download the app from the official Microsoft download center.

The error Sorry, Excel can’t open two workbooks with the same name usually occurs due to an add-in conflict during the start.

Follow the steps above to find and delete the conflicting add-on to fix the error. Do let us know which method helped you in the comments below.

How to quickly force the shutdown settings you want on Xbox Series X and S

A recent update may force you to use the shutdown settings you want on Xbox Series X and S and some that you don’t.  In a possible bid to save some money on your electric bill, Microsoft rolled out an update that automatically switched all Xbox Series X or Series S consoles to energy-saving mode.

This update forces Xbox Series X and Series S users to use their consoles’ Shutdown (energy- saving) power option. This option is more energy efficient than the Sleep (Instant-On) option, which uses more power than Shutdown (energy-savings) when in standby mode.

Force the shutdown settings you want on Xbox Series X or S

Here’s how to prep your console to change the shutdown settings on Xbox Series X or S consoles:

  1. Press and hold the power button on the front of the console for 10 seconds. This will force the console to turn off.
  2. Once the console is off, unplug the power cord from the back of the console.
  3. Wait for at least 30 seconds before plugging the power cord back in.
  4. Press the power button again to turn the console back on.
  5. Once the console has fully booted up, press the Xbox button on your controller to open the guide.

Once you are in the Xbox guide, here’s how to configure your Xbox Series S | X to shutdown or go to sleep when you turn off your Xbox console.

Shutdown (energy-saving option)

Xbox Series X console

In shutdown mode, your Xbox Series X or S console is shut down in order to save electricity. It is the lowest power consumption mode, but it may take up to 45 seconds for your console to start up and you may need to press the Xbox button on either the controller or the console first to power up your console.

To change this setting, follow these steps:

  1. Press the Xbox button to open the guide.
  2. Go to Profile & system > Settings > General > Power options.
  3. Choose the Shutdown (energy-saving) option.

Sleep option

In sleep, your console is put into low-power mode when you’re not actively playing games. Your Xbox Series X or S sleeps instead of turning off, but the downside is that this option uses more electricity and thus more power. This setting is needed for the remote wake and fast boot options and helps the console boot up faster, even letting you use your voice to turn on the console.

Here’s how to change this setting:

  1. Press the Xbox button to open the guide.
  2. Go to Profile & system > Settings > General > Power options > Customize power options.
  3. Choose the Sleep option.

Other power options

force the shutdown settings you want on xbox series x

You can also change the shutdown settings you want on Xbox Series X or S by changing when your console shuts down or goes to sleep after a period of inactivity as well as other power options, here’s what to do:

  1. Press the Xbox button to open the guide.
  2. Go to Profile & system > Settings > General > Power options > Customize power options.
  3. Choose the options you want for your Xbox Series X or S console.

What power settings do you use on your Xbox Series X or S console? Let us know in the comments!

Top Webcam Security Camera Software to Turn a PC into a Monitor

Do you want to add a plus of security to your home or business without having to invest too much in specialized hardware solutions? Webcam security camera software is your answer.

If you are worried about your private space or if you just want to be able to verify certain locations remotely, then you should consider using your own Windows 10 PC as a security camera.

In the following guidelines, we will review the best apps that can be used on Windows to control the built-in webcam as a security surveillance camera. Here’s a quick preview of our top picks:

  • EyeLine Video Surveillance – Webcam motion detection software with playback footage
  • iSpy – Free webcam surveillance software (for personal use only)
  • ContaCam – Lightweight & intuitive webcam CCTV software
  • Yawcam – Easy-to-use webcam surveillance software
  • Active WebCam – Stealthy & discreet webcam spy software
  • WebCam Monitor – Best webcam monitoring software for entry users

How is that possible? As you will see, it’s not that complicated to use a webcam as a security camera on Windows 10. But, you do need to install a dedicated program on your computer.

Can I use a webcam as security camera?

Yes, that’s right. Your own computer can serve as a real security service for home and business. And you won’t have to buy and set up an actual security network.

Instead, you can choose to use your computer’s built-in web camera, or other external webcams that can be attached to your Windows 10 system.

These programs will enable the webcam and will add dedicated features to transform the built-in camera into a security surveillance service and solution.

What app can I use to view my security cameras?

EyeLine Video Surveillance – Top-notch webcam motion detection software

security camera for Windows PC

The EyeLine webcam security camera software helps you set up each camera with just a click of a button and alerts you when it detects any motion.

You also have a web control panel to access and view recordings remotely over the Internet.

After hours, it monitors office buildings for security and is extremely effective for video surveillance in retail establishments to discourage theft.

EyeLine Video Surveillance allows you to record and save compressed surveillance material for later use. Motion detection recording saves space by only recording when necessary.

When you have pets and leave them at home alone, simple and effective video security may be particularly useful.

Furthermore, when implemented in combination with a security alarm system, it may be used to playback footage and determine the cause of an alarm while you are away.

Here are the key features of EyeLine:

  • Simultaneously records up to 100+ camera sources
  • USB cameras and networked IP cameras both supported
  • Email or SMS alerts available for motion detection
  • Optional time stamping of recorded video frames
  • Video can be monitored live as it is being recorded
  • Display options for watching the video on a second monitor, television, or other screens
  • Find and play surveillance recordings ordered by camera, date, duration, and motion detected

EyeLine Video Surveillance

Enjoy a multi-camera security system that records motion for 100+ cameras.
Free trial Visit website

iSpy – Free webcam surveillance software (personal use only)

security camera for Windows PC

iSpy is perhaps the most complex open-source video surveillance software available for the Windows platform.

The program will control your webcams and will let you access the recorded content from anywhere in the world. You can do it from a laptop, notebook, desktop, and even from a portable device.

It has features for both mid-range and high-end users. This means it can be used in different situations and for solving various security challenges.

The app can also be customized and optimized through dedicated plugins and comes with built-in functionality for:

  • motion detection & motion processing
  • recording, scheduling & audio
  • remote access, network audio broadcasting & password protection
  • desktop recording, cloud uploading, and a lot more

Even though its user interface can be a little bit intimidating, once you get used to its options and everything that you can configure, you will be more than satisfied with your choice.

And everything without investing a single cent. As already outlined iSpy is an open-source app so it can be downloaded and used for free.

⇒ Get iSpy

ContaCam – Lightweight & intuitive webcam CCTV software

security camera for Windows PC

ContaCam is another open-source video surveillance program that works great on Windows 10 OS.

Unlike iSpy, this software brings a more user-friendly interface with intuitive built-in settings. The basic features include:

  • history tracking
  • remote watching through port forwarding or Dropbox
  • audio support, and motion detection

ContaCom can be very useful especially if you aren’t looking for a complex/complete service. You won’t get extra plugins or other similar tweaks as explained in the iSpy review.

Furthermore, ContaCam is a light and fast application which runs great even in a low-light environment. Additionally, it won’t require too much power so it can be successfully used on low-end configurations.

⇒ Get ContaCam

Yawcam – Easy-to-use webcam surveillance software

security camera for Windows PC

Yawcam comes as yet another webcam software but it’s more than that. So, is Yawcam safe?

As safe as it gets. Written in Java, this program ensures great webcam control when it comes to setting up a basic video surveillance network.

Just like the other apps that were reviewed already, Yawcam will use the built-in webcam and the external cameras that are attached to your Windows 10 computer. It will record everything that happens in the implied perimeter.

You can install and configure Yawcam within minutes. It features intuitive settings that can be smartly applied even if you aren’t used to these kinds of operations.

And yes, it packs all the basic features such as motion detection, FTP upload, password protection, video streaming, and multi-languages.

⇒ Get Yawcam

Active WebCam – Stealthy & discreet webcam spy software

Active WebCam can control an unlimited number of cameras and ensures simultaneous recordings which you can observe remotely from any web browser.

You can also watch a playback while the recording is still going, or you can choose to see an archive of snapshots in a sequence of still images.

It works with all USB and Parallel Port cameras, Capture Devices, and Framegrabbers compatible with Windows, TV boards, and Network IP Cameras.

The stealth mode renders the software entirely invisible, as no icon appears in the system tool tray and no taskbar tray is displayed.

You can launch the software as a Windows service. This means it begins automatically when the system boots and runs even when no user is signed in.

These are the main features of Active WebCam:

  • Encrypted Transmission is supported
  • Dynamic IP Service, which changes your computer’s IP address as needed
  • Assists you with developing a web page for your web camera
  • The active region for motion detection may be defined

⇒ Get Active WebCam

WebCam Monitor – Best webcam monitoring software for entry users

WebCam Monitor is another webcam security camera software that got good reviews from both entry-level and power users.

The program is packed with essential features so it can detect motion and noise, trigger alerts, and send email notifications or text messages.

The recorded videos will be stored on a specialized server. Alternatively, you can choose to stream certain recordings over the Internet if you want to have full control over your security cameras from any computer or portable device that has an Internet connection enabled.

Setting up this surveillance system can be done through a dedicated wizard, which will guide you through different tweaks and functions.

These built-in features can be configured depending on what you want to obtain from your own security solution.

⇒ Get WebCam Monitor

So, does Windows 10 have camera software? It does and it is simply called Camera. If your camera app isn’t working, make sure to check out the workarounds we suggested.

These are some of the best webcam security camera software that can help you use a webcam as a security camera on Windows 10.

If you have trouble getting your camera up and running, here’s how to fix webcam connection issues on Windows.

SharePoint vs Dropbox – Which one should you choose?

SharePoint and Dropbox are two of the popular cloud storage solution and collaboration platforms. While Dropbox is geared towards the non-tech savvy casual business users, SharePoint, on the other hand, is preferred by IT corporates for security and integration with Microsoft Office.

Now if you had to choose between the two for your company, what would you choose? The answer lies in knowing your requirements. While both of them are great products but are designed to serve different purposes.

In this article, we pitch SharePoint against Dropbox and explore the advantage and disadvantages of these services to help you make your decision easier.

SharePoint vs. Dropbox 

Let’s begin by exploring what two of these programs have on offer, along with their pros and cons. Later, we will explore in detail which platform fulfills the most collaborative requirements depending on the consumer requirement.

Dropbox

Dropbox vs SharePoint

Dropbox is a modern workspace designed to reduce busy work so you can focus on the things that matter. The service offers cloud storage, file synchronization, personal cloud, and client software.

The Dropbox Basic account is free to use and offers 2GB of space. Additional storage can be added with the premium plan starting at $9.99 months, which provides an additional 100GB of storage.

The app is available for your Windows, Mac, and Linux platforms, including mobile platforms such as Android and iOS.

Dropbox allows users to create individual folders on their computers. Dropbox then synchronizes with the account and across devices irrespective of the device in use. The user can import and export files to these folders using the web application interface or the smartphone app.

Pros:

  • Ease of use.
  • Universally accessible
  • Works as a cloud file server

Cons:

  •  Not the most cost-effective solution
  • Being a consumer-grade file-sharing collaborative platform, data security can be a concern for corporates.

SharePoint

Dropbox vs SharePoint

SharePoint is a web-based collaborative platform that is sold as a document management and storage system.

That said, the product is highly configurable, making it the ideal solution for large enterprises due to its flexible nature. SharePoint, being a Microsoft product, offers seamless integration with Microsoft Office.

While SharePoint can be used to perform simple tasks like document sharing, it can also be used as an internet portal, internet site, business intelligence, collaboration tool for project management, synchronizing calendars with Outlook, etc.

The popularity and versatility of the platform can be judged by the fact that 78% of Fortune 500 companies rely on SharePoint to get their job done.

The sheer number of possibilities means the platform is generally more expensive if used just as online data storage and file-sharing platform, which is where Dropbox makes its case.

Pros:

  • Excellent integration with Microsoft products.
  • Robust, cloud, hybrid, and on-premise deployment.
  • It offers the most value for large as well as small businesses.

Cons:

  • Generally, for more expensive if used as a file-sharing platform.
  • Implementation is a complex task and takes time, depending on the size of the business.

Things to consider before selecting the service

Dropbox vs SharePoint

No single service fulfills all the document-sharing and collaboration requirements. However, while choosing a service, consider what’s right for your organization by analyzing the following factors and if they apply to your business.

1. Deployment and Ease of use 

Getting started with Dropbox is as easy as creating an account and downloading and installing the app. The user can start sharing files in less than a few minutes. However, setting up and deploying SharePoint is a complex task and requires IT support.

It may take from anywhere a day to weeks to set up the platform, depending on the requirement.

2. Integration 

SharePoint, being a Microsoft product, offers excellent integration with Microsoft products like Office 365.

The fact that many organizations already use Microsoft Office, SharePoint usually looks like a natural choice due to the seamless integration that the service offers. Dropbox, on the other hand, can use third-party extensions to integrate with Microsft Office.

3. Security 

SharePoint comes with advanced features like password protection, encryption, document access control tracking, and reporting out of the box. Services like Dropbox do not offer these features. While you may still be able to add these functionalities using an extra layer of third-party services, it will take away the simplicity factor from Dropbox.

Who should use Dropbox?

  • Dropbox is an excellent choice for freelancers and other independent workers who offer online service-based business and looking for an easy way to share files with the client and teammates.
  • Dropbox is also an excellent choice if you are looking for a file storage solution to store your personal and work-related documents on the cloud.
    • Cross-platform support means you can access your document on the go on any device.

Who should use SharePoint?

  • SharePoint is better suited for medium and large organizations looking for a tailor-made solution to handle storage, file sharing, and collaborative challenges.
    • It also offers excessive security features such as encryption, password protection, and remote wipe along with an on-premise cloud storage facility to keep the company’s data secure.
  • SharePoint is a go-to choice if your organization is using other Microsoft products like Microsoft Office.
    • The seamless integration with Microsoft products offers enhanced collaboration for your teams.

Microsoft SharePoint and Dropbox are excellent products that cater to the needs of different user bases.

While Dropbox offers ease of use with file sharing and collaboration services, SharePoint is more than just a file storage and sharing platform with a flexible structure and scalability designed to meet the needs of small to large-scale businesses.

How will Microsoft’s planned layoffs affect ChatGPT’s integration into BIng?

This week, Microsoft made an announcement that highlighted its plan to cut 10,000 jobs over the next three months. The company’s CEO further highlighted that the move will help them “adapt to platform shifts” and that they will be taking a $1.2 billion charge in revolving around changes in hardware portfolio, severance cost, and more.

The layoffs will be reportedly spread across different divisions within the company, including teams handling web products like Bing and Edge as well as the ones handling devices like the Surface Hub, as spotted by Business Insider.

Microsoft’s Web Experience Team, WebXT will also be impacted by this change. The team is responsible for building engaging and informative content, services, and platforms for users that can be accessed anywhere on the web.

With the WebXT team also taking a hit from these massive layoffs, what does this mean for the ChatGPT-powered Bing? Earlier this month, there was an indication that Microsoft was working closely with OpenAI to integrate ChatGPT into Bing in a bid to enhance the search experience for users and provide human-like responses. Another report also highlighted that Microsoft was planning to inject a $10 billion investment to ensure that its plans come to fruition.

According to Business Insider’s sources, Microsoft laying off high-earning employees across various divisions is a strategy devised in that it can now hire new employees at significantly low rates and uses their services in “investment areas” such as Bing. Another source also told the Insider that it was possible that some of the tasks being done by the WebXT team were being duplicated by Microsoft’s OpenAI partnership thus creating redundancy.

It seems the layoffs will further affect employees in the devices division, particularly those in the Surface Hub whiteboard team, gaming, recruitment, sales, human resource as well as consulting roles. As such, the affected parties will remain employed for 60 days. They won’t be required to report to work, instead employees on visas will be expected to use this time to seek employment elsewhere so that they don’t have to go back to their motherland. What’s more, they’ll receive a minimum of one month of severance based on tenure.

Microsoft is expected to launch the revamped Bing sometime in March, we will have to wait and see what’s in store for us and the implications these changes have. Share your thoughts with us in the comment section.

via: Business Insider

Mailbox Quota Exceeded: What It Means & How to Fix It?

Many users have complained that their mail server sends a quota exceeding the mailbox for users is full warning message. Luckily, it can be fixed in no time.

Here, we will discuss what this warning means and what we can do to fix the mailbox quota exceeded for Outlook.

What does exceeding the Quota for the mailbox mean?

The mail server sending quota warning appears when users are about to or have exceeded the limit provided for their email account. 

Addressing it is essential to avoid the problems such as not being able to login into your account and error sending emails from your mailbox. Moreover, due to this error, the receiving emails will bounce back to the sender. 

What causes the mailbox quota exceeded error? 

There could be several reasons why you are getting this error; here are some of the popular ones: 

  • Trash and Spam folder is full – If you get a lot of spam messages on your email account, hundreds of emails stored can consume the space provided. Check if you have the Spam quarantine feature enabled; it can accumulate space. Disable it and remove unwanted emails to recover space.
  • IMAP account not maintained – We sync our email on multiple devices, for which we use IMAP in place of POP. This results in storing a lot of emails. Deleting them is also not easy, as these emails might be needed for references. So, you need to be very careful while deleting these emails.
  • POP3 account is configured – With a POP account, all emails are downloaded on the device, and no emails are on the server unless a user has confirmed otherwise, resulting in unnecessary space on the server.
  • Catch-All address feature is enabled – Users enable Catch-All to avoid sending messages to the wrong email addresses. However, the problem with the feature is that it also stores spam emails. Hence taking up unnecessary space and causing the issue.
  • Exhausted the hosting space – If you have exhausted the quota assigned for keeping the database, mail files, and other data, you might get this error. Look for old site backup, unmaintained apps, database dump, & other unnecessary data on the server and delete them.

What can I do if the mailbox quota is exceeded?

Before moving to the troubleshooting steps,  you should consider performing the preliminary checks first:

  • If you are using Microsoft 365, you can ask your IT administrator to increase the mailbox space.
  • Empty your spam folders to retrieve space in your mailbox.
  • Unsubscribe from unwanted mail chains and delete the unwanted messages in the inbox.
  • Save your essential email attachments to OneDrive and delete them from your mail account

1. Delete older inbox items 

  1. Launch Outlook on iOS or Android and go to Settings. Outlook Settings - mailbox quota exceeded
  2. Click Swipe Options. Select Delete as the Swipe option.Delete option Swipe Options
  3. Now you can swipe your way through your inbox to clean it.Swipe Options

2. Remove files from the server if POP3 is configured

  1. Open the Outlook app on your Windows 11 computer. Go to the File tab. File tab -mailbox quota exceeded
  2. Click Account Settings. Account settings
  3. Double-click the mail address. Settings page
  4. Click the More Settings button.More Settings
  5. Go to the Advanced tab.Advanced tab
  6. Place a checkmark next to Leave a copy of messages on the server. 
  7. Place a checkmark next to Remove from server after and reduce day to 1.Leave copy
  8. Click Next and then Finish.

3. Set the Mailbox limit 

Tip icon Tip
Before going through this method, you have to connect the Exchange Online PowerShell module. To know more, click here. Once it’s done, follow the steps mentioned below.

3.1 For single user 

Once you have connected Exchange Online, type the following command on PowerShell, replace User ID with either GUID or email address, replace the Value parameter with the number in GB or MB, and press Enter: Set-Mailbox < UserID > -ProhibitSendQuota < Value > -ProhibitSendReceiveQuota < Value > -IssueWarningQuota <value>

To check if the current list of quotas is attached to the mailbox, copy and paste the following command and press Enter: Get-Mailbox < User ID > | Select *quota

3.2 For multiple users 

After connecting the Exchange Online PowerShell module, copy and paste the following command, replace the value parameter which a number in GB or MB, and press Enter:

Get-Mailbox | Set-Mailbox -ProhibitSendQuota < Value > -ProhibitSendReceiveQuota < Value > -IssueWarningQuota < Value >

So, these are the ways to fix the mail exceeded quota error on Outlook 365. Try them and let us know which worked for you in the comments below.

Fix: PowerPoint Cannot Insert A Video From the Selected File

Suppose you are getting PowerPoint and cannot insert a video from the selected file, verify the necessary 64-bit codec while trying to add a video to your PowerPoint slide.

In that case, you are not alone. Unfortunately, this happens to the best of us. Fortunately, it can be easily fixed.

Here, in this guide, we will discuss some of the best methods to fix this issue right after explaining the causes.

What causes PowerPoint cannot insert a video from the selected file? 

There could be various reasons for PowerPoint cannot insert a video from the selected file; some of the popular ones are: 

  • Video format not supported – PowerPoint supports limited video file formats, including MP4, AVI, and WMV. If you try to add a video file to PowerPoint whose file format is not supported, you might get this error.
  • Incompatible video codec – If the video codec used to compress the video is not recognized by PowerPoint, then you might get this error.
  • Video file corrupted – If the video file you are trying to add to PowerPoint is damaged, you won’t be able to add it, hence the issue.
  • Large video file – PowerPoint has a file size limit for video. So, if you are adding a large video file that PowerPoint can’t handle, you might get this error.
  • Missing codecs – If your computer misses the necessary codecs for PowerPoint, you might see this error. You need to install the codecs on your own.
  • Video file is protected – The video file that you are trying to add to PowerPoint is protected or embedded. Therefore you need rights to access the video file. 

What can I do if PowerPoint cannot insert a video from the selected file? 

Before engaging in the troubleshooting steps, go through these preliminary checks to fix the issue:

  • Use .MP4 files encoded with H.264 video and AAC audio. The video will be compatible with PowerPoint for both Windows and Mac.
  • Check the video file to see if it was downloaded or copied correctly and was not damaged.
  • Compress the video if it is a large file.

1. Install K-Lite Codec Pack 

  1.  Go to the official website of K-Lite Codec Packs.
  2. You will get four variations of the pack. First, choose the Standard pack and download it.Klite -powerpoint cannot insert a video from the selected file
  3. Choose Save if prompted.
  4. Double-click on K-Lite_Codec_Pack_1365_Standard.exe and choose the appropriate option from the installation wizard.
  5. Choose Normal mode.Normal -powerpoint cannot insert a video from the selected file
  6. Click Next.
  7. Modify or accept the installation preferences, then click Next.K-Lite_Codec_Pack_1740_NEXT
  8. On the Additional Tasks and Options, click Next.Additional Tasks and Options
  9. Click Next on the MPC-HC configuration window.MPC -HC configuration Next
  10. Place a checkmark next to Decoding Method under Hardware Acceleration. Click Next.Decoding method
  11. On the next page, for the Preferred Language, accept the default and click Next.Preferred language Next
  12. Click Next on the Audio configuration settings. On the next window, you will be offered additional software; decline the offer.Audio configuration
  13. Now under Ready to Install, click the Install button.Read to install
  14. Once it is installed, restart your PC, then try to add the video to PowerPoint.

2. Change the video format

  1. Open your preferred browser and go to the online video converter website.
  2. Click on the website’s Select or drop file button to add your video file.Select or drop file -powerpoint cannot insert a video from the selected file
  3. From the list of different video formats, choose WMV.
  4. The website will convert the video file, and you can download it once ready.

3. Make changes to video settings. 

  1. Select, right-click on the video file and click Properties. 
  2. Now on the General tab, put a checkmark next to Unblock.Unblock -powerpoint cannot insert a video from the selected file
  3. Click Apply and OK. Try to add the video again.

4. Enable Windows Media Player controls in PowerPoint

  1. Launch PowerPoint. Click File.File tab PowerPoint -powerpoint cannot insert a video from the selected file
  2. Select Options.Options
  3. Click Customize Ribbon; from the Choose commands here, select Main tabs. POWERPNT_Customize Ribbons
  4. Click Developer from the list, and choose Add.
  5. Click OK.
  6. Now from the Developer tab, select More Controls from the Controls section.Developer Controls
  7. From the next window, select Windows Media Player and click OK. Try to add the video to PowerPoint.Windows Media Player

5. Update drivers 

  1. Press Windows + R to open the Run window.Device Manager RUN COMMAND
  2. Type devmgmt.msc and hit Enter to open Device Manager.
  3. Locate and click Sound, video and game controllers to expand it.Update driver -powerpoint cannot insert a video from the selected file
  4. Right-click on every driver present one by one and select Update driver.
  5. On the next window, select Search automatically for drivers.Update drivers - search automatically
  6. Follow the onscreen instructions to complete.

If you’re looking for other ways to update your drivers, we recommend you try Outbyte Driver Updater, as it can detect all the outdated or missing drivers and update them quickly with the latest versions.

Outbyte Driver Updater

Find the newest updates for your drivers and use Outbyte Driver Updater to perform this action in no time.
Free Trial Download now

So, these are some methods you can use to fix PowerPoint that cannot insert a video from the selected file. Try them and let us know which worked for you in the comments section below.

Play Tiny Tina’s Wonderlands this week with Xbox Free Play Days

Xbox Free Play Days returns for another week of free game trials for subscribers of Xbox Live Gold and Xbox Game Pass Ultimate. There are two games in this week’s Xbox Free Play Days lineup, available from Thursday, January 19th through Sunday, January 22nd. Check them out below.

Tiny Tina’s Wonderlands

Tiny Tina's Wonderlands
Developer:
2K
Price:
$14.99

Embark on an epic adventure full of whimsy, wonder, and high-powered weaponry! Bullets, magic, and broadswords collide across this chaotic fantasy world brought to life by the unpredictable Tiny Tina.
Roll your own multiclass hero and loot, shoot, slash, and cast your way through outlandish monsters and loot-filled dungeons on a quest to stop the tyrannical Dragon Lord. Everyone’s welcome, so join the party, throw on your adventuring boots, and be Chaotic Great!

Space Crew: Legendary Edition

Space Crew: Legendary Edition
Developer:
Curve Games
Price:
$24.99

This is Space Crew: Legendary Edition. The legendarily challenging single-player strategic survival simulation game!
You are a captain in the United Defense Force, captain of your own star ship. Recruit your crew, customise your ship and head out to explore the galaxy, defending Earth against the mysterious extraterrestrial threat, known as the Phasmids! There will be challenges ahead. Crew members will be lost. Dangerous missions must be undertaken. Galactic Legends will be made!

Wrap up

It’s a pretty exciting lineup with this week’s Xbox Free Play Days event, though likely the highlight for many will be Tiny Tina’s Wonderlands. As you can see above, both games are steeply discounted this week, so if you want to purchase them be sure to do so before the event ends. And if you would like to learn more about the program, you can head on over to the Xbox Free Play Days FAQ page.

Microsoft OneNote vs Google Keep – Which is Better?

There are dozens of good note taking apps available on the web. Each of them has a different bouquet of features to offer along with the standard note writing. Here I take a closer look at Google Keep and Microsoft OneNote. One is a free application while the other follows a freemium model for offering additional features.

Let us compare them on different platforms and explore the individual features that set them apart.

OneNote vs. Keep – Head On

I took both the apps on a test drive on my Android phone. Do note that Keep has been with me for a longer period but this time around I dig in to explore everything that these note taking apps has to offer.

Before moving forward, you should know that in Microsoft OneNote, a “notebook” is a collection of notes that are organized together in a single file. Each notebook can contain multiple sections and pages, and each page can contain text, images, and other content.

A “note” is a single piece of content within a notebook. It can be a text note, an image, or a file that you’ve added to a page. Notes can be organized and rearranged within a notebook as needed.

Mobile App

Notes Visibility

The mobile users are growing at an exponential rate compared to desktops so it is only fitting to start with the user experience on the mobile app. Microsoft OneNote focuses on taking advantage of the display size and shows significantly more notes. You can see first-two lines of a note in tile and list view on a 6.5 inch screen.

Microsoft onenote vs Google keep

OneNote misses out on the feature to pin notes to the top. They have the option to display by recent access, creation date, and alphabetical but its not the same. Sometimes you need more than one note at the top for quick access for a project.

Google Keep shows you fewer notes but more information from them. The visible notes can preview up to 6 lines, which feels more than enough to get the idea about when scrolling through notes.

Microsoft onenote vs Google keep

Keep lets you pin 3-7 notes, depending on the size, that appears at the top of the home screen. Other notes appear below the pinned items. Unlike OneNote, you cannot sort the notes here and they appear in the order you arrange them.

Notes Taking Experience

Jot down notes by tapping on the page button at the bottom. This will create a page in your default notebook which can be re-arranged. On the other hand, taking a sticky note has an extra step which could have been avoided. You tap on the vertical-three-dots and then select Create a Sticky Note to start writing a note.

Microsoft onenote vs Google keep

Hand written notes work without a sweat while tapping on camera icon lets you take pictures through the device’s camera. You can always add it on any note or page from the editor menu.

The dictation has impressed me on the first try. You can select from 9 different spoken to get better results apart from the 16 plus preview languages which are in beta. The dictation really comes together once you learn the phrases for new line, paragraphs, full stops, smileys, and more.

Microsoft onenote vs Google keep

Keep starts strong with a big plus button for a new note. The positioning is ideal for right-hand users with average size hands. It will be a stretch for left-handed people on larger displays.

Microsoft onenote vs Google keep

The audio dictation here will need you to hold your breath and keep talking to continue the dictation session. You take a pause for more than 2 seconds and the dictation session will be over.

It will appear in sentences with punctuation. That is not all, you will get an audio recording of your dictation which comes in handy when the dictation session has lower accuracy. You can always go back and listen to the recording to fill in the gaps.

Microsoft onenote vs Google keep

Deleted Notes

(note: updated Jan 20 with corrections)

OneNote gives you a 60-day window here to recover deleted items from the bin. On the web, find them in View > Delete Notes.

On the desktop app, go to History > Notebook Recycle Bin to see the deleted items.

Microsoft onenote vs Google keep

Keep lets you preserve the deleted items in the bin for 7 days before they are permanently deleted. You can recover deleted notes from there within a week’s time.

Microsoft onenote vs Google keep

Widgets

Opening the app is not plausible at all times. Widgets let you create notes instantly without looking for the app on the home screen. 

OneNote has five widgets to offer, aimed at single use scenarios. Keep has two widgets which have all the note-taking functionalities in one place. It’s a matter of personal preference in this regard.

Microsoft onenote vs Google keep

Desktop Experience

OneNote clearly has the upper hand here with its robust apps and web experience. Sticky notes are available on onenote.com/stickynotes or your Microsoft email’s notes section so you don’t have to install the app for quick notes.

You can access OneNote web through any browser by logging into your linked Microsoft account. The user interface is similar to a moderately powered Word document with lot of formatting tools.

Microsoft onenote vs Google keep

Similarly the OneNote app for Windows is a part of the Office suite. You can install it as a standalone version or with the package. The desktop app has additional export and history feature that lets you have more control over the notes.

Microsoft onenote vs Google keep

Keep does not offer a dedicated desktop and the support for the Chrome app ended a year ago. The web user-interface takes inspiration from the app. Access pinned and standard notes in the same order. You can create a new note using the note-taking box positioned at the top.

Microsoft onenote vs Google keep

Browser Integration

OneNote Web clipper is available for Chrome, Firefox, and Edge, essentially covering all browsers. Format the text selection and then add it to your Notebook or as an individual note.  The web clipper lets you clip different parts of the page with its box selection.

Microsoft onenote vs Google keep Microsoft onenote vs Google keep

Keep falls a little behind here as their browser extension is available only for Chrome. While two third of the internet uses Google’s browser, it would have nice to have something for Firefox.

Select a region and click on the Keep icon in the toolbar to open the clipper for saving to notes.

Microsoft onenote vs Google keep Microsoft onenote vs Google keep 

Collaboration and Sharing Options

The desktop and web versions of OneNote let you share pages and the entire Notebooks using shareable links. Collaborate with others on a Notebook and manage it together.

You can set the link to view-only or edit. Email-only invites to the notes are also available. OneNote also lets you email a notebook or its page.

Microsoft onenote vs Google keep

Google Keep lets you add people or groups for collaboration via email. You can also create of copy of the note on Google docs.

Microsoft onenote vs Google keep


Over to You

Now all depends on your note taking style. If you are more inclined towards dictation for taking notes, then OneNote is much better suited. On the other hand, Google Keep can accompany you for quick note taking on different devices.

9 Best Music Recognition Software for PC [Free Apps]

Are you looking for music recognition software? We share the best tools you can use in 2020.

Every music lover likes to sing along to the lyrics of their favorite songs. Knowing the lyrics is one thing, but knowing who sang the song is another.

Sometimes you want to save the track on a playlist or share it with your friends so they can find it online or request it on their favorite local radio station.

Sure, you can type a few words on YouTube or Google search, but these bring up thousands, even millions of search results, and sometimes the lyrics are similar to a different song, so you’d have to listen to each result to point out the specific one you wanted.

This is where music recognition software comes in – to help you know exactly who sang the song, even the year.

Here are the best music recognition software tools to take the hassle out of your online searches for both the artiste and/or lyrics.

Top 9 music recognition tools for Windows 10

  1. Shazam – Most popular music recognition app
  2. SoundHound – High accuracy
  3. MusixMatch – Huge music catalog
  4. TrackID – Built-in live map
  5. Audiggle – Multi-language feature
  6. Midomi – Easy to use
  7. Audio Tag – High speed
  8. Tunatic – Versatile tool
  9. WatZatSong – User-friendly tool

Shazam

music recognition software

Shazam is one of the world’s most popular music recognition software apps, which is available for free download on your Windows device.

Its user-friendly interface has features such as auto-listen, which identifies the music for you, and continuous song recognition, which even recognizes songs and shows it hears from your TV.

Here are key features of the Shazam music recognition software:

  • Finding new music
  • Browsing music charts to see what other listeners are searching for
  • Listen to sample music
  • Watch music videos
  • Find other songs from the same artiste
  • Access daily music mixes, as well as videos
  • When offline, Shazam saves the music it picks up with its audio listening feature, then matches it for you
  • Gives detailed information
  • Tag as many songs as you like

Shazam, as mentioned, is very popular, and users love its colorful and user-friendly interactive interface (four panels), plus its ability to identify not just music but also movies and TV shows quickly and accurately.

One of its benefits is its full integration with social media platforms such as Facebook and Twitter, as well as other channels such as Spotify and Pandora.

⇒ Get Shazam

SoundHound

music recognition software

SoundHound is perhaps the biggest rival of Shazam in the music recognition software tools category.

SoundHound provides a full-featured music recognition interface with its iconic big orange button, which lets you tag music by saying ‘Ok Hound’.

Another one of its unique features is supporting voice controls.

You can even hum your favorite track, and Sound Hound will try and identify it. This isn’t found with most other apps. But your humming needs to be accurate so the app can guess the song correctly.

Here are cool features of the SoundHound app:

  • Use voice input to tag music and search for artiste info (no need to use your hands)
  • Play tagged songs
  • Play popular music mixes
  • Add tagged songs to your favorite playlist
  • Read the lyrics to a song
  • Know the albums of your favorite songs

It’s easy to see why SoundHound gives Shazam a run for its money. This tool is also available for free download.

⇒ Get SoundHound

MusixMatch

music recognition software

Nothing makes singing along to a song better than having the actual lyrics.

The MusixMatch music recognition software tool was previously paired with Spotify. It’s because it has a huge catalog of music lyrics that makes it popular among users.

It is also compatible with most third-party music player apps but doesn’t come with music charts.

Here’s what you can do with the MusixMatch music recognition app:

  • Tagging lyrics
  • Saving and sharing lyrics with others
  • Browse lyrics to a song even when offline
  • Play music from your playlist or music library and see its lyrics in real time through the app’s floating lyrics feature
  • Sync lyrics with the song from any point in the song as it plays

⇒ Get MusixMatch

TrackID

music recognition software

You may not have heard about Sony’s TrackID music recognition software tool, but it’s definitely worth your attention. Compared to the others mentioned above, it has a surprisingly large following of users.

Here’s what makes TrackID special:

  • The Discover tab allows users to see what is trending and what’s hot in the music charts
  • The Live map shows tags from different people worldwide in real time. You can also listen to songs that come in only for a few seconds.

However, TrackID has limited tagging options and doesn’t give links to music lyrics and videos, but it redirects you to find them on YouTube or a lyrics website.

⇒ Get TrackID

Audiggle

music recognition software

Audiggle is a new music recognition software tool that instantly lets you know the artist and song name of anything playing on your computer. So if you aren’t sure what a song, movie, or TV show’s name is, use this app.

Here’s what you can expect from Audiggle:

  • Audio recognition that recognizes a song you’ve heard but doesn’t know who sang it
  • Any Source feature which lets you identify any media be it a soundtrack, a YouTube clip, or even your favorite Internet radio
  • Download feature lets you download a song from iTunes or Amazon using links provided
  • Lyrics library that lets you get the words to a song you’ve tracked
  • Multi-Language feature lets you recognize music from all over the globe

⇒ Get Audiggle

Midomi

music recognition software

Midomi is a web-based music recognition software platform owned by the same company that owns SoundHound (mentioned above).

Midomi lets you identify your favorite songs by singing or humming into your microphone, then it gives back the information on the song. If you can’t hum or sing it, you can play the song’s audio clip to your microphone, and it will recognize it.

⇒ Get Midomi

Audio Tag

With Audio Tag, a web-based music recognition software tool, you need only upload an audio track or paste the URL of the audio clip, and it will identify it for you.

The audio clip must be between 15-45 seconds in duration for it to begin identifying the same.

⇒ Get Audio Tag

Tunatic

music recognition software

The Tunatic music recognition software tool lets you identify music after downloading and installing it on your computer. All you need to do is play the song on your earphone on the microphone, then click Search.

You need to be online to connect to the Tunatic database, after which the tool shows you the song’s title and the artiste who sang it.

Tunatic supports both Windows and Mac operating systems.

⇒ Get Tunatic

WatZatSong

music recognition software

Like its name suggests, the WatZatSong music recognition software tool lets you post an audio or music clip on its site, then other followers or users on the site chip in to help identify the song.

This means the tool is based on human knowledge, so you may not get the results as snappy as you would expect.

⇒ Get WatZatSong

Have you tried any of these music recognition software tools? Let us know your experience with these tools, or share which other ones you think are cool to use too.

How to Fix Vizio TV Remote not Working: Step-by-Step

The Vizio remote is important for using your smart TV since you can navigate the menu and various applications. However, some users complain that the Vizio TV remote sensor is not working.

This can be due to a series of factors, but it is not an issue that is impossible to fix. And we will show you how to get it working again in this guide.

Why isn’t my Vizio TV responding to the remote?

Below are some of the reasons your Vizio TV remote sensor might not be working:

  • Low batteries: The first thing to check if your Vizio TV is not responding to the remote is the remote battery. The solution to this is to change your batteries.
  • Presence of obstacles between the remote and TV: There must be a clear path between your remote and TV for the sensor to work. If obstacles block the path, the sensor might fail to work.
  • Interference from other electronic devices: Another potential cause of this issue is the presence of electronic devices emitting radiations that interfere with your remote. The fix to this is to remove these devices.

How to fix Vizio TV remote sensor not working?

1. Check if the sensor is emitting IR

  1. Turn on your mobile phone camera and point the remote to the camera (the end that you will normally point towards your TV).
  2. Press and hold any button (especially the power and volume buttons) on the remote while still pointing toward your camera.
    power button
  3. Check your camera screen to see if the LED light at the top of the remote is flashing light.
  4. Finally, repeat this for all buttons on your remote.

Before making changes to your TV and remote, you should check if the remote is still emitting IR. If it does, you can proceed to the other fixes.

If the test fails, you might need to take the remote to a repair shop or replace it altogther.

2. Change batteries

battery vizio tv remote sensor not working

This is one of the quickest solutions to make sure the Vizio TV remote sensor is working. Just make sure you replace the batteries with fresh and compatible ones.

Most Vizio remotes will take either two AA batters or two AAA batteries. If the new batteries don’t solve the problem, move on to the next solution. 

3. Power cycle the remote and TV

  1. Take the batteries out of the remote.
  2. Press the power button and hold for a few seconds, then release.
    power
  3. Now, press every button on the remote at least once while the batteries are out. This helps to clear residual power from the remote.
  4. Insert the battery into the remote.
  5. Next, unplug the TV from the power outlet.
  6. Press and hold down the TV’s power button for a few seconds. Wait for one minute after doing this.
  7. Finally, plug the TV back into the power source and power it on.

After doing this, check if the Vizio TV remote sensor is now working. This can also work when your TV won’t turn on.

4. Clear the way to the TV sensor

The IR sensor of the TV is usually located either on the bottom left or bottom right of the TV. The sensor is susceptible to anything that might block it, even the protective plastic wrap that comes with new TVs.

This can be the reason the Vizio TV is not responding to any remote. So, move anything that might be in front of the sensor, including books, picture frames, etc.

Also, use a cotton swab with a bit of distilled alcohol to clean any impurities on the TV sensor and the IR remote sensor ( the small lightbulb on the remote‘s front edge).

5. Reset Remote to Clear the Memory (for Universal Remotes)

  1. Press and hold the Set or Setup button. Release the button when the LED light on the top of the remote blinks twice.
  2. Type in the reset code of your remote, most Vizio universal remotes have a reset code of 981 or 977. You can also consult your remote’s manual to find the reset code.
  3. Again, the LED should flash twice. This means that the memory has been cleared, and any firmware issues should be resolved.
  4.  Switch it back to the TV using the button at the bottom of the remote and see if it works.

6. Change the power source

Another effective solution that has been reported to work for some users is changing the power source your TV is connected to. This is imperative if the power transferred to your TV from the source is abnormal.

This can stop your Vizio TV from responding to the remote or buttons, as it will misbehave due to the dirty power. The solution is to change to a stable power source that can provide the quality your TV needs.

We have come to the end of this guide on the Vizio TV remote sensor not working issue. If the problem persists, the problem might be related to the IR sensor. The only solution here is to replace it altogether or to change the sensor.

Similarly, if the Vizio smartcast is not working, check our detailed guide to fix it quickly.

If our solutions worked for you or if you have any other ideas, leave us a note in the comments below.

Printer not Printing Actual Size: Why & How to Fix it

Your printer allows printing of documents in different sizes. Users can select what size of print they need in the printing interface. However, at times the printer fails to print the document in the right size.

This seems to be a common issue with the HP Printer. The issue can occur due to several reasons and most of them are related to the printer driver, misconfigured printer settings, etc. If you are also troubled by this error, here are a couple of ways to fix this issue.

How do I get my printer to print full size?

1. Set Printing Preference

  1. Press Windows Key + R to open Run.
  2. Type control and press OK to open the Control Panel.
  3. Click on Hardware and sounds.
  4. Click on Devices and Printers.
    Printing preferences Control Panel
  5. Right-click on Printer and select Printer Preferences.
  6. Now select Paper Source and set as desired.
  7. Next, select Paper Size and set as desired.
  8. Select Media and set it as desired.
  9. Click OK to save the changes.
  10. Now try to print the document or picture you were trying to print and check if the printer prints correct size.

2. Update Printer Driver and firmware

  1. Press Windows Key + R to open run.
  2. Type devmgmt.msc and press OK to open the Device Manager.
  3. In the Device Manager, expand the Printers section.
  4. Right-click on your printer and select Update Driver.
    Download Printer driver
  5. Select “Search automatically for updated driver software” option.
    Update Driver Device Manager Printer
  6. Windows will look for a new version of the driver for your printer. If found it will download and install the driver.
  7. Reboot the system and check for any improvements.
  8. You can also uninstall the driver and the system, if the device is connected, should install it automatically. Alternatively, navigate to the official support website and download drivers there.

For this task, you can employ the help of professional driver updater software, such as Outbyte Driver Updater. This tool will allow you to scan all the drivers, identify missing or broken ones, and then have them replaced or updated in just a few minutes.

⇒ Get Outbyte Driver Updater

3. Run HP Print and Scan Doctor

HP Printer Diagnostic tool
  1. Go to HP Print and Scan Doctor page.
  2. Click the download now button to download HP Print and Scan Doctor to your PC.
  3. Run the program and select any terms and conditions.
  4. In the HP Print and Scan Doctor window, click the Start button.
  5. It will now scan your system and the printer to connected for any issues. Make sure the printer is connected to the computer before running the program.
  6. Follow the on-screen instructions and apply any recommended fix to fix the issue.

Finally, with modern printers like HP, you can change paper sizing for custom prints so that you always have a clean job. This is actually how to change print size on HP printer.

If you have any questions or solutions we didn’t think about, write them down in the comments.

Fix: Windows 10 Volume Keeps Going Up Automatically

When the volume increases automatically on your Windows 10 device, the problem could either be software or hardware related, such as mic/headset settings, or sound/audio drivers which bring it up.

No matter the cause, this article should help you resolve the sound issue even if you’re not a tech expert.

Before we jump into the solutions, make sure you perform these preliminary checks:

  • check your speaker and headphone connections for loose cables or the wrong jack;
  • check your power and volume levels, and try turning all the volume controls up;
  • some speakers and apps have their own volume controls, check them all;
  • try connecting using a different USB port.

If you’ve already gone through all of these, but none helped, move on to the steps below.

What can I do if the sound goes automatically up on my PC?

1. Update sound driver

  1. Right-click Start and select Device Manager
  2. Expand Sound, video, and game controllers
  3. Select your Sound card and open it
  4. Go to the Driver tab
  5. Select Update driver. If Windows doesn’t find a new driver, look for one on the device manufacturer’s website and follow their instructions.

Alternatively, uninstall your audio driver from Device Manager, by right-clicking on it and selecting Uninstall. Restart your device and Windows will attempt to reinstall the driver.

You can also use the generic audio driver that comes with Windows from Device Manager.

  1. Right-click your audio driver
  2. Click on Update driver software
  3. Choose Browse my computer for driver software 
  4. Select Let me pick from a list of device drivers on my computer
  5. Then select High Definition Audio Device, click Next, and follow the instructions to install it.

We also strongly recommend Outbyte Driver Updater to automatically download all the outdated drivers on your PC. This tool will keep your system safe as you can manually download and install the wrong driver version.

Outbyte Driver Updater fully scans your system not just for outdated audio drivers, but for any driver that is out of date. It then recommends the compatible software for your device.

The best thing is that you can use Outbyte Driver Updater whenever you suspect that there’s a similar problem with your device.

⇒ Get Outbyte Driver Updater

2. Run the Audio troubleshooter

  1. Open the search bar and type troubleshooting then press enter.
  2. Click Hardware and sound
  3. Click Playing Audio and then click Next
  4. The troubleshooter will search for any issues and give feedback on the next steps.

3. Run hardware and device troubleshooter

  1. Click Start and type Troubleshooting in the search box to open the troubleshooter.
  2. Select Hardware and sound
  3. Click Hardware and Devices then click Next to start the process and find out what could be the issue – either mic or headset.

4. Check sound settings

  1. Right-click on the speaker icon on the toolbar
  2. Click Sounds
  3. Go to the Playback tabhdmi no signal
  4. Right-click your speaker and select Properties
  5. Under General tab, select Properties again
  6. Go to the Driver tab
  7. Click Roll Back driver.

Note: If the Roll Back Driver option is grayed out, it means that your system is running the default and standard sound driver.

You can download the most current audio driver directly from the Realtek website or your device manufacturer’s website, then install it.

5. Disable sound effects

  1. Click start and type sound to open the Sound window.  (You can also right-click on the sound icon in the tray area and select Sounds.)
  2. Select the Playback tabhdmi no signal
  3. Right-click on Speakers and select Properties
  4. Go to the Enhancements tab
  5. Uncheck Disable all sound effects (or any similar option you see there)
  6. Restart your computer and see if it works better now.

6. Try different audio formats

  1. Go to Start, type Sound, and press enter
  2. Select Sound Control Panel from the list of results
  3. Go to the Playback tab
  4. Right-click the Default Device and select Propertiesdefault speaker properties
  5. On the Advanced tab, under Default Format, change the settingchange speaker properties Windows 10
  6. Retest the sound. If that doesn’t work, try changing the setting again.

7. Set default audio device from USB or HDMI

  1. Click Start and type Sound
  2. Select Sound from the list of search results
  3. Go to the Playback tab
  4. Select a device and then Set Default.
Set default audio device from USB or HDMI

8. Uncheck Loudness Equalization

  1. Right-click the speaker icon on your taskbar
  2. Select Open your playback device (the one that is actually playing)
  3. Click Properties  and go to Enhancements
  4. Uncheck Loudness Equalization

Were you able to fix Windows 10 sound increases automatically using any of these fixes? Let us know in the comments section below.

How to Fix Corsair Headset Mic not Working [HS80, HS45]

Sometimes, upgrading to the latest version of Windows might cause issues on your peripherals. Thus, a significant number of users reported the Corsair headset mic is not working on Windows 10.

Considering this, they were complaining about experiencing problems where the mic did not record any audio but provided sidetone audio through the earcups.

We have to mention that this issue may also be caused by the latest iCUE software update coming into conflict with your Windows build. 

Even though these kinds of issues may happen often, you should consider that there are options that can fix your unworkable Corsair headset mic.

This article will offer some of the best options to solve your error and make sure that it will never bother you again.

How can I fix Corsair headset mic not working on Windows 10?

1. Check if the headset is correctly connected to your computer

  1. Go to Settings.
  2. Click on the System section.
  3. Go to Sound and scroll down to the Input section.
  4. Under Input, look at Test your microphone and check if the blue bar rises and falls as you speak into your microphone.
  5. If the bar is moving, your microphone is working properly.

2. Use Privacy settings

  1. Go to Settings.
  2. Click on Privacy section.
  3. Go to Microphone.
  4. Check if the toggle switch at the top is enabled.

3. Use Recording tab

  1. Right click on the speaker button and select Sound.
  2. Click on the Recording tab.
  3. Right-click on the Corsair Device and choose Properties.
  4. Select the Advanced tab and then the drop-down list to choose DVD Quality.

4. Increase the volume of your mic

  1. Go to Settings.  
  2. Click on System.
  3. Select Sound and scroll down to Input section.
  4. After you check your microphone is selected under Choose your input device, select Device Properties.
  5. On the Volume section, adjust Microphone Boost slider as needed and click on Start test while speaking into your microphone.

5. Uninstall and reinstall the Corsair headset and iCUE software

  1. Open Control Panel.
  2. Click on Device Manager.
  3. Double click on Audio inputs and outputs from the shown window.
  4. Right-click on the Corsair headset and select Uninstall Device.
  5. Unplug the headset from your PC, and do NOT plug it back in until these instructions state to, then restart your computer.
  6. After your PC is restarted, open Control Panel again.
  7. Select Programs and Features.
  8. Right-click on the Corsair iCUE software, select Uninstall, then restart your PC again.
  9. Once your computer is restarted, open an Internet browser, download the latest version of iCUE, install it and then restart your PC last time.
  10. After reopening your computer, make sure iCUE is running.
  11. Plug your headset back in, and check the functionality.

These were our most relevant options in order to help you fix Corsair headset mic not working on Windows 10. Hopefully you will solve your issue without no trouble.

If you encounter any other question related to this article or unclear information, please don’t hesitate to contact us.

Also, if you’re interested in how to easily fix headphones not working / detected in Windows 10, you’ll find some useful options.

Moreover, in order to complete your Corsair set, we recommend you 5 best Corsair keyboards to buy, so make sure you choose the best one!

How to Edit Right Click Menu on Windows 10: Step-by-Step

Customizing the right click menu window for Windows 10, 8 is probably one of the best features Microsoft has offered, in my opinion. There are a lot of options there like “Copy” and “Paste” a folder or file of your liking or just “Rename” a folder with a name of you’re choosing. These are just a few menu items that you can choose that makes the job a lot easier if you have them around.

The menu that appears when you right click on a folder or an open space on the desktop of the Windows 10, 8 PC can be modified to fit your every day need or you can just take out of there the Windows 10, 8 features that you probably won’t use in your everyday activity. The tutorial below will show you exactly how to customize your right click Windows 10, 8 menu window just by doing a few easy steps I have posted below.

How to customize the right click menu on Windows 10?

1. Use the Registry Editor

  1. Go with the mouse over to the left side of the screen.
  2. Click (left click) in the search box in the upper left of your screen.
  3. Type in the search box “Run” or an easier way to do this is by pressing the buttons “Windows key” and the “R” key on the keyboard(Windows key + R).
  4. Click (left click) on the “Run” icon that appears in the upper left of your screen.
  5. Now you should have the “Run” window in front of you.run window PC
  6. Type in the box on the right from “Open:” the command “REGEDIT” exactly the way I have written it in quotes.
  7. Click (left click) on the “OK” button situated in the lower side of the “Run” window.
  8. Now you should have in front of you a “Registry Editor” window.
  9. Click (left click) on “Computer” icon you have on the upper left side of the “Registry Editor” window.
  10. In the list that you opened you should have there “HKEY_CLASSES_ROOT”, double click (left click) on it.hkey classes root windows 10
  11. In the “HKEY_CLASSES_ROOT” folder you should have there a folder that is named with “*”,double click (left click) on it.
  12. In the “*” folder you should have there a folder that is named with “Shellex”, double click (left click) on it.shellex registry editor
  13. In the “Shellex” folder you should have there a folder that is named with “ContextMenuHandlears”, double click (left click) on it.
  14. Right click on the folder “ContextMenuHandlears”.
  15. In the menu that shows hover the mouse cursor over “New”
  16. Another menu should open up, click (left click) on “Key“ in the “New” menu you opened.
  17. Now you only need to enter your item name that you want to appear in the right click menu.Example “Copy to”
  18. If you want to remove an item from the list , click (left click) on the item and press “Delete”
  19. Click (left click) on the item you created and on the right side of the “Registry Editor” window you should have “Default”.
  20. Click (right click) on “Default”
  21. Click (left click) on “Modify” in the menu you opened.
  22. An “Edit String” window should of opened up.
  23. Under the “Value data” in the white box write for example the code “{C2FBB630-2971-11D1-A18C-00C04FD75D13}” , this code is specific for the “Copy to” item on your right click menu.
  24. Click (left click) on “OK” in the lower side of the “Edit String” window.
  25. Go on the Desktop and right click a folder or file and you should have there the item “Copy to”.

2. Use a context menu editor

If you don’t feel comfortable using the Registry Editor, you can also use a menu editor. These tools feature a user-friendly interface that’s very intuitive to use, thus making your task of personalizing right-click menu much easier.

One of the best right-click menu editors for Windows 10, 8.1 is Easy Context Menu. This software allows you to add a variety of commands and tweaks to the right-click context menus when you select My Computer, your computer’s Drives, and many other Windows components. Using this tool is as simple as a walk in the park: check the box next to the items you wish to add and that’s it.

There you have it, in a few easy steps posted above, you can now customize your right click menu on Windows 10, 8. If you have other suggestions regarding this article and you want to share them with us , feel free to post them in the comments below.

RELATED STORIES TO CHECK OUT:


How to Fix This Installation Package Could not be Opened Error

We all have various third-party applications on our PCs, but sometimes issues while installing applications can occur.

According to users, they are receiving the This installation package could not be opened error message while trying to install certain applications.

Luckily, there are ways to fix it on Windows 10.

How to solve this installation package could not be opened?

Solution 1 – Make sure that the application is unblocked

Depending on your security settings, Windows 10 can sometimes block certain applications from installing, causing the This installation package could not be opened error to appear. To fix this problem, you just need to find your setup file and unblock it. This is rather simple:

  1. Locate the problematic setup file, right-click it, and choose Properties from the menu.
  2. When the Properties window opens, go to the General tab and locate the Unblock checkbox at the bottom. Make sure that the Unblock option is checked.
  3. Now, click Apply and OK to save changes.
  4. If you see a confirmation message, click Continue.

After unblocking your setup file, try to run the application again. If you don’t have an Unblock option, it means that this file is already unblocked, so you’ll need to use a different solution.

Solution 2 – Temporarily disable your antivirus

Your antivirus is one of the most important applications on your PC, protecting you from unsafe and malicious files. It can also prevent certain files from running, however. If that happens, you can encounter the This installation package could not be opened error message.

According to users, you might be able to fix this problem simply by disabling your antivirus software. After disabling your antivirus, try running the setup file again and check if the error message appears.

Keep in mind that Windows 10 comes with built-in antivirus with its Windows Defender, so even if you disable your third-party antivirus your PC will remain safe.

If disabling your antivirus fixes the problem, you might want to check its configuration and try to find the cause of the problem.

On the other hand, if this error appears frequently, you might want to try updating your antivirus. In the worst-case scenario, you might need to switch to a different antivirus software altogether.

Solution 3 – Check if Windows Installer service is running

In order to install any application, Windows Installer needs to run. Sometimes, though, this service can become disabled which can cause the This installation package could not be opened error.

To fix it, you need to manually start Windows Installer. This is relatively simple:

  1. Press Windows Key + R and enter services.msc. Click OK or press Enter.
  2. List of all available services will now appear. Locate Windows Installer service and double-click it to open its properties.
  3. If you can, set Startup type to Automatic. Now, check the status of the service. If the service is stopped, click the Start button to start it. After that, click Apply and OK to save changes.
  4. Close Services window and try to install the application again.

The installation process is closely related to Windows Installer service, so if you’re having this problem, be sure to check if the aforementioned service is running.

Solution 4 – Modify your registry

According to users, you might be able to solve this issue simply by modifying your registry. Modifying the registry can be potentially dangerous and can lead to system instability, therefore we advise you to be cautious.

To modify your registry, do the following:

  1. Press Windows Key + R and enter regedit. Click OK or press Enter.
  2. When Registry Editor opens, in the left pane navigate to HKEY_LOCAL_MACHINESYSTEMCurrentControlSetControlFileSystem.
  3. Optional: Right-click FileSystem key and choose Export from the menu.
    Enter the desired file name, choose the save location and click the Save button.

    You can use this file to restore your registry in case anything goes wrong. This step isn’t mandatory, but it’s always good to make a backup before making any registry changes.
  4. After you navigate to the FileSystem key, locate NtfsDisable8dot3NameCreation DWORD in the right pane. Check the Data value for this DWORD. If the Data isn’t set to 0, double click NtfsDisable8dot3NameCreation to open its properties.
  5. Now, set Value data to 0 and click OK to save changes.
  6. Locate Win31FileSystem DWORD and check its Data value. If its Data value isn’t set to 0, be sure to change it by using the same methods we used above.
  7. Close Registry Editor.

After making the changes, try to start the installation again.

If any new problems occur after changing your registry, you can restore it at any time simply by running the backup file that you created in Step 3.

Solution 5 – Create a new user account

According to users, you can fix the This installation package could not be opened error simply by creating a new user account. Sometimes, your regular user account might not have the necessary privileges or it might be corrupted, causing this problem to occur.

To fix the issue, you need to create a new user account and try to install the application from that account:

  1. Press Windows Key + I to open the Settings app.
  2. When the Settings app opens, navigate to the Accounts section and choose Family & other people tab. In the Other people section, click Add someone else to this PC button.
  3. Click I don’t have this person’s sign-in information.
  4. Now, click Add a user without a Microsoft account.
  5. Enter the desired user name and click Next.

After creating a new user account, log out of your current account and switch to the new one.

Now, locate the setup file and try to run it. If you manage to install the application, you can go back to your main account and try to run it again.

After doing that, feel free to delete the newly created account since you won’t need it anymore.

A few users reported that this error occurs because they have a special character in their username.

Certain setup files can’t handle special characters, so they will give you this error message. If that’s the case, you’ll have to create a new account that has only alphanumeric characters in its name and use it to install the problematic application.

Solution 6 – Enable a hidden administrator account

If creating a new user account doesn’t fix the This installation package could not be opened error, you might need to enable the hidden administrator account. This is rather simple:

  1. Press Windows Key + X to open Win + X menu. Choose Command Prompt (Admin) from the menu.
  2. After Command Prompt opens, enter net user administrator /active:yes.
  3. Close Command Prompt.

This will enable the hidden administrator account. Now, log out of your current account and switch to the new administrator account. After doing that, locate the setup file and try to install the application again.

If you manage to install the application, go back to your main account.

After switching back to your main account check if the application is working properly.

If so, start Command Prompt as administrator and run the net user administrator/active:no command to disable the administrator account.

Solution 7 – Move the setup file to the root directory

Sometimes, in order to fix the This installation package could not be opened error, you need to move your installation file to the root directory on your PC.

To do that, you just have to locate the setup file and move it to C: or any other root directory. After doing that, simply start the installation and it should work without any issues.

Keep in mind that you can move the setup file to any root directory on your hard drive.

Solution 8 – Create a .bat file

According to users, you can fix this problem by creating a .bat file and using it to run the installation. To do that, follow these steps:

  1. Open Notepad.
  2. When Notepad opens, enter msiexec /i %1.
  3. Now, click File > Save as.
  4. Set Save as type to All Files and enter install.bat as the File name. Choose a save location and click Save.
  5. In order to install a certain application, simply drag the setup file to the install.bat file. Keep in mind that this solution only works with .msi files.

If this method works, you’ll have to use it every time this message appears.

Several users are also suggesting to make some adjustments to your registry in order to fix this problem. Before we start, we advise you to back up your registry just in case.

We have to mention that this solution is potentially dangerous, so use it at your own risk. To make these changes, do the following:

  1. Open Registry Editor. To see how to check Solution 4.
  2. When Registry Editor opens, navigate to HKEY_CLASSES_ROOTMsi.Packageshell in the left pane. We recommend you export a shell key in case you need a backup. To see how to export a key, check Step 3 in Solution 4.
  3. Navigate to Open > command in the left pane and double-click on (Default) in the right pane.
  4. The properties window will now appear. In the Value data field, remove the quotes around %1. Be careful to not remove anything else from this field. If you accidentally remove something else, you can cause issues with your PC. To summarize, change “%SystemRoot%System32msiexec.exe” /i “%1” %* to “%SystemRoot%System32msiexec.exe” /i %1 %*. Click OK to save changes.
  5. Now, go to Repair > command in the left pane and double-click on (Default) in the right pane.
  6. When the Properties window opens, replace “%SystemRoot%System32msiexec.exe” /f “%1” %* with “%SystemRoot%System32msiexec.exe” /f %1 %* in Value data field. Click OK to save changes.
  7. Navigate to Uninstall > command in the left pane and double-click (Default) in the right pane.
  8. Change Value data from “%SystemRoot%System32msiexec.exe” /x “%1” %* to “%SystemRoot%System32msiexec.exe” /x %1 %*. Click OK to save changes.
  9. Close Registry Editor and try to install the application again.

This is a bit of an advanced solution, so you need to be extra cautious while performing steps 3 to 8.

As we already mentioned, it’s highly recommended you create a backup of your registry so you can easily restore it in case anything goes wrong.

Solution 9 – Try using a different browser

According to users, the This installation package could not be opened error can appear because your download is corrupted. To fix this problem, you need to download the setup file again with a different browser.

Several users reported that this solution worked for them, so we highly recommend you try it out.

Solution 10 – Make sure that the setup file is located on a local drive

Users reported that the This installation package could not be opened error appears if your setup file is located on a network drive.

If that’s the case, simply move the setup file from a network drive and try to install it again.

Solution 11 – Re-register Windows Installer

You might be able to fix the This installation package could not be opened error simply by re-registering Windows Installer. This is relatively simple:

  1. Start Command Prompt as administrator.
  2. When Command Prompt opens, enter the following lines:
    • msiexec /unregister
    • msiexec /regserver
  3. After running both commands, close Command Prompt.

After doing that, try to install the application again and check if the problem is resolved.

Solution 12 – Change environment variables

You might be able to fix this problem simply by changing your environment variables. This is relatively simple, and you can do it by following these steps:

  1. Press Windows Key + S and enter variables. Select Edit the system environment variables from the menu.
  2. The System Properties window will appear. In the Advanced tab, click the Environment Variables button.
  3. A list of environment variables will appear. Double-click the TEMP variable to change it.
  4. When the properties window opens, change the Variable value to C:Temp. Click OK to save changes.
  5. Repeat the same steps for the TMP variable and save changes.

After doing that, try to install the application again. If the problem persists, you might want to return environment variables to their default values.

Solution 13 – Completely remove iTunes and QuickTime

According to users, they are getting this error when trying to install iTunes.

To fix the problem, you need to uninstall iTunes and QuickTime. To do that, follow these steps:

  1. Press Windows Key + I to open the Settings app.
  2. Go to System section and select Apps & features tab. Select iTunes or QuickTime and click the Uninstall button.
  3. After removing the problematic applications, try installing iTunes again.

A few users reported that in order to fix the problem, you need to delete all the files associated with iTunes and Quicktime, so be sure to do that as well. After, you should be able to install the application without any problems.

Before we go, we covered a similar error in our This app package is not supported for installation by app installer article, so check it out for more potential solutions.

The This installation package could not be opened error can prevent you from installing new applications and even though this error can be a nuisance, you should be able to solve it by using one of our solutions.