Network administrators might need to block user access to certain Windows 10 programs for various reasons.
There are a few ways that network administrators, and anybody else, can block users from running certain software on their desktops or laptops.
Users can apply locks to folders or add passwords to programs with third-party software. However, users can also block access to programs in Windows 10 without any third-party software as follows.
How can I restrict access to only certain programs for users on Windows 10?
1. Block Software from running by editing the Registry
Users can stop certain programs from running by editing the registry. It might be worth setting up a system restore point before editing the registry so you can undo the changes if required. Then, follow the guidelines below.
First, press the Windows key + R hotkey.
Enter regedit in Run’s Open text box, and select the OK option.
Next, open this registry path: HKEY_CURRENT_USER\SOFTWARE\Microsoft\Windows\CurrentVersion\Policies.
If there isn’t an Explorer key under Policies, right-click the Policies key on the left of the window to select New > Key. Enter ‘Explorer’ as the key name.
Select the new Explorer key. Then right-click an empty space on the right of the Registry Editor window and select New > DWORD (32-bit).
Enter ‘DisallowRun’ as the title for the new DWORD.
Double-click the new DisallowRun DWORD to open its Edit DWORD window.
Enter ‘1’ in the Value data box as shown directly below, and click the OK button.
Next, right-click the Explorer key to select New > Key.
Then input ‘DisallowRun’ as the title for the new subkey.
Right-click the new DisallowRun subkey to select the New and String Value context menu options.
Now enter ‘1’ as the string value name.
Double-click the 1-string value to open the Edit String window. Then enter the exact name of the software’s executable file that you need to stop running in the Value data box as shown directly below.
Click the OK button to close the Edit String window.
Close the Registry Editor window.
Now, the blocked program will display the error message shown below when users try to launch it.
Some users might not need to set up an Explorer key if there’s already one there under the Policies subkey. If so, users can skip the step for setting up a new Explorer key.
Open the Computer HKEY_CURRENT_USER Software Microsoft Windows CurrentVersion Policies Explorer path in the Registry Editor. Then, add the DisallowRun subkey to the existing Explorer key instead.
To set up blocks for more software, users will need to enter different names for string values within the DisallowRun key. For example, the string value names within the DisallowRun key for the second and third program blocks will need to be 2 and 3 as shown below.
If you’re establishing a seventh program block, enter 7 as the string value title.
2. Block user access to programs in Windows 10 via Group Policy Editor
Windows 10 Pro and Enterprise include the Group Policy Editor tool, with which users can stop programs running without editing the registry.
Users can adjust a Run only specified Windows applications setting with the Group Policy Editor. Moreover, you can configure access to some software to only be restricted for all or only certain users.
1. Press the Win + R keys at the same time on your keyboard to open the Run dialog.
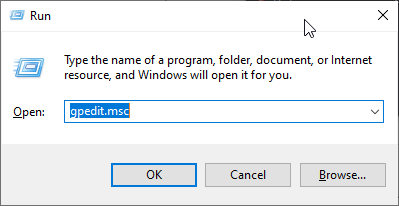
2. Enter gpedit.msc in the text box, and then click the OK button to open the Group Policy Editor.
3. Navigate to User Configuration > Administrative Templates > Templates on the left of the Group Policy Editor window.
4. Double-click onRun only specified Windows applicationsto open that setting’s window.
5. Select theEnabledoption on the Run only specified Windows applications window.
6. Press theShowbutton to open a Show Contents window.
7. Then click a line on the Show Contents window to enter the executable file name of the program to block. Some users might need to open the software’s folder to check what exe file name they need to enter.
8. Press theOKbutton.
9. Click theApplyandOK buttons on the Run only specified Windows applications window. These guidelines will block the program for all users on a device.
10. To block the software for a specific user, you’ll need to add theGroup PolicyObject Editor snap-in to the Microsoft Management Console. Then you can configure policies to apply to specific users as follows.
11. First, press the Win key + Q keyboard shortcut.
12. Enter mmc.exe in the search box, and select to open mmc.exe.
13. Click Yes on the UAC prompt window that might open.
14. Then click File > Add/Remove Snap-in to open the window shown directly below.
15. Select Group Policy Object Editor on the left of the window.
16. Press theAddbutton.
17. ClickBrowse on the Select Group Policy Object window that opens.
18. Select the Users tab.
19. Then select an account to apply the policies to.
20. Press theOKbutton.
21. Click theFinishoption.
22. Select theOKoption on the Add or Remove Snap-ins window.
23. ClickFile>Save Ason the console window.
24. Enter a file title in the Save As window, and click theSavebutton.
25. Thereafter, double-click the saved MSC file to apply the block program policies to the selected account group.
That will launch the Group Policy Editor window from which you can select to block a program as outlined above.
That’s how users can block access to programs in Windows 10. You can unblock the software by erasing the new string values in the registry or disabling the Run only specified Windows applications setting.
However, to ensure that you can always undo registry changes, set up system restore points before establishing program blocks. Then, you can reverse changes made even to admin accounts by rolling Windows back to the restore point.
We hope you found this article helpful and managed to restrict user access to programs you don’t want them to open. Besides, you can block Internet access for specific apps in Windows to enjoy seamless network connectivity.
Let us know in the comments section below if you have any questions.
This is a nuisance for users who do not wish to use those apps and want them home from their computers as soon as possible.
Can I uninstall the built-in Windows 10 apps?
Yes, you can actually get rid of preinstalled apps that come with your Windows 10, even though the traditional method does not work.
There is a workaround for this and it involves using Powershell. Read on to find out more.
How can I delete Windows 10 apps for all users?
If you’re looking to remove the default apps from a Windows 10 image, you can quickly do that with PowerShell. It is a built-in command line tool that can modify your PC via commands.
With PowerShell, you can remove built-in UWP apps from all your laptop’s or desktop’s user accounts. You can quickly uninstall one or all the preinstalled apps for all the user accounts on your device through the usage of the remove-appxpackage all users script command.
1. Press the Windows button on your keyboard to open the Windows search box.
2. Type PowerShell in the search box.
3. Right-click on the result and select Run as Administrator from the list of options.
4. PowerShell will now be opened on your device and you can begin typing commands into it.
5. Input the following command and then press Enter to run it: Get-AppxPackage | Select Name, PackageFullName
This command will display a list of all the apps that are installed on your Windows 10 PC. Each of them will have a specific package name in the column on the right, called PackageFullName.
This is an example of a package full name: Microsoft.XboxApp_41.41.18005.0_x64__8wekyb3d8bbwe.
You can copy the package names for all the apps and note them down in a text document of your choosing, such as Notepad.
Note that you can shorten the package full names by including wildcards (**) around them. For example, you can enter *xboxapp* instead of Microsoft.XboxApp_41.41.18005.0_x64__8wekyb3d8bbwe for the Xbox app .
6. Now you can begin uninstalling apps. You can choose to uninstall an app for one or all users on your device.
In order to only remove an app from a single user account, you would type the following command, and then press Enter :Get-AppxPackage PackageFullName | Remove-AppxPackage
7. However, to uninstall the app from all user accounts you need to include -AllUsers in the command. Thus, the command becomes: Get-AppxPackage -AllUsers PackageFullName | Remove-AppxPackage
For example, to uninstall the Xbox app you would enter the following: get-appxpackage -AllUsers *xboxapp* | remove-appxpackage
8. Now, if you want to uninstall all the preinstalled apps for all user accounts, you need to type the following command: Get-AppxPackage -AllUsers | Remove-AppxPackage
Can I reinstall the preinstalled apps on Windows 10?
You can also reinstall those built-in apps if required. To do so, you need to use PowerShell with admin rights once more.
Once you open PowerShell, type Get-AppxPackage -allusers | foreach {Add-AppxPackage -register "$($_.InstallLocation)appxmanifest.xml" -DisableDevelopmentMode} and press Enter.
To reinstall a single app, enter Add-AppxPackage -register "C:Program FilesWindowsAppsPackageFullNameappxmanifest.xml" -DisableDevelopmentMode in PowerShell instead.
So that’s how you can uninstall preinstalled Windows 10 apps you really don’t need for all users. Just make sure the other users don’t need the apps before you uninstall them using the remove-appxpackage all users command.
Better yet, you can remove common group apps if you just want to get rid of them from your Start Menu to ensure other users are not affected.
If you have any other questions or suggestions, feel free to leave them in the comments section below.
Blizzard‘s Looking-Glass is a handy network troubleshooting tool that can help you figure out if there’s something wrong with your connection. Needless to say, it only works with Blizzard services and games.
However, considering that Blizzard’s services are mostly online, having such a tool can save you a lot of hassle.
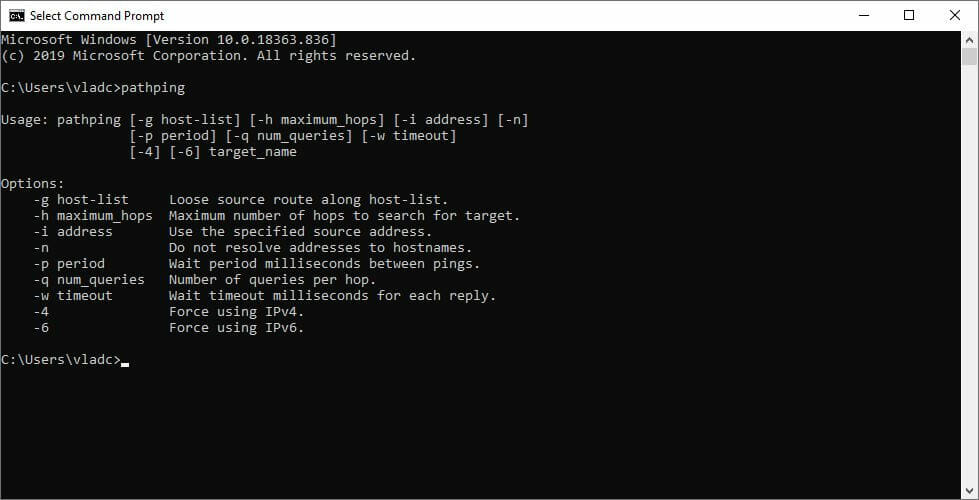
Although we have other articles explaining how to run a packet loss test with pathping, using a dedicated tool such as Looking-Glass can be much easier.
Instead of looking up servers for the game or service that you have problems with, you can just turn to this tool. It’s easy enough that even PC novices can use it without too much effort.
What is Looking Glass used for?
The Blizzard Looking Glass tool is great for checking for downstream issues on some ISPs to verify packet loss, traceroute, and the Blizzard ping test. This Looking Glass speed test starts from the Blizzard servers and shows the route to your servers, including the pathping IP.
If all the results are coming back as 100% loss, this just means the test is being filtered or blocked by the browser. Due to the global impact of recent world events on network bandwidth, there are tons of things impacting everyone’s latency to all games.
The greater the distance between the client and the servers, the greater the impact. In your tests, the ping should be normal until it reaches your ISP, and that’s where all the issues start, with ISP throttling.
How do you install Looking Glass?
Unfortunately, you can’t download the Looking-Glass tool to your PC, as it’s exclusively an online service. However, accessing it is not exactly rocket science.
You just have to navigate to the correct address and you should be facing Blizzard’s network diagnostics tool in no time. Its design is minimalistic and embraces a dark theme, so it’s easy-going on your eyes, as well.
Wait for the test results to appear in the Test Result section.
What do Looking Glass sites show you?
The Battle.net account checker can be helpful to verify your account in the browser by login in through the Battle.net Authenticator. It offers an additional layer of security against unauthorized account access on up to three Battle.net accounts.
Blizzard’s Battle.net Looking Glass response times and packet loss may experience significant spikes. If you have issues with this connection and your gameplay suffers as a result, you should run a Battle.net client troubleshooting, and a Battle.net speed test.
▶ Traceroute By testing the connection from our servers to your computer, trace routes can help identify where connection problems occur. A traceroute report shows the exact path a data packet takes to reach its destination. Any of the following issues in your traceroute report may indicate a problem with your connection:
(asterisk) symbols for timeouts
The number values range from low to high.
The figures are consistently high.
▶ Ping A ping test, unlike a traceroute, does not record the path the packet took. A ping test will notify you if our servers are unable to reach your computer. If you notice any of the following issues in your ping report, it may indicate a connection problem from your ISP servers to your location: ?Packets loss ?Fast response time A ping may fail due to network security rather than actual connection issues.
You can only choose between Korea, the United States, and Europe, as far as regions are concerned. The services menu is richer and holds the following options you can test for ping and packet loss:
Some users report getting 100% packet loss from Blizzard’s Looking-Glass network diagnostics tool. However, this shouldn’t be a serious reason for concern, since most of the time it’s just a matter of interpretation.
For instance, we’ve run the test several times and got 100% packet loss on a bunch of nodes (intermediary). On the bright side, the service (World of Warcraft) worked flawlessly.
On the other hand, other users reported Looking-Glass’s results showed 0% packet loss, while the game or service was impossible to access or play.
Our advice would be to take it with a pinch of salt.
If you want to check if there’s any discrepancy between the standard test (pathping) and Looking-Glass, run both and compare the results. You might be surprised.
If that’s the case, using a VPN won’t only fix packet loss, but also improve ping by routing your traffic away from your ISP’s improperly routed network. Also, if your ISP is throttling your bandwidth, using a VPN should improve things a lot.
Note that having a VPN can help you in several ways, other than improving packet loss and ping. VPNs can give you a tremendous online privacy boost, secure your connection, and even circumvent geoblocking.
2. Troubleshoot your connection manually
✅Check if there’s any faulty software or hardware component on your end (PC, cables, router, drivers).
✅Repair/update/upgrade/replace any faulty component as needed.
✅Switch to wired instead of Wi-Fi (Wi-Fi leaks packets more frequently than wired).
✅Call your ISP and ask them to look into their routing (probably won’t do anything).
✅Contact Blizzard if there’s something wrong on their end.
Note that keeping your end of the connection (home network) in top shape can spare you a lot of headaches. Merely upgrading your cables from, say, CAT 5 to CAT 6, might trigger a dramatic change in speed.
Looking-Glass can be useful at times
The bottom line is that if you don’t want to get your hands dirty performing network diagnostics for Blizzard services, Looking-Glass can be exactly what you’re looking for.
You select a region and the service you’re testing against and let it run its course.
Frequently Asked Questions
What is Blizzard Looking-Glass?
Blizzard’s Looking-Glass is a network diagnostics tool that only shows you information that’s relevant for Blizzard services and games, such as packet loss, and ping.
Yes, but only if your ISP’s network is poorly routed or if the ISP is throttling your bandwidth. Check out our best VPNs to improve ping.
However, note that it might return some inaccurate results, whether it’s scaring you with high packet loss values when the game works flawlessly or telling you there’s nothing wrong when you can barely access the service.
We now have yet another nifty gadget to add to our collections, one that promises to be your best gaming buddy for years to come. But a common issue plaguing devices is Steam Deck stick drift.
Though after Steam Deck, Valve’s handheld gaming PC, finally made its way to the general public, the overall response so far seems to be positive, except for this issue are a few other minor ones.
However, the Steam Deck stick drift is a relatively common problem in controllers, and we will be looking at ways to fix it in the guide. For those who didn’t know, the Nintendo Switch console is notorious for displaying this problem.
Does Steam Deck have stick drift?
Many users have reported stick drift with Steam Deck, which has led to issues with games requiring precision. A user even shared a video of stick drift on their handheld gaming device.
Some reported Steam Deck left stick drift, while the right one was problematic for most. However, the issue has not been reported by all users, so there’s a good chance that your Steam Deck wouldn’t show signs.
Also, Valve has confirmed that the issue started after a recent firmware update and has been identified and appropriately addressed. So, it shouldn’t be the case for new devices being shipped out.
In case you are facing Steam Deck stick drift, find out all the ways to fix it in the next section.
How can I fix the Steam Deck stick drift?
1. Update the software
NOTE
Before updating the software, ensure you are in Game mode and connected to the Internet on Steam Deck.
Turn on Steam Deck, and press the Steam button on the console.
Tap on Settings in the navigation pane.
Now, navigate to System and tap on Check for Updates to scan for a newer version for SteamOS.
If an update is listed after the scan, click on Apply.
Wait for it to be downloaded, tap Restart, and then allow your Steam Deck some time to apply the changes.
A patch to fix the Steam Deck stick drift issue was released recently, and Valve recommends that you install it to get rid of the problem. And so far, it has seemed to work for most users.
2. Check for dust buildup
Though this shouldn’t be the case in the initial days, you may check for dust buildup near the stick to fix drift issues in Steam Deck.
The easiest way to remove any dust particles or grime lodged here would be to wipe the area around the stick with a soft and dry cloth.
3. Contact the Steam support
If nothing helps, it could be a hardware issue, and we recommend contacting Steam Deck Support for more help.
In no case should you open the gaming device to fix things since that could affect its overall functionality and even render the Steam Deck useless. Instead, you should let the experts deal with it!
How do you calibrate a Steam Deck joystick?
Press the Steam button on the console, and then tap on Power.
Select Switch to Desktop here.
Now, open Steam.
Tap on the Big picture mode icon near the top-right.
Next, select Controller Settings under Controller.
Choose your controller after it’s detected.
Tap on the Calibrate button.
Now, drag the slider for the problematic stick to the right until the center dot becomes black.
Once done, tap on OK, and then restart Steam Deck for the changes to effect.
Calibrating allows you to modify the Steam Deck joystick deadzone. And this was a legit workaround for many before Valve rolled out the update the fix Steam Deck stick drift.
That’s it! You now know how to fix the stick drift issue and Steam Deck joystick calibration. So, from now on, you wouldn’t encounter the frequent disruptions affecting the gameplay and will enjoy the console the way it’s supposed to be.
To enjoy Sky’s content, one must live in the United Kingdom or the Republic of Ireland. This can be traversed by VPN, which mimics a UK/RoI IP address to grant you access.
But that’s sometimes easier said than done, as VPN isn’t working on Sky Go for many users, leading to errors like error code 4253024421 & 1415.
Pick another server to connect to. Make sure it’s a server located in the UK.
Once connected, go back to Sky Go and see if it works.
2. Make sure your time and date are set to UK or Republic of Ireland
Press the Windows key + I to open the Settings app.
Open Time & Language.
Under the Date & Time section, disable both ”Set time automatically” and ”Set time zone automatically”.
Select Timezone and choose Dublin-London time zone from the drop-down menu.
Now you can re-enable the ”Set time automatically” option and that’s it.
Start your VPN and give Sky Go another try.
Sky Go can use anti-proxy services to block everyone in a different time zone. Some users resolved the issue by simply setting their system time to mimic the time of the UK/RoI server.
Sky Go error code 4253024421/1415 displays the message An error has occurred. Please double-check your internet connection and retry.
This error can occur for various reasons, including internet problems, a bug with Sky Go, or something else.
When using your trusted VPN to access Sky Go, there are some minor issues. Surfshark not working with Sky Go, and Sky Go not working with NordVPN or ExpressVPN could be the result of too many server location changes in a short period of time.
As a result, Sky Go may have identified you as a third-party snitch attempting to connect. This can be resolved by changing your IP address through your VPN app.
For the sake of addressing it, we prepared a list of possible solutions to get rid of the Sky not working with VPN error. If you’re unable to connect and stream on Sky Go, make sure to check them out.
Wrap up
The most important thing to consider when you get the 4253024421 & 1415 and related errors is ensuring you have a VPN that works with Sky Go.
It needs servers in the UK & ROI as well as anti-detection features. It’s important to mention that Mini boxes can experience issues, and we already wrote about the Sky Mini box not working in one of our other guides.
Also, if you are using the service’s box, find out how to eliminate the red light on Sky Q.
Furthermore, an unsynced timezone or buggy router can also be at fault. Luckily, both are incredibly easy to fix.
You should know that the Sky service is not blocking any VPN connections. Sky Broadband Shield may be interfering but the highlighted link will bring you to the much-needed guide to fix this problem.
Another hint is that if you have a Sky TV account, you can download and use Sky Go for free.
That should do it. In case you have any other questions or suggestions regarding VPN for Sky Go and related issues, make sure to post them in the comments section below.
Sudo or’ superuser do’ permits you to temporarily elevate your user account to access the system’s root level. Moreover, users complain about not knowing how to set up a Sudo password to run a Steam deck Sudo command.
Performing specific, in-depth troubleshooting or using Sudo commands on the Steam deck requires permission from the Sudo utility system. However, users must provide a Sudo password to use the Sudo command in the Steam deck.
Because the Steam deck comes without a password, users need to set one to use Sudo. This article will discuss the Sudo password for the Steam deck and how to easily set one up.
How to set up a Sudo password on the Steam Deck?
Press the Power button on your Steam Deck.
Press and hold down the Power button to prompt a new menu.
Select Switch to Desktop to boot the Steam deck in Desktop mode.
Open the Konsole terminal app.
Press STEAM + X to prompt the Steam Deck’s keyboard. (Also, you can use an external keyboard plugged into the device)
Type in the following command and press Enter: passwd
This will prompt the enter a new password window. (Enter a new password)
Confirm the new password.
Setting up a Sudo password allows you to use commands as the deck user.
The deck user comes with no password set to it by default. It means it can’t be used to run a Sudo command unless the user can set up a Sudo password.
So, there is no Sudo password on the Steam deck until the user sets up a password on it.
Furthermore, Steam’s desktop mode allows you to customize the console and use other commands. Nonetheless, the user must reset the Sudo password to get root access.
The Steam Deck is one of the best handheld consoles. It is a powerful console that has been a great competitor to the Nintendo Switch. However, it is reliable because it can run most steam games.
Though not all steam games are verified to work on the handheld, it is likely to be able to play other games in the future. Hence, we’ll take you through the Steam Deck verified games.
The Steam Deck allows you to access hundreds of games on a mobile handheld. The verified games are supported and can be accessed on the handheld without encountering problems.
However, some steam games are currently unsupported on the Steam Deck and can’t be played on the handheld. Likewise, some games are playable. It means you can access and play those games on the Steam Deck, but there are chances that you’ll run into some difficulties.
Which games are verified on Steam Deck?
There are thousands of verified and playable games you can play while writing this guide. Unfortunately, the total is just about a handful of games short of five thousand.
At the time of writing, close to two thousand games have the verified badge on the Steam Deck library, while another two thousand plus are tagged as playable.
Some of the verified games are 100 hidden birds, Angry Birds, 9th Dawn III, God of War, Doom, and Crazy Taxi.
How many verified Steam Deck games are there?
The Steam Deck has a growing library of verified games. However, users can play many verified games on the handheld. Hence, the verified games library for the Steam Deck boasts over 1800 games.
The figure changes over time because of the rapid growth in the number of verified games on the handheld. So, it would help if you frequently reviewed the Steam Deck verified games update.
Are all Steam games compatible with Steam Deck?
Unfortunately, not all Steam games are compatible with the Steam Deck. However, classifying the games into verified, playable, and unsupported is necessary.
It’ll help us out the games into divisions. Furthermore, some Steam games are compatible with Steam Deck but are still not functioning.
If you are looking for a Steam Deck compatible games checker, there is no better one than the sign next to each game on the Steam Deck library.
Quick Tip:
Because many Steam games are compatible with the Steam Deck, think about how many resources your PC uses. Thus we recommend using a browser designed for gaming purposes outside Steam.
When using the Opera GX browser, you can balance the resources by toggling RAM, CPU, and network consumption, as well as using Discord integration and downloading from the Steam game store.
Opera GX
Use this browser outside the Steam client to balance resource consumption and use sidebar chat integrations.
No Man’s Sky is one of the verified games for Steam Deck. It features adventurous gameplay that themes around redemption. It is the best adventure game for the handheld.
However, the game has undergone several updates, making it better by the day. Hence, you’ll need to check for new updates on the Steam deck constantly.
Dying Light is the perfect choice of game for zombie lovers. It features the best display and missions. Likewise, players go on missions to stay alive while fighting against zombies and gather weapons to fight the undead.
The game operates at high speed, making it an excellent choice for the handheld—one to check out on the Steam deck among the verified games.
Apex Legends is a multiplayer shooter featuring modern scenery where players fight battles and play. It is the best game on the verification board as it is part of the earliest game on the Steam Deck.
It has an active fanbase with many competitions included. So if you are a fan of unplanned havoc and shootings, this is one of the best verified games on Steam.
Role-playing is one of the most fascinating games to play. However, the Scarlet Nexus is a game with many anime characters that allow players to choose their characters.
The compelling storytelling nature of the game makes it a fan favorite. It also features the use of psychic or supernatural powers.
To know if a game is Steam Deck verified, you need to check the sign next to each game. The games with green marks are confirmed, while those with a yellow lower cap letter i sign are playable.
Lastly, the unsupported games on Steam Deck have a danger sign, while the unknown games have a question mark sign.
How do I get verified games on Steam Deck?
Click the Steam button.
Select Store from the options.
Search for a game of your choice, go through the Store for games, andthen click on the game’s thumbnail.
The product page will have a space for verified, playable, or unknown. (It shows the game status)
This way, you’ll be able to identify verified games and download them.
Can I play unsupported games on Steam Deck?
Unsupported games appear as unknown in the Steam Deck’s Store or library. It means the game is not playable on the handheld. Hence, you cannot play unsupported games on Steam Deck.
There are thousands of verified games on Steam Deck game lists, with more joining them frequently. These games cover different genres. So you are not short of options.
Conclusively, there are some issues you may encounter on the Steam Deck, such as the Steam Deck stick drift issue. However, you can check our article to learn how to fix it.
Moreover, the Steam Deck fatal error has been reported by various users. If you encounter it, check out our guide.
In the comments below, let us know the verified game(s) you enjoy playing on the stunning handheld console.
Vizio SmartCast has developed into a reliable smart TV platform, offering a wide range of apps and integrated support for Google Chromecast and AirPlay 2.
The Vizio OLED TV is unquestionably the best inexpensive OLED TV and one of the greatest 4K TV bargains available. The Vizio Smartcast not working is, however, a common problem for many of its users.
Generally speaking, Vizio SmartCast functions flawlessly, but occasionally it may display an error message that reads SmartCast Starting Up Please Wait or Smartcast TV Not Available.
Most of the time, clicking on Update Now will fix the issue and you will be able to enjoy the content.
Why is SmartCast not working on my Vizio TV?
Vizio SmartCast TVs frequently go blank or stop working for a variety of reasons. Here are some of the most important ones:
The software on its core operating system freezes
The Wi-Fi connection isn’t as fast as it should be
Improper network settings
Some Vizio SmartCast TV models may, under extremely rare circumstances, also have hardware issues.
How do I fix SmartCast if it’s not working on Vizio?
1. Reboot the Vizio TV
Restart the TV and see if the issues get resolved.
Restart all of your gadgets, including your SmartCast, any smartphones or tablets you use to operate it, and any other gadgets linked to your home Wi-Fi network.
Open SmartCast again.
2. Power cycle the TV
2.1 Use the TV settings
Press the Menu button on your Vizio TV remote and choose System/Settings.
Choose Reset & Admin from the menu on your TV.
From this screen, choose Soft Power Cycle.
Leave your router’s power cords all unplugged (and modem if you have one) until the process completes.
2.2 Use the Power button on your TV
Using the remote control or the Power button on the TV, turn off the TV and unplug it from the power supply.
While the TV is not connected to a power source, press and hold the Power button for 20 to 30 seconds and then connect your TV to the power source.
Leave the TV idle for a further 20–30 seconds.
Turn on the TV and wait a few minutes without touching the remote or other buttons.
3. Factory reset your TV
Select Menu using the remote (or, if you have a smart remote, the app).
Select System, then Reset & Admin, and then Reset TV to Factory Settings.
By tapping Yes, you can confirm that you wish to execute a factory reset.
4. Check your TV Internet connection
On the remote, tap the Menu button.
Choose Network and then select Test Connection.
5. Refresh Network DHCP Settings
Launch a browser after turning off the smart cast TV.
If available, enter your IP address, default gateway, or domain name server in the URL bar. If not, enter https://192.168.X.X (where X represents the IP address’ final two digits) into the URL bar.
Enter your User name and Password and navigate to Settings.
The DHCP tab can be found in your router’s firmware settings under Advanced, Network Settings, or Local Network Settings. On your router’s configuration page, near the wireless or LAN area, you’ll find the DHCP option.
Disable and then re-enable the DHCP option if you have it activated but it is still not functioning.
Save your preferences. The router will restart, and the process will take approximately 30 seconds.
What can I use instead of SmartCast?
Other than SmartCast you can use Roku TV, Apple TV, Chromecast, or Fire Stick.
Users of the listed TVs can download apps to their mobile devices to stream videos and view them on TV by using the mobile devices as a remote control.
SmartCast TVs differ from smart TVs in that platforms for smart TVs use Wi-Fi to connect and function as their command center for downloading video and streaming services.
Having known some of the causes for SmartCast not working on your Vizio TV and their solutions you are good to go!
If you wonder how to add your favorite GOG games to your Steam library, you’ll find the answer in this article below.
However, keep in mind that a wide range of users have attempted to do this, but they have encountered problems.
Some say that the games are not displayed in the library, while others can not run any GOG game even though they are listed.
In today’s how-to article, we will discuss this subject in its entirety and offer you a way to work around this issue. Read on to find out more!
Can you play games from GOG on Steam?
Signing in with your active Steam account on GOG’s connect page will allow you to connect your library with GOG.com. Assuming you are the rightful owner of the titles mentioned, you will have the ability to import them into your GOG.com library permanently.
The eligible games are only being offered for a limited time, which has been made possible by the participating game creators and publishers.
Only one of your Steam accounts can be linked to your GOG.com library anytime. However, note that this procedure cannot be undone, so make your decision carefully.
Can GOG games be trusted?
If you’re still wondering if GOG games can be trusted, they can. GOG is a subsidiary company of CD Projekt, and it has been delivering a vast catalog of fantastic computer games since the early 1990s.
Nowadays, it is recognized among worldwide users, being preferred by tons of professional gamers.
Our team’s experiments indicated that GOG games are safe and legit sites for game codes. In this case, do not hesitate to pair them to your Steam library.
Let’s jump into the steps required when adding GOG games to Steam achievements without further ado. Follow along!
How can I add my GOG games to the Steam library?
1. Make sure no other apps are interfering with this process
1.1 Close other gaming apps
Before you import GOG games to Steam, use the following keyboard shortcut to open the Task Manager: Ctrl + Shift + Esc.
Now, search for GOG apps that might interfere in the Processes tab, click on them, then choose End task.
1.2 Uninstall other apps
Press Windows + X, then select Apps and Features from the list.
Please search for other apps that might interfere with GOG games, click on the three-dot menu next to them, then select Uninstall.
In some cases, users have identified that some other running GOG application was interfering with the adding process of Steam.
Deleting or closing those apps will allow you to perform the adding process without issues.
Hit the Windows key, type Steam, then open the app.
From the main menu, click on the Library tab.
From the bottom-left corner of the window, click on Add Game, then on Add a non-Steam game.
Search for the game executable file (usually found in the GOG Games folder on your C hard drive). Then, click the respective game executable file and add it to the list while changing the name as you want to.
Right-click on the game shortcut in the Library, then select Properties.
Now, right-click the game shortcut on your desktop, then select Properties.
Copy the Target and Start in inputs into your game shortcut Properties window.
That’s it! This is how you can add or import GOG games on Steam.
How can I add GOG games to Steam Deck?
Open FlatHub’s website from your Steam Deck and click on Install under Heroic Games Launcher.
Press the STEAM button from your left side to open the quick menu.
Scroll down until you find the Power menu.
Then, select the Switch to Desktop option.
Open the Discover app and look for Heroic Games Launcher to install it.
Go back to Steam in desktop mode, then navigate the top-most menu to the Games tab and select Add a Non-Steam Game to My Library …
Find Heroic Games Launcher and add it. Then, close Steam and launch the Return to Gaming Mode shortcut from the applications menu or desktop of your Steam Deck.
In the interest of keeping things as straightforward as possible, we suggest installing GOG titles through the use of an open-source tool known as Heroic Games Launcher.
Because it was developed for launching GOG and Epic titles on various operating systems, including Linux, it is an ideal addition to your Steam Deck.
There is a low probability that every GOG game will have native support for the Steam Deck controllers, and it’s possible that some games won’t even have joypad support at all.
Is GOG better than Steam?
Some users still wonder if GOG is better than Steam and if you’re in the same situation, make sure you keep reading because we’ll give you all the answers you need.
When deciding between GOG and Steam, most users choose the second platform.
GOG has particular advantages, but you should know that its game library is more minor than Steam. At the same time, Steam offers over 50,000 games, and GOG hosts around only 5,000 pieces.
Steam has much more in the way of brand recognition, being more prevalent among worldwide users and having a massive community.
On the other hand, Steam doesn’t support DRM-free games. In these terms, you may need to use it in tandem with a service like GOG.com.
Another great thing about GOG is that it doesn’t imply regional restrictions or geo-blocking problems while running your favorite games. As a consequence, you’re able to play any game you purchase, regardless of your location.
In today’s how-to guide, we discussed the issue caused by not being able to add your GOG games to your Steam Library. If you wonder how to add games to your Steam library without downloading them, unfortunately, you can’t. In some way or another, you will need to download their files.
Of course, adding GOG games to the Steam library is straightforward; you have to get used to it.
These steps have proven helpful for other users experiencing the same problem. Please let us know if you found this practical guide and bypassed the issue.
Some people have recently reported that they’re unable to check for updates on Windows 10 due to a RuntimeBroker.exe error.
Namely, the update process will get stuck at a certain point. When you check for details, the following error message will appear:
RuntimeBroker.exe. The group or resource is not in the correct state to perform the requested operation.
There are a couple of ways to deal with this error, and we’re going to show you exactly what to do to fix it for good.
What is RuntimeBroker exe application error?
The Runtime Broker process was developed by Microsoft and serves an essential function in Windows 10 and 11.
You probably won’t notice RuntimeBroker.exe running just yet if you just login into Windows for the first time and haven’t opened any applications just yet.
RuntimeBroker.exe is a process that is initiated by Universal applications, and after it completes, any and all open applications are terminated instantly.
It’s possible that a damaged Windows system file is to blame for the error notice which can be fixed in various ways.
Users reported many other similar errors that we will address in the solutions below. These are the most common ones that we got:
RuntimeBroker.exe DistributedCOM error – To correct the issue, use Regedit and change the owner setting to Administrator.
RuntimeBroker.exe DCOM error – If you see numerous instances of Runtime Broker running on your computer, you need to make sure that you terminate all of the processes using Task Manager in order to fix the problem.
Error 10016 RuntimeBroker.exe – Before proceeding to the DCOM Configuration in Component services, you must first configure permissions for two registry keys. These keys are located in the DCOM folder.
RuntimeBroker.exe error the group or resource is not in the correct state – The error RuntimeBroker.exe will prohibit your Windows from downloading or installing updates, although the root causes of this problem are unknown.
RuntimeBroker.exe initiated restart – If this is the case, we strongly suggest that you do not try to repair the problem by disabling it using Task Manager.
RuntimeBroker.exe error shutdown – The RuntimeBroker.exe error message will often appear as a result of a malfunctioning file or component inside the Windows operating system.
Is runtime broker exe a virus?
RuntimeBroker.exe is a Microsoft process that is completely safe to use and is present in both Windows 10 and Windows 11 to help with program permissions. It requires less than 3,000 kilobytes of RAM, thus its overall impact on the system is minimal.
The fact that this procedure is operating in the background will not negatively impact the overall performance of the system. Unless you are searching for a speedy way to close all of your applications, you should let this process alone and not interfere with it.
And this script should be more than helpful for solving this update error. To find out more about Windows Update Reset Script, and to download it, check out our linked article.
2. Run the built-in Windows Update troubleshooter
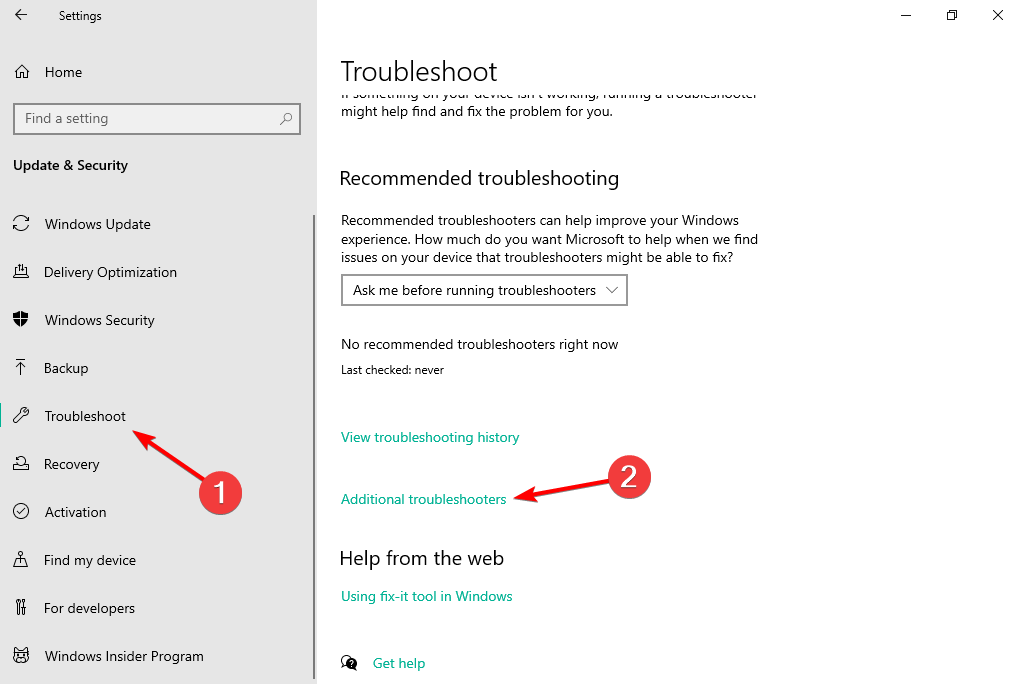
Open the Settings app by pressing Windows + I and go to the Update & Security section.
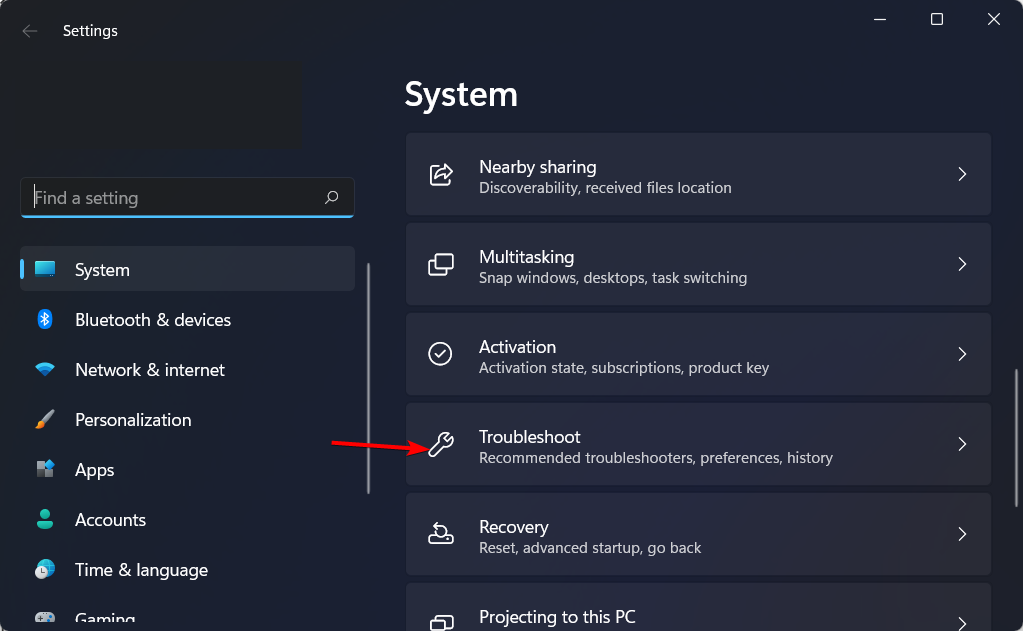
Choose Troubleshoot from the menu on the left side, followed by Additional troubleshooters on the right menu.
Scroll down to the Windows Update troubleshooter, click it and select Run the troubleshooter. The Unable to perform update runtimebroker exe error in Windows 10 will be fixed.
Another method to fix this problem is to simply use the Update Troubleshooter. You can launch it either from Control Panel or directly from the Settings page.
Simply run the troubleshooter, wait until it has completed the scan, restart your computer and check if the issue persists.
3. Manually reset Windows Update Components
If running the WU Reset Script didn’t fix the Unable to perform update runtimebroker exe error in Windows 10/11, or you don’t want to use it for some reason, you can try to manually reset Windows Update Components, and see if the problem is fixed.
Performing a reset will fix corrupt Windows Update Components and help you to install Windows Updates normally.
To manually reset Windows Update Components, follow these instructions:
Press Windows then input cmd and select the Run as administrator option from the right side.
Stop the BITS, Cryptographic, MSI Installer, and the Windows Update Services. To do this, enter the following commands into the Command Prompt, and press Enter after you type each command: net stop wuauserv net stop cryptSvcnet stop bitsnet stop msiserver
Now rename the SoftwareDistribution and Catroot2 folders. You can do that type the following commands in the Command Prompt, and press Enter, after entering each command: ren C:\Windows\SoftwareDistribution\SoftwareDistribution.old ren C:\Windows\System32\Catroot2\Catroot2.old
Now, restart the BITS, Cryptographic, MSI Installer , and the Windows Update Services. To do that, type the following commands in the Command Prompt, and press Enter after you type each command: net start wuauserv net start cryptSvcnet start bits net start msiserver
Close the Command Prompt, and restart the computer.
How do I fix RuntimeBroker.exe error on Windows 11?
Hold Windows + I then go down to the Troubleshoot section and click it.
Select Other troubleshooters.
Scroll down the click the Run button next to the Windows Update troubleshooter.
Should I disable Runtime Broker?
Runtime Broker is required for the protection of your Windows 10/11 computer’s security and privacy while running applications downloaded from the Windows Store since it is needed to manage those applications.
We strongly suggest that you do not try to repair the problem by disabling it using Task Manager. Instead check out the alternative solutions to fix high CPU usage caused by Runtime Broker. For more information, see this guide that explains what are runtime errors.
That’s it, I hope these solutions helped you with your update problem. If you have any comments, or questions, just reach for the comment section below.
Game lovers worldwide have been eagerly waiting for the release of Steam Deck, and with that officially happening, many are curious about the compatible games on Valve Steam Deck.
The list of games for Steam Deck is growing by the day, with the team trying them individually, but the process could be a tad slow in the initial days.
Just so you get the idea, as of February, reports suggest the total number of games on Steam reached 50,000, so Valve employees are facing a pretty daunting task.
But that shouldn’t act as a deterrent. Valve has already verified many cool and exciting games compatible with the Steam Deck, and we have presented the best ones in the following sections.
Is Steam Deck compatible with all Steam games?
Sadly, the answer is no! Steam Deck works on a Linux-based operating system with a 1280x800px resolution, so all games available on the Steam platform won’t be compatible.
Steam has categorized games into four types depending on their compatibility with the Steam Deck.
Verified: These games work perfectly well.
Compatible: Users might have to make slight modifications well within the scope of acceptable ones
Unsupported: The ones that are not functional or simply unsupported games on Steam Deck presently
Unknown: These haven’t been checked for compatibility yet
To find out if your favorite title is available on Steam Deck, head to the Steam store on the console itself and verify the category it falls under.
What games are Steam Deck supported?
Many games are currently compatible and supported on Steam Deck by Valve. You can find the complete list of compatible matches on the official website. And it’s regularly updated, so any game verified will feature here immediately.
Apex Legends is one of the most popular free-to-play games in recent years, with more than 130 million users have played it. The gameplay revolves around legendary characters teaming up to battle for glory and fame.
Every legend has unique skills and abilities. And using an expanding array of lethal weapons, the aim is to be the last man/team standing. So if you haven’t tried it yet, go ahead and play Apex Legends, one of the best compatible games on Valve Steam Deck.
Developed by FromSoftware Inc., Elden Ring falls under the RPG (Role-playing games) category. It’s often said to be one of the most demanding games.
The game is about survival, and defeating your enemies is the key here. In addition, Elden Ring offers users various customizations to enhance the gameplay, from changing the character’s appearance to combining weapons and magic.
God of War has been here for a while. First launched in 2005 for PlayStation 2, the game has since been developed for almost every device and OS and is now one of the compatible games on Valve Steam Deck.
In the game, players control Kratos, the lead character, and a Spartan Warrior sent by the Greek Gods to kill the God of War. The game blends mythology, exciting gameplay, and striking graphics perfectly.
The Witcher 3: Wild Hunt, the third in the series, is one of the best compatible games available on Valve Steam Deck. The aim is to find the Child of Prophecy, a living weapon as predicted by the legends.
A player starts as a highly trained monster slayer available for hire and has to fight foes, kill monsters, and earn rewards. The rewards can be used to upgrade weapons, buy armory, or spend on horse races, card games, and fist fighting.
One of the top-rated racing games, F1 22 has been a delight for gamers and is one of the compatible games on Valve Steam Deck. The 2022 FIA Formula One World Championship is the official game, with better graphics, redesigned cars, and exciting gameplay.
F1 22 also features in the Top Seller list on Steam. The new game comprises 20 drivers and 10 teams, and players are required to create a team and take it to glory. In addition, various modes are available for players to choose from, each offering a captivating experience.
Steam Deck has been called an underpowered device by many. Still, for a handheld gaming console, it’s one of the best available in the market and beats Switch by a considerable margin on most parameters.
You can not expect it to run the most powerful game released 10 years later. But at the moment, most of the major titles are available on Steam Deck and run exceptionally well.
That’s all there’s to Valve Steam Deck and its compatible games. While we have listed just a few, you would be able to play many more on Steam Deck. And the list will surely expand in the coming days.
Also, for those who didn’t know, you could connect your Xbox Game Pass to Steam Deck.
Starting with Windows 10 Build 18936, you can take advantage of the passwordless sign-in for Microsoft accounts on your Windows 10 device.
The tech giant has been working on removing passwords from Windows 10 until finally coming up with a few alternatives to passwords.
The current lineup of authentication methods includes Windows Hello Face, Windows Hello Fingerprint, Windows Hello PIN, Security key, Password, and Picture Password. If you opt into the new passwordless login, the password option will disappear from your Login screen.
What are the benefits of passwordless sign-in on Windows 10?
If you’re wondering why you would want to use passwordless authentication, it’s because it offers more security and a seamless sign-in experience.
Passwords are often reused on multiple accounts, which makes them susceptible to hacking. A PIN code, for example, is much more secure because is stored on your device and not shared online.
Windows 10 stores your PIN on a secure local chip called Trusted Platform Module (TPM). In case of server or online issues, your private key won’t be affected.
So, any of the other Windows Hello sign-in options are more secure than a password.
How can I enable passwordless sign in on Windows 10?
If you no longer want to bother with having to use a password or a PIN code to log in to your PC, you should enable the Windows passwordless login feature.
This feature can be toggled on via your Windows 10 PC’s built-in Settings, from the Sign-in Options menu.
1. Press the Windows key on your keyboard or click the Start button on your taskbar to open the search box.
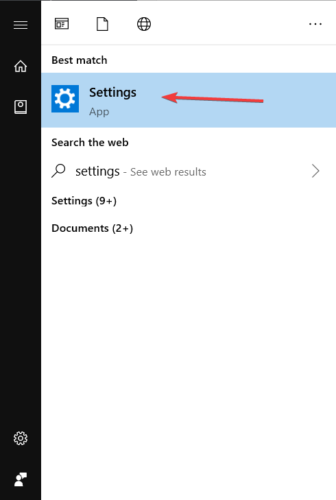
2. In your Windows search box, type settings and click on the first result.
3. In the Settings app, click on Accounts.
4. In the left panel, click on Sign-in options. Now you’ll see multiple authentication methods for your Windows 10 device.
5. In the right section, you can find the Make your device passwordless setting.
6. Toggle the feature on.
7. That’s it. Now you can log in to your Microsoft accounts or Windows 10 device without the need for a password.
Alternatively, on the same screen, you can choose one of the Windows Hello methods and set it up if you want to go back to log in with a password or PIN.
NOTE
If you don’t see the Windows Hello login options in your settings, it’s possible that your device doesn’t support this feature.
In case you are interested in eliminating some of the many passwords used for various platforms, check out this list of the best password managers for Windows 10. It’s the most convenient way of taking this load off your chest.
For any other suggestions or questions, feel free to reach out to the comments section below.
The Steam Deck has various inbuilt memory spaces, ranging from 64 GB to 256 GB and 512 GB. However, Steam Deck is famous for boasting an advantage over several competitors: the ability to install an SD card. The handheld gaming computer allows you to install games with external Storage like an SD card.
Furthermore, Steam Deck lets you expand its storage space by inserting a safe and reliable SD card. It allows users to install Windows on the Steam Deck from an SD card.
Though there are preconditions, such as formatting the SD card on Steam Deck, using it is simple. Ensure that the SD card offers fast read and write speeds to help you get excellent load times.
Likewise, storing games on other SD cards and accessing them on different devices is easier. Users can also install Windows on Steam Deck from a bootable SD card.
How do I install games on my Steam Deck from an SD card?
Execute steps 1-7 above.
Go back to the left pane of the screen and scroll down.
Select Storage and click on MicroSD Card.
Tap on X to make the SD card your default download location for new games.
However, any new games downloaded will be installed on Steam Deck from the SD card. You may be interested in reading about the best deals for the fastest SD card readers.
Will Steam Deck allow SD cards?
The Steam Deck handheld gaming console lets users download, install, and play games from SD cards.
It supports users in expanding storage space by inserting a good quality microSD card into the handheld. However, the users are required to format the SD cards on Steam Deck before using them.
Furthermore, Steam Deck allows SD cards, but not all of them can work perfectly with the device.
Some recommendations are Samsung Pro Plus, SanDisk Ultra, and the SanDisk Extreme Pro. These SD cards offer fast read and write speeds and are very reliable for the Steam Deck.
The Steam Deck supports SD cards of various storage spaces. However, the maximum SD card users can use with the Steam Deck is 1TB. As a result, you can use SD cards with space variations from 32GB, 64GB, 128GB, 256GB, 512GB, and 1TB.
It depends on how much space you need for gaming. The regulated space support for the Steam Deck is 512GB, which is the highest storage option Valve offers for the Steam Deck handheld.
Can you hot-swap microSD cards on Steam Deck?
Hot swapping your micro SD cards from your devices is a bad idea and can cause you to lose vital data. It is ethical and safe to properly eject SD cards from your device before pulling them out.
However, hot-swapping SD cards on Steam Deck is not advisable, even though you can.
Furthermore, some users complain about being unable to access the games on the SD cards after hot swapping.
Hence, removing the SD card without ejecting it may require you to reformat it, meaning you must wipe all the data on the drive.
What causes the issue with hot swapping is that there may be an ongoing writing/reading process. So, a sudden break can affect the SD card.
We have a piece of good news for those who like to manage everything in one place. Microsoft has launched a feature that lets you access Google Drive and Gmailinbox directly from Outlook.com.
This change is part of Microsoft’s efforts to ensure the seamless integration of Google services with its popular email client.
Can I link my Google Drive and Outlook emails?
Thanks to the latest updates, nowadays, both the Windows app and the web version for Outlook, Outlook Web, support Google Drive integration.
This account linking needs to be done manually, and we will show you how to do it in the guide below.
How to use Google Drive with an Outlook account?
It is simple to add your Google Drive account to your Outlook account, and this can be done via Outlook’s built-in Settings that can be accessed via the Web version.
From the Settings menu, you can link whichever Gmail account you want to your Outlook email, in order to gain access to your Google Drive documents.
After the integration is complete, you will be able to add Google Drive files as attachments when composing emails in Outlook.
Furthermore, after you enable it, you can see Drive documents and Calendar entries right away within Outlook. You will be able to see separate inboxes, similar to the way Outlook works in its mobile app.
Is there another method to use Google Drive with my Outlook account?
Back in 2019, the Gmail integration used to only be available to those who were part of the testing group and it worked differently. However, it no longer functions at the moment.
The feature was initially spotted by Twitter user Florian B. According to Florian, Microsoft was working on a Google account integration option for Outlook.com. Florian shared some screenshots explaining how the feature worked.
He discovered a prompt message that allowed users to link their Google Mail and Calendar to their Outlook accounts. This is how this used to work:
Go to Outlook Web.
Navigate to the envelope icon available on the left-hand side.
Once you click on the icon, a dialog box will appear with a message that says Add your Google Mail and Calendar to Outlook and easily manage everything in one place.
Click the Try it button and follow the on-screen instructions to add your Google account.
Now you can see all your Outlook emails directly in your Gmailinbox.
Apparently, the feature was only available to a limited set of users. If you were not one of the few lucky users who had access to the new capability, you had to wait a few more days for a global release.
As previously mentioned, the prompt no longer shows up in 2022, given the fact that an official integration for Google Drive was released in the previous months.
Thankfully, the solution from above is new and updated, and should work without any problems, we recommend you to try it out.
We hope that our guide helped you access your Gmail account in Outlook. Let us know in the comments section below if you have any questions.
The Steam Deck is a gaming handheld computer by Valve. It’s one of the best handheld PCs for gaming. However, using the Steam Deck mostly requires you to have a stable internet connection.
Downloading games from the Steam shame store, updating games, and many other things require it. Nonetheless, the Steam Deck Offline mode allows you to play games on the handheld without having an active connection.
Furthermore, the Steam Deck offline mode doesn’t require you to connect to the internet before accessing games. Hence, there are things that users must do before completely switching to the offline mode.
For instance, you need to open and load the games you want to play to download any updates, if available. Also, downloading games is not possible while in offline mode.
Moreover, there’s been controversy about Steam Deck offline mode vs. airplane mode. The offline mode doesn’t require you to toggle any settings on the device.
So, just disconnecting the internet allows Steam Deck to enter offline mode. It is a way to bypass the online requirements of games.
However, the Steam Deck Airplane mode is a feature available in the settings. It is a simulation of the commercial flight experience for an adult passenger. The user gets to experience and explores the airline travel experience in real-time.
Can I use the Steam Deck offline?
Users can play games on the Steam Deck while offline. In other words, you can navigate through some features without connecting to the internet. However, not every part of Steam Deck is accessible in the offline mode.
Nonetheless, users can enjoy playing several games on the Steam Deck while in offline mode. Although not all games support being played in the offline mode, users can bypass lots of online requirements in games by going offline.
Playing your favorite games on Steam Deck while not being connected to the internet is easy and can be done via Steam’s built-in Settings.
What you need to do is download your game with all the latest updates, uncheck the don’t save account credentials on this computer option, and then enter Offline mode.
1. Log in to Steam while connected to the internet.
2. Launch thegame you want to play offline, wait and see if it downloadsany extra files.
3. After downloading theentire game file, click theExit buttonand go back to Steam.
4. Press the Steam Deck button and select Settings from the left tab.
5. Go toAccountand uncheck thedon’t save account credentials on this computeroption.
6. From the main Steam window, select Steamand click on Go Offline. Doing this will make the games you opened earlier available in offline mode.
As good as the offline mode sounds, there are lots of things that can go wrong. Some problems you may encounter with the Steam Deck offline mode are data loss and the inability to access updates.
However, using this prevents your game history and progress from being saved to the cloud because there is no internet connection.
So, you won’t have any data backed up while playing in offline mode. Likewise, the game won’t be able to update because you are playing it in offline mode.
Furthermore, the offline mode prevents the handheld from having access to updates and patches for fixing bugs. When the Steam deck software is not up-to-date, it impedes its performance. Consequently, it can cause the Stream deck stuck in an offline mode error.
Why is my Steam Deck offline mode not working?
Several things may cause the Steam deck offline mode not working problem. However, some games are not available in offline mode because they require an active internet connection before you can play them.
Also, the Steam deck offline mode may not work if the game you want to play needs to download some extra files or requires an update.
So, users may encounter errors if they don’t follow the appropriate steps for using the offline mode.
The Steam Deck is Valve Corporation’s latest hardware device, and it’s proven to be extremely popular. So much so that Valve is having a hard time producing enough units to keep up with orders.
If you go to the Steam Deck product page, you’ll see the expected order availability much later in the year. At the time of this writing, it’s after Q3 2022, which is around October.
But don’t worry, because there is a way to guess when you’ll get your device, and that’s through the Steam Deck Calculator.
Is the Steam Deck Calculator accurate?
User MooNag created the calculator on Github, and according to people across the Internet, it’s pretty accurate.
Even MooNag admits on his page that it’s only an estimator with fair accuracy, although users already call it the Steam Deck unofficial calculator.
It’s not perfect, and things can change on a whim, so don’t look at the calculator as if it’s the final authority. It’ll give you a pretty good guess, however.
This guide will show you how to use the Steam Deck Calculator and see when you’ll get your device.
How to use the Steam Deck Calculator
1. Using Steam Deck Calculator
Go to the calculator’s web page and enter your Deck’s model, estimated order availability, and region you are in. Valve will only ship to the US, UK, and EU.
Following, enter the rtReserveTime value, which can be found on Steam’s API for reservations.
Copy the number next to rtReserverTime and paste it into the corresponding box.
At the bottom, you will have MooNag’s option to calculate your order and other people’s models. This is because they’ve contributed to the calculator. You can try those out, too, if you want another opinion.
Selecting MooNag’s model will show this particular order will take a very long time to arrive.
Tip
Important notice: The Steam Deck Calculator has been archived and is no longer supported since the 29th of July, 2022. This is due to an update from Valve that all new orders are now in Q4 till the queue fills up. The order will be moved to the next quarter when the queue is full.
However, the Steam Calculator still works and can be helpful for Q3 estimations. Note that the accuracy is no longer the same, as it is now unsupported
2. Using a Shipment estimator
Say, for example. If you finally have your Steam Deck delivery estimate, you can use the shipping estimator to narrow things down.
Go to the calculator’s web page and click the Shipment estimator form link.
On the Shipment estimator form, enter the region you are in that Valve delivers to and the Steam Deck model.
Next, you will need to input the rtReserveTime value, which can be found on Steam’s website. Finally, make sure you’re logged in to your Steam account.
Look for the number next to rtReserveTime.
Enter that number in the bottom box, then click Next.
Enter Valve’s delivery estimate and pre-order estimate. Then hit Next.
Enter when you got your official order email, then hit Submit.
After this, you’ll get a shipment date. However, this method only works if you have an email from Steam confirming the order.
Valve recently announced that it is more good news if you have a reservation. Unlike the formerly predicted long-term demand fulfillment time, you can now get your Steam Deck in Q3 or Q4 2022 if you already have a reservation.
So, depending on your queue position, you should be able to get your Steam Deck order later in 2022 without using the calculator for prediction.
Is Steam Deck more powerful than Switch?
The Steam Deck is way more powerful than Nintendo Switch. It is considerably better in terms of speed and overall performance.
However, Nintendo Switch is more portable and comfortable. Also, in terms of looks, Switch has features like a round screen and an OLED display that is preferable to the LCD in Switch Deck.
And if you’ve ever experienced problems with Steam errors on Windows 10 and 11, you can fix this by updating your drivers and checking the integrity of your games.
Feel free to comment below if you have any questions on other gaming websites. Also, leave comments about reviews you’d like to see or information on anything video game related.
If you’re asking yourself how to check the .NET version on your Windows server, you found the right guide.
Some applications require specific .NET versions to run properly, and the information regarding how to find this information is not easy to find online.
For this reason, in today’s how-to article we will discuss the best methods to find out the version of your .NET on Windows server, no matter whether it is Windows server 2016 or 2019.
Please follow the steps presented here carefully to avoid causing any issues on your Windows server machine.
How can I find what version of .Net Framework I have on my Windows Server?
1. Check the .NET Framework version in Powershell
A handy tool for finding out your .NET Framework version is Powershell. It is a built-in command tool that allows you to modify and find out various things on your PC.
Through a few commands, you can check whether you have a specific version installed or not.
Press the Win + X keys on your keyboard.
Choose PowerShell (Admin) from the list. If you do not find it, you can select Command Prompt, depending on which one is available for you.
Paste the following command: import-module servermanager
Press Enter.
Now you need to input commands to find out whether a .NET Framework version is installed on your PC or not. In doing so, you will eventually find out which one you have.
To check whether you have version ASP.NET 3.5, run the following command:get-windowspackage web-asp-net
To check for version ASP.NET 4.5, run the following command:get-windowsfeature Net-Framework-45-Code
The output will state the install state (Installed or Available).
If your version of ASP.NET doesn’t show as installed, you can use these commands to install them:
ASP.NET 3.5: add-windowsfeature web-asp-net
ASP.NET 4.5: add-windowsfeature Net-Framework-45-Core
2. Find the .NET version using the Server Manager GUI
Open Server Manager (usually the first pinned icon inside your taskbar).
Under the section Configure this local server -> click the option Add roles and features to start the wizard.
Choose Role-based or feature-based installation -> click Next.
Click Select a server from the server pool -> click Next.
If ASP.NET 3.5 or 4.5 are installed they will be located under Web Server (IIS) -> Web Server -> Application Development.
3. Check the .NET Framework version on Windows Server via Registry Editor
A more reliable and faster way to find out your .NET version is to use the built-in Registry Editor. The registry contains a list of all installed .Net Framework versions on your device.
As always, it is important to back-up your Registry prior to making any modifications to it, in order to ensure safety.
1. Press the Win + R keys on your keyboard to open the Run dialog.
2. Enter regedit in the dialog box and click on OK or press Enter to run the command.
3. The Registry Editor window will now open.
4. Navigate to HKEY_LOCAL_MACHINE\Software\Microsoft\NET Framework Setup\NDP.
5. All the currently installed .NET framework versions will be listed here under the drop-down menu. If you do not find a specific version, it means that it is not installed on your device.
For example, version ASP.NET 4.5 should be found at this location: HKEY_LOCAL_MACHINE\SOFTWARE\Microsoft\NET Framework Setup\NDP\v4\Full.
In today’s how-to article we explored the best methods to find out what your .NET version is on your Windowsserver machine.
If you found this guide helpful, please let us know by using the comment section found below this article.
Many users reported Megapersonal error 701, and this issue is related to your browser and personal information. To learn how to deal with this issue, keep on reading.
What does error code 701 mean?
This issue can appear due to malware or corrupted system files or registries. Improperly installed applications and lack of storage space can also cause this problem.
How do I fix Megapersonal error code 701?
1. Perform System File Checker Scan
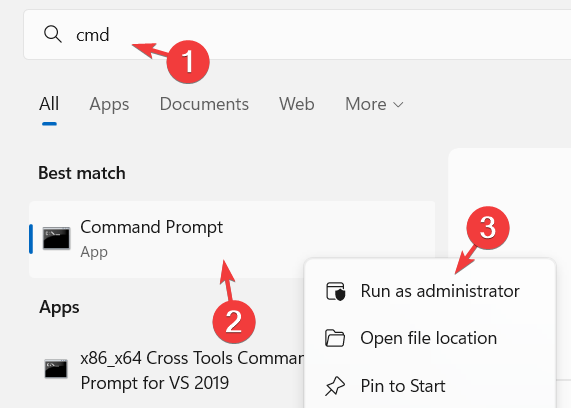
Press the Windows key and type cmd.
Right-click the Command Prompt app from the results and select Run as administrator from the context menu.
Accept the UAC prompt on the screen by clicking Yes.
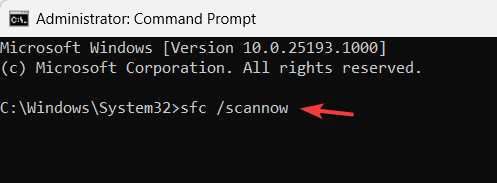
Once the Command Prompt opens, type this command and press the Enter key: sfc /scannow
This starts scanning the entire system for any corrupted system files.
If it finds any, it repairs them.
After that, type the following command and press the Enter key to execute it: DISM /Online /Cleanup-Image /RestoreHealth
This will start restoring the system’s health.
Once done, you can close the command prompt window.
If this error still occurs after you finish the manual procedure, you can always choose an automatic tool that can finish this process without any effort.
2. Repair corrupt registry
Open the Settings app by pressing the Windows and I keys together.
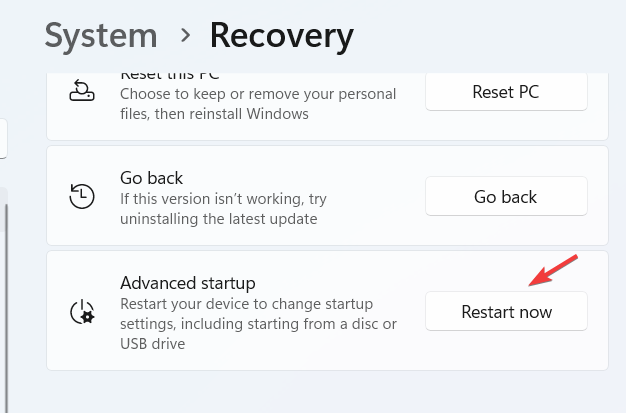
Select the System option on the left panel and select Recovery from the right.
Click Restart now button in the Advanced startup option.
This restarts the system, and you will see the Choose an option page on a blue screen.
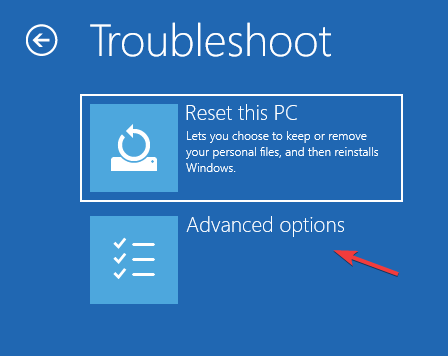
Select the Troubleshoot option.
Choose Advanced options on the Troubleshoot page.
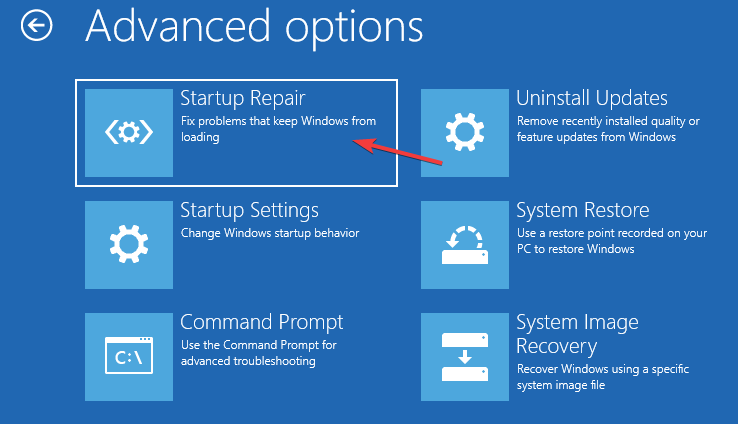
Now click the Startup repair option on the Advanced options page.
This starts troubleshooting the system for any errors or problems.
Wait till it is done, and then restart the system once.
3. Clean boot the system
Open the Run command box by pressing the Windows and R keys together.
Type msconfig and press the Enter key.
This opens the System Configuration window.
Go to the Services tab and check the Hide all Microsoft services checkbox.
Then click Disable all button at the bottom.
Now go to the Startup tab and click the Open Task Manager link.
In the Task Manager Startup tab, ensure all the apps are disabled and restart the system.
After the system starts, enable one service/startup app and see if this causes the error.
Repeat the same steps till you find the error-causing service or startup app.
Click the Disk Cleanup app from the search results page.
Select the Drive from the dropdown list of Drives and click OK.
In the Disk Cleanup window, select all the checkboxes under the Files to delete.
Finally, click OK.
This starts deleting all the selected files which are unnecessary.
If any files are essential, please transfer them to any external hard disk.
5. Scan the system for viruses
To open the Windows Security app, press the Windows key and type windows security.
Then select the Windows Security app from the search results.
Click Virus & threat protection option on the left menu.
Click on Scan options.
Next, select the Full scan radio button and click the Scan now button.
This starts scanning for any virus or other malware files in the system.
What are the most common Megapersonal errors?
Apart from the Megapersonal error 701, there are a few error codes like 702, 601, etc., which could occur on the Windows system due to the improper installation of any application or software.
There is also a possibility of these error codes because of shutting down the system incorrectly, like during a power failure.
Webinars are on top of today’s modern technologies for online promotion. Whether you are an entrepreneur, a content provider, a software creator, or an online training provider, you really need to connect with your audience as close as possible in order to become successful.
To convert your audience into potential buyers, you need to make this connection in a real way so that you will be able to engage the viewer.
Webinar software can help you discover more about your target audience and fit your presentation to your viewers. Such programs will also help you tell all about your services and products to a broader audience, and that’s why they are particularly appropriate for software companies.
There are lots of webinars on the market and we have narrowed the list down to five of the best along with their essential features.
How does webinar software works?
Webinar software lets you host a presentation online and stream it to others. This can be extremely useful if not everyone can attend the presentation.
Hosting a webinar also has benefits, such as reduced cost, and the only thing you need to make a presentation is the software and an optional web camera.
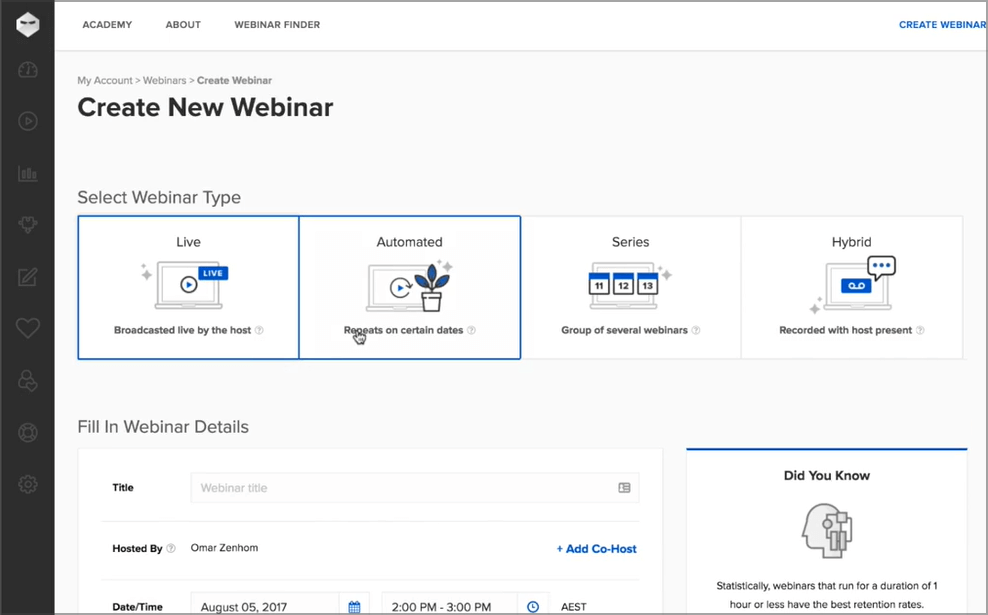
Using a webinar software solution for the first time can be a bit frustrating until you learn what all those buttons do and how to get the most out of the features the tool supports. But this is not the case with Webinar Ninja.
The platform offers plenty of ready-to-use templates and webinar page designs that will help you deliver the information you want without any hassle.
Thanks to these templates, you no longer need to waste precious time working on the aesthetics of your presentations as this aspect has been already taken care of.
When hosting a webinar, audience engagement is key to success. One of the most important features of Webinar Ninja is the FAQ section.
You can use this area to collect all the questions from your audience in a single place and then deliver the corresponding answers. In this manner, no question is lost and all the questions are answered — an approach that your audience will definitely appreciate.
Other audiences engaging features include polls, screen share, live chat, email notifications, and more.
Webinar Ninja is a cloud-based platform that makes it very easy for your attendees to join your webinars from any device. Nobody needs to download anything. For more information, feel free to check out the full demo.
Interested in using Webinar Ninja? Use the link below to connect to the platform.
It comes with two integrations, Zoom and Youtube. Instead of making people watch you directly on Youtube, require them to sign in via Podia and turn anonymous fans into email subscribers.
Podia takes over the tricky logistics so the whole process is automated. It simplifies the management of payment by taking over every individual purchase.
Also, it allows you to save old webinars and earn passive income from them as well as plan, schedule, and sell access to new webinars in advance.
Podia is the perfect platform for content creators to merchandise your workshops, classes, and webinars.
With Podia you also have the option to easily build your brand through a simple website. It provides all the necessary tools to help you build one in a small matter of time.
Use Podia to manage all your marketing, sales, and payments for your online content. It takes seconds to create an account and start using it. No technical or hosting setup is needed. The interface is user-friendly and intuitive so anyone can use it without any guides.
The whole payment process is fast, the payment is approved in under 10 seconds. Show the buyers that professionalism is your main feature.
Save precious time by having all the tools you need to succeed in your webinar.
Podia
Get control of your engagement with the public and boost the reach of your content.
Just as its name suggests, EasyWebinar is the go-to platform if you want to easily plan and host webinars. This sales and customer relationship-oriented tool has a series of interesting features that will help you boost your sales and increase brand awareness.
EasyWebinar offers an impressive full-suite marketing solution that will make potential customers want to buy your products. You can host product demonstrations, show people how your products can help them, and thus generate leads.
If you need to deliver training seminars, EasyWebinar is the right tool for the job. Your sales team will get familiar with new products in no time and they’ll be able to sell more products.
Knowing your customers is the key to success. The platform supports a wide array of customer tracking tools that allow you to profile your audience so as to learn what they want and predict their behavior.
So, if sales are your line of work and you need a webinar solution to boost your sales, try EasyWebinar. You won’t regret it.
EasyWebinar
Plan and host webinars with ease with this full-suite marketing solution.
ClickMeeting – Great for self-employed hosting webinars
ClickMeeting is a versatile webinar platform targeting marketing and sales teams as well as educators. So, if you need a reliable tool to showcase your products, plan the next step for your business, or deliver online courses, ClickMeeting won’t disappoint you.
This platform offers all the features you need to prepare and plan your webinar. The address book helps you better manage attendees and keep them informed. The waiting room features let you display the agenda and the highlights so that people may know what to expect.
The sub-accounts and multi-user features allow you to better define everybody’s roles. These features will come in handy when other colleagues or external trainers take part in the webinar.
When it comes to delivering your message, ClickMeeting has got you covered. The whiteboard feature lets you better illustrate your ideas, while the Call-To-Action button pushes your audience to act fast.
Once the webinar is over, you can analyze its performance by checking the statistics and attendee reactions, deriving predictions, checking social media engagement, and more.
GetResponse is a complex marketing program that is used by small, medium, and large businesses and entrepreneurs.
This solution comes with a webinar platform but also with all kinds of marketing tools such as autoresponders, custom emails, a list segmentation feature, and more.
Take a look at the most impressive features packed in the GetResponse solution:
It provides the email database and the webinar tool in a single place
The account holder can schedule webinar campaigns for subscribers and send them reminders
The event can also be shared on social media
You have the ability to use the registration features to collect emails and then to send automatic messages to the users
It comes with YouTube integration for viewing the videos
The solution allows desktop sharing
You can also use polls and surveys to get instant feedback
GetResponse comes with an integrated whiteboard for drawings and notes as well
It provides detailed reports
You also have the opportunity to try out a free 30-day trial and the basic plans of this solution include up to 100 participants.
Extended projects include up to 500 participants, so they are best suited for larger companies.
GetResponse
Get access to many impressive features that can help with your webinar experience.
WebinarJam is one of the most straightforward intuitive webinar solutions on the market. It’s the best solution for selling a product during a webinar, and it allows you to have popup calls to action during the webinar so that your audience can buy your products effortlessly.
Check out the most relevant features that are packed in WebinarJam:
The chat contains relevant comments highlighting and the ability to moderate comments
It also provides the opportunity to send private messages to moderators
This platform is best suitable for coaching, consulting and promoting new products
The program allows up to 6 co-presenters who will all be shown on one screen
You can temporarily turn the attendee into a presenter
WebinarJam works in all browsers, operating systems, and devices that use the latest technologies
The program is able to record the webinar automatically and it provides a re-play option to attendees
The attendees can send a request to speak and turn into speakers for a while before returning to the attendee mode. WebinarJam is ideal for companies of all sizes, and it’s one of the most excellent webinar software out there.
The coolest thing about Zoom is that it provides essential webinar features without having to pay anything. In other words, if your meetings are less than 40 minutes and the number of participants is under 100, Zoom is free of charge.
The reason for this is that this tool is built for larger companies that will pay lots of cash for video conferencing technology.
Take a look at Zoom’s most impressive features below:
It provides excellent video conferencing features including screen sharing, annotations on the screen, private and group chats, and more
You can create recurring meetings with the same link
Get a simultaneous Screen Share for more participants
There’s also a free desktop and app sharing
It works on all devices and platforms
Note that it records everything at the event including the questions asked by the participants via chat and videos from multiple presenters
Zoom is primarily used for teaching purposes, but this doesn’t mean that entrepreneurs and corporate users will not find it useful as well.
The paid features include detailed webinar reports, admin controls, cloud storage for recordings, the personal subdomain for events, and more.
My Own Conference is an amazing online web service that anyone can use to create meetings of both personal and of a business nature, all thanks to the tools and features that it brings.
The system is very stable, guaranteeing 99.98% uptime so that you can get your message through clearly and without interruptions.
The service can be accessed from anywhere as long as you have a web browser, and you can use it to remind users of upcoming meetings with automatic email invitations.
It is currently available in 16 different languages, and the multi-speaker support makes it so that everyone that has something to say will get the chance to say it.
Note that for a more personal touch, your own webinar can be customized with whatever elements you want, including banners, logos, and backgrounds.
For those that need a bit more management, My Own Conference lets you blacklist users, or just send them warning messages beforehand.
Your meetings can be recorded and shared, you can perform screen recordings, and the program lets you upload and transfer files instantly, so interactions between you and your viewers will be enhanced.
Lastly, My own conference lets you know what your attendees think even when you’re not around, thanks to a feature that lets you create tests and surveys through it.
This depends on various factors, such as the service that you’re using and the quality of the video stream, as well as if you’re sharing your screen with others.
Good webinar software doesn’t always have to be paid for, and many options are available for free. This means that you only need to sign up and you can go ahead and host a presentation.
There’s a caveat though, and usually, that’s the number of people that you can join your presentation, so keep that in mind when choosing your software.
Can webinar software work in a web browser?
Most of these applications work as online services, and many are accessible through a web browser. This means that if you want to join a webinar, you just need to use your web browser.
However, if you’re hosting, it might be better to use actual software for the best results.
If you’re attending a webinar, you’ll need up to 4Mbps for a full HD video. On the other hand, if you’re hosting a webinar, the required upload and download speed should be around 4Mbps for full HD video.
These are six of the best webinar programs that you can find these days. To make up your mind and choose the ideal one for your needs, you should consider your budget, the size of your audience, and the necessity of analytics tools.
If you need something less demanding, you can always use video conferencing software instead, which does the same thing on a smaller scale.
What is your webinar software of choice? Let us know in the comments section below.
As a typist or one who works with documents, scanning your documents and sending them to email can ease your workload. Recently, users have reported scanners not sending emails which has affected users’ workflow.
There are diverse claims raised by users, such as scanner not sending to email Ricoh; Genius scan not sending to email; Tiny scanner not sending email; Adobe scan not sending email, and so forth.
There can also be different reasons for the scanner not sending to email. You can read further to explore the reasons for these issues and the short-term workaround to get your scanner to scan your email.
Why won’t my scanner scan my email?
Wrong email destination: As users, it is possible to make specific slips at times. If you are experiencing a scanner not sending to email, you first should confirm if you have entered the destination email address correctly.
Password has been changed on the host email account: Another reason for scanner Pro not sending email could be because the password on the host email account has been changed. Each scanner has a customized email address, which can require a password change. Unless the password in your scanner’s settings is updated with your email address, you won’t be able to scan.
The filesize is too large: It is worth noting that every email account has a maximum file size to send an email successfully. Hence, if you exceed your scanner’s full file size, you may encounter this problem.
Email domain of scanners/host email is temporarily out of service: It is possible to encounter a xerox scan to email not working or a soft scan to email not working because every scan to email scanner is assigned an email address to enable this feature to work. But the problem is inevitable whenever the email server is down or the email provider has a temporary issue.
New Router or Internet Provider: If, for some reason, you have to get a new router or you make changes to your email service provider, for instance, changes from Comcast to Sonic, then you will have to update the settings in your scanner, or else your scan to email will not work.
How do I get my scanner to scan to my email?
Before we start with the complex changes, here are a few quick checks and tips:
Restart the computer, the modem/router, and the scanner.
Verify that the entered email address is correct.
Make sure the file size is within the scanner’s range.
Check if the patch cord is damaged and needs replacement. Even if it doesn’t appear that way, we recommend you replace it just to be sure.
If none work, head to the fixes listed next.
1. Reduce the DPI Settings
Scan your document at a lower resolution (96 DPI).
Crop the image to remove any space around it.
Shrink the image.
Save the file in JPG format instead.
2. Use a USB thumb drive
Locate the built-in USB port of your color copier.
Connect a USB thumb drive and locate the Control Panel.
Click on the storage space in Control Panel.
Follow the intuitive prompts to scan your documents from your copier to the USB thumb drive.
You can upload the scanned file from your thumb drive to your computer/email.
This is an excellent hack for scanning any time you are experiencing internet or email challenges preventing you from scanning.
Click add attachment symbol. (It usually looks like a paper clip)
After clicking on it, find your file, select it, and press Enter.
4. Reinstall drivers
Right-click on the Start menu icon.
Select Device Manager.
Expand the Imaging devices section.
Right-click on the problematic scanner and click on Uninstall.
Reboot your PC.
Alternatively, you can use Outbyte Driver Updater to locate the latest drivers and download them without having to download them from the manufacturer’s site.
Outbyte Driver Updater
Scan and keep your device’s drivers updated all the time with this professional software.
Click the Options button to open the Outlook Options window.
Select the Add-Ins section. (Settings of plug-ins embedded into Outlook are displayed in the right part of the window)
Click the Add-In Options button.
Following the steps above, you should be able to scan to email via Outlook.
You can work your way through any of the fixes above. One of them should fix your scanner issue. You may also check our guide on how to fix scanner not detected in Windows 11 for more solutions.
If you have more questions or suggestions, leave them in the comments section. We’d like to hear from you.
Windows 10 has a lot of features and sometimes they require multiple steps to set up.
If you don’t fully set up your PC after a clean install of Windows 10, a feature update, or even after a restart or log-in, you can be prompted with the Get even more out of Windows10 message.
Why am I getting the Get even more out of Windows notification?
This message helps you launch services linked to your Microsoft account like:
Set up Windows Hello
Do more across devices
Get Office 365 ready
Protect your files with OneDrive
Link your phone and PC
Can I turn off this notification?
The Get even more out of Windows message can be useful for users who want to set up the above-mentioned services, but for those who don’t, it is really annoying.
Starting with Windows 10 build 18945, the message states Suggest ways I can finish setting up my device to get the most out of Windows and can be turned ON or OFF in Settings, under Notifications & actions.
Today, we’ll take a look at how you can get rid of this prompt in Windows 10.
How can I disable the Get even more out of Windows message on Windows 10?
There are two methods to get rid of the Get even more out of Windows message in Windows 10: via the Settings app and through the Registry Editor.
1. Disable the Get even more out of Windows 10 prompt via Settings
The first way in which you can get rid of the notification is through Windows 10’s built-in Settings. Under the Notifications & actions section, you will find the toggle for enabling or disabling the Get even more out of Windows 10 message.
After you toggle the option off, you should never receive this notification again on your device.
1. Press the Windows key on your keyboard or click on the Start button on your taskbar to open the search box.
2. In your Windows search box, type settings and click on the first result. You can achieve the same result by pressing the Windows key + I.
3. Once in Settings, navigate to System > Notifications & actions.
4. In the right section, under Notifications, find Suggest ways I can finish setting up my device to get the most out of Windows.
5. Click on it to remove the checkmark and disable the option.
6. Close the Settings app.
7. Now, the prompt should be disabled and you won’t see the Get even more out of Windows message anymore.
2. Disable the notification through the Registry Editor
In your Windows search box type regedit and right-click on the first result. Then select Run as administrator.
Once in the Registry Editor, navigate to Computer\HKEY_CURRENT_USER.
From there go to Software\Microsoft\Windows\CurrentVersion\UserProfileEngagement
If you can’t find the UserProfileEngagement, you’ll have to create it by right-clicking CurrentVersion and then select New > Key > name it UserProfileEngagement.
In the right section, double-click on ScoobeSystemSettingEnabled. If you can’t find the Dword ScoobeSystemSettingEnabled, you’ll have to create it by right-clicking UserProfileEngagement and then select New > Dword (32-bit) value > name it ScoobeSystemSettingEnabled.
After double-clicking it, you can disable it by entering the 0 value or enable it by entering the 1 value.
Now close the Registry Editor and restart your PC.
Whenever you conduct a search for a chat message in Microsoft Teams and click on the result you are looking for, you will be redirected to a view that only features the selected message. At times, this may present a difficult situation as users may be unable to the context of the message as it is singled out and no background information is provided to establish some clarity.
But this is about to change as Microsoft is currently working on a feature tagged ID 97510 in the Microsoft 365 Roadmap that will let users view the full chat conversation thread after clicking on search message results. In turn, this will make it easier for users to track their conversations easily and refer to conversations and previous messages revolving around the searched message. We are likely to see this feature hit general availability sometime in October this year for both Windows and Mac users.
In other related news, Microsoft recently launched Teams Rooms Pro, a platform designed to provide an integrated experience and bridge the gap between physical and digital workspaces at $40 per month, it also comes with a one-month free trial.
The Steam Deck resolution measures the quality of images on a screen. It is measured in pixels, with 4K being the highest resolution. The higher the pixel count, the sharper and more detailed your picture will appear.
Some games also require a certain amount of resolution to be able to play. This is because the game may not run correctly with an extremely low or high resolution. And this can happen if you have a low-end computer or laptop.
Aside from resolution issues, you may also encounter the Steam cloud error but worry not, as we have adequately covered it in our detailed guide.
Is the Steam Deck 1080p?
No, as per the information on the Steam Deck’s specification page, the Steam Deck screen resolution supports 1280×800 px, but you can certainly play games at 1080p through docking, given the monitor supports it.
Users have reported playing games on the Steam Deck at 1080p when docked, though the FPS may drop for some of the more demanding ones.
If you were wondering, the Steam Deck TV resolution remains at 800p since the ability to change it is only available in Desktop mode.
Also, if you were to look at the Steam Deck resolution PPI, it comes out to be around 206, which is pretty good for a device its size.
Will Steam Deck support 4K?
The Steam Deck desktop mode resolution can support up to 4K@120Hz, but not the built-in screen.
But gaming in 4K isn’t accessible, especially if you’re running on a PC. Even if your hardware is up to the task, the demands of higher resolutions and higher framerates can cause your game to choke.
Although some PCs can withstand the heat, some may be unable to keep up with the demands of rendering such a high resolution.
You can use 4K resolution if you have a powerful enough graphics card, but if you don’t, your GPU will likely be pushing its limits to get those high frame rates.
In that case, it might be worth turning down some of the settings so you can get more frames per second without sacrificing too much visual quality.
How to change the resolution on my Steam Deck?
Select the particular game you wish to change the resolution on Steam Deck.
Click on Properties.
Select General and navigate to Game resolution.
Click on the drop-down menu and select your preferred resolution.
As a note, these settings will only work if you have installed the latest updates to Steam Deck. If not, you can only change the resolution in desktop mode.
Strictly speaking, the team at Valve has confirmed that Steam Deck will not perform better when docked. And the primary reasoning behind it is that Steam Deck has been developed as a handheld mobile device and the developers want to promote it that way.
But docking Steam Deck does have a few benefits, starting with a larger display and better controls for some. So, it might give the impression to many that the performance has enhanced while it remains the same.
What resolution should a Steam Deck be docked at?
As with most things, there are no hard and fast rules for resolution. However, your Steam Deck’s answer should be the same as your monitor’s resolution.
If you have a 1920 x 1080 monitor and are playing games at that resolution, your Steam Deck output resolution should be set at 1920 x 1080.
Some people prefer a high resolution on the portable device because it is easier to see what’s happening. At the same time, others prefer a lower solution because of performance issues. Ideally, the Steam Deck resolution while docked should be the same as the native Steam Deck resolution.
It is, however, essential to note that when your Steam Deck resolution is docked, you risk compromising the quality and stability of the game if you go higher.
Hopefully, you are now able to change your Steam Deck’s resolution and can enjoy gaming in high quality.
For quite a long time, users asked for a dark theme for File Explorer. We only had rumors about it, but things have changed for the better.
Windows 10 users from all over the world are eager that they can enjoy it or look for ways to enable it as soon as possible.
Is that your case as well? We can only encourage you to stick to this decision. Your eyes will thank you later.
This dark theme that we are talking about comes in different shades of black for the pane, ribbons, menus, popup dialogs, and background.
Therefore, waste no more time and see the detailed steps to enable this dark theme for File Explorer.
How can I use the dark theme for File Explorer in Windows 10?
1. Enable the File Explorer dark theme
Users who are interested in trying out the dark theme in File Explorer can easily toggle it on via Personalization Settings, in the Colors section.
From that menu, you can change between light and dark themes for your Windows 10 device in a simple click. If you are unhappy about it, you can disable it back straight after.
1. Press the Start button on your taskbar and type settings in the search box, then click on the result.
2. Then, navigate to the Personalization tab.
3. Click on Colors.
4. Under the More options section, you just need to select Dark for the Choose your default app.
5. Once you finish these steps, close the Settings window.
6. You may now launch File Explorer and confirm liking the new look.
Once again, go to Settings > Personalization > Colors.
Here you’ll find a variety of different colors to pick from.
You can also use the Choose a custom accent color option.
You may leave the Automatically pick an accent color for my background box checked and avoid this task.
If you made the switch, then all apps, the context menu, and the system UI will become proof of the big change many of you asked for.
Assuming that you have already completed the above procedure, don’t hesitate to tell us more about your experience. Use the comments area below in that regard.
We know many of you are excited after the release of Valve’s handheld gaming device, which resembles a PSP. And as with any device, Steam Deck also receives software updates.
There had been a lot of talk about Steam Deck, even before its release date, which was February 25, 2022. Ever since it was released, the advanced and user-friendly console has undoubtedly appealed to a large part of the gaming community,
If you were wondering what software updates Steam Deck would offer and how these can be downloaded, you have come to the right place. Please read the following sections to find out all about it.
And we know another repeated question: Should you install Windows on Steam Deck? Therefore, don’t hesitate to check out this dedicated guide for a detailed answer.
Will you be able to upgrade the Steam Deck?
From the hardware point of view, you cannot upgrade Steam Deck or its components, except the SSD available on two of the three models, which is not recommended.
Valve has warned users that modifying or replacing the hardware can affect the device’s functionality. For instance, improper battery replacement can lead to Steam Deck catching fire.
Given the device’s functioning and initial reviews, most users wouldn’t need to upgrade Steam Deck. Just update the software regularly, and everything should work fine.
How do I update Steam Deck firmware?
NOTE
Before executing the Steam Deck OS download steps, ensure you are using the console in Game Mode and not Desktop Mode.
Turn on Steam Deck, and then press the STEAM button on it.
Tap on Settings on the left.
Now, navigate to the System tab and click on Check For Updates on the right.
If an update is listed after the scan, click on Apply. All angles are introduced in the new version, and other relevant details are listed under the update. (A small yellow exclamation mark near the System icon indicates that an update is available)
Once the update is installed, tap on Restart for the changes to kick in.
After Steam Deck restarts, repeat the process once to verify that all the pending updates have been successfully installed.
That’s it! Steam Deck software update should be a cakewalk for most of you who had trouble with it until now.
Will there be a Steam Deck 2?
Yes, there will be Steam Deck 2, an upgraded version of Steam Deck. One of Valve’s co-founders confirmed this and hinted at the Steam Deck’s 50-page booklet.
So, if you loved the first generation, there will be further iterations of Steam Deck, with improved specs and upgrades to the SteamOS.
Can you play Steam Deck offline?
Users can play games offline on Steam Deck, as with other gaming consoles and devices. But, again, you would need a stable Internet connection initially to download the game.
Also, some games may require an Internet connection while playing, so you should check that out, but most would work seamlessly without one.
That’s all there’s to software updates on Steam Deck. We also tried to clear some trending queries regarding them openly and hope the information proved helpful.
Besides, find out the games available on Steam Deck. If your favorite appears on the list, make sure to give it today itself!
Many reported that Elden Ring crashes with a white screen. Games typically crash due to lack of system resources, graphics driver issues, or interfering apps.
Elden Ring players also reported getting a white screen right after an update.
Let’s take a closer look at all of these issues so you can get rid of them.
How can I fix Elden Ring’s white screen crash?
Before you head to the complex solutions, restart the computer – this could fix many bugs. If the error persists, follow the advanced options below.
1. Update the graphics driver
Press Windows + S to open the Search menu, enter Device Manager in the text field, and click on the relevant search result.
Double-click on the Display adapters entry here.
Now, right-click on the graphics card and then select Update driver.
Press Windows + I to open Settings, and in the System tab, click on Display on the right.
Click on Graphics here.
Now, locate and select Elden Ring and click on the Options button.
Select High performance always to run the game with this setting.
Once done, launch Elden Ring from Steam and check if it still crashes with a white screen. If it does, there’s likely another underlying cause behind the issue, and the following proposed methods should help.
You can retain the changes made here to get the best performance from Elden Ring.
4. Terminate unnecessary background applications
Press Ctrl + Shift + Esc to open the Task Manager and locate all the non-critical apps running here. Also, look for the ones that are hogging the system resources.
Select each individually and click on End task at the bottom-right corner.
Many reported the Elden Ring white screen with cursor crash occurs when their system runs out of resources. This could be due to both high RAM usage and high CPU consumption.
The easiest way out would be to terminate the unnecessary apps. Also, you can disable the background apps to keep the error from reoccurring.
5. Reinstall the Microsoft Visual C++
NOTE
Before trying the steps listed below, create a restore point in case things don’t go as expected so you can revert to a stable state.
Press Windows + R to open Run, enter appwiz.cpl in the text field, and click OK.
Locate the Microsoft Visual C++ entries, select them, and click Uninstall.
Follow the on-screen instructions to complete the process.
Similarly, uninstall the other entries as well.
Once done, head to Microsoft’s official website, and download all the packages you uninstalled earlier.
Now, launch the setup for each and complete the installation process.
6. Verify integrity of game files in Steam
Launch Steam, and navigate to the Library from the top.
Locate Elden Ring from the list of games on the left, right-click on it, and select Properties.
Now, go to the Local Files tab from the left, and click on the Verify integrity of game files button.
Wait for the process to complete. It’s usually swift.
If the problem lies with the game files, Steam will take the necessary measures, whether repairing or reacquiring them. And once done, the Elden Ring white screen error would most likely be fixed.
7. Disable the fullscreen optimization setting
Right-click on the Elden Ring launcher and select Properties from the context menu.
Navigate to the Compatibility tab, check the Disable fullscreen optimizations option, and click on OK at the bottom to save the changes.
8. Update Elden Ring and Windows
8.1 Updating Elden Ring
Launch the Steam app, open the Library, right-click on Elden Ring, and select Properties.
Now, go to the Updates tab, and ensure you always keep this game updated selected under Automatic Updates.
Next, restart Steam, and it will then automatically update Elden Ring.
8.2 Updating Windows
Press Windows + I to open the Settings app and select Windows Update from the left.
Next, click on Check for updates on the right.
If any updates are listed after the scan, download and install each.
Besides the white screen problem, many report that sometimes the game won’t close, is not using GPU, or not showing keyboard controls. Luckily, with smart tricks like those outlined in this article, you should be able to fix such errors.
One of the most frustrating things that can happen while you’re using your Steam Deck is if you lose your Wi-Fi connection. If you have ever had a Wi-Fi connection issue on your Steam Deck, you know how frustrating it is.
It can easily ruin a promising win streak or a good run especially if it happens right in the middle of an intense game. You may have noticed that your Wi-Fi connection has become a bit sluggish or the connection keeps dropping. This is a common problem on Steam Decks.
Having a good Wi-Fi connection is one of the most important things in your home. Without it, you’d be stuck with slow speeds and constant buffering.
Why does my Steam Deck keep disconnecting from Wi-Fi?
If you are having problems with your Wi-Fi connection on your Steam Deck, there can be several reasons why. Below is a list of the most common causes:
Distance between router and Steam Deck – Your router may be too far away from the Steam Deck, so it can’t send a signal. In this case, you need to move the Steam Deck closer to the router or get a better antenna on your router.
Too many devices connecting to your Wi-Fi network -This can happen if you have multiple phones, tablets, or laptops all connected at once. If this is happening then you will need more bandwidth or remove the devices from the network.
Faulty cable – If you’re using a wired connection to your router, check that the cable is not faulty. If it is, then replace it with a new one.
Network interference – The most common cause of disconnects from Wi-Fi is interference. If you live in a densely populated area, or if there are other networks nearby, the signals can become too weak for your Steam Deck to maintain a connection.
Other causes include outdated router firmware which you can resolve by updating.
How do I fix Wi-Fi issues on my Steam Deck?
1. Check your network connection
If your Steam Deck isn’t connecting to the internet, check that it has an active internet connection first. Try connecting directly to your modem or router with an Ethernet cable and see if that works.
If so, then there might be something wrong with your network configuration or settings. Users have reported having better luck using Ethernet instead of Wi-Fi for their Steam Decks.
2. Check your cable connections
If your cable modem is plugged into the wall with a power adapter instead of plugged into an unswitched outlet, try plugging it directly into the wall instead of using an extension cord or power strip.
Make sure that all cables are securely connected on both ends and that they are not frayed or damaged in any way as frayed cables can reduce performance.
3. Change your channel settings on your router
Wi-Fi channels are like radio stations; they’re just different frequencies that each device uses at any given moment in time.
If there are several devices trying to use the same channel at once, it slows down everyone’s connection speed because they’re competing with one another for airtime on that frequency band.
In order to avoid this problem, try changing your router’s channel settings so that they don’t overlap with each other.
Sometimes when things go wrong with our internet connections, all you need is a good reboot of your router or modem. This will reset everything and hopefully resolve any problems that might have occurred while using your devices across the house.
Try restarting your router by unplugging it from the power source for 10 seconds before plugging it back in. Then, try restarting your Steam Deck again too.
5. Update router firmware
If you’re running an older version of firmware on your router or modem, then you should update its firmware as soon as possible. Outdated firmware can cause all kinds of issues when trying to connect devices wirelessly at home or work.
Make sure that you back up all your data before updating firmware because it could cause some problems with connectivity during the process and leave you without internet access.
Yes, you can use Steam Deck without Wi-Fi. In fact, there are a few different ways that you can play the game without having to connect it to the internet at all.
The Steam Deck requires an internet connection to load content from the cloud, but once it’s loaded, you’ll be able to use the app offline. This includes all of your favorite games and media.
While offline, you may experience an issue where Steam is stuck on offline mode but we have covered ways to bypass this issue.
After recently releasing Build 22622.590 (KB5017846) to the Beta Channel, and Build 25193 to Insiders on the Dev Channel, Microsoft has dropped another update.
Yes, the tech colossus provided availability for Insider Build 25197 to Insiders conducting their business on the Dev Channel.
Through it, the Calculator app is updated to version 11.2208.1.0, with native Arm64 support, plus faster and better performance when you use the app on Arm64 devices.
The Media Player also updated to version 11.2208.22.0, and you can now edit video files in Clipchamp with a new Edit with Clipchamp action.
This is available when you right-click a video in your library and in the lower-right corner of the video player UI under more options when playing a video file.
That being said, for now, the Dev Channel is sticking with version 22H2, which of course will eventually release later in 2023.
What do I need to know about Windows 11 Build 25197?
Let’s get right into it and find out what exactly the popular Redmond-based tech company has prepared for Windows 11 Insiders.
First of all, Microsoft is re-introducing tablet-optimized taskbar and System Tray updates, and these changes are beginning to roll out so not all Dev Channel Insiders get them right away.
What this means is that Microsoft’s latest design will actually make you feel more comfortable using your device as a tablet.
Now, your taskbar will automatically transition to this optimized version when you disconnect or fold back the keyboard on your 2-in-1 device.
Keep in mind that this feature only works on devices that can be used as tablets, and will therefore not work on laptops or desktops.
Also, remember that there are only two states of this taskbar, and you can only use it as collapsed and expanded.
As you would have expected, while in the collapsed form, the taskbar makes way for increased screen space, and stops you from accidentally triggering it.
While in the expanded state, the taskbar is better optimized for touch, and you can easily switch between the two states by swiping up and down on the bottom of your device.
Also with Windows 11 Build 25197 come important updates to the System Tray that affect all device types, not just 2-in-1 gadgets.
Users will see a rounded focus and hover treatment on all icons in the lower right, due to the continued modernization of this experience.
Microsoft also reports that it is not possible to drag and drop or rearrange your system tray icons with this change.
Changes and improvements
Settings
Microsoft is sterting to roll out animated icons and illustrations in the Settings app. With the animated icons in the navigation bar, the company grows its motion design principles to transform these familiar interactions from something purely functional to something that is also delightful.
Input
The company is making the small tweak that began rolling out with Build 25179 to improve the key repeat rate for the traditional touch keyboard layout, as well as the default touch keyboard layout, so it feels more responsive available to all Windows Insiders in the Dev Channel.
Fixes
System Tray Updates
The taskbar should no longer flash because of changes in the system tray in non-tablet-optimized scenarios.
Fixed an issue that was causing parts of the taskbar or its icons like search to get stuck in the wrong theme’s colors when switching between light and dark themes.
Date and time should no longer get stuck cutting off on the side of the screen from system tray changes.
Start
Fixed a crash that users were seeing when using Start’s recommended section.
File Explorer
Fixed an issue leading to a small set of Insiders with “launch folder windows in a separate process” not being able to launch File Explorer in the last two flights due to an explorer.exe crash.
Did some work to help improve the performance of deleting files via File Explorer (when emptying the recycle bin or using Shift + Delete) in the case where there are a large number of files being deleted at once.
Input
Fixed an issue causing ctfmon.exe crashes for some Insiders in recent flights when words were added to your spelling dictionary.
Dragging the voice typing window to another monitor which has a different scaling than the originating monitor should work now instead of bouncing back.
Fixed a sporadic crash in recent builds when using the input switcher.
Fixed an issue which could lead to voice typing and other input features hanging on initialization.
Fixed an issue with displaying certain Sinhala words, where they were unexpectedly overlapping.
Settings
Updated the design of the lists displayed Apps > Startup Apps and Apps > Advanced App Settings > App Execution Alias pages to be more consistent with other Settings pages.
Fixed an issue which could lead to Settings crashing when removing devices.
Updated the Personal Dictionary section under Privacy & Security > Inking & Typing Personalization to now say “Custom word list”.
Widgets
Fixed an issue which was making the weather icon in the taskbar draw too high and with no text in recent flights.
Windowing
Clicking the title bar portion of a preview thumbnail in Task View should now actually switch to that app, instead of just closing Task View.
Fixed a sporadic explorer.exe crash which could happen when using ALT + Tab or Task View.
Task Manager
Fixed an issue impacting Task Manager reliability.
If graphs have been hidden on the Performance page, the circles used to identify each of the different sections should be less blurry now.
Other
Fixed an issue which could lead to hangs in certain apps when attempting to print if an IPP printer took too long to respond to the print request.
Fixed an issue where EnumPrinters wasn’t always returning the correct size for pcbNeeded, which could lead to hangs in certain programs.
Fixed a typo in the dialog displayed when Smart App Control blocked an app.
Fixed an issue where certain characters were missing in the boot environment when using the Chinese (Simplified) or Korean display languages, leading to square boxes in the text.
Known issues
General
Investigating reports that audio stopped working for some Insiders after upgrading to the latest flights.
Investigating reports of a few different apps having started crashing in recent builds.
Investigating reports that Insiders are experiencing a bugcheck when moving their mouse in certain games
Investigating reports that some Insiders are seeing OneDrive setup asking for permission to set up every time their PC reboots.
File Explorer
Working on the fix for an issue where command bar items like copy, paste, and empty recycle bin may unexpectedly not be enabled when they should be.
Settings
Investigating some issues where uninstalling certain apps using Settings > Apps > Installed apps isn’t working correctly.
Tablet-optimized taskbar
The taskbar sometimes flashes when transitioning between desktop posture and tablet posture.
The taskbar takes longer than expected to transition to the touch-optimized version when switching between desktop posture and tablet posture.
Using the left or right edge gestures can result in the Widgets or Notification Center (respectively) to overlap with or look truncated by the taskbar.
When using the bottom right edge gesture to see Quick Settings, the taskbar sometimes stays stuck in the expanded state, instead of dismissing to collapsed state.
When there are no running windows on the desktop, the taskbar can sometimes collapse, when it should be expanded.
Widgets
Notification badge number may appear misaligned on the taskbar.
In some cases, the notification banner for some badging will not appear in the widgets board.
What can I do if Windows 11 Build 25197 fails to install?
Press Win+ I to access Settings.
Select the System category and click on Troubleshoot.
Press the Other troubleshooters button.
Press the Run button next to Windows Update.
Be sure to report any other issues you might come across, in order for Microsoft to address and improve the overall OS experience for us all.
There you have it, folks! Everything you can expect if you are a Dev Channel Insider. Leave a comment below if you found any issues since installing this build.
Don’t know what to play on Game Pass? With literally hundreds of titles available on the service across just about every genre imaginable, it can be tough to know where start. But we’ve got you covered with these Game Pass recommendations for all those roleplaying enthusiasts out there—and we know there are more than a few of you. Here are the best roleplaying games on Game Pass right now. Enjoy.
Fable Anniversary is a spectacular HD remaster of the original Fable with all-new models, textures, lighting, achievements, The Lost Chapters content, and more!
Bethesda Game Studios, the award-winning creators of Fallout 3 and Skyrim, welcomes you to the world of Fallout 4—winner of more than 50 Game of the Year awards.
The Mass Effect™ Legendary Edition includes single-player base content and over 40 DLC from the highly acclaimed Mass Effect, Mass Effect 2, and Mass Effect 3 games.
Eight travelers. Eight adventures. Eight roles to play. Embark on an epic journey across the vast and wondrous world of Orsterra and discover the captivating stories of each of the eight travelers.
The world-famous indie RPG UNDERTALE comes to Xbox One! Fall into the underworld and explore a hilarious and heartwarming world full of dangerous monsters.
Wrap up
There is more than enough here to keep you busy for months to come. Pretty much any one of these titles will have you spending weeks within its magical world, discovering all of its secrets. Have you already played any of these awesome RPGs? If so, share your thoughts on them in the comments. And if you don’t already have a subscription to Xbox Game Pass, you can sign up here. Learn more about Game Pass on the FAQ page. And don’t forget to check out our other “What to play on Game Pass” posts for other Game Pass recommendations.
Earlier this week, we saw Microsoft Advertising introduce five additional ad products and updates to its suite of tools in a bid to assist advertisers to optimize their campaigns. And today, they have just launched a newly redesigned Smart Campaigns experience with a new Multi-platform feature in the United States, which is designed to help small and medium businesses (SMBs) build their online presence as well as a strong client base. This feature will help SMBs save on time and cost, not forgetting that it is easy to use thus promoting efficiency and reliability.
With the new Smart Campaigns, SMBs will be able to focus on running their operations and enhancing profitability as they are simple yet effective, especially for businesses that are just starting out and want to tap into the digital space.
What’s more, it also helps SMBs identify their target market. SMBs will also have access to Microsoft Advertising’s support team through the chat experience across the site to get them started with their campaigns and accord them any kind of assistance that they might need. Microsoft Advertising has also incorporated artificial intelligence into the new Smart Campaigns experience to help businesses optimize their campaigns in an attempt to help them achieve set goals and simultaneously minimize the cost of operation.
The Smart Campaigns also comes with a new feature, Multi-platform. Previously, it was quite tedious for businesses to run their advertisements across multiple platforms. Multi-platform will help you reach a wider audience as you can now optimize ampaigns across multiple digital channels, that is, Google, Facebook, and Instagram directly from Microsoft Advertising for free. And finally on top of this, with Microsoft AI, SMBs will be able to optimize their budget thus enabling them to achieve “the best performance” across all these platforms.
You can sign up for Microsoft Advertising if you haven’t already to get to enjoy all these features. Share your thoughts and experiences with Microsoft Advertising below.
Everybody wants to play games on their PC. Some people play with the keyboard, while others prefer to use the mouse. However, if you want to play the game in a more comfortable way, then an Xbox One or Xbox 360 controller would suffice.
If you are a gamer, then you know that there is nothing better than playing your favorite game on a controller. The Xbox controller is one of the best gaming devices. However, this does not mean that it cannot have any issues.
In fact, the Xbox controller has some issues with Steam Deck at times. There are chances you’ve played some games with an Xbox controller and encountered the dreaded scenario where it stops working on Steam.
There are many benefits of having an Xbox controller in order to play a game on Steam. However, there may be some issues related to it as well.
Why isn’t my Xbox controller working on Steam Deck?
Steam Deck supports a wide range of controllers, including Xbox controllers. However, if you’re having trouble getting your controller to work with Steam Deck, there may be something wrong. Below are some possible causes:
Outdated firmware – If you have an older Xbox controller that has not been updated with new firmware, you may need to update it. Older firmware may be incompatible with your Steam Deck.
Pairing issues – If you’re trying to use a controller that hasn’t been paired before, Steam Deck will prompt you to pair it. If this doesn’t work, check the batteries in your controller or try connecting the controller to another device (like a PC) to verify that it works correctly. Also, if your controller has been paired to another device already, it won’t work with your Steam Deck unless you unpair it.
Loose cable – If you’re using a wired connection, make sure that the USB cable is securely plugged into both your PC and controller. In the case of a wireless controller, make sure it is charged and within range of your computer.
Permissions not enabled – The first time you connect a controller, it will ask you to give permission to Steam so it can use your controller. If you didn’t allow this or if it was interrupted, you can enable it from settings.
If you suspect any of the above could be behind your controller issues, below are some solutions you can try.
How do I get my Xbox controller to work on Steam Deck?
1. Check cable connection
One of the first things that you should do is check the cable connection between your console and Steam Deck. If your console is connected via Bluetooth, then make sure it is turned on and paired correctly before trying again.
For wireless controllers ensure that you have recharged batteries before connecting to Steam Deck. In the case of a wired connection, ensure both ends are secured. It is also possible that your USB port may not be working so try connecting another device to make sure.
2. Disconnect other devices
If you have multiple controllers or devices plugged in at once, disconnect them all and then reconnect only your Xbox controller to see if there’s any difference in how they work.
This can help to identify if one of these devices is causing the issue. If your controller works after disconnecting other devices, then it could be an issue with that device.
3. Update drivers
Drivers communicate with other devices such as your Xbox controller, mouse, or keyboard. When something does not work as expected on your devices, you need to make sure that your drivers are up-to-date.
This is especially true for gaming devices like video cards and motherboards, but it also applies to other hardware components like keyboards and mice.
The easiest and safest way to do this is with the help of a specialized driver updating tool. It will automatically find and download the right drivers for your device.
4. Update your OS
Steam Deck does not currently support Windows 11 so ensure you are not running an unsupported operating system. If Windows is giving you problems, you can revert to the original Steam operating system.
Also, some Windows updates may have compatibility issues so if the problem occurs immediately after an update, you can uninstall recent updates as you wait for Microsoft to release a patch to fix the problem.
It’s a good idea to keep your Steam client up-to-date especially if you’ve been having issues with your Xbox controller. This will ensure that any issues or bugs are fixed and give you new features and functionality that may not have been available previously.
If nothing else works, try uninstalling and reinstalling the game from its original source so that it gets rid of all possible bugs or issues in the game which may be causing problems with your controller.
Which controllers are compatible with Steam Deck?
Steam Deck is compatible with a wide range of controllers, from Xbox One to PlayStation 4, and Nintendo Switch. However, sometimes, it could be a problem with your controllers. You can test whether your input devices are working on Steam Deck to ensure there are no compatibility issues.
If you find a problem with your controllers, you can check out our recommended selection of the best gamepads for Steam to find an alternative.
Many Windows 11 weren’t actually aware that Microsoft has confirmed yet another peculiar issue in the stable version of Windows 11.
Speaking of problems, the tech giant has also admitted to a Daylight Saving time issue that affects multiple versions of the OS, as well as a Defender bug that sends virus alerts.
Wondering what this latest one is? Well, some users might be unable to sign in after adding a new Microsoft account user to the operating system.
Users say they can’t sign in with Microsoft accounts
Microsoft recently shared details about the bug on the official Windows Health Dashboard website and explained how to fix it.
Judging on what the Redmond company had to say, users get locked out briefly after the first restart or sign-out.
This embarasig issue appears only once and for a short time on devices using a Microsoft account, and its worth mentioning that Active Directory domain users and Azure Active Directory accounts remain unaffected.
Another important aspect to keep in mind when talking about this is that it happens only on systems running the client version of Windows 11 21H2.
Users that are experiencing issues with signing into their accounts in Windows 11 21H2 should not do anything to fix the situation.
Note that the operating system will eventually let users sign in after a few minutes, and on top of that, Microsoft fixed the problem using the Known Issue Rollback system.
Thus, you can rest assured that the latter automatically undoes problematic changes without any action required from the end user.
Microsoft will surely find the time to fix this, while still working on other Windows 11 bugs, and designing Windows 12 at the same time.
Make sure you also check out the latest changes Microsoft brought to the cloud, or what it plans to do with Witeboard in 2022.
We’re going to be keeping an eye out and report on any other changes on the current matter. Have you spotted any other issues?
Make sure you report them directly to Microsoft and also in the comments section located right below.
Amazon Kindle is an online platform where you can find nearly endless digital books. However, many are wondering where Kindle books are stored on PC.
In today’s guide, we’re going to answer this and many other questions, so without further ado, let’s get started.
Where are Kindle books stored on PC & Mac?
1. Find the location of Kindle books on Windows 10 and 11
In order to find the location of your Kindle eBooks, you need to use Kindle’s built-in Options menu. From there, you need to navigate to the menu from which you can change the folder location for the books. It will tell you the current location.
The process is the same for Windows 10 and Windows 11, only the app looks slightly different on them. The following steps will show the Windows 11 version.
1. Launch Kindle on your Windows PC.
2. Click Tools and in the drop-down menu that appears select Options.
3. In the new window that appears, select Content.
4. Under theContenttab, you will see where your Kindle books are located inFile Explorer.
5. You can change the location by clicking the Change Folder buttonand selecting a different file.
6. ClickChange Folder then hit Save.
7. For Windows 10, the location is the same. It’s just that the app looks a little different.
For more information, you can also check this complete tutorial on how to read Kindle books on PC for more helpful tips.
2. Find Kindle books’ location on macOS
On macOS, open the Kindle app.
Click Kindle on the bar at the top and select Preferences.
If you look under the Content Folder section, you will see where your Kindle books are located.
If you click the Change button, you can change the location of your Kindle books or create a new folder if you prefer.
Can I save Kindle books to my PC?
Visit the Amazon store and buy the Kindle version of the book.
Next, sync your Kindle application.
The book will now be downloaded to your device.
How do I download Kindle books to read offline?
For this to work, you must purchase the book and sync your device. After going offline on Kindle, your book should still be accessible.
We hope you found this guide informative and that you managed to find your books. To learn more about Kindle, we suggest reading our guide on how to update the Kindle app on Windows.
In case you have additional problems, check our Kindle for PC not working guide to see how to fix them.
Feel free to leave a comment below if you have any questions regarding the above process. Also, do not hesitate to comment about guides you’d like to see or information on other platforms.
If your PC boots into BIOS instead of Windows, we’re here to show you how to fix it.
When this happens, the BIOS might be set to prioritize a device that doesn’t have Windows installed, the boot files could be missing or corrupted, the drive might not be detected, or there could be recent hardware or system changes.
To fix it, you’ll need to check your boot order, make sure your drive is recognized, and repair or reinstall Windows if necessary. Find step-by-step instructions for all of these below.
How do I fix BIOS boot loop?
1. Check the hardware connection
Make sure your hardware is properly connected.
Remove any recently added hardware.
Try removing the CMOS battery temporarily or replacing it.
2. Disable Fast Boot and set your system drive as the primary option
Connect the flash drive/DVD to your PC, and set it as the Primary Boot Drive.
Restart your PC and wait for the bootable device to load. After it finishes loading, choose the Repair your computer option and follow through with the process.
This should fix the existing errors and make the system boot properly.
What’s the difference between UEFI and BIOS?
The Basic Input/Output System, or BIOS, is the firmware discussed in the preceding section on the boot mechanism.
It has a wide variety of utility operations that enable it to read the boot sectors of any associated storage and output information to the screen.
The abbreviation UEFI refers to the Unified Extensible Firmware Interface. It performs the same functions as a BIOS. Still, there is one fundamental difference between the two: all of the information regarding initialization and starting is stored in a .efi file rather than on the firmware.
This .efi file is kept on the hard drive within a specialized partition called the EFI System Partition (ESP).
To learn more about BIOS, we have a great guide on how to update BIOS that you might be interested in.
Regarding BIOS, many reported that Windows skips BIOS, but we covered that issue in a separate guide.
We hope that our recommendations from this article were helpful for you to solve your PC’s unusual behavior. For more suggestions, please access the comments section below.
Mdsched.exe stands for Windows Memory Diagnostics Tool, and it’s used to check the health of your RAM.
The test takes about 5 to 15 minutes, but depending on your memory configuration, sometimes it can take up to 30 minutes. Let’s see how to run Msdched.exe and check its results.
How do I use Mdsched.exe to check the RAM?
How do I use mdsched.exe on Windows 11?
Press Windows, then type Windows memory diagnostic and click the first result.
Select the desired option. We suggest using Restart now and check for problems.
Wait for the process to finish. When it is done, your PC will reboot automatically.
The scan will now start, so wait for it to finish.
To configure the scan, do the following:
During the scan, press F1.
Now you can configure what type of scan you wish to run and how many passes.
You can switch between different sections with the Tab key and use F10 to save changes.
We suggest using Standard or Extended scan with at least 5 passes for best results.
How do I check my Mdsched exe results?
Press the Windows key + X and choose Event Viewer.
Click Windows Logs and select System. In the right pane, select MemoryDiagnostics-Results.
Now you should see the mdsched.exe log.
Is the Windows Memory Diagnostics tool reliable?
This is a decent tool for beginners unfamiliar with memory diagnostics. We would suggest more advanced software, such as MemTest86+, for more advanced users.
Can you use mdsched from the command line?
While you can start this tool simply by typing mdsched in any command line, it will just open the graphical interface, so you can’t run it using the command line interface or parameters.
The Steam Deck is the most powerful, all-in-one portable gaming handheld on the market. This device makes it possible to take your favorite games on the go, including popular AAA games. However, it can still run into problems, here are some of the most common Steam Deck problems and how to fix them.
Users connect their Steam Deck with their Steam account and can have access to their full gaming library. Players can also keep in touch with their friends with the chat feature.
There is also a Steam Deck Docking Station that allows users to connect to external displays if they wish. However, the Docking Station is sold separately from the Steam Deck.
Is the Steam Deck worth it?
If you’re someone who wants to be able to easily take gaming on the go or have a gaming device that is more convenient to use, then the Steam Deck is worth it. Users rave over being able to comfortably game from anywhere using the Steam Deck.
Is the Steam Deck underpowered?
Despite having more power than the Nintendo Switch, users complain that Steam Deck just is not powerful enough to handle some games at higher framerates.
However, the Steam Deck has a screen resolution of 1280 x 800 instead of 1920 x 1200, which allows for a high framerate even with high graphics. Having a lower screen resolution prolongs the Steam Deck’s battery life.
The Steam Deck is designed to run AAA games, however not every game is designed to be played on a smaller screen and might not run as well on the Steam Deck. If you want to know which games are verified on the Steam Deck, we have suggestions for that.
What are the most common Steam Deck problems?
1. Steam Deck not launching games
One of the most common Steam Deck problems is not being able to launch games. This issue typically occurs because there is not enough space on the micro SD card and the internal drive.
Go through your game library and delete some games that you don’t play much until there is some more space on the drive and sd card. Try freeing up some drive space by removing unused games before resorting to a factory reset.
2. Steam Deck not charging
There are a number of reasons why your Steam Deck might not be charging. Try booting the Steam Deck in BIOS recovery mode by holding the Volume up button and pressing the Power button until you hear a sound. This will allow you to enter battery storage mode which may fix the issue.
One thing to try is to check your USB-C cord to make sure it’s not broken or faulty. You can test the cord by plugging it into a compatible device to see if it starts charging. Also, ensure that the USB-C port is clean and free of any debris.
Another method to try if your Steam Deck is not charging is to connect it to the original charger. Using the charger that came with your device is the best way to ensure proper charging and longer battery life.
3. Steam Deck not powering on
If your Steam Deck is not powering on, then try rebooting it by pressing and holding the power button for five to ten seconds. It may take a few minutes for the Steam Deck to power on.
If it does not after some time has passed, then try leaving your device on the charger to ensure it is fully charged first.
If you notice that the power button is stuck or doesn’t seem to respond to pressure, you may have to contact Valve to get a replacement device due to faulty hardware. There were some users that reported having this issue with their Steam Deck.
4. Steam Deck not recognizing SD card
On the Steam Deck homepage, open Settings.
Select System then Format SD card.
Wait for the process to complete.
Some users report issues with their Steam Deck not recognizing the SD card. One easy fix to try for this problem is to format the card. If that doesn’t work try powering down your device, and removing the card, then power on the Steam Deck.
Open the storage menu and re-insert your SD card to see if it appears.
Wi-Fi connectivity problems are another frustrating issue with the Steam Deck. Many users reported their Wi-Fi dropping while downloading or updating games.
To fix this, try going into Developer mode in Settings and then disabling Wi-Fi power saving, then try to connect to a network.
To avoid Wi-Fi issues, be sure to connect to a stable network that is known to be reliable. If using a busy or public network, then your Wi-Fi connection may not be as stable.
6. Steam Deck battery life
Valve claims that the Steam Deck has a battery life range of two to eight hours, however, some users report their device draining after only an hour.
One contributing factor could be the type of game being played. AAA games can consume a lot of power and resources and thus may eat up battery life since these games were designed for PC and consoles. If playing a resource-demanding game, it may be best to remain connected to a charger.
Users can extend their battery life by using the original charger that came with the device and charging it for about 12 hours. Other third-party USB-C chargers are not optimized for the Steam Deck and thus may not fully charge the battery.
Establishing a Framerate Limit allows users to place a cap on FPS which can help extend the battery life. Another way is to lower the Refresh Rate, which managed how often the screen updates. Turning down the screen brightness will also help conserve some battery and make your device last longer.
7. Steam Deck problem signing in error 56
The Error 56 message is displayed when there are issues logging into Steam. Many users reported that an unstable Wi-Fi connection was the reason for this error message, try the solutions offered under Wi-Fi problems to try to solve this issue.
This error message is usually a result of Steam being unable to connect to the servers. Ensuring a stable internet connection may solve this problem. Also, make sure to check for any system updates as this may be a bug.
How much power does a Steam Deck use?
The Steam Deck has a 40Whr (watt-hours) battery that offers two to eight hours of gameplay for users. The handheld gaming device also comes with a 45W USB-C power supply. It has a 3.5GHz CPU and 1.6GHz GPU with a max power draw of 15 W.
We hope this article helped you identify and solve some of the more common Steam Deck problems and issues. Let us know in the comments below which solution helped you.