If you share your PC with others or have both a regular and administrator account, it’s important to know how to switch users on Windows 10.
This is an essential and pretty useful skill, and in today’s guide, we will show you how to do that on your PC properly.
What is the fastest way to switch users in Windows 10?
The fastest way to do this is by using the Windows key + L shortcut. That will instantly lock your account and allow you to switch users on Windows 10 from the lock screen.
How do I switch users on Windows 10?
1. Use the keyboard shortcut
Press Windows key + L to lock your current user account.
Locate the desired user account in the bottom left corner of the login screen.
Click on it to switch to it.
If the account is password protected, you’ll need to enter the password beforehand.
2. Use the Start menu
Open the Start Menu.
Next, click on your user account.
Lastly, select the account you want to switch to.
3. Use Ctrl + Alt + Del shortcut
On your keyboard, press Ctrl + Alt + Del.
Next, choose Switch user.
Select the desired account from the lock screen.
4. Use Alt + F4 shortcut
Go to your Desktop and press Alt + F4.
From the dropdown menu select Switch user and click on OK.
Select the user account you want to switch to from the sign-in screen.
5. Use the command line tool
Press the Windows key + X and select PowerShell (Admin).
Next, run the following command: tsdiscon
Select the account you want to switch to.
Keep in mind that you don’t need to use PowerShell to do this, and you can switch user on Windows 10 with cmd using the same command.
How do I switch users on a locked computer?
Press Windows key + R and enter gpedit.msc.
Next, select Hide entry points for Fast User Switching. You can find it at the following location: Local Computer Policy\Computer Configuration\Administrative Templates\System\Logon
Set it to Not Configured or Disabled and save changes.
After doing that, you should be able to switch users using any of the methods from this guide.
As you can see, it’s pretty simple to switch users on Windows 10 with a shortcut, but you can use any other method from our guide. To learn more about user management, we suggest reading our guide on how to manage users and groups on Windows 10.
Did we miss your favorite method for switching users? If so, don’t hesitate to share it with us in the comments section.
When Alt + Shift is not changing the language on Windows 11, you can use Win + Spacebar for the same effect. Also, make sure to use the Left Alt + Shift not the ones from the right of your keyboard.
Why is Alt + Shift not working to change language?
You don’t have more languages to choose from.
The input language hotkeys have been changed.
A bug in the latest Windows Update prevents you from changing the keyboard language. Uninstall the latest update to fix this issue.
You are in an active window of an app that is using the same hotkeys for another action.
How do you change the language on Windows 11 with Alt Shift?
1. Use the correct sequence of key presses
First of all, make sure you are using the correct method of using the Alt + Shift combination. Press and hold the Left Alt key, then press the Left Shift key. It won’t work with the Right Alt and Right Shift.
If you look at the keyboard language selection, that will be changed, but only if you have other languages available.
Now, if you release the Shift key and keep the Alt key pressed, you will also see the pop-up prompt showing you the change, and pressing the Shift key while still keeping Alt pressed will continue to switch between them.
If you press both left Alt and left Shift together and release them at the same time, the language will change, but you won’t see the prompt on the screen.
2. Set Alt + Shift as the input language hotkeys
Click the Start button and select Settings.
Go to Time & language on the left pane and click on Typing from the right.
Now, select Advanced keyboard settings.
In the next window, choose Input language hot keys.
Make sure that the Left Alt + Shift is the hotkey. If not, click on Change Key Sequence and select if from the list of options.
You will also notice that you may also change the keyboard layout with the Ctrl + Shift key combination.
Please note that the input language is not the same as the keyboard layout. While the input language changes the language you’re using while typing, the keyboard layout will remap the keys on the keyboard to match the standard layout of the keys for a language.
3. Make sure that the keyboard language is not hidden
Click the Start button and go to Settings.
Select Time & language from the left and choose Typing from the right.
Next, select Advanced keyboard settings.
Now, make sure that the Hidden option and the Show the Language bar as transparent are not checked. If so, uncheck them.
The reason you can’t change the keyboard language in Windows 11 might be just because you can’t see the change. If the keyboard language bar is hidden or transparent when inactive, you might simply not notice it.
Here we conclude our guide on what to do if Alt + Shift is not changing the language on Windows 11 and we hope that now everything returned to normal.
If you still can’t change the display language, you should consider the possibility that one of the Alt or Shift keys is stuck or malfunctioning.
One last advice is to minimize all the apps that are opened on the screen and try the Alt + Shift combination. An active app may circumvent the shortcut for another action with the same hotkey.
Before you go, don’t miss our guide on Alt F4 not working, since it can provide you with more potential solutions.
For any other suggestions on better ways to fix this problem, use the comments section below.
The XP-Pen driver is the software that allows you to connect your pen tablet to your computer and use it as a normal input device.
Eventhough connecting the pen to your PC should automatically match you with the right drivers, this doesn’t always happen, so here’s how you can download and install the correct drivers.
Is XP-Pen Compatible with Windows 11?
XP-Pen has a wide range of pen tablets compatible with the Windows operating system. You just have to download the latest drivers for your specific model for them to work seamlessly, and you can start drawing right away.
How do I download & install XP-Pen drivers on Windows 11?
Although you can easily download drivers without third-party tools, an automatic tool is so much easier because even the not-so-tech-savvy users are guaranteed the right drivers.
4. Use Windows Update
Press the Windows key and click on Settings.
Navigate to Windows Update, and click on Advanced options.
Now, click on Optional updates.
Tick the checkboxes for all the available updates under Driver updates, and click on Download & install.
What can I do if my XP-Pen driver is not working?
Reset the pen – Press the button on top of it (depending on your model) for 5 seconds then turn off your tablet and leave it for at least 10 seconds before turning it back on again.
Reinstall your drivers – If an update doesn’t solve your problem, try reinstalling the device drivers software for your tablet device.
Roll back a previous driver update – The current drivers may not be working because they’re corrupt. Such cases may bring up errors like your XP Pen being detected as a keyboard. You can go back to a previous working version as you wait for a bug fix.
Update your OS – Drivers may fail to install on your computer if they’re incompatible with your system. To fix this issue, make sure that your operating system is up-to-date.
Perform a System Restore – Performing a System Restore will allow you to go back to the state where your computer was working properly and your XP-Pen driver was up to date.
The XP-Pen driver for Windows 11 is extremely important if you mainly use the pen to create designs and want to achieve crisp drawings. To further enhance its capabilities, you should also consider getting XP Pen drawing software and take your artwork to greater heights.
To sum up, the XP-Pen driver is a crucial component for setting up and using your XP-Pen tablet monitor on a Windows computer. Using an older version of the tablet driver will often result in compatibility issues, whereas using a new version is bound to provide greater functionality.
Did you manage to get the right XP Pen driver for your Windows 11 device? Which method did you go for and why? Let us know in the comment section below.
While Check Disk is a viable utility that helps fix several drive-related problems, users often find it stuck at CHKDSK is verifying Usn journal. First things first, what is the USN journal? The USN journal stores a log file of all the changes made on a specific volume.
This data is often referred to by programs to understand how the files were modified over the course of time. It comes under Stage 3 of the checks, when the Check Disk is examining security descriptors.
That’s where you see the message, or it could read, CHKDSK is resetting Usn information, when Windows can fix the problem. It may even ask you to run another Check Disk command.
What causes CHKDSK to hang at CHKDSK is verifying Usn journal?
Bad sectors or a failing hard drive
The USN journal is corrupt
Issues with the system files
Another program is accessing the USN journal at the same time
A bug in the recent Windows update
How do I get past CHKDSK is Verifying USN Journal?
Before we start with the slightly complex solutions, try these quick ones first:
Wait for a while. For those wondering how long Chkdsk is verifying usn journal takes, it could be anywhere between a few minutes to up to 24 hours. So let it run interrupted.
Verify if the Check Disk utility was initiated manually or automatically by Windows on identifying disk errors. In the case of the latter, you need to be more vigilant. For the former, you may ignore the issue as long as the system works fine.
Abort the disk check, restart the computer and again run the same Check Disk command.
For some of the solutions here, you will need to access Windows in normal mode. If that can’t be done, boot into Safe Mode and then execute the fixes.
1. Run Check Disk from the Recovery Environment (Windows RE)
Turn off the computer, then power it on, and as soon as the display appears, hold the Power button to shut down. Repeat this thrice.
On the fourth attempt, the OS will launch an Automatic Repair, believing that Windows can’t boot. If it doesn’t find any issues, click on Advanced options.
Now, click Troubleshoot.
Again, select Advanced options.
Click on Command Prompt.
Select your user account and enter the password for it.
Press Windows + S to open Search, type Command Prompt in the search bar, right-click on the relevant result, and select Run as administrator.
Click Yes in the UAC prompt.
Paste the following DISM commands individually and hit Enter after each: DISM /Online /Cleanup-Image /CheckHealthDISM /Online /Cleanup-Image /ScanHealthDISM /Online /Cleanup-Image /RestoreHealth
Now, execute this command to run the SFC scan: sfc /scannow
Once done, restart the computer for the changes to come into effect.
Corrupt system files are known to trigger issues with the built-in utilities. Running the DISM commands and SFC scan will replace these files with the cached copy stored on the PC.
Furthermore, if you’re looking for a faster method, we suggest you use specialized repair software to find healthy replacements automatically for all corrupt system files found.
3. Uninstall recent Windows update
Press Windows + I to open Settings, go to Windows Update from the navigation pane, and click on Update history.
Scroll to the bottom and click on Uninstall updates.
Click the Uninstall option next to a recently downloaded update, after which the problem first appeared.
Again, click Uninstall in the confirmation prompt.
When the computer restarts, verify whether it goes past the CHKDSK is verifying Usn journal stage or is still stuck.
4. Update the drivers
Press Windows + X to open the Power User menu, and then select Device Manager from the list of options.
Expand the Disk drives entry, right-click on the one that’s stuck on Check Disk, and select Update driver.
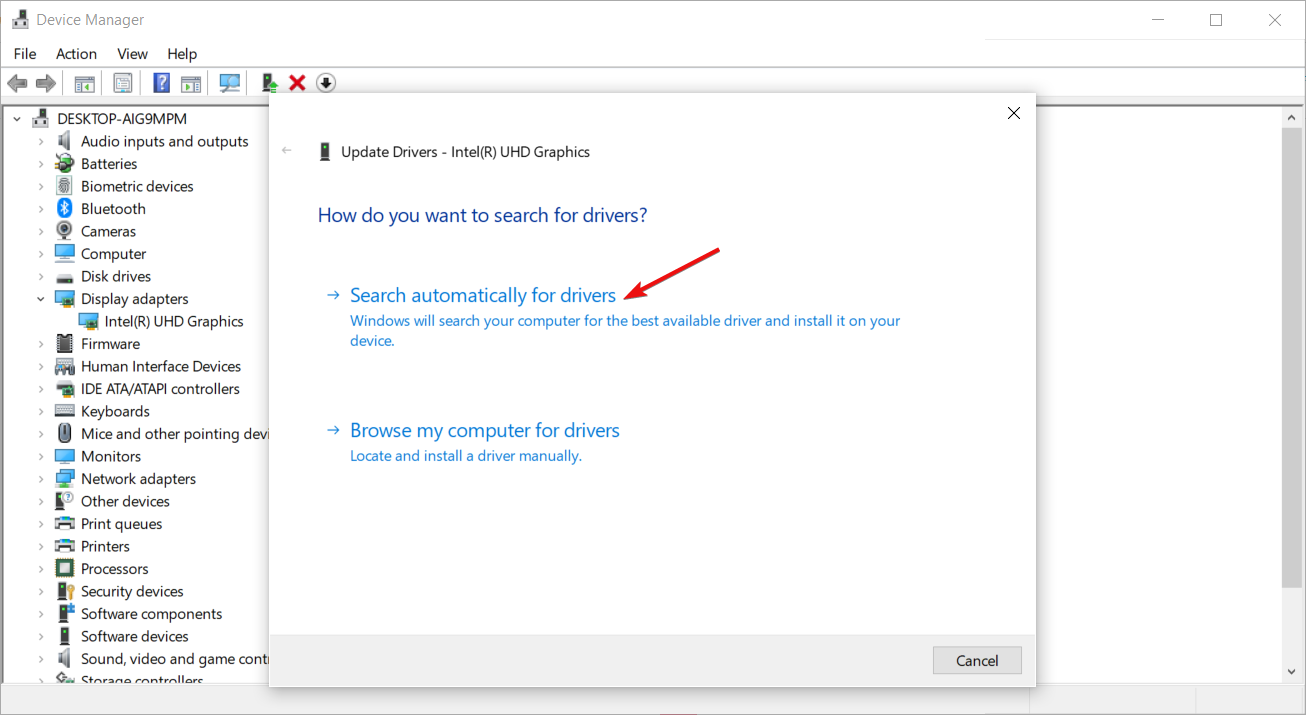
Click on Search automatically for driver and wait for Windows to install the best locally available version.
Finally, restart the computer and check for improvements.
When the utility is stuck at CHKDSK is verifying Usn journal, it could indicate the inability to read data on the drive, which often arises due to outdated or corrupt drivers. So, update the disk drivers.
And if Windows can’t find one, you will need to visit the manufacturer’s website, locate the latest version, download it, and then manually install the driver.
5. Delete the USN Journal file and create another one
Tip
You should delete the USN journal only if Check Disk can’t get past it after repeated attempts and even in the Recovery Environment.
Press Windows + R to open Run, type cmd, and hit Ctrl + Shift + Enter.
Click Yes in the prompt that appears.
Paste the following command and hit Enter to delete the USN journal in the C:drive: fsutil usn deletejournal /d c:
Now, execute this command to create a new USN journal on the C:drive: fsutil usn createjournal m=1000 a=100 c:
Restart the computer and run the Check Disk tool again.
6. Disable Check Disk (CHKDsK) from running at boot
Launch the Command Prompt with administrative privileges.
Now, paste the following command and hit Enter to disable Check Disk from running at boot for the C: drive: chkntfs /x c:
To disable Check Disk for more drives, add thoose to the command. For instance, for both C: and D: drives, the command becomes: chkntfs /x c: d:
7. Check the drive for issues
When nothing else works, and Check Disk is stuck, it’s most certainly a drive malfunction or failure to blame. Hard drives usually have a life of 5-8 years, depending on whether they are attached to a laptop or a desktop respectively
Use an effective disk repair tool to identify and eliminate any problems with it. And for a failing hard drive, you will need a data backup solution so as to not lose any critical files.
The last resort is to replace the hard drive and get a new one, if it’s way beyond the average working span and exhibits performance issues as well.
Remember, the CHKDSK is verifying Usn journal stuck issue can mostly be resolved, but there are situations where replacing the drive is the only solution. It is recommended you contact the system manufacturer or a local service center and get the disk inspected before replacement.
Windows Terminal is a modern, fast, efficient, powerful, and productive terminal application for users of command-line tools and shells like Command Prompt, PowerShell, and WSL. Microsoft announced recently that a Canary version of Windows Terminal is coming, where users will get the latest experimental features.
Windows Terminal is distributed in a variety of formats. We are thrilled to announce that we are adding it to the Windows Terminal family. Windows Terminal Canary is a new canary build that includes “hot off the presses” experimental features (including our AI chat feature).
Windows Terminal Canary will introduce many experimental features, so if you join it, expect it to be highly unstable.
Windows Terminal Canary: Everything you need to know
The channel will release builds nightly. According to Microsoft, every Terminal Canary user will have the chance to discover new bugs.
The Terminal Canary installer on GitHub only works for Windows 11, for now, but a Windows 10 version is coming. However, according to developers, it is an evergreen, architecture-independent application installer that supports automatic updating.
There is also a portable ZIP that works with Windows 10. However, the portable ZIP does not offer automatic updates, or automatic checking for updates.
Prepare for multiple experimental and very unstable features coming to Windows Terminal Canary. These features will also break the channel from time to time, so be aware of it before joining it.
You have asked and the Microsoft gods answered: you can finally insert checkboxes in Excel, now, according to the Redmond-based tech giant’s latest blog in the Microsoft 365 Insider.
Microsoft says users will be able to visualize and set TRUE and FALSE values in a cell using checkboxes. The feature was long requested by Excel users everywhere, and it’s something other sheet data apps, such as Google Sheets, already have.
And if October is already a big month for Microsoft 365, with the new Teams coming, along with a lot of new changes to OneDrive, then the other apps, such as Excel, needed some love too.
So, Microsoft added a new ribbon group called Cell Controls. This new pane will introduce checkboxes to Excel. However, this is the first feature of many, as Microsoft promises there will be more.
How to insert a checkbox in Excel
Open your Excel.
Create a workbook, or open an existing one.
Go to the Insert tab, and select Checkbox in the Cell Controls group.
Now put the checkbox wherever you want, and that’s it.
In the image above, you can see the checkboxes in the selected cells. The blank cells are automatically set to FALSE.
Microsoft says that checkbox formatting only works with Boolean values and blank cells. Any other values, such as number and text, are ignored. And, if the active cell has a checkbox, you can toggle the values of all selected checkboxes by pressing the space bar.
However, for now, users won’t be able to directly remove checkbox formatting in a cell. Instead, you’ll need to select Home > Clear > Clear Formats.
For now, this feature is available to Beta Channel users running Version 2310 (Build 196924.2000) or later, but it will come to the Excel Stable Channel in the following weeks.
Are you excited about inserting checkboxes in Excel? Let us know your thoughts in the comments section below.
If you’ve ever encountered a topic you didn’t understand, SciSpace Copilot can help you break down its complexities with simple explanations.
So, if you’re looking to have a more fun and meaningful science experience, take a look at SciSpace Copilot and how you can use this resource to your advantage.
What is SciSpace copilot?
SciSpace is not your ordinary AI research assistant. Hundreds of AI software and AI websites are available, but SciSpace goes above and beyond to unpack and explain complex research papers in less technical jargon.
The goal is to enable people without a background in science or mathematics to read scientific articles and understand their main concepts easily. You can scan articles using Google Scholar and use SciSpace to break it down.
Hit the Sign up button at the top-right corner of the page.
Fill in the required credentials: email address and password, then hit Sign up.
Enter your Background andField of study, then click Done.
Go to your email and click the verification link to confirm your account, and you’ll have logged in.
1.1 Navigating the User Interface
Search bar – This is centered where you can upload papers and get insights directly either from SciSpace’s repository or from your own Library that you may have created.
Chrome extension – On your homepage, you will see a Chrome extension. Click on it, and you’ll be directed to the Chrome webstore. Add the extension, and now, you won’t have to open SciSpace whenever you want to research a paper.
SciSpace menu – The menu will pop up on the left-hand pane when you hover your mouse. Here, you will discover your Library and other tools to make your work easier.
Popular papers – As you scroll down, you’ll get a collection of papers based on your field of expertise or the various areas you selected when signing up.
SciSpace help – You’ll get the SciSpace chatbot at the bottom left corner. If you have any issues with the tool, you can get answers by chatting with the bot.
1.2 Customizing Settings and Preferences
Language preferences – SciSpace is available in multiple languages. If you have a research paper and want it explained in a different language, you can tweak your settings. Simply click on your Library and expand Copilot at the bottom right corner. Now select your selected language from the drop-down menu. Once you highlight the text you want explained, Copilot will explain it in your chosen language.
Bookmark articles – If you’d like to save an article for later use, you can bookmark it. Simply open the research paper and, just above the title, click on Save. You’ll be prompted to create a collection. Here, you can give your collection a new name and save like papers under that new collection. You can also create as many collections as you like, and they will be saved in your Library.
Share articles – If you’d like to share the research paper with other people, click on the Share icon, and in the drop-down menu, select the mode of sharing you prefer.
Finding technical terms and explanations – If you come across an unfamiliar term and don’t have time to go to the dictionary, simply highlight that word and select Explain. SciSpace will define the technical term.
Generating follow-up questions – If after the technical term has been explained, but you still don’t understand, you can click on Follow up. This allows you to get more insight and helps you better understand the context.
Accessing native language explanations – This can be done just as mentioned above in the language preferences section.
Giving feedback – You can also leave feedback on SciSpace answers. If you feel the answers have been sufficient or need more depth, you can leave remarks for future improvement.
Citation generator – If you don’t have time or don’t know various citation formats, this tool can help you generate them. You can paste a URL or add text manually.
Utilizing AI-powered tools and Chrome Extensions – The tool has an AI detector, and Copilot read with AI. The former helps you create AI-free content by analyzing and scanning the content. Copilot read with AI helps you scan hundreds of pages and come up with summaries or a general overview of the paper without having to scan through pages.
Analyzing scientific papers and articles – SciSpace can analyze a paper in seconds by giving you a concise explanation. With the preset questions, you can easily go through the important parts and move on swiftly.
Paraphrase – If you’d like to create content, the tool can help you paraphrase text and humanize it so that it doesn’t sound robotic. However, you’re better off using open-source AI content generators as they are more reliable.
Is it safe to use SciSpace?
It is completely safe to use SciSpace and even encouraged. The tool’s main purpose is to simplify the technical terms used in scientific literature so that you can get simpler explanations.
Furthermore, additional tools, such as AI detector help you avoid academic dishonesty by producing AI-free content. It becomes problematic when you use the paraphrasing tool and fail to credit the original authors.
Such anomalies can easily be detected using essay grading software as they have built-in features to detect plagiarism. You’d rather use a powerful AI tool such as Caktus AI to help you refine your writing skills and produce quality content.
And that’s about it on how to use SciSpace. We’d love to get your opinion on this tool and your experience if you have used it. Do you think it’s a necessity or just another tool to perpertuate laziness? Let us know your thoughts in the comment section below.
Windows 11’s weather widget got a detailed weather forecast with the 23H2 release, back in September. Spotted by Windows enthusiast, @XenoPanther, the weather widget now shows the time until a certain weather condition happens.
For example, the weather widget will tell you that you should expect rain in your area today, but you generally have no idea when, or the time is not specific. However, now the Windows 11’s weather widget will tell you exactly when it will happen: in 2 hours or 45 minutes.
However, it seems that the widget is also continuing to show detailed forecasts some days ahead, according to the same Windows enthusiast. Users are now able to see messages such as Temps to drop Wednesday on the updated Weather widget.
The feature is now live for Windows 11 users everywhere. So you’re now able to get a detailed weather forecast and plan your day accordingly. Or, at least, you’ll know not to go to those sudden shopping sessions, as there will be rain in 30 minutes.
You won’t have to do anything to enable the detailed weather forecast in Windows 11, as it is part of the widget. For a more handy situation, you might want to place the weather widget on your taskbar so that you won’t miss any information.
Windows 11 gets a detailed weather forecast
If you’re not part of the Windows Insider Program, you shouldn’t worry. This feature is now available in Windows 11. It was released in the 23H2 package, last month.
The release will also bring the now-famous Windows Copilot. And if you don’t trust the Windows 11’s weather widget, you can always ask Copilot to tell you the weather of your area for the next hours.
However, as Copilot will use the internet, and is based on Bing, it will tell you the same thing the weather widget tells you.
You often need to delete documents and files in Microsoft 365, both stored online and offline. And users who are new to the editor suite may face issues with it!
While some found the Delete option missing, others encountered an error in the process. But it shouldn’t be as difficult, right? So, let’s get straight to it and walk you through how to delete files in Microsoft 365 and OneDrive.
How do I delete files from Microsoft 365 online?
1. Delete files in Microsoft Word, Excel and PowerPoint
Tip
The steps listed here are for Microsoft Word, but it works the same way on PowerPoint and Excel. To delete files on these two, open them instead.
1.1 Stored locally
Press Windows + S to open Search, type Microsoft Word in the text field, and click the relevant search result.
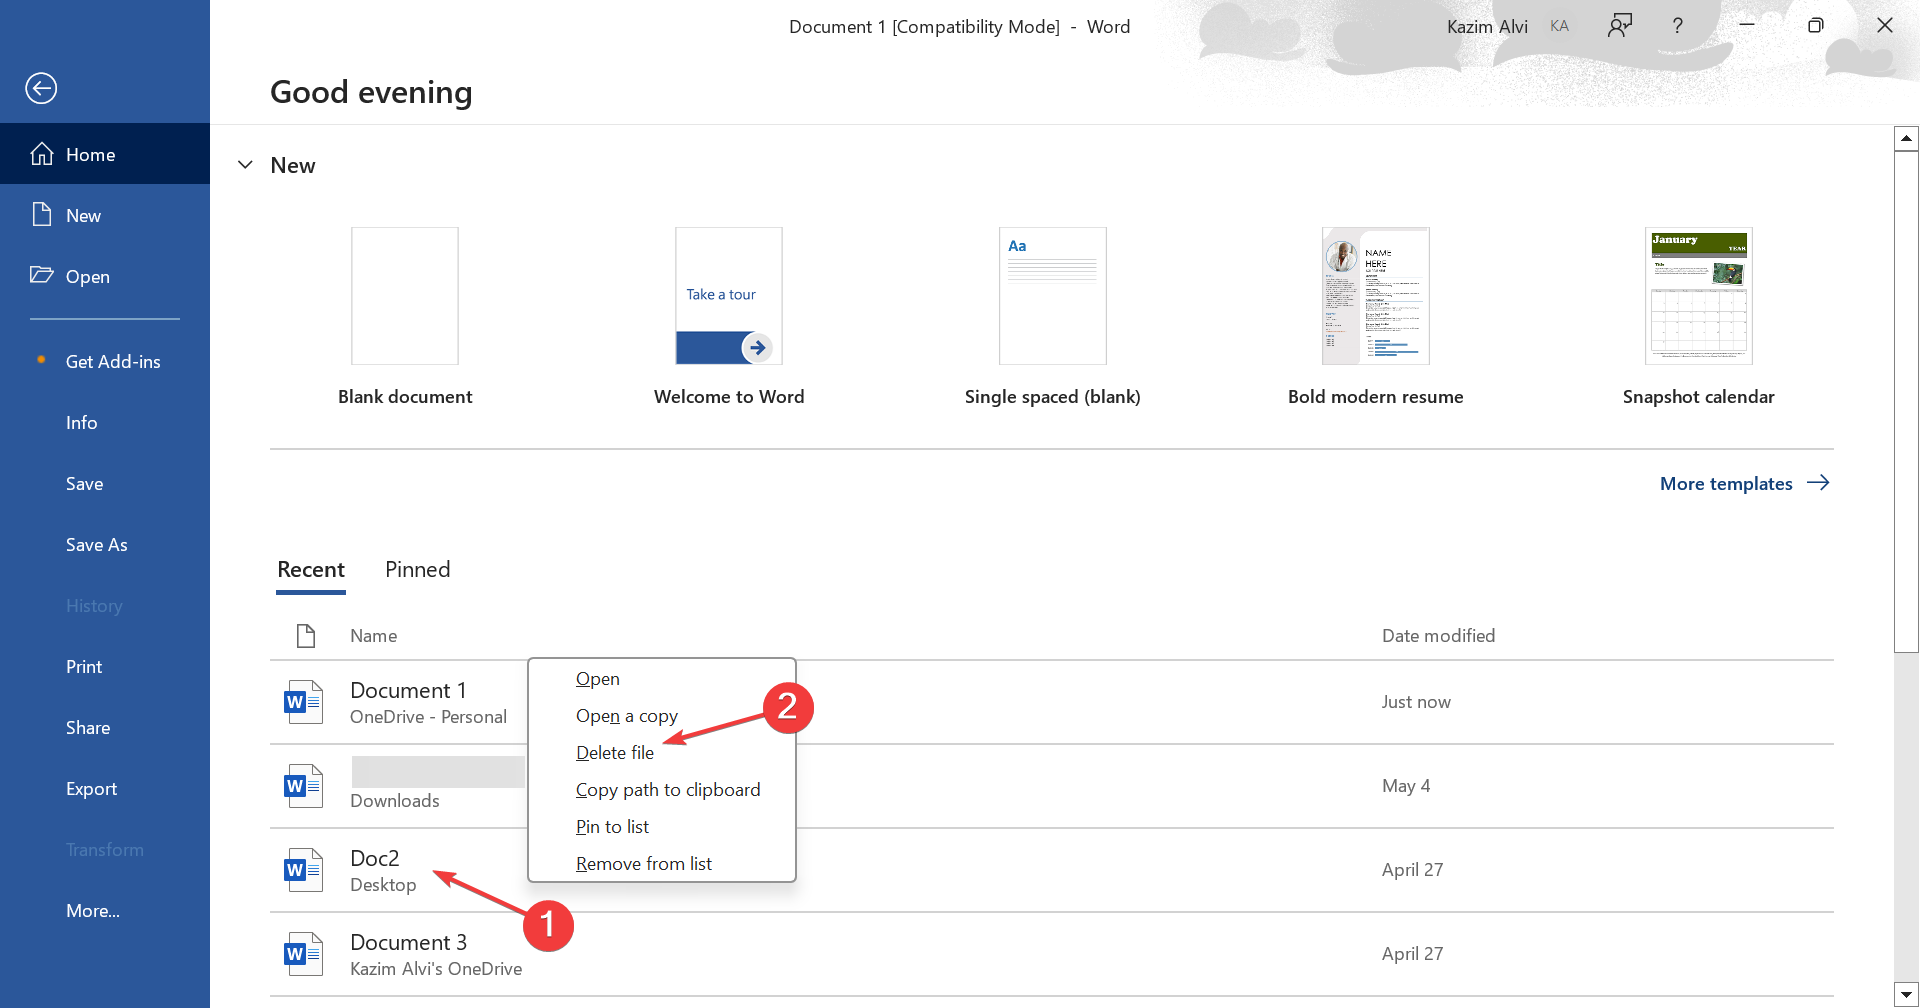
You will now see a document list of recent items. Right-click on the one you want to remove, and select Delete file.
Click Delete in the confirmation prompt that appears.
If the document doesn’t appear in the files list, scroll down to the bottom and click on More documents.
Identify the file here and remove it, or select Browse from the navigation pane to manually locate and delete it.
1.2 Stored on OneDrive
Launch Microsoft Word, scroll to the bottom and click on More documents.
Now, select OneDrive from the left pane.
Identify the document file you want to remove, right-click on it, and select Delete from the context menu.
Depending on where it is stored, be it locally or on OneDrive, you can easily delete a Word document or Excel file in Microsoft 365. Remember, you may have to clear it from both locations if OneDrive stores a copy of the document. Otherwise, the deleted document will keep reappearing.
And, for a cleaner user interface in Microsoft 365, many users prefer to remove recommended items!
Now, locate the file you want to remove, right-click on it, and select Delete.
To remove multiple OneDrive files at once, tick the checkboxes before them, and click on Delete in the menu bar.
2.2 In File Explorer
Press Windows + E to open File Explorer, and select OneDrive from the navigation pane. It’s usually listed with your name and a cloud icon.
Identify the document you want to remove, right-click on it, and click the Delete icon.
Be it via the official website or File Explorer, you can easily delete documents in Microsoft 365 online. The changes are reflected throughout!
Also, if you are using the online version of Microsoft Office and it only shows the hide files option, delete it from the OneDrive section in File Explorer. Or if you don’t want the files or associated apps altogether, there’s always the option to delete the Microsoft account.
Besides deleting documents and files through Microsoft 365 apps, you can remove them directly via File Explorer. Simply locate the file, select it, and hit the Delete key. To clear multiple documents at once, hold the Ctrl key, select as many, and then hit Delete. Also, make sure to clear the Recycle Bin.
Remember, if the deleted file has a OneDrive (cloud) icon under the Status column, it’s online-only, meaning that the file occupies no space on your PC. You will have to delete the backup as well.
Why can’t I delete a file in Microsoft 365?
If you can’t delete a file in Microsoft 365, it’s likely that the file is currently open. Terminate all instances of the suite and then try deleting it.
Besides, corruption is a major reason you can’t delete files. File deletion is a task handled by the OS and not Microsoft 365. So, you should check the path and file properties for more details and to troubleshoot things.
You now have a fair understanding of how to delete documents in Microsoft 365. And if you ever delete a file by mistake, there’s always the option to recover deleted files in Windows.
Lastly, before you leave, find out how to efficiently use Microsoft 365 web for better file management and to perform all actions seamlessly!
For any queries or to share an issue you faced with the process described here, drop a comment below.
The error code ITV-101 with the message Failed to load Watch may appear on your Freevee app when you attempt to stream content. Like many such errors, it can be an internet-related or service-provider issue.
Whatever the case, the resolution is fairly easy, and you should be able to get back to enjoying premium content on your TV once again.
What is Error Code ITV-101 on Freevee?
This error code can occur on your TV, Roku device, or Firestick when you attempt to stream content on the Freevee application. Usually, it can be caused by geographical restrictions that prevent you from accessing content.
How do I fix Error code ITV-101 on Freevee?
Begin by checking off the following prerequisites:
Ensure that you are using the latest version of the Freevee app and your country is set correctly.
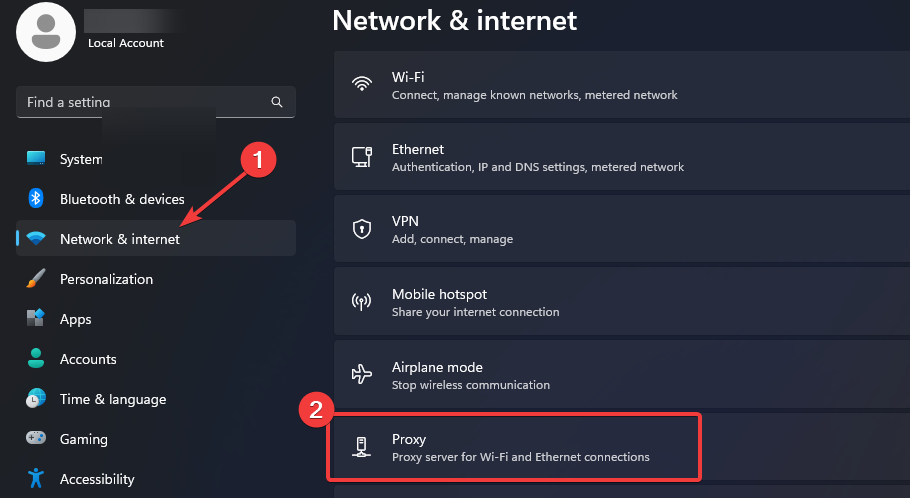
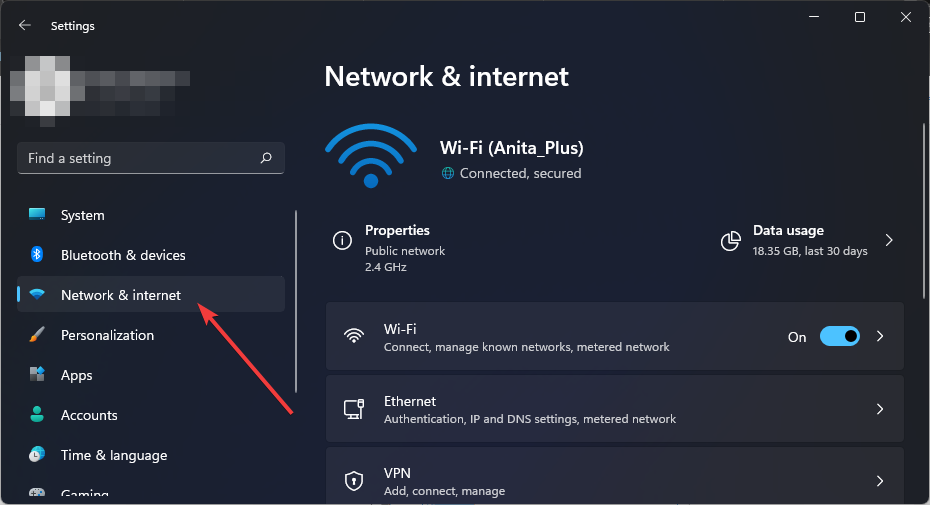
Click on Network & Internet on the left pane, then scroll down and click Proxy on the right pane.
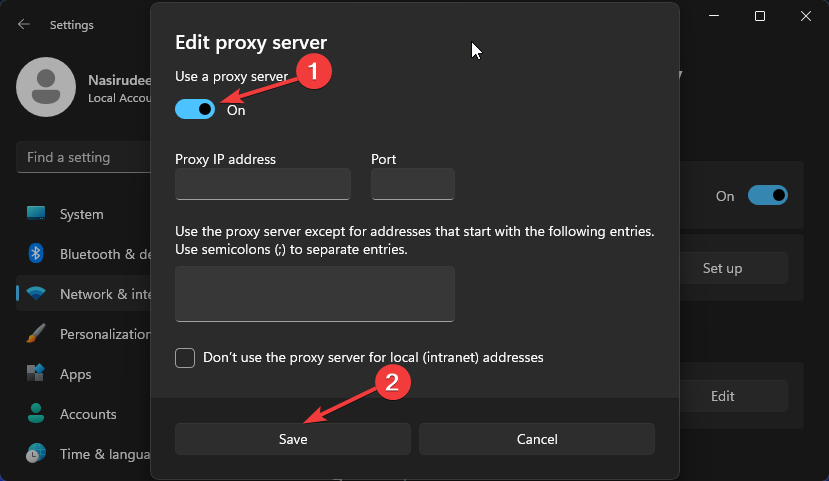
Select Edit next to Use a proxy server option in the Manual proxy setup section, toggle off Use a proxy server and click on Save.
6. Reset your Network
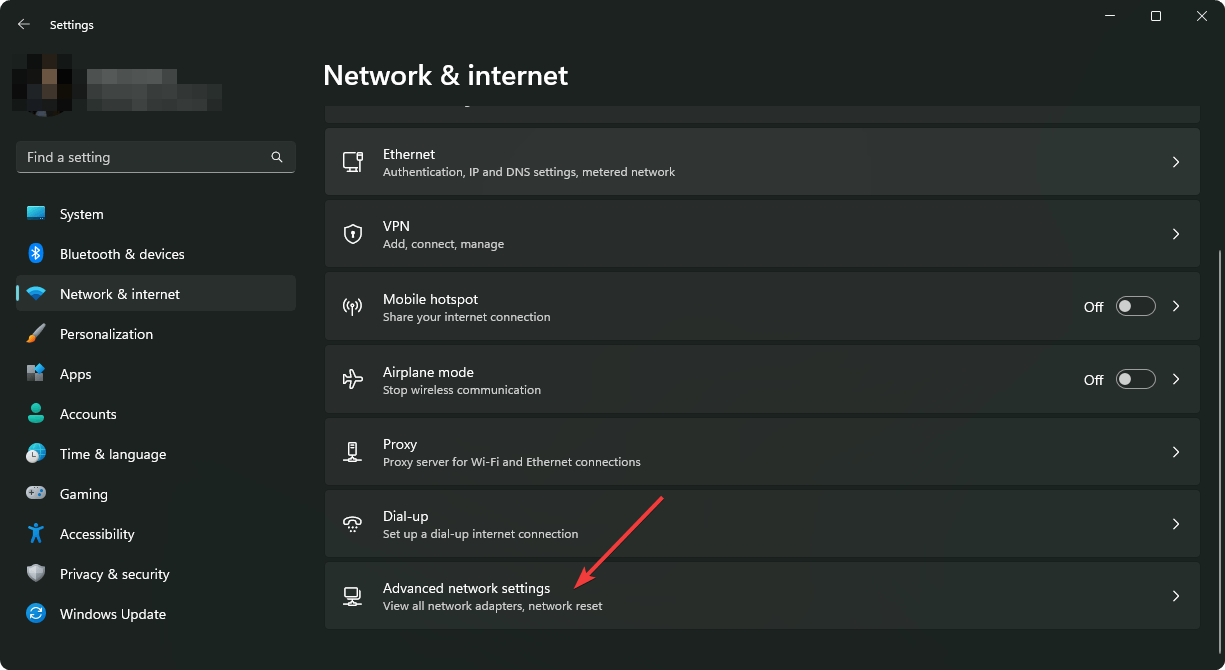
Hit the Windows key and click on Settings.
Navigate to Network & internet.
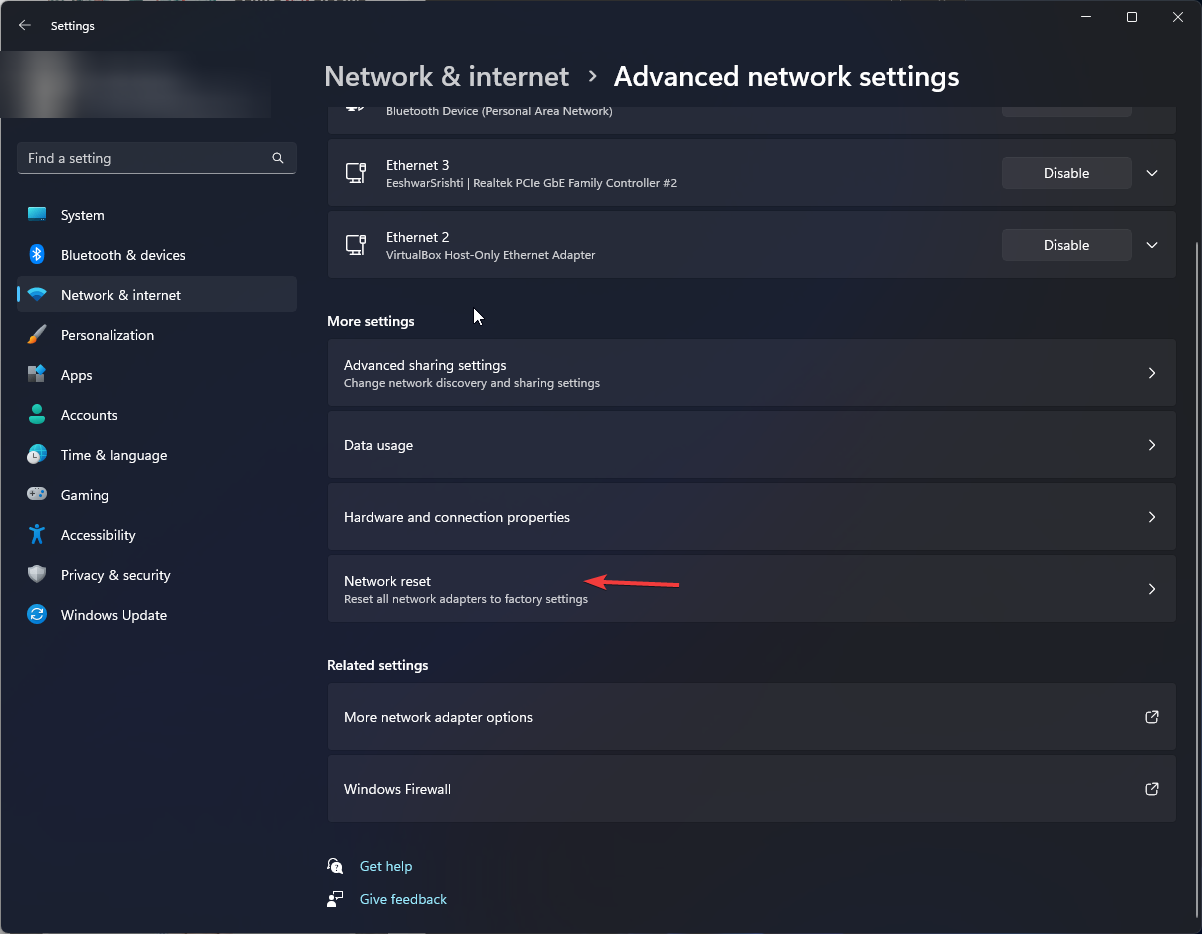
Select Advanced network settings.
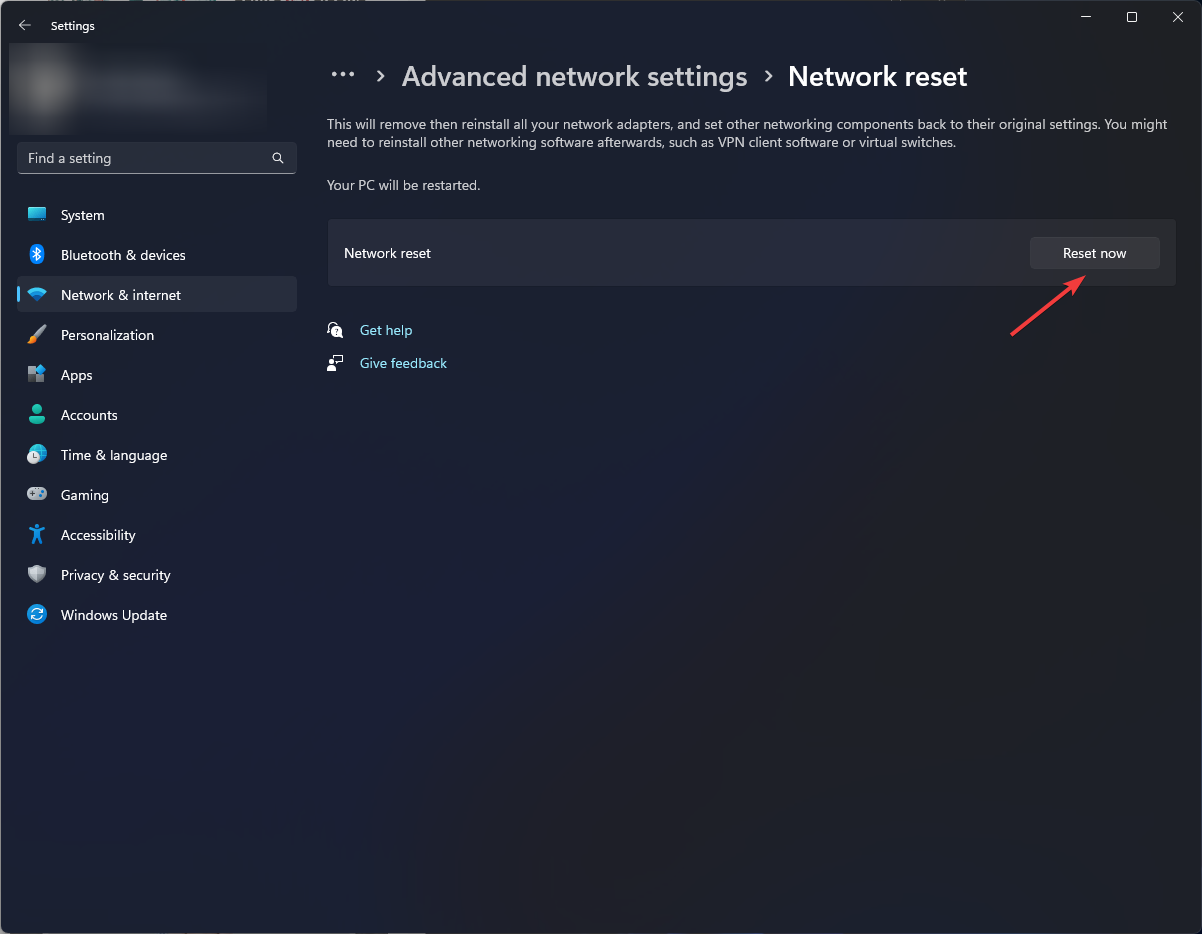
Click on Network reset.
Next, hit the Reset now button.
7. Repair/Reset Freevee app
Hit the Start Menu icon on the Taskbar and click on Settings.
Click on Apps on the left pane, then select Apps & features on the right pane.
Navigate to Frevee app, click on the three ellipses, and select Advanced options.
Scroll down and select Repair.
If it doesn’t get rid of the error, go back and select Reset.
8. Reinstall FreeVee
Hit the Start Menu icon on the Taskbar and click on Settings.
Click on Apps on the left pane, then select Apps & features on the right pane.
Navigate to Frevee app, click on the three ellipses, and select Uninstall.
Launch the Microsoft Store, search for the Freevee app and click Get.
Follow the on-screen prompts and try again.
What are some troubleshooting tips for resolving error codes on Freevee devices?
Enable automatic firmware updates to avoid compatibility issues, as the Freevee app gets updates frequently.
Ensure all cables are connected properly from HDMI, Ethernet, and USB. If cables are not connected properly, then this could cause communication issues.
Always check for hardware compatibility, especially for HDMI cables and ports. For instance, Freevee requires HDCP-compliant cables.
Regularly clear cache and cookies on your browser and any other apps that might be causing interference with your streaming app.
Aside from the error codes like this and Amazon code 2063, you may also get tired of the unskippable ads. Of course, it’s the price you have to pay for watching content for free but if you’ve had enough of them, you can always block ads on your smart TV.
This concludes our guide to Freevee Error code ITV-101. Before you go, you might be interested in our F1 TV BM1300 error guide as well.
If you have tried any other solutions that worked for you, please feel free to share them with us in the comment section below.
If you don’t know how to unzip files on Windows 11, you might not be able to install certain software or view files sent to you by others in archive format.
This process is incredibly simple to perform, and in today’s guide, we’re going to show you the best ways to do it on Windows 11.
Microsoft is working hard to bring support for other archive formats, including RAR, 7Z, TAR, and more. Support for these file types is available to Insiders, and we expect to see it available to the public soon.
For the time being, for best compatibility, you need to use third-party apps for archiving.
You can natively unzip files on Windows 11, however, the support is currently limited, but that will change soon as Windows gets native support for other file archive types.
Need to extract image-based archives? Learn how to unzip ISO files on Windows 11 to access their contents without mounting them. You can also package files into a standalone EXE by creating a self extracting archive, and you can learn the steps in this guide on how to create a self extracting archive.
FAQs
How do I unzip files on Windows 11 without any software?
Right-click the ZIP file, choose Extract All, select a destination folder, and click Extract. Windows will automatically unpack the files for you.
What tool can I use to unzip files on Windows 11?
You can use built-in File Explorer or third-party apps like WinZip, 7-Zip, or WinRAR to open and extract compressed files easily.
Why can’t I extract a ZIP file on Windows 11?
The file may be corrupted, incomplete, or stored in a path that’s too long. Restarting File Explorer or re-downloading the archive often fixes the issue.
Does Windows 11 support RAR and 7Z files?
Native support for RAR, 7Z, and TAR formats is rolling out gradually. Until then, you’ll need a third-party tool like 7-Zip to open those archives.
If you want to take your skills to another level, check our guide on how to extract multiple Zip files. In case you need to work with other file types, our guide on how to open RAR files without WinRAR will provide you with useful information.
The autumn celebration is around the corner, so you’re hunting for Microsoft Teams Halloween backgrounds to amaze everyone in your meetings.
In this article, we gathered the best Microsoft Teams Halloween backgrounds and explained how to use them and apply them in your app.
You should know that you need a 1920×1080 pixels image (16:9 aspect ratio) for the desktop app in the JPEG, BMP, PNG, and JPG formats.
How do I get more backgrounds on Microsoft Teams?
Besides the virtual backgrounds you find within Teams, Microsoft also has a dedicated Teams Backgrounds website where you can download new ones. However, at the moment when this article was published, we didn’t find any Halloween-themed background within the selection.
But, as we highlighted above, you can use any image with a resolution of 1920×1080 pixels or higher, respecting the 16:9 aspect ratio. Below, we have recommended a lot of premade Teams Halloween backgrounds, but also some tools you can use to customize them from available templates.
There are plenty of Hallowing Teams backgrounds online to choose from. We have made a selection for you and provided the links so you can download the 1920×1080 version perfect to upload in Teams.
If none of the images above or the ones you have found online don’t suit your needs or liking, you may opt to create your own background or customize an existing one.
2.1 Customize Teams backgrounds using Adobe Express
Adobe Express has a lot of Halloween templates that you can customize to your requirements. You can change the messages, add or remove images, change the fonts, and many more.
Of course, after you’re finished, you can download the image and upload it as a background on Microsoft Teams.
We also found many customizable Teams backgrounds on Canva. Some of them are free and some cost a few bucks, but they are all fully customizable.
You can add or remove images, shapes, graphics elements, and text, change the fonts and you can perform many other tweaks. For instance, you can slap your logo while you’re at it.
When you’re done, you may download the background to your PC and upload it to Teams right away.
2.3 Customize Teams backgrounds using PosterMyWall
PosterMyWall is another free editor you can use to create and customize any images, including Teams backgrounds.
This tool even allows you to create short-moving images, but unfortunately, you can’t load those into Teams. You just need to save a plain image, but there are a lot of customization options available, just like with Adobe Express and Canva.
There are plenty of Halloween images to tweak; some are free, so try it out.
Essentially, any photo or image editing tool can help you create Halloween Teams backgrounds, but the ones you can find online usually have a lot of seasonal backgrounds to start from.
Type or paste the following line in the search tab and press Enter to get to the Backgrounds folder in Teams: %APPDATA%\Microsoft\Teams\Backgrounds
Now, access the ConsumerUploads folder and paste the images you want to use as backgrounds.
This option is a lot more convenient if you have gathered more backgrounds and you want to upload all of them in a single action. You will see all the images when you open the Background effects now.
Best places to find Microsoft Teams Halloween backgrounds
Google is the limit if you’re looking for images you can use for personal use. Just look for Halloween Teams backgrounds, and you will find many images to download. And if the resolution is different, you can use a built-in image editor such as Photos, or a third-party tool to resize it to 1920×1080 pixels.
In case you want to use the image for commercial purposes or in corporate meetings, you need to look for free copyright image databases. Pixabay and Unsplash are the most popular, but there are a lot of them online. Of course, you can also opt for buying a photo with the rights to use it from a database such as Shutterstock and eliminate any problem with digital rights.
Once you’re done trying spooky setups, you can also explore these funny Teams backgrounds for a lighter touch. They’re perfect if you want to switch from a scary theme to something that makes your meetings more entertaining.
For any other questions or suggestions, let us know about them in the comments section below.
Many have reported that their PS (DualShock) or Xbox controller works only in Steam and not with other games installed on the PC. While some managed to find a solution, others were forced to replace the controller. However, before you get a new one, remember the problem is fixable!
For a few, the controller only worked with the gaming client in Big Picture mode and not during the gameplay. And in most cases, it turned out that the Steam client was at fault.
Why is my controller working only in Steam?
Another device, a gamepad or controller, conflicts with the setup
Problems with the wireless connection
You are running an outdated Steam client, or there’s a bug in the installed version
A corrupted or outdated controller driver is installed
The affected game was not installed properly
How do I get my controller to work on non-Steam games?
Before we head to the slightly complex changes, try these quick solutions first:
Disconnect the controller and then plug it back in. Also, if you have a gamepad connected, unplug it. A user found that removing Tartarus Pro during the Windows boot process gets the controller to work in non-Steam games.
Use a wired connection instead of wireless. And make sure to use the USB cable that came along with the controller.
Reset the controller. To reset a DualShock controller, unplug it and use a pin to hold the reset button on the backside for 5 seconds. For Xbox controllers, remove the battery for a minute.
Check for updates and install them, both for Steam and the affected game(s).
If none work, move to the fixes listed next.
1. Terminate the Steam process
Press Ctrl + Shift + Esc to open the Task Manager.
Locate the Steam process, select it, and click on End task.
Now, relaunch the game you were facing issues with and check for improvements.
Often, users found that the Steam client conflicted with the controller settings, and subsequently, the latter only worked with Steam games. Terminating the gaming client will help get the controller to work!
Launch the gaming client, click the Steam menu near the top left, and select Settings.
Go to the Controller tab from the navigation pane, and turn off the toggle for Enable Steam Input for Xbox controllers, Enable Steam Input for PlayStation controllers, or Enable Steam Input for Switch Pro controllers, depending on the controller you are using.
In case the problem remains unresolved, check the manufacturer’s website, download the latest version, and manually install the driver.
4. Add the game to the Steam library
Open Steam, click the Games menu at the top, and select Add a Non-Steam Game to My Library.
Tick the checkboxes for the affected game from the list, and click on Add Selected Programs.
If the game is not listed here, click on Browse, locate the game launcher, select it, click Open, and then click Add Selected Programs.
When the Xbox controller only works on Steam, an easy solution is to add the Xbox game to the Steam library. It has worked for several users, but should be used as one of the last resorts!
5. Switch to Steam Beta client
Launch the client, click the Steam menu, and select Settings from the list of options.
Go to the Interface tab, and select Steam Beta Update from the Client Beta Participation dropdown menu.
Click Restart Now in the prompt that appears.
Wait for Steam to relaunch and download the beta updates.
If the controller works in Steam but not in game, you could opt for Steam Client Beta and get the latest updates earlier than others. This will eliminate any bugs in the installed version sooner!
When your controller only works in Steam, things are easy to fix! But there are also cases where the controller is detected but not working, and you will then have to look for game or controller-specific solutions.
Collaboration is important for any type of team, and using a digital canvas such as the Microsoft Teams Whiteboard is one of the most versatile ways of collaborating in a meeting.
If you’ve been wondering how to use this feature in your Teams meeting, we share the tips to get you started.
How do you use Whiteboard on Microsoft Teams?
Before you start using Microsoft Teams Whiteboard, ensure you meet the following prerequisites:
Ensure you have an active Microsoft 365 subscription with Azure Active Directory.
Collaboration can only be done with users in the same Microsoft tenant.
Check that your organization has enabled Microsoft Whiteboard from the admin center.
Ensure you allow Whiteboard.ms, whiteboard.microsoft.com, and wbd.ms in your firewall settings.
NOTE
Microsoft 365 Germany does not support the Whiteboard feature
Log into your Microsoft Teams account on your desktop or web browser.
On the top right corner, select the Share icon and select Microsoft Whiteboard.
Choose a pre-existing board or create a new one, then begin sketching.
Can I set up a Whiteboard in Teams before the meeting?
Yes, you can. This can be useful if you want to save time. You can outline the agenda for your meeting or if you want to create a template for other people to use before they join the meeting.
You can also continue working on a Whiteboard after the meeting.
What are some Microsoft Teams Whiteboard features?
Sticky Notes – These are a great way to jot down quick notes, reminders, or updates on the Whiteboard that can be shared with others. This can come in handy when playing Teams games.
Share Tray – This feature allows you to share the Whiteboard link with other users with a Microsoft account.
Annotations – These make collaboration much easier as everyone can add or make comments, and changes can be easily tracked from the collaborative cursors.
Lock feature – If you wish to keep your changes on the Whiteboard, you can lock them in so that they don’t get moved around by other users.
Export feature – You can save whiteboard content as images or PDFs so others can see it outside of Teams meetings or just keep a copy of a previous Whiteboard.
Multiple devices – Users can take advantage of the Whiteboard feature available on a wide range of devices to work on the same project from anywhere.
Blank Whiteboard – This is a blank canvas where you start from scratch and can customize it as per your liking.
Effective Meetings – The Whiteboard Integration into Teams allows for real-time collaboration, ensuring participants are up-to-date with the changes made.
Templates – If you’re not sure where to begin, try using one of the many templates that come with the app.
Microsoft Teams Whiteboard has been around for a while, but adoption is still relatively low. This could be mainly due to users being unaware of the innovative features. It could also be due to how unstable apps can be. Sometimes, you may find that Whiteboard is not working.
Nonetheless, it is still a welcome feature. This holds true especially when compared to the Teams remote control. You had to access another user’s screen to control shared content. Now, all you have to do is collaborate on online meetings.
You can also learn about direct routing to integrate your existing telephony with the platform.
Have you started using the Microsoft Teams Whiteboard feature? There’s a lot of great functionality you may not have realized existed. Let us know some of your favorites in the comment section below.
While many use Google Maps, some users prefer a more detailed view of Earth, and if you’re one of those users, you might want to download Google Earth for Windows 10.
The process is rather simple and it only takes a few minutes, so in today’s guide, we’ll give you step-by-step instructions on how to do this properly.
Benefits of using Google Earth:
Provides users with a 3D representation of Earth.
It offers important geographical information such as maps, satellite imagery, and terrain data.
Useful for educational purposes and travel planning.
How do I download Google Earth for free on Windows 10?
The download and installation process will now start.
The process is fully automated and it doesn’t require user interaction.
Exploring the features of Google Earth for Windows 10
Advanced tools & historical imagery
In the top menu, click on Show historical imagery.
A new slider will appear.
Adjust the slider to see how the location has looked over the years.
Hundreds of cities in 3D terrain
In the layers pane, locate the 3D Buildings option and check it.
If 3D buildings are available, they will appear on the map.
Note: Depending on your Internet speed, it might take a bit for the 3D buildings to render properly.
This feature is available to hundreds of major cities worldwide, and more cities are constantly being added.
High-resolution satellite imagery
Google Earth uses high-resolution satellite imagery, allowing you to view images in 8192×4764 resolution. All images can be downloaded in maximum resolution, allowing you to zoom in and view the details as you please.
Mapmaking tools & measurement tools
In the menu on the top, you’ll find various mapmaking tools including the following:
Placemarks
Polygons
Paths
Image overlays
You can customize the color or opacity of each element or assign links or images that provide more information to users once they click it.
As for measurement tools, you can use them as follows:
Click the ruler icon in the menu.
Choose the desired ruler type.
Use your mouse to create it and you should see the measured distance on the screen.
If needed, you can change your measuring units.
Interactive tours and sharing
In the top menu, click on Add and select Tour.
Click the record button and record your tour.
After you’re done, you’ll see a playback option, use it to preview your tour and ensure everything is in order.
Click the Save icon if you wish to save your tour.
As for sharing, you can do it as follows:
Click the Email icon in the top menu.
Select what you want to share.
Lastly, pick your email client.
Alternatively, you can open this location in Google Maps by clicking its icon and then share the link manually.
You can download Google Earth for Windows 10 in 64 or 32-bit versions, and while it has an abundance of features, its sharing options leave a lot to be desired.
This software is available on almost all versions of Windows, and we have a guide on how to download Google Earth for Windows 11. Do keep in mind that the software has its share of problems, and we already wrote a guide on what to do if Google Earth is not working.
Surface Pro 3 black screen is a common problem, and it’s prevalent across the Surface series and even computers in general. The error arises due to several reasons, but more often than not, users see a black screen on Surface 3 after login.
The desktop icons don’t show up, though the Task Manager and File Explorer are accessible in most cases, even if for a small period. The Microsoft Surface black screen of death requires some effort to troubleshoot and won’t go away on its own!
Why is my Microsoft Surface Go 3 stuck on a black screen with a cursor?
A Surface Go 3 black screen issue with cursor or without one is usually caused due to issues with the battery or the power plan. If the battery has been exposed to a cold climate, it won’t hold charge.
Other than that, you will come across a Surface Go 3 black screen with logo if outdated, corrupt, or incompatible graphics drivers are installed. Lastly, we cannot ignore the possibility of conflicting programs and hardware issues.
How do I fix a black screen on my Surface Go 3?
Before we start with the slightly complex solutions, try these quick ones first:
Hold the Power button on the device for 15-20 seconds until the Windows logo appears, then release it and let the Surface Go 3 start normally. This also helps with the Surface Pro 4 black screen of death.
Connect the keyboard and press Ctrl + Shift + B to reset the graphics. Also, disconnect any USB-C or other peripherals.
In case Surface Go 3 blacked out in the middle of work, charge the device for some time. While Windows may show that the battery is sufficiently charged, keep the power cord connected and then turn on the device.
Check for any pending Windows updates and install them.
Warm up Surface Go 3 using a mild blower or hair dryer. We recommend you be cautious with it and not expose the device to too much heat.
If none work, head to the fixes listed next.
Tip
If the Surface Go 3 device doesn’t turn on at all, and you are faced with a black screen, boot Windows into Safe Mode and execute the solutions listed below.
1. Uninstall conflicting programs
Press Windows + I to open Settings, go to Apps from the navigation pane, and click Installed apps on the right.
Click the ellipsis next to any recently installed app, and select Uninstall from the flyout menu.
Again, click Uninstall in the confirmation prompt.
When faced with a Surface Go 3 black screen with cursor, it’s often an installed problematic app to blame. Here are a few that were reported to trigger the problem:
Explorer Patcher
WSE Vosteran
Search Protect
2. Update the graphics driver
Press Windows + R to open Run, type devmgmt.msc in the text field, and hit Enter.
Expand the Display adapters entry, right-click on the in-use adapter, and select Update driver.
Now, click on Search automatically for drivers and wait for Windows to install the best available version stored locally.
Restart the device in normal mode and check if the Surface Go 3 black screen goes away.
When you find the Microsoft Surface screen black, but the keyboard lights up, it could be the graphics to blame. Update the graphics driver, and things should be up and running!
This will wipe out all the data, so it’s recommended that you back it up using an external storage device or a reliable data backup solution.
When faced with the Surface Go 3 black screen of death issues, it’s often the power supply, settings, drivers, or defective hardware components to blame. For problems with the power supply, you may face charging issues on the Surface device. But it’s all fixable!
Lastly, you may contact a local service center or Microsoft support for more help.
For any queries or to share what worked for you, drop a comment below.
If a game hasn’t been properly optimized for your hardware, you may experience a case of high GPU usage with low FPS. This can be the case even with decent specs.
In such cases, your graphics card is usually working harder than it should be. In the event that this happens, it can lead to several issues such as game lagging or freezing, but not to worry as you can easily resolve this issue.
What causes low FPS despite high GPU usage?
Your game might be using more CPU resources than you have available.
The game may not be optimized for your hardware because your PC doesn’t meet the minimum system requirements.
Your game settings may be too high, especially if you have an old or underpowered CPU hence more strain on your GPU and CPU.
Your graphics card may be running hot, making it struggle to maintain its peak performance levels.
How do I fix low FPS despite high GPU usage?
Below are some preliminary steps to make sure your computer is ready for the process of optimizing GPU usage and FPS:
Ensure your system meets the requirements to run the game.
Ensure you’re running the latest version of your OS and installed the most current version of the game.
1. Lower in-game settings
It’s possible that your game has been optimized for newer computers and lowering some of the game’s settings will help it run smoother on your PC.
For instance, if you are playing a game on High settings and are having problems with high GPU usage and low FPS, try changing the graphics settings to Medium instead. This will decrease the load on your graphics card, allowing it to run more smoothly without sacrificing visual quality too much.
2. Uninstall GeForce Experience
Press the Windows key + R, type appwiz.cpl, and click OK.
Right-click the NVIDIA GeForce Experience option and select the Uninstall option.
Now, follow the onscreen instructions to complete the process.
Click on the Start button, type power plan, then select Choose power plan.
Checkmark the High Performance section, then select Change Plan Settings.
If you can’t see it on the list of plans, click on Show additional plans.
Click on Change Advanced Power Settings.
Go to Processor Power Management and make sure the minimum and maximum processor state is 100%.
4. Update your graphics card drivers
Hit the Windows key, type Device Manager in the search bar, and click Open.
Navigate to Display adapters to expand, right-click on your graphics card, and select Update driver.
Select Search automatically for drivers.
Often, Windows may fail to match your PC with the correct drivers. As such, a driver updater utility can come to your rescue in such situations. Outbyte Driver Updater does a good job at detecting damaged, missing, corrupted,, and outdated drivers and then replacing them with the correct ones.
5. Rollback the previous driver version
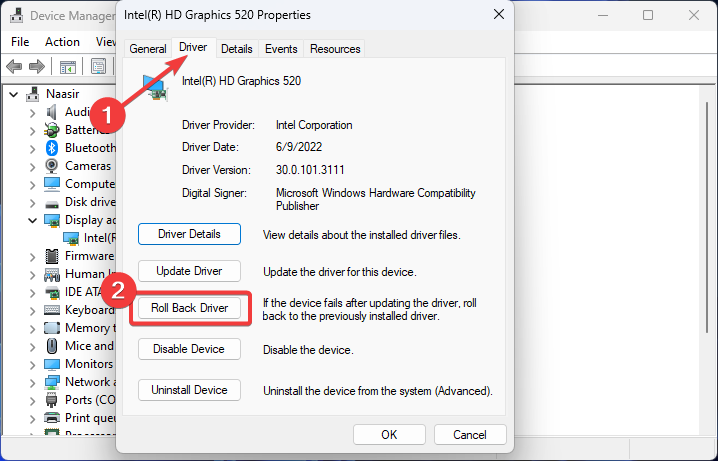
Click the Search icon, type Device Manager in the search bar, and click Open.
Navigate to Display adapters to expand, right-click on your graphics card, and select Properties.
Click on the Driver tab, and select Roll Back Driver.
Select a reason for rolling back in the next prompt, then click Yes.
Restart your PC, and the previously installed drivers for your device will be loaded.
Press the Windows key, search Windows Security, and click Open.
Select Virus & threat protection.
Next, press Quick scan under Current threats.
If you don’t find any threats, proceed to perform a full scan by clicking on Scan options just below Quick scan.
Click on Full scan, then Scan now to perform a deep scan of your PC.
Wait for the process to finish and restart your system.
7. Increase CPU cooler performance
If your CPU is running hot, the CPU will automatically reduce its clock speed in order to prevent damage from overheating. This in turn causes throttling.
And if your computer is throttling because of a poorly cooled CPU, you’ll continously encounter dropped FPS levels. Increasing the fan speed or replacing or using a better cooler will help keep your CPU running at optimal temperatures so that it doesn’t overheat and become damaged.
8. Enable Power-Preserving Modes on Single Threads and CPUs
Navigate to the Advanced tab and click on CPU Configuration.
Locate C-States Control option and Disable it.
Save the changes and exit the BIOS setup utility.
This feature can be useful in scenarios when you want to reduce your CPU’s power consumption while still maintaining excellent performance.
9. Overclock your GPU
Overclocking can help boost your gaming performance by increasing the clock rate of some components inside the GPU but it also increases heat output and power consumption significantly.
You probably have too many background processes on your computer, which use up your CPU power. And if your PC doesn’t have enough RAM or processing power to run your games smoothly, it won’t be able to produce enough frames per second (FPS) for a good experience.
Your graphics settings could also be too high for your hardware or vice versa. If that’s the case, performance will suffer greatly as heat generation limits how fast it can run at full power. You’ll need to invest in a good CPU cooler.
Ultimately, there are definitely some steps you can take to improve your FPS and GPU load. Some may require only minor tweaks and adjustments, while others where the CPU usage is high with low GPU may involve the need for a new graphics card or CPU.
However, before you make hasty, expensive decisions, try proactively tracking metrics related to performance. You can continually tune visual quality to increase FPS and ensure that your game performs well across a wide variety of hardware configurations and settings.
Please let us know in the comments below how these worked out for you, and what other methods you’ve tried. We’d love to hear from you.
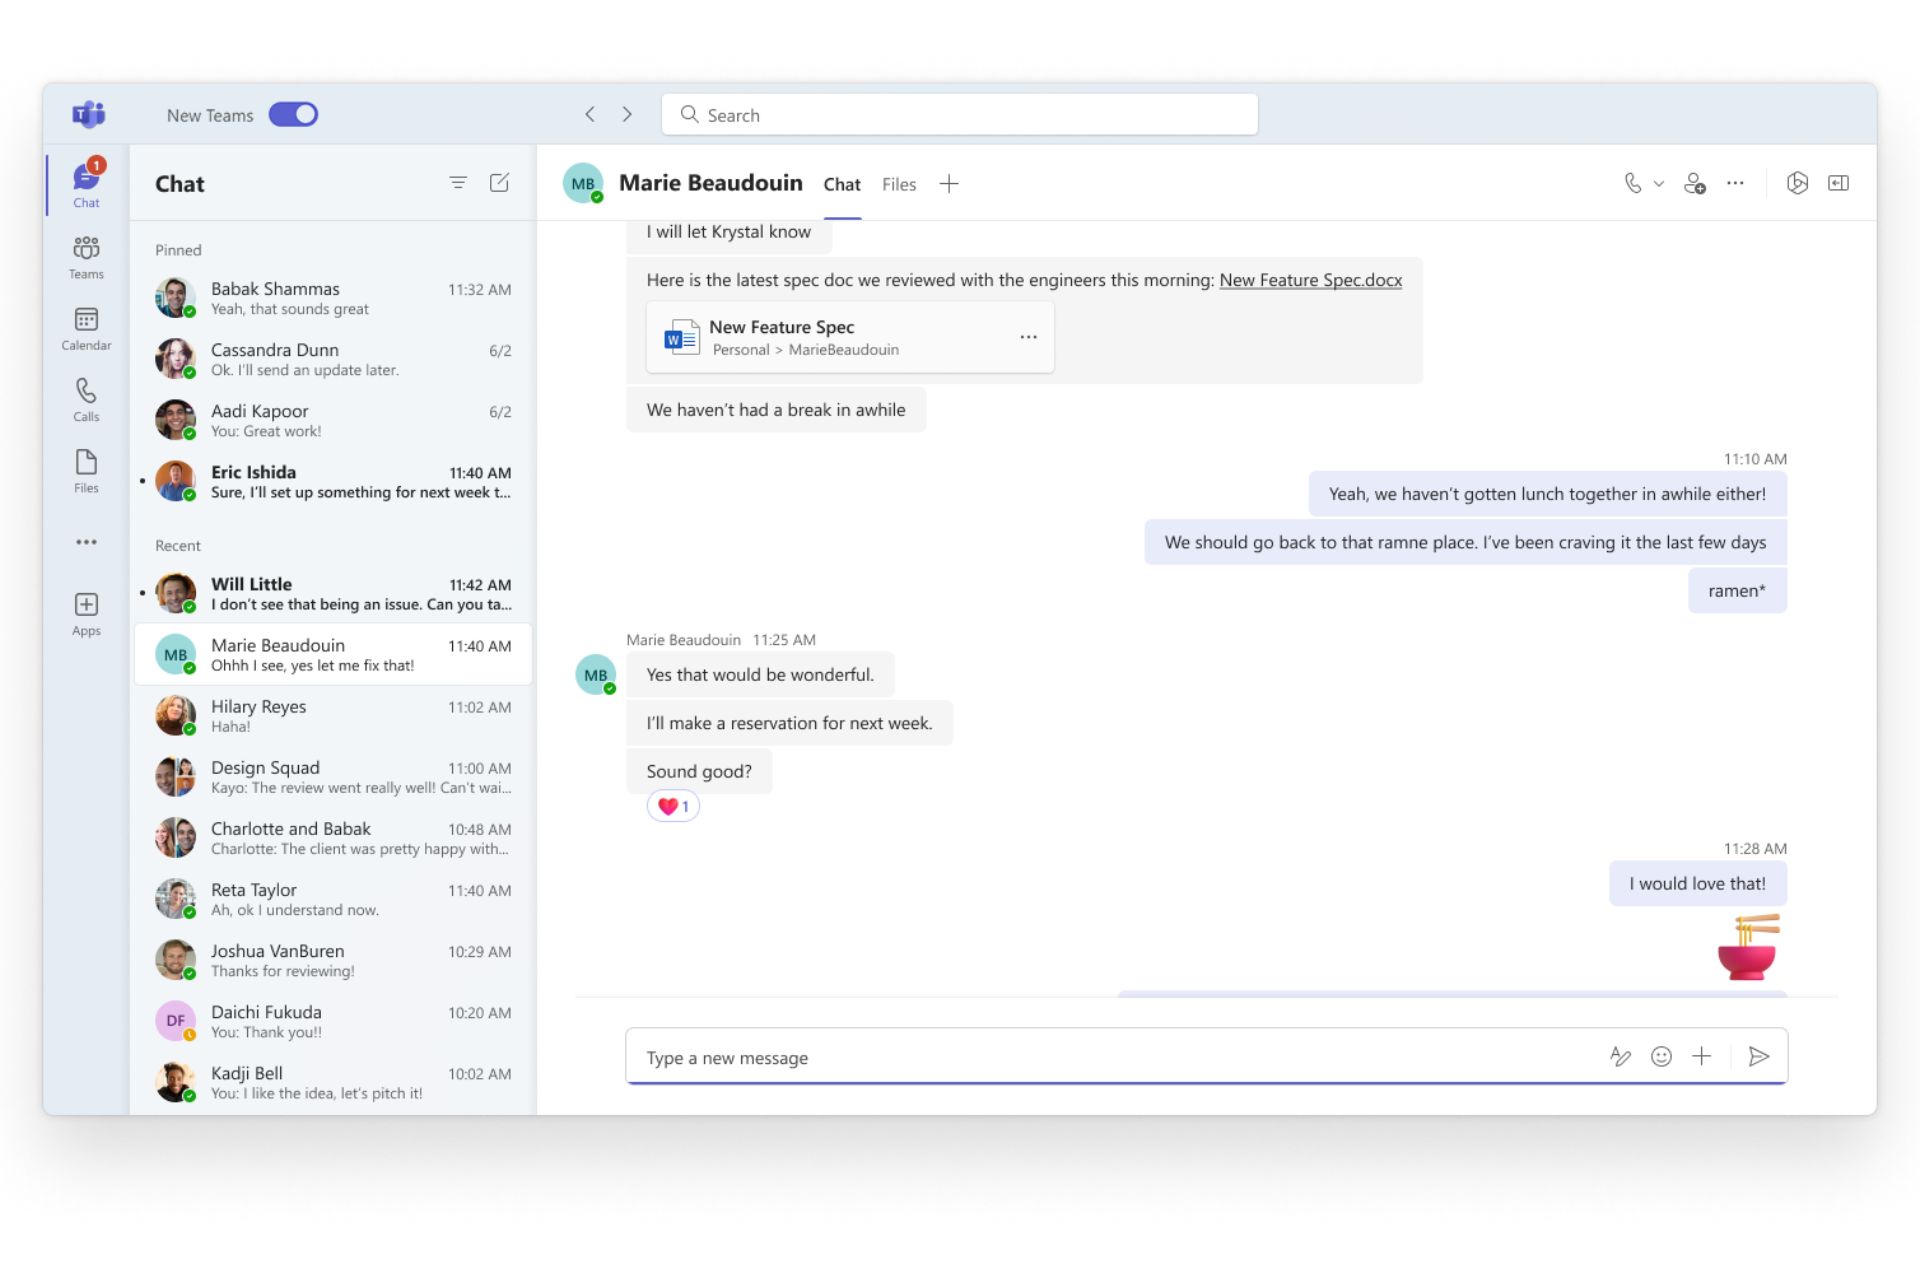
Microsoft Teams is one of the popular collaboration tools that also comes with Machne Wide Installer, which can help streamline deployment across organizational systems.
In this comprehensive guide, we will discuss the step-by-step process to harness the power of this installer, ensuring Microsoft Teams’ smooth integration across all user profiles on a computer.
Benefits of installing Teams machine wide-installer
Streamlines the deployment process of Microsoft Teams across multiple user accounts, saving time & effort in installation.
Centralized installation and management of Microsoft Teams using the machine-wide installer, simplifying administrative tasks like overseeing and updating the app.
Updates and patches are installed uniformly across all the profiles in a computer, reducing potential security risks.
Provides a standard user experience due to a uniform configuration of Microsoft Teams settings across all users on a machine.
What is Teams machine-wide installer, and do I need it?
The Microsoft Teams machine-wide installer is an MSI-based installation method for Teams that allows mass installation and updates of Teams via SCCM or Microsoft Endpoint Configuration Manager across all user accounts on a computer.
If you have a powerful centrally managed endpoint solution like SCCM, you can use this method to streamline deployment and make sure Teams is available & updated as soon as a new user signs in.
Preparing for Teams installation
Check Requirements and System Compatibility
Component
Requirements
OS
Windows 11, Windows 10 (excluding Windows 10 LTSC for Teams desktop app), Windows 10 on ARM, Windows 8.1, Windows Server 2019, Windows Server 2016, Windows Server 2012 R2.
Computer and processor
Minimum 1.1 GHz or faster, two-core
Memory
400 GB RAM
Hard disk
3.0 GB of available disk space
Display
1024 x 768 screen resolution
Graphics hardware
Windows OS: Graphics hardware acceleration requires DirectX 9 or later, with WDDM 2.0 or higher for Windows 10
.NET version
.NET 4.5 CLR or later
Video
USB 2.0 video camera
Devices
Standard laptop camera, microphone, and speakers
Avatars for Teams app
To get the best experience when using avatars, it is recommended to have a computer that has a four-core CPU with at least 8GB of RAM.
Set up Admin Credentials in Active Directory and Registry Key – Configure the essential admin credentials in the Active Directory and set up registry Keys with suitable permissions to ensure smooth installation and updates.
Update Channel Selection & Default File Format Pop-Up Page – Verify and configure the suitable update channels for the app to make sure it gets regular updates and features.
Designate User Profiles, Accounts, and Experience – Define user profiles and accounts for accessing and using the software and check for proper permissions & roles according to their job roles.
All users must have an Office 365 or Microsoft 365 account.
Check the installation status of the Microsoft Teams app – Press Windows + I to open Settings>Apps>Installed apps. If Microsoft Teams is already on the list, remove it.
How can I install Teams using Teams Machine Wide-Installer?
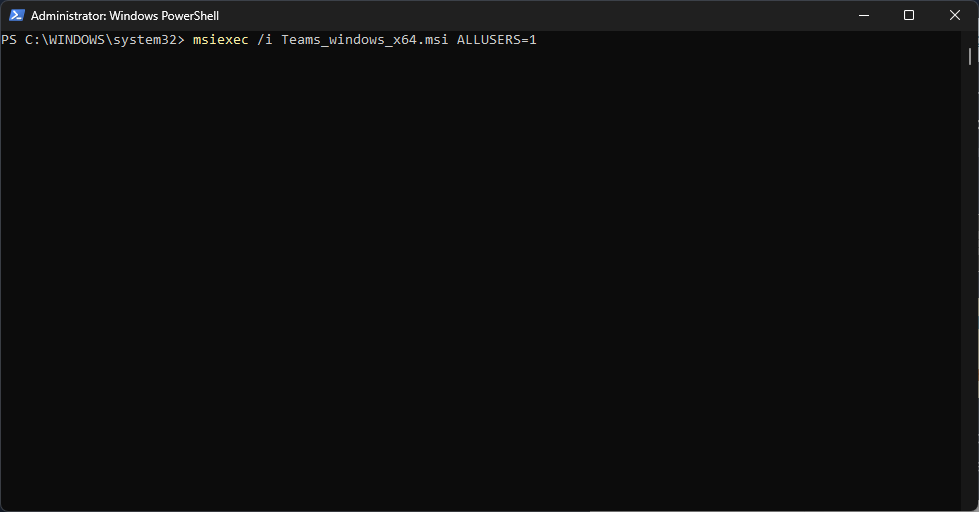
ALLUSERS=1 in the commands make sure the Teams Machine-Wide Installer appears in the Programs and Features list on the Control Panel or Installed apps list on the Settings app.
Once done, the Teams machine-wide installer will store the app in C:\Program Files\Teams Installer or C:\Program Files (x86)\Teams Installer
As soon as a new user logs on to the computer, the installer will automatically install Microsoft Teams to the user’s folder under C:\Users\userprofile
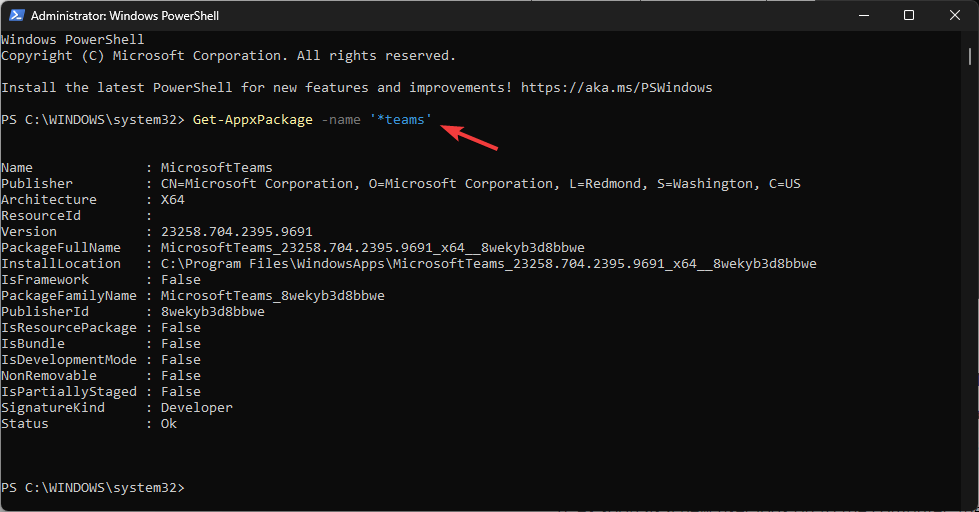
To verify if the Teams installation is successful, type the following command and press Enter: Get-AppxPackage -name '*teams'
How do I update the Teams client to the latest version?
Microsoft Teams desktop app can install updates automatically with the help of its own proprietary update engine. The updates are released every two weeks and usually on Tuesdays.
The administrators can’t modify or interrupt the whole process, however, users can always check for updates manually. All they need to do is click the profile icon>select Settings>About Teams. You will get the version of the app.
To update the Microsoft Teams machine-wide installer, you can also download the latest version of MSI installer & use the same steps mentioned above to install it. However, this will not upgrade the existing version but will update the version installed for the next user logins on PCs.
Can I remove the Teams machine-wide installer?
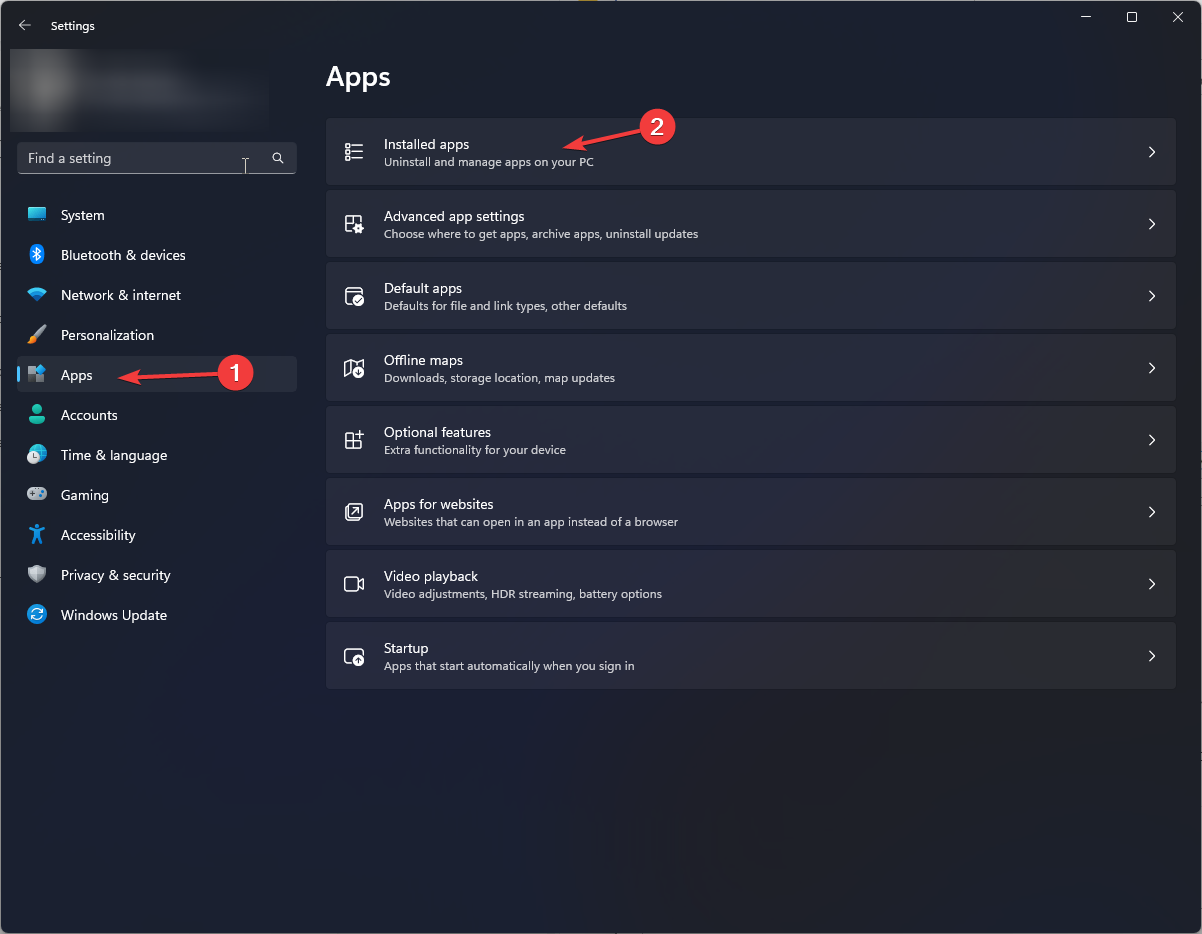
Press Windows + I to open the Settings app.
Go to Apps, then click Installed apps.
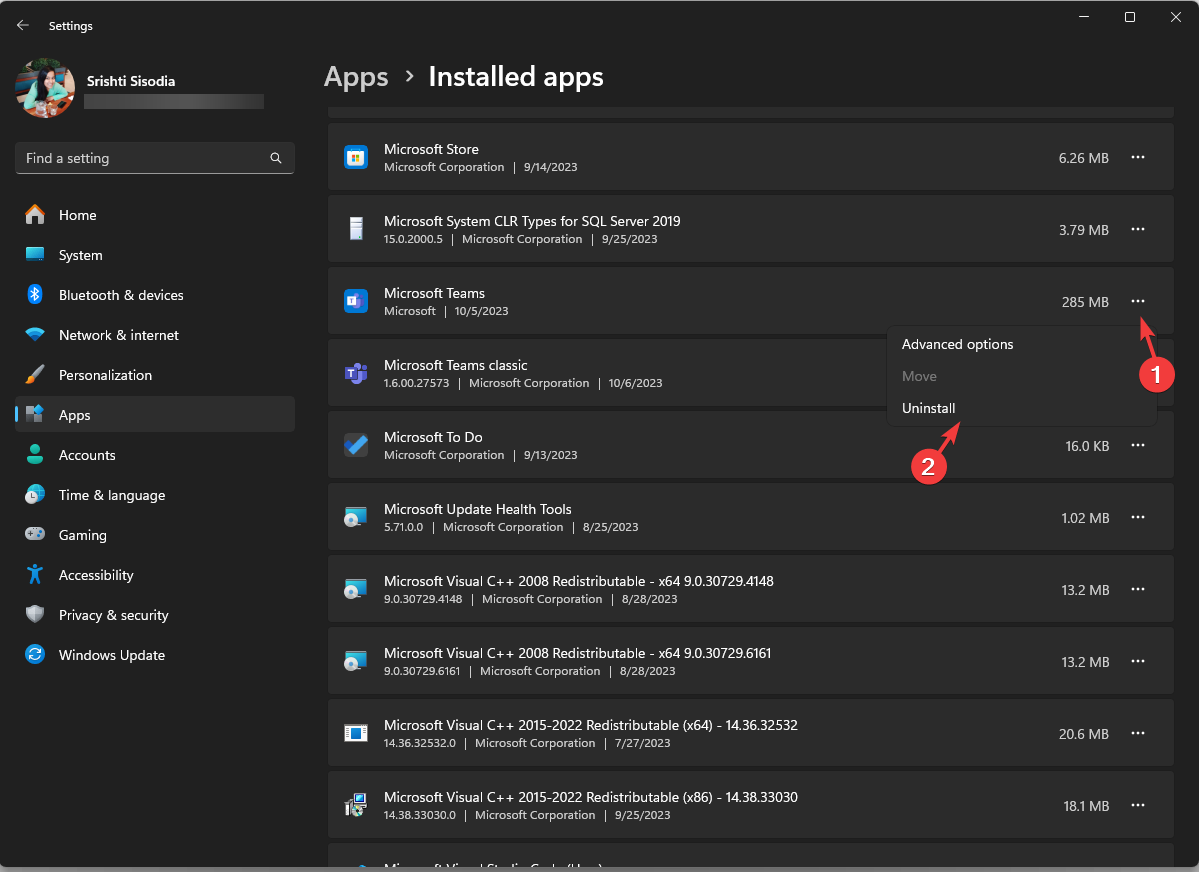
Locate Teams machine-wide installer, click the three dots, and select Uninstall.
Click Uninstall again to confirm the choice.
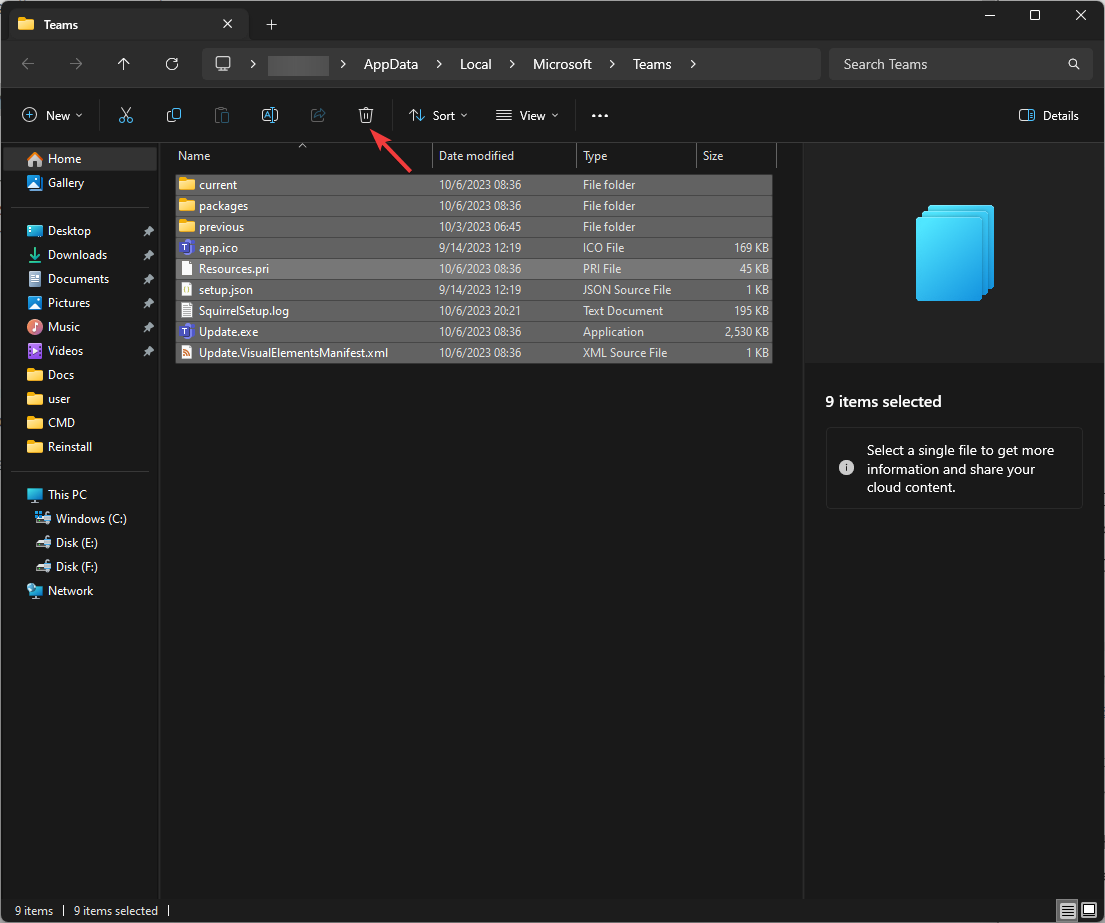
Press Windows + E to open File Explorer; navigate to this path: %LocalAppData%\Microsoft\Teams\
Delete the Teams folder.
You can also use Control Panel> Programs and Features to remove the app. Repeat these steps for all the user profiles on your computer to completely remove the app and stop it from installing again.
In case you can’t uninstall Microsoft Teams, restart your PC & try again; if the issue persists, check this guide for other solutions.
Just like other Microsoft products, the Teams newer version, Teams 2.0, will also get AI assistant Copilot and a revamped interface; read this guide to know more.
If you have any questions or suggestions about the subject, don’t hesitate to mention them in the comments section below.
Xbox error code 80151912 will prevent you from accessing Xbox Live, and this means that you won’t be able to play your favorite games online with your friends.
It’s possible to fix this issue, and in today’s guide, we’re going to show you a couple of solutions that can help you with this error message.
What is error code 80151912 on Xbox?
This is one of many Xbox errors you can encounter, and this particular issue is caused in most cases by server issues.
Users reported this problem while trying to connect Xbox 360 to Xbox Live or when running Xbox 360 games on Xbox Series X/S.
If you’re playing Roblox and you’re suddenly kicked out with the Roblox Error Code E01, or you can’t join a game, sometimes you also get the message Disconnected from Game, Please Reconnect Error. In this article, we’re listing the best solution to fix error code E01 in Roblox.
What is Error Code E01? Roblox Error Code E01 is usually due to server issues, but a problematic graphics driver or local internet problems may also cause it.
How do I fix Roblox Error Code E01?
Before applying more complicated solutions, here are a few quick possible fixes:
Check if the servers are working fine by visiting the Roblox Status Page.
If the servers are fine, check your internet connection and make sure it’s stable. It’s a good idea to reset your router and see if that solves the problem.
Make sure that Roblox is up to date, and also install any Windows pending updates.
If you’re playing the game on a browser, delete its cache and cookies or try another browser.
1. Clear the Roblox cache
Press the Win + R key combination to start the Run console.
Type or paste the following line and press Enter: %localappdata%\Roblox\logs
This will open the cache location of Roblox. Press Ctrl + A to select all files and press the Delete button.
Make sure you’re not logged into Roblox on multiple devices because that can also trigger disconnections.
If Roblox loads properly after clearing the cache but you still cannot use voice chat, check out this detailed guide: Roblox mic not working.
2. Update the graphics card driver
Right-click the Start button and select Device Manager from the list.
Expand the Display adapters section, right-click on the driver, and select Update driver.
Choose to Search automatically for drivers, and if the system finds a new one, install it.
A corrupted or outdated driver might cause the Roblox E01 error code, so updating it can fix the issue right away. We also have a full guide on how to update the graphics driver if you need more information.
If the problem started after updating your graphics card driver, try to roll back your driver to the previous version and see if that fixes the issue.
However, you can completely optimize your PC and update drivers automatically in a blink of an eye. The software will diagnose your system and update problematic drivers immediately.
Choose Apps from the left and select Apps & features from the right pane.
Look for Roblox in the list of apps, click the three dots button from the right, and select Uninstall.
After the process is finished, go to the Roblox website, download the latest version of the game, and reinstall a fresh copy.
Reinstalling the app is a common fix for this issue and others like Roblox error code 524; read this guide to learn about other solutions.
E01 is one of the most unusual Roblox error codes because it doesn’t provide too much information. It’s not as devious as Roblox Error Code 280, but it’s pretty close.
Note that a problem with the server usually causes Error Code E01 in Roblox, and most of the time, you just need to wait out. However, we hope the solutions we provided in our guide will help you fix it, and you can now play Roblox without any issues.
The Discord Error 1105 prevents users from accessing their accounts and is usually limited to a region when there’s a server outage. But, users sometimes reported encountering it for extended periods and had to troubleshoot things manually.
The Discord error code could arise due to a problem at your end or a server error. Let’s find out all about it!
What is Discord Error 1105?
Discord Error 1105 indicates a server issue that prevents a connection between the device and Discord. It usually appears on a restricted network, say a school network. Problems with the Discord app or the stored data can trigger it on a home network.
The error message typically reads one of the following:
Error 1105: Temporarily unavailable. You requested a page on a website (discordapp.com) that is on the Cloudflare network. The page could not be rendered due to a temporary fault.
Error 1105: You are being rate limited. The owner of the site has temporarily banned you from accessing the website
How do I fix Error 1105 on Discord?
Before we move to the slightly complex solutions, perform these quick checks first:
Make sure both the CloudFlare services and Discord servers are up and running. You can also use a reliable service like Downdetector to verify the same. If the services are down, wait for an hour or two and try again.
Check if the issue is limited to the website and the desktop app or Discord is inaccessible on mobile as well. In most cases, the mobile app worked fine.
Switch to another network. If the mobile app works fine, use a mobile hotspot to access the Internet on the computer.
If none work, head to the fixes listed next.
1. Change the DNS server
Press Windows + R to open Run, type ncpa.cpl in the text field, and hit Enter.
Right-click on the active network adapter, be it Wi-Fi or Ethernet and then select Properties.
Choose Internet Protocol Version 4 (TCP/IPv4) from the list, and click the Properties button.
Select Use the following DNS server addresses, and enter the following values in the text field:
Preferred DNS server: 8.8.8.8
Alternate DNS server: 8.8.4.4
Once done, click OK to save the changes.
2. Delete Discord’s app data
Press Windows + E to open File Explorer, paste the following path in the address bar and hit Enter: %AppData%
Locate and open the Discord folder, then press Ctrl + A to select all the files and Delete to remove them.
Similarly, go to the following location and delete all the files in the Discord folder:%LocalAppData%
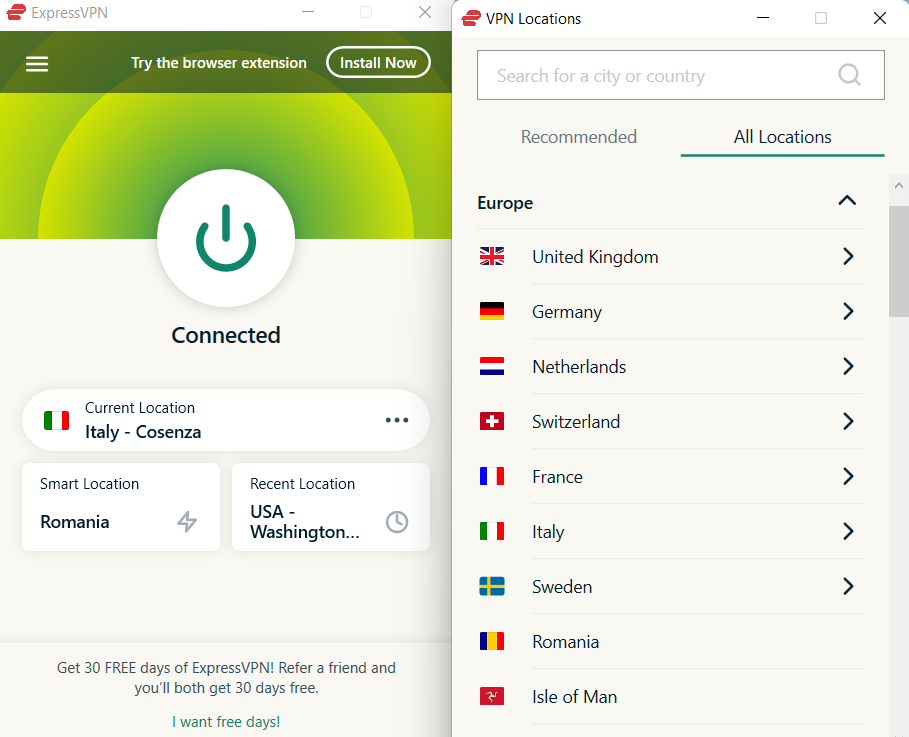
Connect to another server address by accessing All locations.
Once connected, open the Discord app or in the browser.
If the error stops appearing, keep the VPN connection on.
Discord users faced with Error 1105 can bypass any local limitations on a restrictive network using VPN software.
The VPN support can help you by rerouting the IP address of your device and connecting it to another IP localized in a different location. Besides, if the server issue is localized, you can connect to a server in another region and access Discord.
So, get a reliable VPN solution, choose a server that doesn’t adversely affect the Internet speed, and it should do the trick.
4. Flush DNS and reset Winsock
Press Windows + S to open the Search menu, type Command Prompt in the text field, right-click the relevant result, and select Run as administrator.
Click Yes in the UAC prompt.
Now, paste the following two commands individually, and hit Enter after each: ipconfig /flushdnsnetsh winsock reset
Once done, restart the computer and check whether the Discord Error 1105 is fixed.
Resetting the network configuration helps get rid of several Discord error codes, including Discord awaiting endpoint.
5. Contact the ISP to change the IP address
You could ask the Internet Service Provider (ISP) to change the IP address when nothing else works. Users who faced Error 1105 in Discord found that the servers blocked their IP address.
If using a VPN doesn’t make sense in the long term, a new IP address will be a viable solution!
If these solutions don’t work against Discord Error 1105, you can reinstall the app on a PC or mobile device. But it shouldn’t come down to that, and using a VPN or changing the IP address will work in most cases!
Besides, several users have recently reported coming across Bad Activity Result code 96 when cropping a profile picture. Find the solutions beforehand, so that it doesn’t hamper your experience.
For any queries or to share what worked for you, please comment down below.
Cash app error domain 400 will prevent you from logging in to your account and make your funds inaccessible.
This can be a big problem since it will make the service unusable, but there are a couple of solutions that can help you fix this issue, and today, we’re going to take a closer look at them.
What is Error 400? Error 400 is a bad request error similar to Cash App error 503, and it appears when the request sent to the service is invalid or corrupted. The causes for this error in Cash App are the following:
Issues with the app, such as corrupted files or cache.
Bugs with the applications.
Poor Internet connection, connection errors, or server issues.
How do I fix the Cash App session error domain 400?
Make sure to perform these preliminary checks:
Ensure that you have a stable Internet connection. If you’re on a bad Internet connection, try switching to a different one.
Press and hold the Cash App icon on the home screen.
Select Uninstall.
Next, tap OK to remove it.
Once removed, go to the Google Play Store and download it again on your Android device.
Cash App error 400 is often caused by temporary issues with the service itself, so if these guidelines don’t work for you, it might be best to contact customer service if Cash App is not working for you or if you’re dealing with a server-side error.
This isn’t the only service affected by this issue, and many reported DoorDash error code 400 on their devices. Did you find a different way to fix the Cash App session error domain 400 or 500? If so, let us know in the comments section.
Many gamers encountered the Cyberpunk 2077 corrupted or missing scripts file error when trying to start the game. The full message reads Cyberpunk encountered an error caused by a corrupted or missing scripts file and will now be forced to close.
What causes the corrupted or missing script file error in Cyberpunk 2077? Actually Cyberpunk 2077 encountered an error caused by corrupted mods so, actually, the culprits are Red4ext, TweakXL, and ArchiveXL. That is why, Cyberpunk 2077 doesn’t start.
How do I fix the corrupted or missing scripts file error on Cyberpunk 2077?
Before doing anything complicated, make sure to perform a few important actions:
Back up your saved games. You should find them here: %userprofile%\Saved Games\CD Projekt Red\Cyberpunk 2077\
If you have the Cloud Saves feature enabled, disable it from Cyberpunk 2077 if possible.
1. Uninstall Cyberpunk 2077
Click the Start button and select Settings.
Click on Apps from the left pane and choose Apps & features from the right.
Look for Cyberpunk 2077 in the list of apps, click on the three dots button from its right, and select Uninstall.
Wait for the process to finish, then restart your PC.
If you are using clients such as Steam, GOG Galaxy, or EGS, you can also use them to uninstall Cyberpunk 2077 and get rid of the error message.
2. Delete Cyberpunk 2077-related folders
Press the Win + E key combination to start File Explorer.
In case you’re using Steam, GOG, or EGS, go to the Cyberpunk 2077 folder in the respective apps and delete it.
Go to the following location and delete the Cyberpunk 2077 folder as well: %userprofile%\Saved Games\CD Projekt Red\
Navigate to the following location and delete the REDEngine folder and the CD Projekt Red folder if present: %userprofile%\AppData\Local\
4. Verify the integrity of the game files in Steam
Launch Steam, go to the Library, right-click on Cyberpunk 2077, and choose Properties.
Navigate to Local Files from the left and click on Verify integrity of game files.
Hopefully, the missing files will be installed right back, and the game will start working again.
Using the Steam client to check the game files has proved successful many times before to fix corrupt game files so you should try that as well.
Can I just download the missing files in Cyberpunk 2077? You can try, but many of our readers tried that with no results. Moreover, if you download the files from an untrusted source, the file may be infected, thus infecting your PC in the process.
The fresh install of the game has worked for everyone and although it takes a bit more time, at least you fix the problem.
Hopefully, our guide helped you fix the Cyberpunk 2077 corrupted or missing scripts file error and now you’re back in play.
If you want to share an app between user accounts on Windows, keep reading. But, shouldn’t programs installed on one account be available to all users automatically? Sadly, that’s not the case with Windows.
But you can work around that.
How do you see if a program is installed for all users?
To verify whether a program is installed for all users or the current account, check the installation path. If it’s available under the Program Files or Program Files(x86) folder, the program should be accessible on all user accounts.
However, programs saved in the AppData folder of a specific account are accessible only to that user. Remember, it doesn’t matter whether you are the administrator or a standard user in this case.
How do I make apps available for all users in Windows 11?
1. Move the program and configure permissions
1.1 Move the program
Press Windows + E to open File Explorer, paste the following path in the address bar and hit Enter: %APPDATA%\Microsoft\Windows\Start Menu\Programs
Locate the app’s shortcut, and press Ctrl + C to copy it.
Now, navigate the following path or use the address bar like before: C:\Users\Public\Public Desktop
Once in the Public Desktop folder, press Ctrl + V to paste the shortcut.
1.2 Set read and write permissions for everyone
Now, right-click on the shortcut, and select Properties.
Go to the Security tab, and click on Advanced.
Click the Change button next to Owner.
Enter Everyone in the text field, click Check names and then OK.
Click Apply and OK to save the changes.
Now, click the Edit button in the Security tab.
Click on Add.
Again, type Everyone in the available field, and click Check names and OK.
Select Everyone from the list of user profiles, tick the checkboxes for all permissions, and then click Apply and OK to save the changes.
Similarly, locate the program’s actual folder and allow full permissions to Everyone as you did earlier. For Zoom, it’s: C:\Users\<Username>\AppData\Roaming\Zoom
Now, the program is shared between users on Windows 11, and when you sign in to the other user account, it will be listed on the desktop.
Remember, if you just add the application to the Public Desktop folder, it will throw an error when launched. You will have to grant both read and write permissions to the other user for the program’s .exe file in the Public Desktop folder and the program’s base folder.
Some programs are designed to be installed across user profiles. So, when you run the setup, there are separate options to install it for the current user account or all of them. If one is not available, change the installation path to Program Files or Program Files (x86).
For a few, you can make the program available to all users in Windows 11 without any modifications. They automatically get installed across the different accounts.
If you didn’t do that earlier, uninstall the app, and then run the setup all over again. In case you are asked to sign out other users, make sure to do so before proceeding with the installation!
3. Use the Family feature by Microsoft
Microsoft also allows users to share applications downloaded from the Microsoft Store between user accounts. For instance, you can purchase Minecraft from one account and share it with others. You just need to create a family of Microsoft accounts and share the app.
Besides, with the Family feature, you all don’t necessarily need to be sharing the same device. Even family Microsoft accounts on different devices will show all the Microsoft apps.
How do I restrict access to a program in Windows 11?
You can easily restrict access to specific programs using the Registry Editor or the Local Group Policy Editor. The former is the preferred approach, but if you are running Windows 11 Home and want to use the latter, manually install gpedit.msc.
With the Registry, you just need to add a DisallowRun key under Explorer, create a DWORD for the application you want to restrict access to, and it won’t open anymore.
Remember, it is not advisable to make every program available to all users in Windows 11. The critical ones should be limited to the current user.
Also, from the parental guidance point of view, restricting some programs from child users makes sense. And if they have already got any, you can even uninstall Windows 11 default apps using PowerShell.
For any queries or to share which method worked best for you, drop a comment below.
The term is not recognized as the name of a cmdlet error message that will prevent you from running scripts in PowerShell, and that can be a major problem if you’re maintaining a server or multiple systems.
It’s usually caused by the following:
Calling a module that isn’t installed in your script will lead to this error.
Syntax or spelling errors will prevent your code from running and give you an error message.
Path errors, incorrect paths, and problems with the PATH variable can lead to this issue.
Here’s how you can fix it:
How do I fix The term is not recognized as the name of a cmdlet?
1. Use the . before starting the script
Open PowerShell, Command Prompt, or any other command line utility and enter the command to run your script.
If the script requires to have . before it, add another one, like this: .. \myscript.ps1
Run the command and check if the issue is still there.
2. Make sure you have the required module installed
Check the error message and see if it specifies a specific term.
If it does, it means that the script has difficulties finding that module.
Do a quick research and try to determine the module that is associated with the term.
Next, run the Get-Module -Name YourModuleName -ListAvailable
If you get any information, it means the module is installed. If not, you need to install it properly.
3. Check the code for missing quotes
Examine your script file.
Make sure that there are no missing quotes or improperly closed quotes.
If you notice any errors, correct them and check if it solves the problem.
Tips to keep in mind when fixing the error
Make sure that PowerShell is up to date since certain commands won’t work in older versions.
Examine your code thoroughly, and look for any code errors.
Inspect your paths, and path environment variables and ensure that they are correct.
Make sure that all necessary modules are imported properly.
Always consult with official documentation.
The term is not recognized as the name of a cmdlet is a coding error, and as such, fixing it requires in-depth research and analysis from the user. Speaking of PowerShell errors, in the past, we covered PowerShell is not recognized error, so be sure to check it out.
Everyone knows how to use a webcam, but what they might not know is that there are different models of webcams with different features and functionalities. The drivers for these webcams can come in very handy as they allow for a cleaner connection to the internet and more functionality with programs.
Microsoft LifeCam drivers are required to allow your computer to communicate with the camera and if you don’t have them installed properly, your PC may not recognize the device. Fortunately, there are plenty of ways that you can get these drivers so that everything can work as expected again.
USB Port Requirements
Incompatible USB ports may fail to recognize or detect the camera or disconnect while you’re in session. The software uses a USB 2.0 port to connect to your webcam and this is required for proper operation.
If you do not have one, then you need to use a USB hub or buy an additional device that will allow you to plug in your webcam.
How do I download & install LifeCam drivers in Windows 11?
1. By using an automatic driver updater
The best way to install Microsoft LifeCam drivers for your Windows 11 is by using dedicated software. Downloading integrated camera drivers may work, but non-system drivers may present some issues.
The steps are pretty much standard, and anyone who knows how to download software from the internet should be able to do it with no difficulty.
Once you’ve downloaded one of these specialized driver updating tools, you can sit back as they will automatically detect your operating system and find all outdated, missing, or corrupted drivers for you.
2. By using Windows Update
Press the Windows key and click on Settings.
Navigate to Windows Update, and click on Advanced options.
Now, click on Optional updates.
Tick the checkboxes for all the available updates under Driver updates, and click on Download & install.
3. By using the Device Manager
Hit the Windows key, type Device Manager, and click Open.
Locate the LifeCam Studio. It should be either under Camera or Imaging devices entry.
Once found, right-click on LifeCam Studio and select Update driver from the context menu.
Select Search automatically for drivers and wait for Windows to update the drivers.
Because sometimes Windows may match you with an older version of a driver, you’ll find that your LifeCam Studio is not working. This will require you to download from the official site.
4. By downloading from the Manufacturer’s site
The LifeCam drivers have been incorporated into Windows 10 and 11 and have native support. However, some users may still need to download and install these drivers for their camcorder.
This could be because they have not been updated properly after installation or deleted from their computer. You can still find them in the Microsoft Update Catalog. You just need to be extra careful and enter your hardware information to download the correct driver.
What are some common problems when using Lifecam Studio Webcams?
Webcam not working – The webcam may not be working because it is not recognized by Windows. This could be a compatibility issue with Microsoft’s drivers for your webcam.
Video quality issues – This could be because your computer is running other CPU-intensive programs. Clearing superfluous background processes could remedy the situation.
The camera is not detected – This frequently happens when you have a problematic port, or you’re using a USB hub. Ensure the camera is connected directly to an available USB port on your computer.
The camera keeps disconnecting and reconnecting – This is usually due to connection issues. Ensure you are in range of your router and remove any unnecessary devices hogging the bandwidth.
By doing this, you will be more likely to have a smooth-running camera. It is recommended to update the drivers every couple of months. This will keep your computer safe and secure.
We hope that you found our article helpful and that it was a pleasant experience finding the drivers for your device. If you have any questions at all, we’d love to hear them in the comments below.
Accents or diacritic marks can be useful in determining phonetic clarity, language differentiation, and other popular contexts. However, sometimes, it can cause unnecessary hindrances due to accidental inputs.
In this guide, we will walk you through simple methods to turn off accents on the keyboard in Windows 11 to fine-tune your writing preferences.
How do I turn off accents on my Windows 11 keyboard?
Before moving to steps to turn off the special characters on Windows 11, make sure you perform the following checks:
Ensure you don’t have a third-party keyboard app installed.
Verify if you have admin access to your computer.
Make sure you have the updated version of Windows.
1. Using the Language & region option
Press Windows + I to open the Settings app.
Go to Time & language and select Language & region.
Locate Preferred languages; locate the language for which you want to change the keyboard settings, usually, it is English (United States).
Click the three dots next to it, and choose Language options.
On the Options page, under Keyboards, locate the keyboard other than English (United States), click the three dots next to it, and select Remove.
Locate the unwanted keyboard identifier among the list of Keyboard Identifiers in the right pane and delete the one you don’t want.
Close the Registry Editor and restart your PC.
5. Uninstall the display languages
Press Windows + R to open the Run dialog box.
Type lpksetup and click OK to open the Install or uninstall display languages wizard.
Select the Uninstall display languages option from the next window.
Follow the onscreen instructions to delete display languages so they can’t add themselves to the keyboard layout.
Troubleshooting tips for turning off accents on keyboard on Windows 11
First, ensure you have logged in with a user profile with administrative rights.
Always reboot your computer after making the changes.
Use Time & language>Language & region>Remove all the languages and keyboard layout, then re-add the ones you need to remove the conflicts between languages.
If the above steps don’t work, make the changes using a local user profile and check if the special characters are disabled.
Disable or uninstall any third-party keyboard-related software that you think might conflict with default settings.
Keep your keyboard driver updated to prevent issues like typing double characters when inputting single.
You can also use the Language & region option to add a new preferred language, keyboard layout, and type accents on Windows.
Did we miss a step that helped you turn off the special characters? Don’t hesitate to mention it in the comments section below. We will happily add it to the list.
GitHub Copilot for business, as the name suggests, is tailored specifically for business use. This tool leverages artificial intelligence to strengthen code creation, streamline processes, and increase productivity.
In this guide, we will discuss steps to set up and use this cutting-edge artificial intelligence tool to optimize your coding experience and drive your business to new heights.
Can I use GitHub Copilot in my company? You can use organization or enterprise accounts to use GitHub Copilot for your company. However, if you have an individual account and your employer allows you to use it for the company’s work, you can utilize it as well.
How do I set up & use GitHub Copilot for Business?
Sign in with your GitHub credentials and verify with a code if prompted.
Now, you will be presented with two options:
Enable GitHub Copilot at an enterprise level – To activate this, you must be an enterprise administrator.
Enable GitHub Copilot in an organization – To choose this option, you need to be a GitHub organization administrator.
Select the option that suits you and click Continue.
Choose the organization name and click Continue.
Now enter the billing information for your Copilot subscription and associated payment method, then click Save.
Once you have saved the details, on the Select your organization preferences page, use a drop-down menu to choose how GitHub Copilot should be configured and whether it should allow or block suggestions that match a public code, then click Save and continue.
Select the desired number of users on the Assign seats page and click Save and finish.
2. Configure policies & use the tool on an editor
Click your profile image and select Your organizations.
Select Settings next to your organization’s name.
Under Code, planning, and automation, locate Copilot & select Policies and features to change the configuration.
Next, to see the number of seats assigned, go to the Billing and plans option on the Your Organization page, locate Add-on, and under GitHub Copilot, you will get the details.
Once you have completed the setup and assigned seats to your team members, every added member will receive an email notifying them that they can integrate GitHub Copilot into Visual Studio Code, Visual Studio, JetBrains, and Neovim. To start using it, ask them to follow these steps:
Open any of the mentioned coding apps, and click Extensions.
Search GitHub Copilot and click Install to add it to the editor.
Once it is installed, click Enable Gloablly to use it all over the editor.
If you want to learn how to set up and use GitHub Copilot in Visual Studio, we have an interesting article covering all the steps in detail.
Collects, measures, and analyzes data on how the tool is used
Blocks suggestions matching public code
Comes with an option to configure the policies to block suggestions
Allows you to block suggestions
Offers multi-line function suggestions
Can generate entire functions or code blocks that span multiple lines of code
Can suggest complete functions or code segments that extend across multiple lines of code.
Organization-wide policy management
Can manage policies using the administrator account
Subscription doesn’t have this feature
Audit logs
Allows you to keep the usage activities and logs
Doesn’t keep logs
HTTP proxy support via custom certificates
Capable of working through an HTTP proxy using custom or user-provided SSL/TLS certificates.
Doesn’t include the feature
In case you want to try GitHub Copilot for free, GitHub Copilot for Individuals comes with a trial version. However, if you want it entirely free, you need to sign up as a student or teacher.
Exploring the features of GitHub Copilot for Business
An extensive library of code snippets that allows you to quickly insert pre-written, commonly used code segments into your projects, thereby boosting the development process & maintaining code consistency.
Keeps the proprietary code secure and protected, gives code suggestions, and seamlessly integrates with several code editors, enhancing the overall coding experience and providing effortless collaboration within private repositories.
Seamless integration with enterprise-level GitHub accounts, catering to their needs and supporting various programming languages, making them flexible.
Provides admin access & tailored features for different team members and allows customization & management of user settings as per preferences.
Managing legal risk with GitHub Copilot for Business
The tool should be used with caution when it comes to non-GitHub repositories.
Ensure you respect intellectual property rights and licenses to avoid copyright infringement.
Use a Public code filter to avoid suggestions from public repositories.
Always double-check the code sources to minimize risks.
Optimizing your workflow with GitHub Copilot for Business
Use code suggestions to enhance productivity, streamline your coding processes, and maintain code consistency on all projects.
You can assign seats to individual users and leadership roles, which can help in managing the volume of code, making it useful for stakeholders, irrespective of their position in the company.
Manage your codebase to make sure it aligns with your organization’s guidelines.
Useful in writing safe and reliable code, resulting in a secure development process.
GitHub Copilot is coming with a newer version named Copilot X, which will powered by the Open AI GPT-4 model; to learn more about it, read this guide.
Microsoft has also added Copilot to Outlook and Windows & will soon add it to more of its products; to learn how to add it to Outlook, read this guide. You can also check out this GitHub Copilot vs Microsoft Copilot comparison if you’re unsure which tool to use.
After configuring policies and enabling the extension in your editor, it is useful to know how to clone a repository in GitHub so your team can bring codebases into their environment and start collaborating effectively.
Do you think GitHub Copilot for Business can help you elevate your business? Mention your thoughts in the comments section below.
It’s official: Teams 2.0, or the new Microsoft Teams is finally available to everyone on Windows and Mac, according to Microsoft’s latest announcement.
The newer generation of Teams has been in the works for quite some time, and selected users were able to try it in a preview when Microsoft released it in a private preview earlier this year. It was collectively dubbed “Teams 2.0” at that time, and it came with a lot of improvements like a shorter loading time by 50% and more efficient energy consumption.
However, Teams 2.0 released on October 5 brings even more improvements to the platform, as Microsoft notes.
We have made notable progress since the launch of new Teams in public preview. New Teams now has full feature parity for almost all features including custom line-of-business apps, third-party apps, breakout rooms, 7×7 video, call queues, PSTN calling, contextual search in chats and channels, cross-post a channel conversation, and more. We have focused on providing high-quality performance and enhancing the basics in areas such as reliability, security, and IT management to make sure that new Teams meets the evolving requirements of your organization.
Microsoft
Plus, you should know that starting today, new features and enhancements will be exclusively available to Teams 2.0. That means that the classic Teams will only get improvements, so your organization should be thinking about moving to the new Teams as soon as possible, for security reasons. Below you’ll find a guide on how to do it.
How to download/switch to Teams 2.0?
To download Microsoft Teams, you just need to access the official website and download it to your preferred Windows device.
If you already have Microsoft Teams on your Windows device, you’ll need to:
Open your Microsoft Teams app on your Windows device.
Turn on the Try the new Teams toggle at the top of Teams.
Select Get it now from the pop-out dialogue, to install the new Teams.
When it’s done, Teams will automatically reboot with its new version.
With that said, however, not everyone will be happy with the new Teams, at least the version that still needs to be polished before general release. We’ve also covered how to revert to classic Teams if this case applies to your situation.
Important note: Microsoft is making Microsoft Teams 2.0 the default client on Windows starting October 3. This means your device will have the newer Teams 2.0 installed instead of the old Teams version.
Teams 2.0 availability
The new Microsoft Teams is now available to Windows and Mac desktop devices only for now, according to the following plan.
Update channel
Date
Teams Public Preview
October 2023
Targeted Release Channel
October 2023
Current Channel
Late October 2023
Monthly Enterprise Channel
December 2023
Semi-Annual Enterprise Channel (Preview)
November 2023
Semi-Annual Enterprise Channel, Semi-annual Extended, LTSC, and remaining channels
January 2024
Government Cloud (GCC, GCC High) Preview
March 2024
Government Cloud (DoD) Preview
March 2024
When it comes to the Web version, Microsoft has in plan the following roadmap.
Browser
Date
R4, Chrome/Edge, Non-EDU
Mid-November 2023
Chrome/Edge, EDU
November 2023
Safari/Firefox (target date)
March 2024
Gov/Special Clouds
March 2024
What features are changing in the new Teams?
Classic Teams
New Teams
Purple toast notifications
You’ll no longer see the purple “toast” notifications, and the taskbar icon will behave a little different. Notifications are via Windows native notifications to provide a consistent experience.
Adding a Wiki to a channel tab
You’ll no longer see a Wiki app. Instead, select the Notes app.
Adding third-party cloud storage service from the Files app and Files tab in channels
You’ll no longer see the “Add cloud storage” in the Files app on Teams’ left navigation bar and within the Files tab in Teams channels. Now, you can add the third-party storage app directly from the Teams App Store.
Look up an organizational chart while in a 1:1 chat
Select a user’s avatar or profile photo anywhere in Teams and navigate to the organizational chart within the profile card.
Look up LinkedIn while in a 1:1 chat
Select a user’s avatar or profile photo anywhere in Teams and navigate to the LinkedIn tab within the profile card.
Adding a document library (DocLib) app to a tab in channels
Use the Sharepoint app instead. Then, add the document library from there as a tab to the channel. Existing document libraries will automatically convert to a SharePoint document library on first use.
Activity tab in chat
No longer available.
Ability to save messages and files in Teams
No longer available. Will be replaced later this year by a similar feature.
Allow users to follow another user’s presence, then notify them of availability
Select a user’s avatar or profile photo anywhere in new Teams to quickly get an overview of their online status, next available calendar slot in Outlook, work hours, local time, and work location (remote or office).
Ability to sign out from the notification area at the far right of the taskbar (system tray).
No longer available.
Settings dialog
Settings is now an app accessed from the More options menu (…) in the title bar.
About links in the More options menu (…)
About links are now in the Settings app under the About Teams category.
Help in the app bar
The Help entrypoint, including Help links and Give Feedback is now located under the More options menu (…) in the title bar.
Ability to build Teams personsal apps usings Adaptive cards
No longer available.
General appearance changes
Colors, tooltip styles, and general appearance have been updated.
Ability to use tags in the “Add member” dialog.
There is now an advanced flow for tags.
Copilot is coming to the platform
As with multiple Microsoft 365 apps, the new Teams is getting the Copilot treatment. Users will be able to work alongside this AI tool to get work done faster, and more efficiently.
Among the features, Copilot is bringing to Microsoft Teams 2.0, the tool will also help customers look for hard-to-find information across Teams files and documents. You can read more about Copilot in Microsoft Teams here.
Further, aside from the newly revamped interface, you can go ahead and get Teams Exploratory to experience all the features of the premium version at no additional cost!
Microsoft has released a new Microsoft Teams for Education, and the platform is now available for Windows and Mac, according to their announcement.
This is all part of the newer Microsoft Teams, or Teams 2.0, release plan, announced by the Redmond-based tech giant earlier this year. However, back then, Microsoft gave the option to customers to switch between the classic Teams and new Teams. Now, the new Teams is the default desktop client for Windows and Mac.
The new Microsoft Teams for Education is based on Teams 2.0, but Microsoft says this version is more suitable for education environments.
To ensure Teams continues to meet the evolving requirements of educational institutions, here’s a quick look what users can expect from new Teams:
Higher overall performance with enhancements in core areas such as reliability, security, and IT management
Seamless collaboration across multiple organizations or accounts, ensuring no disruption to your workflow
More reliable, improved security, and better manageability – using trusted types, stringent CSPs, and integration with MSIX
Microsoft
However, the new Microsoft Teams for Education is only available for Windows and Mac, and its web version will only be available for Edge and Chrome, at first. But, Microsoft will bring additional browser platform availability in early 2024.
The new Microsoft for Education: everything you need to know about it
Educators and teachers will be able to easily get started with the new Teams. Microsoft has prepared a guide for them to easily transition between the old version and the new version.
The transition to the new Teams will not affect any of the activity currently happening in the old Teams for Education. According to Microsoft, users will be able to pick up where they left off after they’ve upgraded to new Teams.
Starting January 2024, Microsoft will be setting “New Teams as default” for all Education users.
In early January, for tenants and users still using classic Teams, Microsoft will set new Teams as the default Teams client. Administrators will still have the option to set classic Teams for their users via policy, should they choose to upgrade their users to new Teams on a different schedule.
Starting June 2024, all new features and enhancements will be available exclusively as a part of new Teams. To ensure our users can take advantage of latest Teams innovation, all remaining classic Teams users will be automatically upgraded to new Teams at this time.
What are your thoughts on the new Teams for Education?
And now, according to the latest entry in the Microsoft 356 Roadmap, OneDrive for Web is getting an option that will allow users to add individual file shortcuts.
Users will be able to make shortcuts to files from another user’s OneDrive, and it will allow them to organize these shortcuts so they can access the files faster.
This feature will let you create a shortcut to files stored in other people’s OneDrive and document libraries to be able to easily find it within your OneDrive.
Microsoft
How to use a OneDrive file shortcut
Users will be able to make a OneDrive shortcut the same way they do other usual shortcuts, as long as they know the path of the files. Microsoft says that these shortcuts will be manageable as per the user’s options, without impacting the source content.
For example, a file shortcut in OneDrive can be moved, renamed, or deleted and these actions will not change the original file’s content.
Once created, the shortcuts will appear pretty much everywhere in OneDrive, and across devices too. If you create one on OneDrive for the Web, it will appear on OneDrive for Android and iOS, and sync client endpoints everywhere.
Plus, the ability to document them in libraries will allow users to easily keep track of them when they need them. This makes this feature incredibly useful in dynamic situations, such as meetings, interviews, and other similar contexts.
The feature is coming to OneDrive this month, in October and it will be available everywhere.
At the Microsoft Surface Event, back in September, the Redmond-based tech giant revealed that Copilot will be coming to Microsoft 365. However, Microsoft didn’t specify an exact release date for each Microsoft 365 app.
But, according to the latest entry in the Microsoft 365 Roadmap, it seems that Copilot will be coming to Microsoft Teams in November. This means that while Copilot is going to be released to 365 apps in November, each 365 app might actually get the AI tool at a different date over the month.
This would make sense, as each 365 app will integrate Copilot in a different way. There has to be an accommodation period for those customers who use all the Microsoft 365 apps within their work.
According to Microsoft, Microsoft 365 customers will be able to use the AI tool to organize their files, work projects, meetings, calls and even ask for useful insights, such as meeting summaries, or suggested tasks.
Copilot in Microsoft Teams helps users stay organized and on top of all their information in chat, meetings, and calls, with the ability to ask Copilot any question and discover insights. Use one of the suggested prompts or enter a free text question of your own.
Microsoft
Copilot in Microsoft Teams: what can you do with it
For starters, Copilot will come as a free-to-use AI tool inside Microsoft 365. While for each 365 apps, Copilot will come differently, for Teams, this AI assistant will do everything from organizing files to simply having a chat with you on different topics when you want to relax.
Microsoft Teams already has some AI capabilities that are quite useful. For example, earlier this year, Microsoft introduced Intelligent Recap to Teams, an AI feature that summarizes Teams meetings, and it comes with suggestions and recommended tasks for each member involved.
Copilot, however, might integrate capabilities from other apps, such as coming up with reply suggestions on Teams chats, or even preparing entire emails for customers.
The “Software Center stuck installing” problem can be resolved through a series of steps including checking internet stability, refreshing the Software Center, clearing cache, and seeking technical support if necessary. Read below to find more solutions/
Diagnosing the “Software Center Stuck Installing” Issue
Understanding the root causes can help in troubleshooting:
Network Glitches: Installation can falter due to unstable internet connections. Learn more about resolving network issues.
Server Traffic: High server traffic can lead to delays. Check the server status before installation.
Corrupted Cache: Cached data can corrupt over time, affecting installations. Dive deeper into the importance of cache.
Software Conflicts: Other active programs can interfere with the Software Center’s processes.
Steps to fix “Software Center Stuck Installing”
1. Ensure Stable Internet
Confirm that you’re connected to the internet.
Check the Wi-Fi signal strength; if weak, consider a direct cable connection or reposition closer to the router.
2. Refresh the Software Center
Close the Software Center completely.
Press Windows key + S. In the search bar, type “Software Center”.
Select the Software Center from the results and reopen it.
3. Clean the Cache
Open File Explorer by pressing Windows key + E.
Navigate to the path C:\Windows\ccmcache.
Select all files (by pressing Ctrl + A) inside the ccmcache folder and delete.
Restart your computer and retry the software installation.
4. Close Interfering Software
Press Windows key + S and type “Task Manager”.
Open Task Manager, and under the Processes tab, identify potential conflicting software.
Select the software and click “End Task”.
Proactive Steps to prevent it from happening
To minimize recurrence in the future, you need to do the following:
Clear cache periodically.
Always ensure a stable internet connection prior to installations.
Update Software Center when new versions are available.
Avoid simultaneous installations.
Addressing the “Software Center stuck installing” issue requires a systematic approach. By pinpointing the root causes and following the solutions outlined, you can streamline your software installations. Always prioritize regular system checks and maintenance for optimal performance.
Unfortunately, there is no official way to download video from Facebook on a PC or any other device for that matter. However, we will show a few methods on how to download videos from Facebook on PC.
Can I download my videos from Facebook? Of course you can. Just log into your Facebook account, open the video you want to download, click on the three dots button from the top-right corner, and select Download video from the options.
How do I download video from Facebook on PC?
1. Download the Facebook video manually
Go to Facebook, find a video you want to download, and copy the link.
Now, paste it into another tab and replace the https:// part with basic. So, your link will look like mbasic.facebook.com/.
Next, right-click on the video and select Open video in new tab.
Finally, now, if you right-click on the video in the new tab, you will see the option to Save video as and you will be able to download it as an MP4 file on your PC.
Launch the installer and after the setup and short guide, you will get to the main screen.
Now, paste the Facebook link of the video into the internal browser, and click on Go. You will need to log into your Facebook account but after that, you can just click the Download button below.
And BOOM, in a couple of seconds, depending on the size of the video, it will be on your device.
As you can see, you also have the option to go straight to the download folder.
You don’t even need the link to the video, you can search for clips on any of the most popular streaming services like YouTube, Soundcloud, Vimeo, TikTok, Twitch, and many others.
With 4K Video Downloader+ you can download videos of up to 8K and 240 fps which is mesmerizing.
Another interesting feature is that you’re not limited to MP4. You may save the videos as MKV or set the app on automatic, to save it in the original format. Also, you can download up to 6 files simultaneously.
With the free version of 4K Video Downloader+, you have 30 daily downloads. If you want unlimited downloads, you can go for a 1-year license or pay a fixed amount to unlock it forever.
Navigating the complexities of network infrastructure necessitates a robust toolkit. In my extensive experience, the right Ethernet cable tester tools and software aren’t just a luxury; they are indispensable for diagnosing and resolving network issues. This guide lays down a curated list of hardware and software assets that I’ve found to be reliable in ensuring the optimal functionality of Ethernet cables. Through rigorous testing, these tools have proven their mettle, offering precise insights and solutions to common and complex networking problems.
5 Best Ethernet Tester Hardware Tools
The hardware tools delineated below are more than just gadgets; they are your first line of defense against network anomalies. Their build quality, user interface, and real-time diagnostic capabilities make them a quintessential part of any network administrator’s arsenal.
iMBAPrice RJ45 Network Cable Tester:
The iMBAPrice RJ45 Network Cable Tester is an essential tool for testing both LAN and telephone cables. It quickly identifies short circuits, open circuits, and cross lines with a straightforward LED light display. The tester supports remote testing, making it a handy tool for professionals dealing with network and telephone cables on a daily basis.
Klein Tools LAN Explorer Data Cable Tester:
Klein Tools is a reputable brand, and their LAN Explorer Data Cable Tester lives up to the expectations. It’s designed for easy identification of common cable faults, making network troubleshooting a breeze. The tester is known for its reliability and user-friendly interface, ensuring a seamless experience even for those new to cable testing.
Fluke Networks MS2-100 Network Cable Tester:
Fluke Networks is a name synonymous with precision and reliability in the network testing domain. The MS2-100 Network Cable Tester is no exception. It provides accurate results and is capable of identifying a wide range of cable faults, making it a valuable asset for network maintenance tasks.
Noyafa Advanced Multi-functional Cable Tester:
The Noyafa Advanced Multi-functional Cable Tester is a versatile tool that excels in diagnosing and resolving issues related to both telephone and network cables. Its user-friendly design coupled with a range of testing capabilities makes it a favorite among professionals and DIY enthusiasts alike.
Tempo Communications PA1574 Network Cable Tester:
The PA1574 Network Cable Tester from Tempo Communications is a professional-grade tool known for its accuracy and reliability. It’s designed to provide clear and precise results, making the task of network troubleshooting and maintenance straightforward and efficient.
3 Best Ethernet Tester Software Tools:
Software tools provide a digital solution to network testing, offering detailed insights and data analytics for in-depth network analysis and troubleshooting.
Cable-eye PC-based Cable Tester Software:
Cable-eye PC-based Cable Tester Software is an innovative solution designed to scan and evaluate cables with up to 192 test points. Its intuitive interface makes identifying and resolving cable issues a simplified process, making it a valuable addition to the toolkit of network administrators and technicians.
CableIQ Reporter Test Management Software by Fluke Networks:
CableIQ Reporter Test Management Software is a comprehensive program that helps in organizing, customizing, printing, and saving twisted pair and coaxial test records. It is designed to work on various Windows operating systems, offering a user-friendly interface for managing and analyzing cable test records.
Network Testing Tools (a collection by Guru99):
Guru99’s collection of Network Testing Tools is a comprehensive suite of software designed to measure various aspects of a network. It includes tools ranging from ping monitoring to SNMP ping tools, providing network administrators with a robust set of resources for ensuring optimal network performance.
Character AI is a chatbot service that allows users to create private characters or use the ones available publicly. But, while generating responses, Character AI tends to throw a network error.
The error message reads, Network error – click to refresh chat. For a few users, it’s encountered after every few responses, making the service practically impossible to use. And while there are no sure-shot fixes, a few solutions and workarounds might help improve the situation.
Why does Character AI keep saying network error?
Character AI’s network chat error is usually encountered when the servers are heavily loaded or facing downtime. As per reports, users across the globe are facing it.
But in some cases, a poor Internet connection, browser extension conflicts, installed antivirus software, or even network connectivity issues can trigger the Character AI app network error.
How do I fix Chat Error: Please Try Again on Character AI?
Before we start with the slightly complex changes, try these quick ones first:
Check the Character AI server status and make sure it’s running. You can use a third-party service to verify this. If it’s down, wait for a few hours and try again.
Sign out and then log back into the website or app. Also, you can restart the device used to access Character AI.
Check if your Internet disconnects frequently and fix that. You can contact the Internet service provider for more support. Also, try connecting to a mobile hotspot or use Ethernet.
Disable any third-party security software or firewall running on the device and check if the Character AI error message disappears.
Try initiating a conversation with another character, one available publicly. Sometimes, temporary glitches are limited to private characters.
If none work, head to the fixes listed next.
Tip
All the browser-based solutions listed here are for Google Chrome. If you are using another browser, the process are similar, but you could check the manufacturer’s website for the exact steps.
1. Clear the browsing data
Launch the browser, and press Ctrl + Shift + Delete to open the Clear browsing data window.
Select All time from the Time range dropdown menu, tick the checkboxes for Cookies and other site data and Cached images and files, then click the Clear data button.
Once done, relaunch the browser and check whether Character AI starts working.
2. Disable browser extensions
Open the browser, click the ellipsis near the top right, hover the cursor over Extensions, and then select Manage Extensions from the flyout menu.
Disable the toggle for all the extensions listed here.
If the Character AI Please try again message disappears, re-enable the extensions one at a time, wait for the error to reappear, and as soon as it does, the extensions enabled last is the problematic one.
Finally, click the Remove button under that extension and confirm the change.
When Character AI is not working or throws a network error, this could be linked to a conflicting extension, one that modifies the connection parameters or blocks traffic.
3. Reinstall the Character AI app (mobile devices)
If you are getting the Character AI network error on Android or iOS, reinstalling the app might help. This works when the previous app installation has gone corrupt or is missing critical files.
Besides, you could try clearing the app data first, but it’s less likely to work.
As surprising as it may sound, both enabling and disabling a VPN can help get rid of network and chat errors on Character AI. If it’s turned on, disabling the VPN might help fix an unstable Internet connection.
There’s also the possibility that server downtime is limited to a specific region, and using a server based in another country might do the trick!
So, try out both and see what works. And while you are at it, we recommend using only the most reliable VPN software.
5. Contact Character AI support
If nothing else works, you can report the issue to the Character AI support team. Submit a ticket and wait for a response!
Also, you could check the FAQ section and guides, or look through the dedicated forum for more help.
You now know why Character AI is saying network error and that fixing the Internet connection or switching the network type will help.