How to Reset the Wi-Fi Adapter in Windows 10

If you encounter network connectivity issues, you might want to reset the Wi-Fi adapter on Windows 10. It refreshes network settings and can resolve common issues such as limited connectivity, slow connection speeds, or drops.

Here are the step-by-step instructions to help you get your Wi-Fi connection back on track.

How can I reset the Wi-Fi adapter in Windows 10?

Before engaging in advanced troubleshooting steps, you should consider performing the following checks:

  • Try power cycling the router. Sometimes, that is enough to restore the Wi-Fi connectivity.
  • Make sure you installed all the Windows updates because they might have an update for the Wi-Fi adapter.

If these minor tweaks don’t help you, move to the detailed methods mentioned below.

1. Use the Network troubleshooter

  1. Press Windows + I to open the Settings app.
  2. Go to Update & Security.Update and Security reset wifi adapter windows 10
  3. Click Troubleshoot, then select Additional troubleshooters.Additonal troublshooters
  4. Locate Network Adapter and click Run the troubleshooter.Run the troubleshooter
  5. Follow the onscreen instructions to complete the process.

2. Disable/Enable the Wi-Fi Adapter

  1. Press the Windows key, type control panel, and click Open.Control Panel reset wifi adapter windows 10
  2. Select View by as Category and click Network and Internet.
  3. Click View network status and tasks.View the status
  4. Select Change adapter settings.Change settings
  5. Locate and right-click the Wi-Fi connection and select Disable from the context menu.Disable device
  6. Restart your computer

3. Restart the Wi-Fi Adapter in Device Manager

  1. Press Windows + R to open the Run dialog box.Device Manager run command  reset wifi adapter windows 10
  2. Type devmgmt.msc and click OK to open Device Manager.
  3. Locate and expand the Network adapters.
  4. Right-click the Wi-Fi adapter and choose Disable device.Disable device
  5. Click Yes to confirm.Network & Internet  YES
  6. Now, right-click it again and select Enable device from the context menu.

4. Resetting TCP/IP Configuration

  1. Press the Windows key, type cmd, and click Run as administrator.Command Prompt reset wifi adapter windows 10
  2. Copy & paste the following commands one by one and press Enter after every command:
    • netsh winsock reset
      netsh int ip reset
      ipconfig /release
      ipconfig /renew
      netsh reset reset wifi adapter windows 10
  3. Once the commands are executed, restart your computer.

5. Use the Settings app

  1. Press Windows + I to open the Settings app.
  2. Go to Network & Internet.Network & Internet reset wifi adapter windows 10
  3. Click Advanced network settings and click Network reset.Network reset
  4. Locate the Network reset and click the Reset now button.Reset now
  5. Reboot your PC to confirm the changes.

6. Reinstall the Wi-Fi adapter

  1. Press Windows + R to open the Run dialog box.Device Manager Run command reset wifi adapter windows 10
  2. Type devmgmt.msc and click OK to open Device Manager.
  3. Locate and expand the Network adapters.
  4. Right-click the Wi-Fi adapter and select Uninstall device.Uninstall device
  5. Click Uninstall and follow the onscreen prompts, if any.Uninstall
  6. Now click Action, then select Scan for hardware changes.Scan for hardware changes

Now your Windows will scan and reinstall the driver. Once done, reboot your computer to save the changes.

In case nothing worked, you may also restore your computer to a point when the Wi-Fi adapter was functioning correctly.

If you are facing other issues with the Wi-Fi adapter, we suggest you read this guide to find the solutions.

So, these are methods that you can follow to reset the Wi-Fi network adapter on Windows 10. If you have any questions or suggestions, feel free to mention them in the comments section below.

0x80242008 Windows Update Error: 4 Ways to Fix It

Windows throws the error code 0x80242008 when there is a problem installing or updating a specific Windows update or driver.

If you are having problems while updating your Windows or encounter the error code 0x80242008 when attempting to download or install updates, keep reading to find a list of possible solutions.

What is error code 0x80242008?

The Windows update error code 0x80242008 usually occurs when Windows update services are not running properly on your system. It usually indicates that the update process encountered an error or was interrupted.

The error code 0x80242008 in Windows Update can occur due to various reasons, including:

  • Network connectivity issues: If there is a problem with your internet connection or network settings, it can prevent the update from being downloaded or installed correctly.
  • Antivirus or security software conflicts: Third-party antivirus or security software can sometimes interfere with the update process and cause errors.
  • Insufficient disk space: If your system does not have enough free space on the hard drive, it can prevent the update from being installed.
  • Software conflicts: Conflicts between the update and other software installed on your system can lead to errors during the installation process.
  • Corrupted system files: If essential system files required for the update are corrupted or damaged, it can cause an error.

How do I fix error code 0x80242008?

Before moving on to more advanced solutions, it is recommended to try the following prerequisite steps to resolve this error:

  • Restart your computer: Most update-related issues can be resolved with a simple reboot.
  • Check your Internet connection: Before attempting to update Windows, ensure you have a reliable and stable Internet connection.
  • Disable the antivirus: Disable the antivirus program temporarily and then try installing the update again.

1. Run Windows Update troubleshooter

  1. Press Windows + I to launch the Windows Settings app.
  2. Go to the System tab, scroll down, and click the Troubleshoot tile.
  3. On the Troubleshoot settings page, click on Other troubleshooters.Other
  4. Then, click the Run button next to Windows Update.win update troubleshoter
  5. Follow the on-screen instructions to complete the troubleshooting process.
  6. Reboot the computer, try downloading updates again, and see if you still see the 0x80242008 error code.

In addition to this solution, you can increase the chances of solving this Windows OS error with a skilled repairing solution. Such software application starts by diagnosing your PC and detecting broken files to repair them automatically.

2. Repair missing or corrupted system Files

  1. Press Windows + R to open the Run dialog, type cmd, hold the Ctrl + Shift key, and click OK to run Command Prompt as administrator.cmd
  2. Click Yes on the User Account Control prompt window.
  3. Type the following command and press Enter:sfc /scannowsfc scan
  4. After running the system file checker (SFC) scan, proceed to run the DISM scan. Type in the following commands and press Enter after each:DISM /Online /Cleanup-Image /CheckHealth DISM /Online /Cleanup-Image /ScanHealth DISM /Online /Cleanup-Image /RestoreHealthDISM
  5. Once you have executed the SFC and DISM scans, restart your computer and see if the 0x80242008 error is gone.

3. Reset the Windows Update components

  1. Open Windows search, type cmd, and select Run as administrator.
  2. Type the following command and hit Enter after each one to stop the update services.
    net stop wuauserv net stop cryptSvc net stop bits net stop trustedinstaller net stop msiserver
  3. Next, rename the update folders by running the below commands:
    ren C:\Windows\SoftwareDistribution SoftwareDistribution.old ren %systemroot%\system32\catroot2 catroot2.old
  4. Finally, run the below commands and hit Enter after each one to restart the stopped update services.
    net start wuauserv net start cryptSvc net start bits net start trustedinstaller net start msiserverrestart update
  5. Exit the command prompt and check if the 0x80242008 Update error is fixed.

4. Perform a Clean Boot

  1. Open the Run command with Windows + R, type msconfig, and hit Enter.msconfig
  2. Go to the Services tab, check the Hide all Microsoft services box, and click Disable all.hide microsoft apps
  3. Then, click Apply to save the changes.click Apply
  4. Switch to the Startup tab and click on Open Task Manager.Open taskmanager
  5. Now, disable all the startup apps. Select the app and click the Disable button.click disable
  6. Once you have completed these steps, proceed to restart your computer. When the computer restarts, it will only run the essential services.
  7. Run Windows Update again to see if the problem was fixed.

If none of these steps resolve the issue, you can manually download and install the update from the Microsoft Update Catalog repository. This involves identifying the specific update causing the 0x80242008 error, downloading it manually from the Microsoft website, and installing it directly.

What solution worked for you? Please let us know in the comment section below.

Wpprecorder.sys BSoD: How to Fix It in 5 Steps

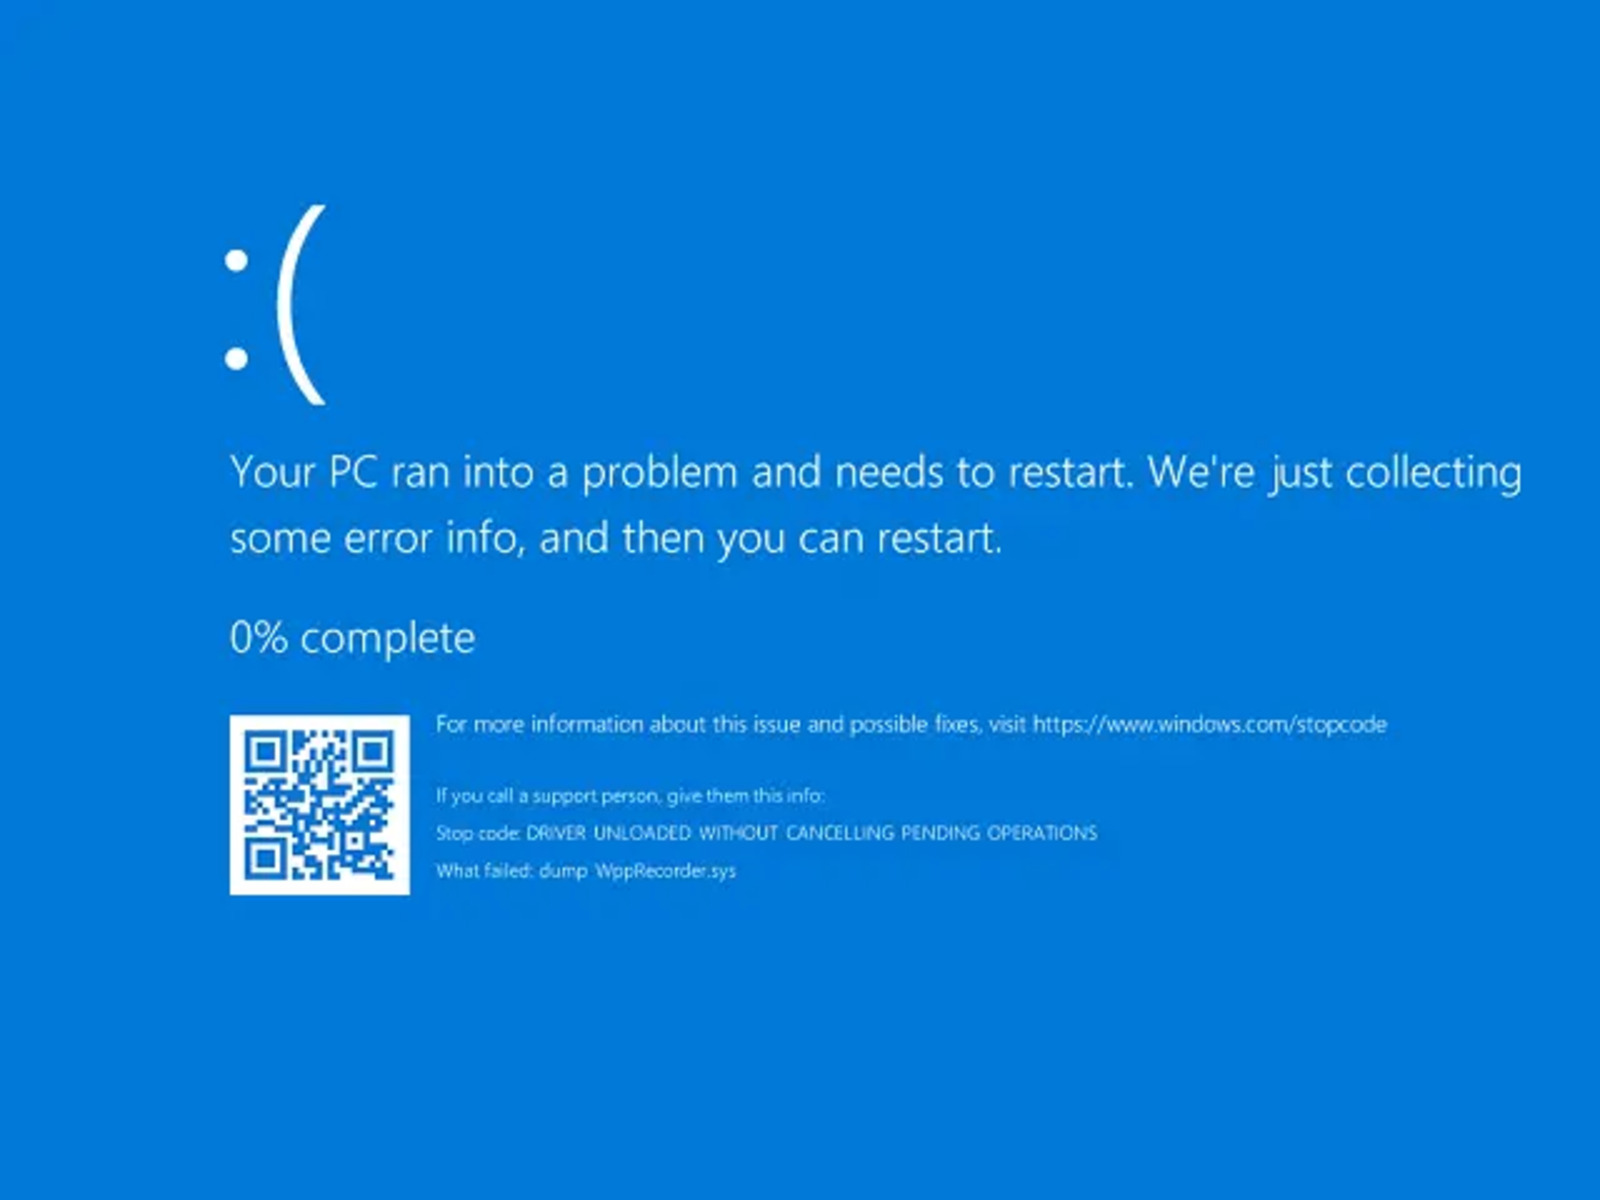
The WppRecorder.sys BSoD (Blue Screen of Death) error usually occurs when there is a problem with the WppRecorder.sys driver. This driver is associated with the Windows Performance Toolkit (WPT) and Windows Performance Recorder (WPR), which are performance profiling tools provided by Microsoft.

The stop code that appears along with the WppRecorder.sys in BSOD errors can indeed vary, for example, SYSTEM_THREAD_EXCEPTION_NOT_HANDLED, DRIVER_UNLOADED_WITHOUT_CANCELLING_PENDING_OPERATIONS.

However, these errors can often be resolved by using the same troubleshooting methods.

What is a WppRecorder.sys file?

WppRecorder.sys is a system file that is part of the Windows Performance Toolkit (WPT), which includes the WPR. WPR allows developers and system administrators to capture and analyze performance-related events and data on Windows systems.

When there is a problem with this driver, it can lead to system instability, crashes, and sometimes the Blue Screen of Death (BSOD) error.

There can be several reasons why the WppRecorder.sys BSOD error occurs:

  • Outdated or Incompatible Driver: If the WppRecorder.sys driver is outdated or incompatible with your system, it can cause conflicts and result in a BSOD error.
  • Driver Conflicts: In some cases, conflicts with other drivers or software on your system can trigger the WppRecorder.sys BSOD error. 
  • System File Corruption: Corruption in system files, including the WppRecorder.sys driver, can lead to BSOD errors. 
  • Hardware Issues: Faulty hardware, such as incompatible or malfunctioning devices, can trigger BSOD errors, including those related to the WppRecorder.sys driver.
  • Software Compatibility Issues: Certain software programs or utilities may not be compatible with the WppRecorder.sys driver. 

How do I fix the WppRecorder.sys BSoD error?

Before proceeding with more advanced solutions, try the following prerequisite steps to address this error:

  • Disable Wi-Fi adaptor: Some users have reported disabling the Wi-Fi adapter helps resolve the issue. If this is the case, uninstall the adapter and reinstall the latest Wi-Fi adapter from the manufacturer’s website.
  • Clear Windows Update cache: Another solution is disabling the Windows Update service temporarily and clearing the Windows Update Cache.
  • Install Intel Management Engine driver: If you have an Intel processor, download and install the latest Intel Management Engine driver from the official Intel website. Ensure that you disconnect the Internet before installing.

1. Update Windows

  1. Click the Start button and select Settings from the Start menu.click settings
  2. Go to the Windows Update tab and click Check for updates.check for updates
  3. Allow Windows to download and install the pending updates. Then, reboot your computer.

2. Run System File Checker and DISM tools

  1. Press Windows + R to open the Run dialog, type cmd, hold the Ctrl + Shift key, and click OK.cmd
  2. Click Yes on the User Account Control prompt window.
  3. Type the following command and press Enter:sfc /scannowsfc scan
  4. After running the SFC scan, proceed to run the DISM scan.
  5. Type in the following commands and press Enter after each:DISM /Online /Cleanup-Image /CheckHealth DISM /Online /Cleanup-Image /ScanHealth DISM /Online /Cleanup-Image /RestoreHealthDISM
  6. Restart your computer and check if the WppRecorder.sys BSOD error persists.

Alternatively, we suggest a specialized repair tool to ease the process and avoid further system issues.

3. Update device drivers

  1. Click the Windows button, type device manager, and select Device Manager.device manager
  2. In the Device Manager console, expand the device drivers related to hardware such as the Chipset, graphics, network adapter, etc., and update them. Right-click the device, and select Update driver.update driver
  3. In the Update Drivers window, select Search automatically for drivers.
  4. Let the Window automatically search for the drivers from the Windows update and install it. Then, click Close.click Close
  5. After updating all the necessary system drivers, reboot your system and check if you still see the WppRecorder.sys BSOD error.

4. Disable NTFS compression

Note icon NOTE
Disabling NTFS compression might be a potential solution for resolving the BSOD (Blue Screen of Death) error caused by the CBS Scavenging process and the compressed driver files. To do this, you may need to access the Windows Recovery Environment.
  1. Press Windows + I to open the Settings app.
  2. Go to the System tab, scroll down, and click on Recovery on the right.recovery
  3. Under Recovery options, click Restart now next to Advanced startup.click restart now
  4. In the Windows Recovery Environment, select Troubleshoot.
  5. Next, choose Advanced options.advanced options
  6. On the next screen, choose Command prompt.command prompt
  7. In the command prompt window, type the following command and press Enter c:\windows\system32\compact.exe /U c:\windows\system32\drivers\*.sys compact.exe
  8. After that, restart the computer and type the below command and press Enter fsutil behavior set DisableCompression 1DisableCompression
  9. Once more restart your computer to apply the changes.

5. Perform a system restore

  1. Open Windows search, type restore, and click Create a restore point.create restore porint
  2. In the System Properties window and click the System Restore button.system restore
  3. Select the Choose a different restore point option, and click Next.choose a different restore point
  4. Then, choose the restore point that you want to use, and click Next.select the restore point
  5. Then, click Finish.click Finish

If the above methods didn’t fix the WppRecorder.sys Blue Screen Error on your computer, you can try resetting your PC or reinstalling Windows.

Additionally, running hardware diagnostics can help identify and address any hardware-related issues that may be causing the error. Ensure to also checkout how we resolved the cldft.sys BSoD error.

If you have any additional questions or suggestions, please leave them in the comments section.

Fix: SecurityHealthSystray.exe Bad Image Error

Recently, some users have complained about the SecurityHealthSystray.exe Bad Image error on their Windows devices. The error occurs when a program is facing difficulty while launching or running. Hence, we’ll discuss some steps for resolving it.

Also, you can read through our article about MSTeams.exe Bad Image and some detailed instructions on how to fix it.

What is SecurityHealthSystray.exe Bad Image?

SecurityHealthSystray.exe Bad Image error occurs when the system can’t go through with a process related to the Windows Defender Security Center.

The error usually comes with an Error status 0xc000012f, indicating \\?\C:\Windows\System32\SecurityHealth\1.0.2207.20002-0\SecurityHealthSSO.dll is either not designed to run on Windows, or it contains an error. 

Further, the error prevents the process from running in the background to scan threats and offers alerts when required.

What causes SecurityHealthSystray.exe Bad Image?

Many factors can cause a Bad Image error to appear on your computer. Some notable ones are:

  • System file corruption – Corrupt system file is a major culprit for the Bad Image error. It means the .exe and .dll files responsible for the program are either outdated or corrupted, causing issues with its process.
  • Installation of faulty Windows updates – If you have recently installed a Windows update, it may trigger the Bad Image error if it is faulty or not properly installed.

These factors may vary in different computers depending on the circumstance of occurrence. Going further into this guide, we will look into steps for fixing the problem.

How can I fix SecurityHealthSystray.exe Bad Image?

Before proceeding with any advanced troubleshooting steps, go ahead with the preliminary checks below:

  • Uninstall recent Windows updates – Since Windows updates may cause this error, removing the recent ones should help fix it.
  • Perform a System restore – Restoring your system to an earlier point when it last worked perfectly might help resolve the error.  Check what to do if the Restore Point is not working on your PC.

If you can’t resolve the error, try the solutions below:

1. Run SFC and DISM scans

  1. Left-click the Start button, type Command Prompt, and click the Run as administrator option.
  2. Click Yes on the User Account Control (UAC) prompt.
  3. Type the following and press Enter: sfc /scannow
  4. Type the following commands and press Enter after each: DISM /Online /Cleanup-Image /CheckHealth  DISM /Online /Cleanup-Image /ScanHealth  DISM /Online /Cleanup-Image /RestoreHealth
  5. Restart your PC and check if the error persists.

Running an SFC scan will detect and repair corrupt system files causing the errors and restore disk health. Check our article on fixing SFC scannow not working on your PC.

Instead of going on with this method, it’s possible to use a system repair solution that goes automatically and fixes broken system files.

2. Run an in-place upgrade

  1. Go to the official site to download Windows 11 Disk Image (ISO) and select Windows 11 Disk Image (ISO).
  2. Open the downloaded file in File Explorer, right-click on the ISO, and select Mount.
  3. Then, click Setup.exe and select Yes on the UAC prompt.
  4. The next window will prompt the Install Windows 11 dialog; click Next.
  5. Accept the license agreement and wait for the setup to start.
  6. Check the box for Keep personal files and apps on the Ready to Install page.
  7. Now, click the Install button. The PC will restart severally before arriving at the lock screen.

This process will guarantee the device upgrade without causing loss of data and files. It is also used to fix corrupted system files, apps, and even incompatible drivers on the system.

3. Reset the Windows Security app

  1. Left-click the Start button, type Windows Terminal in the search box, right-click on it, and select Run as Administrator.
  2. Type the following in the terminal and press Enter: Get-AppxPackage Microsoft.SecHealthUI -AllUsers | Reset-AppxPackage
  3. Exit PowerShell after the command execution and restart your system.
Note icon NOTE
Reinstalling Windows components, such as Defender, comes with security risks for the PC.

Resetting the Windows Security app will restore it to default settings, reversing configuration and issues causing the Bad Image error.

In conclusion, we recommend you check our article about the causes and fixes for the error status 0xc000012f (Bad Image) on Windows 11.

Feel free to use the comments to let us know if our solutions helped you or if you have another tip you would like us to add to the list above.

Fix: iPhone Doesn’t Show Up in Windows File Explorer

Connecting iPhone to Windows PC is effortless now more than ever. However, some users are complaining that iPhone doesn’t show up in File Explorer for some reason.

This restricts your access to the files on your phone. If you also face this issue, the solutions in this guide will help you fix it for good.

Why is my iPhone not showing in File Explorer?

The iPhone doesn’t show up in File Explorer because of varying factors. Below are some of the potential causes:

  • Faulty driver: An outdated or broken Apple mobile device USB driver can be the reason for this issue. You can fix it by updating your driver to the latest version.
  • Outdated PC: If your PC is outdated, it can cause so many reasons like the iPhone doesn’t show up in File Explorer issue on Windows 10 or 11. You can fix this by updating your PC to the latest version.
  • Wrong active driver: Some users have found this issue to be due to selecting the wrong active driver. The solution to this is to change the active driver in Device Manager.

How do I get my iPhone to show up in File Explorer?

Below are the basic troubleshooting steps to apply before proceeding to the detailed fixes in this section:

  • Restart iPhone and PC.
  • Use the official USB cable for iPhone.
  • Download the latest Apple mobile device USB driver from official sources.

Should these fail, you can now explore the fixes below:

1. Update PC

  1. Press the Windows key + I and select Windows Update in the left pane.
  2. Click the Check for updates button.
    check updates iPhone Doesn't Show up in File Explorer
  3. Finally, download and install all available updates.

An outdated PC can be the reason iPhone not showing up in File Explorer on Windows 11, 10, and 7. You need to update and restart your PC to solve the problem.

If your problem happens during device setup rather than when browsing files, you may need a different fix. In that case, see how to fix Quickly Set Up iPhone not working for step-by-step guidance.

2. Switch the active driver in Device Manager

  1. Press the Windows key + X and select the Device Manager option.
    device manager
  2. Double-click the Universal Serial Bus controllers option to expand it.
  3. Now, right-click the Apple Mobile Device USB Driver option and select Update driver.
    update driver
  4. Next, choose Browse my computer for drivers.
    browse my iPhone Doesn't Show up in File Explorer
  5. Select Let me pick from a list of available drivers on my computer.
    let me
  6. Finally, click the MTP USB Device option and click the Next button.

Some users have reported that using the MTP default driver option for the Apple mobile device USB driver fixed this issue for them. So, you should apply the fix too.

3. Take full control of iTunes folder

  1. Press the Windows key + E to open File Explorer and locate the iTunes folder.
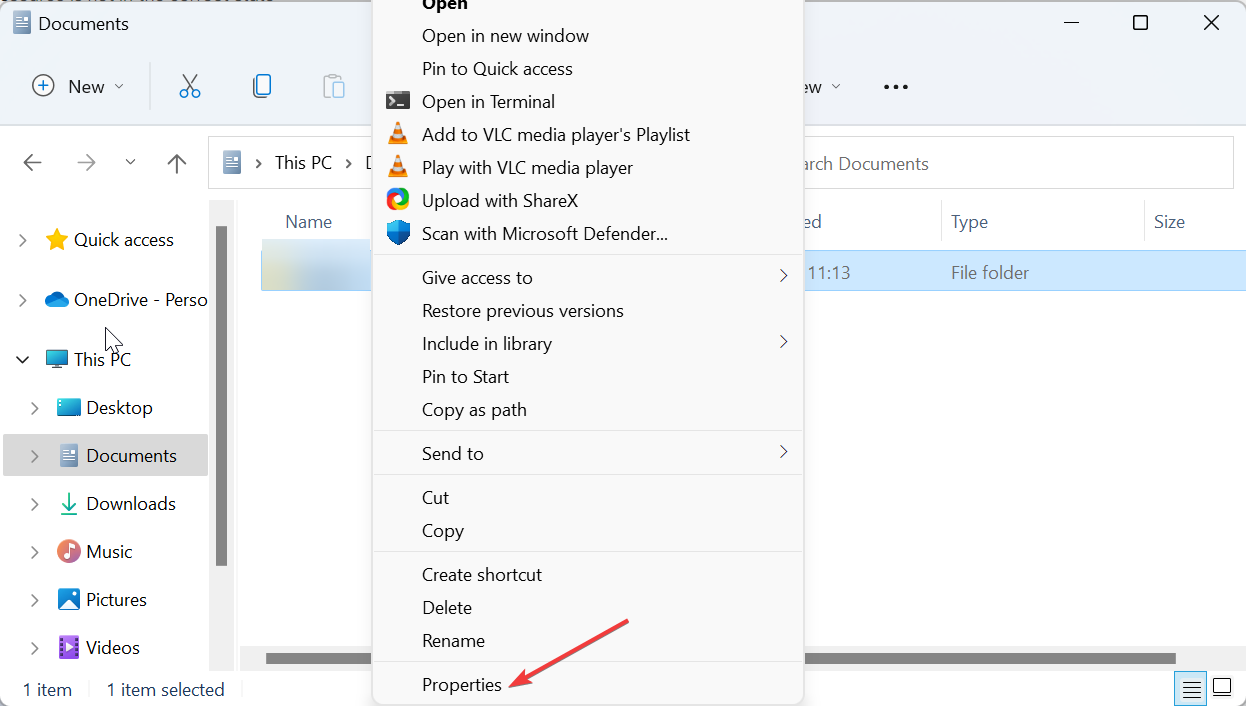
  2. Right-click it and select the Properties option.
    properties
  3. Now, uncheck the box for Read Only (Only applies to files in folder) and click the Apply button.
    read only
  4. Click the Security tab at the top.
  5. Next, click the Edit button.
    edit
  6. Finally, tick the checkbox for Full Control under the Allow section and click the Apply button, followed by OK.
    full control iPhone Doesn't Show up in File Explorer

The iTunes folder holds the content of some of your saved content on the iTunes app. According to some users, lack of full control over this app can cause the iPhone not showing up on Windows 11 or 11 issue.

Hence, you need to take full control of the folder.

4. Create the Camera Roll folder

  1. Press the Windows key + E and click This PC in the left pane.
  2. Click the Pictures option.
    this pc iphone doesnt show up in file explorer
  3. Now, click the New dropdown and select the Folder option at the top.
    new folder iphone doesnt show up in file explorer
  4. Type Camera Roll as the name of the folder.
    camera roll iPhone Doesnt Show up in File Explorer
  5. Finally, move one picture to the new Camera Roll folder and disconnect and reconnect your iPhone.

While this might seem like a weird solution, it has surprisingly worked for so many users. So, you should try it too.

5. Uninstall and reinstall the Apple driver

  1. Press the Windows key + R, type devmgmt.msc, and click OK.
    devmgmt iphone doesnt show up in file explorer
  2. Expand the Universal Serial Bus controllers option and right-click Apple Mobile Device USB Driver.
  3. Now, select the Uninstall device option.
    uninstall device iphone doesnt show up in file explorer
  4. Click the Uninstall button to confirm the action.
    uninstall button iphone doesnt show up in file explorer
  5. Finally, disconnect and reconnect your iPhone, and the driver will be reinstalled automatically.

If you still can’t fix the iPhone doesn’t show up in File Explorer issue on your PC, you need to uninstall and reinstall the Apple mobile device USB driver. This should clear up the potential glitches that might be causing the issue.

We have reached the end of this guide on fixing an iPhone if it is not showing in the Windows File Explorer. You should now be able to fix the issue effortlessly, provided you follow the steps in this guide.

If you can’t access iPhone photos on your PC, check our detailed guide to rectify it.

Feel free to let us know if you could fix this issue in the comments below.

7 Ways to Fix Media Disconnected Errors on Windows

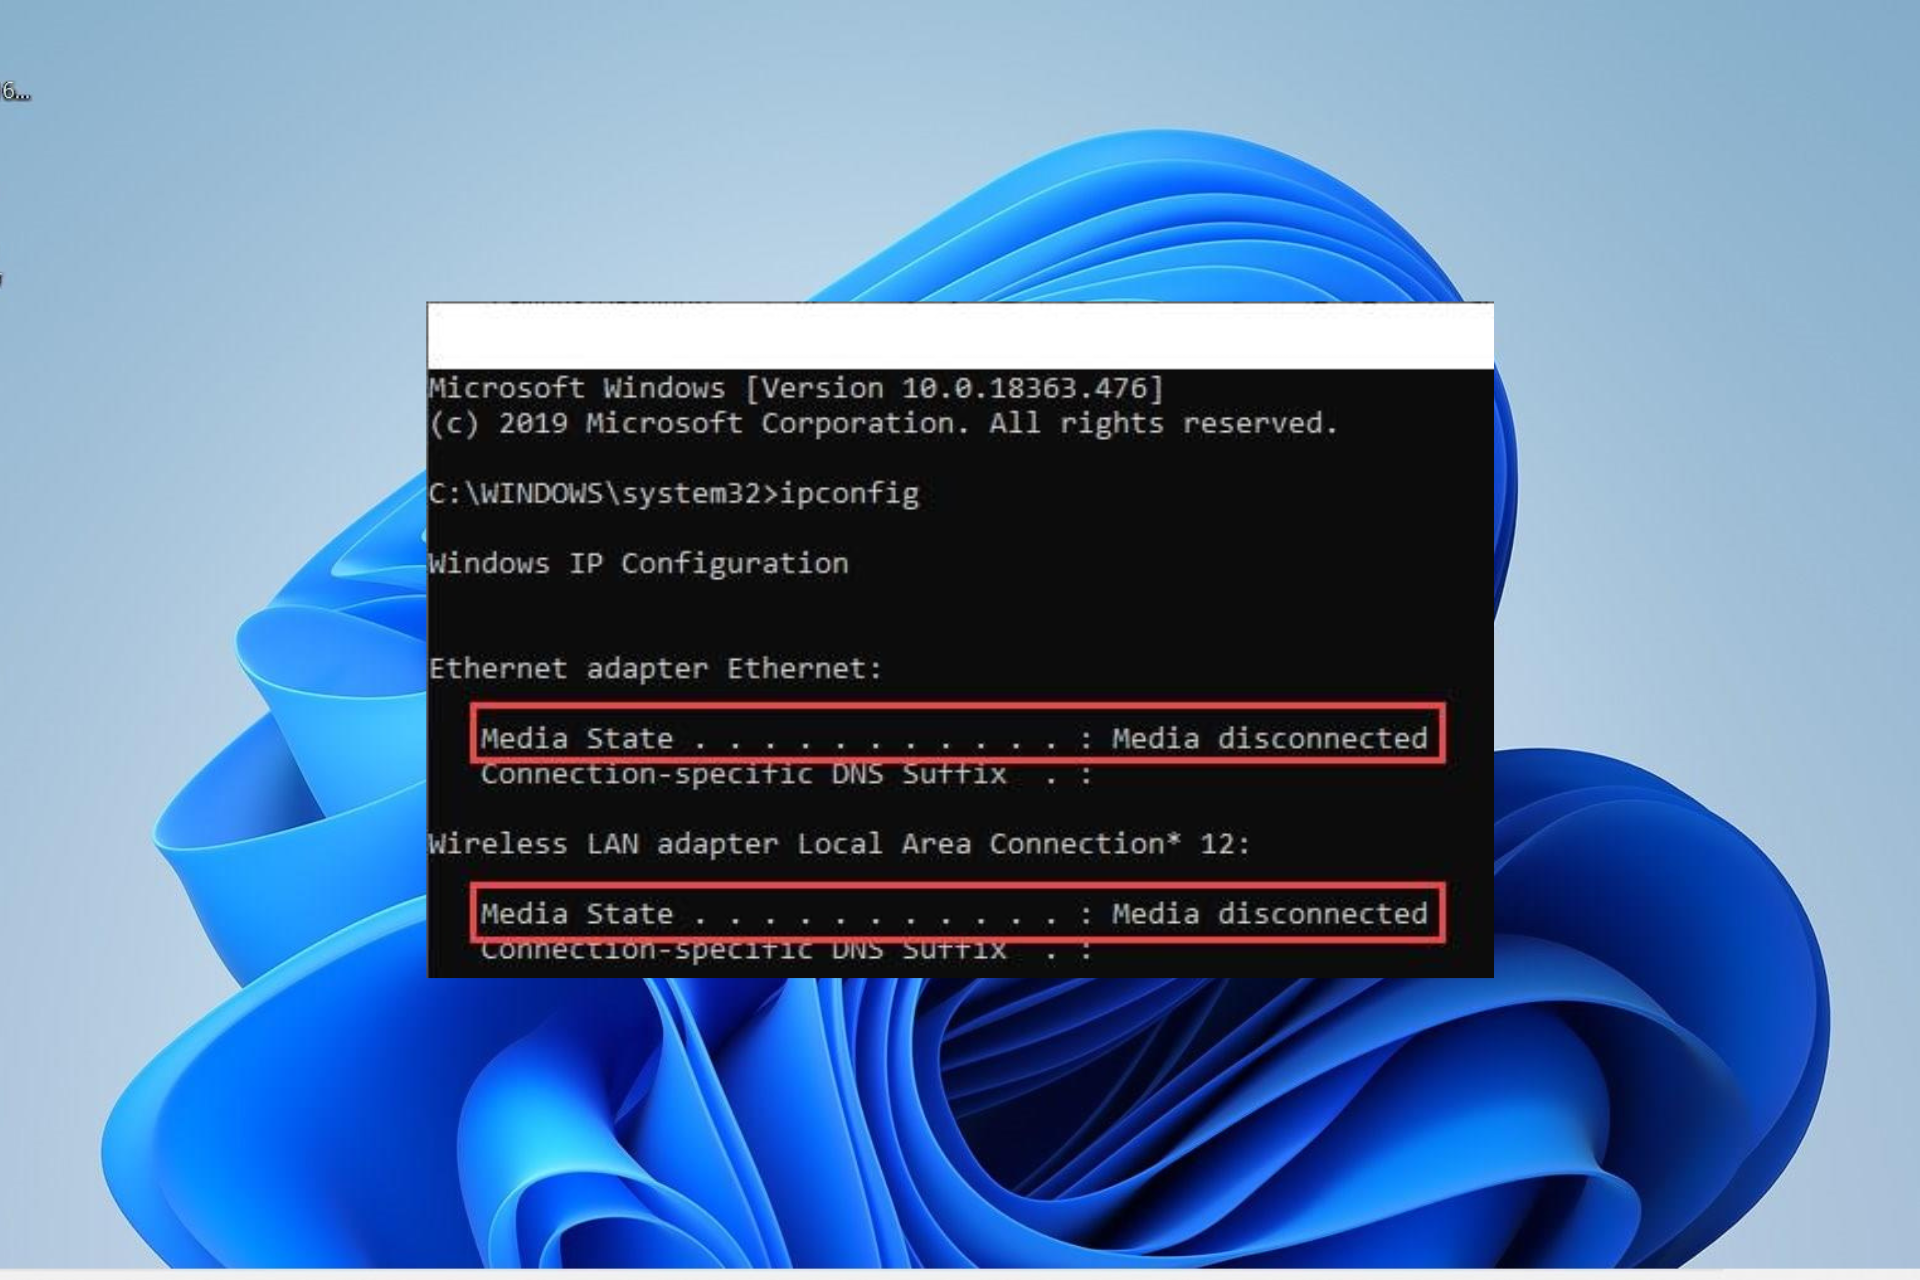
Sometimes you need to check all the information about your network adapter to fix some issues. Unfortunately, some users get a media disconnected error when they run the ipconfig /all command on Windows 10 or 11.

While this issue can be annoying, it is a problem that is easy to solve. If you are also dealing with the media disconnected error, the solutions in this guide will help you fix it quickly.

What does media disconnected mean?

The media disconnected error occurs when there is an issue with your network adapter. Below are some of the potential causes of this error:

  • Outdated network driver: Sometimes, this issue can be due to an outdated network adapter driver. The solution to this is to update your drivers and restart your PC.
  • Disabled adapter: At times, the media disconnected error on nic or any device can simply be due to a disconnected network adapter.
  • Issues with network sharing: Some users have found this problem due to the network sharing feature. The solution to this is to disable it and try to connect again.

How do I fix the media disconnected error on Windows?

Before proceeding to the sophisticated fixes in this section, below are some troubleshooting steps to try:

  • Restart your PC.
  • Reset router.

If these do not work, you can now proceed to the solutions below:

1. Reset Winsock & IP Stack

  1. Press the Windows key, type cmd, and choose Run as administrator under Command Prompt.
    cmd admin
  2. Now, type the following commands and press Enter after each: netsh winsock reset catalog netsh int ipv4 reset reset.log netsh int ipv6 reset reset.log
  3. Finally, wait for the command to finish running and restart your PC.

The first thing to do to fix the media disconnected error on Windows 11, 10, and even the old Windows 7 is to reset Winsock and IP Stack. This should clear the potential factors that might be causing the issue.

2. Update network adapter driver

  1. Press the Windows key + X and select Device Manager.
    device manager media disconnected
  2. Click the arrow next to the Network adapters option to expand it and right-click each of the devices there.
  3. Now, select the Update driver option.
    update driver
  4. Finally, click Search automatically for drivers and install any available update.
    search auto media disconnected

Sometimes, the quickest fix to the media disconnected error on your ethernet on Windows 10 is to update your network adapter driver. You can do this using the Windows driver updater following the steps above.

To make things easier and faster, we recommend using a dedicated tool, such as Outbyte Driver Updater, to get the job done.

This superb software automatically scans for outdated, broken, and missing drivers and fixes them with just a few clicks of the mouse.

Outbyte Driver Updater

Get the latest updates for all your outdated or malfunctioning drivers in no time.
Free Trial Download now

3. Run the Network Adapter troubleshooter

  1. Press the Windows key + I and select the Troubleshoot option in the right pane.
    troubleshoot
  2. Select the Other troubleshooters option.
    other troubleshooters
  3. Finally, click the Run button before the Network Adapter option and follow the onscreen instructions.
    run media disconnected

In some cases, the media disconnected error might be due to minor glitches with some network processes. The best way to clear this is to use the built-in troubleshooter.

4. Enable network adapter

  1. Press the Windows key + R, type ncpa.cpl, and click OK.
    ncpa
  2. Now, right-click your network adapter and click Enable.
    enable
  3. If the adapter is enabled, click the Disable option and enable it after some minutes.
    disable
  4. Finally, restart your PC.

The easiest fix can sometimes be the most effective. You might have been facing the media disconnected error because your network is somehow disabled.

Enabling it should help solve the problem in this case.

5. Uninstall network drivers

  1. Press the Windows key + R, type devmgmt.msc, and click OK.
    devmgmt
  2. Expand the Network adapters option and right-click each of the devices there.
  3. Now, select the Uninstall device option.
    uninstall device
  4. Finally, click the Uninstall button and restart your PC when the process is complete.
    uninstall button media disconnected

If updating your network adapter driver does not eliminate the media disconnected error, you might need to uninstall the adapters altogether.

After restarting your PC, the adapter drivers will be replaced by the default ones, which should solve the problem.

6. Disable network sharing

  1. Press the Windows key + R, type ncpa.cpl, and click the OK button.
    ncpa
  2. Right-click your network adapter and select Properties.
    properties
  3. Now, click the Sharing tab at the top.
  4. Uncheck the box next to Allow other network users to connect through this computer’s Internet connection.
  5. Finally, click the OK button.
    sharing media disconnected

Some users have found this frustrating issue to be down to the network sharing features of Windows. Hence, you can disable the feature temporarily and check if you are still getting the error message.

7. Perform a system restore

  1. Press the Windows key + R, type rstrui.exe, and press Enter.
    rstrui
  2. Click the Next button on the window that pops up.
    next
  3. Now, select your desired restore point and click the Next button.
    restore point media disconnected
  4. Finally, click the Finish button and follow the onscreen instructions to complete the process.
    finish

If push comes to shove and every solution you try fails to solve the media disconnected issue, you need to perform a system restore to a point when everything is working well.

This should undo the intentional or accidental changes made to your PC that might be causing the issue.

With this, we can conclude this article on the media disconnected issue on Windows 10 & 11. Hopefully, you can fix the issue before exhausting the solutions on our list.

Similarly, if your ethernet keeps disconnecting randomly, check our guide to fix it for good and restore normalcy on your PC.

Feel free to let us know the solution that helped you fix the issue in the comments below.

Enable & Use Remote Desktop on Windows 11 [5 Tips]

Are you considering using your Windows 11 desktop in a different room within your home? Instead of physically going there, you can conveniently access it remotely from your phone or tablet. You, however, need first to enable Windows 11 Remote Desktop.

There are a few options to accomplish this, and this our guide will take you through some of the most practical solutions.

Does Windows 11 support Remote Desktop?

Yes, Windows 11 supports Remote Desktop. However, it works only with Windows 11 Pro and Enterprise editions. So for users of the Windows 11 Home edition, there may not be much you can do.

Once you are on an edition that supports the service, you can learn how it is enabled and used on Windows 11.

How to enable Remote Desktop on Windows 11?

1. Enable Remote Desktop using the Control Panel

  1. Press Windows + R to open the Run dialog.
  2. Type control and hit Enter.
    enable remote desktop windows 11
  3. Click on Systems and Security.
    enable remote desktop windows 11
  4. Select Allow remote access under the System menu.
    enable remote desktop windows 11
  5. To enable remote access, go to the Remote Desktop section and choose the Allow remote connections to this computer setting.
    enable remote desktop windows 11
  6. Hit Apply and OK.

2. Enable Remote Desktop from Windows 11 Settings

  1. Press Windows + I to open the Settings app.
  2. On the right pane, click on Remote Desktop.
    enable remote desktop windows 11
  3. Toggle on the Remote Desktop switch.
  4. Finally, confirm your choice if prompted.

3. Enable Remote Desktop using the Command Prompt

  1. Press Windows + R to open the Run dialog.
  2. Type cmd and hit Ctrl + Shift + Enter.
  3. Input the script below, then hit Enter.
    reg add "HKEY_LOCAL_MACHINE\SYSTEM\CurrentControlSet\Control\Terminal Server" /v fDenyTSConnections /t REG_DWORD /d 0 /f
  4. Allow Remote Desktop through the firewall by inputting the script below and hitting Enter (This is an optional step).
    netsh advfirewall firewall set rule group="remote desktop" new enable=Yes
    enable remote desktop windows 11

After following the necessary steps, the Remote Desktop feature will be activated, and the firewall settings will be configured accordingly, granting you remote access to the computer.

4. Using System Properties

  1. Press Windows + R to open the Run dialog.
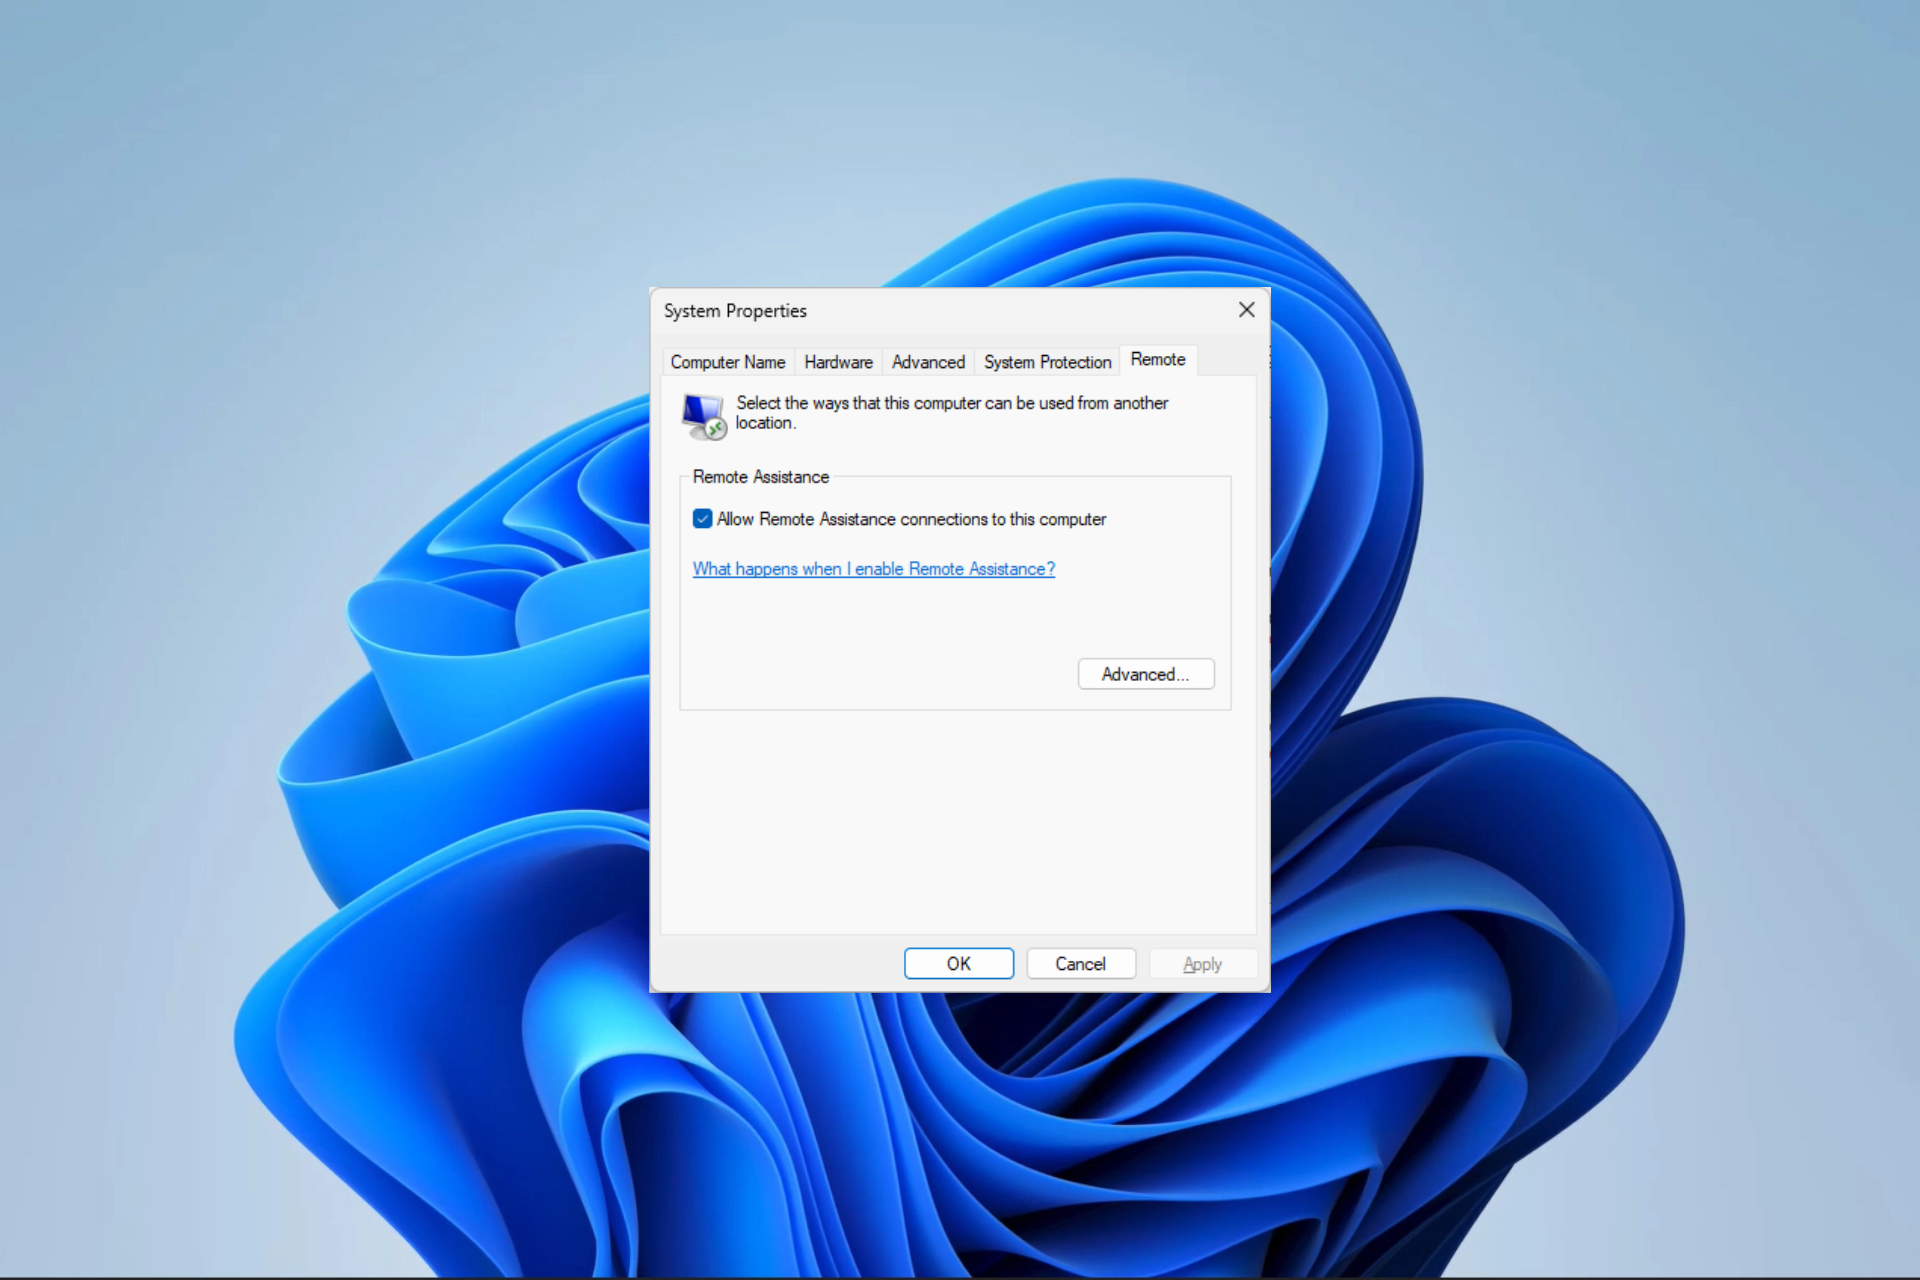
  2. Type sysdm.cpl and hit Enter.
  3. Click the Remote tab.
  4. To enable remote access, go to the Remote Desktop section and choose the Allow remote connections to this computer setting.
    enable remote desktop windows 11
  5. Hit Apply and OK.

5. Enable Remote Desktop from the Windows 11 PowerShell

  1. Press Windows + R to open the Run dialog.
  2. Type powershell and hit Ctrl + Shift + Enter.
  3. Type the script below and hit Enter:
    Set-ItemProperty -Path 'HKLM:\System\CurrentControlSet\Control\Terminal Server' -name "fDenyTSConnections" -value 0
    enable remote desktop windows 11
  4. Allow Remote Desktop through the firewall by inputting the script below and hitting Enter (This is an optional step).
    Enable-NetFirewallRule -DisplayGroup "Remote Desktop"

Once you have completed the necessary steps, you will be able to utilize Remote Desktop on Windows 11 to access your device from afar, even with the firewall activated.

You may go through our comprehensive guide on opening a problematic PowerShell if you can not access the utility.

This is as much as we explore in this guide. If you have followed through, you will realize there are so many options. Simply stick to whichever seems the most accessible.

We, however, would like to know your preferred choice, so please leave us a comment below.

7 Ways to Fix Kernel-Power (70368744177664),(2) Error

You’ve got a kernel-power (70368744177664),(2) attack. This is when the operating system decides it can’t continue with whatever it was supposed to be doing, and the system completely crashes. It keeps doing so, making it impossible to do anything.

In general, it’s good practice to reboot your computer after a kernel panic. It’s not always necessary, but it’s worth trying every time if you’re having random crashes. If this step proves insufficient, stay tuned for more solutions.

What does kernel power 41 63 mean?

A kernel power error 41 63 is a message displayed by your OS when it encounters an unrecoverable problem with your computer’s hardware or software that causes it to crash or freeze. It can also occur when an application unexpectedly quits, freezes, or crashes. 

Some of its triggers include:

  • Faulty memory – Your computer may have faulty RAM installed. This can cause all sorts of problems, including Kernel Power errors and other blue screens of death errors.
  • Software problems – Software conflicts are another common cause for kernel power errors because they can lead to incompatible programs or services running simultaneously on your computer.
  • Hardware changes – If you have recently added new hardware or updated your drivers, you may experience kernel power errors because your system doesn’t recognize the new hardware properly.
  • Infected files or viruses – Viruses can sometimes cause kernel power errors by corrupting key system files, causing them not to run properly when needed by Windows at startup time.
  • Failing PSU – The most common cause of a kernel-power error such as (70368744177664),(2) is a bad or failing PSU (power supply unit). The PSU is responsible for providing the voltage to all components in your computer.

How do I fix the kernel power error?

Try the following preliminary steps before moving on to the slightly advanced solutions:

1. Run the power troubleshooter 

  1. Hit the Windows key and click on Settings.settings windows 11
  2. Click on System on the left pane then Troubleshoot on the right pane.Open system troubleshooter
  3. Select Other troubleshooters.other troubleshooters
  4. Scroll down, locate Power, and click the Run button.

2. Disable Fast startup

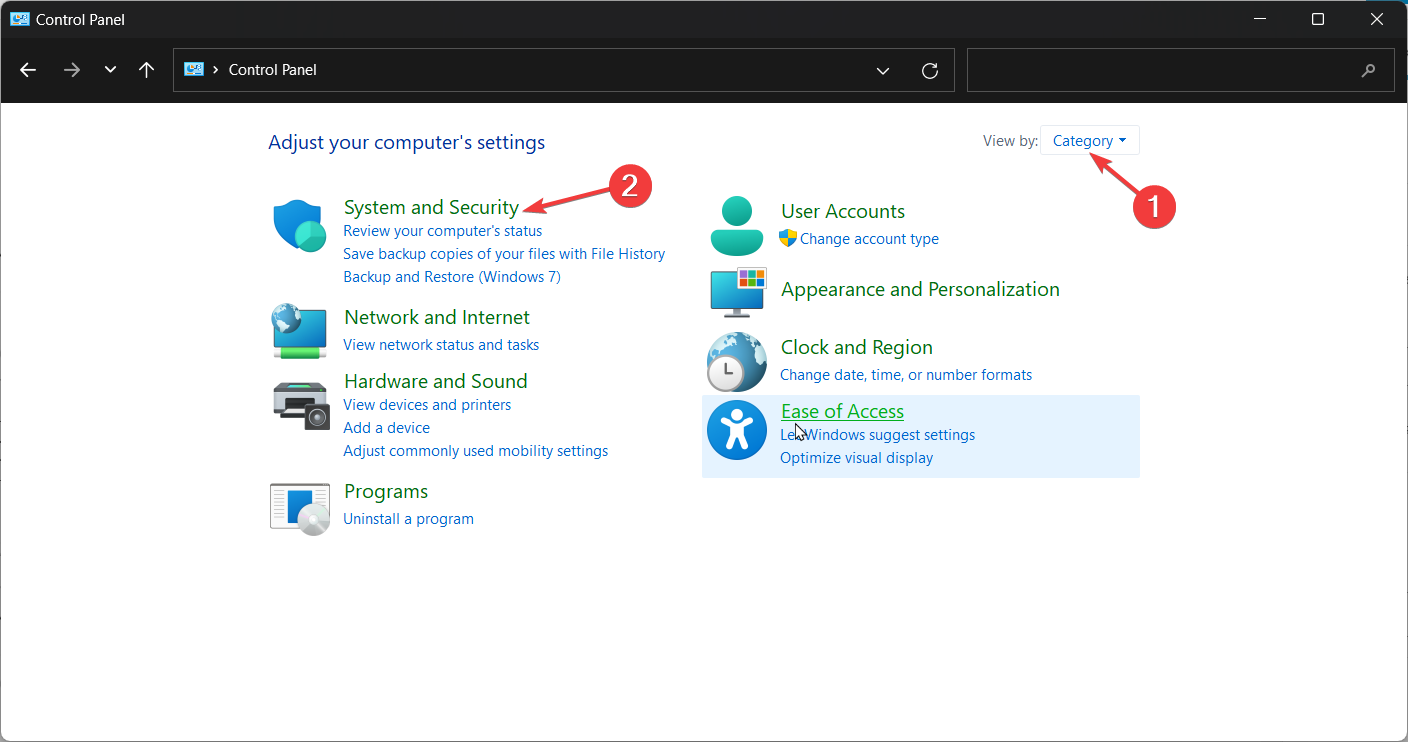
  1. Hit the Windows key, type Control Panel in the search bar, and click Open.control-panel-search fallout new vegas runtime error
  2. Click on System and Security.Security and System
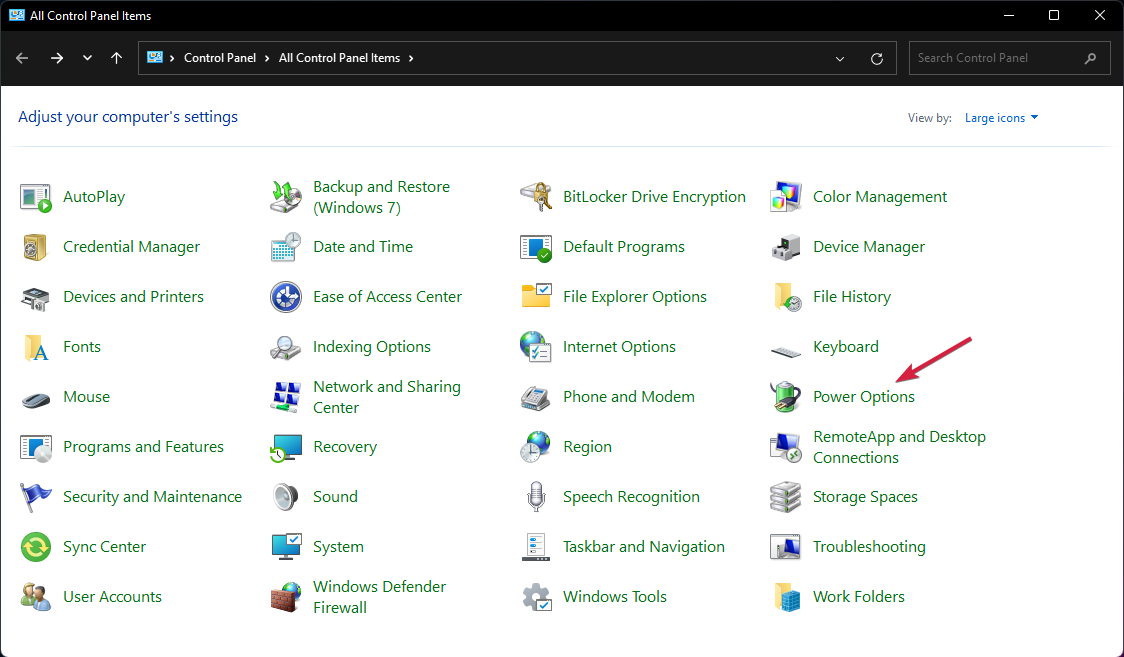
  3. Next, select Power Options.
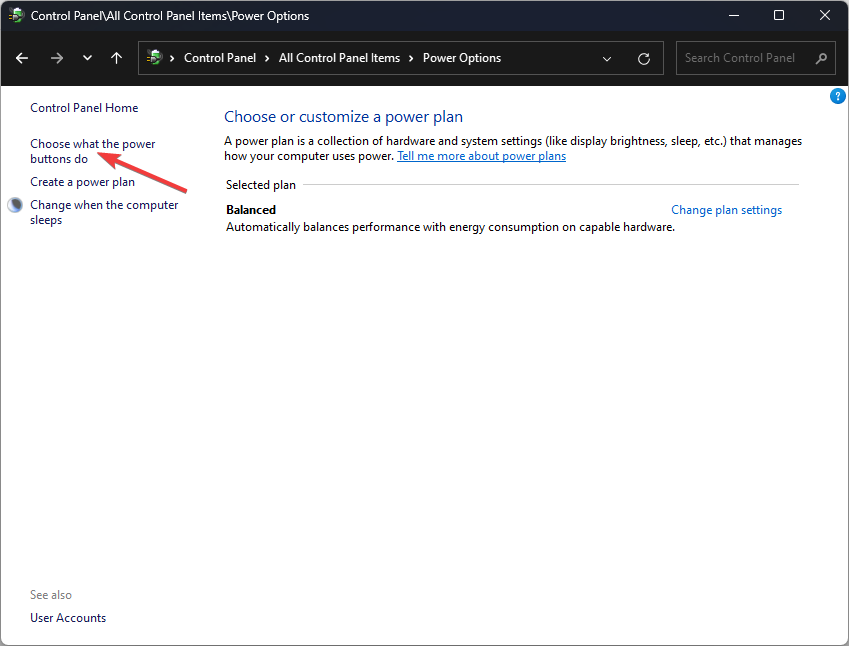
  4. Click on Choose what the power buttons do from the list of options on the left.
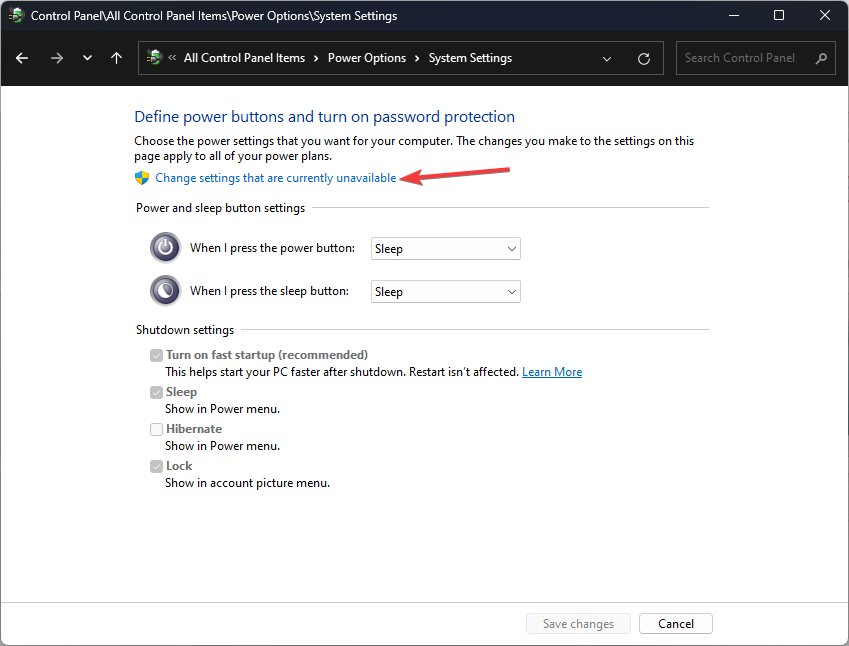
  5. Select Change settings that are currently unavailable.
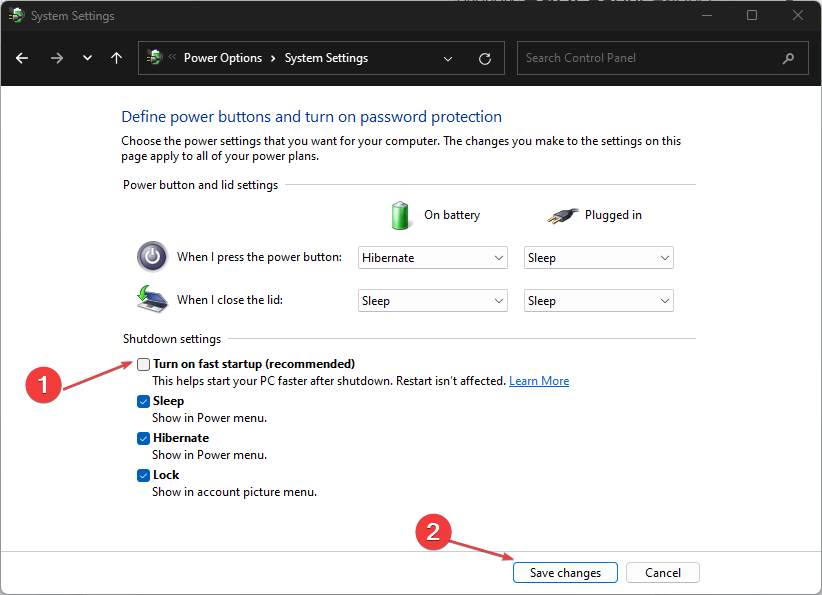
  6. Now, untick the checkbox for Turn on fast startup and then click on Save changes.

3. Run the CHKDSK command

  1. Hit the Windows key, type cmd in the search bar, and click Run as administrator.cmd-run-admin-w11 unexpected kernel mode trap windows 11
  2. Type the following command, replace the C letter with your drive’s letter, and press Enter: chkdsk C: /f

In case CHKDSK gets stuck or takes a long time to complete, proceed to the following step.

4. Run the DISM and SFC commands 

  1. Click on the Start Menu icon, type cmd in the search bar, and click Run as administrator.cmd-run-admin-w11 unexpected kernel mode trap windows 11
  2. Type the following commands and press Enter after each one: DISM.exe /Online /Cleanup-Image /Restorehealth sfc /scannow
  3. Restart your PC.

If you want to get rid of all your Windows system issues, including the error in question, you should try dedicated repair software.

5. Update your graphic driver

  1. Click on the Start Menu icon, type Device Manager in the search bar, and click Open.device manager w11
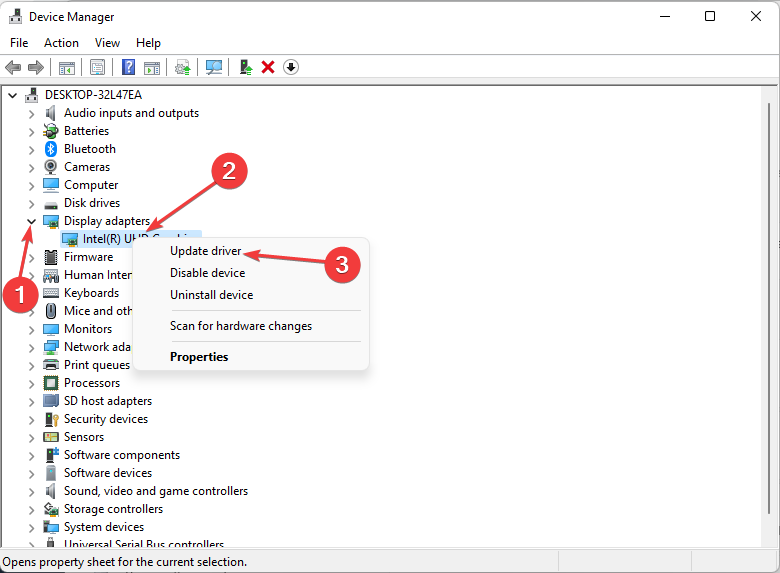
  2. Navigate to Display adapters and find your graphics card. Right-click on your graphics card and select Update driver.Graphic Driver Update
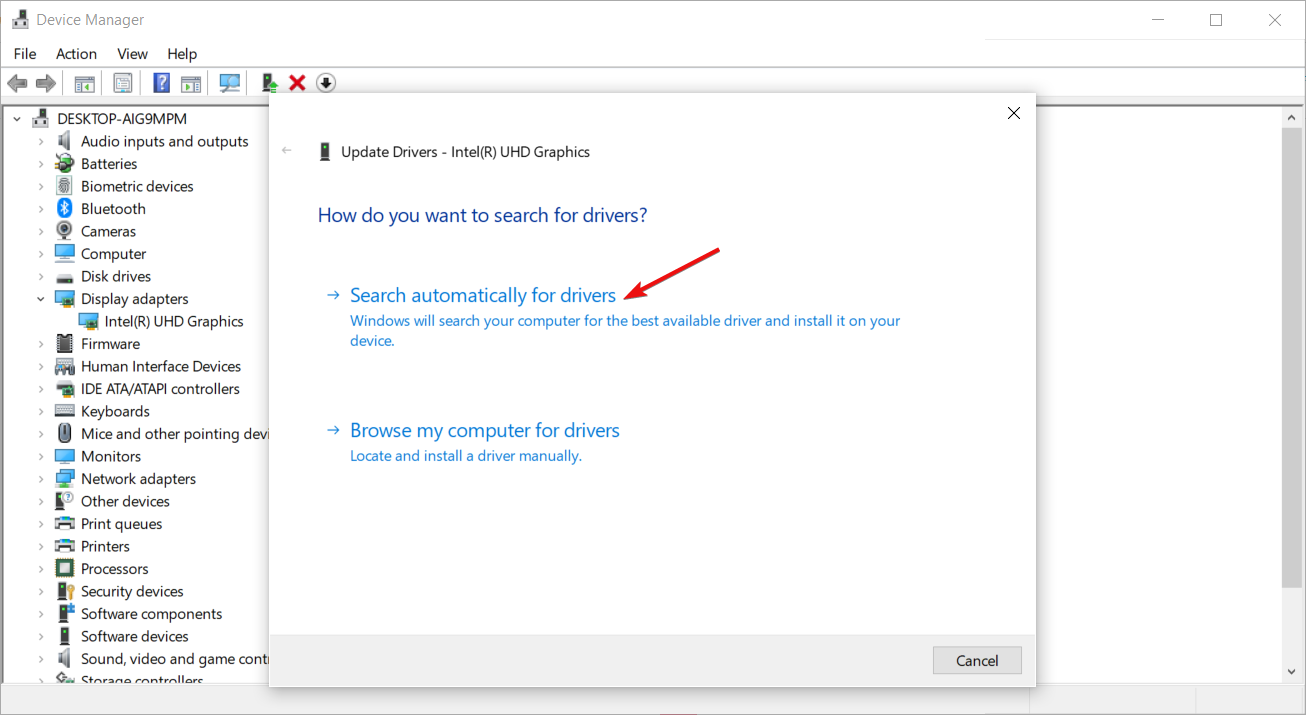
  3. Select Search automatically for drivers.

Windows may not always install the correct drivers, and while you can easily download them from the manufacturer’s website, there are also third-party driver updater tools that can help you find and update the latest versions of your graphics card drivers automatically.

6. Restore default power plans

  1. Click on the Start Menu icon, type Control Panel in the search bar, and click Open.control-panel-search fallout new vegas runtime error
  2. Navigate to Power Options and click to Open.
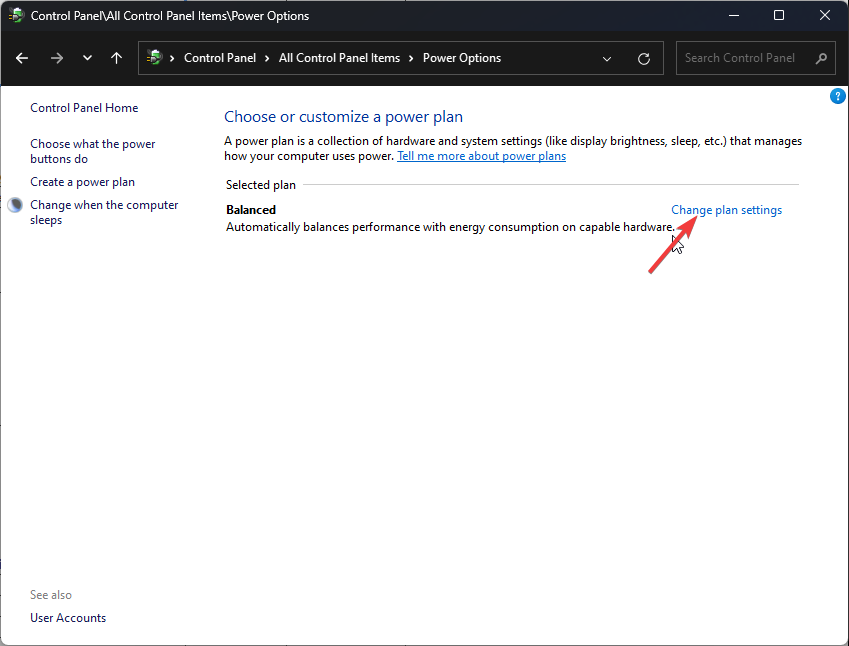
  3. Select Change plan settings.Change plan settings
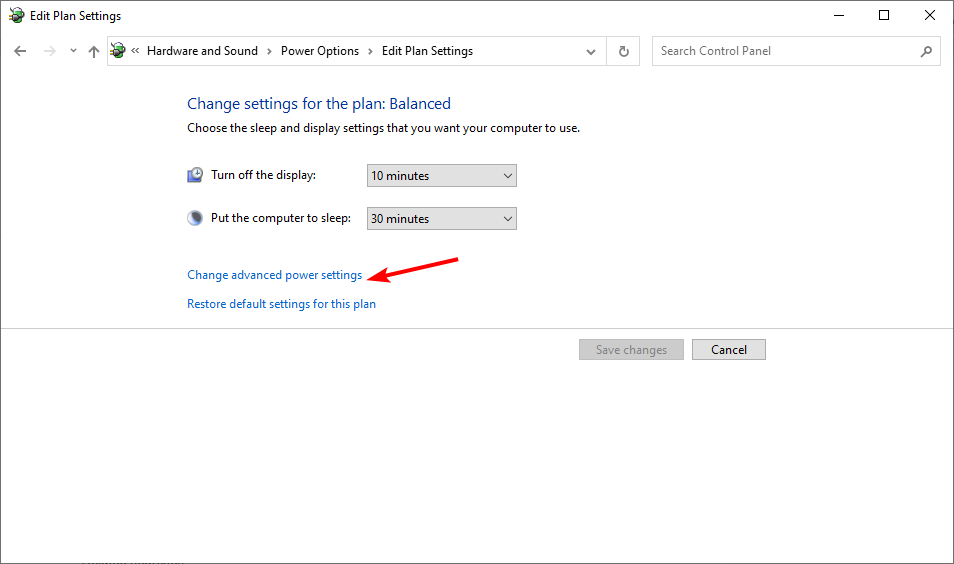
  4. Click on Change advanced power settings.windows-11-not-recognizing-usb
  5. In the Power Options dialog box that appears, select Restore defaults then click Apply and OK to save changes.

7. Update BIOS

  1. The process of updating BIOS will differ depending on your motherboard. For this step, we shall be updating the HP motherboard.
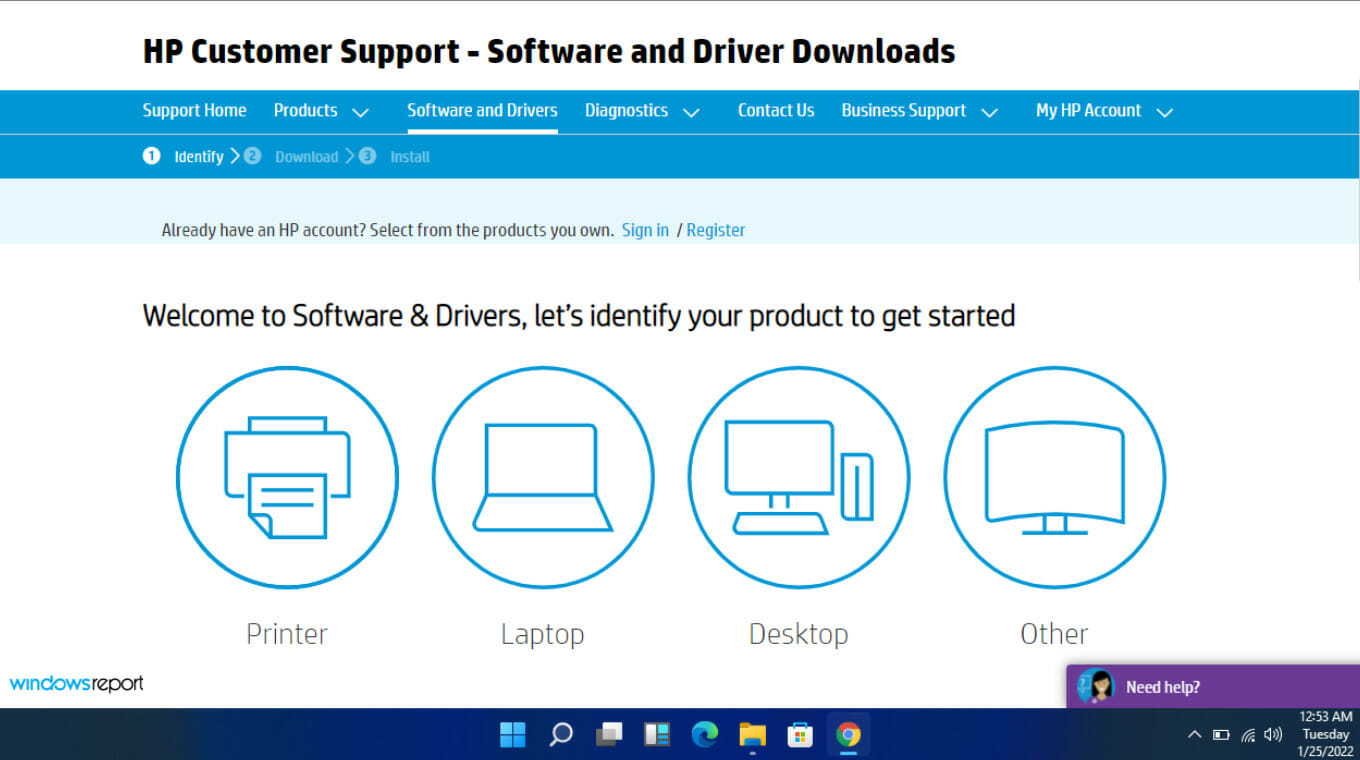
  2. Navigate to the HP driver and software download website.
  3. Choose laptop or desktop, depending on the type of computer you’re using.
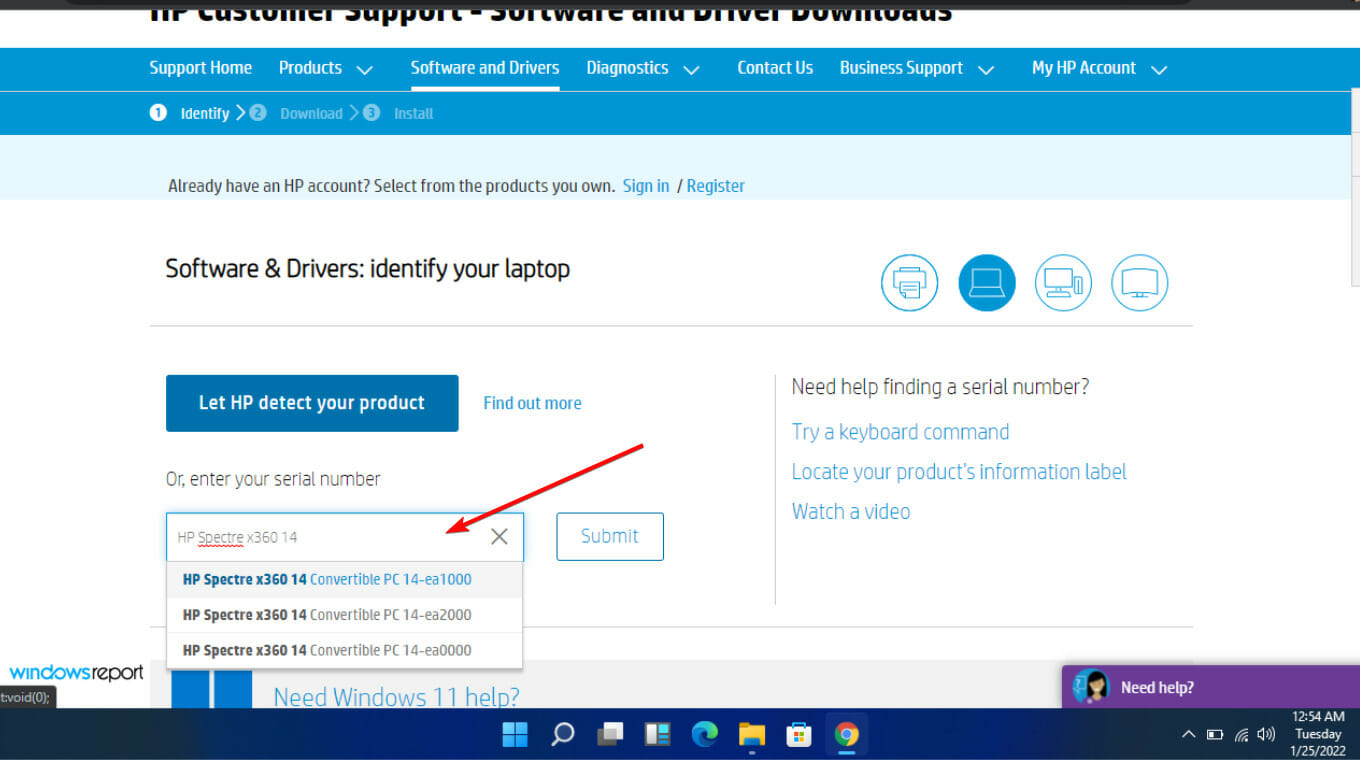
  4. Enter your exact serial number or your exact computer model.
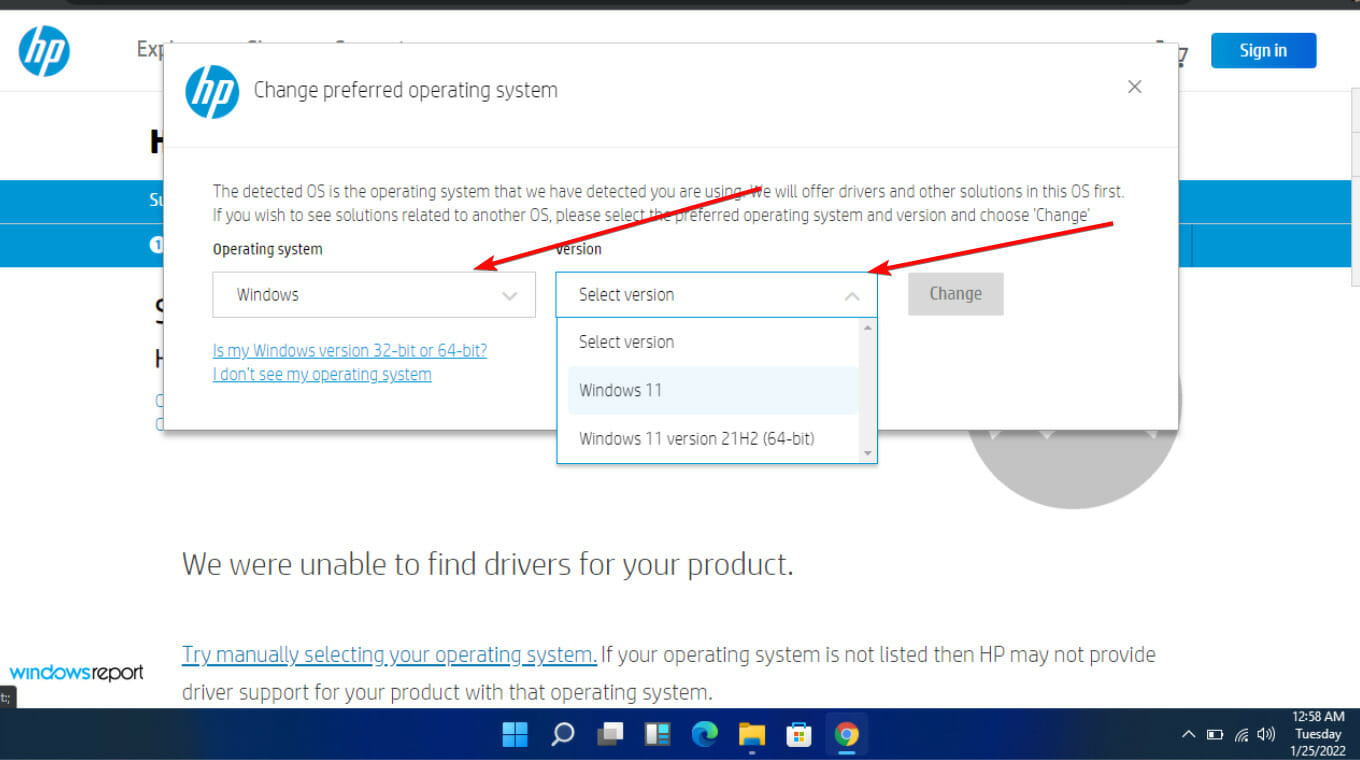
  5. Select your OS and OS version, then click Submit.
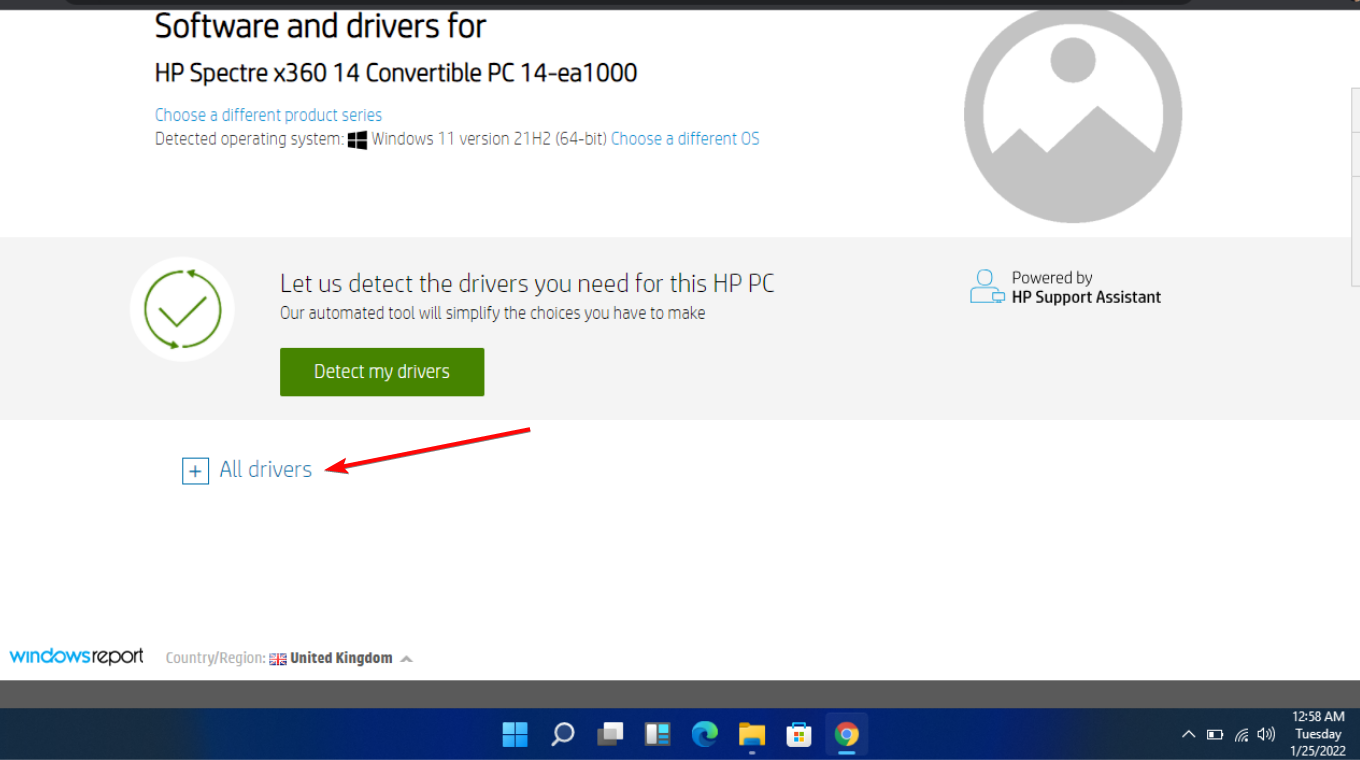
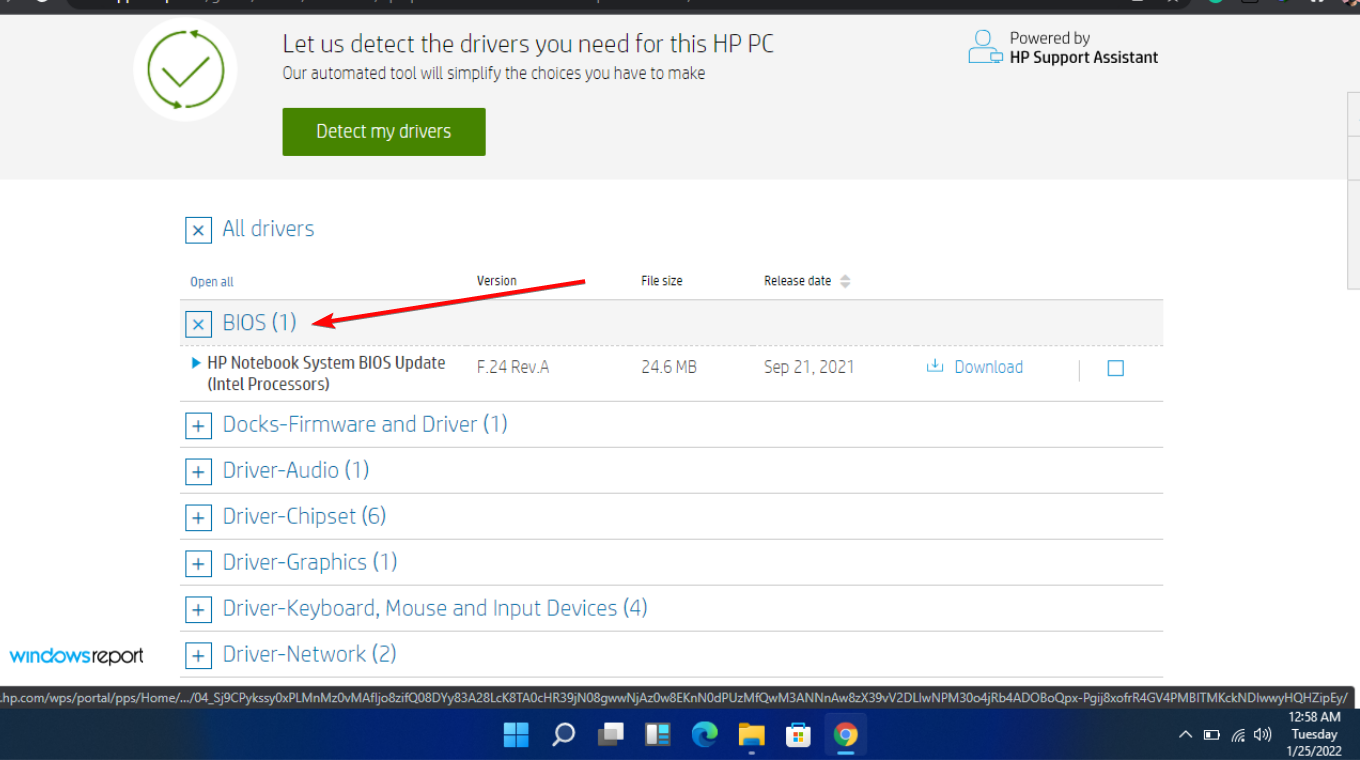
  6. Click on All drivers and then expand BIOS to see available updates.
  7. Click the download icon.
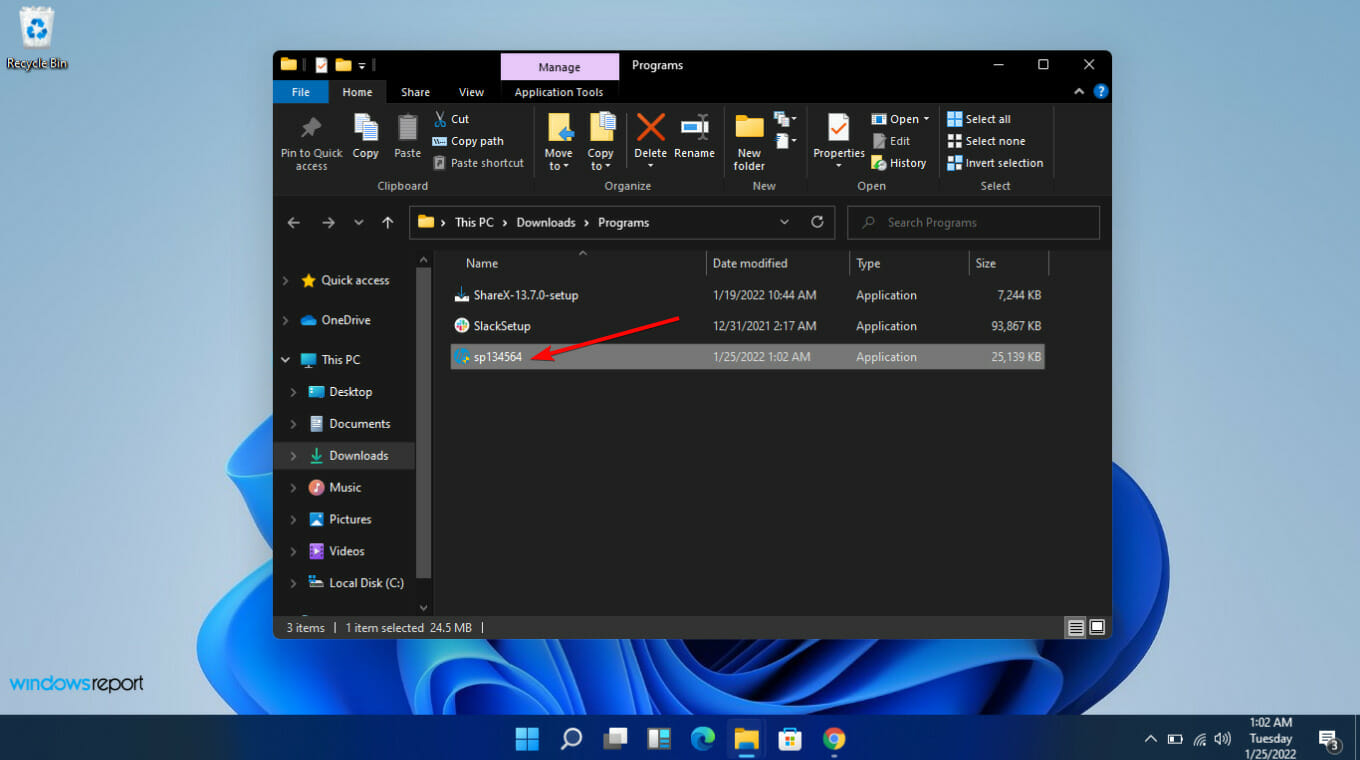
  8. Install the .exe file, following the on-screen instructions.
  9. Restart your PC.

Kernel power errors such as the (70368744177664),(2) issue are fairly common on computers but can usually be fixed easily. For instance, check out how we resolved the kernel power 41 error.

Leave any further questions, thoughts, or suggestions in the comment section below.

0xc000001d Error Code: How to Fix It on Windows 10 & 11

If you have encountered the error code 0xc000001d while launching an application leading to a BSoD error, this guide can help!

We will explore the possible causes of this issue and provide step-by-step instructions to fix it on Windows 10 and 11, ensuring a smooth and error-free computing experience.

What causes the error code 0xc000001d on Windows 10 & 11?

There could be several reasons for this error to occur; some of the common reasons are mentioned here:

  • Corrupted system files – This error may appear due to corrupted or damaged system files. Try running an SFC scan via Command Prompt to resolve it.
  • Outdated display driver – If the display driver is incompatible or outdated, you may see this error. Try updating it to fix the problem.
  • Bad sectors on your drive – Bad sectors on your disk can reduce the system’s ability to execute specific tasks, leading to such errors. Try running a disk check to understand the issue.
  • Third-party software interference – Some third-party security software conflicts and prevent the app from launching, causing the error. Try disabling the antivirus temporarily.
  • Recent changes – Sometimes certain changes in your machine such as app installation or driver update may disrupt the functioning of DLL files, leading to this error.

Now that you know the causes, let us check out the solutions to get rid of this blue screen error.

How can I fix the error code 0xc000001d on Windows 11?

Before engaging in advanced troubleshooting steps, you should consider performing the following checks:

  • Try reinstalling the app or game affected by the error.
  • Close unnecessary apps and background processes to reduce the load on RAM.
  • Run the app as administrator.
  • Disable the antivirus temporarily.
  • Check the app’s recommended system requirements.
  • If the error shows that any DLL file is missing, you can check our guide on missing DLL files to know the quick solutions.

If these minor fixes don’t work for you, move to the steps mentioned below.

1. Repair the corrupted system files

  1. Press the Windows key, type cmd and click Run as administrator.Run CMD as admin 0xc000001d
  2. Copy & paste the following command to repair system or app files and hit Enter: sfc/scannowSFCSCANNOW CMD
  3. Wait for the process to complete, if it shows an error, type the following command to repair Windows OS image files and press Enter: DISM /Online /Cleanup-IMage / RestoreHealthRestore health
  4. Wait for the process to complete, then reboot your PC.

Additionally, you can opt for a specialized repair tool to ensure a thorough repair process for all your PC’s corrupt or malfunctioning system files.

2. Run a disk check

  1. Press Windows + E to open the File Explorer. Locate and expand This PC.
  2. Right-click the system drive and select Properties.Properties Scan 0xc000001d
  3. Switch to the Tools tab, under Error checking, and click Check.Check the disk
  4. Now click Scan drive.Scan the drive

The tool will scan your drive for errors and repair them. You can click Show Details to learn more about them or click Close to close the window.

3. Update the graphics drivers

  1. Press Windows + R to open the Run console.Device Manager Run command 0xc000001d
  2. Type devmgmt.msc and click OK to open Device Manager.
  3. Locate and expand Display adapters, right-click graphics driver, and select Update driver.Graphics Driver update
  4. Click Search automatically for drivers.Search automatically for drivers
  5. Follow the onscreen prompts to complete the process.

4. Add the app files to the firewall exception list

  1. Press the Windows key, type control panel, and click Open.Control Panel start menu 0xc000001d
  2. Select Category for View by, and click System and Security.System and security
  3. Click Windows Defender Firewall.Windows Defender
  4.  Now click Allow an app or feature through Windows Defender Firewall.Allow an app
  5. Click the Change settings option, then click Allow another app.Change app
  6. Click Browse, select the app file, and click Open.Browse1
  7. Now select Add.ADD
  8. Click OK and close the window.

5. Run the Framework repair tool

Note icon NOTE
This solution applies only if the error message mentions .NET Framework corruption.
  1. Download the Microsoft .NET Framework Repair Tool.Download the tool 0xc000001d
  2. Double-click the downloaded file, accept the license terms, and click Next.Aceept license and click Next
  3. It will scan and suggest the changes, click Next, then it will apply the changes.Click Next to apply the changes
  4. Once changes are made, click Finish to close the window.Click Finish
  5. Reboot your computer to save the changes.

If none of the above solutions fixed the problem, you may also perform a System Restore to roll back your system to a previous healthy state.

Windows will restart and restore your PC to the selected version. If System Restore didn’t successfully complete, we recommend you read this guide to know the solutions.

How can I fix the error code 0xc000001d on Windows 10?

To fix this error on Windows 10, you can follow the methods mentioned above for Windows 11.

As a last resort, you can reset your PC using this informative guide to resolve this problem on your Windows computer.

So, these are methods you can use to fix the error code 0xc000001d on Windows 10 & 11. If nothing has worked for you, you need to perform a clean installation of Windows.

If you have any questions or suggestions, feel free to mention them in the comments section below.

Fix: Windows Couldn’t Automatically Bind the IP Protocol

If you are facing issues with your network and, upon running the Network troubleshooter, you encountered the Windows couldn’t automatically bind the IP protocol stack to the network error, this guide can help!

Why can’t Windows bind the IP protocol stack?

There could be various reasons for this error; some of the common ones are mentioned here:

  • Obsolete network adapter drivers – You might face internet issues if the network adapter drivers are incompatible or outdated. Try updating them to the latest version.
  • Conflicting network configurations or settings – If the network settings are conflicting or corrupted, you may face this problem. Try resetting the network configuration.
  • Not able to fetch IP address using DHCP – Check the network adapter for malfunction if it is damaged; it could cause issues while connecting to the internet.
  • Unsupported VPN software – If the VPN software is incompatible or uninstalled but has leftover files, it might hinder the process. Try uninstalling VPN software completely.
  • WLAN AutoConfig service is disabled -This issue could appear if the service is stopped or not working due to a bad Windows update or some third-party app.

So, these are the causes for this internet connectivity issue; let us check out the solutions.

What do I do if Windows can’t bind the IP protocol stack?

Before engaging in advanced troubleshooting steps, you should consider performing the following checks:

  • Restart your computer and router.
  • Disable or uninstall VPN if applicable.
  • Ensure Windows is up to date.

If these fixes don’t work for you, move to the steps mentioned below.

1. Revert to the default Network Adapter Properties settings

  1. Press Windows + R to open the Run dialog box.Network connections windows couldn't automatically bind the ip protocol stack to the network adapter
  2. Type ncpa.cpl and click OK to open the Network Connections window.
  3. Locate & right-click Wi-Fi and choose Properties.Ethernet 1
  4. Go to the Networking tab and take a screenshot of the current configuration.
  5. Check out this list of items below, and if you see any other items in the list checked in the Network Connections window, remove the checkmark:
    • File and Printer Sharing for Microsoft Networks
      QoS packet scheduler
      Link-Layer Topology Discovery Responder
      Internet Protocol Version 4 (TCP/IPv4)
      Link-Layer Topology Discovery Mapper I/O driver
      Internet Protocol Version 6 (TCP/IPv6)
      Microsoft LLDP Protocol Driver
      Client for Microsoft Networks 
      Uncheck the connections list item
  6. Click OK to save the changes.

2. Modify a registry entry

Note icon NOTE
Making changes into the Registry is risky because it may damage the system. We recommend backing it up before performing this solution.
  1. Press Windows + R to open the Run console.Regedit windows couldn't automatically bind the ip protocol stack to the network adapter
  2. Type regedit and click OK to open the Registry Editor.
  3. Navigate to this path: Computer\HKEY_LOCAL_MACHINE\SOFTWARE\Microsoft\Windows NT\CurrentVersion\NetworkCards
  4. You will see two or three sub-keys related to the network adapters under NetworkCards, click on each sub-key one by one, and on the right-side pane, check the Description entry to locate the Network adapter causing the problem.regedit_Network adapter
  5. Select the affected one, double-click ServiceName, copy the Value data from the next window, and paste it somewhere.
  6. Copy and paste the path mentioned in the Registry Editor’s address bar and replace ServiceName_string_Value with the value you copied in Step 5: Computer\HKEY_LOCAL_MACHINE\SYSTEM\CurrentControlSet\Services\Tcpip\Parameters\Interfaces\ServiceName_string_Value
  7. Right-click ServiceName Value, select New, and click DWORD (32-bit) value.New DWORD
  8. Right-click the freshly created entry, select Rename and name it DhcpConnEnableBcastFlagToggle.Rename the DWORD
  9. Double-click it, set the Value data as 1, and click OK.Change Value data to 1
  10. Close Registry Editor and restart your computer.

3. Reset the IP and clear the DNS cache

  1. Press the Windows key, type cmd, and click Run as administrator.CMD elevated windows couldn't automatically bind the ip protocol stack to the network adapter
  2. Copy & paste the following commands one by one and press Enter after every command:
    • netsh winsock reset
      netsh int ip reset
      NETSH RESET WINSOCK
  3. Type the following commands one by one and press Enter after each command:
    • ipconfig /release
      ipconfig /flushdns
      ipconfig /renew
      cmd_flushdns
  4. Reboot your computer to let the changes take effect.

4. Update the network drivers

  1. Press Windows + R to open the Run console.Device Manager Run command windows couldn't automatically bind the ip protocol stack to the network adapter
  2. Type devmgmt.msc and click OK to open the Device Manager app.
  3. Locate and expand Network adapters, right-click the affected entry, and select Update driver.Update driver
  4. Select Browse my computer for drivers.Browse my computer
  5. Next, click Let me pick from a list of available drivers on my computer.Let me pick
  6. Select the suitable one from the list and click Next.Click NEXT
  7. Follow the onscreen instructions to complete the process.

5. Modify the WLAN AutoConfig service properties

  1. Press Windows + R to open the Run dialog box.SERVICES windows couldn't automatically bind the ip protocol stack to the network adapter
  2. Type Services.msc and click OK to open the Services app.
  3. Locate and double-click WLAN AutoConfig to open its Properties.WLAN AUTOCONFIG
  4. Set the Startup type as Automatic.Automatic click OK
  5. Click OK to save the changes.

If none of the solutions worked, you can always perform a System Restore to revert the OS to a previous healthy state.

Windows will restart and restore your machine to the selected state. If System Restore didn’t successfully complete, we recommend you read this guide to know the solutions.

So, these are methods you can use to fix the Windows couldn’t automatically bind the IP protocol stack to the network error. If you have any questions or suggestions, feel free to mention them in the comments section below.

Jusched.exe: What Is It & How to Properly Remove It

You’ve come here wondering what the jusched.exe is. Or perhaps you want to know if it is a dangerous virus or why it is running on my computer.

In this guide, we answer all the most important questions surrounding the executable process and show you how it may be easily removed from your computer.

What is jusched.exe?

The Jusched.exe executable file is related to the Java Update Schedule. The process is legitimate and part of Oracle’s Java Runtime Environment (JRE), installed on systems with Java. The executable is located in the path below:

C:\Program Files\Java\jre1
jusched.exe

It runs in the background and is primarily designed for checking updates. When an update is found, it prompts you to install the latest version, ensuring you have the most secure and up-to-date version of Java.

Should I disable jusched.exe?

Users who don’t need Java or prefer to manage updates manually may disable jusched.exe. However, disabling jusched.exe does not impact the functioning of other software on your system, but it may mean you may miss some critical Java updates.

How do I remove jusched.exe?

1. End the Process

  1. Press Ctrl + Shift + Esc to open the Task Manager.
  2. Click on the Details tab, search for jusched.exe, click on it, and hit the End task button.
    jusched.exe
  3. Click on the Processes tab, search for any jusched.exe process, click on it, and hit the End task button.

This process will disable jusched.exe but not remove it from your computer. If you prefer to remove the Java Update Scheduler from your system completely, follow the next solution.

2. Uninstall from program and features

  1. Press Windows + R to open the Run dialog.
  2. Type appwiz.cpl and hit Enter.
    jusched.exe
  3. Search for Java 6 Update 15 from the program list, click on it, and click the Uninstall button.
  4. Finally, follow the uninstall wizard to complete the uninstallation.

That is all you may need to know about the Java Update Scheduler. Now that you may have uninstalled it, to maintain security and compatibility with Java-based applications, it is crucial to regularly check for updates manually and ensure that you have installed the most recent version of Java.

Also, you may read our comprehensive guide to learn how to install Java on your Windows 11 devices.

That is all we cover in this guide. Let us know in the comment section if you would love to keep using Java without the updater.

Fix: An Error Occurred While Trying to Copy a File

Many users complained about running into an error message saying An error occurred while trying to copy a file. The source file may be corrupt on Windows 11.

It occurs when trying to install an application on your system. However, this guide will discuss basic steps for fixing the error.

Likewise, you may be interested in our article about ways to resolve the Runtime Error: Could not call proc on Windows PCs.

Why did an error occur while trying to copy a file?

 The following are some probable causes for the error:

  • Corrupt installation – The error may appear when installing an app if its installation files are corrupt. Hence, causing affecting the system when copying needed files from the source path to the destination.
  • Memory issues – Sometimes, memory issues, such as insufficient space, can lead to this error popping up.
  • Antivirus settings – You can also encounter the error due to interference from the firewall feature on the antivirus software that may block the installation of the app.

Though this error may be tricky and sometimes difficult to solve, we’ll take you through some fixes to resolve the problem.

What can I do if an error occurs while trying to copy a file?

Before attempting any advanced troubleshooting steps, apply the following:

  • Connect to a stable internet connection – Power cycling your router or modem will refresh its network and fix slow internet connections.
  • Allow the install file administrator privileges – Running the app as an Administrator assigns it permissions to install and run on the system, resolving permission issues.
  • Stop third-party software – Do this by ending tasks for apps, including antivirus software, as it can experience difficulty determining whether the program you’re installing is legitimate or malware.
  • Ensure you have enough space – Before attempting the installation, ensure your hard drive has enough space to store the required installation files for the app.

If the error persists after trying these preliminary checks, go ahead with the fixes below:

1. Reinstall the affected application

  1. Left-click the Start menu, type control panel, and select Open.
  2. Select Uninstall a program link under Programs.
  3. Locate the affected application and select Uninstall.
  4. Wait for the process to complete and close.
  5. Re-download the setup.exe for the application and reinstall it.

As it was enumerated in the error message that the source file may be corrupted, redownloading a secure copy from the appropriate repository can help.

Hence, the newly downloaded file will override the previous installation files, and you should be able to install the app.

2. Disable Control folder access

  1. Left-click the Start menu and select Windows Settings.
  2. Go to Privacy and Security, then select Windows Security.
  3. Select Virus & threat protection from the options.
  4. On the new window, scroll down and select Manage ransomware protection.
  5. Then, toggle off Controlled folder access.

Some users claim they stopped encountering the issue immediately after they disabled this feature.

Note icon NOTE
Disabling this feature could put your PC at risk. Hence, you should enable it back immediately after the process.

3. Use the Memtest86+

  1. Launch your browser and download Memtest86+.
  2. Connect a USB flash drive to your PC.
  3. Select the USB flash drive and then click on the Create button.
  4. Once the process is finished, restart your PC and boot from the flash drive.
  5. Keep scanning your RAM for at least two hours. In order to pinpoint the faulty module, it’s advised to remove all but one module and scan it for 2 hours. Repeat this step until you find the faulty module.
  6. Once you find the faulty module, remove it or replace it.

We hope that our solutions helped you fix An error occurred while trying to copy a file the source file is corrupted error on your PC.

In addition, you can read through our comprehensive guide on ways to fix the Windows cannot install required files error on Windows 11. Also, we have a detailed article about how to install MSIXBundles on Windows PCs.

If you have further questions or suggestions, kindly drop them in the comments section below.

Vid.sys BSOD: Causes & How to Fix It in 5 Steps

Among the long list of errors users encounter on Windows PC, BSODs are undoubtedly the most dreadful. One of these frustrating errors is vid.sys.

This error can be due to faulty hardware or driver issues. If you are also dealing with this Blue Screen of death error, this guide will show you quick and effective ways to fix it quickly.

What is vid sys?

The vid.sys Blue Screen of Death error usually occurs due to driver issues or faulty hardware. Listed below are some of the potential causes of this error message:

  • Outdated driver: One of the leading causes of vid.sys is an outdated or broken driver. Reinstalling or updating your drivers to the latest version should solve the problem.
  • Corrupt system files: If you have corrupt system files on your PC, it might lead to this BSOD. The solution to this is to repair and restore these files.
  • Outdated PC: An outdated operating system can also lead to this error, and you can fix this by updating your PC.

How can I fix the vid.sys blue screen error?

1. Update the driver

  1. Press the Windows key + X and select the Device Manager option.
    device manager vid.sys
  2. Double-click the Display adapters section and right-click the driver under it.
  3. Now, select the Update driver option.
    update driver
  4. Finally, choose Search automatically for drivers and install any available updates.
    search auto

One of the major causes of the vid.sys BSOD error is an outdated display driver. Hence, you need to update your driver to get past the issue.

Another effective option is to use an automatic driver updater to complete this task. This saves you the stress of searching for and installing the drivers yourself. Also, it eliminates the risk of downloading the wrong driver, which can lead to further problems.

⇒ Get Outbyte Driver Updater

2. Repair system files

  1. Press the Windows key, type cmd, and select Run as administrator under Command Prompt.
    cmd admin
  2. Type the command below and hit Enter to run it: DISM /online /cleanup-image /restorehealthdism restore
  3. Wait for the command to finish running. Now, run the command below: sfc /scannowsfc vid.sys
  4. Finally, wait for the command to finish running and restart your PC.

Sometimes, you might face the vid.sys error. The solution to this is to run the DISM and SFC scans.

Alternatively, you can fix this issue for good by using a dedicated repair tool to save you from the stress of running a series of commands and repairing the files manually.

3. Update your PC

  1. Press the Windows key + I to open the Settings app and click Windows Update in the left pane.
  2. Click the Check for updates button.
    windows update vid.sys
  3. Now, download and install all available updates.

If your OS is outdated, it is prone to different issues, including this vid.sys BSOD error. The quickest way to fix this is to update your operating system, following the steps above.

4. Scan for malware

  1. Press the Windows key + S, type virus, and choose Virus & threat protection.
    virus
  2. Click the Scan options link on the next page.
    scan options
  3. Finally, select your preferred scan option and click the Scan now button.
    scan now vid.sys

The presence of malware on your PC can lead to varieties of issues, including the vid.sys error. What you need to do here is to perform a full scan.

5. Perform a system restore

  1. Press the Windows key + R, type rstrui.exe, and press Enter.
    rstrui
  2. Click Next on the new page.
    next
  3. Now, choose your ideal restore point and click the Next button.
    restore point vid.sys
  4. Finally, click Finish and follow the onscreen instructions to complete the process.
    finish

If the solutions above fail to fix the vid.sys BSOD error, you need to perform a system restore to a point where everything works well. This will undo the changes you might have made that are causing the issue

There you have it: everything you need to fix the vid.sys Blue Screen of Death error. You should now be able to solve the problem with the solutions in this guide.

If you are dealing with a similar issue in navagio.sys BSOD error, check our detailed guide to fix it.

Feel free to let us know the solution that helped you solve this problem in the comments below.

Replika Not Working? How to Fix It in 3 Simple Steps

AI powers the Replika chatbot companion for people needing a nonjudgmental friend with no social anxiety or drama involved. However, some readers have reported that Replika is not working.

So, this guide takes you through some of the likely causes as well as the most practical solutions.

Why is Replika not working?

From interactions with readers, we gather the following are the likely reasons the service may not work.

  • Internet-related issues – Replica may not work if connected to a weak, bad, or slow internet.
  • Outdated app – The problem will be triggered for some users if the app is not running on the most recent updates.
  • Service downtime – On rare occasions, you may have problems with the app or service if there is server maintenance.

Below are a few solutions to explore if the Replika service or application is not working.

What should I do if Replika is not working?

We recommend some pre-fixes before any detailed troubleshooting:

  • Check your internet connection – To optimize Replika’s performance, it’s important to have a stable internet connection. If you experience any weak or intermittent connection, consider connecting to an alternative network or restarting your router.
  • Restart the app – If you encounter any temporary glitches or errors, try closing the Replika app completely and relaunching it. A simple restart can often solve the issue.
  • Update your OS – Depending on your device, you should update the OS to be compatible with the latest Replika versions.

If these initial pre-fixes do not work, you may proceed to some more elaborate solutions outlined below.

1. Clear Cache

1.1 Clear cache on the browser

  1. Press Ctrl + Shift + Delete (this works on Chrome but may be slightly different on other browsers).
  2. Select a Time range, tick the checkboxes, and click Clear data.
    replika not working
  3. Restart the browser and verify if Replika is working.

This solution works if you use the Replika browser service. If you use the app, continue to the steps below.

1.2 Clear app cache and data

  1. Open the Settings app on your device.
    replika not working
  2. Scroll down and tap on Apps.
    replika not working
  3. Look for Replika in the list of installed apps and tap on it.
    replika not working
  4. You should currently be viewing the App Info page for Replika. Tap on the Storage.
  5. On the next screen, click Clear cache, then click Clear data.
    replika not working

2. Reinstall the app

  1. Long-click on the app icon and select Uninstall.
  2. Visit the official website and click a link that corresponds to your OS to start the download.
  3. Once the installation is complete, it should fix any problems of Replika not working.

3. Contact Replika support

If the above steps do not solve the problem, it is advisable to contact the Replika support team for further assistance. They can offer precise troubleshooting instructions or look into any server-related problems that could impact the application.

As a last resort, you may wait it out. If this problem is caused by server downtime, there is absolutely nothing you can do than wait for the server to come back on.

While we have not written these fixes in any particular order, we recommend starting from our preliminary solutions as they may save you further troubleshooting. You may also consider using a Replika alternative.

How to Unlock BitLocker Without Recovery Key or Password [3 Ways]

Today we’ll show you how to unlock Bitlocker without a password or recovery key. So if you forgot your credentials, just follow the steps below.

BitLocker is a full-disk encryption feature available in Windows that helps protect data from attacks such as boot sector viruses and other types of malware. 

The easiest method is to rely on the help of a professional software such as AOMEI FastRecovery. This tool will allow you to unlock Biltlocker in no time at all.

Here’s how to unlock it if you forgot your password:

How do I unlock BitLocker without recovery key

1. Format your hard drive

1.0 Use File Explorer

  1. Press the Win + E keys to open the File Explorer.
  2. Right-click on your drive and select Format from the context menu.
  3. Under the File system drop-down, select FAT32.
  4. You can give a name to your volume label or leave it as is.
  5. Click the Start button.

1.1 Use Command Prompt

  1. Hit the Start Menu icon, type cmd in the search bar, and click Run as administrator.cmd-run-admin-w11 unexpected kernel mode trap windows 11
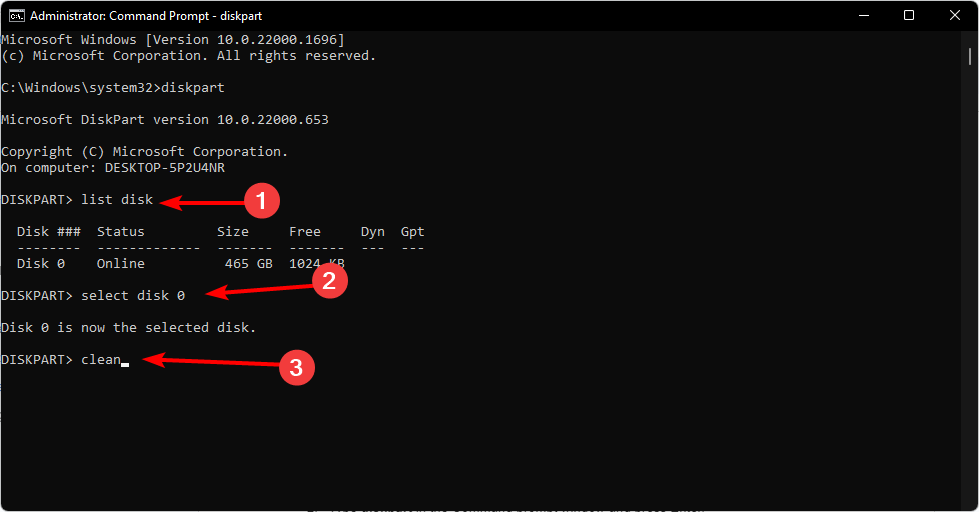
  2. Type the following command and press Enter: diskpart
  3. Next, type listdisk to display the number of available drives in your system.
  4. Check the number listed against the drive you want to format and Enter the following command. Remember to replace X with the corresponding number of the drive: selectdisk X
  5. Next, type in clean to clear everything from the drive.
  6. Wait for the process to finish, and type in the following command: create partition primary
  7. Next, Enter the following commands to format and assign the drive a letter: select partition x format quick fs=NTFS assign letter C
  8. Restart your PC.

For more info, take a closer look at our dedicated guide on recovering the BitLocker Key with Command Prompt.

2. Disable Secure Boot

  1. Enter your PC’s BIOS mode.
  2. Select Boot Mode, then click on Legacy Boot. 
  3. Save settings and restart your PC.

3. Use a third-party tool

The above methods can seem a bit complicated and take up your time. To avoid this, you can enlist the help of a third-party tool such as Elcomsoft System Recovery.

It has garnered quite a praise from users, so it’s worth trying it out and seeing whether you can bypass the BitLocker page.

Where is the lost 48-digit BitLocker recovery key?

Some of the possible locations where you can find your BitLocker recovery key include:

  • Microsoft account – If you have a Microsoft account, you can recover it by logging in to retrieve it.
  • USB drive – You probably saved a copy of your recovery key in a removable drive, so this is another potential location. 
  • Cloud storage – Many users save important information on cloud storage services, including their BitLocker recovery keys. For instance, you can recover your BitLocker key from OneDrive.

If you’ve forgotten the password to encrypt your hard drive and don’t have a recovery key stored anywhere else, you’re out of luck. There’s no way for you to access any of its contents without losing your data.

You can also check more detailed methods in this guide on what to do when your Windows 11 BitLocker recovery key is lost, which outlines every location where Windows may store the key and explains how to recover access safely.

You can reduce the chance of losing your recovery key again by setting up centralized key backup using Active Directory, and you can learn how to do this in our dedicated guide on storing BitLocker keys in Active Directory.

How do I remove the BitLocker password?

  1. Hit the Windows key, type Control Panel in the search bar, and click Open.control-panel-search fallout new vegas runtime error
  2. Navigate to System and Security.Security and System
  3. Click on BitLocker Drive Encryption.
  4. Locate the drive you want BitLocker Drive Encryption turned off, then select, Turn Off BitLocker.
  5. This will take some time, but finally, you’ll receive a message to decrypt the drive. Click on Decrypt to continue.
  6. Once the process is done, you will have removed the BitLocker password.

Check out our fix guide for additional information about what to do when BitLocker keeps asking for your recovery key.

We also have answers to when BitLocker cannot be enabled, so do not hesitate to check out our article.

Hopefully, you now know how to unlock BitLocker without your password or recovery key.

If you’re down on your luck and none of these have been successful, you might have to do a clean install of Windows and forget about your data.

And don’t forget that BitLocker supports automatic unlocking, which is ideal for devices not continuously connected to the internet.

We’d love your feedback on which solution you found easiest or one that worked for you.

How to Switch to a Local Account on Windows 10

Windows allows you to create and manage multiple user accounts on your computer. If you are looking for ways to change the main account on Windows 10, this guide will walk you through the process.

We will cover the steps and prerequisites to change the primary account, ensuring a smooth transition and uninterrupted access to your PC’s resources and settings.

How to change the primary Microsoft account on Windows 10?

Before proceeding with changing the main account on Windows 10, it is important to consider the following prerequisites:

  1. Ensure your computer is connected to the internet.
  2. Back up your important data.
  3. Make sure you have access to the current primary account.
  4. Verify the UAC is enabled and set to an appropriate level to allow administrative actions during the process.

If you have gone through the checks, use different methods to change the account.

1. Create a new user account

  1. Press Windows + I to open the Settings app.
  2. Go to Accounts.Go to Accounts  how to change main account on windows 10
  3. Click Family & other users.
  4. Now under Other users, click Add someone else to this PC.Add someonne
  5. Follow the onscreen instructions to create a new user account.
  6. Once the account is created, select it and choose Change account type.Change the current account type
  7. Now set it as Administrator and click OK.ADMIN CLICK OK
  8. Log out from the current primary account and log in to the new one.

2. Switching user accounts

  1. Press Windows + L to lock your computer or log out of your current account.
  2. On the login screen, choose the user account you want to use as the primary account and enter the password.
  3. Press Windows + I to open the Settings app.
  4. Go to Accounts.Click Accounts how to change main account on windows 10
  5. Click Your info.
  6. Now click Sign in with a local account instead.Sign in user instead
  7. Select the account and then enter the PIN and click Next.Enter PIN and click Next
  8. Now on Enter your local account info page, enter the User name, and New password, and click Next.Username and password  how to change main account on windows 10
  9. Log out and log in using the new account, and it will be your main account.

3. Changing from a Microsoft account to a local account

  1. Press the Windows key, locate the user profile icon, right-click, and choose Change account settings.Change account settings how to change main account on windows 10
  2. On the Your info section, click Sign in with a local account instead.Sign in user instead
  3. Now click Sign in with a local account instead.
  4. Select the account and then enter the PIN and click Next.Enter PIN and click Next
  5. Now on Enter your local account info page, enter the User name, and New password, and click Next.Username and password how to change main account on windows 10
  6. Log out and log in using the new account, and it will be your primary account.

4. Use the Control Panel

  1. Press the Windows key, type control panel, and click Open.Control panel menu how to change main account on windows 10
  2. Select View by as Category, and click User Accounts.User Accounts select
  3. Select User Accounts again.USER ACCOUNTS
  4. Click Manage another account.mANAGE ANOTHER ACCOUNT
  5. Choose the user account you want to change.Select the account
  6. Click Change the account type.Change account type
  7. Select Administrator and click the Change Account Type button.sAVE CHANGES
  8. Now log out and log in using the new account, and it can be the main account.

5. Use the Command Prompt

  1. Press the Windows key, type command prompt, and click Run as administrator.Command Prompt admin how to change main account on windows 10
  2. Copy & paste the following command to create a new username after replacing <new username> with the username that you want & <password> with the password you wish to use and hit Enter: net user <new username> <password> /add
  3. Once the account is created, type the following command and press Enter: net localgroup administrators <new username> /addNet user account
  4. Now log out and log in using the new account, and it can be the primary account.

So, these are the methods you can use to change your main account on Windows 10.

We also recommend reading our guide on what to do if you can’t log into Windows 10 with the Microsoft account.

If you have questions or suggestions, feel free to mention them in the comments section below,

What is Fondue.exe, and Should You Delete It?

If you’ve come across a file named Fondue.exe on your computer and wondering what it is and whether it’s safe to keep or if it should be deleted, this guide can help!

What is Fondue.exe?

Fondue.exe is a legitimate process, developed by Microsoft and also known as Windows Features on Demand UX.

Originally, it can be found in C:\Windows\System32 However, if it is stored someplace else, it might a malware disguising as the process.

Once you have confirmed the process is not legit, you must get rid of it.

How can I remove Fondue.exe from my PC?

Before removing the Fondue.exe process, it is important to consider the following prerequisites:

Once you finish these checks, move to the steps to remove the process. You must follow the steps mentioned in the same order to complete it.

1. Run a malware scan

  1. Press the Windows key, type windows security, and click Open.Windows Security open Windows key fondue.exe
  2. Go to Virus & threat protection and click Scan options.V& T Scan options
  3. Select Full scan and click Scan now.Full scan -
  4. The tool will search for and list malicious files. Remove them to fix the issue.

Windows Defender is a pretty effective antivirus but we recommend using a more powerful third-party antivirus so that you ensure complete removal of the malware.

2. Delete the process manually

  1. Press Ctrl + Shift + Esc to open the Task Manager.
  2. Locate Fondue.exe and right-click to select End task to terminate the process.End task
  3. Now, press the Windows key + E to start File Explorer and search for fondue.
  4. If you find it anywhere else than the System32 folder, or has any other extension, select the file and hit the Delete button.

3. Run the Disk Cleanup app

  1. Press Windows + R to open the Run dialog box.Cleanmgr Run command fondue.exe
  2. Type cleanmgr and click OK to open the Disk Cleanup.DISK C
  3. On the Disk Cleanup: Drive Selection window, select Local C and click OK.
  4. Now click Clean up system files.Cleanmgr 3
  5. On the Disk Cleanup: Drive Selection window, choose Local C and click OK again.DISK C
  6. Under the Files to delete option, select all the files listed and click OK.Cleanmgr 4
  7. Now select Delete files to remove the temporary files.Delete Files

This step is useful as it is advised to perform further cleanup to ensure there are no threats on your computer.

So, these are steps that you can use to remove Fondue.exe safely, and to prevent such issues in the future, you must always keep your Windows operating system up to date, schedule a malware scan once a week, and avoid downloading any suspicious attachments from the email.

If you have any questions or suggestions, feel free to mention them in the comments section below.

Error 0x80040e4e: OLE DB or ODBC [Exception from HRESULT]

If you are here, you have encountered the error code 0x80040e4e with the following exception OLE DB or ODBC [Exception from HRESULT] when loading or refreshing an existing table in the PowerQuery on the PowerBI desktop.

Though the message itself does vaguely not offer any insight on how to resolve it, you can easily fix the error code 0x80040e4e by implementing the solutions covered in this article. 

Why do I get the 0x80040e4e error code in PowerBI? 

You will encounter the error 0x80040e4e: OLE DB or ODBC [Exception from HRESULT] in PowerBI due to one of the following reasons: 

  • Duplicate table in Power Query – If there is a duplicate table in PowerQuery, the error code in question is likely to show up. 
  • Special characters – Incompetency of PowerBI to handle the special characters in the database and create unusual encoding also causes the loading to fail with the error. 
  • Conflicting data type – If there is a conflict between the data type in the source with the data type of the column, the error code 0x80040e4e is likely to show up.
  • Unnecessary relationships – This error may also occur if PowerBI auto-detects a needless relationship between CoE Settings and Environment.

How do I fix the error code 0x80040e4e in PowerBI?

1. Change the data type of the column

  1. Switch to the Home tab from the top menu bar and click to expand the Edit Queries drop-down followed by Edit Queries from the PowerBI ribbon to access the Power Query Editor window. 0x80040e4e
  2. Now, select the column for which you want to change the data type and click the left corner of the column header. 0x80040e4e
  3. Select the suitable data type for the current column from the list of supported data type that appears. 0x80040e4e
  4. A confirmation pop-up window to change the column type will pop up. Click the Replace Current button.

Generally, when a tabled gets loaded from a data source in PowerBI, the data type of the column gets detected automatically. 

However, in some cases, there may be a contradiction when PowerBI applies the incorrect data type, especially for the columns with date data type causing the error 0x80040e4e: OLE DB or ODBC [Exception from HRESULT] in PowerQuery. Hence, changing the data type of the affected column should suffice.

2. Delete unnecessary relationships 

  1. Cancel the table load in PowerBI such that Power BI will now load without any values. 
  2. Switch to the Modeling tab from the top menu bar and choose the Manage Relationships option from the ribbon. 0x80040e4e
  3. Look for the relationship between Environments and CoE Settings in the list of all relationships and press the Delete button located at the bottom. 
  4. Now Save and Close the dialog box and re-load the query.

The query should now load correctly without encountering the error 0x80040e4e in PowerQuery.  

3. Remove duplicate columns from the table 

  1. Open the table in question and click the topmost cell present before the column headers. 
  2. Select the Remove duplicates option from the drop-down menu that appears. 0x80040e4e

Deleting the duplicates in multiple columns across the table will help get past the error code 0x80040e4e in PowerBI. 

4. Clear the data source cache 

  1. Launch the PowerBI desktop and choose File from the top ribbon. 
  2. Choose Options and settings from the left navigation panel, followed by Options from the right sidebar. 
  3. Select Data Load from the left panel of the new window. 
  4. Look for the Clear Cache button under the Data Cache Management Options and Q&A Cache Options section and press the OK button. 0x80040e4e
  5. After you perform the above steps, the Currently used value will be set to 0 bytes. Now re-establish the connection with the required data sources and refresh the data query editor.

5. Clear Global Permissions 

  1. Access the File tab located on the ribbon in PowerBI Desktop. 
  2. Choose Options and settings from the left sidebar, followed by Data Source settings from the right. 0x80040e4e 
  3. In the Data Source settings window, enable Global Permissions on the top, select the BI Connector from the list of data sources, and press the Clear Permissions button at the bottom.  
  4. After you clear the PowerBI cache and data source settings, close all the instances of the Power BI desktop and re-launch it.

Cleaning the global permissions will clear the login credentials forcing you to set up a fresh connection. This will help fix the 0x80040e4e: OLE DB or ODBC [Exception from HRESULT] error when you refresh the table.

That’s pretty much it! You can try the methods listed in this guide to eliminate the error 0x80040e4e : OLE DB or ODBC [Exception from HRESULT] in PowerBI. 

You may also want to fix the PowerBI data source credentials if they are greyed out for you. 

Which of the tricks mentioned in this article worked in your case? We are curious to find out! 

6 Ways to Fix ESO Launcher Stuck on Loading

If your ESO launcher is stuck on the loading page while launching the game, this guide can help! We will cover all the expert-recommended solutions to get rid of the issue right after talking about the causes.

Why is the ESO Launcher stuck on loading error?

There could be several reasons for this error; some of the common ones are mentioned here:

  • Corrupted Microsoft Visual files – If the game files are incomplete or corrupted, it can prevent the launcher from loading properly. Try reinstalling the game to fix the problem.
  • Blocked by Windows Firewall – Sometimes, Windows firewall or antivirus tool could stop the ESO launcher from accessing the required resources, causing it to get stuck.
  • Connectivity issues – The poor and weak internet connection can prevent the launcher from loading. Check your internet connection and restart your router.
  • Server maintenance or downtime – If the game servers are undergoing maintenance, then there could be difficulty in loading the game. Check the status of game servers to ensure it.
  • Obsolete or incompatible software – You may see this error if the app or game you are trying to load is outdated or incompatible with your machine. Try updating or reinstalling the game.

Now you know the causes of the error, let us check out the solutions to eliminate the problem.

What can I do if the ESO Launcher is stuck on loading?

Before engaging in advanced troubleshooting steps, you should consider performing the following checks:

  • Restart your computer and router.
  • Check the game servers’ status.
  • Ensure Windows is up to date.
  • Try to reinstall the game.
  • Run the game as administrator.
  • Verify your PC meets the minimum system requirements to run ESO.

If these minor tweaks don’t work for you, move to the methods mentioned below.

1. Reinstall the Microsoft Visual C++ Redistribution package

  1. Press the Windows key, type control panel, and click Open.ESO launcher stuck on loading
  2. Select View by as Category and click Uninstall a program.CP Uninstall
  3. On the Programs & Features page, locate the Visual C++ Redistribution package and click the Uninstall button.  eso launcher stuck on loading
  4. Again, click Uninstall.VC_redist.x64_Uninstall
  5. Now, repeat the process for all the C++ versions.
  6. Download the latest version of Microsoft Visual C++ Redistributable from the official website.
  7. Double-click the installation file and follow the onscreen prompts.
  8. Wait for the installation to complete, then launch ESO and check if the issue persists.

2. Add the game to the Firewall exception list

  1. Press the Windows key, type control panel, and click Open.eso launcher stuck on loading
  2. Select View by as Category, and click System and Security.System and security eso launcher stuck on loading
  3. Now click Allow an app through Windows Firewall.Allow an app through firewall
  4. Click the Change settings option.Change settings
  5. Now locate ESO or ESO Launcher and check both the Public and Private options.
  6. Select Allow another app.Allow another app
  7. Click Browse.Browse
  8. Go to this path and click Open: Bethesda.net_launcher: C:\Program Files (x86)\ZenimaxOnline\Launcher
  9. Now select Add.ADD
  10. Click OK.Click OK
  11. Follow these steps to add these both paths to the exception:
    • ESO.exe: C:\Program Files (x86)\ZenimaxOnline\The Elder Scrolls Online\game\client\eso.exe
      Steam.exe: C:\Program Files (x86)\Steam\steam.exe

3. Delete the corrupted data

  1. Close the ESO launcher and navigate to the following path: C:\Program Files (x86)\Zenimax Online\LauncherProgram DATA eso launcher stuck on loading
  2. Locate and select the Program Data folder, click the Delete button, then restart the launcher.

4. Repair the launcher

  1. Locate & right-click the ESO launcher icon and choose Run as administrator.Rn as administrator
  2. Once the launcher opens, click the Game Options button from the drop-down menu.
  3. Choose the Repair option, and the process will start.PC_LauncherRepairBig eso launcher stuck on loading
  4. The launcher will reinstall the missing files after downloading. Once done, launch the game & check if the problem persists.

5. Disable the proxy settings

  1. Press the Windows key, type control panel, and click Open.Control Panel start menu eso launcher stuck on loading
  2. Select View by as Category, click Network and Internet.Network Internet eso launcher stuck on loading
  3. Click Internet Options.Internet Options
  4. Switch to the Connections tab, and click the LAN settings button.LAN settings eso launcher stuck on loading
  5. Remove a checkmark next to Use automatic configuration script and Use a proxy server for your LAN.Click OK
  6. Click OK.
  7. Then click Apply, then OK.Click Yes

6. Update the graphics driver

  1. Press Windows + R to open the Run window.Device Manager Run command eso launcher stuck on loading
  2. Type devmgmt.msc and click OK to open the Device Manager app.
  3. Click Display adapters to expand it, right-click the driver and choose Update driver.Graphics Driver update
  4. Select Search automatically for drivers.Update driver 2
  5. Follow the onscreen instructions to complete the process.

So, these are the methods you can follow to fix the ESO Launcher stuck on loading error.

We also recommend checking our list of the best VPNs for ESO to improve the connection in case you need that.

If you have questions or suggestions, feel free to mention them in the comments section below.

0x8004def4 OneDrive Error – 6 Ways to Fix

Error code 0x8004def4 in OneDrive hinders the functionality of the cloud storage app.

Some of the most common reasons why this error is occurring include network connectivity issues, cache corruption, third-party software interference, and outdated versions of the OneDrive app.

Let’s check out how you can fix all of these.

What can I do to fix the 0x8004def4 OneDrive error?

First, make sure you’ve logged in with an administrator account. You must also have a stable internet connection and make sure your Windows is up to date and has enough space.

1. Restart OneDrive

  1. Right-click the OneDrive icon in the system tray and select Exit or Quit OneDrive.Quit One drive
  2. Press Ctrl + Shift + Esc to open the Task Manager.
  3. Go to the Processes or Details tab, locate OneDrive or any process related to it, and right-click it to select End task.Quit OneDrive 0x8004def4
  4. Restart your computer. Once your computer is rebooted, OneDrive will start automatically; sign in using the Microsoft Account.

2. Reset the app

  1. Press Windows + R to open the Run window.Reset app 0x8004def4
  2. Type the following command and click OK: %localappdata%\Microsoft\OneDrive\onedrive.exe /reset
  3. Now OneDrive will reset and reconfigure itself.
  4. Once done, sign in with your Microsoft account when prompted and check if the error persists.

3. Reinstall the app

  1. Press the Windows key, type control panel, and click Open.Control Panel start menu 0x8004def4
  2. Select Category as View as and click Uninstall a program.CP Uninstall
  3. On the Programs and Features window, select OneDrive, and click Uninstall.OneDrive Uninstall
  4. Follow the onscreen instructions to complete the process.
  5. Download the latest version of OneDrive from the official website.
  6. Double-click the file to install the app, then sign in with your Microsoft account and check if the issue persists.

4. Check the proxy settings

  1. Press Windows + R to open the Run console.Internet settings 0x8004def4
  2. Type inetcpl.cpl and click OK to open the Internet Properties window.
  3. In the Internet Properties window, go to the Connections tab.
  4. Click LAN settings.lan SETTINGS
  5. Place a checkmark next to the Automatically detect settings option.dISABLE PROXY
  6. If you are using a proxy server, ensure that the right proxy settings are configured. Click OK to confirm the changes and reboot your PC.

5. Clear cache

  1. Locate the OneDrive icon from the system tray, right-click, and select Settings.sETTINGS  0x8004def4
  2. In the Microsoft OneDrive settings window, go to the Accounts tab.OneDrive_aCCOUNT
  3. Click Unlink this PC to temporarily disable OneDrive on your computer.
  4. Press Windows + R to open the Run console.cLEAR CACHE
  5. Type in the following command and press Enter: %localappdata%\Microsoft\OneDrive\
  6. You will be in the OneDrive folder, press Ctrl + A to select all files and click the Delete button. This will clear the cache on your PC but will not delete the files stored on the cloud.Delete the folders to clear cache
  7. Go to OneDrive settings again, click Accounts, then select Add an account.aDD AN ACCOUNT
  8. Sign in using your Microsoft account credentials.

Select the folders you want to sync, and OneDrive will start working.

6. Sync System time and date

  1. Press Windows + I to open Settings.
  2. Go to Time & Language > Date & Time.
  3. Toggle on Set time automatically and Set time zone automatically if they’re not already enabled.
  4. Restart your computer and check if OneDrive is working.

If nothing worked for you so far, you must contact OneDrive support to mitigate the error. Tell them the issue and all the troubleshooting issues so that they can help you with advanced troubleshooting methods.

If you have other sync issues with OneDrive, we advise you to read this guide to find suitable solutions.

So, these are methods you can follow to fix the 0x8004def4 OneDrive error. If you have questions or suggestions, feel free to mention them in the comments section below.

0xcaa80000 Microsoft Teams Error: How to Fix It

The error code 0xcaa80000 in Microsoft Teams has been a major annoyance for many users who want to join a call or access their accounts. It usually reads We can’t connect you 0xcaa80000.

You might get it when certain security protocols aren’t enabled on your PC or you run an outdated MS Teams app. Regardless of the cause, the tricks below should help you fix it:

How can I fix 0xcaa80000 Microsoft Teams error

1. Update Microsoft Teams

  1. Launch Microsoft Teams.
  2. Click the 3 horizontal dots beside your profile.
  3. Next, choose Check for updates.

If there is an available update, it will be automatically downloaded and installed without any action required on your part.

2. Omit the Microsoft Teams data

  1. Close Microsoft Teams and make sure it’s not running in the background.
  2. Right-click on the Windows icon and choose Run.
  3. Type the following command and press Enter: %appdata%/Microsoft/Teams
  4. Open the following folders and delete the files inside each of them:
    blob_storage
    Cache
    databases
    GPUcache
    IndexedDB
    Local Storage
    tmp
  5. Lastly, try deleting the token binding key in the following directory:
    C:\Users\BobSled\AppData\Local\Packages\Microsoft.AAD.BrokerPlugin_cw5n1h2txyewy\AC\Microsoft\Crypto\TokenBindingKeys\Keys
    fb47a8d42be514593f982d4b0d7edd08_90cb05ef-cd90-4066-aafe-3397eb8039a5_4068bc0f75fd0f09b9c2c7507f15f982 
  6. Apply and restart the PC.

3. Change Internet settings

  1. Click the Search icon from the Taskbar.
  2. Search for internet options and run it and select Internet Options.
  3. Navigate to the Advanced tab.
  4. Check Use TLS 1.1 and Use TLS 1.2.
  5. Apply the changed settings.

We hope that this guide has successfully resolved your issue. If you encounter any further impediments, we recommend referring to a similar Microsoft Teams error code CAA20002.

It would be immensely helpful if you could leave a comment below and let us know which solution worked best for you.

Fix: The Operator or Administrator has Refused the Request

Task Scheduler is an incredibly useful tool, especially for advanced users that want to automate tasks. However, many reported The operator or administrator has refused the request error message while using it.

In case you’re not familiar with this tool, we have a great guide on Task Scheduler tips that you should check out to learn more.

To properly tackle this issue, first, we need to find the right cause.

What causes The operator or administrator has refused the request error?

There are few reasons for this issue, but the most common ones are the following:

  • Task settings – The task might not be configured properly and that can lead to this problem.
  • BIOS settings – In some instances, your PC won’t wake up and complete tasks unless it’s properly configured in BIOS.

How can I fix The operator or administrator has refused the request error?

Before start fixing this issue, a few quick solutions might work:

  • Adjust to the affected task – Sometimes making a small change to your task can fix the problem.
  • Use the path to the script as an argument – If you have issues with PowerShell scripts, start PowerShell via task and use the path to the script as an argument.

1. Change task settings

  1. Enter task scheduler in Search and select Task Scheduler from the list of results.
     
  2. Locate the task that is giving you trouble and double-click it.
  3. Navigate to the Settings tab. Make sure to check the Run task as soon as possible after a scheduled start is missed and If the task fails, restart every.
  4. Make sure that If the task is already running, then the following rule applies is not set to Do not start a new instance. Some users suggest setting it to Stop the existing instance instead.
  5. Go to the Conditions tab and turn off Start the task only if the computer is on AC power.
  6. Go to the General tab and check Run with highest privileges. Click on Change User or Group button.
  7. Type Administrators. Next, click on Check names and if everything is in order click on OK.
  8. Save changes.
Note icon NOTE
Not all steps are necessary, and you might need to apply only a few to fix the problem on your PC.

2. Enable HPET in BIOS

  1. Restart your PC and keep pressing F2 or Del to access BIOS.
  2. Once you enter it, navigate to Advanced and select PCH Configuration.
  3. Locate the High Precision Timer and set it to Enabled.
  4. Save changes.
Note icon NOTE
The location of this feature might be different on your version of BIOS.

The operator or administrator has refused the request can cause problems, but in most cases, the issue is caused by task configuration, and it can be easily fixed.

If you have further problems, our Task Scheduler is not running guide should provide additional solutions.

What solution did you use to fix this problem? Feel free to share it with us in the comments section below.

usocoreworker.exe: What Is It & How to Disable It

High resource consumption affects the PC’s performance, which generally happens when many background processes are running. When users look up the Task Manager to identify the underlying cause, it’s often the usocoreworker.exe process to blame.

The process is a vital part of Windows and was recently introduced. As a result, many antiviruses initially mistook it for a threat, but that’s not the case. USO Core Worker is a legit Windows process. Keep reading to find out all about it!

What is the USO Core Worker?

As per Microsoft, the process, USO (Update Session Orchestrator) Core Worker, manages Windows updates. It prioritizes the updates to be installed first and identifies the ones to be downloaded later. Besides, it also helps troubleshoot issues with the update process.

The usocoreworker.exe location is:C:\WINDOWS\System32

For many users, usocoreworker.exe caused high RAM usage, sometimes as much as 3.5 GB for extended periods, which caused other applications to crash. No matter the case, you should never delete the executable file since it’s a core Windows process.

Here are a few reasons you are facing issues with usocoreworker.exe:

  • Outdated Windows: Oftentimes, an outdated OS triggers the error due to a bug in the installed version or simply performance-related problems.
  • Corrupt system files: For many users, it was the corrupt system files that led to the problem, and repairing them with the DISM tool and SFC scan fixed things.
  • Issues with Windows Updates: Since it is linked to Windows Update, problems with the related components can also cause issues with usocoreworker.exe.
  • Third-party apps triggering conflicts: Many users reported that their third-party antivirus or firewall blocked the process. This mostly happened in the initial days.

How do I disable USO Core Worker?

1. Terminate the process from Task Manager

  1. Press Ctrl + Shift + Esc to open the Task Manager.
  2. Locate the USO Core Worker entry under Windows processes, right-click on it, and select End task.end task to fix usocoreworker.exe issues

The easiest way to terminate the process and fix the usocoreworker.exe memory leak is to terminate it via the Task Manager. Once terminated, it would free up significant resources and make the PC run faster.

2. Disable the Update Orchestrator Service

  1. Press Windows + R to open Run, type services.msc in the text field, and hit Enter.services.msc
  2. Now, locate the Update Orchestrator Service, right-click on it, and select Properties.Update Orchestrator Service
  3. Select Disabled from the Startup type dropdown menu, and click on Stop to terminate the service.disable service to fix usocoreworker.exe
  4. Once done, click on Apply and then OK to save the changes.

Since usocoreworker.exe is triggered by the Update Orchestrator Service, a new way to manage updates, disabling the service will ensure that the process does not initiate automatically.

3. Modify the Registry Editor

  1. Press Windows + S to open Search, type Registry Editor in the text field, and click on the relevant search result.registry editor
  2. Click Yes in the UAC prompt.
  3. Paste the following path in the address bar and hit Enter:Computer\HKEY_LOCAL_MACHINE\SOFTWARE\Policies\Microsoft\Windows\WindowsUpdate\AUpath
  4. Right-click on the empty portion, hover the cursor over New, then select DWORD (32-bit) Value, and name it NoAutoRebootWithLoggedOnUsers.dword to fix usocoreworker.exe issues
  5. Double-click on the newly created DWORD.
  6. Enter 1 under the Value data text field, and click OK to save the changes.modify value data to fix usocoreworker.exe

A more concrete way to disable usocoreworker.exe is through the Registry (regedit). But be mindful while making changes to the Registry because even a minor lapse can wreak havoc and render the computer unusable.

That’s how you can disable USO Core Worker easily in Windows and provide your PC with the much-needed boost.

Before you leave, check which all services can be disabled to improve the PC’s performance even further.

For any queries or to share what worked for you, drop a comment below.

Fix: Windows Can’t Stop Your Generic Volume Device

Some of our readers have reported coming across the Windows can’t stop your Generic volume device because a program is still using it error when ejecting an external hard drive or USB flash drive.

In this guide, we will give you a bunch of solutions that will help you resolve the error and safely eject the external hard drive. Let us get right into it.

Why can’t Windows stop your Generic volume device?

After researching the issue, we have deduced a list of reasons why you will get the Windows can’t stop your generic volume device error:

  • Your PC is still using the drive – Chances are your USB drive or external hard drive is being used by one program on your PC.
  • There is an ongoing file transfer process – You might have started a file transfer process that is running in the background.
  • Windows might be indexing the contents of the USB – Windows indexes the content of the drive that is connected to save the metadata.
  • The drive is not configured for quick removal – You might have not turned on the quick remove feature for your USB drive so the system can’t eject it.

Let us check out the solutions that will help you fix the problem.

How do I do if Windows can’t stop your Generic volume?

1. End the Explorer.exe process

  1. Right-click on the Taskbar and select Task Manager.
  2. Under the Processes tab locate explorer.exe process.
  3. Right-click on explorer.exe and hit the End task button at the top.
  4. You can also kill the process that might be using the USB drive.
  5. Eject your external hard drive or USB and check whether this resolves the issue.

Some of our readers have suggested that ending any Explorer.exe process on their system has helped eliminate the Windows can’t stop your generic volume device because a program is still using it error.

2. Configure your USB for quick removal

  1. Press the Win + E keys to open the File Explorer.
  2. Right-click on the USB drive and select Properties.
  3. Click on the Hardware tab.
  4. Choose the USB Drive under the All disk drives section.
  5. Click the Properties button.
  6. Click on Change settings.
  7. Switch to the Policies tab.
  8. Select Quick removal (default) under the Removal policy section.
  9. Click OK to apply changes.

One of our readers suggested enabling the Quick Removal settings for the USB drive or the external hard drive to fix the Windows can’t stop your generic volume device because a program is still using it error.

3. Force the USB to be in Offline Mode

  1. Open the Start menu by pressing the Win key.
  2. Run Command Prompt as an admin.
  3. Type the below command and press Enter. diskpartUSB drive showing as unallocated
  4. Wait for the process to complete.
  5. Run the below commands to force your USB to be in offline mode and press Enter. list disk select disk* offline disk (The * sign should be replaced with the drive letter)
  6. Restart your PC.

You can remove the USB Drive and check if this fixes Windows can’t stop your generic volume device because a program is still using it error.

4. Assign a new drive letter to your USB drive

  1. Press the Win key to open the Start menu.
  2. Type disk management and open the top result.
  3. Right-click on your USB drive and choose Change Drive Letter and Paths option.
  4. Click on Change.
  5. Select Assign the following drive letter and click OK.
  6. Hit the Yes button in the prompt that appears.

Another trick suggested by one of our readers was to change the drive letter of the USB Drive or the problematic external hard disk with which you are getting the error.

5. Change the file format to FAT32

Note icon NOTE
Formatting your drive will erase all data on it so try to back up all the important data before proceeding with this solution.
  1. Open File Explorer by pressing the Win + E keys.
  2. Right-click on your USB drive and select Format.
  3. Select FAT32 under the File System drop-down.
  4. Hit the Start button.

Another way to resolve the Windows can’t stop your generic volume device because a program is still using it error is to format the USB drive or the external hard drive to FAT32 format.

Make sure that you have copied and created a backup of all the data stored on your USB Drive safely before formatting it. We have a guide that explains what you can do to format a USB drive if you aren’t able to do so.

That is it from us in this guide. We have a guide that explains how you can easily merge multiple USB partitions in 3 ways.

Moreover, you can also check out our guide that gives you a bunch of solutions that will help resolve how you can format a write-protected USB flash drive.

Feel free to let us know in the comments below, how you can easily resolve the Windows can’t stop your Generic volume device because a program is still using it error.

No Playback Devices in Windows 10? How to Enable Them

Sound issues in Windows are common, be it a distortion of some kind or unclear audio. And users have been able to fix distorted audio with ease. But things appear complicated when there are no playback devices in Windows 10.

What would you do when playback devices are not showing? Probably reconnect them, but it generally doesn’t work that easily. So, let’s find out how you can fix things when it reads No audio device is installed on Windows 10.

Why can’t I see playback devices?

First, let’s understand the meaning of playback devices. These are the ones used to output audio or play sounds. Common examples include headphones and speakers.

Here are the primary reasons why you can’t find playback devices in Windows 10:

  • Incompatible or outdated drivers: Users running incompatible or outdated drivers for the playback device are likely to encounter the error.
  • Issues with the audio service: The audio service is largely responsible for ensuring effective playback, and any issues with it can trigger the error.
  • Problems with the hardware: When the playback devices don’t show up, it could be the hardware to blame for the problem. And in this case, our recommendation would be to visit a repair shop.

How do I get playback devices on Windows 10?

Before we proceed to the slightly complex ones, here are a few quick fixes to try:

  • Restart the computer since this often does the trick.
  • Ensure the playback devices are plugged in properly if you can’t find them in Windows 10. Try connecting it to another USB port in case a specific playback device is not showing up.
  • Check for any pending Windows updates and install them.

If none work, move to the solutions listed next.

1. Update the audio drivers

1.1 Via Device Manager

  1. Press Windows + X to open the Power User menu, and select Device Manager from the list.device manager
  2. Expand the Sound, video and game controllers entry, right-click on the affected audio device, and select Update driver.update driver to fix no playback devices windows 10
  3. Choose Browse my computer for computers.browse my computer
  4. Select Let me pick from a list of available drivers on my computer to proceed.pick driver
  5. Untick the checkbox for Show compatible hardware, select Microsoft from the pane on the left, then choose High Definition Audio Device.high definition audio device to fix no playback devices windows 10
  6. Once done, click on Next and follow the on-screen instructions to install the driver.

Often the quickest way to fix things is to update the audio drivers. But in case there’s a bug in the installed version, going with a generic driver does the trick, as reported by many users. Besides, if there are still no playback devices in Windows 10, it’s time to manually install the drivers.

1.2 From the manufacturer’s website

  1. Go to the manufacturer’s official website, locate the audio drivers for Windows 10, and click on Download.driver
  2. Now, run the setup package to install the driver.install driver to fix no playback devices windows 10
  3. Once done, restart the computer.

When Windows can’t find an updated version, it’s recommended that you locate the most recent driver version on the manufacturer’s website and download them. But since the process is somewhat complicated, it’s best that regular users go with an effective driver updater tool.

A more effective way to update all drivers on your PC is to employ dedicated support.

More exactly, you could use highly performant tool that can scan and find outdated drivers instantly, updating them with their official manufacturer version.

⇒ Get Outbyte Driver Updater

2. Roll back the drivers

  1. Press Windows + S to open Search, type Device Manager in the text field, and click on the relevant search result.device manager
  2. Locate the device not appearing in the playback section, right-click on it, and select Properties.properties
  3. Go to the Drivers tab, and click on Roll Back Driver.roll back drivers to fix no playback devices windows 10
  4. Choose a reason for rolling back the drivers, and click on Yes.roll back drivers
  5. Finally, restart the computer for the changes to apply.

Often, when you see no playback devices in Windows 10, it could be that the devices had a recent buggy driver update. And there’s no better solution to it than rolling back the driver. Also, you can disable driver updates for a while to prevent the problematic one from installing again.

3. Restart the audio service

  1. Press Windows + R to open Run, type services.msc in the text field, and hit Enter.services.msc
  2. Locate the Windows Audio service, right-click on it, and select Properties.windows audio properties
  3. Select Disabled from the Startup type dropdown, click on Stop, and then on OK to save the changes.stop to fix no playback devices windows 10
  4. Now, restart the computer, again head to the Windows Audio service’s properties, select Automatic from menu, click on Start, and finally on OK.start service

If you have no sound devices found in Windows 10 or there’s no audio altogether, it could be the relevant service to blame. So, restart the Windows Audio service, and it should get things up and running.

4. Modify the Registry

Tip icon Tip
You will need a healthy Windows 10 PC for this solution. So make sure to get one ready before you proceed.
  1. Press Windows + R to open Run, type regedit in the text field, and click OK.regedit
  2. Paste the following path in the address bar and hit Enter:Computer\HKEY_LOCAL_MACHINE\SYSTEM\CurrentControlSet\Control\Terminal Server\WinStations
  3. Double-click on the ConsoleSecurity DWORD towards the right.ConsoleSecurity to fix no playback devices windows 10
  4. Ensure the entries on the affected device match that on a healthy PC. Make any changes if required, and click on OK to save the changes.modify to fix no playback devices windows 10

Many users reported that when there were no playback devices on Windows 10, it was generally due to misconfigured Registry settings. This happened after users installed an OS update, which automatically made the changes.

5. Uninstall recent Windows updates

  1. Press Windows + I to open Settings, and click on Update & Security.update & security
  2. Click on View update history in the Windows Update tab.update history
  3. Now, click on Uninstall updates.uninstall update to fix no playback devices windows 10
  4. Select the update installed recently, after which the error first appeared, and click Uninstall.uninstall to fix no playback devices windows 10
  5. Click Yes in the confirmation prompt.confirm
  6. Once done, restart the computer for the changes to apply.

That’s it! If you can’t find another PC or couldn’t figure out the changes to be made to the Registry, uninstalling the Windows update that led to the No audio devices are installed error in Windows 10 should do the trick.

And before you leave, check the best Windows repair tools to get rid of such errors automatically and in no time.

For any queries or to share what worked for you, drop a comment below.

0xc19a0003 HP Printer Error Code: How To Fix It

If you are here, sadly it means your HP OfficeJet or Photosmart printer is out of order because of the error code 0xc19a0003. Luckily, it also comes with the message The printhead appears to be missing, not detected, or incorrectly installed and can be easily resolved by effective troubleshooting methods. 

Why do I get the 0xc19a0003 HP printer error code? 

The HP printer error code 0xc19a0003 is primarily triggered due to the following reasons:  

  • No proper ink supply – If the ink cartridge is unable to supply ink or is not detectable by the printer, this error code will pop up. 
  • Printhead failure –The error code 0xc19a0003 can also occur if the printhead is missing, not detected, or not installed correctly. 
  • Driver issues – In some cases, outdated or corrupt printer drivers can also set off this error code. 

Now that we know of the possible reasons for the error code 0xc19a0003 in HP OfficeJet or PhotoSmart printers, let’s proceed with the solutions below.  

How do I fix the 0xc19a0003 HP printer error code? 

Before starting the hardware and software troubleshooting, consider the following preliminary measures:

  • Make sure you’re using the right ink cartridges for your printer and that they are seated properly.
  • Check if there is any obstruction or debris in the path of the printhead and remove it.
  • Reinstall the printer software and ensure you installed the right driver. We have a complete guide on HP printer drivers and how to install them.

If these methods didn’t suffice in solving the issue, start performing the solutions below.

1. Power reset your HP OfficeJet printer

  1. While your HP printer is powered on, disconnect the power cord of your printer from its rear end and then the power plug from the wall socket. 0xc19a0003
  2. Now, wait for at least 30 seconds and reconnect the power plug to the wall socket. 
  3. Next, attach the power cord to the rear end of the printer.
  4. The HP printer will now automatically turn on as it was not switched off previously. 

Now try to print anything via your HP printer to check if the error code 0xc19a0003 is fixed. 

2. Re-install the ink cartridges

  1. Power on your HP printer and open its front lid. 
  2. Remove the ink cartridges when it slides to the central position. 
  3. Take a clean paper or a microfiber cloth and place the cartridges on it. 
  4. Thoroughly clean the seats of the cartridges and install them in the correct position. 
  5. After you are sure that the cartridges are placed in the correct position, close the front lid of the printer. 
  6. Now perform the print test by printing the configuration page to ensure that everything is working smoothly. 

3. Clean the printhead 

  1. Launch the HP OfficeJet Toolbox on your computer. 
  2. Access Toolbox settings for cleaning the toolbox’s printhead.
  3. Next, select the Printer Services option. 
  4. Choose the option Clean Printheads. 0xc19a0003
  5. Follow the step-by-step process on the wizard. 
  6. Next, launch the HP Inkjet Utility again and choose the Clean option.
  7. Follow the on-screen instructions to complete the process of cleaning the HP OfficeJet printer.

After the printhead is cleaned completely, the error code 0xc19a0003 will no longer bother you. 

4. Restore your printer to factory settings

  1. Launch the HP printer software on your computer. 
  2. Access the Setup option on your screen.  
  3. Select the Tools option under the Setup settings. 
  4. Choose the Restore Factory Defaults option. 0xc19a0003
  5. A confirmation pop-up to reset your printer to factory default will open. Select Yes to proceed. 0xc19a0003

After the printer drivers are up-to-date, the 0xc19a0003 error code should subside. 

That’s all about it! Hopefully, you were able to bypass the error code 0xc19a0003 on the HP printer by implementing the solutions listed in this guide. 

Before you leave, you might want to know how to fix the scanning issues with your HP printer. 

If you have further questions regarding this issue, feel free to drop us a comment below. 

Get-Appxpackage Access is Denied: How to Quickly Fix It

There has been a growing number of reports from Windows users experiencing difficulties executing the Get-Appxpackage commands within the PowerShell application. Instead, they are confronted with an error Get-Appxpackage Access is Denied.

The topic at hand resembles the issue of Deployment failed with HRESULT: 0x80080204, which we had previously addressed in a comprehensive guide.

To truly address the issue at hand, we must delve into the root cause.

What is the Get-Appxpackage access is denied error?

The Get-Appxpackage access is denied error is a common issue that a variety of factors can cause:

  • Admin privileges – If the PowerShell software is not granted administrator authority, it might prompt this specific error.
  • Restriction to the destination folder – A lack of permissions for a specific folder can cause this message to appear.

How can I fix the Get-Appxpackage access is denied error?

  • Run PowerShell as administrator – Running Powershell as an admin can be quite effective in operating your command to tackle this error.

1. Make sure the AppX Deployment Service is running

  1. Open Search and search for powershell. Select Run as administrator.
  2. Once the PowerShell app window opens, type the following and press Enter: Get-Service “AppXSvc”
  3. If the status says Running, the Appx Deployment Service is running faultlessly.
  4. If the service is not running, open the Command Prompt by pressing the Windows key + R simultaneously and typing cmd in it.
  5. Then press Ctrl + Shift + Enter keys concurrently and click Yes on the UAC prompt to proceed.
  6. Type the following and press Enter to run it: net start AppXSvc
  7. This command gets executed, and it starts the Appx Deployment Service on your system.

2. Allow permissions to the location folder

  1. Locate the folder on your PC where you want to install the app.
  2. Right-click on this folder and choose Properties from the context menu.
  3. Immediately the Properties window pops up, click the Security tab and look for your username in the Group or user names section.
  4. After selecting your user profile, check if all the permissions are allowed or not in the section just below that.
  5. If there are some permissions not allowed, then click the Edit button to change the permissions.
  6. In the Permissions window, choose your user profile again in the Group or user names section.
  7. Then, make sure all the checkboxes are selected under Permissions for your User profile at the bottom.

    Note: If you cannot find your user profile, you can click Add button and follow the instructions on the popup window to search for your profile and add it.
  8. Next, click OK.
  9. Now you can close all the windows that were opened by clicking OK on all of them.
  10. Lastly, try and see if the commands are executed without any errors.

Keep in mind that you shouldn’t change permissions for any system folders.

3. Make yourself an administrator

  1. On your home screen click Start and select Settings.
  2. Now choose Accounts, Under Family & other users, choose the account owner name (you should see Local account below the name), then select a Change account type.
  3. Under Account type, select Administrator, and then choose OK.
  4. Sign in with the new administrator account.
  5. Now, Launch Powershell and check if the error is gone.

If you can’t make yourself an administrator, you’ll need to create a new local account on Windows 11 and then upgrade to the administrator account.

We hope that this manual has successfully addressed your concern. If you face any further hindrances, we recommend exploring PowerShell Export-CSV access to the path is denied for comparable remedies.

We would greatly appreciate your feedback on the most effective solution you have found. Kindly leave a comment below to let us know your thoughts.

Windows 10 Stereo Mix Missing? 5 Ways to Fix it

Stereo Mix on your PC lets you record the sound coming out from your computer’s speakers. Many of our readers have complained that the Stereo Mix is missing on their Windows 10 PC.

In this guide, we have listed some solutions that will help you get back the Stereo Mix on your Windows 10 PC. Let us check out the solutions.

Why is Stereo Mix missing on my Windows 10 PC?

Here are some common reasons why Stereo Mix is missing on your Windows 10 PC:

  • There is an underlying issue – Chances are that the problem is within the Stereo Mix application that is not allowing you to record the audio.
  • Audio driver is outdated – There might be a problem with your audio driver or the version you are running might be outdated. Updating the audio driver will help you.
  • The mic is disabled: If your mic is inaccessible for audio recording then Stereo Mix won’t work properly.
  • Stereo Mix is disabled – There is a good chance that the feature itself is disabled on your PC. So, no point in tweaking other settings.

Let us now go through the solutions that will help you resolve the Stereo Mix is missing on Windows 10 problem.

How can I resolve Stereo Mix is missing on Windows 10 problem?

1. Check disabled devices

  1. Right-click on the Volume icon on the taskbar and select the Sounds option.
  2. Switch to the Recording tab.
  3. Right-click on the blank area and select Show Disabled Devices and Show Disconnected Devices options.
  4. If Stereo Mix appears, then choose Enable.

Chances are by accident or while using another audio device, you have disabled or disconnected the Stereo Mix on your PC. You can simply enable them by following the above steps.

2. Install Stereo Mix using Realtek Audio drivers

  1. Visit the official Realtek website.
  2. Download the appropriate Realtek audio driver on your Windows 10 PC.
  3. Double-click on the EXE file.
  4. Follow the on-screen steps to install Realtek drivers and restart your PC.
  5. Right-click on the Volume icon on your taskbar and select Sound.
  6. You will see Stereo Mix. If not then right-click on the blank space and click on Show Disabled Devices and enable Stereo Mix.
  7. Select Stereo Mix as the default input device.

3. Enable the microphone

  1. Press the Win + I keys to open the Settings menu.
  2. Click on Privacy.
  3. Click on Microphone from the left pane.
  4. Click on Change and set the slider to On.
  5. Toggle On the slider below Allow apps to access your microphone.
  6. Reboot your PC.

If the microphone on your PC isn’t accessible, then you will face multiple issues including the Stereo Mix missing on your Windows 10 PC. We have a guide that explains some other ways to turn on the mic on your Windows 10 PC.

4. Update the audio driver

  1. Press the Win key to open the Start menu.
  2. Type Device Manager and open the top result.
  3. Expand the Audio inputs and outputs section.
  4. Double-click on your audio device.
  5. Click on the Driver tab.
  6. Hit the Update driver button.
  7. Select Search automatically for drivers option and reboot your PC.

Whenever you come across any audio issue on your PC, then you should check if the audio driver installer on your PC is the latest version or not.

If not then, follow the above steps and update the driver and check if this resolves the Stereo Mix missing on Windows 10 problem or not.

5. Check the volume levels

  1. Right-click on the Volume icon on the taskbar and select Sound.
  2. In the Playback tab, right-click on your playback device and select Properties.
  3. Switch to the Levels tab.
  4. Unmute the sound and microphone.
  5. Click Apply and OK to apply the changes.

If your speaker is muted, then the Stereo Mix will not work. Check if the sound levels are muted and unmute them and check if this resolves the Stereo Mix is missing on Windows 10 problem.

That is it from us in this guide. For users who are looking to fix the audio latency issue on their Windows 10 or 11 PCs, they can check out our guide to resolve the problem.

If you are getting crackling audio on your PC, then you should apply the fixes mentioned n our guide to resolving the problem.

Let us know in the comments below, which one of the above solutions fixed the problem of Stereo Mix is missing on Windows 10.

Nessusd.exe: What is It & How to Easily Stop It

Nessusd.exe is a legit process associated with Tenable Nessus, a popular vulnerability scanning tool used to identify security weaknesses in computer systems and networks.

In this guide, we will discuss what Nessusd.exe is and how to terminate its process if it’s using too many resources.

What is nessusd.exe?

Nessusd.exe is an essential component of the Tenable Nessus software suite and acts as the core engine responsible for managing scanning tasks, collecting vulnerability data, & generating comprehensive reports.

It runs in the background while continuously monitoring the target systems and networks for potential vulnerabilities.

It is located at C:\Program Files\Tenable\Nessus\; however, if it is found in another location, you can run a malware scan using an antivirus tool to remove it.

How can I disable Nessusd.exe?

Before engaging in advanced troubleshooting steps, you should consider performing the following checks:

Once you are done, move to the methods mentioned below.

1. Stop the process & uninstall the app

  1. Press Ctrl + Shift + Esc to open the Task Manager.
  2. Go to the Details tab and locate the Nessusd.exe process.
  3. Right-click on it and select Open file location.Open file location Nessusd.exe
  4. Once it takes you to the location, return to Task Manager, select the process, and click End task.End task
  5. Press Windows + I to open Settings.
  6. Go to Apps, then click Installed apps.Apps, installed apps
  7. Locate Tenable Nessus and click Uninstall.Uninstall
  8. Follow the onscreen prompts to complete the process. If you can still see the files in the Program Files folder, locate & select the file, then click the Delete button to remove it.Delete file

This will remove Nessusd.exe from your computer for good. For removing apps with their associated files from your computer, you can check out our list of best uninstallers on Windows.

2. Use the Windows Services app

  1. Press Windows + R to open the Run dialog box.Services command Nessusd.exe
  2. Type services.msc and click OK to open Services.
  3. In the Services Manager window, locate the Nessusd.exe or Tenable Nessus service.Services app Stop
  4. Right-click on it and select Stop from the context menu.
  5. Wait for the service to stop and close Services.

3. Use the Command Prompt

  1. Press the Windows key, type cmd, and click Run as administrator.CMD elevated
  2. Copy and paste the following commands and hit Enter: sc stop Nessusdcmd_Nessusd.exe
  3. Wait for the service to stop, then close Command Prompt.

So, these are the methods to disable nessusd.exe when needed and possibly uninstall the software.

In case you have problems, we recommend reading our guide on how to remove software leftovers from your PC.

If you have any questions or suggestions, feel free to mention them in the comments section below.

Windows Installer CleanUp Utility: How to Download & Run

If you have ever installed a program and realized you didn’t need it or the app installation failed, you might be aware of the Windows Installer Cleanup utility. 

This tool was available in earlier versions of Windows, but we show you how you can still download it in newer versions.

What does Windows Installer Cleanup Utility do? 

Windows Installer Cleanup Utility is a tool that helps you to remove invalid registry entries and other system garbage. Such files can cause your PC to run extremely slow and other performance issues.

By using this utility, you can scan your computer for known issues and repair them. The utility also provides a way to uninstall programs that were installed on your computer by using Windows Installer technology. 

Other beneficial purposes it may serve include:

How can I download the Windows Installer Cleanup utility?

Before you download the Windows Installer Cleanup utility, there are a few things to note:

  • Microsoft has shelved the tool and stopped offering it for download. 
  • The tool is free to download, and you can still use the utility, but Microsoft will no longer update it.
  • The utility was built for earlier versions of Windows, so if you’re downloading it for newer versions, such as Windows 10 and 11, it may be incompatible or have some glitches.
  • For newer Windows users, such as Windows 10 and 11, Microsoft replaced the Windows Installer Cleanup utility with the Microsoft Fixit tool but later discontinued it.
  • Since the tool was discontinued, it is no longer available on the official Microsoft site, so you’ll have to download it from third-party sites.
  • Because a lot of these sites are untrustworthy, ensure your system is backed up by a reliable antivirus before downloading it.

Now, to download it, follow the steps below:

  1. Launch your browser and download the Windows Cleanup Utility tool.
  2. Open the file location, right-click on it, and select Open to launch the .exe file.
  3. Click on Run.
  4. Hit Next.
  5. Check the I accept the License Agreement box, then click on Next.
  6. Hit Next again and wait for the wizard to complete the installation.
  7. Finally, click on Finish.
  8. Locate the installed tool and start cleanup.

Is it safe to delete the Windows Installer folder?

The Windows Installer folder is a hidden folder that contains all the Windows Installer data for your system. It can get pretty large if you have a lot of programs installed on your computer because it includes files and registry keys. 

If you delete this folder, you’ll lose access to many applications. Instead of deleting the entire folder, we recommend performing a Disk Cleanup or finding other ways to free up space on your hard drive.

The good news is that other options are still available if you want to clean up your PC. Windows 11 has many built-in repair tools at your disposal. The program install and uninstall troubleshooter for Windows 11, for instance, is a replica of the Windows Installer Cleanup utility.

However, you may feel these tools are insufficient, so we recommend you reach out for uninstaller software. These tools will allow you to delete unnecessary files from your computer without worrying about causing future problems with your PC.

Let us know whether you still use the Windows Installer Cleanup utility and your experience thus far, especially in newer Windows versions.

80% of Microsoft 365 accounts were hacked in 2022

A new study from the security company Proofpoint, shows that 81% of the Microsoft 365 Office accounts were hacked in 2022.

Even more, a staggering 60% of Microsoft 365 tenants suffered at least one successful account takeover incident in 2022.

Researchers at Proofpoint analyzed over 450 million malware attacks, over the second half of 2022, specifically targeting Microsoft 365 tenants.

They found out that Microsoft Teams is one of the ten most targeted sign-in applications, and almost 40% of targeted companies had at least one unauthorized login attempt to gain access to the company’s data.

You can see the top 10 most targeted apps in the second half of 2022, according to Proofpoint, below.microsoft 365 hacked 2022

40% of Microsoft Teams accounts had at least one hacking attempt in 2022

Microsoft Teams, the working space app, can be specifically abused by hackers.

Researchers at Proofpoint emulated all kinds of hacking scenarios that took advantage of Teams’ security gaps. They managed to target Teams with additional tabs for files, which allowed them to break through.

They could also easily place malicious URLs in chats, taking advantage of the fact that Teams doesn’t provide a visible URL bar.

Even more, researchers created a malicious website tab that pointed to a file. Teams then automatically downloaded the file to the user’s device, easily compromising an organization’s data and network.

Further, they also created malicious Microsoft Teams meetings, with corrupted links that would enforce a download of malware software.

Needless to say, Microsoft Teams can be easily weaponized against your company. It’s no wonder hackers target it specifically.

So what can you do to make sure your account, or organization, doesn’t get compromised? Proofpoint has a list of recommended actions that you should take to protect yourself from hackers and malware.

  1. Be aware: educate yourself and your organization to be aware of the risks when using Microsoft Teams.
  2. Secure your cloud: Identify the ones trying to hack your cloud environment. The sooner, the better, and the least unfortunate outcome.
  3. Secure your web environment: isolate potentially malicious links in Teams chats.
  4. Know when to limit access: especially when you’re the target, consider limiting its usage.
  5. Restrict the access of Teams to your team only: make sure your Teams services are internal only.

Microsoft is assuring users that Microsoft 365 has the best possible protection.

Regarding the findings made by Proofpoint, the Redmond tech giant has emphasized its Zero Trust Security program is more than capable of handling every hacking attack.

Have you ever experienced a hacking attack? Do you use Microsoft Teams? Let us know your experience with it in the comments section below.

5 Best AI Search Engines to Take Your Browser to the Future

This year has brought us notable advances in AI. There’s no surprise that finding the best AI search engine is a hot topic for almost anyone now.

Since ChatGPT started to change the way we search online, other big actors joined the scene with intelligent products designed to help users to find answers to their questions much faster. It started with web3-ready search engines and keeps on going.

There is a lot of talk regarding AI and its impact on results pages. However, it’s clear that you can take advantage of this new method to browse more efficiently.

Are there any AI search engines?

In addition, there are already browsers that deliver AI-oriented tools such as Opera One from Opera. According to Opera’s last year financial stats, the browser is ranking higher in the market and is also coming with an enhanced search engine that integrates multiple AI prompts.

Actually, there are plenty of AI search engines that already bring incredible technologies:

  • Microsoft Bing – Suitable for complex topics
  • Google Bard – Great for research
  • Neeva AI – Cross-platform & clutter-free
  • You.com – Alternative AI search engine for developers
  • Komo AI – Best free AI search engine

For instance, you have Microsoft Bing’s AI chat, the Bard assistant from Google, or others like the You.com engine. Now, let’s find out more about their useful functionalities.

What is the most advanced AI search engine?

1. Microsoft Bing – Suitable for complex topics

Microsoft Bing is at the frontline due to powerful language capability and new ways of web searching.

Often, Bing AI is compared with Google’s Bard in terms of functionality and helpful answers.

This new Bing engine can help you navigate any topics you’re interested in. For instance, you can get detailed responses about hard topics or plan your next vacation with this assistant.

?️ Key feature: Inspiration answers to help you decide about real-life incidents and image creation AI

2. Google Bard – Great AI search engine for research

Best AI Search Engines

Does Google Search have AI? You wanted to know, we’re here to answer. And the answer is definitely yes. It’s called Bard. You can simply use this AI language chat for multiple queries.

To access it, all you have to do is sign in with your Gmail account and start asking your curiosities. The AI search engine project from Google deserves its place in the list because it comes with enhanced AI language technology.

You can go for this AI hub to search for any complex topics and get a comprehensive summary explained for a 10-year-old.

At the same time, this tool is helpful for productivity improvement. You can ask for planning advice and tools that can enhance your daily goals.

?️ Key feature: Coding experimental responses that help the user to understand complex topics on short notice.

3. Neeva AI – Cross-platform & clutter-free

Best AI Search Engines

Neeva is a user-first AI engine that offers personalized answers with 100% natural language and no ads.

With this new-age search engine, you can forget about aggressive adware and navigate freely to get tailored results.

In addition, you have quick and reliable answers from the search results page in seconds instead of cluttered information.

?️ Key feature: Online shopping is made easy and more accurate to your real buying needs.

4. You.com – Alternative AI search engine for developers

Best AI Search Engines

This extensive AI search engine focuses on your time, privacy, and the quality of information.

More exactly, there are Youchat, Youcode, or YouWrite modes that can support your specific needs with ad-free answers.

?️ Key feature: Multi-dimensional UI that gives you multiple workspaces to search for specific topics.

5. Komo – Best free AI search engine

Best AI Search Engines

Last but not least, this integrative AI search engine is a free solution that offers exploration tools without any ads.

Firstly, you can use Komo for three main purposes: Search mode, Explore, or Ask, each one with its specific model.

With the search mode, you have resourceful AI solutions while the Explore and Ask mode can deliver community links and insights from social spaces.

?️ Key feature: Specifically tailored answers for different needs and users.

That’s it for today. All having been said, we hope that our AI search engine picks meet your browsing needs. For other tips or questions, talk with us in the comment section below.

You can explore more evolving search technologies with this detailed meta search engine list that highlights tools built for broader and more efficient browsing.

3 Ways to Fix Request Header or Cookie Too Large

Visiting a site on your browser could return the request header or cookie too large error message. You already know that cookies are small bits of data that your browser stores locally. 

They’re used for authentication and tracking purposes, but if they exceed a certain limit, they can make accessing a website impossible. Here’s how to resolve this issue.

What does 400 request header or cookie too large mean?

A request header or cookie too large error appears when you attempt to open a given website, but instead of bringing up the expected content, it brings up this error.

This indicates that the server is refusing to fulfill your request because the request header size has exceeded the capacity limits of either the server or the software that runs it.

The exact size of the limit depends on the server’s configuration and operating system.

There are several reasons why this can happen:

  • Corrupt cookies – Unfortunately, cookies can sometimes cause problems in browsers. They may become corrupted if your browser crashes or gets infected with malware.
  • Cookie size is too large – If you’re receiving the request header or cookie too large error, it means that the cookies set by the site you’re trying to visit have gotten too large.
  • Website limitations – Some websites have a limit to how much data they can accept in one request. This is often due to security concerns and/or limitations on their network infrastructure.
  • Outdated/corrupt add-ons – Extensions can sometimes cause problems when connecting to websites. 
  • Server issues – Sometimes, it’s an issue with a particular server and the websites linked to it. You may get a 400 request header or cookie too large nginx error because it may be overloaded with traffic and cannot handle all requests simultaneously.

How do I fix 400 Bad Request request header or cookie too large? 

Perform the following basic checks before moving on to the slightly advanced solutions:

  • Make sure your browser and OS are up-to-date by installing any available updates.
  • Close out any unnecessary browser tabs or windows on your computer and retry the site.
  • Verify the URL of the site you’re trying to visit and ensure it’s correct.
  • Check your Internet connection speed and ensure it meets or exceeds the recommended minimum speed.
  • Restart your browser.
  • Switch to an incognito/private browser tab.
  • Try using another browser.
  • Finally, try restarting your PC.

1. Clear browser cookies

  1. Clearing cookies will differ depending on the browser you’re using. For this step, we shall be using the Chrome browser.
  2. Launch your Chrome browser and click the three vertical ellipses in the top right corner.
  3. Select Settings.Settings CHrome
  4. Click on Privacy and security, then select Clear browsing data.
  5. Check Cookies and other site data and Cached images and files, then hit Clear data.Clear data

2. Perform a browser scan 

  1. Open your Chrome browser and click on the three vertical ellipses at the top right corner.
  2. Select Settings.Settings CHrome
  3. Next, click on Reset and cleanup then select Cleanup computer on the right.
  4. Hit the Find button next to Find harmful software.
  5. Wait for the scan to finish and remove any recommended software.

A browser scan will attempt to fish out any infected extensions and hopefully resolve this error.

3. Reset your browser

  1. Open your Chrome browser and click on the three vertical ellipses at the top right corner.
  2. Select Settings.Settings CHrome
  3. Next, click on Reset and cleanup, then select Restore settings to their original defaults.
  4. Confirm Reset settings in the next dialog box.

If none of these methods fix the request header or cookie too large error, the problem is with the server. You can communicate with the owner of the site or give it some time and see if it fixes itself.

You may also encounter a browser sent request this server could not understand, so ensure you pass by our detailed article and apply our recommended fixes.

Let us know of any other insightful solutions you may have on this error below.

Caktus AI Not working: How to Fix It in 4 Steps

Caktus is a ChatGPT alternative, so you can expect it to offer similar features. While it is a very useful app that can make your life easier, sometimes it may not work properly, and you will face certain issues while using it. 

If this happens, you must fix it as soon as possible. In this article, we will tell you about the most common Caktus AI not working problems and their solutions so that you can use it without any hassle.

How does Caktus AI work?

Caktus AI is a student-centered writing assistant that mainly focuses on delivering academic content by writing essays.

While it is considered just another of the many AI software that seem to be popping up every other day, this one has piqued the interest of many students, given how it delivers its content.

It generates content according to the chosen writing style and cites published sources from its large database.

A unique quality found in Caktus AI is that it can easily adapt to your writing style and apply it to all papers. You can do this by uploading a sample paper you have written before, and the AI will personalize your style for future papers.

Does Caktus AI work?

Having a number of praises, one would actually wonder whether it is a reliable assistant. Well, like any other AI assistant, it does work well and encounters the usual hiccups from time to time. So what causes it not to work during these times? Below are some possible causes:

  • Poor connection – To connect to any website on the Internet, you’ll need a stable connection. If your connection keeps dropping, your Caktus AI cannot perform as expected.
  • Outdated browser – If you’re using an outdated browser, it may not be up to par with the Caktus AI website causing compatibility issues.
  • Overloaded server – Sometimes, too many users are trying to generate content simultaneously, so it becomes overwhelming for Caktus AI. 
  • Expired subscription – You may ask whether Caktus AI is no longer free. There was a free subscription, but now, you have to select a plan to use it. If you were on the free plan, perhaps that’s why it is not working.
  • Corrupt cache/cookies – Browsers accumulate a lot of cached files and cookies, and over time, they become corrupt. This can affect your access to certain websites, including Caktus AI.
  • Browser addons/plugins – At times, you may have installed browser extensions or plugins that interfere with how a certain website works.

What can I do if Caktus AI is not working?

Before jumping to any permanent solutions, try the following:

  • Ensure your browser is up-to-date.
  • Check your internet connection speed.
  • Verify that you’re using an updated and active Caktus AI subscription.
  • Restart your browser.
  • Try switching to another browser.

1. Clear browser cache and cookies 

  1. For this step, we shall be using the Chrome browser.
  2. Launch your Chrome browser and click the three vertical ellipses in the top right corner.
  3. Select Settings.Settings CHrome
  4. Click on Privacy and security, then select Clear browsing data.
  5. Check Cookies and other site data and Cached images and files, then hit Clear data.Clear data

2. Disable extensions 

  1. Launch your Chrome browser, and in a new tab, enter the following address: chrome://extensions/
  2. Peruse through your extensions and toggle the Disable button for any suspicious-looking ones.disable extension
  3. Repeat this step until you find the culprit.

3. Reset your browser 

  1. Open your Chrome browser and click on the three vertical ellipses at the top right corner.
  2. Select Settings.Settings CHrome
  3. Next, click on Reset and cleanup, then select Restore settings to their original defaults.
  4. Confirm Reset settings in the next dialog box.

Sometimes, your browser settings may have been tampered with, and resetting will undo any changes preventing certain websites like Caktus AI from working.

4. Contact Caktus AI support

Finally, if none of the above recommendations seem to be working, it might be a problem with Caktus AI.

In such cases, you need to report the issue via their contacts, such as Twitter account, detailing when you noticed the anomaly, how long it has been going on, and any other relevant information to get a faster response.

Speaking of AI assistants, we also have similar articles on what to do when Character.AI is not working and when ChatGPT is not working.

Were you able to resolve this error? Let us know which solution worked for you in the comment section below.

How to download the ChatGPT mobile app

Are you longing for the ability to have the ChatGPT app on your mobile device? Well, we have some fantastic news to share with you. 

OpenAI is thrilled to announce the launch of the ChatGPT app for iOS. This free app allows you to access ChatGPT’s capabilities conveniently, with the added benefit of syncing your conversation history across multiple devices.

Shortly after its launch, the ChatGPT mobile app skyrocketed to the top position among productivity apps, making it an absolute must-have.

Additionally, the app integrates Whisper, OpenAI’s open-source speech-recognition system, enabling voice input for seamless interactions. ChatGPT Plus subscribers on iOS also gain exclusive access to the advanced features of GPT-4, faster response times, and early access to upcoming enhancements.

Unfortunately, at present, the ChatGPT mobile app is exclusively accessible to iOS users. Android users, on the other hand, may have to exercise a bit of patience as they await the arrival of the app on their devices. 

In this guide, we will walk you through the process of getting started with the ChatGPT iOS app, so you can unleash the versatility of AI conversations right at your fingertips.

How to download ChatGPT mobile app

1. Visit the App Store on your iOS device.

2. Search for ChatGPT and locate the ChatGPT app.

download chatgpt mobile app

3. Tap the Get button to initiate the installation.

4. Wait for the app to download and install on your device.

With that being said, however, the mobile app is only available to US users on iOS, as things stand, but we will keep you updated as OpenAI expands the availability of the app to more countries.

And, while the dedicated ChatGPT app may not be available for Android at this time, Android users can still engage with the impressive AI-powered conversations via Bing AI chat mode.

Have you downloaded the ChatGPT app on mobile? Let us know in the comments. 

0xC00D36FA Error: How to Fix This Audio Issue

Encountering the 0xC00D36FA error code along with the error message We can’t find an audio playback device can be frustrating when trying to play audio or video files. It is a common issue that many Windows users face when using Windows Media Player.

However, there are a few possible solutions to address the 0xC00d36FA error in Windows, and we will explore them here.

What is the 0xC00D36FA error?

When you encounter the error code 0xC00D36FA while playing videos or audio files, you won’t be able to hear any sound, and there may be an issue with the audio device or driver.

Here are some common causes for the error code 0xC00D36FA:

  • Disconnected audio device: If the audio device is not connected correctly, you may encounter an error while playing videos or audio files.
  • Third-party interference: Certain applications or plugins installed on your computer might modify audio settings or conflict with Windows Media Player, causing the error to occur.
  • Audio device or driver issues: Outdated or incompatible audio drivers, misconfigured settings, or faulty hardware can trigger the 0xC00D36FA error when playing audio.
  • Malware or security software: Security software or malware on your system can interfere with the audio playback, resulting in the error code.

How do I fix error code 0xC00D36FA?

Before attempting the complex solutions below, try these:

  • Check your audio device: Ensure you have properly plugged your headphones or speakers into your computer and check if the cables are not damaged.
  • Restart your computer: In most cases, a simple restart will resolve the issue.
  • Use a different player: Try using different media players to open the file and check if the problem is with the program.
  • Disconnect audio devices: Disconnect all external sound devices, such as headphones or speakers, to ensure that the sound device is not malfunctioning.

1. Enable the audio device

Note icon NOTE
Ensure that your audio devices have not been accidentally disabled or uninstalled.
  1. Press the Windows key, type device manager, and select Device Manager.device management
  2. Expand the Sound, video, and game controllers category and check if any device is disabled.
  3. Then, right-click on the disabled device and select Enable device. enable device
  4. You should be able to play your audio file now without any errors.

2. Run the Audio troubleshooter

  1. Press Windows + I to open Windows Settings, go to System, and select Troubleshoot.select troubleshoot
  2. Under Troubleshoot options, select Other troubleshooters.other troubleshooter
  3. Then, click the Run button next to Audio.audio run
  4. Follow the on-screen instructions to troubleshoot the audio or sound problems in Windows.

The troubleshooter will perform diagnostics on your PC to identify the issue you are experiencing. It will also carry out both automated and manual steps to resolve the problem.

3. Restart Audio Services

  1. Press Windows + R, type services.msc in the dialog box, then press Enter.servoces.msc
  2. Find the Windows Audio service from the list, right-click on it, and select Properties.Windows audio
  3. Then, click Stop.Stop Windows audio
  4. If you see a prompt to stop other services, click Yes.Click Yes
  5. Make sure the Startup type is set to Automatic and click Apply.Set Automatic
  6. Click Start and then OK to restart the service.Click Start and OK
  7. After that, right-click on the Windows Audio Endpoint Builder and select Properties.Windows Audio endpoint
  8. Click Stop and then set the Startup type to Automatic.Set automatic
  9. Then, click Apply and then select Start to restart the service.Click Start and apply
  10. Finally, close the Services console, restart your computer, and check to see if the 0xC00D36FA error is fixed.

4. Update sound drivers

  1. Open the Start menu, type device manager, and select Device Manager.device manager
  2. From the list of drivers, expand the Sound, video and game controllers, right-click the audio device, and select Update driver.audio driver
  3. In the Update Drivers window, select Browse my computer for drivers.Browse my computer
  4. Next, click Let me pick from a list of available drivers on my computer. You can also click Browse to choose the driver you downloaded from the manufacturer’s website.pick from list of drivers
  5. Select the correct driver from a list of compatible drivers and click Next.click Next
  6. Once the driver is installed, click Close.Close
  7. Then, click Yes on the prompt to restart your computer.Yes

5. Perform a system restore

  1. Press the Windows key, type restore, and click Create a restore point.create restore porint
  2. In the System Properties window and click the System Restore button.system restore
  3. Select the Choose a different restore point option, and click Next.choose a different restore point
  4. Then, select the restore point, and click Next.select the restore point
  5. Then, click Finish.click Finish

If the 0xC00D36FA error remains unresolved after attempting the previous steps, you may need to consider resetting the Windows.

If you have more questions or suggestions, leave them in the comments section below.