Failed to Initialize WebGL: Bypass & Fix Error in Any Browser

If your browser failed to initialize WebGL, you’d find it difficult to run 3D graphics games on the web. While the error is more common in Google Chrome and Mozilla Firefox, it can impact all major browsers.

If you’re wondering what browser supports WebGL, you’re in for a quick answer. WebGL is supported in most modern browsers such as Firefox, Chrome, Safari, Internet Explorer, and Opera.

➡ How do I know if WebGL is enabled Chrome/Firefox? ⬅️

It’s easy. On your browser, navigate to the get.webgl.org website and check whether there is a spinning cube. This is an indication that it is working perfectly.

And speaking of that, if your current browser supports WebGL but still says that initialization failed, you might want to give Opera a try, since it’s as close to an error-free navigator as you can get.

⇒ Try Opera

What is failed to initialize WebGL?

↪️ One of the most common reasons you may receive the WebGL initialization failed error is that your computer does not have enough graphics processing power or your GPU is old.

If your computer has a graphics card that’s more than five years old, it’s likely that you’ll need to upgrade it before you can use WebGL.

The main disadvantage of WebGL is that it has issues and may not perform at its peak on older computers and mobile devices. In order to use this technology, your PC needs to be equipped with a relatively new graphics card.

↪️ You may also encounter an error where your browser does not support WebGL but you can easily fix it.

Most of the time you may come across a runtime error The browser supports WebGL but initialization failed on one browser but WebGL works fine on other browsers.

The error may also occur when running WebGL on Android where you will get Cesium the browser supports WebGL but initialization failed error.

↪️ Finally, WebGL may be unavailable due to a problematic extension interfering with Firefox or Google Chrome’s settings.

How do I fix WebGL error?

Before we start the actual troubleshooting, here are a few quick prerequisites to check:

  • Make sure you update your browser (Chrome, Firefox, or any other) to its most recent version.
  • Disable extensions individually as one of them may interfere with WebGL’s functionality
  • Tweak hardware acceleration settings to On or Off and check for improvements

1. How do I initialize WebGL?

1.1 Chrome

  1. Launch Chrome and type the following in the URL address bar: chrome://flags/
  2. Use the search box to look for WebGL-related options and make sure you set the value to Enabled.
  3. Finally, click Relaunch Now to restart Chrome.

1.2 Firefox

  1. Launch Firefox and type the following in the URL address bar: about:config
  2. Use the search box to look for WebGL-related options and make sure you toggle the value to True to enable.
  3. Restart Firefox to apply your new settings.

To find out if WebGL is enabled in your browser, go to https://get.webgl.org/ and test it directly. Finally, enabling WebGL can also help with Mapbox GL problems in your browser.

2. Update GPU Driver

  1. Press the Windows key, type Device Manager in the search box, and click Open.
  2. Navigate to Display adapters and find your graphics card.
  3. Right-click on your graphics card and select Update Driver Software.
  4. Select Search automatically for updated driver software.

Driver updates make the paths used by the Graphics Card perform their functions faster by eliminating unnecessary actions or better distributing the workload.

Having the most recent graphics card driver is a task for third-party software such as DriverFix, which can install, troubleshoot, and upgrade any missing drivers.

DriverFix installs drivers that are responsible for a responsive browser with 3D graphics, allowing you to fix the WebGL initialization failed error.

At the very least, you will be well-equipped with the most recent graphics card drivers, preventing any other browser errors.

⇒ Get DriverFix

3. Uninstall and reinstall your graphics driver

  1. Press the Windows key, type Device Manager in the search box, and click Open.
  2. Navigate to Display adapters and find your graphics card.
  3. Right-click on your graphics card and select Uninstall.
  4. Restart your PC and your graphic cards will automatically reinstall.

4. Disable hardware acceleration

  1. Launch the Chrome browser and click on the three ellipses at the top right corner.
  2. Select Settings.
  3. Click on Advanced and select System.
  4. Toggle off Use hardware acceleration when available.

Now, this option can be bliss just as much as it can be a nuisance. For some, turning it off did the trick, while others found that enabling hardware acceleration and relaunching the browser actually solved the failed to initialize WebGL error.

Now, we used Chrome as an example here, but the steps are similar on Firefox and any other browser you might be using. Speaking of that, if you’re experiencing screen tearing in Firefox, disabling hardware acceleration will definitely improve your situation, so make sure you give it a try.

If you are still encountering problems, you can always switch browsers and see if the problem persists. Feel free to leave us a comment down below if you have additional solutions.

How to Save Outlook Folders to Desktop or Hard Drive

If you have many emails, you might find your Outlook folder a daunting place to navigate. Sometimes folders even disappear. This is because there are so many folders in it, and when you want to find something, you might have to click on each one until you get the one that contains what you want.

However, if you move your Outlook folder to your desktop, it will be much easier to find what you are looking for because all the folders will appear there. Now, here’s a simple guide to walk you through this process.

Can I move an Outlook folder to my desktop?

Yes. You can move an Outlook folder to your desktop using a third-party tool or manually. The real question is why you would want to do so. Some of the compelling reasons include:

  • Easy access – If you use the desktop for other purposes, such as storing and organizing files and folders, moving your Outlook folders to the desktop might be a good idea.
  • Offline access – Moving folders to your desktop means you can access them anytime, even without an Internet connection. This is useful if traveling or working in areas with poor connectivity.
  • Better organization – Outlook already has its folders and you can create new folders to send emails. When you move your folders to the desktop, you can create new ones if you wish to organize your emails in different categories. This allows you to stay organized and keep your personal and professional life in order.
  • Reduce clutter – As you get more and more emails in your Outlook inbox, it is easy to get overwhelmed. This can lead you to ignore important emails because they’re not easily seen, especially if your mail is full of spam. If there are folders that aren’t relevant anymore, moving them off-screen will help you keep things more organized by reducing visual clutter.
  • Free up space – If there are folders that contain old messages that no longer need attention, moving them out of sight will make room for new incoming messages which require immediate attention.

If interested, check out this guide on finding a folder that was moved or deleted by accident.

How do I save an Outlook folder to my computer?

  1. Launch the Outlook application, click on File at the top menu bar and select Open & Export then click on Import/Export.
  2. In the Import & Export Wizard that opens, click on the Export to a file option.
  3. Click on Outlook Data File (.pst) then hit Next. Depending on the version of Outlook you’re using, this option could also be Personal Folder File (.pst).
  4. Your Outlook folders will appear on the next screen. Select the ones you wish to import and check the Include Subfolders box if you wish to include them.
  5. Click on the Browse button to select a folder where the folder will be imported to. This is the part where you can select your desktop or hard drive.
  6. Hit the Finish button to complete the process.

Other issues that may trouble you while using the email client include Outlook not opening, but we have already addressed how to navigate this problem in our detailed article.

Also, check out how to search within Outlook by attachment file type for quick and easy access to your files.

In case your Outlook is not sending emails, we also have answers as to why this is happening and subsequent fixes to this error in our expert article. And do check some quick tips to download Outlook as PDF.

And that’s how to save outlook folders to your desktop. Do let us know of any other additional thoughts you may have on this topic.

Fix: NVIDIA Control Panel not Saving Settings

The NVIDIA Control Panel is a must-have utility for users who want to configure and control their NVIDIA GPUs. Unfortunately, there are times when the program will not save changes made to the Control Panel settings. 

This can be frustrating, especially if you have spent time tweaking things to get them right. If you have experienced a similar issue, keep reading and find out how other users were able to resolve it.

Why is my NVIDIA Control Panel not saving settings?

Some users have found that the NVIDIA Control Panel is not saving settings after exiting. You may have just changed your theme, but when you launch your specific game or program, you’ll find the default settings in place.

This issue can be caused by one of the following:

  • Driver errors – If your graphics card is corrupted, outdated, or missing, you’ll have a hard time saving anything.
  • Insufficient permissions – You may not be running the NVIDIA Control Panel as an administrator hence can’t make any changes.
  • Antivirus settings – Some firewalls and antivirus programs tend to block programs from making any changes on the PC.
  • Conflicting programs – Some applications have been known to interfere with the functionality of the NVIDIA Control Panel by preventing it from saving settings correctly

How do I fix NVIDIA Control Panel not applying settings?

Before you start on any complex solutions, kick off with the following basics:

1. Adjust permission settings

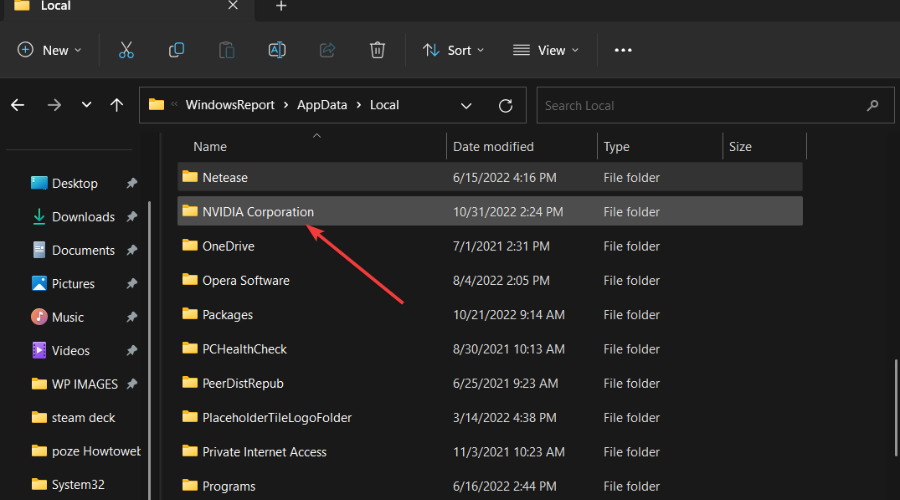
  1. Go to the following location: c:\programdata\
  2. Locate NVIDIA corporation, right-click on it, and select Properties.nvidia corporation
  3. Navigate to the Security tab.
  4. Check against the Permissions column and ensure everything under the Allow section is checked.

2. Update your NVIDIA drivers 

  1. Hit the Start Menu icon, type Device Manager in the search bar, and click Open.device manager w11
  2. Navigate to Display drivers, and click to expand.
  3. Locate the NVIDIA driver, right-click on it, and select Update driver.update-nvidia-driver hp envy microphone not working
  4. Select Search automatically for drivers.Search automatically for drivers
  5. Wait for Windows to find the best match for your NVIDIA card.

It would be best if you kept your graphics card updated regularly to stay up-to-date with the latest technologies and features offered by NVIDIA. This will help enrich the user’s experience. If your graphics card has not been updated in a long time, it may not support new features.

Alternatively, if updating drivers manually is not your thing, you’ll be happy to know there’s a way to achieve similar results without going through too many steps. Outbyte Driver Updater is the driver updater utility you need.

It will detect any missing/corrupted/damaged driver, then search from its comprehensive database to find the correct one. Once the process is complete, it will download and install it for you.

⇒ Get Outbyte Driver Updater

3. Reinstall your NVIDIA drivers

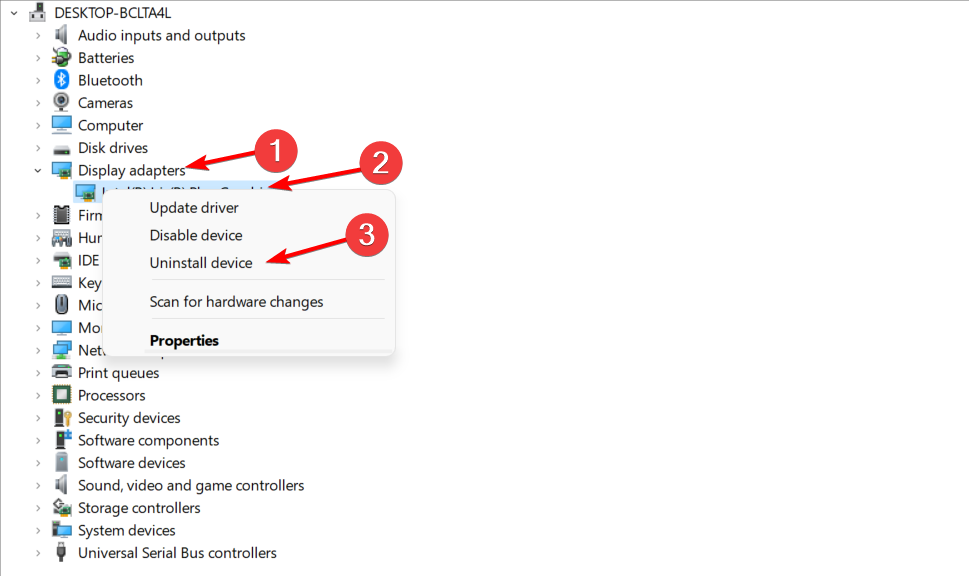
  1. Hit the Start Menu icon, type Device Manager in the search bar, and click Open.device manager w11
  2. Navigate to Display drivers, and click to expand.
  3. Locate the NVIDIA driver, right-click on it, and select Uninstall device.uninstall-device-nvidia nvidia drivers not installing windows 11
  4. Restart your PC, and new drivers will automatically be installed.

4. Disable your antivirus temporarily

  1. Hit the Start menu icon, type Windows Security in the search bar, and click Open.
  2. Click on Firewall & network protection then select Public network.league of legends black screen after champion select
  3. Locate Microsoft Defender Firewall and toggle the off button.turning off Microsoft Defender Firewall Windows

If you have other third-party antivirus tools installed on your PC, proceed to disable them too. Consider whitelisting the NVIDIA Control Panel utility to ensure you’re not blocked in the future from making changes.

5. Run program as administrator

  1. Go to the following location: C: Drive/ program files/NVIDIA Corporation/Control Panel Client/
  2. Find nvcplui.exe, right-click on it, and select Properties.launch the nvcplui exe
  3. Navigate to the Compatibility tab and check Run this program as an administrator.run as

The NVIDIA Control Panel also faces a myriad of issues from time to time. You may find that the control panel crashes often. Check out our helpful guide for more solutions if this is the case.

You may also be unable to launch the NVIDIA Control Panel, so don’t hesitate to refer to our article for various ways to force it to open.

That brings us to the end of this article but do let us know if there’s any solution we may have missed in the comment section below.

The new Bing gets AI-Powered Visual Stories and Knowledge Cards to enhance its visual search experience

Microsoft has announced that it is enhancing the new Bing’s visual search experience for all users by incorporating AI-Powered Visual Stories and Knowledge Cards.

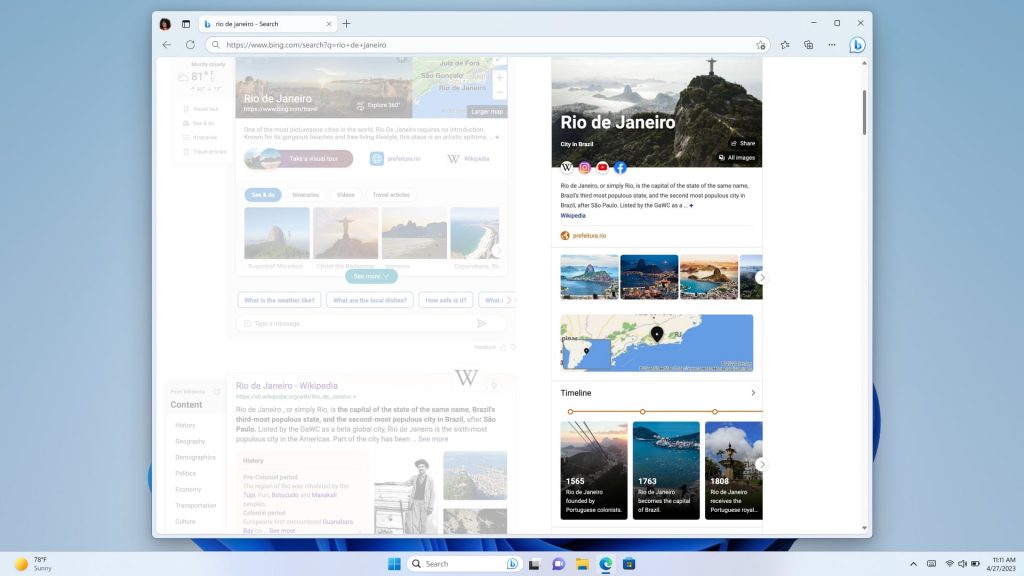
According to the company, the AI-Powered visual stories in Bing will enhance its search experience as well as change how users interact with content while using the web. What’s more, with Knowledge Cards 2.0 users will be able to get insightful information in form of fun facts and key information at a glance.

knowledge card showing information about Rio in Brazil

The AI-powered infographic-inspired experience has received significant enhancements such as interactive, dynamic content like charts, graphs, timelines, visual stories, and more. “With these updates and more coming, our goal is to deliver more immersive experiences in Bing and Edge that make finding answers and exploring the web more interesting, useful, and fun,” says Microsoft.

In related news, Microsoft has also debuted the Bing Image Creator which is designed to let users create and generate images using their own words.

CPU Over Temperature Error: Causes & How to Fix It

Anyone who owns a PC is not new to CPU overheating. So, when you get the CPU over temperature error, this should not be a cause for alarm, especially if you have been playing games or doing other CPU-intensive tasks.

You should, however, be worried if the message keeps popping up more often than not, as it could indicate a problem with your hardware. As such, you must take the necessary steps to address this issue early rather than later.

What causes the CPU over temperature error?

  • Overclocking – While overclocking your CPU can improve its performance, sometimes it comes with an overheated CPU. This is especially true if you have an old processor that cannot handle that much pressure.
  • Faulty cooling system – Your cooling system may not provide the much-needed air, which ultimately causes the CPU to overheat.
  • Clogged heat sink – A heat sink helps absorb heat from the processor and spread it across a larger area to prevent build-up. If it is clogged with dust, it will no longer be effective at pulling away heat from your processor.
  • Too much stress on the CPU – If you’re running multiple programs at once, all of this activity can put a lot of stress on your processor and cause it to overheat quickly. 
  • Poor ventilation – If your computer doesn’t get enough airflow through its vents, it will overheat quickly. 
  • Degraded thermal paste – If you have had your PC for a while, the thermal paste might have degraded over time and needs replacing before it worsens and leads to permanent damage.

How can I fix the CPU over temperature error?

We recommend that you try out the following before moving on to the main solutions: Make sure your PC has plenty of space around it so heat can escape easily, turn off unnecessary applications to free up more RAM, test your PC for stress to ascertain its performance metrics, and update all drivers.

1. Clean dirt 

Dust can cause overheating and reduce the fan’s cooling effect. To clean it out, use a can of compressed air or a vacuum cleaner. You can also use a brush to remove dust from the vents on the back of your laptop.

Cleaning off the vents on your laptop can help improve airflow and prevent dust from clogging up those vents. You can also use a soft cloth or other non-abrasive cleaning material to wipe down all areas around your vent openings.

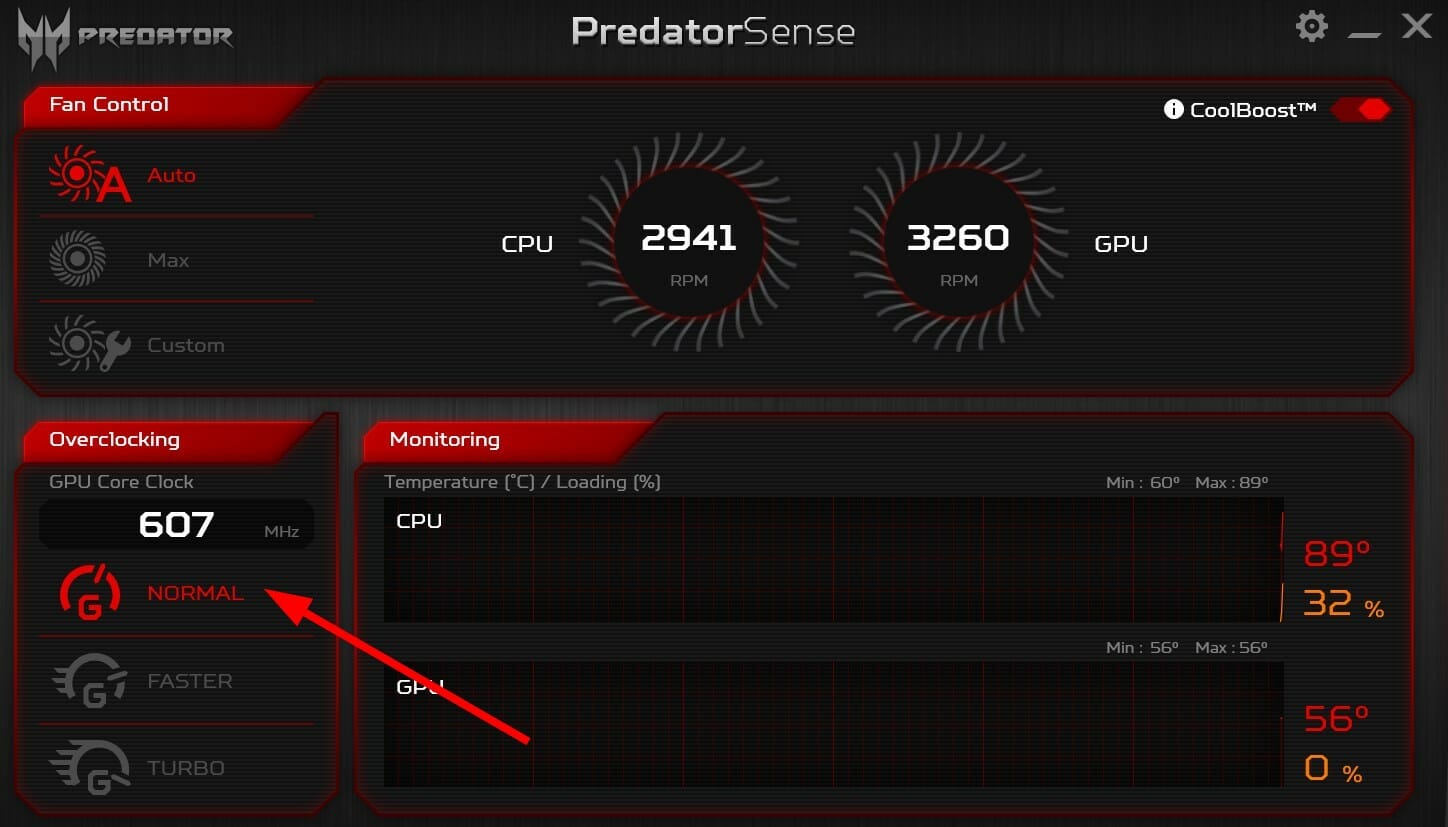
2. Disable overclocking 

Overclocking is making your computer run faster than its normal speed. While it can be a useful tool for gamers and other people who want their computers to be as fast as possible, it can also cause problems if done incorrectly.

Overclocking a laptop will increase battery drain and heat output, which can damage the laptop’s components over time. Your processor also plays a huge role in overclocking. 

If you have an old processor, avoid overclocking at all costs. Alternatively, you install overclocking monitoring software to keep tabs when your CPU is being overworked and stop the process.

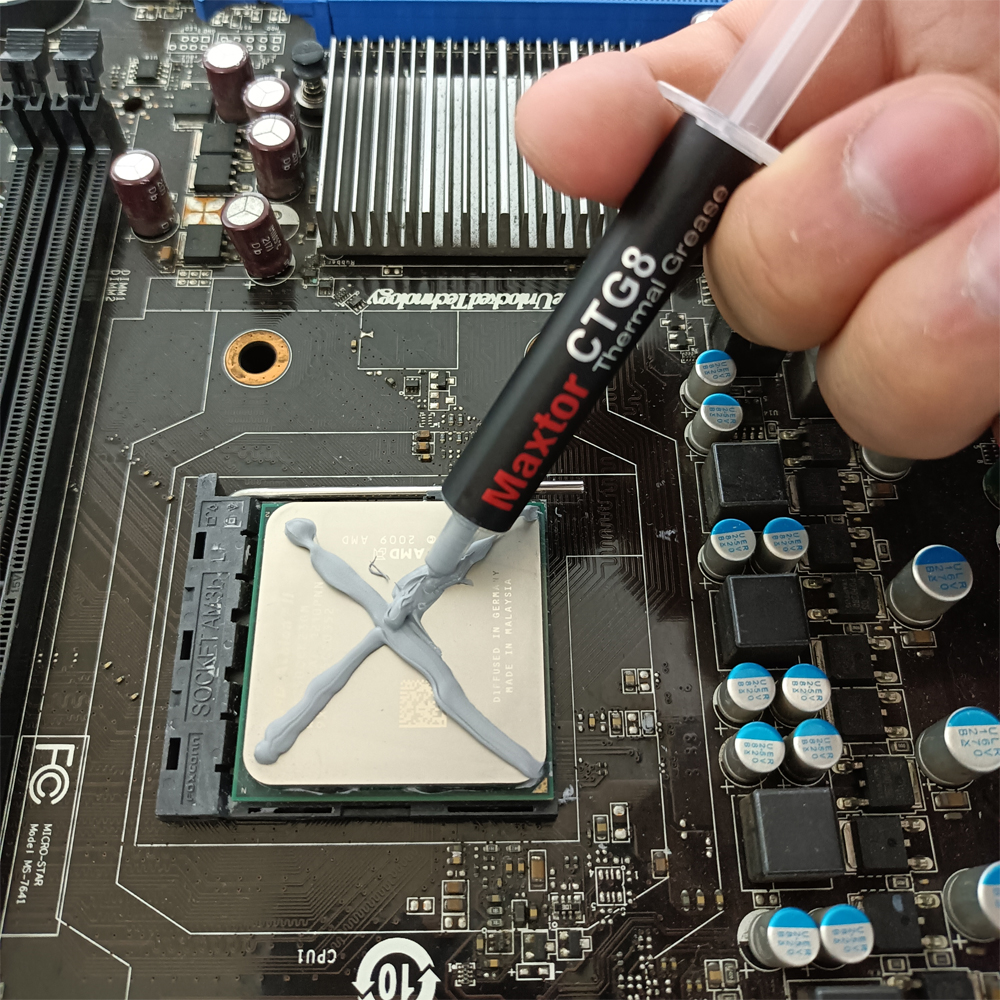
3. Replace thermal paste

Over time, the thermal paste can dry out and lose its effectiveness. When this happens, air pockets will form between the heatsink and the CPU, preventing heat from dissipating properly. 

Since the thermal paste transfers heat from your CPU to the cooler, your CPU will overheat if it cannot perform its functions efficiently. Changing out your thermal paste can help cool down your CPU.

If the CPU over temperature error appears often, it could indicate early signs of CPU failure. Granted, your CPU will not serve you forever, so you need to be prepared for such eventualities. That’s why we recommend some of the best Windows 11 CPUs with impeccable performance.

You can also get a second-hand AIO cooler and check for improvements.

If you feel we have missed a key solution to bypass this error, share it with us in the comment section below.

Survival horror redefined all over again? Here is our Resident Evil 4 Remake review roundup

Classic video game remakes are all the rage right now. This is evidenced by the sheer number of them recently released or coming around the bend: System Shock, Splinter Cell, Prince of Persia, The Witcher, Dead Space, Silent Hill 2 Remake and many others. Unfortunately, the results have been mixed. On the one hand you have the likes of Final Fantasy VII Remake and The Last of Us Part I—games that took classic gaming experiences and reinvented them into something palatable for contemporary gaming audiences. And on the opposite end of the spectrum are video game remakes that somehow missed the mark and failed to do their forebears justice, like 2018’s Secret of Mana and the 2019 MediEval remake.

Given Capcom’s track record with previous remakes of early games in the iconic survival horror franchise, particularly those of Resident Evils 2 and 3 most recently, the excitement for the next in line was understandably high. Resident Evil 4 was the game that redefined not only the series but the horror genre as a whole when it first released back in 2005. It was one of the defining games of its generation and is considered one of the greatest video games of all time.

Those are some pretty big shoes to fill, and now that Resident Evil 4 Remake is about to drop…does it live up to the original’s legacy? Read on to see what some of the top gaming sites are saying.

IGN’s Resident Evil 4 Remake review (10/10)

Whether you’re a fan of the original or a newcomer with a hankering for some action-heavy horror of the highest quality, Resident Evil 4 is like a parasite-riddled Spaniard: a total no-brainer…the most relentlessly exciting Resident Evil adventure of all time that’s been rebuilt, refined, and realised to the full limits of its enormous potential.

IGN’s Resident Evil 4 Remake review lavishes praise on this newest iteration of the survival horror classic.

Engadget’s Resident Evil 4 Remake review

It’s not a terrible game, but it isn’t seamless, either. It adds enemy variety and fresh environments, but Leon’s bullets routinely hit their targets without dealing damage, his movements are clumsy and his new parry ability is only semi-functional. The game clearly establishes combat strategies for each scene, but then its mechanics get in the way, punishing the player in the process. Overall, the word for the RE4 remake is inconsistent.

Gamespot’s Resident Evil 4 Remake review(10/10)

Capcom has masterfully created a new version of a beloved game and continues to blaze a trail with its Resident Evil remakes. Like the Resident Evil 2 remake before it, the studio has used advancements in technology and design to modernize an iconic survival-horror and action game…At the same time, it empowers the player with thrilling new mechanics and places challenges in their way to test their mastery of them…It raises the bar for what a good remake is and at the same time, preserves Resident Evil 4’s legacy as a genre-defining experience and one of the greatest games of all time.

GameInformer’s Resident Evil 4 Remake review (9.5/10)

The Resident Evil 4 remake is about everything I could’ve wanted. But importantly, it doesn’t overwrite its predecessor. If anything, this new version reinforces why the original Resident Evil 4 is a game people should still seek out, play, or at least watch and learn about. But as a love letter to one of the greatest games of all time, as a new historical artifact that reinforces why the source material was so landmark in the first place, this new trek through the Spanish countryside is as good as it gets and makes a great game that much better.

The Guardian’s Resident Evil 4 Remake review (5 stars out of 5)

This is a wonderful game: a beautiful, tense, camp, gory summation of everything that is so good about Resident Evil. Wherever you find yourself, whether rose garden or torture dungeon, it is alive with intimate detail, from the sounds of distant screams and chants to the sight of a grizzly murder scene or a beautiful vase. It is resplendent, delicious and decadent, like an incredibly rich banquet served amid the detritus of some horrible battle. Believe me, you will feast on it.

Niche Gamer’s Resident Evil 4 Remake review (10/10)

Resident Evil 4‘s remake does what the first Resident Evil remake does for the franchise. It expands upon an incredible foundation and creates fresh material while remixing existing scenarios that were sacred. Capcom was very careful with the changes and has delivered another excellent experience that honors the original’s legacy.

Resident Evil 4 Remake: a new horror classic

Much like its predecessor, this new interpretation of Resident Evil 4 is getting glowing reviews ahead of its March 24 release. Does it set a new bar for classic game remakes? Only time will tell. But in the meantime, what are your impressions of the game? Will you be running out and buying Resident Evil 4 Remake? If so, feel free to share your own thoughts with us down in the comments.

Resident Evil 4
Resident Evil 4
Developer:
CAPCOM CO., LTD.
Price:
Free

Featured image via xbox.com. 

Microsoft Outlook’s Play My Emails feature gets support for French and Spanish

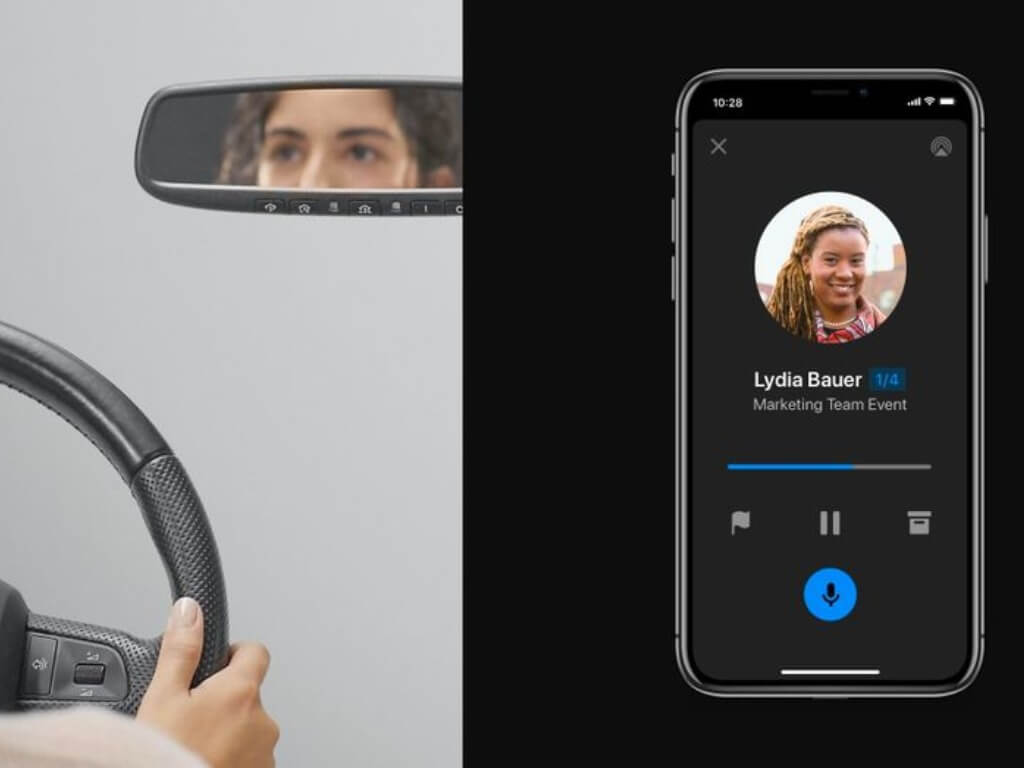
Microsoft has announced that it has expanded the Play My Emails feature in its Outlook mobile apps to French and Spanish speakers. Previously, the feature was limited to English and Portuguese speakers.

For those not conversant with the feature, it is designed to read both emails and upcoming events for Outlook users to make it easier for them to stay up-to-date with everything that’s happening in the inbox.

And now, Microsoft is expanding the feature’s capabilities to two more languages, bringing the total number of supported languages to four.

thumbnail image 1 captioned An animated image demonstrating Play My Emails in Outlook in French on a mobile device.

To access the feature in these new languages, you must be either Outlook for iOS or Android. You must also have an Office 365 work account, an Outlook account, or a Gmail account signed in to Outlook mobile.

Next, you must also ensure that you’re connected to a Bluetooth or wired audio device, then select the Play icon in the notification that appears at the bottom of the screen.

Do you use this feature to enhance your productivity? Share your thoughts with us in the comments.

How to Turn Off Sleep Mode in Windows 10 [Quick Guide]

Sleep mode is a power-saving feature that helps conserve energy by putting your Windows 10 computer into a low-power state. 

While this feature can be helpful, there may be times when you want to disable sleep mode to prevent interruptions or complete maintenance tasks.

In this guide, we will walk you through different methods to turn off sleep mode in Windows 10. Let’s start! 

What are the different ways to turn off sleep on Windows 10? 

1. Use the Settings 

  1. Press Windows + I to open the Settings app. 
  2. Click System.System Settings turn off sleep mode windows 10
  3. Now select Power & sleep.Power & Sleep
  4. Under Sleep, choose Never from the dropdown menu. 

2. Use the Control Panel

  1. Press the Windows, type Control Panel, and click Open. Control Panel sturn off sleep mode windows 10
  2. Select Category for View as and click Hardware and Sound. Hardware and Sound turn off sleep modeWindows 10
  3. Choose Power Options. Power Options Windows 10
  4. Locate the current power plan, and click Change plan settings.Change plan settings
  5. Now click the Put the computer to sleep option and choose Never from the dropdown list. Put the computer to sleep

3. Use the Command Prompt

  1. Press the Windows key, type Cmd, and click Run as administrator.CMD turn off sleep mode windows 10
  2. Type the following command to disable hibernation &  turn off sleep mode, and press Enter: powercfg -h off

4. Use the Group Policy Editor

  1. Press Windows + R to open the Run window.GPEDIT turn off sleep mode windows 10
  2. Type gpedit.msc and click OK to open Group Policy Editor.
  3. Navigate to this path: Computer Configuration \Administrative Templates\System\Power Management\Sleep Settings
  4. Select and double-click  Allow Standby States (S1-S3) When Sleeping (Plugged In)Turn off sleep settings Windows 10
  5. Select Enabled and set the time to Never. 
  6. Click Apply and OK.

5. Use the Registry Editor

  1. Press Windows+ R to open the Run dialog box.REGEDIT RUN COMMAND
  2. Type regedit and click OK to open Registry Editor.
  3. Navigate to this path: Computer\HKEY_LOCAL_MACHINE\SYSTEM\CurrentControlSet\Control\Power
  4. Double-click CsEnabled and change the Value data from 1 to 0.CS enabled turn off sleep mode windows 10
  5. Restart your computer.

6. Use the Device Manager

  1. Press Windows + R to open the Run console.Device Manager RUN COMMAND
  2. Type devmgmt.msc and click OK to open Device Manager. 
  3. Double-click to expand System devices.
  4. Go to system devices and double-click it to open Properties.
  5. Switch to the Power Management tab. Power Management turn off sleep mode windows 10
  6. Removed the checkmark next to Allow the computer to turn off this device to save power. 
  7. Click Apply and then OK. 

7. Use the BIOS settings 

  1. Press Windows + I to open Settings.
  2. Go to System.System Settings
  3. Go to Recovery, under Advanced options, and click Restart now.Recovery Advanced startup - turn off sleep mode windows 10
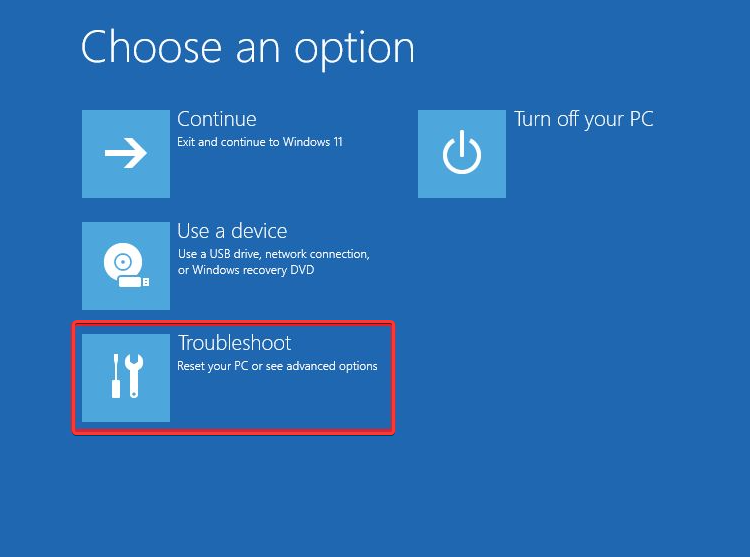
  4. Now under Choose an option page, click Troubleshoot.Choose an option - Troubleshoot
  5. Select Advanced options.Advanced options
  6. On the Advanced options page, select UEFI Firmware Settings.UEFI 2 turn off sleep mode windows 10
  7. Click Restart.UEFI Restart
  8. Select the appropriate option to reach BIOS. For example, go to Power Management or ACPI settings. 
  9. Locate Sleep Mode or Suspend Mode.
  10. Choose Disabled or Off.

8. Use the Task Scheduler 

  1. Press the Windows key, Task Scheduler, and click Open. Task schedular start menu
  2. Click Create Task. Create task - turn off sleep mode windows 10
  3. Name the task Disable Sleep Mode. Create task Disable Sleep Mode turn off Windows 10
  4. Go to the Conditions tab, and remove the checkmark next to Start the task only if the computer is idle for.Start the task
  5. Under the Actions tab, click New.Actions
  6. In the Program/script field, type powercfg.exeNew ACTION
  7. For Add arguments field, type change -standby-timeout-ac 0
  8. Click OK. 

9. Use the Windows PowerShell

  1. Go to the search bar, type Powershell, and click Run as administrator. Windows Powershell turn off sleep mode windows 10
  2. Copy and paste the following command to change the standby timeout for when the computer is plugged into 0 and press Enter: powercfg -change -standby-timeout-ac 0

10. Use the Windows Registry 

  1. Press Windows + R to open the Run console. REGEDIT RUN COMMAND turn off sleep mode windows 10
  2. Type regedit and click OK to open Registry Editor.
  3. Click File, then click Export. Finally, save the .reg file in a desired location to back the registry entries. File export
  4. Navigate to this path: Computer\HKEY_LOCAL_MACHINE\SYSTEM\CurrentControlSet\Control\Power\PowerSettings\238C9FA8-0AAD-41ED-83F4-97BE242C8F20\7bc4a2f9-d8fc-4469-b07b-33eb785aaca0Attributes registry editor turn off sleep mode windows 10
  5. Double-click on Attributes and change the Value data to 2.
  6. Restart your computer for the changes to take effect.

So, these are different ways to turn off sleep mode on Windows 10. Try them and let us know what worked for you in the comments section below. 

Fix: Can’t access Microsoft Teams Admin Center

If you can’t access the Microsoft Teams Admin Center, this guide can help! We will discuss some of the available fixes to resolve the issue quickly. Let’s get started! 

What causes the Can’t access Microsoft Teams Admin Center issue?

There can be various reasons why you are not able to access the Microsoft Teams Admin Center; some of the common ones are: 

  • Permissions issues – If your account doesn’t have the necessary permissions to access the Admin Center, then you won’t be able to access it. Before accessing it, check if you have permission or contact the IT admin to make sure.
  • Browser issues – If your browser has cache, is outdated, or not working correctly, then you might face this issue. Check updates for your browsers and clear the cache to fix the problem.
  • Network connection is weak – If you don’t have a stable internet connection, you might face all kinds of issues, including this one. So first, check your internet speed; if issues are found, contact your ISP.
  • Account-related issues – Your account may be experiencing issues that prevent you from accessing Admin Center. Log out and log in to fix the problem.
  • Microsoft Teams service outage – Sometimes, Microsoft Teams may experience service outages or disruptions that can affect your ability to access the Admin Center.

What can I do to fix the Can’t access Microsoft Teams Admin Center issue?

Before moving to the actual troubleshooting steps, please try to access Microsoft Teams Admin Center in Incognito mode of your browser or use a different browser.

1. Fix browser issues

1.1 Clear cache and cookies 

  1. On Google Chrome, click the three dots icon, and select Settings.Settings Chrome Can't access Microsoft Teams Admin Center
  2. Go to Privacy and security, and click Clear browsing data.Clear cache Chrome Can't access Microsoft Teams Admin Center
  3. Select Cookies and other site data and Cached images and files.Clear data
  4. Click Clear data.

1.2 Reset browser

  1. On the Settings page, click Reset settings.reset 1 Can't access Microsoft Teams Admin Center
  2. Click Restore settings to their original defaults.
  3. Now click Reset Settings.Reset 2 Can't access Microsoft Teams Admin Center

1.3 Check for updates

  1. On the Settings page, go to About Chrome.Settings About chrome
  2. On the next screen, your browser will try to find an update if available.
  3. Download and install the update.

1.4  Block all cookies

  1. Open Settings; go to Site Settings.Site settings
  2. Go to Cookies and site data.Cookies and site data Can't access Microsoft Teams Admin Center
  3. Remove the checkmark next to Block third-party cookies, and Block all cookies (not recommended).Block cookies

2. Troubleshoot your network

  1. Press Windows + I to open the Settings app.
  2. Go to System, and click Troubleshoot.troubleshoot Can't access Microsoft Teams Admin Center
  3. Select Other troubleshooters.troubleshooters
  4. Locate Internet Connections and click Run.Internet connections Can't access Microsoft Teams Admin Center
  5. Follow the onscreen prompts to fix the issue.

3. Enable SipDomain

  1. Press the Windows key, type PowerShell, and click Run as administrator.Powershell 2 Can't access Microsoft Teams Admin Center
  2. Click Yes on the UAC prompt.
  3. Type the following command, replace the DOMAINNAME with your domain name, and press Enter: Enable-CsOnlineSipDomain -Domain DOMAINNAME
  4. Close the PowerShell window.

4. Use the PowerShell to manage Teams

  1. Open PowerShell using the steps mentioned in method 3.Powershell 2
  2. Copy and paste the following commands one by one and press Enter after every command: Import-Module MicrosoftTeams $userCredential = Get-Credential Connect-MicrosoftTeams -Credential $userCredential
  3. You will see a window; enter your admin credentials and click OK.Enter user name Can't access Microsoft Teams Admin Center

5. Make changes to User License

  1. Launch Microsoft 365 Admin Center.
  2. Go to Users, then select Active Users.Active Users Can't access Microsoft Teams Admin Center
  3. Select the user you want to assign a license and click on it.Select User1
  4. Go to License and apps.License and changes
  5. Under the Licenses section, choose Microsoft Teams and click Save changes.

So, these are methods that you need to follow to fix can’t access Microsoft Teams Admin Center. Try them and let us know what worked for you in the comments section below.

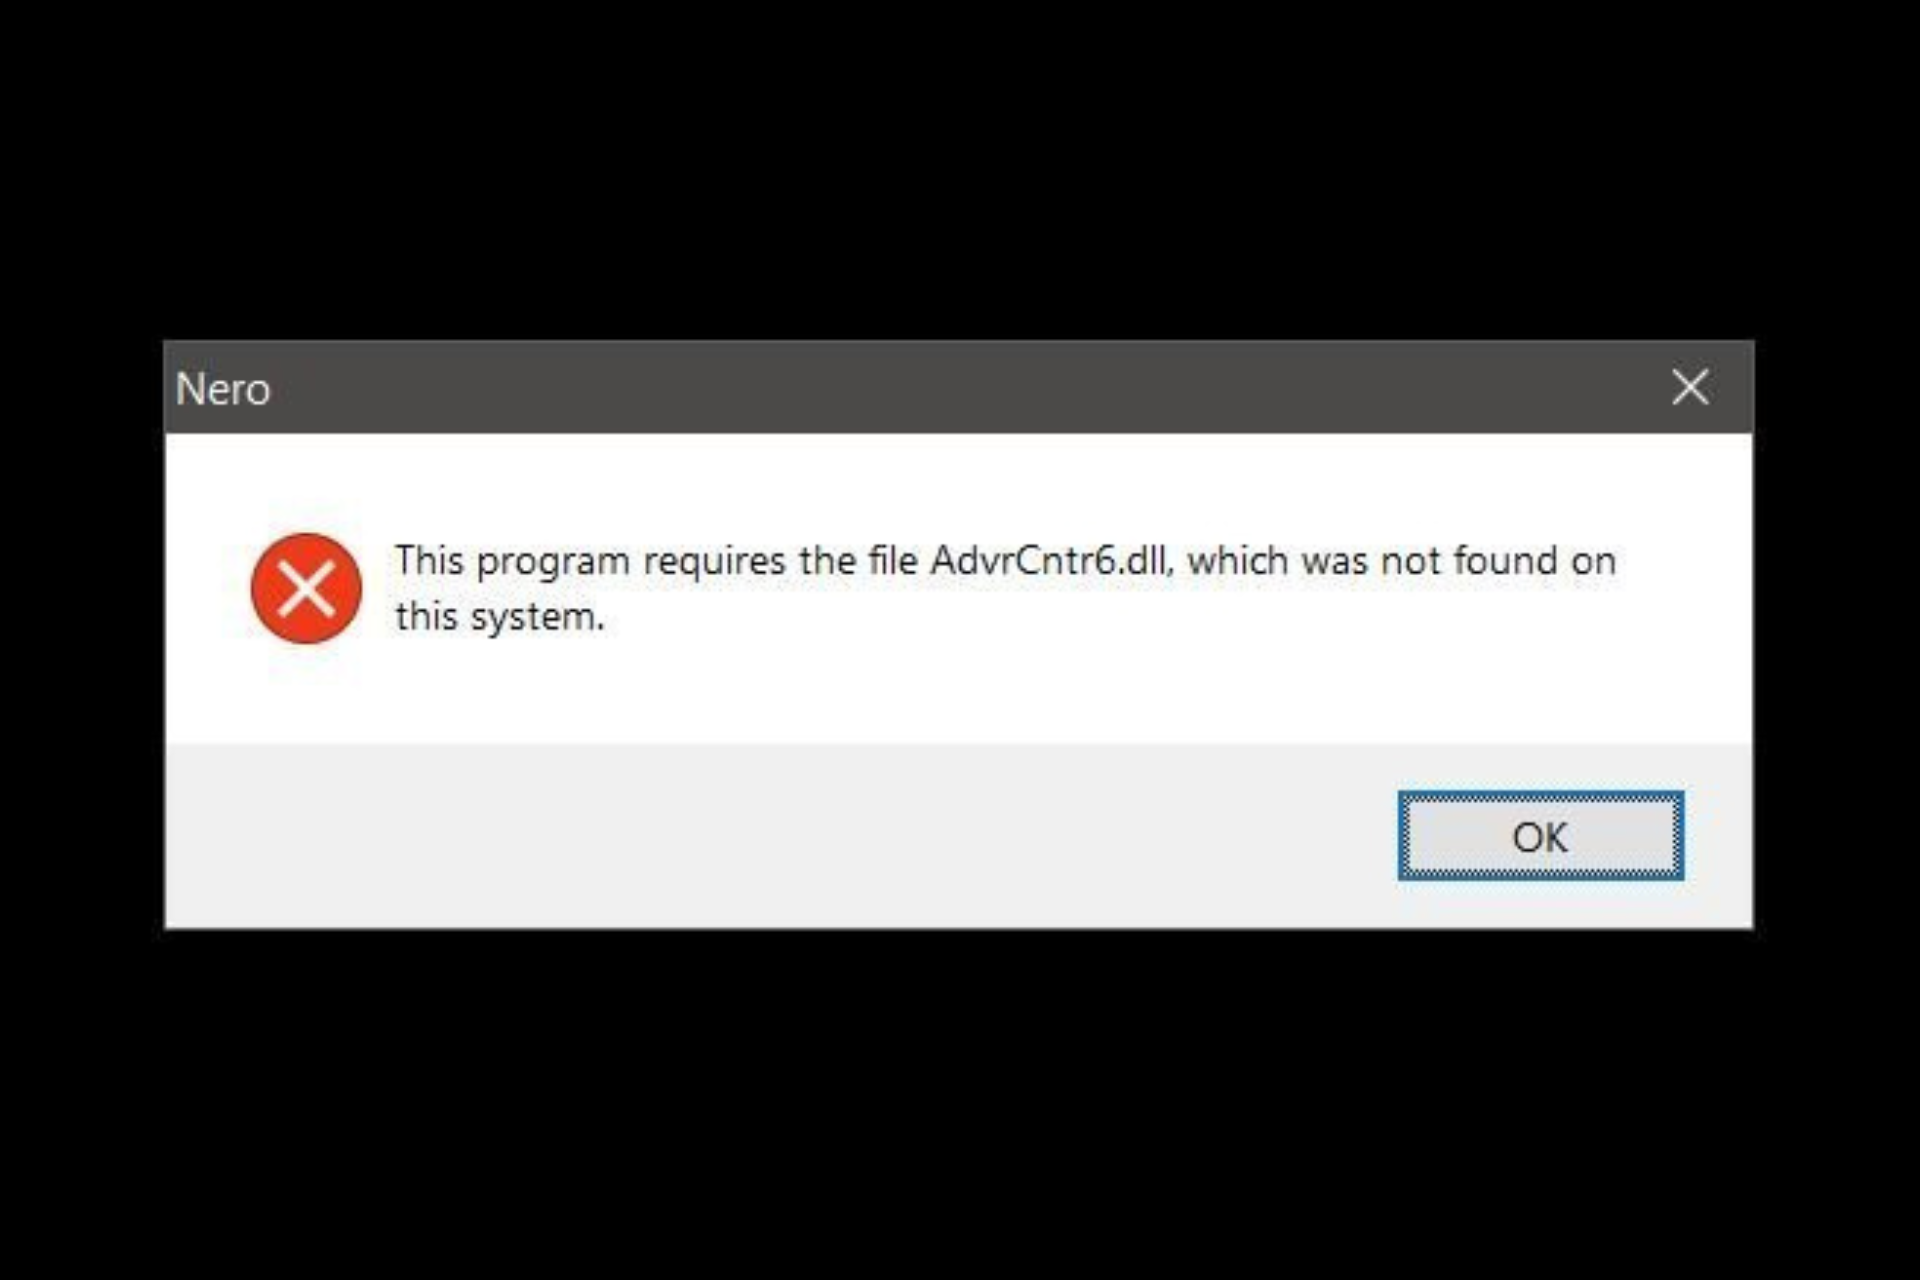
Advrcntr6.dll is Missing: How to Download & Restore it

Sometimes, you may encounter the Advrcntr6.dll missing error while launching software on your PC.

This can be pretty frustrating as it prevents you from running the app. The error indicates that the DLL file is either corrupted or deleted.

In this guide, we will discuss what Advrcntr6.dll is, different methods to fix the issue, and the causes of the problem. Let’s begin!

What is  Advrcntr6.dll?

Advrcntr6.dll is a Dynamic Link Library file developed by Neto AG, a necessary system file of Windows OS. It contains a set of procedures and driver functions used by Windows. 

This component is important for Windows to operate properly. If missing, it could affect the software’s working using the file. 

What causes the Advrcntr6.dll is missing error?

There could be several reasons why this dll is missing; some of the common ones are mentioned here: 

  • Program not installed properly – If the program you are launching is not installed, it might be able to use Advrcntr6.dll hence the error. To fix this, reinstall the app.
  • Outdated driver – Old and outdated drivers could be one of the reasons for the missing DLL file. You need to update drivers to fix the issue. 
  • Pending Windows updates – Windows OS needs to be updated to fix bugs and keep everything running smoothly. If not, you may get all kinds of errors. 
  • DLL file is corrupt – If the DLL file is corrupt or deleted, then the app depending on the file, won’t start and will display the error.

What can I do to fix the Advrcntr6.dll missing error?

Before engaging in advanced troubleshooting steps, you should consider performing the following checks:

1. Re-register the DLL file 

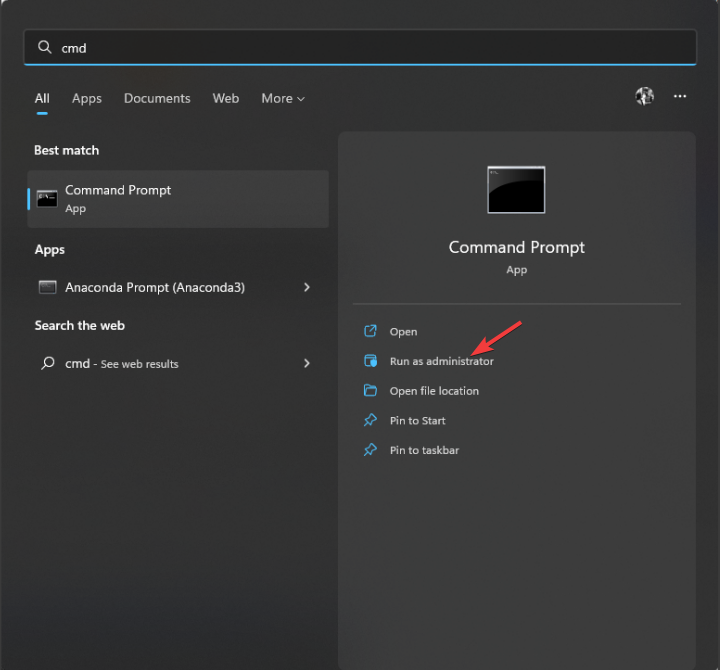
  1. Press the Windows key, type CMD, and click Run as administrator. DOS COmmand Prompt
  2. Type the following command to re-register the dll file and press Enter: regsvr32 Advrcntr6.dll
  3. Restart your computer. 

2. Repair/reinstall the Microsoft Visual C++ Redistributable

Tip icon Tip
If you have multiple entries of Microsoft Visual C++ Redistributable, follow the same process.

2.1 Repair Microsoft Visual C++ Redistributable

  1. Press Windows + I to open the Settings app. 
  2. Go to Apps, and select Installed apps.Apps - Installed apps Advrcntr6.dll
  3. Navigate to Microsoft Visual C++ Redistributable, click on the three dots next to it, and select Modify. Modify C++ Advrcntr6.dll
  4. Click Yes on the UAC prompt.
  5. On the following dialog box, click Repair.Repair
  6. Follow the on-screen prompts if needed.

2.2 Reinstall the Microsoft Visual C++ Redistributable

  1. Open Settings. Go to Apps, then the Installed apps option.
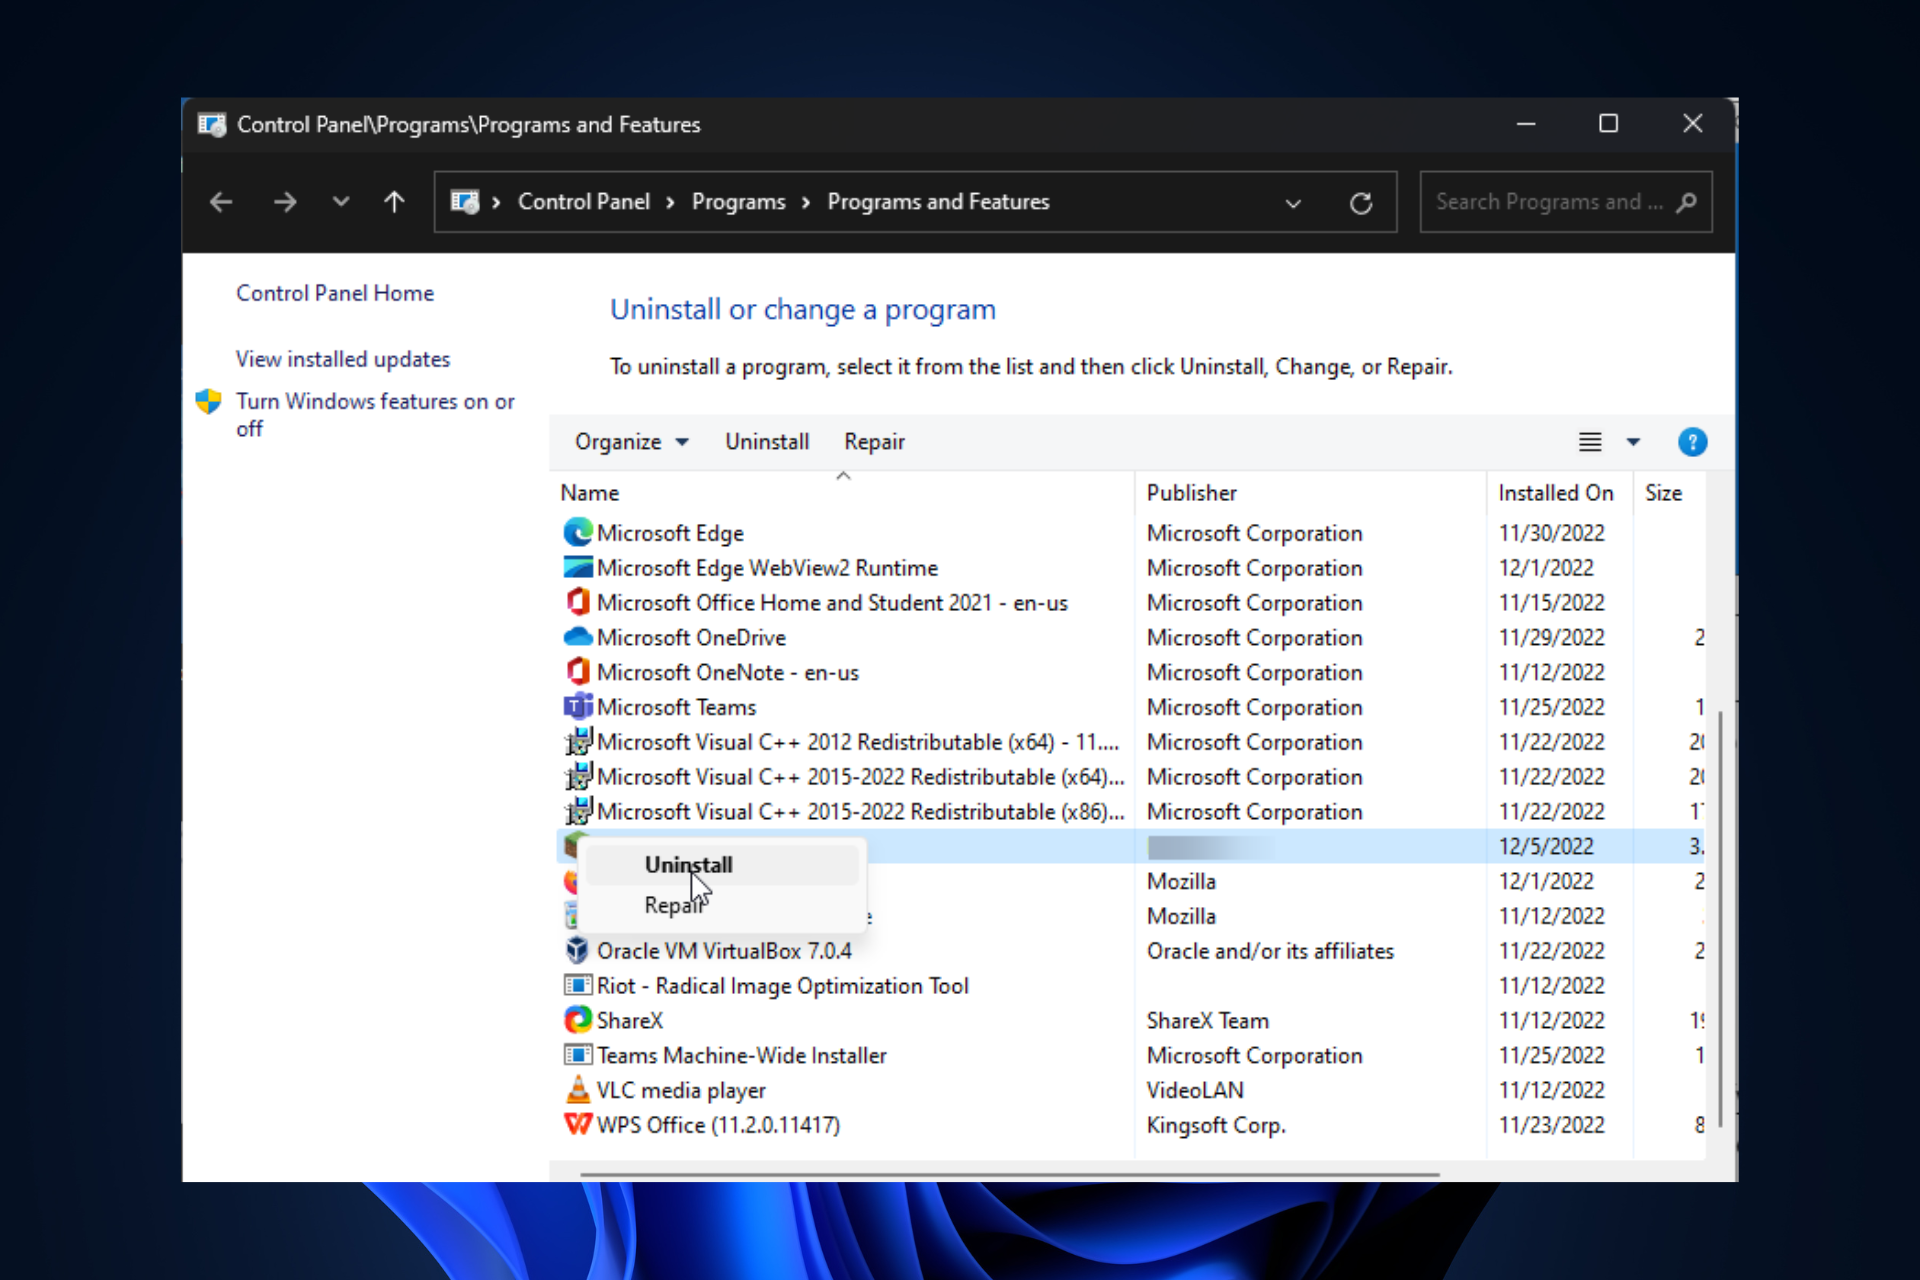
  2. Locate Microsoft Visual C++ Redistributable, click on three dots, and select Uninstall.Uninstall C++ Advrcntr6.dll
  3. Click Uninstall on the next window. Uninstall
  4. Download the Microsoft Visual C++ Redistributable, and double-click the installer file.
  5. Follow the on-screen instructions to complete the process.

3. Update the drivers

  1. Press Windows + R to open the Run window.Device Manager RUN COMMAND
  2. Type devmgmt.msc and click OK to open Device Manager.
  3. Select the drivers from the list individually, right-click, and select Update driver.Graphics Driver update Advrcntr6.dll
  4. Click Search automatically for drivers.Search automatically for drivers
  5. Follow the on-screen instructions to complete the process. 

4. Scan your PC for malware

  1. Press the Windows key, type Windows Security, and click Open.Windows Security open
  2. Go to Virus & threat protection and click Scan options.V& T Advrcntr6.dll
  3. Select Full scan and click Scan now. Full scan -
  4. The security software will scan and show the malicious files on your computer. Select them and delete them when prompted.

5. Use the Command Prompt

  1. Press the Windows key, type CMD, and click Run as administrator.CMD elevated
  2. Copy and paste the following command to repair system files and press Enter: sfc/scannowSFCSCANNOW CMD Advrcntr6.dll
  3. If there is an error, type the following command and press Enter: DISM.exe /Online /Cleanup-Image /RestorehealthRestore health

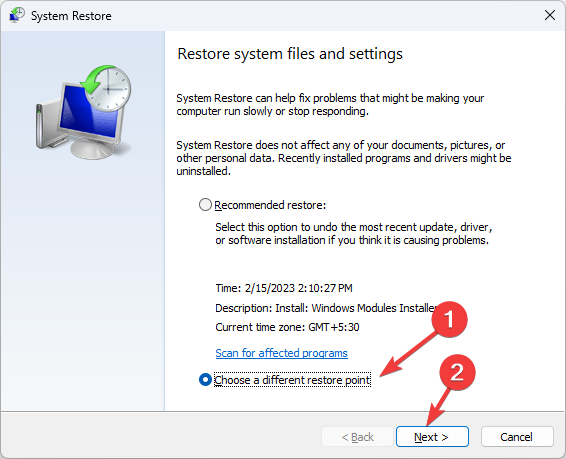
6. Perform System Restore

  1. Press the Windows key, type Control Panel, and click Open.CP
  2. Select Large icons as View by and click Recovery.Recovery Control Panel Advrcntr6.dll 
  3. Click Open System Restore.Open system restore
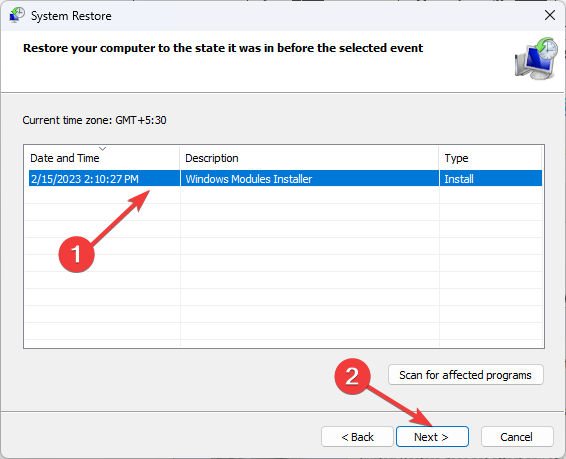
  4. Select Choose a different restore point and click Next.Next Choose a different restore point
  5. Now select the restore point and click Next. Choose a point
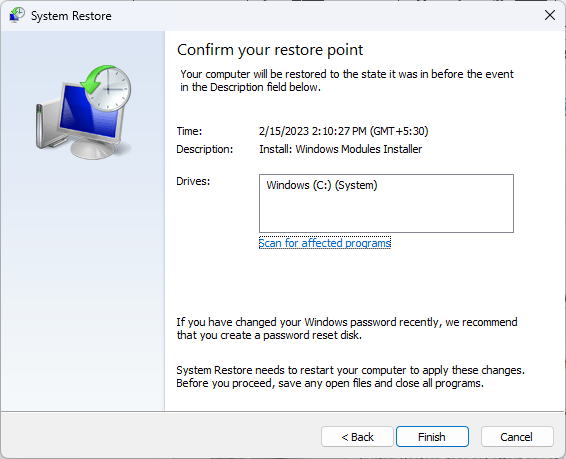
  6. Click Finish to restore the previous settings, and Windows will restart.Finish Restore point

7. Download and install the DLL file 

  1. Go to the DLL website.Advr Manual install Advrcntr6.dll
  2. Download the file which is appropriate to your operating system.
  3. Navigate to this path: C:\Windows\System32
  4. Find the old one and rename it. If you can’t find it, then move to the next step.
  5. Copy and paste the newly downloaded file into the System32 folder.
  6. Now open Command Prompt with administrator rights and copy and paste the following command to register the DLL file: regsvr32 Advrcntr6.dll
  7. Restart the computer.

So, these are methods that you need to follow to fix the Advrcntr6.dll missing error. If you have any questions about Advrcntr6.dll, please mention them in the comments section below.

What is SPReview.Exe And How to Uninstall It

If you see the SPReview.exe file on the Task Manager on your Windows computer and want to know what it is, this guide can help! First, we will talk about this executable file, how to identify if it is malicious, and remove it if needed. 

What is SPReview.exe?

SPReview.exe is an executable file related to the SP Reviewer process, a part of Microsoft Windows OS. The file is installed on Windows systems during service pack installation from Windows Update. It is located in C:\Windows\System32 and is entirely safe. Therefore we recommend not deleting this system file.

To ensure that the file is genuine, follow these steps:

  • Press Ctrl + Shift +Esc to open Task Manager.
  • Locate the SPReview.exe, and right-click it to select Open file location. Open file location
  • If this executable file is found in some other folder or directory, it could be the malware or virus disguised on your computer and must be removed immediately.

How can I uninstall SPReview.exe?

1. Use the Control Panel

  1. Press the Windows key, type Control Panel, and click Open.CP SPReview.exe
  2. Select View by as Category and choose Programs.PorgramsSPReview.exe
  3. Under Programs and Features, click Uninstall a program.Uninstall a program
  4. Look for SPReview.exe, select it, and click Uninstall.SPReview.exe Uninstall
  5. Once it is uninstalled, restart your computer.

2. Use Windows Security if you think the file is malicious

  1. Press the Windows key, type Windows Security, and click Open.Windows Security open SPReview.exe
  2. Go to Virus & threat protection and click Scan options.V& T
  3. Choose Full scan and click Scan now.Full scan -
  4. If you see any malicious detected by the software, remove it when prompted.

What can I do if there are issues with the SPReview.exe file?

1. Use the Command Prompt

  1. Press the Windows key, type CMD, and click Run as administrator.DOS COmmand Prompt
  2. Type the following command to repair system files and press Enter: sfc/scannow
  3. Then, copy and paste the following commands one by one and press Enter after every command: DISM /Online /Cleanup-Image /CheckHealth DISM /Online /Cleanup-Image /ScanHealth DISM /Online /Cleanup-Image /RestoreHealthCMD DISM & SFC  SPReview.exe
  4. Once the commands are correctly executed, restart your computer.

2. Run DiskCleanup

  1. Press Windows + R to open the Run window.Cleanmgr Run command
  2. Type cleanmgr and press Enter to open Disk Cleanup.
  3. On the Disk Cleanup: Drive Selection window, select C and click OK.C
  4. Click Clean up system files.Cleanmgr 3
  5. The Disk Cleanup: Drive Selection window will reappear, click OK.Cleanmgr 2
  6. Now under Files to delete, select all the files listed and click OK.Cleanmgr 4 SPReview.exe
  7. On the next window, click Delete files.Cleanmgr 5

Spreview.exe file is a legitimate Windows component if found in the System32 folder. If not, you can delete it. If you have more questions about this file, please mention them in the comments section below.

Here’s what people are saying about crypto wallet on Edge

Microsoft has reportedly been testing out a new feature of an Ethereum-based crypto wallet on its often-overlooked Edge browser, and it’s safe to say that not everyone is happy about it. 

As spotted by Windows enthusiast Albacore (@thebookisclosed), UI showing Microsoft’s Web3 “non-custodial crypto wallet” is currently out on several select users in its insider program. It can be accessed by typing edge://wallet/crypto/overview into the search bar. 

As an insider program only, the crypto wallet on Edge is still prone to bugs here and there, which is still far from general availability. On top of that, Microsoft also states that it will not reimburse any lost funds caused by errors within this confidential project. 

“We encourage you to test our first Web3 wallet and provide candid feedback along the journey. As the first testers you have the unique opportunity to shape our foray into cryptocurrencies and NFTs.”

You can also view your assets on the tab, send/receive cryptocurrencies in Transactions, and keep up with the latest news on Explore. 

It’s quite a risky move, considering how much money can crypto currency bring to the table. And, despite encouraging insiders to test out this internal beta project, many people don’t seem to be so happy about it. 

What have people been saying about crypto wallet on Edge?

People’s response to this news has been quite polarizing, if not hugely unpopular and controversial. 

One user wrote a lengthy message on Reddit that it could remove Edge’s simplicity, which has somewhat become its trademark despite tons of features added recently. And, apart from this, it could also pose terrible security threats to its users and do nothing but make them retreat to its competitor. 

“After so many attempts at regaining the top spot that Internet Explorer once held, MS finally has a chance with Edge and I really, really, really hope they don’t squander it. People only ever leave their defaults for very specific reasons, and Edge being a lighter, cleaner browser was a huge part of why it brought over many users from other browsers.”

With that said, it’s not the first time Microsoft was thrown in hot water for adding features that are deemed useless. When Redmond officials rolled out its Bing AI chatbot companion and the useable sidebar, many complained that they’d somehow taken away Edge’s humble UI that attracted them in the first place. 

It’s still unclear whether this crypto wallet feature will come to general users, but given its unpopularity within the insiders’ community, chances are it’s slim to none. 

How do you rate this potential move? Let us know in the comments!

Fix: Name Resolution for The Name Wpad Timed Out

If you have encountered the name resolution for the name wpad timed out after none of the configured DNS servers responded error on Event Viewer, then this guide can help! 

We will cover all the available methods to fix the issue right after discussing the causes. Let’s start! 

What causes the name resolution for the name wpad time out issue? 

There could be several reasons for this error message to appear in Event Viewer; some of the common ones are mentioned here: 

  • Badly installed network adapter – If there is a corrupted or incomplete installation of the Network adapter driver, you might get this error. Reinstalling the network adapter can help you fix this problem. 
  • Corrupted DNS cache – If the DNS cache is glitched, it could trigger false positives. To fix it, you can flush the DNS cache. 
  •  DNS server is unstable – If the DNS server is unstable, you might get this error message. You can replace the DNS with Google DNS to fix the issue. 
  • Damaged TCP/IP connection – If TCP/IP instructions are corrupted or interrupted, you might see this error. To fix it, you can refer to the TCP/IP connection. 
  • TCP/IP Offload is enabled – If Autotuning, RSS, and Taskoffload are enabled, you could get this error message. You need to disable them to fix the issue.
  • ISP does not support TCP/IP v6 – If your ISP does not support TCP/IPv6, you can encounter this error. To fix it, disable TCP/IP v6 from the Internet properties.

What can I do to fix the name resolution for the name wpad time out issue? 

1. Run the Network adapter troubleshooter

  1. Press Windows + I to open the Settings app. 
  2. Go to System, then click Troubleshoot.troubleshoot
  3. Click Other troubleshooters. Other Troubleshooters
  4. Select Network Adapter and click Run. Network Adapter Run
  5. After the scan, select the problematic network adapter and click Next. Select network Adapters
  6. Follow the on-screen instructions to complete the process. 

2. Reinstall the Network adapter 

  1. Press Windows + R to open the Run dialog box.CP name resolution for the name wpad timed out
  2. Type devmgmt.msc and click OK to open the Device Manager. 
  3. Select and expand Network adapters.
  4. Right-click the problematic adapter, and click Uninstall device. Uninstall Network driver name resolution for the name wpad timed out
  5. Once uninstalled, close the Device Manager and restart your computer. Your computer will automatically install the best available driver.

3. Reset the TCP/IP connection

  1. Press the Windows key, type CMD, and click Run as administrator.DOS COmmand Prompt
  2. Copy and paste the following command to reset TCP/IP and press Enter: netsh int ip resetCMD netsh name resolution for the name wpad timed out
  3. Once the command is executed, restart your computer. 

4. Flush the DNS cache

  1. Press the Windows key, type CMD, and click Run as administrator.DNS FLUSH name resolution for the name wpad timed out
  2. Copy and paste the following commands one by one and press Enter after every command: ipconfig /flushdns ipconfig /registerdns ipconfig /release ipconfig /renew
  3. Once the command is executed, restart your computer. 

5. Change the DNS 

  1. Press the Windows key, type Control Panel, and click Open. CP
  2. Select Category as View by & click Network and Internet. Network & Internet CP name resolution for the name wpad timed out
  3. Next, click Network and Sharing Center.Network and Sharing Center CP
  4. Now click  Change adapter settings.Change adapter settings
  5. Right-click the network and select Properties.Properties Ethernet
  6. On the Networking tab, double-click Protocol Version 4 (TCP / IPv4).IPV4
  7. Select Use the following DNS server addresses, choose Preferred DNS server as 8.8.8.8 and select Alternate DNS server – 8.8.4.4IPV4 propeties
  8. Click OK, then click OK.

6. Disable TCP/IP

  1. Press Windows + R to open the Run dialog box.NCPA run command
  2. Type ncpa.cpl and click OK to open Network Connections window.
  3. Click Network connection and choose Properties.Properties Ethernet name resolution for the name wpad timed out
  4. Remove the checkmark next to Internet Protocol Version 6 (TCP / IPv6).IPV6 remove
  5. Click OK to confirm the changes.

7. Disable Autotuning, RSS, and Taskoffload

7.1 Use the Command Prompt

  1. Press the Windows key, type CMD, and click Run as administrator.DOS COmmand Prompt
  2. Type the following command one by one and press Enter after every command: netsh interface tcp set global rss=disabled netsh interface tcp set global autotuninglevel=disabled netsh int ip set global taskoffload=disabled
  3. Close the Command Prompt.

7.2 Use the Registry Editor

  1. Press Windows + R to open the Run dialog box.REGEDIT RUN COMMAND
  2. Type regedit and click OK to open Registry Editor.
  3. Navigate to this path: Computer\HKEY_LOCAL_MACHINE\SYSTEM\CurrentControlSet\Services\Tcpip\Parameters
  4. Right-click on Parameters and select New, then DWORD.DWORD new name resolution for the name wpad timed out
  5. Name the DWORD EnableTCPChimney. 
  6. Double-click the DWORD and modify the Value data to 0.DWORD 0
  7. Follow the above three steps and create two more DWORD (32-bit) and name them EnableTCPA & EnableRSS, respectively. Finally, modify their Value data to 0.
  8. Close the Registry Editor and restart your computer.

So, these are methods to fix the name resolution for the name wpad timed out error. Try them and let us know what worked in the comments section below.

How to use Clyde AI on Discord

The war on AI is heating up as popular streaming app Discord just entered the conversation with its latest AI-powered chatbot, Clyde.

The San Francisco-based company announced that the chatbot serves as a companion that could perform multi-complexed searches and ask for recommendations for things like music playlists, GIFs, summaries, and books, on both public and private threads, ChatGPT style. 

The feature is currently rolling out the Alpha channel, meaning it’s getting experimented on several select users only as we speak. With that said, being a new feature, you may come across a few bugs here and there. And, just like when Microsoft first rolled out Bing’s chat mode, it may not be able to generate content for every prompt just yet.

Clyde is experimental and might respond with content or other information that could be considered biased, misleading, harmful, or inaccurate even with safeguards in place. Clyde may not have information or be able to respond to every prompt.

On top of that, while you can draft messages using the same OpenAI technology on Slack, you won’t be able to do it here—yet.

How to use Clyde AI on Discord. 

1. Make sure you’ve joined the Alpha insider program. If not, head over to the channel’s website. Click Download for Windows or Open Discord in your browser to download the client.

2. Once it’s available for you, go to Server Settings ➜ Integrations. 

3. Click Enable (or Disable to perform otherwise). 

4. Type ‘@Clyde’ on any thread to summon the chatbot. 

Being an Alpha insider-only feature means Clyde is still prone to errors. This is the most unstable version of Discord, with lots of updates. Bugs usually happen here so use this client at your own risk.

On another hand, Microsoft, who’d also paid billions in investment in OpenAI, has integrated the latest GPT-4 technology into its 365 office apps ecosystem. That means, it’s about time we’ll see this AI chatbot feature coming on Teams, Slack’s competitor. 

Are you excited about this feature? Let us know in the comments!

Chromebook Black Screen: How to Fix It in 5 Easy Steps

Chromebook black screen issues can be frustrating, but they are not uncommon. Many users have experienced this problem, and fortunately, several possible solutions exist. Therefore, we will explore the most effective steps for fixing a Chromebook black screen issue.

Alternatively, you can read about why your Google Chrome screen is black and how to fix it on your device.

What causes Chromebook Black Screen?

Various factors that can cause the Chromebook’s black screen are as follows:

  • Battery issues – The battery is the power source for the Chromebook. Therefore, a faulty battery or when the laptop battery is drained while the device is off can cause the Chromebook black screen issue.
  • Hardware issues – Hardware comprises the motherboard, hard drive, and other components. A faulty motherboard can prompt the black screen.
  • Display brightness – Most users have encountered Chromebook black screen issues that won’t turn off due to reduced screen brightness.
  • Outdated operating system – An outdated OS can hinder communication with the hardware component. It is because of the bugs affecting the current version, resulting in the screen going blank or black.
  • Overheated device – An overheating laptop is a common issue with high performance which can cause damage to the internal components or lead to system failure.

Nonetheless, we will walk you through the steps to fix the Chromebook black screen in no time.

How can I fix the Chromebook black screen?

Before attempting any advanced fixes, it’s essential to observe these:

  • Ensure that the Chromebook is on.
  • Check if the battery is not dead.
  • Unplug all the USB & external devices.

Checking these basic things, you can rule out simple issues and focus on the advanced fixes for a Chromebook black screen issue below.

1. Increase the screen display brightness

  1. Click on time and adjust the Sun icon level.
  2. Also, you can press the key with the Bigger Sun logo to increase brightness and the Smaller Sun logo to decrease brightness.

Increasing the brightness will allow you to see the screen.

2. Drain out the battery

  1. Let the Chromebook battery get low and wait a couple of minutes.
  2. Plugin the charger and let it charge for at least 30 minutes before powering it up.

Try to remove the battery and plug it back in after trying the above process.

3. System Recovery

  1. Remove all external hardware.
  2. Press & hold Esc + Refresh + the Power key simultaneously.
  3. Release Power first and release other keys until a message appears on your screen.

Performing the steps above will restore the system to the previous point and fix the corrupt system file.

4. Update Chrome OS

  1. Ensure that your Chromebook is on the network. Click the time area at the bottom right and select Settings.
  2. Scroll through and click the About Chrome OS. The current OS on your device will appear under the Google Chrome OS page.
  3. Select the Check for updates button and follow the on-screen command to continue.

Updating the OS will improve the computer security and performance of the device.

5. Factory reset your Chromebook

  1. Click the time section at the bottom right of the Chromebook and click on sign out from the new Windows.
  2. Press and hold Ctrl + Alt + Shift + R on your keyboard.
  3. Click on Restart and select Powerwash from the dialog box that appears.
  4. Select Continue to confirm your selection and follow the on-screen command.
  5. Sign in to your Google account and set up your Chromebook after resetting.

Factory resetting the Chromebook will reset all settings and data to default. Hence, fixing all prior issues that may hinder the display.

In addition, you can read how to run the Windows operating system on a Chromebook device.

Also, check our guide about fixing the microphone not working on Chromebook.

Should you have further questions or suggestions on this guide, kindly drop them in the comments section below.

Best Adult Browsers to Enjoy Private Content Hitch Free

Wondering what the best browser for adults is? You’ve come to the right place as we will talk about the 7 safest and most private browsers to use when you’re not up for being tracked online.

We’ll go into details below, but if you’re in a hurry, here’s a quick look at them:

  • Opera One: Built-in VPN, advanced privacy features, and anti-tracking tools for secure browsing.
  • Tor Browser: Utilizes the Tor network for anonymous browsing, has built-in privacy features, and no tracking.
  • Mozilla Firefox: Enhanced Tracking Protection, private browsing mode, and numerous privacy add-ons.
  • Brave: Built-in ad blocker, private browsing with Tor, and strong anti-tracking mechanisms.
  • DuckDuckGo: Privacy-focused, built-in ad and tracker blocking, and anonymous browsing features.
  • Chromium: Open-source browser with customizable privacy settings, extensions for enhanced security, and Incognito mode.
  • LibreWolf: Privacy-focused fork of Firefox, removes telemetry, and includes built-in tracking protection and security enhancements.

What is the most discreet browser for adults?

1. Opera – Best adult browser with VPN

opera best browser

Opera does not gather any personal data about you without asking for permission.

The Opera web browser comes equipped with an in-built ad blocker and uses a tracker blocker hence being one of the best browsers for adults with VPN as well.

These features work together to prevent users from seeing advertisements. And from having their activity tracked by other websites and advertisers.

Check out Opera’s best features:

  • Free VPN + Adblocker
  • Tracker blocker
  • Cryptojacking protection
  • Easy to set up and use

Opera

Perform any online operations via an entirely private browser with VPN and anti-tracking!

2. Tor Browser – Never keeps track of your history

tor browser

The security of the Tor Browser greatly aids privacy because no one monitoring your connection can monitor your online activities or identify you unless you voluntarily give that information out.

Thus, making it one of the best adult browsers for Windows 10 too. Tor also deletes your cookies after each session and doesn’t keep track of your browser history.

Planning a trip abroad? Don’t forget your private browsing kit for Australia or any other part of the globe, starting with Tor.

Take a look at Tor’s outstanding features:

  • Erases browser history and encrypts all communication with every session
  • The only browser that gives you access to the Dark Web

⇒ Get Tor Browser

3. Mozilla Firefox – Open-source browser

firefox browser

Given that the Mozilla Foundation is a nonprofit organization, it is astonishing to see its volunteer coders working nonstop to make sure Firefox is stocked with the newest browsing and security capabilities within weeks.

Any Internet user would enjoy Firefox’s security features, which include phishing and virus prevention, blocking reported attack websites and web forgeries, and alerting users when a site tries to install add-ons.

Check out Mozilla Firefox’s best features:

  • You can disable telemetry
  • You’re able to disable the WebTRC
  • Has a built-in ad blocker

⇒ Get Mozilla Firefox

4. Brave – Best built-in ad blocker

brave browser

Using a built-in ad blocker that also prevents advertisements from monitoring your online activity, Brave includes a number of tools to keep your activity private.

It also has the ability to secure unencrypted websites with HTTPS. Due to its ad blocker, it is one of the best browsers without ads for adults to use.

Even though Brave’s new Tor tab is private, it falls short of the requirements set by Tor itself since it has a scalable window size that might be exploited to track your surfing habits.

Take a look at Brave’s top features:

  • Blocks trackers, cross-site cookie tracking, fingerprinting, and more
  • Client-side encryption for Brave Sync
  • Uses fine-grained/temporary permissions API
  • Private windows with Tor

⇒ Get Brave

5. DuckDuckGo – Blocks all Google trackers

duckduckgo browser

DuckDuckGo rigorously regulates the amount of personal information it gathers, in contrast to other search engines. That makes it an excellent option for users who want to keep their data private.

Same Internet, greater privacy -that’s how DuckDuckGo sums up its services.

Although, as of now it is only available as a search engine for PCs, it does have a browser for mobile phones that is just as safe as the search engine itself. Nonetheless, it is one of the best browsers for adults to use.

Don’t miss out on DuckDuckGo’s best security features:

  • Prevents search leakage by default
  • Does not collect or share personal information

⇒ Get DuckDuckGo

6. Chromium – The degoogled Chrome

Chromium is a free and open-source codebase that was first created by Google. It acts as the basis for several other browsers, including Chrome, Vivaldi, Edge, Opera, and Brave.

Because it doesn’t rely on Google’s online services, Chromium is effectively a degoogled version of Chrome. It is unobtrusive, light, and tracker-free.

Check out Chromium’s best features:

  • Has access to Chrome‘s extensions
  • Is open-source and without proprietary codecs

⇒ Get Chromium

7. LibreWolf – A privacy-tailored adult browser

A good privacy-focused browser is LibreWolf, which has a number of wonderful features including built-in ad blocking, a firewall, and the ability to utilize privacy-focused search engines like DuckDuckGo, Searx, and Qwant.

Here are some of the best security features of LibreWolf:

  • Removes telemetry
  • Doesn’t cloud sync your data
  • It doesn’t have sponsored content on the homepage
  • No Add to Pocket button

⇒ Get LibreWolf

What is the most unsafe web browser?

Back in 2020, the Edge browser was built on Chromium, which indicates that a portion of its code is available to the public.

What’s more, the browser regularly checks for and installs software updates, the majority of which will be security patches.


It was discovered by researchers in the field of information security that Microsoft Edge sends persistent identifiers that can be used to link requests (and associated IP addresses/locations) to backend servers.

The collecting of such data can expose a significant amount about the identity of the user, and there is not a whole lot that can be done about it.

If however, you choose to use this browser, here are the best VPNs for Edge to protect your privacy while you are using it.

What do you think about these adult browsers? Let us know by leaving a comment in the section below. Thanks for reading!

Paint Cannot Read This File: 5 Ways to Fix This Error

MS Paint is one of Windows’ best and oldest graphics editors and has many users to date. Sadly, almost everyone complains about running into Paint cannot read this file when opening a JPG or PNG image. Hence, we’ll discuss some steps to resolve the error on Windows 11.

Alternatively, many of our readers have reported that they cannot open the PNG files on their PC. Hence, check our solutions in this guide.

Why can’t Paint read this file?

Error message: Paint cannot read this file. This is not a valid bitmap file, or its format is not currently supported appears when opening a JPG or PNG image file you downloaded. Some of the factors responsible for this error are:

  • Unsupported image file format – MS Paint is only compatible with JPEG/JPG, Bitmap (BMP), GIF, PNG, and TIFF formats. So, attempting to open an unsupported file format on it can cause the error to appear.
  • Corrupt MS Paint app – The error can occur if the MS Paint app is compromised. It can be due to an outdated program preventing Paint from installing the necessary updates. Check out our file repair software recommendation to fix the app files.
  • Corrupt image files – If the image file you’re trying to open in the MS Paint app is corrupt, it can affect how it interacts with the app. Hence, it results in an error because Paint cannot read or access the file.
  • Outdated Windows OS – Running an outdated Windows Operating System on your PC can cause viruses or malware infection because of bugs. Do not hesitate to check what to do if Windows Update is not working here.

After accessing the error and its causes, we have devised some tested and effective solutions to resolve it below.

What can I do if Paint can’t read this file?

Before proceeding with any advanced steps, go through the following:

If the error appears again, proceed with the solutions below:

1. Run an SFC scan

  1. Left-click the Start button, type Command Prompt, and click the Run as administrator option.
  2. Click Yes on the User Account Control prompt.
  3. Type the following and press Enter: sfc /scannow 
  4. Restart your PC and check if the Windows update error persists.

An SFC scan will detect corrupt system files that can prevent the user profile from loading. You can check how to fix the run as administrator option if it’s not working on your PC.

2. Update Paint in the Microsoft store

  1. Left-click the Start button, type Microsoft Store, then click to open it.
  2. Click the Library in the top right corner, then select Downloads and updates from the drop-down.
  3. Click the Get updates button to prompt all your installed apps, including MS Paint to update.

Updating apps in the Microsoft Store will fix any compatibility issues and corrupt program files affecting its performance.

3. Repair the Paint app

  1. Left-click the Start button and click on Settings.
  2. Select the System and choose Installed apps.
  3. Select the three dots beside the Paint app and click on Advanced options.
  4. Locate and click on the Repair button or click on the Reset button if it fails to work.

By forcefully repairing the app, it should function better. Hence, if the file is supported, Paint 3D should open it with ease.

4. Disable Windows Firewall

  1. Click the Start button, type control panel, then press Enter to open the Control Panel.
  2. Select the Windows Defender Firewall option.
  3. Click the Turn Windows Defender Firewall on or off option from the left side.
  4. Go to the Private network settings and Public network settings, then click the radio buttons for the Turn off Windows Defender Firewall (not recommended) option.
  5. Exit the Control Panel and restart your PC.

Disabling the Windows Defender Firewall will fix any interference it is causing the Paint software or the image file.

5. Update Windows OS

  1. Press the Windows + I to open the Windows Settings.
  2. Click on the Windows Update category and click on Check for Updates. Wait for the Windows update result and click on Install Update if a Windows update is available.

Updating the Windows OS will install patches for fixing bugs and resolving compatibility issues liable to cause the issue.

However, you can convert or open the image file with one of the best photo editors for Windows 11 and check if it works in MS Paint.

Alternatively, we have a detailed guide about Paint Shop Pro compatibility issues and ways to fix them. Also, check the best painting software for Windows 11.

If you have further questions or suggestions, kindly drop them in the comments section.

How to Disable Intel SpeedStep Technology

SpeedStep is a technology built by Intel to help optimize system performance in some supported CPUs. However, you may encounter problems like SpeedStep activities not being stable, causing the system to be slow or perform poorly. Hence, we’ll take you through some basic steps to disable the features.

Also, we recommend you go through our guide on how to undervolt your CPU on Windows 11.

Is it OK to disable Intel SpeedStep Technology?

Disabling the intel SpeedStep technology does not affect any core processor or components running on the PC. Since it is not an essential system component, stopping its implementation will not pose issues with other programs and tools.

However, disabling it may affect the battery life and power consumption if used to save energy. But if the intel SpeedStep feature is not performing these functions for you, it is safe to disable it.

How can I disable Intel SpeedStep Technology?

1. Disable SpeedStep in BIOS

  1. Press the Windows + I key to open the Windows Settings app.
  2. Select System and click on Recovery.
  3. Then, click the Restart Now option under Advanced startup.
  4. Click Troubleshoot and select Advanced options.
  5. Tap on UEFI Firmware Settings, and click Restart. The system will restart and enter the BIOS menu.
  6. Choose the Advanced tab on your BIOS.
  7. Select CPU Power Management Configuration to disable SpeedStep.
  8. Select Intel SpeedStep or EIST, then select the Disable option to turn the SpeedStep Off.
  9. Exit the BIOS and restart your PC.

Do not hesitate to check our guide on resolving corrupt BIOS components that may cause the BIOS not to work.

2. Disable SpeedStep via the Windows Power Option

  1. Press Windows + R key to open the Run dialog box, type control, then press Enter to open the Control Panel.
  2. Click on the System and Security option and select Power Options from the right pane.
  3. Select either the Balanced or Power save option.
  4. Click on the Save option to save the settings.

Though you cannot disable SpeedStep without using the BIOS, the steps above are the closest way to doing something similar to it.

In addition, we have a comprehensive guide on how to safely overclock your CPU without BIOS on Windows 11.

Likewise, you can read about some of the best Intel overclocking tools to maximize performance on your PC.

Should you have further questions or suggestions, kindly drop them in the comments section below.

How to View the VLC Log File [Quickest Way]

The Log file feature in VLC stores events and allows users to check the log files for troubleshooting. However, many users find it hard to locate the log files whenever needed. So, this article will explore the quickest ways to view VLC log files.

Alternatively, you can read about fixing errors with VLC is can not open the MRL on your device.

What is a VLC log file?

A VLC log file contains a detailed description of the activities and events on the VLC media player. It is created by VLC when it is in use, and its detailed information can include the player’s actions, such as the files played, the video codec packs used, and any errors that occur during playback.

Can I delete the VLC log file?

Yes, you can delete the VLC log file. Deleting the log file will not harm the VLC media player or its functionality.

However, if you are experiencing issues with the VLC media player, the log file may contain valuable information to help you diagnose and fix the problem. In this case, it is advisable to make a backup of the file before deleting it.

How can I view the VLC log file?

1. View the VLC log file directly in the VLC player

  1. Launch the VLC Player on your computer.
  2. Select the Tool tab from the menu bar and click on Messages from the drop-down menu to open the error log.
  3. You will see all the events since the last time you used VLC Player on the new page.
  4. If you want to save the log file, click on the Save as button to extract the error log to your PC.

Extracting the log file allows you to share it with other users and use it for other purposes.

However, if you can’t find the log file on your VLC Player, you can create a new one to store the details of events on the app. Follow the steps below to create a new log file and how to view it:

2. View the VLC log file by creating a new Log file

  1. Launch the VLC Player app on your PC.
  2. Select the Tool tab from the menu bar, then click on Preferences.
  3. Navigate to the Show settings tab, then click on the radio button for the All option.
  4. Check the box for Log to file on the right pane, then click the drop-down button against the Choose Log format and select either HTML or Text.
  5. Click on the Browse button and create the log and set the proper location of the log.
  6. Go to the Verbosity tab, then select Info.
  7. Click the Save button to keep the changes.

Creating the Log file allows the VLC file logger to record any error that occurs while starting or using VLC in the file you created.

In conclusion, you can read about how to fix audio not working in VLC. Also, check our guide about how to fix VLC not working on Windows 11.

If you have further questions and suggestions concerning this guide, kindly drop them in the comments section.

Microsoft intends to launch its Xbox mobile gaming store in 2026

According to a new report, Microsoft could be ready to debut its Xbox mobile gaming store as early as next year. Of course, this is all dependent if the company’s Activision Blizzard deal goes through.

We first learned about the company’s “next-generation store” late last year, a month after Microsoft announced its acquisition of Activision Blizzard. It’s no secret that the company has been busy at work making strides to ensure that it taps into newer markets, particularly in the gaming sector. Xbox head, Phil Spencer has confirmed that the Xbox mobile gaming store is currently in the works.

As per the EU’s Digital Markets Act, key industry players like Google and Apple will be required to open their mobile app stores to other companies. This change is set to take effect as soon as next year. That said, Microsoft could technically leverage this opportunity to tap into iOS and Android via its Xbox app store around the same timeframe.

This will essentially allow Microsoft’s game store to take on Apple and Google’s mobile gaming stores and give them a run for their money. Microsoft disclosed that it intends to make use of Activision Blizzard mobile titles like Candy Crush Saga, Diablo Immortal, and Call of Duty: Mobile to get more users to hop on the new platform once it ships.

While on an interview with Finacial Times, Xbox’s head, Phil Spencer indicated that:

We want to be in a position to offer Xbox and content from both us and our third-party partners across any screen where somebody would want to play. Today, we can’t do that on mobile devices but we want to build towards a world that we think will be coming where those devices are opened up.

Once the Activision deal goes through, Microsoft will be able to compete with the likes of Google and Apple on an even playing field as it will provide the company with “much-needed expertise in mobile game development, marketing, and advertising.”

That said, Microsoft’s deal is yet to be cleared by regulators. Recently, Microsoft devised new remedies to appease the European Commission in regard to its proposed merger with Activision Blizzard. And even struck deals with Boosteroid and Ubitus to bring Call of Duty and other Xbox titles to those platforms for the next 10 years.

Let us know what you think about Microsoft’s Xbox mobile gaming store in the comments.

via: Financial Times

How to Stop Xbox Controller from Opening Virtual Keyboard

When you plug in your Xbox controller to your Windows PC, the last thing you would expect is for it to open the virtual keyboard. Granted, you may have pressed a key accidentally that brought up the keyboard. Sometimes, even the Windows onscreen keyboard keeps popping up.

However, some users have complained that the keyboard pops up, and even after numerous attempts to close it, it still appears on your screen. For today’s article, we get to the root cause of the problem and how to get rid of it.

Why is my controller showing up as a keyboard?

While the keyboard appearing on your screen is not peculiar, users noted that this particular keyboard was not the standard Windows virtual keyboard. A blue keyboard which implies it is the Steam virtual keyboard made a common appearance.

Still, other reasons why the Xbox controller keyboard keeps popping up include:

  • Glitches in software – It is possible that your Xbox controller is not working because it is experiencing sudden changes or bugs that may interfere with its normal operation.
  • Outdated firmware – If you have been using your Xbox controller for a while without updating it, it may exhibit some glitches due to software inconsistencies.
  • Unplugged controller suddenly – If you suddenly unplug your controller while Steam is running, Steam will temporarily think that no controllers are connected and switch to a keyboard-only interface.

How do I stop my Xbox controller from opening my keyboard on my PC?

While the technical solutions have been proven to work fine, a few basic workarounds that may help fix the issue include:

  • The first thing to try is unplugging your controller and plugging it back in. 
  • If you’re using a wireless controller, make sure that the batteries are charged and that they are installed properly.
  • Disconnect all peripherals, then connect only your Xbox controller and see if the keyboard still pops up.
  • Try using a standard keyboard and mouse and check if the problem persists. Perhaps your Xbox controller is the problem.
  • Check for any firmware updates for your Xbox controller and install them if available.
  • Also, update your OS to the latest version to get rid of any incompatibility issues.
  • Update your Steam client software.
  • Clear Steam cache.
  • Uninstall recently installed third-party software.

1. Restart your Xbox console

  1. Press the Xbox button on your controller to open the guide menu.
  2. Navigate through and select the Profile & system option, then click Settings.
  3. Go to General and click on Power mode & startup.
  4. Select Restart now from the power options.
  5. Then select Restart console.

2. Disable the Steam keyboard 

  1. Launch Steam on your PC and click on the View tab.
  2. Click on Settings and find your controller.
  3. Select Controller and click on Desktop Configuration.
  4. Click on the box displaying various Arrow keys at the bottom left of the screen.
  5. Next, select the Show Keyboard option under the Click Action settings. 
  6. You will now see a keyboard and mouse displayed on your screen. Hit the Remove button, then press OK to save the settings.

You can also disable your Windows virtual keyboard if the issue keeps appearing.

2. Reset the Xbox controller

  1. On your controller, press the Xbox button, and on the menu, click the System tab to open Settings.
  2. Select System, then click on Console info.
  3. Hit Reset console.
  4. Choose Reset and keep my games & apps.

Resetting your Xbox controller could help clear any glitches that may be affecting normal operations. If the issue is caused by one of the apps or games you have installed, when resetting, instead of choosing the option to keep your files, select the one where you remove everything.

4. Reinstall Steam

  1. Press on the Windows key, type Control Panel in the search bar, and click Open.control-panel-search fallout new vegas runtime error
  2. Now, under the Programs section, click on Uninstall a program.going uninstall program control panel
  3. In the shown list, locate Steam, right-click on it, then select the Uninstall option.
  4. Proceed to Steam’s website to download it.

The option to uninstall Steam should be a last resort if none of the preceding solutions work. Should the issue be with your controller, it may be time to switch to a modern-day Xbox controller with exquisite features.
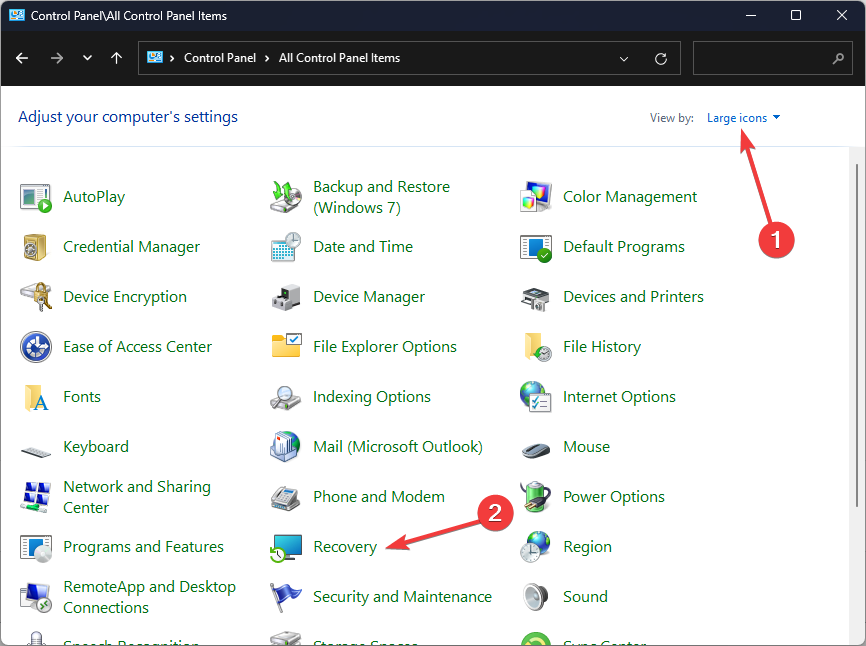
You may also come across Xbox controller driver issues but do not fret as we show you how to bypass such hiccups.
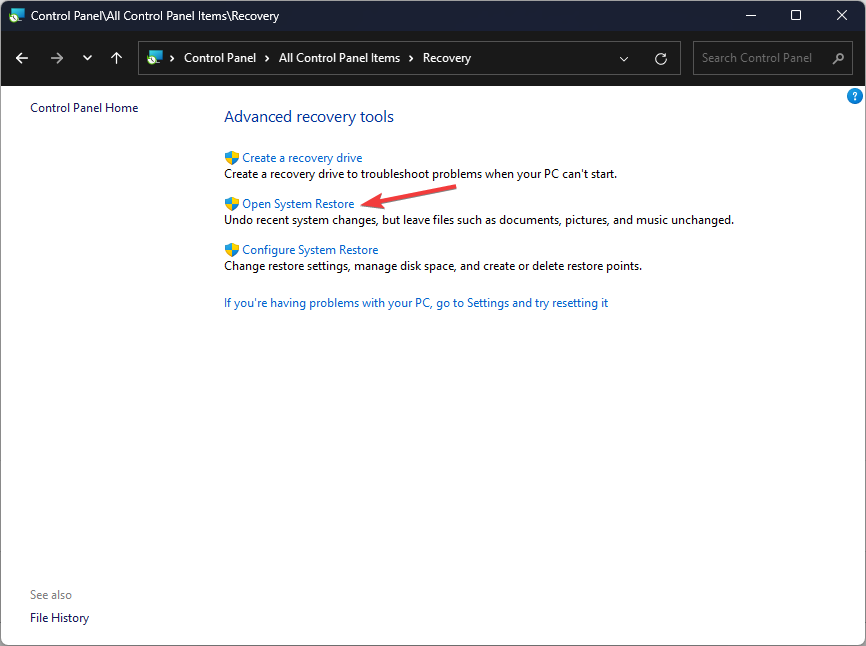
That’s it for this article but do let us know of any other solutions not mentioned here that may have helped you resolve this keyboard issue.

Microsoft sets pinning and default policies for 1st and 3rd party apps

In a recent Microsoft press release, the company patted itself on the back for their latest commitment of “empowering” developers with support for third party application pinning and Taskbar pinning.

According to last week’s press release, Microsoft is committing itself to the following:

  • We will ensure people who use Windows are in control of changes to their pins and their defaults.
  • We will provide a common supported way for application developers to offer the ability to make their app the default or pin their app to the taskbar. This will provide users a consistent experience across all apps.
  • Microsoft apps will use the same common supported methods for pinning and defaults.

As a matter of practicality, the above proclamations amount to new publicly available APIs for developers that will allow their apps to be pinned as either primary or secondary tiles to the Taskbar.

While the end result of the new support will fundamentally look the same, Windows 11 users will now be notified in the Action Center about a pending request from the app, to be pinned to the Taskbar in similar fashion as the Edge browser employes when pinning websites as apps to the Start Menu, Taskbar or both.

As for defaults, Microsoft says it will offer “a new Settings deep link URI for applications to take their users directly to the appropriate location in Settings for the user to change their defaults.”

Windows Default Setting

Microsoft may not have publicly acknowledged a backtracking on its own recent bullish default practices with Edge, it is retrenching in its belief that offering specificity will help the end users. It is debatable whether or not users understand protocols or file extensions, but they dropping them into the exact place to set their favorite app as the default interaction could be beneficial.

Not as beneficial as automatically applying the default to the correct extensions and protocols as the OS had once done, but more beneficial than Microsoft simply replacing a third-party apps interaction with its own.

Windows Insiders on the Devi Channel flight release cycle should start seeing these features pop up in the coming months.

High FPS But Not Smooth: How to Fix Your Choppy Gameplay

So you’ve gone ahead and gotten the best graphics card money can buy, acquired enough RAM to accommodate all your game files, and even with high FPS, your game is still not smooth. You may have 144 FPS, but your game is not smooth. What could be the reason?

Although Windows 11 has been optimized for gaming, some factors may affect your gaming experience. In today’s article, we explore why you’re experiencing choppy gameplay with high FPS and how to mitigate this issue.

Why is my FPS so bad with good specs? 

Whereas you can increase your FPS in Windows 11 to boost your gaming performance, sometimes this is not enough. You may notice that your game is not smooth. But why does this happen? Below are some possible causes:

  • System requirements – Each game has its requirements to perform well. No matter how good your PC specs are, they are not good enough if they don’t meet the particular game’s specs.
  • Hardware failure – Even the best GPU will fail over time. You need to look out for signs of GPU failure so that you don’t end up struggling to play a game when you can easily replace it for enhanced gameplay.
  • Power supply  – The higher your fps settings, the more power your PSU draws. Your game will be stuttering if you do not have sufficient wattage to accommodate this much power.
  • Outdated OS – Although some people prefer not to update their Windows often, this can play a huge role when it comes to playing games. Most games have been optimized for the latest software so there may be some inconsistencies if your OS is not up-to-date.
  • Insufficient RAM – It’s a disservice to your PC to have a good graphics card but not enough RAM to run your game. You need to create a balance between the two.
  • Refresh rate – The refresh rate of your PC matters as it determines how fast your display responds per second. If you’ve set it to low, you might experience a choppy screen even with high fps.
  • Power settings – Your power settings also matter in that they determine how much your CPU is willing to push its limits. If it is set below the optimal limits, your game will have a hard time living up to its performance.

How do I fix a choppy gameplay even with high FPS?

We recommend you try the following basic checks before moving on to more advanced solutions:

1. Adjust your resolution settings 

  1. Hit the Start menu icon and select Settings.settings windows 11
  2. Click on System then select Display.Settings - System - Display High CPU usage New World
  3. Navigate to the Scale & layout section then under Display resolution, click on the drop-down menu and pick a lower resolution setting than your current one.Display resolution
  4. You may need to restart your PC for the changes to take effect.

2. Change your refresh rate 

  1. Press the Windows key and click on Settings.settings windows 11
  2. Click on System on the left pane, then select Display.Settings - System - Display High CPU usage New World
  3. Navigate to Advanced display.
  4. Next, Choose a refresh rate from the drop-down menu. 
  5. Restart your PC.

3. Adjust your power plan settings

  1. Hit the Start Menu icon, type Control Panel in the search bar, and click Open.control-panel-search fallout new vegas runtime error
  2. Navigate to Power Options and click to Open.
  3. Select the High Performance option as your new plan and check if there are any improvements.

If, at this stage, you’re still experiencing some stuttering in your games, you may need to upgrade your GPU. Changing your PSU could also do you some good, especially if it wasn’t delivering enough power. 

When trying out some of these solutions, some users noted that FPS dropped after a RAM upgrade. Should you face a similar hurdle, refer to our detailed article on how to resolve it.

To further enhance your gaming experience, we have curated a set of graphic settings that guarantee you a good time. And for specifics, check out the best Tekken 8 settings for a budget PC.

That brings us to the end of this article, but it doesn’t have to stop here. Keep the conversation alive by sharing with us more tips on how to achieve smooth gameplay at all times.

Reached Daily Limit With Bing AI Chatbot? Here’s How to Trick It!

Microsoft Bing chat display limits errors when you’ve overloaded it with too many questions/ information. There are other possible causes and today we’ll show you how to address them all.

Let’s get kicking:

How to surpass daily limit with Bing Chat AI

Note icon NOTE
This is not exactly a bug. So don’t go to Microsoft for answers. It is a feature that was introduced to restrict the use of Bing’s AI chatbot by some users who were abusing it. 

1. Don’t overload your bot with unnecessary information

Before you start chatting with the chatbot, narrow down your topic and do not ask more than 15 questions on the same topic.

Any attempts to use up more than 15 tries could put your account at risk, and you may end up blocked.

2. Use an incognito tab/window

Some users who wanted to bypass the sorry you’ve reached your daily limit to chat bing message recommended using incognito mode. This feature allows you to browse privately without keeping your search history.

incognito-chrome there was a problem playing this video

This can assist you in asking more than 15 questions, and the bot won’t keep track. Most browsers have this feature, so you have to switch to a new incognito tab or window.

Also, find out more about the differences between Firefox’s private mode and Chrome’s incognito mode.

3. Create multiple accounts

Another workaround is to have different accounts. This way, you can easily switch to another once you hit your daily limit on one.

This also allows you to ask more than 15 questions as you can easily switch to the other account and continue with the superfluous queries you couldn’t complete in one account.

4. Use other apps

Bing chat AI is not only available on the web version. You can also use it on Android apps, giving you more room to expand your search queries. 

If you have exhausted your limits on the Edge browser, you can move on to your phone. Check out our article on how to integrate Bing chat AI with Edge and Skype mobile.

You can also use Bing chat AI with other browsers if you’ve exceeded your limits with the Edge browser. Hopefully, with these tips, you can get more out of the Bing chat AI.

Why Does Bing chat AI say I’ve reached my daily limit?

A section of users has reported that even though they have not used up all 15 tries per session when using the Bing AI, they get the sorry you’ve reached your daily limit to chat bing message. Some of the main causes include:

  • Exhausted quota per session – You may have reached the daily limit per search conversation.
  • Daily limit – It is possible you have already searched for the maximum number of queries within one day.
  • Inappropriate content – If you asked too many questions about topics that are banned from its service or other inappropriate content, your account may be flagged, and you’ll get a similar message.

The technology is still fairly new, and Microsoft is listening to users as they make more improvements. For instance, the 15 daily limit is an upgrade from 5, so it’s likely more will be added in the future. At the moment, you have to make do with the limits or use the tips presented above.

Elsewhere, if your Bing chat has disappeared, we have devised ways to get it back.

We’d love your feedback on Bing chat AI and how you’re coping with the limits in the comment section below.

How to use Microsoft Editor in Microsoft Edge

If your day is spent writing emails, copy, or similar text, you have to be crystal clear with your writing. And although spelling and grammar mistakes are not the end of the world, they can make you look unprofessional, at least from a business perspective.

But if most of your writing is done on Edge, then you’re in luck. Microsoft provides a free editing app, Microsoft Editor, which lets you check your spelling, grammar, and writing assistant. Lucky for you, the app also works on Microsoft Edge through an extension. 

So let’s look how at you can download and make the most out of Microsoft Editor.

How to download the Microsoft Editor in Edge

Microsoft Editor doesn’t come pre-installed in Edge by default. You have to download it instead. So let’s look at how you can install the Microsoft Editor on your Edge browser first.

  1. Launch the Edge browser.
  2. Head to Microsoft Edge Extensions, and look up the Microsoft Editor extension.
  3. Click on Get to download the Editor.
  4. When the download gets finished, click on Add extension.
  5. Now click on the Editor extension button next to the address bar.
  6. Click on Sign in button, and log in with your Microsoft or Microsoft 365 account.

microsoft editor

That’s it—from here on, the Editor will be successfully set up on your PC. You can click on the extension again and toggle on or off the features you would like to use from here on: Spelling, Grammar, and Refinements.

Moreover, you also have the Proofing language option. Click the scroll-down menu below it, then select the preferred language you want to use from here on.

Similarly, under the “Excluded sites” section, click the Add another site button and specify the websites you’d like to use with Microsoft Editor from here.

How to use Microsoft Editor on Edge

After you have set up the Microsoft Editor on your Edge browser, you will receive spelling and grammar suggestions across all your online documents—be it emails, social media, etc.

Let’s look at the features with the Editor extension in your hand in detail.


Using Editor on Edge for your emails

When writing an email, it’s not uncommon to make a barrage of mistakes. For instance, I have written a test email below where I have intentionally made two errors in the first sentence.

test mail

As you can see, the spelling error gets automatically highlighted by an underline. So when I click on the misspelled word, I’ll get an auto-suggestion with the correct wording or spelling. 


But, like most tech things tech, it can also work against you.

For example, if you use an uncommon name, the app will also highlight that. In cases like this, right-click the highlighted word, and select Add to Dictionary to learn the new term.

Some other features

The local feature is limited. It only comes with a feature for AutoCorrect, Spelling, and Grammar.

The paid version of the app, on the other hand, offers many features that make using the Editor a much richer experience. For instance, here are a slew of features on offer:

  • Clarity
  • Conciseness
  • Formality
  • References
  • Vocabulary
  • Resume

The list goes on, but along with handy features, you also get 1TB of OneDrive storage and premium features of all Microsoft 365 apps.

Using Microsoft Editor in Edge Browser

Microsoft Editor definitely brings a lot to the table. Whether you plan on using the Editor just on your browser or you’re thinking of using it to get it to other apps on Windows for daily use, consider trying out the premium version for at least a month. You can then see if you like all the features for more long-term use.

How to Fix Microsoft Teams App Not Working on Android

Microsoft Teams on Android is a powerful collaboration tool that enables teams to communicate, collaborate and stay organized in a virtual workspace. However, like any software, it can encounter errors that may disrupt the productivity and efficiency of its users.

These errors can range from minor glitches to critical issues that require immediate attention. Fortunately, most Microsoft Teams errors can be fixed with some simple troubleshooting techniques. In this article, we will explore some common Microsoft Teams errors and provide step-by-step instructions on how to fix them.

1. Check Your Internet

To keep your email accounts in sync, Microsoft Teams depends on your phone’s internet connection. Therefore, if your phone’s internet connection stops working, the Teams app on Android will also stop functioning, preventing you from sending or receiving emails through the app. Switch off the mobile data and turn it back again if you are using it.

And if you are connected to the WiFi, then try to open Google.com in a web browser. If it is not opening, then first switch off the WiFi on the phone and then turn it back on. When even that is not working, restart the router for any issues.

2. Check App Permissions

Checking app permissions in Microsoft Teams is important to ensure that the app has the necessary access to features and data to function properly. Reviewing and managing app permissions may help to resolve issues with the app not working correctly and improve the security of your Teams account.

  1. Long-press on the Microsoft Team’s icon and then head to the App Info icon.
    fix teams android not working
  2. Head to the Permissions section from the App info.
    fix teams android not working
  3. Give permission to every component by manually turning it on for each one.
    fix teams android not working
  4. Then check if Microsoft Teams is working properly.

3. Clear Temporary Files from the Teams App

When you have been using Microsoft Teams for a long time, it will gather a lot of data, especially temporary files. They can become corrupt and may result in slower performance or prevent you from using certain features.

  1. Tap on the profile picture in the Teams app.
    fix teams android not working
  2. Then go to Settings from the sidebar, which opens up from the left.
    fix teams android not working
  3. Head to Data and Storage from the general section.
  4. Scroll down and tap Clear temporary files.
  5. A prompt will appear confirming that the files have been cleared.

After that restart the app and see if the issues have been fixed.

4. Disable Battery Optimization

Smartphones use a lot of battery power for managing everything. Android has a battery usage feature to enhance battery life by restricting how apps consume power when running in the background.

You can disable battery optimization for Microsoft Teams and see if fixes the underlying problems.

  1. Long-press the Microsoft Teams icon and head to the App info through the shortcut.
  2. Scroll down and go to Battery.
    fix teams android not working
  3. Set the battery to unrestricted. Some phones will have unoptimized instead of unrestricted.
    fix teams android not working
  4. Restart the app and check if the problems are solved.

5. Disable Reduce Data Usage

Microsoft Teams has a data feature that is designed to work on slower as well as capped internet connections. This may reduce the quality of video and audio calls of your meetings. But the good news is that it can be disabled.

  1. Tap on your profile picture in the Microsoft Teams app
    fix teams android not working
  2. Select settings from the sidebar.
    fix teams android not working
  3. Go to Data and storage from the General section.
    fix teams android not working
  4. Then tap on Reduce data usage
    fix teams android not working
  5. Select Never and the check symbol will appear next to it.
    fix teams android not working
  6. After that head back and attend video meetings in a regular fashion. This should fix any issue pertaining to video quality.

However, if this does not fix the issues with video meetings then perhaps you should check the internet speed.

6. Uninstall Microsoft Authenticator App

Microsoft authenticator can throw in errors that will prevent you from logging into the Teams app. That is what a user found in the Microsoft forum so they uninstalled it and that fixed the problem for a number of people. Here is how you can remove the authenticator app.

  1. Long-press the Microsoft Teams icon, and then tap Uninstall.
    fix teams android not working
  2. Then click OK to confirm uninstallation through the prompt.
    fix teams android not working

7. Reset the App Database

Microsoft Teams stores a lot of information in its database on your device for a variety of purposes. It may get corrupted over time and a reset can fix the issue. Here is how it is done.

  1. Head to Data Storage from the Settings.
  2. Scroll down to the storage section and tap Reset database.
    fix teams android not working
  3. It will be completed in a couple of seconds and then you will land on the Team’s home screen. Then check if the issue has been resolved.

8. Reinstall Microsoft Teams

When nothing else works, it might be time to uninstall and then install Teams back again. Install it from the Play Store and then observe if that has solved the problem.

If that is also not solving the issue, then you might want to try installing Microsoft Teams on a different phone. That can help you check if there is an issue with the phone.

Make Teams Great Again

You can fix Microsoft Teams by following the methods we have discussed here. If you cannot solve it after applying all the techniques, then there can be an issue with the phone/tablet.

Total Identified Windows Installations: 0 [Meaning & Fix]

If you have encountered total identified Windows installations:0, this guide can help. We will discuss different ways to fix the issue along with the causes of the problem. Let’s start! 

What does total identified Windows installations:0 mean?

Total Identified Windows Installation:0 appears during the installation process of the Windows operating system. This means that the Windows installer didn’t detect any existing Windows installations on the computer’s hard drive.

This usually occurs if the hard drive is new, formatted, or the existing Windows installation is corrupted or damaged. 

What causes the total identified Windows installations: 0 issue?

There are several reasons why Windows installer may fail to identify existing Windows installations on your hard drive; some of the common ones are: 

  • Hard drive is new or formatted – If your hard drive is new or recently formatted, then you might not have Windows installations or data on it, hence the error.
  • Corrupted Windows installation –  If the existing Windows installation on the hard drive is damaged due to malware infection, hardware failures, etc, the installer might not be able to detect it.
  • Incorrect BIOS settings – If the BIOS settings on your computer are misconfigured, then the installer might show this error.
  • Issues with installation media – If the Windows installation media is corrupted, it might not be able to detect the existing Windows installation. 

What can I do if the total identified Windows installations: 0?

Before engaging in advanced troubleshooting steps, you should consider performing the following checks:

  • Check if the hard drive is properly seated on your motherboard.
  • Restart your computer.

1. Perform System Restore

  1. Press the Windows key, type Control Panel, and click Open.Control Panel Total Identified Windows Installations: 0
  2. Go to View by, select Category, and click Recovery.Recovery Control Panel
  3. On the next screen, click Open System Restore.Open system restore
  4. Select Choose a different restore point and click Next.Next Choose a different restore point
  5. Now select the restore point and click Next.Choose a point
  6. Click Finish to start the restoration process.Finish

2. Use the Boot Recovery feature

2.1 Prepare a recovery drive

  1. Download the Media Creation tool from the Microsoft website.
  2. Double-click the MediaCreationTool.exe file to run the setup.
  3. Click Accept.Accept Setup Windows 11 step1 Total Identified Windows Installations: 0
  4. Select Language and edition and click Next.Next setup Windows 11 step 2
  5. On Choose which media to use, select USB flash drive, and click Next.USB Setup Windows 11 step 3
  6. Select the USB drive and click Next. 
  7. Now Media Creation Tool will download important files to install Windows.

2.2 Recover registry 

  1. Insert your recovery drive and restart your computer.
  2. Click Repair your computer on the installation wizard.Repair your computer Total Identified Windows Installations: 0
  3. Select Troubleshoot.Choose an option - Troubleshoot
  4. On the Troubleshoot window, click Advanced options.advanced- Total Identified Windows Installations: 0
  5. Select Command Prompt from the Advanced options screen.
  6. Go to the following folder in the Command Prompt C:\Windows\System32\config with the following commands and press Enter after every command:  cd windows cd system32 cd config
  7. Type the following commands one by one to replace DEFAULT, SECURITY, SOFTWARE, & SYSTEM, and press Enter after every command: del c:\windows\system32\config\sam del c:\windows\system32\config\security del c:\windows\system32\config\software del c:\windows\system32\config\default del c:\windows\system32\config\system copy c:\windows\tmp\software c:\windows\system32\config\software copy c:\windows\tmp\system c:\windows\system32\config\system copy c:\windows\tmp\sam c:\windows\system32\config\sam copy c:\windows\tmp\security c:\windows\system32\config\security copy c:\windows\tmp\default c:\windows\system32\config\default
  8. Shut down your computer and remove the recovery drive and try to start your computer.

3. Use the Boot Recovery feature

  1. Open the command prompt using the same step mentioned in the 2.2 method.
  2. Copy and paste the following command to search for Windows installations that are not included in Boot Configuration Data and press Enter: bootrec /rebuildbcdCMD Total Identified Windows Installations: 0
  3. If you have Windows installed on your computer, type the below-mentioned commands one by one to remove and rebuilt it again, and press Enter every command: bcdedit /export c:\bcdbackup attrib c:\boot\bcd -h -r -s
  4. Copy and paste the following commands one by one to rename and rebuilt bcd and press Enter after every command: ren c:\boot\bcd bcd.old bootrec /rebuildbcd
  5. When the Add installation to boot list? question appears, type Y or Yes, and press Enter. 
  6. Once you see The operation completed successfully. Restart your computer and check if you can boot normally.

4. Reinstall Windows

  1. Create the recovery drive by following methods in the 2.1 method or if you have already inserted the recovery drive. Restart your computer
  2. When the PC restarts, click Install on the installation wizard.Install now Total Identified Windows Installations: 0
  3. Enter the license key or click I don’t have a product key to skip the step
  4. Select the operating system and click Next.
  5. On the next page, accept the license terms and click Next.
  6. Follow the onscreen instructions to complete the process.

So, these are the methods you can follow to fix Total Identified Windows Installations: 0 issue on Windows. If you have any questions about the issue, please feel free to mention them in the comments section below. We will be happy to help!

Epson Printer Error 1131: What Is It & How to Fix it

Epson printers are very good, but some of our readers reported the Epson printer error 1131 or Epson printer utility setup error 1131 out of the blue. It’s needless to say that the printer is unusable at this point but in this article, we will help you fix the problem immediately.

Why do I get the Epson printer error 1131?

It’s essential to understand why is the Epson printer returning the error 1131, and here are the main causes for this problem:

  • Corrupted or incompatible driver – Sometimes, due to crashes or other unfortunate events, the printer driver may get corrupted. An incompatible driver can also cause the Epson printer error 1131.
  • Installation problem – Ensure you follow the exact instructions from Epson when installing the printer. Otherwise, these kinds of problems may occur.
  • Corrupt files – If some system files or those from the Epson printer software are missing or corrupted, this is most likely causing an Epson printer error 1131.
  • Incorrect configuration – If the printer is not set up correctly, it can cause a number of errors like this one.
  • Malware or virus infection – A PC infection can mess up everything on your PC, including the printer software. Use one of the best antiviruses to run a full scan on your machine.

Now that we know what we’re dealing with, let’s go to the actual solutions to fix the problem.

How can I fix the Epson printer error 1131?

Before going into more complicated tasks, let’s run a few quick solutions that might fix the problem quickly:

  • Install all Windows pending updates.
  • Turn off your printer and your PC, disconnect the power and data cables, and wait for 30 seconds. Power your PC, reconnect the cables, and power your printer to see if the error still occurs.
  • Restart your PC. Although it seems futile, it might help.

1. Run the Printer troubleshooter

  1. Click the Start button and select Settings.
  2. Select Update & Security.
  3. Now, choose Troubleshoot from the left pane and click on Additional troubleshooters from the right.
  4. Select the Printer option and click on Run the troubleshooter button.
  5. Follow the on-screen instructions to carry out the troubleshooting process.

If Windows cannot connect to the printer, this guide will help you solve this problem as well.

2. Update the printer driver

  1. Right-click the Start button and select Device Manager.
  2. Click on the Printers section to expand it, right-click your Epson printer, and select Update driver.
  3. Click on Search automatically for drivers.
  4. The system will look for a driver update and install a new one if it finds it.
  5. If this doesn’t work, repeat step 1 and choose Uninstall device in step 2 to uninstall the driver.
  6. Restart your PC and the system will automatically detect the printer and install a driver for it.

Most printers, including the ones from Epson, usually come with media that contains software and drivers for the device.

Installing the latest version of the driver can prevent issues like Failed to install Port Handler service error code 1073; read this guide to learn more.

You may also try to use the media to reinstall the printer software right after you uninstall the device in step 5.

If you don’t have the media anymore, you can visit the Epson Support page, specify the model of your printer, and get the correct driver and software for your OS.

In case you want to rely on an automated method, you can use third-party software because it will find the latest update for your printer driver immediately.

⇒ Get IObit Driver Booster

3. Run SFC and DISM scans

  1. Click the Windows button, type cmd, and select Run as administrator to start Command Prompt with full privileges.
  2. Type or paste the following command and press Enter to run it: sfc /scannow
  3. System File Checker will scan your system files and repair them.
  4. After completing the scan, type or paste the following command and press Enter: DISM.exe /Online /Cleanup-Image /Restorehealth
  5. Wait for the DISM tool to complete the scan, then close the window and restart your PC.

If the Epson printer error 1131 is caused by file corruption, the SFC and DISM scans should repair them, and the situation should return to normal.

We also have a complete guide on what to do if System File Checker is not working if you stumbled on that problem.

4. Uninstall all other printer software

  1. Click the Start button and select Settings.
  2. Now, choose Apps.
  3. Look for any previous printer software, click on it, and select Uninstall.
  4. After you uninstall all printer software, reinstall your printer again, according to the indications from the Epson printer manual.

If you previously had a different printer from Epson or any other brand, its software might be conflicting with the new one.

Uninstalling all other printer software may fix the Epson printer utility setup error 1131 immediately, so try it out.

Here we conclude our article hoping that our solutions helped you fix the Epson printer error 1131, and now it’s working fine.

We also recommend consulting our guide on what to do if the Epson printer is not printing because it might bring additional information.

If you have any questions or possible working solutions, please write them down in the comments section below.

SystemSettings.exe Error: What Is It & How to Fix It

SystemSettings.exe is an executable file containing machine code in a non-readable form. This file runs as a background service on your Windows PC to ensure that Windows apps function properly. 

What is the SystemSettings.exe error?

When the SystemSettings.exe runtime error occurs, a System Error prompt appears on the screen with a message: The system detected an overrun of a stack-based buffer in this application. This overrun could potentially allow a malicious user to gain control of this application.

Along with this, some of our readers have also encountered the Unknown Software Exception error 0x40000015. The error mostly happens when the process requires the executable to run but fails to launch the EXE. 

What causes the SystemSettings.exe error?

Some of the other reasons for the SystemSettings.exe error are as follows:

  • Virus or malware attack – Malware infections are the most probable causes behind such application errors. We recommend scanning your system with one of the best antiviruses.
  • Corrupt system files – If the system files get corrupt or go missing for some reason, you are bound to get such errors.
  • Obsolete system drivers – Outdated drivers on your PC can give rise to incompatibility issues.
  • Corrupt user account – You can also encounter the SystemSettings.exe error if the Windows user account has become corrupt, so you need to create a new user account.

If you also see this error message on the screen, you can implement the methods provided in the guide to fix the SystemSettings.exe crash. 

How can I fix the SystemSettings.exe system error in Windows?

1. Run SFC and DISM scans

  1. Press the Windows key to launch the Start menu, type cmd in the Search bar and choose Run as Administrator from the right section of the results.SystemSettings.exe error
  2. Choose Yes on the User Account Control pop-up to grant administrative privileges.
  3. Type or paste the following command and press the Enter key to scan your computer. SFC/scannowSystemSettings.exe error
  4. After the SFC scan, type or copy-paste the following command and press Enter key. DISM /Online /Cleanup-Image /RestoreHealthSystemSettings.exe error

The SFC scan analyzes your system for damaged files, and the DISM tool scans and repairs the faulty files of the Windows system image, resolving the SystemSettings.exe error in Windows.

2. Scan the PC using Microsoft Defender

  1. Use the Windows + I shortcut to open the Settings app.
  2. Choose Privacy & Security from the left navigation pane, followed by Windows Security from the right. SystemSettings.exe error
  3. Next, select Virus & threat protection option.
  4. Click the Scan options located on the right.SystemSettings.exe
  5. Select the Microsoft Defender Antivirus (offline scan) option and press the Scan now button at the bottom.SystemSettings.exe

The Windows Defender program will scan your PC to find and remove viruses and malware if it finds any. After completing the scan, you will no longer get the SystemSettings.exe error.

If you have a thirty-party antivirus installed, use its menus to perform a full scan of your PC.

3. Create a new user account

  1. Use the Windows + I shortcut to bring up the Settings app.
  2. Switch to the Accounts settings from the left navigation panel and select the Family & other users option.SystemSettings.exe error
  3. Press the Add account button located under the Other users section.
  4. Click I don’t have this person’s sign-in information on the new pop-up.SystemSettings.exe
  5. Next, click Add a user without a Microsoft account option.SystemSettings.exe error
  6. Provide the login credentials and other related questions on the next screen and press the Next button.

Sign into your PC using the new user account, and hopefully, you will no longer encounter this error. SystemSettings.exe error can also occur if the current user account you are logged in to becomes corrupt. So, creating a new user account can help.

4. Update drivers

  1. Right-click the Windows icon and choose Device Manager from the Quick Links menu.SystemSettings.exe
  2. Double-click the Display adapters category to view the list of devices.
  3. Right-click the graphics card and select Update driver from the context menu.SystemSettings.exe
  4. Choose the Search automatically for drivers option.SystemSettings.exe error

This will prompt your computer to find the best available driver for the graphics card on the system and will automatically download and install them.

However, if you see a message saying the best drivers are already installed, close the Update Drivers window and try other methods to update the graphics card driver on Windows PC.

You can also go for the easier way of updating any drivers from your PC, completely automatically and without any risks. Outbyte Driver Updater is the most suited tool that can scan the system and update all outdated drivers in no time.

⇒ Get Outbyte Driver Updater

5. Perform System Restore

  1. Press the Windows key, type create a restore point in the Search bar, and select the top result to access the System Properties window.SystemRestore.exe error
  2. Click the System Restore button under the System Protection tab.SystemSettings.exe error
  3. Press the Next button.
  4. Select the restore point where your PC was functioning normally and press the Next button.SystemSettings.exe error
  5. Finally, press the Finish button on the Confirm your restore point window.

Performing a system restore will roll back all the changes that could be the reason for the SystemSettings.exe error.

The solutions above will help you fix the SystemSettings.exe error when accessing Windows apps on your PC.

Do not hesitate to go through our troubleshooting guide for the solutions to resolve the 0x8007045d error if you encounter them frequently. Need any further help? Feel free to reach out to us in the comments section.

amdacpbus.sys: How to Fix This Blue Screen Error

amdacpbbus.sys is a system file that appears on Windows computers running AMD hardware and software. But it’s also sometimes the source of the Blue Screen of Death or BSoD.

As you can imagine, having a faulty AMD driver can put a hamper on gaming. Imagine your system crashing in the middle of an online match. Fortunately, there are ways to fix this problem.

What causes the amdacpbus.sys error?

Let’s go over what causes the error in the first place before going into solutions because the culprits can be seemingly benign things. And if it does happen to you, you’ll know how to fix it.

  • Something is wrong with your computer’s drivers – There could be an incompatibility issue. You’ll need to roll back the driver update to address this.
  • Your computer lacks important system updates – Conversely, the problem could be that your drivers are out of date. Be sure to download the latest Windows Updates.
  • Malware has infected your computer – File corruption can be caused by malware and faulty drivers. Be sure to install some antivirus software to clean it up.

How can I fix the amdacpbus.sys error?

Now let’s go into fixing the amdacpbus.sys error, which there are many different ways to do so. If one doesn’t work out, you can try out another method:

  • Reinstall your audio and motherboard drivers from your computer’s manufacturer. amdacbus.sys affects audio drivers, so something may be corrupt on your system.
  • Use the System Restore to revert Windows 11 to an earlier state before the errors started to occur. If you don’t know how to make a restore point, read our guide on creating one.
  • Update your system using the Windows 11 Media Creation Tool. It’s a great and free way to install a bunch of updates to your computer simultaneously.
  • And if all else fails, we recommend contacting your computer’s manufacturer, especially if your machine runs on AMD hardware.

1. Run SFC and DISM scan

  1. Bring up Windows Command Prompt on your computer’s search bar and select Run as administrator.
  2. Enter the following command into the prompt and run it: sfc /scannow
  3. Give your computer ample time to finish the process.
  4. Once done, type in these commands and press Enter on your keyboard one after the other: DISM /online /cleanup-image /checkhealth DISM /online /cleanup-image /scanhealth DISM /online /cleanup-image /restorehealth
  5. Restart your computer and see if the problem has been solved.

2. Uninstall drivers through AMD Clean Uninstall Utility

  1. Go to the AMD Cleanup Utility webpage and download the app from there.
  2. Go to where the file’s location and double-click it to run it.
  3. A new prompt will appear asking if you want to restart your computer in safe mode. For this guide, we’re going to select No although it is recommended you chose Yes for the best results.
  4. Select OK on the following window.
  5. A banner will appear as the cleanup is working. Don’t worry if the banner goes blank a few times.
  6. Once done, a new prompt will appear telling you the software has finished. Click Finish.
  7. On the next window, you have an opportunity to restart your computer to finish up the changes. You can do so now or later.

3. Update via AMD Driver Autodetect

  1. If you don’t want to install AMD drivers manually, you can do so via the AMD Driver Autodetect app. Go to the software’s webpage and download it.
  2. Run the file you just downloaded and go through its installation wizard.
  3. Next, AMD Driver Autodetect will launch automatically and proceed to install drivers for your supported GPU.

4. Perform a clean boot

  1. Launch the System Configuration app from the Windows Search bar. Once open, go to the Services tab.
  2. First, enable Hide all Microsoft services, then select the Disable all button. Afterward, click Apply.
  3. Next, go to the Startup tab and select Open Task Manager.
  4. One by one, disable each enabled item. Make sure you keep track of each one you disabled.
  5. Close Task Manager, return to the Startup tab of System Configuration, and click OK. This will restart your computer in Clean Boot mode.
  6. While in Clean Boot mode, re-enable the apps from earlier and see if they work properly. If one doesn’t, that’s the problematic app causing the BSoD. Uninstall it.

What can I do if AMDPPM.sys cause the BSoD?

AMDPPM.sys (AMD Primary Processor Module) is a driver to enable internal and external AMD hardware. If the file is corrupted, it can cause systemic problems like the Blue Screen of Death.

There are a couple of things you can do to fix a faulty AMDPPM.sys file, like running an SFC scan (as shown earlier) and resetting your computer’s BIOS.

While we have you, be sure to check out how to fix BSoD Error 777, which is an operating system failure caused by unwarranted changes made to the registry editor.

It’s recommended that you perform an automatic repair to address this issue. Just ensure you have a bootable USB drive for Windows 11 before performing it.

UiSeAgnt.exe: What Is It & Should You Disable It?

Some files on the system may camouflage as genuine system files while infecting them with viruses and malware. One such file is the uiSeAgnt.exe on Windows 11. Hence, this article will explain what uiSeAgnt.exe is and provide ways to disable it.

Since these files can also cause exe files not to open on your PC; you should check what to do here when such occurs.

What is uiSeAgnt.exe?

The uiSeAgnt.exe (User Interface for Client Session Agent) file is an extracted executable software file of Trend Micro Worry-Free Business Security by Trend Micro. It is responsible for running an endpoint application that provides real-time security services known as Session Agent.

Furthermore, uiSeAgnt.exe is not an essential Windows process. So it can be modified depending on your preference. Though the file can be attached to a specific component and threaten the system if it is corrupt or compromised by viruses or malware.

The benefit of keeping the file is:

  • It allows the Trend Micro Worry-Free Business Security software to work on your computer.

Reasons you should disable it:

  • The uiSeAgnt.exe file can be a virus or malware disguised as an executable file.
  • If you don’t use the Trend Micro Worry-Free Business Security software, the file is unnecessary.

Moreover, disabling it can’t pose any risk or danger to the system since it’s not an essential component.

How can I disable uiSeAgnt.exe?

Before anything else, you should:

After this, you can try the tweaks below.

1. End task for uiSeAgnt.exe

  1. Right-click the Start button and select Task Manager from the menu.
  2. Go to the Processes tab. Select the uiSeAgnt.exe from the list, right-click on it, then click End Task from the drop-down menu.
  3. Then, restart your PC.

Ending the uiSeAgnt.exe process on your PC will kill its background activities and stop it from running. Check our article for more shortcuts to open Task Manager on your PC.

2. Remove the uiSeAgnt.exe file via File Explorer

  1. Press the Windows + E key to open File Explorer.
  2. Navigate to the following directory: C:Program Files\Trend Micro\Trend Micro Client Session Agent\Client Session Agent\uiSeAgnt.exe_uninstall.exe
  3. Launch the uninstaller and click the Uninstall Program option to remove the uiSeAgnt.exe file.

Removing the uiSeAgnt.exe file in File Explorer will disable the software Trend Micro Client Session Agent program and its components.

If the file still appears on your system, proceed to the next solution.

3. Run a System File Checker (SFC) scan

  1. Left-click the Start button, type command prompt, and select Run as administrator.
  2. Click Yes on the User Account Control prompt.
  3. Type this command and press Enter: sfc /scannow
  4. Restart your PC and check if the uiSeAgnt.exe file still exists.

If the uiSeAgnt.exe file is present without the Trend Micro Worry-Free Business Security software installed, it is likely malicious. So, running the System File Checker scan will find and remove the corrupt files on your PC.

Read our article about what to do if nothing happens when you select run as administrator on Windows 10/11.

4. Uninstall Trend Micro Antivirus Plus Security (or related software)

  1. Left-click the Start button, type Control Panel, then open it.
  2. Click on Programs, then select Programs and Features.
  3. Find the Trend Micro Antivirus Plus Security, then select Uninstall from the drop-down.
  4. Follow the onscreen instructions and Restart your PC to see if the uiSeAgnt.exe file is still running on your PC.

Uninstalling the program responsible for the uiSeAgnt.exe file prevents the threats it causes the system and removes its components.

In addition, you may be interested in antivirus software blocking .exe files on your PC and ways to fix it. Also, we recommend you read a similar article on what TrustedInstaller.exe is and why you should remove it.

If you have further questions or suggestions, kindly drop them in the comments section.

Ws-44750-0 PS4 Error: What Does It Mean & How to Fix It?

Like every other console, playing games on the PS4 console can run into several errors impeding its performance. However, the PlayStation Error WS-44750-0 is one of those errors that users complain about the most. This article will discuss some basic steps to resolve it and get your PS4 working.

Also, we have a detailed guide about this content that cannot be selected at this time on PS4 and some methods to fix it.

What does the WS-44750-0 PS4 error mean?

The WS-44750-0 error code appearing on the PS4 console indicates a failure in the network connection between the console and its servers.

It can occur during a game, during the console or game startup process, or while logging into the PSN.

What are the causes of the WS-44750-0 PS4 error?

The following are the notable causes that may be responsible for the WS-44750-0 PS4 error:

  • Network connectivity issues – The PS4 console requires a stable internet connection to connect with its servers. So, issues like network congestion and a slow internet connection can cause the WS-44750-0 PS4 error when it can’t connect to the server.
  • DNS error – If the console fails to resolve the IP address from the server or requested resources can cause the error to appear.
  • Server issues – PlayStation servers undergo maintenance to help improve performance and fix bugs. Hence, the console can’t connect with the server, resulting in the WS-44750-0 PS4 error.

As we go further into this article, we’ll take you through steps to resolve the error.

How do I fix the WS-44750-0 PS4 error?

Before attempting any advanced troubleshooting steps, proceed with the following:

  • Power cycle your router or modem.
  • Turn off background apps running on your PC.
  • Temporarily disabling third-party antivirus software.
  • Restart Windows in Safe Mode and check if the WS-44750-0 PS4 error persists.
  • Check for Router Firmware updates – you can read the router manual and check for router Firmware update procedures. Also, contact your router manufacturer for guidance on ways to update it.

If you can’t resolve the error, try the solutions below:

1. Test the console’s Internet connection

  1. Select Settings from the console’s Home Menu.
  2. Click on Network from the drop-down window.
  3. Select Test Internet Connection and wait till the test completes.
  4. Follow the on-screen instructions and check if the PlayStation 4 WS-44750-0 PS4 error persists.

Testing the internet connection will resolve any glitch in the communication modules impeding connection to its servers.

2. Change PS4 console DNS Settings

  1. Launch the PlayStation Settings from the Home Menu.
  2.  Click on Network from the drop-down window.
  3. Select Setup Internet Connection and choose the connection type like LAN or Wi-Fi.
  4. Click on the Custom button and set the IP Address field to Automatic.
  5. Click on the Do Not Specify for the DHCP Host Name field and select Manual for DNS under the DNS Settings.
  6. Type in the following DNS values:
    • Google DNS
    • Primary DNS: 8.8.8.8
    • Secondary DNS: 8.8.4.4
  7. Type in the following DNS values:
    • Cloudflare
    • Primary DNS: 1.1.1.1
    • Secondary DNS: 1.0.0.1
  8. Set the MTU Settings to Automatic and Proxy Server to Do Not Use.
  9. Click on the Test Internet Connection button. Once the test is complete, check if the WS-44750-0 PS4 error is cleared.

Reconfiguring the console’s DNS servers allows it to quickly translate the web addresses of the Sony servers.

3. Factory reset your console

  1. Go to Settings from the console’s Home Menu.
  2. Tap the Initialization menu and press the X button on the controller.
  3. Select Initialize PS4, then press the X button.
  4. Choose the Full option. It will reset settings, apps, and data.
  5. Press the X button when a confirmation menu pops up to confirm the Factory Reset process.
  6. After the reset procedure is complete, reinstall your game.

Resetting the console will restore it to default settings, removing the configuration and corrupt files, causing it to malfunction.

Before you go, don’t miss our PlayStation WC-36547-5 article and wc-40383-8 ps4 error code for more useful information and more on ce-33743-0 and how to deal with network errors.

If you have further questions or suggestions concerning this guide, kindly drop them in the comments section.

0x000000BE: What is This Error Code & How to Fix It

Some of our readers have reported encountering the 0x000000BE Blue Screen error when running their PCs. The error is usually accompanied by An attempt was made to write to read-only memory error message.

Nonetheless, we’ll take you through some fixes to resolve the error. Also, you can read our detailed guide about some factors that can cause a Blue Screen of Death on your PC.

What is error code 0x000000BE?

The 0x000000BE error message appears when you try to use the Storport.sys driver to manage some storage devices in Windows PCs. Some notable causes that can prompt the error are:

  • Wrong Registry Editor configuration – The Windows Registry Editor is responsible for the directories and files for services running on the Windows operating system. So, you may run into the 0x000000BE Blue Screen of Death error when there is a corrupt Windows registry or clustered entries.
  • Outdated drivers – You may encounter the error due to outdated drivers on your computer. It prevents you from accessing the updates for resolving driver bugs.
  • Corrupt or missing system files – Having corrupt system files on your computer can cause an Attempt to was made to write to read only memory to occur if the files responsible for the task are corrupted or missing.

Regardless of the causes, try the fixes below to fix them.

How can I fix the error code 0x000000BE?

Before trying anything, apply the following:

If you can’t fix the problem, try the solutions below:

1. Run the SFC and DISM to repair damaged system files

  1. Left-click the Start button, type Command Prompt, then click Run as administrator.
  2. Click Yes on the User Account Control (UAC) prompt.
  3. Type this command line and press Enter:  sfc /scannow
  4. Type the following commands and press Enter after each: DISM /Online /Cleanup-Image /RestoreHealth
  5. Restart your PC and check if the 0x000000BE Blue Screen error persists.

Running SFC and DISM scans will find and repair corrupted Windows system files causing the error on your PC. Read ways to fix the run-as-administrator option if it’s not working on Windows 11.

2. Update device drivers via Windows Update

  1. Press the Windows + I key to open the Settings app.
  2. Select the Windows Update tab and select the Advanced options.
  3. Tap on Optional Update.
  4. Click the drop-down button on the Driver Update and check the list of updates available.
  5. Click the Update and Install button and wait for the driver update to install.

Updating drivers will fix bugs affecting their functionality and improve the device’s performance. Check our guide m about ways to diagnose and fix Windows Update not loading on your computer.

3. Perform a Clean Boot

  1. Press Windows + R key to open the Run dialog box, type msconfig, and click OK.
  2. Click the Services tab, check the box for the Hide all Microsoft services option, then click the Disable all button.
  3. Go to the Startup tab and click Open Task Manager.
  4. Click the startup programs and tap the Disable button.
  5. Restart your PC and check if the error persists.

Performing a clean boot prevents startup programs liable to cause the error 0x000000BE from running when you start the system.

4. Run Blue Screen Troubleshooter

  1. Press the Windows key, select the power icon, and hold the Shift key while clicking Restart.
  2. Then select Troubleshoot.
  3. Select Startup Repair in the Advanced options.
  4. This will auto-troubleshoot the BSoD error.

Perform a Blue Screen troubleshooter finds and remove issues causing the 0x000000BE Blue Screen error.

5. Update Windows OS

  1. Press the Windows + I to open the Windows Settings app.
  2. Click the Windows Update category and click on Check for Updates on the left pane. If there are new updates, they will be prompted for downloading and installation.
  3. Restart your PC to take effect.

Updating the Windows OS will install new updates and patches for fixing bugs, adding new features, and resolving system problems.

Read about fixing Windows not connecting to update service if the error occurs on your PC.

If you have further questions or suggestions concerning this guide, kindly drop them in the comments section.

Fix: Device Has Stopped Responding or Has Been Disconnected

Encountering the error, the Device has either stopped responding or has been disconnected can be annoying. Since this error appears when you attempt to copy files from external devices like printers, scanners, or external hard drives on your PC.

Luckily, this article will proffer solutions to fixing the error. Likewise, we have a detailed guide on fixing Windows detecting a hard disk problem on your PC.

What causes the device has stopped working or has been disconnected error?

Some notable causes are:

  • Faulty hardware – If the error appears during a file transfer, it means there’s an issue with the external hard drive or other devices involved. It may be a physical fault or configuration settings that impede its functionality.
  • Issues with the USB Controller – USB Controllers help the devices connected to the PC function correctly and interact with the necessary system components. Hence, the error may occur if the Controllers aren’t intact or working correctly.
  • Corrupt system files – The system files responsible for the devices you’re trying to run may not be accessible. Also, they may be corrupted, causing them to malfunction.
  • External device connection issues – If the USB drive or other external devices are not rightly connected to the system, it may cause problems with file transfer or other activities.

Though these factors vary on different computers, you can fix them by following the steps below.

How can I fix Device has either stopped responding or has been disconnected?

Before proceeding with anything, go through the following:

If you still can’t fix the problem, try the solutions below:

1. Run the hardware troubleshooter

  1. Left-click the Start button, type Command Prompt, and click the Run as administrator option.
  2. Click Yes on the User Account Control (UAC) prompt.
  3. Type the following and press Enter: mysdt.auxiliary diagnostic device
  4. Click Next to proceed with the scan and troubleshooting process.
  5. After the troubleshooting, try to perform the task and check if it works.

Running the Hardware and Devices troubleshooter will resolve hardware connection issues that may cause the error. Should the Command Prompt stop working, kindly check our guide to fix it.

2. Run an SFC scan

  1. Left-click the Start button, type Command Prompt, and click the Run as administrator option.
  2. Click Yes on the User Account Control prompt.
  3. Type the following and press Enter: sfc /scannow
  4. Restart your PC and check if the Device not responding issue persists.

Running an SFC scan will detect and repair corrupt system files causing the device or peripheral issues. Check how to fix the run-as-administrator option if it’s not working on your PC.

3. Uninstall USB Controllers

  1. Press Windows + R key to open the Run dialog box, type hdwwiz.cpl, and click OK.
  2. Go to the Universal Serial BUS Controllers tab, right-click on the Generic and USB Root Hubs, and select Uninstall device from the drop-down to remove the Controllers.
  3. Restart your PC to automatically reinstall the Controllers, and check if the error persists.

Uninstalling the USB Controllers will allow your system to reinstall credible ones and use them for its activities.

4. Update device drivers via Windows Update

  1. Press the Windows + I key to open the Settings app.
  2. Select the Windows Update tab and select the Advanced options.
  3. Click on Optional Update.
  4. Click the drop-down button on the Driver Update and check the list of updates available.
  5. Select the Update and Install button, then wait for the drivers to install.

Installing pending driver updates will fix bugs affecting the device and improve its performance. You can read about ways to diagnose and fix Windows Update if it’s not loading on your computer.

Moreso, you may be interested in ways to fix USB devices not recognized issues in Windows 11. Likewise, knowing what to do if you are unable to format an external hard drive might also be very important.

If you have more questions or suggestions, kindly drop them in the comments section.

GeForce Experience Driver Download Failed: 5 Ways to Fix It

Nvidia GeForce Experience allows users to optimize graphics card settings, update drivers, etc. Users may encounter a GeForce Experience driver download failed error during an update. Hence, we’ll explore the causes and provide solutions to troubleshoot them.

Alternatively, you can read about how to fix the Nvidia graphics card if it’s not detected in Windows 11.

Why did the GeForce Experience driver download fail?

Some of the reasons you encounter the failed download are outlined below:

  • Network connection issue – Network connection issues can bring about failure in the driver download if it can’t communicate with its servers.
  • Outdated GeForce experience app – App developers release newer software versions to improve performance. So, an outdated GeForce Experience app can lack the tweaks to update drivers on your device.
  • Antivirus conflict – The activities of antivirus software might conflict with other software like GeForce Experiences functionality.

Fortunately, there are some fixes you can follow to resolve the problem and get tie drivers updated.

What can I do if the GeForce Experience drivers download failed?

Try the following preliminary checks before proceeding with any advanced troubleshooting methods.

If the issue is not solved, proceed with the GeForce Experience driver download failed fix discussed below.

1. Enable automatic downloads in the GeForce Experience Client

  1. Press the Windows button, type GeForce Experience, and press Enter to open it.
  2. Then, click the gear icon in the top right corner to open Settings and select the General tab on the left side pane.
  3. Check the Automatically download driver updates and let me choose when to install the box.
  4. Relaunch the GeForce app and select the Drivers tab on the home screen to see the latest update available for installation.
  5. Click the Check for update box if none is displayed.

The above method will automatically notify you about the available driver’s update and installation.

2. Download the driver manually

  1. Open the Nvidia official download page on your browser.
  2. Click the drop-down arrow in the Product type, Product series, and product fields to select your graphics card details. Also, choose your Operating System.
  3. Select Game Ready Driver (GRD) from the download type and click the Search button.
  4. Click the Download button from the search results, then click the Download button to confirm your selection.
  5. Double-click on the download file in your browser to install it.

 Manually installing the driver is an effective means to update the GPU if the automatic update fails. You can check our guide about ways to update drivers manually on Windows 11.

While manually installing the driver options from the official website can be easy for some users it is always recommended to employ the help of a professional driver updating tool as they will scan your computer and download the right drivers in just a few minutes.

3. Reinstall GPU drivers

  1. Left-click the Windows icon, type Device Manager, and press the Enter key to open it.
  2. Scroll through and click on the Display adapters, right-click the GPU, and select Uninstall device from the context menu.
  3. Then, check the Delete the driver software for this device box and select Uninstall.
  4. Close the Device manager and restart your PC.

Reinstalling GPU drivers can help fix issues that may have occurred due to corrupt or outdated drivers.

4. Reinstall the GeForce Experience app

  1. Right-click the Windows + R to open the Run window, input appwiz.cpl, and click OK.
  2. Navigate to the GeForce Experience app, select it, and click on Uninstall.
  3. Wait for the process to complete, close the Window and reboot your system.
  4. Then, go to the Nvidia Officials webpage to download the GeForce Experience app.
  5. Double-click on the downloaded file and follow the on-screen command to install the app.

Reinstalling the GeForce Experience software will fix app bug errors with the GeForce experience driver download failed in 2022. You can read about how to download the GeForce Experience app on Windows.

5. Temporarily disable Windows Defender

  1. Press the Windows button, type Settings, and press Enter to open it.
  2. Next, click the Privacy & Security category and click Windows security.
  3. Select Virus and threat protection and click Manage settings.
  4. Then, toggle off the switch under the Real-time protection option.
  5. Select Yes from the User Account Control prompt to confirm your selection and close the Window.

Turning off Real-time protection will prevent the Windows Defender interference from causing GeForce experience driver download to fail on Windows 11. Further, do not hesitate to check our more comprehensive guide on how to disable Windows Defender on your device.

In addition, if you are interested in fixing Nvidia GeForce Experience when it stops working, apply the solutions in this article.

Should you have further questions or suggestions, kindly drop them in the comments section.

FindTime Not Working on Outlook: How to Enable It

FindTime is a new add-in that helps with plowing through your Outlook calendar and finding available time for your events. Lately, some of our readers have complained about FindTime not working.

So, this article will discuss why the add-in isn’t working and some fixes for it. Also, users complain about Microsoft Outlook crashing when opening the calendar on Windows PCs.

Why is FindTime not working on Outlook?

Many factors may be responsible for the FindTime add-in not working on Microsoft Outlook. Some notable ones are:

  • Disabled FindTime add-in – The FindTime add-in may not work in Outlook if disabled by a setting in the app’s configuration.
  • Add-in incompatibility issues – The add-in only supports Outlook 2013 or later. So, the Outlook app may not work, as well as the add-in, if you installed it on an incompatible app.
  • Corrupt Outlook PST or OST files – PST and OST files store local copies of email data and work done for migration across Outlook servers. If these files become corrupt, it can affect the add-ins running on them.
  • Outdated Outlook app and corrupt installation files – Not installing recent updates on the Outlook app can cause bugs to infect the app and impede its performance. Also, you can experience the FindTime plugin not working if the Outlook installation file is corrupt.

Nonetheless, you can fix the problem by following the solutions outlined below.

What can I do if FindTime is not working on Outlook?

Before proceeding with any advanced troubleshooting steps, go through the following:

If you can’t resolve the problem, go ahead with the steps below:

1. Check if the FindTime Add-in is Inactive or Disabled

  1. Launch the MS Outlook app on your PC.
  2. Click on the File tab and select Options from the drop-down.
  3. Click Add-ins on the left pane of the screen. Check if FindTime appears in the Active, Inactive, or Disabled section.
  4. If the add-in appears under Inactive, click the Manage drop-down and ensure the COM Add-ins is selected, then click Go.
  5. Check the checkbox next to FindTime and click OK.
  6. If the add-in appears in the Disabled section, click the Manage drop-down and ensure the Disabled Items option is selected, then click Go.
  7. Select the FindTime add-in, then click Enable in the bottom-left corner of the screen.
  8. Close Outlook and wait for 5 seconds before you start it again.

The steps above will help you enable the add-in if it was disabled earlier. Also, it will activate it in case it is inactive.

2. Repair Microsoft Office

  1. Press Windows + I key to prompt Windows Settings.
  2. Click the Apps menu and select Installed apps.
  3. Locate Microsoft Office in the apps list, click the menu against it, and select Modify.
  4. Select Quick Repair from the new menu and click the Repair button.

Repairing Microsoft Office will fix issues that can cause PST file errors on Outlook and other interference from similar Microsoft apps.

3. Update the Outlook app

  1. Press Windows + R keys to open the Run dialog box, type outlook.exe/safe, then click the OK to start Outlook in Safe Mode.
  2. Select Yes on the Microsoft confirm prompt.
  3. Click on File, select Office account, and click the Office updates menu.
  4. Click the Update Options button, then click Update Now from the drop-down to install pending updates on Outlook.
  5. Restart your PC and check if FindTime works.

Installing updates can fix Outlook disconnected errors and resolve issues affecting its add-ins’ performance.

4. Clear Outlook cache

  1. Press Windows + R keys to open the Run dialog box, type %LOCALAPPDATA%\Microsoft\Outlook\, then click OK.
  2. Right-click the RoamCache folder, select Copy from the drop-down, then paste it into another folder.
  3. Double-click the real RoamCache folder, select all the items in the folder, or press Ctrl + A, then press the Delete key.
  4. Restart your PC and check if the problem persists.

Clearing the cache will delete corrupt files causing issues with the FindTime plugin on Outlook.

Alternatively, we have a guide on what to do if Outlook crashes after Windows Update on your PC. Also, if you want to fix Outlook error 0x80070021 on Windows 11, do not hesitate to check out this article.

For more questions or suggestions related to this guide, kindly drop them in the comments section.