Click the Browse all Products option under the Identify your product or Search Support section.
Now, click the Software & Solutions option on the page that pops up.
Next, select the Software option in the left pane.
Choose Utilities from the list provided.
From here, choose Alienware Command Center from the Utilities list.
Now, click the Select this Product button.
Select the Divers & Download tab at the top.
Finally, click Download button and wait for the download to complete.
The first step to downloading and installing the Alienware Command Center on your PC is to go through Dell’s official website. Note that the link above is for 64-bit PCs.
❗ If you use a 32-bit system, download the suitable file. When the download is complete, proceed to the solution below to complete the installation.
2. Install the app
Double-click the downloaded file to run it.
On the page that pops up, click the INSTALL button.
Now, click the Yes button when prompted by UAC.
Wait for the installer to install some of the packages needed for the installation.
Finally, follow the onscreen instructions to complete the process.
After downloading the Alienware Command Center on Windows 11, you need to run the installer to install it on your PC. The installation process is pretty straightforward and should not take long.
How to uninstall and reinstall Alienware Command Center on Windows 11?
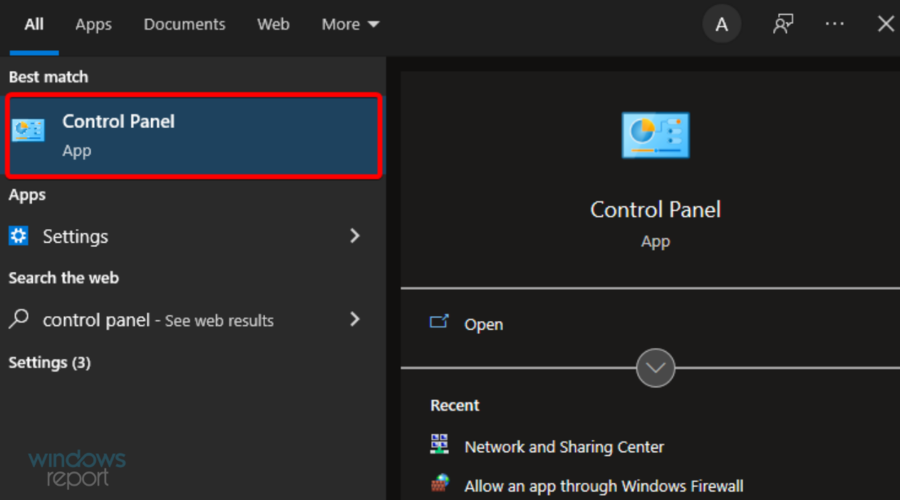
Press the Windows key, type control, and click the OK button.
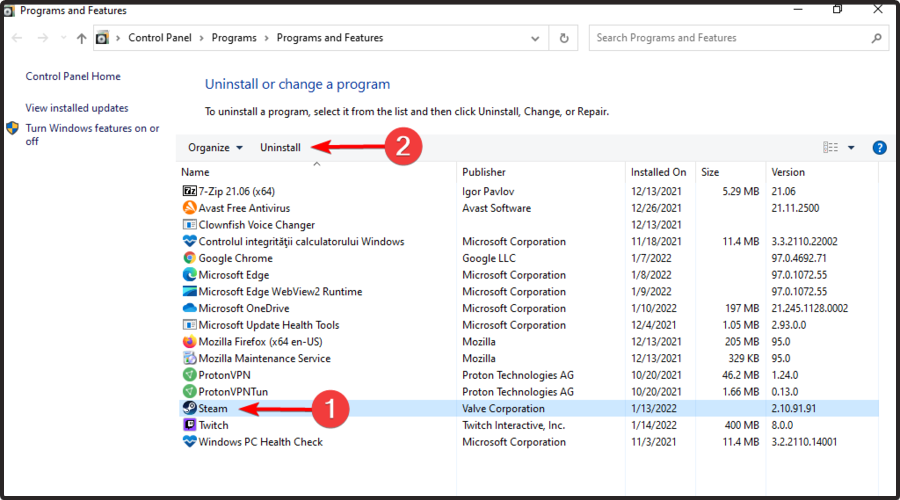
Click Uninstall a program under the Programs option.
Now, right-click Alienware Command Center on the list of installed programs and select Uninstall.
Follow the onscreen instructions to complete the process.
Next, press the Windows key + E and navigate to the path below: C:\Program Files
From here, right-click the Alienware folder if it is still there and click the Delete icon.
Click the Documents option in the left pane.
Finally, delete the AlienFX and Alienware TactX folders.
What does the Alienware Command Center do?
The Alienware Command Center is an excellent app that helps improve your gaming experience on your PC. This app provides a central platform to control most PC features and resources.
One of the major selling points of this software is its provision of a unified interface for different tasks.
With the download of the Alienware Command Center on Windows 11, you can view your PC’s performance metrics like Temperature, Fan Speed, Memory, and CPU usage.
Also, this software has a game library for avid gamers that allows you to organize your game collection. What’s more, you can open the games directly from the software and customize some of your game settings.
Do I need to download Alienware Command Center?
If you are an avid gamer and need a single platform to monitor your PC resources, you should download the Alienware Command Center on your Windows 11 PC. This is especially true if you are a Dell user.
This software is better than downloading different apps for organizing your games and controlling your PC resources. With it, you have just about everything needed to control gaming activities in one single package.
If you are an avid gamer, you need to be able to control your PC resources effortlessly. While there are a series of software you can download on Windows 11, very few compare with Alienware Command Center.
This is due to the many excellent features it packs into one package. If you want to know how to download the software on the latest Windows OS, this detailed guide will take you through the steps to follow.
Wrapping up
With this, the software should now be completely removed from your PC. If you ever want to download and reinstall the Alienware Command Center on Windows 11 again, follow the steps already detailed in this guide.
We have reached the end of this detailed guide on downloading and installing the Alienware Command Center on Windows 11. You should now be able to install and even uninstall the software easily.
The Riot client is home to some of the best PC games users play. So, when the Riot client doesn’t open, the effect is usually devastating for many users who play games like Valorant and League of Legends.
Fortunately, it is not the end of the world, as there are ways to make the client work. In this guide, we will show you how to fix this and help you get back to playing your favorite games.
Why is my Riot client stuck on loading?
Below are some of the potential reasons your Riot client might not be opening:
Outdated PC: One of the major reasons for this issue is an outdated operating system. The solution to this is to update your OS to the latest version.
Compatibility issues: If you started facing this problem after updating your PC, it might be due to compatibility issues between the app and your OS. In this case, you need to run the client in compatibility mode.
Outdated driver: In some cases, this issue can be due to an outdated display driver. You can fix this by updating your graphics driver to the latest version.
Antivirus interference: At times, your antivirus software might interfere with the Riot client. Disabling your security software should do the trick here.
What can I do if the Riot client is not opening?
1. Run the game as an admin and in compatibility mode
Right-click the Riot client shortcut and select Properties.
Click the Compatibility tab at the top.
Now, check the box for Run this program in compatibility mode for.
Click the dropdown and select a lower operating system.
Next. check the box for Run this problem as administrator.
Finally, click the Apply button, followed by OK.
The Riot client might not open because you don’t have the needed privilege. Also, the problem might occur because of compatibility issues.
In this case, you need to run the game as an admin and in compatibility mode for an older OS.
2. Update your PC
Press the Windows key + I to open the Settings app and click Windows Update in the left pane.
Click the Check for updates button.
Now, download and install all available updates.
If your OS is outdated, it is prone to different issues, including this Riot client won’t open error. The quickest solution to this is to update your operating system.
Press the Windows key + I and select Troubleshoot in the right pane.
Select the Other troubleshooters option.
Now, click the Run button before the Program Compatibility Troubleshooter.
Next, choose Riot Client from the available options and click Next.
Finally, follow the onscreen instructions to complete the process.
The Riot client might not open because of compatibility issues with your PC. Running the program compatibility troubleshooter should solve the problem.
4. Update the driver
Press the Windows key + X and select the Device Manager option.
Double-click the Display adapters section and right-click the driver under it.
Now, select the Update driver option.
Finally, choose Search automatically for drivers and install any available updates.
One of the major causes of the Riot client won’t open error is an outdated display driver. So, updating the driver should help you restore normalcy.
Another effective option is to use an automatic driver updater in Outbyte Driver Updater to complete this task. This saves you the stress of searching for and installing the drivers yourself.
With this, you can effectively eliminate the risk of downloading the wrong driver, which can lead to further problems.
Press the Windows key, type virus, and select Virus & threat protection.
Click the Manage settings option.
Now, toggle the switch for Real-time protection backward to disable it.
Finally, if you are using a third-party antivirus, right-click it’s icon on your Taskbar, and select Disable.
Sometimes, your antivirus software might be the one preventing the Riot client from opening. Disabling the software temporarily should do the trick here.
6. Allow the game through your firewall
Press the Windows key, type firewall and select the Windows Defender Firewall option.
Choose the Allow an app or feature through Windows Defender Firewall in the left pane.
Now, click the Change settings option.
Next, locate the Riot Client option and ensure that both Private and Public boxes are checked.
Check for the processes below too
RiotClientServices.exe
Riot Vanguard
Valorant.exe
If the above processes are not there, click the Allow another app… button.
Now, locate the processes and allow them.
Finally, click the Apply button, followed by OK.
At times, Riot client won’t open because your firewall is blocking it. You need to allow the app and its related processes through it to get back to enjoying your games.
7. Close Riot-related processes
Press the Windows key + X and select Task Manager.
Right-click any Riot-related entry and select End task.
Finally, restart your PC and relaunch the Riot client.
If the Riot client won’t open or stuck at loading, you can should force it to stop in Task Manager. If there are multiple instances of the app, make sure you close all of them.
8. Reinstall the Riot client
Press the Windows key + R, type control, and click OK.
Click the Uninstall a program option under Programs.
Now, right-click the antivirus software and select Uninstall.
Next, follow the onscreen instructions to complete the process.
From here, press the Windows key + E to launch File Explorer and navigate to the path: C:\Users\<username>\AppData\Local\Riot Games
Right-click the Riot Client folder and click the Delete icon.
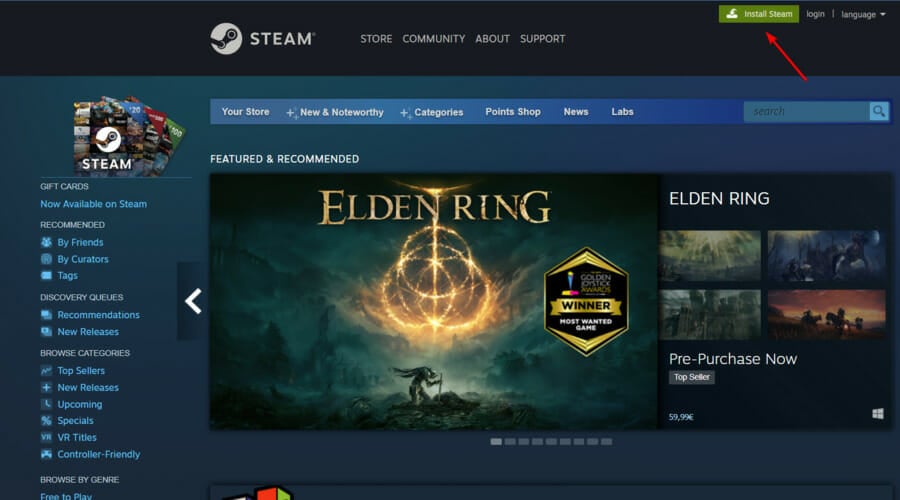
Finally, visit the official website to download and install the Riot client.
If the solutions above fail to get the Riot client to open, you must uninstall and reinstall the app. This will help clear the minor issues that might be causing the problem.
We can now conclude this detailed guide on the Riot client won’t open issue. We now believe you have all the information you need to solve the problem and only need to follow the steps carefully.
Streamlabs is a popular streaming software that works with Twitch, Facebook, and YouTube and is often the first choice of gamers with a decent setup, given the slightly demanding requirements. While it delivers exceptional results, Streamlabs is not opening for a few.
Some also reported Streamlabs crashing on startup, a problem with the same underlying cause. And it’s usually an issue on the user’s end to blame. So, let’s find out all about it and the solutions that worked for others!
Why is Streamlabs not opening?
Here are a few reasons Streamlabs is not opening in Windows:
Missing permissions: In most cases, the missing permissions led to Streamlabs being stuck on the loading screen, and proving the administrative privileges fixed things.
Outdated graphics driver: Streamlabs, as well as other graphics-intensive programs, require updated graphics drivers to function effectively.
Firewall or security software blocking Streamlabs: For some users, the built-in firewall or a configured VPN led to issues connecting to the Internet, and subsequently, Streamlabs was freezing in Windows 11.
A bug in the recent OS update: Many reported the issue started after installing the latest Windows or MacOS updates and reverting to the previous version fixed things.
What can I do if Streamlabs is not opening?
Before we move to the slightly complex solutions, try these quick tricks first:
Check for any pending Windows updates and install them.
Disable the configured VPN or any third-party antivirus running on the PC.
If none work, move to the fixes listed next.
1. Terminate the app from Task Manager
Press Ctrl + Shift + Esc to open Task Manager.
Locate all Streamlabs’ processes, select them individually, and click on End task.
Once done, relaunch the program.
A quick solution that worked for users was to terminate any existing Streamlabs processes and give the program a fresh start. While you could also restart the computer, some processes would automatically start running if the app is configured to launch at startup.
2. Run Streamlabs in compatibility mode
Right-click on the app’s launcher, and select Properties.
Go to the Compatibility tab, tick the Run this program in compatibility mode for checkbox, and select a previous iteration of Windows from the dropdown menu.
Click OK to save the changes.
Once done, relaunch Streamlabs.
Often when running an older version of Streamlabs on a newer Windows iteration, compatibility issues may arise. So, it’s best that you run the program in compatibility mode when Streamlabs is not opening.
3. Whitelist Streamlabs in Firewall
Press Windows + S to open Search, type Control Panel in the text field, and click on the relevant search result.
Click on System and Security.
Click on Allow an app through Windows Firewall under Windows Defender Firewall.
Now, click on Change settings.
Click the Allow another app button.
Click on Browse.
Navigate the following path:C:\Program Files\Streamlabs OBS
Choose the Streamlabs launcher, and click on Open.
Once done, click on Add.
Finally, make sure both the Private and Public checkboxes are ticked for Streamlabs, and click OK to save the changes.
Press Windows + X to open the Power User menu, and select Device Manager from the list.
Expand the Display adapters option, right-click on the graphics adapter, and select Update driver.
Select Search automatically for drivers and wait for Windows to find the best one locally.
An outdated driver can trigger performance issues and even lead to Streamlabs not loading or opening in Windows. So, it’s vital that you regularly update the drivers.
And in case an update can’t be found locally, head to the manufacturer’s website, find the latest version and install the driver manually. Here are the direct download links for the major manufacturers:
Press Windows + R to open Run, type appwiz.cpl in the text field, and hit Enter.
Select Streamlabs from the list of programs, and click Uninstall.
Follow the on-screen instructions to complete the process.
Again, press Windows + R to open Run, paste %appdata%, and then click OK.
Locate and delete the slobs-client and slobs-plugins folders.
Restart the computer for the changes to come into effect.
Finally, head to Streamlabs’ official website, download the setup, and run the installer to reinstall the program.
Some users also recommend reinstalling Streamlabs if it’s not opening or freezes when switching scenes. This is a rather simple solution, given you don’t have to identify the underlying cause.
6. Uninstall recent Windows updates
Press Windows + I to open Settings, go to Windows Update from the navigation pane, and click on Update history.
Scroll to the bottom and click on Uninstall updates.
Click the Uninstall option next to the update, after installing which, the error first appeared.
Again, click Uninstall in the confirmation prompt.
Finally, restart the computer.
If it’s the OS update to blame when Streamlabs is not opening, the only solution is to uninstall the updates. Remember, this also works when you are facing Streamlabs issues on MacOS. And by now, you should have the problem resolved.
Notepad is one of the best note-taking free apps, with excellent features. However, there are times when users encounter issues, with some complaining that Notepad is closing automatically on Windows 11.
While this problem is traceable to several factors, it is not the most difficult to fix. And we will show you how to go about it effortlessly in this guide.
Why does Notepad keep closing?
There are a series of reasons that can be responsible if your Notepad is closing automatically. Below are some of the notable ones:
Memory issues: One of the potential causes of this problem is bad memory sectors. This can lead to issues running apps. The solution to this is to run the CHKDSK command to repair the bad sectors.
Issues with the app: Most times, this issue is down to a problem with the Notepad app. What you need to do here is to uninstall the app and reinstall it from Microsoft Store.
How can I fix Notepad if it keeps closing automatically?
1. Repair Notepad
Press the Windows key + I to open the Settings app and select the Apps option in the left pane.
Select Apps & features in the right pane.
Now, locate the Notepad option and click the three vertical dots before it.
Select Advanced options.
Next, click the Repair button and wait for the process to complete.
If this does fix the issue, repeat the steps above and click the Reset button instead in Step 5.
Finally, wait for the process to complete and relaunch Notepad.
If your Notepad app keeps closing automatically on Windows 11, it might be due to minor glitches with the app. In this case, you must use the repair feature to fix the app.
If this does not work, then you need to reset the app completely.
2. Run CHKDSK
Press the Windows key, type cmd, and select Run as administrator under Command Prompt.
Type the command below and press Enter to run it: chkdsk c: /f /r
Now, press Y when prompted.
Finally, wait for your PC to restart, and the scan will start automatically.
In some cases, Notepad might be closing automatically because of issues with your hard drive. You need to run the CHKDSK command to fix the bad disk sectors.
Launch Notepad and click the Minimize icon at the top.
Now, place your mouse at the edges of the window and extend or reduce it accordingly. Do this for all edges.
Finally, you can return the window size to normal or maximize it.
This is a weird solution for the Notepad closing automatically issue, but users have found it to be effective. Note that this is just a workaround, and you might need to repeat it every time you want to use Notepad.
4. Reinstall Notepad
Press the Windows key + I and select the Apps option.
Select Apps & features in the rght-pane. Programs.
Now, click the three vertical dots before the Notepad option and select Uninstall.
From here, follow the onscreen instructions to complete the process.
Next, launch Microsoft Store and search for notepad.
Finally, click the Get button and follow the onscreen instructions to complete the process.
Sometimes, the Notepad closing automatically issue might be due to problems with the app installation. In this case, you need to uninstall and reinstall the app from the official source to fix the problem.
5. Reinstall Windows 11
If the solutions above fail to stop Notepad from closing automatically, and you need the app to work, you might need to reinstall Windows 11.
This is because the problem might be with your operating system, not the app. While this might look extreme, it has worked for many users.
If Notepad is closing automatically on Windows 11, it can be frustrating, as you are bound to lose your unsaved work. But with the solutions in this guide, you should be able to fix the app and restore normalcy.
When working on Microsoft Excel files, you might have come across two formats, i.e., XLS and XLSX and you might have wondered what are the difference between the two.
In this guide, we will share a guide that explains the differences between XLS vs XLSX and all the different ways to convert them. Let us check out the guide.
XLS vs. XLSX: What are they?
1. What is XLS?
The XLS format is a file format developed by Microsoft that is used by Microsoft spreadsheet programs known as Excel. It is a default file format for saving spreadsheet files.
When you launch the MS Excel program, you will be shown a blank spreadsheet that can be added with multiple columns, rows, calculations, and other data.
The XLS format is an old Excel format that uses proprietary binary, more formally known as BIFF or Binary Interchange FileFormat.
It was first introduced in 1987 when the Microsoft Excel program was released. The XLS file format was later replaced by the XLSX format.
2. What is XLSX?
On the other hand, the XLSX format is a Microsoft spreadsheet designed to be used not only on Windows, but across all platforms such as Android, iOS, and macOS.
When dealing with an XLSX file, you instantly understand that the file may contain calculation, pivot tables, graphing tools, and programming tools such as Visual Basic for apps.
After Microsoft update the Office in 2007, the letter X was added to many of its extensions, such as DOCX, PPTX, and XLSX.
The XLSX file format is more compatible with diverse software outside of Windows and contains Excel data not provided by XLS, including advanced formulas, charts, media, and formats. So if you run into the excel error extension not valid, it’s probably because it is of the XLS format.
XLS vs XLSX: Differences
XLS
XLSX
The XLS format was the default format for Microsoft spreadsheets for MS Excel 97 to Excel 2003.
The XLSX format is the default format for Excel 2007 and later.
XLS file format takes up more storage compared to XLSX.
XLSX takes up less space, thus saving the size of your document.
The row limit is 65,536 (216) and 256 columns (28).
The row limit is 1,048,576 rows (220) and 16,384 columns (214).
XLS is a bit faster compared to XLSX.
XLSX, despite being a newer format, is slower compared to XLS.
XLS is compatible with fewer devices but works across more MS Excel versions.
XLSX is supported by more devices but works with MS Excel 2007 or later versions.
XLS file is less secure and doesn’t have robust security against data loss, because being in binary format.
XLSX comes with more security, more features, and transparency.
Right-click on the target file and select Rename. You can alternatively, click on the file and press F2 to rename it.
Change the file extension from XLSX to XLS or vice versa and hit Enter.
Select Yes in the warning prompt that appears, and the file format will be changed.
This is one of the easiest ways to convert XLS format to XLSX format or vice versa. This doesn’t require the usage of any software and lets you convert between XLS vs XLSX.
2. Convert using MS Excel
Open the XLSX file with MS Excel 2007 version or later.
Click on the File tab on the top.
Select Save as from the left pane and choose the location to save the file.
From the Save as type drop-down, select Excel 97-2003 Workbook (.xlsx).
Click the Save button.
You can also use Microsoft Excel software to change the extension of the XLS file to XLSX or XLSX file to XLS. This will help you to get the file in the desired format to be able to run in the supported version of MS Excel.
3. Use online converters
You can always rely on the internet for some free tool that can help you to convert XLS to XLSX and vice versa. You can use one of the many websites out there like CloudConvert that will help you convert the files.
All you need to do is upload the XLS or XLSX file and select the output format and download it. That’s it. It is as easy as that. If you want to learn more about Excel, we have a great guide how to copy data from Excel to Word, so don’t miss it.
Now that you know the differences, don’t miss our guide on how to open .XLSX files on your PC.
Feel free to let us know in the comments below if this guide helped you understand the difference between XLS vs XLSX.
Many of our readers have asked about the different files and processes they encounter while using their devices. We have explored executables like smartscreen.exe, and rtkauduservice64.exe, but in this guide, we move to the vpnui.exe file.
We explore all the important elements around the file and tell you the functions it performs.
What is Vpnui.exe?
It is a legitimate process from Cisco AnyConnect VPN Client software performing the following roles:
Displaying the user interface for the Cisco AnyConnect VPN Client.
Allowing users to connect to a VPN when they click the Connect button.
Providing security features for VPN connections like encryption, authentication, and authorization.
Allowing users to manage their settings, including the encryption level and authentication method.
If you like AnyConnect VPN, you may love reading our recommendation for the best free Windows 11 VPNs.
Where is the Vpnui exe file?
The file is in a subdirectory of the Program File folder, as shown below, and typically, the file size is about 1,224,704 bytes.
We can confirm that Vpnui.exe is a genuine file since Cisco digitally signs it. However, malware is known to mimic genuine exe files, so you should be cautious if you find a file with a similar name but in a different location. To reduce security risks associated with this file, you should do the following:
AnyConnect is a powerful VPN client essential for the following roles:
Enabling users to connect securely to their company’s network from any global location.
Supplying online security tools, including content filtering and virus defense.
Assisting in device protection for users if they wander on unprotected networks.
Assisting businesses in observing security laws like HIPAA and PCI DSS.
Examines a device’s security state before allowing it to join the network.
In conclusion, vpnui.exe is integral to AnyConnect. However, if you like to try out other VPNs, you may read our recommendations on the best VPNs for Windows 11.
This is as much as there is to know about the vpnui.exe file. However, if you have further questions, we love reading them in the comments section below.
Many applications on your computer come bundled with their specific processes. The MMSSHost.exe is one such process, and it is associated with the McAfee antivirus.
We have discussed Intel System high CPU usage, and this MMSSHost.exe process may cause a similar issue. So, in this guide, we will take you through some practical solutions.
What is MMSSHost.exe?
MMSSHost.exe is a legitimate executable and is part of McAfee antivirus software. Many processes run in the background on the Windows operating system, and MMSSHost.exe is a third-party file that fits this category. It performs the following functions:
Manages the installation and update of McAfee products.
Monitoring the status of all McAfee products.
Assisting McAfee products with needed support.
Where is MMSSHost.exe located?
It is located in the directory indicated below and should be about 493,248 bytes in size.
C:\Program Files\Common Files\McAfee
So, if you find the file in a different folder, especially in the System32 folder, you may suspect malware infection. We recommend a scan using any robust antivirus system.
How do I fix MMSSHost.exe high memory usage?
Before trying any complex solutions, you may use these workarounds:
Uninstall McAfee and use a different antivirus or download and install a new copy of McAfee.
Scan your computer to ensure it is not a malware-related problem.
However, if the high memory usage persists, continue with the fix below.
End the MMSSHost.exe process
Hold the Ctrl+Shift+Esc keys together to launch the Task Manager.
Locate the mighost.exe process among the list of running processes.
Right-click on it and choose End Task to end the process.
There are various ways to install Windows updates, and there’s also a chance that something could go wrong with Windows update. Users have reported running into the error 0x80072ee4 when using the Media creation installation tool.
This error can occur with almost every Windows version, so if this sounds familiar, you’ll find this article particularly helpful in navigating this issue.
What is error 0x80072EE4 on Windows Update?
This is a Windows Update error that can occur under different circumstances. These include:
Upgrading to a newer version of Windows
Installing Windows via the Media Creation tool
Troubleshooting for Windows update errors
According to most users, they get a Windows Initialization failed message whenever they power up their PCs. As a result, most programs are not working, including all browsers. Strangely enough, the Microsoft Edge browser seems exempted from the 0x80072ee4 error.
Other causes include:
Firewall settings – Your firewall may be behind your woes, blocking any updates it terms as suspicious.
Damaged file – You may have corrupt system files preventing the installation of an update or patch.
Incompatible version of Windows installed – If you installed Windows on your device without meeting the system requirements, you may encounter the error 0x80072ee4.
How can I fix the Windows Update error 0x80072EE4?
We recommend you first try out these preliminary fixes before any advanced troubleshooting:
Disconnect any external peripherals.
Check your internet connection and ensure it is stable.
Click the Run option for the Windows Update troubleshooter.
2. Restart the Windows Update service
Hit the Windows + R keys to open the Run command.
Type services.msc and hit Enter.
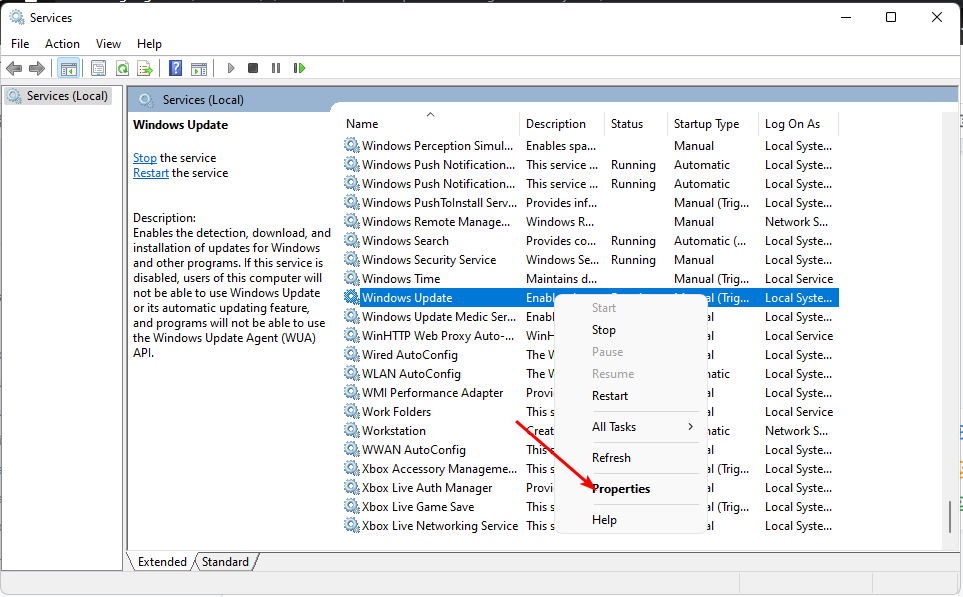
Locate Windows Update service, double click on it and select Properties.
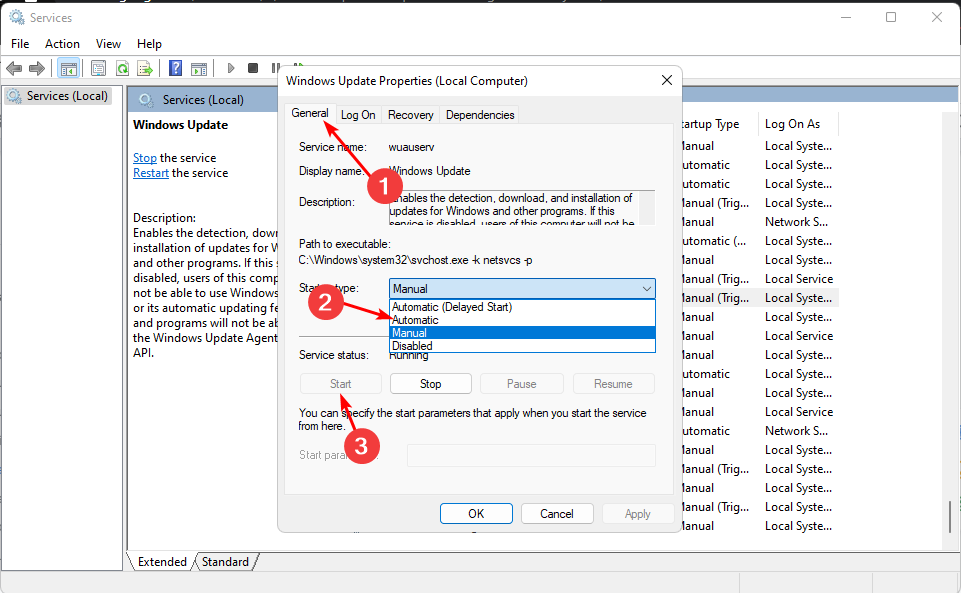
Navigate to the General tab, under Startup type, select Automatic from the drop-down options, and click on the Start button.
Next, click Apply and then OK.
Consequently, check with the BITS service and ensure you restart it too. The Media Creation tool may fail to connect because you were probably using a standard user account, and even after the switch to one with elevated permissions, you will need to restart the service and then run the tool again.
Hit the Start menu icon, type Windows Security in the search bar and click Open.
Click on Firewall & network protection, then select Public network.
Locate Microsoft Defender Firewall and toggle the off button.
4. Run DISM and SFC scans
Hit the Start Menu icon, type cmd in the search bar, and click Run as administrator.
Type the following commands and press Enter after each one:DISM.exe /Online /Cleanup-Image /Restorehealthsfc /scannow
5. Reset Windows update components
Hit the Windows key, type cmd in the search bar, and click Run as administrator.
Type the following commands and press Enter after each one: net stop bitsnet stop wuauservnet stop appidsvcnet stop cryptsvcDel "%ALLUSERSPROFILE%\Application Data\Microsoft\Network\Downloader\*.*"rmdir %systemroot%\SoftwareDistribution /S /Qrmdir %systemroot%\system32\catroot2 /S /Qregsvr32.exe /s atl.dllregsvr32.exe /s urlmon.dllregsvr32.exe /s mshtml.dllnetsh winsock resetnetsh winsock reset proxynet start bitsnet start wuauservnet start appidsvcnet start cryptsv
6. Perform a clean boot
Hit the Windows key, type msconfig, and open System Configuration.
Switch to the Services tab and select Hide all Microsoft services.
Click on the Disable all button, then hit the Apply button to save the changes.
Go back and click on the Startup tab, select Open Task Manager then click OK.
In the Startup tab of the Task Manager, Disable all the Enabled startup items.
Close Task Manager and restart your PC.
Hopefully, the 0x80072ee4 error will eventually disappear after trying out our solutions. And if not, you can always get an automated fix by downloading one of the Windows Update repair tools or a fresh copy of Windows.
If you have a different or better solution, please tell us in the comments. We’d love to hear what you’ve tried and how it worked for you.
Here are 4 ways to download and install Microsoft PowerPoint 2019.
The first software name that pops up when we talk about presentations is Microsoft PowerPoint. So if you need a reliable tool for school on work, here’s how to get started:
How to download Powerpoint 2019 (Windows & 11)
NOTE
The steps to download Microsoft Office/Powerpoint 2019 on Windows 10 and Windows 11 are the same. So, you can apply and follow the steps mentioned below for both OSs.
Click on the Sign in icon on the top right and log in with your Microsoft account.
Choose Services & subscriptions from the top menu.
Scroll down and locate Microsoft Office 2019 and hit the Install button to begin the download of the Microsoft Office 2019. Do note that Microsoft PowerPoint 2019 comes as a part of the Office 2019 package.
After the installation is complete, launch the program and create presentations.
If you deleted a copy of your Microsoft Office 2019 from your computer or want to grab a copy of Office 2019, then you can follow the above steps and download the program if you already have a subscription to it.
That is it from us in this guide. Let us know in the comments below, which one of the above methods you opted to download Microsoft PowerPoint 2019 on your computer.
Many Windows users complain about the ruby.exe process’s high CPU usage, causing PC issues. The executable may consume more system resources for many reasons.
However, this guide will discuss the causes and ways to fix the problem. Also, you may be interested in our article on how to fix services.exe high CPU usage on Windows PCs.
What is ruby.exe used for?
The ruby.exe is an executable file associated with the Ruby programming language. Ruby is an interpreted, high-level programming language known for its simplicity and productivity.
Here are the primary functions of ruby.exe:
Ruby.exe interprets and executes Ruby scripts written in the Ruby programming language.
The Ruby interpreter manages memory allocation and deallocation during script execution.
Loads and interprets the vast ecosystem of libraries and gems that extend its functionality, allowing your Ruby scripts to utilize their pre-defined functions, classes, and features.
Captures and handles errors that occur when executing Ruby script.
Provides an interface for Ruby scripts to interact with the underlying OS and its resources.
Why causes ruby.exe cause high CPU usage?
Here are a few potential factors that can cause ruby.exe high CPU usage:
Ruby script’s intensive computation due to large and complex data leads to high CPU usage.
Multiple threads and processes on a Ruby script spawn contribute to this issue.
Lack of throttling or sleep statements in your Ruby script consumes CPU resources.
Interference from other programs or processes fighting for the same PC resources.
An infinite loop or poorly optimized code can cause this process to consume high CPU resources.
Regardless, we’ll take you through some steps for fixing the problem.
How can I fix ruby.exe high CPU usage?
Observe the following preliminary checks before proceeding with any advanced fixes:
Restart your computer and the Ruby Interpreter to resolve the temporary issues causing the problem.
Review your Ruby script, optimize data structures, and minimize redundant computations.
Throttle or introduce delays if your script performs repetitive tasks or contains tight loops.
Update Ruby and ensure you are using the latest stable version.
If you still can’t get around the ruby.exe high CPU usage, try the solutions below:
1. Change priority for the ruby.exe process
Right-click the Start button and select Task Manager from the menu.
Go to the Details or Processes tab. Locate ruby.exe from the list of running processes on your system.
Right-click on it, hover over the Set priority option in the context menu, then click Normal or Low.
A higher priority level may consume more CPU resources, potentially impacting the performance of other processes on your system. So, choosing the Normal/Low priority level allows the ruby.exe process to run smoothly without using excess resources.
2. End task for ruby.exe
Right-click the Start button and select Task Manager from the menu.
Go to the Processes or Details tab. Select ruby.exe from the list, right-click on it, then click End Task from the context menu.
Click OK to confirm that you want to end the task for the program.
Restart your PC.
The above steps will stop the ruby.exe process on your PC. Consequently, it may prevent the Ruby Interpreter from running.
When you come across an executable file with a name you’re unfamiliar with, it’s important to be cautious. Viruses and malware often disguise themselves with innocent-sounding filenames to trick users and potentially cause harm to your computer system.
If you have found a file called net1.exe on your computer and want to know what it is, what it does, and how it is used in Windows, keep reading to find out.
What is net1?
The net1 stands for Network Settings Command for 21st Century and is an executable file that is part of the Windows operating system. It can be used to perform tasks such as configuring network settings, connecting to shared resources, managing user accounts and groups, and more.
It acts as a powerful command-line tool for network management, diagnostics, and troubleshooting.
The net1.exe is a PE binary file developed by Microsoft, located at: C:\Windows\System32
The 32-bit version of net1.exe is located at C:\Windows\SysWOW64
What is net1 exe used for?
The net1.exe process is used for managing network-related tasks and resources, such as user accounts, shared resources, and network configuration.
Some common uses of the net1.exe include:
Network Troubleshooting: The net1.exe helps diagnose and fix network problems. It allows users to test network connections, check if a remote computer is reachable, and gather information.
Network Configuration: It helps manage network settings. It lets users change IP addresses, subnet masks, default gateways, DNS servers, and other network parameters.
Managing Network Resources: The net1.exe plays a role in managing shared folders, printers, and network connections. It allows users to create, delete, or modify shared resources, add or remove network printers, and establish or end network connections.
Network Security: It helps with network security by providing command-line tools. It allows users to configure firewall settings, control network access, and monitor network traffic.
What is the difference between net.exe and net1.exe?
In most Windows versions, there is no notable distinction between net1.exe and net.exe, except for Windows NT and Windows 2000.
The net1.exe was initially developed as a temporary solution to the Y2K problem that affected net.exe. To overcome this challenge, net1.exe was created as a workaround.
The net1.exe is a file that can do everything that net.exe can do. While the problem with net.exe was fixed in Windows XP, net1.exe still exists today to ensure compatibility with older scripts that depend on its features.
It serves as an upgraded version of net.exe, addressing the Y2K problem and providing enhanced functionality.
Is net1.exe a virus or malware?
As said earlier, net1.exe is a legitimate file signed by Windows. It is neither virus nor malware. It is a command-line tool commonly used to manage various network-related functions and services.
If you are unsure whether or not your net1.exe is a legitimate file, always check its location. If it cannot be found in the location mentioned above, you may have a Trojan on your system. You must take the necessary steps to remove the virus before it can damage your system further.
The game does not have permission – If the COD: Modern Warfare game does not have administrator permission, you may encounter the error.
Pending Windows update – If you have not installed the pending Windows updates, that’s another reason you may encounter the dev error.
A glitch with the game itself – It could be possible that there’s an issue within the game itself, and hence, you see the error. This turned out to be the case with Dev Error 841 in MW3.
Press the Win + E keys together to open File Explorer.
Here, click on the This PC shortcut on the left, and on the right, click on Documents.
Now, look for the Call of Duty folder, select it, and hit Delete.
Once you have deleted the Call of Duty folder, you can now try launching Warzone and check if you still encounter the dev error 5523.
4. Rollback or reinstall the graphics card driver
Press the Win + R keys simultaneously to launch the Run dialog. Type devmgmt.msc and hit Enter to open the Device Manager.
Here, expand the Display adapters section, right-click on the graphics device, and select Properties.
In the Properties dialog, go to the Driver tab and press the Roll Back Driver button.
Once the driver has successfully rolled back to the previous version, press OK. Restart your PC and check if the Dev error 5523 is resolved.
If not, then repeat steps 1 and 2, right-click on the device, and select Uninstall device.
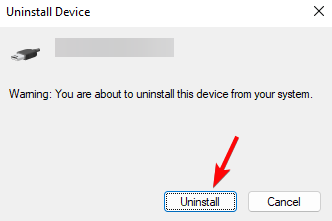
Press Uninstall again in the prompt to confirm the action.
Once done, reboot your PC, and Windows should automatically reinstall the latest graphics card version.
Now that you have rolled back the driver updates or reinstalled the graphic drivers, try launching COD: Warzone and check if the Dev error 5523 still shows up.
5. Run the Game as an administrator
Go to the desktop, right-click on Battle.net, and select Properties.
Next, in the Properties dialog, select the Compatibility tab.
Here, check the box next to Run this program as an administrator and Disable full-screen optimizations. Press Apply and OK.
Once done, you can try running the Call of Duty Modern Warfare or Warzone game and check if the Dev error 5523 is fixed.
To open the Run console, press the Win + R keys together, Type in, ncpa.cpl, and hit Enter to open the Network Connections window.
Next, right-click on the active connection and select Properties.
In the WiFi Properties dialog, go to This connection uses the following item list. Here, select Internet Protocol Version 4 (TCP/IPv4), and then click the Properties button.
Next, in the Properties window, under the General tab, select Use the following DNS server addresses.
Now, enter the below IP addresses to change the server address and press OK:
Preferred DNS server: 8.4.4.8
Alternative DNS server: 8.8.8.8
Once done, try launching Call of Duty: Modern Warfare or Warzone to check if you still encounter the error. This method is also applicable in case you see the dev error on PS4 as well.
7. Disable the second display
Press the Win+I to launch the Windows Settings app, click on System on the left, and then click on Display on the right.
On the next screen, scroll down to the Scale & layout section, and expand Multiple displays,
Here, click on the drop-down below it and select either the Show only on 1 or Show only on 2 option. Press the Keep changes button.
Now, restart your PC, try launching the game, and the COD: warzone dev error 5523 should be gone.
Open the Run console by pressing the Win + R shortcut keys.
Type devmgmt.msc in the search bar and hit Enter to open the Device Manager.
Next, expand Display adapters, right-click on the Integrated video card [Intel(R) HD Graphics], and select Disable device.
While this will help you get rid of the Warzone dev error, you can also use the HDMI monitor if using DisplayPort.
9. Repair the game
Launch the Battle.net app and select the Call of Duty game from the library.
Now, click the gear icon (Settings) next to the Play button. Select Scan and Repair from the menu to start looking for any errors.
The scan will automatically repair/replace any corrupt or missing files.
Now, reboot your PC and check if the Call of Duty dev error 5523 is fixed or if it persists.
Besides, you can turn off and then turn on the microphone to check if this helps fix the error.
If it’s on a PlayStation that you encounter the Warzone dev error, you may want to check the network status to confirm if the servers are down.
Alternatively, to fix the dev error 5523 on PS4, you can also try changing the Wi-Fi band from automatic to 5 GHz. This isn’t the only server error you can encounter, and many recently reported Goldflake errors in Warzone.
Moreover, you can also run the system file checker to fix the corrupted system files using the SFC and the DISM tools. For other like issues like dev error 5433, check out our detailed guide.
If you have any other queries related to the Call of Duty: Modern Warfare or Warzone dev errors, do let us know in the comments box below.
Before you go, don’t miss our latest article on Puget Lakes error for more information.
Writing SQL scripts may be fun until you run into bugs and errors in your code. A few of our readers have complained of the error message your query does not include the specified expression as part of an aggregate function.
How do I fix your query does not include the specified expression as part of an aggregate function?
Use the GROUP BY clause and aggregate function
Define the SELECT statement using the script below. SELECT country, FROM customers
Add the aggregate function using the script below (you must adapt it to your specific need). COUNT(customer_id) AS number_of_customers
Add the GROUP BY clause. In the script below, we want to count the number of customers in each country in a table. By using GROUP BY, the database will count and return the correct figure. GROUP BY country;
Run the script and verify it fixes your query does not include the specified expression as part of an aggregate function.
NOTE
By grouping the rows before applying the aggregate functions, the GROUP BY clause enables the database engine to understand how to combine the entries and deliver the right results.
What are the 5 aggregate functions in SQL?
In SQL, you may be able to use any of the following aggregate functions:
COUNT()
SUM()
AVG()
MIN()
MAX()
However, when using any of the above aggregate functions, remember the following extra considerations:
You can only use aggregate functions on columns with numeric data.
On columns that are part of a GROUP BY clause, aggregate functions will not work.
A column that is also part of the SELECT list will appear in the results as a single value if you apply an aggregate function on it.
Let us know if you found this guide helpful in the comment section below. Also, if you have other ways of fixing the error, we would love to hear from you.
Adjusting the screen size of your Xbox can be very vital, especially if you have some parts cut off during play, so we are going to show you how to do so in this guide.
Remember, you can learn a lot from our other guides; for instance, we have a guide that shows you what to do if Xbox would not install.
Why is my Xbox aspect ratio wrong?
There are a few reasons for this, including:
Problems with the Display settings on your Xbox.
Poorly configured Xbox aspect ratio.
Bad configuration of the TV resolution.
Compatibility issues between HDMI settings on Xbox and the display.
You may check some of the best HDMI cables for your TV and monitor. Now, since adjusting the Xbox screen does the trick most of the time, let’s get to the best ways to do this.
How do I adjust my Xbox screen size?
1. Adjust screen size through the Xbox settings
Select the Xbox button on the controller to bring up the menu.
Scroll to the right and select Settings.
Click the General tab on the left pane, then on the right, select TV & display option.
Select a Resolution under Display, and the screen size should change. For further screen adjustment, also click on Calibrate TV.
Click Next till you are shown the dimensions that show on your TV, after which you will have to make adjustments on the TV.
2. Adjust screen size through the TV settings
Connect your console to the TV and turn both devices on.
On your remote, click View Mode (This button may have alternative names depending on the TV brand) to get screen size options.
Click the View Mode button to change the options. In most cases, you may want to stop when you get to Dot by Dot.
If you have read this far, you know how to adjust Xbox screen size. While the solutions may differ depending on the TV brand, it is always the same if you attempt adjusting from the console.
Our readers will love to know if you know other ways of adjusting the screen size. So, please leave your comments in the comment section below.
If you have ever installed, updated, or uninstalled an application on your computer, you have likely used msiexec.exe, even if you didn’t intentionally run the file or know about it.
When you come across the msiexec.exe process running in the background for the first time, and you’re curious about what it is and what it does, this guide is for you.
What is a msiexec EXE file?
Msiexec.exe is an executable file core component of the Microsoft Windows system. It stands for Microsoft Installer Execution and is responsible for initiating, installing, modifying, and removing software packages that use the Windows Installer technology.
It uses MSI (Microsoft Installer Package) files, which are special database files that hold important information about software packages.
These files hold details about what files to install, registry entries, and instructions for installing and removing the software. When you run an MSI file or start an installation using a setup program, the msiexec.exe program executes the installation process.
It reads the instructions from the MSI file and performs the necessary actions to install or configure the software on your system. It also supports various command-line options that customize the installation process.
In addition to installations, msiexec.exe performs the tasks of repairing, modifying, or uninstalling software on your computer.
Is msiexec.exe a malware file?
The msiexec.exe file is not malware, and it is considered safe. It is highly unlikely that msiexec.exe would cause any harm to your system. However, malware can target the file to carry out malicious actions, just like any other executable file.
If you want to verify whether the msiexec.exe file is malware, you can check its file location on your computer.
Press Ctrl + Shift + Esc to open Task Manager.
Go to the Details tab and locate msiexec.exe.
Right-click on msiexec.exe and choose the Open file location.
If it’s a legitimate process, the msiexec.exe file should be found in the following folder:C:\Windows\System32
If the file is located elsewhere, it is a trojan masquerading as a system file.
If you try to delete the msiexec.exe file, you won’t be able to do so because you don’t have special permission from TrustedInstaller. However, you can gain permission from TrustedInstaller to delete the file.
In case you kill or delete the file, you won’t be able to install or uninstall apps because this file is necessary for the Windows Installer Package tasks.
Remember, while removing programs, reliable uninstaller software is often the best approach since it deletes any leftover files and Registry entries.
Let us know if you have any further questions regarding this file in the comment section below.
And Microsoft doesn’t stop here. There is a dedicated program, Microsoft Edge Canary, where the Redmond-based tech giant is implementing experimental and new features on it every week.
Take this week, for example. A new feature allows you to turn Edge into Edge Photo, and you can effectively use it as you would use the Photo Viewer app. This Reddit user spotted it, and it looks like another way for Edge to show its versatility.
Most likely, the feature will be available to the general public in the next Edge updates, in the following months. For now, it has quite a simple design.
What is Edge Photo & how can you use it
Edge Photo is basically Edge transformed in the Photo Viewer app. The design, for now, is quite simple, but it seems that the feature is in its initial phases. So it will get a revamp in the following weeks, before arriving to live servers.
As you can see, its design is minimal. There is a preview pane on the right side of it, and going through the pictures is similar to using the Photo Viewer app. You can also notice an Edge Photo logo on the bottom-left side of the app.
You can use it by dragging and dropping photos into your Edge. Then the browser automatically transforms into Edge Photo. There is no apparent limit to how many photos you can drag there.
At the bottom-right of the screen, there is an icon. You can actually pop out Edge Photo and use it independently of Edge if you want.
With this being said, keep in mind that the feature is still in its initial phases. So it is prone to changes and improvements in the future, but it does look very exciting.
What do you think about it? Let us know your thoughts and opinions in the comments section below.
Usually, this is a normal operation we don’t expect to go wrong, but when it does, you must address it immediately. We show you how to fix this problem below.
What does insufficient system resources exist to complete the requested service mean?
This message usually means that your computer’s hardware has run out of resources or space to process a task.
A system resource is any computing resource that a computer program can use. Examples of system resources include CPU time, memory, disk space, and network bandwidth.
When a program needs a system resource to complete an operation, it requests that resource through an operating system call. If your system resource is low or the requested resource is unavailable, your application will not work correctly or at all.
For most users, it happened when they tried to open a folder, but in other rare cases, it was after a Windows update. Memory seems to be the system resource in question from these incidents.
According to this thread, a small section encountered this error when trying to install a program and could not access the installation folder.
I get Insufficient system resources exist to complete in Windows 10 when trying to open an installation folder
However, insufficient RAM is not the only cause of the insufficient system resources exist error. It could also be caused by one of several common problems, including:
Virus or malware infection – If a virus infection has plagued your device, it has the capability of changing how your PC works, and that includes preventing you from accessing folders.
Damaged file – The folder you’re trying to access may contain a damaged file, and that’s why you can’t open it.
Hardware failure – You may have a bad hard drive or RAM module that is causing this memory error.
How do you fix insufficient system resources exist to complete the requested service?
Before you move to the slightly technical solutions, try the following:
Open the Task Manager and see which programs are using up all your memory and CPU. Close them down if they’re not essential.
Check out your disk space and use the Disk Cleanup tool to remove unnecessary files from your hard drive.
Click on Apps on the left pane, then select Apps & features on the right pane.
Search for the problematic app, click on the three ellipses, and select Uninstall.
Launch the Microsoft Store, search for the app, and click Install.
Try opening the installation folder and see if the error persists.
Before reinstalling the program, clear any software remnants from the previous installation. This will ensure you don’t replicate the insufficient system resources exist issue that was causing your PC to malfunction.
4. Enable folder inheritance
Hit the Windows + E keys to open File Explorer.
Find the folder, right-click on it, and select Properties.
Navigate to the Security tab and click on Advanced.
Check the Replace all child object permissions with inheritable permissions from this object box then click Apply and OK.
Restart your PC and check if the problem persists.
The insufficient system resources are a relatively common problem you may encounter on your computer.
We hope that this article has been helpful. We gave it our best shot to share the knowledge in a friendly and accessible manner, as this particular topic can be quite intimidating to those without experience.
Please let us know what solution has been a success for you, or if you have any others, drop them in the comment section.
Sometimes, when you try to map a network drive, Windows won’t let you do it. You may get an error message that says The mapped network drive could not be created.
If you are trying to map a network drive on your Windows machine but cannot, there might be a few reasons behind this problem. In this article, we will discuss some of these reasons and how you can fix them.
Why is my network drive not getting mapped?
A network drive is a folder on your computer that you can access, edit and save files to as if it were a local hard drive. The way this works is by using the SMB protocol. These are the same protocols Windows uses to share resources across a network.
If your computer can see another computer on the network, you should be able to use a network drive to access its files.
However, if you’re not having any luck getting things going, here are some reasons behind this issue:
The network drive isn’t available – If the map network drive is missing, it won’t appear in the list of network locations.
You have not enabled the SMB2 protocol on your PC – SMB2 is the protocol used by modern versions of Windows to connect to network drives over ethernet or Wi-Fi networks. If you are using an older version of Windows, then it may not support SMB2.
The folder path is incorrect or doesn’t exist on the server – If the path is incorrect or has been deleted, you cannot map a drive.
You are running an older version of Windows – This can happen if you have upgraded your computer’s operating system or reinstalled Windows and have not installed any new updates.
Network drive is already mapped – If you had previously mapped the network drive, you will not be able to create a new one.
Connection issues – It is possible that your network is experiencing issues such as connection drops, slow response times, etc. This can cause problems with mapping drives.
How do you fix the mapped network drive could not be created?
This is a common issue with many users, and there are several workarounds, such as:
Make sure that your computer is connected to the Internet.
Check with your administrator or IT department to ensure you have sufficient permissions to map this folder or file.
Make sure that your computer and server are connected to the same network.
Microsoft is investing a lot of funds into AI research. There is Orca 13B a soon-to-be open source AI model, that has shown incredible results. There is LongMeM, which is Microsoft’s answer to the struggles of getting an unlimited context length. There is phi-1, which is Microsoft’s incredibly powerful AI language for coding.
And there is DeepRapper, which is Microsoft’s AI rap-generator music software. Yes, you heard that right. An AI rapper.
Developed by the Chinese Muzic, which falls under The Deep and Reinforcement Learning Group at Microsoft Research Asia, DeepRapper is an AI model that generates rap verses according to suitable rhythms.
In this paper, we develop DeepRapper, a novel Transformer-based rap generation system, which leverages rhyme modeling, rhythm modeling and pre-training for rap generation.
According to the paper, the researchers first built a data mining pipeline. This pipeline, which consisted of a dataset with rap songs with aligned lyrics and rhythmic beats, was used to train DeepRapper. After the pipeline was completed, they built a language model that would select rhymes and rhythm models.
The pipeline contained a vast quantity of rap songs, different in structure and composition. After DeepRapper was trained on it, the AI rapper was capable of coming out with complex and high-quality verses.
Even more, the AI rapper has currently generated over 5000 samples, and you can actually see how they look. But so that you know, the verses are currently in Mandarin. However they are translated, and you can actually the complexity.
How can you ignore the reality of your character and never lack arrogance and arrogance? Forge a new ideal, open every farewell on the wings.
Some of DeepRapper’s raps
As in any other creative AI, DeepRapper was trained on a music catalog from the Internet, so the actual raps can contain copyrighted material. However, it’s very interesting to see just exciting the research on AI gets.
With Muzic, Microsoft joins Meta in forging AI models for music creation. Meta also has recently announced MusicGen, a similar AI model that composes music. So it will be interesting to see where this leads.
Will future music be AI-generated? Well, maybe not all of it, but some of it already is. What do you think?
Let us know your opinions in the comments section below.
Most exe files on your computer are simply executable files to install apps. However, some are malicious, and 1.exe is one of these files.
According to reports from users, this is a file that somehow found its way to your PC, and from there, everything went downhill. Their PCs started crashing and randomly freezing. If you’re in the same predicament, we share how to remove this file.
What does the exe virus do?
We have all interacted with exe files in our PC whenever we download certain programs and know they are generally not harmful.
However, an executable virus can be self-replicating. It uses a host application to spread copies of itself. These viruses infect executable files, including boot sector and system files, so they can be executed by the operating system each time the file is run.
Exe viruses are often used for malicious purposes, such as stealing information from your computer or taking over your system process to steal your private data.
They can also be used to take advantage of other security vulnerabilities in Windows or other programs on your computer to gain access to sensitive information like usernames, passwords, credit card numbers, and more.
Other things it can do include:
Disable your firewall and antivirus
Delete files on your computer without your knowledge
One of the main reasons you may find yourself with an exe virus is if you don’t have a reliable antivirus, do not update it regularly, or download files from untrusted sources.
Hit the Start Menu icon, type cmd in the search bar, and click Run as administrator.
Type the following commands and press Enter after each one: DISM.exe /Online /Cleanup-Image /Restorehealthsfc /scannow
Alongside the SFC scan on your Windows PC, you can also rely on tailored system repair tools in order to diagnose the system and detect corrupted system files.
Moreover, the PC repair software will detect any kind of issues on your Windows OS, including virus files or broken registry files.
2. Scan for viruses
Press the Windows key, search Windows Security, and click Open.
Select Virus & threat protection.
Next, press Quick scan under Current threats.
If you don’t find any threats, proceed to perform a full scan by clicking on Scan options just below Quick scan.
Click on Full scan, then Scan now to perform a deep scan of your PC.
Wait for the process to finish and restart your system.
If your antivirus program detects anything, it will likely quarantine or remove it immediately. However, if there’s no luck with the first scan, try running another one with a comprehensive antivirus program.
3. Clean the Registry
Press Windows + R, type regedit in the dialog box, and press Enter or click OK to open the Registry Editor.
In the app, go to File, then Export.
Now select All as Export range.
Enter the desired file name, choose a safe location, and clickSave. This will create a backup. If any issues occur after you modify your registry, you can run the file you created to restore it to its original state.
Now you can start cleaning the files. In the Registry Editor, go to the following location: HKEY_LOCAL_MACHINE\SOFTWARE
Right-click on the file you want to remove and select Delete.
Although manually cleaning the registry is an excellent option, sometimes it does not pick up all errors, so a registry cleaner should suffice.
If the above methods are unsuccessful, you may have to reinstall your copy of Windows. This comes in handy for files like Zbrain.desktop that may be difficult to get rid off. And that brings us to the close of this article.
For any additional thoughts or queries, leave a comment down below.
Uninst.exe is a process file that belongs to the software NCH Software. This process monitors system changes and helps you install, update, and uninstall software on your computer.
It’s a small file that doesn’t require special permissions or privileges to be executed on your computer so you can run it anytime. The big question is whether you should keep it on your PC, so let’s find out.
Should I remove uninst.exe from my PC?
If you are having problems with your computer, and you think that this program may be causing them, then it is recommended that you remove it from your computer.
Press the Windows key, search Windows Security, and click Open.
Select Virus & threat protection.
Next, press Quick scan under Current threats.
If you don’t find any threats, proceed to perform a full scan by clicking on Scan options just below Quick scan.
Click on Full scan, then Scan now to perform a deep scan of your PC.
Wait for the process to finish and restart your system.
As removing unwanted programs is essential to the health of your computer we recommend using specialized software to ensure its security. A tool such as TotalAV is able to perform more in-depth scans of your system and it also provides long-term protection against future threats.
Press the Windows + R keys, type rstui, and hit Enter.
The System Restore window will open. Click on Next.
Select the restore point you wish to revert to and click on Next.
Now click on Finish.
What is uninst.exe?
Keep in mind that uninst.exe is a non-system process used by the DAEMON Tools Lite program to remove files and uninstall programs. It is part of the NCH Software that provides audio, video, photo, and document processing tools.
Some of the roles it plays include:
Uninstall an application from your system – Uninstalling an application using this utility will delete all files associated with it, as well as delete registry entries and other settings.
Install an application – When installing a new program on your system, you can use this utility to ensure that all necessary files are copied over correctly and ready for use by the end user.
Is the uninst.exe file necessary?
There are a lot of non-system processes on your Windows PC, and you may never get to interact with them. However, some may occasionally appear as errors when you start up your PC or as runtime errors.
In such cases, you may have to remove them. Exe files don’t generally cause problems, but there are some signs to look out for that could help you decipher whether they are causing issues. These signs include:
The program was downloaded from a website other than the official website of the software developer
The name of the file contains strange characters or numbers
The size of the file is significantly larger than expected for its purpose
You receive an error message when trying to open the file
The program attempts to install other programs without your permission
Some of the errors you may come across related to the uninst.exe file include the following:
uninst.exe failed
Cannot find uninst.exe
uninst.exe Application Error
uninst.exe not found
uninst.exe is not running
uninst.exe is not a valid Win32 application
If you find yourself with a slower-than-usual machine, these files should be the first place you look for the source of the problem.
With exe files, the problems are varied, and sometimes you may be unable to open these files. If so, look no further than our detailed guide on how to fix such errors.
Hopefully, this article has helped unpack the uninst.exe file, and you’re now in a better position to decide whether to keep it or remove it.
In case you encounter a similar unknown file, we have a great guide that explains if you should remove distnoted.exe, so don’t miss it.
Good news for Windows enthusiasts this week. Microsoft has released Windows 11 Insider Preview Build 23486to the Dev Channel. And it’s packed with a lot of good features, important fixes, and improvements.
It’s almost as big as the last week’s Patch Tuesday updates, and some of these updates will make much easier for you to browse. Take for example this Windows 11 feature: passkeys. According to Microsoft, the future is passwordless, and passkeys are the first step to that.
Basically, passkeys will allow you to replace passwords when you sign into a website or application that supports them. This way, bad actors won’t be able to steal your credentials when signing into a web site or application.
Even more, Microsoft says that passkeys are phish-resistant, recoverable, and faster for users.
Here’s how you can use passkey on Windows 11
In order for you to use passkeys, you need to go to any app or website that supports passkeys. You’ll be signing in by creating a passkey, and then you can use Windows Hello (face, fingerprint, PIN) to sign in.
Create and Sign in using passkeys can be done on Windows 11 devices, as well as your mobile devices.
For a Windows 11 device, you need to:
Go to a website that has enabled passkeys on Windows (Example: bestbuy.com, ebay.com, google.com).
Create a passkey from your account settings.
Sign out of your account and sign-in using your passkey.
And for mobile device, you’ll need to:
Go to a website that has enabled passkeys from your mobile device (Example: bestbuy.com, ebay.com, google.com).
Create a passkey from your account settings.
Go to the website on Windows and sign in using your passkey saved on your mobile device.
You can also manage your passkeys that are saved into your Windows devices. You can view, search, and delete them as you see fit.
Navigate to Settings > Accounts > Passkeys.
Here you’ll find a list of all passkeys saved to your Windows device.
Besides the passkeys, there are a lot of changes and improvements coming with this build. Check them below.
[File Explorer]
Thank you to all the Windows Insiders who gave us feedback on the Folder Options changes in File Explorer that removed a handful of old settings in Build 23481. We’ve rolled back this change. As is normal for the Dev Channel, we will often try things out and get feedback and adjust based on the feedback we receive.
[Dev Home]
[ADDED] Starting with this build, Dev Home is now an inbox app. In a future flight, Dev Home will be found via Start > All apps > Windows Tools. To learn more about Dev Home, check out this blog post here and also read about the latest Dev Home update here.
[Dynamic Lighting]
New Effects are now available for Dynamic Lighting via Settings > Personalization > Dynamic Lighting. Check out Wave, Wheel, and Gradient.
[Emoji]
Unicode Emoji 15, which began rolling out with Build 23475, is now available to all Windows Insiders in the Dev Channel.
[Settings]
We are improving the user experience when changing time zones, including cases of low confidence in location data. It displays a non-dismissible notification for accepting or rejecting the change and prompts the user for confirmation before adjusting the time zone.
We are also improving the user experience while changing the time zone via Settings > Time & language > Date & time. If location settings are disabled, a warning is now shown to the user, urging them to enable location settings to ensure accurate time zone adjustments. This warning provides helpful information to the user, helping them understand why their time zone may not be correct and guiding them towards resolving the issue.
[Dynamic Lighting]
We fixed the issue where on first boot after installing recent builds and connecting a device, the “Use Dynamic Lighting on my devices” toggle is off in Settings and device LEDs may not turn on automatically.
[Input]
We’re rolling a fix for an issue where a blank window whose title is “Windows Input Experience” appears after resuming the device from the sleep.
[Network]
Fixed an issue where the login screen was crashing in the last couple flights when trying to connect to certain types of networks.
[Task Manager]
Fixed an issue causing Task Manager crashes for some people.
Fixed an issue where focus wasn’t getting set correctly to search if the Task Manager window was small enough that search was collapsed to an icon.
Fixed alignment of Task Manager icon and name in the title bar.
Right clicking the empty space in the Details page (aka so no process is actually selected) will no longer show the option to create live kernel memory dumps.
Fixed an issue where the live kernel memory dumps weren’t being cleaned up by Storage Sense.
[Dev Drive]
There might be variable performance on different hardware. If you notice slower performance on your machine, please file feedback!
[Search on the Taskbar]
[NEW] After changing your Windows display language, the search box on the taskbar may continue to display in the previous language for a short time before changing to the new language you selected.
Text scaling may not work in the search flyout.
[File Explorer]
[NEW] In some cases, the context menu background in File Explorer may appear transparent.
Insiders may experience a File Explorer crash when dragging the scroll bar or attempting to close the window during an extended file-loading process.
Thumbnail loading performance in Gallery for dehydrated cloud files and memory usage in large collections are known issues we are focused on improving. Please capture Performance traces in Feedback Hub for any performance-related issues. Rebuilding your Indexer can help if thumbnails are missing for cloud files; Search for “Indexing Options” and look in Advanced settings to find the rebuild tool.
The count shown for selected files in the details pane may be extremely large.
Insiders who have the modernized File Explorer Home that began rolling out with Build 23475:
File Type icons are displayed in place of file thumbnails for ‘Recommended’ section (applicable to Enterprise users).
Insiders signed in with an AAD account and try to navigate the Recommended section on File Explorer Home with the tab key on the keyboard may experience an explorer.exe crash.
When navigating from another group to the Recommended section using a keyboard, focus does not appear on the group header or files appropriately.
Files display file extensions with the Show file extensions setting disabled.
Insiders who have the modernized File Explorer address bar that began rolling out with Build 23475:
Windows Insiders may notice missing craftmanship polish with the modernized address bar and search box. The team greatly appreciates the use of Feedback Hub to help call out important details to address.
Users might experience lost keyboard focus and missing keyboard shortcuts. The team implemented improved tabbing with keyboard shortcuts that will be available soon.
If “…” shows in the address bar path, selecting it will crash explorer.exe.
Insiders will have issues with the following commands on recommended files in File Explorer that began rolling out with Build 23403:
Clicking on the Share command will currently bring up the Windows share sheet (non-OneDrive).
[Notifications]
The copy button for quickly copying two-factor authentication (2FA) codes in notification toasts (first introduced in Build 23403) is currently not working in this build. A fix is coming in a future flight.
[Dynamic Lighting]
[NEW] Using Wave and Wheel effects can result in typing not working in certain apps.
All-device settings changes are not propagating to per-device Settings.
Device icons are missing from the device cards in Settings.
Switching user accounts can turn off device LEDs.
[Windows Ink]
Users can’t use handwriting to erase text in Microsoft Edge.
The address box in Microsoft Edge might not work correctly.
Windows Ink does not convert handwriting to text into the main content (e.g., Word documents and Excel spreadsheets) in Microsoft 365 applications.
Search boxes in Microsoft 365 applications (e.g., Microsoft Word) might not work correctly.
Comment fields in Microsoft 365 applications (e.g., Microsoft Word) might not work correctly.
What do you think about this Build? What about passkeys? Could they really be better than passwords? Let us know in the comments section below.
Vdsldr.exe is a software component that runs in the background and enables users to access their virtual disks. Virtual disks are created by virtualization programs such as VMware.
You’ll probably not need this file on your PC if you don’t have any virtualization software, so if you spot it in your PC and it is throwing errors, we show you how to remove it.
What is the vdsldr.exe file?
The vdsldr.exe process is a component of the Virtual Disk Service Loader. This service allows users to create virtual disks for use with virtualization software.
It’s a Microsoft Windows component that can be used by other programs or services to interact with the Virtual Disk Service Loader.
The file is created when you install your virtualization software and any other services it needs to run properly.
For example, if you’ve installed a virtualization program like VMware Workstation, you’ll have already installed this service and its associated process on your computer.
It is used by the application to connect to the virtual disk service to access and modify virtual hard disks stored on physical disks.
We recommend checking its digital signature if you’re unsure if you should be worried about it. This can be done by following the steps below:
Press Windows + E to open File Explorer and navigate to the path where you have the file.
Right-click on it and select Properties.
Click on the Digital Signatures tab to see a list of signatures in the Signature list section. The genuine publisher is Microsoft Windows Operating System. Any other name or unverified entry should be cause for alarm.
Consequently, you can also check its location. You must remove the file to prevent damage if it is found somewhere other than the following path: C:\Windows\System32
What are some of the vdsldr.exe errors?
There are many vdsldr.exe errors, and not all of them are easy to understand. If you are experiencing a problem with your computer, you may want to check the list below to see if it matches up with your problem.
vdsldr.exe – Bad Image
Cannot find vdsldr.exe
vdsldr.exe Application Error
Error starting program: vdsldr.exe
vdsldr.exe could not be found
Faulting Application Path: vdsldr.exe
vdsldr.exe could not be installed
The file vdsldr.exe is missing or corrupt
vdsldr.exe could not be launched. Class not registered
Windows failed to start – vdsldr.exe
vdsldr.exe could not be started
vdsldr.exe failed to initialize properly
vdsldr.exe has encountered a problem and needs to close. We are sorry for the inconvenience
On the Choose an option screen, click Troubleshoot.
Now on the Troubleshoot page, click Advanced options.
On the Advanced options screen, select Startup settings.
Click Restart. Once your computer restarts, you will be given options to boot. Choose the one which takes you to Safe Mode.
Now locate the file and delete it.
5. Perform a System Restore
Press the Windows + R keys, type rstui, and hit Enter.
The System Restore window will open. Click on Next.
Select the restore point you wish to revert to and click on Next.
Now click on Finish.
And with that, we wind up our article. If, at this point, you’re yet to resolve the vdsldr.exe errors, we suggest uninstalling your virtualization software or performing a clean install.
We also have a rich list of exe files in our library, so if you spot any you’re unfamiliar with, such as the Poqexec.exe file, we explain what they are and how to remove them.
Let us know in the comment section below if you have any concerns.
The build KB5027311 has been released in the Windows 11 Insider Program, and it brings some important changes and improvements with it.
It comes as a nice surprise, considering last week Microsoft released the Patch Tuesday updates, which took care of some of the most important security vulnerabilities.
The Build 22631.1906 (KB5027311) updates for Windows 11 focus mainly on updating several graphic icons and designs so they can fit more with the Windows 11 theme.
However, there is an important and rather overlooked feature that made its way into the build. You will be able finally uninstall programs for good, just by right-clicking their shortcuts. This is particularly useful, considering that sometimes we only delete the shortcuts, and forget to actually uninstall the program.
Here’s how you can finally uninstall programs from app shortcuts
As we mentioned earlier, you uninstall programs by right-clicking on them and selecting Uninstall. Selecting this option will take you to Settings, where you can uninstall Windows 11 applications for good.
As with every Windows Insiders features, this one will be available in the next Patch Tuesday, most probably, the one from July.
But that’s not all. Here are all the features that are previewed in KB5027311:
[Taskbar & System Tray]
You can now hide the time and date in the system tray. You can turn this on by right-clicking on the system tray clock and choosing “Adjust date and time”.
When right-clicking on the network icon in the system tray, we’ve added the option to diagnose network problems.
[Lock screen]
We have updated the network flyout on the Lock screen to align with Windows 11 design principles.
[Windows Security]
We have updated the Windows Security (firewall) notification dialogs that match the Windows 11 visuals.
[Networking]
Added support for bridging adapters via command line via netsh.
[Settings]
We have added links to advanced properties for network adapters and internet properties under Settings > Network & internet > Advanced network settings.
We have added a way to view Wi-Fi passwords for your known networks via Settings > Network & internet > Wi-Fi and “Manage known networks”.
Based on your feedback, we have added additional options to the Data Usage page that allows for daily and weekly data limits. The page will also now show how far a data limit has been exceeded.
We added the ability to join Bluetooth Personal Area networks under the Settings > Bluetooth & devices > Devices. This option will appear for paired devices like Phones that are sharing internet over Bluetooth.
The settings page for wheel devices such as the Surface Dial has been updated to better match the Windows 11 design principles.
[Taskbar & System Tray]
[ADDED] Currently toggling the option to “Hide date and time in the System tray” on will show the System Tray clock while toggling it off will hide it (it’s backwards).
What are your thoughts on these new changes and improvements coming in KB5027311? What about the new feature? Let us know your opinions in the comments section below.
While trying to download a game or update an old game, you may encounter a corrupt disk error on your Steam client. This is a common error and can occur due to several reasons.
The full error reads as follows:
An error occurred while updating [your game] (disk read error) (disk corruption error), see the Steam support site for more information.
For those affected by this error, here is how to fix the corrupt disk Steam error on your Windows machine.
What does corrupt disk mean on Steam?
The data included within a file or storage device can become corrupted if that data is changed from the condition in which it was initially stored, which can cause the data to behave unexpectedly or make it altogether unreachable.
When this happens in Steam, you will have to check the app’s or game’s file integrity as we have shown below.
Why does Steam say corrupt disk?
Keep in mind that in case a BSOD or power outage interrupted the Steam game downloading process, it might have corrupted your download files.
Hence, you’ll probably get the corrupt update files error. If there are problems on your hard disk drive where you have installed Steam, it might result in this error.
In case you’re wondering what exactly is a corrupt disk, do not forget that hard drive data corruption appears when a system cannot finish writing data to a file or when segments of the file become inaccessible.
Moreover, you may encounter one of the following error variations, that are still solvable with the solutions below:
Steam corrupt disk while downloading – Delete the active download folder or rename it in order to start anew.
Steam corrupt update files – Uninstalling an update in Steam is not as easy as simply uninstalling the app altogether and reinstalling it.
Steam disk write error – Verify the integrity of the game you are trying to play as we have shown below or by going to our dedicated guide on this issue.
Steam download corrupt image Mac – Mac users can also apply some of the solutions below in order to fix this issue.
Steam corrupt disk download error – Repair the Steam folder library in order to get rid of any corrupt files.
Steam keeps saying corrupt disk – If nothing works, you may want to rely on a third-party specialized tool that will fix this error for you.
Steam download stopped corrupt disk – Reinstalling Steam is one of the best solutions that you can try if nothing else works.
How do I fix a corrupt disk on Steam?
1. Delete the active download folder or rename it
1.1 Delete the folder
Use the following keyboard shortcut to open File Explorer: Windows + E.
and navigate to the following location: C:\Program Files\Steam\Steamapps\Downloading
Steam stores every game with a unique number. Open the first folder you see inside the downloading folder with a number. Check if it belongs to the problematic game.
Delete the folder.
Exit Steam if still running. Relaunch Steam and try to install the game again.
Before moving to advanced troubleshooting, consider temporarily disabling the Firewall and antivirus. Try again, and if that doesn’t help, move to additional troubleshooting steps.
Another reason for the corrupt disk error can be the corrupt game’s files. You can try to delete the game’s files that are downloading and then restart the download from the Steam client.
1.2 Rename the folder
Locate the Downloading folder in Steamapps by navigating to the following path: C:\Program Files (x86)\Steam\Steamapps
Right-click on Downloading folder and select Rename. Rename the folder as Downloading12.
Next, create a new folder in the Steamapps folder and name it as Downloading.
Launch Steam and try to install the game that was giving the issue. You should be able to download and install the game now.
Rename the download folder to something else and create a new folder named downloading as shown in the steps above.
2. Verify the integrity of the game files
The corrupt disk error can also occur if the game files are corrupted or missing. Steam offers a built-in tool that checks and verifies the integrity of Game files within the client.
Hit the Windows key, type Steam, then open the desktop client.
2. Click on Library.
3. Right-click on the problematic game and select Properties.
4. Under Properties, click on the Local Filestab.
5. Here, click on Verify integrity of game files.
6. Steam will scan the game file for any corruption. If the verification is successful proceed with the next step.
3. Repair the Steam Library folder
Press on the Windows key, type Steam, then open the app.
From the top-left corner of the window, click on Steam.
Go to Settings.
Click on the Downloads tab, then select Steam Library Folders.
Right-click on the Steam Library Folder (or custom library folder) and select Repair Library Folder.
Steam will scan the folder and try to repair it if any problem is detected.
Try to download the games and see if the error is resolved.
If the problem is due to the default Steam Library folder, try fixing it using the Repair Steam Library Folder option. Here is how to do it.
4. Use a specialized tool to repair Steam corrupted files
Another great option you should try is a specialized repair program that will help you protect your system, by removing malware and repairing corrupted files from your PC.
These tools can easily restore and replace DLL files, with impressive databases of genuine and up-to-date files.
5. Change the download folder / Steam Library folder
Hit the Windows key, type Steam, then click on the app to open it.
From the upper-left corner of the window, click on Steam.
Now, navigate to Settings.
Click on the Downloads tab, then choose the Steam Library Folders option.
Next, click on Add Library Folder button on the pop-up dialog box.
Select a different drive on your system and click Select.
Close the Setting window and try to download and install the game with a corruption disk error.
The Steam client allows you to change the Steam Library and set a custom location to download and install games.
If the default Steam Library or the hard disk partition is corrupt, you can switch the drive to fix the error.
From the upper-right corner of the window, click on the Install Steam button.
Follow the on-screen instructions to complete the process.
Launch Steam and you should have all the game data intact.
If not, move the Steamapps folder from the backup drive to the following path: C:\Program Files (x86)\Steam folder
As a last resort, you can try to reinstall the Steam client. Uninstalling your Steam client does not delete the game data and installed games but only the client.
Once you reinstall the Steam client, it will pick up the game data and files from the folder.
However, just to be on the safer side, take a backup of the Steamapps folder by navigating to the following folder: C:\Program Files (x86)\Steam
Once the backup of the Steamapps folder is ready, proceed with uninstalling the Steam client.
Well, if you really must know, the corrupt update files error is only one of the many errors faced by Steam users in general.
It usually happens when you attempt to download a new game that you just bought or update an existing game on Steam.
That being said, know that it may also occur as a result of a power cut or a corrupted download. So there really isn’t just one cause that can trigger this.
Can I recover a corrupted hard drive?
Because many users are wondering whether or not they can recover a corrupted hard drive, we consider properly delivering some useful answers.
Well, if you’re in the same situation, keep in mind that files can be recovered from a failed hard drive by using a skilled data recovery service.
Failed hard drives cannot be salvaged with recovery software since the operating system cannot access the device to allow the application to recover the data.
We hope that our solutions helped you fix the Steam corrupt disk while downloading error and you are able to play now.
After reading this article you will be a lot more prepared to deal with Steam corrupt disk downloads. Remember that Steam corrupt downloads can be fixed with this guide.
Every time you or your friends have to put up with Steam corrupt update files, make sure you do the right thing and refer to this article.
Even if you get the Lost Ark corrupt disk error, the same troubleshooting steps will help you get out of the situation.
Stuck in Safe Mode on your Windows 10 computer and looking for a way out? Don’t worry; this guide can help!
We’ll walk you through the various methods with step-by-step instructions to safely exit Safe Mode and restore your Windows 10 computer to its regular functioning.
How can I safely exit Safe Mode on Windows 10?
Before engaging in advanced troubleshooting steps, you should consider performing the following checks:
Try restarting your computer; sometimes, this could load your PC in normal mode
Type msconfig and click OK to open the System Configuration window.
Navigate to the Boot tab, locate Boot options, and remove the checkmark next to Safe Boot.
Click Apply, then OK.
Select Restart to start your computer normally.
2. Use a key combination
Press the Windows key to open the Start menu and click on the Power button.
While holding the Shift key on your keyboard, click on Restart. This will initiate a restart of your computer into the Advanced Startup Options menu.
Your computer will boot into the Choose an Option screen and select Troubleshoot.
In the Troubleshoot menu, choose Advanced options.
Select Startup Settings from the Advanced options menu.
Click on the Restart button to reboot your PC.
Upon restart, you will see a list of startup options. Press the number key corresponding to Start Windows Normally orExit Safe Mode to boot into normal mode.
If you can’t find this option, press F10 to get more options.
3. Use the Command Prompt
Press the Windows key, type cmd, and click Run as administrator.
Copy & paste the following command to safely exit Safe Mode and hit Enter: bcdedit /deletevalue {current} safeboot
Once the command executes successfully, close the Command Prompt window.
Now restart your PC, and it should boot into normal mode instead of Safe Mode.
Under the Advanced startup section, click on the Restart now button. This will restart your computer in the Advanced Startup Options menu.
Your computer will boot into the Choose an Option screen and select Troubleshoot.
In the Troubleshoot menu, choose Advanced options.
Select Startup Settings from the Advanced options menu.
Click on the Restart button to restart your computer.
Once your computer is up, you will see a list of startup options. Press the number key corresponding to Exit Safe Mode, and your computer will now restart in normal mode.
5. Use the designated key during boot
If your system still supports it, you can try pressing the F8 key repeatedly during startup until the Advanced Boot Options menu appears.
Your computer will boot into the Choose an Option screen and select Troubleshoot.
In the Troubleshoot menu, choose Advanced options.
Select Startup Settings from the Advanced options menu.
Click on the Restart button to restart your computer.
Once your computer is up, you will see a list of startup options. Press the number key corresponding to Exit Safe Mode, and your computer will now restart in normal mode.
6. Use the Windows Recovery Environment
Restart your computer. As it restarts, press and hold the Power button until the computer turns off.
Press the Power button again to turn on your computer.
As soon as the manufacturer logo appears, press and hold the power button again to force the computer to turn off. Repeat steps 2 and 3 two more times.
On the third restart, Windows will enter the Windows Recovery Environment (WinRE).
In WinRE, choose Troubleshoot.
On the next page, select Advanced options.
Select Startup Settings from the Advanced options menu.
Click Restart.
Upon restart, you will see a list of startup options. Press the number key corresponding to Disable safe mode to boot into normal mode.
So, these are the methods to exit Safe Mode safely on Windows 10 and turn your computer back on in normal mode.
If you have encountered an error message mentioning the igfxCUIService.exe file and wondering what it does and how it can crash, this guide can help!
We’ll explore what the file does, its significance, and the steps you can take to fix it if it’s crashing on your computer.
What is igfxCUIService.exe?
The igfxCUIService.exe file stands for Intel Graphics Common User Interface Service. It is a software component of Intel Common User Interface developed by Intel Corporation.
It is associated with Intel graphics drivers and is responsible for providing user interface services related to the Intel Graphics Control Panel.
The Intel Common User Interface allows users to access and configure various graphics settings, display options, and performance optimizations for Intel-integrated graphics.
If you are using an external graphics card along with this one, you may see error messages saying this executable file is missing or has crashed.
The file is located in C:\Windows\System32\DriverStore\FileRepository\igdlh64.inf_amd64_88119f5187d09975\. If it is found elsewhere, chances are the file is malicious. Try running an antivirus scan to be sure.
How can I fix errors related to igfxCUIService.exe?
Before engaging in advanced troubleshooting steps, you should consider performing the following checks:
Restart your computer.
Ensure your Windows is up to date.
If you are using an external graphics card along with this, check its Properties.
Once done, move to the detailed methods mentioned below.
1. Run Hardware and devices troubleshooter
Press the Windows key, type cmd, and click Run as administrator.
Type the following command to invoke Hardware and Devices troubleshooter and hit Enter: msdt.exe -id DeviceDiagnostic
On the Hardware and Devices window, click Advanced.
Select Apply repairs automatically and click Next.
Follow the onscreen instructions to complete the process.
2. Disable startup for Intel(R) HD Graphics Control Panel Service
Press Windows + R to open the Run box.
Type services.msc and click OK to open the Services app.
Locate and right-click Intel(R) HD Graphics Control Panel Service, then select Properties.
Under Services status, click Stop, and for Startup type, choose Disabled from the drop-down.
Click Apply, then OK to save the changes.
Restart your computer and check if the issue persists.
Double-click on the downloaded file, agree to the terms and click Install. To completer the installation, you might have to restart your computer.
Once your computer is up, press the Windows key, type intel driver & support assistant, and click Open.
You will get a list of driver updates available; click Download or Download all.
Click Install to install the drivers. Follow the onscreen instructions to complete the process.
4. Run SFC & DISM scans
Press the Windows key, type cmd, and click Run as administrator.
Type the following command to repair system files and hit Enter: sfc/scannow
Wait for the scan to complete, copy & paste the following command to restore Windows OS image files, and press Enter: Dism /Online /Cleanup-Image /RestoreHealth
Once the command is successfully completed, restart your computer to save the changes.
5. Run your computer in a clean boot environment
Press Windows + R to open the Run window.
Type msconfig and click OK to open the System Configuration window.
Go to the Services tab, place a checkmark next to Hide all Microsoft services, and click Disable all.
Switch to the Startup tab and click Open Task Manager.
Now go to each Enabled item, and click Disable. Close Task Manager.
On the System Configuration window, click Apply, then OK.
Click Restart.
Now check if the issue persists. If the issue is still there, check all the recently installed apps and services to single out the app or service causing the issue.
Once done, follow the same methods to revert the system to normal mode.
So, these are the methods you have to follow to fix the errors related to igfxCUIService.exe and restore system health.
If you are facing other issues with Intel graphics drivers, we suggest you check out this guide to find the relevant fixes. We also have a guide on Jhi_Service.exe, so feel free to check it out for more information.
Please feel free to give us any information, tips, and your experience with the subject in the comments section below.
If you have come across the CompPkgSrv.exe file and wondering about its role on your Windows computer, this guide can help!
We will delve into the details of CompPkgSrv.exe, explaining what it is and what it does to gain insights into its purpose and ensure smooth system operation.
What is CompPkgSrv.exe?
CompPkgSrv.exe is an executable file associated with the Component Package Server service on your Windows computer.
It manages and installs component packages and the collections of software components used by various system functions and apps.
CompPkgSrv.exe facilitates installing, removing, and updating component packages on a Windows device. This ensures the necessary software components are correctly installed and configured for apps and system processes to function properly.
The process typically runs in the background as a Windows service and is essential for properly functioning the operating system.
This executable file is a legitimate system file, and its presence in the Windows system folder is normal.
However, as with any system file, verifying its authenticity is crucial to avoid potential malware or virus infections. So, if it is not found in the System32 folder, run a malware scan for your PC’s security.
What does CompPkgSrv.exe do?
CompPkgSrv.exe performs several functions related to managing and installing component packages. Here are some of the tasks performed by the process:
1. Package management
CompPkgSrv.exe handles the installation, removal, and updating of the component packages to ensure that the necessary software components are correctly installed and configured.
2. Dependency resolution
Component packages often have dependencies on other packages or system resources. CompPkgSrv.exe identifies and resolves these dependencies, ensuring all required components are installed and available for applications and system processes.
3. Package versioning
Component packages may have different versions, and CompPkgSrv.exe helps handle version management.
It keeps track of installed package versions, checks for updates, and performs necessary upgrades to maintain system compatibility and security.
CompPkgSrv.exe handles the installation and removal of component packages.
When a new package needs to be installed, this executable file ensures the installation process is carried out correctly.
Similarly, when a package needs to be removed, it ensures a clean and complete removal.
5. Package integrity & verification
CompPkgSrv.exe performs integrity checks and verification of component packages. This ensures that the packages are not tampered with, corrupted, or modified, maintaining overall system stability and security.
6. Configuration & registration
CompPkgSrv.exe manages the configuration and registration of component packages in the Windows registry and other system databases.
This makes sure that the installed packages are correctly registered and available for use by applications and system processes.
7. Service management
CompPkgSrv.exe runs as a Windows service and handles service-related functions. It manages the startup, running, and termination of the Component Package Server service itself.
Overall, CompPkgSrv.exe is vital in managing, installing, and maintaining component packages in Windows systems. It ensures software components’ availability and proper functioning, enhancing system stability, compatibility, and performance.
Please feel free to give us any information, tips, and your experience with the subject in the comments section below.
Windows operating systems have many processes that run in the background, and it is important to learn about them. Among these processes, one that might look suspicious is smss.exe, which could be mistaken for suspicious activity.
Some users have noticed that smss.exe consumes a significant amount of their GPU and CPU resources, prompting them to question whether the smss.exe process is legitimate or potentially malicious.
In this article, we will discuss the purpose and functionality of the smss.exe process and whether it can be safely disabled to free up memory.
What is smss.exe used for?
Smss.exe, which stands for Session Manager Subsystem is an executable file that runs the Windows Session Manager, and it is part of the Windows NT operating system since Windows NT 3.1.
Smss.exe, one of the essential processes to run when a Windows system starts up, is responsible for initiating and managing user sessions on the computer. Smss.exe prepares the system environment variables and resources needed for user sessions.
The Session Manager is responsible for loading essential components and drivers, creating virtual memory, and so on. It also helps shutting down or restarting the computer properly by closing all the programs and user sessions.
Should you remove smss.exe?
Smss.exe is a critical component of the Windows operating system, and making any changes to it can cause serious issues with the stability and functionality of your system.
If you remove or tamper with smss.exe, your system may experience crashes, display errors, or even fail to start up altogether.
Is smss.exe Safe?
Yes, smss.exe is a legitimate Windows process, posing no threats to your computer. However, some malware may disguise itself as smss.exe, which can be dangerous for your computer’s security. To ensure the file is genuine, you can verify its location and digital signature.
Check the smss.exe location and verify its Digital Signature:
Press Ctrl + Shift + Esc to open your Task Manager.
Go to the Details tab, find and right-click on smss.exe, then select Properties.
In the General tab, check the file’s location and ensure it corresponds to one of the following: C:\Windows\System32C:\WindowsC:\Windows\System32\Event Agent\Bin
Then, switch to the Digital Signatures tab and confirm if the signer’s name is Microsoft Windows Publisher under the Signature list.
If the smss.exe is located in another folder, it is probably malware. In that case, you should immediately use an antivirus or malware removal tool to remove it from your computer. If you see that Microsoft Windows Publisher does not sign the file, it’s a good idea to do the same.
How do I fix missing or corrupt smss.exe?
1. Run System File Checker (SFC) and DISM scan
Press the Windows key, type cmd, and click Run as administrator.
Type the following command to repair system files and press Enter:sfc /scannow
Once the scan is complete, run the DISM scan:DISM /Online /Cleanup-Image /RestoreHealth
Wait for the scan to complete and restart your computer.
2. Run the Check Disk utility
Press Windows + R, type cmd and press Ctrl + Shift, and click OK to run the elevated Command Prompt.
Type the following command and press Enter to repair the disk. chkdsk C: /f /r
If prompted to schedule the scan on the next restart, type Y and press Enter.
Many users have reported that they are experiencing the Blue Screen of Death errors that mentions NETwsw02.sys in the error message.
The issue is not exclusive to a specific Windows version; it has been known to occur on various Windows versions, including Windows 7, Windows 8.1, Windows 10, and Windows 11.
However, it’s not an issue without a solution. In this guide, we have compiled a list of steps that you can follow to resolve this blue screen error on your computer.
What is the NETwsw02.sys file?
NETwsw02.sys is an SYS file associated with Intel Wireless WiFi Link Driver and Intel Wireless Network adapters. If you are experiencing a Blue Screen of Death (BSOD) error related to the NETwsw02.sys file, it means there’s a problem with the Intel Wi-Fi driver on your computer.
A variety of factors can cause the error; here are some common causes:
Corrupted or missing file: The NETwsw02.sys file itself may become corrupted or go missing due to various reasons, such as hardware failures, software conflicts, or malware infections.
Outdated or incompatible driver: Using an outdated or incompatible version of the Intel Wi-Fi driver can lead to conflicts and issues with the NETwsw02.sys file.
Hardware problems: Sometimes, hardware issues like a faulty wireless network adapter or incompatible components can cause the NETwsw02.sys BSoD error.
System or software conflicts: Conflicts with other system files, software, or third-party applications can also trigger this BSoD error.
How can I resolve the NETwsw02.sys BSoD error?
Before diving into more advanced solutions, let’s explore a few quick fixes you can try:
Restart your computer: Sometimes, a simple restart can resolve temporary issues with the driver.
Run a virus scan: Run a deep malware and virus scan to remove the virus infection that causes the BSoD error.
1. Run SFC and DISM scans
Press the Windows key, type cmd, and click Run as administrator.
Type the following command and press Enter to repair system files:sfc /scannow
Once the scan is complete, run the following commands one after the other:DISM /Online /Cleanup-Image /ScanHealthDISM /Online /Cleanup-Image /RestoreHealth
Wait for the command to repair the Windows OS image.
Alongside this troubleshooting process, you can also run the ideal solution to repair and optimize your Windows PC performance. Such dedicated software will start with a full system scan to direct any single issue and then offer you the summary scan. After that, you only have to press Repair.
2. Update the Wi-Fi driver
Press the Windows + X and select the Device Manager option.
Expand the Network adapters section, right-click the Intel Wireless device under it, and select the Update driver option.
Then, choose Search automatically for drivers and install any available updates.
The main reason for the NETwsw02.sys BSOD error is having an old network driver. So, updating your driver to the latest version should fix the problem.
3. Update your PC
Press the Windows + I and select Windows Update on the left sidebar.
Click the Check for updates button on the right-side pane.
Finally, download and install the available updates and restart your PC.
4. Uninstall and reinstall the Intel Wireless Wi-Fi driver
Press the Windows+ R, type devmgmt.msc in the command box, and click OK.
Expand the Network adapters option, right-click the Intel Wireless adapter, and select the Uninstall device option.
Check the Attempt to remove the driver for this device box and click the Uninstall button.
Then, restart your PC.
Go to the official website of your computer manufacturer or the Intel website to download and install the latest version of the Intel Wi-Fi driver compatible with your specific model.
5. Perform a Clean Install of Windows
If the previous steps didn’t fix the random crashes related to the NETwsw02.sys file, there may be a problem with your system files that can’t be easily fixed.
Microsoft and the US Federal Trade Commission sparred today in an explosive first day of court proceedings over the fate of the $68.2 billion Activision Blizzard deal, and the public is now privy to confidential emails, details on secret revenue share deals, and upcoming exclusive games.
As the two opened for the day, the FTC filed 120-pages of proposed findings of fact and conclusions of law that were heavily redacted while the Microsoft and Activision filed roughly 80 combined with the onus on the plaintiffs to also defend the preliminary injunction filed earlier this week.
Microsoft began with an exhibit list for the FTC that included head of Microsoft Studios Matt Booty’s communications to executives on the Nintendo Switch team discussing Xbox games for the console, emails between head of Xbox Phils Spencer and PlayStation CEO Jim Ryan, emails between Spencer and the business strategy teams to bring multiple stores on Xbox, and discussions of “pettiness from Sony and Gamespots fanboy reviews.”
As part of public discovery early in the proceedings, a deposition from Jim Ryan included the reveal that the CEO planned not to share details about its next console with Activision if the deal closes. During the same deposition, Ryan is asked about Microsoft stewardship of Minecraft on PlayStation, which would require the company to have access to console details to provide future services, although redacted, available sentences still have the CEO concerned about a competitor having access to console development information.
Microsoft opened its case with a filing issued today that offered the admission that Xbox has lost the console wars, and its rivals are positioned to continue to dominate.” Further attempting to diminish its role in the gaming market, Microsoft revealed it made up a 16 percent share of console sales in 2021 while only 21 percent of the overall console install base.
During its 20-minute opening argument the FTC’s counsel James Weingarten set the parameters of its case by leaning on the business practice of securing exclusives for console sales and defining the market without Nintendo Switch and PCs because of pricing.
Meanwhile Microsoft spent its 20-minutes painting Sony as a continued market leader over several console generations and wants to secure its current dominance and revenue position which is fueling its opposition to the Activision deal.
Another revelation that surfaced early in the proceedings is an email from Ryan to internal staff that explained that Microsoft’s acquisition of Activision Blizzard was “not an exclusivity play at all,” and that he believed PlayStation “would be fine.” Ryan’s internal email fly’s in contrast to what the CEO proceeded to do months later sharing concerns of exclusivity with regulators.
During witness examinations, Booty answered several questions pertaining to the previous state of relations between Microsoft and Sony, noting that Sony never complained about Xbox taking games away from the PlayStation platform or exclusivities being bad for the industry. Booty also clarified to the preceding judge that Xbox players and Nintendo Switch players can make use of cross-play technologies while Sony has made the effort unnecessarily difficult for gamers.
Another witnessed called today was head of publishing for Bethesda Pete Hines where he revealed during a redirect of questioning that the company had already signed an agreement with Disney to provide a previously undisclosed Indiana Jones game as cross platform before Microsoft acquired the studio and cancelled its multi-platform release.
FTC lawyers then seized on the opportunity to continue its narrative of Microsoft’s recent history with acquisitions and exclusivity releases with Bethesda’s Redfall and Starfield games becoming Xbox exclusives after initially being planned to be multiplatform.
While Hines did offer some validity to the FTCs concerns about Microsoft’s potential to hoard games for exclusivity privileges, he did end his time being question by drilling home the profile difference between unreleased games and a industry staple like Call of Duty.
Last to be questioned today was cvp of Xbox Sara Bond who shifted the conversation to the duopoly in mobile gaming between Google and Apple with Microsoft’s only presence being Minecraft, as well as the 80/20 revenue split the company pays to certain developers to get games to the platform, which is slightly higher than its documented 70/30 split for most others.
Bond also walked FTC lawyers and the judge through the details of Game Pass and Game Pass Ultimate, how xCloud servers differ from Azure ones, stipulations on Xbox marketing of CoD due to Sony and Activision agreements, launching games on NVIDIA GFN, the difference between first- and third-party games, and a clause in the 10-year deals Microsoft has been offering that includes “unanticipated or unforeseeable circumstances.”
The day wrapped up with the biggest revelations revealed by Bond in regard to how cloud gaming works and that Microsoft planned to offer xCloud as a standalone service before it began becoming a user-success, and that xCloud loses Microsoft money the more people use it due to infrastructure and server costs.
Tomorrow offers to be another big day for both Microsoft and the FTC as the witness list includes Phil Spencer, Jim Ryan via video deposition, Microsoft finance director Jamie Lawver, and former Stadia head Dov Zimring.
Recently, a study has shown that over 80% of Microsoft Teams accounts were hacked at least one time, in 2022. What’s even more worrying is the fact that the same study reported that 60% of Microsoft Teams accounts were successfully hacked. That is a worrying number, but just how easily can Microsoft Teams be hacked, in this case?
Well, it turns out Teams can be very easily hacked. New research conducted by JUMPSEC’s Red Team discovered that Team is actually prone to modern malware. And external tenants can easily bring malware into Microsoft Teams as well.
How can this happen? There is a vulnerability in the latest version of Microsoft Teams. This vulnerability allows the malware to infiltrate any organization using Microsoft Teams in its default configuration.
The hacker can bypass the client-side security controls. These security controls prevent external tenants from sending files (malware in this case) to staff in your organization.
IDOR in Microsoft Teams allows for the introduction of malware
The exploitation is possible through a vulnerability in the client-side security controls. In Microsoft Teams, certain security controls can be implemented client-side.
So that means one hacker can impersonate an individual from your organization, and by bypassing these controls, they will be able to send you malicious files. This coupled with another vulnerability, allows the hacker to send malicious files directly into your inbox.
The research states that this method can bypass nearly all modern anti-phishing security controls. However, it requires the hacker to buy a domain similar to your target organizations and register it with M365.
But it impacts every organization using Teams in the default configuration, so this vulnerability has a huge potential for being exploited by threat actors.
The vulnerability was acknowledged by Microsoft, and the Redmond-based tech giant even validated its legitimacy. However, the tech giant said it did not meet the bar for immediate servicing.
There are still things your organization can do to protect themselves. According to the research, you can do the following:
Review if there is a business requirement for external tenants to have permission to message your staff.
Educate staff on the possibility of productivity apps such as Teams, Slack, Sharepoint, etc, for launching social engineering campaigns.
As you can see, while Teams is a very popular app for organizations to use, it’s also extremely vulnerable to attacks. However, since vulnerabilities like these are often patched in updates, you should also keep your Teams updated to the latest version, all the time. You can read the research in full here.
What do you think about this vulnerability? Be sure to let us know in the comments section below.
0x80244002 error code usually means there’s a problem with a Windows update service (WSUS), which can make it difficult for you to install updates on your computer.
Unfortunately, sometimes you might encounter errors like the 0x80244002 when trying to update Windows, which can prevent you from installing the latest updates. In this article, we have gathered why this error happens and provided several steps to fix it.
What is error code 0x80244002 in Windows Update?
Error code 0x80244002 usually occurs when there are problems with the Windows Update service or difficulties connecting to the Windows Update servers. There are several reasons why this error may happen:
Internet connection issues: If your computer is having trouble connecting to the Internet or the Internet connection is unstable, it can result in this error.
Firewall or antivirus interference: Third-party antivirus programs or firewalls can sometimes interfere with the Windows Update process.
Corrupt Windows Update cache: If the Windows Update cache becomes corrupted, it can cause issues with downloading or installing updates, resulting in the error.
Misconfigured Windows Update settings: Incorrect or misconfigured settings related to Windows Update can also trigger error 0x80244002.
Server-side issues: Sometimes, the Windows Update servers themselves may experience technical difficulties or undergo maintenance, which can temporarily prevent your computer from downloading updates.
How do I fix the Windows Update error code 0x80244002?
Check your Internet connection: Make sure you have a stable Internet connection and can access websites without any issues. If your Internet connection is not working properly, fix the connectivity problem first.
Restart your computer: Sometimes, a simple restart can resolve temporary errors or connection issues. Restart your device and try updating again.
Disable the antivirus/firewall: Temporarily disable the antivirus or firewall software you have installed and try updating again.
1. Clear Windows Update cache
Press Windows + R, type the following path, and press Enter: C:\Windows\SoftwareDistribution\Download
Select all the files in the folder and delete them by clicking the Delete button on the Ribbon.
2. Run SFC and DISM scans
Press Windows + R to open the Run dialog, type cmd, hold the Ctrl + Shift key, and click OK to open the elevated command prompt.
Click Yes on the User Account Control prompt window.
Type the following command and press Enter:sfc /scannow
After completing the system file checker (SFC) scan, proceed to run the DISM scan. Type in the following commands and press Enter after each:DISM /Online /Cleanup-Image /CheckHealthDISM /Online /Cleanup-Image /ScanHealthDISM /Online /Cleanup-Image /RestoreHealth
After performing the SFC and DISM scans, restart your computer and check if the 0x80244002 error has been resolved.
Given that such Windows commands may not solve the issue completely, we suggest you try a PC repair solution, that will diagnose the Windows and replace damaged system files automatically.
3. Run Windows troubleshooter
Press Windows + I to open Windows Settings app.
In the left pane, choose System, then scroll down and click on the Troubleshoot tile.
Click on Other troubleshooters on the Troubleshoot settings page.
Now, click the Run button next to Windows Update.
Follow the on-screen instructions to complete the troubleshooting process.
Then, close the troubleshooter and restart the computer.
4. Restart Windows Update-related services
Press Windows + R, type services.msc in the command box, and click OK.
Locate the Windows Update service, right-click on it, then choose Restart.
Similarly, find and restart the Background Intelligent Transfer Service (BITS) and Cryptographic Services using the same method.
Once you have restarted these services, reboot your Windows system.
5. Reset Windows update components
Press the Windows key to open the Start menu, type cmd, and select Run as administrator.
Click Yes in the User Account Control prompt.
Type the following commands and Enter after each line:net stop bitsnet stop wuauservnet stop appidsvcnet stop cryptsvcDel "%ALLUSERSPROFILE%\Application Data\Microsoft\Network\Downloader\*.*"rmdir %systemroot%\SoftwareDistribution /S /Qrmdir %systemroot%\system32\catroot2 /S /Qcd /d %windir%\system32regsvr32.exe /s atl.dllregsvr32.exe /s urlmon.dllregsvr32.exe /s mshtml.dllregsvr32.exe /s jscript.dllregsvr32.exe /s wuapi.dllregsvr32.exe /s wuaueng.dllregsvr32.exe /s wups.dllnetsh winsock resetnetsh winsock reset proxynet start bitsnet start wuauservnet start appidsvcnet start cryptsvc
After that, restart your computer, and check if the Windows Update throws the 0x80244002 error again.
Azure Quantum Elements uses AI, quantum computing and high-performance computing to accelerate scientific discoveries. It will be a very useful tool for scientists and product developers working with chemical matter and material science.
Microsoft promises scientists will be able to make advances in chemistry with unprecedented speed, scale, and accuracy. Moreover, industry innovators, including BASF, AkzoNobel, AspenTech, Johnson Matthey, SCGC, and 1910 Genetics have already adopted Azure Quantum Elements to transform their research and development.
According to Microsoft, Azure Quantum Elements will be available in a private preview in a few weeks, and you can sign up today to learn more.
Compressing a year into one minute with Azure Quantum Elements
Apparently, Azure Quantum Elements is a very powerful tool. As a scientist, or product developer, you’ll be able to:
Reduce time to impact and costs and bring innovative products to market more quickly.
Dramatically increase the search space for new materials, to tens of millions of potential new candidates.
Speed up certain chemistry simulations by 500,000 times, which is like compressing a year into one minute.
Address quantum chemistry problems today with AI and HPC, while experimenting with existing quantum hardware and getting priority access to Microsoft’s quantum supercomputer in the future.
And speaking of the quantum supercomputer, Microsoft plans to build one in the future.
A quantum supercomputer will be able to solve problems that are intractable on a classical computer and scale to solve the most complex problems facing our world. To do this, it must be both performant and reliable. Customers need to understand how capable a quantum system is of solving real problems, from the machine to the network overhead. That’s why measuring a supercomputer can’t be about counting physical or logical qubits.
Microsoft
You can check the roadmap for it here.
And of course, Copilot is coming to Azure Quantum as well.
With Copilot in Azure Quantum, a scientist can accomplish complex tasks on top of a fabric of cloud supercomputing, advanced AI and quantum all integrated with the tools they use today. It can generate the underlying calculations and simulations, query and visualize data and help get guided answers to complicated concepts. Just as Copilot in other Microsoft products is transforming software development, productivity and search, our ambition is for Copilot in Azure Quantum to transform and accelerate scientific discovery — whether it’s creating safer and more sustainable products, accelerating drug discovery or solving the most pressing challenges on the planet.
Microsoft
What do you think about it? Are you excited about the new scientific discoveries ahead? Be sure to let us know in the comments section below.
What causes STATUS_ACCESS_DENIED in Microsoft Edge?
Microsoft Edge might encounter Access Denied error if the UAC settings are high.
Not having the necessary permissions, such as administrative privileges or file/folder access, could prompt the errors.
Antivirus or firewall software can mistakenly block Microsoft Edge’s access to resources or websites.
Misconfigured settings within Microsoft Edge or corrupted browser data can cause this error.
Windows or Microsoft Edge updates can install new features or changes that affect access permissions.
Network restrictions set by network administrators can also cause access-denied errors in Microsoft Edge.
How can I fix STATUS_ACCESS_DENIED Microsoft Edge?
Before attempting any advanced troubleshooting steps, we recommend you go through the following preliminary checks:
Run Microsoft Edge as an administrator to give the browser elevated permissions.
Temporarily disable antivirus or firewall software to fix the error.
Update Microsoft Edge and Windows OS to resolve this issue.
1. Clear Microsoft Edge cache and cookies
Launch the Microsoft Edge app on your computer. Further, click on the three dots on the top right side and select Settings.
Now, select the Privacy, search, and services option on the left side panel menu,
Further, navigate to the Clear browsing data section, and select the Choose what to clear option.
Then, select All Time from the time range at the top, check the boxes next to Cookies and other site data, and the Cached images and filesoption. Then click on Clear now.
Clearing the browser cache and cookies will delete all corrupt data and files and fix the STATUS_ACCESS_DENIED error in Microsoft Edge.
In addition, do not hesitate to check our guide about how to clear the computer cache in Windows 11.
2. Reset Microsoft Edge
Launch the Microsoft Edge app on your computer. Click on the three dots on the top right side and select Settings.
Scroll down, click on the Reset settings option, and click Restore settings to their default values.
Click on the Reset button.
After the reset is complete, Microsoft Edge will open with its default settings restored.
Resetting the browser will resolve issues related to misconfigured settings and other underlying problems. Hence, it fixes the STATUS_ACCESS_DENIED error in Microsoft Edge.
During the pandemic, small businesses were especially affected by lockdowns and a lack of social presence. Now, after a post-COVID period, inflation remains high, putting additional pressure on this kind of business.
However, this is where AI comes to the rescue. By adopting AI and AI-based tools, small companies were able to overcome a lot of challenges, including financial and management ones. According to Microsoft, small businesses everywhere are intrigued by AI. Especially because it brings a lot opportunities in areas where it doesn’t seem it would bring any.
Here’s why Microsoft thinks AI can grow your small business
Microsoft conducted a survey of 1,000 small business owners with 0-24 employees and they found some very interesting facts about AI in the business world.
According to the Small Business State of Mind report, it turns out there are four main points to consider when talking about AI in a small business.
Balancing act
Inflation as well as data security are the biggest pain points of any small business.
65% of small business owners are blaming inflation as the main factor for their financial struggles. And with financial struggles, there are also many other struggles, including a tight budget for security.
49% of small business owners agree that data security is essential, but many don’t have the money for it. So it all falls on the hope that they won’t get affected by security breaches.
Automating a lot of a small company’s processes with AI would free up the budget to invest in other areas, such as data security.
Entrepreneur to admin
Small business owners focus too much on daily tasks, to think about innovation, though they want to innovate.
47% of small business owners are too focused on daily tasks, to even think about innovation in their company.
59% of small business owners want to innovate, though, And they would spend more time on new ideas if only they could find the time.
Tools such as Microsoft Teams and Microsoft Edge, that incorporate AI in their features could also greatly improve the workflow. If time is required to think about new ideas, then AI could very easily make that time.
AI Optimism in your small business
47% of small business owners say AI is a game changer and a valuable asset to their company.
88% of small business owners who consider themselves experts on it, think the same.
This means AI is already seen as a game changer for small businesses. Potentially, it could even be a tool to make their companies grow.
However, according to the study, only:
10% of small business owners know how to use AI for their work-related tasks.
67% of small business owners know nothing about AI in general.
But overall, 79% of small business owners want to learn more about using AI in their companies. Another study conducted by Microsoft says that early adopters are four times more likely to be confident in their business as they progress against business objectives. So it’s a good thing many small business owners want to learn more about AI.
Overall, AI can greatly improve the infrastructure of your small company, if you know how to use it. You could easily automatize tasks with AI. You can easily create content for your marketing strategy using AI. Ai would not only mean more time, but more money as well.
Are you a small business owner? What do you thin about using AI in your company? Let us know your opinions in the comments section below.