In a recent blog post, Microsoft officially acknowledged that the disruptions to its services earlier this month were the result of deliberate hacks. The tech giant attributed the temporary unavailability of some of its services to ongoing Distributed Denial-of-Service (DDoS) attacks conducted by a threat actor identified as Storm-1359.
On June 5, Microsoft’s 365 software suite, including popular applications like Teams and Outlook, experienced an outage lasting over two hours, affecting thousands of users. A brief recurrence was witnessed the following morning. This incident marked the fourth major outage for Microsoft within the span of a year.
Although Microsoft has assigned a temporary designation to the attackers, indicating their affiliation has not yet been determined, a hacktivist group called Anonymous Sudan has claimed responsibility for the hack on the messaging platform Telegram.
Over the past decade, messaging platform Telegram, code management site GitHub, and network provider Dyn have all faced similar attacks. In Microsoft’s case, the hackers focused on causing disruption and seeking publicity. They utilized rented cloud infrastructure and virtual private networks to overwhelm Microsoft servers using botnets comprised of compromised computers worldwide.
Reassuringly, Microsoft has stated that there is no evidence suggesting that customer data has been accessed or compromised during these incidents. DDoS attacks typically aim to temporarily render targeted servers inaccessible through the influx of substantial internet traffic, employing relatively unsophisticated methods.
The recurrence of service disruptions raises concerns about the vulnerability of technology platforms to malicious attacks. Companies like Microsoft are continuously enhancing their security measures to thwart such incidents. Nevertheless, the sophistication and persistence of threat actors continue to present challenges for ensuring uninterrupted and secure digital services.
Microsoft has not disclosed the motive behind the recent DDoS attacks or whether it has identified the individuals or groups responsible for them. As investigations continue, users and organizations are advised to remain vigilant, adopt robust cybersecurity practices, and promptly install security updates to mitigate potential risks.
It remains to be seen how Microsoft and other technology giants will fortify their defenses against future attacks, working towards a more secure digital landscape for businesses and individuals alike.
Fans of Sony’s current-gen PlayStation 5 console have started a petition to bring Bethesda’s upcoming AAA action-RPG Starfield to the platform. The petition was launched on Change.org—the world’s largest petition platform with 500 million users—on June 15 by user Benjamin Dickey. At the time of this writing it has over 1037 signatures, although many of the commenters on the petition appear to have voted just to be able to leave a comment saying how much they disagree.
The “Why this petition matters” section begins,
For over a decade Bethesda games have been released on PlayStation. They perform better on PlayStation, run better, and sell better. Xbox and specially (sic) Phill Spencer have NO BUSINESS taking them away.
The appeal not only calls on Bethesda (which was acquired by Microsoft in 2019) to bring Starfield to PS5, but to “Make Starfield a PS5 EXCLUSIVE!!!!” as the petition’s title suggests. It goes yet another step further,
… it is important for Bethesda games to remain available on PlayStation. Not only that but as a punishment to Xbox and its horrendous player base we need to force ANY AND ALL future Bethesda titles to be ONLY PlayStation exclusives. Not just Starfield.
It ends with “ If youre (sic) a true gamer you will support this and sign.” It’s unclear if perhaps the petition is actually satire, though it appears to be legitimate. Needless to say, the petition has grabbed a fair bit of attention online, including on the Starfield subreddit. You may recall that a similar Change.org petition was launched a year ago when Hideo Kojima’s next game was announced as an Xbox exclusive.
Starfield is slated for release on September 6. Despite getting a negative review score on Metacritic recently, it is one of the most anticipated video games in memory. We got a deep dive showcase of the game just a week ago during the Starfield Direct, and judging from what was shown, Starfield may (hopefully) just live up to the monumental hype surrounding it.
Netflix has made many changes regarding password sharing recently, and users aren’t pleased. In fact, many are wondering how to bypass Netflix password sharing.
In a previous article, we delved into the intricate details of how to use Hola VPN for Netflix. Today, we face a similar obstacle.
But before we proceed with any remedies, it is crucial to identify the underlying cause of this problem. Only then can we devise an effective strategy to address the issue at its root.
How can Netflix detect password sharing?
This is achieved by monitoring the following:
IP address of each user.
Device ID of each device that connects to your account.
Location of your home.
Netflix account activity.
Can a VPN bypass Netflix password sharing?
Yes, some VPNs with Meshnet technology can bypass password-sharing limitations in Netflix. If you’re not familiar, Meshnet technology does the following:
It combines multiple wireless and wired networks.
The technology uses Internet routers to create a large network.
Mesh networks work similarly to LAN.
Routing process sends data from one router to another until it reaches the destination.
How can I bypass Netflix password sharing?
Before we start, you might want to try these workarounds:
Don’t use smart TVs and streaming devices since they are being monitored for password sharing.
Log in to the owner’s Wi-Fi occasionally to keep using Netflix.
Multiple users have reported that they are coming across The Exception Unknown Software Exception (0xe0000008) error message, where the apps such as Discord or Steam randomly crash.
In this guide, we will give you details on what is The Exception Unknown Software Exception (0xe0000008) error message and how you can easily resolve the problem. Let us check out the solutions.
What is The Exception Unknown Software Exception (0xe0000008) error?
We dug the internet regarding this issue and found out some of the most common reasons that could trigger The Exception Unknown Software Exception (0xe0000008) error.
RAM issues – Chances are there is some underlying RAM-related issue that is causing the apps to crash on your PC and throw up the error.
Hard Disk issue – There might be some issue with the hard disk or your computer isn’t able to read the HDD properly, because of which you are getting The Exception Unknown Software Exception (0xe0000008) error.
Corrupt system files – Programs fail to launch or crash when the system files are corrupt or missing from your computer.
Due to 100% usage of Virtual memory – You might need to expand your virtual memory as 100% of the memory is already used.
The latest update isn’t installed – You should make sure that the latest Windows update is installed on your computer to fix such bugs.
Let us now check out the solutions that will help you resolve The Exception Unknown Software Exception (0xe0000008) error.
How do I fix The Exception Unknown Software Exception (0xe0000008) error?
1. Run Windows Memory Diagnostic
Press the Win + R keys to open the Run dialogue.
Type mdsched.exe and press OK to launch the program.
Click the Restart now and check for problems (recommended) button to check for the problems and fix them.
2. Perform SFC and DISM scans
Press the Win key to open the Start menu.
Type Command Prompt and run as an administrator.
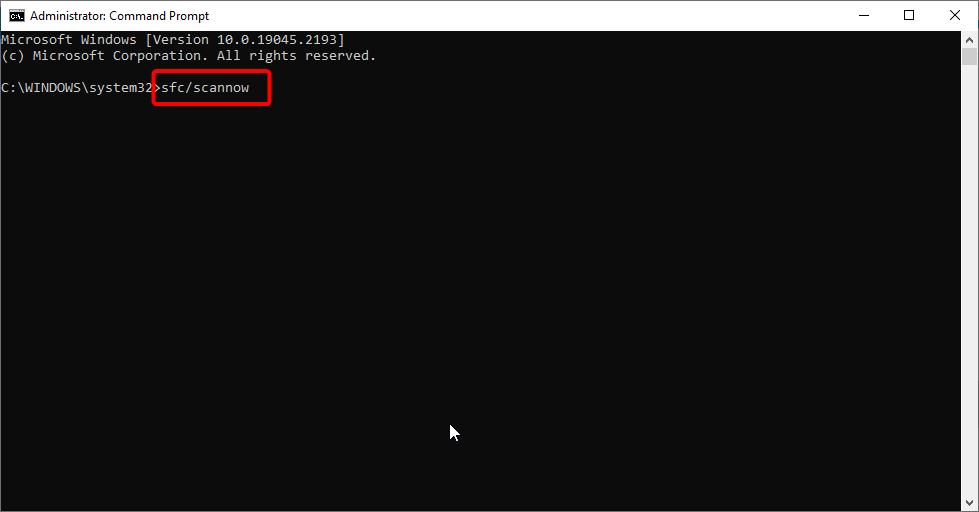
Type the below command and press Enter. sfc /scannow
Let the process resolve the corrupt or missing system files issue.
Type the below commands and press Enter after each one: Dism /Online /Cleanup-Image /CheckHealthDism /Online /Cleanup-Image /ScanHealthDism /Online /Cleanup-Image /RestoreHealth
Restart your computer.
The SFC Scan and DISM tools can help you fix the corrupt system files that will easily resolve other issues including TheException Unknown Software Exception (0xe0000008) error.
If you’re not sure about proceeding with the manual steps and want to avoid further issues, we recommend a specialized tool.
3. Run the CHKDSK utility
Press the Win key to open the Start menu.
Type Command Prompt and run it as an administrator.
Type the below command and press Enter. chkdsk /f /r
Press the Y key on your keyboard.
The CHKDSK utility will help resolve the issues related to the hard disk. Let the command execute that check if this fixes The Exception Unknown Software Exception (0xe0000008) error or not.
In the search bar, type performance, and press Enter.
Click on Adjust the appearance and performance of Windows.
Switch to the Advanced tab.
Under the Virtual memory section, click on Change.
Unselect the Automatically manage paging file size for all drives box on this window and click on Custom size.
Several users have resolved TheException Unknown Software Exception (0xe0000008) error simply by increasing the Virtual RAM memory. We have a guide that explains how to resolve the Your computer is low on memory error.
5. Install the latest Windows Update
Press the Win + I keys to open the Settings menu.
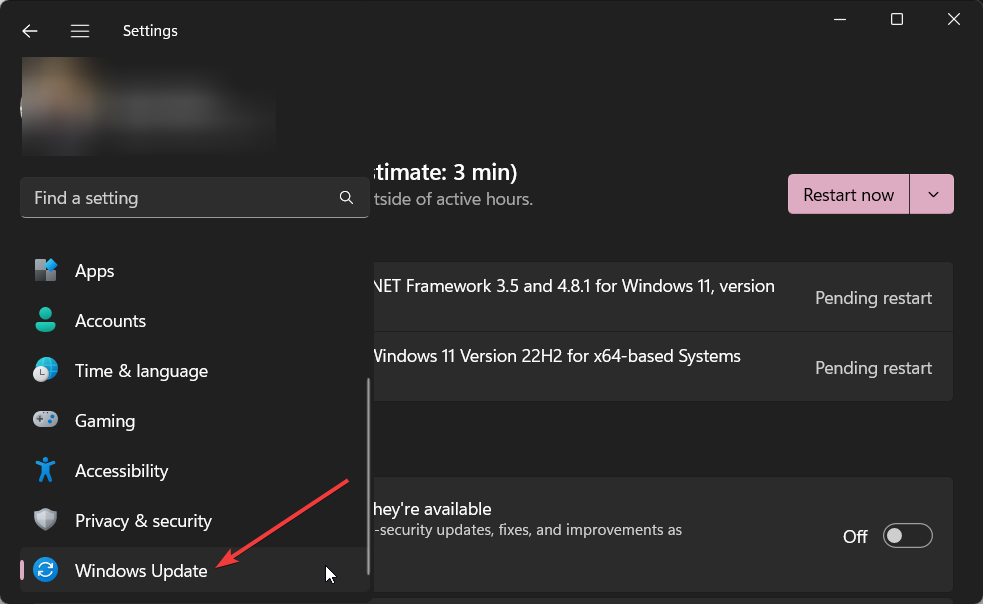
Click on the Windows Update option at the left pane.
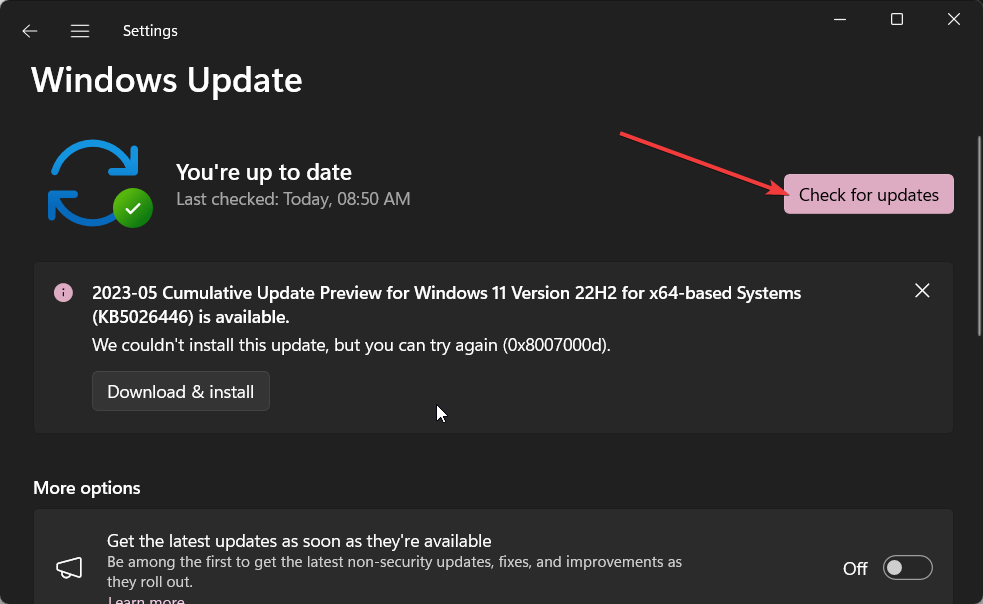
Click on the Check for updates button.
Install any pending update by clicking Download and Install button.
Restart your computer and check if this fixes the issue or not.
The latest update will help resolve any issues that were presented by the previous version. So, you should make sure that you have installed the latest available update on your computer to avoid any glitches.
That is it from us in this guide. Feel free to let us know in the comments below, which one of the above solutions resolved the problem for you.
Mobsync.exe lets you work on files even when you’re not connected to the network. However, the Sync Center feature is unnecessary if your computer is always connected to the network.
If you encounter the mobsyc.exe process in the Task Manager among the many background processes and are confused about its purpose on your Windows computer, don’t worry! In this article, we will explain what mobsync.exe is and guide you on how to turn it off if needed.
What is Mobsync EXE used for?
Mobsync.exe is an executable file associated with the Microsoft Sync Center in Windows systems. The Sync Center is a feature in Windows that lets users sync files and data between their computer and other devices like mobile devices or network servers.
It automatically starts when you log in to your computer and runs in the background to keep a copy of your network files and folders for offline access. When you reconnect to the network, the Sync Center will synchronize all the files, folders, and any modifications made to them.
Should I disable mobsync.exe?
Mobsync.exe helps sync files between your computer and network, keeping everything up to date. If you often use sync features and need files synced, it’s best not to disable mobsync.exe.
But if you don’t use sync or it slows down your system, you can disable it to improve your PC performance. Note that disabling mobsync.exe can free up resources, but it will stop syncing your files and folders.
How do I disable mobsync.exe process?
1. Disable Sync Center via Control Panel
Open the Start menu and type Sync Center in the search bar.
Click on Sync Center from the search results.
In the left-hand pane of the Sync Center, click on Manage offline files.
Click on the Disable offline files button.
Click Yes in the confirmation dialog box to restart your computer for the changes to take effect.
Disabling offline files will disable mobsync.exe and prevent it from running in the background.
Remember that this will also disable the Sync Center feature and any associated synchronization functionality.
2. Disable Portable Device Enumerator Service
Press Windows + R, type services.msc, and click on OK.
Find the service named Portable Device Enumerator Service and double-click on it.
Click the Stop button to terminate the process.
Then, set the Startup type to Disabled and click Apply.
Restart your computer to stop the mobsync.exe at the start-up.
Open the Start menu, search for Edit group policy, and open it.
Under the Computer Configuration section, click on the arrow next to the Administrative Templates option to expand it.
Next, double-click the Network folder to expand.
Then, select the Offline Files folder on the left and double-click on the Allow or Disallow use of the Offline Files feature setting on the right pane.
Choose the Disabled option, click Apply, and then OK.
If high CPU usage lowers your Windows 11 PC’s performance, following these simple solutions can greatly improve CPU speed.
If you have any questions or other ideas on disabling the process, please share them in the comments section below.
USBs are external drives that come in handy when transferring files and essential documents to different places. Like other drives, USBs are prone to several sorts of viruses, the shortcut virus being the sneakiest.
If your USB stick gets affected by the shortcut virus, all the files, folders, and icons stored on it become inaccessible and gradually start changing into shortcuts.
How does the shortcut virus spread to your USB?
There are several ways by which the shortcut virus may have spread to your USB drive:
Downloading executable files from untrusted online sources with a virus hidden in the bundled programs.
Mistakenly clicking the suspicious pop-ups and banner ads that appear on your screen when surfing the web.
Clicking the links on the suspicious email received from anonymous sources.
If the antivirus is not active on your PC, the chances of your USB catching the shortcut virus are quite high.
If you are looking for ways to fix the USB shortcut virus, look no further! This guide lists the various ways to do so without affecting your files and documents.
How do I remove the shortcut virus from USB?
NOTE
Keep your USB drive connected to the PC when performing the following workarounds.
1. Format the USB drive
Launch the Windows + E shortcut to launch the File Explorer.
Click This PC located on the left sidebar to view all the available drives.
Right-click your removable USB drive and select the Format option from the context menu.
On the pop-up that appears, set NTFS (Default) in the file system drop-down, enable the checkbox next to Quick Format to get quick formatting results, and press the Start button.
Press Yes on the confirmation popup to initiate the USB format process for removing the USB shortcut virus.
After the format Complete prompt appears, remove the USB drive and insert it again, the shortcut virus won’t be present.
Formatting the USB drive is the most straightforward way to delete the shortcut virus from a USB drive. However, the process is not entirely successful in every attempt.
2. Execute the CMD command
Press the Windows key to launch the Start menu, type cmd in the search bar on top and choose the Run as administrator option.
Click the Yes button on the User Action Control prompt that appears.
Type the following command and hit the Enter key. Replace H with the letter denoting your USB drive or pen drive. H:
Next, type or paste the following command and hit Enter. del autorun.inf
Finally, paste the following command and press Enter to execute it. Remember to replace H with the USD drive letter. attrib -h - r -s /s /d H:\*.*
If the above commands do not work, it may be because the USB is infected with another virus. To delete the suspicious shortcut virus, try replacing autorun.inf with *.exe in the next attempt.
After the shortcut virus is deleted, format your USB drive once to get rid of the hidden files generated after executing the attrib command.
Right-click the Windows icon on the taskbar and click the Task Manager option.
Locate and right the processes like wscript.exe or wscript.vbs and select End Task option from the context menu.
Next, switch to the Startup apps tab and look for suspicious programs with .EXE or .VBS extension. Right-click each of them and select Disable option from the context menu.
Now exit the Task Manager window and see if the virus shortcut disappears.
3.2 Edit the registry
NOTE
Back up your Windows registry before proceeding and execute the below steps only if you have enough experience with the registry editor to avoid interfering with the registry keys.
Use the Windows + R shortcut to launch the Run dialog box, type the following command in the text box and press Enter. regedit
Paste the following address in the top address bar to directly access the Run key. HKEY_CURRENT_USER/Software/Microsoft/Windows/CurrentVersion/Run
Here, look for strange keys such as OUzzckky in the right section, and if you find any, right-click them and choose Delete.
After deleting the keys, close the registry editor window and choose restart.
3.3 Delete the temporary folder
Bring up the Run dialog box using the Windows + R shortcut key. Type the following command in the text box and hit OK to access the temporary folder of your user account. %temp%
Use the Windows + A shortcut to select everything here and hit the Delete button to delete them.
Deleting the suspicious registry keys, background processes, and temporary files should help delete the shortcut virus in the USB as well as other drivers.
4. Execute the BAT File
Right-click the blank space on the desktop, choose New from the context menu followed by Text document from the sub-menu.
Right-click the new text document and select Open.
Copy & paste the following code into the text file and replace G with the letter representing your USB drive.
@echo off del *.lnk attrib -s -r -h G:\*.* /s /d /l @echo complete
Click File on the top menu and select Save as option from the drop-down menu.
Keep a meaningful file name and add the .bat file extension. Change the Save as type to All files and press Save.
Now exit the notepad window and double-click it on the desktop to execute it.
After the bat file runs successfully, check your USB drive. The USB shortcut virus will be deleted for good.
Executing the above commands in a BAT file is the most effective way to remove the shortcut virus from the USD drive without deleting your stored data.
That’s all about it! Hopefully, you could permanently delete the shortcut virus by implementing the methods discussed in this guide.
Before you leave, you may be interested in the guide explaining ways to fix the USB drive not recognized issue if it bothers you frequently.
In case you need further assistance, we are just a comment away!
Failure to install Windows updates can lead to various issues, so many users wonder how to enable Windows updates through the registry.
In a previous article, we explored the complexities of the Windows 11 update error, and as you know, such errors can occur if Windows Update isn’t enabled.
Therefore, keep reading to learn more about proper ways to enable this essential feature.
What is the registry key for disabling Windows Update?
To disable Windows Update through the registry, you need to modify the following key:
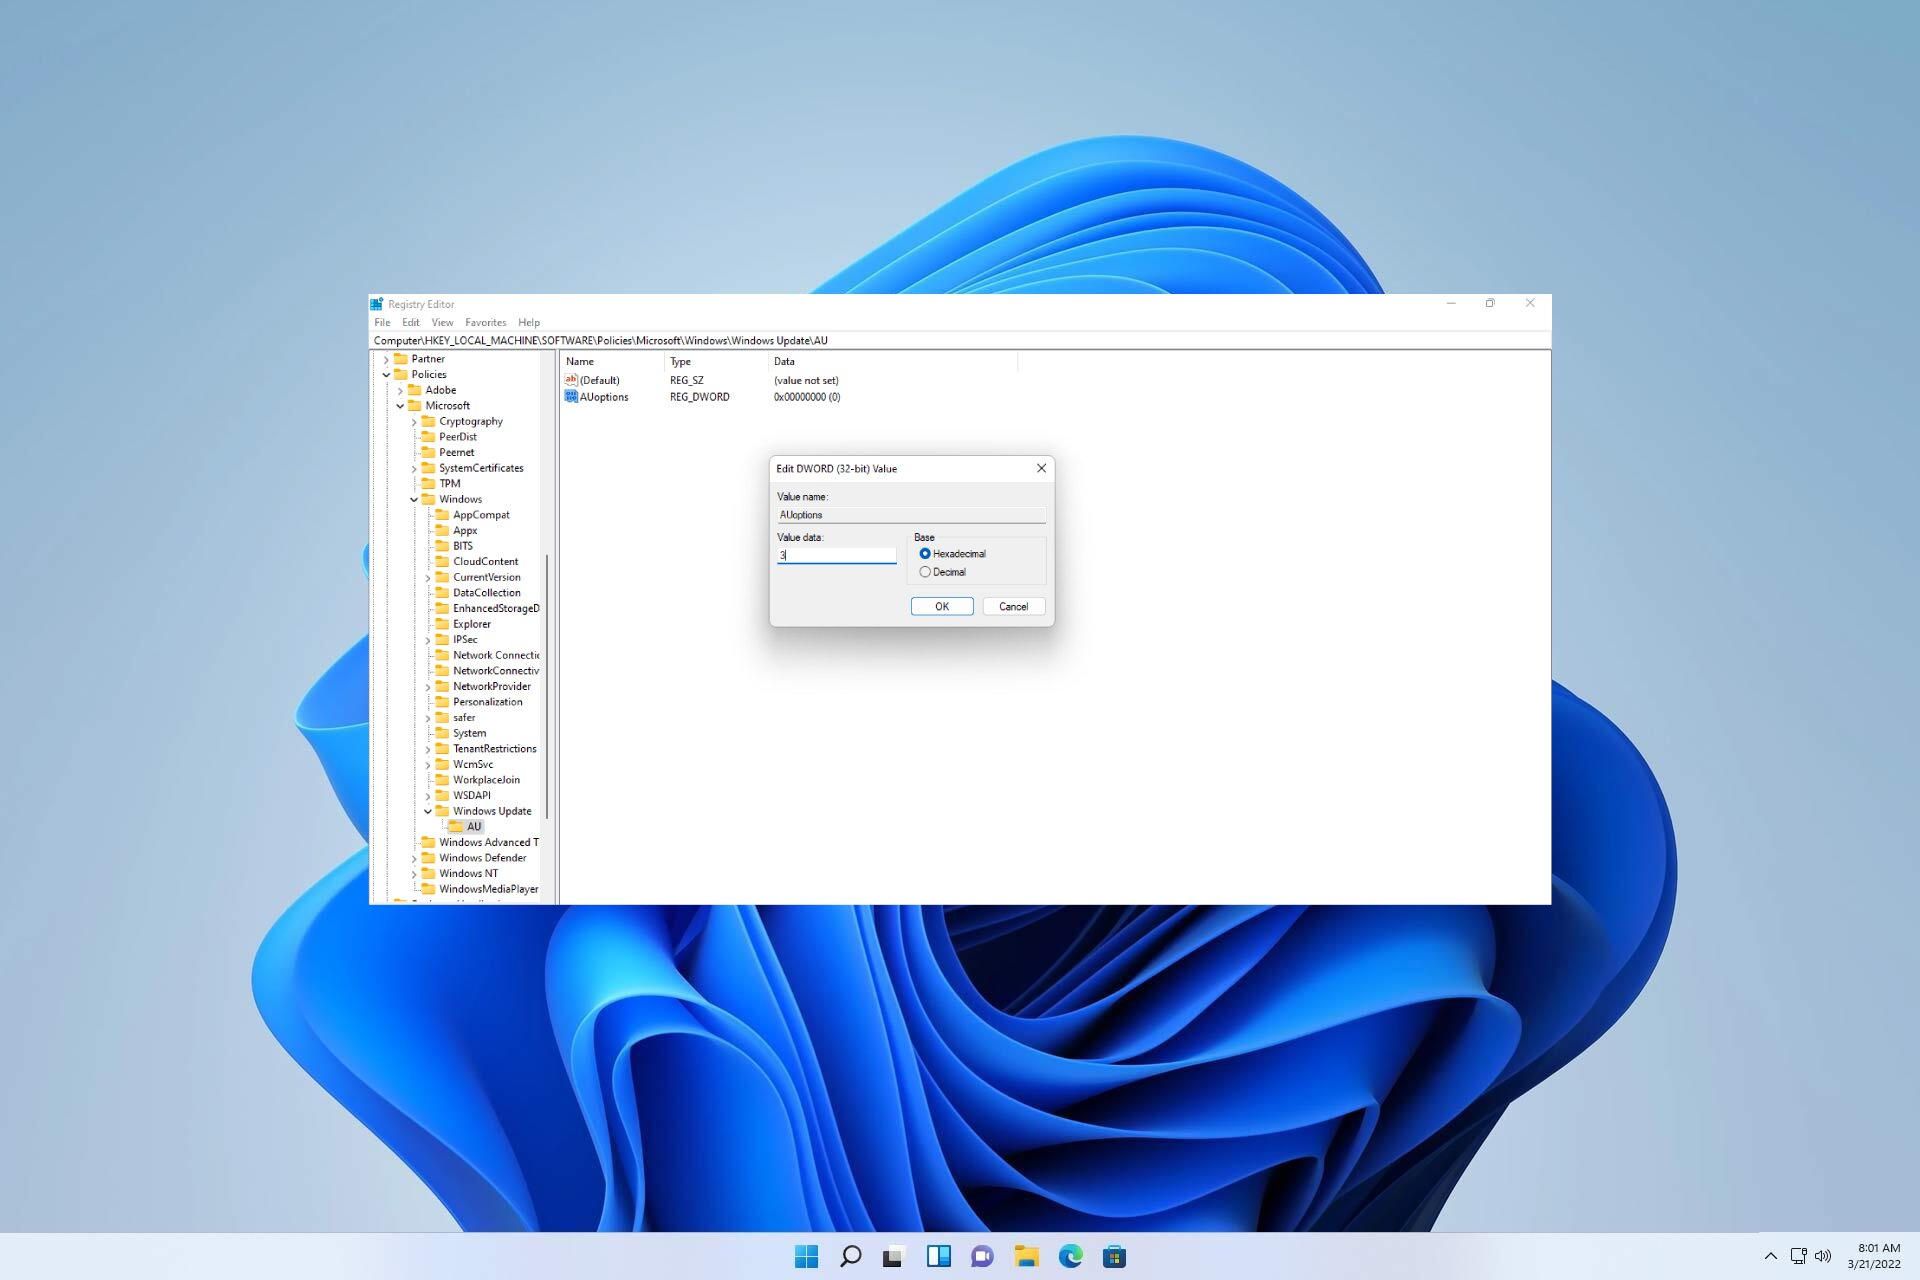
Once you enter this key, you need to make changes to AUOptions DWORD to disable Windows Update through the registry.
How can I enable Windows Update in the registry?
Configuring Windows Updates by altering the registry
On your home screen type in regedit in the search bar and Run as Administrator.
Once the UAC appears, select Yes.
Once the Registry has opened, Navigate the following path: HKEY_LOCAL_MACHINE/SOFTWARE/Policies/Microsoft/Windows
Now right-click on the Windows directory.
Click on the New and select Key, and next create a new folder named Windows Update.
Next right-click on the Windows Update. Choose New and then Key and create a new directory named AU.
Again right-click on the AU directory.
Next action is to click on the New and select DWORD.
Now, define your key name as AUOptions and double-click on the AUOptions to edit the DWORD value.
Kindly input a number between 2-5 as value data, and next click OK to save the setting.
An explanation of each number value is shown below:
2 – This setting will alert you before downloading and installing updates on your system.
3 – All the updates will download automatically and notify you before installation.
4 – This setting will automatically download and automatically set the time to install it.
5 – Allow access to the local system admin to choose the update status.
This is how you can enable Windows Update through the registry. As you can see, it’s not complicated, as long as you carefully follow our instructions.
In case you encounter any other problems, we suggest referring to our extensive guide on Windows Update not working or loading. This guide offers similar remedies that can assist you in finding a solution to your issue.
We value your input and would love to hear your views. Kindly share your thoughts by leaving a comment below and giving us your perspective on the matter.
The Event ID 1026 prompt occurs when the World Wide Web Publishing Service (WWW Service) encounters an error. Like Event ID 5136, this event is not one of the worrisome issues.
Still, if you want to know how to get rid of the event, this guide will take you through the steps to follow.
What is Event ID 1026?
Event ID 1026 denotes that the World Wide Web Publishing Service (WWW Service) faced an error. This happens when it tries to secure the handle of application pool %1 from HTTP.sys.
To know the error number, check the data field. This will give you an insight into what might have caused the error.
How can I fix Event ID 1026?
Below are some preliminary troubleshooting steps to perform before moving to the solutions in this section:
Set the application pool identity.
Restart the application pool.
Should this fail to fix this issue, you can now delve into the fixes below:
Now, click the link to download the runtime version on the next page.
Finally, double-click the download file and follow the onscreen instructions to complete the process.
Sometimes, the Event ID 1026 prompt can be due to problems with the .Net Framework. Downloading and installing the latest version of the tool fixed this issue for many users, and you should try it too.
Now, wait for Windows to prepare the setup and click the Yes button when prompted.
Next, accept the Licence Agreement and wait for Windows to download the required updates.
Choose Whether to keep your files and apps or not. Since this is an in-place upgrade, leave the recommended settings, i.e., keep your files and apps.
Now, click the Install button to start the in-place upgrade.
Finally, wait for Windows to copy the necessary files to upgrade your device and restart your PC.
Another effective method that has worked for many users in eliminating the Event ID 1026 is to perform an in-place upgrade. This will help you install the latest patches on your PC without deleting your files. With this, you can eliminate the potential causes of this prompt.
There you have everything you need to get rid of the Event ID 1026. All you have to do now is to follow the instructions in this guide carefully, and things should be back to normal.
If you are dealing with a similar issue in Event ID 5145, check our comprehensive guide to fix it.
Feel free to let us know the solution that helped you solve this problem in the comments below.
If you’re reading this article, chances are you’re curious about Winsat.exe, a Windows process that performs Windows System Assessment Tests. These tests assess the performance of various system components such as CPU, memory, disk, and graphics.
Nevertheless, it is essential to determine the root cause before attempting to resolve the current problem.
What is Windows System Assessment Tool?
The authentic Winsat.exe is a software component that belongs to Microsoft Windows, developed by Microsoft. Windows is an OS that serves as the backbone of various computer systems.
To evaluate the performance of your PC, Windows System Assessment Tool comes into play as a performance evaluation tool that runs through WinSAT.exe. The good news is that it does not harm your computer whatsoever.
To access WinSAT, you can go to the Control Panel under Performance Information in any of these Microsoft OS: Windows Vista, Windows 7, Windows 8, Windows 10, and Windows 11.
What is the purpose of the Windows System Assessment Tool?
Its primary function is to measure different performance characteristics and capabilities of your hardware system and report them through the Windows Experience Index (WEI) score. The WEI score comprises five sub-scores: memory, processor speed, 2D graphics capability, 3D graphics capability, and disk speed.
WinSAT executes this process flawlessly by assigning scores on a scale ranging from 1.0 to 6.0 on various versions of the Windows OS without causing any damage or disruption to your PC’s functioning.
What does Windows System Assessment Tool do?
The WEI score is a tool that helps individuals align their computer’s hardware capabilities with the software they are utilizing.
The WEI, or Windows Experience Index, empowers users to align their computer’s hardware capabilities with the performance demands of various software applications.
Is Windows System Assessment Tool a Virus?
The Windows System Assessment Tool serves as an instrument for assessing the performance of your computer. WinSAT.exe executes this tool and poses no threat to your device.
There exists a legitimate application on Windows operating system known as Windows System Assessment Tool (WinSAT). If Windows Defender flagged it, it is most likely a false positive.
Should I disable Windows System Assessment Tool?
Pros – If you were to disable the WinSAT application, it would have no impact on your computer’s performance or functionality. Your Windows Experience Index score will remain stagnant, and certain programs that use this score as an input may not update their status accordingly.
Cons – The moment the Winsat app runs in the background, Perhaps you’ve noticed that this software is using up a significant amount of CPU resources, or maybe you’d prefer to disable it to prevent any updates to the WEI score altogether.
Does Windows System Assessment Tool slows down PC?
If your computer is running slow, it could be due to the Windows System Assessment Tool process. Disabling this feature can improve performance and give your PC the necessary boost it requires.
The process involves evaluating the different parts of your computer and gauging their effectiveness. Remarkably, this does not cause any lag or deterioration in your system’s speed.
How can I check my Windows Experience Index Score?
On your home screen type in PowerShell in your search bar and click Run as Administrator.
Now copy and paste the following command to start the benchmarking operation and press Enter: get-wmiobject -class win32_winsat
You will obtain the scores. DiskScore is for Primary Hard Disk, GraphicsScore is for Graphics, MemoryScore is for Memory and D3DScore is for Gaming Graphics.
Our guide aims to ease your worries and equip you with valuable knowledge. We hope that our manual has furnished you with some useful insights.
If you encounter any other issues, we recommend consulting our comprehensive guide on Windows Experience Index freezes your PC. It presents comparable solutions to help you resolve your problem.
We truly appreciate your feedback and would be delighted to hear your thoughts. Please don’t hesitate to comment below and share your perspective with us.
The Event id 5136 is a prompt on the Windows server. This prompt is one of the less severe issues you can encounter, and you don’t need to panic upon seeing it.
In this detailed guide, we will detail everything you need to know about this prompt and how to get rid of it, just like we did with the Event ID 4726. Read on!
What is Event ID 5136?
The Event ID 5136 shows up whenever an Active Directory object is modified. Before this event can show up, there must be an appropriate entry in SACL for the modified entry.
You will likely see two 5136 events for one action in every change operation. This usually has different Operation\Type fields: Value Deleted and Value Added.
The Value Deleted denotes the initial value that was changed, while the Value Added will display the new value.
How can I fix Event ID 5136?
1. Use Event Viewer
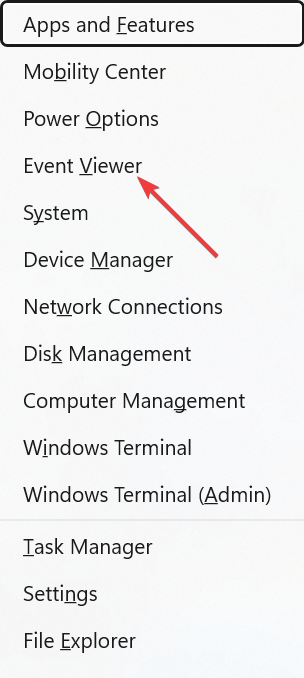
Press the Windows key + X and select the Event Viewer option.
Select Windows Logs > Security in the left pane.
Now, choose Event ID 5136 from the list of errors and go to General.
You can now check the Value Deleted and Value Added parameters and other information.
In most cases, Event ID 5136 is usually just system information that shows up when you make changes to your server. So, it normally does not require any action from the user.
However, you can still check important information like the user that made the change and the sort of changes made in the Event Viewer.
2. Make changes to your registry
Press the Windows key + R, type regedit, and click the OK button.
Navigate to the path below in the left pane: HKLM/System/CurrentControlSet/Services/NTDS/parameters
Now, right-click the empty space in the right pane and select New > DWORD Value.
Enter Maximum Audit String Length as the name of the new DWORD and double-click it.
Next, set its value data to double the string length required because of the Unicode conversion. That is, enter 4000 Decimal if you need 2000 characters in the attribute value.
Finally, restart the Active Directory Domain Services service.
If you want to get rid of the Event ID 5136 error, making changes to your registry is recommended. While this is unnecessary, it is still a nice workaround.
However, ensure to back up your registry before performing this in case of issues.
With this, we can conclude this guide on eliminating the Event ID 5136 error. This issue is usually just system information and does not require any action from you. So you don’t need to worry.
If you are facing a similar issue like Event ID 5145, check our detailed guide to resolve it.
Feel free to let us know the solution that helped you fix this issue in the comments below.
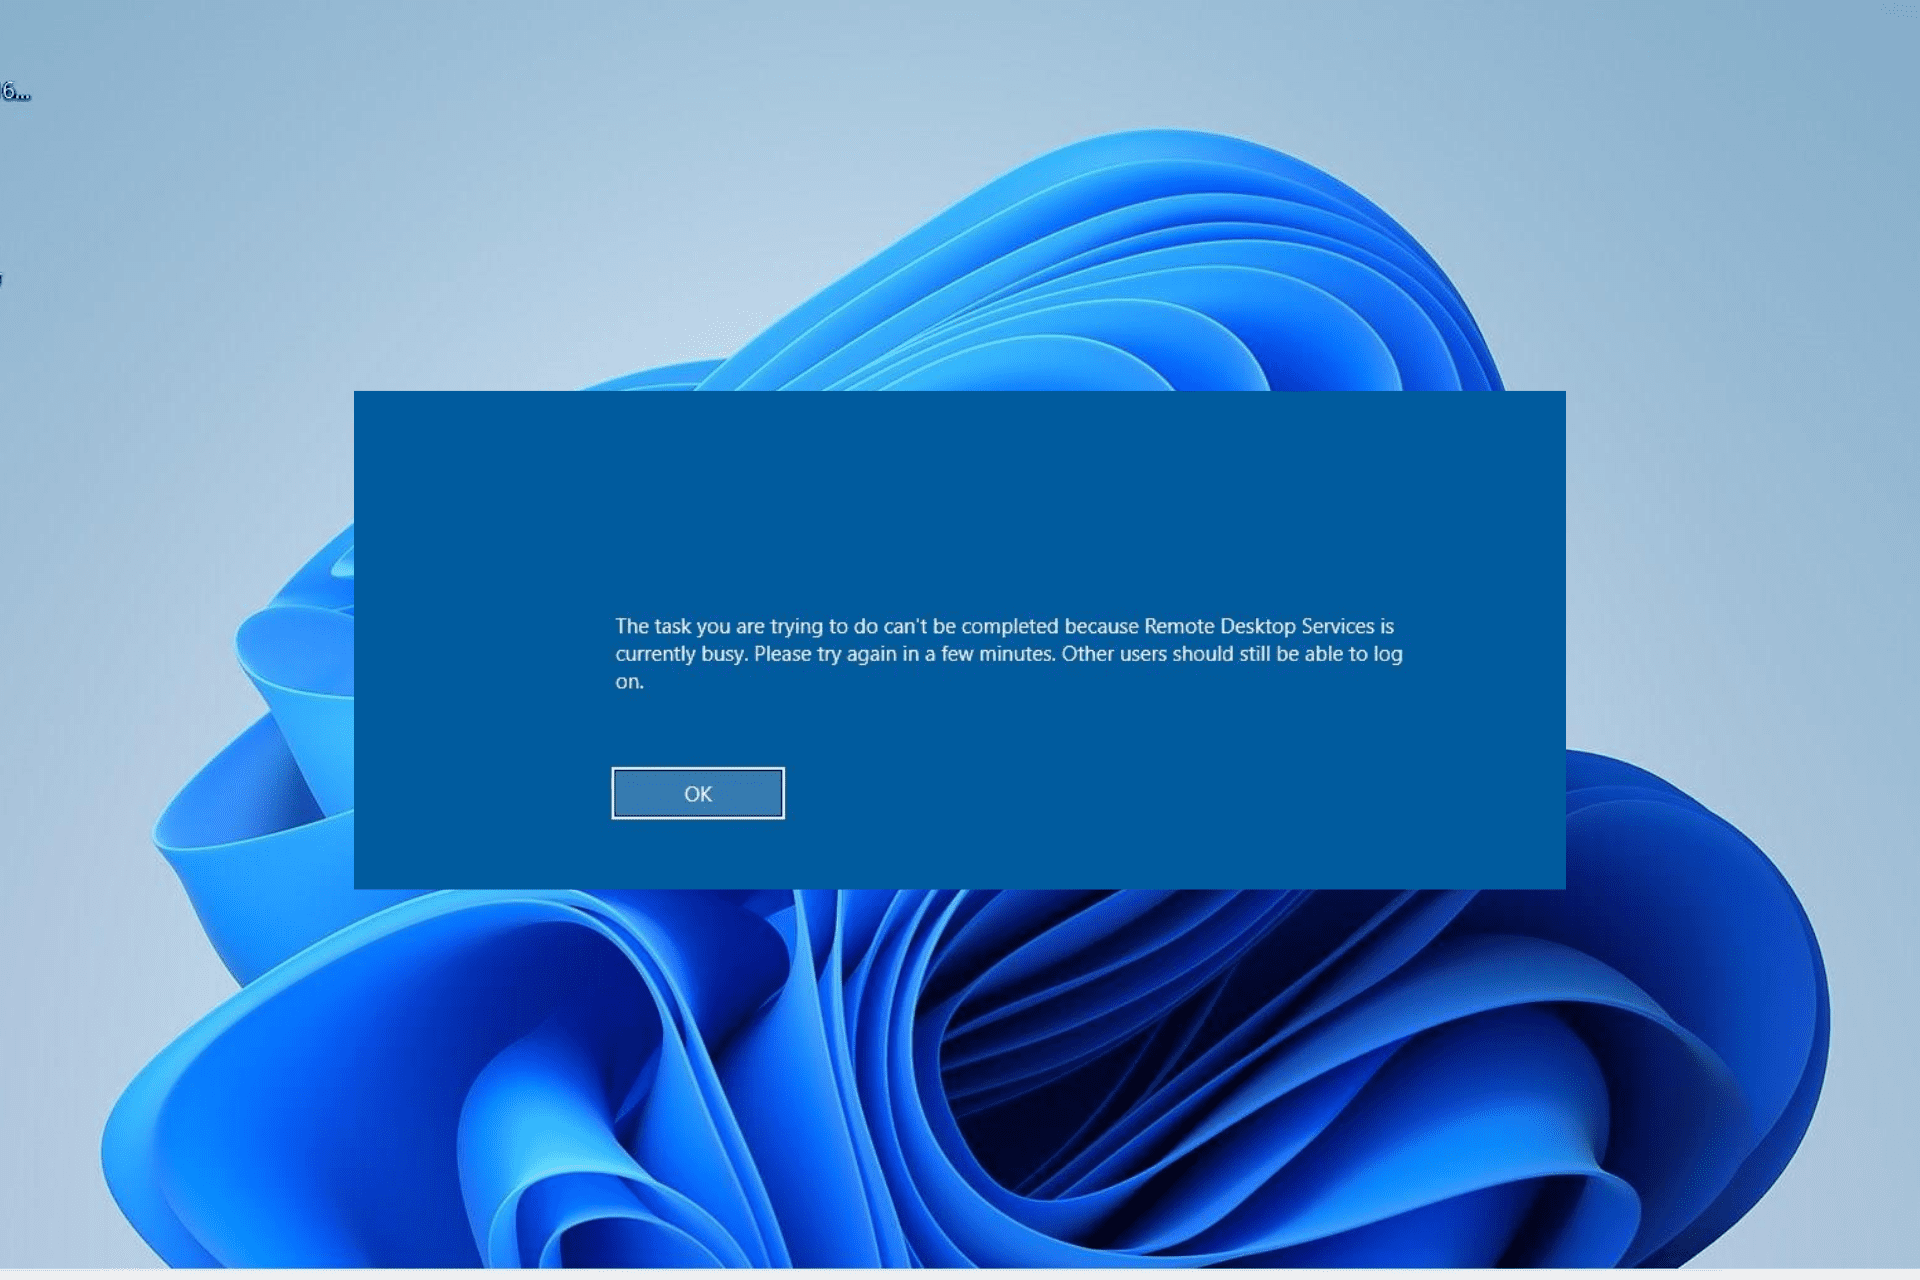
The Remote desktop Services is currently busy error is an issue encountered by some users when trying to connect to a Windows server. This issue can either be due to problems on the server settings or the user side.
Irrespective of the cause, the solutions in this guide will help you solve the problem effectively.
What does Remote Desktop Services currently busy mean?
The Remote Desktop Services is currently busy error means that the server can not accept an additional user for some reason. Below are some of the causes of the error:
Server memory issue: In some cases, this problem might be due to memory leaks on your server. You can fix this by applying some important updates.
Issues with RD listener: Some users have found this problem to be due to an overly increasing RD listener that never decreases. This can also be fixed by installing some updates.
Connection limit policy: If your connection limit policy is quite low, this error might show up when it is reached. You need to increase the limit to fix this.
How do I fix Remote Desktop Services is currently busy?
1. Apply updates to RDSH
Memory leaks are pertinent on some Windows Server 2012 R2 RDSH servers. If this is left unattended, it can cause issues like Remote Desktop Services is currently busy. A quick workaround to this is to restart the RDSH server.
To get rid of the error permanently, install April 10, 2018—KB4093114 update on the RDSH servers. Also, you might be facing this error because of the RD listener created by the RDSH server.
You can restart the RDSH server to reset the count of RD listeners as a workaround. However, to get rid of it permanently, apply the following updates to the RDSH servers:
Press the Windows key, type cmd, and select Run as administrator under Command Prompt.
Type the command below and hit Enter to run it: gpresult /H c:\gpresult.html
Now, open the gpresult.html file in the C drive. You can do this using Microsoft Edge.
Next, press the Windows key + R, type gpedit.msc, and click OK.
Navigate to the path below in the left pane: Computer Configuration > Administrative Templates > Windows Components > Remote Desktop Services > Remote Desktop Session Host\Connections
Locate the Limit number of connections policy in the right pane and double-click it. If you can’t find it, then there is no limit set.
Check if this policy is enabled. If it is, check the limit to see if you need to remove or change it.
Finally, run the command above in an elevated CMD: gpupdate /force
Another cause the Remote Desktop Services is currently busy is the low max connection limit policy. You can adjust this by following the steps above.
3. Reset stuck client remote desktop session on RDS
Launch Command Prompt as an admin, as shown in the solution above.
Type the command below and hit Enter: query session
Note the SESSIONNAME and ID for the affected user. Let’s assume this to be service and session 0, respectively.
Now, run the command (where 1 is the ID noted above) below: query process /id 0
Note the PID and csrss.exe process in the list of running processes in the session ID you noted in step 3.
Press the Windows key + X and select Task Manager.
Next, click the Details tab at the top and locate the PID (588) in step 5.
Finally, right-click all the processes with that PID and select End task. This includes csrss.exe, dwm.exe, LogonUI.exe, and winlogon.exe.
If only one user is encountering the Remote Desktop Services is currently busy error, you can effectively end the processes causing the error, as well as the session on RDS.
4. Reset an RDS user session
Launch Command Prompt as admin.
Run the command below: query process
Now, note the session name of the user experiencing this issue. Let’s assume rdp-tcp#2.
Finally, run the command (rdp-tcp #2 is the session name copied above) below: reset sessionrdp-tcp#2
With this, you should be able to end the RDS session for the user experiencing this issue. You can now ask the person to log in, and the Remote Desktop Services is currently busy error should be history.
We have reached the end of this guide on fixing the Remote Desktop Services is currently busy error on Windows server 2012 R2 or any other version. Just make sure you follow the instructions carefully, and you should be able to get past it for good.
As you peruse this article, your main concern may be the nature of jucheck.exe. Is it a harmful virus or a legitimate third-party program on your device? Does it pose a risk to your system’s performance, or is it essential for its proper functioning? These are the questions that likely occupy your mind presently.
Previously, we explored the complexities of checking your virus protection error on Windows. However, we now face a similar challenge. But before tackling the present hurdle, it’s crucial to identify the underlying cause.
What program is JUcheck EXE?
The Sun Java UpdateChecker Module is identified as Jucheck.exe. This component belongs to the Java(TM) 2 Platform Standard Edition 5.0 Update and is a product of Sun Microsystems, Inc., now owned by Oracle.
The software does the following:
Checks for available Java updates.
Downloads Java updates.
Can I remove Jucheck? – you might also be asking this question. When it comes to the jucheck.exe process running on Windows Operating Systems, it’s essential to exercise caution before deleting it.
If it’s legitimate, you might encounter issues with Java, so do proper research before removing it.
How can I remove Jucheck?
1. Disable the vicious startup package
Hold Ctrl + Shift + Esc together to open the Task Manager.
Once the Task Manager window opens locate the Startup tab.
A list of all the startup apps will be displayed. Now find the Java Updater and right-click to disable them.
2. Uninstall Java
Tap your Windows key and click on Settings.
Select Apps and click on Apps & Features.
Now on the search bar type Java.
Once the Java is located, click on the three dots at the far right corner and select Uninstall.
Our aim in crafting this guide is to allay any apprehensions and give you valuable insights.
Typically, the Jucheck.exe file location is in the Program Files sub-folder and has a size of 325,008 bytes.
However, if an identical file with the same name is discovered in the System32 folder, it’s most likely a virus masquerading as the authentic Java UpdateChecker.
Should you encounter any further difficulties, we suggest referring to our exhaustive manual on how to fix outdated Java messages on Windows 11. This resource offers analogous remedies that can assist in resolving your predicament.
We value your opinion, so kindly share your feedback by leaving a comment below and offering your viewpoint on the issue.
Davinci Resolve is a popular video editing software offering a range of options like color correction, grading, and visual effect. It has long been the primary choice of users. But many find that Davinci Resolve is not opening on their PCs.
The software, developed by Blackmagic Designs, is available for Windows, Mac, and Linux operating systems. And users have been facing trouble with it throughout! So, what exactly is the reason behind it? Let’s find out along with the solutions that worked for others!
Why does my DaVinci Resolve crash before opening?
Here are a few reasons DaVinci Resolve is not working:
Issues with the graphics driver: A common reason behind the problem is an incompatible or outdated driver, especially the one for the graphics adapter.
Compatibility problems: For some users, the compatibility led to DaVinci Resolve not opening in Windows 11, and running the app in an environment designed for an earlier iteration fixed things.
Missing redistributables: Visual C++ Redistributables are a critical requirement for DaVinci Resolve, and if these are missing or corrupt, the app will crash on launch.
Third-party apps triggering conflicts: Even third-party apps, particularly antivirus or security software, may prevent the video editing software from running.
Low system resources: In a few cases, it was the high RAM usage that reduced the resources available for DaVinci Resolve, and, as a result, it crashed. So, you will have to free up both the RAM and CPU.
What can I do if DaVinci Resolve is not opening?
Before we proceed to the slightly complex solutions, try these quick ones:
If you are running the software for the first time, restart the computer and try again.
Update Windows if any newer versions are available.
Disable any VPN and antivirus running on the computer.
Make sure you are running the latest version of DaVinci Resolve. Check the official website to identify this. Also, you could try the Beta version.
If none work, move to the fixes listed next.
1. Run DaVinci Resolve in compatibility mode
Right-click on the DaVinci Resolve launcher, and then select Properties.
Navigate to the Compatibility tab, tick the Run this program in compatibility mode for checkbox, and choose a previous iteration of Windows from the dropdown menu.
Once done, click on Apply and OK to save the changes.
A quick solution when DaVinci Resolve is not opening or keeps crashing is to run the program in compatibility mode. This especially helps in newer iterations of the OS, particularly Windows 11.
2. Uninstall the DaVinci Resolve Control Panels
Press Windows + I to open Settings, select Apps from the navigation pane, and click on Installed apps towards the right.
Click on the ellipsis next to DaVinci Resolve Control Panels and choose Uninstall.
Again, click Uninstall in the confirmation prompt that appears.
DaVinci Resolve developers on certain forum posts shared that the Control Panel, a new addition to the software, was the reason it crashed in Windows, and uninstalling the program should do the trick.
3. Update the graphics driver
Press Windows + X to open the Power User menu, and select Device Manager from the list.
Expand the Display adapters entry, right-click on the active graphics adapter, and select Update driver.
Now, select Search automatically for drivers and wait for Windows to install the best available one.
Running an outdated graphics driver leads to several issues, including poor performance and app crashes. And in this case, it’s best that you update the graphics driver, especially for resource-intensive applications like DaVinci Resolve.
If an update can’t be found automatically, another option is to visit the manufacturer’s website and manually install the latest driver. Here are the download pages for the primary manufacturers:
Alternatively, you can always rely on specialized software, such as Fortect Driver Updater to do this automatically. This tool will identify the correct drivers needed for your system and download them in just a few minutes.
Press Windows + S to open Search, type Disk Cleanup in the text field, and click on the relevant search result.
Select the drive you wish to clean from the dropdown menu, and click OK.
Tick the checkboxes for the file types you want to delete, and click OK.
Click Delete Files in the confirmation prompt that appears.
Some users found that when the drive that stored the file they were trying to open in DaVinci Resolve was running out of free storage, the software crashed or did not open. So, you will need to free up some disk space on the PC, particularly that drive.
Microsoft’s Visual C++ Redistributables play a critical role in the effective functioning of several applications built using Microsoft C or C++ tools. While installing DaVinci Resolve, it would have, by default, downloaded these packages.
Visual C++ Redistributables
But these often corrupt or run into issues. In which case, it’s best that you get a fresh copy from Microsoft’s official website. While doing so, download all the latest redistributable packages listed there.
6. Increase the Virtual Memory
Press Windows + S to open Search, type View advanced system settings in the text field, and click on the relevant result.
Click the Settings button under Performance.
Go to the Advanced tab, and click on Change under Virtual memory.
Untick the checkbox for Automatically manage paging file size for all drives, select No paging file, and click Set.
Once done, choose CustomSize and enter the values using the following formula depending on the installed RAM in the PC:
Initial size: 1.5 x Available RAM (in GBs) x 1024
Maximum size: 3 x Available RAM (in GBs) x 1024
For instance, if the installed RAM was 4 GB, the two values would become 6144 MB and 12888 MB, respectively.
Once done, click on Set and OK to save the changes, and then restart the PC.
If it was low available memory to blame for the issue, increasing the virtual memory should do the trick. Just remember that virtual memory or page file is a space on the hard disk that functions as RAM. As a result, it’s slower and cannot replace actual memory modules.
7. Uninstall conflicting apps
Press Windows + R to open Run, type appwiz.cpl in the text field, and hit Enter.
Select any apps installed around the same time the error first appeared, and click Uninstall.
Follow the on-screen instructions to complete the process.
As per reports, several OpenGL and OpenCL apps conflict with DaVinci Resolve, which leads to the software not opening on Windows and Mac. So, if you have any that fall into the category, uninstall the program. Also, check for other recent apps as well.
That’s it! One of these solutions should have helped get the software running. And before you leave, do check some quick tips to make Windows run faster and get better performance out of apps.
For any queries or to share what worked for you, drop a comment below.
We often encounter issues with our devices, and one such problem may involve the WWAHost.exe program. This Microsoft application plays a crucial role in ensuring that certain Windows apps run smoothly. However, if you’re questioning whether it’s a virus and whether uninstalling it is necessary, rest assured that this isn’t the case.
In a previous article, we delved into the intricacies of WMI Provider Host high CPU usage on Windows 11. Now, we find ourselves faced with a similar dilemma.
Before taking any steps to address this issue, it’s crucial to identify its underlying cause. Only then can we effectively resolve the problem at hand.
What is the WWA Host process?
Microsoft provides a helpful program located in the System32 folder, known as a helper program. It was initially introduced with Windows 8 to aid the execution of JavaScript for certain applications. As such, it is not recommended that you disable it since some apps may still require its functionality.
Even with the changes brought about by Windows 11 in terms of app execution and distribution, if you spot this program, it could indicate that some apps still depend on it.
What is the purpose of WWAHost?
The WWAHost.exe file serves as a host for running certain Metro applications written in JavaScript, so it’s not unusual to see the WWAHost process active in your Task Manager.
While some may worry that it’s a virus, this is quite unlikely as it’s more probable that an application on your computer is utilizing the process.
Is WWAHost a virus?
Based on our findings, it appears that the WWAHost application does not generally cause issues. Its file size of approximately 0.7MB suggests that your device should be able to handle it smoothly.
However, we must note that your PC version might have been compromised by malware. Malicious actors can hide harmful software under the guise of the WWAHost process.
Should I disable WWAHost?
Disable WWAHost.exe only if you’re experiencing:
High CPU usage
High memory usage
Malware infection related to this file
If you choose to disable this process, you might experience the following:
Certain Universal applications might stop working
Problems with the Bing Weather app
Overall, you shouldn’t disable this software unless you’re having issues on your PC.
How can I disable WWAHost?
Use Task Manager
Hold Ctrl+Shift+Esc to open the Task Manager window.
Locate the WWAHost.exe process and right-click on it.
Next click on End task.
Our ultimate goal is to provide you with valuable information that will alleviate any concerns you may have.
This guide offers comparable solutions that can assist in resolving your issue. If you have further issues, we have a great guide on Universal apps that won’t open.
To learn more about similar files, don’t hesitate to check our guide that explains what is aggregatorhost.exe.
We value your feedback and would love to hear from you. Please feel free to share your thoughts and leave a comment below with your perspective on the matter.
If you’re perusing this article, the Windows process known as SearchIndexer.exe has likely piqued your interest. This service, also called Windows Search Indexer, streamlines indexing on your device for greater convenience.
Nonetheless, it is crucial to identify the underlying cause before addressing the issue.
What is Search Indexer?
The Windows Search Indexer is a background service designed to ensure that your search results are always available when needed. It’s essential to keep the Search Indexer running for an optimal Windows search experience.
However, this service can occasionally use up more RAM than necessary, leading to memory problems on your computer.
One of the key features of this system is its ability to allow users to easily locate files and folders using various methods, including searches conducted through the Start Menu or Windows Explorer. In addition to these basic functions, other elements are involved in the overall file search process.
What is the purpose of Microsoft Windows Search Indexer?
When searching for files on your Windows computer, chances are you’re relying on the Windows Search engine to do the job. A Windows service powers this search engine called the Windows Search Indexer.
Its role is to index all of your files so that they can be easily searched for and accessed through various features like the Start Menu search box, Windows Explorer and Libraries.
The executable file responsible for running this service is named SearchIndexer.exe and can be found in the System32 directory of your computer.
What does a search indexer do?
The Windows Search Indexer is an integral tool that diligently searches for content across various locations, including but not limited to your home folder, Start menu, email client, and contacts list.
It makes most tasks easier and reachable on time whenever you urgently need specific files.
Is search indexer a virus?
The searchindexer.exe is completely valid and not in any way a virus. If users are concerned, they may want to consider running a thorough system scan for added peace of mind.
Search index is developed and certified by Microsoft. The users of this software are in the millions across the globe.
Should I disable Windows indexing?
Pros – If you search through your folders and files frequently, you might have come across the Windows Search Indexer. However, it’s worth noting that if you disable this feature, your computer’s performance will significantly boost.
Cons – When Windows Search Indexer runs in the background, it tends to use up a lot of CPU resources. However, if you disable it, you may notice that you won’t be able to search for specific files anymore.
Does search indexing slow down PC?
If you’re using a slower PC, you may experience a decrease in performance due to search indexing. However, turning off indexing can help increase speed and give your computer the boost it needs.
A compatible system rarely experiences any issue with device capacity, so it might vary when it comes to the computer model.
How do I remove a folder from search index?
Press the Start button on your PC and open Settings.
Click on Privacy and Settings, now select Searching Windows.
Click on Add an excluded folder, next choose the drive or folder you want to add or exclude.
Now click on the three dots and tap Remove.
Lastly simply Exit Settings once you are done with the process.
Our comprehensive guide is designed to alleviate your concerns and provide valuable information. We sincerely hope that our manual has provided you with some insightful tips.
In case you encounter any additional problems with searchindexer.exe, we suggest referencing our extensive guide on Search Indexing was turned off. This guide offers comparable solutions to help you overcome your issue.
You may also run into a similar searchapp.exe process so check out our comprehensive article to see whether it is a critical process.
We genuinely value your feedback and would love to hear your thoughts. Please feel free to leave a comment below and share your perspective with us.
Various Windows OS users have been concerned about the activities of the nssm.exe in the Task Manager. To know if it is trustworthy or puts their computer at risk. Therefore, this guide will answer what nssm.exe is and ways to remove it if it poses any security risks.
Likewise, you can read our detailed guide about fondue.exe, and should you delete it on your PC?
What is nssm.exe?
Nssm.exe (Non-Sucking Service Manager) is a utility for Microsoft Windows operating systems that allows you to run any application as a Windows service easily.
It is used for managing the foreground and background processes and services on Windows. It keeps track of its activities by logging progress updates to the system Event Log, which provides insights into any issues or unexpected app behavior.
Additionally, nssm.exe allows you to convert any executable into a service, enabling you to run it in the background.
Also, it helps you to manage it using standard Windows service commands. It provides several features, including automatic restart, service dependency, custom environment variables, etc.
Is nssm.exe a security risk?
The genuine nssm.exe, as a standalone utility, is not inherently a security risk. It is a legitimate tool designed to manage and run applications as Windows services.
Nonetheless, like any software, its security can be influenced by its use and the environment in which it operates.
How to verify if nssm.exe is safe
1. Check file location
Right-click the Start button and select Task Manager from the menu.
Then, go to the Details tab. Right-click nssm.exe, and click Open File Location from the drop-down menu.
The legitimate msfeedssync.exe file resides in the C:\Users\USERNAME\AppData\Roaming or C:\Program Files (x86)\ExpressVPN\bootstrap\amd64
2. Verify the file publisher
Right-click the Start button and click on Task Manager.
Right-click nssm.exe, and click Properties from the drop-down menu.
Select the Digital Signature tab and check if the publisher is legit.
Check the spelling – Often, viruses can disguise using names related to the legitimate file. Examine the name tag; to know if there is a variation it may put your computer at risk.
The decision to remove NSSM.exe depends on your specific circumstances and whether you have a valid reason. If you rely on it for managing your services, removing it may disrupt its functionality.
How can I remove nssm.exe?
1. End task for nssm.exe
Right-click the Windows icon and click on Task Manager.
Click the Details tab. Navigate to nssm.exe, right-click on it, and select End task from the context menu.
Click OK from the pop-up menu to confirm your selection and restart your PC.
Stop error code 0x0000008E is a Windows kernel error that indicates that a critical system process has stopped working properly. This error points toward an internal hardware failure or incompatibility with the system.
A stop error code is also a type of BSoD error that prevents your PC from functioning. Depending on its severity, it can be relatively easy to hard to resolve it. Nonetheless, we bring you top solutions for this error.
What is Stop Error Code 0x0000008E?
Stop error code 0x0000008E is a blue screen error during a system crash. The stop code indicates the type of problem that caused the crash. In this case, it means there was a problem accessing memory (RAM).
The RAM is used to store temporary data and programs so that an issue can cause problems for your computer. To fix this issue, you must first understand its origin.
If you’re having memory issues, it could be due to one or more of the following reasons:
Recent change of hardware – If you have recently installed new hardware on your computer, it could also be causing problems with the RAM.
Faulty RAM module – A faulty RAM module can cause a stop error code 0x0000008E. The memory could be bad, causing the system not to recognize it, or only one slot works.
Corrupt hard drive sectors – Another possible cause is bad sectors on your hard drive. If Windows detects bad sectors on your disk when it boots up, it’ll display this message.
RAM incompatibility – This can happen if the memory installed in your computer has compatibility issues with your motherboard.
Too much RAM – Another possibility is that the motherboard does not have enough power for the memory installed. You need to find the RAM limit for your Windows version to avoid going overboard.
Corrupt BIOS – If you have an older PC, you may still be running on the BIOS that came with it and are due for an update.
How do I fix the stop code error 0x0000008E?
A few preliminary steps to perform before you move to the technical solutions include:
Check the memory to ensure that it is properly seated.
If you have more than one stick of RAM, try removing one or both sticks and see if the problem goes away.
Verify that your hard drive is connected properly.
If you have recently installed hardware or software on your PC, remove it because it might be causing issues with your computer’s hardware and software components.
Power on the system and press the F8key to bring up the Advanced Boot Options. Start pressing the key when your PC’s manufacturer’s logo appears. In some, you may also need to hold down the Fnkey as well.
Use the arrow keys in the Advanced Boot Options screen to highlight the Last Known Good Configuration (advanced)option.
Hit Enter to select the option.
Windows will now use the backed-up snapshot to boot the system without any issues.
This option is for when you’re unable to start Windows, otherwise, use System Restore.
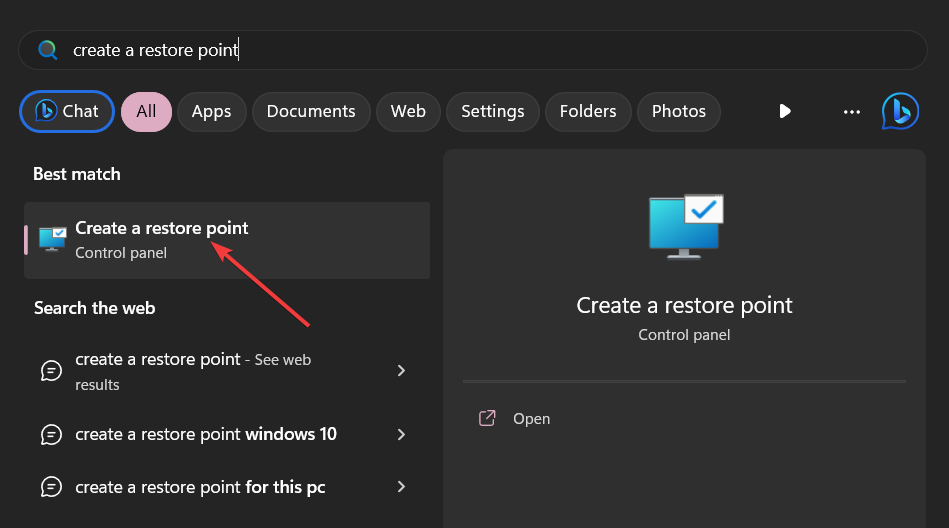
5. Perform a System Restore
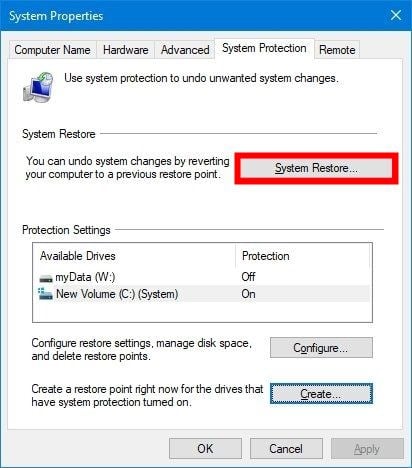
Press the Windows + R keys, type rstui, and hit Enter.
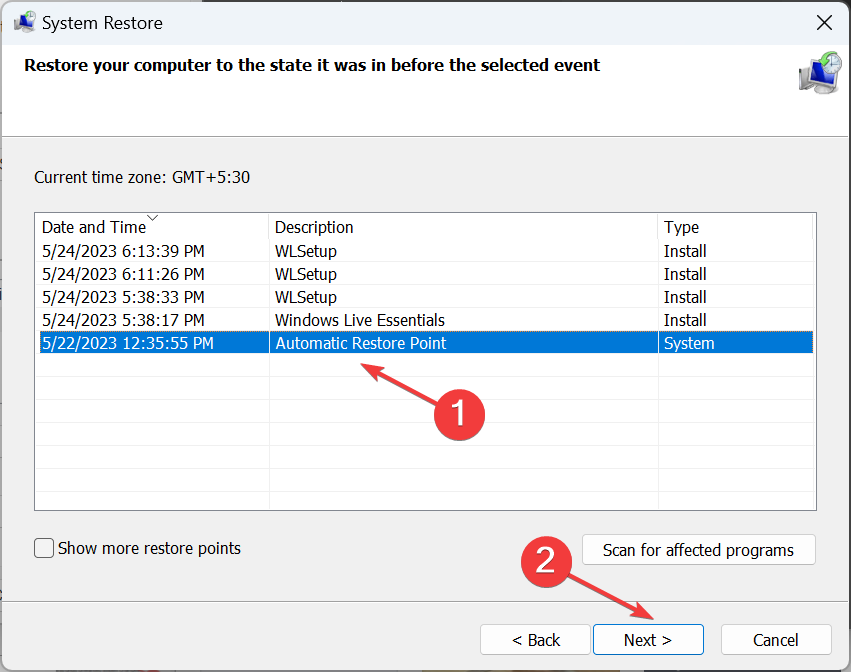
The System Restore window will open. Click on Next.
Select the restore point you wish to revert to and click on Next.
Now click on Finish.
While the 0x0000008E error will often be an indication of a bad memory stick, there are plenty of additional factors that could cause it.
Thankfully, the troubleshooting steps on this page have a high success rate in fixing them. If you’re still having problems, you might need to replace your memory stick. Be careful, though, because your PC may fail to boot after a RAM upgrade.
If you have any other suggestions or another solution that helped you fix this error, let us know in the comment section below.
It runs in the background of your computer and helps to manage virtual machines. However, some users have reported some errors associated with the file, so let’s have a look at what these errors are and how to address them.
What is Vmtoolsd EXE in Windows?
Vmtoolsd.exe is an executable file that belongs to VMware Tools, a set of utilities that improves the performance and usability of VMware Workstation and other VMware products on Microsoft Windows systems.
If you’re wondering, Where is vmtoolsd? It’s usually located in the following directory:c:\Program Files\VMware\VMware
The location of this application’s installation folder and its default file name depends on the product version you are using and whether you are using 32-bit or 64-bit editions of Windows.
You’ll therefore find this file useful when running your virtual machines. The only issue that may arise is that you may encounter some errors if you’re dealing with an obsolete or compromised version.
Potential errors you may come across related to the vmtoolsd.exe file include:
Vmtoolsd.exe not valid
Error in Application: vmtoolsd.exe
Vmtoolsd.exe encountered a problem and will close
Can’t locate vmtoolsd.exe
Vmtoolsd.exe is missing
Faulty Program Path: vmtoolsd.exe
Vmtoolsd.exe failed
Problem starting application: vmtoolsd.exe
Vmtoolsd.exe is not running
Such errors can be caused by a virus attack, corrupt registry files or outdated applications. Below, we look at how you can fix these errors.
How do I fix vmtoolsd.exe system errors?
1. Restart the VMware Tools service
Hit the Windows + R keys to open the Run command.
Type services.msc in the dialog box and hit Enter.
Find the VMware Tools service, right-click on it, then select Stop.
Repeat the process, then click Start.
2. Run DISM and SFC scans
Hit the Windows key, type cmd in the search bar, and click Run as administrator.
Type the following commands and press Enter after each one:DISM.exe /Online /Cleanup-Image /Restorehealthsfc /scannow
Alternatively, we suggest a reliable third-party repair software to make sure you get rid of all corrupt and missing files.
3. Run a virus scan
Press the Windows key, search Windows Security, and click Open.
Select Virus & threat protection.
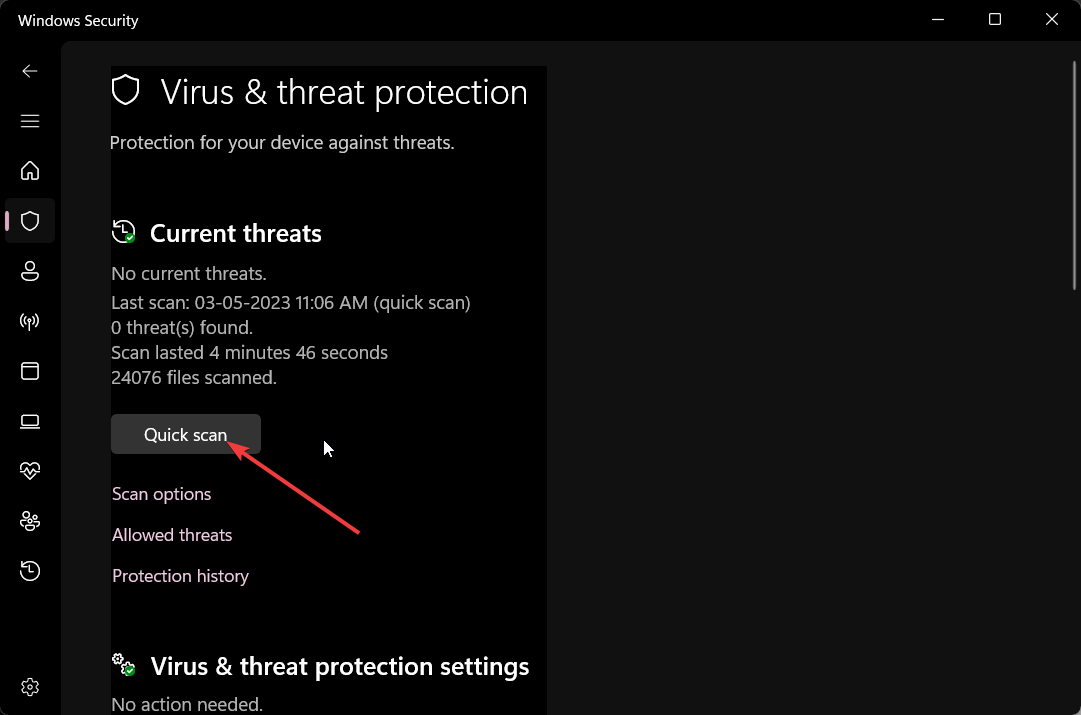
Next, press Quick scan under Current threats.
If you don’t find any threats, proceed to perform a full scan by clicking on Scan options just below Quick scan.
Click on Full scan, then Scan now to perform a deep scan of your PC.
Wait for the process to finish and restart your system.
Hit the Windows key, type Control Panel in the search bar, and click Open.
Click on Uninstall a program under Programs.
Find VMware Tools, click on it, and select Uninstall.
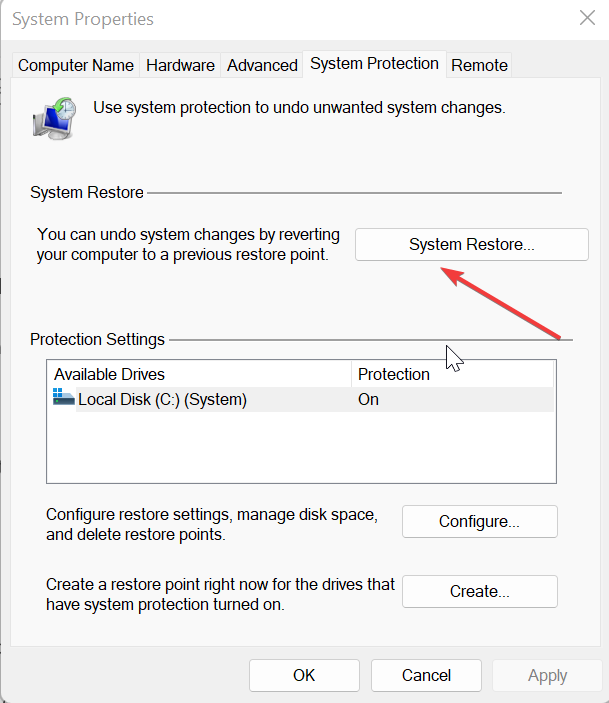
5. Perform a System Restore
Press the Windows + R keys, type rstui, and hit Enter.
The System Restore window will open. Click on Next.
Select the restore point you wish to revert to and click on Next.
Now click on Finish.
If none of the above solutions work in getting rid of the vmtoolsd.exe errors, performing a system restore may be your only hope, but only if you had created a restore point. If not, a clean install may be on the horizon.
Do I need VMware tools?
VMware tools increase the performance of your VM and provide better compatibility with guest operating systems. However, this is only for users who operate virtual machines.
If you’re frugal about the processes you want running on your PC, you might find the vmtoolsd.exe file unwarranted. This is especially true if you are not running any virtual machines.
That being said, vmtoolsd.exe uses very little CPU and RAM resources while running, so it shouldn’t cause any problems with your performance if you leave it running all the time.
However, if it’s using more resources than expected, you can close it anytime by right-clicking on its icon in Task Manager and ending the task.
That sums it up on all things vmtoolsd.exe file. Hopefully, you now have the right information on how to address any errors that may arise by running the VMware Tools program.
We’d love to get your feedback on this topic so for any suggestions or additional information, leave a comment down below.
Numerous Windows users have complained about seeing the msfeedssync.exe process running in the background on their computers. They are curious if it’s a security threat to the system or safe. Hence, this guide will discuss msfeedssync.exe and what it does.
Also, you can check our detailed guide on why exe files are not opening on Windows PC and some fixes for the issue.
What is msfeedssync.exe?
Msfeedssync.exe (Microsoft Feeds Synchronization) is an executable file related to the RSS (Really Simple Syndication) feed synchronization feature in Microsoft Windows.
RSS is a technology used to subscribe to and receive updates from websites that provide content in a standardized format. It is responsible for synchronizing RSS feeds in the Internet Explorer web browser.
Furthermore, msfeedssync.exe is a background process that runs automatically and periodically checks for updates to subscribed RSS feeds.
When it detects new content, it downloads and updates the feeds so that users can access the latest information from their subscribed websites. Hence, it ensures users receive recent content from their subscribed RSS feeds without checking manually.
Is it safe to disable msfeedssync.exe?
Disabling msfeedssync.exe should generally not cause any significant issues or affect the overall functioning of your system.
If you don’t use the RSS feed synchronization feature in Internet Explorer on Windows 11, disabling msfeedssync.exe can help conserve system resources. Also, it can reduce unnecessary background processes, resulting in slightly faster startup time and improved performance on your computer.
However, the RSS feed synchronization feature can verify whether the msfeedssync.exe process is genuine. Like any system file, msfeedssync.exe can be used by malware for malicious activities and other potential threats.
Likewise, you may notice unusual behavior with the msfeedssync.exe process, such as high CPU or memory usage.
How to verify if msfeedssync.exe is safe?
Check the file location
Right-click the Start button and select Task Manager from the menu.
Go to the Details tab. Right-click msfeedssync.exe, and click Open File Location from the drop-down menu.
The legitimate msfeedssync.exe file resides in the C:\Windows\System32
If you find msfeedssync.exe in any other location, it could be a sign of a potential threat.
Verify the digital signature
Following steps 1 and 2 above, right-click on the msfeedssync.exe file and select Properties.
Go to the Details tab and check if it is a valid digital signature from Microsoft.
Once done, close the properties window.
Microsoft signs the valid msfeedssync.exe. If it says otherwise, then it is a dangerous file.
How can I disable msfeedssync.exe?
1. Disable msfeedssync.exe via Feeds and Web Slices
Launch the Internet Explorer on your PC.
Go to the Tools menu and select Internet Options from the drop-down.
In the Internet Options window, navigate to the Content tab. Under the Feeds section, click on the Settings button.
Uncheck the box that says Automatically check feeds and Web slices for updates.
Click OK to save the changes.
Unchecking the automatic synchronization option, you won’t receive real-time updates for your RSS feeds in Internet Explorer.
2. Disable msfeedssync.exe via a Run command
Press Windows + R key to open the Run dialog box.
Type msfeedssync disable, then press Enter to run the command.
If you have used the Windows operating system for a while, you should notice that it comes bundled with thousands of files, many running processes, and utilities. The VBC.exe file is one such file, but often users do not know its purpose.
Some users might feel uneasy when they see an unknown process, and to learn more about processes, we have a great guide on how many processes should be running on your PC.
So, in this guide, we look at the executable and share important points, including its functions and how to spot a legitimate file.
What is VBC.exe?
VBC.exe is bundled as an essential component when you install Microsoft.NET framework. The Visual Basic programming language is supported by the.NET framework, which also offers a runtime for creating and executing programs.
It is the responsibility of VBC.exe to translate Visual Basic source code into Microsoft Intermediate Language (MSIL) code, which may then be translated into native code or run by the.NET Common Language Runtime (CLR).
Is VBC.exe a virus?
No, VBC.exe is not a virus, rather if you install Visual Basic on Windows, this genuine process helps in compiling the code.
However, certain malware can pass as VBC.exe. If you are worried that the file VBC.exe on your computer contains malware or a virus, you may run a reliable antivirus or anti-malware scan on it.
What functions does VBC.exe execute?
VBC.exe is a critical tool for developers working with Visual Basic, and its primary functionalities include the following:
Compilation – VBC.exe translates Visual Basic source code (.vb files) into intermediate language code (.NET assemblies), which the CLR may run. The compilation process includes syntax and semantic analysis, code optimization, and output generation.
Error checking – During compilation, VBC.exe thoroughly checks for errors. It makes the code adhere to the Visual Basic language’s principles, looks for any syntax difficulties, and gives detailed error messages to assist developers in finding and resolving code-related problems.
Generation of executable files and libraries – After a successful compilation, VBC.exe creates executable files (.exe) or dynamic-link libraries (.dll) that may be utilized directly by programs or as dependencies by other components.
Should I remove VBC.exe?
We advise against deleting VBC.exe. Applications written in Visual Basic might not be able to run if you do this. Rather try upgrading your Visual Studio installation if VBC.exe is giving you trouble.
You may want to remove the entire.NET framework to clear up disk space if you are not a developer or do not use Visual Basic. However, the executable runs in the background and is extremely lightweight. So, under typical conditions, it does not use many system resources or affect performance.
How can I determine if VBC.exe is legit?
1. Verify the file location and size
You will find the ideal file in the directory listed below. Therefore, you could suspect malware if you find a file with the same name at a different place.
C:\Windows\Microsoft.NET\Framework\v4.0.30319
Additionally, the actual VBC.exe file is about 2.62 MB in size. Therefore, a virus or other malware is probably to blame if the file size differs.
2. Check the digital signature
Press Windows + E to open File Explorer and navigate to the path where you have the file.
Right-click on it and select Properties.
Click on the Digital Signatures tab to see a list of signatures in the Signature listsection. The genuine publisher is Microsoft Corporation. You may click on a signature to reveal more information about it.
If you have read this far, you should understand the executable and know if you need it on your computer or would rather delete it.
Since OneDrive comes integrated into File Explorer by default, it’s a great way to collaborate with colleagues or share files with friends and family.
Let’s talk about how users can add files to shared folders and find everything in one place for a specific project.
Can I give another user access to my OneDrive?
Yes, you can share OneDrive with another user. There are various methods of doing so depending on the type of account.
You can share access via a link with anonymous users, or you can email the link to share access with specific users. So, let’s find out how to share OneDrive access with another user for personal accounts only.
How do I share OneDrive with another user?
1. Via OneDrive web app
Go to the Microsoft 365 website and sign in to your OneDrive account.
Select the folders or files you want to share by clicking on the circle icons on the left. Click on the Share icon on the top left or right-click the selected items and go to Share.
There will be two options under the Send link pop-up. If you are okay with sharing your data anonymously with editing permissions, go ahead with the default option of Anyone with the link can edit. Or, simply click Copy link and jump to step number 6.
On the next step, under Sharing settings, you can share the link with Anyone or Specific people. Further under More settings:
Change editing permissions – Select Can edit to allow the other users to make any changes. If you are not happy giving editing permissions, select Can viewto only allow viewing of the shared items.
Expiring links (for premium users) – Limit the link access for a certain time period for better security.
Set a password (for premium users) – Set up a password to the link to control access to sensitive data.
Click Apply when done.
On the Send link dialogue box, click Copy link to copy the link to your clipboard. Paste this link to WhatsApp, Facebook or email to share OneDrive access with another user.
Allowing anyone with a link to access files and folders is not a safe option. This option allows anyone with a link to share the files further. That is why it is best to share access with specific people.
However, this is an easy way to share files with a large group of people simultaneously.
Open Windows Explorer and find the folder or file you want to share. Right-click on it and click on Share.
In the next Share link dialogue box, you will see two options:
Select Anyone with the link can edit if you want to give access with edit permissions, or you can change it in the next dialogue box.
If you want to share the items with specific people, enter their email address in the To field or directly, click the Copy linkbutton and paste it wherever you want to share the items.
Sharing OneDrive access with another user from Windows Explorer becomes smooth if you have it in sync with your system.
It is easy to streamline the workflow as a team when you share OneDrive access. OneDrive is secured and cloud-based, so all your colleagues can access documents remotely once you share them.
If you notice that the CCC.exe process is using a lot of your computer’s resources and you’re worried if it’s a virus or malware, don’t be concerned. It’s a legitimate process that runs on computers with AMD video cards.
However, if you have an Nvidia video card and have never installed an AMD card, viruses or malware can disguise as the Catalyst Control Center.
In this article, we will explain the purpose of the CCC.exe process and offer step-by-step troubleshooting instructions to help you resolve any issues associated with CCC.exe.
What is CCC.exe used for?
CCC stands for Catalyst Control Center, it refers to a software suite developed by Advanced Micro Devices (AMD) for their graphics processing units (GPUs). It is designed to provide a graphical interface for managing and configuring various aspects of AMD graphics cards.
If Catalyst Control Center encounters an issue, you may see an error message appear on your screen. Some typical error messages that might appear are:
CCC.exe has stopped working.
CCC.exe has encountered a problem.
Catalyst Control Center: host application has encountered an error and needs to close.
How do I fix the CCC.exe errors?
1. Start the Catalyst Control Center app from its original location
NOTE
Sometimes, the shortcut for the Catalyst Control Center may become damaged, which can prevent you from opening the program using that shortcut. In such cases, it is recommended to open CCC from its original location.
Navigate to the following location and double-click the CCC.exe file: C:\Program Files (x86)\ATI Technologies\ATI. ACE\Core-Static\ or C:\Program Files (x86)\AMD\ATI. ACE\Core-Static\
2. Relaunch the CCC.exe process
Press Ctrl + Shift + Esc to launch Task Manager.
Go to the Details tab, scroll down the list of processes, and find the CCC.exe process.
Then, right-click the CCC.exe process and select End task.
Then, try relaunching the app and see if it solves the issue.
3. Delete the ATI folder
NOTE
If you frequently encounter the ccc.exe has stopped working error, deleting the ATI folder from the AppData directory may resolve the problem. However, you will lose any previously configured custom profiles in the ATI Catalyst Control Panel.
Press the Windows + R to open the Run window. Then, type control.exe folders and press Enter to open File Explorer Options.
Go to the View tab, select the Show hidden files, folders, and drives option under the Hidden files and folders setting, and click Apply then OK.
After that, go to the following location in the File Explorer: C:\ProgramData
Inside, you should find a folder named ATI and delete it.
Next, navigate to the following location: C:\Users\Username\AppData\Local
Replace Username with your admin account name.
Find and delete the ATI folder and ensure it is removed from the Recycle Bin.
Once both folders have been deleted, restart your computer and log in with an admin account.
You will see that the CCC.exe program no longer crashes.
The error code 0x8004de88 is associated with Microsoft OneDrive, specifically with authentication or sign-in issues. It can occur due to many factors. However, this guide will take you through the basics of fixing the problem.
Alternatively, you may be interested in our guide on what to do if the OneDrive error code 0x8004de40 appears on your PC.
Firewall or antivirus interference can interfere with your connection.
How do I fix error code 0x8004de88?
Before proceeding with any advanced troubleshooting steps, observe the following preliminary checks:
Check your internet connection and try restarting your router.
Verify your login credentials and make sure it’s correct.
Clear cache and temporary files.
Disable antivirus/firewall temporarily to make sure there’s no interference.
Update OneDrive to mitigate any known bugs.
1. Check TLS protocols
Press the Windows + R keys to open the Run window, type inetcpl.cpl, and press Enter to open the Internet Properties window.
Navigate to the Advanced tab, and enable all three TLS protocols by selecting the check boxes for the TLS 1.0, TLS 1.1, and TLS 1.2 options.
Select Apply and then OK to save the changes.
Restart your computer and try to sign in to OneDrive to see if the error persists.
Enabling the TLS 1.0 and above security protocol will help establish the encryption channels over the computer network and fix the issue.
2. Reset the OneDrive app
Press the Windows + R key to open the Run dialog box. Copy and paste the following string and press Enter to restart the OneDrive app: %localappdata%\Microsoft\OneDrive\OneDrive.exe /reset
The OneDrive icon will reappear when the process is complete.
If the icon doesn’t reappear, open the Run dialog box, copy and paste the following strings, and press Enter: %localappdata%\Microsoft\OneDrive\OneDrive.exe
Resetting the OneDrive app can help resolve synchronization or authentication problems causing the 0x8004de88 OneDrive error. You can read about how to reset an app in Windows 11 if you have issues with the above steps.
Also, we have a comprehensive guide on OneDrive error code 0x8004deef. Do not hesitate to check this out if you encounter the error.
In conclusion, kindly leave your suggestions or questions in the comments section. We’d like to hear from you if another solution not included in the steps above worked for you.
Recently, many users have inquired about the Unikey.exe file on their PCs. It is because they aren’t sure if it is malicious and can threaten the system. However, this guide will discuss what unikey.exe is and what it is for on Windows PCs.
Likewise, you can check our detailed guide on why exe files are not opening on Windows PC and some fixes for the problem.
What is Unikey.exe?
Unikey.exe is an executable file for Unikey, a popular Vietnamese input method editor (IME) software. IME is a program that allows users to input characters in a particular script or language.
Unikey is designed for typing Vietnamese characters using a standard keyboard layout.
The executable launches the Unikey application on Windows operating systems and mobile devices.
When you run Unikey.exe, it initializes the Unikey program, enabling you to type Vietnamese characters using a phonetic typing method.
Is Unikey safe or a virus?
As said earlier, Unikey is a legitimate software by Pham Kim Long. It is a widely used software for Vietnamese input, and the unikey.exe file is the executable for the Unikey program. So, the official Unikey software is neither a virus nor malware.
However, users can download a compromised or infected version of Unikey from unofficial or untrusted sources like any software.
How can I verify Unikey.exe?
To verify if the Unikey on your computer is safe, you can perform the following checks:
Check the file location. The legitimate Unikey.exe file resides in the C:\Program Files (x86)\UniKey
Check the file size. The legitimate file has a specific file size.
Check for Digital Signature and make sure Pham Kim Long signs it.
As you can see, this is a reputable file, and it poses no risk to your PC. Also, you may have interest in our article about exe files deleting themselves on Windows 11 and how to fix it.
If you have further questions regarding this file, kindly drop them in the comments section.
As of 2023, there are over a billion Gmail users worldwide. Despite being the most popular email platform on the planet, Google does not offer an official Gmail app for Windows.
While Gmail can be accessed and used effectively through a reliable web browser, some users prefer the convenience and easy access provided by a dedicated desktop application.
This guide will show you a few workarounds that let you set up and access your Gmail as a desktop app on your PC.
Is there a Gmail desktop app for Windows?
Even though there is no official desktop email client for Gmail, you can still install Gmail’s web version as an app on your PC with a few workarounds.
With Progressive Web Applications (PWAs) feature in browsers, you can turn websites into individual desktop applications complete with their own icons. This feature enables you to easily access websites like Gmail, providing you with the experience of using a standalone program.
Additionally, some third-party email clients and applications may offer integration with Gmail. These applications can provide a more traditional email client experience on your Windows PC while still being connected to your Gmail account.
How do I install the Gmail app on Windows?
1. Use Edge
Open the Start menu and click on Edge to launch the app.
Go to the Gmail website and sign into your Google account.
Click the three vertical dots in the right-hand corner, move over to Apps, and then click Install this site as an app.
Type a name for the app and click Install.
In the App installed dialog, choose your preferred options for the app such as Pin to taskbar, Pin to Start, and then click the Allow button.
Now, you have successfully installed Gmail as an app on Windows. When you open this Gmail app, it will open in a separate window instead of inside the Edge browser. This is as close as possible to having a Gmail app on your computer’s desktop.
2. Use Chrome
Open the Google Chrome browser on your computer.
Go to Gmail and log in to your account.
Click the three dots in the top-right corner of the screen.
From the options that appear, hover over More tools and then click Create shortcut.
In the Create shortcut prompt, name it Gmail, select the Open as window option, and click Create.
Now, go back to your desktop screen. You will find a Gmail icon representing a progressive web app. Clicking on this icon will open the web version of Gmail with an app-like interface.
Many users have reported upfc.exe process running on their Windows computers and don’t know what it means. Also, some have noticed some issues with the executable. Hence, this article will discuss upfc.exe and how to disable it.
Upfc.exe is an executable file associated with the Updateability From SCM process. It is part of the Microsoft Windows OS Software developed by Microsoft. This executable file does the following:
Facilitates the update ability of software components through the software configuration management (SCM) system.
Updateability from SCM is a core system component that can update or modify software components.
It ensures updates are consistently applied in a controlled manner.
Also, it minimizes the risk of introducing errors or conflicts.
Should I disable upfc.exe?
As said in the previous section, upfc.exe is a legitimate file developed by Microsoft for the Windows OS.
It is essential for system functionality because software systems often require updates to fix bugs, add new features, or address security vulnerabilities. So, the update from SCM software is not considered malicious.
However, a corrupt upfc.exe may threaten the system’s security or if it’s camouflaging as a virus. It can cause high CPU usage and result in a significant reduction in computer performance.
How to verify if upfc.exe is safe or a virus
We recommend you review some verification processes to determine whether upfc.exe is unsafe and should be disabled. Go through the steps below:
Check the file location – Verify if the upfc.exe process on your PC is in the legitimate directory: C:\Windows\System32
Verify the file’s digital signature – The digital signature should be by Microsoft to ensure its legitimacy.
Check the spelling – The original file name is upfc.exe. So any other name variations are not genuine.
How can I disable upfc.exe?
1. End task for upfc.exe
Right-click the Start button and select Task Manager from the menu.
Go to the Processes or Details tab. Select the upfc.exe from the list, right-click on it, then click End Task from the drop-down menu.
Click OK to confirm that you want to end the task for the program.
Restart your PC.
Ending the file process on your PC will stop its software activities and mitigate any threats it can cause the system. Check our article for more shortcuts to open Task Manager on your PC.
2. Remove the dashost.exe file via File Explorer
Right-click the Start button and select Task Manager from the menu.
Locate the upfc.exe in the Processes or Details tab. Right-click on it and click on Open File Location from the drop-down menu.
Right-click on the upfc.exe file and delete it.
Restart your computer and check if its process still runs.
Removing the executable file in File Explorer will disable the malicious software.
Trying to get your weekly Bing quiz only to see it’s not working? We might be able to help you crack that puzzle.
So, whether you’re an adult or kid, or whether you want a geography quiz, yoga quiz, sports quiz, educational quiz, or any other category, the step-by-step instructions below should help.
How do I fix Bing homepage quiz not working?
To start with, try another browser, check for updates, and try disconnecting your VPN or proxy. If that doesn’t fix it, try the following guidelines:
1. Find the Q icon
NOTE
Previously, it was a graduation cap icon, but now it has been replaced by a new Q icon to access the homepage quiz. Remember that the Q icon is not always visible and is hidden by default. This may be why many users think the Bing quiz is not working.
Look for the Q icon that represents the Quiz feature.
Use the Hotspot feature of the Bing homepage to find the Q icon. Move your mouse cursor across different areas of the background image on the Bing homepage.
When your cursor enters the hotspot area, the Q icon will appear somewhere on the image.
Once you have found the Q icon, hover your mouse cursor over it.
Bing will display a fly-out with the homepage quiz when you hover over the Q icon.
The quiz will begin with the first question related to the image of the day.
2. Clear the browser cache and cookies
NOTE
To clear browsing data in Google Chrome, follow these steps. While Microsoft Edge offers similar options and steps, you can also apply similar steps to clear browsing data in other browsers.
Open the Google Chrome browser, and click the three vertical dots in the upper right corner.
Then, select Settings.
On the Settings page, click Privacy and security on the left sidebar and select Clear browsing data on the right.
In the Clear Browsing Data window, select the Advanced tab and set the Time range to All time.
Check the Cookies and other site data and Cached images and files options, and then click the Clear data button.
Clearing the browser data is often effective in resolving various site-related issues on the browser.
Click the three vertical dots, move to More tools, and then select Extensions.
On the Extensions page, disable all the extensions on your browser.
You can also try visiting the Bing homepage in incognito or private browsing mode and see if the Bing quiz is working.
4. Change your region
Open your web browser and navigate to Bing.com.
Click on the Hamburger icon (three-line icon) at the top-right corner of the Bing homepage and select the Settings option and it will expand to reveal a list of options.
Then, click on Country/Region.
Bing will load the Settings page in a new tab. Under the Country/region section, click on the United States to change the country.
Then, reload the website and check if the Bing quiz not working issue is resolved.
4. Contact Bing support
If none of the above steps resolve the issue, it may be worth contacting Bing support directly. They can provide specific assistance and troubleshooting steps tailored to the Bing quiz not working issue.
Bing is a great search engine that offers great features such as AI chatbot and quizzes, but it can be annoying whenever you search for something on your local computer, and Bing pops up.
We hope that with the instructions above you were able to find the answers to the Bing quiz today. If you weren’t, and still need help, leave a comment telling us a bit more about your specific situation.
Exe files on Windows contain instructions and data meant to be executed by the computer. However, most Windows users inquire about what msoia.exe is and have encountered errors with it. Thus, this guide will discuss what it is & how to fix its errors.
Msoia stands for Microsoft Office Agent, and msoia.exe is responsible for the Microsoft Office Telemetry process. It is a background process running on Windows PCs that tracks keyboard and mouse input.
The msoia.exe is a legitimate Microsoft file found in C:\Users\Username\AppData\Local\Microsoft\Office\16.0\Telemetry
Nevertheless, there are errors in the msoia.exe file, like msoia.exe has stopped working,Application Error, high CPU usage, etc. Therefore, we will examine what prompts these errors.
What is Msoia EXE used for?
Collecting inventory, usage, and health data regarding Office.
Used to help organization with application compatibility testing.
What prompts msoia.exe errors?
Corrupted or missing files can result in msoia.exe not found errors.
Outdated or incompatible software can trigger msoia.exe errors.
How can I fix msoia.exe errors?
Here are some preliminary checks to observe before trying advanced troubleshooting steps to fix the msoia.exe error.
Perform an antivirus scan, and that malware hasn’t infected msoia.exe.
Update Windows to the latest version to prevent any issues.
Proceed with the advanced troubleshooting below if the errors persist after observing the preliminary checks.
1. Delete the msoia.exe
Press the Windows + E keys to open the File Explorer.
Navigate to the following path: C:\Users\Username\AppData\Local\Microsoft\Office\16.0\Telemetry
Then, navigate to msoia.exe, right-click it, and select Delete.
Wait for the process to complete, restart your computer and reinstall the msoia.exe.
This step is effective; however, Microsoft often replaces the file after every reboot. Hence, you will need to keep deleting it every time.
2. Block the file in the firewall
Left-click the Start menu, type the control panel, and launch it.
Then, select Windows Defender Firewall.
In the new window, select Advanced settings.
Select Outbound Rules from the left sidebar and choose New Rule from the right sidebar.
Click on Programs. Then browse to the program’s path and click Next.
Choose the Block the connection option and then click Next.
Now, select all three options and click Next.
Input the file name and select Finish.
Some users have claimed this process is more beneficial and permanent to troubleshoot the msoia.exe errors. Blocking access to the internet automatically troubleshoots the msoia.exe issues.
One of the advantages of Outlook is that it allows you to add different emails. However, there are times users are unable to connect their Office 365 email account to Outlook.
This makes it difficult for some users to connect their work emails to their devices. Fortunately, there are a series of ways to solve this problem, and we will detail them in this guide.
Why won’t Outlook let me add an email account?
There are different reasons you might be unable to add your Office 365 email account to Outlook. Below are some of the notable ones:
Outdated app: If you are facing this issue on a specific device, it might be because the Outlook app is outdated. You need to update the app to the latest version to solve this problem.
Issues with Multifactor authentication: If you have Multifactor Authentication enabled for your Microsoft 365 account, you will likely encounter this issue. To get past this, you need to disable MFA.
Outdated PC: In some cases, this error might be because you have not installed the latest Windows patches on your PC. The solution to this is to update your operating system.
How can I fix Outlook 365 if I am unable to add email accounts?
1. Update Outlook
Launch Outlook and click the File tab at the top.
Select the Office Account option.
Now, click Update Options.
Finally, choose Update Now and wait for the process to complete.
If you cannot add an email account to Outlook 365, it might be because the app is outdated. It is good practice always to update the app, which should do the trick for you in this case.
Now, click the I agree option on the Microsoft Services Agreement page.
From here, select Outlook from the available options and click Next.
Select the type of issue you are facing and click the Next button.
Finally, follow the instructions to get rid of the problem.
Another option to try if you cannot add an email account to Outlook 365 is to use the repair tool by Microsoft. This will help you diagnose the problem and give directions on how to fix it.
Press the Windows key, type control, and select the Control Panel option.
Now, click the category dropdown in the top right corner and select Large icons.
Next, choose the Mail (Microsoft Outlook) option.
Select Shows Profiles.
Choose Add, enter the details of the profile, and click OK.
Now, chooseAlways use this profile and click OK.
Finally, go to Outlook and try to add the account again.
Sometimes, you are unable to add an email account to Outlook 365 because you are creating the profile wrongly. One effective method that has worked for many users is to create the profile via Control Panel and add the account after.
4. Update PC
Press the Windows key + I to open the Settings app and click Windows Update in the left pane.
Click the Check for updates button.
Now, download and install all available updates.
An outdated operating system is a requisite for many problems, including this issue. Hence, if you cannot add an email account to Outlook 365, try to install the latest patches for your PC.
5. Disable MFA for Microsoft 365
If you are facing this issue on an Office 365 email account, it might be because you have Multi-Factor Authentication enabled. The quickest way to eliminate the error is to disable the feature on the Microsoft 365 portal.
However, it must be noted that you might have to contact your Exchange administrator to disable the feature.
Being unable to add an email account to Outlook 365 can be frustrating, as it prevents you from logging in to your important account on your PC. But with the solutions in this guide, you should be able to solve the problem for good.
Many Windows users complain about receiving an error stating ole32.dll not found. The error occurs when a program or service relying on the DLL file can’t access it. However, this article will discuss the basic steps for fixing it.
Ole32.dll is a dynamic link library (DLL) file in the Microsoft Windows operating system. It stands for Object Linking and Embedding (OLE) 32-bit Library. OLE is a technology by Microsoft that allows apps to create and manipulate compound documents containing multiple types of data.
Here are the most important ole32.dll functions:
Provides essential functions and interfaces for implementing OLE-related functionality.
Provides object creation and activation.
Allows embedding and interprocess communication.
Why is ole32.dll not found?
Receiving an error message stating that ole32.dll not found indicates that the DLL file is missing from your system. Here are some possible causes of missing DLL file errors:
DLL errors can impact the functioning of apps on your PC, so it’s crucial to address the ole32.dll file not found error to ensure your system operates properly. However, resolving DLL-related issues can be challenging for users without technical expertise.
Fortunately, you can automatically repair DLL files using DLL repair tools. These tools are designed to resolve 100% of DLL issues within the operating system and restore them to their functional state.
2. Reinstall the app that requires ole32.dll
Click the Start button, type control panel, then press Enter to open the Control Panel.
Click on Programs. Go to the Programs and Features tab and find the app from the list.
Select the app and click Uninstall at the top of the tab, then OK.
Restart your PC and reinstall the app to see if the error persists.
Reinstalling the app will download the needed files for running it, including ole32.dll. Hence, it will overwrite the previous data and fix the error.
Right-click the Start button and select Task Manager.
Left-click the Start button, type cmd, and select Run as administrator.
Input the following and press Enter to get to root: cd \
Then, input the following to locate all the versions on the disk: dir ole32.dll /s
Locate a good version, perhaps in DLLcache or SP2QFE or SP3QFE directories, and copy the file.
Now, paste it into the C:\Windows\System32 or C:\Windows\System32\DLLcache
Restart your PC and check if the error persists.
It will paste the ole32.dll file into the Windows folder, making it available for any app that needs it. Some users have claimed this solution has been effective for them.
Spotify is one of the most popular digital streaming services allowing users to stream millions of songs on their mobile phones, Windows PC, and Macbooks. But users have long had issues with it on Windows. Some report that Spotify is constantly not responding.
The error message reads, The Spotify application is not responding. For most users, Spotify stopped responding after turning on the PC from sleep, but the app could crash out of the blue. Keep reading to find out the causes and the fixes that worked for others!
Why is Spotify suddenly not working?
Here are a few reasons Spotify is not responding or stopped working:
Misconfigured app settings: In most cases, it’s the app settings to blame when Spotify stops responding in Windows, and it’s generally the Hardware Acceleration feature.
Bug in the installed version: Often, the problem arises after updating Spotify, which points to a bug in the installed version. And in these cases, a patch is usually released soon.
Firewall conflicting with the app: For some users, the firewall blocked the app from running, leading to Spotify crashing or being stuck at launch. Here, you can either disable the firewall or whitelist the app.
Corrupt app cache: Another major underlying cause when Spotify is not responding is the corrupt app data or cache, and this needs to be cleared for things to get up and running.
Users who also notice playback drops or that Spotify keeps pausing on PC can follow that guide for additional targeted troubleshooting.
How do I fix Spotify isn’t responding?
Before we proceed to the slightly complex solutions, here are a few quick ones to try:
Restart the computer.
Install any pending Windows updates.
Update the graphics driver. Though it’s not a common underlying cause, having an updated graphics card driver ensures superior performance and fewer errors in Windows. So, give it a try.
Disable any third-party antivirus or security software running on the PC. In case the problem is resolved now, we recommend you switch to a more reliable antivirus solution, one that doesn’t conflict with other apps.
If none work, move to the fixes listed next.
1. Relaunch the program
Press Ctrl + Shift + Esc to open the Task Manager.
Locate the Spotify process, select it, and click on End task.
Once done, relaunch Spotify.
If Spotify is not responding after sleep, a quick workaround entails terminating the process and then relaunching it. Remember, this won’t solve the problem but will simply get rid of it temporarily.
2. Check for updates
Tip
The steps listed here are for the Microsoft Store version of Spotify. In case you downloaded the app from the official website, new updates should be listed within the app interface.
Launch Microsoft Store, and click on the Library icon near the bottom left.
Click on the Get updates button.
If a newer version of Spotify is available, wait for it to download and install.
In most cases, simply updating Spotify should do the trick if a bug was triggering the error and a patch for it has been released. So, this should be one of the first things you do while troubleshooting.
3. Disable hardware acceleration
Launch Spotify, click on the Profile icon near the top right, and then select Settings.
Now, scroll down to the bottom and turn off the toggle next to Enable hardware acceleration.
Hardware Acceleration, though meant to improve the app’s performance, often conflicts with the enforced settings and leads to Spotify not responding in Windows 11. Disabling Hardware Acceleration should work for most users.
If you are facing issues like Spotify error code auth 74, we recommend you read this guide to find solutions.
4. Make sure Spotify is whitelisted in firewall
Press Windows + S to open Search, type Allow an app through Windows Firewall in the text field, and click on the relevant search result.
Click on Change settings.
Now, click on the Allow another app button.
Locate Spotify from the list, make sure both the Private and Public checkboxes are ticked next to it, and click on OK to save the changes.
Once done, restart the computer and then relaunch Spotify.
Often when Spotify is not working, it’s the Windows Defender Firewall or a third-party firewall to blame for the issue. While you already know how to whitelist apps in the former, third-party firewalls, too, have a dedicated section or setting for the same.
Press Windows + I to open Settings, select Apps from the navigation pane, and click on Installed apps on the right.
Click on the ellipsis next to Spotify Music, and select Advanced options.
Now, click the Repair button and wait for the process to complete.
In case the problem remains unresolved, click the Reset button.
Again, click Reset in the confirmation prompt that appears.
Windows offers a quick way to Repair or Reset the built-in apps or the ones downloaded from the Micorosft Store. And in case you got Spotify from the latter, reset it to clear the user data and app cache. Once done, verify whether Spotify is still not responding.
6. Modify the hosts file
Press Windows + S to open Search, type Notepad in the text field, right-click on the relevant search result, and select Run as administrator.
Click Yes in the UAC prompt.
Click on the File menu and select Open.
Navigate the following path:C:\Windows\System32\drivers\etc
Choose All files from the dropdown menu.
Select the hosts file, and then click on Open.
Now, look for any entries that mention Spotify. For instance, 0.0.0.0 weblb-wg.gslb.spotify.com0.0.0.0 or something similar.
Finally, remove the entire entry that lists Spotify and press Ctrl + S to save the changes.
Relaunch Spotify, and the problem should be resolved.
The hosts file lists the mapped IP address, which is critical for the effective functioning of the app. And when Spotify is not responding, removing its entry should work for you.
7. Reinstall the app
Press Windows + I to open Settings, select Apps from the left, and click on Installed apps.
Now, click on the ellipsis next to Spotify Music, and select Uninstall.
Again, click Uninstall in the confirmation prompt.
Once done, restart the computer for the changes to come into effect.
In case nothing else works, the last option is to reinstall Spotify. We recommend you get the app from the Microsoft Store since it’s tailored for Windows and eliminates compatibility issues.
Also, if things don’t work out on the first attempt, use an effective uninstaller tool to clear any leftover files or registry entries before the reinstall.
Picture this. You just discovered a new app or want to update an existing one to enjoy the latest features, but when you turn to the Microsoft Store, it loads for an excruciatingly long amount of time, and in the end, it brings up the error code 0x80131505.
This is exactly what some users have to deal with. Microsoft Store errors are common, and just like the others, we’ll give you solutions on bypassing this one too.
Why am I getting the error 0x80131505?
If you have spotted the error code 0x80131505, it is probably because of one of the following reasons:
Network issues – This error can sometimes occur because of a network issue or connectivity problem between your PC and the Microsoft server.
Server issue – Microsoft servers sometimes experience glitches from time to time, so this may be one of those times.
Corrupt cache – Sometimes, the Microsoft Store accumulates cache when you have many downloads. If not cleared in a while, you may experience launch issues.
Compatibility issue – There may be a compatibility issue in your computer, or you have installed some incompatible software that has caused the Microsoft Store to stop working.
How do I fix code 0x80131505 Microsoft Store?
Try the following workarounds before any technical solutions:
Click the Run option for the Windows Store Apps troubleshooter.
2. Restart the Microsoft Store Install Service
Hit the Windows + R keys to open the Run command.
Type services.msc and hit Enter.
Locate the Microsoft Store Install service, double-click on it, and select Properties.
Navigate to the General tab, under Startup type, select Automatic from the drop-down options, and click on the Start button.
Next, click Apply and then OK.
This is a background service that is required to be running for Microsoft Store to function properly. If it has stopped for some reason, you need to restart it. You must also check the Windows Update service and the Background Intelligent Transfer Service.
3. Reset Microsoft Store cache
Hit the Windows key, type cmd in the search bar, and click Run as administrator.
Type the following command and hit Enter: WSreset.exe
4. Re-register the store app
Hit the Windows key, type Powershell in the search bar, and click Run as administrator.
Type the following command and hit Enter: Get-AppXPackage *WindowsStore* -AllUsers | Foreach {Add-AppxPackage -DisableDevelopmentMode -Register "$($_.InstallLocation)\AppXManifest.xml"}
Click on Apps on the left pane then Apps & features on the right pane.
Locate the Microsoft Store app, click on the three vertical ellipses, and select Advanced options.
Click on Repair.
Go back and click on Reset if the repair option failed.
6. Reinstall Microsoft Store
Press the Windows + I keys simultaneously to open Settings.
Type Powershell in the search bar and click Run as administrator.
Enter the following command: Get-AppxPackage -allusers Microsoft.WindowsStore | Foreach {Add-AppxPackage -DisableDevelopmentMode -Register "$($_.InstallLocation)\AppXManifest.xml"
Running into the 0x80131505 issue is a bit of a pain, but thankfully it’s not all that difficult to resolve. The methods outlined above should help anyone suffering from this error get their Microsoft Store working normally again.
Check out our other articles on other Microsoft Store error codes, such as 0x00000190, and find out how we resolve it.
For any other thoughts or comments, leave a comment down below.
Many users have reported that they come across the 0xc000003e application error when they try to run a recently installed program on their computer.
In this guide, we will share with you some effective solutions that will help you fix the 0xc000003e application error, so that you can run the program without any issues.
Why am I getting the 0xc000003e application error?
After doing some research, we have found out some of the common reasons that could trigger the 0xc000003e application error on your computer.
Not running with admin rights – Chances are the program that you are running doesn’t have administrative privileges.
Compatibility issues – There might be a compatibility issue with the version of the program that you are running with the Windows OS.
Corrupt system files – Some important system files might be corrupt or missing from your computer, because of which you are getting the 0xc000003e application error.
Malware infection – Your PC might be infected with a virus or malware that is causing the applications to crash and throw up the 0xc000003e error.
Antivirus block – Often, antivirus software is known to block programs that it falsely detects as malicious, which could be the reason in our case. Disabling it temporarily is a good idea.
Let us now check out the solutions that will help you resolve the 0xc000003e application error.
How can I fix the 0xc000003e application error?
1. Run the Compatibility troubleshooter
Right-click on the file icon and select Properties.
Switch to the Compatibility tab.
Hit the Run compatibility troubleshooter button.
Select the Try recommended settings option.
Click on the Test the Program option and select Next.
Close the troubleshooter and restart your computer.
You should run the compatibility troubleshooter as it will help you troubleshoot any problems related to compatibility issues.
2. Fix corrupt system files
Press the Win key to open the Start menu.
Type command prompt and open it as an administrator.
Type the below command and press Enter: sfc /scannow
The process will fix the corrupt or missing system files issue.
Type the below commands and press Enter after each one: Dism /Online /Cleanup-Image /CheckHealthDism /Online /Cleanup-Image /ScanHealthDism /Online /Cleanup-Image /RestoreHealth
Restart your computer.
Chances are some important system files that are necessary for the program to run smoothly aren’t available, which is why you are getting the 0xc000003e application error. This can be easily resolved by running the SFC and DISM scans.
This action can also be performed more thoroughly using a dedicated tool that can handle the situation for you.
3. Run the CHKDSK utility
Press the Win key to open the Start menu.
Type Command Prompt and run it as an administrator.
Type the below command and press Enter: chkdsk /f /r
Press the Y key on your keyboard.
There might be some issues of bad sectors in the hard drive which is why you are getting the 0xc000003e application error. Some users have reported fixing the issue by simply running the CHKDSK utility.
You can also select Scan options and choose Full scan to perform a deep scan of your PC.
Scanning your PC often for viruses or malware is a great move as this will remove any issues from your PC including the 0xc000003e error.
We have a guide that lists down some of the best anti-malware software that you can opt for and protect your PC against malicious threats.
5. Perform a System Restore
Open the Start menu by pressing the Win key.
Type Create a restore point and open the top result.
Select the drive where you have installed the OS and select System Restore.
Select the restore point and click on Next.
Click Finish to begin the restore process.
You can also:
Restart the application and check if this fixes the issue. If yes, then it is a temporary bug.
Uninstall the problematic application and install it from the official website.
Run the program as an administrator to grant it sufficient privileges to resolve the problem.
You should perform a system restore if you are not sure why you are coming across certain errors including the 0xc000003e application error.
But do note that the system restore process will work, only if you have a system restore point already created on your PC. If you aren’t sure how to do that, you can check out our guide on how to create a system restore point.
That is it from us in this guide. Let us know in the comments below, which one of the above solutions resolves the 0xc000003e error.
When we have too many background processes running the PC, the performance takes a hit. Surprisingly, it’s just a few that cause problems, while the others consume minimal resources. And vmnat.exe is one of these.
Many found the process in the Task Manager and had no idea what it did. Some users reported high CPU usage due to vmnat.exe. Besides, for a few, third-party antiviruses like Malwarebytes and Bitdefender flagged the process as malware. Keep reading to find out all about it!
What is vmnat?
The vmnat.exe process is linked to VMWare Workstation, a virtual machine software, that enables users to run different operating systems on the PC. Its primary role is to ensure network connectivity on the virtual machine and allow users to browse the Internet.
But, many are unsure whether it’s a legitimate process or a malware in disguise. To verify that, you will need to verify the file location. For those wondering where vmnat.exe is located, the path is:C:\Windows\SysWOW64
So, if you have VMWare Workstation installed, and the executable file is found in the SysWOW64 folder, vmnat.exe is not a virus. Also, you could check the file’s digital signature to verify the same.
But it still makes sense to run a malware scan, given the advanced nature of viruses these days. Besides, we have a few solutions for other issues pertaining to the process.
How do I fix vmnat.exe issues?
Before we proceed, here are a few quick tricks to try:
Disable any third-party antivirus on the PC and verify whether the problem is resolved.
Make sure you have downloaded Java and are running the latest version.
If none work, move to the solutions listed next.
1. Scan for malware
Press Windows + S to open Search, type Windows Security in the text field, and click on the relevant search result.
Click on Virus & threat protection.
Click on Scan options.
Select Full scan, then click the Scan now button and wait for it to complete.
If Malwarebytes blocks vmnat.exe or flags it as a threat, we recommend you scan the PC using Windows Security, the built-in antivirus. When it comes to identifying issues, Windows Security is usually more reliable than its third-party counterparts.
And if it, too, delivers the same results, you need to delete the executable file.
Otherwise, it’s also beneficial to employ an alternative antivirus that offers great compatibility and standout detection technology to find and remove any malware threats.
Press Windows + I to open Settings, select Network & Internet from the navigation pane, and click on Advanced network settings.
Click on Network reset.
Click the Reset now button.
Finally, click Yes in the confirmation prompt.
Since vmnat.exe is responsible for network-related functions, any issues with the latter can trigger high CPU usage as well as lead to frequent crashes. So, reset the network settings.
3. Perform a system restore
Press Windows + S to open Search, type Create a restore point, and click on the relevant search result.
Click on System Restore.
Select Choose a different restore point, and click Next.
Pick a restore point from the list, one created the earliest, and then click Next.
Verify the restore details and click Finish to start the process.
If it’s a recent issue, performing a system restore usually works. You may lose a few apps, but the personal files remain unaffected.
Press Windows + R to open Run, type appwiz.cpl in the text field, and hit Enter.
Select the VMWare Workstation app from the list, and click Uninstall.
Follow the on-screen instructions to complete the process.
Once done, press Windows + E to open File Explorer, and navigate the following path:C:\Windows\SysWOW64
Select the vmnat.exe file, and hit Delete.
Choose the appropriate response in case a confirmation prompt appears.
In case nothing else works, the last option is to delete the program and the vmnat.exe file. Do that only if you don’t heavily rely on it and can use another reliable Virtual Machine. Or you could again download Workstation to do a clean install.
If you’re also worried about the SgrmBroker.exe process running in the background in Task Manager, you’re in the right place. This guide will discuss what the SgrmBroker.exe is on a Windows computer. Also, we’ll look into the conditions for terminating the process and how to disable it.
What is sgrmbroker.exe? SgrmBroker.exe is an executable file for the process known as System Guard Runtime Monitor Broker Service.
Is it safe to disable sgrmbroker.exe? Microsoft created and digitally signed the System Guard Runtime Monitor Broker (SgrmBroker.exe) to guarantee its authenticity. It is an essential system file, which means disabling it is liable to affect some processes on the system.
However, the SgrmBroker.exe may be malicious and dangerous to the system if it’s compromised.
In the same way as other executable files, malware and trojan can disguise as the file to remain undetected on the PC. Likewise, its process can sprout behaviors like high CPU or memory usage.
How to verify if sgrmbroker.exe is a virus?
Check the file location. It should be in the C:\Windows\System32\sgrm folder. If you find it anywhere else, that is not a good sign.
Verify its digital signature. Check the Properties of SgrmBroker.exe process in Task Manager and click on the Digital Signature tab if the publisher is indeed Microsoft.
Hence, if the above verification process confirms that the pnkbstra.exe process is malicious and disturbing to the system, proceed to terminate it.
How can I disable sgrmbroker.exe?
1. End task for SgrmBroker.exe
Right-click the Start button and select Task Manager from the menu.
Go to the Details tab. Select the SgrmBroker.exe from the list, right-click on it, then click End task from the drop-down menu.
Restart your PC and check if its process still runs.
Ending the SgrmBroker.exe process in Task Manager will prevent the program from establishing any runtime monitoring process.
Many Windows users have reported an error message indicating the ftd2xx.dll is not found or missing on the computer. The error occurs when launching a program, preventing it from running. However, this article will discuss what causes the error and the basic steps for fixing it.
The ftd2xx.dll file is a dynamic-link library (DLL) associated with the FTDI USB interface chip drivers. FTDI (Future Technology Devices International) is a company that specializes in designing and producing semiconductor devices, including USB-to-serial converter chips.
Additionally, ftd2xx.dll contains resources that allow applications to communicate with FTDI USB devices, particularly those using the FTDI FTD2XX driver library.
These devices could include USB-to-serial converters, USB-to-parallel converters, USB interface chips, and more.
What causes the ftd2xx.dll not found error?
The missing DLL file error occurs when the operating system or an application can’t locate the ftd2xx.dll file. Several factors can cause this error including:
Missing or deleted DLL files will give you this error.
A DLL file that’s not in a proper location will cause issues.
How can I fix the ftd2xx.dll not found error?
Before proceeding with any advanced troubleshooting steps, we recommend you go through the following preliminary checks:
Restart your PC and check if the issue sorts itself.
Repair or clean the registry to fix issues with FTDI devices
1. Use a DLL fixing tool
DLL errors can affect the functionality of some apps on the PC. So, repairing the ftd2xx.dll file not found error is essential to help the system run properly. Unfortunately, most users can’t repair the DLL file because they are not tech-savvy.
Fortunately, users can employ a DLL repair tool to help automatically repair the DLL file. It can fix and restore incompatibility issues due to third-party DLLs on the operating system.
2. Copy the ftd2xx.dll file to the System32 directory