How to Move a Window That is Off-screen [Force It]

If you’ve had a Window moved off your screen, you’ll agree it can be quite frustrating if the program is running but not showing on the screen.

So, if you’re wondering how to move a Window off-screen back to the main screen on Windows PC, here’s how to force it back to the screen.

Why does a window move off-screen?

There can be several reasons behind the Windows move off-screen issues. Before diving into the solutions, let us consider some of the most known triggers for this error:

  • Secondary monitor – The most frequent cause is using a second monitor. Windows assumes you have a second monitor when you don’t. Or, you do have one, but it is currently not working or can’t be turned on. 
  • Multiple Display Support not disabled – Windows on the secondary monitor may occasionally become stuck if you unplug it without first turning off Windows’ Extend Desktop feature or relocating it back to your primary/main monitor.
  • Problematic applications – In some cases, an app may move a window off the screen but fail to bring it back, resulting in the off-screen window issue.
  • Resolution settings – This problem can also occur if your monitor is set with a lower resolution.

Now that you know some of the potential reasons behind the Windows move off-screen error, let’s proceed to how you can fix this problem.

How can I move an off-screen window?

Before engaging in any advanced troubleshooting or settings tweaks for a Window that is an off-screen error, it is important to observe some of the following preliminary checks:

  • Restart your PC and try to run the program again.
  • Disconnect the cables between your PC and external displays and reconnect them.
  • Unplug the secondary monitor if one is connected.

Having confirmed the above checks, and none of them fixes the problem, you can work through any advanced solutions below.

1. Use the Cascade Windows option

  1. Right-click on any empty space on your taskbar and select Cascade windows from the pop-up menu. A list of all open windows on your PC will appear, including those currently off-screen.
  2. Click the window you want to access. The contents of that window will appear.
  3. Hold down the Shift key, then right-click on the appropriate application icon in the Windows taskbar.
  4. Click on Move to in the pop-up menu.
  5. Now, begin pressing the arrow keys on your keyboard to move the invisible window from off-screen to on-screen.

This method will only work on Windows 10 as there is no Cascade feature on Windows 11 taskbar. You can, however, use the tricks below on Windows 10 and 11.

2. Use the Windows and Arrow keys on your keyboard

  1. Start the application.
  2. Select the active application icon located on the taskbar to make it the current selection.
  3. Long-press the Windows key + the right/left/up/down arrow to bring back the Windows to the main screen from the right/left/top/bottom side of the screen, respectively.

This process is regarded as the operating system’s snapping functionality. Aside from snapping windows to different parts of your monitor, it can also be used to move it between monitors.

3. Use the Application Window menu

  1. Select the problematic application window on the taskbar.
  2. Press the Alt + Space keys and select the Maximize option to maximize your application window on the screen.
  3. If your window isn’t maximized, press the Alt + Space + M keys together to move the window.
  4. Now use any arrow keys (right, left, up, or down) to move the window or click and hold the left mouse button, then move the mouse to drag the window where you want to place it.
  5. In case the move option isn’t available in the Window menu, press the Alt + Space keys to open the application window menu and select Restore to get back the window on the screen.

If the other methods did not work, you can use the application’s window menu to get the move menu up instead. From here, you can choose to move the window with either your mouse or keyboard.

4. Use the Alt + Tab keys to move the application window

  1. Press the Alt + Tab keys to bring up the program tabs and hold the Alt key.
  2. Next, switch to the problematic application by pressing the Tab key or pressing the right or left arrow keys to toggle the window.
  3. Release the Alt key or press Enter to open the window.
  4. Now, press the Windows + any arrow keys to move the window.

This is another effective method to move a Window that is off-screen back to the main screen.

5. Use your monitor’s resolution settings

  1. Press the Windows + I keys to open the Settings app.
  2. Click on System on the left pane and click on Display on the right pane.
  3. Under Scale & layout expand Display resolution and select another screen resolution.
  4. Next, click on the Keep changes button to apply the screen resolution.

Once you’re done fixing the problem, change the screen resolution back to your desired setting. However, if you’re unable to change your resolution, use the dedicated solutions in this guide.

And that’s it on how to move a Window off-screen back to the main screen. At least one of the steps provided in this article has surely managed to help you fix the issue. And do not forget to check some quick tips to center an active window.

You can also check our detailed guide on how to fix your windows screen issues any time.

If you have any questions or suggestions, do not hesitate to use the comments section below.

How to Fix CAA50024 Error in Teams

Some of our readers have recently reported that they cannot open the Microsoft Teams application while receiving the CAA50024 error message. Users of the Microsoft applications such as OneNote, Outlook, Word, and so forth have also reported the issue to be frustrating.

What is the CAA50024 error in Teams?

The CAA50024 error in Teams manifests when users try to open the Microsoft 365 (M365) apps. This error is because the device cannot be enrolled in the M365 tenant for device management.

Users can’t sign into their school account on the Office 365 app, and they are met with the following error message: Something went wrong. We couldn’t sign you in. If this error persists, contact your system administrator and provide the error code CAA50024.

There can be several reasons behind the CAA50024 error in Teams. Below are some of them:

  • The device is not connected to Azure – This error code may be displayed if your device is not connected to Azure. To determine if this is the case, check your device’s status in Azure.
  • Admin has blocked the access – If you’re using a public network, the error can appear if the network administrator has restricted access to Microsoft Teams or other programs.
  • Firewall settings – If your firewall or antivirus detects an application or service as a threat to your computer, it may be possible to stop it.
  • Office is outdated – The most frequent reason for this error is that you’re using an out-of-date version of Office. Consider updating the app.
  • Devices registered to Azure have expired – If you are having trouble logging in, it could mean that your Azure account may have expired.

Now that you know some of the potential reasons behind the error, let’s proceed to how to fix it.

How do I fix the CAA50024 error in Teams?

Before engaging in any advanced troubleshooting or settings tweaks, try to perform the following:

  • Ensure you’re using a Microsoft account or a work or school account connected to Office 365.
  • Try to switch to the app rather than the web version.
  • Ensure that your Office app is up to date.
  • Try not to use a public network, or check out how to protect yourself while using public Wi-Fi.

If the problem persists, you can explore the advanced solutions provided below.

1. Remove the Account under Access work or school

  1. Close all Microsoft 365 applications, then press the Windows key + I to launch the Settings app.
  2. Click on Accounts and choose Access work or school.
  3. Now, select the account you want to unlink (your school account) and click on Disconnect.
  4. Restart your device.
  5. Launch Teams and sign into your Microsoft account again.
  6. Do not select the Allow my organization to manage my device option. Leave the box unchecked when it appears, so it does bring back the error.

Removing your account and signing in should help fix the CAA50024 Microsoft Teams error.

2. Temporarily Disable your Antivirus Software

  1. Click on the Start menu icon, type windows security in the search bar, and click Open.
  2. Click on Firewall & network protection, then select Public network.
  3. Locate Microsoft Defender Firewall and toggle the off button.

You should also turn off any third-party antivirus software you’re using before attempting to sign back in. Then, check if the CAA50024 error in Microsoft Teams has been resolved.

3. Connect your device to a school/work account

  1. Press the Windows key + I to launch the Settings app.
  2. Click on Accounts and choose Access work or school.
  3. Click on Connect next to Add a work or school account.
  4. Now follow the on-screen instructions to connect your device with Azure.

To fix Teams error CAA50024, link your device to Azure. Additionally, you need to update the app to the latest version.

And that’s it on how to fix the CAA50024 Microsoft Teams error code.

In case you come across an issue where Microsoft Teams status is stuck on updating, you can check out our helpful guide on how to proceed.

Other related issues include CAA50021, CAA30194, and CAA70007, each requiring different troubleshooting steps.

If you have any questions or suggestions, let us know by using the comments section below.

How to Migrate/Clone Your OS to a Smaller SSD [2 Methods]

Are you looking for ways to migrate OS to a smaller SSD? If so, then this guide is for you. There are instances when users get superfast SSDs and would like to move their OS to it as it would load a bit faster than a standard HDD.

Although most modern PCs come in-built with SSDs, old PCs still use HDD. In this guide, we will show you two methods to migrate OS to a smaller SSD. We will explain the Windows built-in method and use a third-party tool. So let us get right into it.

Why should I migrate OS to a smaller SSD? SSDs are fast and reliable, and most modern PCs have ported over to using SSDs to optimize system performance and speed up the device.

Moreover, SSD doesn’t have moving parts, and the information is stored in a microchip. But they are pricey, and when compared to an HDD of equivalent price, SSD comes with less storage.

Here are some of the few reasons because of high you would want to migrate OS to a smaller SSD:

  • Better stability than HDD.
  • Fast reading and writing speed.
  • Low power consumption.
  • More reliable.
  • Less weight.
  • Lesser noise compared to HDD.

Let us go through the methods to migrate OS to a smaller SSD.

How to migrate OS to a smaller SSD?

1. Use the Windows backup utility

  1. Plug your SSD into your computer.
  2. Open File Explorer.
  3. Right-click on your SSD and select Properties.
  4. Make sure that the SSD has sufficient space.
  5. Open the Start menu by pressing the Win key.
  6. Open Control Panel.
  7. Select Backup & Restore.
  8. Click on Create a System image.
  9. Select your hard disk where the system image would be created.
  10. Choose the drive and partitions you would want to include in the image.
  11. Hit the Start backup.
  12. Launch Windows Media Creation Tool on your PC to install a copy of the OS in your SSD.
  13. Select Create installation media option.
  14. Choose any of the below options.
    • Keep personal files and apps
    • Keep personal files only
    • Nothing
  15. Replace your HDD with the SSD and restart your PC.
  16. Press the prompted key to enter the advanced startup instead of the standard boot.
  17. Follow the on-screen prompts.
  18. Select the preliminary details.
  19. Click on Repair your computer.
  20. Select Troubleshoot.
  21. Choose Advanced Options.
  22. Select System Image Recovery.
  23. Choose your image file.
  24. Click Next.

This is one way to migrate OS to your SSD. You can use the Windows Backup Utility to create a system image and then transfer it following the above steps. Now, let us ease the process and use a dedicated tool to migrate OS to an SSD.

2. Use a dedicated tool

  1. Download AOMEI Partition Assistant Professional.
  2. Install the program on your PC.
  3. Launch the AOMEI tool.
  4. From the left pane, click All tools.
  5. Select Disk Clone Wizard.
  6. Select Clone Disk Quickly.
  7. Hit the Next button.
  8. Click on Select Source Disk and choose it as your Windows OS HDD.
  9. Click Next.
  10. Hit the Select Destination Disk and choose your SSD.
  11. Hit Next.
  12. Adjust the partition size of the SSD.
  13. Click the Apply button at the top-left.

You can ease the process of migrating OS to an SSD by using a dedicated tool such as AOMEI Partition Assistant Professional.

Some of the best features of this tool include migrating OS to SSD without reinstalling windows, recovering lost or deleted partitions, moving apps and folders to another drive, resizing or extending partitions, converting MBR disk to GPT for Windows 11 upgrade, and much more.

That is it from us in this guide. We also have a guide that adequately explains how you can move Windows OS to another drive safely and without any issues.

Also, if you are looking for a specific guide that explains how you can move Windows 10 OS to an SSD without reinstalling, then you should check out our guide. The guide explains the process quickly.

Before going ahead with such tasks, you should always take a backup of all files on your PC. We have listed some of the best backup tools in 2023.

Several users have reported facing Windows detected a hard disk problem. However, this can be easily fixed by following the solutions mentioned in our guide.

Feel free to let us know in the comments below which one of the above solutions resolved the problem for you.

Valorant Could Not Enter Matchmaking: 3 Ways to Join Again

Many users reported that they could not enter matchmaking in Valorant, and this issue will prevent you from playing the game entirely. Luckily, there are a few fixes you can use.

Why can’t I queue in Valorant?

Network connection issues or problems with the server will cause this issue. Also, if you don’t launch the game properly, you might get this problem as well.

How do you fix Valorant stuck at matchmaking?

1. Restart your computer

  1. Click the Windows icon on your screen.
  2. Select Power from the drop-down.
  3. Click on Restart, then OK.

2. Restart Riot Vanguard and Valorant

  1. Right-click on your screen.
  2. Select Task manager and type Riot into the search box.
  3. Click on all the Riot processes running and click on End Process.
  4. Restart the Valorant client.

3. Check Riot Games support platforms

Furthermore, users can follow the latest updates about the game through the platform. However, if there is a server issue, all you can do is wait patiently until the problem is fixed.

Go to the official support page for Riot Games and check if there is any information about the server breakdown or maintenance. It’s also a good idea to test Valorant ping and ensure that the servers are working properly.

Furthermore, there are other errors users complain about while using Valorant. The Valorant error code 0 is one of them. However, you can check our page for fixes for it.

Conclusively, you can read through our article about how to resolve Valorant’s Vanguard Windows 11 errors. Many also reported VAL 59 error code in Valorant, but we have a guide that addresses this issue.

You can leave your suggestions and questions below in the comments section. We’d like to hear from you.

0x803fabba Windows Activation Error: How to Get Rid of It

Recently, some of our readers have raised an outcry, as well as users in the Microsoft Community, regarding the Windows Activation Error 0x803fabba – Digital license not activating after a hardware change. This article will guide you through some troubleshooting steps to fix the issue.

What causes the 0x803fabba Windows Activation error?

There can be several reasons behind the 0x803fabba Windows Activation Error. The following are some of the potential factors that may trigger the error message:

  • Significant hardware changes – Because you have made important changes to your hardware, Windows treats your PC as a new one, therefore, it doesn’t accept the same activation key.
  • Windows digital license not found – Windows might not be able to locate a compatible license when next you power on your PC.
  • Fake or incorrect Product Key – Another possible reason for this error is that the product key you entered is not valid or incorrect. You can follow the instructions provided on how to locate your valid Windows 10/11 product key in this guide.
  • Wrong Microsoft Account – After a hardware change, Microsoft offers a special route for transferring a Windows license, and you must be signed into the same Microsoft account.
  • Incompatible version of Windows – This error could appear if you select a different Windows 11 edition than the one you have the right to use.

Now that you know some of the potential reasons for the 0x803fabba Windows activation error code, you can explore the solutions provided in the next section to fix the issue.

How do I fix the 0x803fabba Windows Activation error?

Before following any of the troubleshooting steps, apply these quick tips:

  • Buy a valid activation code.
  • Check your Internet connection and try again.
  • Confirm your Windows edition.

Having confirmed the above checks and you still require further assistance, check below.

1. Run the Windows Activation troubleshooter

  1. Press the Windows + I keys to open Settings.
  2. Then, click on System on the left pane, and then Activation on the right pane.
  3. If your edition of Windows is not activated, you will see Troubleshoot on the right side.
  4. Click on it and follow the on-screen prompts to fix the activation problems.

Whenever you have an activation error, you should, first of all, run the Windows activation troubleshooting wizard and see if that fixes the issue.

2. Link your Microsoft account to your digital license

  1. Click on the Start button, then select Settings.
  2. Select Accounts from the left pane and click on Your info on the right.
  3. Under your name, you’ll see Administrator.
  4. Confirm that the administrator account is also your Microsoft account by checking to see if an email address is displayed above Administrator.
  5. If an email address is displayed, it is a Microsoft account. If not, you’re logged in using a local account. (Check here to create a new Microsoft account).
  6. Now go back to the Activation page in Settings.
  7. Select Add an account, enter your Microsoft account and password, then click on Sign in.

And that’s it! Once your Microsoft account has been added, the message on the Activation page will now read: Windows is activated with a digital license linked to your Microsoft account.

3. Reactivate the Windows 11 license

  1. Right-click the Start button and select Terminal (Admin) from the list.
  2. Click Yes in the UAC (User Account Control) prompt that appears.
  3. Now, click on the downward-facing arrow and select Command Prompt to open it in a new tab. Alternatively, you can hit the Ctrl + Shift + 2 key combination.
  4. Next, type or paste the following command and hit Enter: slmgr.vbs –rearm
  5. Alternatively, if the procedure fails, you can use the following command and replace the X with the actual license key: slmgr.vbs -ipk xxxxx-xxxxx-xxxxx-xxxxx-xxxxx

This command will force the reinstallation of the Windows 11 license, and if it’s the right one, you will receive the confirmation.

If, after attempting the steps above, nothing works to fix the error, the next best call is to contact Microsoft Support to assist you with re-activating your Windows PC.

You can pool further resources from our article on the most common Windows errors & how to fix them. And in case you can’t activate your copy of Windows 11, you can explore our dedicated guide on how to fix the issue.

If you have any questions or suggestions on Windows activation errors, do not hesitate to use the comments section below.

4 Fast Ways to Fix Error Code LC 202 in Overwatch 2

There aren’t many things more devastating than an issue with your computer game. Especially one of the most popular first-person shooter games: Overwatch. Sometimes these issues can be fixed quickly and easily, but other times more complicated steps must be taken. 

Fortunately, today we’ll be looking at some of the most common solutions you should try if you’re experiencing Overwatch 2 error code LC 202.

What causes the LC 202 error in Overwatch?

Here are some possible reasons:

  • Internet connectivity problems – If your Internet connection is limited, you may see this error message when trying to access an online game or service. Check your router’s settings and make sure you’re connected to your modem with an Ethernet cable (not Wi-Fi), then restart your router and modem.
  • Network latency issues – Latency refers to a delay in receiving data over a network connection, whether it’s high-speed fiber optic cable or wireless signal sent through the airwaves. Latency can cause lag spikes when playing online games — so if you’re experiencing lag spikes while playing Overwatch, this may be one of the causes.
  • Multiple connections – If you have multiple devices connected to your home network, they could be interfering with each other overloading your bandwidth capacity. This could result in packet loss which impacts gameplay performance, especially at higher resolutions like 4K. You can install bandwidth monitors and limit or remove devices that take too much.
  • Firewall settings – Your security software could be blocking the game from running. If it is, disable it temporarily or whitelist the application, then try to log in again. You may also want to consider updating your security software so it will be compatible with newer versions of Windows or other operating systems. This could help resolve some of the issues you’re experiencing.
  • Server issues – At times, Blizzard servers may just be experiencing downtime, and there’s nothing you can do on your side. You’ll have to wait it out.

What is LC-202?

The LC-202 error is encountered on Overwatch, and the message reads, Lost Connection to Game Server. Usually, a network issue triggers the error, but the problem may also lie on the game server’s side. For the latter, you can always check Downdetector to identify if it’s a widespread problem.

The LC-202 error affects all platforms, whether Windows, PS4, Xbox One, or Nintendo. In most cases, you should be able to fix the LC-202 error in no time, and we have the right solutions.

How can I fix the Overwatch LC 202 error? 

First things first, let’s check off some basics:

  • Check for any loose cables and ensure that your PC or Xbox console is connected to the internet.
  • Disconnect and reconnect your console.
  • Switch to an Ethernet cable if using a wireless connection.
  • Make sure that your device is within range of the router’s signal.
  • Run an Internet speed test to ensure you are operating at optimum levels.
  • Disconnect other devices using the same network and close background apps.
  • Restart your PC/Xbox/PS4.
  • Also, reset your router. Unplug it from its power source for 30 seconds, then plug it back in and wait for 10 minutes before attempting to connect again.

If all these check out and the error is still there, below are some troubleshooting steps.

1. Update your router firmware

If your router has outdated firmware, it might not be able to handle all the traffic on its own, which could cause some problems for you when trying to connect to Overwatch.

For most routers, updating the firmware is as easy as downloading a file from the manufacturer’s website and following their instructions for installing it on your computer or laptop.

2. Disable the firewall temporarily

  1. Hit the Windows button, type Windows Security in the search bar, and click Open.
  2. Click on Firewall & network protection then select Public network.public network
  3. Locate Microsoft Defender Firewall and toggle the off button.Turn off firewall if canon printer driver not installing.

3. Reset network settings

  1. Hit the Windows key and select Settings.settings windows 11
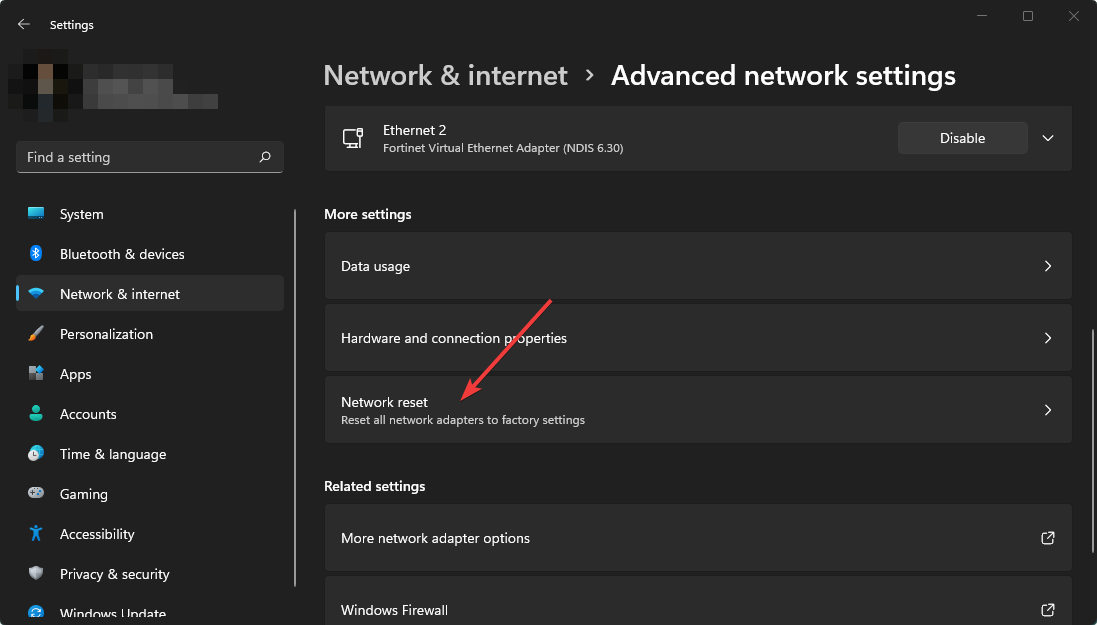
  2. Click on Network & internet on the left hand pane then Advanced network settings on the right pane.
  3. Click on Network reset.clicking network reset win11 settings
  4. Hit Reset now and click Yes in the next confirmation dialog box.

4. Uninstall and reinstall the game

As a last resort, you can uninstall and reinstall the game. This will clear up any problems with your system that might be causing this issue. 

You should also make sure that you have enough space on your hard drive for the installation of the game. If not, delete some files from your computer 

It is also important to consider that your router may have run its course, and it’s time to upgrade to a new router. 

For improved gameplay, we also recommend using a VPN for Overwatch that guarantees no ping or lag. While you are still here, check out how to fix a PC controller that is not working in Overwatch.

Let us know if you have been able to solve this issue in the comments section below.

Error LC 208 in Overwatch 2: How to Permanently Fix It

So you’ve been getting Error LC 208 in Overwatch 2? Don’t worry, you’re not the only one experiencing this. Recently there’s been a huge influx of error submissions across all Blizzard platforms. 

This error can be seen when you try to log in to your Blizzard Battle.net account. It is closely related to the BC-101 error, so let’s explore some solutions to finally get rid of this issue.

What causes the LC 208 error in Overwatch 2? 

According to most users, they are experiencing this error after they merged their accounts. Overwatch 2 has a feature that allows players to merge multiple Overwatch accounts into one main account. 

This feature allows players to play on more than one PC or use their main account on multiple devices. However, this seems to be the bone of contention, locking out users from their accounts.

Other possible reasons include:

  • Server issues – Another set of users complained that they encountered the error immediately after server maintenance. Blizzard will, from time to time, perform maintenance checks on their servers to improve the gameplay. You can contact Blizzard and check whether there’s scheduled maintenance or report the issue. A server issue or scheduled maintenance may also trigger Overwatch 2 error LC-208 on PS4.
  • Modded version – While modded applications usually come with extra features, they are not always safe. If you’re using an unauthorized third-party mod for Overwatch 2 (which we strongly advise against), it could also be causing this error message. What’s worse is that you risk getting banned from playing Blizzard games.
  • Unstable Internet connection – If you are getting this error while playing Overwatch 2, then it could be due to an unstable Internet connection. Sometimes, your Wi-Fi connection keeps dropping. Make sure that you have a stable connection and that no other applications are running on your device. Users also reported Overwatch 2 error LC-208 on PS5 due to an unstable Internet connection.

Now, let’s look at ways to fix these issues down below.

How can I fix the LC 208 error in Overwatch?

If you’re getting this error, there are some basic checks that you can do before having to resort to advanced troubleshooting. These basic checks include:

If you are unlucky and still can’t get past the error, we have more below.

1. Use Blizzard’s troubleshooting tool

Looking Glass is a dedicated diagnostic tool that will test your internet connection and identify any issues causing problems with your connection speed or connectivity to the server.

It will then provide you with instructions on how to resolve those issues so that you can play Overwatch without receiving any more errors. If the tool doesn’t detect any issues with your computer, the problem lies with other elements involved in launching the game.

2. Reset your network settings

  1. Hit the Windows key and select Settings.settings windows 11
  2. Click on Network & Internet on the left-hand pane, then Advanced network settings on the right pane.
  3. Click on Network reset.clicking network reset win11 settings
  4. Hit Reset now and click Yes in the next confirmation dialog box.

3. Uninstall and reinstall the app

If you’re getting the LC 208 error in Overwatch, try uninstalling and reinstalling the app. When you uninstall an app, it removes any corrupted data or files that could be causing the problem and allows you to start fresh. 

This means that if something was causing the problem before, it would be gone after you reinstall it.

Why can’t I still log into Overwatch 2?

If nothing works, you still can’t log into Overwatch 2 and are repeatedly getting the LC-208 error, it indicates a server issue. And there isn’t much you can do in this case other than wait. Or you could check the social media handles of Blizzard for an update on the situation.

But, make sure first to execute the solutions listed here and revert any changes made in the last few days. An easy way out is to perform a system restore using a restore point created before the error first appeared.

Should you encounter any other related issues, such as FPS drop, lag, or stuttering in Overwatch, we have a dedicated guide on what to do.

You may also experience a black screen on Overwatch when launching, so do not hesitate to check our comprehensive article that addresses various fixes.

We value your feedback, so let us know what solution fixed this issue for you in the comments section below.

The new AI-Powered Bing taps into Xbox player’s paradise

Most Xbox players interact with search engines on a daily basis, they might be looking to get more games or just sourcing for more information about a particular entry. As it happens, Microsoft is now making the process easier and seamless for gamers.

In a detailed gamer’s guide, the company highlights how gamers can leverage the new AI-powered Bing capabilities to get responses to any queries they might have regarding video games and more.

What exactly will AI-Powered Bing assist you with while gaming on Xbox? Well, besides furnishing you with more complete answers and access to a better search experience, gamers will also be able to leverage the tool’s chat experience to get detailed responses to queries as well as the added ability to create content.

According to the Xbox team:

The new AI-powered Bing is designed to help you find the information you’re looking for by deciphering intricate questions, with clear answers, coupled with surprisingly in-depth responses. It also knows a hell of a lot about video games. So much so we wanted to really test its gaming knowledge with some hard-hitting questions to see what type of response we’d get.

Xbox highlights 5 cool ways you can leverage Bing’s capabilities to further enhance your gameplay. First up, you can ask the tool to shed more light on a particular issue regarding a specific game.

For instance “Tell me about the best cyberpunk-style role-playing games on Xbox.” And as per the image shared the information relayed was refined and tuned to the user’s liking.

Next, gamers can also use Bing to make well-informed decisions. For instance, when in search of the best gear loadouts, it might be difficult to narrow down seeing as to how the web is jam-packed with lots of information.

Bing allows you to make queries subsequently and through the interaction, it leads you to the most suitable option. Get started by asking it  “What’s the best ______ for me?”

What’s more, you can use the tool’s AI-powered technology to uncover hidden gems in any video game. For instance, you can ask Bing to help you locate where every secret weapon location is in Fortnite. You can even use it to dig further into things that you might not have registered as accurately in mind.

Additionally, Bing can now give you a recap of a video game’s storyline by asking it to “Give me a recap…” of whatever game. And finally, you can ask the tool to show you how to perform certain tasks while playing a game by asking “How do I…?”. Here’s a list of queries that the Xbox team provided as examples:

  • “How do I make a cake like the one that appears in Portal?”
  • “How do I make a toy sword based on a design found in Skyrim?”
  • “How do I prepare a meal based on the ramen recipes found in Yakuza: Like a Dragon?”

It should be noted, that despite asking hyper-specific questions the new Bing will have some follow-up questions to ensure that it gets you as close as possible to what you are looking for.

It is also important to ensure that you remain interactive with Bing, Microsoft notes that it may have “an ancillary topic related to the game you’re asking about.”

Users will be able to dig deeper into responses they feel resonate with them most, this is because Bing highlights the sources where it’s getting information from. Of course, you need to have access to the new Bing in preview to access these capabilities. If you’re still stuck on the waitlist, make sure your birth date is correctly entered in your Microsoft Account profile.

In related news, Featured Answers in Bing Search might soon be replaced with Bing Chat Answers. Share your thoughts in the comments below.

How to Prevent Word From Reducing Image Quality in Documents

Like most Windows Word Processors, Microsoft Word has a feature that allows it to compress images after saving your document. The feature helps save space but often reduces the quality of your pictures.

If you’d like to preserve the quality of your images in Microsoft Word, this article will show you how to prevent Word from reducing image quality in Documents. 

Why does Word reduce image quality? The standard resolution for images is about 300 ppi unless they are screenshots; images in Documents must be at least 300 ppi to prevent the images from appearing blurry. However, after saving documents in Word, images are compressed to 220 ppi.

The image compression feature isn’t peculiar to Microsoft Word alone; the feature is present in virtually all Office products, e.g. Excel and Powerpoint. The feature was designed to help users minimize the size of documents containing images. 

Ultimately, the image compression feature was developed to help users save more space on their system. However, if your document requires pictures of the highest quality, it’ll be best to turn the feature off.  

How to prevent Word from reducing image quality in documents?

  1. Press the Windows key + S, type in Microsoft Word, and hit Enter.
  2. Click on the File tab at the window’s top-left corner and select Options.
  3. Navigate to the Advanced tab, scroll down, and locate Image Size and Quality.
  4. Now, enable the checkbox in the Do not compress images option.
  5. Click on the drop-down menu next to the Image Size and Quality and select whether you wish to apply the current settings to just the opened document or All New Documents.
  6. Close the Microsoft Word Advanced tab.
  7. Delete the pictures earlier uploaded in the document and reinsert them using the Insert feature in Word.

Disabling the image reduction feature in Word is essential if your document requires specific image resolutions. Disable the image reduction feature to ensure you get the maximum resolution of your images after inserting them into Microsoft Word. 

File compression is a neat feature in most applications dealing with file upload. The raw data uploaded to the application is usually large, which doesn’t support swift file transfer. However, file compression lowers image quality and could prove detrimental if you require pictures with maximum graphics.

If you’re looking for more tips, here’s a guide on how to move a picture in Microsoft Word.

If you’ve been searching for a way to prevent Word from reducing the image quality of your documents, read through our guide; it has everything you need to stop image compression in Microsoft Word. 

HTC Vive Drivers Are Not Installing: 4 Ways to Fix It

Gaming has gone to the next level with virtual reality headsets that allow users to play games in real time. Users complain of issues with virtual reality headers, like HTC Vive drivers not installing.

However, issues with the HTC Vive virtual reality headset not connecting or working correctly affect your gameplay. So, this article will discuss the various causes and potential solutions to help fix the problem without hassles.

Why are the HTC Vive drivers not installing?

Although many factors, especially on new devices, can cause driver issues. However, the frequent causes culminated from various forums online point to these major ones:

  • Outdated graphics drivers: Once the graphics drivers are outdated, it can lead to many issues with the gadgets’ performance.
  • Connection issues: When there are issues with the link box power adaptor connected to the link box and power source, you may encounter the problem.
  • Issues with the SteamVR: Sometimes, Steam may encounter server issues, which may cause SteamVR home to crash or not work.

How do I force HTC Vive drivers to install?

Before trying anything else, ensure to perform the following checks:

  • Ensure to close all SteamVR-related background processes.
  • Connect your link box to the USB using a 2.0 USB port and the HDMI to the graphics unit.
  • Stop all other device updates that may be interrupting the drivers.
  • Ensure the Internet connection is stable, or check for your connection speed.
  • It is germane to download from the official download website rather than using third-party options.
  • Try restarting your device, as it could be the reason HTC Vive is not detected.

1. Reboot the HTC Vive headset

  1. Open the SteamVR app on your device.
  2. Click on the SteamVR menu button at the top of the screen and select Devices from the menu drop-down.
  3. Select the Reboot Vive headset option and wait for it to restart.
  4. Connect and check if it can install drivers.

Restarting the HTC Vive headset will resolve the startup errors preventing it from installing rivers.

2. Update your graphics driver

  1. Press Windows + R key to prompt the Run window.
  2. Type the following into the search space: devmgmt.msc, and click OK.
  3. Click on Display adapters from the search results, select the graphics driver you wish to update from the drop-down, and then right-click on it.
  4. Click the Update driver software option, then select Search automatically for drivers, allowing your device to find updates.

Restart your computer after the updating process is complete. Many users confirm that they have been able to fix the HTC Vive not connecting issue.

You can check our guide on the other ways to update graphics drivers on Windows 11 if you have any difficulty with the steps above.

To ensure you get the latest updates, we recommend using Outbyte Driver Updater, a tool that specializes in finding and safely installing the latest versions of all your drivers.

Outbyte Driver Updater

Keep your drivers updated, so you encounter no errors or problems from now on.
Free Trial Download Now

3. Reinstall the SteamVR in the Steam Client

  1. Launch the Steam software on your device and click on the Library tab. 
  2. Click Tools in the Library window, then right-click on the SteamVR to prompt the Properties option.
  3. Select the Local Files tab, and then users can click on the Delete Local Tool Content option.
  4. Then select SteamVR to reinstall.

We recommend you restart your device to sync the changes correctly and allow the SteamVR to reinstall.

Reinstalling the SteamVR in the Steam software can fix the SteamVR Home not working and also help the HTC Vive install drivers smoothly.

4. Perform a power cycle on the Link box

  1. Close all Steam apps on your device and the SteamVR client.
  2. Unplug the HDMI and USB cables connected to the link box and the computer.
  3. Please disconnect the power cable from the electric outlet and leave it to rest for some minutes before plugging the cables back.
  4. Plug all the Link box’s cables back in.
  5. Launch the SteamVR app.

You may receive a driver installation prompt after starting the app. Wait till the installation process ends. Read about the best HTC Vive Virtual Reality headsets in 2022.

Can my PC handle HTC Vive?

The system requirements for HTC Vive are quite basic, to be honest, and most PCs should be able to run it without any issues. Let’s take a look at the minimum requirements:

  • GPU: NVIDIA GeForce GTX 970, AMD Radeon R9 290 or higher
  • Processor: Intel Core i5-4590/AMD FX 8350 or higher
  • RAM: 4GB
  • Video output: HDMI 1.4, DisplayPort 1.2, or a more recent one
  • OS: Windows 7 and higher
  • USB port: USB 2.0 or USB 3.0

These are the best fixes to solve the HTC Vive drivers not installing problem. We recommend that you follow the steps strictly for optimal results.

Meanwhile, it is also important to note that Virtual machines like the Oculus Rift VR and HTC Vive are keen on system requirements.

Navigating through your virtual reality game on a PC that doesn’t meet the requirements will make your VR experience awful and poor.

Hence, we recommend you read our guide on how to check if your PC is ready for a virtual reality gaming experience.

Kindly leave your suggestions and questions in the comments section. We’d like to hear from you.

5 Ways to Fix Nvidia GPU Computing Toolkit Not Found Error

Searching for the Nvidia GPU computing toolkit but can’t find it? Well, this is not an uncommon occurrence. This error occurs when you are trying to install Nvidia’s graphics driver. 

It is not the only error Nvidia users face, as sometimes the Nvidia graphic card cannot be detected, which tends to appear from time to time. Today, let’s focus on the toolkit.

What is NVIDIA GPU Computing Toolkit?

The Nvidia GPU Computing Toolkit is a collection of software development tools, libraries, and sample applications that enable GPUs for general-purpose computation. The toolkit provides a complete solution to accelerate applications across many domains.

It also includes Cuda, a parallel computing platform and application programming interface (API) model that allows developers to write software that executes concurrently on the GPU.

Now that you know what it is, you may have asked yourself: Do I need the Nvidia Cuda Toolkit Directory? Well, it depends. The Nvidia Cuda Toolkit helps you get started with GPU computing. It includes a comprehensive set of libraries that enable the development of general-purpose GPU applications.

If you’re developing applications that require only the Nvidia driver, then no, you don’t need to install the CUDA Toolkit. However, if you plan on doing any development (or debugging), then yes, you will want to install it.

Why can’t I find the Nvidia GPU computing toolkit?

Wondering why you can’t locate the Nvidia GPU computing toolkit? Below are some possible reasons:

  • Incompatible hardware – Some computers don’t support this software, so that it may cause an error message during installation. If you have this issue, try installing it on another computer and see if it works. If it does, your hardware might be causing issues with this software, so try updating it or replacing it with something else.
  • You don’t have an Nvidia graphic card – The toolkit only works with Nvidia graphics cards. If you have an AMD card or any other brand, then it’s possible that this toolkit won’t work for you.
  • Corrupt download – If you downloaded the toolkit from an unverified source, it is possible that you can’t find it. Ensure you download it from the official Nvidia website. The reason why it is so important to install the correct version of this toolkit is that there are several different versions out there, and not all of them are compatible with your PC.

What to do if the Nvidia GPU computing toolkit cannot be found?

First, check the following:

  • Ensure your system meets the minimum requirements for installing the Nvidia GPU Computing Toolkit.
  • Try restarting your computer, which may resolve issues with temporary files or processes running in the background.

Next, dive into the solutions below if none of these check out.

1. Update your graphics drivers

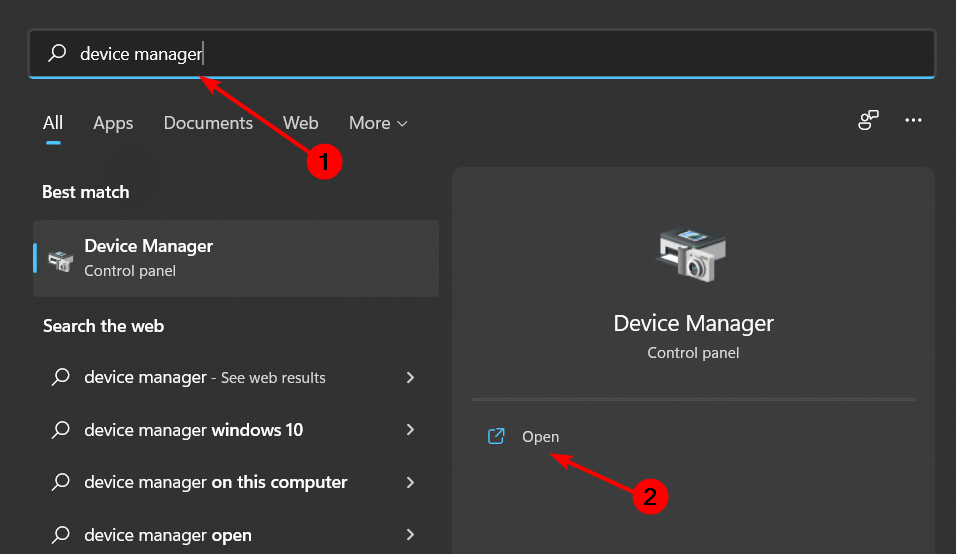
  1. Hit the Windows key, type Device Manager in the search bar, and click Open.
  2. Locate the Display adapters to expand, right-click on your driver, and select Update driver.update-nvidia-driver hp envy microphone not working
  3. Click on Search automatically for updated drivers.

2. Check for Windows updates

  1. Hit the Windows key and select Settings.settings windows 11
  2. Click on Windows update, then select Check for updates.
  3. Download and install if any are available.

3. Check for corrupted system files

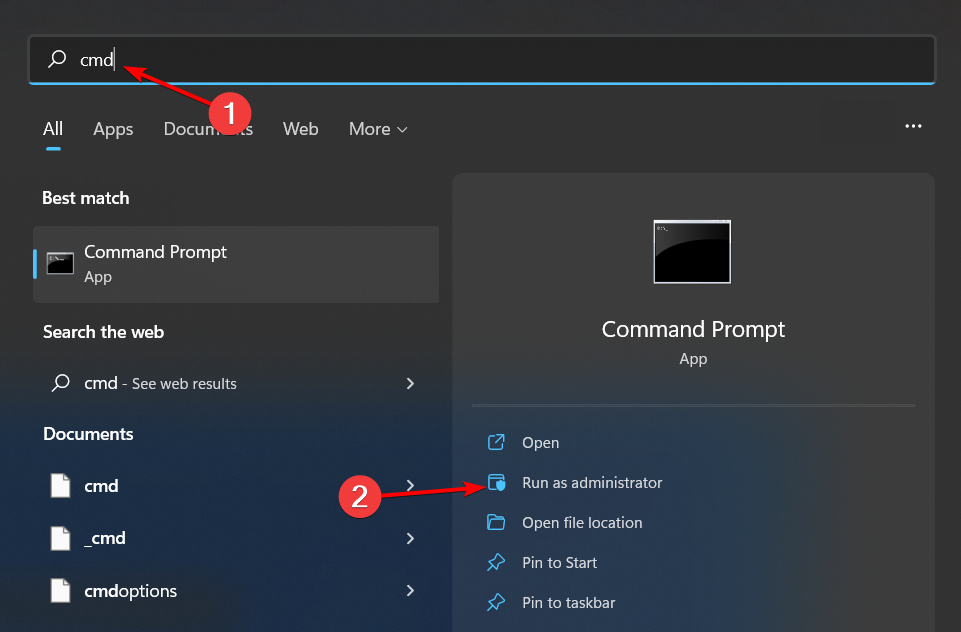
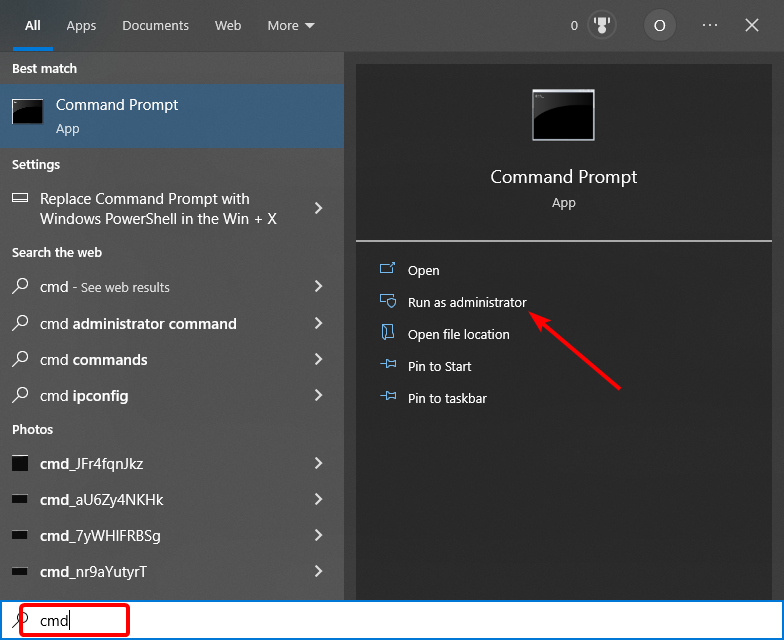
  1. Hit the Windows key, type cmd in the search bar and click Run as administrator.cmd-run-admin-w11 unexpected kernel mode trap windows 11
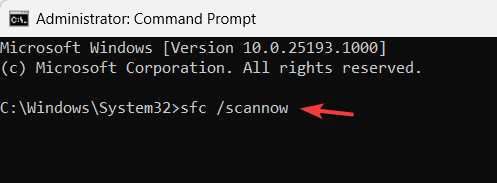
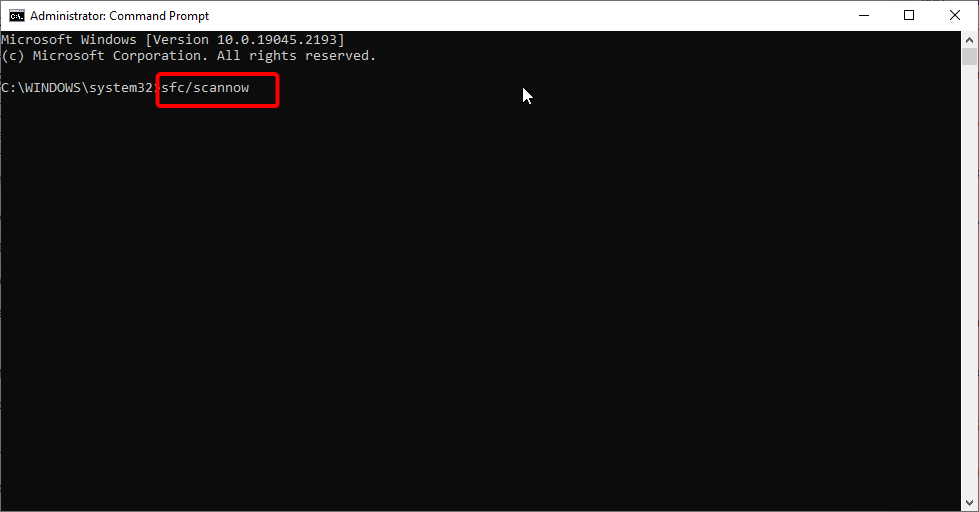
  2. Type the following command and press Enter. sfc /scannowrun command sfc /scannow

You can also use registry cleaner software that fixes all registry errors for you automatically.

4. Remove recently installed programs

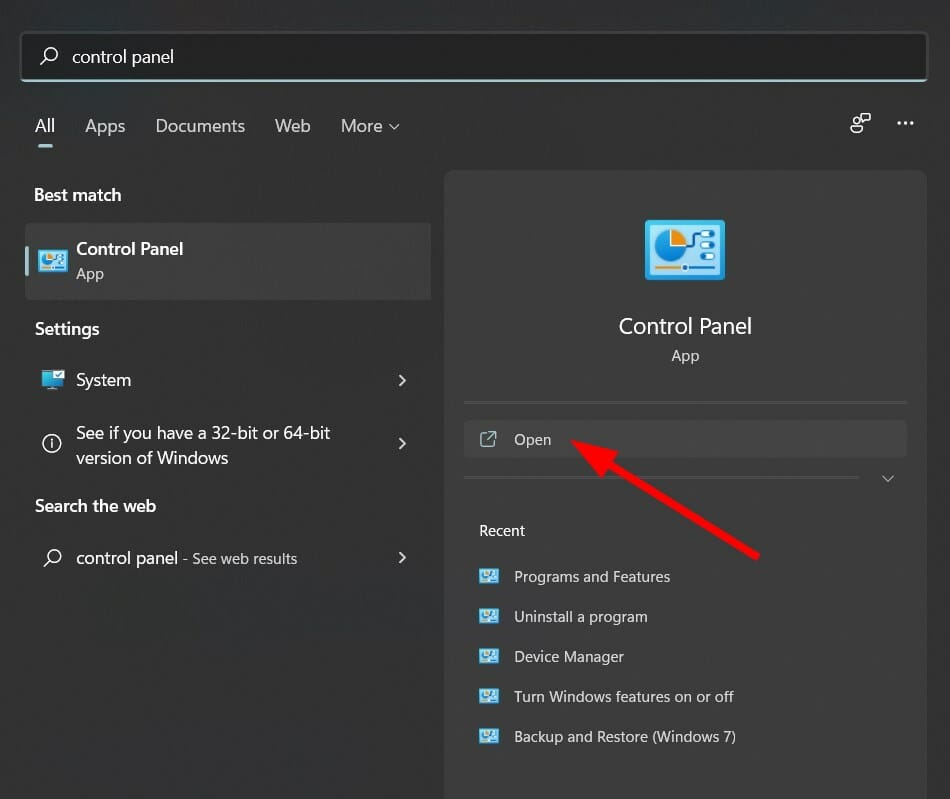
  1. Hit the Windows key, type Control Panel and select Open.control panel open
  2. Navigate to Programs and select Uninstall a program.uninstall-program-control hp printer won't scan
  3. Find the most recently downloaded app and click to uninstall.

5. Reinstall Windows

This is probably the easiest solution to fix the Nvidia GPU Computing Toolkit not found error. If you believe an incomplete installation might have caused the problem, simply reinstall Windows on your computer and then install the Nvidia GPU computing toolkit again.

Once done, things should be up and running again.

How do I find my GPU in Device Manager?

  1. Press Windows + R to open Run, type devmgmt.msc, and then hit Enter.device manager
  2. Expand the Display adapters category.display adapters
  3. You will now find the GPU listed here, along with the integrated display adapter.

Should you run into any additional problems, such as Nvidia drivers not installing on your Windows 11, do not hesitate to check out our detailed guide on the same.

If you are having issues with the version of drivers on your device, you can always roll back to previous Nvidia drivers. New updates are known to have bugs and other issues, so it’s best to stick to older versions until the newer ones are stabilized.

We also explore some of the best Nvidia drivers to install on Windows 11 in case you are stuck or have no idea which ones suit your device best.

Let us know if you have been able to locate the toolkit in the comment section below.

Windows Activation Troubleshooter Not Working [5 Fixes]

When trying to activate a new Windows version, you may often get stuck mid-way due to a glitch, and as you try to use the Windows activation troubleshooter, you realize it’s not working.

It can be frustrating since the activation troubleshooter is a handy tool to fix Windows activation errors and continue the process.

Why is the Windows activation troubleshooter not working?

If the Windows activation troubleshooter fails to work when trying to activate your Windows OS, it could be due to any of the following reasons:

  • An issue with the Windows Firewall – Sometimes, if the Windows Defender Firewall is disabled, it may affect the functioning of the activation troubleshooter.
  • A problem with the product license key – If there is a fault with the product license key, it’s incorrect or not for the correct version.
  • Corrupted system files – Chances are that the system files are corrupted, and that causes the issue.
  • Problem with the PC settings – When the PC settings are corrupted, and that can interfere with the activation troubleshooter.
  • If you have never activated Windows previously – If Windows 11 is activated already, the Troubleshoot option will automatically disappear.

However, it could be possible that you have not activated the Windows troubleshooter, so it’s not working.

How do I activate the troubleshooter?

You can follow the below instructions to activate the Windows troubleshooter and proceed to fix any activation issues:

  1. Press the Win + I keys simultaneously to launch the Windows Settings app.
  2. Next, on the left side of the app, click on System, and then on the right, click on Activation. activation settings
  3. On the next screen, under Activate Windows Now, click on Troubleshoot. windows activation troubleshooter

But, sometimes, this Troubleshoot option is missing in Windows or not working. Fortunately, we have some effective workarounds to fix this issue.

What can I do if the Windows activation troubleshooter is not working?

Before you proceed with the troubleshooting methods below, make sure to run a few preliminary checks as follows:

However, if none of these steps helped you to solve the issue, then it’s time you try the below troubleshooting methods.

1. Turn on Windows Firewall

  1. Press the Win + R keys together to launch the Run console, type firewall.cpl, and hit Enter. type firewall.cpl in run console
  2. On the Windows Defender Firewall screen, click on Turn Windows Firewall on or off on the left. turn windows defender firewall on or off
  3. Next, select Turn on Windows Firewall under both Private and Public Network settings, and press OK.turn on windows defender firewall

Now, restart your PC and the Windows defender Firewall should be blocking any unwanted programs that may be interfering with the activation troubleshooter.

2. Uninstall the Windows product key and reactivate Windows

  1. Press the Win + R keys simultaneously, type cmd in the search bar, and press Ctrl + Shift + Enter together to run the elevated Command Prompt.run command prompt command
  2. Now, run the below command  and hit Enter: wmic path SoftwareLicensingService get OA3xOriginalProductKeyWindows product key
  3. Note down your Windows product key that is displayed as a result.
  4. Next, execute the below command and hit Enter to remove the Windows OS license key: vbs /upk 
  5. Once the license key is deactivated, press the Win + I keys together to open Windows Settings, select System on the left, and click on Activation on the right. activation settings
  6. Click Change product key and enter the Windows product key you noted down in Step 2.Change product key

You have now successfully reactivated Windows with the same product license key, and the activation troubleshooter not working issue should be fixed.

3. Activate Windows by phone

  1. Open the Settings app by pressing the Win + I shortcut keys.
  2. Next, click on System on the left and then click on Activation on the right. activation settings
  3. On the next screen, under the Activate Windows Now section, select Activate by Phone. You will receive a code, that you can enter over the phone.

If the activation by phone option is not available or if it does not work, you can also speak to a live person to get your Windows 11 OS activated.

4. Run an SFC scan

  1. Press the Win + R hotkeys to launch the Run console, type in cmd, and press the Ctrl + Shift + Enter keys together to open Command Prompt with admin rights. run command prompt command
  2. Now, type the below command in the Command Prompt (Admin) window and hit Enter: sfc /scannowrun sfc /scannow command
  3. The scan takes a while, so wait patiently till it’s over. Once you see the success message, restart your PC.

Once your PC boots up, check if you can run the Windows activation troubleshooter not working issue is resolved.

5. Reset the PC

  1. Launch Windows Settings by pressing the Win + I keys together.
  2. Next, click on System on the left and then click on Recovery on the right. recovery settings
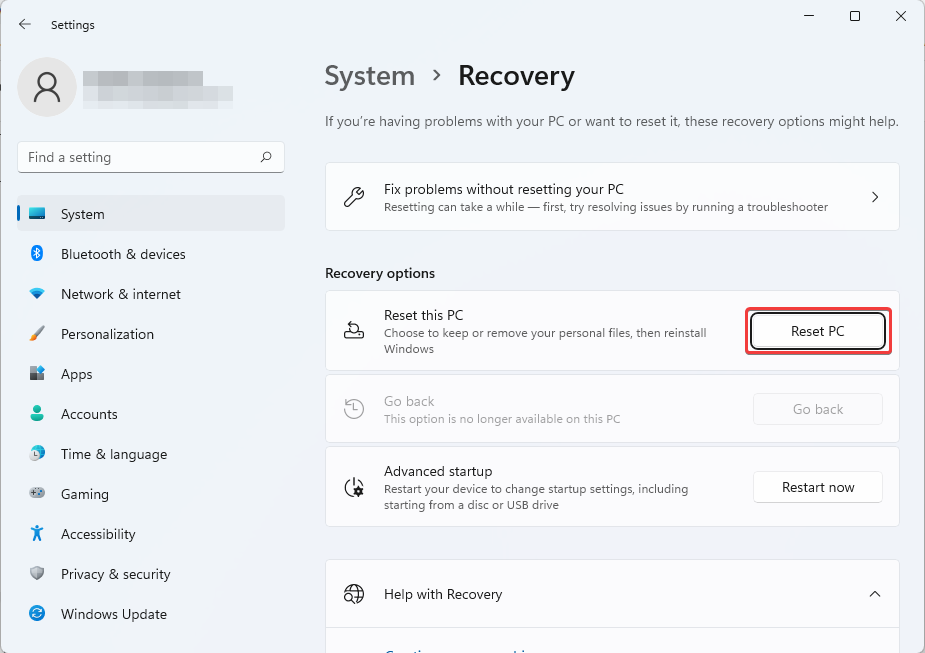
  3. Now, under Recovery options, go to Reset this PC and click on Reset PC. Follow the on-screen instructions to continue. Reset this PC, reset PC

Once the factory reset of Windows is over, your PC restarts automatically. You can then check if the Windows activation troubleshooter is working or if the problem persists.

How to run Windows 10 activation Troubleshooter command line?

You can’t run the Windows Activation troubleshooter from the command line, but only from the Activation settings, that too, when Windows is not activated. If you have already activated the OS, the Troubleshoot button won’t be available.

Though, if you are facing activation issues in Windows 10, the command line will help register Windows and remove the Windows activation notice.

What happens if I won’t activate Windows?

While it won’t be disastrous if you don’t activate Windows 11, there are indeed a few downsides to this:

  • You will miss out on the latest features like the new sleek look, updated default apps, and other hidden features.
  • Missing security updates, bug fixes, and patches can slow down your PC performance.
  • No access to the multiple desktop options, integrated Microsoft Teams, or the tablet mode and docking features.
  • You will also lack the gaming boost, new themes and sounds, and overall performance and security.
  • Besides, you will also keep receiving notifications to activate Windows 11.

If all of the above methods fail to work, you can perform a system restore to revert your PC to a past working state if you have already created a restore point.

Alternatively, you can dial the Microsoft customer support number directly to activate the Windows 11 OS when the Windows troubleshooter is not working.

If you have any other queries related to Windows activation, you can leave a message in the comments box below.

WoW High Latency but Internet is Fine: 7 Ways to Fix Lagging

World of Warcraft is one of the world’s most popular online multiplayer games. However, it is not one without an issue with users reporting that WoW has high latency, but their internet is fine.

This saps life out of their gaming experience. Fortunately, this issue can be easily fixed with the detailed solutions in this guide.

What causes high latency in WoW?

Different factors can cause high latency in WoW, while the internet is fine for other activities. Below are some of the notable causes:

  • Outdated driver: If WoW lags for no reason, it might be outdated network drivers. You can fix this quickly by updating your drivers to the latest version.
  • Issues with the router: In some cases, this issue might occur due to minor glitches with your network device. The solution to this is to reset your network.
  • Outdated PC: Sometimes, you might experience WoW latency in home vs world because your PC is outdated. You need to update your operating system to continue enjoying your game.

What can I do if there is high latency in WoW, but the Internet is fine?

1. Update your driver

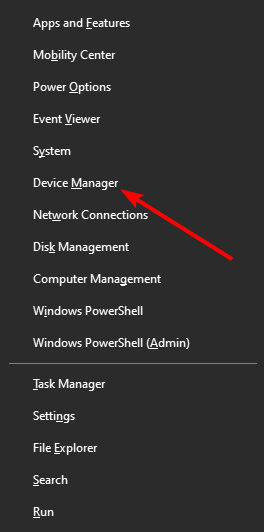
  1. Press the Windows key + X and select the Device Manager option.
    device manager wow high latency but internet is fine
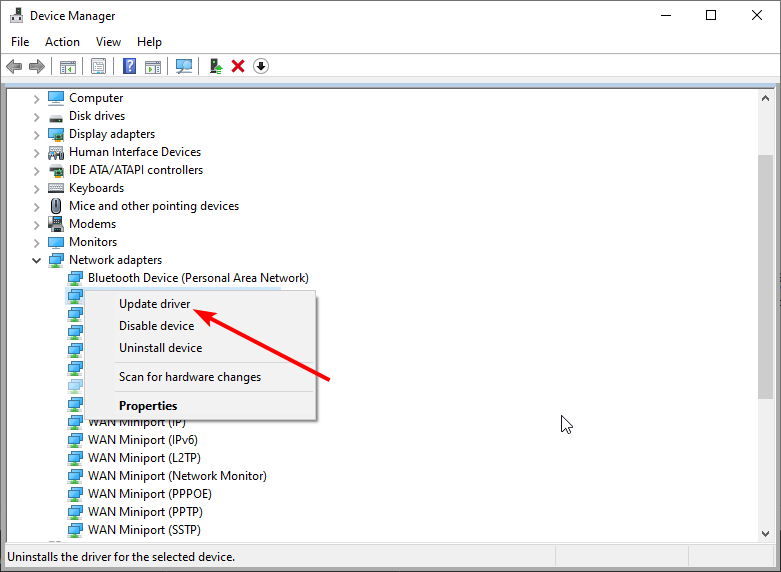
  2. Double-click the Network adapters option to expand it, and right-click your adapter.
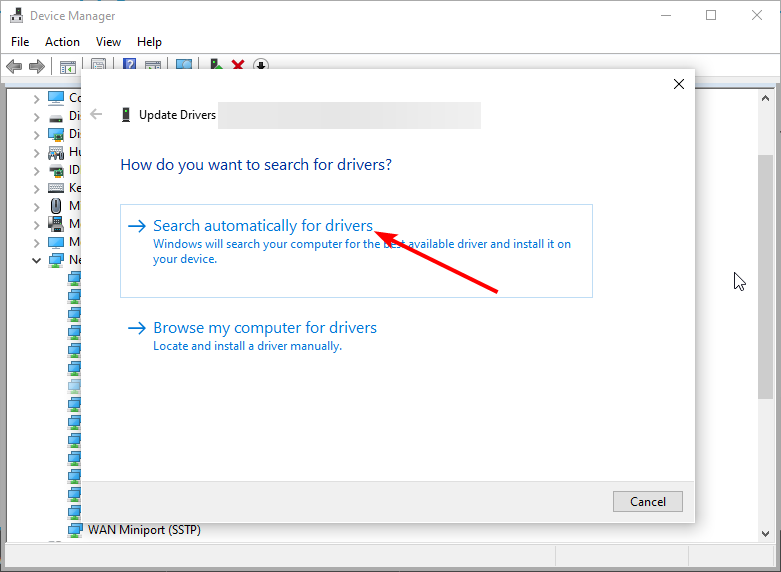
  3. Now, select the Update driver option.
    update driver  wow high latency but internet is fine
  4. Finally, choose Search automatically for drivers and install any available updates.
    search auto

Alternatively, you can visit your network adapter manufacturer’s website to download the latest drivers.

If the Classic WoW high latency continues, but the internet is fine, your network driver is likely the problem, so be sure to update it automatically with a dedicated tool such as Outbyte Driver Updater.

⇒ Get Outbyte Driver Updater

2. Check the server status

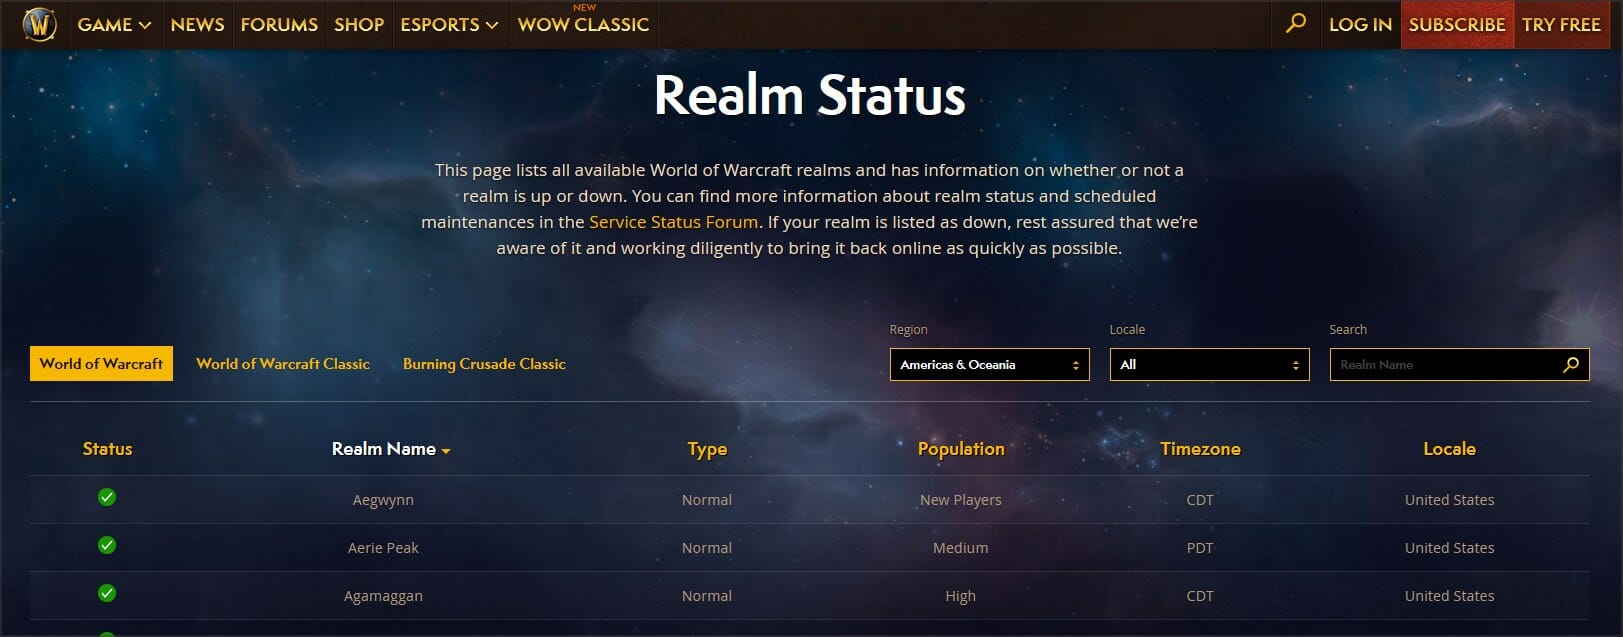
  1. Visit the Realm Status page.
  2. Locate your server on the list.
  3. If the status is set to anything other than a green check mark, there’s an issue with the server.

If you have high latency in WoW, but the Internet is fine, the issue is most likely server-related, so you’ll have to wait for Blizzard to fix it.

3. Clear the game cache

  1. Exit the game completely.
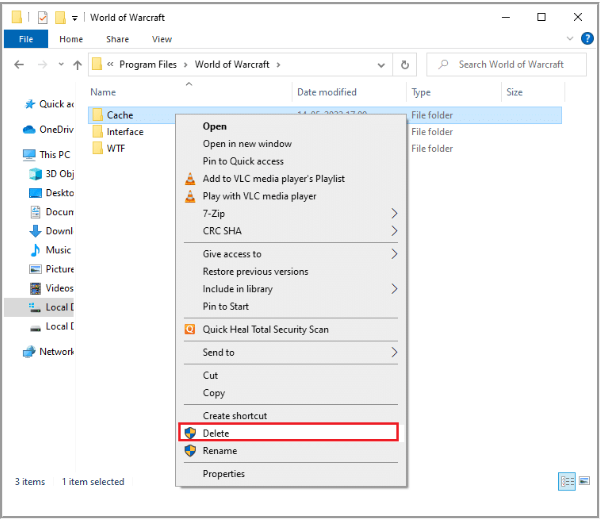
  2. Now, press the Windows key + E to open File Explorer and navigate to the path below: C:\Program Files (x86)\World of Warcraft > Cache
  3. Finally, right-click the Cache folder and select Delete.
    delete

Now start the game again and check if high ping in WoW still occurs. For more information, we suggest reading our guide on how to reset the World of Warcraft user interface.

In some cases, removing or updating specific add-ons can help, so we suggest you try that.

4. Reset the TCP/IP configuration

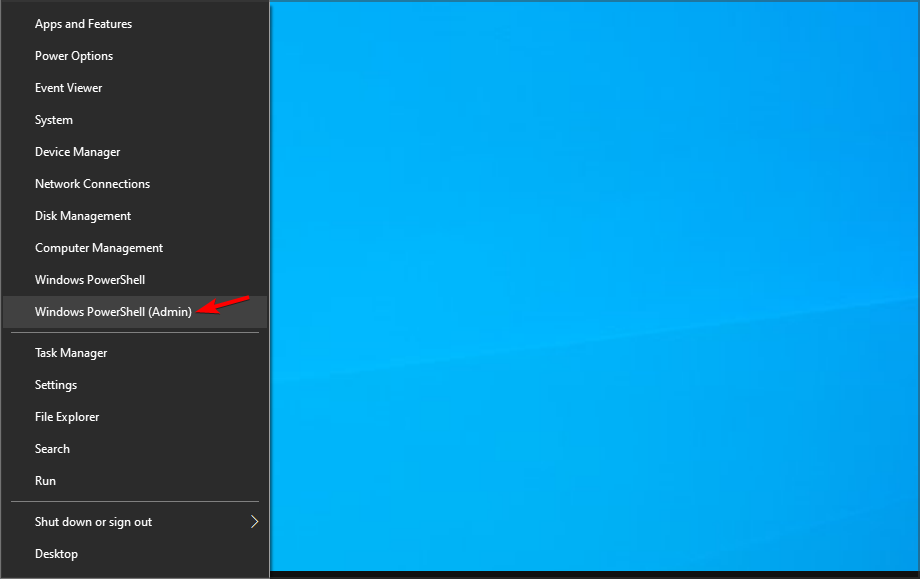
  1. Press Windows key + X and choose PowerShell (Admin) from the menu.
  2. Now run the following commands:
    ipconfig /release ipconfig /renew ipconfig /flushdns
  3. Start the game and check if the issue is still there.

5. Install the latest Windows updates

  1. Press Windows Key + I to open the Settings app.
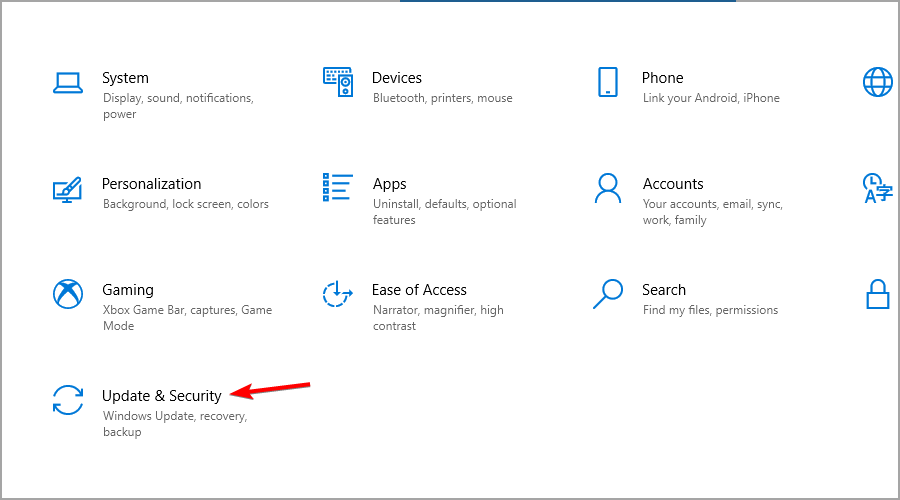
  2. Navigate to the Update & Security section.
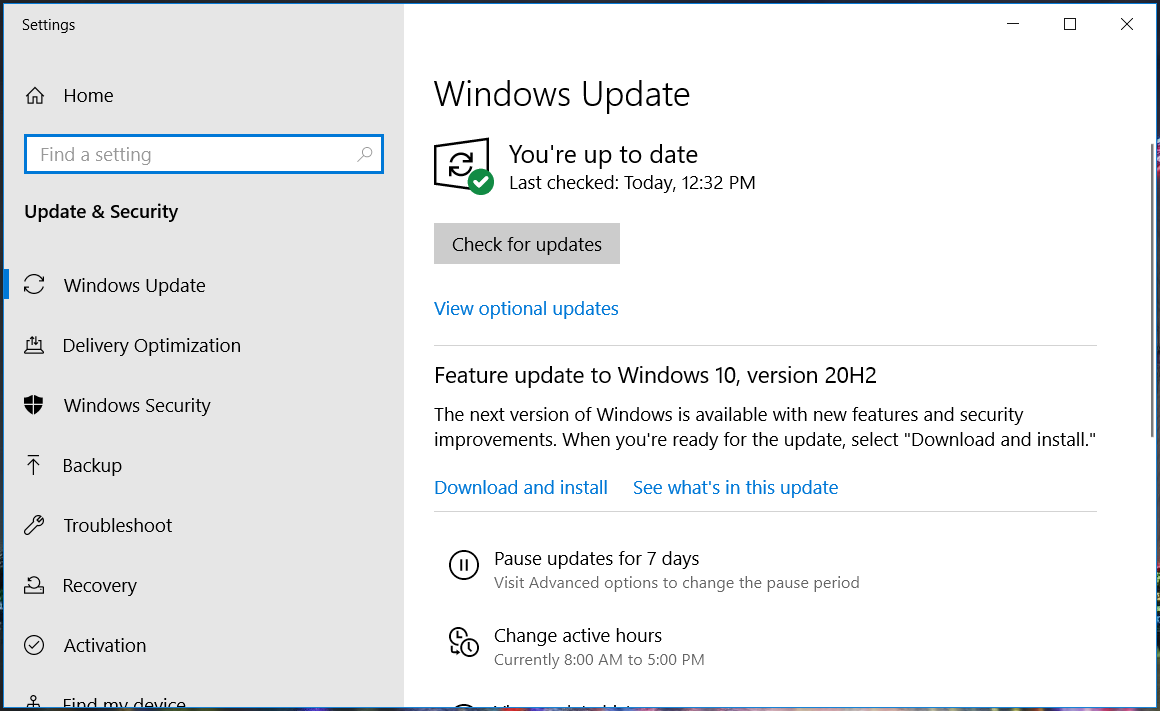
  3. Now, click on the Check for updates button.
  4. Windows will now install the missing updates.

After updating your system, start the game and check if random disconnects in WoW still occur.

6. Run the Network troubleshooter

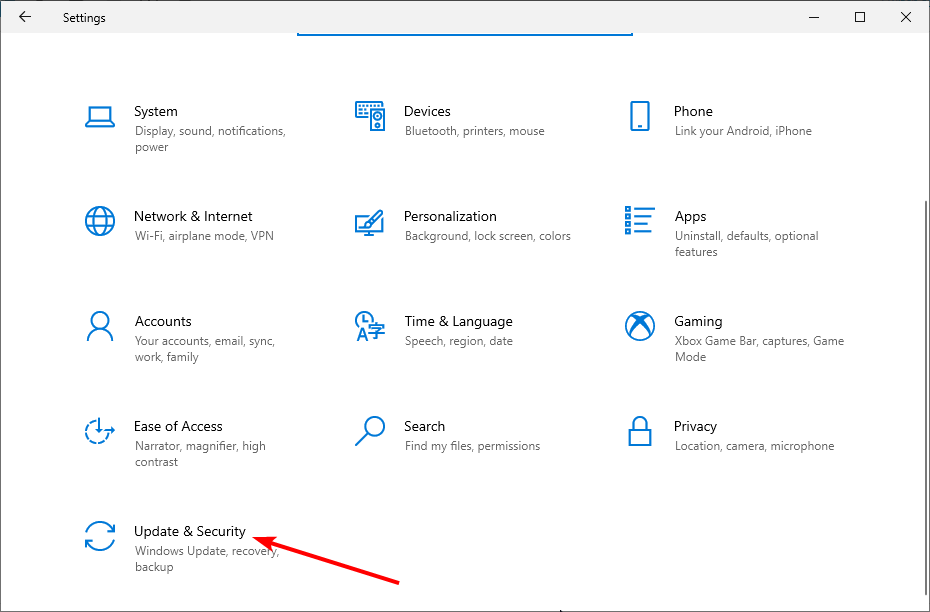
  1. Press the Windows key + I and select Update & Security.
    update and wow high latency but internet is fine
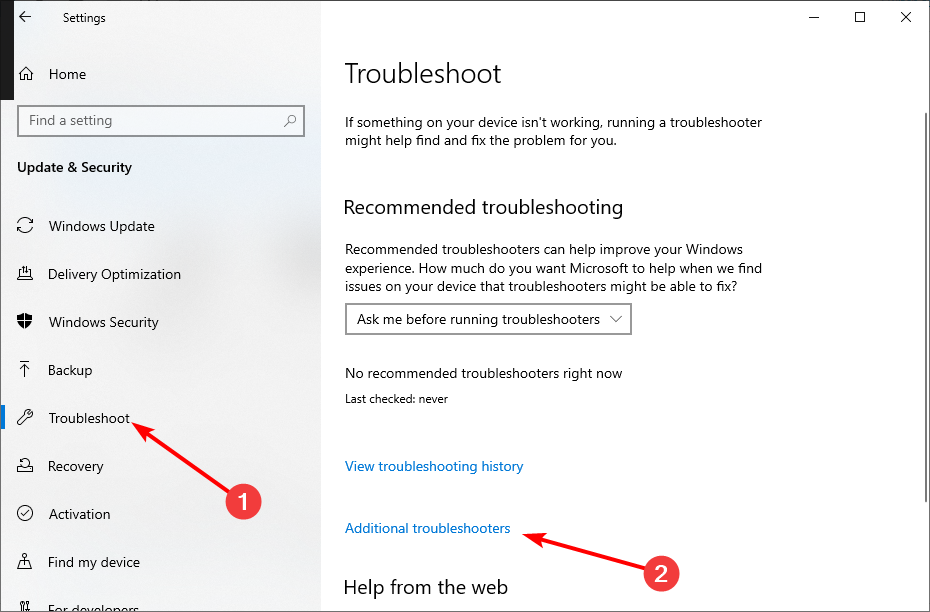
  2. Choose Troubleshoot in the left pane and click Additional troubleshooters.
    troubleshoot
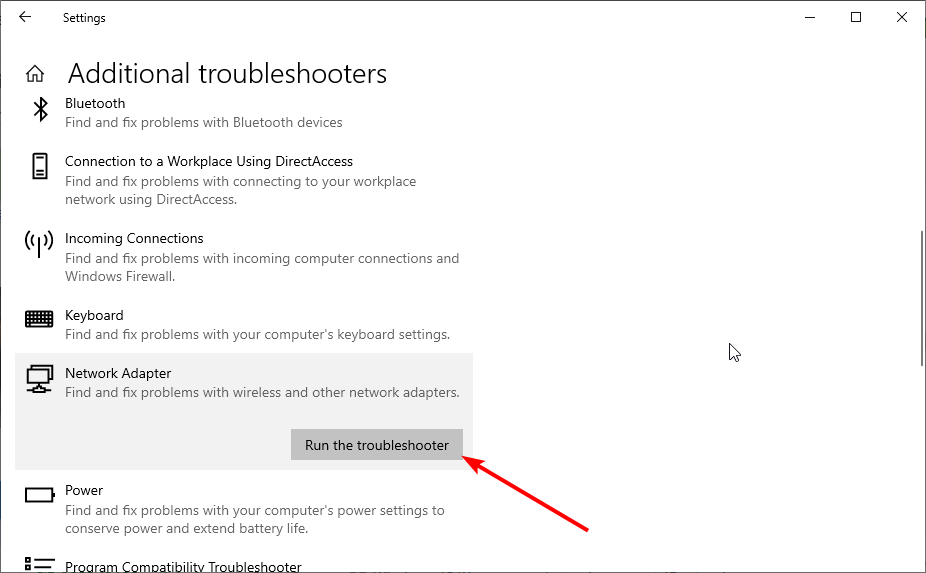
  3. Finally, select Network Adapter and click Run the troubleshooter.
    run the

Sometimes, the WoW high latency with a perfectly working internet connection can be caused by minor issues with your adapter. Running the built-in troubleshooter should diagnose and fix these glitches.

7. Disable proxies

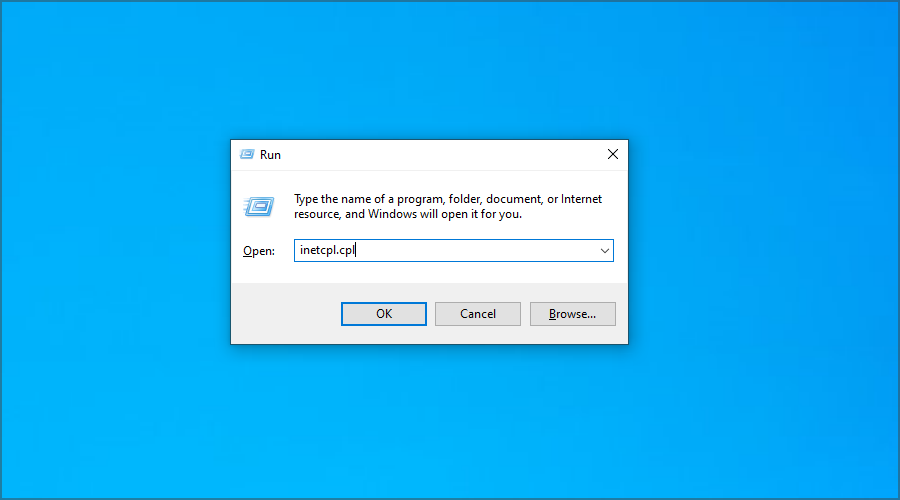
  1. Press Windows key + R, type inetcpl.cpl, and press Enter.
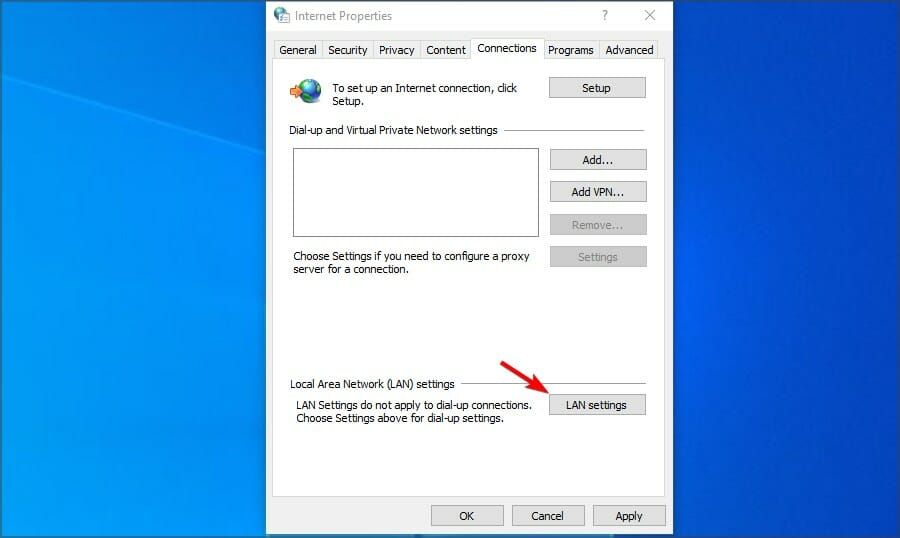
  2. Navigate to the Connections tab and select Never dial a connection if available.
  3. Click on the LAN settings button.
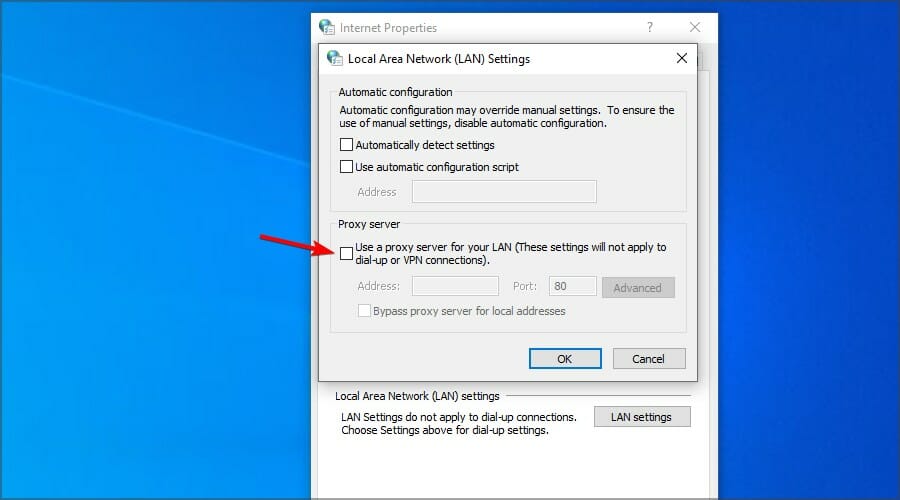
  4. Uncheck Use a proxy server for your LAN option.
  5. Optional: Try toggling the Automatically detect settings checkbox if the previous option is already disabled.

You can try these solutions if you’re experiencing WoW high latency, but your internet is fine for other activities. If the game fails after applying these fixes, you might need to uninstall and reinstall it.

If your PC is the problem, ensure no applications are interfering with the game, and adjust your settings accordingly.

Since you want the best gaming experience, look at these budget laptops for World of Warcraft. They include Solid State Drives that shorten loading times and have impressive displays.

Did you find a solution to this problem on your own? If so, feel free to share it with us in the comments section below.

Error Accessing the Registry: 5 Ways to Allow Access Again

Registry Editor is one of the most critical error-resolving components on Windows PC. However, some users report a frustrating error accessing the registry when merging files using Regedit.

While various factors can cause this problem, it is usually straightforward to fix. And we will show you how to do it in this guide.

Why do I get an error accessing the registry?

Below are some of the factors that can cause the error accessing the registry prompt:

  • Corrupt system files: If you are facing an error accessing the system registry on Windows 10, it might be because of corrupt files. The solution to this is to repair these corrupt system files.
  • Lack of administrative privileges: Sometimes, this problem can be down to a lack of proper privileges to merge the file you are working on. You need to access Regedit as an admin to fix this.

How can I fix an error accessing the registry on Windows 10?

1. Import registry file as admin

  1. Press the Windows key + R, type regedit, and press the Ctrl + Shift + Enter keys to open the Registry Editor as an admin.
    regedit error accessing the registry
  2. Click the Yes button when the UAC page shows up.
  3. Now, click File > Import.
    file import
  4. Navigate to the location of the file you are trying to merge and select it.
  5. Finally, click the Open button to merge it with your registry.
    open

If you are getting an error accessing the registry prompt while trying to merge a file with your registry, it is likely due to a lack of administrative privilege. Following the steps above will give you all the rights you need to operate.

2. Run an SFC scan

  1. Press the Windows key, type cmd, and select Run as administrator under Command Prompt.
    cmd admin
  2. When Command Prompt opens, type the command below and hit Enter: sfc /scannowsfc error accessing the registry
  3. Then, finally, wait for the command to finish running and restart your computer.

If you are troubled by the error accessing the registry prompt, you are likely dealing with corrupt system files on your PC. The SFC scan is one of the most effective built-in tools to fix this.

So, you need to run the scan and wait for your PC to fix the issues.

As an automatic alternative, you can try specialized repair software to fix your device automatically by replacing damaged files with healthy parts from its immense database.

3. Use Group Policy Editor

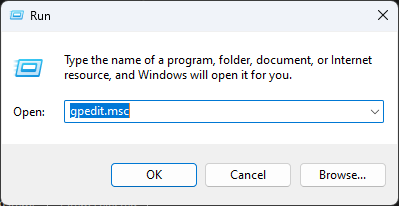
  1. Press the Windows key + R, type gpedit.msc, and click OK.
    gpedit
  2. Navigate to the path below in the left pane: User Configuration > Administrative Templates > System
  3. Now, double-click Prevent access to registry editing tools to open it
    prevent access
  4. Tick the Disabled or Not configured radio button and click OK to save the changes.
    not configured
  5. Finally, restart your PC

In some cases, the error accessing the ole registry might be because you are not permitted to use the Registry Editor editing tools. You can fix this by making the necessary changes in the Group Policy Editor.

4. Enable Regedit manually.

  1. Press the Windows key + R to open the run utility.
  2. Now, copy and paste the following command: REG add HKCUSoftwareMicrosoftWindowsCurrentVersionPoliciesSystem /v DisableRegistryTools /t REG_DWORD /d 0 /f
  3. Finally, click the OK button.
    manual error accessing the registry

Aside from using the Group Policy Editor to enable permission to use the Registry Editor editing tools, you can do it manually without opening Regedit.

This requires you to use the Run utility, as shown above. With this, you should be able to eliminate the error accessing the registry prompt.

5. Perform a system restore

  1. Press the Windows key + R, type rstrui.exe, and click OK.
    rstrui
  2. Click the Next button on the page that pops up.
    next
  3. Now, select a restore point and click the Next button.
    restore point error accessing the registry
  4. Finally, click the Finish button to confirm the action and follow the onscreen instructions to complete the process.
    finish

If the problem persists, you need to restore your system to an older restore point. This will eliminate the changes you have made to your PC that might prevent you from merging your files.

That’s about it; we hope at least one of these workarounds proved helpful in resolving the error accessing the registry issues in Windows 10.

If you can’t edit your registry in Windows 10, check our detailed guide to fix it quickly.

Please let us know in the comments below if you have any comments, questions, or suggestions.

Netwtw04.sys Failed: Fix This Error With These 7 Methods

The netwtw04.sys failed error is a frustrating error that pops up when users launch apps or unplug their headphones. However, these are not the only potential causes of the error.

Irrespective of the cause, we have prepared tested and trusted solutions to fix it in this comprehensive guide.

What does failed netwtw04.sys mean?

The netwtw04.sys failed blue screen error means your driver is incompatible with your operating system. The following are some of the prominent causes of this issue:

  • Outdated driver: One of the major causes of the netwtw04.sys blue screen issue is a faulty or outdated network driver. The quickest way to fix this is to reinstall or update your driver.
  • Presence of malware: Sometimes, this problem might be due to the activities of malware on your PC. You need to perform a full virus scan to get past the error message.
  • Outdated PC: The Windows 10 netwtw04.sys error can be caused by an outdated operating system. Updating the PC to the latest version fixed the issue for many users.

How can I fix the netwtw04.sys failed error on Windows 10?

1. Use dedicated software to fix the BSoD

BSOD stop codes are the most dangerous Windows 10 errors because they can signal hardware problems. Unfortunately, it is pretty hard to troubleshoot manually, and fixing it can sometimes be time-consuming.

Fortunately, there are methods like dedicated repair software specialized in fixing Windows 10 errors, including BSoDs. These kinds of tools are high-speed and will likely repair your system automatically.

2. Update network adapter drivers

  1. Press the Windows key + R, type devmgmt.msc, and click OK.
    devmgmt netwtw04.sys failed
  2. Double-click the Network adapters option to expand it, and right-click the device there.
  3. Now, select Update driver.
    update driver
  4. Finally, click Search automatically for drivers and install any available updates.
    search auto

Some Windows users reported that they could fix Windows 10 error netwtw04.sys failed error by updating their network adapter drivers. Hence, you can update your network adapter to correct the problem.

Alternatively, you can revert to the old driver versions if updating the driver does not fix the issue. Another option is to uninstall and reinstall the driver.

You can also go to the manufacturer’s website and download the driver yourself, but you need to be extremely careful to get the right one for your PC.

Luckily, there is a much faster and easier solution. And that is to use a dedicated tool that can fix and update your drivers automatically with software like Outbyte Driver Updater.

3. Run a full system scan

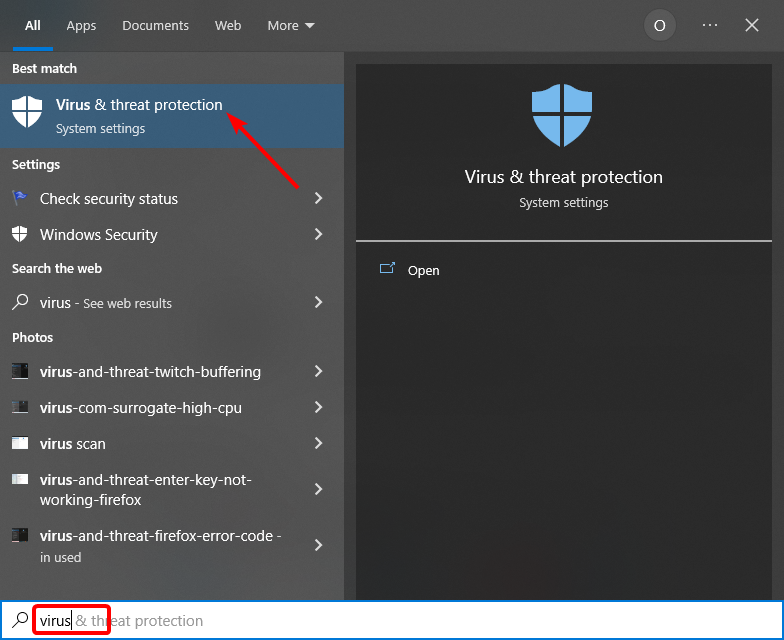
  1. Press the Windows key, type virus, and select Virus & threat protection.
    virus netwtw04.sys failed
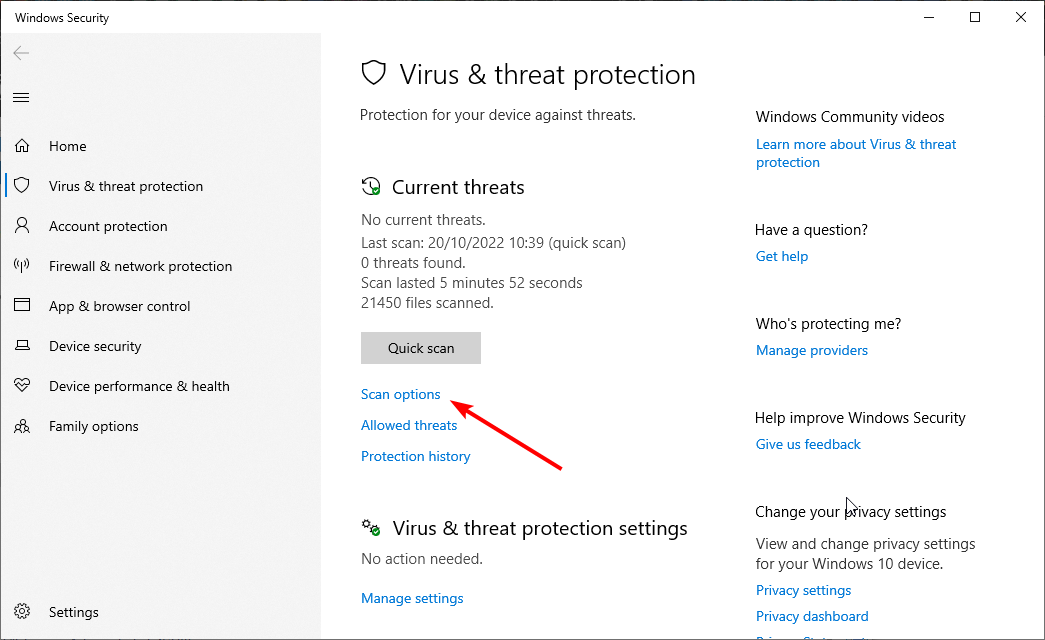
  2. Click Scan options.
    scan option
  3. Finally, tick the Full scan option and click the Scan now button.
    scan now

Viruses and malware can cause the Windows 10 error netwtw04.sys. This malware infects your system file causing the Windows 10 error.

Hence, run a full system scan on your PC to remove every possible virus corruption. You can also use Windows’ built-in antivirus, Windows Defender.

Alternatively, you can use a surefire third-party antivirus in TotalAV. This software will dig deep into your system and eliminate even the most hidden virus.

4. Repair PC registry

  1. Press the Windows key, type cmd, and click Run as Administrator under Command Prompt.
    cmd admin netwtw04.sys failed
  2. Now, type the command below and hit Enter: sfc /scannowsfc scannow
  3. Wait for the scanning process to complete and restart your computer.
  4. If that does not fix the issue, type the command below and hit Enter to run it: Dism /Online /Cleanup-Image /RestoreHealthdism restore

The simplest way to repair your Windows registry is to use a dedicated tool. Alternatively, you can use Microsoft’s System File Checker to check for system file corruption.

The utility program verifies the integrity of all system files and repairs files with problems when possible.

5. Temporarily disable secondary antivirus

Some antivirus programs may cause the Windows 10 error netwtw04.sys. Hence, you may need to temporarily disable your antivirus or firewall to fix the BSoD problem.

However, some antivirus programs have the temporarily disable protection option you can use, while others do not.

If you can uninstall your secondary antivirus, you may do that and consider switching to an alternative that will not interfere with your system.

6. Run System Restore

  1. Press the Windows key + R, type rstrui.exe, and click OK.
    rstrui netwtw04.sys failed
  2. Click the Next button page on the pops up.
    next
  3. Now, select an appropriate restore point and click the Next button.
    restore point
  4. Finally, click the Finish button.
    finish

Another effective solution that can fix the netwtw04.sys failed error message is to restore your PC to a time when it worked without issues.

This will reverse the changes you might have made to your PC that are causing the problem.

7. Install Windows Update

  1. Press the Windows key + I and select Update & Security.
    update and
  2. Click on Check for updates to proceed.
    check netwtw04.sys failed
  3. Finally, download and install the available updates.

Finally, you can also fix Windows 10 error netwtw04.sys problem by updating your Windows 10 OS to the latest version.

Microsoft constantly releases Windows updates to improve the system’s stability and fix various issues and errors associated with the startup error.

We also have a guide dedicated to fixing the Driver_IRQL_NOT_LESS_OR_EQUAL error in Windows 10, so make sure you check that out too.

We hope the solutions listed above helped you fix the Windows 10 netwtw04.sys failed issue. Comment below if you have any questions or know of other solutions.

Microsoft Edge 111 ships to the Stable Channel with Edge Copilot and more

Microsoft Edge version 111 has hit the Stable Channel for everyone to download, coming in at version 111.0.1661.41. The update comes with several notable features. Here’s a look at what you need to know.

First up, the update ships with a new Edge Sidebar which unpacks several new features and improvements designed to enhance productivity and the user experience. The new Edge Sidebar powered by Edge Copilot will let you boost your productivity and efficiency by providing intelligent suggestions and insights based on the context of the web page and the user’s goals.

The Edge Copilot will help you compose better emails, search the web faster, and learn new skills just like the new Bing icon in the Toolbar. Additionally, the Sidebar’s visibility has been enhanced as it features a new Auto-Hide functionality that allows users to maximize the productivity of the sidebar without taking up too much of the screen’s real estate.

What’s more, the update has improved how users will interact with the Sidebar. By hovering on the Bing icon in the Toolbar, you can launch it. Other key features and improvements are highlighted below:

  • Microsoft Feed on Microsoft 365 Edge New Tab Page. We’re rolling out a new experience to the Microsoft 365 tab of the Edge Enterprise New Tab Page. This experience will feature a new layout that centers on a larger version of the Microsoft Feed, featuring more productivity content, and moves the productivity cards including Important Emails, Recent SharePoint sites, Upcoming events, and To Do to the right-hand side of the Microsoft 365 tab.
  • Enhanced security mode improvements. Enhanced security mode now supports WebAssembly for macOS x64 and Linux x64. More cross-platform (ARM64) support is expected in the future. For more information, see Browse more safely with Microsoft Edge.
  • New policy to clear IE mode data on browser exit. The InternetExplorerModeClearDataOnExitEnabled policy controls whether browsing history is deleted from Internet Explorer and Internet Explorer mode every time Microsoft Edge is closed. Users can also configure this setting in the ‘Clear browsing data for Internet Explorer’ option in the Privacy, search, and services menu of Settings (edge://settings/privacy).

As usual, the release brings some depreciated and new policies. We invite you to check out Microsoft’s changelog for more on these. In related news, Microsoft announced that it is currently testing a new feature in the Edge Canary Channel designed to upscale videos with low resolutions dubbed Video Super Resolution. It’s powered by AI technology from Microsoft research.

Microsoft Edge should auto-update to the latest version, but if it does not, you can trigger it manually. Just head to the browser’s menu, choose Help and Feedback then About Microsoft Edge and wait for the update to download, and then restart.

Microsoft hit by more layoffs yet again, AI division affected

Things haven’t been business as usual over at Microsoft ever since the year started, especially after it highlighted its plan to cut 10,000 employees from its workforce. Satya Nadella, the company’s CEO that they were facing a different reality, thus prompting the move to lay off some employees.

Since then, Microsoft has been sporadically laying off employees across various divisions. Thus far, the company’s Surface, Xbox, and HoloLens divisions have been affected. Last week, the company also filed a WARN notice which saw 689 employees based in Redmond, Bellevue, and Issaquah lose their jobs.

And now, according to a report, more employees at Microsoft have been laid off. This time, the company has reportedly laid off the ethics and society team that’s part of the artificial intelligence organization. The team’s mandate is to ensure that Microsoft’s AI principles align with product designs.

A former employee added that “People would look at the principles coming out of the office of responsible AI and say, ‘I don’t know how this applies. Our job was to show them and to create rules in areas where there were none.”

This unfortunate news comes at a time when the company is working towards integrating AI across its products and services, especially after Microsoft extended its partnership with OpenAI by making a multibillion dollar investment. The company has gone on to debut the new Bing, the AI copilot for the web, and even further integrated it across Bing, Edge Mobile apps, and Skype.

Microsoft has however indicated that despite the layoffs, the AI division still remains active and will continue to deliver on its responsibilities. The company further added that:

Microsoft is committed to developing AI products and experiences safely and responsibly, and does so by investing in people, processes, and partnerships that prioritize this,” the company said in a statement. “Over the past six years we have increased the number of people across our product teams and within the Office of Responsible AI who, along with all of us at Microsoft, are accountable for ensuring we put our AI principles into practice. […] We appreciate the trailblazing work the ethics and society team did to help us on our ongoing responsible AI journey.

While the news is quite unfortunate, we’re likely to see more layoffs hit the Redmond giant over the next couple of months. As it stands, the company is nowhere near the 10,000 mark for the employees it intends to send home.

via: Platformer

Microsoft GPT-4: You’ll be able to create videos from texts

Not too long after Google announced its mega-plan to develop an AI speech that could recognize 1.000 world’s most-spoken languages, Microsoft said that it’s ready to launch GPT-4, a successor to the infamous neural network by OpenAI, in March 2023.

During the AI in Focus – Digital Kickoff event, Microsoft Germany CTO Andreas Braun said that the language will bear multi-modal models functionality, as quoted by German publication Heise Online. 

“We will introduce GPT-4 next week, there we will have multimodal models that will offer completely different possibilities – for example videos.”

Being a multi-modal language, the AI will be able to function on different inputs (texts, images, and sound), whereas GPT-3 and GPT-2 could only operate on texts. Moreover, the multi-modal language will be able to translate texts into music and videos, meaning that you can create AI-generated clips using simple prompt words.

What’s going on in the war on AI?

For months, anticipations for GPT-4 have been massively built up. The emerging technology will reportedly contain more parameters than its GPT-3 predecessor by 600 times. 

If that’s not enough, Microsoft has integrated GPT-3-powered ChatGPT into Bing and Microsoft Edge browser, on both mobile and desktop. Not too long ago, Redmond officials announced that the often-overlooked search engine has amassed over 100 million daily users milestone

That means, Google has every right to be worried about it, especially since its BARD AI is still far from primetime. Although they’ve just announced a state-of-the-art speech AI model called the Universal Speech Model (USM), Google still has a lot to catch up on, for now. 

What do you think about this AI war between Microsoft and Google? Let us know in the comments!

Delete Failed Windows Updates Manually With These 2 Methods

Windows updates are essential for the smooth running of your PC. However, this process is not usually smooth and might require you to delete a failed Windows update before going over it again.

This is important to prevent update errors and other issues while installing the latest patches. In this guide, we have prepared the best ways to remove any incomplete update from your PC.

How do I delete downloaded failed and pending Windows Updates?

Below are a couple of ways to delete failed update history in Windows 10:

  • Using File Explorer: The first method is to delete the failed updates from the update folder in File Explorer. With this, you can clear the history and restart the update process.
  • PC cleaner software: Another option is to use dedicated PC cleaner software to remove incomplete downloads. With these tools, you can clean your PC correctly and remove junk files.

How do I delete failed Windows updates?

1. Delete everything from the sub-folder

  1. Press the Windows key + E to open File Explorer.
  2. Navigate to the path below: C:\Windows\SoftwareDistribution\Downloaddownload
  3. Now, delete everything in the Download folder.
    option delete failed windows update
  4. If you want to restart the update process, press the Windows key, type cmd, and select Run as administrator under Command Prompt.
    cmd admin
  5. Finally, type the commands below, and hit Enter after each: net stop wuauservnet stop delete failed windows update net start wuauservnet start

The built-in method of deleting a failed update is through File Explorer. This method is pretty straightforward and requires no technical skills.

2. Use a dedicated tool

While you can permanently delete a failed Windows update from File Explorer, there might be some leftover junk files on your PC.

To get rid of these files, you need to use a dedicated PC cleaner in CCleaner. This easy-to-use tool digs deep into your system and eliminates all unwanted files.

This makes it easy to remove any incomplete updates and other junk files. With this, you can free up valuable space on your PC.

⇒ Get CCleaner

With this, we can conclude this guide on how to delete a failed Windows update. All you need now is to follow the steps, and you should be able to download and install updates smoothly.

If you want to know how to clear the Windows update cache, check our detailed guide to do it quickly.

Feel free to let us know if you encounter any problems following the steps above.

Software Center Missing: Enable it With These 3 Methods

Software Center provides a centralized environment for IT administrators to deploy applications, upgrade apps, or change system policies remotely. Unfortunately, some users report missing the Software Center on their PC.

This takes away an essential remote feature. If you also face this issue, this guide will walk you through the steps to regain the tool.

Why is Software Center on Windows 10 missing?

Several factors can be responsible for the missing Software Center. Listed below are some of the prevalent causes:

  • Corrupt system files: One of the significant reasons the Software Center is not loading or is stuck at 44 percent might be because of faulty or missing system files. The solution to this is to repair these files.
  • Presence of malware: In some cases, this problem might be caused by the activities of viruses on your PC. You can fix this by performing a virus scan with Microsoft Defender or dedicated antivirus software.

What to do if Windows 10 Software Center is missing?

1. Repair system files

  1. Press the Windows key, type cmd, and select Run as administrator under Command Prompt.
    cmd admin software center missing
  2. Type the command below and hit Enter to run it: DISM.exe /Online /Cleanup-image /Restorehealthdism restore
  3. Now, wait for the command to finish running.
  4. Next, type the command below and press Enter to run it: sfc /scannowsfc scan
  5. Finally, wait for the command to finish running and restart your PC.

If the Software Center is missing on your PC, it might be because of broken system files. You can fix it by running the DISM and SFC scans.

You can also fix these files easily using a reliable repair tool, eliminating the stress of having to run numerous scans and repair your system files in no time.

2. Run Windows System Restore

  1. Press the Windows key + R, type rstrui.exe, and click OK.
    rstrui software center missing
  2. Click the Next button in the window that pops up.
    next
  3. Now, choose a restore point and click Next.
    restore point
  4. Finally, click the Finish button and follow the onscreen instructions to complete the action.
    finish software center missing

If the Software Center goes missing after installing an app or making changes to your PC, you need to perform a system restore. This will reverse the changes that might be causing the issue.

3. Scan for malware

  1. Press the Windows key + S, type virus, and select Virus & threat protection.
    virus
  2. Select Scan options.
    scan option
  3. Now, choose the Full Scan option and click Scan now.
    scan  software center missingnow

This issue sometimes occurs if viruses are messing with your PC. You need to perform a deep virus scan to eliminate these viruses and restore normalcy on your PC.

Aside from using Windows Defender, you can also use top-notch antivirus software in TotalAV. This will scan all the files and apps on your PC, including the system files.

With this, it will remove the most hidden malware on your PC.

The steps mentioned above should be enough to deal with the Windows 10 Software Center missing issue. Let us know in the comments section if our solutions worked for you.

TrayApp Removal: Everything You Need to Know About it

The TrayApp is a feature integrated with the HP Photosmart and Digital Imaging software for easy scanning and printing. However, many users seek the best removal methods to eliminate TrayApp.

This is majorly due to different errors related to the trayapp.msi app. If you are also in this boat, this guide will show you surefire ways to get rid of the app.

What is TrayApp?

The TrayApp application comes with the HP Photosmart and Digital Imaging software package. It aids easy scanning and printing of documents and photos.

This app is usually part of most HP products’ installation CDs and tries to install by itself. However, sometimes, the installation fails and keeps trying to complete the process, leading to different issues.

This is one of the reasons most users are looking for an effective TrayApp removal method to get rid of the app.

How can I download trayapp.msi on Windows 10?

If you are getting a missing trayapp.msi error message on Windows 10 and need to download the tool, you need to remove all instances of HP printer software on your PC.

To make things easier, you can also run the HP Print and Scan Doctor, HP Officejet Software, and Driver Removal Utility tools depending on your device. After that, you can reinstall your printer software.

How can I perform TrayApp removal?

1. Use the app’s uninstaller

  1. Right-click on the TrayApp icon and choose the Open file location option.
    open file trayapp removal
  2. Locate and double-click either uninst000, Uninstall, or Uninstaller to launch the uninstaller.
  3. Now, follow the onscreen instructions to complete the removal process.
  4. Next, press the Windows key + R, type regedit, and click OK.
    regedit
  5. Navigate to the paths below in the left pane and delete any TrayApp files (Ensure to back up your registry before deleting any file): HKEY_CURRENT_USER\Software\(TrayApp or related name) HKEY_LOCAL_MACHINE\SOFTWARE\(TrayApp or related name)
  6. Finally, search for trayapp to remove any leftover registry files.

TrayApp, like some other HP apps, has a built-in uninstaller that can be used for the Removal process. Hence, you need to take advantage of the tool and delete any file it has in the registry.

Note that it is imperative you back up your registry. This will save your PC from serious issues that might arise from deleting the wrong files in the registry.

2. Use the Windows uninstaller

  1. Press the Windows key + R, type appwiz.cpl, and click OK.
    appwiz
  2. Right-click TrayApp from the list of apps and click the Uninstall option.
    uninstall trayapp removal
  3. Now, follow the onscreen instructions to complete the process.
  4. Finally, repeat steps 4 to 6 in solution 1 to delete any leftover files.

Another effective TrayApp removal method is to use the built-in Windows uninstaller. This method helps to run the app’s uninstaller without going to the file location.

3. Use a dedicated software uninstaller

If you don’t want to go through the stress of removing the TrayApp and deleting the leftover files, you can use a dedicated tool in CCleaner to perform the task with a few clicks.

This excellent software deletes any problematic software and digs deep to remove any leftover files that can cause problems in the future. Also, it can serve as a PC cleaner for removing junk files.

This helps to create valuable space for other activities on your PC.

⇒ Get CCleaner

We can conclude this guide on the best methods to perform TrayApp removal. You should now be able to eliminate the app and delete its leftover files.

If you want to uninstall the HP Support Assistant on your PC, check our detailed guide to do it quickly.

Let us know the method that helped you remove the app in the comments below.

You Don’t Currently Have Permission to Access This Folder [Fix]

Many users have complained that they encountered the you don’t currently have permission to access this folder issue after upgrading their Windows computer to a newer version.

In this guide, we will cover all the available fixes to resolve the issue right after talking about the potential causes. 

What causes the You don’t currently have permission to access this folder issue on Windows 11? There could be reasons why you don’t have permission to access the folder; some of the common ones are: 

  • Insufficient permissions – If the file or folder you are trying to open is owned by another group or user account, and you don’t have ownership or necessary permission, you might face this issue.
  • Restricted access – If the user account or group has set the permission in a way that prohibits you from accessing the file or folder you want to access, then you might see this error.
  • UAC settings – The User Account Control (UAC) Settings might be blocking your access to the folder, hence the issue.
  • Corrupted file system – If the file system is damaged or missing, you might face this issue when accessing files.
  • File or folder is currently open or in use – The file or folder could be used by another program or process and might prevent you from accessing the folder therefore, you get this error. 

How to fix the You don’t currently have permission to access this folder issue? 

Before moving to the actual troubleshooting steps. It would be best if you went through these preliminary checks:

  • Restart your computer.
  • Close the unnecessary programs and process running on the computer. 

1. Gain complete control

  1. Locate the folder from your hard drive or select the drive itself. Right-click on it and choose Properties.Properties C drive You Don't Currently Have Permission to Access This Folder
  2. On the Properties window, go to the Security tab. 
  3. Select Everyone and click Edit. Edit
  4. Now select Everyone and under Permissions for Everyone: for Full control, choose Allow and Modify.
  5. On the next window, click OK.Allow
  6. Click Continue on all the following windows.
  7. Now click Apply and OK to confirm the changes. 
  8. Restart your computer.

Note: If the Everyone option is not present, follow these simple steps to rectify it:

  1. Go to the folder location or select the drive itself, and right-click it. Choose Properties.Properties C drive You Don't Currently Have Permission to Access This Folder
  2. On the Properties window, switch to the Security tab.
  3. Under Groups & user names, click Edit. Edit
  4. Click Add.Add You Don't Currently Have Permission to Access This Folder
  5. Now, type Everyone and lick Check Names, then click OK.Everyone
  6. Select Everyone, and under Allow, choose Full control and Modify. 
  7. On the following window, click OK.Allow full control
  8. Click Apply and OK to save the changes.
  9. Restart your computer.

2. Use the Command Prompt

  1. Press Windows + E to open Windows Explorer.CMD elevated
  2. Go to the folder location, and copy the address path from the address bar.
  3. Now press the Windows key, type CMD, and click Run as Administrator.
  4. Copy and paste the following command, replace the path of the file or folder\ file or folder name with the path that you copied, and press Enter: TAKEOWN /F "path of the file or folder\ file or folder name" /R /D Y
  5. Type the following command, replace type in the path of the folder that you want to take access with the path of the folder, and press Enter: ICACLS <type in the path of the folder that you want to take access> /grant administrators:F
  6. Close the Command Prompt.

3. Change the ownership settings

  1. Go to the folder location or select the drive itself, and right-click to select Properties.
  2. Switch to the Security tab, and click Advanced. Advanced You Don't Currently Have Permission to Access This Folder
  3. On the Advanced Security Settings for Users, click Change. Change 1 You Don't Currently Have Permission to Access This Folder
  4. Now on the Select User or Group window, type the name of the person you want to give ownership to and click Check Names. Everyone
  5. Click OK. 
  6. Place a checkmark next to Replace owner on subcontainers and objects.Replace owner
  7. Click Apply and then OK.
  8. Click Yes on the permission prompt that appears.

4. Authorize a user account 

  1. Navigate to the following path: C:\UsersProperties Users You Don't Currently Have Permission to Access This Folder
  2. Right-click to open the context menu, and choose Properties. 
  3. Switch to the Security tab and click Edit. Edit User
  4. On the Permissions for Users dialog box, click the Add button. Add user
  5. Now under Select Users or Groups, click the  Advanced button. Advanced Select
  6. Click the Find Now button, and it will list the users. 
  7. Choose your PC username and hit OK. Find NOW
  8. Again, click OK on the following window to close it.
  9. Select the newly added username from Group or user names, and under Permissions, for Full control, select Allow.Full control 1
  10. Click Apply and OK to complete the process.

5. Disable the Read-Only option

  1. Locate & select a file or folder or select the drive itself and right-click to choose Properties.
  2. Switch to the General tab, and remove the checkmark Read-only (Only applies to files in the folder).Read only  You Don't Currently Have Permission to Access This Folder
  3. Click Apply and OK.

6. Make changes in Group Policy Editor

  1. Press Windows + R to open the Run window.GPEDIT You Don't Currently Have Permission to Access This Folder
  2. Type gpedit.msc and click OK to open Group Policy Editor.
  3. Navigate to this path: Computer Configuration\Windows Settings\Security Settings\Local Policies\Security Options
  4. Locate and double-click User Account Control Admin Approval Mode for the Built-in Administrator account to open its Properties.GPEDIT MSC UAC
  5. Click Disabled, then Apply and OK.UAC DISABLED
  6. Locate and double-click User Account Control Run all administrators in Admin Approval Mode to open its Properties.DEFINED
  7. Click Disabled, then Apply and OK.DISABLED 2
  8. Restart your computer.

So, these are the methods you can follow to fix you don’t currently have permission to access this folder. Try them and let us know what worked in the comments section below. 

How to Change Notification Sound in Windows 11

If you don’t like the default notification tone and want to change it, this guide can help! We will explain all the methods to change the notification sounds on Windows 11. Let’s get started!

What can I do to change the notification sound in Windows 11?

1. Use the Settings app

  1. Press Windows + I to open Settings.
  2. Go to System, and select Sound. System - Sound - How to Change Notification Sound in Windows 11
  3. Now go to the Advanced section and click More sound settings to open the Sound dialog box. More sound settings
  4. Switch to the Sounds tab.
  5. Under Program Events, locate the Notification section.Sound Notification
  6. Under Sounds, choose the sound, and click the Test button to hear a preview.
  7. Click Apply, then OK to confirm the changes.

2. Use the Control Panel

  1. Press the Windows key, type Control Panel, and click Open. CP How to Change Notification Sound in Windows 11
  2. Select View by as Category, and click Hardware and Sound.Hardware and Sound How to Change Notification Sound in Windows 11
  3. Now click Sound. Sound 1
  4. On the Sound dialog box, switch to the Sounds tab.
  5. Locate the Notification under Program Events. CP How to Change Notification Sound in Windows 11
  6. Under Sounds, click the drop-down menu and choose notification sound. 
  7. Once selected, click the Test button to hear. 
  8. Click Apply, then OK to save the changes. 

3. Use the Personalization settings

  1. Press Windows + I to open Settings. 
  2. Go to Personalization, and click Themes. Settings personalization How to Change Notification Sound in Windows 11
  3. Locate Related settings and click the Sounds button.
  4. In the next window, go to the Sounds tab. 
  5. Navigate to the Notification section under Program Events.
  6. Under Sounds, click the drop-down menu and choose a new sound. Sound Notification
  7. Click Test to hear the preview.  
  8. Click Apply, then OK to apply the changes.

For broader customization beyond notification alerts, check this guide to change Windows sounds in Windows 11 for system events, themes, and more.

4. Use the Registry Editor

  1. Save the sound that you want to use and copy the path. 
  2. Press Windows + R to open the Run dialog box. REGEDIT RUN COMMAND
  3. Type regedit and click OK to open the Registry Editor. 
  4. Navigate to this path: Computer\HKEY_CURRENT_USER\AppEvents\Schemes\Apps.Default\Notification.Default.Current
  5. Locate and double-click the Default to open the Properties.Registry Editor Value data How to Change Notification Sound in Windows 11
  6. In the Value data field, paste the path of the sound file and click OK. 
  7. Restart your computer to save the changes. 

And if your Windows 11 keeps chiming, we have an answer in our detailed article, but make sure you don’t end up with a situation where the notification sounds are not working at all. But if it happens, the highlighted guide will help you fix the problem.

If its push notifications not working, we also got you covered on that front. Before you go, we also have a guide on Windows 7 startup sound, so you might want to check it out for more information.

So, these are ways to change the notification sound on Windows 11. Try them and let us know what worked in the comments section below.

Tiny10 for Windows 10: Download & install the latest version

Just like what NTDEV did for Windows 11 by releasing tiny11, a debloated version to help low-end PCs to run the operating system under limited resources, the devs also have something similar for Windows 10.

Dubbed tiny10, the tool allows you to bring all Windows 10’s functionalities to life for desktops with limited specifications. Its latest edition, tiny10 2303 x86, also features the component store, the Remote Desktop feature, and serviceability—with a fully functional Windows Defender.

It’s basically a stripped-down version of Windows 10, which only takes 5.2 GB (32-bit system) and 10 GB (10 GB) of disk space compared to Windows 10’s 22 GB storage requirement. In terms of RAM, you only need at least 1 GB on a 32-bit system and 2 GB on a 64-bit system.

Without further ado, here’s how to download and install tiny10 for Windows 10.

H2: How to download tiny10 for Windows 10.

1. Head over to NTDEV’s site on Internet Archive.

2. On Download options, click ISO image.

3. Choose whichever fits your need. In this case, we’re choosing 22H2 Beta2 x86.

Despite its polarizing reviews, tiny10 is still a good tool for developers and software enthusiasts alike who are keen to use Windows 10. The rule of thumb for it, however, remains the same: expect the tool to run into some sort of limitations.

On the other hand, you can also check tiny11 for Windows 11. It’s much more impressive even—some users even reported tiny11’s installation under 100 MB of storage, albeit slower and limited to only the command prompt and some rudimentary batch files work.

What do you think about this tool? Let us know in the comments!

How to switch File Explorer to WinAppSDK on Windows 11

Microsoft seemingly confirmed the weeks-old rumor that File Explorer would go WinAppSDK.

As confirmed by Windows enthusiast @PhantomOnEarth, the new ecosystem is living inside Windows 11’s recent Insider Build 25309. With a few registry tweaks, you can activate the new update.

NOTE: WASDK File Explorer is now simpler to enable in 25309 now that it’s rolling out. The registry edit you needed to make in 25300 is no longer required. If you want to be safe also run: vivetool /enable /id:40731912 vivetool /enable /id:41969252 vivetool /enable /id:42922424

However, another Windows watcher Albacore (@thebookisclosed) seemingly turned down the information. While many news outlets reported that the feature is living inside Build 25309, he spotted that it was actually inside Build 22621, which was released back in May 2022.

During a WinUI community call in February 2023, Microsoft may suggest its first wide step to integrate the file manager with its 365 products.

That means, for the first time in history, the tech giant could be moving File Explorer to WinAppSDK, the same base that built apps like PowerToys and Phone Link. While it’s not an entirely new ecosystem or a bare replacement, the latest SDK is here to enhance users’ experience by serving as a much modernized supporting library for standard APIs and WinUI 3.  

During the hour-long virtual conference where the update was teased, insiders said that the new File Explorer could have easy access to WinUI 3 features.

The question is: when will the update come and what can we expect?

When will Windows 11’s File Explorer update arrive?

The WinAppSDK-based Explorer is here in the Windows Insider Program, featuring a pizza icon in the toolbar to differentiate it from the Windows SDK version. Many believe that general availability will begin to roll out sometime this year.

With its full integration with 365 products, it’s safe to expect personalized toolbars, buttons, properties windows, and pop-up window designs that could bring those products’ features even more alive, and with a much better Recommended files feed experience. 

However, the news has been met with quite a polarizing recipient considering that the declarative language XAML is relatively slower than the traditional Win32 UIs, which already is plagued by performance issues for several users.

One user voices their concern,

It’s going to be extremely slow and buggy (like everything based on winui 3) and definitely pushed out to all users before it’s 100% ready, or even 60% ready. After a few months of patches it will become bearable but never better than the old app. FWIW it does look sleek and stylish.

How to activate WinAppSDK-powered File Explorer?

1. Make sure to join the Windows Insider Program and have the latest Windows 11 Insider Build installed in your system. If not, head over Settings ➜ Windows Update ➜ Install all.

2. Head over to GitHub to download the latest version of ViVeTool.

3. Once downloaded, click Extract all, select the location where you want to extract it by clicking Browse, then hit Extract. In this case, we extract it at C:\Users\WindowsReport\Documents\Tools\ViVeTool-v0.3.2.

4. Hit ? on your keyboard, then type “cmd” and right-click on Command Prompt -> Run as administrator.

5. Type in cd + the directory where we extracted ViVeTool. In this case, it’s at C:\Users\WindowsReport\Documents\Tools\ViVeTool-v0.3.2, then hit Enter.

6. Type the following command then hit Enter.

vivetool /enable /id:40729001

7. Reboot the computer.

In the meantime, it’s still worth noting that being an insider-only feature that isn’t out for primetime yet, you may be running into some performance problems here and there, so, patience is a virtue.

Are you excited about this upcoming feature? Let us know in the comments!

How to Play 5.1 Audio in VLC [Change Audio Output]

VLC media player is an open-source media player which can support different video and audio formats. It is popular, easy to use, and comes with the ability to play 5.1 surround sound audio.

However, if you don’t know how to play 5.1 audio in a VLC player, this guide can help! We will discuss the steps to change the audio output settings in VLC. Let’s get started! 

What can I do to play 5.1 audio in VLC?

1. For DirectX

  1. Launch VLC media player.
  2. Press Ctrl + P to open Preferences. 
  3. Go to the bottom right-hand side navigation pane, and select the All radio button under the Show settings area. All settings how to play 5.1 audio in vlc
  4. Select and expand the Audio tree, choose Output modules, and select DirectX. 
  5. Choose your Output device as Dolby and Speaker configuration as Windows Default from the drop-down menus. Audio DirectX how to play 5.1 audio in vlc
  6. Click Save to confirm your choice, then restart your VLC media player. 

2. For the MMDevice

  1. Press Ctrl + P to open Preferences. 
  2. Go to Audio, then select Output Modules. 
  3. Click MMDevice.MMDEVICE how to play 5.1 audio in vlc
  4. In the Output back-end drop-down list, choose DirectX audio output. 
  5. Reboot VLC for it to let the changes take effect.

So, these are steps to play 5.1 audio in the VLC media player. Please let us know in the comments section below if you have questions or concerns. 

How to Change Your Outlook Theme [2 Easy Steps]

Changing the theme on Outlook enables you to personalize your email application and makes it visually more appealing.

You can customize color, design, and how your messages or reading pane looks to make navigation on the app more accessible. 

In this guide, we will discuss the steps to change your Outlook theme to your liking. Let’s begin!

What can I do to change your Outlook theme on Windows? 

1. Use the Outlook web app

  1. Log in to your Outlook account on the web. 
  2. Click on the Settings (gear-like) icon in the upper right corner of the screen. 
  3. Now under Theme, click View all. View all change outlook theme
  4. From the Featured list, select a Theme. 
  5. Choose the theme you want, and you can see the theme you selected at once. Theme selected

2. Use the Outlook desktop app

  1. Launch the Outlook desktop app.
  2. Click File. change outlook theme File
  3. Then, select Options from the left pane. Options Theme change outlook
  4. Go to General, then locate Personalize your copy of the Microsoft Office section. 
  5. Click the Office Theme drop-down menu. OK
  6. Select one of the four options available and click OK to save the changes. 

So, these are ways to change your Outlook theme on your desktop and web apps.

And while we’re on customization, you may also color code Outlook emails and manage the most important ones better.

We also have a guide on how to change the font in Outlook for Mac or Windows, so don’t miss it for more customization tips.

Please let us know in the comments section below if you have any questions or concerns. 

Steam Manifest Unavailable: Fix it With These 4 Solutions

The Steam manifest unavailable error will prevent you from downloading or updating games, but luckily, there are a few ways to fix this error.

Why does the Steam Manifest unavailable error appear?

Issues with your connection are the most common cause, but this issue can appear due to antivirus or firewall settings.

How can I fix the Manifest Unavailable Steam error?

1. Reset internet settings

  1. Press Windows + R.
  2. Enter the script below and hit Enter.
    steam://flushconfig
    steam manifest unavailable
  3. A Steam – Clear Download Cache dialog box will then open. Press the OK button on that dialog box window.
  4. Now open the Windows rerun dialog box by pressing Windows and R keys simultaneously, input cmd, then hit Enter.
    steam manifest unavailable
  5. After that, in the Command Prompt window, enter the following command, then press the Enter key:
    ipconfig /flushdns
  6. Close Command Prompt, and restart Windows.

2. Change the download region

  1. Open Steam.
  2. In the opened window, click on Steam from the upper-left corner.
    steam manifest unavailable
  3. Click on Settings.
    steam manifest unavailable
  4. From the left window pane, select the Downloads tab, then select an alternative region on the Download Region drop-down menu.
  5. Restart the Steam software.

3. Turn off antivirus software

  1. Click on the hidden access arrow in the Taskbar.
    steam manifest unavailable
  2. Click on your antivirus icon, hover over Avast shields Control and select Disable for 10 minutes (This step varies for different antivirus software).

4. Turn off the Windows Defender firewall

  1. Hit the Windows key to open the Windows Search box, type Firewall, and open the Windows Defender Firewall option.
  2. Click on Turn Windows Defender Firewall on or off to open the WDF settings shown directly below.
  3. Select the Turn off Windows Defender Firewall radio buttons.
    steam manifest unavailable
  4. Press the OK button.

Those are a few confirmed fixes for manifest unavailable and missing content manifest errors. In addition to those resolutions, users can also try reinstalling Steam.

Note, however, that the manifest error can be due to Steam server outages. This isn’t the only problem you can face, and many reported that Steam download is stuck at 100%. Others reported that Steam download drops to 0.

It’s not just the download, many users claim that Steam update is stuck, but we tackled that issue in another article.

Please use the comment section listed below for any additional questions or curiosities.

Inbox Button Not Working on Outlook? Fix It in 4 Steps

The Inbox button not working on Outlook issue is lately being reported by users worldwide. This is not an error or a bug but is a change made by Microsoft. 

In this guide, we will discuss some available workarounds to get it to work as before. Let’s start!

What can I do if the inbox button is not working on Outlook? 

Before moving to these workarounds:

  • You should consider clicking the X sign (Close button) from the top left corner to return to the parent folder/message list. 

1. Add Inbox to favorites

  1. Locate the Inbox folder in the Navigation pane, right-click, and select Add to favorites.Add to FAVORITES 1 Inbox button not working on Outlook
  2. To make the Favorites appear on the navigation pane, click View. 
  3. Then go to the Folder pane, and from the dropdown, select Favorites to enable it.Folder pane Favorites Inbox Button Not Working on Outlook

2. Switch to a different folder 

  1. From the navigation pane, click on the Drafts or Junk folder.Drafts or JUNK Inbox Button Not Working on Outlook
  2. Now click on the Inbox button to go to the inbox folder.

3. Run the Javascript on Chrome

3.1 Activate Javascript

  1. Launch Google Chrome.
  2. Click three dots from the upper right corner. 
  3. Go to Settings. Settings CHrome
  4. Click Privacy and security and then click Site settings.Site Settings Inbox Button Not Working on Outlook
  5. Click Javascript. JAVASCRIPT
  6. Select Sites can use Javascript. Site can use

3.2 Run the script

  1. Open the Outlook web app on Google Chrome.
  2. Press Ctrl + Shift + J.
  3. Click three dots, and choose More tools. 
  4. Select the Developers Resources option.Developer Resources Inbox Button Not Working on Outlook
  5. Go to the Console tab, click the blank space and copy and paste the following script and run it:
document.addEventListener('click', function(event) {        const alreadedSelectedDiv = event.target.closest('div[aria-selected="true"]');
        if (alreadedSelectedDiv) {
            handleAlreadySelectedClick(alreadedSelectedDiv);
            handleAlreadySelectedClick(alreadedSelectedDiv);
        }
    });
    function handleAlreadySelectedClick(selectedDiv) {
       // Code to execute when a selected div is clicked
        var nextTarget = selectedDiv.closest('[role="tree"]').querySelector('div[aria-selected="false"]');
        if(nextTarget){
            nextTarget.click();//click another folder
            selectedDiv.click();//click back to target folder
        }else{
            console.log("no other folders to click!");
        }
    }

Now try to use the Inbox button on the Outlook web app. 

4. Contact Microsoft Support

Contact Microsoft Support

If nothing worked for you, we advised you to contact the Microsoft Support team. Explain your issue to them, and they can help you. 

If you use multiple accounts on Outlook and want to get all the incoming emails in one folder, you can create a unified Inbox view.

We also have a guide on what to do if Outlook is not updating inbox, so be sure to check it out.

So, these are some ways to fix the inbox button not working on Outlook. Try these methods and let us know what worked in the comments section below. 

Fix Steam No Internet Connection Error in 4 Quick Steps

Many games that users actively play on Steam are online or require an Internet connection, so experiencing errors in this area can be very frustrating.

Now, let’s fix this Steam no Internet connection error together, so you can go back to playing with your friends.

How can I fix the No Internet connection error on Steam?

1. Troubleshoot your connection

  1. Test if your network connection is working.
  2. Restart your router (make sure you unplug the power cord and leave it for 30 seconds switched off).
  3. Right-click the network icon in the Taskbar and select Troubleshoot problems.
  4. Open a Command Prompt window by pressing Windows, typing cmd, and running the top result as an administrator.cmd-admin hp printer won't scan
  5. Type the following commands (one by one) and press Enter after each: ipconfig/release ipconfig/all ipconfig/flushdns ipconfig/renew netsh winsock reset ipconfig-release steam no network
  6. Try to run Steam again

2. Update your network driver

  1. Press the Windows key, search for Device Manager and click on Open under the top result.open-dev you need wia driver to use this device
  2. Expand Network Adapters, right-click the first driver, and select Update driver.network driver
  3. Select Search automatically for drivers. The Steam no Internet connection issue will be fixed.search for driver automatically

Would you like to also be able to enjoy quality gaming without having to constantly worry about any crashes, lags, or freezes by keeping all drivers up to date and error-free easily?

It’s true that sometimes, manual checks are hard to perform, that’s why we recommend using an automated assistant that will scan for fresh driver versions daily.

3. Use a VPN

If you are connected to the internet but Steam still won’t connect, there might be a problem with the server you are connecting to. You can use a VPN to connect to a server in a different region.

Connecting via a VPN is safe and fast and can be done in a matter of seconds. For good riddance, we provided some simple steps that you can follow to enjoy a VPN connection and solve the Steam internet problem.

Here are five simple steps (using ExpressVPN as an example):

  1. First, choose a plan and Download ExpressVPN
  2. Then, install it on your computer
  3. Open it, then select Choose Location
  4. Select a Recommended country or another one that you prefer
  5. Enjoy a new and safer Steam connection.

    4. Fix Steam No Internet connection error by running as Administrator

    A quick method to fix the Steam no Internet connection error is to run the .exe file as an Administrator.

    This can be configured from the app’s compatibility settings and usually helps fix most problems.

  1. 1. Navigate to your Steam installation folder.

    steam folder location
  2. 2. Right-click on the Steam executable and select Properties.

    steam properties windows
  3. 3. Click on the Compatibility tab and tick the box next to Run this program as an administrator.

  4. 4. Press the Apply button and close the window.

  5. 5. Check if the Steam no Internet connection error is gone.

By going through this guide you will find yourself one step closer to re-establishing your proper Steam Internet functions.

We can also help you with situations such as:

  • Could not connect to the Steam network error – On occasion, hardware failures like switches or routers might lead to network issues. Or by usage behaviors that weren’t expected. such as increases in network bandwidth and modifications to the application settings.

After doing so, you can go back to enjoying your favorite titles not alone; but with your friends and the rest of the users around the world.

The solutions provided above should fix the No Internet connection error for Steam without too much effort. Should you run into a travis riles connection error, check out our article on how to deal with it.

Let us know in the comments section below which method worked best for you and how easy was it to apply it.

Windows Terminal Not Working: 6 Ways to Enable or Reset It

Windows Terminal not working on your device is one of the most annoying issues you can encounter. It will prevent your access to the Command Prompt, PowerShell, Azure Cloud Shell, and other command-line tools. Hence, this article will discuss some easy fixes to resolve the problem.

Also, you may be interested in our article about the best Windows 11 Terminal emulators to install on your PC.

Why is the Windows Terminal not working?

Since Windows Terminal is a pre-installed program on Windows, the causes may vary. Some of the notable ones are:

  • Corrupt system files – Every service and program running on the computer are attributed to system files that help them function properly. So, the Windows Terminal may not work if the system files are corrupted or missing.
  • Malware and virus attacks – If you have virus or malware attacks on your computer, it can infect and block the communication between Windows Terminal and the system, resulting in the issue.
  • Issues with Windows Terminal installation files – The problem can occur if the system cannot read or run Windows Terminal from its installation directory, making it inaccessible.
  • Windows Terminal is disabled – The Windows Terminal might be available on the PC, but still won’t work because the app is disabled in Settings.

Fortunately, you can resolve the Windows Terminal not opening on Windows 11 by following the steps outlined below.

What can I do if the Windows Terminal is not working?

Before anything, go through the following:

If you can’t fix the problem, try the solutions below:

1. Ensure Windows Terminal is enabled

  1. Press Windows + I key to open the Settings app.
  2. Click on Apps and select Advanced app settings.
  3. Select App execution aliases.
  4. Find Terminal from the list of apps and toggle it On.
  5. Try to access the Windows Terminal on your PC to see if it works.

Toggling Off and On the switch for Windows Terminal in App execution aliases performs a mini reset and refreshes its processes.

2. Run an SFC scan

  1. Left-click the Start button, type Command Prompt, and click the Run as administrator option.
  2. Click Yes on the User Account Control prompt.
  3. Type the following and press Enter: sfc /scannow 
  4. Restart your PC to see if the Windows Terminal works.

Performing an SFC scan will verify the integrity of your system files and repair the corrupt ones causing the issue.

Read our guide on how to fix the run as administrator option if it’s not working on your PC.

3. Repair and reset Windows Terminal via the Settings app

  1. Press Windows + I key to open the Settings app.
  2. Click on Apps, then select Installed apps.
  3. Locate the Terminal app, click on the three dots, and click on Advanced options.
  4. Click on the Repair button and wait until it’s complete.
  5. Then, click on the Reset button to complete the process.
  6. Try to open Windows Terminal and check if it works.

The Repair and Resetting option of the Windows Terminal will fix the corrupt installation files affecting it and restore it to the default healthy state.

4. Reset Windows Terminal via Command Prompt

  1. Left-click the Start button, type Command Prompt, and click the Run as administrator option.
  2. Click Yes on the User Account Control prompt.
  3. Copy and paste the following into the command bar, and press Enter: del /f /s /q /a "%LocalAppData%\Packages\Microsoft.WindowsTerminal_8wekyb3d8bbwe\LocalState\settings.json"
  4. Close the Command Prompt and check if you encounter the same issue when opening the Windows Terminal.

The above command line will reset Windows Terminal to the default settings and resolve configurations causing the problem.

If you encounter issues running the Command Prompt as an administrator on Windows 11, read our guide for quick fixes.

5. Uninstall and reinstall Windows Terminal from the Microsoft Store

  1. Press Windows + I key to open the Settings app.
  2. Click on Apps, then select Installed apps.
  3. Find the Terminal app, click on the three dots, and click on Uninstall.
  4. Close the Settings app.
  5. Left-click the Start button, type Microsoft Store, and launch it.
  6. Click on the search bar in the top-right corner, search for Windows Terminal, and click on the Get button in the top-left corner to install the app.
  7. After the process is complete, check if the Windows Terminal works.

Reinstalling Windows Terminal will fix faulty app issues affecting the program and install a verified version to improve performance.

You can read about how to resolve Microsoft Store not working in Windows 11.

6. Run System Restore

  1. Press Windows + R key to open the run dialog box, type control, then press Enter to open the Control Panel.
  2. Type recovery in the search bar and click on it to open.
  3. Then click Open System Restore.
  4. Click Next in the Restore system files and settings window.
  5. Choose the restore point and click Scan for affected programs.

System Restore will return the system to an earlier point, removing recent files, apps, drivers, and updates which may cause the Windows Terminal issue. Read our article on fixing Restore Point if it’s not working on your PC.

Alternatively, you can read how to download and install HyperTerminal for Windows 11. Also, we have a detailed guide on what to do if Command Prompt keeps crashing on your PC.

If you have further questions or suggestions, kindly drop them in the comments section.

0x8007041d: What Does It Mean & How to Fix This Error Code

Running into the error code 0x8007041d during a Windows Update process prevents your system from downloading or installing updates. It is accompanied by the service did not respond to the start or check request in a timely fashion message. Hence, we will provide the possible solutions in this guide.

Meanwhile, we have a similar article on fixing the 0xc190011f Windows Update error.

What is the error code 0x8007041d?

Error code 0x8007041d: The service did not respond to the start or check request in a timely fashion indicates a malfunction in your system operation. It is a runtime error that occurs during the Windows update process.

Furthermore, the error is usually preceded by Windows running slowly and unresponsive to mouse or keyboard input. Also, it can crash any active windows on the screen.

What causes the error code 0×8007041d?

The 0x8007041d error message often appears as a result of some issues affecting the system, such as:

  • Issues with software installation or uninstallation – Alterations to the software running on your computer leave files and data residues stored on the system. These files may cause issues with the system’s functionality.
  • Incorrectly configured system settings – Some system configurations can impede the Windows updates process, resulting in delay and the time check error.
  • Corrupt system files – Windows error code 0x8007041d can occur due to the system files being corrupted. Hence, the ongoing process can’t access them.

Irrespective of the causes, the solutions outlined below should fix the error.

How can I fix the error code 0x8007041d?

Before proceeding with any advanced troubleshooting steps, try the following:

If you can’t resolve the error, proceed with the steps below:

1. Run a System File Checker (SFC) scan

  1. Left-click the Start button, type Command Prompt, and click the Run as administrator option.
  2. Click Yes on the User Account Control prompt.
  3. Type the following and press Enter: sfc /scannow
  4. Restart your PC and check if the 0x8007041d appears.

An SFC scan will detect and repair corrupt system files on your PC that may be causing the error. Check our guide on how to fix the run as administrator option if it’s not working on your PC.

2. Reset the time and date on your PC

  1. Press Windows + I key to open the Windows Settings app.
  2. Click on the Time & Language and select Date and time.
  3. Click on Change beside Set the date and time manually.
  4. Set the time correctly, then click Change to save and initiate the changes.
  5. Restart your PC and check if the Windows update error 0x8007041d persists.

Setting the correct time and date can fix the error and help the update process to use the appropriate region.

3. Reset the Windows Update process

  1. Left-click the Start button, type Command Prompt, and click the Run as administrator option.
  2. Click Yes on the User Account Control prompt.
  3. Type the following commands and press Enter after each one: net stop wuauserv  net stop cryptSvc  net stop bits  net stop msiserver
  4. Run the following command one after the other: ren C:\Windows\SoftwareDistribution SoftwareDistribution.old   ren C:\Windows\System32\catroot2 Catroot2.old
  5. Type the following commands and press Enter after each one: net start wuauserv  net start cryptSvc  net start bits  net start msiserver
  6. Exit the Command Prompt and restart your PC to see if you can resolve the problem.

The above steps will repair the Windows Update process and fix the problems.

4. Run System Restore

  1. Press Windows + R key to open the run dialog box, type control, then press Enter to open the Control Panel.
  2. Type recovery and select it from the options.
  3. Then click Open System Restore.
  4. Click Next in the Restore system files and settings window.
  5. Choose the restore point, then click Scan for affected programs.

Initiating this removes recent activities after the restore point, recovering the system to the previous point. Do not hesitate to read our guide on how to fix the restore point if it’s not working on your PC.

As an automatic alternative, you can try third-party software to replace all corrupt and damaged files with clean parts from its extensive database.

Conclusively, check how to fix the update error code 0x80070070 on Windows 11. Also, we have an article on fixing slow Windows updates.

For more questions or suggestions, kindly drop them in the comments section.

Gamepad Recognized But Not Working in Games? Try This!

If your gamepad is recognized by Windows but doesn’t work in games, it’s usually caused by USB port issues, outdated drivers, or XInput compatibility problems. Fortunately, these are easy to fix. Follow the steps below to get back to gaming.

What do I do if my PC controller is detected but not working?

1. Run Windows Troubleshooter

  1. Go to the Windows Search Bar, type Control Panel, and click on the relevant search result.
  2. Go to View by the option on the top right corner, and select Large icons.large icon to fix gamepad recognized but not working in games
  3. Select Troubleshooting.troubleshooting to fix gamepad recognized but not working in games
  4. Click the View all option on the left pane.view all to fix gamepad recognized but not working in games
  5. Chose Hardware and Devices, right-click on it, and select Run as Administrator.
  6. Follow the on-screen instructions to complete the troubleshooting process.

Running the Hardware and Devices troubleshooter should resolve the issue if you’re experiencing problems with a recently installed device or hardware on your computer.

2. Reinstall USB drivers

  1. Right-click the Start button and select Device Manager.device manager to fix gamepad recognized but not working in games
  2. Find Universal Serial Bus controllers and double-click on them to expand the section.Universal serial bus controllers
  3. Right-click on the USB Composite device and Mass Storage device and select Uninstall device.uninstall to fix gamepad recognized but not working in games
  4. Click Uninstall in the confirmation prompt.uninstall
  5. Repeat for all other problematic devices.
  6. Reboot your computer.

Once you restart the computer, Windows will automatically reinstall USB controllers on your PC and run the devices properly.

Alternatively, if Windows cannot accurately identify the device, you can use a third-party driver updater such as Fortect Driver Updater.

3. Remove ghost devices

  1. Press Windows + S to open the Search menu, enter Device Manager in the text field, and click on the relevant search result.device manager
  2. Click on the View menu, and enable the Show hidden devices setting.show hidden devices to fix gamepad recognized but not working in games
  3. Now, expand Human Interface Devices, Sound, video and game controllers, and Universal Serial Bus controllers list, and look for lighter and more transparent devices.sections
  4. If any are found, right-click on them and select Uninstall device.uninstall device to fix gamepad recognized but not working in games
  5. Next, click on Uninstall in the confirmation box that pops up.uninstall
  6. Close Device Manager and reboot the computer.

Ghost devices are devices that are no longer attached to your PC. Windows kept a record of these devices, but the information was not removed when the device was unattached. And this often leads to conflicts.

4. Restart the PC in Safe Mode

  1. Press the Windows key + R.
  2. Type msconfig and press Enter.run msconfig
  3. Select the Boot tab.
  4. Under Boot options, check the Safe boot option.system configurations safe boot

When you boot Windows into Safe Mode, it will load with limited files, services, and drivers if the gamepad problem isn’t there while in Safe Mode, then your default settings and primary drivers are not contributing to the issue.

5. Remove duplicate devices

Note icon NOTE
Before executing the steps listed here, boot your computer into Safe Mode.
  1. Press Windows + R to open the Run command, enter devmgmt.msc, and click OK.devmgmt.msc
  2. Again, double-click on Human Interface Devices, Sound, video and game controllers, and Universal Serial Bus controllers to expand them.
  3. Now, locate all duplicate entries, right-click on them individually, and select Uninstall device.uninstall
  4. Confirm the same by clicking on Uninstall in the prompt.uninstall
  5. Close Device Manager and boot your computer normally (not Safe Mode).

While deleting the entries in the Device Manager, remove only the duplicate ones and not both. Once done, verify if the gamepad is recognized but not working in the problem of the game is resolved. If it’s still there, head to the last method.

6. Contact your gamepad device’s manufacturer

As a final resort, you can contact the gamepad’s manufacturer for more on how to resolve the issue. Any device manufacturer has a website where you can find contact options.

Usually, you can also find FAQs and knowledge base articles on the manufacturer’s website that may address the problem. If that doesn’t help, look for a live chat option or drop the support team an email.

How do I test my gamepad on Windows

  1. Press Windows + R to open the Run command and enter joy.CPL in the text field, and click OK.joy.cpl
  2. Select the connected gamepad, and click on Properties.properties
  3. Head to the Test tab, and you can now follow the on-screen instructions to test the gamepad.test to fix gamepad recognized but not working in games

Windows offers a simple and effective built-in tool to test the gamepad in Windows 10 and 11. Besides, you could also use a website like Gamepad Tester for the purpose.

And, of course, if nothing else works, there’s always the option to perform a system restore, or reset Windows 11 to its factory settings.

Why Is My Gamepad Detected but Not Working?

If your controller shows up in Device Manager or the “Set up USB Game Controllers” panel but won’t work in games, common causes include:

  • A bad USB connection
  • XInput/DInput compatibility issues
  • Outdated or missing drivers
  • Ghost or duplicate devices in Device Manager
  • System misconfigurations or corrupted drivers

These are all the ways to solve gamepad issues on Windows and enjoy your gaming session without the OS or the controller throwing any errors. Besides, if you find that the controller only works in Steam and not other games, disable Steam input!

Also, check the best controllers compatible with Windows, and enjoy the gameplay like it’s supposed to. For a more detailed walkthrough, see our full guide on how to fix gamepad issues on Windows.

Let us know in the comments section whether these steps and solutions worked for you.

How to Move Windows to SSD: Migrate the OS Without File Loss

Windows 10 already has improved booting time compared to previous versions of Windows, but moving it from a regular HDD to a new SDD will enhance the system’s booting time and overall performance even more. However, many users wonder if they can move the OS to an SSD without losing data. 

There are a couple of ways to transfer your system data from your current HDD to a new SDD, and we will discuss them all in this article.

The simplest solution is probably performing a clean install on the SSD drive, but you will lose all your data and have to install all your programs again.

And it could take even more time than moving an already-installed operating system. But you might choose this path if you don’t like to experiment.

Installing a fresh copy of Windows 10 on an SSD drive is no different than installing it on an HDD. First, you have to format your current system partition and then just install the fresh copy of Windows 10 on an SSD.

Can I move Windows to my SSD? Yes, you can move Windows to your SSD, and it can provide several benefits, such as improved boot and load times, faster application launch, and improved overall system responsiveness.

The benefits of moving Windows to an SSD include the following:

  • Faster boot times – SSDs have significantly faster write and read speeds than traditional hard drives, which means your computer will boot up more quickly.
  • Faster application launch – Since applications are stored on your SSD, they’ll load faster than on a traditional hard drive.
  • Improved system responsiveness – With an SSD, your computer will feel more responsive overall. Applications will launch faster, and you can navigate your files and folders more quickly.
  • Increased durability and reliability – SSDs don’t have any moving parts; hence they’re less likely to fail due to physical damage. This makes them more durable and reliable than traditional hard drives.

You can move your OS with the techniques we highlight below.

How do I move Windows to SSD?

Before you go into the solutions we offer, you must back up your data because if something goes wrong, you might lose it forever, and it will be required for the process.

When you back up your drive, it’s time to get rid of the additional disk space because SSDs have much less space than regular hard disks, so we want your system partition to fit on the SSD drive.

    Use a dedicated tool to move Windows from HDD to SSD

    You can transfer your system data from your HDD to a SSD using a dedicated tool. We recommend Laplink PCMover, a small desktop application that can help you to easily move all your files, settings, and user profiles to your SSD.

    With Laplink PCMover, the whole process is hassle-free, extremely user-friendly, and intuitive. The programs are installed and ready to use right away. You don’t need OS images, DVDs, download links, OS keys, or similar. You just need to configure the transfer and the tool will do the rest for you!

  1. 1. First, click on Get Laplink PCMover to download the app on both your computer and your SSD. (Make sure the SSD is connected to your computer at all stages of the process.)

  2. 2. Install Laplink PCMover.

  3. 3. Then, open the tool on both your PC and SSD.

  4. 4. Choose which network method you will use to connect your systems for the transfer. Laplink recommends using WiFi.

  5. 5. Then follow the on-screen prompts to allow the tool to discover the SSD (seen as New PC).

    use laplink pcmover to transfer OS
  6. 6. Once the two are connected, open Laplink PCMover on the SSD.

  7. 7. Click on Analyze PC, then follow the prompts to customize what you want to be transferred.

    transfer OS with laplink
  8. 8. After the transfer is complete, your OS will have been moved from your HDD to your SSD. It will take a few hours for the process to finish.

2. Use a specialized tool

  1. First, you must download and install the AOMEI Backupper on your machine.
  2. Then, you need to connect your hard drive to your computer.
  3. Now, go to the Clone option on the right one and select System Clone to launch the process. AOMEI backupper system clone
  4. Your machine should now display a new window asking you where you want to move the OS files. Select your SSD and confirm your choice.windows 10 move SSD
  5. Hit Next and follow the on-screen instructions to complete the process. It’s as simple as that.

If Windows doesn’t activate after the cloning process is complete, follow this guide to solve the problem.

And that’s about that; your Windows 10 is now successfully moved to the SSD drive, and it will perform much faster.

How to move only Windows 10 to an SSD?

  1. Connect your SSD to the PC and ensure Windows recognize it.
  2. Open the Disk Management utility by pressing the Windows key + X and selecting Disk Management.
    how to move windows to ssd
  3. Right-click on the partition containing Windows and choose Shrink Volume.
    how to move windows to ssd
  4. Shrink the volume to a size smaller than the SSD’s capacity.
  5. Create a new partition on the SSD by right-clicking on the unallocated space and selecting New Simple Volume.
    how to move windows to ssd
  6. On your new partition, assign a drive letter.
  7. Download and install cloning software such as EaseUS Todo Backup.
  8. Launch the software and select the System Clone option to clone your hard drive.
    how to move windows to ssd
  9. Select the source partition containing Windows and the destination partition on the SSD.
  10. Start the cloning process and wait for it to complete.
  11. Shut down your computer and disconnect the HDD.
  12. Restart your PC and go into the BIOS by pressing the corresponding Function key for your device.
  13. Set the SSD as the primary boot device.
  14. Start your computer and ensure that everything works correctly.

If you want to reinstall your Windows 10 apps on the new drive, check out this guide for a seamless transition.

That would be all; we presented you with a complete guide on moving your Windows 10 system from your old HDD partition to the SSD and getting everything to work.

If you followed our instructions and successfully moved your system to the SSD, please tell us your impressions in the comments section below, and we’ll be sure to take a look.

Edit Group Policy in Windows 10: Everything You Need to Know

You may need to edit Group Policy in Windows 10. So, in this guide, we will explore the best options to go about this.

What is group policy in Windows 10? Group Policy is a feature of MS Windows operating systems that allows administrators to centrally manage and configure settings for users and computers within an Active Directory environment.

In addition, it provides a way for administrators to define and enforce policies and settings for groups of users or computers.

In Windows 10, Group Policy manages various settings, including security, network, application, and many other system settings. For example, with Group Policy, administrators can configure password policies, user rights and permissions, software installation and updates, and more.

Group Policy settings are in Group Policy Objects (GPOs) and apply to users or computers based on their membership in Active Directory groups.

You may apply them at the local, domain, or organizational unit (OU) levels, allowing administrators to target specific groups of users or computers with different policies. The utility is a powerful tool for managing and configuring Windows 10 environments consistently and efficiently.

How can I edit the Group Policy in Windows 10?

1. Use Local Security Policy

    Normally, the use of the Group Policy could be accessed via the Gpedit option but in Windows 10 Enterprise and Windows 10 Pro we have something similar to this option, called Local Security Policy, or Secpol.

    This tool controls the security of the local Group Policy. Therefore, you can edit the Group Policy through Secpol.

  1. 1. Press the Windows key on your keyboard. This will open the search box.

  2. 2. Type secpol.msc or Local in the search box.

  3. 3. Now left click on the Local Security Policy result to open the app.

  4. 4. In the Security settings folder you will find Local Policies. Double click on it.

    edit local group policy windows 10
  5. 5. Select one of the categories you wish to edit by double-clicking on it. For example, you can edit Security options.

  6. 6. On the right side of the window you will have there two tabs: Policy and Security settings.

  7. 7. In order to disable or enable the group policies, you just need to double click in the box next to the policy under the Security setting tab and select from there the option you want.

    For example you can choose Disable or Enable.

    local security policy edit

In the basic edition, you can edit the Group Policy via Gpedit.msc by following the steps above and replacing secpol.msc with Gpedit.msc.

Also, note that in the basic edition of Windows, you do not have the Secpol tool.

2. Use Group Policy Editor

  1. To limit other users’ access to particular Windows components, go to Administrative Templates under the User Configuration section.
  2. Select the feature you want to edit, and enable or disable access to the respective feature.
    edit group policy windows 10

There you have a few short steps to edit the group policies in Windows 10.

You will succeed using any of the methods covered in this guide. However, note that you will not have access to Group Policy on the Home edition of the OS.

Lastly, if you have anything to add to this article or if you find it useful, let us know below.

How to Change DNS Settings on Windows 11

Your ISP configuration provides a default Domain Name System (DNS) when setting up your internet connection. This poses all sorts of security threats and slows the internet speed making it necessary to manually assign the DNS servers.

Go through this detailed guide to learn how to change DNS settings on Windows 11 computers and secure your online presence.  

How can I change the DNS settings on Windows 11? 

1. Use the Settings app

  1. Head over to the Settings app using the Windows + I shortcut.
  2. Select Network & internet from the left sidebar and choose Wi-Fi or Ethernet from the right section, depending on your internet connection.Change DNS Settings on Windows 11
  3. Scroll down and select Hardware properties.Change DNS Settings on Windows 11
  4. Locate the DNS server assignment setting and click the Edit button next to it.Change DNS Settings on Windows 11
  5. This will open the Edit DNS settings popup. Here, expand the drop-down on the top and choose Manual instead of Automatic (DHCP).
  6. Next, enable the toggle for either IPv4 or IPv6, based on the IP connection type. Change DNS Settings on Windows 11
  7. Now provide the primary DNS server address in the Preferred DNS field followed by a secondary DNS server address in the Alternate DNS field. (For instance, 8.8.8.8 is the preferred DNS address, and 8.8.4.4 alternative DNS address for Google’s DNS server)Change DNS Settings on Windows 11
  8. If you wish to enable the DNS over HTTPS feature to encrypt DNS requests, choose Encrypted only (DNS over HTTPS) for both Preferred DNS Encryption and Alternate DNS Encryption dropdowns.Change DNS Settings on Windows 11
  9. Press the Save button once you are done with the changes. 

You can easily change DNS settings on Windows 11 via the Settings app to speed up the browsing and avoid security issues. Enabling Encryption and defining the DNS with IPv4 and IPv6 protocols ensures that the network communication is much more secure. 

You can improve both speed and security by switching to a trusted resolver, and OpenDNS is a reliable option for safer browsing. Learn more in this guide on OpenDNS free DNS.

Note icon NOTE
Before you change the DNS settings on Windows 11 PC, ensure that your ISP supports manual DNS servers and is not configured by default to use the ISP’s DNS servers only.

2. Use Control Panel 

  1. Use the Windows + R shortcut to launch the Run command window, type the following command and press OK. This will directly open the Network Connections in Control Panel. ncpa.cplChange DNS Settings on Windows 11
  2. Right-click the Wi-Fi or Ethernet connection, depending on your connection type, and choose Properties from the context menu.Change DNS Settings on Windows 11
  3. This will open the Wi-Fi Properties window. Double-click the Internet Protocol Version 4 (TCP/IPv4) located under the This connection uses the following items section.Change DNS Settings on Windows 11
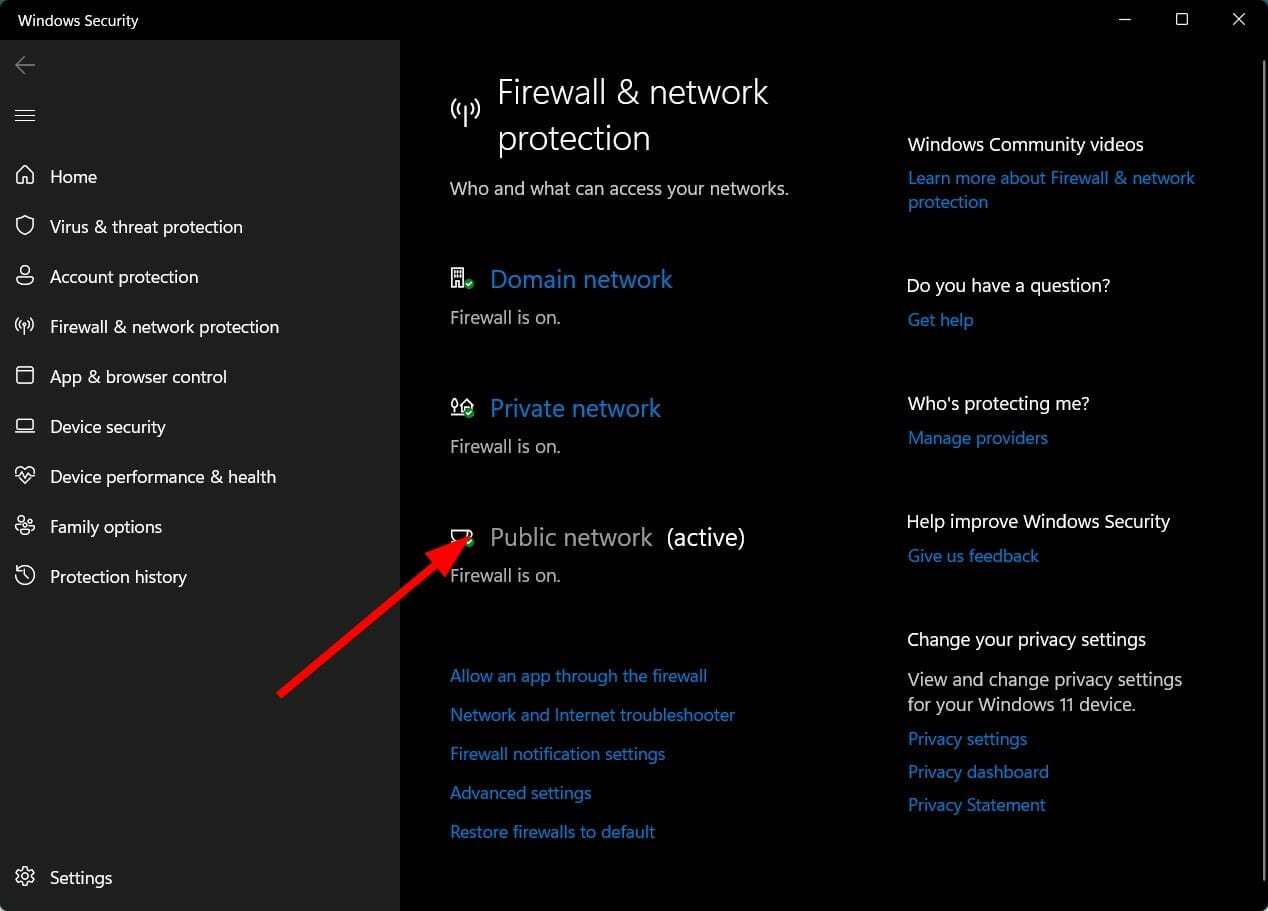
  4. On the new popup, enable Use the following DNS server addresses option and provide the Preferred DNS server and Alternative DNS server addresses in their respective fields. (For instance, to use Cloudflare DNS servers, assign 1.1.1.1 as Preferred DNS and 1.0.0.1 as Alternative DNS).Change DNS Settings on Windows 11 

  5. Press the OK button to save the changes. 

Many of our readers prefer Control Panel to change the DNS settings of their Windows 11 PC. Though it is one of the oldest ways to configure DNS settings, it does not allow you to enable DNS encryption for the servers.

3. Use Command Prompt

  1. Press the Windows key, type cmd in the search bar, and choose Run as administrator, located on the right pane.Change DNS Settings on Windows 11
  2. Click the Yes button on the User Access Control popup.
  3. In the Command Prompt window, type or copy-paste the following command and press the Enter key. Replace Preferred DNS with the primary DNS address of your preferred server. netsh interface ipv4 set dnsservers Wi-Fi Static Preferred DNS primaryChange DNS Settings on Windows 11
  4. Next, type or copy-paste the below command to assign an alternate DNS server and press the Enter key. Replace Alternate DNS with the secondary DNS server address.  netsh interface ipv4 add dnsservers Wi-Fi Alternate DNS index=2Change DNS Settings on Windows 11
  5. To reset the Manual DNS settings to Automatic (DHCP), type the following command and press the Enter key. netsh interface ip set dns "Local Area Connection" dhcpChange DNS Settings on Windows 11

If you use a wired ethernet connection, replace Wi-Fi with Ethernet in the above commands.

We also recommend reading our guide to diagnose & fix the most common DNS issues hogging your Windows computer.

4. Use Windows PowerShell

  1. Press the Windows key, type powershell, and select Run as administrator from the right section.
  2. Type and copy-paste the following command and press the Enter key to find out the InterfaceIndex of your current network configuration. Get-NetAdapter | Select-Object InterfaceAlias , InterfaceIndexChange DNS Settings on Windows 11
  3. Now, type or copy-paste the following command and hit Enter to assign the Primary DNS server address. Replace N with InterfaceIndex of your current network: Set-DnsClientServerAddress -InterfaceIndex N -ServerAddresses 8.8.8.8Change DNS Settings on Windows 11
  4. If you also want to assign an Alternate DNS address, you need type the address after adding a comma: Set-DnsClientServerAddress -InterfaceIndex N -ServerAddresses 8.8.8.8, 8.8.4.4Change DNS Settings on Windows 11

The NetTCPIP module allows you to change the DNS server settings using Windows PowerShell on Windows 11.

So, these are all the possible ways to modify DNS settings on your Windows 11 system. 

You may also be looking for ways to resolve the can’t connect to this network error if it frequents your Windows PC. 

Now that you know how to change the DNS, be sure to check our guide on how to find the fastest DNS servers near you.

If you face any issues when changing the DNS settings, contact us in the comments section for guidance.