Fix: This Email Address is Already Connected with Office 365

Microsoft’s Office 365 is a series of productivity apps that contain software that a lot of people use like Word, Excel, and Powerpoint.

The platform has its fair share of errors, but there’s one in particular that’s debilitating and that’s the inability to use your Outlook email elsewhere. The service may tell you the email is already in use.

Why does Outlook say the email has already been added?

There are multiple reasons why your Outlook app, or any Office 365 app for that matter, may tell you that your email address has already been added or is being used somewhere else.

The following is by means an exhaustive list, but a collection of likely scenarios.

  • Your Outlook email may be out of sync: If it’s out of sync, Windows may tell you that the account already exists. You will have to double-check your Office 365 settings.
  • You have currently signed into another device or platform: A simple mistake that can happen to anymore; you should sign out of all other devices.
  • The other email is already being shared with another account: This can happen if you try to add an email through the Add email account window.
  • You have corrupt files affecting your computer’s performance: If this happens, you can try resetting Windows 11 although this should be considered a last resort if all else fails.

How can I fix this Office 365 email error?

The complex solutions will also detail how to ensure the error doesn’t come back again. Before going into those, let’s go over the easier fixes first:

  • Log out from the other device or app. This should be the first thing that you should do. It’s a simple solution that solves many headaches.
  • Reinstall the Office 365 apps and log into them again. There could be some sort of glitch going on with the app. A simple reinstallation should fix that.
  • Create a different account on your computer. You can do this by going to the Accounts tab in the Settings menu. There should be an option called Add account.
  • You can also try using a different device, computer, or platform to log into your Office 365 accounts.
  • Make sure you have the correct credentials. If you forgot your credentials, it’s recommended you reset the password or contact your network administrator.

1. Reconfigure email via Control Panel

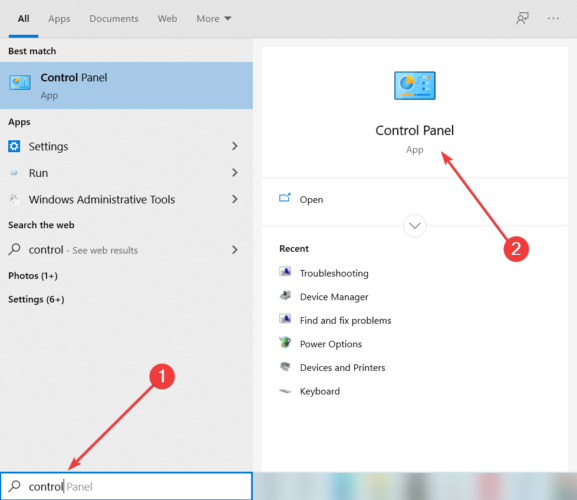
  1. Open the Control Panel and click the Mail entry. If you don’t see it, be sure to set your View By entry to Large Icons.
  2. In the new small window that appears, select Email Accounts.
  3. Click New in the Email tab.
  4. Tick the bubble next to Manual setup or additional server types. Then click the Next button at the bottom.
  5. Now tick the bubble next to Office 365, enter your email, then click Next.
  6. Enter your email password in the new small window that appears, then click OK.
  7. A Microsoft page may appear after this. Sign in with your Outlook account here as well.

2. Reconfigure both POP and IMAP email on Control Panel

  1. Open the Control Panel and return to the Account Settings as seen in the previous solution.
  2. This time, select POP or IMAP instead of Microsoft 365.
  3. Enter the information for your POP or IMAP email account, then click Next. Wait for your computer to finish setting up.

POP (Post Office Protocol) and IMAP (Internet Messaging Access Protocol) are two alternative ways to securely check your email on devices you don’t normally use.

Users have reported getting the same email error message when using one of these protocols.

3. Clear out the Windows 11 cache

  1. Open the Windows 11 Settings menu.
  2. Staying in the System app, click the Storage tab.
  3. Click Temporary files in the following section.
  4. Click the boxes next to each file type you want to remove, then select Remove Files.
  5. Click Continue on the small window that appears right after telling you that the files will be permanently deleted. Give your computer enough time to finish the process.

Do be careful during this process and make sure you’re not deleting anything important, especially files in the Downloads folder. It’s recommended that you move important files before deleting them.

4. Automatically clear out Windows 365 cache

  1. Launch the Office 365 app that you’re having trouble with. You may have to do this to all the apps if you’re having trouble with every single one.
  2. Click File in the upper left corner, then select Options.
  3. In the Options window, click Trust Center on the left-hand menu.
  4. Click Trust Center Settings in this new section.
  5. Check the box next to Next time Office starts, clear all previously-started web add-ins cache.
  6. Select OK then close the app.

This solution uses Microsoft Outlook and Excel as examples, but it works for all apps that are a part of Office 365.

5. Manually clear out Windows 365 cache

  1. Open the File Explorer and enter the following into the address bar: %LOCALAPPDATA%\Microsoft\Office\16.0\Wef\
  2. Go to that location on your computer and delete everything in there.

What can I do if SharePoint isn’t exporting to Excel?

If you’re not aware, some Office 365 users have complained about not being able to export data sheets from SharePoint to Excel. There may be a problem with the browser or the app timed out.

If it’s the latter, we recommend increasing the time-out value for Excel, so it lasts longer. Additionally, you should learn how to open Excel in Safe Mode if you encounter any problems.

You can try booting the entire Windows 11 system in Safe Mode or repair Microsoft Office 365. The files for the platform may have been corrupted.

Feel free to leave a comment below if you have any questions about other Office 365 problems. Leave a suggestion about guides that you’d like to see or information on the productivity apps.

How to Unlock a File on Windows 10 & Windows 11

Sometimes users can’t modify files in Windows 10 & 11 because they are locked. Windows displays variable error messages whenever users try to modify locked files along the lines of: The source or destination file may be in use, The file is in use by another program, The action can’t be completed because the file is open in.

All such file-locking errors prevent users from renaming, copying, deleting, and moving files when needed. Fortunately, it’s usually relatively straightforward to unlock a file with the methods below.

What is a locked file?

A locked file is one that Windows has temporarily restricted access to with its file-locking mechanism. The OS locks files in use by other programs or processes to ensure they can’t be simultaneously modified.

So, a locked file error means another program (process) is using the same file you’re trying to modify. Such an issue can also arise for shared files that can be edited by other users in a network environment.

Users can usually unlock files by ending the program processes utilizing them, as outlined in this guide’s resolutions. Terminating those processes will lift the applied file locking.

How do I unlock a locked file in Windows 10?

Before applying the resolutions below, check a few things first:

  • If the locked file is shared with other users via the internet or an organization-based network, check that nobody else is editing it.
  • Restarting your PC can often be a simple way to unlock a locked file. So, try restarting your PC to see if that unlocks the file.

If you still have problems with locked files in Windows, use the solutions below.

1. End background processes in Task Manager

  1. Press Ctrl + Shift + Esc to access Task Manager.
  2. Click Task Manager’s Processes tab if it’s not selected, then select the End task option for all open programs listed in the apps section.
  3. Disable non-essential third-party programs and services included within the background processes section by right-clicking them and selecting End task.
  4. Try modifying whatever file is locked again.
Note icon NOTE
Don’t disable anything within the Windows processes section. Disabling those more essential system processes will likely cause OS issues.

2. Restart Windows by Clean Booting

  1. Use the Windows + R keyboard key combination to start the Run command box.
  2. To access the MSConfig utility, type this text in Run and press Return: msconfig
  3. Check the Selective startup option on the General tab.
  4. Click System Configuration’s Services tab to view it.
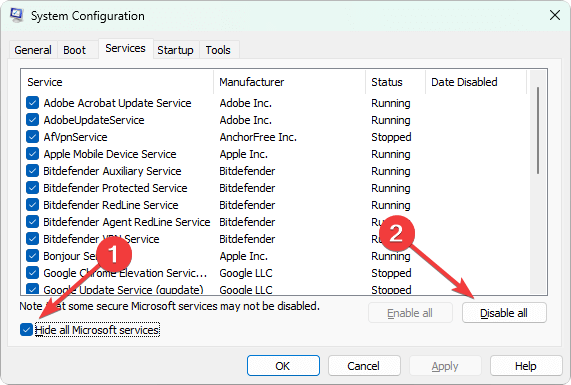
  5. Select Hide all Microsoft services to exclude more important services then click the Service’s tabs Disable all button.
  6. Select Apply and OK, and select Restart in the dialog box.
  7. Try to edit the locked file after clean booting.

3. Use a dedicated tool

  1. Open the IObit Unlocker page, and select Free Download there.
  2. Browse to the folder the IObit Unlocker installer downloaded to within File Explorer.
    Free Download button unlock file windows
  3. Double-click the unlocker-setup.exe file for IObit Unlocker.
  4. Install IObit Uninstaller with its setup wizard.
  5. Open the IObit Uninstaller window with the desktop shortcut for that software.
  6. Click the Add button.
    Add button unlock file windows
  7. Select the locked file you need to unlock and click the OK option in the Browse window.
    Browse for Files window unlock file windows
  8. Press the Unlock button if the file’s status is indeed locked. The box at the bottom of the IObit Unlocker window shows the processes causing the lock.
    Unlock option unlock file windows
  9. Or you can click the small arrow button to select options for unlocking and modifying (renaming, moving, deleting, or copying) the file.
    Unlock operation options unlock file windows

4. Unlock files with PowerToys’ File Locksmith Tool

File Locksmith is another utility you can unlock files with, which is included within the Microsoft PowerToys software. That tool detects processes using a locked file and enables you to end tasks.

To utilize File Locksmith, install the latest Microsoft PowerToys version. Windows Report’s File Locksmith post includes instructions for using that tool and installing PowerToys via PowerShell.

How to unlock a file in Windows 11?

We outlined solutions on how to unlock a file in Windows 10, but all the methods above can be performed identically on Windows 11 as well.

Those methods will almost certainly enable you to unlock all your locked files in Windows 10/11. Then you’ll be able to modify the files however you need to again.

Closing background processes with Task Manager or clean booting will often work for unlocking files. However, It’s worth installing a third-party tool like IObit Unlocker or PowerToys since they make it easier to identify background processes locking files.

Microsoft Edge Quick Links Disappeared: Windows 11 Fix

Microsoft Edge is a full-featured web browser that’s designed for Windows devices. It has an intuitive, easy-to-use interface and is the perfect way to get things done online. One of these features is the quick links option that lets you quickly open your frequently visited sites.

However, it now appears that users can no longer locate their quick links after updating to the latest browser version. If you’ve faced a similar issue, this article explains how to restore quick links.

Why have my Microsoft Edge quick links disappeared?

Quick links take you to your favorites and other pages, such as History and Downloads. You may wonder what is behind this issue so below are some possible causes:

  • You deleted them – It is possible that you may have accidentally deleted your Microsoft Edge quick links. Deletion can happen with a single click of a button so try adding them again.
  • Windows update – This is the most common cause of this problem. If you’re running Windows and have recently accepted an update, it’s likely that this is the culprit.
  • Microsoft Edge update – Another likely reason that your quick links have disappeared is that Microsoft Edge has been updated. 
  • Corrupted browser – It is also possible that your version of the browser has been infected by a bug. This can cause issues such as Microsoft Edge not opening.
  • Problematic extensions – Sometimes you can install an extension that is incompatible with your browser or just problematic. This can cause changes in how your browser behaves.

How do I get quick links back on my edge?

Before you jump onto the slightly advanced solutions, try the following:

  • Check for any browser updates.
  • Sign out of your account and then sign back in.
  • Restart your Microsoft Edge browser.
  • Reboot your computer and here’s what to do if your computer won’t restart.

1. Clear cache 

  1. Open Microsoft Edge and click on the three horizontal ellipses at the top right corner.
  2. Click on Settings.
  3. Select Cookies and site permissions and click on Manage and delete cookies and site data.
  4. Expand See all cookies and site data.
  5. Select Remove all.

2. Disable extensions 

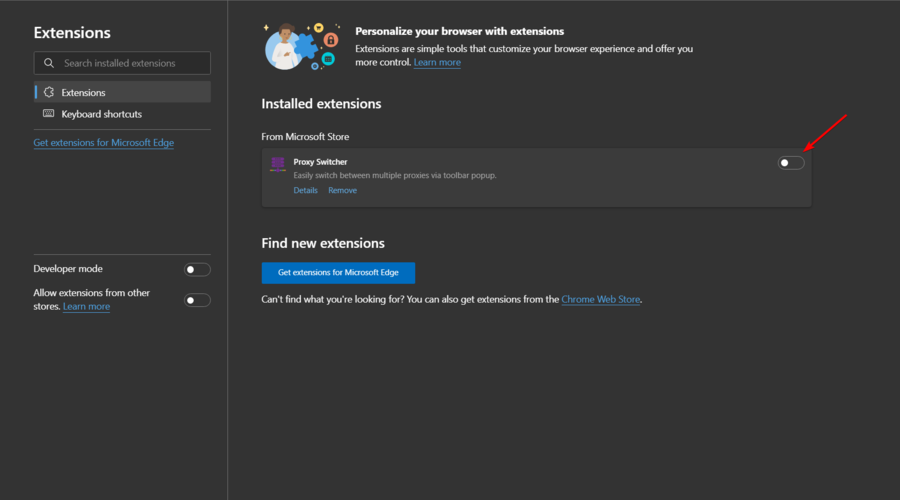
  1. Open Microsoft Edge and click on the three horizontal ellipses at the top right corner.
  2. Click on Extensions then select Manage extensions.
  3. Locate any recently added extensions and toggle the off button.

3. Reset Microsoft Edge 

  1. Open Microsoft Edge and click on the three horizontal ellipses at the top right corner.
  2. Click on Settings.
  3. Select Reset settings and hit Restore settings to their default values.
  4. Confirm Reset in the dialog box that appears.

4. Uninstall the latest Windows updates 

  1. Hit the Windows key and select Settings.settings windows 11
  2. Click on Windows Update and select Update history on the right pane.update-history restart to repair drive errors
  3. Scroll down and under Related settings, click on Uninstall updates.
  4. This will take you to the most recent installed updates.
  5. Select the topmost update and click on Uninstall.
  6. Restart your PC and load Edge again to see if the quick links are still missing.

If the quick links appear after you uninstall the updates, you can contact Microsoft and report that the latest update is causing the quick links to disappear from Microsoft Edge. 

Remember that Windows updates are critical especially to protect your system against threats. As such, keep checking for new updates as Microsoft releases them regularly to fix bugs and any known issues.

5. Reinstall Microsoft Edge 

  1. Hit the Windows key and select Settings.settings windows 11
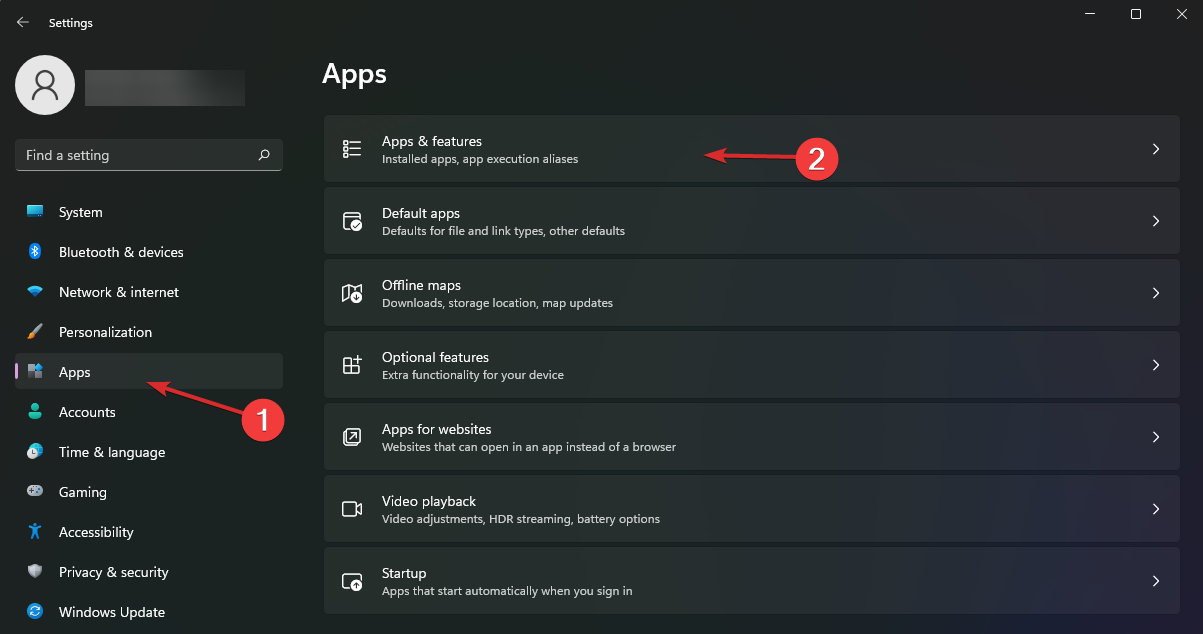
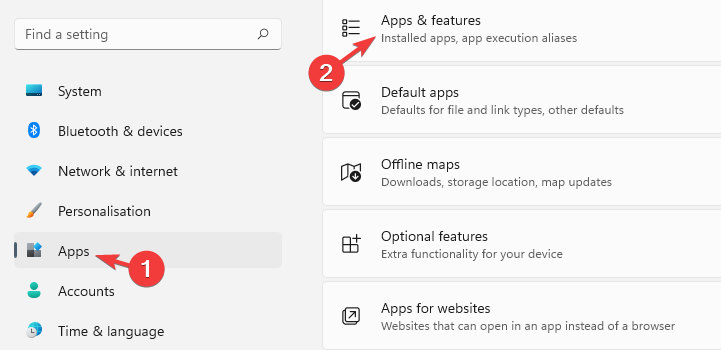
  2. Click on Apps on the left pane then select Apps & features.
  3. Locate Microsoft Edge, click on the three ellipses, and select Uninstall.
  4. Confirm Uninstall in the dialog box that pops up.
  5. Now go to the Microsoft Store, search for Microsoft Edge and click Install.

How to remove quick links in Microsoft Edge?

Whereas most people marvel at quick links and customize them to fit their daily browsing needs, there is a section of users who find them annoying. 

Quick links are basically built-in advertisements for Microsoft products and services. They appear in the new tab page of Edge and are designed to show you relevant content based on your browsing habits. 

To remove the quick links, follow the steps below:

  1. Launch Microsoft Edge and open a new tab.
  2. Click on the arrow below the search bar to open Quick links.
  3. Next, click on the three horizontal ellipses next to each icon then click on Remove.
  4. Continuously repeat these steps until you have successfully removed all quick links.

Should you face any other related issues such as Microsoft Edge being laggy and slow, do not hesitate to check out our expert article on the same.

We also share some of the best Microsoft Edge themes to give your interface a whole new look in case you’re tired of the default one. To get more out of the browser, also check out how to create a collection of pages and group them by interests.

Before you go, we have a guide on how to restore Edge tabs if they disappear, so don’t miss it for more information.

Let us know if you have been able to solve this issue in the comment section below.

8K Wallpapers for Windows 11: Where & How to Get Them

Windows 11 is the most recent OS from Microsoft, and it comes with a host of new features and improvements. One of the most interesting new features is the ability to use 8K wallpapers on your desktop.

8K resolution offers a stunning visual experience with 7680×4320 pixels, which is four times the resolution of 4K and sixteen times the resolution of 1080p. This article will show you where and how to get 8K wallpapers for Windows 11.

How can I set 8K wallpapers on Windows 11?

  1. Right-click on the desktop and select Personalize.
  2. Click on Background.
    windows 11 wallpaper 8k
  3. Click on Browse to select a wallpaper from your computer.
    windows 11 wallpaper 8k
  4. Select the 8K wallpaper you want, then click Apply and Save changes.

It’s important to note that while 8K wallpapers look amazing on high-resolution displays, they can also take up a lot of storage space. They may not be suitable for computers with low-end graphics cards or lower memory.

Also, when using 8K wallpapers on Windows 11, it’s essential to ensure that your computer is powerful enough to handle the high resolution.

How do I download HD wallpapers for Windows 11?

1. Download from Unsplash

  1. Navigate to the 8k section of the Unsplash website.
  2. Hover over any of the wallpapers you need.
  3. Click the download icon to start the download.
    windows 11 wallpaper 8k
  4. Choose a location and click the Save button.

Unsplash is a free website that offers a collection of high-resolution images, including 8K wallpapers. You can find a wide variety of 8K wallpapers for Windows 11 on Unsplash, suitable for different desktops and laptops.

2. Use Reddit

  1. Go to the Reddit website and search for Windows 11 8k wallpapers in the search bar.
    windows 11 wallpaper 8k
  2. Look for a subreddit dedicated explicitly to Windows wallpapers, such as r/Windows11 or r/WindowsWallpapers.
  3. Browse through the subreddit’s posts to find 8k wallpapers for Windows 11.
  4. When you find a wallpaper you like, click on it to open the full-sized image.
  5. Right-click on the image and select Save image as to save it to your computer.
  6. Once you’ve downloaded the wallpaper, you can set it as your desktop background in Windows 11.

Reddit is a great place to find high-quality wallpapers, including 8K wallpapers for Windows 11. Several subreddits are dedicated to wallpapers, such as r/wallpapers and r/Windows11Wallpapers, where users share their favorite wallpapers.

3. Download from DeviantArt

  1. Go to the DeviantArt website.
  2. Search for Windows 11 8k wallpapers in the search bar.
  3. Browse through the results to find 8k wallpapers for Windows 11.
  4. When you find a wallpaper you like, click on it to open the full-sized image.
  5. Look for the download button or right-click on the image and select Save image as to save it to your computer.
    windows 11 wallpaper 8k
  6. Once you’ve downloaded the wallpaper, you can set it as your desktop background in Windows 11.

DeviantArt is a popular online community of artists and designers. You can find a wide variety of 8K wallpapers for Windows 11 on DeviantArt, created by talented artists worldwide.

4. Use Wallpaper Abyss

  1. Go to the Wallpaper Abyss website and search for Windows 11 8k wallpapers in the search bar.
  2. Browse through the results to find 8k wallpapers for Windows 11.
  3. When you find a wallpaper you like, click on it to open the full-sized image.
  4. Look for the download button or right-click on the image and select Save image as to save it to your computer.
  5. Once you’ve downloaded the wallpaper, you can set it as your desktop background in Windows 11.

Many websites, such as Wallpaper Abyss, WallHaven, and Wallpaper Engine, specialize in wallpapers. These websites offer a wide variety of 8K wallpapers for Windows 11, and you can easily filter and search for the resolution you need.

Using any of the resources we have provided in this article, you should be able to get your favorite 8k wallpapers for the new OS.

Please let us know what your preferred alternative is in the comments area below.

Fix: We Were Unable to Set Up Your Pin Error in Windows 11

Are you encountering an We were unable to set up your PIN error when trying to set up a PIN in Windows 11? This can be frustrating, but fortunately, it is often easy to fix.

Whether you’re a seasoned Windows user or new to the operating system, this guide will set you up and running quickly. So, let’s get started!

Why can’t I set up a PIN on Windows 11?

You cannot set up a PIN on Windows 11 for several reasons. Some common causes include:

  • Issues with the region – The PIN feature may not be available in your region or device.
  • System requirements – Your device may not meet the minimum requirements for setting up a PIN.
  • Syncing issues – You may have set a PIN too recently, and the system is still syncing your account.
  • Account problems – There might be a problem with your Microsoft account, such as an expired password, preventing you from setting up a PIN.
  • GP settings – You may have a group policy in the organization that prevents you from setting up a PIN.
  • Conflicting programs – Some other software or hardware conflicts might prevent the setting up of PIN.

Some users may also be faced with the problem of removing the PIN from Windows 11. Also, note that some of these fixes may be useful in Windows 10. So, let us now show you some of the best solutions.

What should I do if I get the error we were unable to set up your PIN in Windows 11?

Before any advanced fixes, you should consider the following:

  • If you are using a device provided by your organization, check to see if there is a group policy in place that prevents you from setting up a PIN. In most cases, you may need an administrator to help with this process.

1. Create a new user account

  1. Press Windows + I to open the Settings app.
  2. Click on Accounts on the left pane, then select Family on the right.
    we were unable to set up your pin windows 11
  3. Now scroll down and select Add someone.
    we were unable to set up your pin windows 11
  4. You can choose to input the email address or select create an account for a child.
  5. Simply follow the wizard to the end, then log in with the newly created account and see if you still get the Windows 11 we were unable to set up your pin error.

2. Use the command prompt to reset the PIN

  1. Press the Windows key + X to open the Power User menu, and then select Command Prompt (Admin) or Terminal (Admin).
    we were unable to set up your pin windows 11
  2. Type the command below and hit Enter. Replace [username] with your Windows username.
    net user [username] *
  3. When prompted to enter a new password, type in a new PIN and press Enter.
  4. Confirm the new PIN by re-typing it and press Enter.
  5. Close the Command Prompt window.

3. Reset your PC

  1. Press the Windows + I keys at the same time on your keyboard.
  2. Click on Windows update and select Advanced options from the right.
  3. Scroll down and click on Recovery.
    we were unable to set up your pin windows 11
  4. Click the Reset this PC button.
  5. Choose whether you want to keep your files or remove everything.
  6. Follow the on-screen instructions to complete the factory reset process.

A reset is also an effective troubleshooting method against the Your PIN is no longer available error.

If you have correctly followed through with this guide, the Windows 11 we could not set up your PIN error should have disappeared. The PIN is an important sign in option on Windows.

Since we have not made this guide in any particular order, we expect you to try the solution that seems most relevant to your case.

Finally, please let us know what worked in the comments section below.

Microsoft news recap: 10,000 job cuts over next 3 months, 250K Xbox Series X|S sold in Japan last year, and more

Microsoft news recap is a weekly feature highlighting the top Microsoft news stories of the past week. Sit back, grab some coffee, and enjoy the read!

Microsoft will officially cut 10,000 jobs over the next three months

Companies across the tech space are announcing mass job cuts, as they prepare for a downturn in the economy, and Microsoft is no exception, with the company planning to cut 10,000 jobs over the next three months, across a variety of divisions, with expectations it will impact game developers such as 343 Industries, as well as the HoloLens hardware team, to name a couple.

Over 250K Xbox Series X|S consoles sold in Japan in 2022

There’s been signs over the past year of Microsoft making in-roads into the Japanese gaming market with its Xbox Series X|S, and according to a new report, there were 269,737 sales of Xbox Series X|S consoles in Japan last year.

ChatGPT capabilities will be part of Microsoft’s Azure OpenAI Service soon

Announced by Microsoft CEO Satya Nadella, OpenAI’s ChatGPT is planned to come to the Azure OpenAI Service, allowing customers to bring AI models into their own applications.

That’s it for this week. We will be back next week with more Microsoft news.

0xc1190011f on Windows 11: How to Fix This Update Error

Are you getting the Windows update error code 0xc1190011f constantly? You are not alone. This article will introduce the most effective solutions along with helpful information.

While updating Windows 11 to 22H2, you may get a lot of error codes. However, in a recent case, we have seen that a lot of users have been encountering this error 0xc1190011f even after applying the common fixes for update problems. If you are already hopeless, don’t worry. You can fix it.

Why is Windows 11 showing the error code 0xc1190011f while updating?

You may consider the following:

  • Corrupted system files: If somehow, system files get corrupted, Windows may fail to update itself to the latest build.
  • Third-party antivirus or services: Third-party antivirus or other services may interrupt the update process, which may cause the error code 0xc1190011f.
  • Disk problem: Low disk space or disk storage problems may cause Windows update errors.
  • Corrupted update components: If the core update components get corrupted, you may face various error codes while updating Windows.
  • Other system issues: There are some other unknown core Windows problems that also may trigger this update error.

How can I fix the update error 0xc1190011f on Windows 11?

After doing some research, we have found effective solutions. However, before going through these ways, we suggest you do the following things:

After that, go through these methods to fix error 0xc1190011f.

1. Run update troubleshooter

  1. Press Win + I on the keyboard to open Windows Settings.
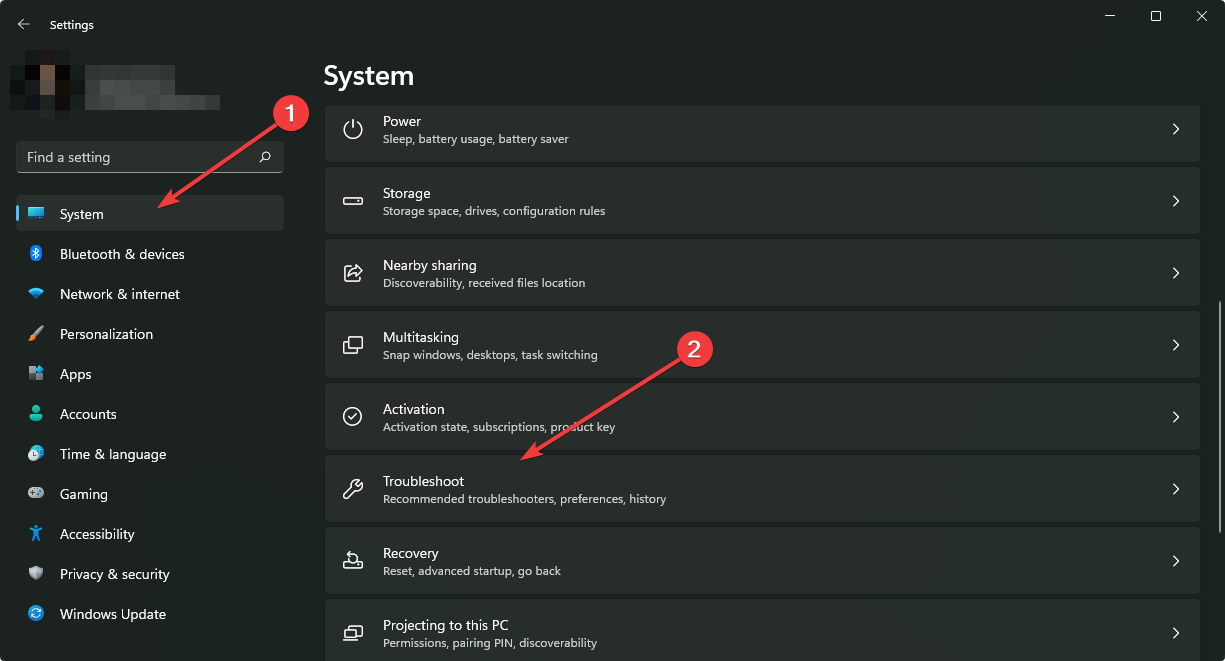
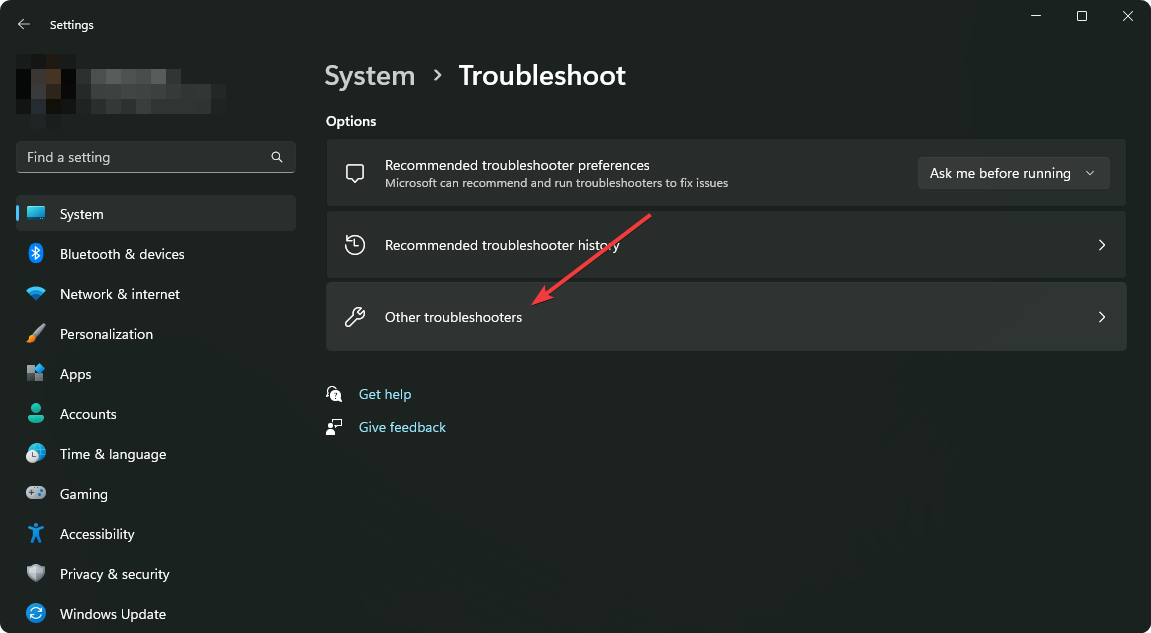
  2. Go to System and click on Troubleshoot.going system and troubleshoot windows 11 settings
  3. Click on Other troubleshooters.going other troubleshooters win11
  4. Then, click on Run next to the Windows Update.running windows update troubleshooter windows 11
  5. Finish any on-screen steps to complete the troubleshooting process.

2. Repair internal system components

  1. Open the Start Menu, and type cmd.
  2. Right-click on the Command Prompt and then click on Run as Administrator.
  3. Now, type the following command and hit Enter to execute it: sfc /scannowsfc scannow command
  4. Next, run the following commands one by one: dism /online /cleanup-image /checkhealth
    dism /online /cleanup-image /scanhealth
    dism /online /cleanup-image /restorehealth
  5. After repairing, restart your PC.

3. Disable delivery optimization and clear the files

3.1 Diable delivery optimization

  1. Open the Windows Settings.
  2. Fo to Windows Update and click on Advanced options.going advanced options windows update windows 11 settings
  3. Go to Delivery Optimization.going delivery optimization windows 11 update settings
  4. Turn it off by toggling the switch.disabling delivery optimization windows 11

After disabling, you will need to clear the existing related temporary files.

3.2 Clear delivery optimization files

  1. From Windows Settings, go to System and click on Storage.going storage settings Windows 11
  2. Click on Temporary files.going temporary files from Windows 11 storage settings
  3. Uncheck everything except Delivery optimization files.checking delivery optimization from temporary files storage settings
  4. Click on Remove files.

Now, try to update Windows 11 again and see if it has helped or not.

4. Clear SoftwareDistribution Folder

  1. Open the Command Prompt like before.
  2. Run the following command one by one: net stop wuauserv
    net stop bits
    net stop cryptSvc
    net stop msiserver
  3. Using File Explorer, go to the following location: C:\Windows\SoftwareDistributionsoftware distribution folder windows 11
  4. Delete everything from there.
  5. Run the following command: net stop wuauserv
    net stop bits
    net stop cryptSvc
    net stop msiserver
  6. Restart your PC.

5. Perform Clean boot

  1. On the Start Menu, type MSconfig, and press Enter.
  2. Go to the Services tab.
  3. Check Hide all Microsoft Services and click on Disable all.disabling non microsoft background items system config windows
  4. Click on OK.
  5. Restart your PC.

The clean boot will ensure that no third-party background task is active. It will help to understand if any of these services is responsible for the error 0xc1190011f on Windows 11.

If you find that this problem is not appearing in clean boot, enable the third-party services one by one and find out which one is the culprit. Then, keep it disabled or uninstall the related software.

6. Reset Windows

  1. Open the Windows Settings like before.
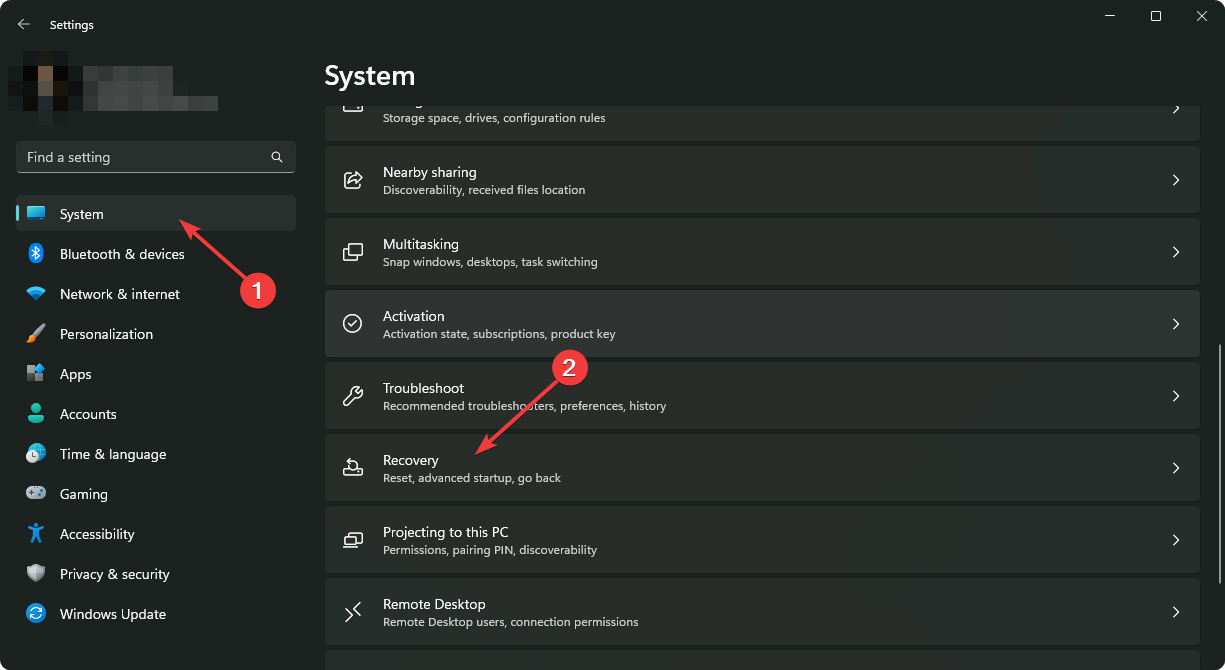
  2. Go to System and then Recovery.going recovery win11 settings
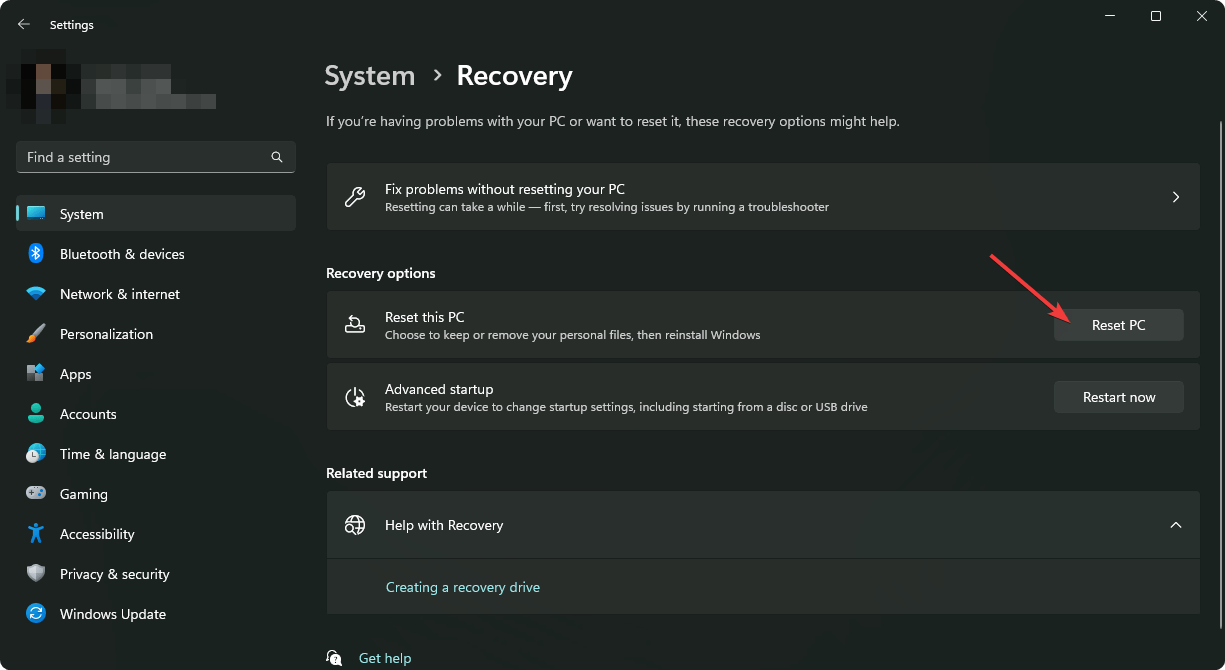
  3. Click on Reset PC.clicking reset PC win11 settings
  4. Go ahead and finish the process.

7. Upgrade using a media creation tool

  1. Go to Windows 11 Media Creation Tool download page.
  2. Click on Download under the Media Creation Tool section.downloading media creation tool
  3. Open it on your PC.
  4. Go ahead and choose your preferences to install the latest Windows 11 on your computer.

Installing the latest Windows 11, for example, version 22H2, using the Media Creation Tool, is very helpful for other problems as well. After doing this, you will not face any similar update error in the future. If necessary, learn how to use Media Creation Tool.

This article has explained how you can fix error 0xc1190011f while updating Windows 11. If you have any suggestions or opinions, let us know in the comment box.

How to Delete OST Files from Outlook: 4 Safe Ways

Outlook is a powerful email client that allows users to manage their email accounts, contacts, and calendar in one place.

However, as you use Outlook, it can create large files called OST files that can take up a lot of space on your computer. These files are used to cache your email and other data for offline access, but they can become corrupted or obsolete over time.

In this article, we will discuss some safe ways to delete OST files from Outlook to free up space and improve the performance of your computer.

What happens if I delete an Outlook OST file?

If you delete an Outlook OST file, Outlook will no longer be able to access the cached data stored in that file.

If you are working offline and delete the OST file, you will no longer be able to access your email, contacts, calendar, or other data cached in that file.

However, if you have a connection to the email server and the data is still on the server, Outlook will automatically download the data again and create a new OST file for offline access.

It is also important to note that if you delete an OST file associated with an account that is no longer in use, it will not affect your current Outlook data or operations.

How can I delete OST files from Outlook?

1. Delete the OST file manually

  1. Press Windows + R to open the Run dialog.
  2. Type the path below and hit Enter.
    %localappdata%\Microsoft\Outlook
    delete ost file outlook
  3. You should be led to where OST files are stored; you can delete them manually here.

This method involves finding the location of the OST file on your computer and deleting it manually.

2. Use a third-party OST file deletion tool

There are many third-party tools available that can help you delete OST files from Outlook. These tools are designed specifically for this purpose and can often delete multiple OST files simultaneously. OST Extractor Pro and OST Recovery may be excellent choices to try.

It’s important to note that some third-party tools may have additional features or options, so read the documentation or help files that come with the tool to learn how to use it effectively.

Also, before you decide to use any third-party tool, you should research, read reviews, and test the tool to ensure that it meets your needs and is reliable. Also, it’s always a good practice to back up your data before you make any changes.

3. Disable cached Exchange Mode

  1. Launch Outlook.
  2. Click on File.
    delete ost file outlook
  3. Navigate Account Settings and Account Settings.
  4. Select Microsoft 365 or Exchange, and click Change.
  5. Under the Offline Settings option, tick Use Cached Exchange Mode.
    delete ost file outlook

This will prevent Outlook from creating and using OST files. However, you will need to be connected to the email server to access your data.

4. Remove the Outlook profile

  1. Launch Outlook.
  2. Click on File.
    delete ost file outlook
  3. Navigate Account Settings and Manage Profiles.
    delete ost file outlook
  4. Click on a Profile and select Remove.

This method can be helpful if you want to delete multiple OST files simultaneously.

Deleting OST files from Outlook is a simple task that can free up space and improve the performance of your computer.

Following the safe methods outlined in this article, you can easily remove these files without damaging your Outlook data or causing other problems.

Whether you need to free up space on your hard drive or want to improve the performance of Outlook, removing OST files is a great place to start.

Lastly, always back up your data before making any changes to your Outlook files so you can restore them if something goes wrong.

How to Install Apple Mobile Device USB Driver on Windows 11

Downloading and installing the Apple Mobile Device USB driver on Windows 11 will ensure a seamless connection between your phone and computer.

First, connect the iPhone to PC using the iTunes App Store app, or using a third-party file transfer app, and connecting via a USB cable. You need to download and install the drivers for your Apple computer and phone. You can find them on the Apple website. Next. you will need a USB cable.

Also, make sure that your iPhone and the PC are updated and that the cable is compatible with your Apple device.

How to download Apple Mobile Device USB driver for Windows 11?

1. Download from the manufacturer’s site 

Apple has an official site where you can find most of its products and services for download. However, not all drivers are always available, and you may have to switch to third-party sites in case it’s missing from the official website.

One such site is Driverscape which allows you to download Apple’s mobile device USB driver. There will be several options to select from depending on your version of Windows. For instance, you can download the Apple mobile device USB driver Windows 11 64-bit or 32-bit.

To add an extra layer of protection, ensure that you have installed a comprehensive antivirus solution on your PC. This will ensure that all downloads are scanned before they are installed on your computer to prevent any virus infections.

2. Use Device Manager 

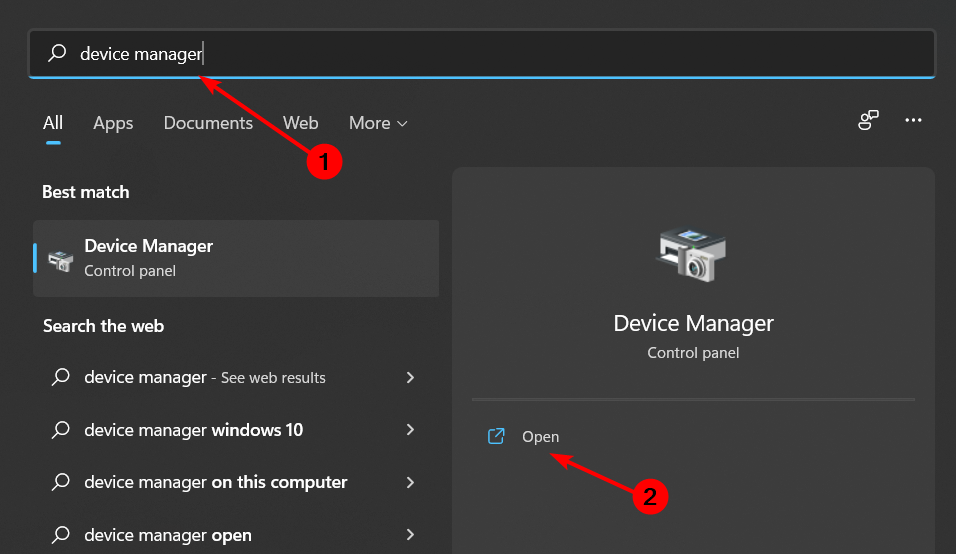
  1. Hit the Windows key, type Device Manager in the search bar, and click Open.
  2. Navigate to Universal Serial Bus devices and click to expand.
  3. Locate your Apple driver, right-click on it and select Update driver.
  4. Select Search automatically for updated driver software.

3. Reinstall the driver

  1. Hit the Windows key, type Device Manager in the search bar, and click Open.
  2. Navigate to Universal Serial Bus devices and click to expand.
  3. Locate your Apple driver, right-click on it and select Uninstall.
  4. Confirm Uninstall in the next confirmation box that appears and restart your PC.
  5. The drivers will automatically be reinstalled.

This is a fairly easy method, especially for those users who have no idea what driver to select from when presented with a list.

4. Use a driver updater utility

The easiest way to install the Apple USB driver on Windows is to use a driver updater utility. It’s by far the simplest, most low-effort method of them all.

A reliable tool such as Fortect Driver Updater is going to automatically search into its trustworthy database for compatible drivers. All you have to do is make sure your Apple USB is connected to your PC.

The software will identify it and add the latest compatible driver on your PC. All you have to do is confirm you want to install it.

Fortect Driver Updater

Get the latest updates for your PC’s drivers with one of the most reliable tools.
Check price Visit website

By now, you already know how to update drivers on your PC and why it’s important to do so.

There’s so much more you can do with Apple devices such as view Apple photos on Windows PCs. While you’re still here, don’t forget to check out our recommendation for iOS emulators so that you too can enjoy all the mind-blowing features of an iPhone on a Windows device.

We also have dedicated guides on how to transfer files between your iPhone and PC, and how to make a backup of your iPhone on PC without using iTunes.

Let us know which method you used to download the USB drivers and the reason behind your selection in the comment section below. 

Fix: Google Drive Disappeared from Windows 11’s File Explorer

Are you a Windows 11 user who recently noticed that Google Drive disappeared from your File Explorer? You’re not alone.

Many users have reported this issue, which can be a frustrating experience. This article will explain what causes this problem and provide a step-by-step guide to fix it.

So, let us get to it.

Why is my Google Drive not showing up in File Explorer?

There could be several reasons why your Google Drive is not showing up in File Explorer in Windows 11. Some possible causes include the following:

  • Drive client not installed or running correctly – The Google Drive client program allows you to access and manage your Google Drive files directly from your computer. If it’s not installed or running correctly, it can cause the drive to not show up in File Explorer.
  • Google Drive client configuration – The Google Drive client must be configured correctly for it to show up in File Explorer. If the configuration settings are incorrect, the drive may not show up.
  • Google Drive service problems – Sometimes, issues with the Google Drive service can cause the drive to not show up in File Explorer. This can happen if the service is down or there is a problem with your account.
  • Windows 11 File Explorer setting – Windows 11 File Explorer has a Quick Access feature that lets you quickly access your most frequently used files and folders. If you still need to add the Google Drive folder in Quick Access, it may not appear in File Explorer.
  • OS problems – Sometimes, issues with the OS can cause the drive to not show up in File Explorer. This can happen if there is a problem with the file system, the registry, or other system components.

Let us now explore the most effective solutions.

How do I get Google Drive back on File Explorer?

Before you try any of these fixes, you should:

  • Restart your computer. A reboot can often resolve any issues preventing Google Drive from showing up in File Explorer.

1. Add Google Drive to Quick Access

  1. Open the File Explorer by clicking on the taskbar’s folder icon or pressing the Windows key + E keys.
  2. Navigate to the Google Drive folder on your computer. It is often in the path below (remember to substitute username for your actual user name).
    C:\Users\username\Google Drive
  3. Right-click on the Google Drive folder and select Pin to Quick access from the context menu.
    google drive disappeared from file explorer windows 11
  4. The Google Drive folder will now be added to the Quick Access section of File Explorer.

This will make the Google Drive folder easily accessible every time you open File Explorer, so you won’t have to navigate to it manually.

2. Reinstall the client

  1. Press Windows + R, type control, and hit Enter.
  2. Select Uninstall a program.
  3. Choose Google Drive from the program list, click Uninstall and follow the wizard to complete the uninstallation.
    google drive disappeared from file explorer windows 11
  4. Visit the Google Drive download page and click on Download Drive for desktop.
  5. Click on the downloaded folder to start the installation, and follow the wizard.

If Google Drive disappeared from File Explorer on a Windows 11 device, it should be accessible again once you install the client.

3. Run the Google Drive or Google Backup and Sync processes

  1. Press Crtl + Shift + Esc to open the Task Manager.
  2. Scroll through the list of processes and ensure Google Drive is running.
  3. If not, start the application and see if it resolves the problem.

4. Set the Google Drive folder as the default sync folder

  1. Click on the arrow at the far right of your Taskbar and select the Google Drive icon.
  2. Now click the gear icon and select Preferences.
    google drive disappeared from file explorer windows 11
  3. Click on the gear icon in the Google Drive interface.
  4. Set the Google Drive streaming location to Drive letter and click Done.

We hope this article has helped you understand why Google Drive disappeared from your Windows 11 File Explorer and provided you with a solution.

The fix is relatively simple and should take a few minutes to complete. Always keep your operating system and apps up to date to prevent potential issues.

If the problem persists, it’s best to contact the Google Drive support team for further assistance.

Fix: Event 2545 on Microsoft-Windows-DeviceManagement Log

This guide deals with how you can solve event 2545 Microsoft Windows Device Management Enterprise Diagnostics Provider. Several users have reported facing the Event 2545, Microsoft-Windows-DeviceManagement-Enterprise-Diagnostics-Provider error, which unfortunately makes the Windows PC misbehave.

The error is also the cause of frequent system crashes, freezes, and random shutdowns. Thankfully, we have a bunch of solutions that can help you fix the problem. Let us get right into it.

What causes Event 2545 on Microsoft-Windows-DeviceManagement Log error?

After some careful research, we have deduced that the Event 2545 on Microsoft-Windows-DeviceManagement Log error is caused because of some issues with the MDM server, and missing sections or logs.

Notably, the MDM server is responsible for letting your PC configure devices securely and wirelessly by sending profiles and commands to the device. This is for the devices that are owned by the user or the organization.

MDM server is also capable of updating the software, and device settings, monitoring compliance with organizational policies, and remotely erasing data or locking the device.

If such an important aspect of Windows gets some issues, then you are bound to face multiple other problems. This problem is also often associated with corrupt system files or issues with the recently install Windows update.

How can I fix Event 2545 on Microsoft-Windows-DeviceManagement Log error?

1. Roll back Windows update

  1. Press the Win button to open the Start menu.
  2. Open Control Panel.
  3. Click on Programs and Features.
  4. Hit the View the installed updates.
  5. Uninstall the recently installed updates.
  6. Restart your PC.

Chances are that the update that you have recently installed is the main culprit and brings some bugs which are causing the Event 2545 on Microsoft-Windows-DeviceManagement Log error.

In such an event, we would advise you to roll back the update or uninstall the latest one that you have installed on your PC and check if this resolves the issue or not.

2. Check for the latest updates

  1. Press Win + I keys to open the Settings menu.
  2. Click on Windows Update on the left pane.
  3. Click the Check for updates button.
  4. Install if a new update is pending.

On the contrary, to uninstall the recently installed update, we would suggest you also check if an update is pending to be installed. Often the latest update brings fixes for the bugs or glitches present in the previous version of the update.

3. Look for MDM failure

  1. Press the Win + I keys to open the Settings menu.
  2. Select Accounts from the left pane.
  3. Click on Access work or school.
  4. Click on Export.
  5. Open File Explorer and navigate to the below path. C:\Users\Public\Documents\MDMDiagnostics

4. Run SFC Scan and DISM

  1. Open the Start menu by pressing the Win button.
  2. Type Command Prompt and run it as an admin.
  3. Type the below command and press Enter. sfc /scannow
  4. Wait for the command to execute and complete.
  5. Execute the below command and press Enter after each one. DISM /Online /Cleanup-Image /CheckHealth DISM /Online /Cleanup-Image /ScanHealth DISM /Online /Cleanup-Image /RestoreHealth
  6. Restart your PC.

Windows OS comes with in-built repair tools such as SFC Scan and DISM that will help you fix the missing or corrupt system files, which are often the reasons for random issues on your PC and could also trigger the Event 2545 on Microsoft-Windows-DeviceManagement Log error.

5. Run the Windows update troubleshooter

  1. Press the Win + I keys to open the Settings menu.
  2. Click on Troubleshoot.
  3. Select Other troubleshooters.
  4. Hit the Run button for Windows update.
  5. Follow the on-screen prompts and check if this resolves the issue or not.

The troubleshooter is another way of fixing several issues related to any program or service on your PC. You can use the Windows Update troubleshooter and check if this fixes the Event 2545 on Microsoft-Windows-DeviceManagement Log error.

6. Use System Restore

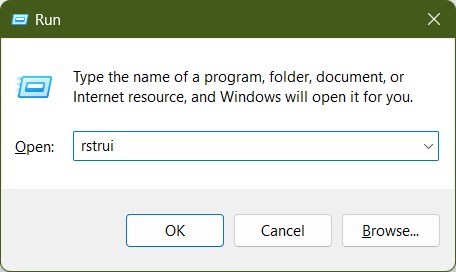
  1. Press the Win + R keys to open the Run dialogue.
  2. Type rstrui and click OK.
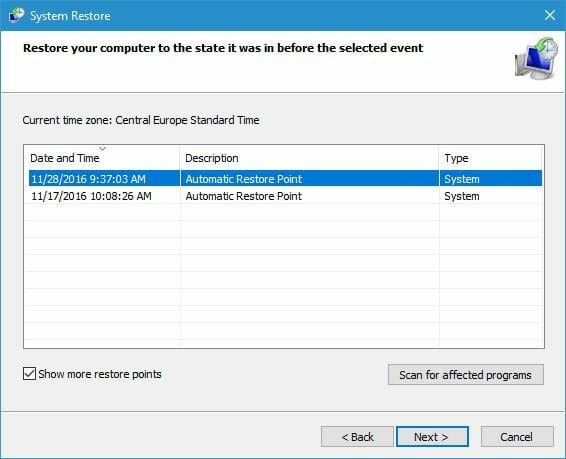
  3. Select Choose a different restore point.
  4. Click Next.
  5. Select a restore point.
  6. Press Next.
  7. Click Finish to initiate the system restoration.

Restoring your PC to a previous time will uninstall software or the Windows update installed after a selected restore point date. This will help you go back to a time when everything was working normally for you.

However, do note that you can restore back to a previous point only if you have created a restore point. We have a dedicated guide that will help you with how to create a system restore point on your PC.

That is it from us in this guide. You can refer to our guide on everything you need to know about the Event Viewer on your PC to help you with understanding the log files and troubleshooting the issues.

Also, in case the Windows update isn’t working or loading on your PC, then you can check out our guide which will help you resolve the issue in no time.

Another solution that can help you fix any issues with your PC is to reset it. However, we would suggest you reset your PC only when none of the above-mentioned solutions worked in your favor. To safely reset your PC, you can check out our guide on how to reset a Windows PC.

Feel free to let us know in the comments below, which one of the above solutions helped you resolve the problem.

How to Reset PS5 Controller: 3 Simple Methods to Pick From

The PS5 controller is a great gaming device, but many are wondering to how to reset it. This is pretty simple, and it can help you with various issues.

Another way to fix controller issues is to update your PS5 controller. If the update doesn’t help, follow the steps to reset your controller.

How can I reset the PS5 controller?

1. Turn the controller off and on

  1. Press the PS button on the controller.
  2. Select Accessories. Next, select the controller that you want to turn off and choose Turn off.
  3. Turn the controller back on and check if the problem is resolved.

This is the simplest way to reset a PS5 controller, so be sure to give it a try.

2. Delete the controller

  1. From the PS5 Home Screen locate and select Settings.
     
  2. Next, go to System and select Accessories.

  3. Here select General and Bluetooth Accessories.
  4. Under the heading Registered Accessories locate and select your controller.
  5. From the menu choose Delete.
  6. When prompted to forget the device, select OK.
  7. After that, pair your controller once again.

By unpairing the controller, you’ll reset your PS5 controller, so don’t hesitate to try it.

3. Perform a factory reset

  1. Turn off your PS5 console. 
  2. Search for and locate the small reset button on the back of your controller.
  3. With a small tool try to push the button inside.
  4. Hold the button down for roughly 3-5 seconds.
  5. Now press the PS button on the front to sync it again.

If you ever wondered how to factory reset a PS5 controller, you should know that’s simpler than you think.

This is about all. As you can see, resetting your PS5 controller is not at all difficult and is something you can easily do by following the instructions presented in this article.

Before trying to reset your controller, be sure to check the battery level of your PS5 controller, to avoid any issues. As for additional problems, few users reported that their PS5 is blinking orange, but we covered that issue in a separate guide.

As always, don’t hesitate to leave us a comment in the dedicated section below, as we would love to read your thoughts on the subject.

PUBG Not Using GPU While Gaming: 9 Quick Fixes

PUBG, also known as PlayerUnknown’s Battleground, is a battle royale game in a similar vein to Fortnite, but with a more mature style. It has seen continuous success and a ton of players since its release in 2017.

When the game launched, people complained it had many technical problems. And while many have been fixed, PUBG players still experience issues, such as not utilizing the GPU properly.

What causes PUBG to have GPU problems?

The thing about PUBG is the game is not well-optimized. Even after all these years, you will still find playing complaining about the title’s poor performance.

But poor optimization is just one aspect of PUBG’s problem. There are several other reasons behind it.

  • Your CPU is bottlenecking: Bottlenecking happens when you use a high-end GPU with a low-end CPU. They can’t work together. Use a bottleneck calculator to see if this is happening to you.
  • There are corrupt files on your system: Corrupted files can mess with computer performance, so you’ll need to clear it up.
  • Your GPU drivers are out of date: It’s possible to go into the device manager and automatically install them from there, but you should do it manually.
  • Your computer’s BIOS is out of date: Upgrading BIOS is a pretty complicated process requiring you to know important details like knowing your computer’s serial number.

How do I force PUBG to use my GPU?

Because there are so many solutions, it’s important to split all the entries down the middle and place them in two categories. The first category would be straightforward fixes while the other features slightly more complex solutions:

  • Install the latest Windows update. Microsoft frequently rolls out patches every single month that normally address multiple bugs and glitches.
  • Verify the game files on Steam. Ironically, even this solution has its own problems sometimes. If file integration fails, it’s recommended that you clear the download cache.
  • Disable your computer’s antivirus software. Anti-virus apps can sometimes be overzealous and get in the way of other programs on your computer.
  • Reinstall PUBG. This should be considered your last resort after you tried out everything else. If this fails, you should probably contact your computer’s manufacturer for help.

1. Change settings in NVIDIA Control Panel

  1. Launch the NVIDIA Control Panel.
  2. Click Manage 3D settings on the left-side menu, and stay on Global Settings.
  3. Scroll down until you locate Power management mode.
  4. Double-click the setting next to Power management mode, and in the drop-down menu, select Prefer maximum performance.
  5. Close NVIDIA Control Panel to apply the settings.

2. Automatically download the latest drivers

  1. Launch the Device Manager, then expand the Display Adapters entry.
  2. Right-click your graphics card and select Update driver.
  3. Click Search automatically for drivers.

3. Download graphics drivers manually

Tip icon Editor’s tip
You can update your drivers manually by following the steps below, or you can use an automated alternative tool like Outbyte Driver Updater to automatically get the most latest update for all of your out-of-date or missing drivers.
  1. Go to the NVIDIA Driver Downloads page and enter information on the type of GPU you have. The image below is an example.
  2. Click Search, then on the following page, select Download.
  3. Click Download again on the following page.
  4. Once downloaded, double-click the file to begin running it.
  5. Click OK in the new window that appears.
  6. Allow the installation enough time to finish.
  7. Now proceed through the installation wizard by selecting Agree and Continue.
  8. Select Express for the quickest installation then Next. Choosing Custom will let you decide which components you want to exclude.
  9. Give the wizard enough time to install the drivers.

4. Enable high performance for PUBG

  1. Search for Graphics Settings in the Windows 11 search bar. Click the first entry you see.
  2. In the graphics settings, click Browse.
  3. Locate PUBG’s game folder on your computer then click Add.
  4. Select Options under PUBG. Choose High performance, then Save.

5. Lower graphical settings

  1. In PUBG, click the gear icon in the upper-right-hand corner, then select Settings.
  2. Lower the in-game graphical settings. For example, try a resolution of 1280×720 pixels and lower the in-game FPS.

What can I do if PUBG won’t launch on my computer?

It depends on what the exact problem is with your computer and the game. You may have some DirectX components that are out of date or corrupt PUB files.

Solving the launching problem is pretty similar to the graphics card issue. You should disable your antivirus program, verify the game on Steam, and update your drivers.

Some players also run into the PUBG dxgi.dll not found error. For this particular issue, you will have to download a specialized repair tool to fix your computer.

Feel free to leave a comment below if you have any questions about other PUBG problems. Leave a suggestion about guides that you’d like to see or information on other gaming topics.

Forgot PIN & Password for Windows 11: How to Bypass Login

While a password is critical for the security of your system, it could be possible that you lost or forgot the same and now have no clue how to bypass the Windows 11 login screen.

Forgetting the PIN and password is common; hence, in this post, we will explain how to bypass the Windows 11 login screen and enter the desktop.

But, if you are unable to remove PIN in Windows 11, here’s a quick guide for you to help you fix the issue.

How do I bypass the Windows 11 login screen?

1. Bypass the Windows 11 login screen using another admin account

  1. If you have another Windows 11 account with administrator rights, log in to this account.
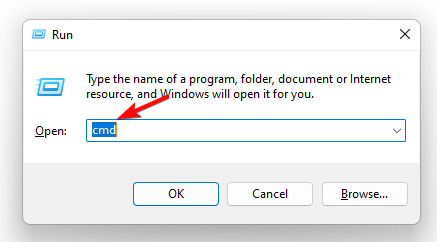
  2. Press the Win + R keys together to launch the Run dialog. Type cmd and press the Ctrl + Shift + Enter keys to launch the elevated Command Prompt. run cmd command
  3. Now, run the below command in the Command Prompt (Admin) window and hit Enter: net user accountname newpasswordchange admin account password
  4. Make sure to replace accountname and newpassword with the new credentials.

Once you see the success message, shut down the Command Prompt window, restart your PC, and enter the new username and password to log in to your system.

Note icon NOTE
This method is applicable only if you have another account with system administrator privileges.

2. Use safe mode with Command Prompt

  1. Start Windows 11 in safe mode using the 5th method in the post.
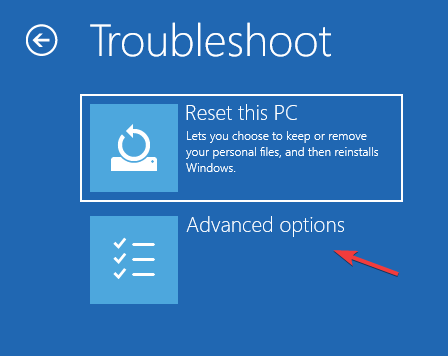
  2. As your PC boots up, under Choose an option, select Troubleshoot. select troubleshoot
  3. On the next screen, click on Advanced Options.advanced options
  4. In the Advanced options window, select Startup Settings. select startup settings
  5. Next, press the Restart button. click on Restart on Startup Settings
  6. As the PC boots, press F6 to get into Safe Mode with Command Prompt. Safe Mode command prompt
  7. In the Command Prompt window, run the below command and hit Enter: net user username newpassword
  8. Make sure to replace the username and newpassword respectively.reset password with command prompt in safe mode
  9. Now, restart your PC and use the new password you just created to enter your Windows 11 PC.

3. Set Windows 11 Auto Login from Settings

  1. Launch the Windows Settings app by pressing the Win + I keys simultaneously, click on Accounts on the left, and then select Sign-in options on the right. windows 11 sign in options
  2. Next, under Additional settings on the right, go to For improved security, only allow Windows Hello sign-in screen for Microsoft accounts on this device, and turn it off. disable For improved security, only allow Windows Hello sign-in screen for Microsoft accounts on this device
  3. You will now see a pop-up window. Here, enter the password of the user account and press Yes.
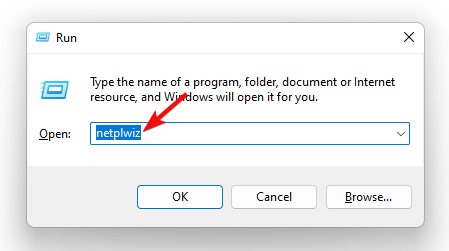
  4. Next, press the Win + R shortcut keys to open the Run dialog, type netplwiz, and hit Enter.run netplwiz command
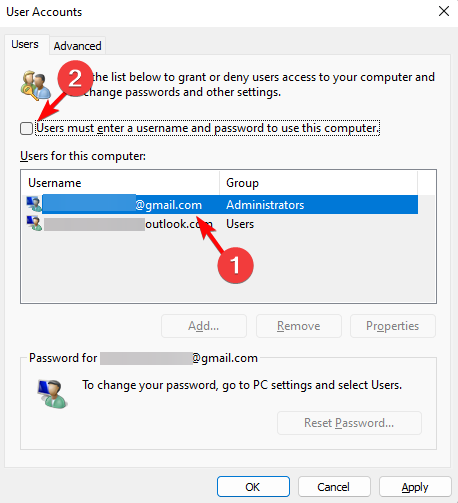
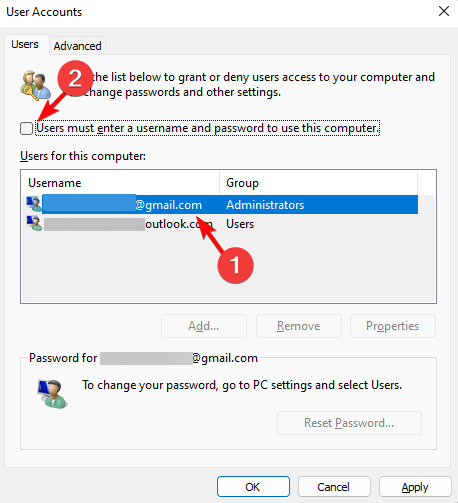
  5. In the user Accounts dialog, uncheck the box next to User must enter a username and password to use this computer. Press OK. This will enable auto login in Windows 11. turn off User must enter a username and password to use this compute
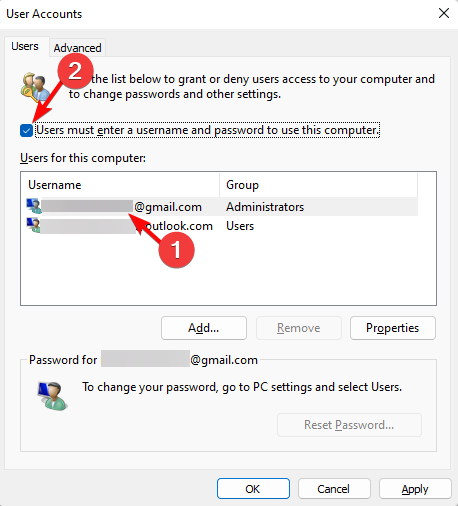
  6. If you want to disable Windows 11 auto login, check this option again.enable https://windowsreport.com/wp-content/uploads/2023/01/users-account-users-tab-select-user-account-User-must-enter-a-username-and-password-to-use-this-computer-uncheck.png
  7. Now, in the Automatically sign-in window, enter your username and password. Press OK and Apply.

Now, reboot your PC, and Windows will automatically log in. So, if you were wondering how to bypass the Windows 11 login screen, the auto login should help you with that.

How to enable/disable the password option in Windows 11?

Note icon NOTE
Please note that this method applies only to a local account, not a Microsoft one.
  1. Press the Win + R shortcut keys simultaneously to open the Run console. Type netplwiz and hit Enter to open the User Accounts dialog. run netplwiz command
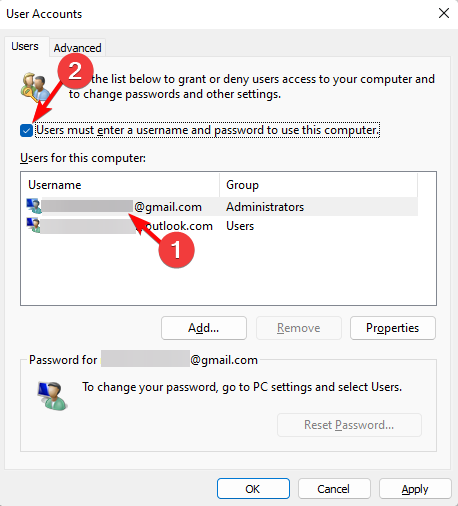
  2. Next, select the account you want to use to automatically log in, and check the box next to Users must enter a username and password to use this computer. Press OK. enable auto login
  3. Type in your password once, then enter it once again to confirm it. Press OK again. This will enable the Windows 11 auto-login feature.
  4. To disable auto-login, simply uncheck the box next to Users must enter a username and password to use this computer and press OK. disable auto login

Now, restart your PC, and the password for the Windows 11 login screen will be skipped successfully, and it will directly take you to the desktop. This may become important when Windows throws the Your organization requires you to change your PIN error.

Alternatively, you can follow our detailed post on enabling auto login in Windows 10 (also applicable to Windows 11) to turn the feature using the Registry Editor method.

You can also visit the Microsoft password reset page to change the Microsoft Account password; this is how you can bypass the Windows 11 login screen.

Or, you can download Microsoft’s Autologon tool to enable/disable the Windows 11 auto login feature. You can even log in without default Windows 11 password, and we have a guide that shows you how to do that.

If you’re still on Windows 7, you might want to check our guide on how to reset Windows 7 password without logging in.

For any other issues related to the Windows 11 login feature, do let us know in the comments section below.

Thrustmaster Control Panel In Windows 11: How to Access

Accessing the Thrustmaster Control Panel in Windows is not immediately obvious. A lack of shortcuts makes it hard to find.

The Thrustmaster Control Panel includes the configuration settings for a Thrustmaster steering wheel. That panel lets you set and test wheel input controls and force feedback effects.

How to open the Thrustmaster Control Panel in Windows?

1. Via Devices and Printers

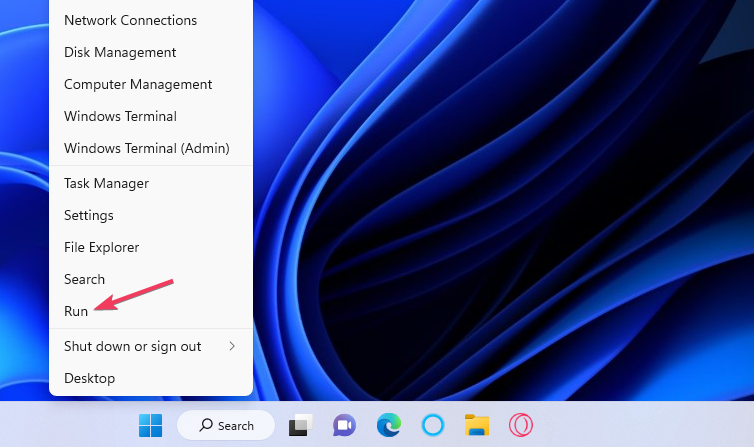
  1. Open up the Run command box, which you can access by right-clicking Start and selecting a shortcut for opening it on the Power User menu.
    Run shortcut control panel thrustmaster windows
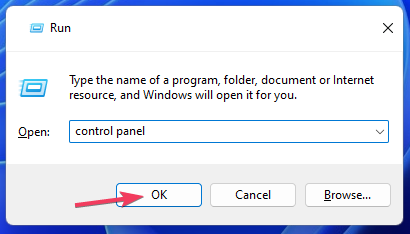
  2. Input this command inside the Open box: Control Panel
  3. Select OK to access Control Panel. 
    The OK option control panel thrustmaster windows
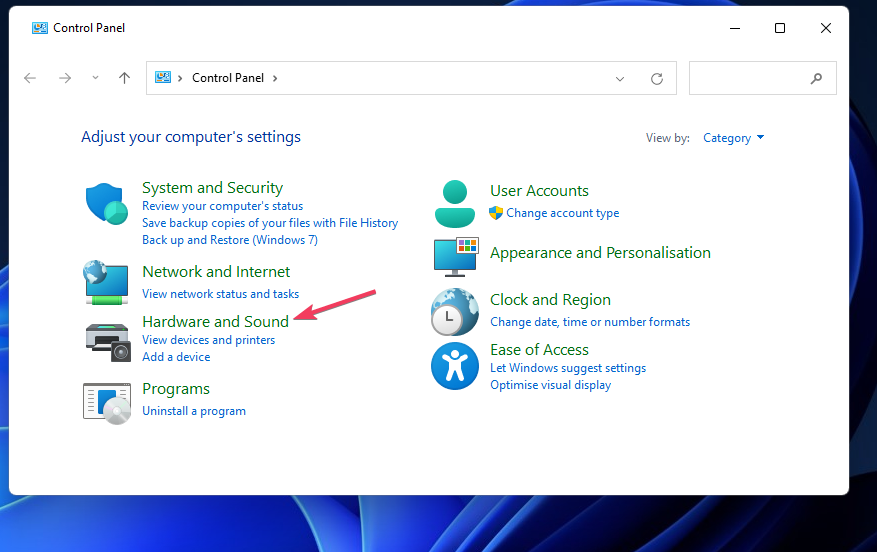
  4. Click the Hardware and Sound Control Panel category.
    Hardware and Sound category control panel thrustmaster windows
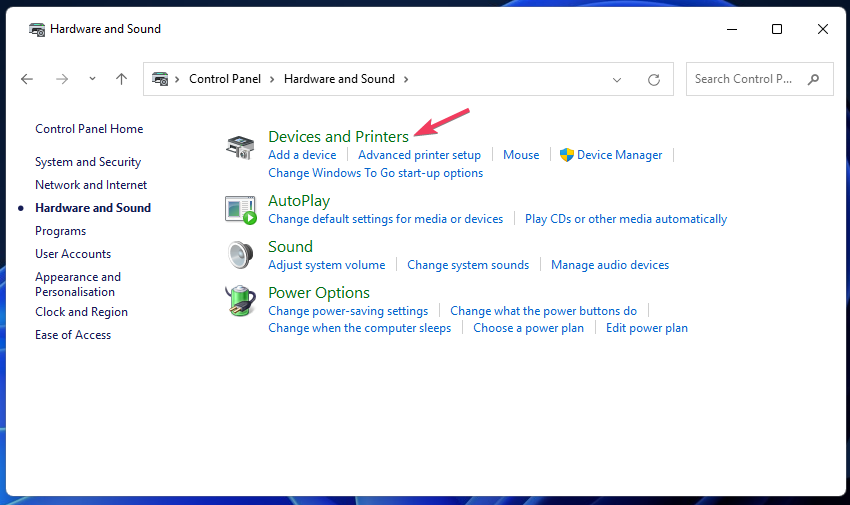
  5. Next, click the Devices and Printers navigation option.
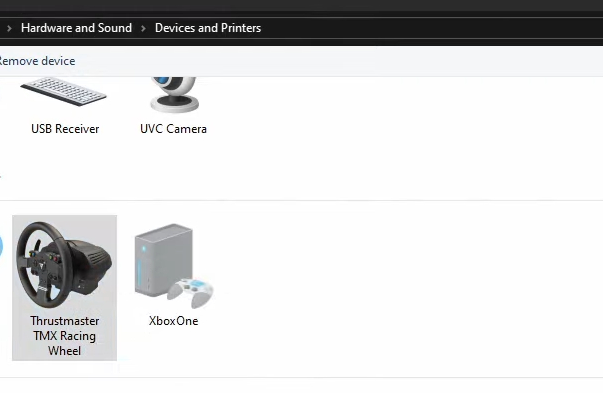
    Devices and Printers category control panel thrustmaster windows
  6. Right-click the Thrustmaster racing wheel and select Game controller settings.
    Thrustmaster TMX Racing Wheel control panel thrustmaster windows
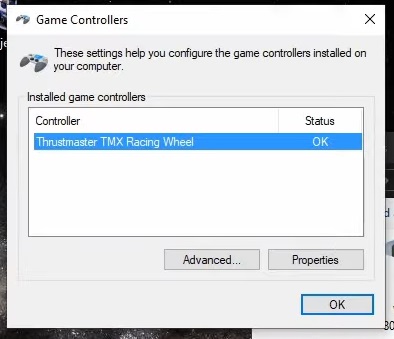
  7. Click the wheel you’ve installed on the list of game controllers.
    Game Controllers windowcontrol panel thrustmaster windows
  8. Select Properties on the Game Controllers window to bring up the Thrustmaster Control Panel.

2. Use the search tool

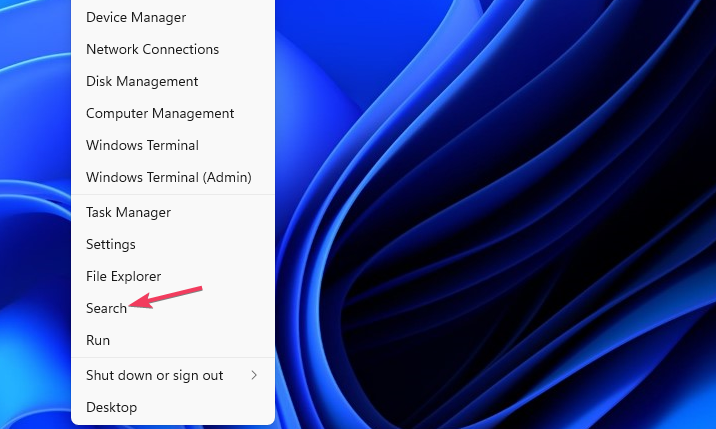
  1. Press the Windows key + X key combination to view the Power User menu.
  2. Click the Search shortcut to access the Windows 11 tool for finding apps and files.
    Search option control panel thrustmaster windows
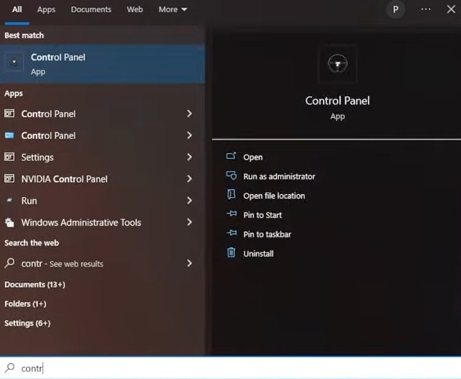
  3. Type in a Control Panel keyword inside the search text box.
  4. Click the Thrustmaster Control Panel app search result.
    A Control Panel search
  5. Select the installed wheel in the Game Controllers wheel.
  6. Then press the Properties button.

We have outlined the methods on how to find the Thrustmaster Control Panel on Windows 11, but the same methods can be applied on Windows 10 as well.

How to download the Thrustmaster Control Panel?

  1. Visit the Thrustmaster Support website.
  2. Find and choose your Thrustmaster device from the list.
  3. Go to the Drivers & Firmware section and download the Control Panel.download thrustmaster control panel
  4. Open the downloaded file and follow the installation instructions.

What Thrustmaster Control Panel Settings changes can I make?

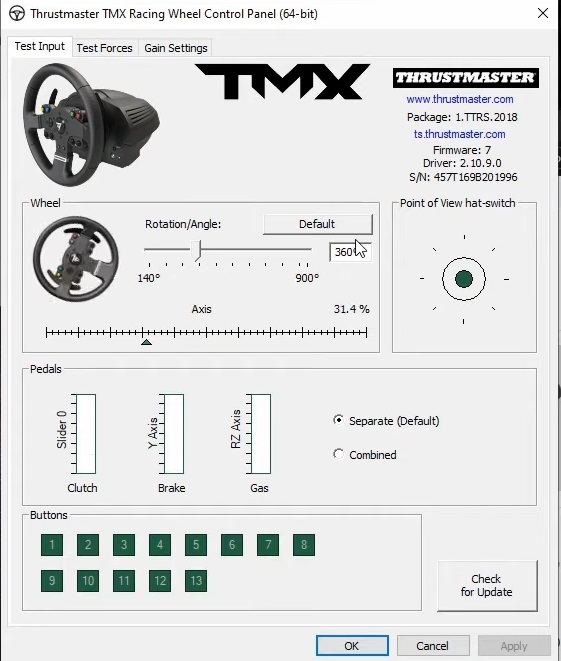
When you’ve opened the Thrustmaster Control Panel, you can adjust the wheel’s settings to your heart’s content. The Test Input tab is a good place to start because it includes input options for the wheel, pedals, and buttons.

The Rotation/Angle setting on that tab sets how much the steering wheel turns. The higher the rotation setting, the more you can turn the wheel.

Test Input tab control panel thrustmaster windows

Most real cars have steering wheels with 900-1200-degree rotation. The highest 900-1080 degree setting range for Thrustmaster wheels matches that and enables the most realistic driving controls.

However, that angle of rotation setting can be irrelevant for racing games that lock rotation. Those racing games automatically set steering rotation irrespective of Thrustmaster wheel settings.

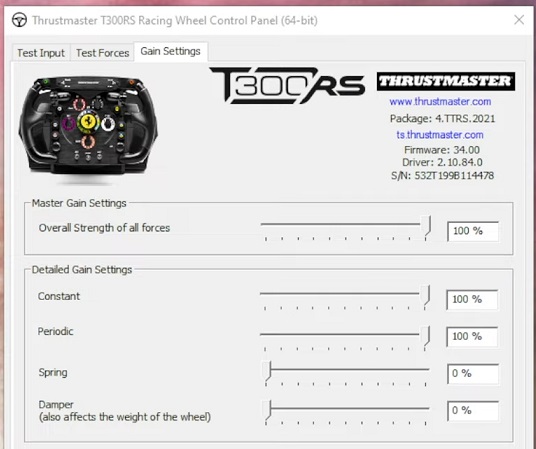
The Gain Settings tab includes settings for adjusting the wheel’s force feedback effect levels. Dragging the slider on the Overall Strength of all forces bar changes the overall power of all the forces.

The Gain Settings tab control panel thrustmaster windows

Below that bar, there are options for more specific gain (force feedback) settings you can adjust. Those force feedback settings are:

  • Constant: Constantly applied force effects on the wheel, such as road surface.
  • Periodic: Wheel-shaking feedback forces with variable frequencies that are periodically applied now and then instead of all the time.
  • Spring: This option sets how quickly the steering wheel will return to its default central position after turning. As a high Spring force setting can sometimes negate other feedback effects, it’s recommended to set this effect to zero.
  • Damper: Damper is like a dynamic friction effect determining the force you must apply to rotate the wheel under certain circumstances. Many players prefer this option set at zero since steering is heavier with a high setting.

To get the most FFB effect in games, most players generally set the Constant and Periodic effects to the maximum. The optimum Spring and Damper settings are often more game-dependent.

However, after opening the Thrustmaster Control Panel, you can set those settings to whatever suits you best. Sometimes, you might need to adjust those options for different racing games depending on in-game settings and effects.

Also, if the Thrustmaster Control Panel is not working, use a USB 2.0 port or reinstall the drivers.

How to Add & Customize Quick Links in Edge [Windows 11 Guide]

Quick links are shortcuts that allow you to access your favorite websites without having to go through the full process of opening a new tab and typing the URL.

In this piece, we’ll show you all you need to know about adding quick links, removing them, and personalizing them for your exact needs.

  1. Launch Microsoft Edge and open a new tab.
  2. Click on the arrow below the search bar to open Quick links.
  3. Hit the + button and input the Name and URL of the site you wish to add to the Quick links section then click on Add.
  1. Launch Microsoft Edge and open a new tab.
  2. Click on the arrow below the search bar to open Quick links.
  3. Next, click on the three horizontal ellipses next to each icon then click on Remove.
  4. Continuously repeat these steps until you have successfully removed all Quick links.
  1. Launch Microsoft Edge and open a new tab.
  2. Click on the arrow below the search bar to open Quick links.
  3. Next, click on the three horizontal ellipses next to each icon then select Disable.
  4. Perform similar steps for all Quick links you wish to Disable.
  5. If you’d like to enable them again, follow the same process.

You can also edit the Quick links in Edge by renaming them to make them easier to remember.

  1. Launch Microsoft Edge and open a new tab.
  2. Click on the arrow below the search bar to open Quick links.
  3. Next, click on the three horizontal ellipses next to each icon then select Pin to taskbar or Pin to page.

Once you’ve added your favorite site to your favorites bar in Edge, you can also pin it directly from there. The Pin feature is particularly helpful for those users who have many sites that may take up all the space on the Start page.

The Pin to page option allows your favorite site to maintain its position on the Start page in case you exceed the maximum number of Quick links displayed on the Start menu.

If you’re using Microsoft’s Edge browser, you may have noticed that there are many ways to customize it. For instance, you can create a collection of pages that contain your interests and put them in one category for easier access.

Quick links are a great way to provide a shortcut to your most-visited pages but what’s the importance of customizing your quick links? Below are some benefits:

  • Save time – Quick links save you the agony of typing in a URL every time you want to access a certain page.
  • Organization – Quick links are a great way to organize your favorite sites. You can customize your Quick links by adding new shortcuts, changing existing ones, and deleting the ones you don’t need.
  • Accessibility – Adding Quick links enhances your productivity as you’re able to get to your favorite sites quickly.

You can change the look and feel of the browser by adjusting its theme. You can also create your own shortcuts for web pages or even entire sites that you visit frequently.

Alongside customizing quick links, you can also take full control of your browsing start page by following this guide to set a homepage in Edge.

To make online shopping just as convenient, set up Microsoft Edge Wallet to save your payment details securely for quick autofill at checkout.

While the Quick links feature is no doubt helpful to users, some may argue that it makes the homepage superfluous and difficult to focus on tasks. As such, others prefer to turn off the feature. To do so, follow the steps below:

  1. Launch Microsoft Edge and open a new tab.
  2. Click on the Settings icon, click on Quick links, and in the drop-down menu that appears, select Off. You can easily enable it should a time come that you want to make use of this feature in the future.

For users who are wondering how to rearrange Quick links in Edge, unfortunately, this feature is not yet available. Aside from the Quick links, you may also benefit from the Microsoft Edge extensions list we curated for you.

For distraction free page searches, learn how to disable related matches in Edge to stop extra highlights during Ctrl + F lookups.

We also have a rich list of eye-catching themes for Edge that will redefine how the browser appears alongside other additional features.

If you’re not a fan of Edge and would like to explore other browsers, we have an exciting in-depth comparison of Opera GX vs Edge. The feature list should give you an idea of what each browser offers.

That brings us to the end of this article, but you can keep the conversation going in the comment section below by sharing any additional thoughts you may have on this topic.

ChatGPT Is at Capacity Right Now: How to Fix This Error

ChatGPT by OpenAI is a powerful language model for natural language processing tasks such as text generation, language translation, and more. 

However, users may sometimes encounter the error message that ChatGPT is at capacity. This error message can be confusing and frustrating, but there are ways to fix it. We will explain the causes and show you the best solutions and workarounds.

What does ChatGPT is at capacity right now mean? 

This error message is displayed when ChatGPT’s servers are currently at maximum capacity. This means that too many users are trying to access ChatGPT simultaneously, causing the servers to become overloaded. 

This error can occur for varying reasons, such as the following:

  • High traffic – One of the most common causes of this error is a sudden spike in traffic to the ChatGPT servers. When too many users are trying to access ChatGPT simultaneously, the servers may become overloaded and unable to handle the demand.
  • Server malfunction – The error may also result from a malfunctioning server. This could be due to hardware failure, software bugs, or other technical issues.
  • Network issues – Network problems such as slow internet connection, DNS errors, or routing issues can also cause the error.
  • Maintenance and upgrades – It’s also possible that the error stems from maintenance or upgrades on the ChatGPT servers.
  • Limited availability – ChatGPT may have limited availability during specific hours or days or a limited capacity due to cost or other factors.

It’s important to note that the exact cause of the error may not always be clear and that the OpenAI team may be working to resolve the issue. In some cases, the cause may be a combination of these factors.

What do I do when ChatGPT is at capacity?

Most of the time, the problem is out of your hand, so we recommend you do the following before diving into any complex solution:

  • The first step is to wait a few minutes and try reaccessing ChatGPT simply. If a temporary spike causes the issue in traffic, the servers may be back to normal capacity soon.
  • Ensure your internet connection is stable and you are not experiencing any network issues. This could be preventing you from accessing ChatGPT.
  • Navigate to the ChatGPT website, click on the chat icon at the bottom right corner and select the Send us a message button. They will be able to provide more information on the cause of the issue and help you resolve it.
  • Keep only one instance of the service. This is a fix that has come in handy for most users. This is because once you have multiple browser instances of ChatGPT, you are more prone to get this error message. You should close them all and open only one service instance.

1. Use a VPN

Sometimes, using a simple VPN has resolved this problem for many users. You just install any VPN of your choice, then try reaccessing the ChatGPT service, and the problem should be resolved.

There are a lot of VPNs to choose from, but we recommend using only the best Virtual Private Networks, as these will guarantee that your privacy and security are maintained while searching the web.

One of the most reliable VPN sources that we recommend is ExpressVPN because it has a private DNS that makes your connections not only safer but faster as well.

Another worth-mentioning characteristic of this VPN is that it has strong AES-256 encryption and a strict no-logs policy which both instantly improve your security and privacy while browsing the internet.

2. Flush DNS

  1. Press your Windows key.
  2. Type command and select the Run as administrator option.
    chatgpt is at capacity right now
  3. Type the script below and hit Enter.
    ipconfig /flushdns
  4. Next, run the following script:
    ipconfig /renew
  5. Restart the computer.

By following these steps, you can fix the ChatGPT is at capacity right now error and get back to using this powerful language model.

Remember, as with any technology, errors and downtime are expected, and it is essential to be patient and find alternative solutions if necessary.

How to Open File Location on Windows 11: 3 Quick Ways

While you can open a file location with a simple right click, the introduction of new features in the Windows 11 has made things a bit complicated.

Fortunately, there are a few ways to find a file location, and we have created a quick list for your convenience.

How do I open a file location on Windows 11?

1. Use Windows Search

  1. Go to Start and type the name of the app/file in the Windows search bar.
  2. As the app/file name appears under the Best match section, right-click on it and select Open file location. open file location for app
  3. If you want to navigate to the file location for an app, on the right side of the search results, you should see the Open file location option. app - right side - open file location
  4. For a file, on the right side of the results, you should Location. Click on the path next to it and it should take you to the location of the file. click on location path for file
  5. You can also select the Open file location option below. open file location on right for file

If you are wondering how to open file location of an app Windows 11, using the Windows search bar is one of the fastest ways for sure.

2. Open file location through File Explorer

  1. Press the Win + E keys together to open File Explorer.
  2. Here, click on This PC shortcut on the left, and search for the app/file name in the search box on the upper right.
  3. As it displays the results, right-click on the app/file and select Open file location. open app file location through file explorer
  4. You may also find the app/file in the Quick access menu. Simply right-click on the app/file and select Open file location. open file location from quick access

For those of you who want to know how to find file path in Windows 11, using File Explorer can help you with exactly that.

But, if File Explorer is freezing or not responding, you can follow the solutions in our comprehensive guide here to fix the issue.

3. Use Command Prompt

  1. To open the Run dialog, press the Win + R shortcut keys. Type cmd and press the Ctrl + Shift + Enter keys together to launch the elevated Command prompt. run cmd command
  2. Run the below command in the Command Prompt (Admin) window and hit Enter: dir “*name of your file*” /srun command in command prompt to open file location
  3. You can now see the file location in the results.

You can also open a folder in the elevated Command Prompt using the expert tips mentioned in this guide.

4. Via Task Manager

  1. Right-click on the Start button and select Task Manager. open task manager
  2. In the Task Manager window, under the Processes tab, go to the Background processes section.
  3. Here, look for the app, right-click on it and select Open file location. open file location through task manager

You can also refer to our expert guide on how to open task Manager in Windows 11 to execute the above method.

5. Use the Start menu to open file location

  1. Click on the Start button, and go to the Recommended section. start menu recommended section
  2. Here, you will see the shortcuts for your files.
  3. Right-click on the desired file and select Open file location. open file location through start menu recommended section

If you are looking for a shortcut to open file location, the Windows 11 Start menu Recommended section is definitely the one.

What can I do if Windows 11 open file location is missing?

However, if the open file location option is missing on your Windows 11, it could be due to a recently installed software interfering with the function. Here’s how to fix the issue.

  1. Press the Win + I keys to launch Windows Settings. Here, click on Apps on the left and then click on Apps & features on the right. Click on Apps & features in App settings
  2. On the next screen, go to the right, and under the App list, look for the problematic app. Click on the three dots next to it, and select Uninstall.
  3. You can also Sort by Installation date, look for all the recently installed apps and choose to uninstall them. sort apps by installation date
  4. Press Uninstall again in the confirmation prompt. press uninstall again

Once done, you can check if you can now find the open file location option in the right-click menu.

For more solutions, you can refer to our detailed guide on how to fix the open file location option missing problem in Windows 11.

Are you still wondering how to find file location on Windows 11? You can also use the Everything search tool that pulls up the file path for you, and you can then right-click on it to navigate to its location.

If you have any other queries related to the file or folder location, do let us know in the comments section below.

Resident Evil 5 Not Launching on Steam: 7 Fixes to Use

Resident Evil 5 is a great game that many horror fans love, but it seems that Resident Evil 5 is not launching for Steam users.

This issue, in most cases, occurs due to missing files or a component called Microsoft Games for Windows Marketplace.

Users reported that they could not play the game at all, and some even encountered Resident Evil 5 crash on startup. Therefore, in this guide, we’ll show you the best methods you can use when Resident Evil 5 won’t launch.

What can I do if Resident Evil 5 Steam version isn’t launching?

1. Run the game in Compatibility Mode

  1. Go to the Resident Evil 5 installation directory. By default, it should be: C:/Program FilesSteam steamappscommonResident Evil 5
  2. Locate the re5dx9.exe file, right-click it, and choose Properties from the menu.
  3. Navigate to the Compatibility tab. Check Run the program in compatibility mode for and select Windows 7 from the list.
  4. Click Apply and OK to save changes.

After doing that, the game will start in Compatibility mode, and the problem should be resolved.

2. Scan and repair game files

  1. Launch Steam and go to your library.
  2. Right-click the Resident Evil 5 game and select Properties.
    properties resident evil 5 not launching steam
  3. Now, click LOCAL FILES in the left pane.
  4. Finally, click the Verify integrity of games files button.
    local files resident evil 5 not launching steam

One of the major potential causes of Resident Evil 5 not launching on Steam issue is faulty game files. This can happen if an important file is corrupt or missing.

The solution is to check the game files’ integrity by following the steps above.

3. Make sure your graphics card drivers are up to date

  1. Press the Windows key + X and select Device Manager.
    device manager
  2. Double-click the Display adapters option to expand it and right-click the device there.
  3. Now, select the Update driver option.
    update driver resident evil 5 not launching steam
  4. Finally, choose the Search automatically for drivers option and install any available updates.
    search

If the Resident Evil 5 Steam version is not launching on your PC, your graphics card drivers may be outdated. If that’s the case, update them with the right software.

4. Update PC

  1. Press the Windows key + I and select Update & Security.
    update and
  2. Click the Check for updates button.
    check resident evil 5 not launching steam
  3. Finally, wait for the scan to complete and install any available updates, including the optional ones.

Sometimes, the Resident Evil 5 not launching on Steam issue can be due to an outdated operating system. The quick way out of this is to install the latest updates.

5. Copy the xlive.dll to the game directory

  1. Get xlive.dll file from another PC or any other credible source.
    xlive
  2. Go to the Resident Evil 5 Steam directory. We gave you a full path to it in Solution 1.
  3. Now, paste the xlive.dll to the Resident Evil 5 directory.

Once the file is pasted, try running the game again and check if the problem is resolved. Several users reported fixing the problem by copying the wmvcore.dll file, so feel free to try that.

After moving that file to the game directory, the issue was completely resolved.

6. Install the latest version of Microsoft Games for Windows Live

To successfully run Resident Evil 5 on a Windows PC, you need the Games for Windows Live (GFWL)app. While the app has been officially discontinued on Windows 10, there are still ways to download it.

To do this, you need to go to a third-party website to Download Microsoft Games for Windows. You can now install the software and try to run RE5 after.

7. Use patch file

  1. Download the patch file created by a fan for bypassing the installation of GFWL.
    download resident evil 5 not launching steam
  2. Right-click the downloaded file and select Extract files.
    extract files
  3. Now, launch Steam and uninstall and reinstall RE5.
  4. Click the newly installed RE5 game, select BETAS in the left pane, and click None.
    betas
  5. Next, copy the extracted files in Step 2 and paste them into the RE5 game folder.
  6. Finally, click Copy and Replace if prompted and restart the game.

There is a patch file created by a user that is targeted at fixing various issues, including Resident Evil not launching on the Steam problem. So, you should try that file, too, and check if it works for you.

If Resident Evil 5 for Steam is not launching on your PC, the most common causes are missing DLL files and Microsoft Games for Windows Marketplace.

The latest version of the game usually doesn’t suffer from these issues, so keep it up to date to avoid this and many other problems.

Even though Steam is a beloved PC gaming platform, such issues do show up from time to time. Don’t hesitate to check out our guide with fixes for Steam games not launching.

Did you manage to fix this issue on your own? Feel free to share your solution with us in the comments section below.

How to Fix Canon Printer Reset Error B203 [Quick Guide]

When trying to execute a printing command, users are sometimes met with a popup error b203 message. Consequently, this error prevents them from finishing the task on their Canon printer.

This printing error likely occurs due to minor issues in a printer device, such as an empty cartridge, the need for a firmware update, an outdated printer driver, a paper jam, or an unstable connection between the printer and the system.

If you are also one of those users facing the error code b203, we have prepared this guide to help you fix it just like we did with the Canon printer not printing black issue.

What is Canon printer error b203?

The Canon printer error b203 means you are trying to print a file when your printer cannot complete the task. This can be due to an empty ink cartridge, an outdated driver, or a faulty printhead.

How can I fix Canon printer error b203?

1. Perform a power cycle

reset your printer
  1. First, turn off your Canon printer.
  2. Disconnect the power cord from the wall outlet.
  3. Then, re-open it by holding the Power button for a minute.
  4. Attach the power cord again and connect it to your device.
  5. Power on both the system and the Canon printer.
  6. Now, try to take a print and check whether the printer error b203 is resolved.

2. Check your ink cartridge

check ink cartridge

First, turn off your printer and make sure all the ink cartridges are full. You can pull all the ink cartridges out of the printer and ensure plenty of ink. Refill the cartridge to resolve the error.

Moreover, improper installation of ink tanks can also generate this precise printer issue. Make sure that’s not your case.

3. Rule out a potentially bad network connection

network connection

To further verify and fix this problem, consider that a bad network connection between the printer and the system could be the core of it.

So, if you have wirelessly connected the system to your printer, try reconnecting it to rectify the issue.

4. Remove paper jam

paper jam
  1. Open the front cover and remove all the torn papers.
  2. If there are any obstacles between the paper feed tray and the front cover, turn out the blue thumbwheel and clean it.
  3. Reconnect the printer with the power outlet and the PC.
  4. Try to take a printout and check whether the error reappears or not.

The b203 error can also occur due to a debris piece of paper or a small document blocking the printer from working properly. Remove the materials described above to restore your Canon printer to its usual working state.

5. Update drivers

  1. Press the Windows key + R, type devmgmt.msc, and click the OK button.
    devmgmt
  2. Click the arrow next to the Print queues section and right-click your printer device.
  3. Now, select the Update driver option.
    update driver canon b203 error
  4. Finally, choose Search automatically for drivers and install any available update.
    search auto

You’ll want to look at drivers if the above does not work. They help the printer and the operating system communicate, so their software must be updated.

If the driver becomes corrupted, the system may crash, resulting in these annoying errors. If Windows can’t find the latest driver, you need to visit the manufacturer’s website to look for it.

6. Use Windows Troubleshooter

  1. Press the Windows key + I and select Update & Security.
    update and canon b203 error
  2. Click Troubleshoot in the left pane and select Additional troubleshooters.
    troubleshoot
  3. Finally, choose the Printer option and click the Run the troubleshooter button.
    run the canon b203 error

Most of the time, the cause of this error is related to simple internal issues of the printer. However, sometimes, the connected system is also responsible for it. This tool steps in as the default troubleshooter on Windows 10, ready to keep your printer free of any errors.

You can easily open it from the search bar by just writing troubleshoot in the search area. Then, this handy tool will automatically resolve all identified issues.

Any solid particles, specks of dust, dirt, etc., found in the paper tray sometimes lead to this kind of error. Don’t hesitate to clean the printhead with a wet cotton ball. Let it dry for some time, and put the cartridge back again.

We hope our solutions and suggestions help fix the Canon printer b203 error. If your Canon printer is not installing drivers, check our detailed guide to fix the issue quickly.

We also have a guide on Canon error 5B00, so don’t miss it for more useful information.

If you have fixed this issue with an alternative resolution, don’t hesitate to share it in the comments below.

Windows Live Mail Attachments Not Showing: 6 Easy Fixes

Since many of you continue to use Live Mail, be sure there can be times when things go wrong with it. Windows Live Mail attachment issues are definitely taking their place in the long list of errors users continuously face.

When Live Mail blocks an attachment that you receive, it shows a warning message we’re sure you know by heart already. The message reads Prohibited file type. File deactivated.

Ready to change that? In this article, we have listed a couple of troubleshooting procedures to help you resolve the Windows Live Mail attachments not showing issue, as well as any other related issues.

How can I fix Windows Live Mail attachments not showing?

1. Use the Repair function

Repair all Windows Live programs
  1. In the Windows Search bar, type Control and open Control Panel.
  2. Click Programs.
  3. Under Programs, click Uninstall a Program.
  4. Search for Windows Live Essentials in the Currently installed programs list, then double click it.
  5. Click Repair all Windows Live programs.
  6. After doing so, restart your computer for the settings to take effect.

Rather than reinstalling the Essentials Suite from the start and thinking of the worst, we recommend turning to the Repair function.

2. Use third-party desktop email clients for Windows

You can use a Windows Live Mail trustworthy alternative for your file attachment needs.

There a many and very time efficient mail platforms that will provide extensive features to improve productivity and support you in organizing emails and files.

At the same time, you should benefit from practical features like updated calendars, contacts, or cloud storage support. It’s likely to have all the integrated functions you need to fulfill your tasks.

Hence, to upgrade from a Windows mail app to a more effective and feature-rich one, it’s recommended to use the best email clients for Windows 10.

3. Change Safety options if Live Mail attachments are not showing

change Safety options
  1. First of all, sign in to Live Mail.
  2. Click the Blue tab on the upper left corner.
  3. Hover your mouse to Options.
  4. The Options menu contains more submenus. Click on the one that says Safety Options.
  5. Click Safe Senders.
  6. Click Add.
  7. Now, type the email address of the sender.
  8. Click OK.
  9. Click Apply, then click OK.
  10. Return to Options > Safety options.
  11. Click Options.
  12. You’ve most likely set this to High (in which case most junk email is caught) at a certain point, but try selecting Low this time.
  13. Click Apply and confirm.

When Live Mail attachments are not showing at all, try adding the sender of the email to your Safe senders list. Then, set Safety options to Low.

This could help you out, but it’s wise to go for this less restrictive option if you don’t receive many junk messages or want to filter only the messages that are the most obvious junk.

Also, consider an antivirus with antispam to get rid of all the junk emails.

4. Change security settings when Windows Live Mail is not downloading attachments

change security settings
  1. Go to Windows Live Mail.
  2. When Windows Live Mail gets opened, enter into Home > Junk.
  3. Find the Safety options tab and click it.
  4. Go to the Security tab next.
  5. You need to uncheck the box next to Do not allow attachments to be saved or opened that could potentially be a virus.
  6. Confirm by clicking Apply.

When the previous steps were unsuccessful and Live Mail is not downloading attachments, you could also change a security setting.

However, we would strongly advise you against performing this action. Turning this option off makes your computer vulnerable to viruses, so it involves some potential risks.

5. Get administrator permission if Windows Live Mail is not opening PDF attachments

get administrator permission
  1. Right-click the Live Mail icon.
  2. Go to Properties > Compatibility.
  3. While there, tick the box next to Run this program as an administrator.
  4. Click Apply.
  5. Also, select Shortcut > Advanced.
  6. Check Run as administrator.
  7. Click OK.

When Windows Live Mail is not opening PDF attachments, there’s one more thing you could try. Follow the steps as described above.

If Administrator option is greyed out, right-click on it, choose Open file location and right-click WLMAIL.EXE . Then, retry the procedure.

6. Uninstall, then install Windows Essentials back

remove Windows Essentials programs
  1. Go to Control Panel.
  2. From the Category view, select Uninstall a program.
  3. Double-click on Windows Essentials.
  4. Click Remove one or more Windows Live programs.
  5. Select the programs that you want to uninstall, then click Uninstall.
  6. Go to Recovery Manager.
  7. Click Software Program Reinstallation under I need help immediately.
  8. On the Software Program Reinstallation welcome screen, click Next.
  9. Look in the Factory installed programs list for the Windows Live Mail to reinstall.
  10. If Live Mail is not listed there, select The program is not in the list.
  11. Click Next and follow the given instructions to reinstall the program.

We have a final troubleshooting step after performing all these procedures. We suggest that you remove your account in Windows Live Mail. Then, reinstall it via the procedure detailed here.

If you need more info on how to uninstall programs and apps in Windows 10, check out this detailed guide.

When Window Live Mail doesn’t allow to download or open any attachments, users also tried restoring an earlier system image/backup or connecting their Gmail account to Outlook.

For any other questions or suggestions on how to solve the Windows Live Mail attachments not showing issue, feel free to reach out in the comments section below.

Office: Most of the Features Have Been Disabled – How to Fix

If you’re dealing with a Most of the features have been disabled error when using Microsoft Office apps like Excel or Word, we’ve got you covered.

Keep reading to find sure ways to solve this annoying error message in most Office applications.

How can I fix Most of the features have been disabled error?

1. Activate Office 365

fix Most of the features have been disabled in word and excel
  1. On the Microsoft Activation Wizard window select that you want to activate the product using the Internet.
  2. Click on Next, if you have purchased.
  3. Download the Microsoft product. There is no product key needed.
  4. Follow the on-screen instructions.
  5. Click on Next, and press Enter to complete the activation process.

Therefore, you can do this very easily by following the steps above in the Microsoft Activation Wizard.

2. Check the status of your subscription

Renew subscription most of the features have been disabled

  1. Close all Office apps.
  2. Go to your Services and Subscriptions page.
  3. Select Sign in, and enter the email address and password of the Microsoft account.
  4. Check the details under the Subscriptions or Cancelled subscriptions heading. If your subscription has expired, you can renew it.
  5. After you renew your subscription, you can restart Word or Excel.

As you can see, dealing with activation errors in Office 365 is not that hard. Make sure that you have a valid subscription and that can easily solve your problem.

3. Run the Microsoft Support and Recovery Assistant

Run Microsoft Support and Recovery Assistant most of the features have been disabled

  1. Download Microsoft Support and Recovery Assistant.
  2. Install the application on your PC and run it.
  3. Select Office and click Next.
  4. Follow the on-screen steps to fix your Office activation issue.

4. Reinstall Office

  1. Delete Office from your PC and then reinstall it. Signing out of Office does not uninstall it automatically.
  2. Sign out of Office, and completely uninstall Office. To make sure you do that, you can use one of these amazing tools.
  3. Now sign back in with your Microsoft account.
  4.  Select Install Office from the Office home page.Reinstall Office most of the features have been disabled
  5. Select Run/ Setup/ Save File, depending on your browser.
  6. You are done start the Office software and see if the problem has been fixed.

Microsoft Office 365 is a great way to access Microsoft’s suite of office tools on a subscription basis, just make sure you’re up to date so everything works normally.

Another security message that users are getting is Microsoft has blocked macros from running because the source of this file is untrusted, but we tackled that issue in another guide.

If you have more questions or suggestions, leave them in the comments section below, and we’ll be sure to check them out.

How to Fix A Specified Logon Session Does not Exist [3 Ways]

Some users have reported having issues when trying to connect their Windows 10 devices to any other PC, or NAS (network-attached storage) server or service.

They see an error message saying: A specified logon session does not exist. It may have been terminated error on Windows 10.

Here’s how one user reported the issue on Microsoft TechNet:

I am running Win 10 Insider Preview for the last couple of months, but after a major automatic update to build 10074, I can no longer access any other devices on the local network.

This issue seems to have been caused by the update to Windows 10 versions 10074 and 10240.

A temporary fix for this problem would be to create and use a local account to sign into Windows. This works but doesn’t fix the issue at its base.

For these reasons, in this article, we will explore some of the proven troubleshooting methods for fixing this error once and for all.

Please follow the steps described in this guide carefully to avoid causing any other issues.

How can I fix A specified logon session does not exist error?

1. Change the Windows sign-in method to PIN

  1. Press Win+X keys on your keyboard -> select Settings.
  2. Select Accounts option.Windows settings accounts button - a specified logon session does not exist. it may already have been terminated windows 10
  3. Select Sign in options –> and follow the on-screen instructions for setting up a new PIN number.signin options pin - a specified logon session does not exist. it may already have been terminated windows 10
  4. Check to see if the issue persists after using the PIN to log in.

2. Change network access settings

  1. Press Win+R keys on your keyboard -> type gpedit.msc -> hit Enter.gpedit.msc command run window - a specified logon session does not exist. it may already have been terminated windows 10
  2. Navigate to Computer Configuration -> Windows Settings -> Security Settings -> Local Policies -> Security Options.
  3. Inside the Policy tab -> right-click Network access: Do not allow storage of passwords and credentials for network authentication -> select Properties -> click Disabled -> click Ok.group policy modifying values in security options - a specified logon session does not exist. it may already have been terminated windows 10
  4. Restart your PC and check to see if this fixes the issue.

3. Use the Credential Manager

  1. Click on Cortana search bar -> type in credential manager -> select Credential Manager Control Panel.Credential manager control panel in start menu - a specified logon session does not exist. it may already have been terminated windows 10
  2. Select Windows Credentials.
  3. Find the NAS device that you’ve had issues connecting to, and delete the entry. (In my case there are no NAS devices set up but you will be able  to find it in the indicated space below)Credential manager - a specified logon session does not exist. it may already have been terminated windows 10
  4. Create a new Windows Credential value, and insert your credentials in as follows:
  • Internet or Network Address:  \servername (replace with the Netbios-name of your cloudstation, or use IP) ; 
  • User name: servernameusername (replace with netbios-name and the username you are connecting with)
  • Password: leave blank

In this article, we explored the possible causes for the error message A specified logon session does not exist.

We also explored the best troubleshooting methods for this error.

Please feel free to let us know if this guide helped you solve your issue by using the comment section found below this article.

Fix: Credential Manager Not Working / Not Saving Passwords

Credential Manager represents an inbuilt feature located within the Windows 10 internal system. This feature is used by Internet Explorer and by other web browsing clients to store your user names and passwords for various websites and accounts.

Now, during the lines from below, we will be checking how to fix the problems that are related to the Credential Manager feature; thus, if you are dealing with malfunctions, don’t hesitate and read the following guidelines.

But why is it so important to use the Credential Manager after all? Well, basically, your web browser app is using this default feature for storing your personal data and accounts.

Then, this information allows the Windows 10 system to automatically log you on to websites or other computers.

Therefore, if Credential Manager isn’t working properly, your Windows 10 device will not be able to save your credentials, and you will not be able to automatically log into your various accounts – thus, a manual operation will be required each time you want to access a website or a different computer.

Addressing the issues that are related to your credentials is easy though you can fix these problems in two ways: manually by using in-built options and by accessing Registry on your computer; both methods will be explained below, choose the troubleshooting solution you prefer the most.

Credential Manager is an important part of Windows, but users reported various issues with it, and speaking of issues, today we’re going to cover the following problems:

  • Windows 10 Credential Manager not saving password
    • This is one of the most common problems, but you should be able to solve it by entering your credentials manually or by removing and adding them again.
  • Credential manager error 0x80070425
    • This is a relatively common issue with Credential Manager, and if you’re having this problem, be sure to try one of our solutions.
  • Cannot open Credential Manager
    • One of the more serious problems with Credential Manager is the inability to open it.
    • This can be a big problem since you won’t be able to access your saved passwords at all.
  • Credential Manager Access denied
    • This error message can sometimes appear while trying to access Credential Manager.
    • This is usually caused by the lack of certain privileges, but you can easily fix this issue.
  • Credential Manager keeps crashing
    • If your Credential Manager is crashing, this can be a big problem.
    • However, you should be able to fix it using one of our solutions.

How do I fix the Credential Manager in Windows 10?

1. Change your Internet Options

  1. Press Windows Key + R to open the Run dialog.
  2. In the Run box type inetcpl.cpl and press Enter or click OK.
    Credential Manager keeps crashing
  3. From the Internet Properties window press on the Content tab and within Auto Complete section select Settings.
    Windows 10 Credential Manager not saving password
  4. Now uncheck all options and click on OK button to save changes.
    Credential manager error 0x80070425
  5. Click the Settings button again, enable all options and click on OK to save changes.
  6. Go back to the General tab and from Browsing history section click on Delete.
    Cannot open Credential Manager
  7. Now cache will be cleared so in the end you should reboot your machine as the problem should be solved.

According to users, you might be able to fix the problems with Credential Manager by changing your Internet Options. After making these changes, check if Credential Manager is working.

2. Use Registry Editor

  1. Press Windows Key + R and enter regedit. Press Enter or click OK.
    Credential Manager Access denied
  2. From Registry Editor go to the following path:
    • HKEY_CURRENT_USERSoftwareMicrosoftInternet ExplorerMain.
      Credential Manager keeps crashing
  3. Head your attention towards the right panel of the Registry Editor.
  4. From there select the FormSuggest PW string.
  5. Right-click on the same, select Edit String and within the Value data field enter Yes.
  6. If you can’t find FormSuggest PW string, you can manually create it by right-clicking the right pane and choosing New > String Value from the menu.
    • Enter FormSuggest PW as the name, and repeat the instructions from Step 4.
      Windows 10 Credential Manager not saving password
  7. Close Registry Editor and reboot your Windows 10 device.

Few users claim that you can fix the problems with Credential Manager simply by using Registry Editor.  After making these changes to the registry, check if the problem is resolved.

3. Change ownership for Vault directory

  1. Open File Explorer.
  2. Now navigate to C:ProgramData directory.
    Credential Manager Access deniedNote: This directory is hidden by default, and in order to reveal it you need to go to View tab and check Hidden items.
    Credential Manager keeps crashing
  3. Alternatively, you can just paste the C:ProgramData in the address bar to access the folder directly.
  4. Navigate to Microsoft directory.
  5. Locate the Vault directory and right-click it. Choose Properties from the menu.
    Windows 10 Credential Manager not saving password
  6. Navigate to the Security tab and click on Advanced.
    Credential manager error 0x80070425
  7. Click the Change permissions button in the bottom left.
    Cannot open Credential Manager
  8. Now check Replace all child object permissions entries and click on Apply and OK.
    Credential Manager keeps crashing

Credential Manager holds its information in a certain Vault directory. However, sometimes, Credential Manage is not working because the Vault directory is missing certain permissions.

After doing that, you need to locate the AC658CB4-9126-49BD-B877-31EEDAB3F204 folder. You should be able to find it inside the Vault directory. Once you locate this folder, you need to do the following:

  1. Right-click the AC658CB4-9126-49BD-B877-31EEDAB3F204 directory and choose Properties from the menu.
  2. Go to the Security tab and click on the Advanced button.
  3. In the Owner section, click on the Change button.
    Windows 10 Credential Manager not saving password
  4. In Enter the object name to select field enter Administrators.
  5. Now click Check Names. If everything is in order, click on OK.
    Credential manager error 0x80070425
  6. Now check Replace owner on subcontainers and objects.
  7. In the bottom left corner click on Replace all child object permission entries and click on Apply and OK to save changes.
    Cannot open Credential Manager

Many users reported that these directories didn’t have any permissions assigned to them, and that caused Access Denied error message to appear when trying to run Credential Manager.

After changing the permissions, this problem should be resolved, and you’ll be able to use Credential Manager again.

4. Set the Credential Manager service to Automatic

  1. Press Windows Key + R and enter services.msc. Now press Enter or click on OK.
    Credential manager error 0x80070425
  2. A list of services will now appear.
  3. Locate the Credential Manager service and double click it.
    Cannot open Credential Manager
  4. Set the Startup type to Automatic and click on Apply and OK to save changes.
    Credential Manager Access denied

If you’re having problems with Credential Manager, you might be able to fix those problems simply by changing the Startup type of its service.

Many users reported that Credential Manager was forgetting saved passwords. After changing the Startup type of service, your Credential Manager should start working again without any problems.

A few users reported that restarting the Credential Manager service fixed the problem, so feel free to do that as well. To restart this service, simply click the Stop button, wait for a few seconds, and then click on the Start button to start the service again.

5. Enter the credentials manually in Credential Manager

  1. Press Windows Key + S and enter credential manager. Select Credential Manager from the list of results.
    Credential manager error 0x80070425
  2. When Credential Manager starts, make sure that Windows Credentials is selected. Now click on Add a generic credential.
    Cannot open Credential Manager
  3. Enter the required information and click on OK to save changes.

If the Credential Manager isn’t working properly, you might be able to fix the problem by entering your credentials manually. Keep in mind that you might have to repeat this solution few times to fix this problem, so feel free to try it out.

6. Use Microsoft Edge to change saved passwords in Credential Manager

  1. Open Microsoft Edge.
  2. Click the Menu button in the top right corner and choose Settings from the menu.
    Credential Manager Access denied
  3. Scroll all the way down and in the Advanced settings section click on View advanced settings.
    Windows 10 Credential Manager not saving password
  4. Scroll down to the Privacy and services section and click on Manage passwords.
    Credential manager error 0x80070425
  5. A list of saved passwords will now appear.
  6. Click on any saved password to change it.
    Cannot open Credential Manager
  7. Change the username or password and click on Save.

According to users, you can fix problems with Credential Manager simply by changing saved passwords in Microsoft Edge.

After doing that, your Credential Manager should start working again. If everything is working properly, be sure to revert any changes you made to your saved passwords in Edge.

Several users suggested removing all your saved passwords from Edge in order to fix the problem. Before you remove your passwords, be sure to export them or write them down since you might not be able to restore them.

A few users reported that removing saved passwords from Edge fixed the problem, so be sure to try that.

7. Use the IP address of the device

If you can’t access the network drive, you might have to make a few changes in Credential Manager. To fix the issue, users suggest finding the problematic credential and removing it.

Now, create a new credential, but be sure to use the device’s IP address in the credential creation process. Now enter your username and password, and the issue should be resolved.

8. Delete the Protect directory

  1. Press Windows Key + R and enter %appdata%. Now press Enter or click OK.
    Credential Manager keeps crashing
  2. Now navigate to MicrosoftProtect directory.
  3. Once you enter Protect directory, select all files and choose Delete.
    Windows 10 Credential Manager not saving password

Few users reported that they fixed the problem with Credential Manager simply by removing all files from Protect directory. Keep in mind that this process will delete all login credentials on your PC, so you might want to export and save your passwords.

After deleting the contents of the Protect directory, the problem should be completely resolved.

So that’s how you can anytime fix your Credential Manager problems. You may also encounter the CredentiaUIBroker.exe error so be sure to check out our detailed article for quick fixes.

Try both methods if the first one isn’t working for you; also, if after completing this step-by-step guide you are still experiencing problems with your Windows 10 device, don’t hesitate to share your issues with us by using the comments field below. We will try to assist you as soon as possible.

A Problem Has Been Detected And Windows Shutdown: Fix

Are you having problems with A problem has been detected and Windows has been shut down to prevent damage to your computer message? This can be a serious problem, and in today’s article, we’ll try to help you fix it.

There are Windows errors and there it is, on a whole different level, the Blue Screen of Death as an ultimate horror for every Windows user.

One of the most common errors that result in BSoD is followed by A problem has been detected and Windows has been shut down.

As you’re probably aware, the dreaded Blue Screen of Death is here since Windows 95. Now, even though a lot of things have changed in the period of 20 years, it’s still present and it still bothers a lot of users from time to time.

There are various reasons why something as bad as the BSoD will occur and in this case, our main suspect is the HDD.

On the other hand, due to a myriad of possible instigators, make sure to check all the provided steps in order to resolve the problem.

Read the next section and choose one of our recommendations to fix the a problem has been detected blue screen error.

How do I fix a problem was detected and Windows was shutdown to prevent damage?

1. Use dedicated software

A problem has been detected and Windows has been shut down is a critical error. We recommend you dedicated software to make your computer perform like new.


2. Check HDD health

  1. Plug in USB or DVD with the Windows installation, and then restart your PC.
  2. Press F11 (function key might vary depending on your motherboard) and enter the Boot menu. A problem has been detected and Windows has been shut down BSOD error
  3. Select Windows installation media and press Enter.
  4. Press any key to boot Windows installation media, and wait for the loading of the system files to end.
  5. Click Next, choose Repair your computer and open Troubleshoot.
  6. Pick Advanced Options, and then open Command Prompt.Fix error a problem has been detected and Windows has been shut down
  7. In the elevated command line, type the following command and press Enter: chkdsk /f C:
  8. Wait for the procedure to finish (it can take some time).
  9. Restart your PC.

The BSoD error is mostly followed by the ”NTFS.sys” error. This, obviously, points towards the HDD.

Namely, it seems that Windows is trying to access the part of the system partition, but for some reason, it’s unable to do so.

Most of the time this happens due to the corruption of system files or corruption (bad sectors) of the HDD itself and results in, none other than the BSoD.

Therefore, what you’ll be addressing firstly is the HDD. If the issue is physical in nature and your HDD is unrepairable, we’re sad to inform you that you’ll need to replace it.

Luckily, that’s not always the case and maybe you can address it with the procedure above. Make sure to try it out and hope for the best.

However, you’ll be needing the installation media for this procedure with the Windows 10 setup.

If the problem is still persistent and you can confirm with certainty that the HDD isn’t the problem, make sure to move to additional steps.


3. Inspect hardware changes

Besides the HDD, almost every other replaceable PC component can be forcing Windows to shut down in order to prevent further damage. Now, this doesn’t always mean that something is malfunctioning.

In case your one of the essential components is ‘dead’, you won’t be able to boot in the first place. Meaning that compatibility is the problem here, rather than a defect. The focus here is, of course, on the CPU.

So, what’s the problem then? Well, if you installed the CPU or GPU which isn’t supported by your motherboard, the system will crash.

The disturbance of homogeneous system configuration will most certainly result in BSoD. So, what you’ll need to do is check whether your motherboard supports certain component.

Maybe your motherboard is indeed supporting the troubling component but it’s not up-to-date. This will require you to update your BIOS/UEFI.

Furthermore, make sure that everything is in its place. Shutdown the PC, and inspect the RAM placement. Sometimes you can change the socket and look for changes.

Moreover, make sure that your PSU (Power Supply) isn’t faulty and that PC isn’t constantly overheating.

Once you’re positive that everything is as it supposed to be, and system crashes keep reoccurring, move with the steps below.


4. Reset Windows 10

If you keep getting this error message, perhaps the problem is related to your Windows 10 installation. Your installation can get corrupted, and that can lead to this and many other problems.

To fix the issue, users are suggesting to perform a Windows 10 reset.

Bear in mind that this process can delete all your files from the system drive, so be sure to back them up beforehand.


5. Update drivers

  1. Download Show or Hide Updates Troubleshooter for Windows 10.
  2. Restart your PC and press F8 rapidly to enter the Advanced Startup options menu.
  3. Start the PC in Safe Mode with Networking mode.A problem has been detected and Windows has been shut down error
  4. Navigate to Device Manager and install proper drivers or perform the roll-back action.device manager a problem has been detected
  5. Run Show or Hide Updates Troubleshooter and prevent Windows 10 from updating drivers.
  6. Restart your PC and look for changes.

Once we’re past the grave instigators of the problem at hand, let’s focus on lesser evil, or in this case, drivers.

The incompatible drivers or the drivers that aren’t properly installed can cause a variety of issues. Including the BSoD.

Now, most of the time the focus is on major devices and their drivers, but occasionally, even the peripheral device, like a printer, can cause the system crash.

So, we advise you to boot into Safe mode, navigate to Device Manager, and install proper drivers.

Moreover, if you’re using Windows 10, this procedure should be accompanied by blocking of drivers-related Windows Updates.

Windows 10 tends to install drivers on its own, and the generic drivers are not always the best-suited ones.

Updating your drivers can become a fast, simple and pleasant task if you use the right tool. After installation, this software will scan your computer and show you all missing, damaged or old drivers.

You will have access to a detailed report of your drivers, and you can also choose to download and install the newest ones. This is possible thanks to this tool’s huge daily updated database.

⇒ Get Outbyte Driver Updater


6. Perform a clean reinstallation

Finally, if none of the previous steps proved fruitful, the only software-related solution that crosses our mind is a clean reinstallation.

Issues as large as this need a thorough approach and what’s more thorough than starting from a scratch.

If you’re not sure how to reinstall your system, we provided a detailed explanation so make sure to follow it closely.

We certainly hope that this was a helpful read and that, you’ll solve the A problem has been detected and Windows has been shut down error. Even more, we encourage troubleshooting shutdown errors caused by apps in Windows, so take a closer look at our dedicated guide.

Furthermore, make sure to tell us about your experience with this error and share alternative solutions we haven’t provided. You can do so in the comments below.

How to Search Attachment File Type in Outlook

Outlook users often need to search for attachments in emails. The application includes flexible search options that enable users to search for attachments in various ways. You can use its search box and built-in filters to search for files attached to Outlook emails.

Read on to find out how to search attachment file type in Outlook using various methods, depending on your wants and needs.

How do I search attachment file type in Outlook?

1. Search for file formats

You can search for specific attachment file formats by entering the extension command in the search box. Click inside Outlook’s search box, and then input the following command: ext:<extension>.

Thereafter, Outlook will list emails with attachments that match the file type included in the command. These are some examples of the ext: <extension> command:

  • ext:pdf
  • ext:jpeg
  • ext:docx
  • ext:zip

2. Search for keywords in attachments

You can search for an email that includes a specific keyword or phrase with the attachment command. Enter this command in Outlook’s email search box: attachment:<keyword>. Outlook will list emails with attachments that include the keyword. Below are a few examples of the attachment command:

  • attachment:December 5
  • attachment:summer
  • attachment:Christmas
  • attachment:anniversary

3. Search for large attachments

  1. To search for large email attachments in Outlook, try utilizing the Has Attachments filter. Click in the search box to switch to the Search tab.
  2. Click the Has Attachments button. That option will display all messages with attachments sorted by date.
    Has Attachments filter outlook how to search for attachment
  3. Click By Date at the top of the search results.
  4. Select Size on the menu to sort the emails with attachments by size. Then you can find the emails with the largest attachments listed at the top.

4. Search Outlook’s calendar for large attachments

  1. To search for Outlook calendar attachments, switch to the Calendar view.
  2. Open the calendar folder to search attachments for.
  3. Select the View tab.
  4. Click the Change View button.Change View button outlook how to search for attachment
  5. Then select the List option.
  6. Click within the Instant Search box.
  7. Click the Has Attachment button on the Search tab. That will display all calendar items with attachments for the opened calendar folder.

So, you can utilize Outlook’s search tools in various ways to find email and calendar attachments. The ext and attachment search operators and the Has Attachments filters are efficient search methods for finding attachments in Outlook.

Also, don’t hesitate to learn how to open EML files in Outlook in case of using an older version.

If you have any other questions or suggestions regarding the topic of Outlook search attachment file type, leave them in the comments section below, and we’ll surely check them out.

[Fixed] Photoshop Error: Scratch Disks are Full on Windows 10

Photoshop is one of the most powerful graphic editors out there. With lots of features and an incredibly intuitive interface, it quickly became a go-to for the PROs and the amateurs alike.

Despite its amazing popularity, Photoshop is not without its flaws and errors. One of the most common issues reported in Windows 10 by users is Scratch Disk is full.

Because Photoshop uses your hard drive as a temporary storage space whenever it runs out of RAM, it becomes the Scratch disk. The number of temporary files can trigger the Scratch disk is full error.

The quickest way to solve the problem is to change the Scratch disk allocation. In most cases, the error gets triggered by insufficient storage space.

After that, you can delete Photoshop Temp files and increase the RAM limit. Let’s find out how to do all that from the solutions below.


How do I fix Scratch Disks are full errors in Photoshop?

1.  Change the Scratch disk allocation

  1. Download Photoshop for free.
  2. Launch Photoshop.
  3. Go to Edit > Preferences > Scratch Disks.photoshop scratch disk full error
  4. Now choose your preferred drive or the one with the most space available.scratch disk full photoshop windows 10
  5. If you cannot open the app, launch Photoshop, and as soon as the launching process begins, hold Ctrl + Alt.
  6. A Scratch Disks Preferences window will appear.photoshop won't launch scratch disk error
  7. Now choose your preferred drive or the one with the most space available.

This is the first thing you should do because it’s rather simple and has been confirmed as working by the majority of users. 

Remember that Photoshop needs a lot of swap space, and by default, it will use the operating system or (C:) drive. If that’s not enough, be sure to change it to another one that has a lot more space.


2. Delete Temp files

  1. Go to C:UsersYour userAppDataLocalTemp
  2. Find all the *PST or Photoshop Temp files and delete them.
  3. You can do the same thing by pressing Windows key + R, type %appdata% and hit enter, then go to the Local>Temp folder.clear photoshop temp files

As we already explained, a large number of temp files can trigger this error. A quick fix could be deleting them to create room for new ones.


3. Increase the RAM limit in Photoshop

  1. Launch Photoshop.
  2. Go to Edit > Preferences > Performance.solve scratch disk error photoshop
  3. Under Memory Usage section, you will see Let Photoshop Use option. Move the cursor to adjust the amount of RAM desired or type the number in the box.increase ram in photoshop scratch disk error

By default, Photoshop is only using 60% of the total amount of RAM. If your RAM limit is the default one or you have lowered it even more, it’s just a matter of time until you will bump into the error.

Photoshop will give you the Available RAM and the Ideal Range. You should take into consideration the Ideal Range and increase your RAM usage to about 70% or 80%.

Note that if you go above these numbers, your Windows 10 PC performance will take a noticeable hit and it is not recommended.


That’s about it. Hope that one of these solutions helped you get rid of the Scratch Disks are full error and you can move on with your amazing projects.

Remember to leave any other questions and suggestions in the comments section below, and we’ll be sure to take a look.


Fix: You Must Enable System Protection on This Drive

System restore is an invaluable utility for fixing Windows issues. Users turn to it when Windows doesn’t boot up. However, some users have posted on support forums about a You must enable system protection on this drive error.

When they try to select a restore point, the listed restore points have a You must enable system protection on this drive status error. Consequently, users can’t utilize System Restore.


How do I fix the enable system protection error?

1. Enable system protection from the Command Prompt

Try enabling system protection from the Command Prompt.

  1. Users can open the Command Prompt from within Windows by entering cmd in the platform’s search utility and right-clicking Command Prompt to select Run as administrator.
  2. If Windows doesn’t boot up, however, you can still open the Command Prompt from Windows Recovery Environment.
  3. Select Troubleshoot, Advanced options, and Command Prompt from within Windows Recovery Environment.Advanced options you must enable system protection on this drive
  4. Next, enter net start vss in the Command Prompt; and press the Return key.
  5. Then enter rstrui.exe /offline:C:windows=active in the Command Prompt, and remember to press Return.
    enable system protection command you must enable system protection on this drive
  6. Restart your desktop and laptop.

2. Rename registry files

If the above fix doesn’t do the trick, try renaming two registry files, which you can do from Command Prompt.

  1. Open the Command Prompt as outlined for the first resolution.
  2. Type cd %systemroot%system32config in the Prompt’s window and press Enter to open that directory.
    change directory command you must enable system protection on this drive
  3. Input the ren SYSTEM system.001 command, and press the Enter key.
  4. Then enter ren SOFTWARE software.001 in the Command Prompt, and press the Return key.Rename command you must enable system protection on this drive

3. Check the Turn on system protection setting in Windows

  1. To check if System Restore is enabled in Windows, press the Windows key + X hotkey.
  2. Then click Run to open that accessory.
  3. Input sysdm.cpl in Run’s Open box and click OK to open the window shown directly below.
    System Properties window you must enable system protection on this drive
  4. Click the System Protection tab.
    System Protection tab you must enable system protection on this drive
  5. Press the Configure button.
  6. Select the Turn on system protection option if that setting isn’t selected.
    Turn on system protection option you must enable system protection on this drive
  7. Click the Apply option, and press the OK button to exit.

4. Restart the System Protection Service

Restarting the System Protection Service might also fix the enable system protection error.

  1. To do that, open the Command Prompt.
  2. Enter net stop vss in the Prompt’s window, and press the Return button.
  3. Then input net start vss and press Enter to restart the service.net start vss command you must enable system protection on this drive

Those resolutions might fix the enable system protection error so that you can utilize System Restore again. In addition to those, the Reset this PC option, which is available within the Windows Recovery Environment, might be worth a shot.

Let us know which one of the steps helped you most, or if you had to reset your PC. Do so by leaving us a message in the components section below.


[wl_navigator]

How to Fix Windows Fax and Scan Not Detecting Scanner

Sending faxes with Windows PC is usually done by Windows Fax and Scan application. You can use it to fax files over with a few simple steps. However, some users’ experience is a rather negative one, as they were met with the “No scanners were detected” prompt while trying to scan files. This especially occurs if they set multiple recipients.

We made sure to conduct research and provide you with some typical solutions for the problem at hand.

What to do if Windows Fax and Scan can’t detect scanners

1. Run hardware troubleshooter

Let’s start with running the hardware troubleshooter. This built-in troubleshooting tool should check for possible driver and configuration errors on your fax modem.

Whether it will resolve it or not, it depends on the gravity of the problem. However, by running it, you’ll at least get a better insight into the problem background.

Here’s how to run Windows Hardware troubleshooter:

  1. Open Control Panel.
  2. Choose Hardware and Sound and then Devices and Printers.printers and devices fax
  3. Right-click on Fax and open Troubleshoot.

You can also remove the device and add it again. This addressed the issue for some users.

2. Reinstall drivers

Drivers are, more times than not, the reason why users run into errors while trying to scan and send faxes. Some more knowledgeable users went as far as to suggest updating all and not only associated drivers. This includes BIOS as well. Of course, the main focus is on the modem driver while the close second is the fax machine/printer itself.

Even if the driver is up-to-date and seemingly functional, it still can get corrupted. For that reason, we suggest downloading the latest iteration from the official support site.

Some older modems require legacy drivers, so bear that in mind when looking for the proper driver. In addition, deleting the current driver is also recommended, as the system might try re-establishing it on its own.

Other than searching for your drivers manually, you should try using third-party software that can find the latest versions automatically.

3. Disable and re-enable Fax and Scan

Windows Fax and Scan is a built-in feature; thus, it can’t be reinstalled. What can be done, on the other hand, is a simple reset of the feature. You can disable it and re-enable it within the Windows Features menu. Once you’ve disabled it, restart your PC and re-enable it again.

Here’s how to access the Windows Features menu and reset Windows Fax and Scan:

  1. In the Windows Search bar, type Windows Features and open “Turn Windows features on or off” from the results list.
  2. Scroll down and expand Print and Document Services.
  3. Uncheck the “Windows Fax and Scan” box and confirm changes.windows features windows fax and scan
  4. Restart your PC and re-enable Windows Fax and Scan.

4. Check modem compatibility

Finally, if none of the previous solutions helped you resolve the problem, consider checking the modem compatibility if you’re using Windows Server. It needs to be on the Windows Server HCL list. The ones which are not on the list might or might not work.

Also, if the error started appearing after a system update, you can always roll back to a previous version and look for improvements. In addition, some users managed to send scanned files via the Photos app to multiple recipients.

With that in mind, we can conclude this article. If you have any questions or suggestions, feel free to tell us in the comments section below. We look forward to hearing from you.

RELATED STORIES YOU SHOULD CHECK OUT:

Posted in Fix

0x80a40026 Error Code: How to Fix this Xbox Issue In No Time

Are you getting the error code 0x80a40026 while trying to play a game on Xbox? If yes, don’t worry. This article contains the solutions you need.

This error is not like other random Xbox errors like code 0x87e10bef. Unlike other issues, it may appear right after launching a specific game. Or, it may appear when a gamer needs to ask for permission from his/her parents for the gameplay. Thankfully, you can fix this problem easily.

Why does the error code 0x80a40026 occur?

Why this Xbox error happens is still a mystery. However, after digging deeper, we have found these possible reasons:

  • Improper account: If you are not using the account with which the game was purchased, it may show the error.
  • Age restriction: Some games are not appropriate for everyone. If you are underage, the problem may appear.
  • Xbox service is down: If the Xbox service is down, you may get the error code 0x80a40026.
  • Internal Xbox issue: Some temporary or critical bugs with your gaming console may trigger this problem as well.
  • Connectivity problem: If the internet connection you are using is not stable, you may get various error codes while playing some specific titles.

How can I fix the error 0x80a40026 on Xbox?

We have found the exact solutions to solve this problem. However, you must ensure the following things before trying them:

After doing the above things, follow these methods to fix the Xbox error 0x80a40026 that appears while playing a specific game.

1. Go offline & online

  1. Press the Xbox button and open Settings.
  2. Go to General.
  3. Navigate to the Network settings.going network settings xbox
  4. Tap on Go offline.going offline xbox
  5. After that, tap on Go online.going online xbox
  6. Now, try to play the game again.

2. Remove from the family account and add again

  1. Go to the Microsoft Family page using a desktop web browser.
  2. Click on the three vertical dots for the account you want to remove and choose Remove from family group.removing from family group microsoft
  3. Click on Add a family member button and add that account again.

This method is applicable if your family member or child is having the error code 0x80a40026 while asking for permission to play a specific title.

3. Clear Xbox cache

3.1 Clear cache from the settings

  1. Go to Settings like before.
  2. Tap on Devices & streaming and then tap on Blu-ray.going blue-ray xbox
  3. Next, navigate to the Persistent Storage.
  4. Tap on Clear Persistent Storage.clearing persistent storage xbox

If you do not find a similar option on your Xbox One/Series S or X game console, follow the alternative method mentioned below.

3.2 Clear using the physical button

  1. Press and hold the Xbox button on your console for 10 seconds to turn it off.xbox button
  2. Unplug the power cable.
  3. Press and hold that button again and repeat it multiple times.
  4. Wait a minute and plug in the power cable again.
  5. Then, wait another minute.
  6. Next, press the Xbox button again to turn on the console.

If the above solutions failed, go to the Xbox contact page. Choose your preferred method to contact, for example, Web chat. Explain your problem and get the proper solution.

Usually, the error 0x80a40026 mostly appears on the Xbox Series X or S. Previous Xbox console users did not encounter this error that much. So, if no method works, contacting support is the best idea.

If you are interested, learn how to solve an error occurred while connecting to the Epic server on Xbox.

You have learned how to solve the Xbox error code 0x80a40026 while trying to play a specific game. If you have any better ideas or helpful suggestions, feel free to let us know in the comment box.

Spotify Is Not Working on Xbox: 3 Quick Ways to Fix It

Spotify has, of late, become one of the most popular audio streaming platforms, with millions registering for it. And while the app runs seamlessly across devices, some Xbox users have reported that Spotify is not working.

For many, Spotify was not working on Xbox one, but the issue is prevalent across different console versions, and even for a few users, Spotify stopped working on Windows. So, if you were looking for a concrete fix, this is the right page.

Why is Spotify not working on Xbox?

Here are a few reasons Spotify is not working on Xbox:

  • Issues with the Spotify servers: If the Spotify servers are down, you will encounter issues accessing the app or streaming content over it.
  • Spotify was not installed properly: Some users reported that an improper installation of Spotify triggered the problem in their case.
  • A buggy update: In case the problem started after updating the Xbox or Spotify, it could be a bug in the update that’s to be blamed. Usually, the developers release a patch for it in the subsequent versions.

What can I do if Spotify is not working on Xbox?

Before we head to the slightly longer solutions, try these quick ones:

  • Check if the Spotify servers are down. For that, you can use a service like Downdetector or head to Spotify’s social media handles for updates.
  • Check if you have reached the maximum device limit because, in some cases, users were unable to run Spotify due to this. To fix things, remove a few devices from the Microsoft account.
  • A simple yet effective fix when Spotify is not working on Xbox is to perform a hard reset. All you have to do is press the Xbox button on the console for 10 seconds and wait for it to turn off. Next, unplug it from the power source for another 10 seconds. All that’s left is reconnecting the Xbox console to the power source and turning it on. Now, check whether Spotify works.
  • Update both the Xbox console and the Spotify app.
  • If Spotify is not working, switch to another app on Xbox where there’s some background music, go back to Spotify from the menu, and increase its volume. Once Spotify starts working, you can navigate back to the app, and it should continue to function normally.

In case none of these work, the ones listed next surely would.

1. Use Spotify Connect

Note icon NOTE
You could use both a mobile device and a computer to stream music to the Xbox via Spotify Connect. The steps here are for the latter, though they remain similar for both.
  1. Download Spotify from the Microsoft Store if you don’t already have the app, and then run it.
  2. Now, play any track or podcast, and click on the Connect to a device option.connect to a device
  3. Finally, select your Xbox from the list of devices.spotify connect to Spotify not working on xbox

Spotify should now start working on Xbox, but again, it’s more of a workaround. If you insist on fixing the problem at hand, the solutions below should help.

2. Test the Internet speed

  1. On your controller, press the Xbox button and then open Settings.settings
  2. Now, in the General tab, choose Network settings.network settings
  3. Select Test network speed & statistics.test network speed & statistics to fix Spotify not working on xbox
  4. Your Xbox will now test the network and should display the results in a few seconds.network test results

If the Internet speed is slow, try connecting to a different network or bringing the router closer to the Xbox console. Also, check the plan that you are subscribed to and make sure it offers a decent speed. In case this, too, fails to work, move to the last solution.

3. Reinstall Spotify on Xbox

If nothing else works, it’s likely the app itself to blame when Spotify is not working on Xbox. As stated earlier, problems during the installation process can affect the functioning of any app.

And the easiest solution here is to reinstall Spotify. Just make sure you are connected to a stable Internet when installing Spotify on Xbox.

That’s it! If Spotify was not working on Xbox earlier, it should now, and that, too, seamlessly, just the way it was intended.

Also, if you are looking for an alternative, check the best Xbox One background audio apps.

For any other queries or to share a solution that’s not listed here, drop a comment below.

VLC Pixelated Video [MKV, AVI, MP4]: 5 Quick Fixes

VLC pixelation issues are coming when using the popular media player.

The video plays perfectly at first, but if you switch to full-screen mode, the video becomes pixelated or gets pixels flashing. This issue occurs even if your video card drivers are up to date.

You’d have thought that the VLC pixelated MP4/MKV is from the video, but it’s not. This is because the video plays fine in full screen on other players, such as Windows Media Player.

The following solutions have fixed the VLC pixelation issues for other users.

How can I fix the VLC pixelated video issue?

1. Fast forward or backward the playback

fastforward-or-backward-playback-fix-vlc-pixelated-mp4


You can fix VLC pixelation issues by simply jumping a few seconds back or forward.

This solution will not fix the issue permanently, but it will clear the VLC pixelated gray screen for the moment.

To jump front or back, simply click on the progress bar and dragging the indicator back or front a couple of seconds.

You can also click on the time you want to jump to instead of dragging the indicator to that point.

Alternatively, you can use the Shift + directional keys combination to fast forward or fast backward the playback.

2. Disable hardware-accelerated decoding

  1. Launch VLC media player.
  2. Click on the Tools menu and select Preferences.
    open-preferences-vlc-pixelated-mp4
  3. Next, click on Reset Preferences and hit OK in the dialog box to confirm the action.
    reset-preferences-vlc-pixelated-mp4
  4. Now, close VLC Media Player and re-open the application.
  5. Again, click on the Tools menu and go to Preferences.
  6. Click on Input / Codecs.
    open-input-codecs-vlc-pixelated-mp4
  7. Click on the dropdown beside Hardware-accelerated decoding and disable the option.
    disable-hardware-acceleration-vlc-pixelation-issue
  8. Finally, click Save and close the application.

3. Change the VLC buffer settings

  1. Open VLC Media Player.
  2. Go to the Tools menu and click on Preferences.
  3. At the bottom of the screen, select All to reveal additional options.
  4. Click on Stream Output from the left-hand menu.
  5. Finally, change the value of the Stream output muxer caching (ms) to 1500 milliseconds.
    file-caching-vlc-pixelated
  6. Hit the Save button.

4. Enable OpenGL video output

  1. Launch VPL Media Player.
  2. Next, open the Tools menu and choose Preferences.
  3. Click on the All switch at the bottom of the screen to reveal more menu options.
  4. From the menu, click on Video to expand the options, and select Output modules.
    vlc-pixelated-opengl-enable
  5. Change the Video output module option to OpenGL video output.
  6. Click Save to confirm your changes.

5. Use a different player

If you didn’t manage to fix the pixelation problem in VLC, try reinstalling the app or installing a better video codec pack.

There is also the option of using a different video player altogether and enjoying the video for the time being.

Apart from the VLC pixelation issues, another common problem with this media player is when your videos lag on Windows 10.

There’s no official fix for VLC pixelated videos, but the solutions in this guide will resolve the problem quickly.

New PC Not Displaying On Monitor: 6 Quick Fixes

There might be times when your PC is turned on but the display isn’t showing anything.

One user on Tom’s Hardware forum described the issue like this:

I just built my kids their first gaming pc, but I can’t get anything to display on the monitor. I have an AMD Ryzen 5 2600 CPU, MSI B450M Pro-VDH motherboard, XFX Radeon HD 6850 gpu and 8gb Patriot Viper RAM. I’m at a complete loss as to what the problem is.

However, before we begin, here is a warning, many of the steps mentioned here are quite advanced. Seek professional help if you aren’t comfortable doing any of those yourself.

How can I fix my new PC not displaying on monitor?

1. Check the monitor

check monitor pc won't display anything
  1. Try connecting the monitor to another PC and to test if it’s working.
  2. Alternatively, disconnect the monitor from the PC while keeping it connected to the power source.

2. Check video cable connection

check monitor cables pc won't display anything
  1. Shut your PC down and unplug cables that connect to the power source and the PC.
  2. Reconnect the cables again, making sure those have been secured firmly.
  3. Turn the PC on and see if the issue is still there.

3. Clear BIOS memory

clear bios pc won't display anything
  1. Try clearing the BIOS memory in order to fix this problem.
  2. To do that, disconnect the PC from the power outlet, open the computer case, and remove the motherboard battery.
  3. Wait for 10 minutes and insert the battery again and start your PC.
  4. Note: Removing the motherboard battery might violate your PC‘s warranty. If you don’t know how to safely remove the battery, it might be better to contact an expert.

4. Check RAM placement

check your ram pc won't display anything
  1. See if the RAM is placed in the correct manner.
  2. Preferably, disconnect the RAM memory from its slot and switch on the PC.
  3. If there is a beep sound coming from the motherboard, it’s a sign of the motherboard being in perfect condition. In that case, wipe the RAM connections with a clean wiper and reinsert it.
  4. If there is no beep sound, there could be something wrong with the motherboard. Consult an expert to confirm the same.

5. Check CPU heat sink

cpu heatsink examine pc won't display anything
  1. Open your PC case.
  2. Remove the CPU fan and check if the heat sink is in perfect working order.
  3. If not, you might be required to apply a fresh coat of thermal paste to ensure the CPU remains cool.

6. Check the graphics card

graphics card pc won't display anything
  1. Test your graphics card by connecting it to a different PC.
  2. If your graphics card works on another PC, connect it to your PC but make sure it’s properly connected.

The above steps should help you if your monitor isn’t showing anything. However, if the problem still persists then you might need to have your motherboard or even the processor checked.

Sometimes, reseating the CPU might also solve the issue. Perform these only after you are done with the above steps and seek professional help if needed.

Fix The Current Profile is not Allowed to Play on Xbox Live

Many gamers reported The current profile is not allowed message that prevents them from accessing online multiplayer on their console.

Before applying the solutions below, make sure that you have a Game Pass Core or Game Pass Ultimate account and that your subscription is still active.

How can I fix The current profile is not allowed Xbox error?

1. Delete and download your profile again

For Xbox 360:

  1. Go to Settings and select System.
  2. Navigate to Storage.
  3. If you don’t have external storage devices attached select Hard Drive. If you have additional devices connected, select All Devices.
  4. Select Profiles and choose the profile that you want to delete.
  5. Choose Delete.
     
  6. Select the Delete Profile Only option to delete your profile. This option will delete the profile while keeping all your saved games and achievements.

After deleting the profile, you need to add it again by following these steps:

  1. Press the Guide button on your controller.
  2. Select the Download Profile option. If you don’t see this option it means that you’re signed in with a different profile currently, so be sure to sign out.
  3. Choose Download Profile.
  4. Enter your Microsoft account login information.
  5. Select the storage location for your profile.

After doing this, check if The current profile is not allowed message is gone.

For Xbox One:

  1. On the Home screen scroll left to open the Guide.
  2. Select Settings and then choose All Settings.
  3. In the Account section select Remove accounts and choose your account.

To add download your account again, follow these steps:

  1. Open the Guide and choose Sign in and choose Add & manage.
  2. Select Add new and enter your login information.
  3. Follow the instructions on the screen to complete the process.

These steps may also come in handy when you encounter your profile was not completely downloaded error.

2. Clear the Persistent storage

  1. Open the Guide and select Settings.
  2. Select All Settings and then Blu-ray.
     
  3. Select Blu-ray and navigate to Persistent Storage. Lastly, select Clear Persistent Storage.

Once the cache is cleared, The current profile is not allowed message should disappear.

3. Clear the MAC address

  1. Navigate to Settings.
  2. Select Network settings and go to Advanced settings.
     
  3. Now choose Alternative MAC address.
  4. Choose the Clear option.
  5. After clearing the MAC address, turn off your Xbox. Disconnect the power cable and wait for a few minutes.
  6. Connect the power cable and turn on your Xbox again.

After doing that, check if the problem is resolved.

4. Test the Xbox Live connection

  1. Go to Settings and choose Network Settings.
  2. Select your network and choose Test network connection option.
  3. After that go to Test multiplayer connection.
  4. After the process is completed, check if the problem is resolved.

Your network connection is the common cause for The current profile is not allowed error, so be sure to check it.

5. Clear the system cache

  1. Press the Guide button on your controller.
  2. Go to Settings and select System Settings.
  3. Select Storage.
  4. Highlight any storage device, and then press Y on your controller (you can select any storage device because the system will clear the cache for all of them).
  5. Select Clear System Cache.
  6. Confirm the action.
  7. Restart your console

6. Perform factory reset

  1. Open the guide by scrolling left on the Home screen.
  2. Select Settings and go to All Settings.
  3. Choose System and then select Console info & updates.
  4. Select Reset console.
  5. You should see two options available: Reset and keep my games & apps and Reset and remove everything.
  6. We suggest that you use the first option since this option will only reset your console and delete potentially corrupted data without deleting games and other large files.
  7. If that option doesn’t work and the problem still persists, be sure to use Reset and remove everything option.

The current profile is not allowed error can prevent you from playing Xbox games online, but we hope that you managed to fix the problem after using one of our solutions.

How can I fix The current profile is not allowed in Warzone?

In most cases, this issue is caused by a server glitch. The issue appears if the game can’t detect an Xbox Live Gold subscription. However, the game is completely free, and it should work without a Gold subscription.

One way to potentially fix the problem is to do the following:

  1. Go back to the game’s main menu.
  2. Now close the game completely, and start it again.
  3. If that doesn’t work, restart your console.

This is just a workaround and most likely this server issue will be resolved by Microsoft.

Sometimes your multiplayer can get blocked by your Xbox Live settings, but we covered that issue in a separate guide.

If the issue is still there, visit our multiplayer is not working on Xbox One guide for more solutions.

Did you find a solution to this problem on your own? Share it with us in the comments section below.

Windows Defender Firewall is Preventing Connections: Fix

Some users have posted on forums about an HSS DNS Leak error message that blocks their Internet connections.

The full error reads Contact your network administrator the Windows Defender Firewall rule HSS DNS leak is blocking your internet connection.

Another similar issue reads Failure: unable to access network data. this may be due to Windows Defender Firewall blocking act.

Thus, users can’t connect to the Internet when that error arises. Of course, at this point, Windows Defender Firewall is also preventing connections to your computer.

How do I stop the Windows Defender Firewall from blocking internet?

1. Uncheck the HSS DNS leak rule’s firewall permission

  1. Type control panel in Windows search and click on Control Panel from the results.
  2. Click on Windows Defender Firewall to open that Control Panel applet.
  3. Then click Allow an app or feature through Windows Defender Firewall to open the setting.
  4. Press the Change settings button.
  5. Deselect the Private and Public check boxes for HSS DSS leak rule.
  6. Click the OK button.

Users have confirmed that unchecking HSS DNS Leak’s Private and Public checkboxes can fix the Windows Defender Firewall rule error so make sure you try the steps above.

2. Turn off Windows Defender Firewall

  1. Open Windows Defender Firewall as shown in the step above.
  2. Click Turn Windows Defender Firewall on or off to open the WDF options.
  3. Select the Turn off Windows Defender Firewall radio buttons there.
  4. Select the OK option.

Alternatively, you can turn off Windows Defender Firewall completely to fix its HSS leak rule blocking the connection so try doing that by performing the steps above.

3. Reinstall Hotspot Shield

  1. Launch Run by pressing the Windows key + R keyboard shortcut.
  2. Input appwiz.cpl in the Open box and click OK to open the Windows uninstaller.
  3. Select the Hotspot Shield software, and then select the Uninstall option.
  4. Click Yes to provide further confirmation to uninstall the software.
  5. Restart Windows after uninstalling Hotspot.
  6. Click Get Hotspot Shield on the software’s homepage to reinstall the latest version of the software.

HSS is the Hotspot Shield VPN software, and users have said they’ve fixed the Windows Defender Firewall rule error by reinstalling Hotspot Shield.

4. Try another antivirus software

All these problems caused by Windows Defender Firewall can be avoided by installing a third-party antivirus because as soon as it’s on your system it will deactivate the built-in solution.

And not only that you will no longer have a blocked connection, but you will also have a lot better protection, at least with the security software recommended below.

This tool is focused on privacy and online protection and its multi-layered security solutions will ensure safe online payments and banking transactions wherever you are.

The program comes with a 30-day trial version so you can get the exact experience of the paid version before committing to buy it.

TotalAV

Forget about blocked Internet connections and browse freely under the protection of this great antivirus.
Check Price Visit Website

That concludes our step-by-step guide to fix this Windows Defender issue with blocking the Internet connection and Wi-Fi and we hope that you can now use it freely.

However, if you’re tired of Windows Defender issues and errors, you can always look at our top antiviruses with unlimited licenses and get a better solution.

Often Windows Defender Firewall can give you Allow Chrome to access the network in your firewall or antivirus settings, but we have a guide that addresses this issue.

If you happen to know any other feasible solutions, don’t hesitate to write them in a comment in the section below.

Fix: Open With Menu Option is Missing in Windows 10

If you want to open a certain file with a different program, usually you’ll right-click that file and choose the Open with from the menu.

Many users use the Open with menu on their PC, but sometimes this menu can become missing.

Why is the Open with menu missing?

There are plenty of reasons why the Open with menu is not showing, but we will take into consideration the most important of them:

  • Registry problem – The Open With registration key is probably missing in Registry Editor, or its data value has changed.
  • Windows 10 problematic update – If you performed any updates prior to this issue appearing, this might be the cause of the registry corruption.
  • Third-party software modified the registry – Did you install any file management software lately? If so, that tool may have overridden the right-click menu from Windows.

This bug has a lot of iterations. Our readers have complained that Open with is disabled in Windows 10, that Windows 10 Open with is grayed out, or that Open with is missing from the right-click context menu.

However, the solutions we provided below will help you fix this problem in no time.

How can I fix the Open with menu missing in Windows 10?

Before getting to more complicated solutions, you should try bringing back the Open with menu with the following simple methods:

  • Pressing the Shift + F10 key combination is the shortcut to the context menu. For other systems, you may also try AltGr + PrtSc + CtrlR. It’s worth trying.
  • Restart your system. If you’ve had any pending updates, they might get installed and solve this issue.
  • Disable the antivirus temporarily because it may be responsible for this issue. If disabling it fixed the problem, you probably need a better antivirus for your system.
  • Install any missing updates for your OS. You can check in Settings, Update & Security for new ones.

If this issue persists, let’s go through the following solutions to fix it permanently.

1. Create a .reg file and change registry values

  1. Click the Start button, type notepad, and open the app from the results.
  2. When Notepad opens, paste the following into it:
    • Windows Registry Editor Version 5.00
    • [HKEY_CLASSES_ROOT\*\shellex\ContextMenuHandlers\Open With]@="{09799AFB-AD67-11d1-ABCD-00C04FC30936}"
  3. Click File and Save as.
    Open with missing from context menu
  4. In the Save as type section, choose All Files.
  5. In the File name section enter OpenWith.reg and click Save.
    Windows 10 Open with not working
  6. Find the OpenWith.reg file and double-click it to add its content to the registry.

2. Change the registry manually

  1. Press Windows key + R and type regedit.
  2. Press Enter or click OK to start Registry Editor.
    Windows 10 Open with not working
  3. When Registry Editor starts, in the left pane navigate to the following key:
    • HKEY_CLASSES_ROOT\*\shellex\ContextMenuHandlers
      Open with disabled windows 10
  4. If you see Open With key available, click it.
  5. If it’s not available, right-click ContextMenuHandlers and choose New and select Key.
  6. Enter OpenWith as the name and click the OpenWith key.
  7. In the right pane, you should see Default.
  8. Double-click it to open its properties.
    Windows 10 Open with greyed out
  9. In Value data enter: {09799AFB-AD67-11d1-ABCD-00C04FC30936}
    Windows 10 Open with greyed out
  10. Click OK to save the changes and close the Registry Editor.

3. Use third-party software to disable shell extensions

Sometimes programs add their functionality to the right-click menu in Windows, and this can sometimes cause the Open with menu to be missing.

To fix this issue, you need to find the problematic software and to do that, you’ll need CCleaner or ShellExView.

Regardless of which one you use, make sure to disable shell extensions and turn them back on, one by one, to see which one is causing the problem. Once finished, make sure to restart Windows.

4. Copy all files from the WinX folder

  1. Press the Windows key + E to start File Explorer.
  2. Go to the following path: C:\Users\Default\AppData\Local\Microsoft\Windows\WinX
  3. Select all files in WinX folder and copy them to the following location: C:\Users\[user.account.name]\AppData\Local\Microsoft\Window\sWinX
    Open with disabled windows 10
  4. Restart Windows Explorer.

5. Create new values in the registry

  1. Open Registry Editor.
  2. Navigate to the following key: Computer\HKEY_CLASSES_ROOT\*\shell
    Open with missing from right click
  3. Now right-click shell key and choose New and select Key from the menu.
  4. Enter Open With as the name of the new key.
    Windows 10 Open with not working
  5. Now right-click Open With key, choose New, and select Key.
  6. Set its name as Command.
  7. Select Command key and in the right pane double click on it.
    Open with disabled windows 10
  8. Set the value data to the following line and click OK to save the changes.: rundll32.exe shell32.dll,OpenAs_RunDLL %1
    Windows 10 Open with not working

6. Perform SFC and DISM scans

  1. Click the Start menu, type cmd, and click on Run as administrator.
  2. Once the Command Prompt starts, type the following command and press Enter: sfc /scannow
    Windows 10 Open with greyed out
  3. The scanning process will now start.
  4. Keep in mind that the SFC scan can take up to 15 minutes, so don’t interrupt it.
  5. Now enter the following command and press Enter: DISM /Online /Cleanup-Image /RestoreHealth
    Open with missing from right click
  6. DISM scan will now start.
  7. Keep in mind that this scan can take up to 20 minutes or more, so be sure not to interrupt it.

Once the DISM scan is finished, check if the problem still appears. If the issue is still present or if you were unable to run the SFC scan before, run the SFC scan again and check if that solves your problem.

7. Create a new user profile

  1. Press the Windows key + I to open the Settings app and navigate to the Accounts section.
    Windows 10 Open with greyed out
  2. Click on Family & other people.
  3. Now click on Add someone else to this PC.
    Open with missing from context menu
  4. Select I don’t have this person’s sign-in information.
    Windows 10 Open with not working
  5. Now click on Add a user without a Microsoft account.
    Open with disabled windows 10
  6. Enter the desired name and click Next.
    Windows 10 Open with greyed out

That is all. If the Open with menu is missing on Windows 10, in most cases, the cause lies in your registry, and the issue can be easily resolved after performing a few registry changes that we mentioned in our solutions.

You might be also interested in our selection of the best universal all file opener software for your PC.

Let us know in the comments section below if you have other suggestions or recommendations.