Best Cpu Motherboard Combo Deals

Choosing the right CPU and motherboard combo is no easy feat. However, it is dependent on the purpose you intend to use them for, whether you are building a top-level gaming station or workstation.

With Amazon’s deals before us, it can be quite frustrating if you do not know what you want to buy. As such, incredible deals could easily slip away from you. Besides, you could end up saving a lot of money by leveraging the available deals.

Do not fret! We will help you make the decision based on your needs and budget. You will first need to look at the sed of the CPUs and the specifications of the motherboards.

It is important to note that they both must be compatible as this will guarantee the smooth performance of your device.

The same goes for the memory of your motherboard and chipset specifications. They both play a crucial role and can actually affect the performance of your PC.

If you’re planning on using this bundle for high-intensity work, then investing in a more powerful CPU might be the best choice for you.

This of course depends on the actual power of the motherboard, so they will need to be fully compatible for your system to work optimally.

What is the best buy for a CPU motherboard combo?

All these items have special prices.

Also, it is important to ensure that your motherboard can handle the speed of the CPU. It should also have enough memory in case you might want to make an upgrade in the future.

Note: All the prices and offers in this article are subject to change, so be sure to check the official product page to get the latest deal. If the product or offer you’re looking for is no longer available, you can try to find it on its official manufacturer page or get another one from our list.

Feel free to share your choices with us by using the comment section below. Which of these products fit your needs, and why?


Red Tint On Laptop Screen – Causes and How to Fix It

A red tint on your laptop screen can be distracting—whether you’re working, browsing, or gaming. It’s usually caused by one of a few common issues:

  • Night Light mode adding a warm color filter
  • Outdated or corrupted display drivers
  • Third-party display software overriding color settings
  • Misconfigured color calibration
  • Loose or faulty cables, if you’re using an external monitor

The good news? Most of these are easy to fix. In this guide, we’ll walk you through simple steps to identify the cause and get your screen back to normal.

How do I fix a red tint on a laptop screen?

Before going through these solutions, if you use a monitor, ensure the connections are tight and correctly done. This way, you will rule out the possibility of simple issues arising from poor cable connections.

1. Confirm the Night Light mode is disabled

1.1 Disabling Night mode

  1. Press the Windows + I keyboard shortcut to open the Settings app.
  2. Open System, then under the Display section, toggle the Night Light mode off.
    laptop screen red tint

1.2 Reducing screen warmth

  1. Press the Windows + I keyboard shortcut to open the Settings app.
  2. Choose System, then under the Display section, click Night Light settings.
    laptop screen red tint
  3. Under Color temperature at night, move the slider to the right to reduce the red tint effect.windows 10 red tint screen fix

2. Check the display driver

2.1 Update the driver

  1. Right-click Start and open Device Manager.
    laptop screen red tint
  2. Expand Display adapters.windows 10 red tint screen fix
  3. Right-click on your GPU and choose Update driver from the contextual menu.
  4. Click Search automatically for drivers.
    laptop screen red tint

Another reliable and easy way of updating your display drivers is to use an automated program, such as Outbyte Driver Updater, to help you find the most recent updates from its abundant database with a single click.

2.2 Reinstall the driver

  1. Right-click Start and open Device Manager.
    laptop screen red tint
  2. Expand Display adapters.
    windows 10 red tint screen fix
  3. Right-click on your GPU and click Uninstall device.
  4. Restart your PC and wait until the system installs the driver.

3. Inspect the accompanying third-party software

  1. Press Windows + R, type control panel, and hit Enter.
    laptop screen red tint
  2. Click Uninstall a program.
  3. Search the list of programs for anyone associated with display configuration, click on it and select Uninstall.

4. Recalibrate display colors

  1. Click the Search menu and type calibrate display color, then select the Calibrate display color app.
  2. Click Next and follow the instructions to calibrate the color.
    laptop screen red tint

That’s it. The red tint on your laptop screen should now be gone. Since we have not written them in any particular order, you should pick the most appropriate.

This isn’t the only issue, and many encountered red screen while playing games as well as red lines on laptop screen.

If you’re unlucky, you might even encounter a Red Screen of Death error on your PC, but we have a guide that addresses it, so you shouldn’t worry too much.

Getting a pink crash screen on Windows? Follow these steps to resolve the Pink Screen of Death and stabilize your display.

Finally, don’t forget to tell us whether writing this was worthwhile or if the screen is still infuriatingly reddish. You can do that in the comments section below.

Step-by-Step Guide to Changing The Sims 4 Language on Any Platform

The Sims 4 is available in many languages, but sometimes the game defaults to one you don’t want.

Whether you bought it on Steam, Epic Games, or the EA App, changing the language settings is usually quick if you know where to go. Here’s a no-nonsense guide to changing your Sims’ language on PC.

How do I change the language in The Sims 4?

1. Change the language on Sims 4 PS4/PS5

ps4 and ps5 logo
  1. Open Settings from the PS dashboard.
  2. Scroll down until you find Language in the list. Then, open it by pressing X.
  3. Choose your preferred language from the drop-down list that appears.
  4. The game will now launch in the language you selected.

2. Change the Sims 4 language on Xbox

  1. Open the Xbox menu.
  2. Choose Settings.
  3. Click on System Settings.
  4. Enter the Console Settings option.
  5. Find the Language and Locale entry, and click on Language.
  6. Select your desired language from the list.

3. Change the Sims 4 language on Steam

Game language settings

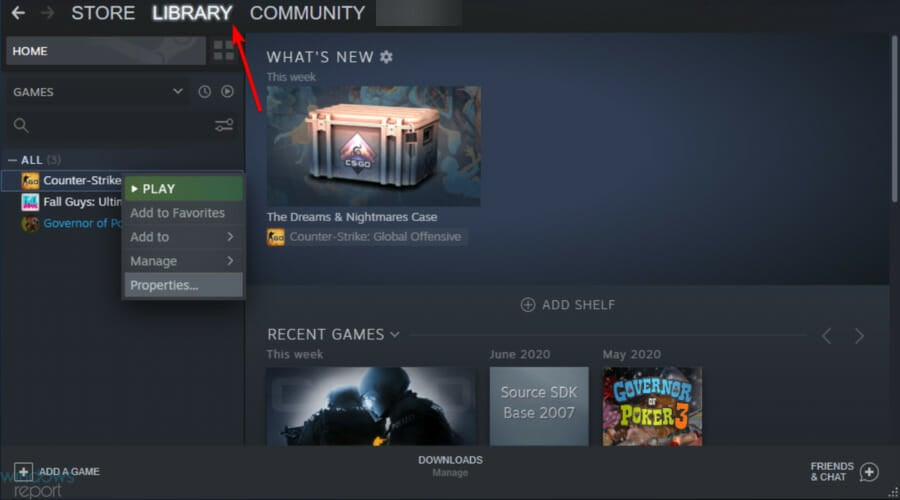
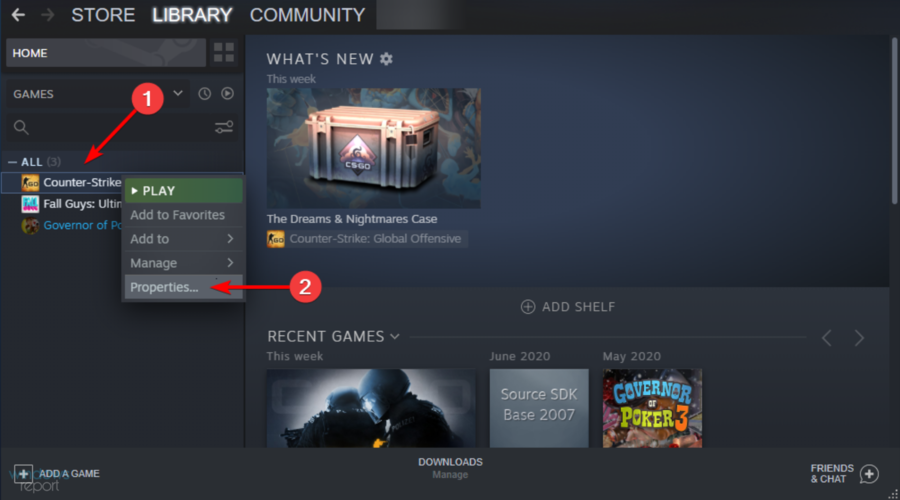
  1. Open your Steam Library.
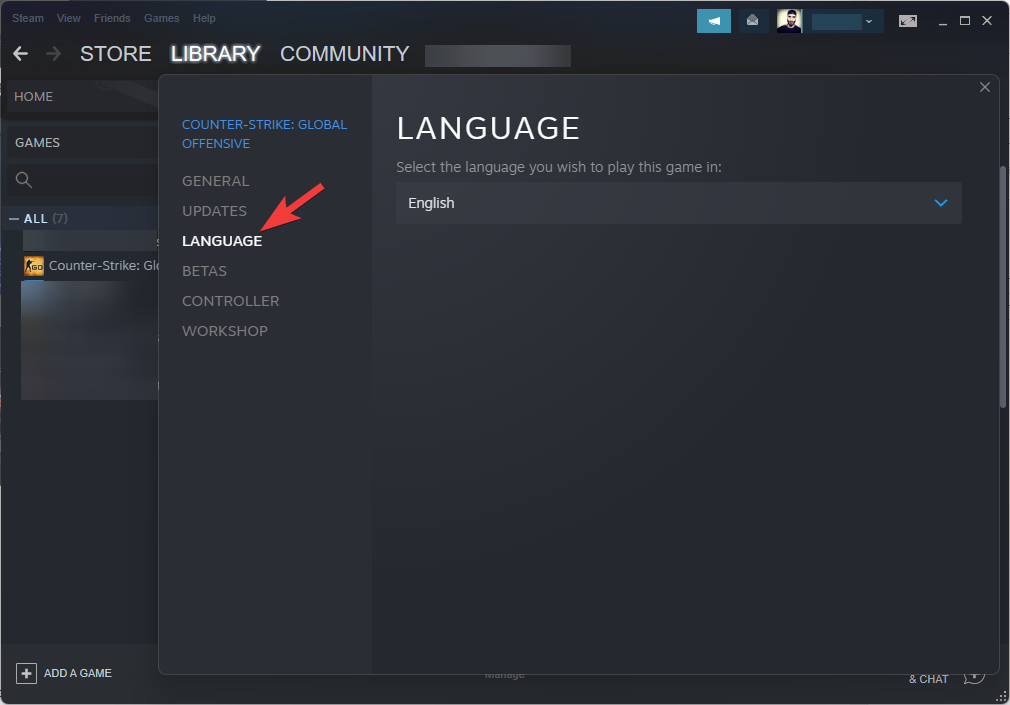
  2. Right-click on the Sims 4 game and select Properties (for the example, we are using Counter-Strike).
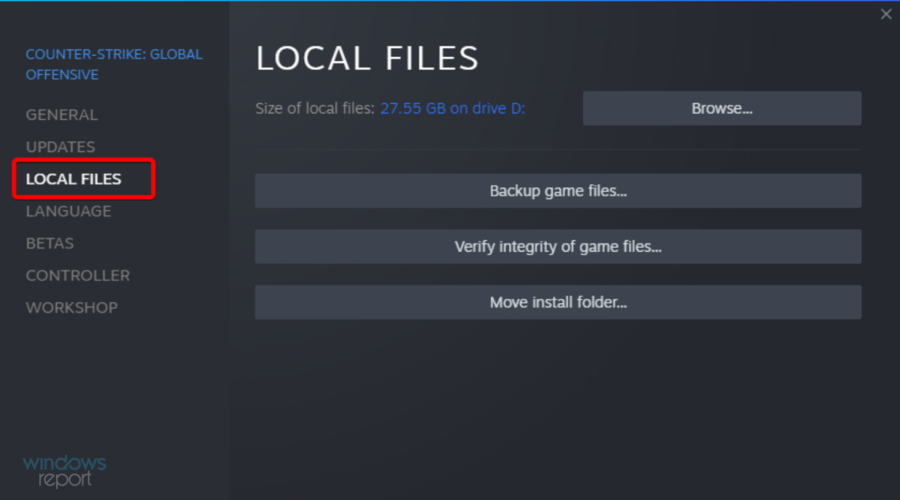
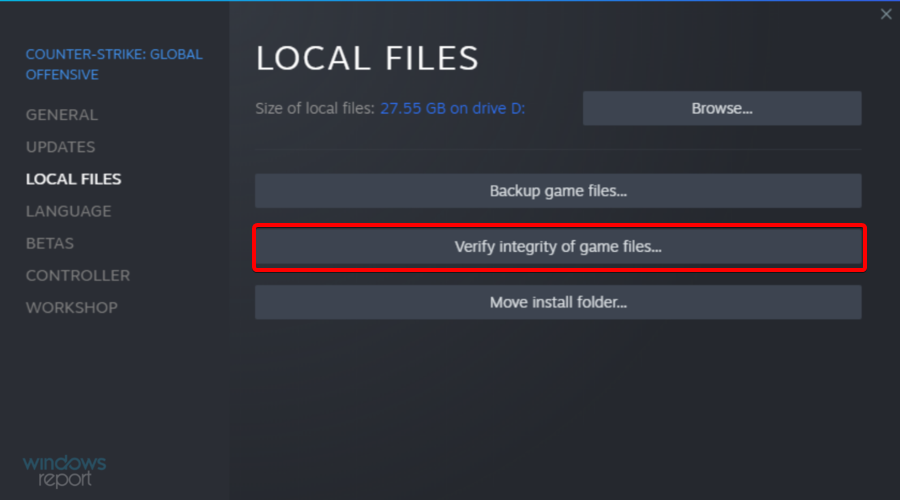
  3. Open the Language tab.
  4. Choose the language you want to use by clicking the drop-down menu.

Steam language settings

  1. Log into your Steam account.
  2. Click Steam from the top menu.
  3. Open the Settings.
  4. Click the Interface tab.
  5. Choose the language you prefer from the drop-down menu.
  6. Click OK and choose the Restart Steam option.

4. Change the Sims 4 language on Origin

  1. Log into your Origin Client account.
  2. Open the My Game Library option by clicking it.
  3. Right-click the Sims 4 entry, and choose Game Properties.
  4. Click the Advanced Launch Options and select your desired language from the drop-down.

5. Change The Sims 4 language from the Windows registry editor

  1. 1. Go to u003cstrongu003eStartu003c/strongu003e.

  2. 2. Type u003cemu003erunu003c/emu003e and click on the first result to launch the Run dialog.

  3. 3. In the Run box, type u003cemu003eregeditu003c/emu003e and then click on u003cstrongu003eOku003c/strongu003e.

  4. 4. Go to the following destination: u003cstrongu003eu003cspan id=u0022urn:enhancement-dba2fb7du0022 class=u0022textannotation disambiguated wl-thingu0022u003eu003ccodeu003eHKEY_LOCAL_MACHINE/Software/Wow6432Node/Maxis/The Sims 4u003c/codeu003eu003c/spanu003eu003c/strongu003e

  5. 5. Change the u003cstrongu003eLocale valueu003c/strongu003e to the desired u003cspan id=u0022urn:enhancement-af4e30bbu0022 class=u0022textannotation disambiguated wl-thing wl-no-linku0022u003elanguageu003c/spanu003e. For example, add pt_BR for Brazilian Portuguese.

6. Change the game config file

If you don’t like editing the Registry, you can tweak the RIdOrigina.ini file. First, navigate to the folder where you installed your The Sims 4, and then open the GameBinRldOrigin.ini with Notepad.

Locate the line “Language,” and you should see a semicolon at the beginning of the line.

Remove the semicolon to activate the language of your choice. You can also change the language by using the following codes:

  • cs_CZ = Czech
  • da_DK = Danish
  • de_DE = German
  • en_US = US English
  • es_ES = Spanish (Spain)
  • fi_FI = Finnish
  • fr_FR = French (France)
  • it_IT = Italian
  • ja_JP = Japanese
  • ko_KR= Korean
  • nl_NL = Dutch
  • no_NO= Norwegian
  • pl_PL = Polish
  • pt_BR = Portuguese (Brazil)
  • ru_RU = Russian
  • sv_SE = Swedish
  • zh_TW= Chinese (Traditional)

Save the file, launch the game, and that’s all.

7. Use the Sims 4 Language Changer

Note icon NOTE
We need to specify that u003cstrongu003eyou will be downloading these files at your own risku003c/strongu003e, as our security systems can not vet the download source.
  1. Update the game to the latest version to have all languages downloaded.
  2. Download the Sims 4 Language Changer installer.
  3. Open it and select your preferred language.

What languages is The Sims 4 available in?

Here are the supported languages:

EnglishRussianItalianDanishSpanishChinese (Simplified)
GermanPolishDutchFinnishCzechJapanese
FrenchSwedishNorwegianBrazilian PortugueseChinese (Traditional)Korean
Source: EA.com

Is there a mod to make Sims speak English?

Not really—Simlish is hardcoded into the game and has been part of The Sims’ identity since the beginning. There’s no official mod that replaces Simlish with real spoken English or other languages.

A few YouTubers have experimented with voice-over mods or fan dubs, but nothing that’s truly functional or widely supported.

For more fun, while playing the game, check out our article on how to install Sims 4 mods.

Wrapping up

Keep in mind that the game can encounter issues, and we already wrote about Sims 4 not opening. We also have a guide on what to do if Sims 4 won’t update, so don’t miss it.

Check out our detailed guides on how to fix Sims 4 won’t start, mods not working, lag problems, and Sims 4 won’t load household issues to get back to smooth gameplay.

If you’re aware of another solution to the problem, please share it with us in the comments section below. Also, leave any other questions, and we’ll be sure to take a look.

External Hard Drive Error: 6 Methods You Can Use to Fix It

What happens when you receive an external hard drive error on the disk? Well, it’s not pleasant, but it’s not the end of the world. It can be fixed.

There are various reasons your external hard drive is not working well, including:

How can I fix the external hard drive error?

First, disconnect your hard drive and restart your PC. Try using it on another computer. If it’s not working, keep reading:

1. Run the CHKDSK scan

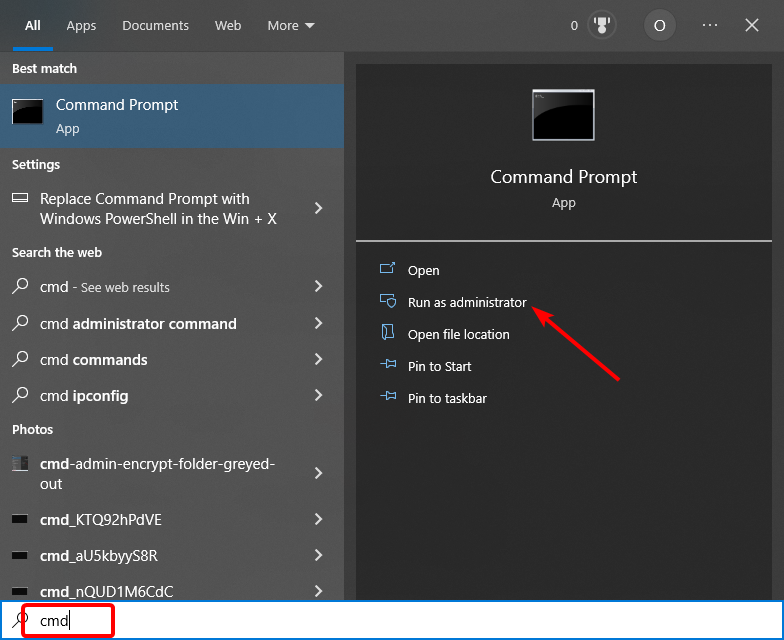
  1. Press the Windows key, type cmd, and click Run as administrator under Command Prompt.
    cmd  admin external hard drive error
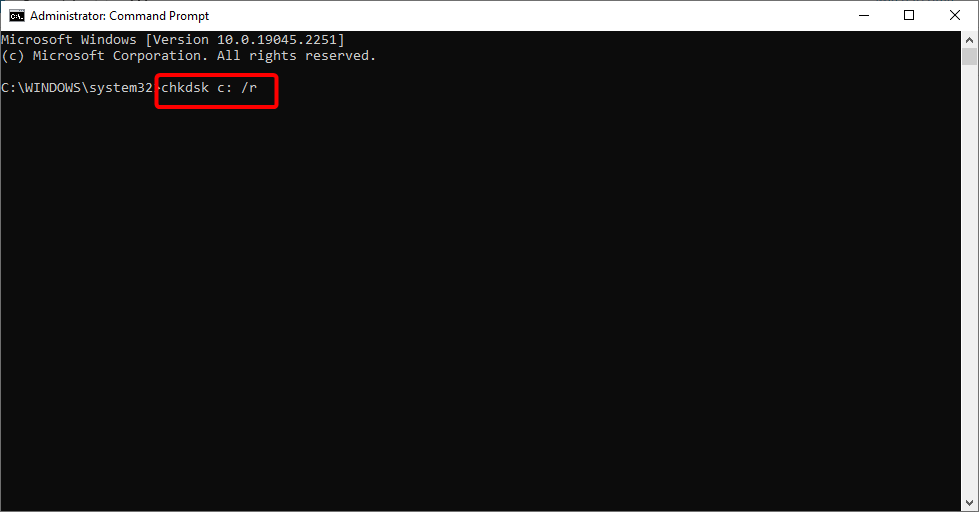
  2. Type the command below (replace C with the drive letter) and hit Enter: chkdsk c: /rchkdsk
  3. Wait for the command to finish running and apply any recommendations.

CHKDSK is a built-in tool that fixes many hard disk issues on Windows. For example, it can improve the problems causing the external hard drive error 0x80071ac3 and other versions of the error.

Remember to restart your PC after applying the recommended fixes.

2. Update drivers

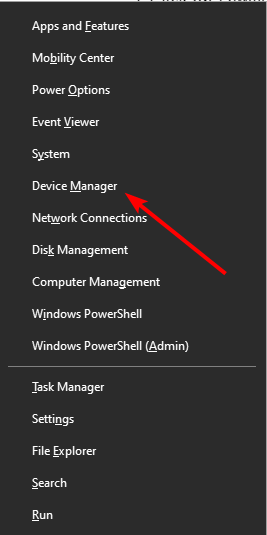
  1. Press the Windows key + X and select Device Manager.
    device manager
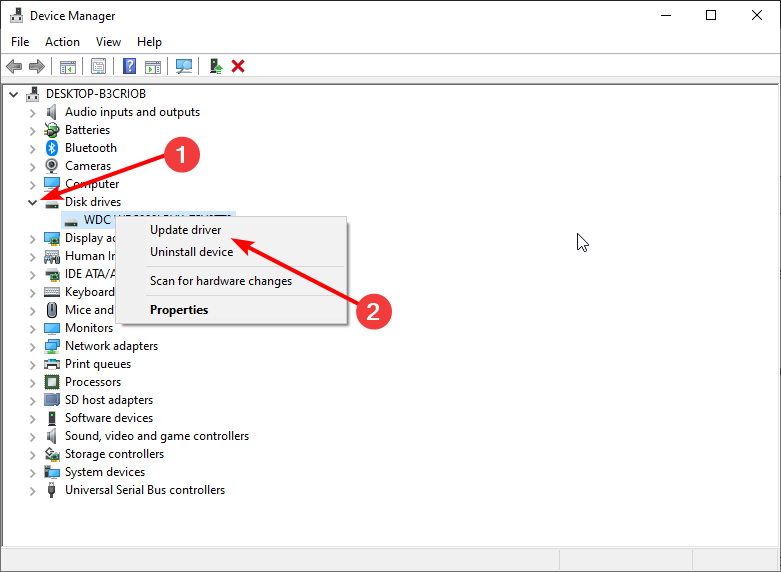
  2. Double-click the Disk drives option and right-click your external driver.
  3. Select the Update driver option.
    update driver disk external hard drive error
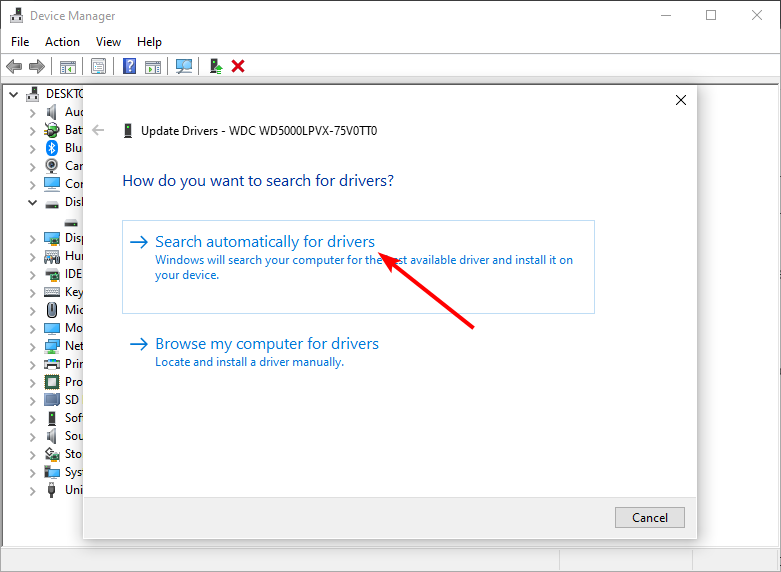
  4. Now, choose Search automatically for drivers and install any available update.
    search auto
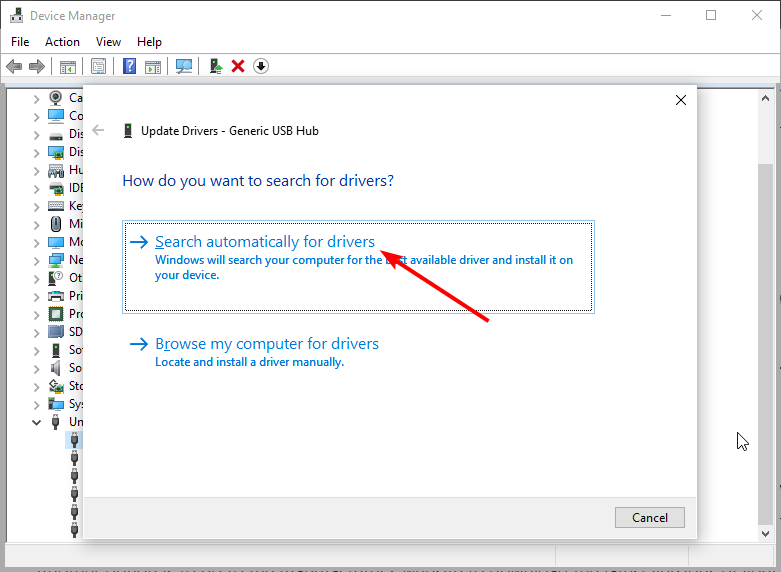
  5. Click the arrow next to the Universal Serial Bus controller option.
  6. Right-click each device there, select Update driver, and choose the Search automatically for drivers option on the next page.
    search auto usb
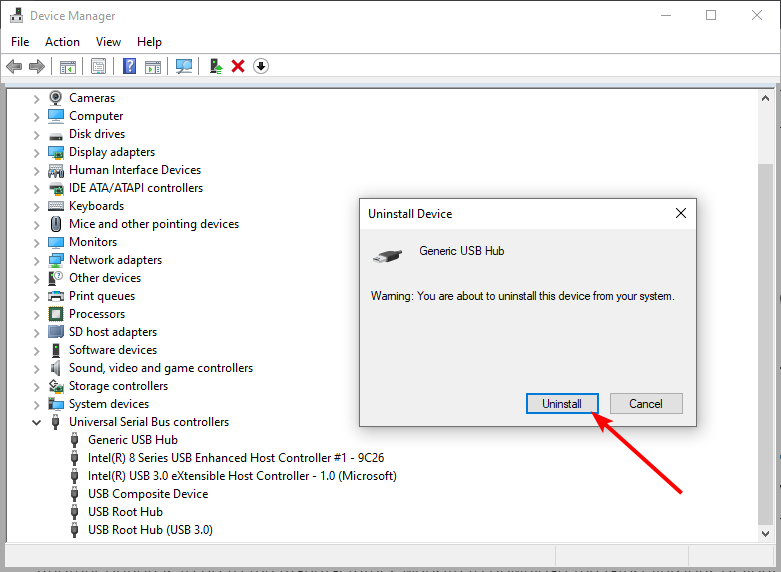
  7. Better still, if you find any device with a yellow exclamation sign, right-click it and select Uninstall device.
    uninstall device
  8. Now, click the Uninstall button and restart your PC.
    uninstall button external hard drive error

3. Assign a drive letter

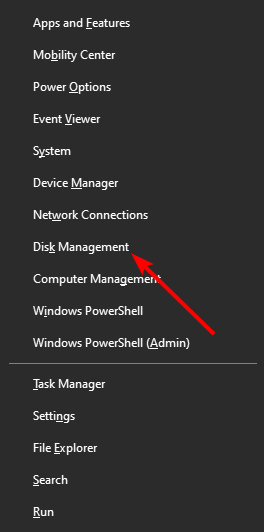
  1. Press the Windows key + X and select Disk Management.
    disk management
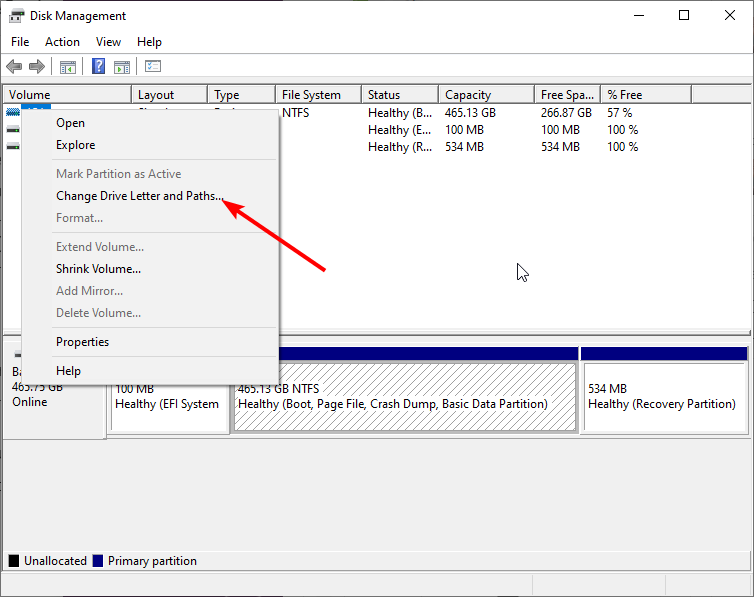
  2. Right-click the external drive and select Change Drive Letter and Paths.
    change drive
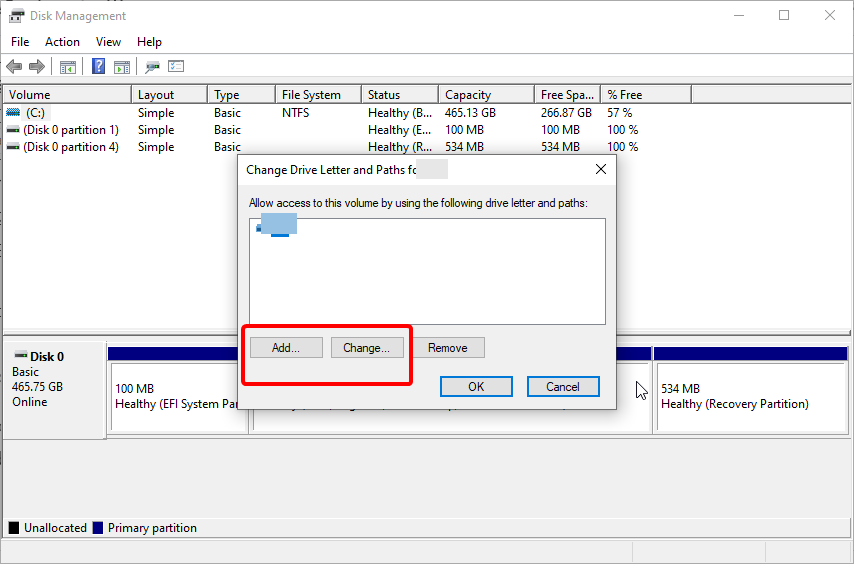
  3. If the drive already has a letter, click the Change button. If it does not have, click the Add button.
    add or change external hard drive error
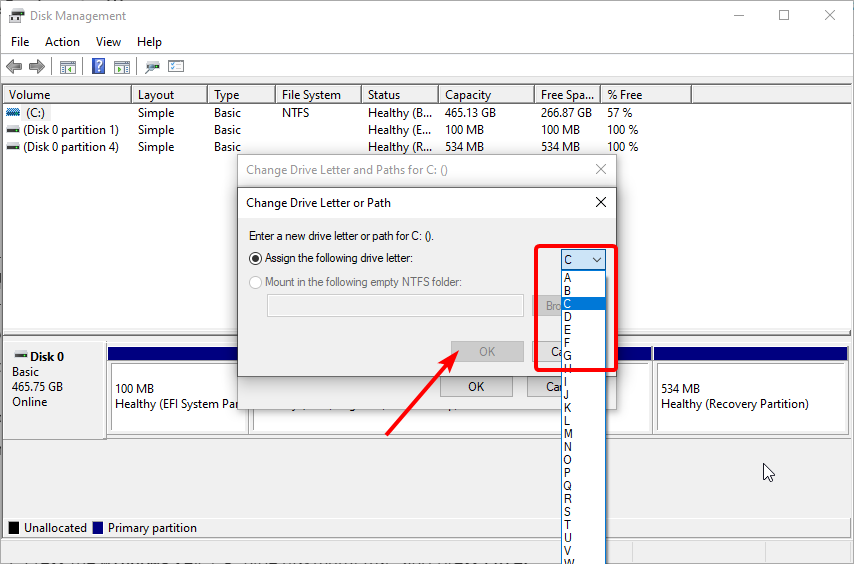
  4. Now, choose a drive letter and click the OK button.
    driver letter

Drive letters make it easy to access your disks. So, if you are getting an I/O device error on your external hard drive, you might need to assign or change its letter.

4. Initialize disk

  1. Launch Disk Management and right-click your external hard drive.
  2. Select the Initialize Disk option.
    initialize external hard drive error
  3. Select the disks you want to initialize, select either MBR or GPT partition styles and click OK.

Initializing your hard drive is a way of activating it. This should clear any roadblocks that might be giving the error you are getting on your external hard drive.

5. Change the drive format

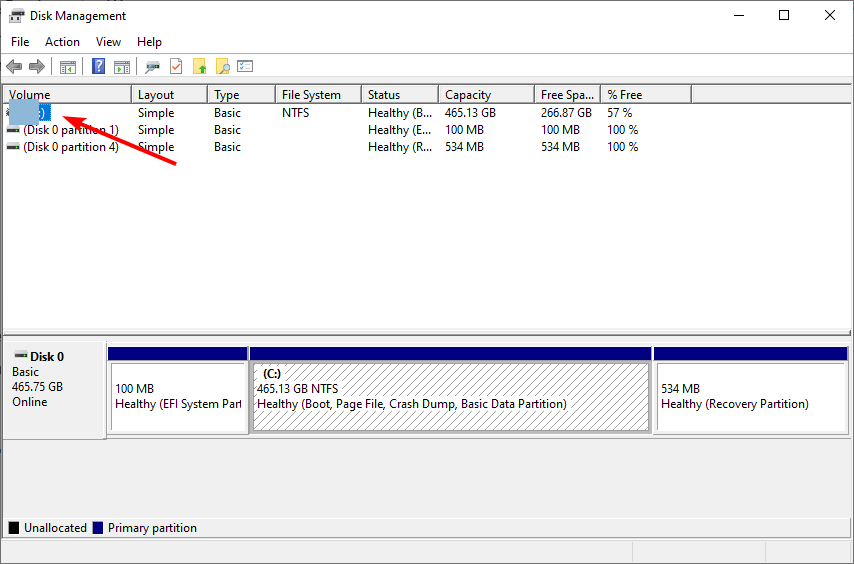
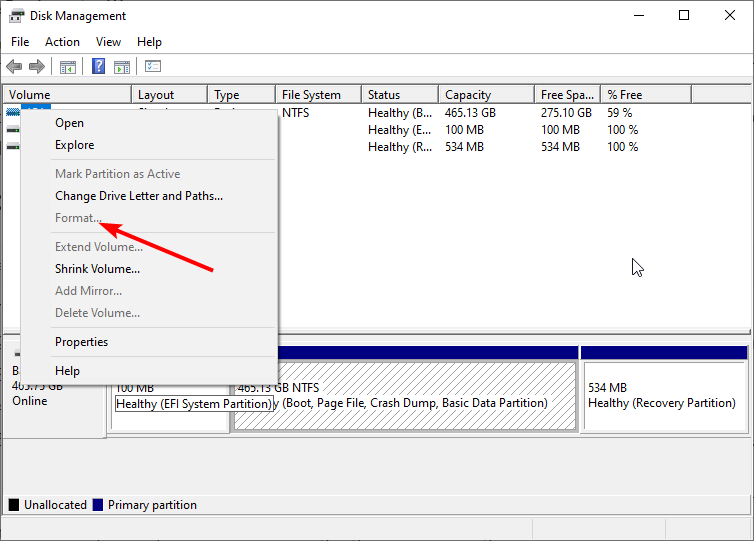
  1. Right-click the Start icon and select the Disk Management option.
  2. Right-click the drive and select Format…
    format
  3. Select the NTFS or exFAT option, tick Quick format, and click the OK button.

You will likely face different errors if your external hard drive is in the wrong format. Changing the format to accessible ones should eliminate these issues and restore normalcy.

This solution can also help with Disk read error occurred error that we covered earlier.

6. Change the power setting for the USB driver

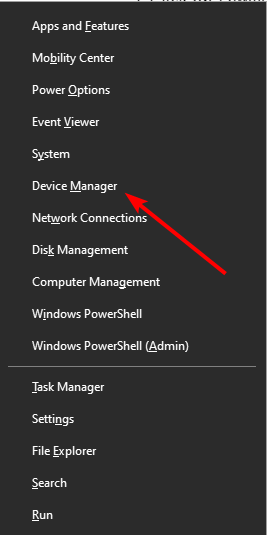
  1. Press the Windows key + X and select the Device Manager option.
    device
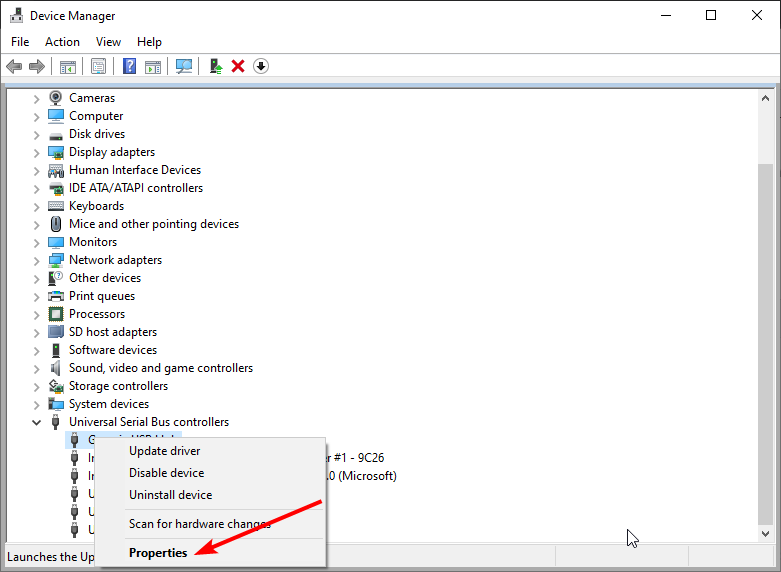
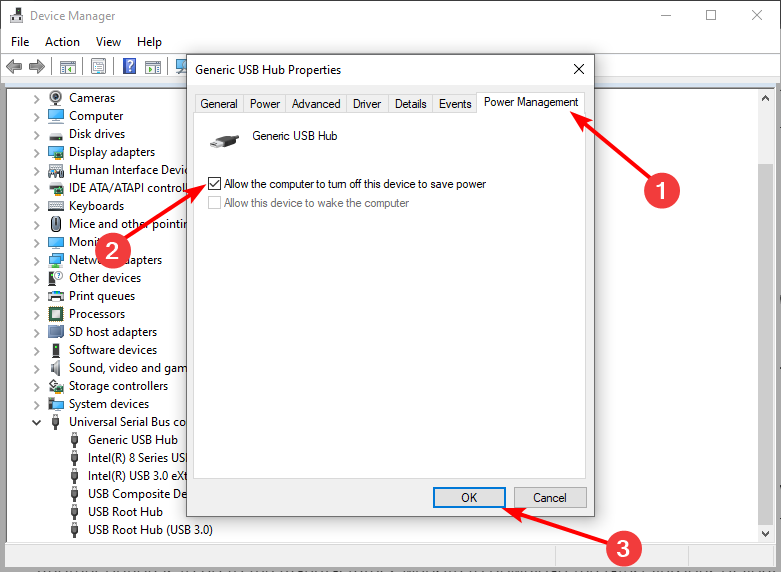
  2. Double-click the Universal Serial Bus controllers option to expand it and right-click the driver there.
  3. Choose the Properties option.
    properties
  4. Now, click the Power Management tab at the top.
  5. Finally, uncheck the box for Allow the computer to turn off this device to save power and click OK.
    power external hard disk error

Your external hard drive needs the required power to function correctly. If the USB port device is set to turn off to save energy, your external disk might give error messages when the feature is activated.

The external hard drive error can be frustrating, as it might lead to the loss of crucial data. But by applying the fixes above, you should be able to fix them quickly.

If you are facing the external hard drive not showing on Windows 10 issue, check our detailed guide to regain access to it quickly.

Let us know the solution that worked for you in the comments below.

Windows 10 Screensaver not Working: 6 Ways to Fix it

You’ve upgraded to Windows 10 from Windows 8.1 or 7, and now your screensaver is not working anymore. You did a fresh install of Windows 10, but the screensaver still isn’t working. Or maybe it is working but only intermittently.

This is a problem many users have contended with, often without much success.

In today’s article, we’ll go through some things that might stop your screensaver from working and what to do in each case to fix it.

Why is my screensaver not working on Windows 10?

From user experience, there may be a few reasons to encounter this error. On top of the list are the following:

  • Settings configuration – In some cases, the problem may be that you have not correctly configured the screensaver. The moment you change your configuration, it should start working.
  • Problems with drivers – The screensaver may also be affected by outdated or bad drivers.
  • Connected peripherals – In some cases, if you have certain devices connected to your system, the problem may be triggered. This is often the case with some game controllers.
  • Damaged files – Corrupted system files may also play a role in the Windows screensaver problem.

As it appears, problems with the screensaver are quite common in Windows 10. In fact, screensaver issues come in various forms. Here are some of the most common screensaver issues you can encounter:

  • Screensaver won’t turn off Windows 10 – This can be a serious problem, as it may render your computer unusable. If you experience this issue, restart your computer, and check out the solutions from this article.
  • Windows 10 screensaver won’t start – If your screensaver won’t even start, ensure it’s enabled first. If the screensaver is activated, check out other solutions from this article.
  • Windows 10 screensaver won’t activate – This problem occurs when you cannot activate your screensaver. Keep reading this article for potential solutions.
  • Screensaver won’t stop Windows 10 – This issue makes your screensaver run constantly. It’s a serious problem, as it can also render your computer unusable.
  • Windows 10 screensaver won’t work – This error appears when the screensaver won’t show up under no circumstances.
  • Screensaver freezes Windows 10 – This problem occurs when you can start the screensaver, but it freezes. If your screensaver keeps freezing, you may not be able to use your computer, which is a serious problem.

Let us now consider some solutions.

How can I fix Windows 10 screensaver if it’s not working?

Before applying any of the solutions recommended in this article, we suggest doing the following:

  • Disconnect peripherals – In some cases, they may trigger the problem, and disconnecting them becomes the easy fix.
  • Restart your computer – Some tiny glitches require that specific processes are rebooted. A restart helps them reboot and may correct this problem.
  • Clean the mouse sensor and mouse pad – Optical mice use an optical sensor to detect movement and direction. Sometimes if the optical sensor or lens has dust on them, the mouse might detect false inputs and prevent your screensaver from showing up.
  1. Update Windows
  2. Check screensaver settings
  3. Update drivers
  4. Reset Power Management Option
  5. Run power troubleshooter
  6. Run the SFC scan

1. Update Windows

  1. Open the Settings app using Windows + I, then click Update & Security.
    windows 10 screensaver not working
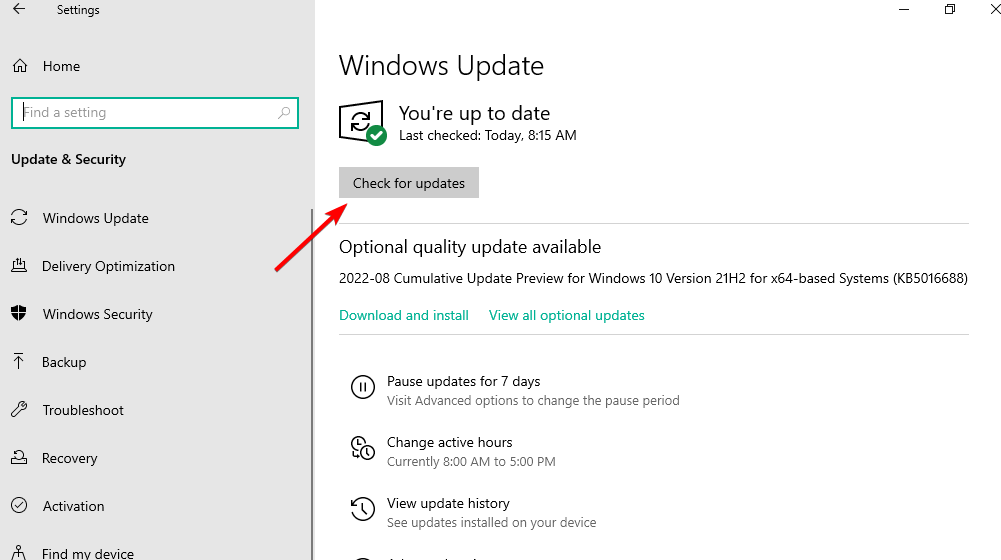
  2. Click on Check for updates and install any updates found.

If you can’t launch the Setting app, look at this article to solve the issue.

2. Check screensaver settings

  1. Press the Start menu, type screensaver, and select the Change screen saver option.
    windows 10 screensaver not working
  2. Pick from the list under the Screen saver dropdown and click Apply, then OK.

You can customize the Photos option further by following our guide on setting your pictures as a screen saver in Windows, which explains how to build a personal slideshow.

3. Update drivers

Device drivers are also prone to bugs; keeping them up to date is as important as doing it for your Windows installation.

Always keep ahead with updating your outdated drivers for your computer to work correctly. With the help of a professional driver updater tool, you can do it automatically and prevent the risk of downloading and installing the wrong driver versions.

⇒ Get Outbyte Driver Updater

4. Reset Power Management Option

  1. Go to Search, type power, and open Choose power plan.
    windows 10 screensaver not working
  2. Choose Change plan settings next to your selected plan.
    windows 10 screensaver not working
  3. Now, go to Change advanced power settings.
  4. Lastly, in the Advanced settings window, choose Reset plan defaults.

5. Run power troubleshooter

  1. Press Windows + I to open Settings, then select Update & Security.
    windows 10 screensaver not working
  2. Now, go to Troubleshoot and select Additional troubleshooter.
  3. Scroll down, find Power, then click Run the troubleshooter.
  4. Wait for the process to finish, and follow further on-screen instructions
  5. Lastly, restart your computer

6. Run the SFC scan

  1. Press Windows + X and select Command Prompt (Admin).
    windows 10 screensaver not working
  2. Enter the following script and hit Enter:
    sfc/scannow
    cmd sfc scannow
  3. Wait for the process to finish
  4. Finally, restart your computer

The solutions will work if the Windows 10 screensaver timeout is not working or even after an update.

We hope these tips help solve the screensaver problems you’re facing in Windows 10. If not, let us know in the comment section below, and we’ll try to help you.

5 Best Laptop Sleeve, Bag & Case Deals

Are you looking for a protective laptop sleeve? Do you want your laptop to be fully protected against bumps, falls, and other unexpected events that may damage it? If the answer is ‘Yes, then look no further.

In this quick buying guide, we’re going to list the best laptop sleeve deals that you can get right now.

Note: All the prices and offers in this article are subject to change, so be sure to check the official product page to get the latest deal. If the product or offer you’re looking for is no longer available, you can try to find it on its official manufacturer page or get another one from our list.

What are the best laptop sleeves to buy?

Arvok 15-15.6 ” laptop sleeve

  • Protects laptop from dust, shocks, bumps, scratches, scuffs, and spills
  • Premium thickened water-resistant neoprene material
  • Quick top-loading zipper on the bag glides smoothly
  • Ideal fit for most of 15-16-inch laptops laptop
  • Ultra-slim and lightweight
  • Easily develops a smell if you don't wash it

Laptop sleeves are the lightweight version of a laptop bag, but they are still useful for transportation nonetheless, and one good example is the Arvok laptop sleeve.

The material is very soft to the touch and yet very durable, and the neoprene will make it so that your laptop will be safe from bumps, dust, and water damage.

More so, you don’t have to worry about carrying it, since it is so lightweight you won’t feel a difference with regards to your laptop.

MOSISO polyester laptop shoulder briefcase bag

  • Polyester foam padding layer and soft fabric lining
  • Removable and adjustable padding shoulder strap
  • Front arc pocket is ideal for storage of small items
  • The top-loading zipper on the bag glides smoothly
  • Ideal for you to carry your laptop out
  • Some pockets seem too small to be usable

This is a great slim laptop bag that can also be used as a laptop sleeve. It features a polyester foam padding layer that allows it to absorb shocks and bumps thus protecting your laptop.

It comes with a removable and adjustable padding shoulder strap that can vary from 27 inches to a maximum of 48 inches.

There is also a small side pocket that you can use to store power adapters, cables, pens, and other small items.

Tucano Second Skin Colore

  • Simple, elegant protective pouch
  • Hard fabric shell type
  • Compatible with 17/18″ laptops
  • Only runs in one color

This elegant laptop sleeve is extremely light light and soft, while also being protective and resistant.

Thanks to the envelope design of the case, you can carry your Windows laptop or tablet in style.

Besides, it can also double as a document-carrying case, especially given its business-like design of it.

DOMISO Laptop Sleeve

  • Waterproof
  • Shockproof
  • Multiple colors
  • Minimal padding

This ultra-slim laptop sleeve is perfect for 17″ display laptops. It fits right over your computer, allowing you to easily carry your laptop around in your backpack or in this pouch alone.

We really like this sleeve’s professional appearance. You can pick from a wide range of different colors, all following the same simple and elegant design.

Vova Laptop Bag

  • 13-17.3″ inches compatible
  • Runs in 8 different colors
  • Shoulder strap
  • Water-resistant
  • Limited storage capacity

Made of high-quality Oxford, this versatile laptop bag is the perfect fit if you want to easily carry your device.

Thanks to its added strap and handles, you can use it on its own, with no need for any additional bag. It runs in multiple colors.

The design is simple, but you can spice it up a little bit and pick a more vibrant color if that’s what you prefer.

These are the hottest laptop sleeve deals of the moment. We’ll keep an eye on these deals and update this guide as soon as we’ve found new laptop sleeve deals.

6 Best Wireless Backup Cameras To Get

It’s that time of the year again when a lot of memories are made from Thanksgiving to the Christmas holidays.

It is also during this time that a lot of accidents take place as a lot of people are on the road traveling to see their families.

The pandemic has already done away with a significant number of people so you want to stay safe while on the road. As such, you need to hurry up your boots and get on the Christmas train with the amazing deals available for wireless backup cameras.

The wireless backup camera comes with its own advantages. While many people trust their rearview mirrors, it wouldn’t hurt to have a set of third eyes on deck. 

Those moments in your driveway when you were close to hitting a kid or a blind spot will be long gone once you get yourself one of these wireless backup cameras.

If technical stuff is not your forte, you are in luck. These cameras are easy to install and you have two options either bracket or flush mounting.

You don’t even have to use it as a rearview camera. Simply place it where you feel most vulnerable from either the front or back.

What is best wireless backup camera?

All these items have special prices.

The cameras have superior night vision with accuracy and stable vivid images with waterproofing capabilities.

What’s so good about the wireless backup cameras is their one-year and some up to two-year warranties with after-sale services and a professional technical team on call.

Note: All the prices and offers in this article are subject to change, so be sure to check the official product page to get the latest deal. If the product or offer you’re looking for is no longer available, you can try to find it on its official manufacturer page or get another one from our list.

Have your eye on any of the wireless backup cameras on sale this Cyber Monday? Let us know in the comment section below.

Sony Honda Mobility EV may include PS5 integration

If you are unfamiliar with Sony Honda Mobility Inc., it is a joint venture established earlier in 2022 by the two Japanese companies to “create new technologies to pioneer a new era of mobility,” according to its mission statement. The venture is seen as one of the most likely competitors to seriously take on Tesla in the electric vehicle market.

The company’s first car models are expected to roll out (no pun intended) sometime in 2025. The stated aim of Sony Honda Mobility is to “develop a car as hardware that will cater to the entertainment and network we would like to offer.” In addition to going head to head with Tesla in the area of autonomous driving technology, Sony Honda Mobility also hopes to get an edge over Tesla in another key department: entertainment technologies. This is where Sony comes in to the Sony Honda Mobility equation.

Sony’s Vision-S 01 has a whole lot of screens and plenty of Sony content to consume.
Via The Verge.

Sony Honda Mobility President and COO Izumi Kawanishi said in an interview with the Financial Times,

Sony has content, services and entertainment technologies that move people. We are adapting these assets to mobility, and this is our strength against Tesla.

So while the company may not be prepared to literally cram a PS5 into the dashboard, you can bet we’ll see some sort of integration with it in these new cars. In the interview Kawanishi suggested it would be possible.

And Sony Honda Mobility would not be the first to do so. Just last month BMW announced that it will bring casual gaming to its iDrive touchscreen systems. And Tesla of course has its Tesla Arcade, which features a catalog of classic games.

Featured image via Car and Driver. 

PDF not Opening in Outlook? How to Fix

Microsoft Outlook is one of the top relevant desktop email clients that can be synced even with custom webmail.

Some Windows users reported that Microsoft Outlook won’t open PDF attachments in their emails. so this seems to be a general problem. It is known that this issue also occurs in Chrome, and also other popular browsers.

For this reason, Windows Report has compiled relevant solutions to this menacing problem. In case you can’t open PDF files in Outlook, consider the practical guide below.

Why can’t I open a PDF email attachment?

If you find yourself in this situation, it could be because of any of the following reasons:

  • Missing programs – Your computer may not have important programs to open files in PDF format.
  • Outdated applications – Sometimes, you would need updated applications to some PDF formats.
  • Damaged files – It is also likely that your current PDF reader is damaged and will need to be repaired or replaced.
  • Malware infections – There are chances that your antivirus is blocking the attachment because it is infected by malware.

Now that we have spoken about possible causes, we can discuss some accessible alternatives and solutions.

What can I do if I can’t open PDF attachments in Outlook?

Table of contents:

  1. Scan the PDF
  2. Use a PDF reader
  3. Run Windows Update
  4. Use the right password
  5. Temporarily disable the antivirus protection

1. Scan the PDF

  1. Press Windows + I to open the Settings app, then select Update & Security.
  2. Click on Windows Security and then select the Virus & threat protection option.
    can't open pdf attachments in outlook
  3. Select Scan options.
  4. Click on Custom scan and click Scan now.
    can't open pdf attachments in outlook
  5. Select the folder where the PDF file is located, and click on scan to proceed.

If Outlook won’t open a PDF file, you need to scan it to ascertain whether it is safe for your Windows PC.

Some PDF files sent to email contain viruses, malware, or even spyware that pose unwanted threats to your system, so be sure to scan it.

Alternatively, you can right-click on the PDF file and select scan with ….(third-party antivirus) to scan the PDF file.

2. Use a PDF reader

You may be unable to open a PDF attachments in Outlook directly due to corrupted files or other causes. To bypass this unpleasant issue, it’s recommended to use PDF reader software.

So, you can get an all-rounded solution that will open each PDF file with no troubles, then pdfFiller is the go-to resolution.

This software lets you view, edit, and share your PDFs, giving the best viewing experience with its easy-to-use tools. The process is plain intuitive, with drag-and-drop action that will open your documents without any troubles.

Moreover, you can fill and sign PDF documents and get or offer feedback by adding notes, text boxes to your teammates.

➡️ Get pdfFiller

3. Run Windows Update

  1. Open the Settings app using Windows + I, then click Update & Security.
  2. In the Windows Update windows, click on the Check for updates button.

Microsoft constantly releases frequent patches containing fixes and drivers for your Windows PC. Hence, ensure you’re running the latest OS version on your computer.

This would keep your PC bug-free and help you if Outlook doesn’t open a PDF file.

4. Use the correct password

Some PDF files are encrypted using a password that secures the PDF from unwanted access—for example, bank statements, payment receipts, sensitive files, etc.

To open this set of files, you need to use the correct password, which is confidential and can only be known by the appropriate individual.

If your PDF file is password-encrypted, you may need to ask for the password to open the PDF file.

5. Temporarily disable the antivirus protection

  1. Click on the hidden access arrow in the Taskbar.
  2. Click on your antivirus icon, hover over Avast shields Control and select Disable for 10 minutes (This step varies for different antivirus software).
  3. Try opening the PDF document again.

Sometimes, antivirus programs can delete or quarantine specific files, patches, or DLLs associated with programs. However, antivirus scanning engines might misinterpret files that can be trusted with potentially harmful packages.

So if you experience PDFs that are not opening in Outlook 365, disabling your antivirus might be a helpful workaround.

Note: After opening the PDF attachments, ensure you enable the antivirus protection afterward.

Before you leave, find out how to download Outlook emails as PDF.

Please share your experience solving the Outlook won’t open PDF attachments problem. Feel free to comment below in the comment section, and we will get back to you.

Windows 10 Version 22H2 (2023 Update) Is Officially Ready For Deployment

It was only yesterday that we were saying that Microsoft just sneaked important software changes past you again and you didn’t even notice.

What were we talking about? Well, Windows 10 version 22H2, which was unofficially confirmed by Microsoft right under our noses some time ago.

Now, this feature update for the Windows 10 operating system has started rolling out and is now available as an enablement package for those sticking to good-old Windows 10 (version 2004 and newer).

Microsoft’s Windows 10 version 22H2 is ready

The Redmond-based tech company says this highly-anticipated release is now finally ready for broad deployment.

Even though Microsoft has yet to tell more about those mysterious productivity features, we managed to dig out some details about what is new in Windows 10 2022 Update.

As you know, broad deployment is the final rollout phase in the lifecycle of a Windows release, so we should all be excited.

It actually means more users with compatible computers receive offers to update, not only those daring to press the Check for updates button.

Just so you know, Windows 11 2022 Update (also 22H2) is currently available to all who check for updates manually.

Now, you can update to Windows 10 22H2 from version 20H2, 21H1, and 21H2, and the process will not take much time or bandwidth since all those releases are enablement packages only and work as regular cumulative updates.

Also, keep in mind that Microsoft is about to stop supporting Windows 10 version 21H1, so users must prepare for a forced upgrade to a newer release.

From what we can see in the official documentation, Windows 10 21H1 will reach its end of life on December 13, 2022. 

Regular users running Windows 10 2022 Update Home and Professional editions will receive 18 months of support, while commercial customers with Enterprise and Education editions will get 30 months.

Microsoft also wanted to remind everyone that at least one version of Windows 10 will remain supported until October 14, 2025, which means users can expect more similar updates in the future.

You can download official ISO files for a clean installation or an in-place upgrade using the updated MediaCreationTool.

Windows 10 version 22H2 will install like the previous smaller feature updates for Windows 10, so there really isn’t anything new in the process itself.

The tech giant said that the Windows 10, version 22H2 release will not bring updates to the Windows Hardware Compatibility Program (WHCP).

Instead, it will follow the same guidelines as Windows 10, version 2004. Let’s have a bit of a closer look at this matter and decide for ourselves:

  • WHCP requirements – No change. Windows 10, version 2004 requirements remain applicable for Windows 10, version 22H2.
  • Windows Hardware Lab Kit – No change. Since WHCP requirements will persist in Windows 10, version 22H2, the Windows Hardware Lab Kit (Windows HLK) will also remain the same. There will not be a new Windows HLK release for Windows 10, version 22H2 and partners can continue using Windows 10, version 2004 HLK for certification.
  • Errata – No change. All Windows 10, version 2004 errata will continue to be valid for Windows 10, version 22H2.
  • Windows HLK playlist – No change. The Windows HLK version 2004 playlist can be used for Windows 10, version 22H2.
  • Driver signature – No change. Drivers that meet all the applicable Windows 10, version 2004 requirements will be digitally signed with the same signature attributes.
  • Submission – No change. Windows 10, versions 2004, 20H2, and 21H1 can be used for WHCP submission.
  • WHCP qualification – Windows 10, version 2004
  • Required OS version – Windows 10, version 22H2
  • HLK version – HLK version 2004

We will keep you posted as soon as new information on the 2022 update, or Windows 10 version 22H2, becomes available.

Until then, check for updates or use the MediaCreationTool and see for yourself what this update has actually brought to the Windows 10 OS.

5 Best Laptop Backpack Deals To Grab Now

A laptop backpack is still the number one option as far as lugging your laptop around is concerned.

Whether you’re attending a meeting, a lecture, or on your way to a business presentation, the laptop backpack is safe and very convenient.

And the latest models are so advanced and come with bonuses like USB charging ports meaning the backpack is now more than just a carrier.

Well, we’ve been out looking for great laptop backpack deals and returned with bucketloads of super offers. Here are the winning laptop backpack packages that you can get.

Note: All the prices and offers in this article are subject to change, so be sure to check the official product page to get the latest deal. If the product or offer you’re looking for is no longer available, you can try to find it on its official manufacturer page or get another one from our list.

Which brand is best for a laptop backpack?

Matein 15.6-Inch

  • Lots of storage space and pockets
  • Comfortable airflow back design
  • Breathable and adjustable shoulder straps
  • Foam padded top handle
  • Lack of padding on the underside

The Matein travel laptop backpack 15.6-Inch is a professional office work bag, that can be also used for college, high school, for big students, or for boys, girls, and teens. This backpack got your back.

You can charge your phone while walking thanks to its built-in USB charger outside and built-in charging cable inside. This USB charging port only offers you easy access to charge, but it will not power itself.

Volher 15.6-Inch

  • Storage space & pockets
  • Mesh pockets at the side for water bottle
  • Multi-panel ventilated padding
  • Breathable and adjustable shoulder straps
  • No metal zippers

The Volher 15.6-inch laptop backpack is made of water-resistant and Durable fabric, and it’s great for secure and long-lasting usage every day.

It has one separate laptop compartment to hold a 15.6-Inch laptop, as well as a 15-Inch, 14-Inch, and 13-Inch Macbook/laptop. 

If you’re looking for a backpack for everyday use, I am not sure it can get better than this!

Mancro 15.6-Inch

  • Perfect size and storage pockets
  • USB port design
  • Antitheft travel laptop backpack
  • Water resistant
  • Bottle does not fit in the side pockets

The Mancro 15.6-Inch laptop backpack doesn’t only carry your favorite 15-inch laptop comfortably but is also spacious enough to haul a lot of your personal essentials.

It can thus serve a multitude of uses:  as a college laptop backpack, or for everyday usage.

And while on the go, the external USB port will offer a convenient charging system for your cell phone. At the same time, you can be listening to your best beats via the headphones jack.

Altmont Victorinox Unisex

  • Available in multiple colors
  • Durable fabric
  • Water-resistant
  • Lightweight
  • Roomy, but not for traveling

First and foremost, the used versatek fabric coupled with the abrasion-resistant special nylon base makes it super durable. Secondly, this backpack has a brilliant design and looks the part in every way.

This multi-compartment backpack will certainly fit and protect your laptop. All pockets are secured with strong zippers.

It’s a great choice to fit all your work or study supplies in one place. The bag itself is pretty light, so you don’t have to worry about having too much weight to start with.

OGIO ALPHA Convoy

  • Waterproof zippered laptop pocket
  • 20L capacity
  • Front valuables pocket
  • Internal key clip
  • Not suitable for traveling

While the Ogio Alpha Backpack has caused quite an excitement because of its long-lasting construction, the outstanding news here is its environmentally friendly nature.

Now, this backpack takes an approach drastically different from the others by using a fabric made from recycled plastics – mainly water bottles.

But that’s not where it all ends. The basics are well catered for so organization is perfect: you will have the waterproof zippered 15” laptop pocket, a luggage pass-through, front valuables pocket, an internal key clip, and reflective zipper pulls amongst other organizers.

It’s hard to separate our exquisite options so choosing may ultimately come down to your specific needs.

Regardless, you can rest assured that these are some of the best backpacks that you’ll ever come across!

MSDN Bugcheck Video TDR Error: 6 Easy Ways To Fix it

You have probably just gotten an MSDN bugcheck video_tdr_error. Let us share all you need to know about this error.

Blue Screen of Death errors like this can cause many problems on your Windows 10 PC.

These BSOD errors will restart your computer every time they appear; therefore, you must know how to fix them.

Why am I getting MSDN bugcheck video_tdr_error?

Users have experienced this error for varying reasons. For example, on the top of the list of triggers, including the following:

  • Issues with drivers – On devices with bad, corrupted, or outdated graphics drivers, you may experience this and other errors.
  • Background apps – On devices with too many applications running in the background, you may also experience this error.
  • Graphics card – If you have a bad graphics card, it is often known to trigger the MSDN bugcheck video error.

The VIDEO_TDR_ERROR blue screen is a relatively standard error that can appear on any PC. Speaking of this error, users reported the following problems:

  • VIDEO_TDR_ERROR Windows 7, Windows 8.1 – This error can appear on any version of Windows, and both Windows 8.1 and 7 users reported it. Even if you’re not using Windows 10, you should be able to apply most of our solutions to your version of Windows.
  • VIDEO_TDR_ERROR nvlddmkm sys, dxgkrnl.sys – Sometimes, this error will give you the file name responsible for the crash. Once you know which file caused the crash, with some research, you can easily find the problematic software or device.
  • VIDEO_TDR_ERROR Nvidia, AMD, Geforce – Your graphics card drivers can cause this error, and both Nvidia and AMD users reported this issue. However, you should be able to fix this problem simply by updating your drivers.
  • VIDEO_TDR_ERROR blue screen, BSOD – This is a blue screen error, and just like any other BSOD error, it will force your PC to crash. However, you should be able to fix it using one of our solutions.
  • VIDEO TDR failure on startup, won’t boot – Many users reported this problem on startup. This is a big problem since your PC won’t be able to boot at all, and if that’s the case, be sure to remove overclock settings and check if that helps.

These are the primary triggers you may expect. That said, let us now consider some fixes.

How can I fix the msdn bugcheck video_tdr_error?

1. Use a dedicated tool for fixing BSoD

BSOD errors are not to be joked with and must be addressed immediately, as they can lead to more severe problems. But don’t worry because, as you can see, we offer plenty of solutions, and one will work.

However, let’s start with the easiest one, which implies using a third-party tool that automatically fixes BSOD errors.

2. Update your drivers

  1. Press Windows Key + X on your keyboard to open the Power User menu and select Device Manager from the list.
    Video tdr error dxgkrnl.sys
  2. When Device Manager opens, locate the driver you want to update, right-click it and choose Update driver.
    Video_tdr_error Windows 7, Windows 8.1
  3. Select Search automatically for updated driver software and let Windows 10 download the appropriate driver.
    Video tdr error nvlddmkm sys
  4. Repeat these steps for all drivers that you want to update.

3. Reinstall your display drivers

  1. Press Windows Key + X on your keyboard to open the Power User menu and select Device Manager from the list.
    Video tdr error dxgkrnl.sys
  2. When Device Manager opens, locate the display driver you want to reinstall, right-click it and choose Uninstall device.
    msdn bugcheck video_tdr_error
  3. Confirm your choice, and restart the computer.

Sometimes the MSDN bugcheck video_tdr_error can be caused by your display adapter drivers, and to fix this error, you’ll have to reinstall your graphics card drivers.

Choosing drivers manually is a long and tedious process; therefore, you might want to use dedicated software that automatically downloads all the necessary drivers.

Outbyte Driver Updater can automatically repair and update your drivers in one go with just a few clicks, so make sure you try it out. Also, it will keep your system safe from malfunctions while installing the wrong driver versions.

4. Install the latest Windows updates

  1. Press Windows Key + I to open the Settings app.
  2. When the Settings app opens, navigate to the Update & Security section.
    Video tdr failure on startup
  3. Now click on Check for updates button.
    Video_tdr_error Windows 8.1

Sometimes you might miss an important update due to specific bugs, but you can always check for updates manually by performing the steps above.

Installing Windows updates is crucial for your system’s safety and stability. Windows 10 has a few issues with specific software and hardware, which can sometimes cause the MSDN bugcheck video_tdr_error to appear.

To prevent this and other BSOD errors from appearing, we advise you to use Windows Update and download the latest Windows 10 patches.

Many of these updates offer new features, but many bug fixes are related to hardware and software.

Therefore, if you want to keep your PC safe and error-free, we suggest installing the latest updates frequently.

Windows will check for available updates and download them automatically in the background.

Once the updates are downloaded, they’ll be installed automatically as soon as you restart your PC. So after you update your Windows, the problem should be resolved.

5. Remove overclock settings

  1. Press Windows + I, navigate System, Recovery, and click Restart now under Advanced startup.
  2. Select Troubleshoot from the options.
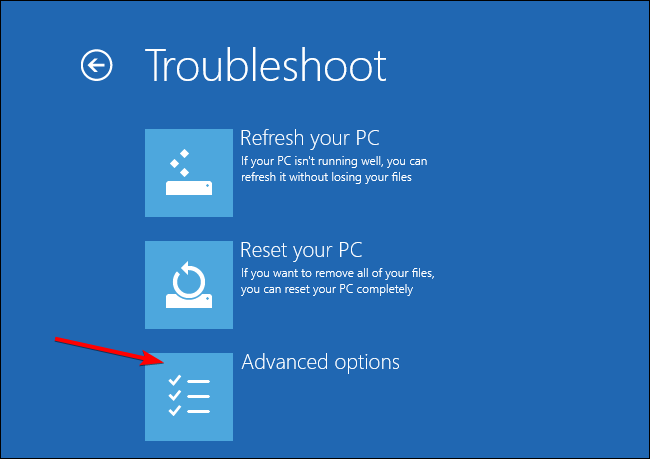
  3. Click on Advance options.
  4. Then click on UEFI Firmware Settings.
    msdn bugcheck video_tdr_error
  5. Click Restart.
  6. Under Performance, find Overclocking, and change the setting to Disable (this final step will depend on the manufacturer).

You can get better performance by overclocking your hardware, but if your overclocking settings aren’t stable, you can cause the MSDN bugcheck video_tdr_error to appear.

To fix this and any other BSOD errors caused by overclocking, we strongly advise you to remove all overclocking settings.

Several users reported fixing the problem simply by changing their RAM frequency. For example, they changed their RAM frequency from 2400MHz to 1600MHz, solving the issue for them.

A few users reported that they managed to fix this error by underclocking their core by 50, so you might want to try that as well.

We must mention that overclocking and underclocking can be potentially dangerous; therefore, use extra caution.

6. Use System Restore

  1. Restart your PC several times during the boot sequence to force the PC to perform an Automatic Repair.
  2. Now choose Troubleshoot, select Advanced options, and click on System Restore.
    msdn bugcheck video_tdr_error
  3. Select your username and enter your account password.
  4. The System Restore window will now appear. Click the Next button to proceed.
    msdn bugcheck video_tdr_error
  5. A list of available restore points will appear. If available, check the Show more restore points option. Now select the desired restore point and choose Next.
    msdn bugcheck video_tdr_error
  6. Follow the instructions on the screen to restore your PC. Once your PC is fixed, check if the issue persists. If not, it means that a third-party application or a driver caused the problem.

The MSDN bugcheck VIDEO_TDR_ERROR can sometimes appear due to installed applications or Windows updates.

These solutions will help you resolve issues related to the MSDN bugcheck video_tdr_error.

We have not written them in any particular order, so we recommend that you try what seems most relevant to you.

Finally, please let us know what worked for you in the comments below.

3 Best Diablo III Deals to Get This Cyber Monday

If you’re a veteran gamer that grew up in the 90s, or a younger one that heard of the oldies but goldies, then you are probably well-familiarized with the Diablo franchise.

Their latest entry, Diablo III, has been a fan-favorite ever since it was first launched, and its popularity doesn’t seem to be dropping at all.

Blizzard knows that very well and is rewarding players that haven’t had the chance to play it yet with the opportunity to get it at a special discount price.

As you may already know, Diablo III has expansions launched until now, and both of them, along with the base game, are now available at discounted prices.

Note: All the prices and offers in this article are subject to change, so be sure to check the official product page to get the latest deal. If the product or offer you’re looking for is no longer available, you can try to find it on its official manufacturer page or get another one from our list.

Which are the best Diablo III deals this year?

Diablo III – Standard Edition

Get started with the third entry in the critically-acclaimed Diablo series and save the world of Sanctuary with the Diablo III – Standard edition.

Play as one of the 4 base classes and fight hordes of endless monsters until you finally manage to face Diablo once more.

Diablo III

The base Diablo III game will bring you tons of hours of entertainment while you slay monsters, clear dungeons, and loot artifacts.
Check price Visit Website

Diablo III – Reaper of Souls

The next chapter in the Diablo III game is called Reaper of Souls, and you now have the chance to continue the story you finished in the base game.

This time you’ll have to face Malthael, and bring balance between Heaven, Hell, and the mortal realm once more.

Diablo III – Reaper of Souls

Continue where you left off in Diablo III and face the forces of evil once more, and finally, come face to face with the fallen angel Malthael!
Check price Visit website

Diablo III – Eternal Collection Xbox

Console players can take advantage of the Diablo III – Eternal Collection that combines the Ultimate Evil Edition and Rise of the Necromancer pack into a single game.

So, grab your console, and fight the demons of hell with your axe, arrows, and spells in the name of good!

Diablo III – Eternal Collection

Console players should rejoice at the chance to play this RPG, especially considering how the previous two entries were PC-exclusive.
Check price Visit website

This concludes our list of the best Diablo III deals that you can get this holiday.

It’s not every day that you can get these games at such a low price, so take advantage of the deal while it still lasts and tries one of the most beloved RPG games of all time.

How to better manage your Outlook.com storage limit in 2 ways so it doesn’t fill up too quickly on OneDrive

The Outlook.com storage limit for free accounts is capped at 15 GB, but if you want more space, you can sign up for a Microsoft 365 subscription to get 50 GB of storage. Microsoft notes that the 50 GB storage space is unavailable to Microsoft 365 Trial subscribers, so they can’t gain access to the increased storage space until after the paid subscription starts.

If you start seeing “Quota Exceeded” or “Mailbox full” messages on Outlook, it might be time to take a look at how much space your emails, attachments, and whatever else is making you reach your Outlook.com storage limit.

Changes to Microsoft 365 cloud storage

Starting February 1, 2023, cloud storage used on Microsoft 365 apps and services will change. This update includes Outlook.com storage (messages and attachments) and certain content found on OneDrive.

This update will not affect your Outlook.com mailbox storage amount, but instead, this might change how much cloud storage you have available on OneDrive. If you fill up your OneDrive, lots of stuff will just stop working until you make more space.

Microsoft details what’s included in the Microsoft 365 change:

  • OneDrive files and photos, for example:
    • Personal files you store, upload and sync from your computer or mobile device, such as Office documents, mobile camera roll, screenshots and other files and photos which have been saved to your OneDrive, including Desktop, Documents and Pictures folders.
    • Any items in your Recycle Bin.
  • Outlook.com attachments.
  • Teams message attachments & recordings.

If you’re interested, you can click the links below to check your storage limits:

Check your storage usage on OneDrive

Check your storage usage on Outlook.com

Check your Outlook.com storage limit

To see how much mailbox storage you have used and to delete and clear up your Outlook.com storage space, follow these instructions.

  1. Open Outlook.com Settings and search for “Storage,” the location is Settings > General > Storage. outlook.com storage limit
  2. Here, you will see a breakdown of your Outlook.com email account, including how much storage is being used, and where it’s located. Use the Empty option from the dropdown menu to permanently delete (All, 3 months, 6 months, or 12 months and older) items in these folders to free up space.

Suppose you are not a Microsoft 365 subscriber. In that case, you may see an option to upgrade to Microsoft 365 to get 50 GB of email storage space along with some other premium Outlook.com benefits.

Permanently delete Outlook.com email

When you delete items from Inbox, Sent, or other folders, items are sent to Deleted Items automatically by default. The Deleted Items folder’s storage does apply your email storage quota until it is manually emptied or the emails are deleted after 30 days, whichever happens first. Storage Items in the Junk folder are automatically deleted after 30 days.

So if you have a lot of large attachments quickly filling up your Outlook.com storage, it might be time to think of other ways of reducing your storage, here are some methods you can try.

Reduce storage space with Sweep

You can use the Sweep button in Outlook.com to remove unwanted emails from your inbox or archive folders. Sweep lets you delete all incoming mail from a particular email address, keeping only the latest message received from that email and deleting any email (from that sender) that is older than 10 days.

To use Sweep, choose an email from your Outlook.com account and select Sweep.
outlook.com storage limit

Get the best of Outlook.com

Another way to increase sending and storage limits is by upgrading your Outlook.com account with a Microsoft 365 subscription. A paid Microsoft 365 subscription gives you advanced email security, an ad-free inbox, 50 GB mailbox per person, larger OneDrive storage, installable Office apps and so much more!

Get a free trial today to try out premium Microsoft 365 features, including more cloud storage and advanced security features for your data and devices.

How do you manage your Outlook.com storage limit? Sound off in the comments below.

5 Best OLED TV Cyber Monday deals [LG, Sony, 65 inch]

With a series of dazzling OLED TVs recently gaining a firm foothold in the market, OLED TV is finally showing signs of toppling the dominant LED LCD TV technology.

And while we all along suspected that OLED had the quality to offer stiff competition to LED LCD, nobody would have guessed it would take this long.

But the wait is proving to have been very worth it if the rate at which homes adopt these high-end TVs is anything to go by.

OLED (Organic Light-Emitting Diode) is a rising type of TV display technology where each pixel self-illuminates once fed with electricity. Comparatively, all pixels are illuminated in LCD by an installed LED backlight.

This makes OLED sets thinner and lighter than LCDs and delivers a stronger contrast ratio. They also tend to have wider viewing angles and better black levels than LED-backlit LCDs.

For these reasons, OLED TV displays are slowly becoming a phenomenon. But for one problem: the prices still look quite extravagant. And that’s where the best deals on OLED TV come in.

Note: All the prices and offers in this article are subject to change, so be sure to check the official product page to get the latest deal. If the product or offer you’re looking for is no longer available, you can try to find it on its official manufacturer page or get another one from our list.

What are the best OLED TV deals?

LG OLED55CXPUA

  • a9 Gen 3 AI Processor 4K
  • HDMI (HDMI 2.1 & HDCP 2.2) x4
  • USB 2.0 x3
  • LG OLED TV
  • Short power cord

The LG OLED55CXPUA TV LG with ThinQ AI technology has Google Assistant and Alexa built-in. It has a 4K processor and Dolby Vision IQ for a better adjustment of picture settings depending on ambient lighting conditions.

The OLED technology makes a difference in movies, shows, sports, and gaming. The NVIDIA G-SYNC and FreeSync give you less lag, high refresh rates, and smooth gameplay.

HISENSE 55A9GQ OLED Series

  • 4K resolution
  • 120 HZ refresh rate
  • Supports HDMI, Ethernet, Bluetooth, Wi-Fi, and USB
  • 44 Inches
  • OLED technology
  • The operating system can be difficult for some

This VIDAA U5-operated TV supports 4K UHD & UHD AI Upscaler. It includes Dolby Vision and Dolby Vision IQ.

Great audio quality is ensured by Dolby Atmos & DTS Virtual X.

The TV supports multiple connections and can be operated through voice control. All in all, it’s a good product if you want high-quality video at a reasonable price.

Sony BRAVIA 4K KD

  • LED Display technology
  • 4K resolution
  • 100 Hz refresh rate
  • Supports Motionflow XR
  • The remote is a bit limited compared to other models

This 55″ LED V offers amazing 4K picture quality and immersive sound with the X-Balanced Speaker. It’s a great option both for streaming movies and playing video games.

It offers dedicated support for all major streaming platforms. 

The TV is easy to operate through the Android TV OS. The package includes an intelligent remote control, but you can also give voice commands.

LG OLED65B9PUA

  • Google Assistant and Alexa with LG ThinQ AI technology
  • 4K processor
  • Standby power consumption – Under 0.5W
  • Power consumption – 139W
  • Does not sense power-off

By using the industry-leading 4k intelligent processor for OLED TVs, this TV is able to again deliver lifelike images with remarkably rich colors, sharpness, plus depth.

Best of all, it’s super-easy to operate with the LG magic remote especially attracting rave reviews because of the ease of issuing commands from Alexa devices.

Sony BRAVIA XBR65A9F

  • Processor x1 ultimate
  • Pairs 4K Ultra HD picture clarity with the contrast, color, and detail of high dynamic range (HDR)
  • Smartphone connectivity
  • TRILUMINOS Display & 4K HDR
  • The HDMI cables are not included

This achieves a peerless picture quality and is considered a benchmark as far as OLED TV is concerned.

The collection of unprecedented features paves the way for an enthralling show of bright, vibrant colors, mind-blowing contrast (with the famed 4K HDR clarity), and marvelous scenery.

If you want to compare OLED vs QLED vs NanoCell devices, we have a special guide that does that, so don’t miss it.

OLED TV is big in many ways. It provides smashing true-to-life images, incredibly rich colors, super sharpness, and true depth for unrivaled picture quality. But of course, this revolutionary show comes at a price.

Save $200 on VR sets During the Microsoft Cyber Monday Sale

It is a great time of the year to get the things you wanted most at a discount price.

Those of you that love a bargain and escaping the reality of mundane life might be looking for a good deal on VR headsets this year.

Well if that’s the case, we have a few offers that might just catch your eye.

As always, before the actual shopping season begins, we give users a sneak peek at what sales are to come, and this year, some neat gaming gear is included.

Note: All the prices and offers in this article are subject to change, so be sure to check the official product page to get the latest deal. If the product or offer you’re looking for is no longer available, you can try to find it on its official manufacturer page or get another one from our list.

Two popular VR headsets are getting a big discount

The two VR headsets included in this year’s Holiday sale sneak peek are the two very popular HTC VR headsets:

HTC Vive Cosmos

The first item on our list is the much budget-friendlier HTC Vive Cosmos.

This VR headset will grant you crystal-clear imagery, all thanks to a 2880 x 1700 combined resolution, 90Hz refresh rate, and adjustable interpupillary distance (IPD) dial for visual comfort and quality.

Besides, getting back to the real world is as easy as 1, 2, and 3 thanks to the flip-up design, as all you need is to simply raise the visor, and that’s it.

Besides, this VR headset is the most affordable of the two, so if you’re on a budget, this is the better option.

  • 6 tracking cameras
  • Superior visual fidelity
  • Convenient flip-up design
  • Steam and Viveport library access
  • 2-month Viveport Infinity subscription
  • Tracking isn't as reliable as with other similar models

HTC Vive Cosmos Elite

The two products are about 85% identical to one another, although the HTC Vive Cosmos Elite does have a more accurate tracking system, so you will benefit from better controls while inside the virtual worlds.

Besides, if you’re playing fast-paced games, the Cosmos Elite’s built-in pixel-perfect motion tracking will help you a great deal in achieving those high scores.

  • Crystal-clear graphics
  • Lighthouse tracking
  • Vive reality system
  • Flip-up design
  • Vive port
  • Not everyone may like the Viveport software

In the end, it’s all about what you want to do with your VR headset and how much your budget can handle it, so go ahead and make your pick

That pretty much wraps up our list of best VR sets for Cyber Monday sales.

Keep in mind that this list is based on the sneak peek given by Microsoft and that more may be added once the official sales actually begin.

That being said, keep an eye on this article since we will be updating it along the way so that you can get the best deals yet.

Let us know what VR headsets are you expecting to see this year by leaving us your feedback in the comments section below.

iCloud for Windows is reportedly showing photos of strangers and corrupting videos

iCloud for Windows seems to be experiencing some technical issues. For those unfamiliar with the platform, it provides you with a unified experience where you can manage your photos, videos, calendar, files, and other important information on your Windows PC. Several users have lodged their complaints and concerns via the Macrumors Forums indicating that they are seeing photos of strangers in their photo libraries.

This issue seems to be centered around users that are either using the iPhone 13 Pro or the iPhone 14 Pro. What’s more, some users have also complained about not being able to view videos they recorded using their iPhones and synced them to iCloud for Windows. When trying to play the videos a black screen appears that features scan lines.

The strange and random photos appearing in some of the users’ photo libraries are reportedly of random families, children, and soccer games.

According to one of the affected users:

iCloud for Windows is corrupting videos recorded from an iPhone 14 pro max resulting in black videos with scan lines. On rare occasions, it is inserting stills into videos from unknown sources, possibly other’s iCloud accounts. I’ve been shown photos of other people’s families I’ve never seen in my life, soccer games, and other random photos. Obviously, this is extremely concerning and does not exactly make me feel safe using iCloud.

As a workaround for this issue, some users have tried deleting iCloud for Windows though this didn’t resolve the issue. This could be an indication that the issue is more technical and that it could be rooted in the server.  In other related news, Windows Insiders recently got a new Photo app that features iCloud support.

Have you experienced this issue? Let us know in the comment section below.

via: MacRumors

A VPN Indicator is the latest hidden Windows 11 Dev Channel feature

Microsoft often uses the Dev Channel of the Windows Insider Program to release the latest Windows 11 features. However, the company may hide some of these features in code till it is ready to release them. As is the case with its latest hidden feature in Windows 11 build 25247, a VPN indicator which appears in the notification area of the taskbar.

As spotted by PhantomofEarth on Twitter, this new feature will allow users to easily check whether their device is connected to a VPN.  The feature is represented by a small ‘shield’ overlay on the network icon.

Microsoft hasn’t communicated officially about this feature. Currently, this feature only works with wired connections. What’s more, you cannot use it to check the status of a third-party VPN app. This could be an indication that Microsoft is not yet ready to release the feature and that it is currently in the works.

Via: Neowin.net

Computer Restarts Randomly on Windows 7: How to Fix it

Having a Windows 7 computer that randomly restarts is a pretty severe problem. It would be tragic to reboot while playing a game, but it’s also a sign of system failure.

You may also experience freezing and a drop in performance; something similar happens on Windows 10. This guide will explore what causes this problem and what you can do to fix it.

How do I fix my Windows 7 computer randomly restarting?

1. Adjust system settings

  1. Click the Window logo in the bottom left corner and right-click Computer in the menu.
  2. Select Properties in the context menu.
  3. In the new window, click Advanced system settings.
  4. A new window will appear. Select the Advanced tab and click the Settings button under Startup and Recovery.
  5. In Startup and Recovery, uncheck the box next to Automatically restart underneath System Failure. Then, click the OK button and close the windows.

2. Uninstall and reinstall graphic drivers

  1. Open the Windows menu and search for Device Manager. Then, click on the entry that appears.
  2. In Device Manager, expand Display Adapters.
  3. Right-click the GPU and choose to Uninstall in the new menu. Now restart your computer.
  4. Windows 7 should automatically install the correct driver upon restart. If it doesn’t, go to your GPU’s manufacturer and download it there (the Device Manager entry will say it. The virtual machine image is just an example).
  5. Conversely, you can also just select Update Driver Software.

3. Run the SFC tool in Safe Mode

  1. To open your Windows 7 machine in Safe Mode, start restarting your computer as it’s rebooting. Then, press and hold the F8 key.
  2. If you do this correctly, Advanced Boot Options will appear. Next, use your keyboard to select Safe Mode.
  3. In Safe Mode, open the Windows menu and search for Command Prompt.
  4. Type sfc /scannow in Command Prompt. Your computer will scan all protected system files and replace any corrupted ones with a cached copy.
  5. It may take several minutes for the Command Prompt to finish.

4. Run Memory Diagnostics Tool in Safe Mode

  1. The Memory Diagnostics Tool will scan your computer’s RAM to see if there’s anything wrong.
  2. Reboot your Windows 7 in Safe Mode as per the previous solution.
  3. Open the Windows menu after it finishes and search for Windows Memory Diagnostics.
  4. Select the first option that reads Restart now and check for problems. Allow your Windows 7 computer time to finish the process.
  5. After scanning, the Diagnostics Tool will say if there’s something wrong with the RAM. If this is a hardware problem, we recommend taking your computer in for repairs.

What causes my Windows 7 machine to reboot automatically?

There are many different causes of any computer suffering from random restarts. Below is a list of just a few likely culprits.

  • Your computer has been infected with malware causing it to go haywire. We strongly recommend downloading some antivirus software on your Windows 7 computer to clean it up.
  • There’s something wrong with the hardware. It could be the GPU, CPU, RAM, or storage drive that’s causing the problem. It’s difficult to say which exactly without opening it up.
  • Similarly, the computer’s power supply may be faulty. You check if this is the case by downloading PSU test software and running diagnostics.
  • Something in the settings is messing up the computer. You may have a certain feature turned on that causes the random restarts.
  • Your computer is overheating. High internal temperatures can cause the software to behave erratically. We strongly recommended changing the computer’s power plan.

Are there ways to improve my Windows 7 computer?

For Windows 7, we recommend downloading a new browser. The vast majority of websites don’t support Internet Explorer anymore. You’ll have a tough time surfing the internet without a new browser.

You should also learn about the best hotspot software for Windows 7 to allow you to share an internet connection with other nearby devices. Virtual Router Manager is one of the best, thanks to its simplicity.

Feel free to comment below if you have questions about other Windows 11 problems or bugs. And leave comments about the most relevant solutions.

Can’t Reactivate Windows Because Servers Aren’t Available [Fix]

Users can encounter difficulties accessing the activation server, resulting in the Can’t reactivate Windows as our servers aren’t available right now. It can occur in various places on your PC.

Also, Windows 10 activation error 0x80041023 may appear due to activation errors on Windows.

Why do I encounter can’t reactivate Windows because servers aren’t available?

The most common factor that causes the error is interference from antivirus software. Also, the connection may be impeded by antivirus software or Windows Defender, resulting in a Windows activation error on your computer.

Other factors that may be responsible are:

  • Network connection issues – Users can encounter a Windows reactivation error if their network connections are unstable. Issues like network congestion on your device can cause problems.
  • Issues with Microsoft servers – The error may occur if there are issues with Microsoft servers or if it’s undergoing maintenance sessions. So, the error may indicate actual problems with the Windows activation servers.
  • Recent Windows update issues – Many issues can erupt from installing or upgrading to another version of Windows from a compromised or pirated version. It can prevent the system from being able to use the Windows activation servers for the new version.

These causes can vary depending on the service you’re running. Nevertheless, you can fix them with general fixes.

What can I do if I can’t reach Windows activation servers?

Before proceeding with any advanced troubleshooting steps, observe the following preliminary checks:

  • Fix network problems on your computer.
  • Turn off background apps running on your computer.
  • Disable VPN services or Proxy servers.
  • Restart Windows in Safe Mode and check if the error persists.

If the error persists, try the solutions below:

1. Disable Windows Defender

  1. Left-click the Start button, type WindowsSecurity in the search box, and launch it.
  2. Select the Virus & threat protection option, and click Manage settings.
  3. Toggle off the Real-time protection option to turn off Windows Defender Antivirus.

Disabling the Windows Defender antivirus on your PC can fix any interference preventing Windows Activation from connecting.

2. Run Windows Activation Troubleshooter

  1. Press Windows + I to open the Settings app.
  2. Select System and click Activation.
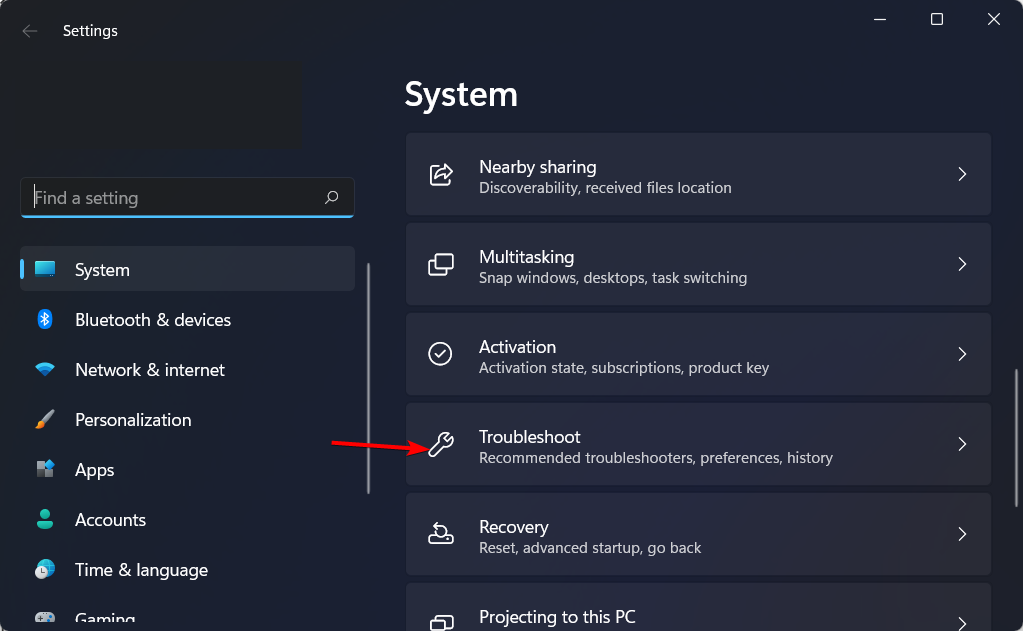
  3. Click on the Troubleshoot button if your Windows is not active. Then follow the onscreen prompts.

Running the Windows Activation troubleshooter will find and can fix the problem.

3. Install the Windows Creator’s Update

  1. Press Windows + R key to launch a Run window, type control update, and press Enter to open Windows Update.
  2. Click on the Check for Updates button, wait for the utility to scan your system, and then restart your system when asked.
  3. Go to the Activation page and check if the error still appears.

Installing the Creator’s update should fix the update problem causing the error. 

Check how to install Windows Creator’s update if the above steps don’t work.

4. Use a generic activation key

  1. Press Windows + R to open the Run window, type slui, and press Enter to open the Windows Activation Client.
  2. Click the Change Product key option, then enter the appropriate generic key for your Windows edition.
  3. Navigate to the Windows Activation page and check if the error still appears.

Check our guide about finding Windows 10/11 product keys on your PC. If the error changes to Windows is activated with a digital license linked to your Microsoft account. Follow the steps below to replace your generic product key:

  1. Left-click the Start button, type cmd, and select Run as Administrator.
  2. Type this command and press Enter: slmgr -ipk product key
  3. Replace the (product key) above with your product key’s code.
  4. Close the Command Prompt and restart your PC.

Wait for a couple of hours before trying another Activation.

Read our guide if the Windows server change product key does not work on your PC.

5. Activate Windows through Chat support

  1. Press Windows + R key to open a Run Window, type slui4, and press Enter to open the Installation ID screen.
  2. Select your country or region, then click Next.
  3. It will prompt you to call the numbers on the screen.
  4. Press the Start button, search for help, and launch the Get Help app.
  5. Reply test and choose No on every prompt until the Talk to a person link appears.
  6. Go to Services & Apps, Windows, and Setting up.
  7. Then select Chat online with a Microsoft Answer Tech.
  8. Wait while the call processes.
  9. Follow the Tech’s instructions and provide the necessary information like a valid License key and the Installation ID.
  10. The tech assistant will give you a Confirmation ID. Go to the Installation ID page, click Enter confirmation ID, and input it.
  11. Click Activate Windows and wait for the license to be reactivated.

The above steps will allow you to get direct help from a Microsoft technician to fix the error.

Alternatively, you can read about what to do if Windows 10/11 won’t activate after reinstalling your PC.

Also, we have a comprehensive guide on installing Active Directory in Windows Server in a few steps.

Fix: Netsh int ip Reset Access Denied in Windows 10

The netsh int IP reset command prompting access denied error on Windows 10 indicates that the command can’t load for some reasons.

Likewise, the error prevents you from using the command line to fix internet or network access issues on Windows.

What causes netsh int IP reset access denied in Windows 10?

Issues with the netsh int IP command on Windows 10 can occur for numerous reasons. The most common cause of this problem is the lack of permissions for the netsh.exe file on your PC. If you don’t allow Windows to use the command, it can result in errors such as Access denied.

Some other factors that may be responsible for the netsh int IP error are:

  • Third-party antivirus software – Installing third-party antivirus software on your PC can cause issues with your network connection and affect the netsh int IP command. Sometimes, Windows Defender can also interfere with the netsh int IP command line.
  • Corrupt system files on the PC – Many issues may arise from having corrupt system files on your computer. They can impede the functionality of programs like netsh int ip running on your computer.
  • Network issues – The netsh int IP command serves as a troubleshooter for network-related issues. Hence, network issues on your device can affect its operations.

However, you may encounter the error on your computer for other reasons not listed above. Nonetheless, users can fix the issues by tweaking your system.

How do I fix netsh int IP reset access denied in Windows 10?

 Before trying any advanced troubleshooting steps for the error, we recommend you go through the following preliminary check:

If the issue continues, proceed with the solutions provided below:

1. Give enough permissions for the netsh.exe file

  1. Press Windows + R key to open the Run dialog box, type Regedit, and click OK.
  2. Go to the following key: HKEY_LOCAL_MACHINE\SYSTEM\CurrentControlSet\Control\Nsi\{eb004a00-9b1a-11d4-9123-0050047759bc}
  3. Click the drop-down button on the last folder, right-click on a folder named 26 and click on Permissions.
  4. Click the Advanced button and click Change on the Advanced Security Setting window.
  5. Navigate to Enter the object name to select and type your user account, then click OK.
  6. Check the box for Replace owner on subcontainers and objects.
  7. Click the Add button, then click the Select a principal link at the top of the page.
  8. Click Advanced to select the user account, tap OK, then select the Everyone option.
  9. Navigate to Basic permissions and choose Full control, then click Apply to initiate the changes you have made.
  10. Restart your PC and check if the error persists.

Assigning enough permissions to the netsh.exe file will resolve any authorization issues affecting it. Check ways to fix the Access denied error on Windows 11.

2. Reset Winsock

  1. Left-click the Start button, type the command and select Run as administrator from the drop-down.
  2. Click Yes if the User Account Control prompt appears.
  3. Type the following and press Enter: netsh winsock reset
  4. Restart your PC and check if the issue persists.

Resetting Winsock can fix issues that may interfere with the netsh int ip command on your PC. Read our guide about what to do if the Winsock registry entries are missing on your computer.

3. Uninstall antivirus software

  1. Press Windows + R key to open the Run dialog box, type control in the text bar, and press Enter to open the Control Panel.
  2. Set the View by to Category, and select Uninstall a program under Programs.
  3. Locate the antivirus software from the lists of programs, right-click on it and click Uninstall from the drop-down.
  4. Restart your PC.

Uninstalling the antivirus software will automatically remove any interference it has on the command.

4. Run additional commands

  1. Left-click the Start button and type Command Prompt in the text bar.
  2. Right-click on the first result and select Run as administrator from the drop-down.
  3. Type the following commands in the command bar and press Enter after each command: ipconfig /flushdns ipconfig /release ipconfig /renew
  4. Restart your PC and run the netsh int ip reset command to see if the issue persists.

Running these additional commands can reset your network components and fix the problem.

In conclusion, you can read about fixing the can’t connect to this network error on Windows 11.

Sims 4 Error Code 0 When Saving the Game: Solved

Playing The Sims 4 requires much work, time, and dedication. This real-life simulation challenges players to involve their characters in various activities and build long-lasting relationships with other Sims.

After investing so much energy and time into the game, the last thing that players want is to encounter save issues. Not being able to save your progress after playing The Sims 4 for hours is a true nightmare.

One of the most common saving errors is the Sims 4 error code 0. This is what a player had to say about it:

Everytime when I play I click “Save” it saves I go off. But when I want to play again my saved family or saved progress isn’t there. Everything I made is gone and it happened around 10 times, sometimes it saves and I can continue on the families for like 2 or 3 times but then after 2 or 3 times they’re gone once again. […] Nothing seem to work for me.

Why am I getting Sims 4 error code 0?

The Sims 4 game failed to save error code 0 prohibits users on PC from saving their game progress. In most cases, it is brought on by an invalid auto save.

Sims 4 is a great game, but many users reported that they could not save their progress. This can be a big issue, and speaking of saving issues, here are some problems that users reported:

  • Sims 4 the game is currently in a state where saving isn’t possible – This isn’t usually a big problem, and if you encounter this message, try waiting for a few minutes and save again.
  • The Sims 4 cannot save / unable to save / doesn’t save /save failed – There are various saving issues that you can experience on your PC, but you should be able to solve most of them using one of our solutions.
  • Sims 4 can’t save while the sim is aging up – Sometimes, you might get this message while trying to keep your game. This isn’t an issue, and in fact, it’s actually a game mechanic, so you have to wait a couple of minutes before trying to save again.
  • The Sims 4 won’t save error code 0 – Error 0 is one of the most common saving errors in The Sims 4. If you encounter it, remove mods and CC and check if that solves the problem.
  • Sims 4 error code 0 failed to save – Delete the cache and make a new save before continuing.
  • Sims 4 game failed to save error code 532 – Error Code 532 will be shown if a piece of broken custom content is selected on a particular day and you or the game attempts to save your progress during that time.
  • The Sims 4 save errors 510, 533, and 536 – These are some other errors that might occur while trying to keep the game. However, you should be able to fix them with one of our solutions.
  • Sims 4 error code 513 – Verify that everything is at its most recent version if you are experiencing trouble storing your progress in the game.

Without further ado, let’s jump right into the list of solutions for the Sims 4 that won’t save errors. Follow along!

How do I fix the Sims 4 game failed to save error code 0?

1. Check your antivirus

In some rare cases, your antivirus software might be causing this issue. Many antivirus tools have a Folder protection feature that will protect system folders. Sometimes this feature will cause problems with The Sims 4 and make you unable to save your game.

However, you can fix this problem simply by disabling the Folder protection feature in your antivirus. If that doesn’t help, you might have to disable your antivirus before starting the game. In the worst-case scenario, you might even have to remove your antivirus.

If removing the antivirus solves the problem, you should consider switching to a different antivirus solution. TotalAV is an outstanding antivirus software; it won’t interfere with your PC during gaming sessions.

It provides perfect antivirus protection by offering a highly developed suite of security features. It is able to prevent ransomware or any type of malware from entering your system. Another thing worth mentioning is that TotalAV isn’t prone to detecting false positives.

TotalAV

Safe antivirus that helps you protect your devices from any online threat.
Free Trial Visit Website

2. Move your mods folder

Many users use various mods or CC to enhance their game. However, that can sometimes cause issues with saving, and if The Sims 4 won’t save, you might want to consider removing certain mods or CC.

To find out which mod or CC is causing the problem, it’s recommended to move them from their directory to Desktop or any other folder on your PC. Move all your mods to the Desktop and check if the problem is still there. If not, move the mods one by one or in batches to their original location.

Remember that you’ll have to restart your game every time you move a mod or CC. OnceHowever, once find the problematic mod, remove it, and the issue will be permanently resolved.

If you are not currently using CC and want to learn how to install mods in Sims 4, check out our dedicated article.

3. Check the autosave file

Sometimes your autosave file can cause this and other similar errors to occur. If you have this problem, you need to check your autosave file by doing the following:

  1. Go to your save folder in the Documents/Electronic Arts/Sims 4 folder and move the slot_00000001.save file to your desktop. That is the autosave file.electronic-arts sims 4 error code 0
  2. Launch the game, go to the load button on the main screen, and try loading one of your game files.
  3. If the load button isn’t there, start a new game.
  4. Play the game for a few minutes, save it, and exit the game.
  5. Go back into the game, go to the load button, and see if your save games are available.

If the load button isn’t there, you can start a new game but can’t build anything, or ‘The game failed to save. Error Code: 0′ error message occurs when attempting to save the game; follow these instructions:

  1. Close the game, go to Documents/Electronic Arts/The Sims 4/cache, and delete all the cache files.sims-folder sims 4 error code 0
  2. Move your saves folder to your desktop, and start a new game to create a new save folder.
  3. Next, move each save game from the folder on your desktop into the new one. Move one folder at a time and test to see if any of them still works. The slot_00000001.save file is usually the culprit.
  4. The Sims 4 keeps the latest saves you make. Remove the .ver0 from the end of the save game file that has the same slot number as the one that you just moved. It should now end only in .save. 

Then start the game and see if it loads and saves your progress. Keep trying that with each of the slot numbers of the save games.

4. Repair the game

If The Sims 4 won’t save your progress, the issue might be your installation. According to users, sometimes the installation can get corrupted, leading to many other errors. To fix the problem, you need to repair your game.

This is quite simple, and you need to start Origin, locate The Sims 4 and choose the Repair game option from the menu.

A few users reported that they had to reinstall the Origin client and then repair the game to fix the problem, so in a worst-case scenario, you might have to try that as well.

5. Clean your registry

Another cause for this problem can be your registry. If there are any bad entries in your registry, they might sometimes interfere with your system and cause this and other errors. Therefore, you need to find and remove these registry entries to fix the problem.

This can be hard to do manually, so you might want to use dedicated tools. For example, you can benefit from efficient registry cleaners tools that optimize your PC.

6. Delete the Origin/The Sims 4 cache files

Over time, these files accumulate out-of-date or corrupted data and can cause various issues. Here’s where you can find the Origin cache files:

  • Origin folder in C:Users<username>AppDataLocal
  • Origin folder in C:Users <username> AppDataRoaming
  • Go to Documents/Electronic Arts/The Sims 4/cache > delete all the cache files.

If you can’t see any files at these locations, Then, click them. Click Next, go to the search menu, type folder, and then select Show hidden files and folders from the search results.

You can also access Local and Roaming directories by doing the following:

  1. Press Windows Key + R to open the Run dialog.
  2. To access the Roaming directory, enter %appdata% and press Enter or click OK.
    The Sims 4 cannot save
  3. To access the Local directory, enter %localappdata% and click OKThe Sims 4 save error 510.

7. Disable recently installed programs

Third-party applications can interfere with your game and cause many issues to occur. For example, if The Sims 4 won’t save, the problem might be a third-party application. To fix the issue, it’s advised to find and remove the problematic application using the uninstaller software.

These applications are specially designed for removing software, and if you need entirely erase unused programs from your system, you should choose the best uninstaller software on the market.

Once you remove the problematic application with this tool, the issue should be resolved.

8. Move the options file

According to users, if The Sims 4 won’t save, the problem might be your options.ini file. To fix the problem, it’s advised to find this file and move it to the Desktop. To do that, follow these steps:

  1. Go to the Documents directory and locate The Sims 4 folder.sims-folder sims 4 error code 0
  2. In there you should see the options.ini file available.
  3. Move the options.ini file to your Desktop and try to start the game again.

If everything works fine after starting the game, it means that the options.ini file was the problem.

9. Enable Online Access and use Save As feature

If The Sims 4 won’t save, you might be able to fix the problem using this quick and simple workaround. According to users, they just enabled Online Access in the Other options of the menu.

In addition to enabling this option, be sure to use the Save as option to save your game. Several users reported that this method worked for them, so we encourage you to try it out.

Why won’t my save game work on Sims 4?

There is a corruption in the file that prevents Sims 4 games from saving. This corruption might be caused by a developer’s system flaw or a file on your computer.

To resolve this issue and enjoy gaming again, it is essential to implement the measures that have been outlined above.

Do keep in mind that Sims 4 won’t open if your Sims 4 mods aren’t working, but we covered these issues in the past articles, so don’t miss them. You may also run into online problems such as the Gallery not loading, and we have a full guide on fixing Sims 4 Gallery not working that can help.

We hope these workarounds helped you fix save issues in The Sims 4. If you’ve found any other solutions for the Sims 4 error code 0, feel free to list the troubleshooting steps in the comment section below.

Windows Can’t Check The Disk While It’s in Use [Force Dismount]

CHKDSK is a Windows command line or utility that means Check Disk. It helps sort and put the system files and disk files in order. However, Windows can’t check the disk while it’s in use: Force a dismount error indicates that Windows can’t access the disk for some reason.

What does it mean to force a dismount?

Windows operating system allows you to mount and dismount data volume. The C: drive remains mounted by default, allowing numerous programs to use it.

However, the Force a dismount message may appear if the CHKDSK (Check Disk) program wants to analyze the disk and detect other programs using it. Hence, forcing a dismount will stop every action on the disk and temporarily unmount the volume.

In short, force a dismount option is an aggressive way of removing a volume, making the partition temporarily inaccessible.

Why can’t Windows check the disk while it’s in use?

Windows CHKDSK (Check Disk) programs require sole ownership and exclusive access to your disk/drive when running a disk check. So, if the disk is being used by other programs or services on your PC, Windows won’t be able to check it.

Furthermore, some other factors that can cause Windows not to be able to check the disk while it’s in use are:

  • CHKDSK is not permitted to run at the time of reboot – When the Check Disk program is not allowed to run before the operating system boots, other programs will run and use the disk before CHKDSK can access it. So, you can encounter the Windows can’t check the disk while it’s in use error if CHKDSK doesn’t run on boot.
  • Other programs running on Windows – Many programs use the disk utility for their processes. Hence, CHKDSK may run into problems due to interference from these programs.

Windows can experience Check Disk problems due to these causes.

How do I fix the Windows can’t check the disk while it’s in use error?

Observe the following preliminary checks before trying any advanced troubleshooting steps:

  • Turn off background apps running on your computer.
  • Unplug any unnecessary external devices and USB drives connected to your PC.

Proceed with the solutions below if you can’t fix the problem:

1. Run the CHKDSK command after reboot

  1. Press Windows + R key to launch the Run dialog box, type cmd in the text bar, and hold the Ctrl+Shift+Enter keys together.
  2. Type the following command in the new window and press Enter: CHKDSK C:/r/x
  3. Press the Y key and press Enter. You’ll see a prompt stating that This volume will be checked the next time the system restarts.
  4. Restart the PC and check if it runs the Check Disk Utility on the System Drive.

Running the CHKDSK command after reboot allows it to take control of the disk before other programs. You may experience chkdsk.exe running on every boot; check how to stop it.

2. Perform a Clean boot

  1. Press Windows + R key to launch the Run dialog box, type msconfig, and click OK.
  2. Go to the Services tab and check the box for Hide all Microsoft services, then click Disable all.
  3. Go to the Startup tab and click Open Task Manager.
  4. Select the unnecessary startup programs, right-click and select the Disable button.
  5. Restart your PC and check if the error persists.

Performing a clean boot will prevent any interference from third-party apps and disable startup apps that may prompt disk errors.

3. Use Advanced Boot Options to force dismount

  1. Press the power button to turn on the computer and click the F8 key continuously until the Advanced Boot Options menu appears.
  2. Select Repair your Computer, select the US keyboard input method and click Next.
  3. Log in as an administrator and click OK.
  4. Select Command Prompt on the System Recovery Options window.
  5. At the system prompt, type the following and press Enter: chkdsk C: /R
  6. Type Y as your response, indicating YES, and restart your PC.

Force a dismount will temporarily disable the partition if Windows can’t check the disk while in use.

Besides, if the built-in utility is stuck at CHKDSK is verifying Usn journal, repair the corrupt system files to get things running!

Alternatively, you can check what you need to do if Windows cannot access the disk on your PC.

Also, please read our guide about CHKDSK getting stuck in Windows 11 and some fixes for the problem.

Do you have further questions? Kindly drop them in the comments section. Also, you can tell us which solutions worked for you.

How to Watch Poland vs Argentina Live for Free

The Fifa World Cup is now upon us. If you want to join the fun and watch Poland vs Argentina on the 30th of November, we got you a way to access it live without paying streaming fees.

The Spanish channel RTVE will show the match live for free, but only to people located in Spain. The platform is region-locked in the rest of the world

For those outside Spain, a Spanish IP is the only pass to watch the match for free. It’s easy. VPNs can help unblock regional restrictions with IP spoofing.

How can I watch Poland vs Argentina live for free?

What you need to do is to make it seem as if you’re browsing from Spain. To do that, you’ll need to browse the web using a Spanish IP address.

The easiest and most trusted way to do that is with the help of a VPN.

IP spoofing allows you to reroute your device address to a region in Spain or anywhere. So you claim a Spanish location and will then be able to access the match live on RTVE without restriction.

Here is how to set it up and watch the Poland vs Argentina match live for free:

  1. Get an ExpressVPN subscription. We rely on this particular VPN thanks to its impressive IP spoofing capabilities and wide range of Spanish servers.
  2. Download the app and follow the installation wizard.
  3. Log-in using your credentials.
  4. Search for a Spanish server.
  5. Select one and tap the big power button to connect.
  6. Go to RTVE and start streaming!

Encryption then makes it hard for ISPs and the RTVE security system to detect your real IP and kick you off the Livestream.

This method of bypassing geo-block is foolproof, and users can stream the match hitch-free thanks to the VPN’s unlimited bandwidth.

Proven suitable for smooth streaming on sites like Netflix, ExpressVPN will allow you to catch all the action in Poland vs Argentina match live for free without lag.

ExpressVPN

Enjoy watching Poland vs Argentina live from anywhere in the world with this strong VPN!
Check price Visit website

Wrap Up

Claiming a Spanish IP will make you stream the Poland vs Argentina match live for free since the RTVE makes it free in the region.

We recommend that you use a reliable VPN for maximum protection, a poor VPN might just let your connection off while the match is on, and data leaks could expose your location to ISPs.

Profile Picture Not Updating in Windows 11: 5 Ways to Fix It

Microsoft allows Windows users to set a profile picture to display wherever profiles show, like in Settings. However, lately, some users report having issues with Windows 11 profile pictures not updating on their PC.

Moreso, users complain about User profile errors after Windows 10/11 update on their computers.

Why is my Microsoft profile picture not updating?

Most times, the Microsoft profile picture is not updating due to an error from Windows’ latest update. However, many users report that they experience the issue after updating their OS.

Furthermore, numerous other factors that can cause Windows 11 profile picture not to update are:

  • Issues with your Microsoft account – Users use a single profile picture for all Microsoft services like MS Word, Outlook, and Windows Settings. Hence, any issue with your Microsoft account can cause your Windows profile picture issues. Also, not logging into the correct version can cause problems.
  • Corrupt system file – The effect of having corrupt system files on your computer goes a long way. It can cause problems with Windows profile pictures not showing or updating.
  • Microsoft Sync issues – The Windows profile picture may not update if the Microsoft Sync feature isn’t working correctly. It’ll prevent changes from other Microsoft services from reflecting on your device.

What can I do if the profile picture is not updating in Windows 11?

Before proceeding with any troubleshooting steps, follow these preliminary checks:

1. Uninstall recent Windows updates

  1. Press Windows + I to open Settings.
  2. Go to Windows Update and select Update history.
  3. Click the Uninstall updates button and select the most recent update.
  4. Click on Uninstall.

Uninstalling the recent Windows update should help fix any issue with the last patch causing problems with the Windows profile picture.

2. Run the SFC and DISM

  1. Left-click the Start button, type Command into the search box, and select Run as administrator from the drop-down.
  2. Click Yes if the User Account Control prompt appears.
  3. Type the following and press Enter: sfc /scannow
  4. Restart your PC and check if the error persists. Then retry the first two steps.
  5. Then type this and press Enter: Dism /Online /Cleanup-Image /Restorehealth
  6. Restart your PC.

Running the SFC and DISM scan will detect corruptions in Windows system files and restore the corrupted files.

Our readers can check what to do if the run as administrator option is not working on their PCs.

3. Check your Microsoft account

You may log into another account, so you should check your Microsoft account and ensure you log into the correct account.

Also, check other Microsoft services on your PC to see if the profile picture has been updated to know if your Windows profile picture has issues.

4. Delete the old pictures from your account

  1. Press Windows + R key to open the Run dialog box.
  2. Copy and paste the following directory into the text bar: C:\Users\yourname\AppData\Roaming\Microsoft\Windows\AccountPictures
  3. Note that the Yourname entry above should be changed to your username.
  4. Select and delete all the pictures in this account.
  5. Restart your PC and try changing your Windows profile picture to check if it updates.

Deleting the old pictures stored in the account directory will clear the corrupt ones causing the Microsoft profile picture not to update.

5. Run System Restore

  1. Left-click the Start button and type Restore, then click Create a Restore Point.
  2. Go to the System Protection tab and select System Restore.
  3. Click Choose a different system restore option and click Next to select a specific Restore Point.
  4. Select the last time your system worked fine, and click Next.
  5. Click the Finish button.

Performing a system restore will backdate your computer, removing the corrupt items causing the issue.

If you have any issues running it, check how to fix the Restore point if it’s not working on your PC.

You can also:

How long does it take for the Microsoft profile picture to update?

For the new Microsoft profile picture to update or appear, it can take up to 48 hours, and it may not. However, how long it takes varies with different users.

How do I change my profile picture in Windows 11?

  1. Press Windows + I to open the Settings app.
  2. Click the Accounts tab and click on Your Info.
  3. Go to Adjust your photo, and click on Browse files to choose a file.
  4. Select an image to set as your profile picture and click Choose picture.

Your profile picture on Windows 11 should change.

Conclusively, our readers may be interested in how to copy a profile to a new user account on Windows 11 or how to change your Microsoft 365 profile picture.

Also, we have a detailed guide on what to do about a corrupted user profile on Windows 10/11.

If you have more queries or suggestions, do not hesitate to leave them in the comments below.

Up to 83% off on Green Man Gaming Early Cyber Monday Deals

Since November has been starting to feel more and more like cyber month, we can expect a lot of deals, during the actual event, but also before, or after it. Many hot deals are already available on the platform.

Many have embraced the culture and are trying to outsmart the competition by showcasing increasingly awesome offers. Take Green Man Gaming, for instance, which is currently boasting a series of deals that you simply can’t miss during the Cyber Monday

Recently, video games have started to seem more and more appealing. So it wouldn’t be a crazy idea to start investing in releases that you might enjoy while you’re at home.

Note icon NOTE
Deals are subject to change. Sometimes, some of the deals listed in our guides may no longer be available by the time you hit the buy button. So, hurry up and grab them while they’re hot.

How do I get my discounted games from Green Man Gaming?

The early deals have offers from big names in the gaming industry such as Bethesda, EA, Ubisoft, and more. With that in mind, let’s take a look at Green Man Gaming’s early offers.

Do you plan on grabbing some great deals from Green Man Gaming’s website? Tell us about the game you’ve been planning on getting for a long time in the comments section below:

Fix: A Javascript Error Occurred in the Main Process [Discord]

If you’re an avid user of online chatting apps such as Skype or Discord, there’s a chance you may encounter errors. Such an error is A Javascript error that occurred in the main process.

Many people complained about this problem. We understand how annoying it can be, especially if you constantly use Discord to contact your friends.

That is why we prepared a dedicated guide to teach you how to fix this Javascript error and get back to using the Discord app without any worries.

What causes a JavaScript error occurred in the main process?

Before getting into the main subject of this guide, here are the most common reasons why this JavaScript error can occur in the main Discord process:

  • Corrupt program files – If your program or its settings have gone corrupt, this error and others may be triggered.
  • Deactivated services – The most common service related to this error is the Quality Windows Audio Video Experience service. If it is not enabled, you may expect this error.
  • Access levels – If you run the app without administrator permissions, you may have restrictions that could sometimes trigger this error.

Now that everything is clear, let’s see the most efficient ways to eliminate this problem.

How do I fix a JavaScript error occurred in the main process on Discord?

1. Automatically start the Quality Windows Audio Video Experience service

  1. Use the following keyboard shortcut: Windows + R.
  2. Type in services.msc, then hit the Enter key.
    a javascript error occurred in the main process
  3. Scroll down the list until you see Quality Windows Audio Video Experience.
  4. Right-click on it and select Properties.
  5. In the Startup Type drop-down menu, select Automatic.
  6. Press on OK, then quit the window.

Even if this option is extremely efficient, there is a slight chance you may get an error labeled:

Windows could not start the service on Local Computer. Error 1079: The account specifies for this service differs from the account specified for other services running in the same process.

If this happens, proceed as follows:

  1. Press Windows + R, type services.msc, then hit the Enter key.
    a javascript error occurred in the main process
  2. Scroll down the list until you see Quality Windows Audio Video Experience, then select Properties.
  3. Go to the Log On tab.
  4. Click the Browse button.
  5. You’ll see an entry box labeled Enter the object name to select, type your Microsoft Windows account’s name in it, then press on Check Names.
  6. Wait for your name to pop up and press OK.
  7. Type in your Windows account’s password in the Password box.

2. Run your program without administrative privileges

  1. Locate your program’s executable, then right-click on it and select Properties.
    a javascript error occurred in the main process
  2. Navigate to the Compatibility tab, then uncheck the box next to Run this program as an administrator.
  3. Press on OK.

3. Delete your program’s folders from %AppData folder

  1. 1. Use the following keyboard shortcut: Windows + E.

  2. 2. Navigate to This PC.

    click on this pc
  3. 3. Go to the location below, replacing the word afamo with your username.

    C:\Users\afamo\AppData\Roaming\discord


  4. 4. Right-click on the Discord folder, then select Delete. If you get an error message stating that the program can’t be deleted because it is in use, enter the Task Manager and end it first.

    select delete
  5. A quick fix for the a Javascript error in the main process issue is to delete Discord’s folders from the AppData folder on your PC. This can be done manually in a few clicks.

Note icon NOTE
This is similar to the steps above, except you manually delete the program’s data from your PC.

4. Re-install your program

  1. Hit the Windows key, then type Discord.
  2. Right-click on it, then select Uninstall.
  3. Once the uninstall process is finished, download the latest Discord version from the official website.
  4. Click on the downloaded file and follow the installation wizard.

However, a simple uninstall does not permanently delete all traces of the software’s files, directories, and registry entries, which remain on your computer.

While this may not seem like a big deal, it might lead to problems later.  

In this case, we strongly recommend checking the best uninstaller software for Windows 10 PCs. These options will eliminate all traces and leftovers of Skype or Discord, allowing you to reinstall it safely.

We ensure to deliver only the most efficient solutions. If you followed the steps closely, the Javascript error in the main process should now be solved.

Users have experienced a Javascript error that occurred in the main process with Visual Studio code, Teams, Faceit, and Steam, and some of these solutions may be adapted.

If you have any other additional questions regarding the a Javascript error occurred in the main process in Discord issue, do not hesitate to use the comment section below.

Only One RAM Slot Works: How to Enable The Other Slots

When you notice that the motherboard only uses one RAM slot, the first guess is that the inactive RAM slot or the RAM stick plugged into it is damaged. If the slot is not intact, the system won’t use the RAM, only the functioning slot will work.

Other factors are incompatible RAM (i.e. hardware components don’t match), motherboard issues (often appear after motherboard replacement, RAM stick not fitted properly or CPU or BIOS upgrade bugs.

What can I do if only one RAM slot is working?

1. Test RAM with Windows Memory Diagnostic Tool

  1. Left-click the Start button, type Windows Memory Diagnostic and launch the first search result to run the application.
  2. Select Restart now and check for problems. Windows will automatically restart and run the diagnostic tests.
  3. After Windows has restarted, check the diagnostic results to see if any issue is detected.

The Windows Memory Diagnostic tool will find any issues with your RAM. Proceed to the next step if it detects nothing.

You can check what to do if Windows Memory Diagnostics shows no results on your PC.

2. Switch RAM cards

  1. Hold the Power button to shut down the system completely.
  2. Depending on your PC, remove the back case by following the instructions in the user’s manual.
  3. Find the RAM cards on your motherboard and remove each from its slot, then fit the RAM card in slot 1 into slot 2, and vice versa.
  4. Following the appropriate procedure, assemble the PC.

Power up the PC and check if the two RAM slots work. Also, check if the RAM card in the working slot works perfectly on the concerned one. If it does, then you need to replace the second RAM card.

3. Replace faulty RAM card

  1. Hold the Power button to shut down the system completely.
  2. Depending on your PC, remove the back case by following the instructions in the user’s manual.
  3. Remove the RAM card you want to replace from its slot.
  4. Use the proper cleaning agents to remove accumulated dust from the slot, then carefully set the new RAM card into the slot.
  5. Assemble the PC and check if the issue is resolved.

4. Consult an expert for motherboard inspection or RAM slots replacement

Replacing RAM slots on the motherboard requires soldering and other processes. Hence, we recommend you seek the assistance of an expert when dealing with motherboard repairs.

Furthermore, any mistake can damage the motherboard and result in expensive repairs or total change. Alternatively, you can consult your manufacturer if your device has a warranty.

Conclusively, we recommend you read about laptops not booting after the RAM upgrade and ways to fix the problem. Also, you can read our guide on how to check RAM on Windows 11.

If your PC feels sluggish, it could be due to Windows 11 high RAM usage or cases where Windows 11 or Windows 10 isn’t using all your RAM, limiting overall performance.

If you have further questions or suggestions, kindly use the comments section.

Epson Printer Not Connecting to WiFi: 7 Quick Fixes

If your Epson printer won’t connect to Wi-Fi, it could be due to SSID issues, password errors, or network settings. This guide covers quick troubleshooting tips to restore wireless printing and get you back online fast.

Why is my Epson Printer not connecting to WiFi?

Suppose your Epson printer is connected to WiFi, but the computer can’t find it. In that case, it could happen due to a driver glitch, printer error, corrupt or incorrect printer configuration, and even issues with your wireless network.

Moreover, our users reported other similar issues as well. Some of them are the following, and note that they can also be fixed with the solutions below:

  • Epson printer et 2720 not connecting to Wi-Fi – After unplugging the power cable of your router from the power outlet and waiting a short while, you should then connect the router back to the outlet.
  • Epson printer not staying connected to Wi-Fi – It is possible that the connection for the other devices on your network will need to be re-established.
  • Cannot find an Epson printer on the network – Maintain physical proximity between your Epson printer and your Wi-Fi network.
  • Epson printer not connecting to Xfinity Wi-Fi – Turn off your antivirus software and firewall, then check to see whether the problem still exists after doing so.
  • Epson printer not connecting to the Internet – Check the printer to determine if the right information about your network password was supplied.
  • l3150 Epson printer not connecting to Wi-Fi – To determine whether or not your router is functioning properly, connect a few of your other electronic devices to it.
  • Epson WF-2850 not connect to Wi-Fi – Check to see whether the SSID of your network contains any characters that are not ASCII.
  • XP-2105 Epson not connecting to Wi-Fi – Download the Epsonnet config utility from the Epson website and install it.
  • Epson printer not accepting Wi-Fi password – This issue may have been brought on by a defective USB cable, a malfunctioning interface card on the printer, or an incorrectly chosen interface type in the printer’s settings.

Without further ado, let’s see what you can do if your Epson printer will not connect to WiFi. Follow along!

What can I do if my Epson printer won’t connect to WiFi?

1. Update printer driver software 

Outdated or missing printer drivers can cause glitches that may prevent the printer from connecting to your wireless network. If you have a CD-ROM that comes with the printer, you can use it to install the required drivers. This should fix any Epson printer WiFi connection problems that you encounter.

However, if the drivers in the CD are outdated or driver download fails, you can use a driver updater utility. It is a Windows program that can scan for missing and outdated drivers and install them automatically.

2. Check and configure printer port settings 

  1. Press the Windows key + R to open Run. Type control and click OK to open the Control Panel.control-ok epson printer not connecting to wifi
  2. In Control Panel, go to Hardware and Sound and then click on Device and Printers.hard-ware-sound epson printer not connecting to wifi
  3. Right-click on your printer and choose Printer Properties.
  4. In the Properties window, open the Ports tab.
    Epson printer not connecting to WiFi
  5. Check if the correct port is assigned to the printer. 
  6. You can set the correct port using the IJNetwork Tool. For example, select your printer and use Associate Port in the Settings menu.
  7. Click Apply and OK to save the changes.

3. Check your network connection 

If your Epson printer can’t find WiFi, make sure your network is discoverable to other devices.

Try connecting to the Wi-Fi using another device, such as a computer or smartphone, to confirm the network is working and active.

If working, ensure the router is within the range of your printer. Avoid placing your product near a microwave oven or even cordless phones operating at 2.4GHz.

You may also want to check for any restrictions, such as MAC address filtering set on your wireless router. If the printer still refuses to connect to the router, check if the WEP key or WPA password is entered correctly.

If the Epson printer connects to Wi-Fi, but the computer can’t find it, then verify the PC and printer are connected to the same network and that the printer is shared.

Also, check for a printer error such as Epson printer error 288. An error code can help you quickly determine the cause and find a solution.

4. Perform a power cycle 

  1. Turn off your printer and wait for it to shut down entirely.
  2. Next, turn off your network device or Wi-Fi router. 
  3. Disconnect all the wires connected to the printer and router. Leave the devices idle for a few minutes.
  4. Next, connect the cords to the printer and router and power on the devices.
  5. When the lights on your router stop blinking, try connecting to the Wi-Fi network and check if the issue is resolved.

5. Clear cache 

  1. Turn off the printer.
  2. Next, press and hold the feed button for a few seconds. Then power on the printer while keeping the button pressed.
  3. When a page starts printing, release the feed button.
  4. Tap the feed button again to print a second page, and all the cache will be cleared.
  5. Restart the printer and check for any improvements.

6. Reset the printer

  1. Power off the printer.
  2. At the back of your printer, locate the Reset button. Press and hold the button for a few seconds.
  3. Power on the printer while keeping the reset button pressed. You will see a page printing indicating the printer is resetting.

This should reset your printer to factory default. After the reset, you will have to reconfigure your printer as all the settings are discarded. If the Epson printer can’t find WiFi issue persists, try reinstalling the printer.

7. Reinstall the Epson printer

  1. Make sure all the printer jobs are canceled.
  2. Power off your printer and then disconnect the data cable.
  3. Press the Windows key + R to open Run. Type control and click OK to open Control Panel.control-ok epson printer not connecting to wifi
  4. In the Control Panel, click on Uninstall a program under Programs.unninstall-program epson printer not connecting to wifi
  5. Choose your Epson printer from the list of installed apps and click Uninstall.unisntall-button epson printer not connecting to wifi
  6. You can now restart your computer. First, make sure you disconnect the printer.
  7. After the restart, connect your printer to the computer and follow the on-screen instructions to complete the installation process.

If prompted, use the CD-ROM consisting of printer drivers to install the latest driver for your computer. Also, go to the official Epson website to find and install the new version of the drivers.

The Epson printer not connecting to the Wi-Fi problem usually occurs due to a driver glitch that you can fix by downloading and installing the latest drivers.

If not, check your Internet connection, reset the printer settings, or reinstall the printer as a last resort.

Why does it keep saying my printer is offline?

If your computer cannot establish contact with the printing device, the printer will most likely display the message Offline on its status bar.

This may result from several circumstances, including loose cable connections, printer drivers that have become obsolete, issues with crucial system functions, and so on.

Moreover, don’t hesitate to take a closer look at our guide that shows you what to do if the printer won’t stay connected to Wi-Fi. Then, rest assured that you’ll be able to solve this issue once and for all.

And if the Epson printer won’t print, see how you can fix it.

As for today’s guide, we would love to know if it helped you fix the problem of your Epson printer not connecting to WiFi. So please let us know by using the comments section below.

5+ Best Tri-Band Routers to Buy this Cyber Monday

Routers are an essential part of an Internet user’s life. The ability to use your laptop to browse the Internet without having to use an Ethernet cable is very important.

There are different types of routers on the market, with one-band, two-bands, and tri-band versions.

Yes, most wireless routers that you can find these days are already dual-band and router companies tend to focus on launching tri-band routers.

In this article, we will explore the best options for tri-band routers available on the market. Just take a closer look below.

Note: All the prices and offers in this article are subject to change, so be sure to check the official product page to get the latest deal. If the product or offer you’re looking for is no longer available, you can try to find it on its official manufacturer page or get another one from our list.

What is the benefit of a tri-band router?

The first option comes with speed limitations, the second is perfect for use in big houses and offices, while the third option is recommended for a high-load network in a large space.

While regular dual-band routers broadcast only two separate signals, tri-band ones broadcast no less than three different signals.

So, what is a triband router? Well, a tri-band router offers a 600 Mbps 2.4 GHz signal as well as double 1300 Mbps 5 GHz signals and it automatically sorts devices into different networks.

This equals more speed for smoother handling of multiple Wi-Fi-connected devices. Yes, it won’t actually speed up a single device but it will offer increased speed to each additional device in your home or office.

What is the best triple-band router?

Netgear Nighthawk RAXE500

  • 10.8 Gbps Wi-Fi speed
  • Powerful 1.8GHz quad-core processor
  • Four 1G ports plus a 2.5G Ethernet port for computers, game consoles, and more
  • Eight high-performance antennas to amplify Wi-Fi signals
  • Incompatible with certain Nest cameras

With a powerful 64-bit 1.8GHz quad-core processor, Netgear Nighthawk 12-Stream 6E (RAXE500) is ready to deliver reliable connections to all your home or office Wi-Fi 6E devices including Samsung Galaxy S21 Ultra 5G.

We are talking about faster speeds and smoother streaming when using high-bandwidth applications like 4K/8K video streaming.

Those two radio freeways for your 5 GHz data to travel on make a difference as long as this tri-band router successfully reduces signal interference even more than dual-band models.

Such a choice makes perfect sense in environments like a business where there are many different people trying to connect to the Internet at the same time.

And if security is one of your greatest concerns as well, keep in mind that Netgear Armor (powered by Bitdefender) provides data protection on an unlimited number of devices with a 30-day free trial.

Linksys AC2200

  • Provides up to 1,500 square feet of Wi-Fi coverage for 15+ wireless devices
  • 64/128-bit Wi-Fi encryption
  • Mu-mimo compatible
  • Compatible with Amazon Alexa
  • Signal strength is not that powerful

The Max-Stream AC2200 MU-MIMO Wi-Fi router from Linksys is one of the lightweight options of tri-band routers on the market. 

It’s ideal for households with heavy Wi-Fi use as long as this router delivers combined speeds of up to 2.2 Gbps. The router also features MU-MIMO technology.

TP-link Archer C5400X

  • 1GB RAM
  • Intelligent traffic optimization
  • One 2.4 Ghz band + 2 x 5Ghz bands
  • Mu-mimo + airtime compatible
  • 8 USB 3.0 ports
  • Slow reboot

TP-link Archer C5400X is one of the best routers on the market with a 1.8 GHz 64 Bit Quad Core CPU. 

The Archer C5400X offers twice as many Gigabit Ethernet ports as most other routers. The gaming router harnesses MU-MIMO and Airtime Fairness to understand your Wi-Fi needs.

Asus ROG Rapture

  • Tri-band (dual 5 GHz, single 2.4 GHz) AC5300 wireless router with the latest 802.11ac 4x4 MU-MIMO
  • 1.8GHz 64bit Quad-Core processor
  • VPN Fusion enables you to run a VPN and ordinary Internet connection simultaneously
  • Game IPS Powered by Trend Micro
  • Reboots randomly

Asus ROG Rapture is a great router that offers speeds up to 5534 Mbps, and thus can easily be used for VR or 4K streaming.

This router has a 1.8 GHz Quad-Core processor, 8 Gigabit land ports, and USB 3.0.

The game Intrusion Prevention System protects your gaming network from external attacks and threats, neutralizing them before they can reach your network or devices.

Netgear Nighthawk X6

  • 3.2 Gbps speeds
  • 6 atennas
  • 1 Ghz Dual Core processor
  • Free ReadyShare app
  • USB 3.0
  • Some issues with the software

The Nighthawk X6 is a great option for those who want a reliable Wi-Fi router that is compatible with Alexa/Amazon Echo offering you the option to use it by voice control.

Gigabit ports give you fast wired connections to your computer and other devices. The two USB ports allow you to share a storage drive across your network.

That’s why it is one of the best Netgear triband routers around.

Is tri-band mesh Wi-Fi worth it?

While the benefits of a dual-band router are unquestionable, using a tri-band Wi-Fi router is indeed ideal if you have quite a few devices competing for the same Wi-Fi bandwidth.

Since each device connects to different bands, it frees up the router from having to shove everyone onto only two bands.

However, this usually raises the price of the router by a good amount but with such offers, you might not even feel the difference in your pocket.

For more options to pick from, also check out this list including the best Windows 10 routers. You can even choose mesh routers to cover fast Wi-Fi connections over a wide area.

If you also decided that tri-band is the way to go, which router are you going to buy? Let us know in the comments section below.

Surface Pro 4 Keyboard Not Working? 7 Easy Fixes

Surface Pro is a great device, but many users reported that the Surface Pro 4 Type Cover is not working for them.

This issue may arise for many reasons, including connection problems, corrupt drivers, or problems with your Windows 10 or Windows 11 keyboard settings.

The Surface Pro 4 keyboard not working can be a big problem, and today we’ll show you how to deal with this keyboard issue. The guide is updated for 2022 so that you can safely apply these solutions without any worries.

Why is my Surface Pro 4 keyboard not working?

Most users report having connectivity-related issues, such as an unresponsive keyboard or cursor. Another common problem is that the keyboard or type cover is slow to respond.

Some users also encounter sudden instances when the keyboard stops working without apparent reason and then randomly starts working again.

Moreover, for some, the Surface Pro 4 keyboard is not working, but the mouse does, or it stopped working after an update.

Below are some of the other variations of the error, as reported by users, and the potential causes:

  • Surface laptop keyboard not working: This issue can be caused by both hardware and software problems. To test your keyboard, boot to UEFI and check if the keyboard works there.
  • Surface Pro 4 type cover not detected, showing in Device Manager: This problem is usually caused by your drivers, so be sure to reinstall and update keyboard drivers and check if that solves the problem.
  • Surface Book keyboard not working: This can occur for various reasons, but you should be able to fix the problem using one of the solutions in this guide.

How do I fix my Surface pro 4 type cover/keyboard not working?

1. Check your hardware

First and foremost, make sure that your keyboard/ type cover is in a good state. Even though it may seem obvious, ensuring the workspace is checked reportedly helped many users.

Make sure that your power source works appropriately. If you use your battery, check if it is charged. The keyboard draws its power from your laptop’s power source, so if you have battery issues, they may cause additional problems to your keyboard.

Users also noted that ensuring that your keyboard or type cover is clean and dust is essential. For this, we recommend you use compressed air.

A trick for type cover users is ensuring you type on a flat surface.

1.1. Check your connector

Some users also suggest checking your connector. We advise doing so carefully because if you press too hard, you may break it.

This procedure is a bit advanced, and it might cause damage to your Type Cover, so if you’re not comfortable with it and don’t know what you’re doing, perhaps it’s best to skip this solution.

If the Surface Pro 4 Type Cover is not working, the connector may have an issue. In addition, some users reported a plastic bump on their Type Cover.

According to them, they fixed the problem simply by pressing the plastic bump behind the connector.

This might sound a bit complicated, and if you don’t know how to do it, we suggest that you skip this solution.

1.2. Try using a Bluetooth Keyboard

Bear in mind that this is just a workaround, so it’s somewhat likely that the issue will reemerge.

If you still have this problem with the Surface Pro 4 Type Cover, perhaps you can try using a Bluetooth keyboard.

This is just a workaround and not a long-term solution, but it should allow you to use your Surface and troubleshoot the problem further.

2. Reinstall your drivers

  1. Type device in the search box and select Device Manager.device manager
  2. Double-click the keyboards option to expand the list.keyboards
  3. Right-click on your Surface Pro 4 driver and select Uninstall.uninstall
  4. Click the Uninstall button when prompted to confirm the action.
  5. To reinstall the driver, right-click on the Keyboard category and select Scan for hardware changes.scan for
  6. Now, your keyboard will automatically reinstall.

Windows 10 and 11 machines automatically detect peripherals connected to your system. For this reason, when you select Scan for hardware changes, the OS will identify your keyboard and install its driver.

This solution is essential if the Surface Pro 4 keyboard is not working for you, but the mouse or touchpad does. Remember to restart your PC after driver reinstallation.

Alternatively, for users that want to save some time and automate the task, we recommend using a third-party driver updater software.

Downloading and installing drivers manually can put your system at risk as you may download the wrong driver version. Be sure to use this tool if you are unsure about the drivers you need to update.

⇒ Get Fortect Driver Updater

3. Run the keyboard troubleshooter

  1. Press the Windows key + I to open the Settings app.
  2. Select the Update & Security option.update surface pro 4 keyboard not working
  3. Choose Troubleshoot in the left pane, followed by Additional troubleshooters.troubleshoot surface pro 4 keyboard not working
  4. Select Keyboard, then click on Run troubleshooter.run troubleshooter surface pro 4 not working
    Now, wait for the process to complete. You will get information about any issues detected and what you can do about them.

4. Check if the Type Cover works in BIOS and UEFI

4.1. Check Type Cover in BIOS

  1. Open the Settings app.
  2. When the Settings app opens, navigate to the Update & Security section.
    update and security surface pro 4 type cover doesn't work
  3. From the menu on the left select Recovery.
  4. In the right pane, scroll down to the Advanced startup section and click on Restart now button.
     surface pro 4 type cover doesn't work restart now button
  5. Now select Troubleshoot > Advanced options > UEFI Firmware Settings. Click the Restart button.

According to users, you can determine if your hardware or software causes this problem. To do that, access BIOS on Surface Pro 4 and check if the Type Cover works.

To boot to BIOS, you need to press a specific key while your PC boots. Of course, this method isn’t always practical, but you can use the above method instead.

Once your system restarts, you’ll automatically enter BIOS. Now check if your Type Cover works in BIOS. If it does, the problem is caused by software issues, and you can proceed to the next solution.

4.2. Make sure that the Type Cover is enabled in UEFI

  1. Turn off your Surface Pro.
  2. Perform a two-button restart. To do that, hold the Volume Up and Power buttons together for 15 seconds.
  3. You should now see the UEFI screen. On the left side, select Devices from the list.
  4. List of devices will appear. Locate Type Cover on the list and disable it.
  5. After doing that, save changes in UEFI and exit.
  6. Shut down your Surface Pro and perform the two-button restart again.
  7. Once you enter UEFI, go to the Devices section, locate Type Cover and enable it.
  8. Save changes and restart.

If Surface Pro 4 Type Cover is not working, perhaps there’s a glitch with it in the UEFI. However, users reported that they fixed the issue simply by disabling and reenabling the Type Cover in UEFI.

This is relatively simple, and you can do it by following the above steps. After that, your Type Cover should start working again without any problems.

5. Disconnect the Type Cover and leave it overnight

According to users, if your Surface Pro 4 Type Cover is not working, you might be able to fix this problem with this workaround temporarily.

To fix the issue, some users suggest disconnecting the Type Cover from the Surface and leaving it without a power connection over the night.

The same goes for Surface Pro; leave it without power over the night. Then, once you connect the two in the morning, the Type Cover should start working again without problems.

6. Update your operating system

  1. In the search bar, type Update and open the Windows Update panel.
  2. Click on the Check for updates button.
  3. You will get a list of any updates available.
  4. Select Download and install and wait for the process to complete.

The issue may also be caused if you do not run the latest system updates. So, follow the steps above and update your Windows 10 or 11 system.

Generally, when you update your operating system, the drivers and firmware get automatic updates, if any are available.

However, Windows 11 users mentioned experiencing the Surface Pro 4 keyboard not working issue after the Update. If the problem persists, check your drivers as well, as presented in the second solution in this guide.

7. Reinstall Windows 10 or Windows 11

  1. Open the Advanced Startup screen. To do that, follow Steps 1-3 from Solution 4.
  2. A list of options should now appear.
  3. Pick Recovery> Reset this PC > Remove everything.
  4. If you’re asked to insert installation media, be sure to do so.
  5. Select your operating system. Go to the Only the drive where Windows is installed > Just remove my files.
  6. A list of upcoming changes will appear. Once you review them, click the Reset button to start.
  7. Now follow the instructions on the screen to complete the process.

If all other solutions failed, perhaps the only solution would be to reinstall Windows 10 or Windows 11. This is a drastic solution; you should use it only if other solutions don’t work.

Several ways to reinstall Windows 10 and Windows 11 operating systems exist. Still, we selected the Reset option because it is probably the most straightforward and user-friendly, giving the same results as the others.

Remember that this process will remove all files from your system drive, so you should back them up beforehand.

It’s also worth mentioning that you might need a Windows 10 installation media, so be sure to create one using Media Creation Tool for Windows 10 or the Media Creation Tool for Windows 11. Once you’re ready, you can reset Windows 10/11 as described above.

Once the reset is finished, check if the problem is still there. If the issue persists, perhaps you should consider performing a clean install.

If you want to learn more about reinstalling your operating system and seeing the alternative methods, check our How to reinstall Windows 10 and How to reinstall Windows 11 guides.

How do I reset my Surface Pro 4 keyboard?

The easiest way to reset your Surface Pro 4 keyboard is to uninstall and reinstall the drivers from the Device Manager.

We have shown how to do this in this guide. So check it out if you need to reset your keyboard.

If the Surface Pro 4 Type Cover isn’t working, that can be a big problem, but we hope that you’ll manage to fix that problem with one of our solutions.

Moreover, don’t hesitate to look at the best Bluetooth keyboards for Windows 10 and 11.

Similar problems may often appear, so feel free to bookmark this Computer Peripherals Hub.

Please let us know which solution worked for you in the comments below in fixing the Surface Pro 4 keyboard not working issue.

5+ Best Cyber Monday Deals for Wireless Routers [On Sale]

Having a quality Wi-Fi router is essential for using the internet today. Whether you’re working, or just browsing the Internet, you need a fast and stable connection on all your devices.

That’s why this is an ideal time to upgrade your Wi-Fi gear, but also save some money on a plethora of available deals.

Before you go through all the products we highlighted for you, let’s go through some of the important criteria on how to select the best device for your needs.

Note: All the prices and offers in this article are subject to change, so be sure to check the official product page to get the latest deal. If the product or offer you’re looking for is no longer available, you can try to find it on its official manufacturer page or get another one from our list.

How we chose the best and cheap router deals

All the routers look pretty much the same, some small boxes with a lot of blinking lights and some antennas sticking from their back but it’s a lot of different technology inside.

Let’s see how to differentiate and pick the best router for you:

➡ Match the speed and technology with your modem and Internet plan

It’s important to know that a router will connect to the modem from your Internet provider and it won’t be able to increase the speed of your connection.

In other words, if you’re paying for a 300 Mbps speed connection, your Gigabyte router won’t be able to top that in any connection.

➡ Check the necessary coverage

If you’re living in a 2-story house, you will need a router with increased coverage or more routers and link them together to expand the connection area.

➡ Easy configuration

Some routers can be hard to configure and if you’re not an expert in this matter, you might need to ask for help.

However, there are also devices that offer very simple configurations with easy-to-follow steps that anyone can perform.

That being said, we compiled a list of the best Wi-Fi router deals to consider, hoping this list will save you some time, hassle, and money.

Which router is the best for home use?

ASUS AC3100

  • WTFast Game Accelerator
  • AiMesh compatible
  • Lifetime Internet Security included
  • Adaptive QoS
  • MU-MIMO standard
  • Price

For a really wide coverage of up to 5000 square feet, you should really consider getting ASUS AC3100.

Besides looking like an alien spaceship, this tool can reach a wireless speed of up to 3,167 Mbps by using the NitroQAM technology.

This is great even for the most demanding gaming needs or for online 4K streaming in any given conditions.

Plus, the Adaptive QoS technology allows you to prioritize gaming packets and activities and assign full dedicated bandwidth while gaming under gamer solo mode so you can say goodbye to latency problems.

And thanks to the MU-MIMO technology, the router assigns every device its own dedicated Wi-Fi connection. Therefore, even if you connect more devices at the same time, the network won’t slow down.

NETGEAR R6700 Nighthawk AC1750 Dual Band

  • AC1750 Wi-Fi—450+1300 Mbps speeds
  • 1 GHz Dual Core Processor
  • Prioritized bandwidth for gaming, streaming videos, or music
  • Fast access to USB HDD with USB 3.0 port
  • Can drop the signal at times

This Wi-Fi router has a fast performance, it can get up to 1500 square feet of wireless coverage with AC1750 speed.

You can rest assured when it comes down to security as this router supports WPA2 wireless security protocols and it includes a firewall, VPN, and more.

It has the best-class antivirus, antimalware, and data protection for all your smart devices, PC, and smartphones.

TP-Link AX1800

  • Setup with Alexa is simple
  • Next-gen 1.8 Gbps speeds
  • Wi-Fi 6 technology
  • Powerful Quad-Core processing
  • The range is not great

With TP-Link AX1800, you can finally test the Wi-Fi 6 (802.11ax) with faster speeds, greater capacity, and reduced network congestion.

This router communicates more data to more devices simultaneously using the revolutionary OFDMA technology.

The device also uses the latest Beamforming technology to focus signal strength to your devices far away using 4 high-gain antennas and an advanced front-end module (FEM) chipset.

Its brain is a powerful 1. 5 GHz quad-core CPU that will ensure smooth communications between your router and connected devices.

TP-Link AC1750

  • Ideal for any internet plan and allow you to directly connect your wired devices
  • USB Access – Share your USB drive content wirelessly
  • TP-Link Tether app – Easily set up and manage your home network at home or remotely.
  • The signal could be stronger

This dual-band router upgrades to 1200 Mbps high-speed Internet (300Mbps for 2.4GHz + 900Mbps for 5GHz), reducing buffering and ideal for 4K stream.

With the Gigabit Ethernet ports, TP-Link AC1750 Smart Wi-Fi Router (Archer A7), is ideal for any internet plan and allows you to directly connect your wired devices.

The TP-Link Tether app allows you to easily set up and manage your home network at home or remotely, depending on your needs.

ASUS Dual-Band 2×2 AC1300

  • Reaches speeds of up to 1267 Mbps.
  • Four external 5dBi antennas for improved Wi-Fi range
  • Compatibility with the ASUS app for managing the router remotely.
  • The 5 GHz Wi-Fi will not stay up

ASUS Dual-Band 2×2 AC1300 comes with a Dual-band AC1300 with the latest 2×2 MU-MIMO technology for reaching speeds of up to 1267 Mbps.

The four external 5dBi antennas support the improved Wi-Fi range and multi-device performance.

This router is compatible with the ASUS app for managing the router remotely and comes with an integrated USB 3.0 for connecting various peripherals.

TP-Link AC1900

  • 4 Gigabit LAN ports and 1GHz powerful dual-core processor
  • Handles multiple devices (laptops, tablets, smart home & more)
  • USB 3.0 and USB 2.0 ports for connecting peripherals.
  • Loses connection to the Internet frequently

TP-Link AC1900 Smart Wireless Router comes with 4 Gigabit LAN ports and a 1 GHz powerful dual-core processor for the most demanding tasks.

This router can easily handle multiple devices (laptops, tablets, phones, smart homes & more). Through Beamforming Technology, the router Smart detects where you need fast  Wi-Fi in its range area.

NETGEAR AC1200

  • WiFi speeds up to 300+900 Mbps
  • Works with all N150, N300, N600 and AC devices
  • ReadySHARE USB Access—Wirelessly access & share USB storage
  • Signal drops repeatedly

The Wi-Fi Range for NETGEAR Wi-Fi Router (R6120) – AC1200 Dual Band Wireless Speed is for medium to large homes.

This router works with all N150, N300, N600, and AC devices and through the Nighthawk App, you can easily set up your router, and manage Internet access by pausing and resuming internet instantly. All from your mobile device.

It supports up to five 10/100 (1 WAN & 4 LAN) Fast Ethernet ports so all the connection possibilities are covered.

If you’re still looking for alternatives, check out our best 802.11ac Wireless routers list and make a choice.

Alternatively, check out our list on the best router with internal antenna.

That’s about it. We certainly hope you’ve found what you’re looking for. Already picked the best deal? Make sure to let us know about it in the comments below.

SearchApp.Exe Suspended on Windows: Quick Fixes

One of the most anticipated features of Windows 10 was its search and virtual assistant Cortana. Although these features are great, some users are having issues with them and they report that SearchUI.exe fails to load so let’s try to solve this issue.

The SearchUI.exe fails to load issue on Windows 10 or Windows 11 is related to the search feature and Cortana. If you’re having any problems with this file, you won’t be able to use Cortana or Search.

There are many potential causes of SearchUI.exe issues, some of the most common ones will be presented below. Keep on reading to find out how to fix this problem ASAP.

What is Windows SearchUI?

The search bar that is located on your taskbar is made functional by a process called SearchUI.exe, also known as SearchApp.exe.

SearchUI.exe was once a part of Cortana, the personal assistant that comes pre-installed on Windows 10 devices.

In April 2019, SearchUI.exe was separated from Cortana and renamed SearchApp.exe to differentiate itself from other components.

What are some common SearchUI.exe issues?

At the moment, SearchApp.exe is a background process that uses a usual low amount of resources and operates in the background.

However, it does make use of certain resources to make sure that when you touch the search bar in the bottom left, the search menu displays practically immediately.

Speaking of issues with SearchUI.exe, users reported the following problems:

  • SearchUI.exe stopped working – According to users, there are various problems that can occur with SearchUI.exe. However, you should be able to fix most of these problems by using one of our solutions.
  • Windows 10 SearchUI.exe suspended – Many users reported that SearchUI.exe is suspended on their Windows 10 PC. This can occur due to your antivirus, so be sure to disable it and check if that solves the issue.
  • SearchUI.exe not responding – It is possible that certain necessary system files are missing, or that there is an issue with the Cortana application itself.
  • SearchUI.exe not found – Because of this, if the SearchUI.exe process on your computer is suspended, you won’t be able to utilize Cortana.
  • SearchUI not working in Windows 10 – After selecting Additional Troubleshooters from the drop-down menu, browse for Search and Indexing and then click on that option.
  • SearchUI.exe not running in Windows 10 – If the SearchUI.exe file on your computer running Windows 10 is unable to load, the issue may be related to your user profile.
  • Windows 11 SearchUI.exe missing – Run the Windows 11 Search and Indexing troubleshooter in order to fix this issue.
  • SearchUI.exe application hangs – This is another problem that can occur with SearchUI.exe. If you’re having this issue, be sure to check if third-party applications are interfering with SearchUI.exe.
  • SearchUI.exe crashing – Several users reported that SearchUI.exe crashes on their PC. To fix this problem, you might have to create a new user account and switch to it.
  • SearchUI.exe application error – If you’re getting an application error related to SearchUI.exe, the problem might be related to Windows 10. To fix the problem, be sure to install the latest updates and check if that solves the problem.

In the next section, you will find out what the possible solutions for the Windows search suspended issue are. Do keep in mind that these fixes target the Searchhost.exe suspended issue in Windows 11 and Windows 10.

How to fix SearchUI.exe not running/suspended on Windows?

1. Make sure that your Windows is up to date

  1. Press Windows + I then go to Update & Security.update-security nmi hardware failure windows 10
  2. Now click the Check for updates button.check-updates searchui windows 10

This is a big problem, and Microsoft is aware of this issue, so the official fix should be available in the form of a Windows update. If you’re having this problem the best solution is to check if any Windows updates are available.

After uninstalling the latest version, verify the problem regarding the Search Host suspended in Windows 10 or Windows 11 is resolved.

2.  Check your antivirus

If you don’t want to uninstall your antivirus, you can try changing its settings and check if that solves the issue. If changing the settings doesn’t work, you might be able to fix the problem by disabling your antivirus.

To determine if your antivirus is the problem, uninstall it and check if the issue still persists. If nothing changed, we strongly advise you to switch to a different antivirus solution.

If you’re looking for a new antivirus, be sure to browse through our collection of several best antivirus software with low resource/CPU usage to get a more appropriate solution for your PC suitability.

All of the antivirus tools we choose for your advantage are fully compatible with Windows 10 & 11 and will not generate SearchUI.exe issues on your PC.

3. Fix the package folder for Cortana

  1. Make sure you find the following location before moving on: C:\Users\AppData\Local\Packages\Microsoft.Windows.Cortana_cw5n1h2txyewyRoamingState
  2. To boot into Safe Mode click the Restart button but remember to hold Shift on your keyboard.
  3. Once your PC opened into Safe Mode, select Troubleshoot followed by Advanced options.advanced nmi hardware failure windows 10
  4. Now, select Command Prompt and type the command below then hit Enter to remove that folder permanently (Before removing it, make sure that the path to the folder is correct and that this folder exists on your computer): RD /S /Q C:\Users\AppData\Local\Packages\Microsoft.Windows.Cortana_cw5n1h2txyewyRoamingStaterds searchui windows 10
  5. Next, enter the following command: Get-AppXPackage -AllUsers |Where-Object {$_.InstallLocation -like "*SystemApps*"} | Foreach {Add-AppxPackage -DisableDevelopmentMode -Register "$($_.InstallLocation)AppXManifest.xml"}get-app searchui windows 10

According to users, the above folder is the main issue because it gets corrupted, and the only solution is to delete the folder.

You probably won’t be able to access the folder directly from Windows, so you’ll have to go to Safe Mode and delete it from there.

4. Create a new user account

  1. Open the Settings app and go to Accounts.
    earchUI.exe application error
  2. From the menu on the left choose Family & other people. In the right pane, select Add someone else to this PC.
    SearchUI.exe not found
  3. Select I don’t have this person’s sign-in information.
    SearchUI.exe suspended Windows 10
  4. Now choose the option Add a user without a Microsoft account.
    SearchUI exe application hang
  5. Enter the desired user name and click on Next to proceed.
    SearchUI.exe crashing

If SearchUI.exe is missing in Windows 11 or fails to load, the problem might be your user profile. Your profile can get corrupted, and to fix the problem it’s advised to create a new user profile.

After creating a new account, switch to it and check if the Search is working properly. If so, go back to your account and the search feature should start working again.

If the search still doesn’t work on your old user account, you’ll need to move your personal files to a new account and start using it as your main account.

5. Delete the Roaming profile

  1. Press Windows + R and enter control. Press Enter or click OK to proceed.
    SearchUI.exe not working
  2. When the Control Panel opens, navigate to System.
    SearchUI.exe suspended Windows 10
  3. In the left pane, click on Advanced system settings.
    SearchUI exe application hang
  4. When System Properties window opens, in the User Profile section click the Settings button.
    SearchUI.exe crashing
  5. Select your domain profile and click Delete.

Some users use the Roaming profile on their Windows 10 PC, and that can cause certain problems with SearchUI.exe. However, you can fix these problems simply by removing the Roaming profile from the local machine and the server.

Keep in mind that you’ll need to contact the domain administrator if you want to delete the Roaming profile on the server.

After doing that, you’ll need to contact the domain administrator and ask him to rename your roaming profile or delete it. Once that is done, the issue should be resolved. Keep in mind that this solution works only if you have a Roaming profile and you’re part of the domain. If not, you might want to skip this solution.

6. Reinstall iCloud

  1. Press Ctrl + Shift + Esc to open Task Manager.
  2. Locate all instances of Windows Explorer, right-click them, and choose End task from the menu. Repeat this step for iCloud processes as well.
    SearchUI exe application hang
  3. Now go to File followed by Run new task.
    SearchUI.exe crashing
  4. Enter explorer in the input field and press Enter or click OK.
    earchUI.exe application error
  5. Windows Explorer will now start. Now you need to remove iCloud and all other Apple-related applications from your PC. There are several ways to do that, but if you want to completely remove iCloud, we suggest you use an uninstaller application.

Uninstaller applications are designed to remove any application along with its related files and registry entries from your PC. There are many great tools that can help you with that. Make sure you choose the best uninstaller software that will safely uninstall even the most stubborn of programs.

After you remove iCloud using one of these tools, the SearchApp.exe suspended problem should be resolved completely. Now you can install iCloud again and the issue shouldn’t appear anymore.

7. Perform a Clean boot

  1. Press Windows + R and enter MSConfig. Press Enter or click OK.
    earchUI.exe application error
  2. The System Configuration window will now appear. Go to the Services tab and check the option Hide all Microsoft services. Now click the Disable all button.
    SearchUI.exe not responding
  3. Navigate to the Startup tab and click Open Task Manager.
    SearchUI.exe suspended Windows 10
  4. The list of startup applications will appear. Right-click the first entry on the list and choose Disable from the menu. Now repeat this step for all startup applications.
    SearchUI exe application hang
  5. Once you disable all startup applications, close Task Manager and go back to System Configuration window. Now click on Apply and OK to save changes and restart your PC.
    SearchUI.exe crashing

As we already mentioned, problems with SearchUI.exe can appear due to third-party applications, and if you want to find the application that is causing this problem, we advise you to perform a Clean boot.

Once your PC restarts, check if the problem still appears. If not, it means that one of the startup applications is causing this problem.

To find the problematic application or service, you need to repeat the same steps again and enable applications and services one by one or in groups.

Keep in mind that you need to restart your PC after enabling a group of services or applications in order to apply the changes. Once you find the problematic application, you can disable or remove it in order to fix this problem.

How can I fix SearchUI.exe problems on Windows 11?

  1. Press Windows + I then scroll down and go to Troubleshoot.troubleshoot-opt-w11 0xa00f4244 nocamerasareattached
  2. Here, select Other troubleshooters.
  3. Finally, click Run next to the Search and Indexing troubleshooter.search-index searchui windows 10

Is it safe to disable SearchApp exe?

Due to the fact that SearchApp.exe is an essential component of your operating system, you should not immediately disable it.

There’s no need to disable SearchApp.exe unless you don’t want to use the search bar from your taskbar anymore. But it is not recommended to do so, since it can cause system crashes.

If you want to avoid the possibility of your system crashing as a result of removing the function, it is essential to set up a system restore point in Windows 10 before you make that decision.

Check out how to create a system restore point in Windows 11 as well before trying to delete the SearchApp.exe process.

If you are going to stop the process from running, you had better have a good cause for doing so. Turn the process off if it’s producing a high percentage of CPU consumption or any other problems.

We recommend that you try to limit the CPU usage of the process instead of deleting altogether. This is a much simpler approach.

Why can’t I type in the search box in Windows 11?

Users have reported that issues with SearchUI.exe sometimes manifest themselves when iCloud is involved. It would appear that there are two separate instances of explorer.exe and icloud.exe running in Task Manager; in order to fix the issue, you will need to close both processes.

It is quite possible that you may notice the file stopped if you are utilizing a third-party antivirus program since this is because your antivirus software is attempting to prevent it from running. We recommend that you change the antivirus that you are using to a better one.

Sometimes a corrupt Cortana package folder is the cause of the file being suspended, which implies that you will need to remove the folder in question. Don’t worry, below we will show you how to find the location of SearchUI.exe in Windows 11.

Moreover, it’s possible that the file’s suspension is due to the fact that you haven’t updated Windows in quite some time, so check whether or not you’ve done so recently.

Was this guide useful to you in fixing the SearchApp.exe suspended issue? Don’t hesitate to share your thoughts and personal solutions with us, in the comments section below. Thanks for reading!

10 Best Tech Deals That You Can Get Now

Winter holidays are upon us! The world is already starting to collapse, and it will all culminate this Christmas. But if you can’t wait for Christmas to come, here it is and there are some sweet deals available already.

This article will guide you through this Holiday season tech deals on Amazon. So, if you’re looking for good value for your money purchase, this is a good place to start.

Note: All the prices and offers in this article are subject to change, so be sure to check the official product page to get the latest deal. If the product or offer you’re looking for is no longer available, you can try to find it on its official manufacturer page or get another one from our list.

What are the best Cyber Monday deals on tech gadgets?

Sony WH-1000XM4 over-ear headphones

  • Dual Noise Sensor
  • Edge-AI sound optimizations
  • Great comfort
  • 30-hour playback time
  • Touch sensor for controlling music
  • Automatic-pause when removed
  • Price could be a bit steep for some users

The WH-1000XM4 headphones from Sony are some of the best devices in this category this year, offering incredible sound quality and amazing comfort as well.

The Dual Noise Sensor technology incorporated in these great headphones ensures that your listening experience will be undisturbed by any other surrounding noise, no matter how intense it is. The built-in pads also ensure sound isolation, while also providing you with comfort even for long usage.

Using the latest development of Edge-AI, these headphones offer amazing music optimization capabilities, tweaked by the world-renowned Sony Music Studios Tokyo.

When it comes to battery life, the WH-1000XM4 will make you forget that they are truly wireless headphones because of the great longevity of the battery. You get 30 hours of continuous usage from one single charge.

Added to that, the fast-charging feature ensures that with just a 10-minute charge, you can use these headphones for about 5 hours.

If you’re interested in a more varied price range and feature sets, you can also explore some other over-ear headphone options.

Samsung Galaxy Buds Pro

  • Noise-canceling
  • IPX7 water-resistant
  • Wireless charger included
  • 11-mm woofer and 6.5mm tweeter
  • Fast charging feature
  • Full touch control
  • Some users reported in-ear instability

The Samsung Galaxy Buds Pro offers a slick and polished design, and we consider them to be some of the best wireless buds available on the market at this point.

Besides the great looks, the Galaxy Buds Pro also offers you amazing sound quality, both when it comes to bass power and high notes, and the full touch design ensures that you can control volume, call answering, skip songs, and other customization simply by tapping the buds.

The 11 mm woofer and 6.5 mm tweeters mounted on each of the buds offer immersive and clear sound no matter what style of music you’re listening to.

The noise-canceling features found with this device include both physical and digital aspects, while the soft rubber padding of the bud isolates your eardrum by fixing inside your ear, the built-in noise-canceling tech ensures that no other sounds pass this barrier.

If you’re more inclined to use the earbuds for sports, don’t hesitate to check out the best earbuds specifically designed for running.

JBL Charge 4 Bluetooth speaker

  • IPX7 waterproof
  • Variety of colors
  • Up to 20 hours of playtime
  • Rugged material
  • Dual bass radiator
  • No power adapter included

The JBL Charge 4 is one of the best Bluetooth speakers on the market, offering a wide range of colors to choose from, thus being able to integrate perfectly into any environment and fit any style.

As you can connect up to two smartphones at the same time to this speaker, you can easily switch between your and your friend’s music without missing a beat.

The 20 hours of playtime available with just one full charge and the IPX7 rating ensures that no matter where you want to take your music with you, the JBL Charge 4 will offer a great experience.

To make this device even more versatile, you can connect a whopping 100 JBL Connect-enabled speakers and extend the range of sound indefinitely.

The JBL bass radiators found on the sides of the speaker ensure that the bass will sound round and powerful even when outdoors, while also maximizing the sound coverage because of the design.

There are other amazing portable Bluetooth speakers to check out, with some great features and price variety.

Samsung SSD 2TB

  • 2TB storage space
  • High-speed data reading and writing
  • 5-year warranty
  • Uses AES 256-bit encryption
  • Expensive compared to other options but worths every penny

The Samsung Evo SSD offers a storage capacity of 2TB, making it more than enough to store your data without worries, including large games, high-quality photos, and videos, and enough to install demanding software.

The V-Nand technology ensures that the reading and writing speeds are the best on the market, and can process 4K videos and 3D data without any problems or lag.

The 550MB/s sequential read and write performance ensures that you can access your files in real-time, and engage in instant tasks without any waiting times, thus improving booting time and usability.

As it is always good to have more options than fewer, be sure to explore some other SSD storage options for both internal and external setups.

MX Master 3 Advanced

  • Two scroll-wheels
  • USB-C charging
  • Great scrolling speeds
  • Multi-device and multi-OS
  • Device switch button
  • Takes some time to get used to it

The MX Master 3 Advanced from Logitech is by far one of the best mice on the market this year and allows you to customize 4 buttons and scroll through documents with the built-in mouse wheels.

You can use this device for gaming but also works perfectly in an office setting, offering great tracking capabilities on any surface, while also protecting your wrist due to the ergonomic design.

The customization of all the buttons presented on the device ensures that you can drastically improve your efficiency no matter what environment you use it in, and the software allows you to do so in a very user-friendly and intuitive way.

To add to the mix, this mouse can be connected to up to 3 devices at the same time, and the button at the top of the mouse allows you to switch between them without wasting any time whatsoever.

Even though the battery life is great, with one charge allowing you up to 3 weeks of usage, you can also use the mouse while it’s charging with the USB-C cable, thus never impeding your capability to use it.

Be sure to check out some other amazing mouse options, that include a variety of other features, and at a variety of accessible prices.

Logitech MX Keys Advanced keyboard

  • Bluetooth connection
  • USB-C charging
  • Compatible across-OSs
  • Metal build
  • Spherical keys
  • Great comfort and stability
  • Automatic backlighting
  • Can be connected to multiple computers at the same time
  • Keys might be too small for some users

The MX Keys Advanced from Logitech is our top pick when it comes to the best keyboard on the market this year, as it offers some amazing features, and looks great as well.

The sturdy metallic build not only looks amazing but also provides you with a stable surface and great response times, while also fitting perfectly in any environment, including an office or at home.

The rounded keys are designed to fit the shape of your fingers perfectly, thus ensuring smooth contact and great writing speeds, without any miss-pressed keys.

The Bluetooth connection ensures true portability, and the battery uses a USB-C cable and port to charge fast, while also allowing you to use the keyboard for 10 days to up to 5 months, depending on the usage times and frequency.

The backlit feature provides you with comfort both when using it at night, or in a dimly-lighted setting, and the fact that it can be connected simultaneously to up to 3 devices, ensures great efficiency across the board.

You can also explore some other great keyboard options, with a variety of prices and notable features.

Razer Manticor mousepad

  • 9 x 7.5 inches in size
  • Aircraft-grade aluminum build
  • Lab-designed microscopic surface for perfect gliding
  • Thin and stable profile
  • Could be too small for gaming

The Manticor mousepad from Razer, even though rebounded for its gaming peripherals, is a versatile item that can be used in any environment, while also providing a great gliding experience and portability.

The aircraft-grade aluminum build offers you a sturdy and comfortable surface that can be easily carried inside your laptop bag, while also providing a stable surface for any type of mouse on the market.

The design fits every type of setting, no matter if you’re in an office environment, or at home with your friends, and the specially-designed microscopic surface offers enough space for any task while improving the precision of your mouse clicks.

Because the Manticor mousepad is stamped flat from only one sheet of high-grade aluminum, this ensures a perfectly-level surface, while also offering your wrist a comfortable position, while allowing the mousepad to grip the surface of your desk perfectly.

You can also explore some more aluminum mousepads, with a variety of features and prices to choose from.

GeForce RTX 3080 Ti GPU

  • Memory: 12GB 384-bit GDDR6X
  • Output: 3 x DP; 1 x HDMI
  • Interface: PCI Express x16
  • Size: 9.1 x 5.6 x 1.6 inches
  • Power: 350W
  • Power requirements might be too much for some motherboards

The RTX 3080 Ti is our top pick for the best GPU worth investing your money in this year, as it offers incredibly fast processing speeds, and is capable of running the latest games without any issues whatsoever.

This device uses the well-reviewed Nvidia Ampere architecture, which uses 2nd generation RT cores and 3rd generation Tensor cores to ensure powerful image processing speeds and incredible quality.

The 12GB GDDR6X memory is more than enough to run any game with full graphics settings, and doing so with optimal FPS ranges, while also being capable of some of the heaviest 3D-imaging processing software available on the market.

To power this beast, you will need to have 350W available only for this device, and it is recommended that you check this element before investing, as nothing is more annoying than getting a powerful GPU that can’t be used as it should be.

The 3 DP ports and HDMI 2.1 port ensure that any device can be connected to this GPU, and allow connection to a total of 4 output displays, making it perfect for multiple-display setups.

Sonnet Breakaway Box 750 USB-C eGPU

  • Great frame rates
  • Perfect for the latest games
  • Special effects, rendering, and editing
  • Temperature-controlled fan
  • Variable speed settings for the cooling system
  • Quite large

The Sonnet Breakaway Box eGPU ensures that you will be able to bolster your computer’s graphics-processing power and speed by simply connecting it to the PC with a USB-C port, making it a perfect option for those of you who don’t have another free GPU slot.

This device will ensure that you can add your GPU, and milk every ounce of power out of your system, allowing for an immersive gaming experience, and even for image and 3D processing software to be used at full speed.

To ensure that you can optimize the power output and efficiency, this device allows you to customize the fan input, thus controlling the speed and overall temperature of your system.

As it works perfectly with both Mac and Windows systems, this powerful eGPU is extremely useful no matter which OS you prefer.

You can easily connect a variety of GPUs, like AMD Radeon VII, RX, RX Vega, Pro W, and Pro WX models; and NVIDIA GeForce RTX series, TITAN, and Quadro models.

To round this device up perfectly, the fans are extremely silent, so your 3D-rendering or gaming experience will not be bothered by extra noise.

There are more amazing options when it comes to great eGPUs, both when it comes to price accessibility and a variety of features.

How we chose the best Christmas teach deals on the market

Our team of expert testers, with a combined experience of 15 years, has tackled a variety of testing tasks for any device you could imagine.

Their experience comes into play as a very important element when choosing the products we described in this guide, and a large variety of factors have been taken into consideration.

The options that have been chosen offer great quality and cover the entire spectrum of price ranges, thus enabling everybody to find something that fits their needs both financially and otherwise.

If you’re interested in exploring this subject further, you can also check out our Windows 11 laptops guide, which offers you more choices with a great variety of configurations and prices.

That’s about it, we hope you’ve found at least something that interests you. So, why don’t you share your shopping list with us in the comments below?

LSA Package is Not Signed as Expected: 5 Ways to Fix It

The LSA package is not signed as expected is an error from the Local Security Authority (LSA) security subsystem in the Microsoft Windows operating system. It verifies login attempts and tasks relating to Windows authentication.

However, the error can pop up when you try to remove your password from Windows 11 or during a system reboot.

Why is the LSA package not signed as expected?
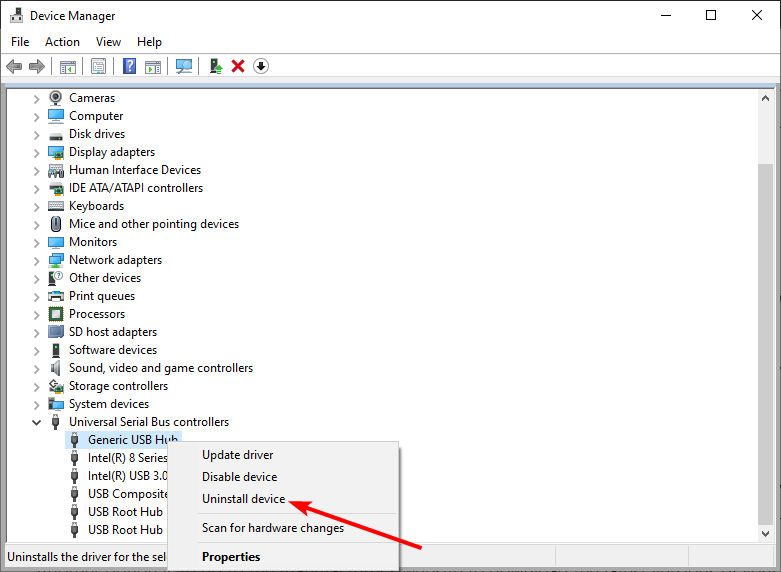
The full error log message reads: Event ID 6155: LSA package is not signed as expected. This can cause unexpected behavior with Credential Guard.

The most common cause of the LSA package not signing as expected error is a Windows update error on your PC. Many of our readers reported that the error began when they rebooted their PCs after updating to Windows 22H2.

Furthermore, other factors that can cause this error are:

  • Third-party app interference with the LSA security system – Third-party apps like antivirus software can impede the activities of the Local Security Authority. They can block access to the necessary credentials, likewise, they can try to access it without authorization. Also, credential manager software can cause the LSA package error.
  • Issues with the Credential Guard – The LSA package is not signed as expected error may appear when there is an issue with the Credential Guard.

Various other factors can cause the issue and vary on different PCs. Nonetheless, you can resolve the problem by troubleshooting your PC.

What can I do if the LSA package is not signed?

Before proceeding with any advanced troubleshooting steps for the error, go through the following preliminary check:

  • First, disable the antivirus software on your PC.
  • Then, restart Windows in Safe Mode and check if the error appears.

If the above checks are not helpful, try the solutions below:

1. Perform a Clean boot

  1. Press Windows + R key to open the Run dialog box, type msconfig in the text bar, and click OK.
  2. Navigate to the Services tab and check the box for the Hide all Microsoft services option, then click Disable all.
  3. Go to the Startup tab and click Open Task Manager.
  4. Select the unnecessary startup programs and click the Disable button.
  5. Restart your PC and check if the error appears.

A clean boot will prevent any third-party app from launching from the start, blocking any interference from the apps. Also, it’ll disable startup apps that may prompt the error.

2. Uninstall recent Windows updates and update Windows

  1. Press Windows + I to open the Settings app.
  2. Click on Windows Update and click the Update history option.
  3. Click the Uninstall updates button and select the most recent update.
  4. Select Uninstall.

Uninstalling the recent Windows update should help fix any bug installed with the last patch causing issues with the LSA package.

3. Perform a System Restore

  1. Left-click the Start button and input restore, then click Create a Restore Point.
  2. Navigate to the System Protection tab and click on System Restore.
  3. Click Choose a different system restore option and click Next to choose a specific Restore Point.
  4. Select the last time your system worked correctly, then click Next.
  5. Click the Finish button.

A system restore will backdate your procedure and remove the recently added corrupt items or faulty components causing the issue.

If you have any issues running it, check how to fix Restore Point if it’s not working on your PC.

If you don’t want to perform this manually, then an alternative to this process would be an automated tool.

4. Enable LSA Protection using the Registry

  1. Right-click the Start button, select Run, type Regedit, and click OK to open the Registry Editor.
  2. Navigate to the following registry key: HKEY_LOCAL_MACHINE\SYSTEM\CurrentControlSet\Control\Lsa
  3. Set the new value to:
    1. Value name: RunAsPPL
    2. Value data: 00000002
  4. Close the Registry Editor and restart your PC.

Enabling LSAvia the Registry editor will set it to isolate other services.

5. Turn off Credential Guard

  1. Left-click the Start button, type Regedit in the search box, and select the Registry Editor from the results.
  2. Navigate to the following keys and set their values to 0 to disable the virtualization-based security: HKEY_LOCAL_MACHINE\SYSTEM\CurrentControlSet\Control\Lsa\LsaCfgFlags HKEY_LOCAL_MACHINE\SOFTWARE\Policies\Microsoft\Windows\DeviceGuard\LsaCfgFlags
  3. Restart your computer.

Note that you must set the registry settings to 0 to disable virtualization-based security.

Read about disabling Credential Guard on Windows 10/11 if you can get around the above steps. This isn’t the only issue and we have a great guide on what to do if Local Security Authority Protection is off on Windows 11.

In conclusion, we have a detailed guide on turning off password-protected sharing in Windows 11.

If you have further questions or suggestions, you can drop them in the comments below.

Steam Application Load Error: 5 Expert Solutions

Some worldwide Steam users reported the Steam Application load error as being one of the most annoying ones.

This message pops up when they try to launch some of their games within Steam. Consequently, the games don’t start. It seems like it frequently appears for Bethesda games.

If the Steam error application load error is also happening to you, make sure you check this guide completely. You’ll discover 5 solutions to fix the problem in less than a few minutes.

How can Steam load errors manifest?

The Steam Application load errors can be various and can appear under different messages that pop up on your Windows screen. Let’s see what are the most common ones:

How can I fix the Steam Application load error?

1. Verify the game’s file integrity

  1. Press on the Windows key, type Steam, then open the desktop client.
  2. From the top menu, click on Library.
  3. Once your games are displayed, right-click on the game you need, then select Properties.
  4. Select the Local Files tab.
  5. Then click on the Verify Integrity of Game Files option.

Steam’s Verify Integrity of Game Files option fixes missing or corrupted files for a selected game. This option can resolve numerous Steam error messages, and that includes the Application load error.

2. Delete the game’s folder from Documents

  1. Open File Explorer with the Windows + E keyboard shortcut.
  2. Then, open this folder path in File Explorer: C:\Users\NAME\Documents\My Games
  3. Make sure you input the name of your own document.
  4. Select the game’s folder in My Game.
  5. Press the Delete button show below to erase the selected folder.

3. Run Steam as an administrator

3.1 Configure the app to always start with administrator privileges

  1. 1. Right-click the Steam shortcut on the desktop, or the Steam.exe in the software’s folder.

  2. 2. Go to the Compatibility tab.

  3. 3. Under Settings, locate the following setting: Run this program as an administrator.

  4. 4. Tick the checkbox next to this setting.

  5. 5.  Click on Apply and OK to save the changes.

  6. 6. Launch Steam and check whether the issue persists.

  7. A very good solution for any Steam-related issues is to run the app with Administrator privileges. You can configure the app to run with admin rights only once or permanently.

    For a permanent modification, you need to modify the app’s Settings. Afterwards, do ensure to check whether the Steam application load error is gone or not.

If the issue is still there, jump to solution 4 for further troubleshooting.

3.2 From the desktop

  1. Right-click the Steam shortcut on the desktop.
  2. Choose to Run as administrator.

3.3 From File Explorer

  1. Open File Explorer by hitting simultaneously the following keys: Windows + E.
  2. In the search bar, type This PC, then hit the Enter key.
  3. Navigate to Local Disk (C:).
  4. Go to Program files (x86).
  5. Navigate to the Steam folder.
  6. Then, right-click the Steam.exe, and select Properties.
  7. Select the Compatibility tab shown below, then checkmark the Run this program as administrator box.
  8. Click on Apply, then on OK.

4. Delete Steam’s appcache subfolder

  1. Right-click on your Steam shortcut, then choose to Open file location.
  2. Look for the appcache folder, right-click on it, then choose to Delete it.

Deleting the app cache folder is another confirmed resolution for the Application load error. Users can do that by opening their Steam folders in File Explorer.

5. Copy the Steam.exe into the game’s folder

  1. Right-click on your Steam shortcut, then choose to Open file location.
  2. Right-click the Steam.exe, then select Copy.
  3. Open the folder for the game that you need to fix the error for.
  4. Then right-click within the folder open in File Explorer and select Paste. That will copy the Steam.exe to the game’s folder.

The Steam application load error often arises for games users have installed on a different drive partition to Steam.

What other Steam loading problems should I be aware of?

Those are some of the best resolutions that have fixed the Steam Application load error. There might be more fixes, and if you’re aware of them, do not hesitate to share them in the comment section listed below.