The Portal 2 and Double Kick Heroes video games are now free to claim for all Xbox console owners with an active Xbox Live Gold subscription.
Portal 2 originally came out on Microsoft’s Xbox 360 console back in 2011 and is playable on both the Xbox One and Xbox Series X console families via backwards compatibility.
Here’s the official game description for Portal 2:
The Games on Demand version supports English, French, Italian, German, Spanish, Polish, Potuguese, Russian, Japanese, Korean, Chinese.The highly anticipated sequel to 2007’s Game of the Year, Portal 2 is a hilariously mind-bending adventure that challenges you to use wits over weaponry in a funhouse of diabolical science. Using a highly experimental portal device, you’ll once again face off against a lethally inventive, power-mad A.I. named GLaDOS. Break the laws of spatial physics in ways you never thought possible, with a wider variety of portal puzzles and an expansive story that spans a single player and co-op game mode.
Double Kick Heroes launched on Xbox One and Xbox Series X console families in 2020. It’s kind of a combo of a rhythm game and a shooter and has a strong retro gaming vibe with its visuals and soundtrack.
Double Kick zombies in the face with insane Metal music! 30 tremendously awesome quality Metal songs by a legendary video game AND Metal composer. Unlock new gear and pimp your Gundillac. Rodriguez infused background story about being weird guys and gals who live for Sex, Drugs and Heavy Metal. Explosions, rebels, militias, undeads, road-rage, madness, apocalypse. Ready to hit the fury road? The only awesome rock and metal rhythm game, what more!?
Double Kick Heroes and Portal 2 join Gods Will Fall as part of September’s Games With Gold titles for Xbox Live Gold subscribers. Portal 2 and Gods Will Fall are free to claim until September 30th while Double Kick Heroes will remain free until October 15th.
If you’re wondering which VPNs on the market have China servers, you’ve definitely come to the right neighborhood.
VPNs have been around quite for some time, and their usefulness range from simply protecting your privacy, to even unblocking geo-restricted content.
Although the general trend is to find VPN services that let you access websites that are blocked in China, some users go the other way.
It’s not uncommon knowledge that China has built some walls, physical and metaphorical, to keep intruders out.
For instance, you may know that China keeps some websites restricted to outsiders. Thus, you can only access them if you’re physically in China. Or, as you’re about to find out if you have a trustworthy VPN with China servers.
How do I bypass China firewall?
As we’ve briefly mentioned above, the Chinese government took drastic measures to block any outsider from accessing certain websites or services on Chinese territory.
Furthermore, regulations have been set to prevent residents from accessing specific non-Chinese websites, such as social platforms, news websites, and streaming services.
However, a China VPN server would only allow you to access Chinese websites from outside of this country.
However, some digital sources are only available in China, specifically the mainland, and accessing them requires a VPN that has specific China servers, not Hong Kong servers.
QQ music, Wang Yi music, and some TV shows may have connection and buffering issues for the first time you connect.
So, for example, if you want to watch Jackie Chan’s Adventure on Aiqiyi (which is free), you’ll need to use a VPN to fool the computer into thinking you are in mainland China.
Otherwise, you’d have to pay for it on Google Play or the App Store. Remember to follow the same steps whenever connecting to a VPN server in China.
Establishing a connection to such a server might mean you’ll temporarily be unable to access various non-Chinese websites/services.
How do I use China VPN?
We are often asked by our readers How do I get China IP VPN? and the answer is simple. You need to get a VPN that offers China servers to unblock the content from China’s mainland.
Hong Kong servers may not work all the time, since the Chinese government is strict about the content found online that its residents can access. Make sure any app, browser is closed before connecting to China VPN.
Here are some easy steps to follow to connect to the China server:
Log in with your credentials and go to settings by clicking on the three dots in the top right corner.
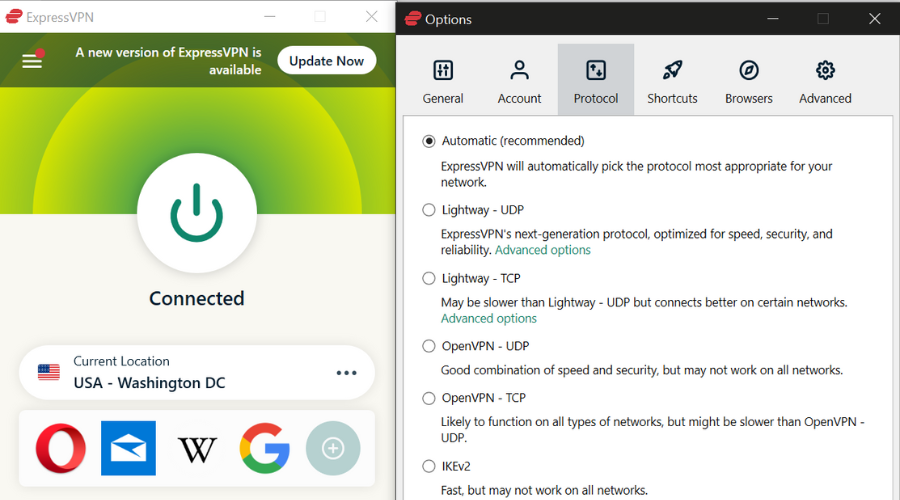
Go to Protocol and select WireGuard, it’s best to use when connecting to China.
You may also use the Dedicated IP section to sync your IP on your device with the VPN.
Go to the main screen of PIA and search for China in the servers list.
Connect to China and start unblocking China mainland content.
Keep in mind that not every time you will get the best out of the content available online, but that’s the censorship that the Chinese government implies.
Private Internet Access (PIA) is a well-known VPN service on the internet. This VPN’s advanced security features and low pricing plans have made it a popular choice in the industry.
You can create your own configuration files that connect to OpenVPN using an IP address rather than a hostname and port TCP 443. By logging into your Client Control panel on the My Account page, you can generate your own configuration files for any region.
You will be able to create your own configuration file for any platform, region, and port, as well as connect using an IP address rather than the server name. The configuration employs a unique username and password that differs from your PIA account login credentials.
A brief list of PIA’s main features:
No logs.
Unlimited bandwidth.
High-speed global server network.
Dedicated apps.
Powerful encryption.
Block ads.
24/7 live support.
Open-source.
In summary, PIA works in China, but it has the same limitations as other VPN services. For example, the VPN works in some parts of China but becomes completely inoperable in others due to the infamous Great Firewall.
Furthermore, the service may be available on some ISPs while being completely unavailable on others. In our experience, using the VPN on a 4G network rather than a Wi-Fi network yields better results. Private Internet Access suggests that you try the Wireguard protocol.
Private Internet Access
Unblocked content from China mainland with a dedicated IP and personal configurations in the VPN.
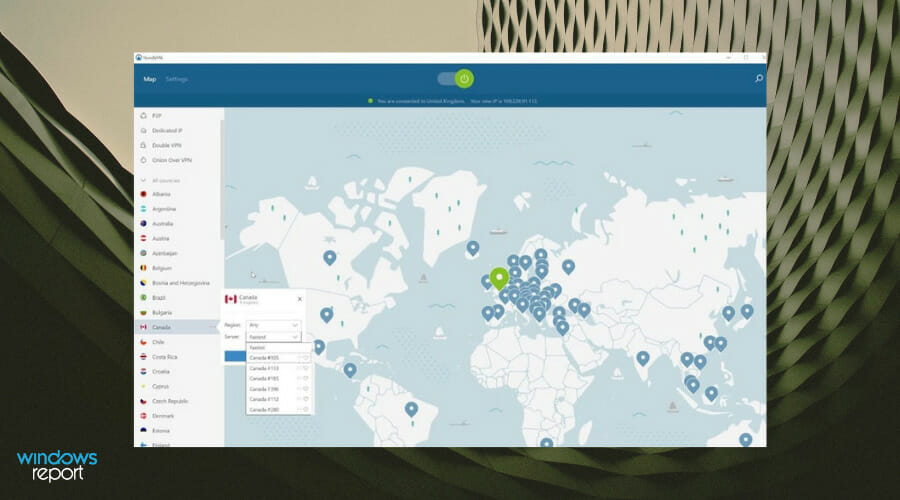
NordVPN has over 5200 servers in 60 countries, allowing you to select the server closest to your actual location for the best speed.
It offers top-tier encryption to protect users from online threats and privacy concerns. NordVPN is the VPN of choice for millions of people and is recommended by major tech experts all over the world.
To connect to a different region, simply launch the app and connect to a China VPN server. However, because the strength of China’s internet restrictions varies by region and year, you may want to use one of the advanced security features.
A brief list of NordVPN’s main features:
Next-generation encryption
Strict no logs policy
DoubleVPN
Automatic Kill Switch
DNS leak protection
Streaming support
SmartPlay
Dedicated IP address
Browser proxy extensions
You can also enable the Threat Protection feature when using the app, which blocks websites known to host malware and annoying ads.
NordVPN also includes a Kill Switch feature, which blocks internet access if your VPN connection is accidentally lost. This means you’re not putting yourself at risk by browsing the web unprotected.
NordVPN also allows for up to six simultaneous connections, allowing you to easily secure multiple devices while on China servers.
NordVPN
Everyone deserves unrestricted internet access, and NordVPN can help you in unblocking China content.
PureVPN is a VPN service owned by GZ Systems, a company that’s based in Hong Kong and founded in 2007. This VPN offers approximately 4,000 servers and roughly 300,000 IP addresses in 140 countries.
As you probably expect, China is among the 140 countries you can connect to using PureVPN. This VPN also provides its users with 24/7 live chat support.
PureVPN has servers in Guangdong and Shanghai, making it a good choice for VPN in China. You can connect to those China servers to obtain a China IP address and enter China.
A brief list of PureVPN’s main features:
Can unblock Netflix, Amazon Prime Video, Hulu
Offers DNS leak protection
Has 4,000 servers in 140 countries
Supports P2P activities (torrenting)
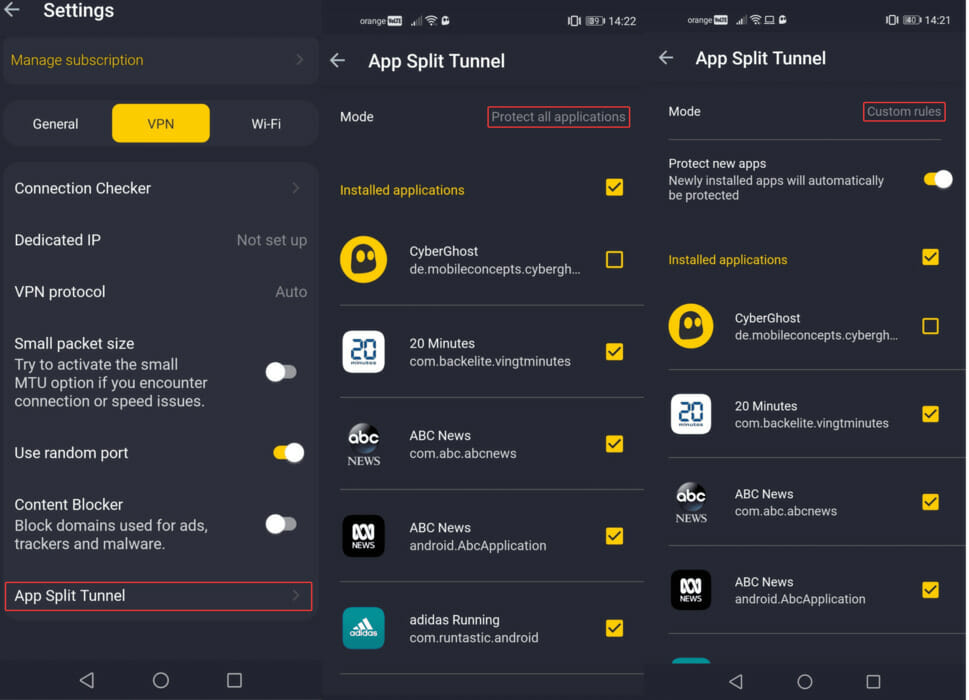
Has split tunneling features to separate ISP/VPN traffic
Apps for Windows, Linux, iOS, Android, Mac, and more than 16 routers
Has browser extensions
If you don’t see any China VPN servers in the PureVPN software’s server list, it’s possible that PureVPN hides their China servers on their software due to heavy VPN blocking from China.
But don’t worry, PureVPN’s website lists its China VPN server addresses on the Server Locations page. Then, copy one of those addresses, switch to PureVPN’s Dedicated IP mode, and use that address to connect to PureVPN’s China VPN server as usual.
PureVPN
To access China websites and unblock its content, PureVPN is another reliable solution.
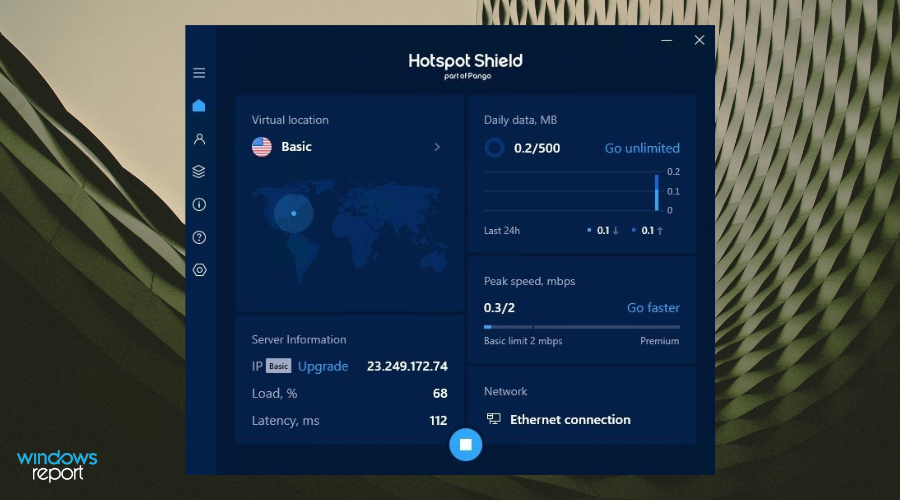
HotSpot Shield might’ve gained a lot of popularity thanks to its free service. It’s one of the few VPN services that offer Chinese servers so that you could access content in China.
It was launched and owned by AnchorFree up until 2019, and is now owned by Pango (formerly AnchorFree). The company has offices in Russia and Ukraine, and the first VPN client app for HotSpot Shield was launched in 2008.
Hotspot Shield Elite VPN has VPN servers in 22 countries, including one in China, making it an excellent choice for VPN access in China. When you connect to its China server, you will be assigned a China IP address and will be able to access China-only content on the Internet.
Check out HotSpot Shield’s most important features:
Has proprietary VPN protocol, which makes VPN traffic detection more difficult
Lets you connect on up to 5 devices
Unlimited data usage (free plan restricted to 500 MBs daily)
More than 115 locations, in more than 80 countries and over 35 cities
Lets you access geoblocked streaming apps (Netflix, Disney+, Hulu)
24/7 live chat support
Malware/phishing protection
The most well-known feature of Hotspot Shield is its free VPN service. However, its free VPN service has some restrictions and displays advertisements. Actually, it also provides a paid VPN service, Hotspot Shield Elite VPN, which has no restrictions and provides more VPN server options.
Hotspot Shield
Protect your network traffic, data, and shared files while on the China server.
Ivacy VPN is yet another service that provides you with Chinese servers. You can easily connect to the service and unblock China-exclusive content from your devices.
Reportedly, Ivacy was the first provider to implement split tunneling, which allows you to separate ISP traffic from VPN traffic.
Thus, you can manage your traffic in terms of what you send back to your ISP and what gets routed through the secure, encrypted tunnel. Split tunneling is essential for accessing LAN resources, such as shared devices or folders.
Ivacy VPN has over 250 servers in over 100 countries, including mainland China. As a result, Ivacy VPN is a good choice for a VPN into China.
Ivacy VPN supports popular VPN protocols such as OpenVPN, PPTP, and L2TP/IPSec. Ivacy VPN supports 5 simultaneous connections and P2P file sharing.
Furthermore, Ivacy VPN has a no-logs policy, making it an excellent choice if online privacy is one of your primary concerns. Ivacy VPN provides a 7-day money-back guarantee to users who want to test out their VPN services.
IvacyVPN
Use it when you want to download large files from China servers and unblock torrents.
Many VPN providers, including Private Internet Access, have what appear to be China servers. In reality, these servers are located in Hong Kong, which has been long considered a safe place for data centers, thanks to its location.
Recent tensions made various VPN providers reconsider this strategy and either pull the plug on HK servers completely or at least reduce their numbers.
But let’s get one thing straight: Hong Kong servers aren’t the same as VPN China servers, although the lines seem to be blurring lately.
Not so long ago, Hong Kong benefited from the free and open Internet, which was a strong advantage to China’s heavily-regulated, censored Internet.
Thus, it goes without saying that we’ll only cover VPNs with true China servers.
All things considered, regardless of your reasons to want a China server on your VPN, there are definitely a few services that could cater to your needs.
Visit the Traveling Section to learn more about how VPNs can help you while traveling. Check out our VPN How-To Hub to discover more awesome, easy-to-follow VPN guides.
Whether it’s PureVPN, HotSpot Shield, or Ivacy VPN, these services will let you get a China IP address. Obviously, there’s also a bunch of Chinese government-approved VPN services, but we wouldn’t recommend using those.
The reason for using a VPN is to keep your privacy safe, and a government-regulated VPN might fail to keep your traffic/identity anonymous.
Some users reported that there were too many login retries when trying to access Steam, and it seems like the message sounds like this:
There have been too many login failures from your network in a short time period. Please wait and try again later.
Fortunately, in today’s article, we’ll show you how to fix the Steam too many login attempts from your network error, so make sure you check all the listed solutions.
How do I fix too many login failures on Steam?
1. Restart your modem
Go to your modem and press the Power button to turn it off.
Wait for at least 30 seconds.
Press the Power button again to turn the modem on.
Once the modem boots, try reaccessing Steam.
2. Clear browsing cache
2.1 Google Chrome
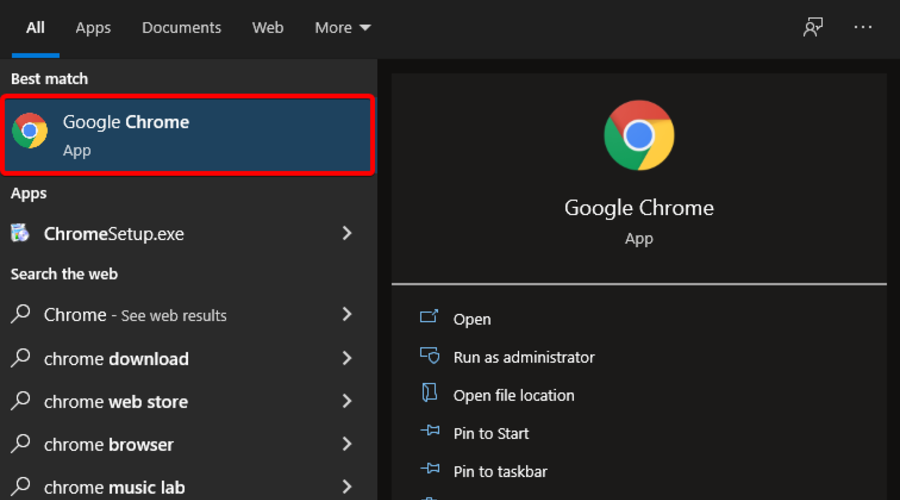
Press on the Windows key, type Chrome, then open the browser.
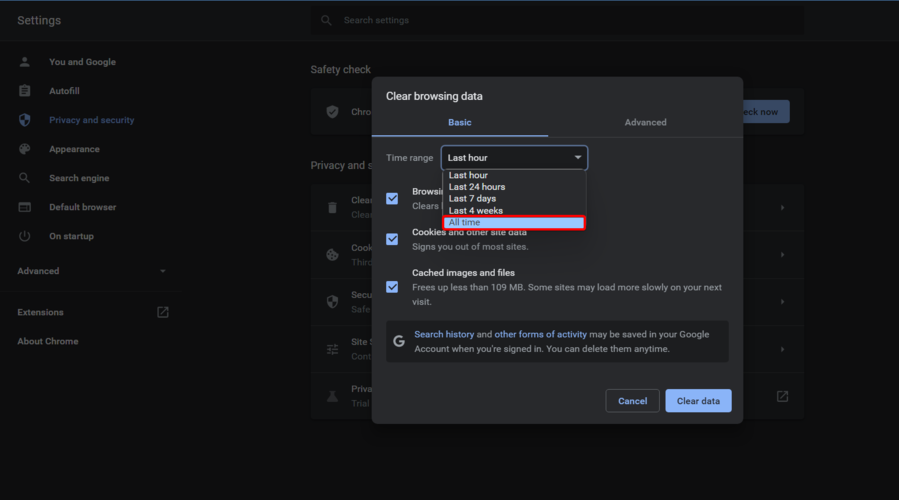
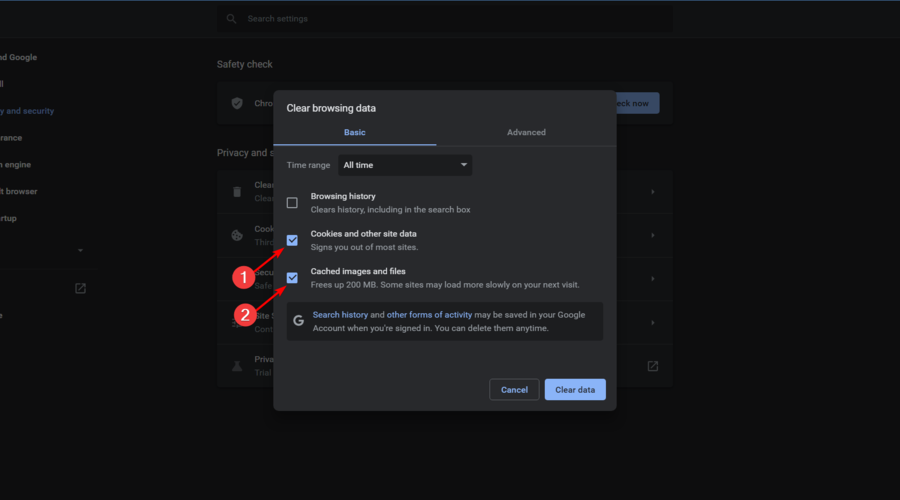
Use the following keyboard shortcut to open the Clear browsing data page: Ctrl + Shift + Delete.
In the Tame range section, choose All Time.
Now, checkmark the Cookies and other site data and Cached images and files boxes.
Click on Clear data.
2.2 Mozilla Firefox
Hit the Windows key, type Firefox, then open it.
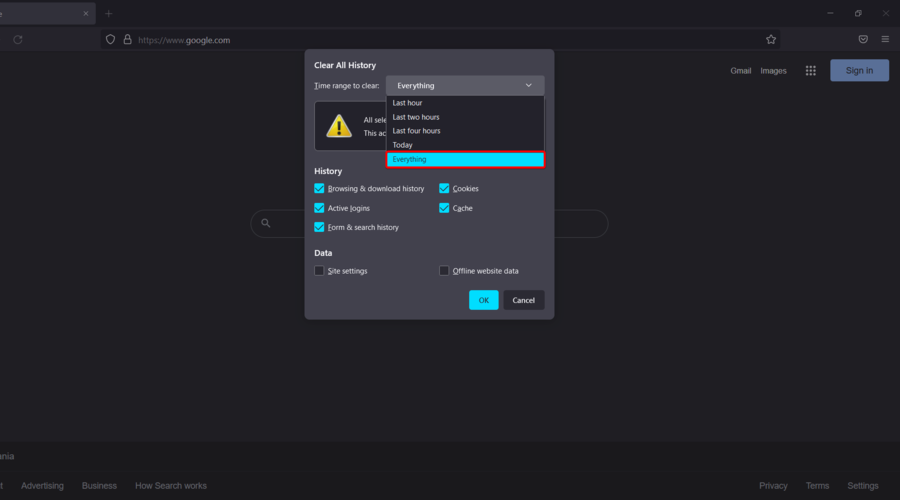
Press simultaneously on the following keys to open the Clear browsing data window: Ctrl + Shift + Delete.
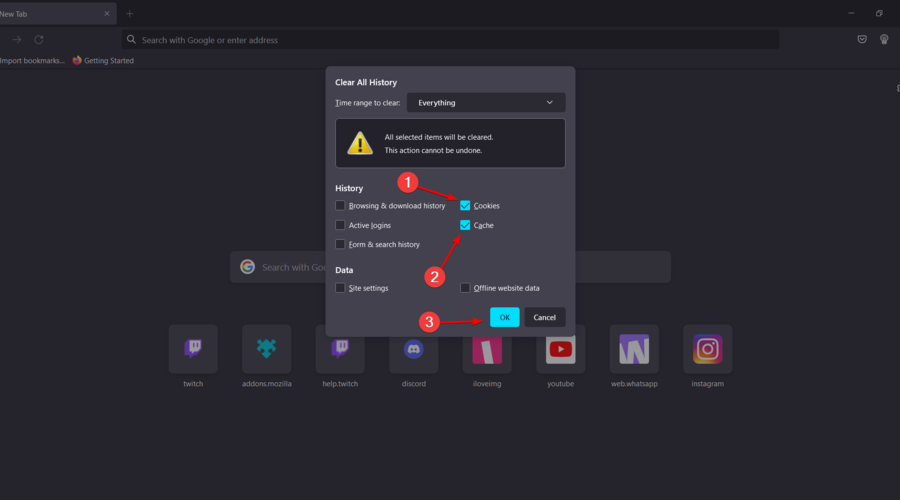
In the Time range to clear section, drop-down the menu, then select Everything.
Now, checkmark the Cookies and Cache boxes, then click on the OK button to save the changes.
After clearing the cache, check if the Too many login attempts message appears in Steam.
We showed you how to clean the cache in Chrome, but the methods should be more or less the same for other web browsers.
3. Wait for an hour
Turn off Steam completely. Make sure that the client is closed.
Wait for at least an hour without trying to log in.
After an hour has passed, try to log in to Steam again.
Several users reported that this method worked for them, so you might want to try it out.
Keep in mind that some users stated that they had to wait up to 24h if there were too many login failures on Steam.
How long does the Steam login failure take?
If you’re wondering how long the Steam login failure takes, the official waiting period is not precise.
Our experiments place it in the 20 to 30-minute window. However, there are many cases when users reported experiencing lockouts for much longer. So, you have to consider hours and even days.
Quick Tip:
You might bypass this waiting time by trying to log in to your Steam account using the Opera GX browser.
Opera GX is a fast, slim, and reliable browser, and with Twitch and Discord integration, it’s a perfect choice for gamers. Our experiments proved that it is fast while navigating and using streaming apps.
Opera GX
Login to verify your Steam account, and see if there is a problem there.
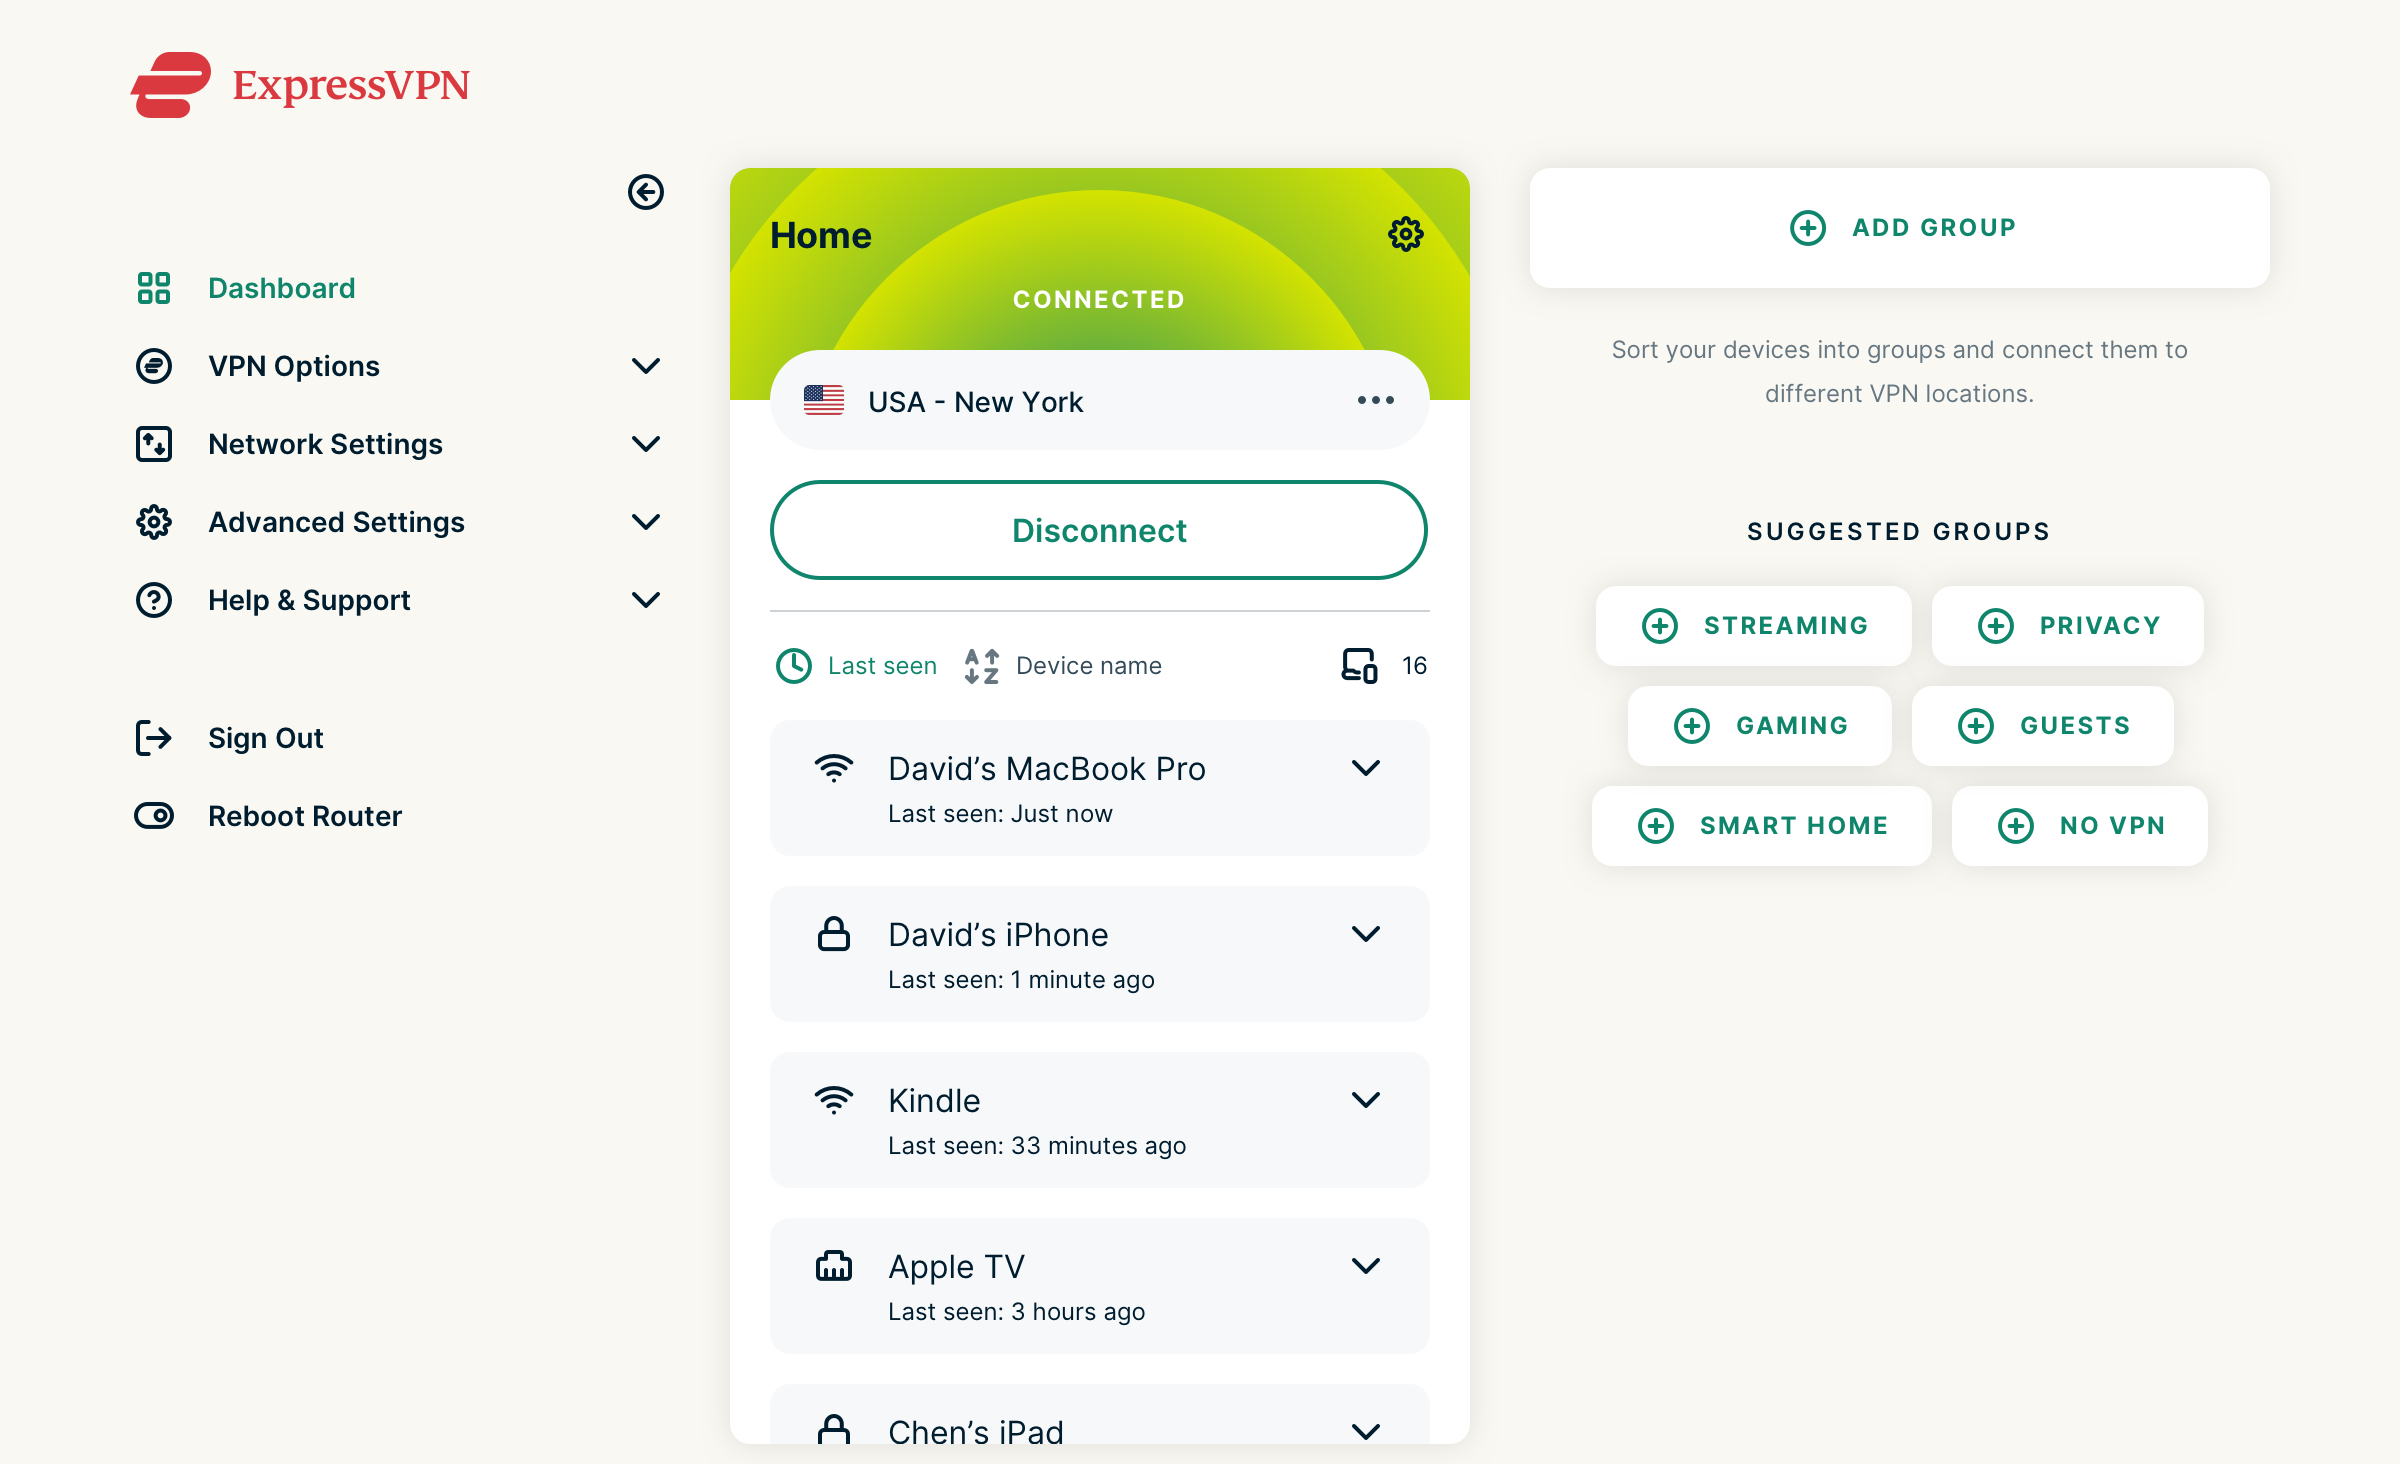
If you’re getting Too many login failures messages on Steam, using a VPN can help you circumvent that, and ExpressVPN is one of the best solutions you can get.
Our VPN recommendation will protect your privacy and encrypt your traffic so that it won’t be visible to third parties or your ISP. Besides, you may change locations to generate a new IP to login into Steam.
This is undoubtedly one of the best VPNs on the market that supports up to 5 devices, and it uses Wireguard, PPTP, Lightway, and OpenVPN protocols.
If you’re concerned about being watched by cybercriminals, remember that ExpressVPN uses military-grade AES-256 bit encryption, which will always guarantee a personal online activity.
Plus, you can usually connect to local or long-distance servers quickly on Steam. Our experiments showed that the average time of accessing a local server is 3 seconds, and when it comes to distant servers, you have to consider like 5 seconds.
ExpressVPN comes with a trustworthy 30-day money-back guarantee, so manufacturers have faith in their products.
5. Use a different network
If possible, switch to a different network and try to log in again.
Alternatively, enable mobile data on your phone, and use your phone to log in to Steam.
Many users reported that this solution worked for them, so try it out.
Also, if you cannot run Steam games on Windows 10, don’t hesitate to look for the best solutions to eliminate this problem.
What other Steam login failures should I be aware of?
Even if you sometimes run into today’s presented problem, you should know that some other annoying login issue can occur while trying to run Steam. In this manner, you have to consider:
No user logon Steam – Some users reported facing this error when accessing their favorite games on Steam; you know how frustrating it can be.
Steam does not remember my password – Many players claimed that Steam couldn’t remember their passwords no matter what they try, but with our dedicated fixing guide nothing is impossible.
Too many login failures error can prevent you from logging in to Steam, but if you can’t wait for a couple of hours, be sure to try one of the solutions from above.
What happens when the Steam account is locked?
When your Steam account gets locked, you will not be able to access your account and thus will not be able to access any related data.
To resolve this issue and recover your account, you have two options:
As you can see, it’s effortless to recover your account on Steam if you have the correct information.
This is a simple workaround, but it might help you fix the network error that indicated too many login failures.
Frequently asked questions
How long do you have to wait after too many login attempts? You usually have to wait for at least an hour, but you can circumvent this by switching to Opera GX or any other web browser.
It’s important to understand how to unblock websites on your WiFi router if you want to bypass certain restrictions. To make it easier for you, we outlined the exact steps to do this below.
How to unblock websites on a Wi-Fi router?
1. Check parental controls in router settings
Launch your browser of choice
Go to the default gateway on your network (your router’s address)
Switch to Advanced mode
Check the Parental Controls section for any blacklist/whitelist rules
In the Security section, make sure the website is not on the blocked list
After changing the settings (if necessary), restart the router
Check if you can access the website now
2. Flush your DNS
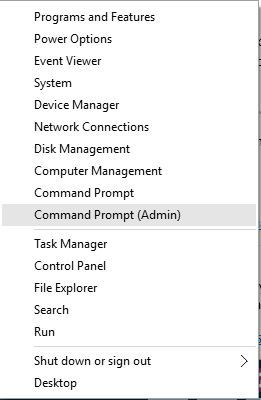
Launch the CMD with administrator rights.
Type ipconfig /flushdns.
Press the Enter key on your keyboard.
Close the command prompt.
3. Change your DNS
Find a DNS you’re comfortable with (we recommend Google, OpenDNS, and Cloudflare).
Launch a CMD instance.
Type ncpa.cpl and hit Enter.
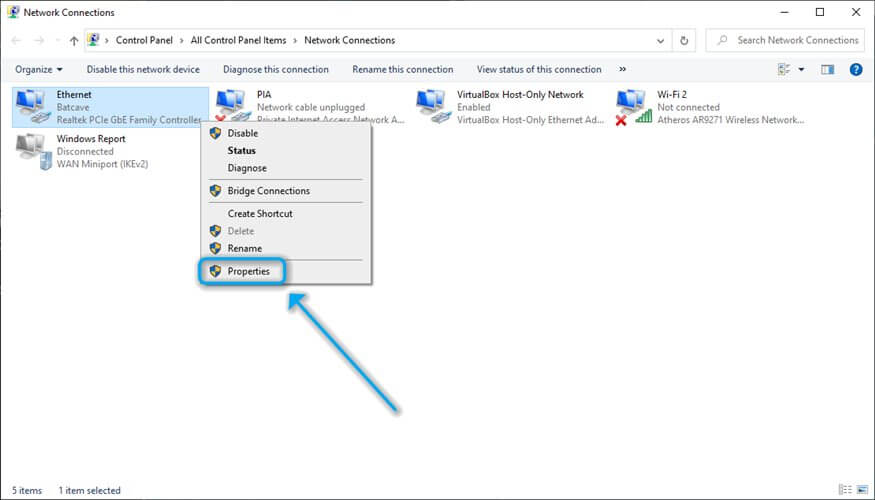
Right-click your active Internet connection and select Properties.
Select TCP/IPv4 and click Properties.
Click the Use the following DNS server addresses radio button.
Type the two DNS servers in the corresponding fields.
Click OK.
Restart your PC.
4. Unblock websites with hosts file
Open File Explorer.
Go to the drive where your Windows is installed (usually it’s C:).
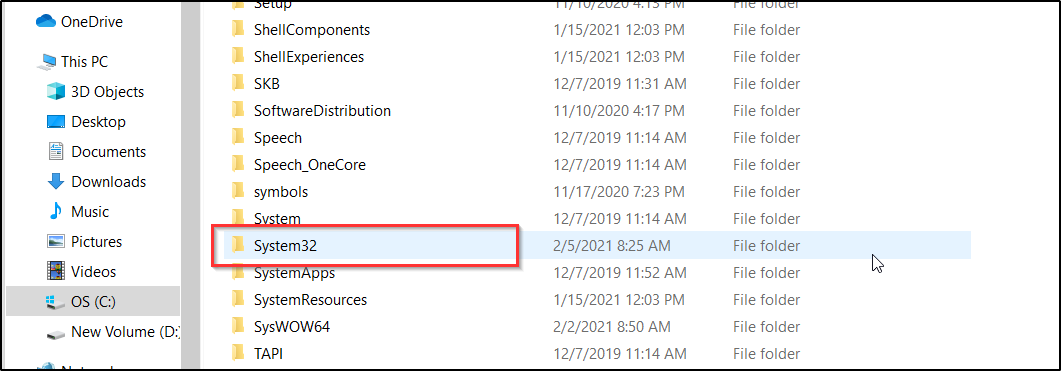
Access the WindowsSystem32driversetc folder.
Right-click the hosts file and open it with Notepad (or your favorite text editor).
Make sure there are no lines of text after the comment lines (the one starting with #).
Save the hosts file.
Restart your PC.
5. Use a VPN
Get a VPN subscription and download the VPN software to your device. We use ExpressVPN because it is very secure and proven to unlock even the strictest platforms.
Install it on your PC.
Launch it and log into your account using the activation code.
Connect to a server in another region (where the website is less likely to be blocked).
Try to access the website again.
VPNs can circumvent geo-restrictions by spoofing your online identity (IP address, DNS, location). ExpressVPN is a great option when it comes to this. All you have to do is install and connect to a server.
ExpressVPN
Unlock any website without being tracked with ExpressVPN’s premium servers.
Many online services got smart and detected VPN traffic without too much effort. That’s why sometimes using a VPN won’t work as intended, especially if it lacks obfuscated servers (ones that bypass VPN blocking).
A Smart DNS service lets you access geo-restricted content by eplacimg your DNS address with one of its servers’ addresses, stripping geo-location data from it.
We hope that our quick guide helped you unblock websites on your WiFi router and access any content you desire.
Remember, if a website is blocked by your ISP or geo-restricted, there’s nothing you can change in your PC’s configuration to make it accessible again other than using third-party specialized tools such as a VPN or a Smart DNS.
Pirated versions of software often come accompanied by security threats. Most of the time, they require secondary applications to run or register.
One of those is Keygen.exe, a simple application that can bring a bag full of malware or spyware right at your front door.
Our intention today is to explain what Keygen.exe is, how it can affect your PC, and how to deal with it. If you’re concerned about the negative effects, look below for a detailed explanation.
Is Keygen safe?
Named also Key Generator, is a hack tool but not malware per se. It mostly comes with pirated software and its main use is to create license keys so users can illegally register the desired application.
Even though this tool isn’t malware by itself, it’s still illegal for obvious reasons, and it can be carrying Trojan, viruses, or data-stealing keyloggers that will damage your PC.
In comparison to cracks, Keygen doesn’t modify any parts of the program. Modifying certain security algorithms enables any random license key to work.
After you’re prompted to insert the license key during the installation, this hack application will generate a code so you can manually insert it.
How can I remove the Keygen.exe virus?
1. Perform a quick virus scan
1. Press theWindows key + I to open theSettings app.
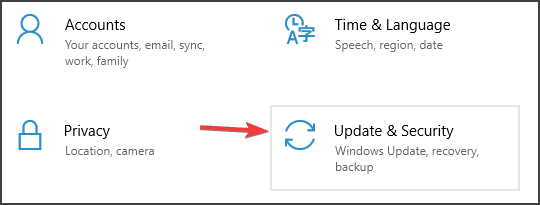
2. Go to theUpdate & Securitysection.
3. SelectWindows Securityfrom the left panel.
4. In the right panel, click onOpen Windows Security.
5. Select Virus & threatprotection, and click onQuick scan.
You can remove the Keygen.exe file from your PC by conducting a virus scan. Your built-in Windows antivirus can scan your PC and not only find the tool, but also provide you with options as to what to do to remove it.
If you’re keen to get rid of Keygen and other related files, you can do it by deleting them manually. Just completely delete the downloaded files and that should be it.
On the other hand, there’s a chance that your system is already infected. Therefore, any infections detected may mean you will have some data loss.
2. Use a third-party antimalware software for a deep scan
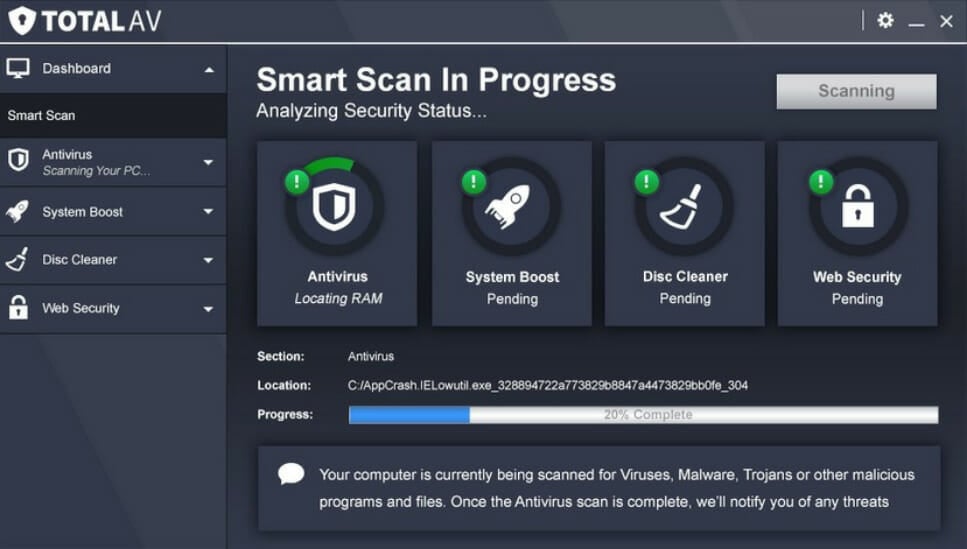
Making sure that your PC is protected from the effects of the malware presence is of utmost importance. In this case, we suggest a full scan with a modern antivirus solution.
This antivirus is a next-generation security solution that is designed to be fast, stay out of the way, and keep your digital life safe.
It offers complete protection against viruses, worms, spam, spyware, and other malware. This AI-powered antivirus is continually improving itself.
TotalAV
To optimally protect your PC from malware and tools like Keygen, rely on one of the best antiviruses.
Even though Keygen.exe isn’t malware, in more than 50% of detections, it carries some kind of malicious software. That’s a risk certain users are willing to take, but we don’t advise you to do that.
We also recommend you keep your computer safe by installing the recommended antivirus or any of these great malware remover tools.
Don’t forget to tell us whether one of the solutions gets you through the problem. If you have any other suggestions or questions, feel free to leave them in the comments section below.
Visual Studio Code is a very good source-code editor that was developed by Microsoft.
It has been used efficiently by clients because of its debugging features, embedded GIT control, and many other useful features.
There are situations in which you will surely need to open up at least 2 new tabs while working in VS Code, and even though this option should be available easily, users have problems finding it.
You have the possibility of opening temporary tabs that close automatically, or the option to open files in new tabs that will only be closed once your work on them will be done.
In today’s article, we will discuss some of the best methods to apply in this situation. If you want to find out more details, please read on.
How do I open multiple files in VSCode?
1. Open VS Code on your device.
2. Click File from the upper menu.
3. ChoosePreferencesfrom the drop-down list.
4. Click onSettings.
5. A window will appear with theUserandWorkspace Settingsbeing available. Choose the latter.
6. Search for workbench.editor.showTabs and modify the value to True.
7. Now you start opening as many files as you want in Visual Studio Code. To start off, click once on a file using your mouse. It will be opened in a temporary tab.
8. If you want to open a new tab that stays on your screen until you choose to close it manually, then you will need to double-click on the file.
In order to be able to open multiple files at once in Visual Studio Code, you need to tweak the app’s settings and set the workbench.editor.showTabs option to True.
When the option mentioned above is set to False, then the VS Code will only open one file at a time. If it’s set to True, then you can open as many files as you want in new tabs.
Even though this might seem like an obvious solution for those of you who have experience in VS Code, this method is very simple to apply.
If you are in a situation in which you’re searching for a specific part of a file, so you’re going through a bigger set of documents, it is recommended that you open the files in temporary tabs.
In today’s guide, we explored some of the best options available for you in order to open multiple files inside VS Code.
The first step is to make sure that the settings of VS Code allow you to open multiple files, and then you can simply use your mouse to open up either temporary or normal new tabs.
If this guide has managed to help you understand and control the situation better, or you have any suggestions, please don’t hesitate to contact us and share the information.
You can do so by using the comment section found below this article.
Defrag Windows 11 using the tools it already has and keep your system running smoothly. Fragmentation builds up over time, and if you’re on a hard drive, it can slow things down fast. Luckily, Windows includes a built-in utility that lets you defragment manually, schedule it, or run quick commands. This guide shows you exactly how to use it.
2. Type defrag in the search box and select Defragment Optimize Drives from the list of results.
3. When the window opens, you’ll see a list of all your drives and their current defragmentation status.
4. Select the drive that you want to analyze, and click the Analyze button.
5. Wait for the process to finish.
6. If your drive is fragmented, select it and click on Optimize.
7. Wait for the process to finish. It can take a while depending on the fragmentation level.
Your Windows 11 PC has a built-in app that you can use to defragment your hard drive. It is called Defragment Optimize Drives and can be used to easily optimize your PC.
2. Use the Command Line
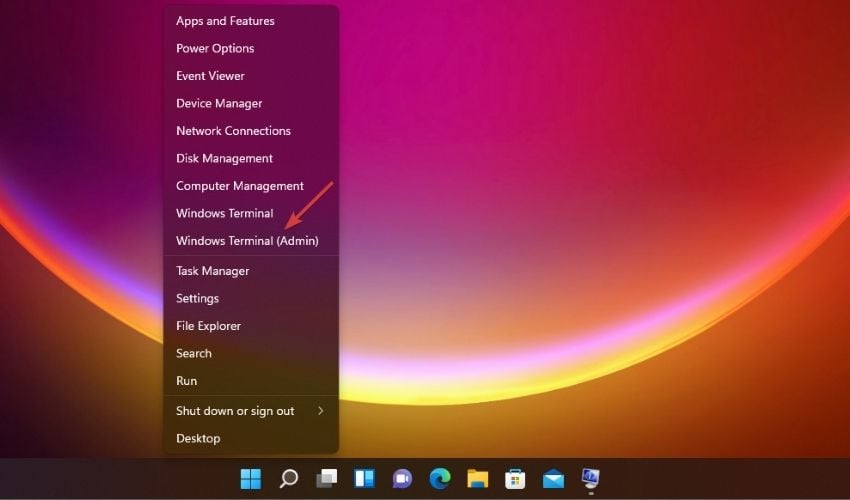
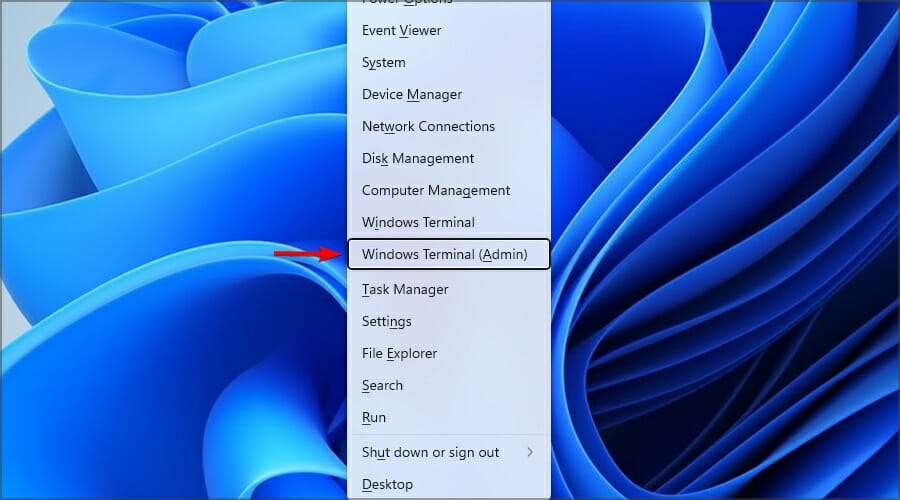
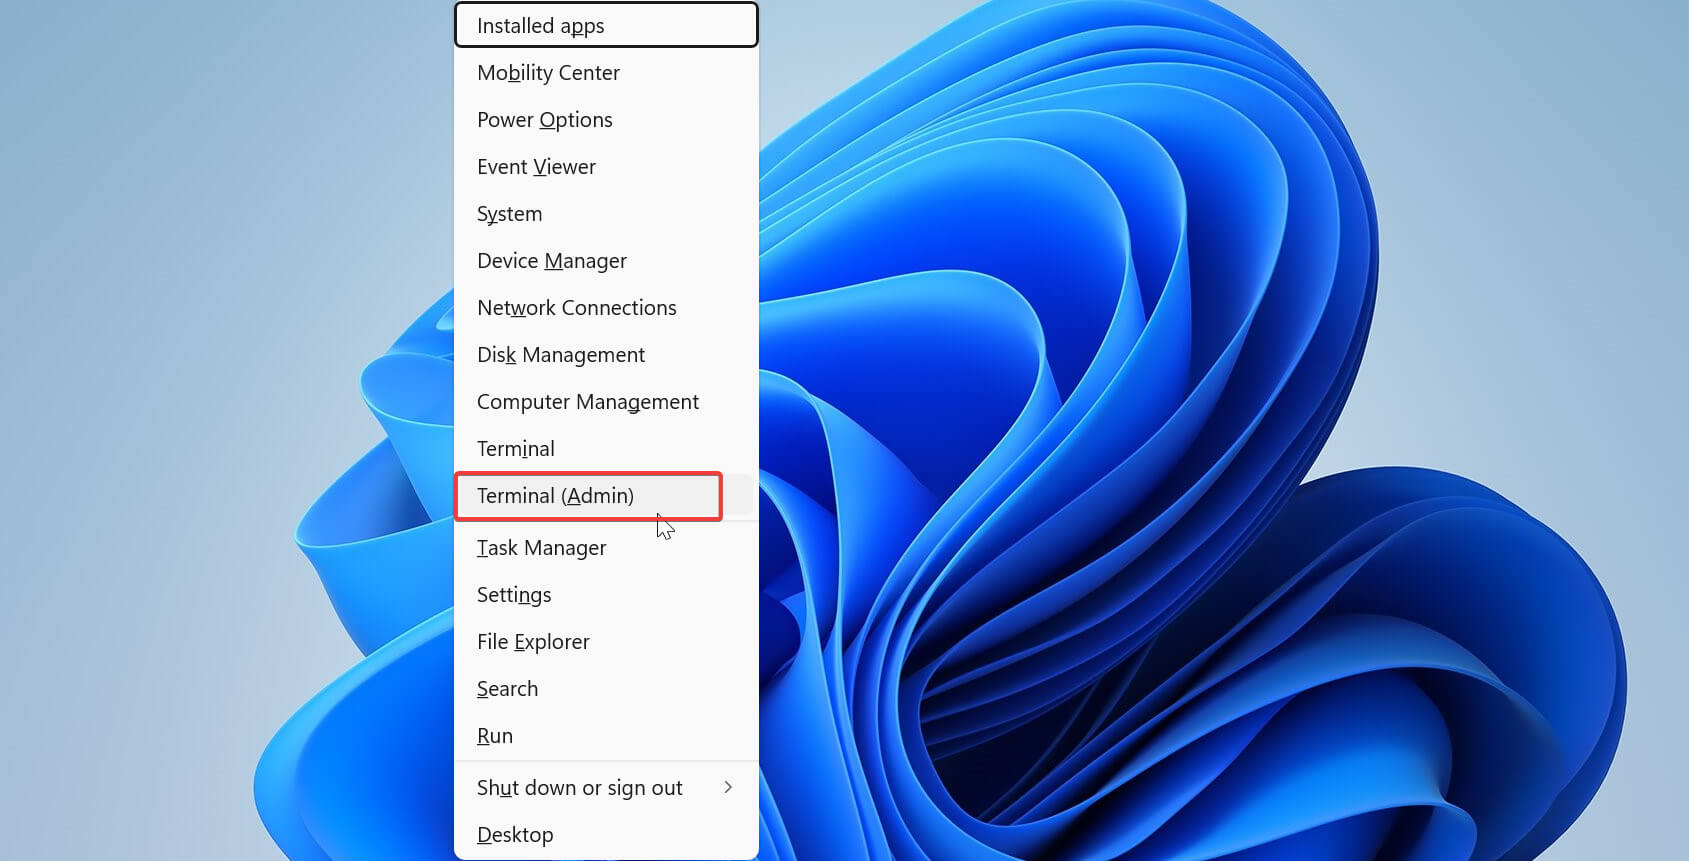
Press Windows Key + X and choose Windows Terminal (Admin).
To analyze your drive enter the following command, but be sure to replace X with the letter of your drive: defrag X: /a
After the scan, you’ll see information about your hard drive, including the fragmentation level and a note saying whether you need to defragment your drive.
Now enter the following command to defrag that drive: defrag X:
Wait for the process to finish.
There are also a couple of hidden commands that might come in handy. To defrag all drives that are available on your PC, use the following command:
defrag /C
To defrag all drives except the specified ones, run this command:
defrag /E X:
How can I schedule defragmentation in Windows 11?
Click on Windows Search (the magnifying glass from Taskbar), type defrag and select the Defragment and Optimize Drives app from the results.
In Scheduled optimization click on Change settings.
Set frequency to Weekly or Monthly.
Now click the Choose button.
Check the drives that you want to schedule defragmentation for and click on OK.
Click OK once again to save the changes.
3. Use Command Prompt
Typecmd in the Start bar.
Under Command Prompt, select Run as administrator.
Type the following command: defrag C:(replace C with the letter of the drive you want to defrag in Windows 11).
Disk defragmentation reorganizes scattered data on your hard drive, placing it closer together. This reduces the time the hard drive takes to find and access files, improving your computer’s performance by making data retrieval faster and more efficient.
Should I defragment my SSD?
Solid-state drives don’t require defragmentation because of two reasons:
SSD has no moving parts: the main benefit of defragmentation is performance improvement. With SSDs being 10 to 20 times faster than the best hard drives and having no mechanical disks that need to be read, there’s no need for defragmentation.
SSDhas a limited amount of write cycles: SSDs last less than hard drives because they have a limited number of write cycles. This means that moving the files and writing them during the defragmentation process will reduce the lifespan of your SSD by using its write cycles.
How can I optimize my SSD?
Click on Windows Search from Taskbar, type defrag, then select the Defragment and Optimize Drives app.
Click on the SSD drive to select it and clic on Optimize.
It’s not recommended to defragment your SSD but you can optimize it instead, with no risks. The procedure is called trimming, and you can access it just like on an HDD, by using the steps above.
The trim action identifies areas on the disk with unused data. In other words, the files that were deleted and are waiting to be overwritten.
That is because when you delete a file, it doesn’t get erased from the disk. They are only marked as free, available space. But after the trimming process, the data will be deleted.
It’s an active way of optimizing your SSD but it’s not as near as effective as the defragmentation procedure for an HDD.
Wrapping up
Knowing how to defragment your HDD is essential if you want good performance. It can prolong the lifetime of your hard drive and help your PC run smoother.
Today’s malware is one of the most significant threats to a home-based or a business computer.
If your system gets infected, it will be less likely that you’ll be able to install and run anything on your system.
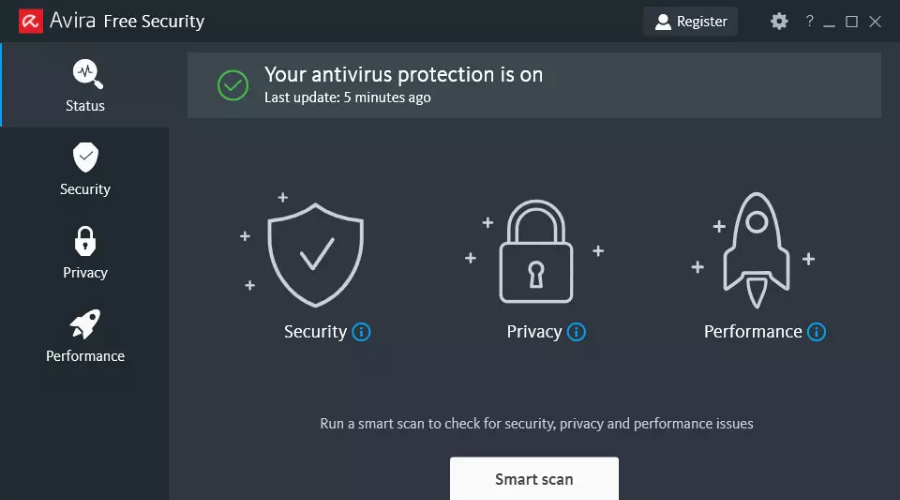
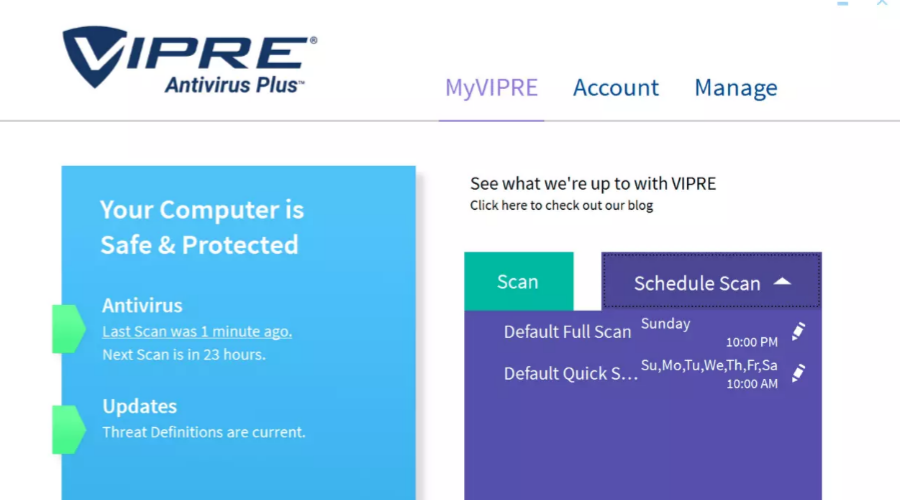
To overcome such a situation, it’s recommended that you have an offline/portable virus scanner to scan your Windows 10 system.
A PC that became severely infected may also not have access to the Internet anymore, and that’s why a portable virus scanner plays such a crucial role in your computer.
We’ve listed some of the best offline antivirus programs that are portable tools, and this means that you’ll be able to easily run them from a USB stick for instance.
Check out all their features and see which one seems to fit your security needs best.
What is an offline scan?
An offline scan is an automated feature that can be capable of running when the system doesn’t work because of the damage caused by a virus. It allows the anti-malware engine to detect and remove any threat that’s affecting your PC.
Specialized third-party tools can thoroughly scan and detect malicious threats and eliminate them from your device, optimizing its working state and reassuring its health.
TotalAV is an antivirus software that offers excellent virus detection rates thanks to its useful security features.
You can schedule scans for malware, tracking cookies, and junk files to run automatically on your previously-set time. You can also custom scan with which you can pick a single file, folder, or disk to scan.
This program has a Real-Time Protection feature that helps you scan your PC and instantly block threats in real-time before they get a chance to damage your system.
Other impressive features are included too:
Block malicious websites
Spyware removal and adware cleaner
Data Breach search
Advanced WebShield
Multi-device compatibility
Secure password vault
TotalAV
Trustworthy software that protects your PC successfully with its in-depth features.
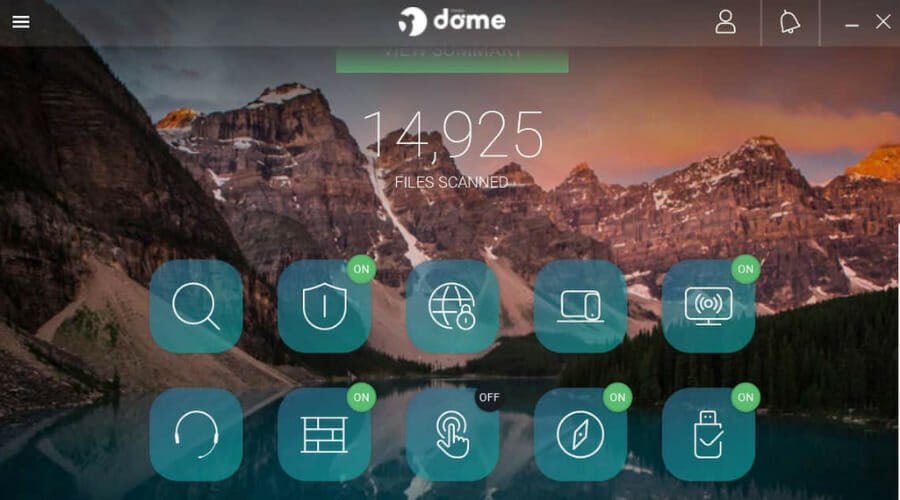
Panda Dome is an antivirus suite with a multitude of different features and high-quality cybersecurity protection.
It has a Data Shield feature that helps you create a barrier against malware and ransomware. You can choose a specific folder or program, which locks out all unauthorized access to it. By doing so, it cannot be overwritten or else corrupted.
It can also scan your hard drive and automatically find and remove fragments of old files and programs, Windows temporary files, and known log files.
This software successfully blocks access to inappropriate or harmful content and wipes your device data remotely in case of theft or loss.
Here are other key features you should know of:
Secure and manage all your passwords with a single click
Virtual vault to protect your money and confidential data
Pin-protect access to specific apps
30-day money-back guarantee
24/7 technical support
Panda Dome
Protect your PC from any threats with Panda Dome’s useful and unique characteristics.
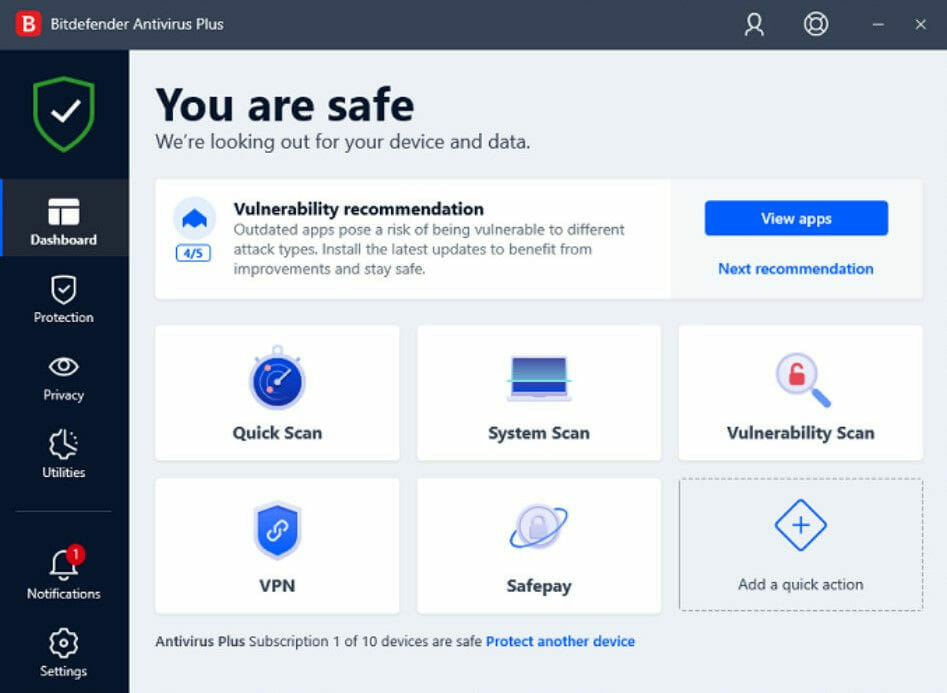
Bitdefender Antivirus Plus is able to provide superior protection from viruses and other threats compared to the built-in antivirus tool from Windows 10, Windows Defender.
The tool will keep your computer secured against malware, and it will offer enhanced protection against phishing attacks, and suspicious activity.
After you install it, you will probably never have to look at it again. The program will take care of everything in the background, and there won’t be any complex configuration to worry about.
This antivirus was designed for anyone who wants to keep the computer secure without having to worry about complicated details.
Lastly, the interface is accessible and clean with a new streamlined dashboard and specific protection against ransomware.
Check out the best features that are included in this software:
Has an excellent track record of picking up both known and unknown threats
To check the files, you just have to drop them onto the program window
A full scan is also a straightforward process
Network-threat prevention is included in the desktop program
Autopilot technology for automatic malware defense
Bitdefender Antivirus Plus
This high-end antivirus is an award-winning solution whether online or offline.
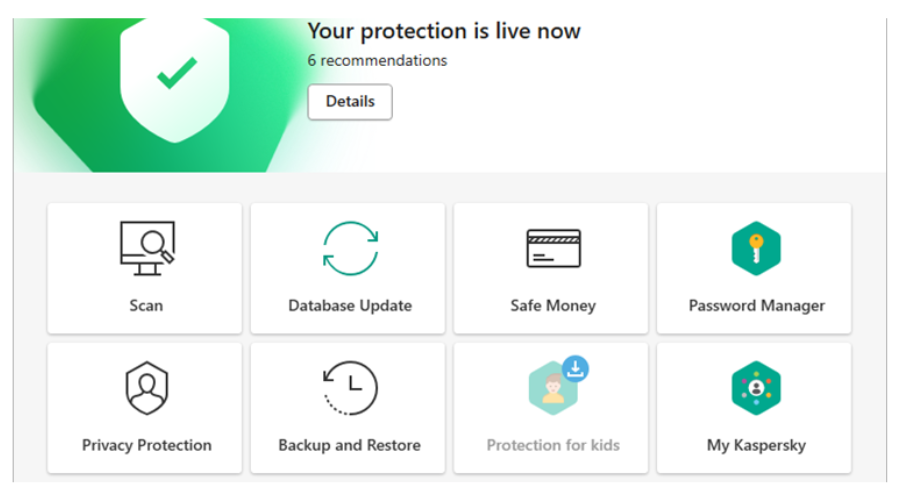
Kaspersky is a great antivirus solution with various scanning options. You can do a Quick scan that checks the usual places on your device where malware can be found.
You can also opt for a Background Scan to scan your system memory, and disk boot sectors, and even check the applications for any vulnerability.
Furthermore, this software lets you grant access to a blocked device in offline mode only if Kaspersky Security Center is deployed in the organization and a policy has been applied to the computer.
It boosts your system and contributes to the fast operation of your device. It can easily remove threats such as spyware, adware, keyloggers, and hard-to-detect fileless trojans.
Take a look at other worth mentioning features of Kasperksy:
Database regularly updated
Protect your passwords
System optimization
Web protection
System cleanup tools
Kaspersky
An antivirus solution to keep your device safe from any type of threat and increase its health.
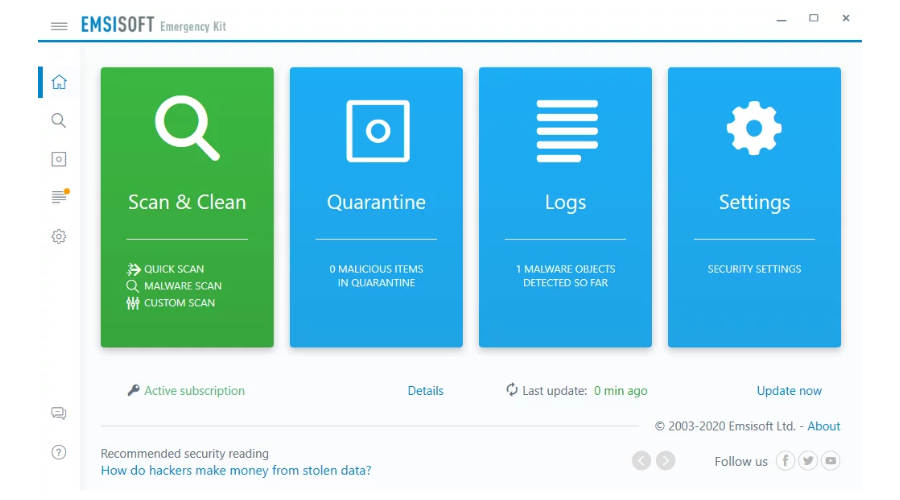
The Emsisoft Emergency Kit is a collection of portable software that comes with a sturdy Malware scanner, HijackFree, and BlitzBlank in the Pro version.
The free version of the software includes a powerful malware scanner that will eliminate deep threats. You can run the program via a USB stick.
A useful option is the Whitelist which will exclude files, folders, and processes from the scan if you choose this.
Check out more of its essential features below:
The software is ideal for rescuing your computer from infections
It supports both the command line and the GUI
You can download it for free, and you can also purchase a pre-compiled USB stick for commercial use
You have to download and run the executables to extract the Emergency Kit
If you run the program on a system without an Internet connection, you have to select No to bypass the online definition update
The website updates the Emergency Kit executable once a day at least
eScanAV AntiVirus Toolkit is less well-known than all of the software that we have mentioned above. On the other hand, its detection results place this program in line or even ahead of some major household names.
eScanAV AntiVirus Toolkit also provides an Antivirus Toolkit that is a dedicated portable virus scanner, and this means that it will work even when you’re not connected to the Internet.
Check out the best features that are included in the software:
Straightforward to use and all your options will be placed in just one window
Select which areas and drives you want to scan
Choose if you want to scan or also clean the drives
You can also check the archives
First, it’s recommended that you update the virus definitions that may be out of date, and for this, you’ll need an Internet-enabled computer.
You have to unpack mwav.exe and run mexe.com to launch the program and click Update to get the latest definitions.
You can take the mwav folder to an offline computer after performing the update.
These are our picks for the best offline virus scanner for Windows 10 and all of them will do a great job.
Each of them comes with its unique set of useful features, but all of these tools are guaranteed to keep your system safe and clean even while you are offline.
Check them all out and after analyzing their features get the best option for your computer’s safety. Drop us a line in the comments section if you have any suggestions or additions.
RAR files are one of the most popular and most used types of files on PCs, and their usage didn’t change in Windows 10.
So in this article, we’re going to talk about RAR files, how to create them, how to extract them, and more.
What is this article for?
The tools that we’ve written about in this article and that we use on a daily basis, are very useful in case you are also searching for:
How to download .rar files on Windows 10 – Downloading .rar files is no different from any other common file, such as a .txt document. Once downloaded, follow the article to learn how to see and extract the contents.
How to open .rar file in Windows 10 – Any of the tools recommended can open .rar file and let you see the content of that file.
How to unrar files on Windows 10 – The process of extracting the files from a .rar file is also commonly called unrar. Therefore, you need to download and install the recommended tools.
What is a RAR File?
RAR file is a compressed file that is used for storing larger files in archives, in order to take less space on the hard disk or transfer easier.
You’ll easily recognize RAR files because it uses a file name extension .rar.
Unfortunately, Microsoft didn’t add native support to Windows 10, despite users’ demands, so to manage .rar files, we’ll have to use a third-party program.
Since we’re talking about .rar files only, probably the most popular program for creating and extracting .rar archives is WinRAR.
How do I make and extract a RAR file in Windows 10?
1. Make a RAR file using WinRAR
Just right-click on the file or folder you want to compress, and click on Add to archive…
Now just name your archive and press OK (you don’t have to touch other options, because everything is already set)
And there you go, you created a .rar archive, and it will appear next to file/folder you compressed
To create a .rar archive/file, you need to download WinRAR first. After that, it can’t be simpler, just follow the steps above.
If you’re compressing a larger file, you’ll notice that it takes less size on the disk than the original, so you can move it quicker.
Once you create an archive, all files will stay in it, no matter if the original is still present on your PC, so even if you delete the original file, you’ll still be able to access it in the WinRAR archive.
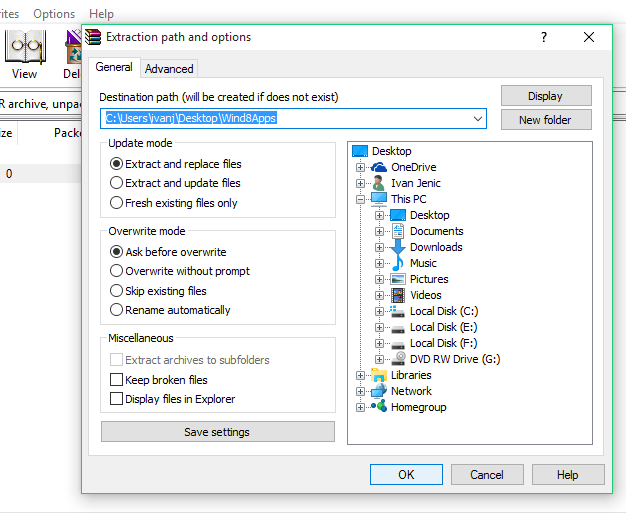
1. Open theWinRAR archiveyou want to extract files from.
2. Select the files you want to extract.
3. Click on Extract to.
4. Choose the destination path where you want your files to be extracted.
5. Finally, click on OK to begin the extraction process.
Extracting .rar files from an archive to a Windows 10 computer is as simple as creating a .rar archive, maybe even simpler.
You just need to open the archive and drag files that you want to extract from the archive to a folder on your computer.
That’s all, you now know how to create and extract .rar files with WinRAR. You don’t have to strictly use WinRAR for managing .rar files, but we consider it’s the best solution.
However, if you don’t like WinRAR, you can use WinZip, which also can handle .rar files exceptionally well.
3. Create a RAR file using WinZip
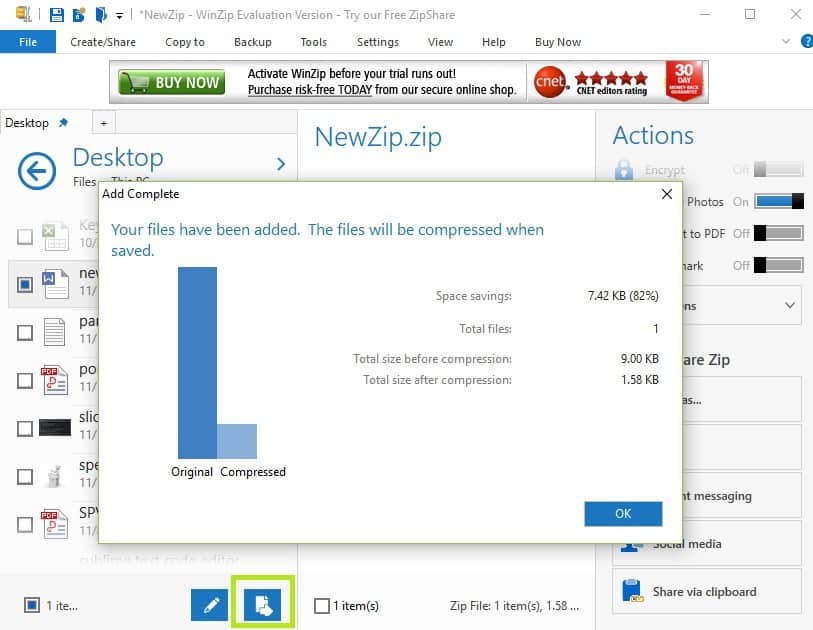
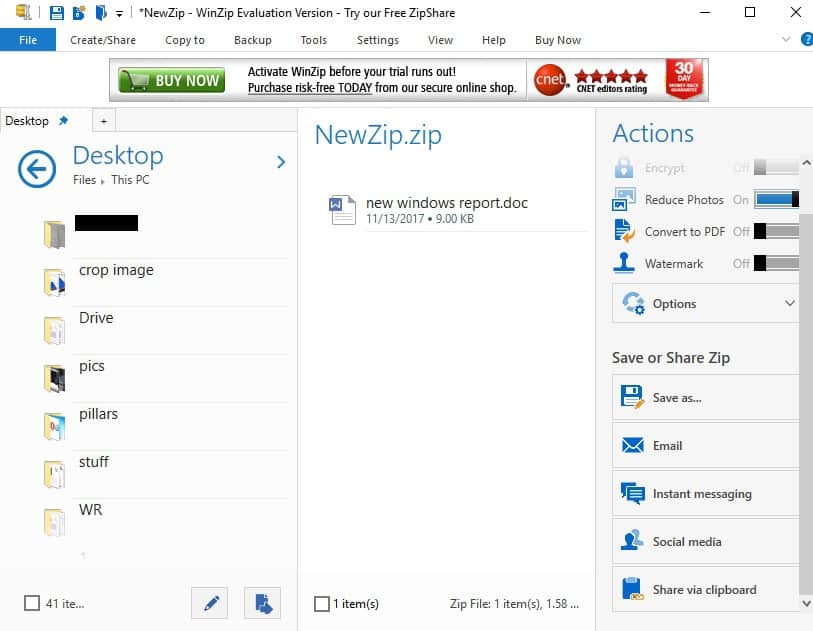
Go to File, select new Zipfile, and add the file that you want to convert into a .rar file
Select the Zip option located in the left-hand panel, and hit OK.
In the right-hand panel, select which actions you want to enable before saving the file: Encrypt/ Reduce photo size/ Convert to PDF/ Add a watermark.
Under Share or save Zip you can choose to create the new zip file, email it or share it on social media.
If WinRAR feels a bit too old, or you are looking for way more options, such as integration with your favorite cloud storage, you should download, install, and use WinZip.
Once installed, be sure to follow the steps above to create a .rar archive/file using WinZip.
”WinZip”
”Quickly
”Free
&aff_sub2=Native” current_url=”true” button_text=”Get it now” image=”https://windowsreport.com/wp-content/uploads/2020/07/winzip-winzippro-24-generic-210×160.jpg”]
If you don’t want to download and install a dedicated tool to create and extract RAR files, you can also use online resources to generate RAR files.
One of the most popular online RAR converters is Zamzar. This tool supports over 1,000 different file conversion types, including compressed formats.
All you need to do is upload the file(s) that you want to compress, select the format to convert to, enter your email address to receive the converted files, and then hit the convert button.
There you go, if you want to create and extract RAR files, you basically have two options: you can download and install a dedicated tool or use an online platform.
If you’ve got other tips on how to create RAR files on Windows 10, let us know in the comments section below.
Windows Terminal is the default command-line tool on Windows 11, and it replaces the PowerShell and Command Prompt.
The software has many improvements and can run various shell interfaces side by side, so you won’t have to learn to use a new tool from scratch.
Thanks to this feature, there’s no need to start Command Prompt, PowerShell, or any other shell individually since you can run them all from a single application.
Windows Terminal can run multiple shell interfaces; therefore, many users wonder if it is possible to set a default command-line shell.
We’re happy to inform you that this is one of the features that the Terminal supports, and in this guide, we will show you how to easily change the default Terminal in Windows 11.
Is Windows Terminal a new application?
Windows Terminal is a modern terminal app for Windows that works with various shells such as Command Prompt, PowerShell, and Windows Subsystem for Linux.
Do keep in mind that Windows Terminal isn’t a new application. It was released in 2019 and is available for download from the Microsoft Store for Windows 10.
You can easily install Windows Terminal when using Windows 10, yet with Windows 11, the Terminal is now the default command-line application, so there’s no need to download and install it separately.
Are Command Prompt and Windows PowerShell still available in Windows 11?
Yes, Command Prompt and Windows PowerShell are available in Windows 11, and Windows Terminal can run both or any other installed shell interface.
If you want to use PowerShell or Command Prompt instead of Windows Terminal, you can search for them and open the app the same way you did on previous versions of Windows.
Windows Terminal has many unique features, and the first one that you’ll notice is the multi-tab interface allowing you to open several tabs.
This is crucial because the Terminal works with multiple shells so that you can use both Command Prompt and PowerShell from a single application.
Customization features are plentiful; you can rename tabs, give them different colors to distinguish them better, or change the color scheme of the entire application.
Lastly, Windows Terminal has a dedicated search feature to easily find any output.
How can I open Windows Terminal?
1. Use the WinX menu
Press Windows Key + X.
Now select Windows Terminal from the list.
2. Use the Run dialog
Press Windows Key + R.
Now type wt and press Enter.
3. Use the context menu
Right-click any open directory.
Now choose Open in Windows Terminal from the menu.
Keep in mind that this method will open the Terminal in that directory and not in the default one.
4. Use Search
Press Windows Key + S.
Enter Windows Terminal and select Windows Terminal from the list of results.
The Terminal is an excellent command-line tool, and changing the default Terminal in Windows 11 is simple and can be performed in seconds.
By default, the Terminal is set to run PowerShell, and from it, you should be able to run most commands, but if you need to switch your default shell, you can do it with the instructions from our guide.
Things aren’t at all complicated if you’re a Mac user, either. You can quickly open a file from Mac Terminal to make commands shorter and easier to remember.
If you want to learn more, our guide on Command Prompt vs Windows Terminal dives into the differences between the two, so don’t miss it.
Also, you might want to visit our guide and learn how to clear CMD if you want to keep your command line clutter-free.
Are you using the new command line in Windows 11 as well? Let us know in the comments section below what you think of it.
Why does my Microsoft Flight Simulator 2020 keep crashing?
There can be different reasons why Microsoft Flight Simulator keeps crashing, and some of the common causes include:
The system does not meet the minimum requirements
Outdated graphics drivers
Corrupted game files
A glitch with the overlay apps
If your PC does not support the game
Interference by the startup apps
A bug in the game
Before we proceed to the next section, you must check if your PC meets the minimum requirements:
CPU
Intel Core i5-4460 or AMD Ryzen 3 1200 or higher
RAM
8GB
OS
Windows 10 64-bit
Video Card
Radeon RX 570 or GeForce GTX 770 or higher
Pixel Shader
5.0
Vertex Shader
5.0
Free disk space
150 GB
Dedicated Video Memory
2048 MB
As a preliminary troubleshooting step, you may also restart the Xbox console or restart Microsoft Flight Simulator, and this helps fix the issue in some cases.
But, if Microsoft Flight Simulator still keeps crashing, we have some workarounds that can help you fix the issue.
How do I fix the Microsoft flight simulator if it keeps crashing?
1. Microsoft flight simulator keeps crashing windows 11/10
1.1 Increase Virtual Memory
Press the Win + R keys simultaneously to launch the Run console.
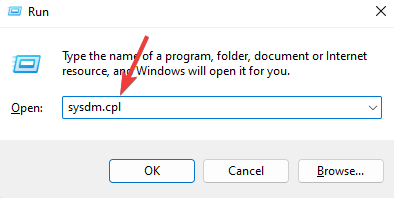
Type sysdm.cpl in the search bar and hit Enter.
Next, in the System Properties dialog, select the Advanced tab and click on Settings under Performance.
Now, in the Performance Options window, go to the Advanced tab, and under Virtual memory, press the Change button.
Here, deselect Automatically manage paging file size for all drives, and select Custome size.
Now, in the Initial size and Maximum size fields, enter the values based on the physical memory of your computer which should be memory should be 1.5 to 3 times the size of physical memory.
For example, in my case, the physical memory (RAM) of my PC is 4 GB.
So, for me, the Initial size will be 4 x 1024 x 1.5 = 6144 MB, and the Maximum size should be 4x 1024 x 3 = 12288 MB.
Once done, click Set and then click on OK to save the changes and exit.
1.2 Perform a Game Files Verification
Open Steam, and navigate to the Library.
Now, right-click on Microsoft Flight Simulator 2020and select Properties.
Next, go to the Local Files tab on the left.
On the right, click on Verify integrity of game files.
Once the process is over, you can open Microsoft Flight Simulator 2020 and test your flight.
1.3 Change your power plan
Press the Win + R keys together to open the Run console.
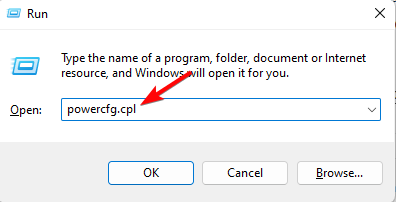
Type powercfg.cpl in the search field and hit Enter.
Next, select High Performance and click on Change plan settings.
Next, go to Turn off the display field and select Never for both On battery and Plugged in options. Click Save changes.
Now, open Microsoft Flight Simulator 2020 and see if the problem has gone away.
2. Microsoft flight simulator keeps crashing Xbox
2.1 Try to use a different profile
On your controller, press the Xbox button on the top.
Next, click on Profile & System and select Add or switch.
Now, try using or switching to a different profile. If only one profile is available then select the Add new option to add another profile that you can use for checking.
2.2 Disable Air Traffic In-Game
Go to the Microsoft Flight Simulator options.
Now, navigate through General settings, and click on the Traffic tab.
After that, click on Aviation Traffic, and turn off the Aircraft Traffic Type.
3. Microsoft flight simulator keeps crashing on startup
Download & install Microsoft Visual C++
Visit the official Microsoft page for Microsoft Visual C++ 2015 Redistributable Update 3 RC.
On the page, scroll down and click on Download.
Once downloaded, follow the on-screen instructions to finish installing the package.
Now, restart your PC and the Microsoft Flight Simulator keeps crashing issue should be resolved.
4. MSFS crashing after update
Press the Win + E keys simultaneously to launch the File Explorer, and go to the location where you have installed Microsoft Flight Simulator.
If you have installed the Windows Store version, below is the path: C:\Users[Your User Name]\AppData\Local\Packages\Microsoft.FlightSimulator_8wekyb3d8bbwe\LocalCache\Packages\
But, if you have installed the Steam versions, then below is the path: C:\Users[Your User Name]\AppData\Local\Packages\Microsoft.FlightDashboard_8wekyb3d8bbwe\LocalCache\Packages\
Now, go to the Community folder, select all content and hit Delete.
Now, close the Nvidia control panel (if using one) and launch the MSFS app to check if it’s still crashing after the update.
5. Update graphics drivers
Press the Win + R keys together to open the Run console.
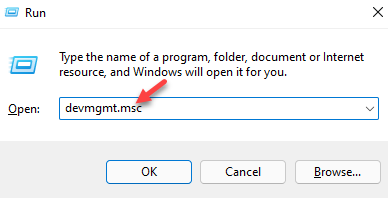
In the search bar, type devmgmt.msc and hit Enter.
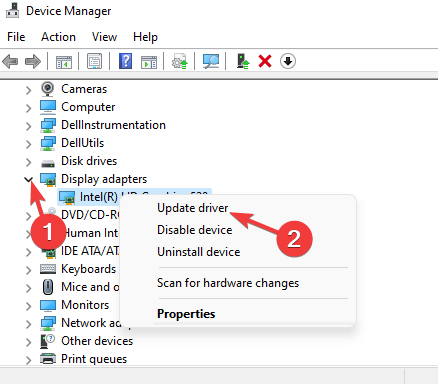
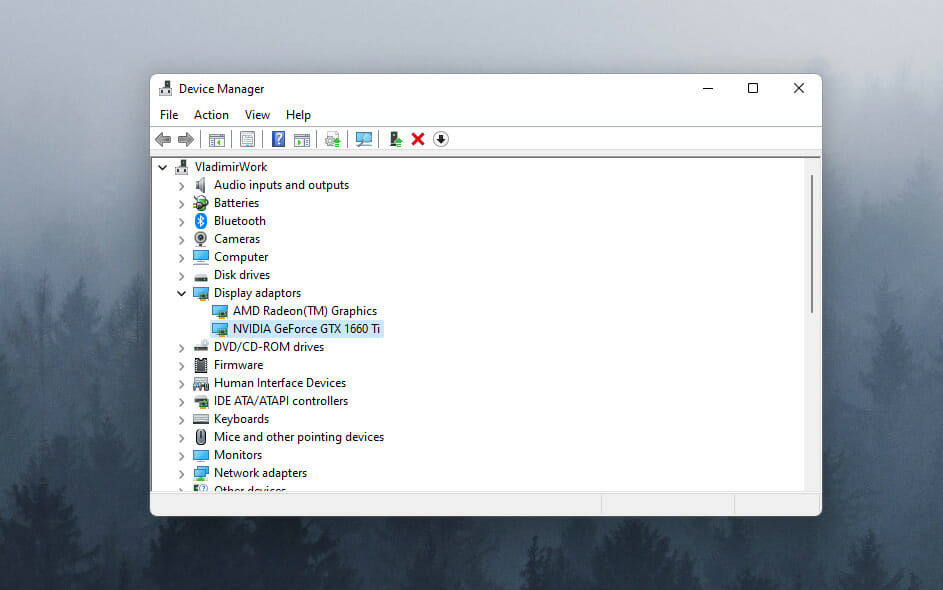
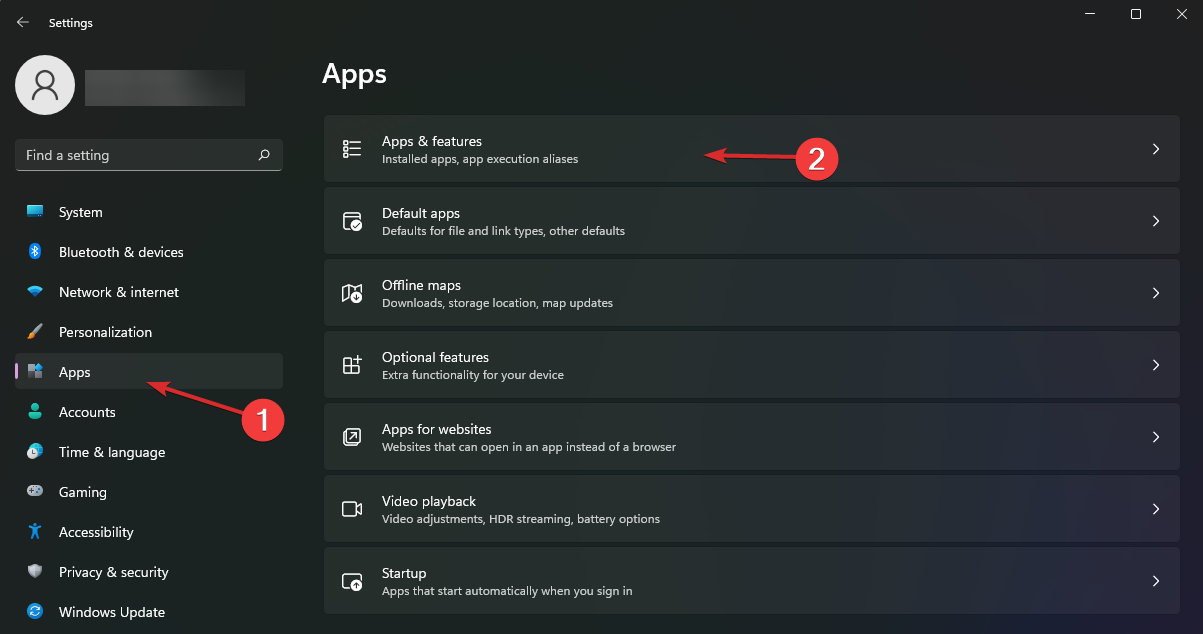
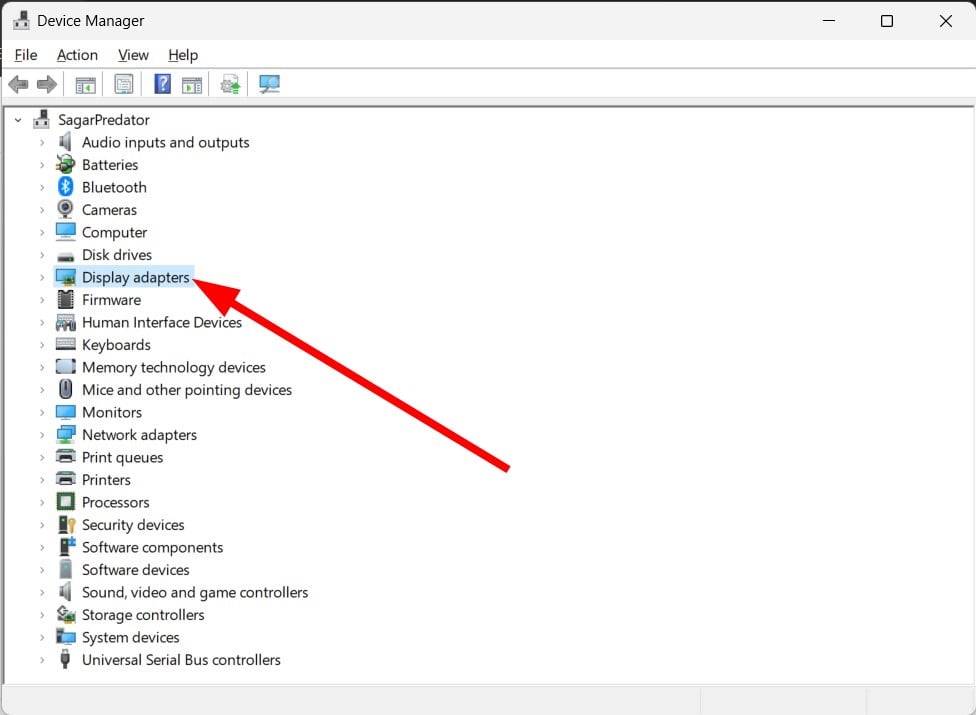
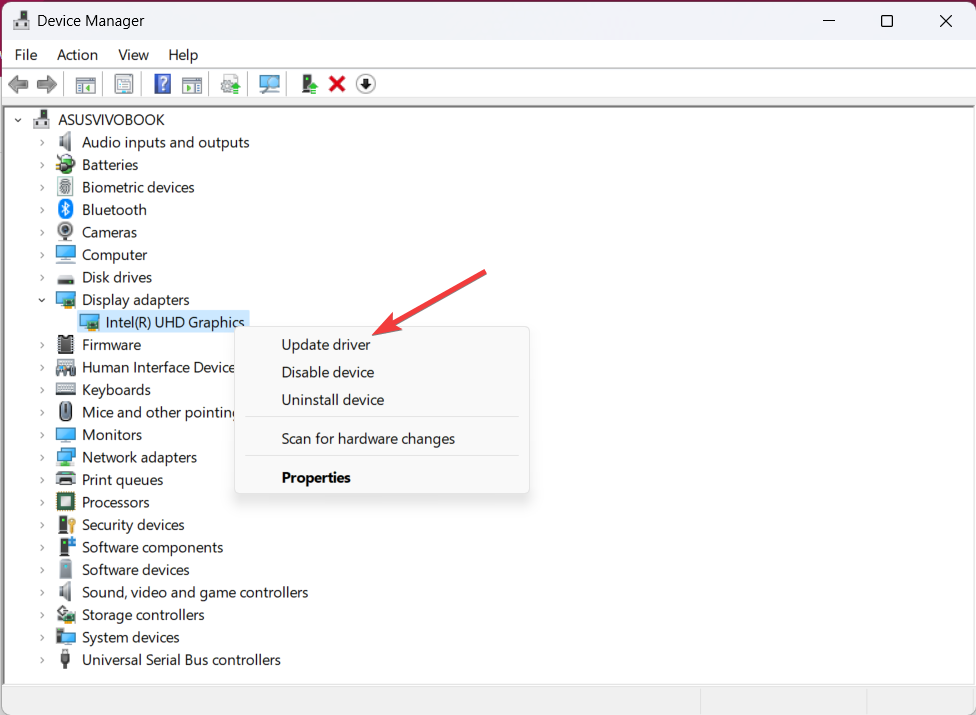
Expand the Display adapters section in the Device Manager, right-click on the graphics card and select Update driver.
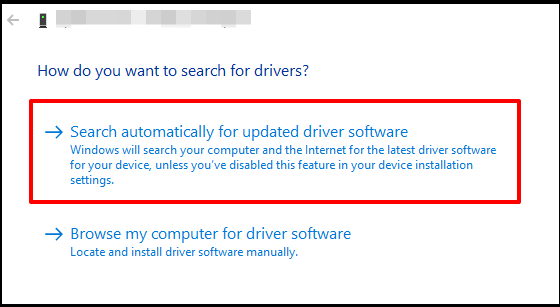
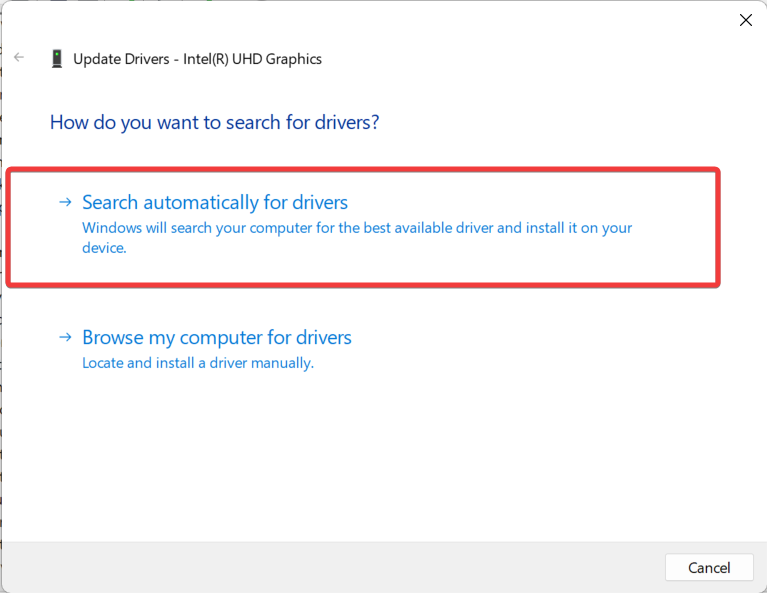
Next, in the Update Drivers window, click on Search automatically for drivers.
Now, Windows will look for the latest driver and finish the installation automatically.
If you want an easier and safer option, then you should use a specialized tool that will perform this process automatically without any effort.
Professional software, such as Fortect Driver Updater is great at this task, as it allows you to scan for and update all your drivers in just a few minutes.
Press the Win + I shortcut keys to launch Windows Settings.
Click on Windows Update on the left.
Now, on the right, click on Check for updates.
Windows will now start looking up any latest updates. If available, it will display the results.
Click on the Download & install to download the update.
Now, click on Restart now to restart your PC and install the updates.
Once the updates are installed, try playing Microsoft Flight Simulator and it should not be crashing anymore.
7. Allow the game in Firewall
Open the Run console by pressing the Win + R hotkeys.
In the search box, type firewall.cpl and hit Enter.
Next, in the Windows Defender Firewall page, click on Allow an app or feature through Windows Defender Firewall.
Now, in the Allowed applications window, click on Change settings.
Go to the list of Allowed apps and features and look for Microsoft Flight Simulator.
Select the app and check the box next to both Private and Public.
How can I make the Microsoft Flight Simulator run smoother?
Microsoft Flight Simulator is a game and app like all others running on your Windows system. So, here are some tips on how to improve its performance:
➡ Close all other apps – All the apps use resources so make sure you are only running Microsoft Flight Simulator when you want to play
➡ Terminate unused processes – Press Ctrl + Shift + Esc to run Task Manager select any unnecessary processes and click on End task to close them
➡ Use minimized settings – If you have a low-end PC, enter the game’s settings and turn all the graphical features to minimum; the game won’t look so nice but it will run a lot smoother.
If none of the above methods work, you can uninstall and reinstall Microsoft Flight Simulator to check if this helps fix the issue.
But, if you are using the Xbox console, make sure that the Xbox software is up-to-date. At the same time, the Microsoft Flight Simulator app should also be updated to the latest version.
There are various services running on the PC dealing with a bunch of activities. One of the critical ones is Superfetch that’s often found to hog the system resources. As a result, several users have been looking for ways to disable Superfetch in Windows 11.
The feature is meant to boost the performance and reduce the loading time for apps but can act quite the contrary by slowing down the Windows. This is generally noticed on PCs with low specifications and with an HDD (Hard Disk Drive) installed.
So, we decided to dedicate this guide to help you understand the feature, and list all the ways to disable Superfetch in Windows 11.
What is Superfetch?
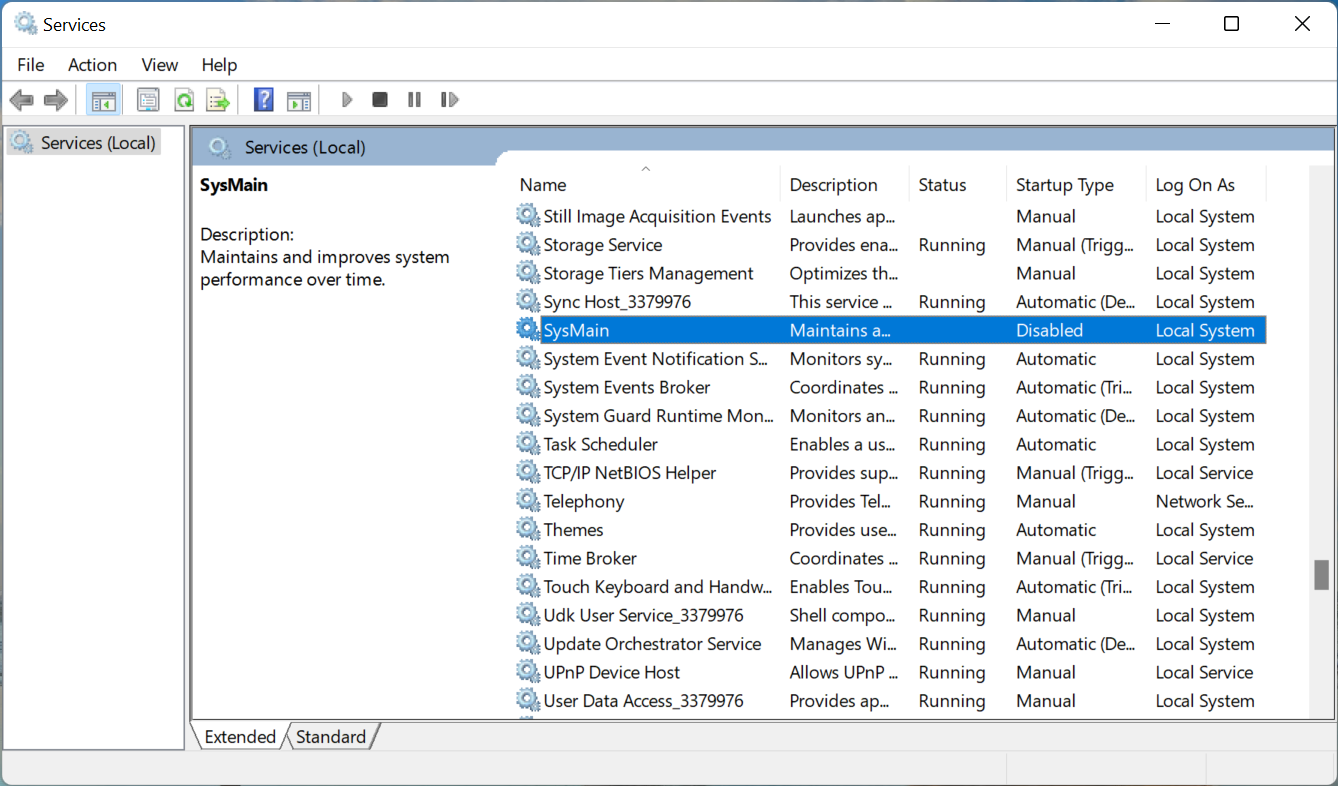
Previously known as SysMain, the Superfetch feature is designed to maintain and improve the system performance over time, at least that’s what the official description reads.
The feature takes note of the pattern in which you open apps, and pre-loads them to the memory beforehand to save time. For instance, if you open a particular program every day at a certain time, Superfetch will automatically have it loaded.
It will only take up the unused part of the memory and if your computer runs out of it, Superfetch will clear some of the loaded apps to free up RAM.
This gives you a basic idea of its functioning. However, several users have experienced considerably poor performance with Superfetch enabled, and want to disable it in Windows 11. If you too are facing the same problem, here are the three ways you can do it.
How do I turn off Superfetch in Windows 11?
1. Use the Services app
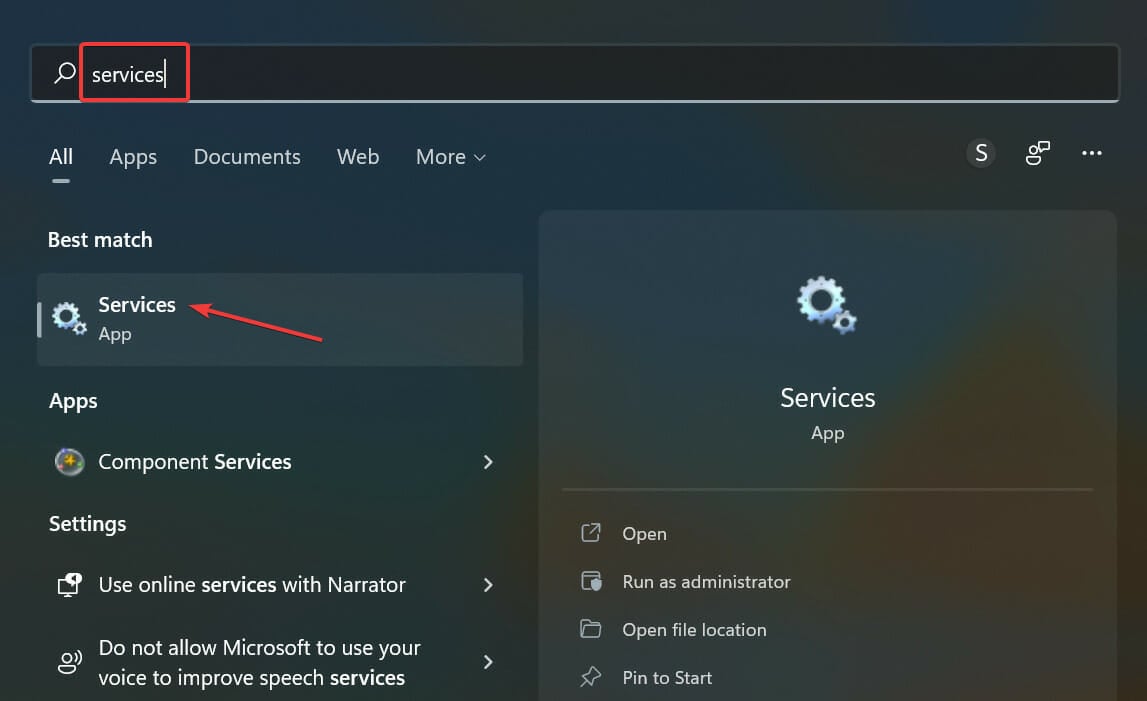
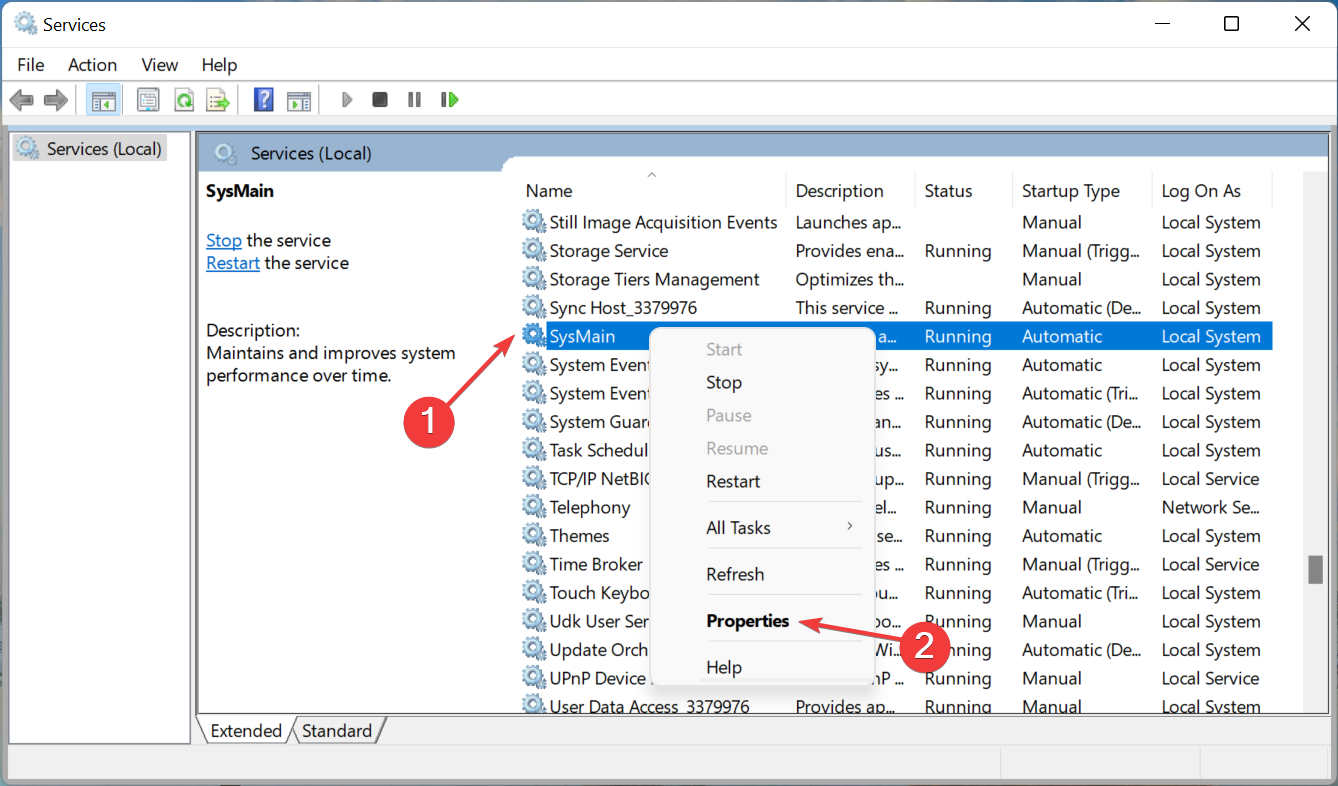
Press Windows + S to launch the Search menu, enter Services in the text field at the top, and click on the relevant search result.
Locate the SysMain entry here, right-click on it, and select Properties from the context menu. Alternatively, you can double-click on the service.
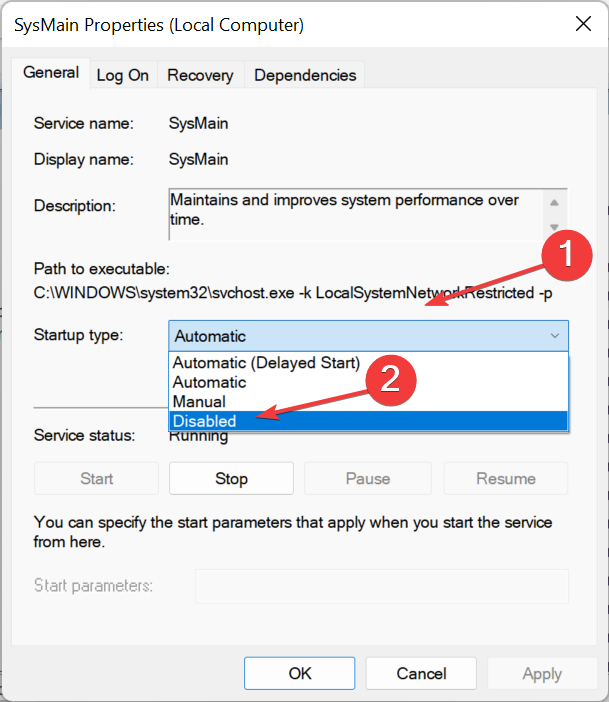
Now, click on the Startup type dropdown menu, and select Disabled from the list of options.
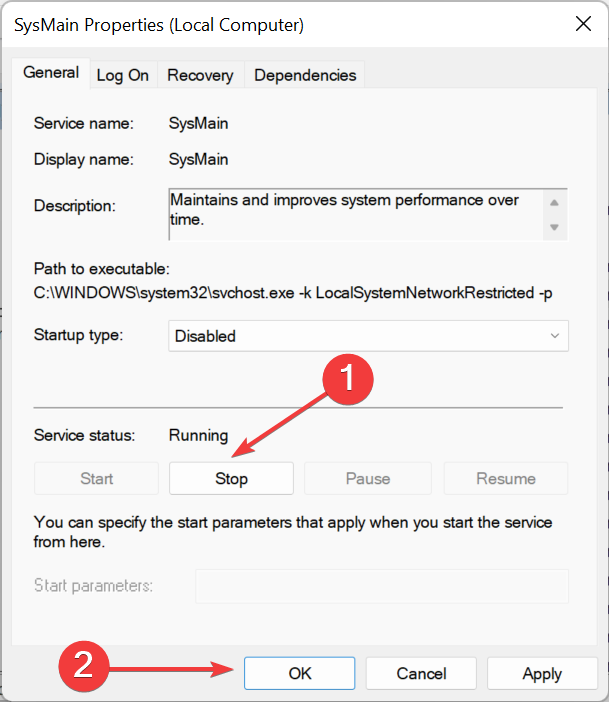
Next, click on the Stop button under Service status if it is currently running, and then click on OK at the bottom to save the changes.
Once done restart the computer for the changes to come into effect.
This is probably the simplest method to disable Superfetch in Windows 11. It’s easy to execute and doesn’t require any intricate commands or modifying the dreaded Registry.
However, if you want to make the change quicker, head to the next method.
2. Use Command Prompt
1. Press Windows + S to launch the Search menu.
2. Enter Terminal in the text field, right-click on the relevant search result, and select Run as administrator from the context menu.
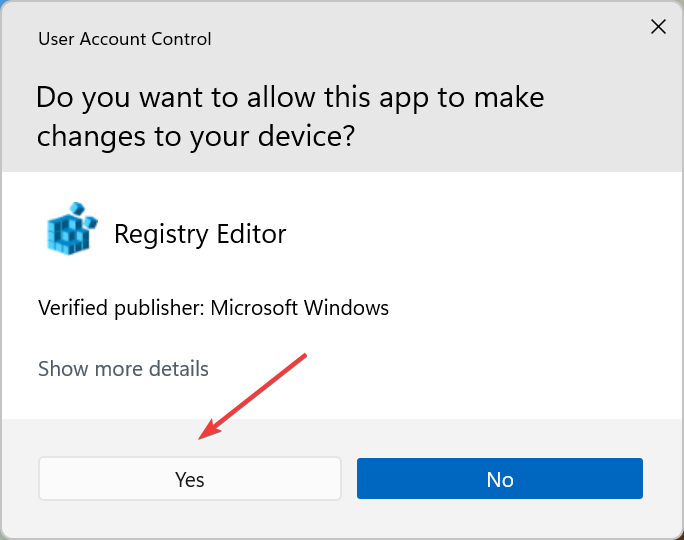
3. Click Yes in the UAC (User Account Control) prompt that pops up.
4. Press on the downward-facing arrow at the top, and select Command Prompt. Alternatively, you can hit Ctrl + Shift + 2 to launch Command Prompt in a new tab.
5. Now, paste the following command and hit Enter to stop the service: net.exe stop sysmain
6. Next, execute the following command to disable Superfetch from loading at startup: sc config sysmain start=disabled
For those who prefer using the command line to execute tasks, there is the option to disable Superfetch on Windows 11 PCs via Command Prompt.
What you need to do is input two commands: one for disabling the service, and one for preventing it from loading at Startup.
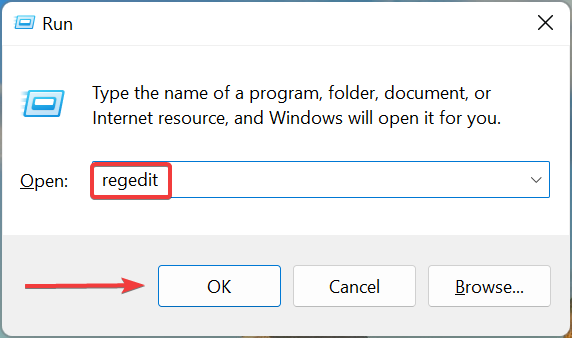
Press Windows + R to launch the Run command, enter regedit in the text field, and either click on OK or hit Enter to launch the Registry Editor.
Click Yes in the UAC prompt that pops up.
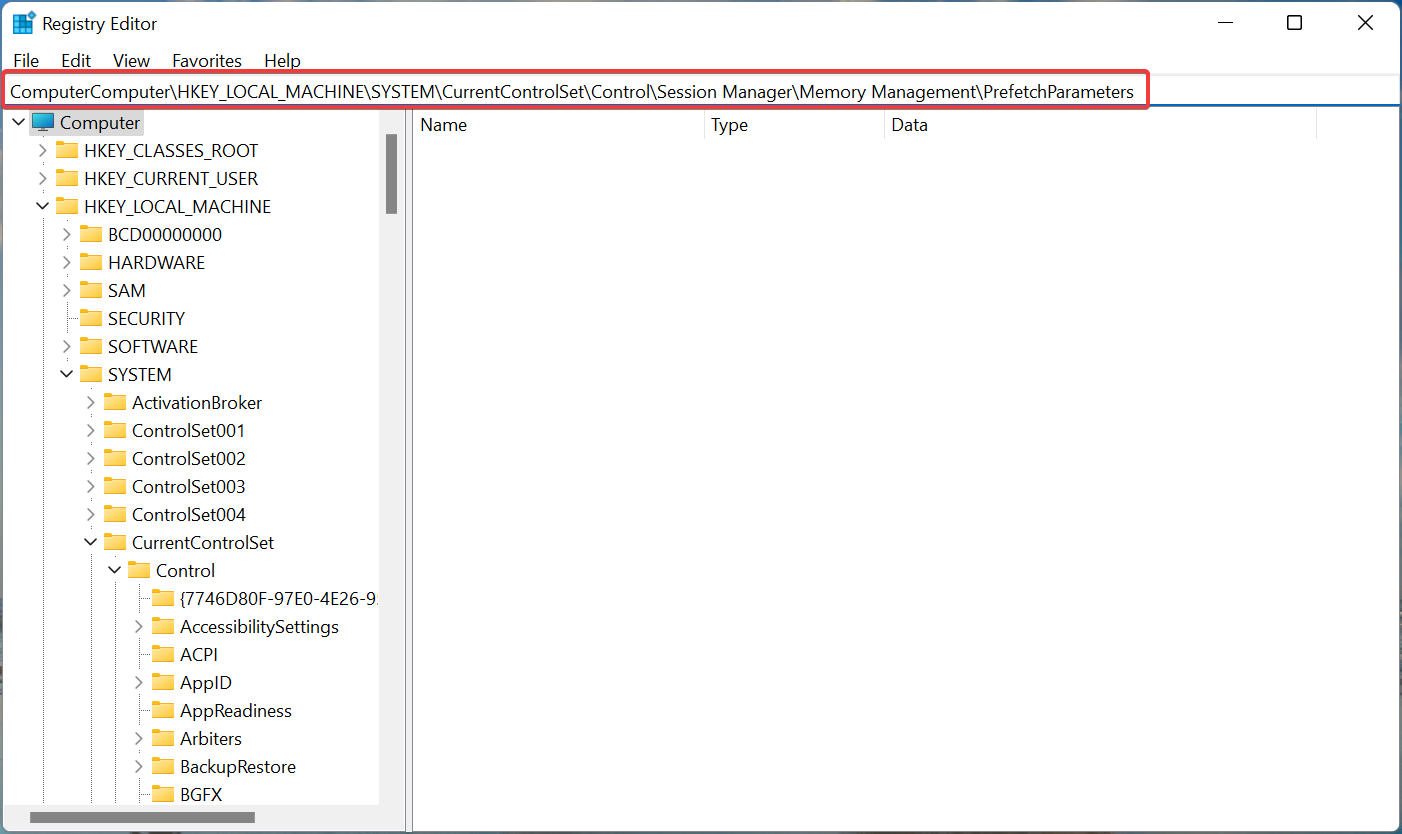
Now, paste the following path in the address bar at the top, and hit Enter or you can follow it using the navigation pane on the left:Computer\HKEY_LOCAL_MACHINE\SYSTEM\CurrentControlSet\Control\Session Manager\Memory Management\PrefetchParameters
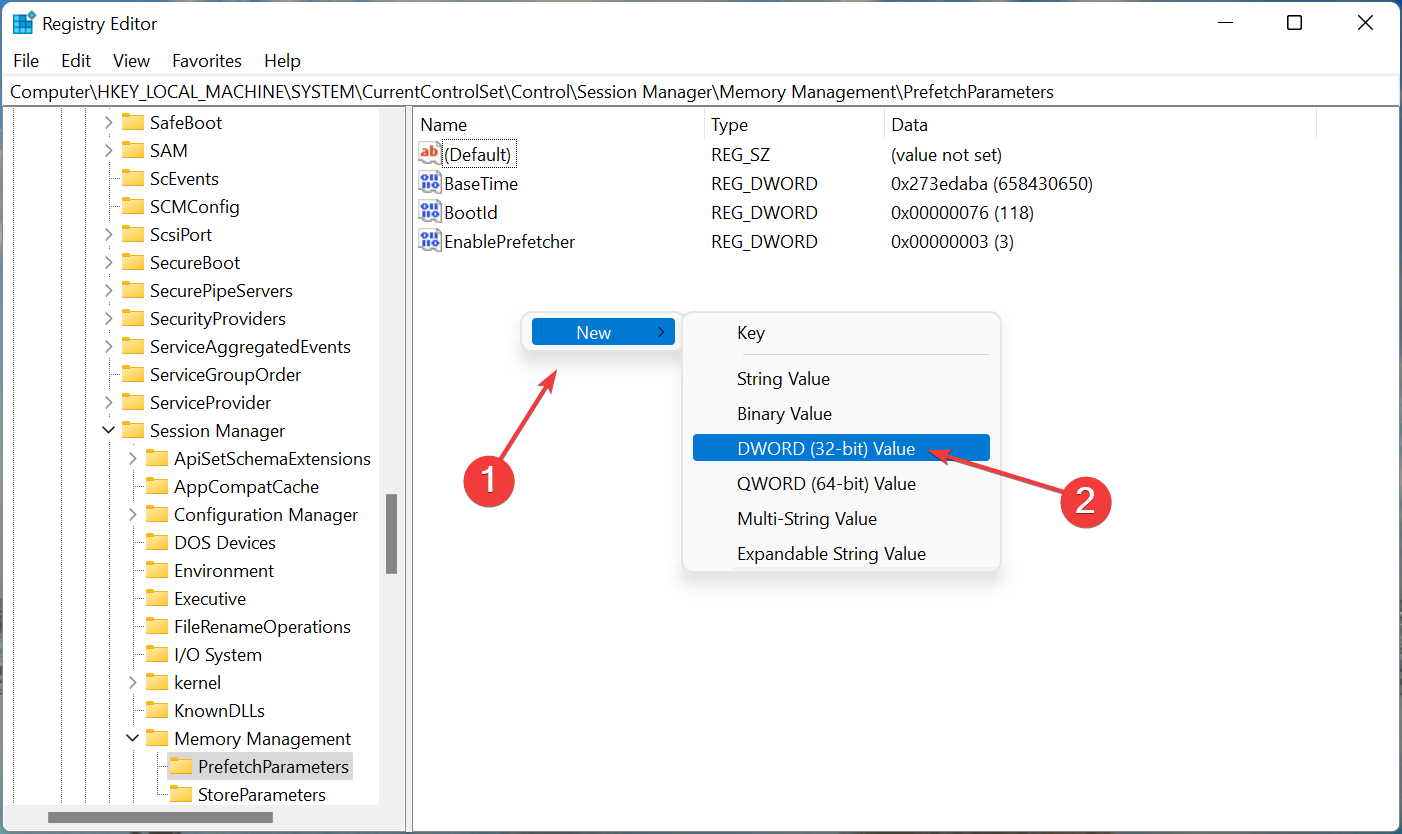
Right-click on the empty space, hover the cursor over New and select DWORD (32-bit) Value from the context menu.
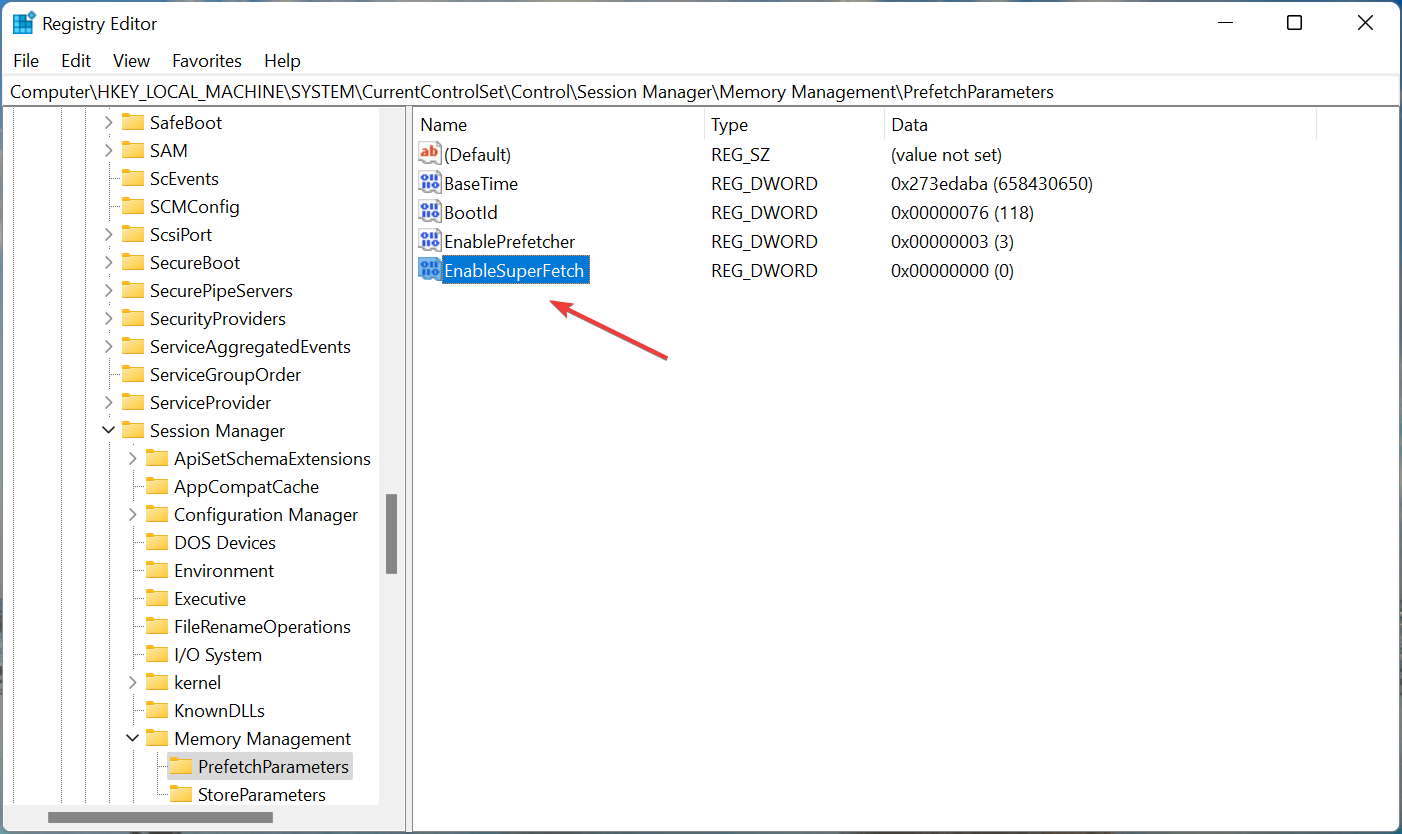
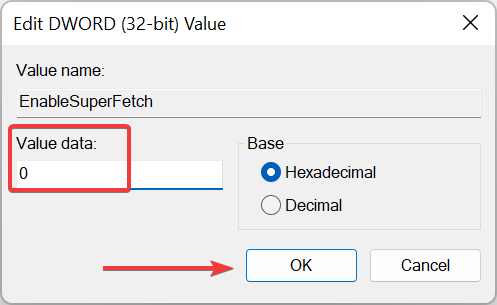
Name the entry as EnableSuperfetch, and then double-click on it to modify the properties.
Enter 0 in the text field under Value data and then click on OK to save the changes.
After making the changes, restart the computer for the changes to come into effect.
Many prefer using the Registry to make changes to the computer, and the steps listed here will help you use it to disable Superfetch in Windows 11.
Though, remember to be cautious during the process and not make any changes other than the ones listed here.
Should I disable Superfetch in Windows 11?
Amongst the many methods to boost Windows 11 performance, disabling Superfetch is generally mentioned somewhere near the top. And the best part, doing so carries no risk.
Also, there are cases when the feature doesn’t offer any considerable benefits. For instance, if you have Windows 11 stored on an SSD, the loading time itself is low, and Superfetch doesn’t play much of a role here.
But, if you notice that the RAM consistently runs full or the Disk usage is high, disabling Superfetch might do the trick. So, disable the feature and check if it works. In case it does, keep it turned off, otherwise, revert the changes.
By now, you know all the ways to disable Superfetch in Windows 11. And, if your PC has been running slow, this would help improve the performance.
We tested 10 best BSoD in the WR labs and came out with the best solutions based on the numbers of problems they can fix, the ease of use, performance and the reliability of the apps and here’s what we’ve found:
Next on the list is Fortect, an excellent program designed to repair and optimize your computer with multiple helpful features.
With this software, you can run a meticulous scan of your device to find its exact condition and deficiencies, such as BSoD errors, that slow down your PC performance.
Fortect is able to show you a comparison between your operating system and a system in an excellent state to see all the irregularities that can cause damage and ultimately correct them.
It can help you fix or replace corrupted or missing files, including DLLs and Registry keys, and automatically ensure an optimal state for your computer.
You can easily free up space and perform a PC cleanup by removing junk files, build-ups, and other files that clog your folders, disk, and hard drive.
Furthermore, Fortect will safeguard your system due to its ability to scan for faulty and incompatible hardware that may lead to errors that cause the blue screen of death.
Take a look at Fortect’s best features:
Windows damage repairing
Restore the OS
Boost Windows Registry
Plans for protecting multiple PCs
PC scan and assessment
Fortect
Easily fix multiple errors and keep your computer in a great state with this amazing software.
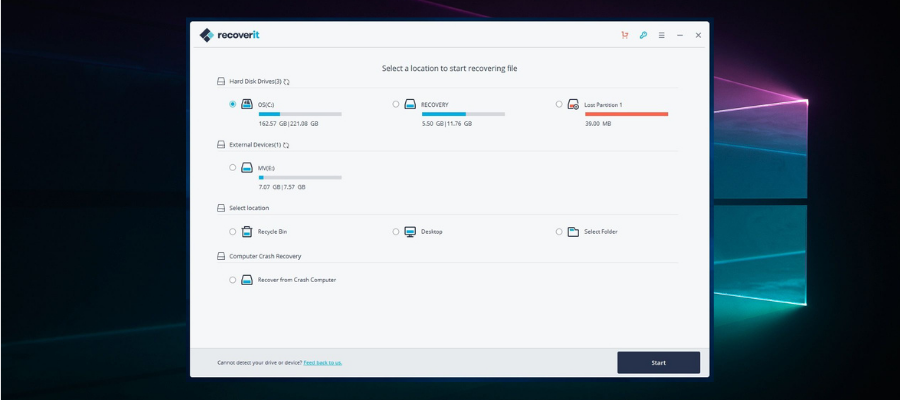
Recoverit from Wondershare is a useful piece of software that will help greatly when dealing with Blue Screen of Death errors on your computer.
This safe and reliable computer data recovery software was designed with ease of use, thus allowing you to control all aspects of how the program is run from a user-friendly main hub.
Recoverit can restore any lost files, whether audio, photos, or normal files, thus being an important step in bouncing back from a BSoD that affected your PC’s storage.
Here are some specific formats this software can easily recover to your system:
Audio: AIF/AIFF, M4A, MP3, WAV, WMA, MID/MIDI, OGG, AAC, etc.
To ensure that you will not be missing any files, no matter where they are stored, the developers also included a feature that recovers data from an external HDD or SSD, memory cards, flash drives, and even digital cameras. Besides that, you can also recover files that have been deleted by mistake and are found in the Recycle bin.
A tool that offers these features can be a lifesaver, as it will ensure that no matter if you’re experiencing a drive getting formatted, a corrupted sector of data, virus attacks, or system crashes, Recoverit will be able to help.
Here are some other useful features:
Quick processing of data
Easy-to-understand user interface
Selective recovery features
Covers a wide range of data loss scenarios
Wondershare Recoverit is a licensed-based software with three different packages available. Each plan is available as a 1-year license, a one-month license, or a perpetual license.
Wondershare Recoverit
Quickly restore lost and deleted files and overcome BSOD problems with this intuitive tool.
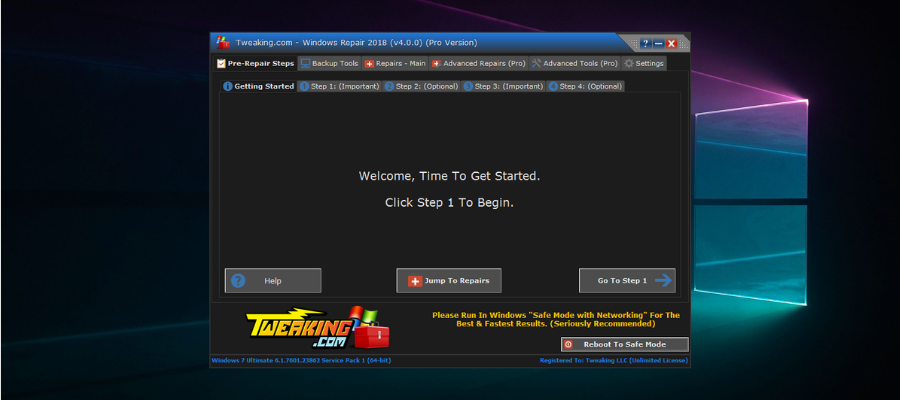
Tweaking Windows Repair is an astonishingly useful software that has the capability to resolve any BSoD errors within just a few minutes.
The step-by-step design of the BSoD repair tool was created in this manner to ensure that no elements are skipped, and this simplifies the actions the user needs to take as well.
To start the software, all you have to do is click on Step 1 and follow the on-screen instructions. You will be guided all the way to the very end of the process, where all the issues that caused the BSOD will be resolved.
As a bonus, the main hub of the software offers you quick access to any of its menus and gives you a useful overview of all the elements contained in this powerful software.
This software from Tweaking is capable of resolving BSoD errors and can tackle almost any type of error or problem you might encounter on a Windows platform.
You can easily resolve problems like registry errors, file permissions problems, Internet Explorer issues, Internet connection problems, and many more.
Even though the interface is not polished and beautifully designed like in the case of other software options, Tweaking Windows Repair makes up for it when it comes to usability.
There is only a small advantage to having slick-looking software, but the goal of this program is to ensure that your system works correctly, and isn’t created with looks in mind.
Other notable features:
Permissions backup and restore of the registry files
Cleans up entries in Windows Firewall
Unhides files to thoroughly identify malware
Enables access to Windows services tools
Tweaking Windows Repair is a licensed product with packages available for one or multiple PCs.
Tweaking Windows Repair
Resolve BSOD errors with this powerful software that thoroughly scans and fixes system issues.
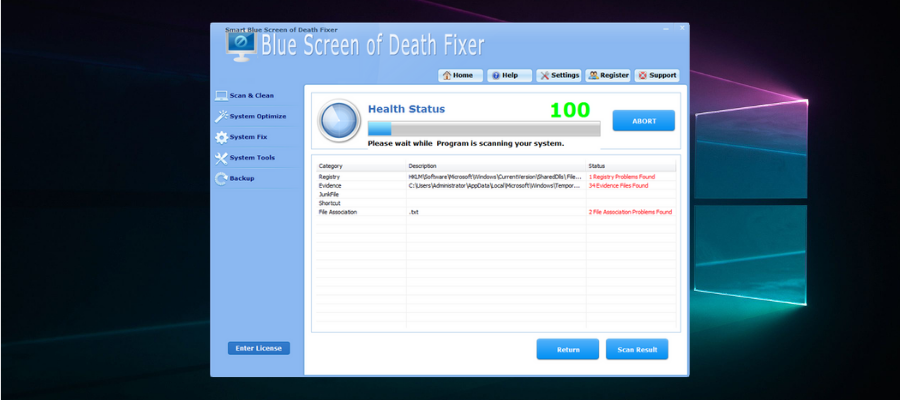
Smart Blue Screen of Death Fixer Pro is another excellent tool that comes in handy for dealing with a BSOD issue.
This great BSoD repair software is one of the world’s top award-winning registry cleaners, boasting millions of downloads now.
Smart Blue Screen of Death Fixer scans the entire drive to ensure there’s no unwanted fragment of software left behind, and it automatically downloads the brand-new program you might need.
The software is so popular due to its great set of features, which not only thoroughly scans and identifies issues, but is also capable of replacing files, fixing them, and optimizing their usage on your system.
This tool is equivalent to using eight separate products, as you get access to unrelated features, but all deal with system stability and stabilizability.
The developers ensured that the application doesn’t take much space on your hard drive, is easy to install, and is even easier to use. The menus and options are designed for simplicity, but that doesn’t take away from the actual capabilities found in the backend.
Using the tool regularly will result in smaller risks for data loss and an extended lifespan for your hard drive.
Other useful features:
Optimizes menus, desktop environments, networks, services, and start-up features
Scans and cleans registries, junk files, shortcuts, etc.
Variety of system tools including an uninstaller manager, file splitter, disk defragmentation, etc.
Backs up your registry, system restore, folders, files, etc.
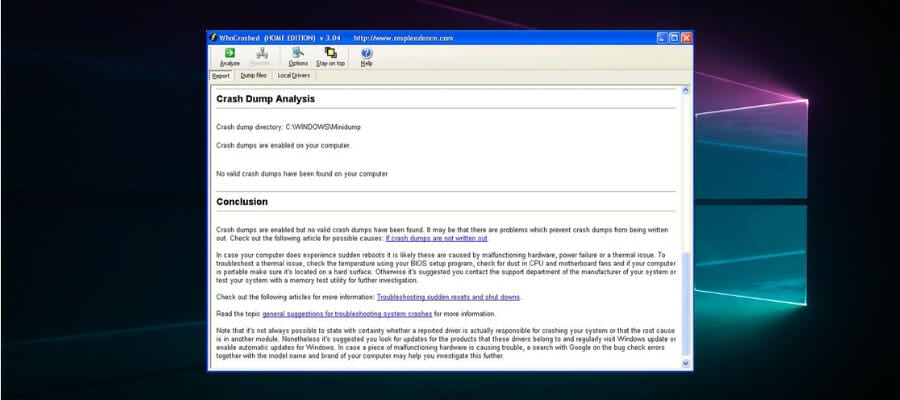
WhoCrashed is an excellent program that can reveal the drivers responsible for your computer’s crash, allowing you to fix the issue and acting as a preventive measure.
Even though it has a simple user interface, don’t get fooled by appearances, as this old-school-looking application can pack a punch.
WhoCrashed will show you the drivers that have been crashing your computer with just a single click of the mouse, thus eliminating the need for the user to go through laborious processes to initiate the recovery.
This tool performs a so-called post-mortem crash dump analysis as described above, presenting all the gathered data most comprehensively for the user while offering guidance in tracing the cause of the problem.
The best part about this process is that you won’t need any debugging skills to be able to know what drivers are troubling your computer running Windows and also how to fix them.
This tool is available as a free download, and it’s packed with lots of useful features:
Scans your dump files, and it provides an estimation of what exactly caused your system to crash
Predicts whether the fault was the computer’s hardware or if it was software-related
Provides a bug check code, the error message, and the path of the file that ultimately caused the error
Comes with a more advanced version that provides a more detailed analysis via symbol resolution.
You can pick any of these tools from the list to fix BSoD errors like Critical_structure_corruption and restore your system to normal functionality.
What causes BSOD errors?
➡ Hardware malfunction
This issue can arise whether you’ve recently installed a new SSD or have existing hardware problems. Malfunctions can start from improper component connections, power loss, or broken elements, often leading to common BSOD errors like PFN_LIST_CORRUPT. Hardware damage can occur due to extreme temperature or voltage conditions.
To ensure that this is not a possible problem, it is recommended that you use a good computer monitoring tool that allows you to check these factors whenever you need to.
➡ Corrupted DLLs or system files
DLL files are the instruction manual of your system, so when and if one or more get corrupted, this can affect how your PC works.
Example of corrupted DLL error
Damage to DLLs can appear because of mistakenly deleting one, malware attacks, and faulty application installations.
The damaged DLL must be replaced with a fresh new one for the system to function without issues.
➡ Device drives improperly written
Sometimes, whenever you create a new partition or during the installation process of a new OS, some drives might encounter errors while being written.
This can happen because of issues with your HDD or the partition software that you’re using. A BSOD can appear, stopping you from accessing your files entirely.
➡ Power supply issues
If your power supply has issues, then this will cause the voltage required for running the hardware on your motherboard to fluctuate. This, in turn, causes the components to malfunction; thus, a BSOD error can appear on your screen.
➡ Full PC memory
Having your PC memory full will hinder the OS’s ability to process information promptly and thus cause issues with the software, which in turn could cause issues with the hardware.
To avoid this problem, it is recommended that you use a PC optimization tool that can quickly identify any clutter and resolve it promptly.
Fortunately, you don’t have to worry about finding an effective method to fix blue screen issues or prevent the file loss triggered by them because some third-party BSoD fixer tools can cover all the risk factors mentioned above.
What can you do to prevent BSODs?
➡ Keep your drivers updated
Even though this might seem like an obvious part of our day-to-day usage of PCs, most of us forget how important drivers are.
Driver issues are the elements that don’t allow your software and hardware to function as intended, and it is one of the most common reasons for BSOD errors.
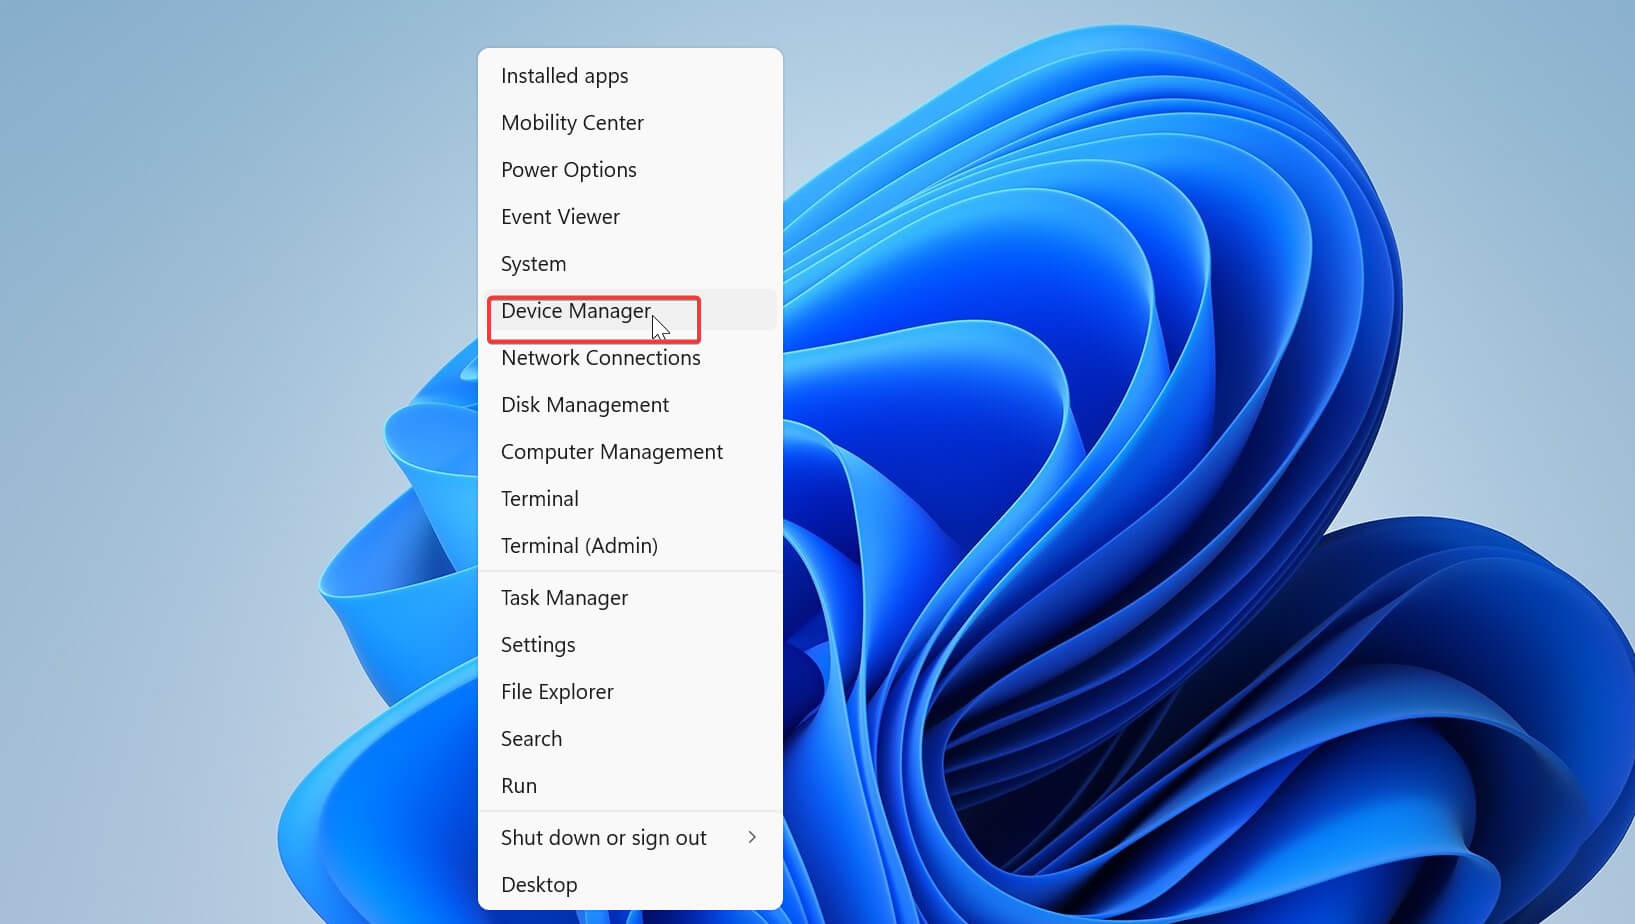
You can update your drivers by right-clicking Start and opening the Device Manager. Then, right-click the hardware components and choose the Update driver options.
Running incompatible software on your PC can cause system instability. The bad effect this will have on your system is related to the importance of the software you installed.
To avoid causing BSOD errors, like the Clock Watchdog Timeout Error we spoke about already, make sure that the software you’re installing is made to run optimally in your version of Windows, whether it’s Windows 7, Windows 10, or the latest Windows 11.
In case you already have incompatible software installed on your PC, you can access the Add or Remove programs app on your computer by using the Start search to find it.
If you want to be entirely sure that all traces of said programs have been removed from your system, you can also use a third-party uninstaller tool.
Finally, you can also use the integrated tools to diagnose your system and help it recover from a BSoD.
How to fix a BSoD on Windows 10 using Command Prompt?
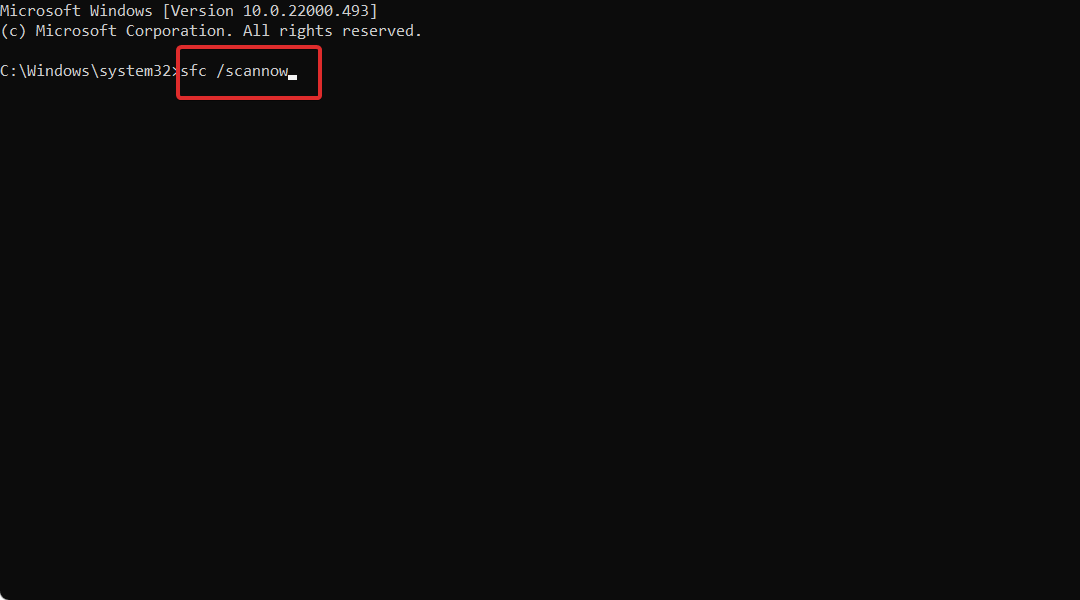
Open the Command Prompt with administrative privileges.
Type the following command in the prompt windows: sfc /scannow
This will scan your system for signs of corruption.
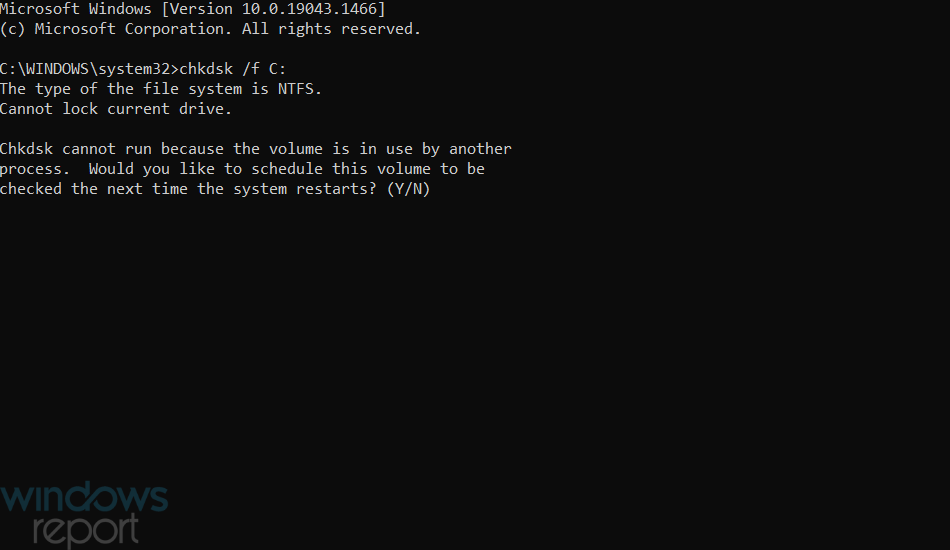
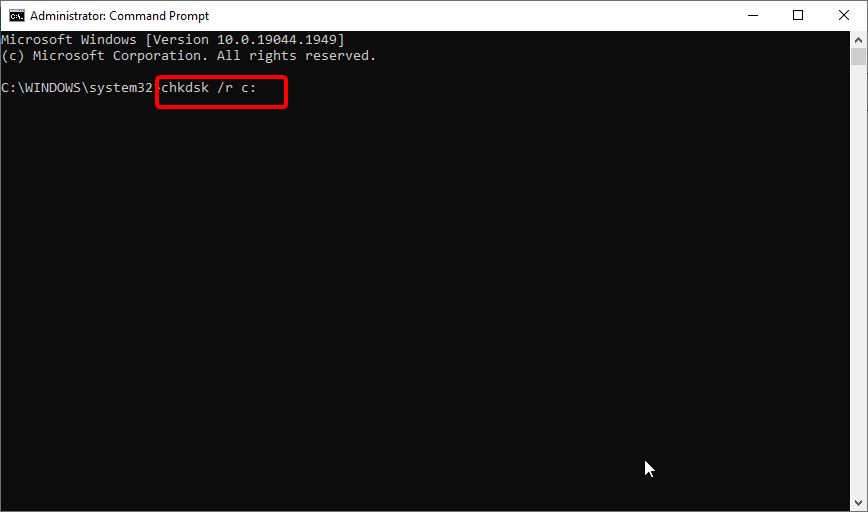
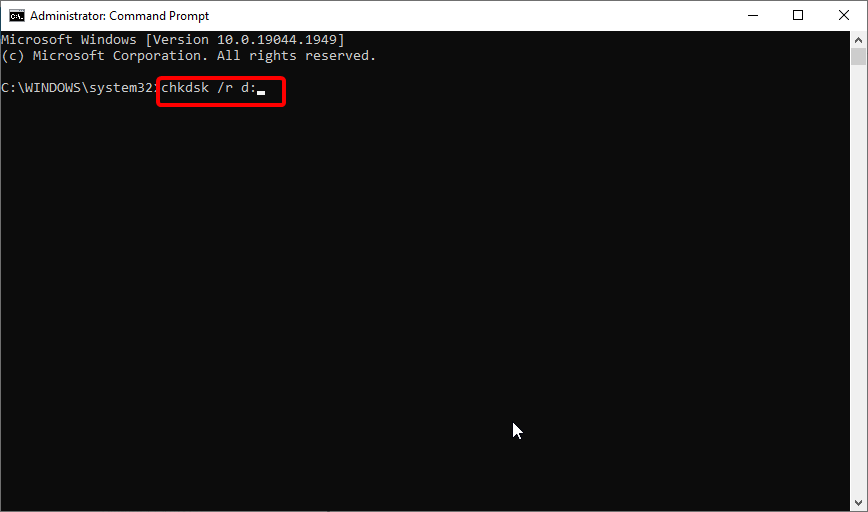
Then, insert this line: chkdsk /f C:
Note that this command will check the disk where Windows is installed for errors. Make sure to replace C: with the letter corresponding to your drive if it is different.
This tool will find damaged system files and replace them with sain ones if it can.
Finally, restart your PC and check if the BSoD has disappeared.
Some users have a hard time opening the CMD as admins; if that’s your case, we got your back. If the native tools fail to solve your issue, your best bet is to use a professional BSoD fixer like the recommended ones.
A buffering wheel may appear briefly at the start of a stream. If this happens frequently or in the middle of a video stream, it could indicate that your Internet speed and strength are poor.
This slowdown occurs when multiple devices, such as phones, laptops, game consoles, or tablets, share a single internet connection.
You will need to troubleshoot the problem and fix your fuboTV when it keeps buffering even after trying other fixes.
When you’re eager to watch a movie or TV show, the annoying spinning circle or arrow that indicates buffering is the last thing you want to see.
This article will cover the problems and provide you with all the practical solutions we’ve discovered.
Slow Internet connection – Although fuboTV will adjust the video quality to match your connection speed, a slow Internet connection may cause the app to buffer continuously
Router problems – If your router is not set up correctly or has some issues, your connection may be inconsistent or too slow; try restarting or reconfiguring it
The video resolution is too high – Forcing the resolution to Full HD or 4K with a slow Internet connection may bring the streaming to a halt
Before starting any troubleshooting, make sure that your Internet connection speed is on par with fuboTV’s requirements:
Resolution
Continuous speed required
Device
480p
3+ Mb/s
Smartphones and small tablets
720p
7+ Mb/s
Larger tablets and connected devices (Roku, Apple TV, Web)
1080p
10+ Mb/s
Some video-on-demand using connected devices (Roku, Apple TV, etc)
4K
25+ Mb/s
4K devices
As you may clearly see, the higher the resolution, the faster your Internet connection speed should be. Check the information provided by your ISP and see if they match.
To check your Internet connection speed, you may use a third-party service like Ookla’s Speed Test website.
Quick Tip
A solution for preventing or solving streaming buffering is using a reliable VPN service. ExpressVPN can help you enhance your viewing experience by reducing lag and bypassing bandwidth throttling by your internet source.
This VPN also keeps your online activity more private and secure, as your connection is safeguarded with tunneling and encryption, thus third-parties like ISPs are powerless to inspect your data packets.
ExpressVPN
Enjoy your streaming services without any interruptions and enhance your internet activity.
Sometimes, the fuboTV servers may be down or in maintenance so the first step would be to verify the service status.
FuboTV has a dedicated page to check the status of its services so that should be an easy task.
If you see that the Streaming service is not operational, just wait until it comes back online.
2. Restart the stream and the fuboTV app
A certain channel may not be working at the moment. That’s why you should try changing to another channel, wait a few minutes, then return to the channel you had problems with.
Another solution is to close the fuboTV app completely on your PC or streaming device and open it again.
3. Clear the web browser’s or the app’s cache
Launch the Chrome browser.
Press Ctrl + H to open the history tab.
Click on Clear browsing data on the left pane.
Select what you wish to delete, then click on Clear data.
Clearing the cache of fuboTV is a very efficient way to fix any issues with streaming. We have shown you above how to do that in Chrome but the process is very similar in other browsers as well.
If you’re using fuboTV on Amazon Fire, go to the Applications from Settings, then select Manage installed Applications, choose fuboTV and pick Clear Cache from the menu.
For the Android mobile app, navigate to the Storage settings on your device, find the fuboTV app, and tap the Clear Cache button.
Yet, to make sure that all cached data and cookies are cleared, we recommend CCleaner, a great tool to clean your PC from junk, free up some memory and optimize PC speed.
To change the video quality of your FuboTV tv while watching a video, press the Settings icon in the bottom right corner of your screen.
Choose a low-quality setting from the choices under Video Quality.
Watch your video for some minutes to see if the buffering continues.
As we’ve written at the beginning of this article, fuboTV matches the resolution with your Internet connection automatically but you can force a lower resolution from its settings.
How can I improve my stream quality?
First, all the streaming apps buffer the video before playing it so the action itself is perfectly OK. The problem comes when the buffering can’t keep up with the viewing.
Here are a few pointers on how to improve the streaming quality:
➡ Use a cable connection – By using an Ethernet connection instead of Wi-Fi, you can considerably improve the quality of your live stream because the Internet connection will be a lot more stable
➡ Limit background tasks – Numerous apps are continuously running in the background of every computer and some of them use the Internet connection so close as many as you can
➡ Close unused tabs – If you’re watching fuboTV in your browser, close the tabs you’re not using at the moment because they may use your precious Internet connection
That’s it! We hope that now the fuboTV buffering issue has been solved and now you can watch your favorite shows.
Over the years, Windows went through various changes and we got many new features and applications.
One of these new applications is the Mail app, and even though this app is simple to use, it seems that users can’t send emails to a contact group in Windows 10.
Can I create email groups in Windows 10 Mail?
Mail app is a default email client in Windows 10, and it does a great job for the most part. The New Mail app offers a clean design and simple user interface, but unfortunately, it seems that option to send emails to contact groups is missing from the new Mail app.
Contact groups are one of the most useful features of every email client because they allow you to easily send an email message to certain groups of people, such as your colleagues or family members for example.
With this feature, missing users have to manually enter all email addresses in order to send an email to a group of people. Even though this is a major flaw, there are a few ways to circumvent this problem.
In this article we’re going to cover the following topics:
Create a group in Windows 10 Mail – Groups aren’t fully supported in Windows 10 Mail, however, there are a few workarounds that you can use in order to send emails to multiple contacts.
Windows 10 Mail distribution list – The Distribution list feature is completely missing from the Mail app, and if you want to send an email to multiple contacts, you’ll have to use one of our solutions.
How can I send emails to a contact group in Windows 10?
1. Use an alternative email client
The Mail app doesn’t have native support for contact groups, therefore if you don’t want to use any workarounds you might want to consider switching to a different email client.
Alternative email clients can help you keep your inbox in check and let you access all your email accounts from one place.
Modern email clients can increase productivity with several time-saving features such as integrated email template presets, email scheduling and snoozing, and more.
Check out our dedicated article to find out what are the best email clients that you can use in 2022.
2. Add group emails to a single contact in the People app
1. Press the Windows key + S and enter people in the search box.
2. Select People from the list of results.
3. When the People app starts, click the + button to add a new contact.
4. In the Name section, enter the name of your group. In the Personal email section, enter all the emails that will be associated with that group.
Be sure to separate all the emails by adding a semicolon after each one.
Do not add space character after an email, just use a semicolon to separate emails.
5. After you’re done, click the Save icon in the top right corner.
6. Now the new Group will be added to your list of contacts.
7. Select the Group from the left pane, and in the right pane click theEmail Personal section.
8. The How do you want to open thiswindow will appear. Select Mail and check Always use this app.
9. Click OK.
10. The Mail app will now open with all email addresses from your Group added as recipients.
One simple workaround for creating email groups in the Windows 10 Mail is to create a new contact in the People app that will represent a specific group.
The only downside of this workaround is that you have to select your group in the People app every time you want to send a group email.
Although it might not be the best solution, many users reported that it works perfectly for them.
This isn’t the best workaround, but some users are suggesting keeping all group email addresses in a draft email. Simply start writing an email and add all email recipients to the To field.
To send an email to a group, simply start a new email message and copy all email addresses from your draft email to the To section in a new email message.
This is a primitive workaround but it’s better than adding each email address individually.
On the other side, since you have your message saved as a draft, you can just select it from the Drafts folder in order to quickly send group emails.
If you tend to send a lot of group emails, this workaround might be perfect for you.
4. Save your emails in a Word document
According to users, sometimes you might be able to circumvent this issue simply by writing down a group of emails in a Word document.
Enter all emails that are in your group and separate them only by a comma.
After doing that, select all emails and convert the selected text to a hyperlink.
Now you just have to press Ctrl and click your link and the Mail app will open in the new window with all your recipients in the correct field.
After that, you just have to type your message and click the Send button to send the group email.
As you can see, this is just a crude workaround, but it works according to users, so you might want to try it out.
One advantage of this workaround is that you can have all your groups in a single Word document and then just click a group in order to send a group email to that specific group.
This is a relatively simple workaround, and if you need to send group emails, feel free to try it out.
If you’re unable to create contact groups in Windows 10, you might be able to solve this problem simply by logging in to the web version of your email provider.
All major email providers, such as Gmail and Outlook, support groups, and you can just log in to the web version, create a group and try to send email to that group from the Mail app.
Although this solution sounds simple, it’s just a workaround, but it might help you with your problem, so feel free to try it out.
6. Install the latest updates
Create a new email message.
Now click the person icon on the right side of the To field.
Select the desired contact from the list.
Repeat this step for all users to that you want to send an email to.
Mail app is a default email client in Windows, and Microsoft is working on it alongside Windows 10.
Group emails are a missing feature, however, Microsoft has made some changes in order to somewhat bring this highly-requested feature.
According to users, Microsoft has added an option to add multiple contacts to your emails in the Mail app.
Keep in mind that this feature doesn’t allow you to create contact groups, meaning that you’ll have to add your contacts one by one.
This isn’t the best solution, but it’s definitely a step in the right direction. To add multiple recipients in the Mail app, you just need to do as described above.
We know that this isn’t the best solution, but if you want to send an email to a few people, this new feature might be rather useful.
On the other hand, if you have dozens of users to that you want to send an email, you might want to try a different solution.
We’re not sure when exactly Microsoft added this feature, but if you don’t have it, we advise you to update your Windows.
How can I update my Windows?
As you know, Windows 10 will usually update itself automatically, but sometimes you might miss an update or two.
However, you can always check for updates manually by doing the following:
Press the Windows key + I to open the Settings app.
When the Settings app opens, go to the Update & Security section.
Now click on Check for updates button.
If any updates are available, they will be automatically downloaded in the background.
Once the updates are downloaded, you just have to restart your PC in order to install them.
After updating your system to the latest version, you should be able to add multiple recipients to your emails.
The Windows 10 mail app doesn’t support contact groups, and this is a major flaw of this app.
This means that you can’t send emails to a contact group in Windows 10 via the Mail app, but you can circumvent this limitation by using one of our solutions.
If you have any other suggestions or questions, feel free to leave them in the comments below.
Sometimes you might get Your session was logged off because DWM crashed or dwm.exe stopped working. This problem can interfere with your everyday activities, so it’s important to fix it, and this guide is here to help you.
What is DWM error?
DWM error such as this one occurs if your GPU isn’t properly connected or configured or if there’s another issue with it.
What can I do if DWM has crashed on Windows 11?
Before trying anything else, check if your GPU is properly connected. If the power cable is loose or the GPU is hanging, tightly connect it and check if the issue is gone. Updating BIOS can also help.
1. Update graphics card driver
Right-click the Windows icon and select Device Manager.
Locate Display Adapters.
Expand the list, right-click your display driver, and clickUpdate.
Select Search automatically for display drivers and wait for the process to complete.
An outdated graphics driver can cause conflicts that lead to DWM crashes. Updating the drivers should fix the issue.
2. Adjust GPU settings in BIOS
Restart your PC.
While the PC boots, keep pressing F2 or Del to access BIOS.
Next, navigate to Advanced.
Locate PCIEX16 Slot Configuration and set it to Gen 4 or Gen 3.
Save changes and restart your PC.
Keep in mind that the steps might be different depending on your motherboard model.
3. Disable Hardware accelerated GPU scheduling
Open the Settings app.
In the left pane, go to System, and then click Display.
Next, select Graphics.
In the Graphics settings, look for Hardware-accelerated GPU scheduling and disable it.
4. Reinstall Xbox app
Press the Windows key + X and choose Terminal (Admin). Alternatively, run PowerShell as administrator.
Next run the following command: Get-AppxPackage Microsoft.XboxGamingOverlay | Remove-AppxPackage
Check if the problem is resolved.
5. Adjust the system for the best performance
Press the Windows + S on your keyboard, type View advanced system settings and then click on the most relevant result.
Click on Settings next to the Performance section.
Tick the Adjust for best performance button, then click Apply and OK on the bottom.
The Adjust for best performance option will make a set of changes to your OS for it to run smoother. If you don’t like them, you can go back by choosing Adjust for best appearance.
6. Delete the mdi264.dll
Press Windows + I to open the Settings menu.
Choose Recovery under the System panel.
Now click on Restart next to the Advanced startup section.
When your computer restarts, choose Troubleshoot, then go to Advanced options.
Once you are in the Advanced options menu, click on Command Prompt and enter the following commands, then press Enter after each: cd C: \Users\Your Name Here\App\Data\Local\Temp del mdi264.dll
Close Command Prompt and restart your computer after doing the above actions.
7. Run the SFC scan
Press the Windows + S to open the Search bar.
Type cmd and select run it as an administrator.
Type or paste inside the window the following command and press Enter: sfc /scannow
Wait for the process to finish (which may take some time) before restarting your computer.
You can also choose to use a specialized repair tool that will do all these steps automatically. These tools can scan your PC in-depth and find any impediment that slows down its performance. After that, they will replace each malfunctioning element with the latest update from its database.
8. Run DISM
Press the Windows + S key to open the Search bar.
Type cmd and click on the run as an administrator option.
Type or paste in the following commands and press Enter after each to start the process: DISM /online /Cleanup-Image / ScanHealth DISM /Online /Cleanup-Image /RestoreHealth
Sit down and wait for the procedure to finish. Please be aware that it may take up to ten minutes. After that, restart your computer to confirm that the changes have taken effect.
9. Disable Hardware acceleration
Press the Windows + S key to open the Search bar, type regedit, and click on the most relevant result.
Navigate to Software under HKEY_CURRENT_USER, then go to Microsoft, followed by Office16.0 and Common.
Right-click the Common key and choose New, then Key from the menu.
Enter Graphics as the name of the new key.
Now right-click the Graphics key and select New, then DWORD(32-BIT) Value. Name the new value DisableHardwareAcceleration.
Double click DisableHardwareAcceleration value and set its Value data to 1.
You must close the Registry Editor and restart your computer for the changes to take effect.
10. Disable problematic services
Press the Windows + R to open the Run dialogue.
Type services.msc, then press Enter or click the OK button.
Disable Skype Updater, Google Update (update), and Google Update (gupdatem)services.
Double-click on each service, one by one, change Startup type to Disabled and click Apply and OK to save changes.
Before closing the Services window, double-check that all of the services listed in Step 2 – Skype Updater, Google Update (update), and Google Update (gupdatem) have been turned off.
Desktop Window Manager (dwm.exe) is a critical system process that aids explicitly in creating visual effects like transparent windows and taskbar thumbnails that you’ll see when using Windows.
The design of the user interface is logged into Windows memory when you start a new program, allowing the design to be developed.
Windows then manipulates the window designs to guarantee their visual effects are applied.
Is it necessary to have DWM?
Yes, the DWM.exe file is an essential Windows core system file and a component of Microsoft Windows. It is mainly responsible for elements including Windows Aero and other visual effects and personalization features like Windows Flip and Flip 3D.
Dwn.exe is an essential Windows 11 process, and many issues with it can occur, but we hope that you managed to fix DWM crash with a black screen and other issues.
We recommend you review our article on dwm.exe issues in Windows 10 for additional information and potential solutions, as some of the approaches discussed here are also applicable in the new OS.
Microsoft Outlook is one of the most popular email clients, and many use them over other clients because of the familiar UI and features.
However, there are many users that are facing the Something went wrong and Outlook couldn’t save your account settings error. This error can prevent you from receiving new emails and could be pretty frustrating if you depend on Outlook for all your email-related needs.
Thankfully, this guide has a list of practical solutions that will help you resolve the problem and get your Outlook working. So let us check it out.
Why is Outlook not saving my account settings?
MS Outlook, being software, throws up new errors now and then. However, there are solutions to resolve them.
But before you go ahead and look to resolve Something that went wrong and Outlook couldn’t save your account settings error, let us know why.
The main reason you would come across this issue is that the Autodiscover process the Outlook uses received an unexpected result. This comes from a third-party server, which it performs the root domain lookup.
When the root domain lookup fails, and Outlook then performs the Autodiscover lookup. However, since it is getting a positive Autodiscover response from the root domain lookup, MS Outlook tries to authenticate the incoming protocols, such as POP and IMAP, and the operation fails.
How do I save my Outlook settings?
Open the Start menu.
Search for Registry Editor and open it.
Navigate to the below path. HKEY_CURRENT_USER\Software\Microsoft\Windows NT\CurrentVersion\Windows Messaging Subsystem\
Right-click on the Profiles key.
Select Export.
Choose the destination location.
Enter the file name and hit Save.
How do I fix Something went wrong and Outlook couldn’t save your account settings?
Then, in the Mail Setup – Outlook window, click on Email Accounts.
From the Email tab, click on the New button.
Add your name, email address, and password, re-enter your password and click on Next.
If you want to manually set up an email account for Office 365, POP or IMAP, or Exchange ActiveSync, select Manual setup or additional server types.
Select your account type and click Next.
Fill in the account details, such as user, server, and login information.
Make sure you change the Ports if needed under More Settings.
2. Disable IPv6
Press the Win + I buttons to open Settings.
Go to Network & Internet.
Click on Status.
Select Change adapter options.
Right-click on your network and select Properties.
Uncheck the Internet Protocol Version 6 (TCP/IPv6).
Click OK to save changes.
Restart your PC.
By default, Windows favors IPv6 addresses over IPv4 addresses. However, IPv6 can lead to Something went wrong and Outlook couldn’t save your account settings error. Follow these steps to disable IPv6 in Windows.
Double-click on ExcludeScp, createset the Value data to 1.
Right-click on AutoDiscover again, create two more DWORD values, and rename them to ExcludeHttpsRootDomain and ExcludeHttpRedirect.
Set the Value Data for both the keys to 1.
Close the Registry Editor and restart your computer.
After the restart, set up the Outlook account again to see if the error is resolved.
If your DNS entry is not set up properly, something went wrong and Outlook couldn’t save your account settings. You can edit the registry to add registry keys and fix DNS related issues.
NOTE
Note: Editing your registry can create problems with your system. If you are unsure how to edit the registry properly, take a professional’s help.
4. Update Microsoft Office Suite
Open any of the Office applications such as Word or Excel.
Click on File and select Account.
Look for the Office Update section.
Click on Update Options and select Enable updates.
Microsoft Office will now look for any pending updates and suggest you download and install them accordingly.
Restart the PC after the updates are installed.
5. Check Your Firewall
Begin with disabling the firewall on your antivirus in the settings.
Next, type Firewall in the Start menu and open Firewall and Network Protection.
Click on your current Active Network and disable the Windows Defender Firewall.
Windows Defender firewall or a third-party firewall can cause the Something went wrong and Outlook couldn’t save your account settings. To fix this issue, it’s advised to disable your firewall temporarily.
6. Remove Outlook Credentials
In the Start menu, type Credential, and open Credential Manager.
Click on Windows Credentials.
Expand any Outlook account credential.
Click on Remove and click on OK.
Windows 10 comes with a password manager called Credential Manager. If you have Outlook credentials saved with Credential Manager and are trying to log in with a new password, you might get Something went wrong, and Outlook couldn’t save your account settings error.
Where are Outlook email account settings stored?
According to the official information, if you have a POP or IMAP account, all your data is stored in the Personal folders in the .PST file format.
However, moving the PST file from one computer to another doesn’t transfer your Outlook account settings.
You must first set up your email account on the new computer, then open the .PST file moved from the old computer to your new computer.
You can find your .PST file in one of the following locations:
Windows 10: drive:\Users\<username>\AppData\Local\Microsoft\Outlook
Windows 10: drive:\Users\<username>\Roaming\Local\Microsoft\Outlook
Older versions of Windows: drive:\Documents and Settings\<username>\Local Settings\Application Data\Microsoft\Outlook
There you go; you should be able to fix the Something went wrongerror in Outlook using the above-given solutions.
Tumblr’s Safe Mode protects users from seeing unexpected NSFW (not safe for work) and inappropriate content. 18+ – rated content was all over Tumblr prior to this.
However, Safe Mode lets users filter out such content, and this brought about a new problem – how to turn Tumblr safe mode off.
If you come across a blocked post on Tumblr, you’ll see a green text indicating that Safe mode is on. You can only access the content when you tap the View Post button.
Bear in mind that Safe Mode in Tumblr is not same as the Safe Mode in Windows, as they serve different functions. In this guide, I’ll teach you how to disable Tumblr’s Safe Mode on various platforms.
How can I disable the Tumblr safe mode option?
1. Turn off Safe Mode in Tumblr on Desktop
If you don’t mind NSFW content, you can safely disable Safe Mode on Tumblr directly from your Desktop PC. All you need to do is access your account settings.
1. Open your web browser.
2. Visit theTumblr website.
3. Click on the Log inbutton.
4. Type in your email address and hit Next.
5. Select Use password to log in.
6. On your Dashboard, click on the Pencil icon, and choose Settings from the drop-down menu.
7. Scroll down to the Filtering section and click on the toggle next to Hide potentially mature content.
Apart from using the methods above, a few third-party websites also let you turn Tumblr safe mode off without logging in to your account. Even if the content is flagged NSFW, you will access it on these sites.
A popular option is Tumbex. Simply visit their website and search for any blog. When you find it, you’ll be able to access the blog easily.
After turning Tumblr Safe Mode off, you may also have to repeat the process for other logged-in devices. This is why we have shown you how to bypass Safe Mode on desktop and mobile.
We hope this guide has helped you resolve this pesky issue once and for all. To share your experience with us, don’t hesitate to use the comment section below.
Are you looking for the best Oculus Quest VR browser games to play right now? This article will give you the top 10 list with additional VR gaming information.
Virtual Reality has opened a new door for gamers. Of course, gaming on a regular flat monitor provides an enjoyable experience. However, if you can feel all the gaming elements surrounding you, this will be a fantastic experience.
Oculus Quest VR gives you this type of experience with a 360 gaming experience. However, not all VR games are delightful and accessible on all Virtual Reality devices.
Yes. Oculus Quest has a built-in web browser called Oculus Browser. Else, there are some third-party browsers available, like Opera One, Firefox Reality, etc.
Yes. You can play any browser games in VR if you use a compatible web browser. There are tons of options to play right now.
It would be best to remember that not all browser games are convenient to play from a Virtual Reality device. The ones developed for VR are the only things you can play with comfort. Another important thing is not every VR will work for some specific games.
Many titles are available that work on different VR headsets but not in Oculus Quest and vice versa.
So, for your convenience, we have prepared a list of the top 10 VR games that can give you an ultimate experience on Oculus Quest and Quest 2.
What are the best VR browser games to play on Oculus Quest?
The Fit’n Punch XR is an Indie VR browser game accessible from devices like Oculus Quest. Right now, this is one of the best free boxing games for this device.
Controlling is very easy in this title. However, you will need to do a few physical movements to play this game, which is very helpful for your health. DAYDEV has developed this fantastic item for you.
Backrooms VR – Endless exploration in a weird place
If you want to enjoy a VR game from the deep, the Backrooms can be an excellent choice for your Oculus Quest and Quest 2 device. But keep in mind that this is a horror game.
In this game, you will need to survive in endless piles of empty rooms and escape or be in the trap forever. Creepy background sounds, sudden elements, etc. surrounding you will give you goosebumps.
Overall, you will get an exhilarating experience while playing the Backrooms. IEP Games have developed this masterpiece, which is currently playable without cost.
Barista Express is one of the free Oculus Quest browser VR games developed by White Rabbit. Here, you will act as a coffee maker+seller who will have to prepare coffee within a timeframe.
In your cafe, people will ask for coffee. You will need to prepare and serve it ASAP to earn money. Overall, it’s a delightful game if you are interested in this type of title.
Back to Space – Relieve your childhood with this classic VR game
If you want a VR shooting game on the Oculus Quest browser, you will not have so many options better than Back to Space. Right now, it is one of the games that will give you maximum enjoyment on a VR device.
In Back to Space, the player will have to shoot the invaders who have come from another planet. Many of them will start coming from the horizon; you will need to shoot and destroy them before getting too close to you. Most people like this type of game in VR to overcome boredom.
Krossa – Release your anger with this VR break room
The Krossa is one of the best WebVR browser games for Oculus Quest and Quest 2. It’s a simulation game where you have to smash vases with a baseball bat.
While playing, you will also perform physical movements that help your health. Overall, it’s an enjoyable option for Quest users.
Beat Knight XR – Save virtual worlds from creatures with your sword
The beat Knight XR is another Web XR game for Oculus Quest from the developers of DAYDEV. This is an action game where you must fight against the attackers.
You will get a sword to kill the attackers. Then, with your VR controller, you will make your move to use the blade. It’s somehow similar to the Back to Space game. Overall, you will find it very enjoyable.
VR Blocks – Create endless worlds made out of blocks
How would it be if you could play Minecraft as a VR browser game? The VR Blocks have made it possible. This is a Minecraft clone game optimized for browsers with VR experience.
Right now, VR Blocks is one of the best Oculus Quest VR online games offering multiplayer facilities. This title is free and doesn’t require anything to run. If you like Minecraft or similar games, you can start enjoying this right now.
The Swipe Surfers VR is another excellent online game for Oculus Quest and Quest 2 users. If you want a VR experience of Subway Surfers, this is a perfect option that you will like.
Controlling this game on VR is very easy. When you pass the obstacles, it feels like you are in the game world. Overall, you will like the game, and won’t cost any money.
Have you watched the Squid Game series? If yes, you will like the RedLight GreenLight. In Virtual Reality, this game is one of the best experiences you can get.
This title is also free, like most other games in our best VR browser games for Oculus Quest. So, you can try it without paying anything.
Right now, OperaOne is the best browser for Oculus Quest and Quest 2 if you consider overall performance and features.
This browser is based on Chromium-engine and can deliver solid performance. Furthermore, the industry-leading browser engine makes Opera One compatible with almost all web elements.
Otherwise, the developers have also removed unnecessary codes from the Chromium engine, making it a different option than Chrome. Due to the excellent compatibility, you can play any VR games on it and do other tasks efficiently without any problems.
This article has featured the best 10 Oculus Quest VR browser games. If you have any suggestions or have played any of the titles from our list, let us know your experience or opinion in the comment box.
Your computer uses dozens of applications in the background and the average user probably hasn’t heard about any of these applications.
Many users reported an application called Hkcmd, and they don’t know what it does. In today’s article, we’re going to take a closer look and tell you what exactly is Hkcmd and if you should remove it.
What is the Hkcmd module in startup?
Hkcmd is a legitimate file, and it’s associated with Intel graphics. The file can usually be found on systems that are using Intel 810 and 815 chipsets.
The actual Hkcmd file is located in the System32 subfolder in the Windows directory.
This file allows you to perform certain keyboard shortcuts and open Intel’s Graphics and Media Control Panel quickly, so it’s not harmful to your PC.
Is Hkcmd needed at startup?
As we previously mentioned, Hkcmd is used only to interpret certain keyboard shortcuts related to Intel graphics.
If you don’t use these keyboard shortcuts, you can disable this process from startup.
Is Hkcmd.exe a virus?
No, Hkcmd is not a virus and it’s a part of Intel’s graphics drivers, which makes it a legitimate file. However, a clever hacker might disguise malware as Hkcmd, but that’s rare.
If you still want to be sure that your system is secure, you can scan this file with reliable antivirus software. Our recommendation offers real-time protection thanks to its holistic technology.
There’s also multi-layer protection, as well as a vulnerability scanner, so it will verify downloaded applications and drivers.
This amazing software offers exquisite protection against all threats including spyware, rootkits, worms, viruses, and even adware. So if security is a priority for you, then it’s worth a try!
Other great features:
Webcam protection
Multi-platform support
Low system requirements
Top-notch anti-malware protection
TotalAV
TotalAV is a fast, reliable and secure antivirus that will keep your PC safe from all online threats. Be sure to try it ou now!
No, Hkcmd comes with Intel drivers, and removing the file might lead to stability issues.
To remove Hkcmd completely, you’ll need to uninstall Intel(R) Graphics Media Accelerator, but that will lead to reduced multimedia performance.
Unless your antivirus detects Hkcmd as a malicious file, there’s no need to remove it. You can, however, disable it.
How to disable the Hkcmd module?
1. Press the Windows key on your keyboard or the Start button on the taskbar to open Windows Search.
2. In the search box, type control panel and press Enter.
3. The Control Panel window will open.
4. Navigate to Intel Extreme Gfx.
5. Disable the Hot Keys feature.
6. Save the changes and close the window.
Hkcmd can be disabled via Control Panel. What you need to do is disable the Hot Keys feature from Intel Extreme Gfx. After doing that, Hkcmd won’t appear anymore.
Also, if you are looking for a good solution to protect your PC, then check out our best lifetime license antivirus tools and find the proper one for your needs.
Hkcmd is a part of Intel Graphics Media Accelerator, and it’s completely safe, so if you ever encounter this file, you shouldn’t worry about it, unless your antivirus detects it as malware.
Write down in the comments section below any thoughts or questions you have about this topic.
Windows 10 includes a native Weather app, but that doesn’t enable you to add a temperate widget to the taskbar.
A temperate widget that tells you what the current temperate is in your town or city would be a handy addition to the taskbar.
However, there are a few third-party programs with which you can add temperature widgets to the taskbar, system tray, or wider Windows desktop.
How can I show the temperature on the taskbar on Windows 10?
1. Use WeatherBug
WeatherBug is a weather application that provides you with an updated and exact forecast, while also displaying the temperature for a selected world region with its taskbar icon.
Go through the installer to add WeatherBug to Windows.
Configuring WeatherBug
After opening WeatherBug’s window, you’ll need to enter your region. Click the location drop-down menu at the top of WeatherBug.
Click the Add Location option.
Enter a location name to add it. Then select the location.
WeatherBug will now display the temperature for your selected region on its taskbar icon as in the snapshot directly below. To change that from Fahrenheit to Celsius, click the settings button at the top right of WeatherBug’s window.
Click Settings to open the options shown directly below. Then click Units to switch from Fahrenheit to Celsius.
To add WeatherBug to the system startup, click Launch Options.
Turn on the Launch at startup option.
WeatherBug also displays a weather temperature widget on the system tray as shown directly below. To select an alternative color for that system tray icon, click the settings button in WeatherBug.
Select Customize > Temperature in the tray to open the options shown directly below.
Select an alternative color for WeatherBug’s system tray icon.
2. Use 8GadgetPack
8GadgetPack allows you to have the weather widget on the desktop instead of the taskbar.
This great tool allows you to customize the way your temperature is being shown, and you can also modify its position and colors.
The WeatherBug and 8GadgetPack are two third-party programs you can add temperature widgets to the Windows 10 taskbar and desktop with.
A new WeatherBug app is also in the pipeline, which will probably be better than the current one. With those temperature widgets, you can see whether you’ll need a coat or not before heading out.
However, there is a built-in option to show the temperature on the taskbar on Windows 10 as well, as long as you don’t mind seeing News on it as well.
We hope you found this article helpful. Let us know in the comments section below what you think about it.
Security is the main concern for Windows users, especially regarding the protection and privacy of information.
That is precisely why constant updates and improvements are being rolled out in this area, including a Tamper Protection feature.
While Windows Security is powerful enough to handle most cyber-security threats, it becomes useless once it is deactivated by third-party software or malware.
This is why the Tamper Protection feature was created, as its primary purpose is to prevent changing relevant Windows Defender Antivirus settings.
To that extent, we’ve compiled a list of methods you can use to disable or enable Tamper Protection in Windows 10, although we highly recommend you keep the feature activated at all times.
How do I turn Tamper Protection on or off in Windows 10?
1. Use the Windows Security UI
Click on the Start button on your taskbar.
Click on Settings.
Go to Updates & Security.
Select Windows Security.
Switch to Virus and Threat protection.
Select Manage Settings.
Scroll a bit to find Tamper Protection.
Toggle between On or Off, depending on what you need.
2. Edit the Registry key for Tamper Protection
1. Click Win + R on your keyboard to open the Run dialog.
2. Type in regedit.exe. This will open theRegistry Editor.
3. Navigate to this location: HKEY_LOCAL_MACHINESOFTWAREMicrosoftWindows DefenderFeatures
4. Double click on the DWORD calledTamperProtectionto edit its value.
5. Set it to0to disable Tamper Protection. Alternatively, you can set it to5to enable Tamper Protection.
A very easy method to enable or disable Tamper Protection on your PC is to tweak the Registry. All you need to do is navigate to the Tamper Protection registry key and change its DWORD value according to your preferences.
Create a profile that includes the following settings:
Platform:
Windows 10 and later
ProfileType:
Endpoint protection
Go to Settings.
Select Windows Defender Security Center.
Click on Tamper Protection.
Configure it on or off.
Assign the profile to one or more groups.
By following any of the following 3 methods, you can toggle Tamper Protection on or off as you see fit. However, keep note that due to the nature of Tamper Protection and what it does, it is recommended that you keep it enabled at all times.
Whether you use your webcam to chat with loved ones, clients, or suppliers, the experience can be improved with the right settings.
A webcam’s software must be installed on the computer in order to use the hardware and configure its settings, regardless of whether the webcam is built-in or external.
However, there are instances where the settings don’t save. In this article, first, we will explain why this happens and how to fix it. So, let’s get started.
Why are my webcam settings not saving?
Some webcam problems, including failing to save your settings, can be traced back to malfunctioning software. Furthermore, this problem might be triggered by running cleaning apps, which frequently erase your saved data or cache.
Also, configuring a webcam without having it connected to a computer can prevent the settings from being saved.
When you launch the app, it will immediately recognize any Logitech webcam you have connected.
Now, click on the NEW CAMERA MODE option and select your camera. This will open the webcam settings.
After configuring the webcam setting, save it. This will fix Logitech’s webcam settings not saving.
If, after restarting your PC, you still have trouble with settings not saving, click Settings in the upper right corner of the program’s main window.
Finally, select Disable this device in the G Hub option. In this way, other apps on your PC will be able to access the camera without interference, which may resolve the issue.
2. Skype webcam settings not working
2.1. Check the webcam’s cable
The first step is ensuring your webcam is connected to your PC correctly. So, check the cables or change the ports the webcam is connected to.
Because it’s possible that the port itself is the source of the problem.
2.2 Select your webcam in Skype settings
Open the Skype app and go to the Settings menu.
After that, select the Audio and Video option. Now, check which device is set as the default webcam (Skype may have selected the wrong device).
If your webcam cannot be recognized, open its app and turn it on using its software.
The first thing you should try is closing the app and starting it back up again. However, if that didn’t work, instead of trying more involved solutions, consider restarting the computer first. Because, in some cases, the problem is minor and can be resolved with a simple app relaunch.
3.2. Disable firewall
Click on the Start menu, search for Control Panel and select it.
Next, choose Windows Defender Firewall and click on Turn Windows Defender Firewall On orOff.
Now, disable it.
Another reason why OBS Studio cannot load the stream is due to the installed antivirus or firewall. These apps can be the main reason why the OBS camera is not showing up.
Disable these tools for now and restart OBS Studio to see if the issue is resolved.
3.3 Update OBS Studio
It’s possible that OBS app problems are to blame when a camera functions normally in its own app but fails when used with OBS.
To solve the problem, reinstalling the app, or installing the latest version, should do the trick. So, a simple reinstall or updating the app should fix the issue.
4. Teams webcam settings not saving
To change the camera settings before the meeting, click the three-dot menu beside your profile picture in the Teams desktop application’s title bar.
Now, go to the Devices option in the left navigation menu, and scroll down to find the Camera option.
Click the drop-down menu, and select the camera you want to use for Microsoft Teams.
If you’re having trouble with saving your camera settings in Teams, it could be because you haven’t chosen the right webcam. So, we recommend you follow the steps above.
How do I change my webcam settings in Windows 10/11?
Press Windows + I keys to open the Settings menu.
Select Bluetooth & devices from the left, then Cameras from the right menu.
Next, choose the webcam or network camera in the Connected camera settings.
Now, use the Brightness, Contrast, and Rotate Video options to change the webcam settings.
You can also enable or disable HDR Video and Eye Contact features if available.
In addition to the solutions detailed above, you may also uninstall Camera from the Device Manager menu and reinstall it.
Using this method, you can fix issues caused by a faulty driver and, perhaps, resolve the problem where your webcam’s settings aren’t being saved.
Please let us know in the comments section below if you were successful in resolving the issue with your webcam settings not being saved.
The Pro version of Windows comes with Hyper-V, the in-house virtual machine solution from Microsoft built into Windows. However, if you enable Hyper-V, it also enables the Windows Defender Credential Guard.
Now, what if you want to disable Credential Guard in Windows 10?
You may be required to disable Credential Guard to make sure that the other virtual machine solutions like VMware operate normally, which is not possible with the Credential Guard running.
In this article, we walk you through the steps required to disable Credential Guard in Windows 10 so that you can run VMware and Hyper-V.
How can I disable Credential Guard to run Hyper-V and VMware?
1. Disable Credential Guard
The Credential Guard can be disabled on your Windows 10 device via the built-in Group Policy Editor tool. You need to modify the specific policy responsible for enabling or disabling this feature.
1. Press the Windows key + R to open Run.
2. Type gpedit.msc and click OK. This will open the Group PolicyEditor.
3. In the Group Policy Editor, navigate to the following location: Computer Configuration > Administrative Templates > System > Device Guard
4. Select Device Guard.
5. On the right pane, double-click the Turn on Virtualization Based Security policy.
6. In the new dialogue box, select theDisabled or Not Configuredoption.
7. ClickOKto save the changes.
8. Close theGroup Policy Editor.
9. Restart the computer to apply the changes.
2. Enable Hyper-V
2.1 Via Windows features
Press Windowskey + R to open Run.
Type control and click OK to open the Control Panel.
In the Control Panel, go to Programs > Programs and Features.
On the left pane, click on the Turn Windows features on or off link.
In the Windows Features window, check Hyper-V and click OK.
If you are running Windows 10 version earlier than 1607, then check Hyper-V Hypervisor as well as the Isolated User Mode option.
Click OK to save the changes.
Windows will prompt you to restart the computer. Click on Restart to install Hyper-V.
If the issue persists, open the Windows Features window again and then de-select Hyper-V and reboot the computer.
If you get WMware Player and device/Credential Guard are not compatible. VMware Player can be run after disabling Device / Credential Guard” error, the first method should help.
However, if the issue persists, you can disable Hyper-V using a PowerShell command.
Right-click on Start and select Windows PowerShell (Admin).
In the PowerShell window, type the following command to disable Hyper-V: bcdedit /set hypervisorlaunchtype off
Now try relaunching VMware and check if the error is resolved.
The first method to disable Credential Guard is recommended if you want to run both Hyper-V and VMware virtual machines on your computer.
However, the PowerShell command can disable Hyper-V without having to install/uninstall it from Windows Features.
Let us know in the comments section below if you managed to disable the Credential Guard on your Windows 10 PC without any problems.
This is simpler than you think, and this guide will show you how to do it.
Which apps are bloatware in Windows 11?
Windows PC Health Check: Used by many to verify if their PC meets the system requirements for Windows 11. But once you are on the latest iteration, there’s no need for the app.
Facebook:The desktop app for the popular social media platform, though most users don’t need it.
Instagram:You can access Instagram via the website, and the app offers no real benefit.
Twitter:Twitter, too, is accessible via the official website and the mobile app, and both these are usually the preferred medium for access.
Netflix:The desktop app for a popular streaming service, though not used by most users. You can safely uninstall it.
Prime Video:The web version is a preferred channel, and the desktop app offers no real utility.
Solitaire Collection:A game on Windows 11, but if you are not a gaming fan or not into this particular genre, uninstall Solitaire Collection right away.
TikTok:It’s a popular short-form video creation and hosting platform, but the mobile app is far more popular and often a preferred option. Go ahead and safely uninstall it.
News:Not a great app for regular updates from around the globe. Much better options are available on the web.
CCleaner:The free version of CCleaner often comes preinstalled with the PC, and the software does a decent job. But, it’s still not meant for everyone, and installation should be optional.
Dropbox Promotion:Comes preinstalled on Dell laptops and is of no use to most users.
Feedback Hub:The app allows users to submit feedback to Microsoft, but if you haven’t ever submitted one like most other users, uninstalling it wouldn’t affect any critical aspect.
Gaming Services:If you are not into gaming, uninstalling the app would be perfectly fine. Moreover, you can always reinstall it from the Microsoft Store.
Microsoft Teams:If you rely on other platforms for video calls and conferencing, say, Zoom or Google Meet, having Microsoft Teams installed isn’t a good idea. Takes up 147 MB even when it’s never been opened.
Mail and Calendar:The app allows you to access emails and schedule activities, but there are other far more reliable options.
Microsoft To Do:Allows you to manage all the tasks, be it work, shopping, creating a reading schedule, or basically anything else. But do you really need a desktop app for it? If the answer is no, it will be bloatware for you.
OneNote:Used to create and share notes with other users. But OneNote is not the preferred option for many, and uninstalling it is often the wise choice.
People:The app allows users to create a list of contacts from all email addresses and effectively manage them. If you feel like it’s a worthy addition, use it, but most users don’t, and hence it falls under bloatware in Windows 11.
Phone Link:Used to connect Android devices to the Windows PC. If you don’t have an Android phone, uninstall the bloatware in Windows 11. Phone Link could be useful to some, but since it comes preinstalled, we have categorized it as bloatware.
Spotify:Spotify is one of the largest music streaming platforms that has expanded tremendously in recent years. But most of you wouldn’t even have noticed the desktop app for it.
Tips:Microsoft Tips provides users with basic information about using the various features and exploring the nooks and corners of the OS.
Weather:Provides weather updates to users, but with the availability of other such apps, this one seems to have lost prominence and is rarely used.
Xbox:If you don’t have an Xbox account or use the platform, the app is of no use.
Xbox Live:Again, the app offers no real utility to most users. It’s dedicated to Xbox users and if you are not one, uninstall it to free up storage space in Windows 11.
uTorrent:The app allows users to download torrent files over the Internet. It’s a good app but shouldn’t come preinstalled on the PC since not many users rely on torrent. You are free to uninstall it.
Print 3D:The app is meant for users with a 3D printer. As is the case with other similar ones, it should be available as an optional app and not come preinstalled with the OS.
Sticky Notes:Very similar to their real-life counterpart, Sticky Notes allows users to quickly jot things down and put them on the desktop.
Terminal:Windows Terminal allows users to open command line applications in various tabs, be it Command Prompt, PowerShell, or Azure Cloud Shell, amongst others. But since all these are already available, many go ahead and uninstall Terminal.
Maps:Microsoft Maps is not as effective as Google Maps, and for most users, having this kind of application installed on the computer makes no real sense.
Cortana:It’s a virtual assistant that comes preinstalled but is not used by most users. If you are one of them, uninstalling it should clear up space.
Xbox Game Bar: A part of the Xbox package preinstalled on Windows PC. If you are not an Xbox user, remove the bloatware from Windows 11.
Xbox Console Companion:The Xbox Console Companion allows you to enjoy multiplayer gaming, but as is the case with all Xbox apps, this too can be uninstalled by non-Xbox Windows users.
Get Started:A Microsoft app that helps users set up Windows and install the programs most suited for them. If you know your way through the OS and are an experienced user, Get Started offers no utility.
Media Player:A built-in audio and video player, but most of us rely on VLC Media Player and other third-party options.
Candy Crush Saga:It’s the desktop app for the popular Candy Crush game and can be easily uninstalled if you are not a fan of it.
Power Automate Desktop: The app helps users create and run automation. Though, it’s not needed by most.
McAfee Antivirus:The trial version of McAfee often comes preinstalled with the PC, and it’s usually done by the manufacturer. But Windows Security, the built-in antivirus, is just as good.
Norton Antivirus:Another antivirus installed on Windows 11 devices by manufacturers and should be uninstalled since you only get a free version, which lacks advanced features.
3D Viewer:The app can be used to view 3D models on the desktop, but most of us never really use it.
Groove Music:It’s an audio player that supports a wide array of formats and is compatible with several devices. But, the app has already been discontinued, and there are better options available.
Snipping Tool:An app to capture and edit screenshots in Windows 11. It recently received an upgrade but is still no match for the best snipping tools in Windows.
Voice Recorder:As the name suggests, it is used to record audio clips. And like most users, you would have never used the app. So, go ahead and uninstall this Windows 11 bloatware to free up storage space.
Java:It was a critical part of Windows until a few years ago, but with websites making the switch to more advanced technologies, the app isn’t useful anymore.
WinRAR:Used to open ZIP and RAR file formats, amongst many others, though 7-Zip is a far better alternative and free to use.
Clipchamp:It’s a video editor preinstalled on some Windows 11 devices. But Clipchamp has several limitations and is not ideal for most users, thus making it a Windows 11 bloatware.
Adobe Creative Cloud Express:It’s a collection of Adobe apps, and if not used, it shouldn’t occupy much space. But why keep it installed when you don’t need it in the first place?
My Dell:The app is present on Dell computers and is used by some. But for most, it’s bloatware in Windows 11, uninstalling, which carries no major harm.
Dell Customer Connect:An app that allows Dell to collect reviews and feedback from users. If you don’t intend to do that, remove the program from Windows 11.
Dell CinemaColor:Used to optimize the display on Dell devices using advanced hardware and software. Not a great utility for many and can be safely uninstalled.
How do I remove bloatware in Windows 11?
1. Via the Settings app
Press Windows + I to launch the Settings app, and select Apps from the left.
Click on Apps & features on the right.
Now, click on the ellipsis next to the bloatware, and select Uninstall from the flyout menu.
Again, click Uninstall in the confirmation prompt.
This is probably the easiest way to uninstall an app in Windows 11. And it will allow you to remove most of the bloatware installed in Windows 11.
Even though some of the bloatware wouldn’t have an uninstall option, you can remove these as well. Find out how in the next section.
2. Use a Windows 11 bloatware remover
A few bloatware in Windows 11 are meant to remain installed, no matter whether you need them or not. The Uninstall button for these would be greyed out in the Settings app.
A dedicated software helps remove a large range of software, including the most tricky ones, with relative ease. Also, it will identify and remove any Registry entries or other leftover files from the program.
This should boost the computer’s performance since you end up clearing more storage space than you would have with the manual method.
Should I remove bloatware?
This is the tricky part! As you may have noticed earlier, several of the applications might seem useful. And many of us often use these. So, before you go ahead and uninstall it, identify whether the application performs the intended purpose for you.
For instance, if you use Microsoft Teams for work-related purposes, it isn’t bloatware anymore but becomes a crucial program. Once you have identified this aspect, deciding whether to keep an app or remove it would be a lot simpler.
And remember, uninstalling bloatware in Windows 11 is actually quite helpful. It not just helps clear the storage space but also improves the system’s performance.
Besides, several bloatware are configured to load when you turn on the computer, thus increasing the boot time. So, after you have uninstalled all these, the computer will turn on faster.
Uninstalling bloatware might also help fix overheating issues in Windows 11 if it was high resource consumption that caused the problem.
So, in all, removing bloatware in Windows 11, or any iteration of the OS for that matter, is quite beneficial, given the program offers no real utility to you.
If you’re getting an error that says “Automatic Repair Couldn’t Repair Your PC” or “Automatic Repair Failed”, stick around. We’ll help you fix it. Sometimes, the built-in Automatic Repair tool in Windows fails. Most commonly, this annoying issue happens when your PC shuts down unexpectedly or you have corrupt system files.
Here are some more error messages and codes you may encounter:
Windows 10 automatic repair failed
log file c /windows/system32/logfiles/srt/srttrail.txt Windows 10
bootrec.exe /fixboot access is denied Windows 10
Windows 10 automatic repair your pc did not start correctly
Follow below to address these and other underlying issues that stop automatic repair from working.
How do I fix Windows 10 automatic repair couldn’t repair your PC?
1. Run fixboot and/or chkdsk command
Restart your PC and repeatedly press F8 before the Windows logo appears.
Choose Troubleshoot > Advanced Options.
Select Command Prompt from the list of options.
Write the following lines and press Enter after each line to run it: bootrec.exe /rebuildbcdbootrec.exe /fixmbrbootrec.exe /fixboot
Additionally, you can also run a chkdsk commands as well.
Type the commands below in Command Prompt and hit Enter after each. chkdsk /r c:chkdsk /r d:
To perform these commands, you need to know the drive letters for all your hard drive partitions. So, remember to use the letters that match your hard drive partitions on your PC instead of the C and D in the commands above.
Restart your computer and check if the issue is resolved.
This solution is a bit tricky because you need to know which driver is causing you this problem. Even if you don’t know, you can still try this solution and stop at Step 4.
If you encounter any issues or your chkdsk gets stuck, check this guide to solve the problem.
2. Run DISM
Enter the Boot Options menu like in the previous solution.
Choose Enable Safe Mode with Networking from the list of options after your computer restarts.
When Safe Mode starts, you need to download an updated version of the driver that’s giving you trouble. You can download the driver from the manufacturer’s website and save it to your USB flash drive.
Press Windows key + X and choose Command Prompt (Admin) from the list.
Copy and paste the command below and press Enter to run it: DISM /Online /Cleanup-Image /RestoreHealth
After the process is done, restart your computer.
When Windows 10 starts, install the driver that you’ve downloaded and the issue should be resolved.
Note that the DISM scan takes up to 15 minutes. So, you need to be patient till the process is complete.
If, for some reason, you can’t boot into Safe Mode, take a look at our troubleshooting guide on how to properly access Safe Mode.
The Windows 10 Automatic Repair couldn’t repair your PC error is one of the harder errors to fix and it can make your computer almost unusable.
Tell us how your fix ended up below in our comments section!
FAQs
How do you fix a stuck preparing automatic repair?
You can use practical methods to handle the automatic repair loop on your Windows 10, which proved helpful for other users. After the automatic repair message, you can hold the power button to force shut down your PC. After the restart, you should get the Troubleshoot option to repair the system and update or reset your device. If this method doesn’t suit you, it’s possible to resolve the issue using Safe Mode, which can offer repairing tools like Startup Settings and Windows startup options. In addition, this stuck preparing automatic repair for Windows 10 is a common problem for Windows 10 Lenovo, HP, Dell, and ASUS.
What does it mean when your computer says preparing automatic repair?
This operation usually happens on your Windows 10 PC when you run into different errors that completely shut down your system. The automatic repair process will start when you power on and try to diagnose the cause of this unpleasant crash on your computer.
Why does Automatic repair couldn’t repair your PC message appear?
There are various reasons you might be getting the Automatic repair couldn’t repair your PC, press advanced options to try other options error message. Below are some of the prevalent causes: Problematic Windows update Broken or corrupt system files Incompatible hard drive Corrupt Window Boot Manager file
How long does automatic repair take on Windows 10?
The automatic repair process on your Windows 10 device will last, depending on your needs. It can take a few minutes to a couple of hours if you require time-consuming tasks. For example, it can last about 30 minutes in case you perform a fresh install without keeping any programs. In the other case, it can take up to 3 or 4 hours if you want to repair it and keep your files. You can use this feature for various issues that generate booting problems on your PC, so consider it if you can’t correctly boot your device.
The .tag file type is fairly obscure. You won’t run into it much unless you’re a programmer or web design enthusiast.
However, if you are not, you may find yourself concerned that these files are part of an elaborate viral infection if they’re on your PC.
The following guide should help you dissolve those worries. You will learn what files with the .tag extension do and how to open them.
What are .tag files?
It’s interesting just how many use cases there are for TAG files. For instance, in web design and development, TAG files are used to build custom tags. They are usually written as mini JSPs (JavaServer Pages).
TAG files typically have one function. Once a programmer defines them, a plethora of JSPs, programs, and/or web pages can use and re-use them.
WordSmith Tools, a software suite used for word analysis in texts and applications, uses TAG files to extend and add custom functionality. Some programs use them for simple metadata.
If you’re unfamiliar with what metadata is, it’s essentially more descriptive information about data or a file.
Other programming tools that create and utilize .tag files include DataFlex and COREX. Both of these are visual object-oriented programming tools for developing multiplatform software applications. These tools for data mapping purposes use TAG files.
How do I open a .tag file?
1. Using HTML CoffeeCup HTML Editor
Download and install CoffeeCup HTML Editor. You don’t have to run CoffeeCup HTML Editor after the setup is complete.
CoffeeCup HTML Editor will assign itself as the default program to run any web-design-related files (that don’t already have default programs to run them). All you have to do is open Windows File Explorer, navigate to where the .tag file is, and double-click on it.
After double-clicking the file, CoffeeCup HTML Editor will open it in a new tab where you can read through it and even edit it.
The best way to open and edit files with the .tag file extension is through the use of a code editor or IDE (Integrated Development Environment) such as CoffeeCup HTML Editor.
CoffeeCupHTML Editor is a development environment for the creation of advanced websites and webpages. It’s particularly useful for opening complex TAG files.
2. Once Notepad is open, click on File, and then on Open.
3. Make sure you select ‘All Files (.)’ from the file-type dropdown box (not ‘Text Document’).
4. Navigate to the .tag file on your directory and then open it.
5. Once it’s opened with Notepad, you can read through it (if you understand JSP) and even make changes to it.
If the .tag file in question is small and not worth opening with a dedicated third-party app such as CoffeeCup HTML editor, then another solution is to use Windows Notepad.
Notepad is a built-in tool available for free on your device, which is perfectly safe to use. It can help you open all kinds of file formats, so that you can not only view them, but also edit them.
As you can see, TAG files are flexible. Although they are primarily used for encapsulation and the recording of metadata, the average user is unlikely to encounter them.
If you do find them on your system, remember, that you have nothing to worry about. As for other unknown files, we also have a guide on AADL3inscription2024.dz, so you might want to visit it.
For any other questions or suggestions, don’t hesitate to reach for the comments section below.
And, if you are into gaming, read the available information on how to turn on Auto HDR on your Windows 11 device.
That being said, let’s focus on the error described in the title and walk you through the necessary steps for fixing the problem.
Why does GeForce keep saying an unknown error has occurred?
Rest assured you won’t have to buy a new PC, only follow a short troubleshooting process that will only take a few minutes.
One of the reasons why we get this error is the internet connection, which is too weak or not working at all, will prevent you from installing the GeForce update.
Your current drivers becoming corrupted or your antivirus software can also stand in the way of a successful installation.
Now that we know what causes An unknown error has occurred on GeForce now, we can properly fix the issue quickly.
How do I fix An unknown error has occurred on Nvidia GeForce?
Expand Display Adapters, right-click on the one you are using and select Update driver.
Select Browse for my computer for drivers.
Click on the Browse button, select the driver, then click on Next and follow the instructions.
If this sounds like a hassle, a simple and quick solution is to use a dedicated tool that automatically scans your PC for outdated drivers and updates them.
2. Close all running apps and programs
Search for Task Manager and open the app.
Locat other running processes, select them individually, and press the End Task button.
Right-click the file you downloaded, then select Run as administrator.
4. Disable your antivirus software
You might not think so at first, but the antivirus software you are using can actually prevent Nvidia GeForce Experience from installing drivers or updates.
Now that you know this, all you need to do is to actually turn off the antivirus service until Nvidia finishes downloading and installing the new software.
Just to be safe, you can also add the Nvidia GeForce Experience app as a Firewall exception. We’ll show you how to do that as well.
How do I allow Nvidia GeForce Experience through the Firewall?
Press Windows + S to open the Search menu, enter Allow an app through Windows Firewall, and click on the relevant search result.
Click on the Change settings button.
Next, click on Allow another app.
Now, click on Browse.
Locate the launcher (.exe file) for GeForce Experience, select it, and then click on Open.
Click on Add.
Make sure you have both Private, and Public checkboxes ticked for the game, and then click on OK to save the changes.
5. Uninstall/reinstall GeForce Experience
Press Win + I to access Settings.
Select the Apps tab, then click on Installed apps.
Locate Nvidia GeForce Experience, click on the dots next to it and select Uninstall.
These are the solutions we recommend for the scenario where you are trying to install a GeForce update or driver and the installation fails with the An unknown error has occurred message.
Share with us in the dedicated comments section located below if this guide has helped you fix this annoying GeForce issue.
Notepad++ is one of the best text editors for Windows that’s packed with handy options, which users worldwide very much like.
One of the best is the handy Word wrap option that adds line wraps to documents. That’s an important option as it wraps lines so that they fit within the Notepad++ window.
How can I wrap lines in Notepad ++?
1. Enable text wrapping in Notepad ++
Launch Notepad ++.
Click the View button from the menu at the top of the window.
Choose the Word Wrap option from the dropdown menu.
Clicking the Word Wrap option once will either turn off or turn on the feature, depending on the original state of this setting.
2. Wrap text in Notepad ++
1. Launch Notepad ++.
2. Click on File > Open, then select a text document to open from your PC.
3. To add a line wrap, click theViewmenu.
4. Select the Word wrap option on the menu. Thereafter, all the lines will be wrapped so they fit within the window.
5. Alternatively, you can click theWord wrapbutton on Notepad++’s toolbar to add line wrap to a text document.
After you enable text wrapping in Notepad ++, you can begin using the feature to your liking. All you need to do is open the file you want to edit text in and apply the wrapping feature to it.
3. Give Word wrap a hotkey in Notepad++
You can assign a hotkey to the Word wrap option by recording a macro for it. To do that, click the Start Recording button shown directly below.
Then click the View menu to select Word wrap.
Click the Stop Recording button.
Click the Macro menu.
Select the Save Current Recorded Macro option.
Enter a title for the macro in the text box.
Select the Ctrl and Shift checkboxes. Then choose an additional keyboard key for the hotkey.
Press the OK button.
Then you can press your Ctrl + Shift hotkey to add line wrap to a document.
You can also wrap lines after a specified number of characters or symbols. To do that, click the Search menu, and choose Find, and click the Replace tab.
Enter (.{10}) in the Find what box. The 10 value specifies a maximum line length of 10 characters for lines, which you can adjust.
Next, input $1rn in the Replace with a text box.
Select the Regular expression radio button.
Click the Replace All button. Then your lines will wrap to a maximum 10 (or whatever value you entered) character length.
5. Get the file to wrap the line at 70+ characters
Make sure to back up your file before attempting this method.
Note the number that represents the length you want your text to wrap to (70+ in this case).
Copy the number to your clipboard.
Select the piece of text you want to wrap.
In the top menu, click on TextFX, and choose the TextFX Edit option.
Choose the option ReWrap Text to your desired 70+width.
So, adding line wrap is straightforward in Notepad++. With Word wrap selected, you won’t need to scroll across text documents anymore as all their lines will fit neatly within the Notepad++ window.
Let us know what you think about our article in the comments section below.
How do I recover the deleted media from my Sony camera?
1. Use Command Prompt
1. Connect the Sony camera to your PC with the USB cable provided with the camera.
2. Windows will detect it and assign a new drive letter to it.
3. Press the Windows key + F to open File Explorer and look to find out what is the drive letter.
4. Click the Start button, type cmd, and select Run as administrator from the results.
5. Type or paste the following command and replace g with the actual drive letter of your camera: chkdsk g:/r
6. CHKDSK will attempt to recover any files you have on your camera.
A handy method to try to recover deleted photos or videos from your Sony Camera is using the chkdsk command in Command Prompt. The tool will attempt to restore the files to your PC.
However, you should know that the tool will not be successful all the time.
Look for the photos you deleted from your Sony camera.
There’s a chance that if your camera has backup options and you’ve connected with your Google account, the photos and videos are backed up on Google Photos.
You can do the same for your Xperia smartphone by opening the Google Photos app on your device.
3. Recover deleted photos/videos using iMyFone D-Back
Visit the D-Back website and click on the Free Download button to get the app.
After the download is finished, double-click the file and select Install.
The software will install shortly and when it’s over, click on Start Now to launch the app.
Now, connect your Sony camera or SD card, USB drive and select the drive from the menu.
iMyFone D-Back will perform a quick scan of your drive first, then switch to a deep scan. The process will take a couple of seconds to a couple of minutes, depending on the drive size.
After the scanning is finished, you need to select the category of files from the left pane, then select all the files or individual ones by checking their boxes.
After you have selected all the files you want to recover, just hit the Recover button from the bottom-right corner of the window.
As you could probably notice, you can recover any files with iMyFone D-Back, not only photos and videos.
Actually, it supports more than 1000 file types, including Office documents, archives, and a lot more.
Also, it can recover files from any drive, including external media like the memory of a camera, an SD card, a USB flash drive, or external SSDs or HDDs.
iMyFone D-Back has an app dedicated to Android devices that you will find on the Google Play Store, download, and use even easier than on your desktop.
So, if you have a Sony Xperia or other Android device, there’s also the possibility of recovering your files quickly.
How do I get iMyFone D-Back?
As you’ve seen, there is a free version that you can use. However, you should know that this version only allows the recovery of up to 100 MB of files.
If you want to recover more files, you will have to purchase a license. But you’re in luck because if you apply the coupon code 90register you will benefit from a 10% discount right now!
The Tumblr dashboard lets you keep up with the blogs you follow and get all their updates in one place.
In a bid to improve your feed, Tumblr’s Best Stuff First feature determines the best content and pushes them to the top of your feed.
Although this is a useful feature, many users consider the Best Stuff First feature to be a miss. That’s mainly because the algorithm determines the best stuff by their note counts.
How can I turn off Best Stuff First on Tumblr?
1. Launch the Tumblr app on your smartphone.
2. Tap on the Account icon.
3. Select the blog for which you want to turn off the feature for.
4. Go to Settings by tapping the gear icon at the top right corner of the screen.
5. Select General settings.
6. Tap Dashboard preferences.
7. Toggle off the Best stuff first switch.
8. You can also turn off Stuff in your Orbit recommendations from this screen.
If you don’t find the Best Stuff First feature useful, feel free to turn it off. You can do this from your smartphone by navigating to Settings.
Best Stuff First gets turned off only on the specific device. So, if you use Tumblr from different devices, you must deactivate Best Stuff First on each of these phones.
Do keep in mind that you can only disable Tumblr’s Best Stuff First feature on Android and iOS devices. There’s no option to disable it from the desktop version.
The screenshots in this guide are from the Tumblr app for Android. The options and layouts are a little different on the iPhone versions, but the steps are the same on both.
We hope this guide has proven useful in your situation. To share your experience with us, feel free to use the comment section found below this guide.
If you are looking for a VPN without email registration, we are here to discuss this misconception of this situation.
One of the most popular ones is Betternet and we shall focus on this type of VPN as well as compare how Betternet holds up to some of the best VPN services on the market, ExpressVPN, PIA, and CyberGhost.
Your identity is not stored in logs, and your email address is only used to validate their marketing purposes in order to improve your experience, once you decide to sign up for the free trial.,
Even though there are no VPNs that do not require you to use your email to register, you will find the best VPNs with no-logs policies in this guide, and signing up for them may require a code sent to your email. However, this is the majority of your data that is tracked or stored in the VPN provider’s database.
Can you use a VPN without an account registration?
Email registration vs No-logs Policies and Anonymity
Most of the completely free VPNs come with ads and potentially unwanted apps that can be installed on your PC without your knowledge if you don’t research thoroughly about them.
There are legitimate reasons to use a VPN with email registration, and if the VPN provider does not keep logs, it doesn’t matter what email or payment method you use. Your information is not visible to anyone public, only to VPN vendors that are using the information to process the payments.
As you can see, even Betternet will require an email for registration when you sign up for the free trial. This does not imply that your information is sold or used against your will and knowledge. This means solely to mark you as a buyer and to offer the features you want extra from the VPN service.
With a proper VPN service, you can remain anonymous, hide your location, and change your IP address. If you do not want any third parties looking into your private life, then a VPN service is ideal for you.
Another advantage of using a VPN is that you can use it to easily access all the functions of streaming services such as YouTube and Netflix. In other words, if you are a Netflix user, then you can access content available for Netflix users in other countries.
Even for casual users, surfing the internet without anti-malware can compromise the security of your computer and private information. Check out this list of the best browsing security solutions that you can use on your computer.
On the other hand, if you are looking for highly functional, secure, no-logs VPN providers, then we suggest you check out ExpressVPN, PIA, and CyberGhost.
A no-logs or zero-logs VPN service does not store information about your online activities or connections.
This means that it will not save any information about your online activities, such as your personal information, payment information, or search history. As a result, you can remain completely anonymous.
What are the best VPNs that don’t keep logs?
ExpressVPN – best VPN for streaming & gaming with ultra-fast servers
ExpressVPN has over 80 servers in the United States alone and can easily bypass geo-restrictions to unblock almost any website or streaming service in the country, including Netflix, Hulu, HBO, and Amazon Prime.
On the surface, both ExpressVPN and Betternet appear to have elegant and slick native Windows clients. Further investigation reveals that, even for its paid service, Betternet lacks several features such as a kill switch, DNS and IPv6 protection, the ability to change protocols, and stealth technology.
ExpressVPN has a feature-rich Windows app with a kill switch, as well as a large server network with Smart Location to choose the fastest server.
Moreover, it has the ability to change protocols, DNS and IPv6 leak protection, and split tunneling to filter which apps should use your VPN connection.
While neither ExpressVPN nor Betternet provide a kill switch in their iOS apps, ExpressVPN is more elegant, user-friendly, and customizable.
ExpressVPN for iOS offers a much larger selection of ultra-fast servers, as well as enhanced security and a verified no-logging policy.
Let’s quickly look at its key features:
Split tunneling
Network lock kill switch
AES-256 encryption
MediaStreamer for VPN non-compatible device
Private DNS
Lightway protocol
Threat manager
If you want the best VPN for streaming, get ExpressVPN. It is extremely fast and unblocks all streaming platforms. To summarize, if you value your privacy and want the best VPN experience, choose ExpressVPN over Betternet.
ExpressVPN
Boasts unrivaled connection speeds, circumvents any geoblocks, and has solid online security and privacy.
PIA – known for the impressive worldwide network of servers
While Betternet allows you to browse the web privately, PIA (Private Internet Access) builds multiple layers of privacy around you and acts as an impenetrable shield against malware, prying eyes, ads, your ISP, and pretty much any kind of threat you can think of, regardless of its nature.
Enjoy the free internet with unmatched perks ranging from military-grade encryption for your data, secure VPN tunnels for routing your traffic, an impressive worldwide network of servers to choose from, lightning-fast speeds, and supreme privacy.
Once activated, the IP cloaking option will anonymize your browsing, plus your online activity will never risk falling in the wrong hands simply because there are no records stored. At all.
Its best-in-class security and privacy-oriented features do not come free of charge, but it is as cheap a solution as you could ever get when searching for a premium VPN.
It’s safe to safe that Kape Technologies owned PIA is budget-friendly offering enormous discounts for top VPN services, plus you get to test all these features completely free of risk thanks to its generous 30-day money-back guarantee.
Let’s quickly look at itskey features:
Private IP address allocation for anonymous browsing
Protection against your ISP and more with a strict no-logs policy
Liberate streaming, bypass censorship, and unblock geo-restricted websites and content
Highest download speeds and unlimited bandwidth without any buffering or slow loading times (ideal for streaming, gaming, and P2P torrenting)
Access to servers from all over the world (3292 + servers in 46 locations)
Secure Protection on Public Wi-Fi and military-grade encryption for your traffic data
Block ads, trackers, and malware
Secure VPN Protocols and tunneling technology
Protects up to 10 devices simultaneously with just 1 subscription
Close to free, but packed with high-grade functionalities, you would not want to miss this VPN.
Private Internet Access
No email, no worries – just supreme privacy with PIA!
CyberGhost – a VPN with no logs, that keeps you completely anonymous
Both VPN providers offer unlimited bandwidth and numerous server locations. But that is pretty much as far as the resemblance goes.
With 15 years of expertise, Cyberghost offers 6479 servers that are renowned for being extremely fast, secure, and reliable. In fact, CyberGhost utilizes a 256 AES bit encryption for its premium network.
Moreover, with just 1 subscription plan you get to protect as many as 7 different devices at the same time, which is a great facility.
Their concern for your privacy goes beyond encryption, they also adhere to a strict no-logs policy that will keep your online activity and traffic data tracking-free, plus you get to enjoy complete anonymity while browsing the web.
In addition, CyberGhost hides your IP address and guarantees supreme confidentiality and protection even when connecting through a public Wi-fi network.
Let’s quickly look at its key features:
Automatic Kill Switch and DNS and IP Leak Protection
Highest possible speed and unlimited bandwidth
Access to over 6479 servers worldwide
Strict No Logs Policy
256-bit AES Encryption
Secure VPN protocols (OpenVPN, L2TP-IPsec, and PPTP)
Simultaneous connections on up to 7 devices
Compatible with all major OS
Whopping 45-day money-back guarantee
So in short, CyberGhost would be a far better option over Betternet as their services are far more flexible, secure, and fast.
Cyberghost VPN
Cyberghost-powered total privacy with no hassle, no logs, completely anonymous.
Windscribe is one of the most trusted no-logs-free VPNs that is safe to use. It uses the same level of encryption as a good VPN provider, so you don’t have to worry about it.
This no-logs-free VPN encrypts your online traffic with military-grade encryption. It uses a 256-bit figure, SHA512 verification, and a 4096-piece RSA key to scramble all of your web data so that no one can catch and understand it.
It also makes use of advanced security features, for example, Forward Secrecy, which generates new and unique encryption keys for your online traffic.
Windscribe is safe and secure to use in terms of security; however, considering the fact that it comes free, we suggest a more trusted VPN service, such as ExpressVPN.
Is there a completely free VPN?
Free VPN services are generally not recommended if you are using social media, streaming services, or accessing confidential banking information because the majority of free VPN providers are not genuine or trusted.
According to our VPN advocates, free standalone VPNs that are not under a bigger vendor umbrella may jeopardize your privacy and security, selling out your information to third parties for marketing purposes.
A free VPN incurs costs for network connections and infrastructure. Advertisements, selling collected information, and more, are not doing this in their free time, everything has its purpose to make something out of it.
If they are not making much money but have a large number of customers. You can expect them to cut costs by limiting your usage in some way, and they will cut costs by using less expensive data protection. Does this imply that free VPNs provide inferior service? Most likely they do.
Does this imply that you will receive better service from a paid vendor? No, not always. The less expensive paid VPN alternative may still be reducing costs and selling valuable data where possible.
Explore more VPN Solutions that can cover every single one of your privacy needs. Don’t forget to check out our Security Hub as well.
While Betternet is a free service, it only offers basic features, that will not be satisfactory for long-term use. A more well-rounded tool like ExpressVPN, PIA, or CyberGhost will, however, fully satisfy your privacy needs.
There has been a lot of talk regarding the first major update for the Windows 11 operating system, and today we’re going to elaborate even more on the subject.
For starters, back in May, when version 22H2 was declared RTM, which means ready for release to manufacturing, everyone thought it was going to get released then.
Now, however, rumors claim that Microsoft is actually getting ready to release Windows 11 22H2 as soon as September 20, 2022.
That being said, users have started receiving updates under the moniker Windows 2022, which triggered them to believe this is actually Windows 11 22H2.
Is Windows 11 2022 actually Windows 11 22H2?
Of course, we do not have an official word from the tech giant yet, but everyone is reasonably confident with what the company plans to ship to its customers.
Users now spotted what everyone thinks seems to be the first mention of the marketing name Microsoft could use for this upcoming OS release.
You’re now running the Windows 11 2022 Update! Read on to discover new features and set things up just how you like.
This could be entirely possible since we are getting closer and closer to the rumored release date, which means the information is not as farfetched as some might think.
Microsoft clearly stated that it plans to service Windows 11 with one feature update per year, so its actually quite reasonable to assume that this release would be called the 2022 Update.
As you might remember, in the past we had monikers such as Creators Update, as well as other puzzling Windows 10 update aliases.
Even though many claim to have already solved the mystery that is Windows 11 and already know what to expect, Microsoft will surely surprise them as well.
Now, however, tidbits of upcoming Insider builds connected to the Moment update may have begun surfacing as Build 22940 has been spotted in a PowerShell issue opened back in July.
According to Windows 11 Insiders, who also happens to be a pretty famous Windows leaker, the Build 229xx range belongs to the 2nd Moment update.
Nice to see a mention of 229xx builds! These are dedicated to development of the 2nd update/"Moment" for Windows 11 v22H2. First comes v22H2 GA, then Moment 1 in October, and Moment 2 sometime next year. Every Moment brings a few new features, e.g. Tabs in File Explorer in M1. https://t.co/SBPOXRb5sT
The 1st moment update also has its own set of Insider builds under the range 228xx, and the updates are apparently getting back-ported to the recent Windows 11 Beta channel builds that have been happening under 22622.
No, it looks like Windows 11, version 22H2 has apparently already begun shipping inside new laptops, just in case you were looking for a new device that supports the latest OS.
Users that have recently bought new laptops were pleasantly surprised to notice a new boot animation when they powered up the devices.
I was not sure if this was actually shipping or not, but I just received a Dell laptop that has Windows 11 22H2, build 22621.521. I thought something was different as it had the new circle animation on boot.
Some of the early reports, backed up by some compelling evidence, had pointed to a September 20th general availability (GA) of the next feature update.
Everybody also believed that build 22621.382 was meant to be packaged as the above-mentioned GA release, but it was apparently false.
Keep in mind that Windows 11 build 22621.521 appears to be a cumulative update under KB5017321 that Microsoft released a couple of days ago in Release Preview alongside the Patch Tuesday updates.
Dism.exe error 1392 is usually displayed whenever a file or directory is corrupted and unreadable.
The location specified in the error message states that some temporary files are corrupt. Since the files are only temporary, you could delete the mentioned file in the error message and check if the issue persists.
The error is caused by missing system files or broken corrupted data, which should be fixed as soon as possible. Taking action should prevent further hardware and app damage, as this can lead to system crashes, data loss, or hardware failure in most cases.
Error 1392 manifests in issues like warning messages, slow or lagging PC performance, system freeze, program lock-up, startup or shutting down problems, and errors in installing apps or other programs and updates.
If you tried to delete the temporary file and nothing happened, try the other solutions in this guide.
What is error 1392?
The DISM error 1392 is usually displayed when a file or directory is corrupt. Also, this issue can be down to unreadable bad sectors on your hard drive.
Below are some of the causes of the DISM error 1392:
Corrupt system files
Antivirus interference
Presence of malware
Bad sectors on the hard disk
How can I fix the Dism.exe error 1392?
1. Perform an SFC scan
Press the Windows button and type cmd.
Click the Run as administrator option under Command Prompt.
Type the command below and hit Enter: sfc/scannow
Whenever you find the Dism error 1392, most likely there are corrupted files, and a system file checker scan will help you replace the incorrect versions with the genuine, correct Microsoft versions.
Restart your computer and check if the Dism error 1392 goes away after completing the above procedure.
2. Run Check disk to check and fix disk errors
Right-click on the Start icon and select Command Prompt (Admin).
Copy and paste the command below, and press Enter to run it. chkdsk /f h:
Note that you need to replace the letter h in the command above with the letter of the drive with the dism.exe error 1392 problem.
After the command, Check Disk will analyze the disk and return a status message regarding any problems it encounters. One of the ways Check Disk locates errors is by comparing the volume bitmap with the disk sectors assigned to files in the file system.
Check Disk can’t repair corrupted data within files that appear structurally intact. Unless you specify further options, Check Disk won’t fix problems, which is why you should use the format of the command above.
When you use this command, Check Disk analyzes the disk and then repairs any errors it finds if it is not in use.
path/filename specifies files to check for fragmentation (FAT16 and FAT32 only)
/F fixes errors on the disk
/V displays the full path and name of every file on the disk (FAT16 and FAT32); displays cleanup messages if any (NTFS)
/R locates bad sectors and recovers readable information (implies /F)
/X forces the volume to dismount first if necessary (implies /F)
/I perform a minimum check of index entries (NTFS only)
/C skips checking of cycles within the folder structure (NTFS only)
/L:size sets the log file size (NTFS only)
/B re-evaluates bad clusters on the volume (NTFS only; implies /R)
3. Scan your computer for malware
Press the Windows key and type virus.
Select the Virus & threat protection option.
Choose Scan options.
Select your preferred scan option and click the Scan now button.
The Dism error 1392 could be related to a malware infection on your computer system. This can damage, corrupt, or even delete Runtime error-related files.
You should choose either the Windows Defender Offline scan or the Full scan option for a deep scan.
Alternatively, you can use one of the best dedicated antivirus software to do a fast scan and detect any malware or virus that can pose a threat and create this issue.
4. Temporarily disable the antivirus program
Press the Windows key and type virus.
Select the Virus & threat protection option.
Click the Manage settings option.
Now, toggle off the switch for Real-time protection backward to disable it.
Click the Yes button when prompted to complete the process.
Antivirus software can help protect your computer against viruses and other security threats. In most cases, you shouldn’t disable it.
When you have to temporarily disable it to see whether it causes the Dism error 1392 or not, do note that your computer is open to attacks all this time.
You can find plenty of non-intrusive alternatives, not to mention the anti-threat and ransomware protection that always keeps you away from system performance and security issues.
5. Perform a system restore
Press the Windows key + S and type restore point.
Click Create a restore point in the list of search results.
Enter your administrator account password or grant permissions if prompted to.
In the System Properties dialog box, click System Restore.
Click Next.
Now, click a restore point created before you experienced the problem.
Finally, click the Next button, followed by Finish.
To go back to a restore point, do the following:
Press the Windows key and type control.
Select Control Panel.
Type recovery in the control panel search box.
Select Recovery.
Click Open System Restore.
Click Next.
Choose the restore point related to the problematic program/app, driver, or update.
Click Next, followed by Finish.
If the Dism error 1392 persists after a clean install, your runtime errors are not software but hardware related. So, replace the hardware that is causing dism.exe error 1392.
As you use your computer, over time, junk files accumulate and if not cleaned out, they may cause your computer to slow down or lag.
This may also bring up the Dism error 1392 due to file conflicts, or an overloaded hard drive. To clean these files, it is advised you use a top cleaner in CCleaner.
This tool removes all junk and unwanted files that can be dragging down your PC. Also, it can be used to uninstall all unwanted apps and their associated files.
CCleaner might just be the only tool needed to keep your PC running optimally.
CCleaner
The best way to clean up your PC and make it smoother.
Press the Windowskey + I to open the Settings app.
Select the Update & Security option.
Click the Check for update button.
Outdated PC can lead to the operating system error 1392, the file or directory is corrupted and unreadable encountered error message. The only fix, in this case, is to update your system to the latest version.
8. Reset PC
Press the Windows key + I to open Settings.
Click the Update & Security option.
Choose Recovery in the left pane.
Click the Get started button under the Reset this PC section.
Choose the Keep my files option and follow the onscreen instruction to complete the process.
If you face the unrecognized win32 error code: 1392 on your PC, you might need to reset your PC if the previous solutions could not solve it. This solution will not delete your valuable files. So you have nothing to lose.
Should I run DISM or SFC scan first?
DISM and SFC are repair tools used to fix issues on your PC. However, the SFC scan comes first and is used to detect and fix corrupt system files.
But if this fails, you can run the DISM scan to fix more complicated issues, including problems with SFC.
The Dism error 1392 can be annoying. Fortunately, it is not the most difficult to fix, as shown in this guide.
Do you want to know how to fix the DISM failed on Windows 10/11 issue? Then, check our guide to do it effortlessly.
Feel free to let us know in the comments below which of these solutions worked in your case.
Windows 10 is the most popular and the latest OS you can install from Microsoft. Upon installation, it allows you to bring some personal customizations and take advantage of a variety of features.
One such feature is the keyboard language. You can add multiple languages so you don’t have to change the keyboard itself whenever you want to type in a language like Japanese.
Can I use the Japanese keyboard on my PC?
Because the Japanese language uses different characters than English, Windows also integrates a feature called Japanese IME.
This is typing software that is already built into your system. You can type Japanese words in Hiragana, Katakana, and Kanji using an English keyboard.
There are basically two methods to type the characters, Romaji Input, and Kana Input. Currently, for the Japanese people, Romaji Input is the preferred method.
The Romanji input is a Romanized version of Japanese, literally meaning the Roman character that the other languages have. The other is via keyboard keys corresponding to the Japanese Kana.
In this article, we will guide you on how to easily add the Japanese language pack and start using it as soon as possible.
How do I use the Japanese keyboard on Windows 10?
1. Add the Japanese keyboard on Windows 10
1. Click on the Start icon and select Settings.
2. Go toTime & Language.
3. From the left menu, choose Language.
4. Under Preferred Languages, click onAdd a language.
5. Type Japanese in the search bar and once it is found, select it and click on the Next button.
6. Select the optional features you want then click Install.
7. Windows willdownload and install the language pack and the keyboard layout.
8. After installing, you will see it on the Language Bar Icon on the taskbar. From here, you can choose to use the Japanese keyboard.
9. To change the keyboard layout, click on the A icon that appeared.
10. The icon will change to Hiragana あ character.
11. Now you can type in Japanese with your keyboard.
In order to use the Japanese keyboard on your device, you must first add it manually via Time & Language settings.
After you confirm your selection for Japanese in the Add a language section, you can choose whether you want to add optional features as well, such as handwriting and TTS.
2. Manually enable the Japanese keyboard
In order to switch to Japanese, you have to see the language icon on the right side of your taskbar, as described in the method above.
However, if you don’t have it, follow the steps below to activate it.
Go to the Start icon and select Settings.
Click on Personalization.
From the left menu, choose Taskbar.
Scroll down to Notification Area and select Turn system icons on or off.
Locate the Input Indicator option and turn it ON.
Now you should see it in the right corner of your taskbar.
From the small A icon, you can switch to different IME options. By default, it will be selected as half-width alphanumeric.
With a right-click on the A icon, you can choose the keyboard mode you want, Hiragana or Katakana.
To use Kanji, instead of pressing Enter after writing the word, you need to hit the space key.
A list will pop up and you can use the arrow keys and space bar to go through the available options.
Now you are all set and can practice Japanese typing without needing a special keyboard.
Let us know whether you found our article useful and learned everything you wanted to know about adding and using the Japanese keyboard on your device.
If you’re learning Japanese, you might be interested in the Rikaikun Firefox extension that will help you read Japanese online.
All Intel-powered computers have an integrated graphics processor to perform basic graphic tasks.
However, while installing a newer version of the Intel Graphics driver, you may encounter This computer does not meet the minimum requirements for installing the software error.
This error can occur for multiple reasons, including motherboard disabling the integrated graphics chipset, incompatible driver or the OS, lack of integrated Intel Graphics, etc.
Now that Windows 11 is out, many out there are testing the new PC Health Check app to see whether they can make the jump to the latest OS as well.
What does this computer does not meet the minimum requirements message mean?
This computer does not meet the minimum requirements for installing the software error message shows up when most users try to install graphics drivers.
It occurs due to incompatible drivers and outdated operating systems. Also, the error can be down to a disabled graphics chipset. Irrespective of the cause, we have prepared a suitable fix for you in this guide.
Can I run a game if my PC doesn’t meet the minimum requirements?
It is possible to run a game from below the minimum needs at roughly 20-30 frames per second, arguably playable.
Occasionally, the game would refuse to allow you to play it and display a notice stating that your computer does not meet the minimum requirements for playing this game. However, you may be able to get away with running it at low enough settings on occasion.
Usually, when the lowest resolution and the lowest settings are used, your machine can only run the game at its lowest settings and resolution while maintaining an average frame rate of 30 frames per second.
You will be able to participate in the game, but the quality of the experience will be significantly reduced, making you want to uninstall it immediately.
If you are also troubled by this issue, here are a couple of troubleshooting tips to help you resolve it in no time.
How do I fix the PC doesn’t meet the requirements error?
These complete solutions scan your PC for any missing, broken, or outdated drivers and then download and install them.
2. Check for Windows updates
Click the Start icon and select Settings.
Select the Updates & Security option.
Now, click on the Check for updates button.
Go through the available updates and click the Install now button to install them.
Once all the available updates are installed, check if the OS or computer doesn’t meet the minimum requirements for this installer error code 21 message occurs again. If the issue persists, try other fixes below.
3. Update graphic card from Device Manager
Press the Windows key + R to open Run.
Type devmgmt.msc, and click OK.
Double-click on the Display adapters option to expand it.
Right-click on Intel HD Graphics and select Update driver.
Click on the Search automatically for drivers option.
Windows will look for a newer version of the driver and install it.
If you are getting a system or graphics device does not meet the applications minimum specifications, it might be down to outdated drivers. Updating it manually will help you search for a suitable driver to install.
Go to your driver manufacturer’s website to download the latest version.
Press the Windows key + X and select Device Manager.
Expand the Display adapters option.
Right-click on your driver and select Update driver.
Choose Browse my computer for drivers.
Now, select the Let me pick from a list of available drivers on my computer option.
From here, click the Have Disk… button and navigate to the folder where the driver you downloaded is saved.
Now, navigate to the Graphics directory and choose the .inf file.
If there is no Graphics directory, just select the .inf file and click Open.
Now, click the Next button.
Finally, click the Yes button when prompted and wait for the driver to be installed.
What happens when a device doesn’t meet the minimum requirements specified by a manufacturer
Manufacturers set minimum requirements for a reason. If your computer does not meet the minimum requirements for installing software or application, the program you are trying to install will not run.
However, if your computer meets the minimum requirements but not the suggested specifications, the program will install but will be slow. Also, it can sometimes encounter problems.
How do I fix this computer does not meet the minimum requirements on Windows 11?
The cause of this error on Windows 11 is the same as on Windows 10. You can effectively fix the problem by updating your graphics driver with a dedicated tool.
Also, you can update your PC to the latest version. Lastly, you can handle this issue effectively with any of the solutions in this guide.
This computer does not meet the minimum requirements for installing the software error occurs if the Intel Graphics processor installed on your system is not compatible with the driver package you are trying to install.
By following the steps in this article, you can install the Intel Graphics processor’s correct version and eliminate the error.
However, your laptop might be outdated or broken if you can’t solve the issue with any of the above solutions.
In this case, you can think about buying a new one. Here you can find a list of the best laptops for any budget, so check it out and find the proper one for your needs.
We hope our solutions helped you fix the PC that doesn’t meet the requirements error. For more suggestions or other questions, please access the comments section below.