Python is an interpreted programming language that some programmers develop software with. PY is the file format for Python scripts.
PY scripts can also have alternative file extensions, which include PYC, PYD, and PWC. The scripts are text files, but you’ll need a Python interpreter to run a PY script in Windows.
What can I use to open PY files?
Programmers can edit Python scripts with numerous software. In fact, you can even edit a PY script in Notepad.
There are also various Python editors that you can open scripts with. Those are otherwise IDE editors designed for Python scripting.
PyScripter, PyDev, and PyCharm are three open-source IDE software you can open your PY files with.
Before opening or editing, it’s often useful to confirm which Python version is installed on your system. You can easily do that by following this guide on how to check Python version in Windows CMD.
IDEs are probably better software for Python coding than Notepad++ as they also include debug tools and integrated interpreters.
We will show you in the guides below what and how to use to open PY files using different methods.
How can I open .py files on Windows 10?
1. Open Python Scripts with File Viewer Plus
You can open PY and many other source code files with File Viewer Plus. This is a universal file viewer for Windows that can open and display over 300 different file types, view, and edit source code files.
On top of that, you’re about to download a reliable editor and converter tool as well. Long story short, that’s also your chance to modify photos using the advanced image editor and convert your latest audio and video formats into different multimedia file types.
Is your budget limited? Then, the limited-time offer that includes a 30-day money-back guarantee will most likely sound like music to your ears.
File Viewer Plus
File Viewer Plus is the best tool to quickly open PY files on your Windows 10 computer. Ready to give it a try?
Download a CPython interpreter. Press the Download Python 3.6.2 button to save one of the more updated interpreters to Windows.
Open the Win + X menu by pressing the Win key + X hotkey.
Select Command Prompt (Admin) to open the CP’s window.
Open the folder that includes your Python script in the Command Prompt by entering ‘Cd’ followed by the path of the file.
Next, enter the full path of the CPython interpreter followed by the full location of the PY file in the Command Prompt, which must include the Python interpreter exe and PY file title. For example, you might enter something like this: C:Python27python.exe C:User FolderPY Files SubfolderPy file title.PY
Press Enter to open and run the PY script.
Text editors are fine for editing files, but you’ll need a Python interpreter to open and run the PY scripts. Some interpreters come bundled with IDE Python software.
However, CPython, otherwise the reference implementation, is the default interpreter for the programming language. Use the above steps to open PY scripts with that interpreter.
3. Open PY file in Notepad ++
You can easily open PY files in Notepad ++. It is a third-party text editor that supports the PY file format. You can add Notepad++ to most Windows platforms.
Note that this software has 32 and 64-bit versions. The 64-bit versions don’t work on 32-bit systems.
1. Right click the Start button and selectSystem to open the window in the snapshot directly below. Check what System type you have.
2. Download Notepad +++. You need to choose the correct version for your System (Notepad++ Installer 32-bit x86 (32-bit) or Notepad++ Installer 64-bit x64 (64-bit)).
3. After you download the setup wizard with which you can install the software, double-click on it to start the installation.
4. When Notepad +++ finished installing, open the application.
5. Go to File > Open.
6. Select the PY file that you want to open from your computer.
7. Notepad +++ will open the file.
So, you can edit and run PY files with text editors, IDE software, and Python interpreters.
You can also convert PY script files to Portable Document Format with the freeware PDF24 Creator software. Chances are to find PDF24 as being simply perfect for what you need.
If you have any other suggestions or questions, don’t hesitate to leave them in the comments section below.
Connecting your laptop to a monitor for a second screen should be easy, right? However, many things can go wrong while connecting your PC to your monitor with a VGA.
VGA not working issues are something most users have complained about. It signifies a difficulty with the VGA signal on your laptop, which means it can’t share the display with the monitor.
The VGA (Video Graphics Adapter) is a connector for computer video output. It creates an analog interface between the laptop and the monitor.
However, you need a VGA signal on your laptop to be able to transmit your graphics to the monitor. Another graphic adapter is the HDMI. Moreso, users complain about VGA not working while the HDMI is.
Furthermore, several conditions may be responsible for the laptop VGA to HDMI not working. Hardware or connection issues are the dominant cause of this issue.
Why does my VGA have no signal?
Hardware/connection issues: One of the reasons why users encounter VGA no signal issues is a connection error. When the VGA cable is not inserted into the appropriate port, it will prompt issues like HP laptop VGA output not working. Also, if the connector is not plugged in completely into the VGA port, it may affect the signal connection with the laptop.
Outdated graphic drivers: Running outdated drivers on your computer can cause many issues with your display connections. Since obsolete graphics drivers lack essential updates to help them run graphics smoothly, they can encounter difficulties like no VGA signal. Also, the laptop to TV VGA not working issue can occur due to outdated graphics drivers.
Computer in hibernation mode: The monitor can’t receive a VGA signal from your laptop if the laptop is in sleep or hibernation mode. The laptop disconnects from every device while in hibernation, as it applies to the Virtual Graphics Adapter.
Outdated Windows: Outdated Windows indicates that the version running on your computer is old and needs to be updated. Hence, it can block the VGA signal or impede graphic transmission, resulting in these VGA issues on Windows 10/11.
How do I know if my VGA is broken?
The best way to test if your VGA has a problem is to switch the VGA connector to a new one and see if the issue persists. Also, using your VGA connector with another laptop can help you know if your VGA is faulty.
How do I fix my laptop VGA if it’s not working?
1. Restart your PC
Click Start on your screen.
Select Power from the drop-down.
Click on Restart, then OK.
Restarting your device can fix the Dell laptop VGA output not working issue.
2. Check your VGA connection
Make sure that the VGA is inserted into the appropriate port. Also, check if it is plugged all the way in by pushing it lightly into the port.
3. Update graphics drivers
Press the Windows + R keys to prompt the Run dialogue box.
Type devmgmt.MSC, then click the OK button.
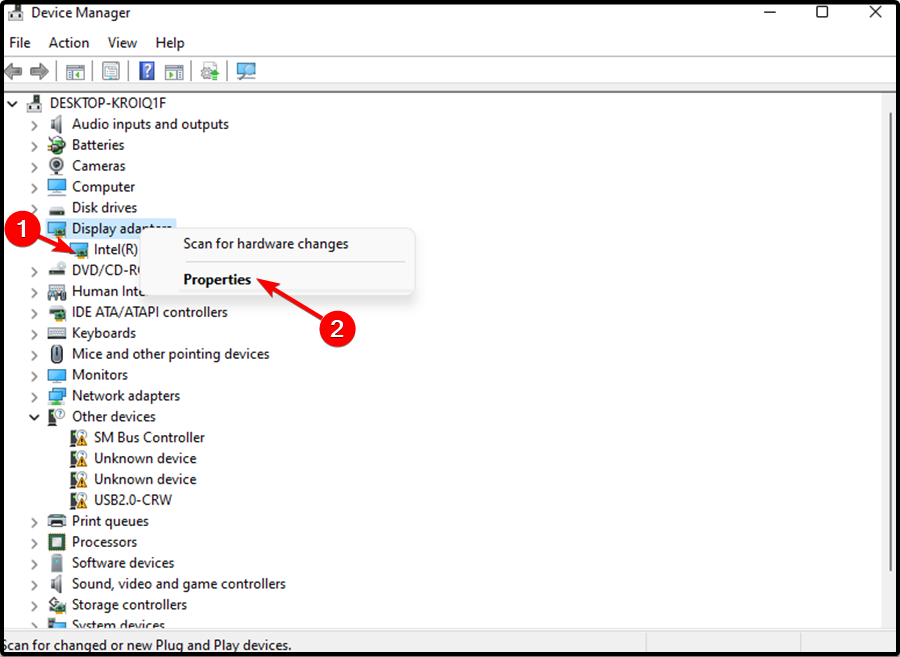
Click on Display adapters.
Select the driver and right-click on it.
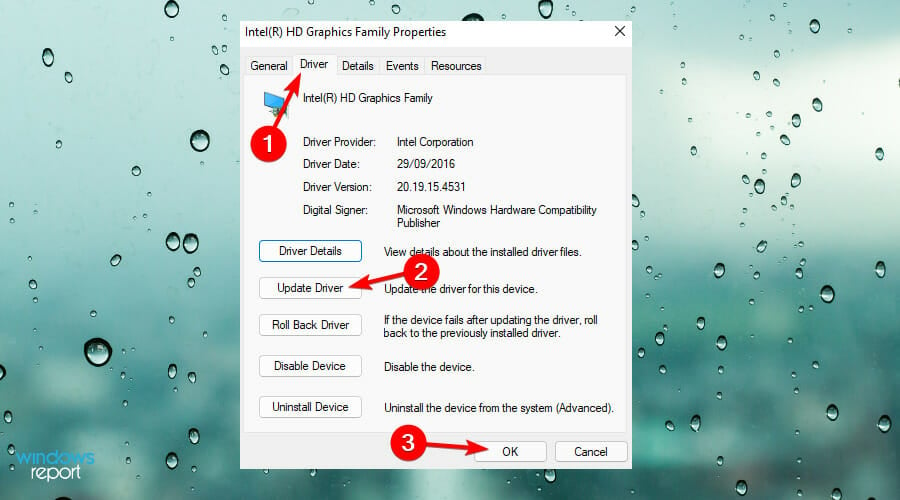
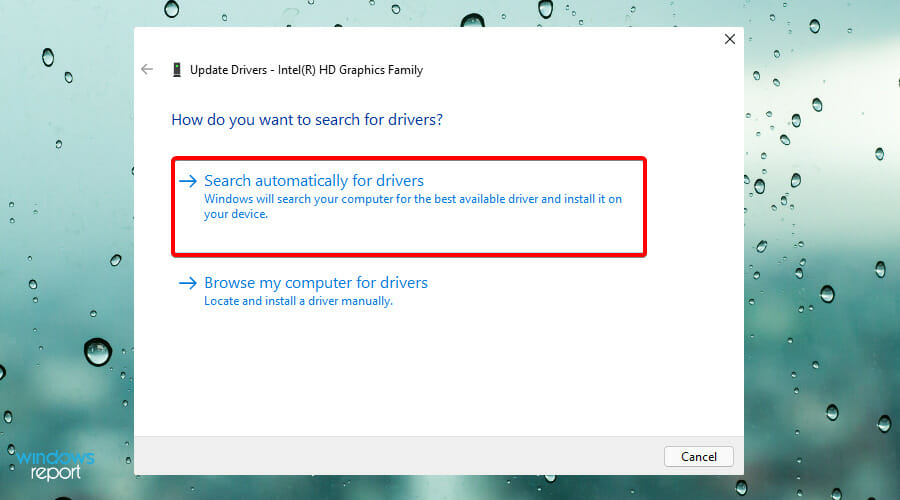
Click the Update Driver option and select Search automatically for drivers.
Updating graphics drivers will fix the laptop VGA port not working on Windows 10/11.
Select Settings from the options and choose Update & Security.
Click on Windows Update, then select Check for updates.
Windows will automatically download updates if there are any available.
5. Switch to HDMI
A simple way to fix the laptop VGA not working issue is by switching to another connector which is the HDMI. The High-Definition Multimedia Interface is another way that users can transfer audio & video from a laptop to a monitor.
Switch to an HDMI to save yourself the stress of troubleshooting your settings. It can help fix the laptop VGA to HDMI not working issue.
Right-click on your screen and select the Display settings.
Select Connect to a wireless Display and select Detect.
Choose VGA monitor and click on OK.
Doing this allows you to switch to a VGA display on your laptop.
These are the most effective troubleshooting fixes we could come up with. If your problem falls within these categories, then any of the above fixes should help solve the laptop VGA not working issue.
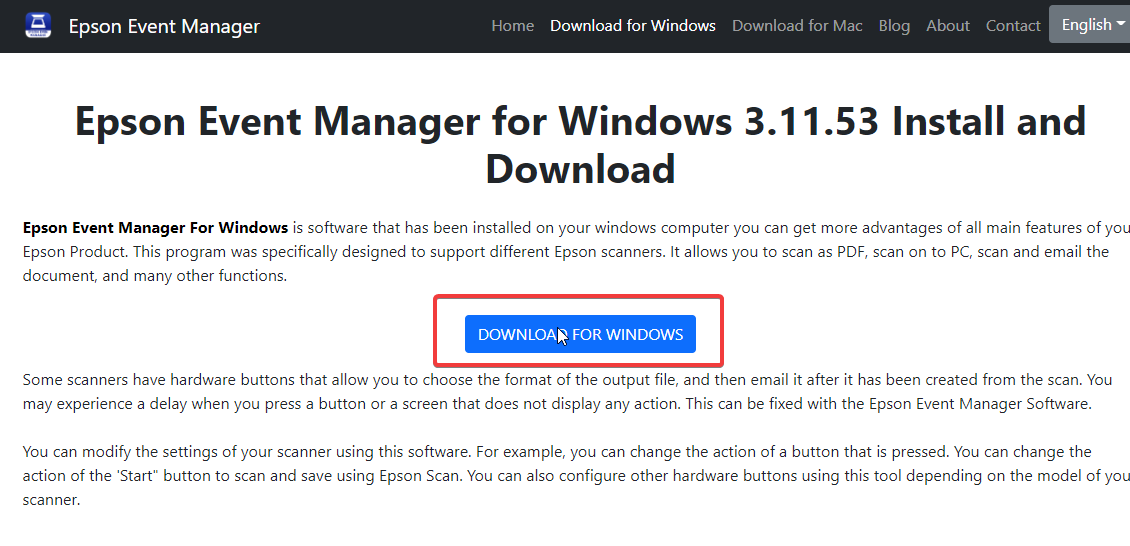
Scroll down and click on the Download for Windows button.
Choose a location for the software download and wait while the .exe file downloads.
After the file is downloaded, click on Open file.
On the prompt, click OK and extract the files setup.
Accept the License Agreement, then click Next.
Click on Install and follow the prompts that follow.
After the installation process is complete, click on Finish.
The Epson Event Manager will automatically start running. Sometimes, it will also create a shortcut menu on the Desktop.
How do I scan to my computer with Epson Event Manager?
1. Configure the Event Manager
Click Start on your computer and select Programs.
Select Epson software, then click on Event Manager.
Click on Button settings and allow all buttons to use Epson Scan.
Click on Close to save the changes.
On your Home Screen, click on Start, and select the Control Panel.
Select Scanners and Cameras or Devices and Printers.
Right-click on the product and select Properties.
Go to Events, and select the Scanbutton for the Select an event option.
Then, choose Epson Event Manager for the Start this program option.
Click OK.
2. Perform the scanning process
Place the original copy you want to scan on the product for scanning.
Click on the Home button, then select Scan.
Select a computer and choose your preferred option.
Press the Scan button on your scanner.
Do I need an Epson Event Manager at startup?
No, you don’t need to have this application in startup. However, if you’re scanning documents daily, then you might need to add this application to startup.
This depends on the model of your scanner. Some models won’t work without this software, while others don’t require it to scan documents.
Is an Epson Event Manager necessary?
The Epson Event Manager is useful but not essential for everyone. It’s designed to help you scan documents, create PDFs, and manage scan settings. If you regularly use your Epson scanner for these tasks, having Event Manager can streamline your workflow.
Can I delete the Epson Event Manager?
Yes, you can delete the Epson Event Manager if you you don’t need it. This won’t affect your printer or scanner’s core functionality, but you’ll lose the convenience of quick scan management features.
Wrapping up
After reading this guide, We hope you understand how Epson Event Manager works. users can also read through our article about Epson scanner software. It will give you more insight into Epson scanner software and how to download it for Windows devices.
Moreover, not properly downloading and installing the Epson Event Manager on Windows can result in some difficulties. Hence, it is essential to know what to do if the Epson scan is not working on Windows 11.
Steam is the world’s biggest and best game client software. Steam Cloud is one of that game client’s good features that syncs game saves. However, some technical issues can arise with Steam’s syncing.
A Steam unable to sync files error is among that game client’s more widely cited syncing issues. Those Steam users who need to resolve that syncing error see this message when trying to launch games:
Steam – Warning: Steam was unable to sync your files for with the Steam Cloud.
Here’s the good news: there are numerous confirmed fixes for that syncing error! You can resolve the Steam unable to sync files error with the solutions below.
Why isn’t my Steam syncing?
Your Steam may not be syncing because of a server issue. Although server issues are rare, they can and do arise now and then. Steam can sometimes be down because of server maintenance.
You can check the Steam server status for your region at SteamDB. Alternatively, open the Downdetector page for Steam. Select your region in the drop-down menu there to view regional server status details.
A more common cause for Steam not syncing is corrupted cloud configuration data. One fix for that is to delete Steam’s userdata folder, which contains cloud configuration files.
Corrupted game data is another reason Steam is unable to sync files error arises for some users. Therefore, verifying the integrity of game files with Steam’s built-in tool is another potential fix.
Security (firewall & antivirus) software and tools can also sometimes get in the way of Steam’s cloud syncing. Such software can block Steam’s connection and processes, which causes the unable to sync files issue.
Does Steam Cloud sync automatically?
Yes, for that is the beauty of Steam Cloud syncing—when it works right. That feature automatically syncs saved games so you can load them on different PCs with the same games installed.
However, note that cloud syncing needs to be manually enabled in Steam. To turn it on, select theEnable Steam Cloud Sync for applications that support it option on the Cloud tab in Steam’s Settings window.
How do I access Steam Cloud storage?
You can access your Steam Cloud storage from the View Cloud Storage page. When you sign in to that page (with a Steam account), you can view and reload Steam cloud saves for your games from there.
Select a game title in your could storage page to view files stored for it. You can download files from there by clicking theirDownload options.
How do I fix Steam unable to sync files?
1. Erase Steam’s userdata folder
Firstly, press the Windows key along with S; and then open Steam installation folder inside Explorer.
Select the userdata subfolder within the Steam directory.
Press Explorer’s Delete button (trash can icon in Windows 11).
Bring up Steam and launch the game to see if the syncing issue remains.
2. Repair the Steam library folders
Open up the Steam gaming client software.
Click Steam’s View menu.
Then select the Downloads option.
Press the Open Download Settings button with the cog icon.
Click the Steam Library Folder button.
Right-click your Steam library folder to select a Repair Folder option.
3. Verify files for games the syncing issue occurs
Bring up the Steam window.
Click Library at the top of Steam’s window.
Right-click whatever game title you need to fix Steam’s syncing error and select Properties.
Select Local Files within the Steam game’s Properties window.
Click the Verify integritybutton to initiate a validation process for the game.
The validation process may take up to 10 minutes to complete depending on the game’s size. Make sure you wait for Steam’s game validation to reach 100 percent.
Open Windows Task Manager (press Ctrl + Shift + Esc).
Disable any Steam processes by selecting them and clicking End task.
Bring up your Steam folder (it will probably be in a Program Files directory).
Right-click the clientregistry.blob file and select Delete (or a trash can icon).
5. Disable Windows Defender Firewall
To access the Power User menu, press Windows + X. Select the shortcut for the Run dialog on that menu.
Open Windows Defender Firewall by typing in this WDF Run command and clicking OK: firewall.cpl
In the WDF applet, click Turn Windows Defender Firewall on or off.
Select both the Turn offsettings there for Windows Defender Firewall.
Press OK to apply the firewall options you’ve selected.
Open Steam and launch games with the firewall off.
Users with third-party firewalls installed should disable them as well via their settings or by simply uninstalling them. Some firewalls are incorporated within antivirus software.
NOTE
If this works, the firewall was likely blocking Steam when enabled. You can remove a WDF block for Steam as outlined in our guide for allowing apps through the firewall.
6. Turn off third-party antivirus protection or shields
If you’ve installed an antivirus suite, it may be conflicting with Steam’s syncing. One way to find out is to right-click a system tray icon for your antivirus package and select to turn off its shield.
We don’t advise permanently disabling an antivirus utility. Select an option to temporarily disable it for a few hours if you can. Then check if the syncing issue continues for your Steam games.
You can also add Steam to antivirus utilities’ exclusion lists. Have a look through your antivirus tool’s settings to see if it includes such a feature. If so it does, add Steam to its software exception list.
7. Reinstall Steam’s client configuration files
Check that there aren’t any Steam background processes running in Task Manager as outlined within steps one and two of resolution four.
Open the Steam directory in the Explorer file manager.
Select everything in that folder by pressing the Ctrl + A hotkey.
Hold Ctrl to deselect the steamapps folder and primary Steam.exe app file.
Press Delete to erase all other selected folder content.
Right-click the Steam.exe file to select a Run as administrator option. Then Steam will start to update itself.
How do I force a Steam game to sync?
Steam doesn’t have a troubleshooting option for forcing games to sync. If Steam detects a sync conflict, you can select sync options to upload and download files to and from Steam Cloud.
What’s the Steam cloud unable to sync Steam Deck error?
The Steam cloud unable to sync error is another cloud issue that can arise on the Steam Deck portable and in Windows. Check out our Steam Cloud error guide for details about how to fix that.
Those troubleshooting methods have resolved the Steam unable to sync files error for users across the world. So, it’s more than likely one or more of them will fix Steam’s cloud syncing on your PC.
Yet, you can still contact Steam’s support service about that syncing issue if need be. Open Steam’s Help page and select Steam Client > Cloud from there. Then press the Contact Steam Support button.
If you have any questions about fixing the Steam unable to sync files error, feel free to drop it in the comments section below.
Many players have been conflicted since the introduction of the Paradox launcher. The central question in most Paradox forums is how to add games to the Paradox Launcher.
The Paradox Launcher is centralized for Paradox games. Its purpose is similar to a hub where users can implement certain features into their games. Also, it helps to advertise other Paradox games easily to players.
Although the launcher was developed to reduce Paradox games stress, most still find it challenging. Hence, this article will detail the process involved in adding games and mods to the Paradox Launcher.
Why do I need Paradox Launcher?
The Paradox Launcher obviates the developers’ stress of developing a launcher for each game. In addition, it helps you to install, mod, and patch games for users who don’t use steam directly.
Also, the platform is more like a centralized space for an interactive community of Paradox gamers. You adjust game settings, resume the last session, and do other game-related activities.
However, you can also link the Paradox and Steam accounts to access games directly on Steam via the launcher. Also, you can use it for multiplayer functions.
Furthermore, it has other features like the Mods Playsets that allow players to add mods to favorites. Also, it aids easy navigation through your mods.
Quick Tip:
While gaming is a big part of our free time, we also browse the internet while we’re at it. For an authentic gaming experience, we recommend you the Opera GX gaming browser.
Apart from other browsers, it comes with unique built-in features and apps, Discord, WhatsApp, as well as Twitter, and Instagram to keep you connected. Furthermore, the user can limit its memory usage, CPU and RAM for improved PC performances while gaming.
Opera GX
Gaming features that provide the smoothest experience for the user.
Click on the Link account option. (Linking your Steam account with Paradox will help you access the owned items in your steam account. Also, it allows you to access mods and multiplayer forums.)
Input your details on the steam login page and click on sign in.
On the Forum and Support Manager page, click on Owned Items.
At the top-left of the screen, select Sync OwnedItems.
The sync option will fetch the games you own on your Steam account and add them to your owned Items list. This approach can be used to add different game accounts. It supports Steam, Epic, Microsoft, Play Station, and Twitch.
In most cases, you have the possibility in Windows 10 operating systems to resize a window of your choosing from either a new app you have installed or perhaps some window in a browser you are using.
Unfortunately, there are some cases where you probably stumbled upon a window that you cannot resize in Windows 10.
This usually happens to the pop-ups that appear either from errors or notifications.
Read our guide to find out a workaround for this issue.
How can I resize non-resizable windows in Windows 10?
There is a free program called ResizeEnable that allow you to resize any window on your device. Fortunately, although this app was made for the previous versions of Windows like Windows 7 or Windows Vista, it still works just as good in Windows 10.
This app is pretty easy to use and, basically, all it does is allow you to resize a window that is normally non-resizable in your Windows operating system.
Read below in detail the explication of how to install this app into your Windows 10 operating system and how to use it properly.
You might find more tips and tricks on how to customize your desktop by searching in our site’s Search bar.
From our article, you were able to find out that only by downloading the ResizeEnable app are you able to resize all of your windows at will and make your use of the Windows 10 system a little bit easier from now on.
Write to us below your opinions on this subject and if this app worked for your operating system.
Can you actually use two or more accounts at once?
Despite the high amount of requests, the OneDrive folder is still not capable of managing multiple accounts, and accordingto Microsoft, it probably never will be.
But don’t panic, there’s actually a way to use multiple OneDrive accounts in one folder, so you can have content from everywhere in one place. Here’s what you need to do.
How can I set up multiple OneDrive accounts on one computer?
1. Use multiple OneDrive accounts in one folder
1. Launch OneDrive on your PC.
2. Log in to your secondary OneDrive account on the website.
3. Create a new folder and name itShared.
4. Move all content from your OneDrive account to the new folder you just created.
5. Select that folder, and go to theShareoption.
6. Choose Email, and send the folder to your primary Microsoft Account.
7. You shared the folder with yourself, so you need to log in to your primary Microsoft Account, and accept the shared folder from your email client.
8. Once you accept the shared folder, it will appear in the OneDrive folder on your computer, as well as in the web version.
You’ll be able to access all content from your secondary OneDrive account from one place.
9. In case you want to sync more than two accounts, just repeat the steps from above for each account individually.
To be able to use multiple OneDrive accounts on one computer you don’t need any hacks or tricks. All you need to do is to take advantage of OneDrive’s capabilities. The app allows you to import your account data from one account to another through a workaround.
Sometimes, some connection issues can ruin your experience. Furthermore, you won’t even be able to set up multiple accounts.
Check that you see the Sync app on the Start menu.
Switch Windows accounts now: log in with your second Windows account.
Install Sync on the second Windows user account.
Double-check that you see the Sync app in the second user’s Start menu.
Developers confirmed that it is possible to use two different Sync accounts on the same computer as long as each account is on a different user on your computer.
Switching user accounts on your computer will allow you to access each Sync account. Thus you will need to use unique user logins on the same computer.
This method will allow you to easily switch back and forth between the two accounts. Even more, Sync is safe and 100% secure, protecting your privacy with end-to-end encryption.
Looking for more cloud storage services? We’ve prepared a list with the best ones available right now.
If you experience issues like two copies of the same file, you can follow the steps in our quick tutorial to solve them.
In the particular case that your OneDrive folder can’t be found, you may want to take a look at our guide that will help you get it back again.
Check it out and tell us your opinion about what is the best cloud service and why. If you have any more questions, don’t hesitate to leave them below.
Memory dump files, otherwise crash dumps, are system files saved during blue screen crashes. When a BSOD error message appears, Windows saves a copy of the system memory.
Those crash dump files can then assist developers to fix BSOD system crashes. Users can send the crash dumps to developers when they file support tickets.
Memory dump files can waste a lot of hard drive space. They can hog gigabytes of hard drive storage. Windows only automatically delete crash dump files when HDD space is limited.
However, users can also erase crash dumps with cleanup utilities.
How do I delete crash dump files in Windows?
1. Delete Crash Dumps Via the Command Prompt
Users can erase crash dumps with a series of Command Prompt commands. To do so, open the Run accessory.
Enter cmd in Run, and press the Ctrl + Shift + Enter keys.
Then enter the following separate commands in the Prompt, and press Enter after entering each one.
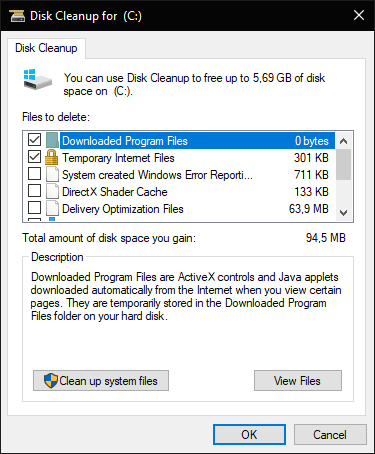
7. Users who can’t find a System error memory dump files option in Disk Clean-up should open that utility via an elevated Command Prompt. To do that, enter the following line in cmd: %SystemRoot%System32Cmd.exe /c Cleanmgr /sageset:16 & Cleanmgr /sagerun:16
8. Press the Return key. Disk Cleanup will open with more checkbox options. Navigate to the System error memory dump files option and click to delete the files.
So, there are a few ways users can erase crash dumps in Windows. Deleting the crash dumps might free up quite a bit of hard drive storage space so make sure to do so.
Let us know which was your method of choice in the comments section below.
Microsoft’s latest desktop platform is now upon us. Since October 2021, users across the world have been upgrading to Windows 11. After that, the first thing you will need to do is add your printer and other external devices to Windows 11.
There are a few ways you can do so – both automatically and manually via Settings. Or you can utilize the Control Panel’s built-in tool for adding new devices.
Many users will no doubt need to add printers of the wireless variety to Windows 11. You can easily add wireless and non-wireless printers with the same built-in options and tools.
Thus, there isn’t much difference between adding wireless and non-wireless ones.
Will my wireless printer be compatible with Windows 11?
Some users might wonder if their printers are compatible with Microsoft’s latest desktop platform. Most Windows 10 device drivers are compatible with 11. If you have utilized your printer with Windows 10, it will probably work ok on the latest platform.
However, if you were utilizing your printer on an older Windows platform, like Vista or 7, you can’t be so sure. Older printers are less likely to be compatible with the latest desktop platforms.
If your wireless printer is Windows 11 compatible, you can add it to the latest platform with the three methods below.
First, make sure your printer is fully set up with reasonably full cartridges installed as outlined within its manual.
The wireless printer also needs to be turned on and connected to your PC’s Wi-Fi network to add it to Windows 11. Your printer’s manual will provide specific details on how you can connect it to local networks.
How can I add a wireless printer to Windows 11?
1. Add it automatically
First, click Start on your taskbar to bring up that menu.
Select Settings on the Start menu.
Click the Bluetooth & devices tab in Settings.
Then select Printers & scanners on that tab.
Press the Add device button.
Click the Add device button for your detected wireless printer.
For additional guidance on setting up your printer, check out this guide on installing a local printer on Windows 11. It provides a detailed walkthrough for connecting local printers to your device using built-in options.
NOTE
Some users might also need to enter a password or PIN authentication for their wireless printers after clicking Add device.
2. Add it via the Control Panel
Click the taskbar’s magnifying glass icon.
Type Control Panel within the search tool that opens.
Select Control Panel to open that window.
Next, select Large Icons on the View by drop-down menu.
Click Devices and Printers in the Control Panel.
Then press the Add a printer button.
Choose a printer on the Add a device window, and press the Next button to install it.
Press the Finish button after the printer has been added.
3. Manually add a wireless printer to Windows 11
1. Press the Windows key on your taskbar.
2. Type settings in the search bar and click on the first result to open the Settings app.
3. Navigate to theBluetooth & devicestab.
4. Go to Printers & scanners.
5. Press theAdd devicebutton.
6. Then click the Add manually option.
7. Select the Add a Bluetooth, wireless or network discoverable printer option.
8. Then choose your wireless printer on the Add a device window.
9. Click the Next button.
10. Thereafter, follow additional instructions in theAdd Printerwizard to finish the installation.
If the automatic installation does not work because your device is not detected, you can try a manual installation of your wireless printer.
This can be easily done through Control Panel’s Bluetooth & Devices menu.
How can I set a printer to be the default one?
After adding a printer, make sure it’s the default one for your PC. Then it will be selected by default to print all your documents. You can set a printer to be the default one via the Control Panel:
Press the Windows key + R hotkey.
Type this Run command in the Open box: control printers
Click Run’s OK button.
Next, right-click the wireless printer you’ve added to Windows 11 to select the Set as defaultprinter option for it.
Press the OK button on the confirmation prompt. Now your default wireless printer will have a green checkmark by it in the Control Panel.
How can I remove a printer in Windows 11?
When you get a new printer, you should remove the old one from Windows 11. You can remove added printers via Settings as follows:
Press the Windows key + I keyboard shortcut for opening Settings.
Click Bluetooth & devices on the left of Settings.
Select Printers & Scanners to view your added printers.
Double-click the added printer you want to remove to open settings for it.
Then press the Remove button.
Click Yes to confirm you want to remove the printer.
How come my wireless printer isn’t detected when I try to add it?
Network discovery needs to be enabled for Windows 11 to detect it. If your wireless printer isn’t detected, it might be because that feature is disabled on your PC. This is how you can enable network discovery on your computer:
Open the Control Panel as specified in the first three steps of the third method.
Select the Network & Internet category.
Click Network & Sharing Center to open that applet.
Next, click Change advanced sharing settings on the left of the window.
Select the Turn on network discovery radio button for your private profile if that option is disabled.
Also, click the Turn on automatic setup of network connected devices checkbox to select that option.
Press the Save changes button to apply the setting.
HP users can quickly diagnose connection and printing errors with the HP Print and Scan Doctor, which automates checks and fixes for Windows 11.
Some printers from the bigger manufacturers have supporting software. So, you might also be able to add your printer to Windows 11 with its supporting app instead. If your printer model has supporting software, you’ll probably be able to download it from Microsoft Store.
However, you can always add a wireless printer or non-wireless one to Windows 11 with its built-in options. Adding wireless printers to that platform with the above three methods is usually quick and straightforward.
When you install Windows 11 for the first time, you will see that there is a new icon on your taskbar, or it will be new if you haven’t been using Microsoft’s Teams collaboration app lately.
When you hover your cursor above the icon, which looks like a camera inside of a cartoon speech balloon, it will say Chat. If you click on it, you’ll be invited to Meet and chat with friends and family using the application.
But, of course, the obvious question arises: What if you’re not interested in using Teams at all?
How can I remove Teams on Windows 11?
Rest assured that there are several things you can do if you find the push to Teams to be a bit irritating. You can stop the app from automatically loading every time you start your machine.
You can remove the Chat icon from the Taskbar, or, if you really want to go all the way, you can even uninstall it.
1. Stop Teams from loading at startup
Press Windows key + I to open the Settings app.
Select the Apps category, and then press on the Startup button.
Locate the Teams app and turn it off.
Also, while you’re in the Startup menu, you can take a look at some of the other apps that automatically start up with your computer that you would like to disable.
2. Remove Microsoft Teams from the taskbar
Right-click on the taskbar and access Taskbar settings.
Under Taskbar items, locate the Chat option and turn it off.
3. Uninstall the app via Settings
1. PressWindows key + Ito open theSettingsapp.
2. Select the Apps category, and then click on Apps & features.
3. Locate the Microsoft Teams app in the list and click on the three vertical dots next to it.
4. Click on Uninstall.
If you want to completely remove Teams from your Windows 11 PC, then you should uninstall it using the built-in Apps and Features settings. In just a few clicks, Teams will be gone forever from your PC.
4. Uninstall Teams using PowerShell
Use the Search option on your taskbar, search for PowerShell and open the application.
Run the following script in PowerShell.
$Teams = Get-Team

for ($i = 0; $i -lt $Teams.Count; $i++)
{
    "{0}: {1}" -f $i, $Teams[$i].DisplayName
}

# multiple can be selected if comman seperated
$Selection = (Read-Host -Prompt "Select Team(s) to remove").Split(',').Trim()

foreach ($number in $Selection)
{
    $Teams[$number]
    #Remove-Team -GroupId $Teams[$number].GroupID
}

<# Output
0: TeamsOne
1: TeamsTwo
#>
All that’s left to do is prompt for the number of teams to remove and re-select it using the index number.
Used the -fstring format operator as it should allow you to assign the current iteration of $i to the choice number, and the Display Name of the teams; giving it a feel of choice selection.
Using the .Split() method let’s you make a multiple choice selection given that it’s separated by a comma.
Finally, use a foreach loop to iterate through the numbers input into our Read-Host assigned to $selection. Which gives you the same index number that will be used to select our choice from $Teams.
That’s pretty much the entire process, depending on which step you choose to take. Pretty simple, right?
So, whether you just don’t want Microsoft’s Teams app to also start when your device does, remove it from your taskbar, or completely uninstall it, now you know how to do so in under two minutes.
Facing high rates of CPU usage while using Windows 11 can make the entire experience sluggish and annoying and thus will impede your capability to work, browse the web, and even play games.
That said, it can only be considered a problem if your system constantly reaches high CPU usage scores, even when no system-heavy applications are running, like antivirus scans or games.
If you find yourself included in the statement above, an essential factor to consider when dealing with this issue is the Windows 11 system requirements.
Even though compared to the latest improvements in technology the OS requirements by themselves shouldn’t pose an issue, there might be situations in which your system is so close to them that it can’t run optimally.
No matter if you’re close to the minimum system requirements or not, some amazing solutions can help optimize the overall Windows 11 experience to a great degree.
In today’s guide, we will cover every option available, including settings-related changes that will help enable you to get the most out of your system without requiring you to upgrade your PC.
Unfortunately, we can’t all afford to invest in a powerful PC simply to run the latest OS released by Microsoft, and opinions vary among users if it’s even worth it at all to consider that option.
As you can see from the statements above, this guide was created to encompass a wide range of elements that can be changed, tweaked, or simply optimized to resolve this issue once and for all.
Why is my CPU usage so high on Windows 11?
Now that we understood how to find out if the PC has a CPU problem or simply has a harder time dealing with some tasks temporarily, we can cover the most common reasons for this problem occurring.
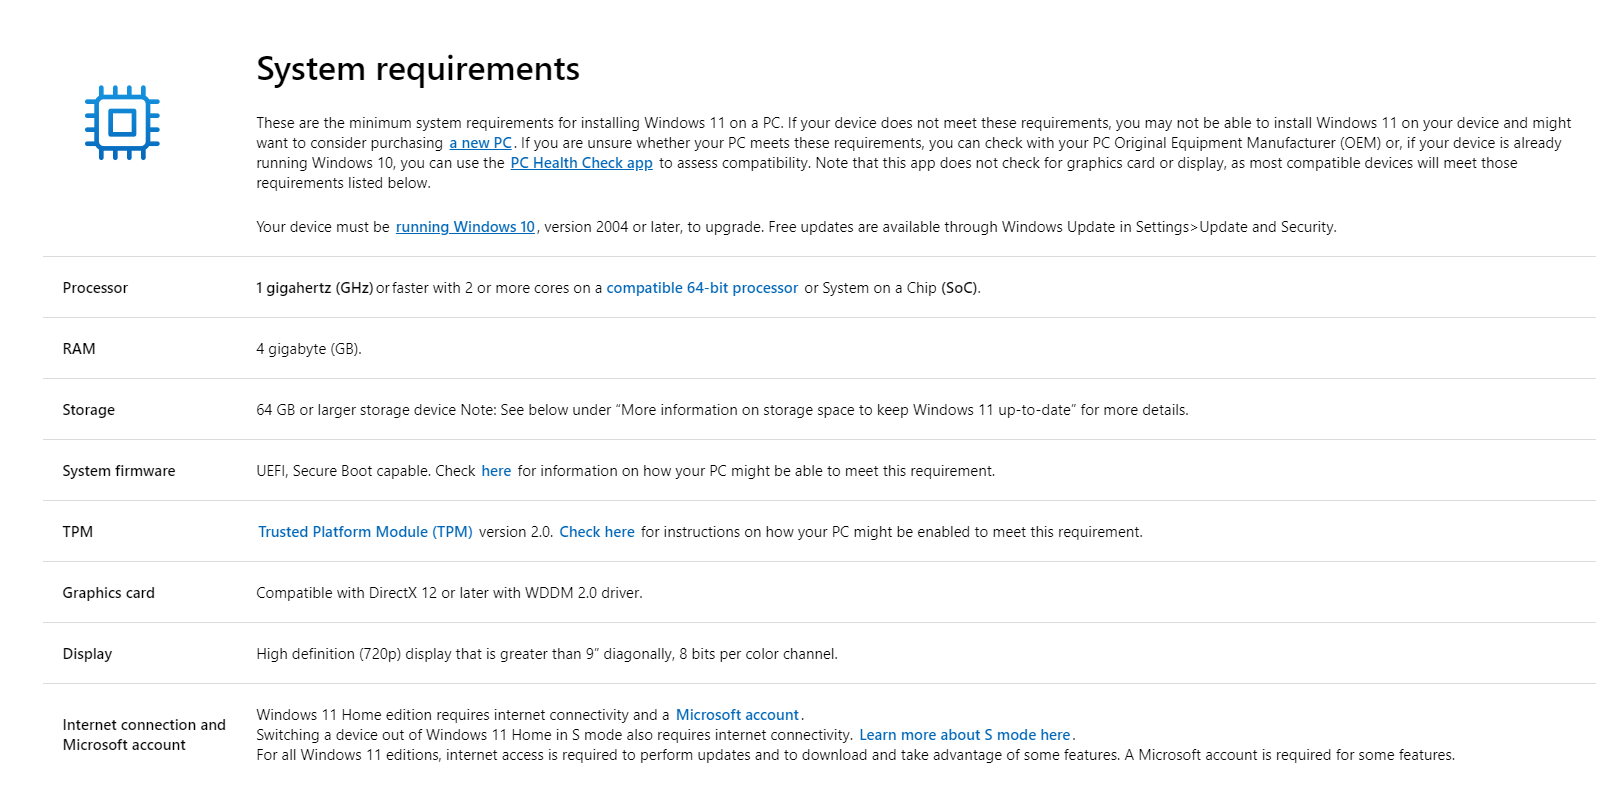
Below, you can see an image of the official system requirements for this OS.
Note that any values that are above these minimum requirements will ensure a smoother experience.
Windows 11 system requirements – Source: Microsoft
Even though this method will require that you have basic knowledge of what system components are, some of the most important elements to take into consideration are the processor speed and the amount of RAM available.
It is also worth noting that the system requirements mentioned in the image above deal only with that factor, and do not include the Windows 11 feature-specific requirements, which are also worth considering.
➡ Having too many applications running simultaneously
If you forget to close applications you’re not using or simply run apps that take a lot of resources to keep open, your CPU usage will show the results.
Of course, this element will vary from user to user, depending on the system configuration and the burden of the previously mentioned applications.
➡ Extra system services that affect your CPU
In the same way, not all apps require the same amount of resources to run, system services are no different.
Even though it is risky to disable some services, at the same time, we have chosen some of them which should not affect the stability of your system, but will improve the efficiency of your OS.
➡ Infection with adware and/or malware
This is a common occurrence, especially if you’re using free antivirus software that either hasn’t been updated recently or has an outdated virus library and can’t effectively identify the latest threats.
➡ Antivirus processes having a high impact on the CPU usage
As in the case of any software, some antiviruses will have a very high demand on your CPU and thus cause your system to run sub-optimally.
We will discuss some great options that affect your system minimally and provide a great set of security and privacy features.
How can I fix High CPU usage in Windows 11?
1. Restart your PC
Even though this step might seem obvious to some users, restarting your PC can solve this issue instantly.
This works as a restart of your system and also re-initiates all the elements that make your OS run optimally, thus impacting the number of resources required and their level of optimization.
Click the Start button from the taskbar.
Select the Power button.
Choose Restart from the pop-up that appears.
2. Optimize startup applications
Press the Win + R keys to open the Run dialog.
Type msconfig inside the Run dialog box.
Press Enter or click OK to run the command.
Click the Startup tab.
Click the Open task manager link.
Click on the Status row title twice to group tasks based on that element.
Identify any applications with an Enabled value that you don’t want starting at Windows startup, and click Disable.
3. Disable background apps
High CPU usage is likely to be caused by a multitude of apps that run in the background at all times. Thus, disabling unused background apps and programs can greatly improve CPU speed.
1. Click the Windowsicon from the taskbar.
2. Choose the Settings cog wheel from the list.
3. Select Appsfrom the left hand side menu.
4. Click on Apps & features.
5. Identify any app that you don’t need and click the 3 dots option on it.
6. Choose Advanced options.
7. Click the drop-down menu for Background app permissions and choose Never.
8. Repeat the same process for all apps you want to disable.
4. Check the Windows 11 power options
➡ If you’re using the Balanced power plan:
Click on the Search icon from your taskbar.
Type power plan and click on the Choose power plan option from the results.
Tick the High performance option.
➡ If you’re already using the High-performance power plan:
Click the Change plan settings link next to the option.
Select the Change advanced power settings link.
Double click the Processor power management option from the list.
Open the Minimum processor state option and choose a good value for both elements (battery and plugged in).
Choose the Maximum processor state option, and make sure both values are set to 100%.
Click OK or Apply.
NOTE
The same power management customization process mentioned above can be applied to the Balanced power plan setting as well.
5. Scan your system for malware and adware to fix high CPU usage
Click on the Start menu button from the taskbar.
Search for Windows Security, and open it.
Choose the Virus & threat protection option.
Click the Scan options link.
Tick the bubble next to Full scan.
Click Scan now and wait for the process to complete.
Even though the built-in security system can identify a large number of threats, the scan will most likely not be as efficient as other malware identification software on the market.
If you want to ensure that any malware and adware will be not only identified, but completely removed, a better option would be specialized software like Malwarebytes.
6. Update your PCs drivers to fix high CPU usage on Windows 11
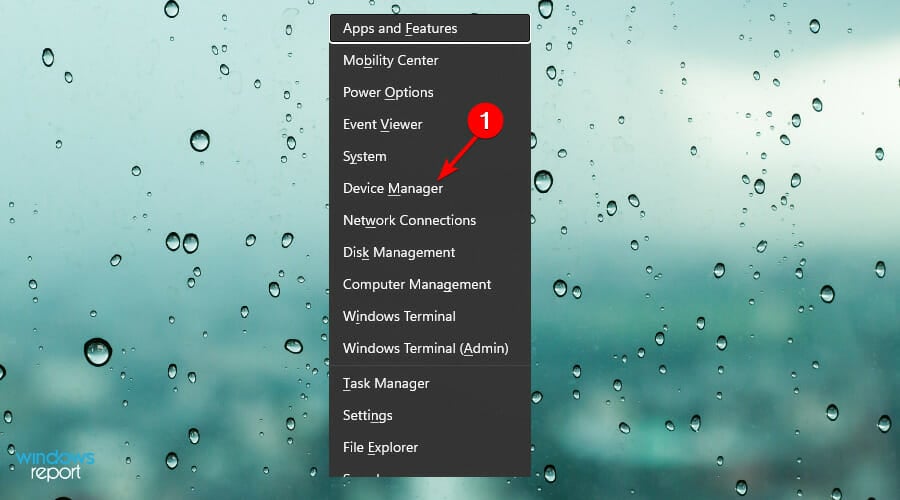
Press the Win + X key combination and choose Device Manager from the pop-up menu.
Identify drivers that need to be updated.
Select the hardware entry you want to update.
Right-click it, and choose Update Driver.
Choose Search automatically for drivers.
Wait for the process to complete and repeat these actions for all drivers.
NOTE
If that specific hardware has the latest driver installed, a message confirming this will appear on the screen.
On the other hand, if the device doesn’t have the latest driver release, Windows will install it automatically.
7. Temporarily turn off third-party antivirus and VPN services
Even though this action is not recommended in the long term, temporarily disabling your antivirus and VPN services will allow you to eliminate the possibility of that software interfering with your CPU too much, and thus possibly causing the issue.
Tip
The exact steps to follow for this method will depend entirely on what software you have installed.
If you have another software installed, simply follow the guidance from the respective software’s website guide.
➡ Antivirus
We will first discuss and exemplify the steps required to temporarily disable our antivirus software – Bitdefender Total Security:
Double-click the antivirus icon from the taskbar to open it.
Click Protection from the left-side menu.
Select Open from the Antivirus pane.
Click the Advanced tab.
Use the toggle button to turn off the Bitdefender Shield.
Click Yes in the User Account Control pop-up.
Use the drop-down menu to choose the time in which the antivirus will be stopped, and then click OK.
Try checking your CPU usage and see if there is any significant change.
➡ VPN
When it comes to the VPN service, simply disconnect from any servers and turn off the software.
Toggle the big power button appearing on the interface.
The VPN will now be disabled until you choose to re-activate it.
8. Update your computer’s policy to speed up the CPU
Even though your PC’s policy should be updated by default when performing Windows updates, there have been cases in which the CPU over-usage was caused by this small yet important detail.
Here are the steps required to perform this action manually:
Press the Win + X keys and choose Windows Terminal (Admin).
Inside the newly opened window, type the following command: gpupdate
Press Enter to run it.
Wait for the process to complete.
Type Exit and press Enter to close the window.
9. Check for Windows updates
Press the Win + X key combination, and choose Settings.
Scroll down in the left side panel, and choose Windows Update.
Click the Check for updates button.
Wait for Windows to check, and install any available updates.
Tip
If Windows installed updates, be sure to test out if your CPU usage is still showing high values by using the method described at the start of this guide. If it still does, follow the next steps.
10. Check the Windows 11 installation partition for bad sectors
Press the Win + X keys and select Windows Terminal (Admin) from the list.
Inside the command prompt window, type the following command: chkdsk c: /f
Press Enter to run it.
A message will appear on the screen.
Type Y and press Enter to accept.
A message saying that the process will take place at the next restart will appear.
Type Exit and press Enter to close the window.
Restart your PC.
Tip
During the restart process, the C: partition (the location on which your Windows 11 OS is installed) will be checked for any bad sectors, and if any issues are found, they will be fixed automatically.
11. Fix high CPU usage in Windows 11 by cleaning your PCs components
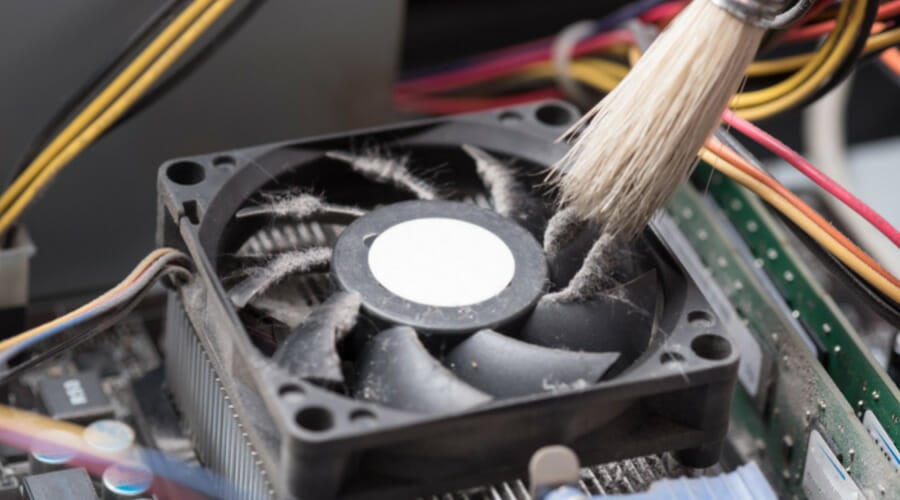
As dust and dirt can act as an insulator, and thus cause internal temperatures to rise considerably, the insides of your PC must be cleaned regularly.
Tip
What you will need:
– A soft brush – Can of compressed air (optional) – Tools to open the device (eg. screwdrivers) – Knowledge of how to open your device without damaging it
Make sure to only attempt this step if you’re sure that you will not cause damage to your system.
If you don’t have experience, we recommend that you take your device to an authorized computer service and ask for a cleanup.
The preponderance of this issue is also closely related to the way your system is built, depending on where the heatsink or fan is placed on the CPU, and if the device is a laptop or a desktop.
Desktop PC
A tower design will always build up more dust or dirt over time when compared to a design in which the heatsink sits flats on the surface of the CPU.
In either of these cases, using a can of compressed air will clear up any impurities from the fan and thus considerably help you with your CPU issues.
As a bonus, after considering the information presented on the CPU’s manual, try removing the CPU from the motherboard and also clean the connector (CPU interface) using the same compressed air can.
This last step will ensure that nothing is bothering your CPU while trying to cope with tasks, and the connection to the motherboard is optimal.
That being said, make sure to check the producer’s website for any guidance in this matter, and after successfully opening the device up, use a can of compressed air to blow away any dirt or dust from the components.
12. Check the PCs power supply
If your PC is not getting enough power, or if the power fluctuates considerably, then the system will not work optimally, and thus will cause your CPU to reach high values even for everyday tasks.
Check along the length of the power cable ensuring that not cuts are present.
Ensure that both ends of the power cable are connected properly (both in the wall socket, and the end that connects to the PC).
If you can’t find any obvious issues, and suspect that this might be causing problems, we recommend you seek professional help (local PC repair shop).
If you’re not sure that the power supply is the issue, you can also try out the next solutions from this guide before taking it to an authorized computer repair shop.
Even though no Microsoft services will be turned off, disabling services can cause system instability.
Press the Win + R keys on your keyboard.
Type MSconfig in the Run dialog box, and press Enter.
Open the Services tab.
Tick the box next to Hide all Microsoft services.
Go through the list and un-tick the boxes next to the services that you don’t need.
After disabling a service, restart your PC and check if the CPU situation has improved.
Repeat steps 4, 5, and 6 until you find the service/services causing issues.
After identifying the service/services that cause your CPU to work extra, enable all the other services one by one.
If you want to disable all the non-Microsoft services, simply click the Disable all button after ticking the box mentioned above.
After you’re done testing which services are causing your CPU to work extensively, restart your system for the update to take effect.
14. Stop/disable specific Microsoft system services (last resort) to fix high CPU usage
Tip
Perform this action at your own risk!
Even though only some selected Microsoft services will be turned off, disabling services can cause system instability.
As running system services your PC doesn’t need to operate will cause the CPU to work overtime without any useful results, deactivating some Microsoft services will prove helpful.
The services which can be disabled without risking system instability are the following:
SysMain – preloads RAM usage for apps
Windows Search – indexes data stored on your system for fast search results
Windows Update – service that automatically scans for Windows updates
You should first try stopping these services and testing out the results.
If the CPU works better after disabling one or more of these services, you can consider disabling them entirely.
Stopping services:
Click on the Search button from the taskbar.
Type service and click on the Services option presented in the results.
Search the services list for SysMain, Windows Search, and Windows Update.
After selecting each of these services, click the Stop link from the side panel.
Test out your CPU usage and how stopping the services has impacted your Windows 11 experience.
If you find that CPU usage is better, and also don’t mind not having the services enabled, follow the next method to disable them.
Disabling services:
Follow step 1, 2, and 3 to open the Services app and search for the respective entries.
Right-click each of the 3 services mentioned above and choose Properties.
Click the drop-down list under the Startup type section.
Choose Disabled.
Click Apply.
If at any point you want to re-activate these services, simply follow the same steps presented here, but choose Enabled from the drop-down menu inside the Properties window.
Close any resource-intensive apps like games and image processing apps by selecting it-them and hitting the End task button.
Check the % of CPU usage in the respective section.
Monitor this value across a few hours to check if it constantly reaches high levels while using your PC normally.
NOTE
If you find that your PC reaches values of up to 100% across longer periods, then it is safe to assume that your Windows 11 system needs some tweaking.
In case your systemreaches 100% CPU usage only occasionally (depending on the apps that you’re running), then we can conclude that your system doesn’t have a real problem but would benefit from a components upgrade and the following tricks nonetheless.
As you can see, there are a variety of ways in which you can resolve issues with your CPU values going overboard.
We presented you with options starting from the least intrusive to the ones that could pose a risk to your system, so make sure to try them out in the order that they were presented.
Added to that, we will also discuss how to make Windows 11 more responsive by ensuring that every aspect of your system is ready to confront the tasks you throw at it.
Every gamer has heard about one of the newest features and trends, High-Dynamic-Range imaging, also known as HDR. This system can reproduce a greater range of lighting levels in games.
HDR heavily outclasses the standard photographic techniques used to light games in the past. This feature is really useful when recording real-world scenes or playing games.
An Auto HDR feature was first introduced in Microsoft’s 9th generation of gaming consoles, the Xbox Series X and S.
Xbox’s game creator experience & ecosystem, Sarah Bond, officially announced Windows 11 includes built-in Auto-HDR.
HDR automatically updates the lighting and color of your screen which will result in better and more realistic graphics.
This is just one of the many improvements that are going to change our gaming experience on Windows 11, which is actually branded as being a game-oriented operating system.
More so, Skyrim isn’t the only game that will benefit from Auto HDR! The feature will work with over 1000 games!
Some Windows Auto HDR-supported games such as DayZ, Rocket League, Age of Empires: Definite Edition, and even Doom 64 are included in the list as well.
If you are curious to see which games support Auto HDR, you should know that most of the games on the Windows Store are eligible.
We all know too well that the purpose of every game is to offer you an immersive experience.
Graphics do the most part, along with performance and of course the actual story of it all, but perfection is found in the small details, and with HDR you’ll get the full package.
The High Dynamic Range imaging offers a more true-to-life experience as it can almost replicate what the human eye is capable of seeing.
This feature not only gives you deeper saturation, more diverse contrast, and darker shadows, but it also captures you in the story and offers you the amazing experience you are searching for.
HDR improves lighting, contrast, and color depth to create a more realistic gaming experience, and readers who want a full comparison can check this guide on Dolby Vision vs 4K vs HDR for deeper clarity.
How do I turn on Auto HDR in Windows 11?
1. Make sure you have the required hardware
Here are the official requirements for external displays:
An HDR display supporting HDR10
DisplayPort 1.4 or HDMI 2.0 or higher
Integrated or dedicated GPU with PlayReady 3.0 support such as:
Intel UHD Graphics 600 series or higher
Nvidia GeForce 1000 series or higher
AMD Radeon RX 400 series or higher
The first thing required to enjoy these new graphic effects is hardware capable of HDR, more precisely an HDR-ready Monitor.
If you don’t have an HDR-ready monitor, visit our great list of the best gaming monitors and browse its products. There are lots of monitors there that support it.
Yes, unfortunately not every display out there supports this feature. Obviously, this is because it is quite new and it needs specific hardware to work.
Additionally, you need to make sure you have the best connection quality. Check your monitor for the available ports, and if you have an HDMI or Display port, connect it through those.
Ideally, DisplayPort 1.4 will yield the best results, both in terms of connectivity and graphics. HDMI and USB-C will also suffice. You should also buy a premium cable.
2. Enable Auto HDR on Windows 11
You can easily turn on auto HDR on your device via Settings. Also, there are different options for displaying HDR. You can use it to play games, or you can watch movies that have the option available.
1. Press theWindowsKey +Sor click on theStart Menuicon located in the middle of the taskbar.
2. Click on the Settings icon.
3. Once the Settingswindow opens, go to System.
4. Then, go to Displayfrom the right-hand pane.
5. Click on HDR.
6. Expand the Display capabilities menu.
7. Now enable all theHDRsettings you need, and you are good to go.
If your main goal is to enable HDR for Stalker 2, follow this step-by-step guide on HDR in Stalker 2 to configure both Windows and in-game settings correctly.
Thankfully, the new Windows didn’t change the settings that much. You can enable Auto-HDR in a similar way to Windows 10, as showcased in the preview build.
Are there any other gaming improvements in Windows 11?
Interestingly enough, Auto HDR is not the first Xbox feature that Microsoft decided to incorporate into Windows. Another great addition is DirectStorage.
What does it do? Well, if your PC has a compatible NVME SSD of 1TB or more, it will redirect I/O calls for 3D graphical assets directly to the GPU.
This will not only reduce loading times, but will also improve other graphical elements such as draw distances, instant asset introduction, and texture variety.
With DirectStorage, which will only be available with Windows 11, games can quickly load assets to the graphics card without bogging down the CPU. This means you’ll get to experience incredibly detailed game worlds rendered at lightning speeds, without long load times.
Let’s just say that if you’re a PC gamer, you’ll want to upgrade your OS and take advantage of these new features to get the best gaming experience.
We hope we answered your question about the HDR feature on Windows 11. If you have anything interesting to add regarding the subject, feel free to tell us in the comments section below.
Although a lot of emphasis on Windows 11 was focused on its new gaming features, our readers discovered that a security feature in this OS actually hinders gaming performance.
We’re talking about VBS, a virtualization security feature that can slow your games in Windows 11 with up to 25%, a huge percentage if you’re a gamer trying to squeeze some extra FPS.
The problem is pretty complex since this component offers important protection against attacks but obviously does a lot of harm to gaming.
What is VBS used for?
VBS stands for Virtualization-Based Security and, as its name suggests, it’s a feature that uses hardware virtualization features to secure and isolate part of the memory from the OS.
Windows uses the virtual mode to run other security solutions like Memory integrity or Kernel mode code integrity and prevent malicious attacks.
How can I turn off VBS in Windows 11?
This feature is not new, and it’s also implemented in Windows 10, so we know exactly how to deal with it. We will present to you five different ways to disable this feature.
1. Disable Memory integrity
Click the Search icon from the Taskbar, type core isolation and click on the setting from the results.
Now toggle Off the Memory integrity option from the Core isolation section.
Restart your PC for the change to take effect.
2. Use the Local Group Policy Editor
Press the Windows key + R to start Run, type gpedit.msc and press Enter or click OK.
Go to the following path: Local Computer Policy\Computer Configuration\Administrative Templates\System\Device Guard
Double-click Turn on Virtualization Based Security.
Select Disabled, then click on Apply and OK.
3. Turn off Windows virtualization features
Click the Search icon from the Taskbar, type windows features, and select Turn Windows features on or off.
Make sure you uncheck the following features from the list: Windows Hypervisor Platform, Virtual Machine Platform, and Microsoft Defender Application Guard.
1. Click the Search button from the Taskbar or press the Windows Key to open the Start menu.
2. Type cmd and then select Run as administrator from the results.
3. Type the following command: bcdedit /set hypervisorlaunchtype off
4. Press Enter to run the command.
5. VBS is now disabled on your Windows 11 PC.
A fast and easy method to turn off VBS on your device is to use the built-in command tool called Command Prompt. All you need to do is open cmd and input a command to disable this feature, and the tool will do it for you.
5. Disable Intel Virtualization Technology in BIOS
Enter BIOS. There are different ways to get into BIOS for different computers but usually implies pressing an F (function) key or Del before booting the OS.
Go to the Advanced tab and change the option from Enabled to Disabled.
Save and exit BIOS. It’s usually done by pressing the F10 key on your keyboard but that depends on your BIOS.
We hope that our solutions helped you disable VBS in Windows 11 and now you can enjoy your games without any limitations.
As you probably noticed, our solutions basically disable any virtualization technology so if you’re running Windows 11 on a virtual machine, the procedures will block that.
Therefore, don’t apply these solutions if you installed the new OS on a VM because that will make your virtual machine unusable.
Group Policy Editor is an administrative feature incorporated within Windows Pro and Enterprise editions. It is a utility that enables users to adjust a multitude of Windows settings included within Group Policy Objects.
You can adjust Group Policy Editor settings in Windows 11 the same as in the previous OS. Now that Microsoft has officially released it, Group Policy Windows 11 ADMX (administrative) templates have also become available for download.
The latest admin templates are compatible with Windows 11, 10, and 7, along with server platforms.
The templates are specified within the ADMX Templates for Windows 11’s October 2021 Update [21H2] file. You can download and install those templates as outlined below.
How can I configure administrative templates?
Administrative templates are collections of settings for Group Policy Editor. You can configure their settings via Computer Configuration and User Configuration within the Group Policy Editor window. ADMX files specify all the registry changes and policy options that apply.
There are numerous new policy settings for Windows 11’s Group Policy Editor. With those options, you can configure various features in the latest platform.
To update GPE with those new settings, you’ll need to install the templates for them with the Windows 11 ADMX installer file.
How can I install the ADMX templates for Windows 11?
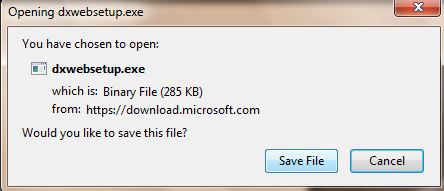
Choose a folder to download the file to on the Save as window.
Click the Save button.
2. Install Windows 11 ADMX templates
If you are looking to expand your Group Policy’s editor settings, you should install ADMX templates for your PC. All you need to do is download them from the official Microsoft download page, then follow the installation wizard’s instructions.
1. Download the ADMX templates.
2. Click the folder icon on Windows 11’s taskbar to bring up File Explorer.
3. Open the folder that you downloaded the Windows 11 ADMX file to.
4. Next, double-click theAdministrative Templates (.admx) for Windows 11 October 2021 Update.msifile to open the setup wizard.
5. Press theNextbutton to proceed.
6. Select theI accept the terms in the license agreement checkbox.
7. Click theNextoption.
8. Select the Next option to install at the specified default folder location. Do not click the Browse button to change the default location.
9. Thereafter, press theInstall button.
10. Select theYesoption on any UAC confirmation prompts.
11. ClickFinishto exit the setup wizard after installing the admin templates.
12. Finally, select thePower Startmenu option and click Restart to reboot your PC.
Download the XLSX reference spreadsheet for Group Policy Editor
There’s also an XLSX reference spreadsheet for the Windows 11 October 2021 Update (21H2) Group Policy settings. That spreadsheet lists all the Group Policy settings you can configure in Windows 11 with additional details for each. You can download and view that file as follows:
Next, choose a folder to save the spreadsheet XLSX file in.
Click Save on the window.
Bring up File Explorer with its Windows key + E keyboard shortcut or by clicking its taskbar button.
Open the folder that includes the Group Policy settings spreadsheet.
Then double-click the XLSX file to open it in your default spreadsheet software.
When you double-click the XLSX file, the spreadsheet that you can see below will open. Its Administrative Templates sheet lists more than 4,000 Group Policy settings users can configure with the GPE tool. The new policies in Windows 11 21H2 are highlighted below:
Open Group Policy Editor and configure the settings
Right-click Windows 11’s Start menu and select Run to open that accessory.
Type this text in Run’s Open box: gpedit.msc
Then click OK to bring up the Group Policy Editor window below:
Thereafter, double-click Computer Configuration or User Configuration.
Select a Group Policy Object within the GPE window.
Then double-click a setting to bring up a window like the one below:
There you can select an Enabled or Disabled setting to turn the setting on/off. Make sure you click Apply to save the new policy setting.
Don’t forget Group Policy Editor doesn’t come included with Windows 11 Home.
Overall, Group Policy Editor is a handy tool that’s often overlooked by users. With its configuration settings, you can apply a wide variety of changes to Windows 11. So, it’s worth having a look at that utility to see what you can do with it.
By downloading and installing the new ADMX templates, Group Policy Editor will include all the latest Windows 11 policy settings.
The latest GPE settings enable users to configure the Start menu, taskbar, printer, and Windows Sandbox features among others.
Let us know if you managed to install the ADMX templates for Windows 11 by using the comments area below.
Xbox One S is a popular video console used worldwide and developed by Microsoft which was released in 2013. The console is the third console in the Xbox family and a direct rival to the Sony PlayStation 4 and Nintendo Wii U.
The Xbox One S has multiple functions apart from gaming and can be used to record video clips or live stream from popular services most notably Twitch.
Online gaming has come through leaps and bounds over the past decade with many popular games such as PUGB, Call of Duty, and Age of Dragons having vast followership online.
However, this has led to some problems such as connection latency and DDoS attacks which cause your game to lag or even disconnect from servers during gameplay on your console.
The main solution to this unpleasant development is to use a VPN.
VPN helps to avoid geolocation blocks on popular websites like Netflix and gives secured, stable connections for online gaming or streaming on your Xbox One S console.
The Windows Report team has compiled this list of the best VPN available for Xbox One S.
Does Xbox series S have VPN?
No. The Xbox console doesn’t have a native VPN, which is why you will have to use a third-party client. We recommend you get a reputable service that truly encrypts traffic data and doesn’t keep activity logs.
Can you use a VPN on Xbox One S?
Yes, you can. Despite not offering a built-in VPN, Xbox One S supports VPN and lets you easily install a third-party VPN app and configure your connection. Here’s how to do it:
Get a VPN subscription. We recommend using Private Internet Access because it’s fast, light and fully compatible with Xbox.
Download the app to your PC and launch it.
Share your VPN connection to your Xbox using the Network and Sharing Center in Windows.
Using a VPN has become quintessential for gaming these days and of the main reasons behind this is preventing your ISP from throttling your bandwidth.
Of course, bandwidth is directly proportional to your response time during gameplay, so you might want to consider choosing a VPN with unlimited bandwidth in order to help lower your ping. PIA does that for you.
This Kape Technologies-owned VPN is optimized for gaming and perfectly suited to bypass geo-restrictions, ISP limitations, and boost your overall gaming performance by allowing you to choose the game servers closest to your location.
And you will have a generous array of choices since PIA relies on a powerful network of 3000+ servers spread across 45 countries making sure no distance however big will ever stand between you and your favorite game’s servers.
Speaking about favorites, a popular device to pair with your gameplay is the Xbox One S.
If you are wondering how to get them acquainted in order to benefit from the best gaming experience, know that it is possible to set a VPN or your console.
Actually, you get to keep all your devices protected with just 1 Private Internet Access VPN subscription because PIA supports up to 10 devices simultaneously.
NordVPN is one of the most popular VPN services available which offers an excellent combination of speed and solid encryption to users.
The VPN is ideal for Xbox One S gamers as you have access to over 5500 servers located in 59 countries; hence, this huge amount of servers available enables connection to your favorite games and streaming websites from anywhere in the world.
Meanwhile, you can also run this VPN on up to 6 devices with a single subscription, making it a flexible VPN service to use.
They own their servers so you can enjoy fast and reliable connections while gaming with added protection advantage against DDoS attacks and snoops.
To enjoy the full services of this VPN you can take advantage of their 3-year special plan which costs $3.49/m, billed every three years.
NordVPN also offers a 30-day money-back guarantee on their plans which enables sufficient time to fully check their services.
NordVPN
Give Nord VPN a try and see what secrecy really means.
ExpressVPN is consistently one of the best VPNs for gaming and is an ideal choice for Xbox One S. This VPN combines fast servers, secure encryption, and an excellent user interface.
They offer a huge global network of fast VPN servers in 94 different countries which enables Xbox One S gamers to connect to game servers and video streaming websites from any region in the world.
In addition, all your connections are rerouted through their secure gateways with strong encryption based on the 256-bit encryption technology.
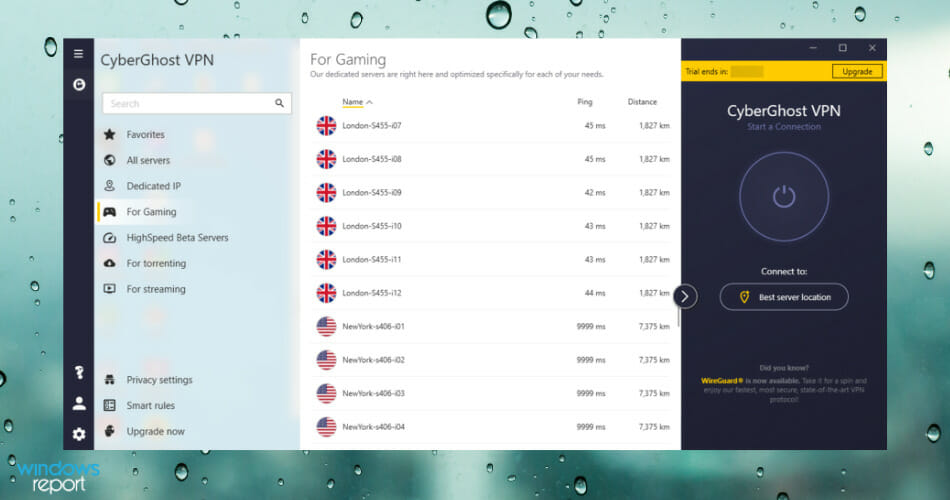
CyberGhost has been in the VPN service market for a long time and has garnered good reviews from customers with its quality services.
Also, CyberGhost is an excellent choice for Xbox One S gamers as it offers you access to over 6000 servers in over 90 countries which gives multiple options for gamers.
In addition, CyberGhost gives excellent server speeds for gaming and for streaming local and foreign content from popular streaming websites like Twitch and Netflix.
They have a proven record of having a secured connection that keeps both your information and online activities safe.
Just 1 subscription protects up to 7 devices simultaneously and one of them can undoubtedly be your Xbox One S.
Here’s how you can set up CyberGhost on your Xbox One S:
Launch the VPN connection and choose the server that you want to access
Open your router’s control panel and locate the area dedicated to the outside network
Insert the security key, IP, Subnet Mask, credentials and other details provided by your VPN
Save the current settings
Note: Cyberghost, PIA, and any other VPN from our list below can be coupled with your Xbox console using one of these methods (either by a router, either via your PC’s network adapter).
With a whopping 45-day money-back guarantee you will have ample time to check all this VPN’s features before full purchase.
CyberGhost VPN
CyberGhost guarantees total privacy on all supported devices, including the Xbox One S, so give it a try!
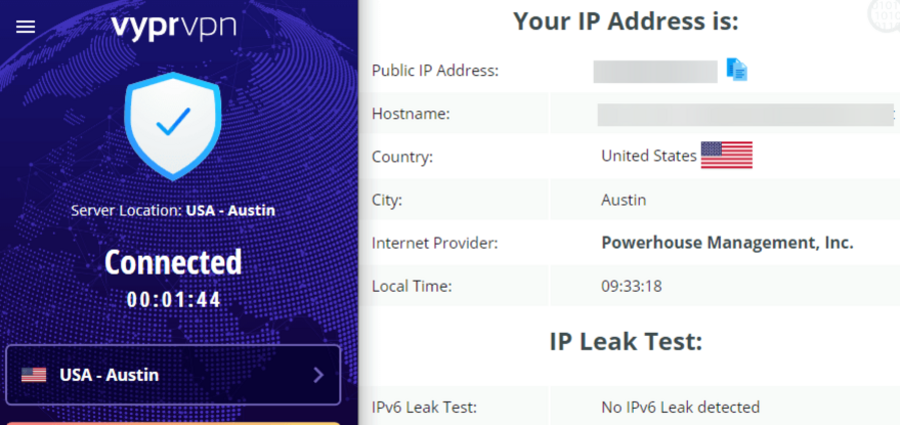
Owned by Golden Frog GmbH, VyprVPN is a popular solution used by millions thanks to its track record of being secured and reliable in overcoming geolocation blocks.
This best VPN on Xbox One S has lots of features not found in some of their rivals; there is a tool for Tomato routers that gives access to connect your TV, console, and other devices under your VPN network.
In addition, VyprVPN has good server speeds which enable you to enjoy optimal gaming experiences on your online games using the Xbox One S console.
They also uphold a strict zero-logs policy which prevents your information from being stored on their servers and DNS leak protection which secures your privacy when online.
You are also offered a 30-day money-back guarantee to evaluate the VPN risk-free before purchasing out rightly.
Vypr VPN
Enjoy your gaming experience freely and safely with the Vypr VPN!
PrivateVPN is a popular VPN service known for its lightning server speeds and secured encryption. The Swedish-based VPN provider has a clean user interface that allows an easy one-click connection.
With over 1000 servers in 60+ countries, Xbox gamers have a plethora of options to connect to their favorite game servers.
This VPN keeps your personal data and internet activity anonymous on Xbox One S. Also, it uses military-grade 256 bit- encryption for all connections.
You also get the kill switch and DNS protection features as part of their package. In addition, their servers have some of the fastest speeds which ensure you get maximum performance during gameplay without lags and connection issues.
PrivateVPN offers premium plans with a 30-day money-back guarantee and excellent customer support to cover any issues you might encounter.
PrivateVPN
Protect your traffic data and improve gaming speed with PrivateVPN.
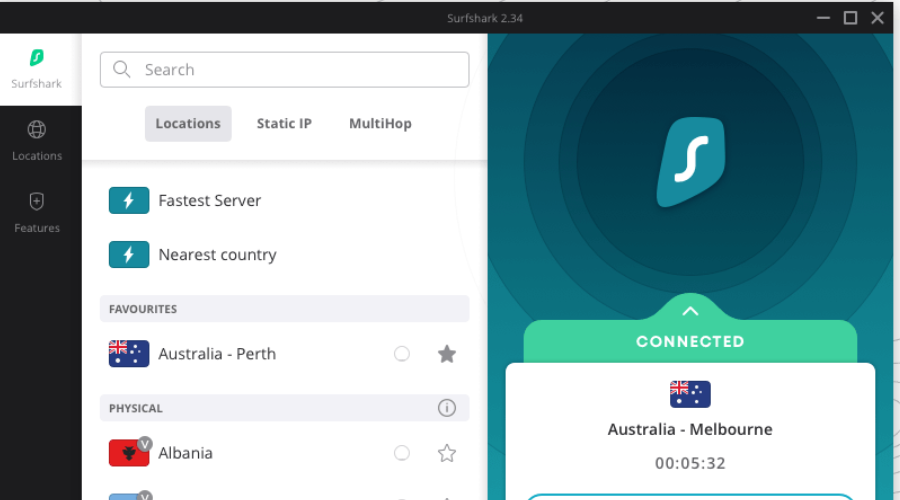
Surfshark’s VPN works for the Xbox One, Series S, and the Series X consoles, securing your digital life and keeping your data safe from theft and other cyber attacks.
This award-winning VPN provides industry-leading security, having fast protocols such as IKEv2/IPsec, OpenVPN UDP / TCP, Wireguard, and Shadowsocks for Windows & Android.
Additionally, it will hide your IP address, while also blocking ADs, banners, trackers, and shielding you from malware and phishing attempts.
Benefit from unmatched access to entertainment by playing region-locked games! Surfshark VPN lets you change your location on a whim.
This works with popular streaming platforms that are also region-locked, like Netflix US, Disney Plus, Hulu, and many more. Now you can watch any movie on any platform.
Your ISP can slow down the internet connection while you’re using it, but thanks to Surfshark VPN, they won’t be able to throttle the bandwidth.
Using a VPN will also protect you against DDoS attacks and SWATing from salty enemies or stream snipers. They can put your belongings or even your life in danger!
If you hide your IP, there is no way for them to find out your whereabouts, and you’ll be able to enjoy your games in a stress-free environment.
If you’re wondering how to set up the VPN, the cool guys at Surfshark actually made a guide to teach you all the steps needed on their official website.
Here is a list of the tool’s main features:
Hides IP address
Bypasses regional restrictions
Stop internet throttling
Prevents cyber attacks
Affordable price
Surfshark
Enjoy the safest Xbox experience and access regional content thanks to this awesome VPN service!
Ready to start using the best VPN on Xbox One S? Let us know your favorite pick, and if there’s one you use that didn’t make the list, tell us about it by leaving a comment in the section below.
Some users often need to capture screenshots in Windows 10 with the PrtSc button, or other third-party utilities.
By default, Windows 10 and its image-editing apps save screenshots as PNG files. However, some users might prefer to have their screenshots saved with the JPG (or JPEG) file format.
In today’s guide, we will discuss how you can perform this transformation process easily while evidentiating the most useful ways to do it.
How can I save a screenshot as JPG?
1. Use Paint’s save feature
Click File > Open. Then select the saved PNG to open it in Paint.
Thereafter, click File > Save as to open the submenu shown directly below.
Click JPEG to convert it to that file format.
Enter a file title, and click the Save option.
2. Change the file extension
Press the Windows key + PrtSc hotkey.
Next, press the Windows key + E hotkey.
Open the Pictures folder in File Explorer.
Open the Screenshots folder.
Right-click a PNG image there and select the Rename option.
Delete PNG at the end of the file.
Then enterJPG as the replacement file extension.
Click Yes to confirm the dialog box.
3. Use the IMG2GO.com image file conversion utility
It is very easy to convert a screenshot to a JPG file using Paint. All you need to do is take a screenshot, upload it to Paint, then save the file in the desired file format using the print feature.
1. Press the Windows key + S hotkey to open the Search menu.
2. Typepaintin the search box to find the app.
3. Click on the result to open Paint.
4. Then press theCtrl + Vhotkey to paste your captured screenshot into Paint.
5. Go to File > Print.
6. Select Save to open the window shown in the shot below.
7. Select the JPEG option on the Save as type drop-down menu to change it. PNG is always the default file format selected, so you need to scroll down and choose JPEG.
8. Enter a name for the file and the location where you want it to be saved, then click on Save. The file is now in JPG format.
Almost all laptops have a touchpad as their input device, but many people use a mouse on their laptops because using a mouse is much simpler than using a touchpad.
Many users use a mouse on their laptop because it’s more comfortable, but certain problems can occur when a mouse is connected to a laptop.
In many cases, your touchpad will remain enabled, so while using touchpad gestures, you might accidentally touch it and move your pointer while you’re typing. This is a minor inconvenience, but several ways exist to fix this problem.
How do I turn off the touchpad when a mouse is connected in Windows 10?
1. Via Settings
You can easily use the built-in Settings menu on your PC to disable the touchpad every time you have a mouse connected.
The touchpad is enabled by default, but you can change this setting from the Mouse & touchpad tab.
1. PressWindows Key + I on your keyboard to open the Settings app.
2. Go toDevices.
3. Navigate to Mouse & touchpad. Here you will find theLeave touchpad on when a mouse is connectedoption. It should be checked by default.
4. Uncheck the box to turn this option off.
5. Now the touchpad will be disabled every time you have a mouse connected.
2. Check Mouse settings
Press Windows Key + X to open the Win + X menu and select Control Panel from the list.
When Control Panel opens, go to Hardware and Sound section and selectMouse.
When the Mouse settings window opens, you should see the ELAN or Device Settings tab. Switch to it.
Locate Disable internal pointing device when external USB pointing device is attached option and enable it.
Click Apply and OK to save changes.
One way to fix a touchpad problem on Windows 10 is to change your mouse settings. Sometimes touchpad drivers add their own settings to mouse settings, so you should be able to disable the touchpad right from there.
3. Edit your registry
This solution works with Synaptics touchpads, so if your laptop has one, you might want to try it.
By performing this solution you should be able to see the option to disable the touchpad when you connect a mouse in your Mouse settings.
Keep in mind that modifying your registry can lead to system instability, therefore we suggest that you create a backup of your registry in case anything goes wrong. To make changes to your registry, do the following:
Press Windows Key + R and enter regedit. Press Enter or click OK.
When Registry Editor opens, go to the HKEY_LOCAL_MACHINESOFTWARESynapticsSynTPEnh key in the left pane.
In the right pane, right-click the empty space and choose New > DWORD (32-bit Value).
Enter DisableIntPDFeature as the name of the new DWORD and double click it to open its properties.
Select the Hexadecimal option and change the Value data to 33. Click OK.
Close Registry Editor and restart your PC.
After making these changes in the registry, you should see the option to disable your touchpad in Mouse settings.
Sometimes, the option to disable the touchpad when the mouse is connected isn’t available unless you have the latest drivers.
To fix this problem, simply visit your laptop manufacturer’s website and download the latest drivers touchpad drivers for your laptop.
After downloading the latest drivers, uninstall your current driver by following these steps:
Press Windows Key + X and select Device Manager from the list.
When Device Manager opens, locate your Touchpad driver, right-click it and choose Uninstall.
If available, select Delete the driver software for this device and click OK.
After the driver is removed, restart your PC.
When your PC restarts, install the latest touchpad driver and check if that fixes the problem.
4.1 Update drivers automatically
If you don’t want to install the touchpad drivers yourself, there’s a great tool that will do that for you.
Using specialized software will help you update drivers automatically and prevent PC damage caused by installing the wrong driver versions.After several tests, our team concluded this is the best automated solution.
It works with all versions of Windows and makes upgrading drivers a breeze because Fortect Driver Updater may be set to detect outdated drivers automatically.
5. Disable the touchpad with the Smart Gesture app
If you use an ASUS laptop, you can disable your touchpad through the Smart Gesture app. To do that, follow these simple steps:
Locate the Smart Gesture app and run it. Smart Gesture application should be available from your Taskbar, so you can easily access it from there.
Go to the Mouse Detection tab and check Disable Touchpad when mouse is plugged in option.
Save changes and check if the problem is resolved.
6. Use the keyboard shortcut
If you can’t find the option to automatically disable the touchpad, you could try using a keyboard shortcut to disable it manually. For ASUS laptops, the keyboard shortcut should be FN + F9, but it might be different on your laptop. Therefore, you might want to check your laptop’s instruction manual.
7. Tweak the Registry
Some users reported that there’s no option to disable their touchpad in the mouse settings, but you can circumvent this problem by editing your registry. To do that, follow these steps:
Open Registry Editor and go to HKEY_CURRENT_USER > Software > Elantech > Othersetting > DisableWhenDetectUSBMouse key in the left pane.
Change the value from 0 to 1 and close Registry Editor.
After making those changes, your touchpad will now be disabled every time you connect a mouse to your laptop. Even though this option isn’t available, you can still enable it by following these steps. We have to mention that this solution applies only if you’re using the ELAN touchpad.
8. Reinstall ASUS Smart Gesture
According to users, you can fix this problem simply by reinstalling the ASUS Smart Gesture software. First, you need to remove the software from your PC. Then, navigate to the ASUS website, download the latest version of ASUS Smart Gesture, and install it.
After that, you should be able to turn off the touchpad without problems when a mouse is detected. Some users also suggest downloading and installing the ATK package, so you might want to try that as well.
Having the touchpad and mouse enabled simultaneously can be problematic, but you can easily disable the touchpad when you connect your mouse simply by using one of our solutions.
Microsoft tries to develop and offer dedicated features and processes to secure the Windows 10 system. And the built-in Windows Defender SmartScreen security software is there to protect your data and your credentials each time a new app or program is installed.
While this default security solution ensures relatively complex protection, in some situations its functionality can become quite annoying.
In that respect, we can now discuss the Windows Defender SmartScreen security warning messages which are displayed quite a lot, even when it’s not necessary.
For example, when you try to install or run a new app and you receive the Windows protected your PC and prevented an unrecognized app from starting warnings.
If you know that this particular app is safe and will do no harm to the Windows 10 system there is no actual reason for receiving those warnings which aren’t letting you with too many options; in fact, you can choose only the ‘don’t run’ option.
Anyway, during the lines below, we will learn how to disable the Windows Defender SmartScreen security software. But first, let’s see how to get past the Windows protected your PC and prevented an unrecognized app from starting warning.
How do I get rid of the Windows protected your PC message?
1. Allow app when Windows protected your PC message appears
The first step would be to allow an app to freely work in the background without Defender preventing it. This is a rather simple task and here’s what you need to do:
When you receive the warning message, don’t click on the ‘Don’t run’ option.
Instead, click on the More info link, displayed beneath the warning message.
Now, a new prompt will be displayed.
If you are sure that the app that tries to access your system can be trusted, click on Run anyway.
Keep in mind that if admin privileges are required, the app will still not run on your computer.
2. Check the Security at a glance
The second step is to check all the boxes (if possible) in the Windows Defender at a glance section. Sometimes, due to a bug, Windows Defender will show a variety of incoherent prompts from time to time. The best way to deal with it is by simply checking all the boxes or dismissing the ones you can’t follow through with. An example would be my disliking of OneDrive. Just dismissed the suggestion and it doesn’t pop anymore.
3. Disable Windows Defender SmartScreen
If you want to permanently get rid of the windows protected your pc error, then you can disable the Windows Defender SmartScreen security software. By doing so, you will stop receiving any more pop-ups from it in the future.
1. Press the Windows Key and type Windows Security in the search bar.
2. Click on the result with the same name to open Windows Defender Security Center.
3. From there go to theApp & browsercontrol field, located in the left sidebar.
So, that should be all. Now the Windows Defender SmartScreen security software is disabled so you will no longer receive the Windows protected your PC and prevented an unrecognized app from starting warnings.
Don’t forget to install an antivirus or antimalware program, otherwise, you will risk in experiencing a malware attack.
If you have further questions don’t hesitate and contact us by using the contact form from below.
Getting a The operation couldn’t be completed. (NSURLErrorDomain error – 1011) when using Blink Intelligent Home Security? You’re not alone!
While Blink is a well-known and resilient security device for your property, it is prone to errors. This particular one is usually caused by VPN interference, out o range WiFI or nework bugs.
How do I fix error 1011 on the Blink?
1. Change your Wi-Fi network
Launch the Blink app and tap on the gear icon (Settings) at the bottom of the screen.
Next tap, under System Settings, tap on your camera device.
On the System Settings screen, tap on Sync Module to open the status screen.
Now, on the Sync Module page, click on Change Wi-Fi Network.
Next, you must follow the on-screen instructions that ask you to press the Reset button on your Blink device, a small hole (on the side of the Sync Module) using a thin object.
On successful reset, the blue LED should blink and the green LED should be solid on your Blink device.
Now, press the Discover Device button and you will be prompted to join the Sync Module Wi-Fi network. Tap on Join.
Next, pick your Wi-Fi network from the options provided under Add Sync Module.
You will then receive a success message saying Sync Module added! Tap on Done.
You have now successfully changed the Wi-Fi network for your Blink security device.
2. Disable the VPN
On your Android phone, swipe down from the top of the screen to open the notification panel.
Tap on the activeVPN.
This will open the VPN app. Here, click on Stop.
Now, press Disconnect to confirm the action.
Once done, force close the Blink app and turn it on again. Now, you should not encounter Blink error 1011, and the smart security system should function normally.
On the Storage page, tap on Clear data at the bottom.
Press OK to confirm the action.
Now that you have successfully reset the Blink app, the error message 1011 should not appear again.
NOTE
You can repeat steps 1 to step 3 as above, and then select Uninstall at the bottom to delete Blink. You can then reinstall Blink, and the error 1011 should not show up again.
Alternatively, you can contact the Blink technical support team for further assistance, and they should readily help you to fix the issue. But if you encounter Blink’s unknown Tulsa error, you can refer to our detailed troubleshooting guide for further help.
YouTube TV is a popular streaming service that brings you not only live TV but also DVR functionality and on-demand video from more than 70 top channels. It requires no cable box nor a contract to work.
You sign up for the service and pay the $49.99/mo. fee, and start enjoying it. However, there’s a teeny tiny catch: you can’t use it nor purchase a plan outside of the US.
Aside from its price-accessible TV streaming capabilities, YouTube TV also provides your own cloud-based DVR. Therefore, you can record your favorite shows and stream them wherever you go.
The DVR has unlimited storage space, and it costs absolutely nothing more than the existing subscription fee. You can share your account with your family members (up to 6 accounts and 3 simultaneous streams).
Last, it costs you nothing to cancel since there’s no binding contract. You cancel the service, and that’s the end of it.
With all that in mind, it’s not hard to see why non-US users want to get their hands on a YouTube TV subscription. And the best way to access geo-restricted services is, as we’ve said before, using a VPN.
Can YouTube detect VPNs?
Yes. Many users report being unable to bypass geo-blocks even when using a VPN because the platform detected it.
The most common thing that makes your VPN connection discoverable is your VPN IP. Many VPNs do a good job at encrypting your traffic and hiding your actual IP.
However, it’s fairly simple to detect whether a user is connected via usual ISP traffic or VPN. To reduce this risk, you need to use a VPN to make it appear as if you are in regular traffic.
We also recommend you always connect with a VPN when accessing YouTube.
That’s because the platforms store some user data, including your location. If they notice you log in from various locations around the world, you may be restricted or get the YouTube TV spinning circle error.
What does VPN proxy detected mean?
This message means that the platform can detect that you are connected using a VPN, hence restricting access.
Try to change to a different VPN server. If the message keeps appearing, we recommend switching to a VPN with features that will hide your traffic better.
Can you trick the YouTube TV location?
Yes, you can, but you need an excellent VPN service for it. YouTube TV tries to block attempts to access the platform from outside the US, and using a VPN signals just that.
So make sure you enable double VPN or server obfuscation and check the guidelines of your VPN provider to see how to best set it up for maximum protection.
Connecting to the exact VPN location and deleting your cookies can also help.
➡️ How many times can you change your location on YouTube TV?
YouTube TV lets you change your account location twice a year.
➡️ Can you have YouTube TV in two different locations?
Yes. You can add several locations to your profile, with a main location being your home.
How do I fix proxy or VPN detected?
YouTube TV, much like other similar streaming services, got smart and started blacklisting VPN traffic. In other words, YouTube TV detects VPN traffic, so there seems to be no way to circumvent it.
VPNs have specific IP ranges, and once YouTube TV caught wind of this, they started to block them.
The same thing happens with Netflix. We’re pretty sure you know that US Netflix is a thing, and it’s more remarkable than the Netflix version you can access from, say, Europe. It has more shows, for once.
But what if we told you you can use a VPN to access YouTube TV?
YouTube TV blocking VPN? Here’s the solution
1. Use a VPN that has both dedicated IPs and obfuscation
Install it and connect to a VPN server by pressing the power button in the main UI.
Go to the Settings panel.
Select the Multi-Hop section.
Enable Multi-hop and obfuscation feature and choose Shadowsocks as your proxy. Select a US location.
Access YouTube TV.
If you really want to avoid any type of inconvenience when attempting to bypass geo-blocks, use a VPN that lets you use a dedicated IP along with server obfuscation.
Private Internet Access
Unblock YouTube TV without being detected with this VPN with thousands of US servers!
In the Optional add-ons field, locate Dedicated IP.
Hit the Add button in the Dedicated IP box.
Click the Select location menu
Make sure to select one of the three US options (YouTube TV only works in the US)
Continue with the purchase (payment info, checkout)
Download CyberGhost VPN on your PC
Install it and launch it
Log into your account
Locate the Favorites section in the CyberGhost VPN app
Connect to your dedicated IP
Access YouTube TV
Everything should be okay, YouTube TV should now see you as a US resident and allow you full access. So you should be able to purchase a subscription/get the trial, and use the service without a hiccup.
CyberGhost VPN
Can’t access YouTube TV with VPN? CyberGhosts’ dedicated IPs can help.
CyberGhost is an awesome VPN service brought to you by Kape Technologies that can help you easily access YouTube TV outside of the US. Just as long as you purchase a dedicated IP, that is.
Connect to an obfuscated US server of your choice.
Access YouTube TV.
Obfuscated servers are a special category of servers that can bypass Internet restrictions more easily than regular ones. It disguises traffic to look just like regular unencrypted traffic by removing metadata that could be tied to VPN protocols.
NordVPN
Does YouTube TV block your VPN? NordVPN might come in handy.
NordVPN also has a dedicated IP address option to purchase alongside your regular subscription. If you did, you can use the dedicated IP server instead of the obfuscated one, just as long as the IP is US-based.
You can watch YouTube TV with a VPN
All things considered, there’s no limit to human creativity when it comes to workarounds. Even though YouTube TV is clearly intended exclusively for US residents, you can access it even if you’re not in the US.
All you need is a trustworthy VPN that offers dedicated IP servers or a VPN with obfuscated servers. However, it’s no harm if the VPN you choose comes with both options.
Scanning documents is essential for many official tasks, educational purposes, and more. These are used in government offices, schools, colleges, banks, etc.
In the olden days, scanning any document was a challenging task. But now, many applications have made these tasks more manageable.
Now scanners can be connected to any system via Wi-Fi or USB cable. They are not just scanning one document but allowing users to check multiple pages using the software introduced by Epson.
Can I scan multiple pages with the Epson event manager?
Yes. Users are allowed to scan multiple pages with the Epson event manager software on the Windows system. This software is supported on other operating systems as well.
How do I get my Epson printer to scan multiple pages?
Connect the scanner device to your Windows system and press the power button to switch it on.
Press the Windows key and type event manager.
Select Event Manager from the search results.
When the Epson Event Manager window opens, select the scanner device connected to your system from the list.
Now make sure the selected scanner device is chosen.
Click the Start button dropdown menu, select Scan and Save – Scan using the EPSON Scan option from the list, and close the Event Manager window.
Once done, you must open the Epson Scan 2 app on your system and select the scanner device.
After that, check the Add or edit pages after scanning the checkbox so that you can add more pages by browsing the PDF file and saving it last.
Select the Image Format as PDF.
Give an appropriate File Name like Scanned_documents.pdf, etc.
Select the Folder where the pdf file should go after saving.
Now place the original document in the scanner and click Scan.
Once done, it will pop up a new window, and you need to click Add after replacing the document in the scanner device.
This will scan again. Now you can replace the original with another document and click Add again.
Repeat the same process till you are done scanning all the documents.
Once all the documents are scanned, you need to click the Save button in the pop-up window.
This will save all the scanned documents in a PDF file in the folder selected by you in the Epson Scan 2 app.
Is there a way to scan multiple pages into separate PDFs?
Yes, there is a way to scan multiple pages into separate PDFs using software that can adjust the settings. This software is meant only for some selected scanners from the Epson called Document Capture Pro.
You have to place a blank page or barcode between the pages of your original documents to let it know where to scan new files.
Now open the Document Capture Pro software on your system.
Click Scan on the left side of the Document Capture Pro window.
Now you will see the preview of the scanned documents.
Go to the File menu and click Batch Save from the list.
Select File Save settings and change all the necessary settings in the window.
Click OK at last, which starts scanning all the documents, and the separate PDF files get saved in the app’s folder selected by the user.
This way, users can scan multiple pages into separate PDFs on their Windows system using Epson’s Document Capture Pro.
The Xinput1_3.dll is missing is an error message that appears when a game or software is launched. The error file is caused by an issue with Microsoft DirectX when the xinput1_3.dll dynamic link library (DLL) file is not found.
The full name of the error is: the code execution cannot proceed because xinput1_3.dll was not found.
However, DirectX improves PC performance for Windows-based games and advanced graphics programs. Furthermore, Microsoft’s operating systems are generally affected by xinput1_3.dll and other DirectX issues.
These Operating versions include Windows 98, Windows 2000, Windows XP, Windows Vista, Windows 7, the most popular OS among gamers, Windows 8, Windows 10, and Windows 11.
We have compiled a list of solutions and how you can fix the xinput1_3.dll missing issue on your Windows PC.
1. Install the DirectX version of the affected program
Software developers usually include a copy of DirectX on the installation disc of the game/program. Installing the DirectX version included in the software can fix xinput1_3.dll is missing problem.
Look for a DirectX installation program on your game or application CD or DVD. Furthermore, the DirectX version that comes with your software installation package is supported on all Windows versions.
It will install the DirectX file needed and supported in that version of Windows. Try this fix to clear xinput1_3.dll is missing error.
Even more, we want to make a note of the importance of DLLs and registries, along with a few repercussions far beyond your imagination.
2. Use a third-party DLL fixer
Since it might be hard to find the specific file by yourself, we recommend using a dedicated third-party repair software that will do that for you, a tool that specializes in DLL fixes, replacements, and repairs.
These kinds of tools are set to solve all your DLL problems in no time. With a quick scan, they will show you not only this error but all the DLL errors that your computer might have.
3. Reinstall the affected program
Go to the Start menu, type control panel, and hit the Enter button.
In the Control Panel, go to the Programs and Features menu to uninstall a program.
Go through the list of the installed applications and double-click on the application that produced the error. Follow the uninstallation prompts.
If you installed using a CD, insert the CD and install it afterward. Download the application at its official download site.
Launch the installer and follow the prompts untill the installation is complete.
Finally, run the application again.
After you reinstall the program along with its components, launch the program again. This fix will solve the xinput1_3.dll is missing problem.
Consider reinstalling the software application that displayed xinput1_3.dll is missing error. Reinstalling the corrupted program will replace the program files including its dynamic link libraries with a fresh one.
Press the Windows and R keys to launch the Run program.
Type devmgmt.msc and click OK to open Device Manager
From the Device Manager’s left panel, expand the Sound, video and game controller category and right-click on the game controller driver.
Select Update Driver and follow the prompts to apply the update.
Finally, after the update, restart your PC.
However, the software application in question may either require a game controller driver or a graphics driver; use these steps to update the specified driver.
Another reason for xinput1_3.dll is missing is due to old graphics or game controller drivers. The software program or game application requires updated drivers to work efficiently.
Another method of updating your driver is by visiting your PC’s manufacturer website to download and install the game controller driver for your PC’s model.
If you want to have the latest GPU drivers, bookmark this page and always stay updated with the latest and greatest.
4.2Update drivers automatically
In case you are not sure about the driver version you find on the manufacturer’s website, we strongly recommend Outbyte Driver Updater as it’s a very fast and reliable solution that gets the job done with minimum effort and time.
It automatically identifies each device on your computer and matches it with the latest driver versions from an extensive online database.
Start by downloading and installing Outbyte Driver Updater. It’s very light software so it will only take a few seconds to download it. Once it does, run the executable file to install it seamlessly.
After the installation, the tool will start running automatically so you don’t need to find its shortcut or the source folder. Outbyte Driver Updater will scan your system for any problematic or missing drivers and it will provide a report in just a few seconds.
All you need to do is to decide whether you update all the drivers in bulk or one by one if you have reasons not to install certain drivers.
For the first solution, you will have to click on the Update all button from the top of the list and for the second you will need to check the individual boxes for each driver and hit the Update button from the right.
Note: Some drivers need to be installed in multiple steps so you will have to hit the Update button several times until all of its components are installed.
5. Update Microsoft DirectX
1. Go to Microsoft’s official DirectX End-User Runtime Web Installerdownload page.
2. Select the checkbox for any additional downloads or ignore and click on No thanks and continue.
3. Save the file to a specified path on your PC.
4. Launch the setup file to install the DirectX updates.
5. Follow the prompts to complete the installation.
Upgrading your current version of Microsoft DirectX can fix the xinput1_3.dll is missing error. What you need to do is download and install Microsoft’s latest updates to DirectX.
An Internet connection is required for this fix. After updating your current version of Microsoft DirectX, launch the affected program.
This method has been known to fix xinput1_3.dll is missing error. Do not download DirectX updates from illegal websites or websites with a bad reputation because of the many dangers involved.
In conclusion, these fixes are applicable in solving the xinput1_3.dll is missing problem. Try out any of the fixes and launch the affected program again.
As always, if you have any other questions or suggestions, leave them in the comments section below and we’ll be sure to check them out.
Your WordPress blog can be hosted on two platforms: on a web server, which is the most popular option among bloggers, or on a computer running the WordPress software package.
Hosting your website on a web server has a clear advantage in that you don’t have to worry so much about uptime.
However, if you’re determined to install WordPress locally on your Windows 10 computer, you’re in the right place.
This article is a step-by-step guide to configuring your computer to act as its own web server for hosting WordPress.
What are the advantages of installing WordPress locally?
The only visible difference when you host your WordPress blog on your Windows computer is the address: you’ll use https://localhost[…] instead of the regular web address.
As far as the user experience is concerned, by hosting WordPress on your computer you can work offline, test changes more quickly, and polish them before you roll them out to the live website.
So, this is a very good solution as a starting point, when you are just building your website and making a lot of tries and modifications.
But if you change your mind and want to take your website to the next level, read on because we also have some suggestions about hosting solutions.
How can I install WordPress locally on Windows 10?
Once you download the archive, double-click it to run it.
After you open the archive, extract it to the desired location.
Go to the extract location and run the Start-InstantWP.bat file.
If you get a Firewall prompt, click on Allow access button.
A guide will appear on the screen. Keep clicking the Next button until you reach the end.
1.2 Install WordPress using InstantWP
1. Download and install InstantWP.
2. Launch the InstantWP app. Several Command Prompt windows will appear. This is perfectly normal, so there’s no reason to worry.
3. Wait while the server starts. This can take about 60 seconds, so be patient.
4. Now click the WordPress Admin button.
5. This will open a new tab in your browser and allow you to log in to the WordPress website on your PC.
If you want to create a WordPress website on your computer, you can do so easily using the InstantWP software.
According to the creators, this is a portable and standalone WordPress developer environment, so it’s perfect if you want to familiarize yourself with WordPress or if you’re a WordPress developer.
Bear in mind that sometimes you might not be able to access your WordPress page on a computer. This is because the server is still starting in the background, so you’ll need to wait for a few more minutes while the server completely starts.
As you can see, this is a simple and fast method to run WordPress on your PC. It’s worth mentioning that this tool is fully portable, so you can just transfer it and run it on any other PC.
2. Use ServerPress
2.1 Download and install ServerPress
Download and install the free version of ServerPress. You’ll have to add the Free version to the cart and enter your email so you can get the download link.
After you get the download link, click it and use it to download the tool. Once the download is finished, locate the download archive, open it and extract it to the desired location.
Once you extract the archive, go to the extract location and run the Install DSL v392 file.
When the new window appears, click on Continue. This will restart the installation and start it with administrative privileges.
Click the Next button and follow the instructions on the screen.
This tool comes in two versions, free and premium, and while the free version is limited in terms of functionality, it should be more than enough for all your needs.
2.2. Install WordPress on Windows 10 using ServerPress
Go to the C:\xampplite directory and run the exe file as administrator. To do that, right-click the .exe file and choose Run as administrator from the menu.
Select Start apache and MySQL services and click Next.
If you get a firewall prompt, be sure to click on Allow access.
Click Next to proceed.
Select Create a new development website and click Next.
Now set the desired name and site root. We suggest that you keep them as they are. As for the Blueprint, be sure that WordPress is selected. Click Create to continue. Be sure to memorize the URL because you’ll need it for future steps.
Wait while the wizard creates the necessary files and folders. This might take about a minute or two, so be patient.
After the process is finished, just go to the URL from Step 6, by default it should be https://www.example.dev.cc. Now you just need to enter the required information and your local WordPress page should be set up.
After doing that, you can access your page and modify it any way you want.
How to get a great hosting solution for my website?
Now you know how to install your WordPress server locally, on your PC but do you have a good hosting service for it?
If you didn’t cover that part, we would strongly suggest using WP Engine, a powerful WordPress hosting platform that will help you with a lot of features.
It’s perfect for any type of usage including for small businesses, and large enterprises but also for hosting a small blog.
For the latter, you can use the Personal plan which is very affordable. The Professional plan can be used for small enterprises and the Business plan covers a lot of advanced features to accelerate your website’s growth.
There you go, these are the best methods you can use to set up a WordPress page on your local computer. Both methods are similar, although the first one might be more straightforward for first-time users.
Encountering issues such as set timezone automatically greyed out has become a rampant issue with the new Windows 11 OS. Because of the difference in time zones in the world, Windows incorporated the set time zone feature in their operating systems. Users can set the time zone of their computers manually or configure their time settings to be automatic.
Furthermore, time zones can change as users relocate from one place to another, depending on the geographical boundaries between countries.
Hence, configuring Windows to set a time zone automatically will help users keep up with the correct time of their current locations.
However, some factors can trigger the problem of Windows set time zone automatically not working. In such cases, most users have attributed the causes to either drivers or settings issues.
So, this article will provide the best troubleshooting fixes to help solve this problem without hassles.
Why is set time automatically greyed out?
Outdated Windows: When running an outdated Windows on your computer, it can prompt many issues like the Windows 11 set timezone automatically greyed out. Likewise, not keeping Windows up to date prevents it from accessing the necessary updates and patches to perform smoothly.
Location services are off in Windows settings: For Windows to be able to detect time zones, it requires access to your computer’s location. However, not enabling location services will not allow Windows to set a time zone because it can’t identify your location automatically.
Third-party app interference: Applications like VPN can automatically cause the Windows 11 set timezone to grey out. VPN creates another location server for your computer, which can confuse auto-set time zones. Hence, this error can be prompted as a reaction to this.
What can I do if the set timezone automatically is greyed out?
1. Restart your computer
Press the Alt + F4keys together to prompt the Shut Down Windows.
Click on Restart, then OK.
Restarting your computer will help it fix boot issues that can prompt the Windows 11 set timezone automatically greyed out.
2. Enable Location services in your settings
Press the Windows + Ikeys to prompt the Settings app.
Select Privacy and Security from the left panel.
Go to App permissions and click on Location.
Toggle On the Location services option and the Let apps access your location option.
3. Troubleshoot timezone settings in the Registry Editor
Press the Windows + Rkeys to prompt the Run windows.
Type in Regedit in the search space and press Enter.
Copy and paste the following path: HKEY_LOCAL_MACHINE\SYSTEM\CurrentControlSet\Services\tzautoupdate
Press Enter.
Double-click on Start from the registry.
Set Value data to 3 to Enable the Set time zone automatically option, then click OK.
Doing this will forcefully fix the Windows set time zone automatically not working issue.
4. Boot your computer in Safe Mode
Press the power button to turn on the PC.
Press the F8key to prompt the Advanced Boot Options menu.
Select Startup Settings.
Select the Safe Mode number and press Enter.
Your PC will reboot, and it should fix the issue.
5. Update Windows
Click Start on your screen.
Select Settings from the options.
Click on Windows Update, then select Check for updates.
To get more detailed steps on how to set the time automatically on Windows 11, you can refer to this comprehensive guide on Set Time Automatically on Windows 11.
The primary reason why your time zone keeps changing after you’ve manually set it up is that the Location service is not turned on on your computer.
As said earlier, outdated Windows can cause several issues with the computer. So, it can be a culprit for the time zone changing issue.
These are the best fixes for the Windows 11 set timezone automatically greyed out issue. Hence, try out all the steps in the fixes for optimal results.
Making a checklist in Microsoft Word is straightforward. Although you can do it manually by searching for the checkbox symbol and inserting it in the document, this method is tedious and doesn’t allow readers to mark the boxes.
Microsoft Word has an inbuilt checkbox feature that gives you a completely working checklist in one click.
How can I create a checklist in Word using the Developer tab?
Learn from our guide below how to make checklists easily in Microsoft Word through the use of the Developer tab. By default, the Developer tab is disabled. However, once you enable the Developer tab, it stays there.
1. How to enable the Developer tab
Open Microsoft Word.
Click on the File tab.
Go to Options.
Select Customize Ribbon from the left sidebar.
Find Main Tabs from the Choose Commands From dropdown menu.
Choose Developer and hit Add.
Click on the OK button.
Before you can make a checklist, you need to ensure the Developer tab is enabled on your Microsoft Word. To enable it, just follow the guide above.
2. Use the Developer Tab
1. Launch Microsoft Word.
2. Create a new document or open an existing one.
3. Type the list of items you want on the checklist.
4. Click on the position where you want to insert the checkbox.
5. Go to the Developer tab.
6. Click on the Checkbox Content Control icon.
7. A checkbox will appear where you placed your cursor in step 3. Repeat the steps for the remaining items on your list.
You can easily make a checklist in your Microsoft Word file by inserting checkboxes in your list of things you want to do. The checkbox can be inserted through the built-in Developer tab in Word.
There you have it, you can now make checklists in Microsoft Word.
You can then make more checklists later without having to enable the tab all the time. You can also make index cards in Word, and we have a guide that shows you how to do it.
Let us know if you managed to create checklists in Microsoft Word. You can do so by using the comment section below.
Destiny 2 is a F2P (free to play) multiplayer first-person shooter developed by Bungie. It was released on PCs in October 2017, a month after its PS4 and Xbox One release.
In this game, you choose from 3 classes and play as a guardian with various abilities. You get to level up and upgrade your equipment as the game gets tougher, to level you against your opponents.
The activities you can engage in Destiny 2 are split into PvE (Player versus Environment) and PvP (Player versus Player).
Things might sound awesome on paper, but the fact that Destiny 2 is online-only puts it against some challenges.
Why is Destiny 2 so laggy?
Lag is generally caused by a bad Internet connection. That’s why it’s important you first and foremost take a look at your network and contact your Sp if necessary.
It’s also possible that your ISP is throttling your traffic. It’s a common practice that restricts bandwidth/traffic for demanding tasks in order to be able to deliver bandwidth to all users.
Overpopulated servers in the game can also cause lag and high ping, that’s why we recommend you use a VPN and try to access other servers that may work better.
What is packet loss in Destiny 2?
In Destiny 2, packet loss occurs whenever data packets that you send or receive never make it to their destination.
As a result, it triggers a desync that can end up increasing your latency, rubberbanding, or downright disconnecting you from the server.
Packet loss is among the most annoying issues you may encounter in Destiny 2. Mostly because it has a lot of potential causes and there’s no immediate fix for it.
For instance, even a bad Ethernet cable or outdated drivers can trigger packet loss. However, the most common cause of this issue is network congestion.
Thus, sometimes the best way to improve packet loss is to wait it out.
How to test packet loss with Destiny 2 servers?
Launch CMD.
Use netstat to locate the Destiny 2 server IP address
Run the pathping x.x.x.x command (replace x.x.x.x with the Destiny 2 server address)
Wait for the test to complete
Locate the node (hop) that’s leaking packets (high packet loss)
As opposed to other online games, Destiny 2 doesn’t use dedicated servers. Instead, it makes use of a P2P-cloud hybrid to increase performance at the cost of security.
That’s mainly because their P2P model exposes your IP address to every other player in the session. So you might expect some DDoS attacks if you’re unfortunate enough to cross paths with a sour loser.
Connect to the server of your choice (make sure it’s a low ping one).
Launch Destiny 2.
Check if the problem still persists.
Private Internet Access is a reliable VPN service brought to you by Kape Technologies that can take care of your packet loss issue and then some.
Remember not too long ago we told you that your public IP is exposed to every other player in the session while playing Destiny 2? Well, using a VPN can take care of this problem.
Private Internet Access
Getting packet loss in Destiny 2? Use PIA to fix it and protect your online privacy!
More so, it can safekeep your online privacy and secure your connection, keeping it away from prying eyes. Last, but not least, a VPN such as PIA can easily bypass geo-restrictions.
Note that VPNs can improve packet loss only if the leak doesn’t occur on your side of the connection or on the side of the server host.
If your ISP throttles your connection, for instance, using a VPN could improve packet loss dramatically.
2. Perform some manual troubleshooting
Restart your router and/or modem
Switch to a wired connection instead of wireless (Wi-Fi leaks packets more often)
Replace/update/upgrade/repair any faulty component on your network (cables, PC, router)
Run a pathping test and call your ISP if it seems that there’s something wrong on their side
Try to avoid peak hours if you notice a pattern of network congestion
All things considered, if you’re leaking packets and can’t enjoy Destiny 2 because of that, you might want to try some of our suggestions.
One of the best courses of action would be investing in a trustworthy VPN, and not only for its potential to fix packet loss issues.
VPNs can also anonymize your IP, so even though Destiny 2 exposes it during an online match, your public IP would be replaced by the VPNs.
For those wondering what Internet connection speed you need for Destiny 2, you should know that at least 3Mbps for download speed and between 0.5 and 1 Mbps for upload speed.
If using a VPN just doesn’t cut it, you might want to try troubleshooting your connection manually. Although it’s not bound to work every time, regularly performing maintenance work on your network is a healthy practice.
If you’re experiencing Arma 3 lag and high ping, use a VPN to fix these issues in no time. Arma 3 is a military tactical shooter with an open world and plenty of MMO content.
You can play this dynamic gameplay on Windows, Mac, and Linux. It’s also available on Steam.
Although the game has a single-player mode, it shines in the multiplayer version, providing you with online and LAN co-op and PvP content. You can use more than 40 weapons and 20 vehicles for combat.
However, a lot of players report Arma 3 high ping and lag, which can be incredibly irritating in multiplayer mode.
If you experience such issues, you can use a powerful Arma 3 VPN to refine your gameplay. That’s because it’s possible to improve your ping with a VPN.
A VPN is not only practical for hiding your IP address and encrypting your data traffic to secure your online identity.
You can also use a VPN to fix packet loss, speed up your Internet connection on restricted networks, and optimize your Wi-Fi for gaming.
Why is my ping so high in Arma 3?
There is no single answer to this performance issue, as it usually involves multiple factors such as Internet connection issues or even advanced system requirements.
Thus, you can experience Arma 3 all servers high ping on your PC due to these reasons:
You have a deficient network connection
The router or modem connections are unstable
Other devices in your home network are increasing the lag
Your Internet connection has packet loss
In addition, it may happen because your WiFi network is not stable enough for gaming purposes. In this case, you can try using an Ethernet cable if possible.
What is a good ping for Arma 3?
Anything between 50 ms and 100 ms ping score is considered to be really good or average. Then, if you have more than 150-200 ping levels on your game, it becomes more difficult to play.
However, different users claim that 200-250 ms ping can be playable on Arma 3, with a few glitches and or server problems.
What are the best Arma 3 VPNs to fix high ping and lag?
If you have Arma 3 constant lag spikes, Private Internet Access (PIA) can help solve this problem.
Made by Kape Technologies, it’s one of the best VPNs for gaming and for fixing packet loss, which can make your Internet connections faster.
You can even open ports for Arma 3 using PIA’s port forwarding mode. It’s wrapped in a user-friendly interface and features intuitive security options, such as DDoS protection.
Private Internet Access is the best Arma 3 VPN if you’re looking to optimize your network for gaming by minimizing jitter and by getting rid of Arma 3 lag and high ping.
At the same time, it features static and dynamic IP addresses, together with exclusive DNS.
In addition, PIA it’s one of the few VPNs with 24/7 live chat support.
Other critical features of PIA:
Compatible with Windows, Mac, and Linux
10 connections at the same time
Eliminates Arma 3 lags when shooting
30-day money-back guarantee (no free trial)
Private Internet Access
If you’re looking for a quick Arma 3 high-ping fix, PIA is the most efficient VPN for it.
NordVPN is among the most popular Arma 3 VPNs when it comes to repairing high ping and lag.
It allows you to swiftly reduce network congestion so that you won’t have trouble playing this game in co-op or PvP mode.
Developed by Tefincom & Co., NordVPN is ideal for bypassing Arma 3 VPN blocks, thanks to the fact that it has obfuscated servers to make your VPN traffic look like regular HTTPS traffic.
So, if you can’t connect to servers using a VPN in Arma 3, use NordVPN’s obfuscation mode.
Furthermore, NordVPN has an integrated kill switch ready to disable your VPN in case of unexpected connection drops. It’s also a great choice for fixing Xbox packet loss.
Other key features of NordVPN:
Works with Windows, Mac, and Linux
Allows 6 simultaneous connections
Provides you with an easy Arma 3 lag fix
30-day money-back guarantee (no free trial)
NordVPN
If you’re wondering how to reduce ping in Arma 3, use this reliable VPN solution.
CyberGhost VPN is another excellent Arma 3 VPN that can fix high ping and lag issues.
Also owned by Kape Technologies, this VPN solution has servers optimized for gaming, streaming, torrenting, and secure browsing. You can use it to evade geoblocks and access blocked sites.
It comes in handy for managing limited network resources by creating whitelists and blacklists so that you can separate VPN traffic by application.
CyberGhost VPN handles Arma 3 lag spikes quite well, thanks to its high-speed VPN servers. It has private DNS servers and leak protection, and it can fix Wi-Fi packet loss for gaming.
Other important features of CyberGhost VPN:
Can be installed on Windows, Mac, and Linux
7 connections at once
One of the best Arma 3 server VPN solutions
Up to 45-day money-back guarantee (1-day free trial)
CyberGhost VPN
Eliminate high ping and lag spikes using one of the best Arma 3 VPNs with high-speed servers.
It should be possible to use ping controls in this PvP shooter. In any case, some users said Arma 3 check ping doesn’t work anymore due to difficulty settings.
Using gaming techniques such as Arma 3 tactical ping can be helpful to mark your targets or elements that improve your game performance.
To summarize, your Arma 3 lag and high ping issues can be quickly resolved by turning to a reliable VPN for Arma 3 that provides you with high-speed VPN servers and top-notch security features.
So, if you’re wondering how to ping in Arma 3, you should be able to use controls like Shift+T to achieve it.
All being said, you can join our VPN Troubleshooting Hub to fix any VPN-related issues or bookmark our Gaming VPN section if you frequently have in-game network issues.
WinRAR is one of the most popular data compression tools out there, and it’s used mostly for compressing large files that could not be sent via email otherwise.
It can happen though that the RAR file is password protected and you have either forgotten the password or you don’t remember it.
But there is no need to worry, we’ve got you covered on both cases.
How can I extract protected RAR files without a password?
In this article, we will explore some ways that can help you open a protected RAR file without having a password.
1. Use a frequently used password
A commonly used method, which you should try before trying anything else, could be thinking and making some guesses in regard to your password.
It depends solely on how you usually protect your files and what type of passwords you are using, but it’s not uncommon to have used the same password on multiple tools.
This could be the case here as well, therefore it’s worth giving it a try. Perhaps you are using often your birth date or initials from your name or hometown.
There are some really big chances that by trying this a few times, you will actually end up guessing the right one.
2. Recover the RAR password online using tools
Another useful method you can try in order to recover your password if you don’t want to use the other ones is to use an online RAR password unlocker.
Usually, using this sort of tool is pretty easy and in just a few easy steps you can recover your files.
One such online tool is HashCrack but keep in mind that you can only recover weak passwords and files that don’t exceed 200 MB.
Weak passwords are the ones that don’t include a lot of special characters, or numbers and letters altogether. They are easier to guess and also to remember.
All you need to do in order to recover your RAR password online is to go to the above website and simply upload your archived file by pressing the Browse button.
From there you will only need to wait for your password to be recovered.
Make sure to keep in mind, when choosing this method that is advised you have your antivirus software activated on your device.
We have a dedicated article on the best free antivirus software that you can use on your device.
Considering that you will upload your file over the Internet and download it afterward, it’s necessary that you keep your device protected from unwanted threats.
3. Use password manager software to recover the RAR file
It can be a lot of trouble trying to remember all the passwords for each tool used on your device, especially if you are using different ones for each app.
In using such software you will take out a lot of pressure from your shoulders trying to remember everything.
Not to mention that the traditional way of writing them down takes some time, can be a bit difficult and it does not guarantee that your passwords will be kept safely there.
Anyone could find them by mistake and this could compromise the security and even confidentiality of your data, especially if you are keeping sensitive information on your device.
4. Use dedicated software
WinZip is a popular compression tool that offers some great features when it comes to compressing or sharing files.
This is a reliable, error-free tool that will make your life a lot easier when it comes to managing your files.
WinZip is an all-in-one software that goes way above simply offering some sharing and archiving features.
It will offer strong encryption that allows you to protect your files as you zip them. Needless to say that the security features WinZip offers are near bank-level encryption.
If you are used to working on your PC or perhaps on different cloud storage such as Dropbox, Google Drive, or OneDrive, then this is another reason why WinZip is the tool for you.
It easily connects with most cloud storage out there and allows easy access to your RAR files, so you will manage them without much effort.
Most of the time, not only large documents take a lot of space or need organizing, but also videos or pictures. With WinZips’ support, you can archive each RAR file and secure them with high encryption tools.
Let’s have a closer look at some of its key features:
A great and reliable method to open your password protected RAR file without using any third-party software is to edit it in Notepad. By making some tweaks in Notepad, you can remove the password requirement from the RAR file.
1. Open the archived file using Notepad.
2. Press Ctr+F and typeÛtà in the Search bar. Replace it with5³tà.
3. Next, search for ‘IžC0 and replace the result with IžC_0.
4. Save the file after you finish making the changes.
5. Open the file. It will not require any password anymore.
We would like to hear which one worked best for you and you can let us know in the comments section below if you have additional suggestions or recommendations.
In previous versions of Windows, you could easily change the name of your network, but in Windows 10 it seems that it’s harder to rename the network.
If you wish to change the name of the network in Windows 10, today we’re going to show you how.
In Windows 7 it was easy to rename your network connection, you just had to go to the Network and Sharing center and click your connection to change its name.
In Windows 10 you can’t do that anymore, but luckily there’s a different way to change your network name.
You can easily change the name of a certain network by performing one registry tweak. All of this can done through the built-in Registry Editor.
1. Press the Windows Key + R and type regedit, then click on OK.
2. Navigate to the following key in the left pane: HKEY_LOCAL_MACHINE\SOFTWARE\Microsoft\Windows NT\CurrentVersion\NetworkList\Profiles
3. Now you need go through all subkeys (they are all labeled with random numbers and letters) under the Profiles key until you find the key with that has ProfileName set as the name of your network.
4. In the right pane double click the ProfileName in order to change its value.
5. Change the value data to the desired name of your network connection.
6. Close the Registry Editor.
7. In order to apply the changes to your network, you might have to restart your computer, or to sign out and sign in again.
If you don’t want to experiment with your Registry, there’s another way to rename a network. So, here’s how to rename a network by using the Local Security Policy:
Press Windows Key + R, type secpol.msc and press Enter to run it.
In Local Security Policy window, go to the Network List Manager Policies in the left pane.
Now in the right pane double click on the network name that you want to change.
In the Properties windows under the Name section make sure that Name is selected.
Now in the input field enter the name that you wish to use for your connection.
Click Apply then OK to save the changes.
You might have to log in again or to restart your computer before the changes are applied.
And that’s how you rename the network in Windows 10. If you have any comments or questions, just reach for the comments section, below.
The Sims is a life-simulation game series played by people all over the world. Sims 4 is the best-selling Sims game to date.
The game receives constant updates and new content from the developers, but what makes the game shine is the mods community.
Custom content and mods allow players to play out any stories they imagine in the game. They bring a new face to the game and make it feel fresh at all times.
To get you started with the wonderful world of playing with mods, we have prepared a guide on how to install them step-by-step.
How can I install Mods in Sims 4?
1. First of all, you need to check your game version. Press the Windows key + E to start File Explorer.
2. Navigate to the following path and double-click on GameVersion.txt:C:\Documents\Electronic Arts\The Sims 4
3. Now you can start downloading the Sims 4 mods you want to add to your game. You need to verify whether the files you want to download are compatible with your game version.
If they are not compatible, the Mods will not show up in game.
4. Launch Sims 4 on your device.
5. Press on the Options button on the screen.
6. Choose Game options from the list.
7. Navigate to the Other section in this menu.
8. Tick the checkboxes next to Enable Custom Contentand Mods and Script Mods Allowed. The checkboxes need to be green for these settings to be enabled.
9. Click on Apply Changes and exit the game. Any setting changes you make from the menu require a game restart.
10. Now it’s time to install the mods. Depending on the file extension type they have, they need to be placed in different places on your computer.
11. To install CAS CC and script mods (.package and .ts4script files), you need to navigate to: C:\Documents\Electronic Arts\The Sims 4\Mods
The Mods folder was automatically created by the game when you enabled Custom Content. If the folder does not exist, create it manually and name it Mods.
12. Copy the downloaded files to this folder. If they are zipped, unzip them.
13. If you downloaded lots, rooms or households, you need to navigate and copy the files to: C:\Documents\Electronic Arts\The Sims 4\Tray
14. Lastly, if you downloaded save files from other players, you need to copy the files to: C:\Documents\Electronic Arts\The Sims 4\Saves
Installing mods for your Sims 4 game on a Windows PC or Mac is very easy. What you need to do is download the files that are compatible with your game version, enable Mods via the game’s settings, and then copy the mods to the dedicated folders.
If have an EA account and download mods from the Sims 4 Gallery, they will be automatically added to your game’s Library.
You can access the Library as soon as you launch the game, from the first menu. From the Library section, you can manage which mods you want to have in your game and which you want to remove.
Differences between Custom Content and Mods
These two terms are often used to describe the same thing, which is player-created content for the game. However, you can differentiate the terms.
Custom Content refers to files that change how your sims look and what objects they have around them. For example, CC consists of custom hairstyles or outfits.
On the other hand, mods refer to files that change how your Sims behave, how they interact with each other, and what options they have when it comes to interactions.
For example, the MC Command Center mod allows you to make changes such as: blacklisting certain outfits from being worn by Sims in your world, disabling the ability to get pregnant, auto-cleaning the lot, or changing control to another Sim.
What types of Sims 4 Mods are available to download online?
Sims fans, also known as Simmers, have created all kinds of mods to play with. That being said, you can find these types of CC online:
CAS items (hairstyles, outfits, accessories, eye colors, etc)
CAS backgrounds
Build items
Households (when downloading a custom Sim, you need to download all the CC used to create that Sim)
Lots
Worlds (these types of mods modify an already existing world)
Core mods
Save files
Core mods, also known as script mods, are created from scratch by players using their codes. Therefore, they can modify the game beyond its default restrictions.
The process of installing script mods in Sims 4 is not different from that of installing other types of mods, as you will see in the following guide.
Unfortunately, at the time being, it is impossible to install any type of Custom Content on consoles.
Xbox consoles do not have mods support yet. If you want to play with mods, you need to be using a computer.
Installing Mods on Windows 10 vs Windows 11
If you are wondering whether there is any difference when you install Sims 4 mods on Windows 10 or 11, you should know that the process is the same.
Even more, the same installing process can be used on other OSs as well, for example, on Windows 7.
What to do with .txt, .img or .png files?
These are additional files that come with your Sims 4 mods and are only meant to inform the user about the item they downloaded.
Therefore, they can be safely deleted and do not need to be placed in the mods folder. If you do choose to place them there, they cannot cause any harm, but take up disk space.
We hope that our article helped you install Sims 4 mods on your device. Let us know in the comments section below whether you have any questions about this topic.
Even if you have slow internet, Steam does not slow its download speed, which impacts the speed and performance of your PC.
The way to fix this is to throttle the download speed. However, users report this feature is not working correctly. Check out the solutions below to solve this issue.
Users report that when they have an unstable internet connection, Steam ignores the download limit they set. If you have an internet connection that cuts in and out and is unreliable, then Steam may ignore any download limits.
This type of erratic behavior can also be linked to other related issues, such as when your Steam download goes to 0 bytes unexpectedly or appears to hang despite being active.
Quick Tip:
If you still want to use your browser while you are downloading a huge game, you can use a specialized gaming browser, Opera GX, mostly for its network-limiting capabilities.
Since Opera GX is a gaming browser, it comes with relevant features, such as a network bandwidth limiter for when you are downloading games, making browsing slower but consistent. It also comes with CPU and RAM limiting capabilities, as well as integrated Discord, WhatsApp, and other amazing features.
Opera GX
Set the limits and enjoy your gaming options while browsing the web.
Open Steam, click on the Steam menu in the top left corner, and select Settings.
Under Downloads, check the box next to Only auto-update games between.
Set your desired time and click OK.
Try adjusting the settings to only have Steam auto-update your games between a specific time, preferably a 1-hour interval during a time that you are not using your PC.
This will limit any updates and downloads to take place during that interval.
2. Change download region
Open Steam, click on the Steam menu in the top left corner, and select Settings.
In Downloads, located Download Region.
Change the region to somewhere that is not as active and click OK.
When choosing a region, don’t pick one that is geographically close to you; instead, like one where the local time is in the middle of the night. Or a region with a spread out population.
We hope one of the above solutions helped you fix the download limit in Steam if it’s not working. Let us know in the comments which step worked for you or if you have a suggestion for a different solution.
Steam can download updates and new games in the background while you play, but this can lead to in-game lag or reduced performance depending on your system and network strength. To manage this, go to Settings > Library and adjust the background download options. You can enable or disable downloads while playing games, depending on your preference. If you’re experiencing noticeable lag or stuttering, it’s best to pause downloads during gameplay and resume them afterward.
Why does Steam download fast, then suddenly slow down?
It’s normal for Steam to start a download quickly and then slow down, especially during installation. That’s because after downloading compressed game files, Steam has to extract and install them, which puts pressure on your CPU and storage drive. This is particularly noticeable on traditional hard drives or systems with limited RAM. If the slowdown is extreme or sustained, it may indicate a problem with your drive’s health or a conflict with another background process. Try clearing your download cache or switching your Steam library to a faster drive.
How do I fix Steam not downloading at full speed?
There are several steps you can take to restore full download speeds. First, make sure Steam’s bandwidth isn’t being limited in the Downloads settings. Next, try switching to another download region and clearing your download cache. You should also pause any other apps or devices that might be consuming network resources. In some cases, your antivirus or firewall might be interfering with Steam, so adding Steam to the exception list can help. Finally, check that your drive isn’t full or overly fragmented, which can also bottleneck performance.
What’s a good download server region in Steam?
Steam automatically selects a content server region based on your location, but the closest server isn’t always the fastest. If your downloads are slower than expected, try manually switching to a nearby region that might be less crowded. You can do this by going to Steam > Settings > Downloads and changing the “Download Region” dropdown. Selecting a neighboring country or a major city near you can make a surprising difference in speed, especially during peak hours.
Does Steam throttle download speeds automatically?
Steam itself doesn’t automatically throttle download speeds unless you’ve set it to do so. However, slowdowns may occur when Steam servers are under high demand, such as during major game releases or seasonal sales. Additionally, third-party network tools or routers with QoS (Quality of Service) features may throttle Steam without you realizing it. Make sure Steam is prioritized in your network settings, and disable any unnecessary bandwidth restrictions in Steam or your router settings.
Can I schedule or pause Steam downloads?
Yes, Steam offers a way to schedule downloads so they only run during certain hours. This is perfect if you want to avoid heavy internet use during the day or only allow updates overnight. Head to Settings > Library > Download Restrictions, and you’ll see an option to enable time-based download windows. You can also pause and resume individual downloads manually from your Library, giving you more control over when and how your games are downloaded.
Google Chrome is one of the most popular browsers out there, boasting an incredible number of features, lightning-fast loading speeds, extension support, and more.
Additionally, it offers multi-tab support, allowing you to multi-task efficiently, while also having lots of customization options for said tabs.
The problem with multiple tabs, however, is that when two of them have the audio feature on, you end up getting a convoluted mess that you cannot understand.
The same scenario applies when you need to work in peace and quiet, and every now and then, some ad or video in a certain tab starts blaring.
Thankfully, when this happens in Google Chrome, you no longer have to close the tabs that have audio. Instead, you can simply mute them, while still keeping them open for you to use.
That is why we’ve created this step-by-step guide that will show you how to enable or disable being able to quickly mute and unmute a tab playing audio in Google Chrome.
Why did Chrome remove the Mute Tab?
Back when Google introduced the Tab Audio indicator (the speaker icon) for the Chrome browser, it also added a flag with the ability to mute a tab with a single click.
That only remained as a flag, but contrary to others, it lasted for four years, as Google finally removed it in 2018, saying that Chrome needs to police content if they provide muting control.
So, if you are looking for an easy answer on how to mute a tab in Chrome using a shortcut, know that there is an extension for it.
Quick Tip:
Although Chrome has been dominating the browsers’ segment in terms of usage for some years now, it’s worth noticing other browsers, like Opera One.
Muting a tab in Opera One is similarly easy, by simply right-clicking on it and selecting the Mute tab option. The browser also comes with unique features as built-in VPN, Ad Blocker and AI.
Opera One
Switch off the noisy tabs with just 2 clicks! Try the awesome Opera One browser today
Press the Shift + M combination on your keyboard to mute that particular tab.
2. Use the contextual menu
Launch Google Chrome.
Open multiple tabs.
They can all have audio, it doesn’t matter.
You can recognize tabs that have audio running by the small speaker icon on them.
Right-click on one such tab.
You can do this from an entirely different tab, you don’t need to switch.
Select Mute site from the context menu.
The website should now be muted, and no more audio should be heard from it. In order to reverse this change, simply right-click the tab again and select Unmute this site.
This change persists through page refreshes and it will stay muted even if it moves on to another video. One thing you should note is that the audio will remain muted even if you close the tab.
You can tell if a site has been muted by the microphone icon located on the tab that is crossed out.
This change also persists through browser restarts and PC reboots, so the only wait to unmute a website is by using the method listed above.
First of all, nothing is broken so you won’t need to fix anything, as nothing is broken. All you have to actually do is unmute the tab, just like you muted it in the first place.
Look at the steps above and follow the exact same procedure, only this time select the unmute option instead of the mute.
You will see that everything will go back to normal and the volume for the selected tab will be restored as a result.
But, if you would rather use the Chrome Mute Tab extension, you will get the same results, only through an easier process.
The Tab Muter extension is entirely free, so don’t be shy and give it a go. As we said, Chrome added the mute tab option instead of the entire site.
If you are also looking for information on how to mute a tab in Chrome on your phone, simply follow the same steps.
That is also how to mute a tab in Chrome for Mac, so all the information you need is right here. Do you think website muting is useful? Let us know what you think in the comments section below.
Even though Chrome is the market holder and the most used browser in the world, it still has some things that can be deal-breakers.
For example, if you accidentally close Chrome with multiple tabs open, it will, well, just close. No warning, nothing at all.
There’s no official way to make Chrome ask when closing multiple tabs. The Close all tabs prompt is one standard feature available on other browsers that were frequently asked for and never delivered in Chrome.
Even though Google delivered many features, stability improvements, and better resource usage over the years, this feature never saw the light.
But don’t worry, we got your back. There’s a way to make Chrome ask when closing multiple tabs.
How do you close 50 tabs?
Regardless of the number of open tabs, you close them all at once by clicking on the X at the topmost right of your browser.
However, you must note that depending on your machine, for 50 tabs, it may not close as fast as you wish.
This is because Tabs in Chrome are treated as individual processes, so closing them at once means the PC has to work its way to ending 50 distinct processes.
How can I see how many tabs I have open?
The number of open tabs is straightforward on IOS; this number is displayed at the bottom of the browser.
However, this may not be a straightforward process on your PC, and you will need an extension like Tab count to see the number of opened tabs.
Is there a limit to the number of tabs in Chrome?
You may be able to go as many as 9000 tabs on Chrome according to Google; however, it is not wise as this increases the workload on your computer.
Let us now show you how to make Chrome ask before closing.
Quick Tip:
While you are busy troubleshooting Chrome, you may need another browser to use until the job is done. Opera One is an excellent alternative to Chrome, with a much lower system footprint.
You get unparalleled control over your UI elements, including your tabs. Opera one comes with workspaces and tab islands, which give you much more control over your tabs. Also brings you a free native AI built-in.
Opera One
Get complete control of your tabs, from how they open, behave, and ultimately close with Opera One.
Keep the Chrome Close Lock tab open while using Chrome to prevent it from closing without a prompt.
Chrome’s most significant advantage is its extensive library. So, even when you feel a feature is missing, you always will find an extension that fits the bill.
And this is an easy way to make Chrome ask before closing multiple tabs.
3. Restore tabs closed by mistake
Actually, you shouldn’t worry too much if you closed a tab or page by mistake because there’s a very simple way of restoring it.
Press the Ctrl + Shift + T shortcut while on Chrome and witness the magic. The tab or page will reappear just as it was when you closed it.
We’re pretty sure you already heard about the changes that the Redmond-based tech company is going to implement for the new operating system’s Start menu and taskbar.
Based on community feedback, Microsoft added another way to customize what you get to see in the Start menu, but it’s still an experimental feature so don’t expect to have it yet.
As a matter of fact, only a limited number of Dev Channel Insiders can test the upcoming change, but it will eventually roll out to more people as time goes by.
How can I show more pinned tiles on the Start menu?
On the off chance that you aren’t already using one of the third-party apps that permit customization options for the Start menu in Windows 11, you are surely eagerly waiting for this change.
But don’t go thinking that you’ll be able to anchor the Start menu wherever you please on your desktop. In fact, the only new addition is the fact that you’ll be able to control more of the content in it.
You can tweak the flow of pins or recommendations that get displayed on the Start menu. And switching between the two is quite easy, as we’re about to show you.
According to Microsoft, we can access Start settings and choose the More pins or More recommendations layout option to show an extra row of either pins or recommendations, respectively.
1. Press the Windows + I keyboard shortcut to open the Settings app.
2. Choose the Personalization option from the menu.
3. Now, navigate to the Start section on the left. This will open the Start Settings menu.
4. Tick the box next to the More pins option to show more pins on the Start menu.
5. If you want to show add recommendations to the Start menu as well, tick the box next to the More recommendations option.
Revert settings back to default
However, if you don’t want more of one or the other, you can just revert that option to Default, which means that there will be a balanced number of the two.
In order to set your Start menu not to favor any of them, you do exactly the same, as follows:
Right-click the Start menu and select Start settings.
Tick the box next to the Default option.
That’s pretty much it! A simple process with a useful outcome. Surely many will already be waiting for this new feature, but Windows 11 users won’t be so easily satisfied.
The community wants to see the good old days of multiple functionalities restored to the taskbar as well. But seeing how Microsoft is doing more and more based on feedback, that could pretty much still happen soon.
We’re eager to see what new ideas Redmond developers will come up with and will closely follow the evolution of the new OS, keeping informed as we go.
Excited about the new changes being tested by Dev Channel Insiders? Share your opinion with us in the comments section below.
The Windows 10 error reporting service is designed to help ensure your PC works optimally. The central idea behind Windows Error Report (WER) is to keep Microsoft informed about user issues working with Windows.
However, every Windows OS version has the service enabled on default settings. But an individual user can choose to disable it if the need arises.
This article explores how to enable or disable the error reporting service on Windows 10.
How the Windows 10 error reporting service works
Windows 10 Error Report focuses on discovering hardware and software issues from the user’s PC and reports to Microsoft.
With a database of likely complaints experienced with using the Windows 10, Microsoft can then send solutions for troubleshooting.
While working with the PC, some users experience pop-ups or alerts requesting the submission of the problem report.
Windows error report usually occurs after a system failure, program crashes, refused to load properly or operating system errors. W
Windows usually prompts the user to submit an error report online to help proffer solutions in the future. The problem report may include the program name, date, time of error, and version.
Should I disable the Windows problem reporting service?
Windows users often disable error reporting due to disk space or privacy issues but might need to exercise restraint. Error reporting service for Windows 10 offers dual benefits to Microsoft and PC users.
Each error report helps Microsoft develop more advanced service packs for dealing with glitches. That means a better user experience with Windows 10 based on the information gathered.
How can I disable the Window error reporting Service?
Just like other versions, Windows 10 does have a slightly different graphical user interface for disabling error reports.
Lower versions of Windows OS have error reporting under Action Center Setting. On Windows 10 it is the Security & Maintenance function that requires working with registries.
1. Use the Run dialog
1. Press down the Windows +R keys on your keyboard.
2. The Run dialog box will open.
3. Type service.msc in the box and click on OK or press Enter to run the command.
4. Locate the Windows Error Reporting Service in the list that opens.
5. Right click on it.
6. Go to the Startup type section and press the button next to it to open a drop-down menu.
7. Click on the Disabled button, which is at the bottom of the list.
8. Click on Apply and OK to save the changes.
9. Close the service window to exit. Now the process has been completed.
The easiest way to manage the Windows error reporting service is via the built-in Settings app. From there, you can enable or disable the problem reporting service in a few clicks.
In some cases, the Startup type which is close to disabled might appear gray. That means the user needs admin rights to continue the process. Therefore, log out and log in as an administrator. Or locate the administrative command prompt by pressing Windows key+ X to select command prompt admin.
2. Use the Registry Editor
Using the Registry Editor is another way to safely disable the Windows 10 Error Reporting Service. This second method for disabling the Windows error reporting service includes tweaking the registry. But first, you need to check for error report issues:
Locate Control Panel from Windows startup.
Click Control Panel> System and Security> Security and Maintenance.
Look out for Report problems. Report problems should by default display ‘On’.
To confirm that the Windows error reporting service has been disabled, go to Security and Maintenance. Check the comment on the report problem to see if it reads on or off.
Can I enable the problem reporting service after I disable it?
To re-enable the error reporting service on Windows 10, simply set the disabled value back to zero.
Another option would be to delete the disabled value in the Registry Editor.
It’s quite simple to disable and enable Windows 10 error reporting service anytime. And understanding how to use the Registry Editor or finder makes everything much simpler.
Before we start, be sure to keep all your software up to date to minimize the chance of bugs. Also, try reducing the game resolution and graphics quality as a workaround.
1. Adjust paging file settings for the game drive
Open your File Explorer, then right-click This PC and open Properties.
Select Advanced system settings on the left pane.
Click the Advanced tab and now click Settings under the Performance category.
Open the Advanced tab in the Performance Options window that just opened. Under the Virtual Memory category, click Change.
Select your system drive, and then select System managed size. Click Set.
Now select the drive where you’ve installed the game on. Then, click No paging file. Click Set once again. Finally, click on OK.
2. Update the graphics driver
Press the Windows + X key, then select Device Manager from the menu.
Expand Display adapters and then right-click the listed graphics card to choose Properties.
Then, click on the Driver tab and then click Update Driver. Then, click on OK.
Finally, click Search automatically for updated driver software. Then, follow through with the on-screen instructions to complete updating the driver.
Once you update your device, you will be able to protect it from malware and hardware failures and also prevent system crashes such as Your GPU memory is full, which is also caused by outdated driver problems.
If you don’t like Device Manager, we recommend you to use a dedicated program such as Fortect Driver Updater. Whenever you run this software, it scans your PC to detect outdated or missing drivers.
It will then present detailed reports. At a click of a button, you can select what drivers you want to update, install or repair.
Before executing this fix, you should note that it will reduce the operating system’s space. Also, it could even lead to more crashes.
Search for Command Prompt in the Start menu, then right-click it, and select Run as administrator.
Now, type in the following command and press Enter: bcdedit /set IncreaseUserVa 3072
Finally, restart your device.
For users with a 32-bit version of Windows, this fix will come in handy to correct the problem. As an alternative, you could also get the 64-bit version of Windows.
4. Tweak the graphics card settings
Press Windows + R to open Run, type control panel in the text field, and click OK.
Once the window appears, set the View by option as Large icons.
Find Intel HD Graphics.
Click the 3D option to open the 3D settings.
Click on Enhance Application Settings, then select Restore Defaults. Finally, click the Apply button to save the changes.
5. Check for unnecessary background programs
Press Ctrl + Alt + Delete simultaneously to open the Task Manager.
Look at the Processes running, verify the amount of memory allocated to each, and make an informed decision on which programs should be terminated.
High-res textures, shadows, and effects demand large amounts of VRAM. Reducing these settings helps prevent memory overuse and crashes.
Adjust these settings first:
Texture quality
Shadows
Anti-aliasing
Draw distance
Post-processing
7. Reduce Display Resolution
Lowering your screen resolution reduces the VRAM required for rendering, especially in full-screen games.
Steps:
Right-click the desktop > select Display settings.
Under Display resolution, choose a lower value (e.g., 1600×900).
Confirm the change.
8. Disable Hardware Acceleration in Apps
Apps like Chrome, Discord, and Adobe tools use GPU memory unnecessarily when hardware acceleration is enabled.
Chrome example:
Go to Settings > System.
Turn off Use hardware acceleration when available.
Relaunch the browser.
9. Close Background Apps Using GPU Memory
Some apps—browsers, overlays, launchers—can eat into VRAM even when minimized.
Steps:
Press Ctrl + Shift + Esc to open Task Manager.
Under Processes, sort by the GPU Memory column.
Right-click unnecessary GPU-consuming apps > choose End Task.
10. Use Lighter Game Mods or Texture Packs
High-resolution mods can push your GPU over its memory limit. Opt for performance-oriented texture packs to reduce VRAM usage.
Tip: Choose “Lite” or “Optimized” versions of mods when available, especially on modding sites like NexusMods.
When a GPU runs out of memory, it struggles to display images properly. You might experience longer load times, noticeable lag in games, and a drop in FPS.
Flushing GPU memory can help, but it’s only safe to do so after saving your work, as premature deletion can lead to permanent data loss. Signs of a failing GPU include screen glitches and BSOD errors.
Now that you know how to clear VRAM, you can check our guide to learn how much VRAM you have. If the issue is still there, our guide on increasing VRAM on Windows 11 should be able to help you.
Did the above fixes help you resolve the issue with your graphics card? Share your thoughts with us in the comments section below.