Do Eero Routers Support OpenVPN? All You Need to Know

Are you wondering if your Eero router supports OpenVPN? Unfortunately, we have bad news: Eero routers don’t natively support OpenVPN.

However, a couple of workarounds exist for using VPN services on your network. This straightforward guide breaks down the alternatives and provides a step-by-step guide for setting up a VPN on your Eero router system.

How to Install OpenVPN on Eero Router?

The Eero ecosystem prioritizes user-friendliness and simplicity, so it doesn’t offer direct support for complex setups like OpenVPN. However, you’re not entirely out of options. Below, we will take a look at how to use a VPN with your Eero router by using a few tricks that we tried and tested on our own.

There are two options that we could think of and that we also encountered when researching the subject.

1. Use a VPN-Enabled Router as a Bridge

  1. Purchase a VPN-Compatible Router: Get a router that supports OpenVPN. Popular options include Asus, Netgear, and Linksys models (if you already have one at home – even better)
  2. Connect the VPN Router: Attach your VPN-enabled router to one of the Ethernet ports on your Eero router.
  3. Configure the VPN Router: Open a web browser and type in the IP address of your new router to access its admin panel. Then, configure it to run OpenVPN.
  4. Set the VPN Router as a Bridge: Navigate to the Eero app, locate the new router in the connected devices list, and set it to function in Bridge Mode.
  5. Connect Devices: Once the setup is complete, connect your devices to the VPN-enabled router to take advantage of OpenVPN encryption.

2. Use a VPN Service on Individual Devices

  1. Select a VPN Service: Choose a VPN provider that supports OpenVPN, such as NordVPN or ExpressVPN. For a comprehensive guide on other VPN options and installation processes, see our article and learn how to install VPN on Eero routers.
  2. Download the VPN App: Visit the provider’s website or app store to download and install the VPN application on each device you wish to protect.
  3. Connect to VPN: Open the VPN app and connect to a server, ensuring that OpenVPN is selected as the protocol.

While understanding the compatibility of OpenVPN with Eero routers, exploring a broader range of VPN options is also beneficial. Discover the best VPNs for Eero routers in our comprehensive guide.

This option doesn’t protect all devices on your Eero network but is more accessible for those uncomfortable tinkering with hardware settings.

While Eero routers don’t offer native OpenVPN support, you can still maintain a secure and encrypted network by using a VPN-enabled secondary router or installing VPN software directly on your devices. Either approach will ensure your online activities remain private and secure.

Posted in VPN

How to Turn a Router Into an Access Point

You can always turn wireless routers into access points but note that not all access points can function as routers. In this article, our WR networking team will provide simple methods to set your Netgear, Asus, TP-Link, Linksys, Belkin, Orbi, and other brand routers as access points.

Benefits of turning a router into an access point:

  • Achieve better wireless coverage.
  • Provide wireless access to more devices on the same network.
  • You get more Ethernet ports for other wired connections.

How do I convert my router into an access point?

1. Connect your modem and router with an Ethernet cable

  1. Plug in the router adapter and power up your device.
  2. Connect an ethernet cable to the LAN port of your modem and the other connector into the WAN port of your router (the WAN port is usually colored yellow or red).
  3. Now, connect an Ethernet cable to one of the ports of your router and the other end to your PC or laptop.

Nowadays, the routers also create the wireless access point immediately and you can connect to the router wirelessly.

So, instead of connecting to your PC via cable, you may also find the access point in the list of Wi-Fi hotspots on your laptop and connect to it by using the access point SSID and password written on the back of the router. 

2. Configure the router as a wireless repeater

  1. Once you have connected your PC via cable or Wi-Fi, open a browser and enter the address or default IP address of the router. For example, https://192.168.2.1 for Belkin routers or https://192.168.0.1 for TP-Link routers. Read the manual of your router to find out what is the address for your router.
  2. Now, log in using the credentials supplied in the router manual. Usually, the user name is admin and the password is also admin. On some routers, you may also find this information printed on the back of the router as well.
  3. Now, if your router is connected to another router, the easiest way is to go to the Wireless settings, and in the Wireless Mode section, click on the drop-down menu and choose Wireless Repeater or Repeater.
  4. Your new router will copy all the connection settings from the main router and it will just broadcast the signal further without interfering.
  5. Save the settings and exit.

After this, you will have a single access point but two routers to deliver the signal independently. This way, you can have the main or primary router downstairs, for instance, and the repeater, connected with a cable upstairs.

By using a router as a wireless repeater, you will actually create a basic mesh network. Here’s our guide that highlights the differences between mesh networks and multiple access points.

3. Configure it as a stand-alone access point

Tip icon Tip
For this method, you will need the type of connection and settings from your ISP. You can also check out the modem connection settings and take them from there.
  1. Log into your router by using a browser and go to LAN or WAN settings.
  2. Here, you will need to access the connection settings: DHCP, PPoE, or Static (if you have a static IP address).
  3. After you have set up the connection, go to Wireless settings set up the SSID for your access point, and set up the security protocol and a strong password.
  4. In the end, save the settings. The router will reboot, and you will be able to use the wireless access point with your devices.

All the menus and settings depend on your router model and manufacturer. Some are simpler and others have more sophisticated settings. Some routers even have an Access Point section instead of setting a Repeater Mode. 

However, the essential procedure is the same for all the routers. The number of internet connections or connected devices depends on the number of channels of the router, the technology supported by them, and the available bandwidth.

If you stumble across conflicts with the router access point, this guide will help you fix it quickly.

Using a second router as an access point should provide more possible wireless connections and even more wireless networks if you want to.

You can even use a PC as a wireless extender, but it won’t be as efficient as a router.

Hopefully, now you managed to turn your router into an access point and you can connect all your devices wirelessly to the internet.

If you have any questions, don’t hesitate to drop us a line in the comments section below.

0x0000042b Error on Windows 11: How to Fix it

Xbox login errors like the 0x0000042b can stall any attempts to play games on your PC. Without an entry gateway, enjoying all that the Xbox app has to offer can be a thing of the past.

Still, this isn’t the end. With a little bit of tweaking, you should regain access to your account in no time.

What is 0x0000042b Error on Windows 11?

This is a login error when attempting to access your Xbox app or Xbox GamePass account. Some users can get past the login page, but after playing for a short while, the screen throws the 0x0000042b error.

It is typically triggered by bad drivers or hardware conflicts, but a corrupt DLL file or a virus infection can also be behind it.

How do I fix the 0x0000042b error on Windows 11?

A few checks to look out for before moving onto the somewhat technical steps include:

1. Restart related services

  1. Hit the Windows + R keys to open the Run command.
  2. Type services.msc in the dialog box and hit Enter.run services.msc command
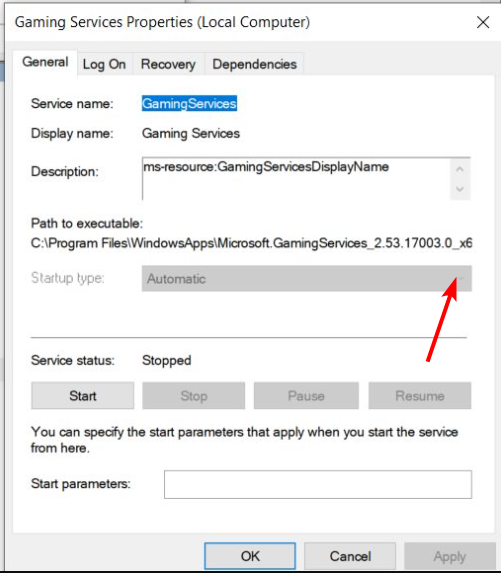
  3. Locate Gaming Services, right-click on it, and select Properties.
  4. Under the Startup section, click on the drop-down menu and select Automatic.
  5. Hit Apply, then OK to save the changes.
  6. Repeat the same steps for IP Helper, Xbox Live Auth Manager, Xbox Live Game Save, and Xbox Live Networking Service.

2. Clear Xbox cache

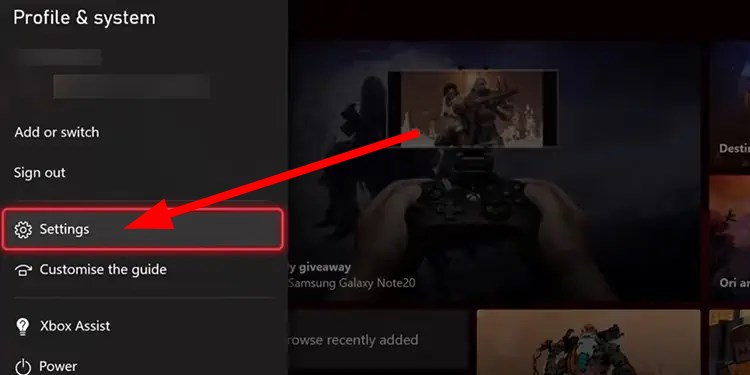
  1. Press the Xbox button on your console.
  2. Select Settings.
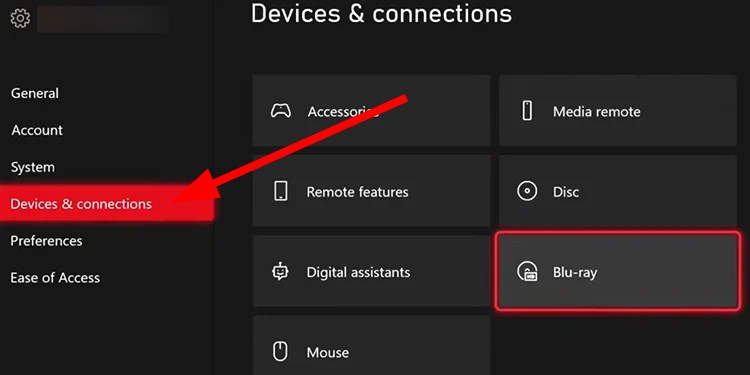
  3. Click on Device & connections on the left.
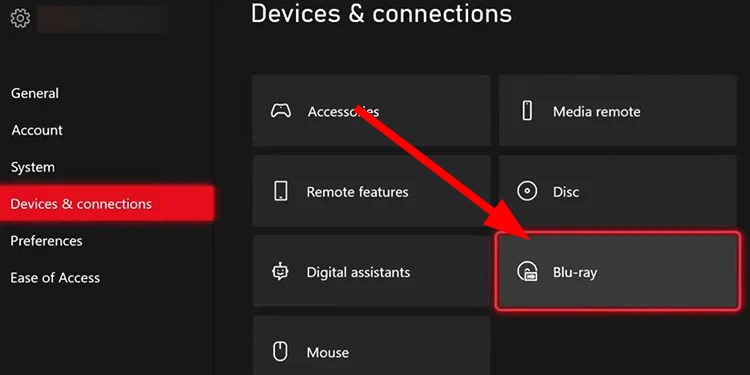
  4. Select Blu-ray.
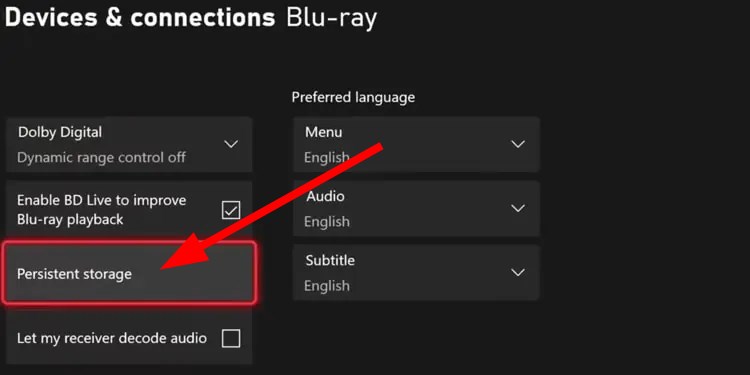
  5. Select Persistent Storage.
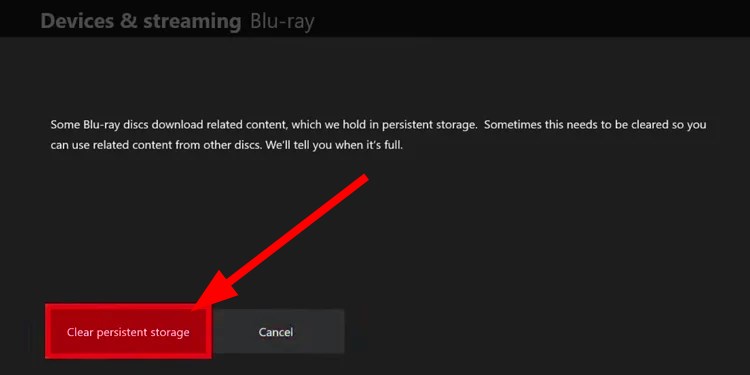
  6. Choose Clear persistent storage.

3. Re-register the DLL file

  1. Press the Windows key, type cmd, and click Run as administrator.DOS COmmand Prompt -amdppm.sys
  2. Type the following command to register the DLL file again and hit Enter:regsvr32 NvLddmkm.DLL
  3. Restart the computer and launch the Xbox app to ensure the issue is resolved. 

NvLddmkm is the associated DLL file for your NVIDIA driver, re-registering it will help fix any issues with missing or corrupt DLL files.

4. Run DISM and SFC scans

  1. Hit the Start Menu icon, type cmd in the search bar, and click Run as administrator.cmd-run-admin-w11 unexpected kernel mode trap windows 11
  2. Type the following commands and press Enter after each one:DISM.exe /Online /Cleanup-Image /Restorehealth sfc /scannow

5. Scan for viruses

  1. Press the Windows key, search Windows Security, and click Open.
  2. Select Virus & threat protection.
  3. Next, press Quick scan under Current threats.
  4. If you don’t find any threats, proceed to perform a full scan by clicking on Scan options just below Quick scan.Scan options
  5. Click on Full scan, then Scan now to perform a deep scan of your PC.Full Scan Scan Now
  6. Wait for the process to finish and restart your system.

6. Clean install the NVIDIA driver

  1. Before you download and install the NVIDIA drivers, ensure you close all unnecessary background processes, disable an overzealous antivirus/firewall, and disable any overclocking software.
  2. Navigate to your browser and download the corresponding NVIDIA driver for your OS.
  3. Locate the installation file, right-click on it, and select Run as administrator.
  4. Click Yes if the UAC prompt pops up and leave the default storage path as suggested.
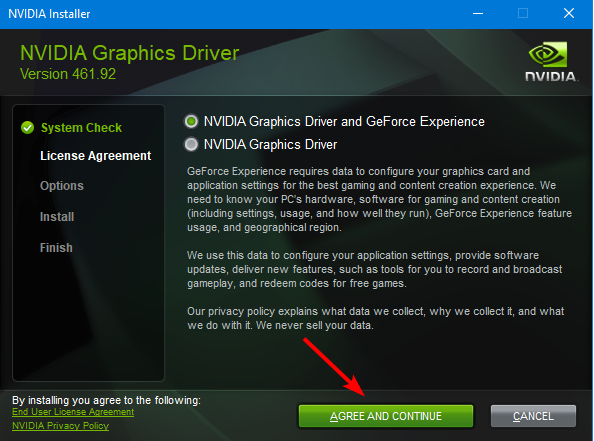
  5. Agree to the terms and conditions.
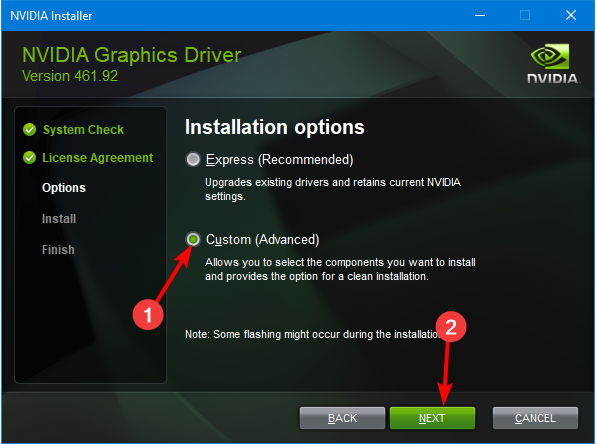
  6. In the next window, select Custom (Advanced) install, then hit Next.
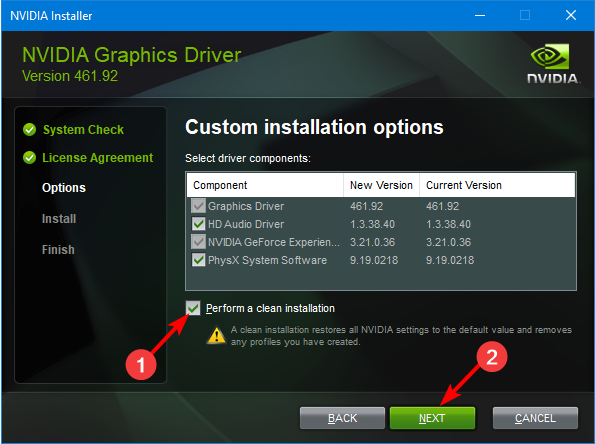
  7. Check the Perform a clean installation box then hit Next.
  8. Wait for the installation to finish, then restart your PC.

The reason behind a clean installation instead of a regular update of drivers is to ensure all previous entries are removed and replaced with newer compatible ones.

Note icon NOTE
Note that this step only applies if you have an NVIDIA GPU.

7. Reset the Xbox app

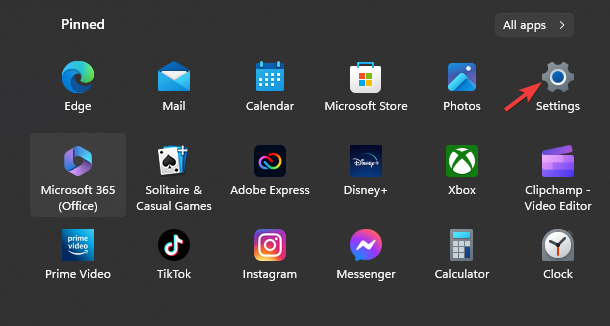
  1. Press the Windows key and click on Settings.
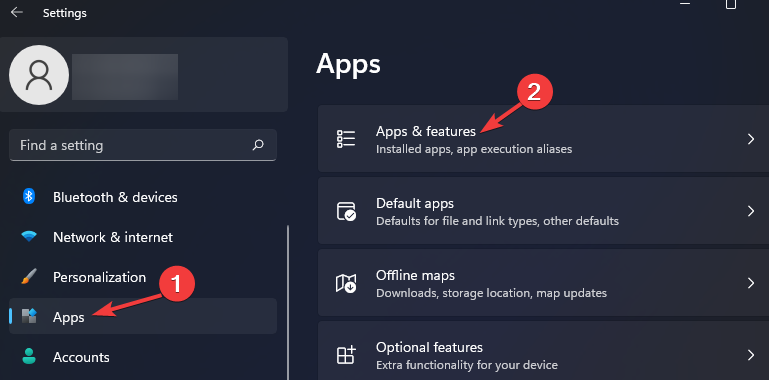
  2. Select Apps from the left side and click on Apps & features from the right.
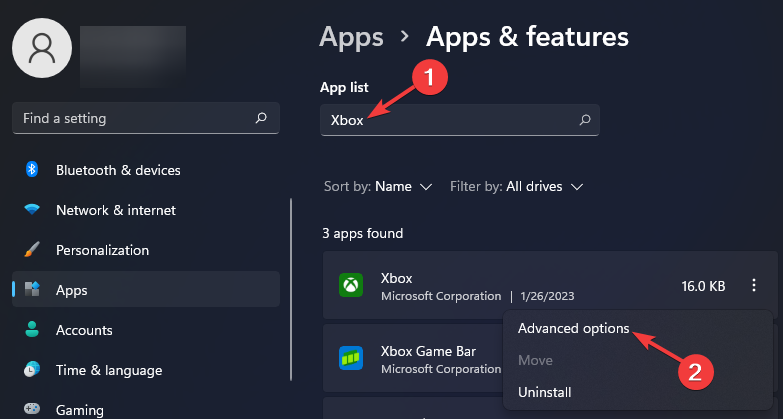
  3. Type Xbox in the search box, hit Enter, click on the three-dot icon, and select Advanced options.
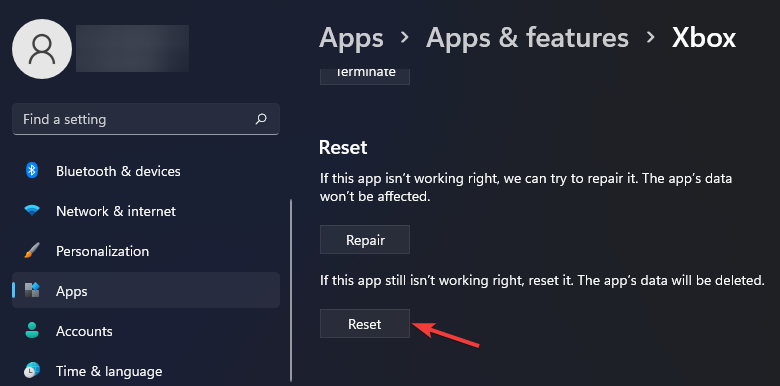
  4. Scroll down and under the Reset section and click on Reset.
  5. Windows 11 will reset the app.

8. Reinstall the Gaming Services app

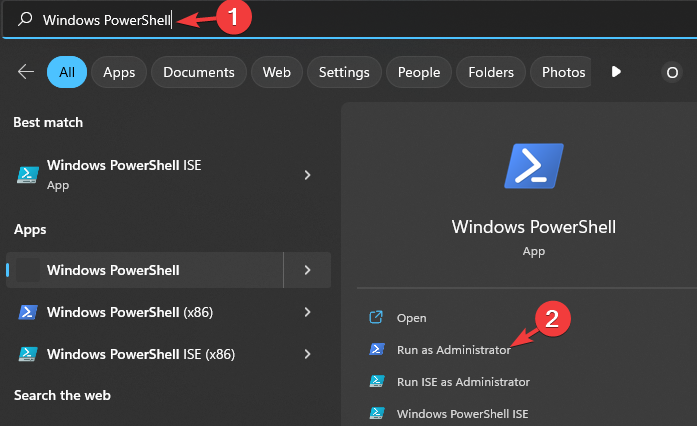
  1. Click on the Start menu, type Windows PowerShell in the box and select Run as administrator.
  2. Select Yes when the User Account Control (UAC) prompt appears.
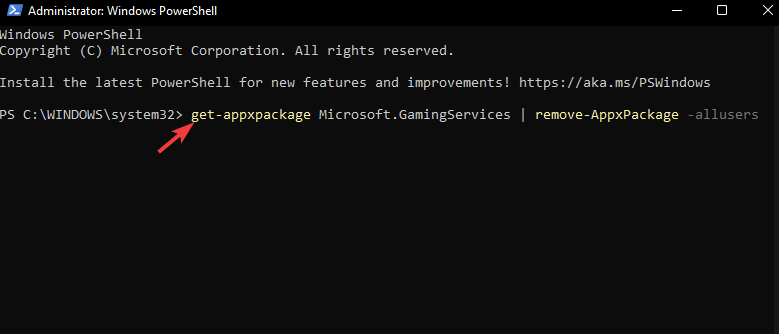
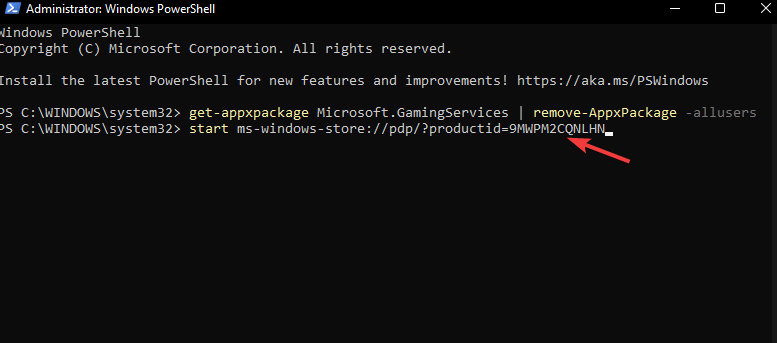
  3. Key in the following command in the console and press Enter to uninstall the Gaming Services app: get-appxpackage Microsoft.GamingServices | remove-AppxPackage -allusers
  4. Now, run the following command to open the Gaming Services app page in Microsoft Store: start ms-windows-store://pdp/?productid=9MWPM2CQNLHN
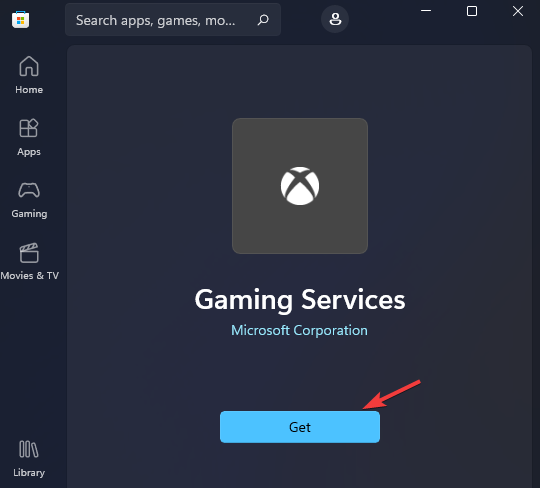
  5. Finally, click on the Get button to download the Gaming Services app once more.

Hopefully, you were able to fix the 0x0000042b error that your were facing on Xbox. If none of them were successful, your hardware might be failing. You’ll need to run a hardware disgnostic test to pinpoint the problematic component.

Unfortunately, Xbox sign-in errors happen in different variations such as error code 0x80a30204 but luckily, the fixes aren’t too hard.

You can tell us which solution worked for you by commenting below. In addition, if you tried any other unmentioned fix, we would like to hear your stories and see if you can help others fix their 0x0000042b login error.

Fix: XP-PEN Calibration is Not Working

If the XP-PEN calibration is not working, you won’t be able to use your pen properly, or it might not even work at all. This can be a major problem and it will make your tablet almost useless.

Although this can be a problem, there are ways to fix this issue, and in today’s guide we’re going to show you the best methods to do that, so let’s get started.

Why is my XP-PEN not working properly?

  • There might be a glitch with the primary display or your device isn’t saving calibration changes.
  • The tablet and display aren’t using the same scaling settings, so you need to adjust monitor preferences.
  • Your device isn’t properly configured in the XP-PEN calibration software.
  • Issues with the tablet driver.

How do I fix my XP-PEN calibration?

Before we try to fix the calibration issue, there are a few quick solutions you might want to try:

  • Start the XP-PEN app before you connect the tablet using the USB cable. This will restore the current calibration settings.
  • Make sure you save calibration settings by clicking OK after calibrating the pen in the calibration tool.
  • Set your tablet as the primary monitor. Wait for a few seconds and then set the correct screen as the primary monitor again.

1. Disable scaling

  1. Press the Windows key + I to open the Settings app.
  2. Navigate to System and choose Display. This will open the display settings.
  3. Lastly, locate the Scale option and set it to 100%.

Keep in mind that for the pen to be calibrated properly, both the tablet and your display need to use the same scaling value.

2. Change settings in the CLIP software

  1. In the CLIP software, go to File and select Preferences.
  2. Navigate to the Tablet tab.
  3. From there enable Set tablet operation area with application and choose the desired monitor.
  4. You might want to experiment with other tablet settings to fix this issue.

3. Reinstall the driver

  1. Press Ctrl + Shift + Esc to open Task Manager.
  2. Locate the PenTablet process, right-click it, and choose End Task.
  3. Next, delete the wintab32.dll file from the following locations: C:\Windows\System32
    C:\Windows\sysWOW64
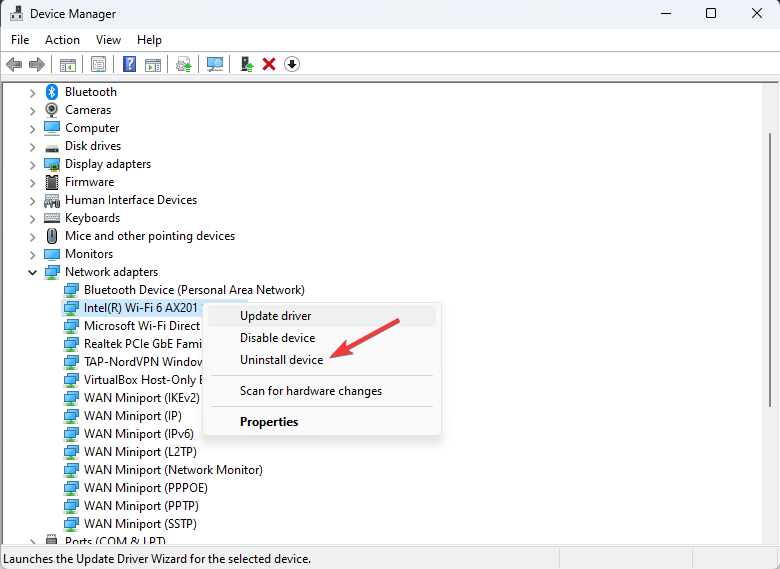
  4. After that, press the Windows key + X and choose Device Manager.
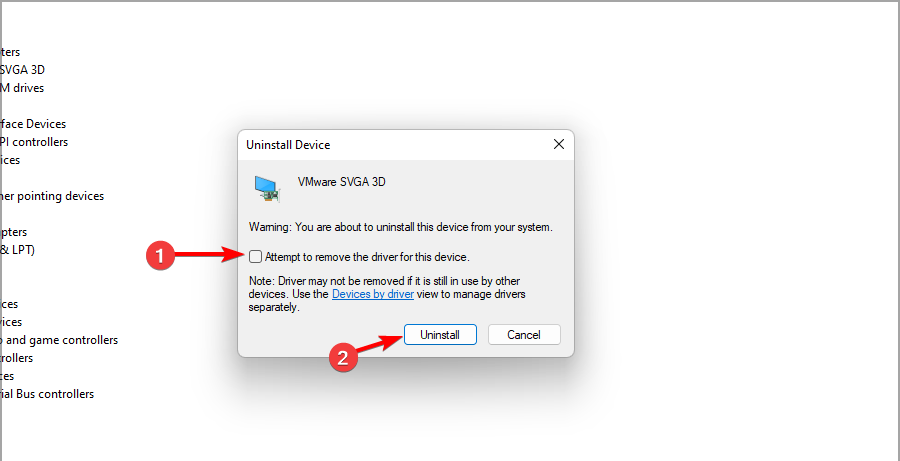
  5. Locate the XP-PEN driver, right-click, and choose Uninstall device.
  6. Check Attempt to remove the driver for this device and click Uninstall. This will remove the current drivers.
  7. Lastly, go to the XP-PEN download page, locate your device, and download the latest driver for your device.

If XP-PEN calibration is not working, the issue is most likely related to scaling or device settings, and it can be easily fixed. This isn’t the only issue, and many reported that the XP-PEN is detected as a keyboard but we covered that issue in a separate guide.

This isn’t the only device that is affected, many users reported that their Surface Pen is not working properly.

Did we miss a solution that worked for you? If so, don’t hesitate to let us know in the comments section.

Uninstalling Edge in Windows 11 Breaks Apps & Widgets, Microsoft warns

Microsoft Edge Chromium, the web browser built into Windows 11, is a core part of the operating system. This means that you cannot uninstall it using conventional methods. But you can uninstall Edge insider versions such as Beta, Dev, and Canary.

Recently, we noticed that Microsoft started triggering a new warning when uninstalling Edge Dev/Canary insider versions in Windows 11 to state that apps and widgets that depend on Edge won’t work when you uninstall it.

Microsoft Edge powers web search in the Start menu, apps, and widgets you use, such as Microsoft News, Weather, Calendar, and more. These are designed to work with Edge. If you uninstall it, they’ll stop working or even disappear.

Here’s the warning we received when uninstalling both the Dev and Canary versions:

Uninstall Microsoft Edge? When you uninstall Microsoft Edge, your apps and widgets that depend on Edge will no longer be available.

Uninstall Edge apps and widgets no longer be available warning

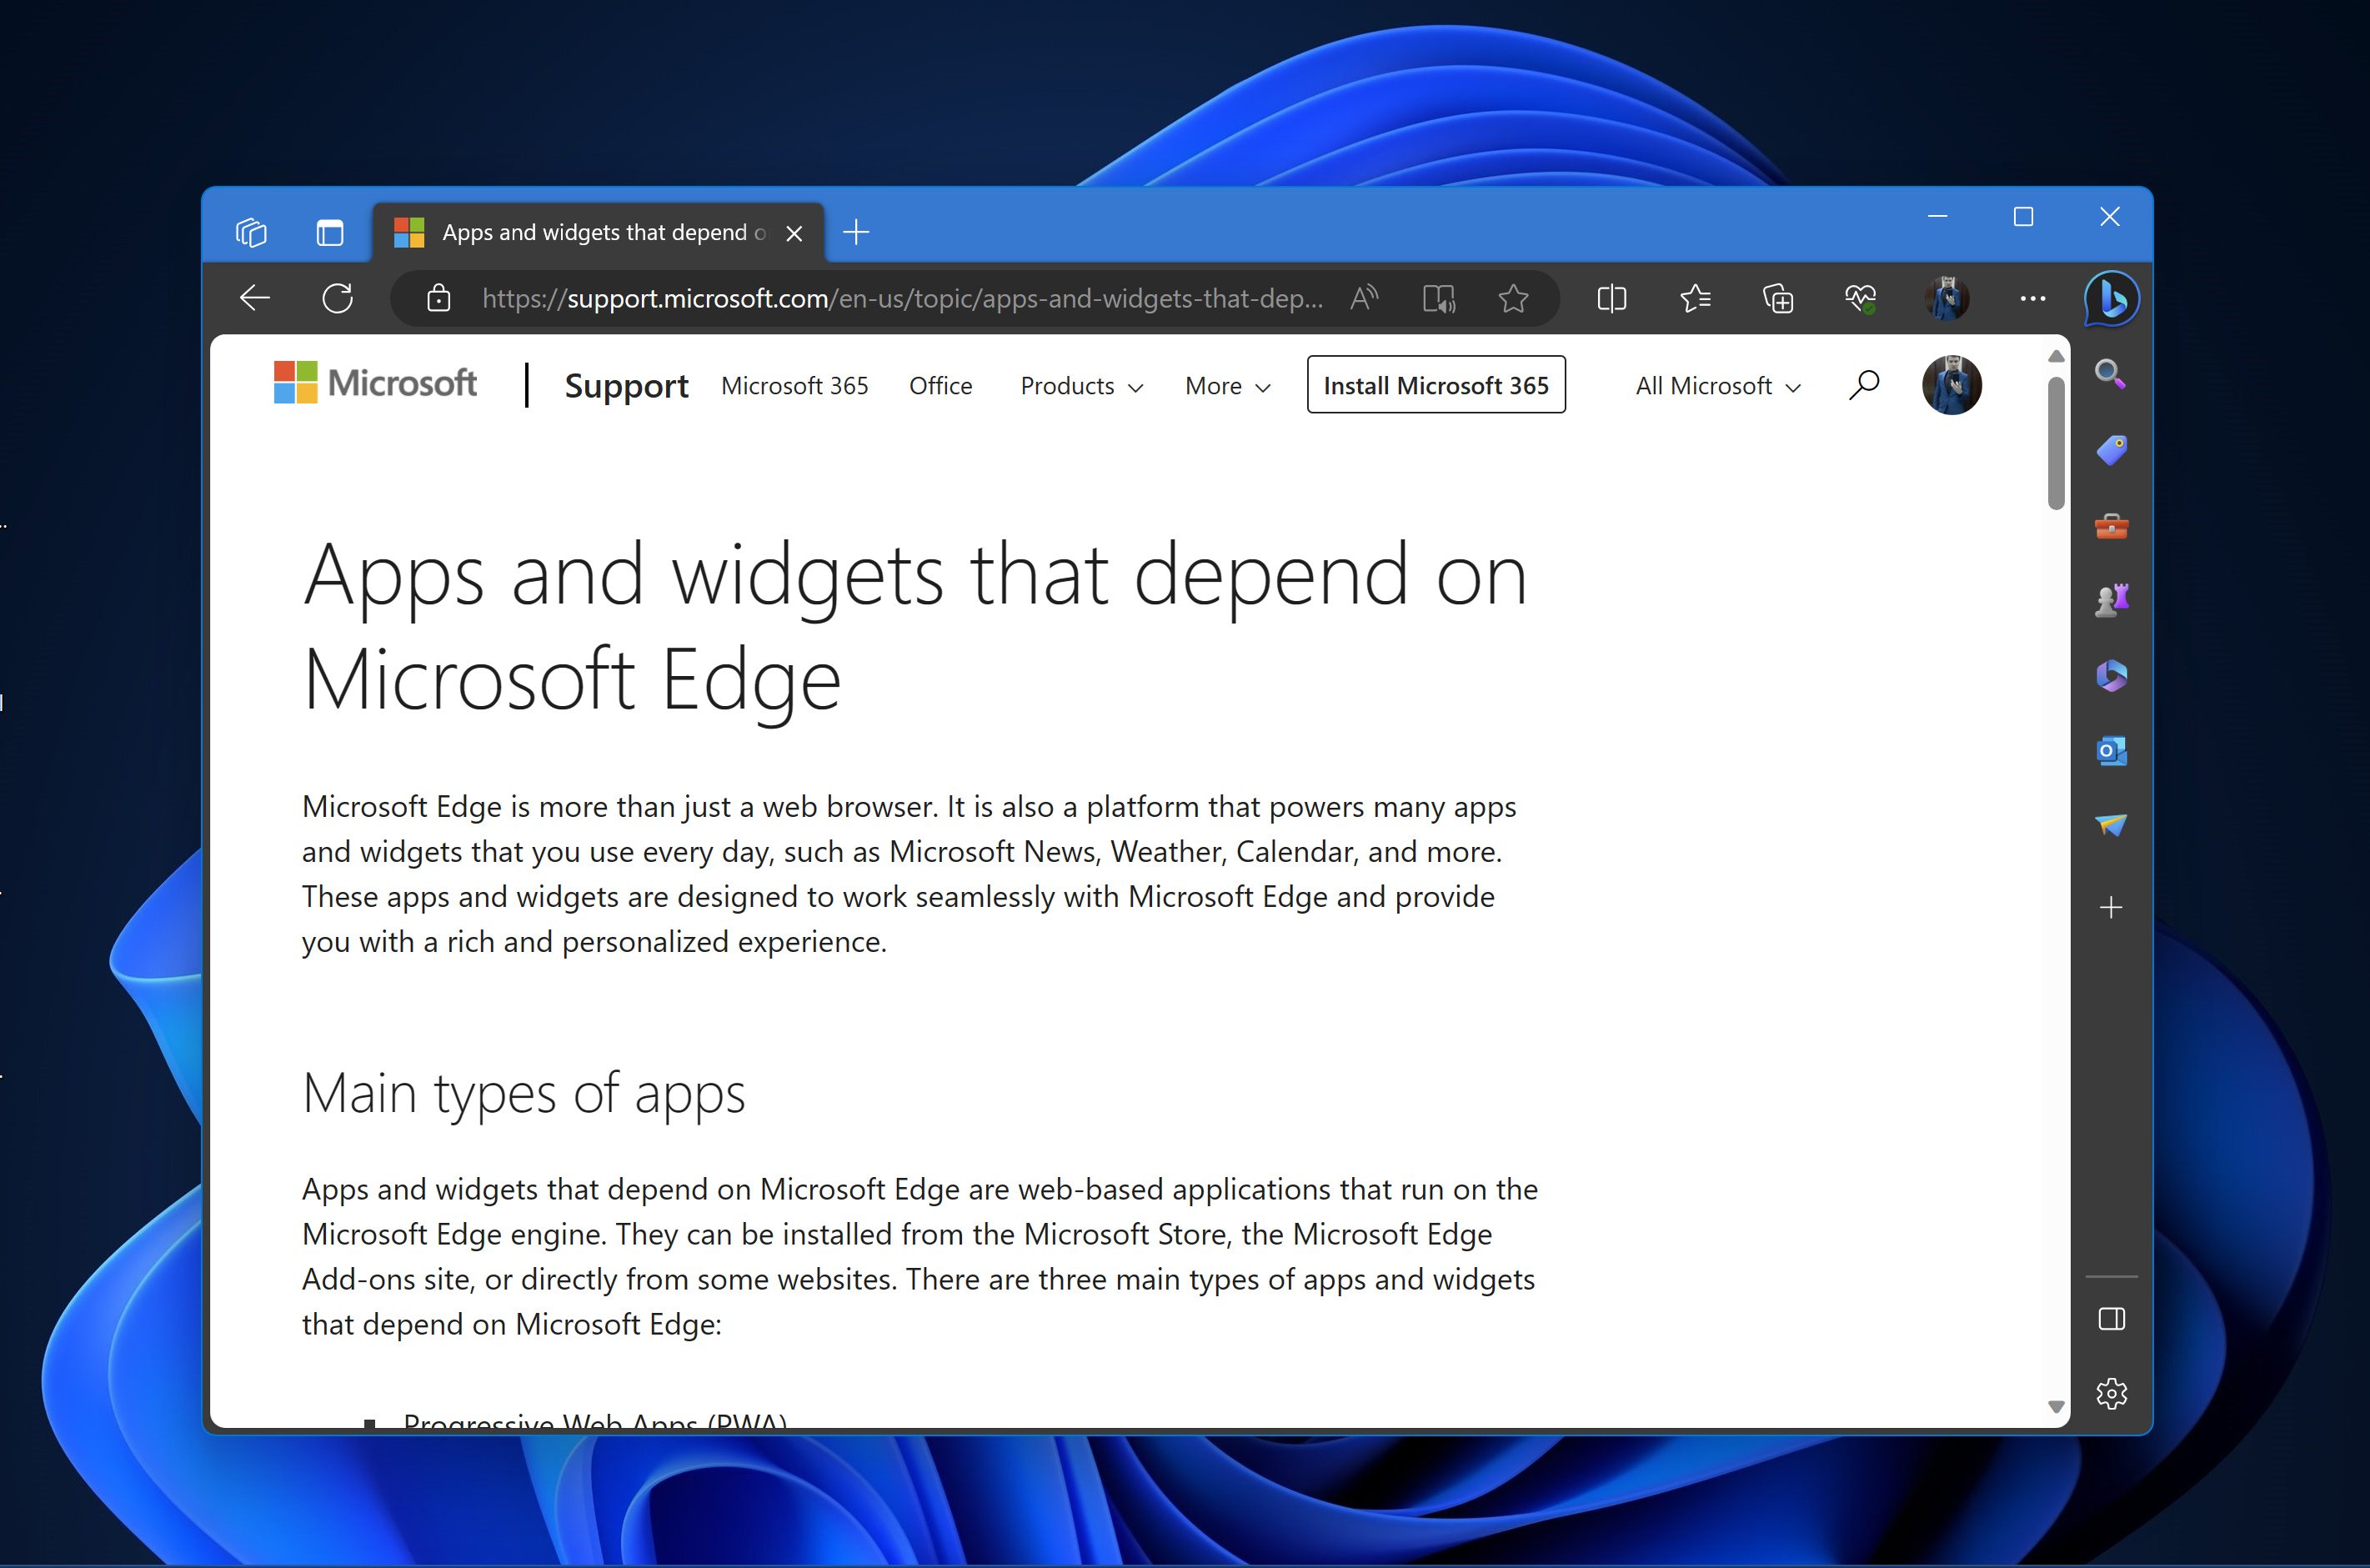
The dialog offers Uninstall and Cancel options with a Learn more link that takes you to the Apps and Widgets that depend on Microsoft Edge support page created on August 7, 2023.

The support page details PWAs, sites as apps, and widgets that run on the Microsoft Edge engine. They can be installed from the Microsoft Store, Edge add-on, or third-party websites. The page further explains:

All PWAs, sites as apps, and widgets run on the Microsoft Edge browser, which means they use the same web engine, settings, extensions, and features as the browser. For example, if you enable dark mode in Microsoft Edge, it will also apply to your PWAs, sites as apps, and widgets. If you sign into Microsoft Edge with your Microsoft account, it will also sync your PWAs, sites as apps, and widgets across your devices.

At the bottom of the article, Microsoft reiterates that uninstalling Edge causes PWAs, Apps, and Widgets to stop working:

Microsoft Edge is an essential part of Windows 10/11, and it is not recommended to uninstall it. If you uninstall Microsoft Edge, it will cause your PWAs, sites as apps, and widgets to stop working.

To avoid this, we recommend that you keep Microsoft Edge updated and installed on your device. If you have accidentally uninstalled Microsoft Edge, you can reinstall it from microsoft.com/edge/download.

Here is what the current Microsoft Edge uninstall dialog looks like:

Uninstall Microsoft Edge dialog

Have you seen the new Uninstall Microsoft Edge pop-up? Share your experience in the comments section below.

WhatsApp for Web will release a new Search by date feature

WhatsApp for Web will soon release a new Search-by-date option that will allow users to look up a past conversation using a specific date. The feature is under development, and it has not been released yet, but WABetaInfo, the one that spotted the feature, said it will come soon to WhatsApp for Web.

The site also had access to images showcasing how the feature will look like in WhatsApp for Web. Users can easily pick a specific date, and then all the conversations that happened on that date will show up. whatsapp search by date

The Search-by-date option is already live on WhatsApp for iOS, but it seems that Meta will expand it to the Web version, as well.

There isn’t yet a release date for it, but it might happen before the end of 2023.

WhatsApp’s Search-by-date: Why does it matter?

Well, the feature could be one of the most useful features ever released on WhatsApp Web, and this is not an exaggeration. The ability to quickly look at a past conversation at a specific time would greatly reduce the time spent looking for valuable information.

For example, if someone knows the date or the month of a specific WhatsApp conversation that holds valuable information, this feature will make it possible to find it in seconds, greatly reducing time and frustration. Plus, users won’t have to endlessly scroll through conversations to find specific info.

WhatsApp recently allowed users to join Channels, and the app will also get AI assistants, as Meta revealed last month. The AI assistants will use Bing to come up with real-time information on everything the users request.

They will be released to the platform at a later date, but coupled with this feature, WhatsApp could actually improve the experience of searching through conversations: imagine telling the AI to look up for a conversation that happened months ago.

5 Best Routers for Access Point [2026 List]

Any router with Wi-Fi can be used as an access point but choosing the best router for access point can be daunting. That is why, your Windows Report networking team has tested and provided the best ones for you.

Why use a router as an access point? It’s better to use a router for the access point because it can be configured for other purposes, paired up with a VPN, it provides access for more devices than a simple access point and it offers more security features.

What is the best router to use for access point?

TP-Link Archer A54 – Affordable and easy to install

  • 802.11n, 802.11b, 802.11a, 802.11g, 802.11ac protocols
  • Beamforming technology for wide coverage
  • Parental control features
  • 1200 Mbps of total available bandwidth
  • WPA3 latest security protocol
  • No USB ports

Archer A54 from TP-Link is a very popular router because it offers excellent performance as an access point and it has a very affordable price point.

From the tests performed by the WR networking team, A54 managed to provide a full signal in our lab and a steady Wi-Fi connection of around 700 Mbps on a 1 Gbps plan.

TP-Link’s router offers a maximum Wi-Fi speed of 867 Mbps so our number was pretty good.

The device was very easy to set up by following the instructions and it also provides 5 Ethernet ports for wired connections. It is one of the best choices for an AP router if you have a small home.

Netgear AX5400 – Wide area coverage

  • Speeds of up to 5.4 Gbps
  • 2,500 sq. ft. coverage
  • 802.11n, 802.11b, 802.11ax, 802.11a, 802.11ac, 802.11g protocols
  • 4 x 1Gbps Ethernet ports and 1 x 3.0 USB port
  • NETGEAR Smart Parental Controls (free trial service)
  • The user interface is pretty antiquated

Netgear’s AX5400 router is in a whole ballpark than its rival above, but it’s also a lot more expensive.

In the WR lab tests, this device was able to supply great signal from over 75 feet away and a wall in between.

We tackled that feature because the manufacturer advertises a 2,500 sq. feet Wi-Fi signal coverage and we must acknowledge that AX5400 is pretty potent in that aspect.

Another capability is holding 6 streams simultaneously which we also found to be true thanks to the Wi-Fi 6 technology and the Beamforming+ technology. If you have a large area and 10+ devices, this router is a great choice.

WAVLINK AC3000 – Up to 96 connections

  • Up to 64-96 connections
  • Tri-band Wi-Fi router
  • 5 GB Ethernet ports & 1 USB 3.0
  • MU-MIMO for gaming streaming
  • Very limited interface

Wavlink AC3000 is a triband Wi-Fi 6 router with one 2.4 GHz channel that can achieve 400 Mbps, one 5 GHz channel that offers an 867 Mbps connection, and a third, 5 GHz channel with up to 1733 Mbps speed.

The 8-antenna setting provides good coverage and it can be great for game parties because it can host up to 96 devices.

However, you also need great bandwidth from your internet service provider, otherwise, it will choke even on 10 devices.

The WR networking team has tested it over 4K streaming with great results and it’s a very good tri-band router for its price point.

Linksys EA8300 Max-Stream – Great for gaming

  • 802.11a/b/g/n/ac protocols
  • Up to 1,500 square feet of Wi-Fi coverage
  • 15+ wireless devices
  • Wi-Fi speeds up to 2.2 Gbps (5 GHz / 400 Mbps) plus (5 GHz / 867 Mbps) plus (2.4 GHz / 867 Mbps)
  • MU MIMO technology
  • It requires a reset once in a while

Linksys EA8300 Max-Stream is another Wi-Fi 6 router with one 2.4 GHz channel and two 5 GHz channels.

The strange bit about this router, as our WR networking team discovered, is that you need to log into the router over Wi-Fi to configure its access. However, once you get after this part, you will be good to go.

Thanks to its Beamforming technology and its large antennas, EA8300 manages to get pretty good coverage and signal strength.

This router is great for the whole family, streaming, and gaming because it will provide more than 15 steady connections.

Linksys Velop Pro – Best mesh system

  • 6 GHz Band Access & 5.4 Gbps speed
  • Up to 3,000 sq. ft. coverage
  • 200+ devices connection
  • 8K streaming & gaming
  • High price

Linksys’s Velop Pro is a mesh system that comes with Wi-Fi 6E connectivity. That means it also has a 6 GHz channel but before you buy it, check if any of your devices is compatible. Otherwise, the extra money for the tech will be wasted.

The advantage of this tri-band mesh system is that you can start with one device and add more and they will sync on a press of a button.

You won’t need to adjust any complicated settings because the routers will identify themselves and adjust their speed and bandwidth to your needs.

Another huge advantage is that with more routers in the mesh, you will be able to cover a huge area of over 3000 sq. feet and a lot more devices than with a single router.

Different types of routers

There are many types of routers to choose from so you should know about the main types and the differences between them:

  • Single-band routers – They are the oldest types and least effective because they only offer the 2.4 GHz band to connect. Also, they may interfere with some Bluetooth devices working on the same band. However, if you only have a few devices in your home and a low-speed connection from your ISP, they are acceptable. We have a list of the best 802.11ac routers that match that description.
  • Dual-band routers – The dual-band routers are the most widespread type, and they provide both the 2.4 GHz and the 5 GHz bands. Many of them can also be used as modems, to replace the one from your ISP. They are the best to use as access points in most homes. 
  • Tri-band routers – They either have an extra 5 GHz channel for more bandwidth (Wi-Fi 6) or feature the new Wi-Fi 6E technology with an extra 6 GHz band to connect the latest devices in your home (a total of three radio bands). Tri-band routers also offer more coverage area and Wi-Fi speeds of up to 9.6 Gbps. However, if you don’t have Wi-Fi 6 compatible devices, or you don’t have a high-speed connection from your ISP, it won’t be worth the investment.
  • Mesh Wi-Fi systems – The mesh systems are networks of more routers that can be used to cover larger areas. One device will act as the router and the others will automatically be set as access points to split the bandwidth in a convenient way to the connected devices. This solution is great if you have a lot of devices to connect (including IoT devices like sensors and automated gadgets) in a large area.
  • Wi-Fi 7 routers – It is estimated that next year, the new Wi-Fi 7 technology will be launched. It will cover the IEEE 802.11be set of protocols working on the 320 MHz band, together with the 4096-QAM, Multi-RU, and Multi-Link Operation, offering connection speeds of up to 46 Gbps. That is roughly 4.8 times faster than Wi-Fi 6 technology and 13 times faster than Wi-Fi 5.

Features to consider when choosing the best router for access point

  • Number of wireless devices – If you only have a laptop, a smart TV, and a smartphone, there is no point in getting the ultimate router for access point. A decent dual-band router will be a perfect choice in this case. However, if you have a large home (500+ sq feet) with 15+ devices to connect, consider tri-band Wi-Fi routers with Wi-Fi 6 or Wi-Fi 6E technology or even Wi-Fi mesh systems.
  • Range & coverage area – Most Wi-Fi routers have a top range of 100 feet (30m) but those are measured in optimal conditions. With most wireless routers, you won’t have a full Wi-Fi signal even after 30 feet, and if you have a brick wall between the devices, you will get a significant drop in the internet connection. A Wi-Fi router with an internal antenna won’t be as effective either.
  • Speed & bandwidth capacity – All ISP provide a plan guaranteeing a certain bandwidth and connection speed. Any Wi-Fi networks you set up, no matter their performance, won’t be able to exceed those numbers. For instance, if you have a guaranteed 1 Gbps from your ISP, there is no way you will get 9.6 Gbps wireless speeds even if you have the best Wi-Fi 6 router and a Wi-Fi 6 compatible laptop.
  • Wireless protocols & standards – Wi-Fi works under the 802.11 family of protocols.
ProtocolFrequency Band (GHz)Channel Bandwidth (MHz)Maximum Theoretical Data Rate (Mbit/s)
802.11b2.42011
802.11a52054
802.11g2.42054
802.11n2.4 and 520, 40600
802.11ac520, 40, 80, 80+80, 1606933.33
802.11ax2.4, 5, and 620, 40, 80, 80+80, 1609607.8
  • Ethernet ports and USB connectivity options – Besides the Wi-Fi connectivity, you must also consider connecting wired devices such as printers (to access the network), the PC, and USB devices like an external drive for storage on the network. So, make sure you have enough Ethernet ports for them as well as at least a USB port.
  • Parental controls & security measures – The latest routers have wireless access encryption systems for extra security. Some of them also feature dedicated settings for parental controls that allow you to apply dedicated rules for certain devices and limit the bandwidth or prevent access to certain apps or websites. Look for those features if you have kids and want to protect them while using the router features.

So, if you need a router for access point, consider the number of devices you need to connect, the area you need to cover with a Wi-Fi signal, and match the internet speed and band from your ISP, or upgrade your plan.

The WR networking team has tested the best Wi-Fi router for access point according to all possible needs and we hope that you have found the right one for you.

Which one did you choose? Tell us all about that in the comments section below.

Copilot in Excel: 4 ways you can use this AI assistant

It’s a great time to be a Microsoft lover and Windows user. After Copilot made its way to Windows 11, the AI assistant is coming to Microsoft 365, in November. And, according to the Microsoft 365 Roadmap, all the 365 apps, including, OneNote, Word, PowerPoint, Whiteboard, OneDrive, and Excel.

Yes, Copilot is coming to Excel, but unlike the other apps, Excel will only get Copilot in February 2024, according to the Roadmap. However, there will be a preview available for it in November.

But even so, Microsoft is already teasing out the AI capabilities coming to Excel, and needless to say, the assistant will greatly improve productivity and ease the workflow when working with data.

So what can you do with Copilot in Excel?

Copilot in Excel: 4 ways you can use the AI to greatly improve your productivity

  1. Copilot will help you understand your data better, and it can easily generate tables, and charts to give you new perspectives on them.
  2. The AI assistant will take a look at your Excel data, and it will generate insights for you to explore further. For example, Copilot can come up to you with various sums that can offer great insights on budgets.copilot in excel
  3. The AI assistant will also highlight important data, filter it, and organize it according to your requests. If you need to summarize tables and charts, Copilot can do it for you in seconds.
  4. And, probably one of the most important features is the ability to generate Excel formulas with Copilot. The AI assistant will come up with suggestions for complex calculations.

We’ll probably see more Copilot features coming to Excel in November when the preview is scheduled to take place. Even so, many of the features will aim to decrease the workload, and increase productivity, as we mentioned earlier.

It’s also good to note that Copilot across Microsoft 365 retains more or less the same features. The AI tool will be able to generate data, and summarize existing data.

What do you think about Copilot in Excel? Will you use it?

Can an Access Point Have the Same SSID as the Router?

Do you know that your router and access point can have the same SSID? Do you know there are also compelling reasons to do so and not to?

The key is to know why you want to do it, how to do it correctly, and the impact it will have on your network. In this post, we will review these questions and uncover more knowledge on this matter.

What happens if 2 routers have the same SSID?

If two routers have the same SSID, and both are broadcasting on the same frequency, then the available wireless devices will be able to connect to any of them if they have an open channel. However, only one of them can be connected at any given time.

The wireless devices will use whichever access point has the strongest signal. If they are close enough to both routers, they could switch back and forth between them. However, the SSID collision will likely result in poor performance and even dropped connections.

Can I set up an access point to have the same SSID as the router?

SSID cloning is possible and very common because it makes setup easier and more convenient for users. However, you should be aware of a few things:

1. The router must be broadcasting its SSID

This is a setting in the router, which you can find by logging in to the router’s admin page. If your router isn’t broadcasting its SSID, your computer will not be able to see and connect to the network.

2. The access point should be using the same wireless channel as the router

The main reason for this requirement is that most devices can only connect to one Wi-Fi network at a time. If you have multiple APs on different channels, your device will have trouble knowing which one it should be connected to.

This is important because you don’t want two devices broadcasting on the same frequency at the same time. If they aren’t using the same channel number, there could be interference between them that causes performance and channel conflict issues.

3. The access point must use the same security settings as the router

The wireless security setting on the access point must be identical to the wireless security setting on the router, preferably the WPA2.

If the wireless network uses any other security protocol, such as WEP,  it’s impossible to clone the SSID, and you’ll likely run into problems when trying to connect devices to the network.

What are the advantages of having the same SSID on both devices?

  • Streamlined connectivity – When you have the same SSID on your router and access point, you can connect to the devices in your home network effortlessly. This is because they will automatically detect the best network to connect to.
  • Easier management of network devices – You only need to manage one network instead of two separate networks with different SSIDs. This can make things easier if you have a large home or office network with multiple wireless devices.
  • Improved Wi-Fi range and coverage – With the same SSID, you don’t need to worry about interference from other networks with different names or security settings.
  • No need to update each device’s settings every time you change routers/access points – Access points can be replaced without having to reset all other devices connected to your home network.

What are the disadvantages of having the same SSID on both devices?

  • Security risks from unauthorized access points – Using the same SSID on both devices can make your network less secure by reducing its complexity. If you have the same SSID on your router and access point, anyone can create a rogue access point and give themselves free Internet access without your knowledge.
  • Interference between wireless networks with the same SSID – This can happen when two devices try to transmit simultaneously. This can cause data loss and even corruption of data packets.
  • Confusion when troubleshooting network issues – If you have a problem with your network and need to troubleshoot it, it’s harder to do this when only one SSID name is being broadcast.
  • Incompatibility with certain hardware/software – Some operating systems have problems with multiple routers using the same SSID. They may either refuse to connect altogether or automatically connect to one of them but not another.
  • Manual configuration – You’ll have to configure both devices manually using the same SSID, which could lead to confusion if something goes wrong.

How do I set up an access point with the same SSID as my router?

Step 1: Gather the necessary materials and information

  • Primary router – The primary router is the device that provides access to the internet for all of your devices. It also serves as the gateway for all local traffic. If you use a modem/router combo, you will only need one device.
  • Secondary Device (Access Point) – The secondary device is an additional access point that connects to the primary router and allows more devices to connect wirelessly.
  • Network cable – You may not need it if your router has a built-in Ethernet port.
  • The name of your router’s SSID – This is the network name or network ID and the password for your router.

Step 2: Configure your primary router settings

Log in to your router’s admin page using its IP address or hostname. You can find this information in its manual or in the network information page of its admin panel.

  • Network name (SSID) – This is the name that identifies your Wi-Fi network. You need to change it first before you can set up the AP.
  • Security type – Most routers support WPA2 or WPA encryption, but some older ones use WEP. Your access point needs to use the same security type as your primary router, so choose one of these two options and enter the correct passphrase when prompted during setup.

Step 3: Configure your secondary device (Access Point) settings

Once you have your secondary device plugged in, it’s time to configure it to work with your primary router. You will need to do this on each additional device you want to use as an access point.

The first thing is to change the IP addresses of both devices to Static IP Addresses. This enables the access point to connect directly to the primary router without other devices getting in the way. Once done, set up the name of the AP to be similar to the router, and you’re good to go.

In the end, if you have more than one access point in your network, it is possible to have them use the same SSID. However, having separate SSIDs can also be beneficial in a number of ways, and there are advantages to implementing multiple hubs.

As you weigh your options and their costs, take into account the time and effort of setting up and maintaining multiple access points. If you’re not careful, trying to connect your computers and devices in different locations around the house can become a nightmare.

Ultimately, you’ll have to decide which option best suits your personal needs. You might actually find out your prefer Wi-Fi mesh to access points.

Have you tried setting up your access point(s) with the same network name as your router? What has been your experience, and would you recommend it? Let us know in the comment section below.

How to Cancel an Xbox Game Pass Subscription on PC

Some users might find it more convenient to use their PC for account management, and therefore many are wondering how to cancel Xbox Game Pass on PC.

This is incredibly simple, especially if you’re away from your console and you want a break from gaming, so keep reading to find out how to cancel a subscription properly.

Is Xbox Game Pass Ultimate free with a new Windows 11 computer?

Yes, some PCs might get a free Xbox Game Pass for a month on a new PC. Keep in mind that this applies only to new subscribers and not existing ones.

How do I cancel Xbox Game Pass on my Windows 11 PC?

Use your browser

  1. Open your favorite browser and go to the Microsoft account page.
  2. Log in with your account that is associated with Game Pass.
  3. Click on Services & Subscriptions at the top.
     
  4. Next, locate your Game Pass and click on Manage.
  5. You should now see the cancellation option. Click on Cancel subscription.
  6. You will get offered to change your subscription plan. Click on Cancel subscription to confirm that you want to cancel the gaming service.

Does PC Game Pass charge monthly?

  • The basic PC Game Pass costs $9.99/mo.
  • The Ultimate subscription, which includes both PC and Xbox Game Pass costs $16.99/mo.

As you can see, it’s pretty simple to cancel Xbox Game Pass on PC. You just need to sign in to your Microsoft account and disable it from the subscriptions menu. To learn more about this feature, we have a special guide on Xbox Game Pass on Windows 11 that will answer all your questions.

If the subscription is too expensive for you, you might want to try getting an Xbox Game Pass Ultimate discount or you can invite friends for an Xbox Game Pass referral.

Did you manage to cancel your Xbox Game Pass on your PC using this method? Let us know in the comments section below.

Ask Bing AI is now Ask Copilot on Edge; Copilot is coming to the browser

The latest Dev Build was just released, and the package brings the new Copilot icon, which was introduced back in September, to the taskbar. Hint: it’s looking quite good. But it seems Microsoft is not stopping here with the AI assistant.

Spotted by Windows enthusiast, @Leopeva64, Microsoft is also replacing the Ask Bing AI option of Microsoft Edge with Ask Copilot, and it also updates it with the new icon.

The option to ask Copilot is now live in Edge Canary, and operatively speaking, it is no different from the Ask Bing AI option. Users will get the same results, however, the naming is different.

Is Microsoft ditching Bing AI in favor of Copilot in Edge? Who knows, but it seems Microsoft is taking serious steps to somehow replace Bing AI on Edge with Copilot.

Update: It seems Copilot will somehow replace Bing Chat in Microsoft Edge, as stated by Microsoft in their latest announcement about features coming to the browser.

Announcement: Icon change in Edge sidebar. In an upcoming update to Microsoft Edge, the Bing icon entry point in the Microsoft Edge sidebar will change to the new Copilot icon. No other changes in the experience are expected.

Microsoft

Ask Copilot: Microsoft is bringing Copilot to Edge

According to the same Windows enthusiast, Edge Canary also shows the updated Copilot icon when refreshing the Bing AI chat on Edge. It’s true, that it only appears in a matter of seconds, but coupled with the new Ask Copilot option, it would be evidence enough that Microsoft might be ditching Bing AI in favor of Copilot on Edge.ask copilot

And now, according to the latest announcements, Microsoft intends to replace the Bing Chat icon on Edge with the new Copilot icon. While we don’t know if the name is also going to be replaced, and Microsoft itself stated that no other changes in this experience will happen, in time, the Redmond-based tech giant might change the name of Bing Chat to Copilot.

The reason? Well, we would argue it’s uniformity. Microsoft is already known as a forefront force when speaking of AI, and the Redmond-based tech giant has been working, developing, and releasing AI-enhanced features all year.

For example, Copilot will not only come to Windows 11. The AI assistant will come to OneDrive, Microsoft Teams, OneNote, and all Microsoft 365 Apps. So, it might be a reason enough to keep encompassing all the AI features under one name.

However, there is Bing Chat Enterprise. And Bing Chat itself is still a very popular AI chatbox. So, these two AI entities would coexist, sure, but maybe, one day, they will become one. On Edge, it’s already happening.

What do you think about it?

How to Fix Ticketmaster’s U521 Error When Your Checkout Suddenly Fails

If you’re getting the Ticketmaster error code U521, it usually means the tickets you’re trying to buy are already gone or your session expired mid-checkout.

It’s frustrating, especially when you know you were quick. In this guide, I’ll break down exactly what the error means, why it shows up, and how to fix it fast.

How do I get rid of Ticketmaster Error Code U521?

1. Change your payment method

Make sure you use an accepted payment method. Ticketmaster typically accepts big names issued in the US. If your bank isn’t on the accepted list, you can also use PayPal.

Here’s a quick view of the accepted vs unaccepted Ticket master payment methods:

Accepted CardsUnaccepted Cards
PayPalBanamex Visa
VisaBanamex Mastercard
MasterCardBanamex Debito
DiscoverBanamex Debito Visa
American ExpressBanamex Debito Mastercard
Ticketmaster Gift CardSantander Visa
VenmoSantander Mastercard
Visa Emitida en Mexico
Mastercard Emitida en Mexico
Santander American Express
Ticketmaster accepted payment methods, courtesy of TicketMaster

2. Clear browser cache

  1. For this step, we shall be using the Chrome browser.
  2. Launch your Chrome browser and click the three vertical ellipses in the top right corner.
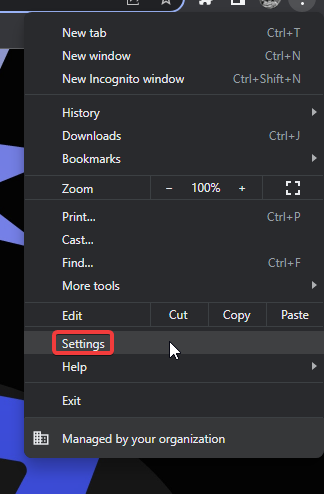
  3. Select Settings.Settings CHrome
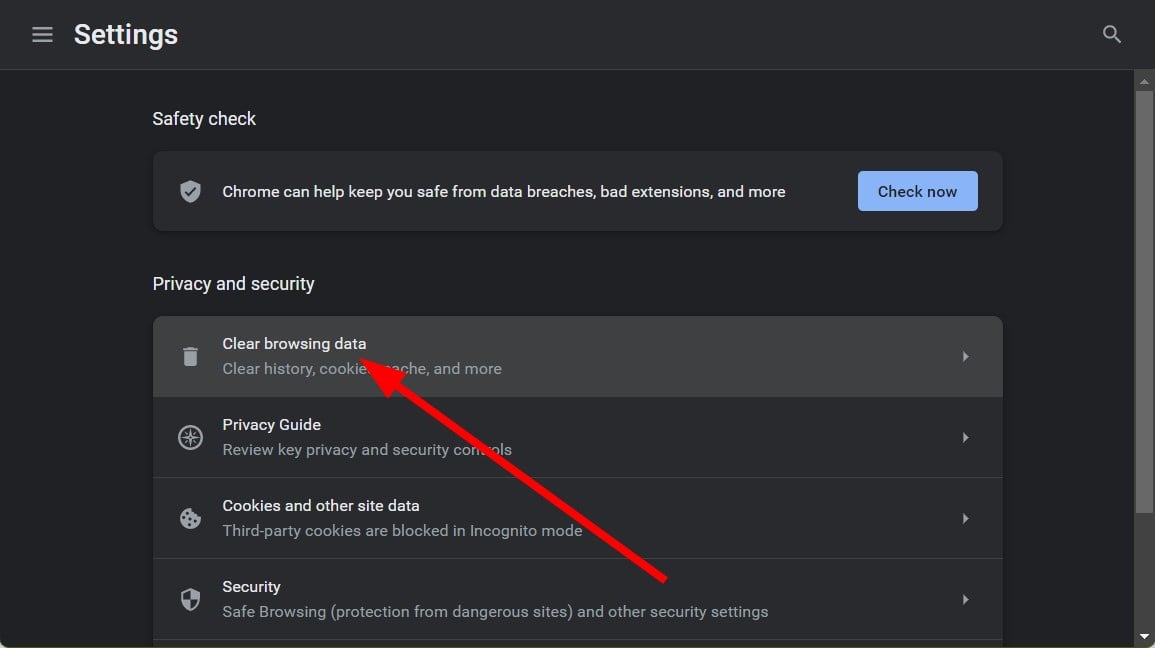
  4. Click on Privacy and security, then select Clear browsing data.clear browsing data
  5. Check Cookies and other site data and Cached images and files, then hit Clear data.Clear data

3. Scan for malware

3.1 Browser scan

  1. Open your Chrome browser and click on the three vertical ellipses at the top right corner.
  2. Select Settings.chrome settings
  3. Next, click on Reset and cleanup, then select Cleanup computer on the right.reset and cleanup
  4. Hit the Find button next to Find harmful software.harmful software chrome
  5. Wait for the scan to finish and remove any recommended software.

Since not all browsers have a built-in malware scanner, ensure also a comprehensive system scan.

3.2 System scan

  1. Click on the Start Menu icon, search Windows Security, and click Open.open windows security
  2. Select Virus & threat protection.virus and threat protection
  3. Next, press Quick scan under Current threats.quick scan
  4. If you don’t find any threats, proceed to perform a full scan by clicking on Scan options just below Quick scan.Scan options
  5. Click on Full scan, then Scan now to perform a deep scan of your PC.Full Scan Scan Now
  6. Wait for the process to finish and restart your system.

For more powerful scans it is always best to use a dedicated security software, such as TotalAV HOME Security Essential. This tool provides you with real-time protection against most threats while navigating the web and it also comes with a powerful antivirus and in-depth scan that will allow you to quickly identify any issues within your system.

⇒ Get TotalAV

4. Disable your VPN

  1. Press the Windows key and select Settings.settings windows 11
  2. Next, select Network & internet and click on VPN in the right-side menu.select vpn
  3. Select the VPN connection you want to disable, click on the drop-down and select Remove.remove VPN

5. Disable your Proxy

  1. Press the Start Menu icon and select Settings.settings windows 11
  2. Click on Network & Internet on the left pane, then scroll down and click Proxy on the right pane.Network proxy settings
  3. Select Edit next to Use a proxy server option in the Manual proxy setup section, toggle off Use a proxy server and click on Save.Disable proxy server

6. Reset your browser

  1. Open your browser (in this case, Chrome) and click on the three vertical ellipses at the top right corner.
  2. Select Settings.chrome settings
  3. Next, click on Reset and cleanup, then select Restore settings to their original defaults.restore settings to their original defaults
  4. Confirm Reset settings in the next dialog box.

7. Reinstall the Ticketmaster app

If you have the Ticketmaster app on your phone, try reinstalling it to see if this fixes the issue. Otherwise, contact the Ticketmaster support team and see if they have any additional answers to your query. Be sure to provide a detailed account of the error for prompt assistance.

What are other tips for avoiding Ticketmaster errors?

  • Try to purchase tickets within a specific time range – There’s no better time than the present. Instead of waiting for last-minute ticket scrambling, book tickets early enough before the site is bombarded with too much traffic.
  • Ensure you’re buying tickets from a legitimate online platform – There are a lot of sites masquerading as the real thing, so always double-check the URL to ensure you’re not being catfished.
  • Double-check payment method before submitting transaction – Before checkout, check whether you have sufficient funds to make the purchase and your credentials match your debit/credit card.
  • Disable third-party extensions – Extensions, especially adblockers, prevent sites like Ticketmaster from loading properly and may keep popping up the Pardon for the interruption error message.

If you’re also encountering error code U533, you can learn how to fix error code U533 on Ticketmaster in our dedicated guide.

Other payment-related issues on Ticketmaster include the error code 5005 and error code 0011, which can also be fixed in a similar manner.

Another common issue is Ticketmaster error code 0002, but we have covered it in our latest guide, so don’t miss it.

And if you’re dealing with other Ticketmaster issues, like not receiving your verification code or repeatedly running into the same error, check out our guides on Ticketmaster not sending code and how to fix Ticketmaster error code U521.

There you go. Now, you should be able to eliminate error code U521 quickly. Do you have any other tips? Share them with us in the comments section below.

Copilot in Whiteboard: Here’s what you need to know about it

Copilot is coming to Microsoft 365 in November, and multiple Microsoft apps are getting this AI assistant, as well. We’re talking about Word, PowerPoint, OneDrive, OneNote, Outlook, and Whiteboard, as well.

According to the latest entry in the Microsoft 365 Roadmap, Whiteboard is the latest Microsoft app to get Copilot, and the AI tool will have more or less the same features.

Copilot in Whiteboard will be available on the web platforms, meaning both desktop and mobile devices will be able to support the AI tool. Users everywhere will now have Copilot on their side to help them create and edit Whiteboard projects.

What can you do with Copilot in Whiteboard?

The AI tool is not so different from its other iterations across Microsoft 365 apps. According to the roadmap, users will be able to generate ideas, categorize, and summarize them with the tool.

In other words, Copilot will take users’ input and create new plans, or suggest new tasks. The AI tool will also be able to organize them using Whiteboard’s designs and sketches. copilot in whiteboard

And if you have a complex Whiteboard project, Copilot will summarize it for you in seconds, according to Microsoft. So, in many ways, once you get accustomed to Copilot on one platform, you’ll be able to master using it on every Microsoft app.

As for other technicalities, for now, Copilot will work best in English, but Microsoft will add improved support for other languages, as well. Spanish, Japanese, French, German, Portuguese, Italian, and Chinese Simplified usage with Copilot will improve following the release of the tool. Plus, it is highly possible Microsoft will add more languages.

The Copilot integration in Microsoft 365 is more than a welcomed addition that greatly eases the way users interact with these apps. Productivity will also be enhanced.

What do you think about AI coming to the Microsoft 365 apps? Let us know your opinions in the comments section below.

Fix: Stuck on Let’s Connect You to a Network on Windows 11

Microsoft made it compulsory to connect to the internet while installing or upgrading to Windows; however, if want to bypass the Let’s Connect You to a Network screen on Windows 11 setup for any reason, this guide can help!

We will explore a few workarounds that can help bypass the internet connection requirement and successfully install Windows 11.

Why Windows 11 cannot connect to the Wi-Fi network?

  • Your device might be missing or have outdated network drivers.
  • Incorrect network settings.
  • Weak Wi-Fi networks or interference from other electronic devices could cause no internet connection issues.
  • The Wi-Fi router or network adapter is not functioning properly.

How do you get past let’s connect you to a network on Windows 11?

1. Using the OOBE command

  1. Once you see Let’s connect you to a network screen, press Shift + F10. This will open the Command Prompt.
  2. Now type the following command to bypass network connection requirements and hit Enter: OOBE\BYPASSNRO
  3. Once the command is executed, your computer will reboot and relaunch the OOBE dialog box.
  4. Follow the onscreen instructions until you reach Let’s connect you to a network screen; this time, you will get I don’t have internet option; click that.Let’s connect you to a network -Stuck on Let's Connect You to a Network on Windows 11
  5. Next, choose the Continue with limited setup option. Continue with limited setup
  6. Accept the license agreement terms and move forward to create a local user account.

2. Kill the Network Connection Flow process

  1. Once you see Let’s connect you to a network screen, press Shift + F10 to launch Command Prompt.
  2. Type taskmgr and hit Enter to open Task Manager.taskmgr  Stuck on Let's Connect You to a Network on Windows 11
  3. Click More Details to access Task Manager in full view.
  4. In the Processes tab, locate Network Connection Flow, right-click it, and select End task from the context menu. More Details to access Task Manager in full view.
In the Processes tab, locate Network Connection Flow
  5. Close Task Manager, type exit, and hit Enter on the Command Prompt window.

Now you will get the Windows 11 setup wizard again; it will prompt you to enter your name and password to create a local user account on Windows 11; follow the on-screen instructions to complete the process.

Once it is done, you must activate your Windows before using it; in case you are facing activation issues, check out this quick guide to fix the issue.

3. Create a local user account using Command Prompt

  1. Once you see Let’s connect you to a network screen, press Shift + F10 to open Command Prompt.
  2. Copy & paste the following commands one by one after replacing the User Name with the name for a user account and hit Enter after every command:cmd_Stuck on Let's Connect You to a Network on Windows 11
    • net.exe user "User Name" /add
      net.exe localgroup "Administrators" "User Name" /add
      cd OOBE
      msoobe.exe && shutdown.exe -r
  3. Windows will now restart and follow the on-screen prompts to complete the installation with a local account.
  4. You will get The user name or password is incorrect message, click OK.
  5. Choose the right account from the bottom left corner of the screen to log in and start using Windows 11.

4. End the Network Connection Flow process using the Command Prompt

  1. At the Let’s connect you to a network screen, press Shift + F10 to open the Command Prompt.
  2. Copy & paste the following command and hit Enter: taskkill /F /IM oobenetworkconnectionflow.exeget past lets connect you to a network on Windows 11?
  3. Once executed, reboot your PC to let the changes take effect.
  4. You will get the Windows 11 setup wizard again; now, enter your local name and password to create a local user account; follow the on-screen prompts to complete the process.

5. Use the Microsoft media creation tool

First, you need another computer to download a Windows 11 ISO image and use an 8 GB USB flash drive to create bootable media. Once done, follow these steps:

  1. Plug in the USB flash drive and boot your computer using it.
  2. Now, the Windows 11 installation setup wizard will appear on the screen.
  3. Select language, time & keyboard and click Next.w11-setup
  4. Accept the license terms, and click Next.
  5. Now, click Install now.
  6. Follow the on-screen instructions to complete the process to set up Windows 11 without an internet connection.

Installing a fresh copy of Windows via a bootable media is always a good idea, especially when you have issues like Windows is stuck Just a moment.

Can you install Windows 11 without the internet?

To install Windows 11 without the internet, you need to create a USB bootable media with Windows 11 ISO file on it, then boot your PC with it to install the operating system.

However, if you are already on the setup wizard and on the network connection screen, you can use any of the methods mentioned above to bypass the wireless network requirement to complete the process.

In case you have network errors on your Windows 11 computer, it is best to update your Windows and drivers to the latest version; read this guide to learn more about it.

If you have any questions or suggestions about the topic, don’t hesitate to mention them in the comments section below. We would be happy to interact!

Fix: Xbox Games Not Showing Up on PC

If your Xbox games are not showing up on your PC, it can be frustrating and prevent you from enjoying a seamless gaming experience across devices.

In this guide, we will discuss the reasons for the issue and will explore a series of practical solutions to tackle this problem so that you can play your favorite games on your computer in no time.

Why are my Xbox games not appearing on my PC?

  • You have an outdated version of Windows.
  • Your Xbox app is corrupted.
  • The gaming service process could be causing the issue.
  • The Xbox Game Pass app is not allowed to establish offline permissions.

How do I get my Xbox games to show up on my computer?

Before proceeding with any steps to fix the Xbox app not showing installed games issue, go through the following preliminary checks:

  • Check the list of all participating games for Xbox Play anywhere list.
  • On the Microsoft Store app, click on your profile icon in the top-right corner, select Sign out, and then sign in with an active Microsoft account.
  • Make sure your Windows and Xbox app is running on the latest version.
  • Verify if you have a stable internet connection and visit the Xbox Live Status website.
  • Ensure you have enough disk space; recover it and try again.

1. Restart the Gaming Services

  1. Press Windows + R to open the Run dialog box.Services RUn command -Xbox Games Not Showing Up on PC
  2. Type services.msc and click OK to open the Services app.
  3. Locate and right-click the Gaming Services, and select Restart.rESTART - Xbox Games Not Showing Up on PC

2. Reset the Microsoft Store app cache

  1. First, close the Microsoft Store app from the Taskbar if open. Press Windows + R to open the Run window.
  2. Type WSReset.exe and click OK to initiate the cache reset process.wsRESET.EXE -Xbox Games Not Showing Up on PC
  3. Once done, the Microsoft Store will open automatically.

3. Repair the Xbox app

  1. Press Windows + I to open the Settings app.
  2. Go to Apps, then click Installed apps.Apps - Installed apps Xbox Games Not Showing Up on PC
  3. Locate Xbox, click the three dots icon, and select Advanced options.click the three dots icon, and select Advanced options.
  4. On the next screen, scroll down under Reset and click the Repair button.under Reset and click the Repair button.
  5. Wait for the process to complete, then close the Settings app.
  6. Reboot your computer to save the changes.

You can repair or reset your Xbox app to fix similar issues like the Xbox app not working; read this to learn more.

4. Reinstall the Gaming Services app

  1. Press the Windows key, type powershell in the search bar, and click Run as administrator.Powershell 2 Xbox Games Not Showing Up on PC
  2. Copy & paste the following command to remove the gaming services app and hit Enter: get-appxpackage Microsoft.GamingServices | remove-AppxPackage -allusersWindowsTerminal_Xbox Games Not Showing Up on PC
  3. Type the following command to open the Microsoft Store and press Enter: start ms-windows-store://pdp/?productid=9MWPM2CQNLHNWindowsTerminal_Xbox Games Not Showing Up on PC
  4. Click Get to reinstall the Gaming Services app.ApplicationFrameHost_YgAMIMNG sERVICES INSTALL

This method could also work if your Xbox app is not detecting gaming services; to learn more about this issue, read this guide.

5. Delete the Delivery Optimization Files

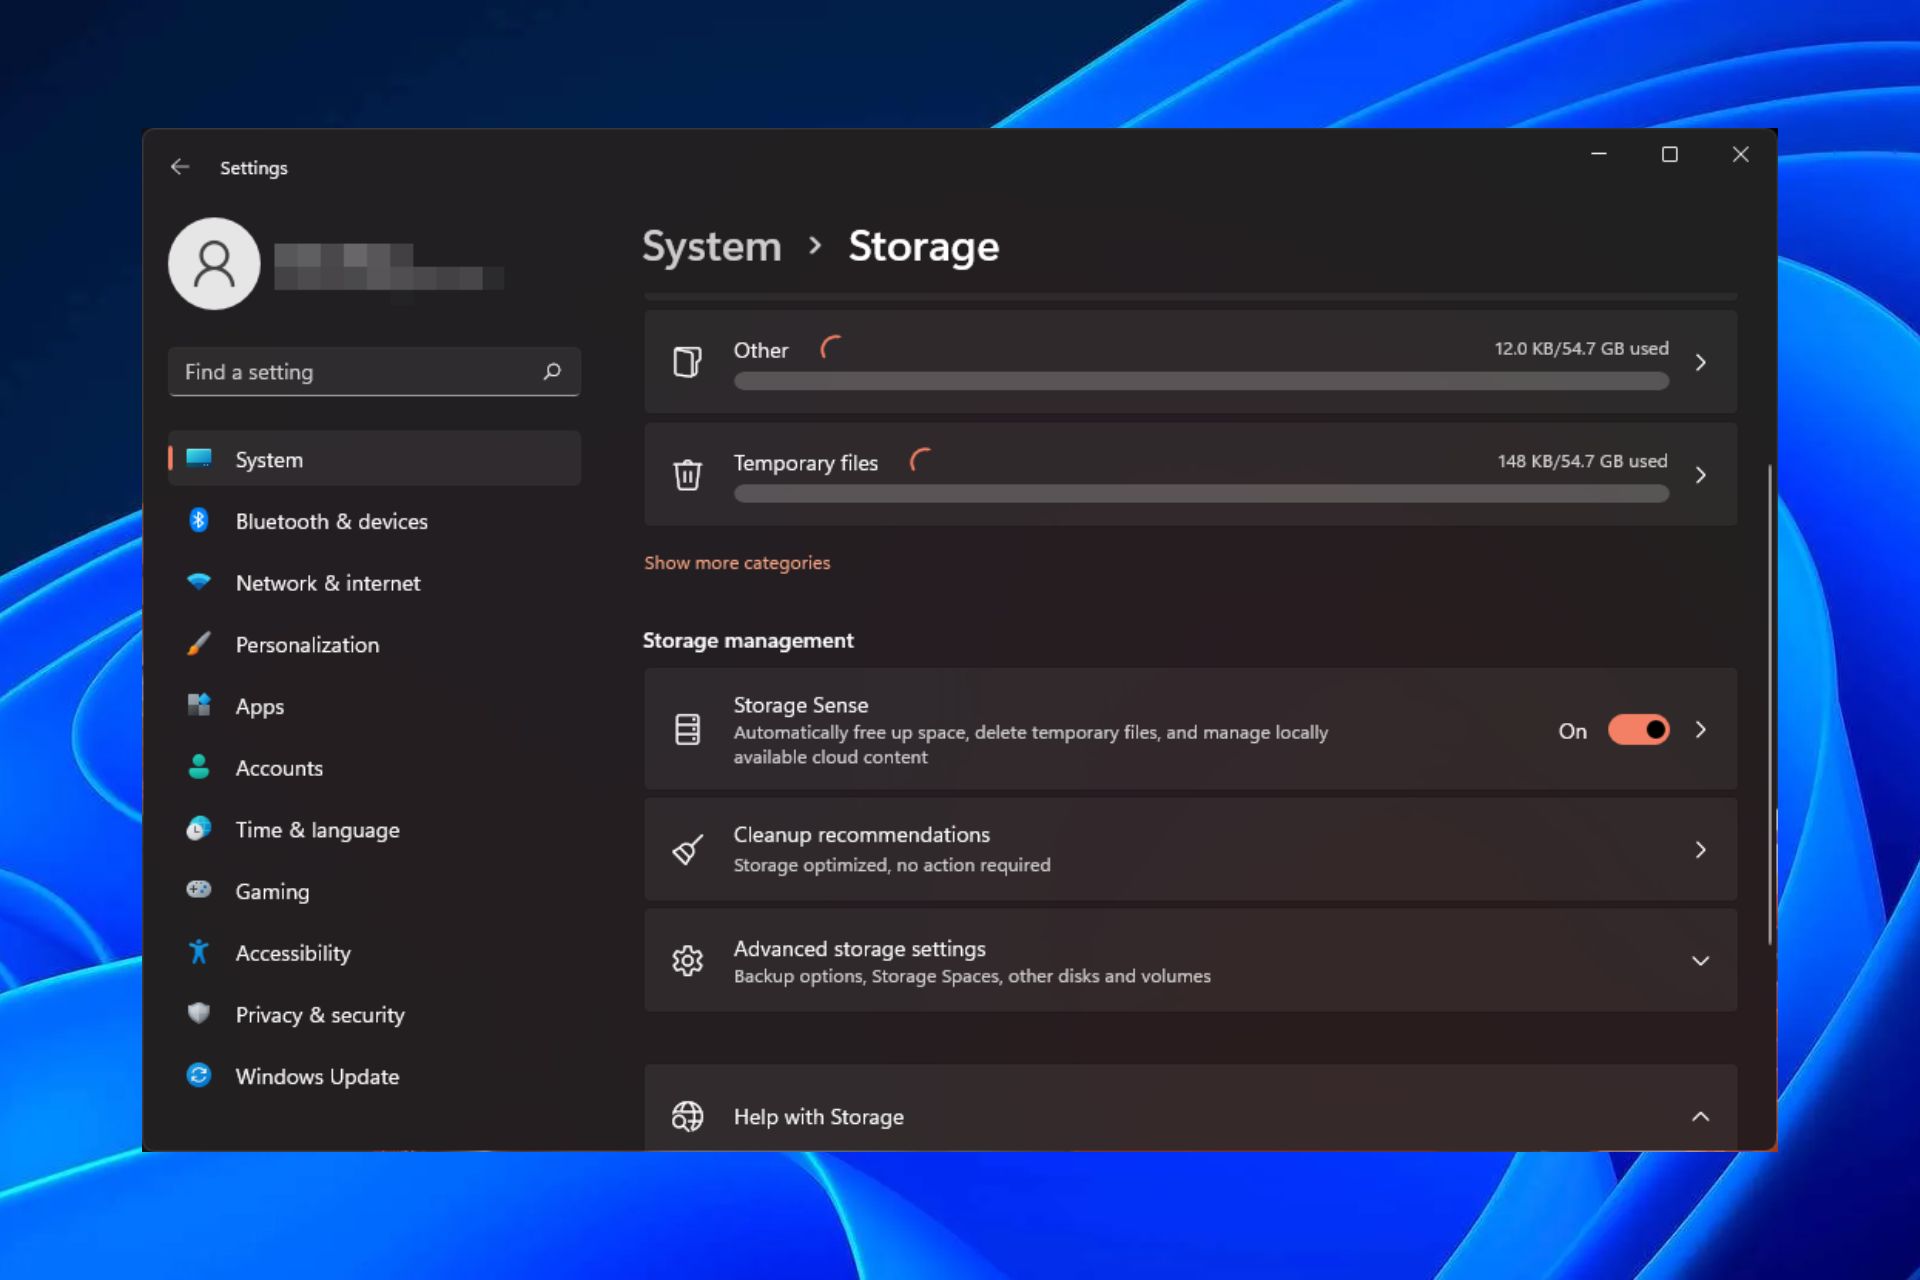
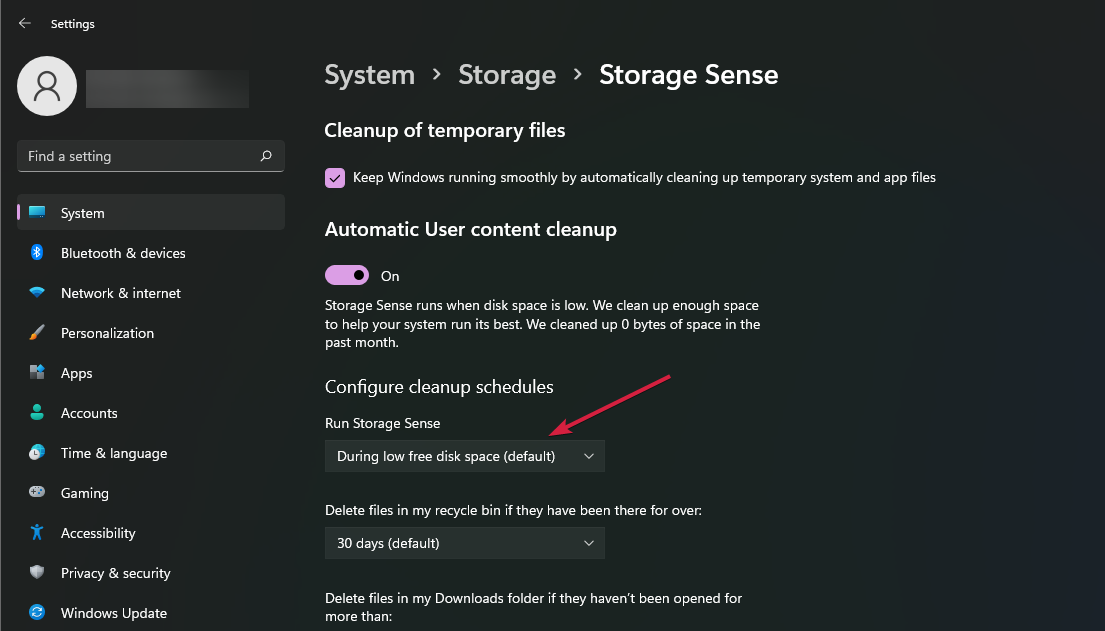
  1. Press Windows + I to open the Settings app.
  2. Go to System, and click Storage.System, and click Storage - Xbox Games Not Showing Up on PC
  3. Select Temporary files.Select Temporary files.
  4. You will get the list of temporary files, look for Delivery Optimization Files, select it, and click Remove files. look for Delivery Optimization Files, select it, and click Remove files.
  5. Restart your PC and check if the Xbox app shows you games on your computer.

6. Modify the registry entries

  1. Press Windows + R to open the Run dialog box.Regedit RUN COMMAND -Xbox Games Not Showing Up on PC
  2. Type regedit and click OK to open the Registry Editor.
  3. First, take a backup of registry entries and go to File>Export. Save the .reg file to the accessible location.fILE eXPORT
  4. Navigate to this path: Computer\HKEY_LOCAL_MACHINE\SYSTEM\CurrentControlSet\Services\GamingServices
  5. Right-click the GamingServices key and select Delete.dELETE - my Xbox games to show up on my computer
  6. Next, right-click the GamingServicesNet key and choose Delete.
  7. Restart your computer and run the Xbox app.

7. Reset IP configuration and network caches

  1. Press the Windows key, type cmd in the search bar, and click Run as administrator.CMD elevated Xbox Games Not Showing Up on PC
  2. Copy & paste the following commands one by one and hit Enter after every command:Ipconfig release
    • ipconfig /release
      ipconfig /renew
      ipconfig /flushdns
      ipconfig /registerdns
      nbtstat -rr
      netsh int ip reset all
      netsh winsock reset
  3. Once executed, the IP settings of your PC will be reset, and all network-related cache will be removed. Restart your computer and check if the games reappear.

In case you can’t access your purchased games on your Xbox One, check out the tips to fix it by our WR experts.

In conclusion, to avoid the Xbox games not showing up issue on your PC, always keep your Xbox app & Windows OS updated to the latest version and make sure you have an uninterrupted internet connection.

Did we miss any steps that helped you fix the issue? Feel free to mention them in the comments section below. We will happily add to the list.

Dev Error 841: How to Fix This Modern Warfare Error

With Call of Duty Modern Warface 3 live in the beta phase, users couldn’t be more thrilled, but it’s not an entirely smooth experience, and a few reported Dev Error 841.

Remember, beta testing stages are known to be unstable, with error codes popping up at different stages or through the entire game. Besides, many face performance issues. But as far as this situation is concerned, it’s a minor error code.

What is Dev Error 841?

This is a server-side error encountered when players are in the middle of a multiplayer game. The game pauses for a second, only to return to the main menu.

Since it’s an online game, issues are bound to appear due to network problems, both at the user’s end and the game’s. The Dev Error 841 is encountered on all devices, including the PC, Xbox consoles, and PlayStation.

How do I fix Dev Error 841 in Call of Duty: Modern Warfare?

Before we start with the slightly complex changes, try these quick tricks:

  • Check for any available game updates and install them to fix Dev Error 841 in MW3. Since it’s widespread, the developers will soon release a patch for it.
  • Switch to another network. If connected wirelessly, go with a wired connection to eliminate any network issues.
  • Check for slow Internet speed or network issues. And make sure the Internet doesn’t randomly disconnect at brief intervals. Try restarting the router or modem.
  • Restart the device throwing the error message, be it a PC, Xbox, or PlayStation.
  • Disconnect other devices on the network to reduce some load off it and increase the available bandwidth.

If none work, head to the fixes listed next.

Note icon NOTE
The solutions here are for a Windows PC. The idea remains the same for those playing the game on Xbox or PlayStation. Execute the equivalent steps on your device.

1. Terminate all instances of Modern Warfare

  1. Press Ctrl + Shift + Esc to open the Task Manager.
  2. Now, locate any active instances of Modern Warfare 3, select them individually, and click on End task.terminate to fix dev error 841
  3. Once done, relaunch the game and check whether the error still appears.

Closing all the processes related to the game can help you fix other issues like MW3 different version, Dev Error 12744 ; read these guides to learn more.

2. Try less problematic modes

The error is frequently encountered in the Ground War game mode. While there is no official statement for it, the only logical explanation seems to be the popularity of the mode and the higher number of users entering a multiplayer match.

So, you could try the other game modes on Modern Warfare 3, be it on a PC or a gaming console.

3. Perform a network reset

  1. Press Windows + I to open Settings, go to Network & Internet from the navigation pane, and click on Advanced network settings.advanced network settings
  2. Click Network reset under More settings.
  3. Click the Reset now button.reset now to fix dev error 841
  4. Finally, click Yes in the confirmation prompt.
  5. Once done, restart the computer and check for improvements.

4. Reinstall the game 

  1. Press Windows + R to open Run, type appwiz.cpl in the text field, and hit Enter.appwiz.cpl
  2. Locate Modern Warfare 3 from the list of applications, select it, and click on Uninstall.uninstall
  3. Follow the on-screen instructions to complete the process.
  4. Now, reinstall the game and check whether the error message disappears.

Sometimes, the previous installation or corrupted files can trigger Dev Error 841 in Modern Warfare. If that doesn’t work, use a reliable uninstaller software to get rid of any leftover files. This also helps with Dev Error 5523.

4. Wait for the official game (stable version) release

In case nothing else works, your best bet is to wait for the official game release. CoD Modern Warfare 3 will be released on November 10, 2023. 

And any issues or bugs in the beta state will be identified and eliminated by then. So, for an uninterrupted gaming experience without Dev Error 841, install the stable build of Modern Warfare 3.

Beta Weekends and Matchmaking Cooldowns

For those wondering what Beta Weekends are, the releases in the beta phase of Modern Warfare 3 have been spread across two weekends.

The first, Oct 6-10, will see PlayStation 4 and PlayStation 5 players getting access to the game, while during the second Beta Weekend, Oct 12-16, the game will be available for PCs and Xbox consoles.

And for anyone bothered about facing matchmaking cooldowns due to server-based errors, that shouldn’t be the case. Unless you willfully abandon an ongoing match or it happens too frequently, no penalty should be imposed!

You now understand that there isn’t much to do when fixing Dev Error 841, except wait for a patch from the developers. But these workarounds might help, as they did during Dev Error 6068 and Dev error 5433. However, as per our research, there were not any cases of Dev Error 841 in MW2.

Besides, these are not exclusive to modern warfare; a few also came across Dev Error 5476 in Warzone. It is Activision’s style of nomenclature! Before you go, don’t miss our latest guide on Dev error 12502.

For any queries or to share how you fixed the error, comment below.

Fix: Wrong RAM Speed on Windows 11

Many users reported that Windows is showing the wrong RAM speed, which concerns them. Not utilizing the full RAM speed won’t get maximum performance out of your RAM.

This can negatively impact some resource-intensive tasks, such as video editing, gaming, or multitasking,  but there is a way to fix this issue, and in today’s guide, we will show you how to fix it.

Why are Task Manager and cmd showing different RAM speeds on Windows 11?

This is normal behavior, depending on how your PC measures RAM speed. If one or the other shows half of the current speed, that’s perfectly normal due to the nature of DDR memory.

How do I clock my RAM to the correct speed?

1. Check Task Manager

  1. Press Ctrl + Shift + Esc on your keyboard to open Task Manager.
  2. Go to the Processes section and select Memory.
     
  3. In the bottom right corner, check the speed.
  4. If it’s half of the value that’s in BIOS or in other applications, that’s perfectly normal.

Certain applications will show you base frequency, and with Double Data Rate or DDR RAM, that frequency is doubled when using it, so this shouldn’t alarm you since your RAM is working at full speed, despite what Task Manager or any other software says.

2. Check your BIOS settings

  1. Restart your PC.
  2. While your PC is booting, keep pressing F2 or Del to enter BIOS.
  3. Once you enter BIOS, enter the Advanced mode.
  4. Look for the Memory Frequency value and you should see your actual frequency.

Despite what the value says when you check RAM speed in cmd, Task Manager, or any other tool, the BIOS value will always represent the correct RAM speed.

3. Load the XMP profile

  1. Enter BIOS on your PC.
  2. Navigate to Ai Tweaker.
     
  3. Set the Ai Overclock Tuner to XMP and select the desired profile.
  4. Press F7 to exit Ai Tweaker and F10 to save changes.

If BIOS shows the wrong RAM speed, you must enable XMP profiles. Remember that these instructions are for ASUS, and steps for other brands might differ slightly.

Enabling XMP also helps when RAM is not running at full speed.

4. Adjust the voltage and frequency manually

  1. Open BIOS, and go to OC Tweaker.
     
  2. Locate DRAM Frequency and DRAM Voltage and set them to desired values.
  3. A few users reported that they needed to use 1.35V as voltage, but you might need different values.
  4. Save changes.
Note icon NOTE
Remember that manually overclocking can cause stability issues, so make sure you use only safe and supported values.

How do I overclock my RAM?

  • Navigate to BIOS, enable XMP, and select the desired profile.
  • Alternatively, manually adjust the values to get the maximum performance.

We described both these procedures in our solutions above, so be sure to check them. For more information, we have a guide on how to change DRAM frequency, so be sure to read it.

What is Dual-Channel Memory?

  • Dual-channel RAM is the most commonly used multi-channel memory type in consumer PCs.
  • As its name says, it uses two channels to send data, thus making it twice as fast.
  • For this feature to work, it requires two modules that must be inserted in the right slots according to the manual.

If Windows is showing the wrong RAM speed, you shouldn’t be alarmed, especially if the RAM speed is twice as slow as the one configured in BIOS. It’s just how some applications show this data.

To better understand how RAM works, be sure to check your RAM type and know the RAM limit on Windows 11 to avoid additional problems. Lastly, you should know that you might experience some performance issues if RAM is faster than your CPU, but that applies only to heavy multitasking.

Have you ever experienced this issue on your PC, and how did you handle it? Let us know in the comments below.

Microsoft officially closed the Activision Blizzard King deal

Great news to start the weekend: Microsoft officially closed its deal with Activision-Blizzard, and now the Redmond-based tech giant is welcoming the legendary gaming studios into its repertoire.

Games like Diablo, Starcraft, Call of Duty, World of Warcraft, Candy Crush, and many more, are now part of Microsoft’s gaming portfolio.

We love gaming. We play games, create games, and know first-hand how much gaming means to all of us as individuals and collectively, as a community. And today, we officially welcome Activision Blizzard and their teams to Xbox.

Phil Spencer, head of Xbox

Are these games coming to Xbox Game Pass? Yes, surely, but it will take some time, as Phil Spencer notes, in Xbox’s latest blog post.

Today we start the work to bring beloved Activision, Blizzard, and King franchises to Game Pass and other platforms. We’ll share more about when you can expect to play in the coming months. We know you’re excited – and we are too.

Phil Spencer, head of Xbox

The deal has gone through some hard times before it could be completed. First, the UK’s CMA was worried the deal would bring it closer to the end of competition in the gaming industry, so it temporarily blocked it. However, it ultimately agreed to let it happen.

And then it was the FTC, which was bent on blocking the deal at all costs. However, the Redmond-based tech giant won the case against it earlier this year.

Below you’ll find all the important points of this acquisition. We chose not to edit it, so you could read all about it.

Microsoft – Activision Blizzard Deal: All the details

The European Union gives the clear, however, the UK’s CMA is not happy about the deal

Contrary to the UK’s CMA’s decision to block Microsoft’s $68.7 billion acquisition of Activision Blizzard, the European Union has cleared the deal. The announcement arrived weeks after the UK’s decision.

The European Commission has granted approval, subject to certain conditions. This decision comes after an extensive investigation into the potential impact of the merger on competition in the gaming industry. The Commission’s approval is contingent upon Microsoft’s compliance with the commitments it has offered.

During its in-depth investigation, the Commission identified specific areas where the acquisition could negatively affect competition. These included the distribution of console and PC video games, multi-game subscription services, cloud game streaming services, and the supply of PC operating systems.

The Commission found that while the acquisition would not harm competition in the distribution of games for rival consoles or multi-game subscription services, it could potentially impact the market for PC operating systems and cloud game streaming services.

To address these concerns, Microsoft has made comprehensive licensing commitments that will be in effect for ten years. These commitments grant consumers in the European Economic Area (EEA) the right to stream all current and future Activision Blizzard PC and console games through any cloud game streaming service of their choice.

Additionally, EEA-based cloud game streaming service providers will receive a free license to stream Activision Blizzard’s games to gamers within the region. These measures ensure that gamers who have purchased Activision games or subscribed to multi-game services can stream those games using any cloud gaming platform and play them on any device, regardless of the operating system.

Besides that, South Korea’s Fair Trade Commission has also joined the suit and granted its approval for Microsoft’s proposed acquisition of Activision Blizzard. With South Korea becoming the 38th country to support the deal, Microsoft moves closer to solidifying its position as a major player in the gaming world.

The UK has blocked the Microsoft – Activision Blizzard deal

In a press release, the UK’s spokesperson for CMA says that Redmond officials haven’t effectively succeeded in addressing issues in the cloud gaming sector, despite its 10-year binding deals with various publishers like Nvidia (GeForce NOW) and Nintendo back in February this year.

The final decision to prevent the deal comes after Microsoft’s proposed solution failed to effectively address the concerns in the cloud gaming sector, outlined in the Competition and Markets Authority’s (CMA) provisional findings published in February.

The CMA found evidence indicating that it would be advantageous for Microsoft to exclusively offer Activision’s games on its cloud gaming platform, which is already well-established in the industry.

Microsoft’s rival, Sony and its PlayStation consoles has been opposing this deal for long. 

Earlier in February 2023, Microsoft boss Brad Smith arrived at a hearing with EU antitrust regulators to smoothen up the tech giant’s attempt to acquire Activision Blizzard. 

Activision CEO Robert Kotick represented his company, while Sony, Google, and Nvidia Corp were also present in the hearing. 

FTC will also try to block Microsoft’s acquisition of Activision Blizzard

The Federal Trade Commission will file an injunction seeking to block Microsoft from acquiring Activision Blizzard. With the injunction, FTC is seeking to stop the transaction from happening before the deal’s deadline of July 18.

The FTC has already sued this deal, choosing the present the case to its internal administrative law judge. In this trial, the judge is set to make an initial decision that can be appealed to the full commission for a vote. Microsoft could then appeal to a federal court if the decision does not go according to the Redmond-based tech giant.

We welcome the opportunity to present our case in federal court. We believe accelerating the legal process in the U.S will ultimately bring more choice and competition to the market.

Microsoft

Regulators and experts have been warning that the deal, which almost reaches $69 billion, could harm market competition given the stature of Microsoft and prevent innovations. 

FTC v. Microsoft hearing and a lot of secrets from the Redmond-based tech giant

The FTC v. Microsoft hearing has revealed a lot of secrets from Microsoft. It seems that Microsoft tried to spend Sony out of business, in order to strengthen Xbox.

In an e-mail from Matt Booty, Microsoft’s Xbox Game Studios chief, he wanted Xbox to pass Sony in game content subscriptions.

In games, Google is 3 to 4 years away from being able to have a studio up and running. Amazon has shown no ability to execute on game content. Content is the one moat that we have, in terms of a catalog that runs on current devices and capability to create new. Sony is really the only other player who could compete with Game Pass and we have a 2 year and 10 million subs lead.

Matt Booty

Microsoft also considered buying Bungie and Sega to further strengthen Xbox Game Pass, according to the Verge, in a 2020 e-mail from Xbox chief Phil Spencer.

We believe that Sega has built a well-balanced portfolio of games across segments with global geographic appeal, and will help us accelerate Xbox Game Pass both on and off-console.

Phil Spencer

Major update: FTC v. Microsoft is over, and Microsoft has won

According to the latest hearing, Microsoft has won against FTC, and now the Redmond-based tech giant is free to close the Activision-Blizzard acquisition. Xbox head, Brad Smith has released a statement, following the news of Microsoft winning.

According to The Verge, Judge Jacqueline Scott Corley decided to deny the FTC’s request for a preliminary injunction.

Microsoft’s acquisition of Activision has been described as the largest in tech history. It deserves scrutiny. That scrutiny has paid off: Microsoft has committed in writing, in public, and in court to keep Call of Duty on PlayStation for 10 years on parity with Xbox. It made an agreement with Nintendo to bring Call of Duty to Switch. And it entered several agreements to for the first time bring Activision’s content to several cloud gaming services. This Court’s responsibility in this case is narrow. It is to decide if, notwithstanding these current circumstances, the merger should be halted—perhaps even terminated—pending resolution of the FTC administrative action. For the reasons explained, the Court finds the FTC has not shown a likelihood it will prevail on its claim this particular vertical merger in this specific industry may substantially lessen competition. To the contrary, the record evidence points to more consumer access to Call of Duty and other Activision content. The motion for a preliminary injunction is therefore DENIED. 

The UK regulators also agree to pause their battle with Microsoft, and negotiate it, according to The Verge. This means Microsoft can now close the acquisition deal before the July 18th deadline.

We’ll keep you updated on this as we follow the acquisition. But you should know that a lot of Activision-Blizzard titles will be impacted by the deal. Titles such as Diablo, World of Warcraft, and Call of Duty will most likely be at the forefront of this merge, with content coming to them more often.

FTC is striking back

After a judge decided that Microsoft is free to close the Activision-Blizzard deal, FTC appeals its loss in the Microsoft case, The Verge reports.

The appeal makes it clear that FTC won’t back down, even if their case, according to the judge, is not sustainable and the arguments do not hold up. However, by appealing the judge’s decision, FTC will want to call the Ninth Circuit Court of Appeals to issue an emergency stay to extend the existing temporary restraining order (TRO) that is set to expire at 11:59 PM PT on Friday, July 14th, The Verge reports.

It’s not yet clear if the appeal will rule before the deadline on July 18th, meaning that Microsoft can close the Activision Blizzard deal on Monday or Tuesday without a restraining order in place, reports say.

FTC’s bid to block the acquisition gets rejected by judge

Following Microsoft’s win over FTC, the Federal Trade Commission came back to appeal its loss. However, according to the latest reports, the appeal got rejected by Judge Jacqueline Scott Corley, who released a two-sentence order late Thursday.

This means Microsoft is finally free to close the acquisition, before July 18th.

Update: Microsoft to close the Activision-Blizzard deal before October 18

Microsoft and Activision have come to the decision to extend their merger agreement to October 18. This is all due to the pending outcome of the UK negotiations.

If you remember, the UK regulators initially blocked the deal, but they reconsider it after Microsoft won the FTC battle. Brad Smith, Microsoft president, says the next couple of months should provide ample time to work through the final regulatory issues.

Phil Spencer, head at Xbox, also said that he’s optimistic about the deal and excited to bring more games to players everywhere now.

According to The Verge, Microsoft and Blizzard Activision agreed to a higher termination fee and new commercial arrangements for the transaction. The termination fee is now set at $3.5 billion if any of the parties walk away and the deal doesn’t get finalized by August 29th. It will jump to $4.5 billion, if the deal is not closed by September 15th.

This sounds like an exciting change, however, Microsoft is making some changes, and to learn more, you can read about Microsoft’s reorientation of Xbox execs.

Major Update: FTC withdraw its case against Microsoft and Activision Blizzard

FTC withdraw its case against Microsoft and Activision Blizzard, almost 2 weeks after it failed its case against the Redmond-based tech giant.

Microsoft and Blizzard Activision are now free to close the deal, before the deadline of October 18.

What do you think about the billion-dollar attempt from Microsoft over Activision Blizzard? Let us know in the comments!

Solved: Windows 11 Restarts After Sleep

You put your laptop or PC into Sleep Mode only to find out that Windows 11 restarts instead. We have stumbled across this problem at Windows Report and if Windows 11 keeps restarting after sleep, the tested solutions below will help you fix it.

How do I stop Windows 11 from restarting after sleep?

1. Disable automatic restart

  1. Click on the Search bar, type advanced system information, and select the View advanced system settings option from the results.
  2.  Now, look for Startup and Recovery and click on Settings.
  3. In the next windows, uncheck the Automatically restart under System failure and click OK.

Our readers also had problems with Windows crashing after sleep but this guide will provide helpful solutions to fix it.

2. Change the power option for the CPU

  1. Click on Search, type control panel, and open the app from the results.
  2. Select Power Options, then click on Change plan settings on the current power plan.
  3. Next, click on the Change advanced power settings option.
  4.  Finally, go to Processor power management, expand the Minimum processor state, and set both On battery and Plugged in values to 5%.
  5. Click on Apply and OK to confirm the settings and restart your computer. 

Changing the power plan settings will prevent your laptop from going to sleep too soon and prevent power issues. You may also change the settings for the hard drive while you are in the Power Options menu.

3. Turn off fast startup

  1. Type control panel in the Search bar and open Control Panel from the results.
  2. Click on Power Settings, then select Choose what the power button does.
  3. Click on Change settings that are currently available (you need to be logged into an administrator account)
  4. Now, uncheck the Turn on fast startup option, then save the changes.

Fast Startup is a great feature that helps you boot your PC faster but the WR software test team has discovered that disabling it fixes many booting and rebooting issues, including the ones where Windows 11 randomly restarts.

4. Change the virtual memory settings

  1. Type advanced system settings in the Search bar and click on View advanced system settings.
  2. Click the Settings button from the Performance section.
  3. Next, click the Advanced tab and click on Change under Virtual memory.
  4. Make sure that the Automatically manage paging file size for all drives option is checked. If not, enable it and click OK, then restart your computer.

5. Run an SFC scan

  1. Click on the Search bar, type cmd, and select Run as administrator to start Command Prompt with full privileges.
  2. Type or paste the following command and press Enter to run it: sfc /scannow
  3. Wait for the scan to complete and restart your computer.

If Windows 11 restarts after hibernate or sleep, that is a sign of a corrupted system and SFC will fix any system file corruption.

It is also a good idea to look at the system event log and get more information about this issue. To do that, open Event Viewer and go to System Logs>System.

Other problems you may encounter

  • Windows turns off instead of sleeping – This is another problem often caused by incorrect power settings but our dedicated guide to fix it will help you in this situation.
  • PC freezes and restarts – This issue has many factors, but our WR software team provided the solutions to fix it.

The bottom line is that when Windows 11 restarts after sleep, our WR software team recommends disabling the automatic restart, changing the power options, turning off fast startup, changing the virtual memory settings, and repairing the system to prevent the issue.  

If you haven’t upgraded to the latest OS, we also have a guide that helps you fix random restarts on Windows 10.

For any other questions or tested solutions, write us a note in the comments section below.

Fix: XP-PEN Pen Pressure is Not Working in Photoshop

While the excitement of getting a new drawing tablet supersedes anything, issues with it are not uncommon, and many have, for long, reported that XP-PEN pressure is not working in Photoshop.

The problem is present across models, be it XP-PEN Artist or the Deco series, and usually has to do with an issue at the user’s end. It could be the misconfigured pressure settings, outdated drivers, or a Windows Ink issue to blame. 

Is XP pen pressure sensitive?

Yes, all styluses for XP-PEN tablets support pressure sensitivity, as per the information available on the official website. Most have 8192 levels, while in a few of the latest models, such as Artist Pro 16, there are 16384 pressure levels. 

How do I fix XP-PEN pen pressure in Photoshop?

Before we start with the slightly complex solutions, try these quick ones:

  • Restart Photoshop, or simply reboot both the computer and the XP-PEN drawing tablet.
  • Update Adobe Photoshop.
  • Replace the nib on your XP-PEN tablet.
  • Make sure pressure control is enabled in Adobe Photoshop. There’s a dedicated button in the menu bar, which, when hovered on reads, Always allow pressure for size. When off, brush presets control pressure. 

If none work, move to the fixes listed next.

1. Create a PSUserConfig.txt file

  1. Press Windows + E to open File Explorer, paste the following path in the address bar and hit Enter: %AppData%\Adobepath
  2. If you can’t find the AppData folder, make sure the hidden items are visible.
  3. Now, double-click the folder for the latest Adobe version, and then open the Abobe Photoshop Settings folder.settings folder to fix xp pen photoshop pressure
  4. Check if a PSUserConfig.txt file exists there. If yes, right-click on it, and choose Delete.delete
  5. Again, right-click in the File Explorer, hover the cursor over New, select Text Document, and name it PSUserConfig.txt.PSUserConfig.txt
  6. Open the file, and paste the following code in it:
    # Use WinTab
    UseSystemStylus 0
    code
  7. Now, press Ctrl + S to save the changes, and close the Notepad.
  8. Relaunch Adobe and check whether the XP-PEN pressure issue is fixed.

2. Turn on Pen Pressure in Photoshop

  1. Launch Photoshop, and press B or click the Brush tool icon in the toolbar.
  2. Click the Window menu, and choose Settings.
  3. Tick the checkbox for Shape Dynamics from the left, and then select Pen Pressure from the Control dropdown menu.pen pressure
  4. Verify whether the pen pressure functionality now works in Adobe Photoshop.

For your stylus to adjust the width based on pen pressure, the functionality has to be manually enabled in Adobe Photoshop. Remember, this applies across drawing tablets, even when Wacom pen pressure is not working.

In case selecting Pen Pressure shows a warning sign that reads, Control by pen pressure requires the use of a pressure sensitive tablet, make sure you install the latest XP-PEN drivers. 

3. Enable Windows Ink in the XP-PEN app

  1. With the XP-PEN connected to the PC, click on the icon in the device icon in the System Tray near the bottom right of the desktop.
  2. Now, tick the checkbox for Windows Ink, and click OK to save the changes.Windows Ink to fix xp pen photoshop pressure

4. Reinstall the XP-PEN device

  1. Press Windows + X to open the Power User menu, and select Device Manager from the list of options.
  2. Expand the Human Interface Devices entry, right-click on the XP-PEN tablet, and select Uninstall device. If the graphics tablet is not listed here, expand the other entries.uninstall device to fix xp pen photoshop pressure
  3. Now, tick the checkbox for Attempt to remove the drivers for this device, if it is available, and then click Uninstall.uninstall
  4. Once done, restart the computer, and check whether Windows has automatically installed the drivers. If not, get it from the XP-PEN’s official website.

5. Update the XP-PEN driver

  1. Press Windows + R to open Run, type devmgmt.msc in the text field, and hit Enter.device manager
  2. Find the XP-PEN display tablet here, right-click on it, and select Update driver. The tablet is usually listed under Human Interface Devices.update driver to fix xp pen photoshop pressure
  3. Choose Search automatically for drivers and wait for Windows to install the best version available locally.search automatically
  4. Restart the computer and check for improvements.

When the XP-PEN pressure is not working in Photoshop, it could always be the driver to blame. And updating them does the trick! It’s also an effective fix when Huion pen pressure is not working.

And if Windows can’t find one, check the official website, choose your tablet model, download the latest version, and then manually install the driver. 

6. Enable/Disable Windows Ink Workspace

  1. Press Windows + R to open Run, type regedit in the text field, and click OK.
  2. Click Yes in the UAC prompt.
  3. Navigate the following path or paste it in the address bar and hit Enter: HKEY_LOCAL_MACHINE\SOFTWARE\Policies\Microsoftpath
  4. Double-click the WindowsInkWorkspace key. If it doesn’t exist, right-click on the Microsoft key, hover the cursor over New, choose Key, and name it WindowsInkWorkspace.windowsinkworkspace to fix xp pen photoshop pressure
  5. Now, right-click on the empty portion, select New from the context menu, choose DWORD (32-bit) Value, and name it AllowWindowsInkWorkspace.AllowWindowsInkWorkspace
  6. Double-click the DWORD.
  7. The digit 1 under Value data enables the feature, while 0 disables it. Enter either and click OK to save the changes.enable or disable

When the Photoshop pen pressure is not working, you may reconfigure the Windows Ink feature. You will have to try both enabling and disabling it since the two worked for users. And this should eliminate all issues with pen pressure!

Tip icon Tip
If everything else fails, the problem likely lies with Adobe Photoshop. Uninstall the app, and then download it all over again.

If XP-PEN has no pressure in Photoshop or the line width is not proportional to the applied pressure, it usually has to do with how things are configured. But you should be able to get pen pressure sensitivity working through either the PSUserConfig.txt files or through the latest drivers.

Besides, many users found that XP-PEN is detected as a keyboard, which, too, is a driver-related problem.

For any queries or to share what worked for you, drop a comment below.

Solved: Bluetooth Slows Down Wi-Fi on Windows 11

If you’ve ever connected a Bluetooth device and noticed your Wi-Fi speeds slow down, you should know this is a normal occurrence. Most of the time, they don’t have any real issues with each other.

And while the issue gets worse as you connect more devices to Wi-Fi or add more Bluetooth devices, you don’t have to be stuck with a poor internet connection as there are ways around it.

Why does my Wi-Fi go slow when I use Bluetooth headphones or speakers?

Because both Bluetooth and Wi-Fi use the same spectrum of the 2.4 GHz frequencies. If you connect a Bluetooth device and it happens to be on the same frequency as your Wi-Fi, it can cause interference with your Wi-Fi network.

The situation worsens when you have a lot of devices using the same frequency band, leaving less bandwidth for your Wi-Fi router to use for its data traffic. This in turn results in slow Wi-Fi on your PC.

How do I stop Bluetooth from interfering with my Wi-Fi?

Before tweaking any settings, try the following basic steps:

  • Turn off Bluetooth when not in use.
  • Move your router away from nearby Bluetooth devices.
  • Upgrade router firmware for better performance.
  • Ensure your Bluetooth and Wi-Fi drivers are up-to-date.

1. By using a different band for Wi-Fi and Bluetooth

  1. Click on the Start Menu icon, type Device Manager in the search bar, and click Open.
  2. Navigate to Network adapters and double-click to expand.
  3. Right-click on your network adapter and select Properties.
  4. Click on the Advanced tab and locate the Preferred Band.
  5. In the Value drop-down menu, select Prefer 5GHz band then hit Enter.
  6. Restart your PC.

Also, ensure your router supports the 5GHz band, as most older routers operate the 2.4GHz band.

2. By using a different Wi-Fi channel

  1. Click on the Network icon on your taskbar, select your Wi-Fi connection, and click on Properties.
  2. Now, scroll down and you should see the Network channel for your Wi-Fi connection.
  3. Navigate to your browser and log into your router with the correct credentials. You can find that info on the router itself or on the manual of the router.
  4. Go to the Wireless settings of your router and change the router channel to a different one from the default. If you’re using a dual-bound router, set this for both bands (2.4GHz and 5GHz).

3. By using a dual/tri-band router

If you can afford one, it’s always better to buy a dual or tri-band router instead of a single-band one. You may notice your connection keeps dropping while downloading because devices are competing for available bandwidth.

A dual-band router allows you to operate two frequencies simultaneously as opposed to just one frequency, like in single-band routers. This way, there will be less interference between the two frequencies and, thus, better performance overall on both networks.

4. By using a Wi-Fi extender

Another great solution is using a Wi-Fi extender. Aside from boosting your router’s signal strength in areas where it’s weak, it can also reduce interference with other devices in your home, such as your microwave or cordless phone.

This will give your devices more space without causing interference between them. You’ll also get better coverage throughout your home and an extended range outside of it.

Just ensure that any additional access points use the same frequency band as your existing router and are different from your Bluetooth devices.

Can I change the Bluetooth frequency?

The operating frequency of a Bluetooth device is set during its manufacturing process and cannot be changed by users. You can probably get around this limitation with software, but the main reason for this limitation is that different frequencies have different ranges.

This means that if you change the frequency of your device, it may not be able to communicate with nearby devices on the new frequency since 2.4 GHz is the default standard.

At the end of the day, this isn’t something to get too concerned about. If you want to use Bluetooth and Wi-Fi, simply shut off one when you aren’t using it. Moreover, you can always rotate these devices if you need to use them for different purposes at different times.

Have you encountered this issue before, and if so, what solution would you say is your go-to? Share with us in the comment section below.

Fix: XP-PEN No Tablet Was Detected

If you get the XP-PEN no tablet was detected message while trying to connect your tablet, you won’t be able to use it to draw on your PC, at all.

This can be an issue, especially if you’re a digital artist or if you’re just an art student who needs a tablet. Luckily, there are a few methods you can use to fix this problem, and today we’re going to show them to you.

How do I get my XP-PEN tablet detected?

Before trying to fix this error, there are a few simple checks that you can perform:

  • Try using a different USB port. If possible, connect the drawing tablet directly to your computer and not a USB hub.
  • Check the USB cord, it’s likely that it’s damaged and needs replacement.
  • Make sure that the tablet is connected to the same graphics processor as your monitor.

1. Connect your tablet properly

  1. Disconnect the tablet from your PC.
  2. Next, connect the USB cable to your PC.
  3. After that, connect the power cable to the outlet.
  4. Lastly, connect the HDMI cable.

2. Uninstall all Wacom drivers from your PC

  1. Press the Windows key + X and choose Device Manager.
  2. Next, locate your Wacom, right-click it, and choose Uninstall device.
    Uninstall Network driver'
  3. If available, select Attempt to remove the driver for this device and click on Uninstall.
  4. Once the driver is uninstalled, make sure your XP-PEN tablet is disconnected.
  5. Navigate to the XP-PEN download page and select your model.
  6. Next, locate the latest tablet driver for Windows and install it.

3. Update/reinstall your graphics driver

  1. Visit your graphics card manufacturer’s download page.
  2. Select your GPU on the list.
     
  3. Download its latest driver.
  4. Optional: You can remove your GPU driver first by following similar steps as in the previous solution. You can also use Display Driver Uninstaller to fully remove the drivers.
  5. Lastly, install the driver that you downloaded.

A few users reported that this issue could be caused by the AMD Chipset driver, especially on X570 motherboards, and updating the correct driver fixed the issue for them.

Dear XPpen users Hello please connect the device first

  1. Navigate to the following directory: C:\Program Files\Pentablet\
  2. Locate PentabletService.exe, right-click it, and choose Run as administrator.
  3. Check if the problem is resolved.

Also, make sure that the red cable is connected to the power adapter and the black one to your USB port. Lastly, unplug the power adapter connect it again, and check if the graphics tablet is detected.

If XP-PEN is not working on Windows 11, in most cases this is a communication issue with your USB device or a compatibility issue with your drivers. In some rare instances, it can be caused by a hardware issue, such as a faulty cable.

Sadly, this isn’t the only issue you can encounter and many reported that their XP-Pen is detected as a keyboard, but we covered that issue in a separate guide. Once you’ve managed to fix this issue, feel free to try one of these great XP Pen drawing software on your PC.

What method did you use to fix this error? Let us know in the comments section below.

Temporary Network Error on Discord: How to Fix it

The Discord’s Temporary Network Error is encountered when accessing the web version or the installed app. It appeared only recently and affected users worldwide, but the servers were back up and running quickly.

Though Discord has acknowledged the problem, we tried to understand more about it and discovered a few quick solutions that will help if the Discord Temporary Network Error appears again on a PC, website, or mobile device.

What is a Temporary Network Error?

The error message highlights a server outage at Discord’s end, which prevents users from accessing their accounts. Based on reports, it’s only a temporary problem that was resolved on its own the last time.

But there is a likelihood of the underlying cause being at your end. For instance, issues with the network or corrupt data can interrupt the connection or make your Discord updates excruciatingly long.

How do I fix the Temporary Network Error on Discord?

Before we start with the slightly complex changes, try these quick ones first

  • Wait for 15-30 minutes and try again.
  • Check the Discord network status and make sure the servers are running.
  • Make sure the Internet connection is fine. Also, restart the device (PC or mobile) and the router. This helps with the Bad network request error.
  • If you get the error on a PC, switch to mobile or vice versa.
  • Connect to another network. Or, if you have things set up wirelessly, try a cabled connection. Also, you can connect to a mobile hotspot.

If none work, move to the fixes listed next. 

1. Install Discord via Epic Games

  1. Go to the Epic Games Store and download the Epic Game Launcher. 
  2. Run the setup, follow the on-screen instructions, and create an account or sign in once installed.
  3. Now, run the Epic Game Launcher and search for Discord.discord
  4. Click the Get button to download the app, and accept the license terms to proceed.get to fix The steps listed here are for Google Chrome, but it's similar on every Chromium-based browser. Check the FAQ section of your browser's official website for the exact steps.
  5. Once Discord is downloaded, sign in with your credentials, and it should be up and running even when the standalone app or website reads Temporary Network Error.

2. Install Discord Canary

Many affected by the Discord Temporary Network Error on the PC found that it only affected the normal build, while Discord Canary worked fine. The latter is the testing program, which receives updates before the normal builds. Subsequently, it’s less stable.

So, go to Discord’s official website and download Discord Canary. Or, if the Canary version feels unstable, you can also try Discord PTB (Public Test Build). It, too, is used for testing but is slightly more stable.

3. Clear the browser cache and cookies

Note icon NOTE
The steps listed here are for Google Chrome, but it’s similar on every Chromium-based browser. Check the FAQ section of your browser’s official website for the exact steps.
  1. Launch your browser, and press Ctrl + Shift + Delete.
  2. Now, tick the checkboxes for Cookies and other site data and Cached images and files, and then click Clear data.clear browsing data to fix discord temporary network error
  3. Once done, open Discord and check if the error message goes away.

4. Change the DNS 

  1. Press Windows + R to open Run, type ncpa.cpl in the text field, and hit Enter.ncpa.cpl 
  2. Right-click the active network adapter, and select Properties.
  3. Select Internet Protocol Version 4 (TCP/IPv4), and click the Properties button.IPV4
  4. Now, select Use the following DNS server addresses and enter the following in the field:
    • Preferred DNS server: 8.8.8.8
    • Alternate DNS server: 8.8.4.4change dns
  5. Click OK to save the changes.

You don’t necessarily have to choose Google’s DNS, but can set the fastest DNS server in your region to fix the Temporary Network Error on the Discord app or website. This also helps with Discord Error 1105.

5. Use a VPN

When nothing else works, the last method is to use a reliable VPN solution. One VPN option we always mention is ExpressVPN because it will reroute your connection through another server and get Discord running if the error is limited to your region.

It also has increased speed scores so that when you’re using it, it won’t interfere with your online experience at all.

Remember, even after fixing Discord’s Temporary Network Error, there’s no guarantee that it won’t reappear since the problem mostly lies on the server’s side. But one of these solutions should help almost every time.

Another network-based issue many encountered around the same time, Sending messages in this channel is disabled, can, too, be similarly fixed. Just check for server issues or change the DNS!

For any queries or to share more solutions with us, comment below.

How to Completely Uninstall Valorant From Your PC

Knowing how to uninstall Valorant completely can save you from a lot of frustration. If you try to remove it through normal settings and nothing happens, or Riot Vanguard keeps blocking the process, you’re not dealing with a simple uninstall. You’ll need to stop hidden processes, clear leftover files, and make sure nothing is running in the background. This guide walks you through every step to fully remove Valorant from your system without running into weird errors or files that just won’t go away.

How do I force uninstall Valorant on Windows 11?

1. Using the Settings app

  1. Press Windows + I to open the Settings app.
  2. Go to Apps, then click Installed apps.Apps, installed apps -Valorant Not Uninstalling on Windows 11
  3. Locate Riot Vanguard, click the three dots icon, then select Uninstall.Riot Vanguard, click the three dots icon, then select Uninstall.
  4. Click Uninstall to confirm the action.UninstALL
  5. Next, look for Valorant, and click three dots, then select Uninstall.
  6. Click Uninstall again to initiate the removal of the app.

This is the easiest uninstallation process and can be used to fix the most common errors you might face while playing the game; read this guide to learn about more solutions.

2. Using Control Panel

  1. Press the Windows key, type control panel in the search box, and click Open.Control Panel start menu - Valorant Not Uninstalling on Windows 11
  2. Select Category for View by and click Uninstall a program under Programs.pROGRAMS UNINSTALL
  3. On the Programs and Features window, locate Riot Vanguard and click Uninstall.Uninstall Riot vanguard
  4. Follow the onscreen instructions to complete the uninstallation process.
  5. Next, locate Valorant, click Uninstall and follow the prompts to remove the app.
  6. Restart your computer.

You can use this method to uninstall Valorant from your computer when the Valorant is not opening on your Windows 11 issue; read this guide to learn more.

3. Using the Command Prompt

  1. Press the Windows key, type cmd in the search bar, and click Run as administrator to open Command Prompt with elevated rights.CMD elevated -Valorant Not Uninstalling on Windows 11
  2. Click Yes on the UAC prompt.
  3. Type the following command to uninstall Riot Vanguard and hit Enter: sc delete vgcsc delete vgc -alorant Not Uninstalling on Windows 11
  4. Copy & paste the following command to delete Valorant and press Enter: sc delete vgksc delete vgk
  5. Close the Command Prompt window, and reboot your computer.
  6. Once your PC is up, log in and press Windows + E to open File Explorer.
  7. Navigate to this folder: C:\Program Files\Riot Games
  8. Locate and select the Riot Vanguard folder, then click the Delete button.explorer_delete folder - alorant Not Uninstalling on Windows 11
  9. Restart your computer to let the changes take effect.

To uninstall Valorant entirely from your computer, you must close all the processes associated with it and close Riot Vanguard, then follow any of the methods to remove it. This can also help you fix similar errors like a critical error that has occurred in Valorant; read this guide to learn more about it.

You must uninstall the Riot client app if you only had it because of Valorant; read this guide to learn the steps. Tell us how much disk space you recovered after uninstalling the app in the comments below.

How to Enable & Use Microsoft Copilot in Word

Copilot in Microsoft 365 apps like Word or PowerPoint is currently available for businesses with a dedicated plan that is $30 per month.

heIn today’s guide, we’re going to show you how to use it, so let’s get started.

How do I enable and use Copilot in Word?

1. Using the Word settings

  1. Press the Windows key, type word, and click Open.Word - How to Enable & Use Microsoft Copilot in Word
  2. Go to File.File option
  3. Select Options to open Outlook Options.Options - Outlook Options
  4. Click Proofing from the left pane and look for the Autocorrect options section, then click the Autocorrect options button.Autocorrect options - How to Enable & Use Microsoft Copilot in Word
  5. Switch to the Smart Lookup tab, and place a checkmark next to the Use Microsoft Copilot to help you with content creation option.
  6. Click OK to save the changes.
  7. On the Word document, click Review from the ribbon and select the Copilot option to open the chat sidebar or simply start writing, and it will give you suggestions accordingly.

You can explore more practical ways to use Copilot by following this guide on how to use Microsoft Copilot effectively for writing, editing, and productivity.

2. Using the Registry Editor

  1. Press Windows +R to open the Run window.Regedit RUN COMMAND - How to Enable & Use Microsoft Copilot in Word
  2. Type regedit and click OK to open the Registry Editor.
  3. Click Yes on the UAC prompt.
  4. First, let us take a backup, go to File, then click Export. Save the .reg file to an accessible location.go to File, then click Export.
  5. Navigate to this path: Computer\HKEY_CURRENT_USER\Software\Microsoft\Office\16.0\Common\ExperimentConfigs\ExternalFeatureOverrides\word
  6. Right-click word, select New, then choose the String Value option.word, select New, then choose the String Value option.
  7. Right-click the String Value, select Rename, and name it Microsoft.Office.Word.CoPilotExperiment, then hit Enter. String Value, select Rename, and name it Microsoft.Office.Word.CoPilotExperiment
  8. Double-click it, set the Value data to true, and click OK.Double-click it, set the Value data to true, and click OK.
  9. Restart your computer.
  10. Launch Microsoft Word, open a new or existing document, click Review from the ribbon, locate the Copilot option, then click it to launch or start typing to get tips.

You can also use Microsoft Copilot in Outlook to draft emails and business proposals with ease and the CoPilot extension in Chrome for seamless searching and task automation.

This December, Microsoft will make Copilot to OneDrive available for all customers who have a Microsoft 365 Copilot license.

Features of Microsoft Copilot in Word

Working with entire documents

Working with entire documents

Microsoft Copilot can help you create a complete document within a few minutes, and all you need to do is give it a correct prompt.

Start with opening a blank document, go to the Review tab, and click Copilot. In the Draft with Copilot box, type or paste your prompt with proper context, and click Generate.

To keep your best instructions handy across documents, check out this detailed guide on how to save a prompt in Copilot and streamline your workflow.

Writing skills and natural language support

With advanced natural language processing (NLP) capabilities, Microsoft Copilot is an advanced assistant that can help you refine your writing skills.

It can shorten or rewrite sections, provide grammar & punctuation suggestions, and help maintain a consistent tone. Also, it offers tips for better sentence structure, thereby helping improve overall readability.

Intelligent suggestions for content creation

One of the main functions of Copilot is to provide suggestions and corrections when you type; this can get work done faster while being efficient.

All you need to do is enable the feature, then start typing in your document, and Copilot will analyze the text and give you tips to smooth out inconsistencies.

AI-powered chatbox to focus on productivity

Chatbox -Use Microsoft Copilot in Word

You can access the AI-powered chatbox within a document and use it to summarize a document or write something in the context of the content, like CTA.

It can also add some context or content to your document from your existing documents or search for it on the web to give you relevant results.

Helps in research and collaboration

Microsoft 365 Copilot can also assist you in researching the topic or the document you are on. All you need to do is click Copilot from the Review tab and click the Research option.

You will get a variety of research tools with an in-built search engine and a dictionary. If you have shared a Word document online, Copilot can help track changes and insert comments for better collaboration.

You can also use Copilot to get instant explanations for code or plain text in Windows by using the new Explain with Copilot feature in Notepad, which we covered in detail in this guide on Explain with Copilot in Notepad.

Models with business data for business users

Copilot combines the strength of large language models with business data & Microsoft 365 apps to create a new knowledge model for every organization by leveraging the massive reservoir of data which are inaccessible.

Business Chat works across all your business data & Office apps to extract the information and insights you need from the data and knowledge inside your organization, thereby saving valuable time and getting you answers fast.

FAQ

How do I enable Microsoft Copilot in Word?

Go to File > Options > General, then check the box for Enable Copilot features if available. You must be signed in with a Microsoft 365 account that supports Copilot.

Why don’t I see Copilot in Word?

Copilot is only available in the latest Microsoft 365 version and certain regions. Update Word via Account > Update Options > Update Now and restart the app.

Can I use Copilot in the web version of Word?

Yes, open Word Online through Microsoft 365, and you’ll find the Copilot icon in the top ribbon for AI writing and editing assistance.

Is Copilot free in Microsoft Word?

No, it’s included only in Microsoft 365 Copilot or Copilot Pro subscriptions, not the free Word version.

In conclusion, Copilot is a powerful tool and has a variety of features & capabilities; it helps you elevate your writing skills and productivity. Moreover, you can even transcribe and translate audio files with Copilot.

For step-by-step visuals, check out our Microsoft Copilot how to videos that cover Word, Excel, Outlook, and Teams in action.

If it becomes overbearing in certain situations like when you’re browsing, you can disable the Copilot rewrite feature in Edge.

Speaking of innovation and AI assistant, you can also try using GitHub Copilot in Visual Studio; here is the guide explaining how to get it.

To learn more about Word, don’t miss our latest guide to see how to properly make a copy of a Word document. You can also draw comparisons between Word and Google Docs to find which one works best for you.

Would you want to use Copilot in your Word document to perform repetitive tasks and enhance your writing proficiency? Feel free to mention your thoughts in the comments section below.

DYMO LabelWriter 400 Driver for Windows 10 [Download & Install]

To make your device work, you’ll have to set up the DYMO LabelWriter 400 driver on your Windows 10 PC. In this guide, we’ll explain how to add the DYMO printer on Windows in just a few quick steps.

Let’s get right to it.

How do I download & install DYMO LabelWriter 400 drivers on Windows 10?

  1. Go to the DYMO website’s compatibility chart page, locate LabelWriter 400, and click DYMO Label Software v.8.5.4.DLS8Setup.8.5.4_dymo labelwriter 400 driver windows 10
  2. Once downloaded, locate the DLS8Setup.8.5.4.exe file from the Downloads folder and double-click it to open the setup wizard.
  3. Press Yes on the UAC prompt.
  4. Select English or the preferred language and click OK.Select the language dymo labelwriter 400 driver windows 10
  5. On the DYMO Label Setup window, click Next.DLS8Setup.8.5.4_click Next
  6. Click I Agree on the License Agreement window. I agree
  7. On the Installation Type window, choose Express installation or Custom Installation and click Next. You must select Custom installation if you don’t want other services.Select Custom installation
  8. Next, remove the checkmark next to all options other than Printer Drivers and click Next.Select the printer driver and click Next
  9. Click Finish and wait for the process to complete.DLS8Setup.8.5.4 FInish

You can use the same steps to install DYMO LabelWriter 330 Turbo on Windows 10. Similarly, for LabelWriter 450 & higher models, check the compatibility chart, download the setup & follow the same steps.

Once you have installed the driver, follow these steps to make it work with your device:

Setup the DYMO LabelWriter from settings

  1. Connect your desktop label printer to your computer via a USB cable.
  2. Press Windows + I to open Settings.
  3. Click Devices.Click Devices  -dymo labelwriter 400 driver windows 10
  4. Go to Printer & scanners; it should be listed under the Printers & scanners list on the right side.
  5. Click Manage.Manage
  6. Select Printing preferences.Printing Preferences
  7. Change the Paper size accordingly and click OK.

Now the DYMO LabelWriter 400, the thermal label printer, is ready to be used on your Windows 10.

Troubleshooting issues with DYMO LabelWriter 400 Drivers on Windows 10

Issue FacedCommon Reasons Common Solutions
Not able to print Printer sensor is dirty, unsupported label size or type, corrupted driverEnsure the label size & type are correct, clean the printer sensor, and reinstall your label printer driver.
Won’t work on WindowsOutdated driverDownload the driver from the DYMO website & install the latest driver in compatibility mode.
Error – Out of Paper Label rolled in the wrong way, or corrupted printer driverRemove the power cable & USB cable, cancel all the jobs labels from the device, and remove the device from the Devices & Printers list. Then, insert the labels properly & reinstall the printer driver.
Printer offlineLabels are jammed, lack of paper, or USB cable/port is faultyCheck the labels and ensure they are properly inserted next, examine the USB cable/port for damage, and try connecting the device directly to your PC via a USB cable instead of a USB hub.
My printer is listed as unspecified or unknown/Windows can’t find my printerYour computer has not identified that device as a printerGo to Device Manager>click View>Show Hidden Devices, then right-click the DYMO driver listed, and select Update driver.
Or use a dedicated driver updater that’ll do this automatically

Additional resources for working with DYMO LabelWriters in Windows 10

  • DYMO LabelWriter comes with a two-year product warranty, so you must register the product when you purchase it to know the warranty status.
  • If you are having issues with the device, you can reach out to DYMO by filling out a contact form or calling the customer care number.
  • The official website has a lot of documentation, FAQs, guides, support articles, and troubleshooting tips to help with issues if needed.

Does DYMO Connect work with DYMO LabelWriter 400?

No, DYMO Connect does not support the LabelWriter 400. DYMO Connect is compatible with more recent models like the LabelWriter 450 and LabelWriter Wireless.

The LabelWriter 400 should work with DYMO Label Software (DLS) – an older version of DYMO Connect. You can download and install it from the DYMO official website.

dymo label software

Wrapping up

Before you start, ensure your Windows is updated to the latest version. This will keep issues like Dymo printing blank labels after Windows Update at bay.

In case you don’t have administrative rights over the computer and still want to install the driver, read this guide to learn the process.

Stuck somewhere while following the process? Don’t hesitate to mention your queries in the comments section below. We will be happy to help you!

How to Enable Windows Defender in Windows 11 Sandbox

If you are a Windows user, then the chances are that you’re always looking to elevate the security of your system, and enabling Windows Defender in Sandbox can help you achieve this.

The built-in antivirus can make you feel confident against malware attacks, so we’re here to shed light on the benefits of this feature.

Does Windows Defender work in Sandbox?

Windows Defender Sandbox is a component of Windows built-in security and works well with newer versions of Windows, starting from Windows 10. It is, however, not enabled by default. For the feature to work, your device must meet the Sandbox prerequisites.

How do I enable Windows Defender in Windows 11 Sandbox?

Before you enable Windows Sandbox, check off the following preliminary steps:

  • Check for Windows updates and ensure your device is running the latest version that supports the Sandbox feature.
  • Verify that you have a stable internet connection.
Note icon NOTE
Windows Sandbox is currently not supported on the Windows Home edition.

1. By using the Control Panel

  1. Hit the Windows key, type Control Panel in the search bar, and click Open.control-panel-search fallout new vegas runtime error
  2. Click on Programs>Programs and Features>Turn Windows features on or off.
  3. Alternatively, you can hit the Search icon on the taskbar, search for Turn Windows features on or off, and click Open.
  4. Locate Windows Sandbox, check the box next to it, then hit OK.

2. By using the Command Prompt

  1. Hit the Windows key, type cmd in the search bar, and click Run as administrator.cmd-run-admin-w11 unexpected kernel mode trap windows 11
  2. Type the following command and hit Enter: setx /M MP_FORCE_USE_SANDBOX 1
  3. Restart your PC.

3. By using the PowerShell command

  1. Hit the Windows key, type PowerShell in the search bar, and click Run as administrator.
  2. Type the following command and hit Enter: Enable-WindowsOptionalFeature -FeatureName "Containers-DisposableClientVM" -All -Online
  3. Hit the Windows key, search for Turn Windows features on or off, and click Open.
  4. Locate Windows Sandbox, check the box next to it, then hit OK.

What are the benefits of enabling Windows Defender in Sandbox?

  • Enhanced security against malware and viruses – Allows you to run applications with potentially suspicious code without risking damage to your other files or programs on your PC.
  • Acts as an additional layer of protection – Aside from the built-in Windows Defender and other antiviruses you may have, Sandbox provides a protected environment through isolation.
  • Improved performance compared to other antivirus solutions – Sandbox helps reduce the load on your computer’s CPU and RAM by limiting the number of processes running at any given time. This allows you to use the full potential of your device without experiencing any slowdown or crash.
  • Reduced attack surface from threats and exploits – By running an application in its own isolated environment, all of its activity will be confined only to that environment.
  • Regular feature updates for maximum protection – Microsoft releases regular security patches to enhance its efficiency and effectiveness.
  • Real-time protection against unknown threats – Windows Defender runs a scan every time you open an app or file from an unknown source and quarantines it before it can do any harm to your PC.
  • Comprehensive detection algorithms for optimal performance – It has a dedicated and advanced detection engine against unknown or emerging threats.

Further, you can configure Windows Sandbox with a few commands and tweak its settings to your preference. And if you’d like to extend its functionality, consider using Sandbox with a VM simultaneously.

The security of your computer’s operating system is definitely something to take seriously. We hope that this article has provided you with the information needed to help secure your PC while safely testing unwanted files and websites.

Have you enabled Windows Defender Sandbox on your PC? If not, we’d love to hear your reservations. Get interactive with us in the comment section below.

Can’t Paste in Paint on Windows 11? Here’s How to Fix That

Some of our colleagues in Windows Report also found out that sometimes, you can’t paste in Paint on Windows 11. The WR software team replicated the situation and we have come up with tested solutions to fix it.

Why can’t I paste images in Paint? If you can’t paste in Microsoft Paint, that means that the information on the clipboard can’t be inserted into Paint. Here are a few possible reasons why this happens:

  • The Microsoft Paint app is corrupted
  • The graphics card is set to 16 colors
  • If you made a print screen, the clipboard didn’t copy the image 
  • Copy/paste is not working at all.

What can I do if the Paste icon is missing in Paint on Windows 11?

1. Use another paste option

  1. If the Paste icon is missing or greyed out, try using the paste shortcut: Ctrl + V.
  2. Another solution is to right-click on an empty space in Paint and select Paste from the right-click menu.

If these methods don’t work, check if the screen shot is in the clipboard. To do that, press Win + V and simply click on the clipboard image to paste it. 

In case the image is not in the clipboard, try to caption the image again by pressing Alt + PrtSc or just the Print Screen button and check again if it is in the clipboard.

Hopefully, this will clear out how to paste a print screen on Paint in Windows 11. If the problem persists, follow the solutions below.

2. Repair and/or repair Paint

  1. Click the Start button and select Settings.
  2. Go to Apps and select Installed apps.
  3. Locate Paint, click on the three dots button to its right, and select Advanced options.
  4. Scroll down and first click on Repair under the Reset section. See if the problem has been resolved. If not, come back to the window and click the Reset button below.

3. Reinstall Paint

  1. Click the Start button and select Settings.
  2. Go to Apps and select Installed apps.
  3. Locate Paint, click on the three dots button to its right, and select Uninstall.
  4. Now, install a fresh copy of Paint.

If you don’t know how to reinstall the classic Paint, this complete guide will help you do that quickly.

4. Make sure that the clipboard is enabled

  1. Click on Start and go to Settings.
  2. Then, go to System and select Clipboard.
  3. Here, check if the Clipboard history is turned on. If not, do that.

One of the main reasons you can’t paste an image in Paint is because the clipboard is not enabled and the image you’re trying to copy or you have captioned is not showing.

If the Clipboard tool is not your favorite, there are 3rd-party clipboard clients that might suit you better.

5. Try pasting the image in another image editor

If none of the solutions above worked, you can try pasting the image into another image editor such as Paint 3D. However, our readers also complained that Paint 3D couldn’t paste because something went wrong.

We recommend looking at our selection of the best photo editors for Windows and choosing a better one instead.

Another reason for this issue why the print screen won’t paste is because, for some reason, Snipping Tool is not copying the image into the clipboard. If that’s the case, the highlighted guide will help you fix it right away.

So, to make a short recapitulation, try to paste the image using the Ctrl + V shortcut, make sure that the image is stored in the clipboard items, and repair or reinstall Paint to resolve this issue. The WR software team has fixed all our computers using these solutions so try them out.

You might also be interested in reading our guide on how to enable copy/paste in Application Guard.

If you have any further questions or know a solution that worked for you, let us know in the comments section.

Disney Error Code 1026: How to Fix it

If you’re a Disney Plus subscriber, you may come across an error code 1026 when you launch the app. This prevents you from streaming any content.

With most streaming networks, this is usually just a minor bug that can be fixed in no time. The same case applies to this error, and we show you easy ways to resolve it.

What are the main causes of Error Code 1026?

  • Disney server may be down due to too much traffic.
  • Using unsupported devices/browsers which can also throw error code 83.
  • Incorrect login information or outdated software.
  • Internet connectivity issues or router/modem malfunctioning.
  • You may have exceeded the maximum number of devices permitted, or your subscription is inactive.

How do I fix error code 1026 on Disney Plus?

Here are some preliminary steps to try before moving to complex solutions or contacting support:

  • Make sure you have an active internet connection, or try connecting your device to a different network.
  • Ensure your subscription is up-to-date and verify the Disney servers are up and running.
  • Remove all devices allowed for simultaneous viewing, log out, then log back in again.
  • Switch to the Disney app if you’ve been using a browser or emulator.
  • Restart your router and TV or other streaming device.

1. Update your TV firmware

  1. For this solution, we shall be using the TCL model.
  2. On your TV, find your Settings.
  3. Go to System.
  4. Click on About then select Software update.
  5. Select Network update and click on System update.
  6. Now click on Check Update. Your system will scan for any available updates.
  7. You’ll either start downloading updates or get a message that your TV is already up to date.

The same applies for other devices. If Disney is not working on your Firestick, check for possible firmware updates and retry.

2. Clear the Disney app cache

  1. On your TV, find your Settings.
  2. Go to Apps.
  3. Find Disney and click on it.
  4. Scroll down and select Clear cache.

If you’re using other devices, such as an Android phone or Windows PC, also clear the app’s cache. The steps should be more or less similar to this.

3. Reset your Network

  1. Hit the Windows key and click on Settings.settings windows 11
  2. Navigate to Network & internet.
  3. Select Advanced network settings.going advanced network settings win11
  4. Click on Network reset.Network Reset 1
  5. Next, hit the Reset now button.Network Reset now

4. Disable/Enable your VPN

  1. Press the Windows key and select Settings.settings windows 11
  2. Next, select Network & internet and click on VPN in the right-side menu.
  3. Select the VPN connection you want to disable, click on the drop-down, and select Remove.
  4. To add, follow similar steps.

If the server is overloaded, changing your location can help you move to a less crowded one and regain connectivity. It can also help resolve other issues, such as the error code 11 when you attempt to view content outside your region.

5. Reinstall the Disney Plus app

  1. On your Android device, click on Settings. android tv settings
  2. In the Settings menu, click on Apps.android TV apps
  3. From the list of apps, click on Disney+, and then press Force Stop. force stop disney plus
  4. Next, press OK to confirm the action.
  5. Now, go back to the app menu, click on Clear Cache, and press OK again to confirm the action.clear cache disney plus
  6. Again, in the menu, click on Clear Data, and click on OK to confirm. clear data disney plus
  7. Return to the app menu, and click on Uninstall.uninstall disney plus
  8. Press OK to confirm the uninstallation of the app.

If none of these solutions seem to work, it may be time to contact the Disney Plus support team. Some users think some TV models are incompatible with the streaming service. If so, you may have to upgrade your device to a supported model or use the web version.

While you may have gotten a reprieve for the error code 1026, this is not an end to all other Disney Plus error codes you may encounter. Luckily, a lot of these issues, like error code 24 are internet-related, so fixing your poor internet connection troubles almost always resolves a majority of them.

If you have any questions, suggestions, or comments about this article, please leave them in the section below.

How to Enable or Disable Storage Sense on Windows 11

Windows users can enable Storage Sense to automatically free up storage when the system runs low on disk space by removing these files. In this guide we’re going to show you how to use this feature, so let’s get started.

How do I enable or disable Storage Sense in Windows 11?

Use the Settings app

  1. Click the Windows button and select Settings.windows 11 settings
  2. Click on the System option on the right and select Storage.storage settings windows 11
  3. Now toggle the Storage Sense button to On.windows 11 sense
  4. The default settings will allow the feature to clean up unnecessary files when your PC runs low on disk space. To configure the Storage Sense option, click on it and select the Run Storage Sense menu.windows 11 sense settings
  5. Select the frequency for cleaning from the drop-down menu and choose from the three settings: daily, weekly, or monthly.windows 11 sense menu

To disable Storage Sense, simply toggle off the feature in step 3.

If you want to prevent the deleted data from being recovered, wipe free space on the disk.

What are the pros and cons of Storage Sense on Windows 11?

Pros

  • It helps you clean up your hard drive and make it more efficient by deleting temporary files and old data.
  • You can set up a cleanup schedule to automatically free drive space when there is no activity on it.
  • It also allows you to uninstall programs that you do not need anymore or clean up other unnecessary files left behind.
  • It helps protect your privacy online by deleting temporary internet files.

Cons

  • Storage Sense is restricted to internal storage only, so it won’t help in freeing up external drives.
  • It can delete crucial system files without asking for permission.
  • It does not delete files in the Recycle bin if they are not from the default system drive. 

How can I troubleshoot possible issues with enabling/disabling Storage Sense in Windows 11?

  • Storage Sense not working – This can happen if you’ve paused or not installed the latest Windows updates. Ensure to keep your system up-to-date to keep other functions working efficiently.
  • PC runs very slowly after enabling Storage Sense – This can happen if you don’t have enough memory. You can run Disk Cleanup to free up space from other drives.
  • Storage Sense isn’t deleting files – If your PC has been infected with malware that corrupts your settings, tools like Storage Sense that rely on these settings for proper operation can fail. You can run a virus scan and retry.
  • Free space stuck – When running two concurrent cleanup utilities, there may be a conflict where free space is stuck. You can disable Storage Sense to get rid of this error.

You can analyze disk usage in more detail by checking our guide on how to use WizTree to quickly find large files and recover storage space.

What is Storage Sense in Windows 11?

Storage Sense is an automatic cleanup feature that deletes temporary files, old downloads, and Recycle Bin items to free up disk space.

How do I enable Storage Sense in Windows 11?

Go to Settings > System > Storage, turn on Storage Sense, then click Configure cleanup schedules to customize when it runs.

Does Storage Sense delete personal files?

No, Storage Sense only removes temporary system data and items from the Recycle Bin or Downloads folder if you choose those options.

Can I run Storage Sense manually?

Yes, you can trigger it anytime by going to Settings > System > Storage > Storage Sense and clicking Run Storage Sense now.

And that brings us to the end of this article. It’s easy to enable Storage Sense on Windows to free up space on your computer or device. Of course, this information could also be used by someone who wants to disable the feature altogether for whatever reason.

Regardless, the process is simple. You can also tailor the storage settings to help clean up your hard drive any way you want, based on your personal preferences and needs.

Should it fail to meet your expectations, you can find other ways to free up space on your Windows device like downloading WinDirStat.

Storage Sense is a great feature if you want to clean the C drive without formatting on Windows 11, so don’t miss it.

To keep your PC running smoothly, check out Storage Sense in Windows 10, which helps automatically clear temporary files and manage disk space efficiently while keeping your personal files safe.

Do you prefer the Storage Sense feature on or off? Let us know in the comments section below.

How to Join a Roblox Private Server on Xbox

Apparently, there is a big issue with how to join a Roblox private server on Xbox, but the WR gaming team has provided all the methods to do that. As it’s one of the favorite games of all the people in Windows Report, we granted special attention to this matter.

Do you need Robux to join a private server? No, you don’t need Robux to join a private server, as long as you have been invited or the settings on the server of your friend allow you to join.

As you will see, it’s pretty easy to join a Roblox private server on Xbox and you will see how to do that next.

How do I join a Roblox private server on Xbox?

  1. Start Roblox on Xbox.
  2. Now, go to the Friends tab to see the friend activity, and select a friend that is online.
  3. Finally, select Join Experience and you’re in.

Make sure you tell your friend to enable the Friends Allowed option on their server. If that is not activated, you won’t be able to join.

How do I create a Roblox private server on Xbox?

The short and honest answer here is that you can’t create a private server on Xbox. However, if you create a second account on a PC or a mobile, you can befriend your Xbox account and join the server without any issues. Here’s how to do that:

  1.  Download and install Roblox on your PC or mobile phone (we have installed it on our PC for demonstration).
  2. Click on Sign up to create a new account.
  3. Then, enter your credentials and click on Sign Up again.
  4. In the main window, open a game you want to create a server on, click on the friends icon, and select Create Private Server.
  5. In the new window, click on Buy Now. This one is free but some will require Robux to buy.
  6. Now, go to the newly created server, click the three dots icon, and select Configure.
  7. Turn on the Friends Allowed feature. Otherwise, you won’t be able to join the private server from your Xbox even if you are a friend. Alternatively, you can generate a link and send it to your friends to join the game as well.
  8. Click on Join to enter the game.
  9. So, you have created a server on your second account. Now, you need to open Roblox on Xbox, go to friends, and add the second account as a friend.
  10. Lastly, go to the Friends tab, select your second account, and choose Join Experience.

You can do the exact same thing on a mobile phone. Create a new account, create a private server, add the new account as a friend on Xbox, and join the server.

However, please note that you can only create one private server for free. To create more private servers or VIP servers, you need to invest a few bucks.

Why can’t my friends join my private server on Roblox?

Most likely, your friends can’t join your private server because you didn’t configure it to allow your friends to join.

As you have seen above in the article, you need to enable the Friends Allowed feature for your server, otherwise they won’t be able to join.

Of course, you need to join the server as well to make the private server active. 

Why don’t I receive game invites on Roblox?

By default, only your friends will be able to invite you to their games. If you want to receive invitations from everyone, you can tweak that setting from Roblox.

Open the game, go to Settings>Privacy, and look for Who can make me a member of their private server? and change it to Everyone.

Other issues you may encounter in Roblox

That’s it! The solutions provided by our WR game testers showed you how to join a private server on Roblox Xbox Blox Fruits or other games.

Now you also know how to create your own server on a PC or a mobile device and join with the Xbox game console account. 

If you have any other suggestions or ideas that might help other Roblox gamers, use the comments section below.

Fix: Unable to Determine Volume Version and State in CHKDSK

Unable to determine volume version and state message when using the chkdsk command is an indicator that something is wrong with your hard drive, and the issue should be immediately addressed.

By failing to fix this issue you may lose all your data on the drive, and in today’s guide, we’ll show you what to do if you encounter this error.

What’s causing the Unable to determine volume version and state error?

  • A failing hard drive or an unreadable disk is the most common cause of this problem.
  • Bad sectors on the drive will also cause this error message to appear.

How do I fix the unable to determine the volume version and state error?

1. Clone your drive

Note icon NOTE
Before we start, make sure you have enough space on the non-dynamic partition to clone the entire drive.
  1. Download AOMEI Partition Assistant.
  2. Go to Clone and choose Clone Disk.
     
  3. Select Sector-by-Sector-Clone and click Next.
  4. Choose the drive you want to clone on Next.
  5. Select the option to save the disk as a virtual drive or file.
  6. Wait for the process to finish.

2. Open the cloned drive and try to recover your files

  1. Press the Windows key + X and choose Disk Management.
  2. Go to Actions and choose Attach VHD.
  3. Select the virtual disk drive you created in the previous section.
  4. The drive should be mounted automatically. If it’s not, right-click it in the Disk Manager and choose Change Drive Letter and Paths, and assign the letter to your drive.
  5. Now open the mounted drive and try to manually recover all important files.

If your files are inaccessible, you might have to use file recovery software on the virtual drive to salvage them or contact a data recovery specialist.

Unable to determine volume version and state chkdsk aborted is a serious error and it appears if Windows has found errors on the drive, or if the drive is failing, so your only option is to recover the files and replace the drive.

This can also lead to other problems, such as Unable to obtain a handle to the Event Log or even file loss.

After thorough research, our team at WindowsReport concluded that continuing to use the drive or performing additional checks such as chkdsk or disk defragmentation will cause further damage to it, so your best option is to try and salvage as much data as you can before the drive fails.

This isn’t the only issue with chkdsk and many reported that chkdsk can’t lock the current drive or that chkdsk got stuck on their PC. If the problem still persists, check our guide on what to do if Windows is unable to repair the drive.

Did you find a different solution for this problem? If so, share your findings with us in the comments section.

7 Ways to Fix Error 0x8096002A Windows 11 Error

Many came across Error 0x8096002A when trying to extract precisely .rar. Though Microsoft introduced support for archived files like .tar, .tar.gz, .tar.bz2, .tbz2, .tzst, .tar.xz, .tgz, tar.zst, .txz, .7z, and .rar, seems like it’s not flawless.

The message reads An unexpected error is preventing the archive from being extracted. Error 0x8096002A: No error description available. It indicates that Windows cannot extract the contents of a password-protected .rar (Roshal ARchive) file, though there is no issue decompressing a normal .rar file.

How do I fix error 0x8096002a in Windows 11?

1. Use a third party extraction software

The best option is to use a third-party tool to extract a .rar file in Windows. It’s an easy process and shouldn’t take more than a minute.

Besides, if possible, use the same tool that was initially employed to compress the archive file to .rar format. Using another tool will also help when a corrupt header is found in the RAR file.

WinZip is one of the most known and used tools to handle archive files, including .rar. Being one of the tools that we often use, we can tell you it is plenty powerful and will help you extract .rar, .zip, and many other archive formats.

WinZip

You can use this amazing tool for everything archive-related.
Free Trial Visit Website

2. Repair the corrupt system files

  1. Press Windows + S to open Search, type Command Prompt in the text field, right-click on the relevant result, and select Run as administrator. command prompt
  2. Click Yes in the UAC prompt.
  3. Now, paste the following commands individually and hit Enter after each: DISM /Online /Cleanup-Image /CheckHealth DISM /Online /Cleanup-Image /ScanHealth DISM /Online /Cleanup-Image /RestoreHealth
  4. Execute this command to run the SFC scan: sfc /scannowsfc scan

The error code 0x8096002A can always arise due to corrupt system files, and you can rely on the DISM commands and SFC scan to replace the problematic files with the cached copies.

3. Check Disk Integrity

  1. Press Win + X and select Command Prompt (Admin).
  2. In the command prompt, type chkdsk C: /f /r and press Enter. (Replace C: with the appropriate drive letter if the archive is on a different drive).check disk to fix 0x00000024
  3. You’ll be prompted to schedule the check on the next restart. Type Y and press Enter.
  4. Restart your computer to allow CHKDSK to run.

4. Update Windows 

  1. Press Windows + I to open the Settings app, go to Windows Update from the navigation pane, and click on Check for updates.update windows to fix error 0x8096002a
  2. If an update is available, download it.
  3. Once done, restart the computer for the changes to apply and verify whether the 0x8096002A Windows error goes away.

5. Switch to the Insider version of Windows

If nothing else works, we recommend you enroll in the Windows Insider Program. This allows you to access updates and releases before others.

Though the error will remain for password-protected compressed files for now, if and when the capability is introduced, those on insider builds will be the first to receive it. And if it doesn’t work out, you can always leave the Insider program.

6. Perform a Clean Boot

  1. Press the Windows key + R, type msconfig and press Enter.msconfig command
  2. In the Services tab, check Hide all Microsoft services. Then Click Disable all.Disable all
  3. Go to the Startup tab and select Open Task Manager.Open task Manager- 0x89235107
  4. Disable all startup apps, go back to System configuration, and click OK.disable startup apps
  5. Restart your PC.
  6. If you’re no longer getting the error, it means that one of the disabled programs or services was causing it. Re-enable them one by one to locate the culprit.

This process starts Windows with minimal programs and services to identify if a third-party service or app is causing the error.

7. Check file permissions

  1. Right-click the file and select Properties.
  2. Go to the Security tab and select your username.
  3. Click Edit, select your username again, and enable Full control.
  4. Click Apply and OK.
  5. In the General tab, check Unblock if available, then click Apply and OK.

While there are a few workarounds, no sure shot fixes currently exist for Error: 0x8096002A. But if you get a WinRAR cannot execute file error, that should be fixed in no time!

Besides, while unzipping files, you may see the WinRAR No archives found error message, and repairing the file does the trick! Even more, you can take a closer look at how to fix 895 System32.exe Failure on Windows 11 as some solutions work here as well.

If you have any questions or want to share more solutions with us, comment below. We will also update the guide with more fixes as they come up.

Is personalized image search the future of Bing? Microsoft thinks so

Microsoft has always been trying to make Bing Search a search engine popular enough to compete with other similar products on the market, such as Google. But, ultimately, it always fails, and while Bing remains the second most popular search engine after Google, it is light-years behind it, according to the latest statistics.

Microsoft’s CEO, Satya Nadella, recently said that he’d do just about anything to make Bing better, according to a report from The Verge, and while the Redmond-based tech company should have done this for years, indeed, if it wanted to make Bing a leading force on the search engine market, it seems that it might start to take the matter into its hands and come up with a solution.

This solution is apparently a new way of searching: a personalized image search, which Microsoft filed a patent for back in 2022. However, it was earlier this year that the patent was published. The patent describes a system that uses a method that employs user profile information and activity to look for and suggest other images that the user might like and be interested in.

In shorter words, the method offers a highly personalized image search. Could this be implemented in Bing? The patent definitely points out clues in that direction.

Personalized image-based search on Bing: how would it work?

The patent, Web-Scale Personalized Visual Search Recommendation Service, describes a system that offers personalized image-based search results.

This is how it would work:

  1. The system receives a search request that includes an image.
  2. It creates a personalized item embedding (a mathematical representation of the image) based on the image and user profile information.
  3. It gets a list of candidate images based on the personalized item embedding.personalized image-based search
  4. These candidate images are ranked according to how likely the user would engage with them.
  5. The system also makes sure there’s visual diversity among these ranked images, so they don’t all look too similar.
  6. Finally, some of these diversified images are returned as the search results.

The patent doesn’t specify if the personalized image-based search system is meant for Bing, but it’s definitely a technology that only a search engine can implement.

Visual Search is a popular research area and is of great interest in the industry. Given an image, a visual search system can return a ranked list of visually similar images. Accordingly, a personlized visual search system is needed for providing images to users in a more personalized manner.

It’s good to note that Bing already has a visual search option, but it’s nowhere near the level of complexity described in the document.

But if that is not enough, Bing Chat, which is the Bing AI tool, also has a fairly complex image-based search feature, and generator as well. Users are able to upload their own images, and Bing AI will generate its personal input, and even create similar images. Giving the context length, this feature could also be taken as personalized image-based search, but limited.

If Microsoft wants to compete with Google, the company needs to bring in new features that are actually useful to customers. This could be one of them, however, there would still be a long way to go before Bing Search catches up on Google Search.

Outlook will let users save their attachments to local folders

Microsoft will bring a bunch of new features to Outlook this month, according to the Microsoft 365 Roadmap, and they have to do with saving attachments. Outlook users will now be able to save their email attachments to local folders of choice.

But this is not all. Outlook will also get an integration with Microsoft 365 attachments, specifically, Word, Excel, and PowerPoint attachments. This integration will let users open the attachments directly in the desktop apps, just by double-clicking them.

For example, if someone sends you an email on Outlook with a Word attachment in it, double-clicking the attachment will prompt the document to open on your Microsoft Word app from your desktop device. The same goes for Excel and PowerPoint attachments.

These new features are coming to Outlook this month, on October 2023 for the new Outlook for Windows. So it’s safe to say that for now, only the desktop version of Outlook will get them.

Outlook: Save to a local folder, Follow a meeting, and many more features

As you might know already, the classic Outlook will reach end-of-life in 2025, so Microsoft is focusing on improving the experience of using the new Outlook. This means more new features, dozens of improvements, and changes to the platform.

For example, besides the save to a local folder feature coming to Outlook this month, Microsoft is also adding a follow-a-meeting feature, which will allow users to get all the updates and notifications for a meeting they won’t be able to attend.outlook save to local folder

The feature is coming to the platform this month, and it is a game changer, as it will allow for greater mobility when using Outlook.

Plus, a new offline support feature for mail action will let Outlook users work on the app even when they’re not connected to the Internet. This way the flow of productivity won’t be disturbed at all, and every change will automatically be uploaded to the cloud, once the user connects the device to the Internet.

All of these features are coming to Outlook in October.