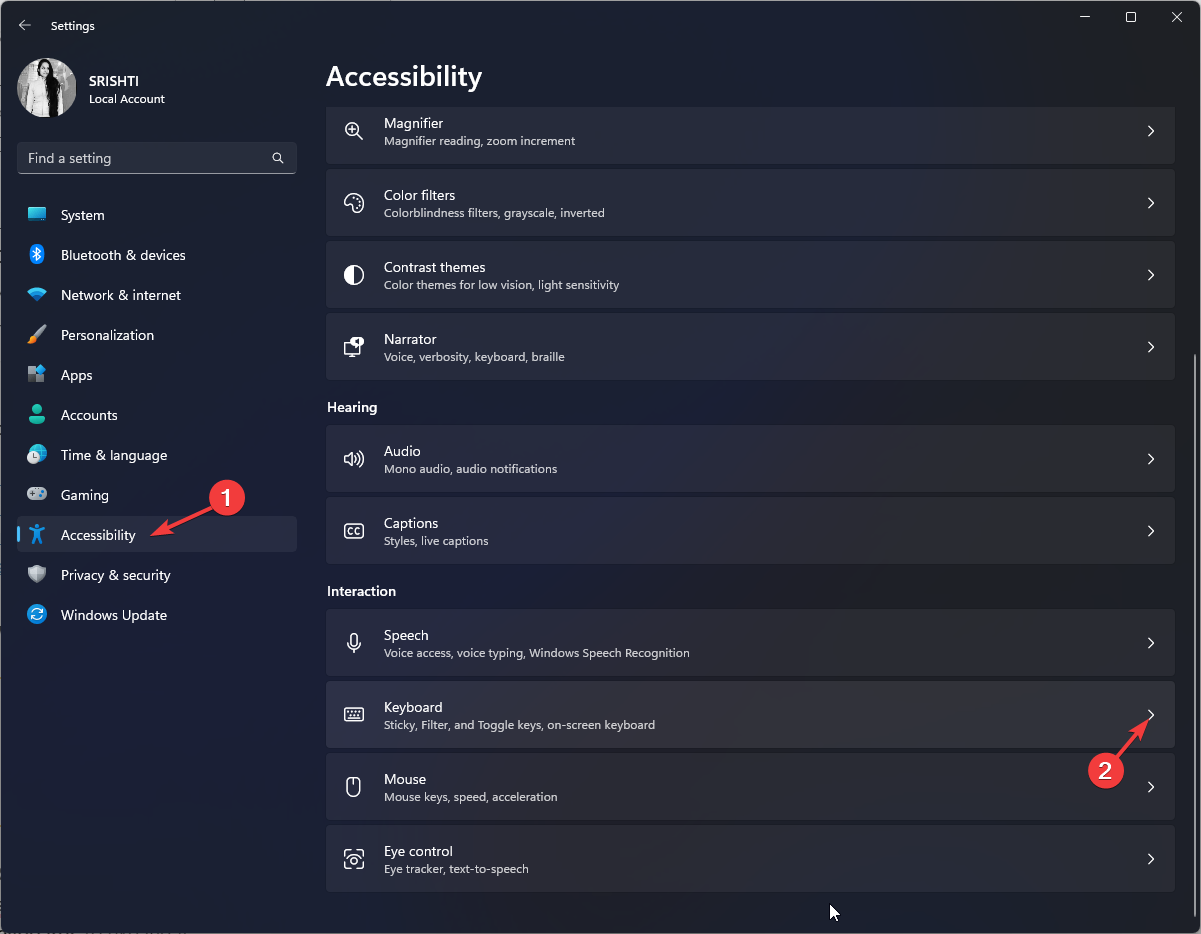
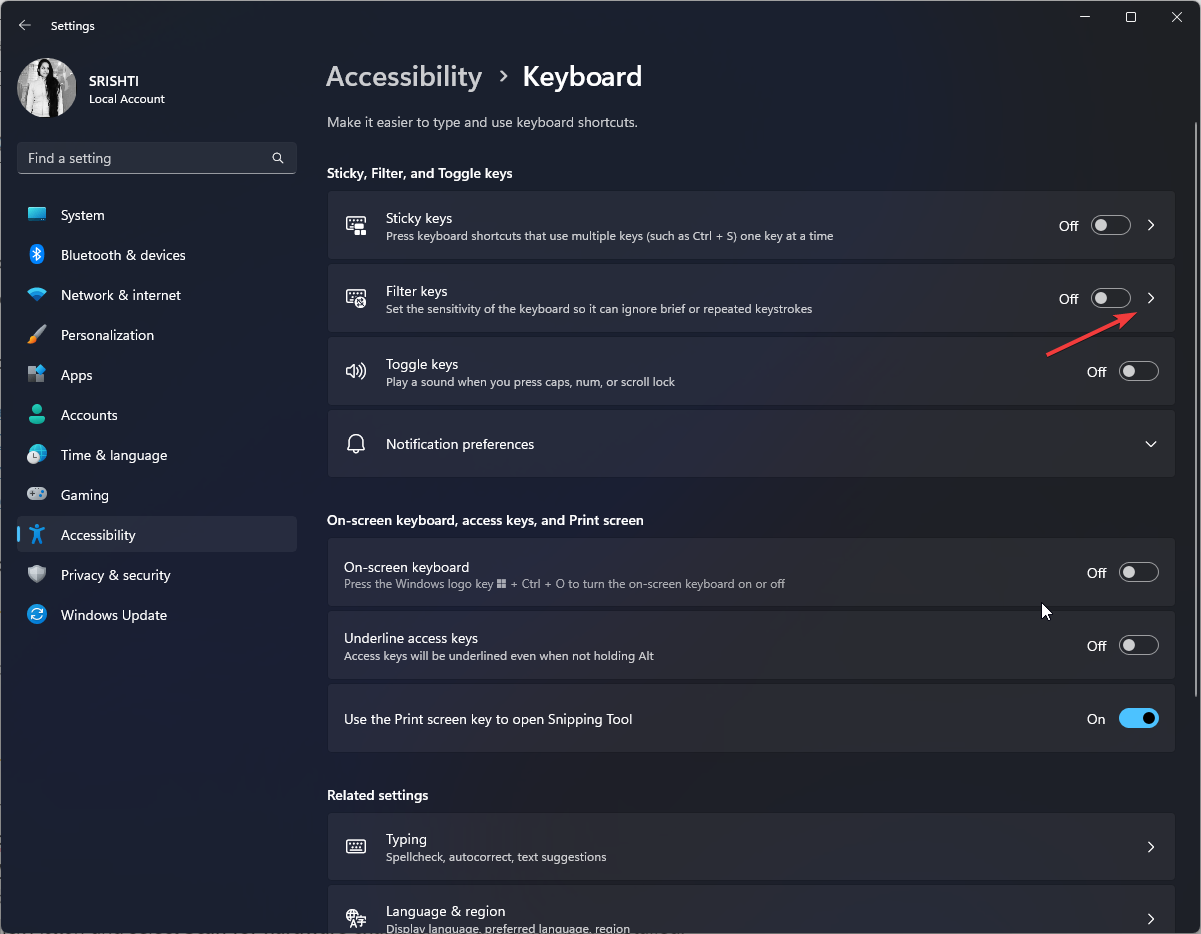
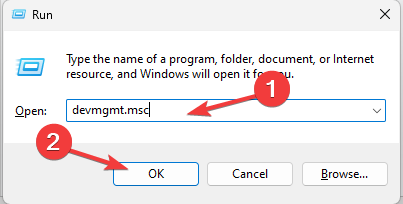
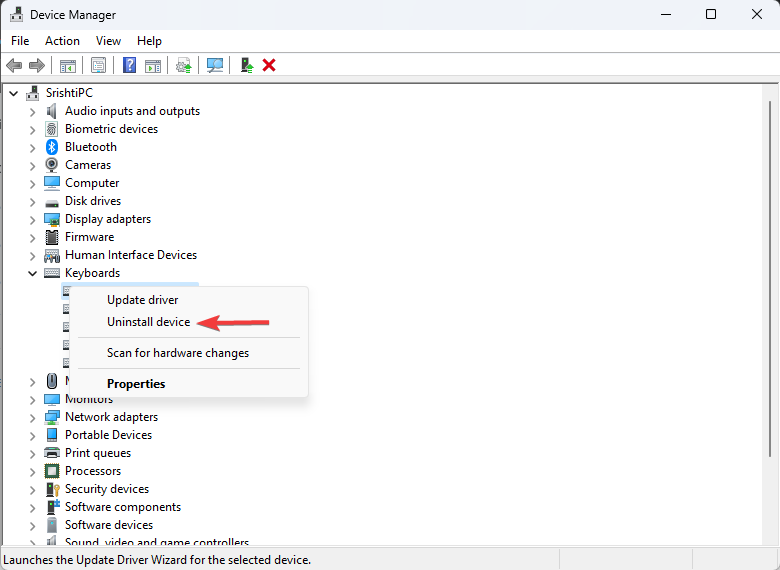
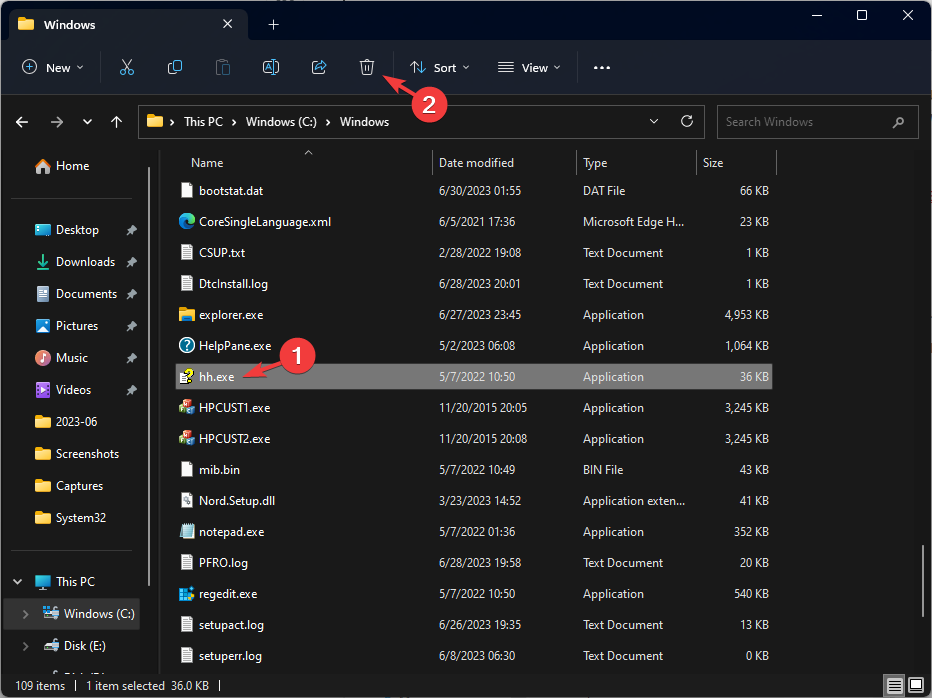
Have you come across the file named Main.exe on your computer and wondered what it is, then this guide can help!
We will delve into the details of Main.exe, its purpose, and step-by-step instructions to troubleshoot and resolve the issues related to the file effectively.
What is main.exe?
Main.exe is a generic name for an executable file that serves as the main entry point for running an application. The main part of the name refers to the primary function of the program.
The file is typically responsible for initializing the program, managing its operations, and coordinating the execution of other components within the software.
However, if you have encountered a file named main.exe on your computer other than in relevant software, it is essential to exercise caution.
It is recommended to run a reputable antivirus scan to ensure it is not associated with any malware or potentially harmful software.
When encountering errors related to Main.exe, it can be frustrating and may disrupt your computer’s performance so move to the next section for solutions.
How can I fix errors related to main.exe?
Before engaging in advanced troubleshooting steps, you should consider performing the following checks:
Try restarting the computer.
Ensure Windows is up to date.
Once you have checked these, move to the detailed solutions.
1. Run SFC & DISM scans
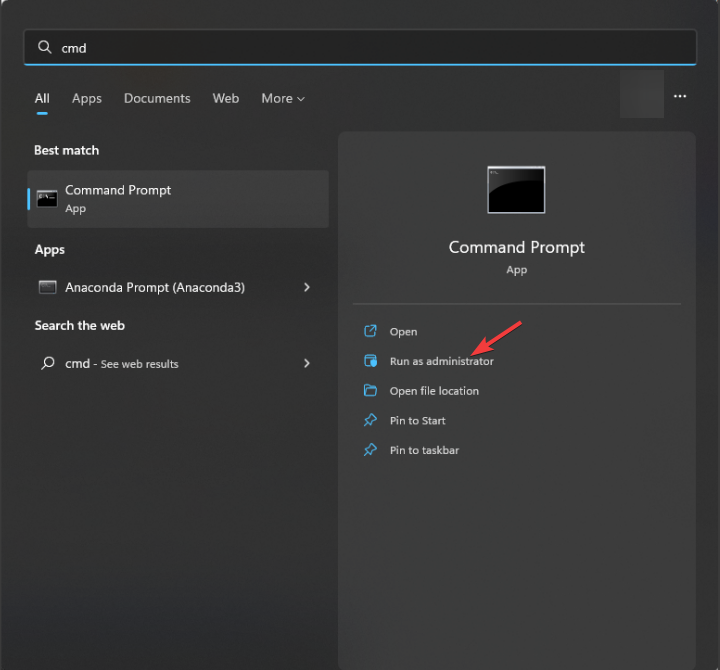
Press the Windows key, type cmd, and click Run as administrator.
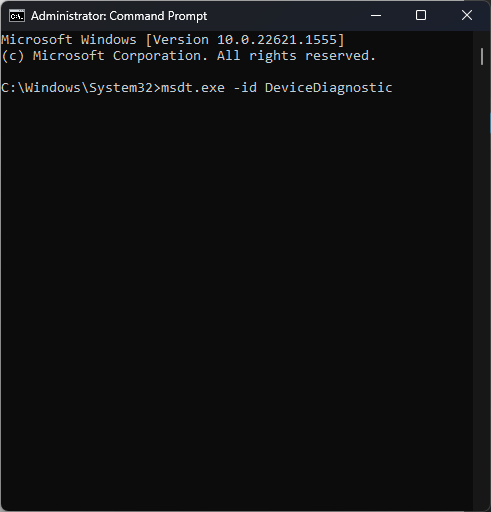
Copy & paste the following command to repair system files and hit Enter: sfc/scannow
Wait for the scan to complete, type the following command to restore Windows OS image files, and press Enter: Dism /Online /Cleanup-Image /RestoreHealth
When the scan is executed, restart your computer to let the changes take effect.
If you’re searching for a faster method, you can use a highly recommended third-party repair software to automate this process.
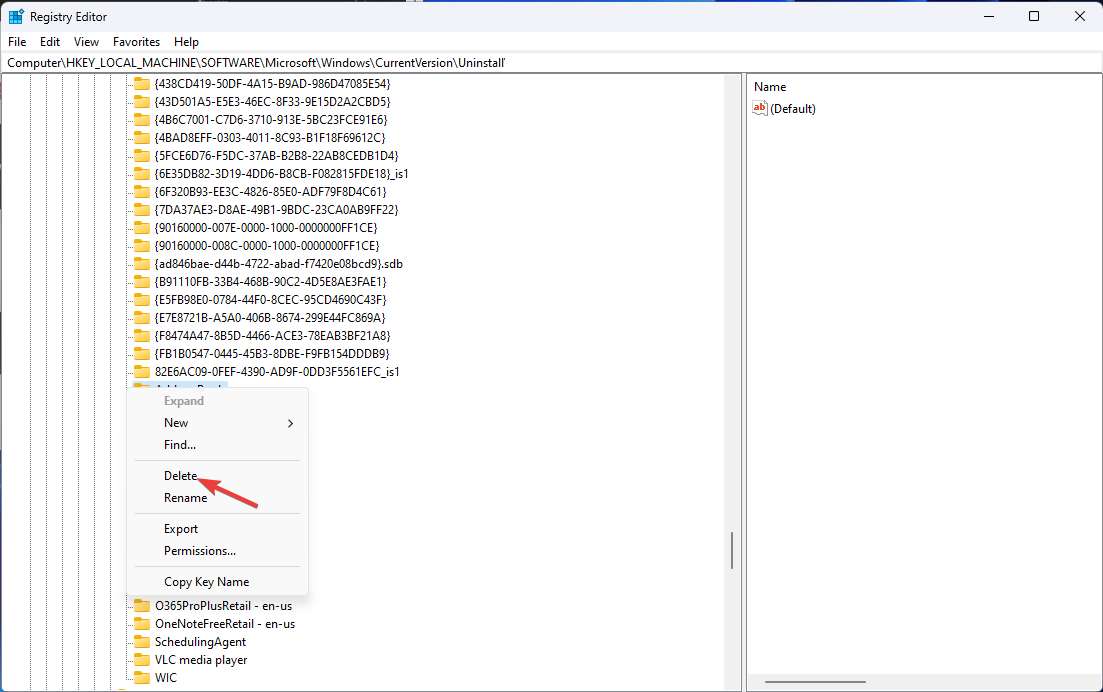
2. Reinstall the app
Press the Windows key, type control panel, and click Open.
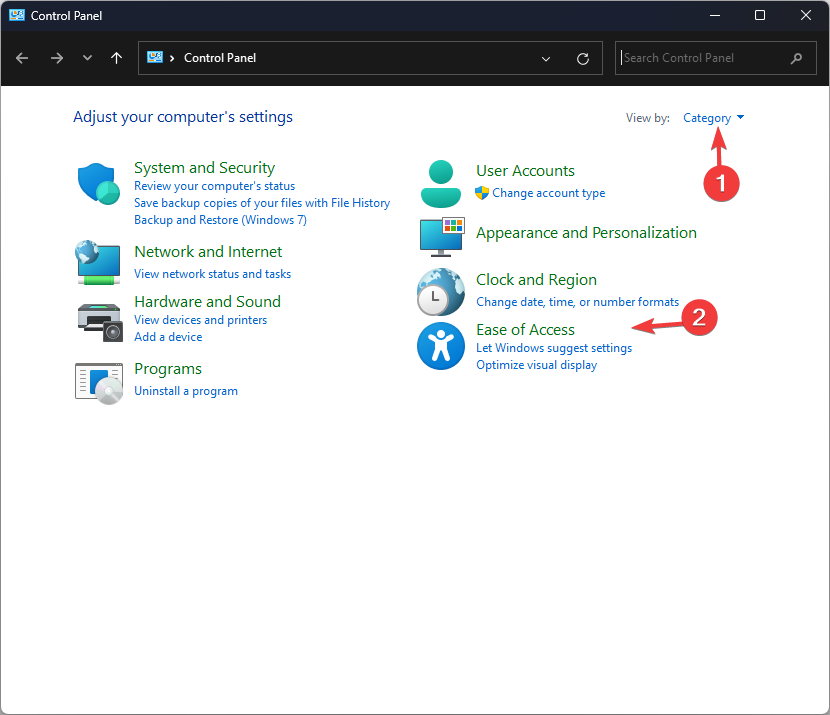
Select Category as View by and click Uninstall a program.
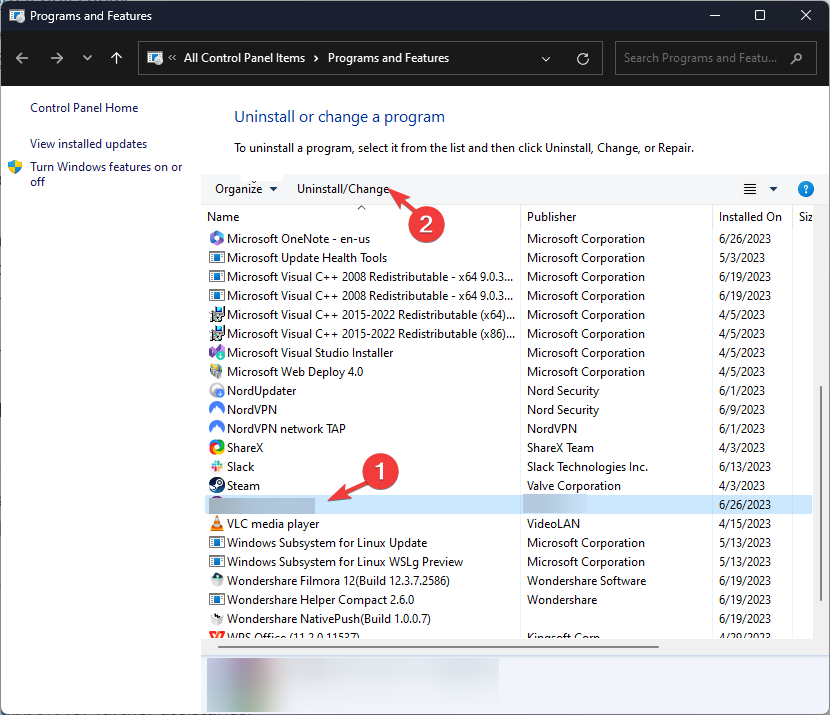
On the Programs and Features windows, select the app.
Click Uninstall.
Now follow the onscreen instructions to complete the process.
Go to the official website of the app and click Download.
Double-click the installation file and follow the onscreen prompts to complete the process.
Press the Windows key, type control panel, and click Open.
Select Large icons as View by and click Recovery.
Click Open System Restore.
On the System Restore window, select Choose a different restore point and click Next.
Select the restore point and click Next.
Click Finish.
Windows will restart and restore the computer to the previous version. If the System Restore is not working for you, we recommend you check out the solutions to fix the issue.
So, these are the methods that you can use to fix the errors related to main.exe, ensuring the smooth functioning of your system. Also, check out our article on what to do if you run into the WbemCons.exe process.
We also have a guide dedicated to asctray.exe and its issues, so feel free to visit it.
Please feel free to give us any information, tips, and your experience with the subject in the comments section below.
Discord users are accustomed to errors, one of which includes the oops, you’ve got an ultra rare error. The error is usually associated with server or network issues and prevents users from accessing Discord.
In this article, we’ll briefly explain some common causes of the error and show you how to fix it.
What causes Oops you’ve got an ultra rare error?
The oops you’ve got an ultra rare error is usually caused by:
Discord server downtime – If the server is experiencing downtime due to maintenance or a security breach, it can lead to errors with the application.
Poor Internet connection – If you have a poor or unstable internet connection, it can cause an ultra rare error. Similarly, no route error can also occur due to this.
Corrupt app – Should the Discord app become corrupt, it can cause to several errors. Also, it may lead to constant unexpected crashes on the Discord app.
Outdated software – If you need to run an updated version of the Discord app, it can lead to bugs and errors.
How do I fix Oops You’ve Got An Ultra Rare Error on Discord?
Before we proceed with advanced troubleshooting solutions, here are a few quick fixes you can attempt:
If the error remains unfixed after attempting the above fixes, attempt the following troubleshooting techniques:
1. Update Discord
Press the Windows key, type discord, and hit Enter to launch the application.
Then, wait for the app to scan for available updates. If there are any available, it’ll be installed automatically.
Alternatively, you can press the Ctrl + R keys while running Discord to update the application automatically.
Updating Discord ensures you get the latest fixes for underlying bugs and errors. Hence, ensure your PC is running the latest version to fix the ultra error on Discord.
Press the Windows key + R to open the Run box, type %appdata%, and hit Enter.
Locate the Discord folder in the next window, right-click, and select Delete.
Once the folder is deleted, close the window, and restart your PC to complete the fix.
Once an application’s cache is corrupt, it can cause a series of errors while using it. Clearing Discord’s cache can fix the ultra rare Discord error. If you want to clear the Windows update cache, check out our guide.
Discord errors are usually caused by server issues or poor internet; fixing them requires little to no technicality and can be achieved by following the steps in this guide.
DLL (Dynamic Link Library) files form a vital part of any Windows PC and aid in the effective functioning of apps. These files are often shared between programs, each accessing the required information from it. One such file that many were concerned about is install.res.1028.dll.
DLL files with names that don’t clarify their purpose or line of action leave users perplexed. And given that malware or viruses are often created with the same name, it’s imperative to verify whether install.res.1028.dll is a legit and safe file. Keep reading to find out!
What is the install.res.1028.dll file?
The install.res.1028.dll is a file generated when you install the Visual C++ 2008 Redistributable Package (any of its available versions). It’s a temporary file created on the drive’s root directory with maximum free storage available.
Ideally, the file should be created in the Temp directory, but due to a bug in Visual Studio C++ 2018, it gets stored in the root directory instead.
Should I delete the install.res.1028.dll file?
Yes, you can safely delete install.res.1028.dll since it’s just a temporary file and has no bearing on the functioning of any apps. Besides, deleting it won’t affect the redistributable package.
Also, several other files get created due to a bug, including eula.1028.txt, vcredist.bmp, globdata.ini, vc_red.cab, and VC_RED.MSI, among others. And these can, just as well, be safely deleted.
How do I delete the install.res.1028.dll file?
1. Manually delete the file
Since these are temporary files, deleting them poses no harm. All you have to do is head to the directory where the install.res.1028.dll file is located and delete it.
Also, for others that fall in the same category, hold Shift, select the temporary files you want to remove, and hit Delete.
2. Install the latest Visual C++ Redistributable packages
Go to Microsoft’s official website, and download the latest redistributable packages from the list. It’s recommended that you get them all.
Run the setup and follow the on-screen instructions to complete the installation.
As per the information available on the dedicated error page, installing the latest version of the Visual C++ Redistributable packages should fix things since a patch has already been released.
By now, you know all about install.res.1028.dll and ways to get rid of it in Windows. Before you leave, check the best DLL repair tools and get one today to keep any related errors at bay.
For any queries or to share how you found out about the file, drop a comment below.
It seems that more than half of these companies are located in the United States, but as you can see, many companies around the world still rely on Skype for communication.
5. Users spend 3 hours and 12 mins per week on Skype
Users spend just over 3 hours weekly on Skype, and most of this usage can be attributed to business use.
This seems a bit low, considering how many companies still rely on Skype for communications.
6. EBay acquired it in October 2005
eBay already acquired PayPal in 2002, and it successfully integrated its payment features with other eBay services.
The same was expected with Skype in 2005 after a $2.6 billion accusation, and eBay had the following plans:
Incorporate Skype’s user base into eBay.
Establish Skype as a means of communication on eBay.
However, eBay users didn’t accept Skype as a mode of communication, and at the time, it seemed unnecessary.
This resulted in Skype being unable to integrate successfully into eBay’s business structure. In 2009, eBay sold Skype to an investor group while holding 30% of the share.
Then in 2011, the remaining 30% was sold to Microsoft.
7. It was a pioneer of instant communication
In the early 2000’s, there weren’t many instant messenger services available. While MSN Messenger was popular, it was slowly losing its user base to Skype.
In fact, Skype was the most popular tool for international calls in the last two decades.
Year
International call market share %
2005
3
2006
4
2008
8
2009
12
2010
13
2012
33
2013
36
2014
40
Skype was available even on older mobile phones and PCs, and before the rise of WhatsApp and other instant messenger apps, Skype was a go-to choice for instant communication and calls.
8. It’s banned in several countries
The following countries have banned Skype:
Uzbekistan
Bangladesh
Morocco
Oman
China
United Arab Emirates
Saudi Arabia
There are several reasons why these countries have banned Skype. For example, Uzbekistan demanded that foreign companies store data about its users on Uzbekistan’s soil, and after Skype refused, they were banned.
In China, for example, Skype is banned from the app store since it doesn’t comply with local laws. On the other hand, United Arab Emirates only allows licensed VoIP services to operate in the country to protect the domestic economy and services.
And in other countries, such as Saudi Arabia, the service is banned due to government monitoring and information restriction.
9. It replaced MSN Messenger
In the early 2000s, MSN Messenger was one of the most used instant communication services on the Windows platform.
However, Skype was rising in popularity, and Microsoft, to deal with the competition, acquired Skype in 2011.
In November 2012, it was announced that MSN Messenger would be discontinued in April 2013 and replaced by Skype.
Of course, Messenger users could sign into Skype with their Microsoft account and find their contacts, and eventually, Skype replaced MSN Messenger in its entirety.
10. Emergency numbers don’t work on Skype
While Skype can be used to call landline phones, it can’t be used to make emergency calls around the world, so you shouldn’t be used for that purpose.
However, it’s possible to make emergency calls in the following situations:
While using Skype for Windows 10, Skype for Windows, Skype for Mac, and Skype for Linux in Australia, Denmark, Finland, the UK, and the United States.
Home phone adapters in the United Kingdom.
Skype mobile app will dial emergency numbers through the phone’s caller app and mobile network in most countries in the world.
What are some fun facts about Skype?
1. The US accounts for 13% of Skype.com’s traffic
Despite the waning popularity of Skype, Skype’s website is mostly accessed by users from the United States. This can be attributed to many US companies that still rely heavily on Skype.
Country
Percent
United States
13.4
Russian Federation
6.3
India
5.9
Brazil
5.4
United Kingdom
3.9
Here’s the visual representation of the data:
2. the younger generation mostly uses Skype
According to data from SimilarWeb, Skype is mostly used by the younger generation. 32.56% of users are between 25 and 34 years.
On the other hand, 21.38% of users range from 18 to 24. After combining the two groups, they make up slightly over half of Skype’s user base.
So even if Skype isn’t as popular anymore among home users, it seems that millennials and Gen Z are still using it.
3. More than 50% of Skype users earn $100,000+ annually
According to reports, about 51% of Skype users earn more than $100,000 annually. This doesn’t come as a surprise since businesses and business users mostly use Skype.
Skype is still highly used in the Informative and Computer industry, so it’s no wonder to see these numbers. Here is the chart that represents the number of users in millions per industry that still use Skype.
4. Skype had 31.8% of the video call market share in 2020
In 2020, Skype had 31.8% of the market share according to EmailToolTester, however, the pandemic changed that.
The workforce and students moved to the remote working/learning model, propelling Zoom as the number one video conferencing tool.
Platform
Market Share 2020
Market Share 2021
Market Share 2022
Zoom
26.0%
47.2%
42.7%
Google Meet
1.6%
21.1%
31.4%
Microsoft Teams
9.5%
14.1%
10.9%
Skype
31.8%
6.3%
6.0%
Slack
17.4%
3.5%
4.8%
This is no surprise since in 2020 Zoom had 26% of the market share. However, the biggest shock came from Google Meet.
In 2020 it had only 1.6% of the market, and in just a year, it held 21.1%. In 2023, Google Meet holds 31.4%.
As for Skype, it lost most of the market share and now sits at 6%.
5. Conferences on Skype can last up to 24h
If you’re looking to have a conference on Skype, you’ll be pleased to hear that conference can last up to 24h with up to 100 participants.
On the other hand, Zoom allows up to 1000 participants, and the maximum duration of the call is 40 minutes for free users and up to 30 hours for paid users.
So, if you want to have a small conference that can last for 24h for free, Skype is your choice.
6. It offers real-time transcriptions in 35 languages for free
Unlike many services, Skype offers real-time transcriptions for conferences in 35 languages. And best of all, this feature is available completely free.
However, before you can use it, it needs to be configured by the broadcaster.
7. The original name wasn’t always Skype
That’s right, the original name wasn’t Skype, it was Skyper, but since Skyper’s domain was taken, the name was changed to Skype.
Skyper stands for Sky peer-to-peer, and it was named that way Skype was using the first peer-to-peer IP telephony network.
8. The software is based on Kazaa’s P2P backend
Skype was developed by Estonian developers Ahti Heinla, Priit Kasesalu, Jaan Tallinn, and Toivo Annus. Some of these developers worked previously on a popular file-sharing software called Kazaa.
Just like many file-sharing apps, this one used peer-to-peer protocol. When developing Skype the developers used the same P2P principles that they used with Kaaza.
By doing so, the quality of your connection was improved depending on the number of other users in your area, thanks to the P2P technology.
9. Skype phones existed in the past
Before smartphones, you could only use Skype on your computer. However, there were special mobile phones that had built-in Skype support.
There were also Skype VoIP phones available that you could use, and even adapters that you could connect to your landline phone and turn it into a VoIP phone.
This was revolutionary technology when it was first introduced since it allows users to use Skype and make international calls without using their PC.
10. Skype Wi-Fi hotspots existed in the past
In the early 2010s Skype introduced a service called Skype WiFi that allowed users to make Skype calls without having to pay for WiFi access.
Instead, you could make Skype calls by paying with your Skype credit. It was an interesting feature since it didn’t ask you to purchase a Wi-Fi session or log into a Wi-Fi portal to use it.
However, the service was canceled on late March 2017, but it’s interesting to see how Skype was used outside of your home before smartphones appeared on the market.
Conclusion
Nowadays, Skype has lost the majority of its popularity, and it holds just 6% of the video conferencing market share. However, it’s still used by many businesses worldwide.
As for the number of registered users, Skype received an influx of 150 million users in 2022, but that wasn’t enough to compete with other services.
However, from 2021 to 2022, 3.8 million fewer people used Skype, even if the number of registered users grew.
It’s worth mentioning that after the acquisition from Microsoft, Skype doubled its users from 760 million to 1.95 million.
Regarding revenue, the company’s annual income fell from $722 million in 2013 to $184.3 million in 2022.
The world is full of debates and opinions on many different subjects. And the operating system most businesses use is one of those.
There’s no denying that certain operating systems are more popular than others. Windows has always been the dominant OS in business, but it’s not the only option.
In addition, businesses are not the same, and each has its unique way of doing things. For instance, just on the surface:
Windows – Windows is an established operating system with a rich ecosystem of applications and services.
MacOS – MacOS is another popular option among businesses because it offers more stability.
Linux is another popular option because it’s free and open-source software.
If you were about to start and run a business and had to choose any operating system software you wanted, what would you choose? If you’re confused, we unpack these OSes so that you’ll have a firm decision by the end of this article.
What factors influence the selection of a business OS?
Just like we said above, each business is unique, making the answer to this question a bit complicated. Each OS has its pros but don’t forget that the cons are always lurking.
Since you can’t avoid the disadvantages, you need to pick one that favors your business and find a way around the cons.
Before you pick an OS, you need to consider several factors. The most important ones are:
1. Ease of use
The easier an operating system is to use, the more likely people will be able to perform their jobs and get things done without needing help from someone else. This means less time will be spent training and troubleshooting problems.
However, there are some general guidelines for determining how easy an operating system will be to work with.
For example, if you plan on using the same computer for several years, you should probably go for an OS with a user interface (UI) that doesn’t change too often over time.
2. Cost
The cost of the OS you select for your business is a major factor when choosing which one to use. Each OS has its own licensing model, so it’s important to understand how much it will cost your company to use each one.
The cost of using a particular operating system will vary from business to business, depending on what software you use, how many employees you have, and how long you plan to use the OS.
For example, if you’re using cloud-based applications that require little or no infrastructure investment, then costs may be minimal. On the other hand, if you’re using an in-house application that requires costly hardware upgrades and maintenance contracts, then costs could be high.
3. Reliability
This is one of the most important factors to consider when choosing an OS for your business. How stable is the platform, and how often does it crash? Does it have any bugs or security flaws? An OS that crashes frequently is unsuitable for business use.
In addition, the technical support offered by the software developer should be adequate enough to meet users’ needs and solve all problems related to the use of the software. A reliable OS will provide consistent performance and minimal downtime, keeping productivity high and costs low.
The operating system must be compatible with the hardware you intend to use in your business. For example, if you have a new computer and want to install Windows 11, it will not work properly if it doesn’t meet the system requirements.
This is because Windows 11 is only compatible with certain types of hardware. And while other older versions of Windows can be installed on the PC, they may not meet the needs of your business adequately because of the advanced technology trends.
6. Business needs
You need to clearly understand the goals you want to achieve with your business to choose the right operating system.
Some enterprises have specific requirements that will determine the type of OS you should use. For example, if you want to deploy an application in a multi-tenant environment, you may need to select a platform that supports virtualization.
If there are no specific business needs, it is better to use open-source software since it is free and easy to use.
7. The size of your company
The size of your company will have a large influence on which OS you should use. For example, if you’re a small startup and don’t have much money to invest in software licenses, Linux might be the way to go.
A small company might also choose an open-source operating system because it can be customized to meet specific needs.
However, if the size of your company is growing, you may want to consider multiple devices and systems. This way, multiple employees can access information from different locations at once.
8. Upgrade costs
The cost of upgrading or updating the software once you’ve purchased and installed it is something you need to consider when choosing an OS for your business.
As new versions of an OS are released, your software vendors may require you to upgrade to continue using their products.
This can be especially problematic if your company uses older software versions because upgrading can be costly or impossible. It’s also important to know how easy it is to upgrade software.
What are the top 3 operating systems for businesses?
A good operating system is the backbone of any business. It allows employees to get their work done; in some cases, it’s even more important than the hardware itself.
Now that you know what to look for when shopping for an OS, let’s look at what is available in the market.
Although there are over three OSes, only Windows, Linux, and MacOS are popularly known. So what makes these top three the creme de la creme?
1. Windows
Windows is the most popular operating system in the world. But what makes Windows so appealing to businesses? And why do they stick with it even as new technologies emerge?
These are some of the benefits:
Market share – Numbers, numbers, and more numbers. Any business will tell you how numbers are important and their influence on making sales. And that’s what Windows has. Its market share has been steadily growing since the release of its first version. More than 1 billion PCs run on Windows. With so many users, it’s easy to find support when you need it, whether trying to fix a problem or find new solutions to help your business grow.
Ease of use – Windows was designed with ease of use in mind so that anyone could pick up a computer and start working immediately. Some would argue Windows isn’t user-friendly, but it all boils down to personal choice. The operating system also comes built-in with tools that allow users to work without buying additional software or apps first. This is not only cost-saving but also saves time.
Compatibility – Windows has a long track record of compatibility with other devices, software, and websites. If you’re already using Windows in your business, it will be easy to integrate new devices and software into your network without worrying about compatibility issues.
Security – Security threats are always evolving and growing more sophisticated every day. Therefore, security needs to be at the forefront of every business owner’s mind when choosing an OS for their PCs. Microsoft has built into its software many layers of protection against viruses, malware, and other types of malicious content that can compromise an organization’s security. These include User Account Control (UAC), Windows Defender, and Credential Manager, among others.
Number of threats available for Windows during the past 16 years (AV Test)
2. Linux
While Windows still has an edge over other platforms when it comes to popularity, Linux offers several advantages over Microsoft’s OS. First, here’s its market share over the years.
Global market share held by Linux, from June 2016 to June 2021 (Statista)
Some of the benefits include:
Security – Linux has fewer security vulnerabilities than other operating systems like Windows or macOS. This is because there aren’t many viruses or malware developed specifically for this platform yet. As a result, cybercriminals aren’t targeting your business as much as they would if you were running Windows. And even if they did, they wouldn’t be able to easily gain access to your network through a security hole in your OS.
Cost-effective – Linux is free, so there’s no need to pay licensing fees or purchase expensive security software. If you’re running a large-scale business and have to pay for several licenses, you can see how much money you’d have to part with to keep the lights on.
Stability – Linux is extremely stable compared with other operating systems like Windows and macOS. This is because it runs on fewer resources than other operating systems. It, therefore, makes it less prone to crashes or hangs.
Flexibility – Linux is highly customizable and has access to thousands of different applications. This means it can be used in various industries and business models. All this can be done without having to change the core functionality of the OS itself.
Open source – Open source software is software whose source code is available to the general public for viewing, modification, or enhancement. This means that any developer can look at the code, fix bugs and add new features when necessary. All this can be done without paying royalties or license fees like with Windows or macOS.
Apple’s macOS has been making steady inroads into business over the past few years. And while it still trails far behind Windows in terms of market share, it has a solid fanbase that appreciates its features.
Here’s why it’s a top choice for businesses.
High-performance – Macs are built from top-quality parts designed to last longer than cheaper PCs. They also run more smoothly than Windows computers, which can slow down over time because of viruses and other issues affecting their performance. This means your employees can get their work done more quickly and efficiently when using Macs.
Security and privacy – MacOS has always been known as the most secure operating system available. The combination of the Unix architecture, sandboxing, and file encryption makes it difficult for hackers to access your data if they do manage to breach your security systems.
User-friendly – The Mac operating system is incredibly user-friendly, so even novice computer users can get up and running quickly. You don’t have to spend hours learning how to use new software programs or how to navigate through different menus and icons. This makes it easier for everyone in an organization, from executives down to entry-level employees, to use the OS.
Reliability – A computer is only as good as its operating system. If an OS crashes or freezes, it can cause many problems for businesses. From lost productivity to data loss to downtime and expensive repairs. Apple’s macOS has a history of being one of the most reliable operating systems. That means you’ll have fewer headaches, less downtime, and less worry about your network crashing at the worst possible time.
What is the best operating system for a small business?
While we’ve touched on the three most popular OSes and why most businesses choose them, we haven’t answered which is the best for you.
Unfortunately, this is a decision you have to make on your own. The good thing is now it doesn’t have to be hard because you know what to look for based on your business’s needs.
Below, we’ve come up with a comparison table to help you assess the risk level of running each OS.
User-friendliness
Cost
Security
Reliability
Compatibility
Windows
High
High
Low
High
High
macOS
Medium
High
High
Medium
Low
Linux
Medium
Low
Medium
Low
Medium
To break it down further, the score per OS is based on how easy it is to install apps, perform backups, and have compatibility with other hardware and software, among others.
Let’s take the user-friendliness performance metric, for instance. Installing Windows is relatively easy compared to the other two. Some devices even come pre-installed with Windows making it easier to use.
However, Linux requires downloading the software and then load into a USB stick, among other actions you need to perform. Such actions make it unsuitable for a business that does not have enough training resources.
Still, the market is rapidly changing, and many businesses are choosing to use a mix of operating systems because it gives them more flexibility and increases their options for software development.
If you’d like a more in-depth analysis of the operating systems, we have a couple you can check out, such as:
We’d love to hear your feedback on what operating system your company uses. Let us know the size of your business, your choice of OS, and why you went for it in the comment section below.
There are hundreds of folders on any active PC. And after an extended period, users may run out of storage and need to clear unnecessary files and folders. And this is when many notice the WpSystem folder.
The WpSystem folder takes up as much as 150-180 GBs of storage space in some cases, thus concerning users. And given that one needs special permissions to access the folder, it further complicates things. So, let’s find out all about it!
What is the WP system folder?
The WpSystem folder stores relevant files for applications downloaded from the Microsoft Store. But the folder is only created when you choose a drive other than C: as the download path.
Besides this, you will also find the WUDownloadCache and Program Files folders created for the same purpose.
Remember, the folder is not created by all applications downloaded from the Microsoft Store. It’s just a few, namely, VLC, Halo 5, and Halo 5: Forge, amongst others. So, if you find the WpSystem folder, these or one of the other apps are probably installed on the PC.
Where is the WpSystem folder located?
The WpSystem folder could be located on any drive other than C:, even external hard drives or USB sticks, if these are configured as the download path for Microsoft Store apps.
And the folder size generally depends on the number of apps storing data in it. The more applications, the larger the folder size.
But is it safe to delete the WpSystem folder? Let’s find out!
Should I delete the WpSystem folder?
You shouldn’t delete the WpSystem folder if it already exists on the PC and an application has files stored in it. Doing so will cause the application to crash or stop responding.
Many users who reportedly deleted the folder faced significant issues and had to, in the end, reinstall the affected apps from scratch. This is especially true for applications that don’t have a built-in file repair option to recover the deleted ones.
The only case in which you can delete the folder is after uninstalling the applications storing data in it or if their effective functioning is no longer critical.
Besides, if you were thinking of moving the WpSystem folder, the related applications would still crash if the folder is transferred to another drive.
How do I delete the WpSystem folder?
Tip
When trying to delete the WpSystem folder, you may encounter an error. This is due to the missing permissions. So, log in with an administrator account and try deleting it. If that doesn’t work, try the following steps while being signed in as an administrator.
Navigate to the required directory, right-click on the WpSystem folder, and select Properties.
Go to the Security tab, and click on Advanced.
Click on Change.
Enter the user name for the active profile in the text field, click on Check Names, and then on OK.
Tick the checkboxes for Replace owner on subcontainers and objects and Replace all child object permission entries with inheritable permission entries from this object, then click OK to save the changes.
Click Yes in the confirmation prompt.
In the Security properties, click on Edit.
Now, click on Add.
Again, enter the active profile name, click on Check Names, and then on OK.
Select the user profile you just added, tick the checkbox for Full Control, and click OK to save the changes.
That’s it! You can now easily delete the WpSystem folder without getting any other errors or popups. And if you are still on a mission to free up disk space, read about Disk Cleanup, the highly effective built-in utility in Windows.
GitHub is a popular platform amongst web developers. It allows them to host files, and store and manage their code seamlessly while also taking help from others on the platform. But for many, GitHub Desktop is not opening.
The problem has been faced by users for a long time, with reports from as long ago as 2018 available on the web. So, it’s not always the program to blame, but it could just as well be an issue at the user’s end. Let’s find out all about it!
Why is GitHub Desktop not opening?
Here are a few reasons GitHub desktop is not opening in Windows 11 and other iterations of the OS:
Bug in the installed version: Oftentimes, it’s a bug in the installed version of the app, and updating GitHub Desktop should get things running.
Issues with the app installation: Several users found that the initial GitHub installation didn’t go through properly, and simply reinstalling it did the trick.
Compatibility issues: When GitHub is not launching, it could be the compatibility to blame, and running the app in an environment designed for a previous iteration should help.
Corrupt app cache: A common reason apps won’t open in Windows is issues with the app cache, particularly its corrupt state. And this part is difficult to figure out.
What can I do if GitHub Desktop is not opening?
1. Open GitHub Desktop from Terminal
Press Windows + S to open Search, type Windows Terminal in the text field, and click on the relevant search result.
Type the following command and hit Enter to launch GitHub Desktop:github
When the conventional method doesn’t work and GitHub Desktop is not launching, you can open GitHub Desktop from Terminal within seconds. Remember, this is just a workaround and not an actual fix.
2. Update GitHub Desktop
Tip
If you can open the app only once after restarting the PC, make sure to try this solution before terminating it.
Launch the app, click on the Help menu, and then select About GitHub Desktop.
Click on Check for Updates, and wait for GitHub Desktop to download the latest version, if any is available.
A few users managed to get things up and running when GitHub Desktop was not opening by simply updating the app.
Right-click on the app launcher, and choose Properties.
Navigate to the Compatibility tab, tick the Run this app in compatibility mode for checkbox, and select a previous iteration of Windows from the dropdown menu.
Now, check the Run this program as an administrator, and click OK to save the changes.
If the problem lies with missing permissions or compatibility, you could fix things by modifying the launch parameters in no time.
4. Clear the app cache
Restart the computer.
Press Windows + E to open File Explorer, paste the following path in the address bar, and hit Enter:%LocalAppData%\GitHubDesktop
Now, press Ctrl + A to select all the files, and hit Delete to remove them.
Once done, relaunch GitHub Desktop.
A common solution recommended on all dedicated forums when GitHub Desktop is not opening is to delete the app cache. This will clear any inconsistencies or file corruption that’s triggering the issue.
5. Remove conflicting apps
Press Windows + I to open Settings, select Apps from the navigation pane, and click on Installed apps.
Click on the ellipsis next to the app you believe is causing the error, and then select Uninstall.
Again, click Uninstall in the confirmation prompt.
Often a third-party app conflicts with GitHub Desktop and prevents it from launching. A quick solution here is to remove that program. We often recommend using a dedicated uninstaller tool to get rid of any leftover files and registry entries created by the program.
6. Reinstall GitHub Desktop
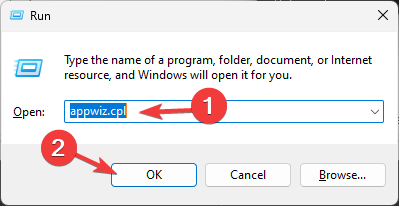
Press Windows + R to open Run, type appwiz.cpl in the text field, and hit Enter.
Select GitHub Desktop from the list of programs, and click Uninstall.
Follow the on-screen instructions to complete the process.
Now, navigate the following path and clear the files here:%LocalAppData%\GitHubDesktop
Once done, restart the computer.
Next, head to the official website and download the latest version of GitHub Desktop.
Run the setup and complete the installation.
When the other solutions fail to work, and GitHub Desktop is still not opening, reinstalling the software is often the best way to go. This will eliminate any installation issues and get you a fresh copy of all the critical files.
7. Try the beta version of GitHub
The last solution is to use the Beta version of GitHub Desktop. This build gets features and updates before the regular one, and though slightly unstable, it should receive the much-needed bug patch sooner.
So, download GitHub Desktop Beta, and install the software. But we recommend not sticking with it for long and reverting back to the regular version as soon as things get fixed.
That’s all! GitHub Desktop should now be opening on your PC and working seamlessly. Before you leave, do check some quick tips and tricks to speed up Windows.
You can also:
Restart the computer and verify whether GitHub Desktop is still not opening.
When you look through the Task Manager, there are several background processes running, some consuming minimal resources while others hogging an enormous amount. And it’s the latter that troubles users. The moe.exe process is one!
The name itself sheds little light on what the process is all about or its functions. But given that moe.exe uses high CPU usage in many cases, you must understand the process. Keep reading to find out!
What is moe.exe?
The moe.exe (Mesh Operating Environment) is a core process and a part of Windows Live Sync, a discontinued file synchronization tool.
Microsoft earlier had Windows Live Sync to allow users to sync files and folders between multiple PCs and online storage in OneDrive, previously known as SkyDrive.
So, while users on the recent iterations of Windows shouldn’t face issues, those still on Windows XP might find moe.exe running on the PC. But if you have somehow managed to install Windows Essentials, the process could be listed in the Task Manager.
The process is usually stored in the following path:C:\Windows\System32
Also, in ideal practice, moe.exe shouldn’t consume significant resources, but problems arise when the system files are corrupt, the PC is infected with malware, or far too much data is to be synced, putting a lot of load on the process.
Should I remove moe.exe?
You shouldn’t disable or remove moe.exe if you heavily rely on Windows Live Sync. If you don’t, and the process is still running, there’s no harm.
But before eliminating the process, make sure to disable it in the Task Manager, verify its effects, and if all works out alright, then proceed with the complete removal.
How do I remove moe.exe?
1. Terminate the process
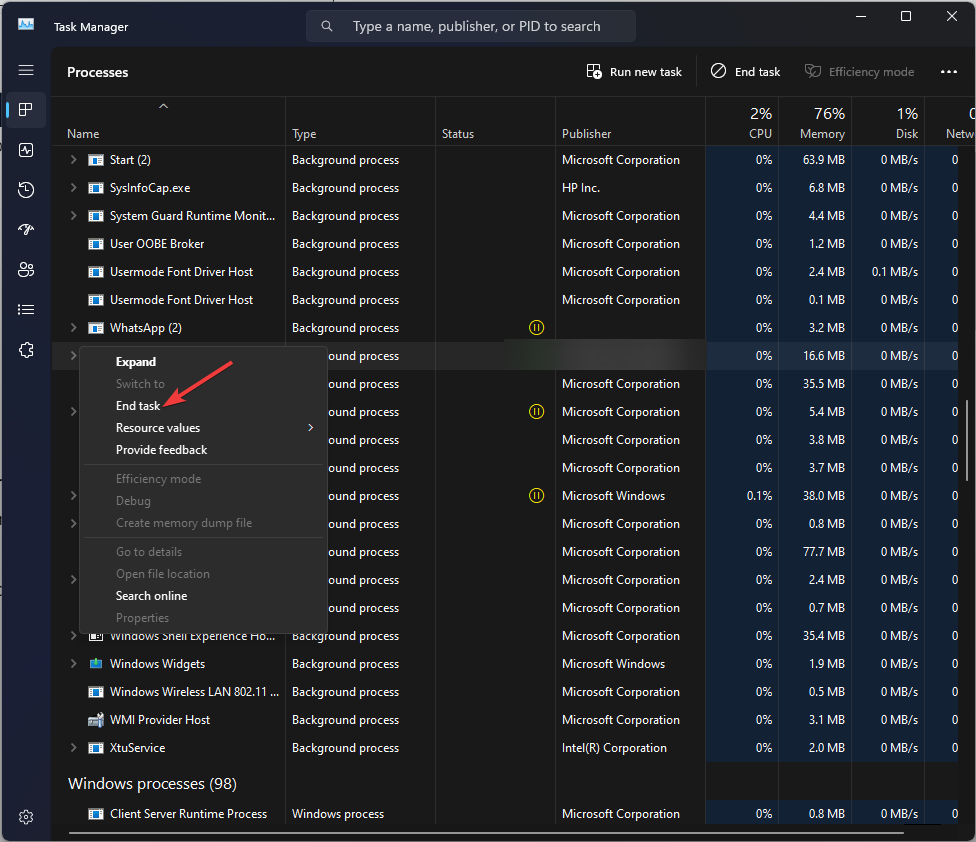
Press Ctrl + Shift + Esc to open the Task Manager, and head to the Details tab.
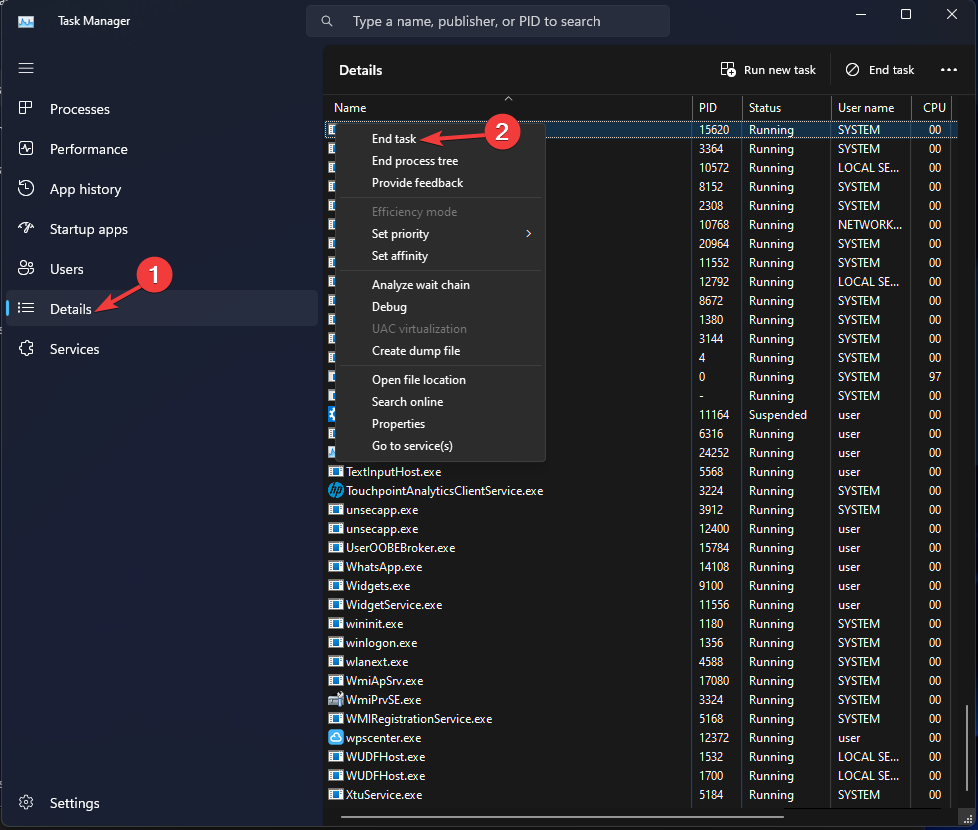
Locate and select moe.exe, and then click on End task.
When faced with temporary high CPU usage and moe.exe runs fine otherwise, a quick fix is to terminate the process via the Task Manager.
2. Disable the startup app/service
Open the Task Manager, and head to the Startup tab.
Now, select Windows Live Devices from the list of programs, and click Disable.
After disabling the program, restart the computer for the changes to come into effect.
When you terminate a process, it might automatically start running the next time you restart the PC if linked to a startup app. So, you will have to disable the startup app, in this case, Windows Live Devices, from the Task Manager or any other feasible method.
Press Windows + R to open Run, type appwiz.cpl in the text field, and hit Enter.
Select Windows Essentials from the list of programs, and click Uninstall.
Click on Remove one or more Windows Essentials programs.
Now, tick the checkbox for Sync, and again click on Uninstall to proceed.
Once done, restart the computer for the changes to come into effect.
Though we don’t recommend removing Sync from PCs that utilize the software, issues with moe.exe often force users to do that. So, uninstalling the program should always be used as a last resort. And by now, all problems with the process should be solved.
Before you leave, check some quick tips to make Windows run faster and get superior performance.
For any queries or to share more solutions with us to get rid of moe.exe, drop a comment below.
There are several controversies about whether the miner.exe process on the computer is safe and what it does. Hence, this article will take you through the details about the executable and what it does. Also, we’ll discuss how to remove it if it’s malicious.
Miner.exe is the executable file for mining programs designed to run on a computer or network of computers to perform the mining process.
The following are the activities the miner.exe executable performs on the computer:
Performs cryptocurrency mining by utilizing the computer’s CPU or GPU power.
Solves complex mathematical problems to validate and secure transactions on a blockchain network.
Earns rewards in the form of cryptocurrency for successful mining.
It can be used as part of legitimate mining software installed intentionally by users.
It may be used by cybercriminals for cryptojacking.
Should I uninstall miner.exe?
In most cases, yes. These are some of the reasons why you should remove it:
It will utilize your CPU/GPU to mine cryptocurrency.
It was installed by a third party on your PC without your consent.
By keeping the software running, you’ll generate revenue for hackers.
You should only keep this file if you’ve configured it to mine cryptocurrency on your PC. In all other cases, it should be removed as soon as possible.
How can I uninstall or remove miner.exe?
1. End task and delete the process
Right-click the Windows button and click on Task Manager from the list menu.
Navigate to the Processes or Details tab. Click the miner.exe from the list, right-click on it, then select End Task from the context menu.
Click OK to confirm that you want to end the task for the program.
Find the miner.exe in the Task Manager. Right-click on it and click on Open File Location from the drop-down menu.
In the folder, right-click on the miner.exe file and delete it.
Restart your PC and check if it is still running.
These steps will stop the miner.exe process on your computer and prevent it from establishing any more threats or running any unwanted programs.
You need to have the best AI image upscale tool in order to get the desired results and upscale blurry images.
In this guide, we will share with you a list of some of the best ai image upscale tools and websites, that you can use and improve the image quality by even up to 800%. Let us check out the tools.
Is there a free AI upscaler?
Yes, there are some free AI image upscaler that you will find on the internet. Some of the best ones are listed in the below list of the best AI image upscale tools.
While some tools offer a free trial, they are either limited in terms of upscaling options, while some require you to login or give you limited credits to download the images.
Moreover, some of the other free AI image upscalers put in their watermarks or produce low-quality output.
HitPaw is one of the best AI image upscaler tools that you can use to bring clarity to those blurry images of yours.
Not only you can unblur the images but you can also upscale the images without any quality losses. The HitPaw also gives you access to photo enhancement tools that can help you further tweak the images.
You can also denoise the images, remove blemishes, soften wrinkles, and make cartoon images look clearer. HitPaw also lets you colorize the black and white images.
Here are some of the best features of the HitPaw AI image upscale tool:
You advanced AI to denoise the images.
Lets you upscale your images without quality loss.
2. Deep Image AI – This lets you easily upscale your images
Another one of the popular tools in our best AI image upscale tools list is the Deep Image AI. The best feature of this website is that it lets you upscale images in bulk. This reduces your waiting time.
The output of Deep Image AI is also outstanding and the blur and noise on your image will go away in an instant.
You should note that the image upscale size is limited to 5000 x 5000 pixels, or 25 megapixels, and is applied to both registered and unregistered users.
Here are the best features of Deep Image AI:
The website is easy to navigate and use
The image output quality is great
Lets you upscale images in bulk
Advanced AI algorithm that helps in producing natural-looking images
You can use the VanceAI image upscale website or software to quickly upscale your image by 800% without any quality loss.
The good thing about this website is that the images that upload for upscaling are deleted within 24 hours. There are other scales to enlarge such as 2x, 4x, 6x, and 8x.
The process is also simple, and all you need to do is upload an image, start the process, and get the output. VanceAI offers image upscaler, image enhancer, image sharpness and other tools.
Some of the key features of VanceAI are:
Upscale in different scales without losing quality
Deletes your content after 24 hours
Reduces noise and blurriness in your images with advanced AI
Automatically compresses images that are resized above 2000×2000
Freepik offers a powerful AI image upscaler among its suite of AI tools. In just a few clicks, you can increase the resolution between 2x and 16x, with clear and crisp results.
Unlike many upscalers, it allows you to tweak the settings, even down to the AI model itself. Classic is more straightforward, while the Magnific model is a bolder and more creative choice, enhancing textures, colors, lighting, and details.
Sliders let you manually adjust the level of creativity, HDR, and fractality. The latter results in more intricate patterns and textures, which can be especially useful for artistic images, textures, or backgrounds.
Just like other tools in our best AI image upscale tools, Let’s Enhance also makes use of advanced AI algorithms to upscale images up to 4K and beyond.
Using AI, this tool can help enhance colors, restore lost details, remove noise and blur, etc. You can use this tool for free where you need to drop your image and the images will be upscaled.
Using the Let’s Enhance website, you can resize your images, and upscale anything from old images to digital art, without losing any quality.
Here are the key highlights of Let’s Enhance:
Improves colors and other details of your images
The website is easy to use and offers its services for free
6. Upscale.media – Freely upscale and enhance your images
One of the best Ai image upscale tools in the list is Upscale.media. This lets you enhance and upscale your images for free.
It lets you upscale your images to up to 4x without losing the quality. Upscale.media can also remove the JPEG artifacts and preserve the details, bringing them closer to the original image when you edit and save JPEG images multiple times.
This website also removes compression to smooth the edges and make the images appear noise-free and of high quality. You can also download the Android and iOS apps.
Some of the best features of Upscale are:
It offers its services for free.
Lets you remove JPEG artifacts.
Upscales images up to 4x without degrading the quality.
Another tool that lets you upscale images for free is Icons8. Although it offers a free AI image upscaler, you will get a watermark on the output image.
The process of upscaling is simple and is driven by advanced AI algorithms. The upscaled output images are of high quality and maintain the details of the original file.
You can upload the images to up to 4x and download the images for free. However, you can remove the watermark by paying a subscription fee.
BigJPG uses the Deep Convolutional Neural Networks algorithm in order to enhance or upscale your images. This helps produce better results with low noise.
You can even upscale illustrations and anime pictures as well. It is known to be one of the best AI image upscale tools especially for anime pictures.
It retains the colors, gives you all the details, and produces quality output without data loss. It limits the upscale size to 3000×3000. You can also perform bulk image upscaling.
Some of the key features of BigJPG are:
Uses neural network to produce results in better detail
If you did not get desired upscaling results with Photoshop, then you should check out the Pixbim Enlarge AI. This tool uses machine learning to fill in the colors, and details on your image when you upscale it.
It can automatically fill in the pixels through intelligent analysis and accurate prediction to give you the desired output.
Using the Pixbim Enlarge AI, you can upscale images up to 4x. However, you need to do a one-time payment to access all the features. There is a free trial version as well.
That is it from us in this guide. We have a guide that lists some of the best AI websites that you should check out apart from ChatGPT, which everyone knows about.
Many users complain about seeing the SquirrelTemp folder on their computer when surfing through File Explorer. It makes them anxious about whether it is malicious or a threat to the computer.
However, this guide will discuss SquirrelTemp and how to delete it safely, so let’s get started.
What is SquirrelTemp?
SquirrelTemp is a folder in Windows that holds temporary files for apps you install using Squirrel. Squirrel serves as a versatile framework associated with Microsoft Teams, Slack, Brave Browser, and Atom applications.
Where is the SquirrelTemp folder?
After successfully installing the Teams application, the SquirrelTemp folder can be found in the specified location: %LocalAppData%\Microsoft\Teams
To play games like Grand Theft Auto and Red Dead Redemption on your PC, you will need the Rockstar Games launcher. Unfortunately, the Rockstar launcher hasn’t been functioning properly recently.
If the Rockstar Games Launcher is not working, you can try several troubleshooting steps to resolve the problem.
Why is my Rockstar Game Launcher not working?
The Rockstar Games Launcher is a desktop application developed by Rockstar Games that serves as a central hub for managing and launching Rockstar Games titles on PC.
It offers features like a game library, automatic updates, cloud saves, integration with the Rockstar Games Social Club, and exclusive offers.
The Rockstar Games Launcher might encounter issues due to various reasons. Here are a few possibilities:
Server or maintenance problems: Rockstar Games may be experiencing server problems or conducting system maintenance.
Internet connectivity issues: If your Internet is slow, keeps cutting off, or has problems, it can make the launcher not work properly.
Firewall or antivirus software interference: Sometimes, firewall or antivirus programs can block the Rockstar Games Launcher from accessing the internet or specific system resources.
Compatibility problems: The launcher may have compatibility problems with your operating system or other software on your computer.
Corrupted launcher files: It’s possible that the installation files or data related to the launcher have become corrupted.
Conflicts with third-party software: Certain third-party software or background processes running on your computer can interfere with the launcher.
How do I fix Rockstar Game Launcher not working?
Check Rockstar Games Servers: Visit the Rockstar Games Service Status page to check if the server is down or undergoing maintenance. If the service is not working, just wait until it becomes operational again.
Restart your computer: Sometimes, all it takes is a quick restart to fix temporary software issues. Close the Rockstar Games Launcher and any related game processes, then restart your computer. Afterward, try launching the launcher again.
Check your Internet connection: Make sure you have a stable Internet connection. The launcher relies on a solid connection to work correctly. Try restarting your modem or router, or connecting to a different network to see if that resolves the issue.
1. Run the launcher in compatibility mode with administrator privileges
Right-click on the Rockstar Games Launcher shortcut icon on your desktop and select Properties.
Go to the Compatibility tab in the Properties window.
Then, check the option Run this program in compatibility mode for: and Run this program as an administrator.
After that, click Apply and then OK.
Once you have made the changes, open the launcher, and it should load without any issues.
2. Update Windows
Press Windows + I to open Windows Settings and go to Windows Update.
Then, click the Check for updates button to download and install any pending updates.
After installing the updates, restart your computer and check if the Rockstar Launcher is still not working.
3. Update your display drivers
Press the Windows + X keys and select Device Manager to open it.
Next, expand the Display adapters section and find your graphics card.
Right-click on the video card and select Update driver.
Then, select Search automatically for drivers.
Follow the instructions to complete the update process.
If it doesn’t work, you can manually update the graphics driver for NVIDIA and AMD by visiting their official websites.
4. Flush your DNS cache
Press the Windows key, type cmd in the search bar, and select Run as an administrator.
Enter the following command and press Enter to flush the DNS cache.ipconfig /flushdns
Once the Command Prompt successfully flushes the DNS Resolver Cache, restart your PC.
Press Windows + R keys to type firewall.cpl in the box and then press Enter.
Click on the Turn Windows Defender Firewall on or off hyperlink from the left sidebar.
Choose the Turn off Windows Defender Firewall (not recommended) options under Public and Private network settings, then click OK.
Also, if you have antivirus software on your computer, make sure to disable or close the application.
6. Clear Launcher and Social Club cache
Open File Explorer and go to the Documents folder.
Find the folder named Rockstar Games and open it.
Then select the Launcher and Social Club folders, and delete them.
After that, navigate to the following folder, but make sure to Username with your username.C:\Users\Username\AppData\Local\Rockstar Games\Launcher
Select all its content and delete them.
The launcher may accumulate temporary files or cache data that can cause issues. Clearing the cache will remove the broken temporary files and fix the Rockstar Launcher not working issue.
Besides, when you relaunch the app, it will automatically regenerate these folders and files.
7. Reinstall the Rockstar Games Launcher and Social Club applications
Press Windows + I to open Windows Settings app.
Go to Apps and select Installed apps on the right pane.
From the list of programs, find the Rockstar Games Launcher app, and click the three dots next to it. Then, select Uninstall.
Click Uninstall again to remove the app.
Likewise, uninstall the Rockstar Games Social Club too.
After uninstalling both apps, restart your computer.
Then, download and reinstall the Rockstar Games Launcher app again from the official website.
8. Clean Boot your system
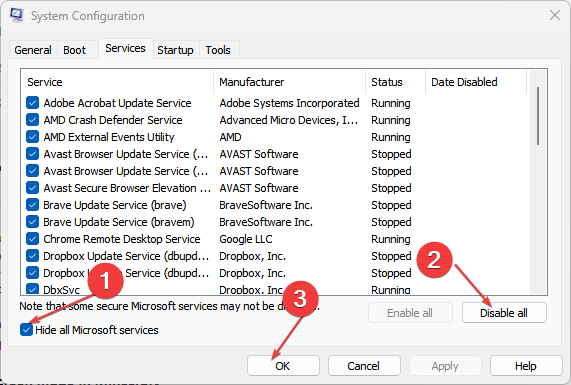
Press the Windows + R keys together, type msconfig in the Run box, and click OK to launch the System Configuration console.
Go to the Services tab and check the box that says Hide all Microsoft services to prevent disabling essential system processes.
Then, click on the Disable all button to disable all the non-Microsoft services.
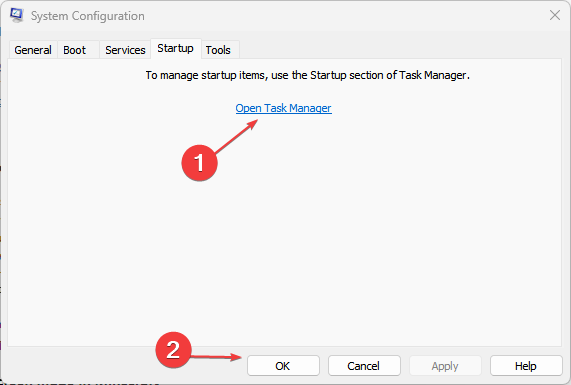
Next, navigate to the Startup tab and click on the Open Task Manager link.
Go to the Startup apps tab in the Task Manager window.
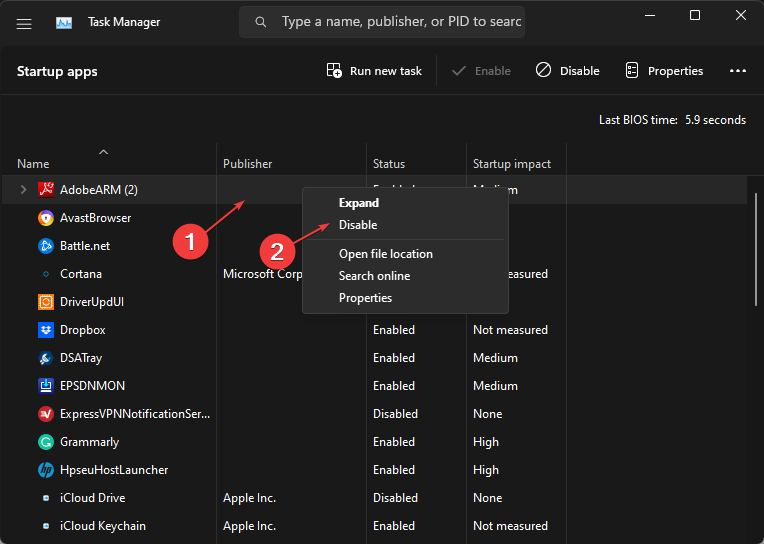
Disable all the startup items by right-clicking on each item and selecting Disable.
Close the Task Manager window.
Go back to the System Configuration window and click Apply, then the OK button.
You will be prompted to restart your computer. Click on the Restart button to proceed.
After your computer restarts, it will be in a clean boot state, with only essential Microsoft services running.
Check whether the issue is fixed.
If the problem is resolved, you can gradually enable the disabled services and startup items a few at a time by checking them, allowing you to identify the specific cause.
Click on Apply and OK and restart your computer.
To fully restore your computer to its normal startup state, click the Enable all button in the Services tab.
Then, go to the Task Manager and enable the desired startup items.
Click on Apply and OK and reboot your computer.
A clean boot can help diagnose and troubleshoot software conflicts or issues on your computer.
GTA V is the most popular Rockstar game, yet it is not without errors and bugs. Also, find out what to do when you are experiencing crashes in GTA V on your Windows 11 computer.
If you managed to fix the issue with another solution, please let us know in the comments.
Several executable files run on the computer to help it use programs and utilities and aid proper communication with the client. However, users have reported a mdm.exe process running on their computer, which they have no idea about.
This guide will discuss mdm.exe and whether to uninstall it. Alternatively, you may be interested in our article on why exe files are not opening on your PC and some fixes to resolve the problem.
What is MDM exe?
The mdm.exe file is associated with Microsoft’s Windows operating system and stands for Machine Debug Manager. It is a legitimate system process related to debugging programs on Windows.
Furthermore, here are the functions of mdm.exe, the Machine Debug Manager, in Windows PCs:
It manages and monitors the debugging process of applications on Windows.
Assists in troubleshooting and resolving software issues during development.
Provides debugging support for developers by allowing them to examine and analyze application code during runtime.
Facilitates detecting and correcting programming errors, such as bugs and crashes.
Helps in identifying and resolving issues related to software compatibility and integration.
Acts as a mediator between the debugging tools and the applications being debugged.
Runs as a background process, automatically starting when needed and closing when debugging is complete.
Where is MDM exe located?
On the Windows operating system, the legitimate mdm.exe file resides in these directories C:\Windows\System32 or C:\Program Files\Common Files\Microsoft Shared
Therefore, it is crucial to ensure that the mdm.exe file is located in the legitimate system directories mentioned above to ensure its authenticity.
Should I uninstall mdm.exe?
Uninstalling mdm.exe could potentially cause issues with debugging apps and hinder the ability to diagnose and fix software problems. It is not recommended to uninstall system processes unless you have a specific reason.
Moreover, you can verify if the mdm.exe process running on your system is legitimate by following these steps:
Check if a digital signature associated with the file is from Microsoft.
Run an antivirus scan to detect any issues or flag the mdm.exe file if it is a threat.
After observing the following verification process, you should conclude whether the mdm.exe process should be uninstalled.
How do I uninstall mdm.exe?
1. End task and delete mdm.exe from File Explorer
Right-click the Windows button and click on Task Manager from the list menu.
Navigate to the Processes or Details tab. Click the mdm.exe from the list, right-click on it, then select End Task from the context menu.
Click OK to confirm that you want to end the task for the program.
Right-click on mdm.exe and click on Open File Location from the drop-down menu.
In the folder, right-click on the mdm.exe file and select Delete from the context menu.
Restart your PC and check if the executable mdm.exe process still runs on your computer.
These steps will stop the mdm.exe process on your PC and delete the executable file from File Explorer. Check our article on what to do if the Task Manager not responding or opening on Windows 11.
2. Uninstall the Machine Debug Manager
Press the Windows + R key to open the Run dialog box, type appwiz.cpl, and press Enter.
In the Programs and Features window, locate Machine Debug Manager or any related entry associated with mdm.exe. Select the entry and click on the Uninstall button.
Follow the on-screen prompts to complete the uninstallation process.
Once the uninstallation process is complete, restart your computer to ensure the changes take effect.
Uninstalling associated programs will remove the mdm.exe process on your computer. Likewise, you can read about the best uninstaller software for Windows.
One of the third-party processes that run in the background on Windows PC is osqueryd.exe. It is important to the operation of its parent software and will always run if it is active.
But it remains one of the lesser-seen processes, and users wonder what it does. If you also need verified information about this process, this guide will shed more light on it.
What is osqueryd.exe?
The osqueryd.exe process is also known as osquery daemon. It is part of the AlienVault Agent or AlienVault software.
This process is known to be safe and reliable, as it is digitally signed. However, you can sometimes encounter issues with this process, just like every other process.
This is because malware can disguise itself as this process or the request of its parent software is high. Irrespective of the form the issue takes, it can be fixed, and we will show you how.
How can I fix issues related to osqueryd.exe?
1. End the process
Press the Windows key + X and select Task Manager.
Right-click the osqueryd.exe process or AlienVault Agent and select End task.
Finally, restart your device.
If you are experiencing high CPU usage with the osqueryd.exe process, you can fix it by forcing it to stop in Task Manager. With this, the process will restart and clear the potential causes of the issue.
2. Scan for malware
Press the Windows key, type virus, and click Virus & threat protection.
Click the Scan options option on the next page.
Finally, select your preferred scan option and click the Scan now button.
There is no limit to the severity of issues that can occur on your PC if viruses attack it. So, if you are encountering issues with osqueryd.exe, it might be one of the effects of malware on your PC.
In this case, you need to perform a full system scan. If using Microsoft Defender does not yield the expected result, we recommend a dedicated antivirus in TotalAV.
This excellent software takes a no-nonsense stand against malware and eliminates even the most stubborn ones before they can cause issues.
Press the Windows key + R, type control, and click OK.
Click the Uninstall a program option under Programs.
Now, right-click the AlienVault Agent or osqueryd.exe and select Uninstall.
Finally, follow the onscreen instructions to complete the process.
At times, issues with osqueryd.exe might not be easily fixable. This is especially true if the process is crashing your PC. What you need to do here is to uninstall the parent software completely.
After uninstalling the software, ensure to remove any of its remnants in your registry. Lastly, if you want to use the software later, ensure you download it from the official website.
4. Perform a system restore
Press the Windows key + R, type rstrui.exe, and press Enter.
Click Next on the new page.
Now, select your preferred restore point and click the Next button.
Finally, click Finish and follow the onscreen instructions to complete the process.
If push comes to shove and the solutions in this guide cannot fix the issue with osqueryd.exe, you have no option to perform a system restore. This is your best bet to reverse the changes made to your PC that are causing the problem.
With this, we can now conclude this guide on the osqueryd.exe process. We have explained what the process is all about and how to fix its related issues.
So, you should now be able to take advantage of the process. Similarly, if you need detailed information on the nxlog.exe process, check out our detailed guide.
Feel free to share your experience with the osqueryd.exe with us in the comments below.
Many users wonder if they can connect their AirPods, an Apple product, with their Windows computers. However, it is possible but requires a little workaround. So, this article will take you through the detailed steps for connecting your AirPods to Microsoft Surface.
Also, we have a comprehensive article about AirPods microphone not working on Mac and Windows 10/11. So, you can check it out if you encounter an issue.
Can you connect AirPods to a Microsoft laptop?
While AirPods are primarily intended for use with Apple devices, such as iPhones and iPads, you can still pair them with non-Apple products. So, you can connect AirPods to a Microsoft laptop, including Surface laptops.
Further, this is possible because AirPods use Bluetooth technology, which is supported by most modern laptops. However, the automatic pairing feature won’t be available for the PC unless it’s a Mac.
Many Windows users have reported issues and concerns related to the NWiz.exe process on their computers.
Due to these concerns, users are curious to know if the executable is safe or threatening to the PC. Hence, this article will discuss this process in detail.
Alternatively, you may be interested in our article on exe files not opening on Windows 11 and some ways to resolve the problem.
What is NWiz.exe used for?
NWiz.exe is an executable file associated with the NVIDIA nView Wizard and its drivers. It is part of the NVIDIA Control Panel application. Here’s what it does:
It provides a graphical interface for users to customize and adjust their NVIDIA graphics card settings.
Allows users to configure display resolution, refresh rate, and multiple monitor setups.
Provides access to 3D settings and configurations.
It runs in the background and allows the programs to function as expected.
What is nwiz.exe file path?
Since this file is associated with Nvidia, it should be located in one of the following directories:
C:\Program Files\NVIDIA Corporation\nView
C:\Program Files (x86)\NVIDIA Corporation\nView
Is NWiz.exe a virus?
No, this exe file is not a virus. It is a legitimate executable file associated with NVIDIA graphics cards and their drivers. If you suspect that it’s infected, you can check by doing the following:
Ensure NVIDIA Corporation appears as the digital signatory.
It’s located in the right installation directory.
If a process uses excessive system resources, it could indicate malware.
An antivirus scan will detect and identify malicious files that are using this file.
How do I remove NWiz.exe?
1. End the task
Right-click the Windows button and click on Task Manager from the list menu.
Go to the Processes or Details tab. Click the NWiz.exe from the list, right-click on it, and then select End Task from the drop-down menu.
Then, click OK to confirm that you want to end the task for the process.
Restart your PC and check if the executable is still running.
The above steps will stop the NWiz.exe process on your PC and prevent it from establishing any more threats. Check our article on what to do if the Task Manager is not responding or opening on Windows 11.
2. Remove the file via File Explorer
Go through steps 1 and 2 from the steps above.
Find the NWiz.exe in the Task Manager, right-click on it, and click on Open file location from the drop-down menu.
In the file location, right-click on the NWiz.exe file and click Delete.
Restart your PC.
Removing the NWiz.exe file in File Explorer will disable any malicious program using the executable on your computer and delete it.
There are many executable files on Windows PC, some of which are legitimate and others that are malicious and can damage the system. Unknown.exe is one of those potentially dangerous executable files you should look into. However, we’ll discuss what unknown.exe is and how to remove it.
Moreover, you may be interested in our article on why exe files are not opening and how to resolve the problem on your computer.
What is unknown.exe?
The name unknown.exe suggests that the file is unidentified or not recognized by the system, or rather is related to a program trying to disguise it. This is likely malware.
Here are the potential threats associated with this file:
Unauthorized infiltration and control of vulnerable systems.
Execution of malicious activities without the user’s knowledge or consent.
Downloading and running dangerous malware such as ransomware and crypto miners.
Compromising the integrity and security of the infected system.
Potential data breaches, loss, or theft of sensitive information.
Disruption of system functionality and stability.
The exploitation of system vulnerabilities for further cyber-attacks.
Potential harm to network infrastructure and connected devices.
Difficulty in detection and removal due to evasive techniques employed by the unknown.exe file.
Should I remove unknown.exe?
Yes, it is advised that you uninstall the unknown.exe executable from your computer as it doesn’t have a specific authority. Also, take this into consideration:
There’s no doubt to say this is malware and ultimately dangerous.
Surreptitiously infiltrate and assume command over susceptible systems.
The insidious executable possesses the capability to retrieve and execute highly perilous malware.
There’s no way to confirm its authenticity.
So, whenever you encounter this file on your device, ensure to remove it immediately. Further, you can read about the best antivirus software to protect your device from malware.
How can I remove unknown.exe?
Before anything else, try the following:
Run a full antivirus PC scan to flag all malicious files and remove them immediately.
Perform a clean install if the executable has already corrupted your PC files.
End task for and delete the file for the unknown process
Right-click the Start button and click on Task Manager from the list menu.
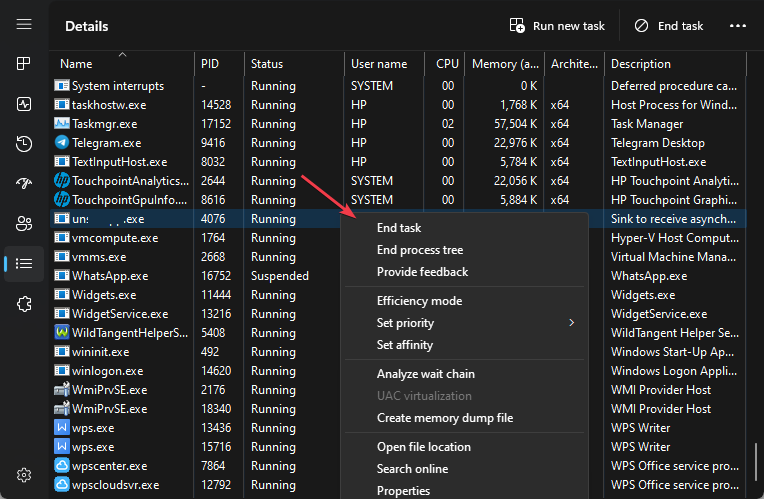
Navigate to the Processes or Details tab. Click the unknown.exe from the list, right-click on it, then select End Task from the drop-down menu.
Click OK to confirm that you want to end the task for the process.
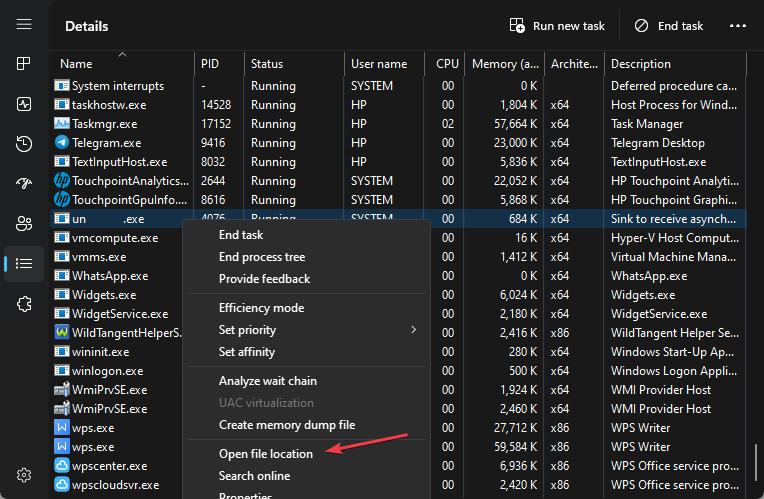
Right-click on the file again and click on Open file location from the drop-down menu.
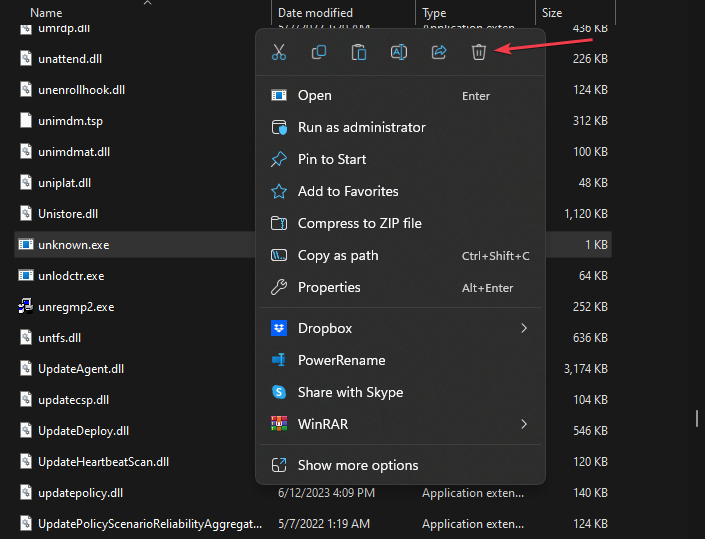
In the file location, right-click on the unknown.exe file and click on Delete.
Restart your computer and check if the unknown.exe executable is still running.
The above steps will stop the unknown.exe process on your PC and prevent it from establishing any more threats. Also, it renders the programs using it powerless as it relies on the executable to run.
Considering the .exe extension on the file name, you can denote that the vkise.exe file is an executable file responsible for a specific Windows program. However, it can cause security risks and several issues with the system.
This article will discuss what vkise.exe means and whether you should uninstall it. More so, we have a detailed guide on what to do if antivirus software is blocking .exe files on the PC.
What is vkise.exe?
The vkise.exe process is also known as Internet Security Essentials and is a part of the Comodo Internet Security Essentials program developed by Comodo Group.
Some of its features are:
Includes real-time scanning and detection of viruses, worms, Trojans, and other malware.
Provides a firewall that monitors and controls network traffic to prevent unauthorized access to your computer.
Offers protection while browsing the internet by blocking malicious websites and other online threats.
Includes a sandbox environment to run suspicious files or programs in an isolated and controlled environment.
Provides a secure shopping feature to protect your sensitive information.
Should I uninstall vkise.exe?
Yes and no. Uninstalling vkise.exe can affect the features and processes depending on it. However, like any executable file, malware and viruses can use a similar or identical name to disguise and remain undetected. Hence, we recommend you verify the file.
Verify if the file resides in the default location: C:\Program Files\COMODO\Internet Security Essentials
Ensure the digital signature is by Comodo Group.
Vkise.exe might be malicious if it’s using excessive system resources or prompting an error.
Scan your PC with an antivirus to identify any malicious files or software disguising.
After going through these checks, you can decide whether the vkise.exe process is safe or should be uninstalled. If it is unsafe, remove it using the steps in the next section.
How do I uninstall vkise.exe?
1. End task and delete the file
Right-click the Windows button and click on Task Manager from the list menu.
Go to the Details or Processes tab. Click the vkise.exe from the list, right-click on it, then select End Task from the drop-down menu.
Click OK to confirm that you want to end the task for the process.
Right-click on vkise.exe and click on Open file location from the drop-down menu.
In the file location, right-click on the vkise.exe file and select Delete from the drop-down menu.
Restart your PC and check if the vkise.exe process still runs in the Task Manager.
It will stop the vkise.exe executable process on your PC and delete the file from File Explorer, preventing the programs running on it to work.
If you are using VMware products, you will likely find the wsnm.exe process running on your PC most time. This is because the process is important to the operation of these software and needs to run in the background.
If you are wondering what the process does, the information in this guide will help shed more light on it and whether it is worth keeping.
What is wsnm.exe?
The wsnm.exe process is also known as VMware View Framework Node Manager. In some cases, this process is referred to as VMware Horizon View Framework Node Manager.
The process comes with either the VMware View Client or VMware Horizon Client by VMware. It is completely safe as it is digitally signed by Verisign. In its normal state, wsnm.exe will not cause problems on your PC.
However, like every other process, malware can hijack its operation and cause problems on your PC. But this can always be fixed with just some minor tweaks.
Should I uninstall wsnm.exe?
As this is not a core Windows process, the decision to delete it depends on its parent software’s importance. If you frequently use VMware clients, there is no need to remove the process, even if you are facing issues with it.
Instead, you only need to look for ways to fix its issues. But if you seldom use its parent software or don’t even know how it got to your PC, you can uninstall it completely.
How can I fix wsnm.exe-related issues?
1. Force stop the process
Press the Windows key + X and select Task Manager.
Right-click the wsnm.exe process or VMware View Client and select End task.
Finally, restart your PC.
One of the issues related to the wsnm.exe process is high CPU usage. If you are experiencing this problem or some other issues, you need to end the process in Task Manager.
This will allow it to restart and clear the potential causes of the issue.
2. Scan for malware
Press the Windows key, type virus, and click Virus & threat protection.
Click the Scan options link on the new page.
Finally, choose your preferred scan option and click the Scan now button.
A PC attacked by viruses is a site for so many issues. If the wsnm.exe process keeps misbehaving on your PC, you shouldn’t look past the effects of malware.
So, you need to perform a deep malware scan and rid your PC of troublesome viruses.
If using Microsoft Defender does not yield the expected result, we recommend a dedicated antivirus in TotalAV.
This excellent software takes a no-nonsense stand against malware and eliminates even the most stubborn ones before they can cause issues.
Press the Windows key + R, type control, and click OK.
Click the Uninstall a program option under Programs.
Now, right-click the VMware View Client or VMware Horizon Client and select Uninstall.
Finally, follow the onscreen instructions to complete the process.
Sometimes, you need to go for broke and completely remove the software that installed the wsnm.exe process on your PC. This is especially true if the process is causing issues that can crash your PC.
After removing it, check and remove any remnant of the software in your registry. If you eventually need the process for anything, you can download and install it from the official website.
Press the Windows key + R, type rstrui.exe, and press Enter.
Click Next on the new page.
Now, select your preferred restore point and click the Next button.
Finally, click Finish and follow the onscreen instructions to complete the process.
In the worst-case scenario, when the effect of issues related to wsnm.exe remains even after uninstalling it, you need to perform a system restore. This will help reverse the changes made to your computer that might be the cause of the problem.
The wsnm.exe process is important for users using VMware clients. It runs in the background when its parent software is active. Normally, it shouldn’t cause issues, but there are times when other factors influence it.
We have shown how to fix its related issue in this guide and remove the process completely. So, you now have the tools needed to decide on it.
In the same vein, if you need detailed information on the osu.exe process, check out our detailed guide. Lastly, feel free to share your experience with wsnm.exe with us in the comments below.
Most applications installed on Windows come with files and processes that support the program’s functionality.
Sometimes, these files can get corrupted or missing, leading to errors with the application. So, we will explore mcbuilder.exe application errors and proffer ways to eliminate them.
What is mcbuilder.exe used for?
The mcbuilder.exe is a legitimate Windows executable file developed by Microsoft Corporation. The file is utilized by a couple of Windows essential applications like Microsoft Office.
The file belongs to the Resource cache builder tool process; you should be careful when deleting it if it is running. The file can also be malware or virus masquerading as a legitimate Windows file to elude the antivirus software.
Where is mcbuilder.exe located?
Windows essential exe files are collectively stored in a specific location to allow users to differentiate them from third-party exe files. The location of the mcbuilder.exe file is: C:\Windows\System32
Also, the file size is around 302080.00 (byte). Hence, to confirm it’s legitimacy, you have to ensure the file size corresponds.
How can I fix the mcbuilder.exe application error?
Before anything else, try the following preliminary checks:
Uninstall the problematic app prompting the application error.
If the error persists, try the following fixes.
1. Run SFC/DISM scans
Press the Windows key, type in cmd, and select Run as Administrator.
Click Yes in the UAC prompt.
Type the following in the command prompt window, and hit Enter: sfc /scannow
Then, type this and hit Enter: DISM.exe /Online /Cleanup-Image / Restorehealth
Wait for the process, and restart your PC to complete the fix.
Corrupt system files are some of the most common causes of application errors; running the system file checker locates and repairs corrupt files on your OS.
2. Disable the mcbuilder process and delete its file
Right-click on your Start menu, and click Task Manager from the list of options.
Locate the mcbuilder.exe process from the Details or Processes tab, right-click on it, and select End Task.
Right-click the file again, then select Open file location.
Now, right-click the file in the location and select Delete.
Close the Task Manager, and check if the mcbuilder.exe error is fixed.
If there are multiple running instances of the mcbuilder.exe, one is likely a virus; disabling it from the Task Manager will protect your PC from harm.
Left-click on the Windows icon, type in create a restore point, and hit Enter.
Click the System Restore button under System protection tab.
Then, click Next on the new window.
Select the restore point to which you wish to revert your system and click Next.
Click the Finish button to complete the System Restore.
A system restore reverts your PC to an earlier state free from bugs and errors; this can help you restore your PC to an earlier version free from mcbuilder.exe app errors.
However, it’s recommended to backup your PC before running a system restore to avoid losing important files.
Exe files are one of the most critical files used by Windows applications. However, some can conceal malware and harm your PC. You’ll have to disable or remove the file from your OS to prevent this.
With the steps in this guide, you can fix the mcbuilder.exe application. Should you have further questions or suggestions, kindly drop them in the comments section.
Docking stations are used to enhance connectivity and productivity in laptops. It is a device to connect your laptop to a keyboard, mouse, monitor, printer, backup drives, storage, and LAN, all at once. But the USB port is not working on a Dell docking station for many uses.
When the USB ports on a Dell docking station stop working, it becomes difficult to transfer data efficiently, access external storage, or even use the connected devices or peripherals connected. Keep reading to find out the solutions!
Why are my USB ports not working on my Dell docking station?
Incompatible or obsolete drivers: Using incompatible or outdated drivers can cause the Dell docking station’s USB ports to not function properly.
Hardware issues: Damaged USB ports, defective or broken USB cables, or loose connections may cause the docking station issue.
Insufficient power supply: If sufficient power does not reach the docking station, the USB might start malfunctioning.
Outdated firmware: Outdated firmware may cause the USB ports on the docking station to perform poorly.
How do I fix the Dell docking station USB not working issue?
Before we proceed to the slightly complex ones, here are a few quick solutions to try:
Ensure that the docking device is connected to a reliable power source, ensuring that it is powered adequately. Also, try reconnecting the docking station to your laptop to check for loose ends.
Verify that all the devices, including the laptop, the USB devices, and the docking device, are securely connected. Try replacing the USB cables since the connectivity issue may be due to faulty USB cables.
If none work, move to the fixes listed next.
1. Update drivers
Press Windows + X to open the Power User menu, and select Device Manager.
Locate the docking station, right-click on the device, and then select Update driver.
Choose Search automatically for drivers and then wait for the process to complete.
If this doesn’t work, go to Dell’s website and look for the latest version of the USB driver for your device. Make sure you download the driver compatible with your device and your Windows version.
Once you have updated the drivers, check whether the device is detected on your laptop’s Device Manager.
However, updating driver manually can be tricky and even risky for your system. That being the case, it’s more effective to update all the PC drivers with specialized input from a dedicated driver application.
Outbyte Driver Updater
Approach this easy-fix and intuitive driver update software to fully optimize your PC.
We hope this guide helped you when the Dell docking station USB is not working. If the docking station is not detected altogether, you might have to run a hardware and devices troubleshooter.
Tell us which fix worked for you in the comments section below.
Sometimes, it is normal for certain programs like video editors or IDEs to be demanding and use a lot of CPU time and memory. However, if a program like mysqld.exe which used to be a lightweight program suddenly starts to consume CPU time and/or memory, it could be a sign of underlying issues.
In this guide, we will explain what mysqld.exe is, examine the factors causing high CPU usage in this MySQL process, and offer practical solutions to fix the issue.
What is Mysqld in Task Manager?
The mysqld.exe is a process associated with the MySQL database management tool. The process is responsible for running the MySQL server, which allows clients to connect to the database, execute queries, and perform various database operations.
When you install MySQL on your system, the mysqld.exe file is usually located in the MySQL installation folder, and it is launched when you start the MySQL server. Once the client connection is established, it handles the incoming requests, executes SQL commands, and manages the underlying data.
Why does mysqld.exe use so much CPU?
The mysqld.exe is a crucial component of MySQL and is responsible for the core functionality of the database server. The process runs in the background as long as the MySQL server is running, silently carrying out its tasks.
High CPU usage by mysqld.exe can be caused by various factors. Here are some common reasons:
Poorly optimized queries: Inefficient or poorly written queries can cause high CPU usage.
Increased simultaneous connections: A large number of simultaneous connections to the MySQL server can lead to increased CPU usage.
Server overload: If the MySQL server is handling a heavy load or experiencing a sudden surge in traffic, it can cause high CPU usage.
Bad indexing: Missing or improper indexes can lead to excessive CPU usage during query execution.
Software bugs or compatibility issues: Bugs or compatibility problems can cause abnormal CPU usage.
How do I fix mysqld.exe high CPU usage?
1. Use MySQL’s built-in monitoring tools
NOTE
Use MySQL’s built-in monitoring or third-party monitoring tools to check for specific queries or processes that consume a significant amount of CPU resources.
First, connect to your MySQL server using a MySQL client (e.g., MySQL Workbench)
Open the Start menu, type MySQL 8.0 command line client (for MySQL 8.0), and launch the tool.
To access the Performance Schema tables, type the following command and press Enter:SELECT * FROM performance_schema.events_statements_summary_by_digest ORDER BY `SUM_TIMER_WAIT` DESC;
By running this command, you can see the queries that take the longest time to execute, which can help you find out what might be causing the issue. Look at the results to find the queries or processes that are using a lot of CPU power.
2. Review and adjust MySQL configuration
Open File Explorer and navigate to the following location:C:\ProgramData\MySQL\MySQL Server 8.0
Right the file named my.ini and select Open with.
Then, select Notepad and click Always.
Find the parameter named innodb_buffer_pool_size and modify the value to an appropriate amount of memory for your server.
Choose a value that suits the size of your server and database, like 1 for 1 gigabyte of memory.
Next, locate the parameter called max_connections and decrease its value to a lower number, such as 100.
By lowering this value, you can limit the workload and restrict the number of simultaneous connections allowed to the MySQL server.
After making the necessary changes, click File and select Save to save the configuration file.
Restart the MySQL server to apply the new configuration.
Then, monitor the mysqld.exe process to see if it still uses a lot of CPU resources.
Before you start the upgrade, it’s better to make backups of your databases to prevent losing any data. You can use tools like mysqldump or programs like MySQL Workbench to create backups of all your databases.
Press the Windows key, type MySQL Installer and select the MySQL Installer – Community app from the search result.
In the MySQL Installer dashboard, click the Catalog button.
Then, click on Execute to download the latest changes to the catalog.
Click Yes on the prompt box to download the most up-to-date information for the upgrade.
Then, click Next to review the update history.
Click Finish to get back to the MySQL Installer dashboard.
After that, click Upgrade to view will see a list of products with newer versions available.
Follow the installer instruction to update MySQL products.
After upgrading, you may need to reconfigure the upgraded MySQL server. You will need to set up parameters such as port number, root password, and other configuration options.
Lastly, restart your computer and launch MySQL again. Check if the mysqld.exe process is still using a lot of CPU
4. Upgrade your hardware
If your server always has high CPU usage, consider improving your server’s performance by upgrading the hardware or allocating more resources.
This means adding more things like CPU cores, memory (RAM), or storage. When the server doesn’t have enough resources, it can’t handle the workload properly, and that causes high CPU usage.
Data corruption and data loss are common problems in MySQL servers. If you’re experiencing these issues, let’s take a look at the steps required to repair a corrupted database in SQL Server.
Please feel free to share in the comments below the solution that worked for you in fixing this issue.
You probably found this guide because you just encountered the volume does not contain a recognized file system error. The error is common among users trying to access a disk or external storage device. We will walk you through easy steps to get your drive working perfectly.
How do you fix the volume does not contain a recognized file system?
1. Use a third-party file recovery tool
Many third-party tools may help you fix the drive problem. We have extensively compiled a list of the best file recovery tools. Some of these tools will be able to repair a bad drive sector and should rectify any occurrence of the error.
Hence, this file recovery solution can take care of any storage media issues on your Windows devices. You can either fix internal or external storage drives such as HDD or SSD or 4K devices.
The repairing process is extremely efficient and easy to understand. Firstly, the software scans the corrupted hard drive and partitions and recovers any deleted or broken files.
For more support on the matter, you can also go for a particular Windows file recovery software that is developed to bring your data back automatically from any corrupted or formatted drives.
Stellar Data Recovery
Solve corrupted drive issues by regaining lost data with this selective data recovery tool.
This solution will erase everything on your drive, so we recommend applying it as a last resort.
Press Windows + R to open the Run dialog.
Type diskmgmt.msc an hit Enter.
Right-click on the problematic drive and select Format.
Select the File system you want to use (we recommend NTFS) and click OK.
When the format is complete, verify it fixes the volume does not contain a recognized file system.
There you have it. In most cases, all the solutions we discussed should be effective. You should, however, try what seems most appropriate to your situation.
If you found this guide helpful, you may love our other guide, where we discussed how to repair hard drive errors.
Lastly, please let us know in the comment section below if you have additional questions.
Whether you want to temporarily disable the keyboard to prevent accidental input or re-enable it after a period of inactivity or after you accidentally disabled it, this guide can help!
We will walk you through simple methods to lock or unlock your keyboard on Windows 10 and 11 computers.
How can I lock or unlock a keyboard on Windows 10/11?
First, reconnect the keyboard to ensure it is properly connected, ensure the Num Lock key is disabled, and press Windows + L to lock the keyboard instantly.
1. Use the Shift key
Press the Shift key for 8 seconds till you see the Filter keys prompt.
Click Yes to lock the keyboard.
Again, press the Shift key for 8 seconds to unlock the keyboard.
2. Use the Settings app
Press Windows + I to open the Settings app.
Go to Accessibility, then select Keyboard.
Toggle on the switch for Sticky Keys and Filter Keys to lock the keyboard.
Toggle off the switch for both to unlock the keyboard.
Locate the KeyboardLocker.zip file, double-click it, and select Extract all to extract the file.
Now click Extract. The folder with Keyboard Locker will open.
Open it and double-click the KeyboardLocker.exe file; you will see a little keyboard symbol in your notification area.
To lock your keyboard, press Ctrl + Alt + L. The icon changes to indicate that the board is secured.
Your keyboard may be locked because Sticky Keys or Filter Keys are activated, a keyboard shortcut accidentally locks it, or drivers interfere. To fix it and similar issues, follow the steps above.
If you’ve noticed a file named iBtSiva.exe on your computer, you may wonder what it is and whether it’s safe to keep.
In this guide, we will delve into the details of iBtSiva.exe, explaining its role, & potential risks, and quick steps to remove it if needed.
What is iBtSiva.exe?
iBtSiva.exe is a legitimate executable file associated with Intel Wireless Bluetooth driver software. It is a part of the Intel Bluetooth service found on computers with Intel Bluetooth drivers.
The purpose of the file is to facilitate the functioning of Bluetooth connectivity on devices equipped with Intel wireless Bluetooth capabilities.
If Intel Bluetooth drivers are installed on your computer, iBtSiva.exe is expected and indicates that Intel’s software is handling the Bluetooth functionality.
However, if you don’t have the related drivers on your PC, the file might not be legit or malicious.
If you suspect it is malicious, you must run a deep scan using reliable security software and ensure your computer’s security. However, if it is a harmless file but you still want to remove it, move to the next section.
How can I remove iBtSiva.exe?
Before engaging in advanced troubleshooting steps, you should consider performing the following checks:
Imagine your PS5 console freezing in the middle of a game you are so close to winning. Frustrating isn’t it?
The culprit you can boldly pin this on is latency.
Normally, your game ping is supposed to be at an excellent rate of 20ms in some games. Up to 30ms is a considerable level. However, if it shoots beyond that, your console will lag terribly.
We have good news:
By the time you are done reading this article and following the detailed guide, you will know how to lower ping in PS5. In fact, your game sessions would be as smooth as silk henceforth.
What causes high ping on PlayStation 5?
Here’s the thing:
What gamers overlook during setup often causes high ping on PlayStation 5 while they are gaming. Now that you are here, we’ll list out the factors that can contribute to delay in PS5.
Let’s dig in already:
Network Congestion: If too many devices are linked to the same network or your ISP is facing high traffic, it can cause high ping.
Distance from server: When the game server is located far away from your location, freezing will occur due to the time it takes for data to travel back and forth.
Outdated software: An old PS5 software can cause connectivity issues, leading to alarming lag spikes.
Limited storage: Your PS5 console running out of space makes its response slow.
Packed DNS cache: Excess cache in your device can cause a PS5 downtime.
Database issues: Corrupt PS5 database.
How can I lower ping on PS5? Is that what is running through your mind?
Don’t stress! We will reveal all the solutions to you in the next section if you follow us patiently.
How to lower ping on PS5?
Ensure to tweak your network connection to its best before you begin testing out the fixes below. Just to be clear it is not an ISP provider issue.
Try out each of the solutions below until you successfully lower ping on your PS5.
1. Use performance mode
Using the performance could be just what you need to get back on track with your game. Sadly, taking this step will lower your game visuals. Also, not all games have this option.
Switching to this mode allows you an overall sleek gaming experience.
How to do it:
Go to Settings.
Click Saved Data and Game/App Settings.
Choose Game presets.
Switch from Resolution to Performance mode.
2. Update your controller
Your PS5 controller is entirely different from the console’s OS and can cause game latency if it is outdated.
The longer your controller takes to respond to input, the higher the game will lag.
To Update it:
Go to Settings > Accessories > Controllers > Wireless Controller Device Software.
A message informing you of a new version will show up on the screen.
Plug your controller into your console via the cable and click on Update. Do not unplug or switch off your console till the download is complete.
3. Use a VPN
The benefit of using a VPN to game cannot be overemphasized.
It may enhance speed by routing you to a server that’s closer to the game’s server.
Not only that but as long as you use a VPN with unlimited bandwidth such as ExpressVPN, you’ll achieve seamless gaming for as long as you want.
Having said that, it is worthy of note that there is no option to directly install any VPN on PS5. However, you can either share a connection from your router or PC.
Now, to share a VPN connection with PS5:
On your PC:
Login to ExpressVPN.
Expand the ellipsis beside the current location to choose a location.
Plug in the ethernet cable to your PC and the other end into your PS5.
In the taskbar search bar, enter Control panel. Click on the app to open it.
Go to Network and Internet > Network and Sharing Center.
Choose Change Adapter Settings on the left panel.
Right-click on your VPN connection and select Properties.
Select the Sharing tab and and check the ‘Allow other network users to connect through this computer’s internet connection’.
Click on the downward arrow beside Select a private network connection.
In the drop-down menu, select your network connection. This should be a WiFi connection if there is only one ethernet port on your PC.
On your PS5:
Go to Settings on the PS5 main menu.
Navigate to Network > Settings.
Select Set up Internet connection. The PS5 will automatically scan and create an ethernet connection.
Select Do not Use a Proxy Server when the prompt appears.
Accept all options. Return to the previous step and toggle on Connect to the network.
Restart your PlayStation 5.
That’s not all:
ExpressVPN has a wide range of over 3000 servers worldwide, including some of the best VPN locations for gaming.
ExpressVPN
Connect to a stable VPN server to reduce ping issues on PS5!
Letting go of some unnecessary data may lighten the weight on your PS5 and make it more battle ready.
Before we begin, make sure to transfer your games and information to cloud or a USB drive if you intend to keep them.
Do the following to free up storage space on PS5 and reduce ping on your console.
Go to PS5 Settings.
Select Console Storage.
Click Saved Data and Game/ App Settings.
Check the boxes beside the files you intend to delete.
Click on Delete to confirm the process.
5. Rebuild the PS5 database
Restructuring the database on your PS5 is a maintenance process that boosts the console’s performance. Additionally, it resolves issues related to data corruption or fragmentation.
To rebuild the database on your PS5 to lower ping, you can follow these steps:
Turn off the console completely
Press and hold the power button until you hear two beeps, which will initiate the Safe Mode menu.
Connect a DualSense controller to the console using a USB cable.
Select Rebuild Database from the menu, then press X to confirm.
Wait for the process to complete, which may take several minutes, depending on the amount of data on your PS5.
Once the process is complete, the console will restart automatically.
6. Update your PS5
An outdated PS5 software ruins your moments of glory when you are gaming. It does this by introducing bugs that make your PS5 stutter.
Go to Settings.
Click on System.
Choose System Software > Select System Software Update and Settings.
Click on Update using Internet. Click on the Update button on the page that comes up.
The newest version of your PS5 firmware will download automatically and will restart itself afterward. Try not to turn off your console during this process.
Now that you have learned how to lower ping on PS5, rest assured that you won’t have to worry about latency anymore.
Additionally, feel free to let us know if any of these fixes worked for you and, more importantly, share any other methods you implemented to enhance the high ping on your PS5.
Summary
Connecting to a WiFi may sometimes slow down PS5 because of other devices that share the network. We recommend that you use an Ethernet cable while gaming.
All things being equal, updating your PS5, using a VPN, rebuilding the device’s database, and so on increases the console’s performance. This in turn lowers ping in PS5.
If you’ve come across the file named Wrsa.exe on your computer, you may be curious about its purpose and whether it’s necessary to keep it installed.
In this article, we will delve into the details of Wrsa.exe, providing insights into its functionality, considerations to keep in mind, and recommendations for managing this file.
What is WRSA.exe?
WRSA.exe is the main executable file related to the Webroot SecureAnywhere software developed by Webroot. Webroot SecureAnywhere is an antivirus and internet security program that protects against various threats, including malware, viruses, and spyware.
It handles the tasks like running and managing the security features provided by the software, such as real-time scanning, threat detection, and system monitoring.
The file is typically located in the installation directory of the Webroot SecureAnywhere software. This executable file indicates that the security program is functioning properly.
However, if you encounter any issues or suspect any problems with WRSA.exe, you should ensure you have installed the latest version of the Webroot SecureAnywhere software.
If you are not using the software anymore, you can remove this file, as it would be useless.
How can I remove WRSA.exe?
1. Close Webroot SecureAnywhere
Right-click on the Webroot SecureAnywhere icon in the system tray (bottom right corner of the screen).
Select Shut Down Protection or a similar option to close the program.
2. Delete the process manually
Press Ctrl + Shift + Esc to open the Task Manager.
Locate wsra.exe and right-click to select End task to terminate the process.
3. Uninstall Webroot SecureAnywhere
Press Windows + R to open the Run dialog box.
Type appwiz.cpl, & click OK to open the Programs and Features window.
Locate Webroot SecureAnywhere in the list of installed programs.
Right-click on it and select Uninstall.
Follow the on-screen instructions to complete the uninstallation process.
Press Windows + R to open the Run dialog box again.
Type %ProgramData% and click OK to open the ProgramData folder.
Locate the WRData or Webroot folder and delete it. You may need administrative privileges to do this.
5. Remove the Webroot registry entries
Press Windows + R to open the Run dialog box.
Type regedit and click OK to open the Registry Editor.
Navigate to the following key: Computer\HKEY_LOCAL_MACHINE\SOFTWARE\Microsoft\Windows\CurrentVersion\Uninstall
Look for a subkey related to Webroot SecureAnywhere, right-click and choose Delete to remove the entry.
Once done, restart your computer to save the changes made.
So, these are the detailed steps to remove WRSA.exe & associated components from your PC if you find it suspicious or useless on your Windows computer.
To prevent such issues in the future, you must always keep your Windows operating system up to date, schedule a malware scan once a week, and avoid downloading any suspicious attachments from the email.
Please feel free to give us any information, tips, and your experience with the subject in the comments section below.
Applications rely on DLL files to work properly, and many reported that their software won’t run because vcruntime140_app.dll was not found.
This isn’t the only file that can cause issues, and in the past, we covered missing DLL files on Windows 11, so we encourage you to check that guide as well.
Before we start fixing this issue, let’s focus on the DLL file at hand and see what it does.
What is vcruntime140_app?
This DLL file is a part of the Visual C++ 2015 Redistributable package, and it’s used by many popular applications.
Why is vcruntime140_app.dll missing?
If you’re having issues with this file, there are several potential causes:
Software conflicts – Sometimes certain applications can interfere with the DLL files can cause this issue to appear.
Missing components – If the necessary components aren’t installed, you will errors regarding this DLL file.
What can I do if vcruntime140_app.dll is missing?
1. Use a dedicated DLL fixer
Many applications rely on the vcruntime140_app.dll file to work properly. Fixing this issue manually can be a tedious task, especially if you don’t know how to do it properly.
To make this process simpler, we suggest using DLL repair software. The software is designed to fix any compatibility issues that you may have with third-party DLLs and your operating system.
Install the software and let it scan your PC and it will inform you about all missing DLL files and restore them.
2. Remove the software that is giving you the error
Press the Windows key + I to open the Settings app. Next, go to Apps and in the right pane select Installed apps.
Select the app that is giving you this error and choose Uninstall.
Follow the instructions on the screen to complete the process.
Users reported that HP 3D DriveGuard, Razer Cortex, and Microsoft Teams were causing this issue. However, almost any app that uses this file can experience issues.
Press Windows key + X and choose Windows Terminal (Admin).
Enter the following command sfc /scannow
Wait for the scan to finish.
After that run the following commands: DISM /Online /Cleanup-Image /CheckHealth DISM /Online /Cleanup-Image /ScanHealth DISM /Online /Cleanup-Image /RestoreHealth
Keep in mind that these commands can take a while to finish, so don’t interrupt them.
Missing vcruntime140_app.dll files can cause many problems, and we hope that you found this guide useful in fixing missing DLL files on Windows 10 and 11.
Did we miss a solution that worked for you? Let us know in the comments below.
Sometimes, you may encounter the 0xa00F4289 webcam error when trying to access the webcam via the inbuilt camera app. This problem occurs if there is a problem with the drivers or camera.
In this guide, we will discuss different methods to fix the issue right after talking about the causes.
What causes the 0xa00F4289 webcam error?
There could be many reasons for this webcam error; some of the common ones are mentioned here:
Outdated webcam drivers – If the webcam drivers are outdated or corrupted, it can cause the 0xa00f4289 error. Try updating the drivers to the latest version to fix the issue.
Third-party app interference – This error can occur if another app is using the webcam. Try closing or disabling it to resolve the issue.
Incorrect camera settings – If the camera access settings for the app you are trying to use the webcam with are not set correctly, it can cause an error.
Damaged webcam hardware -This error could appear if the webcam hardware is damaged or malfunctioning. In this case, replacing the webcam may be necessary.
Now that you know the reasons behind the issue, let us check out the solutions.
What can I do to fix the 0xa00F4289 webcam error?
Before engaging in advanced troubleshooting steps, you should consider performing the following checks:
Restart your computer.
Check for hardware damage.
Reinstall the affected video conferencing app.
If you are a laptop user, apply gentle pressure around the webcam.
If these small fixes didn’t work for you, check out the detailed methods to fix the problem.
1. Start the Windows Camera Frame Server service
Press Windows + R to open the Run dialog box.
Type services.msc and click OK to open the Services app.
Locate the Windows Camera Framer Server service and double-click it to open Properties.
Go to Startup type, select Automatic, and for Service status, click Start.
Click Apply, then OK.
2. Enable camera access
Press Windows + I to open the Settings app.
Go to Privacy & security.
Toggle on the switch for Camera access.
Check the list of apps accessing the camera and close the Settings app.
3. Update the camera driver
Press Windows + R to open the Run dialog box.
Type devmgmt.msc and click OK to open Device Manager.
Go to Cameras, select your camera, right-click, and choose Update driver.
Click Search automatically for drivers.
Follow the on-screen prompts to complete the process.
Also, if you see any other webcams that you’re not using in Device Manager, right-click on them and select Uninstall device.
As an alternative, you can avoid the manual steps and choose a more reliable method to update the webcam or any other driver.
With the Outbyte Driver Updater software, it’s easy to run the scan on your PC and detect outdated drivers. Afterward, you can choose to update them all at once with a single click.
Press the Windows key, type windows security, and click Open.
Go to Virus & threat protection and click Manage settings.
Locate Real-time protection and toggle off the switch.
So, these are the methods that you can follow to fix the 0xa00F4289 Webcam error.
You may also need to take into account that you may need to replace your webcam in case it is damaged. We have a list of the best webcams for Windows 11 that might help in choosing the right one for you.
If you have any questions or suggestions, feel free to mention them in the comments section below.
Several Windows users have reported that they cannot tile their wallpaper across a screen or multiple screens because the Fit Tile option is not working on their PC.
Hence, we will discuss what causes the Fit tile option to stop working and how to fix it in simple ways.
Why is the Fit Tile option not working?
There can be several reasons why the Fit Tile option is not working on your PC. Here are a few possible reasons:
Image resolution – If the image resolution is too low, it may not be able to fill the screen perfectly, resulting in unexpected behavior or the option not working at all.
Third-party software conflicts – If third-party wallpaper management or customization software is installed, it could interfere with the built-in Windows options.
Compatibility issues – In some cases, specific image formats may not be fully compatible with the Fit Tile option. Using standard image formats like JPEG, PNG, or BMP for wallpapers is best.
Above are a few possible reasons why the Fit Tile option is not working. To troubleshoot this issue, you can proceed to the next section.
What can I do if the Fit Tile option is not working?
Before engaging in any advanced troubleshooting or settings tweaks, you should consider performing the following preliminary checks:
Disable or uninstall any third-party wallpaper software temporarily to see if it resolves the issue.
Don’t use a small image as your desktop wallpaper.
Check the image format to avoid compatibility issues.
Having confirmed the above checks, if the problem persists, you can work through any of the methods provided below to fix the issue.
1. Set your desktop background image to default
Right-click on the desktop and select Personalize from the options.
Navigate to the Background tab in the Personalization settings window.
Now, change the Personalize your background option to Picture option and select one of the default images provided by Windows.
Press the Windows + E keys to open the File Explorer.
Now, locate the image file on your computer.
Right-click on the image, select Open with and choose Paint from the list of available applications.
Click on the File option in the Paint window’s top-left corner.
Next, select Save as. Choose a destination folder to save the modified image.
In the Save as type field, select the format you want to save the image in, such as JPEG, PNG, or BMP. Then, click on the Save button.
Alternatively, you can explore our detailed guide for the best image compression software, enabling you to format the image seamlessly and use it as your desktop background.
Press the Windows + R keys to open the Run dialog box. Type msconfig in the dialog box and press Enter to open the System Configuration window.
Now, go to the Services tab. Check the box next to Hide all Microsoft services, and click on Disable all.
Navigate to the Startup tab and click on the Open Task Manager link to open the Task Manager.
Go to the Startup tab in the Task Manager, right-click on each entry and selecting Disable.
Close the Task Manager, click Apply, and then OK in the System Configuration window to save the changes.
Restart your PC to start in a clean boot state. Then, set the wallpaper now.
After restarting your computer in the Clean Boot state, you can try to use the Fit Tile option to set your wallpaper and see if the problem is fixed. If the problem persists, please get in touch with Microsoft support for further assistance.
And that’s it on how to fix the Fit Tile option is not working error. Some users also claim that the Weather app live tile is not working in Windows 11. You can explore our dedicated guide to fix the issue.
Don’t forget to comment in the comments section below if you have any questions or suggestions.
Internet Explorer has, for a long period, been the primary browser for users. It was probably the first browser most of us used to browse the Internet. And while there are several fast browsers available, many still go with it. But for some users, Internet Explorer is not opening.
Internet Explorer has a history of issues. That’s understood, given it was the first one and had to undergo a wide range of changes to fit the user requirements better. But when the browser doesn’t open, you are in for big problems. Keep reading to find out the solutions!
Why can’t I open Internet Explorer in Windows 10?
Here are the primary reasons users can’t open or work with Internet Explorer:
Support for the browser is over: The support for Internet Explorer ended on June 15, 2022, except for certain iterations, primarily Windows 7. So, unless you are running this iteration, Internet Explorer will no longer be accessible.
Misconfigured settings: Every app requires settings to be a certain way to perform right, and when any of these are misconfigured, you are bound to face issues running apps in Windows.
Corrupt system files: If the system files are corrupt, it will affect the other installed applications, particularly the built-in ones.
Third-party apps preventing IE from opening: In a few cases, users found that third-party apps, generally antivirus or security software, were triggering conflicts.
How do I fix Internet Explorer not opening?
Before we proceed to the slightly complex solutions, here are a few quick ones to try:
Restart the computer.
Disable any third-party antivirus running on the PC. If that works, we recommend uninstalling the program and switching to a Windows-friendly antivirus solution.
Run the setup and follow the on-screen instructions to complete the installation.
If Internet Explorer is missing from the PC, and, as a result, you can’t open it, downloading the browser works. Remember, Internet Explorer now only supports Windows 7 SP1 and Windows Server 2008 R2 SP1.
2. Reset Internet Explorer settings
Press Windows + R to open Run, type inetcpl.cpl in the text field, and hit Enter.
Navigate to the Advanced tab, and then click on Reset.
Tick the checkbox for Delete personal settings, and click Reset.
Once done, restart your computer.
Resetting the browser often works when Internet Explorer is not opening in Windows 7. But, as stated in the reset window, only choose this option when the browser fails to work.
3. Repair the corrupt system files
Press Windows + R to open Run, type cmd, and hit Ctrl + Shift + Enter.
Click Yes in the UAC prompt.
Paste the following three commands, one after the other, and hit Enter after each:DISM /Online /Cleanup-Image /CheckHealthDISM /Online /Cleanup-Image /ScanHealthDISM /Online /Cleanup-Image /RestoreHealth
Execute the following command to run the SFC scan: sfc /scannow
If the PC has corrupt system files, the DISM command and SFC scan should help replace the affected files with their cached copy. And once you are done with the two, Internet Explorer should start opening fine in Windows 11.
4. Change Edge settings
Launch Microsoft Edge, click on the ellipsis near the top right, and select Settings.
Navigate to the Default browser tab, and select Don’t allow from the Allow sites to be reloaded in Internet Explorer mode (IE mode) dropdown menu.
If Internet Explorer is not opening and redirecting to Edge, you should simply disable the IE Mode in Microsoft Edge. This mode allows sites that were developed for Internet Explorer to be loaded properly. IE Mode is expected to be supported at least until 2029.
Press Windows + R to open Run, type appwiz.cpl in the text field, and click OK.
Select the program after installing which the issue first appeared, and click Uninstall.
Follow the on-screen instructions to complete the process.
Restart the computer for the changes to apply.
When Internet Explorer is not opening websites or not launching altogether, make sure you don’t have any conflicting apps running on the PC. If there are any, remove them. Also, we recommend using an effective uninstaller software to effectively clear any leftover files and registry entries.
Choose Upgrade this PC now and click on Next to proceed.
Once the download is complete, the setup will automatically perform a repair upgrade.
An in-place or repair upgrade usually helps when you are facing issues with the built-in apps or Windows components. It’s basically like getting all the critical files replaced with a fresh copy without affecting the data stored on the PC.
And it should help when Internet Explorer is not opening in Windows 10.
7. Create a new user account
Press Windows + I to open Settings, and click on Accounts.
Go to the Family & other users tab from the navigation pane, and click on Add someone else to this PC.
Click on Add a user without a Microsoft account.
Select I don’t have this person’s sign-in information.
Now, enter the user name, add a password if required, and click Next to create a new account.
Once done, select the account, and click on Change account type.
Next, select Administrator from the Account type dropdown menu, and click OK.
Finally, sign out of the current user account and into the new one, then start using the browser.
If nothing else works when Internet Explorer is not opening, you can create a new user account and use it to access the browser. You will have to use a backup tool to transfer the data between the two. Though, an external USB stick would do the job perfectly.
And if the problem remains unresolved, our recommendation would be to switch to another user-friendly browser, preferably Opera, given its wide range of features.
For any queries or to share more solutions with us, drop a comment below.
The soundboard feature in Discord allows users to play pre-recorded sound clips or sound effects during voice calls or in voice channels. However, some of our readers are facing issues with the Discord Soundboard not showing up.
Hence, this article will discuss what causes this error and how to fix it seamlessly.
Why is Discord soundboard not showing up?
If the Discord soundboard is not showing up for you, there could be several reasons behind this issue. Below are some of the possible reasons behind the error:
Outdated version of Discord – The soundboard functionality may not be available or has been moved to a different location if the application is outdated or failed to update.
More than 50 members in your server – It has been confirmed from some users that more than 50 members in your server will not allow the Discord soundboard to show.
The community feature is enabled on your server – If this is enabled, your Discord soundboard may not show up.
Server restrictions – If you are in a Discord server where the administrators or moderators have restricted the soundboard feature, you cannot see or use it.
User permissions – Check your user permissions within the server. Ensure you have the necessary permission to access and use the soundboard feature.
Some of the reasons above can also be responsible for mics not to work in Discord voice channel. Irrespective, let’s proceed to explore various ways to fix the issue.
How can I fix Discord soundboard not showing up error?
Before trying any of the advanced solutions provided in this guide, be sure to confirm the following preliminary checks, as they may help resolve the issue:
Force close and restart the Discord app.
Make sure you are using the desktop version instead of the mobile version.
Check for any updates or changes made to the Discord application.
Visit the official Discord page to download the desktop version of Discord for Windows.
Double-click on the downloaded file and follow the on-screen instructions to complete the installation process.
Launch the Discord app on your desktop. Navigate to a server with less than 50 members and the community feature disabled.
Join a voice channel and click on the soundboard icon.
Then, choose an audio clip to play.
You should have access to the soundboard feature on your desktop version of Discord, having followed the above steps.
And that’s it on how to fix the Discord Soundboard not showing up issue. Hopefully, one of the methods provided in this guide will help you fix the issue.
Runtime errors are glitches that trigger errors and keep the program from running. Runtime error 481 is one of the many errors on Windows. Generally, runtime error popups do not stop unless the issue is resolved.
If you need help resolving this error, we’ve got your back. In this article, we walk you through five fixes for Runtime error 481.
What causes Runtime error 481?
Here are a few reasons for the runtime error 481: invalid picture:
Insufficient disk space: This is the most common reason for runtime errors. Lack of disk space can result in Runtime error 481.
Virus: A virus attack can cause various system-level issues that lead to runtime error 481.
Memory leak: A memory leak is when Windows fails to deallocate memory in use by an application even after the process finishes. This causes the system to slow down and result in runtime error 481.
Incompatible apps: If you have recently installed a program after which the runtime error 481 has occurred, that program might not be compatible with your device.
Faulty or outdated graphics driver: If you haven’t updated your drivers in a while, they could have become outdated or faulty, resulting in Runtime error 481.
How do I fix Runtime error 481?
1. Clear temp files
On your desktop, right-click on Computer and go to Properties.
Go to Advanced system settings.
Under the Advancedtab, click on Environment Variables.
Under the User variables for usersection, select the TEMP variable. Click Delete and then OK to clear up disk space.
2. Uninstall conflicting programs
Search for remove programs in the Start Menu and click on Add or remove programs.
Look for recently installed programs, after which the problem appeared.
Click on the ellipsis next to the program you want to remove, then click Uninstall.
Again, click Uninstall in the confirmation prompt.
Some apps might require a restart to complete uninstallation. Once the computer reboots, see if the error persists.
3. Scan for virus
Search for virus in the Start Menu and open Virus & threat protection.
Click on Quick scan to quickly scan for viruses.
If the issue persists after the Quick Scan, click on Scan options to carry out further extensive scans.
Full scan: This will scan your entire system and, subsequently, will take longer than a quick scan, maybe more than an hour.
Custom scan: This allows you to scan specific files and folders.
Microsoft Defender Antivirus (offline scan): This helps scan and remove malicious software and may take around 15 minutes. The device restarts after the scan.
Namely, there is a multilayered antivirus solution that includes efficient virus detection and malware removal to keep your Windows OS safe at all times.
Hopefully, this guide helped resolve your runtime error. If these methods do not work, try fixing any broken registry keys. Before making any changes, it is best to back up your registry.
Let us know in the comments section below if you face any issues while trying these fixes. We’ll get back to you with a solution.
Macrium Reflect is a popular backup and disk imaging software designed for Windows operating systems. Sadly, many users find it challenging to download and install it on their PCs.
Hence, this article will take steps to help you get the software running on your computer. Alternatively, you can check out our guide on what to do if the Macrium Reflect clone failed to boot error appears on your Windows PC.
What is Macrium Reflect used for?
Here are some of the main functions provided by the Paid (Full) version of Macrium Reflect:
Create disk images of entire drives or specific partitions and backup individual files and folders.
Perform incremental and differential backups to save time and storage space.
Restore system backups to previous working states and create rescue media for bootable recovery options.
Schedule automated backups for regular data protection.
Clone disks to transfer data or upgrade to larger drives.
Mount backup images as virtual drives for easy file retrieval.
Verify backup images for data integrity and encrypt backups for enhanced security.
Explore backup images to extract files and folders selectively.
In summary, Macrium Reflect free edition is available for download, but the paid version offers much more.
Can you still download Macrium Reflect for free?
The free edition, Macrium Reflect Free, has been retired, and it’s no longer available for download.
It’s worth mentioning that a free 30-day trial version is still available, but if you’re looking for the unlimited free version, it’s not available anymore.
How can I download and install Macrium Reflect on Windows?
You should note that it is essential to download the Macrium Reflect installation package from a trusted source. It’ll help avoid security problems that may occur due to the file being malicious.
In conclusion, we have a detailed article about how you can fix the Macrium MFT corrupt error on your computer.
If you have further questions or suggestions regarding this guide, kindly drop them in the comments section.
Copying and pasting texts, files, and other data from one location to another on the computer is made easy by using Ctrl C and Ctrl V. However, several users have reported the Ctrl C not working on Windows 11. Therefore, this guide will attempt to provide possible solutions to fix the issue.
Many factors may be responsible for Ctrl C or other keyboard shortcuts not working on Word, Excel, VSCode, or other apps on the computer. Some notable ones are listed below:
Problems with the connection between the keyboard and the computer can cause the issue.
If the keyboard layout is not set correctly, the Ctrl C key combination may not function as expected.
Other apps or utilities might intercept or reassign the Ctrl C command to a different function.
An outdated or missing keyboard driver could also be causing problems with the Ctrl C key or the keyboard not to work correctly.
What can I do if Ctrl C and Ctrl V doesn’t work?
Before trying any advanced fixes, you can observe the following preliminary checks:
Restart the computer to resolve temporary glitches or conflicts affecting keyboard shortcuts.
If you have come across a file named hh.exe on your computer and wondering what it does, this guide can help!
We will talk about this executable file, its purpose, and whether it is safe to remove from your computer, along with steps to remove it if needed.
What is hh.exe?
Hh.exe is a legit executable file associated with the Microsoft HTML Help system. It is primarily responsible for launching and managing HTML Help files (.chm) on Windows operating systems.
The HTML Help system is a platform used for creating and displaying interactive help documentation, tutorials, and user guides.
While it is an essential system file for running HTML Help files, it is not uncommon for malware or malicious programs to disguise themselves with similar file names.
If this file is not located in C:\Windows, it could be malicious. So, to get rid of it, it is recommended to run a deep scan using a reputable antivirus or antimalware tool.
Should you remove hh.exe?
All the non-system processes, including hh.exe, can be stopped as they are not important for the normal functioning of the operating system.
However, it is advised not to modify or delete a Windows file if you don’t know all about it. To avoid file corruption and other performance issues, you need to ensure that the system is updated with the latest service packs and security updates.
The hh.exe, if legit, is considered harmless. Therefore, you don’t need to delete or disable it. If you’re experiencing problems related to the HTML Help system or encountering abnormal behavior with hh.exe, you may remove it from your computer. To do so, move to the next section.
How can I remove hh.exe?
Before removing the hh.exe process, it is important to consider the following prerequisites:
Make sure your Windows is updated.
Verify you have logged in using your Administrator account.
Press Windows + E to open the File Explorer window.
Navigate to this path: C:\Windows
Select the hh.exe and click the Delete button to remove it.
If you face any issues removing the file, you can enter safe mode and try again.
So, these are steps that you can follow to remove the hh.exe file. If you have any questions or suggestions, feel free to mention them in the comments section below.