Keeping your drivers up to date is crucial if you want your PC to run without any issues. Many users are wondering how to install ASUS drivers on Windows 11, and this guide will show them how to do it properly.
Installing drives doesn’t have to be a complicated process, and there are a couple of methods you can use to update your drivers on Windows 11.
This guide will show you the quickest and fastest ways to do that, so be sure to follow our instructions carefully.
Is Windows 11 compatible with ASUS?
Yes, Windows 11 is compatible with most ASUS devices and hardware. If you’re using an ASUS laptop, be sure to check if your hardware fully meets the requirements.
As for other hardware, almost all newer hardware will work without any issues, however, some compatibility issues might be expected from older hardware.
How do I Install ASUS drivers on Windows 11?
1. Use Device Manager
Press Windows key + X and choose Device Manager from the list.
Now locate the missing driver, right-click it, and select Update driver.
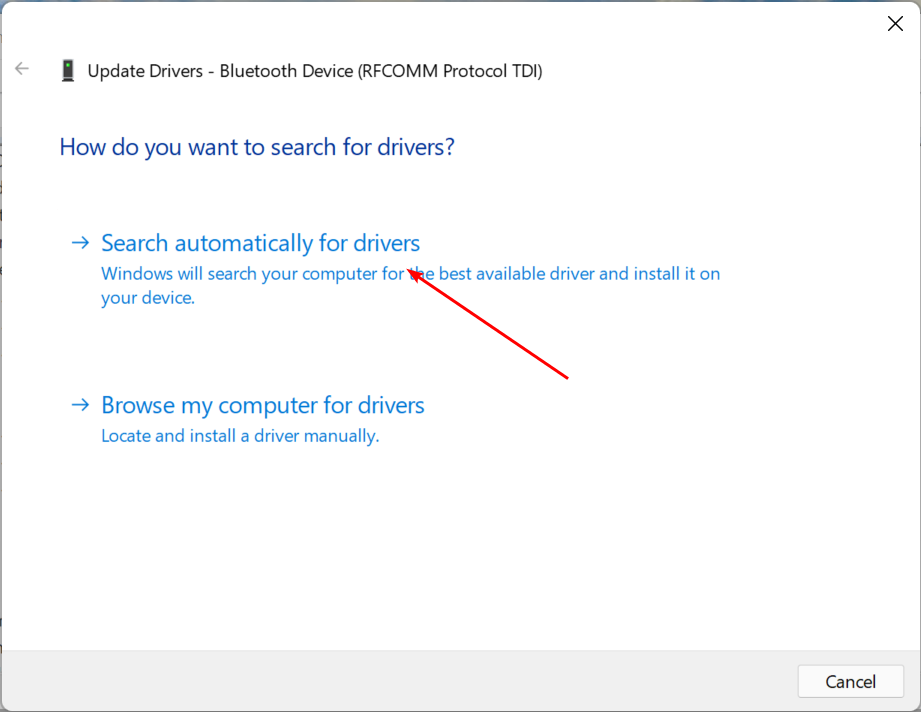
You’ll be presented with two options. Select Search automatically for drivers.
Wait while Windows tried to find and download the best driver for your device.
Although this is the simplest way to do it, it’s not always the most reliable. Sometimes with this method, you won’t get the latest drivers, or you won’t find any drivers at all.
Luckily, there’s a more advanced solution that you can use.
On the input field on the left, enter your product name or select the product category. Once you find your model, select Driver & Utility from the right side.
Depending on the selected device, you might have to select the correct BIOS model for it. After that, select the operating system that you’re using.
A list of available drivers will now appear. Locate the desired driver and click the Download button next to it.
Wait for the driver to download.
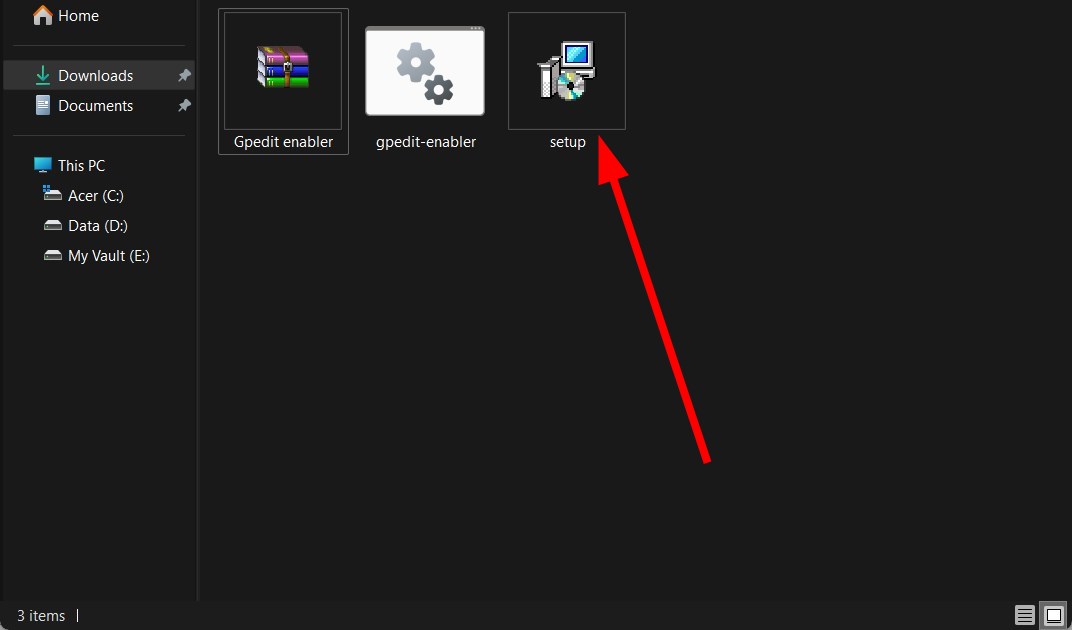
Once it’s downloaded, double-click the setup file and follow the instructions to install the driver.
Keep in mind that you need to repeat these steps for all drivers that you want to install.
This method is a bit more complex since you need to know the exact model of the device that you want to upgrade. However, by using it you’ll always get the latest ASUS ROG drivers or any other driver for your PC.
3. Update the drivers with a specialized tool
There is specialized software you can use to entirely scan the system and detect missing drivers in your Windows 11 device, thus installing the manufacturer’s official drivers with one click.
4. Use the MyASUS app
NOTE
This method is useful if you have an ASUS laptop or notebook. If you have individual ASUS hardware, this method might not work for you.
Press Windows key + S and enter store. Select Microsoft Store from the list.
Search for MyASUS and select MyASUS from the list of results.
Click the Get button in the top right corner and wait for the software to download.
Once the software is downloaded, click Open.
Select the desired option. We chose Explore with limited features, however, you might want to use the other one and create an ASUS account if this one isn’t working for you.
Next, go to Customer Support in the left pane.
In the right pane, you should see available BIOS and driver updates. Locate the driver you want to update and click the download arrow and the software will do the rest.
While ASUS drivers download utility is useful, it might not work properly if you don’t have an ASUS laptop or notebook.
As you can see, downloading and installing ASUS drivers is simpler than you think. While using the Device Manager is the most straightforward solution, it doesn’t always give the best results.
For a complete overview of MyASUS features and how to make the most of them, check out How to Use MyASUS.
A blue screen of death (BSOD) is a common error screen on Microsoft Windows. Each BSOD error is unique, and the text message may vary depending on the cause of the crash. For instance, a section of users has been getting the Amdkmpfd.sys BSOD error.
One thing that stands out from most of these cases is that they all have an AMD graphics card. BSODs can occur for many reasons, including hardware failure or memory corruption. That being said, let’s get to the root cause of this error and possible solutions.
Why am I getting the Amdkmpfd.sys BSOD error?
If you’re wondering what triggered the Amdkmpfd.sys BSOD error, below are some possible causes:
Faulty hardware – Sometimes, installing new hardware can cause the BSOD, especially if the new hardware is incompatible with existing programs.
Corrupt software drivers – Downloading drivers from unofficial sites could have you end up with corrupt drivers that cause this error message to appear when you boot up your computer.
Driver conflicts – Driver conflicts are common causes of this error message, especially if you have recently updated or reinstalled one of your software programs.
Fast startup – While most users enable the fast startup feature to speed up their PCs, it can also bring up issues such as BSOD errors.
Overheating – Another reason why you may get the Amdkmpfd.sys BSOD error is because your computer has been overheating for quite some time.
How can I fix the Amdkmpfd.sys BSOD error?
Try the following simple tips before moving to the more complex solutions:
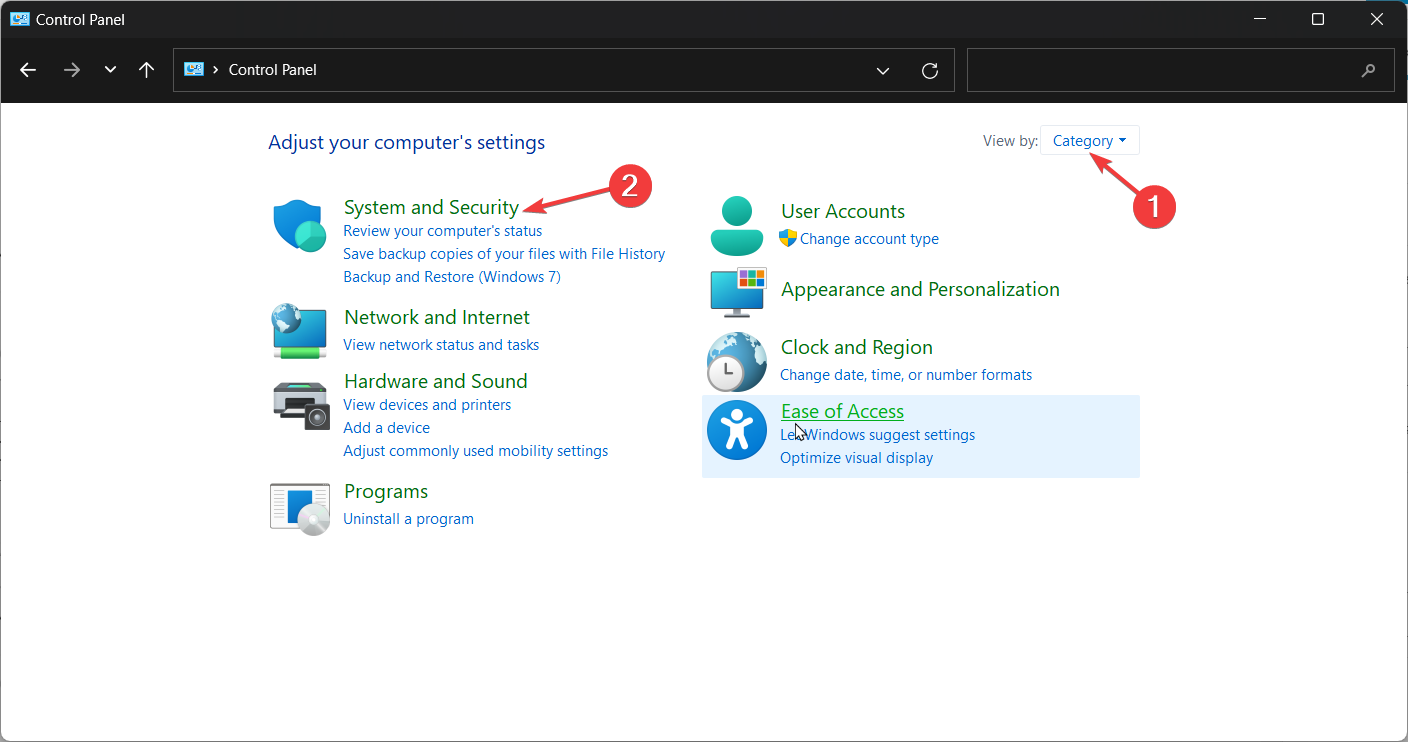
Hit the Windows key, type Control Panel in the search bar, and click Open.
Click on System and Security.
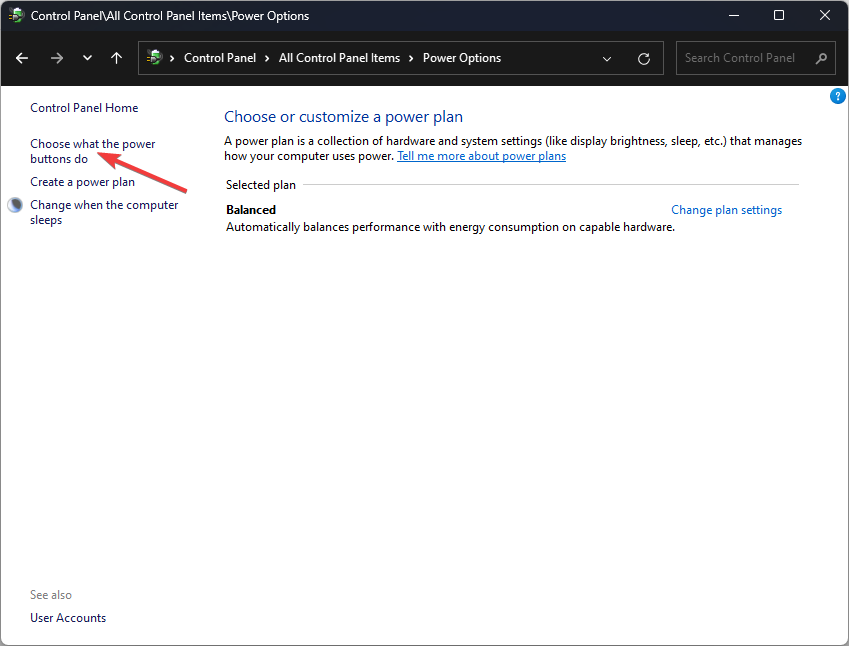
Next, select Power Options.
Click on Choose what the power buttons do from the list of options on the left.
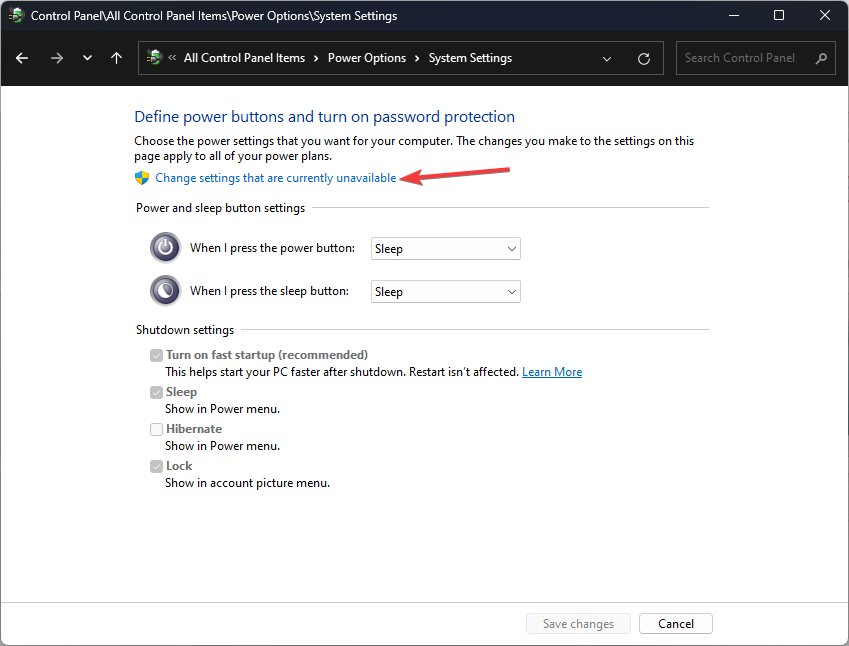
Press on Change settings that are currently unavailable.
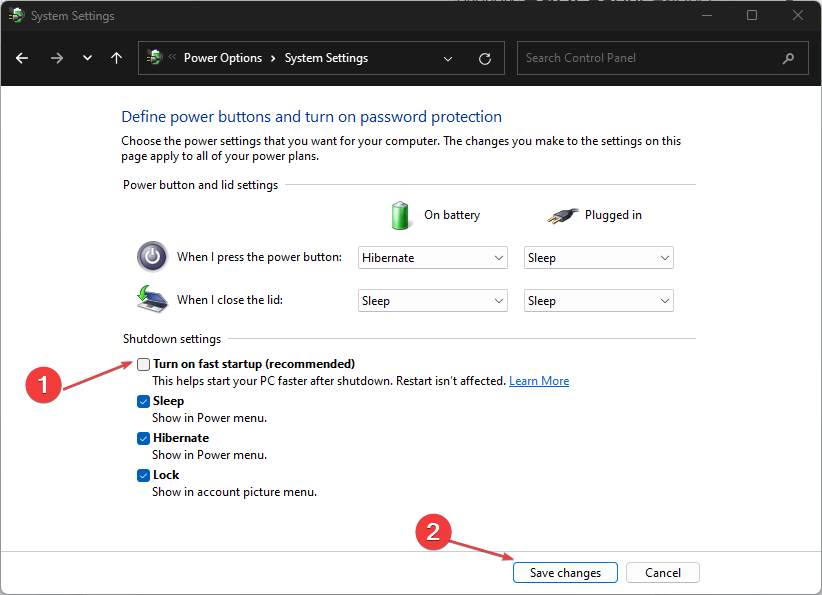
Uncheck the Turn on fast startup box and then click on Save changes.
Although Fast startup allows your PC to start up much faster, especially if you were experiencing a slow boot, it has been known to cause problems.
This is because when you shut down your computer, it goes through a series of steps to make sure all your data is safely written to the hard drive.
Fast startup lets you bypass those steps, so when you start up again, there’s no waiting for your PC to load everything back into memory again. The downside is that if something goes wrong during startup Windows won’t be able to tell, at which point it’ll throw a BSOD error.
2. Update your graphics driver
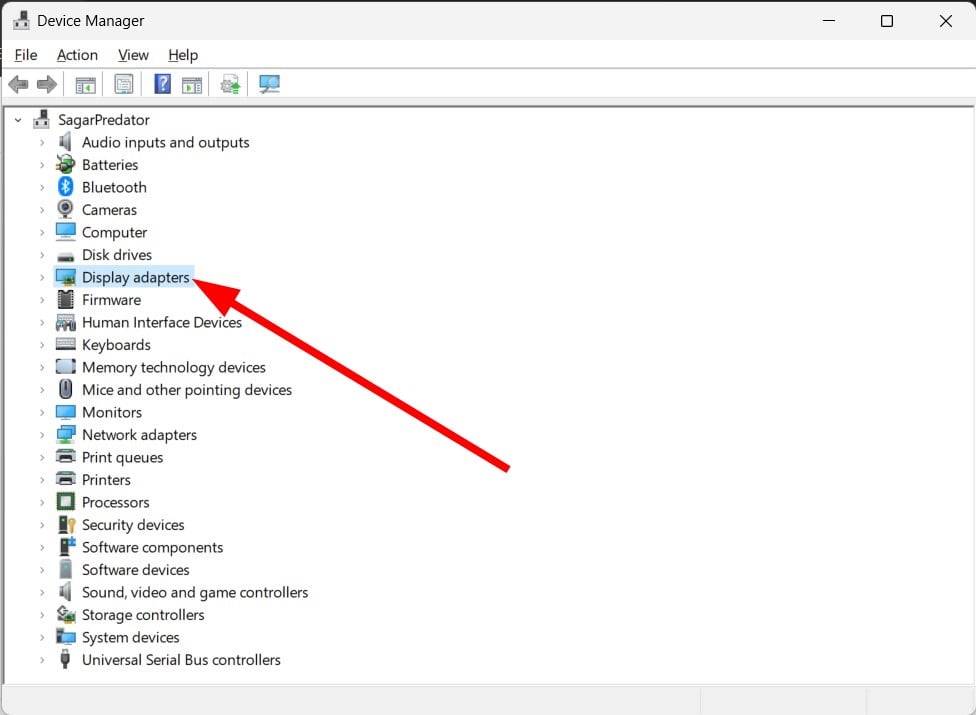
Click on the Windows button, type Device Manager in the search bar, and click Open.
Navigate to Display adapters to expand, right-click on your AMD graphics card and select Update driver.
Select Search automatically for drivers.
While this method usually works well, sometimes Windows keeps installing old or wrong AMD drivers. In such a case, you need an alternative way to update your drivers. A driver updater tool should suffice, given how effective they are.
Our top choice for this job has to be Outbyte Driver Updater because it has been tried and tested as the perfect automatic tool.
Not only does it scan and detect your PC for missing/old/corrupt drivers, but it also downloads and installs them.
Outbyte Driver Updater
Take care of any system flaws on your PC using this fully effective driver management tool.
Click on the Search icon, type Device Manager in the search bar, and click Open.
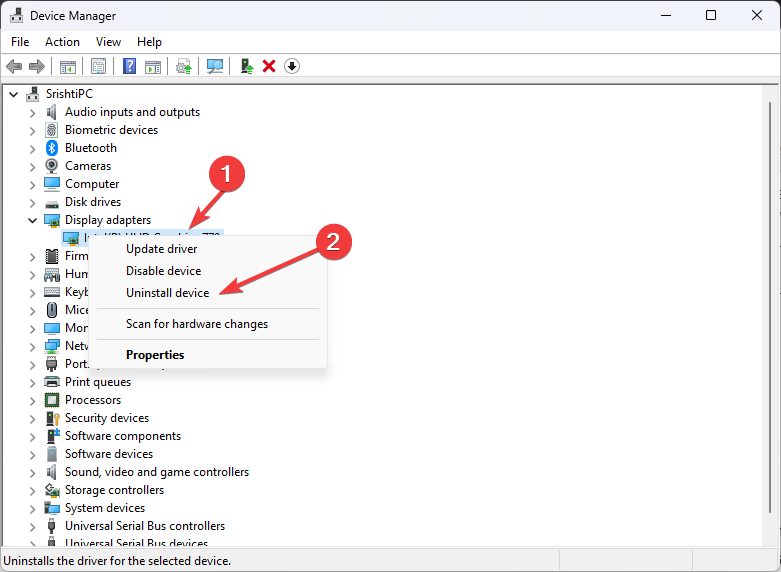
Navigate to Display adapters to expand, right-click on your AMD graphics card and select Uninstall device.
Confirm uninstallation in the next dialog box.
Restart your PC, and the drivers will automatically be reinstalled.
Some users reported a side effect after reinstalling the driver: the FPS drastically dropped in some of their games. If you have experienced the same issue, check out our article on how to deal with FPS drops and stuttering.
And that’s how to resolve the Amdkmpfd.sys BSOD error. Sometimes, not even the solutions listed above can save you if your AMD graphics card has become obsolete. You’ll have no choice but to upgrade to a new GPU.
Let us know what solution has resolved this issue in the comment section below.
What are the odds that using Bluetooth headphones on your PC could have you to end up with a BSoD error? Well, that is the latest conundrum that Windows users face, dubbed btha2dp.sys error.
The most common issue you’ll likely encounter with the feature is Bluetooth not working. However, a BSoD error implies the issue is serious, as most users reported their PCs immediately restarted. Let’s examine the causes and how to fix it, shall we?
What causes the btha2dp.sys BSoD error?
The btha2dp.sys file is used to support Bluetooth devices and headset devices. If your computer fails to load this file during start-up, it can cause it to crash with a BSoD error message.
The most common causes for this type of error include:
Virus infection – Viruses and malware can infect your system files and corrupt them, which causes the BSoD error.
Overheating – Overheating components inside your PC, such as the CPU or GPU, causes BSoD errors.
Corrupt system files – If you suspect that there are corrupted system files in your PC, it is very likely that this problem could be caused by a hardware issue.
Incompatible software – Sometimes, certain applications can interfere with other programs’ functionality. Security software is notorious for this behavior and tends to cause system crashes along with other errors like BSoDs.
How do I fix the btha2dp.sys BSoD error?
A few basic troubleshooting steps that could save the day include:
Unpair and repair the Bluetooth device. This involves you forgetting the device from your PC and then repairing it.
Check whether your firewall or antivirus is blocking the connection and disable it. Sometimes, the problem is your antivirus, and you may have to find an alternative that performs similar functions.
Run the DISM and SFC scans to check for any corrupted system files.
1. Check for Windows updates
Hit the Start Menu icon and click on Settings.
Select Windows Update and click on Check for updates.
Click the Run option for the Windows Update troubleshooter.
3. Run the Bluetooth troubleshooter
Hit the Windows key and click on Settings.
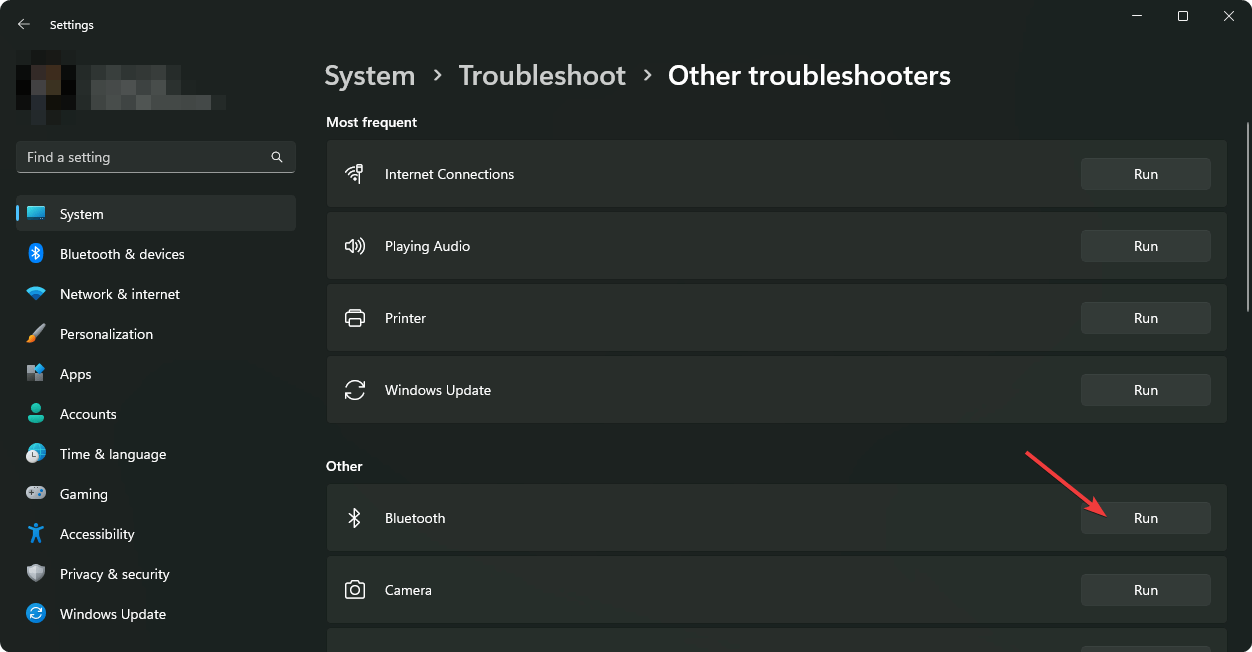
Click on System and select Troubleshoot.
Navigate to Other troubleshooters.
Click the Run option for the Bluetooth troubleshooter.
4. Update your Bluetooth driver
Click on the Start Menu icon, type Device Manager in the search bar, and click Open.
Find your Bluetooth device, right-click and select Update driver.
Select Search automatically for drivers.
Restart your PC and try the updates once more.
A section of users admitted to ending up with the wrong drivers while using Device Manager to update their drivers. An alternative option would be to download them straight from the manufacturer.
Better yet, why not let a third-party tool do all the heavy lifting? Outbyte Driver Updater is capable of scanning for any outdated or corrupt drivers and then searching from its wide database. It will then replace them with the correct versions and does all this automatically.
Outbyte Driver Updater
Fix all driver-related impediments and find the newest updates with Outbyte Driver Updater for better performance.
Click on the Start Menu icon, type Device Manager in the search bar, and click Open.
Navigate to your Bluetooth device, right-click, and select Uninstall device.
Check the Delete the driver software for this device box, and click Uninstall.
Restart your PC, and the driver will automatically reinstall.
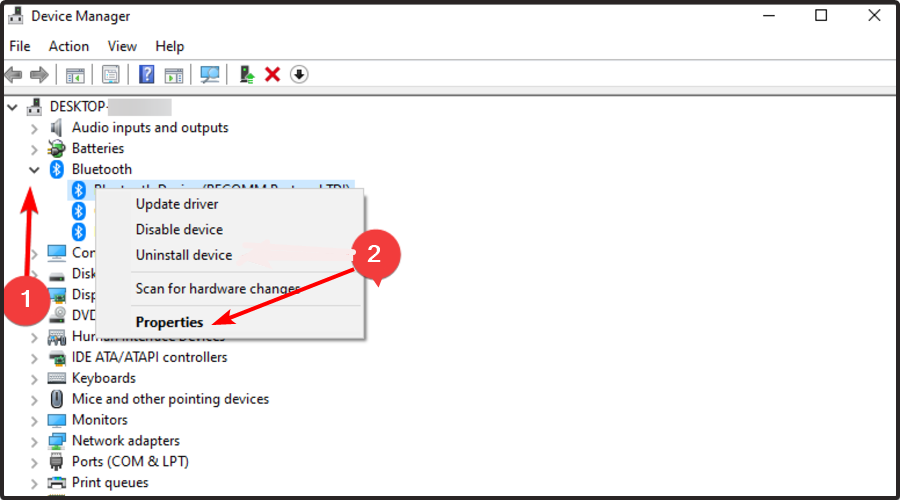
6. Rollback previous Bluetooth drivers
Press the Windows Search icon, type Device Manager, and click Open.
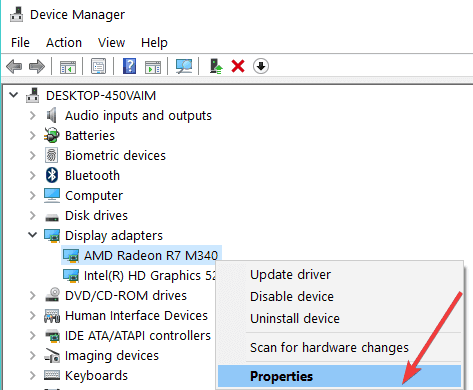
Right-click on your Bluetooth device and select Properties.
Click on the Driver tab, then click the Roll Back Driver button.
Select a reason for rolling back the driver.
Restart your PC.
Hopefully, you’ve been able to address the btha2dp.sys BSoD error. However, if that is not the case, we highly recommend installing BSoD fixer tools. It can be tedious to keep trying solution after solution when encountering such errors.
Luckily, these tools are comprehensive in their scans and can repair many issues. Elsewhere, you may also come across the Tcpip.sys BSoD error or the INSUFFICIENT_SYSTEM_MAP_REGS error, so don’t hesitate to check out our article for detailed fixes.
Many of our readers report an error saying The program can’t start because MFC140U.DLL is missing from their computers when opening an app. It occurs when the needed DLL file can’t be accessed for some reason. However, we’ll show you how to fix the error as we go further into the article.
Aside from the mfc140u.dll not found error, there are other DLL file missing errors you can run into on Windows 11.
Why is mfc140u.all not found?
If a mfc140u.dll file required for running a program is missing from your PC, you won’t be able to run it which results in an error message. Some factors that can cause this are:
Corrupt system files – If the mfc140u.dll file the program wants to access is corrupt, it can become inaccessible or unavailable when invoked. It can be due to the impact of corrupt system files that have infected it, causing its functionality to be suppressed.
Interference from other apps – Most DLL file missing error appears due to a program on your PC overwriting the file and rendering it unusable. It makes it impossible for other programs to fetch the file, causing them to stop working.
Viruses and malware – Users may run into the mfc140u.dll not found on Windows 11 due to malware or virus deleting the DLL files.
Fortunately, there are some troubleshooting steps to resolve the error and get your apps running again.
What can I do if mfc140u.dll is not found?
Before trying any advanced troubleshooting steps, go through the following:
Left-click the Start button, type command prompt, and click Run as administrator.
Click Yes on the User Account Control window.
Type the following and press Enter, then Wait for Windows to register the DLL: regsvr32 MFC140U.DLL
Restart your PC.
Registering the mfc140u.dll file will revalidate the file and fix the error on your computer. It helps the system rewrite the file, making it visible to the needed services.
Microsoft news recap is a weekly feature highlighting the top Microsoft news stories of the past week. Sit back, grab some coffee, and enjoy the read!
Bing Image Creator officially ships in Creative mode
Microsoft’s AI image generation tool, Bing Image Creator, has launched in Creative mode, allowing users who have been given access to generate image using AI, by supplying a description of the desired image. It’s not unlimited use, however, as users are given a set amount of weekly credits, but can also purchase more using Microsoft Rewards points.
CMA provisionally concludes Activision Blizzard deal will not harm competition, though investigation continues
WhatsApp rolls out new Windows client with improved group calling features
WhatsApp has introduced a new app for Windows, with a focus on improving the group calling experience. The app allows for 8 people to be in a video call at the same time, and audio calls with up to 32 people, whilst offering end-to-end encrypted communication.
Microsoft announces developer toolkit that will measure Xbox energy consumption
The Windows 11 scaling issue on High DPI Monitors happens when the system display struggles to resolve the size of the screen content. It can cause the content to be blurry or distorted.
If the monitor or device you’re using doesn’t respond to scaling or has scaling issues, it can be due to many factors. Some notable ones are:
Unsupported High Definition displays – Some apps and external monitors don’t support features like High DPI scaling by default. So, you may not be able to adjust its display quality or have it adjust to the system settings.
Custom scaling – Whereas custom scaling allows you to tailor the display to your needs, it doesn’t always work as it should.
Moving app windows between monitors using different display resolutions – The scaling issue may occur if you’re switching between monitors using varying display resolutions. It causes problems with the scaling because the display settings that apply to one, won’t apply to the other.
Using separate display configurations on the PC – There are times when you use different screen features like docking and undocking configuration on the same system, which can cause scaling issues as these features have different screen sizes and resolutions.
Faulty Graphics drivers – When your drivers are outdated, they won’t be able to access patches for fixing bugs, causing them to malfunction.
These factors may vary on different devices. Nonetheless, you can fix the issue by troubleshooting some display settings on your PC.
How can I fix scaling issues on Windows 11 high DPI monitors?
If you can’t get around the problem, proceed with the solutions below:
1. Adjust the DPI Scaling feature for individual app
Left-click the Start button, find the app whose DPI settings you want to change, right-click on it, then select Open file location from the drop-down menu.
Right-click the application’s shortcut on the left pane and select Properties from the context menu.
Go to the Compatibility tab and click Change high DPI settings.
Check the box for Override high DPI scaling behavior. Scaling performed by, then select System (Enhanced) from the drop-down menu below.
Click OK to save the changes.
Restate the app and check if the issue persists.
The above steps will change the DPI settings for the specific app and resolve any scaling issues you experience while running it.
2. Tweak Windows Display settings
Press the Windows + I to open the Windows Settings app.
Click on System from the left pane, then select the Display option from the right.
Go to the Scale and Layout tab, click the arrow button after Scale, and input the scaling percentage you want, then check the box against it.
If the Signout prompt appears, click it to sign out of your system, then sign in.
Restart your PC.
Using the Custom scaling feature allows you to modify the scaling percentage you want to achieve your display resolution.
Press the Windows + I to open the Windows Settings app.
Click on System from the left pane, then select the Display option from the right.
Click the arrow button for Graphics.
Go to the app whose graphics settings you want to change and click the Options button.
Tick the radio button for High performance and click the Save button.
Close the Settings app and check if the issue persists.
The High-performance option in the Graphics settings helps the system adjust to High DPI scaling.
7. Update Windows OS
Press the Windows + I to open the Windows Settings app.
Click the Windows Update category and click on Check for Updates. Wait for the Windows update result and click on Install Update if a Windows update is available.
Restart your PC.
Updating the Windows OS will install new updates and patches for fixing bugs affecting your display and resolving scaling issues.
If Fortnite is using 100% of your CPU, you’re not alone. High CPU usage can be caused by graphics settings, outdated drivers, background apps, or even overheating.
Disabling multithreaded rendering, enabling performance mode, and updating your drivers can help. Find step by step instructions for these and more tried and tested solutions below.
What can I do to fix high CPU usage on Fortnite?
1. Disable background apps
Press the Windows + I key to open the Settings app.
Select Apps and click on Installed apps.
Choose the app, then click the three dots, and select Advanced options.
Then, tap the drop-down button for Background app permissions and click on Never.
Now, repeat the same process for other apps.
Disabling apps from running in the background prevents them from contending with Fortnite for system resources.
Right-click the Start button, then select the Device Manager from the drop-down.
Expand the Display adapter entry, right-click on the device driver, then select Update driver from the drop-down menu.
Click on Search automatically for the updated driver software option.
Restart your PC.
Updating the graphics drivers will fix bugs and corrupt graphics cards affecting the Fortnite game on your computer. Read about updating graphics drivers on Windows 11 if you have any issues.
3. Verify Fortnite game files
Left-click the Start button, type Epic Games Launcher, then click on it to open the app.
Select Library.
Click on the 3-dot icon to open Menu, and select Manage from the drop-down.
Click the Verify button on the Verify Files tab. After the verification, follow the on-screen prompt.
Verifying game files check if the game files are missing or corrupt.
Left-click the Start button, type Epic Games Launcher, then click on it to open the app.
Click on the Profile icon in the top-right corner. Select Settings from the drop-down menu.
Click on the Install Now button, then tap on Yes if the UAC confirmation pops up.
After the update, launch Fortnite and check if the high CPU usage persists.
Installing the latest updates for Epic Games Launcher will resolve bugs affecting its games and add new features to improve performance.
5. Perform a clean boot
Press Windows + R, type msconfig, and press Enter.
In the System Configuration window, click on the Services tab.
Check the box for Hide all Microsoft services, then click Disable all.
Go to the Startup tab and click on Open Task Manager.
In Task Manager, disable all startup items by selecting each one and clicking Disable.
Close Task Manager and click OK in the System Configuration window.
Restart your PC.
Now your PC will boot only with the absolute necessary apps. Try running Fortnite and see if the high CPU usage persists. If it doesn’t your culprit is most likely another app that’s interfering with Fortnite.
Re-enable apps one by one and keep an eye on CPU usage to identify the faulty one.
What causes high CPU usage on Fortnite?
Fortnite’s high CPU usage may occur due to many factors. Some are:
Outdated graphics cards– It is because your system can’t access updates to fix the bugs impeding the graphics device from functioning correctly, causing it to use more system resources than needed for the game.
Game requirements – Fortnite has system requirements that determine the specifications of devices that can play the game. So, you can experience Fortnite’s high CPU usage and low GPU usage if your PC can’t run the game.
Interference from other running apps – Your game performance can be affected by the activities of other apps. When you have many apps running simultaneously, it doesn’t give enough system resources to Fortnite, causing high CPU usage.
Genshin Impact is a popular game that lets you play different characters in an open world. Unfortunately, the game requires a bit of a powerful CPU in order for you to run it. However, there are several users that have reported that they are facing Genshin Impact’s high CPU usage problem.
Well, there are many reasons for triggering the Genshin Impact high CPU usage problem. In this guide, we will show you how to quickly fix this issue and play Genshin Impact without any problems. So let us get right into it.
What is causing Genshin Impact’s high CPU usage issue?
Here are a few reasons we have found out the most common reasons why the Genshin Impact high CPU usage is triggered.
Your PC does not meet the min requirements: Chances are that the PC that you are running the Genshin Impact game on does not meet the min system requirements, because of which the PC is struggling to run the game.
There are multiple background tasks: If you have a bunch of background tasks running then not only this game but you will also come across high CPU usage issues with other apps.
Fullscreen optimizations aren’t working: Often, the fullscreen optimizations don’t work well with everyone, which could be the reason that is triggering the issue.
The Power Plan isn’t correct: You might have selected the power plan that stresses more on saving the battery.
How can I fix the Genshin Impact high CPU usage issue?
1. Stop overclocking your PC
If you are using overclocking software, you should ensure that your PC isn’t being overclocked. While overclocking pushes your PC to improve the performance of resource-intensive apps and games such as Genshin Impact, it could also lead to high CPU usage.
Disable any overclocking application you have on your PC and run the game to see if this resolves the Genshin Impact high CPU usage issue.
2. Update the GPU driver
Open the Start menu by pressing the Win key.
Open Device Manager.
Expand the Display adapter section.
Open your GPU driver.
Switch to the Driver tab.
Click on the Update driver option.
Select Search automatically for drivers option.
Follow the on-screen prompts to update the driver.
You can update the driver on your PC using the above method from the Device Manager. But this method isn’t feasible when you have to update multiple drivers.
In such a case, we suggest you rely on a dedicated driver updater called Outbyte Driver Updater. With the tool, you can easily update multiple drivers, perform scheduled driver scans, create driver backups, and much more.
Outbyte Driver Updater
Simplify the updating process and let Outbyte Driver Updater locate the latest driver options in no time.
When you select the high performance battery plan, you are making sure that all the resources are optimally utilized to run the Genshin Impact game, reducing the high CPU usage issue.
5. Change in-game graphics settings
Launch the Genshin Impact game.
Click on Settings.
Select Graphics.
Tweak the below settings as mentioned:
Graphics Quality: Low
Display Mode: Fullscreen or the native resolution
FPS: 60
V-Sync: Open
Render Resolution: 1.1 or 0.8
Shadow Quality: Low
Visual Effects: Low
SFX Quality: Low
Overall Settings: Low
Anti-Aliasing: SMAA
Motion Blur: Close
The above settings will help you run the game using meager resources allowing the CPU to have some pause and, in turn, get rid of the high CPU usage issue.
6. Disable fullscreen optimizations
Right-click on the Genshin Impact desktop icon.
Select Properties.
Switch to the Compatibility tab.
Check the Disable fullscreen optimization option.
Click Apply and OK.
Restart your PC.
Sometimes the fullscreen optimization may not improve the gameplay but instead worsen it for you and result in high CPU usage, which could also happen with the Genshin Impact game. Try disabling the fullscreen optimizations and check whether this resolves the issue.
7. Close all unnecessary background tasks
Press Ctrl + Shift + Esc buttons to open the Task Manager.
Switch to the Processes tab.
Select the unwanted processes, one by one, and hit the End task button at the top.
You should also ensure that not many background tasks or processes are running, as this will impact gaming performance and increase CPU usage.
That is it from us in this guide. You could also try installing the latest Windows update or updating the game to fix the issue, as this Genshin Impact high CPU usage issue could be because of a bug.
Well, the error code 0x80240004 can appear to you when you try to download an app from the Microsoft Store or even when you try to update your Windows PC. In the former’s case, it prevents you from downloading an app, and in the latter’s case, you won’t be able to install necessary updates.
Thankfully in this guide, we will show you a bunch of solutions that will help fix the error code 0x80240004 associated with the Microsoft Store or the Windows update. So let us get right into the guide.
Why am I getting error code 0x80240004?
Before heading over to the solutions, it is better to understand the reasons triggering the error code 0x80240004 on your PC.
Your PC is infected with the virus: A virus or malware attack can not only cause your PC to get slow, but it can also affect your system’s performance.
Incorrect date and time: If the time zone has been changed, by you or a third-party app, then it could cause multiple issues on your PC.
Windows update service isn’t running: For Windows updates to get installed, you have to ensure that the associated service is running.
Let us take a look at the solutions and resolve this issue.
How can I fix the error 0x80240004?
1. Run the Windows update/Windows Store troubleshooter
Press the Win + I keys to open the Settings menu.
Click on Troubleshoot.
Select Other troubleshooters.
Click on the Run button next to Windows Update.
Follow the on-screen prompt to start the troubleshooting process.
Apply the prompted fixes.
Click on the Run button next to Windows Store Apps.
Apply the prompted fixes.
Restart your PC and check if this resolves the issue or not.
Your Windows PC offers a bunch of troubleshooters that can help you resolve various issues on your PC. A couple of which are the Windows update and Windows Store troubleshooters that fix various petty issues triggering the error 0x80240004.
2. Check if necessary services are running
Press the Win + R keys to open the Run dialogue.
Type services.msc and press Enter.
Locate one by one, and check if the below services are running.
BITS (Background Intelligent Transfer Service)
Cryptographic
Windows Installer
Windows Update Services
It would be best if you made sure that the services mentioned above are running and aren’t stopped. If these are stopped, press the Start button and check whether this fixes the 0x80240004 error.
Click on Time Zone drop-down menu and choose your time zone.
Scroll down and click the Sync now button.
Incorrect date and time can also cause multiple issues on your PC, including the error 0x80240004 with the Microsoft Store or Windows update. Set the correct time zone and the date and see if this resolves the issue.
4. Perform a virus scan
Press the Win key to open the Start menu.
Open Windows Security.
Click on Virus & threat protection.
Click on Quick Scan.
Wait for the scan to complete.
Apply the prompted fixes.
You can also click on Scan options and select Full scan for a deep scan.
Restart your PC.
You should always make sure that your PC is protected, and for that, you should perform regular scans. Unfortunately, however, Windows Security isn’t that effective when it comes to tackling modern viruses or malware.
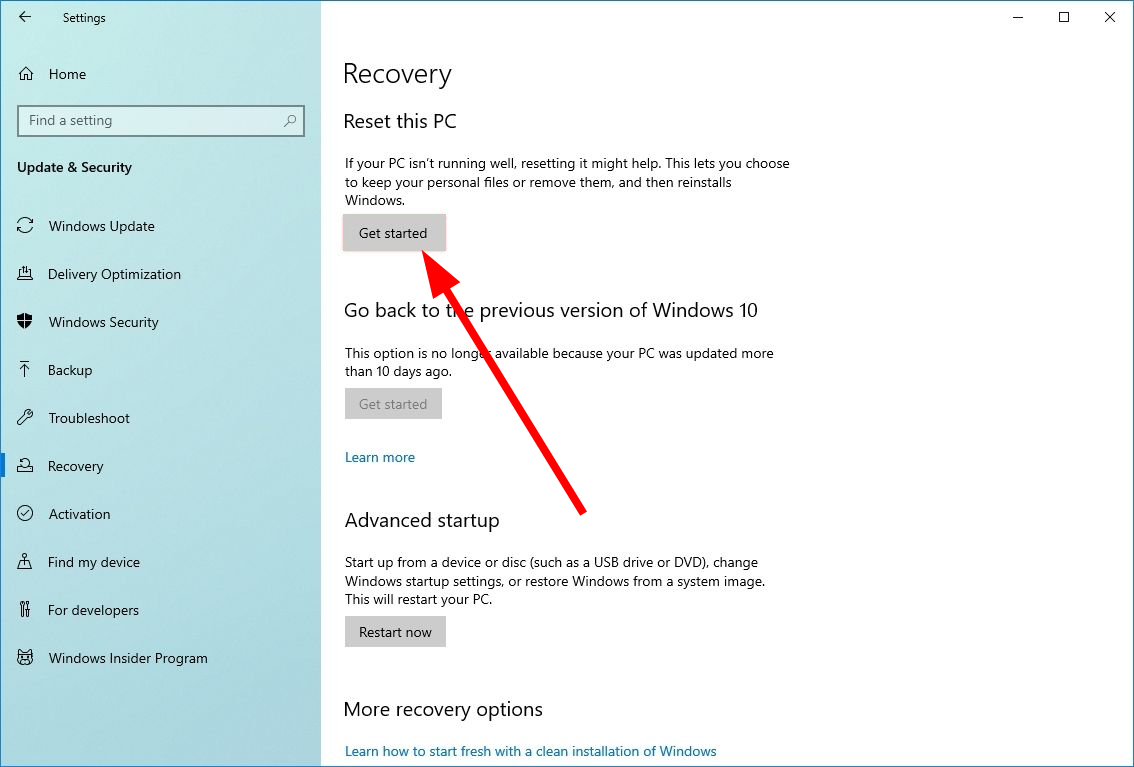
Click on the Reset PC button for the Reset this PC option.
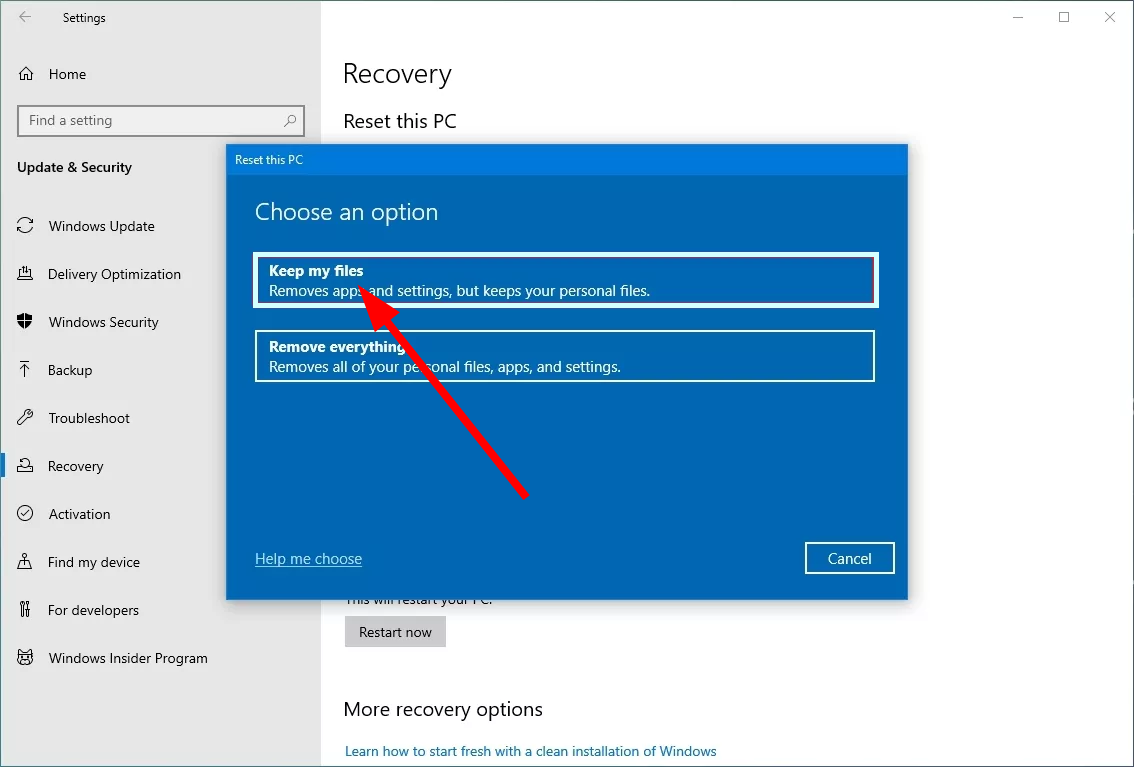
Select the Keep my files option.
Follow the prompts.
Restart your PC.
If nothing works, then you should probably resort to resetting your PC. When you reset your PC, you can easily take your PC back to a state where everything was usually working, and the error 0x80240004 wasn’t troubling you.
That is it from us in this guide. If you are getting Windows update error 0x800f0845, you can check out our guide and resolve the problem.
For users coming across the update error 0xFFFFFFFF, they should apply the solutions mentioned in our guide to fix the problem.
Feel free to let us know in the comments below which one of the above solutions resolved the error code 0x80240004 on your PC.
This error happens when a user is trying to send or receive an email via Outlook or when they are trying to download the offline address book.
In this guide, we will give you many solutions to help you resolve the MS Outlook error code 0x80190194. We will also list down the reasons that could trigger this issue. So, let us get right into it.
What is causing MS Outlook error 0x80190194?
We researched the internet and found a bunch of solutions that are responsible for the Outlook 0x80190194 error.
Corrupt Outlook folder: If your Outlook email client’s AppData folder goes corrupt, you will come across the error 0x80190194.
Corrupt offline address book: Chances are that the Offline Address Book (OAB) you are trying to download is partially corrupt.
Corrupt Outlook profile: This issue, apart from being related to the address book, is also associated with the corrupt Outlook profile.
Problematic Outlook cache files: Also, corrupt cache files can give rise to multiple issues on your PC.
Now, let us look at the solutions that will help you resolve Outlook error 0x80190194.
How can I fix the Outlook 0x80190194 error?
1. Rename the Outlook folder
Press the Win + R keys to open the Run dialogue.
Type %appdata% and press Enter.
Locate the Roaming folder.
Open the Microsoft folder.
Look for an entry named Outlook.
Rename the Outlook entry to Outlook.old. Unfortunately, this will force your system to create the Outlook folder from scratch.
Restart your PC.
You should be able to fix the Outlook error 0x80190194 after renaming the Outlook folder, as shown above.
2. Clear the contents of the OAB folder
Close the Outlook program if it is running.
Press Win + R keys to open the Run dialogue.
Type %localappdata% and press Enter.
Click on Microsoft.
Open the Outlook folder.
Open the Offline Address Book folder.
Select all files inside the folder.
Delete all files.
Restart your PC and check if this fixes the issue or not.
Follow the on-screen instructions and click Finish.
Return to the Mail dialogue box and select Always use this profile.
Click Apply.
Restart your PC.
If nothing works, it might be that your Outlook profile is having some issue or is corrupt. Because of this, you are getting the Outlook error 0x80190194.
Create a new Outlook profile and download the Offline Address Book to see if this fixes the issue.
Speaking of address books, we have a great guide on how to update the global address list, so you might want to check it out.
That is it from us in this guide. We have a guide that explains some tips to help you fix the slow speed of Outlook email clients.
Some Outlook 2016 users have reported that for them the client crashes as soon as they try to open it. This can be fixed by applying the solutions mentioned in our guide.
If you are getting the Outlook error code 0x8004011c, you should check out our guide that gives a bunch of solutions to fix the error.
If you encountered error code 0x80070006 while updating or installing Windows 10, this guide could help!
We will discuss some available troubleshooting methods to eliminate the error in no time. Let’s get started!
What is error 0x80070006?
Error code 0x80070006 is a Windows error that indicates an issue with Windows Update or the Windows Store. For example, this error appears when an update or installation has failed due to a permissions issue.
While updating, Windows can’t access specific files or folders needed for an update or installation; you can encounter this error. This happens if the user account you are using does not have the necessary permissions to access the files or folders in question.
What causes the Windows installation error 0x80070006?
There are several reasons for this update error: some of the common ones are mentioned here:
Corrupted system files or registry entries – Damaged system files and registry entries could cause various issues, including this error. You need to repair system files to fix it.
Malware infection – If your PC is infected with viruses or malware, your computer might not be able to perform simple tasks, such as updating Windows. You need to run a deep scan using reliable anti-malware software.
Outdated device drivers – Device drivers are important for the proper functioning of your computer. If they are outdated or incompatible, your computer might not work correctly and throw you errors like these. You must update device drivers to the latest version to avoid these issues.
System resources overloaded – If your CPU, RAM, or other system components are overloaded or working at full capacity, you might face this error.
Misconfigured system settings – Incorrect system configurations may cause many issues, including this update error.
Incomplete updates – If while updating your Windows, your computer was interrupted or if the update was not completely installed, it could cause this issue.
What can I do to fix the Windows installation error 0x80070006?
Before engaging in advanced troubleshooting steps, you should consider performing the following checks:
Restart your computer.
Check your internet connection.
1. Run the troubleshooter
Press Windows + I to open the Settings app.
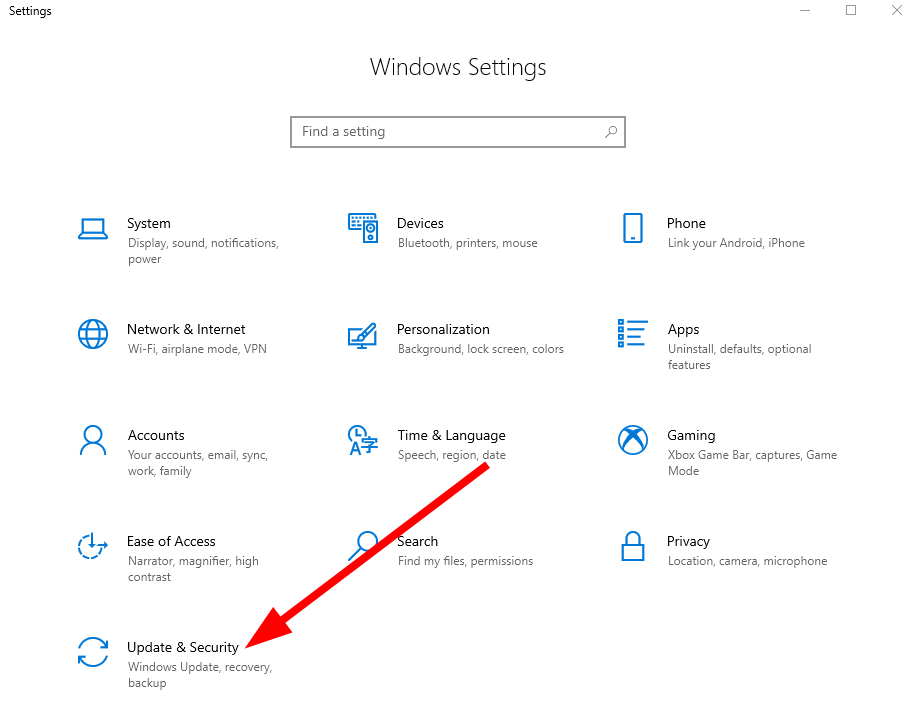
Go to Update & Security.
Click Troubleshoot from the left pane, and select Additional troubleshooters.
Locate Windows Update and click Run the troubleshooter.
Follow the on-screen instructions to complete the process.
2. Install pending updates
Press Windows + I to open the Settings app.
Go to Update & Security.
Click Check for updates.
If available, click Download and install.
Please wait a few minutes and let it download and install the updates. Restart when prompted.
3. Run a malware scan
Press Windows + I to open Settings.
Go toUpdate & Security.
From the left pane, select Windows Security.
Go to Virus & threat protection, and click Scan options.
Select Full scan and click Scan now.
Now Windows Security will scan your computer for infection. If found, delete the malicious files when prompted.
Go to This PC, then C Drive, right-click it, and select Properties.
Switch to the Tools tab, under Error checking, and click Check.
Now click Scan this drive.
Follow the on-screen prompts to complete the process.
5. Use the Command Prompt
5.1 Run SFC and DISM commands
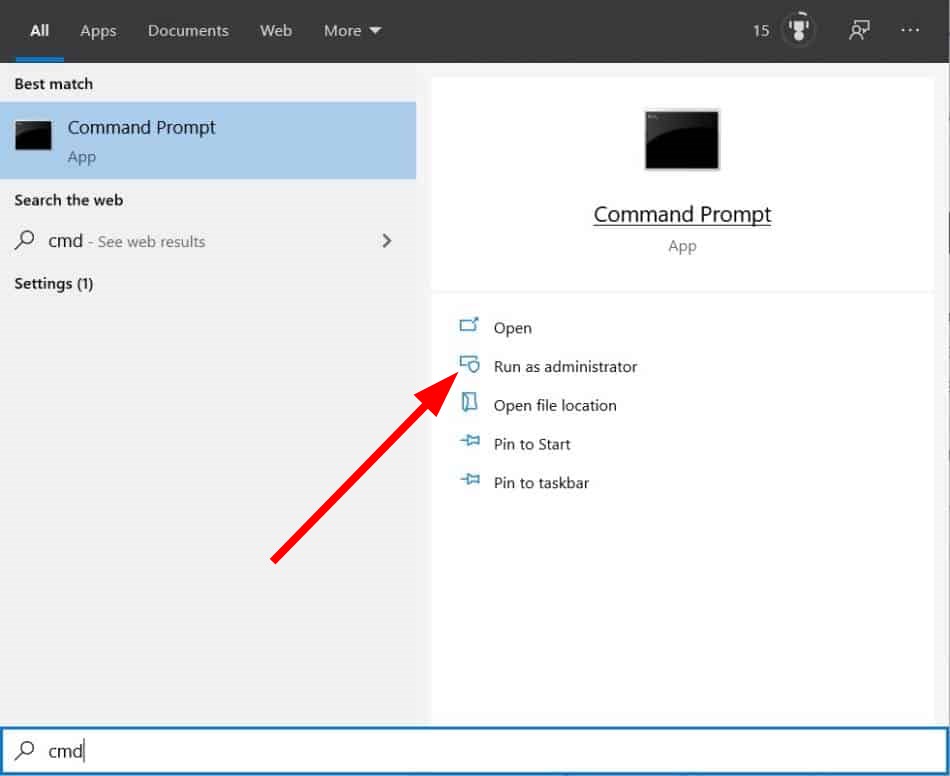
Go to the Search bar, type Command Prompt, and click Run as administrator.
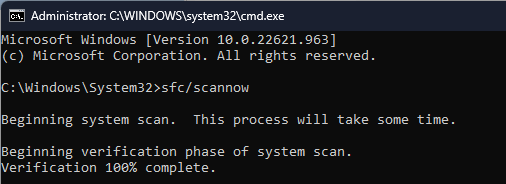
Type the following commands one by one to repair the system file and Windows image, and press Enter after every command: sfc/scannowDISM /Online /Cleanup-Image /RestoreHealth
Restart your computer after the command is executed.
5.2 Reset the Windows Update components
Open Command Prompt with admin rights.
Copy and paste the following commands one by one to stop the BITS, Cryptographic, Windows Update, and MSI Installer; press Enter after every command: net stop bitsnet stop wuauservnet stop appidsvcnet stop cryptsvc
Now to delete qmgr*. dat files, type the following command and press Enter: Del “%ALLUSERSPROFILE%\\Application Data\\Microsoft\\Network\\Downloader\\qmgr*.dat”
Copy and paste the following commands one by one and press Enter after every command to execute it: regsvr32.exe atl.dllregsvr32.exe urlmon.dllregsvr32.exe mshtml.dllregsvr32.exe shdocvw.dllregsvr32.exe browseui.dllregsvr32.exe jscript.dllregsvr32.exe vbscript.dllregsvr32.exe scrrun.dllregsvr32.exe msxml.dllregsvr32.exe msxml3.dllregsvr32.exe msxml6.dllregsvr32.exe actxprxy.dllregsvr32.exe softpub.dllregsvr32.exe wintrust.dllregsvr32.exe dssenh.dllregsvr32.exe rsaenh.dllregsvr32.exe gpkcsp.dllregsvr32.exe sccbase.dllregsvr32.exe slbcsp.dllregsvr32.exe cryptdlg.dllregsvr32.exe oleaut32.dllregsvr32.exe ole32.dllregsvr32.exe shell32.dllregsvr32.exe initpki.dllregsvr32.exe wuapi.dllregsvr32.exe wuaueng.dllregsvr32.exe wuaueng1.dllregsvr32.exe wucltui.dllregsvr32.exe wups.dllregsvr32.exe wups2.dllregsvr32.exe wuweb.dllregsvr32.exe qmgr.dllregsvr32.exe qmgrprxy.dllregsvr32.exe wucltux.dllregsvr32.exe muweb.dllregsvr32.exe wuwebv.dll
To reset Winsock, type the following commands one by one and press Enter after every command: netsh winsock resetnetsh winhttp reset proxy
Now to restart the services that we stopped, copy and paste the following commands and press Enter after every command: net start bitsnet start wuauservnet start appidsvcnet start cryptsvc
Restart your computer to let the changes take effect.
6. Use System Restore
Go to the Search bar, type Control Panel, and click Open.
For View by select Large icons, click Recovery.
Now click Open System Restore.
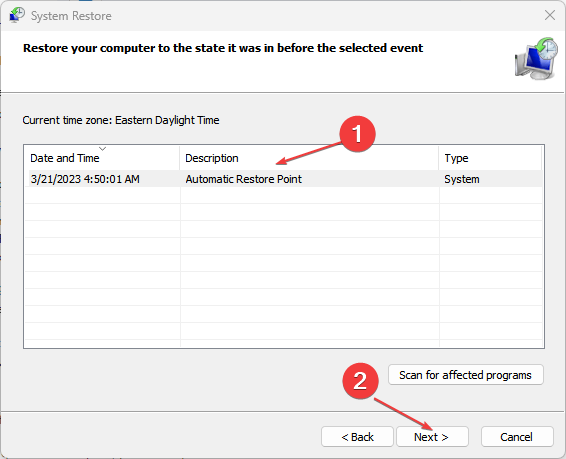
On the System Restore window, click Next.
Select the restore point from the list and click Next.
Click Finish to complete the process.
7. Reset this PC
Press Windows + I to open Settings.
Go toUpdate & Security.
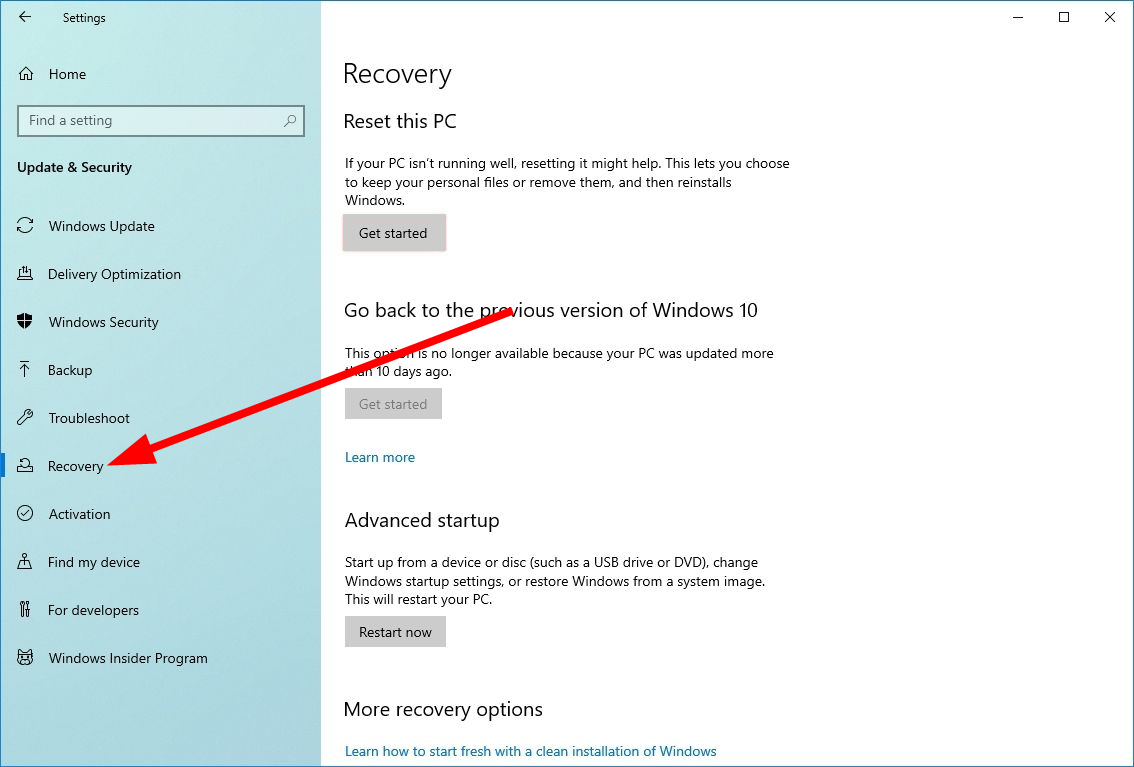
Click Recovery from the left pane; under Reset this PC, click Get Started.
Select Keep my files.
Choose Clouddownload.
On the Additional Settings page, select Next.
Click Reset.
So, these are methods to fix the Windows installation or update error 0x80070006 on your computer. If you have any questions about this error code, please feel free to mention them in the comments section below.
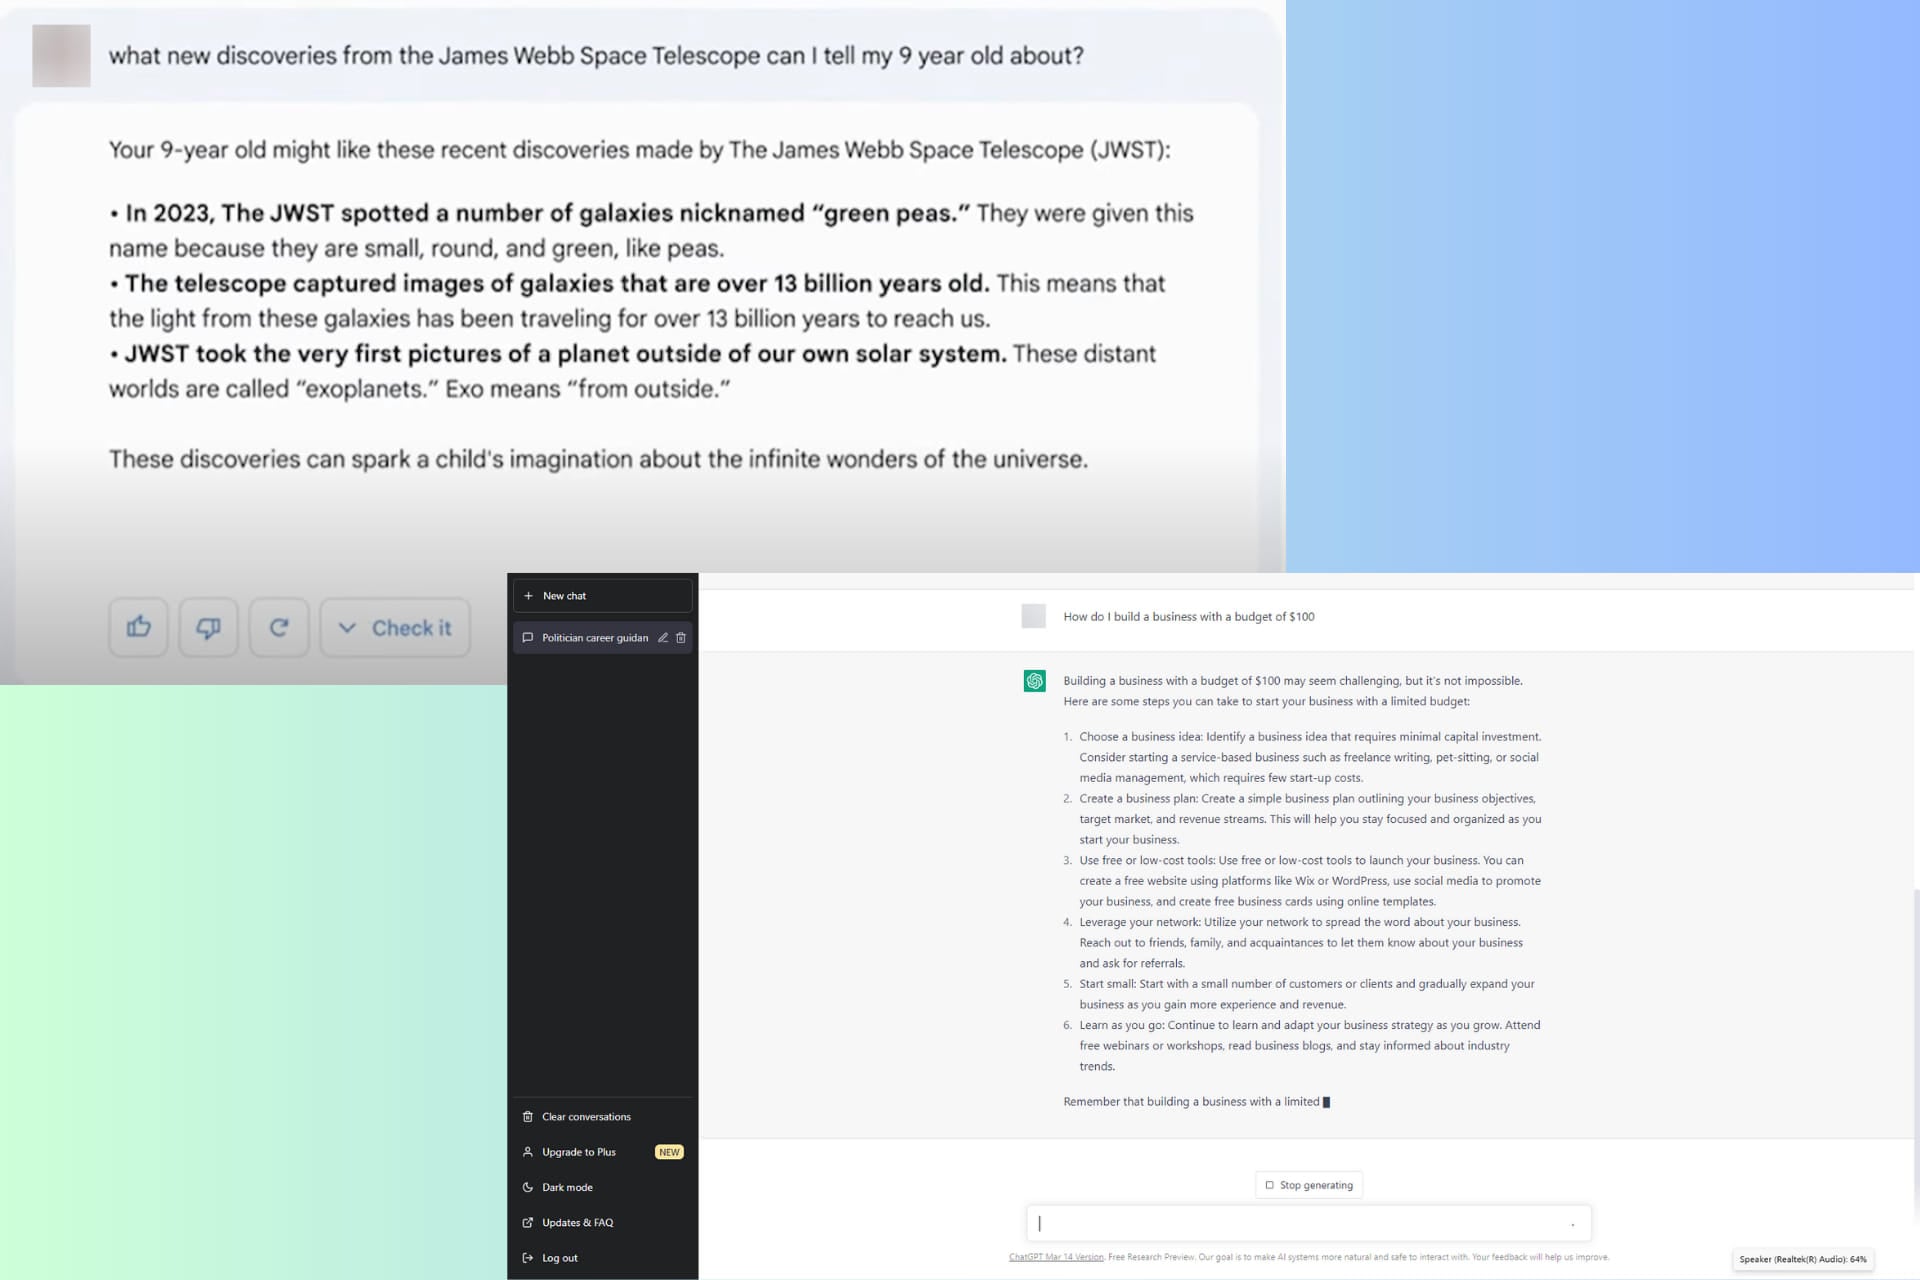
This article is the total ChatGPT 4 vs Google Bard comparison. But it is important to have some context before going into the meat of it.
Regarding communication, two things come to mind – technology and art. On the one hand, we have advanced technologies like ChatGPT that can generate human-like text, answer questions and interact with people in real-time.
On the other hand, we have the traditional art form of storytelling, where bards use their words and voice to captivate an audience and convey messages. Google classes Google Bard as less of an information finder and more of ideas, email, and perhaps poetry.
While ChatGPT 4 and Bard share the common goal of effective communication, they approach it differently. So, we will help you navigate key elements by analyzing and contrasting the two services in this guide.
What is ChatGPT 4?
This should not be mistaken for the last free version, ChatGPT 3. This is the paid version of OpenAI’s language model, built on a multi-modal model. it is more creative, reliable, faster, and accurate than its predecessor.
It is specifically designed for natural language processing (NLP) tasks such as text completion, summarization, and translation and has demonstrated impressive results on a wide range of NLP benchmarks.
The Language model is trained on a diverse range of text data sources, including web pages, books, and articles, to capture the nuances and complexities of natural language. Its applications include chatbots, customer service systems, and personal assistants.
What is Google Bard?
Google Bard is a similar AI language model powered by LaMDA (the Language Model for Dialogue Applications).
Google fondly refers to it as the conversational AI service, and it combines an intelligent language model with the information it draws from Google’s search engine to provide comprehensive, natural responses.
Before we go into details in this ChatGPT vs Bard comparison, note that Google Bard is very much in an experimental stage. It is now only available to people in the US and UK and to a very limited subset of people in these regions.
ChatGPT is also evolving but, in many aspects, may be ahead of the Google competitor. With that in mind, let us explore these two services in greater detail.
ChatGPT vs Bard: How do they stack up against each other
1. Communication methods
The ChatGPT AI language model uses natural language processing to generate text similar to human-generated text. ChatGPT’s ability to generate text is based on its massive dataset, which has been trained on various texts, such as books, articles, and online conversations.
Google Bard, on the other hand, is an AI model that generates ideas and poetry based on a given prompt. Google Bard uses deep learning techniques and rule-based systems to generate responses similar to human thinking.
However, both differ in their approach. ChatGPT generates text algorithmically, while Google Bard uses more specific rules to generate replies. Also, ChatGPT can generate text quickly and consistently, while Google Bard takes time to generate responses intended to be both creative and coherent.
2. Accuracy and authenticity
ChatGPT 4 builds on its predecessor GPT 3, and has a broadened dataset that makes it even more accurate. Because it works with a multi-modal large language model, it can receive queries in text and imagery, improving its authenticity.
On the other hand, Google Bard is trained on Infiniset and specifically designed for conversations and dialogue intended to be similar to responses written by humans.
So, as you may imagine, both services differ in accuracy and authenticity regarding text generation.
OpenAI’s ChatGPT can generate unbiased and objective text, as personal biases or interpretations do not influence it as much. However, this can also result in text that lacks the nuance and emotional depth of human communication.
On the other hand, Google Bard is specifically designed to create emotionally resonant responses. Still, it may be limited in generating other text types, requiring a more objective approach.
3. Scalability and efficiency
This is an important consideration when discussing AI models that generate text, as it affects the speed of text generation.
The OpenAI service is created to be very scalable. It can generate a massive amount of text quite efficiently and fast and can be trained on massive datasets of texts to improve its performance through time.
This is evident in its evolution to the current GPT 4, an upgrade on different versions that have proven more capable and robust.
Also, you can fine-tune it for specific tasks, allowing it to generate more accurate and relevant texts aimed at specific applications. Therefore, it becomes an ideal choice for applications requiring large text volumes, such as content creation or customer service.
ChatGPT 4 wins in this parameter since Google Bard is less scalable due to its specialized focus on producing ideas and poetry. You may expect less scalability regarding other text types. It also seems like it will require more time and resources to fine-tune it for specific applications.
Regarding efficiency, we generally consider ChatGPT 4 more efficient than Google Bard. Its speed makes it an ideal option for applications needing real-time text generation. Google Bard will take longer since it focuses on producing creative and engaging replies.
4. Flexibility and adaptability
This is a very interesting criterion for these two AI services. ChatGPT 4 has a massive knowledge base, and even though this is upgraded from GPT 3, it is still somewhat limited in information to what is contained in this database. However, you would find this sufficient in most cases because of its size.
The OpenAI service is also extremely flexible and adaptable if you need to produce large content; however, it falls short for scenarios outside its knowledge base.
In such a situation, you may find the Google service more adaptable. Especially since it can draw on information on the web. This means it is constantly updated as far as there is new information on the web.
However, the choice between the two may depend on the specific context and the intended use of the generated text.
For applications that require highly customized and personalized text generation, ChatGPT may be a better choice. In contrast, Google Bard may be the better option for applications requiring current information in a highly creative and engaging way.
They both allow you to input a prompt. This can be a simple keyword or a developed question. After you receive a reply, you may modify your prompt so that the AI service generates a response more streamlined to your needs.
ChatGPT 4 takes queries a step further but includes the flexibility of picture uploads. This has seriously enhanced the user experience and tilts usability in its favor.
However, the formatting of responses gives Google Bard some edge. Every response comes with a call to action to Google it. This improves trust and means that you can verify the source of information presented to you, an element lacking in the OpenAI service.
The response from Google Bard also looks more aesthetically pleasing with texts that are much easier to scan than ChatGPT’s chunky responses. This is also important for efficiency in cases where you may not have the time to go through a lengthy response or piece of information.
ChatGPT vs Bard: Key differences
ChatGPT 4
Google Bard
Conversation Retention
Able to remember last conversations up to 3000 words
Retention ability is very limited
Coding
Can create complex code, debug code
No coding features
Language
Primarily English, but also proficient in French, Spanish, Arabic, Italian, Mandarin, Korean, and Japanese
Primarily English
Responses
All responses are from a knowledge base, the Generative Pre-training Transformer 4
Capable of drawing responses from existing internet resources
In conclusion, we must point out that while ChatGPT 4 and Google Bard differ in their approaches and communication methods, they have unique strengths and advantages. You, however, would get great responses and answers from both services.
Also, Bard is in an experimental stage, and you probably will have to join a waiting list to use the service.
The choice between the two may depend on the specific situation or context, such as the size of the audience, the need for speed or personalization, or the desired level of authenticity or creativity. It may also depend on cost since ChatGPT 4 is a 20 USD / month subscription.
By considering the benefits and drawbacks of each, you can better understand how AI technology can work to create an exciting new form of communication.
That’s as much as we will share in this Chatgpt 4 vs Bard comparison. You may want to check out our article on ChatGPT vs Bard.
Lastly, please leave your thoughts in the comments section below.
In the world of artificial intelligence, there’s a battle for supremacy. And it’s between two of the biggest names in technology: Microsoft and Google. You’ve probably heard about Bing, Microsoft’s search engine. But have you heard about Bard? It’s a new AI assistant from Google.
But which is better? Which one should you use? We’re here to help you choose between these two products by comparing them head-to-head.
What is the comparison between Google and Bing?
Google and Bing are two of the most popular search engines in the world. While Google and Bing may seem similar on the surface, they have some key differences that make them unique.
Bing AI and Bard AI are two artificial intelligence systems that can answer questions by searching the internet. But which one is better?
First off, when it comes to popularity, Bing isn’t as well known as Google when it comes to search engines. However, Bing has made some big changes over the past few years, and it seems to be paying off.
By launching the Bing AI chatbot, Microsoft has been able to surpass over 100 million users per day. Although often overlooked, it seems this AI integration has catapulted it to greater heights.
These numbers are probably why Google has officially launched Bard with the hope of reclaiming its position.
The two platforms have different strengths and weaknesses, and this article will look at them in more detail to decide which suits your needs better. Also, check out how Bing compares to ChatGPT 4 or ChatGPT vs Bard in our comprehensive reviews.
What are the similarities between Bing AI and Bard AI?
Similarities
1. Search features
Bing AI and Bard AI have search features that allow users to find the information they need. The search engine can search for specific topics or anything else you might be looking for.
You can easily search via text, images, and video. Both are powered by artificial intelligence, so they can understand and respond to your needs.
Bing uses a set of APIs that allow developers to add machine learning capabilities to their applications. For example, an app can use Bing AI to detect faces in images or videos, identify objects or text in images and videos, or detect emotion in images and videos.
When you look at how far searching on the Internet has come, being able to upload an image and get search results is a step in the right direction.
2. Human factor
While AIs are here to automate tasks, no one wants to read a robotic text that doesn’t have a hint of humanism. Luckily, both have the ability to recognize natural language, which allows them to understand complex questions.
The two types of AI are very similar in how they generate natural coherent text. When looking for answers from both AIs, the responses do not immediately sound machine-like.
3. Content curation
When it comes to AI, you may need to get your facts right because as much as they will provide you with information, it may not always be factual. Both Bing AI and Bard seem to have mastered the art of content curation.
This is important as it will help you gather relevant information and organize it into an easy-to-consume format. If you’re pressed for time and need to give a presentation on, say, a 40-page document, both AIs can easily summarize it for you. And judging from users, so far, so great.
Differences
1. Accuracy
The accuracy level in AI is still a grey area, as it’s usually a hit or a miss. In some areas, both are extremely accurate and in some, it is questionable.
While they both provide users with relevant information, they aren’t always able to give accurate answers due to their limitations as tools that help humans make decisions.
However, Bing chat appears to have a higher accuracy level if we’re keeping count, which we are. Bard has just been launched, so it might take some time to qualify its accuracy, but given its large database, its accuracy level may be unmatched in no time.
2. Privacy
Of course, everyone who puts their information on the Internet is worried about their privacy. First, to get a response as human as possible, the AI must collect some data about you.
It does this by learning about you over time and providing personalized results based on your previous searches and other factors such as location, language preferences, and so on. Bing leverages your Microsoft account and IP address, while Bard uses your Gmail account.
The information gathered is quite different, which plays a role in the overall search results. Needless to say, you need to read the fine print of the privacy and data protection policy before you use either.
And now to the component that sets both AIs apart. Plagiarism, especially when trying to come up with original content, is not only a form of dishonesty but greatly smears the credibility of the source.
Bing seems to have taken this into account. You’ll be happy to know that Bing AI integrates a similarity checker in Microsoft Products such as Office and Excel to enhance originality. Further, when using the chat AI, it will also include citations from sources.
On the other hand, Bard has not employed any of these features, and judging from what users say, the plagiarism levels are too high. Of course, it would be detrimental to rely on AI results fully, but the citation on Bing makes it more reliable.
Conclusion
From the in-depth comparison, the question on everybody’s mind: Is Bing better than Google? Bing AI was a big winner in this battle, outperforming its counterpart by a wide margin. This is not to say that Bing is perfect, as it also has its downsides, such as the daily limit to chat.
Still, Bard is fairly new in the market and is looking to improve. The most important takeaway from this war is that you’re only as good as what you put out. Will Google reclaim its number-one spot?
Is Bing way far ahead for Google to catch up? These are questions that can only be answered in the near future. Whatever the outcome, the user stands to benefit as each tech giant finetunes their products to stay ahead.
Overall, if you have to pick a side between Bing and Bard, or one of their rivals, it just boils down to which side you want to be on.
For now, we can only bask in the impressive features that both AIs have to deliver. Have you tried either of the AIs? What’s your verdict? Share your experience with us in the comment section below.
One of the common errors faced by Microsoft Store users is 0x80070520. It shows up when you try to update or install an app on Windows Store.
This guide will discuss some of the tested methods to fix the problem in no time.
What causes the error code 0x80070520 on Windows?
There are several reasons for this Microsoft Store error: some of the common ones are mentioned here:
Scan for malware infection – If your computer is infected with viruses, Microsoft Store might not work correctly, hence the error. You need to run a deep scan using reliable antivirus software to remove the infection.
Corrupted system files – Damaged or missing system files can cause various issues, including this error. You need to repair system files using Command Prompt.
Misconfigured system settings – If your system settings are incorrect, it can cause a Microsoft Store error. You need to check the power plan and other important system settings to ensure everything is in place.
An issue with thedigital certificate revocation process – Windows checks the revocation status of the digital certificate via the online certificate revocation list (CRL) hosted by the certificate authority (CA) that issued the certificate. If the CRL is not available or cannot be reached due to a network issue or firewall, Windows may fail to verify the certificate and display the error.
What can I do to fix the error code 0x80070520 on Windows?
Before engaging in advanced troubleshooting steps, you should consider performing the following checks:
Type wsreset.exe and click OK to delete the Windows Store cache.
Once done, Microsoft Store will restart.
5. Remove the SoftwareDistribution folder
Press the Windows key, type CMD, and click Run as administrator.
Type the following commands one by one to stop Windows Update and BITS service, and press Enter after every command: net stop wuauservnet stop bits
Minimize the Command Prompt and navigate to this path: C:\Windows\SoftwareDistribution
Select all the content and click the Delete icon.
Copy and paste the following commands one by one to restart Windows Update and BITS service and press Enter after every command: net start wuauservnet start bits
Restart your computer.
6. ReRegister and Reinstall Windows Store App
6.1 Re-Register the app
Press the Windows key, type PowerShell, and click Run as administrator.
Copy and paste the following command and press Enter to execute it: Get-AppXPackage WindowsStore -AllUsers | Foreach {Add-AppxPackage -DisableDevelopmentMode -Register “$($_.InstallLocation)\AppXManifest.xml”}
Once the command is executed, restart your computer.
6.2 Reinstall the app
On the PowerShell window with admin rights, type the following command and press Enter: Get-AppxPackage-AllUsers|Foreach{Add-AppxPackage-DisableDevelopmentMode-Register“$($ _. InstallLocation)\AppXManifest.xml”}
Once the command is successfully executed, restart your PC.
7. Update the Microsoft Store
Launch Microsoft Store and click on the Library button.
Choose Updates & downloads.
Click Get Updates to download the updates if available.
The process will take some time to complete. Next, restart your computer to confirm the changes.
So, these are some of the methods to fix the error code 0x80070520. Try them and let us know what worked for you in the comments section below.
If you’re experiencing any trouble with Razer Synapse not detecting Razer devices, do not worry as there are a few things you can try to fix the issue.
The issue of Synapse not detecting devices is mostly reported for Razer mice and keyboards. In this article, we will discuss how to fix the issue seamlessly.
Why is Razer Synapse not detecting Razer devices?
There can be several reasons why Razer Synapse is not detecting razer devices on your PC. Below are the most common reason for the triggers:
The Razer device is not properly connected – This is by far the major reason for this error. You need to make sure that you connect directly to your device and not through a USB hub.
Incompatibility – If you are using a Razer device that is not supported by your Synapse version it can lead to this error. So, you need to ensure that you are using the latest version of the Razer Synapse or check for Razer Synapse-supported devices.
Old corrupted files – If your software is corrupted, it can hinder Razer Synapse from detecting your Razer devices. Some users claim they were able to fix the problem through a clean reinstall.
Outdated drivers – Facing this error may become inevitable if some relative drivers on your PC are outdated or if it contains some discrepancies. Try to update your drivers to the latest version to clear all doubts.
Synapse software is malfunctioning – It is also possible that the Synapse software is currently in an error state. A simple reinstallation should fix the problem.
The above causes are a few of the most known triggers for this error. However, the solutions compiled in this next section for the Razer Synapse not detecting Razer devices error can be applied to fix the issue.
What can I do if Razer Synapse is not detecting Razer devices?
Before trying any of the advanced solutions provided below, you should consider performing the following preliminary checks and see if that fixes the issue:
Make sure you have administrative privileges.
Ensure that you are properly connected to the Internet.
Try plugging your Razer devices into another USB port.
Connect the Razer device to a different computer that has Razer Synapse installed. If it works, that means the problem is with your PC.
After confirming the above checks and if you still require further assistance in fixing the problem, you can proceed to apply the fixes outlined below.
1. Run the Hardware and Devices troubleshooter
Connect your Razer device to your computer.
Press the Windows key, type cmd, and click Run as administrator.
Type the following command in the text field and press Enter: msdt.exe -id DeviceDiagnostic
Now, click on Next in the Hardware and Devices troubleshooter.
Follow the on-screen instructions and apply any recommended fixes.
Running the Hardware and Devices troubleshooter has worked for several users. You should try it too. But, if it doesn’t work, try the next fix.
2. Reinstall device drivers
Press the Windows + R keys to open the Run, type devmgmt.msc and press Enter to open Device Manager.
Expand the Mice and other pointing devices category. Right-click on the mouse and click on Uninstall device.
Next, repeat the steps to uninstall your keyboard driver as well after expanding the Keyboard category.
Make sure that you check the box next to Delete device drivers when uninstalling each device.
Restart your PC, and Windows will reinstall the device drivers automatically.
Make sure your PC is properly connected to the Internet after restarting your computer so that your device drivers can be reinstalled to their latest version.
The antivirus programs can prevent your mouse from being detected by your computer or by Razer Synapse.
If you’re running antivirus programs like Windows Defender, you can temporarily disable it from your computer, then try using your mouse again to see if it works.
4. Repair Razer Synapse
Press the Windows key, type control, andclick on Control Panel to open it.
Next, click on Uninstall a program, select Razer Synapse and click on Change.
Click on the Repair button.
Razer Synapse will now scan the app for file corruption and fix them if required.
You can now relaunch Razer Synapse and check if it detects your Razer devices.
5. Reinstall Razer Synapse
Press the Windows + R keys to open the Run command dialog box, type appwiz.cpl in the text field and press Enter.
Select Razer Synapse, click Uninstall and then click Yes to confirm the action.
Once uninstalled, restart your PC.
Finally, download the latest version of Razer Synapse from the official Razer website.
Now, install the app.
Connect your Razer devices to your computer and check if Razer Synapse detects the devices.
And that’s it on how to fix Razer Synapse not detecting Razer devices error. Work your way through any of the steps compiled in this article to know what works for you.
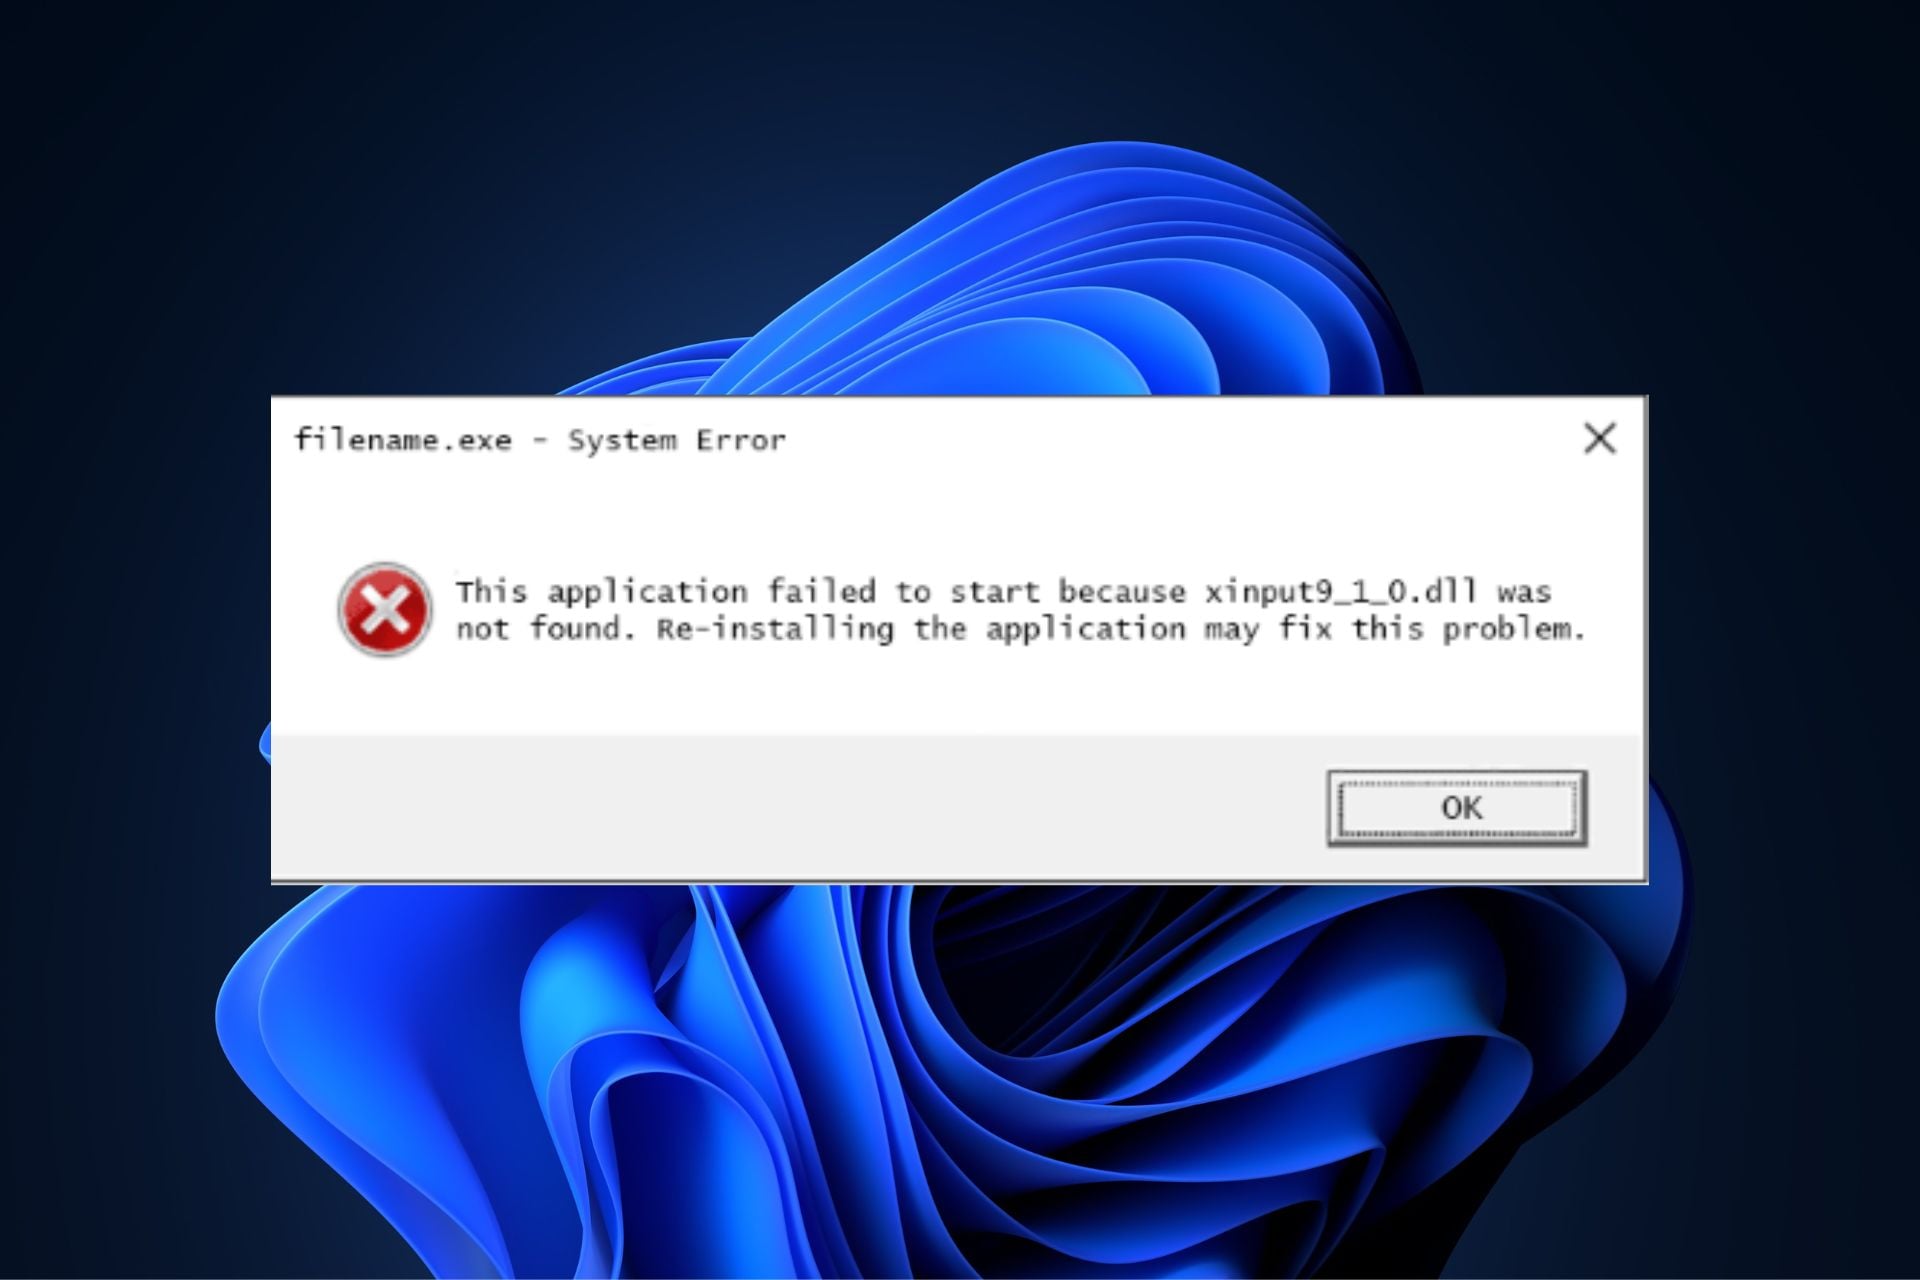
Several of our readers have reported that they can’t find their Xinput9_1_0.dll file on their PC for some reasons they yet do not understand. And as it is, DLL files are just as important as files with an EXE extension.
DLL files are convenient and efficient fiłes to use, but they can be vulnerable to problems. The following are some of the potential causes behind the Xinput9_1_0.dll missing error:
Some important Xinput9_1_0.dll files have been deleted or misplaced – Many times, the accidental deletion or uninstalling of the shared file of another program can lead to missing Xinput9_1_0.dll files on your Windows PC.
Another program has overwritten your Xinput9_1_0.dll file – Another possible reason for this error is that a program on your computer is overwriting a DLL file and rendering it unusable. And once this happens, other programs wouldn’t be able to access it and may, in turn, become missing.
Virus or Malware attacks – It could be malware or virus that is deleting the DLL files, and in this case, running a full-system scan using an effective antivirus should do the trick.
Damaged Windows Registry – One of the major harm that could come to a PC is registry failure. If your PC’s registry is corrupt or damaged, it may trigger the Xinput9_1_0.dll error. You can check how to fix a damaged registry here.
System file corruption – The Xinput9_1_0.dll error could also be triggered by system file corruption. This can result from a power outage when loading intensive software or due to bad sectors on your hard drive.
Now that you know some of the potential reasons behind the Xinput9_1_0.dll missing error, work your way through any of the steps below to fix the problem.
How can I download and fix Xinput9_1_0.dll if it’s missing?
Before engaging in any advanced troubleshooting or settings tweaks, you should ensure that you perform the following preparatory checks:
Try to restart your computer because the error might be temporary, and simply restarting your PC might clear it up.
If after attempting the above checks, you still require further assistance, you can apply any of the fixes below starting from top to bottom.
1. Download and install Xinput9_1_0.dll manually
NOTE
Although we don’t recommend downloading from third-party websites, this process has been tested by our expert for safety.
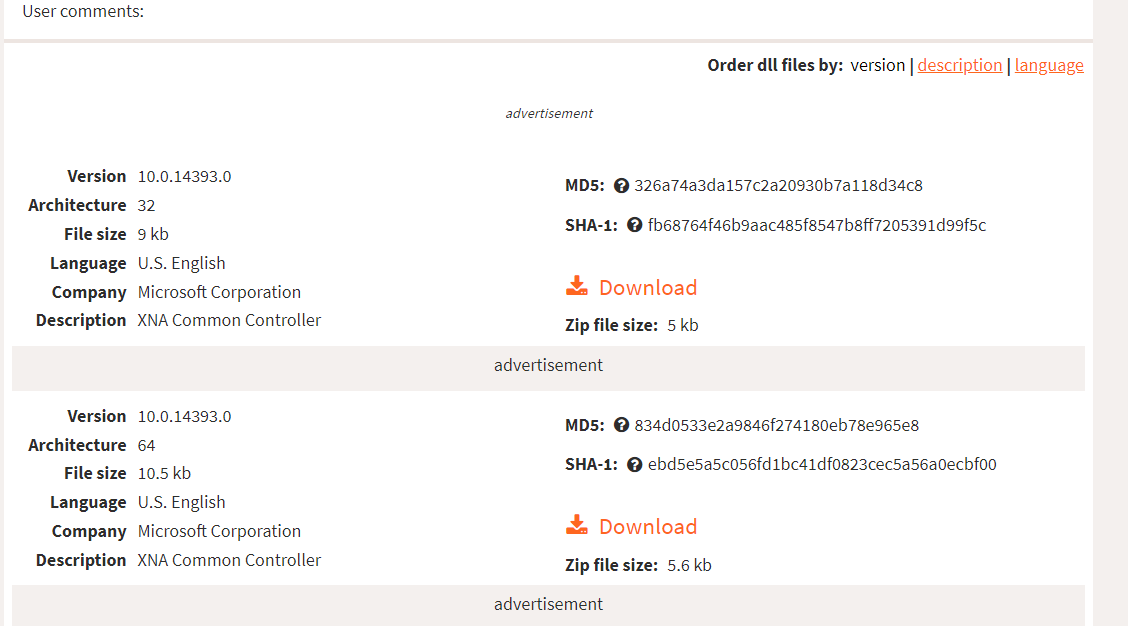
Go to DLL-files.com and choose from the 10 different available versions for this file.
After downloading, extract and copy the DLL file to the installation directory of the program where it is missing.
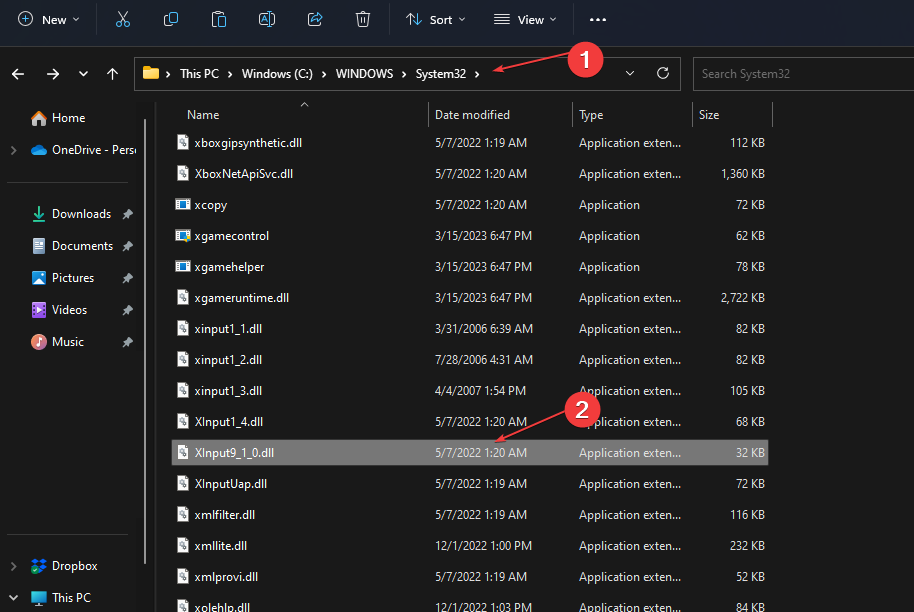
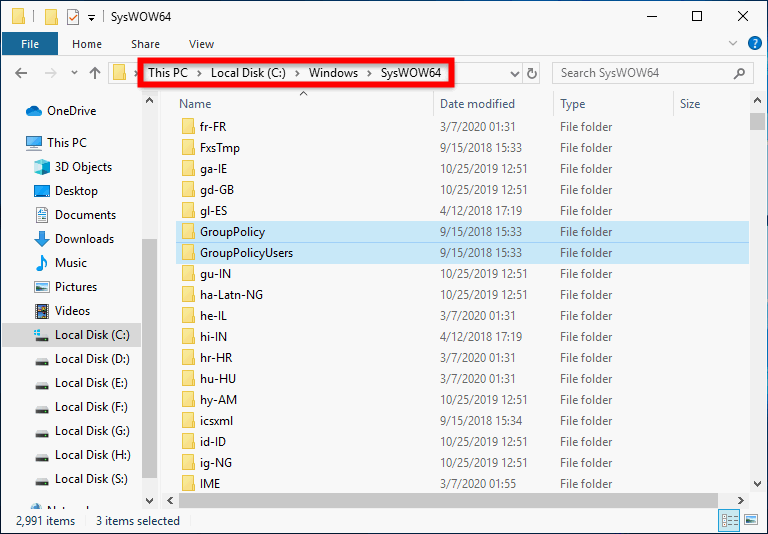
Alternatively, you can move the DLL file either to your System directory, which is located in C:\Windows\System32, or for a 64-bit processor, move it to C:\Windows\SysWOW64\.
Now, restart your PC.
Before downloading, make sure you check the description of each of the files to select the right processor (32-bit or 64-bit) for your system. It is also advisable that you go for the highest version.
2. Install the latest version of Microsoft DirectX
Tick the checkbox for any additional downloads or ignore it and click on No thanks and continue.
Save the file to a designated location on your PC.
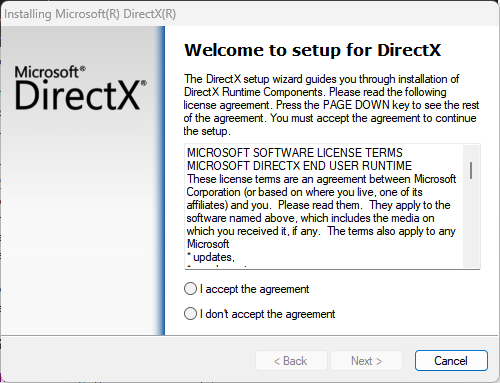
To install the DirectX updates, double-click the setup file and follow the on-screen instructions to complete the installation.
Upgrading your Microsoft DirectX is one of the possible ways to fix the Xinput9_1_0.dll missing error. The DirectX installation package on the official download page works for all versions of Windows.
3. Run a System File Checker
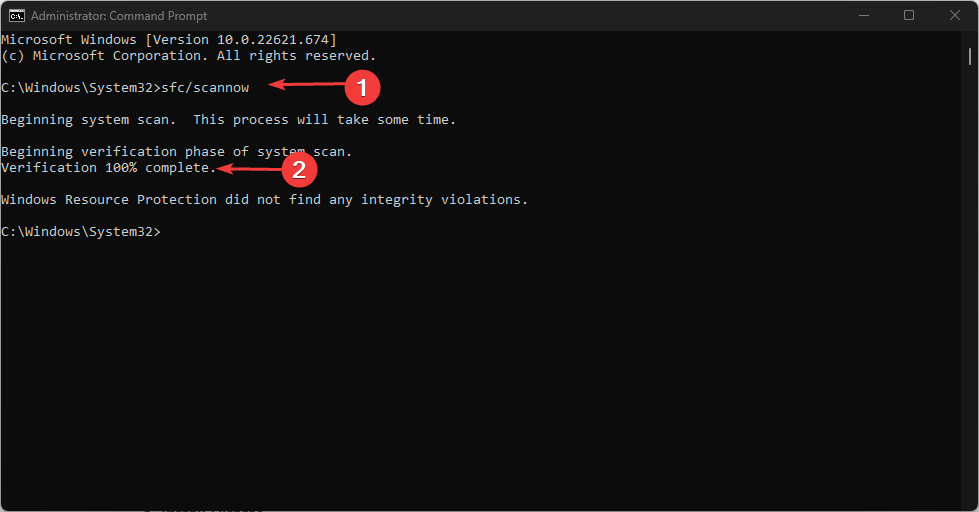
Press the Windows key, type Command Prompt, and click on Run as administrator.
Next, type the following and press Enter: sfc /scannow
Once completed, restart your PC and check if the error is fixed.
By running the SFC scanner, Windows Resource Protection will help determine what the problem is and fix it.
As an alternative, it’s also recommended to use verified repair solutions specifically developed to fix DLL file errors or find missing files such as the Xinput9_1_0.dll.
4. Reinstall Visual C++ Redistributables
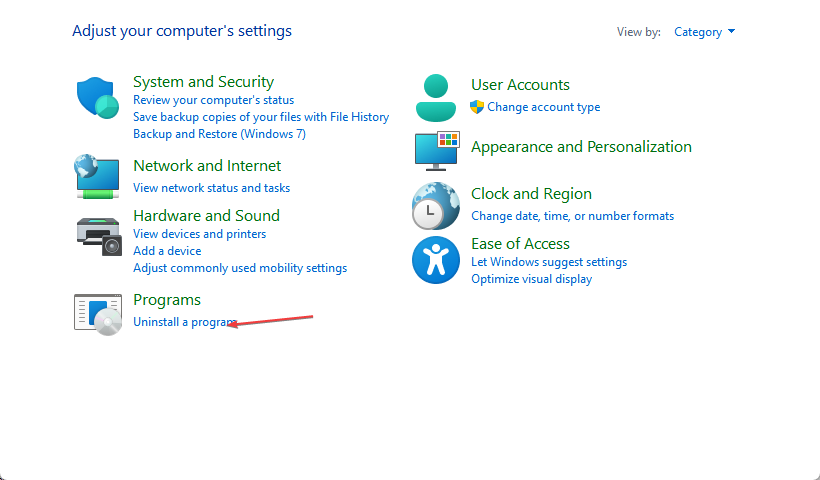
Press the Windows key and select Control Panel. From the menu, click on Uninstall a program.
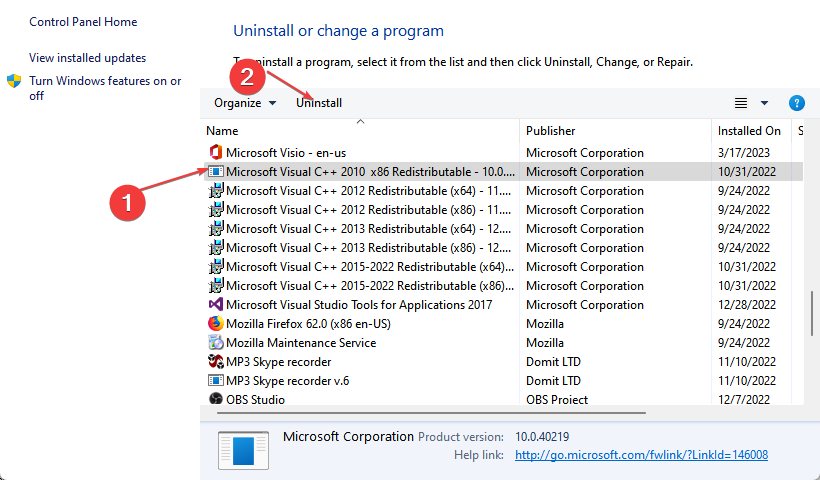
Check the version of Microsoft Visual C++ Redistributable and click on uninstall.
Uninstall the rest of Microsoft Visual C++ Redistributable.
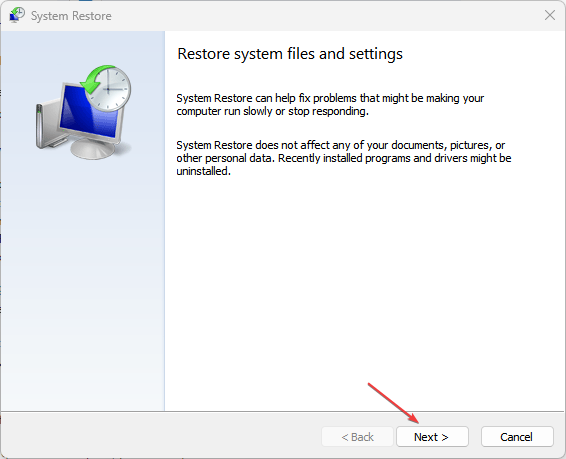
Press the Windows + R keys, type rstui, and press Enter.
Once the System Restore window opens, click on Next to proceed.
Next, select the restore point you wish to revert to and click on Next.
Now click on Finish.
Your PC will now restart and restore itself to the selected restore point.
Constantly creating a restore point is one of the ways to keep your data safe. You can use this as your last resort for fixing the Xinput9_1_0.dll error.
Regardless of the cause, the solutions compiled in this article for the Xinput9_1_0.dll missing issue can be safely applied to fix the error on your Windows PC.
Some of our readers have recently requested to know how to remove the Power button on sign-in screen for Windows PCs.
In this guide, we have provided some steps to follow and why users may want to remove the Power button on sign-in screen.
Why should I remove the Power button on Sign-in?
There may be several reasons why users may want to remove the Power button on the Windows Sign-in screen; however, below are some of those reasons:
Protects you from losing unsaved work on your PC – The Power button on the Sign-in screen on Windows PC allows users to Sleep, Shut down, Hibernate, or Restart the computer without signing in to Windows. Leaving the Power button on the Sign-in screen may allow users to shut down their PC abruptly, thereby leading to data loss.
It improves the security of your PC – By removing the Power button on your Sign-in screen, only authorized users will have access to the shutdown command. Even if you lock your PC, you or anyone else will need to sign in before shutting it down.
There may be others, but the above are the major reasons several users prefer to remove the Power button from their Windows sign-in screen.
How can I turn on or off the Power button on sign-in screen?
1. Use the System Registry Editor
Press the Windows + R keys shortcut to open the Run command dialog box. Type regedit in the text field of the dialog box and press Enter to open the Registry Editor.
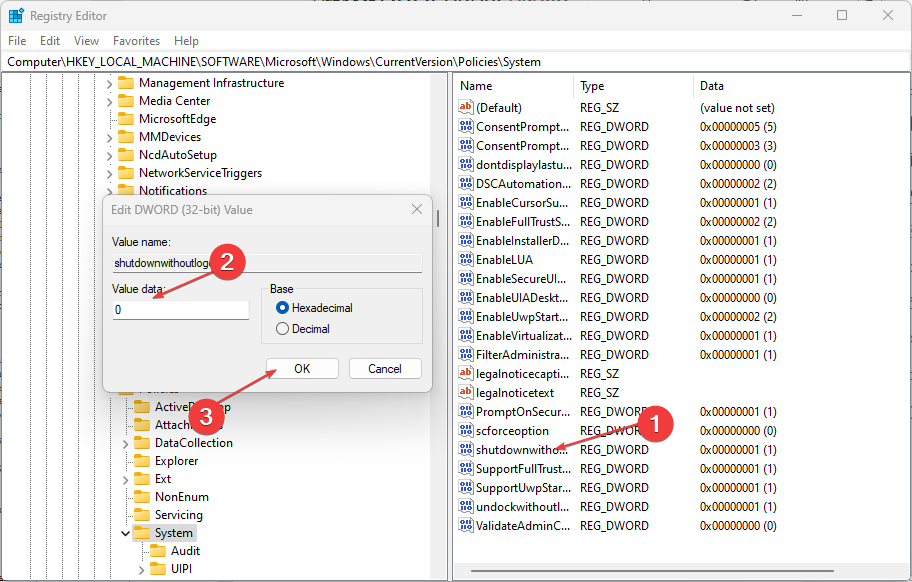
Next, navigate to the following path or paste it into the address bar at the top and press Enter: HKEY_LOCAL_MACHINE\SOFTWARE\Microsoft\Windows\CurrentVersion\Policies\System
Double-click the shutdownwithoutlogon DWORD to change its value from 1 to 0.
Then, click OK to apply the changes. (However, if the DWORD doesn’t exist, you’ll have to create a new one by following the steps below:
On the left pane of your Registry Editor, right-click the System (folder) key, select New, and click on DWORD (32-bit) Value.
Name the key shutdownwithoutlogon and press Enter.
Double-click the shutdownwithoutlogon and set its value to 0.
Click on OK to save the changes.
Finally, close the Registry and restart your PC for the setting to take effect.
With the modifications, the Power button and related options will be removed on the Sign-in screen upon startup or when you lock your PC.
However, make sure you back up the Registry and your computer before making changes to avoid the irreversible damage that can be caused if you don’t do it correctly.
2. Use the Local Security Policy
Press the Windows + R keys to open the Run command dialog box. Type secpol.msc in the dialog box and press Enter.
Now, open Local Security Policy in the left pane, and click on Security Options.
On the right pane of Security Options, double-click on the Shutdown: Allow system to be shut down without having to log on policy to open its properties.
The dot for Enabled is likely on, so select the Disabled dot to remove Power button on sign-in.
If you are finding it difficult to open the Local Security Policy, you can explore our detailed guide on adding it to Windows if it is missing.
You can try any of the steps provided in this article on your Windows 10/11 PC to turn on or off the power button on the Sign-in screen. Besides, you may change the power button actions in Windows 11 for seamless functioning.
As spotted by Albacore (@thebookisclosed) on Twitter, the feature is supported but it’s still completely hidden without third-party registry tweaks here and there.
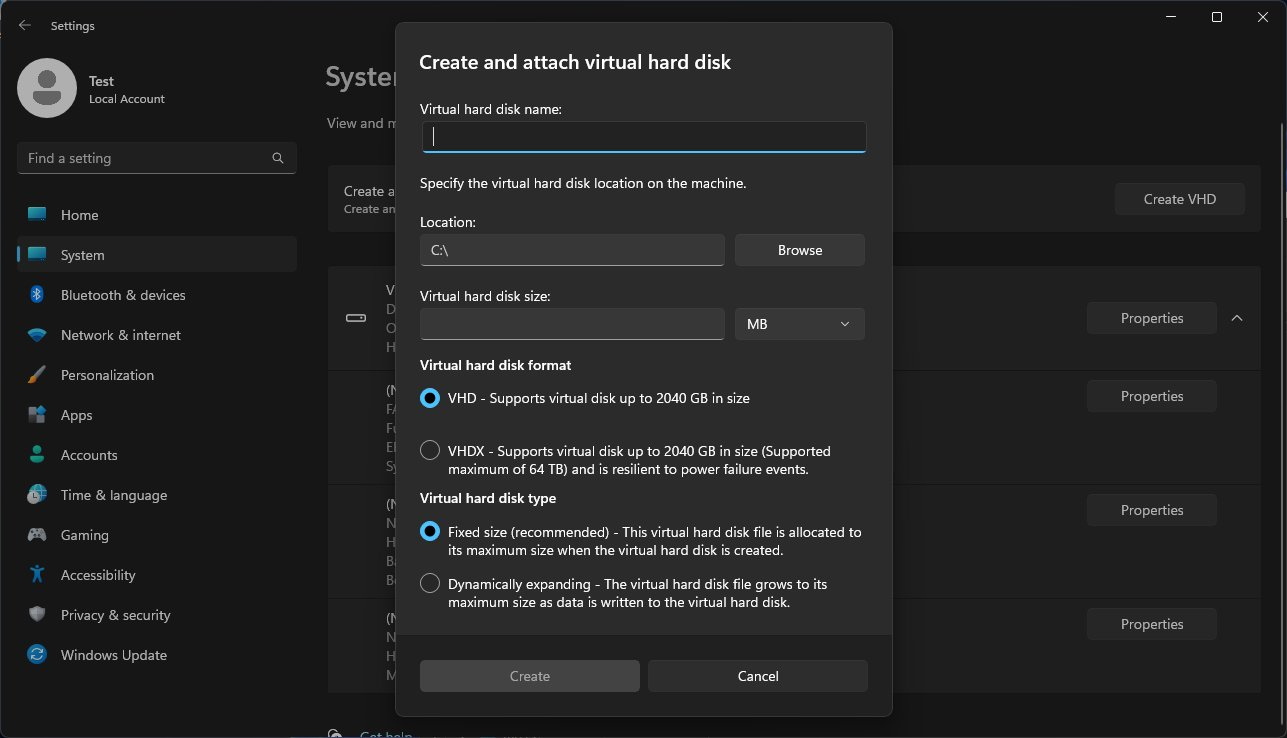
The feature to add VHD/VHDX units is now available through Disk Management from the Start menu or PowerShell, but once this feature is out for the public, you can create the units comfortably in the Settings app.
Additionally, the Windows enthusiast also says that the build comes with a brand-new look for Home in Settings, a built-in presence sensing feature that lets the device scans for sensors to detect users nearby and allow them to control apps, and a little tweak for keyboard’s settings.
A few week after 25300’s release, it seems like we’re getting somewhere with this Disk Management feature. As spotted by Windows enthusiast @PhantomOfEarth, the feature, albeit still hidden, can be activated with a third-party tool thanks to Build 25324 from Canary.
Ability to create a virtual disk in Settings, first spotted by @thebookisclosed in 25300, now works in build 25324, hidden feature! To get it working, you need to enable it with ViVeTool:
1. Make sure to join the Windows Insider Program and have the latest Windows 11 Insider Build from Canary (25324) installed in your system. If not, head over Settings ➜ Windows Update ➜ Install all.
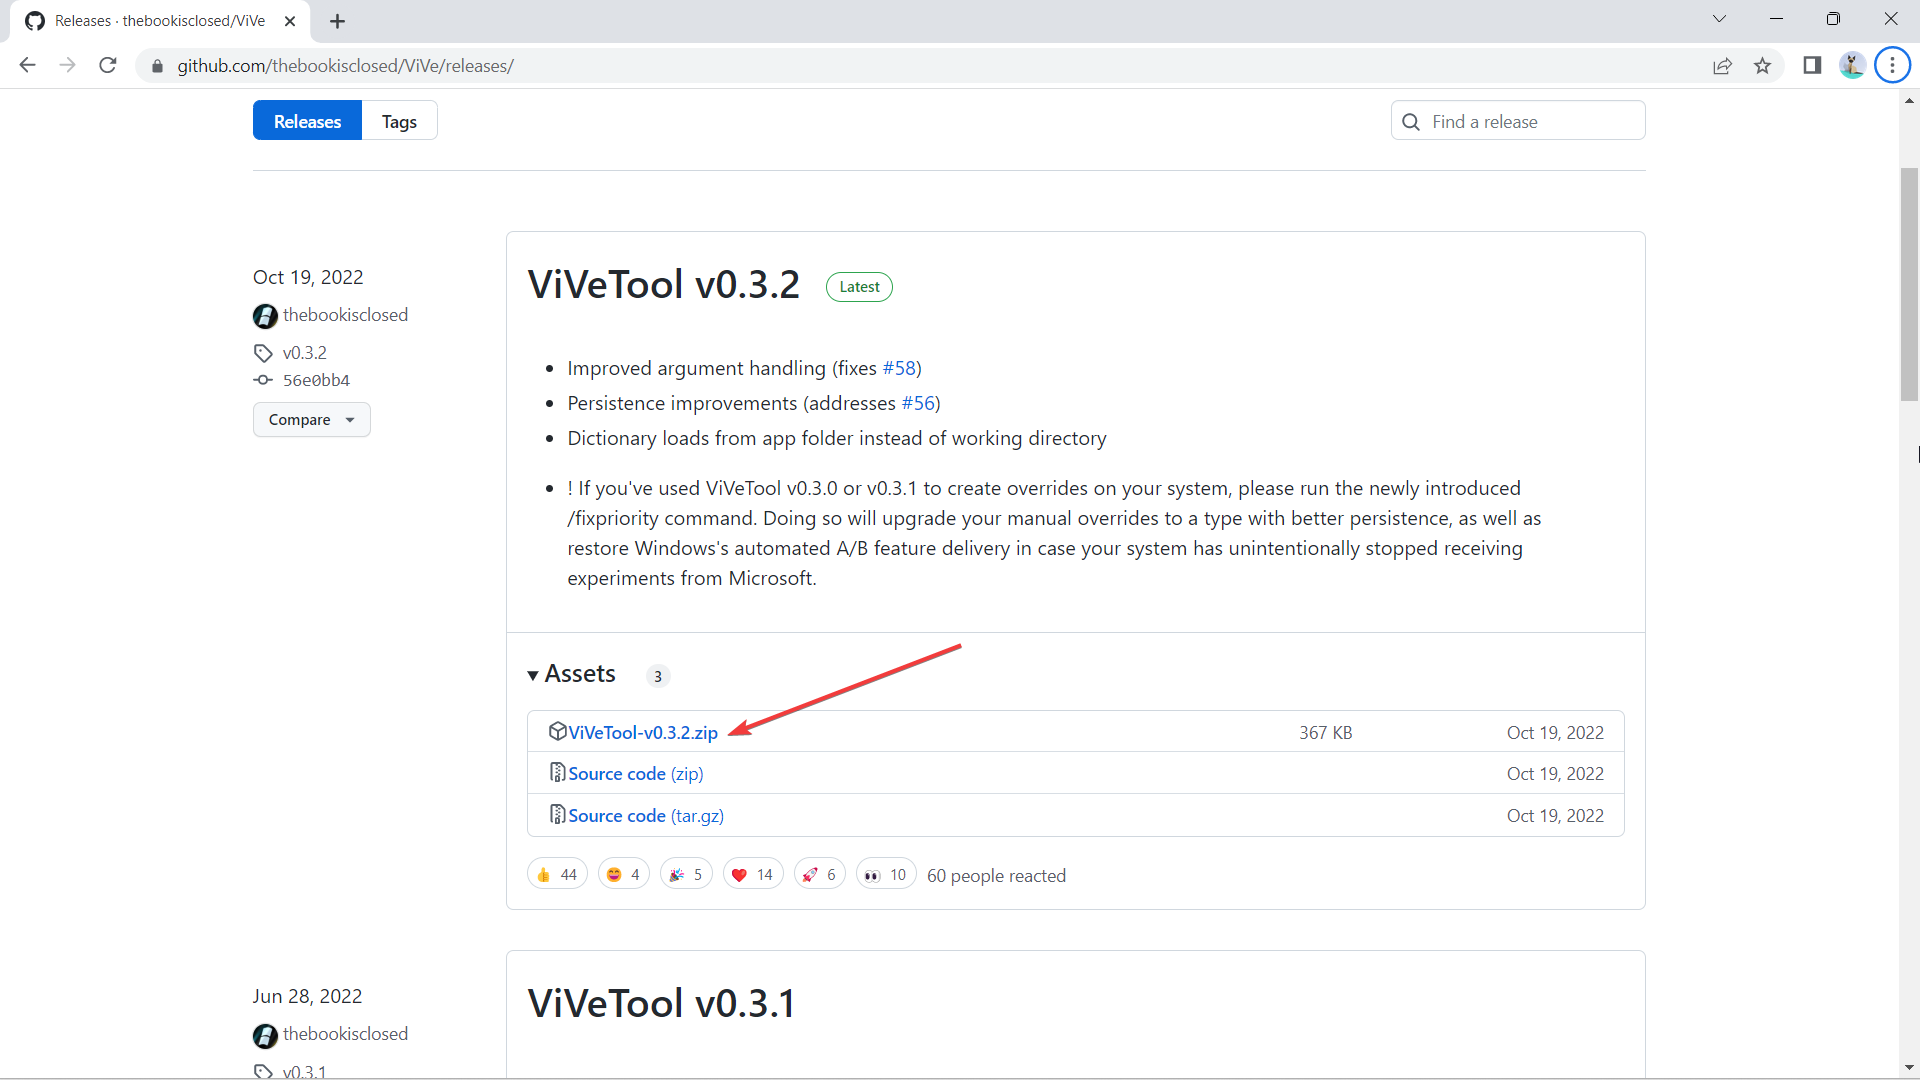
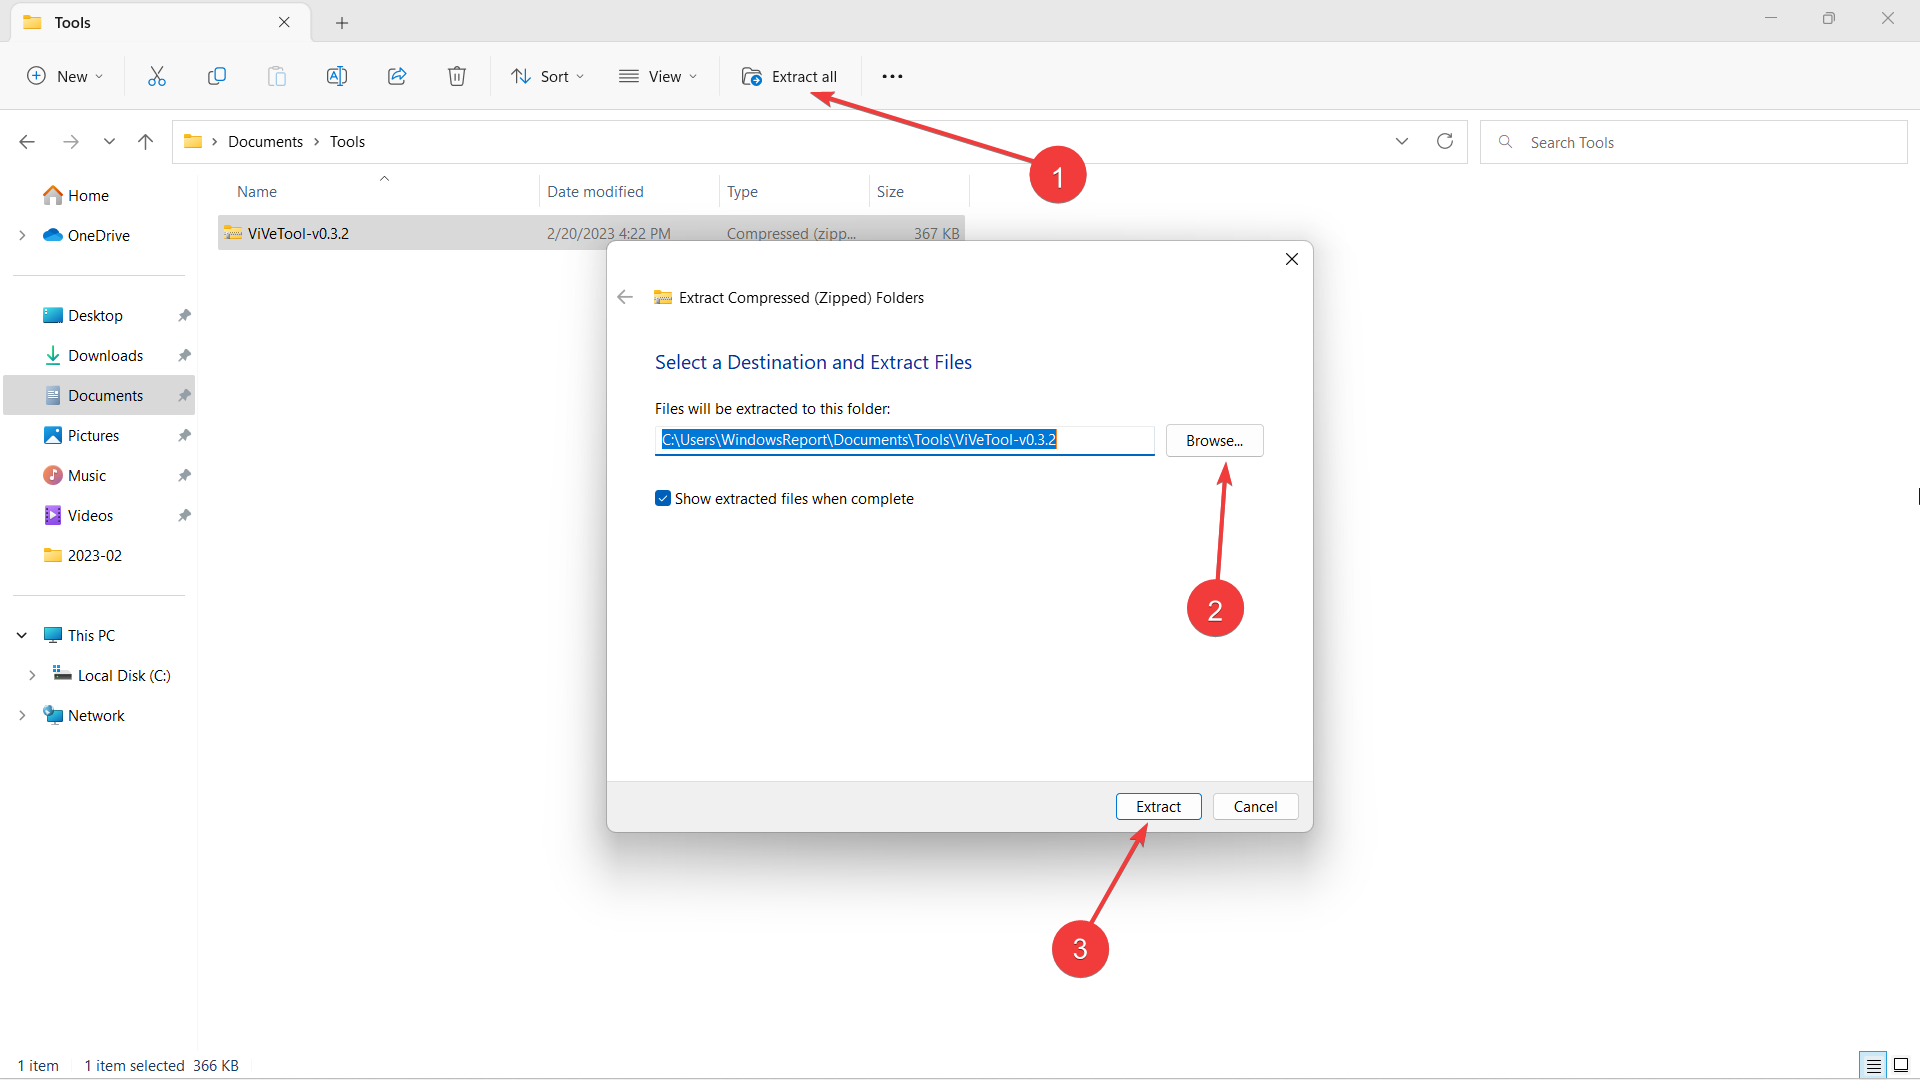
3. Once downloaded, click Extract all, select the location where you want to extract it by clicking Browse, then hit Extract. In this case, we extract it at C:\Users\WindowsReport\Documents\Tools\ViVeTool-v0.3.2.
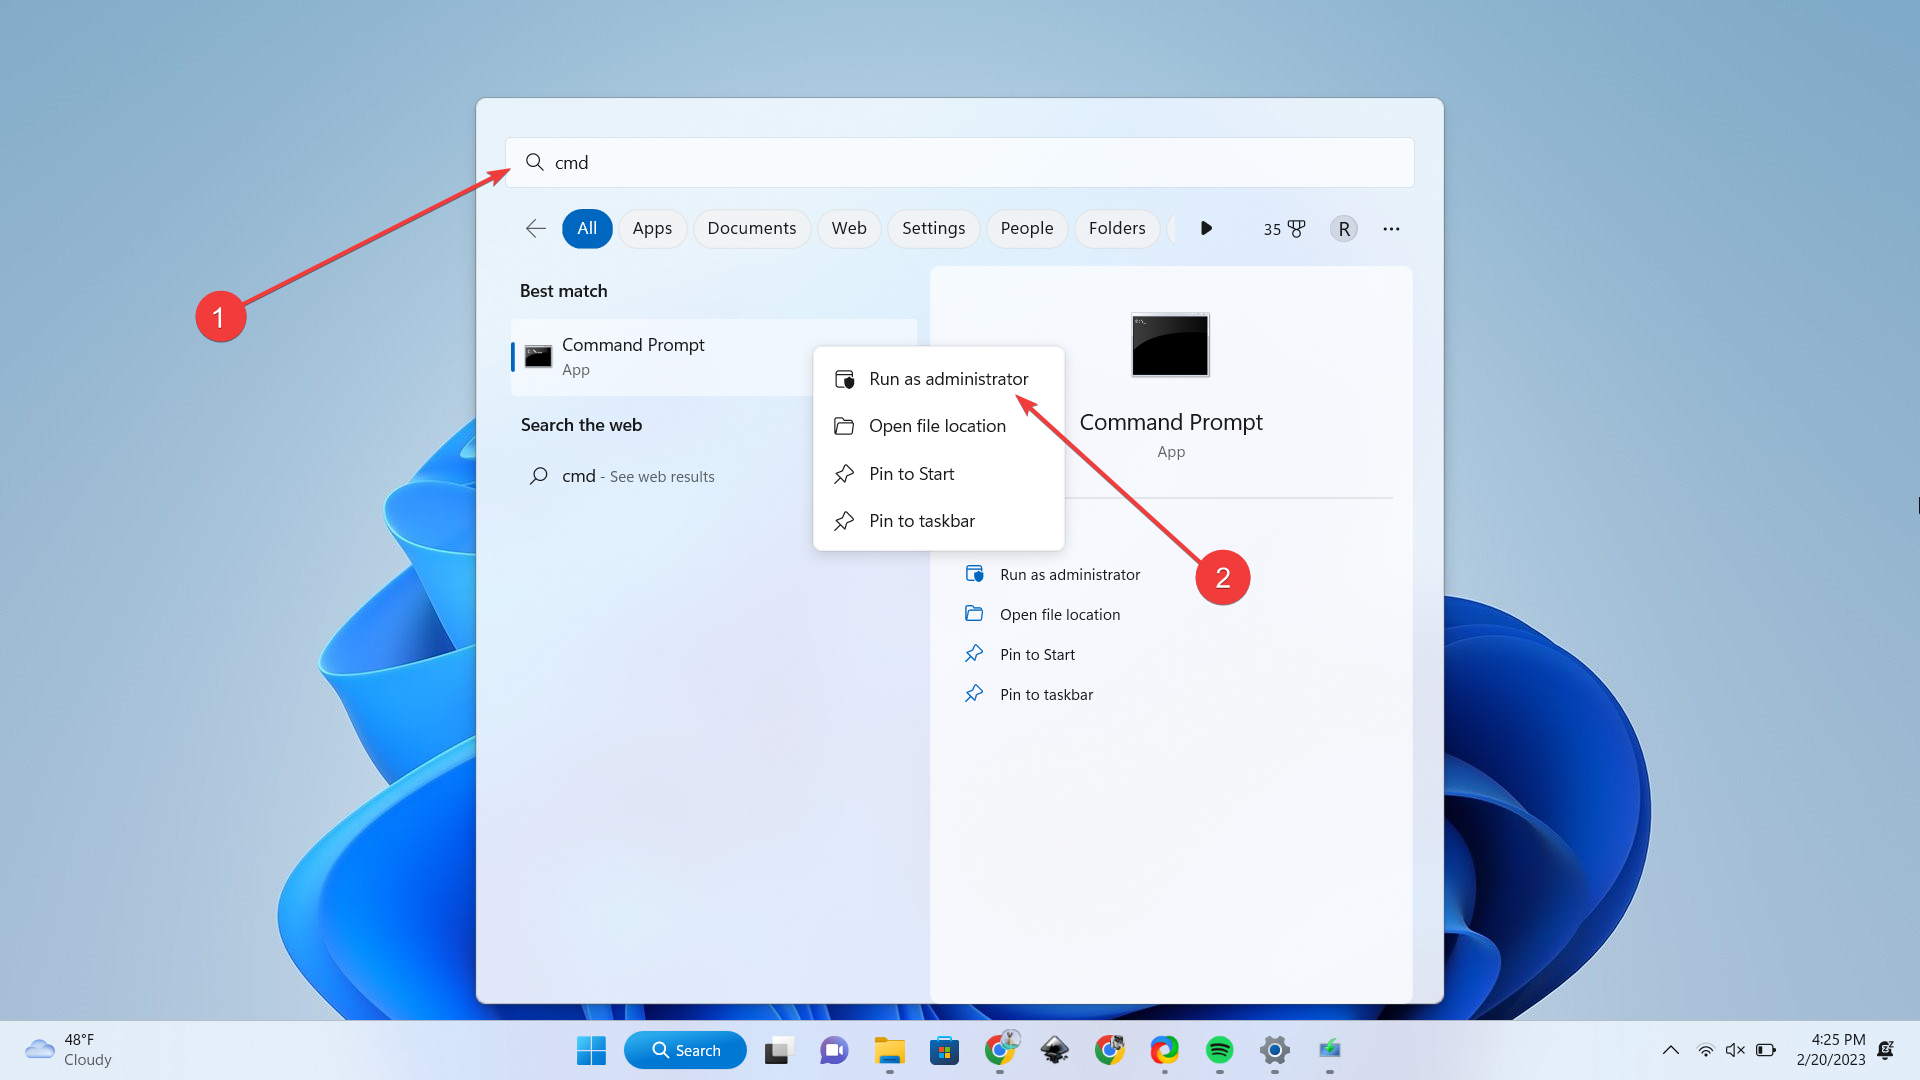
4. Hit ? on your keyboard, then type “cmd” and right-click on Command Prompt -> Run as administrator.
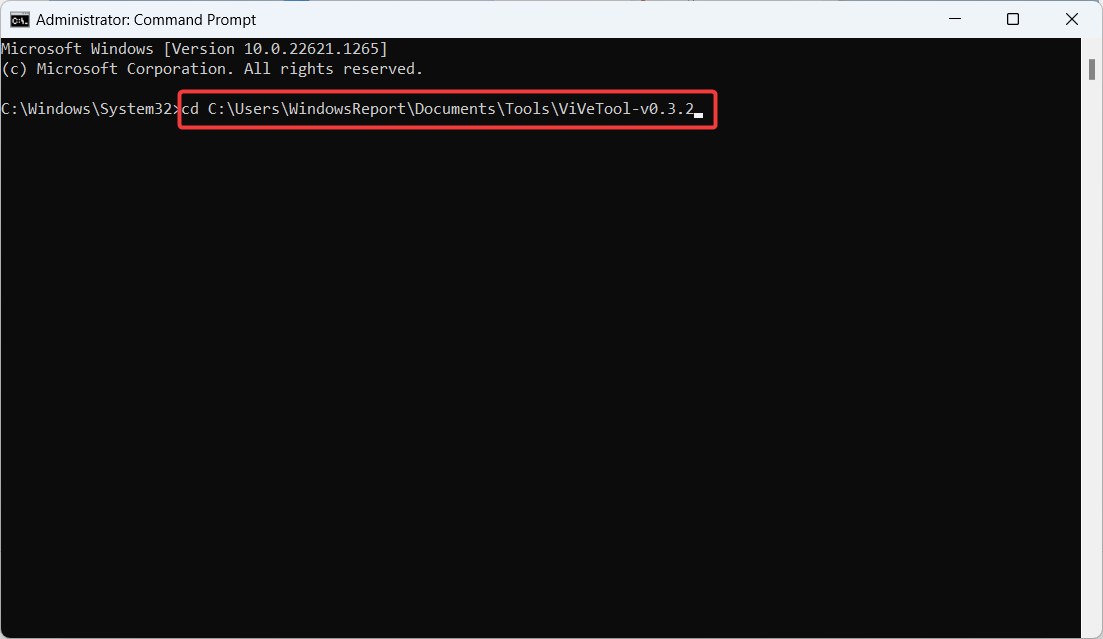
5. Type in cd + the directory where we extracted ViVeTool. In this case, it’s at C:\Users\WindowsReport\Documents\Tools\ViVeTool-v0.3.2, then hit Enter.
6. Type the following command then hit Enter.
vivetool /enable /id:42401084
7. Reboot the computer.
With that being said, it’s still worth noting that being an insider-only feature that isn’t out for primetime yet, you may be running into some performance problems here and there.
Are you excited for this feature? Let us know in the comments!
Your public IP address is unique and visible to websites and network admins. It contains information about your internet service provider, city, region, and country.
As you can imagine, having your public IP address visible is not the best for privacy.
Moreover, the information provided by your IP is the reason why you can’t access a lot of sites due to geo-restrictions or governmental regulations.
For this reason, many people use VPNs to hide their IP. But VPNs do much more than that, and you may not want to pay for a full VPN service if you only need it for changing your IP.
Luckily, there are other ways you can change your IP address on Windows 10.
What is an IP address?
An Internet Protocol (IP) address is a long string of numbers assigned to every device connected to a network.
→ In version 4 of the internet protocol (IPv4), an IP address is a 32-bit number in the form x.x.x.x, where x is a value between 0 and 255.
→ However, if your internet provider offers IPv6 (internet protocol version 6) on its network, you will have something like this: 2001:0db8:85a3:0000:0000:8a2e:0370:7334
In theory, IPv6 is safer and more secure, but it’s not supported by a lot of ISPs and applications due to outdated infrastructure.
Both are equally safe for most online activities, but IPv4 is still the preferred choice because of this compatibility issue.
Now, let’s see how you can change your IP address.
How to change IP without VPN on Windows 10
If you want to change your IP address without using a VPN on Windows 10, you can try a few different methods.
1. Use a proxy server
Like a VPN, a proxy is a middleman between your device and the internet. Websites and apps see the IP address of the proxy server and not your actual IP address.
A VPN is technically a proxy that can be an SSL, SSH, or SOCKS proxy.
Here’s how to set up a proxy server on Windows 10:
Open the Windows Settings.
Click on “Network & Internet.“
Select “Proxy” from the left-hand menu.
Turn on the “Use a proxy server” toggle switch.
Enter the IP address and port number of the proxy server you want.
Click “Save” to apply the changes.
✅ Pros
Configurable in existing apps like your browser
There are free proxy servers available online
❌ Cons
Real IP could be exposed if the proxy connection drops for some reason
Susceptible to man-in-the-middle attacks
They lack encryption and other security features
Changing your IP address using a proxy server can help protect your online privacy and security.
Moreover, it will allow you to access geographically restricted content and bypass network restrictions.
2. Use the Tor browser
When you connect to Tor, your internet traffic is encrypted and routed through a random sequence of these volunteer “nodes,” which are sort of like proxy servers.
Tor browser uses nodes that hide your IP address whenever you access any network. The nodes will change each time you use them. That guarantees your anonymity as well.
Websites can only see the IP address of the last server in the sequence, called the exit node.
Each time you visit a website, the nodes’ sequence changes, making tracing activity back to the original IP address practically impossible.
✅ Pros
It’s completely free
Easy to use
❌ Cons
Some websites block connections from known Tor nodes
May sometimes leak IP address
Tor is used to avoid censorship, ensure online privacy, and avoid targeted ads based on browsing history.
3. Use the Command Prompt
Changing your IP address using Command Prompt can help troubleshoot network issues or protect online privacy.
Following these simple steps, you can release your current IP address, renew it with a new one, and verify your new network configuration information.
Press the Windows key + R to open the Run dialog box.
Type “cmd” and hit Enter to open the Command Prompt.
Now, type “ipconfig /release” and hit Enter.
Type “ipconfig /renew” and hit Enter to obtain a new IP address from your network.
✅ Pros
Helpful in diagnosing network problems
Improves privacy
It resolves network issues such as slow internet speed
Free
Changes IP within seconds
❌ Cons
Disruption to the network connection.
Changes IP to one belonging to your ISP
It doesn’t stop tracking
When experiencing network issues and looking to protect your online privacy, this method can help with quick resolution.
4. Change your router’s MAC address.
The MAC address is a unique identifier for a computer’s network interface, with which websites can track online activities.
When using a router, every device on the network has a unique identifiable MAC address.
By changing your router’s or system’s MAC address, you can change your IP address or that of all devices connected to the router’s network.
Here’s how to change your system MAC address, hence IP address on Windows 10:
Press the Windows key + X and select “Device Manager” from the menu.
Expand the “Network adapters” section.
Right-click on the network adapter you are using and select “Properties“.
Click “Advanced” and select “Network address” from the list.
Select “value” and enter the new MAC address you want to use.
Select “ok” to apply changes.
✅ Pros
Bypass network traffic restrictions by allowing your device to appear as a different device on the network, potentially gaining access to restricted resources..
Improves online security
It makes it difficult for websites to link your device to your previous activities.
❌ Cons
Limited effectiveness as some ISPs may not assign a new IP address
Technical knowledge is required
Can disrupt network connection
Some public WiFi networks may restrict access to specific devices based on MAC addresses.
If you cannot connect to a public WiFi network, changing your MAC address can help you bypass these restrictions and access the network.
How to change IP without VPN on Windows 11?
The methods of changing your IP address on Windows 11 are similar to that of Windows 10, as outlined above.
Therefore, you can change your IP address without VPN on Windows 11 using the Command Prompt, proxy server, or Tor browser.
The main difference between Windows 11 and Windows 10 is the location of some of the settings.
In Windows 11, the Settings app has a new design and layout, but the options for changing your IP address are still in the Network & Internet section.
Summary
Changing your IP address without a VPN on Windows 10 is possible, but it’s important to proceed cautiously and understand each method’s potential risks and benefits.
By using a proxy server, releasing and renewing your IP address, or changing your MAC address, you can take steps to protect your online privacy and access blocked content.
Some of our readers have recently reported that while writing and testing some codes, they encountered the apex CPU time limit exceeded error message.
Salesforce has a timeout limit for transactions based on CPU usage and once reached this error message comes up. In this article, we will discuss how to fix this issue.
What causes Apex CPU time limit exceeded error?
There can be several reasons why you are experiencing the apex CPU time limit exceeded error. Below are some of the potential reasons:
LoggingEnabled set to True – The most likely reason for an error that says Apex CPU time limit exceeded when you submit an order is that the LoggingEnabled custom setting is set to true. Set LoggingEnabled to false to solve the issue.
Trigger logic entered multiple times – Another reason behind the apex CPU time limit exceeded is that the trigger logic is fired multiple times. Once trigger logic ends, it is followed by workflow to update the record which then causes the trigger logic to re-enter. This can then cause the CPU timeout error.
Excess nested loops – Loops with more than two levels can significantly lengthen CPU time. Instead of cramming too much into a single set of nested loops, try employing multiple code blocks.
Code in the managed packages – This is, unfortunately, a BlackBox, if the code in a managed package takes too long to execute, it will result in this error. To fix this, you need to reach out to the vendor for assistance.
Since you now know some of the possible reasons behind the apex CPU time limit exceeded error, let us proceed to how you can fix this problem.
How can I fix the apex CPU time limit exceeded error?
Before trying any of the advanced solutions provided in this article, whenever you encounter the error, try to perform the following preliminary checks:
Disable any unnecessary Process Builder flows if possible.
Avoid multiple automation per object – every object should have an automated plan based on the demands of the company and the Salesforce team supporting it
Avoid Nested Loops – Using Maps is a quick and easy approach to eliminate nested loops.
Having tried the above checks, and the issue persists, you can now explore the advanced solutions provided below.
1. Set LoggingEnabled to False
Go to the Lightning environment, click the Settings gear icon, and click Setup.
Type Custom Settings in the Quick Find text field then click on Custom Settings.
Navigate to General Settings and click the Manage link next to it.
Then, click on the Edit link next to LoggingEnabled.
Now, change the text in the Value field with the word false and click on Save.
The LoggingEnabled setting uses more processing power than is necessary for day-to-day operations. Changing the settings to false reduces the likelihood of receiving the apex CPU time limit exceeded error.
Process builder processing is reported by many users to always trigger the apex CPU time limit error.
According to Salesforce, process builders and workflow should not be used for automation, but using Salesforce Flow can save users from CPU timeout errors.
3. Use Map-based queries
To avoid extra loops, use map-based queries. Below is an example of a map query used for loop to get record ID which increases the CPU time:
List<Account> accList=[Select Id,Name from Account limit 100]; Set<Id> setIds=new Set<Id>(); for(Account acc: accList){ //More CPU time for sure due to looping setIds.add(acc.id); }
Using Map query saves the CPU a great deal of time and it has proven to be one of the best solutions for the apex CPU time limit exceeded error.
And that’s it on how to fix the apex CPU timelimit issue. If you have any questions or suggestions on the best fix to apply for this issue, do not hesitate to use the comments section below.
While trying to clone a GitHub repository or push changes, you might encounter the no remote repositories found error in VS code.
The first thought that comes to your mind is that the repository doesn’t exist. However, in this case, the repo exists, but specific problems have prevented the repository from displaying.
If you’ve been struggling with the no repository found in VS code error, this article will briefly overview the error and steps to help resolve it.
Why is no repository found in VS code?
Here are some of the reasons why you’re experiencing the No Repository Found error in VS code:
Authentication – To perform any actions on GitHub, like creating a pull request, the user must have sufficient access to the relevant resource. If you try to access a repository where you have yet to be added as a collaborator, you can run into the no remote repositories found error.
Change of Remote Origin – In some cases, the remote origin of the resource you’re trying to access might have been changed, or an incorrect value has been added. When this happens, you won’t be able to access the repository due to errors from the resource origin.
What can I do if no repository is found in vs code?
The following are a couple of troubleshooting steps you can apply to help you fix the no repository found in VS code error:
1. Set Base URL
If you’re attempting to perform actions on a repository, you need to set a base URL on your local machine.
Launch the VS code app on your PC, and double-click the icon to open the application.
Replace the Username and ProjectName with their corresponding data. Once the base URL is set, the no repository error found should be resolved.
2. Delete Git Credentials
Press the Windows key + R to open the run dialog box, type in control and hit Enter.
In the control panel, click on User Accounts and select Credential Manager.
Click on Windows Credentials and locate the GitHub credentials under the Generic Credentials section.
Click on Remove to delete all the git credentials.
Sometimes, the problem is not from the URL. Instead, you can check if your password has been changed recently.
If you’ve changed your password recently, the old password may still be in use because the new one has yet to be cached. If this is the case, you need to clear all git-related info from your PC.
On the website, click on your profile icon, and click on Settings.
Scroll down to locate Developer Settings and click on it.
In the next window, click on the Personal Access Tokens tab, and select Generate New Token.
Open the VS code terminal window, and navigate to the directory of your repo.
Once in the directory, type in the command nano and hit Enter: .git/config
Replace the username with your username and the personalToken with the token you generated.
Close the Terminal and try accessing the repo to see if the error persists.
Fixing the no repository found error in VS code is tricky because many factors could trigger the error. However, the error usually lies with access and authentication.
With the steps above, you should be able to fix the error. If you’ve got alternative solutions that helped you resolve this error, you can let us know in the comments below.
ChatGPT has been present for a while now, and it’s an amazing artificial intelligence chatbot. It can be used for giving information and for performing various tasks.
Since it’s such a versatile tool, it’s no wonder that Microsoft implemented ChatGPT to Bing search. By doing so, the search engine can give users more accurate information.
The new version of ChatGPT has been released, and if you want to learn more about its features, visit our ChatGPT 4 vs ChatGPT 3 guide for more information.
With the release of the new version, many are wondering if there are any differences between Bing and ChatGPT, and in today’s guide, we’re going to take a closer look at them.
ChatGPT vs Bing, everything you need to know
Access methods
Although ChatGPT in Bing is available to the public, it’s not available in all browsers. To use it, you need to have a Microsoft Account and use Edge.
This can be a problem, especially if you rely heavily on ChatGPT and don’t use Microsoft Edge for web browsing. Being forced to use a certain browser only to get access to this feature seems like a major inconvenience for most users.
On the other side, ChatGPT has a dedicated button in Edge, so it’s quick and easy to access, and you don’t need to have a separate tab open just to run it.
On the other hand, ChatGPT is available in all modern browsers, and to use it, you need Microsoft or Outlook account. This means that you don’t need to switch to a different browser or change your workflow to use it.
GhatGPT-4 isn’t available to the general public since it was released in the early March of 2023. However, ChatGPT premium users get access to new and upcoming features, so they are already using it.
You can also join the ChatGPT-4 API waitlist if you’re a developer and you want to give it a try. On the other hand, ChatGPT-3.5 is available to the general public.
It’s important to mention that ChatGPT is available only via the website, so there’s no app on your phone that you can use. This isn’t a dealbreaker, but it can cause inconvenience to some users.
On the other hand, Bing ChatGPT had a waitlist when it was first announced, but now it’s available to the public. To top it off, the new Bing runs on ChatGPT-4 optimized for search.
As for availability, the Bing search is available in Edge and mobile apps, allowing you to access it on any platform.
Different purposes
While ChatGPT-4 can be used for any purpose, the Bing version of ChatGPT is optimized for helping users with searching for specific data using the Bing search engine.
During our testing, we didn’t find any major differences between the two, however, more advanced users that rely heavily on ChatGPT might be able to spot them better.
This led some users to believe that the Bing version doesn’t have the access to the same features as the OpenAI version, however, we didn’t find any major differences in this regard.
Censorship issues
Some users complained that the Bing version of Chat GPT has issues with censorship and that the ChatGPT premium version offers more access to unfiltered information.
We haven’t had the chance to test this in practice, but if you want unrestricted access to the information, perhaps the ChatGPT premium might be a better option.
User interface
ChatGPT has a simple but effective user interface that comes with no distractions. All the data is easily presentable, and you can easily start a new chat.
On the other hand, ChatGPT on Bing is more colorful, trying to match Bing’s esthetics. We’re not a fan of this design choice, and we do prefer the minimal interface that the original offers.
On the other hand, there’s also a ChatGPT available in the sidebar, and while this version looks more streamlined, it doesn’t have enough space to present more data in a readable format, and the responses might feel a bit cluttered.
Accuracy
Since Bing’s version of ChatGPT is designed for improving the user’s search experience, many claim that it’s more accurate than the original.
This version relies on relevant search results, so in theory, it should provide you with fresh and accurate data right from Bing search.
On the other hand, ChatGPT-4 has a limited number of sources, so its data might not be always 100% correct.
Chat limitations
Both versions have certain limitations, and currently, Bing ChatGPT has a limit of 6 messages per chat and 60 total chats per day. This seems rather limiting, but unless you’re a heavy ChatGPT user, you probably won’t exceed these limitations.
On the other hand, ChatGPT-4 from Open AI has a limit of 100 messages every four hours to handle more messages daily. If you use chatbots more frequently and are an advanced user, then the OpenAI version will work better for you.
Lastly, we have to talk about pricing. Currently, ChatGPT comes with free and premium models. The premium model runs on ChatGPT-4, and it offers better responses and early access to new features.
However, it comes with a hefty monthly fee, so unless you’re using ChatGPT daily, you probably aren’t going to subscribe.
We have a great guide on ChatGPT Professional, so be sure to check it if you plan to start using it.
On the other hand, the Bing version of ChatGPT is completely free and open to the public, allowing you to use it without any restrictions, which is perfect if you’re a casual user that wants to give ChatGPT a try.
Is Bing Chat better than ChatGPT?
While Bing ChatGPT chatbot offers access to ChatGPT-4 and better access to recent information, it lacks certain functionality compared to its OpenAI counterpart. If you’re an advanced user, you can even install the ChatGPT app locally, and that’s something that Bing AI can’t do.
Simply put, this version is optimized for web search, so if you’re an advanced user you may feel that this version doesn’t utilize the full potential of ChatGPT-4.
On the other hand, Bing ChatGPT is perfect for casual users that predominantly use the Edge browser. In our opinion, we’ll wait until ChatGPT-4 becomes available to the general public and continue using the ChatGPT-3.5 that is currently available.
In our opinion, Bing Chat might be better for casual users, but we’ll always prefer ChatGPT due to its advanced functionality. Not a fan of ChatGPT? Maybe you should look into ChatGPT alternatives instead.
Google is also joining the AI chatbot market, and if you want to learn more, we have a great guide on Bing AI vs ChatGPT that you should check out.
What are your thoughts? Let us know in the comments section below.
The printer error 0x0000052e Windows cannot connect to the printer can show up during a printer installation or when you’re simply want to perform a printing job. This can be caused by an improper cable or network connection to the printer, malfunctioning driver or just a wrong setup. Before starting the solutions below, make sure that the printer is connected properly and you have a steady internet connection.
How do I fix printer error 0x0000052e?
1. Run the troubleshooter
Press Windows + I to open the Settings app.
Go to System, and click Troubleshoot.
Select Other troubleshooters.
Locate the Printer option and click Run.
Select Apply this fix.
Besides the steps mentioned above, we also think you should take care of other critical issues, such as corrupted system files, which can also be the problem of the error.
Thus, to help you simplify this situation, we suggest you try a specialized tool in this area that will help you take care of all corrupted, broken, or even missing files by finding healthy components as replacements.
2. Start the network printer using CMD
Press the Windows key, type CMD, and click Run as administrator.
Type the following command, replace <servername> with the printer server name & <printername> with the name of your printer, and press Enter: start \\<servername>\<printername>
On the authentication window, enter your username and password.
3. Reset the printer spooler
Press Windows + R to open the Run dialog box.
Type %WINDIR%\system32\spool\printers and click OK to open the Printers folder.
Select all the content and click the Delete icon.
Restart your computer to let the changes take effect.
On the Install Windows page, choose language, time, and keyboard preference and click Next.
Click Install Windows.
Wait for a few minutes, Windows will be installed and it will take you to the login screen.
What causes the 0x0000052e Windows cannot connect to printer issue?
There are several reasons for this printer error: some of the common ones are mentioned here:
Incorrect printer configuration -If your printer is misconfigured, then your computer might not be able to connect to the printer. You need to check the printer settings to make sure that’s not the case.
Damaged printer driver – Drivers are important for the smooth functioning of your computer. If the device drivers are outdated or incompatible, then you might not be able to connect your computer to a printer. To fix this, you need to update device drivers to the latest compatible version.
Firewall or security settings – The security tool or firewall settings of your device could prevent your computer from connecting to the printer. You need to check if Firewall is blocking the printer port or if the security software is blocking the printer driver.
Network connectivity issues – If the printer is connected to the network and there are connectivity issues, then the computer might not able to establish a connection with the printer.
System files are corrupted – If your Windows files that handle printer dependencies are missing or damaged, then you might face this issue. You need to perform a clean installation to fix it.
So, these are the methods that you can follow to fix 0x0000052e: Windows cannot connect to the printer. Try them and let us know what worked for you in the comments section below.
Incorrect drivers – Drivers are important for your computer for smooth functioning. If drivers are outdated or corrupted, it could cause issues during the OOBE setup process and trigger an error message. You need to update your device drivers to the latest version.
Software conflicts – Sometimes, third-party software or antivirus programs can interfere with the OOBE setup process and cause issues. Check for the newly installed apps and uninstall them to see if the issue persists.
Hardware issues – Hardware issues, including faulty RAM, hard drive errors or other hardware problems, could cause this error.
A lot of us can or already have fallen victim to ruthless hackers, so keeping ourselves protected in this ever-changing online world is paramount.
Know that the U.S. Cybersecurity & Infrastructure Security Agency, also known as CISA, has released a new open-source incident response tool.
This new software actually helps detect signs of malicious activity in Microsoft cloud environments, which can be huge in the battle against malicious third parties.
Commonly known as the Untitled Goose Tool, this Python-based utility can dump telemetry information from Azure Active Directory, Microsoft Azure, and Microsoft 365 environments.
According to CISA, it is a robust and flexible hunt and incident response tool that adds novel authentication and data-gathering methods.
With this tool, you can basically run a full investigation against a customer’s Azure Active Directory (AzureAD), Azure, and M365 environments.
Furthermore, Untitled Goose Tool also gathers additional telemetry from Microsoft Defender for Endpoint (MDE) and Defender for Internet of Things (IoT) (D4IoT).
We know you are curious about specifics, so let’s get into it. With the cross-platform Microsoft cloud interrogation and analysis tool, security experts and network admins can:
Export and review AAD sign-in and audit logs, M365 unified audit log (UAL), Azure activity logs, Microsoft Defender for IoT (internet of things) alerts, and Microsoft Defender for Endpoint (MDE) data for suspicious activity.
Query, export, and investigate AAD, M365, and Azure configurations.
Extract cloud artifacts from Microsoft’s AAD, Azure, and M365 environments without performing additional analytics.
Perform time bounding of the UAL.
Extract data within those time bounds.
Collect and review data using similar time-bounding capabilities for MDE data.
Keep this in mind if you value the privacy and security of your company. However, know that it all starts with us being extra careful when on the internet.
Is this something you would be interested in using yourself? Share your opinions with us in the comments section below.
Over the last few years, Microsoft has put a lot of effort into getting as many people to use their products as possible. You can tell from products like the Edge browser, which has evolved over the years with its features.
For today, we want to concentrate a little on project management tools. Microsoft Loop and Notion, to be precise.
Both are cloud-based project management apps, but which one is better? We look at some of the main differences between these two products to help you decide which is right for your business.
What is Microsoft Loop used for?
Microsoft Loop is an online project management tool integrating with Office 365 services such as SharePoint Online and OneDrive for Business. This is the tool for any business that values organization and boosting productivity.
You can easily organize your team by creating tasks, setting due dates, and tracking progress toward goals. Another notable feature is that Microsoft Loop has enabled API, which will be great for developers as they can extend the app’s functionality if needed.
With all these praises, you may wonder, Is Microsoft Loop ready? Yes, it is, and it is publicly available.
Other tasks you can perform with Microsoft Loop include:
Create documents in Word, Excel, or PowerPoint from within the app
Share documents with others
Create separate workspaces for each project you’re working on
Add tasks to a task list for each project
Give feedback in real-time
Both services have an impressive array of features, and we look at some astounding similarities below.
What are the similarities and differences between Loop and Notion?
Similarities
1. Templates
Loop and Notion offer templates to help you get started, but they go about it differently. You can use these templates as is or as a starting point for your custom design.
Templates are great because you don’t have to start from scratch every time. What’s even better is that you can customize these templates to create your workflow. They also come in various categories, so you can rest assured that you’ll save lots of time.
2. Integration
Since Loop is Microsoft’s project, it is expected to integrate with other Microsoft products. Notion notably integrates with collaboration platforms such as Zoom, Slack, and Google.
This is great, especially for a business mainly using products like Teams. The whole point of an all-in-one workspace is to have all associated apps working together.
It isn’t fun at all to keep switching from one app to another when working on a project, and Loop and Notion have ensured that users won’t have to worry about this.
3. AI-powered
AI is not going anywhere, and every business is bound to integrate it somewhere. Loop and Notion have not been left behind when it comes to exploring the power of AI.
Loop integrates AI in contextual suggestions to help you bring your ideas to life. Notion, on the other hand, leverages AI to automate tedious tasks. Its AI model is more advanced as it can help you write, explain and translate, among other features.
The idea is that by using AI to automate these tasks, you can spend more time focusing on making progress toward your goals instead of wasting time doing tedious work.
While both applications are similar in many ways, several differences between Loop and Notion may make it easier for you to decide which is best for your needs.
1. Pricing
A critical component when choosing your project management tool is pricing. You want to select one that meets your needs but still be able to keep the lights on when it comes to monthly subscriptions.
Loop and Notion both have a free version, but there are some major differences in their pricing.
Notion has various pricing packages, from the free option to the Enterprise package, which is custom-built for each business. The major difference in the pricing is that the number of guest collaborators increases as you move up.
So, depending on the number of team members you have, you can select a plan that fits your workspace. Prices range from $8 to $15 per month, which is quite affordable given all the features provided.
Since it has just been launched, the pricing is still a bit hazy for Microsoft Loop users, but for now, it seems it will be included in the Microsoft 365 subscription. This is a win because you don’t have to get a separate subscription.
2. Collaboration
We’ve already established that both tools are great collaborative apps, but each goes further in the number of people who can simultaneously edit in the workspace. In this sector, Notion takes the crown.
An unlimited number of people can all edit at once, and all edits will be displayed instantly. For Microsoft Loop, only 50 people can edit the workspace at once, and even so, Microsoft still recommends a maximum of 12 at any given time.
This will prevent the workspace from getting too cramped. Looking at it from another angle, it may not be so disadvantageous as 12 is a good number as it allows you to keep track of any changes.
For Notion, having an unlimited number of people making edits on a single workspace can be overwhelming, especially if you have to keep up with every edit and comment.
3. Security
Security is one of the biggest differences in the Microsoft Loop vs Notion war. While both systems offer encryption, it’s only available on the Enterprise version in Notion. This means that features like audit logs and single sign-ons are reserved only for premium members.
For Loop, users must create security groups alongside their Azure AD membership. The admins will then grant access to users, which can be revoked at any time.
In contrast to Notion, this is more secure because admins can monitor and detect potential security risks and avert them in time.
Now that Microsoft Loop is publicly available, it’s only a matter of time before users decide which platform reigns supreme. Notion and Microsoft Loop are available as desktop apps which makes If you were part of the Microsoft Loop preview, it is nothing new, and you can decide which is the better option.
Loop and Notion are solid productivity apps and can help you get more out of your workflow than ever. Ultimately, the better option depends on each business’s individual needs. If we had to choose, we’d go for Microsoft Loop, given the security benefits that come with it.
Also, the integration with Microsoft apps will offer a seamless experience. We’re keen to know what your preference is between the two. Let us know in the comment section.
Adding a shared mailbox in Outlook can help streamline team communication and collaboration. It allows multiple team members to manage and access messages from a shared account, improving productivity and promoting better teamwork.
This guide will discuss different ways to add a mailbox in Outlook with step-by-step instructions. Let’s get started!
What can I do to add a shared mailbox in Outlook?
Before proceeding with the steps to add a shared mailbox, go through the following:
First, it should be available in Microsoft 365.
MS Outlook is configured with your Microsoft 365 account.
You should have access to the shared mailbox.
Always remember that configured shared mailbox can allow external access.
An email address and display name should be associated with it.
1. Use the Outlook app
On the Outlook app, click File.
Click Account Settings, and select Account Settings from the drop-down.
Click Change.
Go to More Settings.
Switch to the Advanced tab and click Add.
On the Add Mailbox, enter the name under Add Mailbox and click OK.
Go to your mailbox; on the Folders option, right-click and select Add shared folder or mailbox.
On the next window, enter the name or email address and click Add.
4. Use the Open & Export method
On Outlook, click File to open the Outlook menu.
Go to Open & Export, then click User’s Folder.
The Open Other User’s Folder window will open; enter a name or click on it to get the Address Book.
Select the shared mailbox from the list and click OK.
On Open Other User’s Folder, click OK to close the window.
So, these are ways to add a shared mailbox in Outlook in no time. We also have a great guide on how to delete an Outlook group if you don’t want to use a shared mailbox anymore, be sure to check it out.
After checking out the most recent Canary Build, it’s time to look at other channels as well. More specifically, Microsoft released new software for Beta Insiders as well.
And, as we told you before, be careful when using the Snipping Tool. It was discovered that it hides a vulnerability that can be exploited by malicious third parties.
Circling back, it’s time to focus on the new Beta build, one that was just delivered to Windows Insiders on that specific Channel.
Before we proceed, we want to remind you about the fact that the March 2023 Patch Tuesday updates are seriously slowing down your SSD.
Windows 11 Beta build 22624.1470 restores seconds in the systray clock, and more KB5023780
Lots of new features added to the Windows 11 Beta Channel
Yes, you guessed it, we are getting twin builds delivered to this Channel again. Microsoft has started doing this since last year.
Today, the tech giant released builds 22624.1470 and 22621.1470 (KB5023780) to the Beta Channel for Windows 11 Insiders to test and enjoy.
Microsoft has now added a USB4 hubs and devices page in the Settings app. USB4 enables new productivity scenarios for docking, high-performance peripherals, displays, and charging.
This USB4 settings also page provides information about the system’s USB4 capabilities and attached peripherals on a USB4 capable system.
Let’s get right into the rest of the changelog. It contains all the fixes that have been performed in order to improve the experience.
What’s different from the Canary build is that this one has some known issues, while the other doesn’t have any confirmed ones just yet.
Changes and Improvements in Build 22624.1470
[General]
Users will now see a copy button for quickly copying two-factor authentication (2FA) codes in notification toasts from apps installed on the PC or from phones linked to the PC. We make a best effort to determine if a notification toast has an authentication code but please send us feedback if we got it wrong or if we failed to detect the code in a notification toast.
[Taskbar & System Tray]
Added a glanceable VPN status into the system tray when connected to a recognized VPN profile. The VPN icon, a small shield, will be overlayed in your system accent color over the active network connection.
In response to user feedback, we are introducing the capability to show seconds in the clock on the system tray. This feature can be enabled by toggling the option listed under Settings > Personalization > Taskbar in the Taskbar behavior section. You can also right-click on taskbar to quickly get to taskbar settings. UPDATE: This experience is currently not working as expected – see the known issues below.
Changes and Improvements for BOTH Build 22621.1470 & Build 22624.1470
[Search on the Taskbar]
The search box on taskbar will be lighter when Windows is set to a custom color mode. Specifically, when the Windows 11 mode is set to dark, and the app mode is set to light under Settings > Personalization > Colors you will see a lighter search box on taskbar.
Fixes in Build 22624.1470
[Live captions]
Fixed the issue causing live captions to not work for Chinese Traditional on Arm64 devices.
Fixes for BOTH Build 22621.1470 & Build 22624.1470
[Search on the Taskbar]
Fixed rendering issues when using the touch keyboard with the search box on taskbar.
Fixed an issue when double clicking the search highlight glyph in the search box makes it disappear.
Fixed an issue where the search box would randomly disappear.
Fixed an issue where the search icon flips incorrectly for right-to-left (RTL) languages.
Fixed on issue where you might have seen some text flicker in the search box when you click into it.
Fixed an issue where the search box might disappear on one monitor if you are using multiple monitors.
Made some accessibility fixes to the settings for search under Settings > Personalization > Taskbar.
Known issues
[System Tray]
While the setting to turn on to show seconds in the clock on the system tray is shown under Settings > Personalization > Taskbar, it currently does not work on this build.
[Live captions]
On ARM64 devices, enhanced speech recognition support installed through the Language & Region settings page will require restarting live captions if you switch languages in the live captions Caption language menu.
Certain languages shown on the Language & Region settings page will indicate speech recognition support (e.g., Korean) but don’t yet have support for live captions.
When adding a language through the Language & Region settings page, language feature installation progress may become hidden, and you may not see install completion of “Enhanced speech recognition” (required by Live Captions). (You can use the language’s “Language options” to monitor progress.) If this happens, there may be an unexpected delay before the live caption setup experience detects this and lets you continue.
Captioning performance may be degraded in non-English languages and missing out-of-language filtering in non-English (United States) languages which means that incorrect captions will be shown for speech not in the caption language.
What can I do if I can’t install build 25324?
Press Win+ I to access Settings.
Select the System category and click on Troubleshoot.
Press the Other troubleshooters button.
Press the Run button next to Windows Update.
Make sure to report any other issues you might come across, in order for Microsoft to address and improve the overall OS experience for us all.
This is everything you can expect if you are a Windows 11 Beta Channel Insider. Leave a comment below if you found any issues since installing this build.
Users frequently ask why a high-end PC like an Alienware laptop overheats. It is because they experience the PC getting hot, especially when gaming. However, we’ll discuss the causes of Alienware laptop overheating and ways to mitigate it.
Many factors can cause the Alienware laptop overheating. Some notable ones are:
Heavy workloads – The Alienware laptop can overheat and not work correctly if you’re performing lots of heavy-duty workloads simultaneously. It causes it to overwork its components without tile to rest.
Faulty GPU or CPU components – Running outdated graphics cards on your laptop can affect its GPU performance, causing it to malfunction and work forcefully. Also, failing hardware like the CPU may generate more heat, resulting in laptop overheating.
Air vent blockage – Placing the Alienware laptop on a soft surface can block the vent flow, which helps disperse heat and allows cooling air.
Faulty fans and dust accumulation – The fans in the Alienware laptop help it to cool its hardware components and remove heat from the motherboard. However, dust accumulation on the fan can prevent it from spinning, causing the system to overheat.
These factors can differ on different Alienware laptops depending on the situation. Nonetheless, you can fix the problem by following the steps outlined below.
What can I do when my Alienware laptop is overheating?
Before applying any advanced troubleshooting steps, go through these:
Remove the Alienware laptop from the soft surface and place it on a flat wooden desk or a laptop stand.
Unplug the laptop from its power source.
Ensure your room temperature is cool.
Don’t run the Alienware laptop for an extended period.
Clean the vents and check the fans.
Use a cooling pad – we have a detailed review of best cooling pad deals for your PC here.
If you can’t fix it, try the steps below:
1. Reduce Processor temperature
Left-click the Start button, type Power plan, then select Edit power plan from the Best results.
Click Change advanced power settings.
Select the Processor power management option and set the values according to your requirements.
Reducing the processor workload by about 20% can help reduce heat.
2. Update your graphics drivers
Press Windows + R keys to prompt the Run window, type devmgmt.msc, and click OK to open the Device Manager.
Expand the Display Adapter entry, right-click on the device driver, then select Update driver from the drop-down menu.
Click on Search Automatically for the updated driver software option.
Restart your PC and check if the overheating issue persists.
Updating the graphics drivers on the Alienware laptop will resolve bugs causing the GPU malfunctions and install the latest features to improve the drivers’ performance.
Recently, we looked at KB5023778, which brings the long-awaited Bing chat shortcut for the Edge browser to the Windows 11 taskbar.
On the Windows 11 topic, be careful with the Snipping Tool app. It was discovered that it hides a vulnerability that can be exploited.
It’s time to focus a bit on the new Canary build, one that was just delivered to Windows Insiders on that specific Channel.
Before we do, though, we have to remind you about the fact that the March 2023 Patch Tuesday updates are seriously slowing down your SSD.
What should I look for in build 25324?
Not long ago, we announced the introduction of the Canary Channel to the Windows Insider program. Since then, Insiders here received two builds.
Microsoft has released a new build for Windows 11 Canary Channel Insiders today. Build 25324 brings SHA-3, a new Defender warning UI, and a new USB4 settings page.
It also boosts the performance of File Explorer, the company says. And, as always, there are many more bug fixes and other improvements.
The tech giant is now beginning to preview a revamp of the widgets board, with a larger canvas and dedicated section for widgets and feed content with a clear separation between them.
If your device supports it, you can have a 3 collum widgets panel. Not all Insiders will get this feature exactly from the start.
Also, the tech giant is adding a USB4 hubs and devices page in the Settings app. USB4 enables new productivity scenarios for docking, high-performance peripherals, displays, and charging.
This USB4 settings also page provides information about the system’s USB4 capabilities and attached peripherals on a USB4 capable system.
Furthermore, starting in Windows 11 (version 22H2), Enhanced Phishing Protection in Microsoft Defender SmartScreen has been enabled.
Keep in mind that this helps protect Microsoft school or work passwords against phishing and unsafe usage on sites and apps.
Furthermore, starting with this build, there is added support for the SHA-3 family of hash functions and SHA-3 derived functions (SHAKE, cSHAKE, KMAC).
In fact, the SHA-3 family of algorithms are the latest standardized hash functions by the National Institute of Standards and Technology (NIST).
Let’s also check out the rest of the changelog and see what else we are getting in this new Canary Channel build.
Changes and Improvements
[Widgets]
Beginning to roll out animated icons for Widgets on the taskbar. The animation triggers when you hover or click on the Widgets taskbar entry-point or when a new widget announcement is displayed on your taskbar. Currently, only a few weather and finance icons are supported.
[Search on the Taskbar]
Once you have access to the new Bing, the search box on the taskbar will include a button that opens the Bing chat experience in Edge. If you don’t have access to the new Bing, the search box on the taskbar will feature a dynamic search highlight button. We’re beginning to roll this out to Insiders, not everyone will see it right away.
[Input]
Updated several simplified Chinese fonts and the Microsoft Pinyin IME to support GB18030-2022. With this update, you can enter and display characters from conformance level 1 or 2 via the additions to Microsoft Yahei, Simsun and Dengxian. Unicode Extensions E and F are now supported in our Simsun Ext-B font to meet the requirements for level 3.
[Settings]
As part of the deprecation of Microsoft Support Diagnostic Tool (MSDT) and MSDT Troubleshooters, we have begun redirecting some of the troubleshooters found under Settings > System > Troubleshoot and in other areas of the OS to the new Get Help troubleshooting platform.
If you have multiple cameras that support Windows Hello, you can now select your preferred camera under Settings > Accounts > Sign-in Options.
[File Explorer]
Made some changes which should noticeably help improve the performance of the “calculating” phase when sending a large number of files at once in File Explorer to the recycle bin.
What can I do if I can’t install build 25324?
Press Win+ I to access Settings.
Select the System category and click on Troubleshoot.
Press the Other troubleshooters button.
Press the Run button next to Windows Update.
Make sure to report any other issues you might come across, in order for Microsoft to address and improve the overall OS experience for us all.
This is everything you can expect if you are a Windows 11 Canary Channel Insider. Leave a comment below if you found any issues since installing this build.
Acer laptop overheating is a common issue that can cause slow performance, sudden shutdowns, or even hardware damage. It often happens due to dust buildup, poor ventilation, or heavy workloads, but the exact cause depends on your usage and maintenance habits.
Why Your Acer Laptop Is Overheating
Overheating is common in laptops with compact cooling systems. In Acer models, it often occurs when airflow is restricted, the cooling fan is malfunctioning, or heavy processing tasks overload the CPU and GPU.
Press Windows + R key to open the Run dialog box, type taskmgr.exe, and click OK to open Task Manager.
Find the app, right-click it, then select End Task from the drop-down menu.
Restart your PC and check if the overheating continues.
Ending tasks for some apps and games will stop their background activities and reduce the power intensity on the system. Check how to turn off background apps on Windows 11 for more steps.
Press Windows + R keys to prompt the Run window, type devmgmt.msc, and click OK to open the Device Manager.
Expand the Display Adapter entry, right-click on the device driver, then select Update driver from the drop-down menu.
Click on Search Automatically for the updated driver software option.
Restart your PC and check if the overheating issue persists.
Updating the graphics driver can fix GPU bugs that cause overheating by forcing the chip to overvolt under load. If you encounter issues during manual updates, you can use Fortect Driver Updater to scan for outdated or missing drivers and install the correct versions automatically. This helps avoid OS damage from incompatible drivers.
4. Update BIOS and chipset power management
Press the Windows key, type “System Information,” and note the System Model.
Go to Acer Support, search your exact model, and open the Drivers & Manuals page.
Download the latest BIOS and Chipset/power management packages.
Plug in the charger and close all applications.
Install the chipset package first and restart.
Run the BIOS updater, follow the on-screen steps, and let the system reboot.
After boot, check if thermals improved by monitoring temperatures during normal use.
5. Reduce battery-related heat while charging
Avoid leaving the laptop at 100% charge for extended periods when idle.
Once the battery reaches full, unplug the charger and let it discharge to around 60–80% during light use.
Keep the area around the laptop cool and unobstructed.
If your Acer utility offers a battery health mode, enable it to limit peak charge during desk use.
If the battery appears swollen, stop using the device and have it replaced.
Just in time for the weekend, Microsoft has released a new build to the Canary Channel. This one has no new features, and is only meant to “test the servicing pipeline.” As promised, this new Canary Channel build doesn’t even rate a Windows Insider Blog post, but Microsoft tweeted out the news a few minutes ago:
Cumulative Update Build 25314.1011 (KB5025849) is rolling out to #WindowsInsiders in the Canary Channel. This update does not include any new content and is designed to test our servicing pipeline.
The weather determines how we carry ourselves every day in every aspect of life from farming to dressing. This is why weather forecasting is very important.
It allows us to prepare early enough for what’s coming be it good tidings or adverse weather conditions that require elaborate measures to be put in place to prevent extensive damage and loss of life.
Microsoft’s Weather from Microsoft Start has particularly been resourceful. It has even received recognition from the Director of NOAA’s National Weather Service for the same recently.
In an independent study commissioned by Microsoft to be conducted by ForecastWatch to determine how effective and efficient the tool is in comparison to the top global weather providers, it emerged that the company’s Weather from Microsoft Start was “the most accurate weather forecasting service.”
Microsoft attributes this success to the past two years where it has worked tirelessly to enhance the tool’s capabilities by leveraging “industry-leading machine learning, AI, and other innovative technologies.” Weather from Microsoft Start was also at the top of the list when it comes to making accurate high temperature, low temperature, and wind speed predictions.
The company further added that:
Built right into Windows, Weather from Microsoft Start is accompanied by an intelligent, personalized feed that delivers up-to-the-minute weather information, for free. In addition to severe weather alerts, Weather from Microsoft Start provides precise weather information to help users make better decisions for their lifestyles, health, jobs and activities – including accurate 10-day global weather forecasts updated multiple times every hour.
Do you use Weather from Microsoft Start to make informed decisions on how to go about your day? Share your experience with us in the comments.
With the Group Policy Editor, you can easily tweak important system settings on the computer and the connected network. However, there are some users that aren’t able to open the Group Policy Editor and are coming across the Windows cannot find gpedit.msc error.
If you are also experiencing this issue and looking for ways to fix it, you are in the right place. In this guide, we will show you a bunch of solutions to resolve the Windows cannot find gpedit.msc error on Windows 10. Let us get right into it.
Why am I getting the Windows cannot find gpedit.msc error?
It’s not just you, but several Windows 10 users are getting the Windows cannot find gpedit.msc error. The complete error message reads Windows cannot find ‘gpedit.msc’. Make sure you’ve typed the name correctly, then try again.
Here are a few of the most common reasons that will trigger Windows cannot find gpedit.msc error on your Windows 10 PC.
Your Windows 10 version doesn’t support it: You should ensure that the version of Windows 10 installed on your PC supports the Group Policy Editor.
Corrupt system files: Chances are some Group Policy Editor-related system files are missing from your PC, because of which you are getting the Windows cannot find gpedit.msc error.
You have to enable it manually: If the Group Policy Editor is missing from your PC, you might have to enable it manually.
Repair the system image file: Chances are that the Windows image has become unserviceable and is causing the issue.
Let us now check the solutions that will help you fix the Windows cannot find gpedit.msc error.
How can I fix the Windows cannot find gpedit.msc error?
1. Check your Windows version
Press the Win + R keys to open the Run menu.
Type winver and press Enter.
A new About Windows box will open, and you will see the details there.
Do note that if you are running Windows 10 Home version, the Group Policy Editor does not feature in it.
This is why we advised you to check out the version of Windows OS you are running, as this will eliminate any confusion on why you are getting the Windows cannot find gpedit.msc error.
Type the below command and press Enter. sfc /scannow
Wait for the tool to fix corrupt system files.
Restart your PC.
Fixing corrupt files has helped several users resolve the Windows cannot find gpedit.msc error on their Windows 10 PCs.
You can surely follow the above steps and use the SFC Scan to fix corrupt or missing system files; it can be eased by using a dedicated tool called Fortect.
With this software, you will be able to fix corrupt system files, fix system crashes, fix DLL and BSOD errors, and much more.
Fortect
Keep your computer healthy and repair all corrupt or broken OS files with Fortect.
Find GroupPolicy, GroupPolicyUsers, and gpedit.msc respectively.
Copy these folders.
Go to C:\Windows\System32.
Paste the items here.
This solution was suggested by one user who has helped thousands of users to resolve the Windowscannot find gpedit.msc error. You can also follow the above steps and copy the mentioned files into the folder.
Open the EXE file and follow the instructions to install Gpedit.
Restart your PC.
Following the above steps, you will manually add Gpedit or Group Policy Editor to your Windows 10 PC.
The file above is safe, and you do not need to worry about it being a virus. However, if you want to create a batch file, follow the method below.
4.2. Create a batch file
Press the Win key to open the Start menu.
Open Notepad.
Copy and paste the below content on the notepad. @echo off pushd "%~dp0" dir /b %SystemRoot%\servicing\Packages\Microsoft-Windows-GroupPolicyClientExtensions-Package~3*.mum >List.txt dir /b %SystemRoot%\servicing\Packages\Microsoft-Windows-GroupPolicy-ClientTools-Package~3*.mum >>List.txt for /f %%i in ('findstr /i . List.txt 2^>nul') do dism /online /norestart /add-package:"%SystemRoot%\servicing\Packages\%%i" pause
Save the file with .BAT extension and rename it gpedit_enabler or something like that.
5. Reset your PC
Press the Win + I keys to open Settings.
Select Update & Security.
Click on Recovery.
Click Get started under Reset this PC.
Select the Keep my files option.
If nothing works, then you should resort to resetting your PC. Chances are that the files are missing related to gpedit from your PC.
You can quickly fix this issue by resetting your PC. Be sure to check the keep my files option so that nothing of your files are deleted during the reset process.
Microsoft has ventured into the filming scene and has now released a new entry dubbed Empowering Dreams. The film which majorly focuses on showing the company’s investment and commitment to empowering people across the globe with its solutions, features Pankaj Kapur, a seasoned director and actor.
Additionally, the film also captures how users can leverage technology to promote equality. It highlights how users can make use of tech to promote inclusivity by breaking down communication barriers, this way everyone gets to play a significant role in the development of the community.
The Executive Director, Corporate, Medium, and Small Business at Microsoft India, Samik Roy also indicated that:
Through this film, we want to showcase the power of dreams and how technology can serve as a reliable ally for individuals and businesses to fulfill their aspirations. In line with Microsoft’s mission, we have a steadfast commitment to empowering businesses, irrespective of their scale and size. We enable organizations and people to unlock their full potential with our secured solutions across productivity, collaboration, infrastructure, low/no code application platform, Data and AI, business applications and devices.
We invite you to check out Microsoft’s blog post, where you will get a brief synopsis of what the film’s all about, you can also get to check it out from there.
With the Dynamic Lock feature available on Windows 10 and Windows 11, users can easily lock their PCs as soon as they move away from them. This feature works brilliantly without needing an additional camera or hardware setup. It only requires Bluetooth.
However, several users have reported that the Dynamic Lock is not working for them. Thankfully, in this guide, we will give you a bunch of solutions to help them resolve the Dynamic Lock not working problem in Windows 11. So let us get right into it.
Why isn’t the Dynamic Lock working on Windows 11 PC?
Dynamic Lock screen uses a phone which is paired with your PC. It remains inside the user’s pocket; when the user moves away, the PC recognizes the same and locks the screen.
We did some internet digging and discovered the most common reasons why the Dynamic Lock is not working on your Windows 11 PC.
The feature isn’t enabled: Well, the first thing you should ensure for any feature to work is that it should be allowed inside the settings menu.
Check Bluetooth driver: Chances are that the Bluetooth driver is outdated, corrupt, or missing, because of which you cannot use the Dynamic Lock feature.
Dynamic Lock feature is disabled on your PC: For some users, the Dynamic Lock feature is disabled from the registry settings, which you need to tweak for it to work.
Hit the 3-dot icon next to your smartphone and select Remove device.
Click Add device after removing your phone.
Pair your phone.
Often there are some issues with the paired device, which could create trouble with features using the Bluetooth function. You can easily re-pair your phone with your laptop and check whether this fixes the issue.
3. Update the Bluetooth driver
Open the Start menu by pressing the Win key.
Open Device Manager.
Expand the Bluetooth option.
Double-click on your Bluetooth device.
Switch to the Driver tab.
Hit the Update driver button.
Click on Search automatically for drivers option.
Install the latest drivers if available.
Restart your PC.
Chances are that the Bluetooth driver is corrupt or outdated, which is causing the issue. However, you can update the driver by following the above steps from the Device Manager.
However, you can also use a dedicated tool called Outbyte Driver Updater. Using Outbyte Driver Updater, you can easily update all drivers on your PC, perform schedule scans, create driver backups, and much more.
Outbyte Driver Updater
Get the newest driver options while saving time and effort with the Outbyte Driver Updater app.
Navigate to the below path. HKEY_CURRENT_USER\Software\Microsoft\Windows NT\CurrentVersion\Winlogon
Open the EnableGoodbye entry on the right.
Set the Value data to 1.
Press OK.
Restart your PC.
When you set the Value data to 1 for the EnableGoodbye entry in the registry, you enable the Dynamic Lock feature on your PC.
As already mentioned, the feature wasn’t enabled or showing for some users. Also, some users have reported that the Dynamic Lock feature is greyed out for them. However, this can be easily fixed by following the above steps.
5. Enable from Group Policy Editor
Press Win + R keys to open the Run dialogue.
Type gpedit.msc and press Enter.
Click on Computer Configuration on the left.
Select Administrative Templates.
Click on Windows Components.
Select Windows Hello for Business.
Open the Configure dynamic lock factors.
Select Enabled.
Click Apply and OK.
Restart your PC.
You can also enable the Dynamic Lock feature on your PC from the group policy editor. This could also fix your issue of the Dynamic Lock feature not working.
6. Reset your PC
Press the Win + I keys to open the Settings menu.
Click on Recovery.
Hit the Reset PC button.
Select the Keep my files option.
Follow the onscreen prompts to finish the reset process.
If nothing works, you should reset your PC and check if this fixes the Dynamic Lock not working issue.
Sometimes main system files related to a feature get corrupt and cause issues. In such a case, you should reset the PC following the above steps and resolve the problem.



 NOTE