Check the Last Reboot on Windows Using a Simple Command

In this guide, we’ll show you exactly how to check the last reboot time in Windows, so you can stay on top of your system’s performance and activity.

You don’t need any extra softwarejust a quick command or two in Command Prompt or PowerShell will give you a clear answer.

How to see the last reboot time & computer uptime?

The systeminfo | find /i “Boot Time” command helps you check the last reboot time in Windows 11. Today, we’ll guide you through the exact steps in Command Prompt to make it work. If it fails, we’ve also included alternative methods.

1. Use Command Prompt

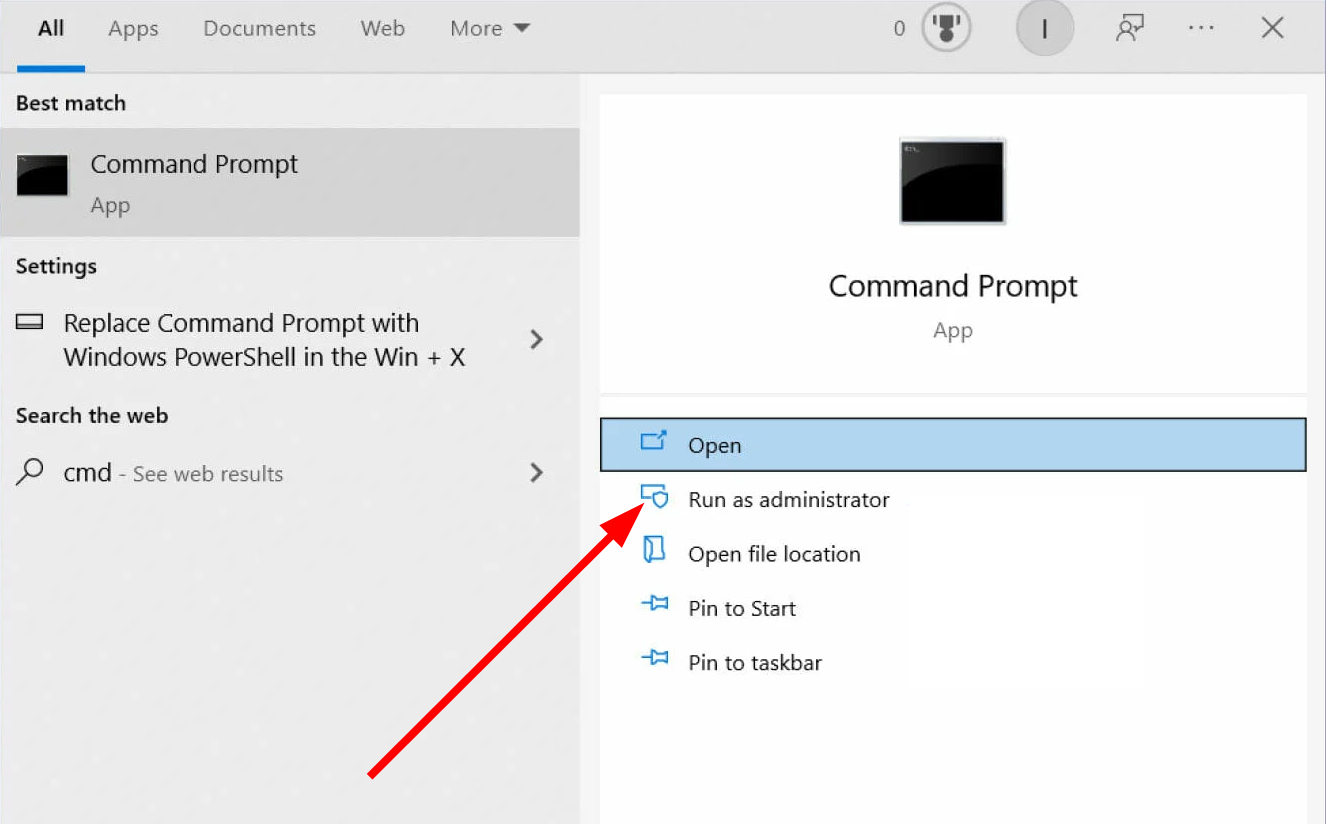
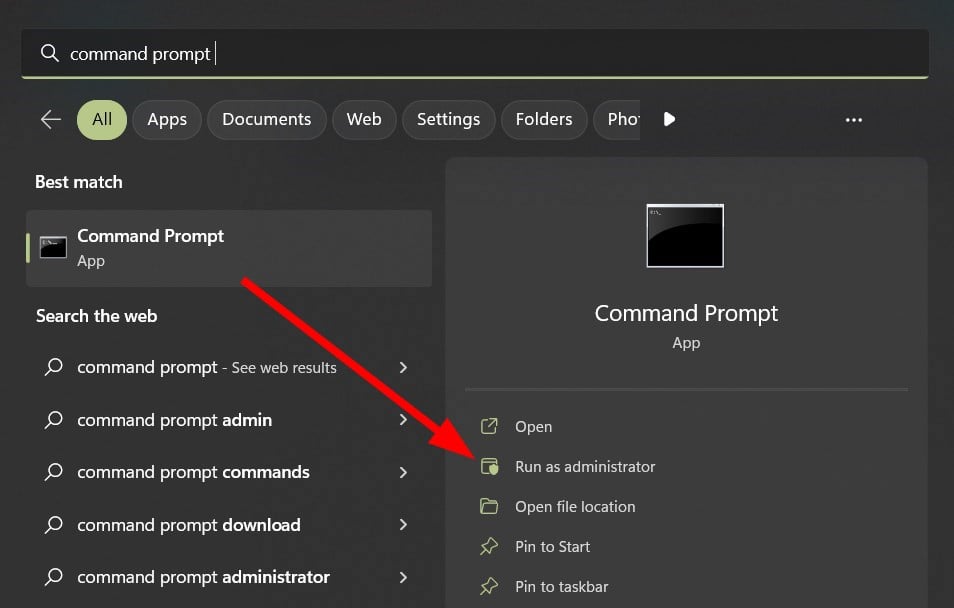
  1. Open Command Prompt as an administrator.
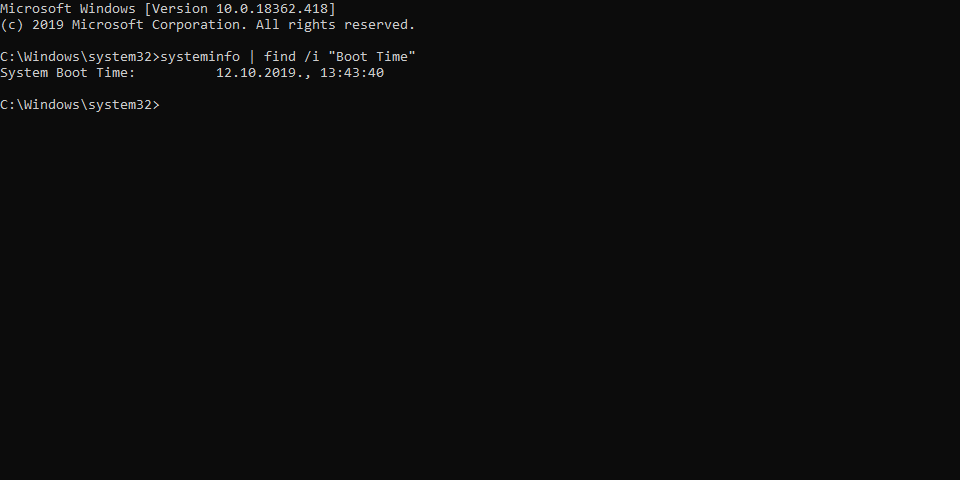
  2. In the command line, copy-paste the following command and press Enter:
    systeminfo | find /i “Boot Time”How to check last reboot on Windows Server
  3. You should see the last time your PC was rebooted.

If you’re having trouble opening CMD as admin or the command doesn’t work, you can use Task Manager.

2. Check the Task Manager’s uptime

  1. Open the Task Manager by simultaneously pressing CTRL + SHIFT + ESC.
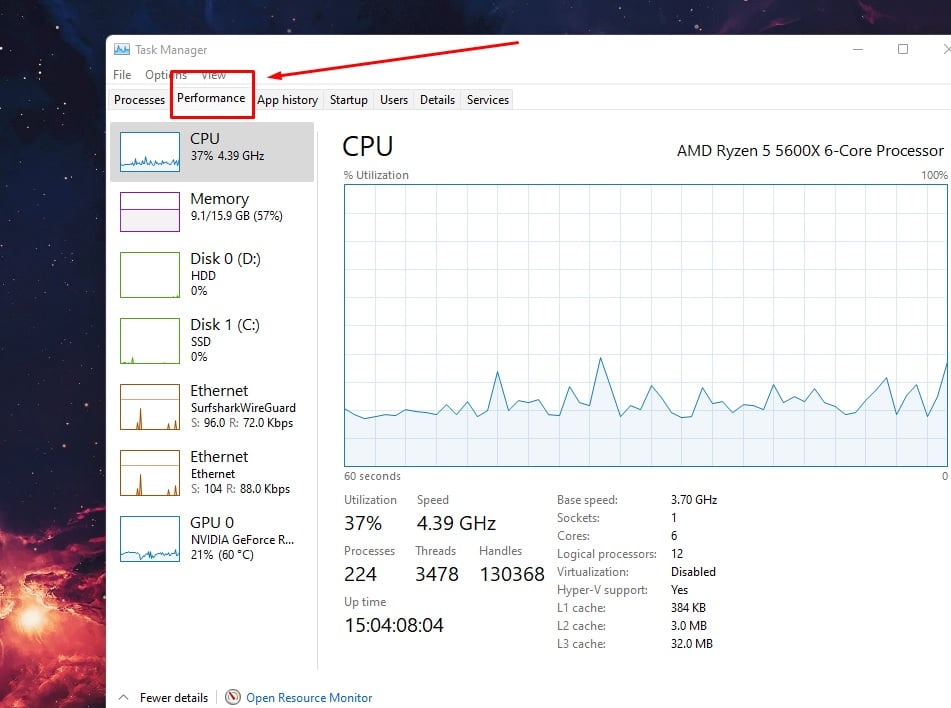
  2. Then click the Performance tab.
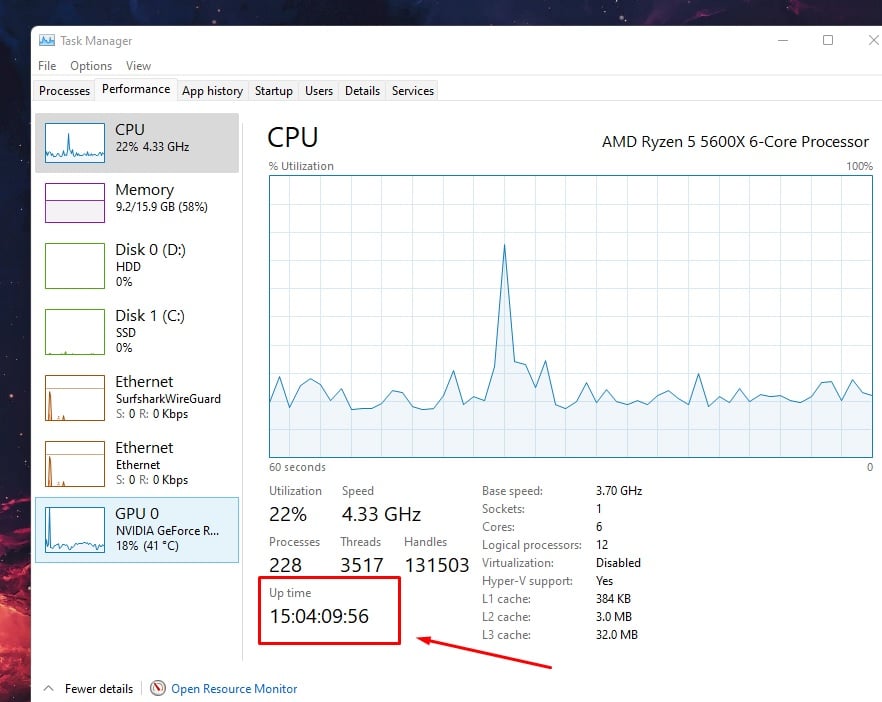
  3. In the lower part, you can find the Up time since your last reboot.

3. Use the System Event Log

  1. Open Event Viewer from the Start menu.
  2. In the far right pane, select Create Custom View.
  3. Under the Log drop-down menu, choose Windows Logs.
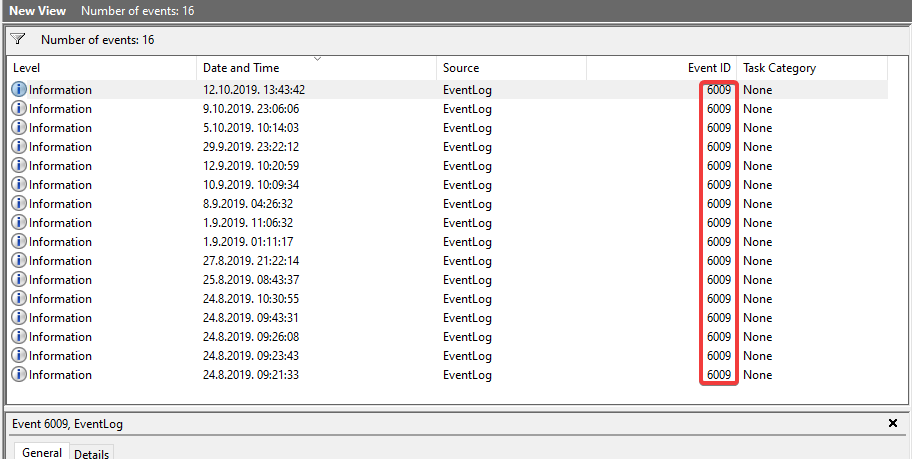
  4. Under the <All Event IDs> add just 6009.How to check last reboot on Windows Server
  5. Create a custom view.
  6. Now you can see all the times your PC was rebooted since the system was installed, which is a great feature.

You can use the System Event Log to find out when the last reboot of Windows was. This procedure is quite simple, as the only important thing is to single out one Event.

4. Schedule reboot with Scheduled Tasks

  1. Open Scheduled Tasks from the Start menu.
  2. Select Add a New Scheduled Task and click Next.
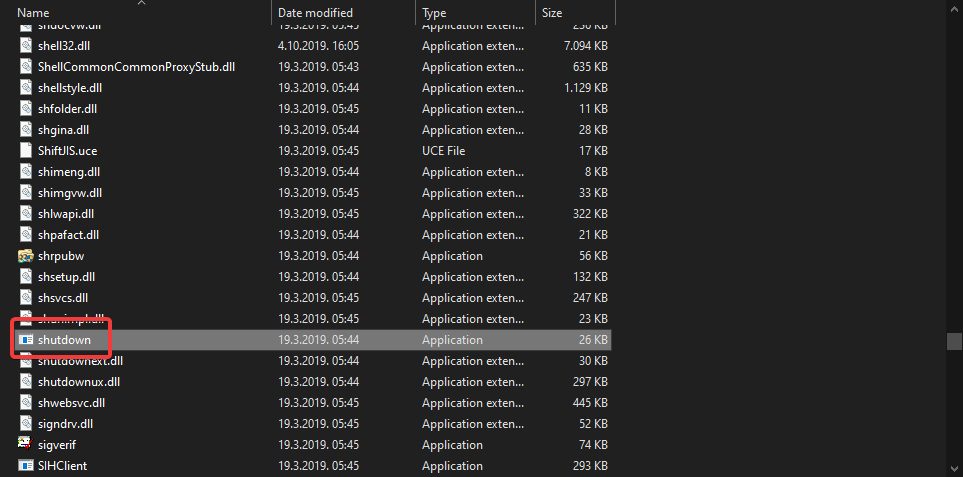
  3. On the Program selection screen, navigate to C:WINDOWSSystem32shutdown.exe.How to check last reboot on Windows Server
  4. Select shutdown.exe and name the task shutdown.
  5. Choose the shutdown frequency.
  6. Select the time and day when the scheduled reboot will occur.
  7. Enter your administrative credentials and confirm.
  8. Now, check the Open Advanced options when I click Finish box and click Finish.
  9. Finally, when a new window appears, copy-paste the following command and replace the default one:
    C:WINDOWSsystem32shutdown.exe -r -f -t 01
  10. Select Apply, and you are good to go.
  11. Later, you can check when the last time the Windows reboot occurred with one of the first two steps.

If you are interested in automatizing the reboot sequence, you can create a scheduled task. If you are not familiar with it, here’s how to schedule a reboot on Windows Server via the Scheduled Tasks utility:

If you’re on Windows 11, we have a great guide on how to check Windows 11 uptime, so visit it for more information.

Checking last reboot in Windows 11 is easiest with Command Prompt, but if it doesn’t work, you can also find the last restart time using Task Manager or the System Event log.

IPConfig /Renew Not Working? Try This!

Several users told us that the ipconfig /renew is not working for them. If they open a new Command Prompt and type ipconfig, they get the same old IP number.

If you are also facing a similar issue, this guide is for you.

What can I do if ipconfig /renew is not working?

1. Use troubleshooting tools

1.1 Run Windows Network Diagnostics

  1. Right-click on the internet connection icon in the Taskbar.
  2. Select Troubleshoot problems.
  3. The Windows Network Diagnostics tool will begin and will fix the problem.

1.2 Use internet troubleshooter

  1. Press Win + I to open Settings.
  2. Select Update & Security.
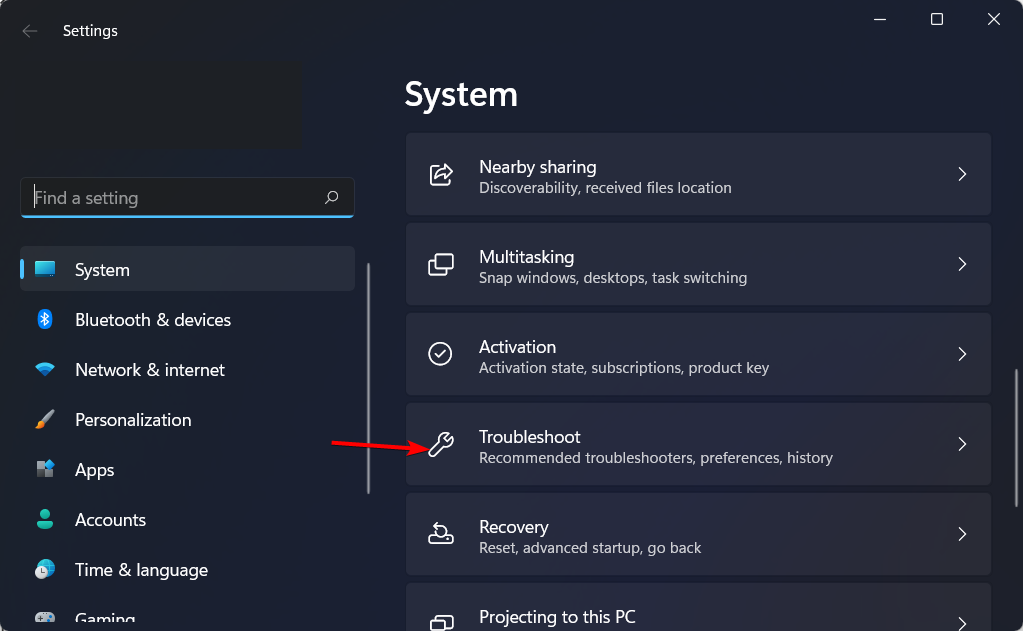
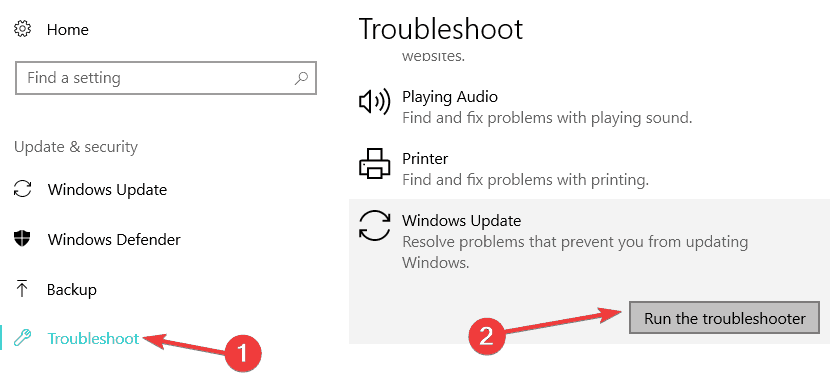
  3. Click on Troubleshoot.
  4. Under Incoming Connections, select Run the troubleshooter option.

Windows OS comes with a built-in troubleshooting tool that helps you diagnose and fix problems associated with the network.

Some users facing the ipconfig /renew not working issue reported that running the network troubleshooter helped them resolve the issue.

2. Reset TCP/IP

  1. Open the Start menu.
  2. Run command prompt as an admin.
  3. Type the below commands and press Enter after each one. netsh winsock reset netsh int ip reset ipconfig /release ipconfig /renew ipconfig /flushdns
  4. Restart your PC.

Winsock settings if corrupted can often cause issues and could also result in the ipconfig /renew command not working problem.

You can try resetting the Winsock network infrastructure and check if this resolves the problem at your end or not.

3. Reinstall the network adapter

  1. Press the Win + X key to open the context menu.
  2. Select Device Manager.
  3. Expand the Network adapters section.
  4. Right-click on your network adapter and select Uninstall.
  5. Restart your PC.
  6. Open Device Manager again.
  7. Click on the Action menu at the top.
  8. Select Scan for hardware changes.
  9. Your system will install the drivers for your network adapter.

This is one way of reinstalling the network drivers for your network adapter as some file corruption can lead to the ipconfig/renew not working issue.

An alternate way of updating your drivers is using a third-party program called Outbyte Driver Updater. Using Outbyte Driver Updater, you can update all of the drivers with just a few clicks at once, create driver backup, and more.

⇒ Get Outbyte Driver Updater

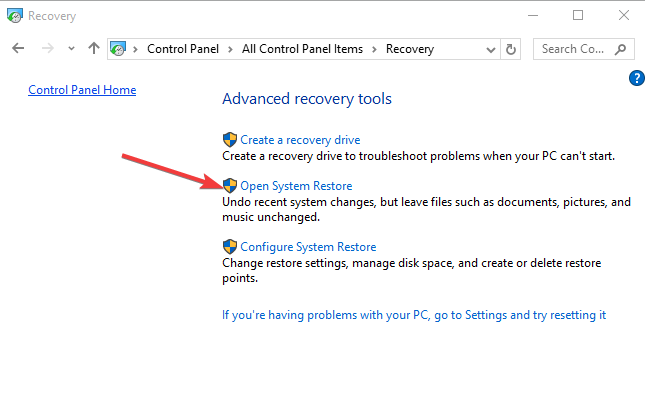
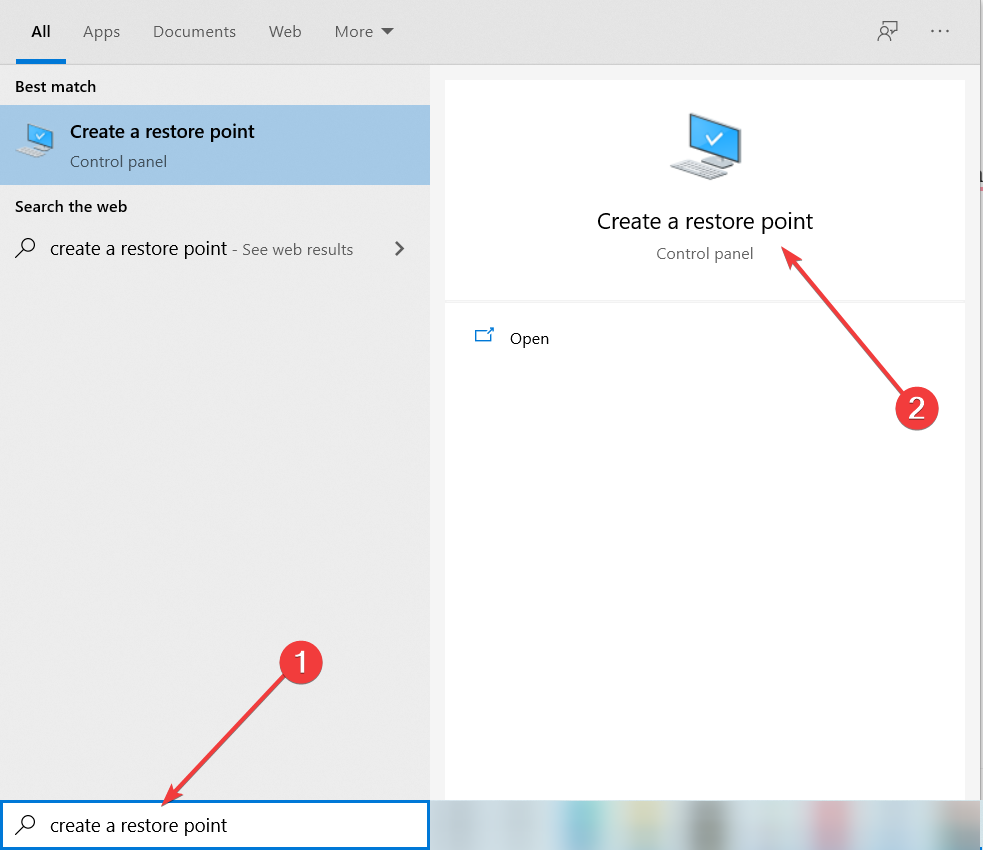
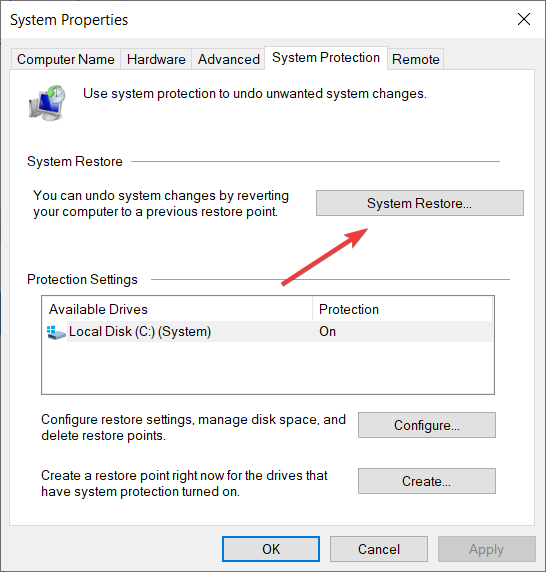
4. Perform a system restore

  1. Open the Start menu.
  2. Type create a restore point and open it.
  3. Click on the System Restore button.
  4. Click on Choose a different restore point.
  5. Hit the Next button.
  6. Select the desired restore point and click Next.
  7. Follow the instructions on the screen to perform the restoration.

If nothing works, then it is best to restore your PC back to a state where everything was working normally. For such scenarios, you can make use of the system restore.

The ipconfig /renew command, when you execute this command in the Command Prompt, you are basically ordering your DHCP client to regenerate, renew, or renegotiate a new IP address from the DHCP server on your router.

Following the steps above you should be able to fix it when it’s not working. We also have a guide that will allow you to resolve the PC won’t acquire IP addresses issue. If your PC is facing issues contacting the DHCP client, then you can check out our article.

Let us know in the comments below, which one of the above solutions helped you resolve the problem at your end.

How to Fix Javascript Void(0) in Chrome, Firefox & Edge

Before we tackle the steps let’s see what is it exactly we’re dealing with. In other words, what is Javascript void 0 error? Well, Javascript Void 0 is a standard error that occurs when users try to access certain web pages.

While it is not a major or critical issue, it’s still quite annoying to be blocked from accessing websites without an actual reason, so let’s see how to fix it.

How do I fix JavaScript void 0 in Chrome?

1. Make sure Java is properly installed

  1. Press the Win+X keyboard keys and from the displayed list choose Control Panel.The exclusive semaphore is owned by another process
  2. From Control Panel switch to Categories and then click on Programs.
  3. Under Programs and Features, click on Uninstall.
  4. The list of all installed programs will be listed.
  5. Search for the Java entry. If you cannot find Java, install it on your PC.
Tip icon Tip
Even if Java is installed, uninstall it and then reinstall the software. In this way, you can fix any possible corrupted files or other software conflicts.

2. Turn on Java on your browser

  1. Enable Java on Google Chrome:

    1. Click on the Menu icon (the three dots from the upper right corner).

    google chrome settings
  2. 2. Then, choose Settings and select Advanced.


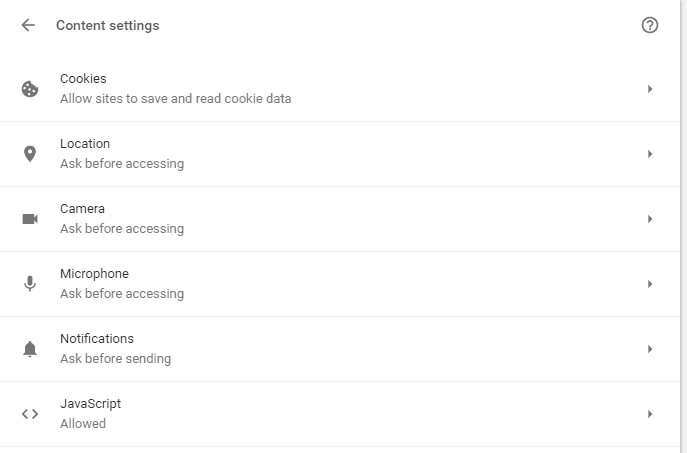
  3. 3. Scroll down until you find Content Settings; access this option.

    allow java chrome
  4. 4. Find the Javascript entry – the allowed status should be displayed; otherwise choose to allow all sites to run JavaScript (recommended).

  5. Enable Java on Edge:

    1. Open Edge and click on the three dots in the upper right corner.

  6. 2. Select Settings from the Menu.

  7. 3. In the left pane, look for Site permissions and click on it.

  8. 4. In the new windows, locate and click on JavaScript.

  9. 5. Toggle the switch next to Allow (recommended) to ON and restart the browser to validate the changes.

  10. Enable Java on Firefox:

    1. Launch Firefox and click on the Menu icon.

  11. 2. Select Add-ons and then go to the Plugins tab.

  12. 3. Select the Java Platform plugin which should be displayed there.

  13. 4. Finally, pick up always activate.

  14. You need to enable Java on your browser. Now, depending on your favorite browser this option might differ as shown above.

Need help enabling scripts? Follow our enable JavaScript in your browser guide for Chrome, Firefox, and Edge.

3. Reload the webpage

If the problem is only temporary you can solve the Javascript:void(0) error by reloading the webpage by bypassing the cache.

That can be achieved by pressing the CTRL+F5 keyboard hotkeys. Additionally, you should also clear the cache on your browser before retrying to access your favorite web pages.

4. Remove cookies

Cookies are there to optimize your browsing experience. However, it might also be the reason why you get the JavaScript Void 0 error while trying to access certain websites.

So, you can fix this malfunction by removing cookies.

Here is how you can complete this task for different web browsers:

Google Chrome:

  1. Open Chrome and click on the Menu icon.
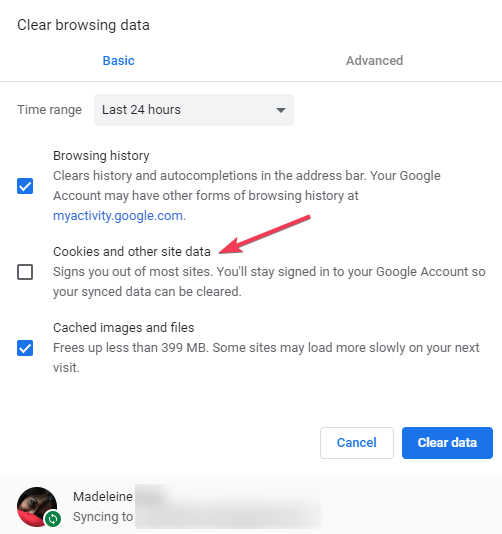
  2. Then, select More Tools and pick Clear Browsing Data.
  3. Select the Cookies and other site data entry and perform the wipe.
  4. Restart your browser at the end.

Mozilla Firefox:

  1. Run Firefox and click on the Menu button.
  2. Go to Options and under Privacy & Security choose History.
  3. Under Firefox will choose Use custom settings for history.
  4. Next, click on the Show Cookies button.
  5. Just remove all cookies and restart your browser.

MS Edge:

  1. Open the Edge browser on your PC.
  2. Click on the Settings option.
  3. Click on the Privacy, search, and services tab.
  4. Now, go to the Clear browsing data tab and click the Choose what to clear button.
  5. Select the Time range, check the Cookies and other site data, and Cached images and files options (optionally).
  6. Click the Clear now button.

Alternatively, you can use a specialized tool such as CCleaner to automatically clean your browser’s cookies, trackers, internet history, download history, and cache.

5. Clear the cache

If the issue persists, clearing the browser cache may help you to fix it.

  1. Go to your browser‘s settings page.
  2. Find the option that allows you to clear browsing data.
  3. Locate the cache option and delete all the cache information stored in your browser.
javascript void(0)

For example, if you use Google Chrome, click on the menu icon, go to Settings, Advanced, and then navigate to Privacy and Security. Scroll down to Clear browsing data.

It’s worth mentioning that there are variations of this error, so let’s quickly review some of the most common issues reported by users:

  • Javascript void(0) error Windows 10, Windows 11
  • Javascript void(0) Chrome, Firefox, Edge
  • HTML link Javascript void 0
  • Javascript void(0) Chrome Mac
  • Javascript void(0) on click
  • Href Javascript void 0 not working

Hopefully, you can now browse through the Internet without any further issues. The steps from above should have helped you fix the Javascript Void 0 error.

FAQs

What does “Javascript:void(0)” mean?

The “Javascript:void(0)” message appears when a web page link or script fails to execute properly. It usually means the browser blocked the action or the site’s JavaScript code ran into an error.

Why do I get the Javascript:void(0) error?

Common reasons include disabled JavaScript in your browser, outdated cache, corrupted extensions, or security settings blocking scripts. Sometimes, the issue comes from the website’s own faulty code.

How can I fix Javascript:void(0) in my browser?

Enable JavaScript in your browser settings, clear cookies and cache, and disable conflicting extensions. If that doesn’t work, try updating your browser or switching to another one temporarily.

Is Javascript:void(0) harmful to my computer?

No. It’s not a virus or malware. It simply indicates that a script on a web page failed to run, preventing certain buttons or links from working correctly.

If you have further questions or if you didn’t correctly understand some of the steps listed in this guide, don’t hesitate to contact us by using the comments field down below.

We are always here to assist you with the best Windows tips and tricks.

CES 2023: Lenovo’s gaming lineup include AI chips, gearless headtracking, and Xbox Game Pass subscriptions

Lenovo is revamping its gaming efforts with a new Lenovo LA AI chip which the company claims is “chip, the world’s first dedicated AI chip on a gaming laptop.”

At CES 2023, Lenovo introduced several gaming PCs such as the Legion Tower 5i and 7i, Legion Pro 5 and 7, and a new Legion Y27f-30 FHD monitor.

Starting with the Legion Pro’s that include 5, 5i, 7 and 7i, the company refreshes its offerings in 2023 with their Lenovo AI Engine+ which,

Deploys a software machine learning algorithm to optimally tune system performance. The chip uses software machine learning, deployed through Lenovo Vantage, to help monitor in-game FPS and dynamically adjust for the highest performance output. Offering up to 15% higher TDP, this chip and machine learning software combo allows Legion Pro Series laptops to deliver higher performance compared to previous generations.

Lenovo is also introducing Tobi Horizon with its 2023 Legion hardware that ats as gearless head tracking alongside Tobi Aware software to utilize the tech.

05_Legion_Pro_7i_Hero_A_Cover

On the desktop front, Lenovo is refreshing its Legion Tower’s that include the 5, 5i and 7, 7i selections that come with up to 13th Gen Intel processors paired with the latest NVIDIA GeForce series GPUs or AMD Ryzen 9 mobile processors paired with AMD Radeon RX 7000 series GPUs all paired with up to 64GB of 5600Mhz DDR5 RAM, larger VRM heatsink, and up to 6TB of SSD.

03_Legion_Tower_7i_34L_Hero_Front_Facing_Right_AMD_RADEON_AIR

Back to Lenovo’s Pro series that includes the 5, 5i, 7, and 7i. The Pro 7 series comes with mostly top-tier specs such as Lenovo’s patent ColdFront 5.0 Hybrid thermal technology, an extra wide Vapor Chamber, liquid metal infusion cooling, 235W of TDP as well, 240Hz variable refresh rate panels, on a 16:10 WQXGA display. Per usual, the Pro series keyboards support Lenovo’s TrueStrike keyboard technology with Spectrum per key RGB customizable lighting.

The Pro series 5 line up is a step down from the 7 but maintains the same chipset configurations as the 9 series as well as Lenovo’s patented Lenovo LA AI chip, 240Hz variable refresh rate, and ColdFront 5.0 thermal technology.

To complete your home setup, Lenovo is rolling out the Legion Y27f-30 which is a 1920×1080 display with a matching 240Hz refresh rate panel that can be overclocked to 280Hz, AMD FreeSync Premium Adaptive Sync Support, 400 nits of brightness, 113% sRGB support and 90.7% DCI-P3 color gamut support.

12_Legion_Y27f-30_Rear_Facing_Right_Normal_Position

  • US Pricing and Availability
    The Lenovo Legion Pro 7i (16”, 8) with Intel Core processor will start at $1999.99 and is expected to be available starting March 2023.11
  • The Legion Pro 7 (16”, 8) with AMD Ryzen processor will not be available in North America.
  • The Lenovo Legion Pro 5i (16”, 8) with Intel Core processor will start at $1479.99 and is expected to be available starting April 2023.11
  • The Lenovo Legion Pro 5 (16”, 8) with AMD Ryzen processor will start at $1459.99 and is expected to be available starting April 2023.11
  • The Lenovo Legion Tower 7i (34L, 8) with Intel Core processor will start at $2479.99 and is expected to be available starting April 2023.11
  • The Lenovo Legion Tower 5i (26L, 8) with Intel Core processor will start at $1199.99 and is expected to be available starting April 2023.11
  • The Lenovo Legion Tower 5 (26L, 8) with AMD Ryzen processor will start at $1299.99 and is expected to be available starting May 2023.11
  • The Lenovo Legion Y27f-30 Monitor will start at $399 and is expected to be available starting May 2023.11
  • The Lenovo Legion Y27qf-30 Monitor will start at $599 and is expected to be available starting May 2023.11

Windows Update Error 0x80d05001: Fix it in 6 Steps

Well, there is a long list of Windows update errors that you will face on your Windows PC, irrespective of the OS version you are running.

In this guide, we will discuss the Windows update error 0x80d05001. This error is different from the error 0x80D05001 in Microsoft Store. Here is the complete error message that you will come across:

Download error – 0x80d05001
There were problems downloading some updates, but we’ll try again later. if you keep seeing this, try searching the web or contacting support for help. this error code might help: (0x80d05001)

Why am I getting Windows update error 0x80d05001?

We have found some of the most common reasons that will trigger the Windows update error 0x80d05001.

  • Windows update glitch: There might be a normal bug in the Windows update service that is preventing you from downloading the update.
  • You are using a VPN: If you are using a VPN, then this could conflict with the Windows update servers and trigger the update error 0x80d05001.
  • Aggressive Firewall: Often aggressive Firewall or antivirus setting can also block important Windows services, which could be causing the problem.
  • System files are corrupt: Missing or corrupt system files will not only trigger Windows update errors but will also hamper the smooth performance of your PC.

The Windows Update error 0x8024a21e can also be daunting but the highlighted guide will help you with tested solutions.

How can I fix Windows update error 0x80d05001?

Here are a few fixes that we would suggest you try before going ahead with the advanced troubleshooting methods:

  • Restart your PC as it will help the system load all the files from scratch. Here’s what to do if your computer fails to restart.
  • Run the Windows update again and check if it lets you download the update or continues to throw the error.
  • Disconnect external devices such as Bluetooth mouse, keyboard, etc., and check if the update is starting or not.

Now, let us check out the solutions that have helped users fix the problem.

1. Run the Windows update troubleshooter

  1. Press the Win + I buttons to open Settings.
  2. Click on Troubleshoot.
  3. Select Other troubleshooters.
  4. Hit the Run button for Windows Update.
  5. The troubleshooting process will begin and will prompt you to apply the fixes if it detects any issues.

Windows OS comes with an in-built troubleshooting tool that can help you resolve some petty bugs or glitches that might be preventing you from using the feature perfectly.

2. Reset the Windows update

  1. Press the Win key to open the Start menu.
  2. Type the command prompt and open it as an administrator.
  3. Execute the below commands and press Enter after each one. net stop wuauserv net stop cryptSvc net stop bits net stop msiserver
  4. Run the below commands and press Enter after each one. ren C:\Windows\SoftwareDistribution SoftwareDistribution.old ren C:\Windows\System32\catroot2 Catroot2.old
  5. Execute the below commands. net start wuauserv net start cryptSvc net start bits net start msiserver
  6. Restart your PC and check if this fixes the issue or not.

3. Disable the proxy server

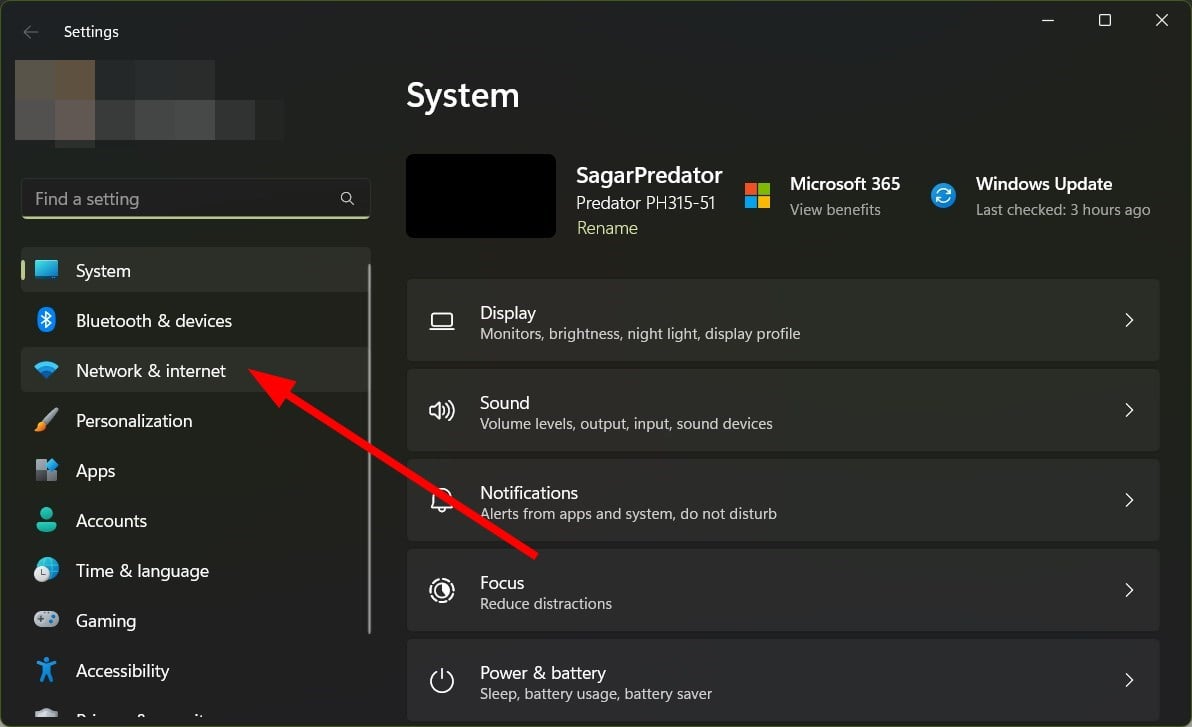
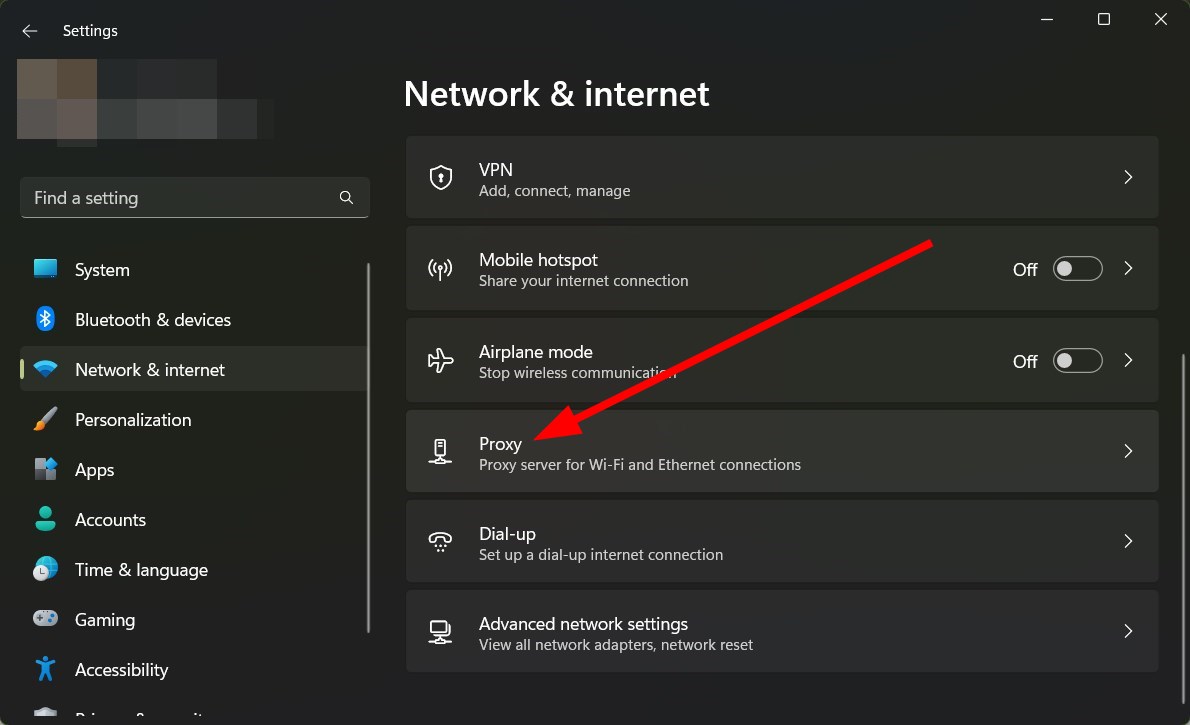
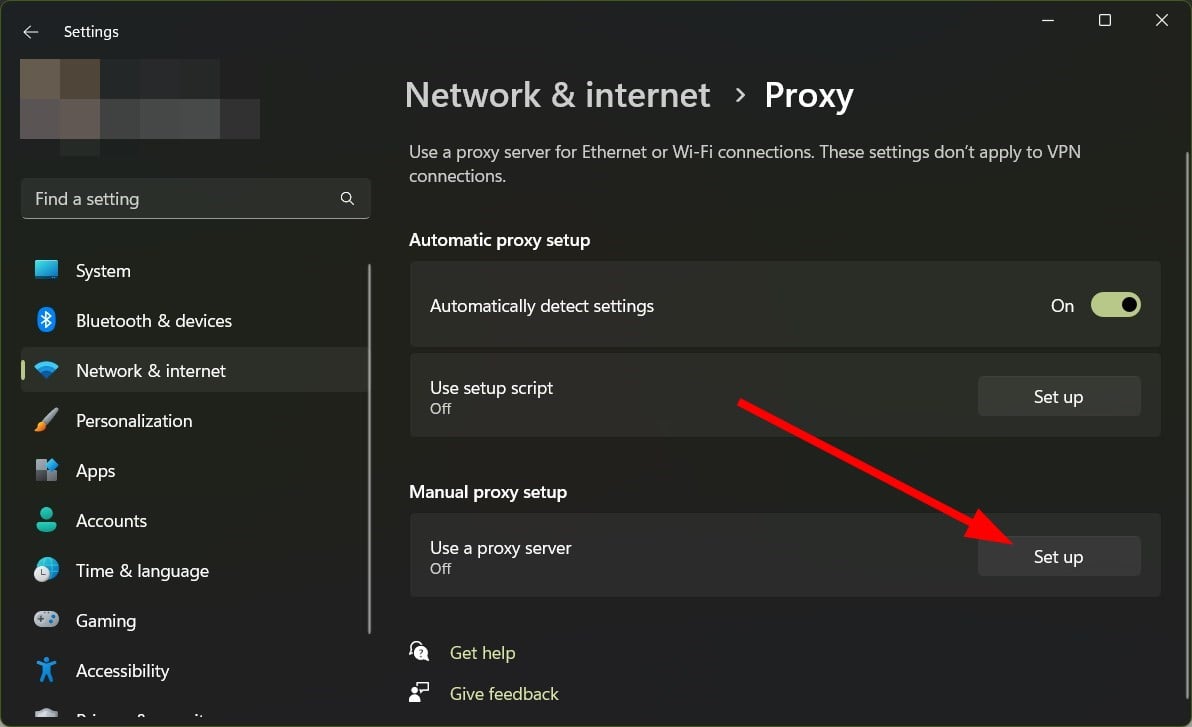
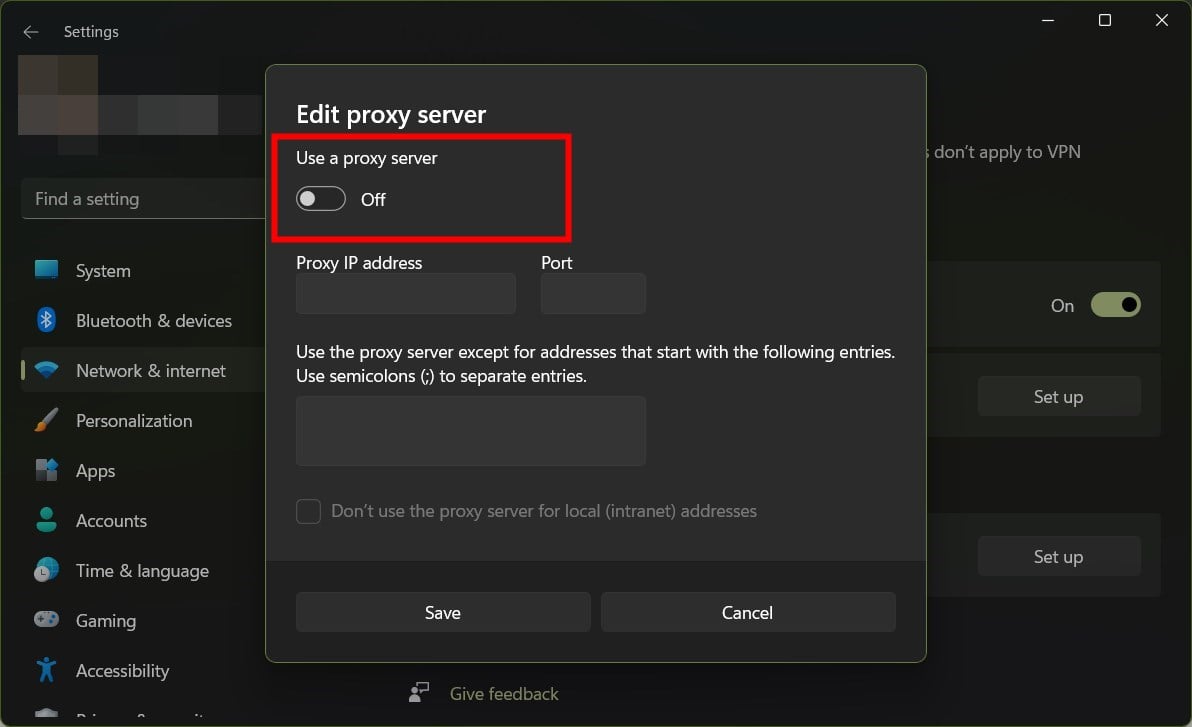
  1. Press the Win + I keys to open the Settings menu.
  2. Select Network & Internet.
  3. Click on Proxy.
  4. Under Manual proxy setup, click the Set up button.
  5. Turn on the Use a proxy server option.
  6. Restart your PC.

4. Uninstall VPN

  1. Open the Start menu by pressing the Win button.
  2. Open Control Panel.
  3. Click on Programs and Features.
  4. Select the VPN and hit the Uninstall button.
  5. Follow the on-screen prompts to remove the VPN from your PC.
  6. Restart your PC.

We have shown the steps for removing a different program, but the steps are the same for removing any VPN from your PC.

5. Run SFC Scan and DISM commands

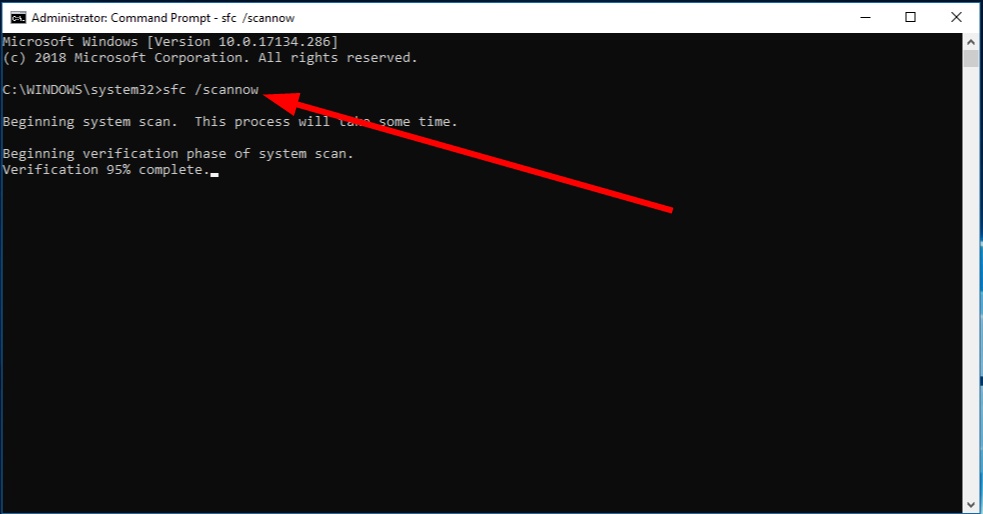
  1. Open the Start menu.
  2. Type command prompt and run it as an administrator.
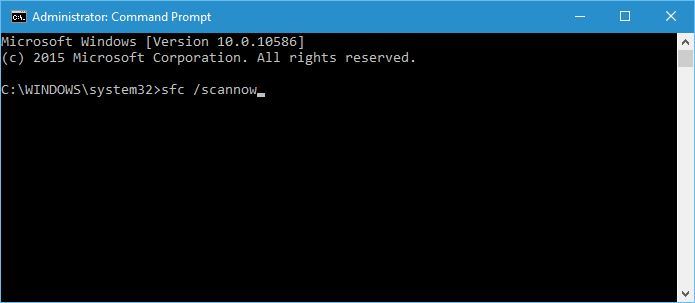
  3. Type the below command and press Enter.sfc /scannow
  4. Wait for the process to complete.
  5. Execute the below commands.Dism /Online /Cleanup-Image /Check healthDism /Online /Cleanup-Image /restorehealth
  6. Let the process complete.
  7. Restart your PC.

You can make use of the SFC Scan and DISM commands to check the health of your PC and fix the corrupt or missing system files.

While the above process requires you to use some commands, it isn’t a cup of tea for everyone. Some like to use an automated repair program that will do everything for them with just a click.

6. Run the Background Intelligent Transfer Service

  1. Press the Win + R keys to open the Run dialogue.
  2. Type services.msc and press Enter.
  3. Locate Background Intelligent Transfer Service and double click on it.
  4. Under Service Status, select Start.
  5. From the Start up type drop-down select Automatic.

That is it from us in this guide. We have a guide for users getting Windows update error 0X800f081f. You can also refer to our guide on 0x800f0988 Windows Update error to fix the problem.

Our guide on Windows update error 0x80070002 and update error 0x800f0905 will help you resolve the problem with some effective solutions.

We have listed five quick tips to resolve the Windows update error 0x800704cf. You can also check out our guide on update error 0x800f0831. Let us know in the comments below which one of the above solutions resolved the problem for you.

WAN Vs LAN Port (Differences & When To Use Each One)

You have a wireless router and a curious mind as you want to know the differences between the LAN and WAN ports that your router has.

If you are thinking about it and have landed here, then you will get all of your answers and more importantly, what are the differences between WAN and LAN and when to use each one. Let us get right into this comprehensive guide.

WAN Port vs LAN Port

So, without wasting much time, we are jumping straight into the comparison. This table will help you understand what basically is a WAN and a LAN and what differentiates them from one another:

LAN PortWAN Port
LAN stands for Local Area Network.WAN stands for Wide Area Network.
You can use a LAN port to connect the PC and other client machines.You can make use of a WAN port to establish a connection with the internet.
The number of LAN ports depends upon the type and brand of the router. You will find most routers with one WAN port. 
It is often labeled as Ethernet as well.It is labeled as the Internet or simply WAN.
LAN refers to a network that is meant for a small geographical area such as a home or an office.WAN spans a large geographical area. For example, a city, a state, or a country.
With LAN you can control all the connected devices.LANs can be interconnected through a single WAN.
LAN connects PCs using an ethernet cable.WAN connects to a cable or a modem which then connects to the internet.
Someone having access to your LAN also gains access to all the computers on LAN.In the case of a WAN, a hacker will gain access to only the connected PC.

WAN vs LAN on a router

As we have already mentioned in the comparison table above, a modem will have typically one WAN port and multiple LAN ports.

The WAN port on a router can be used to connect to a high-speed modem, which then connects the router to the internet. You will find the WAN port on your router labeled WAN or Internet.

On the other hand, the LAN port is used to connect computers that don’t have Wi-Fi access. It can connect to the LAN port via an ethernet cable and then establish a connection with the internet.

The moment the cable is plugged into the router, you have established a wired connection.

LAN vs MAN vs WAN

Apart from LAN and WAN, there is MAN as well. In such a case, it becomes important to know the difference between them as it will help you make a decision on when to use one.

LANMANWAN
LAN stands for Local Area Network.MAN stands for Metropolitan Area Network.WAN stands
Can be used for small areas such as home or office.Can be operated in large areas such as a city.Can be used for larger areas such as a country or a continent.
The ownership is private.The ownership can be private or public.WAN might not be owned by one company.
Speed is high.Speed is moderate.Speed is low.
Less congestion.Medium congestion.Heavy congestion.
Short delay.Moderate delay.High delay.
LAN maintenance is easy.Maintenance is more difficult than LAN.Maintenance is more difficult than LAN and MAN.

Should I use a WAN or LAN port?

For those who wish to connect to the internet, then you should use the WAN port and connect your router to it. Because LAN will let you connect two or more computers together and transfer data.

The WAN port on your ISP router is the one that brings the internet into the network. Using the WAN port to connect to the second router won’t give you internet access.

In this case, you can make use of the LAN port and connect the second router via the LAN port and then enjoy internet access with the second router.

Also, you should not confuse WAN with a Wireless Area Network. WAN stands for Wide Area Network, whereas, WLAN stands for Wireless Local Area Network. WLAN is a LAN with wireless functions instead of an ethernet cable. So, when you connect your device to a router using Wi-Fi, you are using WLAN.

When is it best to use LAN, WAN, MAN, and CAN?

Here are some of the best use-case scenarios for LAN, WAN, MAN, and CAN.

  • LAN: You can use LAN when your purpose is to transfer files between computers, print with shared printers, and primarily connect one computer with another. You can even share applications, software, hardware, and the internet with connected computers. This could be beneficial for colleges, schools, offices, hospitals, etc.
  • WAN: You use a WAN to connect to the internet. Corporations with offices spread across the county or different continents use WAN to connect offices together. It can be used to run and host internal apps, communicate using voice or video, access data, remotely backup data, etc.
  • MAN: MAN is made up of interconnected LANs. It combines the networks of multiple organizations and makes use of fiber optics. It can be used to connect offices in a single city, factory, and HQs as it can be used to transmit data using modems and wires.
  • CAN: Controller Area Network is designed to allow communication between microcontrollers. This can be used to trigger airbags in cars, anti-braking systems, power steering, and other scenarios. It is also used in sports cameras, automatic doors, coffee machines, etc.

When should I use the WAN port on the router?

If you have a modem and router as separate devices then you need to connect them in order to access the internet. The connection is done via an ethernet cable. Through this connection, your modem passes an internet signal to your router, ultimately which allows you to access the internet.

So, if your router isn’t connected to the modem via the WAN port, you won’t be able to access the internet.

Is LAN or WAN better for Ethernet?

LANs have better speed and reliability as compared to WANs. Typically, LAN speeds range between 1,000 Mb/s to 40,000 Mb/s as compared to 150 Mb/s WAN speed. LANs are also easily manageable and less costly to set up.

That is it from us in this guide. If you are getting lower ethernet speeds, then you can refer to our guide and apply the 10 expert tips to enhance the internet speed.

We also have a guide that mentions some effective solutions to resolve the ethernet not working problem. You can check out our guide that helps you with combining two internet connections on a Windows 10 PC.

For users facing Wake on LAN not working problem, fortunately, we have a guide that mentions some solutions that have helped users fix the problem.

7 Best Label Printing Software for Zebra Printers

Printers are an essential addition to a business that helps users get documents in a usable format. With electronic documents like e-readers, and PDF formats, gone are the days of paper printouts.

Also, environmental movements like saving trees have reduced paper usage considerably. So, to meet the print requirements and deadlines, people can rely on one of the best software for Zebra Printer.

How can a dedicated Zebra printing software help you?

While Zebra comes with its own ZebraDesigner V2 barcode label design software for printers, it only includes basic design features.

If you need to stand out and create a personalized label to emphasize your brand, you will need a more powerful software tool.

There are in fact many other commercial label design options that come with powerful features to make a difference from your competitors.

Therefore, in this post, we will explore some of the best label printing software for Zebra.

What are the best label software tools for Zebra printers?

Label LIVE – Ultimate customization features

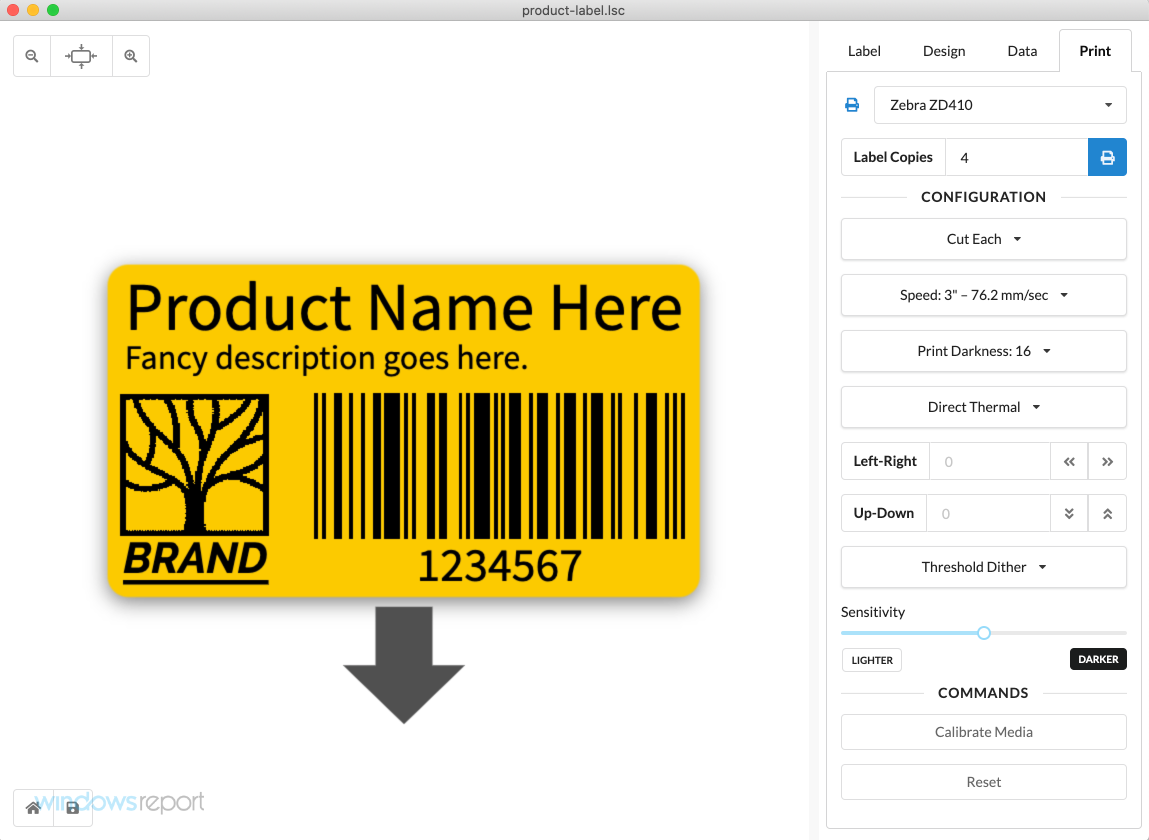
Zebra thermal printers can be difficult to set up and use. Label LIVE solves orientation and other issues without having to install drivers which makes it one of the best label printing software for Zebra printers.

This excellent Zebra label printing software streamlines the design process. From layout to spreadsheet data, to serial numbers, to output formats, Label LIVE offers both simplicity and flexibility for designing and printing labels.

Create labels that make sense for your business and reflect your style without added stress. Time is an increasingly rare commodity these days.

That is why Label LIVE lets you design and print labels in minutes. All you have to do is connect your computer – Windows or Mac – and your Zebra printer via USB, and start printing.

Let’s have a look at some of the most exciting features Label LIVE label design and printer software has to offer:

  • Label software that works with Windows and Mac
  • Easy installation and setup with Zebra printers
  • No drivers are required for using our label printing software with Zebra printers (via USB)
  • Import and print from Excel, CSV, and Apple Numbers spreadsheet files
  • Create, edit and save templates for the future label printing
  • Setup cutter, speed, darkness, and cutter without installing Zebra printer drivers
  • Share your label design across your organization and between locations
  • Extensive options for label design, including advanced barcode support including QR code, UPC, EAN, and more.

If you are looking for a zebra alternative, mydpi label printers are a great option. Label LIVE is bundled with the mydpi label printer for the highest quality prints.

Label LIVE for Windows and Mac

Flexible and modern software that takes the hassle out of Zebra label printing!
Free trial Download Now

Adobe Creative Cloud Express – Great for professionals

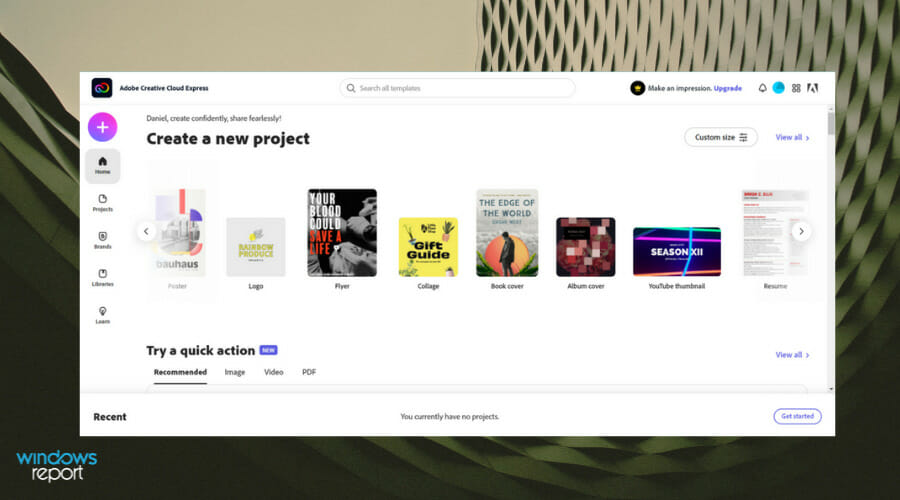
Adobe Creative Cloud Express is an unparalleled tool for publishing and content creation, but you probably didn’t know that it’s also a powerhouse for label creation with one of its tools, Adobe Creative Cloud Express Post.

It features thousands of templates designed by professionals, so you won’t be staring at a blank canvas for long. You can search through them by task, mood, aesthetics, platform, or color to get started right away.

And when you find it’s just a matter of clicking or tapping it to open it in the editor. Now it’s up to you to select an original font, add your brand, and photos, or just add one from the thousands of free images from Creative Cloud Express.

If you choose the Premium version of the software, you will also get to apply your brand logo, fonts, and colors automatically. And if you’re creating a label for online usage, just add animated stickers from GIPHY.

All your team can collaborate on a project, and after you’re done, you may use the resize feature in Adobe Creative Cloud Express to adapt it to any platform you are distributing it.

This label maker feature is perfect for Zebra printers, but you can also easily save and share your creations with just one click.

Let’s review some of its most important features:

  • Advanced label creation tools
  • Free image library
  • Add animated stickers for online labels
  • Resizing feature to customize the output
  • Team collaboration

Adobe Creative Cloud Express

This software has all the tools needed for you to create the most exciting labels using a ton of templates.
Check price Visit website

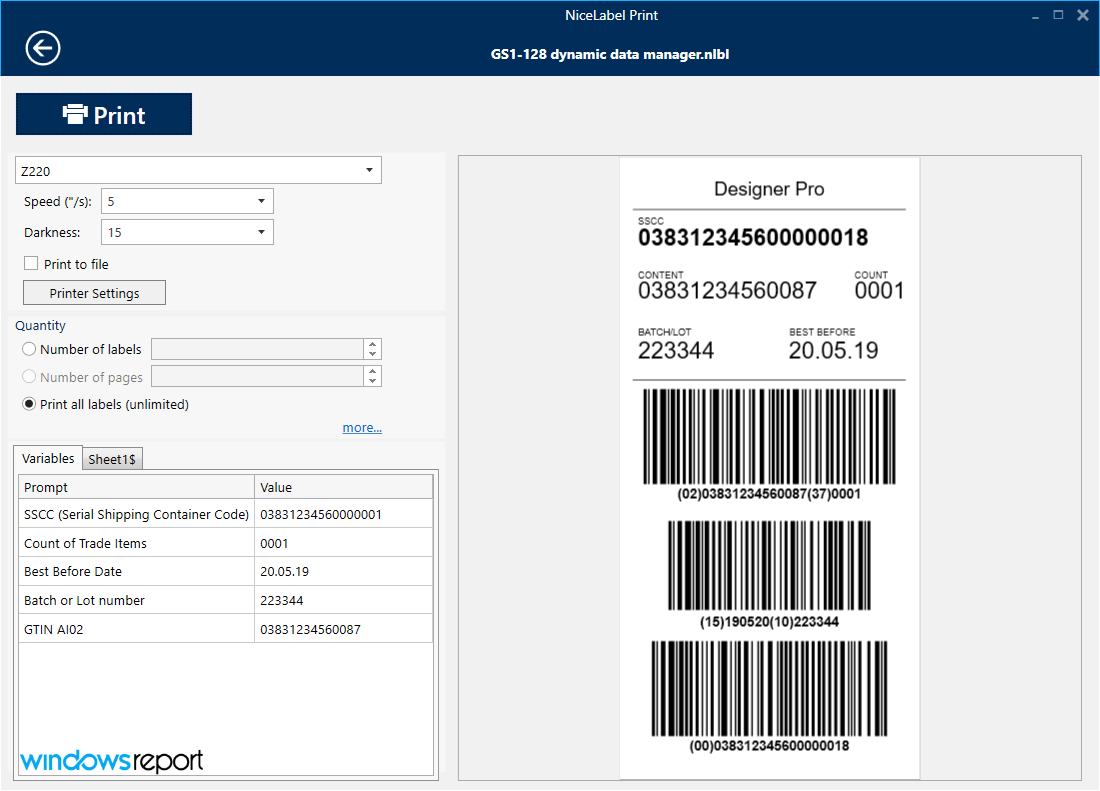
NiceLabel – Easy to use

NiceLabel is among the best software for Zebra printers that works locally with all the barcode drivers of the printer.

The software promises ultimate performance by using the original ZPL, EPL, or CPCL compared to the graphics mode.

This helps to print the first label out much quicker without any halts between the labels. It’s the only label design software that has control of the driver settings of the Zebra printer from inside the program.

It provides support for over 2500 thermal label printers from more than 70 brands. It also offers avant-garde variable data, graphics, and scripting (VB/Python). Moreover, it prints the documents through an exclusive printing application.

Best of all, it supports automated printing from the user’s ERP or WMS software and offers business automation and web printing at a business level.

This label maker software is easy to use and is able to do a lot more, on any label printer.

Take a look at this app’s best features:

  • Support for over 2500 thermal label printers from more than 70 brands
  • Variable data, graphics, and scripting (VB/Python) functions
  • Automated printing
  • Original ZPL, EPL, or CPCL modes
  • Business level printing

⇒ Get NiceLabel

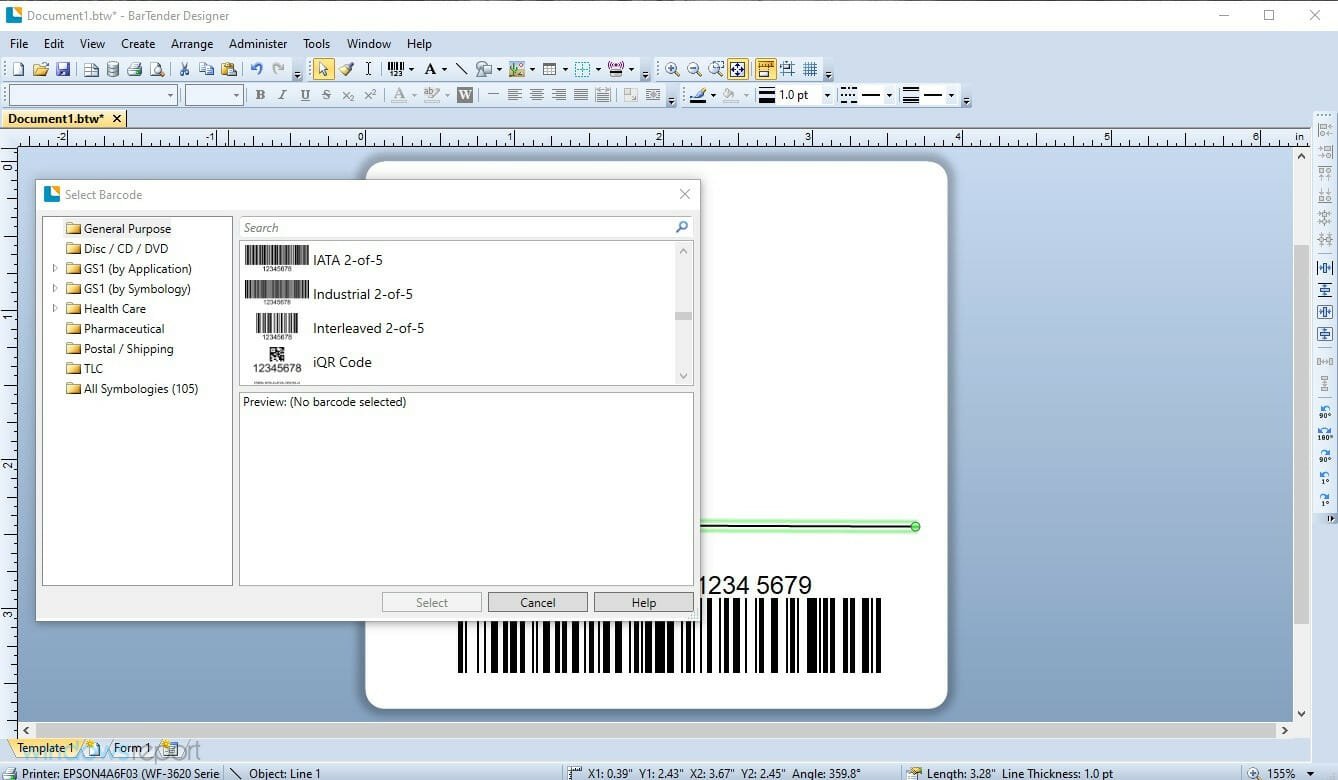
BarTender – SAP integration

BarTender by Seagull Scientific is another well-known label software for Zebra printers that’s fast, flexible, and easy to handle.

It helps users quickly set up professional quality label designs. You are then allowed to get prints of those designs from a printer (laser/thermal).

Note that it comes with responsive designing tools and helpful wizards that help users start designing and printing cards and labels instantly.

Moreover, it activates RFID coding and improves designs for cards and labels. This helps you to take advantage of the content from spreadsheets, databases, and more.

Integration with SAP is another great feature. The best part is the brand offers direct technical support with each purchase.

This enables you to seek help while setting up a new print station. From getting help on installation to using the advanced features, support is just a phone call away.

Here are the best features of BarTender:

  • RFID coding
  • Improved designs for cards and labels
  • SAP integration
  • Quick, dedicated support services
  • Flexible and easy to handle

⇒ Get BarTender

Labels and Databases – Great fill image effects

One of the leading software for Zebra printers, Labels, and Databases, helps users make and design labels, effortlessly.

You can print labels, and cards with different integrated label formats, add details to them from the databases, and also create envelopes, using Mail Merge.

From texts, images, or oval lines to boxes, or barcodes, it allows you to easily add many different elements to their documents.

Users can also fill image effects like mask and opacity level, along with other settings, to create visually appealing results.

Additionally, feel free to print an endless number of labels beginning from any position on the sheet. You may even export these designs in different formats, such as JPEG, TIFF, PDF, BMP, PNG, etc.

The integrated database in the software module allows you to save and manage the contact details, easily. Furthermore, it can print linear and 2D barcodes, text and images.

Besides, it supports Postnet, Code 128, ISBN, Datamatrix, etc. From different editing options to offering circular text features, Labels and Databases has much to offer.

Let’s see what its best features are:

  • Image effects available
  • Support for Postnet, Code 128, ISBN, Datamatrix, and more
  • Add elements on the label easily
  • Integrated database
  • Multiple format export feature

⇒ Get Labels and Databases

EasyLabel – Very friendly UI

EasyLabel by Tharo is among the best software for Zebra printers for its ease of use. It takes care of almost all methods of label designing and printing quickly, accurately, and easily.

What’s interesting is that it’s so easy to handle that users don’t even need computer skills to perform the intricate labeling processes.

The software also includes an RFID and a GS1 (EAN/UCC) wizard that helps users meet all their existing and future labeling needs.

Best of all, the product is available in seven different versions with individual features offering a complete labeling solution.

Let’s go through a couple of its most interesting features:

  • RFID and a GS1 (EAN/UCC) wizard
  • Simple, easy-to-use UI
  • Fast and accurate
  • Support for all complex labeling requirements

⇒ Get EasyLabel

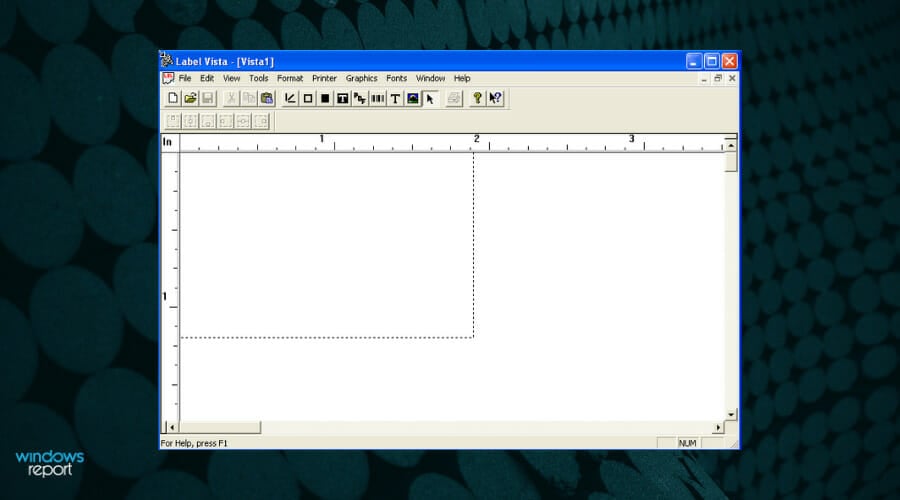
Label Vista – Simple configuration

For those looking for software that helps configure the range of printers by Zebra, Label Vista makes for a perfect choice.

It’s a user-friendly program that configures the settings for Bluetooth and RF and sends files or updates the firmware.

This free tool is used to design labels for CPCL-supported Zebra mobile or Comtec mobile printers.

It comes with responsive graphic-supported conditions for the users with robust editing tools that can also be easily mastered. Moreover, it makes way for the effortless development of format files that stay inside the printer.

These files then help with simple integration with variable data files that are transferred from the host. These files are also essential for label printing with a combination of constant and variable data fields.

What’s more? It also boasts a feature of creating fonts that allow users to create pre-scaled and fixed-sized fonts (downloadable) rising from TrueType fonts.

Take a look at some of its most important features:

  • Intuitive graphically-based user environment
  • Network printing, and FTP file transfer
  • Font creation capabilities
  • Free software
  • CPCL support

Printing and designing cards, labels and barcodes is an intricate process, and so, a professional-level software tool is what you need for a perfect job.

Above are some of the best software for Zebra printers that can help you get the desired output without any hassle. So, get one of them today and create high-quality labels and barcodes, effortlessly.

We also created a list including the best label printing software to help you with more options for personalizing your design.

Don’t hesitate to drop us a line with your thoughts about the best software you’ve tried. Other readers might also benefit from your opinion.

Try Saints Row this week with Xbox Free Play Days

Xbox Free Play Days makes a return this week after a holiday hiatus. And the first Xbox Free Play Days event for 2023 is a doozy, featuring the Saints Row reboot as well as two other games for subscribers of Xbox Live Gold and Xbox Game Pass Ultimate to take for a spin at no additional charge. The games will be available from Thursday, January 5th through Sunday, January 8th. Let’s check out the complete lineup.

Saints Row

Two characters pose next to a muscle car during sunset.

As the future Boss, with Neenah, Kevin and Eli by your side, you’ll form The Saints – and take on Los Panteros, The Idols, and Marshall as you build your empire across the streets of Santo Ileso and battle for control of the city. Ultimately Saints Row is the story of a start-up company, it’s just that the business The Saints are in happens to be crime.

Experience the biggest and best Saints Row playground ever created; the unique sprawling world of Santo Ileso is the backdrop for a wild, larger than life sandbox of thrilling side hustles, criminal ventures and blockbuster missions, as you shoot, drive, and wingsuit your way to the top.

For the King

For The King

For The King is a strategic RPG that blends tabletop and roguelike elements in a challenging adventure that spans the realms. Set off on a single player experience or play cooperatively both online and locally. None before you have returned from their journey. Will you put an end to the Chaos?

For The King is a challenging blend of strategy, turn-based combat, and roguelike elements. Each playthrough is unique with procedural maps, quests, and events. Explore Fahrul in either single player, local, or online co-op.

Just remember adventurer, you do this not for riches or fame but for your village, for your realm, For The King!

Cricket 22

Cricket 22

Cricket 22 delivers the most robust, substantial game of cricket that fans have ever seen. Enjoy the full licensed Ashes contest – the pinnacle of the long-standing rivalry between Australia and England. In addition, contest Australia’s big-hitting Big Bash T20 competition, the hugely innovative The Hundred in England, the tropical party of the CPL in the Caribbean, and take to the international field of battle with fully-licensed teams from Australia, England, The West Indies, New Zealand and Ireland.

And, in keeping with Big Ant’s commitment to equality and equal representation, both the Men’s and Women’s games have been replicated across all of Cricket 22.

Xbox Free Play Days discounts

Games features in Xbox Free Play Days events typically can be purchased at discounts during the event. For The King is 75% off this weekend, while Cricket 22 is available on Game Pass and is discounted there if you choose to buy the game. Saints Row (Platinum Edition) is currently featured in the Xbox Last Chance sale at 33% off.

Learn more over on the Xbox Free Play Days FAQ page.

Connect_Error_Social_Login_Failure: Easy Ways to Fix

Many users have reported getting a connect_error_social_login_failure error when trying to launch EA games on Steam, PlayStation, and Xbox.

The error message screen also comes up with a Reset password button. And, no matter how many times they changed the password, it says wrong credentials.

Here, in this guide, we will discuss some ways to fix the issue and the reasons for its occurrence. Let’s get started! 

What causes the connect_error_social_login_failure error?

There could be various reasons for this sign-in error to occur. Some of them are listed here: 

  • Your old EA account is linked to the gaming platform –  If you have an old account added to Steam or Xbox, you might get this error. You need to log in using the same performance and remove it from the EA website to fix it.
  • Your EA account is disabled – If your EA account was disabled for some reason, you might get this error. To resolve this, you need to contact EA support.

What can I do to fix the connect_error_social_login_failure error?

1. Unlink your old/disabled account

Tip icon Tip
Unlinking accounts doesn’t delete EA or Xbox accounts. Instead, you need to contact the company’s customer care to delete or completely obliterate the account.

1.1 If the account is old but accessible

  1. Visit the EA website and sign in to your EA account that you want to unlink.
  2. Go to Profile.Profile - connect_error_social_login_failure
  3. Navigate to the Account Settings page.Account Settings
  4. Locate the Connections section from the left pane and click Unlink beside the Steam logo.Unlink
  5. Click Yes to confirm the action.
Tip icon Tip
You can use the same process if your EA account is connected to Xbox or any other gaming platform.

1.2 If the account is disabled

If the linked account is disabled, you can’t unlink the EA account from your Xbox account. Instead, you need to contact EA support to get that account reinstated. Once done, you can use the above method to unlink the account from Xbox.

2. Link your main EA account

  1. Once unlinked the old account, open any EA games on your gaming console or platform.
  2. Enter your main EA account’s email address and password on the login page.Login page - connect_error_social_login_failure
  3. Once you sign in, your accounts will be linked.

3. Check if the console server is working 

  1. Visit Xbox or PlayStation website.Xbox status - connect_error_social_login_failure
  2. Check if all the servers and services are up and running.
  3. If the servers are down, you must wait for some time.

4. Contact EA Support

If none of the above solutions fix the error, you should contact EA Support. Explain the whole scenario, the instances when you got the error, and the methods you tried. This will help them understand the situation and assist you better. 

So, this is how you can fix the connect_error_social_login_failure error while accessing EA games on Steam. Try them and let us know what worked for you in the comments below.

PC Crashes Randomly? Main causes & How to Fix It

If your PC crashes randomly, it would be best to verify the power supply before implementing other fixes. A malfunctioning power supply is a frequent cause of sporadic PC crashes.

Most people merely check the power cord, but the source is probably the culprit and is often overlooked. Therefore, we advise using a separate power source to connect the computer. If it functions well, the original is the problem, and you should have it fixed immediately to prevent further harm.

How to fix PC from crashing randomly?

1. Troubleshoot specifically for the error message

Most crashes will come with a displayed error message. This is especially the case when you have the BSOD.

You should take note of the error message and troubleshoot accordingly. Some common error messages are:

If your PC crashes randomly, you can resolve it by following the solutions in the individual links above.

2. Scan for viruses

  1. Type Windows Security in the Search bar, and click on the relevant search result.
    pc crashes randomly
  2. Now, click on Virus & threat protection here.
  3. Click on Scan options.
    pc crashes randomly
  4. Now, select Full scan and click on the Scan now button at the bottom.

When dealing with PC crashes it is always a good idea to perform thorough and in-depth system scans. Professional security software such as TotalAV excels at this task and will quickly help you identify the culprit if malware is the cause of your PC crashing.

3. Check for issues with RAM and storage drive

  1. Press Windows + R to launch the Run command.
  2. Type mdsched.exe in the text field and hit Enter to launch the Windows Memory Diagnostic tool.
    pc crashes randomly
  3. Click on Restart now and check for problems to run the scan.
    pc crashes randomly

Problems with the RAM or hard disk most frequently cause Windows crashes. Check the compatibility if you have recently altered any of these.

The computer’s RAM is utilized to store the files being used temporarily. Consequently, a problem with it might make Windows sluggish and crash.

To check for and resolve RAM issues, use the Windows Memory Diagnostic program. Finally, the machine will boot back up and check memory diagnostics. Next, check whether the problems causing the PC to crash at random have been fixed once it has finished executing.

Additionally, check whether the HDD (Hard Disk Drive) or SSD is failing (Solid State Drive). When you attempt to open specific files or applications, the OS crashes, which means that a particular component of the drive is broken. We advise backing up your data and having the disk fixed or replaced.

Several third-party software applications are available to back up the saved data. Even though the instructions are for Windows 10, the apps should function flawlessly on the most recent version.

4. Update your drivers

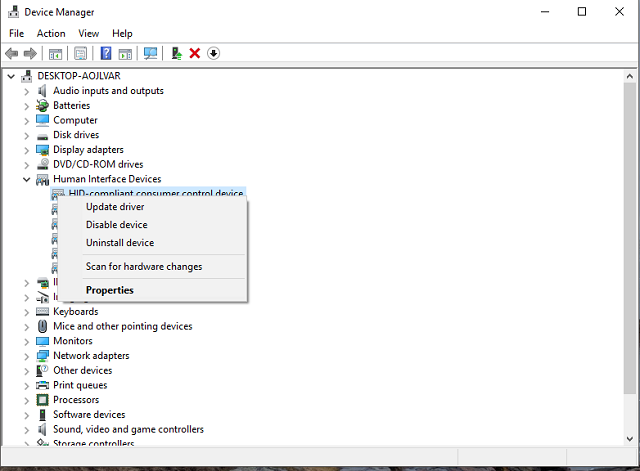
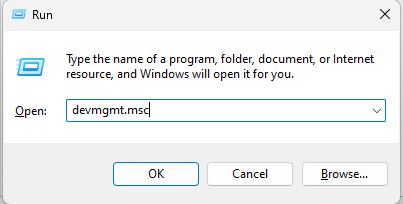
  1. Press Windows + R, type devmgmt.msc, and hit Enter.
    pc crashes randomly
  2. Double-click on Display adapters to view the devices listed under it.
  3. Right-click on the graphics adapter and select Update Driver from the context menu.
  4. Next, select Search automatically for drivers from the two options in the Update Driver window to let the system automatically scan for the best available driver on the computer.

While the Graphics drivers are the main culprits, you may want to perform the steps for all available drivers.

You can also use an automatic driver updating tool, to easily scan your PC for outdated or even missing drivers and update them instantly with the newest updates from its database.

5. Reduce overheating

Your computer may become slower or have an OS crash due to overheating. Although the latter is an extreme example, the issue may still be seen.

Reduce the number of programs running to lessen the burden when the computer starts to overheat since this will cause the CPU fan to operate at full speed.

Our tutorial will show you the best techniques to decrease overheating in Windows out of the numerous options available.

Additionally, there are several options for tech-savvy users to manage the fan speed in Windows to prevent overheating further.

Why does my PC keep freezing and crashing?

There could be many reasons why your PC is crashing. Users have attributed these constant shutdowns to different factors, including:

  • Drive issues – It could be due to hardware issues, such as a failing hard drive or, in some cases, insufficient memory. We always recommend using only the best hard drives on your computer.
  • Power-related issues – This is an often overlooked trigger, but in some cases, a crash could be a sign of latent power issues on your computer.
  • Software-related issues – These crashes could be due to software problems, such as conflicts between programs, malware, or outdated drivers.
  • Overheating – In every computer system, overheating is a pretty prevalent problem. In addition to shortening the lifespan of the components, overheating may cause the system to crash repeatedly.
  • Corrupt system files – Corrupt system files trigger diverse issues and sometimes manifest as crashes.

You should note that these issues will come in different forms. For example, users have experienced the following related issues:

  • PC crashes randomly not overheating – in this variation of the crashing issue, you will usually not experience any overheating. Instead, it may be triggered by hardware failure.
  • Windows crashes randomly – Here, you may not know precisely what caused the crash, but a few troubleshooting steps may come in handy.
  • PC crashes randomly no blue screen – While most crashes will be associated with the BSOD and an error message, there is the occasional occurrence when this is not the case.
  • PC crashes randomly and restarts – Often, this is the case. You may not need to take any action for your crashed PC to restart. The downside is that these may repeat at different times.

In conclusion, you should note that none of these fixes have been written in any particular order. You may be presented with an error like tpm-wmi 1796 so we recommend going through the appropriate solutions and you should get some resolutions using any of the fixes mentioned.

We believe you should have found resolutions if you have read this far. So please, let us know in the comments below what worked for you.

Windows Update Error 0x80010108 [SOLVED]

Computer errors can happen at any time, and speaking of errors, Windows 10 users reported a 0x80010108 error.

This error appears while trying to search for updates, so let’s see how to fix this problem.

How can I fix the error 0x80010108?

1. Turn on User Account Control

User Account Control is a security feature of Windows 10 that notifies you when you or any other application tries to perform certain action that requires administrator privileges.

Many users tend to turn off this feature due to its frequent notifications, but it seems that you can fix error 0x80010108 by turning on User Account Control. To turn this feature on, follow these steps:

  1. Press Windows Key + S and enter user accounts. Select User accounts from the menu.
    0x80010108-user-accounts
  2. Click the Change User Account Control settings.
    0x80010108-change-user
  3. Move the slider all the way up to the Always Notify. Click OK to save changes.
    0x80010108-always

2. Check your date and time

Sometimes these problems can occur if your date or time are incorrect. Incorrect date and time can occur due to broken motherboard battery, and if you’re getting error 0x80010108 we advise you to check your time and date. If date or time is wrong, do the following:

  1. Click the clock in the bottom right corner. Choose Date and time settings.
    0x80010108-date
  2. Turn Set time automatically option off and then turn it back on. This should automatically fix your time and date.
    0x80010108-time

3. Clear the Windows Store Cache

This is a simple procedure, and you can do it by following these steps:

  1. Press Windows Key + R and enter wsreset.exe.
    0x80010108-wsreset
  2. Wait for the process to complete and check if the problem is resolved.

Many Windows Store problems can be fixed simply by resetting the cache, so be sure to try this solution.

4. Turn off proxy

According to users, this error can occur if you’re using proxy, therefore be sure to turn it off. To do that, follow these steps:

  1. Press Windows Key + S and enter internet options. Select Internet Options from the menu.
    0x80010108-internet-options
  2. Go to Connections tab and click on LAN settings.
    0x80010108-LAN-settings
  3. When settings window opens, uncheck Automatically detect settings and Use a proxy server for your LAN options. Click OK to save changes.
    0x80010108-proxy-1

You can also do the same thing with Settings app. To turn off proxy using the Settings app, follow these steps:

  1. Open the Settings app and go to Network & Internet section.
  2. Go to the Proxy tab and turn off Automatically detect settings and Use Proxy server options.
    0x80010108-off

5. Turn off VPN

VPN software is great if you want to protect your privacy online or bypass certain limitations, but sometimes VPN software can cause 0x80010108 error to appear. To fix this problem, it’s recommended that you disable VPN software on your PC. If that doesn’t work, you might have to remove all installed VPN clients and check if that fixes the problem.

6. Clean the DNS cache

In some cases your DNS can cause 0x80010108 error, and to fix this issue you need to clear the DNS cache. To do that, follow these steps:

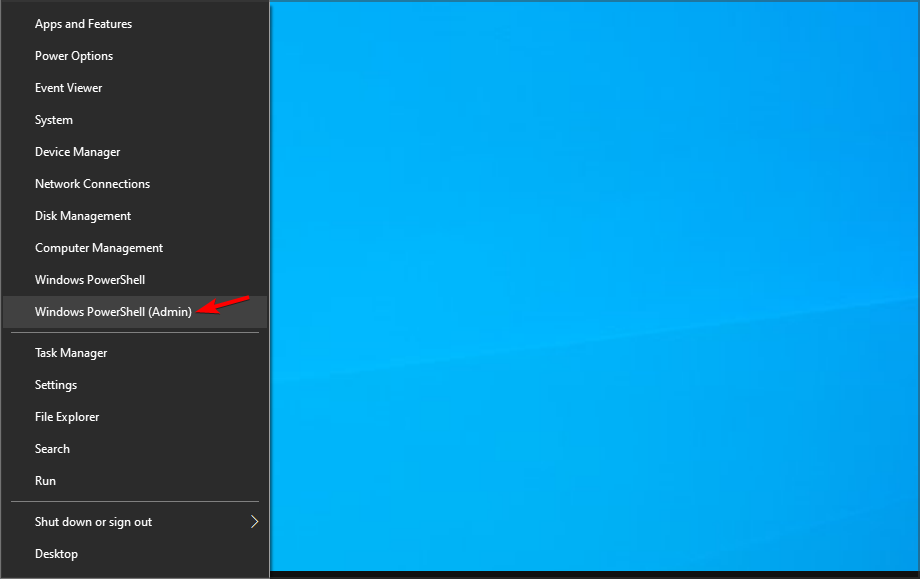
  1. Open Command Prompt as administrator. To do that, press Windows Key + X to open Power User Menu and choose Command Prompt (Admin).
    0x80010108-admin
  2. When Command Prompt opens, enter ipconfig /flushdns and press Enter.
    0x80010108-flushdns
  3. After the process is completed, close Command Prompt and check if the issue is resolved.

7. Reset Windows Store 

The next thing we’re going to try is also one of the most common solutions for Store-related problems. And that’s, of course, resetting the Store. To reset the Microsoft Store, all you have to do is to run one command. And here’s how to do that:

  1. Go to Search, type wsreset, and open the WSReset.exe script.
  2. Wait for the script to finish loading and restart your computer.

8. Perform a Clean Boot

Third-party applications and services can sometimes interfere with Windows Store and cause various problems, therefore, you might want to perform a Clean Boot. To do that, follow these steps:

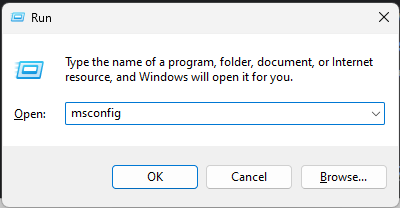
  1. Press Windows Key + R and enter msconfig.
    0x80010108-msconfigf
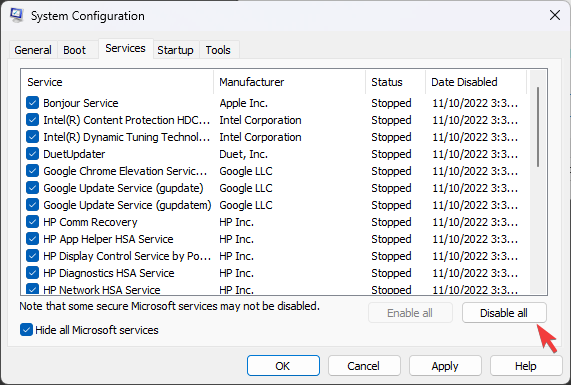
  2. When System Configuration window opens, go to Services tab and check Hide all Microsoft services. After that click the Disable all button.
    0x80010108-disable-all
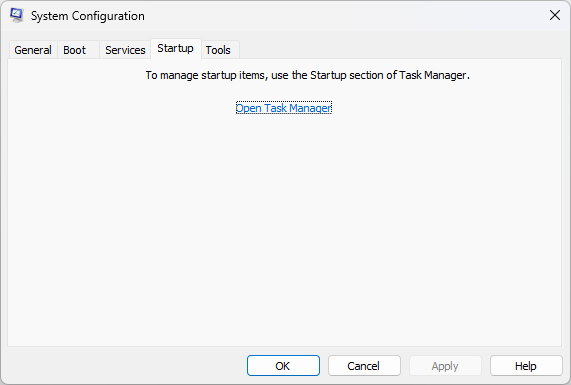
  3. Go to Startup tab and click Open Task Manager.
    0x80010108-open-task-manager
  4. When Task Manager opens, select each Startup application, right click it and choose Disable. After disabling all applications close Task Manager and click Apply and OK in System Configuration window.
    0x80010108-disable
  5. Restart your PC and check if the problem is resolved.

If the problem is fixed, it means that one of the third-party applications was causing it. To find which application caused this problem, repeat the same steps, but be sure to enable applications and services one by one until you find the one that is causing this issue.

9. Perform the SFC scan

This error might appear if your installation is corrupt, and in order to fix it, you need to run sfc scan. To do that, follow these steps:

  1. Open Command Prompt as administrator.
  2. When Command Prompt opens, enter sfc /scannow and press Enter.
    sfc-scan
  3. Wait for the process to complete.

10. Disable your antivirus software

Sometimes third-party antivirus software can interfere with Windows Store and cause all sorts of problems, therefore it’s recommended that you try disabling your antivirus tool. Bear in mind that almost any antivirus software can cause this issue to appear, therefore be sure to disable all third-party antivirus tools that you have installed. If disabling the antivirus doesn’t help, we suggest that you temporarily uninstall it and see if that fixes the problem. If you’re concerned about your safety, you should know that Windows 10 comes with Windows Defender pre-installed, so your PC won’t be completely defenseless.

11. Re-register wups2.dll file

According to users, you can fix error 0x80010108 by re-registering wups2.dll. To do that, follow these steps:

  1. Start Command Prompt as administrator.
  2. Enter the following lines and be sure to press Enter after each line in order to execute it:
    • net stop wuauserv
    • regsvr32 %windir%system32wups2.dll
    • net start wuauserv
  3. Close Command Prompt and check if the problem is resolved.

12. Restart Windows Update service

Few users reported that restarting the Windows Update service fixed the problem for them, and to do that, you need to follow these steps:

  1. Press Windows Key + R and enter services.msc.
    0x80010108-services
  2. When Services window opens, locate Windows Update service, right click it and choose Stop.
    0x80010108-stop
  3. Don’t close Services window. Press Windows Key + S and enter disk cleanup. Select Disk Cleanup from the menu.
    0x80010108-disk-cleanup
  4. Select your default partition, in our case it’s C, and click OK.
    0x80010108-cleanup-drive
  5. Wait until Disk Cleanup scans your C drive.
    0x80010108-scan
  6. Select the types of files you want to remove. In our case we selected all types of files.
  7. After you’re done, click the OK button to clean the files.
    0x80010108-ok-clean
  8. After the cleaning process is completed, go back to Services window, right click Windows Update service and choose Enable from the menu.
  9. Try to download the latest updates again.

13. Install the latest version of Windows Essentials

Sometimes this error can be caused by other applications, especially if you have Windows Essentials installed. To fix this problem it’s advised that you remove Windows Essentials from your PC and install the latest version.

14. Uninstall latest Windows updates

There’s also a possibility that some Windows Update actually disrupted the Store. If you suspect that might be the case, go on and delete the troublesome update. Here’s how to do that:

  1. Press Windows Key + I to open the Settings app.
  2. Once the Settings app opens, navigate to Update & security section.
  3. Go to Windows Update tab and click on Update history.
  4. Click on Uninstall updates.
  5. List of installed updates will now appear. Select the problematic update that you want to remove and click the Uninstall button.
  6. After removing the update, restart your PC.

15. Run the Update troubleshooter

Windows 10 also features its own troubleshooting tool. This tool can be used for dealing with all sorts of issues, including the probems with Windows Store apps and the Store itself. So, if none of the previous solutions resolved the issue, try running the troubleshooter.

Here’s how to run Windows 10 troubleshooter:

  1. Open the Settings app and go to Update & Security section.
  2. Select Troubleshoot from the menu on the left.
  3. Select Windows Store Apps from the right pane and click Run the troubleshooter.
  4. Follow the instructions on the screen to complete the troubleshooter.

16. Run DISM

And finally, if none of the previous solutions resolved the problem, let’s re-deploy the system image using the DISM (Deployment Image Servicing and Management) tool. Hopefully, this tool will resolve the problem for good.

We’ll walk you through both standard and the procedure that utilizes the installation media below:

  • Standard way
  1. Right-click Start and open Command Prompt (Admin).
  2. Paste the following command and press Enter:
    • DISM /Online /Cleanup-Image /RestoreHealth
  3. Wait until the scan is finished.
  4. Restart your computer and try updating again.
  • With the Windows installation media
  1. Insert your Windows installation media.
  2. Right-click the Start menu and, from the menu, choose the Command Prompt (Admin).
  3. In the command line, type the following commands and press Enter after each:
    • dism /online /cleanup-image /scanhealth
    • dism /online /cleanup-image /restorehealth
  4. Now, type the following command and press Enter:
    • DISM /Online /Cleanup-Image /RestoreHealth /source:WIM:X:SourcesInstall.wim:1 /LimitAccess
  5. Make sure to change an X value with the letter of the mounted drive with Windows 10 installation.
  6. After the procedure is finished, restart your computer.

Error 0x80010108 can cause problems while updating Windows, but it can sometimes affect other applications as well. This error can be troublesome, but we hope that you fixed it by using one of the solutions from this article.

Excel Toolbar Not Working: How to Make it Respond to Mouse?

Microsoft Excel is one of the Office suite’s best and most widely used tools. However, users often face issues using it, no matter how popular it is. One such issue is the Excel toolbar not working. Luckily, the issue can be fixed without much hassle.

Here, in this post, we will discuss the possible scenarios that might have caused the issue and the potential fixes to resolve the problem.

Why is my toolbar not responding in Excel?

There could be various reasons why the Excel toolbar/menu is not responding to the mouse; some of the popular ones are: 

  • Excel is not updated – If you have an old version of Excel downloaded on your Windows, it might not be compatible with your computer, causing the toolbar issue.
  • Customized add-ins – If you have installed add-ins or have made changes to the toolbar, the customization could interfere and cause the issue.
  • Corrupted program files – If the Excel files or the app itself is damaged, it might cause the toolbar to stop working.
  • Third-party software interference – If you have any other similar software running in the background, it could conflict with Excel. It may cause the toolbar to stop responding to the mouse.

What can I do if the Excel toolbar is not working?

Before moving to the detailed troubleshooting steps, please make sure you go through these quick fixes: 

  • Close and reopen Excel.
  • Check for updates for Excel.

If you still can’t access the toolbar on Excel using your mouse, then follow these steps:

1. Run Windows in a Clean boot environment

  • Press Windows + R to open the Run window.CLEAN BOOT 1
  • Type msconfig and press Enter to open System Configuration.
  • Go to the Services tab, remove the checkmark for Hide all Microsoft Services and click Disable all.Clean BOOT 2 -EXCEL toolbar not working
  • Now switch to the Startup tab, and click Open Task Manager.CLEAN BOOT 3
  • Go through the items listed. Right-click all the Enabled items one by one and select Disable.Clean BOOT 4
  • Close the Task Manager. Click Apply and OK to close System Configuration.CLEAN BOOT 5

2. Start Excel in safe mode

  1. Press Windows + R to open the Run console.EXCEL SAFE RUN -excel toolbar not working
  2. Type the following command and press Enter to open Excel in safe mode: excel /safeExcel safe mode

3. Disable add-ins

  1. Launch Excel and go to File.File menu
  2. Click Options.Options excel toolbar not working
  3. From the next window, click Add-ins from the left pane.
  4. Navigate to Manage: Excel Add-ins and click Go.Excel options
  5. Remove the checkmark from all the add-ins available.Addins OK
  6. Click OK to confirm the changes.

4. Reset Toolbar settings

  1. Open Excel and go to File.File menu
  2. Click Options.Options excel toolbar not working
  3. Now go to Customize Ribbon.
  4. For Customizations, click on the drop-down and select Reset all customizations.Customize Ribbon Excel toolbar not working
  5. Click OK.

5. Repair Microsoft Excel

  1. Press Windows + I to open Settings.
  2. Go to Apps, then click Installed Apps.Apps, installed apps
  3. Locate Microsoft Office, and click three dots.
  4. Select Modify.Modify excel toolbar not working
  5. Now select Quick Repair and click Repair.Quick Repair
  6. Follow the on-screen instructions and wait for the process to complete.

6. Contact Microsoft Support

You need to contact Microsoft customer support if nothing has worked for you. Explain the situation and everything you have tried to help them assist you better.

So, these are the things you need to try to fix the Excel toolbar not working. Try them and let us know what worked for you in the comments below.

Windows Update Error 0x8024200D: 8 Quick Fixes

There’s no secret that Windows 10 and its forced Update features can occasionally do more harm than good to users. Special emphasis goes to major updates, like the previous Anniversary or Creators Update.

All of those frustrating error issues are followed by an alphanumeric code. The update error we are going to address today goes by the code 0x8024200D.

There are countless reasons for this exact error and we’ll try to resolve them step by step. So, if you have been prompted with this error while trying to update your Windows 10, follow the instructions below.

How can I fix the error 0x8024200D?

1. Run the Windows Update troubleshooter

  1. Download the Windows Update troubleshooter.
  2. Save the file.
  3. Run the troubleshooter and wait for the process to finish.
  4. You’ll be informed if the problem is resolved.

Firstly, let’s give the Windows update troubleshooter a chance to work properly. At least for sake of acknowledging the problem so we can know what measures to take later.

You can use a built-in troubleshooter, but we advise you to download and run the special tool from Microsoft’s official site.

2. Uninstall third-party antivirus

The impact of third-party antimalware software on updates can be enormous. It seems that those two are not functioning well for different reasons.

Firstly, your antivirus can accidentally delete or block some of the update files and even make a conflict with Windows Defender.

That battle for supremacy over your PC security can prove fatal for both updates and all-around system performance.

Because of that, we advise you to uninstall antivirus before updates and lower the chances of something going wrong.

Have in mind that you can reinstall your antivirus software after the updating procedure is finished.

3. Use a dedicated repair tool

You can try to do things manually, and we certainly provide all the means to do so, but if you’re not a technical person, you can fix such update errors with a dedicated repair tool.

4. Use batch script to reset Windows Update components

  1. Download the batch file from here.
  2. Save the file on the desktop.
  3. Right-click on batch and Run as Administrator.
  4. After the process is finished, try updating again.

When trying to resolve update issues such as the error code 0x8024200d, there are a few processes you’ll probably want to reset. Additionally, you’ll probably want to rename/delete the folder with all update installation files.

Well, you can do that manually or, thanks to the Windows enthusiasts, use the batch script file that will do it for you.

Follow these instructions above to employ batch and resolve various update issues. Additionally, you can create your own batch file by following the instructions in this Windows Update reset script article.

5. Repair corrupted files with SFC

  1. Right-click Start and run Command Prompt (Admin).
  2. In the command line type the following and press Enter to confirm:
sfc/scannow

The SFC tool is one of the most valuable tools you can run in the Command prompt. Basically, it addresses all system corruptions and there so, it can fix failed update issues, as well.

This tool is easy to run so follow the instructions above to launch it. This will scan and fix all corrupted files. However, for specialized scan and fix tools, you should look out for DISM  below.

6. Uninstall peripheral drivers

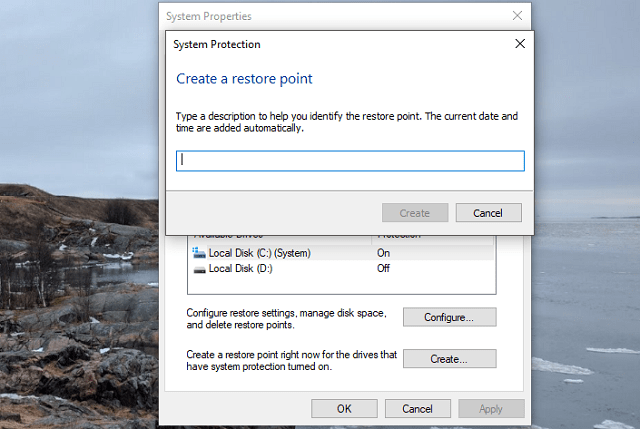
  1. On Search Windows, type Create a restore point.
  2. Open System properties.
  3. In the System Protection tab, on the bottom of the list, click Create.
  4. Enter the description and create a restore point.
  5. Now, right-click Start and open Device Manager.
  6. Unplug all peripheral devices except the mouse and the keyboard.
  7. Go to their respective drivers and uninstall them one by one (printer, scanner, webcam, etc.).
  8. Restart your PC and try updating again.
  9. After the update, reinstall drivers.

Issues with Windows 10 update and legacy drivers are well-known. The conflict that may occur will not just prevent the updates, but affect system stability and eventually lead to errors and crashes.

Because of that, follow the above instructions. Sometimes, the issue might not be solved this way as the peripherals may create lots of errors when used by the system via a driver system that thinks it’s good.

4.1 Update drivers automatically

Sometimes installing the wrong driver version can cause irreversible damage to your PC, for this reason, is highly recommended to advise using a dedicated tool for automating the operation.

Keeping in mind that all drivers need to be updated, so you won’t experience these types of errors, you will need to choose the correct driver version for your device.

⇒ Get Outbyte Driver Updater

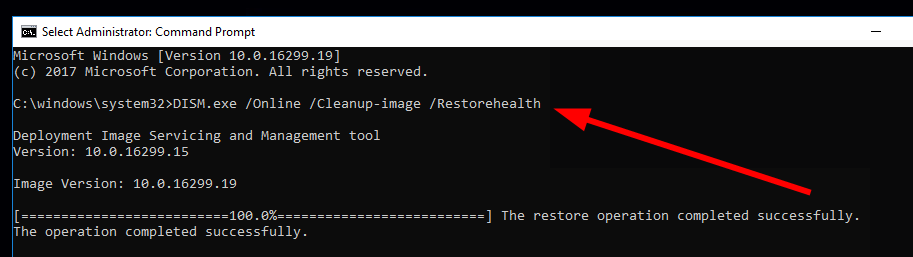
7. Use DISM to repair update files

  1. Right-click Start and open Command Prompt (Admin).
  2. In the command line type the following and hit Enter to start the procedure:
DISM.exe /Online /Cleanup-image /Restorehealth 

Besides the restarting the update components and SFC scan, you can also try to fix the update files corruption. And the good thing is that you don’t have to use third-party programs.

DISM is a built-in tool that scans update files and fixes possible corruption while restoring the deleted files.

You can use DISM to repair your system update files this way, so don’t hesitate to apply the above procedure right away.

8. Perform a clean install with Media Creation Tool

Your last resort is complete reinstallation. We know that may sound like a time-consuming process but it will fix most of your issues.

Since you can’t do it inside the running system, you’ll need the drive (USB stick, DVD) for installation setup files. Use the Windows Media Creation tool to create the bootable drive.

Do not hesitate to create a backup of your files from the system partition and write down your license key.

With that said, we are at the end of the list of fixes for the Windows Update error 0x8024200d. In case you have any remarks or questions, please share them with us in the comments section. We’ll be glad to help.

Fortnite Keeps Crashing on Windows 11? Fix it in 5 Steps

Fortnite is one of the most famous battle royale games enjoyed by millions of players worldwide. However, players facing issues like Fortnite keep crashing on Windows 11 is more common than you think. Fortunately, it can be fixed. 

This guide will discuss the causes and potential ways to prevent Fortnite from crashing on Windows.

Why Fortnite keeps crashing on Windows 11?

There could be various reasons for this battle royale game to be crashing on your Windows; some of the popular ones are: 

  • Outdated or damaged drivers – If your computer has obsolete graphics drivers, your computer might not function properly and cause issues while playing Fortnite.
  • System requirements are not met – The program can stop working if your computer doesn’t meet the recommended system requirements.
  • The Fortnite app is not up to date – If you run an older version of Fortnite that has become corrupt or is missing files, the game might crash.

What can I do if Fortnite keeps crashing on Windows 11?

Before diving into the detailed troubleshooting methods, please make sure you have gone through these checks first : 

1. Make changes to the game settings

1.1 Verify the game files

  1. Open the Epic Launcher.
  2. Go to Library.
  3. Locate Fortnite and click on the three dots next to it.
  4. Select Manage.Manage -fortnite crashing windows 11
  5. Now locate and click Verify next to Verify Files option.Verify Files
  6. Once verified, restart Fortnite.

1.2 Lower in-game graphics 

  1. Launch Fortnite, click on the three horizontal lines, and select the Menu icon.Settings - fortnite crashing windows 11
  2. Now go to Settings and click Video Settings.
  3. Change the Quality Presets to Low, the Rendering mode to DirectX 11, and the Frame Rate Limit to 60 FPS.Video Settings
  4. Click Apply to confirm the changes.

1.3 Disable High-Resolution Textures

  1. Launch Epic Launcher.
  2. Go to Library, then Fortnite.
  3. Click on three dots and select Options.Options - Fortnite crashing Windows 11
  4. Now remove the checkmark next to High-Resolution Textures.High Resolution
  5. Click Apply.

2. Update graphics drivers

  1. Press Windows + R to open the Run window.Device Manager RUN COMMAND
  2. Type devmgmt.msc and press Enter to open Device Manager.Graphics Driver update - fortnite crashing Windows 11
  3. Go to the Display adapter and expand it. Next, right-click the graphics driver and select Update driver.
  4. On the next screen, choose Search automatically for drivers.Update driver 2
  5. Follow the on-screen prompts to install drivers if available.

If you’re looking for another option to update your graphics driver, then we recommend you try a specialized tool like Outbyte Driver Updater to detect all your outdated drivers and update them automatically with the newest versions.

Outbyte Driver Updater

Keep your computer in check and update your drivers in no time with Outbyte Driver Updater.
Free Trial Download now

3. Repair the Visual C++ Redistributables

  1. Download all the Visual C++ Redistributables, both x64 and x86 versions.
  2. Double-click the executable files and choose Repair.Fortnite crashing Windows 11
  3. If there is no repair option, complete the installation using the on-screen prompts.
  4. Once done, restart your PC and relaunch Fortnite.

4. Change the launch settings

4.1 Launch it as admin

  1. Locate and right-click the Epic Launcher and click Run as administrator.
  2. Launch Fortnite to check if the issue persists.

4.2 Run the game in compatibility mode

  1. Press Windows + E to open Windows Explorer.
  2. Follow this path: C:\Program Files\Epic Games\Fortnite\FortniteGame\Binaries\Win64\
  3. Locate and right-click FortniteClient-Win64-Shipping.exe, then select Properties. Properties - Fortnite crashing Windows 11
  4. Go to the Compatibility tab. Compatibility tab
  5. Place a checkmark next to Run this program in compatibility mode for and select Windows 8.
  6.  Remove the checkmark next to Disable fullscreen optimizations.
  7. Click Apply and OK, then relaunch the game.

5. Reinstall the game

  1. Launch the Epic Launcher. Click Library.
  2. Go to Fortnite and click on the three dots next to it.Uninstall - Fortnite crashing Windows 11
  3. Select Uninstall.
  4. On the next page, select Uninstall again to confirm.Uninstall confirmation
  5. Now from the list of games, select Fortnite and click Install.
  6. Click Yes on the UAC prompt to complete the installation.

So, you need to follow these steps to fix Fortnite, which keeps crashing on Windows 11. Also, if it’s a new update like Chapter 5 that keeps crashing, sign out, then sign back in again to your Epic account.

Try them and let us know which worked for you in the comments below.

0x80073712 on Windows 11: What is it & How to Fix it

After installing the operating system on your device you might get the error 0x80073712 on Windows 11 and Windows 10. Don’t worry, this isn’t only happening to you.

This can cause some problems since it appears that your system has encountered an issue while trying to install the latest update.

Fortunately for you, there is a solution and by reading the guide posted a few rows below you will find out how to properly handle this issue.

So without further ado, join us while we take a closer look at some common causes of this error and all of its potential solutions.

Why does the update error 0x80073712 appear?

Usually, this error message appears if one of the system components is corrupted. Fixing this issue isn’t always simple, since you need to repair the damaged files.

There are several tools that you can use, but if everything else fails, you’ll have to reinstall your version of Windows to fix the problem for good.

Which versions of Windows are affected by the update error 0x80073712?

All versions can get this error message since it’s a pretty common issue. This guide focuses primarily on Windows 11 since it’s the latest edition.

However, all solutions listed in this guide and will work for Windows 10 and older, with some minor modifications.

How to fix the Windows 11 0x80073712 error code?

1. Troubleshoot your PC

  1. Download Windows Update troubleshooter.
  2. Save the file on your PC and run it.
  3. Select Windows Update and click on Next.
  4. Wait for the proces to finish.
  5. Optional: Run additional available troubleshooters.

2. Run a DISM scan

  1. Press Windows key + X and choose Windows Terminal (Admin) from the menu.
  2. After the Command Prompt window pops up you will need to write in there the following line: DISM.exe /Online /Cleanup-image /Scanhealth
  3. Press the Enter key on the keyboard and wait for the process to finish.
  4. Write in the command prompt window the following line: DISM.exe /Online /Cleanup-image /Restorehealth
  5. Press the Enter button on the keyboard and wait for the process to finish.
  6. Close the Terminal and restart your PC.

If you’re not familiar with DISM, be sure to check our guide on how to use DISM. Although made for Windows 10, it fully applies to the latest OS as well.

3. Reset your PC

Note icon NOTE
This method will remove all installed apps, so it’s a good idea to back up your files.
  1. Click the Start button and select Settings.
  2. In the right pane, select Recovery.
  3. Click the Reset PC button.
  4. Select Keep my files.
  5. Now select Local reinstall.
  6. Follow the instructions on the screen to complete the process.

How to fix the update error code 0x80073712 in Windows 10?

1. Restart Windows Update services

  1. Press Windows key + X and select Windows PowerShell (Admin).
  2. Run the following commands:
    net stop bits
    net stop cryptscv
    net stop wuauserv
    net stop msiserver
    Ren C:\Windows\SoftwareDistribution SoftwareDistribution.old
    Ren C:\Windows\System32\catroot2 Catroot2.old
    net start bits
    net start cryptscv
    net start wuauserv
    net start msiserver

To make this process faster and fully automated, you can use the Windows Update reset script.

2. Download the update manually

  1. Vist Microsoft Update Catalog website.
  2. In the search box, enter the KB number of the update you’re unable to download.
  3. Locate the update that matches your PC architecture and click on Download.
  4. Once the download is finished, run the downloaded file to install the update.

How does the update error 0x80073712 affect my PC?

This error message will prevent you from downloading new Windows updates. This can be problematic for several reasons. Firstly, you’ll miss out on security updates, so your PC might become vulnerable to exploits and malware.

Secondly, you won’t be able to download bug fixes and feature updates, so you’ll be stuck with any current bugs that your operating system has.

How to deal with Windows update errors?

This greatly depends on the type of error you’re dealing with. In most cases, repairing the corrupted files will help with this issue.

You also need to check if your firewall or antivirus isn’t blocking Windows Update from working properly.

Error 0x80073712 is not the only one that can obstruct the functionality of your PC. There were many updates released recently, and all of them had some specific problems.

If you didn’t manage to fix this problem, you can always reset Windows 11 as the last option, but be sure to back up your files first.

You can also write us below for any questions that you may have regarding this error message and we will help you in the shortest time possible.

Easy Fixes to Fallout 4 Face Bugs & Glitches [Brown, Black, Dark]

Fallout 4 is one of the most popular video games available, with an interesting storyline and graphics.

Still, fans all around the world have been complaining about several Fallout 4 face color bugs and glitches for several years now, and the developers couldn’t come up with a stable fix.

In comes the big question: how do I fix the glitch in Fallout 4? Since it’s quite a common issue, unfortunately, everyone knows exactly what you’re talking about.

And speaking of issues, let’s take a look at the most common ones:

  • Fallout 4 face color bug (dark face, black face, brown face, rusty face, etc.)
  • Fallout 4 face texture glitch
  • Can’t change skin color in Fallout 4
  • Fallout 4 eyes closed bug
  • Fallout 4 everyone is glowing red

One of the most common and annoying bugs has to do with the characters’ faces, which appear to be brown, black, rusty, or just dark. Sometimes, the issues encountered with the characters don’t even let the user play the game.

The faces keep changing out of the blue, after playing for a while or even before starting the game. The platform is also not much of a criterion since you can stumble across the Fallout 4 black face color bug on Xbox, Ps4, or PC alike.

Although the face bugs have no impact on the performance, plenty of players are threatening with giving up on the game.

How do you fix brown/black face bugs in Fallout 4?

1. Try the Fallout 4 blackface fix from Nexus

fix brown face fo4
  1. Download the brown face workaround mod from the Nexus Mods website on your PC.
  2. Now, copy and paste the extracted files into the Data folder of Fallout Game. The most common location is: C:/Program Files(x86)/Steam/Steam/Apps/Common/Fallout4Data 
  3. Alternatively, you can use your desired Mod manager to enable the Mod.
  4. Launch the game and the bug should be fixed.

The same method can be applied for the rusty face bug, but the file is different.

2. Try a third-party mod: High Res DLC Black Face Fix

fix fo4 black face
  1. First, open the Fallout 4 Game folder on your PC.
  2. Find and open the Fallout 4.ini file with Notepad.
  3. Now edit the following lines in the .ini file through Notepad on your PC: [Archive] bInvalidateOlderFiles=1sResourceDataDirsFinal=
  4. Save changes and exit.
  5. Then download the Black Face Fix Mod.
  6. Run the Nexus Mod Manager and activate the mod by selecting its file.

Now, the Fallout 4 dark face fix mod is nothing but a workaround, as it downscales the textures of the faces. What’s more, it seems that the glitch appeared after the launch of the High-Resolution DLC.

If the bug is not fixed, the issue might lie somewhere else.

In both cases, look for the latest files and it is helpful to also skim through the posts added by various FO4 fans that have tried these solutions.

Hopefully, we’ve helped to improve your gaming experience. For sure, any suggestion on this topic is helpful for the gamers community.

Windows Update Error 8024afff: 3 Quick Fixes

If you’re a Windows 10 user, there’s a high probability that you’ve run into one or multiple update errors. There are so many of those that are the legacy of the previous Windows iterations, just like the one with the error code 8024afff.

Apparently, this error prevents downloading certain security patches, but gravity-wise, it’s not so hard to overcome. Of course, you’ll still need to perform some troubleshooting steps.

If you’re unable to resolve it on your own, the workarounds provided below should be of use.

How do I fix the error 8024afff?

1. Run the Windows Update Troubleshooter

In comparison to previous Windows iterations, Windows 10 has more than a valid built-in troubleshooter which covers basically every issue that can occur, including the 8024afff error code.

In that bunch of various standard troubleshooters, the one that’s probably most used is the Windows Update troubleshooter, mainly since the update errors are quite common.

Once you run it, this tool should enable you to address the most simple halts in the Windows Update feature, by restarting the related processes and refreshing the update procedure.

In case you’re not sure how to run it, follow these steps:

  1. In the Windows Search bar, type Troubleshoot and open Troubleshoot from the list of results.
  2. Expand Windows Update troubleshooter and click on the Run the troubleshooter button.windows 10 error 0x80070714
  3. Follow instructions until the problem is solved.
  4. Try updating again.

You can also try the program described below to address this and many other issues with your PC. This is an incredible troubleshoot and repair program that maintains your PC in top shape with only a few clicks.

The best part is that you won’t have to go seeking a needle in a haystack; all of this and more can be accomplished with an automated solution.

Restore is a great piece of malware repair and removal software for Windows systems. It does a thorough system analysis, then performs rigorous system optimization, eliminates malware and viruses, and fixes the Windows registry.

2. Use the batch script to restart Update services

When it comes to updating issues, everything points towards dedicated system services and the folder in which the downloaded updates are stored.

Now, there’s a way of utilizing Command Prompt and running a plethora of commands in order to reset the Update services and reestablish the Software Distribution folder. This should get rid of the Windows Update error 8024afff.

However, there’s also a custom batch file that will do that for you.

You can download this batch file or create it on your own by following the steps provided in this article. If you’re inclined towards the former, make sure to follow these steps:

  1. Download the batch file here.
  2. Save the file.
  3. Right-click on the batch script and choose to Run it as an Administrator.
  4. After the process is finished, try updating again.

3. Install updates manually

Finally, regarding minor cumulative security updates and patches, you can always navigate to Microsoft’s dedicated site called Microsoft Update Catalog and download them there.

Once you’ve obtained an individual update that caused the 8024afff error over the OTA update protocol, you can install it just like any other executable file.

Follow these instructions to identify the troubling update and install it manually:

  1. Press Windows key + I to open the Settings app.
  2. Choose Update & Security.windows 10 error 0x80070714
  3. Click to check for updates and write down the identification code of the troubled update.
  4. Navigate to Microsoft Catalog by using Edge. It seems that Microsoft valiantly blocked access to other browsers.windows 10 error 8024afff
  5. In the Search bar, type the identification code and press Enter.
  6. Download and install the update and restart your PC.

That’s it. If you have an alternative solution for the 8024afff error on your mind or questions regarding the ones we provided, we encourage you to tell us in the comments section.

Windows Update Error 0x80240fff: 8 Quick Fixes

Thousands of Windows users who tried to update their Windows 10 OS lately have encountered the annoying 0x80240fff error code.

Both Insiders and non-Insiders are plagued by this error that prevents their system from finding the available updates.

Here’s how one user describes the problem:

I just got a new laptop and was trying to make sure my windows 10 was up to date but every time i try to have it search for updates I get Error code 0x80240fff. I dont even think its failing to download its just acting like it cant even search for new updates?

Users have also tried to update during a clean boot without success.

What causes the 0x80240fff Windows Update error?

According to Microsoft, this error can occur if custom content uses a Product name that matches an existing Category name. For example, you create a product within SCUP named Tools.

This confuses the system when evaluating the categories since you now have a product named Tools and an update classification called Tools.


How can I fix the error 0x80240fff?

Before you try out more complicated solutions, make sure you perform a quick PC restart. This could easily fix the issue in no time.

1. Defer updates

This solution is available for Windows 10 Pro users. Go to Windows Update Settings > Click on Advanced Options at the bottom of the page > Select Defer Upgrades.

This changes your Windows update server and the problem should be solved. However, updates will be postponed.

2. Use the Media Creation Tool

Use the Media Creation Tool to download the latest Windows 10 updates on your machine. You can choose to upgrade your PC immediately, and Windows should do that automatically for you.

This solution can also be used by Windows 10 Home users. As you all know, there is no Defer Upgrades option available for Windows 10 Home.

These are the solutions provided by Insiders. Microsoft’s Support engineers have also offered additional solutions, so you may want to try them as well.

3. Run the Windows Update troubleshooter

Windows 10 features a series of built-in troubleshooters that can help you fix general technical issues, including update problems such as 0x80240fff.

You may go to Settings > Update & Security > Troubleshoot and run the Windows Update Troubleshooter.

windows update troubleshoot

4. Restart the Background Intelligent Transfer Services

  1. Press Windows key + R key, and type services.msc in the text box.
  2. Locate Background Intelligent Transfer Service (BITS) on the list.
  3. Right-click the Background Intelligent Transfer Service (BITS) service, and then click Properties.reset bits windows 10
  4. On the General tab, next to Startup type, make sure that Automatic (Delayed Start) is selected. If it isn’t, select it, and then click Apply.automatic bits startup
  5. Next to Service status, check to see if the service is started. If it isn’t, click Start.

5. Reset Windows Update components

  1. Go to Start > type cmd > select Command Prompt (Admin).
  2. Click Yes when asked for permissions.run command prompt
  3. Stop the BITS, Cryptographic, MSI Installer, and Windows Update Services by typing the following commands (hit Enter after each command):
    • net stop wuauserv
    • net stop cryptSvc
    • net stop bits
    • net stop msiserver
  4. Rename the SoftwareDistribution and Catroot2 folder by typing the commands below in the Command Prompt (as always, hit Enter after each command):
    • Ren C:WindowssoftwareDistribution SoftwareDistribution.old
    • Ren C:WindowsSystem32catroot2 Catroot2.old
  5. Restart the BITS, Cryptographic, MSI Installer, and Windows Update Services. Type the following commands in Command prompt hitting Enter after each one:
    • net stop wuauserv
    • net stop cryptSvc
    • net stop bits
    • net stop msiserver
  6. Close Command Prompt
  7. Try running Windows Updates again to check if the error persists.

6. Turn off antivirus/antimalware/firewall protection

Sometimes your security software (firewall, antivirus, and antimalware tools), may block Windows Update. The quickest and simplest solution to fix this issue is to temporarily disable these programs.

Then try to install the latest Windows updates again to check if this solution fixed your problem.

Don’t forget to turn these programs back on as soon as you’re done to ensure that your system is protected against cyber attacks.

7. Disable your VPN software

Some users confirmed that turning off VPN software helped them fix error 0x80240fff. So, if you do use a VPN software, disable it and then check for updates.

Let us know if this solution worked for you.

8. Download the latest Servicing Stack Update

Microsoft regularly rolls out Servicing Stack Updates to improve Windows Update. Make sure that you’re running the latest Servicing Stack Update available for your Windows 10 version.

You can also download the update from Microsoft’s Update Catalog website.

There you go, we hope that the solutions listed in this article helped you fix the Windows Update error 0x80240fff.

No less important, users complain about a similar message that states: There were some problems installing updates, but we’ll try again later. If you keep seeing this and want to search the web or contact support for information.

When encountering this issue, don’t hesitate to run the Windows Update troubleshooter or try out our previously mentioned solutions.

If you’ve got additional tips and suggestions on how to fix the 0x80240fff error, list them in the comments below.

Windows Update Error Code 0x80246007 [SOLVED]

Windows Insider users reported not being able to download and install certain OS builds. It appears that many users of the OS beta version encountered the 0x80246007 error code when trying to download the latest Windows 10 build.

The errors they got displayed the following messages:

  • Some updates didn’t finish downloading. We’ll keep trying. Error code: (0x80246007)
  • 0x80246007 Windows Store – Sometimes this error can appear while trying to download apps from Windows Store.
  • 0x80246007 Windows 7 – So the error can affect older versions of the OS as well.
  • Windows 10 update error 80246007 – This error usually appears when trying to install updates on Windows 10.

So if you’ve encountered one of these instances, check our recommended solutions.

How to fix the Windows Update error 0x80246007?

1. Set BITS Service to run automatically

  1. Press Windows Key + R to launch Run. Type services.msc and press Enter.
    0x80246007 Windows 7
  2. Select Background Intelligent Transfer Service (BITS) in the newly opened window.
    Windows 10 update error 80246007
  3. Right-click BITS and select Properties.
    Some updates didn't finish downloading. we'll keep trying. error code: (0x80246007)
  4.  On the General tab, set the Startup Type to Automatic (Delayed Start). Click Start and then Apply.

2. Perform a Clean boot

  1. Press Windows Key + R to open the Run dialog.
  2. Now enter msconfig and press Enter or click OK to proceed.
    Windows 10 update error 80246007
  3. Navigate to the Services tab and check Hide all Microsoft services.
  4. Now click Disable all button.
    0x80246007 Windows 7
  5. Go to the Startup tab and click Open Task Manager.
    Some updates didn't finish downloading. we'll keep trying. error code: (0x80246007)
  6. Right-click the first entry on the list and choose Disable from the menu. (Repeat this step for all startup applications.)
    0x80246007 Windows Store
  7. After doing that, close Task Manager and go back to the System Configuration window.
  8. Click Apply and OK to save changes and restart your PC.
    0x80246007 Windows 7

Once your PC restarts, check if the problem still persists. If not, it means that one of your startup applications was causing the issue.

Now you can enable the disabled applications and services by using the same method as above.

If the error appears again, you might have to disable all your services and startup applications one by one until you find the one that is causing the problem. Once you find it, disable it or remove it, and the issue will be permanently resolved.

It’s worth mentioning that many applications will leave certain files and registry entries even after uninstalling them, and these might interfere with other programs.

So it’s recommended to use the best uninstaller software to remove problematic or unused applications from your PC.

Such a tool removes all files and registry entries associated with the unwanted application. Uninstaller programs are easy to set up and use, and also they are excellent at removing any traces of previously deleted apps.

3. Create your own Repair. bat file

  1. Launch Notepad.
  2. Copy one of the following codes in the Notepad file:

net stop wuauserv
cd %systemroot%SoftwareDistribution
ren Download Download.old
net start wuauserv
net stop bits
net start bits

or

net stop wuauserv
cd %systemroot%SoftwareDistribution
ren Download Download.old
net start wuauserv
net stop bits
net start bits
net stop cryptsvc
cd %systemroot%system32
ren catroot2 catroot2old

net start cryptsvc

  1. Go to File and choose Save As.
    Some updates didn't finish downloading. we'll keep trying. error code: (0x80246007)
  2. Enter Repair.bat as the file name.
  3. In the Save as type box, click All Files (*.*) and save the file on your desktop.
    0x80246007 Windows Store
  4. Right-click the Repair.bat file and select Run as administrator.
  5. Type the administrator password if required, or click Continue.
    0x80246007 Windows 7
  6. Try to install the build again. When the build has been installed, delete the Repair.bat file.

4. Check your antivirus

If you’re getting error 0x80246007 while downloading Windows 10 builds, the issue might be your antivirus.

Even though antivirus tools are necessary, some tools aren’t fully compatible with Windows 10 and that can cause this and many other problems to appear.

For instance, McAfee users were highly impacted. The solution was to disable the McAfee antivirus firewall.

However, if you’re using a different antivirus, you might want to try disabling its firewall or other features and check if that solves the issue.

If the problem still persists, it’s recommended to completely disable your antivirus or remove it, and check if that solves the issue.

At the same time, consider switching to a more reliable antivirus solution to quickly detect any cyber threats and keep you protected, without compromising other OS processes.

5. Make sure that Windows Defender Firewall service is running

  1. Open the Services window.
  2. Locate Windows Defender Firewall on the list.
  3. Check the status of Windows Defender Firewall service. If the service isn’t running, right-click it and choose Start from the menu.
    Windows 10 update error 80246007

After starting the Windows Defender Firewall service, check if the problem is resolved.

Note that Windows Update requires Windows Defender Firewall service to be activated.

6. Change User Account Control settings

  1. Press Windows Key + S and enter user account control.
  2. Choose Change User Account Control settings.
    Some updates didn't finish downloading. we'll keep trying. error code: (0x80246007)
  3. Move the slider all the way down to Never notify. Now click on OK to save changes.
    0x80246007 Windows Store

After doing that, User Account Control should be disabled and the problem will be resolved.

If you’re not familiar, User Account Control is a useful feature that prevents applications and users from running certain tasks that require administrative privileges.

7. Run the Windows Update troubleshooter

  1. Press Windows Key + S and enter troubleshoot.
  2. Choose Troubleshoot from the menu.
    0x80246007 Windows Store
  3. Select Windows Update from the menu on the left and click Run the troubleshooter.
    Windows 10 update error 80246007
  4. Follow the instructions on the screen to complete the troubleshooter.

Once the troubleshooter is finished, the 0x80246007 issue should be completely resolved.

On rare occasions, the troubleshooter itself freezes or won’t open. See this exhaustive guide to quickly get it back on track again.

8. Perform a System Restore

  1. Press Windows Key + S and enter system restore.
  2. Select Create a restore point from the list.
    Some updates didn't finish downloading. we'll keep trying. error code: (0x80246007)
  3. Click the System Restore button.
    0x80246007 Windows Store
  4. Now click Next.
    0x80246007 Windows 7
  5. If available, check Show more restore points and pick the desired restore point.
  6. Now click the Next button. Follow the instructions on the screen to complete the restoration process.
    Windows 10 update error 80246007

Once your PC is restored to its original state, check if the problem still persists.

If you have other suggestions on the topic, feel free to share them with us in the comments.

Bookmark our News Hub to get the latest details related to Windows 10 OS.

Our Windows 10 Troubleshooting section offers complete guides on fixing various system errors.

These solutions should help whenever you’re having trouble installing the latest Windows 10 build in the Insider OS and getting the error code 0x80246007.

Fix: Adobe Illustrator Keeps Crashing on Windows 11

It can be frustrating if apps like Adobe Illustrator keep crashing on your Windows 11. As it not only hinders your work but also degrades your computer’s performance. Fortunately, this issue can be fixed in no time. 

Here, in this blog, we will discuss some potential fixes available to fix the issue right after examining the reason behind the problem.

Why does my Adobe Illustrator keep crashing?

There are several reasons why Adobe Illustrator might keep crashing on Windows 11; some of the popular ones are mentioned here: 

  • Outdated software or damaged files – If you have an outdated version of Adobe Illustrator or your program files are corrupt, it may cause the app to crash.
  • System requirements not met – If your computer doesn’t fit the recommended system requirements, then there is a chance you might face this problem.
  • Obsolete drivers – If your graphics driver is outdated, the app depending on it, including Illustrator, might crash. It is recommended to keep your drivers up to date.
  • Preferences are corrupt – There is a preference file of Illustrator on your computer; if it gets corrupt, the app might crash.

What can I do if Adobe Illustrator keeps crashing on Windows 11?

Before going to the detailed troubleshooting steps, make sure you go through these preliminary checks: 

  • Check the system requirements for the program.
  • Restart your computer and try to relaunch the app.
  • Check the System Compatibility Report for outdated GPU driver issues.
  • Sign out, remove the credentials and sign in to the app.
  • Your computer has enough space for the program to function smoothly.

Once you are done with the above checks and the issue persists, try the below-mentioned methods: 

1. Update Adobe Illustrator

  1. Launch the Creative Cloud Desktop app. Locate Apps.
  2. Click Updates. From the right pane, click Check for updates.Updates Apps - Adobe Illustrator keeps crashing Windows 11
  3. If any update is available for Illustrator, click Update to install it.
  4. Once complete, restart your PC.

2. Update your graphics drivers

  1. Press Windows + R to open the Run window.Device Manager RUN COMMAND
  2. Type devmgmt.msc and press Enter to open Device Manager.
  3. Go to Display adapters, and click to expand it. Next, right-click your graphics driver and select Update driver.Graphics Driver update - adobe illustrator crashing Windows 11
  4. On the next window, select Search automatically for drivers.Update driver 2
  5. Follow the on-screen instructions to install drivers if available.

Besides our recommended manual steps above, sometimes it is easier to use an automatic alternative like Outbyte Driver Updater to scan your computer and detect any outdated driver and ultimately replace it with the latest update.

Outbyte Driver Updater

Let Outbyte Driver Updater find the best updates for your drivers and boost your device’s health.
Free Trial Download now

3. Reset preferences for Illustrator

  1. Close Adobe Illustrator if open.Illustrator keeps crashing on Windows 11
  2. Now press Ctrl + Alt + Shift and launch Illustrator to reset preferences.

4. Reinstall Illustrator – Use the Creative Cloud Cleaner tool

  1. Download the Adobe Creative Cloud Cleaner tool.
  2. Right-click on the downloaded app and select Run as administrator. Click Yes on the UAC prompt.Run as admin
  3. Now choose the language by typing the first letter of the language and then press Enter. For example, for English type e.Adobe Illustrator crashing Windows 11
  4. Check the Adobe End-User License Agreement, type y, and press Enter.Accept the terms
  5. You will get a list of apps. Type the number at which Creative Cloud is to uninstall Creative Cloud apps and press Enter.CC apps
  6. Select the app you want to remove by typing the number next to the app name and pressing Enter.
  7. Type y to confirm and press Enter.
  8. Once done, you will see the Adobe Creative Cloud Cleaner tool completed message successfully; press Enter and restart your PC.Enter
  9. Now download the Creative Cloud app again. Follow the on-screen instructions to complete the installation.

5. Contact Adobe Support

If nothing has worked for you, then we suggest you contact Adobe Customer Support and explain the situation along with the methods you have tried.

So, this is how you can fix Adobe Illustrator keeps crashing on Windows 11. Try them and let us know what worked for you in the comments below.

How to Delete Multiple Rows in Excel at Once [Simplified]

Microsoft Excel is one of the popular programs that is used by billions of people to manage their data and bills. It is used by businesses to keep track of their finances, inventory, and more.

The fact that businesses are relying on the application to manage their data, they often need to delete multiple records from Excel documents.

One of the users who experienced problems while deleting multiple rows reported on forums.

How can I delete multiple rows in Excel? If I mark everything and try to delete, it just deletes a single row. Even if I right-click and select delete, it still deletes one row at a time. I need to delete all rows separately selected with Ctrl in one go.

Fortunately, there are many ways that you can use to delete multiple rows from an Excel sheet in one go.

How can I delete multiple rows in Excel?

    1. Delete Multiple Rows through Contextual Menu

    You can easily delete multiple rows in Excel by using the application’s built-in contextual menu. All you need to do is to select the rows you want to remove and to press the Delete button.

  1. 1. Open the Excel sheet that you want to delete rows from.

  2. 2. Select all the rows that you want to delete.

    delete multiple rows excel select
  3. 3. Right-click the selection to open the Contextual Menu.

  4. 4. Select Delete or Delete rows from the list of options.

  5. 5. A drop-down menu will open on your screen.

  6. 6. Select Delete Sheet Rows to delete the selection.

    delete multiple rows excel guide

2. Delete multiple Rows using a Shortcut key

  1. Select the targetted rows from your excel sheet to delete multiple rows in a single attempt.select rows delete multiple rows in excel
  2. Press Ctrl and – keys to delete the selection.

This method applies to both multiple consecutive and non-consecutive rows.

3. Delete multiple rows through cell selection

  1. First and foremost, select all the cells in the corresponding rows that you want to delete.
  2. Right-click on one of the selections and select Delete.
  3. Click Entire Row from the delete dialogue box and click the OK button.select entire row delete multiple rows in excel

4. Delete multiple Rows by running a Macro

  1. Select the targetted rows that you want to delete.
  2. Open the VBA editor by pressing Alt+F11 keys from your keyboard.
  3.  Click the first project from the left-hand pane.
  4. Navigate to the menu bar and select Insert >> Module.
  5. Paste the following code in the new window to select multiple cells for deletion:
    • Sub Delete_Rows()
    • ‘delete multiple rows (rows 4, 5 and 6)
    • Worksheets(“Sheet1”).Range(“C4:C6”).EntireRow.Delete
    • End Sub
run macro script delete multiple rows in excel

Change the row number references (“C4:C6”) to choose the specific rows that you want to delete. For instance, if you want to delete nonconsecutive rows (3,7,8), you can specify the range as  (“C3,C7,C8”). Specify the name of your worksheet by changing Sheet1.

Finally, click the Run button or press F5 to run the script.

This can come in handy if you can’t insert a row in Excel because there are too many available already.

Which of the following method worked for you? Let us know in the comments section below.

Windows Update Error 80244018 [SOLVED]

Problems with updates are quite frequent in Windows 10, and an update is extremely important in the latest version of Microsoft’s operating system, you must solve the update issues as soon as possible.

We already solved (at least we hope we did) a lot of update problems in Windows 10 before, but in this article, we’re going to talk about error code 80244018, which appears when you’re trying to download a certain update.

How can I fix the Windows Update error 80244018?

1. Make Sure BITS is Running

BITS or Background Intelligent Transfer Service is a Windows component which is crucial for delivering updates to your system.

So, if this feature doesn’t work correctly, you won’t be able to receive updates, and various errors could occur, including error 80244018.

To make sure BITS is working properly, do the following:

  1. Go to Search, type services.msc, and open Services
  2. Find Background Intelligent Transfer Service, right-click on it, and choose Propertieswindows 10 error 80244018
  3. Make sure Startup type: is set to Automatic (Delayed Start), and Service status: is set to Running (if not, change it)
  4. Restart your computer

If BITS is running properly, and you’re still unable to receive your update, do one of the solutions below.

3. Configure Proxy via Command Prompt

Maybe something is wrong with your proxy configuration, which prevents your updates from downloading or installing. To check that, you’ll need to run a few proxy checking commands.

You can find all necessary details about running these commands, and what they are for on this Microsoft’s support page.

3. Turn Off the Firewall

Sometimes Windows Firewall could block certain updates, so in order to normally receive the desired update, try turning this feature off. To turn off the Firewall in Windows 10, do the following:

  1. Go to Search, type firewall, and open Windows Firewall
  2. Go to Turn Windows Firewall on or off
  3. Check Turn off Windows Firewallwindows 10 update error 80244018
  4. Check if you can download the update, again

It is not recommended to turn Windows Firewall off, so if this feature caused the problem with the update, turn it on again, once you download the update.

Most of today’s third-party antiviruses have their own Firewall, as well, so if you’re running a third-party antivirus on your computer, try turning off its own Firewall, it might be helpful.

4. Use WUReset Tool

If none of the above-mentioned solutions fixes the problem, you can use one useful tool.

The tool is called WUReset tool, and it fixed various problems with Windows Update, so it could fix the problem with error 80244018, as well.

To find out more about this tool, check out this article.

5. Run DISM

Deployment Image Servicing and Management is the built-in command-line tool native for Windows systems. Its main use is to scan for system errors and restore the integrity of the affected files.

If you’re not sure how to run this tool, follow the instructions we provided below:

  1. Type cmd in the Windows search bar, right-click on the Command Prompt and run it as an administrator.
  2. In the command line, type the following line and press Enter:
    • DISM /online /Cleanup-Image / ScanHealth0x80248014 windows 10 error
    • DISM /Online /Cleanup-Image /RestoreHealth
  3. Wait for the procedure to finish (it might take up to 10 minutes) and restart your PC.

6. Run the Windows Update Troubleshooter

Even though it’s commonly overlooked, the unified Windows Troubleshooter can come in handy in various scenarios.

The dedicated Windows Update troubleshooter can help you a lot with update errors, including the one we’re addressing today.

Follow these instructions to run Windows Update Troubleshooter and resolve the ”80244018” error:

  1. Press Windows key + I to summon the Settings app.
  2. Open Update & security.
  3. Select Troubleshoot from the left pane.
  4. Click on Windows Update, and then on Run the troubleshooter.
  5. 0x80248014 windows 10 error

7. Obtain update manually

Besides the standard OTA updates, Microsoft offers an online update catalog. There you can, if you’re aware of the details, locate and download every Windows 10 update.

Including all security patches and KB updates. There’s a good chance that the error will be resolved after you update your system manually.

Follow these steps to download and install Windows updates manually:

  1. Navigate to Windows Update Catalog, here.
  2. Type the update number in the Search box and run the Search.
  3. Download and install all needed updates.
  4. Restart your PC.

8. Disable Proxy or whitelist WSUS

Finally, this exact error is commonly associated with the proxy server permissions granted to your PC.

So if you’re using a limited network protected with a proxy server, there’s a chance that it prevents Update Services from communicating through.

Because of that, we advise you to either disable proxy temporarily until the update is acquired or to contact your network administrator and whitelist WSUS.

That’s about it, I hope at least one of these solutions helped you to solve the problem with Windows Update error 80144018, and that you’re now able to download all your updates.

If you have any comments or questions, just reach for the comment section below.

How to Type the “Does Not Equal” Sign [Excel, Mac, Word]

The does not equal sign (≠) is a mathematical symbol. Sometimes users might need to type the does not equal sign-in documents. However, there isn’t a key for that symbol on standard keyboards. So, some users might wonder how they can enter does not equal in their documents.

In today’s guide, we will explore this subject, covering different ways to use the does not equal sign (≠). Read on for more details.

How can I enter and use the Does Not Equal sign?

    Insert the Does Not Equal Sign from Character Map

    Windows includes a Character Map from which you can select and copy various symbols. Therefore, you are able to insert any sign you desire from it, without having to type it yourself.

  1. 1. Press the Windows key + S hotkey to search for the Character Map.

  2. 2. Enter Character Map in the Type here to search box.

  3. 3. Click on the result for Character Map to open it.

  4. 4. Select Advanced view to open further options.

  5. 5. Enter not equal in the Search for box.

  6. 6. Click the Select button.

  7. 7. Press the Copy button.

  8. 8. Open the document you need to add the does not equal sign to.

  9. 9. Then press the Ctrl + V hotkey to paste the does not equal sign into the document.

How to Insert the Does Not Equal Sign on a keyboard using a shortcut

Alternatively, you can Google the does not equal sign and then copy it over where you want to.

  1. Open Google in a browser.
  2. Enter the keyword does not equal sign in Google’s search box.
  3. You’ll see a does not equal sign right at the top of the search results as in the image directly below.
  4. Hold your left mouse button and drag the cursor over the does not equal sign to select it.
  5. Press the Ctrl + C hotkey.
  6. To remove any formatting from the sign, paste it into Notepad first. Type Notepad in Windows 10’s search box.
  7. Click Notepad to open it.
  8. Press the Ctrl + V hotkey to paste the sign there. Then copy the does not equal sign in Notepad with Ctrl + C.
  9. Finally, paste the does not equal sign into your document with the Ctrl + V keyboard shortcut.

How to type Does Not Equal sign on Mac?

Mac keyboard does not equal sign

Mac users can enter the does not equal sign-in documents without copying it. Apple keyboards include an Option key users can press in combination with others to type symbols and characters in documents. Press the Option key + = Mac hotkey to enter the does not equal symbol in documents.

Select the does not equal symbol in Word

  1. MS Word users can select symbols to add to documents. To add the does not an equal symbol, click the Insert tab in Word.
  2. Click Symbol to open a selection of characters.
    The Symbol option does not equal sign
  3. Select the does not equal symbol there.

Where is the Not Equal To operator in Excel?

Excel users can enter the does not equal sign into spreadsheet cells with any of the above methods. However, entering does not equal signs for Microsoft Excel functions is not the same. For that, users need to input the <> operator for does not equal within the function bar.

A does not equal function does not equal sign

As an example, select an Excel spreadsheet cell to include the does not equal function. Then click in the function bar, enter =7<>9 in the bar, and press Return. The function’s cell will then display TRUE as shown directly below.

However, the does not equal function’s cell will display FALSE if its values are the same. Enter =9<>9 in the function bar instead, and press the Return key. Then the function’s cell output will be FALSE as in the snapshot directly below.

As you can see, there are a few different ways you can enter the does not equal sign into a word processor or spreadsheet document.

If you found this information useful don’t hesitate to share your experience with us by using the comment section below.

Windows Update Error 8024401c [SOLVED]

Have you tried the Windows Update feature in Windows 10 and it failed to install a specific update? Well, in many cases we found that the error code 8024401C is the main error message that appears on your screen.

Follow the steps listed below and you will repair your system or at least find out why you have this issue in the first place and what to do next to solve it.

What causes the 8024401c Windows Update error?

The error code 8024401C is usually caused by a bad connection to the internet in your house or at work.

Also, in some cases, the culprit is a third-party application that restricts access to the Windows Update feature.

So, if you follow the instructions posted below in the order they are presented, you will be able to fix the Windows Update if it fails on a clean installation with the error code 8024401C.

How can I fix the error 8024401C?

1. Check your Internet connection

  1. Check your Internet Connection to see if it works, you can access any number of sites using an internet browser.
  2. If you have no internet connection, then you should use the built-in Network Troubleshooter. Otherwise, you will most likely have to call your internet service provider because the steps listed below will not work for you in this case.

Note: If you use a router, we suggest unplugging it from the power socket, waiting one minute and plugging it again to reset it.

2. Run the Windows Update troubleshooter

  1. Press and hold the Windows button and the W button.
  2. Now you will have the search feature in front of you.
  3. Write the following in the search box: Troubleshooting.
  4. Left-click or tap on the Settings feature after the search has finished.
  5. You will have a topic named Troubleshoot computer problem and under it left click or tap on the View all feature on the left side.
  6. Left-click or tap on the Windows Update troubleshooter and follow the instructions on the screen to finish the process.
  7. RebootWindows 10 after the process has finished and check again for the 8024401C error message.

On Windows 10, you can also run the Update troubleshooter from the Settings page. Go to Settings > Update & Security > Troubleshoot > and launch the Windows Update troubleshooter.

windows update troubleshooter

3. Download Windows Update Diagnostic

If the step above did not work follow the lines below

  1. Left-click or tap on the link posted below to download the troubleshooting app.
  2. Left-click or tap on the Save File button.
  3. After the download has finished, go to the directory where you saved it and double click the executable file.
  4. Install it and follow the instructions on the screen to finish the troubleshooting process.

4. Disable your antivirus

  1. Whatever antivirus application you are using, try disabling it for the duration of this step.
  2. Reboot the Windows 10 device.
  3. After the device starts up with the antivirus disabled, check again for the error code 8024401C. If it doesn’t show again, then your antivirus is blocking your access to the Windows Update Server.

5. Disable Proxy server settings

  1. Open the Internet Explorer application in Windows 10.
  2. Left-click or tap on the Gearbox situated in the upper right side of Internet Explorer.
  3. Left-click or tap on the Tools button.
  4. Left-click or tap on the Internet Options feature.
  5. Left-click or tap on the Connections tab situated in the upper side of the window.
  6. Left-click or tap on the LAN settings feature.
  7. Uncheck the box next to Use a Proxy server for your LAN.disable proxy server for LAN
  8. Left-click or tap on the Apply button.
  9. Left-click or tap on the OK button to close the window.
  10. Reboot the Windows 10 device.
  11. Check again for the error message 8024401C.

6. Use System Recovery

  1. Move the mouse cursor over to the upper right side of the screen.
  2. From the menu that pops up left click or tap on the Search icon.
  3. In the search box write the following: Control Panel.
  4. After the search has finished left click or tap on the Control Panel icon.
  5. Now that you have the Control Panel window in front of you, left-click or tap on the search box in this window.
  6. Write in the search box the following: Recovery
  7. Left-click or tap on the Recovery feature after the search has finished.
  8. Left-click or tap on the Open System Restore feature.
  9. Now you will need to follow the instructions on the screen to finish the system restore and bring back your Windows 10 device to a point where you did not have this issue.

7. Reset Windows Updates components

If the problem persists, try resetting your Windows Update components. Here are the steps to follow:

  1. Launch Command Prompt (Admin)
  2. Stop the Windows Update Services by typing the following commands (hit Enter after each one):
    • net stop wuauserv
    • net stop cryptSvc
    • net stop bits
    • net stop msiserver
  3. Rename the SoftwareDistribution and Catroot2 folder by typing the commands:
    • Ren C:WindowssoftwareDistribution SoftwareDistribution.old
    • Ren C:WindowsSystem32catroot2 Catroot2.old
  4. Restart the Windows Update Services by typing the following commands:
    • net start wuauserv
    • net start cryptSvc
    • net start bits
    • net start msiserver
  5. Exit Command Prompt, restart your computer and check if you can install the latest updates.

8. Check date and time settings

Windows update errors often occur due to incorrect date and time settings. Make sure that Windows 10’s date and time are correctly set by following these steps:

  1. Go to the Settings page > select Date & time settings
  2. Toggle the Set time automatically and Set time zone automatically options on. Restart your computer, and check for updates to see if the problem has been solved.check date time settings
  3. Alternatively, you can also choose to select the time zone manually. To do this, you first need to toggle off Set time zone automatically.set time zone manually windows 10
  4. You can also synchronize the clock with the server by clicking Add clocks for different time zones in Control Panel, as shown in the screenshot below.add clocks different time zones control panel windows 10
  5. Go to the Internet Time tab > Change settings
  6. Select the Synchronize with an internet time server check box > select a server from the drop-down menu and then hit the Update Now button.

There you have it. These methods can help you fix the Windows Update installation error 8024401C in Windows 10.

If you encounter other issues while following the steps listed in this guide, you can write to us in the comments section below.

Fix: Windows 10 Settings won’t Open from Start Menu

The Windows Settings app and Start menu are ideal tools for any computer system, so it can be hard to imagine either one not working. But it’s entirely possible.

Nothing on a computer, including the Settings app, is immune to bugs or glitches. And it’s essential to learn how to fix this issue to regain control over your machine.

What causes the Settings app not to open?

The Windows Settings app not opening can be a pretty annoying error. You’ve essentially lost access to the most basic of computer tools.

Before going through the solutions, it’s essential to learn what causes this problem in the first place.

  • Your computer has corrupt data files: Corrupt files can cause problems like disabling base functions. You will need to repair and restore these files to get back to the Settings app.
  • Windows 10 is out of date: You must always keep your computer up to date. In addition, we recommend learning how to update offline for better security.
  • The Start menu is constantly crashing: A malfunctioning Start menu can result from a glitch. To address this, you’ll need to refresh Windows 10.

How can I fix the Windows 10 Settings app?

There are a ton of things that you can do to fix the Settings app on Windows 10, from more simple solutions to more complex ones. The following are the ones we recommend the most.

  • Try out one of the alternate ways to open Settings. For example, pressing the Windows and I keys will launch the app. Going to the Action Center and clicking All settings does the trick too.
  • Install any missing Windows updates. Then, after launching Settings with one of the alternate methods, go to the Windows Update section and install the patch from there.
  • Create a new local account. This is particularly useful if any files on the other account become corrupt.
  • And finally, reboot your computer. Most of the time, restarting your computer will solve all your problems.

1. Re-register Settings via PowerShell

  1. Bring up Windows PowerShell in the Search bar and select Run as administrator.
  2. Copy and paste the following into PowerShell, then hit Enter Get-AppXPackage -AllUsers | Foreach {Add-AppxPackage -DisableDevelopmentMode -Register "$($_.InstallLocation)\AppXManifest.xml"}
  3. Give PowerShell the time it needs to complete the process.
  4. Once it finishes, restart your computer.

2. Reinstall the Start menu

  1. Launch WindowsPowerShell with the same administrator permissions as the previous solution.
  2. Copy and paste the following command, then hit Enter on your keyboard: Get-AppXPackage -Name Microsoft.Windows.ShellExperienceHost | Foreach {Add-AppxPackage -DisableDevelopmentMode -Register "$($_.InstallLocation)\AppXManifest.xml"}
  3. Restart your computer after PowerShell finishes. After rebooting, open PowerShell with administrator applications again.
  4. Copy and paste this upcoming command, then hit Enter Get-AppXPackage -Name Microsoft.Windows.Cortana | Foreach {Add-AppxPackage -DisableDevelopmentMode -Register "$($_.InstallLocation)\AppXManifest.xml"}
  5. Check if Settings can open now.

3. Download and run Windows Update Troubleshooter

  1. Go to the Windows Update Troubleshooter page and click Check for Windows updates. This will open the Settings menu.
  2. If a small window appears at the top of the page, click Open.
  3. Select Troubleshoot on the left-hand side, then click Additional troubleshooters.
  4. Under Get up and running, click Windows Update.
  5. Click Run the troubleshooter.
  6. Allow the Windows Update Troubleshooter to resolve any problems present and finish up.

4. Run Media Creation Tool

  1. Go to Windows 10 installation media page and click Update now.
  2. Run the file that you download to open the Windows 10 Update Assistant. Then, click Update Now to install the latest version of Windows 10.
  3. Give your computer the time it needs to complete the process. Depending on various factors like internet speed, it may take a while.
  4. Once it’s done, you will be asked to restart your computer to finish up.

5. Run System File Check

  1. Use the Command Prompt in the Windows Search bar and click Run as administrator.
  2. Type in the following command and hit Enter DISM.exe /Online /Cleanup-image /Restorehealth
  3. After it finishes, enter the following sfc /scannow

Are there other ways to fix apps not opening?

There are multiple ways to fix Windows 10 apps that don’t open. First, you should ensure that the Windows Update service is running. Afterward, download all missing updates for the apps.

We also recommend restoring a total system to revert your computer to an earlier version. However, it doesn’t always work correctly. Some users have had problems with the tool.

If a system restore is completed, we recommend running the tool in Safe Mode or disabling your antivirus. Sometimes antiviral software can interrupt other apps.

Feel free to comment below if you have questions about addressing Windows 10 problems. Also, leave comments about guides you want or information on other software problems.

Windows Update Error 0x8007045b: FULLY FIXED

The 0x8007045b error on Windows arises for some users when they try to update those platforms. When some users check for updates to install, Settings displays an error message that states:

There were some problems installing updates, but we’ll try again later.

That error message also includes the 0x8007045b error code. So, you can’t install updates when that issue arises.

What does the error code 0x8007045b mean?

This error code stands for ERROR_SHUTDOWN_IN_PROGRESS and may be caused by various things, such as:

  • System files corruption
  • Third-party antiviruses & apps
  • Corrupted Windows Update services

How do I fix the Windows Update error 0x8007045b?

1. Run the Windows Update troubleshooter

The Windows Update troubleshooter is Windows 10’s built-in utility for fixing update issues.

  1. To open that troubleshooter, press the Type here to search taskbar button.
  2. To search for the troubleshooter tab, input the keyword troubleshoot.
  3. Click Troubleshoot settings, which will open that tab in Settings.
    Troubleshoot tab Fix 0x8007045b Error on Windows
  4. Click Windows Update on the Troubleshoot tab.
  5. Then press the Run this troubleshooter button to launch the troubleshooter.
    Windows Update troubleshooter Fix 0x8007045b Error on Windows
  6. The troubleshooter might then suggest a potential fix for the 0x8007045b error. If so, click the Apply this fix option.
  7. Restart Windows before checking for updates again.

2. Run deployment image (DISM) and system file scans (SFC)

Users often need to repair corrupted system files to resolve error 0x8007045b.

  1. To do so, open the Windows search box.
  2. To search for Command Prompt, enter cmd in the search box.
  3. You’ll need to open Command Prompt as an administrator.
    • So, right-click Command Prompt to open a context menu from which you can select Run as administrator.
  4. To initiate a Deployment Image Servicing scan, enter DISM.exe /Online /Cleanup-image /Restorehealth.
    • Press the Enter key to initiate that scan.
  5. After that, input sfc /scannow; and press the Enter keyboard key.
    System File Checker command Fix 0x8007045b Error on Windows
  6. Wait for the System File Checker scan to complete. Restart Windows when the scan is complete.

3. Clear the Windows Update cache folder

  1. Resetting Windows Update components is one of the more reliable ways to fix update errors like the 0x8007045b error. First, open an elevated Command Prompt as outlined for resolution two.
  2. Next, input the following separate commands in the Prompt’s window:
    net stop wuauserv
    net stop cryptSvc
    net stop bits
    net stop msiserver
  3. Close the Command Prompt, and press the Windows key + E keyboard shortcut to open File Explorer.
  4. Open the Windows folder.
  5. Right-click the SoftwareDistribution subfolder in the Windows folder and select Rename.
    The Rename option Fix 0x8007045b Error on Windows
  6. Input SoftwareDistribution.old as the new title for that folder, and press the Return key.
  7. Open the System32 subfolder in the Windows folder.
  8. Then right-click the catroot2 folder and select Rename to change its title to Catroot2.old.catroot2 folder Fix 0x8007045b Error on Windows
  9. Open the Command Prompt as administrator again.
  10. Restart the services by entering these commands:
    net start wuauserv
    net start cryptSvc
    net start bits
    net start msiserver

4. Uninstall third-party antivirus utilities

  1. Error 0x8007045b might be due to third-party antivirus software blocking update server communications.
  2. To fix that, right-click your Start menu button and select Run.
  3. Type appwiz.cpl in the Open box, and click the OK button.Programs and Features applet Fix 0x8007045b Error on Windows
  4. Image Select the antivirus software listed within the Programs and Features Control Panel applet.
  5. Press the Uninstall button.
  6. If any dialog box opens, click Yes on it to provide confirmation.
  7. Restart the desktop or laptop after uninstalling.

It’s recommended users uninstall antivirus software as disabling them isn’t always enough to ensure their firewalls don’t get in the way of updates.

However, you can try disabling an antivirus utility first by right-clicking its system tray icon to select a disable or turn off setting there.

If that doesn’t fix the issue, however, uninstall the antivirus utility. Thereafter, Windows Defender can replace your uninstalled antivirus package.

Those are a few of the potential fixes for the 0x8007045b error. If they aren’t enough, however, you might need to reset Windows.

You can do that with a repair install or the Reset this PC utility, as outlined within the Factory reset Windows 10 post.

Which one of these solutions helped you with the Windows Update error 0x8007045b? Let us know by leaving your feedback in the comments section below.

Epson Printer won’t Print Black and White without Color Ink

Printer makers are known to configure their printers in a way where the printer may stop printing if one of the ink cartridges is depleted. Even if you have a full black ink cartridge and want to print in black and white, the printer still will not print.

If your Epson printer doesn’t print black and white without color ink, you can force the printer to print in black and white with a workaround.

In this article, we discuss both the official workaround and other steps that can help you to print black and white without color ink in Windows.

The printer won’t print black and white without color ink

1. Epson printer won’t print black without color ink

Set Grayscale in Print Options:

Epson printer won't print
  1. Make sure the print job is canceled. When the Epson Status Monitor status appears click Cancel or Stop.
  2. Load plain paper in the tray.
  3. Click File.
  4. Select Print or Print Setup
  5. Click on Properties or Preference
  6. Open the Main
  7. Select the appropriate Quality Option settings.
  8. Select Plain or Envelope as the Type setting.
  9. Choose the Grayscale checkbox in Print Options.
  10. Click OK to close the printer settings window.

Now try to print your file to see if the Epson printer can only print in Black and White. Epson Status Monitor will appear on your computer screen, simply click Print in Black to print with black ink.

Note that, according to Epson, this workaround will only work on SX420W/SX425W/NX420 series printers. If you have a different model, give it a try to see if it works.

2. Force print in Black and White

Epson printer won't print
  1. Close any applications that you are using to print.
  2. Press Windows Key + R to open Run.
  3. Type control and click OK to open Control Panel.
  4. Click on Hardware and Sound.
  5. Right-click on the printer that you are trying to configure.
  6. Select Printer Preferences.
  7. Open the Color
  8. Select the Print in grayscale
  9. Select the High-quality setting in the drop-down list under Print in grayscale option.
  10. Click Apply and OK to save the changes.

Close the Devices and Printers window. Open any program with a print functioning and try printing the file. Click OK on any prompt that will confirm printing in black and white only.

3. Disable Epson Status Monitor

Epson printer won't print
  1. Press the Windows key.
  2. Type control and click on Control Panel.
  3. Go to Hardware and Sound > Devices and Printers.
  4. Right-click on your printer and select Printer Preferences.
  5. Find the box that read Speed and Progress.
  6. Locate Disable Epson Status Monitor and check the box to disable it.
  7. Select Save.

By following the above steps, you can disable the annoying Epson Status Monitor warning message that may occur due to the use of third-party ink cartridges.

4. Run Printer Troubleshooter

Epson printer won't print
  1. Press Windows Key + I to open Settings.
  2. Open Update and Security.
  3. Open the Troubleshoot tab.
  4. Click on Printer.
  5. Click the Run the troubleshooter button.
  6. Follow on-screen instructions and apply any recommended fix.

Once applied, try printing in black and white to see if the error is resolved.

If the issue persists, you may want to check if there is an issue with the printer hardware. Try removing the cartridge and looking for any debris that might be blocking the printing. Also, check if you have sufficient ink to print in black and white.

Most printers require the user to use their proprietary ink cartridges and do not print if a third-party ink cartridge is used. We have some excellent Epson ink cartridge recommendations below.

5. Clean the Printhead

  1. Open your Epson printer utility on your PC or Mac.
  2. Run a Nozzle Check to confirm black ink flow.
  3. If gaps appear, run the Printhead Cleaning process.
  4. Wait 30 minutes, then run the Nozzle Check again.
  5. Repeat up to 3 times if needed.

6. Update or Reinstall the Printer Driver

  1. Visit Epson’s Support Page.
  2. Search your model and download the latest driver for your OS.
  3. Uninstall the current driver via Control Panel > Programs (Windows) or Applications (Mac).
  4. Install the downloaded driver and restart your system.

Alternative: If you want a faster and more automated method, use Fortect Driver Updater. It scans your system, detects outdated or missing printer drivers, and updates them automatically without manual searching.

7. Adjust Paper and Quality Settings

  1. Open the print dialog before printing.
  2. Set the Paper Type to match your sheet (e.g., Plain, Glossy).
  3. Choose a Draft or Standard quality option for quicker printing.

8. Check Firmware for Restrictions

  1. In your printer’s menu, look for Maintenance or Setup.
  2. If available, disable any “Prevent Printing” settings related to ink status.
  3. Update firmware if an option appears in the Epson software.

Best Epson ink cartridges to buy

1. Epson T252XL120 DURABrite (Black)

Epson printer won't print

Epson’s revolutionary DURABrite Ultra Ink produces smudge, fade, and water-resistant prints for brilliant results on both plain and glossy papers.  You can only replace the cartridge that runs out with individual ink cartridges.

⇒ Get Epson T252XL120 DURABrite

2. Epson T069120-BCS DURABrite

Epson printer won't print

Epson T069120-BCS DURABrite comes in an Ultra Black and Color Combo pack that contains Black, Cyan, Magenta, and Yellow color cartridges. It is an excellent choice for occasional printing. If you are into high-volume printing, look for XL/High-Capacity package.

⇒ Get Epson T069120-BCS DURABrite

The Epson printer won’t print black and white without color ink usually occur if your printer notices the ink cartridges to be depleted. However, you can bypass this issue using the workarounds listed in the article above.

Windows Update Error 0x8024401c [Solved]

We can safely say that Windows 10 is quite an improvement compared to the previous versions of the system despite Windows 7 setting a pretty high bar.

Nonetheless, it seems that Microsoft, while trying to improve the all-around experience, can get a bit stuck with some issues — especially the ones that are related to mandatory updates.

One of those issues is the Windows Update error 0x8024401c, which can be caused by various factors. Fortunately, it can be fixed by various workarounds.

So, if you’ve encountered this problem, we’ll address it with a few possible solutions.

How do I fix the Windows Update error 0x8024401c?

1. Install new drivers

Because of inappropriate drivers, especially for older peripheral devices (e.g. printers, ethernet card etc.), Windows 10 updates may become obstructed. Thus, you might encounter the error code 0x8024401c, for example.

And that goes for other update errors, not just the one we are addressing today.

For that reason, you should uninstall generic drivers and install the ones provided by the original equipment manufacturer. To do so, follow these instructions:

  1. Press Windows logo + X key.
  2. Click on Device manager.
  3. Select the not-working driver.
  4. Right-click on it and open Properties.
  5. Open the Details tab.
  6. Navigate to Driver Ids in the drop-down list.
  7. Open the Driver tab and uninstall the driver.
  8. Copy the first line, paste in your web browser and search for original manufacturer site.
  9. Download the drivers.
  10. Install them and restart PC.

Although you may find a lot of results for your specific device, we advise you to download the drivers from trusted sources.

Learn from our guide to update your drivers like a pro!

1.1 Update drivers automatically

We also strongly recommend the Outbyte solution. It automatically identifies each device on your computer and matches it with the latest driver versions from an extensive online database.

Drivers can then be updated in batches or one at a time, without requiring the user to make any complex decisions in the process.

Thus, you keep your system safe from downloading and installing the wrong driver versions.

2. Perform an SFC scan

The SFC tool is a built-in tool that lets you check and repair corrupted or incomplete system files. As you are probably aware, malware can inflict system errors on your system.

For that reason, we advise you to get rid of third-party software while updating and use Windows Defender instead. Moreover, you can use this tool to scan your system for additional flaws.

Here’s what you need to do:

  1. Press Windows key + X and open Command Prompt (Admin).
  2. In the command line type sfc/scannow
  3. The process will check all files and automatically replace corrupt ones.

When you are sure your files are spot on, give updating another try.

3. Uncheck iPv6 and go with the iPv4 network

Some users found an interesting workaround for this issue. On some occasions, this error is related to a failed connection with servers that result in a timeout.

For that reason, updates can’t be downloaded and the whole process gives you a tough time.

When this happens, disable the iPv6 protocol and go exclusively with the iPv4 network:

  1. Press Windows key + X and open Network connections.
  2. Right-click on the connection (either LAN or Wi-FI) you’re currently using and choose Properties.
  3. In the list of the connection items, uncheck the iPv6 box and confirm the selection.
  4. Go to Windows Update and check for updates.

That should get you moving and allow needed updates to be installed on your computer.

In case you have any additional workarounds that proved successful or questions concerning the ones presented for the Windows Update Error 0x8024401c, do tell us in the comments.

Excel Date Format is Not Changing: How We Fixed it

If your Excel software is not changing the date format, you have to know that you’re not the only one experiencing this issue.

This problem seems to be spread across a variety of platforms and versions of Excel, but don’t worry, we will give you step-by-step instructions to fix it.

This method will fix Excel if it doesn’t change the date format

  1. Click the Data tab from the top menu of your screen.
  2. Choose the Text to columns option from the menu.
  3. Tick the box next to the option Delimited to activate it.
  4. Press the Next button two times to move through the setup pages.
  5. Select Date -> click the drop-down menu -> choose the MDY custom option.
  6. Click the Finish button.
  7. Select any empty cell inside your Excel document -> press the Ctrl+1 keys on your keyboard.
  8. Select the Custom format option found at the bottom of the list.
  9. In the text box -> type YYYY/MM/DDD -> press Ok.

Here’s how to change the Windows default date format

Because in some cases the formats used for dates can be confusing, it is recommended that you change the default Windows date format to simplify the process in the long run.

Of course, this specific setting will depend on your requirements, but you can follow these steps to set it:

  1. Press Win+R keys -> type control international > press Enter.
  2. Under the Formats tab -> check or change the default formats available.
  3. Click the drop-down lists and choose the desired option.
  4. Press Ok to save the settings.
Note icon NOTE
Changing the Windows date format settings will affect all the applications installed on your PC, and not only the options found in MS Excel.

Conclusion

In today’s article, we discussed the most efficient way of dealing with Excel not changing the date format.

If you found this guide helpful please don’t forget to let us know. You can do so by using the comment section found below this article.

Fix: Radeon Host Service has High GPU Usage

The service called Radeon Host Service has been seen taking heaps of GPU resources. If this happens, you’ll need to act fast and fix your GPU memory to protect your hardware.

High GPU usage is usually do to intense usage by one or more apps, incorrect settings or an old or corrupted graphics card driver.

The first things you can try are to reinstall the problematic game or the AMD Radeon Settings app. You may also lower the game’s graphics settings. If that doesn’t work, try the solutions below.

How can I free up GPU resources from Radeon Host Service?

1. Disable ReLive and Record Desktop

  1. Open the AMD Radeon Settings app and select the ReLive tab.
  2. In the following window, click the Global tab.
  3. Click the toggle switches next to ReLive and Record Desktop to turn both off.

2. Disable Instant Replay and more on AMD Software: Adrenaline Edition

  1. If you use AMD Software: Adrenaline Edition, open it and click the gear icon in the top right corner.
  2. Click the General tab.
  3. Under the Media section, click the toggle switch next to Instant Replay and Instant GIF to turn it off.
  4. Under the Recording section, disable Record Desktop, Show Indicator, and Borderless Region Capture.

3. Change Windows Power Plan

  1. Open the Control Panel and select Power Options. If you don’t see it, make sure View By is set to Large icons.
  2. Select either Balanced (recommended) or the High performance power plan, although it’s recommended that you select the latter.

4. Fix drivers with AMD Cleanup Utility

  1. Go to the AMD Cleanup Utility page and select AMD Cleanup Utility for Windows to download the software automatically.
  2. Go to the file’s location and double-click it to run it.
  3. A small window will appear asking if you want to restart your Windows computer in safe mode. It’s highly recommended that you select Yes.
  4. Click OK on the following prompt to continue with the cleanup. It explains what the process will entail.
  5. When finished, a window appears telling you the process has been completed. Click Finish, then Yes to reboot your system and complete the process.

5. Roll-back drivers

  1. Open the Device Manager.
  2. Expand Display adapters, right-click a graphics card, and select Properties.
  3. If available, go to the Driver tab and click the Roll Back Driver button.

Rolling back drivers should be considered to be a last-ditch effort. This will revert the drivers to an earlier version until AMD releases a fix.

What are other ways that I can take better care of my GPU?

There’s a peculiar problem you should be aware of. Users have complained of their GPU fans spinning and then suddenly stopping repeatedly. This is usually because the RAM battery needs replacing.

You can also try updating the GPU driver. We recommend learning what to do if the Device Manager doesn’t recognize your AMD graphics card. You may have to install drivers in Compatibility Mode.

Feel free to comment below if you have questions about addressing GPU problems. Also, leave comments about guides you want or information on other hardware problems.

Fix: 0xa00f4244 NoCamerasAreAttached Windows Camera Error

A camera as a device holds a firm place in Windows 10 and Windows 11 but even built-in cameras on laptops or third-party cameras misbehave occasionally. Such is the case with the Windows Camera App Error Code 0xa00f4244 NoCamerasAreAttached.

Windows users have the built-in Windows 10 or 11 Camera application as their default camera software. It is a very simple application that lets you test out your camera capabilities, take quick snapshots, and record video footage.

If you have problems with your camera application or with other related apps that use the device, we advise you follow the guide below to see how to check camera permissions, reset your camera, and more.

The most common camera-related error Windows 10 and 11 users encounter goes by the code 0xa00f4244 and it comes with the We can’t find your camera message.

Luckily, when there’s a problem – there’s a solution. Or, a few of them, just to be certain. So, make sure to check them out and reclaim your camera usability back in a few easy steps.

What does the Windows Camera App error code 0xa00f4244 mean?

There are a few possible explanations for the Windows camera app error code 0xa00f4244. This error happens because the application for your camera was not installed correctly. And the system was unable to identify its presence.

Alternatively, it’s possible that the camera is being blocked by your antivirus program, which you can opt to uninstall and choose a better antivirus software that doesn’t interfere with safe processes.

How do I fix the error 0xa00f4244 NoCamerasAreAttached?

1. Check drivers

  1. To fix the 0xa00f4244 nocamerasareattached error in Windows 11/10. Right-click the Start menu and choose Device Manager.device-manager-w10 amd driver install problems
  2. Navigate to Cameras and expand the sub-menu in order to see your camera, then right-click on the camera device and select Update driver.update-driver-cam 0xa00f4244 nocamerasareattached

If your driver is up to date but the issue is resilient, there’s a chance the latest driver update broke the camera for you. In this case, we advise you to try and roll back the camera driver.

  1. Right-click the Start menu and choose Device Manager.device-manager-w10 amd driver install problems
  2. Navigate to Cameras and expand to sub-menu in order to see your camera, then right-click on the camera device and open Properties.prop-cam 0xa00f4244 nocamerasareattached
  3. In the Driver tab, click on the Roll Back Driver button. The 0xa00f4244 nocamerasareattached error in Windows 10 will be fixed.

Finally, the fact that you have a proper driver may not suffice. Namely, generic drivers aren’t exactly the best fit for the job.

True, sometimes Windows Update will provide you with the official drivers, but it’s always the safest bet to download drivers from the official site of the equipment manufacturer.

If you want to save time, you can use dedicated driver updater software. This type of tool will scan your whole PC, identify any outdated drivers, and install the latest versions available.

2. Make sure you turn on the Camera app

  1. Type settings in the taskbar and open the Settings panel then head to the Privacy section.
  2. Select Camera. If it says Camera access for this device is off, click on the Change button and toggle the button corresponding to Allow apps to access your camera to On.camera-on 0xa00f4244 nocamerasareattached

Alternatively, if you want to be more precise, you can scroll down and select the exact apps that you want to grant camera access to. Generally here’s where you will find your Camera app and other apps that use your camera such as VOIP apps.

For each app, you will have to toggle the On/Off button according to your preferences.

3. Run the Store Apps Troubleshooter

  1. Press Windows + I to open the Settings app then choose Update & Security.update-security nmi hardware failure windows 10
  2. Select Troubleshoot from the left pane.
  3. Scroll to the bottom and click on Windows Store Apps.
  4. Click on the Run the troubleshooter button.
    windows store apps troubleshooter Camera error code 0xa00f4244

If Windows detects any malfunctions or problems within your Camera app, it will provide a report at the end of the troubleshooting scan.

This report will let you know what can be done about the issue. In most cases, if any problem is found, the troubleshooter will give you easy-to-follow prompts on how to solve it, you just have to follow along.

After running the troubleshooter, check if the Windows Camera App Error Code 0xa00f4244 is still present in the Camera app.

4. Scan for malware

  1. First, open Windows Defender from the notification area.
  2. Choose Virus & threat protection.
  3. Select Scan Offline.windows defender scan Camera not working due to error code 0xa00f4244
  4. Your PC will restart and the scanning procedure should commence.
  5. After that, open Windows Defender again and select Virus & threat protection.
  6. Open Virus & threat protection settings and enable the Cloud-based protection.

If you want to benefit from more advanced security features and get more accurate scan results, we strongly recommend you use a third-party antivirus along with the Windows Defender.

The built-in app is a very good and strong utility, but professional antivirus tools have higher detection rates and protect your PC on all fronts.

You can nowadays find plenty of light and highly functional antiviruses that will protect you in real-time without taking a toll on your PC’s speed.

The scan process is pretty straightforward for most antiviruses and highly similar to what we did in Windows Defender.

5. Reset the camera app

    Resetting the camera eliminates all app-related data, allowing it to work as new. Many Windows 10 and Windows 11 users report that this trick fixed theiru003cspanu003e u003c/spanu003eu003cemu003ewe can’t find your camera 0xa00f4244u003c/emu003eu003cspanu003e u003c/spanu003eerror.

  1. u003colu003ern tu003cliu003eu003cspanu003eType u003c/spanu003eu003cemu003esettingsu003cspanu003e u003c/spanu003eu003c/emu003eu003cspanu003ein the taskbar and open the Settings panel then go to u003c/spanu003eu003cstrongu003eAppsu003c/strongu003eu003cspanu003e.u003c/spanu003eu003c/liu003ernu003c/olu003e

    apps-w10 0xa00f4244 nocamerasareattached
  2. u003cspanu003e2. Select u003c/spanu003eu003cstrongu003eApps and featuresu003c/strongu003eu003cspanu003e from the left menu, then locate your u003c/spanu003eu003cemu003eCamera appu003c/emu003eu003cspanu003e and click on it.u003c/spanu003e

  3. u003cspanu003e3. Click on u003c/spanu003eu003cstrongu003eAdvanced optionsu003c/strongu003eu003cspanu003e.u003c/spanu003e

  4. u003cspanu003e4. Scroll down and click on the u003c/spanu003eu003cstrongu003eReset buttonu003c/strongu003eu003cspanu003e.u003c/spanu003e

    reset-cam 0xa00f4244 nocamerasareattached
  5. 5. u003cspanu003eThe u003c/spanu003eu003cemu003ewe can’t find your camerau003c/emu003eu003cspanu003e error will be fixed.u003c/spanu003e

6. Tweak the registry

  1. In the Windows Search bar, type regedit, then right-click the Registry Editor and run it as an administrator.
  2. Click on File, choose Export, and backup your registry. If something goes wrong, you can restore it with ease. In addition, you can create a Restore Point, just in case.file-export 0xa00f4244 nocamerasareattached
  3. Now, follow this path for 32 bit system: ComputerHKEY_LOCAL_MACHINESOFTWAREMicrosoftWindows Media FoundationPlatform
  4. And for 64-bit system: ComputerHKEY_LOCAL_MACHINESOFTWAREWOW6432NodeMicrosoftWindows Media FoundationPlatform compture-path 0xa00f4244 nocamerasareattached
  5. Right-click in the right window and choose New and select DWORD (32-bit) Value.
    new dword Camera not working error code 0xa00f4244
  6. Name this value EnableFrameServerMode.
  7. Right-click and choose to Modify this newly created registry value then set its value to 0 (zero) and save changes.
  8. Restart your PC and you should be good to go.

Because of the difference in encoding standard certain cameras just won’t work in Windows 10 or Windows 11, and that can lead to error 0xa00f4244 in the Camera app, but this registry change should fix that.

7. Repair the Microsoft Store

  1. Type cmd in Windows search and click on Run as administrator to start Command Prompt with full privileges.cmd-run-admin 0x80070002 windows update
  2. Type the following commands and press Enter after each one:

net stop bits
net stop wuauserv
net stop appidsvc
net stop cryptsvc
Del "%ALLUSERSPROFILE%Application DataMicrosoftNetworkDownloader*.*"
rmdir %systemroot%SoftwareDistribution /S /Q
rmdir %systemroot%system32catroot2 /S /Q
regsvr32.exe /s atl.dll
regsvr32.exe /s urlmon.dll
regsvr32.exe /s mshtml.dll
netsh winsock reset
netsh winsock reset proxy
net start bits
net start wuauserv
net start appidsvc
net start cryptsvc
net-stop 0xa00f4244 nocamerasareattached

Hopefully, this solution will fix Microsoft Store and all its components and your camera will be recognized, so that you never see the Windows Camera App Error Code 0xa00f4244 again.

8. Use a third-party camera app

Finally, if none of the presented solutions sufficed, we can only recommend trying and switching to an alternative camera app.

Most of them are not Metro-style apps and they come with their own formatting software and, occasionally, drivers as well. Of course, the best of them all is the one provided by the OEMs themselves.

That should be it. We hope that you managed to sort the Windows Camera app error code 0xa00f4244.

How can I fix 0xa00f4244 nocamerasareattached on Windows 11?

  1. Press Windows + I then scroll down to the Troubleshoot section and select it.troubleshoot-opt-w11 0xa00f4244 nocamerasareattached
  2. Click Other troubleshooters.
  3. Scroll down the click the Run button next to the Camera troubleshooter.run-cam 0xa00f4244 nocamerasareattached

By running the Windows 11 built-in Camera troubleshooter, you may find detailed information about what went wrong with your camera, and how to fix it.

On what devices does the no camera attached 0xa00f4244 error occur?

According to user reports, we can’t find your camera 0xa00f4244 error message seems to be more prevalent for the following laptop manufacturers:

  • 0xa00f4244 NoCamerasAreAttached on Dell – Ensure that the camera is turned on by going into the BIOS of your Dell laptop and selecting the appropriate option. You can either restart the computer or turn it back on.
  • Surface Pro 0xa00f4244 NoCamerasAreAttached – The error number 0xa00f4244 NoCamerasAreAttached is often triggered when the Windows Camera app is disabled, as this is the most common cause.
  • Acer 0xa00f4244 NoCamerasAreAttached – It is recommended that you delete the camera driver and then reinstall it.
  • 0xa00f4244 NoCamerasAreAttached on Asus – Make sure to run the Windows camera troubleshooter.
  • MSI 0xa00f4244 NoCamerasAreAttached – The error number 0xa00f4244 NoCamerasAreAttached comes from the Camera app, and it typically displays when the application is unable to recognize your webcam in the correct manner.
  • 0xa00f4244 NoCamerasAreAttached on HP – In order to resolve this issue, verify that the webcam is the active device, remove and reinstall any applications you currently have, put your webcam through its paces, and finally, bring the webcam drivers up to date.
  • Samsung 0xA00F4244 NoCamerasAreAttached – To save time, you may use a dedicated driver updater which we’ll mention below.
  • 0xa00f4244 NoCamerasAreAttached on Lenovo – Your privacy settings are preventing the camera from working properly.

If you use any of these and encounter the issue, make sure to check out all the solutions presented in the guide below, as they should remediate the issue and allow you to use your camera app with no problem.

How do I fix my laptop camera not found?

The camera on a laptop can be put into a variety of functions; however, the two most common ones are taking pictures and participating in online video chats, such as those found on Skype or Google Hangouts.

However, there is no guarantee that the built-in camera on the laptop will always start up or function in the way that was originally intended for it too. Videoconferencing apps, as may be anticipated, are more likely to be negatively affected than other types of apps.

When making a video chat on a laptop, one of the most important pieces of hardware to have is a camera that works. Thus we recommend that you check out our dedicated post on how to fix your laptop camera in 9 easy ways.

How to stop antivirus from blocking my camera?

While security software is necessary, it’s also a fact that it can occasionally get in your way and block legitimate processes and apps.

That might just as well be your case with your very own guarding acting overzealously.

Note icon NOTE
u003cemu003eHow do I unblock my camera with antivirus?u003c/emu003eu003cbru003eu003cemu003eu003cbru003eu003c/emu003e➡ First of all, make sure you granted permissions for apps to access the camera as shown in our solution no 2.u003cbru003e➡ Next, access your antivirus settings and set an exception rule to always allow the camera app through.u003cbru003eu003cbru003eThe precise setup will vary according to your software provider, but you needn’t worry, the terminology and functionality will be similar to the Microsoft Defender antivirus, so it’s pretty intuitive.

If you have additional issues, questions, or suggestions in regard to the 0xa00f4244 NoCamerasAreAttached error, make sure to tell us about that in the comments section below.

Calligraphy Software for PC: 7 Best in 2026

Calligraphy is a visual art that refers to the execution of lettering with a brush, or other writing instruments.

Now let us shift the point of interest towards the digital era and yes, it is possible to practice calligraphy on your PC.

There are three types of calligraphy: Western, Eastern, and Arabic, each reflecting the language and handwriting of a specific region of the globe.

Unlike the conventional form of writing, digital calligraphy requires no special pens, inks, or brushes. However, it does require quality software that comes with various brush presets.

One might ask why bother with digitalizing calligraphy or creating calligraphic fonts when there are already so many designs available to choose from.

As in all other areas, it is important to find your own voice or in this case your own writing style in order to make your work stand out from the plethora of similar services available on the market.

If so, take a look at our selection below, compare and explore the different capacities that each software has to offer and become an expert at digital calligraphy.

What is the best software for calligraphy?

Adobe Illustrator – Vector-based structure

Adobe Illustrator

When it comes to the state of the art of illustration, Adobe Illustrator is the best software that money can buy.

The graphics software is used by millions of designers and artists to create anything from mobile graphics to book illustrations and much more.

One of its distinguishing features is its vector-based structure which means you will never have to deal with resolution issues. Your calligraphy can be easily scaled larger or smaller while preserving intact quality.

Besides, the Image Trace feature can quickly scan your calligraphic fonts and transform them into vectors. The Illustrator also boasts a user-friendly brush widely appreciated for its accurate results.

The tools included in Illustrator’s suite enable you to find a font style that fits your work or turn to other graphic designers for calligraphic design inspiration.

You can even import your favorites by choosing from over 17,000 high-quality fonts with Adobe Fonts or sync with Adobe Stock and use it as a basis for custom fonts.

With Adobe Illustrator you can make your own custom font design based on handwriting or serif or sans serif fonts.

Not only that, but you can also create custom letterforms that fit your unique layout and design.

Let’s quickly go through its key features:

  • Adobe Originals (available in Illustrator’s font menu, it allows you to choose an existing font to kick off your design process, then adjust the weight, width, or slant to suit your specific needs)
  • Sketch-based development (you can either draw by hand in Illustrator or import hand lettering / digital art from Adobe Photoshop)
  • Image Trace (transform your imported font sketch into an easily edited vector graphic to refine your work)
  • Integration options (third-party plug-ins can easily be integrated to help you finalize and manage your fonts)

Adobe Illustrator is a paid service, but you can try it out for free for 7 days. You can integrate it within the Creative Cloud if you use other Adobe products.

Adobe Illustrator

Take your project from average to eye-catching with Adobe Illustrator! Its calligraphy and custom fonts make all the difference.
Free Trial Visit Website

Adobe Photoshop – Unique designs

best software for calligraphy

Adobe Photoshop is the most popular graphics software for professionals and there are good reasons for that.

It’s the pinnacle when it comes to calligraphy work thanks to its numerous brushes and special effects, not to mention the fact that it gives you complete control over the lettering since you can edit your graphics pixel-by-pixel.

In calligraphy, each letter is carefully thought out according to the artist’s vision.

This leads to a wide variety of styles and Photoshop brushes cover them all: from spray paint or ink wash effect, precise linework shading with pencil, ink, and charcoal brushes, and watercolor brushes to splatter effects.

You can perfect your calligraphy brushstrokes with thousands of preset high-quality Photoshop brush sets or create your unique, custom drawing brushes and sync them with Creative Cloud libraries.

You can create unique calligraphy designs by playing around with effects and color options.

Users can also create custom brushes or use one from the comprehensive brush preset collection.

Let’s quickly go through its key features:

  • Your work is automatically saved to the cloud for quick access, no matter where you are
  • Lens Blur offers a more natural and realistic look when blurring an object in the foreground
  • Improved Content-Aware Fill
  • Object Selection tool (create fast and precise selections by drawing a simple rectangle)
  • Performance improvements (smoother panning, zooming, and navigating)

Adobe Photoshop is a subscription-based service that is integrated into the Creative Cloud. It has a 7-day free trial.

Adobe Photoshop

Make your calligraphy stand out with custom brushes, advanced lettering options, and more.
Free Trial Visit Website

Graphic Design Studio – Full artistic color palette

Graphic Design Studio is a powerful vector drawing tool that enables you to sketch out your design or import a vector graphic in SVG format to add your own creative touch.

When it comes to calligraphy, the tool is suitable for both professionals and beginners who can use pre-designed graphics without the hassle of starting from scratch.

With a full artistic color palette, easy-to-use pen and pencil, and tools that allow you to control size, shape, text, lines, and layers, you can start creating unique and stunning lettering designs with a creative edge in no time.

Graphic Design Studio gives you a plethora of inspiring tools, including over 2 000 pre-designed vector graphics and images.

The tool lets you also create your own presets and add them to the Component Library, so you can reuse them in the future.

It comes with full layering support, so you can tweak and change up your lettering without disturbing other parts of your design.

Let’s quickly go through its key features:

  • Powerful editing tools
  • Full support for SVG files, including import and export
  • Creative filters and effects (3D tunnel effects and unique shapes, blurs, shadows & glows)
  • Creative background and fill textures
  • Artistic color palettes and gradients
  • 65+ commercial use fonts

Graphic Design Studio is a paid product, so if you want to use you will have to purchase a license.

Graphic Design Studio

Step up your calligraphy game and create remarkable letterings with Graphic Design Studio’s practical pencil toolset.
Check Price Visit Website

Caligrafile – Curated archive of 500+ supplies

 best software for calligraphy

Caligrafile is not a simple calligraphy tool because it includes diverse word lettering and editing tools for professional writers or hobbyists.

You can start with this tool if you need an integrated platform to find and use multiple fonts or calligraphy tools.

More exactly, this platform offers an archive with valuable lettering supplies, magazines, or even physical pens and nibs.

It’s possible to employ this tool for seamless integrations with productivity or email tools, such as Office 365, Google Workspace, or Slack.

Besides this, you’re not limited only to lettering or font software as the platform offers design tools, practice sheets, pad and brushes & mockups.

It is worth mentioning that you have customizable tags and labels to create a personalized system and set tags to your documents or files.

Let’s quickly go through its key features:

  • Organized collection of brushes
  • Accesorries for caligraphy practice
  • Illustration or design tools
  • Intuitive guides for learning
  • Font favorite apps

⇒ Get Caligrafile

FontLab 8 – Improved font curves and coloring

 best software for calligraphy

FontLab 8 is a popular font editor with professional and detail-oriented tools for creative and colorful fonts.

This typeface solution is tailored for professionals and artists of all levels for creating mind-blowing lettering projects.

It has multiple standout capabilities that can turn any font designs into convincing artworks or marketing products.

For example, you have professional Bezier drawing assets for creating fluid letterforms and font types precisley.

Other worth mentioning features for this calligraphy solution are the drafting sketchboard, font variations, or OpenType functions like alternates or substitutions.

Let’s quickly go through its key features:

  • Available on MacOS and Windows devices
  • Editing and refining tool
  • Precised numeric values
  • Color fill with gradients or full colors

⇒ Get FontLab 8

Calligraphr – Simple user interface

Calligraphr is a popular app that allows you to transform your calligraphy into fully functional vector-based fonts with genuine custom designs.

Creating your own calligraphic artwork has never been easier thanks to the pens and pencils as well as the color, line thickness, and transparency of each tool boasted by this software.

The best part is that you can even modify characters after scanning thanks to the internal image editor.

You can create standard font files (TFF or OTFF formats) which can be easily editable and included in other font or graphical editing software.

Caligraphr also includes character randomization which is an essential solution when you want to simulate genuine handwriting.

This calligraphy tool supports multiple languages, so you can easily access and edit all sorts of characters.

Let’s quickly go through its key features:

  • Simple user interface
  • Ligatures (suitable character sequences are automatically replaced with your specified ligatures)
  • Customizable templates (with exactly the character set you need for your font)

Calligraphr has a free as well as a paid version. The free version lets you freely create and design calligraphy, but it does have some limitations on the number of fonts you can make at the same time.

⇒ Get Calligraphr

Inkscape Calligraphy – Custom pen degrees

best software for calligraphy

Inkscape is definitely a powerful contender in the race for the best calligraphy tool thanks to some nifty features like the undo command which would not be possible with a traditional pen and ink.

Thanks to its flexibility, the tool enables both advanced and beginner users to design intricate calligraphy. Plus, Inkscape is able to utilize the pressure and tilt sensitivity of a tablet pen.

You can take full control of the look of your design with width and thinning settings, so your calligraphy looks exactly as you envisioned.

Inkscape also gives you the possibility to fully control the angle and fixation of your pen, with custom pen degrees, from 0 to 90 or -90.

Let’s quickly go through its key features:

  • Tremor (to give a more natural look to the calligraphy strokes by producing anything from unevenness to blotches and splotches)
  • Wiggle and mass

You can take full control of the look of your design with width and thinning settings, so your calligraphy looks exactly as you envisioned.

Inkscape also gives you the possibility to fully control the angle and fixation of your pen, with custom pen degrees, from 0 to 90 or -90.

⇒ Get Inkscape

By emulating the look of handwriting, calligraphy fonts are more artistic than the average font.

If you decide to create your own, you have even better chances to produce an eye-catching design that is sure to impress the right audience for your project.

So why not try your hand at digital calligraphy with the help of a specialized tool? Let us know how that worked for you in the comments section below.

7 Best Music Sequencer Software for Music Producers

A music sequencer is one of the key components of a recording setup. It is an essential program for every music producer and studio engineer.

However, getting the hardware could be too expensive for a low-budget music-producing firm or professional. Hence, the advent of music sequencer software seeks to bridge this gap and make the program available at affordable prices.

A standard music sequencer software is designed to organize sound sequences from a series of MIDI operations.

In plain words, sequencers allow sound engineers, music producers, or music enthusiasts to create (record) and manipulate (edit) songs or recordings to generate desired outputs.

A typical music sequencer is a very technical device, requiring a certain level of expertise to operate.

As such, there are only a handful of standard music sequencer applications out there, as most of the available ones are of low quality, especially some of the so-called free sequencers.

In this article, we bring you five of the best music sequencer software currently available in the market.

What’s the best music sequencer software for PC?

Adobe Audition – Professional audio

Adobe Audition is a professional audio workstation that allows you to create, mix, and design sound effects.

It is recognized as one of the industry’s best digital audio editing software, providing everything you need to create and mix audio tracks.

Adobe Audition is designed to accelerate video production workflow and audio finishing thanks to its complex toolset, including multitrack, waveform, and spectacular display.

You can do everything with this music editing software from creating, mixing, editing, and restoring audio content.

With Adobe Audition, you can record audio tracks from connected input devices and start post-producing them.

You can also use the virtual studio options to create digital audio tracks and edit them with fade-in and fade-out effects, add studio reverb, and more.

The tool also supports multitrack editing, so you can overlap multiple compositions to create a final robust audio track.

Let’s quickly go through its key features:

  • Robust audio toolkit to record, edit and integrate music clips
  • Seamless workflow with Adobe Premiere Pro
  • Essential Sound panel (achieve professional-quality audio)
  • Remix (easily and automatically rearrange any song to fit any duration)
  • Repair and restore (best tools for fixing audio, including spectral frequency display, Diagnostics panel, and effects)

Adobe Audition is part of the Creative Cloud and works well with other Adobe products such as Premiere Pro. You can try it out for free for 7 days.

Adobe Audition

Adobe offers not just a music sequencer, but a state-of-the-art audio workstation to make your audio pieces sound smashing.
Free trial Visit Website

FL Studio – 80+ Plug-ins

FL Studio best music sequencer software

FL Studio is an all-inclusive music-producing software, better known as a DAW – Digital Audio Workstation.

It is one of the best music sequencers in the market, and as a versatile software, its functions go beyond sound sequencing. FL Studio is cross-compatible with both Windows and macOS computers.

The music sequencer software is designed to create, mix, edit, arrange, and master music or recording. With FL Studio, you don’t need an army of music-producing programs, as it offers everything you need in one package.

FL Studio lets you create and edit audio tracks with piano roll and pattern clips.

It also provides access to plenty of clip types such as playlists, audio recordings, automation clips, Slicex, Edison, and more.

Some of the key features of FL Studio include:

  • Step Sequencer
  • Piano Roll
  • 80+ Plug-ins (automation, phasing, reverb, bit crushing, equalization filtering, and more)
  • VST & ReWire support
  • Live DJ Control
  • Event Editor
  • Automation Editing/Recording
  • Audio Key Generator
  • Vectorial Interface

The above-highlighted features make FL Studio one of the best music sequencer software out there. And for that reason, it is the ultimate choice of many music producers and sound engineers across the globe.

FL Studio

Try FL Studio to create, mix, and master music by using its amazing features.
Free Trial Visit Website

Acid Pro – Drum grid mode

Acid Pro 10 is yet another professional-level software that includes all tools necessary to complete a music production project from start to finish.

It incorporates a playable MIDI chopper that lets you sample from beats, loops,, and drum kits. 

Along with that, it also includes a Beatmapper that’s a fast solution when it comes to remixing music. You can upload pre-existing audio files and play around with tempos, and time signatures, add additional audio clips, edit pitches, and more.

This music production software also includes a Morph Pads view where you can see, edit and adjust plenty of audio effects.

Acid Pro 10 also includes professional plugins from Branworx. These include a synthesizer, a buss compressor, and more.

The tool can also be used for audio recording. You can record multiple tracks at the same time so you can, later on, put them together and create a professional-sounding audio file.

Other key features of Acid Pro include:

  • Inline editing
  • MIDI track freeze
  • MIDI filtering and processing
  • Drum grid mode

Acid Pro 10 is a licensed-based software, but if you want to try it out, you can download the free trial version directly from their website.

Acid Pro 10

Create amazing audio production with professional tools and plugins!
Free trial Visit Website

Steinberg Cubase – User-friendly interface

Steinberg Cubase, simply tagged Cubase, is one of the leading music sequencer software in the world, with hundreds of thousands of users across the globe. The software is supported on both Windows PC and MacBook.

Like FL Studio, Cubase is an industry-class all-around music production package, allowing you to record, edit, mix and repeat music as you see fit.

It is flexibly designed to, not only sequence audio tracks but also compose and create beats.

In a nutshell, it is optimized to produce a music track from start to finish, as every needed music production tool is hosted on the software.

Steinberg Cubase features an exceptional next-generation audio engine with a 64-bit floating-point resolution at a 197 kHz sample rate.

This means that the software is able to produce extremely clear and well-defined sound quality.

The tool also provides a very pleasant user experience. Although it is packed with features, the user interface is not intimidating at all.

It integrates the MediaBay library where you can add and organize your content, so you can easily access and edit your tracks without having to browse around separate folders.

Some of these tools/features include:

  • Control Room
  • Audio Alignment
  • Swift & Multi-take Comping
  • OMF & AAF Support
  • Track Archives
  • MixConsole History
  • Note Editing (MIDI style)
  • MIDI Effects
  • VST System Link

Cubase is available in three basic versions: Pro 10, Artist 10, and Element 10. 

⇒ Get Steinberg Cubase

Ableton Live – Sound Library

Ableton Live is a dual-purpose music sequencer software, designed to serve as a live music performance tool and a digital audio workstation.

The software is supported on both Macbook and Windows PC, with exclusive support for all modern Windows OS (from Win7 to Win10).

Ableton Live’s live performance suite makes it highly suitable for DJs. And this alone stands it out as one of the most widely used music software across the globe.

Furthermore, despite being a dual-purpose package, Ableton Live can stand toe-to-toe with any music sequencer software in the market.

And like other leading music sequencers, it is well-equipped to edit, arrange, mix, compose and master audio tracks.

The software hosts a dynamic set of live performance and DAW (digital audio workstation) tools, some of which include:

  • MIDI Sequencer
  • MIDI Editor (for multi-clip editing)
  • Multitrack Recording
  • Sound Library
  • Track Freeze
  • VST & Support

Ableton Live offers a 30-day free trial to first-timers, after which they can opt for one of the three available licensed editions.

The available editions include Live 10 Intro, Live 10 Standard, and Live 10 Suite.

⇒ Get Ableton Live

Renoise – Unlimited add-ons

Renoise is a top digital audio workstation (DAW), which is widely used as a music sequencer by creative artists and music producers.

It is dynamic, flexible, and built to support all major computer operating systems, including Windows, Linux, and macOS.

Renoise, like most standard music sequencer software, uses a tracker-based system to compose, arrange/rearrange, edit, mix, and master sounds, aiming to produce top-quality (error-free) tracks or records.

The software hosts a user-friendly UI, making it ideal for rookie studio engineers or producers.

Its powerful set of features is also fairly easy to use, with a flexible (customizable) blend, to adopt and apply the features as you see fit.

Other key features of Renoise include:

  • Plugin support
  • Sampler
  • Pattern Matrix
  • Tracker interface
  • Native FX

Some of the noteworthy features of Renoise include a sampler, tracker interface, graphical automation envelopes, plugin grabber, unlimited add-ons, multichannel in/out support, flexible routing, ReWire support, pattern matrix, VST support, native FX effects (26+), spectrum analyzer, open sound control (OSC), track grouping, free upgrades, manual guide and more.

⇒ Get Renoise

Reason – Audio merger and splitter

Reason, from Propellerhead, is a popular digital audio workstation, and it rounds up our list of best music sequencer software. The software is exclusively built for only Windows PC and MacOS computers.

Reason is a dynamic music-producing platform that allows you to create (compose), record, mix, edit and master audio content, with little expertise. Its UI is also fairly easy-to-navigate, making it very ideal for music producers with basic to medium-tech proficiency.

In the same vein, Reason provides a flexible platform, which, although simple, is complex enough for highly technical studio engineers or music producers. As such, it is built to serve the needs of all classes of users.

Its usage is further made easy by the comprehensive video guide on the host website.

Reason, like any standard DAW, is equipped with a host of best-in-class features/tools, each designed to serve a set of unique functions, toward creating a near-perfect sound blend or audio track.

Some of these features include:

  • ShapeShifting & Polysonic Synthesizers
  • Sample Manipulator
  • Players (creative performance utilities)
  • Sound Library (up to 7 GB)
  • Vocal Ensemble
  • Drum Machine (pattern-based)
  • Acoustic Piano
  • Pitch Adjuster
  • VST Support
  • Audio Merger & Splitter
  • Audio Effects (synchronous modulation, echo, and more)

Besides that, Reason is a propriety-licensed music sequencer software; hence, it is not available for free.

However, before a full purchase, there is a free trial version on offer, which is valid for a limited period of 30 days.

⇒ Get Reason

Above are some of the best music sequencer software available. And they have been selected and rated based on their respective user-friendliness, compatibility, features, and affordability among others.

Therefore, if you are a music producer who is looking to simplify the studio workflow, the above-listed software are some of the best options for you.

3 Easy Fixes if Cricut Won’t Connect to Design Space

If your Cricut won’t connect to Design Space, and you are looking for ways to deal with this issue, your search ends here. Design Space is a graphics design software that comes free with Cricut.

This utility is cloud-based and easy to use, so you can put it to work any time you need to, wherever you are. However, that does not mean that you will be exempt from dealing with occasional Cricut connection issues.

For instance, Design Space not recognizing Cricut is unfortunately quite common. While we’re at it, let’s see some other frequent problems reported by users:

  • Cricut Explore Air 2, Maker not connecting to Design Space
  • Cricut Explore Air 2 not connecting to computer
  • Design Space not recognizing Cricut – If such is the case, Cricut Design Space won’t connect to the machine.
  • Cricut Design Space not connecting to Internet
  • Cricut won’t connect with USB, to Bluetooth – If such is the case, Cricut won’t connect to the computer.

Why is my Cricut not connecting?

There can be many possible culprits behind the Cricut not connecting situation. Obvious reasons include making sure that the device is actually turned on and that the official requirements match.

Good instincts imply making sure that your system complies with the official specifications:

if pc is incompatible cricut won't connect to design space

Minimum requirements for Windows

  1. At least 4GB of RAM.
  2. Bluetooth connect or an unused USB port.
  3. 50MB of free space available.
  4. The computer must be running Windows 8 or above.
  5. AMF processor or the Intel Core series processor.

Meanwhile, there can also be other more subtle ones such as USB driver issues or third-party security software (firewall or antivirus) blocking the connection.

What to do if your Cricut won’t connect?

Before we dig in, here are a few useful tips you can implement:

  • Clear the cache and history of your web browser
  • Scan your computer for malware
  • Defragment the hard disk.
  • Make sure your firewall or antivirus is blocking Cricut connections

1. Check your Internet connection

The first thing to check when Cricut won’t connect to Design Space is the internet speed. To use Cricut with Design Space, your internet download speed must be at least 2 Mbps, and the minimum upload speed is 1 to 2 Mbps.

Run an internet speed test to determine if yours is up to these recommended speeds.

If it is not, then the speed may be the problem. To get faster internet speeds, you may want to change your modem or switch to a different ISP altogether.

If Design Space still fails to load or keeps freezing after you confirm your internet speed and reconnect, follow our full Cricut Design Space not working troubleshooting guide for step by step fixes covering cache cleanup, app updates, and clean reinstall.

2. Check Bluetooth or USB connections

  1. Use the Windows + X shortcut on your keyboard and select Settings.
  2. Go to Devices and toggle the Bluetooth switch to On if it’s not the case.
  3. Then, click on Add Bluetooth or another device. Your Cricut device has a built-in Bluetooth module, so you only need to make sure the device is turned on and in proximity to your PC (approximately 3 meters).
  4. If the Cricut device is already on the list, you might want to choose one of these options instead: Forget or Remove device.
  5. Pair the two again and check if the Cricut connection issues are solved.

If you’re going for USB instead, use a suitable cable and make sure your USB drivers are properly installed, up to date, and ready to use.

You can perform these tasks manually via the Device Manager on your PC or automate the process with the help of a specialized driver updater tool such as Outbyte Driver Updater.

3. End background processes

  1. 1. Press the following key combination: CTRL + ALT + DELETE.

  2. 2. Click on Task Manager.

  3. 3. Next, navigate to the Processes tab, if you are not already there.

    In this window, you will find a list of all the applications and processes currently running, as well as the percentage of CPU, memory, and other resources they are using.

  4. 4. Click on the Memory tab, so that the little arrow beside the percentage faces downward.

  5. 5. Next, right-click on the first item on the list and hit End task.

  6. 6. Do this for the first few applications or processes on the list, retrying Cricut after closing each one.

  7. Be sure not to close a program or process that is in use. When loads of applications are running in the background, Cricut won’t connect to Design Space.

The above tips will boost your computer speed. In turn, the faster system can deal with the Cricut that won’t connect to Design Space.

Do you have a Cricut that will not connect to Design Space? How did you get to fix it? If these guides solved the issue, feel free to tell us about it in the comment section below.
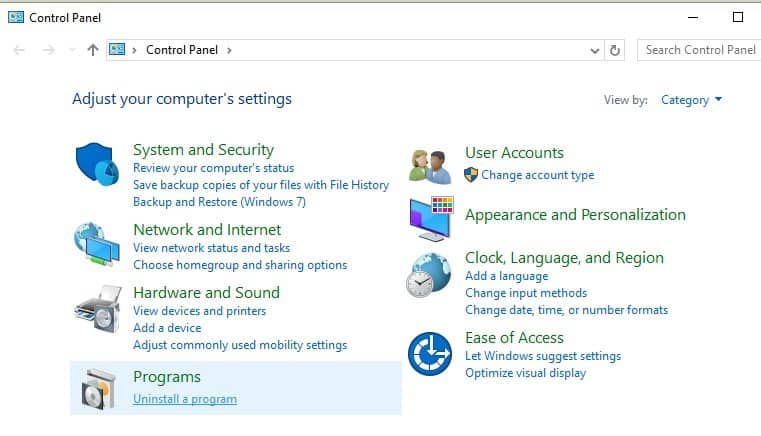
Windows Update Error 0x800F0923 [SOLVED]

If you’ve been trying to install the latest Windows 10 updates or upgrade to Windows 10, but you couldn’t complete the update process due to error 0x800F0923, this post may help you.

Error 0x800F0923 is one of the most frequent Windows 10 update errors. It occurs when either a driver or app isn’t compatible with the updates that users are trying to install.

Oftentimes, the culprits are the graphics driver, an outdated hardware driver or an old program or security software.

How can I fix the Windows Update error 0x800F0923?

1. Update your drivers

Update drivers manually

  1. Open Win + X menu by pressing Windows Key + X.
  2. Now choose Device Manager from the list.
  3. Expand the categories to find the name of your device > right-click it > select Update Driver.
  4. For graphics cards, expand the Display adapters category > right click your graphics card > select Update Driver.
    Windows Update error 0x800f0923
  5. Select Search automatically for updated driver software.
    0x800f0923 Server 2012
  6. If Windows doesn’t find a new driver, look for one on the device manufacturer’s website and follow their instructions.

Several users reported that error 0x800F0923 was caused by their drivers. Sometimes outdated drivers can prevent you from downloading new updates, but you can fix the problem by updating the drivers manually.

1.1 Update drivers automatically

Be aware that permanent damage can be caused to your PC by installing the wrong driver version. Thus, we recommend you use Outbyte Driver Updater (100% safe and tested by us) to do it automatically.

The tool is easy-to-use, and besides launching it, choosing what to fix, and then restarting your PC, there’s nothing for you to actually do since it is fully automated.

You can even set it to run constantly in the background, being available in the System Tray.

This allows it to periodically scan the Internet for more recent drivers and apply them as well.

Outbyte Driver Updater

<a>f you need drivers to be updated, then go ahead and gives Outbyte Driver Updater a try, since it will make everything easier.</a>
Free Trial Visit website

2. Temporarily disable your security software

A common cause of error 0x800F0923 might be your antivirus software. Third-party antivirus tools tend to interfere with your system, and that can sometimes lead to this error. However, you might be able to fix the problem simply by disabling certain antivirus features. If that doesn’t solve the problem, you can try temporarily disabling your antivirus and see if that helps.

In the worst-case scenario, you might have to remove your antivirus to fix the problem with Windows Update. Even if you remove your antivirus, Windows 10 comes with Windows Defender, so you don’t have to worry about your safety.

If removing the antivirus solves the issue, it might be a perfect time for you to consider switching to a different antivirus solution. There are many great antivirus applications on the market, but if you want a tool that will offer great protection without interfering with your system, we recommend you try TotalAV.

Not only is it a world leader when it comes to cyber-protection, but it also offers all that protection without any of the common drawbacks, such as a laggy PC or limited network accessibility.

3. Use Microsoft’s update troubleshooter

  1. Open the Settings app by pressing Windows Key + I.
  2. Now navigate to the Update & Security section.
    0x800f0923 Server 2012
  3. Select Troubleshoot from the menu on the left and click Windows Update in the right pane.
  4. Now click Run the troubleshooter button.
    Windows Update error 0x800f0923
  5. Follow the instructions on the screen to complete the troubleshooter.

According to users, sometimes you might be able to fix error 0x800F0923 simply by running Windows Update troubleshooter.

As you might know, Windows 10 comes with various troubleshooters that can fix common problems automatically.

Once the troubleshooter is finished, the issue should be completely resolved and Windows Update will start working again.

4. Check your computer’s compatibility

If error 0x800F0923  is preventing you from upgrading your computer to Windows 10, make sure that your device is compatible with this OS version.

Here’s what you need to do:

  1. Check the Windows 10 Creators Update system requirements
  2. Go to your computer manufacturer’s website and check the list of devices supporting Windows 10

Also, make sure that your antivirus supports the latest Windows 10 version.

5. Remove SPTD drive

  1. Open Device Manager.
  2. Now locate SPTD driver on the list, right-click it and choose Uninstall device from the menu.
    0x800f0923 Server 2012
  3. When the confirmation dialog appears, click Uninstall.
    0x800f0923 laptop

After removing the driver, check if the problem is resolved.

Alternatively, you can disable this driver from Registry Editor. To do that, you just have to follow these steps:

  1. Press Windows Key + R and enter regedit. Now press Enter or click OK.
    0x800f0923 laptop
  2. In the left pane, navigate to this key:
    • HKEY_LOCAL_MACHINESystemCurrentControlSetServicesSptd
  3. In the right pane, double-click the Start DWORD.
  4. Change its value to 4 and click OK to save changes.

In some cases, certain drivers can prevent you from downloading updates and give you error 0x800F0923. SPTD driver is a common cause of this problem, and in order to fix the issue, you need to remove this driver.

After doing that, check if the problem is still there.

You can also uninstall the driver simply by downloading and running SPTD Driver setup file. To do that, just download the setup file from SPTD’s website. When you start the setup file, select Uninstall option to remove the driver.

We have to mention that this driver is related to Alcohol 120% software, so if you’re using this tool or any other similar kind of software, be sure to remove this driver.

6. Reset Windows Update components

  1. Press Windows Key + X and choose Command Prompt (Admin) or Powershell (Admin) from the menu.
    Windows Update error 0x800f0923
  2. When Command Prompt opens, run the following commands:
  • net stop wuauserv
  • net stop cryptSvc
  • net stop bits
  • net stop msiserver
  • Ren C:WindowsSoftwareDistribution SoftwareDistribution.old
  • Ren C:WindowsSystem32catroot2 Catroot2.old
  • net start wuauserv
  • net start cryptSvc
  • net start bits
  • net start msiserver

In order to download Windows Updates, Windows Update and other related services need to work properly.

If there’s an issue with one of these services, you’ll encounter error 0x800F0923 or another similar errors. However, you can fix the issue by resetting Windows Update components.

After the commands are executed, try to perform Windows Update again and check if the error reappears.

If you don’t want to manually restart these services, you can always create a Windows Update reset script that will automatically reset all required services with just a single click.

7. Manually install the update

  1. First, you need to find the KB number of the update you’re trying to download. To do that, you need to open Windows Update and find the KB number of the problematic update or check the Windows Update History website.
  2. After you find the KB number, visit Microsoft’s Update Catalog website and search for the problematic update using the KB number.
  3. List of results will now appear. You should see updates for different architectures, so be sure to download the update that matches your system architecture.
    0x800f0923 laptop

If you can’t download updates due to error 0x800F0923, you might be able to circumvent this problem simply by downloading the updates manually. This isn’t as hard as you think, and you can do it by following these steps.

Once you download the update, install it and the issue should be resolved. Keep in mind that this solution won’t fix the core problem, so you might encounter this issue again when trying to download future updates.

8. Perform an in-place upgrade

If other solutions can’t fix error 0x800F0923, you might have to perform an in-place upgrade. This is relatively simple to do, and you can perform it by following these steps:

  1. Download and run Media Creation Tool.
  2. Select Upgrade this PC now and click Next.
  3. Wait while the setup prepares the necessary files.
  4. Select Download and install updates (recommended) and click Next.
  5. Once the updates are downloaded, follow the instructions on the screen until you get to the Ready to install screen. Now click Change what to keep.
  6. Choose Keep personal files and apps. Now click Next.
  7. Follow the instructions on the screen to complete the setup.

Once the setup is finished, you’ll have the latest version of Windows 10 installed and the issue will be resolved.

This issue can be quite problematic and prevent you from downloading new updates. Speaking of this error, here are some similar issues that users reported:

  • Windows Update error 0x800f0923 – This error usually occurs when trying to download Windows Updates. To fix the issue, simply reset Windows Update components and check if that helps.
  • 0x800f0923 Server 2012 – This issue can also affect Server 2012, and if you’re using it, be sure to try some of our solutions.
  • 0x800f0923 laptop – Many users reported this error on both laptops and desktop PCs. The simplest way to fix this error on any PC is to download and install the update manually, so be sure to try that.

The Windows Update error 0x800F0923 can be problematic, but we hope you managed to solve it using one of our solutions.