5 best Xbox One Christmas sweaters [Nerdy/Ugly/Geek & more]

There are just a few days left until Christmas. If your best friend, significant other or other family members are avid Xbox fans, then a really nice Xbox Christmas sweater would make for a perfect gift.

There are plenty of gaming-themed sweaters on the market and choosing the right one to surprise your loved ones is not an easy task. Well, we did the heavy lift work for you and compiled this list of the best Xbox Christmas sweaters to get this year. Enjoy!

What Xbox Christmas sweaters can I find this year?

Eat Sleep Game

  • Bright color options
  • Fleece fabric
  • Sizes fit
  • 50% polyester

Teenagers and adults looking for gaming hoodies find this model very nice, comfy, with a quality design and a large pouch pocket.

It comes in various sizes and colors that should fit anyone. Not to mention that you can wear it not just indoors.

Gamer Mode

  • Bright colors
  • Quality material
  • Sizes according to chart
  • No large sizes

If you’re a gaming geek, this hoodie should definitely be part of your lifestyle gaming apparel.

It comes in even more color options than the previous recommendation and it has only regular sizes, which should also be perfect for ladies.

Choose Your Weapon

  • High-quality material
  • Made in the USA
  • Wide range of colors
  • Return is charged

This hoodie is yet another no-name clothing brand for gamers. There’s nothing special about it and the price tag is similar to that of other models.

The design is funny and the color option are varied.

Heartbeat of a Gamer

  • Soft feel
  • 100% cotton
  • Excellent quality
  • Only big sizes

If your friend’s heart beats for Xbox gaming, then this is the perfect gift for him/her. This simple sweatshirt is 100% cotton which makes it very comfortable to wear.

This is a high-quality product, there will be no loose threads after tens of wears and washes, and the print will stay the same.

I can’t adult, I’m gaming

  • 100% cotton
  • Super-large sizes available
  • Unisex
  • One color only

We really like the message on this hoodie. It’s a statement. Remember the days when your parents were yelling at you all the time, asking you to stop playing Xbox games and get a life?

Well, this hoodie features a very funny message that will definitely make them smile today.

It’s made of 100% pre-shrunk cotton, it was designed and printed in the USA. Rest assured, you can machine wash it.

These are some of the most interesting Xbox sweaters and hoodies that you can get this Christmas. We’re sure that your gamer friends will be very happy when they unwrap their presents.

Microsoft Store Error 0x8004e108 [Solved]

The Windows Store (now Microsoft Store) error 0x8004e108 is one that occurs for some Microsoft Store users when attempting to download new apps or app updates.

The error message states: “Something went wrong. The error code is 0x8004E108, in case you need it.”

Consequently, Microsoft Store users can’t install or update Store apps. If that error message has popped up on your laptop or desktop, try some of the below fixes for it.

How can I fix the code: 0x8004e108?

1. Reset the Microsoft Store Cache

  • Resetting the Microsoft Store cache can fix numerous Store issues. To reset the cache, press the Cortana button on the left of Windows 10’s taskbar.
  • Enter the keyword ‘wsreset.exe’ in the search box.
  • Right-click wsreset.exe and select Run as administrator.
  • Then press the Yes button to confirm.

2. Open the Windows Store App Troubleshooter

The Windows Store App troubleshooter is the one to open when there’s something up with the Microsoft Store or other apps. This might automatically fix the 0x8004e108 error. You can open the Windows Store App troubleshooter as follows.

  • Click the Cortana button to open the virtual assistant’s search box.
  • Input ‘troubleshoot’ in the search box.
  • Then you can click Troubleshoot to open the Settings window’s Troubleshoot tab.
  • Select the Windows Store Apps troubleshooter and press Run the troubleshooter to open the troubleshooter as below.
  • The troubleshooter will automatically scan for app errors when you launch it. Then you can go through the troubleshooter’s resolutions.

3. Edit the SoftwareDistribution Folder Title

  • Some have found that editing the SoftwareDistribution folder title can fix the 0x8004e108 error. To do that, first enter ‘cmd’ in the Cortana search box and select Command Prompt.
  • Input ‘net stop WuAuServ’ in the Prompt, and press the Return key.
  • Next, press the File Explorer button on the Windows taskbar.
  • Enter ‘C:\Windows’ in File Explorer’s path bar, and press the Return key.
  • Right-click SoftwareDistribution and select Rename.
  • Enter ‘SDold’ as the new title for the SoftwareDistribution folder.
  • Open the Command Prompt again.
  • Input ‘net start WuAuServ’ in the Prompt, and press the Enter button.

4. Disable or Uninstall Anti-virus Software

Some Microsoft Store users have confirmed that uninstalling third-party anti-virus software fixed the 0x8004e108 error for them. First, try temporarily switching the anti-virus software off by right-clicking its system tray icon and selecting a disable option on its context menu. If disabling the anti-virus utility doesn’t resolve the issue, you can uninstall the software as follows.

  • Open the Win + X menu by pressing the Windows key + X hotkey.
  • Click Run on the Win + X menu to open that accessory’s window.
  • Enter ‘appwiz.cpl’ in Run, and click the OK button.
  • Select your anti-virus software, and press the Uninstall/Change button.
  • Click Yes to provide further confirmation.

5. Restore Windows to a System Restore Point

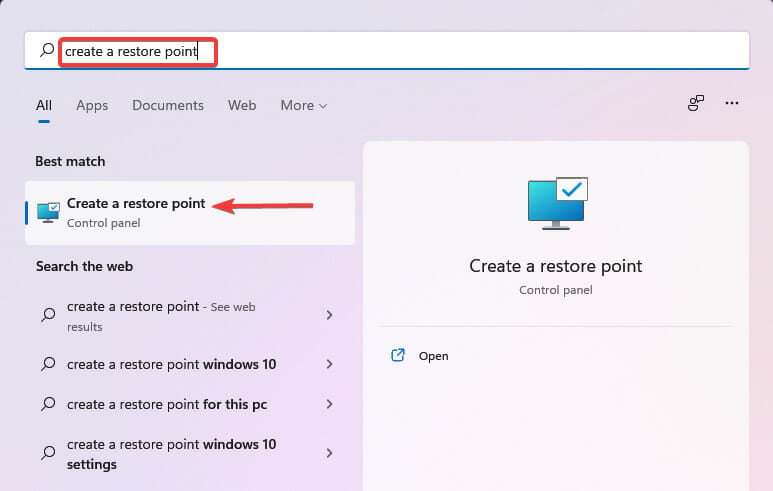
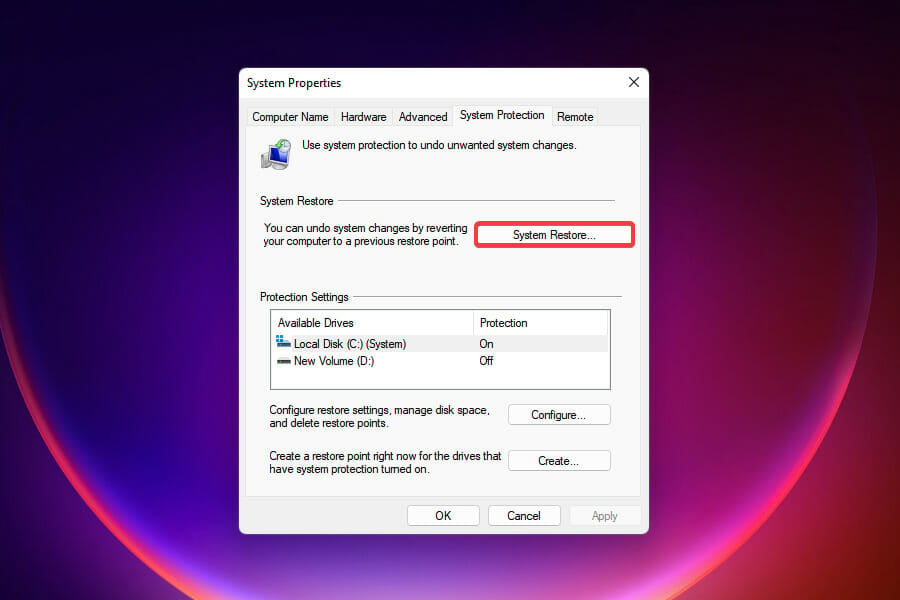
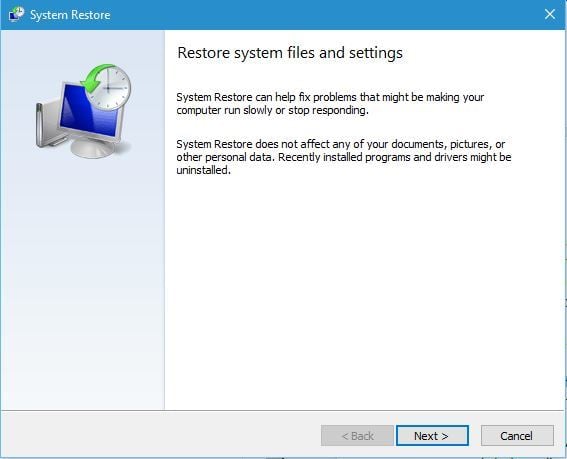
The Microsoft Store was working just fine a few months back, right? If so, rolling Windows back to a restore point might resolve the 0x8004e108 issue. That will remove any updates and third-party programs installed after a selected restore point date that might be responsible for the issue. The System Restore tool will undo the system changes. This is how you can utilize System Restore to fix error 0x8004e108.

  • The quickest way to open System Restore is to press the Win key + R hotkey.
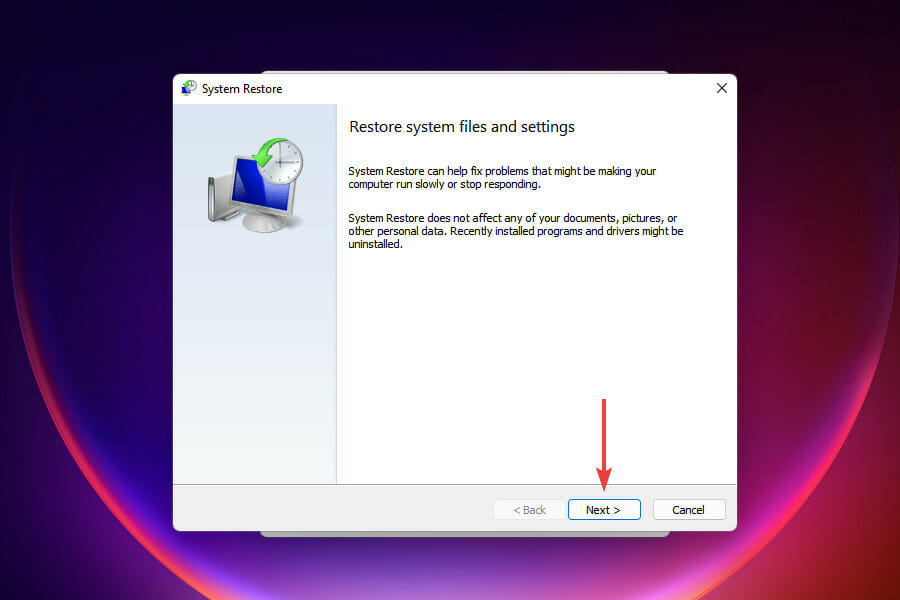
  • Then you can enter ‘rstrui’ in Run to open the System Restore window directly below.
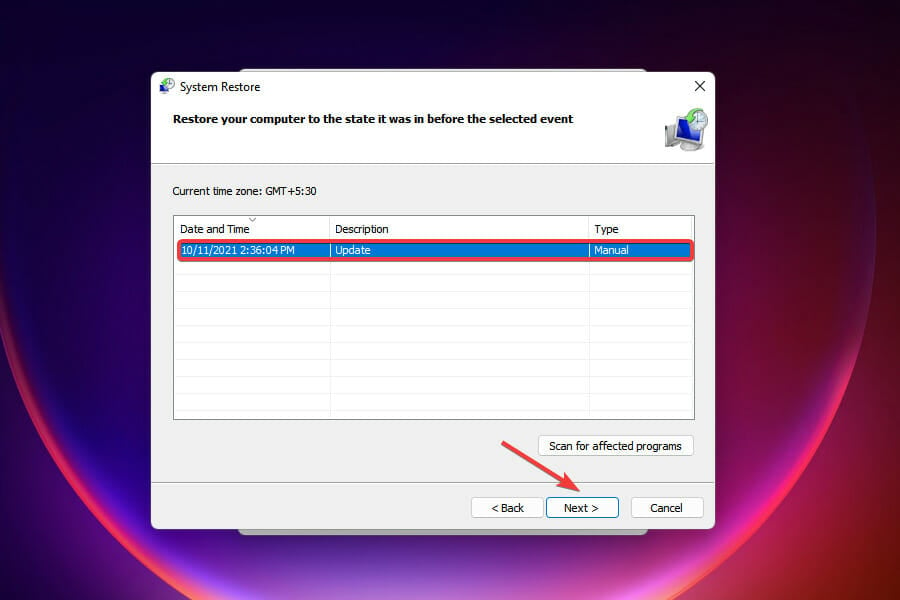
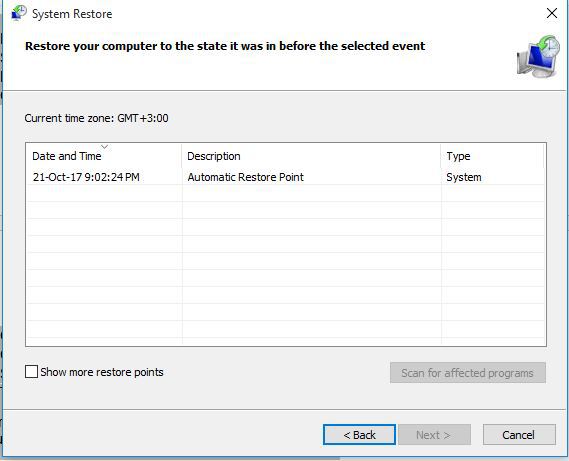
  • Click Next to open a list of system restore points as below.
laptop won’t detect second monitor
  • Choose a system restore that predates the 0x8004e108 error.
  • Then you can confirm your selected restore point by pressing the Next and OK buttons.

6. Sign out of Your Microsoft Account

Some Microsoft Store users have also confirmed they’ve fixed apps not downloading by signing out of the MS Store app and then back in again. To do that, first enter ‘Microsoft Store’ in Cortana’s search box to open that app.

  • Click the small profile button highlighted in the snapshot directly below.
  • Select the Sign out option on the button’s menu.
  • Then search for the Store app that you need to download.
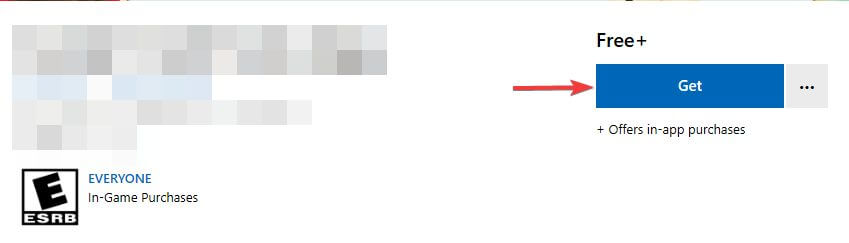
  • Press the Get button on the app’s page.
  • Click Sign in to sign back in with Microsoft. The app might then install.

Those are a few resolutions that might, or might not, fix the 0x8004e108 error. Aside from those fixes, check for Windows updates such as KB4058043 that Microsoft released to resolve Store app update issues.

Check out our article for further resolutions that might fix Microsoft Store apps that aren’t downloading.

We hope you managed to fix the error code: 0x8004e108 in Microsoft Store using our guide. Let us know your thoughts in the comments section below.

Microsoft Store Blank White Screen [How-To Fix]

The commodity of Microsoft Store’s faultless performance is an unexplored field for certain users. Besides already standardized errors with the distinctive code, some users report freezes accompanied by black, blue, or white screens respectively, when trying to access the Store in Windows 10.

The Microsoft Store blank white screen is a grave problem that renders Microsoft Store completely unusable, so we prepared some of the most common solutions in order to address it.

In case you’re looking at the blank screen instead of the Store offerings, make sure to check them out below.

How can I fix the Microsoft Store blank white screen issue?

1: Run the Windows Troubleshooter

The built-in automatized troubleshooter that Microsoft faithfully introduced with Windows 10 has a rather low success rate. However, when something like this occurs, we’ll need to deploy all available steps before posting the error report to Microsoft. So, without rushing, let’s move through the list starting with the Windows App Troubleshooter.

Follow the instructions to run the dedicated Windows Troubleshooter and, hopefully, resolve the issue at hand:

  1. Press Windows key + I to open the Settings app.
  2. Open the Update & Security section.windows 10 store black/blue/white screen
  3. Select Troubleshoot.
  4. Scroll to the bottom and expand ‘‘Windows Store Apps” troubleshooter.windows 10 store black/blue/white screen
  5. Click on the ”Run this troubleshooter” button.

2: Download the alternative troubleshooter

As we already said above, the built-in automatized troubleshooter is lackluster for the majority of complex errors Microsoft Store users experience. Furthermore, for that or some other reason, Microsoft provides users with a downloadable tool that specializes in Windows\Microsoft Store issues. Instead of focusing on alternative apps, this tool will focus on issues within the Store itself.

If you’re not accustomed to its use, make sure to check these steps:

  1. Download the troubleshooter.
  2. Navigate to the download location and run the Troubleshooter.windows 10 store install button missing
  3. Click Next and follow the instructions.

3: Disable certain third-party applications

These variants of blank screens don’t exclusively point toward the Store bug. Namely, there’s a good chance that some of the third-party applications might’ve affected the Store’s performance and caused the Microsoft Store blank white screen issue. The first pick goes to antivirus solutions which tend to block Microsoft Store execution. We don’t want to point fingers, but it seems that McAfee blocked Store for some users.

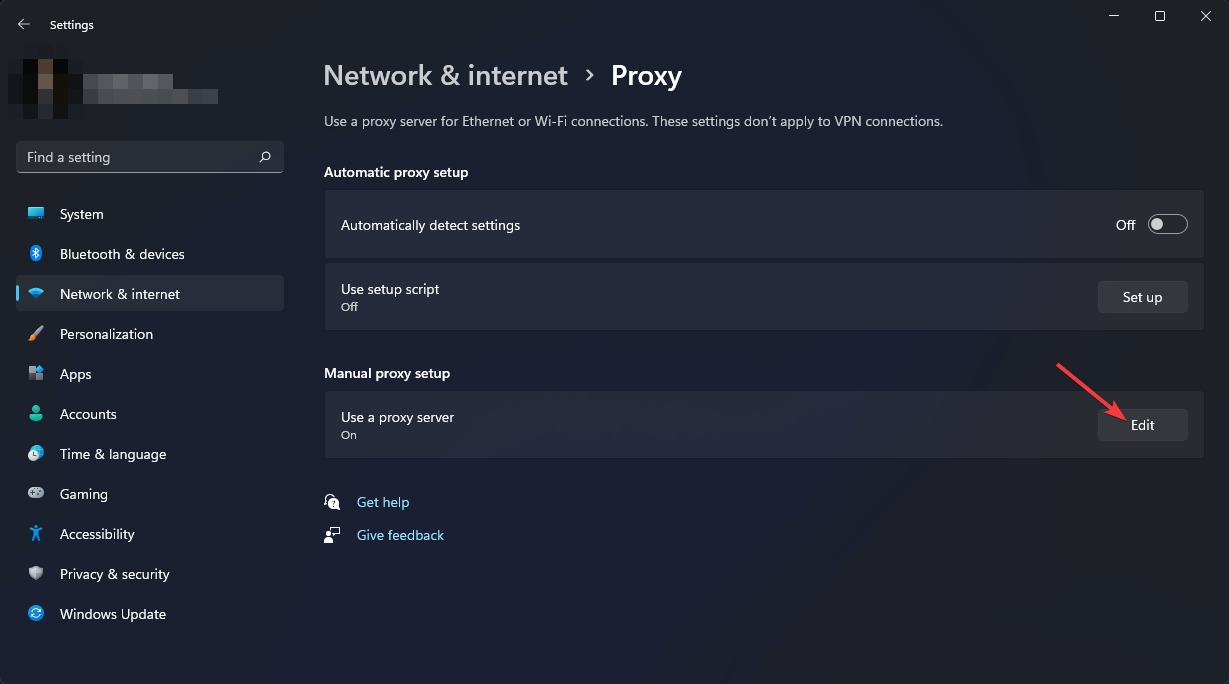
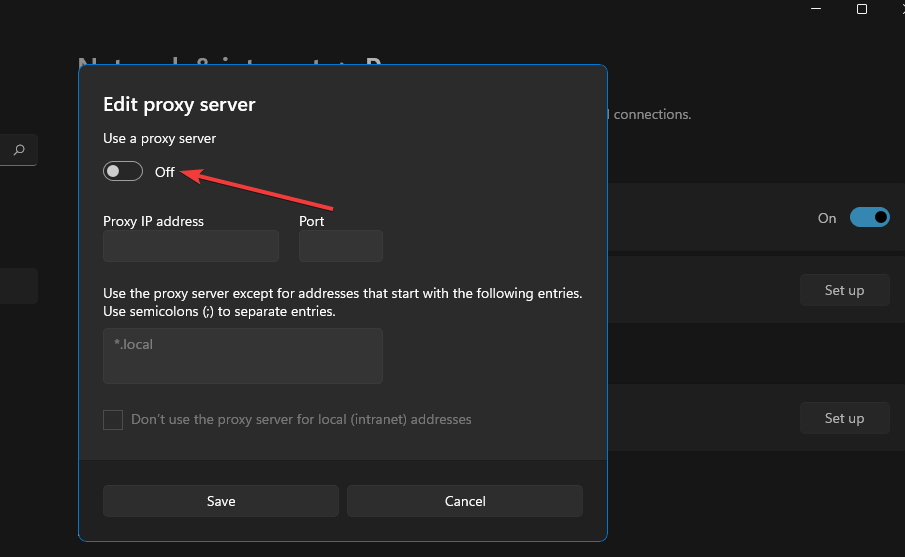
Nonetheless, there are certainly other antimalware solutions that can provoke the same unwelcome outcome. So make sure to disable the antivirus for the time being and restart the Store. Also, we advise you to disable VPN or proxy if you tend to use them. They can also obstruct the Store connection and thus the result might be the same: black, blue, or blank white screen error.

4: Reset the Store’s cache data

When things go awry with the Microsoft Store, the most common solution you can apply, besides the Windows Troubleshooter, is to run the preinstalled executable. To make things simple, ”wsreset.exe” is the command you’ll need to run in order to reset the store’s cache. Once you’ve done it, the possible corruption caused by pilled-up cache data should be resolved.

Here’s how to do it in a few simple steps:

  1. Close Microsoft Store.
  2. In the Windows Search bar, type wsreset.
  3. Right-click on WSreset and run it as an administrator.windows 10 store black/blue/white screen
  4. Restart your PC and look for changes.

5: Check the connection

The connection can be a possible reason for black, white, or blue error screens users have experience. Making sure that your connection is well-established is essential, so we advise you to perform a standard check-up of both your software and equipment before we can move to additional steps.

Follow these instructions to confirm that the connection isn’t the thing invoking Store issues:

  • Try disabling VPN/proxy for the time being.
  • Reset your PC and router/modem.
  • Use wired connection instead of wireless.
  • Run Connection troubleshooter.

6: Make sure the time and region are properly set

Microsoft Store service is heavily dependent on your time and date settings. These might seem unimportant, but Store servers need to be in sync with your system settings. In case those are misconfigured, you won’t be able to access the Store and would encounter the Microsoft Store blank white screen problem.

Here’s how to make sure that your time and date are properly set in Windows 10:

  1. Right-click Start and open Settings from the Power menu.
  2. Select Time & Language.windows 10 store black/blue/white screen
  3. Under the Date & Time section, enable the ‘Set time automatically‘  and ‘Select time zone automatically‘.windows 10 store black/blue/white screen

Additionally, the best-performing region setting in regards to Store is the United States. Namely, certain Store features seem to be malfunctioning with the different region settings, so you can try and change the region, as well.

Follow these instructions to change your regional settings in Windows 10:

  1. Open Start again and choose Settings.
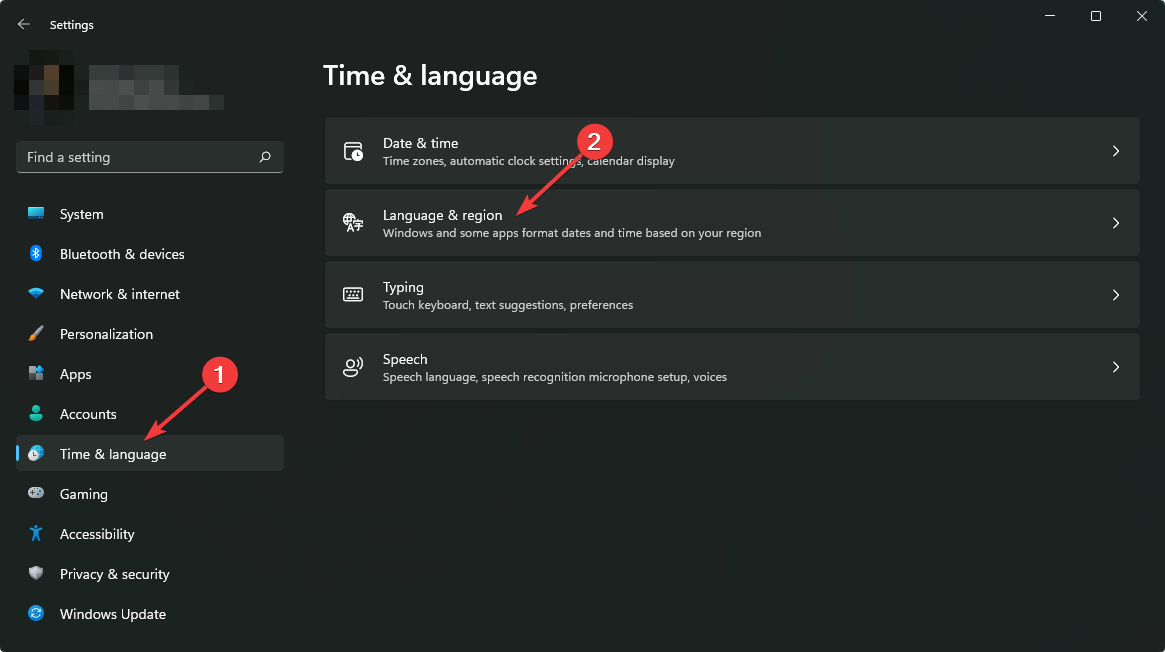
  2. Select the Time & Language section.
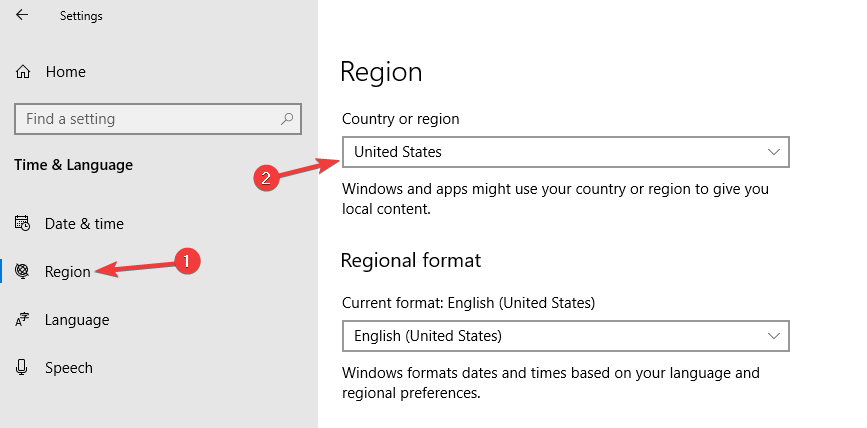
  3. Choose Region and language from the left pane.windows 10 store black/blue/white screen
  4. Change country or region setting to ‘United States‘.
  5. Restart your PC and try using Store again to see if the Microsoft Store blank white screen issue persists.

7: Run SFC and DISM

Since Microsoft Store is an inseparable part of the platform, it’s quite prone to various system errors. It utilizes system files and those can get corrupted because of misuse or virus infections. For that purpose, you can turn to System File Checker, the command-line tool which checks the integrity of system files and fix them.

Here’s how to run it in Windows 10 via Command Prompt:

  1. Right-click Start and run Command Prompt (Admin).
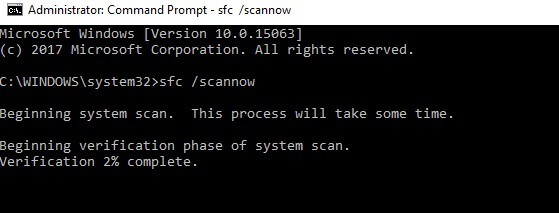
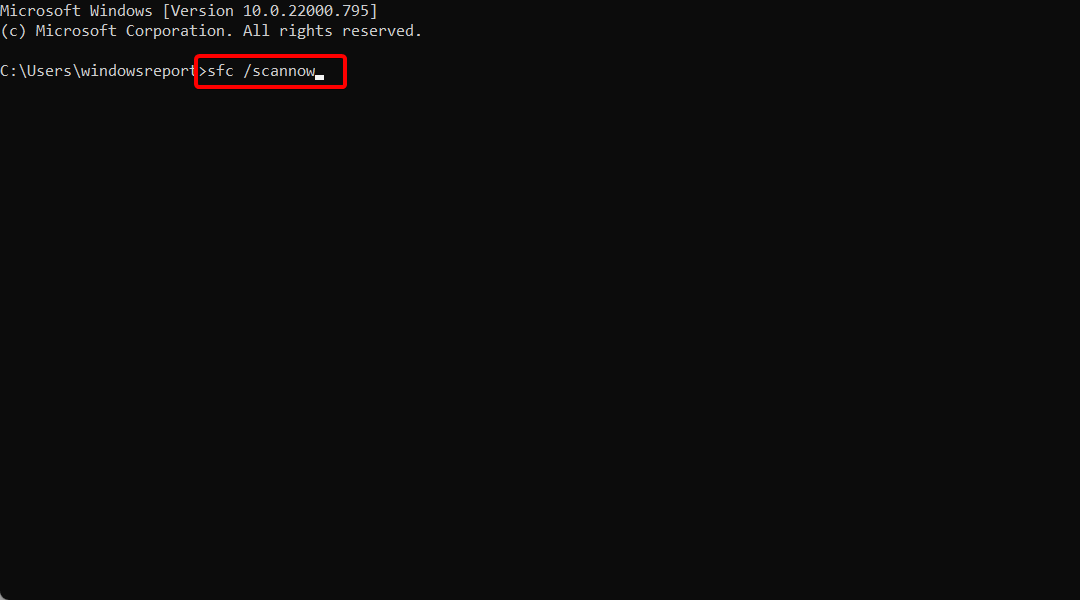
  2. In the command line, type sfc/scannow and press Enter.
  3. Wait for the scanning\repairing to end and restart your PC.

Furthermore, if the SFC fails to identify system issues, that’s when the DISM tool can come in handy. The ”Deployment Image Servicing and Management” tool also runs through Command Prompt, but it appends a more thorough approach.

If you’re not accustomed to running DISM, follow these instructions closely:

  1. Type cmd in the Windows search bar, right-click on the Command Prompt and run it as an administrator.
  2. In the command line, copy paste these lines one by one and press Enter after each:
    • DISM /online /Cleanup-Image / ScanHealth
    • DISM /Online /Cleanup-Image /RestoreHealth
  3. Wait until the procedure ends (it might take up to 10 minutes).
  4. Restart your PC.

8: Re-register Store with PowerShell

The common approach you’ll take with a standard application can’t be applied to Microsoft Store. You can’t reinstall it with the conventional approach, but there’s a way to restore it to its default values. This procedure should, hopefully, resolve the stall within the Store and relieve you of the frozen screen.

In order to run it, you’ll need to use the PowerShell elevated command-line. Follow these instructions to re-register Microsoft Store:

  1. In the Windows Search bar, type PowerShell, right-click on the PowerShell and run it as admin.
  2. Copy-paste or type in the following command in the command line and press Enter:
    • Get-AppxPackage -allusers Microsoft.WindowsStore | Foreach {Add-AppxPackage -DisableDevelopmentMode -Register “$($_.InstallLocation)\AppXManifest.xml”}

9: Update Windows

Frequent updates can be irritating, to say the least, but many of those bring, besides security patches, a resolution to system issues. So, if you’ve decided that enough is enough and set metered connection limit or postponed updates, now is the time to check for updates. Maybe they’ll resolve the black\white\blue screen issue in Microsoft Store.

Follow these instructions to check for system updates manually:

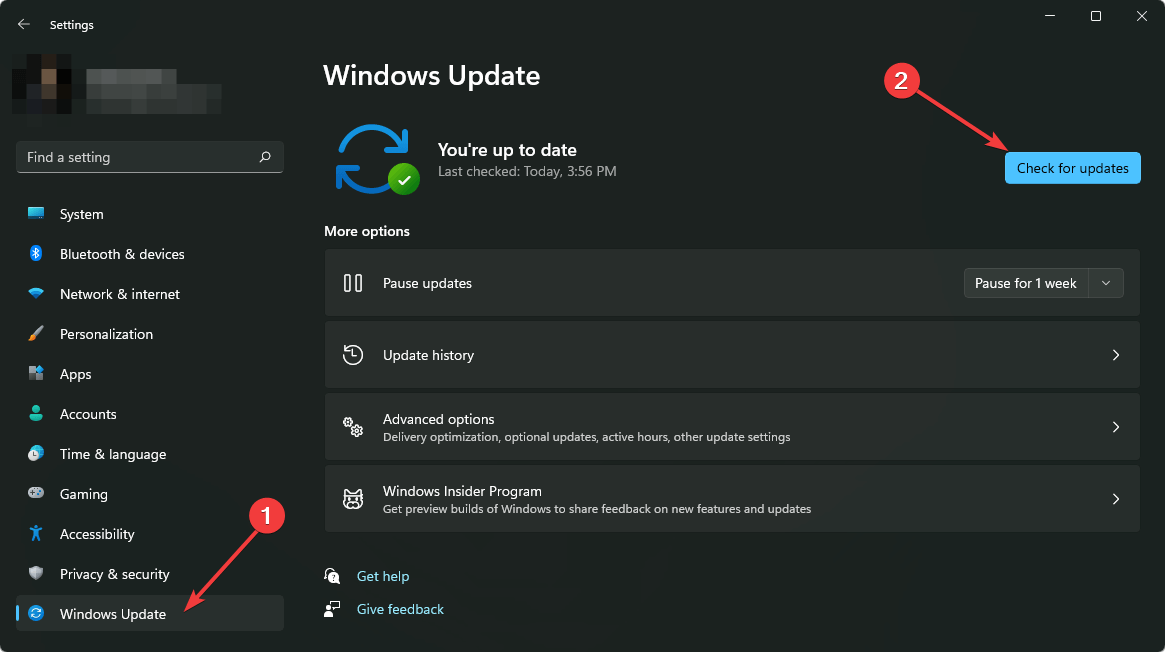
  1. In the Windows Search bar, type Updates and open ”Check for updates” from the list of the results.
  2. Click on Check and install available updates.
  3. Your PC system will reboot and there’s a good chance that Microsoft Store will work as intended.

10: Reset your PC

Finally, if none of this was enough to resolve the Microsoft Store blank white screen problem, the only remaining option is to make your way to Recovery and reset your PC to factory settings. By doing so, you’ll basically have the same outcome as with the complete reinstallation. However, you get to preserve your files, which makes it much less painful.

Here’s how to Reset your PC to factory values and sort out Microsoft Store issues:

  1. Right-click Start and open Settings.
  2. Choose Update & Security.
  3. Choose Recovery in the left pane.
  4. Expand Reset this PC.windows 10 store black/blue/white screen
  5. Click Get started.
  6. Preserve your personal data or remove it. It’s your choice.windows 10 store black/blue/white screen

With that, we can wrap it up. In case you’re still bothered by the Microsoft Store blank white screen issue, make sure to post your error on the official forum and hope for the best.

In addition, don’t forget to post your suggestions or questions in the comments section below.

No Login Screen on Windows 11: 6 Solutions to Get it Back

Windows 11 is the latest iteration from Microsoft and one of the most refined. It offers a complete revamp for most aspects, exciting features, and a user-friendly interface. But, many users reported no login screen in Windows 11.

This could be after you power on the computer from sleep/hibernation or after a complete shutdown. So, let’s find out all about why the Windows login screen is not showing and the solutions for it.

Why does my computer not show the login screen?

Here are some of the reasons Windows won’t show a login screen:

  • A bug in the OS – In most cases, it was a bug in the installed version of Windows 11. Since the iteration is relatively new, there might be such issues.
  • Windows Update in process – Some users reported that Windows ran updates as soon as the computer was turned on, and as a result, Windows starts but there’s no login screen. Instead, users see a black screen for a few minutes.
  • Fast startup – The feature, though meant to reduce the boot time, can sometimes conflict with the boot process. Due to this, you can’t login in Windows 11.
  • Corrupt user profile – If a Windows 11 local account is not showing on the login screen, the user profile could be corrupt.

How do I fix the no login screen error on Windows 11?

Note icon NOTE
If you cannot boot Windows without a login screen, use Safe Mode to execute the fixes listed here.

Before we head to the slightly complex solutions, here are a few quick ones you can try:

  • Press Ctrl + Alt + Del on the login screen in Windows 11 to refresh the interface.
  • Hold the power button to turn off the computer and then turn it on.
  • Check for any available Windows updates and install them.
  • Disconnect all non-critical devices and peripherals from the PC—for instance, the printer, speaker, and headphones, amongst others.

If these don’t work, the fixes listed below surely would:

1. Disable Login Password

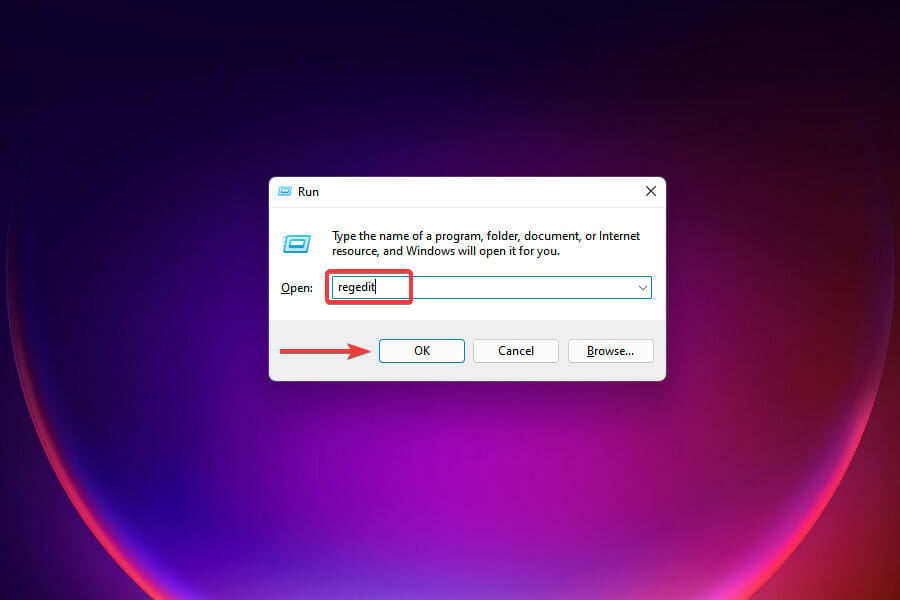
  1. Press Windows + R to open Run, enter regedit in the text field, and then click OK.Launch Registry Editor
  2. Click Yes on the UAC prompt that appears.
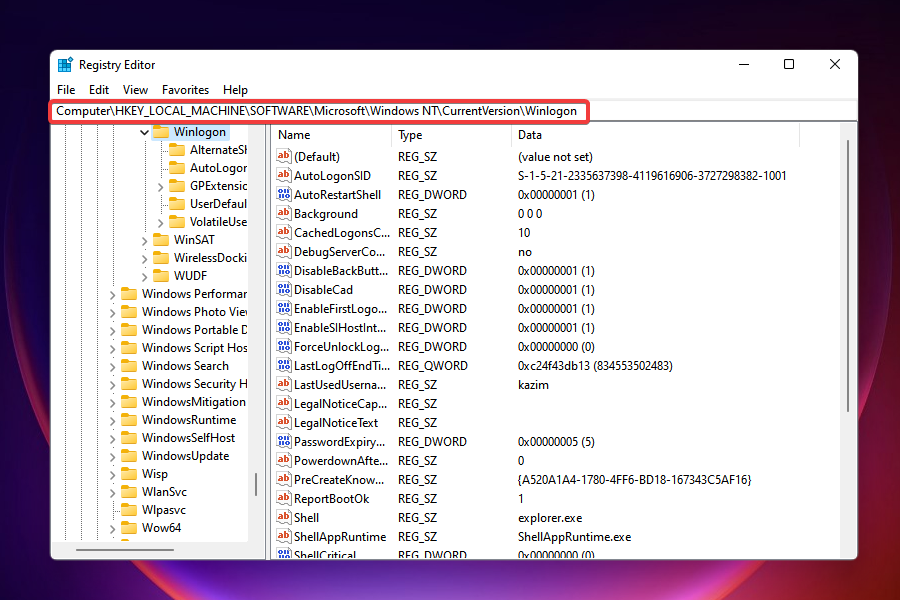
  3. Next, navigate to the following path or paste it into the address bar at the top and hit Enter.Computer\HKEY_LOCAL_MACHINE\SOFTWARE\Microsoft\Windows NT\CurrentVersion\WinlogonWinlogon in registry
  4. Check if there is a DefaultUserName string present.
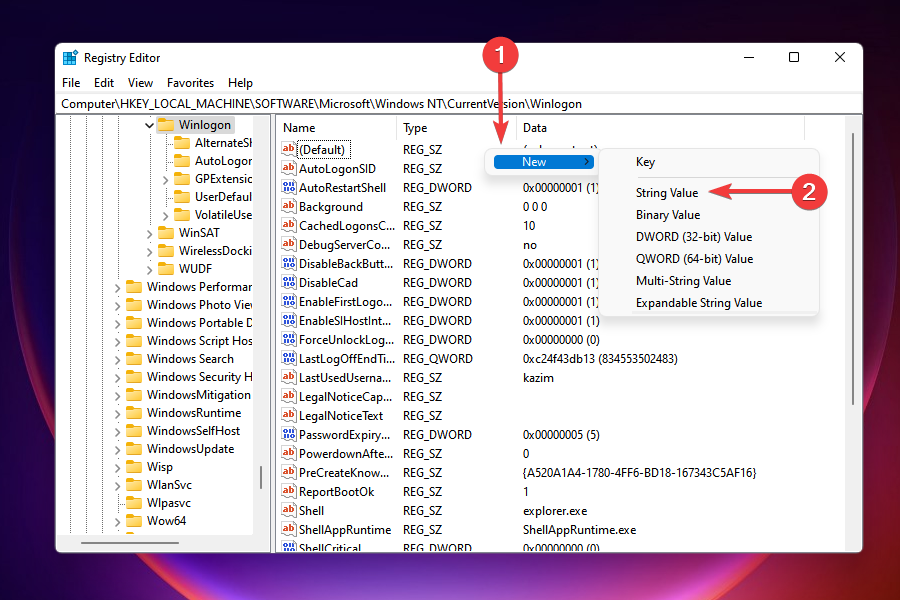
  5. If you can’t find one, right-click on the empty space, hover the cursor over New, select String Value from the context menu, and name it DefaultUserName.create new string in registry
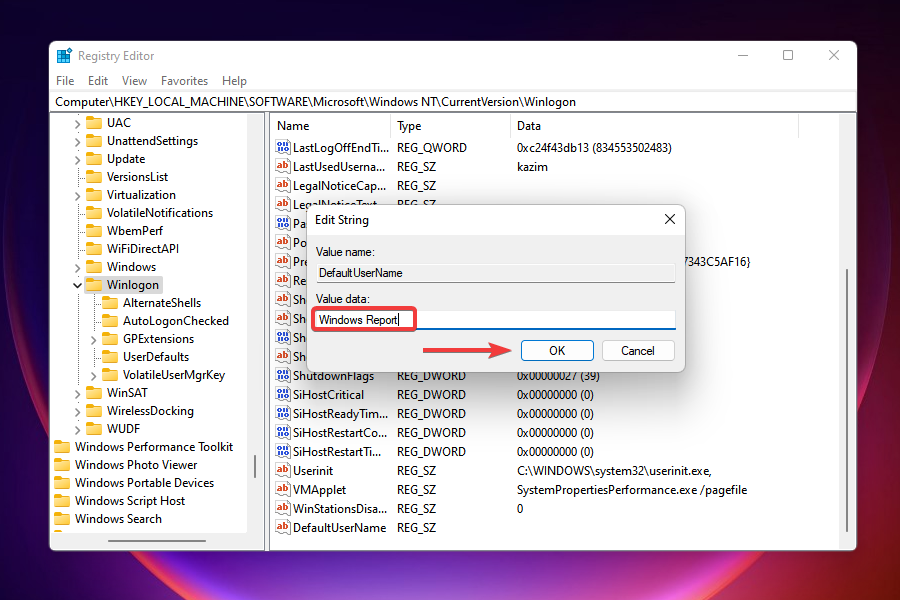
  6. Double-click on the string, enter your account username under Value data, and click on OK to save the changes.edit string Value data
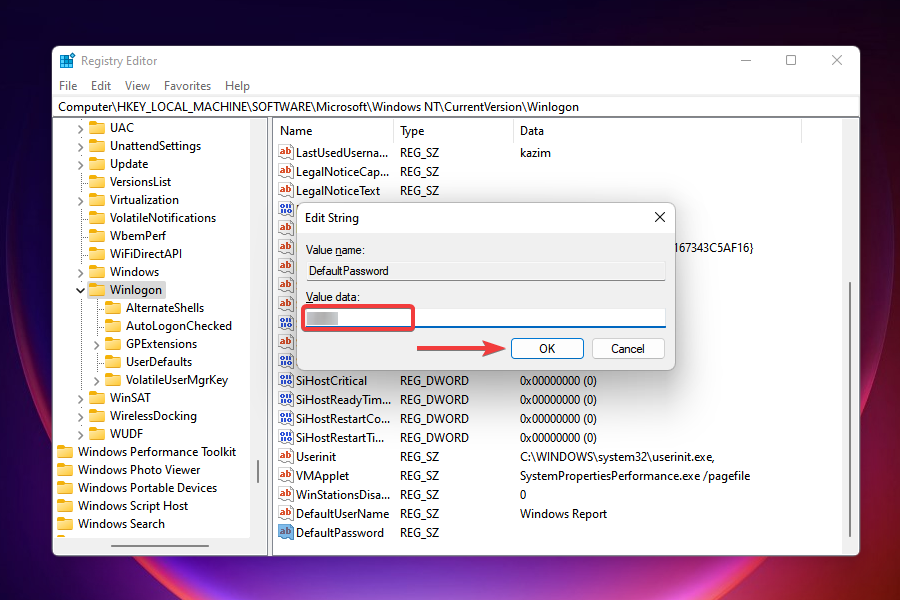
  7. Create another string value and name it DefaultPassword.
  8. Double-click on it, enter your account password under Value data, and click on OK to save the changes.edit string value
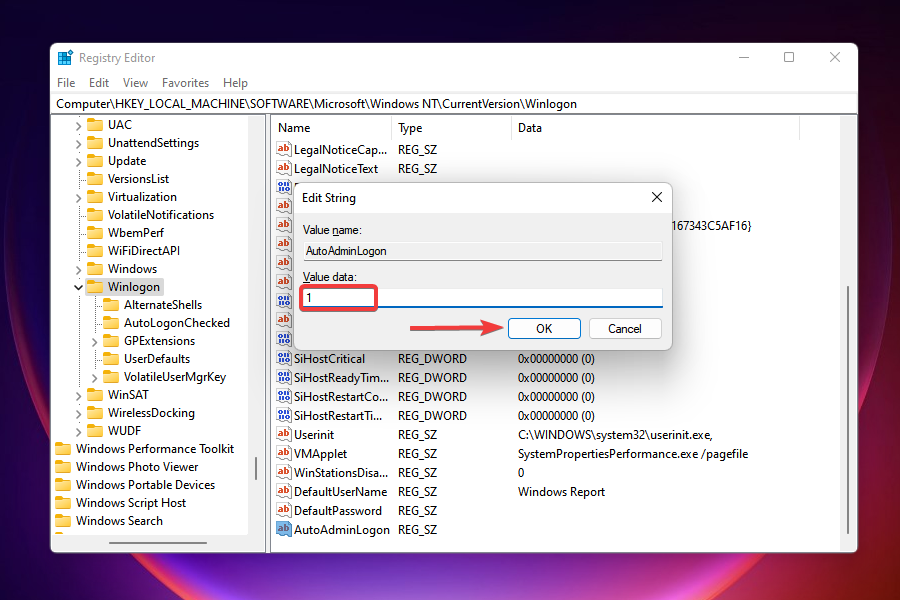
  9. Check if there is a AutoAdminLogon string present. In case there isn’t one, create it as discussed earlier.
  10. Double-click on the string and enter 1 under Value data.edit string value
  11. Close the Registry Editor.

You aren’t required to enter the password every time the computer is turned on. Instead, the sign-in will be automatic. This will fix things when you can’t login with a password in Windows 11.

Also, you can permanently delete the three strings if you want Windows 11 to ask for the password when signing in. Just in case, check out our guide on removing the login password in Windows 11.

2. Modify the registry

  1. Press Windows + S to open Search, type Registry Editor in the text field, and click on the relevant search result.registry
  2. Click Yes in the UAC prompt that appears.
  3. Now, paste the following path in the address bar and hit Enter:Computer\HKEY_LOCAL_MACHINE\SYSTEM\CurrentControlSet\Control
  4. Now, right-click on the empty portion, hover the cursor over New, select DWORD (32-bit) Value, and then name it AutoStartDelay.autostartdelay to fix windows 11 no login screen
  5. Enter 180000 under Value data, and click OK to save the changes.value data
  6. Now, press Windows + R to open Run, type services.msc, and click OK.services
  7. Double-click on the Microsoft Edge Update Service to open its properties.microsoft edge update service
  8. Choose Automatic (Delayed Start) or Manual from the Startup type dropdown menu, and click OK to save the changes.change startup type to fix windows 11 no login screen
  9. Once done, restart the computer for the changes to come into effect.

3. Perform a Startup Repair

Note icon NOTE
Only perform the Startup Repair if you bypass the error by pressing Ctrl + Alt + Del at log-in. If you forced a shutdown of the system thrice to access the Safe Mode, Windows has already performed Startup Repair, and you can head to the next fix.
  1. Press Windows to launch the Start menu, click on the Power button, press and hold the Shift key, and choose Restart.Launch Windows RE
  2. Your system will now enter the Windows RE (Recovery Environment).
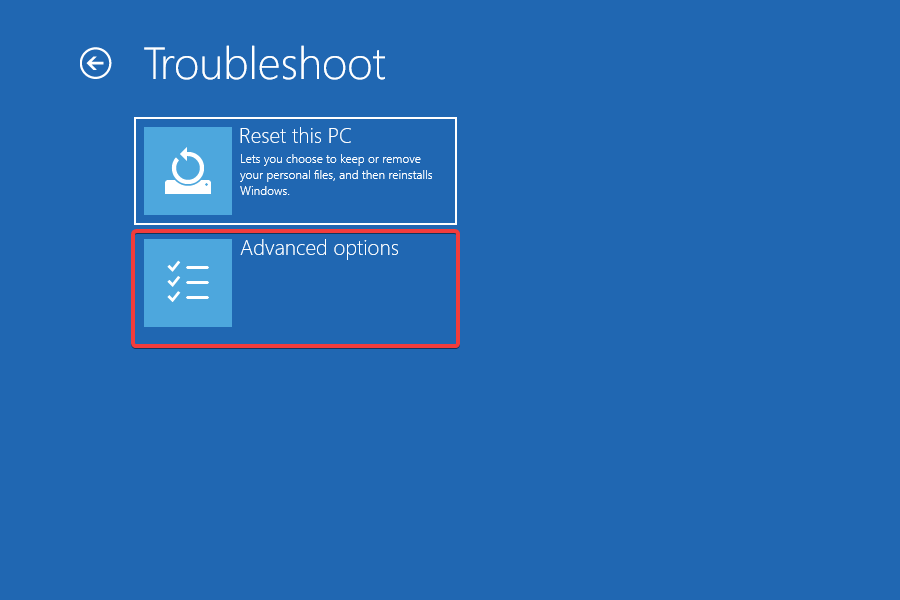
  3. Click on Troubleshoot.Troubleshoot
  4. Select Advanced options.Advanced options
  5. Click on Startup Repair.Startup Repair
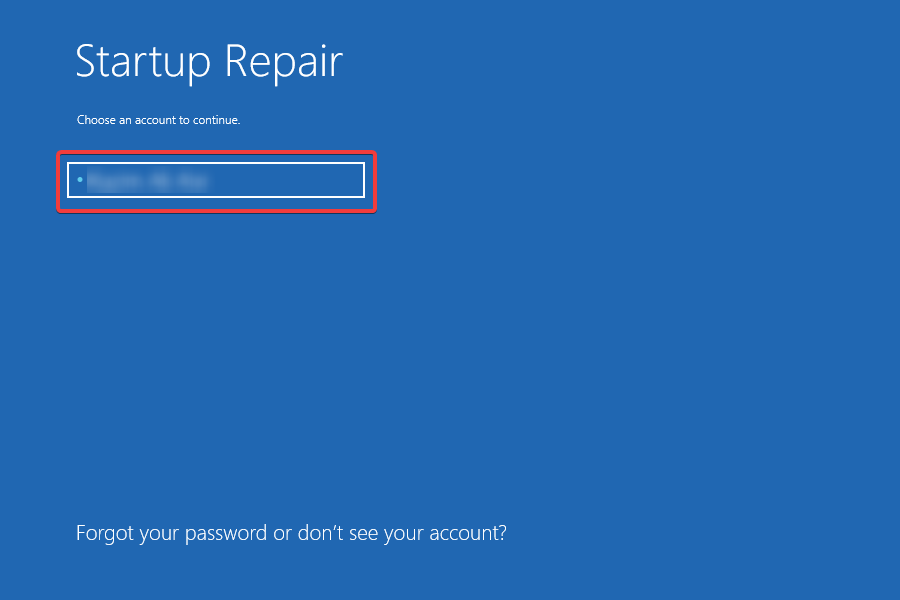
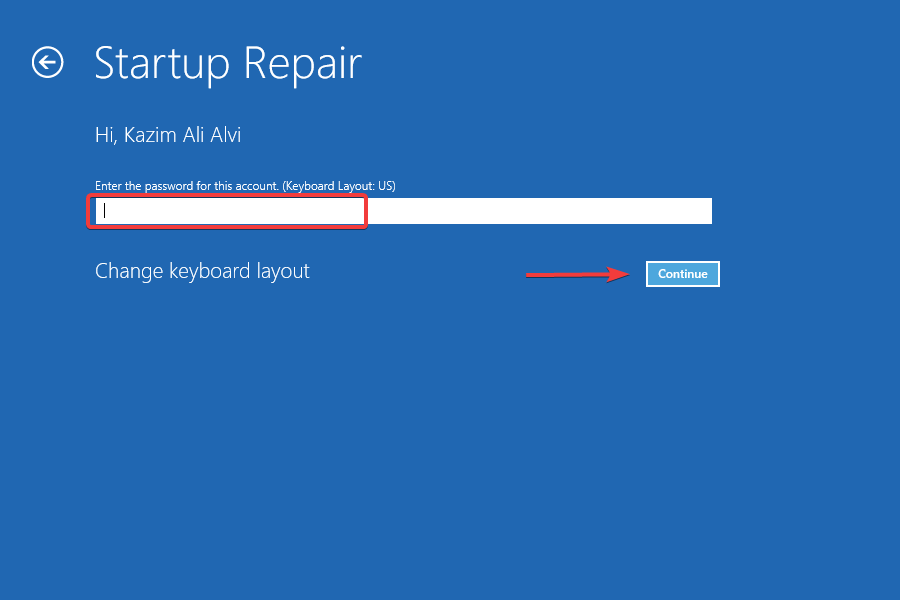
  6. Choose an account to proceed.choose account
  7. Enter the password and click on Continue to initiate the Startup Repair.enter password
  8. The repair process should begin in a few moments.

Startup repair is a built-in utility that allows users to run a scan and fix the problems preventing Windows from booting, and this should fix things if there’s no login screen in Windows 11.

4. Reinstall Windows 11

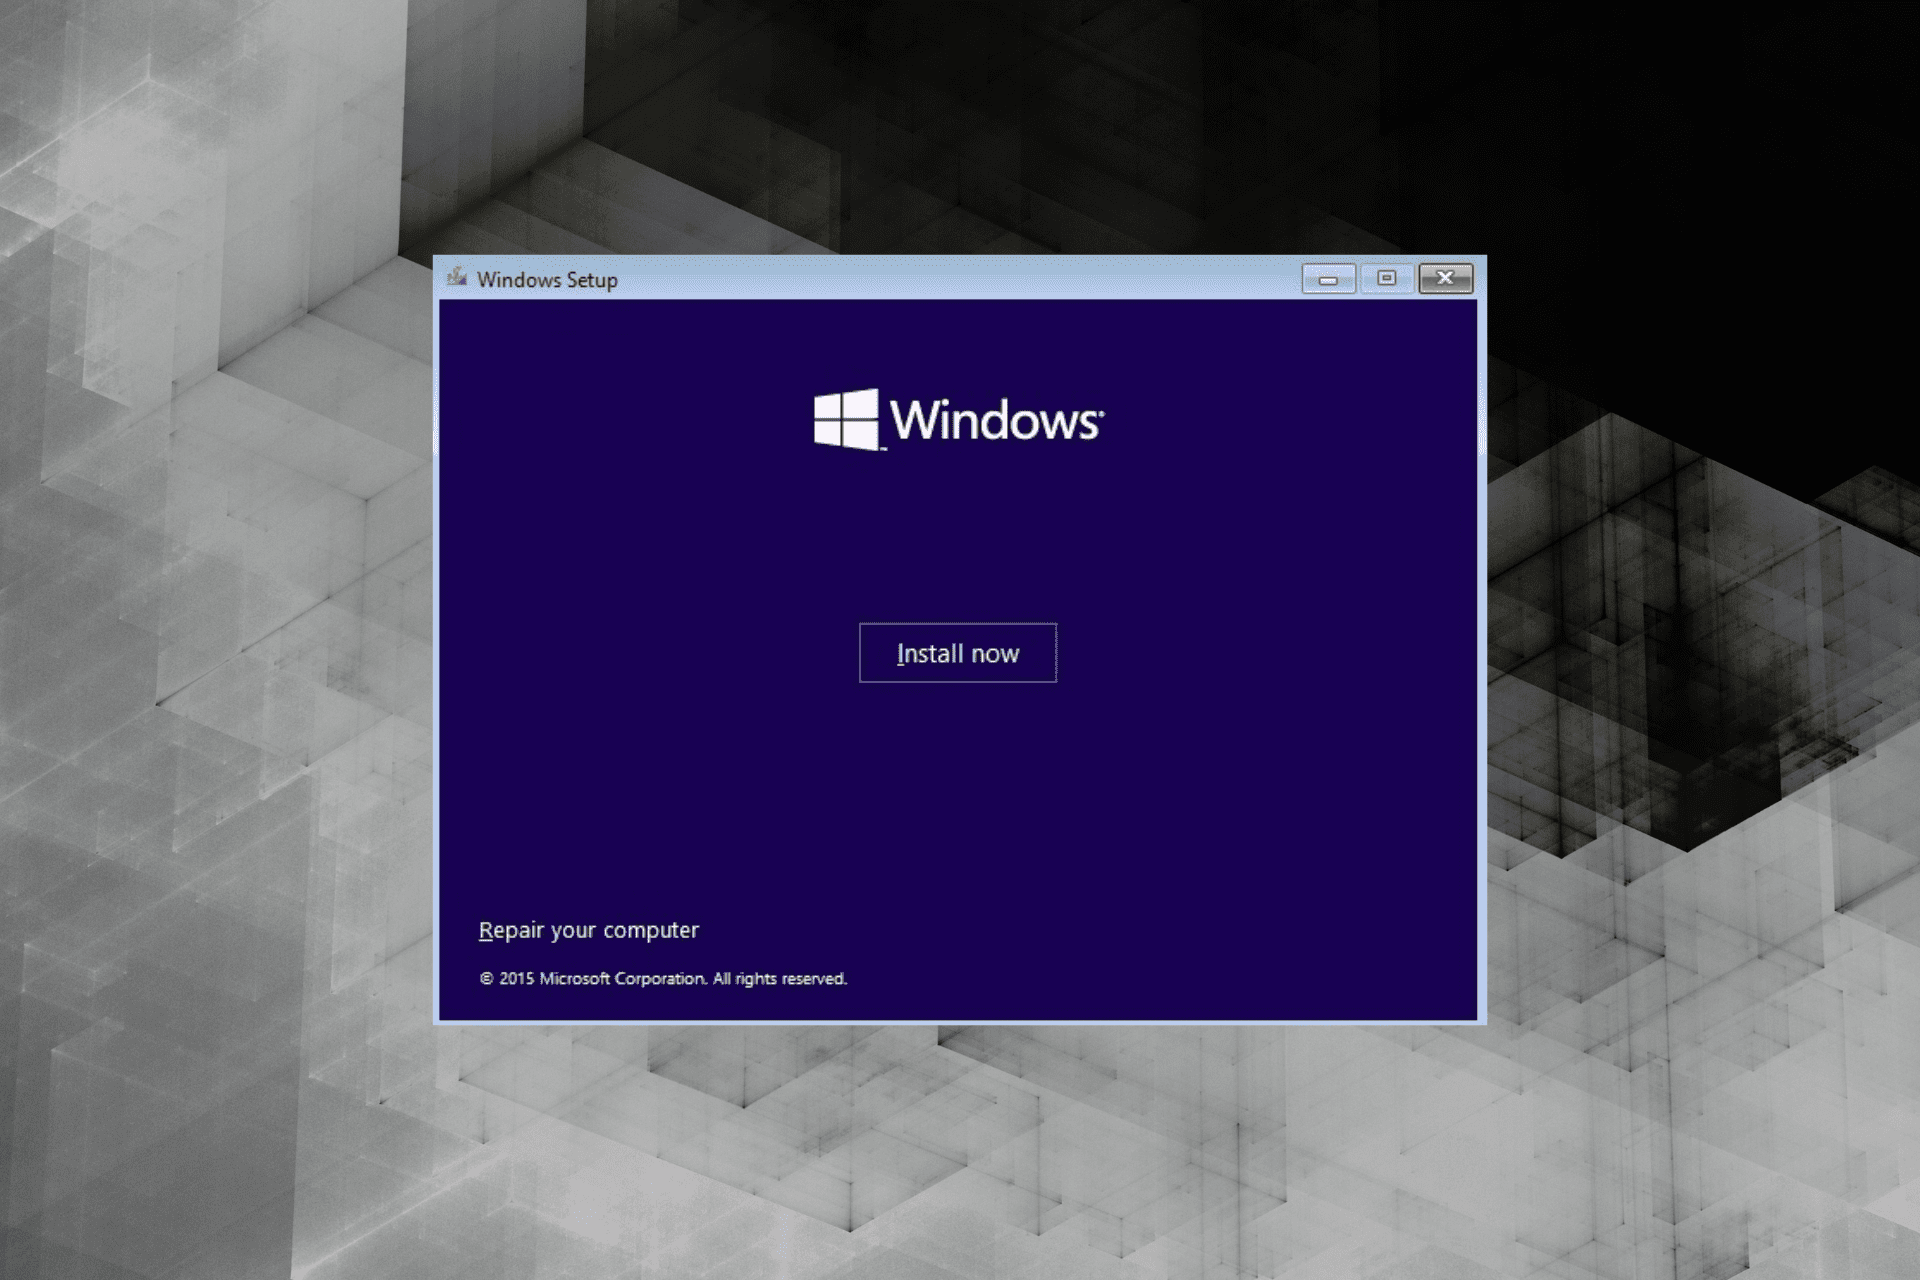
If nothing has worked, the only option that worked for others is to reinstall Windows 11. All you have to do is create a bootable drive and choose it when turning on the computer.

This primarily works when there are issues with the computer but can’t be fixed by either Startup Repair or an SFC scan. By the time you have successfully reinstalled Windows 11, the login screen should appear, if it did not earlier.

5. Create a new user account

  1. Press Windows + R to open Run, type netplwiz, and hit Enter.netplzwiz
  2. Now, click on the Add button.add
  3. Enter a Microsoft-linked address in the text field, and proceed with the on-screen instructions.microsoft account
  4. You can create a local account by clicking on Sign in without a Microsoft account (not recommended).sign in without a microsoft account to fix windows 11 no login screen
  5. Next, click on Local Account.local account
  6. Fill out the various fields here, and proceed with the account creation process.create account

If a particular account is not showing up on the login screen in Windows 11, it could be corrupt. To verify the same, create a local account, and check if it’s listed. If this works, move the data from the problematic account to the new one, if possible.

6. Perform a system restore

  1. Press Windows + R to open Run, type rstrui, and hit Enter.rstrui
  2. Select Choose a different restore point, and click on Next to proceed.choose a different restore point
  3. Choose a restore point from the list, and click on Next.restore to fix windows 11 no login screen
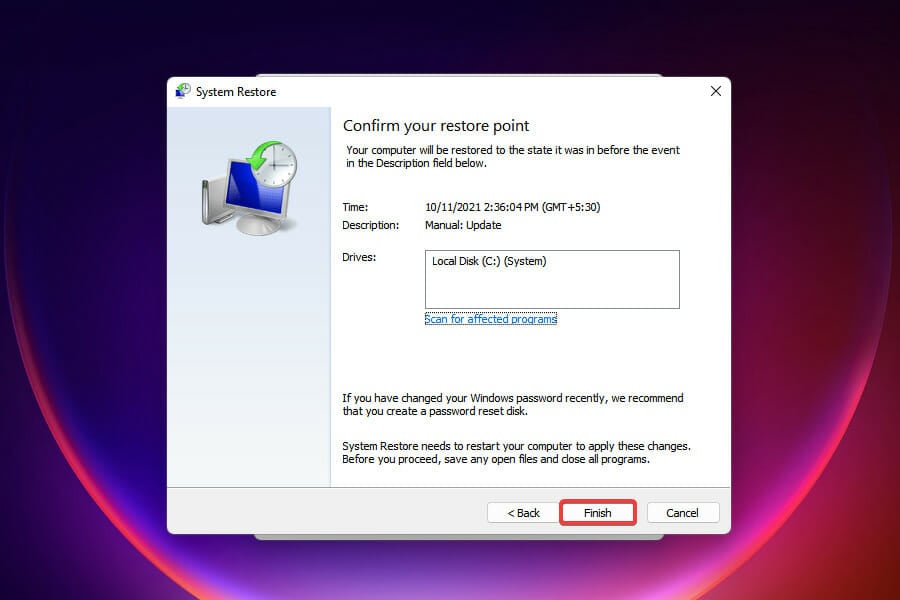
  4. Now, click on Finish to start the restore process.restore to fix windows 11 no login screen

Whenever you encounter an error on Windows, and the fixes don’t seem to work, a simple trick is to perform a system restore, and it should fix things where there’s no login screen in Windows 11.

You can also perform a system restore by using a specialized tool as it can complete this process in a simpler and safer way.

How can I prevent the no login screen error from reoccurring?

You can employ specific measures that will prevent the no login screen error and boost your computer’s performance.

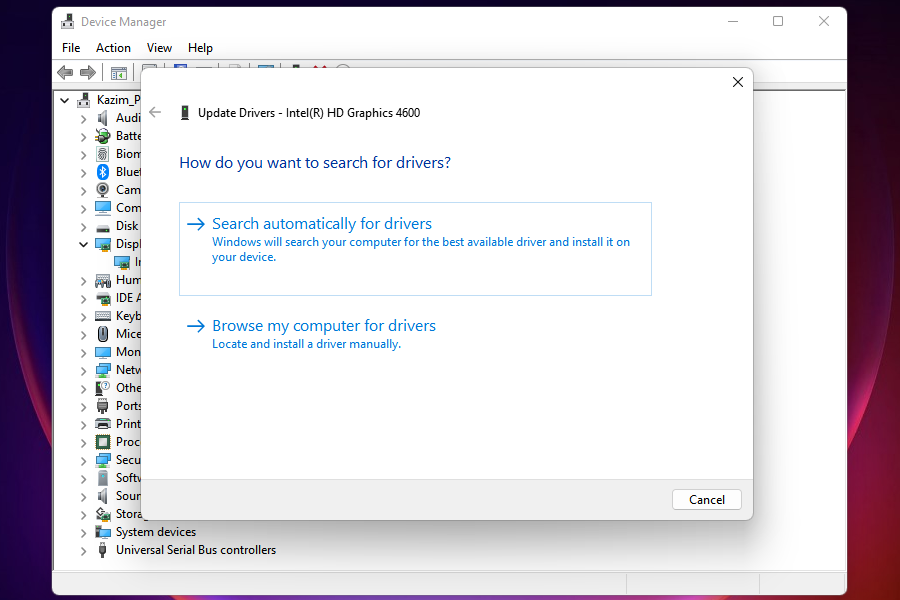
You must first update the drivers on Windows 11. Outdated drivers are likely to cause a bunch of issues. We recommend using Outbyte Driver Updater, a reliable tool that scans for updates and keeps the installed drivers up-to-date.Update driver

Another rule you must follow is to shut down your computer after each session. When you shut down the computer, it gives a break to the various components, and they start fresh when you turn on the PC.

Malware disguised as applications and tools is also known to cause many errors. So, using an excellent antivirus to secure your system would be best.

Before you leave, find out how to configure auto-login in Windows 11 and eliminate such errors.

Let us know your experience in the comments section below.

What should I ask for Christmas? [Unique Holiday gifts]

It’s a beehive of activities with shoppers making several runs to get their favorite supplies for the Christmas celebration. In case you are confused and don’t know what Christmas gifts you should ask for this yuletide season, keep reading this post.

Let’s explore a few ideas of what you can add to your list of requests or acquisitions to make the Christmas celebration a blast.

These listed ideas are perfect if you’re interested in the following:

  • Perfect Christmas gift
  • Unique Christmas presents
  • Cheap Christmas gifts

What Christmas gifts should I ask for this Christmas?

iClever BK03 Bluetooth keyboard

  • iOS, Android and Windows-compatible
  • Ergonomic and durable design
  • Great for editors and writers
  • Portable and lightweight
  • Some may find it to be a bit small

The iClever BK03 Bluetooth keyboard offers users a Windows-compatible device that should take away the stress of on-screen keyboards this Christmas season, typing away with the hot QWERTY keys.

With the 64-hour battery life, you get to enjoy uninterrupted functionality anytime.

And because it is foldable, light, and ultra-slim it adds no stress with carrying around. Now, you’ve got your answer on, what Christmas gift should I ask for this season!

Eufy by Anker vacuum cleaner

  • Automatically increases suction power within 1.5 seconds when extra vacuuming strength is needed
  • Consistent, powerful suction at a volume no louder than an operating microwave
  • Anti-scratch tempered glass-top cover for protection
  • Increased suction power at 1300Pa
  • You need to make sure you don't trip on it

The Eufy by Anker vacuum cleaner adds comfort and style to your home or office cleaning experience this Christmas season.

The incorporation of Alexa features using voice prompt, remote control or app makes it all the easier to vacuum clean hard floor surfaces or thin carpets.

With two hours of battery life, ergonomic design, and more the Eufy by Anker vacuum cleaner is the appropriate response to your question; what Christmas gift should I ask for this season?

Cuisinart Quart Ice cream maker

  • Easy-lock lid with window
  • Three condiment containers
  • Makes very creamy ice cream
  • Double-insulated freezer bowl
  • Fully automatic soft-serve ice-cream maker
  • Can be a bit noisy

How else to enjoy the thrill and frill of the yuletide season except with the Cuisinart ice cream maker? It gives instant access to your lovely creamy ice cream from this easy-to-operate machine.

The freezer bowl helps to mix all items briskly with the double-insulated walls helping to keep to cool long enough for a pleasurable serving experience.

Get friends and loved ones excited this Christmas by dishing out ice cream with the Cuisinart Ice cream maker.

Yeah, we know this is not a tech gift, but who would say ‘No’ to a nice creamy ice cream? If you can get it as a Christmas deal, the better.

Fire 7 Tablet with Alexa

  • Up to 7 hours of reading, browsing the web, watching video, and listening to music
  • 7-inch IPS display; 16 or 32 GB of internal storage
  • Hands-free with Alexa, including on/off toggle
  • Faster 1.3 GHz quad-core processor
  • Battery drains daily by about 10% even if it sits idly

Amazon’s Fire 7 tablet clearly answers the, what Christmas gift should I ask for question. It offers 16 GB of storage space plus a microSD slot for storing impressive videos and pictures this Christmas season.

With the Alexa feature users can get any question answered or watch millions of Echo show and spot, movies, TV shows, Netflix, Spotify, play music, follow the news, and many more.

iFox iF012 Bluetooth Shower Speaker

  • Great also as a Bluetooth speaker in the car as it suctions to your car windscreen
  • 100% waterproof, even fully submersible
  • Impressive connectivity range
  • Bluetooth version 5.0
  • The battery life is a bit short

Want to know what Christmas gift should I ask for this yuletide season?

Then go for the iFox iF012 Bluetooth shower speaker and never miss any minute of your lovely musical renditions again even when going to indoor or outdoor events.

It is compatible with any smart device, is resistant to water, and carries batteries that can last up to 10 hours before recharging.

The list never gets exhausted just as the offers this season are endless. So, it’s quite understandable if one ponders what Christmas gift should I ask for.

However, making a list of what you need and having a budget can help make the most of the moment this Christmas.

It would be nice to acquire a blend of Christmas gifts from tech gifts, to cooking items, electronics, sports gear, wears, and more just to ensure an exciting Christmas celebration.

But suggesting one or some of the above list of Christmas gift items should surely increase the thrill of the moment. Have a splendid Christmas shopping session.

Windows Store Error 0x80d0000a: Solved For Good

Error code 0x80d0000a is one of the most common Windows Store issues that users have been reporting lately. This error prevents users from downloading and updating apps, and even updating the Store itself.

Since almost every Windows 10 user uses at least one Windows Store app, this error can be a serious and annoying issue. So, we need to address it as soon as possible.

Luckily, there’s a simple solution for this issue, and after applying it, you shouldn’t have any problems.

Sometimes you might not be able to access Windows Store due to error 0x80d0000a. Speaking of this error message, here are some similar issues that users reported:

  • Windows app store error code 0x80d0000a – If you encounter this error while trying to use Windows Store, simply run Windows Store Apps troubleshooter and the issue should be resolved.
  • Windows Store cache may be damaged – Sometimes issues with cache can cause problems with Windows Store. However, you can fix that problem simply by renaming the Cache directory.
  • Windows 10 update error 0x80d0000a – This error can occur while trying to download updates. If this happens, be sure to check your network connection.

How can I fix the Windows Store error 0x80d0000a?


1. Use WSReset

So, to fix everything, you just need to reset the Store cache, using the WSReset feature, and that’s it. After performing this workaround, the Windows Store should work normally, and you won’t have any problems downloading and updating your apps and games.

In case you don’t know how to run WSReset, follow these instructions:

  1. Press the Windows Key + R to open the Run dialog.
  2. Type WSReset.exe, and then click OK.
    Windows Store cache may be damaged
  3. The Store will now open, and the following message will appear: The cache for the store was cleared. You can now browse the store for apps.

This command will completely reset the Windows Store, and your problems should be resolved. However, some users have reported that running the WSReset.exe doesn’t solve the problem at first. In that case, run the command again, reboot your computer, and you should be fine.


2. Run Windows Store Apps troubleshooter

According to users, if you keep getting error 0x80d0000a while trying to use Windows Store, you might be able to fix the problem simply by running Windows Store troubleshooter. Built-in troubleshooters can fix various problems, and in order to run the troubleshooter, you need to do the following:

  1. Press Windows Key + I to open the Settings app.
  2. Navigate to Update & Security section.
    Windows Store cache may be damaged
  3. Now choose Troubleshoot from the menu on the left. In the right pane, select Windows Store Apps and click the Run the troubleshooter button.
    Windows 10 update error 0x80d0000a
  4. Now follow the instructions on the screen to complete the troubleshooter.

Once the troubleshooter is finished, check if the Windows Store error 0x80d0000a is resolved.


3. Rename the Cache folder

If you’re having a problem with Windows Store error 0x80d0000a, you might be able to fix it by renaming the Cache folder. Sometimes your cache can get corrupted, but by renaming this folder, you’ll force Windows Store to recreate the cache. To rename the Cache folder, first you need to do the following:

  1. Open Task Manager. You can do that by pressing Ctrl + Shift + Esc on your keyboard.
  2. When Task Manager opens, locate Store and Store Broker tasks. Right-click each task and choose End Task from the menu.
    Windows Store cache may be damaged

After ending these two tasks, you can make changes to the Cache folder. To do that, just follow these steps:

  1. Press Windows Key + R and enter %localappdata%. Press Enter or click OK.
    Windows 10 update error 0x80d0000a
  2. Navigate to PackagesMicrosoft.WindowsStore_8wekyb3d8bbweLocalState directory.
  3. Inside of LocalState folder, you should see Cache directory. Rename Cache directory to CacheOld.
  4. Now create a new folder in the same directory and name it Cache.

After doing that, you should be able to access Windows Store without any issues.


4. Try using VPN software

If you have problems with Windows Store and error 0x80d0000a, the issue might be your Internet connection. Few users reported that they solved this problem simply by using a VPN software. In case you’re not familiar, VPN software is designed to protect your privacy and give you a new IP address.

Several users reported that by using a VPN they were able to access Windows Store, so you might want to consider using a VPN software in the future. There are many great VPN applications available, but one of the best is CyberGhost VPN.


5. Perform a Disk Cleanup

According to users, sometimes the Windows Store error 0x80d0000a can be caused by temporary files on your PC. Temporary files can get corrupted and that can lead to this and many other problems. However, you might be able to solve this issue simply by performing Disk Cleanup. To do that, follow these steps:

  1. Press Windows Key + S and enter disk cleanup. Select Disk Cleanup from the list of results.
    Windows 10 update error 0x80d0000a
  2. Select your system drive, by default it should be C, and click OK.
    Windows app store error code 0x80d0000a
  3. Select all items on the list and click OK. If you want, you can select Clean up system files in order to remove temporary system files.
    Windows Store cache may be damaged

After cleaning up your files, check if the problem is resolved. If you’re not a fan of Disk Cleanup and you want a more powerful tool to remove temporary files, you might want to consider using CCleaner.


6. Reinstall all Windows apps

If you have problems with Windows Store and error 0x80d0000a, you might be able to fix the problem simply by running a single command from PowerShell. According to users, you can fix the problem simply by reinstalling all Windows apps.

Before you make any changes, we advise you to create a System Restore point. PowerShell is an advanced tool, and sometimes certain issues can occur if you’re not careful, therefore it’s always a good idea to have System Restore point ready.

To reinstall Windows apps, you need to do the following:

  1. Press Windows Key + S and enter powershell. Now right-click Windows PowerShell from the list of results and choose Run as administrator.
    Windows 10 update error 0x80d0000a
  2. When PowerShell starts, run Get-AppXPackage | Foreach {Add-AppxPackage -DisableDevelopmentMode -Register “$($_.InstallLocation)AppXManifest.xml command.
    Windows app store error code 0x80d0000a

After running this command, all Windows applications will be reinstalled and the Windows Store error 0x80d0000a will be resolved.


7. Make sure that your system is up to date

If you have any problems with Windows Store, you might be able to fix them simply by updating your system. Certain issues can occur that can interfere with Windows Store, but you should be able to fix them by keeping your system up to date.

Windows 10 automatically installs the missing updates, but sometimes you might miss few updates if there are any issues with your system. However, you can always check for updates manually by doing the following:

  1. Press Windows Key + I to open the Settings app. Go to Update & Security section.
  2. In the right pane, click Check for updates button.
    Windows app store error code 0x80d0000a

If any updates are available, Windows will download them automatically in the background. Once the updates are downloaded, Windows will install them as soon as you restart your PC. After updating your system, check if the problem is resolved.


8. Create a new user account

If you have problems with Windows Store and error 0x80d0000a, the issue might be your user account. Your user account can get corrupted, and if that’s the case, the only solution is to create a new user account. This is relatively simple, and you can do it by following these steps:

  1. Open the Settings app and go to the Accounts section.
    Windows app store error code 0x80d0000a
  2. In the left pane go to Family & other people. In the right pane, click Add someone else to this PC.
    Windows app store error code 0x80d0000a
  3. Select I don’t have this person’s sign-in information.
    Windows Store cache may be damaged
  4. You’ll be asked to create a new Microsoft account. Choose to Add a user without a Microsoft account.
    Windows 10 update error 0x80d0000a
  5. Enter the desired username and click Next.
    Windows app store error code 0x80d0000a

Once you create a new account, switch to it and check if that solves your problem. If the issue doesn’t appear on the new account, you should move your personal files to it and start using it instead of your old account.

That’s about it, according to numerous reports by Windows 10 users worldwide, this should solve the problem completely. In case the problem remains unresolved, you should check out our dedicated article on how to fix general Windows Store bugs for additional solutions.

If you have any comments, questions, or suggestions regarding the Windows Store error 0x80d0000a, please let us know in the comments section below.

Clean Install Windows 10 on SSD: 13 Steps to Properly do it

Windows 10 is a free upgrade for those running the previous iteration and is one preferred choice. But for those already running Windows 10, a clean install on SSD is usually the best choice.

Experts often recommend installing Windows 10 on SSD when the computer has both HDD and SDD since the latter helps deliver faster performance. So, let’s find out how you can install Windows 10 on SSD without removing HDD.

Can I directly install Windows 10 on SSD?

Yes, you can directly clean install Windows 10 on SSD UEFI without affecting the PC’s functionality. The process is straightforward and shouldn’t take much time.

Before you do, here are a few benefits of clean installing Windows 11:

  • Eliminates errors – One of the common reasons why users do a clean install is that it fixes all errors seamlessly.
  • Removes malware and virus – A clean install of Windows 10 removes any malware or virus on the PC, even if it’s disguised as an app or process.
  • Fixes corrupt system files – If the system files are corrupt, users usually go with the SFC scan and DISM tool. But if these two fail, only a clean install will ensure that all the system files are replaced.

How can I clean install Windows 10 on SSD?

Note icon NOTE
Before you begin, make sure you have a USB flash drive plugged into the PC, where you will create a bootable drive. Also, connect the SSD to the PC where you want to install Windows 10.
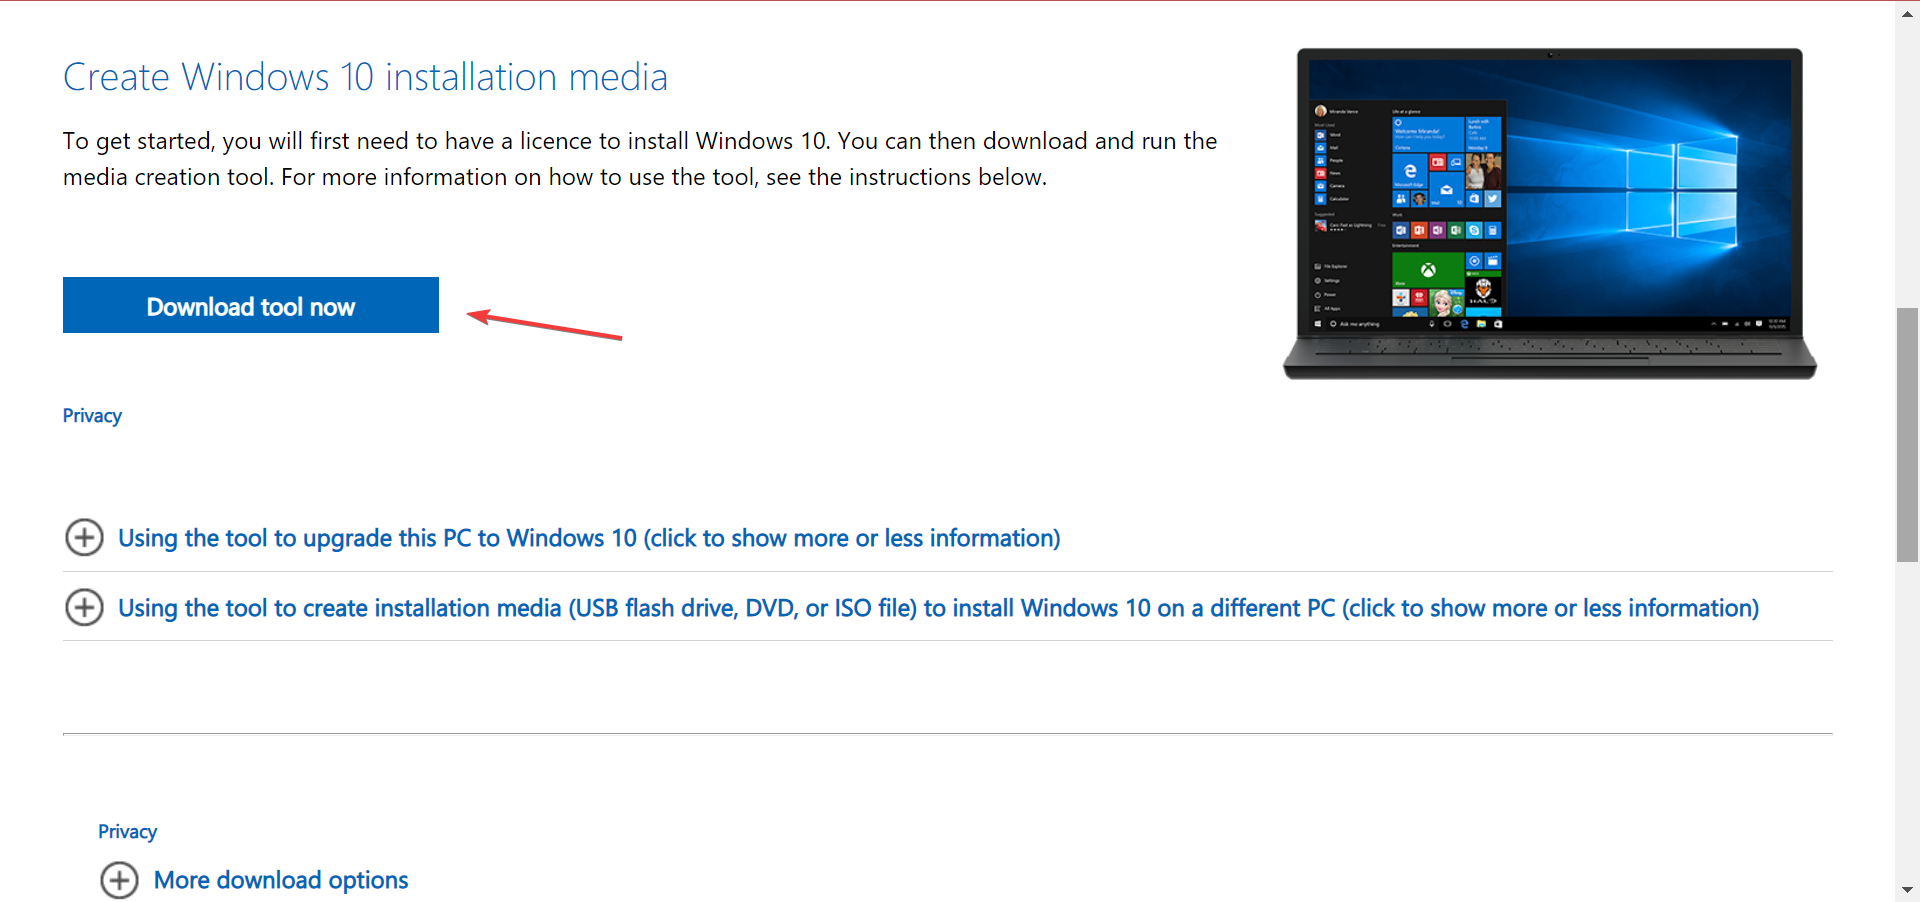
  1. Go to Microsoft’s official website, and click on the Download tool now to get the Windows 10 Media Creation Tool.download tool
  2. Once done, run the setup and click Yes in the UAC prompt.
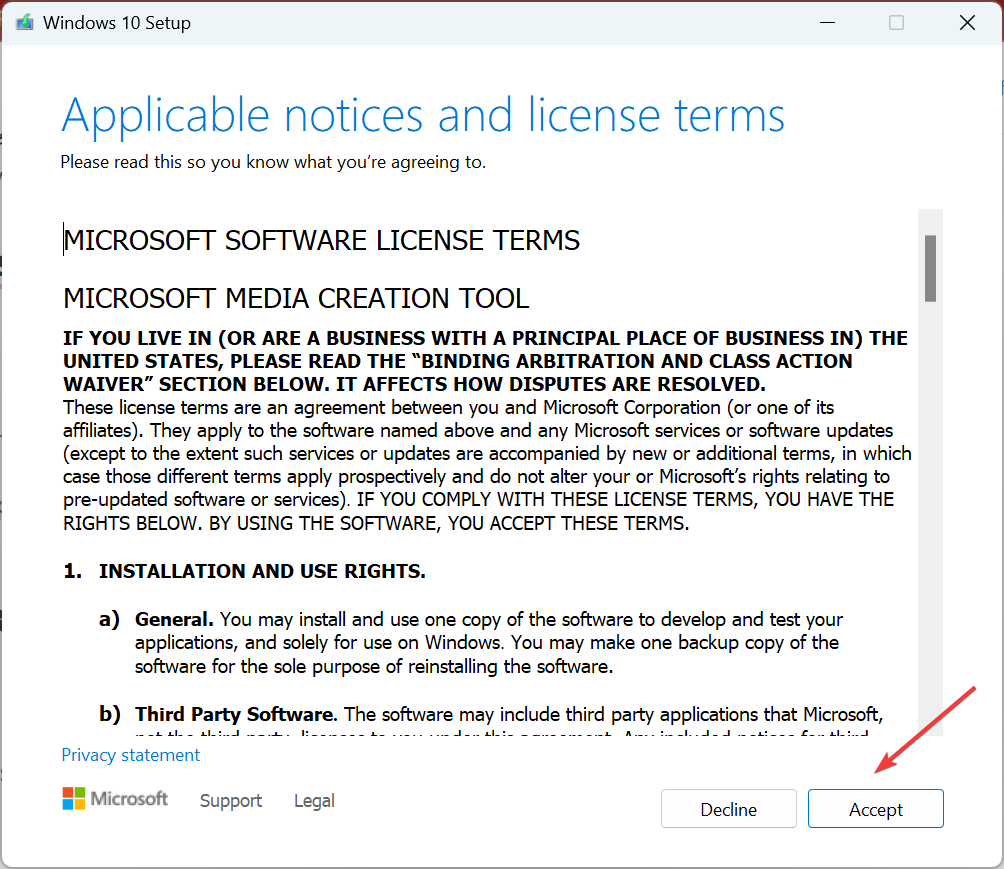
  3. Click on Accept to agree to the license terms.accept
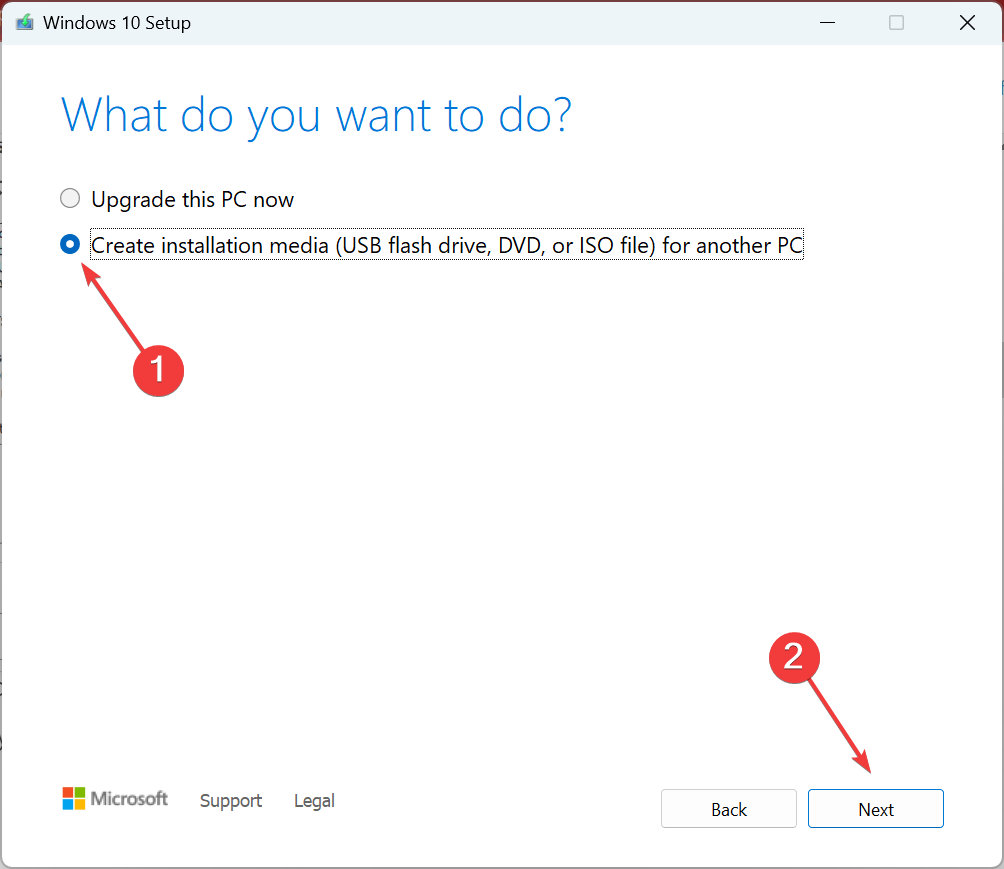
  4. Choose Create installation media (USB flash drive, DVD, or ISO file) for another PC, and then click Next.create installation media to clean install windows 10 on ssd
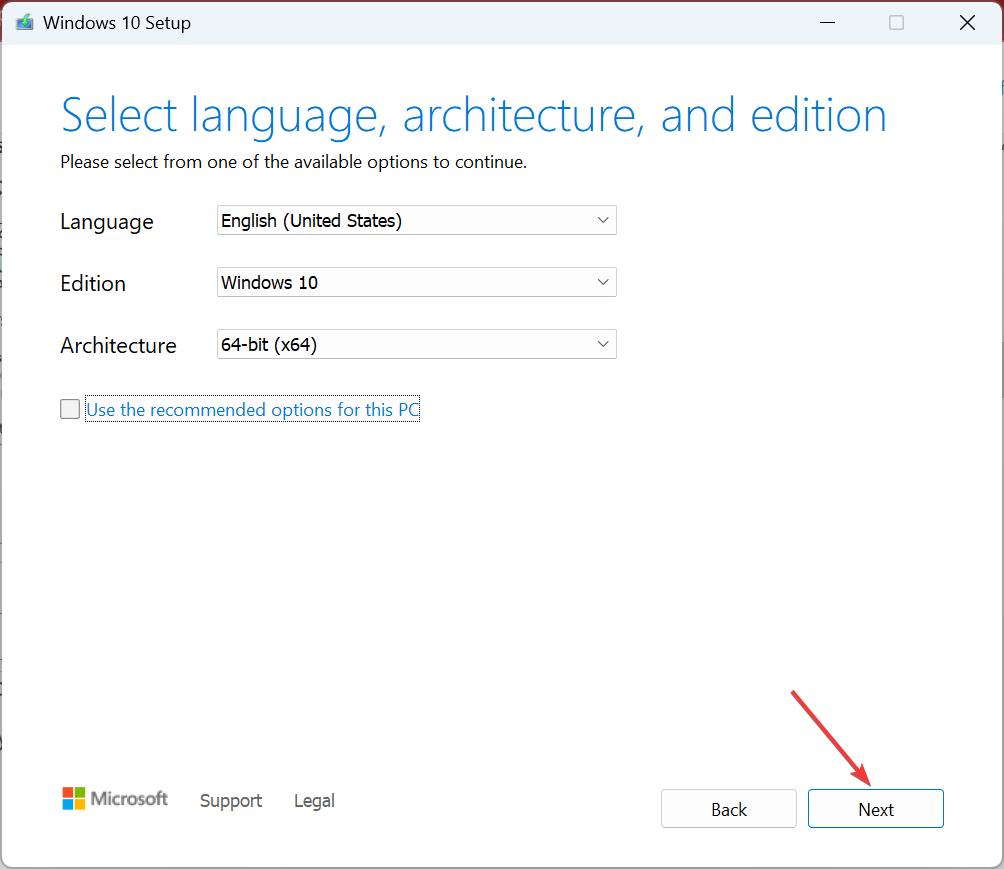
  5. Select the preferred options from the dropdown menus, go with the default settings, and click Next.install
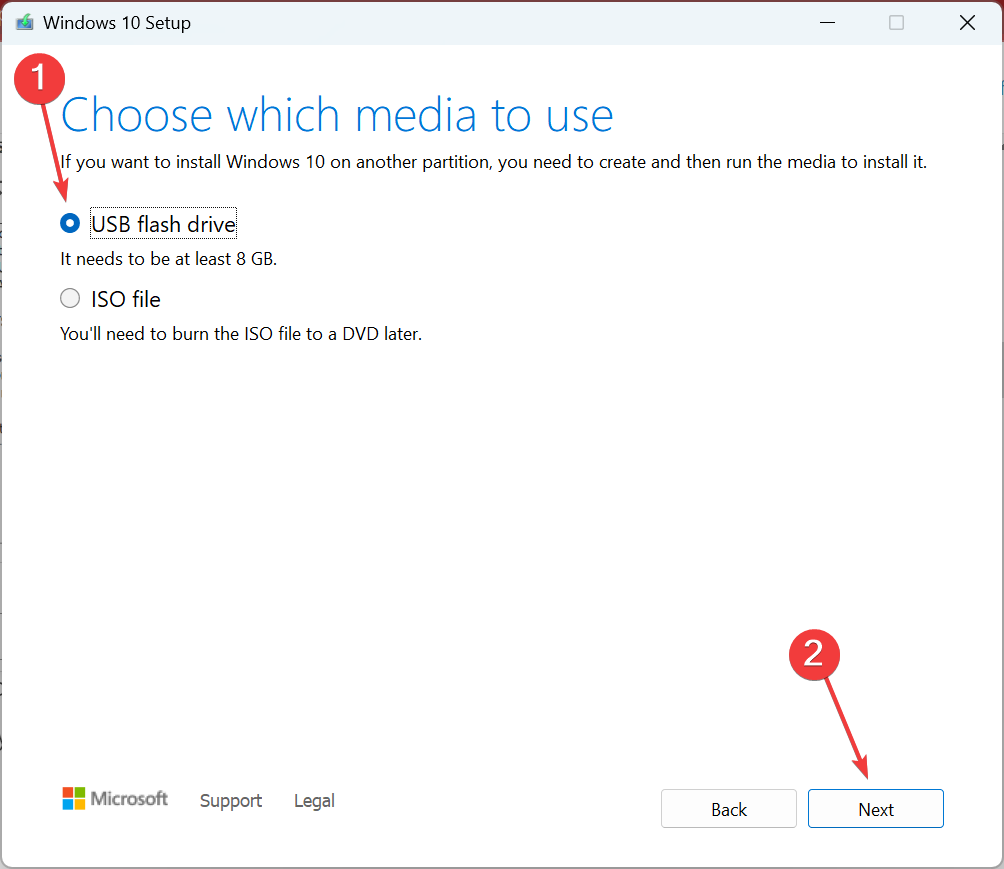
  6. Now, choose USB flash drive and click Next.USB drive
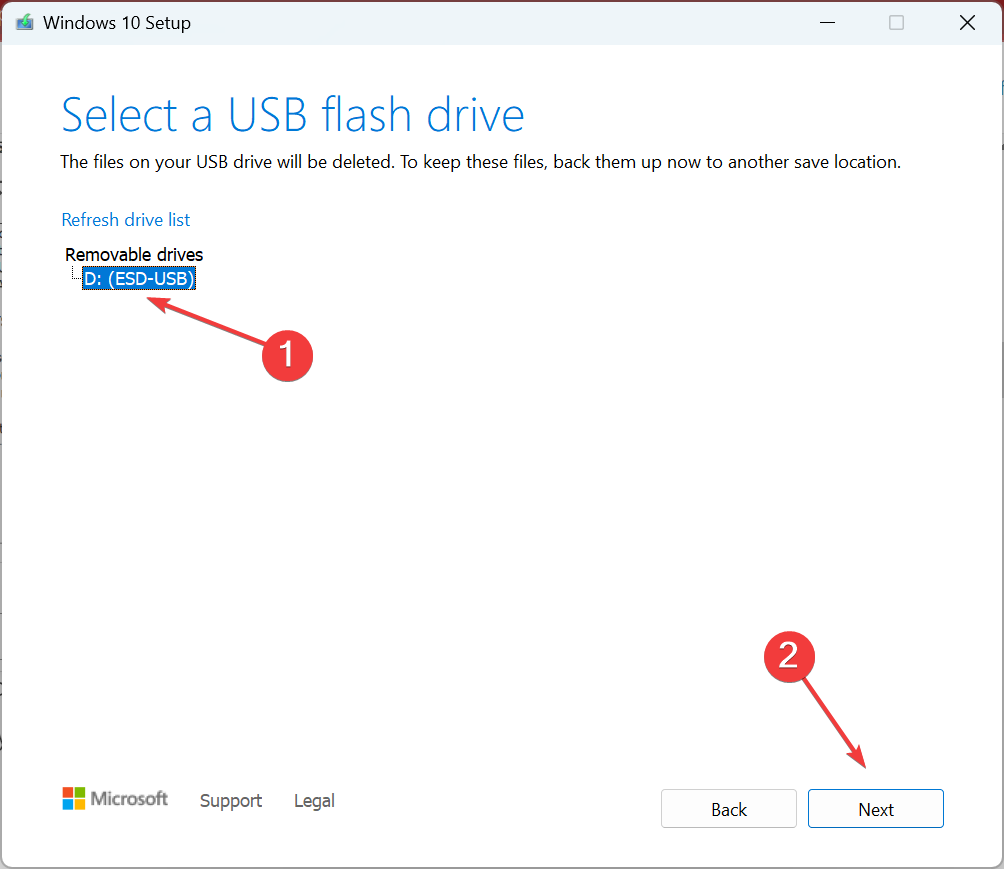
  7. Select the USB drive you connected earlier from the list, click Next, and wait for the process to complete.choose drive
  8. After the bootable drive is created, you will see the message, Your USB flash drive is ready.
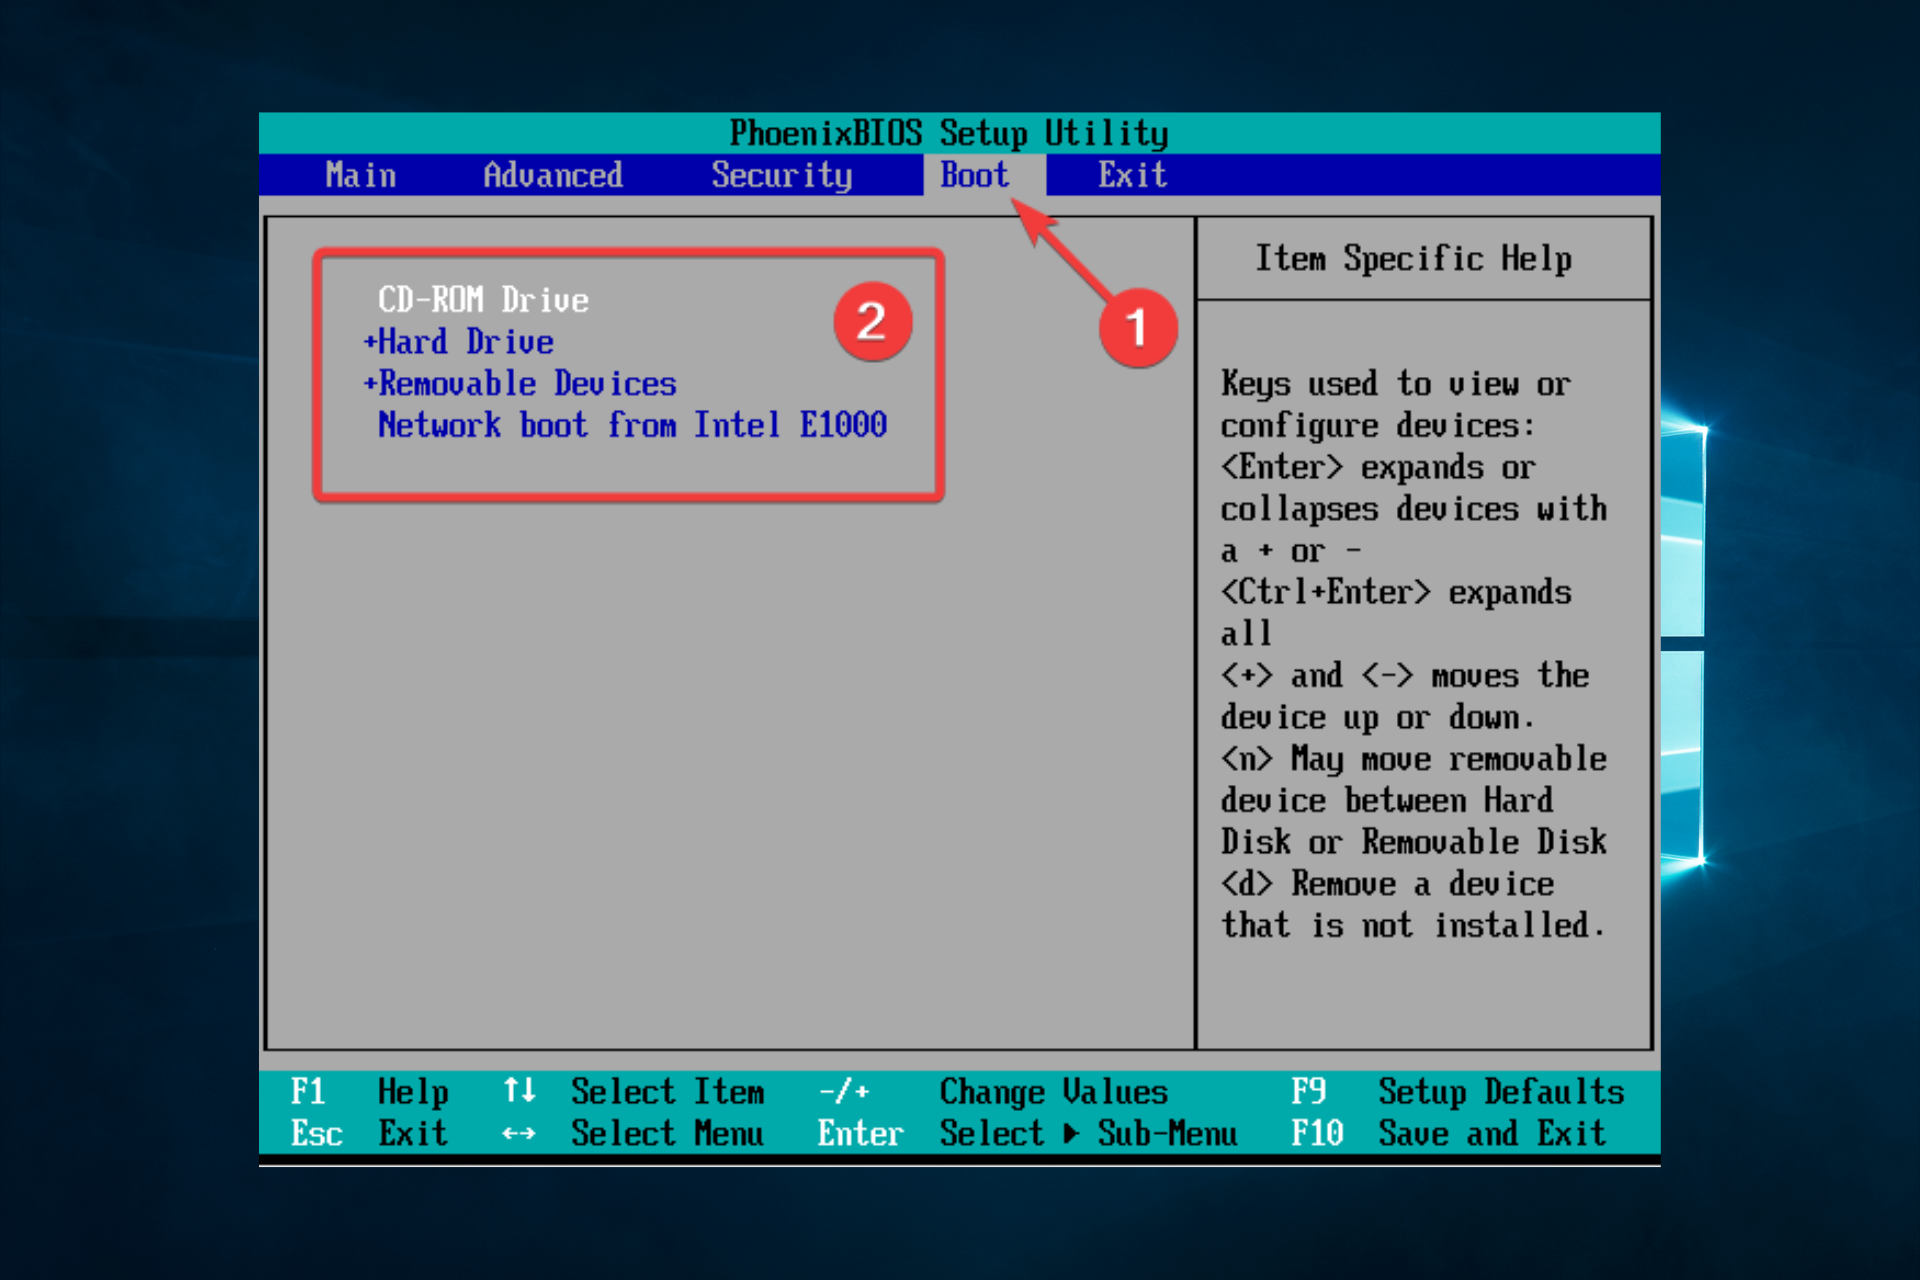
  9. The next step is to connect the USB flash drive to the computer where you want to clean install Windows 10 on SSD, press F10 or Del to enter the BIOS, and select the USB drive as the boot device.
  10. Choose the appropriate responses to continue with the process.
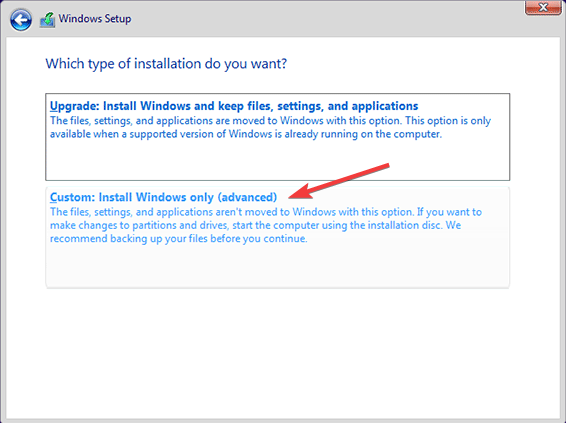
  11. When asked, choose Custom: Install Windows only (advanced).custom
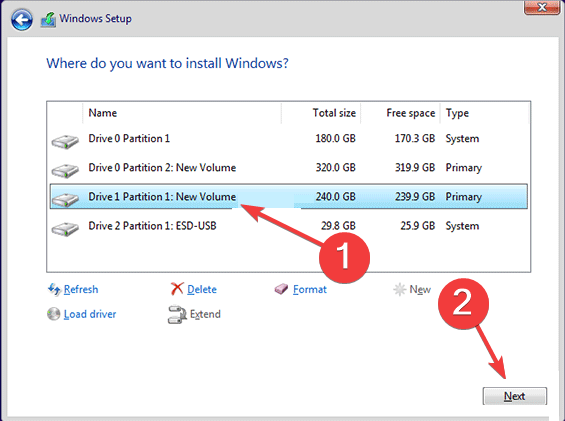
  12. Select the SSD from the partitions listed here, and click Next.choose to get clean install windows 10 on ssd
  13. All that’s left for you is to wait for the installation to complete.

That’s it! Within a while, you would have completed a clean install of Windows 10 on m.2 SSD and should notice a considerably shorter boot time and better performance.

Also, if the C: drive already exists on the SSD, you can clean install Windows 10 on the new SSD without USB. Besides, if you don’t have an SSD yet, check the best SSDs available, and get one today!

Tell us your experience of running Windows 10 on SSD in the comments section below.

Xbox One is Not Finding Wi-Fi? Here’s How to Fix it

Xbox One consoles use Wi-Fi to connect to the Xbox Live service. This enables you to access features like online games and streaming videos. However, you cannot get such access when your Xbox One is not finding WiFi, as the connection has to work well to enable this.

There are several reasons, mostly technical, why your Xbox One won’t find Wi-Fi or other internet connections you can use. These prevent access to a network and also to Xbox Live.

When there’s no connection or the connection is not visible, you may get an error on your console’s screen giving suggestions to resolve the issue.

However, if you’re stuck and need quick-fix solutions to resolve the problem, try the solutions below.

What can I do if Xbox One is not finding Wi-Fi?

  • Check if you can see any other wireless networks.
  • Check if your other devices can see your wireless network. This helps determine if the issue is with your wireless router. If you have a computer, phone, TV, or other consoles for gaming, check if they can see your wireless network.
  • After every few seconds check if the network name (SSID) is broadcasted by your wireless router every few seconds. This lets other wireless devices discover the network. So, it may not be seen if your router isn’t broadcasting the Wi-Fi network name.
  • If no other wireless devices can detect the Wi-Fi, then your router is the problem, not your console. You can fix this by restarting the network hardware.

1. Clear the Alternate MAC address in Xbox

  1. Press the Xbox button on your controller to open the Guide menu.
  2. Navigate to the Profile & System tab and access Settings.
  3. Now, choose Network settings, then select Advanced settings.
  4. Access the Alternate MAC address option.
  5. Choose the Clear option to remove the existing alternate MAC address.
  6. Now, check the network connection by going to Profile & system > Settings > General > Network settings > Test network connection and see if the problem is solved.

We also have a complete guide on how to add an alternate MAC address on your Xbox, but you may also use it for removing it.

2. Check for interference with your signal

If the router broadcasts the SSID or network name, then the Wi-Fi may be working properly, so you may want to check whether something is interfering so Xbox One is not picking up any Wi-Fi networks. In this case, do the following:

Disconnect third-party headsets as these can cause interference. They broadcast on the same frequency as the wireless router, so disconnect the power from the wireless headset and check if you can see the Wi-Fi.

To do this:

  1. Open the guide on Xbox
  2. Select Settings.
  3. Click All Settings and choose Network.
  4. Tap Network settings.
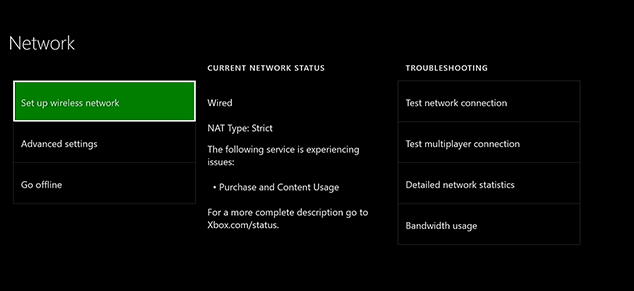
  5. Select Setup wireless network on the left panexbox Network settings
  6. Check if your wireless network is listed under Which one’s yours? If it is listed, then it means some third party headsets are affecting the connection, especially if they have a transmitter (base station).

If it isn’t listed, check for any other wireless interference. This can be anything from electronic devices like microwave ovens, air conditioners, CRT televisions, wireless headsets, baby monitors, other wireless networks, cordless phones, and wireless speakers.

3. Power cycle your console and network hardware

  1. Unplug the power cable from the router, modem or gateway.
  2. Press Xbox button to open the guide.
  3. Select Settings and choose Restart console.
  4. Then tap Yes to confirm and wait five minutes.
  5. Plug in the router and wait for all of the lights to return.
  6. Plug in the rest of your hardware and check if you still experience the same connection issue.

4. Soft reset your Xbox

  1. Press and hold the Xbox Power button on your console for 10 seconds until it turns off.
  2. Unplug the system from the outlet and wait at least 10 seconds.
  3. Plug it back in and press the Xbox button on your console to turn it on.

5. Check that the router is specifying the correct SSID for Xbox One

  1. Verify that the router is broadcasting the correct SSID.
  2. Configure the wireless settings on your Xbox console.
  3. Use the SSID that is broadcast by the router.
  4. Open the guide and select Settings.
  5. Select Network settings
  6. On the Network Settings screen, select Setup wireless network and check the SSID name.

6. Restore your router to factory defaults

Note icon NOTE
Restoring your router to factory defaults resets your SSID and deletes the current wireless password.

When you do this, all the router settings return to how they were when you bought the router. To reset your router, follow these steps:

  1. Check the back or bottom of the router for a button or small hole labeled Reset.
  2. Press the button and hold for at least 10 to 30 seconds. When the lights on your router blink, the router has been reset.
  3. Reconfigure the SSID and password of your wireless router.

7. Reset your internet connection

  1. Unplug the power cord from your modem.
  2. Disconnect the Internet connection cable
  3. Unplug the power cord from your router and wait 60 seconds
  4. Connect the power cord and internet connection cable to the modem.
  5. Once the modem lights are back to normal, connect the power cable to your router.
  6. Wait 60 seconds and check if you are connected to the Internet.

Once your router is reset, check to see if you can see your wireless network by doing this.

8. Check if your firmware needs an upgrade

Router firmware that has older information may not work correctly. Manufacturers of these routers usually provide updates for performance improvement, security, connectivity, and stability. Updating your firmware can resolve issues with connections and slow performance.

Download and update then install them yourself, but ensure your computer is directly connected to the router via wired connection so as to upload the new firmware file directly to your router.

Once updated, use the steps below to check that your wireless network is working. If you still don’t see your wireless network, go to the next solution.

9. Hard reset your Xbox console

  1. Turn the system on and press the Xbox button on the controller.
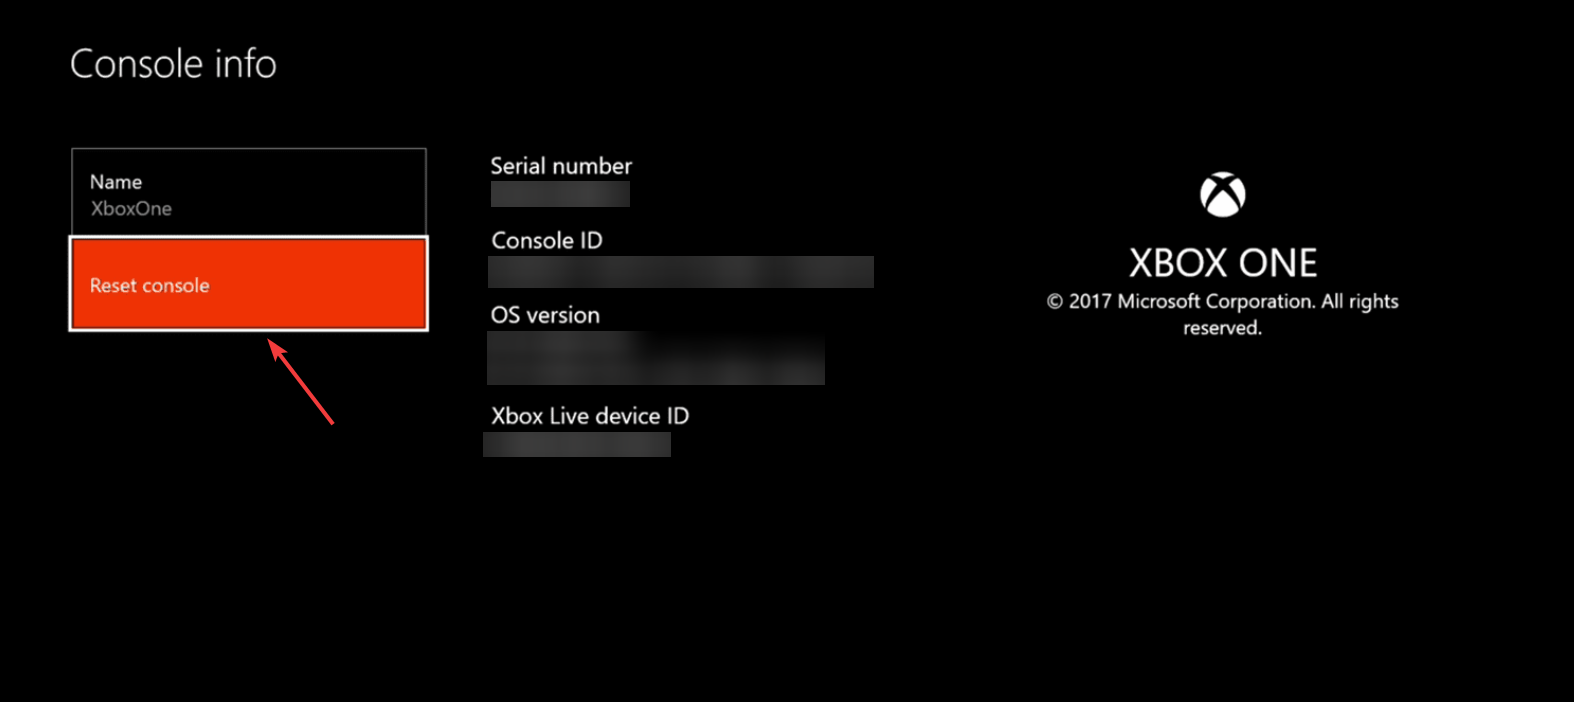
  2. Select Profile & system > Settings > System > Console info.
  3. Select Reset Console.
  4. Now, you can either choose Reset and remove everything removing all data from your Xbox, or select Reset and keep my games & apps that will not delete your games or game data.

If Xbox is still not finding Wi-Fi connections, you may need to get new network hardware because it may indicate that your router is incompatible with your console and with Xbox Live. Of course, you may also opt for a cable connection instead if that is available.

Similarly, the router may be damaged or doesn’t work correctly. If it is incompatible or damaged, check with your hardware manufacturer.

Were you able to find a solution that works from the ones on this list? Let us know in the comments section below.

Microsoft Store Keeps Opening: How to Stop it

Microsoft Store is a free app that helps you browse, purchase and manage your digital content. With Microsoft Store, you can enjoy your favorite movies, music, TV shows, and apps on your Windows PC or device. 

That being said, it is more useful when you want to open it intentionally rather than having it open itself randomly. Elsewhere, users also complained about the Microsoft Store not opening but we have already addressed that in our detailed guide.

Why does my Microsoft Store keep opening?

Wondering why the Microsoft Store keeps opening? Here are some possible reasons:

  • Virus infection – If you have multiple instances of Microsoft Store, you can check to see if there is an active malware infection on your computer. This can cause the Microsoft Store to close immediately after it opens.
  • Program conflicts – If there are other programs installed on your PC that use similar services as the Microsoft Store, this can result in a conflict and cause them to stop working correctly.
  • Pending updates – If you have a bunch of programs that are due for an update, Microsoft Store will keep popping up until you finish updating them.

How do I stop the Microsoft Store from popping up randomly?

As always, a few preliminary checks could save the day. These include:

  • Close the Microsoft Store from the Task Manager. Sometimes, Windows won’t end tasks in Task Manager.
  • Shut down any background processes that could be using the app.
  • Finally, try restarting your PC and see if it gets rid of the problem.

1. Scan for viruses 

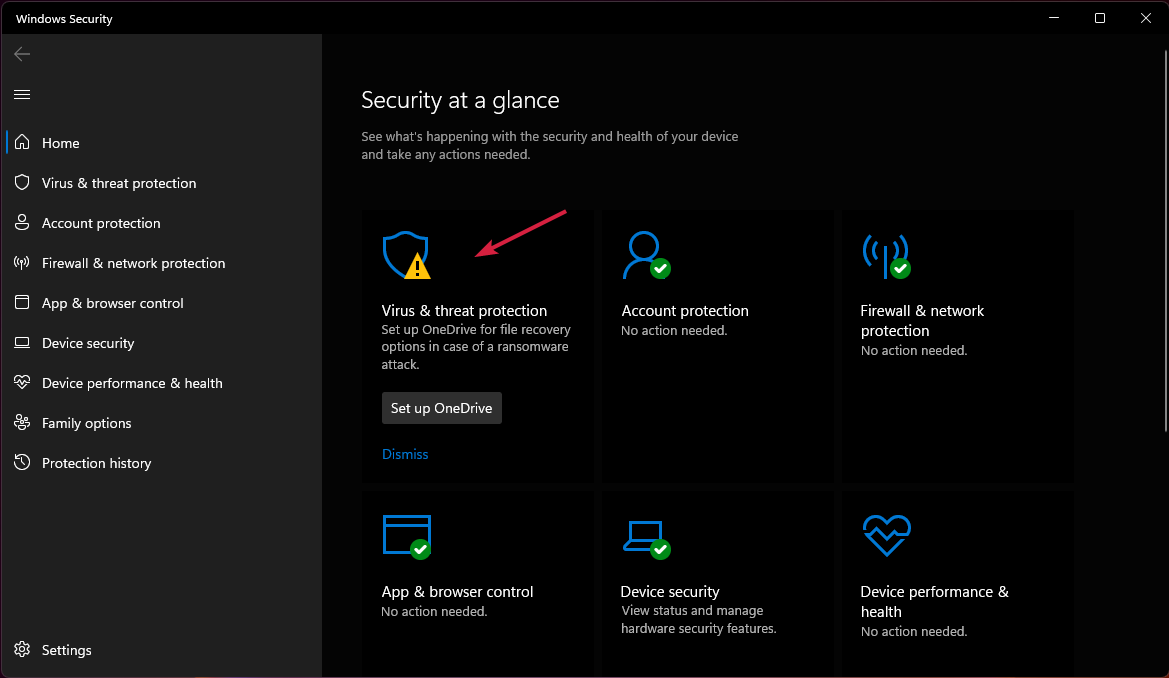
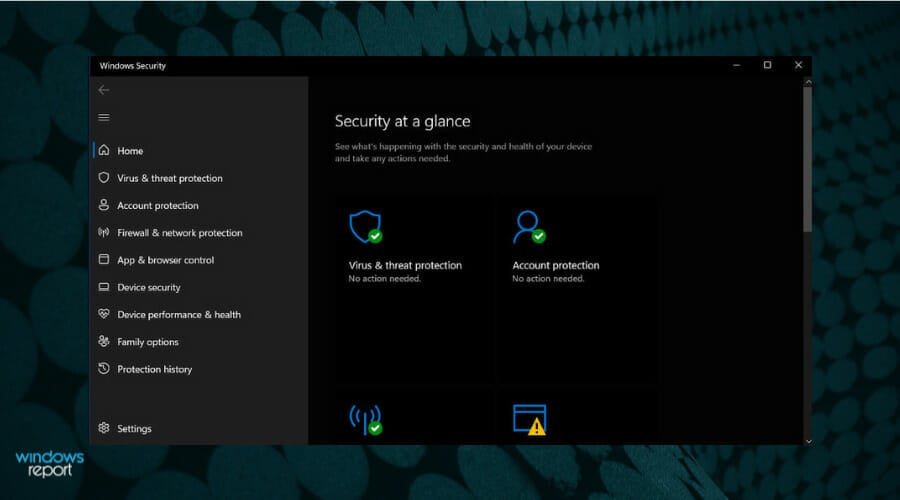
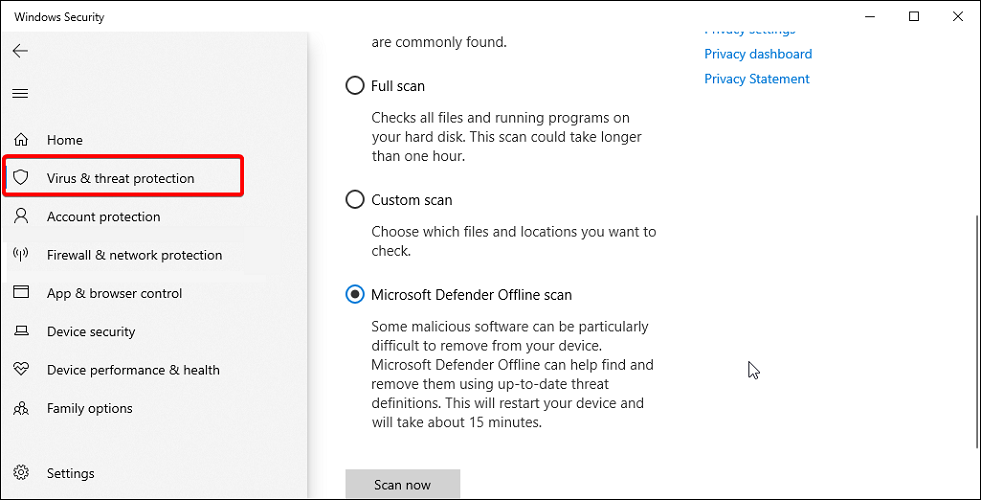
  1. Press the Windows key, search Windows Security and click Open.
  2. Select Virus & threat protection.
  3. Next, press Quick scan under Current threats.
  4. If you don’t find any threats, proceed to perform a full scan by clicking on Scan options just below Quick scan.
  5. Click on Full scan to perform a deep scan of your PC.Full scan
  6. Wait for the process to finish and restart your system.

2. Reset Microsft Store cache

  1. Hit the Windows search icon.
  2. Type WSReset.exe in the search bar and hit Run as administrator.

The Microsoft Store will be closed temporarily so that its cache can be cleared out. When you reopen it after running this command, any problems with your installation should be resolved because all of your old data has been deleted from its servers.

The process may take a while, so if you are working on something, you may want to postpone this process until such a time when you are ready.

3. Repair and reset the Microsoft Store app

  1. Hit the Windows key and click on Settings.settings windows 11
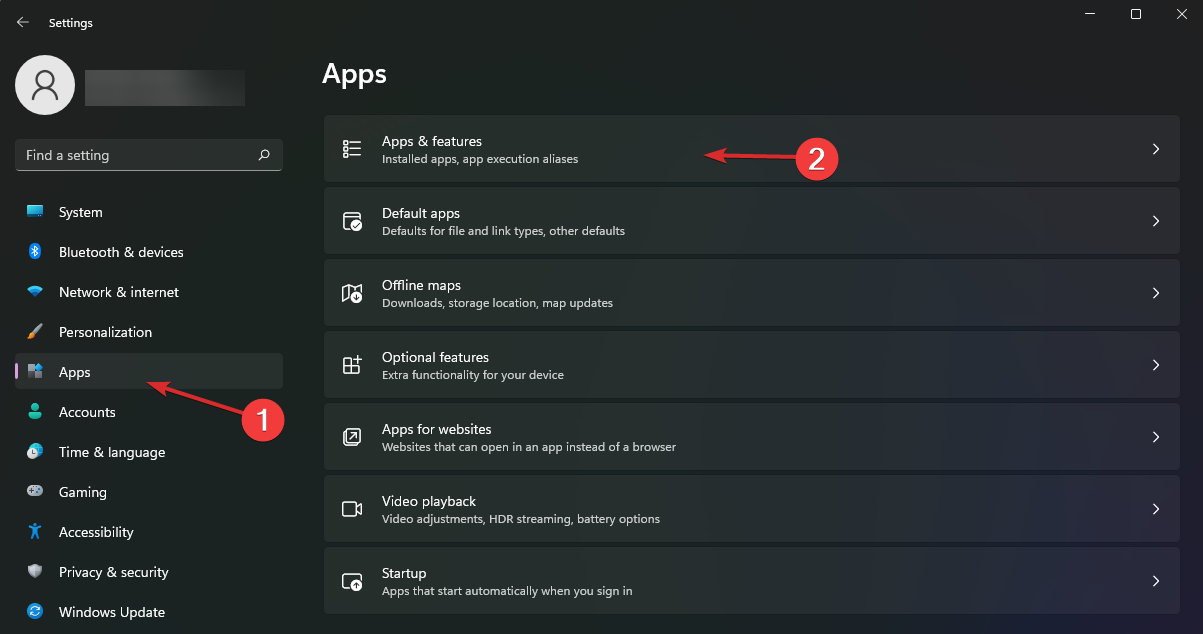
  2. Click on Apps on the left pane then Apps & features on the right pane.
  3. Locate the Microsoft Store app, click on the three vertical ellipses and select Advanced options.
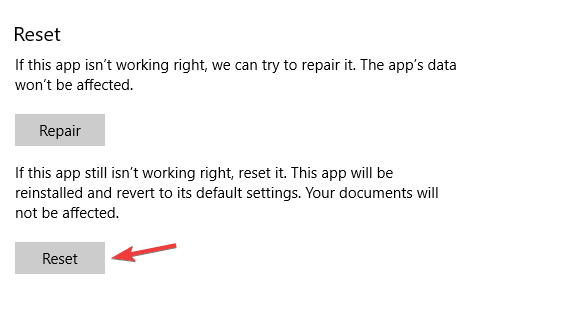
  4. Click on Repair.
  5. Go back and click on Reset.

If none of the above methods work for you, consider reinstalling the Microsoft Store or starting Windows in Safe Mode. This will allow the OS to start with only a minimal set of critical services and possibly establish the issue.

Should you encounter other related problems, such as Microsoft Store not installing apps, feel free to refer to our helpful guide on how to bypass this error.

We’d love to know which method worked for you, so drop us a comment down below.

Microsoft Store Error Code c101a006 [Solved]

If you are using the new Windows 11 OS, or you prefer to stick to the old Windows 10 operating system on your mobile devices, you most definitely have stumbled upon the Microsoft Store error code c101a006 while trying to buy a certain application.

After viewing more and more online posts on this issue, I have decided to list the steps you need to take in order to the c101a006 error.

What is the c101a006 error code in MS Store?

This error code is directly linked to your Microsoft information account or the Xbox feature you have available on Windows.

In the tutorial below, we will be changing some options in the Settings feature of the operating system and see how it goes from there.

How do I fix the Microsoft Store error code c101a006?

1. Change your region

  1. Go to the Start screen of your Windows 10, 8.1 operating system.
  2. Select the “Settings” feature you have available on the Start screen.
  3. From the system settings please choose the “System application” feature.
  4. Now in the next window that pops up, you will need to tap on the “language + region” feature.
  5. Right next to the “Country/Region” topic you will need to select the supported region like “United Kingdom”.
  6. Set the Phone Language correctly.
  7. Set the Regional Format correctly.
  8. Scroll down to the bottom of this page and tap on the “Restart Phone” button.
  9. After the phone reboots, you will need to tap on the link posted below.
  10. Click here for Xbox
  11. Scroll down all the way to the bottom of the page and change the region in there as well with what you chose in the step above.
  12. Tap again on the “Settings” feature in Windows 10, 8.1.
  13. From the “Settings” feature tap on the “Phone” Settings.
  14. Now from the Phone settings, you will need to tap on the “music+video” settings.
  15. Find the “Connect with Xbox Music option” and turn the slider to “ON” position.
  16. Find the “Xbox Music cloud collection option” and turn the slider to “ON” position.
  17. Find the “Now playing on Xbox option” and turn the slider to “ON” position.
  18. Close the windows you opened so far and reboot your Windows 10, 8.1 Phone.
  19. Check again if you still get the error code c101a006 while trying to buy a certain application.

2. Hard reset your phone

  1. Back up all your important apps, files and folders from Windows 10, 8.1.
  2. Perform a hard reset for the phone using the Windows 10, 8.1 operating system.
  3. After the hard reset is done go back to the application you were trying to buy and try again to see if you get the error code c101a006.

3. Update your phone

Make sure that you’re running the latest OS version on your Windows phone. Outdated software versions often cause Windows Store issues and errors, such as the 101a006 error code, so make sure to cross this off your list.

4. Close background apps

If you’re running too many apps or games in the background, this may explain why you’re getting error c101a006. So, close absolutely all your apps running in the background and then try to complete your purchase. Hopefully, the Microsoft Store error code c101a006 won’t pop up on the screen this time.

These are the methods that I have found helpful when dealing with the error code c101a006 on Windows phones.

If you do have further questions regarding the 101a006 error, or if you have any updates and suggestions on this matter, you can let us know by using the comments section below.

Reference by Pointer BSoD Error: 4 Simple Methods to Fix it

Blue Screen of Death errors shouldn’t be taken lightly since hardware problems often cause them. One is the Rreference_by_pointer BSoD error (also known as MSDN bugcheck reference_by_pointer 0x00000018).

This error can be a nuisance on Windows 10, but fortunately, there are a few ways to solve it, as we will show in this guide.

What causes reference by Pointer BSOD?

Like other BSOD, the reference_by_pointer blue screen error is mainly caused by hardware issues. Below are some of the known causes:

  • Memory issues: If you are facing the reference_by_pointer error with any stop code, your PC memory is the first thing you need to check. Most users have found the problem to be with their C drive. So, you need to run the CHKDSK command to fix any faulty memory partition.
  • Corrupt system files: Like other BSODs, a broken, faulty, or missing system file cannot be ruled out in this case too. The way out is to repair and restore fix these files using the built-in tools.
  • Activities of third-party apps: Sometimes, the reference by pointer error on Windows 10 can be caused by problematic third-party apps. You need to remove these apps using one of the best uninstaller software to restore normalcy.

How do I fix the reference_by_pointer error?

There are some prerequisite troubleshooting steps you need to try before proceeding to the solutions in this section:

  • Disable any overclocking setting and remove overclocking apps
  • Deactivate or remove third-party antivirus

If these do not work, you now apply the fixes below:

1. Run the CHKDSK command

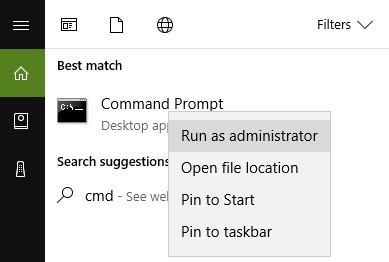
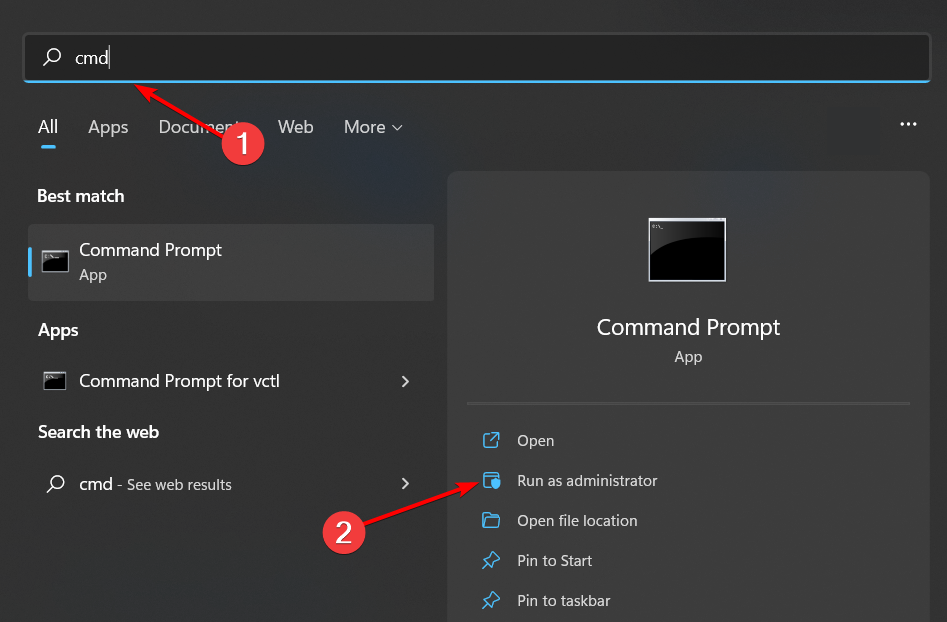
  1. Press the Windows key, type cmd, and click Run as administrator under Command Prompt.
    cmd reference_by_pointer
  2. Now, type the command below and hit Enter: chkdsk c: /rchkdsk  reference_by_pointer
  3. Press the Y key if you get any prompts, and wait for the command to do its thing.

The prominent cause of the reference_by_pointer (18) error issues with some partitions on the C: drive. Running the CHKDSK command has fixed this for many users and should help you too.

2. Repair system files

  1. Press the Windows key + S, type cmd, and select Run as administrator under Command Prompt.
    cmd reference_by_pointer
  2. Type the command below and hit Enter: sfc/scannowsfc scan
  3. Wait for the command to finish running, copy and paste the command below, and press Enter: DISM /Online /Cleanup-Image /RestoreHealthdism
  4. Finally, wait for the command to finish running.

Since the reference_by_pointer ntoskrnl.exe error is a BSOD issue, you cannot rule out the possibility of broken system files. However, running the commands above should fix this and restore regular service.

You should still run the DISM command even if the SFC scan fails. However, you can now rerun SFC after DISM finishes.

To remove any uncertainty, it is advised to use a specialized BSOD fixer to prevent further errors and system issues from occurring.

3. Use the Windows Memory Diagnostic tool

  1. Press the Windows key + R, type mdsched.exe, and click the Enter button.
    mdsched reference_by_pointer
  2. Select Restart now and check for problems (recommended) option.
    restart now
  3. Finally, wait for your PC to restart, and the tool will check your RAM.

Another known cause of the reference_by_pointer error is problems with your RAM. Again, the Windows Memory Diagnostic is ideally placed to fix these issues.

If the tool does not work, you can employ a third-party tool in MemTest86.

4. Remove problematic software

  1. Press the Windows key + R, type msconfig, and click OK to run it.
    msconfig
  2. Once the Windows Configuration window opens, select Selective Startup and uncheck Load startup items.
    selective reference_by_pointer
  3. Now, go to the Services tab, check Hide all Microsoft services, and click the Disable all button.
    services
  4. Select the Startup tab and click on Open Task Manager.
    open  reference_by_pointer
  5. Right-click each item on the list and choose Disable from the menu.
    disable
  6. Finally, go back to the System Configuration window and click Apply and OK.
    apply ok

After your PC restarts, check if your computer is stable. If there are no BSOD errors, the error was caused by one of the installed applications.

Now, you need to find the problematic application. To do that, you need to enable the applications in batches and check the one that brings the error again.

Then, all you need to do is to remove it using a top-notch uninstaller in CCleaner. This should restore normalcy on your PC. This solution has primarily helped fix the reference_by_pointer blue screen on Dell.

We have come to the end of this guide with this solution. The reference_by_pointer BSOD error can be problematic, but we hope you fix it with one of these solutions.

If you are facing other BSOD errors like system exception on Windows 10, check our detailed guide to fix it quickly.

Feel free to let us know the solution that helped you fix this issue in the comments below.

Clear & Delete Windows Update Cache/ History: 5 Ways

Here’s how you can delete Windows update cache so you can free up space on your PC. While keeping the update cache can help you identify and troubleshoot various errors, if it gets cluttered, you can clean it up. Info about an update you did 6 months ago is most likely irrelevant.

So let’s see how to locate and delete those files.

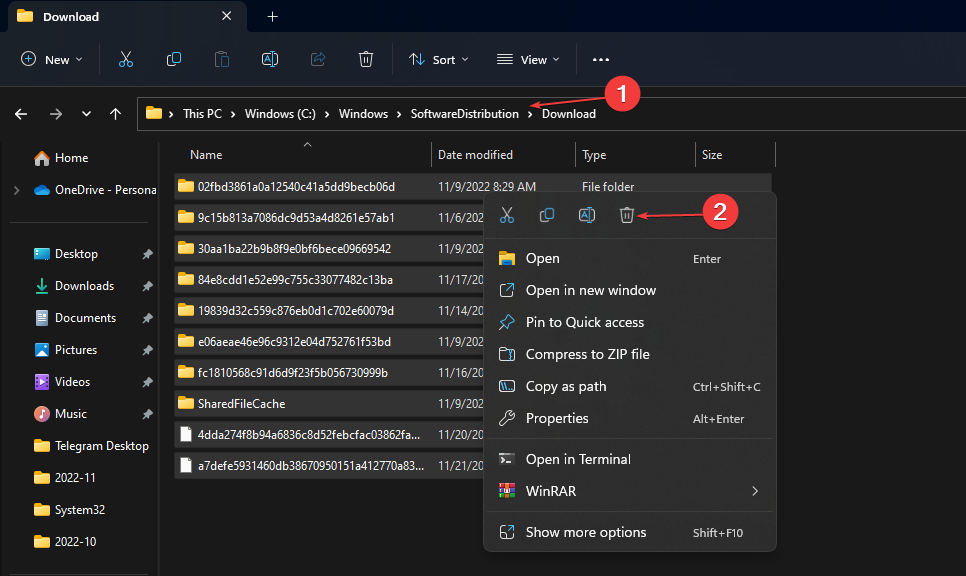
You can locate all Windows Update files in the following directory: C:\Windows\SoftwareDistribution\Download

How do I clear the Windows Update cache?

1. Use Disk Cleanup

  1. Click the File Explorer icon on your taskbar to open the app.
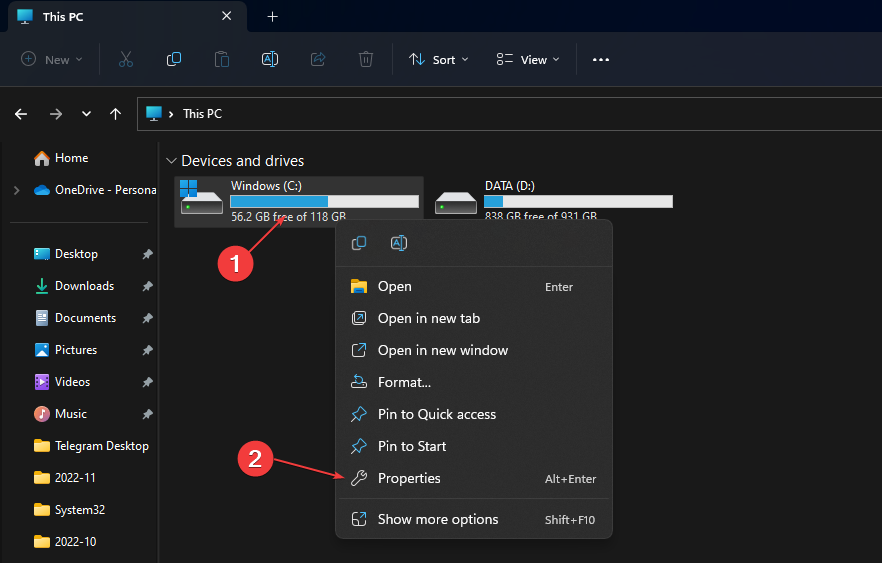
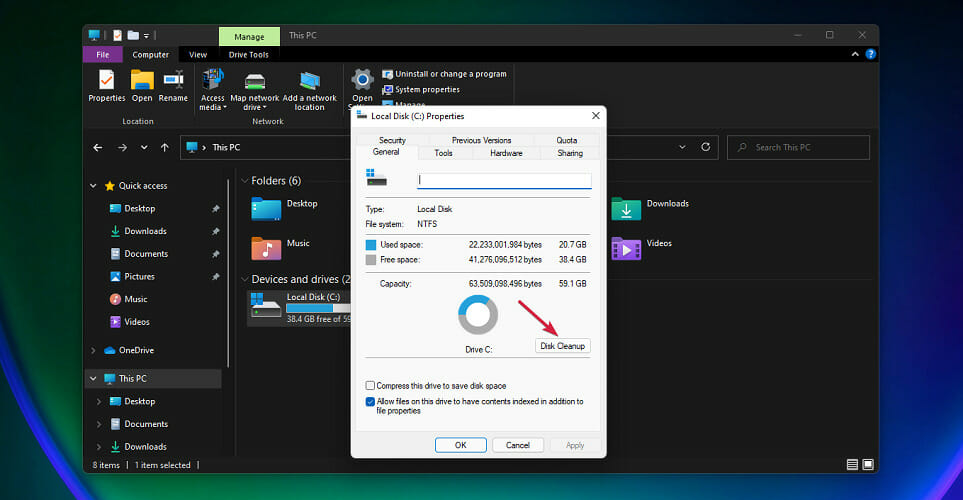
  2. Right-click the Local Disk (C) and select Properties from the drop-down.
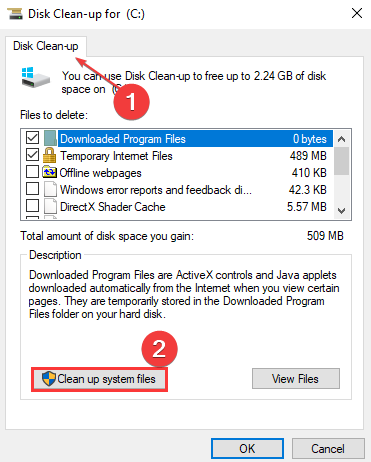
  3. Click on Disk Clean-up, then click the Cleanup system files button.
  4. Check the boxes for Windows upgrade log files and Temporary Windows Installation files, then click OK.

To learn more, we have a great guide on how to use Disk Cleanup on Windows 11, so be sure to check it out.

2. Manually delete Windows update folders

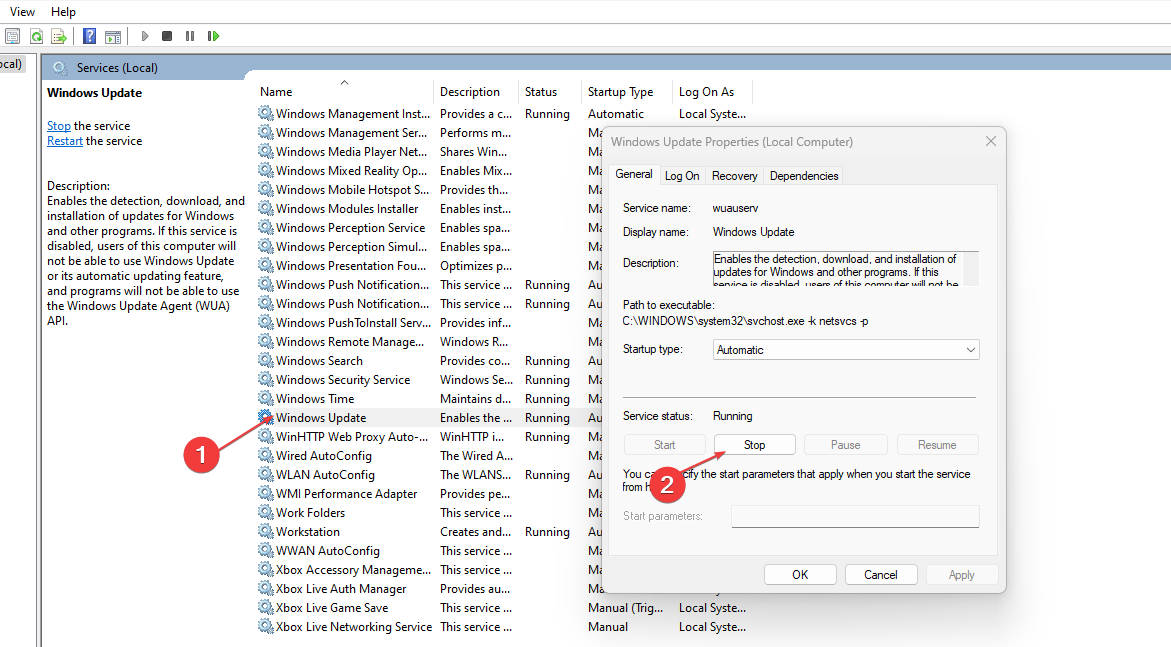
  1. Press Windows + R key to open the Run dialogue box, type services.msc, and click OK to open Services.
  2. Double-click Windows Update and select Stop.
  3. Open the File Explorer, and navigate using this: C:\Windows\SoftwareDistribution\Download folder
  4. Press Ctrl + A to highlight every file, right-click and select delete.
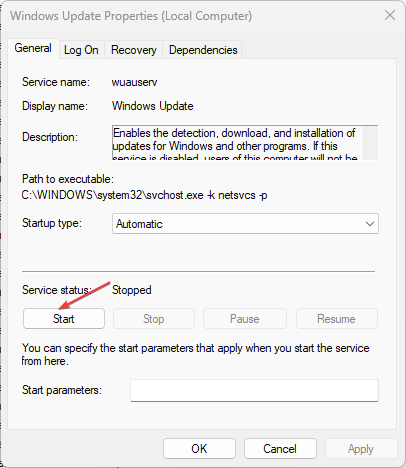
  5. Press Windows + R key, and type services.msc, then press Enter.
  6. Find and double-click on Windows Update, then click Start.

Disabling Windows Update services before clearing the distribution directory will fully clear the cache without any issues.

3. Clear Windows Update cache via Command Prompt

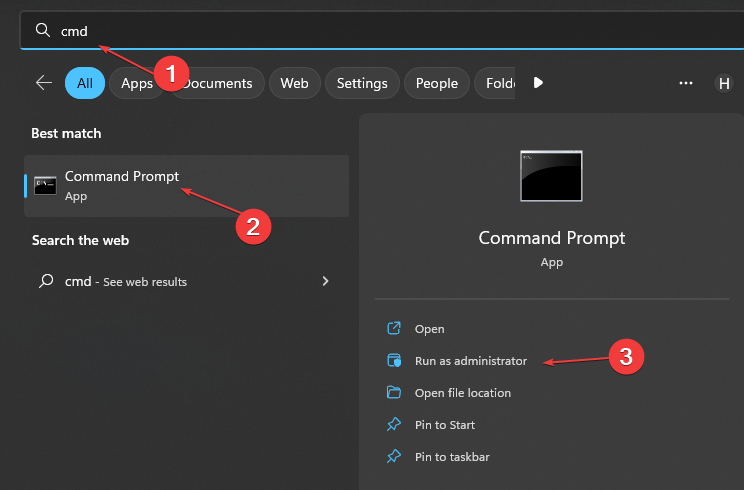
  1. Left-click the Start button, type cmd in the search space, and select Run as Administrator.
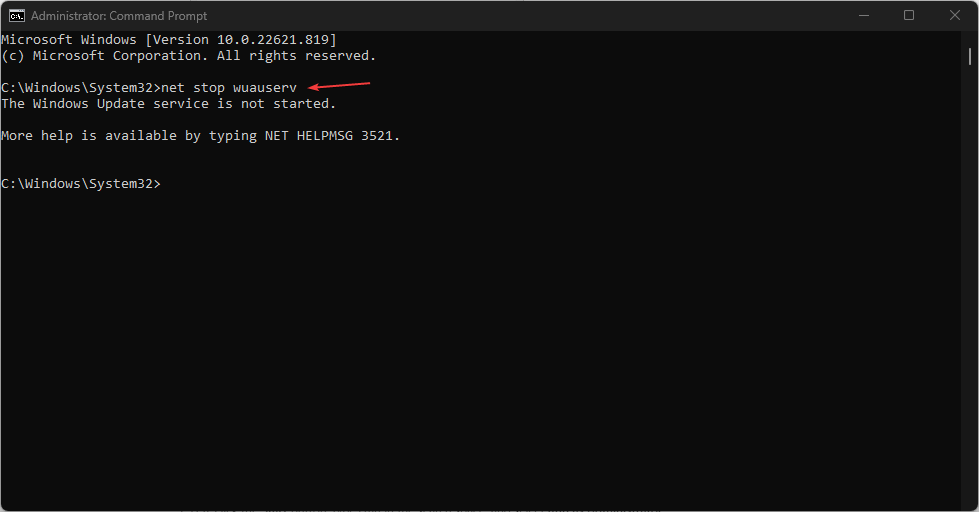
  2. Type the following, then press Enter: net stop wuauserv
  3. Type the following commands and press Enter after each: C:  cd %Windir%\SoftwareDistribution  del /f /s /q Download

These commands will delete the cache files on your PC.

4. Reset Windows Update cache

  1. Left-click the Start button, type cmd in the search space, and select Run as Administrator.
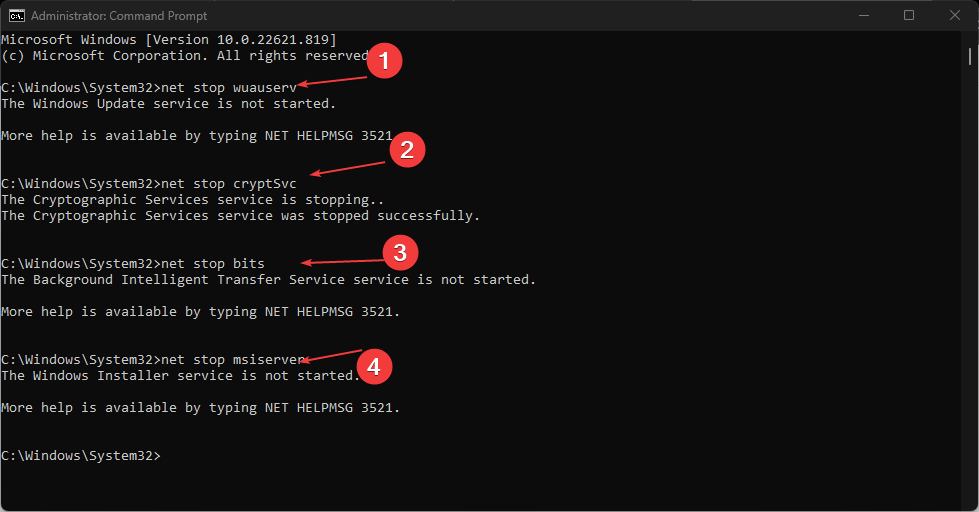
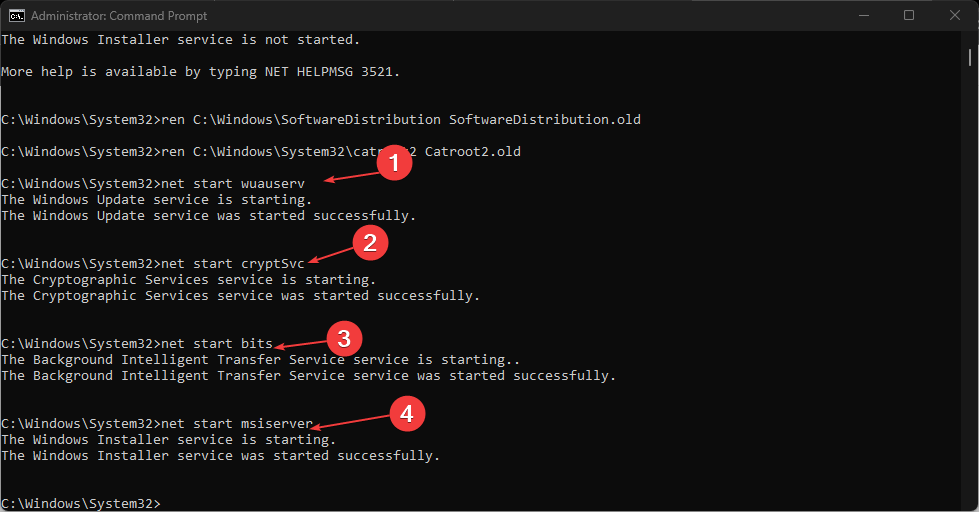
  2. Type the following commands and press Enter: net stop wuauserv  net stop cryptSvc    net stop bits    net stop msiserver
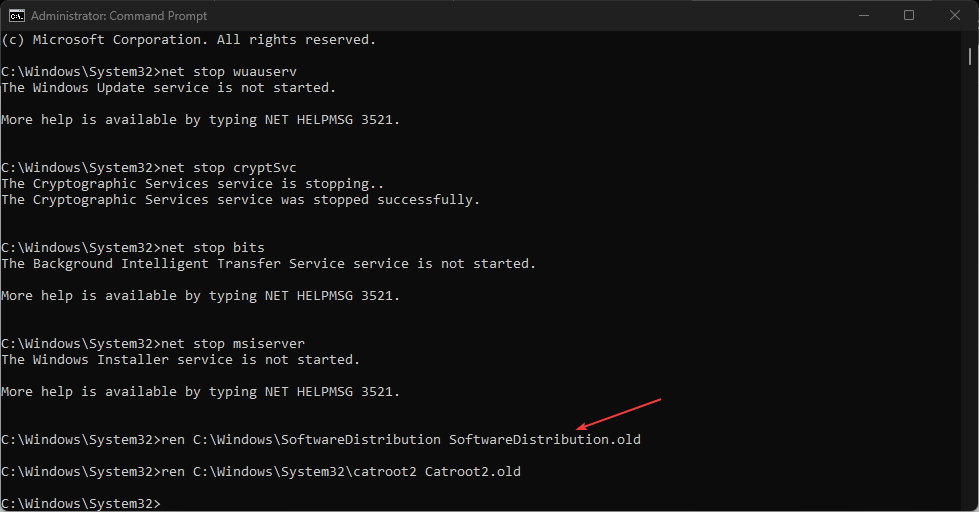
  3. Run the following command one after the other:  ren C:\Windows\SoftwareDistribution SoftwareDistribution.old    ren C:\Windows\System32\catroot2 Catroot2.old
  4. Type the following commands and press Enter after each one: net start wuauserv  net start cryptSvc    net start bits    net start msiserver
  5. Close the Command Prompt and restart your computer.

Resetting the relevant service can also clear the previous update cache from your computer.

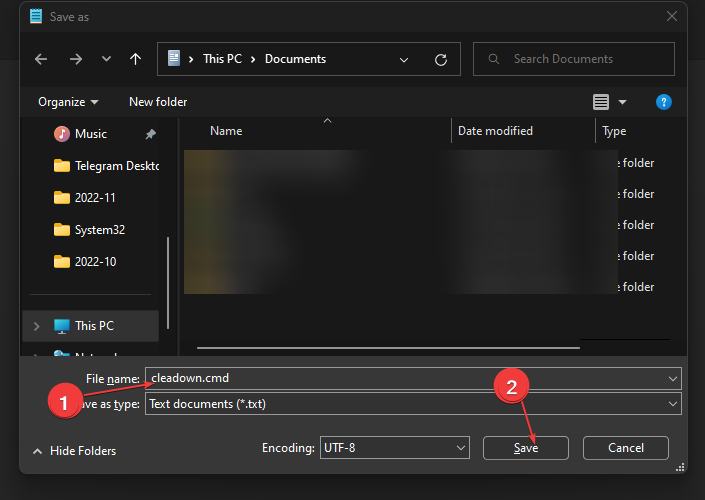
5. Clear Windows Update cache via script

  1. Press the Windows + R key to open the Run window, type notepad and click OK.
  2. Copy and paste the following codes:
    @Echo On
    net stop wuauserv
    cd %Windir%\SoftwareDistribution
    del /f /s /q Download
    pause
  3. Save the file as Cleardown.cmd on your computer.
  4. Right-click the Cleardown.cmd file and select Run as administrator.

In conclusion, our readers may be interested in our article about fixing a damaged Microsoft Store cache that may affect their PCs.

Moreover, do check out our article on clearing caches on Windows 11. Also, you can check how to fix the Cache Manager error on Windows 10/11.

Learn how to enhance your gaming on Xbox Series X by following our tips on Clearing Cache on Xbox Series X.

Please leave your questions and suggestions regarding how to clear the Windows Update cache in the comments section below.
5 Best Tv Christmas Deals & After Christmas Sales

Christmas is the time to buy gifts, whether be it for your loved ones or for use in your own home. Almost everything sells for a discount during this time of the year, including TVs, of course.

Mentioned here is a compilation of some of the most attractive deals on TVs currently available. So, if you are on the lookout for a new smart TV, you will do well to pay heed to these deals.

What are the best TV deals for Christmas?

Sceptre X405BV-FSR LED TV

  • Great picture quality
  • Stylish design
  • Budget-friendly
  • Natural and lifelike images
  • 4 HDMI ports
  • Questionable packaging

This is another TV with a huge fan following, and the primary reason for that is its exceptional picture clarity.

The slim and attractive design is worthy to be mentioned, while the TV also boasts no less than 4 HDMI ports.

Even more, it allows you to connect up to 4 devices at once so you can stream, browse, and listen to all your preferred media.

Samsung Q6OT QLED 4K UHD HDR SMART TV

  • Genuine cinematic color
  • Best 4K picture
  • Targeted sound
  • No messy cables
  • Heavyweight

This Samsung TV is designed to look excellent from every angle by offering an amazing picture detail experience with bold contrast and detailed color tones.

It has a Quantum HDR powered by HDR10+ so you can enjoy fine picture detail in every movie you’re displaying.

With this Samsung TV option, you can experience a perfected sound because it inspects and optimizes the sound in every scene of the movie to provide great audio.

LG 22LJ4540 Full HD LED TV

  • Triple XD Engine
  • Natural color expression
  • Deep contrast for a more lifelike picture
  • Exceptional brightness
  • Great price
  • No smart functionality

This LG TV boasts full array backlighting along with local dimming and full HD resolution, all of which conspire to produce an excellent quality picture.

The other salient features of the TV include its Triple XD Engine and a refresh rate of 120Hz. The TV also offers Flicker Safe and Eye Comfort Mode, which means it’s less taxing on your eyes.

Moreover, get ready to enjoy richer colors and deeper blacks, not to mention that LEDs offer greater energy efficiency compared to conventional LCD monitors.

Samsung UN32J4001 LED TV

  • Clear HD quality
  • Vibrant and bright images
  • Easy to set-up
  • Great audio
  • Modern design
  • Notable artifacts, especially on skin tones

With its slim and elegant looks, this Samsung UN32J4001 TV, not surprisingly, is one of the crowd favorites. Add to that the amazing picture clarity and you have a winner in your hands.

The TV also boasts of a high refresh rate and backlight technology which contributes to getting those life-like pictures the TV displays. In short, that’s a TV that can add life to your living room.

TCL 55S405 4K Roku Smart LED TV

  • Smart functionality
  • Access to over 4,000 streaming channels
  • 4K Ultra HD picture clarity
  • 120Hz refresh rate
  • Advanced backlight scanning
  • Random freezing issues

The display is just mesmerizing and one reason for that happens to be none other than its ultra-HD resolution.

The TV has a refresh rate of 120Hz which means zero blurs with fast-moving action scenes. Also, with Roku TV onboard, there will be no dearth of content to watch on the TV.

And if you are able to take your eye off the scintillating display, the TV also comes in an attractive form factor, with thin bezels.

These are some of the very best TV Christmas deals & After Christmas sales. Let us know your final pick in the comments area below.

A Fatal Error Occurred Preventing Product use: 3 Ways to Fix It

Like most hardware peripheral devices, the HP printer needs you to install appropriate drivers first.

However, some users have reported that the Windows PC displays a message that says a fatal error occurred preventing product use while trying to install the needed drivers.

While different factors can cause this issue, it is not the most challenging problem. In this guide, we have listed the solutions needed to do precisely that and get back to using your printer.

Why am I getting A fatal error occurred preventing product use?

Below are some of the reasons you might be getting a fatal error has occurred preventing product use click cancel to cancel the install prompt while trying to connect or use your HP printer:

  • Issues with the Spooler service: If you are getting a fatal error occurred preventing product use on HP printer 1536 or error 7 on HP LaserJet, it might be because of the Print Spooler service. Disabling it should fix the issue quickly and effectively.
  • Interference from third-party antivirus: Some users have found the HP printer installation error to be down to interference from their third-party antivirus software. You need to disable any security software you are using and probably switch to one of the best antiviruses for Windows.
  • Issues with the printer installation files: In some cases, the problem might be incorrect installation. In this case, you need to uninstall the printer from Control Panel or use an uninstaller software and reinstall it.

How can I fix A fatal error that occurred preventing product use?

Before proceeding with the fixes in this section, below are some troubleshooting steps you should attempt:

  • Restart your PC
  • Disconnect and reconnect the printer
  • Disable third-party antivirus

If these steps fail to fix the issue, you can explore the following fixes:

1. Add the printer from the Devices and Printers menu

  1. Press the Windows key + R, type control, and click OK.
    control a fatal error occurred preventing product use
  2. Select the Hardware and Sound option.
    hardware
  3. Now, choose the Devices and Printers option.
    devices
  4. Finally, select Add a device and follow the onscreen instruction to add your printer.
    add a device a fatal error occurred preventing product use

In some cases, the method you are using to add your printer to your PC might cause a fatal error preventing product use.

Some users have found the installation process to be smooth and effortless using the Devices and Printers menu in the Control Panel. So, you can try it too.

2. Uninstall and reinstall the printer

  1. Press the Windows key, type control, and select the Control Panel option.
    control panel
  2. Select Uninstall a program under the Programs section.
    uniinstall a program a fatal error occurred preventing product use
  3. Now, right-click your printer, select Uninstall, and follow the onscreen instruction to complete the process.
    uninstall
  4. Go back to the Control Panel window and click on View devices and printers under Hardware and Sound.
    view
  5. Now, right-click your HP Printer and choose Remove device.
    remove
  6. Press the Windows key + R, type Printui.exe /s, and hit OK.
    printrui a fatal error occurred preventing product use
  7. Click the Driver tab at the top.
  8. Locate the HP printer driver, click on it, and select the Remove button.
    remove
  9. Now, tick the Remove driver and driver package radio button and click OK.
    remove ok
  10. Click the Apply button followed by OK on the Printer Server Properties window and restart your PC.
    ok apply a fatal error occurred preventing product use
  11. Finally, install the printer software from the HP website.

Sometimes, you might get a fatal error occurred preventing product use because of faulty installation. The solution here is to uninstall all instances of the printer from your PC and reinstall it from the official website.

3. Stop Print Spooler service

  1. Repeat Steps 1 to 3 in Solution 2 to remove the HP printer software from your PC.
  2. Press the Windows key + R, type regedit, and click the OK button.
    regedit
  3. Click the File tab at the top, followed by Export.. to back up your registry.
    file export
  4. Now, download and run this registry file to change printer-related policies on your PC.
  5. Press the Windows key + R, type services.msc, and click OK.
    services a fatal error occurred preventing product use
  6. Now, right-click the Print Spooler service and select Stop.
    stop
  7. From here, open File Explorer and follow the path below: C:/Windows/System32/Spool/drivers
  8. Rename the W32X86 folder to W32x86.old and the x64 folder to x64.old.
    drivers
  9. Finally, restart your PC and reinstall the HP printer software.

Another solution to eliminate a fatal error preventing product use is to stop the Print Spooler service from the Services window. After that, you must delete all the Spool folder files.

Rerun the driver installation package and check for any improvements.

Printers are essential office equipment; not using them can be pretty annoying.

Suppose your HP Printer displays the message a fatal error occurred preventing product use while installing the latest drivers. In that case, you should be able to fix the problem following the solutions given in this article.

If your HP printer won’t scan on Windows 10, follow our detailed guide to get it usually working again.

Do let us know the fix that worked for you in the comments below.

Minecraft For Windows Error Download: Fixed

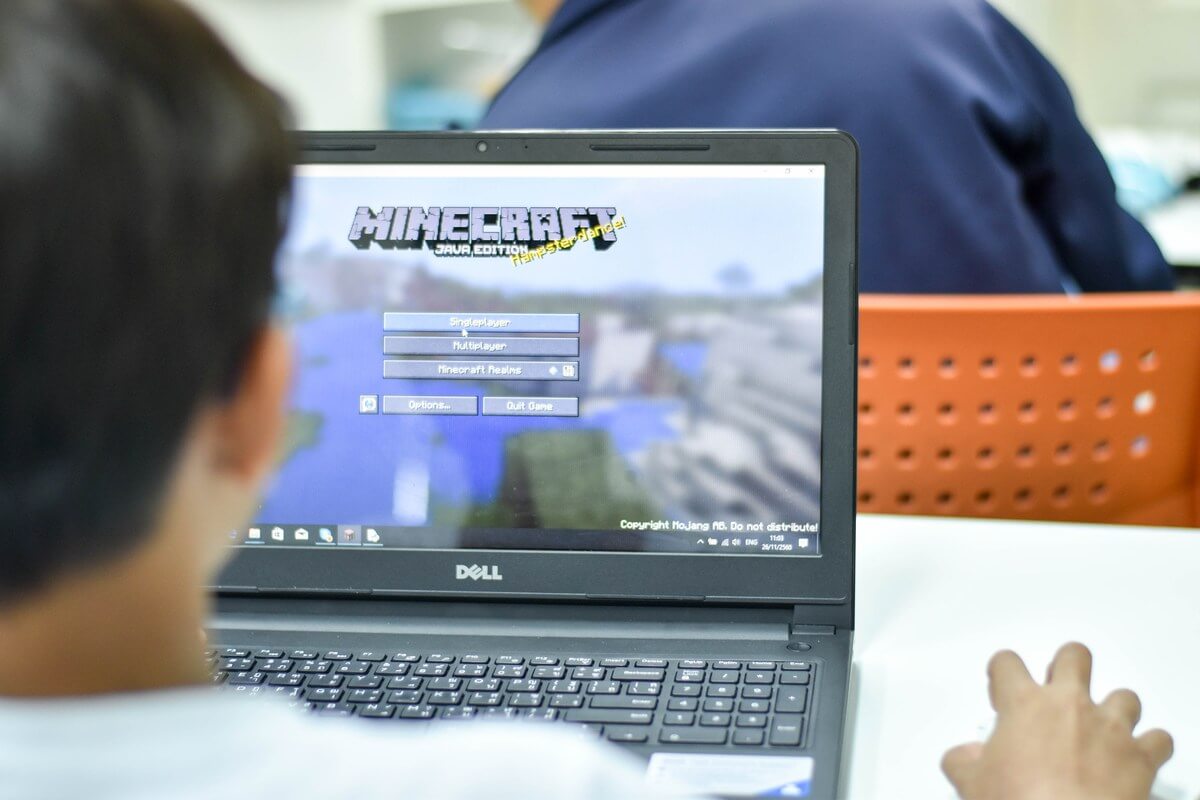
Minecraft is probably the most popular game in the world, and Microsoft did the right thing when it included the game in Windows Store, also known as Microsoft Store.

Some players are reporting that they encountered a Minecraft for Windows error download, so here are a few tips if you’re facing this problem, too.

If the error code is 0x803f7003, we have a dedicated article on it that could help you out.

How can I fix the Minecraft for Windows download error?

1. Try to refresh the download multiple times

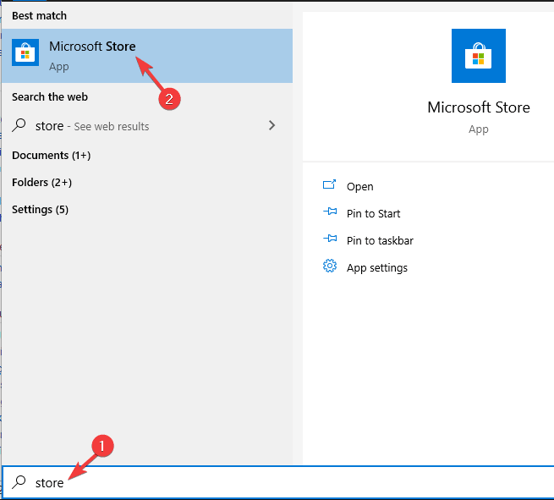
  1. Press Windows Key + S and enter Microsoft Store. Select Microsoft Store from the list.
    microsoft store 0x803f7003 Minecraft download error Windows Store
  2. In the search bar in the top right corner enter Minecraft.
  3. Select the version of Minecraft that you want to download.
  4. Click the Download You might have to repeat this step a couple of times until you manage to download the game.
    download app 0x803f7003 Minecraft download error in Windows Store

In some instances, you might have to wait a couple of minutes and try to download Minecraft again. This is a simple solution, but it can help you with Minecraft for Windows error download.


2. Reset Windows Store

  1. Go to Search and type wsreset.exe.
  2. Right-click wsreset.exe from list of results and choose Run as administrator.
  3. Login to your Microsoft Account once again, and try to download Minecraft.

You can also reset Windows Store from the settings by from Settings app.

  1. Press Windows Key + I to open the Settings app.
  2. Go to Apps section.
  3. Select Microsoft Store > Advanced options.
  4. Click the Reset Click Reset to confirm.
    reset windows store 0x803f7003 Minecraft download error in Windows Store

After doing that, check if the error downloading Minecraft on Windows 10 or Windows 11 persists or not.


3. Check your regional settings

  1. Open the Settings app and go to the Time & Language section.
  2. Go to the Region in the left pane. In the right pane set Country and region to the United States.
    country or region 0x803f7003 Minecraft download error in Windows Store
  3. After doing that, check if the problem is still there.

After changing your regional settings, check if the problem is still there.

If the problem is still present, you should check out our article about solving Windows Store problems for more solutions.

There you go, these are just a couple of simple solutions that can help you with the Minecraft for Windows error download.

If you found our article helpful, feel free to let us know in the comments section below.

6 Best Fortnite Christmas Gifts Ideas [Fans Love #1]

Choosing Christmas presents for Fortnite fans can be as interesting as playing the game itself. For someone who has never played the game, here is a chance to get into the Fortnite world.

Gifting out the game in the spirit of Christmas can help you plant a smile on someone’s face. Let’s explore some exciting Fortnite presents to give this Christmas to a friend who is a fan of the game.

What are the best Christmas presents for Fortnite fans?

Fortnite Loot Llama Plush Pillow

  • 19 inches tall x 16 inches wide
  • Officially licensed Fortnite pillow in the shape of a Loot Llama
  • Super soft microfiber fleece plush pillow
  • 100% Polyester
  • Nothing really

Help someone experience a relaxed season this Christmas on the Fortnite Llama Plush Pillow as awesome Christmas presents for Fortnite fans. The pillow is 19 inches tall and 16 inches wide and it has a very good quality print.

It’s made from top-quality materials to guarantee a blissful sleep. It’s comfortable and easy to wash.

Fortnite Light up Boogie Bomb

  • 4.5 inches height by 3.75 inches width by 3 inches depth
  • Realistic pull-pin trigger and on/off switch
  • Lights and music show
  • 2x AAA batteries included
  • Poor customer support

The Fortnite light up boogie bomb is just exactly the best Christmas presents for Fortnite fans. It is a music boogie bomb that can dole out exciting music to get everyone dancing. The boogie bomb carries appealing lights that actually displays beautiful colors to light up the environment.

With the pull pin trigger, like with a real bomb you can control the light bomb to enjoy great tunes. It’s portable and fits entertainment with a couple of Fortnite fans community and friends.

Monopoly: Fortnite Edition

  • Well-known locations as properties
  • Aim to earn Health Point chips instead of money to stay in the game
  • Comes with 27 Fortnite outfits with pawn stands
  • Pretty far from the original Monopoly game

The Monopoly game specifically comes as great Christmas presents for Fortnite fans designed for the Fortnite edition. Enjoy playing your favorite monopoly but this time with popular Fortnite characters in the game using the 27 Fortnite outfits. The game is best suitable for ages 13 and above, earning health points.

As small as two players and as many as 7 players can participate in the monopoly game.

Fortnite Gaming Mouse Pad

  • Durable stitched edges
  • Washable design
  • Ultra-smooth surface
  • Fade Prevent
  • It can be too steady

A washable gaming mouse pad is a lovely gift idea for this holiday. It is made from resistant rubber and offers easy navigation on any surface thanks to its slick fabric.

This Fortnite Gaming Mouse Pad guarantees durability due to the stitched edge which prevents it from falling apart.

Fortnite Battle Royale Socks

  • 5-pack of socks
  • Fortnite characters design
  • Great value
  • May not be true-to-size

The lovely Fortnite socks with character prints are another friendly items to gift out. What qualifies it as the perfect Christmas present includes the comfort and warmth it provides this season.

Also, Fortnite fans can enjoy a variety of designs, colors, and sizes for boys and girls. Being an all-purpose breathable sock, it could be worn everywhere you want.

Fortnite Character Emote Camo Llama

  • 2 Compartments
  • 11.81 x 1.97 x 17.72 inches - perfect for school necessities
  • 100% genuine licensed Fortnite
  • Very light
  • Not very rezistant

Everyone loves a backpack and almost everyone carries one. The Fortnite backpack offers an exceptional gift idea this Christmas season. The Fortnite backpack is made from high-quality material.

Featuring an awesome all-over camo character print, including the fan-favorite loot box and mascot, Llama. The Fortnite backpack makes it easy to move valuable items around on camping trips, schooling, hiking, travels, and a laptop bag.

This was our selection of the best Fortnite Christmas gift ideas. We hope you found at least a good idea to gift this year. Leave us a note in the comments section below with other suggestions.

Windows 11 Camera Not Working: How to Reset or Unblock it

The webcam is one of the most often used instruments on a computer nowadays, and any disruption in its operation is intolerably inconvenient.

In most cases, Windows 11 recognizes peripherals, automatically. Regardless of the operating system’s accuracy in detecting faults, we may encounter errors ourselves.

For instance, the Windows Camera app error code 0xA00F4244, which is notorious in Windows 10 is now also happening in Windows 11.

It doesn’t matter whether you are obtaining the Access denied error message when attempting to use your webcam or receiving any other issue; the remedies listed below will apply and work in all cases. Follow along!

Why is my webcam not working?

There are two primary categories of explanations for this: hardware and software. For example, unlike something that is malfunctioning within Windows, a webcam is a physical device.

As a result, it is possible that the issue stems from the device itself or from your computer’s inability to recognize how to connect to it. The majority of problems with the Windows webcam are caused by software.

That is, either Windows 11 does not recognize that a camera has been plugged in or the software you are using does not have the appropriate rights enabled, resulting in access to the camera being denied.

This problem can be caused by a variety of other factors, including recent system updates, privacy settings that restrict access, and hardware concerns.

It’s annoying, but the camera will become mandatory if you need to install Windows 11 on your device, so you have to fix this problem.

We may, however, quickly correct the problem by utilizing several often-used workarounds. We’re here to talk about them and figure out how to get the camera app to operate.

Similar issues that our readers encounter frequently include:

  • Windows 11 Hello camera is not working – Our linked guide will fix the problem with the facial recognition option.
  • Wecam not working on Team – The problem is most likely linked to the software’s permission through Windows.
  • Skype camera not working – Fixing this issue is relatively simple as you probably have to update your webcam drivers and check your camera settings on Skype.
  • LifeCam Studio webcam not working – Changing port connections and unplugging other devices often help you solve these Microsoft LifeCam inconveniences.

What can I do if the webcam isn’t working in Windows 11?

1. Unplug and plug the camera back in

If the webcam is connected to the computer through a cord, unplug it and then plug it back in again.

Take advantage of this opportunity to switch to a different port to rule out the initial port as the source of the problem. Also, unplug any USB devices that are not in use (e.g., external hard drive, printer).

Other gadgets that are plugged into the computer could be interfering with the camera’s ability to communicate with Windows, which is doubtful.

2. Give access to apps

  1. Press the Windows key + I to open the Settings app, then go to Privacy & security and choose Camera from the right side.
  2. First of all, make sure that both camera access switches are on.
  3. Next, enable all the apps that you want to access your camera by turning on the switch next to them.

It is this approach in particular that will resolve the Access denied issue that you may receive when attempting to use your webcam. Checking the app access also helps when the camera freezes in Windows 11.

3. Update the camera driver

  1. Click the Search icon from the taskbar, type device manager, and select the app from the results.
  2. Expand the Cameras section by clicking on it, then right-click the adapter and select Update driver.
  3. Now select Search automatically for drivers.
  4. The system will scan for new drivers and if it finds a new one, it will install it.

We strongly advocate using a specialist driver updating program to do automatic scans for out-of-date drivers.

4. Check for optional updates

  1. Press the Windows key + I to open the Settings app and click on Update & Security from the left panel followed by Advanced options on the right side.
  2. Scroll down until you find the Additional options section then click on Optional updates.
  3. Now click on the Driver Updates option then select all the driver updates you are presented and lastly click on the Download & install button.

Despite the fact that Windows is generally in charge of driver updates, if you are experiencing an issue, you can perform a manual search for updates.

5. Repair and reset the Camera app

  1. Press the Windows key + I to start the Settings app, then click on Apps from the left pane and select Installed apps from the right.
  2. Look for the Camera app in the list, click on its three points button and select Advanced options.
  3. Now scroll down until you find the Reset section, then click on the Repair button. Check if the app is detecting your webcam and if not, also hit the Reset button.

If the native Camera app from Windows 11 is not detecting your webcam, it’s a good idea to repair and reset it from the Settings menu.

You should also look at our complete guide on how to enable the camera in Windows 11 and see if you overlooked some details.

6. Run the built-in camera troubleshooter

  1. Use the Windows key + I shortcut to start the Settings app, scroll down on the right side of the window and select Troubleshoot from the list of options.
  2. Tap on Other troubleshooters.
  3. Locate the Camera troubleshooter and click on Run next to it.
  4. Go on with the troubleshooting to fix the problem.

Windows will discover and resolve any issues that may have arisen with the device or its configuration settings. Once the mistakes have been identified, instructions will be provided, so make sure to follow them carefully.

7. Test your webcam online

  1. Go to a website that tests your webcam like WebcamMicTest and click on the Test webcam button. Make sure you grant them access to your webcam and mic for the test.
  2. If it detects your webcam, you should be seeing an image right away. If not, you might have other hardware or software issues.

8. Temporarily disable your antivirus

  1. Click the Search icon on the taskbar, type security and select Windows Security from the results.
  2. Now choose Virus & threat protection.
  3. Click on Manage settings unde Virus & threat protection settings.
  4. Turn the switch to off unde Real-time protection and check if the camera works now.

If the Windows 11 integrated camera is not working, disable your antivirus, firewall, and privacy applications for the time being.

Some programs feature built-in webcam protection, which could be the cause of the problem you’re experiencing.

We have shown you how to disable Windows Defender but if you have a third-party antivirus installed, you will have to go through its security menu and disable it from there.

If turning off these apps causes the camera to function properly, study their settings to determine what needs to be changed, and then immediately switch them back on.

A Webcam Protection option will prevent your apps from using your webcam so you should check the app that you installed for the camera.

9. Disable other cameras

  1. Click on the Search icon from the taskbar, type device manager, and select the app from the results.
  2. Look for the Cameras section, click on it to expand it, and if you have more than one installed, right-click on the one you’re not using and select Disable device.

If you have both an internal and an external webcam installed on your computer and the wrong one is being used, disable the webcam.

Windows will not allow you to utilize both webcams at the same time, and certain apps will not allow you to choose which webcam to prioritize.

Suppose you want to utilize the built-in camera but prefer to use the external one instead. In this case, you can disable the internal webcam in Device Manager.

Even if the camera is already activated and there is just one installation, you should take advantage of this opportunity to disable the webcam and enable it again.

10. Replace the webcam with a new one

Really old cameras are unlikely to work with newer versions of Windows and are slower to respond to any of the troubleshooting suggestions provided here.

In that scenario, your only choice is to upgrade to a more recent camera model. Take a look at our selection of the best 1080p webcams for PC and choose the one that fits your requirements.

Has my webcam been hacked?

One of the primary reasons so many people cover their computer webcams with tape or by using a dedicated cover to turn them off is to protect their privacy.

The ability to hack into webcams means that hackers may turn them on and record you whenever they want, usually with the help of a RAT (remote administration tool), that has been discreetly uploaded to the webserver.

Anyone could be the target of this type of attack. Ransomware attacks are generally directed at gaining control of anything that can be used to generate revenue.

Because of this, several malware programs attempt to infect webcams in order to obtain content suited for extortion from the cameras.

It’s critical to have strong anti-malware software to protect your webcam privacy, but also be aware of the indicators that someone has taken control of your webcam.

For example, you should be able to see a small indicator light next to your computer webcam. When a webcam is engaged for something like a video conference, you may see it turn on and become visible.

Although this indicator light may appear to be on at inconvenient times, especially when you aren’t using it, this is a telling sign that someone has gained control of your webcam from a distance and is utilizing it to have a look.

In order to learn more about how to protect yourself from hackers, we recommend that you read our article on the best webcam security software.

If you have not yet updated your operating system, check our guide on how to fix the camera app not working in Windows 10.

Alternatively, check out our guide on how to download the integrated camera driver for Windows 11 as you will definitely need one to make the best out of your webcam or download LifeCam drivers if it’s your webcam of choice.

For those who are using a laptop and have not found the suggestions above to be helpful, we have another post that describes different ways to fix your laptop’s camera.

Comment below and tell us which technique works best for you and whether you have already taped your camera or plan to do so.

Microsoft Store Error 0x803f7003 [Fixed]

Windows Store got remodeled, and now comes with a new interface and even a new name (Microsoft Store). Sadly, even the revamped Microsoft Store version isn’t without issues of its own.

One error that was quite common on previous iterations of Store is still here and it still bothers Windows users around the world. It goes by the Microsoft Store error 0x803f7003 and it, apparently, blocks updates or even access to the installed apps.

This error, in comparison to some milder ones, will render Microsoft Store completely unusable. In order to help you address this issue, we provided some solutions below. In case you’re irked by this error, progress through the list until you resolve it.

How can I fix the Microsoft Store Error 0x803f7003?

1: Run the Windows Troubleshooter

First things first. Before we move to a list of more complex applicable solutions, let’s give a Windows-native dedicated troubleshooter a chance.

With the introduction of Windows 10, users are able to resolve issues with the unified troubleshooter. A lot of reports say that it’s lackluster and barely helpful, but at least you’ll get some feedback on the severity of the error at hand.

Follow these steps to run Windows Store Troubleshooter and, hopefully, resolve the error:

  1. Press the Windows key + I to open the Settings app.
  2. Open Update & Security.windows 10 app store error 0x803f7003
  3. Choose Troubleshoot from the left pane.
  4. Scroll to the bottom and highlight the Windows Store Apps troubleshooter.
  5. Click on the ”Run the troubleshooter” and wait for it to finish.windows 10 app store error 0x803f7003

2: Reset Store’s cache

The majority of Microsoft enthusiasts enlist this as the major solution for the 0x803f7003 error code. However, it seems that the success isn’t the same for every user.

Some managed to resolve the error at hand with this simple side application called ”wsreset”. This application’s main use is to reset the cached data of the Microsoft Store, resolving the common halts in the process.

The procedure is simple, so just follow these steps:

  1. In the Windows Search bar, type wsreset.
  2. Right-click on wsreset and run it as an administrator.windows 10 app store error 0x803f7003

3: Check the time and regional settings

Time and regional settings are also important if you expect to have fully functional Microsoft Store, including the containing apps. The full-feature package works only for the United States, so we advise you to switch your regional settings to the US.

In addition, make sure that you’re time is properly set. This doesn’t need to be the sole reason for the error, but it might help you address it.

Here’s how to check these essential settings and apply the needed changes:

  1. Press the Windows key + I to summon the Settings app.
  2. Open Time & language.
  3. Under the Date & Time section, enable the ‘Set time automatically‘  and ‘Select time zone automatically‘.windows store app download stuck
  4. Now, choose Region & language from the same pane.
  5. Change Country or region to ‘United States’.windows store app download stuck

4: Run DISM

Deployment Image Servicing and Management is the dedicated command-line tool. It’s one of those tools no one have heard of until the issues emerge. Its main purpose is to scan the system files, especially the critical ones, and resolve possible issues. Since Microsoft Store is the essential part of Windows 10, DISM can be massively helpful.

There are multiple ways to run DISM, with both system resources and external installation media. We made sure to provide you with both variations down below:

The standard way:

  1. Type cmd in the Windows search bar, right-click on the Command Prompt and run it as an administrator.
  2. In the command line, type the following line and press Enter:
    • DISM /online /Cleanup-Image / ScanHealth
    • DISM /Online /Cleanup-Image /RestoreHealth
  3. Wait until the procedure ends (it might take up to 10 minutes).
  4. Restart your PC.

With the installation media:

  1. Mount your Windows 10 installation media, either USB or ISO DVD.
  2. Open Command Prompt (already explained how to above).
  3. In the command line, type the following commands and press Enter after each:
    • DISM /online /Cleanup-Image /CheckHealth
  4. If there’s not any single error, enter this command and press Enter:
    • DISM /online /Cleanup-Image / ScanHealth
  5. If DISM finds any errors, enter the following commands and tap Enter:
    • DISM /Online /Cleanup-Image /RestoreHealth /Source:repairSource\install.wim
  6. Have in mind that you’ll need to replace the ”repair source” part of your installation media with the source path.
  7. Wait for the procedure to end and restart your PC.

5: Reinstall Microsoft Store

As you’re probably aware, one can’t uninstall Microsoft Store. It simply can’t. Microsoft is pushing its native store flamboyantly, and it doesn’t allow users to meddle with it as they wish. Windows 10 is service, isn’t it?

However, jokes aside, you can at least reinstall Microsoft Store with the little help of PowerShell command-line and one quite long and convoluted command. This should restore Store’s setting to factory values. It should be just the same as when the system was installed.

Here’s how to do it in a few steps:

  1. Right-click on the Start button and open PowerShell (Admin).
  2. In the command line, copy-paste (or type) the following command and press Enter:
    • Get-AppxPackage -allusers Microsoft.WindowsStore | Foreach {Add-AppxPackage -DisableDevelopmentMode -Register “$($_.InstallLocation)\AppXManifest.xml”}windows store error 0x87AFo81
  3. Restart your PC.

6: Wait for updates

This. We’re all aware that issues are common, especially for the ever-growing system that adds occasionally a large bundle of changes. A lot of those issues are uncalled for and can make usage distressful.

However, the majority of buggy improvements are polished after a certain period of time, especially if an issue is critical as this certainly is.

Windows 10 updates are mainly automatically distributed, but you can check for updates manually and update your system accordingly. Here’s how to do it:

  1. Press the Windows key + I to open Settings.
  2. Open the ”Update & Security” section.windows 10 app store error 0x803f7003
  3. Under Windows Update, click Check for updates.

7: Reset this PC

Ultimately, you can always turn to recovery options and resolve all issues that way. Windows 10 comes with the ”Reset this PC” function, which should restore factory values similarly to system reinstallation.

We won’t advise this procedure with minor issues, but the 0x803f7003 error is rendering Microsoft Store completely unusable. Thus, this might be a need and not an optional solution or workaround.

If you’re unsure how to reset your PC to factory settings in Windows 10, here’s how to do it:

  1. Press Windows key + I to summon the Settings app.
  2. Open the Update & Security section.windows 10 app store error 0x803f7003
  3. Select Recovery from the left pane.
  4. Under ”Reset this PC”, click Get started.wifi not working on laptop but working on other devices
  5. Choose to preserve your data and restore your PC to default settings.

That should wrap it up. We certainly hope that one of these solutions hit the jackpot and that you’ve managed to resolve the Microsoft Store error 0x803f7003.

In case you care to share your experience with the error, provide additional solutions or ask a question in regards to the subject, make sure to do so in the comments section below.

Best Holiday Movies On Microsoft Store [This Season]

With Christmas around the corner, what better way to get into the holiday season mood than watching a Christmas movie? The list of Christmas movies available is quite long, but choosing just the right one is a difficult task,

Fortunately, we’re here to help you. In this article, we’re going to list the best Christmas movies available in the Microsoft Store to help you decide which movies to watch.

These are excellent if you’re looking for the following topics:

  • Classic Christmas movies
  • Greatest Christmas movies
  • Family Christmas movies
  • Christmas movies for kids

Which are the best Christmas movies on the Microsoft Store?

The Santa Clause 3: The Escape Clause

This hilarious Disney family comedy will make you laugh until your belly hurts. Santa Claus (Scott Calvin) faces his most difficult challenge yet:

The mischievous Jack Frost plans to end Santa’s career using the Escape Clause because he is jealous that he has no holiday.

If you’re curious to see how this story unfolds, purchase The Santa Clause 3: The Escape Clause from the Windows Store.

The price tag ranges from $3.99 if you want to rent the SD version of the movie to $17.99 if you buy the HD version.

⇒ Check price

One Magic Christmas

Ginny Grainger is a young mother who rediscovers the joy and beauty of Christmas. Her six-year-old daughter Abbie and Gideon, Ginny’s guardian angel, guide her through this wonderful experience.

Ginny is not exactly very happy. She has a hard time enjoying Christmas because her husband is unemployed and she holds a humble position as a grocery store clerk. Eventually, she realizes that things could be much worse and learns to appreciate what she has.

You can purchase One Magic Christmas for $3.99 or $17.99 (the HD version) from the Microsoft Store.

⇒ Check price

Santa Buddies

This is because nobody believes in Christmas anymore. The bad news is that if the icicle continues to melt, Christmas will be history.

As the Christmas Icicle makes a big crack, the reindeer become weak and powerless and the North Pole slumps into darkness due to power issues.

Puppy Paws, the son of Santa Paws and his newfound buddies must save Christmas and teach everybody what the real meaning of Christmas is.

To see if they succeed, you can purchase Santa Buddies from the Microsoft Store. The SD version of the movie costs $9.99 while the HD version costs $17.99. You can also rent the movie for $3.99.

⇒ Check price

Surviving Christmas

If you want to have a good laugh this Christmas, watch Surviving Christmas. A lonely, obnoxious young millionaire pays a family to spend Christmas with him and this triggers a series of funny events.

The millionaire participates in the Latham family traditions, such as Christmas tree selection and holiday shopping. However, Alicia, the family’s eldest daughter refuses to comply with her family’s wishes.

If you want to see what happens next, download the movie from the Microsoft Store.

⇒ Check price

The Christmas Dragon

Can you image December without Christmas? We can’t but this movie takes you to Medieval Europe where Christmas hasn’t come for several years.

A young orphan girl receives an important mission from a dying elf — to save Christmas. As she embark to this journey, she’ll need to use her wits and escape dragons, goblins, ogres and other creatures.

If you’re curios to see whether or not she manages to save Christmas, you can download The Christmas Dragon from the Store.

⇒ Check price


The Smurfs: A Christmas Carol

If you like animation movies, we’re sure you’ll enjoy The Smurfs: A Christmas Carol.

It’s Christmas time in Smurf Village! ‘Tis the season that brings joy to all the Smurfs…except one: Grouchy Smurf. When Grouchy Smurf says “Bah-Humbug” to the Christmas spirit, it’s up to Papa Smurf’s magic potion and three enchanted Smurfs to set things right. Can the Smurfs of Christmas Past, Present and Future teach Grouchy the real meaning of Christmas before Smurf Village falls into the hands of the evil Gargamel?

You can get this movie from the Microsoft Store.

⇒ Check price

A Heavenly Christmas

A workaholic who never valued Christmas too much dies at an early age and is then recruited to be a Christmas Angel.

The twist is that she fells in love with the man she was supposed to help heal his old wounds. Watch the movie to see who everything unfolds.

⇒ Check price

I’ll Be Home For Christmas

Jake Wilkinson is a self-centered college student who desperately wants to get home for Christmas dinner. If he doesn’t, he risks losing that vintage Porsche his father promised him.

The problem is that he suddenly wakes up in the California desert without even a penny in his pocket. Strangely enough, he’s wearing a Santa suit.

Jake desperately takes advantage of every transportation means he can find and races against time to get home for Christmas.

To make his task even more difficult, a series of comedy of errors trips him up and sets him off course. As he struggles to get back home, Jake eventually grasps the true meaning of Christmas and the importance of family.

You can purchase I’ll Be Home For Christmas for $3.99, or $17.99 (the HD version).

⇒ Check price

As you can see, the list of Christmas movies available in the Microsoft Store is not very diverse. Nevertheless, the seven movies listed above will definitely cheer you up this Christmas.

Windows Emoji Shortcut is Not Working? How to Enable It

Keyboard shortcuts are the secret weapon that power users use to save time. You can do all sorts of things with keyboard shortcuts, including closing windows, opening new tabs, and more. While it is a useful feature, some users prefer to turn off keyboard shortcuts.

Others on the other hand may have trouble at times getting these shortcuts to work. Sometimes, when you’re typing a message and you want to include an emoji, the keyboard may not pop up. 

Why are my keyboard shortcuts not working?

 There are a few reasons why this might be happening:

  • Outdated keyboard drivers – You may be using an outdated keyboard version. Ensure you keep your keyboard drivers updated for optimum performance.
  • You have disabled the shortcut – You may have accidentally disabled or changed the default keyboard settings in Windows. 
  • Third-party keyboards – If you have installed another keyboard, the two might conflict with each other and cause this behavior.
  • Keyboard language – Your keyboard may not be set up properly. Sometimes, the keyboard language changes automatically.
  • You’re using an unsupported app – You may be using the keyboard shortcut on an app that does not support it. 
  • Faulty keyboard – It is possible that your keyboard is damaged or isn’t working correctly.

How do I enable Windows emoji shortcuts?

The Windows emoji panel comes automatically enabled, but if for some reason this is not the case, here are steps to enable it:

  1. Hit the Windows + R keys to open the Run command.
  2. Type regedit then press Enter.
  3. Navigate to the following location: Computer\HKEY_LOCAL_MACHINE\SOFTWARE\Microsoft\Input\Settings\proc_1
  4. Find EnableExpressiveInputShellHotkey, right-click on it and select New DWORD (32-bit) Value.
  5. Set the Value data to 1 to enable the emoji panel. 
  6. Restart your PC to save the changes.
  7. Now press Windows + . or Windows + : combinations as shortcuts to open the emoji panel on any text editor.

If interested, check out this quick guide on adding emojis to Outlook.

What can I do if the Emoji shortcut is not working in Windows?

Before moving on to the slightly technical solutions, try the following:

  • Close any background programs.
  • Disconnect other peripherals and connect only the keyboard to see if it works.
  • Try using a different keyboard if available to rule out whether it is a hardware or software issue.
  • Restart your PC.

1. Disable third-party keyboards temporarily 

The Emoji shortcut feature only works with native Windows keyboards. If you have an alternative keyboard installed, like SwiftKey or Gboard, try disabling it.

There are also many apps that can change your default keyboard, such as TouchPal. If you have installed any of these apps, you may need to disable or uninstall them.

2. Change your keyboard language 

  1. Hit the Windows key and click on Settings.settings windows 11
  2. Click on Time & language then click on Language & region on the right side.going language and region windows 11 settings
  3. Under Windows display language, ensure you set it to English (United States).

This is important because the keyboard shortcuts for emojis vary depending on which language you’re using. 

3. Update keyboard drivers

Using an outdated keyboard driver may be the problem behind the Windows Emoji shortcut not working error, and you can complete this procedure by using third-party software as it is the most efficient solution.

4. Check for updates

  1. Hit the Windows key and select Settings.settings windows 11
  2. Click on Windows Update then select Check for updates.check for updates windows 11 settings
  3. If available, click on Download & install.

Users have also complained of an issue where their keyboard is typing the wrong characters and letters. If you encounter the same problem, refer to our helpful guide for quick fixes.

In case you have a faulty keyboard on your hands, it may be time to upgrade your keyboard for improved performance and reliability.

Let us know if your emoji shortcut is working after trying out our recommended solutions in the comment section below.

Fix Keyboard Typing Wrong Letters and Symbols in Windows

A keyboard typing incorrect letters signals hardware issues, stuck keys or misconfigured settings. Below we’ll walk you thorugh tried and tested ways to fix this problem. Let’s get right to it.

What can I do if my keyboard is typing the wrong letters?

Here are some quick fixes to try first:

  1. If you are using a wired keyboard, connect it to another port on the computer.
  2. Make sure Num Lock is not enabled. If that’s the case, its indicator light would be turned on.
  3. If you are using a laptop, ensure no pressure is exerted on its body. Oftentimes, this causes the touchpad or keyboard to act weirdly.

If you tried these and the keyboard is still nto showing the correct symbols, try the more advanced fixes below.

1. Override the default input method

  1. Press Windows + I to open Settings, select Time & language from the navigation pane, and then click on Typing.
    time & language
  2. Now, click on Advanced keyboard settings.
    advanced keyboard settings to fix keyboard types wrong characters
  3. From the Override for default input method dropdown menu, choose English (United States) – US.
    change input to fix keyboard types wrong characters

Resetart your PC to make sure the changes apply. If you can’t find the desired entry here, add the language pack for it.

You can also run the built in Keyboard Troubleshooter in Windows to automatically detect and repair common typing issues, so check the full guide here: Keyboard Troubleshooter in Windows.

2. Reinstall keyboard drivers

  1. Press Windows + X to open the Power User menu, and select Device Manager.
    device manager
  2. Expand the Keyboards entry, right-click on the problematic keyboard, and choose Uninstall device.
    uninstall device to fix keyboard types wrong characters
  3. Again, click Uninstall in the confirmation prompt.
    uninstall
  4. Once done, restart the computer, and Windows will automatically download the best available drivers for the keyboard.

If this doesn’t work, you can update your keyboard drivers using a specialized tool, preventing PC damage by installing the wrong driver versions. For this, we highly recommend the easy-to-use and reliable Fortect Driver Updater.

3. Add the required language pack

  1. Click a picture of your keyboard, and add it to Google Lens to perform a search to identify the keyboard layout.
  2. Once you know the layout, press Windows + I to open Settings, choose Time & language, and click on Language & region.
    language and region
  3. Click on Add a language button.
    add a language
  4. Now, choose the relevant language pack, and click Next.
    choose language
  5. Click Install.
    language pack to fix keyboard types wrong characters
  6. Once done, head to Advanced keyboard settings, and then choose the language pack you just downloaded from the dropdown menu.
    choose language

4. Check AutoCorrect settings (for Microsoft Word)

  1. Open Word, and click on the File menu.
    file
  2. Now, choose More, and then click on Options.
    options
  3. Navigate to Proofing and select AutoCorrect Options.
    autocorrect options to fix keyboard types wrong characters
  4. Uncheck the entries that seem to be causing the trouble, and click OK to save the changes.
    untick options

Ensuring AutoCorrect is appropriately set up is a workaround, especially if your keyboard types the wrong letters in Word, but it works fine in other apps and programs.

In case the keyboard types the wrong characters in another program, make similar changes to it as well.

Why are my keys typing different symbols?

After some research, we could deduce a list of reasons the keyboard is typing different symbols or words.

  • Hardware issues – In most cases, the issue lies with the keyboard itself. It could be a malfunctioning key or an object stuck under one. Cleaning the keyboard usually does the trick, but you might have to replace it.
  • The Shift key might be stuck – If the Shift key is stuck or Num Lock is enabled, the keyboard behavior will be different from what you expect.
  • Keyboard drivers are causing problems – Incompatible, corrupt, or outdated drivers usually trigger conflicts and may affect the effective functioning of the keyboard.
  • The correct language pack is missing – A missing language pack can often be the underlying cause when your keyboard types the wrong characters. Simply adding the language pack should do the trick here.

Well, if nothing worked, then maybe your keyboard is faulty. In which case, you could either get it repaired, but that’s not often a sustainable option. Once a keyboard starts to fail, new problems keep coming up, and replacement only makes sense.

So, find out the best available keyboards, and get one for your computer. After you replace it, things should be up and running just fine.

Before you leave, find out the best ways to speed up Windows and get things done faster.

Other common keyboard problems that can be fixed with similar solutions include your keyboard automatically typing on its own, constant beeping while typing, not allowing double letters, or Windows 10 randomly switching keyboard language.

If you’ve got additional tips and suggestions on how to fix this issue, let us know in the comments below.

MS Store Errors 0x8007064a, 0x80246007 & 0x80248014: Fix

More error codes here, as we get them from the Microsoft Community support forums. Now, somebody is reporting that the Windows Store doesn’t install app updates and gives the following error codes – 0x8007064a, 0x80246007, 0x80248014.

Earlier today we reported an annoying Windows 8, Windows 8.1, and Windows 10 errors, codenamed as error 0×8004005. A Microsoft user says the following:

Windows Apps Store are not installing new updates, neither any new Apps is installing from Windows Apps Store. The Installation gets failed every time and we get error code :- 0x8007064a, 0x80246007, 0x80248014

Since we do have a lot of Windows 8, Windows 8.1, and Windows 10 app updates, it’s natural that we worry for those who can’t install the latest versions.

Of course, this happens only with those that receive the updates automatically and have to install them themselves. I’ve read somewhere that having more than one antivirus software installed could be the culprit.

You can also try doing the following:

  1. Press the Windows key + R
  2. Type WSReset.exe and hit enter
  3. Reboot and give another shot

If this doesn’t solve your problem, dive in into these troubleshooting methods.


How do I fix the MS Store errors 0x8007064a, 0x80246007, and 0x80248014?

1. Set your country and language settings to the real country you live in

If you selected another country than the one where you currently live, this may trigger various errors. The quickest solution to fix them is to use your real country and language settings.


2. Run the Windows 10 Troubleshooter

  1. Go to Start > type ‘settings’ > double click on the first result to launch the Settings page
  2. Click on Troubleshoot in the left pane > under ‘Find and fix other problems’, select Windows Store Apps0x8007064a, 0x80246007, 0x80248014
  3. Launch the troubleshooter

Windows 10 comes with a built-in feature that allows you to quickly identify and fix general issues affecting various Windows components.


3. Update Windows Store apps

  1. Click on the three-dot menu > select Downloads and Updates
  2. Click on ‘Get Updates’ to install the latest Microsoft Store updatesfix 0x8007064a, 0x80246007, 0x80248014
  3. Restart your computer and check if the issue persists.

4. Install the latest OS updates

Microsoft regularly releases new updates in order to improve system stability and fix various bugs reported by users.

Your Microsoft Store app is dependent on your Windows 10 OS, so running outdated OS versions may cause various Microsoft Store app issues and errors, including these three errors: 0x8007064a, 0x80246007, and 0x80248014.

To access the Windows Update section, you can simply type update in the search box. This method works on all Windows versions. Then go to Windows Update, check for updates and install the available updates.


5. Repair your registry

Before repairing your registry, don’t forget to first back it up in case anything goes wrong. To repair corrupted or missing registry keys, you can use a dedicated tool, such as CCleaner orMicrosoft’s System File Checker.

Since the SFC is already available on your computer by default, here’s how to run an SFC scan:

1. Go to Start > type cmd > right-click Command Prompt > select Run as Administrator

2. Now type the sfc /scannow command

3. Wait for the scanning process to complete and then restart your computer. All corrupted files will be replaced on reboot.


6. Run WSReset.exe

Windows 10 has a built-in tool for resetting Windows Store cache. The WSReset.exe command allows you to restart Windows Store and clear the app‘s cache.

It is very useful when you’re dealing with stalls and errors, including 0x8007064a, 0x80246007, 0x80248014 .

Here’s how to run his nifty tool:

  1. Press Windows key + S.
  2. In the Windows Search bar, type WSReset.exe and press Enter.0x8007064a, 0x80246007, 0x80248014
  3. This will restart Windows Store and clear the stored cache.

On the other hand, if you’re unable to resolve the error this way, make sure to check the additional solutions below.


7.  Reinstall the app

Sometimes, apps are the ones to blame for errors, not the Microsoft Store itself.

The best way to fix issues within the apps is to reinstall them. Once you have identified the culprit, here’s how to remove it:

  1. Navigate to Start > go to Apps & features > select the problematic app
  2. Click on Uninstalluninstall microsoft store app
  3. Restart your PC
  4. Open Windows Store > search for the app you uninstalled and install it again.

8. Sign out from Windows Store

Interestingly enough, some users confirmed they managed to fix errors 0x8007064a, 0x80246007 and 0x80248014 after signing out of their Windows Store account.

Here are the steps to follow:

  1. Open the Windows Store app.
  2. Click on your profile in the top right corner.
  3. Sign Out of your profile.sign out microsoft store account
  4. Search for the App that you want to install or update.
  5. Click on the app and choose the preferred action.
  6. Windows Store will ask you to sign-in.
  7. Sign in and check if the errors persist.


By following of these solutions fixed errors 0x8007064a, 0x80246007, 0x80248014. If you’ve got additional tips and suggestions on how to fix these errors, you can list them in the comments below.

Outlook Error 0x80040115: 4 Ways to Easily Fix it

When sending an email using Microsoft Outlook, the users have encountered the Microsoft Outlook error 0x80040115. If this error occurs, Outlook can’t log on or access the server.

Several users have reported similar errors in the Microsoft community forum, and today we’re going to show you the best ways to fix it.

What does the Outlook error 0x80040115 mean?

This error message appears when Outlook is unable to connect to the server. Regarding the causes, here are the most common ones:

  • DNS cache – It’s not uncommon for DNS cache to cause network errors. If this happens, you’ll need to flush your DNS.
  • Add-ins – Certain add-ins can cause issues, and sometimes Outlook won’t open if certain add-ins are installed.
  • Corrupted installation – If your Outlook installation is damaged, you won’t be able to use the client properly. The only option is to repair Outlook or reinstall it.

How do I fix Outlook error 0x80040115?

Before we start fixing this issue, you should check the following:

  • Check Microsoft 365 Admin Center – Visit the Admin center and make sure that your user account is not unlicensed.
  • Create a new mail profile – In Control Panel, locate the Mail applet and use it to create a new profile. Add your email to it, and that’s it. Some users reported that deleting and recreating their profiles helped solve the issue.
  • Repair your pst file – Use SCANPST to find and repair your pst file. Once the file is repaired, the error will be gone.
  • Restart Microsoft Exchange Services – If you’re a server admin, you can fix this problem by restarting Exchange services.

1. Flush DNS  records

  1. Press the Windows key and type cmd. Next, right-click on Command Prompt and select Run as Administrator.

  2. In the Command Prompt, type the following command and hit enter to execute:
    ipconfig /flushDNS
    ipconfig/flushdns command
  3. Close Command Prompt and check for any improvements.

This error can occur due to a DNS configuration error. Multiple users have reported that flushing the DNS has helped them resolve the error.

2. Check for add-in issues

2.1. Open Outlook in safe mode

  1. Press Windows Key + R to open Run.
  2. Type the following and click OK:
    Outlook /safe

  3. If prompted, choose a profile and click OK.
  4. When the Outlook opens, try sending an email.
  5. If the error does not occur in safe mode, you may have a third-party add-in installed that is creating conflict with the program.

2.2. Find and remove add-ins

  1. Launch Outlook.
  2. Click on File and select Options.

  3. In the Outlook Options window, select the Add-ins tab from the left pane.
    Outlook sending error 0x80040201
  4. Disable all the third-party add-ins installed.
  5. Relaunch Outlook and check for any improvements.

3. Repair Outlook installation

  1. Press Windows key + R to open Run.
  2. Type appwiz.cpl and click OK.
    appwiz unable to access jarfile
  3. Select the Outlook client and click on Change.

  4. In the Office troubleshooter window, you will see Quick Repair and Online Repair. Select the first option and check if it solves the problem. If not, use Online Repair instead.
    Outlook not implement error
  5. Close the troubleshooter and launch Outlook. Check for any improvements.

4. Change profile security settings

  1. Press the Windows key and type control panel. Click on Control Panel.
    Open control panel change default camera windows 10
  2. In Control Panel, search for Mail.
  3. Click on Mail ( Microsoft Outlook 2016) (32-bit) option.
  4. In the Mail Setup window, click the Show Profiles button.
  5. Select your profile and click the Properties button.
  6. Click the Email Accounts button.
  7. Select your email account and click the Change button.
  8. Click the More Settings button.
    Microsoft Outlook error 0x80040115
  9. Open the Security tab.
  10. Make sure Encrypt data between Microsoft Office Outlook and Microsoft Exchange is checked.
    Microsoft Outlook error 0x80040115
  11. Click OK to save the changes.
  12. Relaunch the Outlook client and check for any improvements.

The Microsoft Outlook error 0x80040115 error can make it difficult to send and receive emails. However, we have listed all the possible fixes to help you resolve the issue in no time.

In case you’re having additional problems, check our guide on the most common Outlook errors for more fixes.

Go through the steps and let us know which method helped you resolve the issue in the comments.

Windows Store Error Code: 0x80240439 [Solved]

The error 0x80240439 is back, preventing users from downloading Windows Store apps. This error has plagued thousands of Windows users in previous years and has now returned.

According to user reports, error code: 0x80240439 affects all Windows devices, and the workarounds available last year don’t really seem to work this time.

Users have so far tried a variety of solutions to fix this error: they reset the time/date settings, ran wsreset.exe, disabled third-party antivirus software, all to no avail.

Let’s find out together how to fix this Windows Store error on your PC.

What does the error 0x80240439 do?

I am getting the error code listed above and have tried all of the solutions provided in this thread on the support section.  I have tried to reset the time/date settings and have run wsreset.exe in addition to disabling the third party antivirus software i had running entirely.  Can someone please advise?

Microsoft’s support engineers didn’t reply to any of the forum threads created by users to report this issue, and the other Windows users/ Insiders couldn’t offer a solution for this issue either. According to one Insider, error 0x80240439 could be triggered by the maintenance operations Microsoft recently carried out on its servers.

Seeing the amount of people posting this error in the last couple of hours I think that MS is having server issues, as we were notified on the Insiders forum that MS was doing some upgrades at their end this might be the reason my guess is to wait a day before trying.

The good news is that some users already confirm error 0x80240439 no longer plagues them. Nevertheless, they are still very disappointed, criticizing Microsoft for not informing them about the server maintenance operations and the possible Windows Store issues that could ensue.

Now, in the morning, all of a sudden and without changing anything I am able to download previously bought apps again. No error message any more. Therefore, I do think that MS had server problems. I am so SICK of Microsoft. […] There is no excuse whatsoever to have server problems for more than 5 hours without communicating them immediately.

Can you download Windows Store apps now? Or is error 0x80240439 still plaguing you? Tell us more about your experience in the comment section below.

10+ Best After Christmas Laptop Deals [Sales & Offers]

Christmas is approaching fast and the season of winter magic and giving is starting. Today, one of the best gifts that you can buy for your loved one is a laptop computer.

If you’re not sure what laptop would be your best choice as a holiday gift, we made a list of the best Windows laptops to get this Christmas, enjoy.

Of course, this list is the best in our view, and we’ve tried to include the newest devices, but also some older ones that we still think are a good go. However, if you want to suggest another device, we’ll be glad to take a look at your idea.

Editor’s Note: We refined our buying guides and we compiled this exhaustive list of the best Windows 10 laptops to get today. We filtered the results by user intent to simplify your purchasing decision process.

If you’re looking for a budget-friendly laptop, you can keep on reading the original article below.

What are the best Windows Christmas laptop deals?

Dell Newest Inspiron 3511

  • 15.6-inch FHD and WVA Touchscreen display
  • 1TB PCIe SSD space and high-speed 32GB RAM
  • Next-Gen Intel i5 Quad-Core processor
  • Windows 11 Home pre-installed & multi-monitor performance
  • Light gaming capacity

This new version of Dell Inspiron 3511 is a worthwhile device for anyone searching for high-end specifications and rich memory space. More exactly, you benefit from a 1TB SSD and the fastest bandwidth to run countless programs or tabs.

Even more, this brand-new laptop offers a robust display image with a 15.6-inch screen, anti-glare LED Backlight, 720p camera, and integrated dual array microphones.

Dell XPS 13 9305

  • Intel Core i7 family processor
  • 13.3 Full HD Display
  • 16GB RAM and 512 SSD memory
  • Dual fans and heat pipes for low temperature
  • Not the best webcam quality

Dell XPS 13 aluminum laptop is a great Christmas deal because it has a portable architecture and advanced specifications such as FHD 1920×1080 resolution, Intel Evo platform for leading performance, amazing graphics, and the 11th generation Intel Core i7-1165G7.

In addition, the Dell laptop offers the InfinityEdge display with 3 sides that gives you a crystal-clear screen with a sweeping color spectrum and 100% sRGB and a 1500:1 contrast ratio.

Lenovo IdeaPad 3

  • 15.6-inch HD touchscreen display
  • Physical webcam shutter for added protection
  • 10th generation Intel Core i3-1005G1 processor
  • 1 TB 5400 RPM HDD + 128 GB PCIe SSD
  • Integrated graphics

Lenovo IdeaPad 3 is the right example of a low-cost laptop with a nice configuration. Its performance and screen quality are solid for a device from this price range.

The laptop has a 15.6-inch HD touchscreen display, perfect for a student or an artist. It sports a 10th-generation Intel Core i3 processor and 8 GB of RAM, perfect to power the preinstalled Windows 10 Home OS.

Lenovo ThinkPad L13

  • Powerful 10th Gen Intel Core processing
  • Thin and light-13.3-inch display
  • 720p HD camera
  • Window 10 Home
  • No optical unit

The Lenovo ThinkPad L13 laptop certainly has its pros and its cons (as anything else on this world, of course). The main con of this device is the fact that it’s not such a powerful laptop for gaming of any other graphics intensive application.

However, it’s highly configurable and you can choose, for instance up to a 512 GB SSD and ut to a 10th generation Intel Core i7 but if you want to stay on a low budget, the minimum configuration is pretty modest. One thing will stay the same, the 13.3-inch nice display.

HP Pavilion 15t-dk100

  • Windows 10 Home 64-bit OS
  • 10th gen Intel Core i5 processor
  • NVIDIA GeForce GTX 1050 graphics card with 3 GB of dedicated memory
  • 16 GB RAM and 256 GB SSD storage
  • The sound is not gaming grade

The HP Pavilion 15t-dk100 laptop is driven by a 10th generation Intel Core i5 processor and 16 GB of RAM so you will have a strong start on running all applications and utilities. It’s also a great laptop for video editing.

It’s a gaming laptop so it’s only natural to sport a discrete graphics card. The NVIDIA GeForce GTX 1050 comes with 3 GB of dedicated memory that will handle some of the newer games out there. Another good news is the integrated Windows 10 Pro OS.

HP Chromebook 11a-na0060nr

This HP Chromebook laptop offers very good performances and battery life for a device of its price range. But as the main weakness of this model is its pretty weak configuration designed to run the Google Chrome OS.

This laptop only has 4 GB of RAM and 32 GB of eMMC storage. It also has a MediaTek processor and MediaTek integrated graphics so this rig will be OK for browsing and even streaming on its 11.6-inch HD (1366 x 768) touchscreen, but it will not be great for more demanding apps.

⇒ Check price

Lenovo ThinkPad X13

Choosing Lenovo ThinkPad X13 as your ultrabook is a maverlous pices of business. ThinkPad X13 a high-resolution screen with wide viewing angles and long battery life packed in a slim and very durable lightweight laptop.

Besides long battery life, charging time of this laptop is very fast. Unfortunately it has no Ethernet or VGA, but this device is an excellent choice, especially for business users. It’s also a good laptop for photo editing.

⇒ Check price

Lenovo Yoga Duet 7i

Lenovo Yoga Duet 7i is a 2-in-1 convertible laptop and comes with a very good configuration for its price. It can go up to Intel Core i7 10-th generation processor, and 8 GB of RAM.

But the star of the show is the 13-inch IPS 2K resolution touch display that comes with Dolby Vision technology. You can also be the star of the Internet by using the Wi-Fi 6 connectivity and keep your gadgets close with Bluetooth 5 technology.

⇒ Check price

Dell Alienware M15 R3

Alienware M15 R3 is a gaming laptop, and a strong one, ready for any virtual battle. It comes with an extreme configuration starting with an Intel Core i7 10th generation processor, an AMD Radeon RX 5500M graphics card with 4GB of dedicated GDDR6 memory and 16 GB of RAM to push things to the limit.

The only weak spot, if you can call it that, is that the SSD installed has only 256 GB of storage. This laptop is pretty expensive but once you get in on the action you will see that it was worth every penny.

⇒ Check price

HP Spectre x360

HP Spectre x360 is a fast laptop, that can handle all tasks and can even be put to work in the latest games thanks to the NVIDIA GeForce MX250 graphics card with 2 GB of dedicated GDDR5 memory.

Moreover, it comes with 16 GB of memory and a speedy SSD with 512 GB of storage. At the helm there’s Quad-Core 10th generation Intel Core i7 processor.

⇒ Check price

ASUS VivoBook 15

This laptop is sleek and elegant and it has a great configuration for its price. The AMD Quad Core R5-3500U CPU is helped by 8GB of RAM and the AMD Radeon Vega 8 graphics. The 256 GB SSD is just right for a home or even a business laptop.

The 15.6-inch Full HD display with slim bezels also makes ASUS VivoBook 15 a great laptop for entertainment and video streaming.

⇒ Check price

ASUS ZenBook Flip S

ASUS ZenBook Flip S offers really impressive performance from a great configuration even if it’s a 2-in-1 convertible laptop. Its smooth design and great 4K screen make this device a high-budget laptop.

The 11th generation Intel Core i7 processor, the 16GB of RAM, and the 1TB SSD will most likely convince you to give this laptop a run for its money.

⇒ Check price

ASUS ROG Strix G17

ASUS ROG Strix G17 is another titan created especially for games but it still makes a great deal for its spectacular configuration. Unleash your budget for a 17.3-inch 144Hz IPS display laptop that sports an NVIDIA GeForce RTX 2070 SUPER with 8GB of GDDR6 memory and ROG Boost.

You can always count on a 10th-generation Intel Core i7 processor and 16 GB of RAM.

⇒ Check price

If you’re looking for an AMD-built gaming laptop, you can go with the ASUS TUF Gaming A15 laptop that is constructed around an AMD Ryzen 5 4600H processor and a GeForce GTX 1650 graphics card.

Its 15.6-inch 144Hz Full HD IPS display will be great for any type of game but the 8GB of RAM is not as promising for the latest titles that are more demanding.

⇒ Check price

MSI GL65 Leopard

The MSI GL65 Leopard is powerful as much as it’s good looking. MSI’s gaming machine has a fast and powerful Intel Core i7 processor, and a stunning NVIDIA GeForce RTX 2070 graphics card with 8 GB of dedicated video memory.

The device’s amazing 1080p display, keyboard with lighting effects, and great audio system make this laptop one of the best gaming laptops out there. The only con of this laptop is the fact that it is a little bit heavy for carrying. But of course, using this beautiful gaming beast has its price.

⇒ Check price

ASUS ROG Zephyrus G15

If we’re talking about slim and light gaming laptops, ASUS ROG Zephyrus G15 will be one of the main topics. This device is one of the best-designed and fastest gaming portables on the market.

G15 comes with a 15.6 inch IPS display with a stunning 144Hz refresh rate and 3 ms response time so it comes packed for any gaming genre. 16 GB of RAM and an NVIDIA GeForce GTX 1660 Ti graphics card with 6GB of dedicated video memory will stand tall to any title.

⇒ Check price

Asus Zenbook 14

Asus ZenBook 14 is one of the best Asus in-house business laptops and is a mix of awesome performance and great design. With an AMD Octa-Core Ryzen 7 4700U processor and a 1 TB SSD, you will smoothly run any business application with lightning speed.

ZenBook 14 is very silent and has a good battery life, which means that you can concentrate on your work without worrying about the laptop. Unfortunately, this device is a little bit expensive.

⇒ Check price

Acer Aspire 1

With 10 hours of battery life, Acer Aspire 1 comes as a big contender for a very affordable business laptop. It doesn’t have a powerful configuration but with its Intel Celeron N4020 dual-core processor and 4GB of RAM it will run most office and business applications.

A sleek design and comfortable keyboard will make you feel great while working. Aspire 1 has an ultrasharp 15.6 inch Full HD display, but it’s not very bright.

⇒ Check price

Acer Aspire 5

It’s slim and light and comes with a moderate configuration and a great price. It’s Acer Aspire 5, a great budget laptop that will be great for home or office. It comes with a nice 15.6-inch Full HD IPS display with great viewing angles and an AMD Ryzen 3 3200u processor that will be ready to run all your applications.

The 8 GB of RAM and the 256 GB of SSD storage fit perfectly inside this good-budget laptop. It comes with a backlit keyboard so you can work or type in low-light environments and you can connect it to a bigger screen with a HDMI cable.

⇒ Check price

Surface Pro 3

Microsoft Surface Pro 3 wind8apps

Microsoft Surface Pro 3 offers a bigger and sharper, 2160 x 1440, 12.5-inch display, and is significantly lighter and thinner than the previous model from the series. It’s a perfect laptop for remote working.

Surface Pro 3 also features a very flexible hinge and a new magnet on the Keyboard Cover, which makes this device very comfortable for use in the lap. Although Microsoft could do a better job with the battery life of the Surface Pro 3, this is still a very quality, premium device.

⇒ Check price

Toshiba Dynabook Tecra A50

Business laptops are supposed to be sober and professional looking so that’s what Toshiba Dynabook Tecra A50 inspires. It’s packed with an Intel Quad Core i7-8565U processor, 16GB of RAM, and no less than 512GB of storage space in a speedy SSD.

With Wi-Fi 6 and Windows 10 Pro already installed, A50 is a recipe for success, in any business application you would throw at it. It also comes with an HDMI cable that invites you to pair it with a bigger screen to enjoy a movie after work.

⇒ Check price

This was our exhaustive selection of the best after-Christmas laptop deals. It’s impossible not to find the perfect laptop for your budget and requirements from our list so leave us a comment below with the laptop you chose and why.

Create a Restore Point in Windows 10 With 3 Simple Steps

Creating a system restore point on Windows 10 is always good. This is because you never know what will happen to your operating system at one point or another.

In this way, you will easily be able to restore a good working copy in no time without performing a clean install of Windows 10. While this may seem simple, you still need to know how to do it. And that is precisely what we will show you in this guide.

Is creating a restore point good?

Creating a restore point has so many advantages with little to no downsides. The System Restore feature on your PC automatically makes a restore point with every Windows update you install.

The same happens when you install an unsigned driver or program from MSI. This helps to fix your PC if anything goes wrong.

Below are some of the benefits of a restore point:

  • Helps to restore a PC to working condition without reinstalling the OS
  • Repairs Windows Environment
  • Does not delete user data files

How can I create a Windows 10 restore point?

  1. 1. Press the Windows key, type system restore, and select Create a restore point.

    start menu
  2. 2. Select the System Protection tab at the top and click the Create… button.

    system restore point windows 10
  3. 3. Now, enter the name for the restore point and click the Create button

    create system restore point windows 10

That is how you can create a restore point on Windows 10 without a sweat. In the rare case Windows 10 can’t find your restore point, check our detailed guide to get it back quickly.

If you want to restore your PC and System Restore fails due to antivirus, this guide will show you how to push it through.

If you have any additional questions regarding this article, please write to us in the comments below.

Fix: Silhouette Studio Encountered an Error and Must Quit

Silhouette Studio is a popular design software that allows you to create a wide range of designs from scratch or download one from the Design Store. Unfortunately, however, the Silhouette Studio has encountered an error and must quit issue that seems to bug a lot of users.

Why does my silhouette studio keep crashing?

Here are a few reasons why you get the Silhouette Studio quit without saving error:

  • Outdated graphics drivers – Running outdated drivers is usually the reason behind the error for most users, and updating the graphics drivers fixed things.
  • Corrupt library – If the software’s library is corrupt, you may receive the silhouette studio an error has occurred quit without saving error.
  • Misconfigured settings – Another common reason leading to the Silhouette studio won’t open error, but probably the easiest to fix.
  • A bug in the installed version of the software – Often, users encounter the error after updating the software, which points to a bug in the installed version.

Now that we know why this issue is occurring, let’s fix the problem once and for all.

How can I fix Silhouette Studio has encountered an error and must quit?

Before we head to the slightly complex solutions, let’s try a few quick ones:

  • Make sure your PC meets the system requirements for Silhouette Studio.
  • Unplug any non-critical peripheral connected to the computer.
  • Restart the computer. It’s probably the easiest way to get things up and running, even if it’s temporary.
  • Launch Silhouette Studio with administrative privileges. To do that, right-click on the app launcher and select Run as administrator.
  • Check if any Windows updates are available, and download them.
  • Verify if a newer version of Silhouette Studio is available on the official website, and download it.

If none worked, try the solutions listed below, and you will find one to fix the problem.

1. Update the graphics drivers

  1. Press Windows + X to open the Power User menu and select Device Manager.
  2. Right-click on your graphics card driver and select Update driver.
  3. Now, select Search automatically for drivers.
  4. Finally, wait for Windows to download and install the appropriate driver.

Updating the drivers helped many users who reported that Silhouette Studio was crashing in Windows 10.

If you want to update all drivers on your PC quickly, we suggest using driver updater software such as Outbyte Driver Updater that can do that automatically for you.

Outbyte Driver Updater

A trustworthy solution for finding the right and newest updates for your drivers each time your PC needs it.
Free Trial Download now

2. Delete the program’s App data

  1. Close all running instances of Silhouette Studio.
  2. Press Windows + R to open Run, type %appdata%, and press Enter.
  3. Now, delete the com.aspexsoftware.Silhouette_Studio folder.
  4. Empty the Recycle Bin.
  5. Once done, try opening Silhouette Studio again and see if the problem is fixed.

3. Restore Silhouette Studio to factory settings

Note icon NOTE
Removing your library from Silhouette will delete all files stored. Therefore, it is recommended that you back up your projects before you try this step.
  1. Launch Silhouette Studio, click on the Edit menu, and select Preferences.preferences
  2. Navigate to the Advanced tab and click on Restore Factory Defaults.restore defaults to fix silhouette studio has encountered an error and must quit
  3. Finally, click on Continue and wait for the process to complete.continue to fix silhouette studio has encountered an error and must quit

Another quick fix to resolve the Silhouette Studio has encountered an error and must quit error is to reset the app to its factory defaults. This method has worked for many. However, remember that any set preferences and settings will be lost.

4. Download a previous version of Silhouette Studio

  1. Press Windows + R to open Run, type appwiz.cpl, and click OK.programs and features to fix silhouette studio has encountered an error and must quit
  2. Locate and select Silhouette Studio, and then click on Uninstall.uninstall to fix silhouette studio has encountered an error and must quit
  3. Follow the on-screen instructions to complete the process.
  4. Now, head to Silhouette Studio‘s software page, and click Download Legacy Versions.download legacy versions to fix silhouette studio has encountered an error and must quit
  5. Next, click on the Download button for the version that worked fine.download
  6. After the download, launch the installer and follow the instructions to complete the process.

In case you started receiving the Silhouette Studio has encountered an error and must quit error after the software was updated, it’s likely a bug in the installed version.

So, return to the relatively stable one, throw no such errors, and the problem will be fixed for good.

What do I do if Silhouette Studio crashes on Windows 11?

  1. Press Windows + I to open Settings, navigate to Apps, and click on Installed apps.
  2. Click the ellipsis next to the Silhouette Studio and choose Uninstall.
    Confirm uninstall
  3. Follow the instructions on the screen to complete the process.
  4. Now visit the Silhouette Studio download page.
  5. Select the Windows 32-bit version from the dropdown menu.
  6. Once the application is downloaded, install it.

Downloading the 32-bit version will help fix the Silhouette Studio has encountered an error and must quit error in not just Windows 11 but all iterations of the OS.

One of our readers also managed to fix this problem by lowering the display’s resolution so that you could also try that.

If the problem refuses to disappear, do not forget to check some of the best designing software you can switch to today!

Please let us know if this guide helped you fix the error message by using the comments below.

Fix Potential Windows Update Database Error Detected

When trying to repair your Windows 10 Update feature, you might get the error message potential Windows Update database error detected.

This can be fixed by applying the steps posted below and then returning to your everyday usage of Windows 10 or Windows 11. Users have also reported receiving this error on Windows Server 2016.

Let’s see what this error means and how we can fix it in a few simple steps.

What does the potential Windows Update database error detected mean?

This error means that your operating system cannot access the Windows folder. This is due to some bad registries inside the Windows system.

If a database corruption occurs, Windows Update will stop working until you manage to recreate the database or remove the cache files.

File corruption can also cause Windows update error 0x8024001F, and to fix it, you need to make sure that nothing is interfering with the update process.

If any issue happens, you might get Windows Update components must be repaired message, but luckily for you, this is a simple process we’ll cover in this guide.

Many problems can occur with Windows updates, and in this article, we’re going to address the following issues:

  • Repair Windows update database corruption failed – According to users, sometimes issues the with Windows Update database can occur. However, many users reported that the database repair process failed on their PC.
  • Windows Update database error 0x800f081f – This problem sometimes comes with an error code. Many users reported 0x800f081f code along with this error message.
  • Windows Update database error registration is missing or corrupt – This is a variation of this problem, but you should be able to fix it by using one of our solutions.
  • Server 2016 Potential Windows update database error detected – You will need to manually visit the Microsoft Update Catalog, download the updates, and then manually install them on your PC.
  • Windows Update database error update service not running – Many users reported this problem as well. According to them, it seems that the update service isn’t running on their PC at all.
  • Windows Update components must be repaired – Make accessible space on your system disk.
  • Potential Windows Update database error detected 0x80070490 – This issue may arise due to a dispute between software provided by third parties or because the Windows Update database may get corrupted.
  • Windows Update database error code 80072ee2 – This error message sometimes comes with an error code, and many users reported error code 80072ee2 on their PC.
  • Windows Update database was stuck – Sometimes issues with Windows Update can occur, and several users reported that their database was stuck.

Let’s jump right into the list of solutions for the Windows Update database error without further ado. Follow along!

How do I fix potential Windows Update database error detected?

1. Delete folders

  1. Open File Explorer by pressing Windows + E, then enter the following location inside the search bar and delete everything inside this folder by right-clicking the files and selecting Delete: C:\Windows\SoftwareDistribution\Download download-folder Fix Potential Windows Update Database Error Detected
  2. Next, go to this address and delete the Download.old file: C:\Windows\SoftwareDistributionsoftware-distribution Fix Potential Windows Update Database Error Detected

After this, the update should start right away without any Windows Update database errors.

2. Use third-party repairing software

You can use a reliable system repair program to scan and identify all the Windows files that need to be fixed and restore the registry values to their default settings.

For a fully optimized OS and a healthy PC, it’s essential to replace the files that have been corrupted with new ones. These tools have extensive databases of replacement files, and with a simple click, you can enable it to replace all the damaged files with healthy ones automatically.

After the software performs the actions mentioned above, reboot your computer.

3. Run the troubleshooter

  1. Press Windows, then type control and select Control Panel from the results.control-panel-serarch-w10 opera not responding
  2. Change the View by option to Large icons in the top right corner.view-large 0x80070002 windows update
  3. Left-click the Troubleshooting feature.troubleshooting-option 0x80070002 windows update
  4. Left-click the View All button situated on the left side of the screen.
  5. You will have a list of options now, and you will need to left-click the Windows Update troubleshooter.
    Windows Update database error registration is missing or corrupt
  6. Follow the instructions on the screen to complete the Windows updates troubleshooter.
  7. Reboot the Windows 10 device after the troubleshooting process finishes.

If you can’t open Control Panel on Windows 10, check out our article to find comprehensive solutions to this issue.

4. Perform an SFC scan

If you’re getting the same error message, you might be able to fix it by performing an SFC scan. By completing this scan, you’ll fix file corruption that might be causing this error.

To perform an SFC scan, do the following:

  1. First, tap Windows, then enter cmd and choose the Run as administrator option.cmd-run-admin 0x80070002 windows update
  2. When Command Prompt starts, enter the following command and press Enter to run it. SFC scan will now start and try to repair your PC. Keep in mind that this process can take about 15 minutes, so don’t interrupt it: sfc /scannowscannow 0x80070002 windows update

After the SFC scan is finished, check if the problem still appears. If you’re still having this problem, you might want to try using the DISM scan instead. To do that, open Command Prompt as administrator and run this command: DISM /Online /Cleanup-Image /RestoreHealth

Remember that a DISM scan can take 20 minutes or more, so try not to interrupt it. After the scan is complete, check if the issue still appears.

If you could not run an SFC scan before, try running it after the DISM scan and check if the problem is resolved.

5. Restart the Windows Update service and rename the affected files

Sometimes you can fix the error message simply by disabling the Windows Update service and renaming the affected directories. To do that, follow these steps:

  1. Press Windows, then input cmd and select the Run as administrator option from the right side.cmd-run-admin 0x80070002 windows update
  2. When Command Prompt opens, enter the following commands and press Enter after each: Net stop wuauserv Net stop cryptSvc Net stop bits Net stop msiserver Ren C:WindowsSoftwareDistribution SoftwareDistribution.old Ren C:WindowsSystem32catroot2 Catroot2.old Net start wuauserv Net start cryptSvc Net start bits Net start msiserver net-stop-server potential windows update database error detected

After running these commands, restart your PC. Once your PC restarts, try to install Windows updates again.

If you’re having trouble accessing Command Prompt as an admin, you better look at our guide.

6. Perform a clean boot

Sometimes, the issue can appear due to third-party applications. For example, applications can interfere with Windows and cause this message to appear.

To find the complex applications, you need to perform a clean boot by doing the following:

  1. Input msconfig in the Windows search box that you can open by pressing Windows, then press Enter.msconfig-w10 vertical lines on monitor
  2. Look for the Services tab, then select the Hide all Microsoft services box. Click Disable all.hide-disable vertical lines on monitor
  3. Navigate to the Startup tab, then click Open Task Manager.startup-open vertical lines on monitor
  4. Click on any startup app you might think will interfere with your activity, then choose Disable.
  5. Close Task Manager, click OK in the System Configuration window and reboot your PC.

If you’re interested in how to add or remove startup apps on Windows 10, don’t hesitate to refer to our post.

After your PC restarts, check if the issue still appears. If not, one of the disabled applications or services was causing the problem.

To fix the cause of the problem, you need to enable disabled apps and services one by one until you find the one causing this issue.

Remember that you need to restart your PC after enabling a set of applications or services. After you find the problematic application, you can uninstall, update, or keep it disabled.

How do I repair Windows Update?

The most straightforward way to repair Windows Updates is to use the dedicated troubleshooter. Then, follow the steps of our third solution to see how it’s done in more detail.

If necessary, use our guide on how to fix Troubleshooter has stopped working issues as they are handy tools to have.

That is it, six methods on how you can fix your potential Windows Update database error detected error message in Windows 10.

You can write to us below if these solutions worked for you or if you need further assistance with this issue.

Fix: Windows Update Client Failed to Detect Error 0x6024a005

If you are getting the Windows Update Client failed to detect with error 0x8024a005 while installing updates manually or automatically through the built-in Windows Update, it means there is something wrong with your system configuration. 

Windows has been known for its software updates released regularly to fix bug fixes. But what if your Windows Update is unable to install these updates? Some of your installed programs/hardware may be preventing the update process from running smoothly on your PC.

Why am I getting the error 0x8024a005?

If you’re getting the error 0x8024a005, it means that Windows Update wasn’t able to check for updates. This can happen because of a number of factors:

  • Poor internet connection –  If you have a poor internet connection, Windows Update will fail to download patches and updates.
  • Virus infection – It is possible that your computer is infected with malware that is preventing the installation of Windows Updates. Always ensure you have a reliable antivirus to counter such attacks.
  • Software conflicts – If you’re having problems installing updates, it’s possible that there are conflicts between other software running on your computer and the update files themselves. 
  • Incorrect proxy settings – If Windows cannot detect your proxy server settings, it could be because it is configured incorrectly, and Windows Update can connect to the Internet.

How can I fix the error code 0x8024a005?

Before moving to the advanced troubleshooting steps, try the following:

  • Check your internet speeds and ensure they are at optimal levels to handle large updates.
  • Make sure there aren’t any other devices nearby that are interfering with your signal.
  • If possible, connect your PC directly to the router with an Ethernet cable instead of over Wi-Fi.
  • Try restarting your PC to clear any temporary files that may be interfering with the updates.

1. Disable your antivirus temporarily 

  1. Hit the Start menu icon, type Windows Security in the search bar, and click Open.
  2. Click on Firewall & network protection then select Public network.public network
  3. Locate Microsoft Defender Firewall and toggle the off button.turning off Microsoft Defender Firewall Windows

2. Run the Windows Update troubleshooter

  1. Hit the Windows key and click on Settings.settings windows 11
  2. Click on System and select Troubleshoot.Open system troubleshooter
  3. Navigate to Other troubleshooters.
  4. Click the Run option for the Windows Update troubleshooter.run-windows-update error 0x80004005 windows 11

3. Reset the Windows Update component

  1. Hit the Windows key, type cmd in the search bar, and click Run as administrator.cmd-admin hp printer won't scan
  2. Type the following commands and press Enter after each one: net stop wuauserv rd /s /q %systemroot%\SoftwareDistribution net start wuauserv
  3. Next, type the following command and press Y after completion: Del "%ALLUSERSPROFILE%\Application Data\Microsoft\Network\Downloader\*.*"
  4. Now, delete the Windows Update cache by typing in the following commands: rmdir %systemroot%\SoftwareDistribution /S /Q rmdir %systemroot%\system32\catroot2 /S /Q
  5. Type in the following commands to reset Windows Update to the default security descriptor: sc.exe sdset bits D:(A;CI;CCDCLCSWRPWPDTLOCRSDRCWDWO;;;SY)(A;;CCDCLCSWRPWPDTLOCRSDRCWDWO;;;BA)(A;;CCLCSWLOCRRC;;;IU)(A;;CCLCSWLOCRRC;;;SU) sc.exe sdset wuauserv D:(A;;CCLCSWRPLORC;;;AU)(A;;CCDCLCSWRPWPDTLOCRSDRCWDWO;;;BA)(A;;CCDCLCSWRPWPDTLOCRSDRCWDWO;;;SY)
  6. Next, enter the following command: cd /d %windir%\system32
  7. Now, reregister the Windows Update files and update the DLL files by typing in the following commands and pressing Enter after each one:  regsvr32.exe atl.dll regsvr32.exe urlmon.dll regsvr32.exe mshtml.dll regsvr32.exe shdocvw.dll regsvr32.exe browseui.dll regsvr32.exe jscript.dll regsvr32.exe vbscript.dll regsvr32.exe scrrun.dll regsvr32.exe msxml.dll regsvr32.exe msxml3.dll regsvr32.exe msxml6.dll regsvr32.exe actxprxy.dll regsvr32.exe softpub.dll regsvr32.exe wintrust.dll regsvr32.exe dssenh.dll regsvr32.exe rsaenh.dll regsvr32.exe gpkcsp.dll regsvr32.exe sccbase.dll regsvr32.exe slbcsp.dll regsvr32.exe cryptdlg.dll regsvr32.exe oleaut32.dll regsvr32.exe ole32.dll regsvr32.exe shell32.dll regsvr32.exe initpki.dll regsvr32.exe wuapi.dll regsvr32.exe wuaueng.dll regsvr32.exe wuaueng1.dll regsvr32.exe wucltui.dll regsvr32.exe wups.dll regsvr32.exe wups2.dll regsvr32.exe wuweb.dll regsvr32.exe qmgr.dll regsvr32.exe qmgrprxy.dll regsvr32.exe wucltux.dll regsvr32.exe muweb.dll regsvr32.exe wuwebv.dll
  8. Reset your network configurations by entering the following commands: netsh winsock reset netsh winsock reset proxynetsh-ip the default gateway is not available
  9. Now restart the Windows Update service by typing in the following commands: net start bits net start wuauserv  net start cryptsvc
  10. Restart your PC, and the service should work normally.

4. Disable your proxy

  1. Press the Start menu icon and select Settings.settings windows 11
  2. Click on Network & Internet on the left pane, then scroll down and click Proxy on the right pane.Network and internet settings
  3. Select Edit next to the Use a proxy server option in the Manual proxy setup section.click edit manual proxy setup
  4. Toggle off Use a proxy server and click on Save.

Elsewhere, users also complained of the Windows update not loading, so if you experience the same, don’t hesitate to check out our article on the same.

We may also be able to help if you come across the Windows Update Error 0x800703f1, so be sure to refer to our article for a quick fix.

That’s all we had for this error today. Let us know of any other issues related to this error that you may have experienced in the comment section below.

How to Fix a PC That Won’t Boot After BIOS Updated

If your PC won’t boot after a BIOS update, the problem often comes down to boot errors caused by unsupported BIOS versions, third-party flashing tools, or interruptions during the update. These issues can prevent Windows from starting or even brick your motherboard.

Below, you’ll find solutions that work across major brands like HP, Dell, and ASUS to help you recover your system.

How can I fix a PC that won’t boot after BIOS update?

1. Reset CMOS

  1. Shut down your PC completely.
  2. Unplug the power cord and remove the battery if it’s a laptop.
  3. Hold the power button for 60 seconds to completely discharge your PC.
  4. Open the PC case and touch a metal surface to discharge your static electricity.
  5. Remove the CMOS battery; it should be a 3V standard flat wristwatch battery.pc error code 0xc000000 CMOS battery
  6. Please wait for a few minutes and place it again carefully.
  7. Power On your PC and look for changes.

On the other hand, if you cannot reach and access the CMOS battery, you can reset BIOS settings by temporarily removing motherboard jumper pins and reconnecting them.

In addition, once you boot again, set the proper BIOS time in the Boot settings. Without it, you won’t be able to boot in Windows 10.

2. Try booting into Safe mode

  1. Plug in or insert a bootable drive (USB flash stick or DVD) and restart your PC.
  2. Access the boot menu by pressing the F8 key during Restart (this may differ depending on the make).
  3. Using the arrow keys, navigate to the Boot section and change the boot order to start with the bootable drive.
    pc won't boot after bios update
  4. The loading process of the installation file should commence.
  5. Select your preferences and hit the Next button.
  6. Select Repair your computer from the bottom left corner in the following dialog box.
    pc won't boot after bios update
  7. Open Troubleshoot and choose Advanced Options.
    pc won't boot after bios update
  8. Choose Startup Settings and select Restart.
    pc won't boot after bios update
  9. Once your PC restarts, press F4, F5, or F6 to boot in various Safe Mode options.
  10. When/if the system boots in Windows 10 finally, you can restart your PC and start the system in a standard manner.

Many users reported that, somehow, the Safe mode ‘forced’ the system to boot and resolved the stall caused by the flashing failure.

If you want to know how to create a Windows 10 installation media, follow the steps in this simple guide.

3. Tweak BIOS settings

Now, this highly depends on your PC’s configuration and motherboard model. We advise you to google your motherboard and look for the preferred settings for that purpose.

Explaining what you’ll need to change is redundant since the options are pretty diverse.

If you’re not 100% sure, don’t meddle with BIOS settings. Instead, you should contact the official support or explain your problem to knowledgeable folks or PC enthusiasts.

That’s your safest bet to tweak BIOS settings and retrieve full functionality.

4. Flash BIOS again

You flashed BIOS once, and the hell broke loose. It seems ludicrous to do it again, but that might resolve your problems. Namely, you probably installed the wrong version or interrupted flashing and bricked your motherboard.

Luckily, some users who managed to get over the initial boot screen (and get stuck in Windows 10 animation) resolved the problem by flashing BIOS again with the correct version.

Nevertheless, we advise you not to rush and to take every step carefully. To help you address this, we recommend reading the article below with a thorough explanation of flashing.

Make sure to check it out before you move to flash.

5. Reinstall the system

Some users reported that the problem could be solved by reinstalling the system completely. However, it seems that the failed flashing procedure affects the hard disk somehow, forcing you to start from scratch.

The Windows 10 reinstallation procedure isn’t as complicated as it was on some older Windows iterations back in the day.

Nonetheless, for a novice user, it can lead to prolonged hardship. To avoid that, make sure to read the complete instructions compiled in the article below.

6. Replace your motherboard

Finally, if none of the previous steps helped you, we’re sorry to inform you that you’ll need another motherboard.

On a side note, you can ask for a repair which is also an option, but that’s a long shot, and the odds are not in your favor.

Your Windows 10 BIOS settings and updates control key hardware and boot functions but can sometimes cause startup issues. Using an unsupported BIOS version can cause verification ID errors or prevent your PC from booting properly. Interruptions during the BIOS update process may also lead to boot failures after flashing BIOS. Brands like ASUS have specific BIOS update steps worth following carefully.

If your PC automatically boots into BIOS without warning, this guide will help you fix it. When your BIOS recognizes your SSD but Windows won’t boot, there are targeted solutions to try. And if your PC gets stuck and won’t exit BIOS, our detailed walkthrough can get your system back on track.

That should conclude it. In case you have any questions or alternative solutions, make sure to share them with us. You can do it in the comments section below.

ReadyBoost Tab Missing in Windows 11: How to Bring It Back

The ReadyBoost feature helps increase system speed when Windows access the HDD. The feature is available on most Windows versions. However, some users report the ReadyBoost tab is missing on Windows 11.

Also, the missing feature will prevent you from improving your PC performance on Windows 11.

Why is the ReadyBoost tab missing on Windows 11?

The ReadyBoost tab may be missing on Windows 11 for many reasons ranging from issues with the USB device to problems with Windows.

However, the device compatibility issue is one of the most common factors. If the USB device plugged into your PC doesn’t meet the requirements for ReadyBoost, the tab will not be available.

Other factors that can cause the ReadyBoost tab to be missing on Windows 11 are:

  • Recent Windows updates – Windows users can encounter problems with some services on their PCs if the recent update is not fully installed or corrupt. It can cause the ReadyBoost tab to be missing, even when the USB device is intact.
  • Corrupt system files – It is common for Windows to malfunction when a corrupt system file is blocking its functionality. It can cause its services to fail and not respond when initiated. So, ReadyBoost missing on your PC can be due to corrupt system files.
  • Outdated drivers – When the driver responsible for the USB drive is outdated, it can cause issues with its activities, such as using ReadyBoost. Also, outdated drivers can expose your computer to bugs that affect its performance.

Fortunately, you can fix these causes by troubleshooting your PC. Hence, we’ll take you through some fixes for the issue.

What can I do if the ReadyBoost tab is missing on Windows 11?

Go through the following before proceeding with any advanced troubleshooting:

  • Temporarily disable antivirus software on your PC.
  • Turn off background apps running on your computer.
  • Restart Windows in Safe Mode and check if the ReadyBoost tab is still missing.
  • Check if the USB driver or SD card plugged into the computer is compatible with ReadyBoost. The ReadyBoost tab won’t show under its properties when the drive isn’t supported.
  • You should check the requirements below and see if your drive meets up with them: a USB flash drive or a memory card with a free storage capacity of at least 500 MB; a high data transfer rate; it must be in an NTFS drive or card format.

If the problem persists, try the solutions below.

1. Run an SFC scan

  1. Left-click the Start button, type command prompt, and click Run as administrator.
  2. Click Yes on the User Account Control prompt.
  3. Type the following and press Enter: SFC /scannow
  4. Restart your PC and check if the ReadyBoost tab appears.

The System File Checker (SFC) scan will detect possible corrupt or missing system files that can be responsible for the ReadyBoost tab missing.

You can check how to fix the run as administrator option if it’s not working on your PC.

If you are not sure about following the manual steps, you can also opt for automated repair software.

These tools help you run an extensive scan of your computer to find missing or corrupted files and then proceed to replace them with healthy, new files from their large databases.

2. Update USB drivers

  1. Press Windows + X key to launch the Quick Link Menu and click on Device Manager.
  2. Right-click on all the USB devices, then select Update driver from the drop-down.
  3. Click on Search automatically for drivers.
  4. Restart your PC and check if the error persists.

The USB driver update will fix bugs preventing the system from interacting with the USB device.

You can check our article for other ways to update drivers on Windows 11 if you can’t get through with the steps above.

3. Uninstall the recent Windows update

  1. Press Windows + I key to open the Settings app.
  2. Navigate to the Windows Update tab and select Update history.
  3. Click on Uninstall updates and select the most recent update installed.
  4. Click on the Uninstall button.

Uninstalling the recent Windows update will fix issues caused by the bugs in the recent Windows updates and make the ReadyBoost tab available.

Conclusively, our readers can check our guide about Windows 11 not recognizing the USB device and some fixes.

Also, you can read our article on how to make Windows 11 faster by disabling processes you don’t need on your PC.

If you managed to fix this issue, we have a guide on how to enable ReadyBoost on Windows 11, so don’t miss it. If for some reason, you can’t enable it, you can always use ReadyBoost alternatives instead.

This feature is available on other versions of Windows, and to learn more, don’t miss our ReadyBoost on Windows 7 guide to see how to enable it.

You can leave your comments below if you have any questions or suggestions regarding this guide. Should you have other queries also, do not hesitate to drop them.

Fix Screen Flickering in Windows 11 Like This

The Windows 11 screen flickering issue is changing display brightness at quick intervals. Like the screen dimming issue, this is a sign of an underlying problem that requires immediate attention.

While the problem might look serious, it can be easily fixed by following the solutions in this guide.

Why is my screen flickering and glitching?

A bunch of problems can cause the Windows 11 screen flickering issue after login or sleep. Listed below are the ones that users generally encounter:

  • Issues with the display adapter or graphics driver: If your Windows 11 screen is flickering on startup, it might be due to issues with your display driver. In this case, the entire display is likely to be affected. The solution here is to reinstall or update the driver.
  • Problematic or incompatible program: A faulty or conflicting app can cause your screen to flicker. The issue should be confined to the particular program or sections of the screen. You need to remove this app with an uninstaller software to fix the problem.
  • Incorrect refresh rate: If you have set the wrong refresh rate, you can experience the Windows 11 screen flickering and sometimes with no Taskbar. This affects the entire screen. Your only way out of this problem is to change the refresh rate to the default value.
  • Loose or incorrect connections: Sometimes, your laptop screen might be flickering because of hardware issues. This happens if there are loose connections between components. You might need to see an expert to check the problem is not hardware related.

How do I fix screen flickering on Windows 11?

If you are experiencing this issue on a desktop, try the troubleshooting steps below before delving into the fixes in this section:

  • Check for loose connections between the CPU and monitor
  • Try another cable
  • Check with another monitor

If none of the above steps fixed the issue for you, you can now proceed to the solutions below:

1. Update the graphics driver

1.1 Using Device Manager

  1. Right-click the Start button in the Taskbar and select Device Manager from the Quick Access menu.
    launch Device Manager
  2. Double-click on Display adapters to expand and view the devices under it.
    Display Adapters
  3. Right-click on the listed display adapter and select Update driver from the context menu.
    Update driver
  4. Select the Search automatically for drivers option and wait for the installation to complete.
    Search automatically for drivers
Tip icon Tip
If you are looking for an easier and faster option to update your drivers, we recommend using a dedicated tool such as Outbyte Driver Updater for automatic scans of missing or outdated drivers.

1.2 Using Windows Update

  1. Right-click the Start button in the Taskbar to launch the Quick Access menu, and select Settings.
  2. Select Windows Update from the tabs listed on the left.
    Settings app
  3. Click Advanced Options on the right.
    Advanced options
  4. Select Optional updates under Additional options.
    Optional Updates
  5. Select Driver updates to view the available updates.
  6. If you find an update for the graphics driver, tick the checkbox for it, and click on Download & install.

Driver updates submitted to Microsoft are listed in Windows Update after testing and verification for you to download. So while Windows is likely to install it in most cases automatically, there’s no harm in verifying if there’s an available update.

After updating the driver, restart the PC for the changes to take effect. However, you can still check the manufacturer’s official website if an update isn’t listed here.

1.3 Via the Manufacturer’s Website

  1. Launch the Device Manager, expand the Display adapters, right-click on the installed display adapter, and select Properties from the context menu.
    Graphics adapter properties
  2. Navigate to the Drivers tab and jot down the Driver Version. Once you have the current driver version, you can quickly identify if there’s an update available.
    Note driver version
  3. Go to Google and search for the device manufacturer’s website along with the driver’s name and version. Given below are the links to the download pages of the three leading graphics adapter manufacturers.
  4. After downloading the update, run the installer and follow the onscreen instructions to complete the installation process.

After updating the driver, check if Windows 11 screen is still flickering. In case it persists, moves to the next fix. If you cannot download and install the driver update, there are many methods to fix things.

Instead of submitting the driver update to Microsoft, many manufacturers directly upload it to their official website for users to download. So if you couldn’t update the graphics driver with the methods mentioned earlier, this one should work for you.

2. Roll back driver updates

  1. Launch the Device Manager, click on the down arrow before Display adapters to view the devices under it, right-click on the graphics driver, and select Properties.
  2. Navigate to the Driver tab and select Roll Back Driver.
    Roll back driver
  3. Finally, Follow the onscreen instructions to complete the rollback process.

If you started encountering the Windows 11 screen flickering issue after updating Windows or the driver individually, it could be a bug in the driver itself causing the issue.

In this case, you can roll back the driver update and revert to its previous version, which worked fine.

3. Reinstall the graphics driver

  1. In the Device Manager, expand the Display adapter, right-click on the installed graphics adapter, and select Uninstall device from the context menu.
    Uninstall device
  2. Now, tick the checkbox for Attempt to remove the driver for this device and click on Uninstall.
    Uninstall driver
  3. After the device is uninstalled, restart the computer. Once it continues, Windows will automatically install a fresh driver for the graphics adapter.

Now, check if Windows 11 screen is no more flickering. If it isn’t, you are not encountering the problem due to an outdated, faulty, or corrupt driver.

4. Select a lower refresh rate

  1. Press Windows + I to launch Settings, and select Display from the right.
    select Display
  2. Scroll down and select Advanced display under Related settings.
    Advanced Display
  3. Now, click on the drop-down menu next to Choose a refresh rate, and select a lower value from the available options.
    Change refresh rate

After changing the refresh rate, verify if the flickering screen problem is fixed.

If you set a high refresh rate, the Windows 11 monitor may exhibit issues with the display, with screen flickering being one of the common ones.

A higher refresh rate generally enhances our experience, but it’s sometimes counterproductive, as is the case here.

5. Uninstall the incompatible/problematic apps

  1. Press Windows + I to launch Settings.
  2. Navigate to the Apps tab on the left and select Apps & features.
    Uninstall app
  3. From here, identify the problematic app, click on the ellipsis next to it, and select Uninstall.
    select Uninstall
  4. Finally, click Uninstall on the prompt that pops up.

If your Windows 11 screen started flickering after installing an app or a particular program, this app might be the problem. To prevent further issues, you need to uninstall the app.

If you want to be sure that you have removed all components of the app, you should use uninstaller software. CCleaner is one of the best available to help remove even the most stubborn program.

It also helps remove any leftover files that can quickly lead to problems.

6. Perform a system restore

  1. Press Windows + S to launch the Search menu, enter Create a restore point in the text box, and click on the relevant search result.
    Search menu
  2. Click System Restore.
    System restore
  3. Click Next in the System Restore window that appears.
    Click Next
  4. Now, select a restore point and click on Next.
    select a Restore point
  5. Review the restore settings and click on Finish to start the process.
    Click Finish
  6. After the system restarts on completion of the restore process, check if the screen flickering is fixed.

If nothing else works, you can always perform a system restore. But the catch here is that the restore point must be created before you first encounter the error.

When performing system restore doesn’t resolve the Windows 11 screen flickering issue or there isn’t a restore point, you can always reset Windows 11 to its factory settings.

The solutions listed here will, in all likelihood, solve the flickering screen problem on your Windows 11 PC. Apart from the screen flickering, some users reported the screen flashing issue that can quickly be resolved with the right set of fixes.

You can also check our guide on part of laptop screen flickering to learn how to fix situations where only a section of your display is affected.

Let us know which solution worked for you, and share your experience in the comments section below.

External Hard Drive Not Showing Up Windows 11 – Fixes That Work

When your external hard drive is not showing up on Windows 11, it can disrupt backups, file transfers, or even day-to-day work. Whether it’s a new drive or a trusted one suddenly missing, this guide will help you identify the cause and fix it quickly.

How to Fix External Hard Drive Not Showing Up in Windows 11

1. Try a Different USB Port or Computer

Start by checking for basic hardware issues:

  • Unplug the external drive and reconnect it to another USB port
  • If possible, try the drive on a different computer
  • Avoid USB hubs and connect the drive directly to your PC

If you’re using a WD drive, some models have known connection issues. Here’s how to fix a WD external hard drive not showing up on Windows.

2. Check If the Drive Appears in Disk Management

Even if your drive doesn’t show in File Explorer, it may be visible in Disk Management:

  • Right-click the Start button and choose Disk Management
  • Look for a drive marked as “Unknown” or “Not Initialized”
  • If it’s unallocated, you may need to assign a drive letter or format it

After a major system update, drives may disappear from view. If that’s the case, follow this fix for a hard drive missing after a Windows 11 update.

3. Assign or Change the Drive Letter

If the system didn’t assign a drive letter, it won’t appear in File Explorer:

  • Open Disk Management again
  • Right-click the drive and select Change Drive Letter and Paths
  • Click Add or Change, then assign an unused letter and click OK

This is also useful if your second hard drive sometimes interferes with the boot process. Here’s what to do when your second hard drive stops Windows from booting.

4. Reinstall or Update the USB Controller Drivers

Corrupted or outdated drivers can prevent Windows from recognizing the drive:

  • Open Device Manager and expand Universal Serial Bus controllers
  • Right-click each USB Root Hub or Host Controller and select Update driver
  • Restart your PC once all drivers are updated

If you need help updating components, see this guide on how to update drivers on Windows 11. You can also install drivers manually if automatic updates fail.

For a faster solution, you can try automatic driver updater software to handle all updates in one step.

5. Format the Drive If It’s Not Recognized Properly

If the drive shows as RAW or unallocated, formatting may be necessary. Note that this will erase all data:

  • Open Disk Management
  • Right-click the drive and select New Simple Volume
  • Use the wizard to format it using NTFS or exFAT

You should also check if the drive is blocked by permission settings. If so, follow this Windows 11 permissions guide for external drives.

6. Enable the Drive in BIOS or UEFI

Some systems may have external USB access disabled in BIOS:

  • Reboot your PC and enter BIOS by pressing F2, Del, or Esc during startup
  • Find the USB Configuration section and make sure USB ports are enabled
  • Save and exit, then boot into Windows and check again

7. Run the Hardware and Devices Troubleshooter

This built-in tool is still accessible via a hidden command:

  • Press Windows + R, type msdt.exe -id DeviceDiagnostic, and press Enter
  • Follow the prompts to run the Hardware Troubleshooter

8. Check for Hidden Devices in Device Manager

Sometimes, Windows hides disconnected or malfunctioning devices:

  • Open Device Manager and go to View > Show hidden devices
  • Expand Disk Drives and look for greyed-out items
  • Right-click and select Uninstall, then reconnect the drive

If you want an automated method, Fortect Driver Updater can scan your system for hidden or outdated entries and help reinstall or clean them up with one click. It’s especially useful if you’re unsure which USB controller or device is causing the issue.

If the external USB still isn’t working, follow this guide on what to do if Windows doesn’t recognize a portable hard drive.

9. Run Error Checking

Corruption on the drive may prevent Windows from recognizing it properly:

  • Open File Explorer, right-click the drive (if visible), and select Properties
  • Under the Tools tab, click Check
  • Follow the prompts to scan and repair the file system

If you’re planning to replace the drive, check out the best hard drives for Windows 11 to ensure full compatibility.

Conclusion

If your external hard drive is not showing in Windows 11, the issue often comes down to drive letter conflicts, USB driver problems, or file system corruption. Most problems can be fixed through built-in tools or simple updates. However, if the drive is physically damaged, you may need professional recovery.

FAQ

Why is my external hard drive not showing up in Windows 11?

This can happen due to missing drive letters, outdated drivers, permission errors, or physical connection issues.

How do I force Windows 11 to recognize an external hard drive?

Reconnect the device, assign a drive letter, update USB drivers, and check BIOS settings if needed.

Can a damaged hard drive still show up in Disk Management?

Yes. It may appear as unallocated or RAW, even if it’s not visible in File Explorer.

What format should I use for an external drive in Windows 11?

Use NTFS for Windows-only drives or exFAT if you need macOS compatibility too.

AdobeGCClient: What is it & How to Safely Remove it

Some other tools and features come with the package when you install Adobe software. One of them is the AdobeGCClient.

If you have been seeing the program and wondering what it is and how you can easily remove it, this guide will show you everything you need to know about it.

What is the AdobeGCClient?

The AdobeGCClient (Adobe Genuine Copy Validation Client Application) is a process that is part of the Adobe Software Integrity Service validation testing.

It checks for pirated Adobe software and tampering with Adobe program files. Also, it detects any improper or invalid licenses.

How can I disable or uninstall AdobeGCClient?

1. How do I disable AdobeGCClient?

1.1. Using Task Manager

  1. Press the Shift + Ctrl + Esc keys to launch the Task Manager and locate the AdobeGCClient. Check for the Adobe Genuine Software Integrity option if you can’t find it.
  2. Right-click it and select the End task option.
    end task adobegcclient
  3. Now, press the Windows key + E to open File Explorer and follow the path below: C:\ProgramFiles(x86)\CommonFiles\Adobe
  4. Right-click the AdobeGCClient folder and select Delete.
    delete
  5. Finally, restart your PC.

1.2. Using Windows Services

  1. Press the Windows key + R, type services.msc, and click OK.
    services
  2. Double-click the Adobe Genuine Software Integrity Services.
    adobe adobegcclient
  3. Now, set the Startup type to Disabled and click the Stop button.
  4. Finally, click the Apply button followed by OK to save the changes.
    disabled

With the steps above, you should be able to disable the AdobeGCClient easily.

2. How do I uninstall AdobeGCClient?

  1. Press the Windows key + R, type control, and click OK.
    control
  2. Now, select Uninstall a program under the Programs option.
    uninstall a
  3. Right-click the Adobe Genuine Service option and select Uninstall.
    uninstall adobegcclient
  4. Finally, click the Uninstall button when prompted to confirm the action.
    uninstall button

If unsatisfied with disabling the AdobeGCClient service, you can follow the steps above to obliterate it. This will help eliminate any prompt you get from the process while trying to use your Adobe software.

If your Adobe Acrobat is showing an internal error occurred prompt, check our detailed guide to fix it quickly.

Feel free to let us know in the comments below if you encounter any problems while implementing the steps above.

Windows Program Not Responding: Why Does It Happen & How to Fix It

Do you have programs that are not responding on your computer? Many Windows users are in the same boat.

Common Windows error message when programs don’t respond

The good news is, today’ we’ll help you fix all of that. And if you’re curious how we got to these solutions, you can find some info about why this error happens in the first place below.
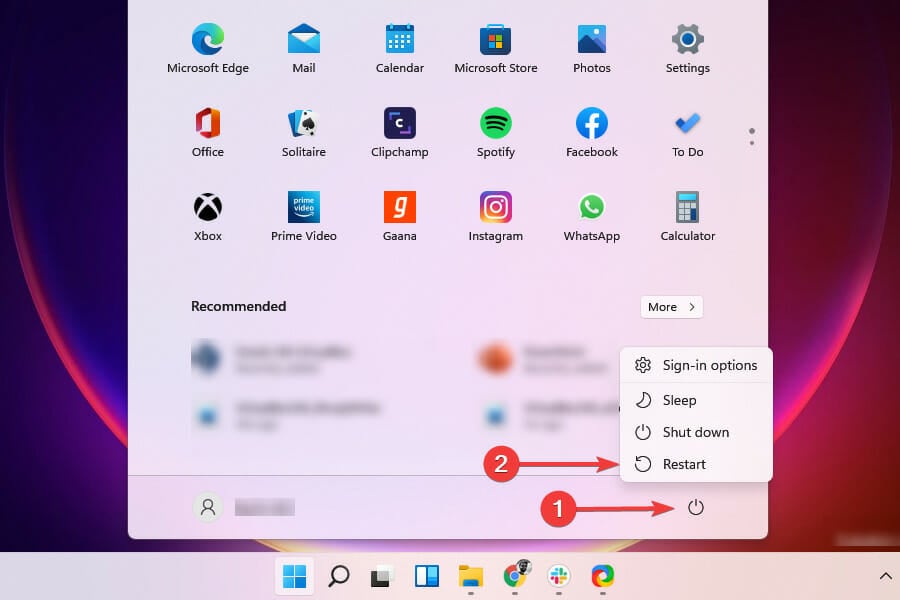
But first:

How to fix “Program is not responding” Windows error

1. Restart your computer

The first and the simplest thing you should do is restart your computer, mainly if the issue occurred recently. To perform a restart, press Alt + F4, select the option from the dropdown menu, and click OK.

Before you move on to more advanced solutions, try restarting the computer and see if the program not responding frequently in Windows starts to work after that.

2. Terminate the program

  1. Press Ctrl + Shift + Esc to open the Task Manager.
  2. Click the View more button in case the window is displayed in its short form, then click Processes.processes-task flash game lag
  3. Now you can right-click the app that’s not responding and select End task from the menu, or from the bottom right corner.
  4. Once done, relaunch the program on the computer not responding earlier in Windows 10, and check if it works fine now.

3. Update your app

  1. Type microsoft store in the Windows Search tab and click on the app from the results.
  2. Select the Library icon from the bottom-left corner, and click the Update button for each app if there’s a newer version available. Or, you can click the Update all button to install the latest version for all apps in one go.
  3. Restart your PC and check if your app works fine.

This is how you can update the apps you got from Microsoft Store, but if the unresponsive app is from another source, you will need to check its menu for this option.

In the unlikely situation where the app doesn’t have an update feature, head over to the developer’s website and get the latest version.

Also, find out what to do if Microsoft Store doesn’t work in Windows since it would prevent you from updating existing apps and installing new ones.

4. Perform SFC and DISM scans

4.1 Run an SFC scan

  1. Search for cmd and click Run as administrator to open Command Prompt with full privileges.
  2. Type the following command, and press Enter:sfc /scannow
  3. The scanning process will take a little time, so don’t interfere with it while it repairs your system.

If you cannot perform this step, check what to do if you can’t access Command Prompt as administrator and fix this problem immediately.

4.2 Run a DISM scan

  1. Type cmd in the Search tab and select Run as administrator.
  2. Paste the following command, and press Enter to run it: DISM /Online /Cleanup-Image /RestoreHealth
  3. Like the SFC scan, this process will also take a while, so make sure you don’t interrupt it.

5. Reinstall the program

  1. Press Windows + I to open Settings and choose Apps from the menu.
  2. Now scroll down in the right pane, click on the app you want to remove, and select Uninstall.
  3. Once done, head over to the source where you first downloaded the app and reinstalled it.

6. Perform a full antivirus scan

  1. Type security in the Search tab and click on Windows Security from the results.
  2. Select Virus & threat protection.
  3. If you don’t have a third-party antivirus, you can now select the Full Scan or the Microsoft Defender Offline scan option and click on the Scan now button.
  4. If not, you can click on the Open app to your antivirus and perform a full scan from its options.
  5. For instance, in Bitdefender, the System Scan option is accessible right from the dashboard, but if you have a different antivirus, that might be different.

Since we’re talking about antiviruses, you might as well check if your system is infected with malicious software.

7. Disable your antivirus

  1. Click on the Search tab, type security, and select Windows Security from the results.
  2. Choose Virus & threat protection.
  3. If you don’t have a third-party antivirus, click on Manage settings under Virus & threat protection settings. manage settings
  4. Now, disable the toggle for Real-time protection.real-time protection
  5. Next, click Yes in the UAC to confirm the change.yes
  6. If you have a third-party antivirus, click on the Open app to access your antivirus and disable it from the security menu.

Windows 10 is infamous for preventing updates within certain apps and software. We want to check if your current antivirus solution conflicts with some of your programs.

8. Reset the PC

  1. Click Start and open Settings.
  2. Open the Update & Security section.
  3. Choose Recovery from the left pane and click Get Started under Reset this PC.
  4. Choose Keep my files.
  5. Follow the on-screen instructions, and choose the appropriate response when prompted to complete the reset process.

When a program does not respond in Windows, it stops interacting with the OS. This happens after Windows sends several messages in a few seconds, and if the program doesn’t respond and the message queue fills up, the error message is encountered.

Windows don’t throw an error when the program is not responding, and in some cases, it might start working again in a while. But, if it doesn’t, you could terminate the program from the Task Manager and then relaunch it.

Why do programs not respond?

There can be a lot of factors causing the problem—from a faulty system, conflicting apps, and bad drivers to malicious software and more.

You can’t pinpoint a single issue in this case, so trying as many solutions as possible is essential.

When a program is not responding, it means it is having problems communicating with Windows properly. This might be because the program is carrying out some background processes or due to some bugs and other issues.

Moreover, here are some error variations that you can encounter, and fix with the same solutions below:

  • All programs not responding
  • Programs not responding Windows 10, mMc
  • Program not responding and won’t close
  • Program not responding but using CPU
  • Windows program not responding

And if you’re unsure why the program stopped working in Windows 10, review each of the solutions presented and see what works for you!

What to do if a program is not responding?

Once again, since this is a widespread issue, we can’t know for sure what caused it. If you have any questions or suggestions, place them in the comments below.
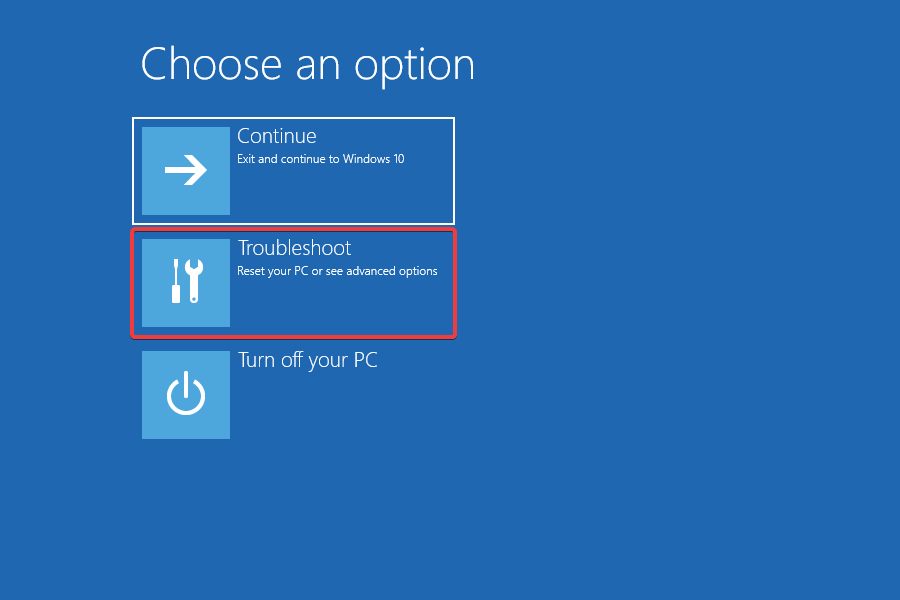
Disk Cleanup in Windows 11: How to Access it & Free up Space

It’s essential to run Disk Cleanup in Windows 11 occasionally to get rid of that data and free up some space on your drive. In this piece, we’ll show you a few different ways to perform a disk cleanup on your PC:

How to do Disk Cleanup on Windows 11?

1. Via Drive Properties

  1. 1. Press the Windows key + E keys combination to start File Manager.

    file manager on windows 11
  2. 2. Click on This PC.

    file manager windows 11 this pc
  3. 3. Now right-click the C: drive and select Properties from the drop-down menu.

    windows 11 file manager drive properties
  4. 4. In the General tab, click on Disk Cleanup to start the app.

    windows 11 disk cleanup how to
  5. 5. Select the data you want to delete by clicking the corresponding boxes, then on OK.

    disk cleanup windows 11 settings
  6. For a complete cleaning of your computer, you should use the Disk Cleanup feature. The easiest way to access it is via Drive Properties, a built-in menu on your PC. From there, you can select which files you want to keep and which to delete.

2. Clean up the disk using Run

  1. Press the Windows + R shortcut on your keyboard to start Run.run windows 11 dialog
  2. Type the following line and press Enter to run it: cleanmgr /VERYLOWDISKcleannmngr command cmd
  3. After the command has run, you will receive a report of how much space you’ve managed to free up.saved space on disk

You can also use the following command to clean up your disk, but it will erase less data than with the command provided in our steps above:cleanmgr /LOWDISK

If you want to choose which files to clean, use this Disk Cleanup command, and then press Enter to run it:cleanmgr /sageset:1

It will start the Disk Cleanup utility with a minimum of options checked, but you can click the boxes you want from the menu.

3. Enable Storage Sense

  1. Click the Windows button and select Settings.windows 11 settings
  2. Access the System option from the right and select Storage.storage settings windows 11
  3. Now toggle the Storage Sense button to On.windows 11 sense
  4. If you click on the Storage Sense option further, you can configure it. By default, the feature will start to clean up unnecessary files in a low disk space situation. You can change that by clicking on the Run Storage Sense menu.windows 11 sense settings
  5. Select the right option for you to act automatically. You can choose from three settings: daily, weekly or monthly.windows 11 sense menu

Storage Sense is the automatic cleaning option that you can also find in Windows 10. If you don’t set it up, it will only be triggered when your disk space is low.

However, if you follow the steps above, you can enable Storage Sense in Windows 11 and configure it to start within desired time intervals so that you don’t need to do that manually again.

4. Remove temporary files

  1. Press the Windows + R to start the Run app, type %tmp%, and press Enter or click OK.windows 11 temp
  2. The action will open a File Manager app containing the Temp folder on your PC.windows 11 file manager
  3. Press the Ctrl + A shortcut to select all the files and folders, then right-click on them and select the Delete option (the bin icon). You can just hit the Delete key on your keyboard after selecting the files.windows 11 delete bulk

If you’re not ready to perform a bulk delete action using the Disk Cleanup tool in Windows 11, you can delete the junk files from the Temp folder on your PC.

Is it good to run Disk Cleanup?

Deleting most of the file categories that appear in Disk Cleanup is perfectly safe. But, it’s recommended that you don’t delete the Windows ESD installation files if the option shows up since these are critical to reset the OS.

Also, you may look through the other categories to identify if any sound files are selected, though deleting them should not harm. You might only miss the ability to revert to the previous version, and you can always do that using the Microsoft Update Catalog.

How to increase the drive space on your PC?

You might be in a situation where you run out of space on your drive, but you have already deleted all unnecessary files, folders, or programs.

However, you have a couple of options that you can use to increase the available space.

1. Extend your system partition

Note icon NOTE
This is an advanced procedure so make sure you backup data on your drives before starting.
  1. Click the Windows search icon from Taskbar, type create and format, and click on Create and format hard disk partitions from the results.windows 11 create and format
  2. Right-click the non-system partition and select Delete Volume from the menu. Be aware that this action will delete all the data from that partition. Also, make sure that you don’t select the system partition instead.windows 11 delete volume
  3. Now right-click your system partition (usually, it’s the C: partition) and select the Extend Volume option.windows 11 extend volume
  4. Windows will automatically allocate all the free space to the system drive you selected, thus increasing its amount of space.

You can delete an existing non-system partition to achieve your goal if you have more partitions on your drive.

You can scan your drive with a fast disk analyzer by checking our guide on how to use WizTree to identify large files and recover extra space.

2. Upgrade your PC or buy an external drive

Eventually, if nothing else works and you need more space, you’re only left with the option to install a new internal or external drive on your PC.

We have an excellent list, including the best external SSD drives with USB-C connections that will solve the space problem and are faster than HDDs.

Drive space can be problematic if you’re trying to install or run more demanding apps, and Disk Cleanup is the first and most convenient option to free up some valuable space.

However, besides running the Disk Cleanup app, you can use a more comprehensive storage analyzer like WinDirStat or manually uninstall the apps you no longer use.

FAQs

What does Disk Cleanup remove?

Temporary files, recycle bin items, thumbnails, delivery optimization files, and old Windows Update caches to free space safely.

How do I run Disk Cleanup?

Press Start, type Disk Cleanup, open it, pick the drive, check items, select OK, then Delete Files. For more options choose Clean up system files.

What is the difference between Disk Cleanup and Storage Sense?

Disk Cleanup is a manual tool. Storage Sense in Settings > System > Storage can automatically clear temp files on a schedule.

Is it safe to delete Windows.old or Windows Update Cleanup?

Yes, if you do not plan to roll back. Removing Previous Windows installation(s) and Windows Update Cleanup frees large space but ends rollback.

Summary

We hope our guide helped you use the Disk Cleanup app and provided information on how to free up space on your computer or upgrade your storage. You might consider wiping out the free space to prevent deleted data from being recovered.

This is one of the best tools to clean the C drive without formatting, so it’s important to know how to use it properly.

Also, check out the best deep clean hard drive software that will assist you in optimizing the drive space.

Disk Cleanup is one of the best ways to delete temporary files on Windows 11, but there are other built-in tools that can help. If you’re using an older version of Windows, we also have a great guide on Disk Cleanup on Windows 10, so don’t miss it.

If you have any questions or suggestions, please leave them in the comments section below.