If you want to try the Windows 10 Technical Preview, but you like your old interface (From Windows 7 or XP) more, you’re probably facing a dilemma if you should use it or not.
Since our site supports innovations, we’ll advise you to try the new OS, and we’ll show you how to make the new Start menu look like the Start menu from Windows 7 (as much as possible).
How do I get Windows 10’s Start menu and taskbar to be like Windows 7’s?
1. Remove the Live Tiles feature
The main thing that separates the Windows 10Start menu from the Start menus of previous versions of Windows operating systems is live tiles.
Live tiles were introduced in Windows 8 as a part of the Start Screen, and now they’re relocated to the Start menu.
Thoughts about live tiles being separated, some people think Microsoft should remove live tiles from Windows, because they remind us of Windows 10, while some people think that live tiles are refreshments for the Start menu.
But if you’re reading this article, you probably belong to the first side.
So if you want to get Windows 7-like Start menu, you’ll have to get rid of the live tiles. Luckily, that is very easy, and here’s all you should do to remove live tiles from your Windows 10 Start menu:
Go to Start Menu
Right-click on each live tile and choose Unpin from Start
Once you’ve unpinned all live tiles from your Start menu, you’ll get a nice and slim Start menu, that reminds (well, as much as possible) of Windows 7.
Does your Start Menu disappear? Don’t panic! Fix the problem like an expert with our guide.
2. Make the Windows 10 taskbar look like Windows 7’s
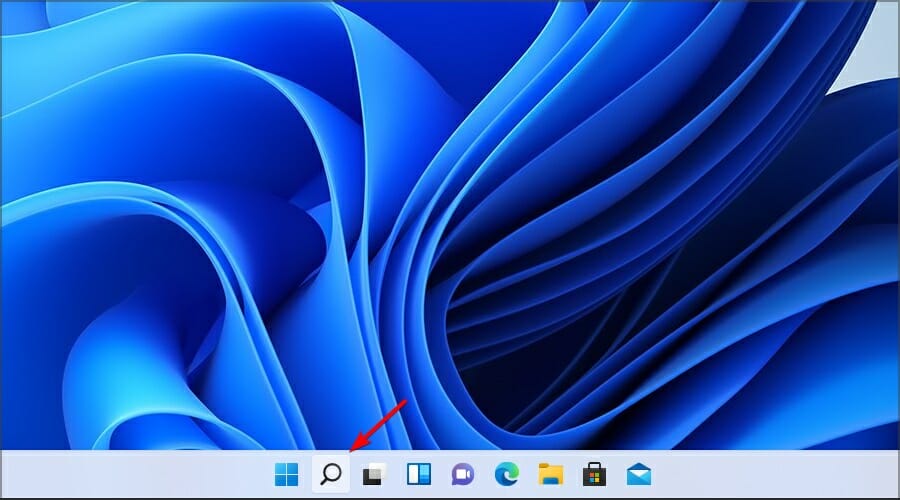
1. Right click on the taskbar.
2. Under Search, choose Hidden.
3. Now that the search box is now removed, you need to also remove the Task View button from the taskbar.
4. Right click on the taskbar once more.
5. Uncheck the Show Task View button.
You’ll need to customize the taskbar in order to make it like Windows 7’s. The first thing you need to do is to remove the search box or search button from your taskbar.
After you remove it, there’s only one thing left for you to do. If you really want your taskbar to look like Windows 7 as much as possible, you should also remove the Task View button, because Windows 7 Start menu didn’t have it.
I know it doesn’t look exactly like the Start menu from Windows 7 or Windows XP, but you can’t do more than this.
Maybe some new builds of Windows 10 Technical Preview will bring more customization options to the Start menu and taskbar, and we’ll be able to change it even more, but that’s all for now.
We’ve written extensively on Taskbar issues. Check out our guide for more information.
3. Use software to make Windows 10 look like Windows 7
There is something else you can try in order to make your Windows 10 look like Windows 7. There is a lot of software in the market right now, but one, in particular, got our attention.
3.1 Start10
Start10, a program developed by Stardock, can make big differences in your Windows appearance. After installing, if you want to return to the classic Windows 7 style or just give your OS a modern makeover, it’s up to you.
However, you should know that there is a cost, around 4.99$, but you can try it for free.
Here are Start10’s main features:
Restores the quick links to core system functionality
Filter searches in the Start menu
Replaces the start button and allows you to use your own
Integrates Stardock’s “Fences” into the menu
Maintains the “All Programs” folder metaphor
Apply texture to the Start10 background and taskbar
Add custom shortcuts to the right panel
Re-arrange the right panel to fit user needs
Configure individually how the start button and Windows key act when selected
Adjust menu size
Learn more about the Start10 tool from our dedicated review.
3.2 Classic Shell or Open Shell
Classic Shell is another third-party application that can help you bring back Windows 7 Start Menu to Windows 10. To use it, just do the following:
Navigate to the Start Menu Style tab and select Windows 7 style. If you want, you can also replace the Start button as well.
Head over to the Skin tab and select Windows Aero from the list.
Click OK to save changes.
Note: Classic Shell is no longer actively developed, so you might encounter certain bugs while using it. Open Shell is a similar application, and it’s actually based on Classic Shell. Open Shell is actively maintained by the Git community so be sure to consider it instead of Classic Shell.
There you go, we hope that you found our guide helpful and that you managed to change the look of your Start menu and taskbar in Windows 10 to be like Windows 7’s.
If your Canon PIXMA MG2522 stopped working, most likely, you need to update the Canon PIXMA MG2522 driver for Windows 10/11. The best method of dealing with this is to consult the manual of the product and find the installation media that came with the product. If you lost it, we will help you with the right procedure.
How to download and install the Canon MG2522 driver?
Download the installation package and save it to your download folder or wherever you want to keep it.
Save the installation setup file in your hard drive, which will be needed during the extraction process.
2. Installation process
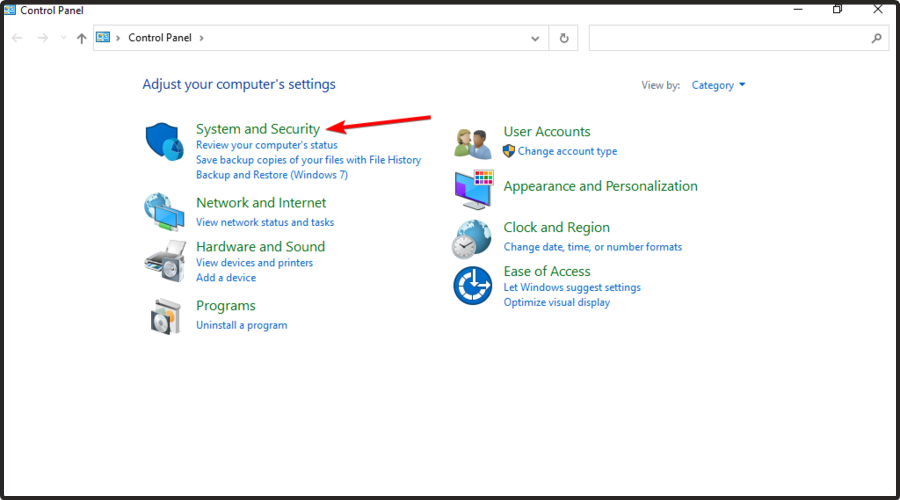
Click on your PC’s Start button, and then click Control Panel.
Locate and click on Hardware and Sound.
Click on Devices and Printers.
Click on Add a Printer and selectAdd a Local Printer.
Select the option to Use an existing port, and afterward, Choose a port. (NOTE: There are about three USB connection ports)
Please select one of them related to the model of your printer number.
Select your printer driver.
Check from the left pane to choose your printer brand name.
Then select the exact printer model number from the right pane, and click the Next icon.
If you can’t find your printer model number in the list, you can browse the extracted driver’s .inf file and click on Have disk.
Next, click on the Browse button.
Go to where you have extracted the drivers and select drivers.INF file and open it.
Now select the driver.inf file named Autorun.inf (INF file name may be different) and click on open.
Go to Install from disk and click OK to access drivers.
Select Replace the current driver in the next window and click on Next.
Check the box for the Do not share printer option in the next window.
Finally, select the set your printer as default check-box and click Finish.
Now your Canon PIXMA MG2522 is installed and ready to use.
If you are setting up another Canon model, such as the G3110, you can use this Canon G3110 driver download guide to get the right driver package and follow the correct installation process.
Is the Canon MG2522 printer compatible with Windows 10 &11?
The Canon PIXMA MG2522 printer model is compatible with Windows 10 and 11. Not just that alone, it is also compatible with Windows 8, 8.1, 7, 7 SP1, and Vista SP2 OS systems.
You can work your way down the step-by-step process provided for you to download and install the Canon MG2522 driver in Windows 10/11.
Here you can also check our detailed guide on what to do if the Canon printer won’t scan in Windows 10/11. Let us know which solution worked for you in the comments area below.
You’re getting the There was an unexpected error with the login session message when you’re trying to log in and play League of Legends. Some blame this error on game installation’s problem. However, the same login issue may occur in other cases if the region settings are incorrect.
Furthermore, the LOL servers may experience this issue if they are overburdened with traffic or facing downtime.
Try restarting your Ethernet router before attempting any of our solutions. You can also try signing into League of Legends with a different account and then logging out and back in with the desired account.
How do I fix There was an unexpected error with the login session?
1. Sign out of the game before the error shows
Load the League of Legends client and log in to your account.
Before the error messageappears, click on the X button as if you want to close the game.
On clicking X, LoL will ask if you wish to exit or sign out.
Finally, hit Sign out.
League of Legends will restart, this time without the unexpected error with the login session.
2. Sign out and close processes in Task Manager
Launch the League of Legends client.
Press Alt + F4 to close the client. From the options, click on Sign out.
After signing out, press Ctrl + Shift + Esc to bring up Task Manager.
From Task Manager, click on every instance of League of Legends, and hit the Close button.
When you are sure that all is closed, load the client once again and attempt to log in.
Now do the same for RiotClientServices.
If you still get the there was an unexpected error with the login session League of Legends message, repeat the steps, but on step 4, close the KillerServiceNetwork.exe program.
3. Edit the DNS server address
Open the Run dialog using the Windows + R keys.
Type the path below in the address field and hit Enter. ncpa.cpl
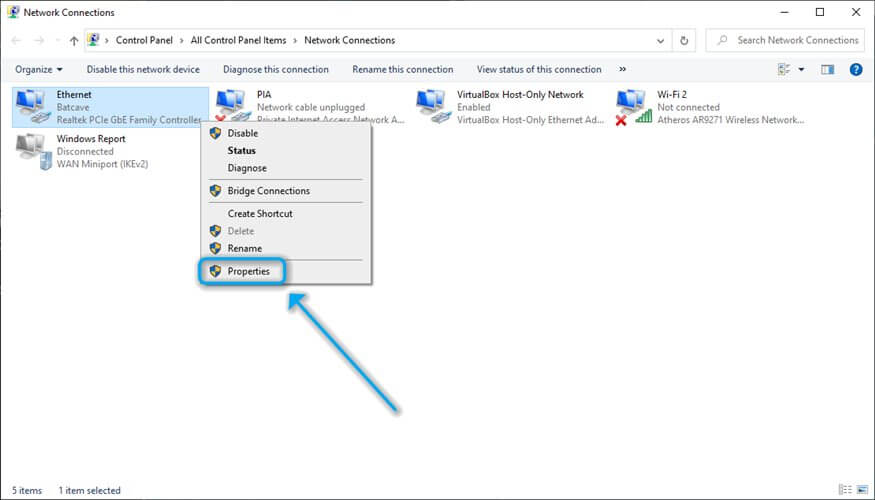
Right-click on your network adaptor and select Properties.
Double-click Internet Protocol Version 4 (TCP/IPv4).
Select the option for Use the following DNS server addresses and use the following values Preferred DNS server and Alternate DNS server: 1.1.1.1 1.0.0.1
If you’re having issues with the Riot client, you must ensure that your drivers, system, and client are up to date.
In addition, double-check your firewall settings and make sure that the client is available to access the Internet.
Riot Games, the developer of League of Legends, proffered the second solution to clear the there was an unexpected error with the login session League of Legends issue.
How do I allow LOL through the firewall?
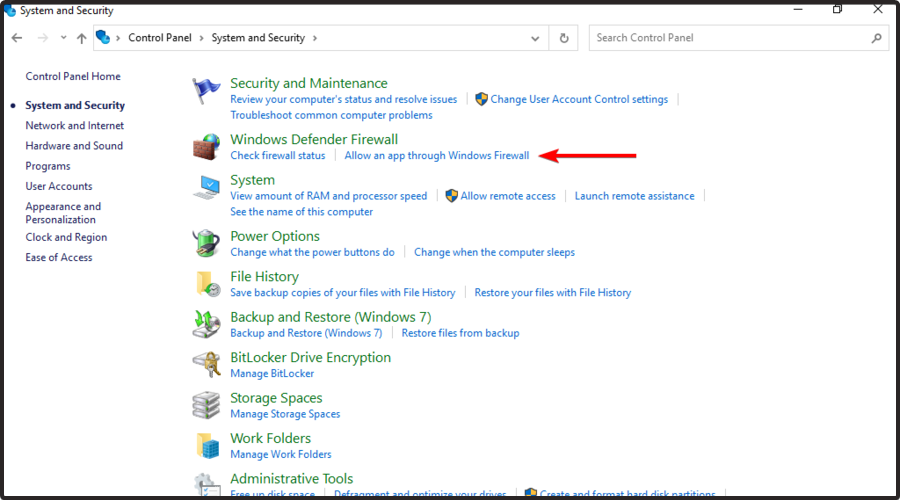
Click on the Start menu, type allow app in the search field, then select the option to Allow an app through Windows Firewall.
Click on the Change settings button.
From the list of apps, search for League of Legends, tick its checkbox to allow it, and then click OK.
Some users who experienced this login session error also experienced the League of Legends RADS error; some of the fixes here may apply.
How do I fix the attempt to join queue failed error?
If you encounter this error message, there may be a network issue, and once you can resolve the League of Legends connection issues, you will be back gaming.
Alternatively, you can check your firewall and make sure that the game is allowed to connect to the Internet. You should also check your connection and ensure it’s stable.
Here are similar scenarios and variants of this error reported by gamers all across the globe:
We’ve encountered an unknown error. Please wait a moment and try again. League of Legends
LOL timeout login
Invalid at hash League of Legends
There was an unexpected error with the login session Garena
Riot client unknown error occurred
There was an unexpected error with the login session Hatası
Riot we’ve encountered an unknown error, please wait a moment and try again
Lol An unexpected error has occurred while attempting to join the queue
You should try any of these solutions if you encounter an unexpected error with the login session error. While not all solutions will work for every situation, you will find one that resolves your specific case.
Let us know what worked for you in the comments section below.
Are you wondering what your PC’s Internet speed is? To check that, you’ll need to use a Net Speed Monitor for Windows 11.
Since Windows doesn’t have one by default, you need to get it by following these steps.
How can I add a Windows 11 net speed monitor?
1. Get Net Speed Meter
1. First, you’ll need to sign in to your Microsoft account to download a UWP app from MS Store. If you don’t have such an account, set one up from the Microsoft account page.
2. ClickStarton Windows 11’s taskbar.
3. Then select the Microsoft Store app on the Startmenu to open it.
4. TypeNet Speed Meterin the MS Store’ssearchbox.
5. Then select theNet Speed Meter appin the search results.
6. Click theGetbutton forNet Speed Meterto install it.
7. When installed, click the Open button on the Net Speed page.
8. Select the Yes option when asked to keep Net Speed Meter on the taskbar. Then you’ll see Net Speed Meter on the desktop.
9. You can drag and that meter around the desktop by left-clicking it and holding the left mouse button.
10. To add that speed meter to the taskbar, right-click it and select theKeep in Taskbar button.
11. You can customize Net Speed Meter by right-clicking it and selecting Setting. Then change the options according to preference.
12. For further instructions, you can right-click Net Speed Meter and select theHow to useoption.
If you’re looking for an internet speed meter for Windows 11, you should know that our first recommendation is Net Speed Meter. It is a Microsoft Store application that can be downloaded for free by all users with an account.
The Net Speed Meter app can be customized to your liking via Settings, and can be added to your Windows 11 taskbar for quick access.
Does the widgets bar include a network speed monitor in Windows 11?
The widget panel doesn’t include a network speed monitor. There are 11 widget options available there, and none of them add a net speed meter to the panel.
Can I check the connection speed in Windows 11 without third-party apps?
Windows doesn’t have any desktop feature that displays connection speed details, and the only option is to use third-party software.
How can I speed up my PC’s download speed?
If your Internet is slow on Windows 11, close as many background apps as you can on your PC. You can do that by turning off the Let apps run in the background option on the Settings’ Background apps tab.
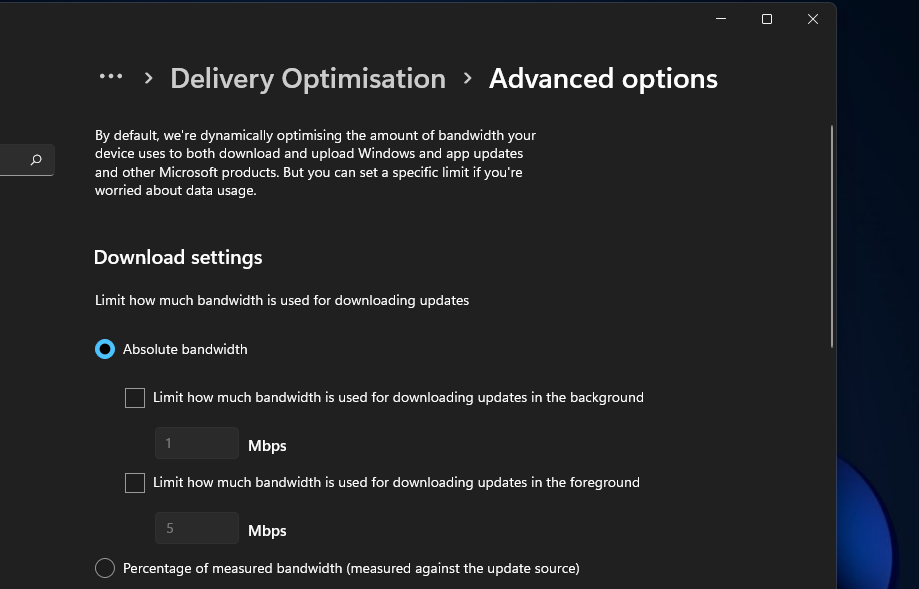
You can also limit bandwidth for updates via the Windows Update tab’s advanced options in Settings.
You can also turn off any other devices you have connected to the Internet, such as tablets, smartphones, consoles, etc.
In some cases, you need to check network card speed and make sure that your network adapter isn’t bottlenecking your connection.
You can also try updating your network adapter’s driver if your PC’s download speed seems a lot lower than what it should be.
You can do that by scanning your computer with a third-party driver updater utility, such as Outbyte Driver Updater. Driver updater software enables you to download and install new drivers for PC devices in no time.
Moreover, don’t hesitate to use the best bandwidth limiter tools for those programs that use more bandwidth. Even if they are for Windows 10, you can also use them to see exactly what apps are more demanding in terms of network data.
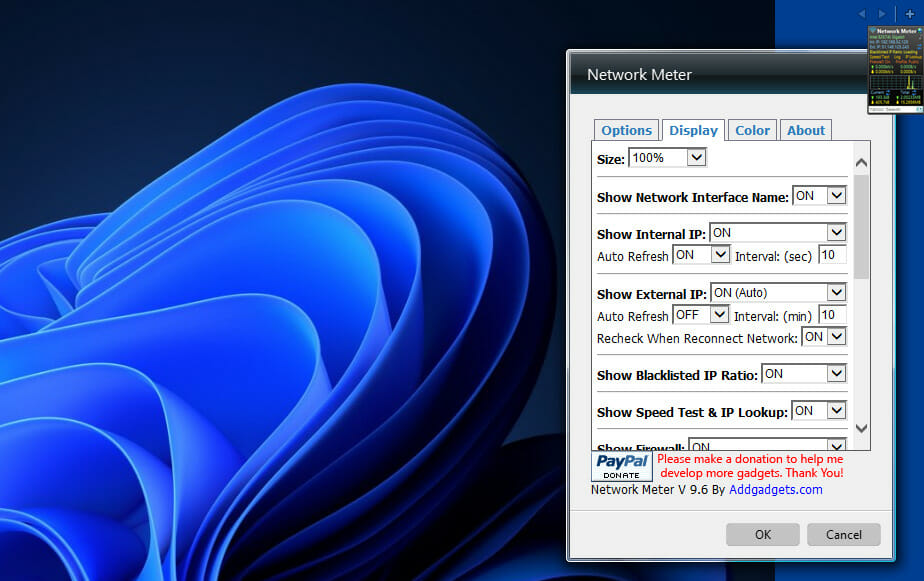
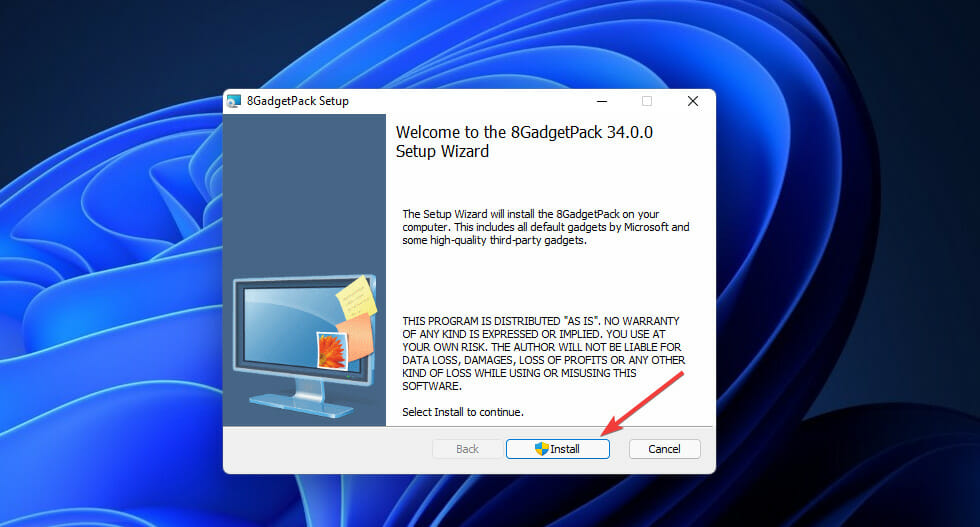
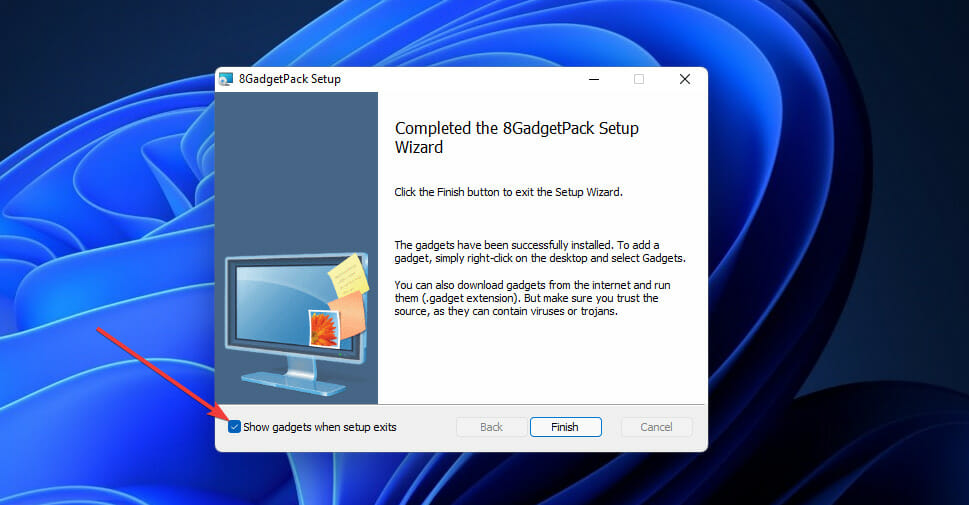
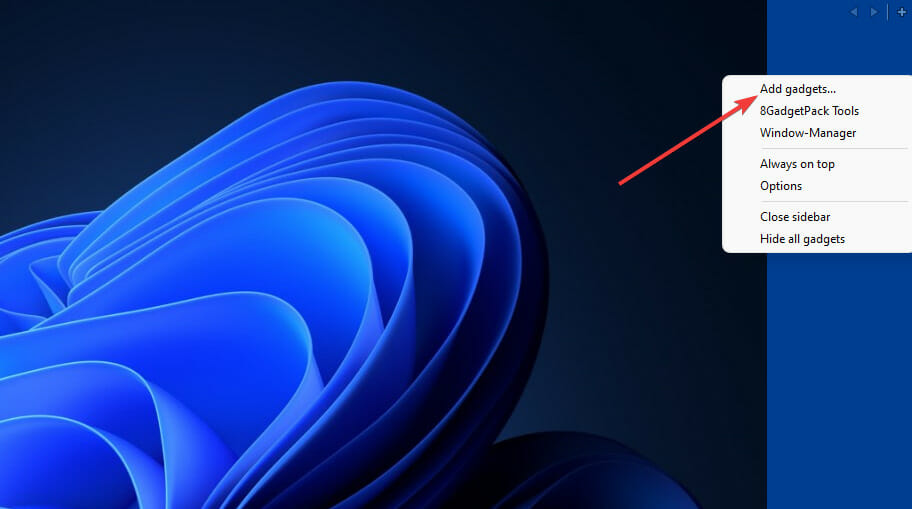
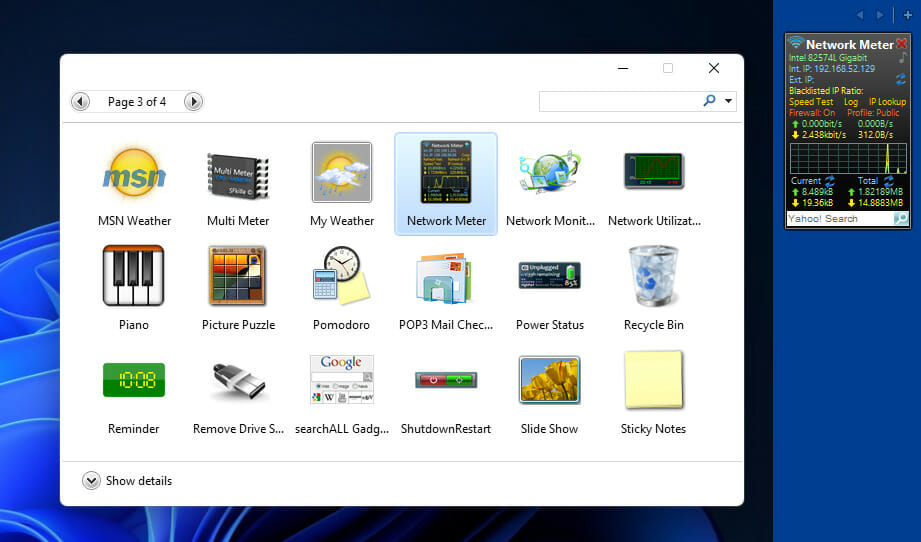
A Windows 11 net speed monitor is a nice addition to the desktop. Net Speed Meter and 8GadgetPack’s Network Meter are two freely available ones that pack in numerous customization settings.
Either of those network speed monitors on your desktop will make it clearer how long your downloads and uploads might take. With one of those apps installed, you can proactively monitor your PC’s network speed. So, 8GadgetPack and Net Speed Meter are two Windows 11 apps worth noting.
For a Windows user, it’s possible that at one time or the other, there might be a situation in which the computer’s disk space gets crowded.
There might be attempts by the user to get rid of unneeded files without success.
When trying to delete an unneeded item, an annoying dialog box pops up, indicating that the action is not permitted as a result of a locked file.
The inability to delete a file or folder may either be because it’s locked (encrypted with a security code or password) or because the file is open in a program.
Sometimes, it may be a background program that is preventing the file from being deleted. To completely get rid of the locked files/folders, follow the procedures listed below.
How can I remove locked files and folders?
1. Use specialized file eraser software
If you’re unable to delete user folders in Windows 10 using conventional methods, you might want to try a different, more professional approach.
Using dedicated file erasure software such as Stellar BitRaser comes with many advantages one of which is permanently erasing files that are beyond the scope of data recovery.
By securely erasing confidential data from all devices (running on Windows and Mac as well), servers, and partitions, this privacy safeguarding software meets all your media sanitization requirements.
You can schedule the erasure of files, folders, and traces to occur once, daily, weekly, monthly, or at system boot. You may also examine planned jobs and data such as status, state, algorithm, mode, frequency, and more. You can also add files to a “ignore list” to prevent them from being erased, and keep them secured.
Using it is as simple as a breeze too: all you need to do is download the.EXE file, install the tool, select the items you want to erase, and Delete.
1. Right-click on the locked folder or file that you want to remove from your PC and select Properties.
2. Navigate to the Details tab.
3. Scroll down to the Folder path section and copy the path written there.
4. Press the Windows key to open the Windows search box. Alternatively, you can open it by clicking on the Start button on your taskbar.
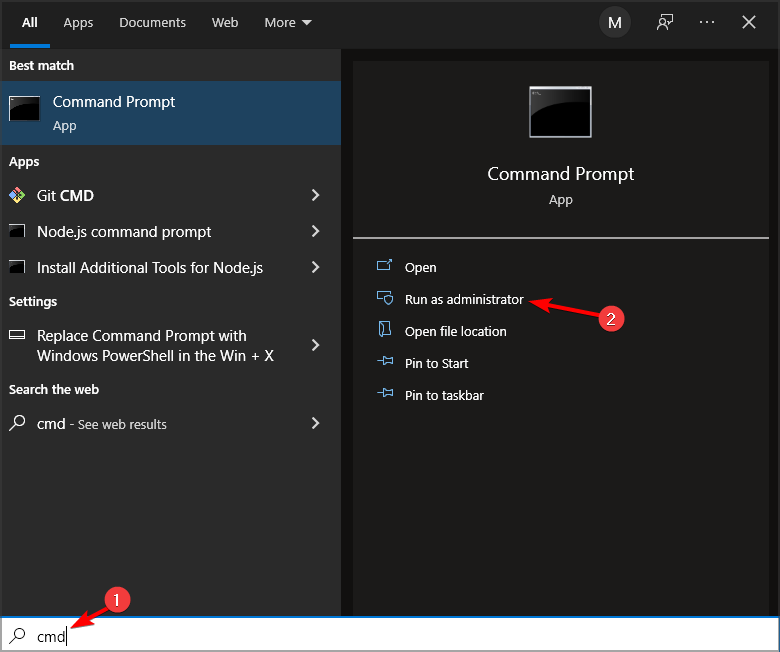
5. Type cmd in the search box and right-click on the first result, then select Run as Administrator.
6. Now you need to navigate to the folder path using Command Prompt. To do that, you need to input the following command, but replace folderpath with the actual path that you previously copied: cd folderpath
7. Press Enter to run the command.
8. Type the following command, where filename represents the name of the locked file to be deleted: del /f /s <filename>
9. Press Enter and the file will be gone.
A locked file or folder can be easily deleted from your Windows 10 PC using commands in a command-line tool such as Command Prompt.
With Command prompt, you can navigate to the file path of the specific file and perform an automatic removal.
Some locked files may not be this easy to remove. This might prompt going the extra mile by trying out the Windows Recovery method described below. Alternatively, you can download software to fix this.
3. Use Windows Recovery to delete locked folders
Switch the computer off and insert the windows re-installation disc into the disc drive.
Turn the PC on, and let it boot (not from the hard disk this time but from the disc).
Put the computer into the recovery console mode by pressing the key R on the keyboard: this mode is a troubleshooting option built into windows.
In the recovery mode, go to the location of the locked file using the Command Prompt. For example, a command like cd C: Documents Settings My Documents filename
The pattern given in this example should be followed using the directory of the locked file to be deleted.
After locating the file, it can be removed by typing in del and leaving the recovery mode. Type the command exit and restart the computer.
Windows Recovery is another method by which locked files can easily be deleted. Refer to the above procedure in that regard.
4. Use dedicated software to manage your locked files
There are a number of software tools that can be downloaded and used to manage locked files from the PC. Here are a few options:
4.1. IOBit Unlocker
This is a handy software that can unlock and manage files and folders to keep them safe and available. What’s more, IOBit Unlocker is incredibly easy to use.
All you need to do is to drag and drop the locked file or folder into the software’s interface and choose the delete option (or unlock, rename, move, copy, and so on, according to your specific needs).
It also provides details about the location of the file and directory alongside the details of the process, so you’ll easily use it even if you’re not a pro.
A renowned software called Process Explorer comes in a similar format to the Windows Task Manager.
It’s easy to use and doesn’t require installation, all that is needed is to run it and allow administrator permission, then follow these steps.
Go to the File menu on the menu tab and choose show details for all processes.
While still on the menu tab, select the Find option, and click on Find Handle or DLL.
Enter the name of the locked folder in the search field of the process explorer task manager.
Choose the locked file and check out the handle in the details section below the window.
In the same manner that the process can be ended on the regular windows task manager: right-click on the filehandle and click on close handle.
You would have effectively stopped it from running in the background and stopped it from getting deleted. You can now go back to the file location and delete the file.
4.3. LockHunter
This comes in as very helpful software. LockHunter also helps in identifying the particular program that is keeping the file locked.
Going forward, the processes can be stopped in an expedited manner before the file gets deleted.
Lockhunter doesn’t permanently remove the file. However, it sends the file to the recycle bin allowing the user the chance of restoring the file if need be.
This is an easy-to-use software tool and its line of action is similar to 10bitunlocker. It is useful in deleting locked files, especially those that are inaccessible due to a virus or other malware.
Access FileASSASSIN on the computer.
Drag the locked file or folder into the FileASSASSIN text area.
Select how exactly how the file or folder should be deleted from the various menu options and click on execute to get the file deleted.
Access to the files will be possible using the FileASSASSIN thereafter.
The Xbox app has also been a part of Windows 10, and it offered the gaming community an all-inclusive platform. You can link your Xbox account with the computer, browse through a vast collection of games, play them, and connect with others across devices.
However, several users in the recent past have reported that the Xbox app can’t choose the drive on Windows 11. Simply put, they cannot choose a purpose other than the one selected by default.
While some don’t even bother checking the install location of a game, others effectively organize the files and apps stored on the system, and this error posed a major setback to them.
In this article, we will explore all the fixes for the error along with the other relevant information that would aid the troubleshooting process.
What is preventing the Xbox app from selecting a drive?
Various issues could lead to trouble when choosing a different drive while installing a game. We have listed the most prominent ones:
Misconfigured storage settings
Bugs in the current version of Windows
Lack of permissions
Corrupted storage
The error largely depends on the four problems listed above. If you can identify the one in your computer, directly head to the relevant fix for it; otherwise, execute them in the same sequence for a quick troubleshooting process.
What can I do if the Xbox app can’t select the drive on Windows 11?
1. Change the drive Xbox downloads games to
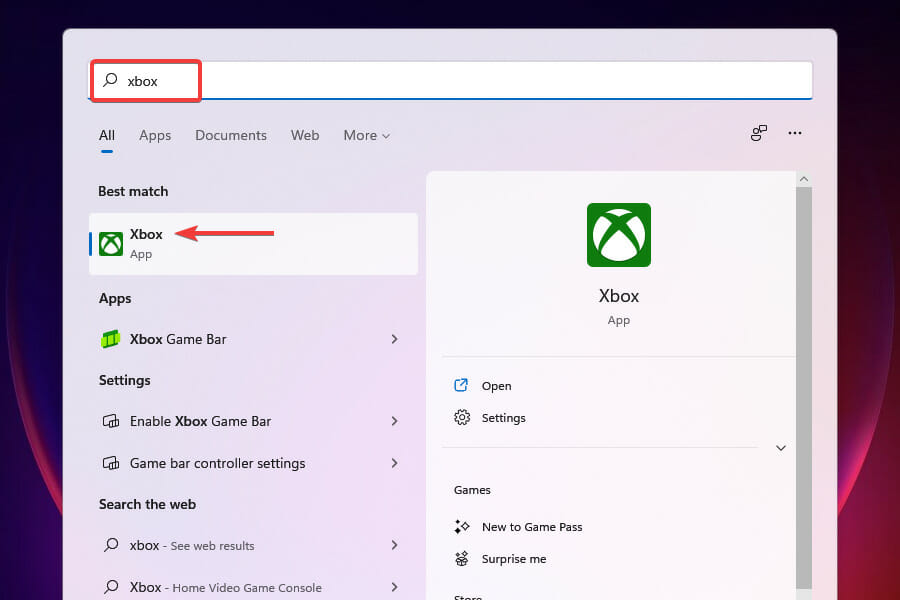
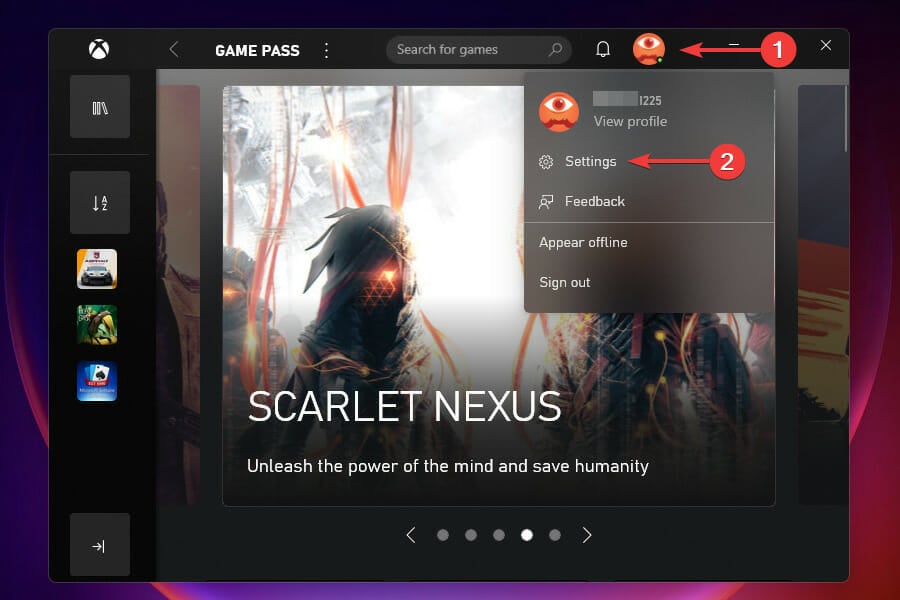
Press Windows + S to launch the Search menu, enter Xbox in the text field at the top, and click on the relevant search result to launch the app.
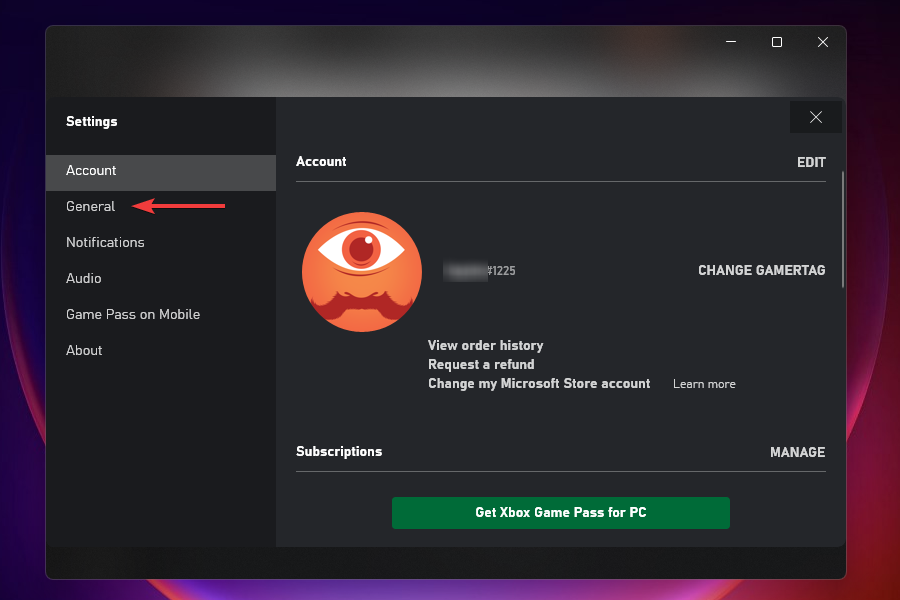
Click on the Profile icon near the top-right and select Settings from the flyout menu.
Go to the General tab.
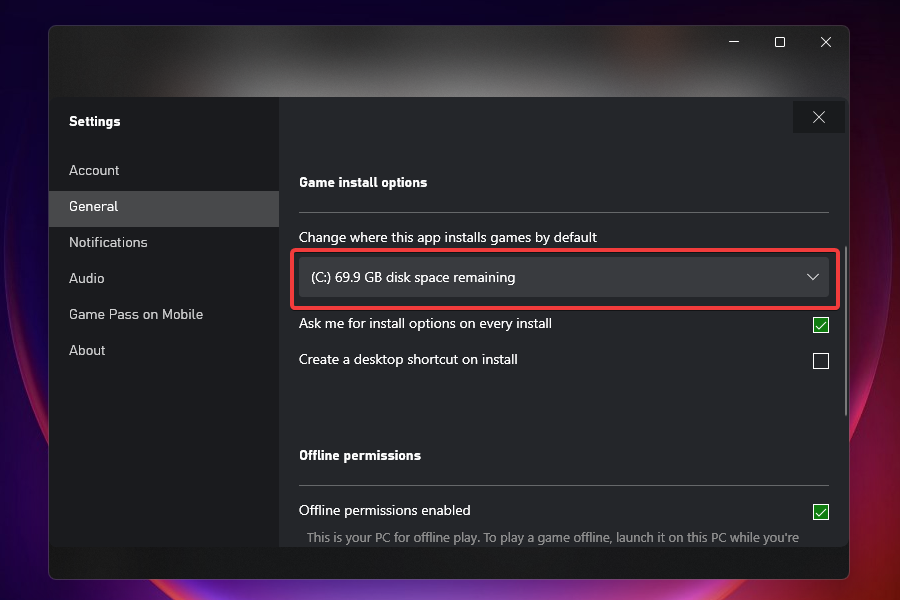
Click on the dropdown menu under Change where this app installs by default.
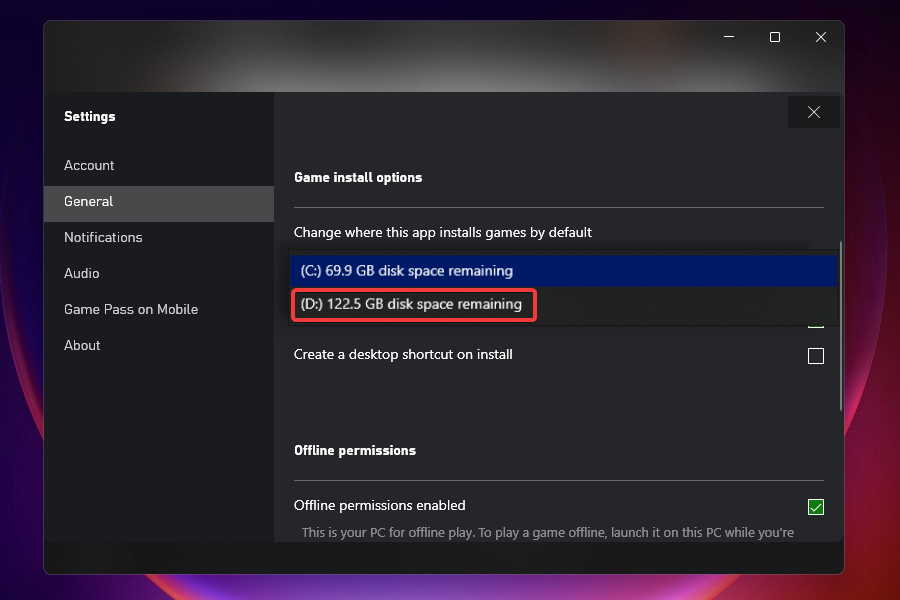
Select the desired drive from the list of options.
Restart the computer and check if the drive you were facing issues with earlier can be used for installing apps.
While some may have already given this method a try, it’s imperative to mention it since this is the most critical aspect and one that helps diagnose the issue.
A small yellow warning box next to an option indicates that the problem lies with the drive itself and not the app storage settings. You can format the drive in that case, but we recommend trying the other fixes listed below before going for the extreme.
2. Change the system storage settings
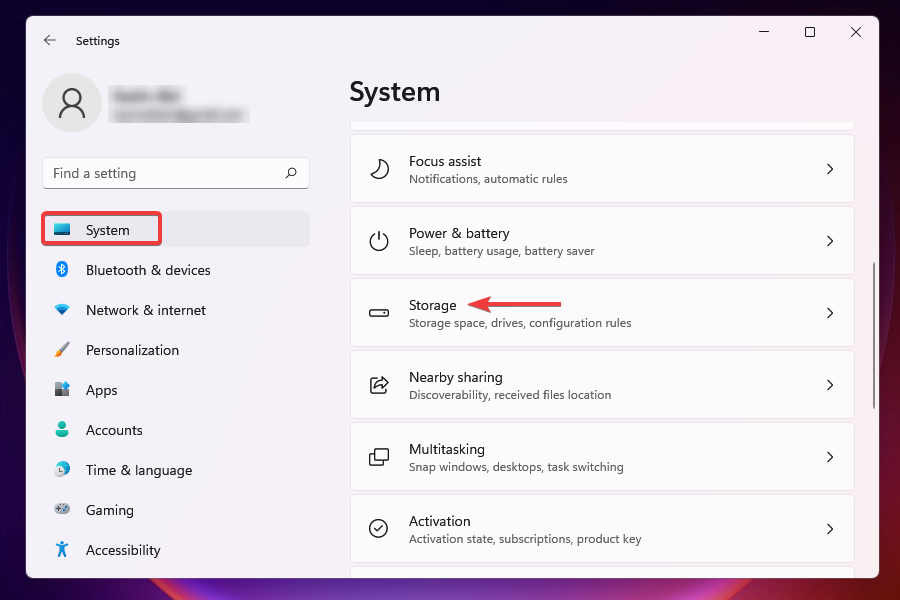
Press Windows + I to launch the Settings app, and click on Storage from the list of options available on the right in the System tab.
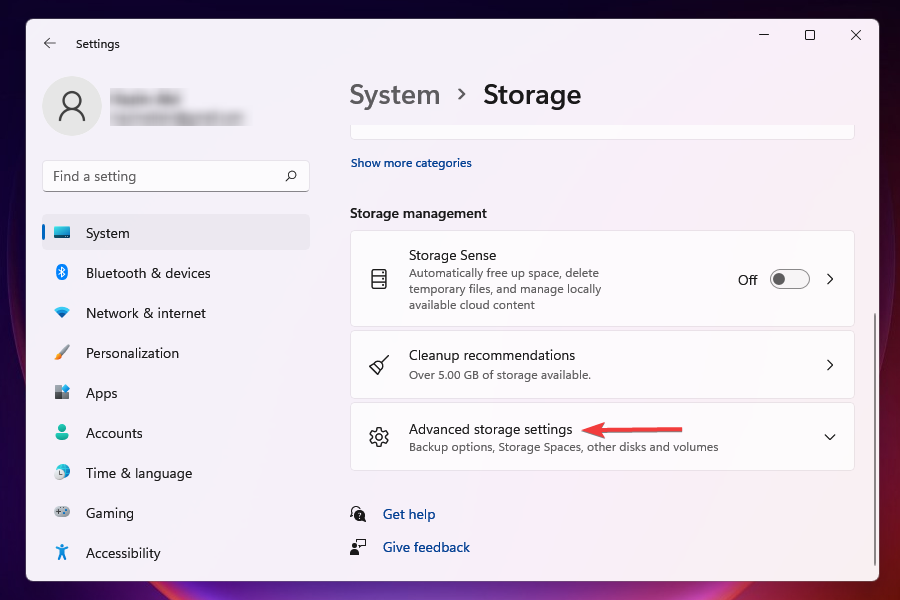
Select Advanced storage settings under Storage management.
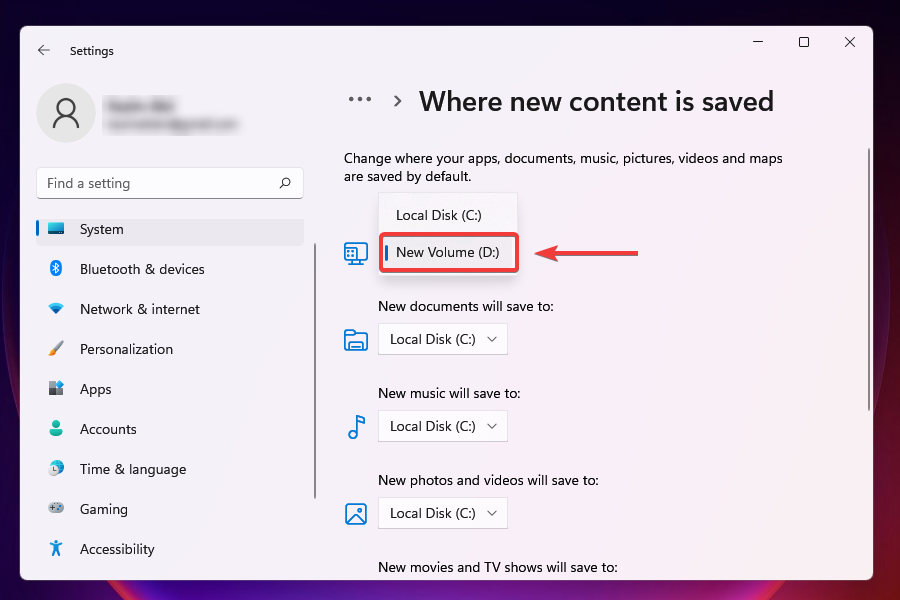
Click on Where new content is saved from the list of options that appear.
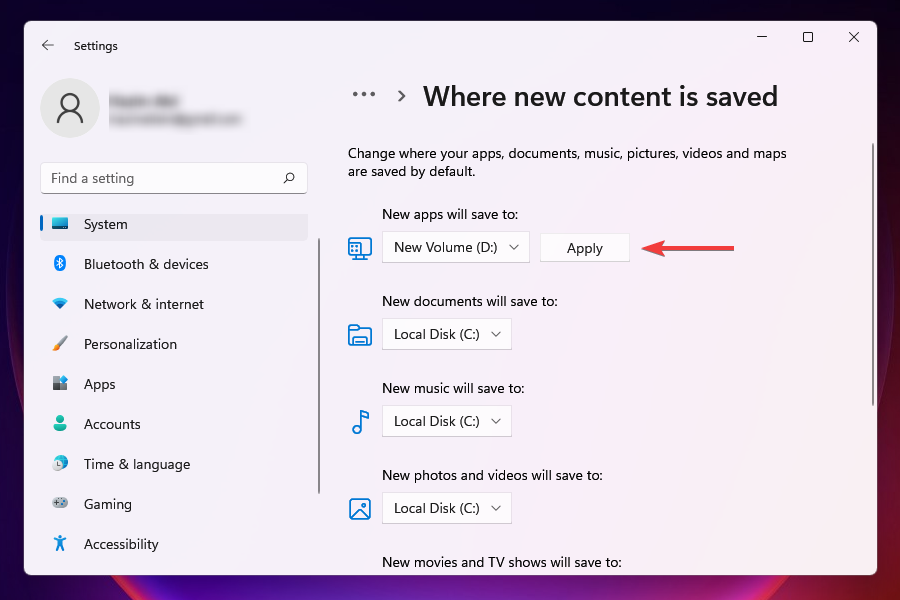
Select the dropdown menu under New apps will save to select the desired drive.
Click on Apply for the changes to come into effect.
Restart the computer and check if you can select another drive while downloading a game.
The current settings on your PC may prevent the Xbox app from changing the drive when downloading a game. After you have adjusted the default settings, check if the Xbox app still can’t choose drive. Suppose that’s the case, head to the following method.
3. Modify Folder Permissions
Press Windows + E to launch File Explorer, and navigate to the drive where you want to install the apps (in our case, it’s the D: drive).
Locate the WindowsApps folder. If you cannot find one, create a new folder by the same name.
Right-click on the WindowsApps folder and select Properties from the context menu. Alternatively, you can select the folder and hit Alt + Enter to launch the Properties window.
Navigate to the Security tab and select Advanced.
Click on Continue in the Permissions tab of the Advanced Security Settings window.
Select Change to modify the permissions and grant access to the folder.
Click Advanced in the Select User or Group window.
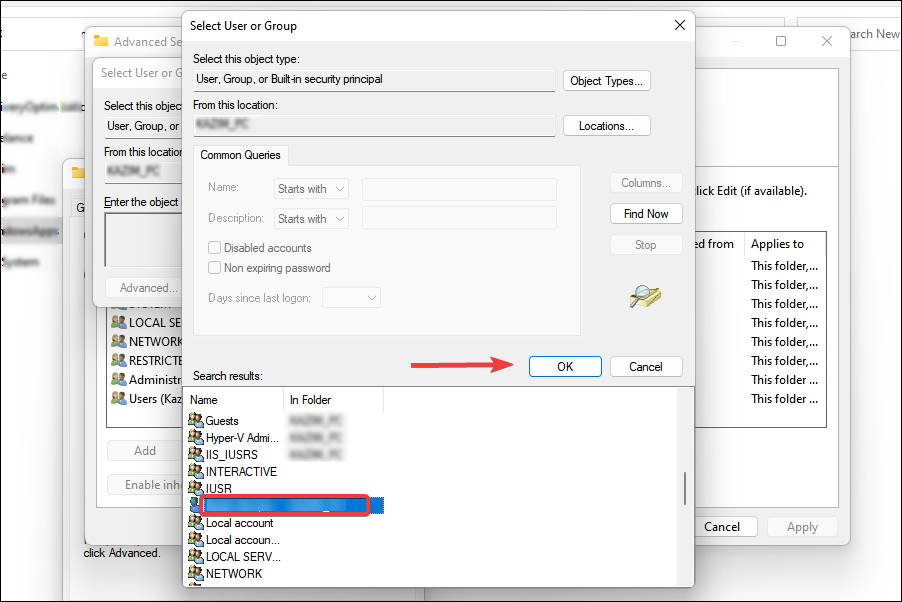
Click on Find Now.
Select your user account from the list at the bottom and click on OK.
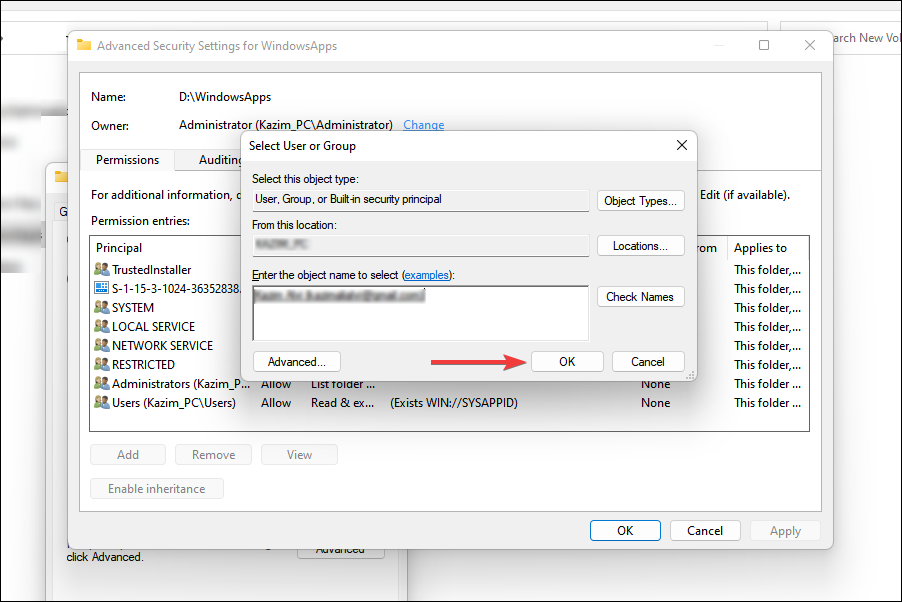
Click OK in the Select User or Group window.
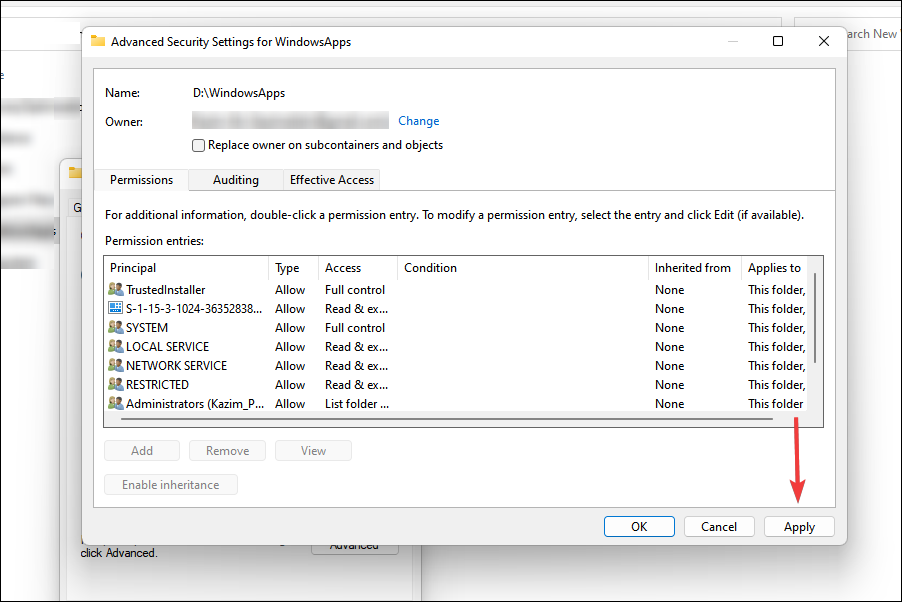
Click on Apply to save the changes.
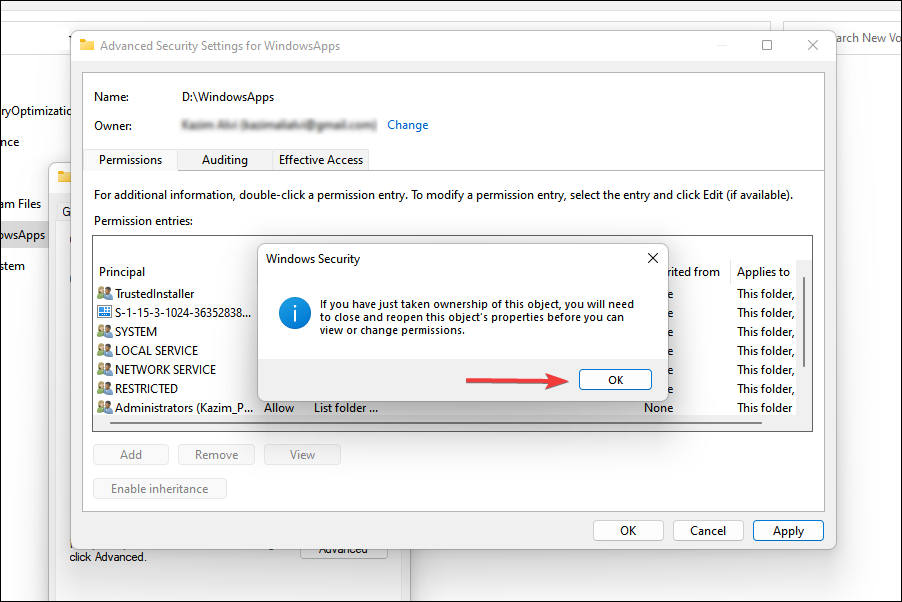
Select OK in the Windows Security prompt that appears.
Finally, click OK to close the window.
After making the changes, restart the computer and check if you can now save the games to the selected drive.
4. Update Windows
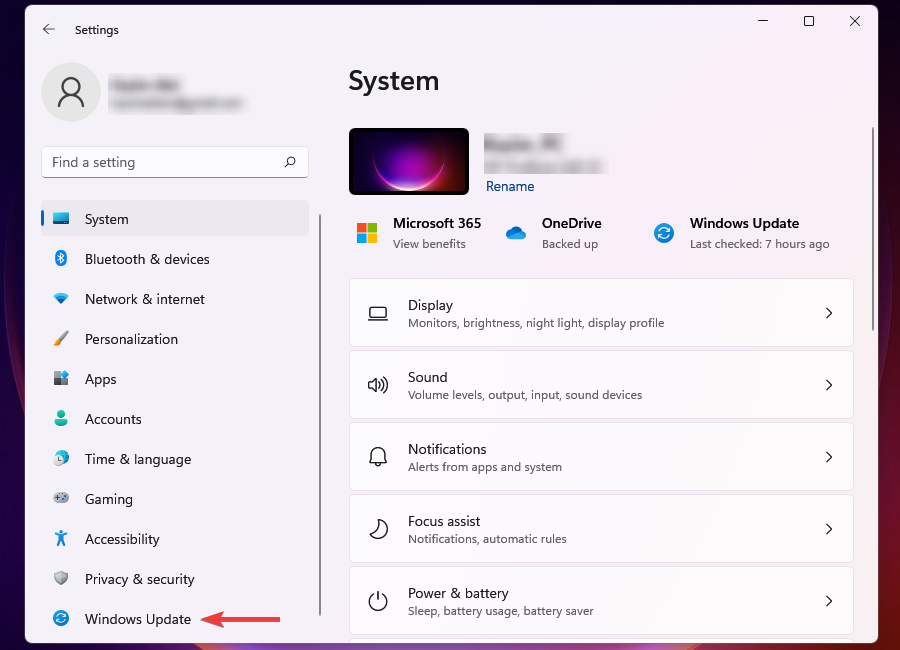
Press Windows + I to launch the Settings app, and select Windows Update from the tabs listed in the navigation pane on the left.
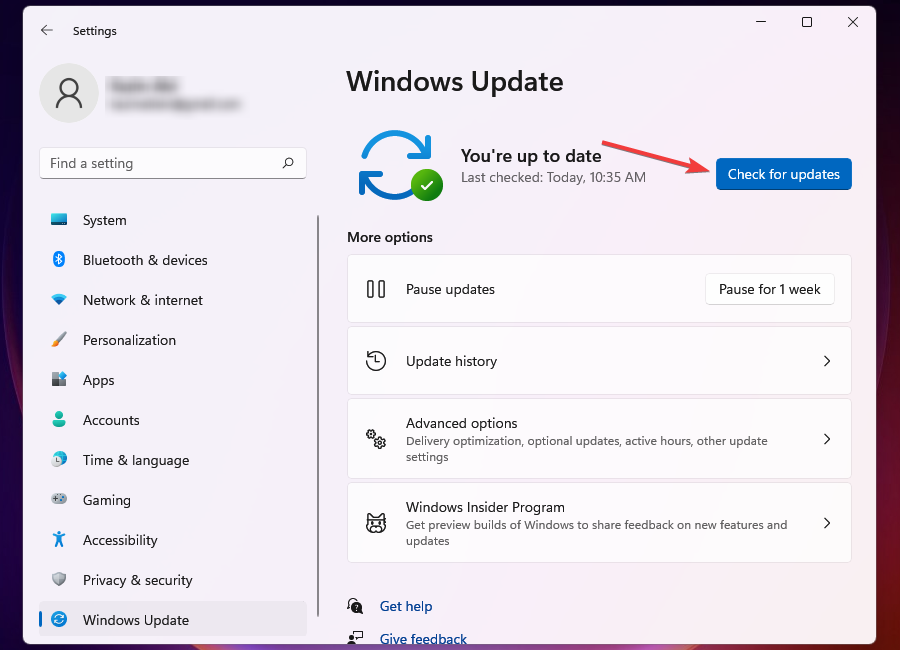
Click on Check for Updates to scan for any pending updates, and download and install them to your computer.
If you are running an outdated version of Windows, or there’s a bug in the current version preventing you from selecting another drive, try updating the Windows. And once done, check if the Xbox app can’t choose drive problem is fixed.
When you install the latest version, apart from features, a bunch of patches for the bugs in the previous version are also installed. This has fixed the issue for many users, and you must try it before proceeding.
If you are having trouble accessing the Settings app, an issue reported by many users, find out what to do when the Settings app crashes.
5. Restart the Xbox services
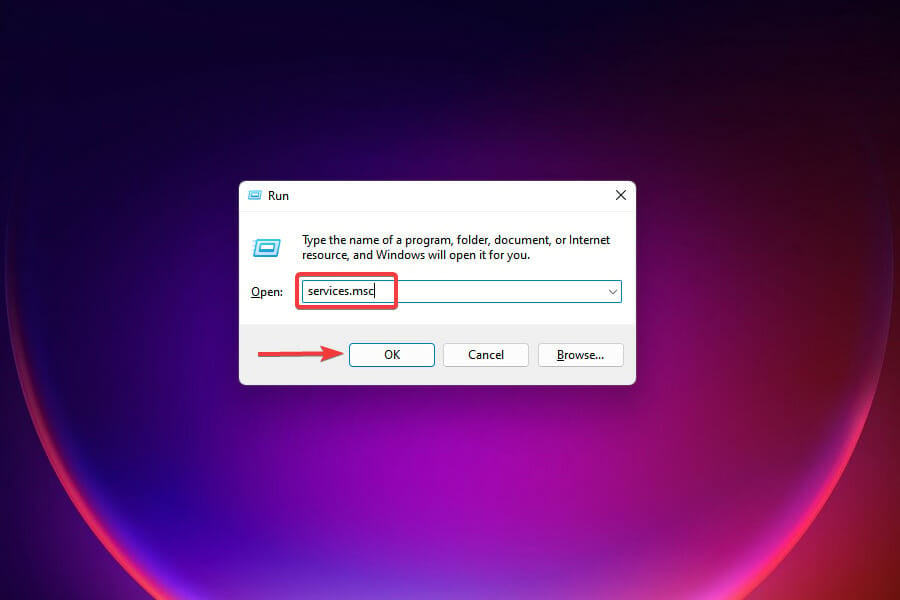
Press Windows + R to launch the Run command, type services.msc in the text field, and either click OK at the bottom or hit Enter to launch the Services app.
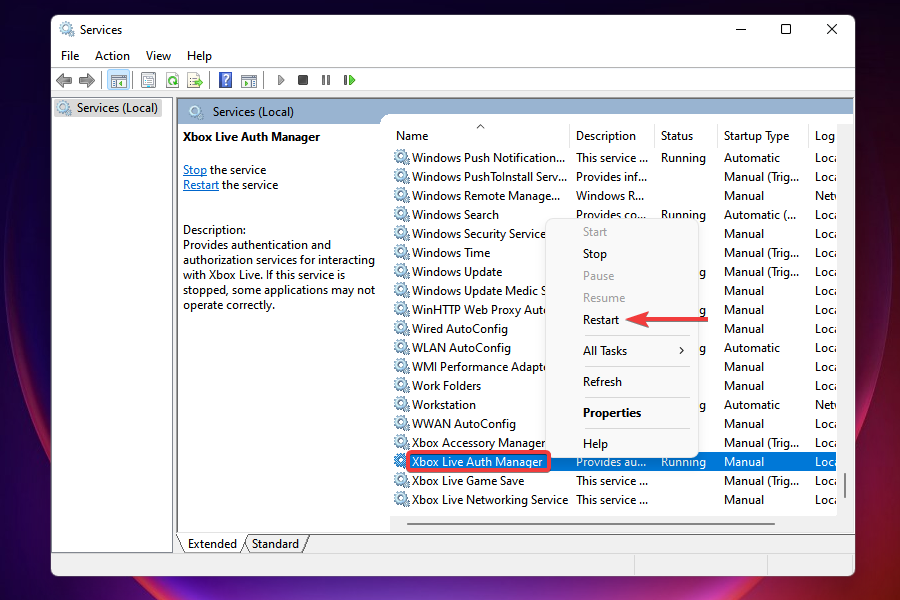
Locate the services starting with Xbox, right-click on them and select Restart from the context menu.
Repeat the process for all such services that are currently running.
If the Xbox services have encountered a bug while running, restarting them will give them a fresh start and fix any such bugs. Once done, check if the Xbox app resolves the issue that you can’t choose a driver. If not, the following solution would help.
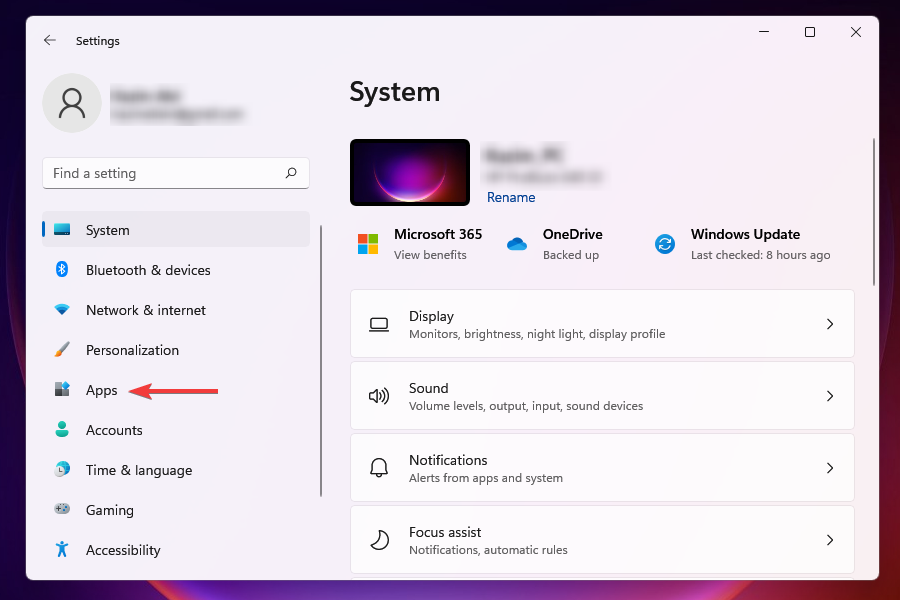
Press Windows + I to launch Settings, and select Apps from the tabs listed in the navigation pane on the left.
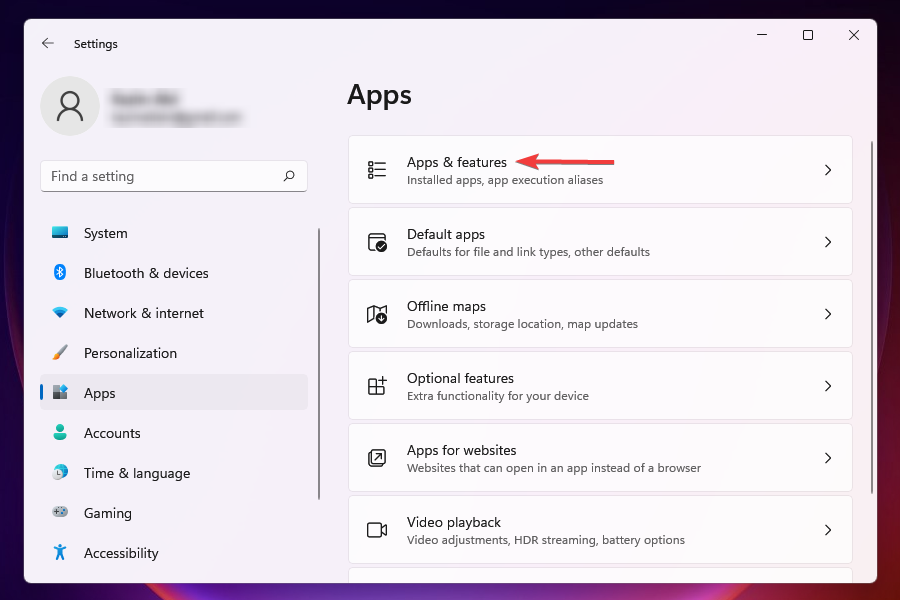
Click on Apps & features on the right.
Scroll down, locate and click on the ellipsis next to Xbox, and select Advanced options from the menu.
Click on Repair under Reset.
Please wait for the process to complete; it shouldn’t take more than a few minutes.
While most users go around uninstalling an app in case of trivial issues, the Repair option is more than capable of fixing the problem. Also, you don’t lose any data when repairing an app, as opposed to when you uninstall it.
This will also come in handy when the Xbox app for Windows is not detecting any of my drives.
7. Make changes to the Registry
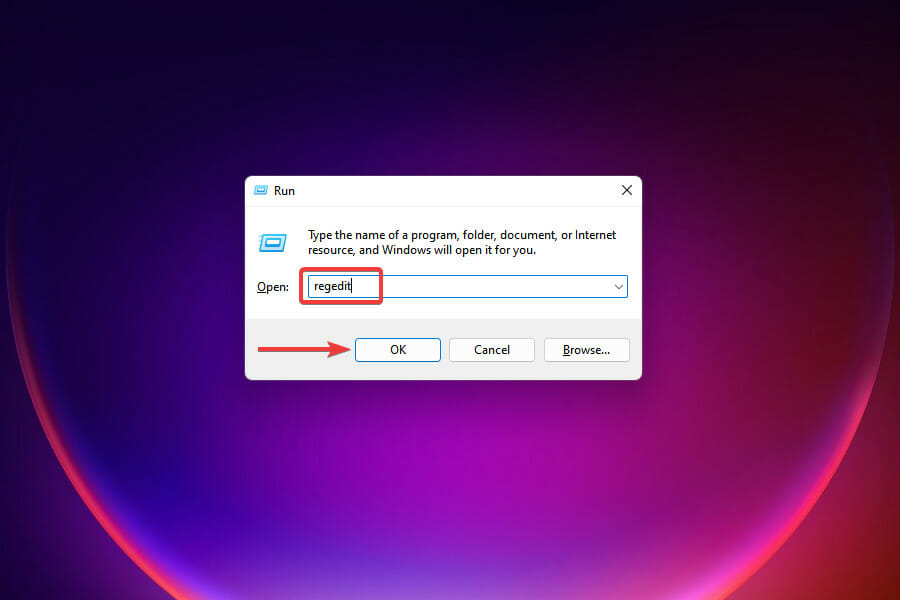
Press Windows + R to launch the Run command, type regedit in the text field, and click on OK or press Enter to launch the Registry Editor.
Click Yes on the UAC prompt that appears.
Paste the following path in the address bar at the top and hit Enter: HKEY_LOCAL_MACHINE\SYSTEM\CurrentControlSet\Services\GamingServices
Now, right-click on its entry in the navigation pane on the left and select Delete from the context menu.
Select Yes in the confirmation box that appears.
Similarly, paste the following address and hit Enter: HKEY_LOCAL_MACHINE\SYSTEM\CurrentControlSet\Services\GamingServicesNet
Again, right-click on the entry in the navigation pane and select Delete.
Click Yes in the confirmation box that appears.
Close the Registry Editor and restart the computer.
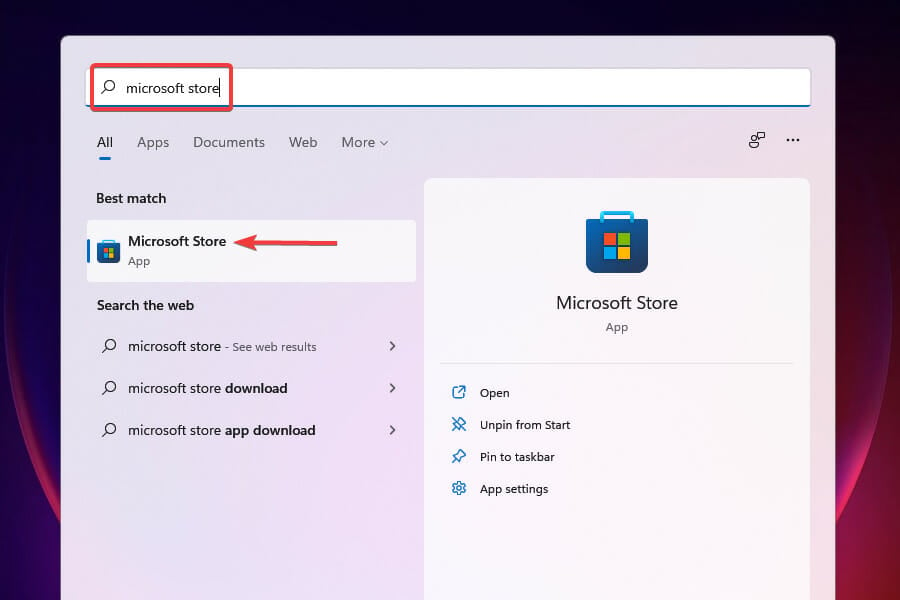
After the PC restarts, press Windows + S to launch the Search menu, enter Microsoft Store in the text field at the top, and click on the relevant search result to launch the app.
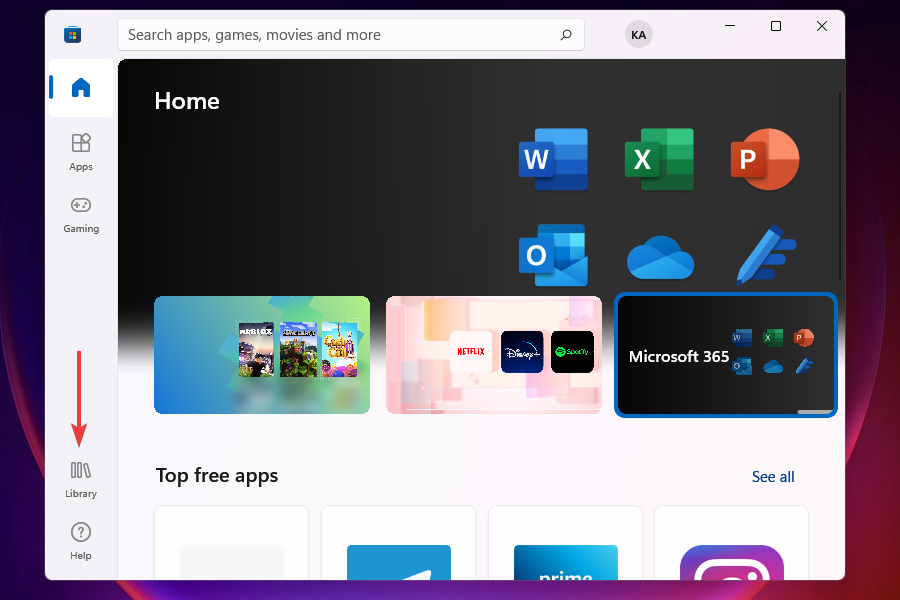
Click on Library near the bottom-left corner.
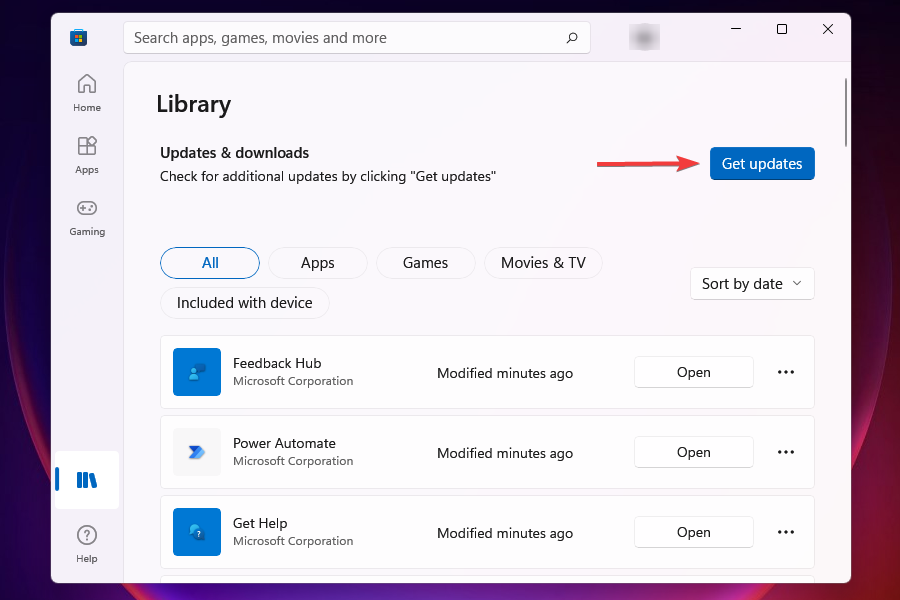
Click on Get updates.
Download the updates for Gaming Services that appear.
This fix works when the Xbox app won’t let me choose drive. Then, when you reinstall the updates, it solves many bugs or corruptions leading to the error.
Even if this doesn’t work with the other methods mentioned above, you are left with no option but to format the drive.
8. Format the drive
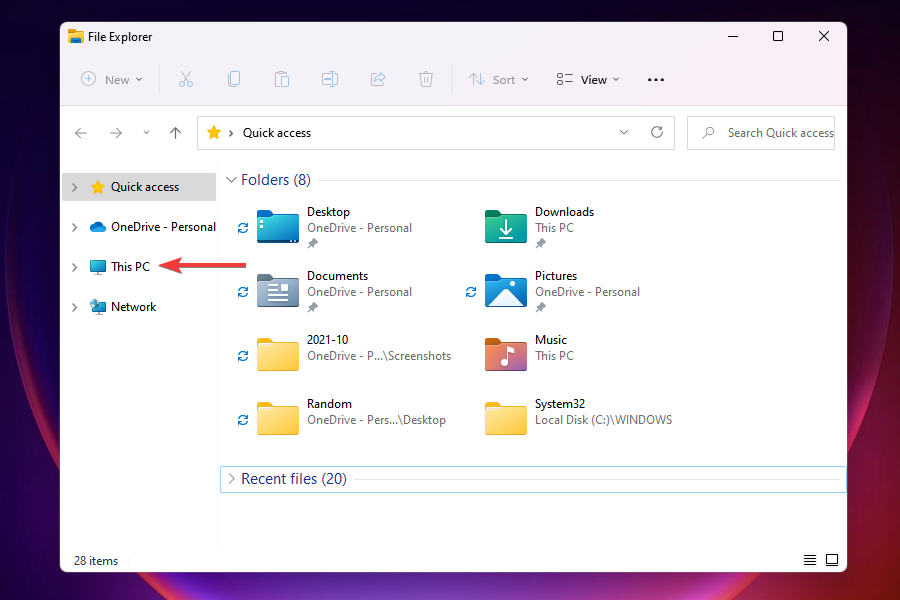
Press Windows + E to launch File Explorer, and click on This PC on the left to view the available drives.
Right-click on the drive to which you were having trouble installing the apps and select Format from the context menu.
In the format window, ensure NTFS is selected under File system, and click on Start at the bottom. It’s recommended that you don’t make any other changes to the default settings and proceed as is.
The format process will take a while, depending upon the hard disk’s speed and the amount of data stored on it.
If the drive that you want to install games to is corrupted or in a file system that is not compatible, you are likely to encounter the Xbox app can’t choose drive error on Windows 11.
In this case, a recommended system for drives is NTFS, and changing the file system to this will fix the problem. Also, for corruption, formatting the drive is an ideal solution.
We scoured through various online platforms, and this method worked for most users who could not get things up and running with the previous ones.
Once done with the issue, you must check out a fantastic offering by Microsoft, the Xbox Game Pass. It allows you to browse through and play 100+ games available on the platform at a small monthly subscription fee.
You will find it in the Xbox app. In addition, thereus subscriptions are available to cater to users with all needs.
The above fixes must have resolved the Xbox app can’t choose drive error. If you still encounter the problem after executing all the methods mentioned here, there’s always the option to reset Windows 11 to its factory settings.
If that doesn’t work, it’s likely an issue with the Windows itself, and you may roll back to Windows 10. Keep checking gaming or similar forums for updates from other users, and once the problem is fixed, you can reinstall Windows 11.
After reverting to Windows 10, try these fixes if you cannot access the Xbox app.
Have the above procedures worked for you? Let us know your experience in the comments section below.
Keeping both our hardware and software up to date is essential for everything to go smoothly, and also to keep everything secure.
Don’t think that updates are just meaningless MB downloaded with no purpose whatsoever. In fact, updates contain important fixes, improvements, or security patches.
It’s even more important to have our software up to date when we are talking about the Windows OS, as the system can become vulnerable if not constantly updated.
We are about to show you a few methods that you can use in order to update your central processing unit (CPU) on your Windows 10 or Windows 11 PC.
it really doesn’t matter, as the steps are pretty much the same for both versions of the popular Microsoft-designed operating system.
Why should I constantly update my drivers?
Well, let’s just say that a hardware component for your PC would be pretty much useless without its software counterpart.
Thus, updating your device’s drivers can actually resolve problems, improve performance, and increase the stability of your computer.
Yes, we did say improve performance, which should be the sole interest you have when mentioning the PC’s CPU.
For better health and longer usage, we strongly recommend you install updates for the system’s software every time they become available.
Malicious third parties are always looking for a way inside our lives, so keeping everything updated makes it less likely that you will become a victim of cybercriminals.
Usually, a CPU is integrated with a graphics card (GPU), making these updates even more meaningful than first anticipated.
CPUs that come without a native GPU, don’t have drivers. Software support for that kind of CPU is included in its motherboard’s BIOS.
So, it goes without saying that, in order to upgrade the CPU driver, you will therefore need to update your BIOS.
How can I update my CPU drivers?
1. Use the Device Manager
1. Press the Windows key on your keyboard to bring up the Windows search box.
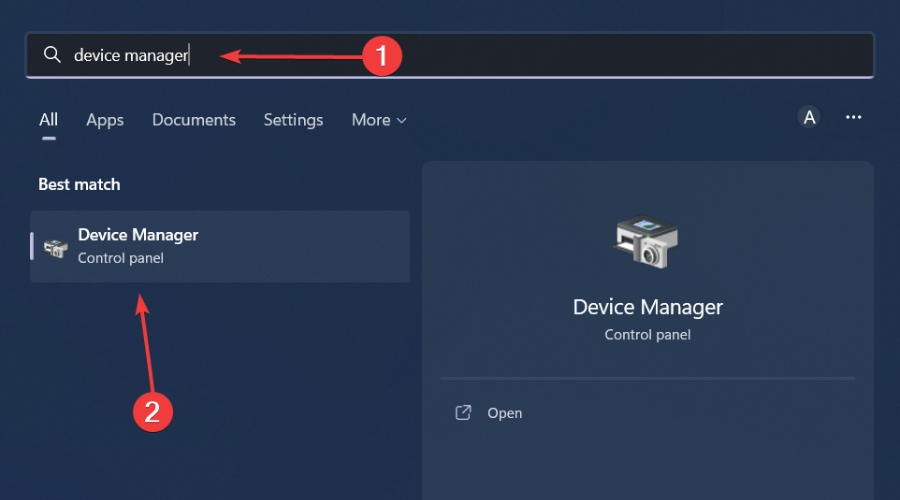
2. Type device manager in the search box and click on the first result to open the app.
3. Scroll down to the Processors section.
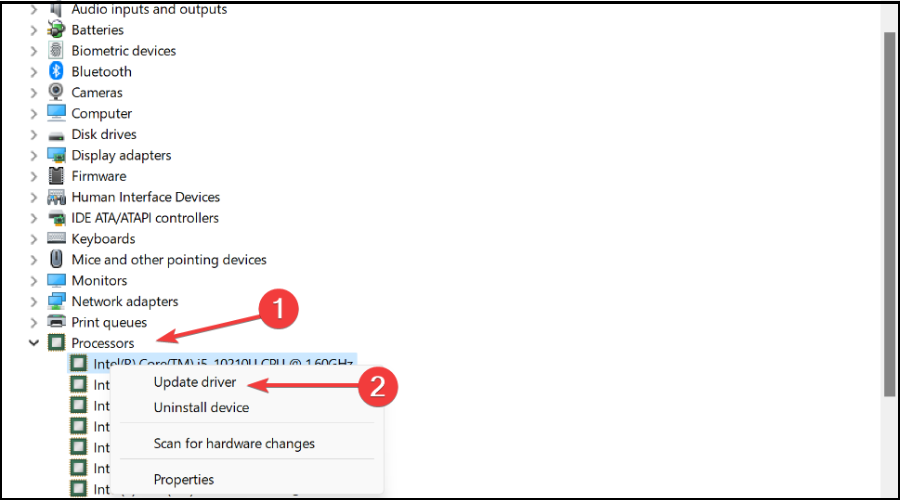
4. Expand Processors, right-click the one you are using, and select Update driver.
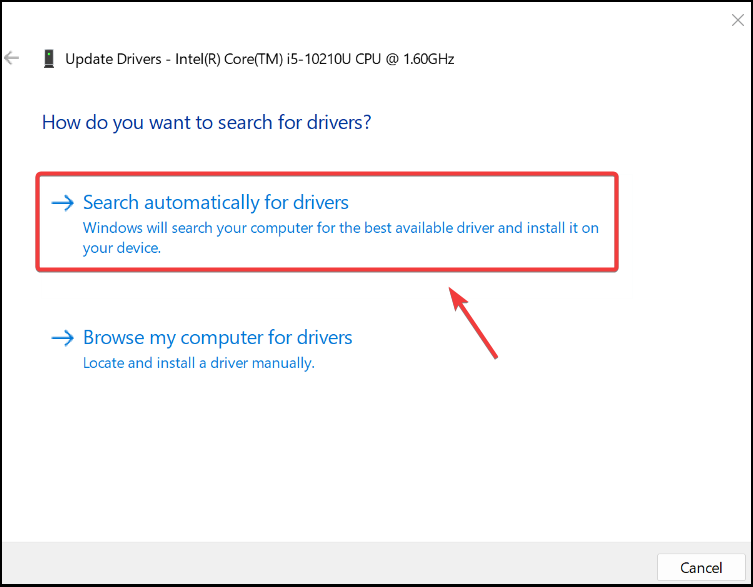
5. Choose Search automatically for drivers.
The first method you should try out when you’re looking to update your CPU drivers on a Windows 10/11 PC is to update them with Device Manager.
Device Manager is a built-in app on your device that allows you to install and update your devices’ drivers in a few clicks.
2. Use specialized software
It should go without saying that whatever choose to do on your PC can be done without crashes, lags, or freezes by keeping all drivers up to date and error-free.
Sometimes, manual checks are hard to perform, that’s why we recommend using an automated assistant that will scan for fresh driver versions daily.
So, if you are not in the mood to use any other of the solutions we are presenting to you in this guide, stop right here, download the specialized software and let it do the work for you.
Even though updating your CPU driver is an easy task, it’s understandable that you want to deal with it, so that’s why we recommend using an automated tool.
3. Use the Windows Update tool
PressWindows+Ito access Settings.
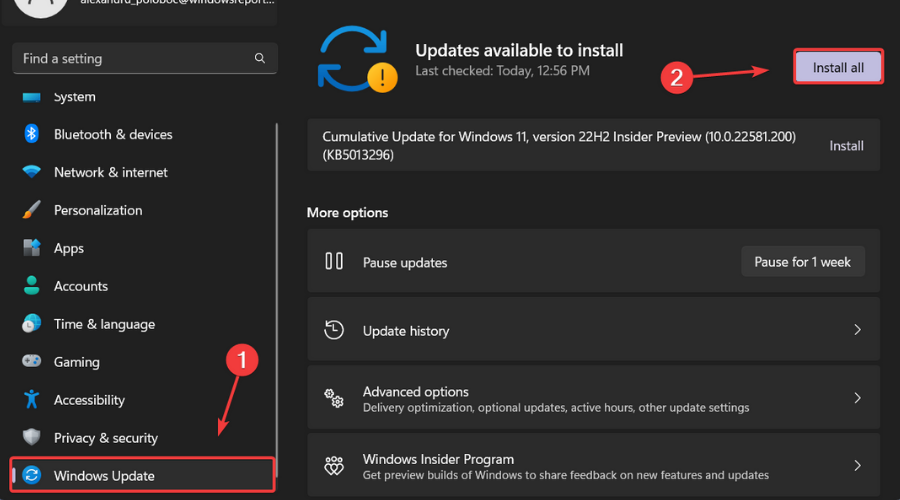
Select the Windows updates tab and click Install all.
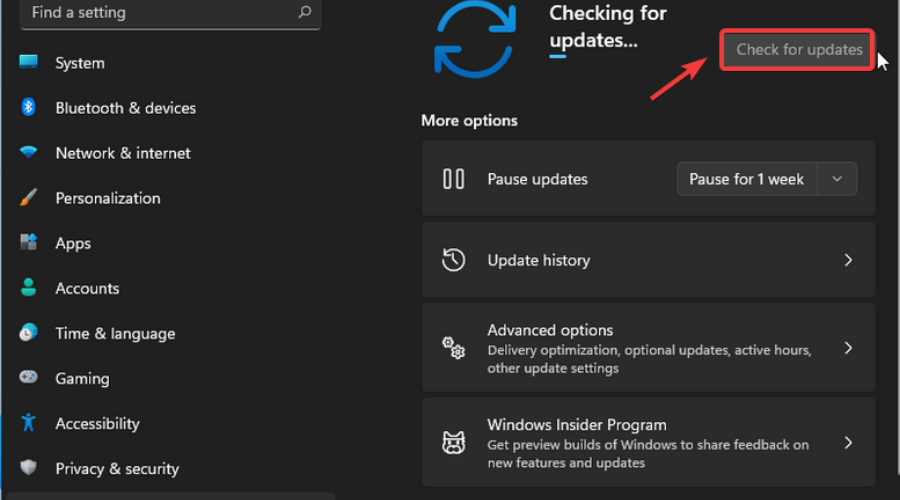
If no updates are queued for installation, press the Check for updates button.
4. Download the driver from the manufacturer’s site
Some users don’t even rely on the Device Manager or the Windows Update tool to update the driver that their CPU uses.
In fact, those people choose to cut the middle man and go directly to the supplier, just like in the good old days.
What does that mean? It means that they go directly to the website of the CPU’s manufacturer, which can be Intel, AMD, or others, and download the diver directly from the source.
After downloading on your device, simply double-click the executable you downloaded and it will take you through the setup.
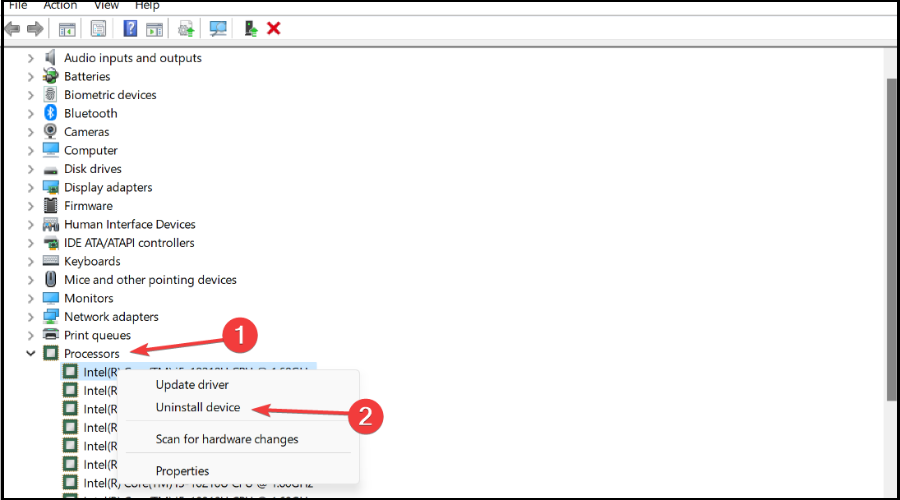
Expand Processors, right-click on the one you are using, then select Uninstall driver.
Restart your PC.
Usually, after restarting your PC, Windows will try to install the latest CPU software including CPU driver software, so don’t worry.
If, however, the system doesn’t automatically do it, use the Device Manager and it will automatically find the one for you.
6. Manually install using CD/USB stick
Sometimes, when we purchase a new processor, it comes with a CD, or USB stick that contains the setup file and necessary drivers.
Simply put the CD in your PC, or insert the USB stick, and run the executable you find on it. Go through the setup and that’s all there is to it.
However, the CD/USB stick only contains the stater driver pack, so your system will need to download the latest drivers off the internet. Just use one of the methods above.
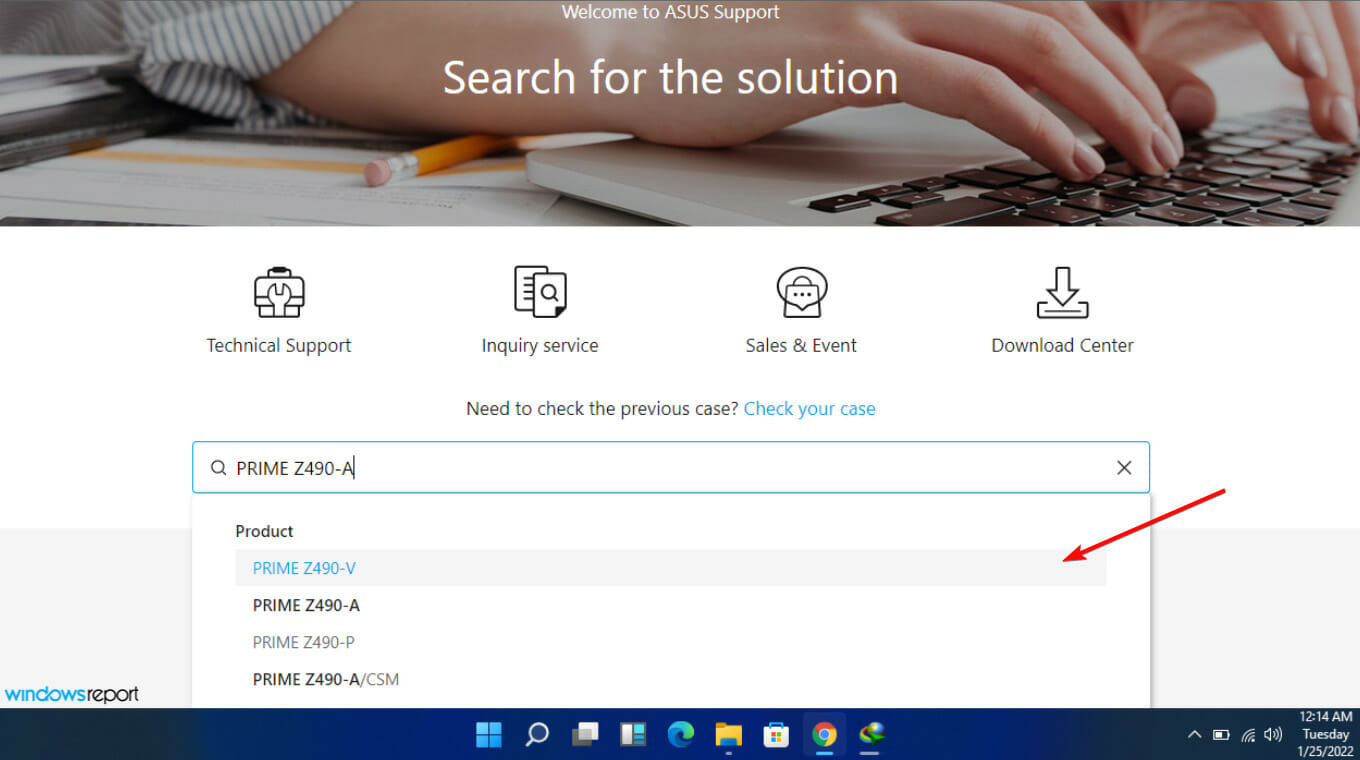
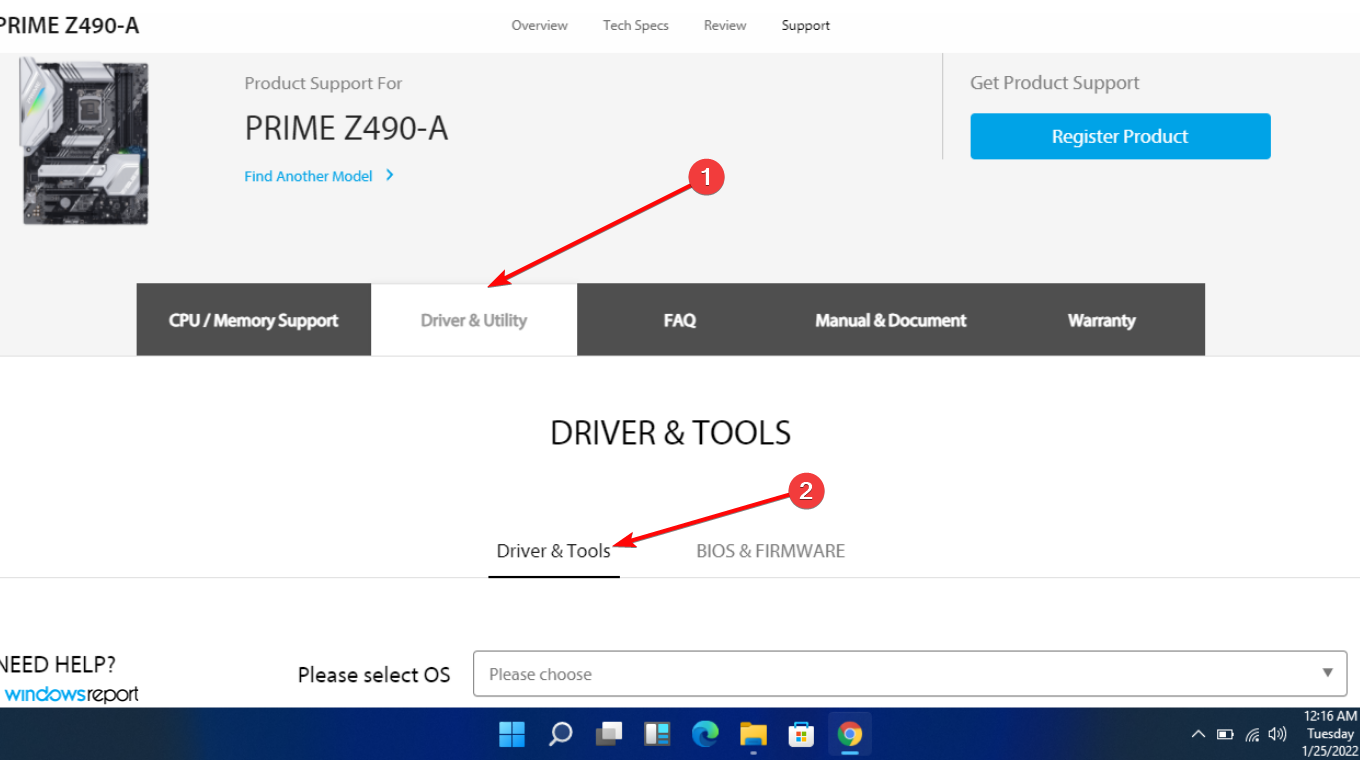
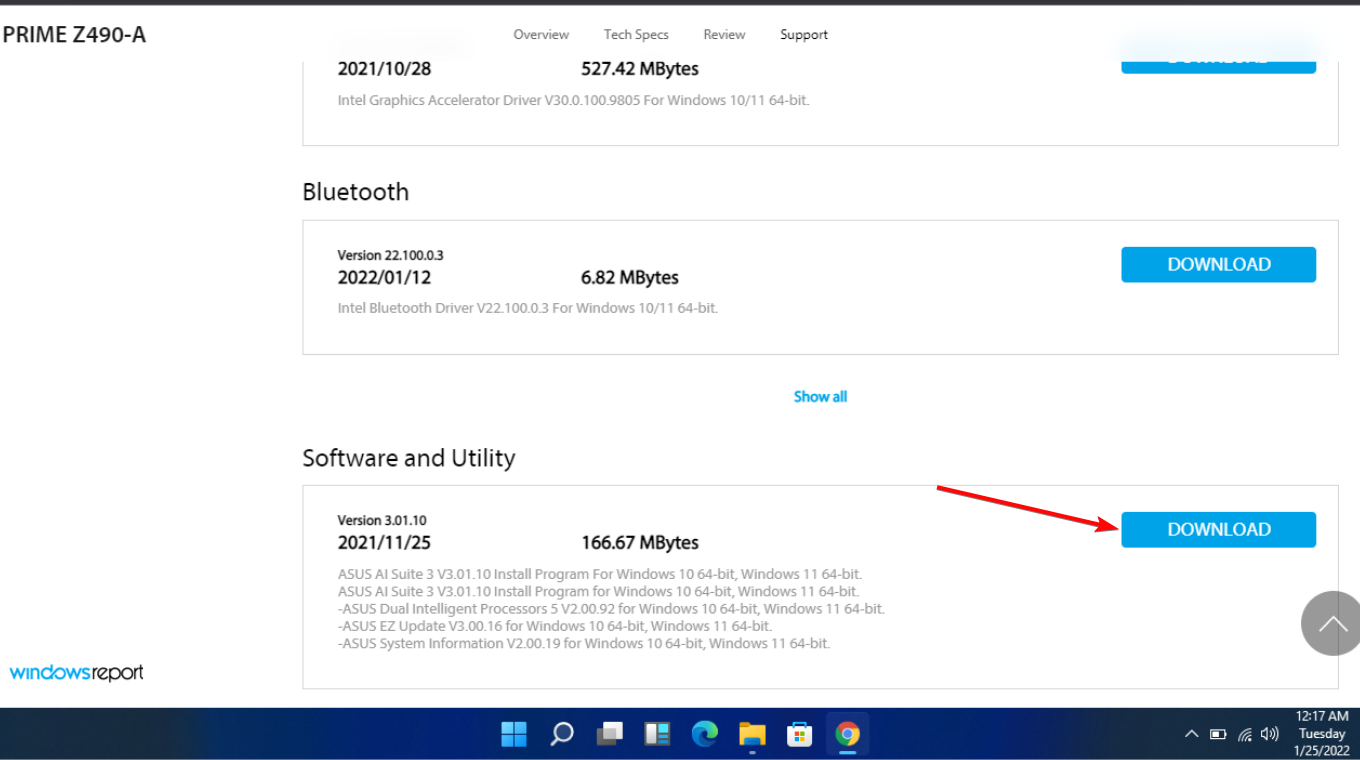
2. Select Driver & Utility and thenDriver & Tools.
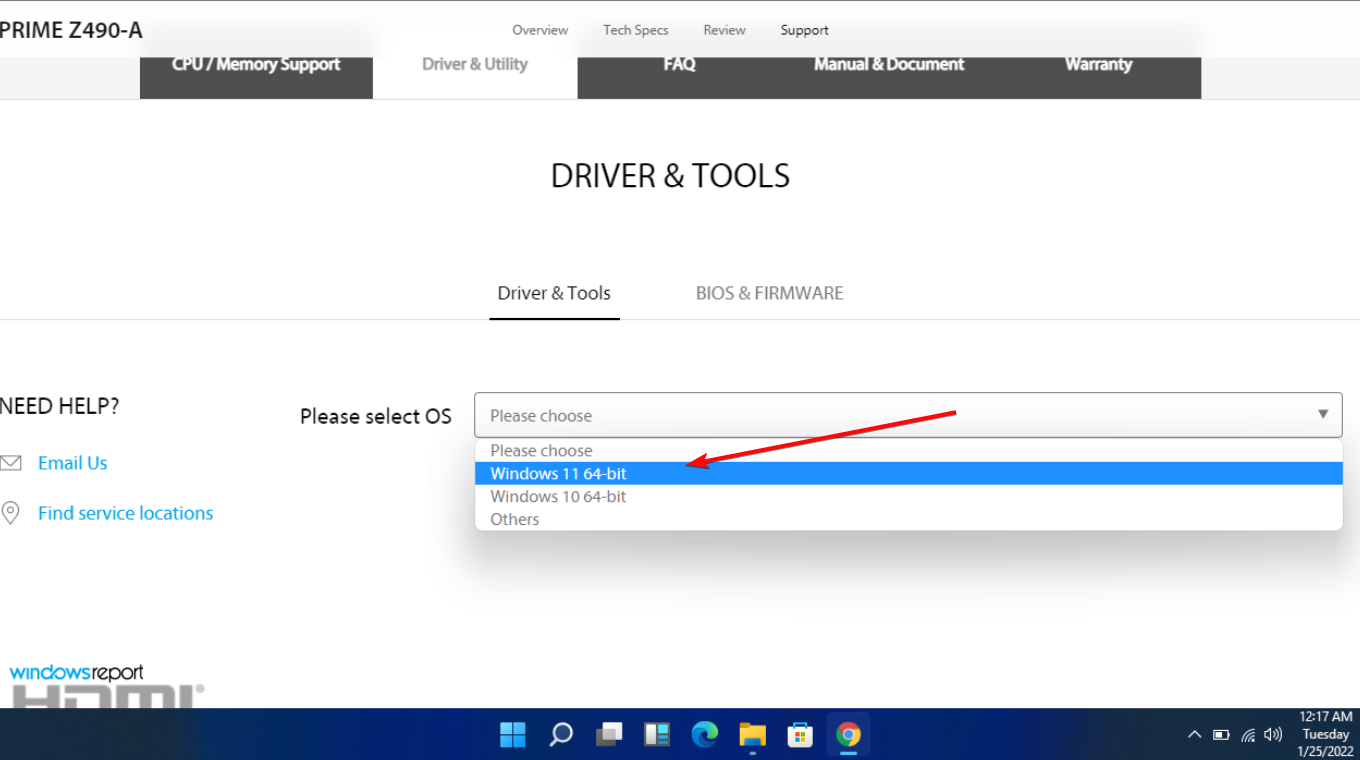
3. Choose your OS (we chose Windows 11 in this case).
4. Under Software and Utility, look for ASUS AI Suite 3, and select Download.
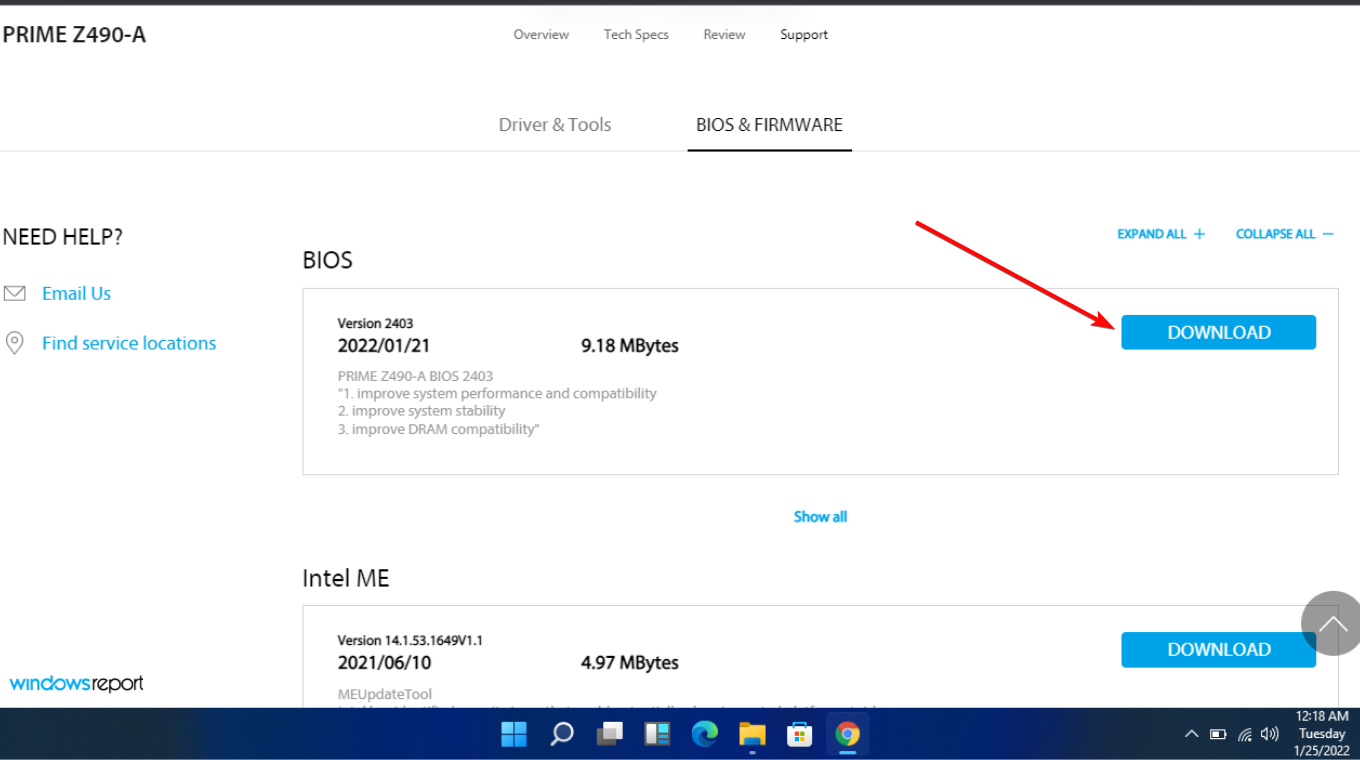
5. Scroll back to the top and click the BIOS & FIRMWARE tab.
6. Up next, scroll to the BIOS section and select Download.
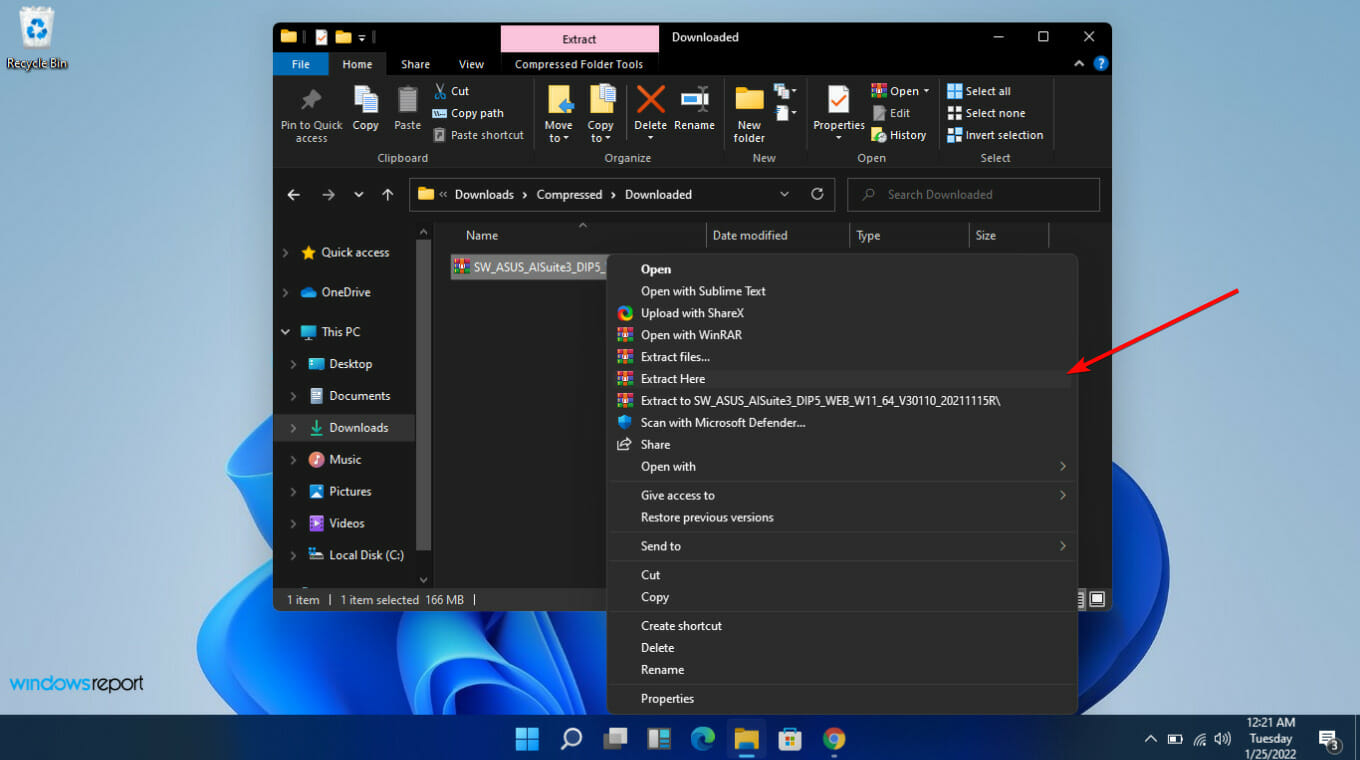
7. Extract the ZIP file containing ASUS AI Suite 3, then open AsusSetup.exe and install the program. When finished, reboot your computer.
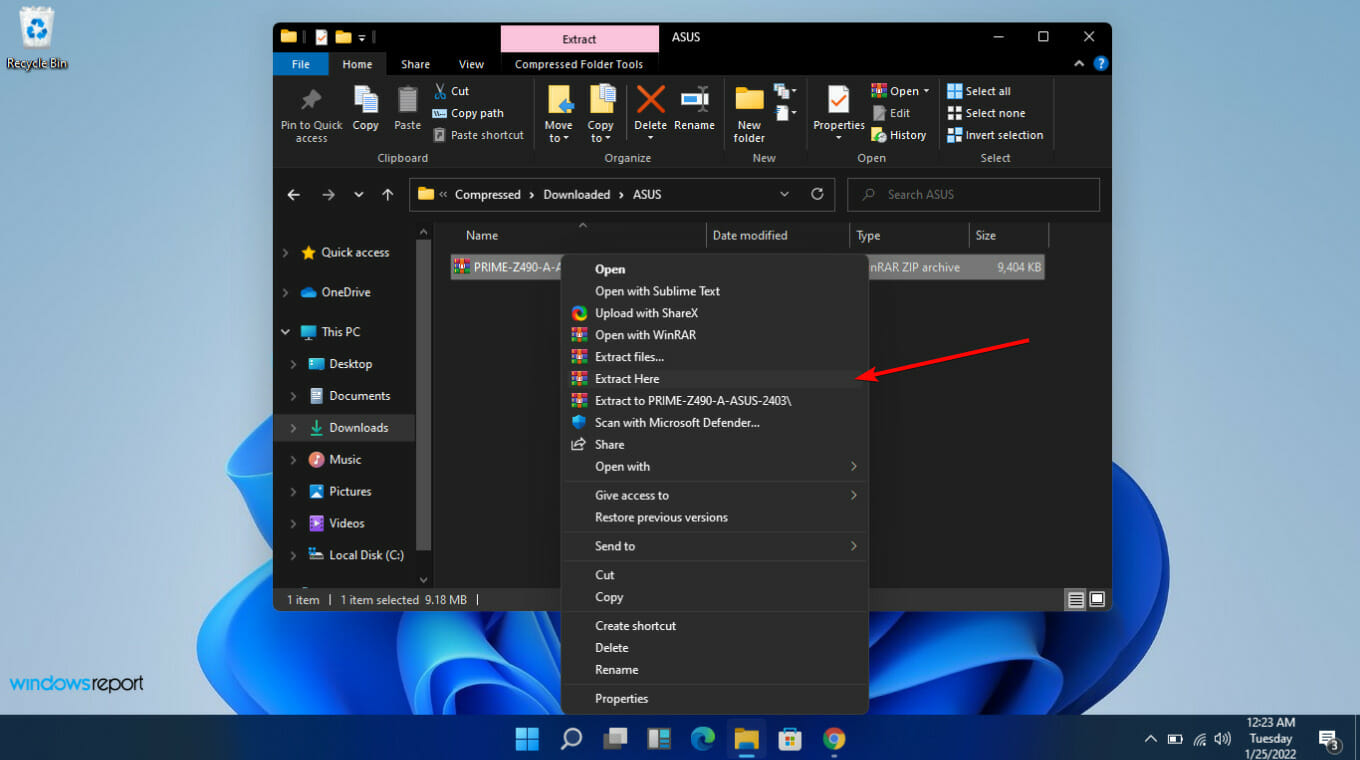
8. Extract the ZIP file that contains the BIOS folder.
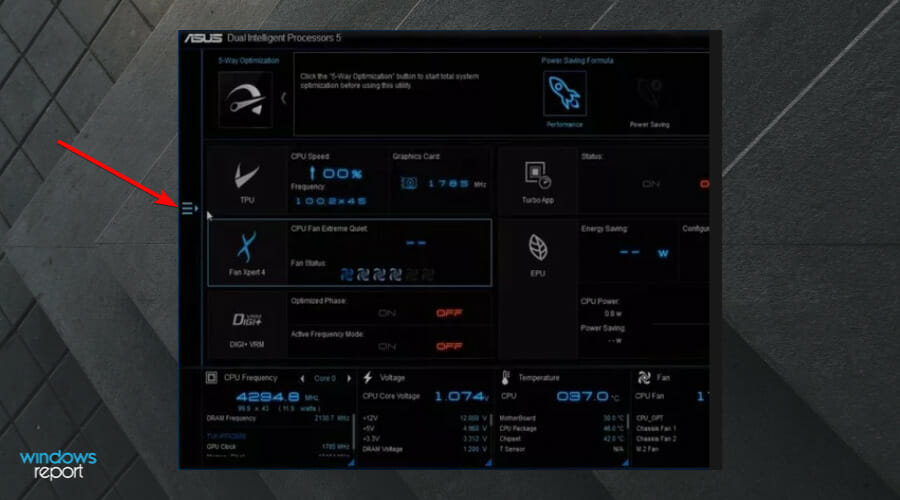
9. Open Asus AI Suite 3 and select the Menu icon (the three horizontal lines) on the left side.
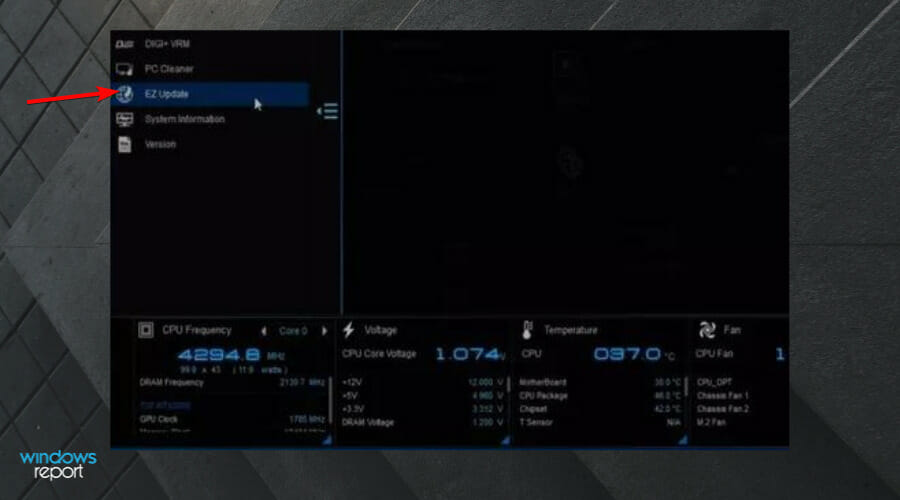
10. Select EZ update.
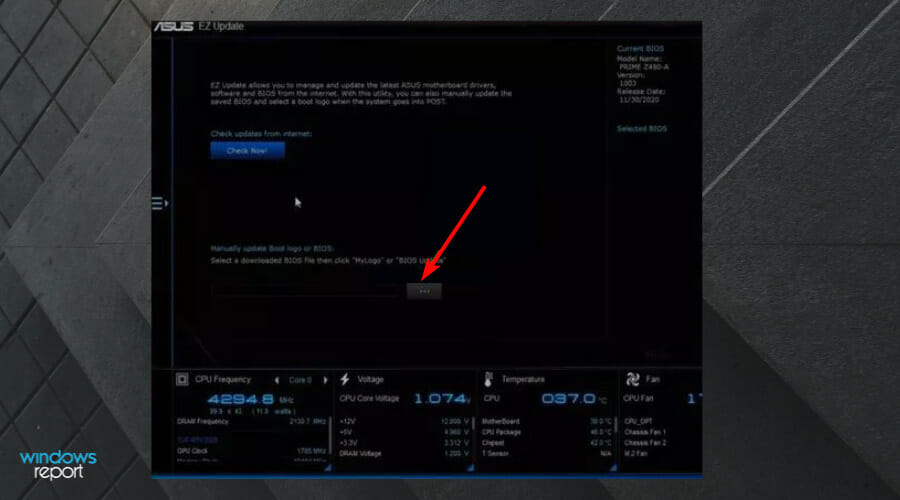
11. Under Manually update boot logo or BIOS, select the Ellipses (…), and choose the same BIOS file you had extracted earlier.
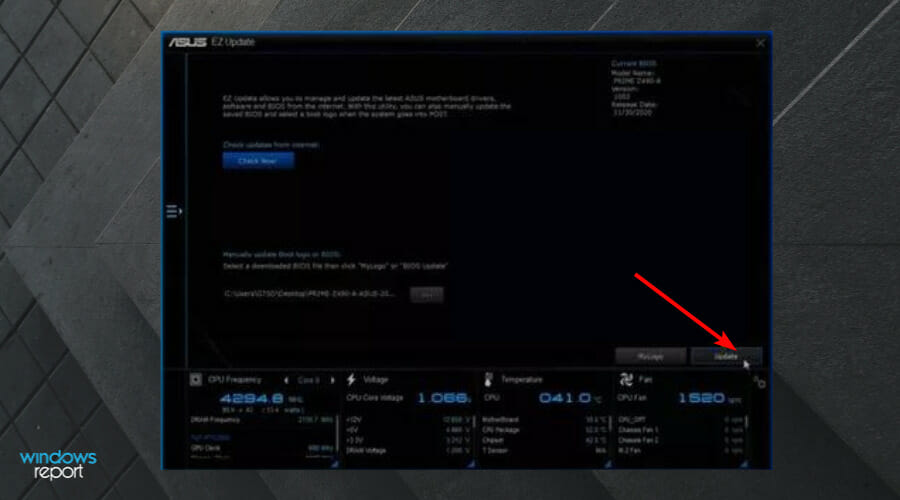
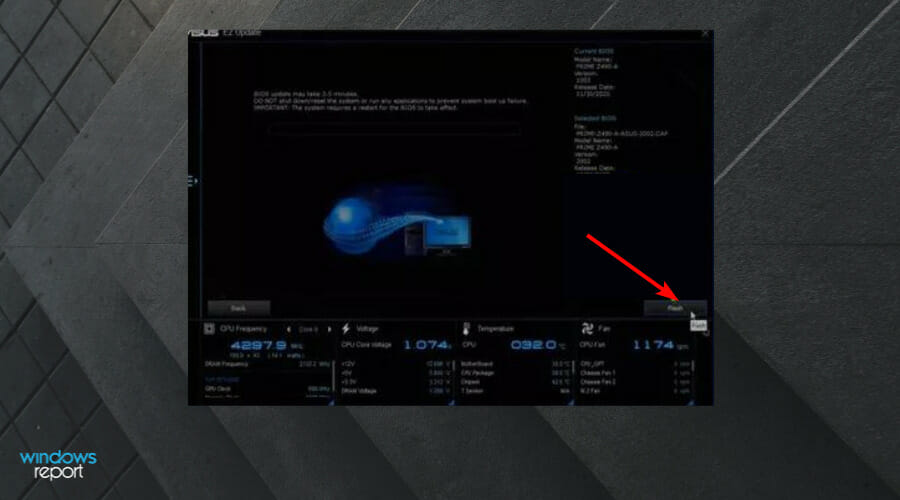
12. Choose Update in the lower-right corner.
13. Select Flash.
14. Choose OK. Reboot your computer once the process is done.
If you have a different laptop brand, don’t hesitate to check the dedicated article above on how to update your BIOS.
All the methods described in this article are valid for Windows 10 and Windows 11, so simply follow the same steps regardless of OS version.
When should I update my CPU drivers?
As a general rule, you should keep your PC and its components updated at all times. Regular driver updates also bring security measures and should ultimately help you avoid any problems.
Windows automatically checks your device for new software updates. This happens frequently, to ensure that you won’t miss out on any security updates.
Has this guide been helpful to you in your quest to update your CPU? Let us know in the dedicated comments section located below.
Password protected sharing is a security feature in Windows 11 that limits file and printer sharing access to users with a valid username and password. If you want easier access across a home network or guest device, you may prefer to turn it off.
Here’s how to turn off password protected sharing in Windows 11, along with helpful context and step-by-step instructions.
How can I turn off password protected sharing in Windows 11?
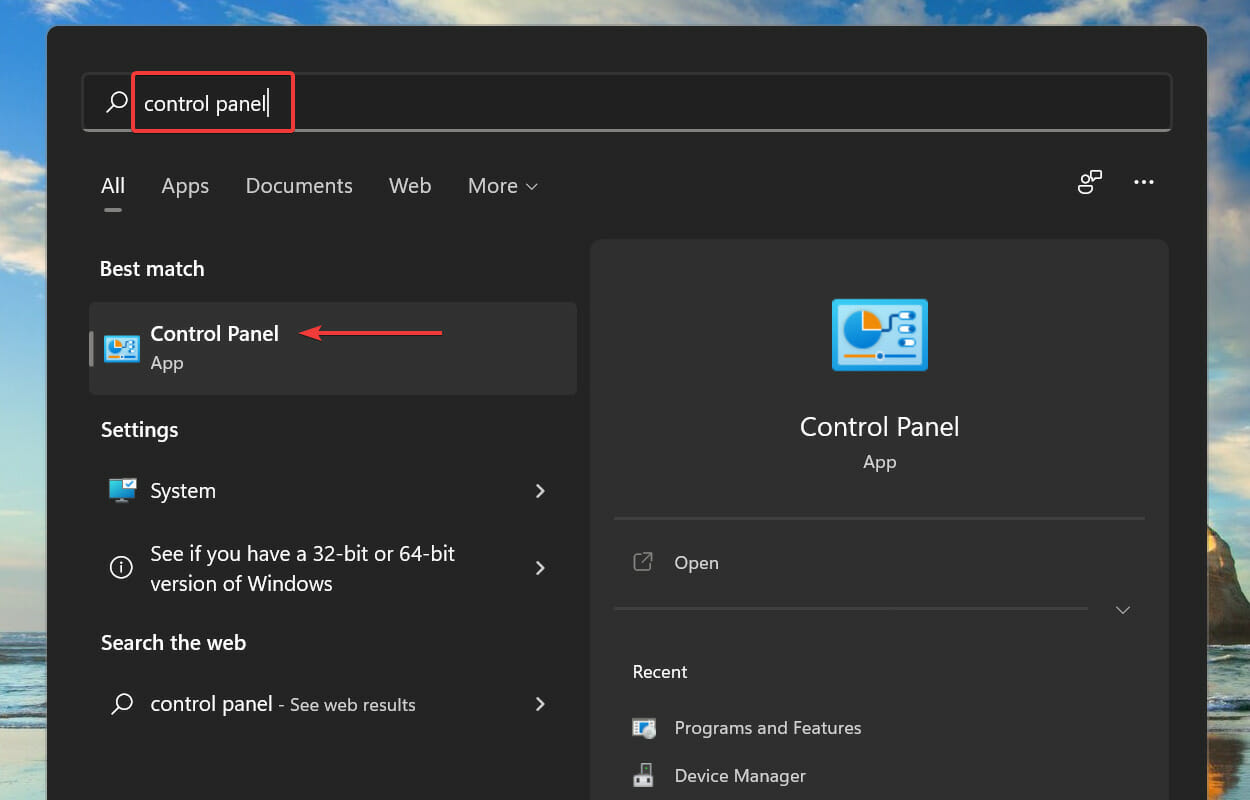
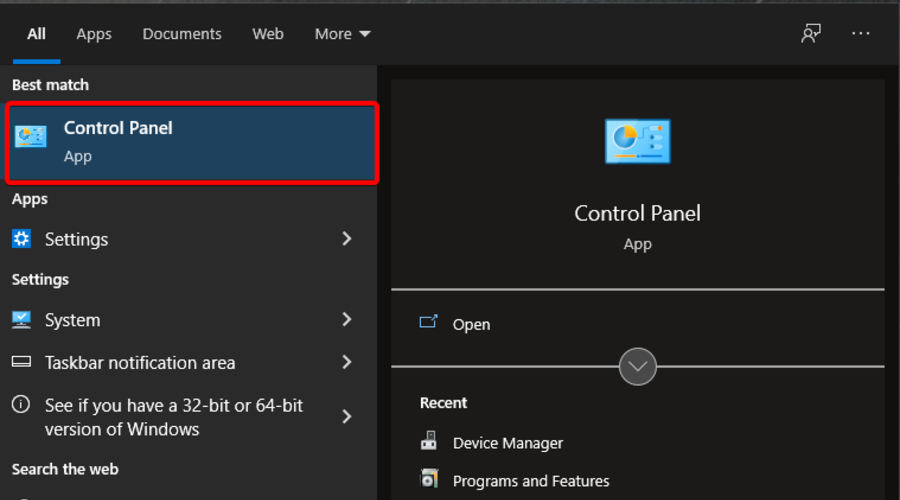
2. Enter Control Panel in the text field at the top, and click on the relevant search result that appears.
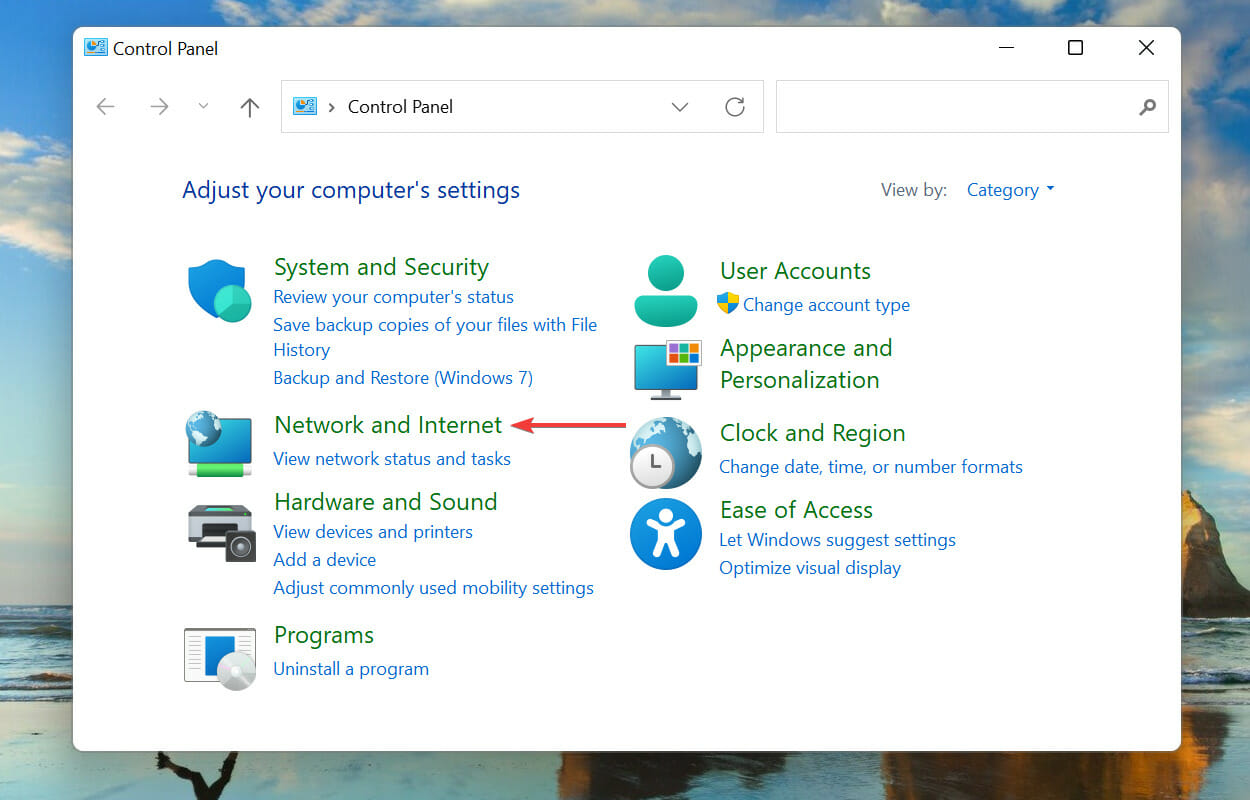
3. Select Network and Internet from the options that appear.
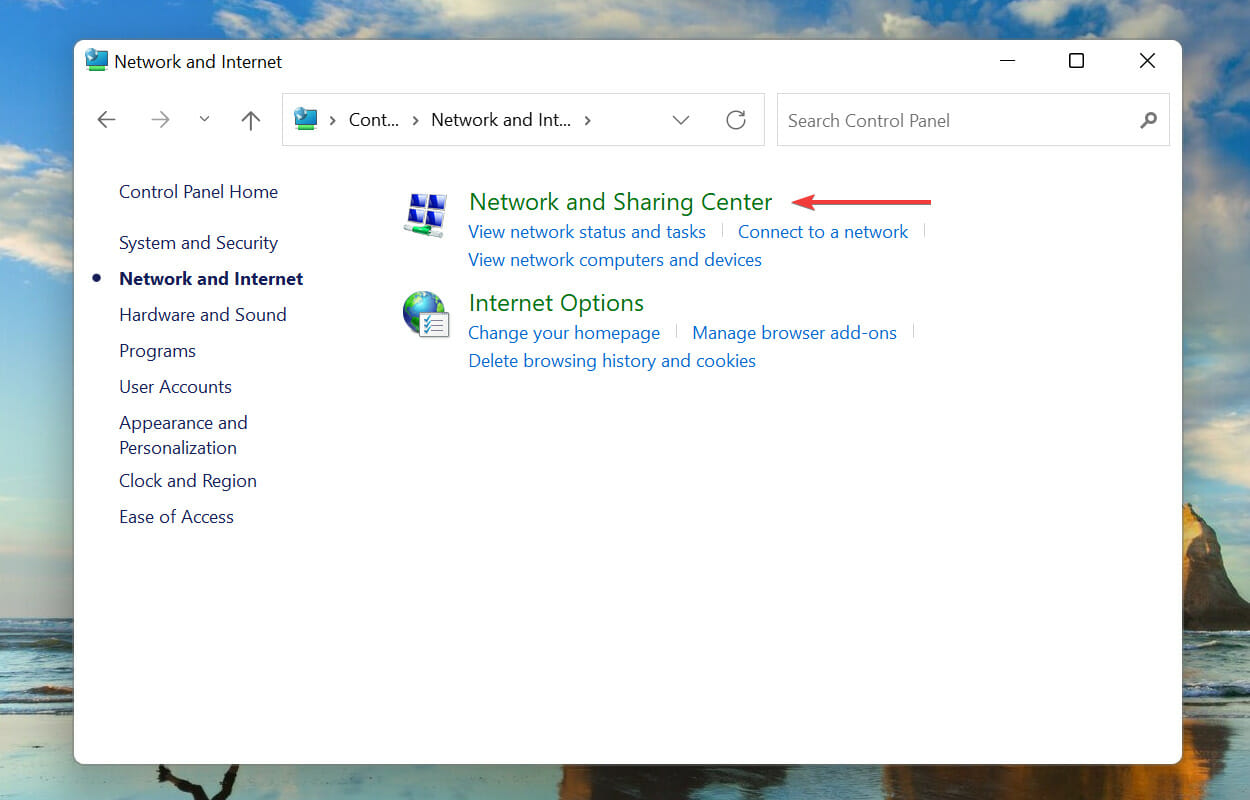
4. Click on Network and Sharing Center
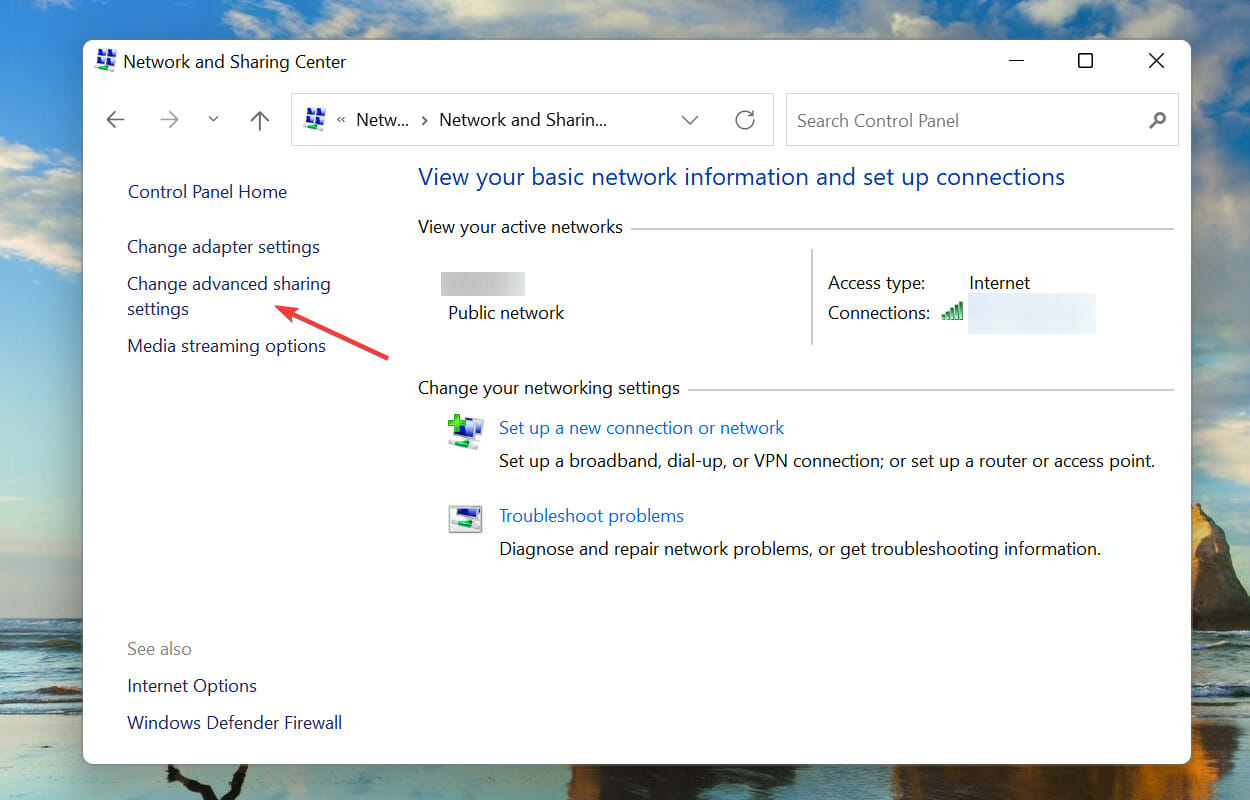
5. Next, click on Change advanced sharing settings from the list of options on the left.
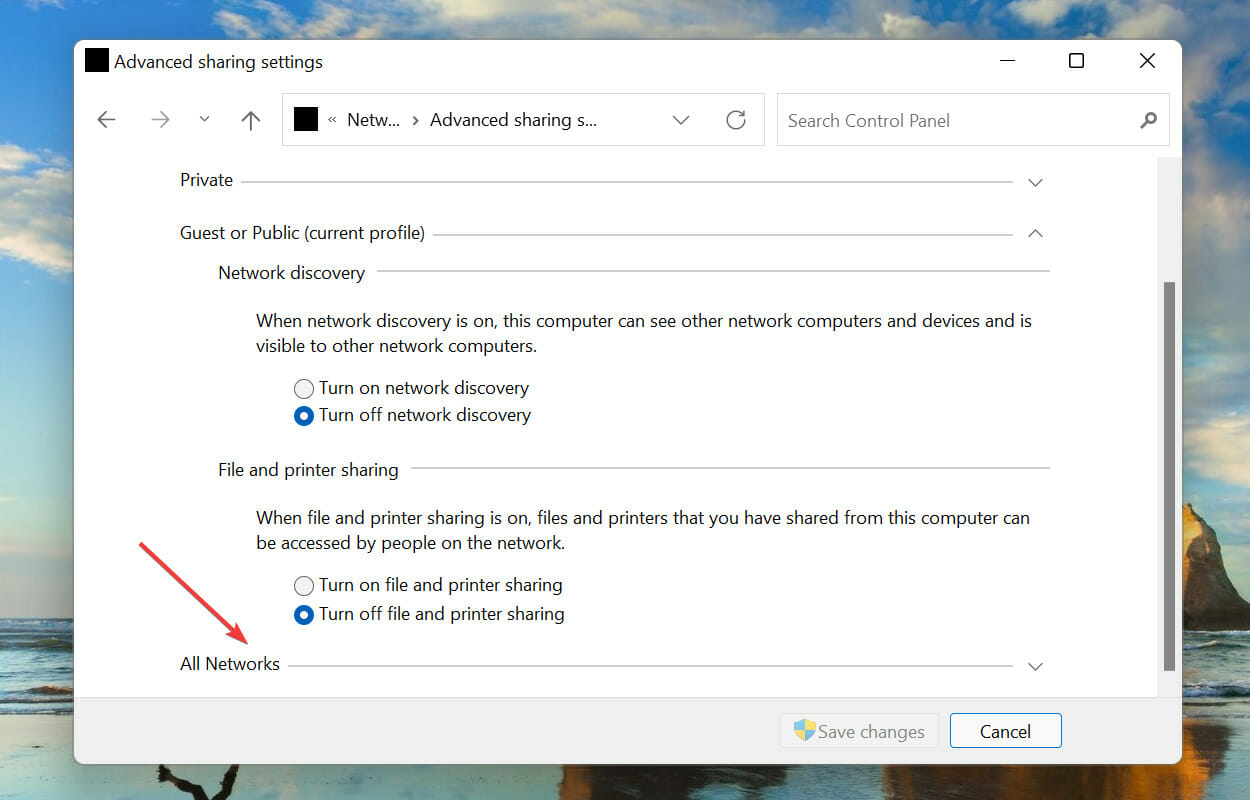
6. Press on All Networks at the bottom to view the password protected sharing settings.
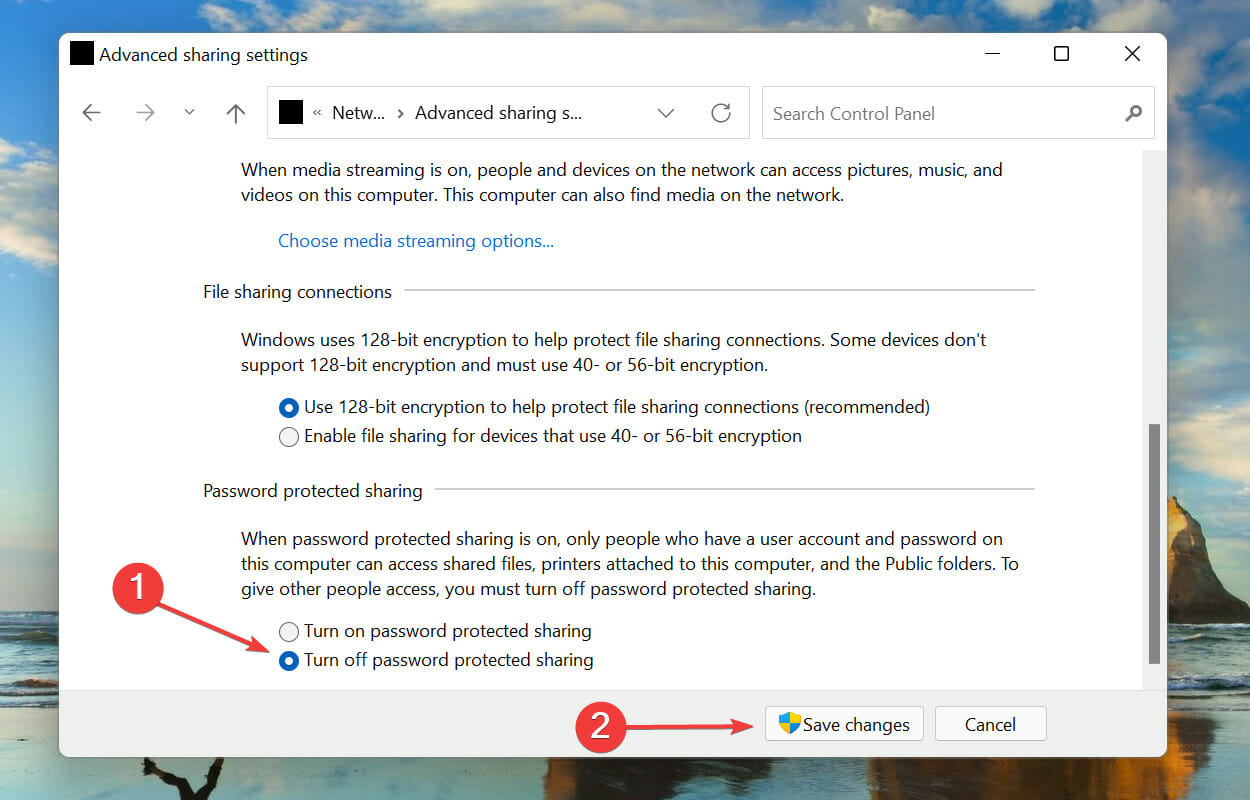
7. Finally, select the Turn off password protected sharing option and click on Save changes at the bottom.
8. Once done modifying the settings, restart the computer, and the password protected sharing will be turned off in Windows 11.
If you’re looking to share a folder without password in Windows 11, you can turn off password protected sharing via Control Panel.
Control Panel is a built-in tool on your device that is perfectly safe and easy to use, and allows you to make system modifications in no time.
2. Via Registry
NOTE
Modifying the Registry is a critical process and any lapse on your part can render the computer useless. We recommend following the steps listed here as is and making no other changes.
Press Windows + R to launch the Run command.
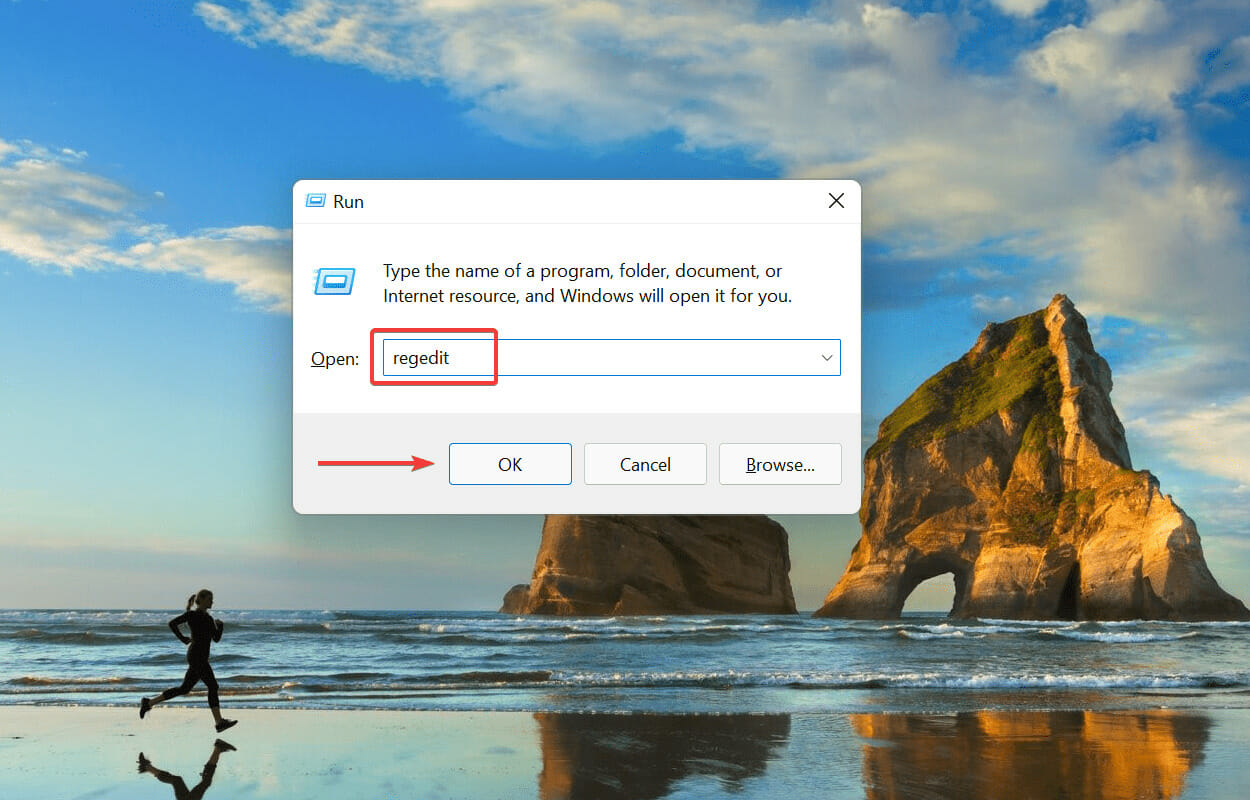
Type/paste regedit in the text field, and either click on OK or hit Enter to launch the Registry Editor.
Click Yes on the UAC (User Account Control) prompt that pops up.
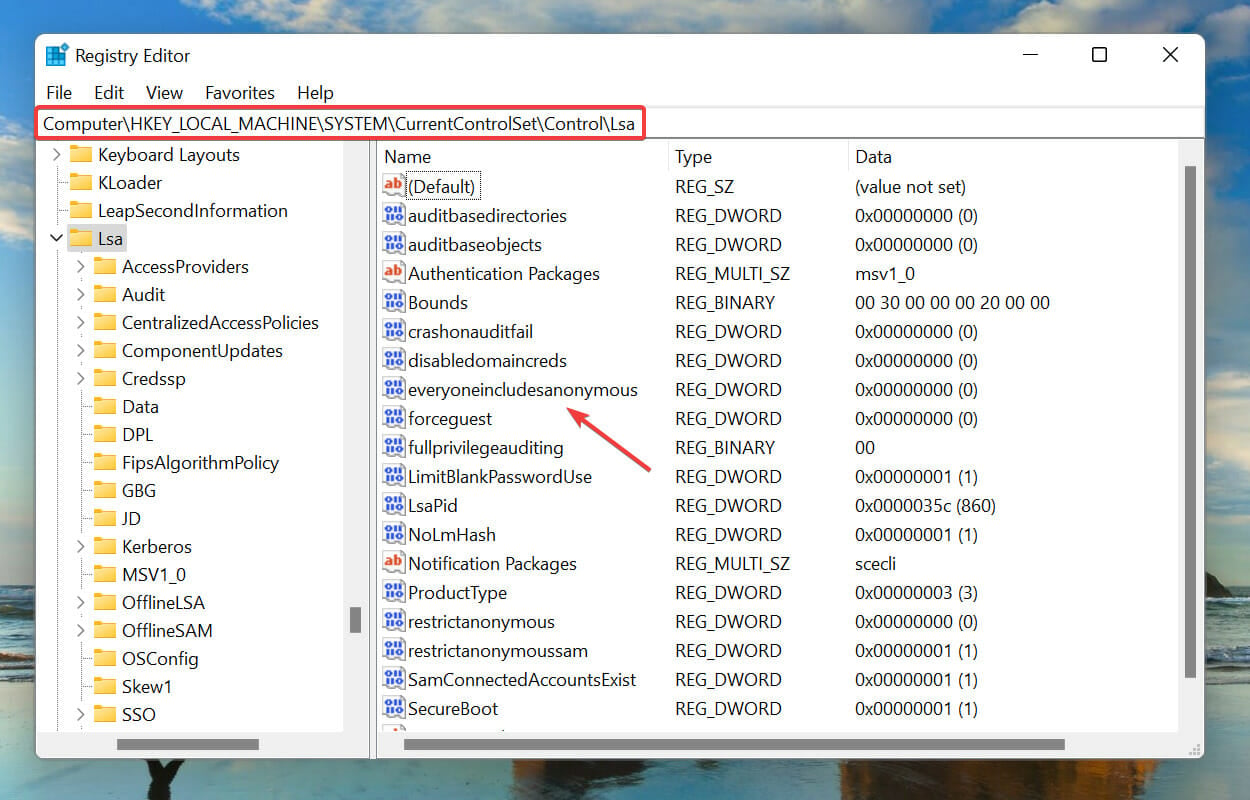
Paste the following path in the address bar at the top and hit Enter, and then double-click on the everyoneincludeanonymous REG_DWORD:HKEY_LOCAL_MACHINE\SYSTEM\CurrentControlSet\Control\Lsa
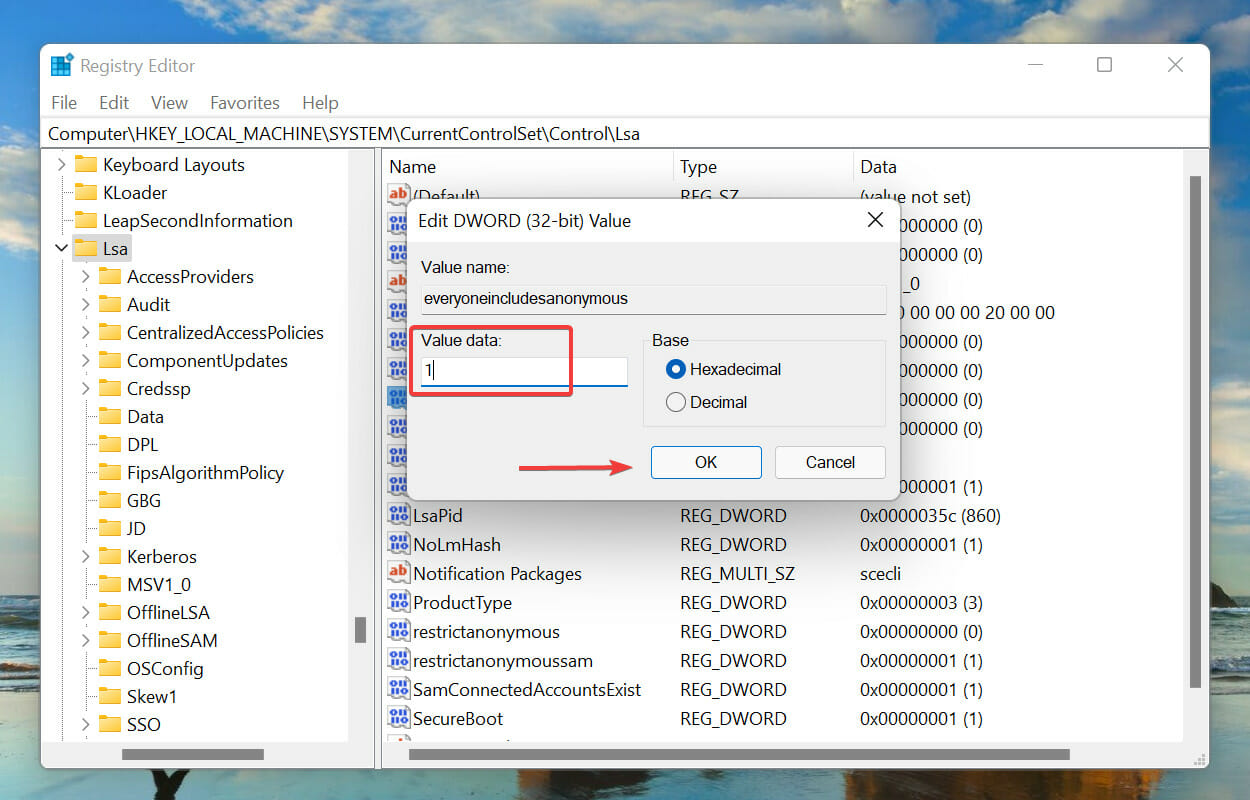
Enter 1 under Value data and click on OK to save the changes.
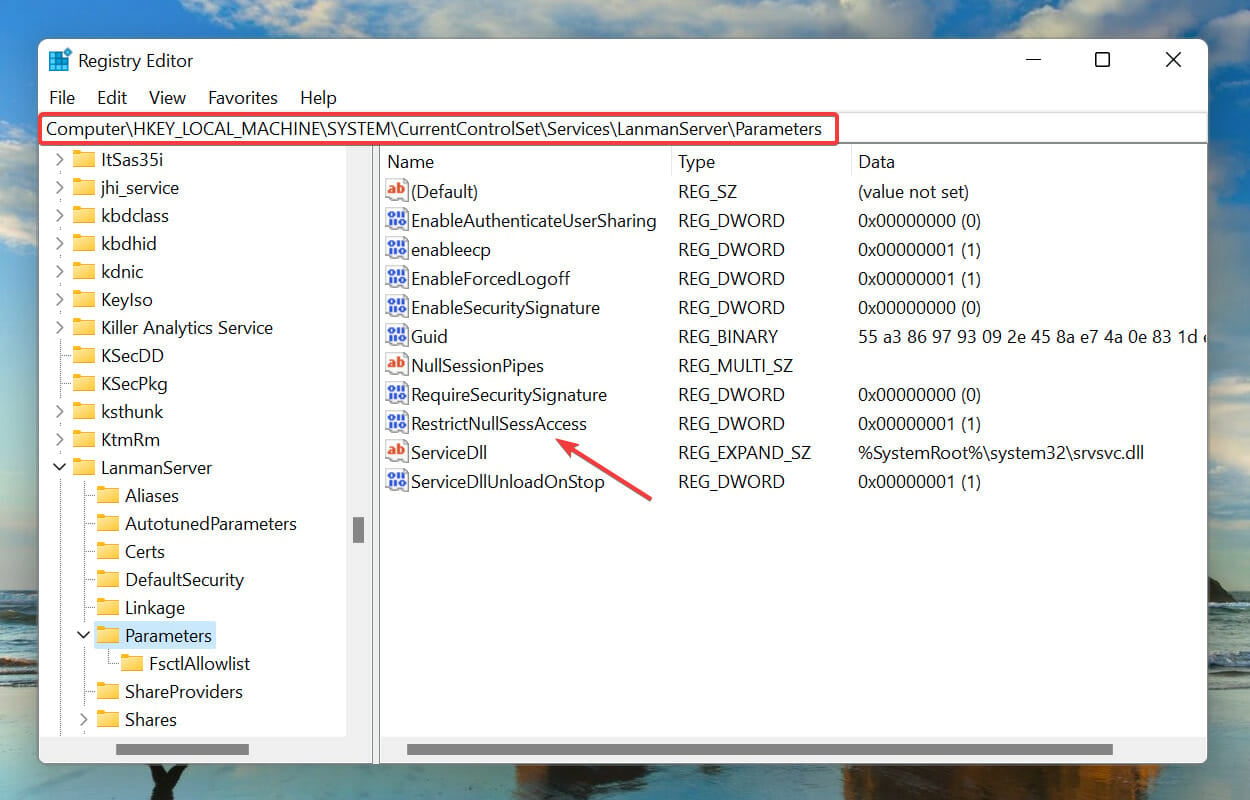
Next, navigate to the following path or paste it in the address bar and hit Enter, and double-click on the restrictnullsessaccess REG_DWORD:HKEY_LOCAL_MACHINE\SYSTEM\CurrentControlSet\Services\LanmanServer\Parameters
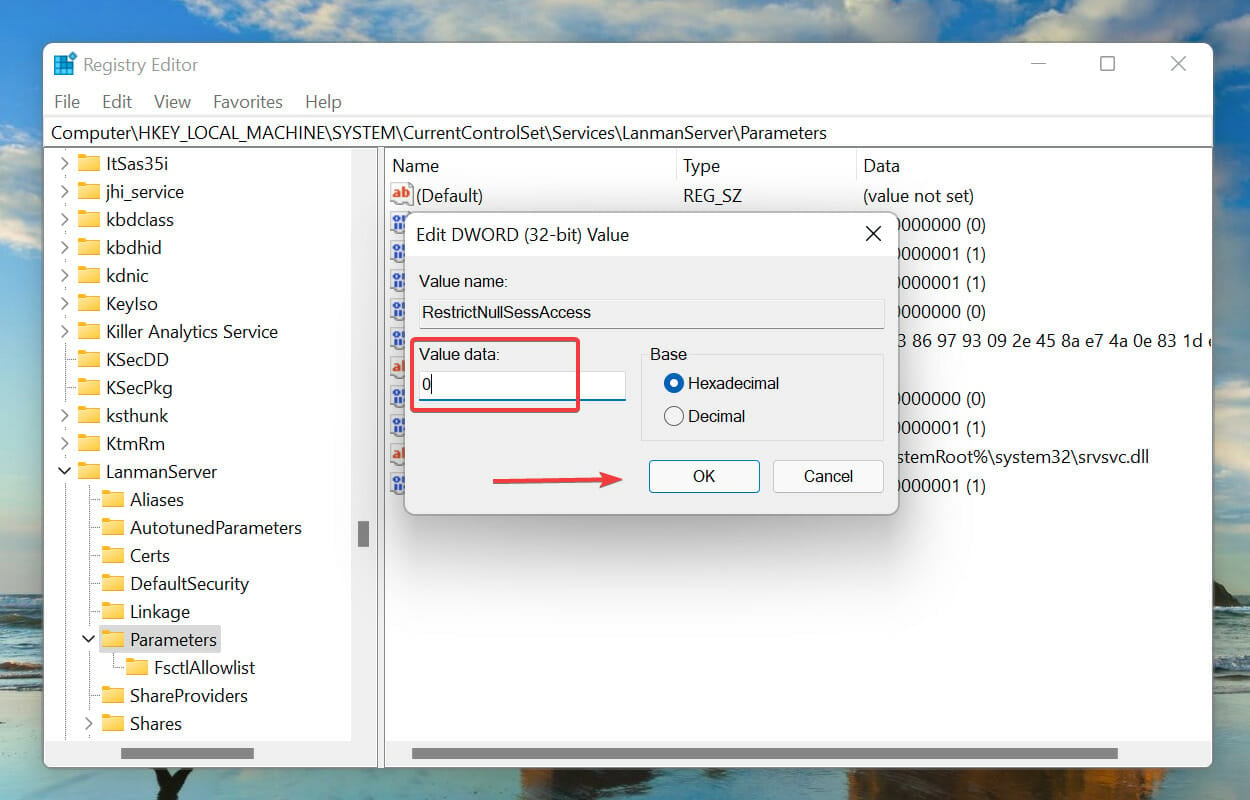
Enter 0 under Value data and click on OK to save the changes.
Close the Registry Editor and restart the computer to turn off password protected sharing in Windows 11.
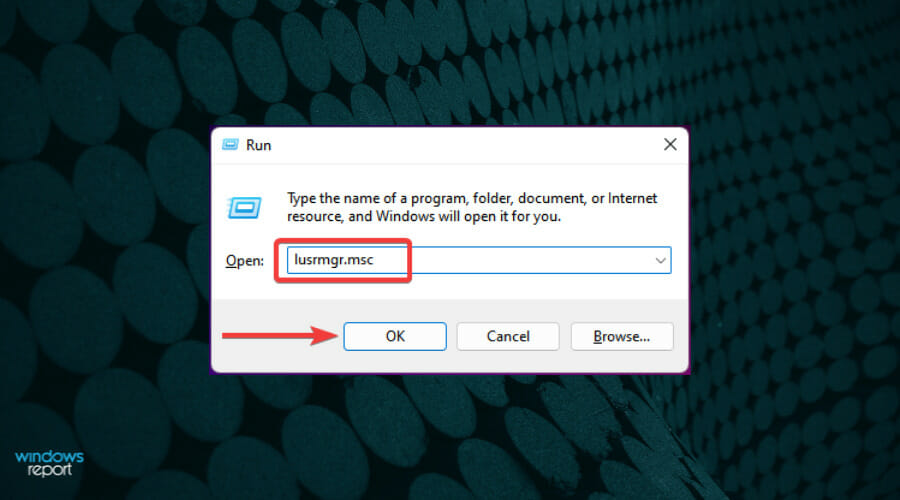
Type/paste lusrmgr.msc in the text field, and either click on OK or hit Enter to launch the Local Users and Groups window.
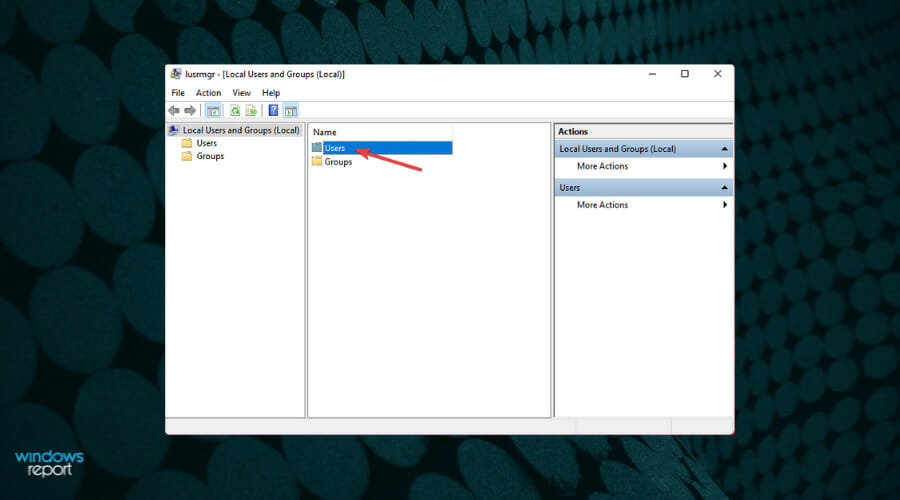
Click on the Users entry on the right.
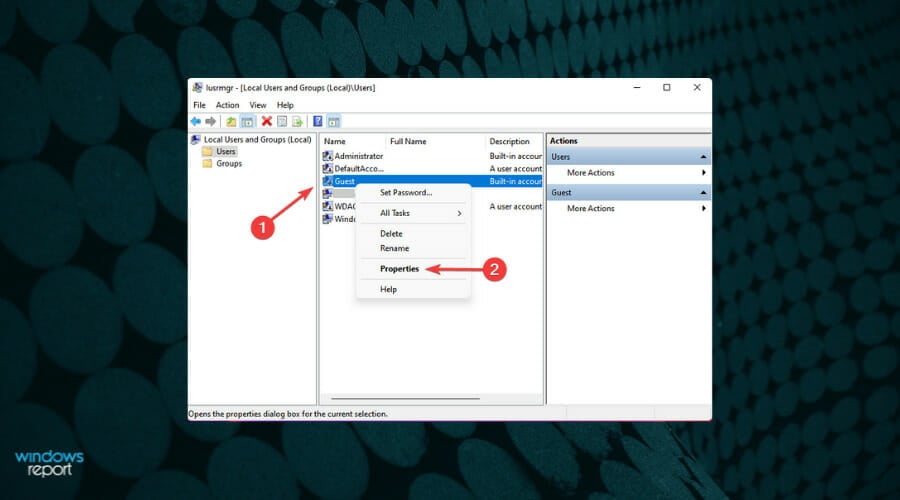
Next, right-click on Guest and select Properties from the context menu.
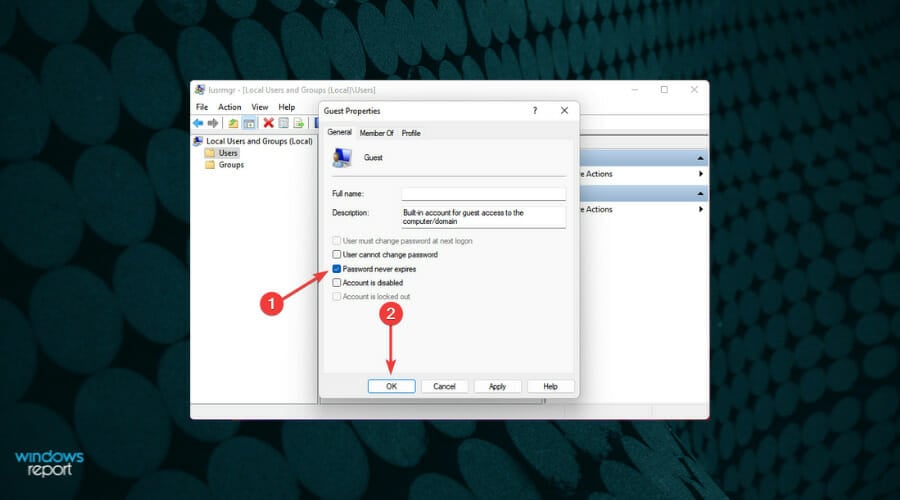
Now, tick the checkbox for Password never expires and untick the others, and click on OK to save the changes.
Restart the computer and password protected sharing will be turned off in Windows 11. You will be able to share a folder without a password.
Should I turn off password protected sharing in Windows 11?
There is no one answer to this question, and it all comes down to the resources being shared and the users it’s being shared with. If you are sharing certain folders or devices on a home network, it wouldn’t be a big deal to turn off password protected sharing.
So, weigh the pros and cons of disabling password protection, to help make an informed decision.
What to do if I am unable to turn off password protected sharing in Windows 11?
While the methods listed above work smoothly for most users, some have reported that they are unable to turn off password-protected sharing. This could be due to a bunch of reasons, including misconfigured settings.
Getting the “Your Windows license will expire soon” warning doesn’t always mean you need to buy a new product key. It’s usually triggered by system glitches or an outdated activation status
You’ll usually see this message on Windows 10 or 11, even if your PC came pre-activated. It means your system thinks the license is either:
Temporary or trial-based, or
Unable to verify your activation status (often due to updates, hardware changes, or volume license policies).
Here’s how to check what’s really going on, and how to fix it.
How do I stop messages saying Your Windows license will expire soon?
1. Use ShowKeysPlus software
Visit the ShowKeysPlus page and click on Download.
Next, click on Get to start the installation process.
Start the application.
Check the Installed field. If it has an asterisk symbol at the end, it means you’re using a generic key.
If you have any keys in the Original Key or OEM Key fields, you can use them to activate your version of Windows. If these fields are empty or not present, it means that you don’t have a license key added, so you’ll need to purchase one or check if you already have one.
2. Use the slmgr command
Press the Windows key + S and type cmd. Select Run as administrator.
Enter the following command: slmgr /dlv
A new window will now appear. Look for Product Key Channel value.
If it says Volume:GLVK, it means you’re using a volume key that is part of an organization, so you need to contact your organization administrator and check how to renew the key.
If you’re not part of the organization, you have a generic key instead of an actual license. If you have any issues with these steps, we also have a guide on how to check your Windows 11 license type, so don’t miss it.
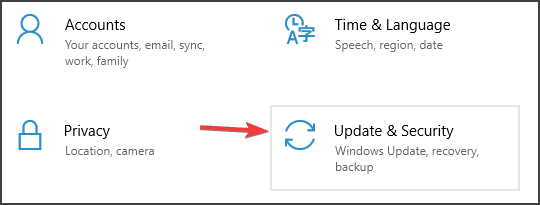
Press the Windows key + I to open the Settings app. When Settings opens, navigate to Update & Security.
Next, select Activation and click on the Change product key.
Enter your OEM key from Solution 1 and click Next.
Wait for Windows to activate.
Keep in mind that you can activate only the edition of Windows you have a license for. This means you can’t activate Windows Pro with a Home license and vice-versa.
If this happens, you’ll need to perform a clean install and install the correct version.
What happens if your Windows license expires?
When Windows expires, you can continue using it, but you’ll get a watermark in the bottom right asking you to upgrade.
You’ll also get pop-up windows asking you to activate, and you won’t be able to make any customization changes. For more information, visit our guide to learn what happens if you don’t activate Windows.
How do I get a new Windows license key?
If you do not have an official Windows license key and are running a temporary Windows version, you need to purchase the official license key to eliminate this issue.
There is also the possibility that you already have a license. In that case, check our guide on how to recover your license key.
But don’t worry if you don’t have one. You can easily buy one on the Internet with just a few clicks.
Beware! Buying on sites or Internet shops that do not have an official partnership with Microsoft can be a waste of money – the key might not be working.
Wrap-Up
The “Your Windows license will expire soon” message doesn’t always mean your system is in danger—but it is a sign that something’s not syncing right with your activation status.
Start with the basics: check your activation state, rearm the license, and use the built-in troubleshooter. If you’re using a volume license or unauthorized version, consider switching to a permanent retail license to stop the warning for good.
KRNL exploit plays an important part on Roblox, as it helps you get access to many games and some features. However, to get the best out of the exploit software, you must ensure it is up-to-date.
Unfortunately, updating KRNL is not straightforward, as it does not provide auto-updates like some software. Also, the process is sometimes disrupted by error messages and download failure.
One of the update KRNL error messages that show up on running an older version is, You are using an outdated version of krnl! Please update!
This guide explains the two most effective methods to help you carry out the update smoothly. We have also provided fixes to the update problems like we did with Roblox was unable to update on Windows and Mac issue.
How do I update KRNL?
1. Update with the bootstrapper
Open the folder with your KRNL exploit files.
Delete all other files except the krnl_console_bootstrapper.exe file.
Double-click on the bootstrapper file to download the latest version of KRNL on your system.
You now know how to update KRNL console with bootstrapper. This is the easiest way to update your KRNL to the latest version. Deleting the other files helps to remove all the outdated contents, while the bootstrapper helps fetch the newest version online.
Click the Download Latest Version Now (BETA) button and wait for the download to complete.
Open File Explorer on your PC and locate the downloaded folder.
Right-click on the file and select the Extract files… option.
Run the krnl.exe file and wait for the installation to complete.
Sometimes, the KRNL bootstrapper is also updated, making it impossible to use it for the update. So, to ensure you are getting the latest package, you should install the complete KRNL file from the official website.
While we covered the simpler method earlier, you now also know how to update the KRNL Beta version. And now on, you shouldn’t face any trouble with the
Note that you must disable any active antivirus on your PC before starting the installation, as stated in Step 1.
How can I fix KRNL if the update is not downloading?
1. Disable the antivirus
Most antivirus software flag the KRNL exploits as harmful software. Unfortunately, this prevents you from installing the update from the official website.
Hence, if you are having problems updating KRNL from the official website, the obvious fix is to disable antivirus temporarily. You can activate it after the installation.
2. Check connection speed
Open your browser and type internet speed test in the address bar.
Click the GO button, and it will show your network performance.
Whether trying to update KRNL with the bootstrapper or via the website, you must have a strong network. Else, you might not be able to download the update.
If the speed test shows your network to be weak, you might need to change it to get the latest version of KRNL.
If you have a preinstalled Roblox on your PC, you might find it challenging to install the latest version of KRNL. This is because most of these Roblox software tools are built to allow only a few modifications.
This makes it difficult for some of them to work with KRNL updates. The only solution is to uninstall the preinstalled version and reinstall the correct version from the official website.
The importance of the KRNL exploit on Roblox cannot be stated enough. And the software is only at its best when updated. With the two methods discussed in this guide, you have everything you need to update KRNL easily.
Do you need a list of the best Roblox browser extensions to install to improve its functionality? Then check our guide for the top options to download.
Feel free to let us know the most effective method for the update in the comments below.
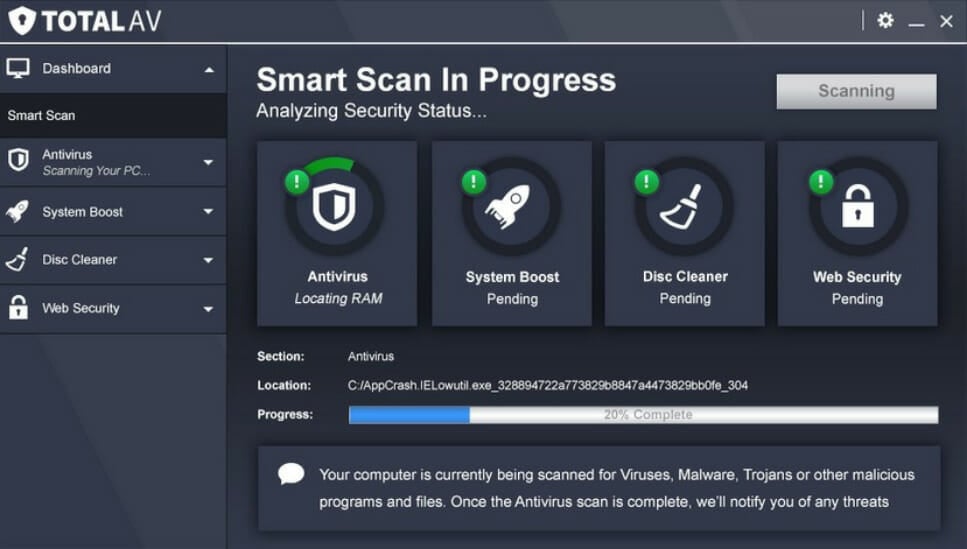
TotalAV is also a lightweight software that doesn’t impact your computer performance and still provides outstanding protection.
It instantly detects and blocks malicious websites and content to keep your personal data safe and secure. It also checks your downloads and executables for threats and viruses every time your PC accesses them.
TotalAV helps you encrypt your connection by leaving no digital footprints and making your activities anonymous and impossible to track.
Remove harmful threats from your PC and schedule smart scans to run at your set time and ensure your system remains protected at all times.
Total AV
Secure your PC efficiently with TotalAV’s fast, light solution!
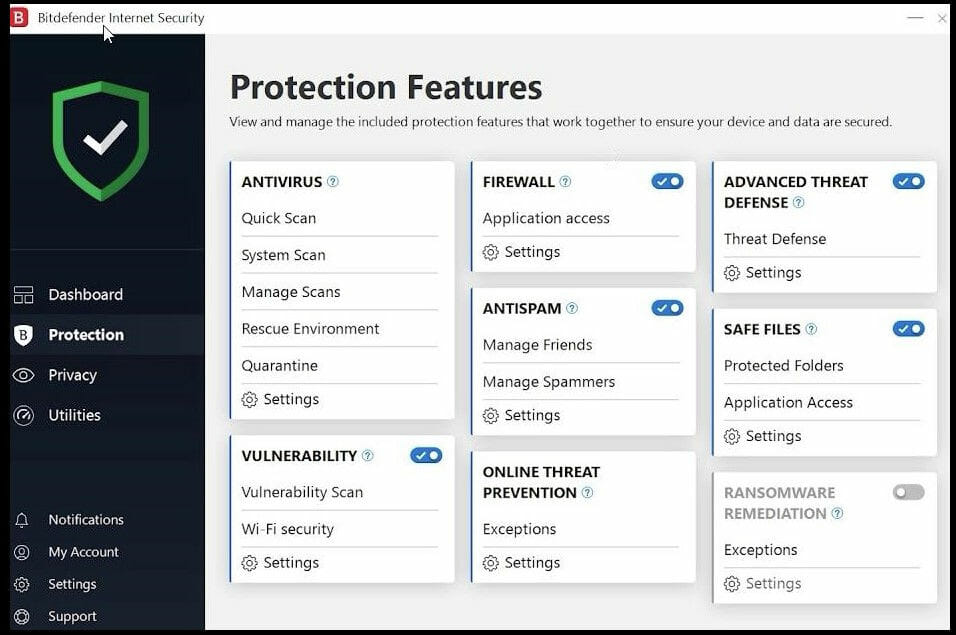
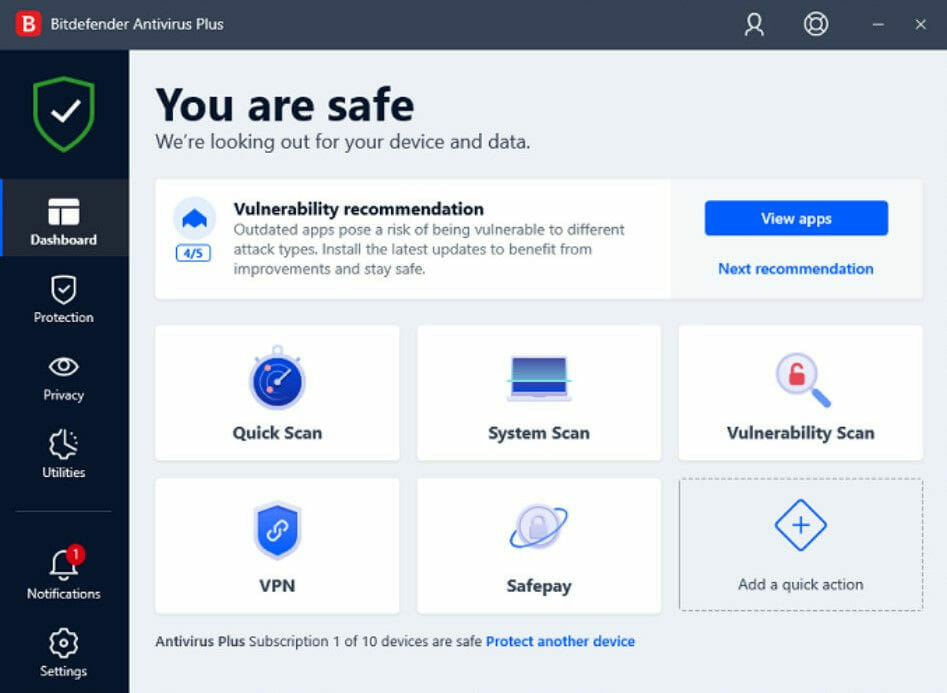
Next, we have a tool that has been on the market for a long time. Bitdefender Internet Security is well known for its powerful capabilities to detect, block, and remove cyber threats.
It is built by a strong development team that aims to offer comprehensive protection. Its detection mechanism does not use too many system resources, so it is suitable for older PCs as well.
The tool has a powerful vulnerability assessment feature that can be very useful for users of older PCs. It identifies outdated or unsecured software, missing security patches, and other holes that can lead to infection.
Bitdefender
Experience smarter security with Bitdefender’s adaptability!
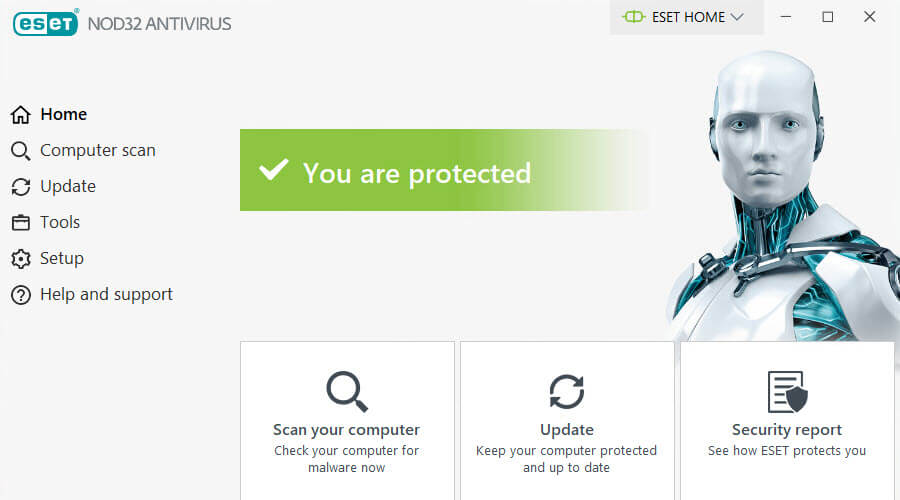
The top lightweight solution on the market for low-end PCs is ESET NOD32. When it comes to resource consumption, an older PC might not hold up with the stress caused by demanding antivirus software.
Antiviruses are known to take a toll on the system they’re installed in, especially when doing thorough scans.
Luckily, ESET is able to manage your system, protect it, remove malware, and perform periodic scans without affecting its performance.
The Advanced memory scanner feature will decrypt, analyze files and monitor malicious behavior through a specialized algorithm that doesn’t sacrifice CPU power to run.
ESET NOD32
Optimize your old PC’s protection with ESET’s lightweight shield!
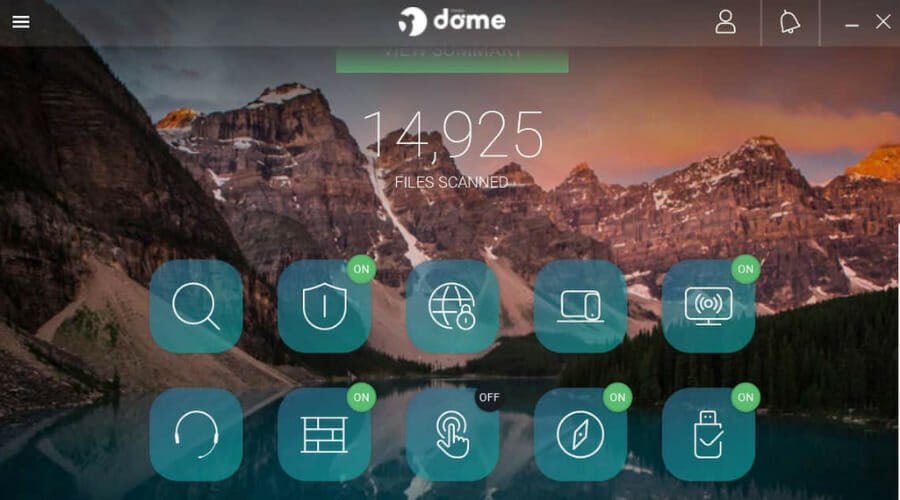
Panda Security is known for its pleasant user experience. It has a simple application with intuitive options. It is light but strong in terms of protection capabilities.
The antivirus can block online cyberattacks with its strong Firewall that can run alongside the Windows built-in Firewall.
Along with that, it includes a VPN that enables you to have a more secure online experience. It can help protect sensitive data such as your location, bank information, and identity.
Panda Security
Simplify your protection with Panda’s intuitive lightweight antivirus.
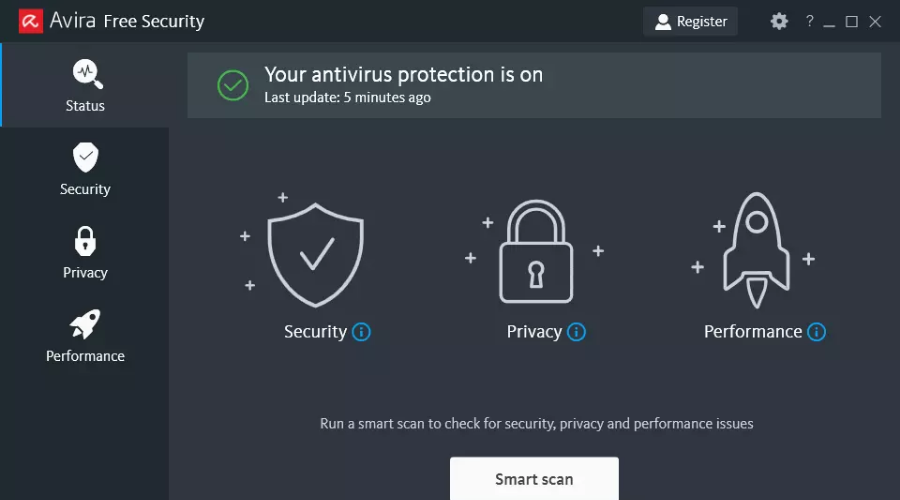
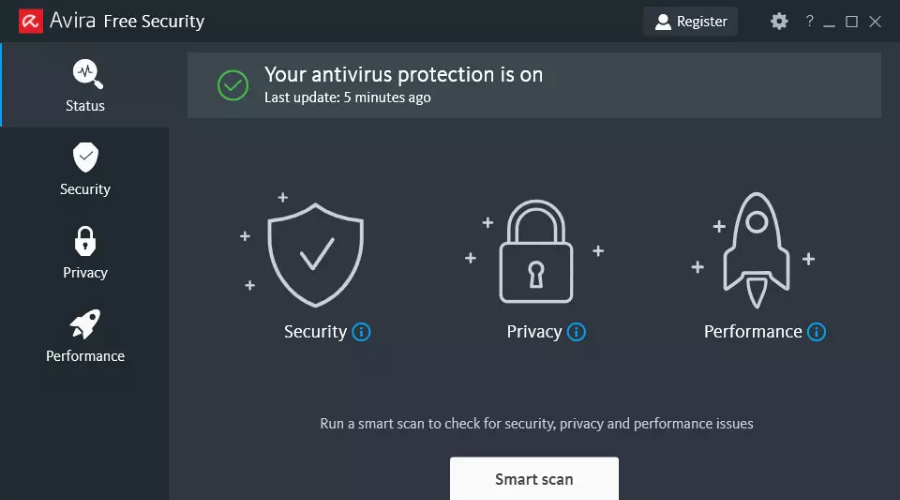
Another great and free option on our list is Avira. The software performs very well on older PCs, and it’s proven to be one of the best antiviruses currently.
You will be able to perform thorough scans of your computer without encountering any problems. Besides that, Avira can also help improve your PC’s performance by removing unwanted files.
The antivirus has both a full scan and quick scan feature and is always running in the background to stop incoming attacks.
Avira Antivirus
Discover seamless security with Avira’s free, powerful tools!
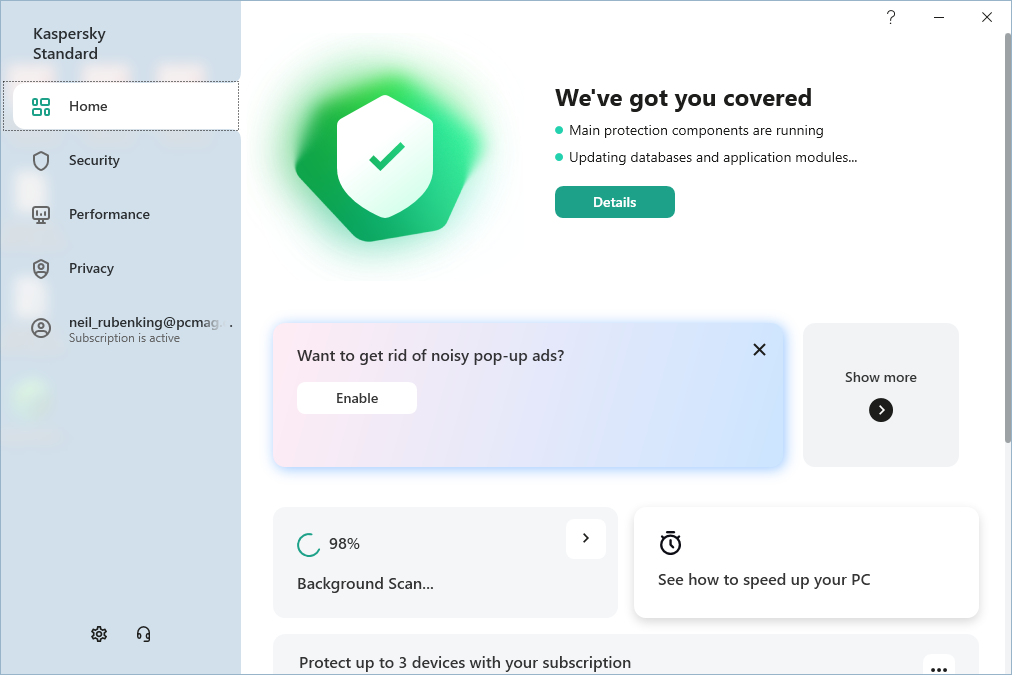
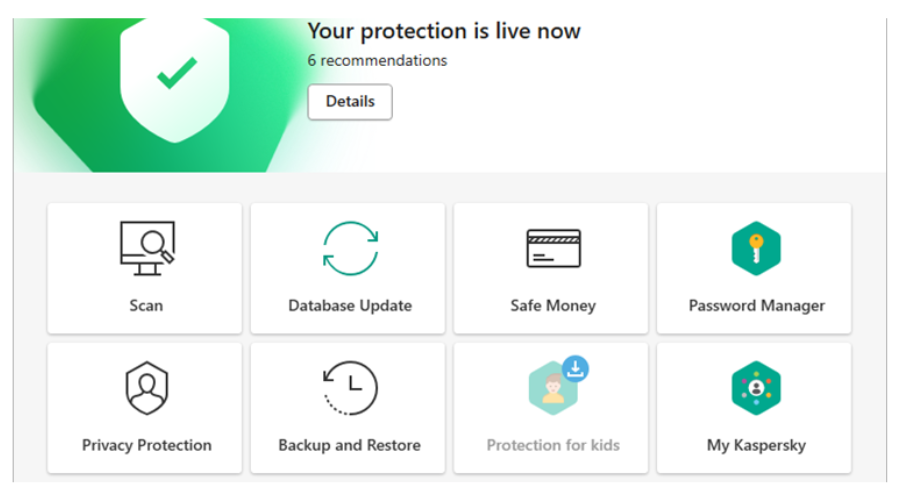
Kaspersky Antivirus is one of the most widely used antivirus software in the world which gives protection against malware.
This program includes file scanners, software uninstallers, gamers’ mode, ransomware decrypter, system restore, virtual keyboard, cloud protection, browser configuration, rescue disk, etc.
In addition, one of the unique features of Kaspersky is that it requires 512MB Ram and 480MB disk space to run.
This makes it a great option for older PCs especially PCs which have 1GB Ram and slower processors.
Kaspersky
Strengthen your old PC with Kaspersky’s reliable defense.
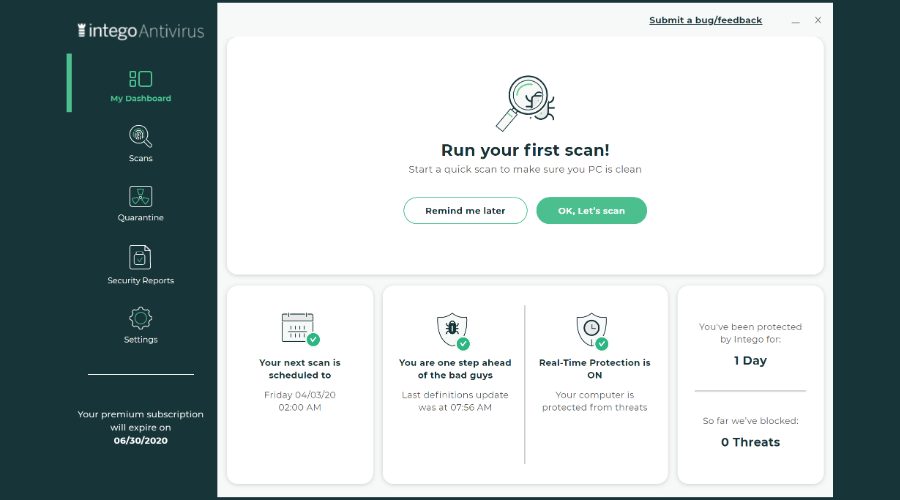
Intego ONE is our second choice when it comes to world-class and lightweight antivirus programs for old computers.
It has a low-resource usage so you don’t have to worry about slowing down your device’s performance and state.
Intego ONE can help you not only exterminate all types of cyber threats but prevent them from destroying your PC’s health as well.
It is very easy to work with because it has an intuitive user interface and offers advanced technology that keeps your old PC safe with real time monitoring.
Intego ONE is a well-known and recommended antivirus software thanks to its excellent digital threat detection capabilities and improved security.
Intego ONE
Protect your PC with Intego’s efficient, real-time security.
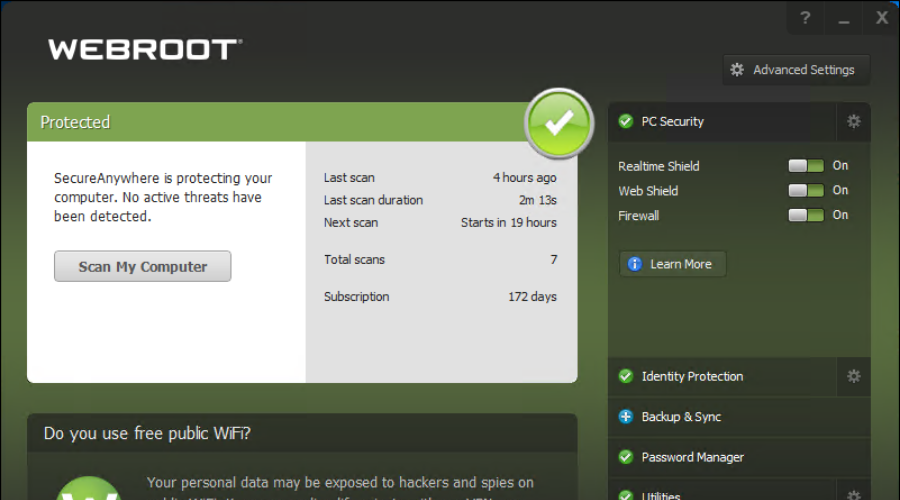
Next, Webroot Secure Anywhere is a web-based antivirus for your old PC. This antivirus incorporates premium security features in a tiny little package; hence, few computer resources are utilized while providing excellent protection to your old computer.
The tool protects you against web attacks with a strong firewall, as well as web filtering. This stops hackers from trying to steal your data.
Webroot Secure Anywhere
Defend your old PC with Webroot’s lightweight, online-ready shield!
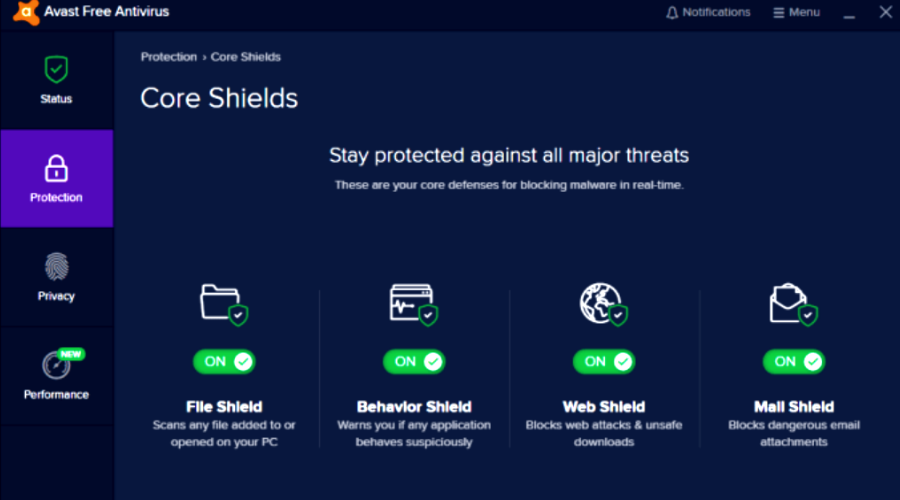
Avast is a worldwide giant in the antivirus industry with hundreds of millions of users worldwide. If you want an efficient antivirus for your old PC, look no further than Avast Free Antivirus. Moreover, it is compatible with all Windows OS.
This tool comes with features such as a file scanner, Windows Explorer context menu integration, Rescue Disk, password manager, junk file cleaner, Wi-Fi inspector, Game Mode, and browser cleaner.
The Wi-Fi inspector ensures that you have a secure connection even when connecting to a public network.
Avast Free Antivirus
Get robust protection for your PC with Avast’s free features.
AVG is a full-featured antivirus utility. It can detect and remove well-known threats as well as new, emerging ones. It blocks suspicious activity that could signal an infection.
The antivirus blocks insecure downloads and email attachments, ransomware, spyware, viruses, and other types of malware.
If you use an older PC, this antivirus can be of help. Not only is it lightweight, but it also has a performance scanner feature.
It lets you know whether there are any faulty settings or outdated apps that slow down your PC.
AVG
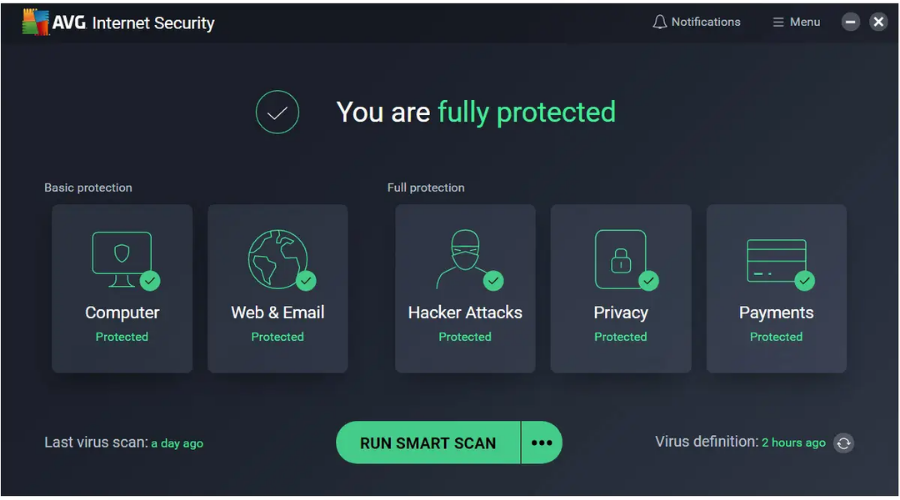
Block threats effectively with AVG’s lightweight antivirus!
Clam AV is a cross-platform antivirus software with a very small file. It supports both 32-bit and 64-bit builds for Windows.The benefit of this software is that it gets more frequent updates. This means that it is able to detect and block new threats with high accuracy.
The tool has multiple versions available, you can select your preferred option when you download it.
Clam AV is able to protect your email with built-in support for all email file types. It also scans files and apps and does not let you start them until it’s clear they are secure.
This antivirus is for the most part used for its file scanning and email protection capabilities.
Despite the fact that it is able to detect and remove PC malware, it specializes in that area.
It can thoroughly scan all major document file formats including PDF, HTML, and DOCX.
Why do you need a lightweight antivirus for an old PC?
A lightweight antivirus is a safe solution for an old PC because it is a program specially created to take minimal impact on your computer and not slow down its performance at all.
Some of them even have advanced technology that knows when you’re gaming, for instance, and doesn’t interfere with your activity to avoid slowing down your PC.
Do share with us your experience in using any of the antiviruses for the old PC which we mentioned above. We do appreciate your feedback when you comment below.
Now, shifting back to TalkTalk, if you are experiencing packet losses, or ping spikes, you are now in the right place to find answers to this situation.
Why am I having packet loss on TalkTalk?
You should know that packet loss is actually the failure of data packets to be successfully transmitted over the Internet from sender to receiver.
That being said in VoIP, lost packets delay communication, create garbled sounds, and can even scramble and reorder parts of the conversation.
As to what causes these packet losses, causes can range from:
Bandwidth congestion
Faulty network wires
Incompatible hardware
Software issues
Slow Wi-Fi networks
Malware attacks
Throughout this article, we are going to look at some solutions for the TalkTalk fibre packet loss issue, as we’ve already established what triggers it.
How do I fix packet loss on TalkTalk?
1. Restart your router/modem
Every now and then, there may be a problem with the router or modem, which causes problems as mentioned in the article above.
Try restarting the router or modem by unplugging it from the system and waiting for a few minutes. After the wait is over, reconnect the router to the system, or plug it back if it is a modem.
If you think the router or modem is faulty, connect it to another system and see. You might have to replace it if it still creates the same problem.
Also, we know that mostly everyone connects their TVs through WiFi, but we recommend wired connections whenever possible.
2. Use a VPN
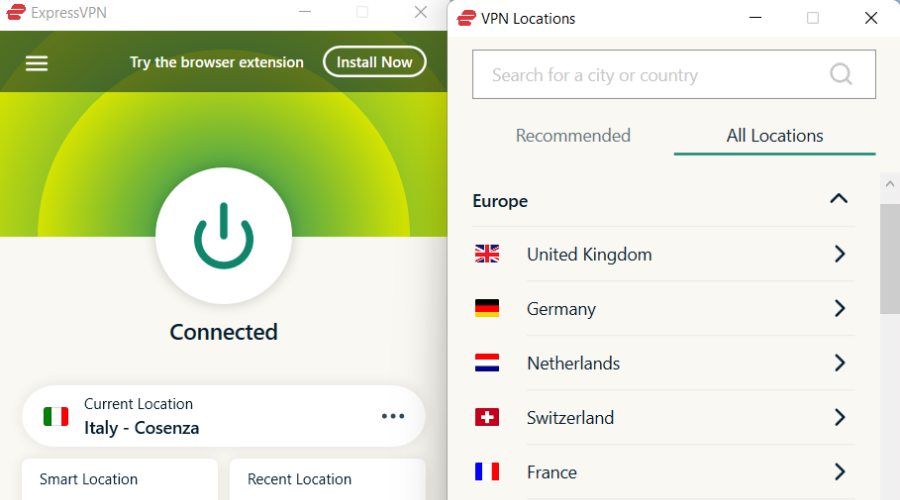
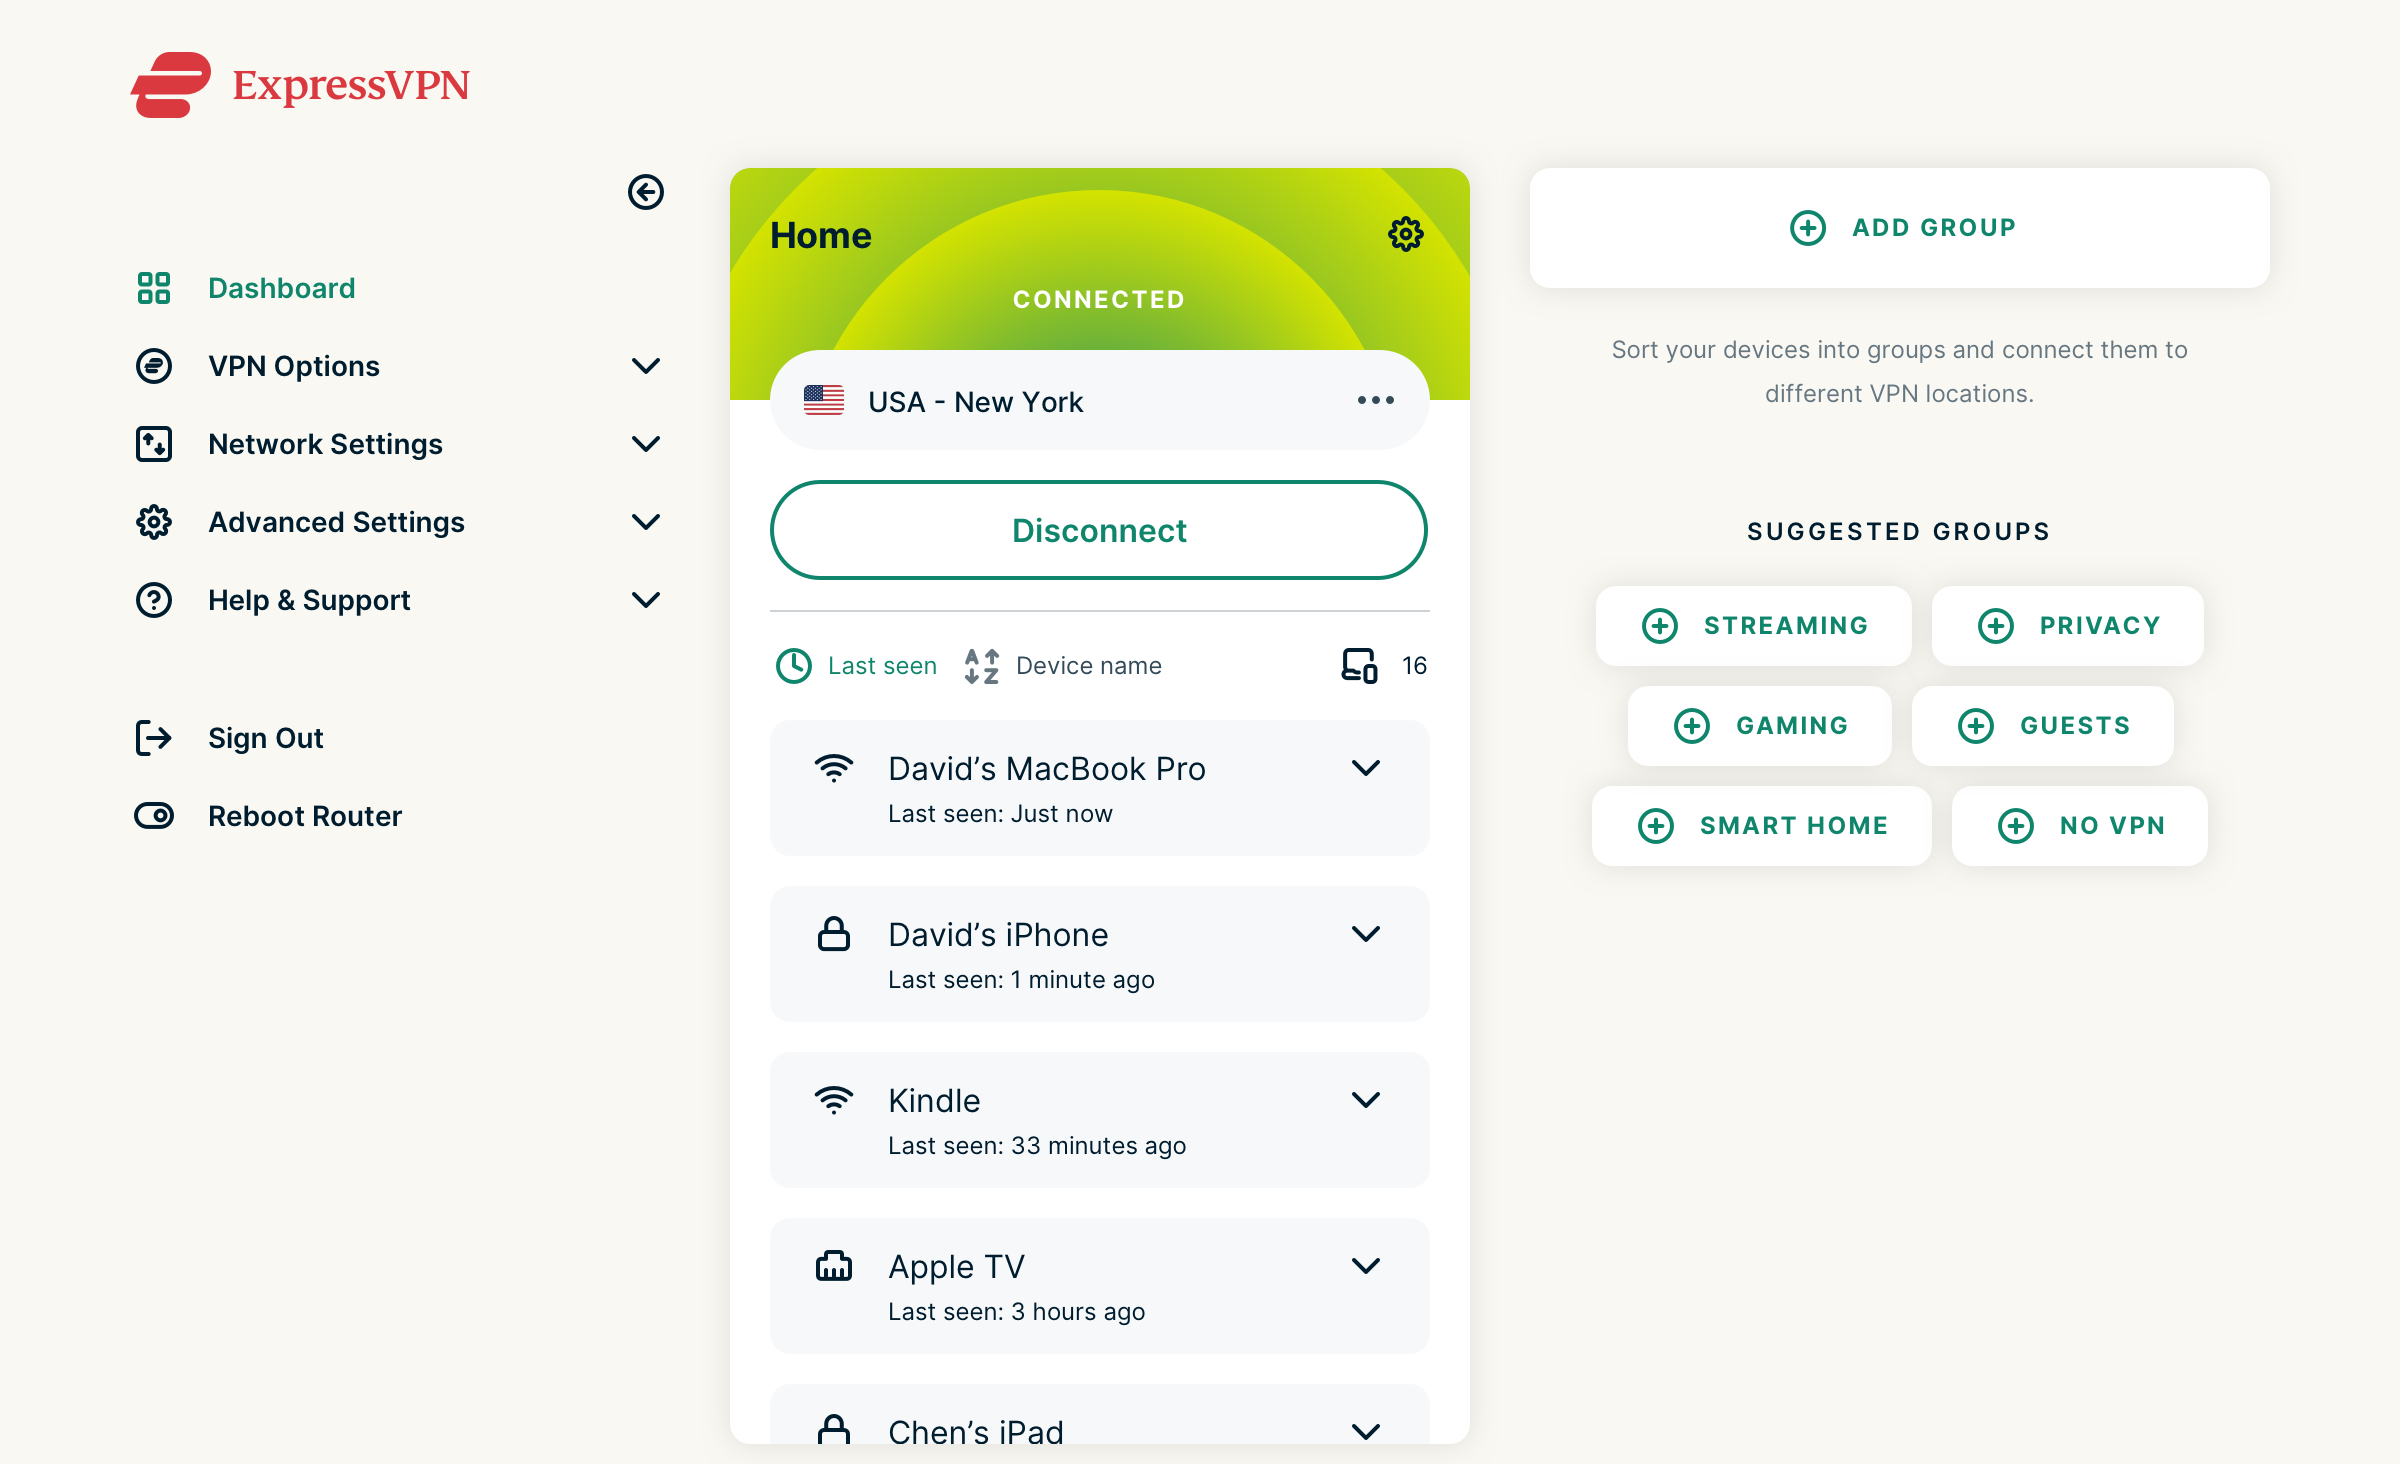
An easy way to fix packet loss and lag spikes is to use a VPN provider to connect to a different server. Our recommendation is ExpressVPN, as one of the most trusted VPN providers.
Using a VPN is safe and legal, and it allows you to browse the web without worrying about having any of your data leaked. With ExpressVPN, hiding your IP makes you untraceable.
Also, when using a VPN you gain access to geo-restricted content. Whether it is on Youtube or other streaming platforms, choosing a different IP location will unlock the content.
ExpressVPN
Never experience lag spikes again when watching online content.
Select the Windows updates tab and click Install all.
If no updates are queued for installation, press the Check for updates button.
4. Scan your PC for malware
Press Win +I to access Settings.
Select the Privacy & Security tab, then click on Windows Security.
Select Virus & threat protection.
Choose Full Scan and click on the Scan now button.
5. Reconnect your TalkTalk account
Remember when we said that the simplest solutions can sometimes fix the biggest, most complicated problems we have?
Well, even though a rational mind can’t find any connections between one and the other, TalkTalk users reported the problem being fixed after a simple relog.
Since you are having this issue and nothing else worked for you, why not give this underdog of a solution a try?
Disconnect from your TalkTalk account, then reconnect using your credentials and see if this annoying problem persists.
If you don’t notice any damage to your internet cables, your connection is stable and you are still experiencing troubles, it’s better if you contact your Internet service provider.
Many TalkTalk users have managed to fix the problem after talking to their ISP, so we suggest you do the same in this case.
Use this as a last resort, after you went through the other troubleshooting steps above, but nothing else did the trick for you.
How do I test my packet loss?
Press Win + R to bring up the Run command.
Type cmd into the Run box and press OK.
Once in the terminal, paste the following command and press Enter: Ping 127.0.0.1 -t
Examine the results.
How can I improve my TalkTalk quality?
To improve the overall experience in TalkTalk, you might need to invest. For the service to run impeccably, you need a strong, reliable internet connection.
Furthermore, a better monitor/TV will enhance the way you watch your favorite show, so keep that in mind as well.
We’re always into having the best experience, so why not spice everything up and make it just the way we like it? Has this guide been helpful to you?
Make sure you let us know in the dedicated comments section that is located just below.
Keep in mind that your Steam desktop client checks and applies new updates automatically, every time you launch the gaming service.
However, it might occasionally fail to install the latest version, resulting in the Failed to apply the update, reverting error message.
Here’s an example:
The steam client will go through the standard startup procedure but at the end of it will simply say: Failed to apply update reverting.
This would not be an issue except for the fact that i cannot acess the store anymore nor does the popup for offers work, they simply display a blackscreen of nothing, the store appears to be loading but does so endlessly and displayes nothing at all.
After going through the solutions we listed in this article, we finally got the Steam Store to work the way it should. Steam update keeps failing because of some missing or corrupted files in the permissions of the app and other apps may interfere.
Why does Steam fail to apply updates and reverting?
When updating a game, Steam might display an error message that looks like this:
An error occurred while updating [game title]
or
An error occurred while installing [game title]
This kind of error results when Steam is not able to complete the installation. Keep in mind that the specific reason for the error will be shown in the parenthesis at the end of the error message.
When you see that Steam needs to be online to update Mac you need to make some additional changes to your IP.
Change the default DNS server in your Mac’s IP settings; it may point to your ISP’s DNS servers. Change it to Google’s public DNS address, 8.8.8.8, and the steam client will work immediately. If you do this, remember to hit Apply before reopening Steam.
What can I do if Steam fails to apply updates?
1. Disable any VPN browser extensions
If you have a VPN addon installed in your web browser, turn it off. It seems that Steam, Google, and other services have connection and graphics issues with virtual private networks. This is the main reason why Steam failed to apply update Windows 11 and you get the reverse error.
In fact, a lot of users report that VPN is not working on Steam at all. But deactivating the VPN browser extension seems to help.
It’s only a temporary fix, though, because it means toggling your VPN every time you launch Steam so that it has enough time to update itself without errors.
You will still be able to use your VPN for browsing activities, torrenting, and so on.
However, Steam will not be routed through the secure tunnel, so it will not encounter updating issues due to VPN anymore.
You won’t find a good free VPN with split tunneling support. But you can invest in a premium solution like ExpressVPN.
It uses the Lightway and OpenVPN protocols. Plus, its military-grade 256-bit AES encryption will always take care of hiding your online traffic, regardless of the game you’re playing or the browser you’re using.
ExpressVPN does an awesome job when it comes to streaming services. Our experiments indicated that it unblocks platforms like Netflix or HBO Max without any issues.
The ExpressVPN secure tunnel will not interfere with the, so you if Steam won’t ever fail to apply updates and reverting.
What else you should know about ExpressVPN:
Kill switch, port forwarding, and private DNS servers
A zero-logging privacy policy
5 simultaneous connections
24/7 live chat support
30-day money-back guarantee
Optimized servers for gaming
ExpressVPN
The split tunneling allows more traffic for the Steam desktop client and updates are made easier.
By following the same logic as in the previous step, you have to inspect the settings panel of your anti-malware application.
Make sure to exclude Steam and Steam games from your anti-malware so that they won’t get flagged and blocked by the real-time engine. They must be whitelisted.
According to Steam, you should also check settings in your anti-spyware tools, torrenting and other P2P client or file-sharing software, FTP and web server apps, IP filtering programs, along with download accelerators and download managers.
5. Clear Steam Download Cache
Hit the Windows key, type Steam, then open the app.
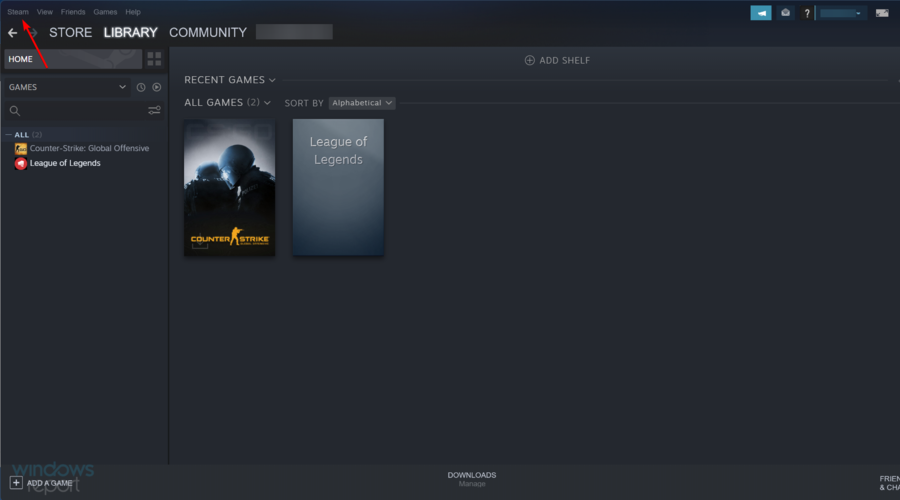
From the top-left corner of the window, click on Steam.
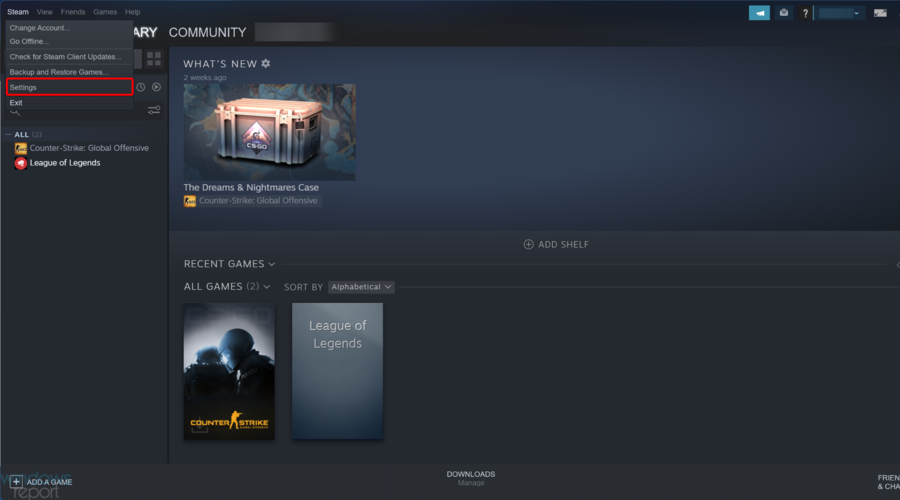
Navigate to Settings.
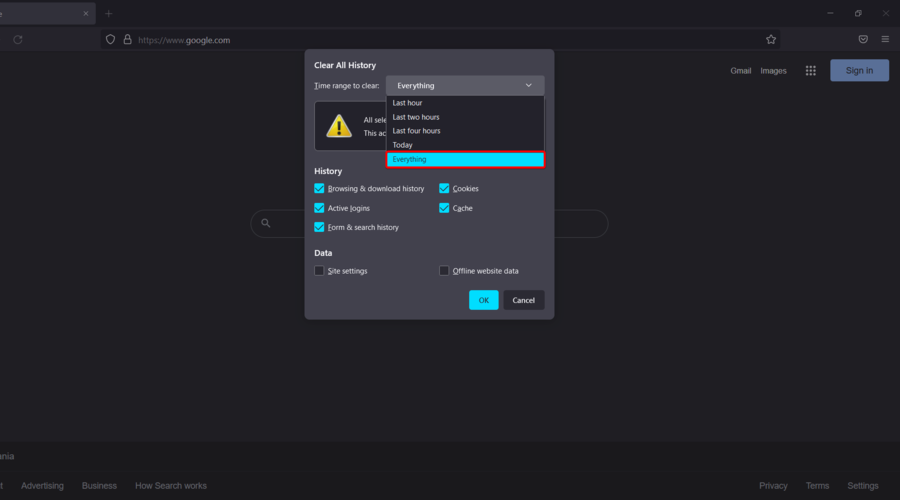
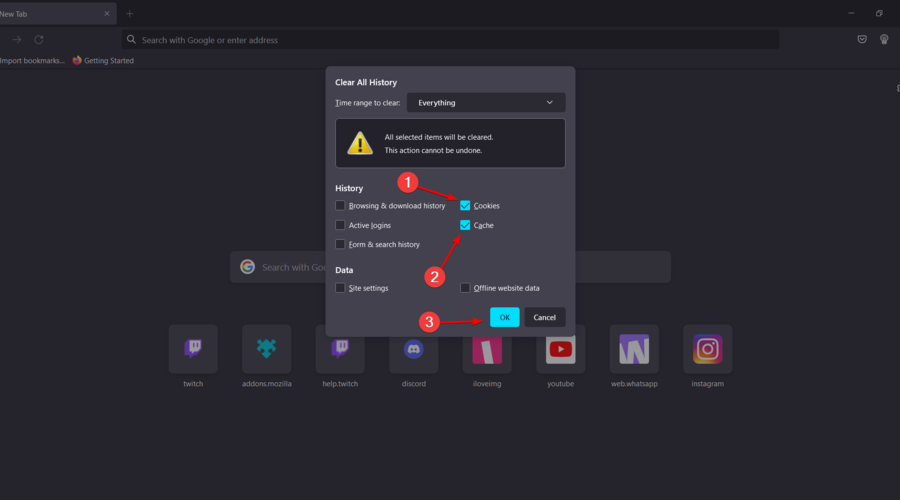
Now, from the left window pane, click on Downloads, then choose to Clear Download Cache.
Deleting the Steam download cache might fix update errors.
What other Steam updating fails should I be aware of?
It is true that Steam might fail to apply updates and reverts, but there are several other related issues you should be aware of.
That’s why we’ve compiled a list with the most common ones and we strongly recommend saving the listed solutions somewhere safe.
Steam failed to update borrower – The full error reads Failed to update borrower (rate limit exceeded) and it can occur either on your front or your friend end while he is sharing the game with you.
The Steam update goes backwards – It seems that it might be possible that after the download reaches a certain point, it starts going backward, leaving users unable to complete the process.
Steam update stuck or not downloading – Steam updates might also hang or get stuck. Then, the installing update window will hang indefinitely when updates get stuck.
To recap, if Steam fails to apply updates and reverts all changes instead, make sure to disable your VPN browser exceptions.
Instead, opt for a premium VPN service that has split tunneling support, such as ExpressVPN.
But you should also exclude Steam and Steam games from the firewall and antivirus engine, as well as check other programs which could harm the gaming platform.
Gaming is probably, with rendering put aside, the most demanding process users will ever encounter. Modern PCs are built to withstand overheating, and hardware is specifically optimized for long gaming sessions.
However, for some users, the computer shuts down automatically when playing games and they are not sure what is causing the issue.
So I was playing fine under windows 7 but under windows 10 about 2 min into playing MechWarrior Online my system just shuts down.. not restart.. shuts down.. no power, just off… help
This guide will show you how to fix the issue for good and restore normalcy on your PC.
Why did my PC just randomly turn off?
The common cause of the PC randomly shuts down not overheating issue is hardware problems. It can be down to issues with your WiFi card, Bluetooth adapter, or a recently installed GPU.
Also, if your RAM is faulty, it can cause your computer to randomly turn off and back on.
What to do if the laptop turns off when playing games but it’s not overheating?
If your computer randomly shuts down, it’s possible there’s an issue with the power supply or the battery, so you might want to check them.
Just to be sure, it’s always good to check if your laptop is shutting down due to overheating, and you can do that with all kinds of specialized software.
If the temperature isn’t the problem, you should look into battery drain. We have a great guide on how to fix laptop battery drain after shutdown, so be sure to check it out.
What should I do when my computer shuts down while gaming?
1. Check for hardware issues
If any of your computer’s hardware components are malfunctioning, it can lead to an unexpected computer shutdown. This is most likely to happen with the newly installed hardware due to an incompatible driver.
Remove any recently installed hardware component like a Bluetooth adapter, WiFi card, or maybe your latest GPU. Boot the computer after removing the hardware and check if the error is resolved. Also, check your RAM strips. Faulty RAM strips are a common cause of computer shutdown.
If you have installed the latest graphics card but have an older and dated PSU, then it might be causing the issue due to power fluctuation. Check if the PSU is compatible with your graphics card and replace it with a new variant if necessary.
2. Check for issues with UPS
One common but not so obvious device that can cause the issue is your UPS or surge protector.
Try to connect any other computer to the same surge protector and UPS and check if the issue persists.
If the issue persists, you may have a faulty surge protector UPS that needs replacement in order to play games without shutdowns.
3. Check for a PC virus
Press the Windows button and type virus.
Select Virus & threat protection.
Click Scan options.
Select your preferred scan option and click the Scan now button.
It is possible that a virus may have infected your system. Some viruses are programmed to cause frequent computer shutdown upon meeting certain criteria.
Performing a virus scan with the built-in Windows Defender should help detect and eliminate the virus.
Alternatively, you can use dedicated third-party antivirus software to perform a deep and thorough search.
For this purpose, we recommend the trusted TotalAV because has high malware detection rates. Also, it boasts powerful firewall protection, top-level encryption, parental controls, and more.
More importantly, it works really well without interfering with other apps and it has a game-mode option.
TotalAV
Enjoy gaming with no interruptions while keeping fully protected.
Select the Choose what power buttons do option in the left pane.
Now, click on Change settings that are currently unavailable.
Uncheck the box for Turn on fast startup (recommended).
Finally, click the Save changes button.
Sometimes, the Windows PC randomly shuts down, not overheating and without warning issue can be because of the Hybrid shutdown system. In this case, you only need to deactivate the feature and things should be back to normal.
5. Update PC
Press the Windows key + I to open the Settings app.
Click Update & Security.
Now, click the Check for updates button.
Finally, click the Install now button if there are any updates available.
An outdated operating system can lead to all sorts of issues, including the PC shuts down or crashes randomly, not overheating problems.
While Windows automatically downloads and installs updates if you are not on a metered connection, you can still miss out on some vital releases for some reason. So, you should manually search and install updates especially when you are facing issues.
Press the Windows key + S, type power plan, and select Edit power plan.
Click the dropdown in front of Put the computer to sleep under the Plugged in section.
Select Never.
Now, click the Change advanced power settings option.
Click the + sign next to Hard disk to expand it.
Set the values for On battery and Plugged in to Never by clicking the down arrow till it reaches 0.
Now, expand the Sleep section.
Set the values for On battery and Plugged in under the Sleep after section to Never.
Set the values for Hibernate after to Never.
Finally, click the Apply button, followed by OK to save the changes.
Sometimes, your power plans might be the reason for the computer randomly shuts off while playing games not overheating and without an error message issue. By tweaking the settings as shown in this solution, your PC should no longer turn off randomly again.
Can CPU cause random shutdown?
Among the obvious reasons for random shutdown are BIOS settings and PSU. However, the CPU can not be left out too.
This is especially true when the CPU overheats. The computer turns off, sometimes without notification to prevent damage to your PC.
The PC shuts down randomly not overheating issue can be frustrating as it puts an abrupt end to your tasks. Also, it can make you lose valuable data and unsaved work.
But with the solutions in this guide, you should be able to fix the problem for good. If you are facing other issues like computer shuts down instead of sleeping, check our detailed guide to fix it.
Feel free to let us know if any of our solutions helped you solve the shutdown problem in the comments below.
How often have you faced this rather strange scenario, that of the wireless internet getting disconnected each time a virtual private network connection is established?
It is a weird scenario, to say the least, not to mention downright annoying as well.
However, it can be just as easy to remedy the situation. Just follow the steps mentioned below.
Does VPN interfere with Wi-Fi?
VPN uses your Wi-Fi to reroute traffic; if there’s a misconfiguration in your setup, you will have difficulty establishing a connection. This will not only affect your primary connection but also cause your Wi-Fi to disconnect when using an external monitor.
Not having optimal Wi-Fi settings to support a VPN will result in all sorts of errors, the most concerning of which is when your Internet doesn’t work on a VPN.
The issue is very prevalent, and VPN users around the web report getting all sorts of errors, including:
Can’t connect to Wi-Fi after disconnecting from VPN
VPN connected but no Internet access
VPN disconnects Wi-Fi on Windows 10/11, iPhone, iPad, Android and macOS
The problem concerns all VPN providers, even reputable ones.
Concerns with VPN causing connection problems on various clients include GlobalprotectVPN, Cisco Anyconect, Norton VPN, Watchguard VPN, Pulse VPN, and ExpressVPN disconnects Wi-Fi
That’s why it’s essential to check your configuration because your VPN may work just fine afterward.
Why does my VPN disconnect my Wi-Fi?
If you cannot access the web when using a VPN, there may be a conflict in your setup. Your device might have certain pre-established VPN settings that don’t match your VPN.
It’s also possible that your antivirus or firewall is blocking your VPN to protect your data. Some security tools falsely flag VPNs and you have to whitelist them or add them as exceptions.
How do I enable Internet when connected to a VPN?
1. Re-install VPN software
Almost all VPN connections come with their own custom software. Those are available to download from the company website. Just download it to your device and follow the on-screen instructions during the installation process.
Launch Settings (Click on Start > Settings or simply type Settings in the Cortana search box.)
Select Network & Internet > VPN.
In the VPN page, click on Add a VPN connection shown at the top.
Fill out the details on the page that appears. However, select Windows (built-in) for the VPN provider drop-down menu. This assigns VPN Type as Automatic and Type of sign-in info to User name and password.
Fill out Connection name and Server name and address details. This will be availed from the VPN provider.
Scroll down the screen to enter your User name and Password in the slots provided.
Click on Save and close Setting.
The other option for you will be to use the VPN client integrated with Windows 10. Here is how you proceed:
Click on the Wi-Fi symbol in the taskbar system tray. The VPN connection you just created should show here. You are now ready to go.
As a more accessible alternative, you can change your VPN with a better one that won’t have any of these issues.
Speaking of VPNs, if you’re planning on subscribing to one, you might as well get the best one that money can buy.
We’re referring to ExpressVPN, which masterfully blends simplicity, efficiency, and cost-effectiveness into a single software bundle.
The encryption will allow you to browse any Internet content without the ISP knowing what you are doing.
Furthermore, your browsing speed will not be hindered like typical VPNs because of the huge number of servers available worldwide.
Connecting to a good VPN service will lower your general Internet speeds by 5%. So, your WiFi connection itself will not be affected if other people use it without a VPN.
ExpressVPN
Say goodbye to errors with this reliable VPN with strong encryption and versatile configuration options!
You are led to the Network status Here, click on Change adapter options.
You get to see the Network Connections window that lists out all LAN, Wi-Fi or VPN connection you have.
Right-click on VPN connection and select Properties.
In the Properties window, select Networking tab > Internet Protocol Version 4 followed by Properties
Select Advanced. Here the Use default gateway on remote network should be unchecked.
Close all intervening windows.
If you’re having trouble opening the Setting app, take a look atthis article to solve the issue.
Check to see if the issue has been resolved. Another way to enable or disable the default gateway for the VPN is via PowerShell commands. Here are the steps:
Type Powershell in the Cortana search box in the task bar.
Select Windows Powershell desktop app from the search results.
Alternatively, you can also right-click on the Start button and select Windows Powershell (admin) from the list of options provided.
In the Powershell command prompt, type the following commands:
Close the Powershell window and check if the issue has been resolved.
Frequently, letting a VPN connection use the remote network’s default gateway leads to this issue. This is so because the above setting can cancel the default gateway setting as has been specified in your TCP/IP setting.
3. Delete VPN connection followed by adding it again
Launch Device Manager. For this type Device Manager in the taskbar search box followed by selecting the option from the search results given.
In the Device Manager window, expand Network Adapters.
Locate the VPN adapter you want to delete and right-click on the same.
From the shortcut menu that appears, select Uninstall device.
This will begin the uninstallation process though there will be a confirmatory box before that. You will be asked if you consent to Delete the driver software for this device. Make sure it is selected.
Click on Uninstall to let the process begin.
There might be the issue of VPN software getting corrupted. To rule out such possibilities, it would be best to delete the VPN network connection followed by reinstalling the same again/
Once it is done, you will need to re-install the VPN software again.
4. Update Windows
Check to see if you have the latest Windows version. This will ensure you have all the latest patch software installed, which should also take care of the VPN issue. Here are the steps if you aren’t already aware of it.
Click Start > Settings.
Select Update and Security.
Click on Check for updates to see if you have any updates pending.
Let the system install any update that might be available and then your problem should have been resolved.
Wait for the process to complete and close the Command Prompt.
This command restores your DNS cache. It can help with VPN and connectivity issues in general.
Checking your DNS server configuration or reconfiguring VPN are some of the most common and reliable fixes for this problem.
Data accumulating over time may lead to errors like VPN disconnecting your Wi-Fi, so you should flush your DNS occasionally.
So there you have it, all that you need to do when faced with the rather strange scenario of losing a Wi-Fi connection when connecting to a VPN.
Ensure your connection is running, and don’t disconnect from Wi-Fi. A common misconception is that you can get an Internet connection solely from a VPN.
If you disconnect from Wifi and there are no other ways to have an Internet connection, your connection to the VPN will also be cut off.
You might also want to use VPNs at work, school, or hotel, yet public institutions tend to practice network restrictions. Our guide will show you some useful tips to correct this issue quickly.
If you have any more questions, leave them in the comments section below.
A number of PC gaming enhancements have arrived with the Windows 11 22H2 update. The following is a breakdown of all the latest PC gaming features on Windows 11.
New Controller Bar
This is an updated iteration of the Xbox Game Bar, and is a controller-friendly way to quickly access game launchers and recently played games. Simply press the Xbox button on your PC-connected controller.
Visual improvements
As part of the Windows 11 2022 update, there are several graphical enhancements gamers will appreciate. Games running DirectX10 or 11 will see dramatic display latency improvements. Also Auto HDR and variable refresh rate (VRR) are introduced for those API’s.
Also introduced in the Windows 11 2022 update is a new HDR calibration app, which will allow users to tweak color accuracy and consistency for their specific HDR displays. Other graphics enhancements for existing gaming features include a DirectX12 upgrade called DirectX12 Ultimate, and broader implementation of DirectStorage support.
New gaming features in Microsoft Edge
The update also brings several gaming for Microsoft’s Edge browser, with a new Gaming Homepage. This was introduced over the summer, and allows ever easier access to all things Windows gaming. Also introduced was a built-in feature exclusive to Edge: Clarity Boost. This makes games look sharper and clearer than ever in the Edge browser.
Microsoft touts Edge as the best web browser for gaming. Game Pass subscribers in particular will find much to love in this update, with many PC Game Pass games enjoying a visual facelift and easier access with the new Controller Bar. With all the slick new features rolling out for Windows 11 2022, perhaps it can make the same claim for the Windows 11 OS.
More content and new developer opportunities are coming to the Microsoft Store. Content is the heart of the Windows PC experience from apps, to movies, and gaming. Microsoft’s passion for making it easier for developers to bring apps to customers inspired the store redesign. Microsoft has also embraced a new set of Open App Store Policies that allows developers to use their own commerce and storefront options.
Microsoft Store Ads
At Microsoft Build, Microsoft Store Ads were announced to allow developers to get their products in front of consumers at the right time. Today, with the release of Windows 10 2022, Microsoft has announced they have started onboarding developers to the Microsoft Store Ads Pilot program. Developers will be able to create ad campaigns in the Microsoft Store using Microsoft Advertising to reach both Windows 10 and Windows 11 devices. Microsoft is committing to balancing both the developer and consumer experience.
Android Apps and Games
In the coming weeks, the Amazon App Store will expand to 31 countries including Australia, Canada, France, Germany, Italy, Japan, Spain, United Kingdom, United States, and more. making more than 20,000 apps available to new customers. To get started head over to the Microsoft Store on Windows app. Microsoft has made it easier to find Android apps using editorials and search inside the store. You’ll see inline ratings and reviews and be able to share links with your friends.
Amazon Prime Video, ESPN apps coming to the Store
Sports fans will be thrilled to hear that soon they will be able to watch their favorite programming from the ESPN App, coming “this month.” Disney fans will be getting full access to Disney+ and Amazon Prime moves and TV shows will be available in the Amazon Prime App, available for the first time today to Windows Insiders.
If you’re a creator Microsoft Store has options for you too, ClipChamp and CapCut. If you’re mixing music there’s Djay Pro. Note taker? The new unified One Note will be available this month.
Game Pass
Microsft hasn’t left the gamers out. Don’t forget GamePass has hundreds of games available for both Xbox and PC for one monthly price. The new Microsoft Store design makes it easier to find your favorite titles, sales, and installation requirements. File access for your favorite titles is also now available for installing custom mods and addons.
More updates are coming to the Microsoft Store in October for those running the latest version of Windows 11. Customers will have a brand new search box inside the Microsoft Store. Also when moving to a new PC they’ll also be a restore option to easily get your apps from the store onboard.
Now, back to the matter at hand, many Drive users have reported dealing with the An unknown error has occurred problem, as we’re going to show you what to do.
Why does Google Drive keep saying an unknown error has occurred?
Well, this issue can be triggered, among other causes, by your internet connection. A faulty or slow connection will lead to big load times and errors.
Also, your Windows Firewall can get in the way of proper interaction between you and Google Drive, so remember that as well.
Even though the Google company prides itself on its product’s uptime, it isn’t unknown for the service to go down every once in a while. Check that as well when troubleshooting this problem.
How do I fix an unknown error has occurred on Google Drive?
1. Check the status of Google Drive
In case you are experiencing file upload problems, the first thing you should check is Google Drive’s status. There really is no point in trying to resolve the problem if it isn’t on your end.
In order to do so, simply go to Google’s Status Dashboard and take a quick peek at the server’s uotime status or connection problems.
You will find a huge list of all of their services and tells you if there are any service disruptions or outages lately.
Not to mention that it can also be worth checking other sites like Downdetector and Outage.Report, where users can report issues with online sites and services.
2. Restart your router or modem/Switch to a wired connection
From time to time, there may be a problem with the router or modem, which causes problems as mentioned in the article above.
Try restarting the router or modem by unplugging it from the system and waiting for a few minutes. After the wait is over, reconnect the router to the system, or plug it back if it is a modem.
If you think the router or modem is faulty, connect it to another system and see. You might have to replace it if it still creates the same problem.
3. Disable your Windows Firewall
Press Win +I to access Settings.
Select the Privacy & Security tab, then click on Windows Security.
Click on Firewall & network protection.
Click on Public Network.
Switch Firewall to Off.
4. Reinstall Backup & Sync
Open Chrome.
Click on the Options button and select Drive.
Click on the cog-shaped icon and select Get Backup and Sync for Windows.
Performing this action will ensure you’re getting the most recent version of the program. Run it, progress through the wizard, and select Yes when asked if you want to replace your current version.
That being said, an alternative approach is to remove the software from your system first, then redownload it using the steps above.
It should go without saying, but you can also try disconnecting and reconnecting your Google account, as many users said it worked for them.
This means that absolutely all your files have to resynchronize, so it could take some time. Users that went through the same situation said that re-logging actually helped.
How do I refresh Google Drive storage?
Locate the Google Drive folder that needs updating.
Hold the Shift key and right-click the folder.
Select the Refresh folder.
So, if you find yourself unable to access a document please make sure you are connected to the internet while using Google Drive.
From time to time, you may encounter an error message such as The server encountered an error on Google Drive, but don’t panic, just use the guide above.
This is all you need to know in case your Google Drive is not working on Windows 10/11. Has this guide helped you fix this issue? Let us know in the comments section below.
When you decline a meeting invite in Outlook, that declined meeting email goes to the Deleted Items folder; and the meeting doesn’t appear on the application’s calendar.
However, some users might still need to keep meetings they’ve declined to attend on their calendars.
Outlook doesn’t include any option that you can select to show declined meetings on the calendar. Nevertheless, you can still show a declined Outlook meeting on your calendar with this trick.
How can I see a declined meeting on Outlook’s calendar?
1. Show a declined meeting in Outlook 2019, ’16, and ‘13
Click the mail button at the bottom left of Outlook’s window.
Then click on Deleted Items on the left of Outlook.
Select the meeting you declined in Deleted Items.
Then click the Accept button on the right.
Select the Do Not Send a Response option on the Accept button’s submenu. That will add the meeting to your Outlook calendar without sending a response.
2. View a declined meeting in the Outlook web app
1. Open the Outlook app in a browser.
2. Click the Toogle Left Pane button shown directly below.
3. Then navigate to Folders.
4. Go to Deleted Items. Here you can find all the meetings you have deleted from your Outlook.
5. Right-click the declined meeting you want to see and select theMove to Calendaroption.
You can see declined meetings via the web application for Outlook just as easy as you can in the app. What you need to do is navigate to the Deleted items folder, and you will see all your previously declined meetings in there.
Optionally, you can choose to keep a declined meeting in the calendar by restoring it from the previously mentioned folder.
So, that’s how you can keep declined meetings on Outlook’s calendar. Note, however, that the meeting invite won’t be in Deleted Items if you’ve emptied that folder. If it isn’t there, you’ll need to request that the organizer send another invite to you.
If you have any other questions or suggestions, feel free to leave them in the comments section below.
Dealing with overheating issues when your laptop is charging? We’re here to help! High temperature can lead to poor performance and even hardware damage.
It’s best to act fast, so just follow the step-by-step instructions below.
How do I fix the laptop if it’s overheating when charging?
First and foremost, keep your laptop’s air vents clean and unobstructed, and close unused background apps to prevent overheating.
1. Run the power troubleshooter
Click the Start icon and type troubleshoot in the search bar.
Select the Troubleshoot settings option.
Choose the Additional troubleshooters option.
Click the Power option.
Finally, click the Run the troubleshooter button and wait for the scan to complete.
2. Reinstall graphics driver
Press the Windows key + I and select Device Manager.
Click the arrow next to the Display adapters option to expand it.
Right-click on the driver there and select Uninstall device.
Click the Uninstall button to confirm the action.
Finally, click the Scan for hardware changes icon at the top and your PC will reinstall the driver.
3. Change the power plan of your laptop
Press the Windows button, type control, and select Control panel.
Click the Hardware and Sound option.
Select Power Options.
Click Create a power plan in the left pane.
Now, choose your preferred power plan.
If you leave your laptop on while not in use, adjust the power settings to turn off the monitor when idle. This helps keep your laptop cooler and can address overheating issues while charging.
4. Identify corrupt processes using Task Manager
Press the Windows key + X and Task Manager.
Select the Processes tab.
Click the CPU column header to sort the processes by CPU load.
Right-click on any process that is using high CPU resources and select End task.
This heat can be caused by corrupt software or malware, which consumes CPU time between 1 and 100 percent of the CPU.
5. Update your laptop BIOS
Press Windows + R, type msinfo32, and note the BIOS Version/Date.
Go to your motherboard or PC manufacturer’s website and download the latest BIOS update for your model.
Format a USB drive to FAT32 and copy the BIOS update file to it.
Restart your PC and enter BIOS setup (usually by pressing F2, F10, Delete, or Esc). Find the BIOS update option and select your USB drive to update.
After updating, restart your PC and adjust any BIOS settings if needed.
One of the main functions of the BIOS is to monitor temperature and adjust operating conditions. Keeping it up-to-date is essential for good performance.
6. Check if BIOS is set to Hybrid
This function lets the laptop draw power from the battery when the machine needs more power than the AC can provide. This can be a design flaw, or your laptop just has cheap parts.
But the hybrid charge will seriously reduce your battery life. You can try disabling the hybrid battery behavior in the system BIOS and see if it solves the laptop overheating when charging issue. If it does help, replace your AC with a larger capacity AC.
7. Get a laptop cooler/cooling pad
A laptop cooler provides additional cooling assistance.
This is because many laptops take in cool air from underneath. So it won’t make sense to get a cooler that sits at the bottom of the laptop, as it will accelerate overheating.
If your machine has intake grills underneath it, get a cooler or cooling pad that will blow the cool air upwards and into the machine.
Common causes of overheating include dust buildup or inadequate cooling. Signs include games freezing and Windows becoming unresponsive. While laptops naturally get hot when charging, overheating during gaming may indicate a need for cleaning.
You should always unplug your charger from your laptop when it is fully charged. In fact, it is recommended to do so before it gets to 100 percent. You can plug it again when it is down to 40 percent. This is to elongate the battery life and get the best out of your PC.
Wrapping up
The laptop overheating when charging issue is dangerous, as it can lead to bigger problems. Fortunately, it is a problem that is pretty easy to fix, as shown in this detailed guide.
Have you tried any of these solutions and they worked? Or do you have other suggestions that worked for you that aren’t listed here? Let us know by leaving a comment in the section below.
You’ve come to the right place if Print Screen isn’t working on Windows 11. Whether you use Snipping Tool, Cut & Snip, or another app, we’ll help you figure it out.
Why can’t I take screenshots anymore?
It might be because of broken system files. You can fix this by using dedicated software or the built-in Windows repair tool. Outdated keyboard drivers can also cause this error.
Regardless, following the steps below will help you fix it:
How do I fix the screenshot tool not working on Windows 11?
1. Check the date and time set
Press the Windows key + I to open the Settings app.
Select the Time & Language option in the left pane and select Date & Time from the right panel.
If the Set time automatically option is switched on, turn it off.
Select the Change button next to Set date and time manually.
Change the date to October 31 or before, then set it back to the latest current date.
By manually resetting the time and date, the Snipping Tool reconfigures its settings, therefore correcting any potential problems that may have occurred previously.
2. Restart the app
Press Ctrl + Shift + Esc on your keyboard to launch the Task Manager app.
Select the Snipping Tool app under the Process tab, and click the End task button at the bottom.
Now press Windows + S to open the search function and type in snipping tool to re-open it.
Once the program has been relaunched, you have the option of either closing it or leaving it open in the taskbar. To take screenshots with it, hit the Windows + Shift + S keyboard shortcut combination.
3. Update the keyboard driver
Press the Windows key + X and choose Device Manager from the shortcut menu.
Expand the Keyboards directory.
Right-click on Standard PS/2 Keyboard and select Update driver.
Select Search automatically for updated driver software and wait for Windows to automatically install the latest driver.
After the update procedure is complete, restart your computer and check to see if the print screen key is now operational.
4. Allow the Snipping Tool to run in the background
Press the Windows key + I to open the Settings app on your PC.
Select the Apps tab on the left and click on Apps & features from the right panel.
Use the search box to locate the Snipping Tool app quickly. Now use the three-dot menu on its right side to open Advanced options.
Under Background apps permission use the dropdown menu to choose Always from the list.
5. Repair the app
Tap the Windows key + S to open the search function and type in snipping tool.
Right-click on the top result, and choose App settings.
Next, navigate to the Reset section and click on the Repair option.
If mending the app doesn’t work, you may try resetting it by going to the same section and hitting the Reset button. It’s worth noting that resetting the app would wipe out all of your data.
6. Use other hotkey combinations
If hitting the single PrtSc key does not yield results, you might try the keyboard shortcut buttons listed below:
With the Alt key + PrtSc, you can capture the currently chosen window and save it using Paint or another image-editing tool of your choosing.
Likewise, a screenshot will be taken by pressing the Windows + PrtSc hotkeys combination, which will be saved to the Screenshots folder with the name Screenshot (NUMBER).
This folder can be found in the Pictures folder on your PC. Please keep in mind that on laptops, the combination Fn + Windows + PrtSc should be used.
7. Check the F lock key
Some keyboards contain an F Mode or F Lock key, which can be useful. If they are turned off, the print screen key will not work properly. For the print screen key to function, you must first enable the F Mode or F Lock keys by pressing them.
8. Run the SFC scan
Press the Windows + S keys then search for cmd and right-click on the top result to open it as an administrator and get full privileges.
Type or paste in the CMD prompt the following command then press Enter: sfc /scannow
Wait for the procedure to be completed. Restart your computer and run the Snipping Tool software to see if everything is operating properly.
How do I change where screenshots go in Windows 11?
With the Snipping Tool, you might not need to use a third-party screenshot application anymore. Everything on the screen can be simply captured with the built-in app.
The location of screenshots taken with the built-in tool on Windows 11 is this directory: C:Users<user name>PicturesScreenshots
However, you can move the default location to a different folder for easy access or if the Windows 11 screenshot is not saving.
To begin, use Windows Explorer and navigate to the directory: C:Users<user name>PicturesScreenshots
NOTE
Please note that <user name> should be replaced with your actual username.
Right-click the Screenshots folder in the photos directory and choose Properties from the popup menu. The next step is to go to the Location tab and press the Move button.
Select the destination folder you want to use as your default screenshot folder in the File Explorer box and click Select Folder.
You’ll get a dialogue box asking if you want to move all of your files from the old location to the new one, you’ll need to select Yes.
Those programs, including Snipping Tool, that used the Screenshots folder to store photographs by default will now use the newly selected destination directory after completing the aforementioned instructions.
Why is PrtSc not working?
If the PrtSc key is not working, it might be down to the F Mode or F Lock keys on your keyboard. This is because these keys disable the print screen key.
Another known cause of the issue is outdated drivers. We have shown how to fix these issues in this guide. So, be sure to check out the solutions.
As you can see, certain features in the new OS have changed dramatically, while others haven’t. If you want to learn more about the subject, here’s a full comparison of Windows 10 vs Windows 11.
Outlook is one of the most popular email clients, so it’s not surprising that some users may experience problems with it. One of the most common issues is Outlook not prompting for MFA.
The Microsoft Office 365 Multi-Factor Authentication (MFA) feature is a security best practice that helps protect your organization’s Office 365 data.
Multi-factor authentication is an umbrella term that includes MFA, 2FA, and other types of security measures. It refers to any technology that requires a second factor before granting access to an account.
This feature requires users to verify their identity by using an additional method, such as a security code sent via mobile app or text message, before they can sign in to their accounts.
Although Outlook comes in a standalone app, you can also use the web version if you have limited storage space. You can use one of the best browsers to use with Outlook for a seamless experience.
Does Outlook prompt for MFA?
When you use a Microsoft account to sign in to Outlook, Outlook prompts for MFA if it’s turned on in your organization or if you’re signing in from a device that isn’t already enrolled in MFA. You can also configure Outlook to prompt for MFA automatically.
How often should MFA be prompted?
It depends on a variety of factors, including the type of authentication method used, the security requirements of an application and its users, and the nature of an organization’s risk profile.
The main purpose of multi-factor authentication (MFA) is to make it harder for attackers to gain access to an account. MFA is a great way to protect your account from unauthorized access. However, it can be inconvenient to enter your password every time you want to log in.
If you’re not getting an MFA prompt and send out multiple requests in a short span, you may receive a message that says you have exceeded the limit and may have to wait until Microsoft can verify your identity.
How do I get the MFA prompt in Outlook?
1. Upgrade your Outlook version
If you’re using an older version of Outlook and don’t want to upgrade, then one of the reasons why it might not be prompting for MFA could be because you’re using an older version of Outlook.
The security policies in older versions aren’t as advanced as newer ones, so they may not support MFA by default.
2. Clear your cache
Your cache is where Outlook stores information about emails so that it doesn’t need to re-download them every time it needs a copy.
Clearing your cache can help fix Outlook when it’s not prompting for MFA because if there are issues with cached data, clearing it will remove any corrupted entries from your cache and reset its settings back to normal.
3. Check your settings in Office 365
The first place to check is your account settings in Office 365. Check whether the account is set up for MFA in the first place. If you are using an Office 365 subscription plan make sure that your account has been set up for MFA.
You may have disabled Multi-Factor Authentication (MFA) or changed your password. It is also possible that you may have changed your authenticator app settings or mobile number to receive the code.
When Office 365 prompts users for MFA, it does so based on device type. If you are using multiple devices such as a desktop computer, laptop and smartphone then you will be prompted multiple times.
If you’re using Outlook.com or Office 365, and you’re not prompted for multi-factor authentication (MFA), the first thing to try is logging out of your account and then logging back in.
5. Reset your password
If you reset your password recently, you might have triggered an expired MFA token. In that case, you’ll need to go back and add MFA to your account again.
Alternatively, if you have authorized more than one authentication method, opt for the other if the code is not showing up on your phone. There could be a problem receiving messages.
How long does the Microsoft MFA code last?
Once you get an MFA code, it is valid for 60 minutes. If this period expires before you can log in, you can request a new token that will be valid for 14 days.
The refresh token has the possibility of extending to 90 days if you are actively using your mailbox during this period. This way, you won’t have to input a code as often.
However, if you log out, or exceed more than 14 days without signing in, you will be prompted with an MFA again.
To be cautious, only use this route if it’s a personal computer as leaving your account logged on on public computers can expose you to cyberattacks.
You can always install password managers that also come with multi-factor authentication to secure your passwords if you easily forget.
If you were experiencing this problem, we’d love to know which one of our solutions has worked for you. In case you applied another method not mentioned here, also let us know in the comments section below.
Discord is a safe place for gamers to congregate, share content, and play games together. Unfortunately, this software isn’t entirely flawless, and sometimes errors occur that can cause problems for your account.
When you try to log into Discord, it might give you a message that says An unknown error has occurred. The message is shown when something goes wrong with your account or network connection.
If the issue is a bad network request, you can easily solve the problem with the recommended fixes in our detailed article.
What is the meaning of an unknown error occurred on Discord?
An unknown error has occurred on Discord usually appears when you try to open the app or game. It can also occur when you try to open a specific feature of the app or game.
If you are getting this message, then there can be several reasons behind it:
Outdated app – Software tends to become outdated over time as new versions of apps replace older ones. This means that sometimes, the latest version of an app may not work properly because they don’t have the necessary hardware specs for it to run smoothly enough.
Problem with the server – This is by far the most common reason for this error. If an internal server error has occurred on Discord, then it can cause this problem. It could be that something has gone wrong with the server or that there are too many users trying to access it at the same time.
Cached files – Sometimes this problem occurs because of a corrupt cache file on your computer. This can be fixed by restarting your PC or reinstalling Discord again on your device. It’s also often the reason behind Discord Error 1105.
Poor internet connection – Discord needs to connect to the Internet to use its features. You may get a network error has occurred or you are not currently logged in message. Make sure that you have connected your device with a good Internet connection and that there are no issues with the network provider as well.
Now that you are aware of the causes, below are some solutions to get you out of this situation.
How do you fix an unknown network error has occurred on Discord?
1. Update the Discord app
Check your device settings to make sure that you have the latest version of the app installed. An outdated app may present problems with some functions or even deny you access to Discord.
You should always make sure that you have the latest version of any app as it could contain fixes for bugs or problems like an unknown network error has occurred on Discord.
2. Check your internet connection
If you have trouble connecting with other people on Discord because of this error, then start by making sure that your Wi-Fi connection isn’t broken or damaged in any way. You should connect your device to another Wi-Fi network and see if it works properly.
Also, try connecting with an ethernet cable instead of a wireless connection as it offers a more stable connection. It would also do you good to test your internet speed to make sure it’s fast enough for Discord.
3. Check server status
If you’re experiencing an unknown error has occurred on Discord, there’s a chance that it’s an issue with their servers or network.
To check whether this is true or not, visit Discord status page and see if any of your servers are listed as being in maintenance mode or down for everyone. In most cases, if one server is down for everyone, all servers are also affected by this issue.
Locate your VPN client under VPN connections and click on Disconnect.
What are the most common Discord errors?
Discord errors are common, as millions of people worldwide have downloaded the app. However, it’s essential to know how to fix them so you can continue using Discord without any problems.
Here are some of the most common errors you might encounter while using Discord:
Discord setup error – If you have a Windows PC, the first step to setting up Discord likely is to download the installer. This will give you access to the desktop app and browser support. Unfortunately, sometimes this can throw up an error message that looks like this: Failed to extract the installer.
No Route error – This error means there’s no way for Discord to reach the servers that run the Discord app. This can happen if your ISP or network provider is having problems.
Discord static noise – Discord static noise is a problem that can occur on any server. It is the sound of white noise that plays when you are streaming and can be caused by incorrect audio output settings or outdated audio drivers.
Are you looking for the best personal cloud storage application for your Windows 10 PC? WindowsReport has got you covered!
File storage has come a long way over the past few decades — from bulky hardware storage to portable hard drives to the latest cloud storage method.
With the advent of cloud storage, the issue of storage limitations has been completely eliminated.
Today, many users and businesses save their files and documents in the cloud. A typical cloud storage service offers many functions, ranging from file backup, to file security or unlimited storage.
Today, there are quite a good number of cloud storage software, some more remarkable than others. So it’s important to do some research, to test the authenticity and durability of a cloud service before saving sensitive files on its hub.
In this article, we have compiled some of the best cloud storage services (Windows 10 compatible), taking into account price, durability, security, and bandwidth space.
What are the best cloud storage services for Windows 10?
pCloud stands out as more than just a simple backup tool. It might seem pricey at first sight, but not many storage software is as fully-featured as this one.
Besides the classic features like generous storage space, trash recovery, or automatic sync across multiple devices, all pCloud plans include the following:
The collaboration features include sharing and personalizing your data, as well as receiving reports for the shared links.
You will be surprised to find also built-in video and audio players, plus video streaming.
It even comes with file management options such as data recovery, remote upload, or a rewind feature to recover accounts that go back more than 30 days.
pCloud offers integration with all major cloud platforms such as Google Drive, OneDrive, Facebook, Instagram and more.
Sync is a relatively new cloud storage service, which has managed to become one of the most durable personal cloud storage services for Windows 10 in the market.
The software is compatible with Windows devices, and it allows users to store, access, and share files easily via its user-friendly interface.
In addition, Sync is equipped with end-to-end encryption, which ensures that data transferred and shared via the cloud is safe, and secure at all times.
Sync stores all information on your devices in a centralized location, thereby facilitating file access and retrieval.
Integration with popular tools like Slack or Asana eases access for whole teams to the same safe workspace.
Features like password protection and permissions facilitate a smooth workflow, while also eliminating the issue of unauthorized access.
Box is another popular personal cloud storage service renowned for its relative affordability.
Upon signing up, you are provided with free 10GB storage. While exploring Box, you’ll see that it features a variety of options, depending on the size and type of files to be stored.
Box is flexible enough to support integration with popular productivity apps like Google Docs, or Office 365.
The software also boasts an attractive and easy-to-navigate user interface, which facilitates your cloud storage experience.
If you’re concerned about security certificates, you should know that HIPAA and PCI are among the supported ones. So the security infrastructure of this tool ensures top-rated protection against unauthorized access.
Dropbox is the most popular personal cloud storage for Windows 10 PC, used by millions of individuals and businesses worldwide.
Despite its relatively low free storage space (2GB), its premium plans offer the best available set of cloud storage features.
Dropbox’s Business plan facilitates collaboration between team members since each team member can get a personal account.
The app integrates perfectly well with Windows 10, and you can easily edit or modify your files directly from the app on your Windows 10 computer.
Notable collaboration software like Slack, Asana, Photoshop, and others can integrate seamlessly with Dropbox so you can easily import/export data directly from or in the cloud.
As a Google product, Google Drive is an ideal personal cloud storage service for Windows 10 users.
Synchronization is one of the core benefits of Google Drive, as you can easily synchronize data from your mobile devices to your desktop devices and vice versa.
The free cloud storage space you get (15GB) is still one of the most generous in the industry.
This makes Google Drive a good option for personal use and low budget firms, with low storage requirements.
MultCloud – Great for file transfer and management
MultCloud is a free app that helps you connect all your cloud drives under one dashboard.
After you log into your cloud accounts on the platform, you will be able to transfer or sync files from one cloud service directly to another.
That means you can manage all your online files just like you would do in a file management app and use the usual commands like cut, copy, paste, move, delete, rename, and more.
It also means that you can say goodbye to all the duplicate files that take up the precious space on your cloud accounts.
All the data transfer processes will be performed offline, on the MultCloud server so you don’t need to stay online.
You also have access to filtering files with certain extensions or scheduling cloud transfers easily.
The award-winning IDrive offers one of the best personal cloud services, having one of the most secure storage hubs.
Over the years, the developers have added extra features, making the tool stand out as one of the best.
Besides the well-known backup functions, some unique features that IDrive brings are IDrive Express (backup and retrieval of data in less than a week via physical storage shipment) or snapshots and versioning of all backed-up files.
The developer’s advanced security protocol provides a warranty for all your cloud-saved files.
Hence, in the case of irretrievable file loss, the company uses the Express feature mentioned above, sending a hard drive (to the recipient’s address), containing your files. To learn more, don’t miss our in-depth IDrive review!
If you have other preferred cloud storage apps, mention them in the comments below and we’ll surely take a look. And who knows, maybe we’ll include them in future lists.
Build 107.0.1379.1 is now live for all Edge Insiders in the Dev channel. This latest Insider build makes the default profile icon consistent across platforms, improves video player playback, added support for Microsoft Rewards in India, and refined the Read Aloud feature when translating text.
The Portal 2 and Double Kick Heroes video games are now free to claim for all Xbox console owners with an active Xbox Live Gold subscription.
Portal 2 originally came out on Microsoft’s Xbox 360 console back in 2011 and is playable on both the Xbox One and Xbox Series X console families via backwards compatibility.
Here’s the official game description for Portal 2:
The Games on Demand version supports English, French, Italian, German, Spanish, Polish, Potuguese, Russian, Japanese, Korean, Chinese.The highly anticipated sequel to 2007’s Game of the Year, Portal 2 is a hilariously mind-bending adventure that challenges you to use wits over weaponry in a funhouse of diabolical science. Using a highly experimental portal device, you’ll once again face off against a lethally inventive, power-mad A.I. named GLaDOS. Break the laws of spatial physics in ways you never thought possible, with a wider variety of portal puzzles and an expansive story that spans a single player and co-op game mode.
Double Kick Heroes launched on Xbox One and Xbox Series X console families in 2020. It’s kind of a combo of a rhythm game and a shooter and has a strong retro gaming vibe with its visuals and soundtrack.
Double Kick zombies in the face with insane Metal music! 30 tremendously awesome quality Metal songs by a legendary video game AND Metal composer. Unlock new gear and pimp your Gundillac. Rodriguez infused background story about being weird guys and gals who live for Sex, Drugs and Heavy Metal. Explosions, rebels, militias, undeads, road-rage, madness, apocalypse. Ready to hit the fury road? The only awesome rock and metal rhythm game, what more!?
Double Kick Heroes and Portal 2 join Gods Will Fall as part of September’s Games With Gold titles for Xbox Live Gold subscribers. Portal 2 and Gods Will Fall are free to claim until September 30th while Double Kick Heroes will remain free until October 15th.
If you’re wondering which VPNs on the market have China servers, you’ve definitely come to the right neighborhood.
VPNs have been around quite for some time, and their usefulness range from simply protecting your privacy, to even unblocking geo-restricted content.
Although the general trend is to find VPN services that let you access websites that are blocked in China, some users go the other way.
It’s not uncommon knowledge that China has built some walls, physical and metaphorical, to keep intruders out.
For instance, you may know that China keeps some websites restricted to outsiders. Thus, you can only access them if you’re physically in China. Or, as you’re about to find out if you have a trustworthy VPN with China servers.
How do I bypass China firewall?
As we’ve briefly mentioned above, the Chinese government took drastic measures to block any outsider from accessing certain websites or services on Chinese territory.
Furthermore, regulations have been set to prevent residents from accessing specific non-Chinese websites, such as social platforms, news websites, and streaming services.
However, a China VPN server would only allow you to access Chinese websites from outside of this country.
However, some digital sources are only available in China, specifically the mainland, and accessing them requires a VPN that has specific China servers, not Hong Kong servers.
QQ music, Wang Yi music, and some TV shows may have connection and buffering issues for the first time you connect.
So, for example, if you want to watch Jackie Chan’s Adventure on Aiqiyi (which is free), you’ll need to use a VPN to fool the computer into thinking you are in mainland China.
Otherwise, you’d have to pay for it on Google Play or the App Store. Remember to follow the same steps whenever connecting to a VPN server in China.
Establishing a connection to such a server might mean you’ll temporarily be unable to access various non-Chinese websites/services.
How do I use China VPN?
We are often asked by our readers How do I get China IP VPN? and the answer is simple. You need to get a VPN that offers China servers to unblock the content from China’s mainland.
Hong Kong servers may not work all the time, since the Chinese government is strict about the content found online that its residents can access. Make sure any app, browser is closed before connecting to China VPN.
Here are some easy steps to follow to connect to the China server:
Log in with your credentials and go to settings by clicking on the three dots in the top right corner.
Go to Protocol and select WireGuard, it’s best to use when connecting to China.
You may also use the Dedicated IP section to sync your IP on your device with the VPN.
Go to the main screen of PIA and search for China in the servers list.
Connect to China and start unblocking China mainland content.
Keep in mind that not every time you will get the best out of the content available online, but that’s the censorship that the Chinese government implies.
Private Internet Access (PIA) is a well-known VPN service on the internet. This VPN’s advanced security features and low pricing plans have made it a popular choice in the industry.
You can create your own configuration files that connect to OpenVPN using an IP address rather than a hostname and port TCP 443. By logging into your Client Control panel on the My Account page, you can generate your own configuration files for any region.
You will be able to create your own configuration file for any platform, region, and port, as well as connect using an IP address rather than the server name. The configuration employs a unique username and password that differs from your PIA account login credentials.
A brief list of PIA’s main features:
No logs.
Unlimited bandwidth.
High-speed global server network.
Dedicated apps.
Powerful encryption.
Block ads.
24/7 live support.
Open-source.
In summary, PIA works in China, but it has the same limitations as other VPN services. For example, the VPN works in some parts of China but becomes completely inoperable in others due to the infamous Great Firewall.
Furthermore, the service may be available on some ISPs while being completely unavailable on others. In our experience, using the VPN on a 4G network rather than a Wi-Fi network yields better results. Private Internet Access suggests that you try the Wireguard protocol.
Private Internet Access
Unblocked content from China mainland with a dedicated IP and personal configurations in the VPN.
NordVPN has over 5200 servers in 60 countries, allowing you to select the server closest to your actual location for the best speed.
It offers top-tier encryption to protect users from online threats and privacy concerns. NordVPN is the VPN of choice for millions of people and is recommended by major tech experts all over the world.
To connect to a different region, simply launch the app and connect to a China VPN server. However, because the strength of China’s internet restrictions varies by region and year, you may want to use one of the advanced security features.
A brief list of NordVPN’s main features:
Next-generation encryption
Strict no logs policy
DoubleVPN
Automatic Kill Switch
DNS leak protection
Streaming support
SmartPlay
Dedicated IP address
Browser proxy extensions
You can also enable the Threat Protection feature when using the app, which blocks websites known to host malware and annoying ads.
NordVPN also includes a Kill Switch feature, which blocks internet access if your VPN connection is accidentally lost. This means you’re not putting yourself at risk by browsing the web unprotected.
NordVPN also allows for up to six simultaneous connections, allowing you to easily secure multiple devices while on China servers.
NordVPN
Everyone deserves unrestricted internet access, and NordVPN can help you in unblocking China content.
PureVPN is a VPN service owned by GZ Systems, a company that’s based in Hong Kong and founded in 2007. This VPN offers approximately 4,000 servers and roughly 300,000 IP addresses in 140 countries.
As you probably expect, China is among the 140 countries you can connect to using PureVPN. This VPN also provides its users with 24/7 live chat support.
PureVPN has servers in Guangdong and Shanghai, making it a good choice for VPN in China. You can connect to those China servers to obtain a China IP address and enter China.
A brief list of PureVPN’s main features:
Can unblock Netflix, Amazon Prime Video, Hulu
Offers DNS leak protection
Has 4,000 servers in 140 countries
Supports P2P activities (torrenting)
Has split tunneling features to separate ISP/VPN traffic
Apps for Windows, Linux, iOS, Android, Mac, and more than 16 routers
Has browser extensions
If you don’t see any China VPN servers in the PureVPN software’s server list, it’s possible that PureVPN hides their China servers on their software due to heavy VPN blocking from China.
But don’t worry, PureVPN’s website lists its China VPN server addresses on the Server Locations page. Then, copy one of those addresses, switch to PureVPN’s Dedicated IP mode, and use that address to connect to PureVPN’s China VPN server as usual.
PureVPN
To access China websites and unblock its content, PureVPN is another reliable solution.
HotSpot Shield might’ve gained a lot of popularity thanks to its free service. It’s one of the few VPN services that offer Chinese servers so that you could access content in China.
It was launched and owned by AnchorFree up until 2019, and is now owned by Pango (formerly AnchorFree). The company has offices in Russia and Ukraine, and the first VPN client app for HotSpot Shield was launched in 2008.
Hotspot Shield Elite VPN has VPN servers in 22 countries, including one in China, making it an excellent choice for VPN access in China. When you connect to its China server, you will be assigned a China IP address and will be able to access China-only content on the Internet.
Check out HotSpot Shield’s most important features:
Has proprietary VPN protocol, which makes VPN traffic detection more difficult
Lets you connect on up to 5 devices
Unlimited data usage (free plan restricted to 500 MBs daily)
More than 115 locations, in more than 80 countries and over 35 cities
Lets you access geoblocked streaming apps (Netflix, Disney+, Hulu)
24/7 live chat support
Malware/phishing protection
The most well-known feature of Hotspot Shield is its free VPN service. However, its free VPN service has some restrictions and displays advertisements. Actually, it also provides a paid VPN service, Hotspot Shield Elite VPN, which has no restrictions and provides more VPN server options.
Hotspot Shield
Protect your network traffic, data, and shared files while on the China server.
Ivacy VPN is yet another service that provides you with Chinese servers. You can easily connect to the service and unblock China-exclusive content from your devices.
Reportedly, Ivacy was the first provider to implement split tunneling, which allows you to separate ISP traffic from VPN traffic.
Thus, you can manage your traffic in terms of what you send back to your ISP and what gets routed through the secure, encrypted tunnel. Split tunneling is essential for accessing LAN resources, such as shared devices or folders.
Ivacy VPN has over 250 servers in over 100 countries, including mainland China. As a result, Ivacy VPN is a good choice for a VPN into China.
Ivacy VPN supports popular VPN protocols such as OpenVPN, PPTP, and L2TP/IPSec. Ivacy VPN supports 5 simultaneous connections and P2P file sharing.
Furthermore, Ivacy VPN has a no-logs policy, making it an excellent choice if online privacy is one of your primary concerns. Ivacy VPN provides a 7-day money-back guarantee to users who want to test out their VPN services.
IvacyVPN
Use it when you want to download large files from China servers and unblock torrents.
Many VPN providers, including Private Internet Access, have what appear to be China servers. In reality, these servers are located in Hong Kong, which has been long considered a safe place for data centers, thanks to its location.
Recent tensions made various VPN providers reconsider this strategy and either pull the plug on HK servers completely or at least reduce their numbers.
But let’s get one thing straight: Hong Kong servers aren’t the same as VPN China servers, although the lines seem to be blurring lately.
Not so long ago, Hong Kong benefited from the free and open Internet, which was a strong advantage to China’s heavily-regulated, censored Internet.
Thus, it goes without saying that we’ll only cover VPNs with true China servers.
All things considered, regardless of your reasons to want a China server on your VPN, there are definitely a few services that could cater to your needs.
Visit the Traveling Section to learn more about how VPNs can help you while traveling. Check out our VPN How-To Hub to discover more awesome, easy-to-follow VPN guides.
Whether it’s PureVPN, HotSpot Shield, or Ivacy VPN, these services will let you get a China IP address. Obviously, there’s also a bunch of Chinese government-approved VPN services, but we wouldn’t recommend using those.
The reason for using a VPN is to keep your privacy safe, and a government-regulated VPN might fail to keep your traffic/identity anonymous.
Some users reported that there were too many login retries when trying to access Steam, and it seems like the message sounds like this:
There have been too many login failures from your network in a short time period. Please wait and try again later.
Fortunately, in today’s article, we’ll show you how to fix the Steam too many login attempts from your network error, so make sure you check all the listed solutions.
How do I fix too many login failures on Steam?
1. Restart your modem
Go to your modem and press the Power button to turn it off.
Wait for at least 30 seconds.
Press the Power button again to turn the modem on.
Once the modem boots, try reaccessing Steam.
2. Clear browsing cache
2.1 Google Chrome
Press on the Windows key, type Chrome, then open the browser.
Use the following keyboard shortcut to open the Clear browsing data page: Ctrl + Shift + Delete.
In the Tame range section, choose All Time.
Now, checkmark the Cookies and other site data and Cached images and files boxes.
Click on Clear data.
2.2 Mozilla Firefox
Hit the Windows key, type Firefox, then open it.
Press simultaneously on the following keys to open the Clear browsing data window: Ctrl + Shift + Delete.
In the Time range to clear section, drop-down the menu, then select Everything.
Now, checkmark the Cookies and Cache boxes, then click on the OK button to save the changes.
After clearing the cache, check if the Too many login attempts message appears in Steam.
We showed you how to clean the cache in Chrome, but the methods should be more or less the same for other web browsers.
3. Wait for an hour
Turn off Steam completely. Make sure that the client is closed.
Wait for at least an hour without trying to log in.
After an hour has passed, try to log in to Steam again.
Several users reported that this method worked for them, so you might want to try it out.
Keep in mind that some users stated that they had to wait up to 24h if there were too many login failures on Steam.
How long does the Steam login failure take?
If you’re wondering how long the Steam login failure takes, the official waiting period is not precise.
Our experiments place it in the 20 to 30-minute window. However, there are many cases when users reported experiencing lockouts for much longer. So, you have to consider hours and even days.
Quick Tip:
You might bypass this waiting time by trying to log in to your Steam account using the Opera GX browser.
Opera GX is a fast, slim, and reliable browser, and with Twitch and Discord integration, it’s a perfect choice for gamers. Our experiments proved that it is fast while navigating and using streaming apps.
Opera GX
Login to verify your Steam account, and see if there is a problem there.
If you’re getting Too many login failures messages on Steam, using a VPN can help you circumvent that, and ExpressVPN is one of the best solutions you can get.
Our VPN recommendation will protect your privacy and encrypt your traffic so that it won’t be visible to third parties or your ISP. Besides, you may change locations to generate a new IP to login into Steam.
This is undoubtedly one of the best VPNs on the market that supports up to 5 devices, and it uses Wireguard, PPTP, Lightway, and OpenVPN protocols.
If you’re concerned about being watched by cybercriminals, remember that ExpressVPN uses military-grade AES-256 bit encryption, which will always guarantee a personal online activity.
Plus, you can usually connect to local or long-distance servers quickly on Steam. Our experiments showed that the average time of accessing a local server is 3 seconds, and when it comes to distant servers, you have to consider like 5 seconds.
ExpressVPN comes with a trustworthy 30-day money-back guarantee, so manufacturers have faith in their products.
5. Use a different network
If possible, switch to a different network and try to log in again.
Alternatively, enable mobile data on your phone, and use your phone to log in to Steam.
Many users reported that this solution worked for them, so try it out.
Also, if you cannot run Steam games on Windows 10, don’t hesitate to look for the best solutions to eliminate this problem.
What other Steam login failures should I be aware of?
Even if you sometimes run into today’s presented problem, you should know that some other annoying login issue can occur while trying to run Steam. In this manner, you have to consider:
No user logon Steam – Some users reported facing this error when accessing their favorite games on Steam; you know how frustrating it can be.
Steam does not remember my password – Many players claimed that Steam couldn’t remember their passwords no matter what they try, but with our dedicated fixing guide nothing is impossible.
Too many login failures error can prevent you from logging in to Steam, but if you can’t wait for a couple of hours, be sure to try one of the solutions from above.
What happens when the Steam account is locked?
When your Steam account gets locked, you will not be able to access your account and thus will not be able to access any related data.
To resolve this issue and recover your account, you have two options:
As you can see, it’s effortless to recover your account on Steam if you have the correct information.
This is a simple workaround, but it might help you fix the network error that indicated too many login failures.
Frequently asked questions
How long do you have to wait after too many login attempts? You usually have to wait for at least an hour, but you can circumvent this by switching to Opera GX or any other web browser.
It’s important to understand how to unblock websites on your WiFi router if you want to bypass certain restrictions. To make it easier for you, we outlined the exact steps to do this below.
How to unblock websites on a Wi-Fi router?
1. Check parental controls in router settings
Launch your browser of choice
Go to the default gateway on your network (your router’s address)
Switch to Advanced mode
Check the Parental Controls section for any blacklist/whitelist rules
In the Security section, make sure the website is not on the blocked list
After changing the settings (if necessary), restart the router
Check if you can access the website now
2. Flush your DNS
Launch the CMD with administrator rights.
Type ipconfig /flushdns.
Press the Enter key on your keyboard.
Close the command prompt.
3. Change your DNS
Find a DNS you’re comfortable with (we recommend Google, OpenDNS, and Cloudflare).
Launch a CMD instance.
Type ncpa.cpl and hit Enter.
Right-click your active Internet connection and select Properties.
Select TCP/IPv4 and click Properties.
Click the Use the following DNS server addresses radio button.
Type the two DNS servers in the corresponding fields.
Click OK.
Restart your PC.
4. Unblock websites with hosts file
Open File Explorer.
Go to the drive where your Windows is installed (usually it’s C:).
Access the WindowsSystem32driversetc folder.
Right-click the hosts file and open it with Notepad (or your favorite text editor).
Make sure there are no lines of text after the comment lines (the one starting with #).
Save the hosts file.
Restart your PC.
5. Use a VPN
Get a VPN subscription and download the VPN software to your device. We use ExpressVPN because it is very secure and proven to unlock even the strictest platforms.
Install it on your PC.
Launch it and log into your account using the activation code.
Connect to a server in another region (where the website is less likely to be blocked).
Try to access the website again.
VPNs can circumvent geo-restrictions by spoofing your online identity (IP address, DNS, location). ExpressVPN is a great option when it comes to this. All you have to do is install and connect to a server.
ExpressVPN
Unlock any website without being tracked with ExpressVPN’s premium servers.
Many online services got smart and detected VPN traffic without too much effort. That’s why sometimes using a VPN won’t work as intended, especially if it lacks obfuscated servers (ones that bypass VPN blocking).
A Smart DNS service lets you access geo-restricted content by eplacimg your DNS address with one of its servers’ addresses, stripping geo-location data from it.
We hope that our quick guide helped you unblock websites on your WiFi router and access any content you desire.
Remember, if a website is blocked by your ISP or geo-restricted, there’s nothing you can change in your PC’s configuration to make it accessible again other than using third-party specialized tools such as a VPN or a Smart DNS.
Pirated versions of software often come accompanied by security threats. Most of the time, they require secondary applications to run or register.
One of those is Keygen.exe, a simple application that can bring a bag full of malware or spyware right at your front door.
Our intention today is to explain what Keygen.exe is, how it can affect your PC, and how to deal with it. If you’re concerned about the negative effects, look below for a detailed explanation.
Is Keygen safe?
Named also Key Generator, is a hack tool but not malware per se. It mostly comes with pirated software and its main use is to create license keys so users can illegally register the desired application.
Even though this tool isn’t malware by itself, it’s still illegal for obvious reasons, and it can be carrying Trojan, viruses, or data-stealing keyloggers that will damage your PC.
In comparison to cracks, Keygen doesn’t modify any parts of the program. Modifying certain security algorithms enables any random license key to work.
After you’re prompted to insert the license key during the installation, this hack application will generate a code so you can manually insert it.
How can I remove the Keygen.exe virus?
1. Perform a quick virus scan
1. Press theWindows key + I to open theSettings app.
2. Go to theUpdate & Securitysection.
3. SelectWindows Securityfrom the left panel.
4. In the right panel, click onOpen Windows Security.
5. Select Virus & threatprotection, and click onQuick scan.
You can remove the Keygen.exe file from your PC by conducting a virus scan. Your built-in Windows antivirus can scan your PC and not only find the tool, but also provide you with options as to what to do to remove it.
If you’re keen to get rid of Keygen and other related files, you can do it by deleting them manually. Just completely delete the downloaded files and that should be it.
On the other hand, there’s a chance that your system is already infected. Therefore, any infections detected may mean you will have some data loss.
2. Use a third-party antimalware software for a deep scan
Making sure that your PC is protected from the effects of the malware presence is of utmost importance. In this case, we suggest a full scan with a modern antivirus solution.
This antivirus is a next-generation security solution that is designed to be fast, stay out of the way, and keep your digital life safe.
It offers complete protection against viruses, worms, spam, spyware, and other malware. This AI-powered antivirus is continually improving itself.
TotalAV
To optimally protect your PC from malware and tools like Keygen, rely on one of the best antiviruses.
Even though Keygen.exe isn’t malware, in more than 50% of detections, it carries some kind of malicious software. That’s a risk certain users are willing to take, but we don’t advise you to do that.
We also recommend you keep your computer safe by installing the recommended antivirus or any of these great malware remover tools.
Don’t forget to tell us whether one of the solutions gets you through the problem. If you have any other suggestions or questions, feel free to leave them in the comments section below.
Visual Studio Code is a very good source-code editor that was developed by Microsoft.
It has been used efficiently by clients because of its debugging features, embedded GIT control, and many other useful features.
There are situations in which you will surely need to open up at least 2 new tabs while working in VS Code, and even though this option should be available easily, users have problems finding it.
You have the possibility of opening temporary tabs that close automatically, or the option to open files in new tabs that will only be closed once your work on them will be done.
In today’s article, we will discuss some of the best methods to apply in this situation. If you want to find out more details, please read on.
How do I open multiple files in VSCode?
1. Open VS Code on your device.
2. Click File from the upper menu.
3. ChoosePreferencesfrom the drop-down list.
4. Click onSettings.
5. A window will appear with theUserandWorkspace Settingsbeing available. Choose the latter.
6. Search for workbench.editor.showTabs and modify the value to True.
7. Now you start opening as many files as you want in Visual Studio Code. To start off, click once on a file using your mouse. It will be opened in a temporary tab.
8. If you want to open a new tab that stays on your screen until you choose to close it manually, then you will need to double-click on the file.
In order to be able to open multiple files at once in Visual Studio Code, you need to tweak the app’s settings and set the workbench.editor.showTabs option to True.
When the option mentioned above is set to False, then the VS Code will only open one file at a time. If it’s set to True, then you can open as many files as you want in new tabs.
Even though this might seem like an obvious solution for those of you who have experience in VS Code, this method is very simple to apply.
If you are in a situation in which you’re searching for a specific part of a file, so you’re going through a bigger set of documents, it is recommended that you open the files in temporary tabs.
In today’s guide, we explored some of the best options available for you in order to open multiple files inside VS Code.
The first step is to make sure that the settings of VS Code allow you to open multiple files, and then you can simply use your mouse to open up either temporary or normal new tabs.
If this guide has managed to help you understand and control the situation better, or you have any suggestions, please don’t hesitate to contact us and share the information.
You can do so by using the comment section found below this article.
Defrag Windows 11 using the tools it already has and keep your system running smoothly. Fragmentation builds up over time, and if you’re on a hard drive, it can slow things down fast. Luckily, Windows includes a built-in utility that lets you defragment manually, schedule it, or run quick commands. This guide shows you exactly how to use it.
2. Type defrag in the search box and select Defragment Optimize Drives from the list of results.
3. When the window opens, you’ll see a list of all your drives and their current defragmentation status.
4. Select the drive that you want to analyze, and click the Analyze button.
5. Wait for the process to finish.
6. If your drive is fragmented, select it and click on Optimize.
7. Wait for the process to finish. It can take a while depending on the fragmentation level.
Your Windows 11 PC has a built-in app that you can use to defragment your hard drive. It is called Defragment Optimize Drives and can be used to easily optimize your PC.
2. Use the Command Line
Press Windows Key + X and choose Windows Terminal (Admin).
To analyze your drive enter the following command, but be sure to replace X with the letter of your drive: defrag X: /a
After the scan, you’ll see information about your hard drive, including the fragmentation level and a note saying whether you need to defragment your drive.
Now enter the following command to defrag that drive: defrag X:
Wait for the process to finish.
There are also a couple of hidden commands that might come in handy. To defrag all drives that are available on your PC, use the following command:
defrag /C
To defrag all drives except the specified ones, run this command:
defrag /E X:
How can I schedule defragmentation in Windows 11?
Click on Windows Search (the magnifying glass from Taskbar), type defrag and select the Defragment and Optimize Drives app from the results.
In Scheduled optimization click on Change settings.
Set frequency to Weekly or Monthly.
Now click the Choose button.
Check the drives that you want to schedule defragmentation for and click on OK.
Click OK once again to save the changes.
3. Use Command Prompt
Typecmd in the Start bar.
Under Command Prompt, select Run as administrator.
Type the following command: defrag C:(replace C with the letter of the drive you want to defrag in Windows 11).
Disk defragmentation reorganizes scattered data on your hard drive, placing it closer together. This reduces the time the hard drive takes to find and access files, improving your computer’s performance by making data retrieval faster and more efficient.
Should I defragment my SSD?
Solid-state drives don’t require defragmentation because of two reasons:
SSD has no moving parts: the main benefit of defragmentation is performance improvement. With SSDs being 10 to 20 times faster than the best hard drives and having no mechanical disks that need to be read, there’s no need for defragmentation.
SSDhas a limited amount of write cycles: SSDs last less than hard drives because they have a limited number of write cycles. This means that moving the files and writing them during the defragmentation process will reduce the lifespan of your SSD by using its write cycles.
How can I optimize my SSD?
Click on Windows Search from Taskbar, type defrag, then select the Defragment and Optimize Drives app.
Click on the SSD drive to select it and clic on Optimize.
It’s not recommended to defragment your SSD but you can optimize it instead, with no risks. The procedure is called trimming, and you can access it just like on an HDD, by using the steps above.
The trim action identifies areas on the disk with unused data. In other words, the files that were deleted and are waiting to be overwritten.
That is because when you delete a file, it doesn’t get erased from the disk. They are only marked as free, available space. But after the trimming process, the data will be deleted.
It’s an active way of optimizing your SSD but it’s not as near as effective as the defragmentation procedure for an HDD.
Wrapping up
Knowing how to defragment your HDD is essential if you want good performance. It can prolong the lifetime of your hard drive and help your PC run smoother.
Today’s malware is one of the most significant threats to a home-based or a business computer.
If your system gets infected, it will be less likely that you’ll be able to install and run anything on your system.
To overcome such a situation, it’s recommended that you have an offline/portable virus scanner to scan your Windows 10 system.
A PC that became severely infected may also not have access to the Internet anymore, and that’s why a portable virus scanner plays such a crucial role in your computer.
We’ve listed some of the best offline antivirus programs that are portable tools, and this means that you’ll be able to easily run them from a USB stick for instance.
Check out all their features and see which one seems to fit your security needs best.
What is an offline scan?
An offline scan is an automated feature that can be capable of running when the system doesn’t work because of the damage caused by a virus. It allows the anti-malware engine to detect and remove any threat that’s affecting your PC.
Specialized third-party tools can thoroughly scan and detect malicious threats and eliminate them from your device, optimizing its working state and reassuring its health.
TotalAV is an antivirus software that offers excellent virus detection rates thanks to its useful security features.
You can schedule scans for malware, tracking cookies, and junk files to run automatically on your previously-set time. You can also custom scan with which you can pick a single file, folder, or disk to scan.
This program has a Real-Time Protection feature that helps you scan your PC and instantly block threats in real-time before they get a chance to damage your system.
Other impressive features are included too:
Block malicious websites
Spyware removal and adware cleaner
Data Breach search
Advanced WebShield
Multi-device compatibility
Secure password vault
TotalAV
Trustworthy software that protects your PC successfully with its in-depth features.
Panda Dome is an antivirus suite with a multitude of different features and high-quality cybersecurity protection.
It has a Data Shield feature that helps you create a barrier against malware and ransomware. You can choose a specific folder or program, which locks out all unauthorized access to it. By doing so, it cannot be overwritten or else corrupted.
It can also scan your hard drive and automatically find and remove fragments of old files and programs, Windows temporary files, and known log files.
This software successfully blocks access to inappropriate or harmful content and wipes your device data remotely in case of theft or loss.
Here are other key features you should know of:
Secure and manage all your passwords with a single click
Virtual vault to protect your money and confidential data
Pin-protect access to specific apps
30-day money-back guarantee
24/7 technical support
Panda Dome
Protect your PC from any threats with Panda Dome’s useful and unique characteristics.
Bitdefender Antivirus Plus is able to provide superior protection from viruses and other threats compared to the built-in antivirus tool from Windows 10, Windows Defender.
The tool will keep your computer secured against malware, and it will offer enhanced protection against phishing attacks, and suspicious activity.
After you install it, you will probably never have to look at it again. The program will take care of everything in the background, and there won’t be any complex configuration to worry about.
This antivirus was designed for anyone who wants to keep the computer secure without having to worry about complicated details.
Lastly, the interface is accessible and clean with a new streamlined dashboard and specific protection against ransomware.
Check out the best features that are included in this software:
Has an excellent track record of picking up both known and unknown threats
To check the files, you just have to drop them onto the program window
A full scan is also a straightforward process
Network-threat prevention is included in the desktop program
Autopilot technology for automatic malware defense
Bitdefender Antivirus Plus
This high-end antivirus is an award-winning solution whether online or offline.
Kaspersky is a great antivirus solution with various scanning options. You can do a Quick scan that checks the usual places on your device where malware can be found.
You can also opt for a Background Scan to scan your system memory, and disk boot sectors, and even check the applications for any vulnerability.
Furthermore, this software lets you grant access to a blocked device in offline mode only if Kaspersky Security Center is deployed in the organization and a policy has been applied to the computer.
It boosts your system and contributes to the fast operation of your device. It can easily remove threats such as spyware, adware, keyloggers, and hard-to-detect fileless trojans.
Take a look at other worth mentioning features of Kasperksy:
Database regularly updated
Protect your passwords
System optimization
Web protection
System cleanup tools
Kaspersky
An antivirus solution to keep your device safe from any type of threat and increase its health.
The Emsisoft Emergency Kit is a collection of portable software that comes with a sturdy Malware scanner, HijackFree, and BlitzBlank in the Pro version.
The free version of the software includes a powerful malware scanner that will eliminate deep threats. You can run the program via a USB stick.
A useful option is the Whitelist which will exclude files, folders, and processes from the scan if you choose this.
Check out more of its essential features below:
The software is ideal for rescuing your computer from infections
It supports both the command line and the GUI
You can download it for free, and you can also purchase a pre-compiled USB stick for commercial use
You have to download and run the executables to extract the Emergency Kit
If you run the program on a system without an Internet connection, you have to select No to bypass the online definition update
The website updates the Emergency Kit executable once a day at least
eScanAV AntiVirus Toolkit is less well-known than all of the software that we have mentioned above. On the other hand, its detection results place this program in line or even ahead of some major household names.
eScanAV AntiVirus Toolkit also provides an Antivirus Toolkit that is a dedicated portable virus scanner, and this means that it will work even when you’re not connected to the Internet.
Check out the best features that are included in the software:
Straightforward to use and all your options will be placed in just one window
Select which areas and drives you want to scan
Choose if you want to scan or also clean the drives
You can also check the archives
First, it’s recommended that you update the virus definitions that may be out of date, and for this, you’ll need an Internet-enabled computer.
You have to unpack mwav.exe and run mexe.com to launch the program and click Update to get the latest definitions.
You can take the mwav folder to an offline computer after performing the update.
These are our picks for the best offline virus scanner for Windows 10 and all of them will do a great job.
Each of them comes with its unique set of useful features, but all of these tools are guaranteed to keep your system safe and clean even while you are offline.
Check them all out and after analyzing their features get the best option for your computer’s safety. Drop us a line in the comments section if you have any suggestions or additions.
RAR files are one of the most popular and most used types of files on PCs, and their usage didn’t change in Windows 10.
So in this article, we’re going to talk about RAR files, how to create them, how to extract them, and more.
What is this article for?
The tools that we’ve written about in this article and that we use on a daily basis, are very useful in case you are also searching for:
How to download .rar files on Windows 10 – Downloading .rar files is no different from any other common file, such as a .txt document. Once downloaded, follow the article to learn how to see and extract the contents.
How to open .rar file in Windows 10 – Any of the tools recommended can open .rar file and let you see the content of that file.
How to unrar files on Windows 10 – The process of extracting the files from a .rar file is also commonly called unrar. Therefore, you need to download and install the recommended tools.
What is a RAR File?
RAR file is a compressed file that is used for storing larger files in archives, in order to take less space on the hard disk or transfer easier.
You’ll easily recognize RAR files because it uses a file name extension .rar.
Unfortunately, Microsoft didn’t add native support to Windows 10, despite users’ demands, so to manage .rar files, we’ll have to use a third-party program.
Since we’re talking about .rar files only, probably the most popular program for creating and extracting .rar archives is WinRAR.
How do I make and extract a RAR file in Windows 10?
1. Make a RAR file using WinRAR
Just right-click on the file or folder you want to compress, and click on Add to archive…
Now just name your archive and press OK (you don’t have to touch other options, because everything is already set)
And there you go, you created a .rar archive, and it will appear next to file/folder you compressed
To create a .rar archive/file, you need to download WinRAR first. After that, it can’t be simpler, just follow the steps above.
If you’re compressing a larger file, you’ll notice that it takes less size on the disk than the original, so you can move it quicker.
Once you create an archive, all files will stay in it, no matter if the original is still present on your PC, so even if you delete the original file, you’ll still be able to access it in the WinRAR archive.
1. Open theWinRAR archiveyou want to extract files from.
2. Select the files you want to extract.
3. Click on Extract to.
4. Choose the destination path where you want your files to be extracted.
5. Finally, click on OK to begin the extraction process.
Extracting .rar files from an archive to a Windows 10 computer is as simple as creating a .rar archive, maybe even simpler.
You just need to open the archive and drag files that you want to extract from the archive to a folder on your computer.
That’s all, you now know how to create and extract .rar files with WinRAR. You don’t have to strictly use WinRAR for managing .rar files, but we consider it’s the best solution.
However, if you don’t like WinRAR, you can use WinZip, which also can handle .rar files exceptionally well.
3. Create a RAR file using WinZip
Go to File, select new Zipfile, and add the file that you want to convert into a .rar file
Select the Zip option located in the left-hand panel, and hit OK.
In the right-hand panel, select which actions you want to enable before saving the file: Encrypt/ Reduce photo size/ Convert to PDF/ Add a watermark.
Under Share or save Zip you can choose to create the new zip file, email it or share it on social media.
If WinRAR feels a bit too old, or you are looking for way more options, such as integration with your favorite cloud storage, you should download, install, and use WinZip.
Once installed, be sure to follow the steps above to create a .rar archive/file using WinZip.
”WinZip”
”Quickly
”Free
&aff_sub2=Native” current_url=”true” button_text=”Get it now” image=”https://windowsreport.com/wp-content/uploads/2020/07/winzip-winzippro-24-generic-210×160.jpg”]
If you don’t want to download and install a dedicated tool to create and extract RAR files, you can also use online resources to generate RAR files.
One of the most popular online RAR converters is Zamzar. This tool supports over 1,000 different file conversion types, including compressed formats.
All you need to do is upload the file(s) that you want to compress, select the format to convert to, enter your email address to receive the converted files, and then hit the convert button.
There you go, if you want to create and extract RAR files, you basically have two options: you can download and install a dedicated tool or use an online platform.
If you’ve got other tips on how to create RAR files on Windows 10, let us know in the comments section below.
Windows Terminal is the default command-line tool on Windows 11, and it replaces the PowerShell and Command Prompt.
The software has many improvements and can run various shell interfaces side by side, so you won’t have to learn to use a new tool from scratch.
Thanks to this feature, there’s no need to start Command Prompt, PowerShell, or any other shell individually since you can run them all from a single application.
Windows Terminal can run multiple shell interfaces; therefore, many users wonder if it is possible to set a default command-line shell.
We’re happy to inform you that this is one of the features that the Terminal supports, and in this guide, we will show you how to easily change the default Terminal in Windows 11.
Is Windows Terminal a new application?
Windows Terminal is a modern terminal app for Windows that works with various shells such as Command Prompt, PowerShell, and Windows Subsystem for Linux.
Do keep in mind that Windows Terminal isn’t a new application. It was released in 2019 and is available for download from the Microsoft Store for Windows 10.
You can easily install Windows Terminal when using Windows 10, yet with Windows 11, the Terminal is now the default command-line application, so there’s no need to download and install it separately.
Are Command Prompt and Windows PowerShell still available in Windows 11?
Yes, Command Prompt and Windows PowerShell are available in Windows 11, and Windows Terminal can run both or any other installed shell interface.
If you want to use PowerShell or Command Prompt instead of Windows Terminal, you can search for them and open the app the same way you did on previous versions of Windows.
Windows Terminal has many unique features, and the first one that you’ll notice is the multi-tab interface allowing you to open several tabs.
This is crucial because the Terminal works with multiple shells so that you can use both Command Prompt and PowerShell from a single application.
Customization features are plentiful; you can rename tabs, give them different colors to distinguish them better, or change the color scheme of the entire application.
Lastly, Windows Terminal has a dedicated search feature to easily find any output.
How can I open Windows Terminal?
1. Use the WinX menu
Press Windows Key + X.
Now select Windows Terminal from the list.
2. Use the Run dialog
Press Windows Key + R.
Now type wt and press Enter.
3. Use the context menu
Right-click any open directory.
Now choose Open in Windows Terminal from the menu.
Keep in mind that this method will open the Terminal in that directory and not in the default one.
4. Use Search
Press Windows Key + S.
Enter Windows Terminal and select Windows Terminal from the list of results.
The Terminal is an excellent command-line tool, and changing the default Terminal in Windows 11 is simple and can be performed in seconds.
By default, the Terminal is set to run PowerShell, and from it, you should be able to run most commands, but if you need to switch your default shell, you can do it with the instructions from our guide.
Things aren’t at all complicated if you’re a Mac user, either. You can quickly open a file from Mac Terminal to make commands shorter and easier to remember.
If you want to learn more, our guide on Command Prompt vs Windows Terminal dives into the differences between the two, so don’t miss it.
Also, you might want to visit our guide and learn how to clear CMD if you want to keep your command line clutter-free.
Are you using the new command line in Windows 11 as well? Let us know in the comments section below what you think of it.
Why does my Microsoft Flight Simulator 2020 keep crashing?
There can be different reasons why Microsoft Flight Simulator keeps crashing, and some of the common causes include:
The system does not meet the minimum requirements
Outdated graphics drivers
Corrupted game files
A glitch with the overlay apps
If your PC does not support the game
Interference by the startup apps
A bug in the game
Before we proceed to the next section, you must check if your PC meets the minimum requirements:
CPU
Intel Core i5-4460 or AMD Ryzen 3 1200 or higher
RAM
8GB
OS
Windows 10 64-bit
Video Card
Radeon RX 570 or GeForce GTX 770 or higher
Pixel Shader
5.0
Vertex Shader
5.0
Free disk space
150 GB
Dedicated Video Memory
2048 MB
As a preliminary troubleshooting step, you may also restart the Xbox console or restart Microsoft Flight Simulator, and this helps fix the issue in some cases.
But, if Microsoft Flight Simulator still keeps crashing, we have some workarounds that can help you fix the issue.
How do I fix the Microsoft flight simulator if it keeps crashing?
1. Microsoft flight simulator keeps crashing windows 11/10
1.1 Increase Virtual Memory
Press the Win + R keys simultaneously to launch the Run console.
Type sysdm.cpl in the search bar and hit Enter.
Next, in the System Properties dialog, select the Advanced tab and click on Settings under Performance.
Now, in the Performance Options window, go to the Advanced tab, and under Virtual memory, press the Change button.
Here, deselect Automatically manage paging file size for all drives, and select Custome size.
Now, in the Initial size and Maximum size fields, enter the values based on the physical memory of your computer which should be memory should be 1.5 to 3 times the size of physical memory.
For example, in my case, the physical memory (RAM) of my PC is 4 GB.
So, for me, the Initial size will be 4 x 1024 x 1.5 = 6144 MB, and the Maximum size should be 4x 1024 x 3 = 12288 MB.
Once done, click Set and then click on OK to save the changes and exit.
1.2 Perform a Game Files Verification
Open Steam, and navigate to the Library.
Now, right-click on Microsoft Flight Simulator 2020and select Properties.
Next, go to the Local Files tab on the left.
On the right, click on Verify integrity of game files.
Once the process is over, you can open Microsoft Flight Simulator 2020 and test your flight.
1.3 Change your power plan
Press the Win + R keys together to open the Run console.
Type powercfg.cpl in the search field and hit Enter.
Next, select High Performance and click on Change plan settings.
Next, go to Turn off the display field and select Never for both On battery and Plugged in options. Click Save changes.
Now, open Microsoft Flight Simulator 2020 and see if the problem has gone away.
2. Microsoft flight simulator keeps crashing Xbox
2.1 Try to use a different profile
On your controller, press the Xbox button on the top.
Next, click on Profile & System and select Add or switch.
Now, try using or switching to a different profile. If only one profile is available then select the Add new option to add another profile that you can use for checking.
2.2 Disable Air Traffic In-Game
Go to the Microsoft Flight Simulator options.
Now, navigate through General settings, and click on the Traffic tab.
After that, click on Aviation Traffic, and turn off the Aircraft Traffic Type.
3. Microsoft flight simulator keeps crashing on startup
Download & install Microsoft Visual C++
Visit the official Microsoft page for Microsoft Visual C++ 2015 Redistributable Update 3 RC.
On the page, scroll down and click on Download.
Once downloaded, follow the on-screen instructions to finish installing the package.
Now, restart your PC and the Microsoft Flight Simulator keeps crashing issue should be resolved.
4. MSFS crashing after update
Press the Win + E keys simultaneously to launch the File Explorer, and go to the location where you have installed Microsoft Flight Simulator.
If you have installed the Windows Store version, below is the path: C:\Users[Your User Name]\AppData\Local\Packages\Microsoft.FlightSimulator_8wekyb3d8bbwe\LocalCache\Packages\
But, if you have installed the Steam versions, then below is the path: C:\Users[Your User Name]\AppData\Local\Packages\Microsoft.FlightDashboard_8wekyb3d8bbwe\LocalCache\Packages\
Now, go to the Community folder, select all content and hit Delete.
Now, close the Nvidia control panel (if using one) and launch the MSFS app to check if it’s still crashing after the update.
5. Update graphics drivers
Press the Win + R keys together to open the Run console.
In the search bar, type devmgmt.msc and hit Enter.
Expand the Display adapters section in the Device Manager, right-click on the graphics card and select Update driver.
Next, in the Update Drivers window, click on Search automatically for drivers.
Now, Windows will look for the latest driver and finish the installation automatically.
If you want an easier and safer option, then you should use a specialized tool that will perform this process automatically without any effort.
Professional software, such as Fortect Driver Updater is great at this task, as it allows you to scan for and update all your drivers in just a few minutes.
Press the Win + I shortcut keys to launch Windows Settings.
Click on Windows Update on the left.
Now, on the right, click on Check for updates.
Windows will now start looking up any latest updates. If available, it will display the results.
Click on the Download & install to download the update.
Now, click on Restart now to restart your PC and install the updates.
Once the updates are installed, try playing Microsoft Flight Simulator and it should not be crashing anymore.
7. Allow the game in Firewall
Open the Run console by pressing the Win + R hotkeys.
In the search box, type firewall.cpl and hit Enter.
Next, in the Windows Defender Firewall page, click on Allow an app or feature through Windows Defender Firewall.
Now, in the Allowed applications window, click on Change settings.
Go to the list of Allowed apps and features and look for Microsoft Flight Simulator.
Select the app and check the box next to both Private and Public.
How can I make the Microsoft Flight Simulator run smoother?
Microsoft Flight Simulator is a game and app like all others running on your Windows system. So, here are some tips on how to improve its performance:
➡ Close all other apps – All the apps use resources so make sure you are only running Microsoft Flight Simulator when you want to play
➡ Terminate unused processes – Press Ctrl + Shift + Esc to run Task Manager select any unnecessary processes and click on End task to close them
➡ Use minimized settings – If you have a low-end PC, enter the game’s settings and turn all the graphical features to minimum; the game won’t look so nice but it will run a lot smoother.
If none of the above methods work, you can uninstall and reinstall Microsoft Flight Simulator to check if this helps fix the issue.
But, if you are using the Xbox console, make sure that the Xbox software is up-to-date. At the same time, the Microsoft Flight Simulator app should also be updated to the latest version.