How to Fix Outlook Data File Has Not Been Configured

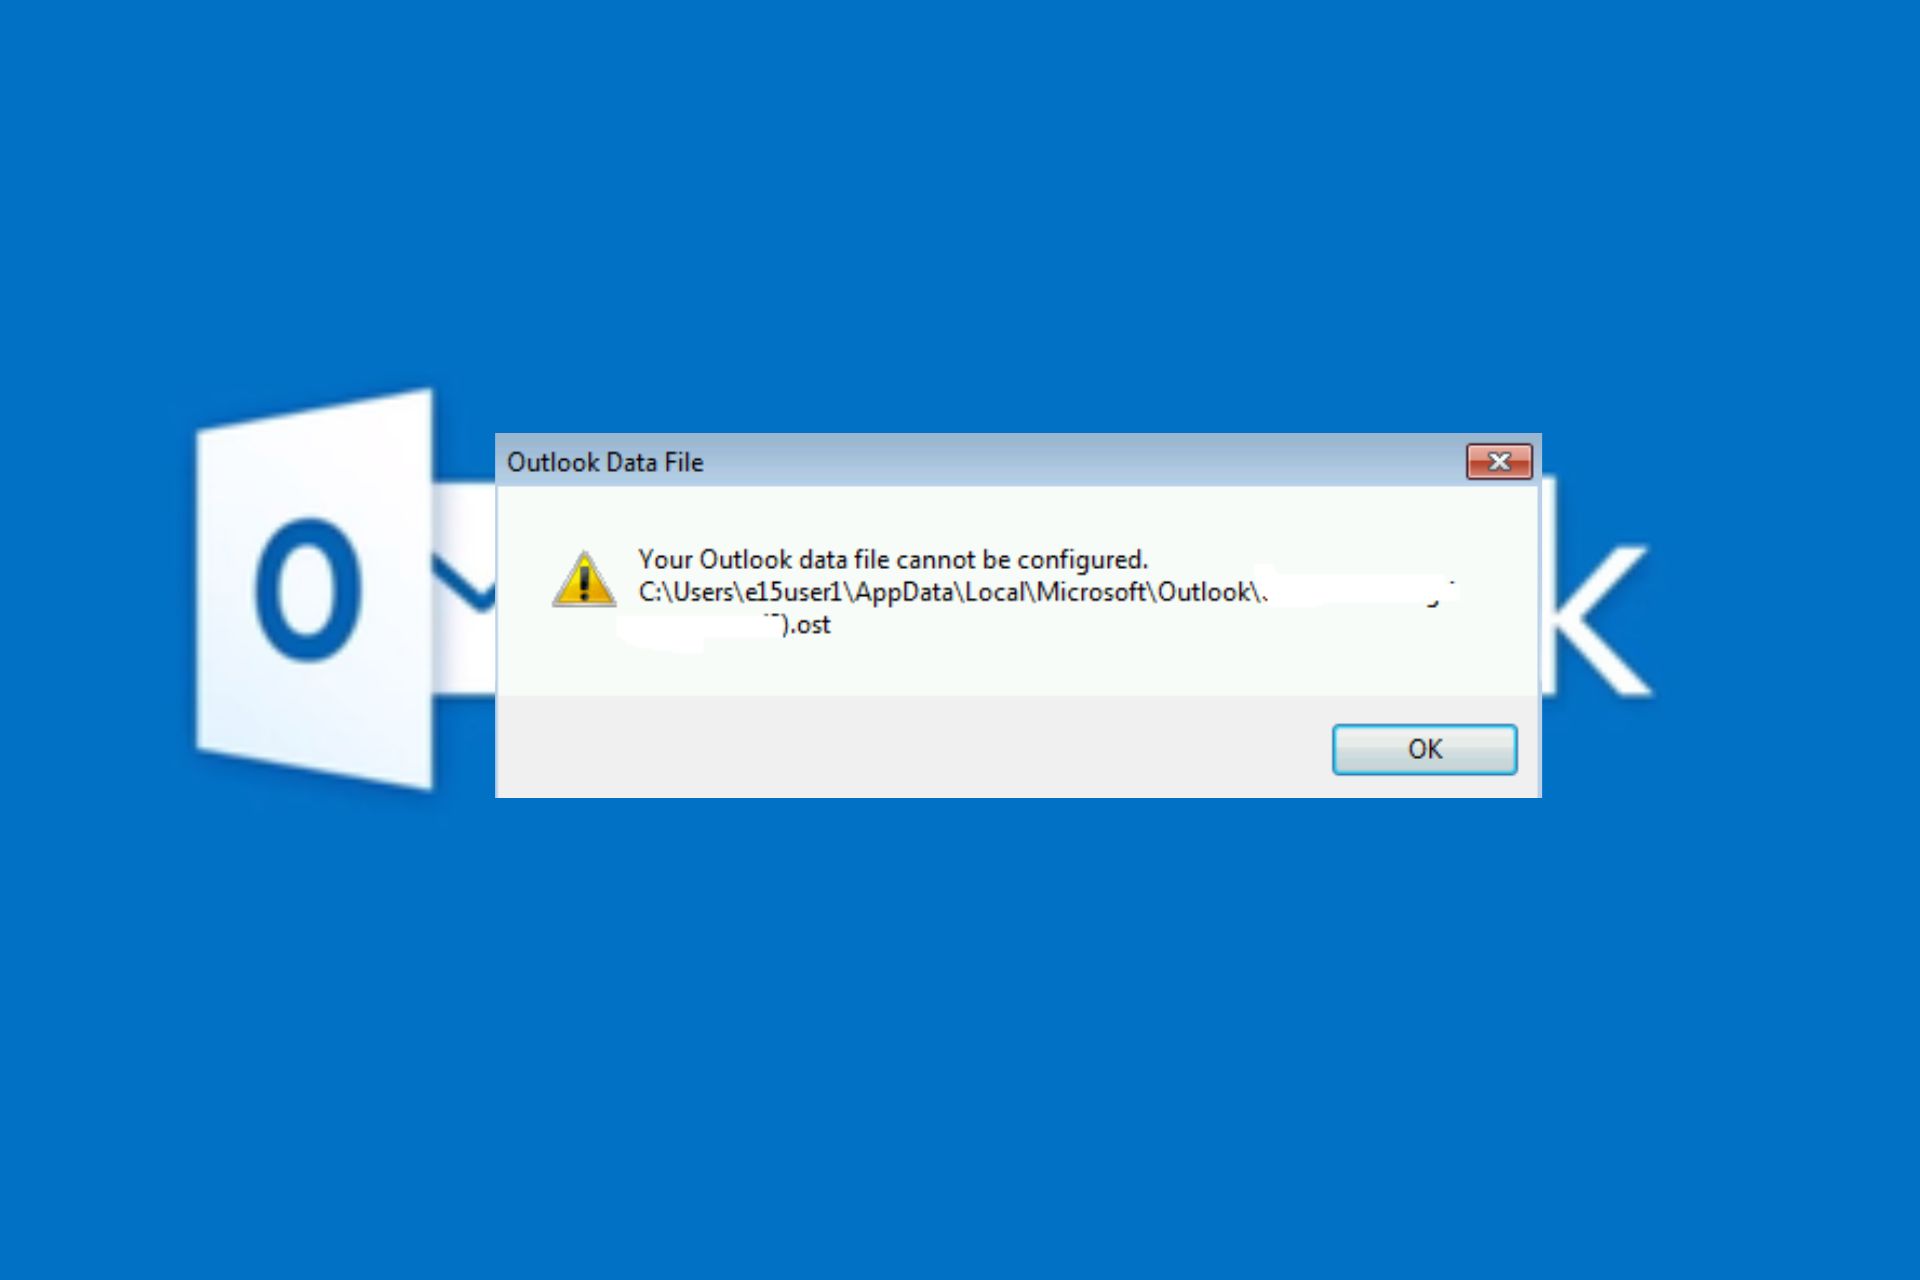
When you open Outlook and get a prompt to configure your data file, you need to set up your email account properly to use it, or else you risk losing important files.

We will share the main causes of this error and the solutions to resolve it.

What does Outlook data file not configured mean?

Outlook stores information about your Outlook profile in a PST file on your computer. However, if you have previously deleted the PST file or if it is corrupted due to a virus infection, you may see this error message when you start Outlook.

It can also occur if you’re trying to access your email account on a different computer than you normally use.

How do I fix Outlook data file has not been configured?

Check off the following preliminary steps first:

  • Close all Office 365 programs and any other superfluous processes.
  • Verify that the Outlook server is up and running and ensure your app is updated.

1. Start Outlook in Safe Mode

  1. Hit the Windows Search icon, type outlook.exe /safe in the search bar, and click Open.
  2. Try sending emails in Outlook and check whether the problem persists.

2. Force update Outlook

  1. Repeat steps 1-3 in solution 1 to start Outlook in Safe Mode.
  2. Click on File at the top of the screen, select Office account, and click the Office updates menu.
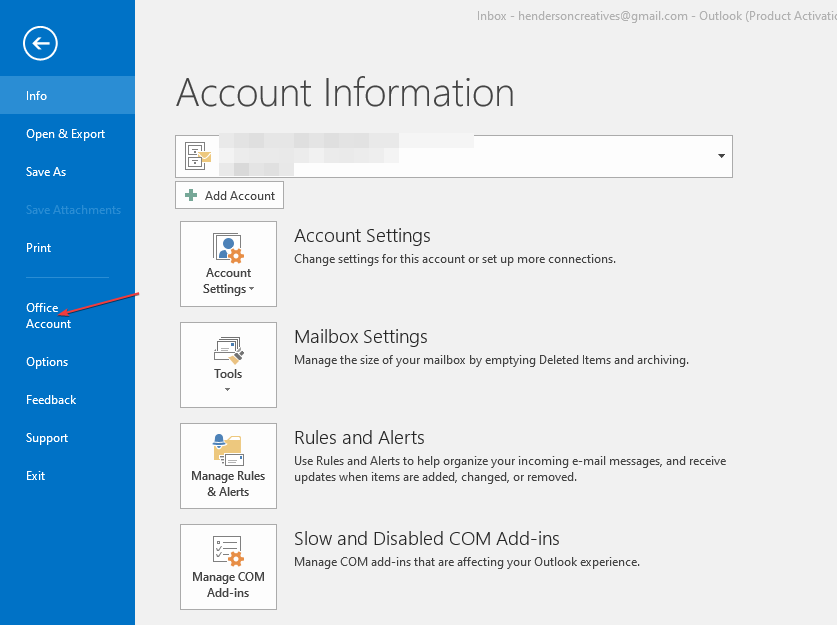
  3. Click the Update Options button, then select the Update Now option from the drop-down to install pending updates on Outlook.
  4. Restart your PC and launch Outlook to see if the error persists.

3. Repair the PST file

  1. Press the Windows + E key to open File Explorer.
  2. Navigate to the following path depending on where your Outlook files are located: C:\Program Files\Microsoft Office\Office14 C:\Program Files\Microsoft Office(x86)\Office14
  3. Double-click on the SCANPST key to launch the SCANPST.EXE utility.
  4. On the Microsoft Outlook Inbox Repair utility page, click Browse, and choose the PST file.
  5. Click Start to scan the file for errors; if there are errors, click Repair and wait for the Repair to complete.
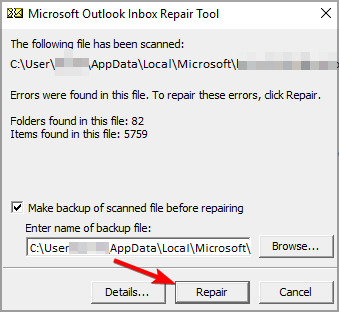
Scanning and repairing your PST files using the built-in tool may be the easiest way, but it may not be effective. We recommend using a tool designed specifically for repairing corrupt PST files. Stellar Repair for Outlook can repair even the severely damaged PST files in just a few minutes.

⇒ Get Stellar Repair for Outlook

4. Repair Microsoft Office

  1. Hit the Windows key, type Control Panel in the search bar, and click Open. control-panel-search fallout new vegas runtime error

  2. Navigate to Uninstall a program under Programs.going uninstall program control panel
  3. Locate MS Office, click on it, and select Change.
  4. Select the Online Repair option and click on the Repair button.
  5. Wait for the repairs to complete and try launching the app again.

5. Reset the Outlook app

  1. Press the Windows key + I to open the Settings app.
  2. Click on Apps followed by Apps & features.

  3. Within the Apps & features box, seek for the Office application by typing its name into the search area and selecting it from the three-dot menu, then selecting Advanced options.office-advanced-option windows 11 outlook crashing
  4. Scroll down until you reach the Reset area, and then click on the Reset button to restart the process.reset-app windows 11 skype crashing

6. Delete and re-add the problematic account

  1. Hit the Windows key, type Control Panel in the search bar, and click Open.control-panel-search fallout new vegas runtime error
  2. Type Mail in the search bar and click to open.
  3. Next, click on Show Profiles under Profiles in the Mail Setup window that pops up.
  4. A list of Outlook profiles registered on your PC will appear. Find the one that was having problems, click on it, then select Remove.
  5. A confirmation dialog box will appear, click Yes to confirm.
  6. Repeat the same steps, but when you get to step 4, instead of Remove, click on Add.
  7. Follow the on-screen prompts to re-add the account.

7. Reinstall Outlook

  1. Hit the Windows key, type Control Panel in the search bar, and click Open. control-panel-search fallout new vegas runtime error
  2. Navigate to Uninstall a program under Programs.going uninstall program control panel
  3. Locate MS Office, click Uninstall at the top of the menu, and then press OK.
  4. Restart your computer, then go to the Outlook download page to install the latest version available for your computer.

If all else fails, you can download your Outlook mail or switch to other email clients with similar or even more advanced features than Outlook.

In the future, consider converting your PST files to the OST format because of its many benefits. You can rest assured you won’t lose any data during the conversion process, but if you do, you can restore Outlook emails easily.

This should also sign that it’s time to start backing up your important files.

These solutions are relatively easy to complete and will not cost you much time. Your feedback is important to us, so let us know which solution did it for you in the comment section below.

Discord Rules Screening Not Working: 5 Ways to Fix it

Rules Screening in Discord allows server administrators to set up rules that new members must accept before joining the servers and interacting with other users, but it’s often not working.

Either the server admin can’t find the rules, or they are not displayed to a new member when joining. It’s a common problem, and moving the rules screening settings added to the confusion.

Why can’t I see rule screening in Discord?

You must first set up a community to see rules screening in Discord. The feature is exclusive to communities, though it doesn’t necessarily have to be discoverable. Besides, rules screening in the server settings is now moved to the Safety Setup tab under Moderation.

What can I do if Discord rules screening is not working?

Before we start with the slightly complex solutions, try these quick ones:

  • If you don’t see rules screening in Discord, terminate the process via Task Manager and then relaunch the app.
  • When new members don’t see rules at the time of joining, ensure you have at least set up some and that a bot is not assigning roles.

1. Check the Safety Setup tab

  1. Launch Discord, right-click on your server, and select Server Settings.server settings
  2. Go to the Safety Setup tab under Moderation, and click on the Edit button next to DM and Spam Protection.safety setup to fix discord rules screening not working
  3. Enable to toggle for Members must accept rules before they can talk or DM, then add a description, set the server rules, and save the changes.enable rules

2. Set up a community

  1. In Discord, right-click on your server, and select Server Settings.
  2. Go to the Enable Community tab, and click on Get Started.get started
  3. Tick the checkboxes for Verified email required and Scan media content from all members, and click the Next button.set up community to fix discord rules screening not working
  4. Follow the on-screen instructions to set up the community.
  5. Once done, either head to the Onboarding tab under Community or Safety Setup under Moderation to configure the rules screening in Discord.

3. Update the Discord app

With each update, Discord may introduce new features, rearrange the elements, and release patches for known bugs. And if Discord rules screening is not working or you can’t set up rules under the server settings, updating the app will do the trick!

To update Discord in Windows, terminate the app > reboot the PC > launch Discord > allow it to check for updates and download any pending ones.

Updating the app also jelps fix the Channel verification level is too high error on Android.

4. Re-enable the rule

  1. Right-click on your server in Discord, and select Server Settings.
  2. Go to the Safety Setup tab, and click the Edit button next to DM and Spam Protection.
  3. Disable the toggle for Members must accept rules before they can talk or DM.toggle
  4. Terminate the app via Task Manager and then relaunch it.
  5. Again, head to the server settings and re-enable the rules screening setting.

5. Add a small delay

When you have bots assigning roles to members at the time of joining, the membership screening is bypassed. While you could disable bots from assigning roles, another option is to add a delay.

And you can easily introduce a delay using MEE6, a popular Discord bot. To do that, enable the toggle for Delay at server rules acceptance, and keep the delay minimal, say 1-2 minutes.

So, if Discord rules screening is not working, you should be able to fix it now. Remember, the settings have been reshuffled a bit, and setting up a community is a must. Understand this aspect, and things should work.

And if you own a server with several members, discover the best Discord rules template for streamlined management.

For any queries or to share what worked for you, drop a comment below.

Exclusive Images: This is Samsung Galaxy Fit 3

Samsung will release a new fitness tracker called Samsung Galaxy Fit 3, and we’ve got the first images from our trusted source that confirm its existence.

There have been talks and rumors about Samsung Galaxy Fit 3 since we heard rumors about a patent that seemed to describe the device.

It has been a long while since Samsung released a fitness tracker. Fit 2 was launched in September 2020, and the new Galaxy Fit 3 shows a remarkable evolution in design.

Its main competitors are the Fitbit, Xiaomi, and Garmin trackers, and their manufacturers already have a tradition of producing such devices.

Samsung Galaxy Fit 3 design and features

We don’t know much about the technical specifications of Samsung Galaxy Fit 3. Still, Fit 2 has a 1.1-inch full-color AMOLED screen, heart rate monitor, gyro, accelerometer, sleep tracking, and automatic workout detection. Of course, it also featured display notifications and music playback control for the paired smartphone.

The Galaxy Fit 3 display is obviously much bigger, and from what we can tell, it might have an Android OS instead of the old rtOS, but it looks like Samsung definitely included a vivid AMOLED display.

By looking at the back of Galaxy Fit 3, we also notice a heart rate monitor sensor and docking connections.

Although Fit 3 looks slimmer than Fit 2, it might also include the GPS sensor that the older model lacked.

We also might expect built-in memory for storage and stand-alone music playback while it’s not connected to the phone.

A great feature that made Fit 2 popular was the fact that you could change the wristband that included the rubber bezel of the fitness tracker. That gave you the opportunity to get a band in any color you would like to fit your mood or clothes.

At first glance, Fit 3 has no hinge or mechanism to replace the band. If you can’t change it, you will be stuck with whatever colors Samsung releases.

We don’t know anything about Fit 3’s autonomy yet, but Fit 2 had approximately 15 days of battery life on normal usage and 21 days with low usage. Since 2020, batteries have become more efficient, but we can expect the same from Fit 3 if we consider the bigger screen.

Samsung Galaxy Fit 3 price and availability

We don’t have that information yet, but Fit 2 was released at $59 three years ago. However, Fit 3 looks like a more expensive tracker.

About the launch date, fitness trackers are traditionally launched together or around the date of a smartphone release. Since we’re expecting Samsung Galaxy S24 in January 2024, that will also be a great opportunity for the Fit 3 launch.

Will it be launched for Christmas this year instead? It could be a great present for fitness and fashion buffs alike.

What do you think about Samsung Galaxy Fit 3? Let’s talk about it in the comments section below.

How to Try-except-print an Error in Python

To write a working code, it’s necessary to find and handle any errors, and this can be achieved by using try-except and printing error information in Python.

By handling errors, you will ensure that your code is working, so it’s crucial to learn how to do it properly, and this guide will help you with that.

Do Python exceptions stop the execution?

This depends on the error but in most cases, if the code encounters an unexpected error, such as invalid syntax or an invalid integer, it won’t be able to proceed and it will stop the program execution.

How to use try except print for errors in Python?

1. Use the try and except block

  1. Open the code editor.
  2. Add the following lines:
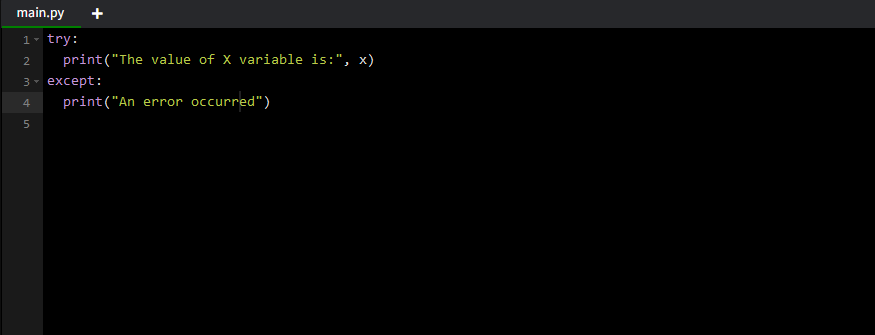
    try:
    print("The value of X variable is:", x)
    except:
    print("An error occurred")

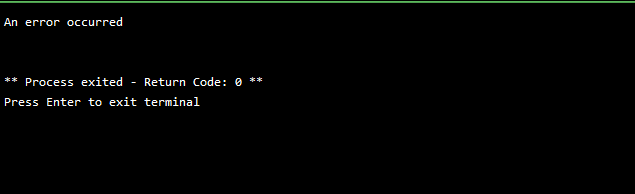
  3. Run the code and you should get a message in the terminal saying that an error occurred.

2. Get the error description

  1. Open your Python file.
  2. Use the following code:
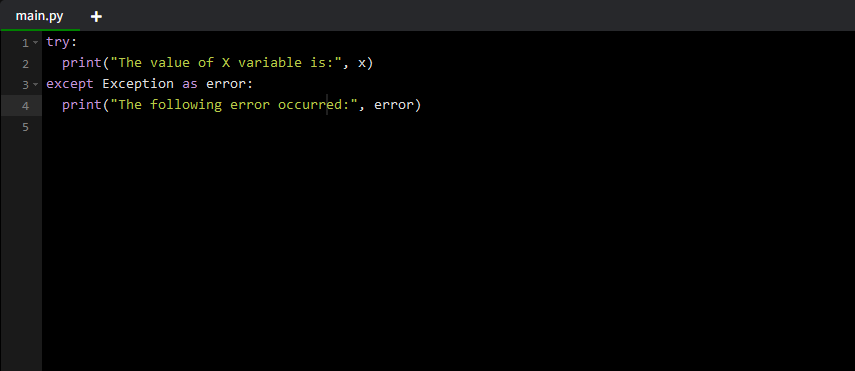
    try:
    print("The value of X variable is:", x)
    except Exception as error:
    print("The following error occurred:", error)

     
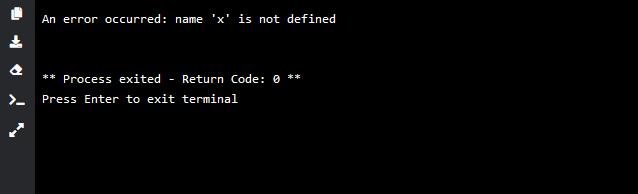
  3. When you run the code you’ll get the error message in the terminal thanks to the exception class and the error information will be printed from the exception object.

With these two methods, you only get the basic information, such as an error description, which can be useful for beginners or smaller projects.

When using try-except for debugging, it also helps to know which Python version you’re running, since error messages can differ. Here’s how you can check Python version in Windows CMD before testing your scripts.

3. Use the traceback module

  1. Open your coding tool.
  2. Enter the following:
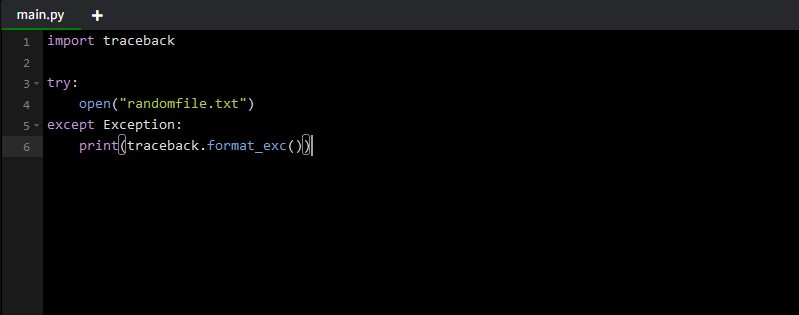
    import traceback
    try:

    open("randomfile.txt")
    except Exception:
    print(traceback.format_exc())

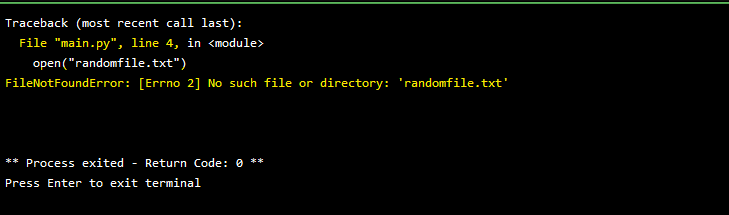
  3. When you try to run the code, you’ll get an exception message saying which error occurred, along with the information about the file name and the exact line that caused the error.

You can also use traceback.print_stack() instead if you want to see the stack trace that led to that error.

What is the difference between print and raise exceptions?

  • The print function will just display the error name as well as the line and file name where the error occurred.
  • With the raise statement, you can use custom exceptions, set exception types, and you can optimize your code using the exception handler.

This is how you can use try-except block and print errors in Python, and by using these tips, you’ll ensure that your code is always working properly without any unhandled exceptions.

While working with Python, you’ll encounter various issues, such as Python runtime error and ImportError: The specified module could not be found, but we covered both of these in separate guides.

Many also experienced PermissionError [Errno 13], but we have a guide that addresses it.

If you are facing another issue with Python, such as python setup.py bdist_wheel did not run successfully or _xsrf’ argument missing from POST, we have separate guides on them.

Did you ever use try-except to print error stack trace in Python? Share your tips with us in the comments section.

Solved: A Critical Error Has Occurred in Valorant

If you have encountered A critical error has occurred and the process must be terminated in Valorant when trying to launch the game, this guide can help!

We will discuss the probable causes and offer WR experts tested solutions to get rid of the error message so you can enjoy the game without interruptions.

What does critical system error mean?

When the game launcher or your Windows system encounters a problem that interferes with the game while it is trying to launch, it could cause the game to crash or throw you an error like this. The main reasons are:

  • Faulty game configuration files or server issues.
  • Riot Vanguard service is disabled or stopped.
  • Outdated graphics card drivers or game launch settings.

How can I fix a critical error has occurred issue in Valorant?

Before we go to the advanced fixes, here are a few preliminary checks you should do:

  • Restart your computer & router, and ensure Windows is updated to the latest version.
  • Verify your computer meets the minimum requirements, check Valorant server status to ensure that’s not the issue, and temporarily disable the third-party antivirus.
  • Close all the unnecessary programs, including RTSS and Afterburner, and update your BIOS firmware.

1. Run the game always as an administrator

  1. Locate the Valorant desktop shortcut, right-click it, and select Properties.Properties - a critical error has occurred and the process must be terminated
  2. On the Properties window, go to the Compatibility tab.
  3. Under Settings, select Run this program as administrator.Under Settings, select Run this program as administrator.
  4. Click Apply, then OK to confirm the choice.

2. Update your graphics drivers

  1. Press Windows + R to open the Run dialog box.Device Manager Run command - a critical error has occurred and the process must be terminated
  2. Type devmgmt.msc and click OK to open the Device Manager app.
  3. Locate Display adapters and click it to expand.
  4. Right-click your graphics driver and select Update driver.Graphics Driver update
  5. Select Search automatically for drivers.Update driver 2 -Search automatically for drivers.
  6. Follow the on-screen instructions to complete the process.

Keeping your graphics drivers up to date can also help you prevent other game issues like Valorant not working on Windows 11; read this guide to learn more about it.

3. Change the Startup type for the vgc service

  1. Press Windows + R to open the Run window.Services RUn command -a critical error has occurred and the process must be terminated
  2. Type services.msc and click OK to open the Services app. locate vgc and double-click it to open its Properties.
  3. In the Services list, locate vgc and double-click it to open its Properties.
  4. In the Properties window, for Startup type, select Automatic from the drop-down list.Startup type, select Automatic
  5. Click Apply, then OK to confirm, then close the Services window.
  6. Press Windows + E to open File Explorer and navigate to this path: C:\Riot Games\VALORANT\live\ShooterGame\Binaries\Win64
  7. Locate the VALORANT-Win64-Shipping.exe file, right-click it, and select Properties.Properties - a critical error has occurred and the process must be terminated
  8. Go to the Compatibility tab, and under Settings, place a checkmark next to Run this program as administrator.explorer_Run this program as administrator.
  9. Click Apply, then OK to save the changes.

4. Perform a TCP/IP reset, DNS flush and port forward

  1. Press the Windows key, type cmd, and click Run as administrator.CMD elevated -a critical error has occurred and the process must be terminated
  2. Type the following command to remove all static IP information for all the NICs on the machine and hit Enter: netsh int ip resetcmd_netsh command
  3. Copy & paste the following commands to remove the current IP configuration and request your DHCP client to reset an IP address and press Enter after every command:
    ipconfig /release
    ipconfig /renew
  4. To clear the corrupted or incorrect DNS cache, type the following command and hit Enter: ipconfig /flushdnscmd_ipconfig/flushdns - a critical error has occurred and the process must be terminated
  5. Copy & paste the following command to reset Winsock settings and recover your PC from socket errors if any, and press Enter: netsh winsock resetcmd_netsh winsock reset
  6. Restart your computer to let the changes take effect.

5. Change the Unicode settings

  1. Press the Windows key, type control panel, and click Open.Control Panel start menu -a critical error has occurred and the process must be terminated
  2. Select Category as View by and click Clock and Region.explorer_Clock and Region.
  3. Locate Region, and click Change date, time, or number formats.explorer_Change date, time, or number formats - a critical error has occurred and the process must be terminated
  4. Go to the Administrative tab on the Region window and click Change system locale.rundll32_Change system locale.
  5. On the Region Settings window, for the Current system locale, select English (United States) from the drop-down list.rundll32_English (United States) from the drop-down list.
  6. Click OK, then OK to save the changes.
  7. If this doesn’t work, go to the Region Settings again and place a checkmark next to Use Unicode UTF-8 for worldwide language support.se Unicode UTF-8 for worldwide language support.
  8. Click OK, then OK to confirm the changes.
  9. Reboot your computer and check if the issue persists.

6. Modify the GameSettings file

  1. Press Windows + R to open the Run dialog box.explorer_%localappdata% - a critical error has occurred and the process must be terminated
  2. Type %localappdata% and click OK to open the Local AppData folder.
  3. Navigate to this path: ShooterGame\Saved folder\Config\WindowsClient\GameUserSettings.ini
  4. Double-click the file to open it in Notepad. Locate DefaultMonitorIndex, change its value to -1 & then look for LastConfirmedMonitorIndex, and change the value to 0.Notepad_Edit gameusersettings - a critical error has occurred and the process must be terminated
  5. Press Ctrl + S to save the changes.

7. Repair/reinstall Valorant and Riot Games client

  1. Go to Valorant’s official website and click Download.Download - a critical error has occurred and the process must be terminated
  2. Double-click the installer file and select Advanced options.Install_VALORANT_(1)_Advanced options
  3. You will get the location where Valorant will be installed; choose the location of the existing app, then click Install.Install_VALORANT_(2)You will get the location where Valorant is installed; choose the exact one, then click Install.
  4. Wait for 10 minutes, then restart your PC.

If you are still experiencing the issue, follow these steps to reinstall the Valorant app:

  1. Press Windows + I to open the Settings app.
  2. Go to Apps, then click Installed apps.Apps - Installed apps -a critical error has occurred and the process must be terminated
  3. Locate Valorant, and click three dots, then select Uninstall.Uninstall Valorant a critical error has occurred and the process must be terminated
  4. Click Uninstall to confirm the changes.
  5. Go to Valorant’s official website and click Download.Download - a critical error has occurred and the process must be terminated
  6. Double-click the installer file and select Install to initiate the installation.

If you are not able to uninstall Valorant on Windows 11, try closing all the related processes, including Riot Vanguard, and try again.

If you use Blitz, MSI Afterburner, or Rivatuner, try uninstalling them using Steps 1-3 and check if the issue persists.

To avoid all common issues related to the game, like Valorant not updating, always run the app as administrator, allow it through the Windows firewall, and ensure the device has a stable internet connection.

If nothing worked for you, go to the Riot support page and submit a request explaining the issue and methods tried for further assistance.

Did we miss a step that helped you? Don’t hesitate to mention it in the comments section below. We will happily add it to the list.

How to Fix Error Code Weasel in Destiny 2

Destiny 2 errors are common, but they are usually quite straightforward, except for the weasel error code. There’s a certain lack of clarity as to what the error entails.

And until recently, a quick search on Google highlighted that it’s related to a ban applied to your account, which added to the confusion.

What is the error code weasel in Destiny 2?

As per the official website, Weasel is an all-encompassing error message indicating an issue with the network. Though it also shows up when a user is banned, and they are returned to the title screen.

The weasel error arises due to a problem with the Internet connection, using non-compatible mods, or network restrictions. 

How do I fix error code Weasel in Destiny 2?

Before we start with the slightly complex solutions, try these quick ones:

  • Check Destiny 2’s Server Network and Update Status, and make sure everything is up and running. 
  • Verify that you don’t have the Empowering Finisher equipped along with another finisher mod if you are getting the Destiny 2 error code weasel when changing loadout. Also, check for other invalid combinations and change the class item mods.
  • Switch to another network. If on a wireless connection (Wi-Fi), switch to a wired connection (Ethernet cable), and vice-versa. Besides, you could connect to a mobile hotspot. Also, perform a power cycle of the console, or if it’s a PC, simply restart it.
Note icon NOTE
The error message is encountered across devices, be it Xbox, PlayStation, or PC. And though our solutions are focused on Windows, the idea applies across the three. So, the equivalent measures on a different device will help.

1. Use a VPN

Your primary approach when faced with the error code weasel in Destiny 2 should be to use a reliable VPN solution. Often, selecting a server based in another region helps bypass any local local or network-related issue.

Remember, you will have to try out the different servers or, sometimes, even switch servers after a session to continue playing. But it should, in all likelihood, work out. 

We recommend for this task a reliable and powerful VPN, such as ExpressVPN. This tool has servers in 105 countries so you can always pick a new one if you were not satisfied at first.

ExpressVPN also offers very high connection speeds and very good security features, which you know for sure are very important when playing your favorite online games.

⇒ Get ExpressVPN

2. Verify the integrity of game files

Tip icon Tip
This solution only works if you have installed Destiny 2 via Steam.
  1. Launch the Steam app, and go to Library.
  2. Right-click on Destiny 2 from the game list, and select Properties.properties
  3. Go to the Installed Files tab, and click on Verify integrity of game files.repair files to fix destiny 2 error code weasel
  4. Once done, relaunch Steam, run Destiny 2, and check for improvements.

When corrupted game saves, missing app data or issues with the cache are to blame for Destiny 2’s error code weasel, using the built-in file repair option will work.

3. Whitelist the game in the firewall

  1. Press Windows + S to open Search, type Allow an app through Windows Firewall in the search bar, and click the relevant result.
  2. Click the Change settings button.
  3. Make sure Destiny 2, and the platform have both the Private and Public checkboxes ticked.private and public
  4. If you can’t find one, click on Allow another app at the bottom.allow another app to fix destiny 2 error code weasel
  5. Click the Browse button.
  6. Now, go to the app launcher’s location, select the .exe file, and click Open.
  7. Click on Add.add
  8. Tick the checkboxes for Private and Public, and click OK to save the changes.

If the firewall is blocking a port or program, you will have to whitelist it manually. It will get rid of the Destiny 2 error code weasel on a PC. Also, do the same for any third-party firewalls.

This also helps with Destiny 2 error code calabrese.

4. Change the DNS server

  1. Press Windows + R to open Run, type ncpa.cpl in the text field, and hit Enter.ncpa.cpl
  2. Locate the active network adapter, right-click on it, and select Properties.properties
  3. Choose Internet Protocol Version 4 (TCP/IPv4), and click the Properties button.
  4. Select Use the following DNS server addresses, and input the following:
    • Preferred DNS server: 8.8.8.8
    • Alternate DNS server: 8.8.4.4change DNS to fix destiny 2 error code weasel
  5. Click OK to save the changes, reboot the PC, and check for improvements.

While we used Google’s DNS server, it also makes sense to use the fastest DNS server near you as long as it works.

5. Enable UPnP

  1. Open your router settings using a web browser. The internal IP address is usually printed on the router’s backside.
  2. Go to the Advanced Network tab, and then select Advanced. 
  3. Tick the checkbox for Enable UPnP and save the changes.UPnP
  4. Relaunch Destiny 2 and check whether the error code weasel is fixed.

6. Reinstall the game

  1. Press Windows + R to open Run, type appwiz.cpl in the text field, and click OK.
  2. Select Destiny 2 from the list of apps, and click the Uninstall button.uninstall app
  3. Follow the on-screen instructions to complete the process.
  4. Once done, reboot the PC and download Destiny 2 again.

If the game error persists, use an effective software uninstaller tool to get rid of any leftover files.

7. Contact support

When nothing works, you can always contact Bungie support. Though, as per user feedback, it’s not a very pleasant experience. Also, if you were indeed banned and believe that it was wrongly imposed, raise a ticket to support.

Besides, while waiting for a response, you can always contact the ISP (Internet Service Provider) and check for issues with the network connection. If it’s an unstable Internet connection, increase the Wi-Fi signal strength or switch to a faster plan.

These solutions will help get rid of the weasel error code in Destiny 2.

Remember, a similar approach helps with most gaming issues, including the Destiny 2 error code buffalo. And if you are looking for something more comprehensive, discover all Destiny 2 error codes and their solutions.

For any queries or to share which fix worked for you, drop a comment below.

How to Find & Change Microsoft Teams Recording Location

Whether you want to save the lecture to take notes after or revise important points a client has provided for a new project, recording a Teams meeting can be helpful.

In this guide, we will talk about how to find and change the Microsoft Teams recording location so that you can efficiently manage & access the recorded content whenever you want.

Where are recordings from Microsoft Teams stored?

1. For the Teams channel meetings

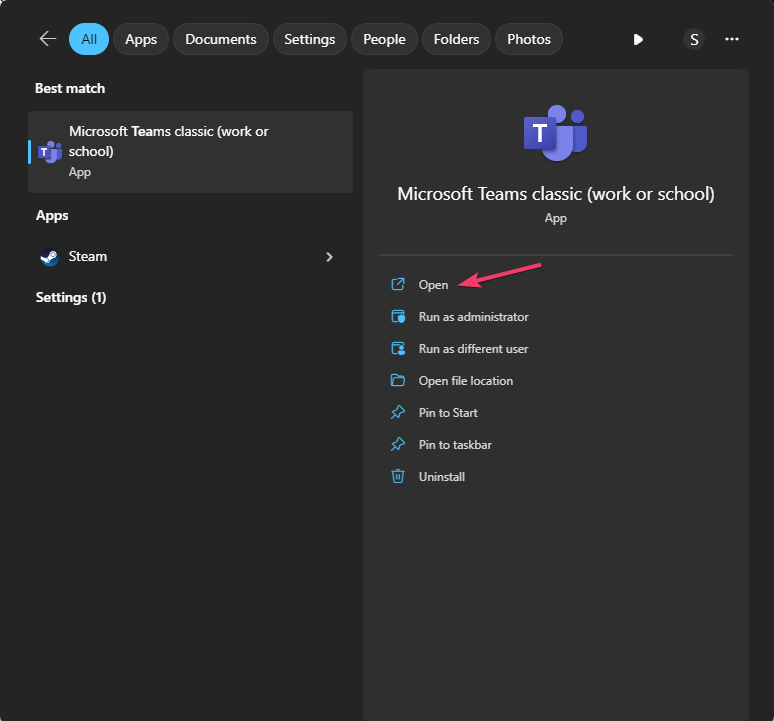
  1. Press the Windows key, type teams, and click Open.Teams - Find & Change Microsoft Teams Recording Location
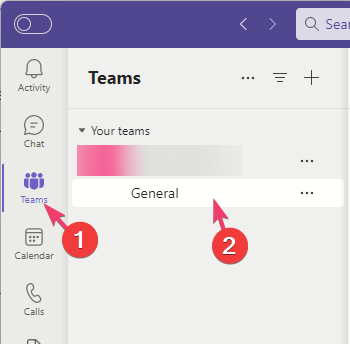
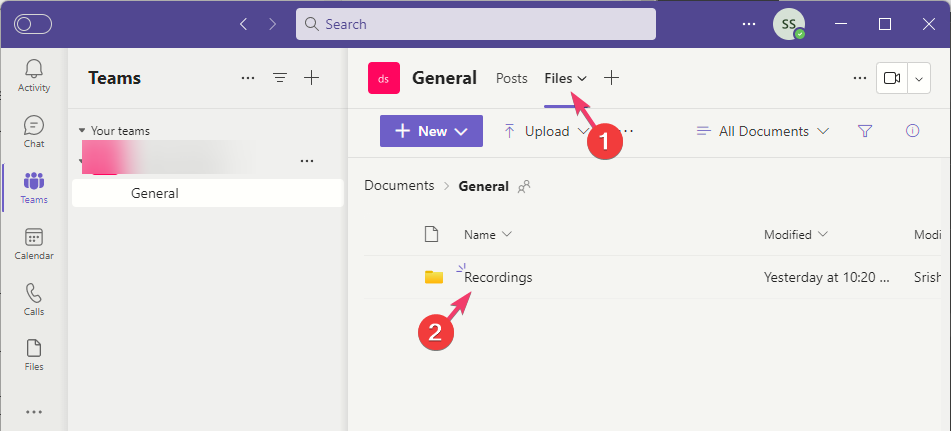
  2. Click Teams from the left pane and select the channel. Files tab from the top menu.
  3. Click the Files tab from the top menu in the meeting chat feed.Teams -microsoft teams recording location
  4. You will get the Recordings folder, then double-click it to open the Teams meeting recordings list.

Now that you know where Teams Meetings are recorded, you can easily access and view them.

2. For the Non-channel meetings

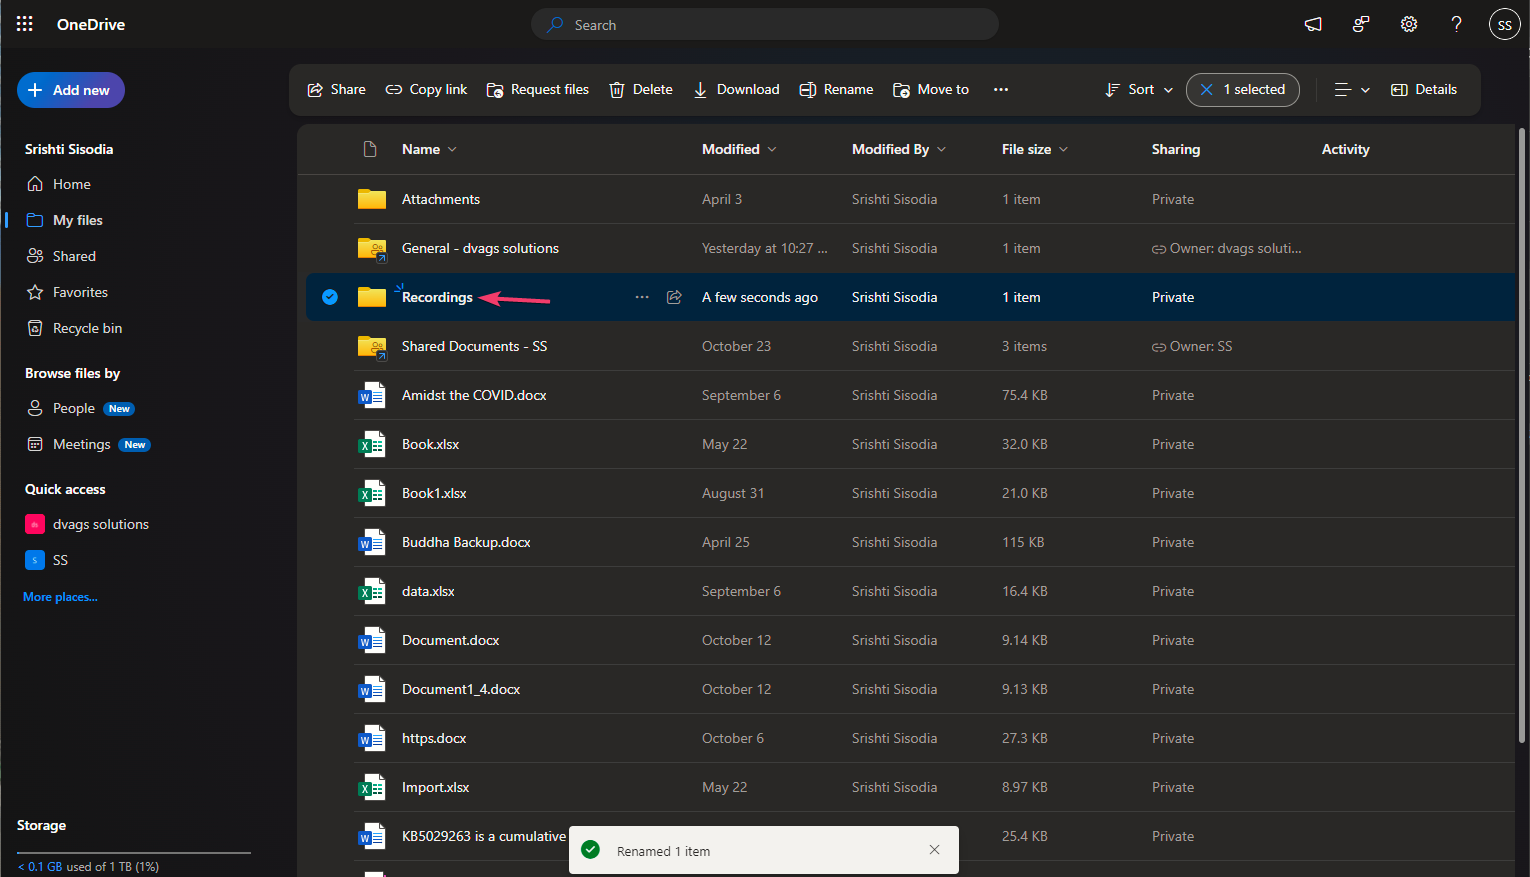
  1. Log in to your OneDrive account.OneDrive - Recording microsoft teams recording location
  2. Locate the Recordings folder, double-click it to open it, and you will find all the recordings of the meetings for which you initiated the recording.

Remember, for the non-channel meeting, only the meeting organizer can access the recording as it is stored in their OneDrive Recordings folder. However, all team members can access the recording from the Files tab for the Team channel meetings.

If you cannot find the recording files in the SharePoint folder, you need to rearrange the files correctly. To know more, read this guide.

How do I change the location of Microsoft Teams recordings?

Now that you know where Teams meetings are recorded, let’s see if you can change the default location. While the answer is no, you can move recordings from SharePoint or OneDrive if needed.

1. For the Teams channel meetings

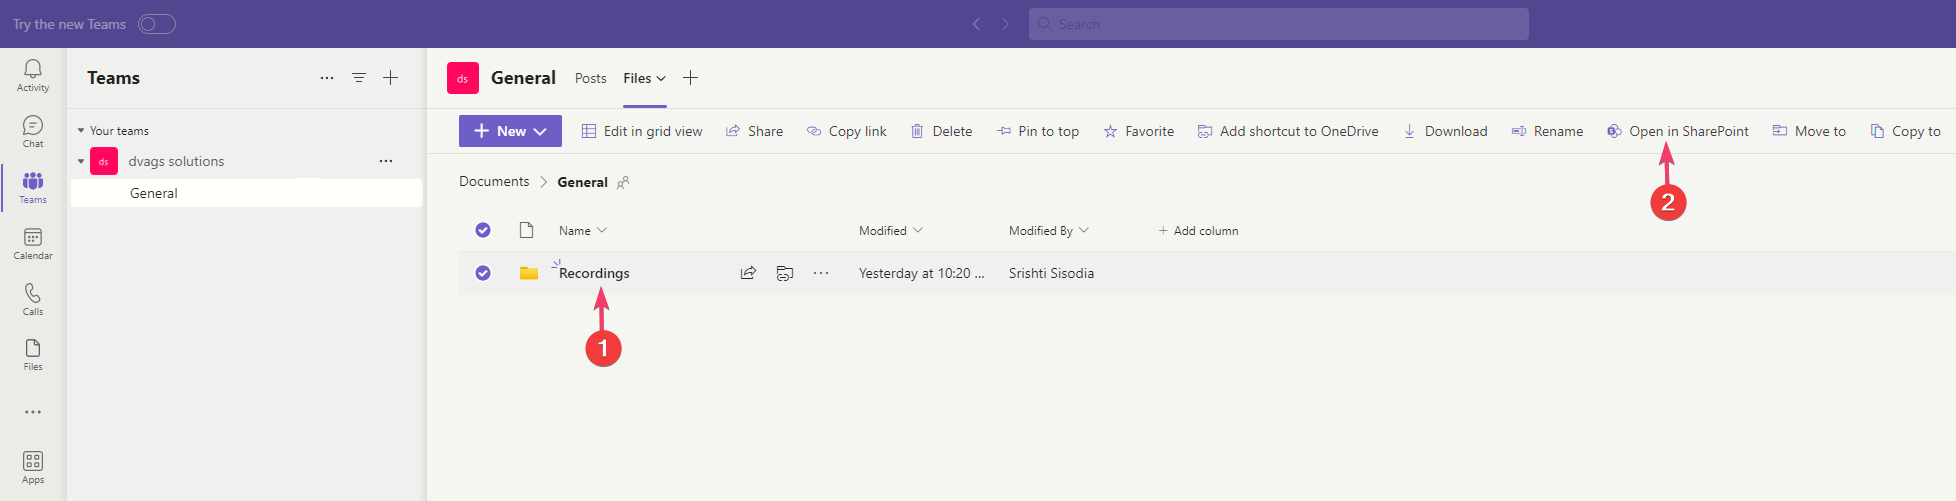
  1. Go to Teams, select the channel, and then click the Files tab from the top menu in the meeting chat feed.Teams_Teams, select the channel, and then click the Files tab
  2. Select the recording, then click Open in SharePoint.Open in SharePoint
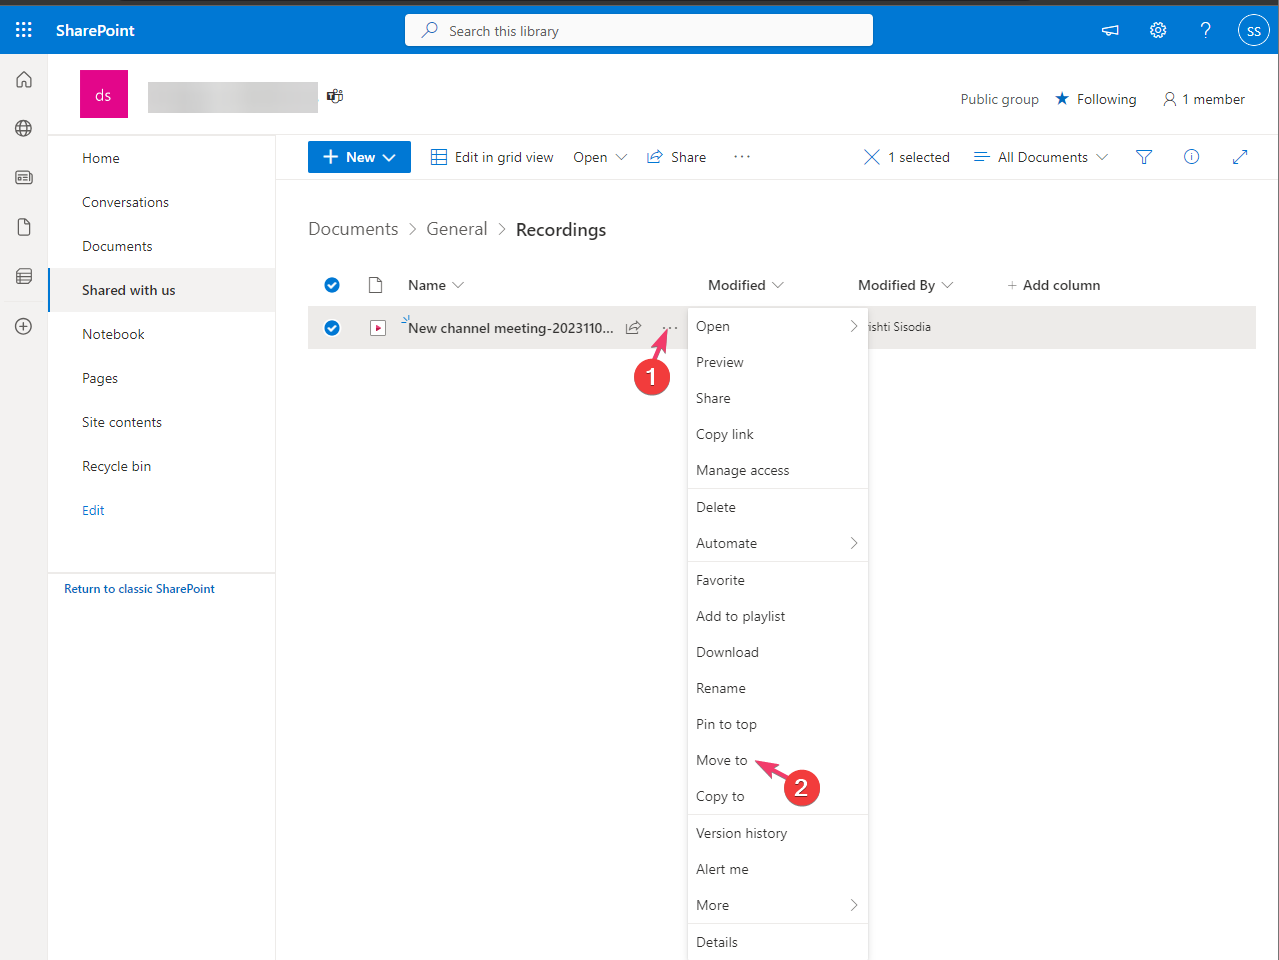
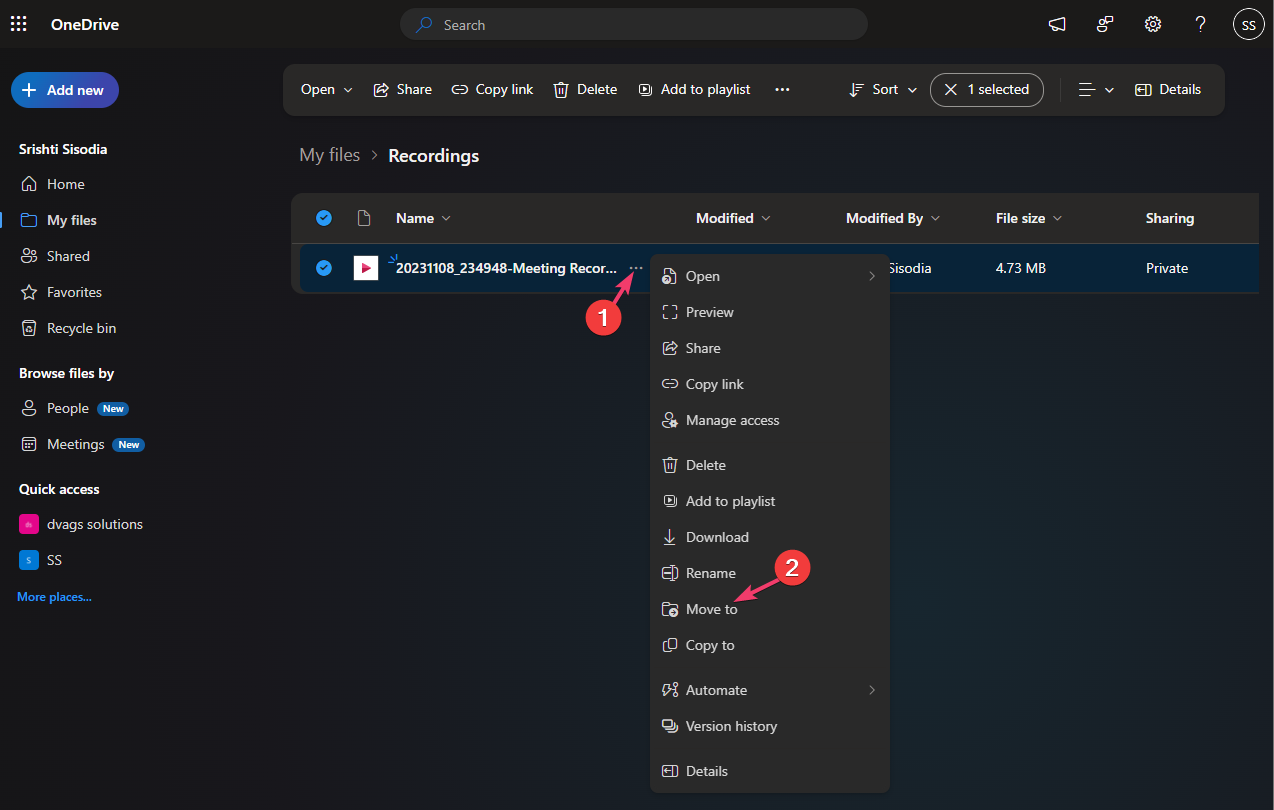
  3. Locate the recording, click the three dots next to it, and select Move to.Locate the recording, click on the three dots next to it, and select Move to.
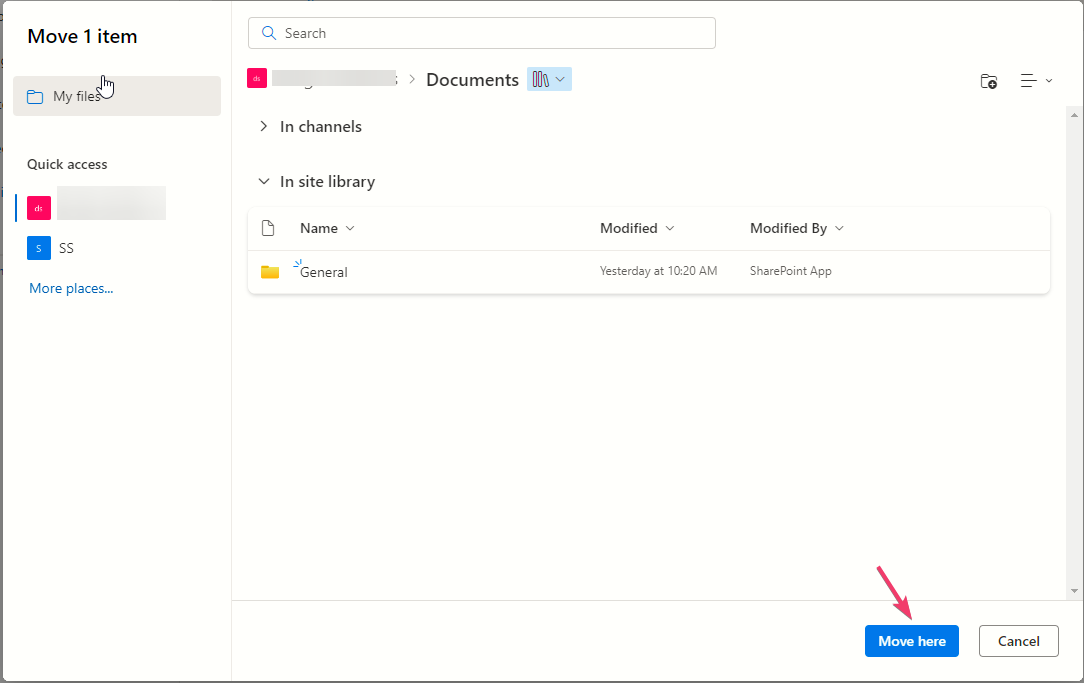
  4. Navigate to the location and click Move here.chrome_Navigate to the location and click Move here - microsoft teams recording location

2. For the Non-channel meetings

  1. Locate the recording in OneDrive, click the three dots next to it, and select Move to.click the three dots next to it, and select Move to -microsoft teams recording location
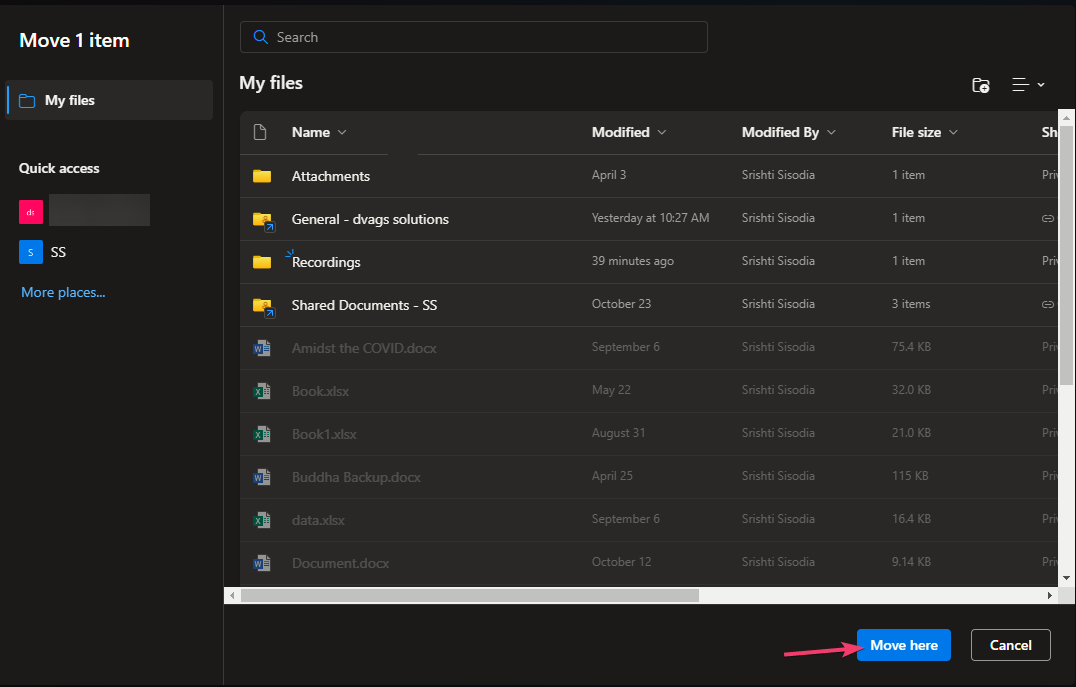
  2. Now, choose the folder or other location to move the recordings and click Move here.chrome_click Move here.

Since the Microsoft Teams meeting recordings have an expiration date, so if you want to save them longer, download them on your Windows 11 computer or move them to another location on the drive itself.

Why can’t I find my Teams recording?

  • The meeting recording has passed its expiration time of 120 days or the limit set by your organization.
  •  The recording was not initiated appropriately.
  •  You had unstable internet connectivity during the meeting, causing the issue.
  •  The default storage location is full, or the Microsoft Teams app is outdated.

Tips for Optimizing and Enhancing Your Meeting Recordings with Microsoft Teams

  • Before the meeting is initiated, inform all the participants that the session will be recorded to ensure everyone gives consent and engages in discussions for a productive session.
  •  Preview your video before turning on the camera to ensure it appears how you want while recording.
  •  Use Reactions, like Raise hand (indicating that you want to speak up) or Applause/Heart to show how you feel about a topic.
  •  Select a video layout for the meeting; on the meeting controls, choose More options, and choose from Gallery, Large gallery, or Together mode.
  •  Spotlight the main speaker video to ensure everyone sees them on their screen; right-click the speaker video, and select Spotlight>Spotlight to confirm the choice.
  •  Use breakout rooms for focused conversations; in the Teams app, select Breakout rooms>Select number of rooms you need> Assign participants> Create rooms>Start rooms.

FAQs

Where are Microsoft Teams meeting recordings saved by default?

Teams meeting recordings are saved to OneDrive for non-channel meetings and to SharePoint for channel meetings.

How do I find a recording from a regular Teams meeting?

For non-channel meetings, recordings are stored in the meeting organizer’s OneDrive under the Recordings folder.

Where are recordings stored if the meeting took place in a channel?

Channel meeting recordings are saved in the channel’s SharePoint site inside the Recordings folder.

Can I access Teams meeting recordings from the chat?

Yes. A link to the recording automatically appears in the meeting chat or channel conversation after the session ends.

Is it possible for admins to change the storage location of recordings?

Yes. Administrators can configure policies to adjust where recordings are stored based on organizational needs.

Now you know where Teams meetings are recorded, but remember that as of 2021, the recordings are no longer stored in Microsoft Stream but are found in SharePoint (Channel meetings) or OneDrive(other meetings).

Also, you can’t change the default location of recordings but can move them to a different location for future use and recover the storage on the drive.

Before you go, check our guide on how to properly record Teams meeting on your PC. Keep in mind that if you delete your recordings, you can easily restore Microsoft Teams recordings, so you don’t have to worry about losing them.

If you are on limited data and have to attend Teams meetings now and then, you must limit your data usage to ensure you stay within the data limit.

If you have any questions or suggestions about the subject, feel free to mention them in the comments section below.

Midjourney Internal Server Error: How to Fix it

One downside of a high-performing site like Midjourney is sometimes issues like the internal server error may occur because too many people are trying to access it. Fortunately, we found a way around it so that you can continue using it when such errors occur.

How can I fix the Midjourney internal server error?

First, verify that the Midjourney and Discord server statuses are up and running. Also close any system-hogging apps and processes then restart the app.

1. Clear Discord cache

  1. Press the Windows key + R to open the Run box, type %appdata%, and hit Enter.
  2. Locate the Discord folder in the Roaming folder, right-click, and select Delete.
  3. Once the folder is deleted, close the window, and restart your PC to complete the fix.

2. Re-add the bot

  1. Open the Discord app on your mobile or computer and locate the Midjourney Bot.
  2. Click on the bot’s name. Then click on Kick Midjourney Bot to remove the bot from your server.
  3. Wait for a few minutes to allow time for the bot to reboot before inviting the bot again.
  4. Go to the Midjourney server. click on people icon, click on Midjourney Bot, and select Add to server.
  5. Select your server, and Continue.
  6. Then, select Authorize.

3. Rejoin the Midjourney Server

  1. Firstly, press the Windows key, type Discord in the search bar, and hit Enter to open the app.
  2. In the Discord window, locate and open the Midjourney bot. Click the Downward arrow next to Midjourney, and click Leave Server.
  3. Then, press the Windows key, enter the name of your browser, and hit Enter.
  4. In your browser window, navigate to Midjourney’s official website to locate the Discord invite link.
  5. On the Midjourney webpage, click Join the Beta, and click Accept Invite to rejoin the Midjourney server.
  6. Check to see if the error is fixed.

4. Check your commands

At times, nothing is wrong with the servers and the issue is on your end. According to an X user, they repeatedly got the internal server error on Midjourney because of using double colons. After making the switch to commas, the error disappeared.

Midjourney may fail to process your commands because of common mistakes like these. Examine your commands and ensure you’re not using characters or commands that may fail to generate the images. You can familiarize yourself with some of the Midjourney commands to avoid making mistakes.

5. Reinstall Discord

  1. Press the Windows key, type Control Panel, and hit Enter.
  2. Click on Programs and Features in the Control Panel window.
  3. Scroll down to locate Discord, click on it, and click Uninstall.
  4. If there is a confirmation prompt, click Yes to confirm the uninstallation and close the Control Panel once the process is completed.
  5. Press the Windows key, type Microsoft Store, and hit Enter.
  6. Type Discord, and click on the displayed result.
  7. Click the Get or Install button to download the app.
  8. Once it’s installed, launch the app to see if the error is fixed.

6. Contact Discord support

If you have tried all the solutions above but still have no luck fixing the internal server error in Midjourney, we suggest that you contact the support team of Discord and let them know of the server issue. 

Alternatively, you can also check out the Member support channel where moderators, server members, and other Discord users give updates on common errors, technical issues, and available fixes in real time.

You will likely encounter a variety of errors along the way, but there is always a way through them.

To continue using the app seamlessly and avoid issues like an unresponsive Midjourney app, ensure your CPU resources are sufficient, you have no corrupt system files, and your PC is malware-free. After all, the goal is to continue creating more bespoke art designs.

Hopefully, with the tricks in this article, you’ll be able to get past that annoying Midjourney server error and save yourself the disappointment or confusion when you come across this for the first time.

And in the same breath, if you have any tricks related to this error that could be potential solutions, drop us a line below.

Solved: Spotify is Not Working on PS4

While Spotify runs seamlessly across devices, a few users on PS4 reported that the app is not working. For some, it wouldn’t appear in the app list, many had an error message, while others couldn’t download it altogether. 

Users even had audio issues with Spotify on the PlayStation, and in most cases, it turned out to be a problem at their end.

Why is Spotify not working on PS4?

  • Spotify is installed on an external storage
  • The PS4 database is corrupted
  • Issues with the DNS server and cache
  • The PlayStation Network or Spotify servers are down

How do I get Spotify to work on my PS4?

Before we start with the slightly complex solutions, try these quick ones first:

  • Make sure both Spotify and the PlayStation Network are up and running. For the former, use Downdetector, while for the latter, you can go to the official Network Service Status page.
  • Log out of the app, reboot the console, and then log back in if Spotify won’t play on PS4. Also, re-login to the PlayStation Network.
  • Make sure your Internet connection works fine. Consider switching to a wired connection (Ethernet) or mobile hotspot. Also, install the latest updates for both the Spotify app and the PlayStation.
  • If the PS4 Spotify is not playing music, make sure to increase the volume from the interface. It’s different from the general console volume.

1. Install Spotify on the PS4 system storage

Tip icon Tip
This method only works when you have installed Spotify on an external hard drive. We recommend you give it a try, even when using an external drive. If not, skip it and move to the next solution.
  1. Disconnect the external storage from your PS4, turn off the console, remove the power cable, plug it back, and reboot the device. Do not connect the external hard drive yet.
  2. Now, open the PlayStation Store and download Spotify.download to fix spotify not working on ps4
  3. Reconnect the external drive.
  4. When prompted with a message saying that Spotify is installed in two places and has to be deleted from one, remove it from the external HDD or SSD.
  5. Once done, reboot the console, and Spotify should work on your PS4. 

Installing the app directly on the built-in storage and removing it from the external drive worked for 9 out of 10 users. It even eliminates any Spotify installation errors on PS4.

2. Rebuild the database

  1. Hold the PS button on your console, go to Power from the menu, and select Turn off PS4.turn off
  2. Now, with the controller connected, hold the power button on the console for 12-15 seconds until you hear two beeps and the PS4 enters Safe Mode.
  3. Choose Rebuild Database from the options.rebuild database to fix spotify not working on ps4
  4. Select OK to confirm.
  5. Now, wait for the process to complete. It typically takes a few minutes, but in rare cases, the process could go on for an hour or more.database
  6. Once done, boot the console and check whether Spotify is still not working on PS4.

3. Disable linking with other services

  1. Launch the PS4 main menu, and open Settings.
  2. Go to Account Management.account management
  3. Select Link with Other Services.link
  4. Choose Spotify from the list of apps.
  5. Select Sign out.sign out to fix spotify not working on ps4
  6. Now, reboot the console and check for improvements. 

4. Change the DNS server

  1. On your PS4 console, go to Settings.
  2. Select Network from the list of options.network
  3. Choose Set Up Internet Connection.
  4. Select the Use Wi-Fi option.use Wi-Fi
  5. Go with the Custom setting.
  6. Choose your Wi-Fi network from the list, enter the password for it, and proceed.
  7. For the IP Address Settings, choose Automatic, then for DHCP Host Name, select Do not specify, and when you reach DNS Settings, go with Manual.dns
  8. Now, enter the following in the two fields and save the changes:
    • Primary DNS: 8.8.8.8
    • Secondary DNS: 8.8.4.4change to fix spotify not working on ps4
  9. For the remaining settings, go with the default selection and set up the network.

Also, while configuring the DNS settings, manually changing the MTU (Maximum Transmission Unit) to 1450 did the trick for many! Changing the MTU and DNS also helps with PS4 error CE-37813-2, WS-37431-8.

5. Reinstall Spotify

  1. Press the PlayStation button on the controller to open the main screen.
  2. Highlight Spotify from the list of apps (do not open it), expand the options, and select Delete.uninstall to fix spotify not working on ps4
  3. Select OK in the prompt to confirm the change.
  4. Now, reinstall Spotify from the PlayStation Store.

6. Reset the PS4 console to factory defaults

  1. On the PS4 main menu, select Settings.
  2. Scroll down to the bottom and choose Initialization.initialization
  3. Select the Initialize PS4 option.initialize PS4 to fix spotify not working on ps4
  4. Choose Full and follow the on-screen instructions to complete the process. It will take a few hours.full
  5. Once the PS4 boots up after the reset, download Spotify all over again.

When the previous solutions failed, and Spotify is not working on PS4, a full-factory reset might do the trick! Besides, it helped many with the A serious error has occurred message on PS4 

7. Create another Spotify account

Lastly, you may try creating another account and signing into Spotify with it. A few claimed that their account created using the Facebook profile was the reason Spotify was not working on the PS4. And switching to a regular account set up using an email address worked.

You may also contact Spotify support since they might be able to transfer the data from the old account to the new one.

If Spotify was not working earlier, it should do now on the PS4 console. Remember, the problem often lies with the network settings, the console’s configuration, or the app itself. But things are always easy to troubleshoot!

Before you leave, find out how to play PS4 games on your PC using the remote play software.

For any queries or to share more solutions with us, drop a comment below.

Microsoft might update Copilot to offer personalized experiences

Copilot finally made its debut in Windows 11 last month, when the Redmond-based tech giant released it along with Windows 11 23H2, after months of anticipation.

For now, the AI tool is capable of a lot of things: it uses Edge and Bing search to help users get tasks done. We’re talking about composing, suggesting Spotify playlists, summarising long texts, and even getting Windows 11 ready based on users’ inputs.

However, even though the tool was recently released, we can’t help but wonder where will the Redmond-based tech giant take it. And, if we’re to trust this recently published patent from Microsoft, it seems that Copilot might be soon updated to offer personalized experiences.

The patent was filed in 2020, but it was only recently published, meaning that Microsoft has been thinking about it for quite a while. If we take into consideration that AI is now a major feature in the tech world, and Windows 11, being able to vocally interact with Copilot doesn’t sound so futuristic.

There are Siri, Alexa, and many other AI models at our disposal. Talking to our Windows devices? Why not? However, this could be next level, and here’s why.

How would Copilot offer personalized experiences on Windows?

The patent describes a digital assistant that will be able to offer personalized experiences to users through a computer-based device that processes voice, text, and physical gestures. In many regards, this sounds similar to the technology Microsoft is developing for the next Windows version.

The catch about this particular technology is that this digital assistant model can be used by multiple people on the same account, effectively identifying between all of them, and offering every one of them a personalized experience based on their input.

The users of a digital assistant that receives input from a single device, or a single account associated with multiple devices, can vary in age, gender, country of residence and origin as well as multitude of other variable factors.

Would it work? According to the patent, yes, because this technology would use voice patterns, speech patterns, language patterns, and natural language processing to identify who is giving the input from a group of users.voice access personalized experience

This is not all, though. The technology is also capable of finding out and putting together background characteristics and traits of each user to form an image of them and use that to offer them personalized experiences.

The image would also be used by this technology to interact with you in a personal manner by giving you personalized responses and feedback.

In many ways, this could be the future of Copilot on Windows: a digital assistant capable of voice access and awareness of each user of a Windows device, delivering unique experiences to each of them.

Could Windows 12 bring this version of Copilot? Most probably, and if it’s not happening there, then it will eventually happen down the road.

What’s your opinion on this? Finally, we also invite you to check out our comparison Copilot vs. Copilot Pro.

Shahid Error Code 6009: How to Fix it

When it comes to Video on Demand services like Shahid, you can always expect some technical issues like error code 6009. This can interrupt your watch time but if you’re lucky, service should be restored in no time.

This is the same case we at WindowsReport have experienced and we bring you first-hand solutions.

Why is Shahid glitching?

Glitching or loading issues from streaming services are occasioned by unstable internet connections, server failures, or app-related issues. The error code 6009 on Shahid can manifest in frequent disconnections or interruptions.

What can I do to fix the Shahid error code 6009?

Start with the following simple workarounds before proceeding with the slightly technical troubleshooting steps:

  • Log out then log back into your Shahid app. Also, log out of other devices you may be signed in.
  • Verify that the show you want to watch is included in your current package and you have an active subscription.
  • Check your internet speeds and ensure they’re optimal for streaming then restart your device.

1. Update your Shahid app

  1. Launch the Google Play Store or Apple Store depending on your TV.
  2. Search for the Shahid app and check whether there’s an update.
  3. Click on Update then restart it.

2. Update your TV firmware

  1. For this solution, we shall be using the TCL model.
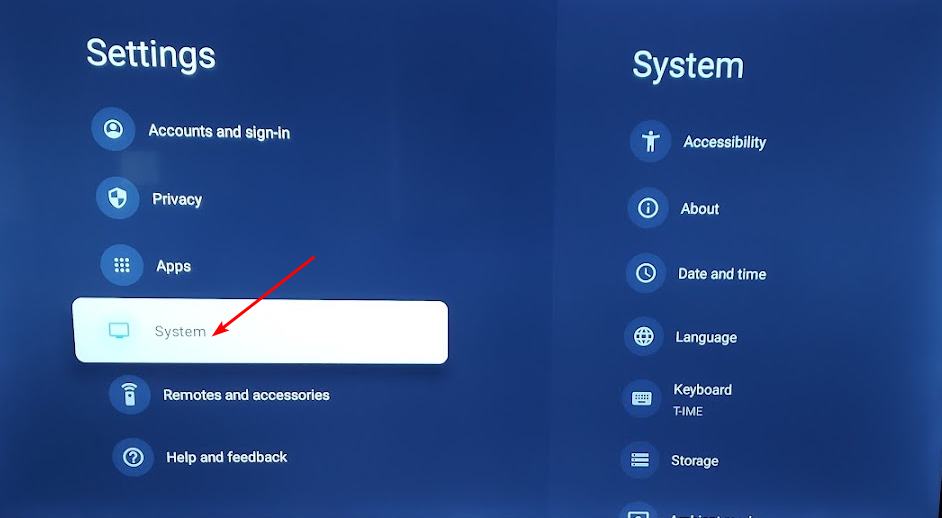
  2. On your TV, find your Settings.
  3. Go to System.
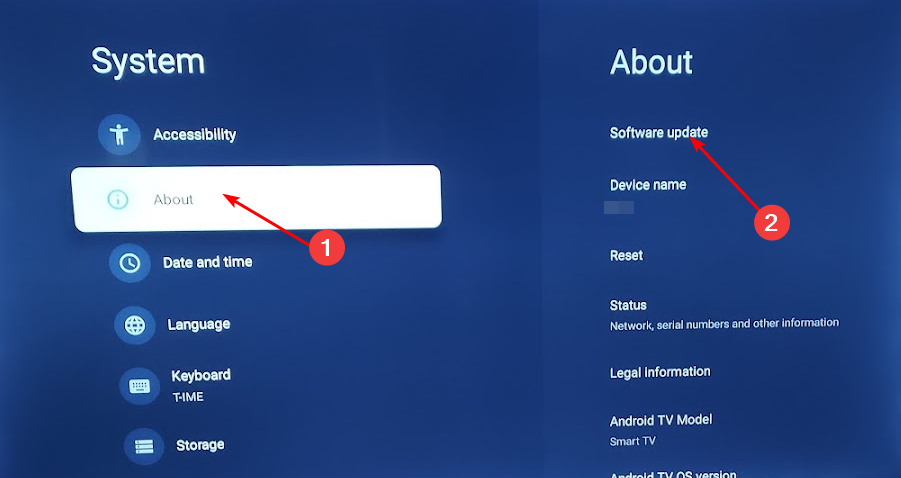
  4. Click on About then select Software update.
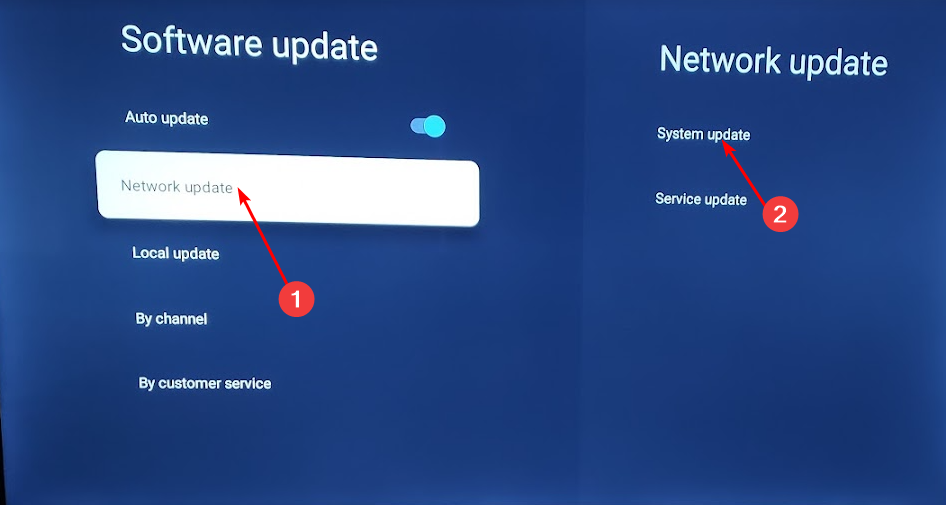
  5. Select Network update and click on System update.
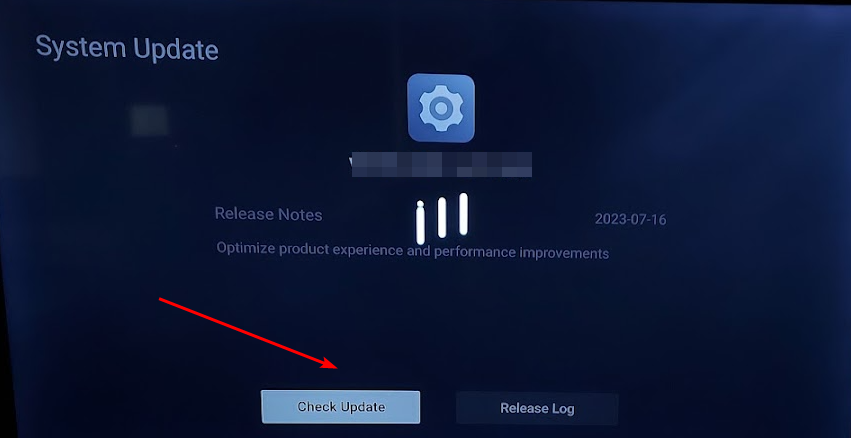
  6. Now click on Check Update. Your system will scan for any available updates.
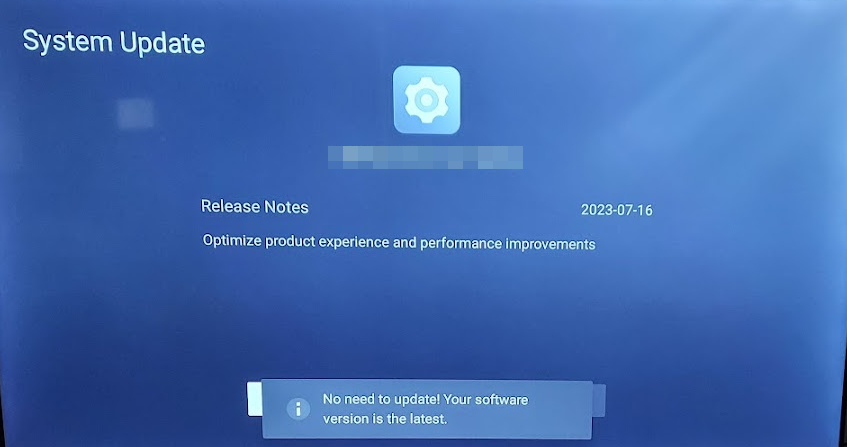
  7. You’ll either start downloading updates or get a message that your TV is already up to date.

3. Clear app and cache data

  1. On your TV, find your Settings.
  2. Go to Apps and select Shahid.
  3. Scroll down and hit Clear data and Clear cache.

If you’re using the Shahid mobile app or a browser, proceed to clear the cache as well.

4. Reinstall the Shahid app

  1. Launch the Google Play Store or Apple Store depending on your TV.
  2. Search for the Shahid app and click on it.
  3. Select the Uninstall button.
  4. Wait for it to finish uninstalling, then click Install again.

5. Contact customer support

Finally, if at this stage you’re still spotting the error code 6009 on your screen, it is time to contact the Shahid customer team. They’re quite responsive on X so you can also send a direct message if you’re looking for instant and fast replies.

Remember that Shahid is a geo-restricted app so depending on your location, you may need to switch your VPN on or off. Alternatively, you can try watching content from a web browser because some errors are app-related.

Otherwise, you’ll just have to wait until Shahid fixes the issue. And as you wait, you may want to check out other streaming services that offer equally great content. There’s no harm in having a variety of engaging content from different apps to switch from.

Hopefully, one of these solutions has helped you get out of the rubble. Do let us know if you have any other solutions not mentioned here in the comment section below.

Is Error Code 1001 in Roblox Real? All to Know

While most error codes are intended to highlight a problem with the system or the servers, the Roblox Error Code 1001 warns users of a possible RAID.

The error message states, Possible Raid Warning. We have detected another device in your house. In case you are alone, seek for help as soon as possible. Another variation of it asks users to call 911.

Is Roblox Error Code 1001 real?

A brief history

The first known instance of someone posting about it was in Jan’22 on the Roblox Fandom page. Though, the Internet didn’t fall for it the first time, as is evident through the comments on the post.

But, when, in Aug’22, a TikTok user by the name @grotyneverdies2 (account deactivated when last checked) posted about it, the error message went viral. As things picked up, there were quite a few reports of the error code on TikTok and Reddit, with several users creating mock-ups of the error message. 

roblox error code 1001
Reddit post on Error Code 1001

Some users also claimed that the error message existed before 2013 but has since been discontinued. We couldn’t confirm that, though the claim can’t be trusted.

Debunking Roblox Error Code 1001

First things first, the Roblox Error Code 1001 is as fake as it could be! As confirmed through several channels and by experts, this is just a prank with its origins traced to TikTok.

Now, coming to how it was confirmed that the Roblox Error Code 1001 is fake.

First, the grammar is all messed up. Secondly, the early instances of the error recommended calling 911, something Roblox would never do.

roblox error code 1001
Variations of Roblox Error Code 1001

Third, Roblox usually has three-digit error codes, while this has four. Lastly, after a detailed inspection, some users claimed that the font was also not in line with the style used by Roblox.

Besides, no real player has ever encountered the error, and all such reports are baseless and simply a prank. The Roblox Error Code 1001 is categorized, by some, as creepypasta, a term used for user-generated fake horror content on the Internet. But it’s undoubtedly one of the scariest Roblox errors.

Even though we have debunked the Roblox Error Code, you must still prioritize privacy and security over the web. There’s nothing better than a reliable antivirus solution to scan for malware and an effective VPN solution to mask your digital identity.

Also, not all Roblox errors are fake, such as the startup error or authentication error. So, read more about Roblox error 280, an issue arising out of missing updates, and Roblox error 264, which highlights multiple sign-ins.

For any queries or to share your thoughts on the creepypasta Roblox error, drop a comment below. 

Copilot on Windows 10 is happening: But is it a good idea?

Microsoft recently released Copilot on Windows 11, after the Redmond-based tech giant teased it for several months. In less than a year since ChatGPT made its way into the world, Windows 11 has a native AI app that can do almost anything you of it, within good reasons, of course.

Copilot is next-level Cortana, enhanced to suit the needs of the modern Windows user: it can easily compose texts for you, automatically set your Windows 11 to a dark theme, and recommend stuff for you to do.

With this being said, Microsoft is reportedly planning to bring Copilot to Windows 10. The reason behind it? Windows 10 has the numbers and could prove to be the perfect ground for testing a Copilot adoption.

Copilot will retain most of its features and capabilities on Windows 10, and the AI tool will be accessed through the Windows 10 taskbar. It will also open like it currently does on Windows 11, with a sidebar. The AI tool will reportedly be coming to Windows 10 in a future update.

But is it a good idea? Could the Windows 10 community accept Copilot?

Is Copilot on Windows 10 a good idea?

Windows 10 won’t be receiving any major updates anymore, as the OS is expected to reach EOS in October 2025. However, the Windows 10 community is still more popular than the Windows 11 one, and judging by the number, it won’t change any time soon.

More than 1 billion people use Windows 10, so it’s understandable why Microsoft would want to release it there, as well.

However, given the fact that most Windows 10 users don’t upgrade to Windows 11 because of the features that the newer operating system has, most people would be displeased with Copilot on Windows 10.

One of the reasons Windows 10 is still used by so many is the quality of its performance: Windows 10 is stable, fast, and suitable for older devices. Copilot is a continuous app that consumes power even after closing it, so the addition of an AI app getting a big portion of CPU and RAM power might not be preferable to a lot of these users.

As you can see in the picture below, Copilot starts as a Microsoft Edge disguise with 13 instances open all the time, even when not using it at all. It’s not quite preferable on lower or mid-range devices.copilot windows 10

If Microsoft wants to release Copilot on Windows 10, the Redmond-based tech giant will have to build a version of Copilot that is not too demanding.

Speaking of comparisons, if you want to know the difference between Copilot and Pro versions, check out this extensive Microsoft Copilot Vs. Copilot Pro comparative guide.

What do you think about it? Would you like to see Copilot coming to Windows 10 or not?

Fix: Internet Shortcut is Not Deleting

Internet shortcuts are a quick and convenient way to access frequently visited sites, but when they are not deleting after you’re done with them, your desktop can become unsightly.

After testing various workarounds, our experts were able to come up with some successful resolutions.

How do I get rid of a shortcut that won’t go away?

Start off with the following basic steps before any technical troubleshooting:

  • First, ensure you’re using an account with administrative privileges, click and drag the shortcut to the Recycle Bin or hold the Shift key, right-click, and hit the Delete button.
  • If you’re using a backup service, first delete the shortcut from there before the desktop version.
  • Start your PC in Safe Mode and try deleting the shortcut.

1. End the process in Task Manager

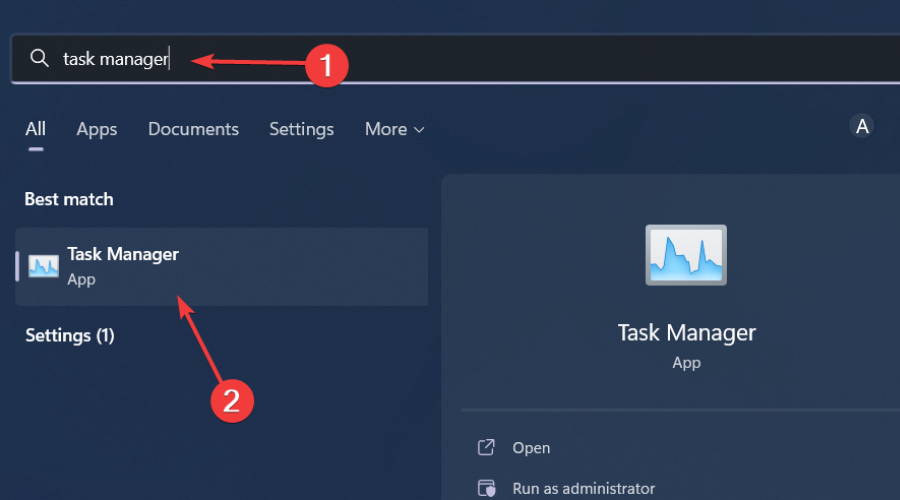
  1. Hit the Windows key, type Task Manager in the search bar, and click Open.task manager search
  2. Navigate to the Processes tab, and find any process with a similar name as the internet shortcut.
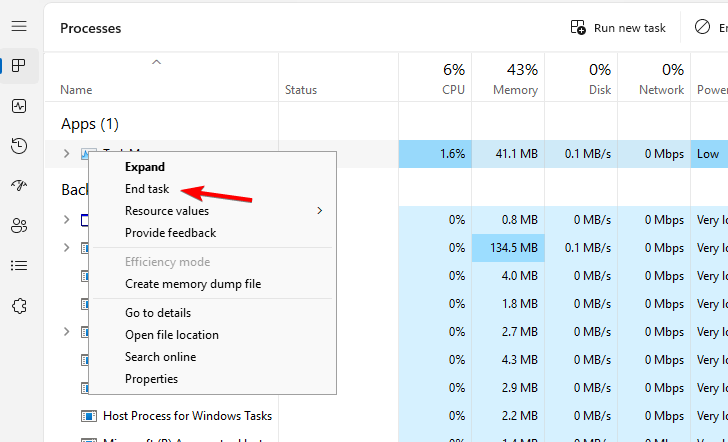
  3. Right-click on it and select End task.
  4. Go back to your desktop and try deleting it.

If you don’t find any process with a similar name, you may have to end all browser-related processes then try deleting it again.

2. Move the file to a folder

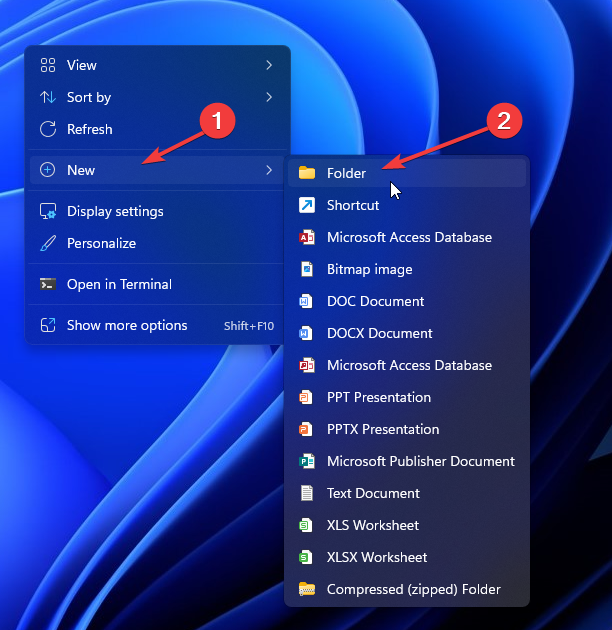
  1. Right-click on an empty space on your desktop and select New>Folder.New folder create step 1
  2. Drag the internet shortcut file to the newly created folder.
  3. Right-click on the folder and hit the Delete button.

By creating a folder and moving the shortcut, you can easily force delete the folder compared to a shortcut. However, if it’s a shortcut that is not working, changing its location to a new folder may suffice.

3. Reset Internet Explorer settings

  1. Hit the Windows + R keys to open the Run command.
  2. Type inetcpl.cpl in the dialog box and hit Enter.
  3. Navigate to the Advanced tab from the Reset Internet Explorer Settings dialog box pick Reset.
  4. Select Reset in the dialog box that says Are you sure you want to reset all Internet Explorer settings?
  5. Select Reset in the dialog box that says Are you sure you want to reset all Internet Explorer settings?
  6. After Internet Explorer finishes applying the default settings, click Close, then OK.
  7. Restart your PC in order for the changes to take place.

4. Disable the UAC settings 

  1. Hit the Start Menu icon, type UAC in the search box, then click Open to access the Change User Account Control settings.
  2. The User Account Control Settings window will open. Click and hold the slider, hover your mouse over the Never notify option at the bottom, then click OK.
  3. Now, attempt to delete the shortcut.

With UAC disabled, you’ll no longer require administrative privileges to delete files.

5. Use the Command Prompt

  1. Hit the Windows key, type cmd in the search bar, and click Run as administrator.cmd-run-admin-w11 unexpected kernel mode trap windows 11
  2. With the folder you created in step 2 above, type in the following command and replace the generic path with the new directory: del C:\Users\Folder\Documents
  3. Next, Enter the following command to delete the shortcut. Remember to replace filename with the actual name: del “filename"

6. Use a third-party program

If you’re still having trouble getting rid of those unwanted shortcuts, perhaps the introduction of a third-party app that can delete it will interest you. In this case, the problem is not with the shortcut file but with your computer’s operating system.

7-Zip is a famous archiver with some additional features and supports a decent number of formats. It fits the job, especially in cases where your desktop icons are corrupted and won’t delete.

Hopefully, you’ve been able to get rid of that internet shortcut that has overstayed its welcome on your desktop.

If nothing works, you can go to the extreme of performing a clean install of Windows, but if it’s the unsightly arrow usually found at the corner of the file, you can remove the shortcut arrow for a cleaner look.

Your feedback is important to us, so make sure you leave any additional thoughts or comments below.

How to Reset Only C Drive on Windows 11

If you are having problems with your Windows 11 computer, the best way to fix it is to reset it, and with the latest versions, Windows allows you to reset only the C drive, leaving other drives as they are.

In this guide, we will discuss three simple methods to reset your PC and get it working without deleting the data on other drives.

How do I reset only the C drive in Windows 11?

Before proceeding with the steps to reset the C drive on Windows 11, make sure you have checked these things:

  • Ensure you have a working internet connection or switch to an ethernet cable if you want to opt for the Cloud download option.
  • Make sure you back up or move important data from the system drive.
  • Check if your system drive has sufficient disk space.

1. Using the Settings app

  1. Press the Windows + I to open the Settings app.
  2. Go to System, then click Recovery.System - Recovery Window -reset only c drive windows 11s 11
  3. Next, under Recovery options, click the Reset PC button.RESET
  4. On the Choose an option screen, choose Keep my files if you wish to keep the personal files on the system drive or select Remove everything to delete them.Keep my files
  5. Select Cloud download (download the fresh copy of Windows using your internet connection) or Local reinstall(use the recovery image to reinstall Windows by default). Choose Cloud download only if you have a stable internet connection & sufficient disk space.Cloud download
  6. If you have selected Remove everything, on the Additional settings box, check the Current settings, it should say:SystemSettings Reset everything screen
    • Remove apps and files. Do not clean the drive.
    • Delete all files only from Windows drive.
    • Download and reinstall Windows.
  7. If you have selected Keep my files, then it should say:keep everything additional settings
    • Restore apps and settings which came with this PC
    • Download and reinstall Windows
  8. If you see other options instead, click Change settings and make the desired changes. Once everything looks okay, click Next to proceed.Change settings
  9. In case you get a prompt related to a Recent update, click Next.
  10. Click Reset.Reset -reset only c drive windows 11

Your Windows will start to reset, the computer will reboot a few times, and the process will take some time to finish. Once done, you will greeted with the lock screen, then use the user account password to log in to your Windows 11.

If you want to know what apps have been removed from your computer, check the Removed Apps.html file saved on the desktop to get a list of apps you need to reinstall.

However, if you select Remove everything, all the personal files from the system drive will be wiped. Once the system is reset, you will get a setup screen, wherein you need to select the Keyboard layout, accept the license agreement, choose a network, sign in to a Microsoft account, and more before you can use your Windows PC again.

For a complete walkthrough on restoring Windows 11 to factory settings, check our guide on Windows 11 factory settings.

2. Using the Advanced Startup screen

  1. Click the Start menu, and click the Power button.
  2. Press and hold the Shift key, and click Restart from the menu, then release the Shift key.Power optioin - How to Reset Only C Drive on Windows 11
  3. Windows will restart, and you will get the Choose an option screen, select Troubleshoot.Choose an option - Troubleshoot - How to Reset Only C Drive on Windows 11
  4. Next, choose Reset this PC.
  5. Click the Keep my files option if you wish to keep the personal files, or select the Remove everything option to delete them.Keep my files or remove everything
  6. If you select Remove everything, choose Only the drive where Windows is installed, and then Just remove my files on the following screen.Only the drive where Windows is installed
  7. Select Cloud download.
  8. Next, click the Reset button.

Your computer will reset, then restart a few times, and once it is finished, you will get the login screen on your computer or setup page, depending on what to choose while resetting your PC.

If you cannot refresh your PC because it is locked, then the advanced startup screen can help you fix that issue; read this guide to learn more about it.

3. Using the Command Prompt

  1. Press the Windows key, type cmd, and click Run as administrator.CMD elevated - How to Reset Only C Drive on Windows 11
  2. Copy and paste the following command to reset your system drive and hit Enter: systemreset –factoryreset
  3. On the Choose an option screen, select from the Keep my files option if you wish to keep the personal files or select the Remove everything option to delete them.
  4. You will be get the list of apps that will be removed during the process; click Next to proceed.
  5. Click the Reset option to initiate the process.

The process will take a few minutes, and your computer will restart a few times, so make sure you plug it into the charger if using a laptop. Once done, you will be taken to the setup page or the sign-in screen, depending on your choices.

This is one of the easiest ways to reset your Windows computer, and you don’t have to use the Settings app for the same.

How can I format the C drive without deleting the OS?

You can reset the C drive without deleting the Windows operating system using the Command Prompt with administrative rights.

Remember, if you want to remove all your files from the system drive and bring your device to factory settings, select Remove everything.

However, if you have decided to keep the files, choose Keep my files and use the Cloud download option to download & install Windows only if you have enough disk space to complete the process.

In case you can’t perform certain operations on your computer as your system drive is locked, you need to check your computer for bad sectors or corrupted system files; read this guide to learn more.

If you have any questions or suggestions about the subject, don’t hesitate to mention them in the comments section below.

Fix: Windows 11 Narrator Won’t Turn Off

While Windows 11 Narrator is a great feature, it won’t turn off for some users, even after disabling the dedicated toggle in Settings. For a few, the narrator starts on the login screen or a male robotic voice is heard when booting or shutting down the PC.

The problem was present in the previous iterations of the OS as well, including Windows 10 and Windows 7, where the Windows Narrator won’t stop running.

Why is my narrator not turning off? 

It usually happens when some related settings or permissions are misconfigured. Or if the narrator is off but the computer is still talking, it could be the Ease of Access Center configurations to blame, especially when you have inadvertently set the to use the computer without a display.  

How can I completely disable Narrator in Windows 11?

Perform the following checks, and if the problem remains unresolved, head to the solutions listed next:

  • Make sure you have disabled Narrator in the Accessibility settings.
  • Install the latest Windows updates.
  • Disable any programs that can control or facilitate narration in Windows 11 or simply uninstall the app.

1. Rename the Narrator.exe file

  1. Press Windows + E to open File Explorer, paste the following path in the address bar, and hit Enter to access the file location: C:\Windows\System32
  2. Now, locate the Narrator.exe file, right-click on it, select Rename, and name it Narrator_old.exe.rename to fix windows 11 narrator won't turn off
  3. Finally, reboot the PC and check for improvements.

Renaming the file to turn off Narrator in Windows 11 works when your computer says everything you do. Besides, to get back the functionality, revert the change.

2. Disable the Narrator.exe file execution

  1. Press Windows + E to open File Explorer, and navigate the following path: C:\Windows\System32
  2. Right-click on the Narrator.exe file, and select Properties.properties 
  3. Go to the Security tab and click the Advanced button.advanced
  4. Click on Change.
  5. Now, enter your username in the text field, click Check Names, and then OK on all windows to save the changes.check name to fix windows 11 narrator won't turn off
  6. Again, head to the Security tab in Narrator.exe Properties, and click the Edit button.
  7. Click on Add.add user
  8. Enter your username as you did earlier, click Check Names and then OK.
  9. Now, select your username from the list, untick the checkbox for all permissions, and then click OK for the changes to apply. Or you could check the Deny box as well next to all the entries.deny permissions to fix windows 11 narrator won't turn off
  10. Reboot the PC and check whether the Windows 11 narrator is now turned off.

3. Change the Ease of Access settings

  1. Press Windows + S to open Search, type Control Panel in the search box, and click the relevant result.
  2. Click on Ease of Access.ease of access
  3. Click on Ease of Access Center.
  4. Now, select Use the computer without a display.use the computer without a display
  5. Untick the checkbox for Turn on Narrator, and then click Apply and OK to save the changes.uncheck to fix windows 11 narrator won't turn off
  6. Reboot the PC and verify if the Windows 11 narrator still won’t turn off.

4. Change the Narrator’s settings

  1. Press Windows + I to open the Settings app, go to Accessibility from the left panel, and click on Narrator.narrator
  2. Expand the Narrator entry, then untick the checkbox for Start Narrator before sign-in and Start Narrator after sign-in.disable sign in to fix windows 11 narrator won't turn off
  3. Also, disable the toggle for Keyboard shortcut for Narrator, to prevent accidentally enabling the feature each time.

5. Reconfigure Narrator settings in the Registry

  1. Press Windows + R to open Run, type regedit in the text field, and hit Enter.regedit
  2. Click Yes in the UAC prompt.
  3. Navigate the following path or paste it in the address bar and hit Enter: HKEY_LOCAL_MACHINE\SOFTWARE\Microsoft\Windows NT\CurrentVersion\Image File Execution Optionspath
  4. Now, right-click on the Image File Execution Options, hover the cursor over New, select Key, and name it Narrator.exe.narrator.exe
  5. Similarly, right-click on Narrator.exe, choose New, select String Value, and name it Debugger.
  6. Double-click the REG_SZ you just created.
  7. Enter %1 under Value data, and click OK to save the changes.change to fix windows 11 narrator won't turn off
  8. Finally, reboot the PC, and the built-in functionality won’t be running now.

If the Windows 11 narrator feature won’t turn off, you can always disable it via the Registry Editor. Also, to re-enable the feature, simply delete the Debugger string.

In the unlikely scenario that the problem persists, we recommend you reset Windows 11 to factory defaults. Or you could reinstall Windows 11, using a bootable USB being the preferred approach.

Similarly, if you find that the Xbox narrator won’t turn off, change the console’s accessibility settings.

For any queries or to share which method you used to disable the narrator, drop a comment below.

How to Remove Static Noise From Microphone on Windows 11

Trying to record a podcast or attend online meetings, but there is a lot of static noise coming from your microphone on Windows 11?

You’re in luck because this is a first-hand experience from our WindowsReport experts, so stay tuned to see how you can achieve better sound quality.

How do I fix static noise on my microphone in Windows 11?

Begin with the following preliminary checks before any advanced troubleshooting:

  • Test your microphone and ensure it’s in good working condition.
  • Try plugging it into a different port on your computer to ensure they’re not damaged.
  • Ensure your PC has been updated with all available software updates, then restart it.

1. Run the audio troubleshooter

  1. Hit the Windows key and click on Settings.settings windows 11
  2. Click on System then select Troubleshoot.Open system troubleshooter
  3. Select Other troubleshooters.other troubleshooters
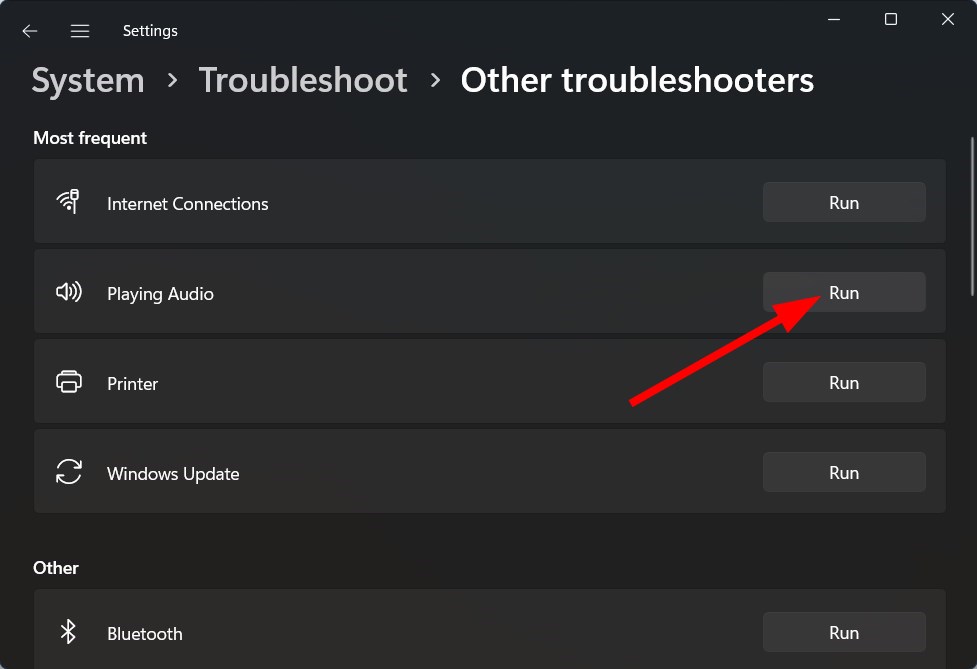
  4. Hit the Run button next to Playing Audio.

2. Disable audio enhancements

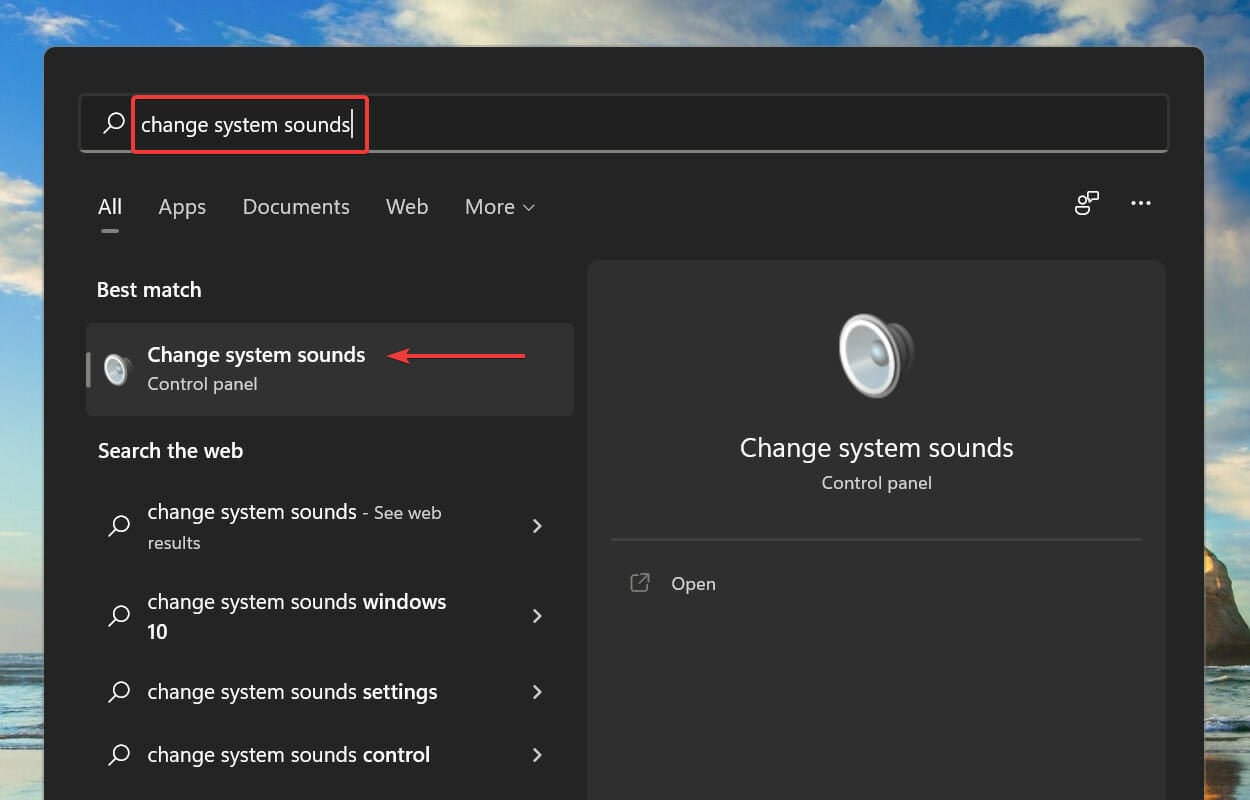
  1. Press Windows + S to launch the Search menu. Enter Change system sounds in the text field at the top, and click on the relevant search result that appears.Change system sound settings to fix audiodg.exe high cpu problem
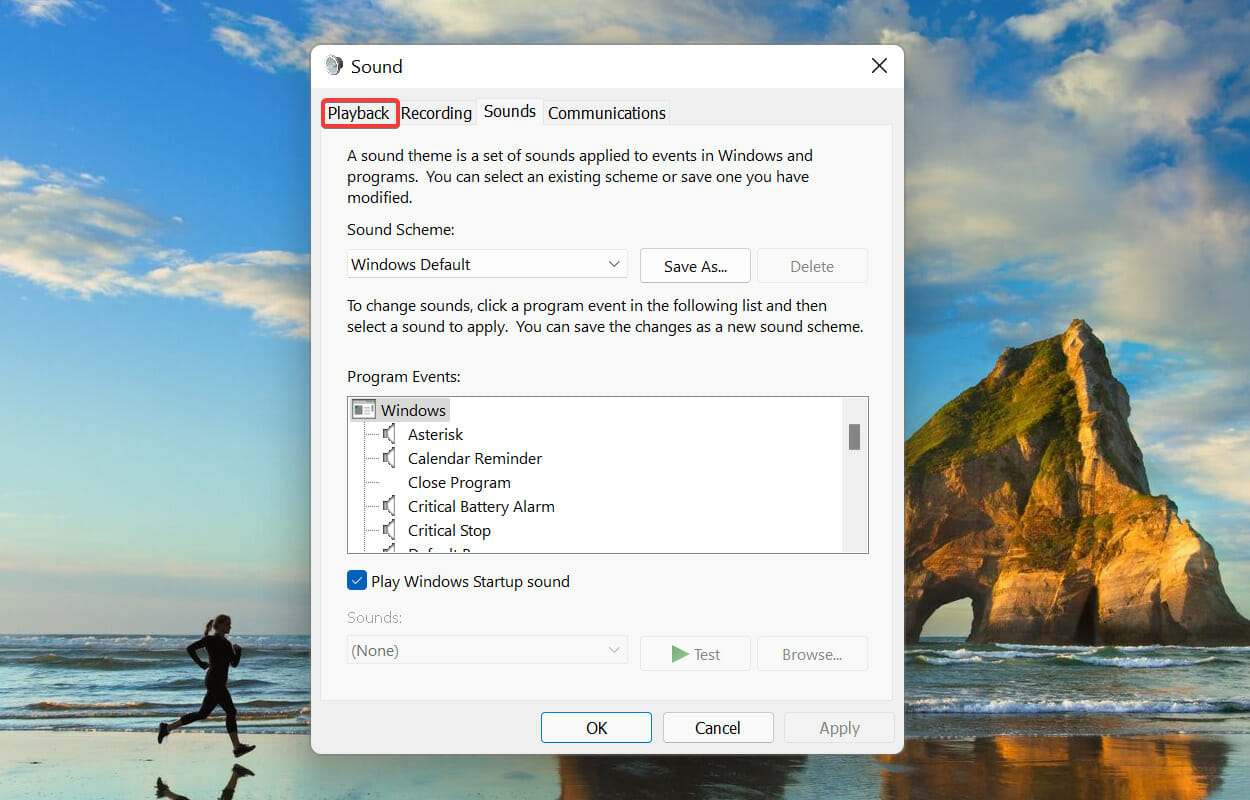
  2. Navigate to the Playback tab in the Sound window. Playback
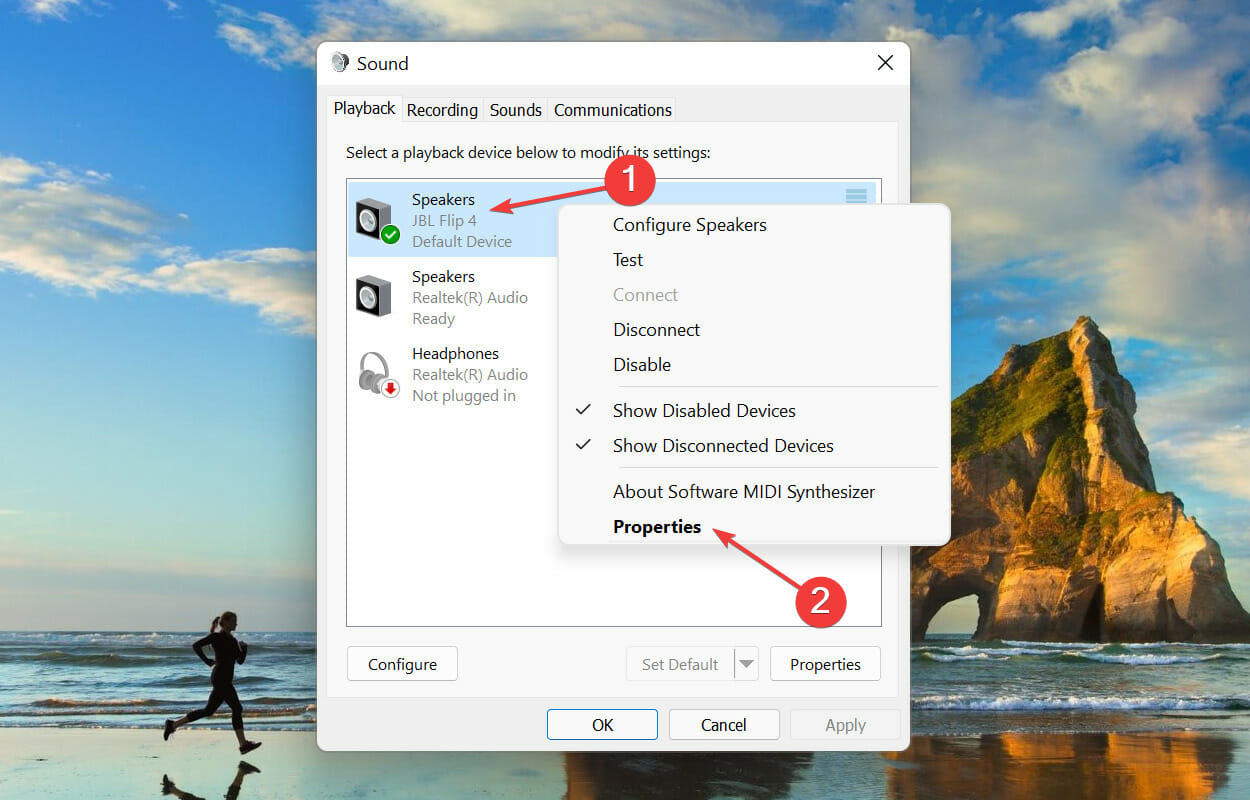
  3. Right-click on the device currently in use, and select Properties from the context menu.Device properties
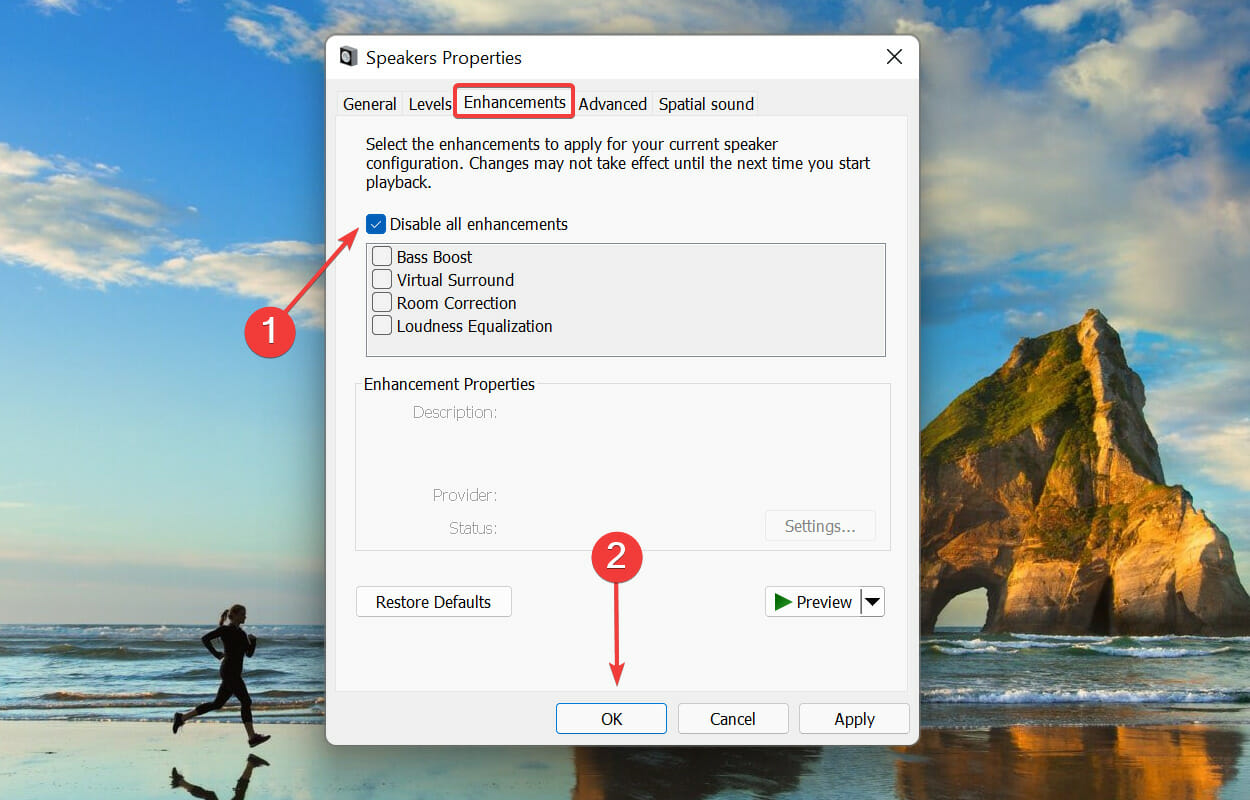
  4. Now, navigate to the Enhancement tab in the Speaker Properties window, tick the checkbox for Disable all enhancements, and click on OK at the bottom to save the changes.Disable enhancements to fix audiodg.exe high CPU usage

Removing these enhancements or resetting your microphone settings to default will not only resolve the Windows 11 microphone static noise but also help with issues like the volume too low on your microphone.

3. Reinstall audio drivers 

  1. Hit the Windows key, type Device Manager in the search bar, and click Open.device manager w11
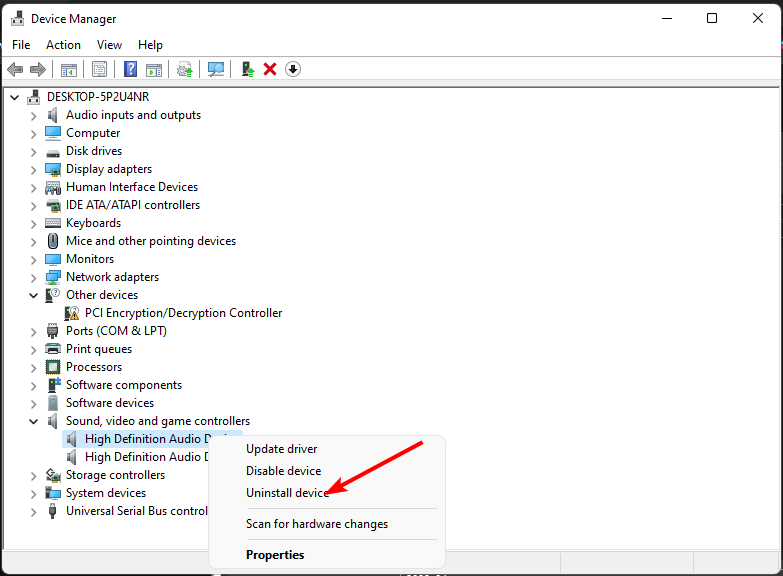
  2. Navigate to Sound, video, and game controllers to expand, right-click on your audio device, and select Uninstall device.
  3. Confirm on Uninstall.
  4. Restart your device, and the drivers will automatically reinstall themselves.

4. Update audio drivers 

  1. Hit the Windows key, type Device Manager in the search bar, and click Open.device manager w11
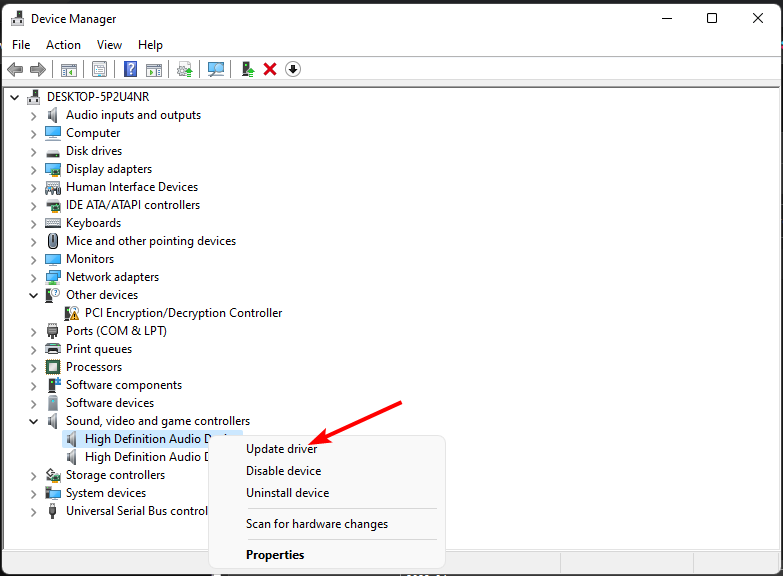
  2. Navigate to Sound, video, and game controllers to expand, right-click on your audio device, and select Update driver.
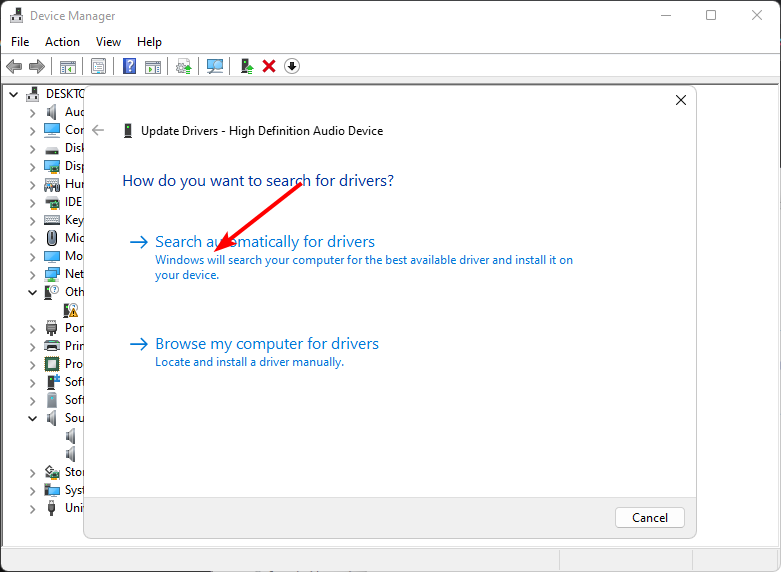
  3. Select Search automatically for drivers.
  4. Restart your PC and try reconnecting.

If this method doesn’t yield the expected results, consider downloading straight from the manufacturer’s website. Better yet, use a driver updater tool like Outbyte Driver Updater that automatically detects, scans, and replaces missing, damaged, or outdated drivers with the correct ones.

⇒ Get Outbyte Driver Updater

5. Rollback previous audio driver

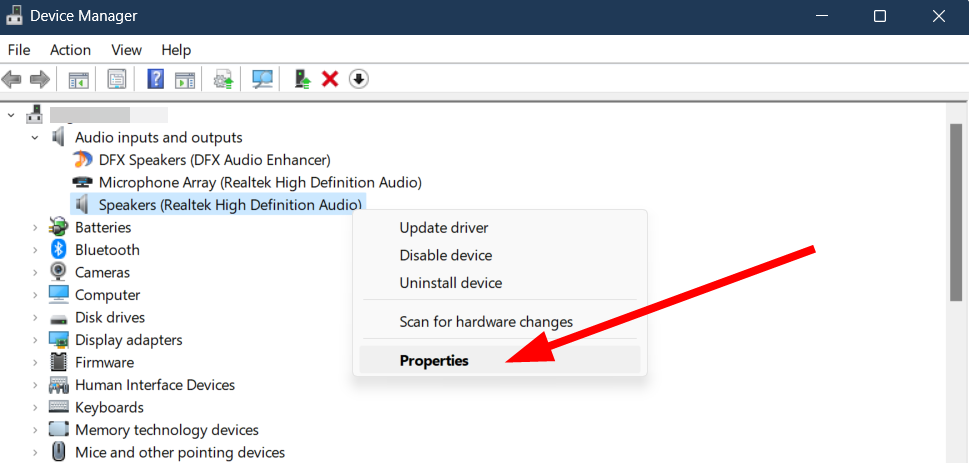
  1. Hit the Windows key, type Device Manager, and click Open.device manager w11
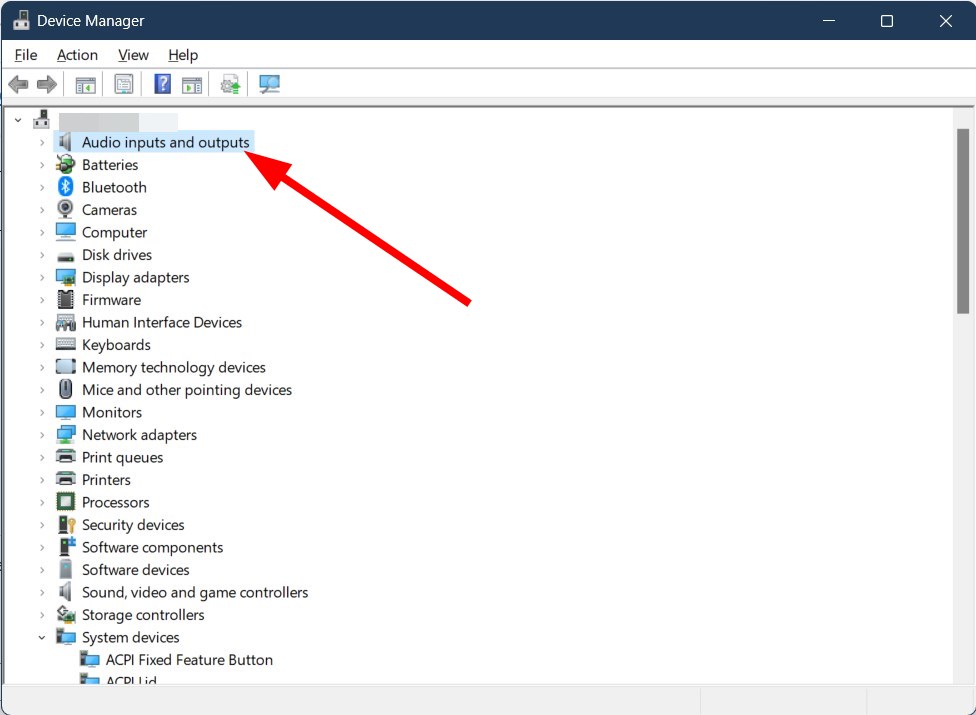
  2. Expand the Audio inputs and outputs section.
  3. Right-click on your audio driver and select Properties.
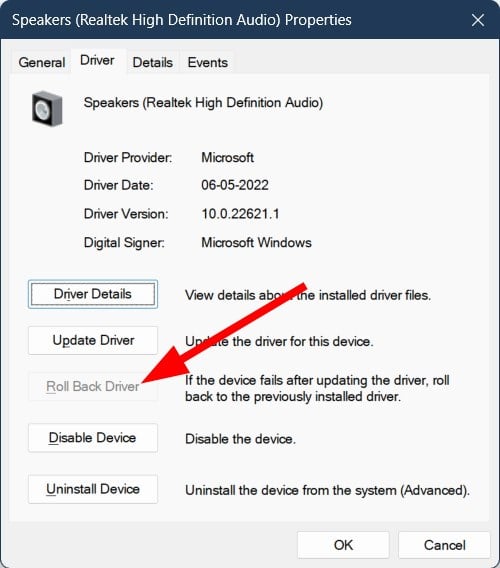
  4. Hit the Roll Back Driver button.

6. Uninstall recent Windows update

  1. Hit the Windows key and select Settings.settings windows 11
  2. Click on Windows Update and select Update history on the right pane.update-history restart to repair drive errors
  3. Scroll down, and under Related settings, click on Uninstall updates.uninstall-updates-w11 computer-recognize-logitech-unifying-receiver
  4. This will take you to the most recent installed updates.
  5. Select the topmost update and click on Uninstall.uninstall-update-latest computer-recognize-logitech-unifying-receiver
  6. Restart your PC and check if the problem persists.

A buggy update can cause your microphone to stop working, so removing it can restore its once-normal working condition.

7. Disallow app controls

  1. Hit the Windows key, type Control Panel in the search bar, and click Open.control-panel-search fallout new vegas runtime error
  2. Click on Hardware and Sound.
  3. Select Sound.
  4. Navigate to the Playback tab, right-click on your audio output device, and select Set as Default Communication Device.
  5. Click on Properties at the bottom.
  6. Navigate to the Advanced tab and uncheck the Allow Application to take exclusive controls on this device box.

8. Perform a System Restore

  1. Press the Windows key, type Control Panel, and click Open.control-panel-search fallout new vegas runtime error
  2. Select Large icons as View by and click Recovery.Recovery Control Panel Advrcntr6.dll
  3. Click Open System Restore.Open system restore
  4. Select Choose a different restore point and click Next.Next Choose a different restore point
  5. Now select the restore point and click Next. Choose a point
  6. Click Finish to restore the previous settings, and Windows will restart.Now click on Finish.

How do I calibrate my microphone on Windows 11?

You can easily calibrate your microphone via the Settings app in Windows 11. Simply navigate to System>Sound>Input>Test your microphone>Start test. You’ll have to speak into the microphone and listen, but be prepared to adjust it a few times until you’re satisfied with the new sound settings.

Luckily, you don’t have to do it manually because there exists sound calibration software that can do this in a few seconds. This allows your microphone to work more effectively by eliminating background noise and other interferences.

Most of the time, static noise will appear in audio recordings during transition periods or in between pauses. With other interference factors under your control, like weather or hardware, you can always move to a quieter room and upgrade to noise cancellation microphones.

Unfortunately, microphone problems are in plenty and can show up at any time. The good news is we address a huge chunk of them, so your sound is not interrupted.

That wraps up this article. If your solution isn’t covered in this article but was instrumental in fixing this problem, feel free to share it with us in the comment section below.

406 Not Acceptable Error: What it Means & How to Fix

406 Not acceptable error is an HTTP response status code, and it appears if the server can’t properly return the data. However, there are a few ways to fix this issue, if it happens in your code.

How do I fix HTTP error 406?

1. Adjust the accept parameter in your code

  1. Open your code.
  2. Locate the line that sends the request and change it like this: profile = personality_insights.profile(profile_text, accept='application/json', content_type='text/plain').get_result()
  3. Save changes.

Note that the accept parameter can only use application/json or text/csv value.

2. Use JSON.stringify

  1. Open your code.
  2. Make sure you add a JSON.stringify function, like this:
    $.ajax({ url: 'https://example.com:9200/incidents/incidents', type: 'POST', data: JSON.stringify(this.incident), dataType: 'json' })
  3. Lastly, save the changes.

Keep in mind that this solution only works if the object is not a properly serialized JSON string.

3. Make sure you specify the user-agent in the header

  1. Open your code editor.
  2. Next, add the request headers and include them like this:
    page_url = 'https://examplepage.com' headers = { 'user-agent': 'Mozilla/5.0 (Macintosh; Intel Mac OS X 10_15_7) AppleWebKit/537.36 (KHTML, like Gecko) Chrome/102.0.0.0 Safari/537.36', } rawpage = requests.get(page_url,headers=headers)
  3. After doing that, all you need to do is to save the changes.

What is the difference between HTTP 404 and 406?

The HTTP 406 client error response appears when the client sends a legitimate request, but the returned data isn’t in the accepted format.

On the other hand, HTTP error 404 response code is one of the most common client-side errors and probably the most known 4xx error. It appears when the request can’t be processed because the requested data wasn’t found.

406 Not acceptable errors can appear in Java, Angular, and any other language that supports HTTP requests. This issue usually affects developers and not the average Internet users.

To fix it, ensure your client is configured to accept the specific type of data from the server as a response. You can also change server configuration and adjust configuration files so that the server and client both use the supported format.

FAQs

What is HTTP error 406?

HTTP error 406 means the server cannot return a response that matches the format the client asked for. The issue often comes from request headers like Accept or Accept-Language that do not match what the server can provide.

Why does HTTP 406 occur?

It occurs when the client requests a specific content type, such as JSON or XML, and the server cannot serve that format based on the headers sent.

Is HTTP error 406 permanent?

No. It is a temporary mismatch between what the client requests and what the server can send. Correcting headers or server responses usually resolves it.

Does HTTP 406 mean the website is down?

No. The site is reachable, but it cannot send a representation that matches the client’s requested format.

This is just one of many errors you can encounter, and in the past, we covered HTTP error 431 and HTTP error 413, so don’t miss them if you need more information.

If you are dealing with other server-side issues, you might also encounter the HTTP error 503 Service Unavailable, which indicates that the server is temporarily unable to handle the request.

What method did you use to fix the 406 Not acceptable error in Nginx? Share your findings with us in the comments section.

Zoom Error 4502: How to Quickly Fix It

If you encounter error 4502 while deleting or editing the meetings using the Zoom Outlook plugin, this guide can help! We will explore the common causes and offer WR-tested solutions to fix the problem quickly.

What causes the Zoom error 4502? The Zoom 4502 error is caused by either an outdated or corrupted client or a weak internet connection.

How can I fix the Zoom error 4502?

Before proceeding with any steps to fix the Zoom error 4502, ensure you have a stable internet connection and restart your computer and router to refresh the connection.

1. Update Zoom to the latest version

  1. Press the Windows key, type zoom, and click Open.Zoom app open - error code 4502
  2. Click the Profile icon and select the Check for Updates option from the drop-down list.Check for updates
  3. If there is an update available, it will be downloaded.

Ensure the version showing after the update is 5.16.6 or higher. Updating the app to the latest version can help you fix similar Zoom issues like error code 100000502; read this guide to learn more about it.

2. Clear Zoom app cache

  1. Press the Windows + E to open the File Explorer window.
  2. Navigate this path after replacing the Username with your user profile name: C:/Users/Username/AppData/Roaming/Zoom
  3. Locate and select the data folder, then click the Delete icon to clear the Zoom cache.explorer_delete the data - error code 4502

3. Disable the Windows Firewall temporarily

  1. Press the Windows key, type control panel, and click Open.Control Panel start menu -Zoom error 4502
  2. Select Category as View by and click System and Security.System and Security CP -Zoom error 4502
  3. Click Windows Defender Firewall.Windows Defender Firewall
  4. Select Turn Windows Defender Firewall on or off.Select Turn Windows Defender Firewall on or off
  5. Click the radio button next to Turn off Windows Defender Firewall for both Private & Public network settings.Turn off Windows Defender Firewall for both Private & Public network settings.
  6. Click OK.

Now, check if you encounter the same error, and if the issue persists, reverse engineer the steps to ensure your computer stays protected.

4. Reinstall the Zoom client

  1. Press Windows + I to open the Settings app.
  2. Go to Apps, then click Installed apps.Apps - Installed apps -Zoom Error 4502
  3. Locate Zoom, click the three dots icon, and select Uninstall.Uninstall the app
  4. Click Uninstall to confirm the action.
  5. Go to Zoom’s official website, locate Zoom Desktop Client, and click Download.Download Zoom to fix zoom error code 4502
  6. Once the executable file is downloaded, double-click it to install the app.

Reinstalling the Zoom app can help you fix the Zoom not responding problem; read this guide to learn the other solutions.

How do I fix error 4502 Zoom Outlook?

This problem is related to the version of the Zoom Outlook plugin, which is not integrated into Outlook. This bug has been fixed by Zoom version 5.15.5.926 (Windows). So, in order to fix the error 3000 or 4502 Zoom Outlook, simply upgrade Zoom. 

If nothing helped you, you must consider contacting Zoom customer support and explain the issue & fixes you tried for further help!

If you are stuck with the Zoom error code 3113, here are a few expert-proven solutions to fix the issue so that you can successfully host a Zoom meeting.

Did we miss a step that helped you? Don’t hesitate to mention it in the comments section below. We will happily add it to the list.

How to Fix Error Code U13 in Google Pay

Google Pay has made online purchases convenient, but occasional errors like U13 can pop on your screen and frustrate you.

However, this is no reason to be alarmed. There are ways to fix this error and complete your purchase.

Why can’t I pay with Google Pay?

  • If you don’t have the latest software version or have a poor Internet connection, you won’t be able to make purchases.
  • The merchant doesn’t accept Google Pay transactions.
  • You’re using an unsupported device, or your bank doesn’t support Google Pay.
  • The bank servers are unavailable, or you’ve incorrectly set up your account information.

What can I do to fix error code U13 in Google Pay?

Attempt the following simple solutions first: ensure you have a stable internet connection and try again during off-peak times, close any background apps and restart the app in question, restart your network connection and device.

1. Update your OS

  1. Locate Settings on your device. (We’ll be using the Samsung model for this step).
  2. Go to Software update.
  3. Tap on Download and install.
  4. Wait for the update to finish installing if available, and retry your transaction.

A software update can resolve any compatibility issues since Google Pay supports newer versions of Android and iOS.

2. Clear cache & data

  1. Tap on Settings on your phone.
  2. Next, tap on Apps.
  3. Find the Google Wallet app and tap on it.
  4. Scroll down and select Storage.
  5. Tap on Clear data and Clear cache, then try again.

Clearing cache and app data can help you fix other app-related issues, such as transaction failed due to security reasons; read this guide to learn more.

3. Delete and re-add your saved cards

  1. Go to Google Payments Center and click on Payment methods.
  2. Select the card you wish to remove and click on Remove.
  3. Next, click on Add a payment method.
  4. Proceed to fill in your debit/credit card details and hit Save.

Sometimes, your payment channel may not accept your card because of missing or incorrect details. Re-adding your card will help resolve any issue that may have occurred during the initial setup.

4. Reset your mobile device’s settings

  1. Remember this option will restore all apps to their default settings, so ensure you back up any important files.
  2. Locate Settings on your device. (We’ll be using the Samsung model for this step).
  3. Go to General management>Reset.
  4. Tap on Reset all settings.

This also helps if the Google Play Store reads, Your administrator has not given you access to this item, while downloading apps.

5. Contact Google Pay support

If none of the above steps have fixed the error code U13 in Google Pay and you’re sure it’s not a case of your card can’t be verified, it’s time to get some help. You can contact Google Pay support and describe the issue. 

You can also contact your bank to verify if they’re having any issues or if the merchant accepts Google Pay purchases before you attempt to make payment again.

Lastly, if everything is okay with your bank, your only other option is to wait until Google Pay is available again. It may be a temporary issue that will be resolved quickly.

What are some additional tips to avoid errors in Google Pay?

  • Ensure your mobile phone is compatible with Google Pay, and keep your OS and app updated.
  • Make sure your payment information is correct, and you have enough money to transact.
  • Practice safe online shopping tips when transacting to avoid phishing scams.
  • Avoid transacting during peak hours.

To enjoy the full benefits of Google Pay, it’s best to avoid mistakes when using the service. And for enhanced protection, switch to safe and secure browsers for banking.

You can also opt for a DCB association if you like. This isn’t the only issue you can encounter and we wrote about tackling OR_PMCR_32 problem in Google Pay in our other guide, so don’t miss it.

Before you go, make sure to check our guide addressing the OR-RWE-03 error in Google Pay since it might give you additional solutions. We also have a great guide on how to fix [OR-PMSA-05] Google Pay payment error so be sure to check it out.

So there you have it, the resolution to the dreaded error code U13 in Google Pay. We hope you successfully resolved this error message using one of these methods; if not, feel free to comment below.

doh.xfinity.com Certificate Error: How to Fix it

Recently, a lot of users had their antivirus sending notifications about a certificate error for doh.xfinity.com. Even when accessing the website, they were informed of the certificate issue and that it expired on Friday, September 8, 2023.  

In most cases, Kaspersky antivirus flagged the SSL connection and reported the expired certificate. It’s mostly a problem on the server side, but DNS queries and requests, or an incorrect date and time, could also be the culprit.

What is the doh.xfinity.com certificate error?

The error indicates that the certificate assigned to the website has expired or is not properly configured. Subsequently, an encrypted connection cannot be established between the server and the application, say Adobe AcroCEF or Overwolf. 

How do I fix the doh.xfinity.com certificate error?

Before we start with the slightly complex solutions, try these quick ones:

  • If you must access the website, click Advanced and then select Proceed in your browser.
  • To get rid of the antivirus notifications, disable the app trying to connect to doh.xfinity.com. Or you could disable the app from loading at boot and restart the PC.

1. Set the correct date and time

  1. Press Windows + I to open Settings, go to Time & language from the navigation pane, and select Date & time.date & time
  2. If the time is configured incorrectly, disable the toggle for Set time automatically, and click the Change button next to Set date and time manually.set time
  3. Now, set the current time and date, and then click Change for the new time to apply.change time to fix doh.xfinity.com certificate error

Also, as a workaround, you can change the date and time manually to a point when the certificate was valid and check whether that helps access doh.xfinity.com. This also helps with certificate errors in Edge.

2. Change the DNS server

  1. Press Windows + R to open Run, type ncpa.cpl in the text field, and hit Enter.ncpa.cpl
  2. Right-click on the active network adapter and select Properties.properties
  3. Select Internet Protocol Version 4 (TCP/IPv4), and click Properties. 
  4. Select Use the following DNS server addresses, and enter the following details in the fields:
    • Preferred DNS server: 8.8.8.8
    • Alternate DNS server: 8.8.4.4change DNS to fix doh.xfinity.com certificate error
  5. Click OK to save the changes and reboot the PC.

Often, an issue with the DNS server can lead to the doh.xfinity.com certificate error. Also, it’s possible to use the fastest DNS server near you instead of Google’s DNS.

3. Contact Xfinity support

When nothing else works, it’s best to contact the Xfinity support. Though they have already acknowledged that the problem lies at their end, apprising them of the same may result in quicker action.

Also, if you see another error message on doh.xfinity.com, say HTTP Error 400, inform the support team of that as well.

While certificate errors, be it with doh.xfinity.com or another website, are usually fixed within a day or two by the site owners, do check for issues at your end. And no matter what anyone says, never disable the antivirus! 

Before you leave, find out how to ignore certificate errors in Chrome and bypass such messages. But only do this if you are sure of the website’s security.

For any queries or to share what worked for you, drop a comment below.

How to Fix Diablo 4 Error Code 700004

Diablo 4 error code 700004 will prevent users from logging in, especially after purchasing a Battle Pass. This can be a frustrating issue since you won’t be able to log in and experience the new content.

However, you can use a couple of methods to fix this annoying error, and in today’s guide, we will show you solutions that work for others.

What is Diablo 4 error code 700004?

  • This is a server error, and it occurs after the season ends.
  • You will get this error if you try to activate the last season’s Battle Pass.

How can I fix Diablo 4 error code 700004?

1. Log out of Battle.net client and log back in

  1. Click your profile icon in the top right corner.
  2. Choose Log out.
     
  3. Wait for a few moments and enter your login information.

2. Log in to your older character

  1. If you have a character from the previous season, log on to it.
  2. Log out from that character.
  3. Lastly, try logging in to the character from this season.

3. Use the Scan and repair option

  1. Select Diablo 4 in your library.
  2. Click the cog next to the Play button.
  3. Now choose Scan and Repair from the menu.
  4. Follow the instructions on the screen to complete the process.

Why can’t I play Diablo 4 offline?

It’s not possible to play Diablo 4 offline because the game syncs your progress with Battle.net servers. By being always online, Blizzard minimizes the chance of copyright infringement.

A server-side bug usually causes Diablo 4 error code 700004 error, which can be fixed simply by logging out and back in. Since this is a server issue, Blizzard is aware of it; it will probably be fixed soon.

Sadly, this isn’t the only issue you can encounter, and many reported that they can’t redeem their Diablo IV code. Speaking of errors, we recently covered Diablo 4 error code 395002, and Data Retrieval error, so be sure to check it out.

Did you find a different way to fix Diablo 4 error code 700004? If so, share your findings with us in the comments section.

Discord Elevated Latency: What Does it Mean & How to Fix

If you have encountered Discord Elevated API Latency and errors message and cannot use Discord on any platform, including PS5, then this guide can help! We will explore the error message’s meaning and offer WR experts-tested workarounds to fix the issue.

What does Discord Elevated Latency mean? might be your question. Well, Discord Elevated Latency means there is an interference between the Discord remote server & the Discord user client, which could cause a delay in communication, and it could happen due to various reasons.

Some include network congestion or server issues, outdated software, low battery, unstable internet connection, or malware infection at the client’s end.

How can I fix the Discord Elevated Latency error?

Before proceeding with any steps to fix the Discord Elevated API latency issue, restart your device, disable VPN, and ensure you run an updated operating system version; verify if you have a stable internet connection, check the Discord server status, and restart the Discord app; run a malware scan.

Note icon NOTE
At the time of writing, Discord has resolved the issue, and your Discord app must work as usual. If not, it could be an issue at your end; follow the steps below to fix it.

1. Clear the app cache

  1. Press Windows +R to open the Run dialog box.explorer_cache folder - discord elevated latency
  2. Type the following path and click OK: %APPDATA%/Discord/Cache
  3. Press Crtl + A to select all the files in the folder, then click the Delete icon.Delete cache

Once done, try to log in to Discord again and check if the issue persists.

2. Turn on the Hardware Accelerator option

  1. Press the Windows key, type discord, and click Open.Discord open - discord elevated latency
  2. Click the User Settings option next to your Profile icon.Discord_select the USER SEttings
  3. Locate App Settings, then click Advanced from the left pane.
  4. Toggle the switch to enable the Hardware Accelerator option.Discord_hardware accelerator
  5. Click Okay to confirm the action.

Remember, this feature helps your CPU deal with the heavy apps you use on Discord; however, you must only enable this feature if your system supports it, as it might cause high CPU usage issues.

3. Disable the Quality Of Service feature

  1. Press the Windows key, type discord, and click Open.Open the Discord app - discord elevated latency
  2. Go to the User Settings option next to your Profile icon.Discord_select the USER SEttings
  3. Under App Settings, click Voice & Video.
  4. Look for the Advanced section in the right pane, then Quality of Service.Discord_disable QoS
  5. Toggle off the switch next to Enable Quality of Service High Packet Priority.

4. Update/reinstall the Discord app

  1. First, press Ctrl + Shift + Esc to open the Task Manager, and look for any instance of Discord. If found, right-click it and select End task.
  2. Press the Windows key, type discord, and click Open.Discord open - discord elevated latency
  3. If an updated version of Discord is available, it will start downloading.

If Discord won’t update and throws you an error, it could be the cache files; read this detailed guide to learn more.

Reinstalling the Discord app is a universal fix for issues like Discord Fatal Javascript error; read this guide to learn more.

However, if there is no update and you are still stuck with the Elevated API latency issue, follow these steps to reinstall the app:

  1. Press Windows + I to open the Settings app.
  2. Go to Apps, then select Installed apps.Apps - Installed apps -discord elevated latency
  3. Locate Discord, click the three dots, and select Uninstall.Uninstall the Discord app
  4. Click Uninstall again to confirm.
  5. Once done, visit Discord’s official website and click Download for Windows to get the latest Discord version.Download for Windows -discord elevated latency
  6. Double-click the downloaded file to initiate the installation. Once it is finished, log in using the credentials and try using the app.

If nothing worked for you, you must contact the Discord customer support team and explain the issue & fixes you tried for further assistance.

If you cannot open the Discord app on Windows 11, check the Discord server status first; if that’s now the issue, read this guide to learn other solutions.

We also have a great guide on how to create a verification channel in Discord, so don’t miss it.

If you have any questions or suggestions about the subject, please mention them in the comments section below.

Cricket 23: We Have Encountered an Error [Fixed]

Commng across a Cricket 24 Error that reads Please try again later. Press A to begin, but pressing the key does nothing. We got you. Eror code N12029B64-1F128 often accompanies those messages.

Why is Cricket 24 not working?

  • Corrupt game files or cache
  • Conflicts due to an antivirus software
  • Network connectivity issues
  • Issues with the game installation

Here’s how to make it work:

How do I fix We have encountered an error in Cricket 24?

First,

Note icon NOTE
The solutions listed here are for a Windows PC, though the idea applies across devices. If you are facing the issue on PlayStation or Xbox, use the equivalent steps wherever possible.

1. Modify the force_account_name file

Tip icon Tip
If you don’t find the steam_settings folder or the force_account_name file, either reinstall the game or head to the next solution.
  1. Head to Cricket 24’s directory, go to the steam_settings folder, and then open the force_account_name text document. 
  2. If you see Player listed here, replace it with your game’s username.modify file to fix cricket 24 we have encountered an error
  3. Click the File menu, and select Save for the changes to apply.
  4. Relaunch Cricket 24 and check whether the We have encountered an error issue is fixed. 

2. Verify the game files

  1. Launch Steam on the device, and go to the Library.
  2. Right-click on Cricket 24, and select Properties from the context menu.properties
  3. Go to the Installed Files tab, and click on Verify integrity of game files.repair game files to fix cricket 24 we have encountered an error
  4. Wait for the process to complete.

When you are facing issues with Cricket 24 due to corrupted game saves or files, the built-in repair tool comes to the rescue. Besides, it will also help fix the Don Bradman Cricket 17 errors.

3. Update the drivers

  1. Press Windows + X to open the Power User menu, and select Device Manager from the list of options.
  2. Expand the Display adapters entry, right-click on the active graphics adapter, and select Update driver.update driver to fix cricket 24 we have encountered an error
  3. Choose Search automatically for drivers to let Windows locate the best locally available version and wait for the driver update process to complete.search automatically
  4. Finally, reboot the PC for the changes to come into effect and launch Cricket 24.

Updating the graphics drivers can help fix performance issues as well the We have encountered an error Cricket 24 problem. Also, while you are at it, update the network drivers.

And if Windows can’t find one automatically, head to the manufacturer’s official website, and manually install the drivers.

Alternatively, you can make things easier by using dedicated driver manager software, such as Outbyte Driver Updater. This tool will scan your computer and automatically update or repair any drivers.

⇒ Get Outbyte Driver Updater

4. Reinstall the game

  1. Open Steam, and to your game Library.
  2. Right-click on Cricket 24, hover the cursor over Manage, and select Uninstall.uninstall
  3. Again, click Uninstall in the confirmation prompt.
  4. Once done, restart the PC, and then reinstall Cricket 24 on Steam.

As a last resort, you can always reinstall the game. And if that, too, fails, use a reliable software uninstaller tool to delete any leftover files and Registry entries before reinstalling.

5. Contact Big Ant support

When nothing else works, the last option is to contact Big Ant support. You can raise a ticket from the official website and wait for a response.

Though in most cases, it shouldn’t come down to that, and one of the solutions listed here should help get rid of the We have encountered an error launch issue in Cricket 24.

Before you leave, find out how to optimize the PC for gaming and get the best performance.

For any queries or to share what worked for you, drop a comment below.

How to Fix the #NAME Error in Excel

Whether you are a beginner or an experienced Excel user, you might have encountered the #NAME error. This guide will discuss the probable reasons and effective ways to eliminate it quickly.

How do I fix the #NAME error in Excel?

1. Check the function name spelling

The most common reason for the #NAME error in Excel is the wrong spelling of the function’s name. When you mistype the function’s name, Excel can’t recognize it and displays the #NAME error.

For example, if you are applying the COUNTIF formula on your sheet, but while applying the formula, you mistyped the spelling of COUNTIIF, Excel won’t consider it a function; you will get the #NAME error instead of the result.

To avoid the typos in formula names, use the Formula Wizard. Whenever you type a formula name in a cell or Formula Bar, you will get a list of formulas matching your typed words. Select from the drop-down list; once you have the formula name and opening parentheses, you will see the syntax as hover text.

Alternatively, you can select the cell with the formula and click the Insert function next to the Formula Bar; you will see the wizard with the information to help you correct the formula.

2. Invalid named range

Microsoft Excel allows you to use named ranges, which makes differentiating between cells more accessible, and you can easily refer to the data in it.

However, if you use a formula that refers to a named range that has been deleted, misspelled, or doesn’t exist, you receive the #NAME error.

To avoid this, ensure you have selected the named range of the correct scope (within the worksheet), and the named range is correctly spelled in the formula; for that, follow these steps:

  1. Click the Formulas tab, then under Defined Names, select Define Name.Define Names - #Name error in Excel
  2. Choose the Defined Name, and for Scope, select Workbook (refer to the entire workbook) or specific sheet.Add a defined name
  3. Click OK.
  4. Take your cursor in the formula syntax to the point where you want the name you created to appear.
  5. Next, go to the Formulas tab, locate Defined Names, click Use in Formula, and choose the defined name from the drop-down menu.Use in Formulas

3. Double Quote missing from the text value

If you are adding text references in formulas, you must enclose the text in double quotation marks, even when you are using just a space.

To fix it, closely examine the syntax and check the text and space to ensure all of them are enclosed in double quotes.

4. Using the new function in the older Excel version

If you want to use a new function in an older version of Microsoft Excel, you will get the #NAME error. For example, some dynamic array functions like FILTER & UNIQUE are introduced with Microsoft 365; therefore, you can’t use them with earlier versions like 2019, 2016, 2013, 2007, etc.

5. Wrong range reference

Inserting the wrong range in a formula can cause the #NAME error to appear. This usually happens if you type in the wrong cell reference or call a cell outside the selected Excel range. To avoid this issue, use the mouse to drag and select the range you need for the formula.

6. Custom function is not available

Some Excel functions need you to install add-ins on your desktop app for them to work correctly, like the Euroconvert function. This function needs you to enable the Euro Currency Tools add-in.

So before using any custom function, make sure you enable the Add-in related to it; for that, follow these steps:

  1. Go to the File tab.Go to File menu - #Name error in Excel
  2. Click Options to open the Excel Options window.EXCEL_Options - Fix the #NAME Error in Excel
  3. Choose Add-ins from the left pane.EXCEL_Manage Add-ins - GO
  4. Locate the Manage list box, choose Excel Add-ins, then click Go.EXCEL_add-ins
  5. Select the add-in and click OK to confirm.

This will help you use the custom functions; however, you must disable the ones you don’t use to prevent issues like Excel has run into an error and file not being found; read this to learn more about it.

7. Check for a missing colon

Missing colon - #Name error in Excel

When you mention a range reference, you must add a colon in between; if that is missing, you will get a #NAME error. To avoid this, ensure whenever you select a range reference, you separate them using a colon in between.

How can I find #NAME? errors in Excel?

  1. Select the entire range of cells you want to inspect.
  2. Go to the Home tab, locate the Editing group, then click Find & Select.Select Go to Special -Fix the #NAME Error in Excel
  3. Click Go to Special or press F5 on the keyboard and click Special…
  4. The Go to Special dialog box will open. Select the radio button next to Formulas, and click Errors, then OK.EXCEL_select errors

Excel will display all the errors on your Excel sheet; you can check and fix them one by one using the abovementioned tips. Press Ctrl + F and type #NAME? to spot errors quickly.

So, whether you use VLOOKUP, IF function, or pivot table, these tips can help you spot the #NAME? error & other problems with a formula, and quickly remove them from your sheet.

Also, keeping these things in mind while creating a new worksheet can minimize the risk of errors, thereby saving you time and effort.

Other than the wrong formula, if you face other Excel errors like 0x800ac472, it could be due to corrupted system files; read this guide to learn more.

If you are getting #NAME in Google Sheets indicating a Formula parse error, read this guide to learn about the solutions. Moreover, we can help you out if the YEAR function isn’t working correctly.

If your formula doesn’t show the expected result and instead returns 0, you might be facing a different issue than the #NAME? error. In such cases, it’s best to learn how to fix Excel formulas returning 0 so you can ensure accurate calculations in your spreadsheets.

FAQs

What does the #NAME? error mean in Excel?

Excel shows #NAME? when it doesn’t recognize part of your formula. Typical causes are typos in function names, missing quotation marks around text, or undefined named ranges.

How do I fix a misspelled function name causing #NAME?

Check the function spelling and retype it using Formula AutoComplete. For example, correct SMM to SUM, AVERGE to AVERAGE, or VLOKUP to VLOOKUP.

Why do I get #NAME? when using text in a formula?

Text must be enclosed in double quotes. If you write IF(A1=Yes,1,0) instead of IF(A1=”Yes”,1,0), Excel treats Yes as an unknown name and returns #NAME?.

Can missing add-ins cause #NAME?

Yes. In older Excel versions, functions like NETWORKDAYS, EDATE, or EOMONTH require the Analysis ToolPak. Enable it via File > Options > Add-ins > Excel Add-ins > Analysis ToolPak.

If you have any questions or suggestions about the subject, please mention them in the comments section below.

Paramount Plus Error Code 1100: How to Fix it

The error code 1100 may show up on your screen when trying to watch your favorite show on Paramount Plus. 

According to most users, the video in question becomes unavailable. Fortunately, this isn’t a symptom of a larger issue. If this sounds familiar, we share with you the top solutions that came through for other users.

What is the Paramount Plus error code 1100?

This is an error code that prevents you from watching a show on the streaming platform. Some users say the error appeared a few minutes into watching a show, while others could not view it after clicking on it. It could be a server error, location issues, or app-related temporary glitches.

In other cases, it’s not an error, and it’s just that the show’s latest episodes are yet to be uploaded.

How do I fix the Paramount Plus error code 1100?

Try the following simple steps first:

  • Make sure that all cables are securely connected, check that you have the latest version of the app installed, then log out and log back in.
  • Verify Paramount Plus’ server status to ensure there are no downtimes and ensure your internet connection is stable.
  • Reboot your streaming device and restart your router then switch to a web browser for streaming.

1. Relaunch the Paramount Plus app

  1. Open the Settings app on your phone or your Android TV.
  2. Select Apps.
  3. Locate the Paramount+ app and tap to open it.
  4. Select Force stop button.
  5. Launch the Paramount Plus app on your phone and check if this resolves the issue.

2. Use a VPN

  1. Press the Windows key and select Settings.settings windows 11
  2. Next, select Network & internet and click on VPN in the right-side menu.
  3. Click on Add VPN to start the manual setup.vpn-add settings
  4. Enter your VPN settings, such as encryption type, server IP address, and other connection options, and click on Save.Adding VPN Connection in Windows 11

Adding a VPN can be beneficial, especially if Paramount has removed the particular show from your location. This trick will get rid of the 1100 error and related ones like 3002 error code.

Over time, the platform removes old shows to create space for newer ones. However, this is done in phases, and you may find the show available when you switch locations.

Although the native Windows VPN will work, it is recommended you use a dedicated VPN solution, such as Express VPN. This software offers servers in 105 countries and has very good connection speeds, plus it comes with extra security features.

ExpressVPN

Never worry about errors when trying to watch your favorite shows with this powerful VPN.
Check Price Visit Website

3. Clear cache

3.1 Android TV

  1. On your TV, find your Settings.
  2. Go to Apps and select Paramount Plus.
  3. Scroll down and hit Clear data and Clear cache.

3.2 Android phone

  1. Tap on settings on your phone.
  2. Next, tap on Apps.
  3. Find the Paramount Plus app and tap on it.
  4. Scroll down and select Storage.
  5. Tap on Clear data and Clear cache, then try again.

3.3 Browser cache

  1. Launch your browser, and for this step, we shall be using Google Chrome.
  2. Click the three horizontal dots and select Settings.Settings CHrome
  3. Go to Privacy and security and click Clear browsing data.
  4. Select Browsing history, Cookies and other site data, & Cached images and files, then click Clear data.

4. Reinstall the app

  1. Open the Settings app on your Android TV.
  2. Select Apps.Apps paramount plus fatal error
  3. Locate the Paramount Plus app and open it.
  4. Choose the Uninstall option.Uninstall app 1 paramount plus fatal error
  5. After the uninstallation completes, go to the app store, search for Paramount Plus, and install it. Paramount install

5. Contact support

If you have already tried everything and still cannot resolve this issue, then you can contact Paramount support for assistance. You’ll be directed to answer a few questions to give a detailed account of the error.

They will then help you fix this issue and get back to watching all your favorite TV shows on your device on condition that the show is available on the platform. Otherwise, you’ll just have to wait until the show is uploaded or try another platform.

What is the download limit error on Paramount Plus?

It means the content provider has restricted the number of times you can download their content. Paramount Plus subscribers can download videos for offline viewing to avoid running into the error code 1100 when they become unavailable.

However, these download privileges have their limits. Only 25 videos are allowed in your library at any given time, and only 5 similar videos across different devices. 

Unlike other errors like Paramount Plus constantly buffering, the error 1100 is largely dependent on the availability of the particular show on the platform. If it’s not yet been updated, there isn’t much you can do.

Admittedly, these may seem like too many errors when you sign up for the streaming service, but the good news is that you get to test it out for free before committing to a subscription.

And if it is not your cup of tea, there are other Paramount Plus alternatives that have a rich library of content and are more affordable.

Well, there you have it. We hope you found this guide useful. If you have any other tips or suggestions for troubleshooting this Paramount Plus connection error, please share the knowledge in the comments section below.

Cloudflare Error 1001: How to Fix This DNS Issue

Cloudflare error 1001 will prevent users from visiting your website, and this can be a serious problem if you’re hosting an online service that needs to constantly be online.

Errors such as this will cause downtime and revenue loss, so you must fix them as soon as possible, and this guide will help you do that.

What is Error 1001: DNS resolution error?

  • This error appears when a web request is sent to Cloudflare for a non-existing domain or if the DNS provider is unavailable.
  • An external domain that is not on Cloudflare but has a CNAME record to an active Cloudflare domain can cause this issue.
  • If the target of the DNS CNAME record can’t be resolved, you’ll encounter this error message.
  • The Always Online feature is enabled for the Custom Hostname domain and that can lead to issues.

How do I fix Cloudflare error 1001?

1. Adjust your domain settings

  1. Open your domain settings.
  2. Locate your CNAME records and ensure they are properly configured with valid IP addresses
  3. You’ll have to enter two values, and to work, those values need to be different.
  4. After updating DNS records, check if the problem is gone.

2. Enable Secure DNS in Firefox

  1. Click the Menu button in the top right and choose Settings.
  2. Navigate to the Privacy and Security section.
  3. Select one of the Secure DNS settings and save changes.

3. Contact support

  1. Contact Cloudflare support.
  2. In addition, you might want to contact your domain name provider.
  3. If you have any other services that might be associated with Cloudflare, contact their support as well.

Cloudflare error 1001 is usually caused by your DNS configuration, but if your DNS is properly set, you might have to contact the support and ask them to look into this issue.

This is just one of many Cloudflare error codes you can encounter. In the past, we covered Cloudflare 403 forbidden error as well as the error 1005 access denied.

Another prominent issue that users reported is Cloudflare error 521, and we have a special guide that addresses it.

We also have a guide on Argo tunnel error, so don’t miss it for more information.

Did you find a different solution for this issue? If so, don’t hesitate to share it with us in the comments section.

 3 Ways to Remove Background from Video

Whether you are a content creator or vlogger, choosing the right background for a video can have a significant impact, allowing you to customize and take it to the next level.

In this guide, we will discuss three WR expert-tested methods that can help you remove background from a video to give it a polished look.

How do I remove the background from a video?

1. Using the inbuilt Windows tool – Clipchamp

  1. Press the Windows key, type clipchamp, and click Open.Microsoft ClipChamp - remove a video background
  2. Click the Create a video button on the home screen and select a format.Clipchamp_Create a video clip
  3. Click Import media.Clipchamp_Import media
  4. Select the video or image and click Open.Click Open - remove a video background
  5. The clip or image will appear on the top left corner under Import media; drag it to add it to the timeline.Clipchamp_add the clip to timeline
  6. Now click the clip on the preview screen, and from the right-side pane, select Effects.
  7. Look for the Green screen filter and adjust the color or effect.Effects - Green screen -
  8. Click Import media or Stock videos, choose any video or clip that matches your video, and drag it under the timeline.Import the media
  9. Crop the image with a green screen (now the black screen) on the preview to ensure it is placed where you want. You can even select it to appear in Picture in Picture mode.the final outcome

2. Using the Movavi Video Editor Plus

ClipChamp app has its limitations and doesn’t come with advanced video editing features., including multi-track editing, video stabilization, and more.

That’s why you need a professional tool like Movavi Video Editor Plus, which comes with the ability to edit 4k videos and uses AI to remove background, motion tracking, & noise removal. Let us see how we can use Movavi Video Editor Plus to remove background from your video:

  1. Go to the Movavi Video Editor’s official website and click Download for Free.Download - remove background from a video
  2. Click Install.Install
  3. Launch Movavi Video Editor, then click File Import, then Add Files. VideoEditor_Add file
  4. Select the clip or video that you want to remove from the background and click Open.VideoEditor_click Open to select the file
  5. Drag the clip to the timeline, choose a background want to add, and drag it to the timeline.VideoEditor_drag a file to timeline
  6. Once both videos are in the timeline, drag the main video and drop it above the background.
  7. Now you will get editing options like Position, Pan and zoom, Stabilization, and Animation. Scroll through and find Chroma Key.VideoEditor_remove a background from a video
  8. Next, click the dropper next to the Color, then click on the clip. This will remove the background color of the video. Now, you will see the background that you chose on the clip.

3. Using the online background remover

If you want to create a meme or funny video for sharing with friends and want to remove the background without even installing software, you can opt for an online background remover. We are using Unscreen, a popular video background remover tool; here are the steps:

  1. Go to the official website.
  2. Click Upload Video.chrome_Upload clip - remove a video background
  3. Select the clip and click Open. The online platform will start the process, and in a few seconds, you will get the clip with the background.Click Open
  4. You can click Change Background and add the one you want, then click Share to share it from the platform directly.chrome_Share the video
  5. You can also click Download and select GiF, Animated PNG, or Single Frames to get it on your computer. 

You can choose any above-mentioned methods to remove the background from your video based on your preferences.

If you wish to remove the background from a clip to share it with friends, you can use the online background remover mentioned above or any other similar tool available online.

However, if you aim to edit a video for professional use, want to add various effects, and achieve a polished result, we recommend using Movavi Video Editor Plus.

It offers a wide range of features, including background removal, video stabilization, color correction, the addition of intros & stickers, audio editing, and more.

Interested in trying out this powerful video editing tool? Download it from the official website for free to explore its capabilities further.

We also have a new guide on how to blur the background in CapCut, so don’t miss it for more useful information.

If you already use the tool, share your experiences with the software in the comments section below.

How to Fix Nebula Data Error on PayDay 3

The Nebula Data error on PayDay 3: Failed To Fetch Game Config Data error message while starting the game indicates an overload at the server end as too many players are trying to access the game at the same time. This may also be due to an unstable internet connection or Firewall blocking the game.

How do I fix the Nebula data error in PayDay 3?

1. Login to your game using the Starbreeze account

If you have linked the game to the Steam account, log out from it, type in the username and password for your Starbreeze account, and then try playing the game.

However, if you are logged in using the Starbreeze Nebula account, try logging out from it and link your game to Steam, then check if it helps!

In case this doesn’t help, you can try creating a new Starbreeze account to access the game, provided you are yet to play the game.

2. Add PayDay 3 to the Windows Firewall

Note icon NOTE
Before moving with the steps below, check if PayDay3 is blocked by the Windows Firewall using our guide.
  1. Press the Windows key, type control panel in the search box, and click Open.Control Panel start menu -nebula data error payday 3
  2. Select Category for View by and click System and Security.System and Security
  3. Under Windows Defender Firewall, choose Allow an app through Windows Firewall.aLLOW AN APP THROUGH FIREWALL
  4. On the Allowed apps page, click the Change settings button, then select Allow another app.Change app
  5. Click Browse and locate the PayDay 3 executable file on your computer.Browse1
  6. Click Add.ADD
  7. On the Allowed apps window, you will see PayDay3 added to the list; place a checkmark next to Private and Public, and click OK to confirm the changes.

Making sure the game is allowed by the Windows Firewall can help you fix other similar issues like PayDay 2 failed joining game error.

3. Verify the game files’ integrity

  1. Press the Windows key, type steam, and click Open.
  2. Locate and right-click PayDay 3, and select Properties.
  3. Select the Local files tab and click Verify integrity of game files.Verify-Integrity-of-games-files -nebula data error payday 3
  4. Steam will verify the game files; if there is an issue, click Repair to allow the broken files to be fixed.

Verifying the game files can help you repair & recover the missing files of the game and is a common solution for issues like PayDay 2 Access Violation Crash.

4. Reset your network settings

  1. Press Windows + I to open the Settings app.
  2. Click the Network & Internet from the left pane, then select Advanced network settings.Network Internet - nebula data error payday 3
  3. Under More settings, locate and click Network reset.Network Reset` 1
  4. On the next page, click the Reset now button.Reset now 1
  5. Click Yes to confirm the selection.Reset confirmation

Your computer will restart in 5 minutes after resetting the network, so make sure you save your work before it reboots.

Can you play PayDay 3 without Nebula?

No, you need a Nebula account to access PayDay3; however, you can link it to your existing Steam account.

Remember, there are no certain fixes for this issue, and developers are working to fix it; however, you can try the above-mentioned workarounds.

In case you are facing other issues related to PayDay, like PayDay 2 mods not working, read this guide to learn the solutions. You should also check the X account for the server issues with PayDay 3 guide because it will offer additional information.

If nothing worked for you, you may need to contact the game’s official support channels for further assistance.

Did we miss a step that helped you? Don’t hesitate to mention it in the comments section below. We will happily add it to the list.

Runtime Error 76: Path Not Found [Fix]

The Run time error 76 Path not found is encountered on all operating systems, including Windows and MacOS, and across programs, say Microsoft Office apps or World of Mixed Martial Arts 5 (WMMA5).

It could arise due to file corruption, incorrect file path, missing permissions, a conflicting antivirus software, or compatibility issues.

How do I fix runtime error 76?

Before we start with the slightly complex solutions, try these quick ones:

  • Update the program throwing the error and also install the latest Windows version.
  • Run the program as administrator.
  • Shorten the file path by removing excess characters from the folder names. Also, remove any incompatible characters from the folder/file name.
  • When facing the Run time error 76 path not found issue with VB6 on an application you developed, make sure the code references the absolute path instead of the relative path.

1. Run the program in compatibility mode

  1. Locate the affected program’s launcher, right-click on it, and select Properties. 
  2. Head to the Compatibility tab, tick the checkbox for Run this program in compatibility mode for, and select a previous version of the OS from the dropdown menu.compatibility mode to fix run time error 76
  3. Once done, click on Apply and OK to save the changes, and verify whether the error message goes away.

2. Restore the previous folder version

  1. Right-click on the folder that stores the launcher for the affected program, and select Properties.properties
  2. Go to the Previous Versions tab, select a version from the list, preferably the oldest, and click Restore.restore folder to fix run time error 76
  3. Click on Restore in the confirmation prompt and wait for the process to complete.
  4. Finally, reboot the device and verify whether the Run-time error 76 path not found issue in Windows 10 is fixed.

3. Create the EnableLinkedConnectionsRegistry key

  1. Press Windows + R to open Run, type regedit in the text field, and hit Enter.regedit
  2. Click Yes in the UAC prompt.
  3. Now, navigate the following path or paste it into the address bar and hit Enter: HKEY_LOCAL_MACHINE\SOFTWARE\Microsoft\Windows\CurrentVersion\Policies\Systempath
  4. Right-click on the empty portion on the right, choose New, select DWORD (32-bit) Value, and name it EnableLinkedConnections.dword to fix run time error 76
  5. Double-click the EnableLinkedConnections DWORD.
  6. Enter 1 under the Value data field, and click OK to save the changes.value data
  7. Restart the PC and check for improvements. 

4. Download the latest Visual C++ Redistributables

  1. Go to Microsoft’s official website and download the Visual C++ Redistributable package corresponding to your system’s architecture.Visual C++ distributable
  2. Run the setup and follow the on-screen instructions to complete the installation.

5. Scan the PC for malware

  1. Press Windows + S to open Search, type Windows Security in the text field, and click the relevant result.
  2. Click on Virus & threat protection.virus & threat protection
  3. Click on Scan options.
  4. Select Full scan here, and then click the Scan now button.full scan to fix run time error 76
  5. Wait for the built-in antivirus to detect any malware or threats and eliminate/quarantine them.

You can use an effective antivirus solution instead of Windows Security. Also, a virus scan will fix Runtime error 255.

6. Reinstall the affected program

  1. Press Windows + R to open Run, type appwiz.cpl in the text field, and hit Enter.
  2. Select the affected program from the list and click Uninstall.uninstall to fix run time error 76
  3. Follow the on-screen instructions to remove the program.
  4. Now, reboot the device and re-download the program from an official source.

Often, an improper initial installation or file corruption can lead to Run time error 76 in Excel and other programs. Reinstalling the program also helps with Run time error 217.

7. Perform a system restore

  1. Press Windows + S to open Search, type Create a restore point, and click the relevant result.
  2. Click the System Restore button.system restore to fix run time error 76
  3. Now, select Choose a different restore point and click Next. 
  4. Pick another restore point from the list, one created before the error first appeared, and click Next.restore point
  5. Verify the details and click Finish to start the restore process.  

When nothing else works against Run time error 76 path not found in Word or other apps, reverting to a stable state where things worked fine should do the trick.

Remember, when faced with the Run-time error 76, your primary approach should be to identify the culprit file and fix it. And when that’s not possible, program or OS-specific solutions always come to the rescue.

Also, in some cases, you will have to update the drivers, for instance, Runtime error R6025.

For any queries or to share more solutions with us, drop a comment below.

Solved: Suspect ARP Probe Failed [Wi-Fi, Ethernet]

The Suspect Arp Probe Failed error sometimes appears on the client-side Windows machines when the Wi-Fi or Ethernet connection drops suddenly. We have replicated the SuspectArpProbeFailed connection issue in our WR labs, and we have the tested solutions to fix it.

What is an ARP probe? The ARP Probe is a tool that checks a local network to validate that an IP address is unique. If it finds a duplicate IP address, it will look for a response from the original IP. In our case, the Suspect Arp Probe Failed error is caused by problematic Wi-Fi or Ethernet drivers from the endpoint.

How do I fix the Suspect ARP Probe Failed error?

Before going into more detailed fixes, let’s crosscheck some quick methods to investigate the problem further:

  • Check the packet loss on the endpoint and monitor the situation to see if the broadcast packets are constantly dropped or if there is a one-time occurrence.
  • Verify all the network equipment and see if all the components are up to par. Even a problem with the Ethernet cable can cause the Suspect ARP Probe Failed error.
  • Make sure that you don’t have duplicate IPs on your network map.

1. Run the Network and internet troubleshooter

  1. Go to Settings and click on Troubleshoot from the System tab.
  2. Now, select Other troubleshooters, locate Network and Internet, and hit the Run button.
  3. The troubleshooter will run the connection tests and provide a solution if it detects any issues.

For Windows 10, go to Settings>Update & Security>Troubleshoot>Additional troubleshooters, select Internet Connections, and click on Run the troubleshooter.

2. Update or roll back the Ethernet or Wi-Fi driver

  1. Right-click the Start button and select Device Manager.
  2. Extend the Network adapters section, right-click on the Ethernet or the Wi-Fi driver, and select Update driver.
  3. Choose Search automatically for drivers. If the system will find any new ones, install them.
  4. If there aren’t any new drivers, close the window, right-click once again on the driver and select Properties.
  5. Go to the Driver tab and click on Roll Back Driver.
  6. This will automatically revert the driver to its previous version. See if that fixes the issue.

If the solution doesn’t work, uninstall the driver and get the latest driver directly from the manufacturer’s website. This solution will work seamlessly on Windows 11 and 10.

If you’d like to simplify this whole process you can always rely on dedicated software such as Outbyte Driver Updater. This tool will scan your system, identify any outdated or broken drivers, and replace them with new up-to-date versions, in a matter of minutes.

⇒ Get Outbyte Driver Updater

3. Reset the network settings

  1. Go to Settings, select Network & internet from the left pane, then click on Advanced network settings from the right.
  2. Now, click on Network reset, then click on the Reset now button in the next window.
  3. The procedure will require a reboot.

After applying these solutions, the internet access will be restored, and if the device has any DNS issues, they will be fixed. To be on the safe side, you may also reset the router to make sure that the problem is not associated with the PC not getting the right settings from the router.

How do I fix Unexpected ARP Probe and ARP Announcement?

This is a very similar error that can be solved with the same solutions outlined above. However, the problem is caused by one of the computers from the network sending too many ARP packets.

So, the first thing you need to do is to isolate the system that is causing the overflow by disconnecting the terminals one by one and monitoring the network at the same time.

To summarize our guide, the Suspect ARP Probe Failed error is usually caused by problematic drivers for either the Ethernet or the Wi-Fi adapters. Running the Network and internet, troubleshooting, or fixing the drivers will eventually solve the problem. 

You may also reset the network adapters to default factory settings if needed. 

We also recommend reading our guide on how to fix a Wi-Fi adapter if it’s not working.

If the problematic computer is older, you might consider getting a better USB network adapter and using it instead.

For any other questions about this topic, head over to the comments section below.

Fix: War Thunder Connection Error Incompatible Server Version

The War Thunder connection error incompatible server version error message may prevent you from playing your favorite multiplayer game.

The problem may be due to some issues with your system or network, but with a few tweaks, this can be rectified in no time.

What does the War Thunder connection error incompatible server version mean?

It means that your game version does not match the current version on the game server. The War Thunder game servers are updated regularly with new content, features, and bug fixes. In order to connect to these servers, your client must be up-to-date with the latest patch.

If you’re using an out-of-date client, you will be unable to join any of the official servers and will receive this message.

How do I fix the Incompatible Server Version error on War Thunder?

Before any advanced troubleshooting, attempt the following simple preliminary checks:

  • Ensure your device meets the minimum system requirements for War Thunder and your version is not a modded version.
  • Check that all of your drivers are up-to-date, you have enough bandwidth, and the network connection is stable.
  • Restart your game client and then connect again. If it doesn’t help, restart your computer or console and connect to a different server.

1. Download the server version update

On some consoles, it takes quite a bit of time for the game updates to go live. The delay is usually due to approvals from companies like Sony. It usually doesn’t take long, but it could be anything from 30 minutes to three hours.

If this seems too long, you can head over to War Thunder’s website and download the update manually. Ensure the game version and server version numbers match; otherwise, you’ll not have fixed the error. Remember, the update is also subject to approval, so if it doesn’t work, you still have to wait.

2. Reset your console

2.1 Xbox

  1. Press the Xbox button on your game controller, this will direct you to the guide.
  2. Click System in the guide, then select Settings.xbox settings
  3. In settings, go to general, then click personalization.
  4. Click the My home Xbox, then select the Make this my home Xbox to choose your home console.
  5. If there’s a need to remove a system, click Remove this as my home Xbox.

2.2 PS5

  1. Turn off your PS5 console. 
  2. Search for and locate the small reset button on the back of your controller.
  3. With a small tool try to push the button inside.
  4. Hold the button down for roughly 3-5 seconds.
  5. Now press the PS button on the front to sync it again.

3. Disable your antivirus temporarily 

  1. Hit the Start menu icon, type Windows Security in the search bar and click Open.
  2. Click on Firewall & network protection, then select Public network.league of legends black screen after champion select
  3. Locate Microsoft Defender Firewall and toggle the off button.turning off Microsoft Defender Firewall Windows

If this works, you might need to whitelist War Thunder in order for it to work properly.

4. Verify the integrity of game files

  1. Launch Steam and click the Library option at the top.
    library unrecognized game files cannot continue
  2. Right-click on War Thunder and select Properties.
  3. Now, choose Local files in the left pane.
    local files
  4. Finally, click Verify integrity of game files and wait for the process to complete.
    verify integrity unrecognized game files cannot continue

If you have recently updated your computer or reinstalled Windows, there is a chance that some of the files may have been corrupted or deleted.

This could cause a mismatch between the game version and the server version. Verifying the game files will fish out any corrupt game files and replace them with the correct ones.

5. Run the game in compatibility mode

  1. Left-click the Start button, input Steam in the search box, and select the Steam client from the search results.
  2. Go to the Steam Library at the top of the screen and locate the game you want to run in compatibility mode.
  3. Right-click the game title and select Properties from the drop-down.
  4. Navigate to the Local Files tab, and click the Browse Local Files option.
  5. Find the game’s executable file, right-click it, then select Properties from the drop-down.
  6. Navigate to the Compatibility tab and check the box for Run this program in compatibility mode, then choose the operating system.
  7. Click OK to save the changes, then Apply.

If you go with this route, the game might be slightly slower than it would be and may crash frequently. In addition, your system won’t be as stable.

Hopefully, this guide was helpful to you if you were experiencing the connection error incompatible server version while playing War Thunder.

Unfortunately, War Thunder problems do not end here. You may experience packet loss issues while playing, especially if there’s network congestion in your connection, but with a good VPN, this can easily be resolved.

Other issues like the video driver hung error are usually caused by overclocking your PC, and undoing it will enable you to enjoy the game uninterrupted.

Let us know if it worked for you in the comments below.

CTRL + D is Not Working: How to Fix it

Ctrl D not working can affect various applications including VS Code, Google Sheets, Terminal, and Photoshop. If this happens, you won’t be able to access certain functionality as quickly and that will negatively impact your performance.

This might be an arbitrary issue, but it can disrupt your workflow, so it’s advised to fix it as soon as possible. In today’s guide, we’re going to show you a couple of solutions that can help you with this problem.

What can I do if the CTRL + D shortcut is not working?

Before we start fixing the issue, there are a few checks you can perform:

  • Use a different keyboard, since your current one may be faulty.
  • Keep the keys pressed for more than 3 seconds when using this shortcut.
  • Remove any unnecessary plugins or add-ons that might interfere with keyboard shortcuts.

1. Close all unnecessary applications

  1. Close all unessential applications on your PC.
  2. Go to the system tray and make sure that you’ve closed all applications.
     
  3. Press Ctrl + Shift + Esc to open Task Manager.
  4. Locate the running process, right-click it, and choose End Task.
  5. Repeat this for all running processes.

By doing this, you’ll close any applications that might be using Ctrl + D shortcut. With a bit of investigating, you can find the application that is blocking this shortcut from working and remove it or change the shortcut key.

2. Make sure you’re using the English keyboard layout

  1. Click the Language bar in the system tray.
  2. Select English from the list.
  3. Check if the problem is resolved.

Keep in mind that this solution only applies if you’re using multiple keyboard layouts.

3. Update the keyboard driver

  1. Right-click the Start button and choose Device Manager from the list.
  2. Locate your keyboard driver, right-click it, and choose Update driver.
  3. Next, go to Browse my computer for drivers.
  4. After that, select Let me pick from a list of available drivers on my computer.
  5. Select the driver that matches your keyboard.

Users reported that updating the Wireless Keyboard Filter Device on their Surface device helped with this problem, so don’t hesitate to try it.

CTRL + D shortcut alternatives

The alternatives vary greatly depending on the software you’re using, but here are a few ones you can try:

  • If you use this shortcut to duplicate text, you can use Ctrl + C and Ctrl + V instead.
  • For bookmarking, you can always manually bookmark websites instead of using the shortcut.
  • Many use this feature for text deletion. Instead, you can manually select the text you and to remove and use Backspace or Delete.
  • If Ctrl + D is not working in Excel, you can use the fill handle or the Fill command instead.
  • Alternatively, change the key bindings and change the current shortcut to another one.

If Ctrl D is not working, the most likely cause is another application that is also using this shortcut, thus causing the conflict, so be sure to close it and the issue will be gone.

Problems with keyboard shortcuts are fairly common, and many reported that shortcuts are not working in Chrome as well as issues with keyboard shortcuts in Outlook.

Other Office tools are affected by this as well, and we covered keyboard shortcut problems in Word and shortcut issues in Excel in our previous guides.

Many reported that keyboard shortcuts are not working in Photoshop, but we have addressed this issue in the past.

Did you use a different solution on your PC? If so, share it with us in the comments!

Windows 11 23H2 Fix: We Are Unable to Complete Your Request at This Time

The We are unable to complete your request at this time error while downloading Windows 11 or another iteration of the OS is a network issue and is usually specific to devices, meaning that other devices on the same network might not encounter it.

The complete error message reads, We are unable to complete your request at this time. Some users, entities and locations are banned from using this service. For this reason, leveraging anonymous or location hiding technologies when connecting to this service is not generally allowed. 

Users are subsequently asked to contact Microsoft support if the problem persists. But it shouldn’t come down to that because our solutions will fix things!

How do I fix the We Are Unable to Complete Your Request at This Time error?

Before we start with the slightly complex changes, try these quick ones first:

  • Try downloading again in a few days, and don’t make repeated attempts because it’s known to worsen the situation. Also, disable any active VPN.
  • Switch to the Incognito/Private mode by pressing Ctrl + Shift + N.
  • Download the update directly from Microsoft’s official website instead of using a tool like Rufus. Or you could download the ISO on another device, then move it to the affected one, and proceed with the installation.

1. Try a reliable VPN solution

Sometimes, you have to connect to dedicated servers to bypass the We are unable to complete your request at this time error, and for that, it’s best to use an effective standalone VPN program.

This especially helps if you are based in a country where Microsoft has suspended sales or future releases, for instance, Russia.

ExpressVPN is professional software that can help you in this matter. This tool offers servers in 105 countries, so you can pick the one that best suits your needs. Plus, this VPN has very high connection speed and powerful security features.

ExpressVPN

Bypass restrictions and stay safe online with this dedicated VPN solution.
Check Price Visit Website

2. Use Opera’s built-in VPN

  1. Launch the Opera browser, and head to the webpage that lists the update you are trying to install.
  2. Click the VPN icon in the toolbar, click the Power button to enable it, and then retry the download. You may have to switch servers to find one that works.enable VPN to fix we are unable to complete your request at this time
  3. In case that fails, paste the following path in the address bar and hit Enter: opera://settings/vpnWithDisclaimer
  4. Now, enable the toggle for all the three settings here, and retry the download. reconfigure settings

3. Go with the Windows 11 Installation assistant

  1. Open Microsoft’s Windows 11 download page, and click the Download Now button under Installation Assistant. installaiton assistant
  2. Run the setup and follow the on-screen instructions to complete the installation of the latest Windows version.

If you are getting the We are unable to complete your request at this time while downloading Windows 11 23H2 using Rufus or another software, the version is finally available on Microsoft’s official website and can be installed seamlessly.

4. Change the DNS server

  1. Press Windows + R to open Run, type ncpa.cpl in the text field, and hit Enter.ncpa.cpl
  2. Right-click on the active network adapter, and select Properties from the context menu.properties
  3. Select Internet Protocol Version 4 (TCP/IPv4) from the list, and click on Properties.
  4. Now, choose Use the following DNS server addresses and input the following data in the fields underneath:
    • Preferred DNS server: 8.8.8.8
    • Alternate DNS server: 8.8.4.4change DNS server to fix we are unable to complete your request at this time
  5. Click OK to save the changes.
  6. Reboot the device and check for improvements. 

Often, the DNS server assigned by the Internet Service Provider may be out of sync or broken. So, switch to Google’s DNS or use the fastest DNS server near you.

5. Reset the network settings

  1. Press Windows + I to open Settings, go to Network & Internet from the navigation pane, and click on Advanced network settings.advanced network settings
  2. Click on Network reset.
  3. Click the Reset now button.reset now to fix we are unable to complete your request at this time
  4. Finally, click Yes in the confirmation prompt and wait for the reset to complete.

If a network connection issue or the proxy service settings are to blame, resetting the network in Windows 11 will do the trick. Also, you may consider restoring the browser to factory defaults. It also helps when Windows 11 ISO fails to download.

All these fixes will help get rid of the We are unable to complete your request at this time download error in Windows. And in case nothing works, you can always connect with Microsoft’s customer service representative and get a resolution.

Besides, if you are facing errors with Windows 11 ISO, check the network connection or clear disk space. Or when the Windows 10 ISO is not working, re-download it.

For any queries or to share which fix worked for you, drop a comment below.