How to Enable gpedit.msc on Windows 10/11 Home Edition

In Windows 10 and 11 Home Edition, the Group Policy Editor (gpedit.msc) cannot be accessed by default. However, you can enable it without having to change your operating system.

You can use a batch file to make it work. If you want to learn how to do that and fix gpedit.msc not found, keep reading.

How do I enable Gpedit msc in Windows 10?

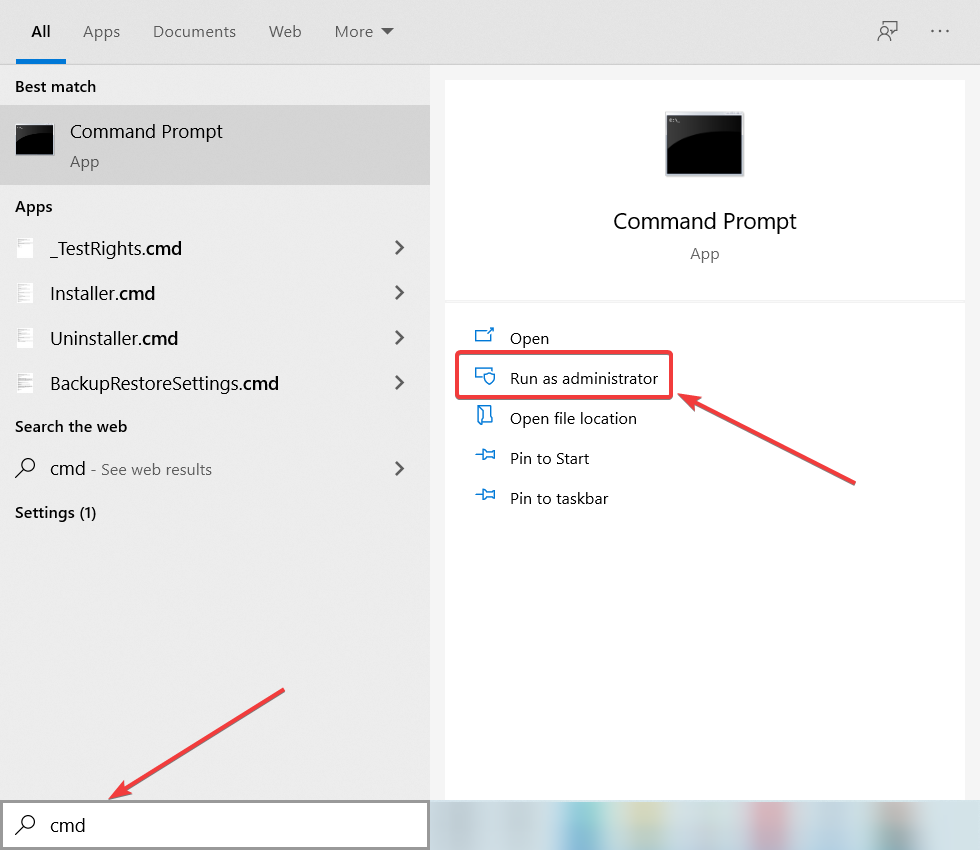
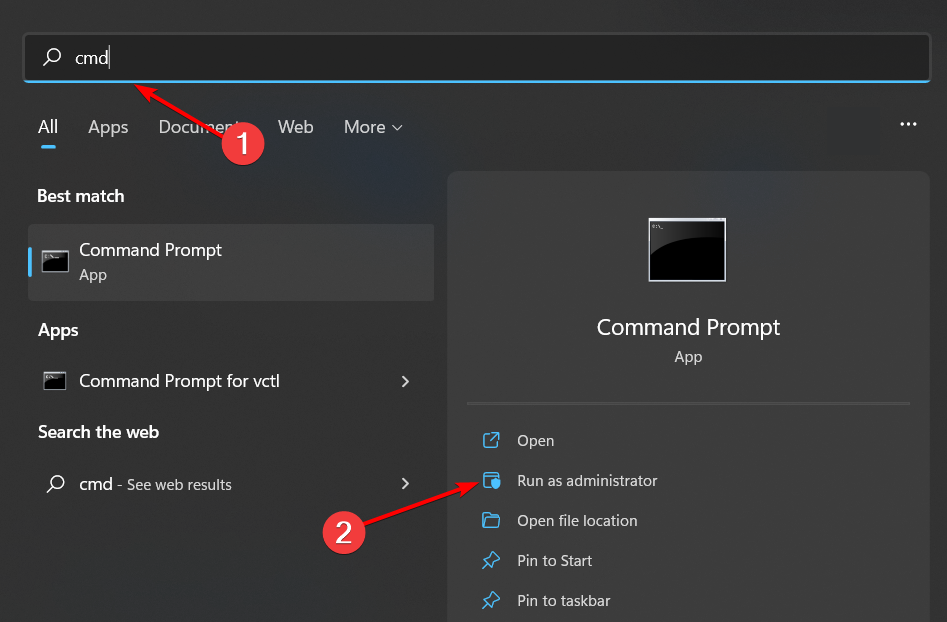
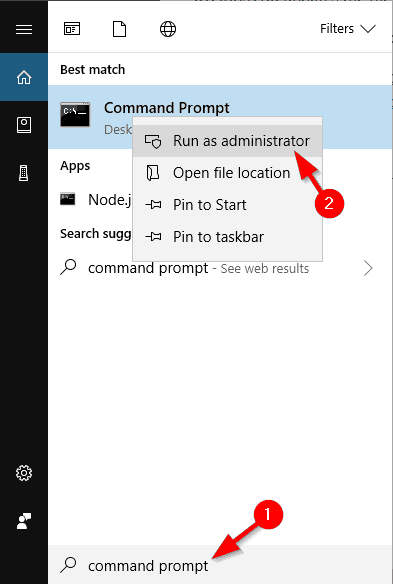
  1. 1. Type cmd in the Search bar, and click on Run as administrator.

    launch cmd as admin
  2. 2. Click Yes in the UAC prompt.

  3. 3. Paste the following two commands one at a time, and hit Enter after each:FOR %F IN ("%SystemRoot%\servicing\Packages\Microsoft-Windows-GroupPolicy-ClientTools-Package~*.mum") DO ( DISM /Online /NoRestart /Add-Package:"%F" ) FOR %F IN ("%SystemRoot%\servicing\Packages\Microsoft-Windows-GroupPolicy-ClientExtensions-Package~*.mum") DO ( DISM /Online /NoRestart /Add-Package:"%F" )

    enable gpedit.msc in Windows 10 home
  4. 4. To verify if the Local Group Policy Editor is installed, press Windows + R  to open Run, type gpedit.msc and click OK.

    gpedit.msc
  5. If your PC does not have Group Policy Editor enabled, you can easily tweak some settings to enable it. For this, you will have to use Command Prompt.

What can I do if the Group Policy Editor doesn’t start?

1. Force update the Group Policy Editor

  1. Press Windows + R to open Run, type the following command, and click OK: gpupdate /force

Windows will now force update the policies on your computer, and it should also fix issues with gpedit.msc.

2. Make changes in the Registry

  1. Press Windows + R to open the Run console, type regedit, and press Enter or click OK.
  2. Navigate to the following location in the Registry: HKEY_CLASSES_ROOT/CLSID/{8FC0B734-A0E1-11D1-A7D3-0000F87571E3}/InProcServer32
  3. Double-click the Default key, enter the following path under Value data, then click OK: %SystemRoot%/System32/GPEdit.dll

Once done, check if you are now able to launch gpedit.msc in Windows.

3. Change the Environment Variables

  1. Click the Windows button, type control panel, and select the app from the list.
  2. Make sure you have Large icons selected under the View by menu, and then click on System.
  3. Now scroll down in the right pane and choose Advanced system settings.
  4. Navigate to the Advanced tab, then hit the Environment Variables button.
  5. Select Path under System variables and click the Edit button.
  6. Copy and paste the following variables into the form and click OK:
    • %Systemroot%/System32
    • %Systemroot%
    • %Systemroot%/system32/WBEM

That being said, if you managed to open gpedit.msc, you might also be interested in finding out how to edit a Group Policy in Windows 10.

If you have any other questions, leave them in the comments section below, and we’ll be sure to take a look.

Enter Network Password in Outlook: 5 Ways to Get Rid of it

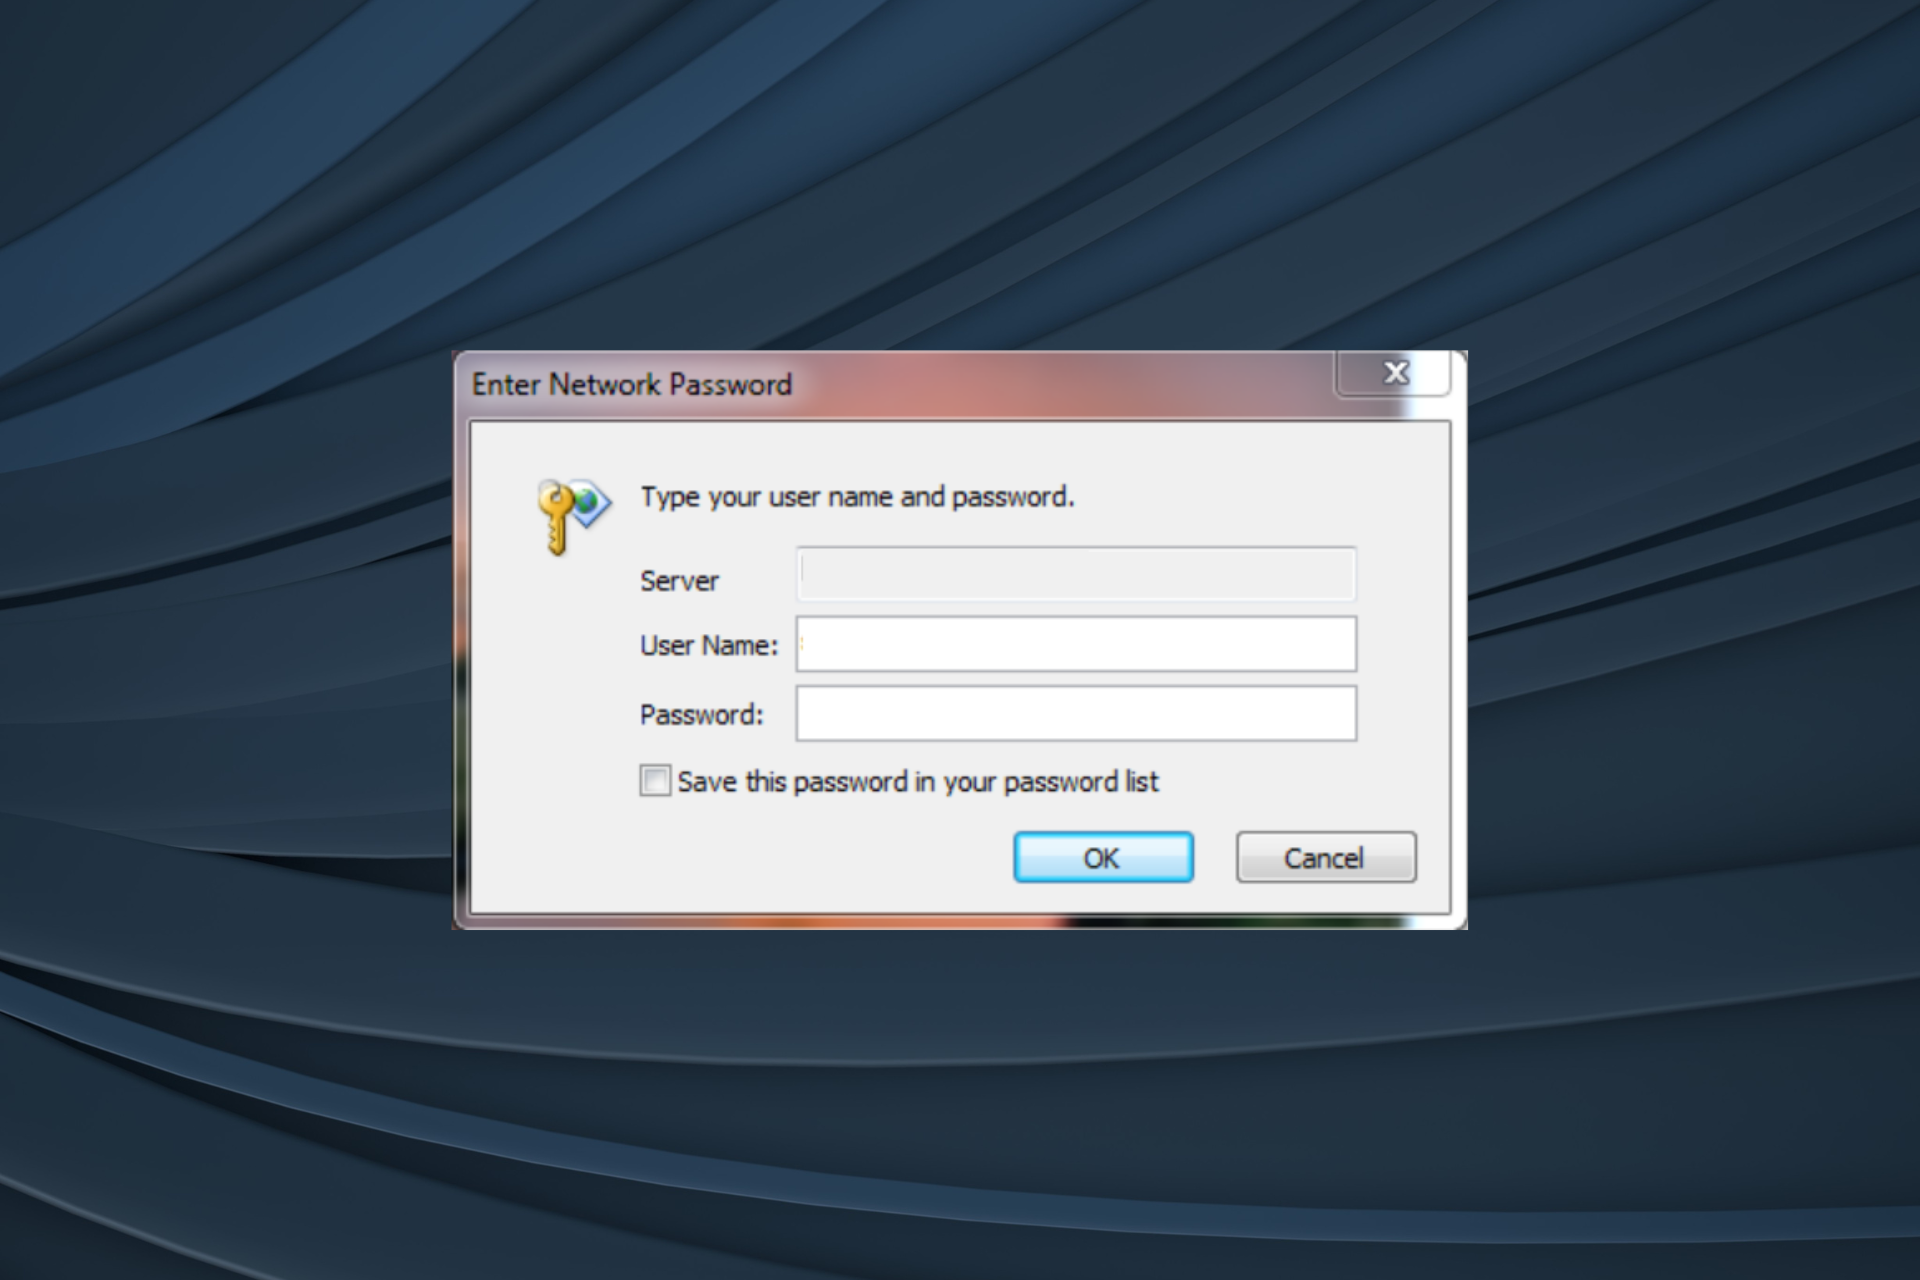
Outlook is more than an email client, allowing users to create and manage tasks and note-taking, amongst many other features. Yet, many users reported that the Enter Network Password popup keeps appearing in Outlook.

The problem has been reported on all versions, including the Enter network password error in Outlook 2007. So, let’s find out how you can fix things.

What does Enter network password mean in Outlook?

The Enter network password box in Outlook 2007 keeps popping up when you have made changes to the account or migrated the profile. It usually acts as a confirmation medium, but when the error keeps appearing, it points to a problem.

Here are a few reasons you might be getting the prompt:

  • Incorrect password – The most common reason why the popup keeps reappearing in Outlook is that the password being entered is incorrect.
  • Misconfigured settings – In some cases, users found that misconfigured Outlook settings were responsible for the problem.
  • Corrupt Outlook profile – Even a corrupt profile can trigger issues, and the ideal solution here would be to rebuild the Outlook profile.

How can I fix Enter network password error in Outlook?

Before we head to the solutions listed below, here are a few quick tricks that might work:

  • Restart the computer and the modem router (wait for at least 30 seconds before turning it back on). Once done, verify whether the Enter Network Password error in Outlook is fixed.
  • Check if the Internet connection is unstable, and fix that.
  • Update Outlook.
  • Disable any third-party antivirus, firewall, or other applications designed to modify the network. In case that works, uninstall the program, and the error should be fixed for good.

If none of these work, head to the fixes listed next:

1. Check your Outlook password

Back to Outlook, the Enter network password message usually occurs if your password was changed recently. Sometimes, you might change the password in the webmail and forget to change it in the Outlook settings.

If you’re confident you didn’t change the password, try resetting the password and configuring your Outlook account again. After doing that, verify whether the Enter Network Password popup stops appearing.

2. Change your Send & Receive schedule

  1. Open Outlook and click on the File menu.file
  2. Next, click Options.options
  3. Navigate to the Advanced tab, and click on the Send/Receive button.send/receive
  4. Enter a value higher than 15 in the field next to Schedule an automatic send/receive every, and save the changes. We used 30 since it worked for most users.change time to fix enter network password outlook
  5. Once done, restart Outlook for the changes to apply.

After making this change, you shouldn’t see the Enter Network Password error in Outlook 2007 for Gmail.

3. Clear the Credential Manager

  1. Press Windows + S to open the Search menu, type Control Panel, and click on the relevant search result.control panel
  2. Click on User Accounts.user accounts
  3. Now, click on Manage Windows Credentials under Credential Manager.manage Windows credentials to fix enter network password outlook
  4. Locate the Outlook credential, select it, and then click on Remove.remove to fix enter network password outlook
  5. Finally, click Yes in the confirmation prompt.confirm

4. Rename the Protect folder

  1. Press Windows + R to open Run, enter %appdata% in the text field, and click OK.
    enter network password outlook keeps popping up
  2. Navigate to the Microsoft directory, locate the Protect folder, and rename it to Protect.old.
    enter network password outlook keeps popping up
  3. After doing that, launch Outlook, enter your password, and choose the option to remember it.

Once done, the Enter Network Password prompt in Outlook should disappear for good. Many reported that can’t rename the folder, but that, too, is easily fixable.

5. Add the account again

  1. Open Outlook and click on the File menu.file
  2. Click on Account settings, and again choose Account settings from the dropdown menu.account settings
  3. Select the account where the popup keeps appearing, and click on Remove.remove to fix enter network password outlook
  4. Click Yes in the confirmation prompt.confirm
  5. Again, head back to the File menu, and click on the Add account button.add account to fix enter network password outlook
  6. Enter the email address and follow the on-screen instructions to complete the process.add

That’s it! If nothing so far worked, adding the account again should fix things in case the corrupt cache triggered the Enter Network Password popup in Outlook 2007 for Yahoo Mail.

Before you leave, find out how to speed up Outlook in Windows.

If you have any queries or know of a solution not listed here, drop a comment below.

OneDrive Not Syncing on Windows 11: How to Force it

You found this article because you have OneDrive sync issues in Windows 11. Here is all you need to know.

Microsoft OneDrive is a cloud hosting service that sees a ton of usage. Right off the bat, it stores every kind of File on company servers with 5 GB for free. The client also adds file synchronization and is available on many platforms, some of which don’t belong to Microsoft.

To name a few, OneDrive is on macOS, iOS, Android, the Xbox Series X, and even the Xbox 360 from over a decade ago.

A big question asked by everyone is: Does Windows 11 support OneDrive? Windows 11 is the most compatible OS you can use, along with the OneDrive service.

Microsoft Office apps are directly integrated with OneDrive to ensure no previous work is lost. So there’s nothing worse than working on a giant project only to delete it suddenly.

All in all, OneDrive is incredibly useful, and it’s hard to imagine life without it, and it sees frequent updates. But however it may be, there are times when OneDrive will stop working for whatever reason. For example, it may get stuck and stop connecting to Microsoft’s servers.

Why is OneDrive not syncing my files?

OneDrive might stop syncing for various recognized reasons, which can keep you from accessing crucial files and disrupt your productivity. However, a few simple techniques may often resolve OneDrive sync problems.

There is a potential that you may encounter OneDrive sync troubles if you are using an outdated version of the program.

It would help if you attempted to obtain extra space on the cloud since you could have run out of room there. However, even if you have a premium account, OneDrive only allows you to upload files up to 10 GB in size.

The OneDrive sync issue might also be brought on by uploading a significant amount of data.

Other frequent problems contributing to the OneDrive not syncing issue include a problematic OS upgrade, a shaky connection, or a denial of permission.

Moreover, here are some error variations that you may encounter, but nonetheless, fix with the solutions below:

  • OneDrivenot syncing to a new computer
  • OneDrivenot syncing quickly
  • OneDrivefiles not showing on another computer
  • OneDrivenot syncing between devices
  • OneDrivenot syncing after password change
  • OneDriveisn’t connected, not signing in Windows 11
  • OneDrivenot working, not responding, not running in Windows 11
  • OneDrivesync pending (Windows 11)

Without further ado, let’s jump right in!

How to fix OneDrive sync issues in Windows 11?

1. Reset OneDrive in Windows 11

  1. Click on the magnifying glass icon to open the Windows 11 search bar.
  2. Search for the OneDrive app.
  3. Right-click the app and select App settings.
  4. A new window will appear; scroll down until you see Reset.
  5. Select the Reset button to reset all OneDrive settings and resync the app.
  6. Conversely, you can select the three dots at the top of the OneDrive app to bring down the menu.
  7. Click Settings.
  8. You can reset the app by clicking Reset the app at the bottom of the settings menu.

2. Get more storage

  1. Select the three dots at the top of the OneDrive app to bring down the menu, and click Settings.
  2. If that’s the case, click on Get more storage.
  3. You will then be taken to a webpage where you can purchase more storage space for your OneDrive account.

3. Add OneDrive to the Windows Defender Firewall whitelist

  1. Click on the magnifying glass icon to bring up the search bar.
  2. Search for Windows Defender Firewall and select the first entry you see.
  3. Click on Allow an app or feature through Windows Defender Firewall on the left-hand menu.
  4. Click on Change settings at the top of the menu.
  5. Scroll down and locate OneDrive in the Allowed apps and feature menu. It should automatically be whitelisted.
  6. If unchecked, select OneDrive and then click the boxes under Private and Public.
  7. If it’s not there or OneDrive still doesn’t work, click on the Allow another app… button at the bottom.
  8. A new window will appear. Select Browse…
  9. In this new File Explorer window, search for Microsoft OneDrive.
  10. Click on the specific folder or File you want to whitelist on Defender Firewall.
  11. It will appear on the small window; click Add on the bottom.
  12. Once done, click OK at the bottom.
  13. Then close Defender Firewall and check if OneDrive sync issues on Windows 11 are resolved.

4. Turn off the Proxy server via Settings

  1. Click on the Start menu in the bottom left corner.
  2. Select Settings.
  3. Select Network & Internet on the left-hand menu.
  4. Click Proxy.
  5. Locate Manual proxy setup and select Setup.
  6. If it’s On, click the blue tab to turn it off.
  7. Click Save at the bottom.

5. Revert to Default DNS

  1. Click on the magnifying glass icon to bring up the search bar.
  2. Search for the Control Panel and click on the first entry you see.
  3. Click on View by in the corner.
  4. Select Category.
  5. Click Network and Internet.
  6. In this new window, go to Network and Sharing Center.
  7. Click Change adapter settings on the left-hand side.
  8. Right-click on Ethernet0 or your WiFi network, depending on what you have.
  9. Select Properties in the new drop-down menu.
  10. Next, double-click Internet Protocol Version 4 (TCP/ICPv4).
  11. Select Obtain DNS server address automatically.
  12. Then click OK to save changes.

6. Reset the OneDrive app with the Command Prompt

  1. Bring up the search bar again by clicking on the magnifying glass icon.
  2. This time, search for the Command Prompt.
  3. Click on Run as administrator on the right-hand side.
  4. Enter the following command into the Command Prompt: %localappdata%\Microsoft\OneDrive\onedrive.exe/reset
  5. Hit Enter to run the command.
  6. Once you’ve run the command, launch OneDrive and sign in to your account. After that, you should no longer have any syncing problems.

For a more detailed walkthrough on fixing sync problems this way, see this OneDrive reset command guide.

Will resetting OneDrive delete files?

All your current sync connections, including personal OneDrive and, if configured, OneDrive for business or education, are terminated when OneDrive is reset. Resetting OneDrive on your PC won’t result in losing any files or data.

Once the sync is complete, you must choose to sync all folders again if you just want to sync a select few before the reset. For both your personal OneDrive and OneDrive for business or school, you must finish this.

Also, resetting it may help when OneDrive opens multiple instances in Windows.

How do I reinstall OneDrive on Windows 11?

  1. Open the File Explorer and input the path below in the Address bar, then hit Enter.
    %systemroot%\SysWOW64\
  2. Double-click on the OneDriveSetup File.
    OneDrive sync issues Windows 11
  3. Windows begins to install OneDrive immediately after you open the File. To finish installing OneDrive, follow the installation wizard’s instructions.

You should have resolved your OneDrive sync issues on Windows 11 if you have read this far.

You also may be interested to know about the wide variety of note-taking apps on Windows 11. You may think that writing notes doesn’t require a specialized app, but you’d be surprised at what some apps can do with their advanced features.

Some have features that assist creatively-minded people with their projects.

Feel free to comment below if you have questions about other Windows 11 apps. Also, leave comments about guides you’d like to see, information on other Windows 11 features, or list guides like this.

Microsoft Store Purchased Moments Ago Notification: Fix

Lately, there’s been a lot of concern amongst Windows users regarding a message within the Microsoft App Store.

Apps they never downloaded, never used, or apps that were purchased years ago, either appear as being purchased moments ago, either as being purchased today.

The Microsoft Store purchased moments ago notificatiom might appear because Microsoft Store either automatically downloaded the free apps or they simply came preinstalled with Windows 11.

There is no need to worry or get frustrated as there are a few easy ways to get rid of it, you just follow the steps below.

How do I get rid of the Microsoft Store purchased moments ago notification?

1. Run the troubleshooter

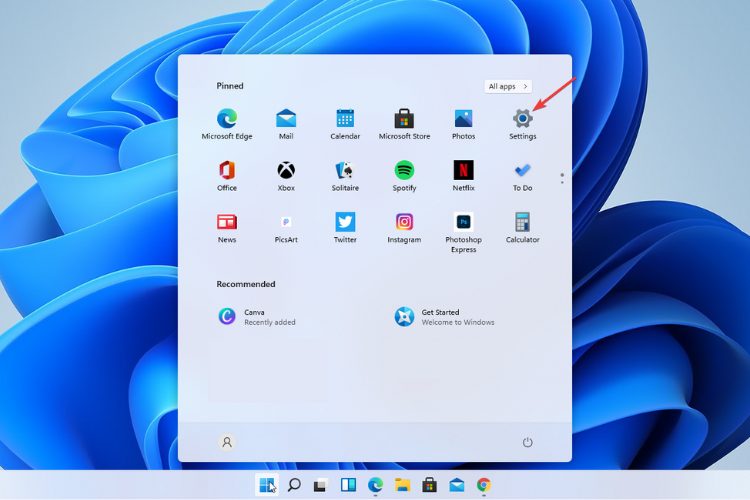
  1. Go to the Start button and select Settings.Start - Settings
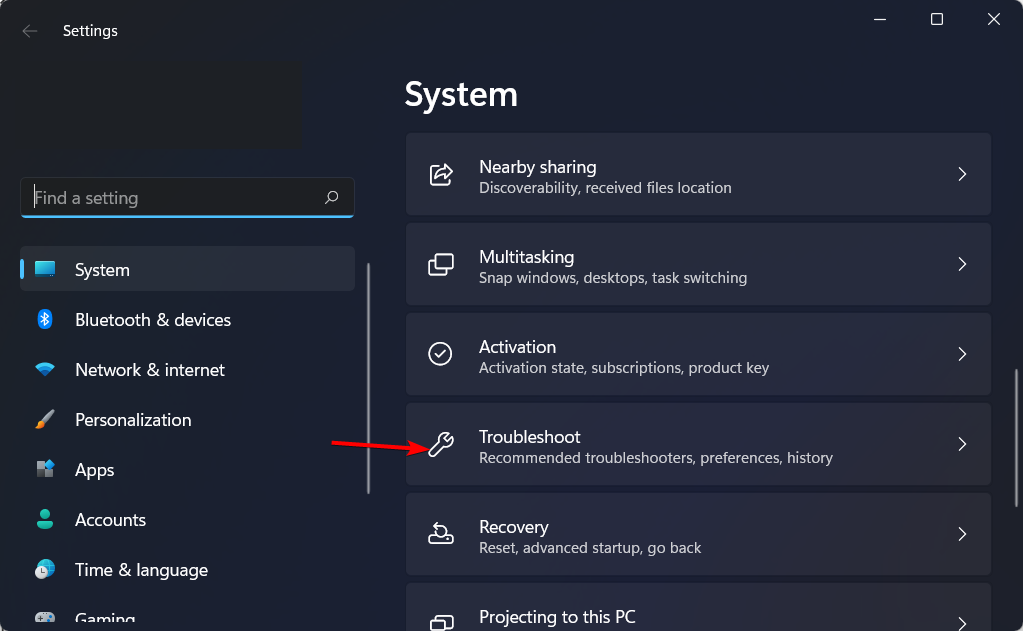
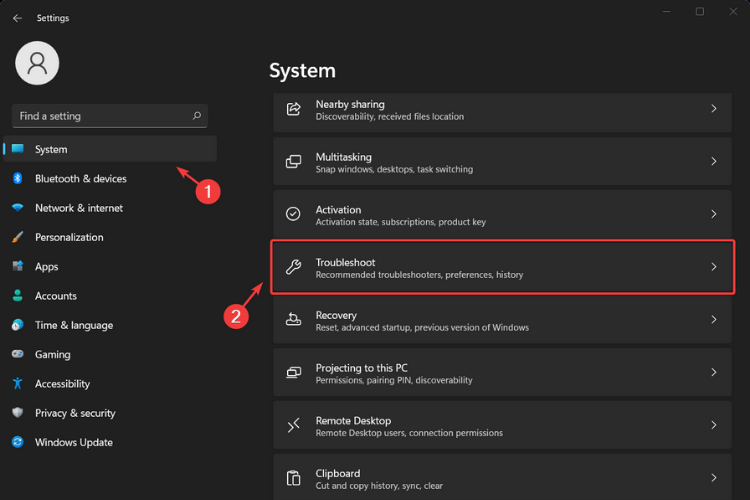
  2. Click on System then on Troubleshoot.System - Troubleshoot
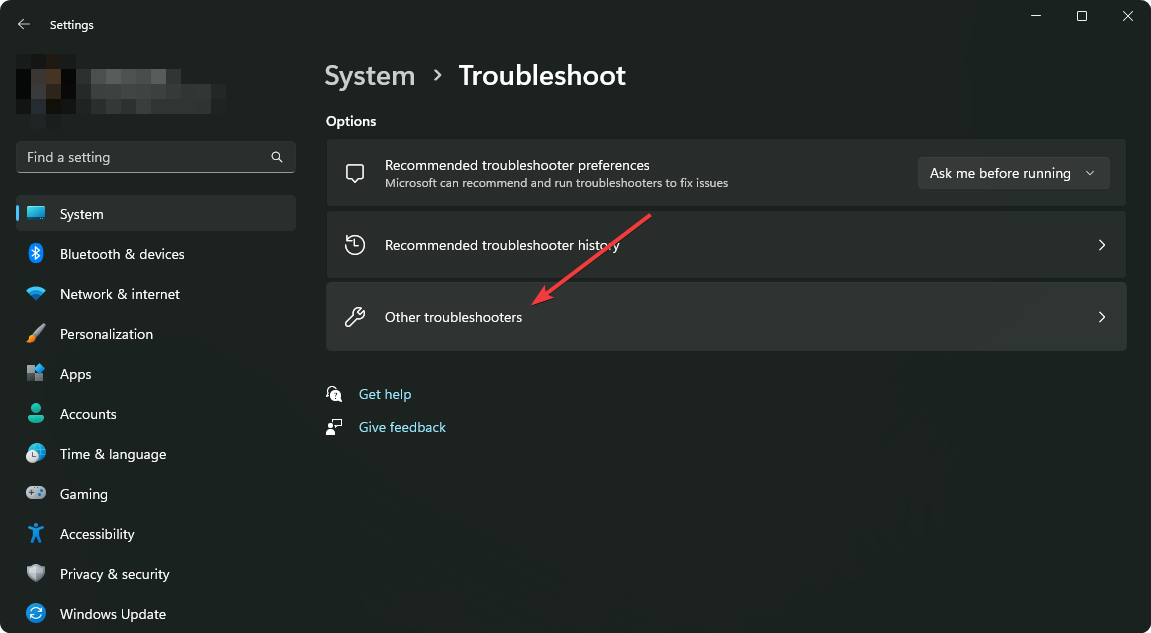
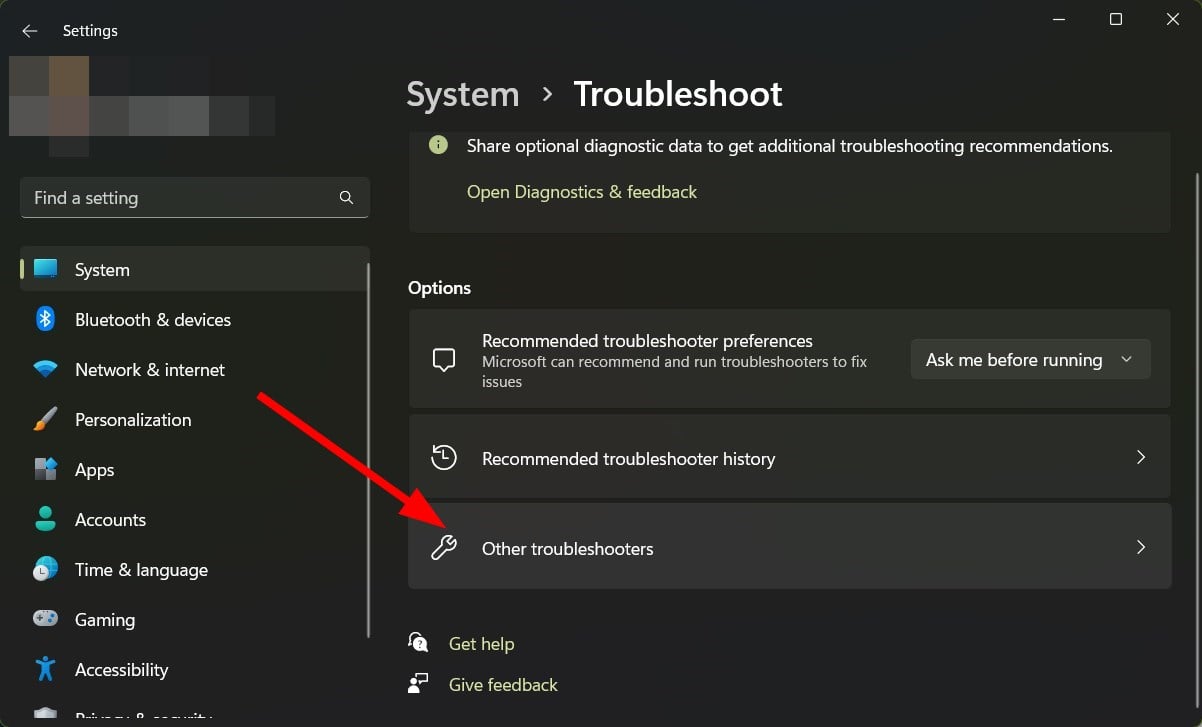
  3. Click on Other troubleshooters.Other troubleshooters
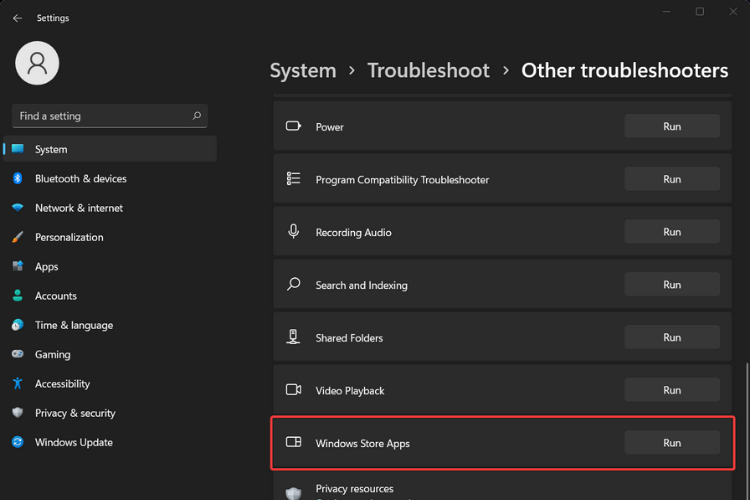
  4. From the list select Windows Store Apps and click on Run.Windows Store Apps
  5. Wait for the troubleshooter to finish the process.
  6. Restart your PC.

After you’ve finished with the troubleshooting process, you can go to the Microsoft Store again and verify if the error is still there.

If some of the apps still have the message purchased moments ago, move on to the next step as you may need to reset the cache.

2. Reset the Microsoft Store cache

  1. Press the Windows Key + R shortcut to open the Run dialog box.
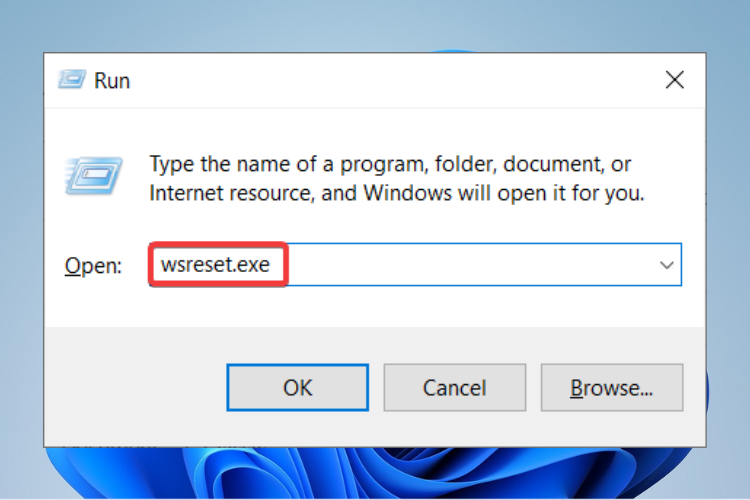
  2. Type wsreset.exe then click on OK.WSreset
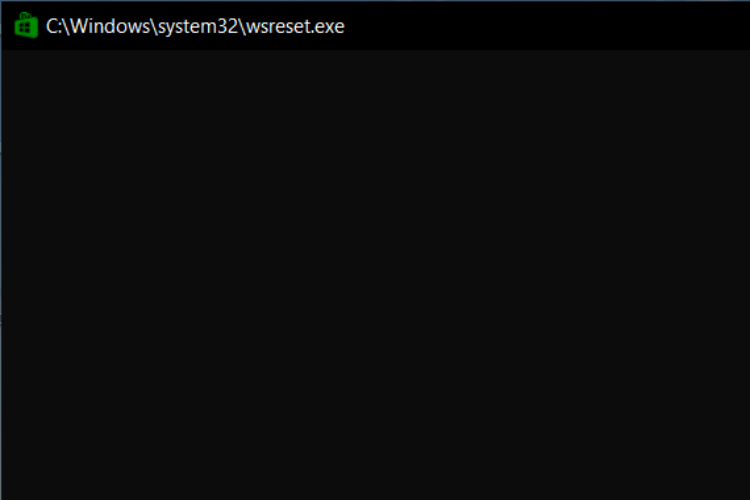
  3. A blank Command Prompt window will open.cmd_WSreset
  4. Wait for a few seconds as the window will close by itself and Microsoft Store will open automatically.
  5. Restart your computer.
  6. Check if the error persists.

By using this command, all the cache files in your Windows Store will be completely cleared and permanently deleted.

The cache contains the app’s data on your device including your sign-in details so you will need to log in again when opening Microsoft Store.

3. Update Microsoft Store

  1. Open Microsoft Store.
  2. Here, select See more.
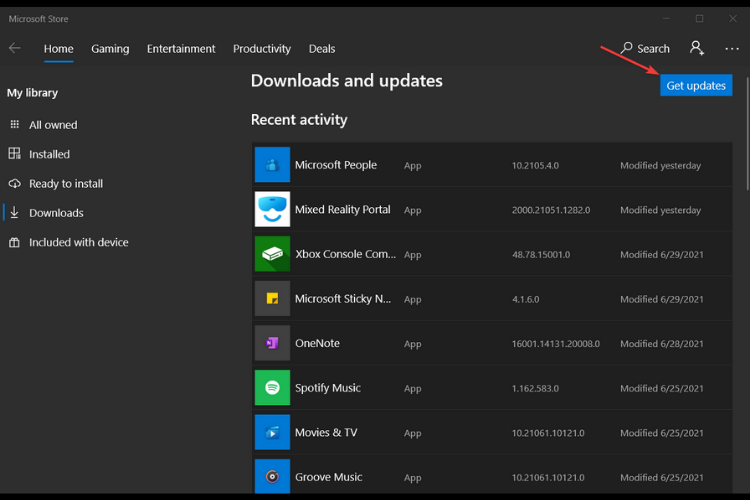
  3. Got to Downloads and updates.
  4. Click on Get updates button.Get updates
  5. If an update for Microsoft Store is available, it will start installing automatically.

If you are having trouble updating Microsoft Store, you should take a look at our article and follow the steps to fix it.

Fixing is just as important as preventing so if you want to know how to prevent your Windows 11 to download apps & games automatically, keep reading our guide.

How do I prevent Windows 11 to automatically install apps?

1. Turn off automatic installation of apps / games without permission

  1. Press Windows + R keys to open the Registry Editor.
  2. Type regedit in the taskbar search bar then click OK.Regedit command
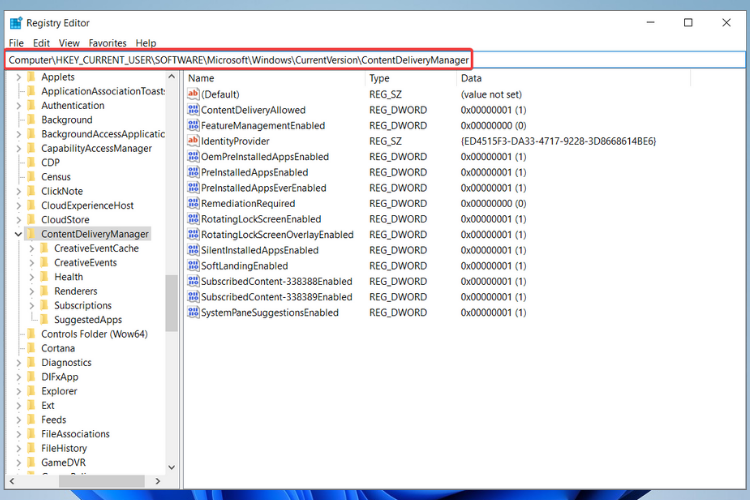
  3. Navigate to: HKEY_CURRENT_USER\Software\Microsoft\Windows\CurrentVersion\ContentDeliveryManagerNavigate to CDM
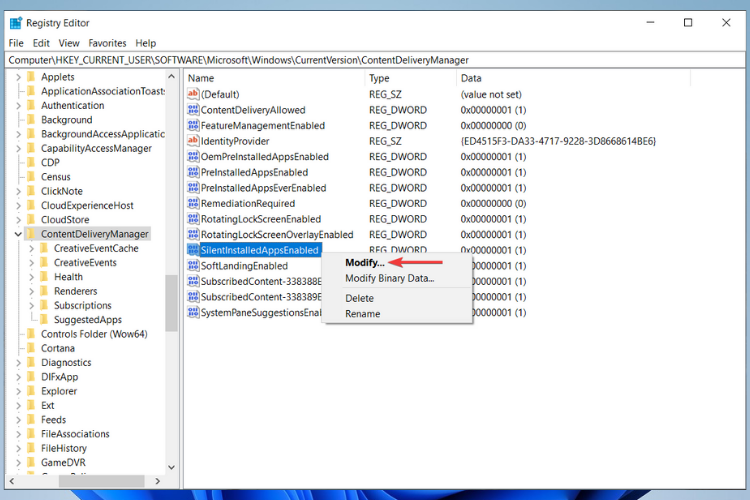
  4. Locate SilentInstalledAppsEnabled value from the right-hand pane, right-click on it and select Modify.Modify - SIAE
  5. Note: If you cannot locate this value, create one by right-clicking on the blank screen and choosing New > DWORD (32 bit), and renaming it SilentInstalledAppsEnabled.
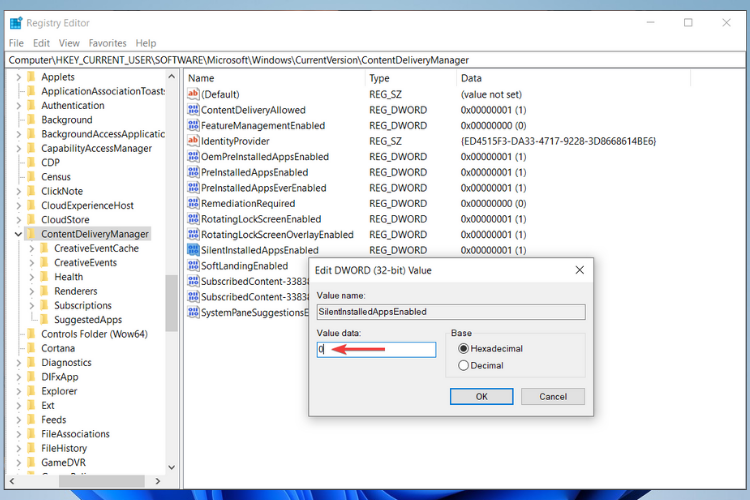
  6. Change its value to 0 in the Value data box and then click OK.Change value to 0 - SIAE
  7. Restart your device.

2. Create a new Windows Key

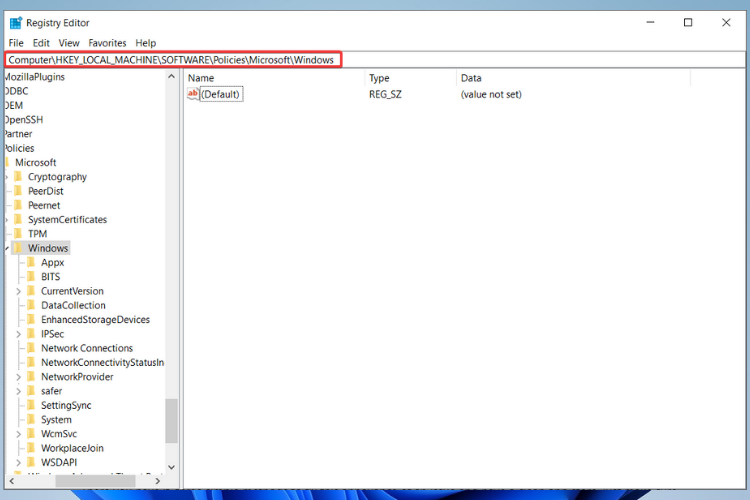
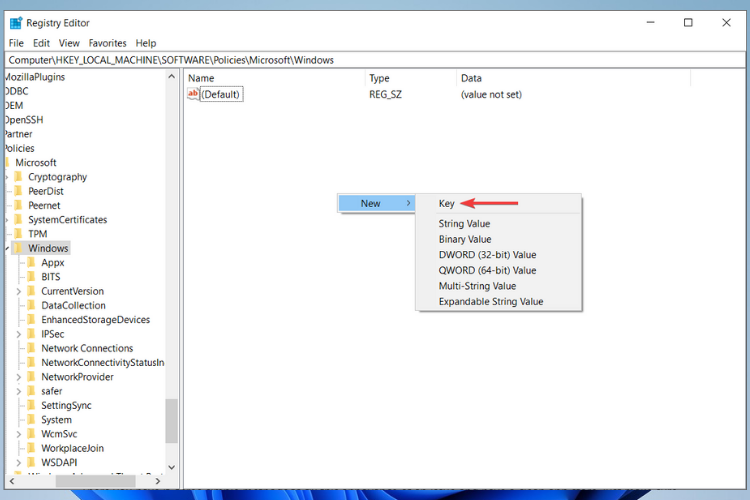
  1. Follow the above steps to get to the Registry Editor, only now navigate to: HKEY_LOCAL_MACHINE\SOFTWARE\Policies\Microsoft\Windows\Navigate to Windows
  2. Create a new key inside the Windows key by right-clicking the blank space and choosing New > Key.New - Key
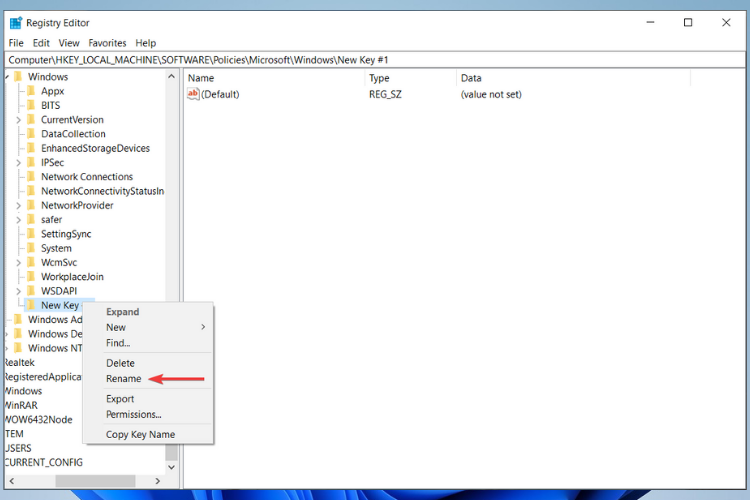
  3. Rename the new key CloudContent.Rename new key
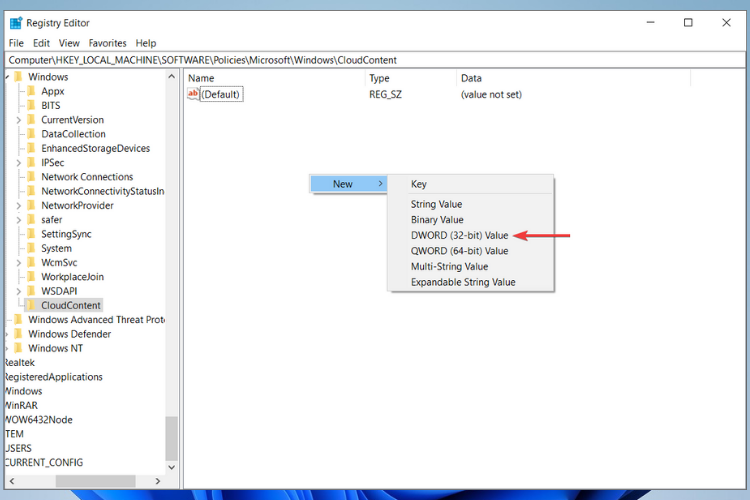
  4. Create a new value inside that new key by right-clicking in the blank space of CloudContent key and selecting New > DWORD (32-bit) Value.New - DWORD value
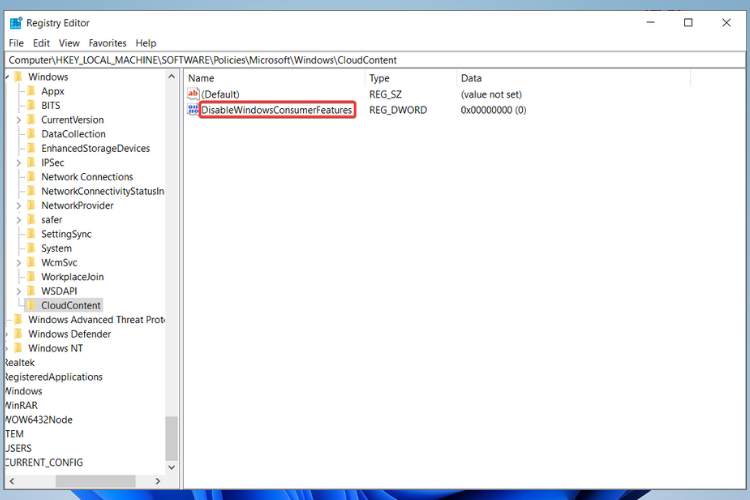
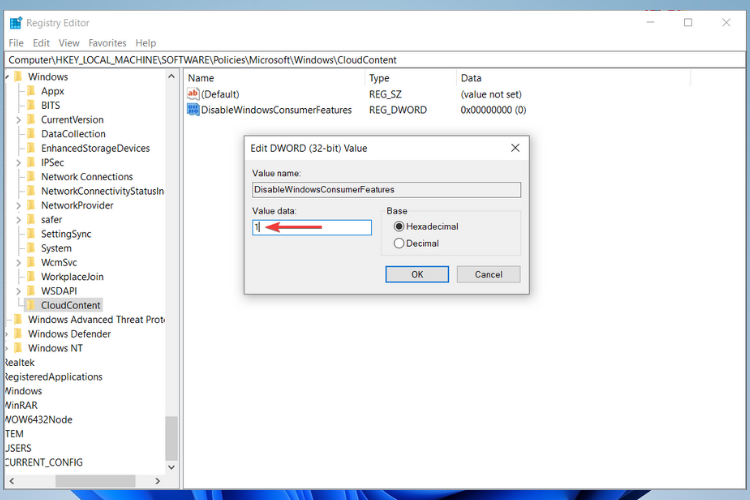
  5. Rename the new value DisableWindowsConsumerFeatures.Rename DWCF
  6. Right-click on DisableWindowsConsumerFeatures value, select Modify then change the value to 1 in the Value data box.Change value to 1 - DWCF
  7. Click OK then restart your computer.

Now is also a good time to uninstall the unwanted apps that were automatically installed by Microsoft as they will not come back again.

There you have it, three simple methods to fix the Microsoft Store purchased moments ago issue and two ways to prevent it from ever happening again, all you need to do is TO follow all the steps carefully and in order.

You should also take a look at this Windows 11 preview and find out what other apps are pre-bought or pre-installed on your new Windows 11 build.

If you want to ask us any questions, have a suggestion, or simply want to thank us, feel free to use the comments section below.

Dual Monitor Mouse Pointer Problem: 4 Simple Ways to Fix It

Many users use multiple monitor setups, but sometimes dual monitor mouse pointer problems can occur in form of a corrupted cursor.

This isn’t the only issue, and sometimes your mouse can disappear completely. However, today, we’re focusing solely on the corrupted mouse cursor issue.

Why does my cursor look weird?

There are several causes for this issue, with the following being the most common ones:

  • Temporary glitch – Most of these can be fixed by simply moving your cursor or disconnecting the second display temporarily.
  • Monitor rotation – If you rotate your screen, you might encounter this issue. This is just a minor glitch, and it can be fixed easily.
  • Mouse settings – Certain settings can cause this issue. Adjust your mouse settings to fix this issue.
  • Projection mode – Your currently selected projection mode can also cause this issue, so you might need to change it.

How can I fix the dual monitor mouse pointer problem?

Before we start fixing this, there are a couple of checks you can perform:

  • Move the cursor between displays – A few users reported that moving the mouse quickly between the two displays fixed the issue for them. Moving the mouse over the right side of the Taskbar also helps. To do that, make sure to show the Taskbar on both monitors. You can also try moving the mouse in circles in the top right corner of the affected display.
  • Disconnect the second display – You will get a mouse pointer problem when using a dual monitor setup. Disconnect the second display, and the issue will be resolved. Also, ensure you properly set up dual monitors with different resolutions.
  • Disable monitor rotation – The issue appears with rotated screens, so disable rotation and turn it back on. Hopefully, that will fix the issue.

1. Select the Display pointer trails option

  1. Press the Windows key + S and type mouse.
  2. Select Mouse settings.
    mouse settings corrupted mouse cursor
  3. Click the Additional mouse settings option.
    additional
  4. Select the Pointer Options tab.
    pointer options
  5. Now, check the Display pointer trails box.
    display pointer
  6. To remove the trail effect from the cursor, drag the Display pointer trails bar to short at the far left.
  7. Click the Apply button, followed by OK to save the changes.
    ok apply corrupted mouse cursor

Some users reported activating the Display pointer trails box fixed the corrupted mouse cursor issue. While the pointer trail can sometimes be frustrating, you can reduce the effect considerably.

2. Update the mouse drivers

  1. Press the Windows key + R, type devmgmt.msc, and click OK.
  2. Click the arrow next to the Mice and other pointing devices option to expand it.
    mice
  3. Right-click the driver there and click Update driver.
    update corrupted mouse cursor
  4. Click the Search automatically search for drivers option.
    search automatically corrupted mouse cursor
  5. Now, follow the onscreen instructions to install the available driver update.

In some cases, the problem might be caused by an outdated driver. To update your mouse driver manually, follow these simple steps above.

Another solution to easily update your drivers is to use professional third-party programs that automatically download and install Windows drivers to avoid the risk of your PC malfunctioning.

3. Turn Off the Screensaver

  1. Click the Search icon and type screen saver.
  2. Choose the Change screen saver option.
    screen saver
  3. Click the screensaver drop-down menu and select None.
    none
  4. Select the Apply option, and press the OK button to close the window.

Some users have fixed corrupted cursors by turning the screensaver off. That resolution might not work for everybody, but it’s worth a try.

4. Select Duplicate on the Project Sidebar

  1. Press the Windows key + P to open the Project menu.
  2. Select the Duplicate option if you currently have a dual monitor setup configured with the Extend display mode.
    duplicate option
  3. Now, click Extend again to go back to the extended mode.
    extend

This is another fix that a few users using dual monitors have stated fixed a corrupted mouse pointer program.

How to reset the mouse cursor on Windows 10?

  1. Press the Windows key + S, type mouse, and select Mouse settings.
    mouse settings corrupted mouse cursor
  2. Click the Additional mouse settings option.
    additional
  3. Click the Pointers tab at the top.
    pointers corrupted mouse cursor
  4. Now, click the Use default button.
    use default
  5. Finally, click the Apply button, followed by OK.

With the steps above, your mouse settings should reset to default.

Those are some of the resolutions confirmed to fix corrupted cursors. Aside from those resolutions, reinstalling or updating the ATI graphics card driver might also set a corrupted mouse pointer.

Are you facing other issues, like erratic mouse movements on Windows 10? Check our detailed guide to fix them quickly. Also, consider easing movement between displays to prevent your mouse from getting stuck in corners.

If you have another corrupted cursor fix, share it below.

iertutil.dll Missing: How to Download & Fix it

Iertutil.dll is a library file that is used by the Internet Explorer browser. It loads the Internet Explorer toolbar and other components. While it is important for the smooth running of your PC, sometimes it can go missing.

A damaged or missing DLL file is one of the most common reasons why your computer won’t start up properly. You may have accidentally deleted it, so read along to find out how to restore the missing DLL file.

What is Iertutil DLL?

You already know that DLL or Dynamic Link Library files are small files that contain compiled code and resources that can be shared among many applications. Iertutil.dll is a Windows DLL file. 

It’s a dynamic link library that contains functions to assist with internet and network connections. These functions can be used by any program or process running on your PC.

Iertutil DLL is required for Internet Explorer to work properly, and it may be associated with other products from Microsoft Corporation as well.

Why is the Iertutil.dll file missing?

A missing Iertutil.dll file can cause a variety of problems, including program crashes and error messages. Possible causes include:

  • Windows registry issues – If the registry becomes damaged or corrupted, it can cause problems with many different functions of your PC. 
  • Virus or malware infection – Viruses and other malicious programs are known to cause DLL errors by modifying important system files and resources.
  • Insufficient disk space –  If your hard drive has insufficient space, then you may start getting errors while installing programs or accessing some functions of your computer.
  • You’ve uninstalled applications that use this file – If you have recently uninstalled software that uses this file, then it is possible that the system has removed it from the computer for some reason.
  • Incorrect/incomplete installation –  If you have installed a program that includes the iertutil DLL and the installation fails, those DLLs will not be registered correctly.
  • Hardware failure – A hardware failure occurs when some part of the PC starts to malfunction. This could be anything from a broken motherboard, hard drive, or video card. You’ll need to run hardware diagnostics.

What can I do if the Iertutil.dll file is missing?

Before you embark on the multi-step solutions, check off the following:

  • Check your Recycle bin to see if the iertutil file is present. If so, you can easily recover deleted files.
  • Restart your Internet Explorer browser.
  • Try restarting your PC.

1. Run a virus scan 

  1. Press the Windows key, search Windows Security and click Open.
  2. Select Virus & threat protection.
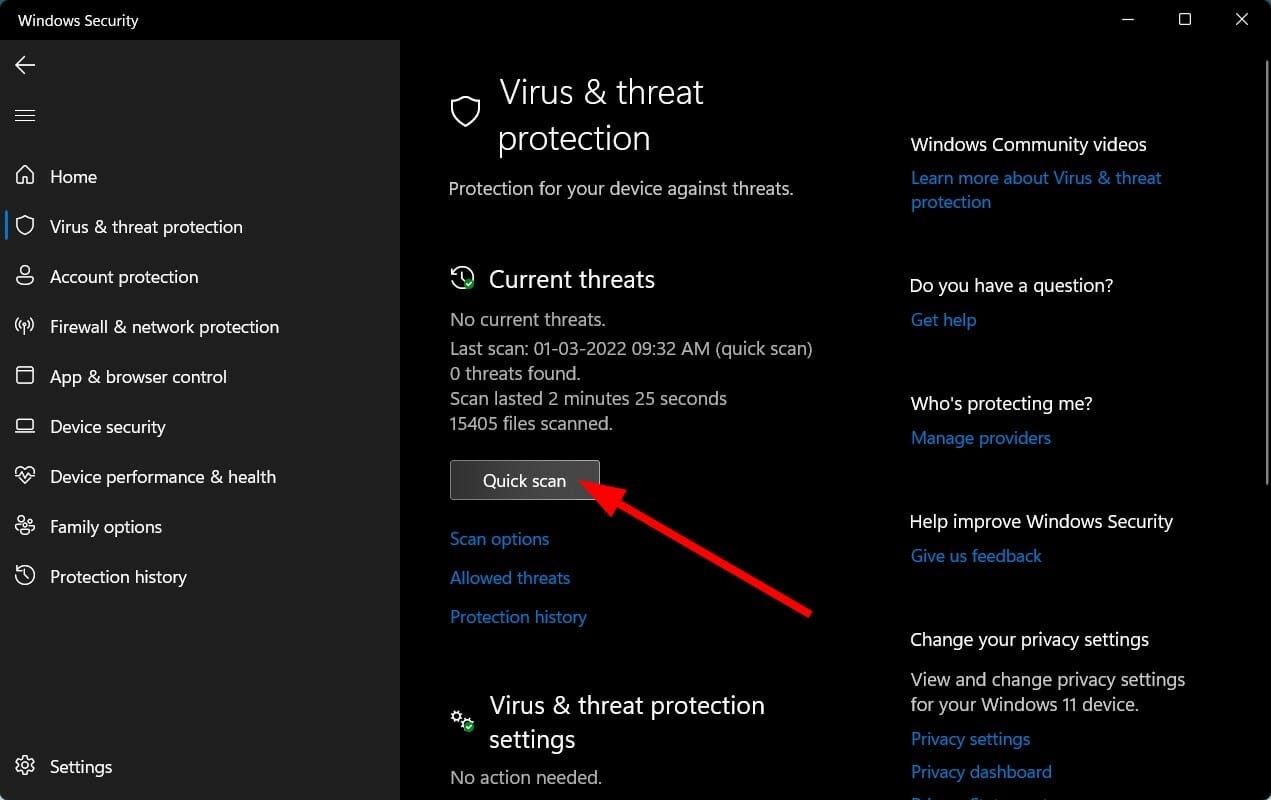
  3. Next, press Quick scan under Current threats.
  4. If you don’t find any threats, proceed to perform a full scan. Click on Scan options just below Quick scan.
  5. Click on Full scan to perform a deep scan of your PC.Full scan
  6. Wait for the process to finish and restart your system.

You can also use an alternative and let a professional antivirus do a malware scan for you. This kind of tool comes with some of the most advanced security features that will keep all viruses at bay.

2. Clean the registry 

If your registry is corrupt by any chance, it would do you good to clean it. The best way to keep your Windows registry clean and healthy is to use a good registry cleaner tool.

Registry cleaners scan your entire registry and look for problems such as missing links or invalid entries. If, after the scan, it finds corrupt entries, it fixes these problems automatically.

3. Run the DISM and SFC commands

  1. Hit the Windows key, type cmd in the search bar and select Run as administrator.cmd-run-admin-w11 unexpected kernel mode trap windows 11
  2. Enter the following command: DISM.exe /Online /Restorehealth 
  3. Allow for the command to be executed, then type in the next one: sfc /scannow

If you had trouble with your Internet Explorer browser because of the iertutil.dll file missing, we hope our guide has offered substantial help. You may also come across a variation of the same error in the form of Iertutil.dll not found or Iertutil.dll bad image. The same fixes may apply to resolve these issues.

In case you’re looking to solve such issues faster, we have ranked some of the best DLL repair software to help you get this done in no time.

If you managed to fix the error with a solution not mentioned above, you’re welcome to share it with us in the comment section below.

Solved: Xbox One Home Screen is Not Showing Properly

The Xbox has come a long way since its launch, as Microsoft works hard to clean up its Home screen. Among the changes that have been introduced via updates include being able to customize the Home screen, so you can get to your favorite apps, games, and friends.

Additionally, there’s a community screen where you can share game clips, achievements, and other happenings, which has also been revamped for easier browsing.

While we’re glad there are constant re-tooling changes happening on the interface for ease of use and better experiences, it may not be such a happy experience when the Xbox One S is not showing the Home screen.

If this is your situation, try the solutions below and see if they help resolve the issue for you.

Xbox One not showing the Home screen

1. Blank screen

    To fix a blank screen when your Xbox One is not showing Home screen, turn off the console by holding down the Xbox button for ten seconds, then turn it back on by pressing the Xbox button on the console

    If the screen is blank after you turn on the console, here’s how to fix it:

    • Turn on your TV and Xbox One S console
    • Set your TV to the correct input signal (HDMI).
    • Ensure the HDMI cable connection to your console, and the HDMI connection to your TV is secure.
    • Check that the HDMI cable is connected to the “out to TV” port on the console.
    • Cold boot your Xbox One console by holding the power button on the front of the console for approximately 10 seconds, and then turn it on again.
    • Reset your display settings by first ejecting any disc in the console, press and hold down the Xbox button for five seconds to turn the console off, then press and hold the Xbox button and Eject button till you hear a beep on the console – one immediately, and another after 10 seconds. The power light will flash on just before the second beep, but hold still until the second beep occurs. This boots your console in low resolution mode.
    • Reset the low resolution mode by going to System>Settings>Display & Sounds>Video Options>TV Resolution
    • Plug the HDMI cable into a different port on your TV
    • Use a different HDMI cable to connect the Xbox One S console to TV
    • Connect your console to a different TV

2. Black Home screen after system update

A system update could cause Xbox One S not showing the Home screen if the console will not go past the green Xbox startup animation or displays a black screen instead of the green Xbox startup animation.

If you’re seeing a black screen, it could be that the system check has failed to run the startup animation three times in a row, so the system flags it down as ‘do not run’ causing the startup to be blocked from running, and eventually you see a black screen in place of the Home screen.

You need to leave your console on this black screen for ten or so minutes, but it doesn’t mean there’s an error.

If you’re seeing a black screen, try the solutions below:

3. Perform an offline system update

The Xbox Offline System Update (OSU) lets you update your console from a USB flash drive, by downloading a file to the drive and then installing it directly to your console. To do this, get a PC with internet and USB port, and a USB flash drive with a minimum of 4GB space formatted as NTFS.

If you can see the Xbox Startup troubleshooter, download the OSU file (OSU1), then do this:

  • Plug your USB flash drive into a USB port on your computer.
  • Open the OSU1 file
  • Click Save to save the console update .zip file to your computer.
  • Unzip the file by right-clicking on the file and selecting Extract all from the pop-up menu.
  • Copy the $SystemUpdate file from the .zip file to your flash drive. The files should be copied to the root directory, and there shouldn’t be any other files on the flash drive.
  • Unplug the USB flash drive from your computer.

4. Update your Xbox One console

Once you have the correct OSU file on your flash drive, install it on your console using the OSU option on Xbox Startup troubleshooter. Here’s how to bring up the troubleshooter:

  • Power off your console
  • Unplug the power cord to completely power off the console
  • Wait 30 seconds, and then plug the power cord back in.
  • Press and hold the bind button on the left side of the console, and the EJECT button on the front of the console
  • Press the Xbox button on the console.
  • Continue holding the BIND and EJECT buttons for 10-15 seconds.
  • Listen for two “power-up” tones a couple of seconds apart. You can release the BIND and EJECT buttons after the second power-up tone.
  • The console should power up and take you directly to the Xbox Startup Troubleshooter.
  • Plug the flash drive with the OSU files to a USB port on the console
  • Once inserted, the OSU option will turn green (or become active)
  • On your Xbox controller, use D-pad and A button to select OSU to initiate the update using the files on your drive

Once the update is complete, the console will restart and you should be able to see the Home screen. Remove the flash drive from the USB port on your console.

5. Xbox One console doesn’t display the Xbox Startup Troubleshooter

In some cases, you may not be able to see the Home screen on your console because the console doesn’t display the Xbox Startup Troubleshooter.

Here’s what to do when this happens:

Verify the Xbox operating system version you are running

  • Press the Xbox button to open the guide.
  • Select Settings.
  • Open All Settings.
  • Choose System.
  • Select Console info & updates.
  • Your OS version is listed in the third row. Write down this information so that you can select the correct download.

Download the OSU file (OSU2)

The current OS version of your console requires two updates to be installed, OSU2 and OSU1 in that order. You need to wait until OSU2 update is complete before installing OSU1. To do this:

  • Plug your USB flash drive into a USB port on your computer.
  • Open the Offline System Update file OSU2
  • Click Save to save the console update .zip file to your computer.
  • Unzip the file by right-clicking on the file and selecting Extract allfrom the pop-up menu.
  • Copy the $SystemUpdate file from the .zip file to your flash drive. The files should be copied to the root directory, and there shouldn’t be any other files on the flash drive.
  • Unplug the USB flash drive from your computer.
  • Update your console

You will either be returned to the Home screen or prompted to start a second update (online) if the first update was successful. If the update wasn’t successful, download OSU1, and use the same procedure to get the first update.

Also, if you don’t see the Something went wrong error screen, restart your console. If this doesn’t show the Home screen, reset your console from the Xbox Startup Troubleshooter.

  • Use the D-pad and A button on your controller to select Reset this Xbox.
  • When prompted, select Keep games and apps. This option will reset the operating system and delete all potentially corrupted data without deleting your games or apps.  If the console reset is successful, you may be prompted to repeat some general console set-up steps before you are returned to the Home screen.
  • If after the reset the Xbox One S is not showing Home screen restore your console to factory settings via the Xbox Startup Troubleshooter to completely restore your console to its factory settings.
  • Note: This should be a last resort method. Resetting your console to its factory defaults erases all accounts, saved games, settings, and home Xbox associations. Anything not synchronized with Xbox Live will be lost.
  • Select Reset this Xbox. When prompted, select Remove everything. This will delete all user data, and all games and apps. If the console reset is successful, you will be prompted to repeat some general console set-up steps before you are returned to the Home screen.

If the reset was unsuccessful, then your Xbox One S console needs to be repaired. You can submit a request to have it repaired via Device Support at Xbox.

RELATED STORIES TO CHECK OUT:

Fix The Installation Failed in the Safe_OS Phase: Boot, Apply_image

Our readers report getting The installation failed in the safe_os phase with an error during apply_image operation. or The installation failed in the safe_os phase with an error during boot operation. The error occurs during the update process, whether offline or online when the operating system cannot migrate the driver since doing so will result in unauthorized operation.

During the safe OS phase, the system checks to ensure that everything, including the drivers, is acting in the manner that has been programmed. When it comes to the system’s reliability, any operation that is not encrypted or without the appropriate signatures will create a problem. In addition, when you try to upgrade an incompatible system by force, you will frequently get a Blue Screen of Death (BSoD).

How do I fix the installation failed in the Safe_os phase with an error during boot operation?

1. Update all your drivers

According to users, Installation Failed in Safe_OS Phase With an Error During Apply_image Operation message can appear if you have any problems with your drivers.

Outdated drivers can cause this problem to appear, so updating them is recommended.

For instance, many users reported that their USB drivers were the problem. After updating them, the issue was resolved.

However, other outdated drivers can cause this problem as well. So we wholeheartedly recommend using a third-party driver updating tool, to help detect and update all the essential drivers.

Once installed and launched, the tool scans your system and finds all problematic drivers. It also offers reliable recommendations for the latest software you can safely install.

2. Change your Windows 10 installation

This is a bit more complex solution since it requires you to change Windows 10 setup files. This solution is helpful to some users, but make sure that you follow instructions carefully to prevent any damage and unwanted issues.

The leading cause of this error is the KB3064209 Intel CPU microcode update. This doesn’t apply to you if you don’t use Intel’s CPU.

This was proven to work on Gigabyte GB-BXi3-4010 motherboards with Intel i3 4010U CPU installed, but we assume it should work with any other motherboard with Intel CPU.

KB3064209 updates the file C:/Windows/system32/mcupdate_genuineintel.dll

To install Windows 10, you need to delete this file. To do so, follow the steps below (we’ll use X: as a USB drive, C: as our operating system drive letter, and User as the user profile name. When applying this solution, make sure that you change these to match your settings.)

  1. Download Windows 10 ISO and copy its contents to a USB stick.
  2. Tap Windows then type cmd and open the Command Prompt result as an administrator.cmd-run-admin 0x80070002 windows update
  3. Create a new folder on your Desktop and call it mount.
  4. Mount and edit WIM (Image file:boot.wim, Index 1) by entering into Command Prompt: dism /Mount-Image /ImageFile:X:sourcesboot.wim /index:1 /MountDir:C:UsersUserDesktopmountdism-mount the installation failed in the safe_os phase
  5. Use Windows Explorer and navigate to: C:/Users/User/Desktop/mount/Windows/System32/mcupdate_GenuineIntel.dll
  6. Right-click mcupdate_GenuineIntel.dll and choose Properties.
  7. Go to the Security tab, then click Advanced.
    Windows 10 error 0xc1900101 - 0x20017
  8. Next, Change the Owner to your User account. (Enter your user account and click on Check Names button. Click OK to save the changes.)
    The installation failed in the safe_os phase with an error during install_updates
  9. In the Security tab click Edit and then Add to add your user account. (Make sure that you check Full Control so you can have maximum privileges. Click Apply and OK to save changes.)
    The installation failed in the safe_os phase boot
  10. Now delete mcupdate_GenuineIntel.dll.
  11. Close all open Windows Explorer windows.
  12. Go back to Command Prompt and unmount the image by entering: dism /Unmount-Image /MountDir:C:UsersUserDesktopmount /commit
  13. Now you’ll have to repeat steps 4-11 for the following files:
    • boot.wim /index:2
    • install.wim /index:1
    • install.wim /index:2
  14. If you’re confused, just replace boot.wim /index:1 with the values from the list above.
  15. Delete the mount folder from your desktop, remove the USB and boot the installer.

This is an advanced solution, so be sure to follow the screen instructions carefully to perform it properly.

3. Use an uninstaller third-party solution

Installation Failed in Safe_OS Phase With an Error During Apply_image Operation error can appear due to your temporary files, and one way to fix it is to uninstall them completely.

To perform this, removing your problematic files or programs from your computer is advisable.

Still, using Windows Control Panel might not help you with leftover files in your system.

And this is where uninstaller software plays its part, entirely removing all problematic files from the PC. So you can try to fix this error by using the best uninstaller software on the market right now.

Whatever the stop code accompanying this error: 0x800f0830 – 0x20003, fail code 0xc1900101, 0x800f0955 – 0x20003, and so on, you can try to remove your VPN software from your PC (along with any software leftovers).

Then, check if this measure helps to unblock the installation process on Windows 11.

4. Set services to automatic

  1. Press Windows + R and type services.msc. Press Enter or click OK.
    The installation failed in the safe_os first_boot
  2. Find the following services:
    • BITS(Background Intelligent Transfer Service)
    • Windows Update Service
    • Cryptographic Service
  3. Double-click each of these services to open their Properties.
  4. Now find the Startup type and set it to Automatic. Finally, click on Apply and OK to save changes.
    Windows 10 error 0xc1900101 - 0x20017
  5. Repeat the process for all three services.
  6. Restart your computer and try to install Windows 10 again.

After enabling all these services, the problem should be resolved, and you’ll be able to install Windows 10 without any issues.

5. Unplug all USB devices from your computer / remove your WiFi adapter

Some users report that unplugging all USB devices fixes this issue, so you might want to do that. This applies to your printer, phone, external hard drive, etc.

Try using a PS/2 keyboard and mouse instead of a USB one.

Also, if you’re using a dedicated WiFi card, you might want to remove it from your computer while trying to install Windows 10.

Do this only if you know how it works or your device is under warranty. Then, contact the official repair shop if available.

6. Disable your graphics/network card

If you’re getting Installation Failed in Safe_OS Phase With an Error During Apply_image Operation while installing Windows 10, the problem might be related to your dedicated graphics card.

According to users, your graphics card might not be fully compatible with Windows 10, and the only solution is to disable it from BIOS.

To do that, first, you need to enter BIOS while your PC boots. There are several ways to do that, and if you don’t know how to do it, be sure to check your motherboard manual for detailed instructions.

Once you enter BIOS, you need to find your dedicated graphics card and disable it. If you don’t know how to do that, check your instruction manual for detailed instructions.

Once the dedicated graphics is disabled, you might have to connect your monitor to the onboard graphics on the back of your PC. Now try to install Windows 10 again and check if the issue reappears.

Several users reported that disabling their dedicated graphics fixed the problem, so be sure to try that out.

In addition to your graphics card, the problem might be your network card.

If you’re using a built-in network card to access the Internet, disable it from BIOS and check if that solves your issue.

7. Update your BIOS

If you’re getting Installation Failed in Safe_OS Phase With an Error During Apply_image Operation error message while trying to install Windows 10, the problem might be related to your BIOS.

Sometimes outdated BIOS can cause this issue to appear; to fix it; you need to flash your BIOS and install the latest version.

Updating your BIOS is an advanced and somewhat risky procedure that can cause irreversible damage to your PC if you’re not careful.

To see how to properly update the BIOS on your motherboard, check your motherboard manual for detailed instructions, as well as our article linked.

Several users reported that updating their BIOS fixed the issue for them, so be extra cautious if you plan to use this solution.

8. Add/remove RAM modules

Another way to fix Installation Failed in Safe_OS Phase With an Error During Apply_image Operation error is to add or remove RAM modules.

Several users reported that they fixed the issue simply by adding or removing one or two memory modules to or from their PC. After doing that, the installation went smoothly.


How do I fix 0xC1900101 error when installing Windows 11?

  1. Press Windows + I then scroll down and click Troubleshoot.troubleshoot-opt-w11 0xa00f4244 nocamerasareattached
  2. Select Other troubleshooters.
  3. Scroll down to the Windows Update troubleshooter, then select Run.run-windows the installation failed in the safe_os phase

How do I fix a corrupted boot of Windows 10?

PC users who have had the misfortune of experiencing troubles with their systems may find that the boot repair tools for Windows 10 and Windows 11 are a godsend. There is nothing more frustrating than when your computer won’t start up.

Problems during the Windows boot process are more prevalent than you would believe. They can be brought on by anything, from the corruption of a single byte on your hard drive to malfunctioning a boot drive to the absence of a key in the registry.

Fortunately, we’ve developed a guide on the five best Windows 10/11 boot repair tools to rescue your PC.

Users reported the following variations as being the most common ones that they meet:

  • The installation failed in the safe_os phase with an error during the install recovery environment
  • The installation failed in the safe_os phase 0x20017
  • 0xC1900101 the installation failed in the SAFE_OS phase with an error during boot operation VMWare
  • The installation failed in the safe_os phase with an error during REPLICATE_OC operation
  • The installation failed in the safe_os phase with an error during install_updates operation
  • 0x80070570 – 0x2000c the installation failed in the safe_os phase during apply_image operation
  • The installation failed in the safe_os phase with an error during migrate_data operation
  • The installation failed in the safe_os phase with an error during install_drivers operation
  • The installation failed in the safe_os phase with an error during apply_image operation
  • 0x800f0830 – 0x20003 – The installation failed in the safe_os phase
  • The installation failed in the safe_os phase in Windows 11, windows 10
  • The installation failed in the safe_os phase 2022, server 2019, server 2016

Variations of this error include installation errors during the following phases: Recovery environment, Prepare rollback, Replicate_oc operation, Migrate_data operation, and First_boot.

Hopefully, one of our solutions proved helpful for your particular situation. We’d like to hear about how you managed to solve the problem, so feel free to drop us a line in the comments below.

SD Card not Showing up on Windows 10: 4 Ways to Recognize it

More and more postings suggest that many Windows 10 users are affected by SD card not recognized problems.

If you also are experiencing problems with your SD Card or SD Card reader not being recognized in Windows 10, below are the steps you need to follow.

If you can’t read the SD card in Windows 10 can be a big problem, and in this article, we’ll show you how to fix the following issues:

Why is my SD card not showing up on my computer?

There are different reasons why you may experience this issue. Among the top are the following:

  • Damaged SD card hardware – If you use an SD card reader, you should double-check if it is physically damaged.
  • Bad PC hardware – Sometimes, if you connect the SD card directly to your PC, you may not see the card if the port is wrong.
  • Bad connections – There are also chances you have not properly connected the card to your computer.
  • Driver problems – This may be the case if you still use old or outdated PC drivers.

Let us now discuss similar issues and the best solutions.

What are other common SD issues?

  • SD card not showing up Windows 10 – According to users, their SD card isn’t in Windows 10. This can be an annoying problem, but you should be able to fix it using the solutions from this article.
  • Micro SD card not reading – Several users reported that their Micro SD card is not reading their files. This can be a big problem and prevent you from accessing your files.
  • External SD card not recognized – Sometimes, you might have difficulties with your SD card. According to users, the external SD card wasn’t recognized on their PC. This is a relatively common problem, and you should be able to fix it using one of our solutions.
  • SD card not recognized after format, partition – Several users reported that their SD card wasn’t recognized after formatting. This can occur if you select an incompatible file system.
  • SD card not detected in any device – If your SD card isn’t detected in any device, your card might be faulty or locked. This issue can also occur if you select an unsupported file system.
  • Kingston, Kodak, Verbatim SD card not recognized – This problem can occur with various SD cards, and many Kingston, Kodak, and Verbatim users reported this problem.
  • SD card not showing up, detected, working, writable, erasing, ejecting, reading, transferring, connecting, holding data – Various problems can occur with your SD card. Fortunately, most of these problems can be easily solved using one of our solutions.
  • SD card is write protected – If you’re getting this error message on your PC, the problem is most likely a locked SD card. However, you can fix this issue simply by pressing the lock switch on your SD card.

How can I fix the SD card not if it’s not showing up on Windows 10?

Before starting with any of the fixes mentioned, you should ensure the SD card is not locked. While you may still see the SD card even if locked, it is the best practice.

You may also try viewing your card reader before you insert your SD card. This way, you rule out the possibility of a damaged reader.

1. Run the hardware troubleshooter

  1. Press the Windows key + I to open the Settings app.
  2. Navigate to the Update & security section.
    Micro SD card not reading
  3. From the menu on the left, select Troubleshoot. Now select Hardware and devices and click on Run the troubleshooter button.
    External SD card not recognized

Sometimes, you can fix this problem simply by running the hardware troubleshooter. This is relatively simple, and you can do it by following the steps above.

After the troubleshooter is finished, the issues with your SD card should be resolved entirely.

If you’re having trouble opening the Setting app, look at this dedicated article to solve the issue.

2. Make sure that your drivers are up to date

2.1 Manual update

  1. Right-click on the Start menu and select Device Manager.
    sd card not showing up windows 10
  2. Look for any driver group with a yellow exclamation, expand it, right-click on the driver, and select Update driver.
    sd card not showing up windows 10
  3. Select Search automatically for drivers.
  4. Right-click on the driver setup file and select Properties.
    SD card is write protected
  5. Select the Compatibility tab.
  6. Check Run this program in Compatibility mode and select the previous version of Windows supported by the software from the drop-down list. Then click on Apply and OK to save the changes.
    SD card not showing up Windows 10
  7. Then restart your computer and check how it works.

2.2 Update drivers automatically

Updating drivers manually can be tricky sometimes, so we suggest using a third-party tool to do it automatically. Thus, you will prevent file loss and even permanent damage to your computer.

The tool recommended below will do a complete scan of your system automatically. Then, with a single click, you can repair and update all the necessary drivers in a single shot.

3. Use Disk Management to format your card

  1. Right-click the Start button to open the Win + X menu. Now select Disk Management from the list.
    External SD card not recognized
  2. Now you should see the SD card available. Right-click it and choose Format.
    SD card not recognized after format
  3. A warning message will appear telling you that formatting will delete all files from your card. Click on Yes to proceed.
    D card not detected in any device
  4. Set the File system to FAT32 and click on OK.
    Kingston SD card not recognized

If Windows 10 doesn’t recognize your SD card, you might be able to fix the problem simply by formatting it. You can do that from Disk Management by following the steps above.

After formatting the card, the issue should be resolved entirely, and your SD card will become recognized.

Keep in mind that the FAT32 file system has limitations, and if you want to save files larger than 4GB, you might want to use NTFS instead.

4. Use Command Prompt

  1. Type cmd in Windows search and click on Run as administrator to start Command Prompt with full privileges.
  2. Once the Command Prompt opens, you need to enter the following command and press Enter (Be sure to replace X with the letter that matches your SD card):
    attrib -h -r -s /s /d X:*.*
    SD card not detected in any device

According to users, you can sometimes fix this problem simply by using Command Prompt.

Malware can sometimes change the security permissions on your SD card, causing it to become unreadable. However, you can fix this problem by performing the steps above.

After running this command, your security permissions for your SD card will change, and the card should become recognized again.

There you have it. You should know that these solutions are not in any particular order. It would be best if you tried whatever seems the most appropriate.

Now, let us know in the comments section below what worked for you and what didn’t. Also, if you have any other questions or suggestions, leave them there.

Undoing Changes Made to Your Computer [Windows 11 Fix]

You probably have just encountered the message undoing changes made to your computer. We will take you through all you should know.

Windows Update issues are not yesterday’s news, and they are probably here to stay longer than we would like.

One of our readers reported that when he tries to update Windows 11, the process gets stuck, getting the 0xc1900101 error.

Then, the PC restarts only to see the Undoing changes made to this PC message on the screen. It’s incredibly frustrating because the update gets interrupted at a high completion percentage.

We have been confronted with error 0xc1900101 on Windows 10 too, and it’s usually related to corrupt or faulty drivers, so it’s most likely that Windows 11 inherited this bug.

Why does my computer keep saying undoing changes?

From user experience, we can tell that a few things may trigger this message. At the top of the list, we have the following:

  • Update errors – The Undoing changes made to this PC message result from an error during the Windows Update process.
  • Uncompleted processes – This mainly comes with the error 0xc1900101, but any such Windows Update fault can trigger the same problem and stop the process.
  • Bad or corrupted drivers – Problematic drivers usually produce this particular error.
  • Corrupted system files – Generally, when vital system files are corrupted, you will expect various errors to be thrown by the computer, which may trigger the computer to undo changes.
  • Overprotective antivirus programs – For some users, this is the case. The antivirus is doing more than required and may not allow some legitimate systems to run correctly.

There’s a whole family of error codes related to this problem, and the solutions we recommend will also work if you experience error codes 0xC1900101 – 0x2000c, 0x20004, 0x20017, 0x40017, 0x30018, 0x3000D, or 0x4000D.

How can I fix Undoing changes made to your computer message?

Before trying any of the solutions recommended below, we suggest you detach every connected peripheral. There is the off chance that they may be interacting with a process and triggering this error.

1. Update the drivers

  1. Click the Search button from the Taskbar, type device manager, and click the app from the results.
  2. Click any outdated driver section; in this case, we use the Display adapters section, right-click on the driver, and select Update driver.
  3. Select the first option, Search automatically for drivers.
  4. If the system finds a new one, it will install it. If not, you can click on Search for updated drivers on Windows Update.
  5. You will be redirected to the Windows Update. Click on Advanced options.
  6. Now, look at the Optional updates option. If you see that you have any new updates related to drivers there, click it and install them right away.

The method showcased above is manual and often tiring, so we recommend downloading Outbyte Driver Updater, a reliable tool that will keep the installed drivers up-to-date.

⇒ Get Outbyte Driver Updater

2. Run the Windows Update troubleshooter

  1. Click the Windows button and select Settings.
  2. Select System from the left pane, scroll down on the right pane, and click on Troubleshoot.
  3. Now click on Other troubleshooters.
  4. Locate the Windows Update troubleshooter and hit the Run button from its right.
  5. The system will detect any problems with the update and attempt to fix them. Next, try performing the update again and see if this time works.

3. Check for Windows updates

  1. Click the Start button and select Settings.
  2. Then click on Windows Update from the left pane and hit the Check for updates button from the right.
  3. If there are any new updates, the system will start downloading and installing them.

Even though the update is exactly the procedure you cannot perform, there might also be other system updates that you have missed, and installing them before the problematic one may solve this issue.

4. Disable or remove your antivirus

  1. Click the Search button from the Taskbar, type security, and select Windows Security from the results.
  2. Choose Virus & threat protection.
  3. In the next window, click on Manage settings.
  4. Now turn off the real-time protection.

We have shown you how to turn off the Windows Defender Antivirus, but if you have a third-party antivirus installed, you need to turn it off from its settings.

If that doesn’t work, uninstall your antivirus temporarily because it may block your updates. Of course, you can always reinstall it afterward.

If you discover that that software was causing the problem, think about getting a better antivirus for Windows 11.

5. Run an SFC scan

  1. Click the Search icon on the Taskbar, type cmd, then click on Run as administrator to start Command Prompt with full privileges.
  2. Type or paste the following command and press Enter to run it: sfc /scannow
  3. System File Checker will look for corrupt system files and attempt to fix them. Wait for the process to finish, then restart your PC.

6. Scan your hard drive for errors

  1. Select the Search button from the Taskbar, type command prompt, and click on Run as administrator to start Command Prompt with administrative rights.
  2. Type or paste the following command and press Enter to run it: Dism /Online /Cleanup-Image /RestoreHealth
  3. Wait until the process has finished, then restart your system.

7. Reset your PC

Note icon NOTE
Unfortunately, if none of the solutions above helped, it’s time to reset your PC to factory settings. However, the reset process allows you to keep your files, but you will lose all installed programs, so make sure you still have the software to restore them.
  1. Choose the Start button located on the Taskbar and click on Settings.
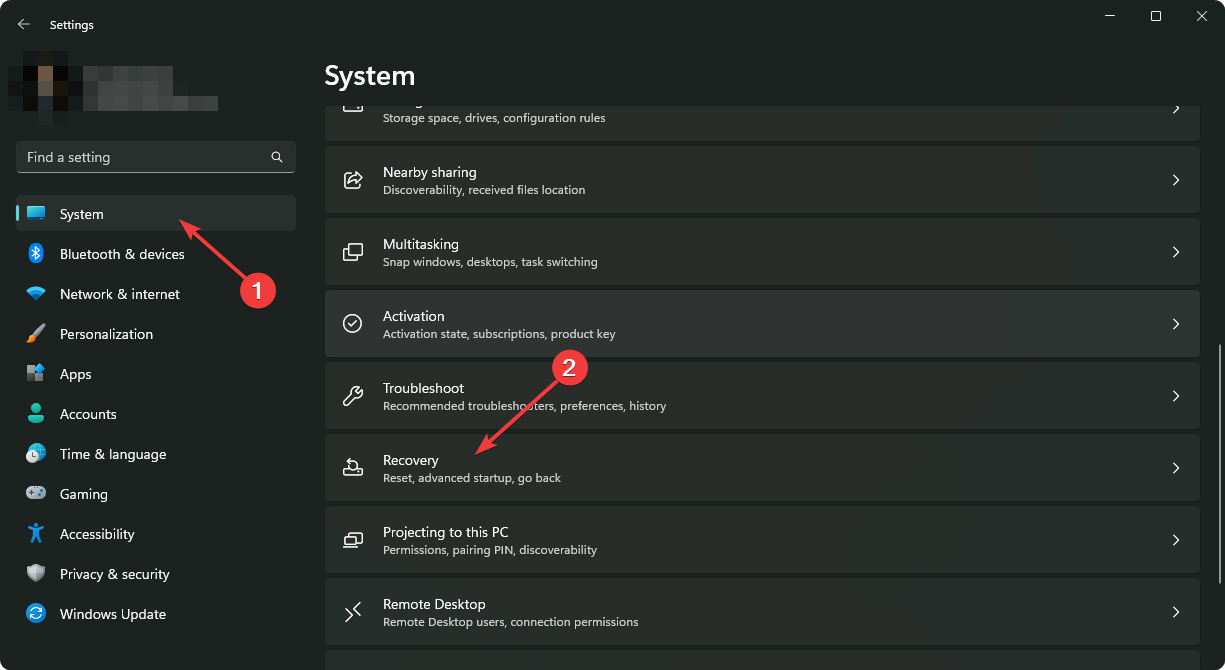
  2. Now select System and click on Recovery from the right pane.
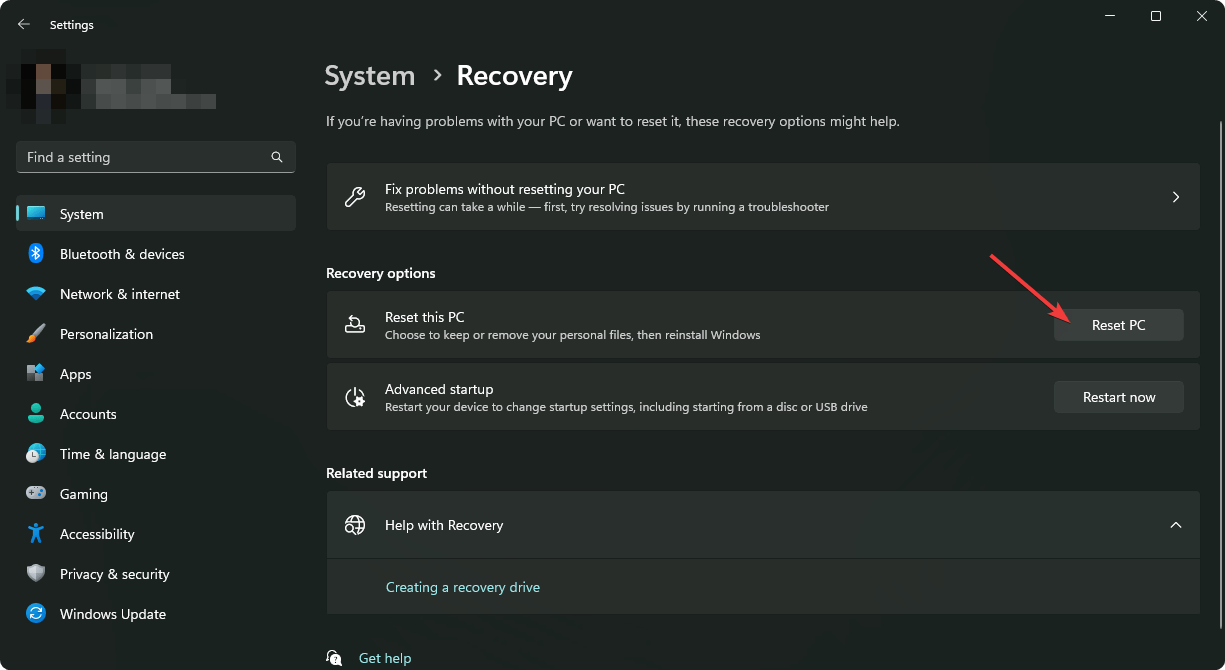
  3. Next, hit the Reset PC button.
  4. Click on Keep my files if you don’t want to lose them, or select the second option if you want a fresh start. We also recommend performing a backup before going through with this step.
  5. Select the first option, Cloud download, to get Windows 11 online (you need at least 4 GB of free space on your drive). You can go for the second option if you have a local kit.
  6. Click Next, then Reset, and Windows 11 will start the reinstallation process.

If the procedure is unsuccessful, read our guide on what to do if the Reset PC is not working in Windows 11 and solve it immediately.

We hope our solutions helped you fix this update problem and that you removed the Undoing changes made to this PC message on the screen.

You should also check if your PC has enough space on your drive for the update because this update error might also be caused by insufficient disk space.

It would be helpful to check our article on how to make Windows 11 faster and more responsive, and you will also learn how to free some space on your drive.

Lastly, note that the solutions above will work for many cases, including undoing changes made to your HP or Dell computer and the black screen problem.

Let us know the method you opted for in the comments section below.

FSX Error 1722: Use These 5 Methods to Enable FSX

FSX (Flight Simulator X) installation error 1722 can occasionally occur when installing or removing software from Windows.

It returns the following error message: Error 1722 Windows Installer Package FSX. A program run as part of the setup did not finish as expected. Contact your support personnel or package vendor.

Here are the probable triggers and most practical solutions if you have encountered them.

What is error 1722?

The 1722 error is a generic installation error that indicates a problem on the system level. It is known to be triggered by varying factors, including:

  • Windows installer – The error message highlights that this issue pertains to the Windows Installer, which many software depend upon for installation.
  • Invalid registry entries – While we caution against tweaking registry details, in some cases, you may need to; if not, the invalid entries will trigger this error.
  • Suspended services – Users may experience this error because some services have stopped, and they may need to be restarted.

If this error message pops up when you install or remove specific software, this is how you can fix FSX install error 1722 in Windows 10.

Update: Microsoft released the new title in the series. The new Microsoft Flight Simulator 2020 looks incredible, but gamers already have problems installing it.

How can I fix FSX error 1722?

  1. Start the Windows Installer Service
  2. Re-register the Windows Installer Service
  3. Open the Program and Uninstall Troubleshooter
  4. Enable Windows Script Hosting
  5. Scan the Registry

1. Start the Windows Installer Service

  1. Press the Win key + R hotkey, type services.msc in Run’s text box, and hit Enter.
    fsx error 1722
  2. Scroll and double-click Windows Installer.
    fsx error 1722
  3. If the service status is stopped, press the Start button on the Windows Installer Properties window.
    fsx error 1722
  4. Then press the OK button to close the window.

2. Re-register the Windows Installer Service

  1. Press the Win key + X hotkey, and select Command Prompt (Admin).
  2. Input the script below and hit Enter.
    msiexec /unregister
  3. Then input the registration script below and hit Enter.
    msiexec /regserver
  4. Close the Command Prompt, and then restart the Windows OS.

3. Open the Program and Uninstall Troubleshooter

  1. Visit the Windows troubleshooter download page, and click the Download troubleshooter button.
    fsx error 1722
  2. Open the folder that you saved the troubleshooter to, and click MicrosoftProgram_Install_and_Uninstall.meta.diagcab.
  3. Press the Next button to go through the troubleshooter.

4. Enable Windows Script Hosting

  1. Press the Win key + X hotkey, and select Command Prompt (Admin).
  2. Enter the following line and press Enter:
    REG DELETE "HKCUSOFTWAREMicrosoftWindows Script HostSettings" /v Enabled /f

5. Scan the Registry

  1. Download CCleaner and install it.
  2. Open CCleaner and click Registry.
    fsx error 1722
  3. Select all the checkboxes, and press the Scan for Issues button.
    fsx error 1722
  4. After that, press the Fix Selected Issues button.
    fsx error 1722
  5. A dialog box opens requesting that you back up the registry. Click Yes, select a folder to save to, and press the Save button.
  6. Next, press the Fix All Selected Issues button to repair the registry.

You can fix Windows Installer registry entries with a registry cleaner or system optimization software.

We love to recommend CCleaner. It is a registry cleaner with millions of users; the above is how you can run a registry scan with that software.

So that’s how you can fix Windows Installer error 1722 to install or uninstall software that relies on the installer service. Note that these fixes should work for FSX errors 1722 and 1603.

You could also try fixing the issue with repair utilities included in this software guide.

If you have more questions or suggestions, feel free to leave them in the comments below.

Xbox Free Play Days December 8-11: Chivalry 2/Chorus/Hell Let Loose

Xbox Free Play Days is back once again for another round of games for Xbox Live Gold and Xbox Game Pass Ultimate subscribers to try out free of additional charge. This week’s lineup is an eclectic one for sure, though a few of them are already available on Game Pass. These games will be available from Thursday, December 8 through Sunday, December 11.

Chivalry 2 

Chivalry 2
Chivalry 2
Price:
Free

Return to the ultimate medieval battlefield. Chivalry 2 is a multiplayer first person slasher inspired by epic medieval movie battles. Players are thrust into the action of every iconic moment of the era – from clashing swords, to storms of flaming arrows, to sprawling castle sieges and more. Storm into battle with cross-play on all platforms!

Chorus

Chorus
Chorus
Developer:
Deep Silver
Price:
$39.99

Take control of Nara on a quest to destroy the dark cult that created her. Unlock devastating weapons and mind-bending abilities in a true evolution of the space-combat shooter. Along with Forsaken, her sentient starfighter, explore ancient temples, engage in exhilarating zero-g combat, and venture beyond our waking reality.

Hell Let Loose

Hell Let Loose Anniversary Edition

Over the past year, millions have heard the battle cry and risen to fight in this epic WWII first person shooter. Join the masses, where you and your teammates will face off against 50 other skilled soldiers, playing unique important roles, on a series of iconic battlefields. In this limited-edition bundle celebrating its first year, you’ll hit the ground running with over 13 different maps and 5 of the most popular DLC packs we’ve released.

Which of these games are you eager to install and dive into this weekend? Tell us in the comments. If you would like to learn more, check out the Xbox Free Play Days FAQ page.

Minecraft Fix: Something Went Wrong in the Login Process

You try logging into Minecraft, but you get the Something went wrong during the login process error. This can happen to anyone, no matter how good your internet connection is or how powerful the hardware you’re using is.

You can solve most issues with the game by updating Minecraft but some will require more. If you are stuck at the login screen, this article attempts to help you address the issue.

Why can’t I log in to Minecraft?

There are many reasons why you may have trouble logging into Minecraft on your PC or console:

  • You’re using the wrong username or password – Make sure that the username and password you’re using are correct. If you’ve forgotten either of these details, you can recover them.
  • Connection issues – If you have a slow Wi-Fi connection, you may get interrupted and get the Something went wrong in the login process if the problem persists, check your internet message.
  • You haven’t verified your email address – Minecraft requires you to verify your account details so if you haven’t, you may be locked out.
  • Browser cache/cookies – Browser cookies and cache are helpful to log in faster but over time they can become corrupted and cause issues.
  • Account has been banned – It’s also possible your account has been locked due to suspicious activity on your account. 
  • Server maintenance – Minecraft undergoes maintenance often so ensure to check the status page to see if there’s any scheduled maintenance.

How can I fix the Something went wrong in the login process error?

Before you jump into the slightly technical solutions, try the following:

  • Verify that the username and password you’re using are correct.
  • Close any unnecessary applications before logging in to Minecraft.
  • If possible, plug in an Ethernet cable rather than using Wi-Fi. Wi-Fi connections can be unreliable at times.
  • Your router won’t connect to the internet at times so restarting it may help improve connection issues.

1. Check for Minecraft updates 

  1. Hit the Windows key and click on Settings.settings windows 11
  2. Click on the Microsoft Store to open.
  3. Locate Minecraft and check whether it is due for an update.

2. Clear browser cache and cookies

Sometimes when you’re playing Minecraft, cookies and stored information from other websites can interfere with the game servers’ ability to recognize who you are. Clearing these items will allow them to start fresh again so they can identify who you are properly when logging in.

Each browser has its own unique steps for clearing its cache so ensure you follow the specific steps for your browser.

3. Run the Windows Store troubleshooter 

  1. Hit the Windows key and click on Settings.settings windows 11
  2. Click on System on the left pane then Troubleshoot on the right pane.System - Troubleshooters
  3. Select Other troubleshooters.going other troubleshooters win11
  4. Scroll down, locate Windows Store Apps and click the Run button.

4. Update Display driver

  1. Hit the Start Menu icon, type Device Manager in the search bar, and click Open.
  2. Navigate to Display adapters and find your graphics card.
  3. Right-click on your graphics card and select Update driver.update-graphics-driver video memory management internal windows 11
  4. Select Search automatically for drivers.search automatically for driver

You can also use a third-party tool that updates drivers automatically so that you don’t have to go through multiple steps. Outbyte Driver Updater is the said tool, and it scans and downloads from a wide database to install the best match for your drivers.

Outbyte Driver Updater

Great app to use when your drivers need a quick update with the latest versions.
Free Trial Download now

5. Repair and reset the Minecraft app 

  1. Hit the Windows key and click on Settings.settings windows 11
  2. Select Apps on the left pane then click on Apps & features on the right pane.
  3. Locate Minecraft, click on the three vertical ellipses and select Advanced options.
  4. Click on Repair.
  5. Go back and click Reset.

When you use this feature, your game files will be deleted, along with any data stored on your device. This will fix any issue you may be having with Minecraft, including the Something went wrong in the login process error in Minecraft in Windows 11, crashes, bugs, and more.

6. Check for Windows Updates

  1. Hit the Windows key and click on Settings.settings windows 11
  2. Select Windows Update and click on Check for updates.check for updates button in settings
  3. Download and install if available.

7. Uninstall and reinstall Minecraft

  1. Hit the Windows key and click on Settings.settings windows 11
  2. Select Apps on the left pane then click on Apps & features on the right pane.
  3. Locate Minecraft, click on the three vertical ellipses and select Uninstall.
  4. Open the Microsoft Store, search for Minecraft and Install it.

And that’s how to go about the Something went wrong in the login process error in Minecraft. We also have tips on how to play Minecraft on cross-platforms so that you and your friends can experience the fun even with different versions of the game.

You may also find our list of VPNs to play with Minecraft very useful, especially if you want to mask your identity while playing online.

Let us know if you have been able to solve the login issue in the comment section below.

FIX: Xbox One doesn’t fit the TV screen [Simple Guide]

“So I just recently got an Xbox One S, and I love it. However, something has been bugging me. The screen is too large and doesn’t fit on my TV screen. My TV is 1080p, and I have it set to that, but it doesn’t fit. Any Advice?”

If you’re going through a similar situation where your Xbox One S is not fitting the TV screen, one of the causes could be the display adjustment settings either on your console or another device.

Most users who have had this problem usually raise it with regard to their console and TV, so the solutions we’ll offer here are centered on the two devices.

If you encounter the Xbox One S not fitting screen issue, try some of the workarounds listed here and see if they help.

How to adjust screen size on Xbox One if it doesn’t fit the TV screen:

1. Preliminary checks

To fix Xbox One S is not fitting screen, there are a few general troubleshooting fixes you can use before trying anything else, such as turning off the console by holding down the Xbox button for ten seconds, then turning it back on by pressing the Xbox button on the console

If the screen still won’t fit, turn on the TV and console, set the TV to the correct input signal, and ensure the connection is secure.

Cold boot your console and turn it on again then reset display settings by first ejecting any disc in the console, press and hold down the Xbox button for five seconds to turn the console off, then press and hold the Xbox button and Eject button till you hear a beep on the console – one immediately, and another after 10 seconds. The power light will flash on just before the second beep but hold still until the second beep occurs. This boots your console in low-resolution mode.

You can also connect your Xbox One S to a different TV or monitor and see if it helps.

Does this resolve the Xbox One S not fitting the TV screen issue? If not, try the next solution.

2. Check TV Overscan

Most people today have ditched the use of cables for streaming as a way of watching media on their TVs, but cables still have their function, and their quality in terms of data transmission is still flawless. However, you may encounter problems with over-scanning at one point or another.

Overscan is a term used to describe a scenario when the edges of the display extend beyond the TV’s edges, making it hard for you to see everything you want. This dates back to the old days of cathode ray tube televisions, but there are ways of fixing it as described below:

  • Using TV

You can fix Overscan via the TV settings, regardless of the TV you’re using, so as to maintain picture quality. The setting name will vary from one TV brand to another, but you can find it by:

  • On your remote, press Menu
  • Navigate to Picture size
  • Select Aspect Ratio (or similar)
  • Pick settings (these can include 16:9, 4:3, Zoom or Super Zoom among others).

You can also find a Just Scan or Screen Fit option, so select that and your display should now fit perfectly within your TV’s four corners.

  • Using Windows

This method depends on your GPU, but you can do the following:

  • Go to the control panel of the graphics card
  • Select Display
  • Select Adjust desktop size and position.
  • Select your TV from the options
  • Check the Enable desktop resizing box (check that you’re not duplicating the display)
  • Click Resize
  • Use the sliders to adjust the fit on your screen

3. Calibrate your TV for Xbox One S

Each Xbox One version has a TV calibration tool in its settings toolbox, which helps you get the most out of your console. To do this:

  • Open settings on your Xbox One S console by first tapping the Home button on your controller to open the quick menu
  • Highlight Settings
  • Hit ‘A’ to open Xbox One S settings app
  • Select Display and Sound
  • Hit right on the controller’s d-pad to select Video output and push A
  • In Display and Sound settings, select Video output
  • Select Calibrate HDTV to start
  • Change your TV settings – some TVs have game-specific picture modes compared to having gaming mode, which can be enabled together with another picture mode. If yours has picture mode instead of game mode, use the picture mode.
  • In picture mode, set to Cinema/Movie/Standard
  • Set Color temperature, Dynamic contrast, Color Management, and Edge enhancement to off
  • You will get a pattern with two rectangles, a square and circle displayed. Ensure all these fit in the bounds of your screen. Check that they’re not distorted.
  • Go to your TV picture settings
  • Find Aspect Ratio option (also called Image Size). If you see an option for original size or ‘Just Scan’, select that
  • Once the rectangles fit on your screen, open TV picture settings
  • Choose Sharpness and reduce it to as low as it can get without blurring the screen, then save the settings

Did any of these solutions help? Let us know in the comments section below.

RELATED STORIES TO CHECK OUT:

Solved: Outlook Data File Cannot be Accessed

Many readers reported getting the Outlook data file cannot be accessed error when sending or receiving emails. This error mostly occurs due to a corrupt user profile, issues with Microsoft Office or changed files location.

Before we head to the slightly tricky solutions, try restarting your PC and temporarily disabling the third-party antivirus if you’re using one.

How can I fix the Outlook data file cannot be accessed?

1. Create a new profile

  1. Press Windows + S to open Search, type Control Panel, and click on the relevant search result.control panel
  2. Enter Mail in the search field, and click on Mail (Microsoft Outlook).mail fix outlook data file cannot be accessed
  3. Click on Show Profiles.show profiles
  4. Now, click on the Add button.add
  5. Enter a profile name, and click on OK.create new profile to fix outlook data file cannot be accessed
  6. Next, fill out the various fields here, and proceed with the on-screen instructions to complete the process.account

Once done, check whether the Outlook data file cannot be accessed error is fixed. If not, head to the next solution.

2. Verify the location of the PST file

You also need to make sure that the PST file is present in the default location because if it’s now, Outlook might throw errors. So, head to the following location, where Username is the current profile, and verify the same:C:\Users\Username\AppData\Local\Microsoft\Outlook

find pst file

If you started getting the Outlook data file cannot be accessed error after moving PST, this should fix things.

We also have a great guide on Outlook PST file location, so be sure to check it out to learn more.

3. Modify the Registry

  1. Press Windows + R to open Run, type regedit, and hit click OK.registry
  2. Click Yes in the UAC prompt.
  3. Now, paste the following path in the address bar and hit Enter:Computer\HKEY_CURRENT_USER\Software\Microsoft\Office\16.0\Outlook\PSTpath
  4. Now, locate the PromptRepair DWORD, double-click on it, change the Value data to 0, and click OK to save the changes.change to fix outlook data file cannot be accessed

4. Disable OneDrive

  1. Click on the OneDrive icon in the system tray, select the gear icon, and then choose Settings.onedrive
  2. Navigate to the Accounts tab, and click on Unlink this PC.unlink this pc to fix outlook data file cannot be accessed
  3. Click on Unlink account to confirm.unlink

That’s it! Many users reported the Outlook data file cannot be accessed error in the shared mailbox due to issues with OneDrive, and unlinking the PC should fix things.

If you want to learn more about Outlook, visit our guide on Mail Merge in Outlook to learn how to use this feature.

5. Repair Office

  1. Press Windows + R to open Run, type appwiz.cpl, and hit Enter.appwiz.cpl
  2. Locate and select Microsoft Office, and then click on Change.repair office to fix outlook data file cannot be accessed
  3. Now, select Online Repair, click on Repair, and allow Office to fix issues with it.online repair

The online repair should get things up and running since the problem most likely lies with Outlook. From now on, you won’t receive the Outlook data file cannot be accessed error in Windows.

If Outlook can’t create the work file, the highlighted guide will help you.

If nothing worked for you, look for the Outlook BAK file to recover & restore lost Outlook Data.

Also, find out what to do if Outlook runs slow in Windows or how you may open EML files in Outlook in case of using an older version.

Don’t hesitate to contact the comments section below for any other questions.

Epson Printer Recovery Mode: Get out of it With 3 Methods

Epson printer, like any other device, needs driver updates. These are necessary pieces of software that your printer needs to run smoothly.

However, quite a few users encountered an issue with updating this driver. Simply put, the Epson printer gets stuck in recovery mode. This error usually occurs when the user interrupts the update process.

Luckily, there are some solutions available to solve the problem quickly.

Why does my printer say recovery mode?

The reasons for the Epson printer being stuck in recovery mode issue are not far-fetched. Listed below are some of the known ones:

  • Faulty or outdated firmware: If you are experiencing the Epson printer recovery mode issue on l5190, ET-2720, and ET-2760, the problem can be an interrupted firmware update. The solution here is to download and install the latest firmware update.
  • Outdated driver: Another prevalent cause of this issue is outdated printer drivers. To fix this, you need to update the driver from the manufacturer’s website.

How can I fix the Epson printer stuck in recovery mode?

Listed below are some prerequisite troubleshooting steps you need to perform before proceeding to the fixes in this section:

  • Disconnect all peripheral devices
  • Remove your USB and ethernet cable
  • Turn off the printer for about 20 seconds and restart it
  • Check network connection

If you can’t fix this issue with these steps, you can now proceed to the solutions below:

1. Update firmware

  1. Download and install the Epson Software Updater and launch it.
  2. Select your printer model and check the box next to Firmware Updater.
    firmware epson printer recovery mode
  3. Click the Install item(s) button and follow the onscreen instructions to complete the process.
    install items

The primary cause of the Epson printer recovery mode issue on the XP-4105, WF-2850, and other models is outdated or faulty firmware. Updating it following the steps above should restore normalcy.

2. Update the driver

  1. Visit the Epson support website, enter your printer’s model, and click the Search button.
    search
  2. Click the Drivers option to expand it.
    drivers
  3. Now, download and install the suitable driver for your product there.
    driver epson printer recovery mode

Another possible cause of the Epson printer recovery mode problem is outdated drivers. And the best place to download the latest drivers is the manufacturer’s website.

3. Update network driver

  1. Press the Windows key + X and select the Device Manager option.
    device manager
  2. Click the arrow next to the Network adapters option to expand it and right-click the driver there.
  3. Select the Update driver option.
    update driver
  4. Finally, choose the Search automatically for drivers option and install any available update.
    search auto epson printer recovery mode

Some users have also found outdated network adapter drivers to cause the Epson printer recovery mode issue. This is why you need to update the drivers too.

If updating the driver manually is not fixing the issue for you, you can use an automated tool in Outbyte Driver Updater to scan and install the latest drivers.

This tool will help install the drivers from its database. With this, you can eliminate the risk of installing the wrong drivers.

Outbyte Driver Updater

Let this tool automatically install the latest drivers to make sure all new devices are compatible.
Free Trial Download Now

While the Epson printer recovery mode issue might seem like a big problem, it is not the most difficult to fix, as shown in this guide.

If your Epson printer won’t print despite showing on your PC, check our detailed guide to fix it and restore regular service.

Did you get out of recovery mode with the help of our solutions? Then, do let us know in the comments below!

Minecraft Is Not Responding: 5 Quick Ways to Fix It

Minecraft crashes can happen to anyone, but they’re especially frustrating when you’re in a middle of a game or building something cool.

The game may become unresponsive because it is not using the GPU or your hardware is just undergoing wear and tear.

Why does my Minecraft keep crashing?

If you’re a Minecraft fan, you’ve probably noticed that the game is crashing on your PC. That doesn’t mean the end of your fun, but it does mean that something is going wrong in the background.

Here are some reasons why your Minecraft might crash:

  • Outdated game – Minecraft is a constantly updated game, and the developers make sure to patch up any issues that may arise. It is possible you’re running an old version.
  • You have too many mods installed at once – If you rely heavily on mods, they can cause lag or other issues because they are so resource-intensive. 
  • Low on memory – If you are running low on memory, Minecraft may be unresponsive as it tries to compensate with the limited resources.
  • You’re using an unofficial version – Pirated copies are often riddled with bugs and issues that can make the game unstable or unplayable.
  • Outdated graphics card –  If you’re using an old computer with a dated graphics card, it might not be able to handle the latest version of Minecraft. You’ll need to upgrade your hardware before playing the game again.

How do I fix Minecraft not responding?

Before performing any advanced troubleshooting, we recommend you check the following:

1. Disable Minecraft mods 

Sometimes Minecraft modpacks may not be responding, which can lead to crashes and errors like not responding when launching the game or even crashing while playing online with others. If this happens often enough, then disabling all mods may be an effective solution. 

This will help you determine if there is any conflict between them and Minecraft itself. If disabling some of these causes a positive change, then it could be that the problem lies with them instead of the game itself. 

2. Free up hard drive space

If Minecraft isn’t responding, it’s usually because the game is using more memory than your computer can provide.

There are multiple ways to free up hard drive space on your PC. You can choose to perform all of them or use one and check whether the game improves.

3. Update your graphic drivers 

  1. Hit the Windows key, type Device Manager in the search bar, and click Open.
  2. Navigate to Display adapters and find your graphics card.
  3. Right-click on your graphics card and select Update driver.update-graphics-driver video memory management internal windows 11
  4. Select Search automatically for drivers.search automatically for driver

Updating your graphics drivers to the latest version is always a good idea. It can be a pain, though, because you have to find out which ones you need and then download them. 

Outbyte Driver Updater automates the process for you. It picks up all the latest available drivers from their servers and downloads them to your system where they are installed automatically.

Outbyte Driver Updater

Have your graphic drivers along with all your old drivers in no time.
Free Trial Download Now

4. Check for Windows Updates

  1. Hit the Windows key and click on Settings.settings windows 11
  2. Select Windows Update and click on Check for updates.check for updates button in settings
  3. Download and install if available.

5. Uninstall and reinstall Minecraft

  1. Hit the Windows key and click on Settings.settings windows 11
  2. Select Apps on the left pane then click on Apps & features on the right pane.
  3. Locate Minecraft, click on the three vertical ellipses and select Uninstall.
  4. Open the Microsoft Store, search for Minecraft and Install it.

A reinstall of the application can be helpful in getting rid of any corrupt file or stored cache that may have been causing issues with the game.

It is also important to note that Minecraft not responding on startup or when joining the server may also be caused by server issues. If the servers are down or undergoing maintenance, all you can do is wait it out.

Other issues that may crop up include a BSOD error appearing on Minecraft while launching. If you come across such an error, don’t hesitate to check out our detailed guide on how to go about it.

Let us know if, after trying out these steps, there’s improved performance on your Minecraft game.

Xbox One S Keeps Disconnecting from Wi-Fi: How to Fix

The revolutionary nature of Xbox One S makes it one of the best gaming platforms to date, and a viable successor to the Xbox One.

Nonetheless, it’s not without its issues, most annoying when it keeps disconnecting from Wi-Fi.

For that purpose, we prepared the most viable solutions in the hope to help you address the problem at hand. Make sure to check them out below.

Why does my Xbox keep disconnecting from the internet?

Solution 1 – Use wired connections

We’re aware this is an obvious solution, but if there’s even the slightest opportunity to connect your Xbox One S to an ethernet cable, make sure to do so.

There are literally dozens of reasons why a wireless connection isn’t as good, especially for gaming.

Even without repetitive disconnections, wireless isn’t the best suited for gaming in general.

Now, one can say this is a problem exclusive to the Xbox One S and maybe that’s the case.

But until Microsoft offers a permanent solution or even acknowledges it as a widespread problem, try sticking with ethernet.

On the other hand, if you’re unable to use a wired connection or you’re experiencing the same issues, make sure to check the additional steps.

Solution 2 – Adjust modem or router settings

Even though there’s a slight chance this is a general issue with Xbox One S, it’s more likely that this is an individual error.

Connectivity is a delicate subject if we consider the infinite number of different devices and configurations.

Now, although they are different, there are still some things you should check-up.

The first step is the simple one: restart your router. This will clear possible IP conflicts. In addition, try disconnecting other connected devices.

If any of them is in use for streaming, VoIP, or torrent downloading, make sure to disconnect them temporarily and look for changes.

In addition, you should check the ports. These are the ports you need to open in order to run Xbox Live:

  • Port 88 (UDP)
  • Port 3074 (UDP and TCP)
  • Port 53 (UDP and TCP)
  • Port 80 (TCP)
  • Port 500 (UDP)
  • Port 3544 (UDP)
  • Port 4500 (UDP)

Moreover, to avoid DHCP conflicts, make sure to assign the Xbox One S out of the scope. This can be done by accessing your router.

Since the procedure depends on your router model, we advise you to google it and learn about it in details before you start with tweaking.

Solution 3 – Disable Instant-On

Instant-On mode is indeed useful and it substantially speeds up the startup process.

However, some users suggested that, after hours and hours of passive work in the background, this can affect both performance and hardware.

Add to that a lot of gaming hours per day, and it’s clear that the console will heat up.

Can this affect the connectivity? Probably. Because of that, we advise you to switch to energy-saving mode and look for changes.

Follow the instructions below to switch to energy-saving mode:

  1. Press Xbox button.
  2. Choose Settings.
  3. Open All Settings.
  4. Choose Power & startup.
  5. Expand Power mode & startup.
  6. Select Energy-saving mode and confirm changes.

Solution 4 – Restore factory settings

Finally, to address all possible software bugs that may affect your connectivity, we advise you to perform a factory reset.

This is the last resort, but if you’re 100% positive that everything is set up as intended and the problem is persistent nonetheless, it might help you resolve it.

The instructions below should show you how to restore factory settings on your Xbox One S:

  1. Press the Xbox button.
  2. Select Settings.
  3. Choose All Settings.
  4. Open System.
  5. Select Console info & updates.
  6. Select Reset console.
  7. Here, you can choose between the 2 options:
    • Reset and remove everything.
    • Reset and keep my games & apps.
  8. We advise you to select the second option because the games and apps shouldn’t affect the console issues in any manner.

Even though it’s helpful, this procedure is, as some users stated, only a temporary solution or rather a workaround.

If you encounter any other errors with your Xbox One S, we recommend you to take a look at this guide in which we dealt with the most frequent ones.

In the end, if none of the previous solutions proved productive, we advise you to contact your retailer or contact Microsoft support.

We also have an article on what to do if Xbox Series X keeps disconnecting from Ethernet.

Feel free to share your experience with Xbox One S disconnections in the comment section below.

[Fixed] Runtime Broker High CPU Usage: 9 Quick Solutions

The Runtime Broker is a Windows process that helps manage app permissions on your PC. Usually, this tool shouldn’t use more than a few MB of memory, but in some cases, the Runtime Broker uses even 1GB of RAM or more.

Such unusual CPU usage affects the processor’s performance and in time, it can shorten its lifespan. In the majority of cases, the Runtime Broker uses too much RAM due to a faulty app.

If your Runtime Broker causes high CPU usage, try the workarounds below to fix this issue.

What is Runtime Broker?

Runtime Broker is a Windows process that can be managed through Task Manager and assists in administering permissions for software obtained from the Microsoft Store.

RuntimeBroker.exe is a process that is initiated by Universal programs, and if that process terminates, all apps that are presently active will close immediately.

Why is Runtime Broker using so much CPU?

According to Microsoft, high CPU usage is typically caused by incompatible or defective applications on your machine.

After installing a certain application, if you are experiencing High CPU Usage, you can uninstall the application to see if this solves the problem.

Additionally, if you have multiple Runtime Broker instances going on simultaneously, you will experience high CPU usage.

How can I fix Runtime Broker high CPU usage on Windows 10?

1. Stop the Runtime Broker from Task Manager

According to users, sometimes you can fix the problem with the Runtime Broker and high CPU usage simply by ending the Runtime Broker process.

This is quite simple to do, and you can do it by following these steps:

  1. Open Task Manager. You can do that quickly by pressing Ctrl + Shift + Esc.
  2. Then click Processes.processes-task flash game lag
  3. Now locate Runtime Broker process on the list. Right-click it and choose End task from the menu.
    Runtime Broker multiple instances
  4. Reboot your computer afterward.

After disabling all Runtime Broker processes, check for the problem. Keep in mind that this might be just a temporary workaround, but you might want to try it out.

You can apply the same approach to other processes, such as Microsoft Common Language Runtime Native Compiler High CPU Usage.

2. Hack the Registry

If you’re having problems with Runtime Broker and high CPU usage, you might be able to fix the problem simply by making a few changes in your registry.

This is relatively simple to do, and you can do it by following these steps:

  1. Press Windows Key + R and enter regedit. Press Enter or click OK.
    Runtime Broker multiple instances
  2. Go to HKEY_LOCAL_MACHINESYSTEMCurrentControlSetServicesTimeBroker.
  3. Change Start=dword:00000003 to dword:00000004.  However, this action affects parts of Cortana’s reminders.
timebroker regedit windows 10

After making these changes, check if the problem with high CPU usage is resolved.

3. Disable the tips about Windows

According to users, sometimes certain features of Windows can cause problems with Runtime Broker and high CPU usage.

However, you can fix the problem simply by disabling the Windows tips. To disable this feature, do the following:

  1. Open the Settings app. The quickest way to do that is to use Windows Key + I shortcut.
  2. When the Settings app opens, head over to the System section.
    Runtime Broker keeps running
  3. Now choose Notifications & actions from the left pane. In the right pane, locate and disable Get tips, tricks and suggestions as you use Windows.
    Runtime Broker high RAM

After doing that, the issue with Runtime Broker and high CPU usage should be resolved.

4. Switch your lock screen background Windows Slideshow to Picture

A few users reported that Runtime Broker high CPU usage issue is caused by your lock screen background.

It seems that the slideshow background on your lock screen is causing this problem, and to fix this issue, you need to disable it and switch to a single picture.

This is rather simple, and you can do it by following these steps:

  1. Open the Settings app and navigate to the Personalization section.
    Runtime Broker keeps running
  2. Go to the Lock screen section in the left pane. In the right pane, set Background to Picture.
    Runtime Broker high memory

After doing that, the issue with Runtime Broker should be completely resolved.

5. Check your antivirus

Sometimes, your antivirus can cause problems with Runtime Broker and lead to issues with high CPU usage.

To fix this problem, we advise you to disable certain antivirus features and check if that helps. If the problem is still present, you might have to disable or uninstall your antivirus.

If removing the antivirus solves the problem, perhaps this is a good time to consider switching to a different antivirus.

There are many great antivirus tools on the market, but if you’re looking for useful antivirus software that won’t interfere with your system, you should definitely look through the list and choose a better option for you.

You would have a better Auto-Pilot user experience, an extra-protection layer that encrypts immediately every file that is threatened by malicious programs, and better optimization for your PC.

6. Customize the advanced update settings

Sometimes, your update settings can cause Runtime Broker high CPU issues to appear. To fix this problem, you need to disable peer-to-peer updates.

This feature can be useful since it allows you to download updates from other PCs on the Internet and your local network.

However, sometimes that can lead to high CPU usage, but you can fix the problem by doing the following:

  1. Open the Settings app and navigate to the Update & Security section.
    Runtime Broker error
  2. In the right pane, click Advanced options.
    Runtime Broker error
  3. Scroll all the way down and click on Delivery Optimization.
    Runtime Broker multiple instances
  4. Locate the Allow downloads from other PCs option and disable it.

After turning this feature off, you won’t download updates from other PCs, instead, you’ll download them only and directly from Microsoft.

By turning this feature off the problem with Runtime Broker should be resolved.

7. Disable background apps

According to users, sometimes background applications can lead to this problem.

If you’re having issues with Runtime Broker and high CPU usage, perhaps you might be able to fix this problem by disabling the background applications.

This is simple to do, and you can do it by following these steps:

If you’re having problems with high CPU usage, the problem might be the Groove Music app.

  1. Open the Settings app and go to the Privacy section.
    Runtime Broker keeps running
  2. Navigate to the Background apps in the left pane. In the right pane, disable Let apps run in the background option.
    Runtime Broker high disk usage

After disabling this feature, the problem with high CPU usage should be resolved. Keep in mind that by disabling this feature you might miss certain notifications from Universal apps.

8. Delete Groove music using Powershell

Several users reported that this application is responsible for Runtime Broker’s high CPU usage, and in order to fix this problem, you need to remove it.

Since this is a Universal application, you’ll need to remove it with PowerShell. To do that, just follow these steps:

  1. In the Search bar, enter powershell. From the list of results right-click Windows PowerShell and choose Run as administrator.
    Runtime Broker error
  2. Copy the following commands one at a time: Get-AppxPackage -name Microsoft.ZuneMusic | Remove-AppxPackage Get-AppxPackage -name Microsoft.Music.Preview | Remove-AppxPackage

After removing Groove Music, check if the problem is still there.

9. Remove OneDrive

In some cases, Runtime Broker and high CPU usage can occur due to OneDrive.

To fix this problem, it’s advised to disable OneDrive or to remove it. To remove OneDrive from your PC, you need to do the following:

  1. Open Command Prompt as administrator. To do that, press Windows Key + X and choose Command Prompt (Admin) from the list. If Command Prompt isn’t available, you can use PowerShell (Admin).
    Runtime Broker high disk usage
  2. Type the command taskkill /f /im OneDrive.exe to end all OneDrive processes.
  3. Type the command %SystemRoot%System32OneDriveSetup.exe /uninstall for 32-bit Windows or %SystemRoot%SysWOW64OneDriveSetup.exe /uninstall for 64-bit Windows to uninstall OneDrive.
    uninstall onedrive cmd

After removing OneDrive from your PC, check if the problem with Runtime Broker and high CPU usage is still there.

How to fix Runtime Broker high CPU in Windows 11?

Besides the solutions above, which are also applicable in Windows 11, you can follow the next steps:

  • Update your OS
  • Optimize startup applications
  • Disable background apps

You can find out more solutions by checking out our guide on what to do to fix high CPU usage in Windows 11.

Runtime Broker problems can negatively impact your performance, and speaking of this process, here are some common problems that users reported:

  • Runtime Broker high disk usage, memory, RAM – This process can negatively impact your performance, but in order to fix the issue, you have to disable certain Windows features.
  • Runtime Broker error – Sometimes Runtime Broker errors can appear on your PC. This is usually caused by your antivirus, but you can fix that issue by changing your antivirus settings.
  • Runtime Broker multiple instances – If multiple instances of Runtime Broker appear on your PC, be sure to end all processes from Task Manager and the issue will be resolved.
  • Runtime Broker keeps running – Sometimes this process can keep running on your PC and negatively impact your performance. To fix that, simply change your Windows Update settings and the issue will be resolved.

For additional troubleshooting steps, check out how to fix CPU at 100% for no reason.

Problems with Runtime Broker and high CPU can cause many problems, such as reduced performance, but we hope you managed to solve this issue using the solutions from this article.

How to Rebuild Outlook Profile on Windows 10

Commonly, Microsoft Outlook users keep their PST (Personal Storage Table) files protected by a password to prevent others from getting access to personal data.

The PST feature inside MS Outlook deals with attributing that password to an Outlook profile and sometimes it may become corrupted. This results in you not being able to access the Outlook inbox.

For this reason, in this article, we will discuss the best solutions for rebuilding an Outlook profile in Windows 10. The repair process applies to Outlook 2007, 2010, 2013, and also the 2016 version.

How can I rebuild my Outlook profile on Windows 10?

Use Control Panel

    A quick and easy way to rebuild your Outlook profile is via Control Panel. Simply follow the steps below and you will complete the process within a few minutes.

  1. 1. Press Windows then type control and open Control Panel.

    control-panel-image fix corrupt outlook profile
  2. 2. Type mail inside the search box then select the Mail (Microsoft Outlook) result.

    mail-outlook fix corrupt outlook profile
  3. 3. Click Show Profiles.

    show-profiles fix corrupt outlook profile
  4. 4. Click Remove, followed by Add, to create a new Outlook profile.

    remove-add fix corrupt outlook profile
  5. 5. Restart your computer.

So, in today’s article, we explored some of the best ways to fix a corrupted Outlook profile. We covered all versions of the software, so you don’t have to search separately for solutions.

Please feel free to let us know if this article helped you better understand your circumstances and what you can do to change them.

For more solutions, check out how to fix the Outlook Cannot Log On Verify You Are Connected Error.

You can let us know by using the comments section below.

Discord High CPU Usage: 5 Tested Solutions to Fix it

Initially designed for games, Discord also became an excellent platform for chatting. However, many of our readers reported that Discord has high CPU usage.

If Discord uses too much CPU, that can also affect the PC performance and other applications, such as games. It seems like high CPU usage and low GPU usage problems are bothering many, so make sure to fix them.

Why is my Discord using so much CPU?

This problem might occur because Discord is a VoIP (voice over Internet protocol), instant messaging, and digital distribution platform. Therefore, when Discord works, it requires more hardware resources, including the power of the central processing unit (CPU).

Also, Hardware Acceleration is often found to cause very high power usage in Discord, and disabling it worked for users. Besides, you should verify if there are conflicting programs on the system that affect the functioning of Discord and uninstall them.

Lastly, if the boot configuration is set incorrectly or limits the number of processors, it could also lead to a problem.

Now, let’s see what you can do if Discord is causing high CPU usage.

How do I fix Discord’s high CPU usage?

1. Turning on or off hardware acceleration

  1. Hit the Windows key, type Discord, then click on the first result.
  2. On the Discord app, go to User Settings (marked as a gear).
  3. On the left pane, scroll down to Advanced.
  4. Toggle the switch for Hardware acceleration forward.
  5. Click on the Okay button.
    Okay
Note icon NOTE
Hardware acceleration should be u003cstrongu003eONu003c/strongu003e, u003cspanu003eas the graphics card will take over a part of the performance. As a result, the processor is relieved. u003c/spanu003e

Many users noticed that having it on was causing high CPU usage in Discord, and by turning it off, the problem was fixed.

However, if your system supports the feature, you must keep it enabled as it could help you fix the Elevated API latency; read this to learn more about it.

So, if your hardware acceleration is on, turning it off could help you. But if this method doesn’t work for you, keep reading.

2. Change the Cores your computer uses

  1. Hit the Windows key, type msconfig into the search bar, and hit the Enter key to open System Configuration.
  2. System Configuration should pop up on your screen. Next, click on the Boot tab.
  3. Click on the Advanced options button.
  4. Untick the checkbox for the Number of processors.
  5. Click OK and close the windows.

Keep in mind that if this option is unticked, it tells your laptop not to limit itself to just one core of your processor. So, by changing this one setting, you can fix Discord’s high CPU usage problems for good.

3. Download and reinstall a fresh copy of Discord

  1. Press the Windows key + I to open the Settings app.
  2. Select the Apps option.
    apps discord high cpu usage
  3. Locate and click on the Discord app.
  4. Now, click the Uninstall button and follow the onscreen instruction to complete the process.
    uninstall
  5. Finally, go to Discord’s official website to download the app.

Another common fix is to reinstall the app. Downloading a new version can resolve the problem, as there may be a problem with your current version. 

For a more effective and straightforward uninstallation process, it is advised to use one of the best uninstaller software in CCleaner. This tool does not only remove the Discord file but also eliminates all remnants of the program.

Also, CCleaner helps to remove Junk files on your PC and keeps it in optimal shape. It might be all you need to remove all unwanted files and apps on Windows 10/11.

⇒ Get CCleaner

4. Change the graphics preferences

  1. Press Windows + I to open the Settings and navigate to System.
  2. Stay on the Display page, then scroll down and select Graphics settings from the right window pane.
  3. Select the Desktop app under Graphics performance preference and hit the Browse button.
  4. In the pop-up window, find the Discord file, then click on the Add button.
  5. Click on Options.
  6. Now set the Option/Graphics preference to High performance.
  7. Save and exit, then restart your PC.

Even if your processor is at 100% of its power, it won’t affect the processor itself and won’t create any long-lasting damage. So, the only issue you may have is with the processor overheating.

5. Turn off voice processing features

  1. Open Discord then go to Settings followed by Voice & Video.voice-video  Discord High CPU Usage
  2. Here, scroll down to the Voice Processing section and turn off all the features in there including Echo Cancellation, Noise Suppression, Advanced Voice Activity, and Automatic Gain Control.voice-processing Discord High CPU Usage

Discord app vs. browser CPU usage

You should probably use the Discord app regarding CPU usage and speed. Most browsers like Chrome already register high CPU usage due to add-ons and other running tabs.

So, this affects the performance of Discord and increases CPU usage. With the dedicated app, the processes will only be limited to Discord activities.

How do I optimize Discord?

You can reconfigure several settings to optimize Discord’s performance and enhance your experience. Start with Noise Suppression, a feature found under Voice & Video settings, to filter out the background noise.

Noise Suppression setting in Discord

If you receive too many notifications from servers you are not presently active on; there’s always the option to modify the notification setting. To do that, right-click on the server, hover the cursor over Notification Settings, and select the desired option.

Also, you can configure keyboard shortcuts or Keybinds, as they are called on Discord, to perform functions quickly and easily. So head to the Keybinds setting and start adding them right away!

Adding Keybinds on Discord

These three changes will make your Discord experience seamless and much more enjoyable.

That’s all there’s to fixing things if Discord is using too much CPU once and for all and optimizing the app. You can also try basic troubleshooting steps like restarting your PC and Discord and scanning for viruses before proceeding to the fixes.

Discord is not the only app that can be prone to this issue. It seems like Avast Antivirus may also cause high CPU usage. Also, do not forget that you can always try the best software to fix high CPU usage.

For additional questions or curiosities, feel free to use the comments below.

Windows 11 Sync Settings Not Working: 4 Fixes to Apply

Are the Windows 11 sync settings not working or just greyed out? If yes, you should follow this article to learn about this problem along with the effective solutions.

Windows 11 is amazing. You can sync your settings across other computers if these have the same OS. However, the problem occurs when it doesn’t work, or the option is not accessible. If you are currently facing this problem, you are not alone.

Why is the sync option not working on Windows 11?

Usually, the synchronization-related issue occurs when the following reasons exist on your device:

  • Microsoft account problem: If the account you are using has some problems, it may not work with the sync feature of Windows 11.
  • Problems with the registry: It may be possible that some software or services may have changed some values of the registry that are causing the problem.
  • Problems with group policy: If Windows 11 sync is disabled from group policy, you will not be able to use this feature.
  • Corrupted system: Misconfiguration or problems with system files can be another reason.
  • Blocked account: If your Microsoft account has been blocked for some reason, there is no way to use sync feature with this account until it is unblocked.

What can I do if Windows 11 sync settings are not working?

Before going through the troubleshooting methods, you should check the following things:

  • Restart Windows. In case of facing any restart issues, you can solve them in no time.
  • Update Windows to the latest version.
  • Make sure your Microsoft account is not blocked.
  • If possible, try a different account and see if it helps.

After that, go through the following methods to solve the sync settings problem on Windows 11.

1. Verify Microsoft account

  1. Press Win + I to open Settings.
  2. Go to Accounts and go to Email & accounts.going email accounts setting windows 11
  3. If you see a message like this account needs to be verified, click on the Verify button.
  4. Provide the necessary credentials and verify the account.

If it is a newly created MS account, check your email to verify on Microsoft’s server side.

2. Enable sync from group policy or registry

2.1 From Group Policy Editor

  1. Open the Start Menu, type gpedit.msc and press Enter.
  2. Expand Computer Configuration.
  3. Click on Administrative Templates and then on Windows Components.expanding windows components gpedit computer configuration
  4. Go to Sync your settings.
  5. Find the option Do not Sync and double-click on it.going do not sync gpedit
  6. Enable and save the settings.disabling do not sync windows 11 gpedit
  7. Restart your PC.

2.1 From Registry Editor

  1. On Start Menu, type regedit and hit Enter.
  2. Navigate to the following location: HKEY_LOCAL_MACHINE\Software\Policies\Microsoft\Windows\SettingSync
  3. Create a new DWORD and give the name as DisableSettingsSync and set its value 2.dsablesettingsync regedit value 2
  4. Create another DWORD called DisableSettingSyncUserOverride and set its value 2.
  5. Restart your PC.

3. Enable from Azure Active Directory

  1. Go to Azure AD admin center and log in.
  2. Click on Azure Active Directory and go to Devices.
  3. Go to Enterprise State Roaming.going enterprise state roaming azure
  4. Select Users may sync settings and app data across devices.
  5. Save it.

If you are a part of Azure Active Directory and encountering Windows 11 sync settings not working issue, the above steps will solve the problem. However, if you are not an admin, you will need to discuss about the steps with the system administrator.

4. Reset Windows

  1. Open the Windows Settings like before.
  2. Go to System and then Recovery.going recovery win11 settings
  3. Click on Reset PC.clicking reset PC win11 settings
  4. Go ahead and finish the process.

You also may be encountering different types of sync problems. If necessary, learn how to solve Windows 11 theme sync problem and also OneDrive Sync problem.

After trying the above methods, you will be able to solve Windows 11 sync settings not working issue. If you know any other better methods, feel free to let us know in the comment box.

How to document and track changes in Excel on Microsoft 365

Many people already know how to view and Track Changes in Word, but they might be worried that the steps will be different from Track Changes in Excel.

Track changes in Excel 2022

Microsoft’s previous directions on how to track changes in a shared workbook in Excel are obsolete. Microsoft is looking to remove Track Changes to make way for “co-authoring,” a special feature which is now available only to Microsoft 365 paid subscribers.

To co-author or track changes in Excel for Windows desktops, here are 3 things you need:

  1. The latest version of Excel for Microsoft 365 is installed on your machine.
  2. Be logged in to your Microsoft 365 account. If you already have the latest version of Excel installed, or use other Office apps on your PC, you may already be signed in to your subscription account.
  3. Use Excel workbooks in .xlsx,.xlsm, or .xlsb file format. If you have a file that doesn’t use these formats, go to File > Save As and click Save to save the file in .xlsx file format. Please note: Co-authoring in Excel does not support Strict Open XML Spreadsheet format.

Co-author a Workbook with others

Once you have the 3 prerequisites, you probably want to know how to actually use the co-authoring feature with an Excel Workbook.

If you find that coworkers in your group can’t see any edits they made or different colors in a workbook you share with them, make sure that everyone’s AutoSave is turned on.

track changes in Excel
Excel for Microsoft 365 app on Windows 11

Once AutoSave is turned on, you will be able to co-author an Excel Workbook with others.

Follow these steps to co-author a workbook in Excel:

1. Upload or create a new workbook using a web browser in OneDrive, OneDrive for Business, or a SharePoint Online library. SharePoint On-Premises sites not hosted by Microsoft do not support co-authoring.

tracking changes in excel

If you are using the Windows Desktop App, you can go to File > Save a Copy and save a copy to a specific location on your OneDrive to track changes in Excel.

2. Click the Share button in the upper right corner and click Share a second time. TRACK CHANGING IN EXCEL

3. Insert the name, group or email addresses of the people you want to share the workbook and click Send to send an email or click Copy to copy the link.

Summary

Reminder, Co-authoring in Excel is only available to paid subscribers, click here to try or buy Microsoft 365. Be sure to check Microsoft’s guidelines for Best Practices for Coauthoring in Excel to help you get started.

These steps will likely change as Microsoft is prepared to release a new Microsoft 365 app to replace the Office.com app installer. Be sure to check out our dedicated Microsoft 365 news hub for similar tips and tricks.

Microsoft’s latest Edge Dev build 110 drops support for Windows 7, 8 and 8.1

Microsoft has released the first Edge Dev version 110 build. Coming in at version 110.0.1543.0, this build features the usual reliability fixes and improvements as well as new features. Here’s what you need to know.

First up, the newly added features. This version now supports a more consistent dark mode, even Sidebar content. What’s more, you will be able to create a share and redeem Workspaces share link in, and finally, you’ll be able to tell who closed Workspace tabs with timestamps.

For Mobile users, the Collections feature has been updated. The feature will get to show new content based on your collections as well as the web. Your existing collections will not be affected by this change and you can also switch back based on your preference. As for the Enterprise users, they will get enhanced support for ExtensionInstallBlocklist policy to block all Sidebar apps. Enterprise users also get s new policy that lets them control the scope search feature.

Aside from the added features, this update also features a host of reliability fixes and changed behavior. The most notable one is that starting with Chromium 110, Windows 7, 8, and 8.1 will no longer be supported. You might want to consider upgrading to Windows 11 to continue accessing Edge’s features and updates.

That said, be sure to check out Microsoft’s blog post for more details pertaining to this update. In other Edge related news, version 108 recently hit the Stable Channel, there was also an indication that Microsoft was working on a new feature dubbed Project Kodiak.

This update should roll out to users automatically, however, if this is not the case, you can trigger the update manually by visiting Edge’s Settings menu, then click on Help and Feedback, select About Microsoft Edge, and then wait for the browser to download the update.

via: Microsoft

How to redeem a gift card or code for Xbox Game Pass Ultimate and Microsoft 365

When you shop online, sometimes you can score offers to redeem a gift card or code and add it to your Microsoft account. Have an old Xbox Live Gold code or membership gift card you want to redeem? Microsoft has you covered. Xbox Live Gold codes or gift cards are automatically converted to the equivalent value in Xbox Game Pass. See Microsoft’s conversion table for more information.

redeem a gift card

And depending on your user level (Level 2 is the highest), you can also get significant Microsoft Rewards point discounts to use to buy gift cards that you can use towards buying physical Microsoft products, like the Surface Pro 9 or Xbox Series S|X.

Redeem a gift card or code for Xbox Game Pass

Xbox gift cards or Microsoft product key codes are typically 25 characters long and include both numbers and letters. Regardless if the gift card or code is for Xbox or Microsoft 365  To redeem a gift card or code, follow these steps:

  1. Go to https://redeem.microsoft.com enter the 25-character code, and click Next.
    redeem a gift card
  2. Click Continue to be taken to the next screen.
    As noted earlier in this post, Xbox Live Gold codes are automatically converted to an equivalent Xbox Game Pass Ultimate subscription. So the 3-month Xbox Live Gold code that was entered will only get 50 days (just barely 2 months) of an equivalent Xbox Game Pass Ultimate subscription.
  3. Click Confirm to confirm your gift card or code information that will be added to your Microsoft account.
    redeem a gift card

To check if you already redeemed a code, check your Microsoft account order history. If you want to activate a Microsoft 365 or Office-related product key code, you need to use a slightly different method.

Want a step by step walkthrough for console, web, and mobile? Check this guide on how to redeem a code on Xbox. Ready to install your games on Windows? See How to Download Xbox Game Pass Games on PC for clear step by step instructions.

Redeem a gift card or code for Microsoft 365

To activate a Microsoft 365 product code or license key, follow these steps:

  1. Go to https://setup.office.com, sign in to your Microsoft account, and click Next.
    redeem a gift card
  2. Enter the 25-character code and click Next to download and install Microsoft 365 apps (if needed).
    redeem a gift card

If the system can’t find your code, visit the Troubleshooting section for additional Microsoft support.

Redeem a gift card or code via the Microsoft Store app

Another way you can redeem a gift card or code is by using the Microsoft Store on Windows 11. Here’s what you need to do.

  1. Open the Microsoft Store on your Windows PC.
  2. Click your Microsoft account and click Redeem code or gift cards.
    redeem a gift card
  3. Enter the 25-character code in the space provided, click Next and follow the prompts.
    redeem a gift card

What happens after I redeem my gift card or code?

There are 3 things that may happen after you redeem a gift card or code:

  1. If the card or code has a cash value, the monetary balance will be transferred to your Microsoft account for you to spend online on Windows, Xbox, or the Microsoft Store.
  2. If the card or code is for a specific app or game, it will be added to your Microsoft account library so you can download and install it. To redeem certain Windows apps and Xbox games, you may need to go to a separate product page to download and install them.
  3. If the card or code is for a Microsoft 365 subscription, you can locate it under your Services & subscriptions in your Microsoft account.

Summary

Keep in mind, these steps will likely change once Microsoft migrates from using the Office app installer to the new Microsoft 365 app. Microsoft 365 updated its online web experience as of November 2022, but the app redesign won’t happen until January 2023.

Once released, the new Microsoft 365 app may change the way you redeem a gift card or code. But until that time, you can continue to use this method.

How do you usually redeem a gift card or code? Let us know in the comments!

Microsoft plans to add a Vertical Tabs layout option to OneNote on Windows soon

Over the past few months, Microsoft has made a ton of improvements as well as enhancements across the OneNote clients. That is, from letting users view notebooks within Teams mobile apps to incorporating a dictate feature in the platform that makes the note-taking process easy.

And now, Microsoft has announced that it will be adding new Layout Options for OneNote on Windows. This is the top request the company has received from course facilitators and education facilities, especially those planning to transition to the OneNote on Windows (Desktop) version.

What’s more, they also requested Microsoft to make the UI resemble Windows 10’s OneNote. This is mainly because the Windows 10 version features pages, sections, and notebooks aligned on the left-hand side, and supports vertical tabs compared to the new app that presents the content in a horizontal tabs layout.

Moreover, students have stated that they prefer this layout option because it makes it easier for them to navigate through their reading material. That said, Microsoft has indicated that they will be adding a new layout option for students, Vertical tabs that will make it easier for them to navigate through their notebooks, sections, and pages in OneNote on Windows early next year.

As you might already be aware, Microsoft removed the OneNote for Windows 10 from the Microsoft Store replacing it with the new and unified OneNote app. Though you can still make use of OneNote for Windows 10, you’ll need a direct link to download it since it is no longer available on Microsoft Store.

However, if you are looking to get the new OneNote app, it is usually part of the pre-installed Office apps that come with a new Windows 11 device. If not, check out our guide which will help you download and install the correct version of the app. We also have a separate post that will equip you with neat tricks and tips that will help you get started with OneNote.

via: Microsoft

OneNote
OneNote
Price:
Free

Unable to Find the Ubisoft Game Launcher: How to Fix It

Ubisoft allows users to play games on their devices and access their stats. It serves as a game launcher for its video game franchises. However, users report the unable to find the Ubisoft game launcher error when they want to play.

Ubisoft servers not available is another problem users commonly experience.

Why am I unable to find the Ubisoft game launcher?

Many factors can contribute to the occurrence of the unable to find Ubisoft game launcher problems. However, it mostly appears when users try to play Assassin’s Creed on Ubisoft.

Furthermore, a common factor that can cause the problem is an outdated Ubisoft Connect version on your PC. It means the app does not work with the latest features and builds. Other factors that are liable to cause problems are:

  • Ubisoft Connect cache – It is common to run into problems with apps on the computer if their cache files are corrupt or damaged. They become old and cause problems with the Ubisoft game launcher.
  • Issues with games installation files – Issues with the game installation files will relatively affect its functionality. It can make it not launch at all or prompt errors from time to time.

The causes listed above may differ depending on the instances of the problem. Nonetheless, you can fix the Ubisoft game launcher by following some steps.

What can I do if I am unable to find the Ubisoft game launcher?

Apply the following preliminary checks:

If the error appears, follow the advanced steps below.

1. Delete the Ubisoft launcher’s cache folder

  1. Press Windows + E to launch File Explorer.
  2. Navigate to C:\Program Files (x86)\Ubisoft\Ubisoft Game Launcher\
  3. Click on the Cache folder, press Ctrl + C to copy it, then paste it into Desktop.
  4. Go back to the Cache folder and delete it.
  5. Close File Explorer and restart your PC to check if the error persists.

Deleting the cache folder will resolve any problem with corrupt caches that is causing the error to occur. If you run into errors, delete the folder in File Explorer, and check some fixes.

2. Run in compatibility mode and as an administrator

  1. Right-click on the Ubisoft Connect client, then click on Properties.
  2. Click on the Compatibility tab, check the box for Run this program in compatibility mode for, then select your operating system.
  3. Scroll down and check the box for Run this program as an administrator.
  4. Click Apply, then OK to save the changes.
  5. Launch the Ubisoft launcher and try accessing your game to see if the error persists.

3. Verify your game files

  1. Launch the Ubisoft Connect app on your PC.
  2. Go to the Games tab, then click the game you wish to verify (the game prompting the error).
  3. Select Properties, and click on Verify files under Local files.
  4. Click on Repair after the verification to fix the corrupt or broken game files.
  5. Close Ubisoft Connect and relaunch the launcher to help it download the faulty game files.
  6. Try to play your game and check if the error persists.

Verifying game files for the game prompting the error will repair any corrupted files that may affect the game.

4. Uninstall and reinstall Ubisoft Connect

  1. Right-click the Start button, type installed apps, and launch it.
  2. Search for Ubisoft, click the three dots at the front, then click Uninstall.
  3. In the Ubisoft Connect Uninstall window, click Next to proceed.
  4. Leave all boxes unchecked, then click Uninstall.
  5. Go to the Ubisoft Connect page, click the menu, then click Download for PC.
  6. Double-click on the UbisoftConnectInstaller file, then click I Accept on the new page.
  7. Click Browse, select Desktop to change the installation directory, then OK.
  8. Click Install, then tap on Finish to complete the process.
  9. Launch your game and see if the error is fixed.

Reinstalling Ubisoft should be the last option to try because you can lose some app data.

Alternatively, check our fixes for the Uplay not compatible with the operating system error on the PC. Also, we have a guide on fixing the EasyAntiCheat error messages in Ubisoft games.

Kindly leave your suggestions and questions in the comments section below.

How to Unblock Adobe Flash Player [Chrome, Edge, Firefox]

As you all know, Flash was once one of the leading web technologies, but now, Adobe Flash Player is blocked by default on almost all web browsers. As a result, most browser developers (Mozilla, Google, and Microsoft) have abandoned mainly Flash in favor of HTML 5.

Well, since the End of Life of the technology in 2020, it was clear browsers would jump ship. So, without support from any major browser, what are your options?

Read on as we explore these options in some of the most used browsers and learn what to do now that Adobe Flash player is no longer natively supported.

Can I still use Adobe Flash Player?

Before we answer this question, you should consider that the new HTML 5 is much superior to Flash, and developers are not lacking as they adopt this tech.

You, however, can still use Flash. However, this is unsafe and not recommended since the technology no longer receives support and can easily be used to compromise your computer.

To use Flash in 2022, you will need plugins, and we will showcase some of the best in your major browsers. Alternatively, you may use browsers that support the newest and latest technology.

Opera One is one of the finest browsers to replace Flash if you previously used it. The browser can easily manage several tabs since it uses little of your resources. It’s important to note that you can quickly do a tab search and arrange tabs into workspaces.

Thanks to Opera One’s built-in ad blocker and tracking protection, you won’t ever have to deal with adverts again. In addition, a free, limitless VPN is offered for an additional layer of protection.

Opera One

How to get around Adobe Flash Player? This might be the ideal moment to try Opera One.

What do I do if Adobe Flash Player is blocked?

1. How to unblock Adobe Flash Player on Edge?

  1. Launch the Edge browser.
  2. Navigate to the Flash Player 2022 extension page.
  3. Click on the Get button.
    adobe flash player is no longer supported
  4. Click the Add extension button.
    adobe flash player is no longer supported
  5. Now you can click on the extension’s icon to view Flash content.

Alternatively, you may try the Flash Player – emulator or the Flash Player Enabler extensions to view Flash content on Edge. These are very easy to use and install, and you will follow the same steps described above.

You must note that Edge no longer supports Flash natively; the only workaround is using these plugins.

2. How to unblock Adobe Flash Player on Chrome?

  1. Launch the Chrome browser.
  2. Navigate to the Flash Player + extension page.
  3. Click on the Add to Chrome button.
  4. Click the Add extension button.
    adobe flash player is no longer supported
  5. To use the plugin, click on the extension icon, and you will be able to Add Flash from the actual page or view your playlist.

Alternatively, use the Flash Player for Chrome or the Flash Player Emulator 2022 addons to render Flash content on Chrome. The same processes we previously mentioned will apply to using and installing them.

You should be aware that Chrome no longer natively supports Flash; the only solution is to use these plugins.

3.  How to unblock Adobe Flash Player in Mozilla Firefox?

  1. Launch the Firefox browser.
  2. Navigate to the Flash Player extension page.
  3. Click on the Add to Firefox button.
    adobe flash player is no longer supported
  4. Confirm by clicking the Add button.
  5. To use the plugin, click on the extension icon, and you can add Flashes from the Current Page or view your playlist.

Alternatively, use the Flash Player 2022 addon to render Flash content on Firefox. The same processes we previously mentioned will apply to using and installing it.

You should be aware that Firefox no longer natively supports Flash; the only solution is to use these plugins.

How to unblock Adobe Flash Player on Windows 7, 10, 11?

Whether you’re using Windows 7, 10, or 11 it all comes down to your browser on your PC.

As you can see, we previously mentioned some practical steps for each of the main browsers on the market.

To unblock Adobe Flash Player on Windows 7, identify your browser, and follow the required steps. These Adobe Flash Player browser plugins will work for Windows 10 and even the newest OS.

What will replace Flash?

Other technologies have mostly usurped the position of Flash. Notably, we have WebGL, WebAssembly, and HTML5.

Since Adobe Flash player is no longer supported, it is wise to become used to the new technology and move away from inferior alternatives.

That is as much as we will be covering in this guide. However, these plugins are excellent Adobe Flash Player alternatives, and now you should be able to access the dying tech on your significant browsers.

We, however, recommend against using Flash as it could be a way of introducing malware to an unsuspecting user.

We also have a guide that explains if it’s still possible to download Adobe Flash Player for Windows 10, so check it out.

Feel free to share your experience with us in the comment section below this guide.

Top 5 free websites to download sound effects
 for Windows

Ever wondered what it would be like to use your Windows PC without all the sound effects that fire up when you boot up your Windows, shut it down, or something goes with a program? You guessed it—it’d just be downright dull.

While a rare, eccentric bunch of people might not care about these features, a varied sound effect system is essential to a fulfilling user experience for most of us. And that’s precisely why Microsoft comes packed with various sound effects; they make casual use way richer than it would’ve been otherwise.

However, if you’re the curious tinkerer like most people reading this, we’re confident you’d want to try out something new. In this article, we’ve rounded up some cool sites for you, so you don’t have to scroll through endless search results and Reddit posts; you can safely try out new sounds from these hand-picked sources.

1. Pixabay

pixabay sound effects

Pixabay is one of the most popular sites I occasionally use for free stock images for my work. While the site has made a big name for its images, a relatively unknown feature is the quality of music and sound effects it gives for free.

Head to the sound effects section, and you’ll find many free sound effects for your Windows computer.

pixabay

As you can see from the screenshot above, the website lets you try out the effects before you begin downloading. Just click on the drop-down menu next to the Download button, and click on the Play icon to get a quick preview.

2. freesound.org

freesound org

As you might have inferred from the website’s name, freesound.org is an online source that hosts a wide variety of sounds, recordings, and beeps—all under a creative commons license—that you can download for free.

The website was founded in 2005 by the technology society in Universitat Pompeu Fabra, Barcelona, Spain, and has since been going strong.

You can grab all sorts of sound from the Sounds section at the top; from nature, metal, and random things—the site covers them all. Different from other websites, the website all hosts sound contests from different websites around the world. For example, as of writing this, I can see a blog post from Wikipedia for a logo contest held a few months back.

So, if you or anyone you know who’s into sound creation, freesound.org is an excellent place to look out for in keeping a check on your wishlist.

3. BBC Sound Effects

bbc sound effects

BBC Sound Effects are the sound hosting website from BBC, the national broadcasting service from Britain.

The sound effects’ website offers over 30,000 sound effects to choose from. While the sound effects are free to use, the only caveat is that you can only use them for non-commercial purposes.


 As you can see from the image, you have various categories to pick from: Animals, Birds, Bells, Aircraft, Military, etc. The list goes on to list up to 26 different types of sound effects.

And then you have the Mixer Mode—the feature lets you build your sound effects through mixing and editing. After you’re done, you can download the sound without any login or registration requirements.

4. SoundBible

soundbible

SoundBible is another option you can try your hand at. The sound effects will be available in .wav and .mp3 formats, and you can grab them for free. However, in contrast to BBC Sound Effects, SoundBible will also let you use their sound effects for commercial purposes.

Click on the Sound effects tab from above, and you’ll get to see a host of sound effect options; from Muscle Car, Poker Chips, and so on, there’s a whole array of options to check out.

To download a specific file, click on the name of that file. Then, choose the type of download you’d like to have from the next page—.mp3 or .wav, and that’s it; your download will be completed almost instantly.

5. 99Sounds

99 sound effects

99Sounds is an indie sound label that hosts a ton of sound effects and drum samples. The website is made available by Bedroom Producers Blog, a magazine catering to music producers of all types—all royalty-free for both non-commercial and commercial uses.

For example, head to the Browse section, and you’ll be surprised with several different categories of sound effects—Drum Samples, Underground Sounds, Garage Folley, and many other albums that pack a wide variety of sound effects.

Downloading Windows sound effects on your Windows PC

Although Windows comes with many default sound effects, the websites we’ve recommended above will give you a chance to try out new, alternative sound effects for free. So don’t wait now. Go ahead and try them all out!

Network Logon Service Was Not Started: 5 Ways to Fix It

You will come across An attempt was made to logon but the network logon service was not started error when the netlogon service isn’t responding. Users who tried to log in through the remote desktop server to the local admin account reported facing this issue.

It is one of those network errors that would possibly annoy you. If you are also coming across this error message, and are looking for ways to resolve the problem, then you have landed at the right place. Because in this guide, we will share with you 5 effective solutions to resolve the problem.

Why am I getting the Network Logon Service was not started error?

After some research and checking user reports, we have come up with a list of reasons which could trigger the An attempt was made to logon but the network logon service was not started error on your PC:

  • Outdated drivers: It is very important that you have the latest drivers installed on your PC for them to perform optimally.
  • Netlogon service is disabled: If, by accident, you have disabled the NetLogon service, then it will eventually throw you this error.
  • Misconfigured IP settings: If you have tweaked the IP settings, then you should check if that is causing the error or not.
  • Windows is not updated: It could be a temporary bug or a glitch present in the current version of Windows installed, which you can fix by updating your PC.
  • DNS cache: DNS cache, if not cleared for a good amount of time, can cause multiple network-related issues.

How can I fix the Network Logon Service was not started error?

Here are a few preliminary solutions that we would advise you to try:

  • The first that you should do whenever you come across any software error, or network error is to restart your PC.
  • Next, check if your internet is working properly or not.
  • Install the latest Windows update if there is a new one available, as it could have brought a fix for this issue.

Let us check out the advanced troubleshooting methods.

1. Start Netlogon service

  1. Open the Start menu.
  2. Type services and open the app.
  3. Locate Netlogon.
  4. Right-click on Netlogon and select Properties.
  5. From the Startup drop-down select Automatic.
  6. Under Service status, select Start.
  7. Click Apply and OK.
  8. Restart your PC.

2. Modify the registry

  1. Open the Start menu.
  2. Type regedit and open it.
  3. Navigate to the below-mentioned path and press Enter. HKEY_LOCAL_MACHINE/System/CurrentControlSet/Services/Netlogon/
  4. Double-click the DependOnService value.
  5. In the Multi-String Editor dialog box, enter the following strings and click OK: LanmanServer LanmanWorkstation
  6. Close Registry Editor.
  7. Restart the computer.

This solution is suggested by Microsoft itself. It is advised that you follow the steps correctly to make sure you do not modify the registry incorrectly.

3. Flush DNS and reset IP

  1. Open the Start menu.
  2. Type Command Prompt and run it as an administrator.
  3. Type the below command and press Enter. ipconfig/flushdns
  4. Execute the below command one by one and press Enter after each command. nbtstat –r netsh winsock reset netsh int ip reset
  5. Close command prompt.
  6. Restart your PC and check if this resolves the issue or not.

When you run the above commands, they will clear any IP addresses or other DNS records from your cache.

This can help with multiple issues, including security, internet connectivity, and the one at hand An attempt was made to logon but the network logon service was not started error.

4. Update network driver

  1. Open the Start menu.
  2. Open Device Manager.
  3. Expand the Network adapters section.
  4. Right-click on your network adapter and select Update driver from the context menu.
  5. Hit the Search automatically for drivers option.
  6. Let your PC scan the internet for update. Install it if prompted.
  7. Restart your PC and check if this resolves the issue or not.

The above steps require you to manually check for the update for your drivers. However, there is an easy way to update all of your drivers in one go.

We are talking about a trusted third-party tool called Outbyte Driver Updater. Outbyte Driver Updater allows you to scan and update all of your drivers with just a few clicks.

Apart from updating drivers, you can schedule driver scans, create driver backups, improve system stability, and much more.

Outbyte Driver Updater

Have all your old network drivers updated so you won’t experience any issues.
Free Trial Download Now

5. Perform a System Restore

  1. Open the Start menu.
  2. Search for Create a restore point and open it.
  3. Select C drive and hit the System Restore button.
  4. Click the Next button.
  5. Select the restore point and hit Next.
  6. Click the Finish button.
  7. Your PC will begin the procedure of restoring your system back to the state when everything was working normally.
  8. Once done, check if this resolves the issue or not.

Reverting back to a restore point when everything was working fine comes in handy in a situation when you have accidentally tweaked the system settings wrongly.

We would advise you to always create a system restore point for your PC. We have a guide that will help you create a restore point on your Windows 11 PC.

That is it from us in this guide. Let us know in the comments below which one of the above solutions resolved the issue for you.

Code: 0x80d02017 in Microsoft Store [Fixed]

Some users have posted on Microsoft’s support forum about a Microsoft Store error code 0x80d02017. That issue can arise when a user tries to download an app from the Microsoft Store. The error message is Something unexpected happened and includes the 0x80d02017 code.

What causes the error code 0x80d02017 in Microsoft Store?

The error message doesn’t give any meaningful clues to this conundrum. However, there might be a few reasons for this problem:

  • Recent buggy update – Many of our readers reported this problem after a Windows update and maybe a bug in the system makes Microsoft Store unusable.
  • A firewall or antivirus is blocking the app – Some third-party antiviruses have the nasty habit of blocking some apps and Microsoft Store might be the victim this time.
  • Incorrect IP v6 settings – If Microsoft Store can’t connect to the server, the error code 0x80d02017 may arise.

Now that we know the reasons for this peculiar error, let’s start fixing it.

How do I fix the error code 0x80d02017?

Before going through any actual troubleshooting solutions, let’s apply some preliminary measures:

  • Restart your computer. Sometimes, a problem like this may go away magically after a restart.
  • Deactivate the third-party antivirus from its settings. If that doesn’t work, one of our solutions below will instruct on how to uninstall it completely.
  • Check the system for updates. If there are any bugs causing this, there are chances that Microsoft issued a patch.

If you’ve cross-checked these methods from your list, try the solutions below to fix the problem.

1. Disable IPv6

  1. Right-click Windows 10’s Start button and select the Run option.
  2. Input ncpa.cpl in the Open box and click OK to open the Network Connections applet.
  3. Right-click your active net connection and select Properties.
  4. Deselect the Internet Protocol Version 6 checkbox and press the OK button.Networking tab microsoft store error 0x80d02017
  5. Thereafter, restart your desktop or laptop.

2. Reset Microsoft Store via PowerShell

  1. Click the Start button and type powershell in the search box.
  2. Right-click Windows PowerShell and select Run as administrator on the context menu.
  3. Then input this command in PowerShell’s window: Get-AppXPackage -AllUsers -Name Microsoft.WindowsStore | Foreach {Add-AppxPackage -DisableDevelopmentMode -Register "$($_.InstallLocation)AppXManifest.xml" -Verbose}

Resetting Microsoft Store is extremely simple, and it might solve this issue, so try it out.

3. Remove the third-party antivirus

  1. Press Windows + R to launch the Run console.
  2. Enter appwiz.cpl in the box, and press Enter.Programs and Features applet microsoft store error 0x80d02017
  3. Select the antivirus utility listed within the uninstaller window.
  4. Click the Uninstall option in Programs and Features.
  5. Click Yes on any confirmation prompts that pop-up.
  6. Restart Windows after uninstalling the third-party antivirus utility.

Check if Microsoft Store is now working. If so, that means you need a better antivirus for Windows 10 that won’t interfere with your apps.

4. Deactivate the VPN

  1. Press the Windows key + R to launch the Run accessory.
  2. Then input ncpa.cpl and click OK to open the Control Panel applet shown directly below.Network Connections microsoft store error 0x80d02017
  3. Right-click the VPN there and select Disable.

You may also deactivate the VPN from its menu and settings. Then, try to use Microsoft Store again.

If you’re looking for a better tool, consult our list of the best VPNs for Windows 10.

5. Reset Windows Update

  1. Press Start and input cmd to search for the Command Prompt.
  2. Right-click Command Prompt to select Run as administrator, which opens the app with elevated rights.
  3. Input the following commands separately to turn off four services:
    • Net stop wuauserv
      Net stop cryptSvc
      Net stop bits
      Net stop msiserver
  4. Then enter the following line into the Command Prompt, and press the Enter key: Ren C:\Windows\SoftwareDistribution SoftwareDistribution.oldrename command microsoft store error 0x80d02017
  5. Input this command and press Enter: Ren C:\Windows\System32\catroot2 Catroot2.old
  6. Restart the services by entering these commands:
    • Net start wuauserv
      Net start cryptSvc
      Net start bits
      Net start msiserver
  7. Close the Command Prompt, and restart Windows.

Those are some of the confirmed resolutions for error code 0x80d02017 in Microsoft Store. There’s a good chance that one, or more, of the resolutions above will fix error 0x80d02017 for you so that you can download apps from the MS Store once again.

You might also find useful our article on how to reinstall Microsoft Store in Windows.

If you know of any other solution that fixed this error for you, leave us a message in the comments section below, and we’ll update the article accordingly.

This Driver has Been Blocked From Loading: 3 Fixes to Use

The driver has been blocked from loading is an error message prompted by the Windows system when you try to install or run a program that powers your device that’s not compatible with the system.

Irrespective of the cause of this issue, this guide will show you quick and effective ways to fix it.

What does This driver has been blocked from loading message mean?

This driver has been blocked from loading messages means that there is an incompatibility issue between the app you are trying to run or install and your PC.

Below are some of the potential causes of this issue:

  • Antivirus interference: Sometimes, the LUAFV or SECDRV this driver has been blocked from loading on Windows 10 issue can be down to interference from your antivirus software. The solution to this is to disable your antivirus temporarily.
  • Lack of privileges: At times, this issue can occur if you don’t have administrator rights. You need to run the faulty program as an admin to solve this issue.

How can I fix This driver has been blocked from loading on Windows 10?

1. Disable antivirus protection or add an exception

  1. Press the Windows key, type virus, and select Virus & threat protection.
    virus and this driver has been blocked from loading
  2. Click the Manage settings link.
    manage settings
  3. Finally, toggle the switch for Real-time protection backward to disable it.
    real time protection

If you are using the built-in protective software Windows Defender or any other third-party antivirus tool, you can receive The driver has been blocked from loading error message when trying to install new apps.

The solution to this is to disable the antivirus protection and retry the installation process. Remember to re-enable your antivirus after.

2. Disable driver signature enforcement

  1. Press the Windows key, type cmd, and click Run as administrator under Command Prompt.
    cmd admin this driver has been blocked from loading
  2. Type the command below and press Enter to run it: bcdedit.exe /set nointegritychecks onon
  3. This will automatically disable driver signature enforcement on your device.
  4. Now, if you want to enable this feature back again, run the command below: bcdedit.exe /set nointegritychecks offintegrity off

Additionally, you should also do the following:

  1. Press the Windows key + R, type sysdm.cpl, and click OK.
    sysdm this driver has been blocked from loading
  2. Click the Advanced tab at the top.
  3. Now, click the Settings option under Performance.
    advanced settings
  4. Next, click the Data Execution Prevention tab.
  5. Check the box for Turn on DEP for essential Windows programs and services only and click the OK button.
    data this driver

As a security protection measure, Windows requires digitally signed drivers. This is a helpful feature that can protect your Windows 10 device.

So, to solve this driver has been blocked from loading issue, you need to disable the feature temporarily.

3. Run your programs with administrator rights

  1. Right-click the program you are trying to run or install and select Properties.
    properties this driver has been blocked from loading
  2. Now, click the Compatibility tab at the top.
  3. Check the Run this program as an administrator box.
  4. Finally, click the Apply button, followed by OK.
    run this

If you are running a program without administrator rights, you might experience The driver has been blocked from loading issue. This also helps when the system has a driver that is locked to manufacturer specifications.

So, you should install or run the program as an administrator. This can fix other issues like services.msc has been blocked for your protection.

With this, we can conclude this guide. Hopefully, you should be able to fix this issue before exhausting the solution therein.

We also have a dedicated guide on how to make yourself an administrator, so be sure to check it out.

Feel free to let us know the solution that helped you solve this problem in the comments below.

8024400a: How to Fix This Windows Update Error Code

The error 8024400a mostly occurs when you try to install Windows updates on your system using the built-in Windows Update feature of Windows. These updates are required for your PC to function properly and for it to be secure from external attacks.

If you’ve tried to install an update for Windows and it fails, this article will help determine the cause and offer possible solutions.

Why I’m I getting the Windows update error code 8024400a?

  • Corrupt update – You may have a corrupt Windows Update file, or you are missing a required service pack.
  • Server issues – It is also possible that Microsoft servers are crowded at the time of the update and causing the interruption. You can check the server status to verify.
  • Multiple updates – If you’re installing multiple updates at once, they could be conflicting with one another and causing problems.
  • Interrupted connection – Your internet connection may be unstable or drops suddenly during the update process.
  • Firewall settings – You may have a third-party firewall or antivirus installed on your computer that is blocking Windows updates.
  • Insufficient hard drive space – If the update is too large and you don’t have enough space to accommodate it, the update may be interrupted before it is finished.

How can I fix the Windows update error code 8024400a?

Check off the following before you proceed to advanced troubleshooting:

  • If you have too many background processes, close them, as they could be interfering with the update process.
  • Check your internet connection and switch to an Ethernet cable if possible.
  • Restart your PC.

1. Run the Windows Update troubleshooter 

  1. Hit the Windows key and click on Settings.settings windows 11
  2. Click on System and select Troubleshoot.Open system troubleshooter
  3. Navigate to Other troubleshooters.
  4. Click the Run option for the Windows Update troubleshooter.run-windows-update error 0x80004005 windows 11

2. Run the DISM and SFC commands

  1. Hit the Windows key, type cmd in the search bar, and select Run as administrator.cmd-admin hp printer won't scan
  2. Enter the following command: DISM.exe /Online /Restorehealth 
  3. Allow for the command to be executed then type in the next one: sfc /scannow

3. Disable the firewall temporarily

  1. Hit the Start menu icon, type Windows Security in the search bar, and click Open.
  2. Click on Firewall & network protection then select Public network.public network
  3. Locate Microsoft Defender Firewall and toggle the off button.turning off Microsoft Defender Firewall Windows

Remember to turn it back on after the update, as it is critical in ensuring your system stays protected.

4. Reset the Windows Update components

  1. Hit the Windows key, type cmd in the search bar, and click Run as administrator.cmd-admin hp printer won't scan
  2. Type the following commands and press Enter after each one: net stop wuauserv rd /s /q %systemroot%\SoftwareDistribution net start wuauserv
  3. Next, type the following command and press Y after completion: Del "%ALLUSERSPROFILE%\Application Data\Microsoft\Network\Downloader\*.*"
  4. Now, delete the Windows Update cache by typing in the following commands: rmdir %systemroot%\SoftwareDistribution /S /Q rmdir %systemroot%\system32\catroot2 /S /Q
  5. Type in the following commands to reset Windows Update to the default security descriptor: sc.exe sdset bits D:(A;CI;CCDCLCSWRPWPDTLOCRSDRCWDWO;;;SY)(A;;CCDCLCSWRPWPDTLOCRSDRCWDWO;;;BA)(A;;CCLCSWLOCRRC;;;IU)(A;;CCLCSWLOCRRC;;;SU) sc.exe sdset wuauserv D:(A;;CCLCSWRPLORC;;;AU)(A;;CCDCLCSWRPWPDTLOCRSDRCWDWO;;;BA)(A;;CCDCLCSWRPWPDTLOCRSDRCWDWO;;;SY)
  6. Next, enter the following command: cd /d %windir%\system32
  7. Now, reregister the Windows Update files and update the DLL files by typing in the following commands and pressing Enter after each one:  regsvr32.exe atl.dll regsvr32.exe urlmon.dll regsvr32.exe mshtml.dll regsvr32.exe shdocvw.dll regsvr32.exe browseui.dll regsvr32.exe jscript.dll regsvr32.exe vbscript.dll regsvr32.exe scrrun.dll regsvr32.exe msxml.dll regsvr32.exe msxml3.dll regsvr32.exe msxml6.dll regsvr32.exe actxprxy.dll regsvr32.exe softpub.dll regsvr32.exe wintrust.dll regsvr32.exe dssenh.dll regsvr32.exe rsaenh.dll regsvr32.exe gpkcsp.dll regsvr32.exe sccbase.dll regsvr32.exe slbcsp.dll regsvr32.exe cryptdlg.dll regsvr32.exe oleaut32.dll regsvr32.exe ole32.dll regsvr32.exe shell32.dll regsvr32.exe initpki.dll regsvr32.exe wuapi.dll regsvr32.exe wuaueng.dll regsvr32.exe wuaueng1.dll regsvr32.exe wucltui.dll regsvr32.exe wups.dll regsvr32.exe wups2.dll regsvr32.exe wuweb.dll regsvr32.exe qmgr.dll regsvr32.exe qmgrprxy.dll regsvr32.exe wucltux.dll regsvr32.exe muweb.dll regsvr32.exe wuwebv.dll
  8. Reset your network configurations by entering the following commands: netsh winsock reset netsh winsock reset proxynetsh-ip the default gateway is not available
  9. Now restart the Windows Update service by typing in the following commands: net start bits net start wuauserv  net start cryptsvc
  10. Restart your PC, and the service should work normally.

If none of the above works, consider performing a clean boot and see if it resolves the issue. The Windows Update Error Code 8024400a is closely related to the error 0x800f0988, so be sure to check out our article. Also, note that these fixes apply for Windows 7 update error 8024400a too.

In other extreme cases, Windows Update may not be loading, but we also have an answer for such hiccups in our detailed article.

Let us know if you have been able to solve this error and what solution did it for you in the comment section below.

5 Best Xbox One Keyboard & Mouse Adapters

Many people prefer using mouse and keyboard for gaming, but that’s not always possible on consoles such as Xbox One.

To use your keyboard and mouse on Xbox One, you need a special adapter, and in this guide, we’re going to show you the best Xbox One keyboard and mouse adapter that you can get.

What is the best keyboard and mouse adapter for Xbox One?

Mcbazel KX Keyboard & Mouse Converter

  • Compatible with PS4, PS3, Xbox One, Xbox 360, Nintendo Switch
  • Works with almost all games
  • Supports both singleplayer and multiplayer games
  • Compatible with almost all wired mouse and keyboards
  • Simple to use
  • Can’t map controls to all keys

Mcbazel KX Keyboard & Mouse Converter allows you to use your keyboard and mouse to play console games. Regarding compatibility, this adapter should work with most console games.

As for supported gaming systems, this adapter works with PS4, PS3, Xbox One, Xbox 360, and Nintendo Switch, so you should be able to play games from all platforms with a mouse and keyboard.

Mcbazel KX Keyboard & Mouse Converter offers great features, and if you want to play Xbox One games or games from any other platform with a mouse and keyboard, this device is the right choice.

ZJFKSDYX C91MAX

  • Works with PS4, PS3, Xbox One, Xbox 360, and Nintendo Switch
  • 3.5mm audio interface, supports two-way communication
  • 48K audio support
  • Works with wireless peripherals
  • Simple to use
  • No major complaints

ZJFKSDYX C91MAX is another great keyboard and mouse adapter for Xbox One. In addition to Xbox One, this model works with PS4, PS3, Xbox 360, and Nintendo Switch.

In addition to the keyboard and mouse port, this adapter has a 3.5mm audio jack, so you can easily connect your headphones to it. It’s important to mention that this device fully supports wireless peripherals, which is also a plus.

ZJFKSDYX C91MAX is a great device, and with its ease of use, it’s a perfect choice if you want to use your keyboard and mouse with Xbox One or any other gaming console.

HYCARUS Keyboard and Mouse Adapter

  • Compatible with Xbox One, Nintendo Switch, PS4, and PS3
  • Supports keybind customization
  • Mouse sensitivity and ADS sensitivity adjustment
  • No input delay
  • Easy to set up
  • Remapping keys can be complicated

If you want to use a mouse and keyboard with your console, then HYCARUS Keyboard and Mouse Adapter might be the right choice for you.

As for the compatibility, this adapter works with Xbox One, but it also supports PS4, PS3, and Nintendo Switch. It’s important to mention that this device is compatible with almost all wired peripherals, without any configuration.

HYCARUS Keyboard and Mouse Adapter allows you to adjust mouse sensitivity as well as ADS sensitivity, and you can even modify the keybinds, so it’s one of the best keyboard and mouse adapters that you can get.

ECHZOVE Mouse and Keyboard Converter

  • Simple to use
  • Works with Xbox One, Xbox 360, PlayStation 4, PlayStation 3, and Nintendo Switch
  • Playing and settings mode
  • Button mapping
  • Supports most games
  • Connectivity issues for some users

Playing console games with your mouse and keyboard is possible, especially if you’re using the Mouse and Keyboard Converter. As for compatibility, this model works with Xbox One, Xbox 360, PS4, PS3, and Nintendo Switch.

The adapter supports a wide array of games, but it works best with FPS games. The device supports button mapping, so you can assign specific buttons to any key on your keyboard.

ECHZOVE Mouse and Keyboard Converter is a simple but powerful device, and if you need a keyboard and mouse adapter for Xbox One, be sure to consider this model.

NEXiLUX Mouse Keyboard Converter

  • Keymapping support
  • Mouse sensitivity adjustment
  • Works with Xbox One, Xbox 360, PS4, PS3, and Nintendo Switch
  • Simple to use
  • Works with most games
  • Few users had issues with the software on their PC

If you’re looking to play console games with your mouse and keyboard, then NEXiLUX Mouse Keyboard Converter might be just what you need.

This adapter works with Xbox One, but it can also work with Xbox 360, PlayStation 4, PlayStation 3, and Nintendo Switch. It’s important to mention that this adapter supports button mapping as well as mouse sensitivity adjustment.

Overall, NEXiLUX Mouse Keyboard Converter is a great device, and it’s a great keyboard and mouse adapter for Xbox One.

Using your keyboard and mouse with Xbox One isn’t hard, as long as you have the proper adapter for it. In this guide we showed you some of the best keyboard and mouse adapters for Xbox One, so we hope that you found something for your needs.

7 Best Cookbook Writing Software for Windows & Mac

Making a beautiful cookbook of their own is every culinarian’s dream. It’s a different feeling to see your own recipes feature in a thoughtfully designed book.

The best software to create cookbook help users create spectacular photo books, share electronically, create grocery lists, and more.

There are thousands of recipes to choose from, automatic adjustment of servings, analysis of nutritional value, and much more.

While there are many applications around these days, there are some that stand out based on their features and functions.

The best recipe book software should be basically easy to use and understand even for first-timers. Moreover, it should also have good customer support to help clear confusion.

We have created a list of some of the best recipe software programs that are easy to handle and respond to quickly.

How do I make a cookbook on my computer?

Cooking is an art that has to be handed down from generation to generation, so what’s better than designing your own cookbook?

The most effective way to create a cookbook is to benefit from the features of a dedicated program, called cookbook maker. This kind of software can offer you impressive graphic designs, unlimited infographics, and a multitude of templates from which you can choose.

When designing a book, you have to use lots of pictures alongside the recipes, in order to make them look more professional and be more visually pleasing for the reader. Moreover, you can organize your recipes and your shopping list with as much or as little information as you like.

Here are the essential features that can be discovered with these apps:

? Design tools

? Various templates

? Book styling guidelines

? Smart view of the recipes

? Insert images and tables

Here are the best apps that we have found, just for you:

SoftwareTop featurePublishing/shipping features
Adobe InDesign Compatibility with other Adobe software Professional-level publishing tool
BlurbEfficient designs and templatesOvernight shipping
ScrivenerDesigned for lengthy writing projects eBook and PDF formats
MasterCookAvailable on mobile phonesRecipe printing and PDF format
CreateMyCookBookAdd multiple writers to the bookeCookBook and shipping possibilities
Paprika Recipe ManagerOne-click recipe download PDF and eBook format
Shop’NCookFree cloud sync servicePDF format

What is the best program to write a cookbook?

Adobe InDesign – Wide range of templates

A good cookbook writing software ok is one that takes great attention to how it combines the images with the instructions and the ingredients. Get the best results by using the best tool: Adobe InDesign.

It offers all the tools needed to help you create the most beautiful graphic designs. This means that it is a versatile software that allows you to use your creativity to the full while making your very own cookbook.

Offering a wide range of templates in the library you can make use of all the resources available to create and adjust the design just the way you want it.

You can align text or wrap it around an object and use any font you prefer. It even supports OpenType SVG fonts.

Adobe Indesign allows you to add columns, frames, page breaks, and paragraph returns and you can use drop caps to enhance the design of the paragraph.

Here are some of the benefits of using Adobe InDesign for creating a cookbook:

  • Great text design tools
  • Professional-level publishing tool
  • Compatibility with other Adobe software
  • Free 7-day trial
  • Easy import and organization

Adobe InDesign

Adobe InDesign is by far the best tool for creating and editing a cookbook with great design and features.
Free Trial Visit Website

Blurb – Budget-friendly

Blurb is hands down one of the best cookbook maker software that gives wings to the cook’s imagination. It’s the perfect tool for those looking to transform their recipes into professional-quality cookbooks.

Users can choose from the three formats in which they want to print their recipes, book, magazine, or ebook.

It gives that premium-looking smooth pages with Layflat paper type. Best of all, users can choose to get either one print or several at a much more reasonable price.

Blurb has a unique Quick Design feature that offers you beautiful and balanced layouts on every page so it is easier and faster for you to make stunning cookbooks.

It also offers a wide range of template options and you can choose the number of photos to fit on each page and where to put them. It is simple, clear, and easy to use so you are able to get the product of your choice in just a few steps.

Here are some other key features of Blurb:

  • Efficient designs and templates
  • Book styling guidelines
  • Overnight shipping
  • Budget-friendly

Blurb

Choose this amazing tool to transform your recipes into professional cookbooks.
Check Price Visit Website

Scrivener – Integrated outline feature

Scrivener is the writer’s word processor. It has a familiar interface with all the standard tools you’d expect from such software. It has a set of handy features that help users stay organized and focused. 

First and foremost, in terms of standard features, everything is covered. You can edit fonts, add bolds or italics, make lists, insert images or tables and add feedback through the comments section.

This tool is designed for lengthy writing projects which can be easily managed with the Corkboard- a highly customizable sticky-notes-based planning tool. There is also an integrated outline feature that helps with creating your structure ahead of time.

Moreover, to help you not get overwhelmed with extended materials, you have the sectioning feature. You can break down texts into smaller sections and focus on one task at a time. Once satisfied, you can switch back to viewing the whole document.

Scrivener is highly versatile with respect to the types of files you can insert: not only can you add the usual pictures, but you can also add audio and video files, web pages, and other text document formats.

With Scrivener, when you finish your cookbook, you can save it directly in the eBook format of your choice (e.g. .epub or .mobi). The toolset is well-suited for creating beautiful-looking, professional books.

Therefore, whether you’re a book writer, journalist, blogger, or editor it is well suited to complete your scripts easily and organized.

Scrivener

This writer’s best friend can benefit anyone to actively write all kinds of papers, so start the journey today.  
Check price Visit Website

MasterCook – Available mobile version

Mastercook is one of the best online cookbook creators. It’s a feature-rich program that comes with some unique functionalities that keep it ahead of its competition.

Whether the users prefer designing their cookbooks on their desktop, or over the web, it provides support for all.

From useful menu planning features or shopping lists with cost estimation to nutritional analysis for a healthy diet, it’s undoubtedly one of the best recipe software programs around.

Best of all, it’s also available as a mobile phone app. Users can simply add their recipes to their online account, and even edit them.

At the same time, users can save recipes from blogs and websites using the web clipper feature.

Moreover, the make your own cookbook app offers one year of paid web access and free apps for mobile devices. The app is compatible with both iOS and Android, enabling users to access the app on the go.

⇒ Get Mastercook

CreateMyCookBook – Personalized cover page

For those looking to create their own cookbook easily, CreateMyCookBook is just what they need. It transforms the users into designers who can personalize their cookbooks using different types of fonts, layouts, and more.

The free and easy-to-use cookbook software allows users to click photos of their recipe cards, while the program types them for them.

Moreover, users can also protect and arrange their recipes in one single place. This helps them make a new cookbook at any given time without the hassle of retyping.

What’s more? It also allows users to share their cookbooks with friends and family. They can invite friends who can add their chosen recipes.

Users have the freedom to choose from hardback or spiral-bound books, that are professionally designed like those in the bookstores.

The cookbook can be created using the web designer and that also allows the users to customize their cover page and add a dedication note.

⇒ Get CreateMyCookBook

Paprika Recipe Manager – Advanced search tools

Paprika Recipe Manager is the perfect application for those who are looking for the best recipe software programs. Whether it’s an ambitious cook or an experienced chef, this amazingly simple program is for everyone.

From extensive shopping lists or planning a meal to the option to import from the web, there’s everything a seasoned cook needs.

Moreover, cooks can also save their recipes from any website into their integrated browser. Best of all, it can also be accessed on devices like mobile phones or tablets, using a free cloud sync service.

This service helps the data to sync smoothly on all devices. While users can create and change their recipes, they can also clip recipe details from any website via the clipboard tools.

Hundreds of recipes are automatically downloaded from several websites in just one click.

Moreover, users can adjust ingredients as per their serving size. Users can even get a smart view of the recipes where they can strike off the ingredients once it’s done.

It also allows users to save nutritional details and customized notes for every recipe.

Subcategory arrangement to find recipes quickly, advanced search tools, a pantry that tracks the ingredients already present, facility to share recipes by email, or getting a print, there’s a lot that it can do.

⇒ Get Paprika Recipe Manager

Shop’NCook – Integrated cloud sync

For those who focus on detailed nutritional information, Shop’NCook is just what they need. The menu offers help to the users to arrange their recipes and even plan their weeks from way earlier.

The recipe app comes with a user-friendly interface where users can add a recipe, estimate recipe costs, plan meals, check nutritional details, and optimize grocery prices easily.

It enables users to add recipes in as little as 20 seconds with all the nutrition and cost details. Further, users can analyze the cost of the menus and recipes easily.

As an added bonus, video tutorials help users get a hang of the recipe costs and more. Apart from just planning their meals, users can also adjust their recipes, and create shopping lists from the meal plans and recipes, all in just one click.

Best of all, the integrated cloud sync makes it available on all devices, on the go.

⇒ Get Shop’NCook

Cooking is an art and so, is creating a cookbook of your favorite recipes. But, the best software to create a cookbook makes it smooth and easy with its user-friendly features.

So, get on to one of these software programs today to start with your long-desired cookbook.

How to delete cloud saves on Xbox One? [Guide]

Xbox one comes with a built-in hard drive for game installation and saves. However, Xbox One saves all of the game data in the cloud. While this is a handy feature, at times, you may face Xbox One can’t delete cloud saves issue when trying to delete game data.

The issue seems to have affected many users as reported by the users in the Reddit as well as the Microsoft community forum.

I want to start a new game in AC Unity but for some stupid reason the game doesn’t have a way to start a new save file. I’ve tried to delete my save file but it can only be deleted on my console locally and it resyncs my save from the cloud

If you are also troubled by this issue, here are a couple of troubleshooting tips to help fix Xbox One can’t delete cloud saves.

How to delete cloud saves on Xbox One:

1. Delete cloud saves

    delete cloud saves in Xbox One

  1. 1. Xbox One has the option to delete your game data from everywhere. It includes the console’s hard drive as well as the Xbox cloud.

  2. 2. On your Xbox One console, go to My Games and Apps.

  3. 3. Click on Installed games.

  4. 4. Now find the game for which you want to delete the cloud saves.

  5. 5. Select Menu (three lines) and choose Manage Games.

  6. 6. Scroll down to Saves.

  7. 7. On the saved File, press the A button and select Delete Save data.

  8. 8. Now choose “Delete everywhere“.

  9. 9. Confirm the action and click on Yes.

  10. 10. Repeat the steps to delete all the game saves from the cloud as well as a local drive.

2.  Perform a power cycle

delete cloud saves in Xbox One
  1. If, for some reason, you are unable to delete the cloud saves following the above steps, perform a power cycle, and try again.
  2. From the Home Screen, press the Xbox button on your controller.
  3. Select Power Off from the options.
  4. Once the Xbox is turned off completely, unplug the power cord from the wall socket.
  5. Unplug the power cord connected to your Xbox.
  6. Wait for a minute.
  7. Replug the power cord back to the wall socket as well as to your console.
  8. Power on Xbox One. Try to delete the cloud saves following the step all again.

If the issue persists, try to sign out from the Xbox account. Reboot the console and log in again using Microsoft account credentials.

Xbox One saves game data in the cloud to keep working backup in case something goes wrong with the console. It also allows you to access your game data from anywhere with an internet connection.

This method can be useful if syncing data on Xbox One is taking forever, so keep that in mind.

That being said, you can fix Xbox One can’t delete cloud saves by following the steps in this article.