7 Best Headphone Software to Improve Your Sound Quality

A good pair of headphones do make a difference, period. You will notice an immediate improvement in the sound quality as soon as you swap them with mid-range or high-end headphones. But, a headphone software makes things even better.

These allow you to modify the sound parameters and adjust the quality and output. There aren’t many options when it comes to headphone software for PC, but we managed to find the best ones for you.

Do headphones need software?

It all comes down to requirements, but having a reliable and effective headphone software wouldn’t hurt. Some headphone software are even free. Here are some of the benefits of using Bluetooth headphones software:

  • Improved quality – One of the significant benefits is the software’s ability to improve audio quality. It reduces background noise and eliminates any distortion, among making other changes.
  • Louder sound – If an audio or video has an extremely low sound, a headphone software will allow you to enhance the volume.
  • Presets to choose from – A gaming headset software, and even the other ones, have a range of presets to choose from, thus saving you time.

What is the best headphone software to use?

Boom 3D – The best option in the market
headphone software for gaming and music

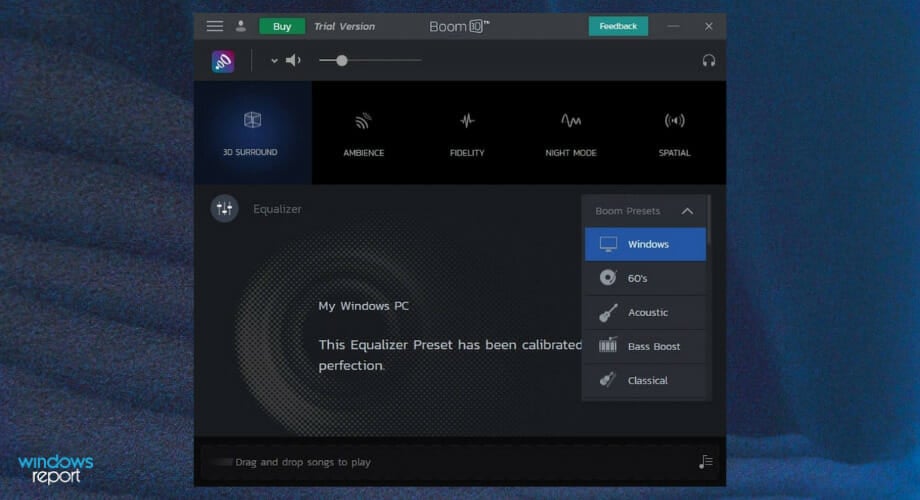
Boom 3D is an award-winning audio enhancement software that can calibrate itself based on your sound system card. It was designed to play music with 3D effects on any type of headphones and player.

The 3D Surround Sound feature lets you customize equalizer presets for your liking and enjoyable music listening. With Boom, you also get access to 20,000+ local and international radio stations.

You can also adjust the bass level, scale the intensity, and turn on/off the individual virtual sound.

Some features include:

  • Quick controls
  • Special audio effects – ambiance, night mode, spatial
  • Volume booster
  • Audio controller

Boom 3D

With 3D boosting technology, you can revolutionize the way you listen to music, hear movies, and play video games.
Free trial Visit website

Razer Surround Sound – Best for surround sound
headphone software for gaming and music

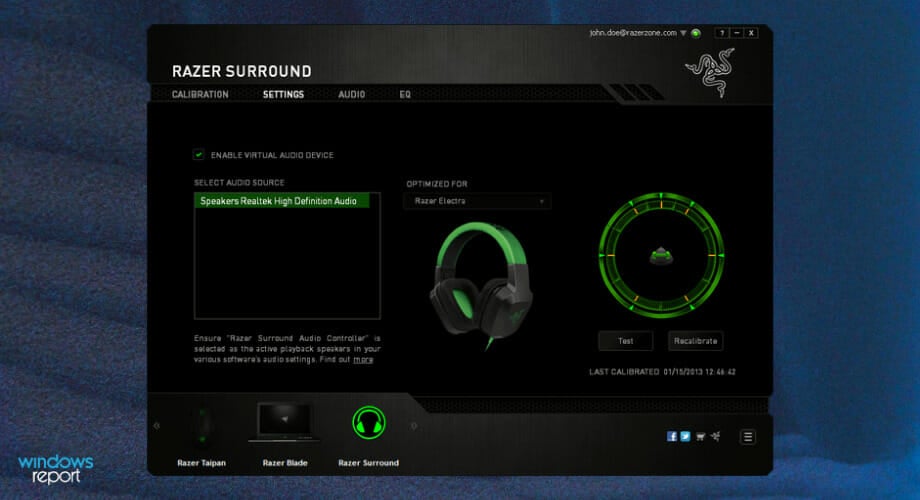
Razer is known for its gaming-based laptops and accessories. On top, Razer also has quite a few software applications like Surround Pro. This is a surround sound application that enables users to experience the best virtual 7.1 channel surround sound on any stereo headphone.

There are two versions of Razer Surround. While the standard version is free, the Pro version of the same comes with a few more added features on its official website.

As said earlier, the Surround Pro works with any headphones, including Razer headphones. The software allows the users to calibrate positional sound as per their preferences. For gamers, this can be of advantage.

Apart from gaming, the Razer headphone software can overall adjust the sound for music and movie, offering a better listening experience. Razer Surround Pro takes time delay, audio interference, amplitude, and other factors and creates sounds from any distance and direction.

The personal calibration can be saved in the cloud and used on any computer by logging into your Razer account saving you from the hassle of having to calibrate the audio preferences manually for each computer.

The free version of the Razer Surround supports 7.1 Surround Sound, pre-configured calibration for razor audio products, and also works with third-party headphones.

The Surround Pro, on the other hand, offers more, including bass boost, sound normalization, voice clarity for incoming communication, voice level adjustment, 11 pre-set and customer equalizer settings, and the ability to calibrate to individual’s preferences.

A few key features include:

  • Supports 7.1 surround sound
  • Allows positional calibration of sound
  • Offers bass boost and voice clarity

Razer Surround Sound

Enjoy a wide range of options for customizing your audio settings and listening to your favorite music!
Check price Visit website

TNK Surround Audio System – Allows output to multiple devices
headphone software for gaming and music

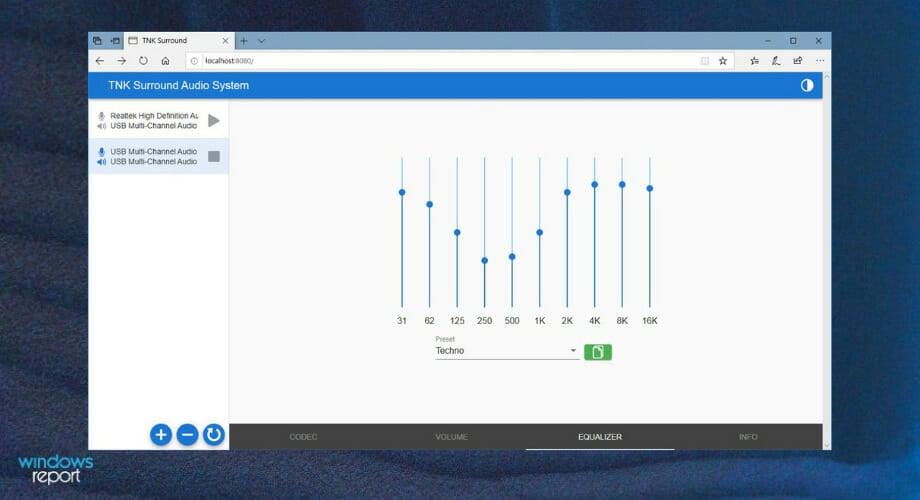
TNK Surround Audio System is a surround audio-focused server program for an enjoyable experience while using headphones. 

Loopback recording allows several devices to be output at the same time. It delivers high-quality audio for Windows 10 through C++ WASAPI (Windows Audio Session API).

You can use an optical audio connection to collect surround audio from your computer or output it to an external audio device if you have an audio pass-through adapter.

If a device does not have a S/PDIF output connection (for example, the PlayStation 5, Xbox Series X), you can import it using an HDMI audio converter.

When you select this function, the volume gradually recovers from quiet to normal level during playback. When you use headphones, you may prevent the problem of a loud sound abruptly bursting out.

It includes a 2-channel surround effect software as well as a virtual surround program that replicates 5.1 channel surround on stereo audio. Even though the audio is the only stereo, you receive surround sound.

Individual recordings of audio can be altered. You may emphasize the volume on the rear, in addition to changing the speaker placement, to assist you in focusing on the back of the 3D game.

A 10-band audio equalization is included. You may assemble your preferred audio environment from a variety of players.

Key features include:

  • Allows users to output to multiple devices simultaneously
  • Supports 5.1 surround sound
  • Offers modification to sound quality

TNK Surround Audio System

Enhance the sound through your head speakers and adapt the inputs for a surround experience with TNK Surround Audio System!
Free trial Visit Website

Dolby Atmos for Headphones – The most reliable option
headphone software for gaming and music

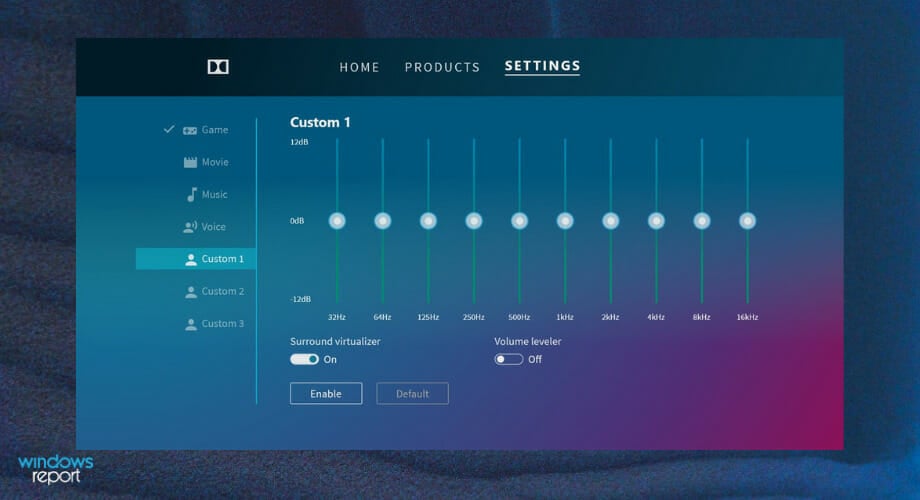
Whether you want precision audio for PC games or spectacular sound while watching movies and listening to music, the Dolby Atmos for headphones can offer it all. It is a premium headphone calibration software that costs $14.99 but comes with 30 days of a free trial.

Dolby Atmos for Headphones works with Windows 10 and Xbox console and is compatible with any pair of stereo headphones, much like Razer Surround Pro.

The software uses the audio object metadata to correctly position the audio within the 360-degree space allowing it to get more than two-speaker sound for the headphone users.

According to Dolby, the software can help you pinpoint teammates, enemies, and obstacles in competitive games. Apart from that, it also allows you to enjoy music and movies with a more encompassing experience.

Do note that Dolby Atmos for Headphone feature is only available on Windows 10 creator updates or above running machines.

The key features include:

  • Works with most headphones
  • Offers surround sound experience
  • Compatible with Xbox consoles

⇒ Get Dobly Atmos for Headphones

FxSound Enhancer – Best for enhancing sound
headphone software for gaming and music

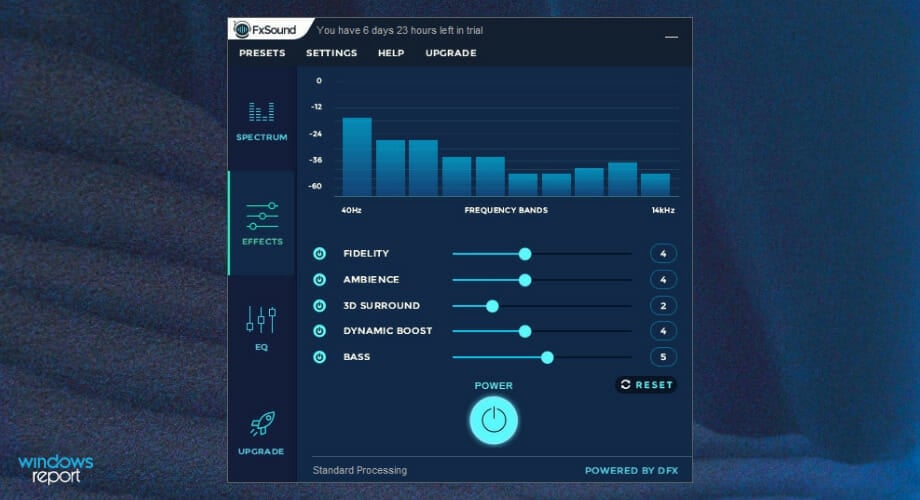
FxSound Enhancer is not a virtual surround sound software for headphones but a sound enhancer that offers high-resolution audio, full customization, and tons of presets.

The software boosts the sound quality of the content playing on PC. The software can optimize music in real-time and offer increased bass and crystal clear audio, and high fidelity.

FxSound Enhancer also has a 3D surround sound feature. With 7.1 surround sound support, it replicates a studio-quality listening environment for headphones.

FxSound Enhancer is highly customizable as you adjust the effects for fidelity, ambiance, 3D surround, dynamic boost, and bass functions. It also has over 20 presets and allows you to adjust the audio equalizer precisely.

FxSound Enhancer is a premium software, but you can use the trial version before opting for the premium version of FxSound Enhancer.

Some of the key features are:

  • Offers a plethora of presets
  • Provides the option to boost sound quality
  • There is a trial version available

⇒ Get FxSound Enhancer

SonarWorks SoundID – Supports almost every headphone
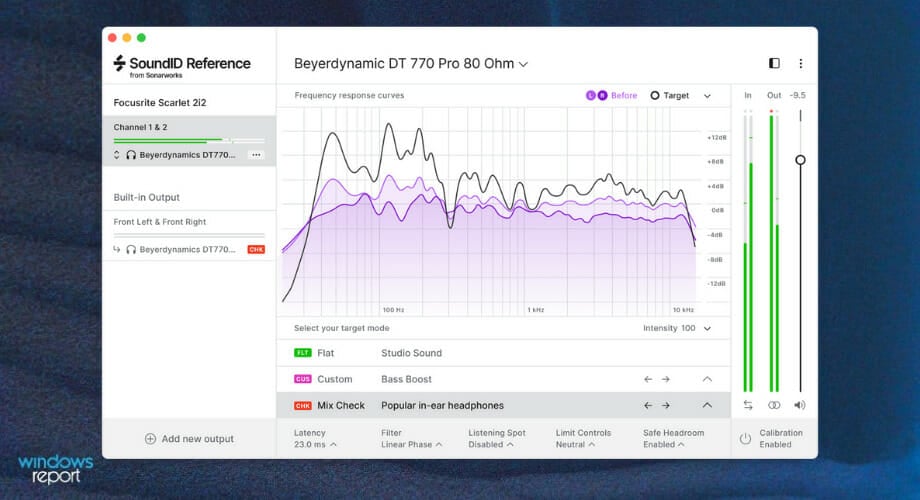
SonarWorks uses the same technology that is being used in recording studios and brings it to the masses with its SoundID Reference for headphones. The software currently supports over 287 pairs of headphones from popular brands, including Sony, Beats, and Audio Technica.

With its much-hyped headphone calibration technology, SoundID from SonarWorks allows you to build your unique audio experience through headphone sound and even sub-par headphones for mixing but works really great when gaming.

Our hearing varies, therefore, we use various devices to have the best experience possible when listening to music or speech, and it becomes even more amazing.

Maybe your hearing isn’t symmetrical because you live in a city with a lot of noise pollution. This is something that SonarWorks SoundID can help with, and avoid any distractions while playing your favorite podcast.

Use your existing headphones to their highest capacity, and connect to your computer’s desktop for playback. It’s the only sound technology designed based on tones artists have heard in the studio.

Even with low-cost headphones, you can feel the difference as it offers a better bass response (if it lacks one) and better clarity and details in the high end.

Some key features include:

  • Supports over 287 headphones
  • Eliminates distractions
  • Improves sound quality even on low-range headphones

⇒ Get SonarWorks 

Spatial Sound Card – Best for immersive surround sound
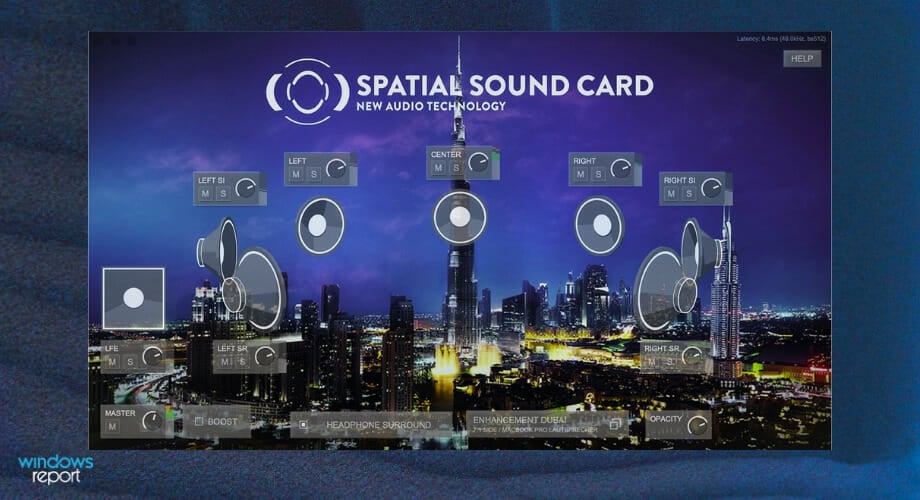
Spatial Sound Card is one of the latest entrants in the headphone surround sound software market and offers a 5.1 surround sound experience absolutely for free, at least for now.

This program has been developed by a US studio and is mainly aimed at games that want an immersive surround sound experience using their headphones.

It has a simple user interface and is the most accessible headphone software from the lot. The developer claims the software can offer a cinema-like experience while watching movies and exceptional sound quality while listening to music.

During gaming sessions, you can precisely hear the enemy’s and teammate’s movements and unlock an optional low-latency mode optimized for pro gamers. The low-latency feature is being offered as an in-app purchase.

A few key features are:

  • Delivers 5.1 surround sound experience
  • Straightforward UI
  • Enhances the gaming experience

⇒ Get Spatial Sound Card

The difference in quality depends on the kind of headphones you own. While you may see substantial improvement in quality and clarity from high-end headphones, the difference may not be as much with low-end headphones.

But all these will enhance the audio quality to the fullest, regardless of the headphone type or price range. So, before you leave, do not forget to check out the best gaming headsets for Windows.

Do let us know your favorite pick in this list in the comments below.

Xbox One S 4K and HDR not Working [FIXED]

The Xbox One S is a powerful gaming console capable of delivering 4K gaming. But, like all electronic devices, it’s subject to technical issues. If you’re experiencing 4K and HDR not working, such as 4K options not appearing in settings or missing 4K features, then follow the troubleshooting steps listed below.

Fix: Xbox One S HDR and 4K not working

  1. 1. Check your TV’s capabilities to make sure you have a 4K TV.

  2. Different TV manufacturers use different names to describe 4K capabilities. Check the packaging or your TV manual and look for the following codes:

    Names for 4K 4K, 4K Ultra HD, UHD, UHD 4K, SUHD TV, Ultra HD, Ultra UDTV, 2160p
    Listed resolutions or modes 3840 x 2160 at 24 Hz, 50 Hz, or 60 Hz
    Names for HDR10 HDR Premium, High Dynamic Range, HDR, UHD Color, Ultra HD Premium, Ultra HD deep color

  3. 2. Check your TV’s 4K and HDR capabilities with the console connected. Double-tap the Xbox button on the controller, go to Settings > All settings > Display & sound > choose Advanced video settings > 4K TV details.  If your TV supports 4K and HDR but these features don’t work, follow the steps below.

  4. 3. Make sure the console can automatically detect your TV. Open the guide > go to Settings > All settings > select Display & sound > Advanced video settings > Auto-detect.  As a quick reminder, 4K isn’t available when HDMI or DVI is manually selected.

  5. 4. For HDR, check if your TV supports the HDR10 media profile. Look for HDR10, BT2020 and HDR support, or some of the names listed in the table above.

  6. 5. Make sure your HDMI cable is plugged into the port that supports the full set of 4K features. Check your TV manual to see if there are special 4K HDMI ports.

  7. 6. Check your TV’s settings menu. Your TV might have a special mode that turns on 4K or HDR. Refer to your TV manual.

  8. 7. If some content won’t play, make sure your TV supports HDCP 2.2. Turn this feature on in your TV’s settings.

  9. 8. Use the HDMI cable that was included with the Xbox One S.

  10. 9. Try a different HDMI cable. Make sure it’s an HDMI High Speed or HDMI Premium certified cable.

  11. 10. Remove any devices plugged in between your TV and console. Plug your TV directly into your console with the HDMI cable that was included with the Xbox One S.

  12. 11. Make sure your TV and AV receiver firmware are up to date.

  13. 12. If a blank screen or an error message appears while trying to play 4K content, turn native 4K playback off to try to play the content in a lower resolution. Go to Settings > Display & sound > Advanced video settings > clear Allow 4K.

  14. 13. If you receive an error message when you choose 4K UHD in your display settings, check this Xbox Support post.

  15. 14. If you’re seeing strange colors while playing HDR content, turn HDR off. Go to Settings > Display & sound > Advanced video settings > clear Allow HDR.

If you’ve come across other workarounds to fix the annoying Xbox One S 4K and HDR issues, list the troubleshooting steps in the comment section below.

Forgot Your Outlook Password? Try 4 Password Recovery Tools

Are you locked out of your Outlook account and you are finding it difficult to remember your password?

This article is designed to help you out. We’ll be showing you how to recover your Outlook email password, to ensure you are not locked out of your account for long.

People forget passwords every day, which is why there are numerous password recovery programs on the market today.

These apps are specially designed to facilitate password recovery and ensure we are always provided unfettered access to our accounts, documents, gadgets, and so on.

Can I retrieve my Outlook password?

For Microsoft Outlook users, there is a manual procedure, which can easily be followed to recover a lost or forgotten Outlook email password.

And we’ll be enlightening you on how to use this procedure, as well as other notable methods, to recover Outlook email passwords.

    How do I recover my Outlook email password?

    Microsoft Outlook, like other notable communication programs, provides an option for recovering the forgotten passwords.

    This is the basic process for recovering forgotten Outlook password, and it is often referred to as the manual recovery process.

    Moreover, this action is the conventional method that can easily be used, first of all, by anyone, to recover Outlook email passwords.

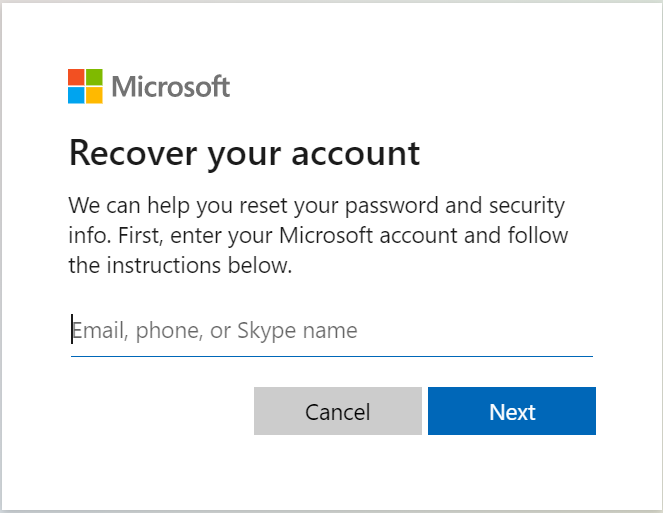
  1. 1. Navigate to the Reset your password page on the Microsoft website.

  2. 2. Input your phone, email address or Skype name associated with your Microsoft account.

    microsoft recover password
  3. 3. After this, you’ll receive a verification code via the provided email address or phone number.

  4. 4. Input the verification code in the appropriate box and press Enter.

  5. 5. Reset and generate a new password.

However, if you can’t recall your Microsoft account’s recovery email or registered phone number, you might have to adopt a third-party software solution to recover a lost Outlook password.

Top 3 programs specialized in Outlook password recovery

1. Stellar Password Recovery for Outlook

After testing and trying all the recovery tools out there, we would like to recommend that you give Stellar Password Recovery a try if you can’t remember your Outlook password.

This powerful tool not only allows you to reset passwords, but it can also find the username and password from web browsers, FTP client applications, and even remote desktops.

Moreover, if you have lost the license keys of the Microsoft application, rest assured that Stellar Recovery will help you restore those as well.

This tool works perfectly and performs a smooth recovery without having to make any complex steps. It’s fairly easy to use, once you install the program on your device.

Stellar Password Recovery’s main features:

  • It makes six sets of passwords that can be used to open locked PST files
  • Recovers lost or forgotten passwords to open PST files that are locked with a password
  • Supports PST files that have been encrypted by MS Outlook 2021, 2019, 2016, and earlier versions

Stellar Password Recovery for Outlook

Reset and recover any lost password with ease, including Outlook email, by using this powerful tool.
Check Price Visit Website

In case you didn’t know, Outlook stores all of your emails on your hard drive in a format called PST. Programs like Kernel Outlook Password Recovery are designed specifically for handling these types of files, allowing access to them.

The program is extremely efficient at recovering Outlook PST file passwords, thus being of great help to those that have forgotten them.

More so, the PST messages themselves can be unlocked, so you can view their contents, regardless of whether they were password-protected or not.

You are not limited by language barriers since the program supports multilingual password recovery, meaning roman, Arabic, Asian, and all other known alphabets are supported for recognition.

Once the password has been recovered, you can easily change the password attributed to the files as well, and even encrypt the files for a better degree of protection.

Lastly, you should know that this program supports all major versions of Outlook, from the latest Office 365 version up to Outlook 97. This means that emails new and old are up for recovery in no time.

Kernel Outlook Password Recovery’s main features:

  • Recovers Outlook PST file passwords right away
  • Effectively unlocks PST files that are locked with a password
  • Supports recovering passwords in multiple languages

2.1 How to recover Outlook email password with Kernel Outlook?

  1. Purchase the Kernel Outlook Password Recovery tool. You can also download the free trial version.
  2. Install the program on your computer and open it.
  3. Import the passworded Outlook program or document to be recovered.
  4. Select one of the three available password recovery options: Recover, remove, or set a new password.
  5. Open your Outlook account and access your email messages.

⇒ Download Kernel Password Recovery

Note icon NOTE
After a successful recovery, it is highly recommended you reset your Outlook email password to a less complex combination. If you are still in doubt, then it’s better to outrightly remove the password.
recover outlook email password

Windows Key from Passware is a prominent password recovery solution for resetting/recovering all types of passwords and security settings on a computer, specifically Windows computers.

It is exclusively designed to support only Windows 10/8.1/8/7/Vista/XP. Also, it can be adapted to reset passwords on Windows Server 2013 and older (down to WinServer 2003).

Windows Key from Passware is fairly easy to use. And it works alongside a bootable USB drive or CD.

The program embeds the recovery tool on a bootable CD/Flash drive, which can then be used to reset Outlook passwords and/or other password-protected programs on your computer.

Passware Windows Key can execute the following security commands: reset the admin password, or other program-specific passwords, reset secure boot, system security policy, and more.

These commands are optimized to operate at a 100% recovery rate.

Windows Key from Passware’s main features:

  • Helps more than 340 file types
  • Analysis of live memories
  • Acceleration of hardware decrypts Encrypting the whole disc (FDE)

3.1 How to recover Outlook email password with Passware Windows Key?

  1. Purchase the program and install it on your computer.
  2. Get an ISO image or a Setup CD (for Windows).
  3. Request for an ISO image, if you don’t have one. You can table your request from this page.
  4. Burn the ISO image on a blank Flash drive or an empty disk.
  5. Allow the Flash drive/CD to take control of your system’s boot process.
  6. Reset the security settings on your computer.
  7. Recover Outlook email password.

After a successful recovery, you are all set! You can now open your Outlook account and access your email messages as you see fit.

⇒ Download Windows Key free

If you forgot your Outlook account password, don’t become so hard on yourself; we all forget passwords.

To ensure you are easily able to recover your password and access your Outlook account, we have created a comprehensive guide for you.

In this guide, we have described the conventional Outlook password recovery method, as well as durable software solutions, which you can easily employ to recover your password and access your Outlook email account.

These tools can come in handy if Outlook is asking for password, so don’t hesitate to give them a try.

If you’ve attempted any of the solutions in this tutorial, kindly share your experience with us.

Check out KB5020035 for the Windows 11 Insider Beta Channel

This is a great week for Windows 11 Insiders, as they received a lot to work with on both the Beta and the Dev Channels.

Earlier, we took a look at Build 25252, which just got released to the Windows 11 Dev Channel. A lot to see there, so we invite you to have a gander.

Also, since we’re on the topic of Windows 11, remember that it is now supported by the new VMware Workstation 17.0 Pro, just in case you didn’t know.

Getting back on topic, we’re about to review builds 22621.1020 and Build 22623.1020, as they just got released to the Beta Channel.

What should I expect from Builds 22621.1020 and 22623.1020?

First of all, yes, there are two builds. Microsoft has released an update with two new builds, which are 22621.1020 and 22623.1020 (KB5020035) to the Beta Channel.

This has been going on for quite some time now, so everybody is surely accustomed to the way Beta Channel Insiders receive their goodies.

And, if you are a Beta Channel Insider, you surely know that build 22623.1020 comes with new features, while build 22623.1020 has new features off by default.

Keep in mind that Insiders who were previously on Build 22622 will automatically get moved to Build 22623 via an enablement package.

Through this release, Microsoft is announcing support for new Braille displays and new Braille input and output languages in Narrator.

Some of the new braille displays we support include the APH Chameleon, the APH Mantis Q40, the NLS eReader, and many more.

Note icon NOTE
If you have the JAWS for Windows screen reader installed from Freedom Scientific and are using a version released in April 2022 or later along with a Focus braille display then there is no need to select the braille display as noted above.

Fixes

[General]

  • The spelling dictionary now uses a language-neutral word list and syncs across all devices that use the same Windows account (Microsoft accounts and AAD) is now available to all Windows Insiders in the Beta Channel. Users can toggle this feature via Settings > Accounts > Windows backup > Remember my preferences > Language preferences.

[Taskbar & System Tray]

  • Fixed a high hitting explorer.exe crash in the previous Beta Channel flight related to the system tray. This crash is also believed to be the cause of some Insiders experiencing a repeated explorer.exe crash when entering safe mode on that flight.
  • Fixed an issue which was causing certain third-party app icons in the system tray to be unresponsive after the latest system tray changes.
  • The Windows Update icon in the system tray should no longer look pixelated after changing between light and dark mode.

[Windowing]

  • If you have two monitors on top of each other, the Desktops list in Task View should no longer appear to be floating in the middle of Task View.

[Task Manager]

  • Moved the open navigation pane button to be under the title bar when Task Manager is wide enough to expand it inline – in doing so, addressed an issue where you couldn’t drag Task Manager from the area in the title bar above the navigation pane if the navigate pane was expanded.
  • The Delete key should work in the search box now.

Fixes for BOTH Build 22621.1020 & Build 22623.1020

  • Combined Windows Spotlight with Themes on the Personalization page. This made it easier for you to discover and turn on the Windows Spotlight feature.
  • Provided the full amount of storage capacity of all your Microsoft OneDrive subscriptions. We also displayed the total storage on the Accounts page in the Settings app.
  • Gave Microsoft OneDrive subscribers storage alerts on the Systems page in the Settings app. The alerts appeared when you were close to your storage limit. You could also manage your storage and purchase additional storage, if needed.
  • Added the organizational messages feature. With it, third-party companies could provide content to their employees. They did not need to use the default behavior of Windows.
  • Fixed an issue that affected protocol activation of the Settings app. The app failed to open a page under the Accounts category.
  • Fixed an issue that affected certain applications. They stopped working. This occurred when you used keyboard shortcuts to change the input mode for the Japanese Input Method Editor (IME).
  • Fixed an issue that affected cluster name objects (CNO) or virtual computer objects (VCO). Password reset failed. The error message was, ” There was an error resetting the AD password… // 0x80070005”.
  • Fixed an issue that might have caused certain apps to stop responding. This occurred when you opened the Open File dialog.
  • Fixed an issue that sometimes affected File Explorer when you opened a file. Because of that, there was high CPU usage.
  • Fixed an issue that affected Microsoft Defender for Endpoint. Automated investigation blocked live response investigations.
  • Fixed an issue that affected Distributed Component Object Model (DCOM) authentication hardening. We would automatically raise the authentication level for all non-anonymous activation requests from DCOM clients to RPC_C_AUTHN_LEVEL_PKT_INTEGRITY. This occurred if the authentication level was below Packet Integrity.
  • Fixed an issue that affected microphone streams that used the Listen To feature to route to the speaker endpoint. The microphone stopped working after you restarted the device.
  • Fixed an issue that caused File Explorer to stop working. This occurred when you closed context menus and menu items.

Known issues

[General]

  • Looking into reports that audio stopped working for some Insiders in recent Beta Channel builds.

[Taskbar & System Tray]

  • The taskbar sometimes flashes when transitioning between desktop posture and tablet posture.
  • The taskbar takes longer than expected to transition to the touch-optimized version when switching between desktop posture and tablet posture.

[Task Manager]

  • Filtering by publisher name does not match correctly on the Processes page.
  • Some services may not show in the Services page after filtering is applied.
  • If a new process is starting while a filter is set, then that process may appear for a split second in the filtered list.
  • Some dialogs may not render in the correct theme when applied from Task Manager Settings page.
  • The data content area of the Processes page may flash once when theme changes are applied in the Task Manager Settings page.
  • There’s an issue we’re investigating where Task Manager isn’t displaying light and dark content correctly, leading to unreadable text. This happens when you have your mode in Settings > Personalization > Colors set to Custom – as a workaround for the time being, please switch it to Light or Dark.
  • The Startup apps page in Task manager does not list any apps for some Insiders. If you are impacted, please use Settings > Apps > Startup for the time being.

THere you have it, folks! That’s pretty it much it for the Beta Channel release for Windows 11 as far as this week is concerned.

What can I do if I can’t install KB5020035?

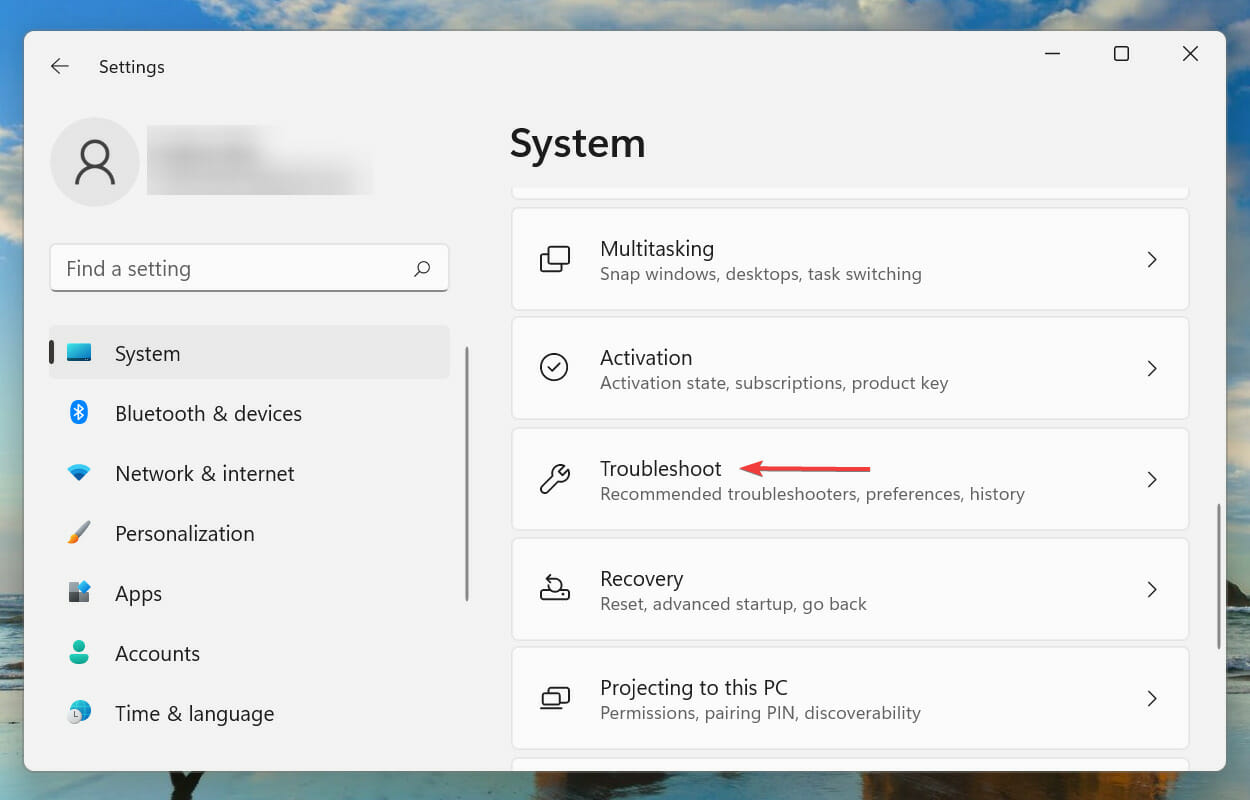
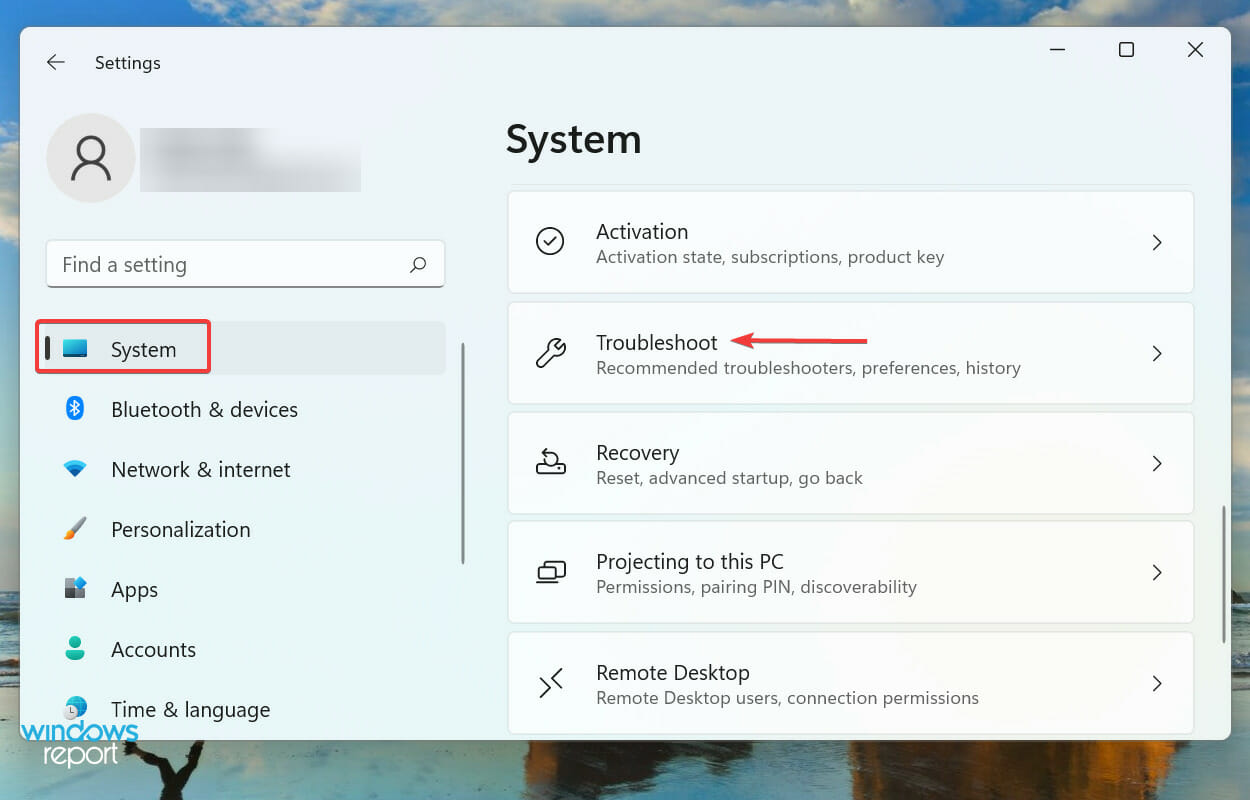
  1. Press Win+ I to access Settings.
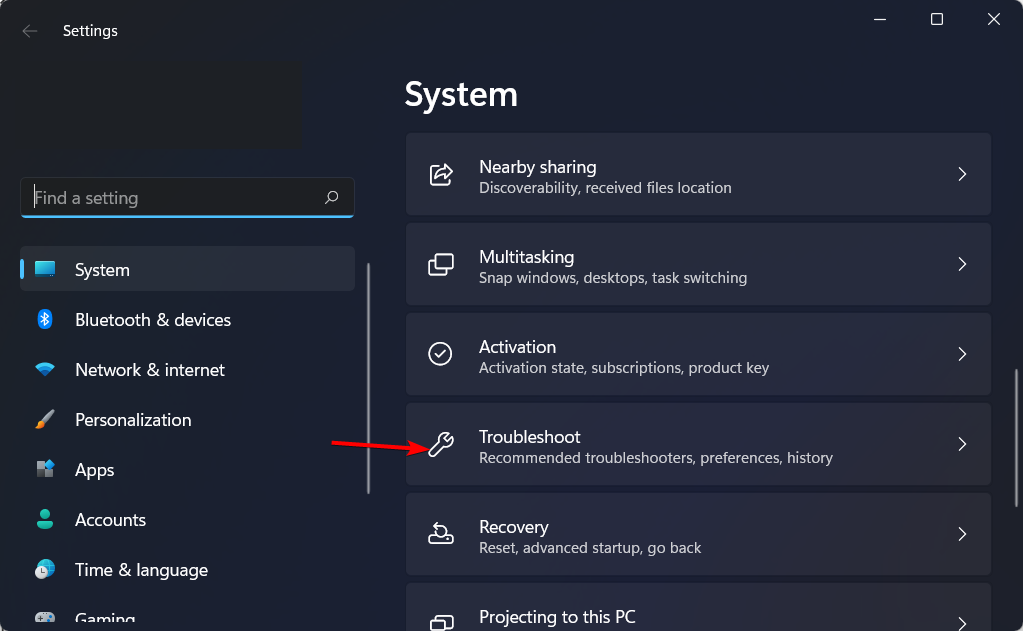
  2. Select the System category and click on Troubleshoot.w11 troubleshoot
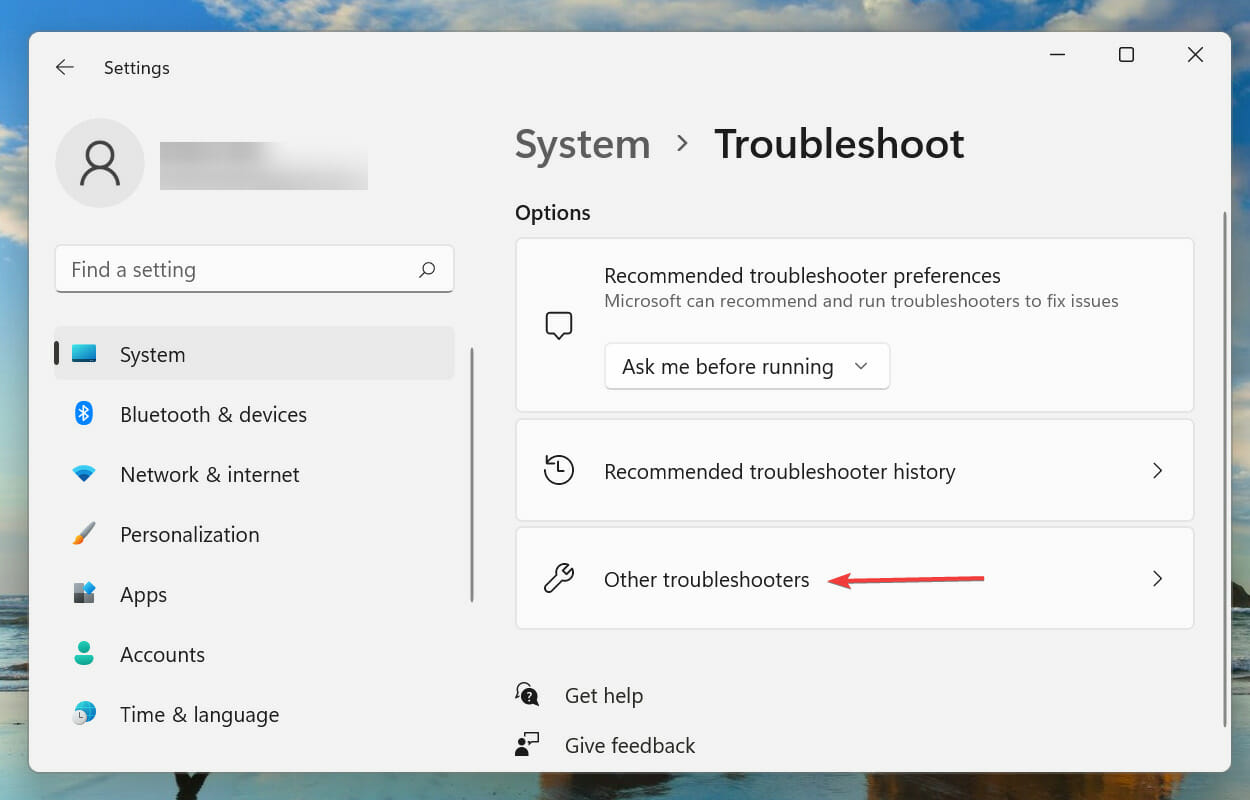
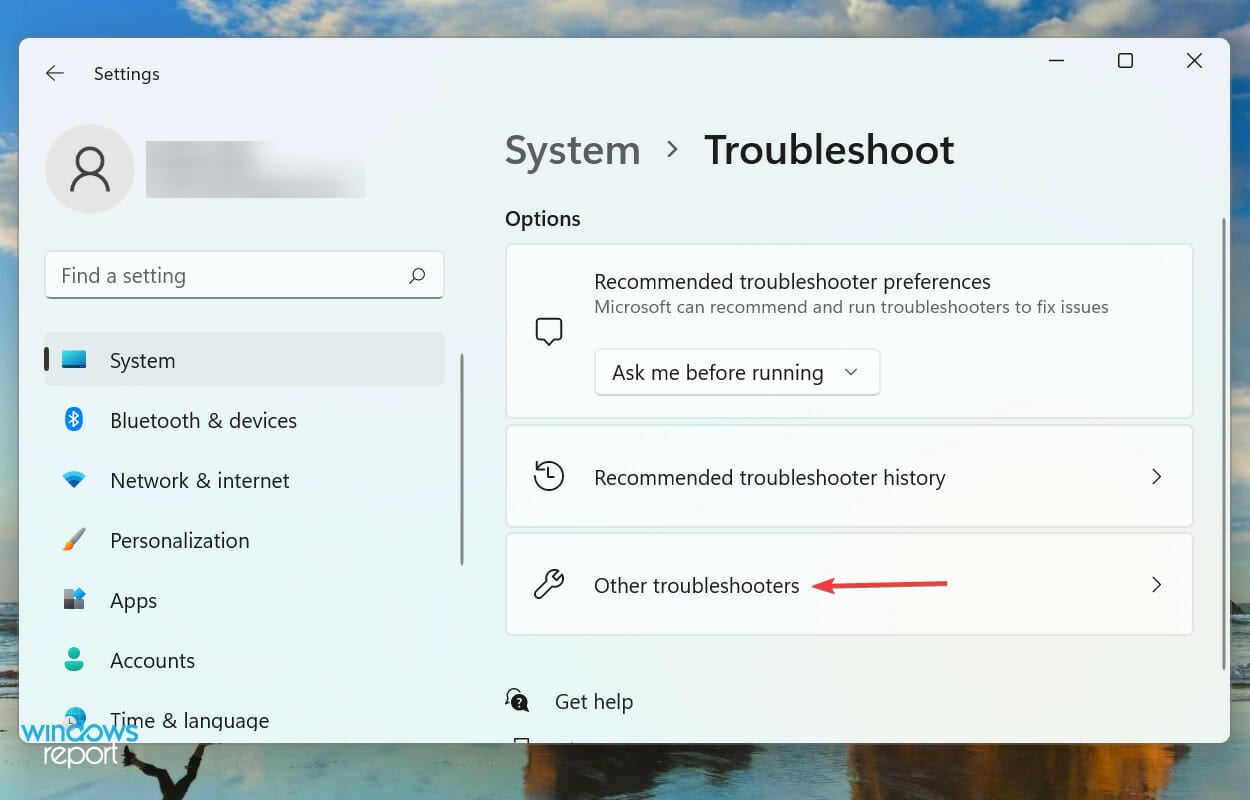
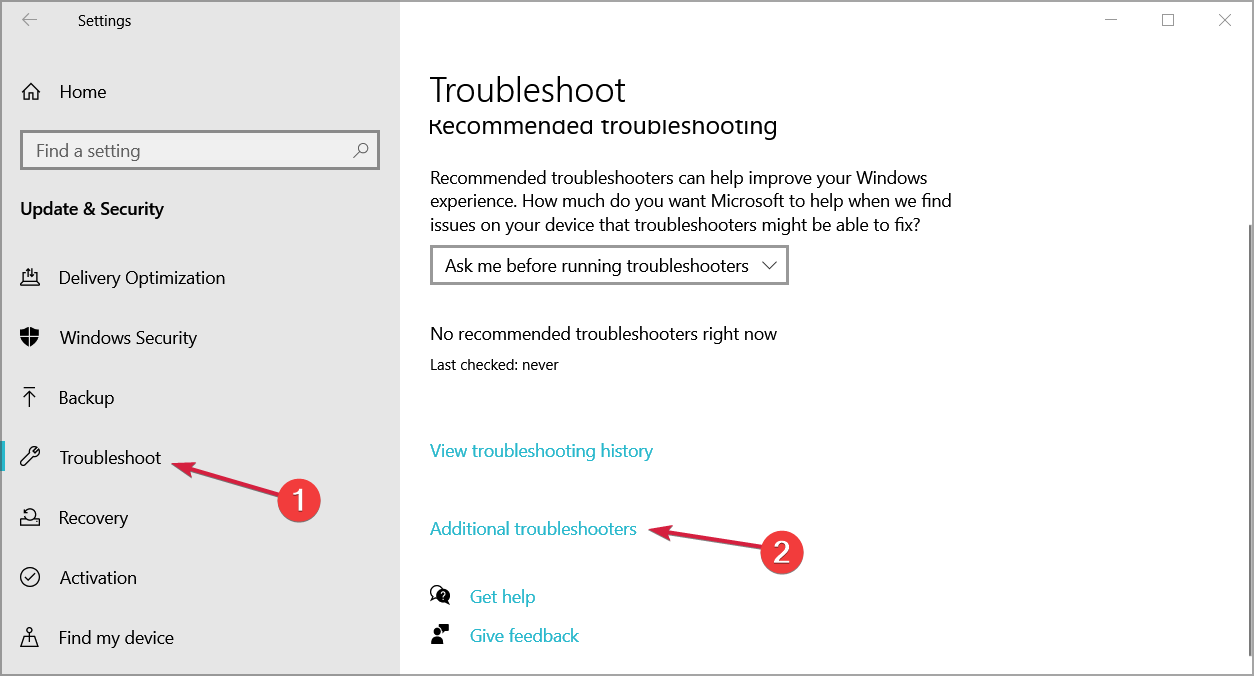
  3. Press the Other troubleshooters button.other troubleshooters windows 11
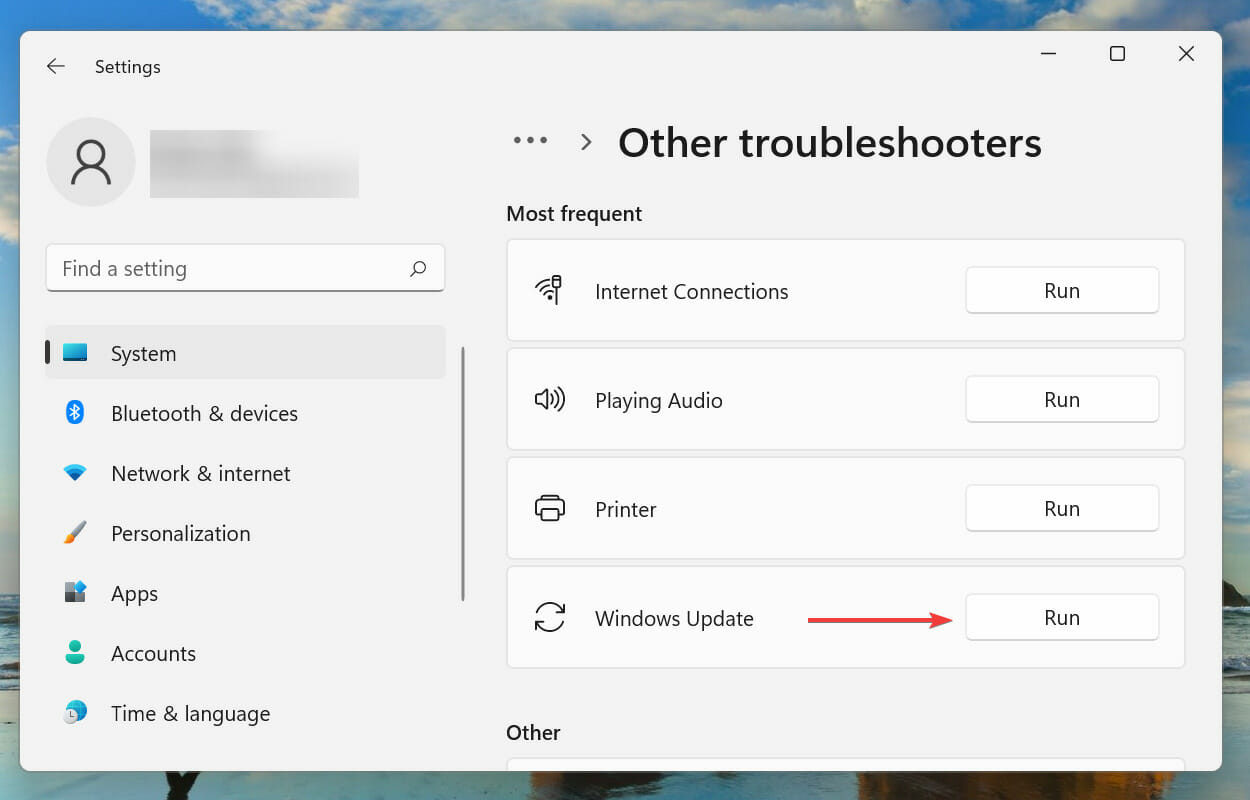
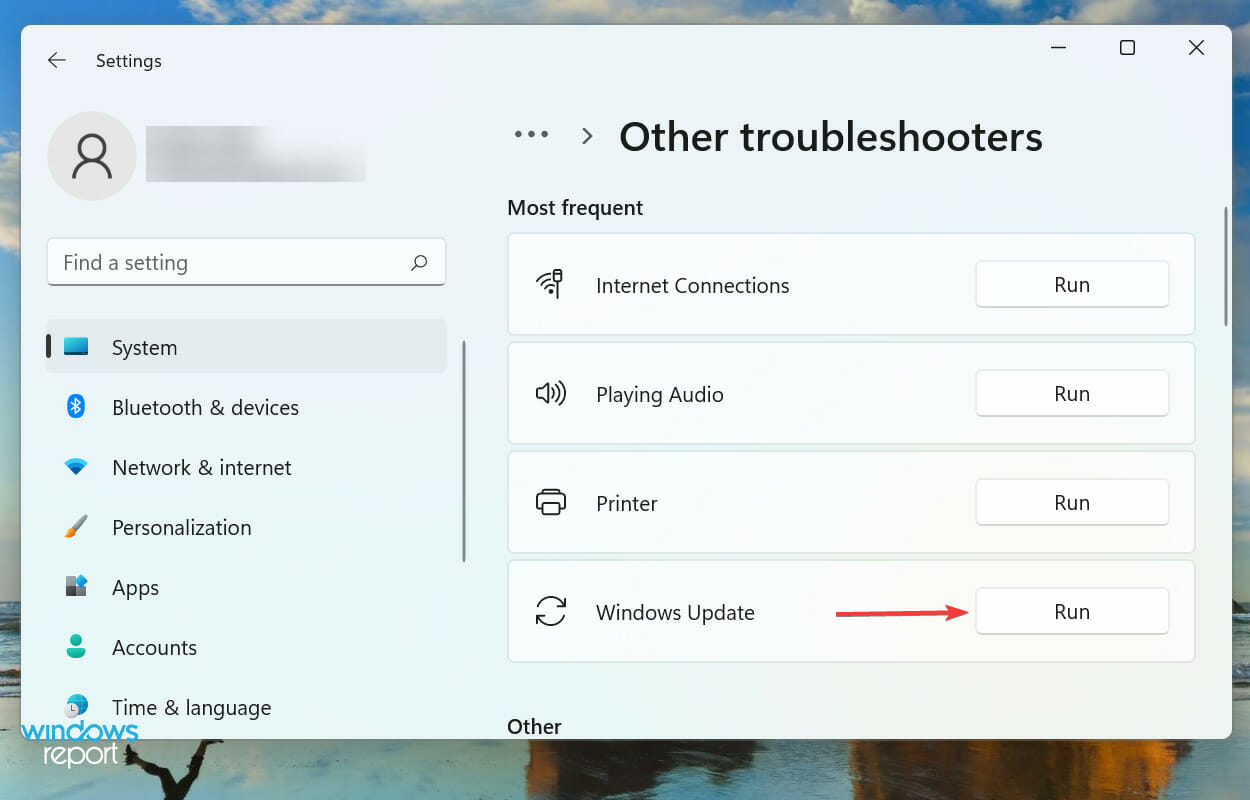
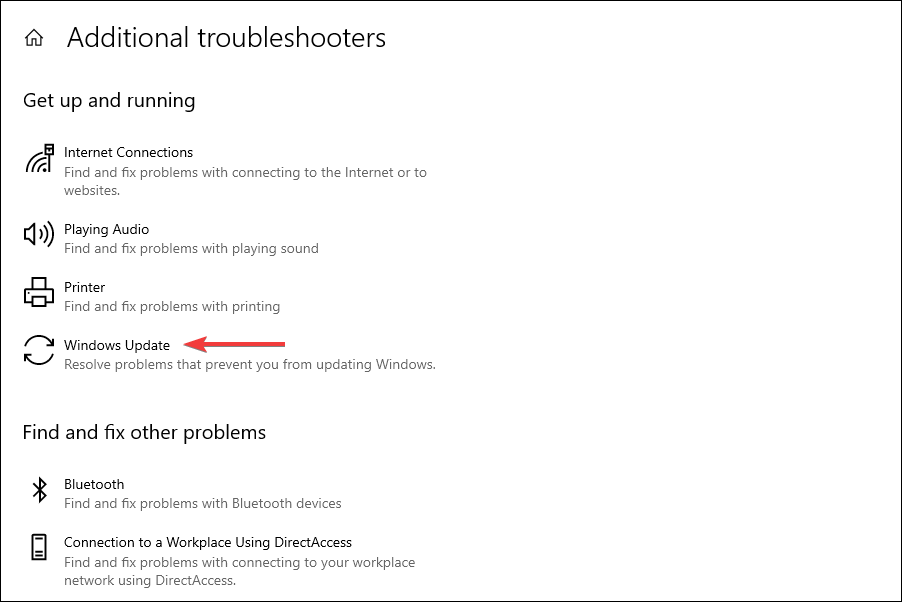
  4. Press the Run button next to Windows Update.windows update troubleshooter

Also, make sure to report any other issues you might come across, in order for Microsoft to address and improve the overall OS experience for us all.

This is everything you can expect if you are a Windows Insider. Leave a comment below if you found any issues since installing this build.

8 Quick Ways to Fix Instagram Not Working in Chrome

Instagram not working on Chrome isn’t uncommon, but it’s easy to fix. If you’re dealing with problems in the likes of not being able to log in, your Insta feed not loading, or getting a Something went wrong error follow the steps below.

How can I fix Instagram if it’s not working on Google Chrome?

1. Clear the browser cache

    Clearing the cache and site data can help if Instagram is not loading on Chrome. However, you may have to repeat the steps if the problem occurs again after a few days.

  1. 1. Launch Google Chrome.

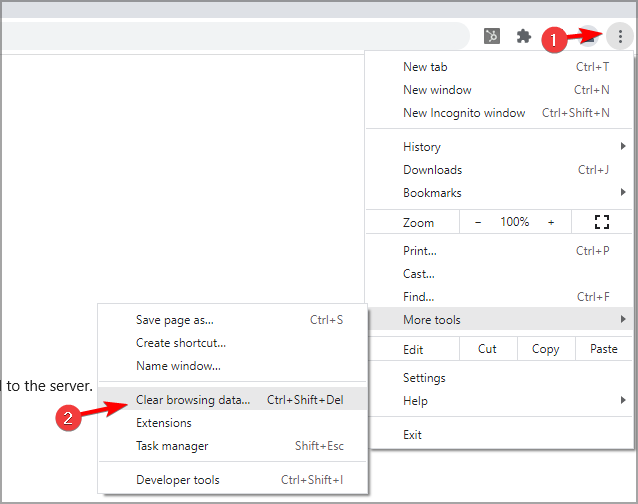
  2. 2. Click More (three dots) and select More tools. Lastly, select Clear browsing data.

    clear-browsing-data-chrome
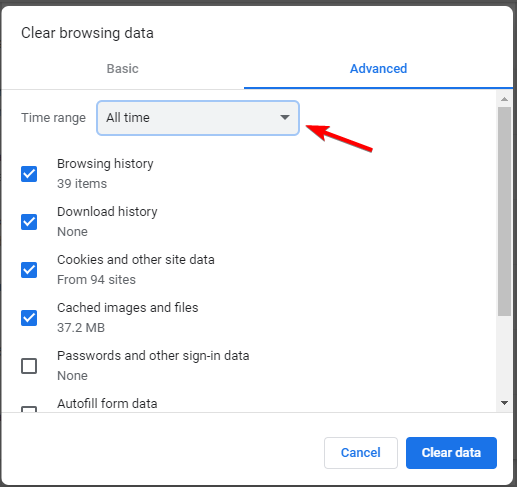
  3. 3. Select a Time range.

    all-time-clear-browsing-data
  4. 4. Check the boxes for Cookies and other site data and Cached images and file options.


  5. 5. Click the Clear data button.

Once the cache is cleared, relaunch the browser. Open Instagram to see if the issue is resolved.

2. Reset Chrome to default

  1. Launch Google Chrome and click the three dots in the upper right corner.chrome  three dots
  2. Click on Settings.chrome settings
  3. Scroll down to Reset Settings and click on Restore settings to their original defaults.chrome reset settings to default
  4. Click on the Reset settings button to confirm your choice.reset settings button google chrome

Restoring Chrome to default could help fix the issue by disabling possible conflicting settings that prevent you from accessing Instagram web.

3. Check saved credentials

  1. Open Google Chrome, click the three dots and select Settings.chrome settings
  2. Select Autofill and Passwords and click on Google Password Manager.chrome autofill and passwords
  3. Under Passwords, locate Instagram and click on it.instagram in google password manager
  4. A Windows Security window will pop up requiring your device’s PIN/Password. Enter it to continue.
  5. Click on the eye icon next to your password to view it.click to view saved password
  6. Confirm the password saved in Chrome corresponds to the password you use on Instagram. If it doesn’t click on the Edit button to update it.

4. Disable Google Chrome extensions

  1. Launch Google Chrome.
  2. Click on More (three dots).
  3. Next select More Tools and choose Extensions.
  4. Look for any recently installed extensions such as an ad-blocker, etc.
  5. Toggle the switch to disable the problematic plugin.

Relaunch Google Chrome and try to access Instagram in normal mode. If the issue persists, disable all the plugins one by one until you find the conflicting extension.

5. Disable anti-tracking software/extensions

  1. Open your anti-tracking software or extension.
  2. Navigate to Settings.
  3. Make sure to add Instagram to the list of exclusions.
  4. Save changes.

6. Update Google Chrome

  1. Launch Google Chrome.
  2. Click on More.
  3. Go to Help and then select About Google Chrome.

  4. Chrome will check for any pending updates.
  5. If available, you can download and install the update.

Once the update is installed, relaunch Google Chrome and check for any improvements. Updating the browser can help if Instagram not working on Chrome, so be sure to try it.

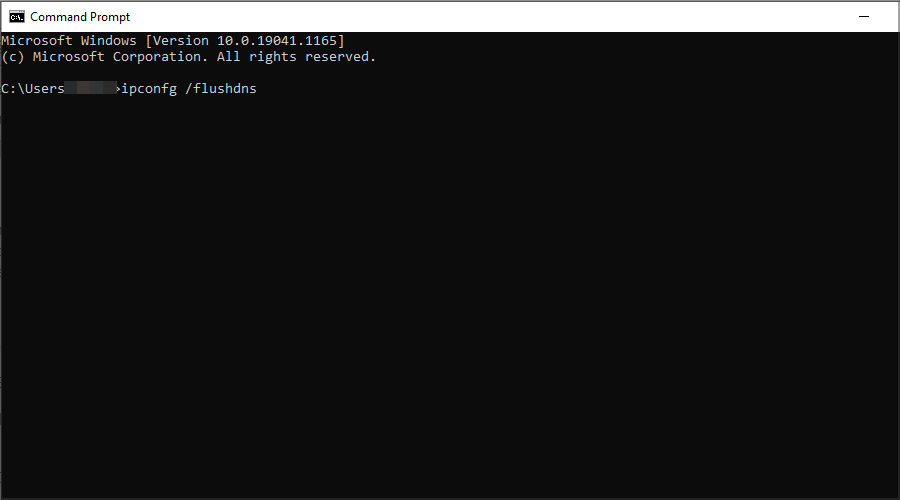
7. Flush DNS

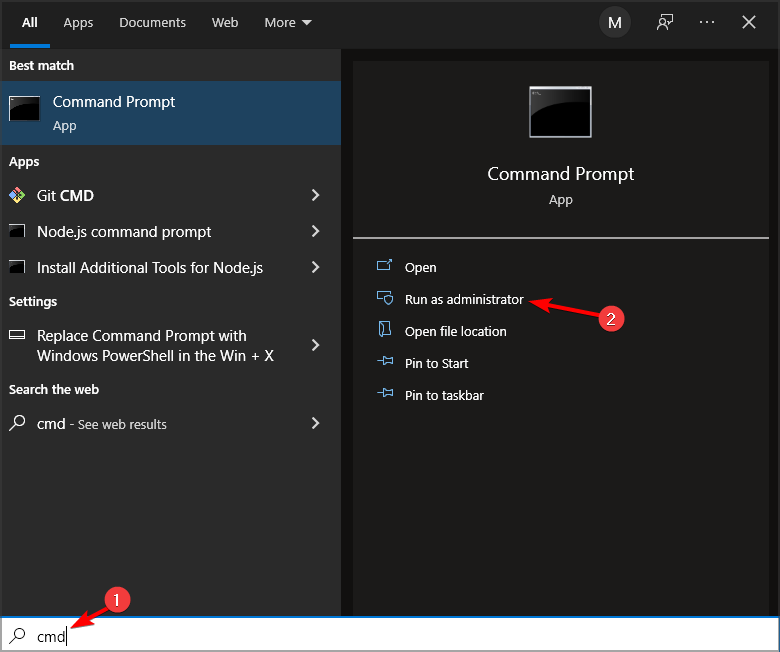
  1. Press the Windows key and type cmd.
  2. Click on Open as Administrator.

  3. In the command prompt window, type the following command and hit Enter to execute:
    ipconfig /flushdns

  4. Once you see a success message, close Command Prompt.

Open Google Chrome and check if Instagram is working. This is a useful method if Instagram is not working on Chrome, so be sure to try it.

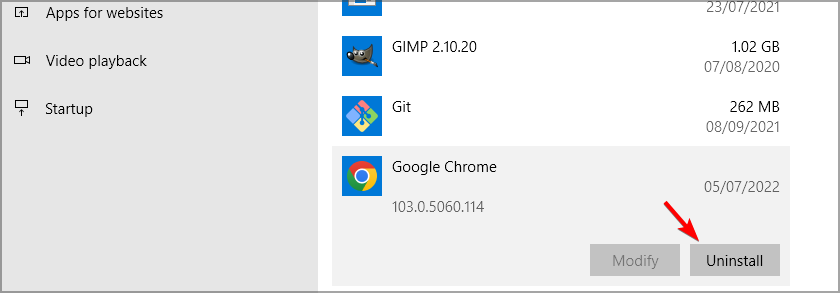
8. Reinstall Google Chrome

  1. Press Windows key + X and choose Apps and features.
  2. Search for Google Chrome.
  3. Select Chrome and click Uninstall.

  4. Confirm the action to uninstall the browser.
  5. Go to Google Chrome’s download page and reinstall it.

Instagram not working in Chrome is easy to fix once you know the underlying causes that interfere with it. The social media app’s web version has issues in other browsers too, notably Firefox.

Following steps like clearing your cache, disabling interfering extensions and flushing DNS usually fixes the problem, regardless of the browser used.

So if you can’t log in to Instagram or get a message to Wait for a few minutes before you try again, following the guidelines above should help. Leave a comment below if you need any more help.

5 Best PC Parts to Boost Performance [Cyber Monday]

If you spend hours tinkering around with computers or laptops, don’t let Christmas pass by without taking advantage of the incredible PC parts deals available this year. You can buy top-notch GPUs, CPUs and other parts to improve the performance of your PC or repair it if need be.

So, in this quick guide, we’re going to list some of the hottest PC parts deals that you can get as Christmas deals.

Note: Deals are subject to change. Sometimes, some of the deals listed in our guides may no longer be available by the time you hit the buy button. So, hurry up and grab them while they’re hot.


Which are the best deals on PC parts to grab in 2022?

Graphics Cards

gpu computer parts deals black friday

Your GPU is crucial for your computer, especially if you’re a gamer. Make sure to equip your machine with a powerful GPU for optimum graphics performance.

Here are some of the best GPUs to get as computer parts and integrate them onto your machine:

CPU deals

cpu deals computer parts black friday

Your CPU is your computer’s brain. If you’ve got a few extra dollars to spend, invest them in your CPU. Purchase a powerful CPU and you won’t experience any lag no matter how many processes your computer runs at the same time.

Here are some of the hottest CPUs that you can grab as PC parts deals:


PC memory kits

pc memory kit black friday

The next piece of hardware you’d want to add in your shopping cart in a memory kit. Make sure that your computer never runs out of memory by installing one of the memory kits listed below:


Sound card deals

sound card deals black friday

Next, let’s focus on some of the best Black Friday sound card deals that you can get this year. This piece of hardware is extremely important for gamers and multimedia fans.

So, here are some of the hottest deals to grab right now:

So, if you’re interested in learning what deals are available for other PC parts, do let us know in the comments below. We’ll quickly run a search and update this post using the information that we found.


Fix: Xbox One Multiplayer is Not Working [Expert Guide]

Xbox One is all about playing your favorite games with your friends. Yes, you can still have fun alone, but it’s much more fun when you have company. And since your friends can’t come over every day, playing online is a great way to stay connected and have fun.

But what if Xbox One multiplayer is not working? Well, in that case, you’re on your own.

Of course not! In case you have problems connecting to the Xbox One multiplayer, we’ve prepared a few solutions that might help you to get back online.

What to do if the Xbox One multiplayer is not working?

1. Restart Xbox One

The very first solution that basically anyone would recommend is simply restarting your console. In case of a faulty connection, restarting the Xbox might be just what you need to solve the connection issues.

In case you’re not sure how to correctly restart your console, just follow these instructions:

  1. Unplug the power cable from the back of the router, and wait for five minutes.
  2. Restart your Xbox One console:


    • Scroll left from Home to open the guide.
    • Select Settings.
    • Click Restart console.Restart xbox one
    • And then select Yes to confirm.
  3. After five minutes, plug the modem in, and wait for it to get back to its normal state.
  4. Try to connect to the multiplayer again.

If you’re still unable to connect to multiplayer with your Xbox One, move on to another solution listed below.

2. Check the network cable

Your network cable needs to be correctly connected to your console in order for the internet to work. So, you need to make sure your network cable is connected properly, and here’s how to do that:

  1. Unplug the network cable from the back of your Xbox One console.
  2. Check the cable’s connector and the Xbox One console socket to make sure that they are clean and debris-free.
  3. Plug it back in.
  4. Now, unplug the network cable from your router.
  5. Check the cable’s connector and the socket of the router to make sure that they’re clean and debris-free.
  6. Now, do one of the following (depending on your network hardware):
    • Router or gateway: Plug the network cable into a different port. Make sure the cable clicks into place.
    • Modem: Plug the network cable back into the modem. Make sure the cable clicks into place.
  7. Verify that all power cables are firmly seated in the modem, gateway, or router and that all networking devices are powered on.
  8. Try to connect to the internet again.

3. Connect directly to the modem

If your console is connected to the router, try connecting it directly to your modem. That way, you’ll be able to re-establish the internet connection, in case there’s something wrong with your router.

If the multiplayer on your Xbox One works while you’re connected to the modem, you’ll need to replace your router or investigate for possible issues.

4. Make sure your Live Gold membership is still valid

Being subscribed to the Xbox Live Gold is absolutely mandatory for the multiplayer on Xbox One.

So, if none of the solutions listed above worked, make sure you’re still subscribed to the Live Gold. This especially applies if you’ve recently signed up for the Free trial, as your trial might has just expired.

5. Check the Xbox Live service status

There’s also a chance that Xbox Live services are currently under maintenance or offline. In that case, there’s really nothing you can do. As a matter of fact, the only thing you can do is wait for Microsoft to get the services fixed.

You can check the Xbox Live services status anytime on this link.

6. Make sure your kid isn’t restricted from playing online

If you’re reading this article because your child isn’t able to connect to the internet, you need to check if he/she is eligible for going online at all. Due to age restrictions, kids under a certain age are not able to connect to the internet.

The same goes for account restrictions. You can learn more about managing your kid’s account and safety on Xbox One here.

7. Specific case: Multiplayer error, your account is set up online

You may run into problems if you have an account that was previously made online. In this case, it is likely that your privacy and online settings aren’t properly set up and you need to make some changes before you continue. 

For this problem, you can check out our guide and follow the steps listed there in order to solve your issue. We also have a dedicated guide for a similar Space Marine 2 error code 140 error.

That’s about that. We certainly hope this article helped you to get back online, and play your favorite Xbox One games with your friends.

If you have any comments, questions, or suggestions, just let us know in the comments below.

4 Quick Ways to Manually Uninstall Kodi

Kodi is a media player software that has been in the market for a while. It has undergone several changes, but still not the perfect option to consider, which is why users sort out how to uninstall Kodi on their PCs.

Likewise, users report that the Kodi app is not working on Windows 10/11 computers.

What is Kodi, and why should I uninstall it?

Kodi is an open-source media player app that allows you to access different media content, including music and videos. It is a cross-platform media player for various devices.

Nevertheless, many users, particularly Windows users, have complained about encountering numerous issues with the app. The most common problem is that the Kodi app happens to be incompatible with most apps, so they conflict with each other, resulting in issues.

Some other reasons why you should uninstall the Kodi software on your PC are:

  • Frequent crash – Kodi frequently crashes on Windows PCs and affects other processes on the PC. It can cause other programs to crash or malfunction due to its instability, so uninstalling it is the best way to avoid issues.
  • Malicious activities on Kodi – Many users report that Kodi software on their Windows PCs has resulted in malicious attacks. It means the software is compromised and can result in threats to your computer.
  • Low-quality service – Some users think the software is not as advanced as they thought it was, so they don’t want to keep it. Also, other apps in the market offer better services, so uninstalling Kodi is a good idea.

However, the reason for uninstalling the Kodi software on your Windows PC may vary depending on your complaints.

How do I uninstall Kodi on a Windows PC?

There are some steps for uninstalling Kodi on your PC, but we recommend you apply the following preliminary checks first:

The above steps will help prepare your PC for uninstallation and avoid any issues. Follow the steps below to uninstall Kodi:

1. Via the Windows Settings app

  1. Press Windows + I key to open the Settings app.
  2. Click on Apps and select Installed apps.
  3. Find and click on the Kodi app from the list of installed apps, then click Uninstall.
  4. Select Remove on Kodi’s uninstall wizard prompt, then click Next to uninstall the program.
  5. Click Yes on the Confirmation page and Finish after the installation.
  6. Restart your PC and check if you run into any issues.

Check what to do if the Windows Settings app is missing on your PC.

2. Uninstall Kodi via Windows PowerShell

  1. Left-click the Start button, type PowerShell in the text box, and select Run as administrator.
  2. Copy and paste the following command in and press Enter: Get-AppxPackage -AllUsers | Select Name, PackageFullName
  3. Find Kodi, select the entire text, and press Ctrl + C key to copy everything next to the PackageFullName line.
  4. Copy and paste the following commands and replace the PackageFullName entry with the text you copied earlier: Remove-AppxPackage -package PackageFullName
  5. Restart your PC and check if you run into any issues.

Check what to do if Windows PowerShell stops working on your Windows 11 PC.

3. Uninstall Kodi with its uninstaller.exe

  1. Press the Windows + E key to launch File Explorer.
  2. Navigate to Kodi installation folder: C:\Programs files\kodi
  3. Locate the uninstall.exe file, and double-click the file to start the uninstallation process.
  4. Wait for the process to complete and restart your PC to see if it affects you.

Read what to do if File Explorer keeps crashing on your PC as this may prevent you from accessing the uninstaller.

4. Remove Kodi add-ons and library data from the folder

  1. Press the Windows + E key to launch File Explorer.
  2. Navigate to the following location: C:\Program Files\Kodi\addons
  3. Press Ctrl + A to highlight everything in the folder, then right-click and select delete.
  4. Navigate to the following location: C:\Program Files\Kodi\userdata
  5. Press Ctrl + A to highlight everything in the folder. Then select the delete key to clear the user data directory content.

In conclusion, our readers who have issues with using VPN with Kodi can check our guide on fixing the problem and getting it working.

Also, you can read about Kodi not installing add-ons zip on your PC.

Should you have further questions or suggestions, kindly drop them in the comments section below.

Why is my Xbox Screen Blurry and How to Fix it [Guide]

When users connect their Xbox One to a TV or monitor, the console adapts to the video settings of the respective TV or monitor.

However, this can cause various video quality issues, such as blurry images, fuzzy and static screens, and more.

If you’re experiencing blurry screen issues after you connect your Xbox One console to your TV set, follow the steps listed below to fix this problem.

How can I fix Xbox One blurry screen display issues?

1. Adjust the screen resolution

  1. Scroll left on the Home screen to open the guide > select Settings > select All Settings.
  2. Go to Display & sound > select Video output.
  3. Select TV resolution.
  4. Select the appropriate screen resolution for your TV. The Xbox One offers screen resolutions of 720p and 1080p.

2. Adjust color depth

  1. Go to the Home screen > open the guide >  select Settings > select All Settings.
  2. Under Display & sound > select Video output.
  3. Select Color depth > select the option that works best for your HDTV. It is worth mentioning that not all HDTVs accept deep color information, meaning a color depth of 30 bits per pixel (bpp) or higher.

3. Adjust color space

  1. Scroll left on the Home screen to open the guide >  select Settings > select All Settings.
  2. Under Display & sound > go to Video output.
  3. Select Color space > choose the best option for your TV:
    1. Standard (recommended): This is the optimal reference level and it should work on all displays
    2. PC RGB – recommended only if you’re using a PC monitor.

4. Contact Xbox Support

If the actions listed above didn’t solve the problem, we suggest reaching to Xbox Support and asking for reparations or replacement.

We hope that one of the solutions above helped you fix your display issues on Xbox One.

If you’re aware of any alternative methods, feel free to tell us in the comments section below.

Lenovo Yoga 11e Touch Screen Driver: 3 Ways to Update it

To ensure that your device is working correctly, you need to have the latest drivers installed, and in this guide, we’ll show you how to download the Lenovo Yoga 11E touchscreen driver.

By downloading the latest drivers, you’ll ensure that your device works without errors and at maximum performance.

There are several ways that you can use to update your drivers, and in this guide, we’re going to show you the best ones.

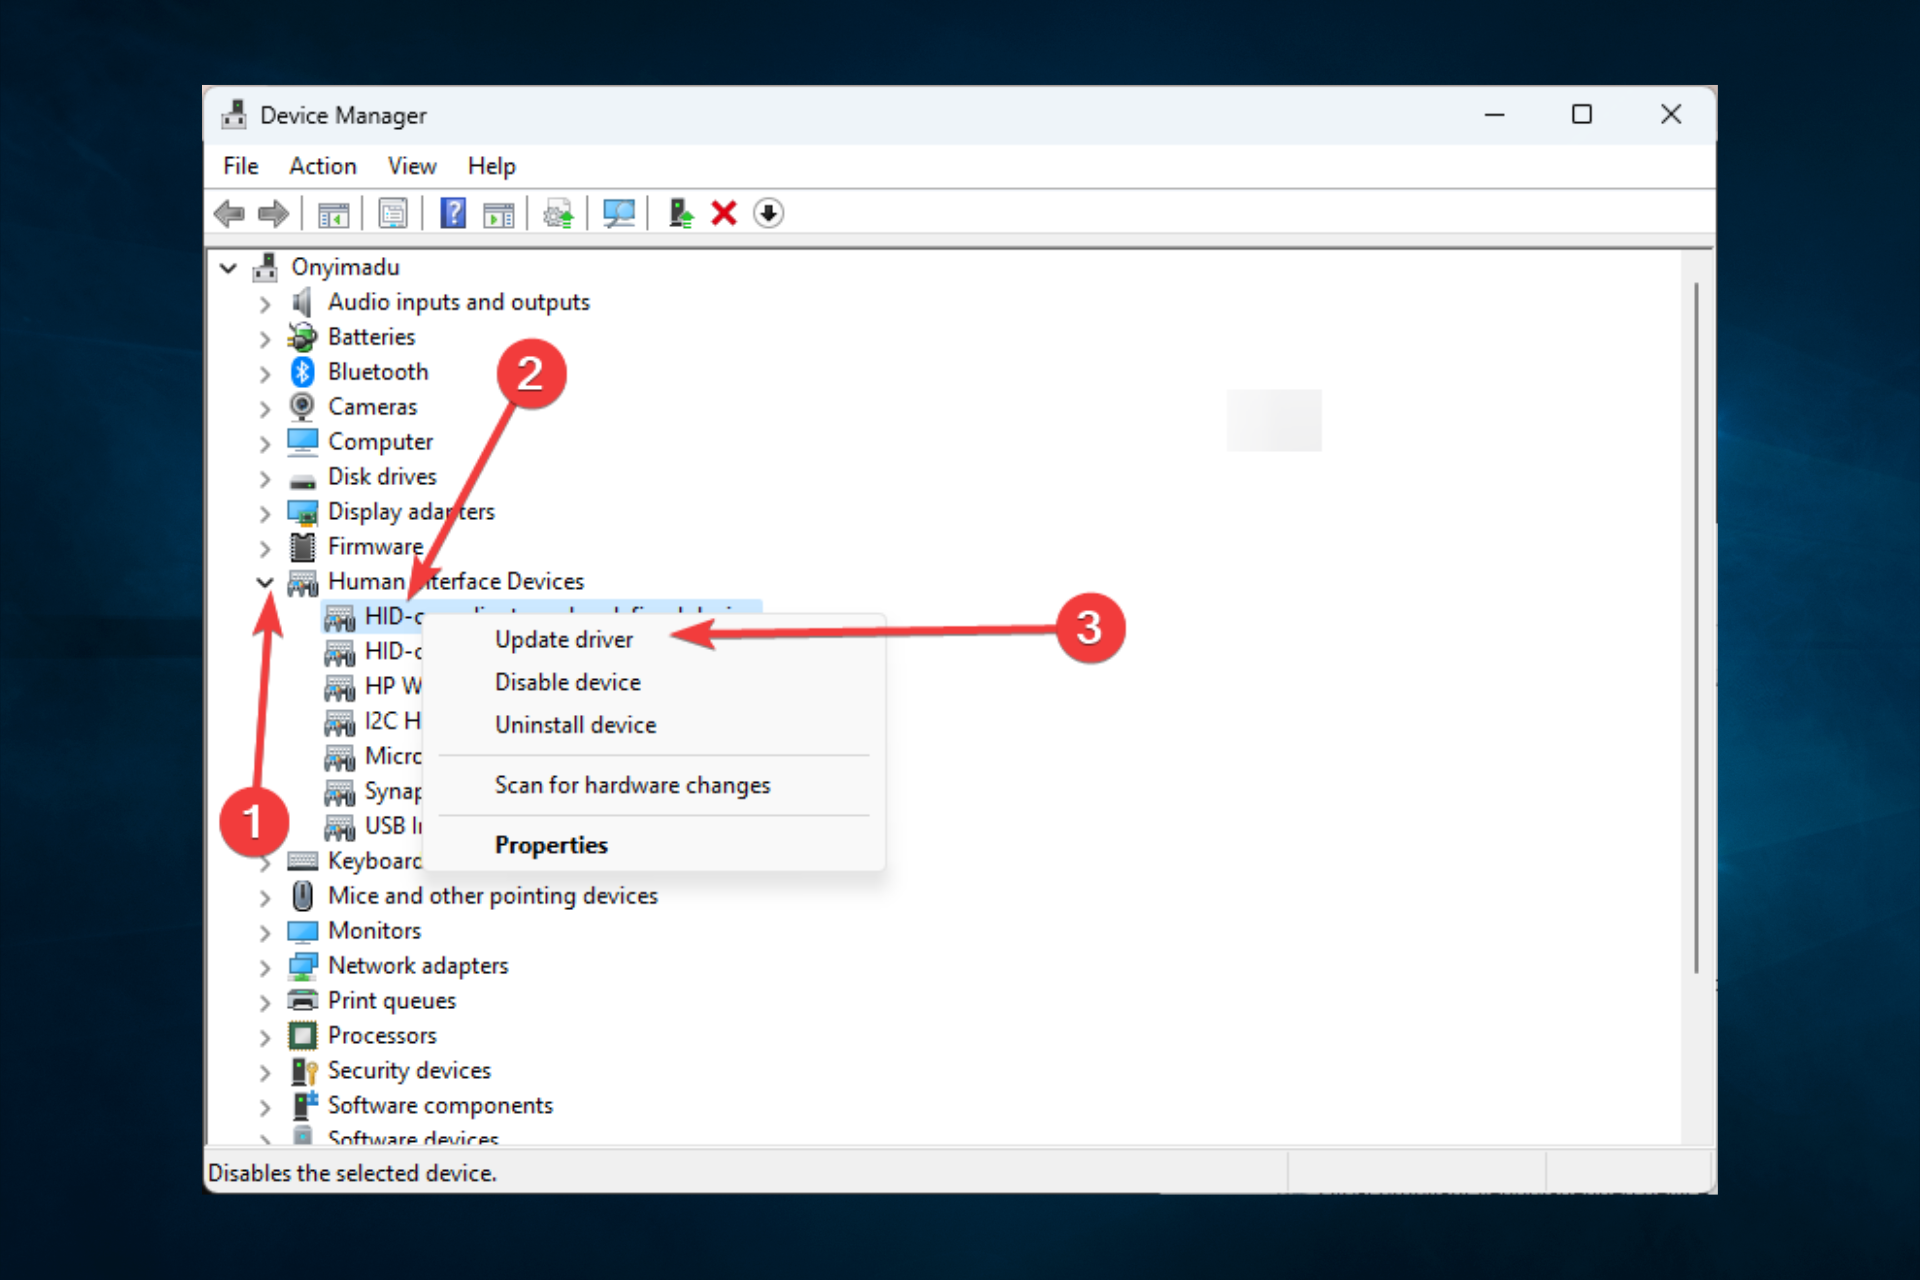
Where is the touchscreen driver in Device Manager?

Once you open the device manager, you must expand the Human Interface Devices (HID) section. Here you will be able to find your touchscreen driver among other HID drivers.

You can perform different operations on this driver from here unless it has been greyed out.

In some rare cases, it may not be listed under the HID section; you may see it under Compliant Touchscreen.

Let us show you the best ways to update your touchscreen driver on Lenovo Yoga 11E.

How can I update the Lenovo Yoga 11E touchscreen driver?

1. Download the drivers from Lenovo’s website

  1. Go to Lenovo’s driver download page.
  2. Select the appropriate category.
  3. Locate the driver you want to download and click the down arrow icon. Now click the download icon.
  4. Choose the download location and save the file.
  5. Once the file is saved, double-click it to run it and follow the instructions on the screen.

Alternatively, you can use the automatic driver update feature by following these steps:

  1. Visit Lenovo’s automatic driver update page.
  2. Click on the Start Scan button.
  3. Tick the Terms and Conditions checkbox and select Download.
    lenovo yoga 11e touch screen driver
  4. Once the software is installed, follow the instructions on the screen to scan and update all outdated drivers.

These two methods are relatively simple to follow, and by using them, you can easily update the Lenovo Yoga 11E touchscreen driver.

If this method doesn’t work for you, or if you can’t find the necessary drivers, then the next solution should be able to help you.

2. Use a specialized driver updater software

If you’re looking to update all your Lenovo Yoga 11E drivers, the best way is with specialized driver updater software.

These powerful tools allow you to run a comprehensive scan of your system and quickly apply updates to any driver in just a few minutes.

3. Use Device Manager

  1. Press Windows Key + X and choose Device Manager from the list.
    device manager
  2. Expand the Human Interface Devices section, locate the touchscreen device on the list, right-click it and choose the Update driver option.
  3. Now click on Search automatically for updated driver software.
    lenovo yoga 11e touch screen driver
  4. Windows will now search its driver database for a suitable driver and try to update the driver in question.

Remember that this isn’t the most reliable solution since the Windows database can get outdated, so it’s possible that it won’t download the latest driver.

This method is helpful if you’re a less experienced user and don’t know how to search for drivers properly, but if you’re an advanced user, we suggest using one of our other methods.

Updating the Lenovo Yoga 11E touchscreen driver isn’t as hard as you think as long as you know where to look for the driver.

What methods do you use for a driver update? Feel free to share them with us in the comments section.

Sims 3 There was an Error During Startup: 5 Ways to Fix it

Sims 3 is one of the best games in its series. However, some players have posted about a Sims 3 startup error on EA’s forum.

The error message for that issue states, There was an error during startup. Consequently, users can’t launch Sims 3 when the game displays that error message.

Users have also reported getting the Sims 3 error There was an error during startup please see the Log for more details Steam.

Here are the causes and the best fixes for this error.

Why am I getting Sims 3 there was an error during startup error?

From user experiences, we gather that a few factors may trigger this error. The top of the list includes the following:

  • Lack of administrative privileges – In some cases, only an account with admin rights can run the game.
  • Conflicting game mods – Users have reported that certain mods will cause startup errors and may need to be erased.
  • Corrupt game files – Corrupt files always trigger some error. In most cases, they should be replaced or repaired.

Regardless of why this error appears, the solutions below will surely fix it so you can get back to playing the game.

How can I fix Sims 3 there was an error during startup error?

1. Run the game with administrator privileges

  1. Right-click the launcher for Sims 3 and select Properties.
    sims 3 there was an error during startup
  2. Click the Compatibility tab.
    sims 3 there was an error during startup
  3. Select the Run this program as an administrator checkbox, then click the Apply and OK buttons.
    sims 3 there was an error during startup

The first recommended fix for the Sims 3 launcher error during startup is to run the game with administrative privileges.

Running Sims 3 in a dedicated gaming browser is a game-changer. And we believe it’s worth it.

2. Delete cache files for Sims 3

  1. Press the Windows + E hotkey.
  2. Select the View and Hidden items options.
  3. Then navigate to the following path replacing afamo with your user name.
    C:\Users\afamo\AppData\Local
  4. Open the Sims 3 folder, and delete everything in it.

3. Delete game mods

  1. Press the Windows + E hotkey.
  2. Next, open this folder path:
    C:\Program Files (x86)\Electronic Arts\The Sims 3\Mods\Packages
  3. Press the Ctrl + A keyboard shortcut to select all content in the Packages folder.
  4. Press the Delete button to erase the selected folder content.

4. Reinstall Sims 3

  1. Open the Origin game client software, click My Game Library and select Sims 3.
    sims 3 there was an error during startup
  2. Press the Settings button (with the cog icon) for Sims 3, and select the Uninstall option.
    Uninstall option sims 3 there was an error during startup
  3. Press the Yes button to confirm if a dialog box window opens.
  4. Restart Windows.
  5. Finally, download Sims 3 from EA’s website again to reinstall it, then check whether the Sims 3 there was an error during startup is gone.

5. Delete expansion registry keys

  1. Press Windows + R and type regedit, then click Enter.
  2. Next, open this registry key:
    Computer\HKEY_LOCAL_MACHINE\SOFTWARE\WOW6432Node\Sims
  3. Delete Sims 3 expansion registry keys you don’t need by right-clicking them and selecting Delete.

Those are some of the confirmed fixes for the Sims 3 there was an error during startup issue. So, there’s a pretty good chance the above fixes will resolve the issue for most users.

Remember to try what you seem most comfortable with since these solutions are not written in any particular order.

Let us know in the comments below what worked for you.

Windows Update Error 800f0902: How to Quickly Fix it

The error code 800f0902 mostly appears when there’s a Windows update error on your PC. It can indicate some problems with the update process, preventing you from installing it.

Another Windows update error that users complain about is error 0x800f0900 caused by corrupt system files.

What is error code 800f0902?

Windows releases new updates and patches from time to time to help users install the latest features and security updates on their PCs.

However, installing these updates may result in errors like error code 800f0902. The error occurs when there’s an issue with the installer.

Furthermore, error code 800f0902 only appears during Windows OS updates. It makes it challenging to install updates.

Why do I get the error code 800f0902?

The error code 800f0902 can occur for many reasons varying from update installer issues to other problems on the PC. However, corrupt system files can cause the error code. It means some of your system files are compromised, causing issues with your update services.

Other causes of the error code 800f0902 are:

  • Third-party app interference – Apps such as antivirus software on your computer can block the Windows update process. Hence, the update process will prompt errors indicating it can’t install it.
  • The trusted installer is busy – The Windows update installer may be busy with other processes, so it can’t initiate the installation. Thus, the error code 800f0902 appears on your screen.

Many other factors may prompt the error, which can vary in different devices. Nonetheless, we’ll take you through some troubleshooting steps to fix them.

How do I fix the error code 800f0902?

Go through the following preliminary checks:

  • Fix network congestion issues on your PC.
  • Turn off background apps.
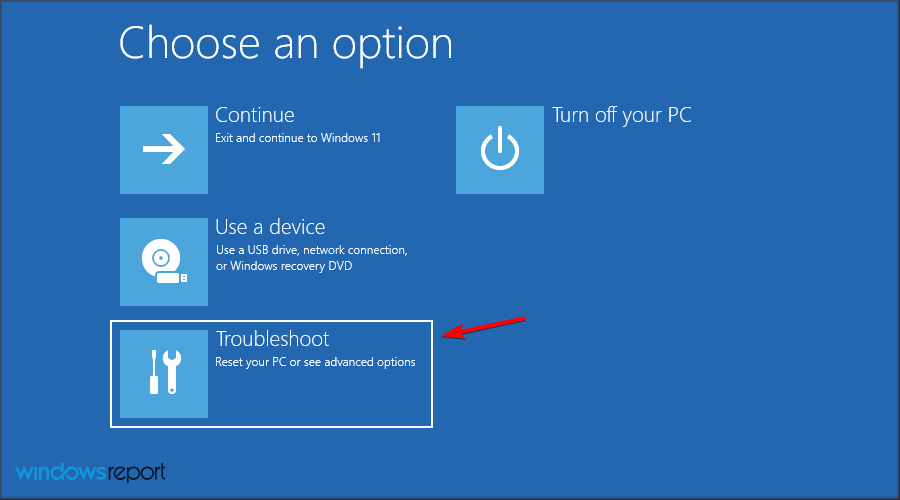
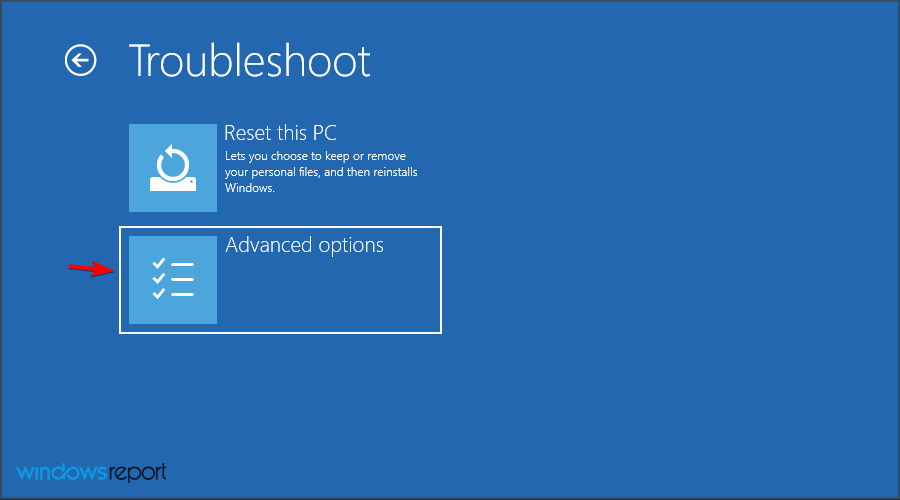
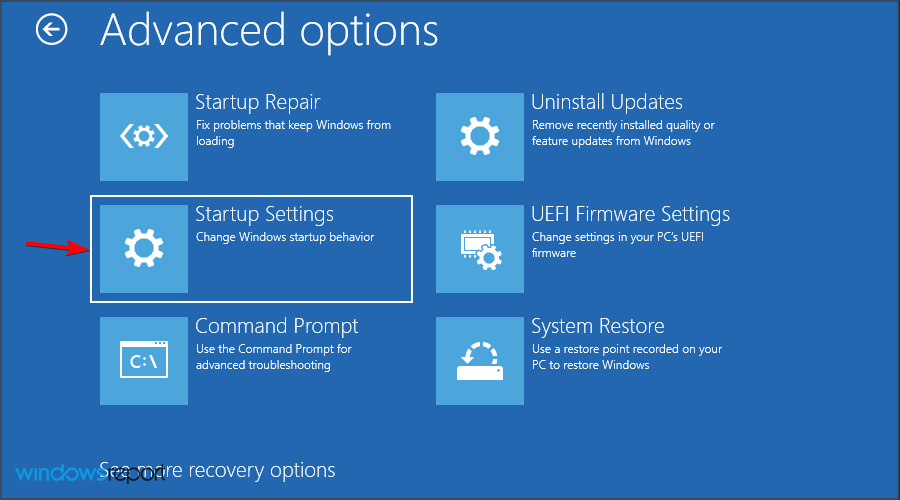
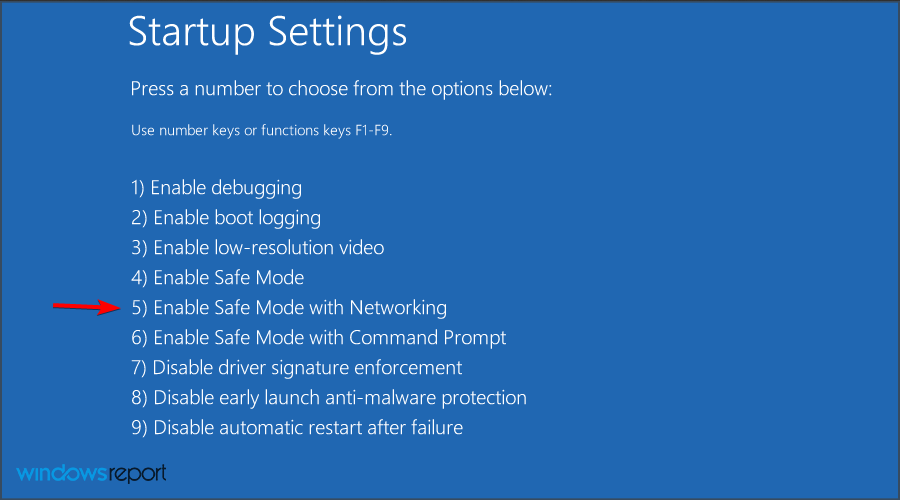
  • Restart Windows in Safe Mode and see if the error persists.

Try the solutions below if you can’t fix the problem still.

1. Run the SFC and DISM to repair damaged system files

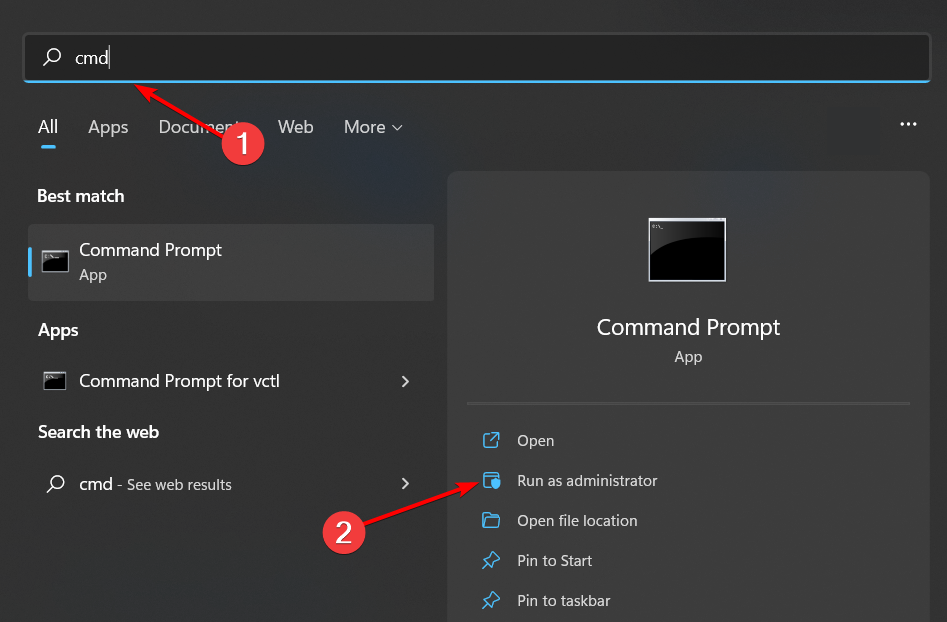
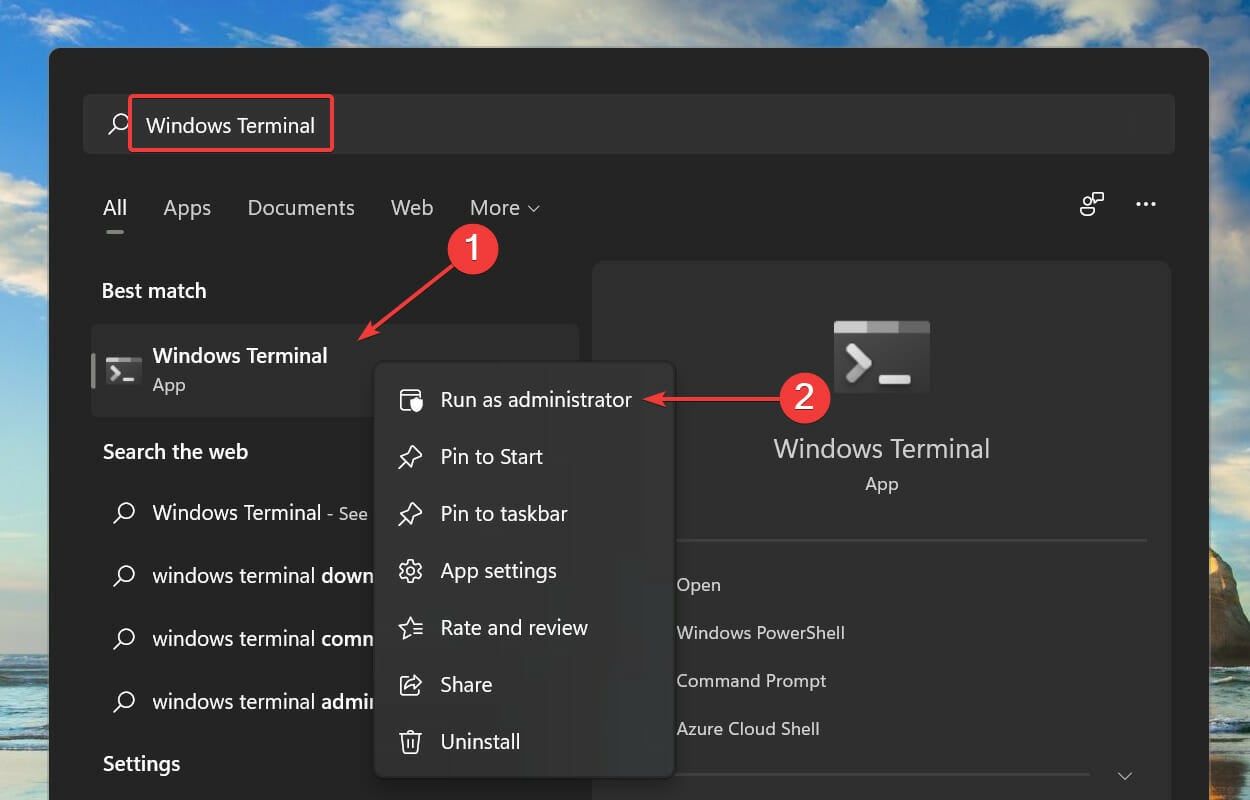
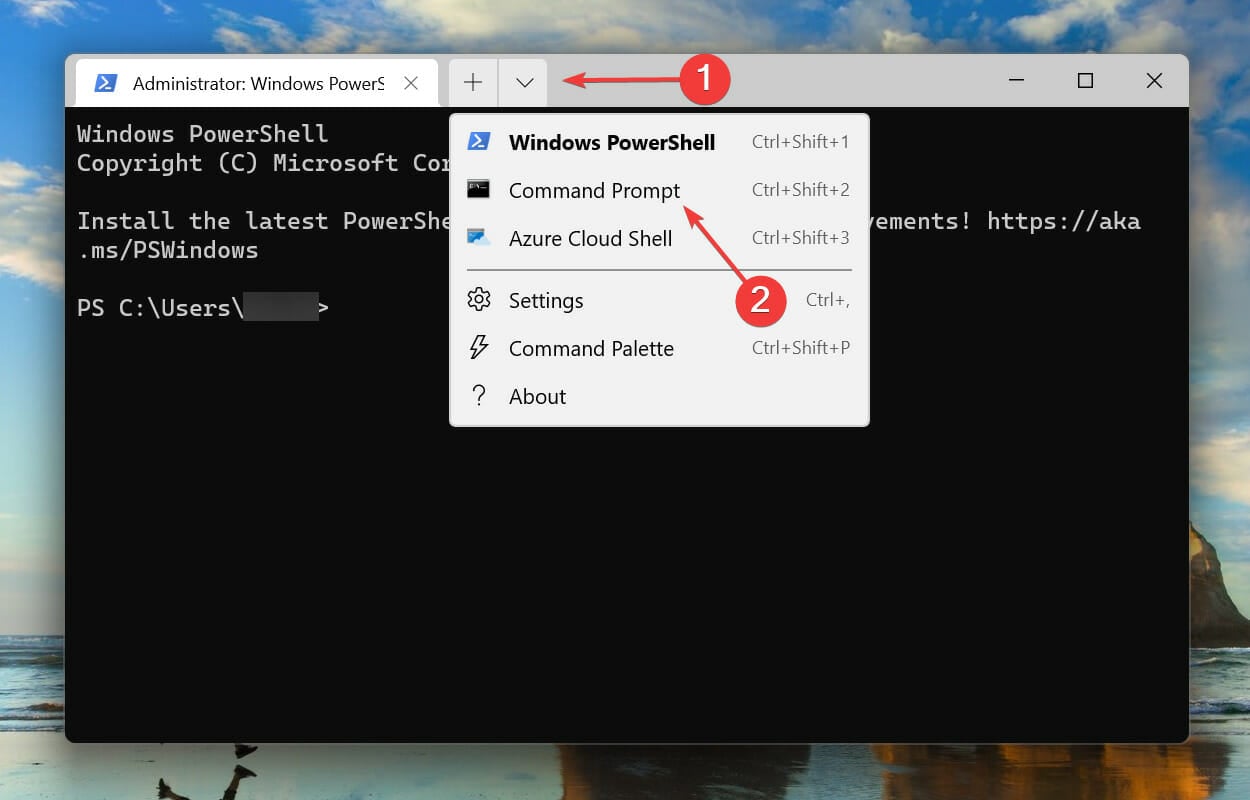
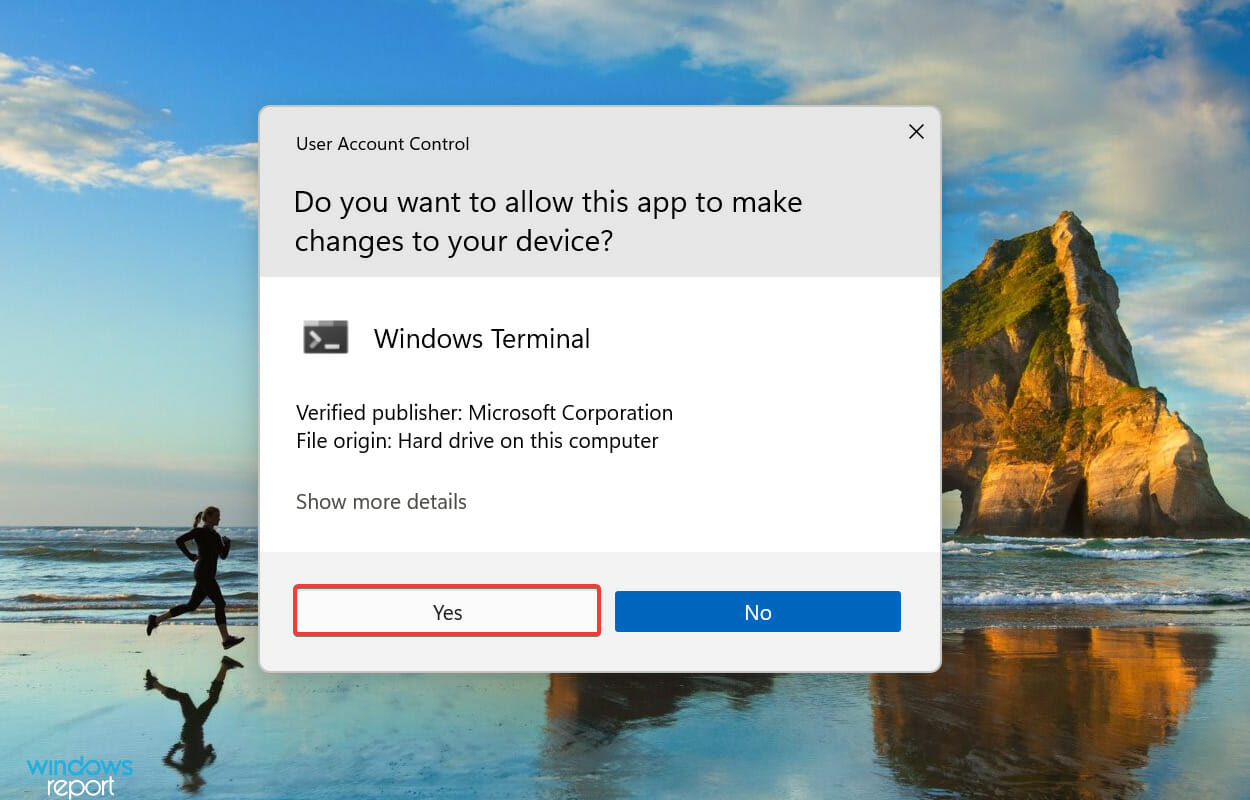
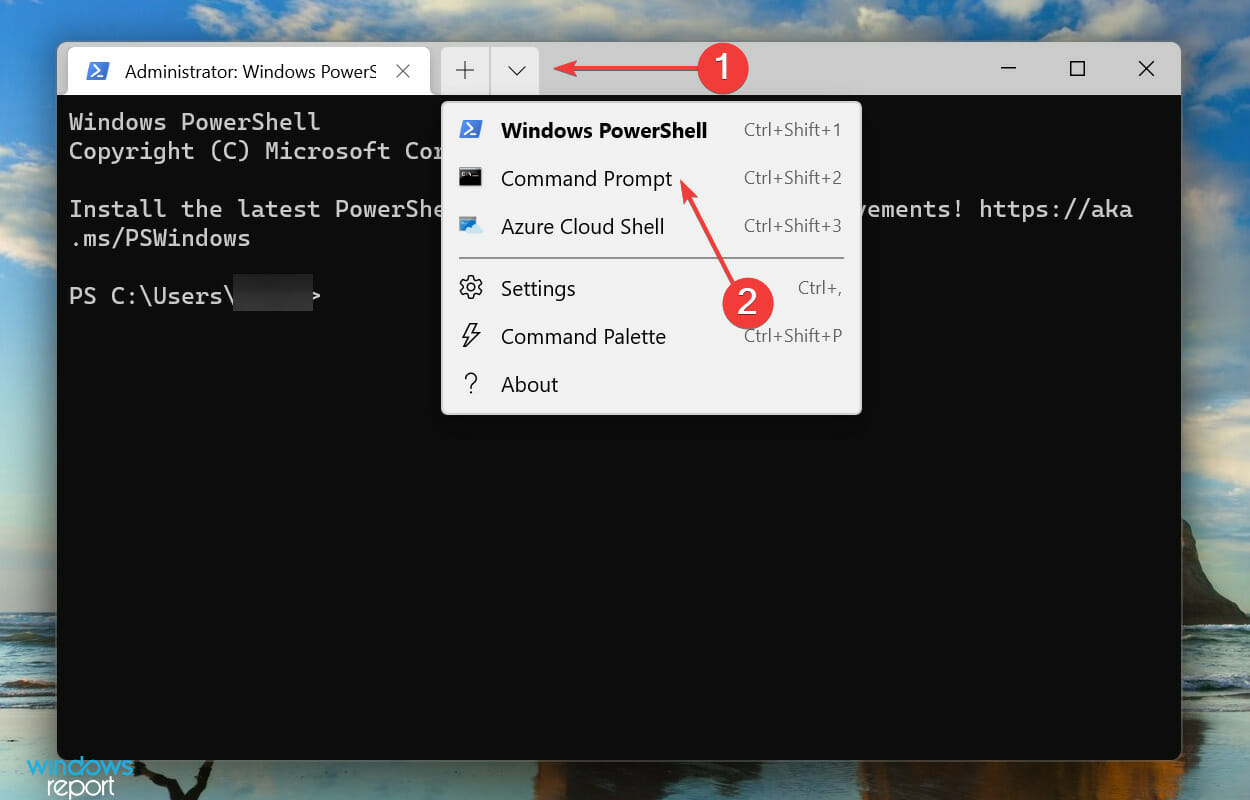
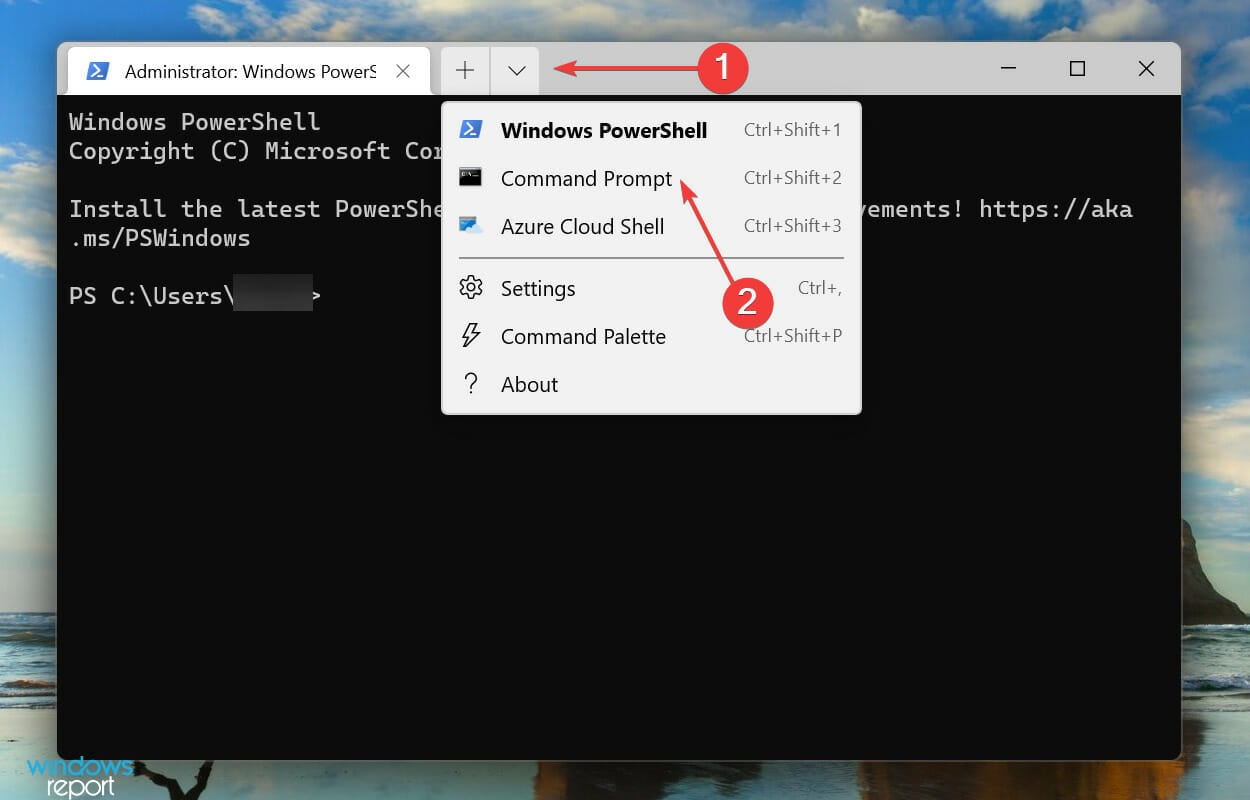
  1. Left-click the Start button, type cmd, then select Run as administrator from the drop-down.
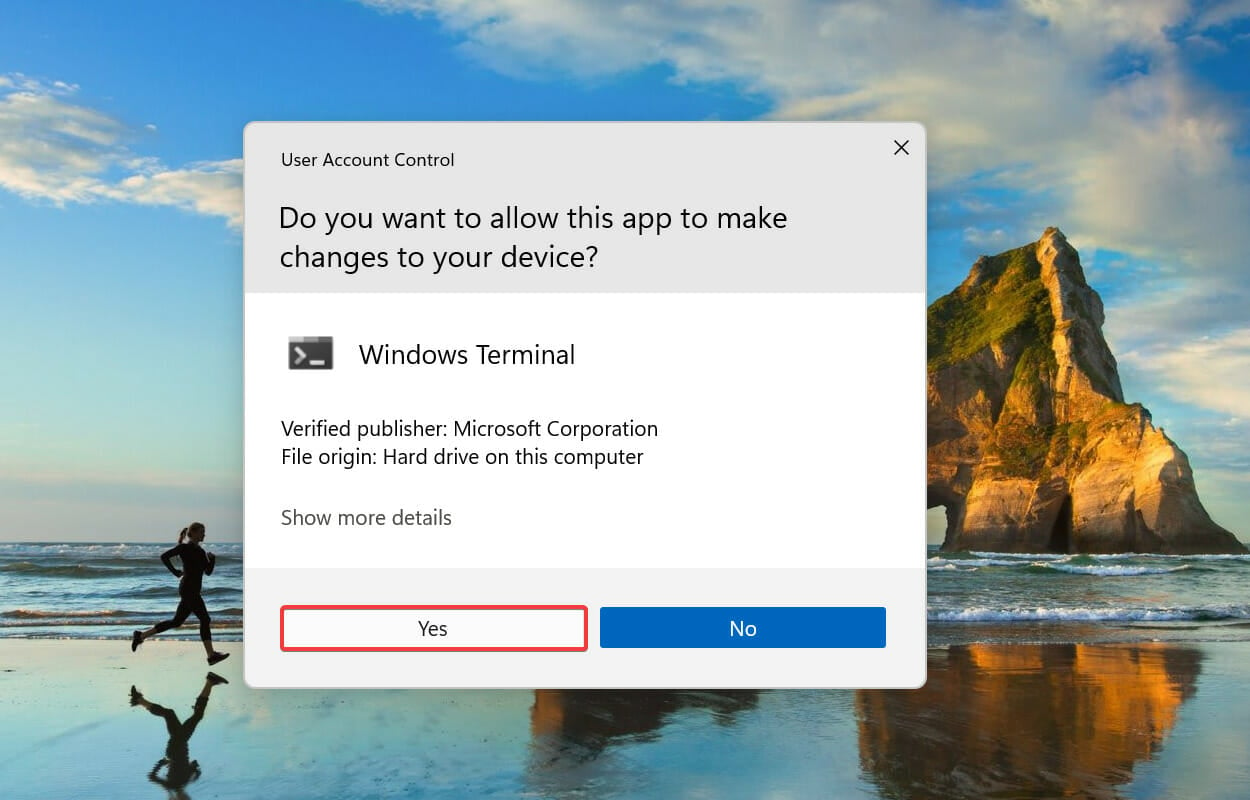
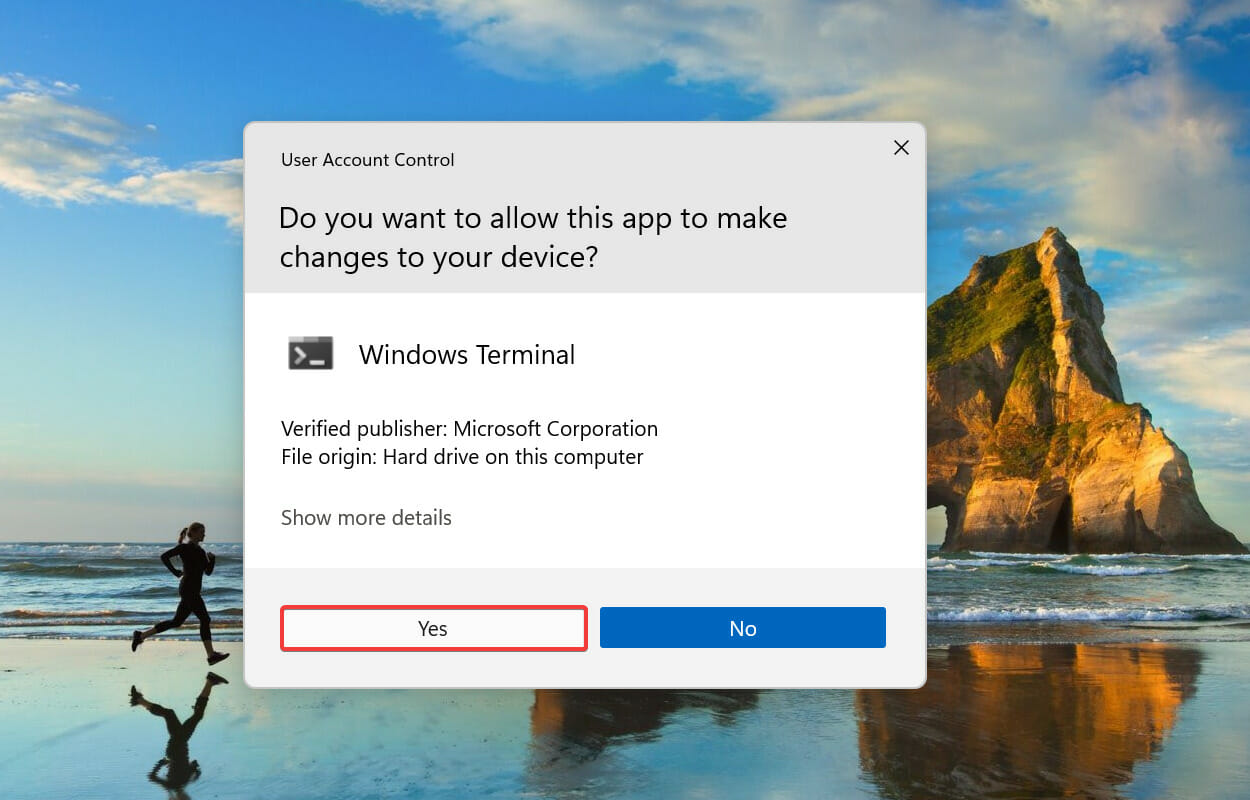
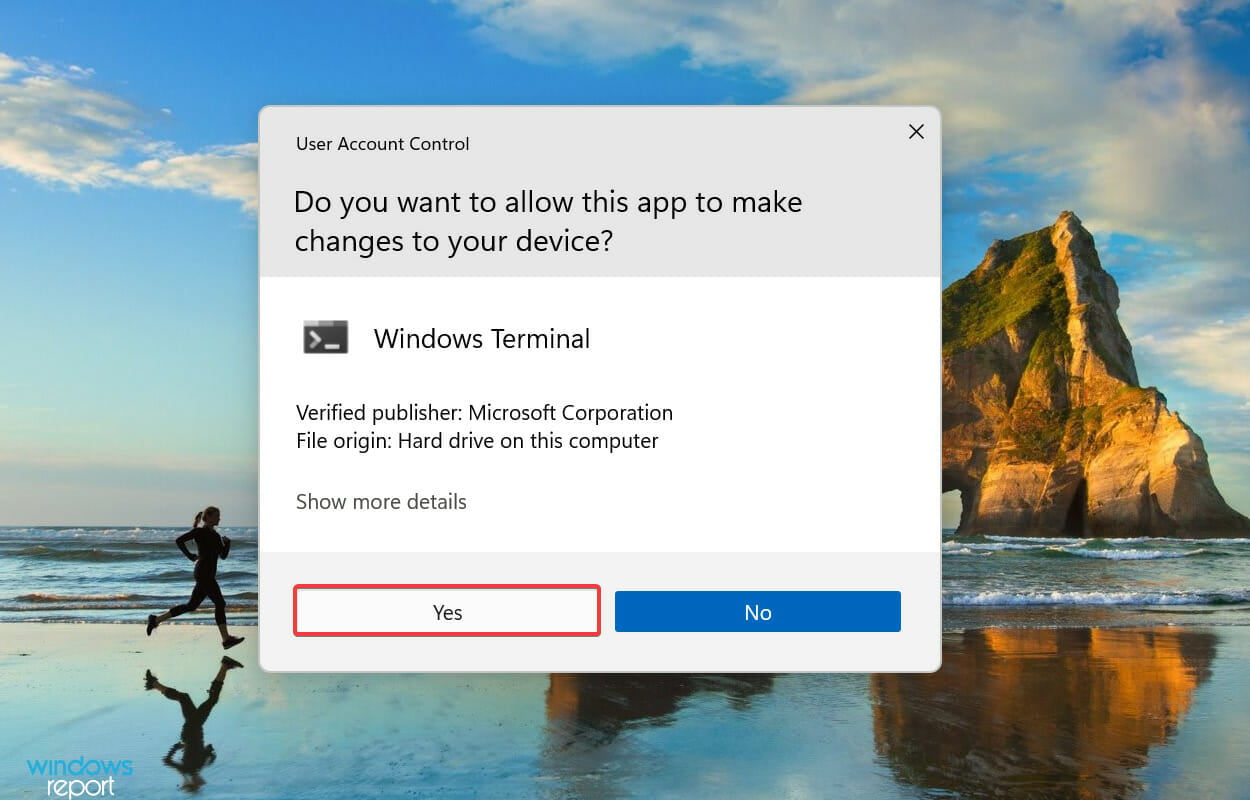
  2. Click Yes if the User Account Control appears.
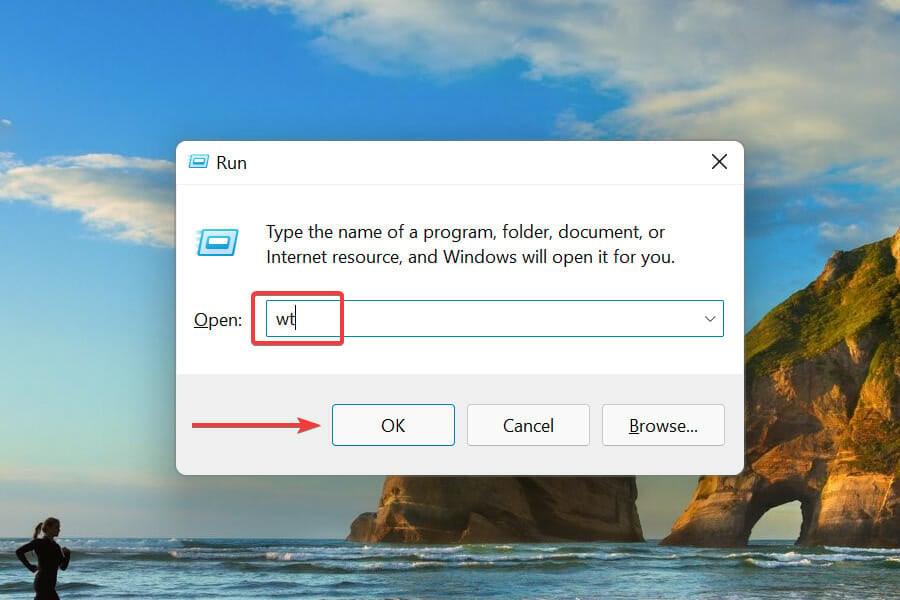
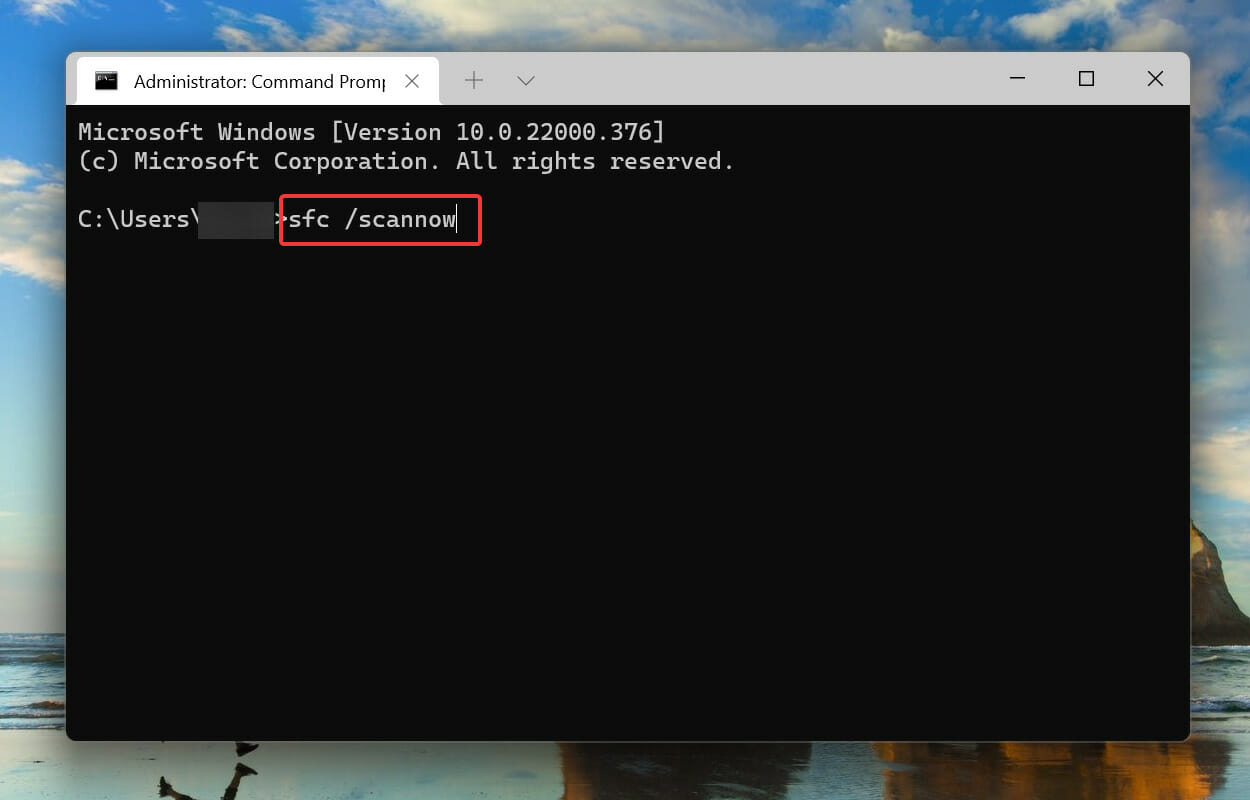
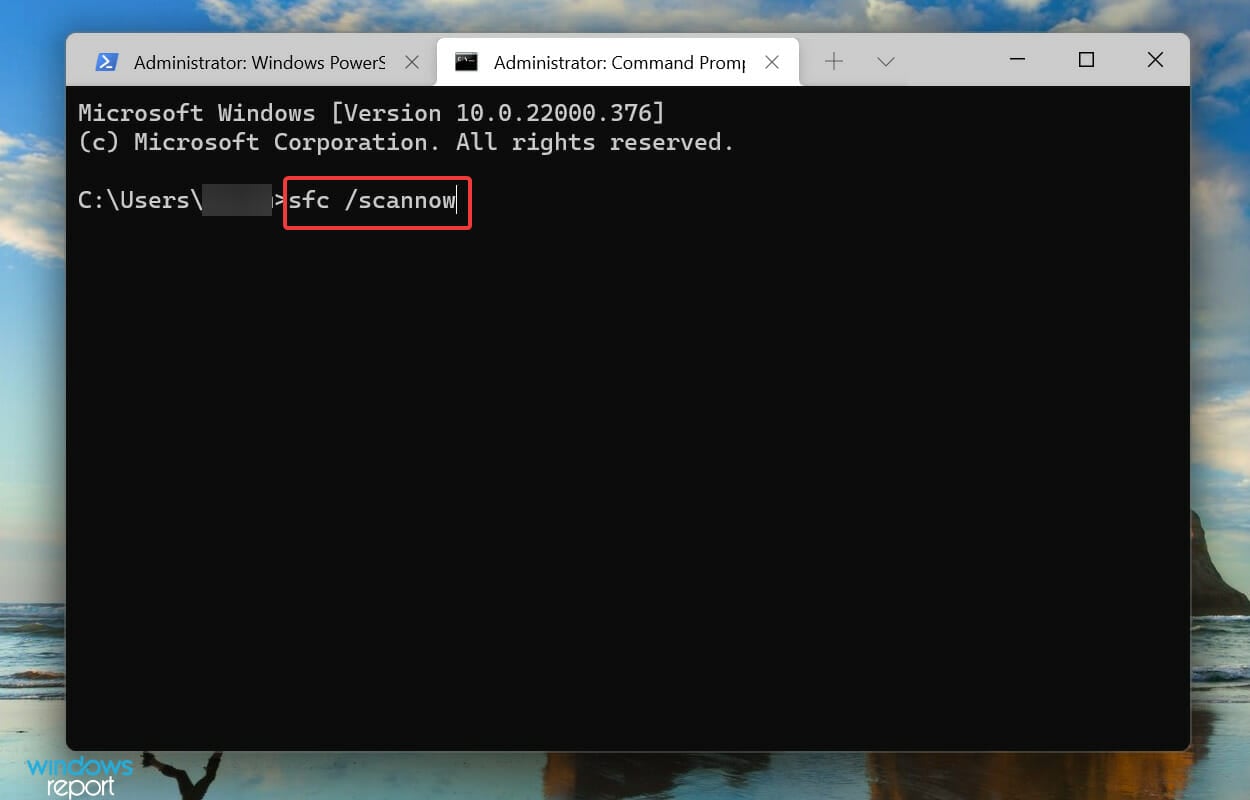
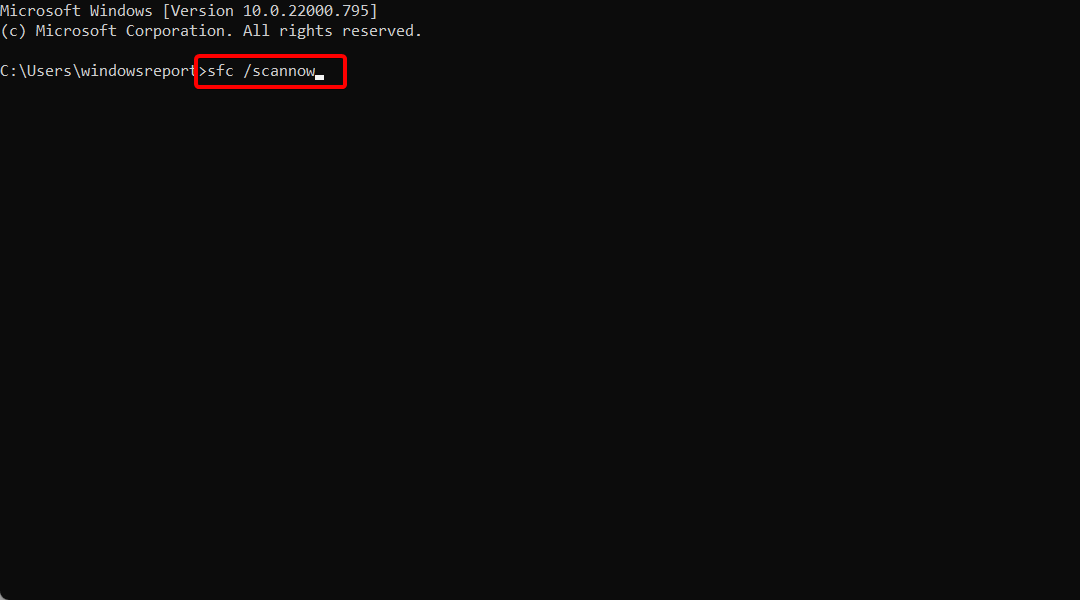
  3. Type the following and press Enter to start the scanning process: sfc /scannow
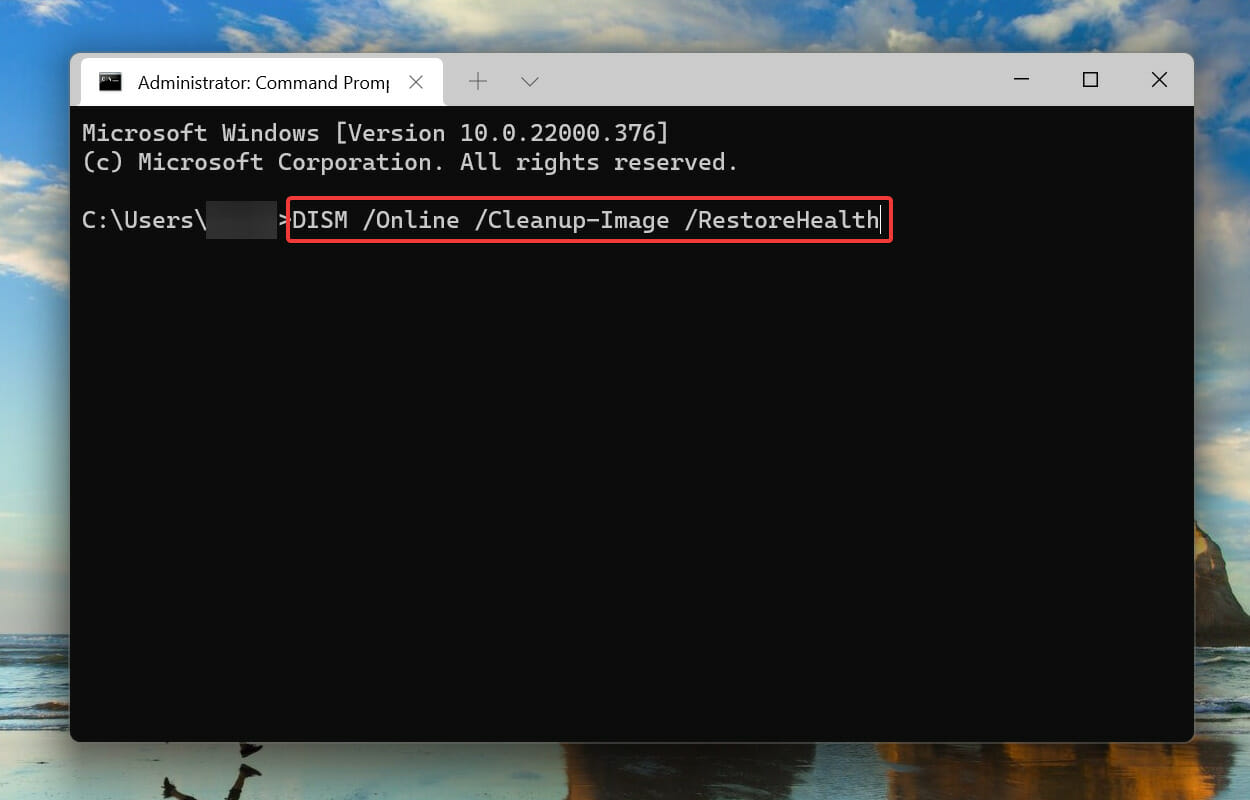
  4. Type the following commands and press Enter after each: DISM /Online /Cleanup-Image /RestoreHealth
  5. Restart your PC.

The SFC and DISM scan will find corrupt system files and repair corrupted files, fixing the update error.

If you have problems using the run as administrator, check how to fix the run as administrator option not working on your PC.

To make sure that there is no corrupted file on your PC, we recommend using a specialized tool that will automatically find and repair any damaged system file.

2. Reset the Windows Update process

  1. Left-click the Start button, type cmd, and select Run as Administrator.
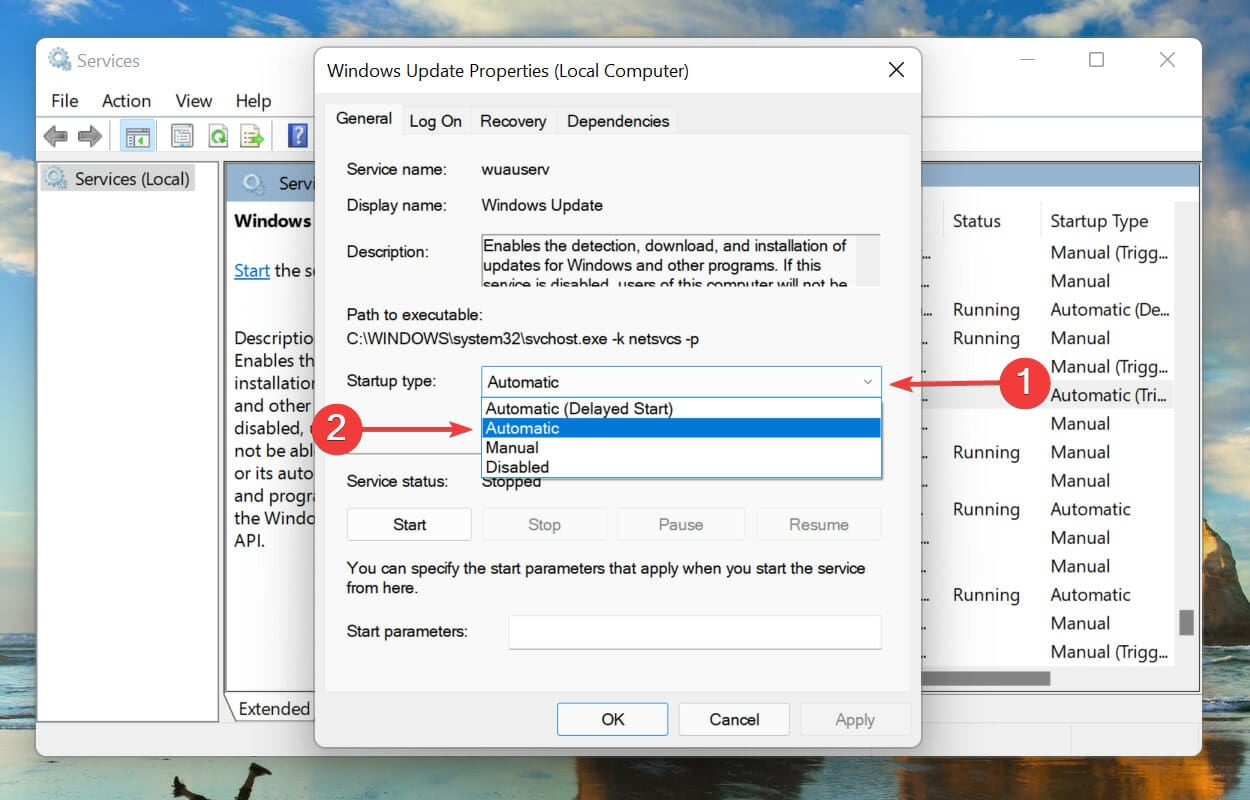
  2. Type the following commands and press Enter after each one: net stop wuauserv net stop cryptSvc net stop bits net stop msiserver
  3. Run the following command one after the other: ren C:\Windows\SoftwareDistribution SoftwareDistribution.old   ren C:\Windows\System32\catroot2 Catroot2.old
  4. Type the following commands and press Enter after each one: net start wuauserv net start cryptSvc net start bits net start msiserver
  5. Exit the Command Prompt and restart your PC.

Resetting the Windows update process can fix the error and clear the previous update cache from your PC.

3. Run Windows Update Troubleshooter

  1. Press Windows + I key to open the Settings app.
  2. Click System and select Troubleshoot.
  3. Expand the Other troubleshooters.
  4. Then click on Windows Update and click the Run button.
  5. Follow the on-screen prompts.

The troubleshooter will find and repair the problems causing the Windows update not to work on your PC.

You can check other ways to run the Windows Update troubleshooter in Windows 11 if you have issues with it.

 4. Restart Windows Module Installer service (trustedinstaller.exe)

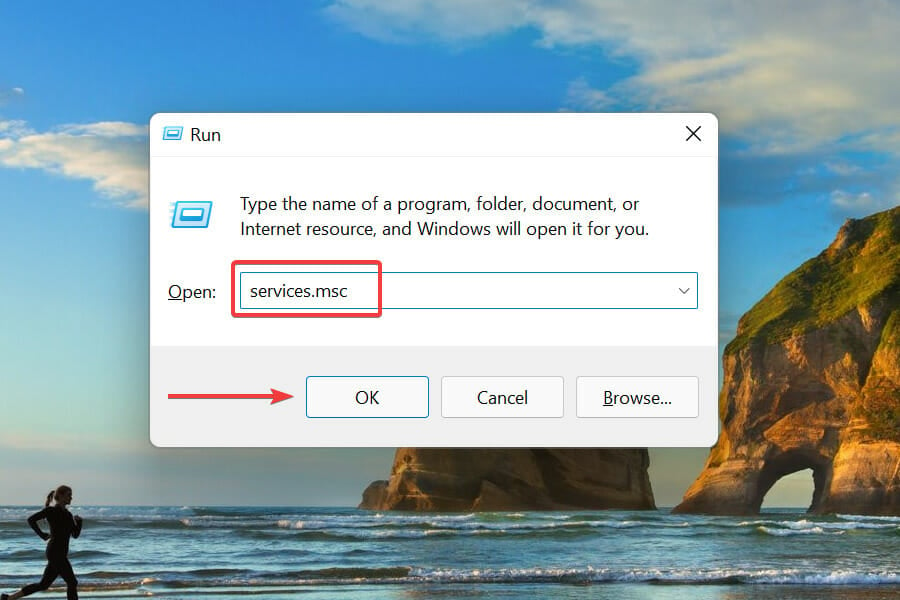
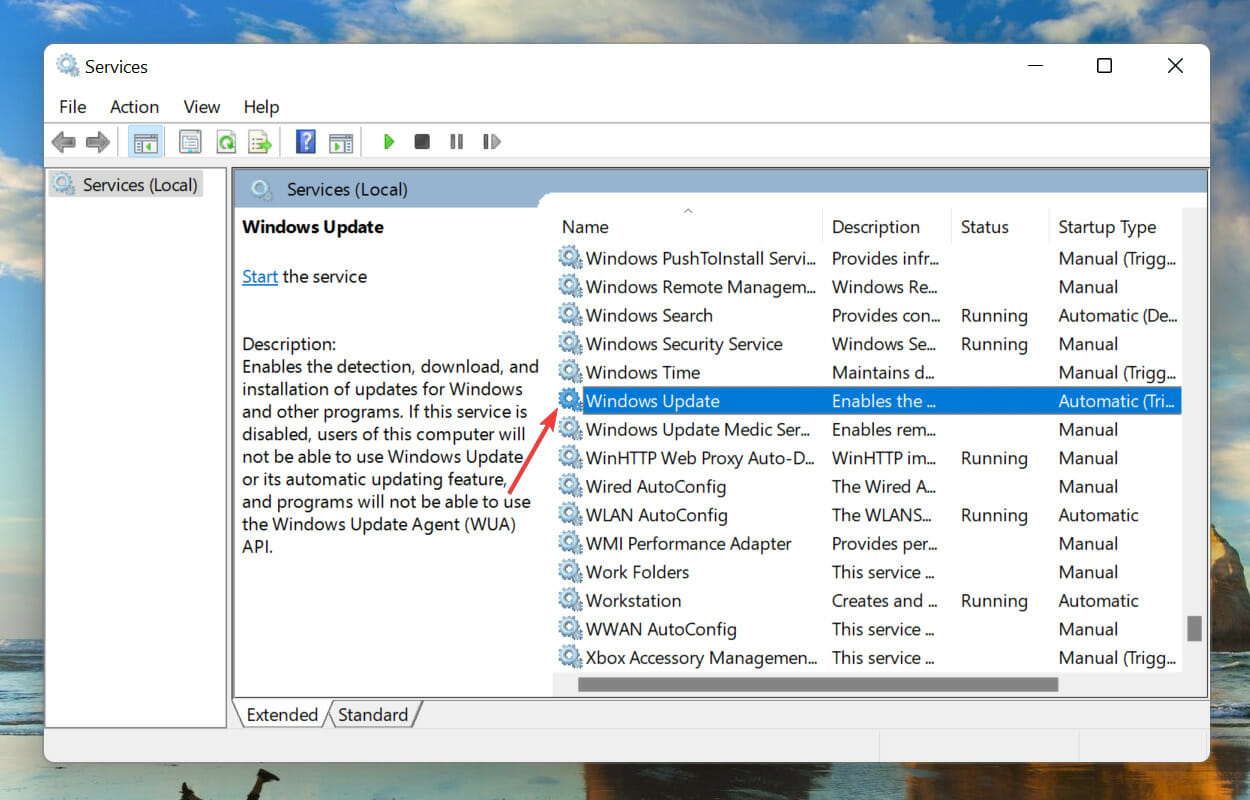
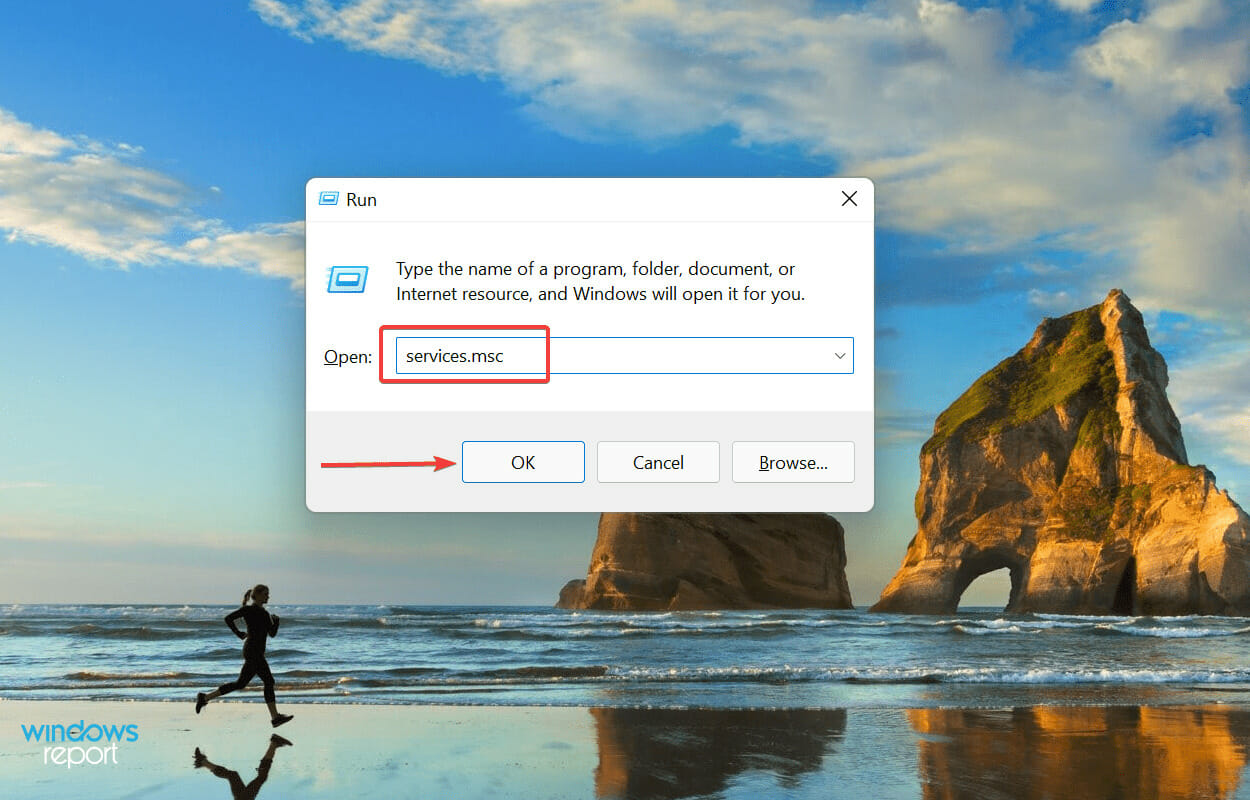
  1. Press Windows + R key to open the Run dialog box and type services.msc, then press Enter.
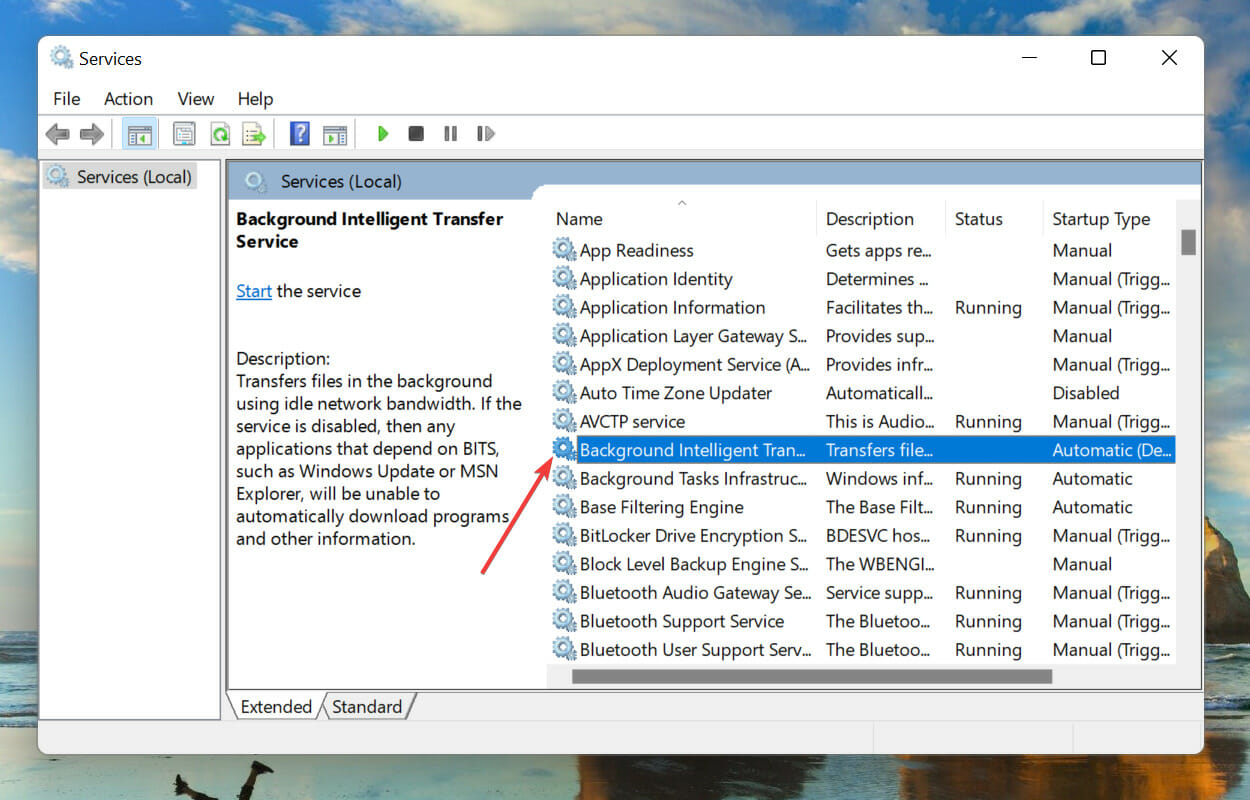
  2. Find and right-click on the Windows Modules Installer, then select Properties.
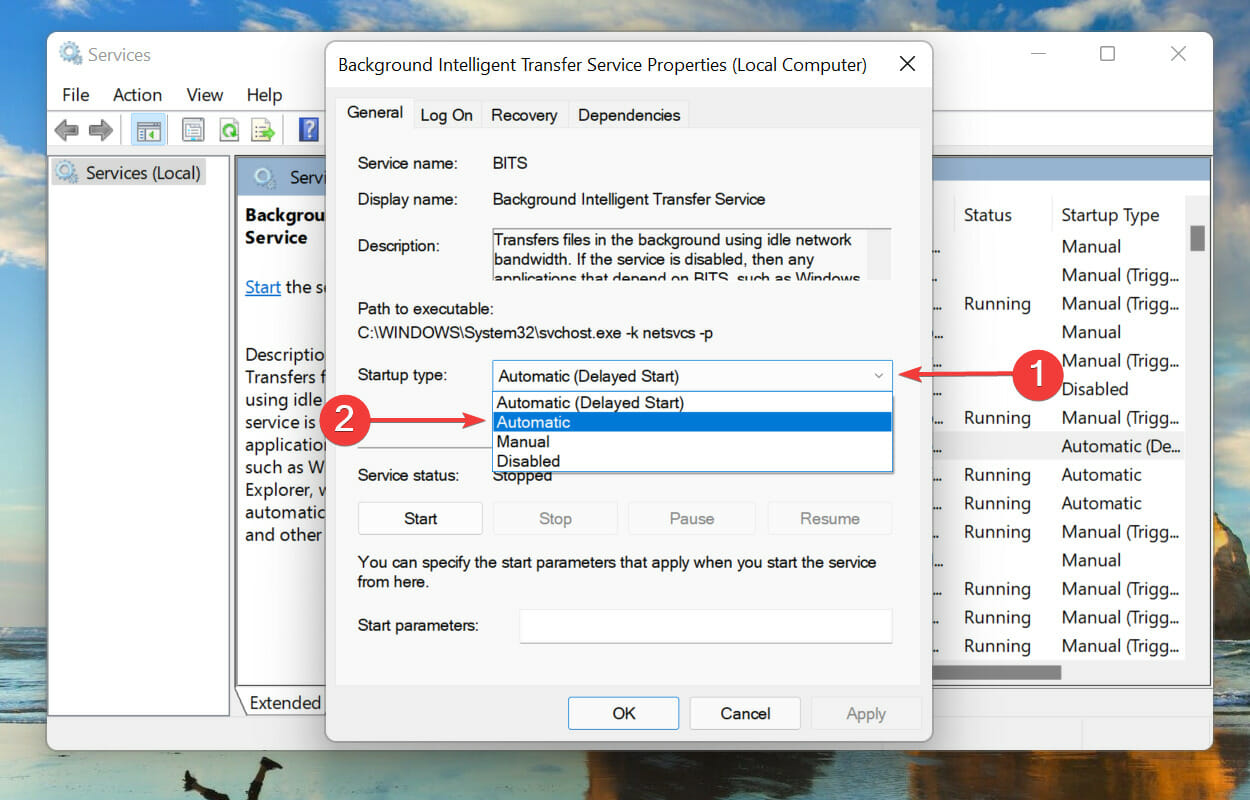
  3. Go to the General tab, click on the Stop button, then click the Start button to restart it.
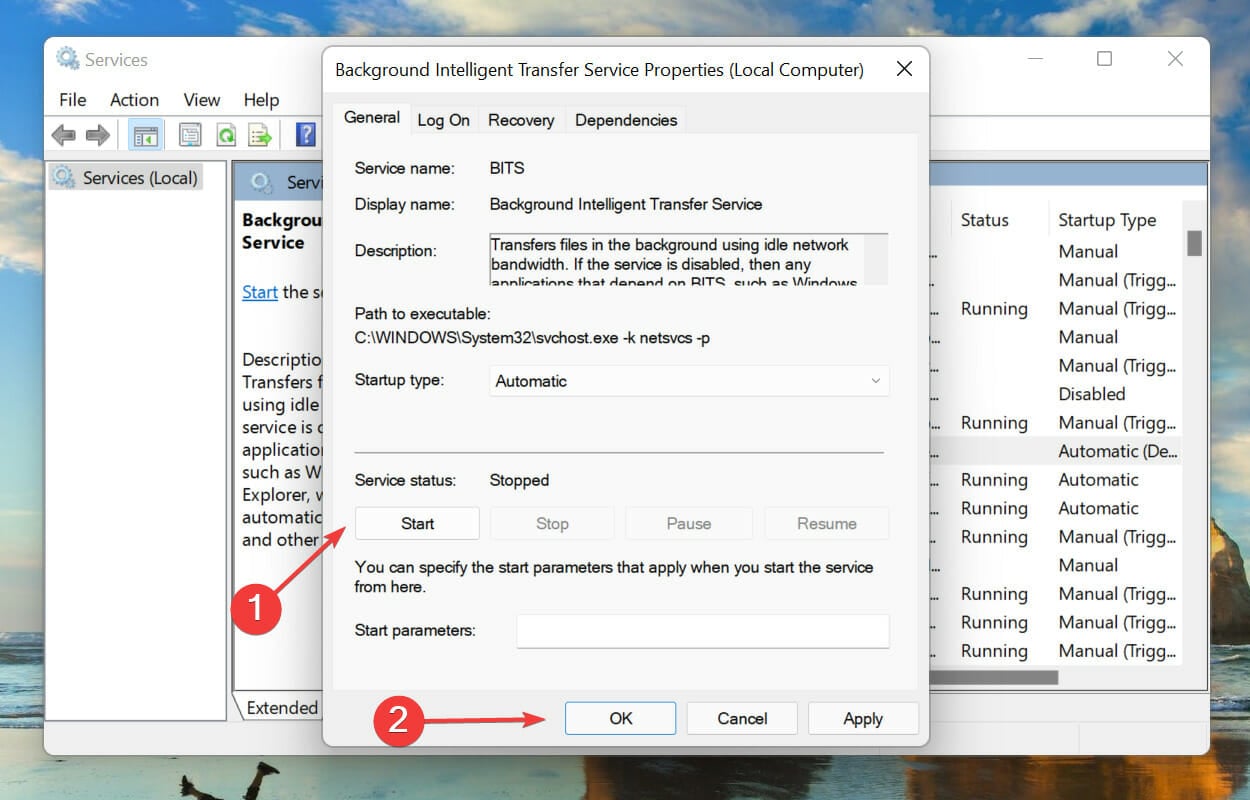
  4. Click the OK button, then Apply to confirm the process.
  5. Restart your PC and check if the error persists.

Restarting the Windows Module Installer service will close any update running in the background that may cause errors.

For users experiencing Windows Module installer high CPU usage, check how to fix it.

In conclusion, we have a detailed guide to help you fix other Windows update errors, such as error 1935 and error 9c48 on Windows 11.

If you have more questions, kindly drop them in the comments section.

PaperPort Won’t Open: 5 Easy Ways to Fix it

You must have found this guide because PaperPort won’t open. We will show you all you need to know.

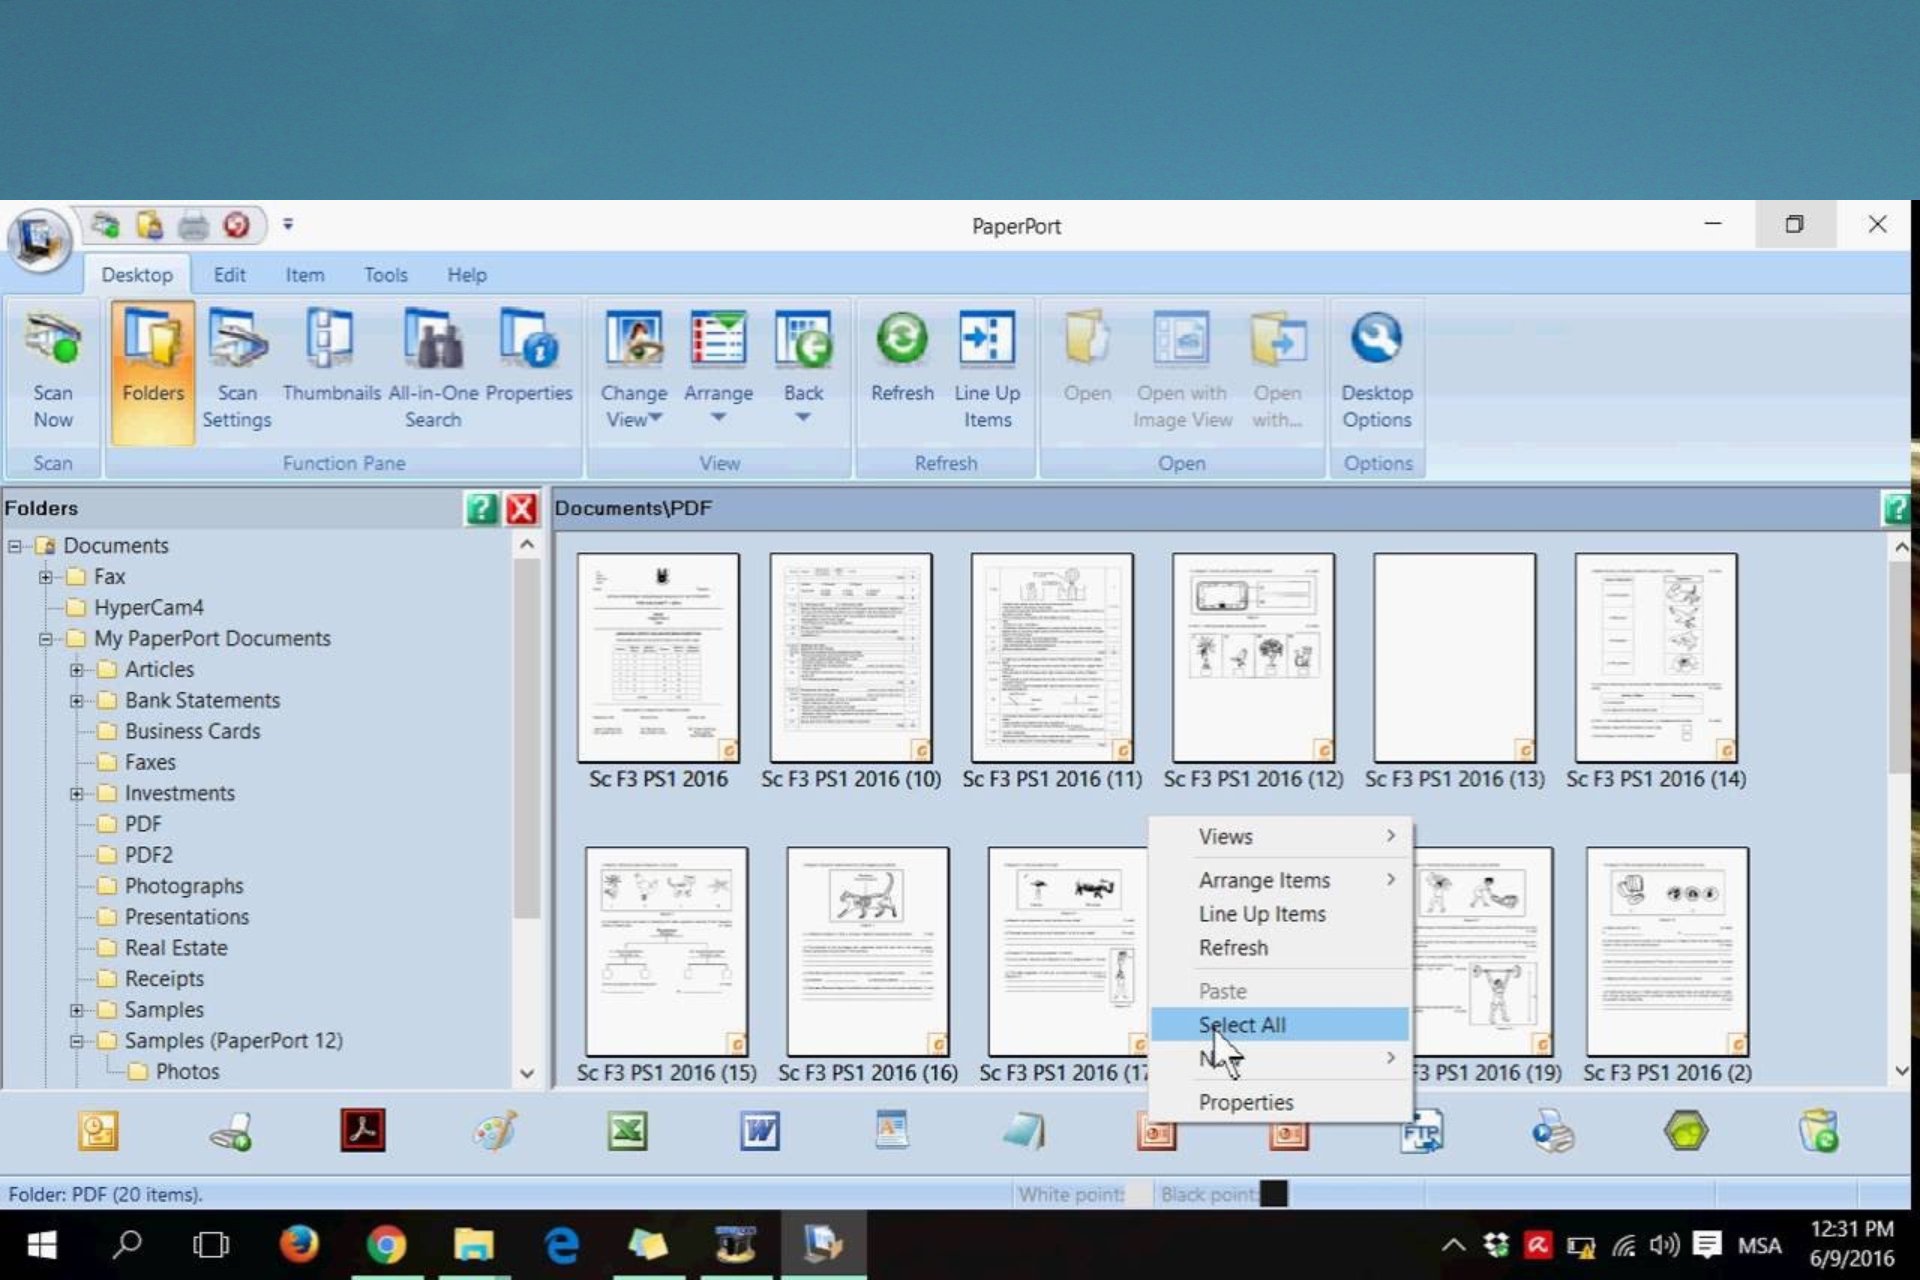
Kofax’s PaperPort is a commercial DMS designed for handling scanned papers. However, it does more than scan documents and will organize, search, and share documents on your computer.

If you cannot start the app, here are the causes and some of the best solutions.

Why won’t PaperPort open?

We have gathered that there may be a few factors in play that will hinder PaperPort from working. Here are the top causes to take note of:

  • Compatibility issues – In some cases, you may have installed a non-compatible version of the software, which may cause it not to run. This may force you to use the compatibility troubleshooter.
  • Conflicting programs – Sometimes, other applications on your computer may interfere and stop PaperPort from running correctly.
  • Account issues – In some cases, it has been observed that, for some reason, the app will not work on some accounts.

It would be best if you tried the suggested solutions as they should work regardless of the cause of the problem.

How can I fix Paperport if it won’t open?

Before going into any of these fixes, we recommend rebooting the computer. A restart forces some processes to shut down and could solve some computer issues.

  1. Run the compatibility troubleshooter
  2. End Paperport task in Task Manager
  3. Update Paperport to a newer version
  4. Run the Program Compatibility Troubleshooter
  5. Create a new user account

1. Run the compatibility troubleshooter

  1. Right-click on the PaperPort executable installation file (it will be in your downloads folder or any other location you may have saved it in).
  2. Select the Troubleshoot Compatibility feature.
  3. Click Troubleshoot program.
    paperport won't open
  4. Check the box next to The program worked in earlier versions of Windows but won’t install or run now, then click Next.
    paperport won't open
  5. In the next window, you will need to select the previous version of Windows you know that the PaperPort app worked fine with, then click on Next and follow the screen instructions to finish installing the PaperPort app.
    paperport won't open
  6. After the installation, choose the option Yes, save these settings for this program.
  7. After the changes are saved, you will need to click the Close button and try to run your Paperport application.

If PaperPort still doesn’t open, try the next solution.

2. End Paperport task in Task Manager

  1. Press Ctrl + Shift + Esc to open the Task Manager.
  2. Now right-click ppmv.exe, select End task from the menu, or choose ppmv.exe and click the End task button at the bottom-right corner.
    paperport won't open
  3. Close the Task Manager window, and try opening the PaperPort application now to see if it works.

3. Update Paperport to a newer version

Paperport is now compatible with Windows 10, but not all versions will run smoothly on Microsoft’s OS.

If you run Paperport 14.0 or an older version, you must upgrade the tool. Keep in mind that only Paperport 14.5 works well within Windows 10.

If PaperPort still doesn’t open, try the next solution.

4. Run the Program Compatibility Troubleshooter

  1. Press Windows + I to open the Settings app.
  2. Click on Updates & Security.
    paperport won't open
  3. Click Troubleshoot on the left pane, scroll through the right pane, select Program Compatibility Troubleshooter, and click Run the troubleshooter.

If PaperPort still doesn’t open, try the last solution.

5. Create a new user account

  1. Press Windows + I to open the Settings app.
  2. Click on Account, select Family & other people, then click Add someone else to this PC.
  3. Create a new user account and check if this solved the problem.

You can use a few methods to properly run the PaperPort application on your Windows 10 operating system.

If these steps do not work for you, I suggest posting a message on the official Nuance website about this issue to find out if there are any available updates on the application that you can try installing.

These solutions will work if PaperPort is not launching or PaperPort 14 is not opening on Windows 10.

Also, if you have any other questions regarding this article, please write us in the comments section of the below page, and we will help you further with this issue.

Fix: There is not Enough Memory to Complete This Operation

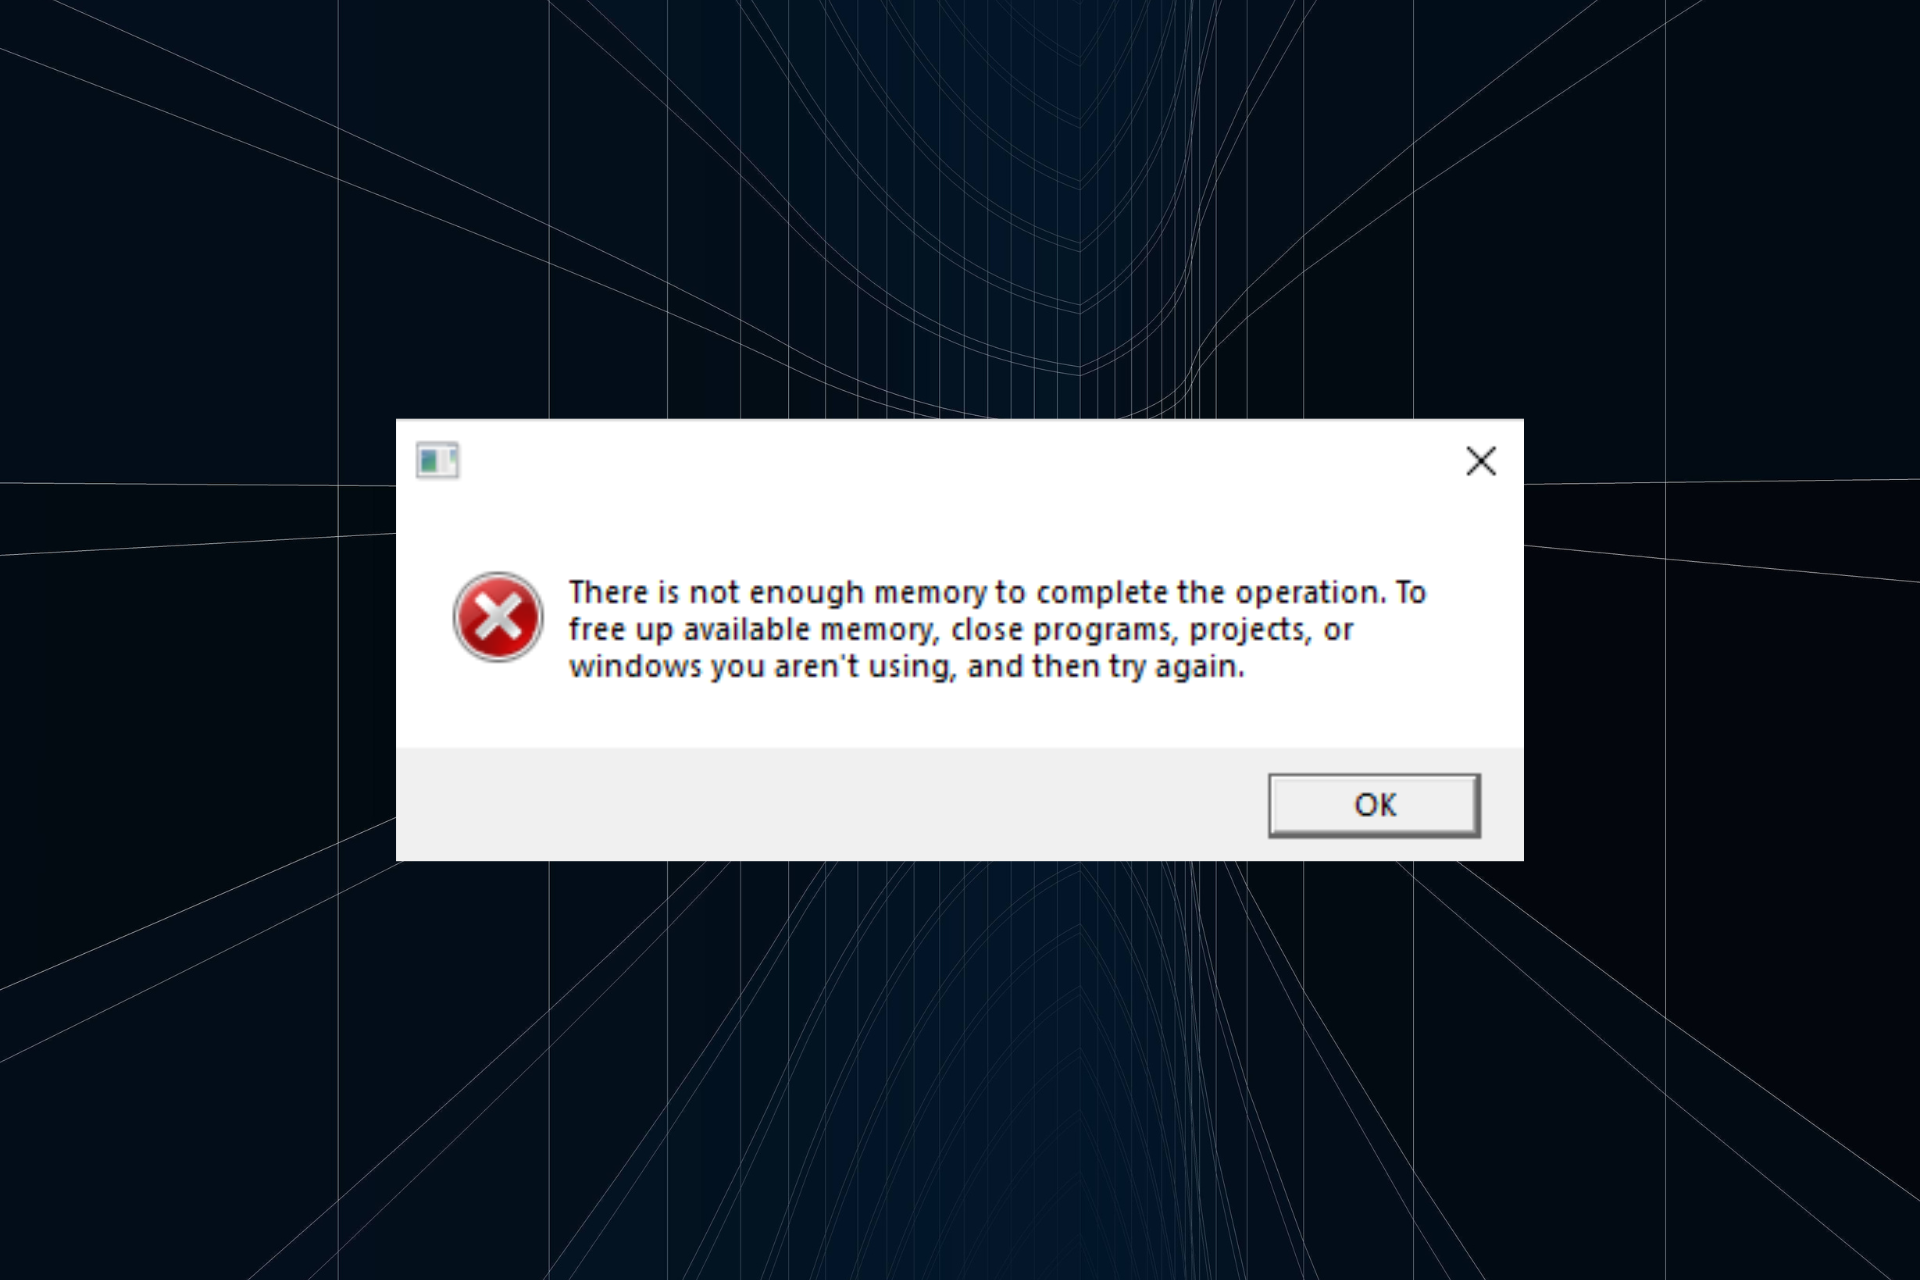
Memory or RAM is a critical component, and issues with it, or even running too many processes, can trigger errors. One such is the There is not enough memory to complete this operation error in Windows.

The error is intricate, and the underlying cause could be related to the hardware and software, making troubleshooting a tad more complicated. So, let’s find out how you can fix things.

Why am I getting There is not enough memory to complete this operation?

Here are some of the reasons why you are getting the error:

  • Insufficient RAM – In some cases, your PC is indeed out of RAM, and can’t handle any more tasks or operations, and the ideal solution here would be to kill a few non-critical processes.
  • Corrupt system files – If it’s the corrupt system files, that should be evident since it affects other parts of the OS as well.
  • Problems with the app itself – Oftentimes, the issue lies with the app itself, in which case, repairing or reinstalling the affected program is the only solution that works.

How can I fix There is not enough memory to complete this operation error?

1. Repair the app

  1. Press Windows + I to open Settings, go to Apps in the navigation pane, and then click on Installed apps.installed apps
  2. Now, click on the ellipsis next to the problematic app, and select Advanced options.advanced options
  3. Click on Repair.repair to fix there is not enough memory to complete this operation
  4. If that doesn’t work, click on Reset.reset to fix there is not enough memory to complete this operation
  5. Again, click Reset in the confirmation prompt to start the process.confirm
  6. Wait for the process to complete and restart the computer for the changes to take effect.

In most cases, a simple repair or reset should fix things when you get the There is not enough memory to complete this operation error. If that doesn’t work, head to the next solution.

2. Delete app files

Note icon NOTE
The steps here are for Microsoft Excel. In the case of other apps, you can similarly find the relevant files and delete them. Also, remember that the AppData folder is hidden by default.
  1. Press Windows + E to open File Explorer, and navigate the following path while replacing the Username with the current profile:C:\Users\Username\AppData\Roaming\Microsoft\Excel
  2. Now, press Ctrl + A to select all the files, and then hit Del to delete them.delete files to fix there is not enough memory to complete this operation
  3. Similarly, navigate the following path and delete all the files here as well:C:\Users\Username\AppData\Local\Temp\ASPWebView
  4. Once done, restart the computer and check if the problem is fixed.

3. Increase the Virtual Memory (Page File)

  1. Press Windows + S to open Search, type Adjust the appearance and performance of Windows, and click on the result that goes by the same name.performance options
  2. Navigate to the Advanced tab, and click on Change under Virtual memory.change
  3. Untick the checkbox for Automatically manage paging file size for all drives, select No paging file, and click on Set.no paging file
  4. Click Yes in the confirmation prompt.
  5. Once done, choose Custom size, enter the values using the formula below, click on Set, and then on OK to save the changes:
    • Initial size: 1.5 x Available RAM on the PC x 1024 (since the value has to be input in MB)
    • Maximum size: 3 x Available RAM on the PC x 1024change virtual memory to fix there is not enough memory to complete this operation
  6. Finally, restart the computer for the changes to come into effect.

Often, when the RAM is full, the Virtual Memory could take some load off it by storing the processes that have been inactive for a file. And this should help if you keep getting the There is not enough memory to complete this operation error while copying files.

4. Install another version of the affected app

Many users fixed things by installing another version of the app. For instance, if you are currently running the 64-bit version, downgrade to 32-bit, if that’s available, and vice-versa.

Most apps have both a 32-bit and 64-bit version to allow users to get the one that matches the system architecture.

5. Test the RAM

If nothing else works, it could be a faulty RAM to blame. But before we start testing it, make sure it’s properly seated. To do that, remove it and then firmly reconnect the memory modules.

Once done, run Windows Memory Diagnostic, a built-in repair tool that automatically identifies and fixes various errors. But as with most built-in apps, it isn’t that effective.

And therefore, we also recommend using MemTest86+, a free, open-source tool that will run a series of tests (probably take hours) and list out the problems with the RAM. Then, if one or more of the modules are problematic, replace them immediately.

You could also try to:

  • Restart the computer. It wouldn’t fix things but should provide reprieve and allow the tasks to be completed.
  • Change the format of the text. Changing the font to Arial in a Word document for one user got things running. For Excel, simplify the sheet a bit. For instance, delete empty rows and make similar changes to reduce its processing power.
  • Update Windows and the app that throws the error, in case it’s just one or a few. If every app throws the error, it’s likely a more severe problem.
  • If you have a third-party antivirus or security software installed, disable it. Then, if that works out well, switch to a more effective and reliable antivirus that doesn’t conflict with the OS and processes.
  • If the error first appeared after installing another program, uninstall that app, and check if things run perfectly. Also, remove any unnecessary browser extensions that you may have installed.

Here are a few apps that usually throw the error:

  • After Effects There is not enough memory to complete this operation – The software is often affected when Mercury Transit is enabled.
  • Word There is not enough memory to complete this operation – Microsoft Office applications are commonly affected by the error.
  • Excel There is not enough memory to complete this operation – It’s usually the case when the Excel file has extensive data to be loaded.
  • Outlook There is not enough memory to complete this operation – Restarting the application might fix things, even if temporarily.
  • Project There is not enough memory to complete this operation – Several users reported that downloading the 32-bit version of the program helped fix things.
  • Disk Management There is not enough memory to complete this operation – In this case, make sure that RAM and storage devices aren’t faulty.
  • Illustrator There is not enough memory to complete this operation – The app, too, throws errors for many, and our solutions should help.

That’s it! There is not enough memory to complete this operation error should be fixed by now. However, in case it persists, reinstall the affected app and if that doesn’t work, take your PC to a repair shop and get the hardware checked.

If are facing similar memory management issues like Not Enough Memory in Windows 11, we suggest you check out this guide for easy solutions.

A similar issue affects Kyocera, but we have a special guide for troubleshooting Kyocera’s Memory Allocation Failure issue that you shouldn’t miss.

We hope that our guide was helpful. If you solved the problem using our solutions, let us know in the comments below.

Xbox Controller Keeps Disconnecting: How to Stop It

If your Xbox controller keeps disconnecting, it can be a pain to play games. You’ll find yourself constantly having to reconnect the controller, which can cause you to lose your focus during gameplay.

The issue can happen when the Xbox controller is not connecting to your Steam deck or keeps disconnecting. This can be an indication that the Xbox controller is not working as it should be and you need to troubleshoot.

Why is my Xbox controller not staying connected to my PC?

If you are wondering why your Xbox controller is disconnecting while plugged in, below are some possible reasons:

  • Low battery level – You should see a green light on the front of the controller when it’s plugged in and charging. If there isn’t a green light, then the battery may be dead and needs to charge for at least two hours before using again.
  • Outdated controller firmware – The Xbox controllers have firmware that can be updated just like any other device and without these updates, they can malfunction. 
  • Wrong USB port – Your Xbox controller USB device might not detect properly if it is connected to the wrong port. 
  • Signal interference – If your controller is not staying connected, then it could be due to infrared interference. The most common devices that emit infrared signals are other wireless devices like mice and keyboards.
  • The controller is using wireless technology – Wireless devices often have trouble staying connected. Your Xbox controller could be disconnecting on Overwatch 2 randomly.
  • Faulty controller – The most common reason for this is a controller that has been dropped or damaged in some way. If this is the case, you need to upgrade your controllers.

Why is my Xbox One controller flashing and not connecting?

If your controller is flashing, it usually means that it is out of range of the console, especially for wireless controllers. To resolve this issue, move closer to the console and try again. For a wired Xbox controller disconnecting from the PC, you can try switching the USB ports.

The battery may also not be charged enough to connect. You can resolve this by fully charging the controller.

How do I stop my Xbox controller from constantly disconnecting?

A few checks before the technical solutions can help you address this issue. These include:

  • Make sure that the Xbox controller is plugged in properly. 
  • Ensure that your controller’s batteries have been charged before using them in the console.
  • Switch to another USB port on your computer or another wall adapter if possible. Your USB port may be faulty or damaged and some ports can be more reliable than others.
  • Turn off any devices that could be causing interference and see if it helps improve connection stability
  • Try connecting to another device to see if it works. If it does, then your original device may have been damaged or broken.
  • Restart your Xbox console.

1. Update your Xbox controller

If you have a controller that’s more than a year old, it may need to be updated. The update will ensure that your controller is running on the latest firmware and that any bugs or glitches are fixed.

If you’re unsure of how to update your controller, Microsoft has instructions on how to do so on its website. You can also check out our article on how to update an Xbox One controller for more details on how this process works.

2. Re-sync your controller

If your controller is constantly disconnecting, it may be out of sync with the console. Re-sync the controller by pressing the sync button on top of the device and then holding it down until the flashing lights become solid.

This process creates a pairing between your controller and console. It also refreshes the connection between your console and PC.

3. Reset your Xbox console

  1. On your controller, press the Xbox button and on the menu, click the System tab to open Settings.
  2. Select System then click on Console info.
  3. Hit Reset console.reset xbox one console
  4. Choose Reset and keep my games & apps.

The Xbox One controller has a built-in battery that can last up to 35 hours on a single charge, but it has a limited life. In time, the battery will lose its ability to charge and hold a charge, which means you’ll have to replace the battery.

If your Xbox controller is constantly disconnecting and reconnecting from your console, resetting and reconnecting it will fix the problem.

In case you are unable to remove the Xbox controller device, we have a dedicated article with ready fixes. Also, if you are in the market for a gaming controller, we have excellent recommendations that guarantee you a perfect gameplay experience.

Let us know of any additional fixes not mentioned here that worked for you in the comment section below.

Disable Windows Key: 5 Easy Ways to Lock it

The Windows key is somewhat helpful and is a part of many shortcuts on Windows 10. However, many users use it frequently, and some want to disable it.

The key can sometimes be a problem, especially during intense gaming sessions. By default, pressing the Windows key will open the Start Menu, which can make you lose focus while gaming.

This guide will show you the easy ways to disable the Windows key and prevent any distractions.

Can you disable the Windows key while gaming?

There are limited ways to disable the Windows key in game mode. This is because Microsoft views and has placed much importance on the key.

However, some gaming keyboards have a unique feature to lock and unlock the Windows key. Another option is to disable the Windows key from opening the Start Menu in-game.

This will require you to alter the keyboard configuration and controls in the game.

How can I disable the Windows key?

1. Modify your registry

  1. Press the Windows key + R, type regedit, and click OK.
    regedit run window disable the Windows Key
  2. To be on the safe side, click File > Export… to create a backup.
    file export registry disable the Windows Key
  3. Select All as Export range, choose a safe location, enter the desired file name and click on Save.
    export settings disable the Windows Key
  4. In the left panel, navigate to: Computer\HKEY_LOCAL_MACHINE\SYSTEM\CurrentControlSet\Control\Keyboard Layout
  5. In the right pane, right-click the space and choose New >Binary Value from the menu.
  6. Enter Scancode Map as the name of the new value.
    new binary value registry disable the Windows Key
  7. Double-click the Scancode Map value and enter 00000000000000000300000000005BE000005CE000000000 in the Data field. 
  8. Be extra cautious and double-check if the entered value is correct. Now click OK.
    edit binary value disable the Windows Key
  9. After doing that, close Registry Editor and restart your PC.

Keep in mind that your registry has sensitive information in it. So, if you want to edit it, use extra caution. If you encounter problems with your PC after modifying the registry, restore the backup created.

After your PC restarts, the Scancode Map you created in the registry should disable the Windows key altogether. Therefore, you need to delete the Map from the Registry Editor to enable it later.

Finally, if you are uncomfortable editing your registry manually, download Disable Windows key.reg and run it. This will perform the task for you quickly. To enable the key later, you must download and run Enable Caps Lock and Windows keys.reg.

2. Use Registry Editor to block Windows Key hotkeys

  1. Open Registry Editor.
  2. When Registry Editor opens, from the left panel, go to: HKEY_CURRENT_USER\Software\Microsoft\Windows\CurrentVersion\Policies\Explorer
  3. Right-click any space in the right panel and choose New > DWORD (32-bit value).
  4. Enter NoWinKeys as the name of the new DWORD.
    new dword disable the Windows Key
  5. Double-click NoWinKeys DWORD to open its properties.
  6. Set Value data to 1 and click OK to save changes.
    value data disable the Windows Key
  7. After you’re done, close Registry Editor and restart your PC to apply the changes.

This solution is ideal for you if you want to disable the Windows key because of a shortcut affecting games like Razer Huntsman and Apex Legends. It disables all shortcuts related to the Windows key entirely.

You can learn more about related keyboard controls by reading our guide on the Pause key.

3. Use Group Policy Editor

  1. Press the Windows key+ R, enter gpedit.msc, and click OK.
    gpedit.msc run window disable the Windows Key
  2. Now navigate to the User Configuration > Administrative Templates > Windows Components > File Explorer in the left pane.
  3. Locate and double-click the Turn off Windows key hotkeys option in the right pane.
    turn off windows key hotkeys disable the Windows Key
  4. Select the Enabled option and click on Apply and OK to save changes.
    enable policy turn off windows key hotkeys
  5. After that, restart your PC and check if that solves the problem.

This is a simple solution, but like before, it should disable only the Windows key shortcuts. If you need to disable the Windows key entirely, you might want to try a different solution.

4. Use a third-party software

  1. Download and start SharpKeys.
  2. Once the application starts, click on Add.
    sharpkeys
  3. Now you’ll see two columns. Click on the Type Key in the left pane and press the Windows key.
    type key disable the Windows Key
  4. Now click on OK to select the pressed key.
    type key confirmation disable the Windows Key
  5. Select Turn Key Off in the right pane and click OK to save changes.
    turn key off sharpkeys
  6. Now, click on the Write to Registry button.
    write to registry sharpkeys disable the Windows Key
  7. From here, restart your PC or log out and log back in to apply the changes.
  8. Start Sharpkeys, select the desired key from the menu to enable the Windows key again and click on Delete.
    sharpkeys delete disable the Windows Key
  9. After deleting the key, click on the Write to Registry button.write to registry disable the Windows Key
  10. Now restart your PC or log off and back on to apply the changes.

This free and portable tool allows you to remap your keys but can also disable keys or assign them to certain functions. Remember that this is a powerful application, so you’re using it at your own risk.

Other third-party options include the simple-to-use Winkill and creating a script with Autohotkey to disable the Windows key.

5. Use Gaming mode on your keyboard

Many gaming keyboards have a Gaming mode feature that allows you to block the Windows key with ease. However, you usually have to press a particular keyboard shortcut to activate Gaming mode.

Some keyboards even have a controller icon on one of its keys so you can easily find the shortcut key for Gaming mode. However, if you can’t find the shortcut, we advise you to check your keyboard manual for detailed instructions on activating Gaming mode.

Remember that not all keyboards support this feature, so check if your keyboard supports it.

The Windows key is beneficial but can get in your way sometimes. While there are many ways to disable it, the best and safest option is to use a gaming keyboard and set it to Gaming mode.

After reading this article, you may have a better understanding of why the Windows key is not working on Windows 11.

If you need a list of the best Logitech gaming keyboards, you can buy them today; check our detailed guide for the top picks you can select from.

If you have suggestions or questions, leave them in the comments section below, and we’ll take a look.

Fix: An Error is Preventing This Slideshow From Playing

Windows includes an image slideshow screensaver that you can use to showcase your fave photos. However, that screensaver doesn’t always work. Moreover, it occasionally throws up the same error message stating that An error prevents this slideshow from playing.

Consequently, the screensaver doesn’t display any image slideshow. These are a few resolutions that can fix the slideshow screensaver in Windows 10.

Why am I getting An error is preventing this slideshow from playing message?

Below are a few reasons for an error is preventing this slideshow from playing message:

  • Outdated PC: One of the major causes of an error is preventing this slideshow from playing as a screensaver issue is an outdated OS. The solution here is to update Windows 10 to the latest version.
  • Broken system files: Broken or missing system files can also cause your slideshow screensaver from working well. In this case, you need to repair and restore these files to get them working again.
  • Outdated display driver: The display driver plays an important role in making your screensaver work smoothly. Updating your driver should restore normalcy.

How can I fix An error is preventing this slideshow from playing?

1. Update your PC

  1. Press the Windows key + I to open the Settings app and select Update & Security.
    update and an error is preventing this slideshow from playing
  2. Click the Check for updates button.
    check for
  3. Finally, install any available updates.

If your PC is outdated, it can cause all issues, including an error preventing this slideshow from playing prompt. The fix here is to update Windows 10 and restart your PC afterward.

2. Restore picture libraries

  1. Back up your pictures and open File Explorer.
  2. Click the Libraries option in the left pane, select the Pictures option, and right-click each picture.
    libraries an error is preventing this slideshow from playing
  3. Select the Delete option.
    delete
  4. Right-click the Libraries option in the left pane and select Restore default libraries.
    restore

Sometimes, an error preventing this slideshow from playing prompt can be because your system can’t access the pictures in your Library. Resetting to the default library following the steps above should fix this issue.

3. Repair system files

  1. Press the Windows key, type cmd, and select Run as administrator under Command Prompt.
    cmd
  2. Type the command below and hit Enter: DISM.exe /Online /Cleanup-image /Restorehealthdism an error is preventing this slideshow from playing
  3. Wait for the command to finish running, type the command below, and hit Enter: sfc /scannowsfc scan
  4. Finally, wait for this command to finish running and restart your PC.

System files are essential in the successful execution of any program on your PC. So, if you are getting an error preventing this slideshow from playing a message, this might be the cause.

4. Change pictures to jpg format

  1. Right-click each of the photos in your Library and choose Open with… > Paint.
    open with
  2. In the Paint window, click file File in the top left corner.
  3. Now, select Save as and click JPEG pictures.
    save as an error is preventing this slideshow from playing
  4. Select a location to save the picture and click the Save button.
    save
  5. Finally, move the jpg pictures to your Photos folder and restart your PC

Some users have been able to fix the error is preventing this slideshow from playing message by converting their images to .jpg format. Thus, it is an option that is worth exploring for you too.

5. Update display driver

  1. Press the Windows key + X and select the Device Manager option.
    device manager an error is preventing this slideshow from playing
  2. Double-click the Display adapters option and right-click the driver under it.
  3. Now, select the Update driver option.
    update driver
  4. Finally, choose the Search automatically for drivers option and install any available update.
    search auto

If the display driver is outdated, it might cause the slideshow to misbehave. This can lead to an error is preventing this slideshow from playing.

Using the built-in driver updater should help you find the latest driver for your device. You can install the newest driver from the manufacturer’s website if this does not work.

Alternatively, you can use a specialized tool in Fortect Driver Updater to update your drivers automatically. This tool scans and updates outdated drivers before they can cause a problem.

Fortect Driver Updater also fixes any broken driver and installs any missing one. It might just be all you need to keep your PC running smoothly.

That’s about it, for the error prevents this slideshow from playing prompt. However, with the information in this guide, you know everything to fix the issue for good.

Similarly, if you need the best slideshow maker software for Windows 10, check our guide for the excellent available options.

Feel free to let us know the solution that helped you fix this issue in the comments below.

Google Drive Crashing in Windows Explorer: 3 Steps to Fix it

Google works well, most of the time. But it is not without problems, with users complaining that the Google Drive folder keeps crashing on Windows Explorer.

Just like the Google Driver keeps going offline problem, this issue seems to be due to some bug. Thankfully, it can be easily fixed by following the steps in this guide.

Why does Google Drive keep crashing on Windows 10?

The reasons Google Driver keeps crashing Windows Explorer are within a close circle. However, below are some of them:

  • Antivirus issues: If the Google Drive folder is frozen when you open an app on Windows Explorer, it might be because of your third-party antivirus program. The solution is to disable or uninstall the software using dedicated uninstaller software.
  • Faulty drive app: Some users noticed this issue after installing the app’s latest updates. The solution here is to uninstall Google Drive and clear the cache.

How can I fix Google Drive if it’s crashing in Windows Explorer?

Before delving into the fixes in this guide, you should disable your third-party antivirus apps. This has fixed the issue for some users without making further changes to their PC.

If this does not work, you can now explore the fixes below:

1. Disable Windows Explore details pane

  1. Press the Windows key + E to open Windows Explorer.
  2. Click the View tab at the top.
    view google drive crashing windows explorer
  3. Now, click the Details pane option to disable it.
    details pane

Some users have reported that, for some reason, the details pane feature of Windows Explorer keeps crashing the Google Drive folder and the app.

Thus, you need to disable the feature to access your Google Drive folder in Explorer.

2. Uninstall Google Drive and clear the cache

  1. Press the Windows key + I and select the Apps option.
    apps
  2. Select the Google Drive option and click the Uninstall button.
    uninstall google drive crashing windows explorer
  3. Follow the onscreen instruction to complete the removal process.
  4. Now, open Windows Explorer and navigate to the path below: C:/ Users/ UserName\AppData\Local\Google
  5. From here, right-click the DriveFS folder and select Delete.
    delete
  6. Restart your computer to remove any leftover cached settings.
  7. Finally, go to the official website to download the Google Drive installer and follow the onscreen instruction to complete the installation.

If Google Drive is crashing on Windows Explorer, it might be because of your version of the app. In this case, you need to uninstall the app and clear its cache.

To ensure all leftover files are removed, you should use dedicated uninstaller software in CCleaner. This tool removes all components of the app and ensures that they cannot cause problems in the future.

3. Uninstall antivirus software

  1. Press the Windows key + I and choose Apps.
    apps option google drive crashing windows explorer
  2. Choose the antivirus app and click the Uninstall button.
    uninstall antivirus
  3. Finally, follow the onscreen instructions to complete the process.

If disabling your antivirus software does not fix the Google Drive crashing on Windows Explorer issue, you might need to delete the software. Should this fix the issue, you might need to switch to one of the best antivirus software for Windows 10 to keep your PC secure.

While the Google Drive crashing on Windows Explorer issue can be devastating, it can be fixed by tweaking one or two things on your PC. If you still can’t fix this issue, you can switch to another effective cloud storage.

If you face other issues, like Google Drive won’t sign in to your account, you can check our detailed guide to fix it quickly.

Feel free to let us know the solution that helped you fix this issue in the comments below.

Disk Cleanup Missing: 4 Fixes to use if it’s not Showing

Disk Cleanup is an essential Windows PC feature that helps clean junk files on your hard disk. This is important when creating space and can fix some hard drive issues.

However, some users have complained that the Disk Cleanup feature is missing on their PCs. Unfortunately, this removes a crucial free component that helps keep your hard drive running smoothly.

Thankfully, it is not the most challenging issue to fix, as shown in the following sections of this guide.

Why does Disk Cleanup disappear?

There are several reasons the Disk Cleanup option is missing on your PC. Below are some of the causes:

  • Corrupt system files: If the Clean up system files button is missing on Windows 10, it might be because of broken or missing system files. You can fix this easily by restoring and repairing these system files with built-in repair tools or dedicated software.
  • Faulty user account: Sometimes, it might be because your user account is corrupt. The solution here is to create a new admin account and run the Disk Cleanup tool from there.
  • Disabled User Account Control: Another cause of the Disk Cleanup missing issue is the disabled UAC feature. This is because the Disk Cleanup tool requires some privileges to use it. And the UAC is known to protect your system from other people making changes to it. Hence, if this is disabled, you might have access to some tools, including the Disk Cleanup tool.

How can I fix Disk Cleanup if it’s missing?

1. Check if Disk Cleanup is accessible from the Run utility

  1. Press the Windows key + R, type %windir%\system32\cleanmgr.exe, and click OK.
    local run disk cleanup missing
  2. Now, select the drive to clean up and click the OK button.
    ok drive
  3. From here, click the Cleanup system files option.
    system files
  4. Select the drive to clean again and click OK.
    ok drive
  5. Finally, select the files to clean up and click the OK button.
    clean disk cleanup missing

Sometimes, the Disk Cleanup feature might be missing from its usual locations. The Run utility shown above will help you use the tool easily if it is still available on your PC.

2. Turn on UAC

  1. Press the Windows key + S, type user account, and select the Change User Account Control settings option.
    user account
  2. Move the slider up. You can set it to Always notify if you want maximum security, but you can also use a default setting.
  3. Click OK to save changes.
    always disk cleanup missing
  4. Restart your PC.

If the Disk Cleanup tool is missing on your PC, it might be because UAC is turned off. The solution here is to turn on this feature and restart your PC.

Note that you need to restart your PC to let the changes occur.

3. Repair system files

  1. Press the Windows key + S, type cmd, and select Run as administrator under Command Prompt.
    cmd
  2. Type the command below and press Enter:DISM.exe /Online /Cleanup-image /Restorehealthdism
  3. Wait for the command to finish running, then type the command below and hit Enter:sfc /scannowsfc disk cleanup missing
  4. Finally, wait for this command to finish running and restart your PC.

System files are essential to the successful execution of PC programs. So, if the Disk Cleanup tool is missing, these files might be at fault.

The commands below should help you fix these files and get the slideshow to work again.

Another excellent option to repair your system files is to use a dedicated system fixer. These specialized tools help you replace corrupt system files with the original versions from its database.

4. Create a new user account

  1. Press the Windows key + I and select the Accounts option.
    accounts
  2. Choose the Family & other users option in the left pane.
  3. Select the Add someone else to this PC button under the Other users section.
    family disk cleanup missing
  4. Select the I don’t have this person’s sign-in information option.
    i don't disk cleanup missing
  5. From here, click Add a user without a Microsoft account.
    add a user
  6. Enter the username, password, and security questions, and click Next.
    next
  7. Now, select the account you created and click the Change account type button.
    change account
  8. From here, click the dropdown under Account type, select the Administrator option and click OK.
    administrator disk cleanup missing
  9. Finally, log in to the account and check if your Taskbar is working.

Some users have reported missing the Disk Cleanup due to a corrupt user account. The solution is to create a new admin account and run the tool from there. This allows you to clear the junk files from your hard drive without any problem.

The Disk Cleanup tool is too important to the overall health of your hard drive to be missing. That is why you must follow the steps in this guide to fix the issue and get back to using the tool effectively.

If you want to try third-party tools, check our list of the best hard drive cleaner software you can get.

Feel free to let us know the solution that helped you fix the issue in the comments below.

Teredo Tunneling Pseudo-Interface Missing: 4 Fixes to use

Teredo Tunneling Pseudo-Interface is a protocol that lets home users access IPv6 web services before their local connection supports the protocol. In the end, this translated into an easier transition from IPv4.

However, some users have been complaining the Teredo Tunneling Pseudo-Interface is missing from their driver list. This guide will show you how to fix this issue and help you get back to using IPv6 web services.

Why is my Teredo Tunneling Pseudo-Interface missing?

The reasons for the Teredo Tunneling Pseudo-Interface missing issue are few and can sometimes be hard to trace. However, below are some of the known ones:

  • Disabled services: If the Microsoft Teredo Tunneling Adapter has a driver problem or is missing completely in the Device Manager, it might be because some services are disabled. You need to enable these services to make it work again.
  • Problems with other network adapters: Some users have found this prob be due to issues with another network adapter on your PC. The solution here is to disable the adapter and check for hidden devices.

How can I fix Teredo Tunneling Pseudo-Interface if it’s missing?

1. Restart the IP Helper service

  1. Press the Windows key + R, type services.msc, and click OK.
    service teredo tunneling pseudo-interface missing
  2. Right-click on the IP Helper service and select the Restart option.
    restart teredo tunneling pseudo-interface missing
  3. Now, scroll down and right-click the Xbox Live Networking Service.
  4. Select the Refresh option.
    refresh
  5. Finally, test your connections again.

If the Teredo Tunneling Pseudo-Interface is missing, it might be due to glitches with some processes. You Restarting and refreshing these processes should do the trick.

You must restart the IP Helper process and refresh the Xbox Live Networking service. Again, be careful not to mix them up. If this does not work, proceed to the next solution.

2. Reactivate the protocol

  1. Press the Windows key + S, type cmd, and select Run as administrator under Command Prompt.
    cmd
  2. Type the following commands and press Enter after each: netshnetsh int teredoint ter teredo tunneling pseudo-interface missing set state disabledset disabled
  3. Now, press the Windows key + X and select the Device Manager option.
    device manager
  4. Right-click the Teredo Tunneling Pseudo-Interface and select the Uninstall device option.
  5. Click the Uninstall button.
  6. From here, launch Command Prompt as admin again.
  7. Now, type the following commands and press Enter after each of them: netshnetsh int ipv6int ipv6 set teredo clientset  teredo tunneling pseudo-interface missing
  8. After these commands run, open Devie Manager and click the Scan hardware changes.
    scan for
  9. Finally, select Show hidden devices and restart your PC.

In some cases, the Teredo Tunneling Pseudo-Interface missing issue can be due to some problems with the protocol. Running the commands above should reset the process.

3. Use the Command Prompt

  1. Open Command Prompt as admin.
  2. Type the following commands and hit Enter after each: netshnetsh 1 int ipv6int ipv6 set teredo clientset teredo tunneling pseudo-interface missing
  3. Finally, check if the protocol is now available again.

Some users have been able to fix the Teredo Tunneling Pseudo-Interface missing by running the commands below. In this case, you don’t need to uninstall and reinstall the protocol again.

4. Disable any other network software

  1. Press the Windows key + X and choose Device Manager.
    device manager
  2. Click the arrow to the Network adapters option to expand it and right-click any device there.
  3. Now, select the Disable device option.
    disable
  4. Click the Yes button to confirm the action.
    yes
  5. Finally, show hidden devices and check if Teredo Tunneling Pseudo-Interface shows up.

Problems with other network adapters can cause the Teredo Tunneling Pseudo-Interface missing issue. Following the steps above should restore the protocol.

We have come to the end of this guide. Following the steps carefully should eliminate any missing Teredo Tunneling Pseudo-Interface issues.

If you are facing other issues like Teredo not being present in legacy hardware, check our detailed guide to fix it quickly.

If you know any other methods to help with the missing Teredo Tunneling Pseudo-Interface issue, leave a message in the comment section below to share it with everyone else.

Fix: Remote Computer is Redirecting You to Another Computer

The Remote Desktop Protocol allows you to connect to other remote computers from the host. However, users are getting an error message: The remote computer that you are trying to connect to is redirecting you to another remote computer.

This is an issue that occurs when a remote computer is redirecting you to another remote computer. It could be that the Remote desktop is not working or another issue, such as a malware infection.

Why am I getting The remote computer is redirecting you to another?

There are several causes for this issue, with the following being the most common:

  • DNS issues – This issue can affect your clients, and to fix it, it’s advised to flush the DNS.
  • RDP settings – Sometimes, the configuration of your RDP file can cause this problem, so you’ll need to adjust it manually.

Why is Remote Desktop on my computer?

Remote Desktop comes with Pro versions of Windows, allowing you to connect to a remote computer or vice versa.

The application is safe to use, and only authenticated users can connect from or to a remote PC.

What can I do if The remote computer redirects you to another message?

1. Flush DNS

  1. Hit the Start menu, type cmd in the search bar, and click Run as administrator.cmd-admin hp printer won't scan
  2. Type the following command and press Enter: ipconfig /flushdns
  3. After doing that, close Command Prompt.

Users reported that running this command on client PCs helped, so be sure to try it. However, this was just a temporary solution for some users.

2. Change the RDP file

  1. Open the RDP file on client PC. You can do that by right-clicking it and choosing Open with, and then selecting Notepad.
  2. Locate use redirection server name:i:0. Change it to use redirection server name:i:1.
  3. Few users also suggested adding enablecredsspsupport:i:0 to the RDP file.
  4. If that doesn’t work, check the Always prompt for credentials.

After doing that the problem should be resolved on the client PC.

3. Change RD Connection Broker setting

Note icon NOTE
These steps might be different depending on the server that you’re using.
  1. Start Remote Desktop Session Host Configuration.
  2. Under RD Connection Broker double-click on Member of farm in RD Connection Broker.
  3. Locate RD Connection Broker tab and change the RD Connection Broker setting from Use IP Address Redirection to Use token redirection.

Alternatively, you can try this:

  1. Open Remote Desktop Session Host Configuration and select RDP-TCP Properties.
  2. Locate the Security Layer and change it to RDP Security Layer.
  3. Save changes.

Hopefully, you can now connect to your intended Remote desktop device without being redirected.

If you’re interested in more remote control software, we have amazing recommendations you can benefit from in our comprehensive guide.

Do let us know if you have been able to solve this problem in the comments section below.

Just Dance finally dumps Kinect and Xbox One with Just Dance 2023

The latest entry in the long-running Just Dance video game franchise, Just Dance 2023, is now available to play on Microsoft’s Xbox Series X family of consoles though, surprisingly, not on Microsoft’s last-gen Xbox One consoles.

This means that not only was Just Dance 2022 the final game in the series to release on Xbox One, it was also the last Just Dance game to support the Kinect motion sensor. While Just Dance 2022 did also release on the Xbox Series X generation of Xbox consoles, players on those consoles had to use a smartphone with a dedicated app for the title’s motion detection as the Kinect doesn’t work with the Xbox Series X. The free Just Dance smartphone app is also needed play Just Dance 2023.

The abandoning of the Xbox One is a bit of a surprise as Just Dance has a history of supporting video game consoles long after most other franchises jumped ship. For example, the series was still releasing on the Xbox 360 as recently as Just Dance 2019.

Rather amusingly, Just Dance 2019 was the final game in the series to launch on Nintendo’s WiiU console yet Just Dance 2020 still got a release on the Nintendo Wii, a console two generations behind the Nintendo Switch.

Just Dance 2023 is also sticking to current-gen consoles on PlayStation as well with it coming out on Sony’s PlayStation 5 exclusively, leaving the PS4 behind.

One likely reason for this change is budgetary. The Just Dance franchise isn’t as popular as it used to be and many companies are cutting budgets across the board, including in the games industry. Another possible, though unlikely, reason is the noticeable UI and design aesthetic change made with Just Dance 2023 and the promised support for online multiplayer coming sometime next year. None of these features should require high-end hardware though as the game is essentially just a music video player with, now, zero input from cameras. Also, online multiplayer was actually already a feature in Just Dance 2019 on Xbox One consoles.

Are you going to give Just Dance 2023 a try or have you moved on from the franchise? Let us know in the comments below.
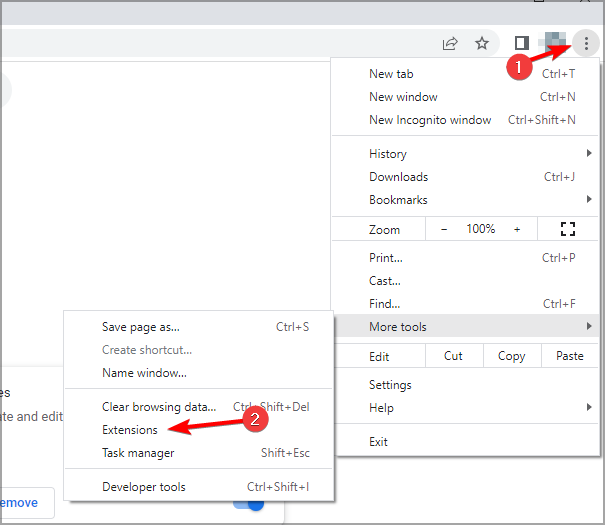
Windows 11 Version 22H2 Failed to Install? How to Force it

Only a couple of days have passed since the Redmond-based tech giant has rolled out the first major update for Windows 11, and already the problems are starting to mount up.

Users recently reported that the 2022 update is causing some pretty nasty problems with Nvidia GPUs. Now, it seems that the installation for the update itself is failing for some people.

Error code 0x800f0806 is all users see when they try to update their Windows 11 version to 22H2. Let’s take a closer look at this error and see what’s up with it.

Comment
byu/LittleJ0704 from discussion
inWindows11

Error 0x800f0806 is preventing users from installing version 22H2

As we said, since release, many users are reporting of problems and issues when trying to update to Windows 11 22H2, which came via KB5017321.

According to these recent reports, the installation process for the update is failing with the annoying error code 0x800f0806.

Apparently, this is happening when users try to do an in-place upgrade via Windows Update in Settings due to some compatibility issue or something similar.

That being said, know that a clean install though is seemingly working fine since nobody has complained about it yet.

But, there’s no need to worry, because some of the more tech-savvy users have already come up with a workaround for this nasty issue.

What can I do to fix error code 0x800f0806?

Apparently, from what we’ve learned from user reports, manually downloading and installing the update seems to bypass this problem caused by trying to do an upgrade via Windows Update.

if you want to do so as well, simply head over to Microsoft’s Update Catalog website and download the target update.

Keep in mind that other known solutions, such as running the sfc /scannow tool via Command Prompt, or resetting the Windows Update mechanism don’t appear to be working either.

ANother user affected by this Windows 11 installation error said that running the Windows 11 Installation Assistant also resolves the problem.

If you don’t have this software, you can download it from Microsoft’s official page. Have you also got this error when trying to install Windows 11 22H2?

How do I install KB5017321?

  1. Press Windows + I to access Settings.
  2. Select the Windows updates tab and click Install all.install Windows updates
  3. If no updates are queued for installation, press the Check for updates button.

Share your experience thoughts, and opinions with us in the dedicated comments section located right below.

Windows Update Error 0x800b0109: Solved

Keeping your Windows up to date is important, especially if you want to ensure that your PC is running bug-free.

However, sometimes, issues with the update process can occur, and you’re unable to install updates.

Many users reported Installer encountered an error 0x800b0109 error when installing updates, and in today’s guide, we’re going to show you how to fix this issue.

Why does the update error 0x800b0109 occur?

In most cases, this and many other update errors occur because there’s an issue with the Windows Update component.

It’s also possible that your system files are damaged or that an application is interfering with the update process.

Is error code 0x800b0109 serious?

The error will prevent you from downloading updates, and if you can’t update your operating system, it will become vulnerable.

In addition to vulnerability, this error will prevent you from getting patches and new features, so it’s important to fix it.

How can I fix the 0x800b0109 error?

1. Run the Windows Update troubleshooter

  1. Press Windows key + I to open the Settings app.
  2. Now navigate to Troubleshoot.
  3. Click on Other troubleshooters.
  4. Now locate Windows Update and click on Run.
  5. Wait for the process to finish.

If the troubleshooter didn’t work for you, you might want to try using specialized repair software to fix this issue.

2. Disable or uninstall third-party antivirus

  1. Disable your antivirus software and check if that solves the issue. If not, move to the next step.
  2. Click on Start and select Settings.
  3. Go to Apps and select Installed apps.
  4. Locate your antivirus software, click the three dots next to it and choose Uninstall.
  5. Follow the instructions on the screen to complete the process.

After removing your antivirus, check if the problem is resolved. Alternatively, you might want to consider using antivirus software for Windows 11 to avoid such issues in the future.

3. Run SFC and DISM scans

  1. Press Windows key + X and select Windows Terminal (Admin).
  2. Now run the following command: sfc /scannow
  3. Wait for the process to finish.
  4. Run this command: DISM.exe/Online/Cleanup-Image/ Restorehealth
  5. Wait patiently for the process to finish.

4. Enter Safe Mode

  1. Click on Start and navigate to Settings.
  2. Select Recovery.
  3. Click the Restart now button in the Advanced startup section.
  4. Choose Troubleshoot from the list of options.
  5. Navigate to the Advanced options.
  6. Select Startup settings and click Restart.
  7. Now you just need to press F5 or 5 to select Safe Mode with Networking.

Once you enter Safe Mode, try to update your PC again. If you’re having issues performing these steps, we suggest reading our guide on how to access Safe Mode on Windows 11.

5. Perform an in-place upgrade

  1. Head to Windows 11 webpage.
  2. Select the desired version and click on Download.
  3. Choose the language you wish to use. Now click on Confirm.
  4. Select 64-bit download.
  5. Wait for the download to complete.
  6. Double-click the file that you downloaded.
  7. A new window will appear. Locate setup.exe and double-click it.
  8. Pick if you want to download the available updates and click Next.
  9. Select Keep personal files and apps if possible and click Next.
  10. Follow the instructions on the screen to finish the setup.

Only use the option to keep your personal files and apps or else this process will reinstall Windows instead of upgrading it.

6. Use System Restore

  1. Press Windows key + R to open the Run dialog. Type rstrui and press Enter.
  2. Choose a restore point and click Next.
  3. Now press Finish.
  4. Wait while the restoration process is finished.

To learn more about this feature, we suggest reading our guide on how to create Windows 11 restore points.

What to do if the Installer encountered an error 0x800b0109 on Windows 11?

Download the update manually

  1. Locate the KB number of the update. You can find it in the Windows Update section.
  2. Go to the Microsoft Update Catalog website.
  3. Enter the KB number and click on Search.
  4. Find the update that matches your system architecture and click on Download.
  5. Now click on the available link to download the update.
  6. Once the file is downloaded, run it to install the update.

Is it possible to download updates outside of Windows Update?

Yes, Microsoft Update Catalog allows you to download individual updates as files and install them on your PC.

The website is created by Microsoft, so you can rest assured that updates from it are completely safe to download and install.

How can I remove Windows updates?

  1. Open the Settings app using the Windows key + I shortcut.
  2. Head to the Windows Update section and select Update history.
  3. Select Uninstall updates.
  4. Double-click the update you want to uninstall.
  5. Follow the instructions on the screen.

Getting the Installer encountered an error 0x800b0109 message prevents you from installing updates, but hopefully, you should be able to fix it with these solutions.

In case you’re having additional problems, we suggest visiting our 0x800f0831 Windows 11 update error article for more solutions.

Did you find an alternative solution for this error? If so, feel free to share it with us in the comments section below.

Install Error 0x8007012a (Windows Update): Solved

Windows 11, though the latest and probably the most advanced iteration from Microsoft, is still not completely free of errors. And, the worst are the ones that prevent you from updating the installed components or the OS. One such is the 0x8007012a install error in Windows 11.

Users encounter the error on the Windows Update screen where, though the update is listed but it can’t be installed. Along with the listed update is a Retry button, clicking on which generally doesn’t eliminate the error unless you go for troubleshooting.

In the following sections, we have listed the underlying causes for the 0x8007012a install error in Windows 11 and the methods to resolve it. By the time you reach the end of this article, your system would have installed any pending updates.

What causes the install error 0x8007012a?

There can be a bunch of causes for the 0x8007012a install error, most of which indicate a problem with the software, and rarely does it have to do with the hardware.

  • Problems with the update components
  • Issues with the Internet connection
  • Malware or virus
  • Corrupt system files
  • Malfunctioning external peripherals

Listed above are the most common underlying issues and once you have an understanding of these, it would be easier to eliminate the error on your system. If you can identify the error, simply head to the relevant fix and execute it. Or, you can go ahead with them in the listed sequence.

How can I fix the 0x8007012a Windows Update error?

1. Disconnect external peripherals

External devices connected to your PC are often known to conflict with its functioning, thus it’s recommended that you disconnect the non-critical ones. These include the printer, headphones, speakers, and other similar peripherals.

After disconnecting these, restart the computer and check if the 0x8007012a install error in Windows 11 is eliminated.

2. Run Windows Update troubleshooter

  1. Press Windows + I to launch the Settings app, and click on Troubleshoot on the right in the System tab.Troubleshoot
  2. Next, click on Other troubleshooters to view all of them.Other troubleshooter
  3. Locate the Windows Update troubleshooter and click on the Run button next to it.Run Windows Update troubleshooter to fix install error 0x8007012a
  4. Let the troubleshooter diagnose issues with the computer, and follow the instructions listed on the screen.

Whenever you encounter an error in Windows, it’s recommended to run a relevant troubleshooter for it. Microsoft offers several built-in troubleshooters that automatically diagnose and resolve the problems, and in some cases list out the steps to fix them.

Once the troubleshooter is done running, check if the 0x8007012a install error in Windows 11 is eliminated. If that did not help, we recommend using specialized repair software as it is more advanced and has a higher chance of fixing your PC.

3. Run Windows Update & BITS

  1. Press Windows + R to launch the Run command. Enter services.msc in the text field, and either click on OK or hit Enter to launch the Services app.Launch Services
  2. Locate and double-click on the Background Intelligent Transfer Service.BITS
  3. Select Automatic from the Startup type dropdown menu.Automatic
  4. Click on the Start button and once the service is running, click on OK to save the changes.Run BITS to fix install error 0x8007012a
  5. Next, locate and double-click on the Windows Update service.Windows Update
  6. As you did earlier, select Automatic from the Startup type dropdown menu.Set automatic
  7. Finally, click on the Start button and then on OK to save the changes.Run Windows Update service to fix install error 0x8007012a
  8. Check if the 0x8007012a install error in Windows 11 is fixed, and you are able to download updates.

4. Clear Software Distribution folder

  1. Press Windows + S to launch the Search menu. Enter Windows Terminal in the text field at the top, right-click on the relevant search result, and select Run as administrator from the list of options.Launch elevated Windows Terminal to fix install error 0x8007012a
  2. Click Yes on the UAC (User Account Control) prompt that appears.Yes in UAC
  3. Click on the downward-facing arrow at the top, and select Command Prompt from the list menu. Alternatively, you can press Ctrl + Shift + 2 to launch the Command Prompt tab in Windows Terminal.Launch Command Prompt
  4. Now, type/paste the following commands and hit Enter after each to stop the Windows Update service and BITS.net stop wuauserv net stop bitsStop WIndows Update and BITS to fix install error 0x8007012a
  5. Once the services have been stopped, press Windows + R to launch the Run command, enter the following address in the text field and click on OK.C:\Windows\SoftwareDistributionLaunch Software Distribution folder
  6. Press Ctrl + A to select all the files listed here and then hit the Del key to delete them.Delete the files in Software Distribution folder to fix install error 0x8007012a

The software distribution folder contains files that are temporarily required for the update process. However, if these are corrupted due to any reason, you may encounter errors with Windows Update.

Though you manually delete the files, the system will automatically redownload a fresh set of these but the update history will be lost. Also, it would take a little longer for the update process to go through the next time.

5. Run SFC and DISM

  1. Press Windows + R to launch the Run command, type wt in the text field, hold the Ctrl + Shift keys, and either click on OK or hit Enter to launch an elevated Windows Terminal.Launch Elevated Windows Terminal from run command to fix install error 0x8007012a
  2. Click Yes on the UAC (User Account Control) prompt that pops up.UAC
  3. Next, click on the downward arrow at the top and select Command Prompt from the list of options.Command Prompt
  4. Type/paste the following command and hit Enter to run the SFC scan.sfc /scannowRun SFC scan to fix install error 0x8007012a
  5. After the SFC scan is complete, type/paste the following command and hit Enter to run the DISM tool.DISM /Online /Cleanup-Image /RestoreHealthRun DISM tool to fix install error 0x8007012a
  6. Once done, restart the computer and check if the 0x8007012a install error in Windows 11 is fixed.

6. Reset Windows Update components

  1. Press Windows + X to launch the Quick Access/Power User menu, and select Windows Terminal (Admin) from the options listed here.Launch Windows Terminal (Admin)
  2. Click Yes on the UAC (User Account Control) prompt that appears.UAC
  3. Click on the downward-facing arrow and select Command Prompt from the menu.Command Prompt
  4. Now, type/paste the following commands and hit Enter after each to execute them. The following commands will stop the BITS and Windows Update service:net stop bits net stop wuauserv
  5. Execute the following command to delete the qmgr*.dat files:Del “%ALLUSERSPROFILE%Application DataMicrosoftNetworkDownloaderqmgr*.dat”
  6. Next, execute the following commands to rename a few critical folders. If this the first attempt at resetting Windows Update comments, you can skip this step.Ren %Systemroot%\SoftwareDistribution\DataStore DataStore.bak Ren %Systemroot%\SoftwareDistribution\Download Download.bak Ren %Systemroot%\System32\catroot2 catroot2.bak
  7. Paste the following commands and hit Enter after each to reset the BITS and Windows Update service:sc.exe sdset bits D:(A;;CCLCSWRPWPDTLOCRRC;;;SY)(A;;CCDCLCSWRPWPDTLOCRSDRCWDWO;;;BA)(A;;CCLCSWLOCRRC;;;AU)(A;;CCLCSWRPWPDTLOCRRC;;;PU) sc.exe sdset wuauserv D:(A;;CCLCSWRPWPDTLOCRRC;;;SY)(A;;CCDCLCSWRPWPDTLOCRSDRCWDWO;;;BA)(A;;CCLCSWLOCRRC;;;AU)(A;;CCLCSWRPWPDTLOCRRC;;;PU)
  8. Now, execute the following command:cd /d %windir%\system32
  9. Paste the following commands one a time and hit Enter after each to reregister to BITS and Windows Update files and fix the 0x8007012a install error in Windows 11:

regsvr32.exe atl.dll
regsvr32.exe urlmon.dll
regsvr32.exe mshtml.dll
regsvr32.exe shdocvw.dll
regsvr32.exe browseui.dll
regsvr32.exe jscript.dll
regsvr32.exe vbscript.dll
regsvr32.exe scrrun.dll
regsvr32.exe msxml.dll
regsvr32.exe msxml3.dll
regsvr32.exe msxml6.dll
regsvr32.exe actxprxy.dll
regsvr32.exe softpub.dll
regsvr32.exe wintrust.dll
regsvr32.exe dssenh.dll
regsvr32.exe rsaenh.dll
regsvr32.exe gpkcsp.dll
regsvr32.exe sccbase.dll
regsvr32.exe slbcsp.dll
regsvr32.exe cryptdlg.dll
regsvr32.exe oleaut32.dll
regsvr32.exe ole32.dll
regsvr32.exe shell32.dll
regsvr32.exe initpki.dll
regsvr32.exe wuapi.dll
regsvr32.exe wuaueng.dll
regsvr32.exe wuaueng1.dll
regsvr32.exe wucltui.dll
regsvr32.exe wups.dll
regsvr32.exe wups2.dll
regsvr32.exe wuweb.dll
regsvr32.exe qmgr.dll
regsvr32.exe qmgrprxy.dll
regsvr32.exe wucltux.dll
regsvr32.exe muweb.dll
regsvr32.exe wuwebv.dll

9. Execute the following command to reset Winsock:netsh winsock reset

10. Finally, paste the following command and hit Enter to restart the BITS and Windows Update service:net start bits net start wuauserv

If the Windows Update components have corrupted, you are likely to encounter issues while downloading and installing updates. In this case, you should reset these to fix the 0x8007012a install error in Windows 11.

7. Manually download the update

  1. Head to the Windows 11 update history, and note down the KB (Knowledge Base) number for the update you are having trouble installing. The one in the screenshot below is for the latest update at the time this article was first written.Check the KB number
  2. Next, go to the Microsoft Update Catalog, paste the KB number you copied earlier in the search box near the top-right, and hit Enter.Search for update in Windows Update Catalog
  3. Click on the Download button next to the relevant update.Download relevant update to fix install error 0x8007012a
  4. Now, click on the link to start the download.Start download
  5. Once downloaded, double-click on the file to launch the setup, and follow the on-screen instructions to complete the installation process.Install latest update to fix install error 0x8007012a

The above method will help you manually download updates for the OS. In case you are encountering an error when downloading driver updates, learn how to manually update them. Amongst the methods listed in the linked guide, follow the one to get the updated version from the manufacturer’s website.

How can I reset Windows 11 if the methods listed above don’t fix the 0x8007012a install error?

If the fixes listed above don’t work, though highly unlikely, you can reset Windows 11 to its factory settings. There are a bunch of ways you can proceed with each having its advantages. So, choose the one that best suits you and get done with the process. When resetting the PC, you have the option to keep the files or remove them.Reset Windows 11 to fix install error 0x8007012a

But, resetting the PC will remove the installed applications and configured settings. Therefore, it should be your last resort, only after all the others listed above didn’t work.

That’s all there’s to the 0x8007012a install error in Windows 11 and the most relevant fixes for it. We believe that these should have fixed the error on your PC.

In case you are facing other install errors, check how to fix the 0x80070643 error code, 0xc1900101 error code, or 0x800f0831 error code in Windows 11.

Tell us which fix worked for you in the comments section below.

0x80072ee7 on Windows 11: How to Fix This Error

Some Windows 11 updates can cause issues and bigger versions, leading to performance errors. For example, if you don’t fix update error 0x80072ee7, it can make your machine run abnormally. 

It is triggered in different situations, and fixing it depends on the reasons behind the hitch. Occasionally, users have reported that the problem occurs when installing some Windows updates. 

Security notifications and system errors do not appear randomly while browsing. If that happens, there is a likelihood that your computer has unwanted programs or malware. 

The reasons behind the 0x80072ee7 Windows 11 error vary from antivirus issues to other software interfering with Windows Update.  

How do Windows Update errors occur?

If the error code 0x80072ee7 shows up while browsing, that’s a scam. Malicious attackers may use social engineering and scare tactics to target you. 

In such a case, you need to run an anti-malware tool to clean up your system and reduce security threats.

However, there are situations where you need to run in-depth fixes to repair the error completely. The severe error comes in the form of the following versions:

  • Windows update error 0x80072ee7. This is caused by issues and inappropriate services for Windows updates. 
  • Windows 11 upgrade error 0x80072ee7. It appears with Windows Operating Systems’ latest version. It is caused by an AV tool that interferes with other programs. 
  • Windows Store error 0x80072ee7. This problem comes out when you are trying to open Windows Store. Corrupted apps and files mainly cause it. This can be repaired easily. 

As we discussed earlier, system errors can happen for various reasons. Fortunately, the fixes described in this article will help you resolve the problem easily.

How can I fix the error code 0x80072ee7 in Windows 11?

1. Run general troubleshooting steps. 

  1. Reboot your computer, and try the update again. 
  2. Remove all the peripherals and reconnect them. 
  3. Disconnect your internet once the download is complete and continue with the update. 

2. Use a specialized repair tool

System errors can be quickly fixed with powerful dedicated software. These tools allow you to perform an in-depth scan of your computer and replace any files that have issues with fresh genuine ones from their large databases.

3. Run an SFC scan

  1. Type cmd in the search box and press Enter.
  2. Select Run as administrator. 
  3. Type sfc/scannow and press Enter.
  4. Give your PC time to scan and repair all the corrupted files and programs. 

4. Remove the problematic applications

  1. Right-click on the Start button and select Apps and Features.
  2. Scroll down to locate the app you want to uninstall.
  3. Select the app, click on the three-dotted menu and select Uninstall.
  4. Restart your PC and reinstall the application. 

5. Change the DNS server address

  1. Type Control Panel in the search box and press Enter.
  2. On the Control Panel window, select Network and Internet.
  3. Select Network and Sharing Center.
  4. Choose Change adapter settings and then right-click on the name of your connected internet icon.
  5. Click on Properties and select Internet Protocol Version 4 (TCP/IPv4).
  6. Click on the Properties and choose the General tab. 
  7. Select Obtain DNS server address automatically and hit OK.
  8. If Obtain DNS server address automatically is ticked, click on Use the following DNS server address instead and hit OK.
  9. Enter the following addresses and click OK. Preferred DNS server: 8.8.8.8. Alternate DNS server: 8.8.4.4.
  1. Save the changes and restart your computer. 

6. Ensure Windows Update service is working

  1. Press Windows key + R to open the Run box. 
  2. Type services.msc and press Enter. 
  3. Right-click on the Windows Update and select Properties.
  4. Click on the General tab change the Startup type to Manual.
  5. Select Apply and OK to save the changes. 

7. Check for the latest update

  1. Type Settings on the Search box and press Enter. 
  2. Navigate to Updates.
  3. Check for updates on the right side of the window.
  4. Install or schedule for your preferred time. 
  5. Give your PC time to download and install the updates and then reboot it. 

Should I get worried about Windows Update errors?

System update issues cannot harm your PC, but they prevent you from installing new updates. This may lead to security threats in the long run. 

The only way for Microsoft to patch these errors is by updating your system. Ensure your apps and OS are up to date to be on the safer side. 

Most importantly, updating your applications gives you access to new features. If you fail to update, you won’t enjoy what others get. 

If you encounter the message We cannot install required files, it means your installation media is corrupted, and you need to repair it. 

In many instances, users have reported the error message – There were some problems installing updates. You can use the guide in this article to repair this issue. 

You might also want to fix update error 0x80072efd in Windows 11 if it appears when updating your applications. 

We would like to hear your feedback. Which solution worked for you to solve the 0x80072ee7 Windows 11 error code?? Free free to leave us a message in the comment section. 

Fix: 0xc004f025 Access Denied Activation Error on Windows 11

The Windows error code 0xc004f025 is an activation issue that can arise when some users try to activate license keys with SLMGR (the Software Licensing Management Tool in Command Prompt).

The error 0xc004f025 message states: Error:0xC004F025 Access Denied: the requested action requires elevated privileges

Luckily, there are a few straightforward solutions you can try to fix this. Keep reading as we walk you through all of them.

How can I fix Windows error code 0xc004f025?

1. Revert Windows to a previous version

  1. Click on the Start menu and select Settings.
  2. Go to System, then click on Recovery.recovery settings in windows 11
  3. Under Advanced startup, click Restart now, then select Troubleshoot > Advanced options > System Restore.restart now advanced startup option
  4. Select a restore point from before the error occurred and follow the prompts to restore your system.

To do that from the Windows settings, you should already have a System Restore Point. If that is not the case, you can use dedicated tools.

The best repair software can fix a wide variety of Windows errors. Such tools basically scan your PC to detect issues. Then they’ll fix detected errors when you click their fix/repair options.

Just let it scan your PC and let it fix all issues found. It is completely safe and easy to use.

2. Open the Command Prompt as an administrator

  1. First, open the search utility in Windows by pressing the Windows key and S at the same time.
  2. To find the Command Prompt, enter cmd in the search tool’s box.
  3. Right-click the Command Prompt search result to select a Run as administrator option.
    Run as administrator option windows error code 0xc004f025
  4. If a UAC prompt pops up, click the Yes option on it.
  5. Then try activating your license key within an elevated Command Prompt window.

3. Change your standard user account to an admin one

  1. Launch Run with the appropriate Windows + R keyboard shortcut.
  2. Next, type the following in Run’s Open box and click OK: Control Panel
  3. Then click User Accounts to open the Control Panel applet.
    User Accounts window windows error code 0xc004f025
  4. Click Change your account type to open the options in the shot directly below.
    The user account settings windows error code 0xc004f025
  5. Then select the Administrator radio button.
  6. Press the Change Account Type button.
  7. Thereafter, restart your computer, sign in to your new admin account, and then try activating Windows again.

4. Open the Activation troubleshooter

  1. Click Start and select Settings on the menu.
  2. Next, click Update & Security to open Windows update options.
  3. Select Activation on the left of Settings.
    Activation tab windows error code 0xc004f025
  4. Click Troubleshoot to open an Activation troubleshooter.
  5. Select the Apply this fix option.

5. Fix rearm dependencies

Change the SkipRearm DWORD value

  1. Open the Run window.
  2. Enter this Run command in the Open text box: regedit
  3. Click OK to open Registry Editor.
  4. Next, open this key path in the Registry Editor: Computer\HKEY_LOCAL_MACHINE\SOFTWARE\Microsoft\Windows NT\CurrentVersion\SoftwareProtectionPlatform
    Registry Editor windows error code 0xc004f025
  5. Select the SoftwareProtectionPlatform key, and double-click the SkipRearm DWORD to open the window shown directly below.
    Edit DWORD window windows error code 0xc004f025
  6. Then select the Hexadecimal base option if it’s not already selected.
  7. Enter 1 in the Value data box to replace the zero value.
  8. Press the OK button on the Edit DWORD window.
  9. Close the Registry Editor window.

Is there something wrong with the Registry Editor? Things aren’t as scary as they seem. Check out this guide dedicated to solving errors while accessing the Registry and set things right again.

Run the slmgr -rearm command

  1. Launch the Run accessory again, and enter this command in its Open box: cmd
  2. Press the Ctrl + Shift + Enter hotkey to open an elevated Prompt.
  3. Then input this command in the Command Prompt: slmgr -rearm
    slmgr -rearm command windows error code 0xc004f025
  4. Press the Enter key to execute the slmgr rearm command.

Change the slmgr.vbs file

  1. Thereafter, open File Explorer with its Windows key + E keyboard key.
  2. Next, select the Hidden items checkbox on File Explorer’s View tab.
  3. Open this folder in File Explorer: C:\Windows\System32
  4. Then type slmgr.vbs in File Explorer’s search box.
    slmgr.vbs file windows error code 0xc004f025
  5. Right-click the slmgr.vbs file and select Rename.
  6. Change the slmgr file extension to old so that the file is slmgr.old, and press the Enter key.
  7. Finally, restart Windows after changing the slmgr file.

6. Reinstall Windows

If the above resolutions made no difference, you might need to reinstall Windows to resolve the issue. You can reinstall Windows 10 with the Media Creation Tool or Refresh Tool.

Our guide on how to clean install Windows 10 provides further details for reinstalling Windows 10 with the Media Creation Tool.

Windows Media Creation Tool windows error code 0xc004f025

Those are the most likely ways to fix Windows error code 0xc004f025. The fifth resolution is one of the most widely confirmed fixes for the issue.

Keep in mind that Windows 10 has a lot of bugs, lags, and other annoying issues. When you lack the time or patience to follow complicated procedures, the best Windows PC troubleshooting tools are waiting for you.

Make a choice, give that tool a try and you’ll be able to find and solve all your PC problems. As for this particular error, don’t hesitate to let us know which solution worked for you in the comments area.

0x80071ab1: How to Fix This Windows Update Error Code

Windows 11, the most advanced iteration from Microsoft, contrary to popular opinion is prone to errors. And, the worst are the ones that affect basic functioning. In this article, we will be discussing the 0x80071AB1 error.

Note that it is encountered when users try to get the .NET framework, but 0x80071AB1 shows up instead. This poses a major hurdle since a lot of apps require these to function effectively.

To fix the 0x80071AB1 error, we have dedicated this article that explains how the .NET Framework functions along with the most effective methods to eliminate the error.

In the next section, we will walk you through the methods to resolve the 0x80071AB1 error and get .NET Framework.

How can I fix the error code 0x80071ab1 in Windows 11?

1. Update Windows 11

  1. 1. Press Windows + I on your keyboard to launch the Settings app.

  2. 1. Select Windows Update from the list of tabs in the navigation pane on the left.

    Update Windows to fix 0x80071AB1
  3. 3. Next, click on Check for updates to scan for any updates pertaining to .NET Framework.

    Check for updates to fix 0x80071AB1
  4. 4. If any updates are found, download and install them.

  5. 5. Check whether the error persists.

  6. The first thing you should do if you encounter error code 0x80071ab1 on your Windows PC is ensure that your device is up to date with the latest updates.

    After the introduction of .NET Frameworks 3.5, any updates with respect to these were released through Windows Update. So users now don’t have to do pretty much anything other than regularly check for updates.

    It is possible that the error will go away on its own after you update your Windows, and you won’t have to rely on other more complicated methods.

2. Run the Windows Update troubleshooter

  1. Press Windows + I to launch the Settings app.
  2. Click on Troubleshoot on the right in the System tab.Troubleshooters
  3. Click on Other troubleshooters.Other troubleshooters
  4. Now, locate the Windows Update entry and then click on the Run button next to it.Run Wndows Update troubleshooter to fix 0x80071AB1 error

The built-in troubleshooters offered by Microsoft are pretty good at eliminating a plethora of errors, including the 0x80071AB1 Windows Update error. If .NET Framework didn’t appear in Windows Update in the last method, it could indicate a problem with the update process itself.

Hence, it’s recommended that you run the Windows Update troubleshooter to diagnose and fix the issues preventing .NET Framework from appearing in the update section.

If that does not help, you can try a specialized repair tool, which will scan your PC and fix any errors related to missing DLL files, faulty registry entries, or malware.

3. Perform a quick SFC scan

  1. Press Windows + S to launch the Search menu.
  2. Enter Windows Terminal in the text field at the top, right-click on the relevant search result, and select Run as administrator from the context menu.Launch Windows Terminal to fix 0x80071AB1
  3. Click Yes on the UAC (User Account Control) prompt that pops up.Yes
  4. Next, click on the downward-facing arrow at the top, and select Command Prompt from the list of options in the menu. Alternatively, you can hit Ctrl + Shift + 2 to launch Command Prompt in a new tab.Open Command Prompt tab
  5. Type the following command and hit Enter to run the SFC scan:sfc /scannowrun SFC scan to fix 0x80071AB1
  6. Wait for the scan to complete, restart the computer, and check if the error is fixed,

The SFC (System File Checker) scan identifies the corrupt system files, and if any are found, replaces them with their cached copy stored on the system.

Corrupt system files are known to cause a bunch of errors including install error 0x80071AB1 in Windows 11.

4. Run the Windows Update service

  1. Press Windows + R to launch the Run command, enter services.msc in the text field, and then either click on OK or hit Enter to launch the Services app.Launch services app
  2. Now, scroll down, locate the Windows Update service, and double-click on it to launch the Properties. The services here are listed in alphabetical/reverse-alphabetical order, so it shouldn’t be difficult locating the service.Windows Update service to fix 0x80071AB1
  3. Click on the Startup type dropdown menu, and select Automatic from the list of options.Set to Automatic
  4. If the service isn’t running, click on the Start button under Service status, wait for it to run, and click on OK to save the changes.Start service to fix 0x80071AB1

Once done, restart the computer and check if the 0x80071AB1 error is eliminated.

5. Reset Windows Update components

  1. Right-click on the Start icon in the Taskbar or press Windows + X to launch the Power User/Quick Access menu, and select Windows Terminal (Admin) from the list of options.Launch Windows Terminal to fix 0x80071AB1
  2. Click Yes on the UAC (User Account Control) prompt that appears.Click Yes
  3. Click on the downward arrow at the top, and select Command Prompt from the menu to launch it in a new tab.Launch Command Prompt in a new tab to fix 0x80071AB1
  4. Now, start pasting the following commands one at a time and hit Enter after each to reset Windows Update components These two commands will stop BITS and Windows Update service:net stop bits net stop wuauserv
  5. Next, execute the following command to delete the qmgr*.dat files:Del “%ALLUSERSPROFILE%Application DataMicrosoftNetworkDownloaderqmgr*.dat”
  6. If this is your first attempt at resetting, skip the following three commands and move to the next step. In case it doesn’t work out, you can execute these in the subsequent attempt:Ren %Systemroot%\SoftwareDistribution\DataStore DataStore.bak Ren %Systemroot%\SoftwareDistribution\Download Download.bak Ren %Systemroot%\System32\catroot2 catroot2.bak
  7. Next, execute the following commands to reset the BITS and Windows Update service:sc.exe sdset bits D:(A;;CCLCSWRPWPDTLOCRRC;;;SY)(A;;CCDCLCSWRPWPDTLOCRSDRCWDWO;;;BA)(A;;CCLCSWLOCRRC;;;AU)(A;;CCLCSWRPWPDTLOCRRC;;;PU) sc.exe sdset wuauserv D:(A;;CCLCSWRPWPDTLOCRRC;;;SY)(A;;CCDCLCSWRPWPDTLOCRSDRCWDWO;;;BA)(A;;CCLCSWLOCRRC;;;AU)(A;;CCLCSWRPWPDTLOCRRC;;;PU)
  8. Paste the following command and hit Enter:cd /d %windir%\system32
  9. Now, execute each of the following commands individually to re-register the critical files:

regsvr32.exe atl.dll
regsvr32.exe urlmon.dll
regsvr32.exe mshtml.dll
regsvr32.exe shdocvw.dll
regsvr32.exe browseui.dll
regsvr32.exe jscript.dll
regsvr32.exe vbscript.dll
regsvr32.exe scrrun.dll
regsvr32.exe msxml.dll
regsvr32.exe msxml3.dll
regsvr32.exe msxml6.dll
regsvr32.exe actxprxy.dll
regsvr32.exe softpub.dll
regsvr32.exe wintrust.dll
regsvr32.exe dssenh.dll
regsvr32.exe rsaenh.dll
regsvr32.exe gpkcsp.dll
regsvr32.exe sccbase.dll
regsvr32.exe slbcsp.dll
regsvr32.exe cryptdlg.dll
regsvr32.exe oleaut32.dll
regsvr32.exe ole32.dll
regsvr32.exe shell32.dll
regsvr32.exe initpki.dll
regsvr32.exe wuapi.dll
regsvr32.exe wuaueng.dll
regsvr32.exe wuaueng1.dll
regsvr32.exe wucltui.dll
regsvr32.exe wups.dll
regsvr32.exe wups2.dll
regsvr32.exe wuweb.dll
regsvr32.exe qmgr.dll
regsvr32.exe qmgrprxy.dll
regsvr32.exe wucltux.dll
regsvr32.exe muweb.dll
regsvr32.exe wuwebv.dll

10. Now, execute the following command to reset Winsock:netsh winsock reset

11. The last step is to restart the BITS and Windows Update service. Execute the following two commands to do that:net start bits net start wuauserv

After resetting the Windows Update components, check if the 0x80071AB1 error is fixed and you are able to get the .NET Framework in Windows 11.

6. Run an in-place upgrade

Note icon NOTE
To do an in-place upgrade, you need to have administrative privileges on the current user account. Make sure to check that before proceeding. Also, save any open files since the computer will restart and it might lead to loss of data.
  1. Create a bootable USB drive for Windows 11.
  2. Once created, connect the drive to the system. Now, press Windows + E to launch File Explorer and double-click on the bootable USB drive.Open bootable USB
  3. Double-click on the setup.exe file to launch it.Run Setup to fix 0x80071AB1
  4. Click Yes on the UAC (User Account Control) prompt.Click Yes
  5. Click on Change how Setup downloads updates.Change how setup downloads updates to fix 0x80071AB1
  6. Next, select Not right now and click on Next to keep the repair process simple and quick.Select Not right now
  7. Click Accept at the bottom.Accept terms
  8. Now, click on Change what to keep.change what to keep to fix 0x80071AB1
  9. Select the option to Keep personal files and apps and click on Next at the bottom.Keep personal files and apps
  10. The last step is to click on Install.Start Installation

The in-place upgrade is an effective repair process that can be used to eliminate a wide variety of errors, including some of the most complex ones without affecting the files and apps stored on the system.

How does .NET Framework work?

The .NET Framework, in simple terms, is a collection of thousands of pieces of code that help developers create an application. Since the code is accessible to all, the developers can use this, wherever required, instead of writing it from scratch.

Apart from that, the .NET Framework also provides a runtime environment to developers in order to test their applications. It’s called the Common Language Runtime or CLR, which compiles and executes the code.

We can go for hours just discussing the .NET Framework, but to eliminate the error at hand, a basic understanding of it would suffice.

If you have an application that requires these codes or the .NET Framework, it’s time you install it.

How can I install/download .NET Framework 3.5 in Windows 11?

  1. Press Windows + S to launch the Search menu, enter Turn Windows features on or off in the text field at the top, and click on the relevant search result.Turn Windows features on or off to fix 0x80071AB1
  2. Tick the checkbox for .NET Framework 3.5 and click on OK at the bottom.Select .NET Framework 3.5
  3. Next, select Let Windows Update download the files for you from the two options listed here.Let Windows Update download the files for you
  4. Wait for the required files to be downloaded, and once done, restart the computer to effectively apply the changes.Wait for download to complete

That’s how you can install .NET Framework 3.5 in Windows 11 in easy steps within no time. Also, check out how to fix some of the common .NET Framework 3.5 errors. Though the article is for Windows 10, the methods work just as fine on the latest iteration as well.

These are all the ways you can fix the 0x80071AB1 error in Windows 11, and get the .NET Framework installed to eliminate problems in running applications.

In case the .NET Framework 3.5 is missing from your Windows 10 PC, check how to install it.

Do not hesitate to tell us which fix worked to solve the Windows Update error 0x80071ab1 and your experience of Windows 11 thus far, in the comments section below.

Error 0x800705aa (Windows Update): Solved

Error 0x800705aa is another of those not entirely uncommon Windows update issues. However, numerous users have posted on Microsoft’s forum about the 0x800705aa error. That issue can arise in both Windows 11 and Windows 10 operating systems.

The 0x800705aa error can arise for cumulative (patch) and build (feature) Windows updates. When this happens, users see an install error message with 0x800705aa codes in Settings’ Windows Update tab like the one directly below:

The 0x800705aa error 0x800705aa

Consequently, the Windows Update service doesn’t download and install updates because of error 0x800705aa.

However, you can feasibly resolve it with the potential fixes below but not before understanding more about the actual causes.

What are the causes for the install error – 0x800705aa?

This error’s causes are similar to numerous other Windows update issues. These are some of the more likely aspects to keep in mind:

  • Incorrect time and date settings: Windows update issues can arise because time and date settings are configured right on users’ PCs
  • Corrupted system files: Error 0x800705aa can be due to corrupted system files
  • Broken Windows Update component: This issue might arise because of corrupted Windows Update components
  • Conflicting programs: Software conflicts are another potential factor behind the 0x800705aa error
  • Limited hard drive space: This issue can also occur because your PC’s hard drive has little storage space left

As there are various potential reasons behind the 0x800705aa error, there are numerous possible fixes for it. So, to solve it right away, try applying these potential resolutions.

How can I fix the error 0x800705aa?

1. Correct time & date settings in Windows

  1. Right-click the clock on the Taskbar and select Adjust date and time.
  2. Toggle on the Set the time automatically option if it’s off.
    Set the time automatically option 0x800705aa
  3. Click Set the time zone automatically to turn on that option.
Note icon NOTE
If the time on your PC’s clock changes after correcting time settings, your desktop or laptop might need a new CMOS battery.

2. Run the Windows Update troubleshooter

  1. First, press the Start button on your Taskbar and select Settings.
  2. Select Troubleshoot on the System tab.
    System tab 0x800705aa
  3. Click Other trouble-shooters in Settings.
  4. Press the Run button for the Windows Store Apps troubleshooter listed there.
    Run button 0x800705aa
  5. After that, wait for the troubleshooter to detect why the Windows 11 Update installation has failed. Then, if it makes any suggestions, apply the proposed resolutions.

3. Run a system file scan

  1. Press the magnifying glass button on the Windows 11 taskbar to bring up a search utility.
    The Search button 0x800705aa
  2. Type cmd in the search utility’s box.
  3. Click the Command Prompt’s Run as administrator option in the search tool.
  4. Next, input this Deployment Image Servicing command and hit Enter:
    DISM.exe /Online /Cleanup-image /Restorehealth
  5. After that, type this System File Checker command within the Prompt’s window and press Return: sfc /scannow
    sfc /scannow command0x800705aa
  6. Wait for the SFC scan to complete before closing the Command Prompt.

To run a complete and in-depth file integrity scan, we recommend using specialized software that can automatically scan for and replace any broken system files.

4. Free up drive space

  1. Open the search tool in Windows by clicking its taskbar button.
  2. Type the keyword Disk Clean-up in the search text box.
    Disk Clean-up search 0x800705aa
  3. Select the Disk Clean-up tool to open a new window.
  4. Now select some file deletion options in the Disk Clean-up utility. Please select all of them to free up some storage space.
  5. Press the OK button, then click the Delete Files button to confirm.
    Delete Files button 0x800705aa
  6. You can also clear up space by clicking the Clean up system files button. Then, repeat steps four to six to erase superfluous system files with Disk Clean-up.

Alternatively, users can free up disk space in Windows with third-party system maintenance software like CCleaner. Don’t hesitate to try it; rest assured that it protects your privacy and makes your PC faster.

Note icon NOTE
There are other ways to free up hard drive space in Windows without disk cleaner tools. Even if the procedures are detailed for Windows 10, rest assured that you may apply them to the new OS too.

5. Fix Windows Update components

  1. Right-click Start and select the Run accessory shortcut.
    Run shortcut 0x800705aa
  2. Type in this command below and press Enter.
    services.msc
  3. Next, right-click the Background Intelligent Transfer Service, Cryptographic Services, and Windows Update services and select their Stop options.
    Stop option 0x800705aa
  4. Now click File Explorer’s Taskbar button.
    The File Explorer button 0x800705aa
  5. Open this folder path:
    C:\Windows
  6. Right-click the SoftwareDistribution folder and select Rename.
    The Rename option 0x800705aa
  7. Then enter sd.old as the new folder name.
  8. After that, navigate to this path in File Explorer:
    C:\Windows\System32
  9. Next, right-click the catroot2 folder and select the Rename option.
    catroot2 folder 0x800705aa
  10. Input catroot2.old as the folder’s new title.
  11. Please return to the Services window, and restart the Background Intelligent Transfer Service, Cryptographic Services, and Windows Update services by right-clicking them and selecting Start.
  12. Finally, click the Power and Restart options on your Start menu to reboot.

6. Clean-boot Windows

  1. Open Run as outlined in the first step of the previous resolution.
  2. Type this command in Run’s text box and click OK:
    msconfig
  3. Next, click the Selective Startup radio button on the general tab to select it if required.
    Selective startup radio button 0x800705aa
  4. Uncheck the Load startup items checkbox to deselect it, and ensure the Load system services checkbox is enabled.
  5. Click Services to open that tab.
  6. Deselect the checkbox for Hide all Microsoft services.
    The Hide all Microsoft services checkbox 0x800705aa
  7. Press the Disable all button to uncheck all the checkboxes for remaining third-party services.
  8. Click Apply and OK to save settings and close the System Configuration window.
  9. Select Restart on the dialog box that pops up.
    The Restart option 0x800705aa
  10. Try applying updates via Settings after clean-booting Windows to see if error 0x800705aa still arises.

7. Reset Windows

Note icon NOTE
Resetting Windows 11 is the last resort resolution akin to reinstalling the platform. You’ll need to reinstall any software that didn’t come preinstalled on your desktop or laptop after resetting Windows 11, and keep in mind that this solution is ideal for Windows 10 users too.
  1. First, press the Start button on your Taskbar and select Settings.
  2. Select Recovery on the System tab.
  3. Click Reset PC to open that utility.
    Reset PC button 0x800705aa
  4. Select Keep my files in the Reset this PC window.
    The Reset this PC window 0x800705aa
  5. Click the Cloud reinstall option.
  6. Press the Next button to confirm.

Can I install updates without using the Windows Update service?

You can manually download and install updates without the Windows Update service. The Microsoft Update Catalog includes a repository of Windows updates for download. This is how users can download updates from that website:

  1. Open the Microsoft Update Catalog website in a browser of your choice.
    Microsoft Update Catalog 0x800705aa
  2. Input a KB number for an update to download in the search box.
  3. Click the Download button for the update that matches your PC’s Windows platform version and system architecture.
    A Microsoft Update Catalog search 0x800705aa
  4. Then click the download link that opens to save the file.
  5. Open the folder that includes the downloaded update file.
  6. Click the Windows update file to install it.

If the error code 0x800705aa arises when installing a Windows version (feature) update via Settings, try updating the platform with the Media Creation Tool instead.

Who can I contact about error 0x800705aa?

Contact Microsoft’s support service for Windows if you still need more potential fixes for the 0x800705aa error. To do so, click Get Support on the Contact Microsoft Support webpage. Afterward, type a description for the error in the text box and click Get help, then Contact Support.

Microsoft’s community forum also helps many users fix Windows errors. To add a post about the error, click the Ask a question option on the Windows forum. Then enter the details for the error in the text editor, and click the Submit button.

However, you might not need to contact Microsoft’s support service if you apply the Windows 11 resolutions above. Those will probably fix the problem for most users.

There are also a few other potential solutions for this issue that might work. Rolling Windows back to an earlier date with System Restore and uninstalling third-party antivirus utilities might help resolve error 0x800705aa.

Things are no different for a similar error code 0xa00f4271. Again, corrupted driver files are often to blame, but the solutions from our guide will most likely do the trick.

We’d like to hear more from you on this subject, so feel free to drop us a comment in the comments section below.

Error Code (0x8007042b) on Windows: Solved

Windows 10 and 11 offer various improvements over their predecessors while keeping prominent features. Nonetheless, with more than a few upgrades, we also encountered a large portion of issues.

Some of those issues are not addressed and are related to Windows update features. As we all know, the latest operating systems depend highly on updates.

And if you can’t obtain a particular update, you can’t expect to have up-to-date protection and features. 0x8007042B is one of those issues.

It prevents users from installing the latest build and occurs after the second boot phase while migrating data. This makes your PC vulnerable, as you won’t be able to use the latest security patches.

Just like we did with the Windows update error 0x800f0900, we will also show you proven ways to fix the error code: (0x8007042b) as well.

What does the error 0x8007042b mean?

There are a series of reasons for the Windows update error 0x8007042B. Below are some of the variations of the error and possible causes:

  • Failed to install 0x8007042b – Sometimes Windows Update process can fail due to this error. However, you can fix the issue simply by disabling your antivirus.
  • 0x8007042b Windows 10 upgrade – This error commonly occurs when installing a new Windows 10. If you keep getting this error, you might want to try downloading and installing the update manually.
  • Windows 10 error code 0x8007042b 0x2000d/0x3000D/0x4001e – In some cases, this error message is followed by an additional error code. If this happens, try repairing your files and check if that solves the issue.
  • Failed to deserialize/execute Pre oobeboot operations Error 0x8007042B – Windows 10 installation failed in the second boot phase with an error during migrate_data operation
  • The process terminated unexpectedly 0x8007042b

How can I fix the error code 0x8007042B?

1. Remove additional USB peripherals

If you use the Media Creation Tool to install updates or upgrade your OS, you can have occasional USB conflicts. To prevent that, pull out all other devices except the system drive.

Some users reported this as a solution for this issue. Once they removed peripheral devices, the second boot failure stopped and the system updated as intended.

2. Manually download and install the update

  1. Type Updates in the Search Windows bar.
  2. Choose to Check for updates.
    Windows 10 error code 0x8007042b 0x2000d
  3. Once you see which update should be installed, write down the update’s code.
  4. Open your web browser and search for Microsoft Catalogue.
  5. Type the name of the KB in the search bar.
  6. Download the given update file and save it to a desktop.
    Windows 10 upgrade failed
  7. Run the file and install it.
  8. You may need to restart your PC for the installation to finish.

If you can’t download or install updates due to error 0x8007042B, you might be able to circumvent this error by installing the update manually.

Since you’re downloading and installing the update manually, you won’t encounter the error message, but the core problem might still be there and appear while downloading future updates.

3. Use a third-party software

Specialized software can be used to automatically scan for and replace broken system files in just a few minutes. These tools often come with powerful features that allow them to act as a reliable long-term maintenance solution for your computer.

4. Disable or uninstall antivirus

If you have problems with the update error 0x8007042B, you might want to try disabling certain antivirus features and check if that solves the problem. If the issue is still there, your next step would be to disable your antivirus entirely.

In some cases, disabling the antivirus won’t help, so your next step would be to uninstall your antivirus completely. Once the antivirus is removed, check if the issue reappears.

If removing the antivirus solves your problem, you might consider switching to a different antivirus solution. There are many great antivirus tools available.

5. Clear Recent items list

According to users, sometimes your Recent items list can cause the update error 0x8007042B to appear.

It seems that Windows might have some issues with the Recent list. You need to clear items from the Recent list to fix the problem.

After that, try to install the update again and check if the problem is resolved.

6. Perform DISM and SFC scans

  1. Press Windows key + X and choose Command Prompt (Admin) or Powershell (Admin).
    0x8007042b Windows 10 upgrade
  2. When Command Prompt opens, type sfc /scannow and hit Enter.
    0x8007042b Windows 10 upgrade
  3. SFC scan will now start.

According to users, the update error 0x8007042B can sometimes appear due to file corruption. In this case, you need to run an SFC scan to repair the files.

This scan can take up to 15 minutes, so don’t interfere with it. Once the scan is finished, check if the problem is still there.

If you could not run an SFC scan or if it didn’t fix the problem, your next step would be to perform a DISM scan.

To do that, you need to start Command Prompt as administrator and run the command below: DISM /Online /Cleanup-Image /RestoreHealth

DISM scan will now start, so be patient while it repairs your PC. The scan can take up to 20 minutes, so don’t interfere with it. Once the scan is finished, check if the problem is still there.

If the problem is still there, or if you couldn’t run the SFC scan before, repeat the SFC scan once again, and the issue will be permanently resolved.

7. Reset Windows Update components

  1. Open Command Prompt as administrator.
  2. When Command Prompt opens, type the following commands and press Enter after each: net stop wuauserv net stop cryptSvc net stop bits net stop msiserver ren C:WindowsSoftwareDistribution SoftwareDistribution.old ren C:WindowsSystem32catroot2 catroot2.old net start wuauserv net start cryptSvc net start bits net start msiserver pause

According to users, if you’re having this issue, you might be able to solve it by resetting Windows Update components.

Your system relies on certain services to work correctly, and if these services are bugged, you’ll encounter the update error 0x8007042B. After running these commands, check if the problem is resolved.

Lastly, if you don’t want to run each command manually, you can always create a Windows Update reset script and run it to reset all Windows Update services quickly.

8. Perform System Restore

  1. Press Windows key + S and enter system restore.
  2. Select Create a restore point from the list.
    Windows 10 upgrade failed
  3. The system Properties window will now appear.
  4. Click the System Restore button.
    0x8007042b Windows 10 upgrade
  5. When the System Restore window opens, click Next.
    Windows 10 error code 0x8007042b 0x2000d
  6. If available, check Show more restore points.
  7. Now, select the desired restore point and click Next.
    Windows 10 upgrade failed
  8. Follow the instructions on the screen to complete the restoration process.

If you keep getting the update error 0x8007042B, you might be able to solve the problem by performing System Restore. Once your PC is restored, try to perform the upgrade again and check if the issue is still there.

9. Install update using Windows Media Creation Tool

  1. Download Media Creation Tool here and install it.
  2. Select Upgrade this PC now and click Next.
  3. Setup will start preparing the necessary files.
  4. Now select Download and install updates (recommended) and click Next.
  5. Wait while the setup downloads the necessary files.
  6. Follow the instructions on the screen until you reach the Ready to install screen. Now click Change what to keep option.
  7. Make sure that Keep personal files and apps is selected and click Next.
  8. Follow the instructions on the screen to finish the setup.

If any of the previous workarounds haven’t helped you solve the update error 0x8007042B, you should move on to performing a clean install. If there’s corruption or other issues with system files, the only way to get rid of them is to reinstall your system.

Once it’s done, you can perform updates and resolve the code error. Note that this fix helps to install the latest Windows version without tampering with your files and applications. So, you can continue where you left off.

Why is my Windows Update disabled?

This can result from an update service issue or a damaged file in the Windows update folder. These problems are often quickly fixed by rebooting the Windows Update components and making simple registry adjustments to add a registry entry that sets updates to automatic.

Also, you may have accidentally turned off this service and will simply need to reenable it.

How can I fix Windows 11 0x8007042B update error?

Broken or faulty system files mainly cause the update error 0x8007042B on Windows 11. You can fix this by running the SFC and DISM scan, as shown in this guide.

Also, you might need to reset some of the Windows components to get past this error. As a matter of fact, all the solutions in this guide work well on Windows 10 and 11.

The update error 0x8007042B can be frustrating, as it stops you from getting beneficial updates. Fortunately, it is not the most challenging issue to fix, as shown in this guide.

Are you facing other issues like the Windows update error 0x800703f9? Then, check our detailed guide to fix it quickly.

We hope you managed to get rid of the error code: (0x8007042b). If you have any questions or alternative workarounds, feel free to let us know in the comments below.

Error Code 0x80072EE2 (Windows Update): Solved

If you get the Windows Update failed to check for updates with the error 0x80072ee2 in Windows 11, it is usually triggered by the operating system’s update components.

It will prevent you from updating your system. Several elements can cause this error. This article will discuss what is causing error 0x80072EE2 and how you can fix it.

When Windows 10/11 cannot connect to the update server, you usually get the error 0x80072EE2.

If your Windows operating system does not receive a response from the update server in a specific time frame, you will get this error message.

This error can be caused by having a poor Internet connection, your Windows 11 Firewall blocking your access to the update server, or perhaps you have a Windows 10 system that interrupts the communication with the update server.

In one case, Windows Updates should not be there or stay too long. So, let’s see what you can do about this precise 0x80072EE2 error.

What does error code 0x80072EE2 mean?

Several distinct causes might have brought on the problem identified by the error code 0x80072ee2. Among the most common reasons are settings on the system that have been poorly configured or irregular entries made in the system elements.

The error code 0x80072ee2 is one of the problems users could experience due to improper or unsuccessful program installation or uninstallation, which might have resulted in faulty entries in various system components.

Here are some iterations of the OS on which you can encounter the error:

  • Error code 0x80072ee2 Windows 10 update
  • 0x80072ee2 Windows 7
  • 0x80072ee2 Windows Server 2016
  • add-windowscapability failed. error code = 0x80072ee2
  • exception from hresult: 0x80072ee2

But don’t worry; you can fix this error by following our solutions below. Keep on reading!

How can I fix the Windows Update error 0x80072EE2?

1. Check your Internet connection

Make sure you have a working Internet connection. Then, you can open your Internet Explorer/Edge browser, for example, or any other browser installed on your Windows computer and try to access a website.

You can access www.google.com, for example, and see if your Internet connection is working correctly.

If your Internet connection is not working correctly, I suggest calling your Internet Service Provider and finding out precisely what the issue is.

2. Turn off your firewall

  1. If the Internet connection is not the problem, then you should turn off your Windows 10 firewall for the duration of this trial and see if this is why error 0x80072EE2 occurred in the first place.
  2. Click on the Start button on Windows. Next, type control panel and select the Control Panel feature (it should be the first result).control-panel-serarch-w10 opera not responding
  3. You will have a search box in the right-hand corner where you can type firewall and select Windows Firewall afterward.
  4. Select the option that says Turn Windows Firewall On or off.
  5. Select the Public network settings option and check the Turn off Windows Firewall (not recommended) box. Next, select the Private network settings option and check the Turn off Windows Firewall (not recommended) box.windows firewall disable
  6. Click the OK button to apply the changes you made.
  7. Check if you still get the error 0x80072EE2 after your Windows Firewall is turned off.
  8. If you still have this error message after you follow the steps listed above, turn on your Windows Firewall by following the same steps but this time, check the Turn on Windows Firewall box.

Speaking of turning off your firewall, you may also temporarily try to disable your antivirus and VPN software. Maybe this will help fix the 0x80072ee2 Windows Update error.

3. Use a non-intrusive antivirus

You should know that your antivirus can easily block your Wi-Fi. Unfortunately, this prevents you from connecting to the Internet in the first place. Therefore no update is possible.

There is a multitude of software available on the market, and we encourage you to look for a reliable antivirus alternative that better fits your needs.

TotalAV is just one example of a great antivirus that offers real-time protection without interfering with other apps on your PC.

This one is a reliable, easy to use and ideal for users concerned about privacy, online shopping and web-surfing.

TotalAV

Use this efficient tool which protects all aspects of your digital life with cutting-edge expertise.
Free Trial Check Website

4. Whitelist the Windows Update servers

  1. Press Windows, then type Internet Options and access the top result.internet-options-w10 0x80070002 windows update
  2. Select the Security tab that you have in the upper menu of the Internet Options window. Then select the Trusted Sites option available, followed by Sites.
  3. Uncheck the Require server verification (https:) for all sites in this zone feature.
  4. You will now have a box that says Add this website to the zone. Type in the following addresses: https://update.microsoft.com and https://windowsupdate.microsoft.com.
  5. Click on the Add button after you type in the addresses above.
  6. Click on the OK button to save your settings.

Leave the respective addresses in the trusted website list if you don’t get the error 0x80072EE2 anymore.

If the solutions listed above did not work for you and you’re still getting this error message, try to add the updated server addresses to your list of trusted websites to see if this is the root cause.

5. Run the Windows Update Troubleshooter

  1. Press Windows and type troubleshoot settings, then open the top result.
  2. Here, click Additional troubleshooters.troubleshoot-aditional can't remove bluetooth device windows 10
  3. Click the Windows Update troubleshooter and select Run the troubleshooter.windows-update-run 0x80072ee2

Windows features a series of troubleshooters allowing users to fix various issues affecting the OS quickly. All you need to do is find the right troubleshooter and run it. This should fix the Windows activation error 0x80072ee2 in no time.

After you run the troubleshooter, try to install the problematic updates again and check if the error persists. If you encounter an error while trying to run the troubleshooter, check for malware or run an SFC scan.

6. Reset the Windows 10 Update components

  1. Press Windows, then type cmd and open the Command Prompt result as an administrator.cmd-run-admin 0x80070002 windows update
  2. Type the following commands and hit Enter after each one to stop all the Windows Update Components: net stop wuauserv net stop cryptSvc net stop bits net stop msiserver net-stop-suvr update error w 10/11
  3. Now, rename the SoftwareDistribution folder by entering the following commands: ren C:\Windows\SoftwareDistribution\SoftwareDistribution.old ren C:\Windows\System32\Catroot2\Catroot2.old
  4. Restart the Update Components that you previously stopped at step 2. To do this, enter the following commands and press Enter after each: net start wuauserv net start cryptSvc net start bits net start msiserver net-stop-suvr pink screen of death
  5. Close Command Prompt, restart your computer and check if the error persists.

Windows Update corruption issues may also trigger error 0x80072EE2. Fortunately, you can fix this problem by resetting Windows 10’s Update components in Command Prompt:

If you’re confident that corrupted files trigger the error, you can try to repair them. We’ve compiled the best tools that will help you repair corrupted files.

We also have a guide on how to fix the can’t access Command Prompt as an admin, in case you experience that issue.

7. Run SFC scan

Manually resetting your Windows Update components helps you get rid of update corruption issues. However, if some of your system files are missing or corrupted, you need to use a different approach.

The System File Checker tool allows you to scan your system and fix file corruption issues.

  1. Press Windows, then type cmd and open the Command Prompt result as an administrator below.cmd-run-admin 0x80070002 windows update
  2. Paste or type the following command and press Enter: sfc /scannowscannow 0x80070002 windows update

Wait until the scanning process completes, and then restart your computer. Hopefully, error 0x80072EE2 is history now.

A good way to skip those manual steps and have the scan done automatically is to try out a third-party software that will identify your corrupted Windows update components for you.

How do I fix the 0x80072EE2 error on Windows 11?

  1. Press Windows + I, then scroll down to the Troubleshoot section and click it.troubleshoot-opt-w11 0xa00f4244 nocamerasareattached
  2. Click Other troubleshooters.
  3. Please scroll down the page, find the Windows Update troubleshooter, and click Run next.windows-update-run-new pink screen of death

Why is Windows 10 failing to update?

When Windows needs more than one update, it’s a common reason for this problem and is also one of the most prevalent causes.

Suppose your personal computer does not have sufficient free space on its hard drive to perform a Windows 10 update successfully. In that case, the update will be terminated, and Windows will indicate that the update was unsuccessful.

In most cases, resolving this issue will require deleting the corrupted update files. However, you may have a gadget attached that’s preventing the software from updating correctly.

The steps listed above should help your solve the 0x80072EE2 error code and prevent it from ever occurring again.

You can also visit this Troubleshooters section and make your own choice to try to fix the issue. We’ve got a whole collection of similar guides, so check out this Windows 10 Errors Hub.

Drop us a line in the comments section below and tell us if the solutions available in this article worked for you. Also, leave any other questions, and we’ll certainly take a look.

Excel Toolbar Missing: Here’s How To Get It Back

Microsoft Excel is one of the most sophisticated tools in the Office suite, and it comes with loads of functions, most of which are manipulated using the toolbar. The toolbar missing makes it tough to get work done with Excel.

Without these crucial elements in Excel, you won’t be able to get jobs done quickly, so, understandably, you are searching for fixes.

The missing or hidden toolbar in Excel is a common complaint, but this is not usually a bug or issue from Excel itself. Incorrect display settings commonly cause it. Learn how to get your toolbar back in Excel.

Preliminary check:

➡️ Press CTRL + F1, which is the ribbon shortcut.

Pressing the ribbon button when the toolbar is visible hides it. If the toolbar is not showing in Excel, the ribbon shortcut makes it visible.

How to show the toolbar in Excel?

1. Ribbon hidden, show the ribbon

    ✅ How to get toolbar back in Excel in 2 clicks

    This is a simple process that will unhide the toolbar. Be sure you follow the steps below:

    1. In an MS Excel window, click on the Ribbon Display Options icon to reveal the following options:

    • Auto-hide Ribbon:
      • The ribbon disappears when you work on the sheet and shows up only when you hit ALT or click on the More ellipse icon.
    • Show Tabs:
      • Display only the tabs and leave the toolbar and ribbon hidden.
    • Show Tabs and Commands:
      • Display the tabs and commands at all times.

    how to repair toolbar not showing in excel
  1. 2. Select either Show Tabs or Show Tabs and Commands to display your toolbar to show the missing Excel toolbar.

2. If the add-in tab is not showing in Excel

excel toolbar missing from disabled add ins
  1. Hit the File menu link at the top of the page.
  2. From the File menu, select Options.
  3. Next, navigate to the Add-ins section from the left panel and select Disabled Items.
    • If Excel disables the add-in, you will find it on the list here.
  4. Select the add-ins for which its tab is missing and hit Enable.

3. Other solutions for when Excel toolbars are missing

➡️Click on a tab to view the ribbon temporarily. Then, to the lower right of the screen, click the pin icon to pin the ribbon to the screen permanently.

➡️Double-click on the visible tab names.

➡️Right-click the tab and uncheck Collapse the Ribbon (or Minimize the Ribbon, depending on your Excel version).

➡️If you select the option of Auto-hide Ribbon, while working on the sheet, the ribbon and toolbar disappear. To see them, simply move your mouse to the top of the workbook and click.

Note that the above items are not steps to resolve the toolbar not showing in Excel issue; they are rather individual solutions that can help you get your toolbar back in Excel. Also, you can try them in any order.

The ribbon or toolbar is not showing in Excel is rarely a sign of an issue or bug; it is mostly due to the ribbon display settings. Press the ribbon shortcut (CTRL +F1) to show the Excel toolbar missing.

If that still does not solve the problem, then try out another solution on this page.

Error Code 0x800706BA (Windows Update): Solved

Windows 10 and 11 are frequently updated like the earlier versions of the Windows operating systems. These are primarily security patches to protect your PC against current threats.

Hence, it is essential to install these updates when they are available. However, I’ve notice on different forums that some users keep getting similar errors, like the update error 0x800f081f, while trying to install these latest updates.

Another prominent issue preventing users from installing updates is the error code 0x800706ba. Thankfully, we have provided the fix for this issue in this guide, just like we have done for the earlier problems.

What does 0x800706BA mean?

The leading cause of the Windows update error 0x800706BA is broken system files. This can be fixed with the built-in repair tools on your PC. You can also repair the system files with a dedicated tool.

Also, the issue can be down to glitches with the update process. You can rectify this by running the Windows Update troubleshooter.

Users have faced different variations of this error including

  • Error 0x800706ba the RPC server is unavailable
  • 0x800706ba windows 7
  • Result failure error code 0x800706ba
  • SCCM 0x800706ba

Regardless of the variations, the solutions we suggest will come in handy in resolving the problem.

How can I fix error 0x800706ba on Windows?

1. Run SFC and DISM

  1. Press Windows key + Q and type cmd.
  2. Choose the Run as administrator option next to Command Prompt.
    command prompt admin 0x800706ba
  3. Copy and paste the command below and hit Enter: sfc /scannow
    sfc scan
  4. Wait until the scan and repair process is finished.

Windows 10 error 0x800706ba is primarily caused by corrupted system files. Fortunately, you can use one of the Windows built-in tools, like System File Checker (SFC), to correct the situation.

If the SFC scan does not work, you can use the Deployment Image Servicing and Management (DISM)tool to fix corrupt system files, as shown below:

  1. Open Command Prompt as admin.
  2. Copy and paste the following command into the command line and hit Enter: dism.exe /Online /Cleanup-image /Restorehealth
    dism restore health
  3. If the DISM can’t obtain files online, try using your USB or DVD installation. Insert media and type the following command: dism.exe /Online /Cleanup-Image /RestoreHealth /Source: C:/RepairSourceWindows /LimitAccess
    dism repair 0x800706ba
  4. Be sure to replace the C:/RepairSourceWindows with the path of your DVD or USB.

Note: Make sure to replace the repair source path with your own.

Finally, instead of worrying about other system errors, you can use a dedicated tool to fix these corrupt and broken files.

2. Use Windows Update Troubleshooter

  1. Press the Windows key + I to launch the Settings app.
  2. Select the Updates & Security option.
    update and 0x800706ba
  3. Select Troubleshoot in the left pane.
    troubleshoot
  4. Click the Additional troubleshooters option.
    additional troubleshooters
  5. Choose the Windows Update option.
    windows update option 0x800706ba
  6. Click the Run the troubleshooter option.
    run troubleshooter
  7. Finally, follow the onscreen instruction to complete the process.

Windows Update Troubleshooter is a Windows 10 built-in tool that can also be used to fix this problem since error 0x800706ba is associated with Windows updates.

3. Enable Critical Windows Update Services

  1. Press the Windows key + R to launch the Run utility.
  2. Type services.msc in the run box and click OK.
    services
  3. Double-click the Background Intelligent Transfer service.
    background 0x800706ba
  4. Click the dropdown before Startup type and select Automatic.
    automatic 0x800706ba
  5. Now, click the Start button followed by OK.
    start
  6. Finally, go back to the Services window and repeat Steps 4 and 5 for the Windows Update and Workstation services.
    workstation and windows 0x800706ba

There are essential Windows Update services that ensure that updates and patches are securely downloaded and installed without issues.

Some vital Windows Updates services include Windows Update, Workstation, and Background Intelligent Transfer service. However, when these services are disabled, the Windows 10 error 0x800706ba problem might occur.

4. Download the update manually

  1. Go to the Microsoft Update Catalog website.microsoft update catalog error 0x800706ba
  2. In the search box, enter the update code and then hit the Enter key.
  3. From the list of matching updates, locate the update that uses the same architecture as your system.list of updates error 0x800706ba
  4. Click the Download button next to the update to download it.
  5. Once you download the update, run the setup file and follow the installations.
  6. After the update is complete, restart your Windows PC.

Another workaround to help you fix the error 0x800706ba is downloading the update directly from Microsoft’s Update Catalog. Though, you need to identify the update code of the problematic update before you can advance.

Typically, every Windows update code starts with KB, followed by an arrangement of numbers. After identifying the update code, you can proceed to download and install the update manually.

5. Reset Windows Updates Components

  1. Press the Windows key + X and select Command Prompt (Admin).
    command prompt (Admin) error 0x800706ba
  2. Once the Command Prompt opens, run the following commands: net stop wuauserv net stop cryptSvc net stop bits net stop msiserver Ren C:WindowsSoftwareDistribution SoftwareDistribution.old Ren C:WindowsSystem32catroot2 Catroot2.old net start wuauserv net start cryptSvc net start bits net start msiserver
  3. After running these commands, check to see if the problem is resolved.

Lastly, you can resolve the Windows 10 error 0x800706ba problem by manually resetting Windows Updates components. Alternatively, you can create a reset script using the steps outlined in our WUReset script guide.

What does RPC Server unavailable mean?

It is the RPC Server. When a Windows PC is unable to connect to other networks’ devices, an unavailable error message appears. Your firewall settings may not be correct, or third-party software might be interfering.

Using the solutions above will come in handy to fix this error.

How can I fix the 0x800706ba error on Windows 11?

  1. Press the Windows key + R, type gpedit.msc, and hit Enter.
    gpedit
  2. Select the Administrative Templates option in the left pane.
    administrative 0x800706ba
  3. Double-click the Windows components option to open it.
    windows components
  4. Select Windows Update.
    windows update 0x800706ba
  5. Now, double-click the Configure Automatic Updates option.
    configure updates
  6. Finally, tick the radio button for the Not Configured option and click OK.
    not configured

With the steps above, you should be able to use the GPO local editor to fix the 0x800706BA error. Also, you can use the other five solutions in this guide to resolve the issue.

If you want to fix Windows Update error 0x800706be on Windows 11, you should know that the solutions are almost identical to the ones for Windows 10.

Similar to update error 0x80070422, the issue is most likely caused by file corruption, so repairing your system might be necessary.

In some cases, running the troubleshooter should be enough, so if you encounter this or update error 0x80070424, be sure to try that or any other solution from this guide.

In conclusion, we hope you can resolve the error 0x800706BA problem by applying any of the solutions we mentioned above. If so, let us know by dropping a comment below.

Error Code 0xc1900107 (Windows Update): Solved

As you probably know, Microsoft imagines Windows 10 as a service. That means you have only one operating system, with frequent updates that enhance and improve it.

With that in mind, users must install significant Windows 10 updates for the best possible experience and performance.

Windows 10 and 11 are known for causing various update errors, with some like the Windows update error 0x800f0900 disturbing users.

This article will discuss one particular problem – error code 0xc1900107 (or update error 0xc1900107). This problem usually occurs when installing a major update for Windows 10 and 11.

This guide will show you how to fix and install the update on your PC.

What causes the Windows Update error 0xc1900107?

Windows 10 upgrade error 0xc1900107 can prevent you from installing specific updates, and your system security might be affected. Speaking of this error, here are some variations of the error and their causes:

  • Windows 10 update failed to install: This problem can appear due to third-party applications on your PC. If you’re having this problem, you should try updating your drivers and disabling your antivirus.
  • Error code 0xc1900107 Creators Update: This issue was reported while installing Creators Update, but it can appear with almost any update. If you’re having this problem, be sure to disconnect USB devices and check if that solves the problem.
  • Windows 10 update failed loop: Sometimes you might get stuck in a loop when trying to install Windows Updates. If this happens, restart Windows Update components or try to manually download and install the update.
  • 0xc1900107(-1047527161) sccm
  • Windows update troubleshooter

How do I fix the error code 0xc1900107?

1. Update your drivers

1.1. Update drivers manually

  1. Press the Windows key + S and type in Device Manager.
  2. Click the arrow next to the adapter you wish to update the driver to expand it.
    disk driver 0xc1900107
  3. Right-click on each of the drivers there and select Update driver.
    update driver 0xc1900107
  4. Choose the Search automatically for drivers option.
    search automatically
  5. Wait for the scan to complete and install the available update.
  6. Repeat for every device that needs to be updated.
  7. Restart your PC at the end.

Sometimes error code 0xc1900107 can appear if your drivers are out of date. Your drivers are essential since they allow your PC to communicate correctly with your hardware.

To fix the problem, it’s advised to update drivers for all major components such as your graphics card, sound card, network adapter, chipset, etc. You can do this manually by downloading the latest drivers from your manufacturer.

1.2. Update drivers automatically

On the other hand, if you want to update all your drivers with just a couple of clicks, an automated solution, such as Fortect Driver Updater will download and install the necessary drivers for you.

Besides that, it will constantly scan your device for new drivers to ensure everything is up to date at all times, so you don’t have to worry about incompatibility issues anymore.

⇒ Get Fortect Driver Updater

2. Run the Update Troubleshooter

  1. Press the Windows key + I to open the Settings app.
  2. Click the Update & Security option.
    update and security
  3. Select Troubleshoot.
    troubleshoot 0xc1900107
  4. Then, select Additional troubleshooters.
    additional trouble
  5. Click on Windows Update.
    windows update
  6. Lastly, select Run the troubleshooter.
    run troubleshooter 0xc1900107

The first thing we will try is running the Windows Update Troubleshooter. This is Microsoft’s tool, designed explicitly for resolving more or less update-related severe issues in Windows.

To run the Update Troubleshooter, follow the simple and comprehensive method above. It’s pretty straightforward.

3. Delete the $WINDOWS.~BT folder

  1. Open File Explorer, go to This PC, then Local Disk (C:) (or whichever your system hard drive is).
  2. Now, click View and check the box that says Hidden Files.
    Error code 0xc1900107 Creators Update
  3. Find the folder named $WINDOWS. ~ BT.
  4. Rename it or delete it.

Many Windows 10 users who have experienced this issue suggest that deleting the $WINDOWS.~BT folder solves the problem.

If you’re unfamiliar with this folder, it stores some of your user data from the previous system version. However, in some cases, that data may cause trouble upgrading.

After you’ve done that, try upgrading your system once again. If the issue persists, move on to another solution.

4. Perform the SFC scan

  1. Press Windows key + X and choose Command Prompt (Admin).
  2. If the Command Prompt isn’t available, you can also use Powershell (Admin).
    Windows 10 update failed loop
  3. In the command line, type and hit Enter: sfc/scannowWindows 10 update failed loop
  4. The process should last a few minutes.
  5. When completed, close the Command Prompt.

If none of the solutions from above worked for you, try running the SFC scan. This is Windows’ built-in tool, which aims to fix various system issues, including update errors. To run the SFC scan, do the following:

If an SFC scan can’t fix your problem, you might want to consider using a DISM scan instead. To do that, you need to do the following:

  1. Open Command Prompt as administrator.
  2. Enter the following command and press Enter: DISM /Online /Cleanup-Image /RestoreHealthWindows 10 update failed to install
  3. DISM scan will now start. The scan can take about 20 minutes, so don’t interrupt it.

Once the scan is finished, check if the problem is resolved. If the issue is still present or you couldn’t run an SFC scan before, repeat it. After running both scans, the situation should be resolved.

You can also run this scan with a specialized tool to make sure everything is fine. This type of software is able to scan and identify any broken files within just a few minutes. Then you can replace them with fresh ones from their databases.

5. Check your antivirus

If you’re getting error 0xc1900107 while trying to upgrade, the issue might be related to your antivirus since it might glitch your Windows.

Although antivirus will protect you from online threats, you should also know that antivirus can interfere with your system and cause this and other errors.

If you suspect your antivirus is the problem, you might want to try disabling certain antivirus features and check if that helps. If that doesn’t work, you can try disabling your antivirus entirely.

In a worst-case scenario, you might have to remove your antivirus to fix this issue. But, don’t worry; the Windows Defender will still be active while no third-party security app exists.

If removing the antivirus solves the problem, you might consider switching to a different antivirus solution. There are many great antivirus tools available on the market.

If you’re looking for a new antivirus, you will find many Windows 10 compatible antivirus software that provides excellent protection and won’t interfere with your system.

6. Disconnect USB devices

Sometimes error 0xc1900107 can be caused by specific USB devices. For example, several users reported that a USB wireless adapter could cause this issue, so if you have a USB adapter, be sure to disconnect it.

Other USB devices can also cause this problem to appear, and to fix it, it’s advised to disconnect all non-essential USB devices from your PC.

This includes printers, gamepads, external hard drives, flash drives, etc. It would help if you disconnected all devices except your keyboard and mouse.

Once you disconnect unnecessary USB devices, try to upgrade your PC again.

7. Reset Windows Update components

  1. Open Command Prompt as an administrator.
  2. Run the following commands one by one:
    net stop bits net stop wuauserv net stop appidsvc net stop cryptsvc Ren %systemroot%SoftwareDistribution SoftwareDistribution.bak Ren %systemroot%system32catroot2 catroot2.bak net start bits net start wuauserv net start appidsvc net start cryptsvc
  3. Restart your PC and check if the problem was solved.

If you don’t want to run these commands manually, you can also create a script that will run the commands automatically for you.

We showed you how to do it in one of our articles dedicated to creating Windows Update Reset scripts, so be sure to check it out for more instructions.

8. Download the necessary update manually

  1. Go to the Microsoft Update Catalog website.
  2. In the search field enter the update code of the update you’re trying to install.
  3. A list of matching updates will appear.
  4. Find the desired update and click the Download button to download it.
  5. Keep in mind that there will be listed versions for both 32-bit and 64-bit versions of Windows, so be sure to choose the version that matches your system’s architecture.

If you can’t install a particular update due to error 0xc1900107, you can always download the update from Microsoft’s Update Catalog.

First, you need to go to Windows Update and check the number next to the update. The updated code will look like KBXXXXXXX.

Once you download the update, you should be able to install it without too much hassle.

How can I fix the 0xc1900107 error on Windows 10?

Fixing the update error 0xc1900107 on Windows 10 is as straightforward as the fixes for Windows 11. This is because the causes are pretty much the same.

So, to fix the issue, you should update your drivers and repair your system files using the built-in tool. Then, you can apply any fixes listed in this guide to solve the problem.

The Windows update error 0xc19001007 can be frustrating, as it occurs when users try to install a major update. But you should be able to fix it quickly if you follow the steps in this guide.

If you are having trouble updating your OS, here’s an excellent article dedicated to fixing the Windows 10 update problems. And we also have a guide on how to solve Windows Update error code 0xd000034 in no time.

Please let us know in the comments below if you have any comments, questions, or suggestions.

Windows Update Error 0x80070017: Solved

The Windows Update 0x80070017 error is among the most common update issues many users have encountered.

It usually occurs when trying to install the latest updates on your computer or when you intend to upgrade your OS.

Users reported that the installation went into verification mode and failed at 76% with an error message every time. There are several variations of this error that users have reported, and they are the following:

  • Windows Update error 0x80070017 – This usually appears while trying to download the latest updates. If that happens, restart Windows Update components and check if that helps.
  • Error code 0x80070017 in Windows 7 – According to users, this error can appear on Windows 7. Even if you don’t use Windows 10, most of our solutions are compatible with older OSs, so feel free to try them out.
  • 0x80070017 System Restore – This error can sometimes appear while trying to perform a System Restore. However, you should be able to fix the problem simply by disabling your antivirus.
  • Windows cannot install the required files 0x80070017
  • CRC 0x80070017

What does the error 0x80070017 mean?

Sometimes you might encounter this error when installing a new build. This is usually followed by the message – We couldn’t create a new partition. The cause might be your storage device settings, so check them.

In some instances, you can get Windows cannot install required files, and this message appears if your installation media is damaged, so be sure to repair it.

This error code also appears during updates, followed by the error message – There were some problems installing updates. Luckily, there are ways to fix this problem, and this guide will show you how to do it.

How can I fix the Windows Update error 0x80070017?

Here’s what you should first do:

  • Restart your PC a few times, then try again.
  • Disconnect all peripherals.
  • When updating through Windows Update, disable your Internet connection, and proceed with the installation when the download reaches 100%.

1. Disable your antivirus

  1. If you have third-party antivirus installed, disable it.
  2. Press Windows key + S and type defender. Select Windows Security from the list.
  3. Select Virus & threat protection in the left pane. In the right pane, choose Manage settings.
  4. Locate Real-time protection and disable it.
  5. Check if the problem is still there.

If this method solves your problem, be sure to turn back your system protection again after you’re done.

2. Run the Windows Update Troubleshooter

  1. Press the Windows key + I to open the Settings app.
  2. When the Settings app opens, navigate to the Update & Security section.
  3. From the menu on the left, choose Troubleshoot. Then, in the right pane, click Additional troubleshooters.
  4. Select Windows Update and click on Run the troubleshooter.
    Select Windows Update

You can always opt for an automated system optimization tool. This way, you will accomplish the steps above faster and more securely.

3. Reset your Windows Update components

  1. Press the Windows key + X, then select Windows Powershell (Admin).
  2. When PowerShell opens, run the following commands one by one (You will have to paste the commands and press Enter):
    net stop wuauserv
    net stop cryptSvc
    net stop bits
    net stop msiserver
    Ren C:\Windows\SoftwareDistribution SoftwareDistribution.old
    Ren C:Windows\System32\catroot2 Catroot2.old
    net start wuauserv
    net start cryptSvc

If you don’t want to run all these commands manually, you can also create a Windows Update reset script that will restart the services automatically for you.

4. Update your drivers

  1. Visit your hardware manufacturer’s website.
  2. Locate your device on the list.
  3. Go to the Drivers section and download the latest driver.
  4. Once it’s downloaded, double-click it to install it.
  5. Do this for all significant components, including your motherboard, chipset, and graphics card.

If you’re having problems manually updating your drivers, you can always use driver updater software to make the process faster and simpler.

5. Install the updates manually

  1. Go to Microsoft’s Update Catalog website.
  2. In the search bar, enter the update code. The code should start with KB followed by an array of numbers.
  3. Once you find the update, click the Download button to download it.
  4. After downloading the update, double-click the downloaded file to install it.
Note icon NOTE
It’s essential to download the update that matches your system’s architecture, so double-check everything before downloading it.

6. Install Windows from a USB flash drive

According to users, error 0x80070017 can appear while trying to install Windows 10. This problem usually occurs due to issues with your installation media or DVD drive.

If you’re having this problem, try replacing your DVD drive or installation media and check if that helps. Alternatively, you can create a Windows 10 bootable USB drive and try installing Windows 10 from a USB flash drive and check if that solves the issue.

Surprisingly, many reported the We couldn’t create a new partition error 0x80070017 while installing Windows, and changing the drive format and recreating the bootable USB did the trick.

7. Run a chkdsk scan

  1. Press Windows key + X and select Windows PowerShell (Admin).
  2. Enter the command below and hit Enter. Before you run it, be sure to replace X with the letter that matches your system drive. In almost all cases, that would be C.
    chkdsk /f X
  3. You’ll be asked if you want to schedule a chkdsk scan once the PC restarts.
  4. Press Y and restart your system.
  5. Wait for the scan to finish.

8. Perform a clean boot

  1. Press the Windows key + R, enter msconfig, and hit Enter.
  2. Go to the Services tab, check Hide all Microsoft services, and click the Disable all button.
  3. Now go to the Startup tab, and click on Open Task Manager.
  4. Disable all startup apps. To do that, right-click the desired application and choose Disable from the menu.
  5. Once you disable all startup applications, go back to System Configuration window, and click Apply and OK.
  6. Restart your PC.

9. Perform an in-place upgrade

  1. Visit the Windows 10 download page.
  2. Click on the Download tool now in the Create Windows 10 installation media section.
  3. Once the tool is downloaded, run it.
  4. Select Upgrade this PC now, and click Next.
  5. Wait while the setup prepares the necessary files.
  6. Select Download and install updates (recommended), and click Next.
  7. Follow the on-screen instructions until you get to the Ready to install screen.
  8. Select Change what to keep.
  9. Choose Keep personal files and apps, and then click Next.
    0x80070017
  10. Follow the on-screen instructions to complete the process.

This process will install the latest version of Windows on your PC while keeping all your applications and file intact.

What is Windows 7 installation error code 0x80070017?

When you see error code 0x80070017, it signifies that while the files are being copied from the disk, they are not moved to the storage disk in the same structure and format.

The error prevents Windows 7 from being installed on the PC and could arise due to issues with the bootable DVD or the disc reader itself. The best solution is installing Windows 7 via a bootable USB drive.

How do I fix Error code 0x80070017 on Windows 11?

The great news is this. If you’ve read the guide, you can fix Error code 0x80070017 on Windows 11 as well. This is true because the fixes that apply to one operating system also apply to the other.

Although minor UI variations occasionally occur, you should generally anticipate the same steps.

Why do Windows Update errors occur?

There are several reasons why these issues occur, but usually, the cause is related to your antivirus or other software interfering with the update process.

In some instances, even specific drivers or devices can lead to problems. Lastly, there’s file corruption, and if your system files are damaged, you might have issues installing updates.

How dangerous are Windows Update errors?

The errors aren’t dangerous, but they will prevent you from installing updates, leading to security issues.

Sometimes, vulnerabilities and bugs are discovered, and this is the only way for Microsoft to patch them, so you must keep your system up to date.

In addition, Windows updates are used to deliver new features to the users, so if you have update errors, you won’t be able to experience them.

How to find the update number?

  1. Press the Windows key + I to open the Settings app.
  2. Now go to the Update & Security section.
    update and security (in Windows 11 download error)
  3. You should see the update’s name and the KB number in the brackets.

Each update has a unique KB number, which you can find by following the steps above.

What is the update number used for?

This number is used as a unique identifier, so if a specific update is giving you this problem, feel free to use this number to troubleshoot the issue.

You can also use it to download the update from Windows Update Catalog and install it manually.

Error 0x80070017 can be problematic and prevent you from getting the latest updates, but we hope you solved it using one of our solutions.

If Window Update is not working on Windows 10 after following these steps, we suggest you reset your operating system and check if that helps.

Windows errors can appear during updates or installations, not just with 0x800f0825. If you encounter similar issues, this guide on fixing error 0x800f0825 in Windows explains the main causes and solutions.

Did you find a way to fix this error? Feel free to share it with us in the comments section below.

Error 0xc1900209 (Windows Update): Solved

You will likely encounter Error code 0xC1900209 when using Windows Update or trying to upgrade your operating system.

The update error has been reported on both Windows 10 and the latest iteration of the OS, i.e., Windows 11. Along with the error, users reported getting a SetupDiag listing the following:

  • 0xC1900209 0x4000D
  • MOUPG CSetupManager::ExecuteInstallMode 1065 Result = 0xC1900209

And honestly speaking, the two aren’t very helpful in identifying what’s causing it.

Don’t worry! We have got you covered. Go through the following sections to find the underlying cause and the solutions for the 0xC1900209 update/upgrade error.

What is error code 0xc1900209?

The error code is usually encountered due to incompatibility issues concerning the installed apps or drivers. For example, if the app installed on the current version/iteration is incompatible with the one you are updating/upgrading to, the 0xC1900209 error would show up.

Also, specific background applications, including third-party antiviruses, though compatible with the OS, are often found to conflict with the update/upgrade process and lead to this error.

No matter the underlying cause, the 0xC1900209 error can be fixed easily with the solutions listed in the next section.

How do I fix error code 0xc1900209?

1. Use third-party software to fix the error

Windows Update issues are incredibly diverse, and sometimes it’s impossible to pinpoint the cause of the error.

That means that the troubleshooting soon becomes time-consuming and tedious. Luckily, in this case, you have our guide to indicate exactly what you need to do, but even so, the manual process can be tricky for most.

However, a quicker and easier way to fix this problem is by using a dedicated third-party solution that can automatically clear the issue.

2. Use the Windows Assessment and Development Kit (ADK)

2.1 Download and install SQL Server

  1. Download Microsoft SQL Server from Microsoft’s website. The ADK will use a SQL Server database to store its entries, so you can’t go further without installing this.SQL server to fix to fix 0xc1900209
  2. Open the SQL Server installer.
  3. The installer gives you three options to install SQL Server. First, the easiest and fastest way is to go with Basic, so choose that and follow the on-screen instructions to complete the process. The 0xC1900209 0x4000D error will be fixed afterward.basic

2.2 Download and install the ADK

  1. Download the ADK installer.
  2. Open the ADK installer. Click Next in the first two windows and agree to the terms of the License Agreement on the third.accept
  3. Select the features you want to install window, select Application Compatibility Tools, uncheck everything else, and then click on Install at the bottom.Application Compatibility tools to fix 0xc1900209
  4. Wait for the installation to finish.

You are ready to install the Windows Assessment and Development Kit to find and fix any compatibility issues causing the 0xc1900209 error.

2.3 Use the ADK to detect compatibility issues and fix them

  1. Launch the Compatibility Administrator application.
  2. Click on Search in the menu bar and choose Fixed Programs… from the list.
  3. Click on the Find Now button and wait until the application has finished the search. This goes through the folder where your programs are stored and matches them against the database of a known application list with compatibility issues. In the end, the program will come up with a list of applications in the bottom pane.
  4. Double-click on an item from the list.
  5. It will take you back to the program’s main section with an entry selected. Right-click on the desired item and copy it.
  6. Please go through the list until you find an entry titled New Database under Custom Databases, right-click on it, and paste the copied entry.
  7. Repeat steps 4-7 for each item on the list.
Note icon NOTE
Only if you have a 64-bit Windows: In your version of Windows, programs are not only stored in the Program Files folder but also the Program Files (x86) folder. That’s why you must also search for compatibility issues there. Click on Browse in the top right corner, select the Program Files (x86) folder, and repeat steps 3-8 again for this folder.

Once done with the Compatibility Administrator, the 0xc1900209 update error will be fixed, and you can install the desired version/iteration of the OS.

3. Update the installed drivers

  1. Press Windows + S to open the Search menu, enter Device Manager in the text field, and click on the relevant search result.Device Manager
  2. Double-click on the Display adapters entry.display adapters
  3. Right-click on the graphics adapter, and then select Update driver.update drivers to fix 0xc1900209
  4. Now, select Search automatically for drivers.search automatically for drivers
  5. Wait for Windows to automatically locate and install the best available driver on the computer.

In some cases, Windows might be unable to locate a newer version while one is available. So, you should also try manually updating the drivers installed on the computer. Remember to update all the drivers.

To keep them up to date and find the latest driver updates from manufacturers, we recommend using Outbyte Driver Updater, an automated tool that specializes in updating drivers.

Outbyte Driver Updater

Keep your system running at peak performance by keeping all drivers updated.
Free Trial Download Now

How to stop a Windows 10 update?

  1. Press Windows + I to open the Settings app, and click on Update & Security.update & security
  2. Click on Advanced options on the right.advanced options to fix 0xc1900209
  3. Now, click on the Pause until dropdown menu, and choose a date up to when you want to stop Windows 10 updates. pause until

That’s it! Windows wouldn’t install any new updates until the chosen date. Alternatively, you can download the Windows Update reset script for computers running Windows 10 and fix this issue.

In case you want to upgrade to Windows 11 with ISO, check out our dedicated post on this subject.

By now, we have covered the most effective solutions for fixing the 0xc1900209 error in Windows 11 and 11, and you should be able to upgrade/update the OS seamlessly.

Also, find out how to quickly fix update errors in Windows 11.

Let us know in the comments section below if you’ve come across other workarounds to fix it.