Fix: Your Administrator Has Not Given You Access to This Item

The Your administrator has not given you access to this item error means that the device is set up with a work account, and the admin restricts downloading apps that are not a part of Managed PlayStore Applications.

However, the problem is also faced by users with a personal Google account, and it usually arises due to misconfigured settings or the device being previously connected to an organization, so let’s fix it.

What can I do if Google Play says Your administrator has not given you access to this item?

Tip icon Tip
The workarounds and fixes listed below are for the end user. If you are the admin, head to the next section.

1. Clear the Google Play Store cache

  1. Open the Android Settings, scroll down and go to Apps.apps
  2. Tap on Google Play Store.
  3. Now, select Storage.storage
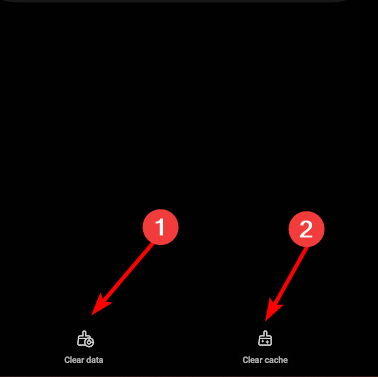
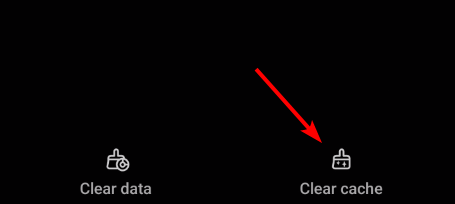
  4. Tap on Clear data and Clear cache individually, and choose the appropriate response if a confirmation prompt appears.clear data to fix your administrator has not given you access to this item
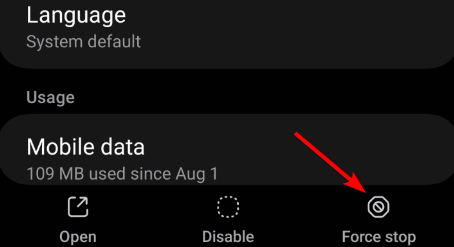
  5. Once done, head back to the previous screen, and then tap on Force stop.force stop
  6. Finally, relaunch the Google Play Store and try downloading the app.

2. Factory reset the device

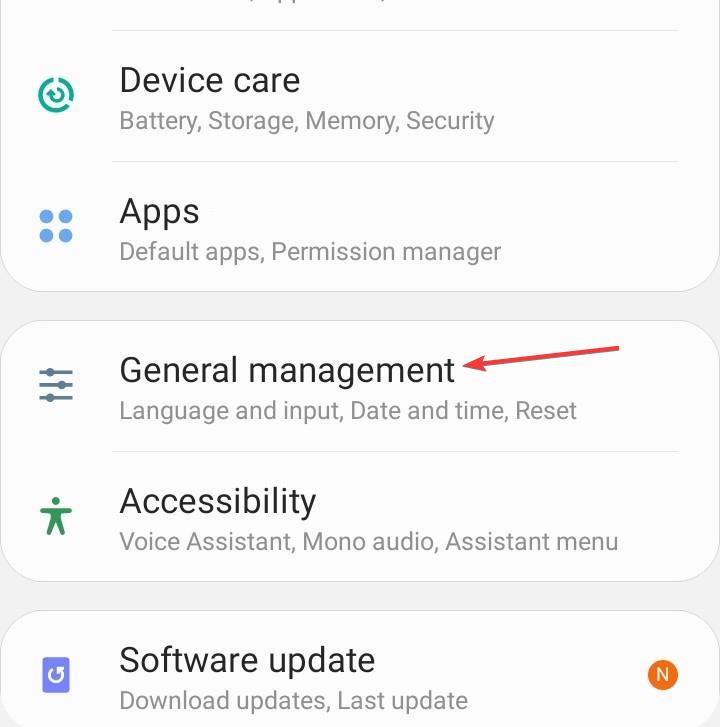
  1. In the phone Settings, go to General management.general management
  2. Tap on Reset.
  3. Tap on Factory data reset.factory data reset to fix your administrator has not given you access to this item
  4. Scroll down to the bottom and tap on Reset.
  5. Confirm reset in the prompt.

Resetting the device to factory defaults also helps with Error Code U13 in Google Pay.

3. Contact the seller

If you recently purchased the refurbished phone and it shows Your administrator has not given you access to this item while downloading apps from the Google Play Store, it’s likely that the device was previously enrolled in a managed device environment.

So, contact the seller and ask for a replacement or a refund!

What can admins do to fix Your administrator has not given you access to this item?

  1. Go to Configuration profile > look for Applications settings > enable the toggle for Allow access to all apps in Google Play store. Remember, this will allow users to download all apps.
  2. Add the user or device getting the error to the App Protection Policy.
  3. Go to Store Presence > Pricing & distribution > User programs > add the organization under Manage trackers.

Administrators can also refer to the Google Workspace Admin Help page for the steps to set up and troubleshoot managed apps.

If you are keen on digital privacy and security, find out how to use a VPN on Google Play Store!

We also have guides for Google Play error code 492 and OR-RWE-03 payment error on Google Play, so don’t miss them.

For any queries or to share what worked for you, drop a comment below.

Fix: Error While Updating Worn Items on Roblox

Many people have encountered the error while updating worn items message on Roblox while editing their avatar.

In this guide, we will discuss the probable causes of the error and offer WR experts-tested solutions to fix the issue related to avatar editing on Roblox.

Why my avatar editor is not working?

  • Faulty internet connection.
  • Logged in to a different Roblox account.

How can I fix the error while updating worn items on Roblox?

Before proceeding with any steps to fix the error while updating worn items on Roblox, here are a few preliminary checks you should do:

  • Ensure you have a reliable internet connection and check if you have logged in to the right Roblox account.
  • Check the Roblox server status. If the server is down or having technical issues, wait until it is up & running and verify the item you are trying is not banned.

1. Add the item to your profile

  1. Login to your Roblox account.
  2. Click the three horizontal lines from the upper left corner, then choose Avatar.Avatar - Error While Updating Worn Items on Roblox
  3. You will see different categories; select the category of the item for which you are getting the error.
  4. Click the item name to open it separately, click the three dots icon, and choose Add to Profile.Add this to profile
  5. Once it is added, go to the Avatar option from the left pane, and you will see the item in your list.
  6. Click the item to add it to the avatar.

2. Clear the temp files

  1. Press Windows + R to open the Run dialog box.%localappdata%\Temp - Error While Updating Worn Items on Roblox
  2. Type %localappdata%\Temp and click OK to open the Temp folder in the Local directory.
  3. Search and select the Roblox folder and click the Delete icon.Delete the roblox temp folder

After clearing the cache, you need to log in to your account again. These steps can help you fix similar issues like error code 264; read this guide to learn more about it.

3. Clear the browser cache

  1. Launch the preferred browser; we are using Google Chrome.
  2. Click the three dots icon, then select Settings from the menu.Settings CHrome -Error While Updating Worn Items on Roblox
  3. Go to Privacy and Security, then select Clear browsing data.Clear browsing data
  4. For the Time range option, select All time, then place a checkmark next to Cookies and other site data and Cached images and files.Clear data
  5. Click Clear data to confirm the action.
  6. Relaunch your browser and log in to your Roblox account to check if the issue persists.

If these steps don’t work for you, then we suggest you contact Roblox customer support and explain to them the issue with all the details possible to get further assistance.

The error while updating worn items message on Roblox usually occurs due to technical issues at the server’s end; that’s why you can either try the workarounds mentioned or wait for the glitch to get fixed.

Another popular issue users face is not being able to launch the Roblox app on their computers; it could be due to the Windows Firewall or an incorrect date or time on their device; read this guide to learn more.

Some users also encountered Roblox freezing and crashing issues, but we discussed this issue in a separate guide.

If you have any questions or suggestions about the subject, feel free to mention them in the comments section below.

How to Set Up OBS Studio Hotkeys for Productivity

If you often find yourself using OBS Studio to record screens and live stream videos, you must learn about OBS hotkeys.

In this guide, we will discuss setting up hotkeys and delve into popular keyboard shortcuts to enhance productivity and streamline your workflow while using OBS Studio.

How do I enable hotkeys in OBS Studio?

Before we delve into the steps to enable hotkeys in the OBS Studio, we would suggest you not add too many hotkeys as it will be quite confusing and could lead to chaos.

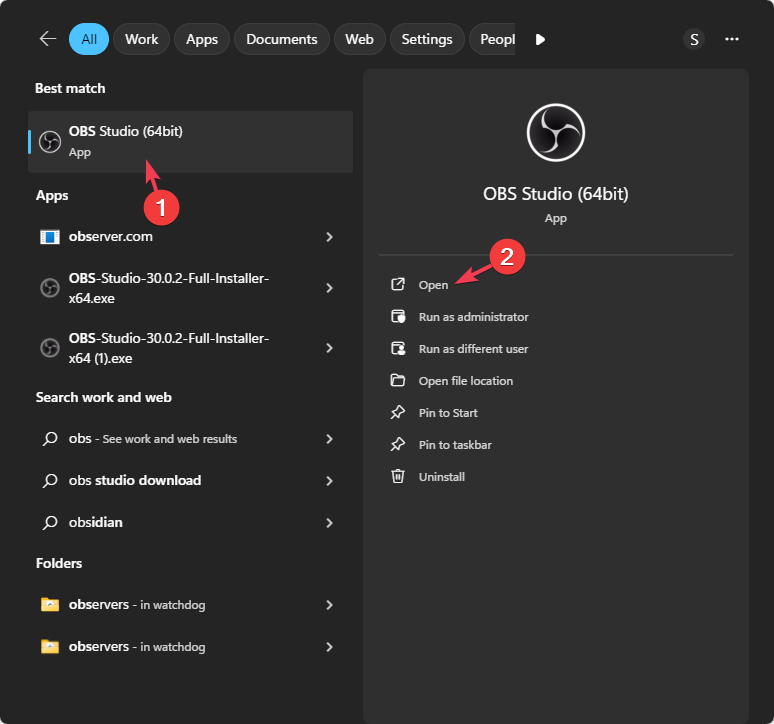
  1. Press the Windows key, type obs in the search box, and click Open.Open OBS - obs hotkeys
  2. Go to File, then select Settings from the drop-down.File - Settings
  3. Navigate to Hotkeys; you will get a list of hotkeys you can set, including Start Streaming, Stop Streaming, Start Recording, and Stop Recording.obs64_setting up the hotkey - obs hotkeys
  4. Go to Start Streaming, and type in any key combination like Ctrl + O. Similarly, you go through the list of options and set the key combination as a shortcut. You can use the Undo and Delete buttons to remove the key combination.
  5. However, if you want another key combination for the same hotkey, use + next to the hotkey to add it; this can be helpful when using two different keyboards.
  6. To remove the additional key combinations for the hotkey, you can click the - button next to it.
  7. Click Apply, then OK to confirm the changes.

Once you have assigned the key combinations to the hotkeys, follow these steps to set the way you want to control the Hotkey focus behavior:

  1. Go to Advanced from the left pane and scroll down to the Hotkeys section.
  2. From the drop-down menu, choose either Disable hotkeys when the main window is in focus or not in focus.Advanced from the left pane - obs hotkeys
  3. You can also set it to Never disable hotkeys.
  4. Click OK to save the preference.

If you are looking for the ideal OBS settings for low-end PC, we have a great guide for you to help set up the software for just that.

What are the basic keyboard shortcuts for OBS Studio?

CommandKey Combinations
Copy sourceCtrl + C
Paste sourceCtrl + V
Remove sourceDel
Crop source Press & hold ALT and drag the bounding box
Disable source snapping temporarilyPress & hold Ctrl while moving the bounding box
Stretch a sourceShift
Move previewPress & hold Space+Drag
Zoom previewPress & hold Space+mouse scroll wheel
Center to screenCtrl + D
Stretch to screenCtrl + S
Fit to screenCtrl + F
Reset transformCtrl + R
Edit transformCtrl + E
Move the source up in the listCtrl + Up
Move the source down in the listCtrl + Down
Move the source to the top of the listCtrl + Home
Move the source to the bottom of the listCtrl + End
Nudge source upUp arrow key
Nudge source downDown arrow key
Nudge source leftLeft arrow key
Nudge source rightRight arrow key
Quit OBS StudioCtrl + Q
Undo editCtrl + Z
Redo editCtrl + Shift + Z

Tips to use hotkeys to increase productivity

  • Avoid using common key combinations, as it could create confusion and end up hampering your workflow.
  • The best way to set key combinations is by using numbers from 0 to 9 keys with Ctrl, Alt, and Shift.
  • Once you set the hotkeys, note them down on a sticky note and take reference from them until you can memorize them.
  • You can change the key combinations for a hotkey anytime, so try one out, and if you don’t find it suitable, change it whenever needed.
  • Always set shortcuts for frequently used actions like start/stop recording & streaming, and mute/unmute the audio to increase your work speed.

What can I do if hotkeys are not working in OBS?

  • Right-click OBS and select Run as administrator.
  • Check the Hotkeys list to ensure there is no clash.
  • Try turning the lock keys like Num Lock, Caps Lock, and Scroll Lock on or off.
  • Ensure the OBS Studio software is updated to the latest version.

Hotkeys can be fruitful for streaming and recording screens efficiently but always remember to limit the use of hotkeys to the most frequently used actions, as too many of them could hamper your work.

To avoid OBS not opening issues and to make sure the OBS Studio software runs smoothly, keep the software and Windows up to date.

If you have any questions or suggestions about the subject, feel free to mention them in the comments section below.

Google loses antitrust case against Epic Games

After three years of legal battles, Epic Games has procured a victory against Google in its antitrust case against Google. The jury in the case has come to a verdict, and has decided that Google has an illegal monopoly relative to its Google Play Store, and engaged in anticompetitive practices concerning the Android app distribution market and Android in-app billing services.

More specifically, the jury found that Epic Games proved “by a preponderance of evidence” that A) there was in existence a relevant antitrust market; B) “that Google willfully acquired or maintained monopoly power by engaging in anticompetitive conduct;” and C) that Epic Games “was injured as a result of Google’s violation of the antitrust laws” (in accordance with the Sherman Act Section 2).

A more detailed list of the jury’s findings can be seen here in the jury verdict form.

Google affairs and public policy VP Wilson White said the company plans to appeal the verdict.

Epic Games’ released their own statement calling the verdict a win for developers and consumers alike.

Today’s verdict is a win for all app developers and consumers around the world. It proves that Google’s app store practices are illegal and they abuse their monopoly to extract exorbitant fees, stifle competition and reduce innovation.”

For those who haven’t been following the case, Epic’s suit against Google began in 2020 with the former alleging that Google was in violation of antitrust laws by forcing app users to make payments through its own billing system (and thereby charging developers a fee of up to 30%) instead of allowing devs to redirect users to their own stores/billing platforms. As with Epic Games’ Fortnite, which was banned from the Google Play Store (as well as similarly being banned from Apple’s App Store) when it did just that.

Unlike Epic’s fight against Apple over its App Store policies, Epic vs. Google involved secret deals in which certain entities like Netlflix and Spotify were offered “sweetheart deals” by Google in which they could bypass Google’s developer fees or even circumvent Play Billing.

The jury came to its decision after just a couple hours of deliberation. At this point it isn’t certain what exactly Epic Games will gain from its court victory going forward. It will be up to the judge in the case, Judge James Donato, to decide whatever remedies are in order. Each party will meet with Donato in January to discuss potential remedies.

TeaTV Not Working? How to Fix it

TeaTV not working could manifest in various ways from loading, downloading, or even login issues. We narrowed down some of the common problems and bring you this report.

Is TeaTV a legal app?

Our verdict would have to be that it isn’t a legal app. Factors like copyright infringement, license to operate and publishing requirements are good metrics to determine whether an app is legal. TeaTV satisfies some of these requirements but fails in others.

You can find it in Google Play Store which means it has undergone rigorous security checks making it reputable but it is also banned in some countries due to copyright issues.

What can I do if TeaTV is not working?

1. Login issues

Note icon NOTE
On the log in page, you’ll see the Trakt service but not to worry as it is responsible for updating your watchlist.
  • Make sure that you enter the correct login details.
  • Perform a speed test and boost your internet speeds where necessary. You can also switch to an Ethernet cable instead of Wi-Fi if possible.
  • Restart your streaming device and try again later if it’s a server issue.

2. Loading/buffering issues

2.1 Lower resolution settings

TeaTV not loading or constantly buffering indicates insufficient bandwidth to cope with the streaming resolution. You can lower the settings and adjust accordingly until you get to a resolution with no interruptions.

You can also remove other devices from your connection, close unnecessary processes and apps, and remove any bandwidth limits to improve streaming.

2.2 Change your router’s channel

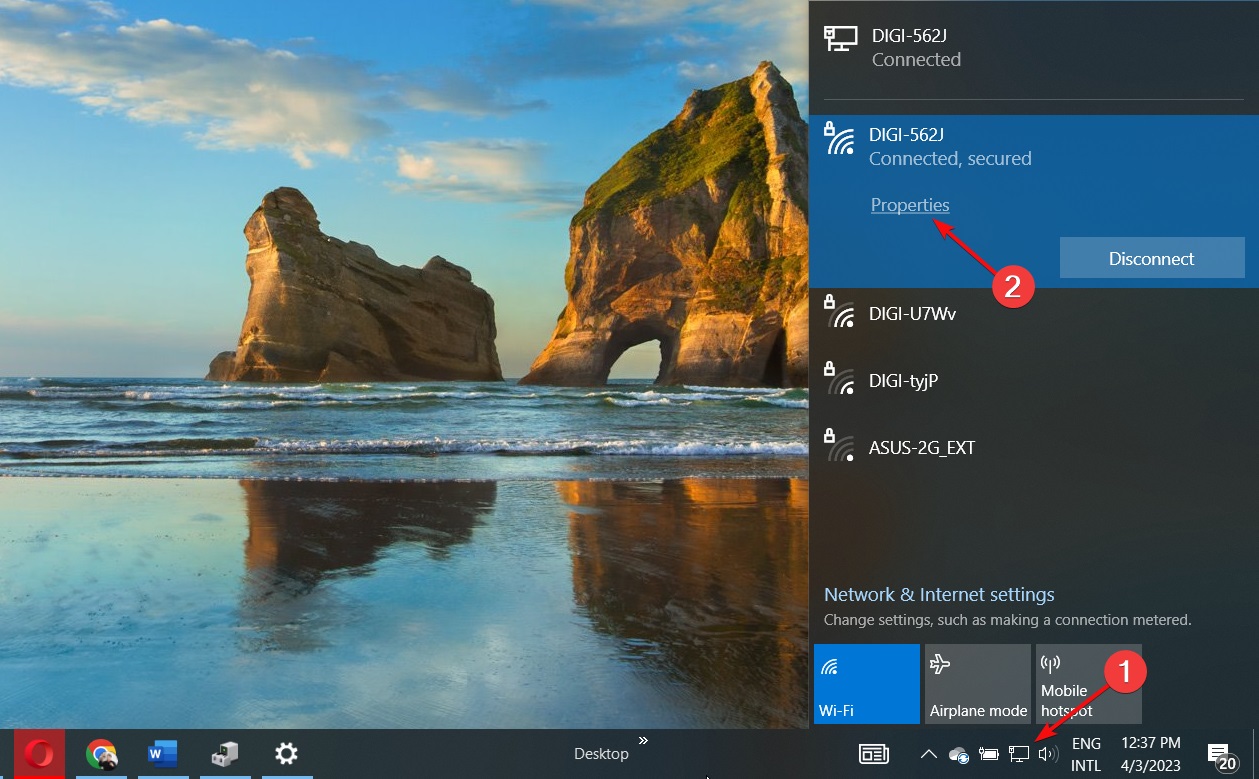
  1. Click on the Network icon on your taskbar, select your Wi-Fi connection, and click on Properties.
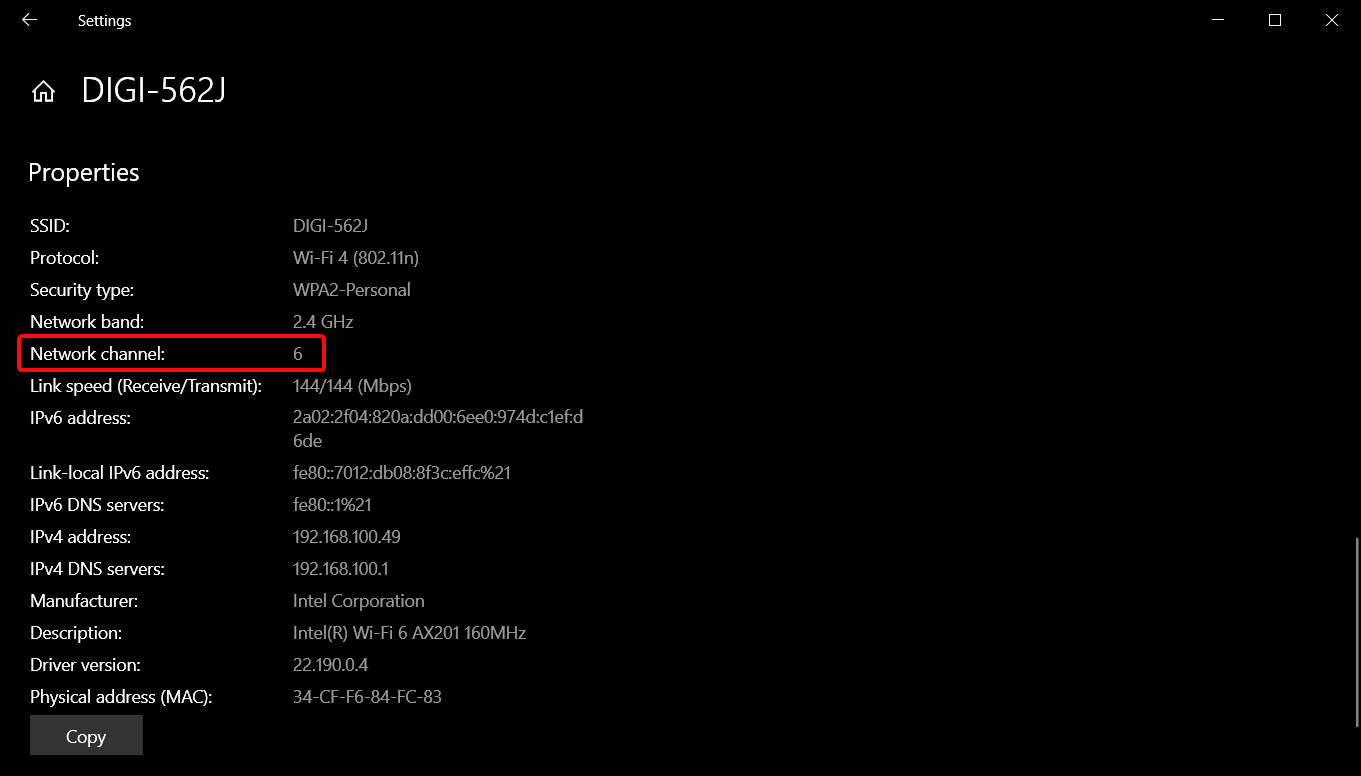
  2. Now, scroll down and you should see the Network channel for your Wi-Fi connection.
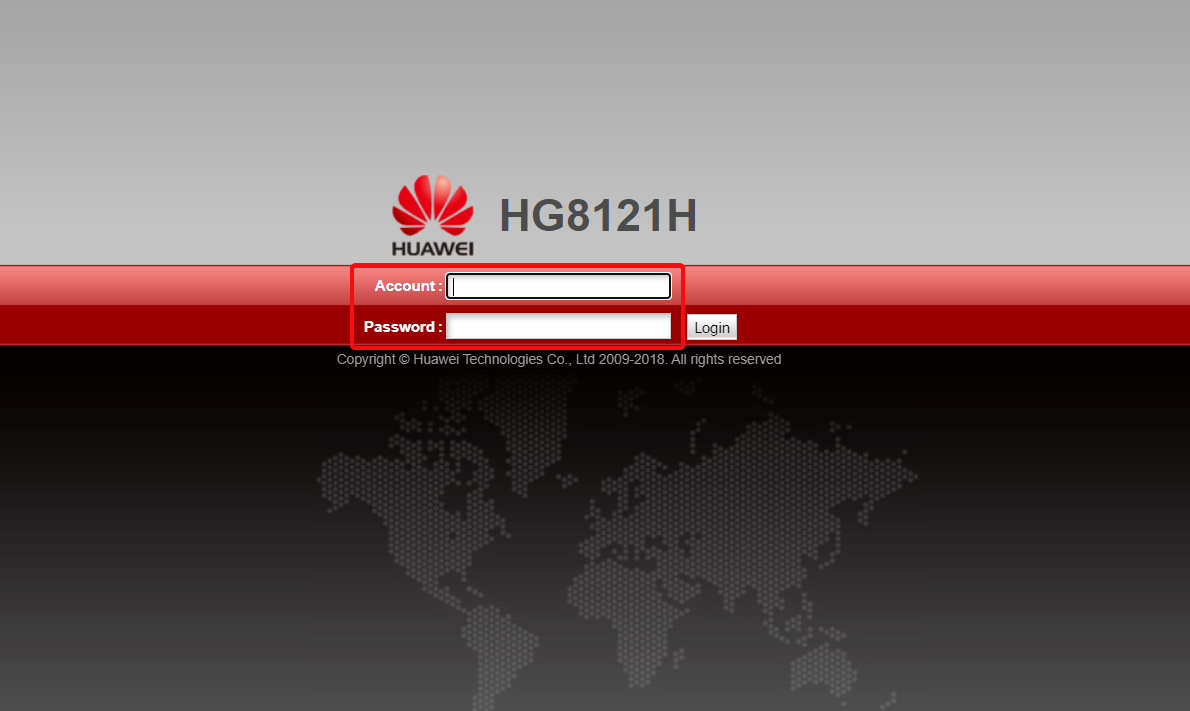
  3. Navigate to your browser and log into your router with the correct credentials. You can find that info on the router itself or on the manual of the router.
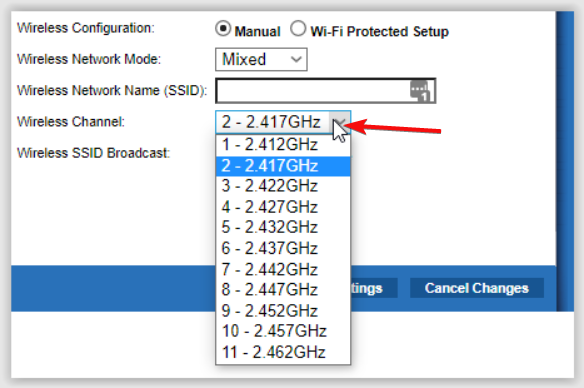
  4. Go to the Wireless settings of your router and change the router channel to a different one from the default. If you’re using a dual-bound router, make this setting for both bands (2.4GHz and 5GHz).

2.3 Update your graphic drivers

  1. Hit the Windows key, type Device Manager in the search bar, and click Open.device manager w11
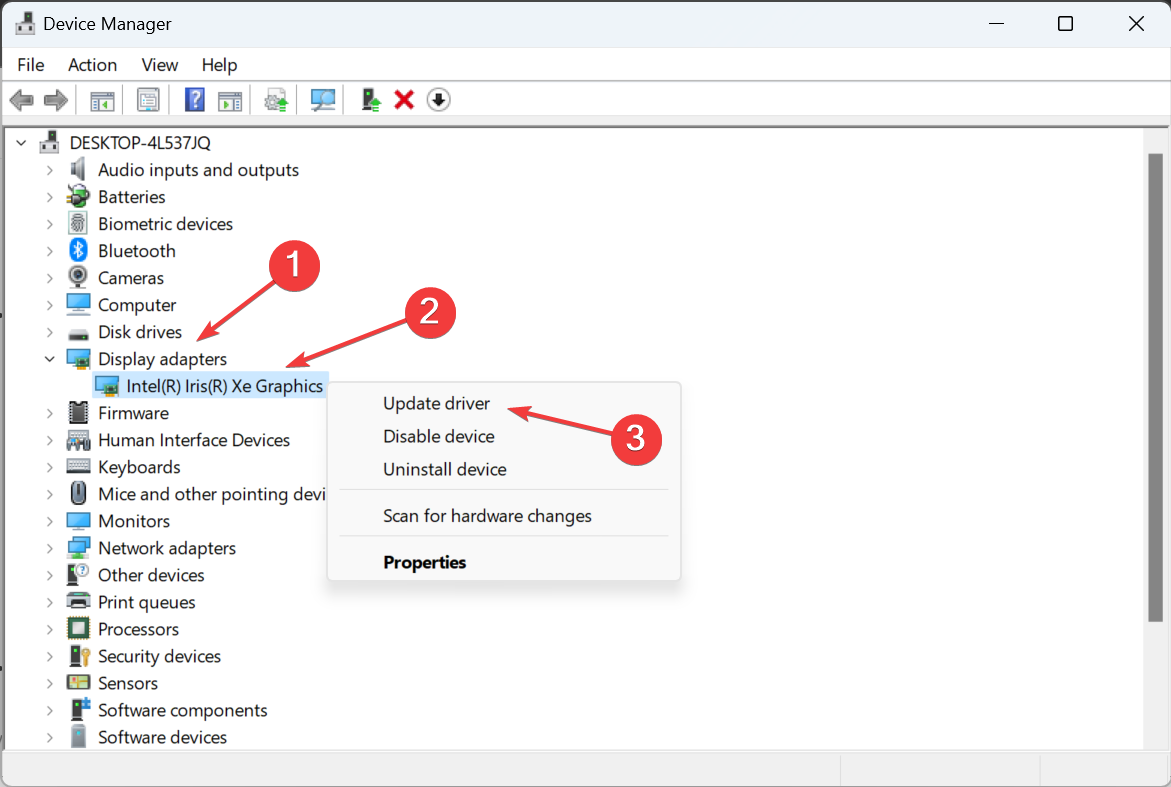
  2. Navigate to Display adapters to expand, right-click on your graphics card, and select Update driver.Graphic Driver Update
  3. Select Search automatically for drivers.

2.4 Switch off your VPN

  1. Press the Windows key and select Settings.settings windows 11
  2. Next, select Network & internet and click on VPN in the right-side menu.
  3. Select the VPN connection you want to disable, click on the drop-down and select Remove.remove VPN

3. Downloading issues

3.1 Update your device’s OS

  1. Locate Settings on your device. (We’ll be using the Samsung model for this step).
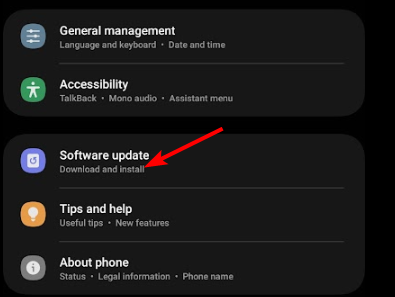
  2. Go to Software update.
  3. Tap on Download and install.
  4. Wait for the update to finish installing if available, and retry your TeaTV app.

3.2 Clear cache

  1. Tap on settings on your phone.
  2. Next, tap on Apps.
  3. Find the TeaTV app and tap on it.
  4. Scroll down and select Storage.
  5. Tap on Clear data and Clear cache, then try again.

If you’re on a browser or TV app, proceed to delete the cache and restart the app.

3.3 Reset your network

  1. Hit the Windows key and click on Settings.settings windows 11
  2. Navigate to Network & internet.
  3. Select Advanced network settings.going advanced network settings win11
  4. Click on Network reset.Network Reset 1
  5. Next, hit the Reset now button.Network Reset now

4. Link issues

4.1 Force stop the app

  1. Tap on settings on your phone.
  2. Next, tap on Apps.
  3. Find the TeaTV app and tap on it.
  4. Tap on Force stop at the bottom then reopen the app.

4.2 Change VPN servers

If you are located in a country where this website is blocked, you can change your VPN server location.

You’ll need a good VPN app as most of the free ones are easily detectable and may be blacklisted.

Finally, you can reinstall the app or go for an older version if you’re still experiencing any of these issues.

You can try your luck with the methods mentioned above to get TeaTV working again. They’re not limited to the underlisted issue so you can try them all and see what works for you.

But, if it still doesn’t work, you may have to download an alternative. It’s hard to know what the problem could be without actually seeing the error message and even then, it probably won’t tell you much.

If it’s any consolation, TeaTV is not the only streaming app that faces such issues. Even big giants like Netflix and Hulu are not working at times.

Have you experienced any issues with TeaTV and what solutions do you consider most helpful? Share with us in the comment section below.

Arc browser for Windows enters beta testing

The Browser Company has finally sent out beta invites for Arc browser on Windows. The startup says it will onboard “hundreds of beta testers over the next several weeks,” and adds that starting in January 2024 that list of beta testers will be expanded to thousands. Anyone interested in joining the waitlist can sign up here. At the time of this writing there appears to be only a few people signed up, so chances are good you might get onboarded if you act quickly.

From cofounder and CTO of The Browser Company Hursh Agrawal:

For us, this period leading up to our Windows release is about crafting the very best version of Arc that we can. And that means learning from you — what you love, what’s missing, what doesn’t feel quite right.
It still feels surreal to say, but it really does all begin today.

Developed using Apple’s Swift programming language, the Chromium-based Arc browser rolled out in April 2022 for macOS and iOS. Arc breaks away from traditional browser design in a few key aspects. You’ll find the URl address/Search bars on the left side rather than at the top, with vertically-oriented tabs. Most of the browser’s functionality is within the sidebar, with the rest of the screen dedicated to the browsing window.

Arc features built-in apps including a built-in ad blocker and a virtual notebook. One feature called “Boosts” reportedly allows users to customize website cosmetics. Arc will feature integrations with Google apps like Gmail and Google Calendar, and will use Google Search as the default search engine. Extensions from the Chrome Web Store will also be supported.

Whether Arc will prove to be the Chrome-killer that some are touting it as, only time will tell.

How to Change the Paper Size on an HP Printer

Depending on the document you wish to print on your HP printer, you might need to change the paper size from the default which is usually Letter or A4. In this guide, we’ll be sharing how to go about it.

How do I set a paper size on my HP printer?

Before you start, ensure the following conditions are met:

  • Make sure that your HP printer is on the same network connected to your computer.
  • Ensure you have the right type of paper loaded into your printer.

1. By using the paper tray

The length, width, and size of the paper tray will vary depending on your model of HP printer. You can insert your chosen paper size into the tray just make sure it is not over the standard size.

Once loaded, your printer will display a prompt to modify the paper size to match the paper you just replaced it with. Some older models cannot detect the size automatically so you’ll have to do this manually on the print page lest you end up with the printer not printing the right size.

2. By using the HP Printer Control Panel

  1. Launch your HP printer’s control panel menu by pressing the Home button on the front of your printer. (The exact steps you need to take will depend on your model).
  2. Select Paper Settings then select Modify.
  3. Choose a size from the listed options or enter a custom size.

3. By using the HP Smart app

  1. Launch the HP Smart app on your device or download it if you haven’t already.
  2. Go to Advanced settings>Settings>Tray and paper management.
  3. Select a paper size from the options.

4. By using the Settings app

  1. Hit the Windows key and click on Settings.
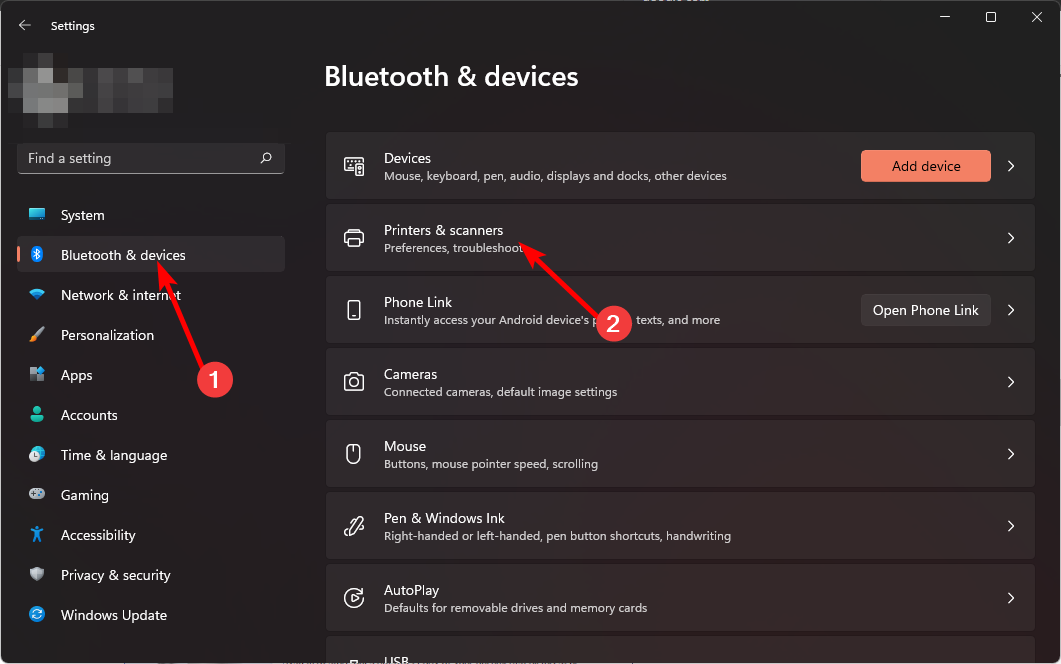
  2. Select Bluetooth & devices then click on Printers & scanners.
  3. Choose the HP Printer from the list.
  4. Scroll down and select Printing preferences.
  5. Navigate to the Paper/Quality tab and select Custom.
  6. Click on New then fill in the custom width, height, and name for your new paper size then hit OK to save changes. (As a rule of thumb, avoid setting dimensions higher than the default paper size to avoid print job problems).
  7. Now load the paper and start printing. Remember to select this custom paper size when prompted.

5. By using the Control Panel

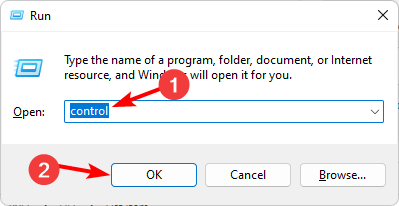
  1. Hit the Windows + R keys, type control in the dialog box, and hit Enter to open the Control Panel.
  2. Go to Hardware and Sound>Devices and Printers.
  3. Scroll down to the Printers section, double-click on your HP printer, and select Printing preferences.
  4. Navigate to the Paper/Quality tab and select Custom.
  5. Click on New then fill in the custom width, height, and name for your new paper size then hit OK to save changes.

While the standard paper size works well most of the time, sometimes it isn’t necessary, especially when a smaller size of paper suits the print job.

Changing your HP printer’s paper size can help you avoid issues like printing only half of your document or having to reprint because your printer ran out of paper mid-print job.

If you tend to print on several different types of paper, now you know how to make the adjustment and have more control over your printer and the papers it uses. Further, if you’re on a HP Instant Ink plan, you get to make more savings.

Keep in mind that these instructions may not work for all models and makes of HP printers, but they should at least give you a place to start. If you have any additional questions, suggestions, or comments, leave them in the comment section below.

How To Combine RAR Files: 3 Quick Ways to Merge Archives

If you need to combine RAR files, it can be done in several ways by using WinRar and other archivers. In this article, we will show you how to join RAR files and save a lot of space in the process.

How do I combine RAR files on Windows easily?

1. Merge RAR files into a new archive

  1. Open WinRAR and navigate to the folder where you have the archives you need to combine.
  2. Select the archives you want to merge by pressing Ctrl and clicking each one, then click on the Add button.
  3. Now, enter the new archive name, select the type of archive you want to create, and click OK.
  4. You can set additional parameters or options, such as deleting the original files after they are joined, setting a password, etc.

The result will be a more extensive archive that will contain the archives you included. This is the quickest way to combine RAR files, and you can do that with many other archiving software such as WinZIP, 7-ZIP, and others. Read more for other options.

If you can’t open the archive because it’s corrupt, check out a list of archive repair software to fix them.

2. Add a RAR file to an existing archive

  1. Open WinRAR and go to the folder where you have the RAR files you need to join.
  2. Select the RAR file you want to merge, click on the Wizard icon, and select Add files to already existing archive.
  3. Now, select the target archive where you want to include the contents of the first one and click OK.
  4. Click Next, select the tight compression mode if you want, or check the box to delete the files after merging and hit the Finish button.
  5. The resulting archive will have a folder with the contents from the first RAR file and the archive where you included it.

3. Extract and join the files

  1. Open WinRAR and navigate to the folder containing the archives you want to merge.
  2. Press Ctrl and select the archives you want to merge one by one, then click the Extract To button.
  3. Select a folder where you want the files to be extracted (Preferably a new one).
  4. Next, navigate to the folder location by using the WinRAR file manager.
  5. Select all the files and click on the Add button.
  6. Just like in the previous solutions, add the necessary options if you need to and click OK to create a new RAR archive.
  7. Alternatively, you can open File Explorer (Win + E), locate the folder containing the files, select them, right-click on the selection, and pick an archiver software from the menu to compress them.

Although this solution seems more complicated, it’s not, and it can be performed with other archiving software as well.

How do I combine RAR files on Mac?

Luckily, RARLABS has a WinRAR version for Mac so, you can apply all the above solutions minus the File Explorer on macOS seamlessly.

However, you can also use other archivers such as The Unarchiver or Keka on Mac and perform the same actions.

To sum up our guide, to combine RAR files or join RAR files, you can do so by merging the archives, adding an archive to an existing one, or by decompressing the files first and joining them right after.

You might also be interested in using some of the best email archiving software for Windows.

Also, if you’re looking for open-source archiver apps, our highlighted article will bring you a great list to choose from.

If you have any questions or suggestions, feel free to use the comments section below.

The Sims 2 Not Working on Windows 11 [Solved]

Reports of The Sims 2 not working on Windows 11 are common. For users who managed to get the game running, the process consisted of a series of tweaks, including the Graphics Rule Maker.

Though it doesn’t have to be that complex! When The Sims 2 is not opening or crashes at launch, it’s usually an outdated graphics driver, missing Visual C++ Redistributables or DLL files, or third-party apps triggering conflicts to blame.

What can I do if The Sims 2 is not working on Windows 11?

Tip icon Tip
If you are facing issues installing The Sims 2 on Windows and get the This app has been blocked for your protection error, disable Windows Defender SmartScreen.

Before we start with the slightly complex solutions, try these quick ones:

  • Make sure you have the 4GB patch and all the game components installed.
  • Download any available Windows updates. This also helps with The Sims 2 DirectX error.
  • Disable any third-party antivirus installed on the PC.

1. Run Sims 2 in compatibility mode

  1. Right-click on the The Sims 2 launcher (.exe file), and select Properties.
  2. Go to the Compatibility tab, tick the checkbox for Run this program in compatibility mode for, and select Windows 7 from the dropdown menu.compatibility mode to fix sims 2 not working on windows 11
  3. Click on Apply and OK to save the changes.

If this doesn’t work, try out the other iterations listed in the dropdown menu.

2. Update the graphics driver

  1. Press Windows + X to open the Power User menu, and select Device Manager from the list.
  2. Expand the Display adapters entry, right-click on the active graphics adapter, and select Update driver.update driver to fix sims 2 not working on windows 11
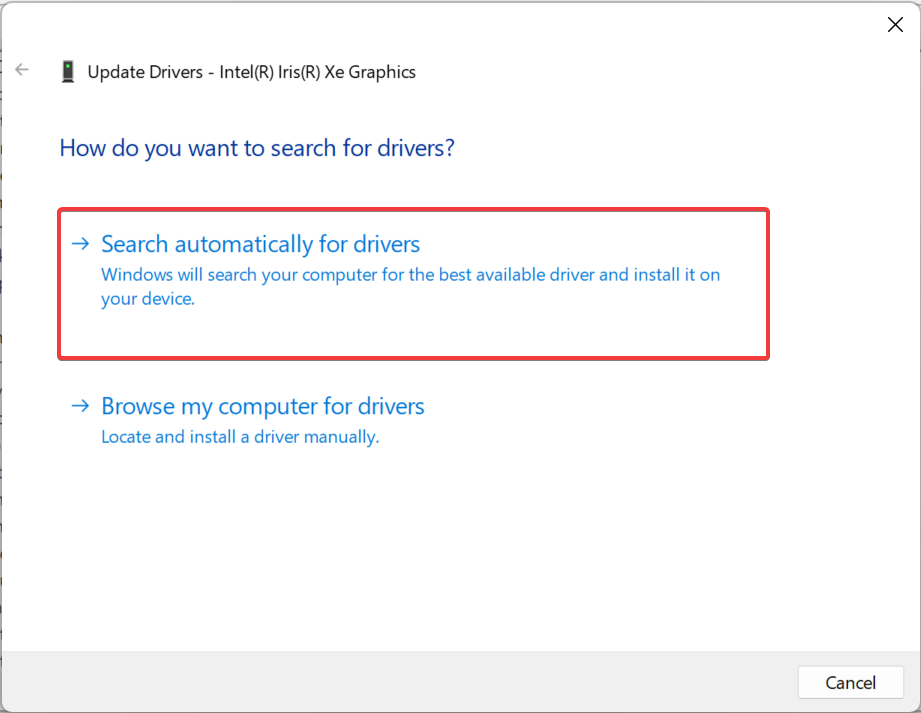
  3. Click on Search automatically for drivers and wait for Windows to install the best available driver on the PC.search automatically
  4. Once done, reboot the Windows 11 PC.

When The Sims 2 won’t launch on Windows 11, update the graphics driver. And if Windows can’t find a newer version, search for it on the manufacturer’s website and manually install the latest driver.

This also helps when The Sims 2 crashes on Windows 10.

3. Disable the integrated GPU

Note icon NOTE
This solution only applies when you have multiple GPUs. If there’s only one, head to the next fix.
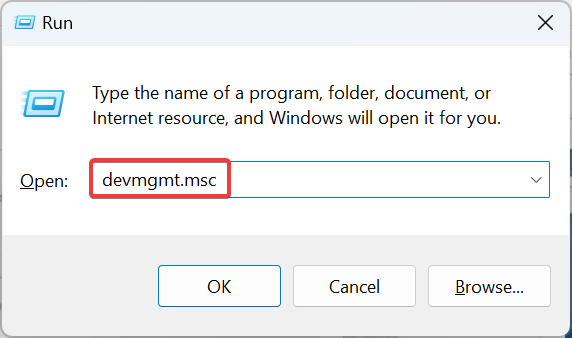
  1. Press Windows + R to open Run, type devmgmt.msc in the text field, and hit Enter.devmgmt.msc
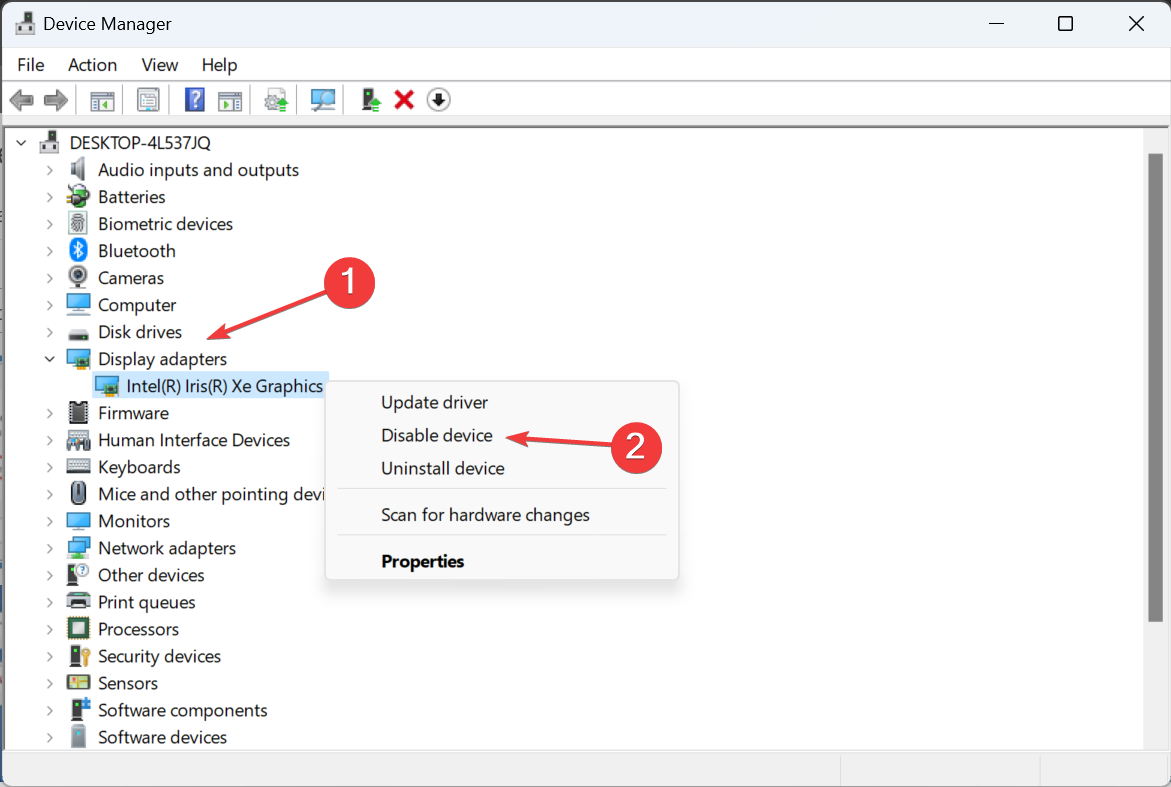
  2. Double-click the Display adapters entry.
  3. Now, right-click on the integrated graphics, and select Disable device.disable device to fix sims 2 not working on windows 11
  4. Click Yes in the confirmation prompt.

4. Clear the game cache

  1. Terminate any instances of The Sims 2 in the Task Manager or restart the computer.
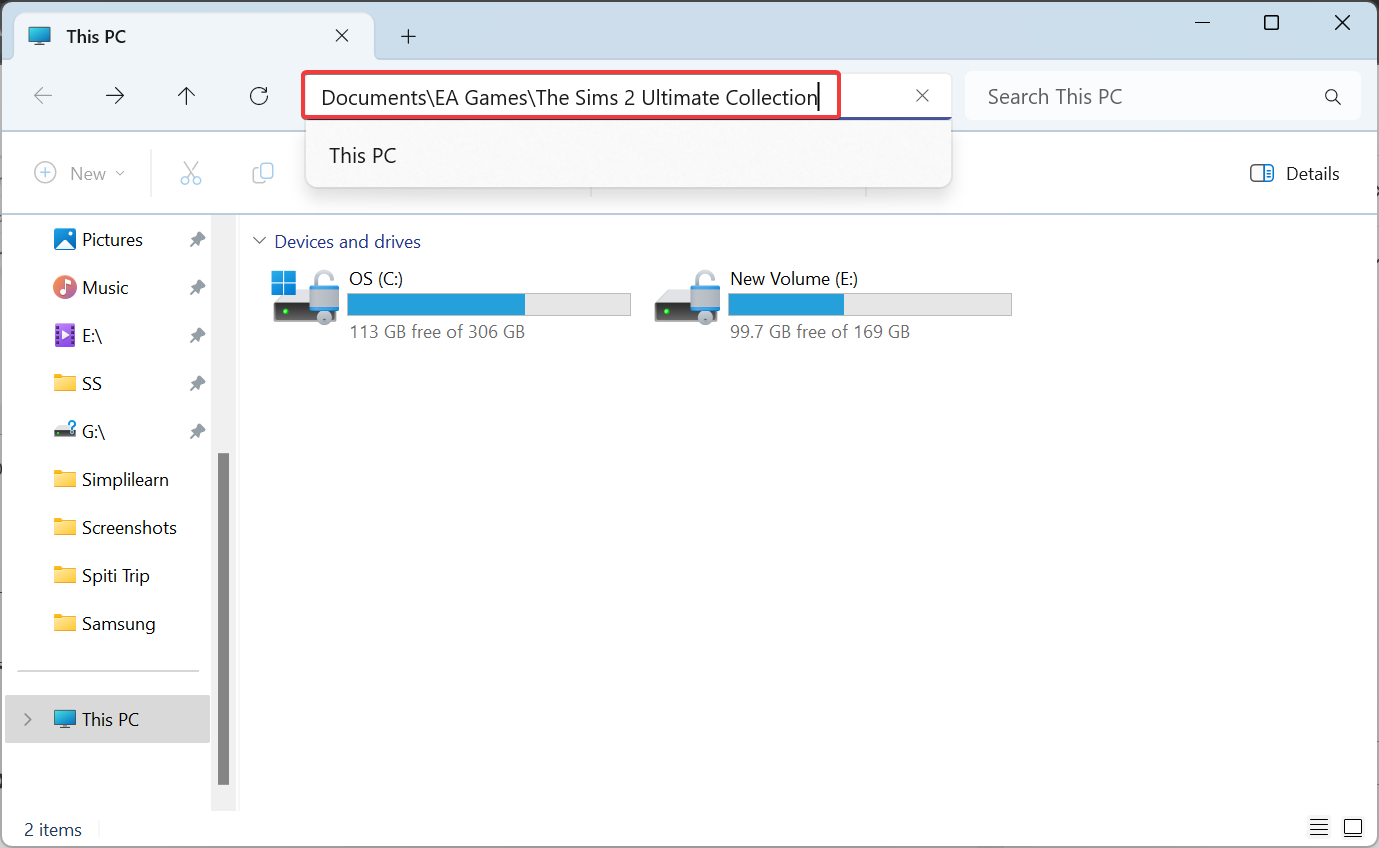
  2. Now, press Windows + E to open File Explorer, paste the following path in the address bar and hit Enter: Documents\EA Games\The Sims 2 Ultimate Collectionpath
  3. Delete the following two files:
    • Groups.cache
    • Accessory.cache
  4. Relaunch The Sims 2 and check whether it’s now working in Windows 11.

5. Disable OneDrive and other cloud storage services

  1. Click the OneDrive icon in the system tray. If it’s not there, open OneDrive via the Search menu, and the icon will appear.
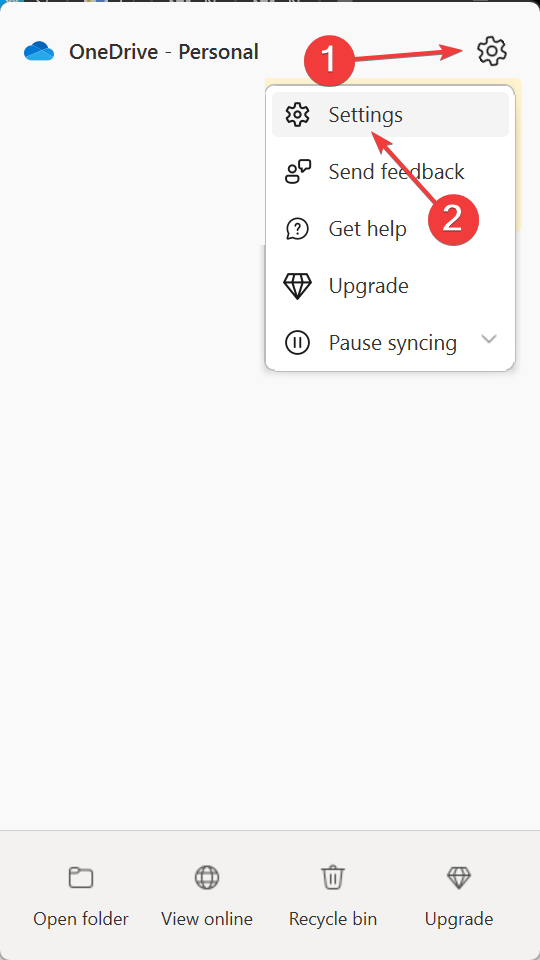
  2. Click the gear icon near the top right, and then select Settings.settings
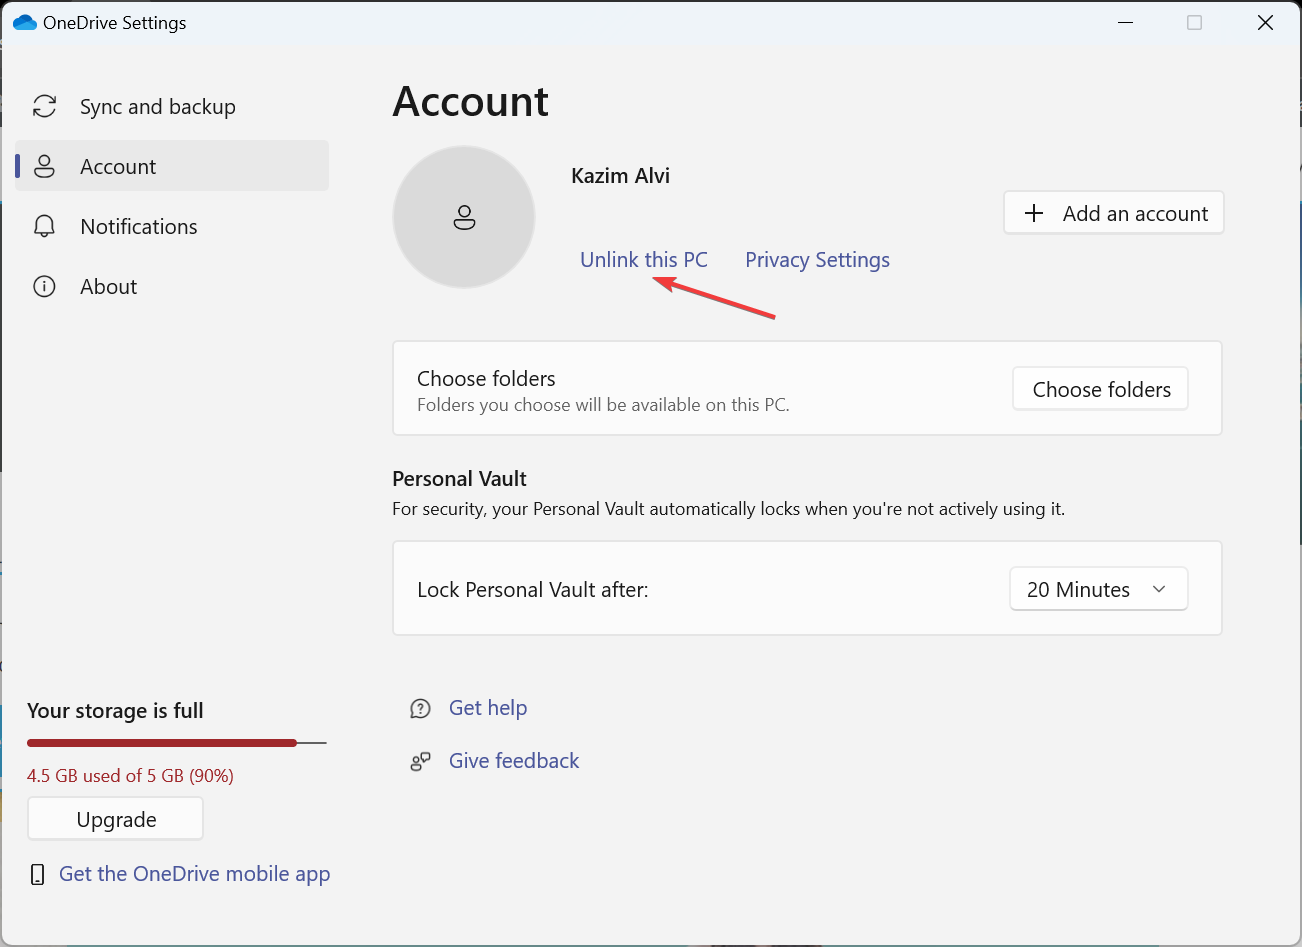
  3. Now, click on Unlink this PC.unlink to fix sims 2 not working on windows 11
  4. Click Unlink account in the confirmation prompt that appears.
  5. Restart the computer and check for improvements.

As per our experts, OneDrive may alter the files stores in the Documents folder, which will cause The Sims 2 to crash or not work on Windows 11. So, disable or remove OneDrive!

6. Install the Visual C++ Redistributables

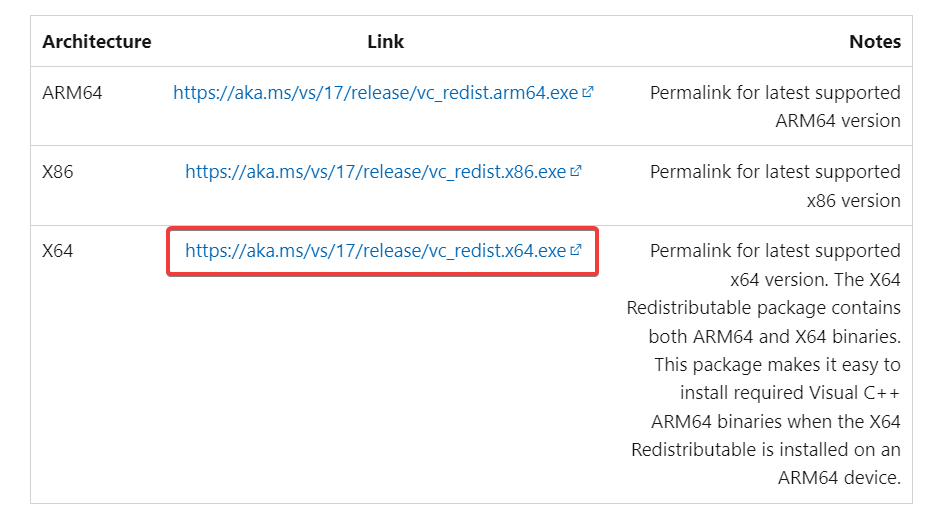
  1. Go to Microsoft’s official website, and download the latest X64 Visual C++ Redistributables.visual C++
  2. Run the setup and follow the on-screen instructions to complete the installation.

If The Sims 2 throws an error saying that MSVCP140.dll is missing or VCRUNTIME140.dll is not found, get the latest Visual C++ Redistributable packages.

7. Reinstall The Sims 2

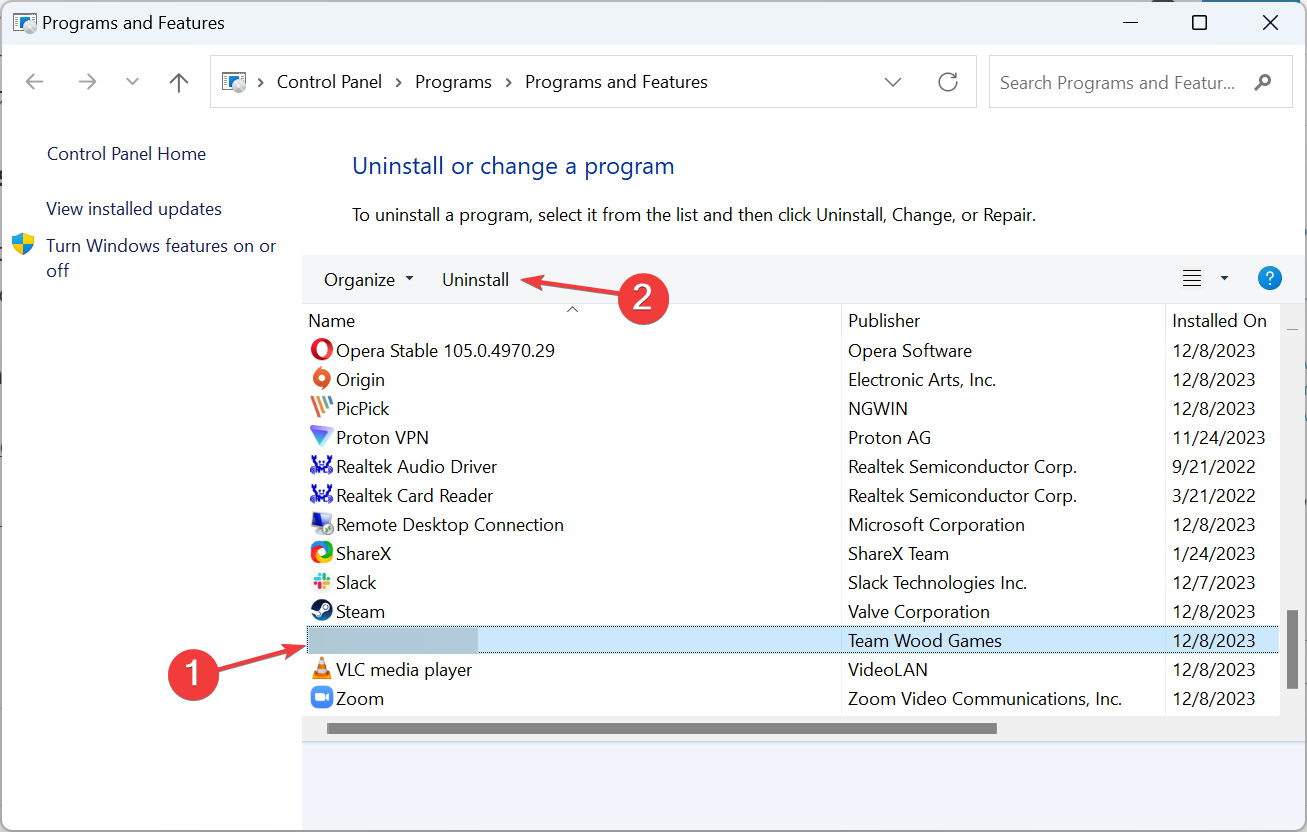
  1. Press Windows + R to open Run, type appwiz.cpl in the text field, and hit Enter.
  2. Select The Sims 2 from the list of applications, and click Uninstall.reinstall to fix sims 2 not working on windows 11
  3. Follow the on-screen instructions to complete the process.
  4. Reboot the device and then reinstall The Sims 2 from an official source or the disc.

If the problem persists, you can use a reliable software uninstaller to delete any leftover files and Registry entries. The game will work post-reinstall!

A few users could run The Sims 2 on a virtual machine when it wasn’t directly working on Windows 11. When doing so, make sure to install Windows 7 or an older iteration of the OS.

Before you leave, discover the best Windows 11 graphic settings for gaming for a finer experience!

For any queries or to share what worked for you, drop a comment below.

Solved: Windows Sandbox Copy Paste Not Working

Many readers reported that the Windows Sandbox copy/paste function is not working. They copy a file from the host, and nothing happens when applying Ctrl + V in the sandbox. Our WR software team replicated the issue and highlighted the working solutions below.

How do I copy and paste into Windows Sandbox? To copy and paste into Windows Sandbox, select a file from the host, press Ctrl + C to copy it, then go to Windows Sandbox and press Ctrl + V to paste it wherever you like. If that doesn’t work, read below to learn how to fix the Windows Sandbox copy/paste issue.

What do I do if Windows Sandbox copy-paste is not working?

1. Enable Clipboard sharing with Windows Sandbox using Gpedit

  1. Press the Windows + R shortcut to launch the Run console, type gpedit.msc, and press Enter to start the Local Group Policy Editor.
  2. Navigate to the following location: Computer Configuration\Administrative Templates\Windows Components\Windows Sandbox
  3. Now, double-click on Allow clipboard sharing with Windows Sandbox.
  4. Check Enable, then click on Apply and OK.
  5. Restart your PC and check if you can now use copy-paste in Windows Sandbox.

The Allow clipboard sharing with Windows Sandbox shouldn’t cause any issues if it’s not configured. However, if it’s disabled, that is the main cause of Ctrl + V not working in Windows Sandbox.

2. Enable Clipboard sharing with Windows Sandbox from the Registry

Note icon NOTE
We recommend creating a backup of the Registry before making any changes. Just use File>Export in the Registry editor and save the reg file somewhere safe.
  1. Press the Windows + R keys to start the Run console, type regedit, and press Enter to open the Registry Editor.
  2. Next, navigate to the following key: HKEY_LOCAL_MACHINE\SOFTWARE\Policies\Microsoft\Windows\Sandbox
  3. Double-click the AllowClipboardRedirection DWORD and set it to 1 to enable it. You may also delete it altogether for the same effect.

Usually, we’ve managed to fix the problem after enabling the Group Policy rule, but if that doesn’t work, allowing the Clipboard redirection will fix the issue.

3. Diasable and reenable Windows Sandbox

  1. Click the Search tab on the taskbar, type turn windows features on and off, and click on the app from the results.
  2. Now, scroll down, find Windows Sandbox, uncheck its box, acknowledge the change, and restart your computer when prompted.
  3. After the restart, open Windows Features again and enable Windows Sandbox again.
  4. Restart the computer and check if copy and paste are working in Windows Sandbox.

The solutions above should fix Windows Sandbox if copy and paste are not working in Windows 11 but the solutions can be applied to Windows 10 as well.

To sum up, if Ctrl + C and Ctrl + V are not working on Windows Sandbox, just enable the local group policy for clipboard sharing or change the value of the Registry key. Disabling Windows Sandbox and reenabling it will also work.

For more information, you may also check our complete guide on how to install and use Windows Sandbox on Windows 11.

If you can’t install Windows Sandbox, read the highlighted guide to fix the problem quickly.

Now that you’ve managed to fix the problem, you might also be interested in our guide on how to configure Windows Sandbox.

Do you know any other viable solutions that we didn’t cover in this article? Let us know in the comments section below.

Webcam Detected as NDIS Compatible Device: 3 Ways to Fix it

The webcam is often detected as a Remote NDIS Compatible Device and is listed under the same entry in the Device Manager. The issue is seen on both Windows 10 and Windows 11.

The problem arises when Windows perceives the webcam as a network device instead. This usually happens after an OS or driver update is installed.

What can I do if the webcam is detected as an NDIS compatible device?

Before we start with the slightly complex fixes, try these:

  • Restart the computer.
  • If it’s an external webcam, reconnect it to the PC. Also, switch between the available USB ports and make sure you are not using a hub.
  • Check for any pending Windows updates and install them.

1. Browse your computer for the webcam driver

  1. Press Windows + X to open the Power User menu, and select Device Manager from the list of options.
  2. Right-click the webcam detected as an NDIS compatible device, and select Update driver.driver
  3. Choose Browse my computer for drivers.browse
  4. Click on Let me pick from a list of available drivers on my computer.
  5. With the Show compatible hardware checkbox ticked, select another driver from the list, and click on Next.new driver to fix Webcam detected as NDIS compatible device
  6. After the driver installation is complete, restart the computer.

2. Install the webcam driver from the manufacturer’s website

  1. Open the device manufacturer’s driver download page, and select your computer’s model.
  2. Look through the available drivers and find one for the webcam.
  3. Click the Download button next to the latest webcam driver.download
  4. Run the setup and follow the on-screen instructions to complete the process.
  5. Finally, reboot the computer for the changes to apply.

Even when the webcam is not showing in the Device Manager, you follow a similar approach and update the webcam drivers. For external webcams, you will have to go to the webcam manufacturer’s website instead.

Remember, since Windows can’t usually find an update, it’s best that you manually install the latest drivers. But be cautious and only install the compatible driver!

3. Perform a system restore

  1. Press Windows + S to open Search, type Create a restore point in the text field, and click the relevant result.
  2. Click on System Restore.system restore to fix Webcam detected as NDIS compatible device
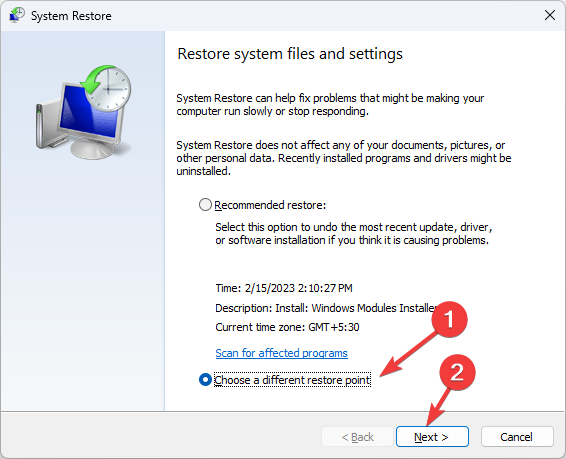
  3. Select the Choose a different restore point option, and click Next.
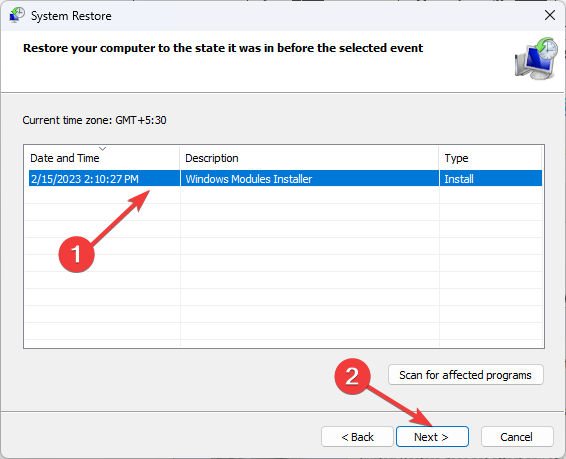
  4. Pick another restore point from the list, one created before the issue first appeared, and click Next.restore point
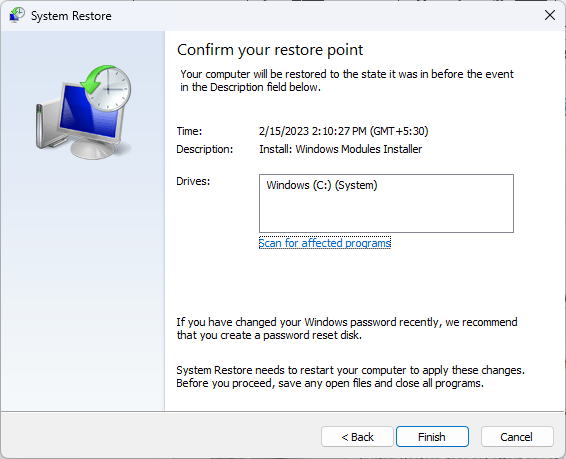
  5. Verify the details and click on Finish.
  6. Wait for the system restore to complete. It may take up to an hour.

If you have created a restore point, use System Restore to revert the changes when the webcam is detected as a Remote NDIS Compatible Device.

Remember, there aren’t many troubleshooting measures available, and if all else fails, reset Windows to factory defaults. Before you do that, transfer the important files to an external storage drive.

And if it turns out to be a hardware problem, you can always switch to the best webcam for Windows.

For any queries or to share what worked for you, drop a comment below.

Canon EOS Utility Not Working in Windows 11 [Solved]

The Canon EOS Utility not working in Windows 11 was earlier a sign of incompatibility. Canon soon released a suitable version for the latest OS iteration.

Yet, for many, the Canon camera doesn’t show up. Some came across The connection was lost message when transferring images. A few even had a popup that read, Some Windows Firewall settings must be changed. Let’s find out how you can fix them all!

What can I do if the Canon EOS Utility is not working in Windows 11?

Tip icon Tip
If you are trying to use the camera as a webcam for video calls, the Canon EOS Utility doesn’t do that. There’s a separate EOS Webcam Utility, which can be downloaded from the Software and Drivers page for your camera model.

Before we start with the slightly complex solutions, try these quick ones:

  • If the EOS Utility is not detecting the camera in Windows, remove the Wi-Fi card, then connect the camera to the PC and manually turn it on.
  • Connect the camera via a USB cable directly to a port on the PC instead of using a USB hub.
  • Disable any third-party antivirus on the PC. If that works, uninstall the app and switch to a Windows-friendly antivirus solution.
  • Check for any firmware updates for the camera on the official website and install them.

1. Manually launch the EOS Utility

  1. Connect the Canon camera to the PC.
  2. Press Windows + E to open File Explorer, paste the following path in the address bar and hit Enter: C:\Program Files (x86)\Canon\EOS Utility\EU3path
  3. Now, double-click the EOS Utility 3.exe file to manually open the app.open .exe to fix canon eos utility not working windows 11

2. Turn on Network Discovery

  1. Press Windows + I to open Settings, go to Network & Internet from the navigation pane, and click on Advanced network settings.advanced network settings
  2. Click on Advanced sharing settings.
  3. Enable the toggle for Network discovery under both Private networks and Public networks.network discovery to fix canon eos utility not working windows 11

When the EOS Utility is not detecting the camera with Wi-Fi on Windows 10 or the latest iteration, turn on Network Discovery.

3. Run the app administrator or in compatibility mode

  1. Right-click on the EOS Utility launcher, and select Properties from the context menu.
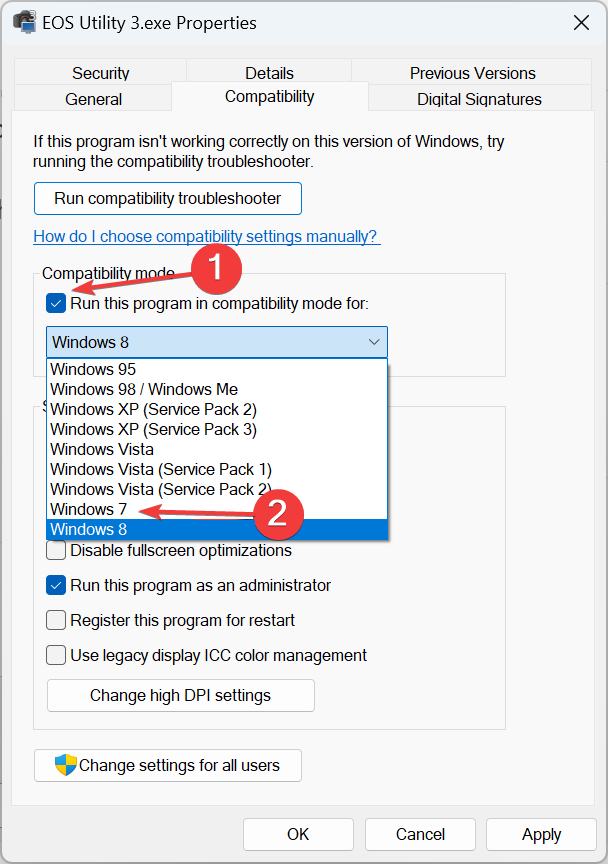
  2. Go to the Compatibility tab, tick the checkbox for Run this program as an administrator, and click Apply and OK. run as administrator to fix canon eos utility not working windows 11
  3. If the EOS Utility is still not working in Windows, again go to the Compatibility tab, tick the checkbox for Run this program in compatibility mode for, and select Windows 8 from the dropdown menu.Compatibility Mode
  4. Once done, click Apply and OK, and check for improvements.

4. Reinstall the camera driver

  1. Press Windows + X to open the Power User menu, and select Device Manager from the list.
  2. Now, look for the Canon camera (usually under Portable devices), right-click on it, and select Uninstall device.uninstall to fix canon eos utility not working windows 11
  3. Click Uninstall in the confirmation prompt.
  4. Now, restart the computer with the camera connected and let Windows reinstall a fresh copy of the driver.

If this doesn’t work, go to the manufacturer’s website, select your product, and then manually install the latest drivers.

5. Allows EOSUPNPSV.exe in the firewall

  1. Press Windows + S to open Search, type Allow an app through Windows Firewall, and click the relevant result.
  2. Click the Change settings button.change settings
  3. Now, click on Allow another app at the bottom.
  4. Click Browse.browse
  5. Navigate the following path:C:\Program Files (x86)\Canon\EOS Utility
  6. Select EOSUPNPSV.exe from the list, and click on Open.open
  7. Click the Add button.
  8. Finally, tick the checkboxes for both Private and Public next to Canon EOS UPNO Detector, and click OK to save the changes.whitelist to fix canon eos utility not working windows 11

6. Reinstall the app

  1. Press Windows + R to open Run, type appwiz.cpl in the text field, and hit Enter.appwiz.cpl
  2. Select Canon Utilities EOS Utility 3 from the list, and click on Uninstall.uninstall to fix canon eos utility not working windows 11
  3. Follow the on-screen instructions to complete the process.
  4. Similarly, uninstall the other Canon Utilities.
  5. Once done, reboot the device and then reinstall the Canon EOS Utility app from the official website.

If Canon EOS Utility is still not working in Windows 11, use a reliable software uninstaller to get rid of the leftover app files and Registry entries.

Besides, you can download the previous version of Canon EOS Utility. To do that, click on Load More on the Software and Drivers page > scroll down > click the Download button next to the stable version.

7. Contact support

If nothing else works, you can always contact Canon support. They will help identify the problem and share a series of curated solutions, depending on the Canon EOS Utility version you are running.

In the meanwhile, connect your camera to the Windows 11 PC with a USB cable and transfer files as you do from a drive. Or you could put the card from the camera into a card reader (connected to the PC) and transfer files.

These are all the ways you can fix things when the Canon EOS Utility is not working in Windows 11 or even Windows 10, and image transfer shouldn’t be a problem anymore.

Before you leave, find out what to do if your PC doesn’t recognize the Canon camera.

For any queries or to share what worked for you, drop a comment below.

4 Ways to Fix The Sims 4 For Rent Download Error

If you are not able to download The Sims 4 For Rent, even if you have pre-ordered the game, this guide can help!

We will talk about common causes of the issue and offer WR experts’ tested solutions to help you resolve it in no time.

Why does my Sims 4 keep saying download error?

  • The EA client has an outdated cache.
  • Server overload if too many people are downloading the pack.
  • The order is not marked as complete.

How can I fix The Sims 4 For Rent download error?

Before proceeding with any steps to fix this download error, go through the following preliminary checks:

  • Check if you have a stable internet connection, or try connecting to another Wi-Fi.
  • Move your mods folder somewhere else temporarily.

1. Check order processing

  1. Open your preferred browser and log in to your EA account.
  2. Click the profile icon and select the Account settings option.
  3. Locate Order History, then check the order status for Sims 4 For Rent.Order history - The Sims 4 For Rent download error
  4. If it says Processing, then wait until the status changes to Completed.
  5. If it says Completed, launch the EA app, go to Installed apps, and select Sims 4.
  6. Go to Manage and click the Manage Add-Ons option to get the list of the packs installed.

2. Restart the EA app

  1. First, cancel the download for The Sims 4 For Rent.
  2. Next, log out of the EA app and close it.
  3. Press Ctrl + Shift + Esc to open the Task Manager, then go to the Processes tab.End task - The Sims 4 For Rent Download Error
  4. Right-click the EA client and other processes related to it one by one, then select End task.
  5. Relaunch the EA app, then log in again and try to download the game.

3. Clear the EA app cache

  1. Press the Windows key, type ea, and click Open.
  2. Locate the three dashes from the left corner and select Help.App Recovery - The Sims 4 For Rent Download Error
  3. Click App recovery, then choose Clear cache.Clear cache
  4. If you get a prompt to complete the process, select a positive response.

Clearing the cache of the EA client app can also help you fix the Sims 4 won’t open issue; read this guide to learn more about it.

4. Reinstall the EA app

  1. Press Windows + I to open the Settings app.
  2. Go to Apps, then select Installed apps.Apps, installed apps  - The Sims 4 For Rent Download Error
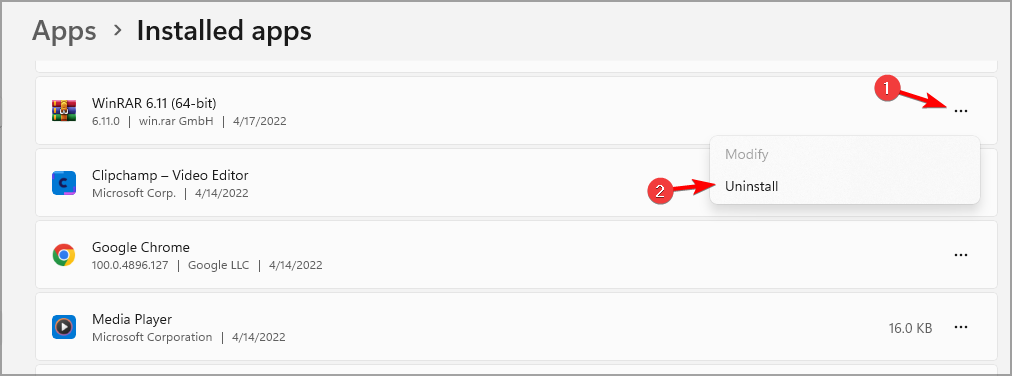
  3. Locate the EA app, click the three dots icon, then select Uninstall.Uninstall app -The Sims 4 For Rent Download Error
  4. Click Uninstall again to confirm the action.
  5. Visit the EA official website and click Download the EA app.Download the EA app
  6. Double-click the executable file and follow the on-screen instructions to complete the installation.

If nothing worked for you, we would suggest that you contact the customer support team, explain to them the issue, & provide the details of fixes you tried to get further assistance.

Remember that before downloading the game on your device, ensure the order has gone through. If you still face the issue, restart your EA app, clear its cache, and finally, try uninstalling it.

This isn’t the only issue related to The Sims 4 For Rent, and many reported that The Sims 4 won’t update, but we covered it in a different guide.

If you have any questions or suggestions about the Sims 4 For Rent download error, don’t hesitate to mention them in the comments section below.

Fix: Rainbow Six Siege Error Code 4-0xFFF0BE25

If you have encountered the Connection Failure Rainbox Six Siege error code 4-0xFFF0BE25 while connecting to the game, this guide can help!

We will discuss the probable causes and cover the WR experts’ recommended solutions so you can enjoy the game without issues.

What causes the error code 4-0xFFF0BE25?

  • The game server is under maintenance, or you have a faulty internet connection.
  • Outdated cookies & cache or DNS cache.

How can I fix the Rainbow Six Siege error code 4-0xFFF0BE25?

Before we go to the advanced fixes to resolve error code 4-0xFFF0BE25, here are a few preliminary checks you should do:

  • Turn off your modem for 30 seconds, then turn it back on and verify if you have a stable internet connection.
  • Run your computer in clean boot to understand the root cause of the issue and ensure the Windows OS & network driver are updated to the latest version.
  • Check the game server status; if it is down, wait a while, then try again.

1. Restart the game

  1. Press Ctrl + Shift + Esc to open Task Manager.
  2. Go to the Processes tab, right-click Rainbow Six Siege, and select End task from the context menu.End task -Rainbow Six Siege Error Code 4-0xFFF0BE25
  3. Now, close the unwanted processes and apps one by one using the same step.
  4. Once done, close Task Manager and relaunch the game.

2. Clear the DNS cache

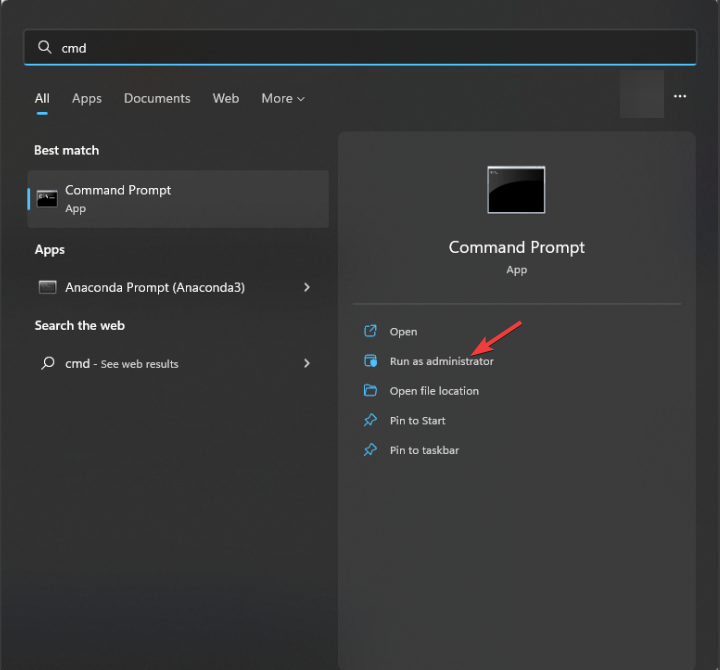
  1. Press the Windows key, type cmd, and click Run as administrator.CMD elevated -Rainbow Six Siege Error Code 4-0xFFF0BE25
  2. Type the following command to clear the DNS resolver cache on Windows and press Enter:DNS FLUSH ipconfig/flushdns
  3. To register all DNS records for a computer, copy & paste the following command and hit Enter: ipconfig/registerdns
  4. Type the following command to release the assigned IP address of the network interface and press Enter: ipconfig/release
  5. Copy & paste the following command to request a new IP address from a Dynamic Host Configuration Protocol server for the network interface and hit Enter: ipconfig/renew
  6. Restart your computer to confirm the action.

Clearing the DNS cache deletes the recently visited websites’ IP addresses; hence, it is good to clear them periodically so your computer can easily communicate with the game servers. This can also help you fix the game’s slow-loading issues; read this guide to learn more.

3. Use Google DNS

  1. Press Windows + R to open the Run dialog box.NCPA run command 1 -Rainbow Six Siege Error Code 4-0xFFF0BE25
  2. Type ncpa.cpl and click OK to open the Network Connections window.
  3. Right-click the active network connection and select Properties.Network Connection properties - Rainbow Six Siege Error Code 4-0xFFF0BE25
  4. Under the This connection uses the following items option, select Internet Protocol Version 4 (TCP/IPv4) and click the Properties button.Internet Protocol Version 4(TCPIPv4) Properties
  5. Click the radio button next to Use the following DNS server addresses.
  6. Now, for the Preferred DNS server, type 8.8.8.8, and for the Alternate DNS server, type 8.8.4.4, then click OK.DNS server -Rainbow Six Siege Error Code 4-0xFFF0BE25
  7. Click Close.

Changing DNS can improve the browsing speed and can also help you fix error code 10-0x000001f4; read this guide to learn more.

4. Allow the app through the Windows Firewall

Note icon NOTE
Check if Rainbow Six Siege is blocked by Windows Firewall using our guide. If, after disabling the firewall, you don’t see the error, you need to follow the below-mentioned steps to add the game to the Allowed apps list.
  1. Press the Windows key, type control panel in the search box, and click Open.Control Panel start menu -Rainbow Six Siege Error Code 4-0xFFF0BE25
  2. Select Category for View by and choose System and Security.System and security
  3. Under Windows Defender Firewall, click Allow an app through Windows Firewall.aLLOW AN APP THROUGH -Rainbow Six Siege Error Code 4-0xFFF0BE25 FIREWALL
  4. On the Allowed apps screen, look for Rainbow Six Siege; if not found, click Change settings, then click Allow another app.Change app settings
  5. Click Browse, look for the game’s executable file in the system drive, select it, and click Open.Browse
  6. Now click Add.ADD
  7. Once added to the Allowed apps page, place a checkmark next to Private and Public for the game and click OK.

5. Modify the GameSettings file

  1. Press Windows + E to open the Windows File Explorer.
  2. Navigate to this folder and replace your username with the current user profile name: C:\Users\yourusername\Documents
  3. Locate and click the Rainbow Six – Siege folder, then open the folder with a long name.
  4. Find and double-click the GameSettings file to open it in Notepad.
  5. Search for UseProxyAutoDiscovery and change its value from 0 to 1.Gamesettings file -Rainbow Six Siege Error Code 4-0xFFF0BE25
  6. Press Ctrl + S to save the changes.

If nothing worked for you, we would suggest you contact Ubisoft customer support and explain to them the issue & fixes you tried to get further help.

Remember that this error could occur due to an unstable internet connection or server maintenance. Therefore, the first step should be to check your internet connection and the server status.

Next, if your internet connection is fine from the ISP end but flaky at yours, then try flushing the DNS or using Google DNS to improve its performance and check if you face the issue.

Did we miss a step that helped you fix Rainbow Six Siege error code 4-0xFFF0BE25? Feel free to mention it in the comments section below. We will add it to the list.

Can’t Disable Palmcheck in Windows 11? Do This

The Palmcheck feature in Windows 11 is designed to prevent accidental mouse clicks or taps when in tablet mode but it can also be very annoying hence the need to disable it.

We discovered users had trouble trying to turn it off so we compiled this report to help you through it.

How do I disable Palmcheck in Windows 11?

Begin with the following preliminary checks before any technical troubleshooting:

Note icon NOTE
It should be noted there’s no native way to disable Palmcheck in Windows 11 without disabling Touchpad. The solutions listed here are to suppress the taps when you place your palm so that it’s less intrusive.

1. Adjust the Touchpad sensitivity

  1. Hit the Windows key and click on Settings.
  2. Select Bluetooth and devices on the left then click on Touchpad on the right.Go to Touchpad
  3. Click on Taps and from the drop-down menu, change to High sensitivity or Most sensitive.

Depending on how the Palmcheck feature is behaving, adjusting its sensitivity levels can help manage the frequency at which the taps happen and hopefully with fewer interruptions.

2. Update your Touchpad drivers

  1. Press Windows + R to open Run, type devmgmt.msc in the text field, and hit Enter.
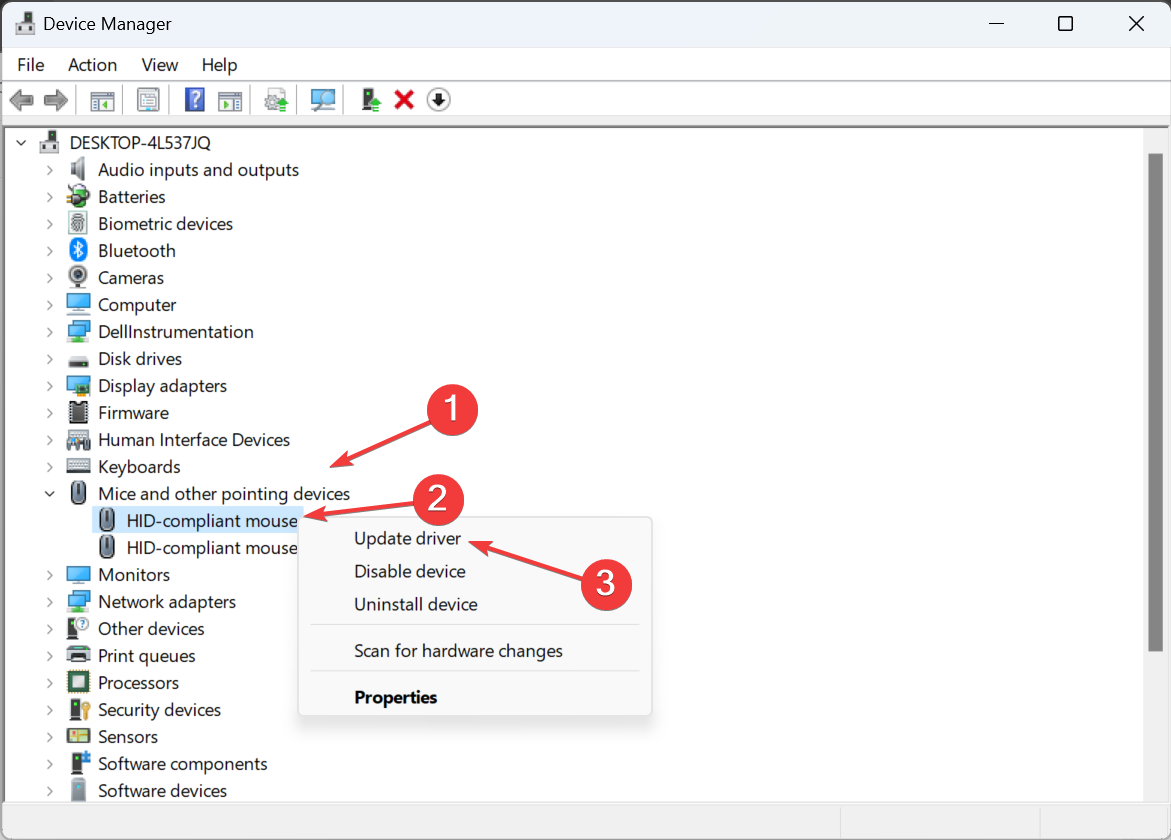
  2. Double-click on Mice and other pointing devices, right-click on the touchpad device and select Update driver.update driver to fix touchpad clicks but doesn't move
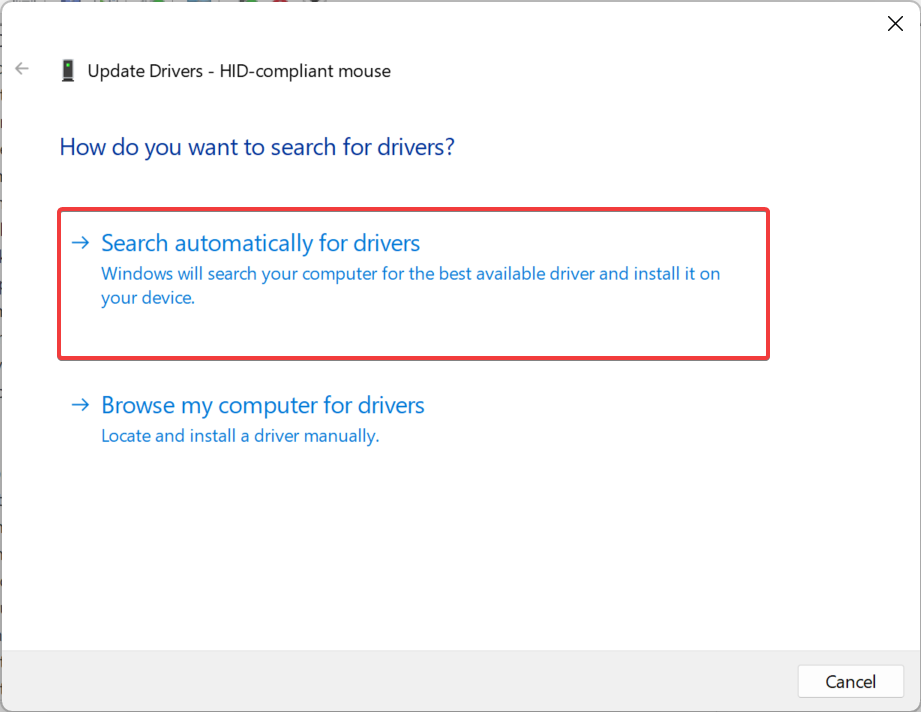
  3. Click on Search automatically for drivers and wait for Windows to install the best drivers available locally.search automatically
  4. Finally, restart the computer.

You may also be unable to locate the Touchpad drivers in Device Manager but with our expert article, they shouldn’t be too hard to find.

3. Reinstall your Touchpad drivers

  1. Press the Windows key, type Device Manager, and click Open.
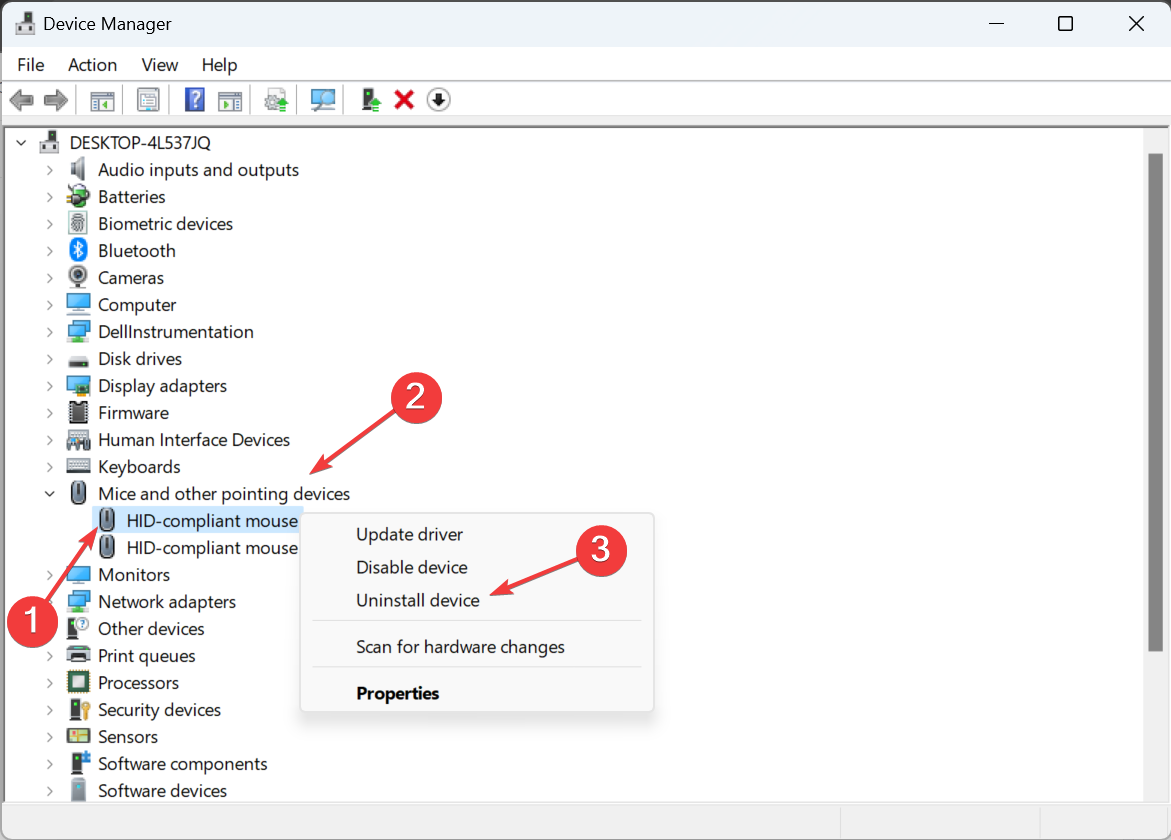
  2. Expand the Mice and other pointing devices entry, right-click on the touchpad, and select Uninstall device.uninstall device
  3. Now, tick the checkbox for Attempt to remove the driver for this device if available, and click Uninstall.
  4. Once done, restart the computer, and Windows will automatically install a fresh copy.

4 Disable the Registry keys

4.1 Disable by Manufacturer

  1. Make a backup of your Registry or create a restore point to cushion your device from irrecoverable damage.
  2. Hit the Windows + R keys to open the Run command.
  3. Type regedit in the dialog box and hit Enter to open the Registry Editor.
  4. Navigate to the following location: (The path may differ slightly depending on your device’s manufacturer) Computer\HKEY_CURRENT_USER\Software\Elantech\OtherSetting
  5. On the right-hand pane, find DisableWhenType_Enable, double-click on it, and type 1 in the Value data entry.
  6. Restart your PC and see if Palmcheck has been disabled.

4.2 Disable AAP key

  1. Hit the Windows + R keys to open the Run command.
  2. Type regedit in the dialog box and hit Enter to open the Registry Editor.
  3. Navigate to the following location: HKEY_LOCAL_MACHINE\Software\Microsoft\Windows\CurrentVersion\PrecisionTouchPad
  4. On the right-hand pane, find AAPThreshold, double-click on it, and type 0 in the Value data entry.
  5. Restart your PC.

AAP stands for Accidental Activation Prevention which is a feature that suppresses accidental taps within a given window period.

This should be a last resort if all other steps fail. Consequently, you can always adjust the touchpad sensitivity settings to moderate if you still need to use the feature.

However, if it’s causing issues such as mouse lag, or the Touchpad keeps freezing, it’s best to get rid of it altogether. If your Synaptics Touchpad driver scroll is not working, PalmCheck is likely responsible, so consider disabling it.

That’s all we had for this article but we’re keen to hear any other solutions you may have. Drop us a comment down below with any additional solutions.

How to Turn Off 3D Display Mode in Windows 11

The 3D display mode may conflict with the ability of a monitor, and it’s often best that you turn off the 3D display mode in Windows 11.

Enabling it may cause the screen to go black, and the display won’t return even on subsequent reboots. In some cases, it was just a black screen with the cursor.

How can I turn off 3D display mode in Windows 11?

1. Change the projection mode

1.1. Boot into Safe Mode

  1. Shut down the computer, then press the Power button, and as soon as the Windows logo appears, hold the Power button to turn it off again.
  2. Repeat this thrice, and on the fourth attempt, Windows will begin an Automatic Repair. After the scan, click on Advanced options.advanced options
  3. Click on Troubleshoot.
  4. Again, click Advanced Options.
  5. Now, click on Startup Settings.startup settings
  6. After the PC restarts, press 5 or F5 to boot Windows into Safe Mode with Networking.safe mode

1.2 Switch to another projection mode

  1. After the PC restarts, press Windows + P to view the available projection modes.
  2. Select each of the available options individually, and when the 3D display mode toggle appears, disable it.projection mode
  3. You can check that under the Display settings.

We did this because in our tests, after you enable the 3D display mode, the button goes missing, and you may even end up with a black screen with a cursor. Changing the projection mode should help in this case!

If that doesn’t work, connect another monitor, one compatible with the 3D display mode, and then disable the feature.

2. Reinstall the graphics driver

  1. Boot Windows 11 into Safe Mode.
  2. Press Windows + X to open the Power User menu, and select Device Manager from the list.
  3. Expand the Display adapters entry, right-click on the active graphics card, and select Uninstall device.uninstall to turn off 3d display mode windows 11
  4. Tick the checkbox for Attempt to remove the driver for this device, and click Uninstall.drivers
  5. Similarly, uninstall the drivers for any other display adapters listed here.
  6. Restart Windows 11 into normal mode, and the 3D display mode should be turned off in Windows 11.

3. Via the dedicated graphic card’s Control Panel

The dedicated Control Panel for the graphics card has the 3D display mode setting if both the hardware and driver support it.

  1. For the NVIDIA Control Panel, go to Set up stereoscopic 3D from the navigation pane > untick the checkbox for Enable stereoscopic 3D.stereoscopic 3D to turn off 3d display mode windows 11
  2. For the Intel Graphics Control Panel, you will find the 3D option on the main screen. Go to it and disable the toggle.disable 3D
Tip icon Tip
Since the solution requires modifying the Registry Editor, we recommend you create a restore point to be able to revert the changes in case things go wrong. Also, don’t make changes other than the ones listed here.
  1. Boot Windows into Safe Mode.
  2. Press Windows + R to open Run, type regedit in the text field, and hit Enter.registry
  3. Click Yes in the UAC prompt.
  4. Paste the following path in the address bar and hit Enter: HKEY_LOCAL_MACHINE\SYSTEM\CurrentControlSet\Control\GraphicsDriverspath
  5. Right-click on the Configuration key in the navigation pane, and select Delete.delete key to turn off 3d display mode windows 11
  6. Click Yes in the confirmation prompt.
  7. Similarly, delete the following two keys:
    • Connectivity
    • ScaleFactors
  8. Restart the computer normally and check for improvements.

5. Perform a system restore

  1. Press Windows + S to open Search, type Create a restore point in the text field, and click the relevant result.
  2. Click the System Restore button.system restore
  3. If available, select the Choose a different restore point option, and click Next.
  4. Pick a restore point created before the issue first appeared, and click Next.restore
  5. Verify the restore details, and click Finish.restore to turn off 3d display mode windows 11
  6. Wait for the restore process to complete. It usually takes 30-60 minutes.

6. Reset Windows

If you don’t have a restore point or can’t reinstall the graphics driver, reset Windows to factory defaults. This will wipe out all the data, including personal files and installed apps.

Resetting Windows 11

The other option is to reinstall Windows 11. It’s the same as resetting the OS but comes in handy in extreme situations when a reset is not possible. You will need a bootable USB drive to perform a reinstall.

With one of these solutions, you should be able to turn off the 3D display mode in Windows 11 without losing data (except for a reset). And this will help get rid of the black screen.

Before you leave, discover some quick tips to make Windows 11 faster and get the best performance!

For any queries or to share more solutions with us, drop a comment below.

Solved: Join Failed Because You Are on a Different Version in MW3

Many users have encountered the Join Failed Because You Are on a Different Version error in MW3 after updating the app on a PC or console.

In this guide, we will discuss probable reasons for the error and offer WR experts-tested methods to ensure you can play Modern Warfare 3 without any issues.

What causes mw3 different version error?

  • You and the players are not using the same version of the game.
  • Failed to download the latest patch update.

How can I fix the MW3 different version error?

Before proceeding with any steps to fix the issue, go through the following preliminary checks:

  • Ensure you and your friends are using the same version of the game.
  • Check the CODUpdates on X to verify if there is an update on the issue, as the developers are already working on the error.

1. Restart the game

  1. Press Ctrl + Shift + Esc to open Task Manager.
  2. Navigate to the Processes tab and search for the process related to either Steam or Battle.net, depending on the client you are using.
  3. Once located, right-click the process and select End task from the context menu.End task - delete the processes -mw3 different version error
  4. Also, look for other game-related processes and follow the same steps.

This will close the game completely, and if it doesn’t work, then restart your device. Also, ask your friends to restart the game, console, or PC.

Closing all the processes related to the game can help you fix other issues like Dev error 841; read this guide to learn more.

2. Update the game

Steam

  1. Press the Windows key, type steam, and click Open.Steam Open -mw3 different version error
  2. Go to Library, locate the game, right-click it, and select Properties.Properties of game
  3. Select Installed Files or Local Files from the left pane, then click Verify integrity of game files.Verify integrity of game files - mw3 different version error

Wait for the process to complete as it may take some time. If everything is verified correctly, you should have the latest version of the game installed.

Verifying the game files can also help you fix the MW3 reset rank error; read this guide to learn more about the issue.

Battle.net

  1. Press the Windows key, type battlenet, and click Open.
  2. Go to the game and click the Gear icon next to the Play button.Check for updates - mw3 different version error
  3. Click Check for updates, and if available, download and install them.

PlayStation

  1. On the home screen, locate Modern Warfare 3.
  2. Press the Options button.
  3. Choose Check for Updates.

Xbox

  1. On the home screen, locate Modern Warfare 3.
  2. Press the Start button, then choose Manage game and add-ons.
  3. Select Updates.

If nothing worked for you, we would suggest you wait for a while and keep an eye on updates on X, or you can contact customer support to get a clearer idea.

Remember that to successfully invite or join the game with your friends or fellow players, ensure that all the participants have the updated version of the game.

If you have any questions or concerns about the subject, feel free to mention them in the comments section below. We will be happy to help!

Solved: Dev Home Update is Stuck at 90%. How to Reinstall

Many of our readers found that the Dev Home update is stuck at 90% or not downloading at all. Many have also asked why Dev Home was installed on their Windows 11 computers in the first place.

Dev Home is a control center designed for developers that helps them connect to their developer accounts and tools (such as GitHub), and more. It’s entirely useless for the average user, so if you want to free some space, read below to learn how to uninstall it.

What do I do if the Dev Home update is stuck at 90%?

1. Uninstall Dev Home

  1. Right-click the Start button and select Windows Terminal from the list.
  2. Now, type or paste the following command and press Enter to run it: Get-AppxPackage *Windows.DevHome* | Remove-AppxPackage

In a few seconds, Dev Home will be uninstalled from your PC. However, it is possible to be reinstalled after another Windows 11 update.

2. Reinstall Dev Home using Microsoft Store

  1. Open Microsoft Store on your computer.
  2. Search for Dev Home and hit the Install button.
  3. However, we also got a stuck installation within the Microsoft Store. It says Update available but it is circling forever, without installing any update.
  4. If this is happening to you too, apply the following solution to install Dev Home on Windows 11.

We also have a complete guide on how to download and install Dev Home if you need more info.

3. Reinstall Dev Home from Github

  1. Open the browser of your choice and go to the Dev Home Github Releases page.
  2. Scroll down and download the Dev Home installer from the Assets section.
  3. After downloading, run the file and hit the Install button.
  4. This time, Dev Home will be installed flawlessly and will start running without asking you about any pending updates.

If you are using WinGet, you can also install Dev Home by running the following command: winget install --id Microsoft.DevHome -e

So, from the WR labs tests, if Dev Home update is stuck at 90%, you need to uninstall the app and then reinstall it by using the latest version from GitHub.

However, if you’re not a developer, you can just uninstall the app without any problems.

Some of our readers recommended resetting Windows 11 to factory defaults, but our WR experts fixed the Dev Home stuck update problem without such drastic methods.

This is very useful for developers, and our guide on how to use Dev Home for Windows will help you start off.

You might also be interested in learning about the best front-end developer apps you may use.

A few users also reported Hotkey for Dev Home Project Ironsides in startup applications, and we have a great guide that explains what it is and how to remove it.

Did you manage to repair the Dev Home app using our solutions? Let us know in the comments section below.

Pokemon Home Error Code 504: How to Fix it

Pokemon Home error code 504 is usually a server-side problem so there’s not much you can do except wait for it to go away on its own. However, if it’s happening frequently, we lined up a few solutions to get you by.

What is error code 504 on Pokemon Home?

In some rare but possible cases, altering the game files using tools that spoof your location to gain an advantage over other players in battle can also throw this error.

How do I fix error code 504 on Pokemon Home?

Begin with the following preliminary steps before any complex troubleshooting:

  • Make sure that you have the latest official version of Pokemon Home installed.
  • Try switching your connections by disconnecting from Wi-Fi and connecting to a cellular network (if available).
  • Try playing Pokemon Home on a browser or PC app via an emulator.

1. Update your device’s OS

  1. Locate Settings on your device. (We’ll be using the Samsung model for this step).
  2. Go to Software update.
  3. Tap on Download and install.
  4. Wait for the update to finish installing if available, and retry the game.

If you’re playing Pokemon on your PC via a Pokemon emulator or browser, proceed to update your OS and browser respectively then try again and see if the error code 504 persists.

2. Clear app cache

  1. Tap and hold the Pokemon Home icon. Select App info.
  2. Next, head to Storage.
  3. After that, tap on Clear cache and check if the problem is gone.
  4. If not, repeat the same steps but this time choose Clear data.
  5. Tap on Delete to confirm.

Clearing the app cache will not only help solve the Pokemon Home error code 504 but may also resolve the error code 400.

3. Reinstall the app

  1. Press and hold the Pokemon Home icon.
  2. Choose Uninstall.
  3. When the confirmation dialog appears, tap OK.
  4. Delete the PokemonHome folder from your computer and restart your computer.
  5. Go to your dedicated app store, search for Pokemon Home.
     
  6. Tap on Install next to Pokemon Home and wait for the app to install.
  7. Once installed, start it again and check if it works.

4. Reset your network

4.1 Windows

  1. Hit the Windows key and click on Settings.settings windows 11
  2. Navigate to Network & internet.
  3. Select Advanced network settings.going advanced network settings win11
  4. Click on Network reset.Network Reset 1
  5. Next, hit the Reset now button.Network Reset now

4.2 Android

  1. Open the phone Settings, and go to General management.general management
  2. Tap on Reset.
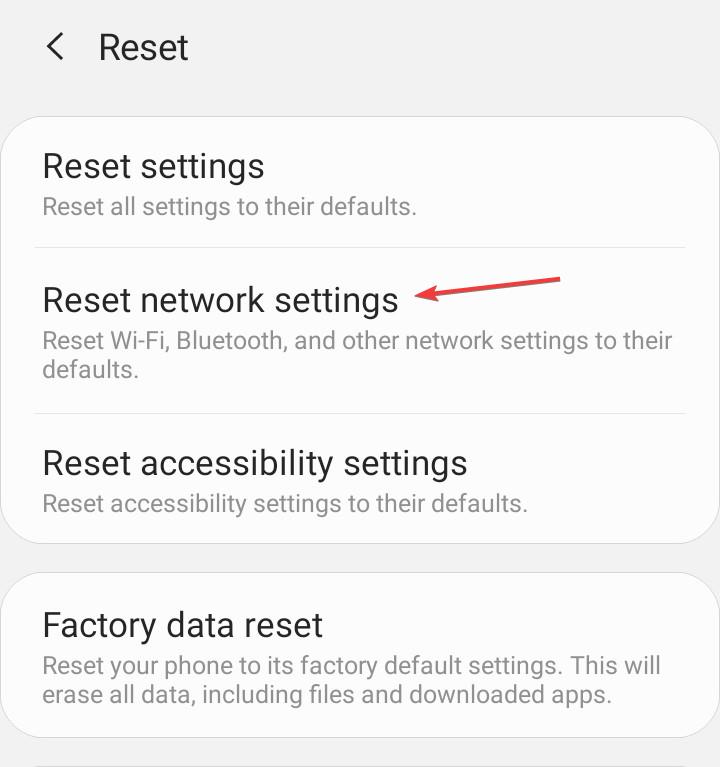
  3. Now, select Reset network settings from the list of options.reset network settings to fix error 201 arena of valor
  4. Tap on Reset settings to confirm.

4.3 iOS

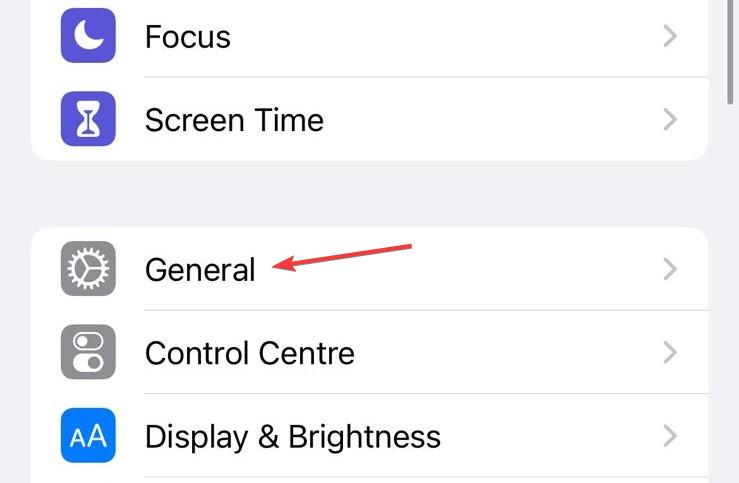
  1. Open the iPhone Settings, and go to General.general
  2. Tap on Transfer or Reset iPhone.
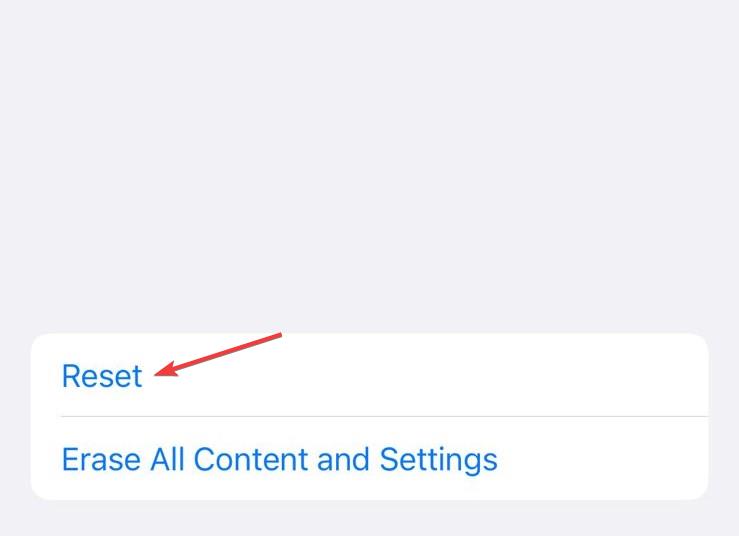
  3. Tap Reset at the bottom.reset to fix error 201 arena of valor
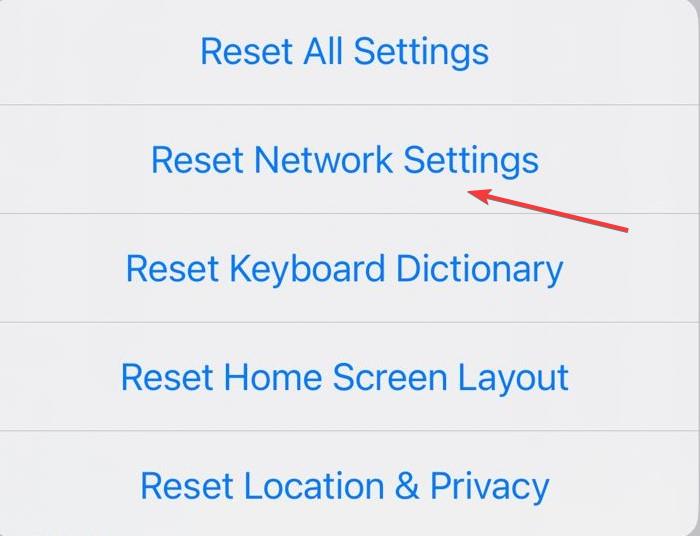
  4. Select Reset Network Settings from the list of options.reset network settings
  5. Enter the device’s passcode to confirm the reset.

5. Contact support

If neither of those work, then it’s time to contact Niantic Labs directly and get help from Pokemon customer care representatives. Sometimes, it’s an issue they may be able to help you with or at least give you a timeline of when a fix will be available.

If you have to wait, there’s no harm in exploring other Pokemon games you can play on your browser. Lucky for you, there’s an extensive library of fun games in this family you’ll be spoilt for choice.

In case you are having problems with your emulator, we have lined up some of the best Pokemon emulators that run Android games seamlessly. We also have a new guide on Pokemon HOME error code 10015, so feel free to check it out.

Hopefully, one of these solutions will help you get back to your Pokemon adventure without any trouble at all. For any additional thought on comments, let’s meet in the comment section below.

4 Ways to Fix SECOL.exe High CPU Usage

The SECOCL.exe file using a high CPU has been troubling many. Not only does it use up resources, but it’s not much information about its intended purpose. We’ll help you shed some light on it.

The process is associated with Sound Research SECOCL software and was found on some HP and Asus devices in the System32 directory.

It’s totally safe and legit, but if it’s hogging your system, you can adjust it, as shown below.

How do I fix SECOCL.exe’s high CPU usage?

Before we start with the slightly complex solutions, check for any pending Windows updates and install them. You can also update your BIOS.

1. Terminate the SECOCL.exe process

  1. Press Ctrl + Shift + Esc to open the Task Manager.
  2. Scroll down, locate the SECOCL.exe process, right-click on it, and click the End task button.terminate SECOCL.exe

2. Update the drivers

  1. Press Windows + X to open the Power User menu, and select Device Manager from the list of options.
  2. Locate all the Realtek entries, right-click on them individually, and select Update driver.update driver to fix SECOCL.exe
  3. Click on Search automatically for drivers and wait for Windows to install the best one available locally.search automatically
  4. If a newer version is installed, restart the computer.

To fix SECOCL.exe’s high CPU usage, update the Realtek drivers on the PC. If Windows can’t find an update, check the manufacturer’s website and manually install the latest driver.

For some users, updating the graphics driver also helped reduce CPU usage. So, try that!

3. Disable the Sound Research SECOMN Service

  1. Press Windows + R to open Run, type services.msc in the text field, and hit Enter.
  2. Scroll down, right-click on the Sound Research SECOMN Service, and select Properties.properties
  3. Choose Disabled from the Startup type dropdown menu, then click on the Stop button under Service status.disable to fix SECOCL.exe
  4. Click Apply and OK to save the changes, then restart the PC and check for improvements.

4. Reset Windows

When nothing else works, you can always reset Windows to factory defaults. This will wipe out all the stored files and installed apps. After a reset, the computer reverts to the state you first got it in.

Resetting Windows

We recommend you move the critical files to an external USB storage or use an effective data backup solution. This was, you can restore these files after the reset.

Can I delete SECOCL.exe?

We recommend against deleting SECOCL.exe. If you are keen on doing that, first, move the file to another folder. This way, Windows is unable to load the process. Now, check for any adverse effects on the PC’s audio input or output.

And if everything is fine after changing the SECOCL.exe’s location, you can safely delete it. As a precautionary measure, create a restore point first.

Remember, SECOCL.exe is not the only process that triggers such issues. We have come across high CPU usage by OmenCap.exe, and a similar approach helps!

We also have a guide on CxUIUSvc service high CPU usage, so don’t miss it if you have an HP device.

Before you leave, discover some quick tips to improve the PC’s performance and enjoy faster loading speeds.

For any queries or to share what worked for you, drop a comment below.

Solved: File Explorer Group by Greyed Out

You open up File Explorer, and you want to sort out your files but when you go to the group by option, it is greyed out. We give you our tried and tested solutions to resolve this issue.

What does it mean when a folder is greyed out?

This could mean the folder is currently unavailable, you’ve disabled grouping or there are no files in the folder. Other possible reasons could be that the folder is in use by another application or you don’t have permission to view the contents of the folder.

What can I do if the Group by option is greyed out in File Explorer?

Start off troubleshooting with the following basic checks:

1. Restart File Explorer

  1. Right-click on your Taskbar and select Task Manager to open.
  2. Locate Windows File Explorer, right-click, then select End task.
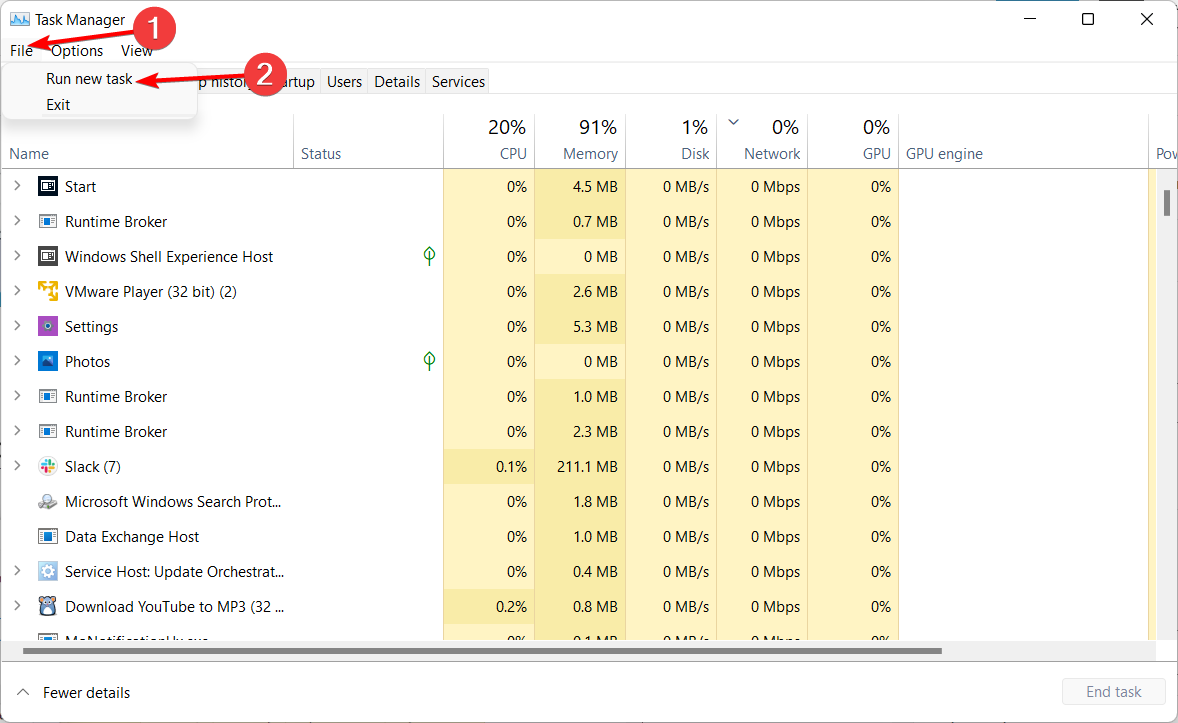
  3. Click on File in the top left corner and select Run new task.run-new-task windows 11 taskbar empty
  4. In the dialog box that appears, type explorer.exe to restart File Explorer.

2. Reset File Explorer to default settings

2.1 Reset View settings

  1. Click the Search icon on your taskbar, type File Explorer in the search field, and choose File Explorer from the search results.Reset file explorer
  2. In the File Explorer window, click the Menu icon (three ellipses) located on the extreme right of the menu bar and choose Options from the drop-down menu.Reset file explorer
  3. Switch to the View tab to access the related settings and press the Reset Folders button located in the Folder views section to reset File Explorer to its default view.Reset file explorer
  4. A reset confirmation popup will open on the screen. Click Yes to confirm that you want to reset Windows 11 File Explorer to the default view.Reset file explorer
  5. Next, press the Restore Defaults button under the Advanced Settings section to revert these settings to their default value.Reset file explorer
  6. After the File Explorer is reset, press the OK button to save the changes you’ve made and exit the File Explorer Folder Options popup.

Although customizing your File Explorer can help you navigate through the folders, files, and drives in your PC easily, sometimes it can mess up with certain settings and cause issues like the group by option to be greyed out.

2.2 Reset File Explorer cache

  1. Use the Windows + S shortcut to launch the Search menu. Type PowerShell in the search bar, and select the Run as Administrator option.Reset file explorer
  2. Type or copy-paste the following command and press the Enter key to execute it. kill -n explorer Reset file explorer

When you use your computer for a long time, you accumulate a lot of files and with time, some files can get corrupted or damaged. In such cases, you need to remove them by clearing the cache.

3. Uninstall recent Windows updates

  1. Press the Windows + I keys simultaneously to open Settings.settings windows 11
  2. Navigate to Windows Update, then go to Update history.windows-update-history logitehc unifying not working
  3. Click on Uninstall updates.uninstall-updates-w11 computer-recognize-logitech-unifying-receiver
  4. Select the most recent update, then click Uninstall.

4. Create a new user profile

  1. Press Windows + R to launch the Run console, enter netplwiz in the text field, and click OK.
  2. Click Add in the User Accounts window.
  3. Select Sign in without a Microsoft account (not recommended).
  4. Click on Local account button.
  5. Enter a username and password (optional) for the new user account, and a hint, in case you set a password. Once done, click on Next.
  6. Click on Finish to create the Local account.

If you create a new profile and the group by option is not greyed out here, your previous account may be corrupt. In this case, you need to repair your user profile and try again. Alternatively, you can copy your old user profile into the new one.

5. Perform a System Restore

  1. Press the Windows key, type Control Panel, and click Open.control-panel-search fallout new vegas runtime error
  2. Select Large icons as View by and click Recovery.Recovery Control Panel Advrcntr6.dll
  3. Click Open System Restore.Open system restore
  4. Select Choose a different restore point and click Next.Next Choose a different restore point
  5. Now select the restore point and click Next. Choose a point
  6. Click Finish to restore the previous settings, and Windows will restart.Finish Restore point

6. Use a third-party file manager

If all the above fail, you can always turn to other file manager programs. These apps have more advanced features that let you group your files by specific criteria more easily than File Explorer.

You may also discover that your new file manager is faster as Windows File Explorer tends to be slow at times especially if your PC is running low on memory.

Hopefully, we’ve shed light on how to get your group by option active again. Should you face any other related issues like File Explorer not opening, be sure to check out our recommended fixes.

That’s all we had for this article but if you have any other solutions that worked for you, don’t hesitate to share them with us in the comment section below.

amfrt64.dll Failed to Open or Not Signed [Solved]

Recently, users faced trouble with amfrt64.dll or amfrt32.dll (the DLL version for 32-bit architecture).

For some, the DLL didn’t open, leading to issues with installed programs, primarily video editing, while others found that amfrt64.dll was not digitally signed.

What is the amfrt64.dll file?

The DLL is installed by the AMD drivers and is linked to the Advanced Media Framework (AMF). The latter helps ensure the seamless encoding and decoding of videos, amongst other similar tasks. If you don’t have AMD graphics, the DLL shouldn’t be ideally installed.

What can I do if amfrt64.dll failed to open?

Before we start with the slightly complex solutions, try these quick ones:

  • Restart the computer and check whether the program now loads.
  • Install all pending Windows updates, including the optional ones.
  • Disable any third-party antivirus installed on the PC. If that works, we recommend you uninstall the app and switch to a Windows-friendly antivirus solution.

1. Use a dedicated DLL repair tool

For DLL errors, whether the file is corrupt or not loading, use an effective DLL repair tool. They will look for any problematic or missing files on the PC, and then download a fresh copy from their extensive library hosting thousands of DLLs.

The process negates the need to download DLL files from the web, which is considered risky, given that these can infect the PC with malware.

2. Reinstall the AMD graphics driver

  1. Press Windows + X to open the Power User menu, and select Device Manager from the list of options.
  2. Expand the Display adapters entry, right-click on the AMD graphics card, and select Uninstall device.uninstall to fix amfrt64.dll error
  3. Tick the checkbox for Attempt to remove the driver for this device, and click Uninstall.uninstall
  4. Once done, run the setup you used initially to install the driver or download a fresh copy from AMD’s official website.

If reinstalling the AMD driver doesn’t help with the amfrt64.dll failed to open error, use a reliable driver uninstaller tool to remove all related files and then perform a clean install.

3. Update the AMD graphics driver

  1. Press Windows + R to open Run, type devmgmt.msc in the text field, and hit Enter.device manager
  2. Double-click the Display adapters entry, then right-click on the graphics, and select Update driver.update driver to fix amfrt64.dll
  3. Choose Search automatically for drivers and then wait for Windows to install the best locally available drivers.search automatically
  4. If a newer version is installed, restart the computer.

When it’s a bug in the installed version to blame for amfrt64.dll, update the graphics driver. And if Windows can’t find one, go to the manufacturer’s website, locate the latest version, and manually install the driver.

This also helps when Nvapi64.dll is throwing errors.

4. Reinstall the affected application

  1. Press Windows + R to open Run, type appwiz.cpl in the text field, and click OK.
  2. Select the application that throws the DLL error from the list, and then click Uninstall.uninstall application to fix amfrt64.dll errors
  3. Follow the on-screen instructions to complete the process.
  4. Now, restart the computer and then reinstall the app from the official website.

We often get amfrt64.dll errors with OBS. If reinstalling it doesn’t work, the problem might arise due to the poor performance of the PC. In this case, try lowering the resolution and also go with 30 FPS (Frames Per Second).

For FFmpeg, setting the correct codec version did the trick. This worked for a few users (replace the version): ffmpeg4.4 -i input.mp4 -codec:v h264_qsv output.mp4

5. Perform a system restore

  1. Press Windows + S to open Search, then type Create a restore point, and click the relevant result.
  2. Click the System Restore button.system restore to fix amfrt64.dll errors
  3. Select the Choose a different restore point option and click Next.
  4. Pick the oldest restore point from the list, and then click Next.restore point
  5. Verify the restore details, and click on Finish.restore
  6. Wait for the process to complete. It may take up to an hour.

If you have created a restore point earlier or Windows is configured to do so automatically, performing a system restore will revert any recent changes that trigger the amfrt64.dll error.

Why is amfrt64.dll not signed?

The amfrt64.dll file is not signed, but that doesn’t necessarily indicate the file is unsafe or corrupt. For some, even the nvcpl.dll file, linked to NVIDIA graphics, is not signed.

If you believe that it’s a malware disguised as the DLL, scan the file using the built-in Windows Security or an effective antivirus tool.

That’s all you need to know about the amfrt64.dll and all related errors. As long as the installed programs and associated functionalities work fine, you shouldn’t be too worried about the DLL not being signed!

Before you leave, find out what to do if DLL files are missing in Windows, another common problem faced by users.

For any queries or to share more solutions with us, drop a comment below.

10 Christmas Party Games to Play on Zoom This Festive Season

The holiday season has begun, and to embrace the Christmas spirit this year and bring joy to your virtual meetings, use party games on Zoom.

In this guide, we will discuss some fun and easy games you can play with your friends or colleagues to make your virtual gatherings entertaining and memorable.

What are the party games you can play this Christmas on Zoom?

Virtual scavenger hunt – Send your team to an interesting quest

Virtual Scavenger hunt - Zoom Christmas games

This holiday can be fun connecting with your friends, colleagues, and family with virtual scavenger hunts.

Before your Zoom meeting starts, send a list of things you want them to find, along with the rules that apply.

You can create a list of things they can do, like finding their favorite midnight snack, a link to the last YouTube video, your go-to breakfast, a shell, a scented candle in their house, or the last note they wrote in 60 seconds. If you need help creating the list, visit websites like PlayPartyPlan.

You can play five rounds of this, and the person who can collect the maximum number of things in the time frame will be the winner.

Christmas quiz – Questions related to Christmas

Christmas quiz - Zoom Christmas games

Another great way to interact with your colleagues is a Christmas quiz. Prepare a set of questions about Christmas traditions and the holiday season, then divide people into small groups using Breakout rooms.

Come up with funny questions and answers to entertain your teammates, and this could be a great way to bond with each other.

If you need help finding out the questions and answers that you can use, we suggest you check out the Beano website; it has hundreds of quizzes and a dedicated page for the Christmas-related questionnaire.

In case you use Microsoft Teams to interact with your friends, family, or colleagues and want to create an interactive quiz, check out this guide.

Bingo – Play, Win, Repeat

Bingo - Play, Win, Repeat

Bingo is another fun activity you can use to indulge your teammates and have fun, irrespective of their location.

This game can be a team-building exercise, ice breaker, or a great way to bond during this holiday season over a Zoom meeting.

Bingo by Funtivity allows you to customize the game according to the interests and personalities of your team members, encouraging them to be creative and thereby enhancing their problem-solving skills.

Before starting the game, ask everyone to add the game to Zoom from the Zoom Apps section, hop into a meeting, and start playing.

Funtivity also offers games like Trivia, Escape Room, Doodle Challenges, Forbidden Words, etc., for team building and peer networking.

A dress-up competition – Strut, Sparkle, Slay

A dress-up competition

First, to organize a dress-up competition, decide on a theme, like celebrity lookalikes, decades flashbacks, or festive looks.

Send the details to your colleagues with the competition details and encourage them to go all out and be themselves.

Once everyone is ready, hop in on a Zoom meeting, ask everyone to use the Zoom Spotlight feature to showcase their attire, and ask what inspired them to choose the outfit.

Now, ask everyone to vote for the best dressed on creativity, following the rules of the competition and their presentation, etc.

Also, create a virtual photo booth where the participants can click their photos and share their awesome looks.

You can also suggest getting a group photo by asking them to choose the same background and taking a screenshot, then sharing it with all for a delightful recap.

If you are looking for a beautiful Christmas wallpaper for your computer, we have a guide with a list of options for you.

Gingerbread – Create gingertastic masterpieces

Gingerbread -  Zoom Christmas games

Asking everyone to follow their tradition and making gingerbread at an online Christmas party on Zoom is another fun game to share the festivities.

Before starting, ask everyone to get a gingerbread decorating kit, then pick a theme like Winter Wonderland to add a challenge,

Then, arrange a Zoom call and ask all participants to request everyone to ensure their decorating station is visible in the video.

Allocate a certain amount of time to decorate their gingerbreads, encourage them to ask for advice, and show their creativity. Once the time is up, ask each participant to present their dish with their design inspiration.

Judges can decide which one is the best and provide e-gift cards as prizes for Most Creative and other titles, then click pictures and share them on your group.

Charades – Express & guess to win

Charades

Who doesn’t enjoy a Charades session with friends? Playing Charades, even on Zoom calls, can be a great way to bond with team members.

Decide on a theme, set up a Zoom call, divide the participants into teams, and use the Zoom Spotlight feature for the person acting out the charade.

Unlike traditional charades where players are silent, ask participants to use sounds, gestures, facial expressions, virtual props, and background filters to convey the word or phrase, adding excitement to the game.

The rest of the game can be the same as the conventional one, including the guessing time, scoring system, and rotation of the person acting out the charade.

Guess the Christmas movie – Who guessed it right?

Guess the movie -  Zoom Christmas games

Guessing a movie from a tune, cast, or plot can be a perfect game for a virtual holiday gathering on Zoom.

First, select iconic Christmas movies; you can add the classics and the new ones to add an extra thrill. Next, arrange a Zoom video call and select the grid view so everyone can be visible on the same screen.

Decide on a game master who presents the clue and keeps the score, then divide the participants into teams.

The game master will give you hints like the cast, description of scenes, or tune related to the film, and participants will guess at a given time. Ask them to submit the answer either verbally or in Zoom chat.

5-second rule – Think fast, speak faster

5-second rule

Another exhilarating game to play with your team at an online Christmas party on Zoom is the 5-second rule. The host will prepare a list of trivia questions, present the questions, and keep track of time.

You can divide participants into teams, establish a rotation to take turns answering questions, or make it impromptu by calling out the person’s name to answer the question.

Also, let the participants use the Zoom chat box for friendly banter or to challenge each other to make the game more enthralling.

Once the game is over, offer digital gift cards or virtual trophies to the participant with the highest score.

Never Have I Ever – Great for icebreaking

Never Have I ever  Zoom Christmas games

A fantastic ice-breaking game, Never Have I Ever is another awesome game you can play in a virtual meeting on Zoom to break barriers and enjoy a fun evening with your colleagues.

Arrange a video call on Zoom, then explain the rules of Never Have I Ever to make everyone understand the game like the participants taking turns and stating a sentence beginning with Never Have I Ever.

Participants can also come up with open-ended statements that can prompt a wide range of responses. Make sure the statements made are light & fun.

Virtual Pictionary – Sketch, guess & win

Virtual Pictionary - Christmas Party Games

To play Pictionary on Zoom online, first set up a Zoom video call and use the gallery view on Zoom so that everyone can see each other’s reactions.

First, divide participants into teams; for each round, choose one person from each team to be an artist, and others will guess and keep rotating so everybody gets a chance to draw.

Participants can use the drawing tools available in Zoom, set a time limit for each round, and keep a score.

So, these Christmas party games can fill your virtual Christmas celebration with your teammates, friends, and colleagues with joy and laughter.

From playing classics like Bingo and Charades to participating in gingerbread making, guessing a movie, or using the Never Have I Ever statement, you can embrace the Christmas spirit this holiday season over a Zoom call and bond with your teammates.

Choose any of the party games from the list or a combination of games if you have more time on your hands to make your Zoom Christmas party a hit.

If you are looking for computer Christmas games to play this holiday season, we have curated a list for the same; have a look.

Don’t forget to share your favorite game and experience playing it in the comments section below. We will be happy to talk!

Snipping Tool: Recording Stopped Something Happened [Solved]

Snipping Tool is Windows’ built-in screen capture and recording utility. But when using the latter functionality, many got the Recording stopped error with a message that read, Something happened and we’ve stopped recording. Wait a bit, then try again. If this continues, send us your feedback.

The Recording stopped error primarily affected devices running Windows 11. What happens is, when you click the Record button, the Snipping Tool app will start the countdown and then immediately freeze while displaying the error message.

Why does Snipping Tool randomly stop working?

This is due to a bug in the app, given the high number of users facing the issue. More so, many reported that the Snipping Tool may automatically start working after a restart. Besides, conflicts with the graphics adapter (card) or misconfigured projection mode can also trigger the error.

How do I fix the Snipping Tool Recording stopped error?

Before we start with the slightly complex solutions, try these quick ones:

1. Update Snipping Tool

  1. Press Windows + S to open Search, type Microsoft Store in the text field, and click on the relevant result.
  2. Click the Library icon near the bottom-left corner.library
  3. Now, click the Get updates button.get updates to fix snipping tool recording stopped something happened
  4. If an update is listed for the Snipping Tool, make sure to download it and then check for improvements.

2. Repair/reset the app

  1. Press Windows + I to open Settings, go to Apps from the navigation pane, and then click on Installed apps.installed apps
  2. Click the ellipsis next to Snipping Tool, and select Advanced options from the flyout menu.advanced options
  3. Scroll down, click the Repair button, and once done, check for improvements.repair to fix snipping tool recording stopped something happened
  4. If the error persists, click on Reset.reset to fix snipping tool recording stopped something happened
  5. Again, click Reset in the confirmation prompt.

Repairing or resetting the app often fixes issues with it. With the latter, you basically reinstall the app and set the configured settings to default, which might be the reason behind the Snipping Tool Recording stopped error. This also helps when Snipping Tool is too slow.

3. Switch to high-performance GPU

  1. Press Windows + I to open Settings, go to System from the left pane, and then click on Display.display
  2. Scroll down to the bottom and click on Graphics under Related settings.
  3. Select Microsoft Store app from the Add an app dropdown menu, and click the Browse button.browse
  4. Select Snipping Tool from the list.
  5. Click the Options button under Snipping Tool.options
  6. Select High performance and then click on Save.high performance to fix snipping tool recording stopped something happened
  7. Restart the computer and check for improvements.

If you also have the Specific GPU option, try out the different graphic adapters listed under it and verify whether the Snipping Tool’s Recording stopped something happened error message goes away.

4. Disable additional graphics adapters

Note icon NOTE
This solution only applies when you have multiple display adapters available. If there’s just one, move to the next method.
  1. Press Windows + X to open the Power User menu, and select Device Manager from the list of options.
  2. Expand the Display adapters entry, right-click on any one of the graphics adapter, and select Disable device.disable device
  3. Click Yes in the confirmation prompt.

If you have multiple graphic cards available, disable each individually while running just one. For some, disabling Intel Graphics did the trick, while others got things up and running after disabling the NVIDIA adapter.

5. Change the projection mode

  1. Go to the desktop and press Windows + P.
  2. Select PC screen only from the listed projection modes.pc screen only to fix snipping tool recording stopped something happened
  3. Launch Snipping Tool and try recording again.

6. Change the file save location

  1. Press Windows + E to open File Explorer, paste the following path in the address bar while replacing Username with the current profile name and hit Enter:C:\Users\Username
  2. Right-click on the Videos folder and select Properties.properties
  3. Go to the Location tab and click on Move.move to fix snipping tool recording stopped something happened
  4. Choose another path for the directory, and click on Select Folder.select folder
  5. Once done, click Apply and OK to save the changes.

For some users, the recordings were saved to the Captures folder under Videos. In this case, you should change its location instead.

7. Perform an in-place upgrade

  1. Go to Microsoft’s official website, select the OS edition and product language, and then download the Windows 11 ISO.windows 11
  2. Double-click the ISO file and click Open in the confirmation prompt.
  3. Run the setup.exe file.setup.exe
  4. Click Yes in the UAC prompt.
  5. Click Next in the Windows 11 Setup to proceed.next
  6. Check the license terms, and click on Accept.
  7. Make sure the setup says, Keep personal files and apps, and click on Install.in-place upgrade to fix snipping tool recording stopped something happened
  8. Now, wait for the process to complete. It may take a few hours.

When nothing else helps, and Snipping Tool keeps freezing in video mode or throws an error, the last option is to perform a repair upgrade. This is the same as reinstalling Windows but doesn’t affect the stored files and apps.

By now, you should have fixed the Snipping Tool Recording stopped something happened error. If the problem persists, wait for Microsoft to release a patch since this is most likely a problem with the app itself.

For the time being, switch to an effective snipping tool for Windows. These are even better in most ways!

For any queries or to share what worked for you, drop a comment below.

Christmas PowerPoint Templates: Best Holiday Slides

The best Christmas PowerPoint templates will provide a great starting point for creating a winter holiday presentation.

We have gathered for you the greatest Christmas slide templates to use for any presentation this holiday.

What are the best Christmas PowerPoint templates?

Canva Powerpoint Templates – Fully customizable

Canva has over 200 free PowerPoint Christmas templates to choose from. Most of them have only the first slide; if you add slides, they will continue on the same theme.

However, all can be fully customized, and they have dedicated stylish fonts that will bring that friendly holiday cheer forward.

You will also find some entirely created presentations with Christmas traditions, carols, and gift lists.

⇒ Get Canva Powerpoint Templates

Slidesgo Christmas Templates – Great graphics

If you’re looking for professional-grade graphics, you will find some awesome free Christmas presentations on Slidesgo.

We have downloaded a few, and they come with full icons, guides, and sets of fonts to help you with.

Moreover, all the slides have download links for Google Slides or PowerPoint versions. As for the themes, you will find everything you may imagine, including calendars, corporate events, stories, and carols.

⇒ Get Slidesgo Christmas Templates

Slideegg Christmas Presentations – Free and customizable

Slideegg is another great website where you can find free Christmas presentations for Powerpoint.

They have over 470 of them, and some are prepared with contextual slides, ready to present.

There is even a Family Feud PowerPoint presentation with Christmas-themed questions and answers, perfect to play with family and friends.

⇒ Get Slideegg Christmas Presentations

PoweredTemplate Christmas selection – Great filtering

We have found 221 free Christmas PowerPoint templates on the PoweredTemplate website.

Honestly, they are not the best we’ve seen design-wise, but the website has a very good filtering system, so you can really find exactly what you’re looking for.

You may even find presentations with a certain number of slides on different themes according to your needs.

⇒ Get PoweredTemplate Christmas selection

Does PowerPoint have Christmas templates?

Yes, PowerPoint has a few Christmas templates. They are mostly printable decorations and cards or photo albums, but not actual presentations.

Summing up our article, you now have over 1000 Christmas PowerPoint templates and presentations you can customize.

If you’re looking for other office Christmas templates, this guide will help you with hundreds of choices.

You might also be interested in captivating Christmas quizzes you can play with your friends this holiday.

Did you find the right holiday presentation? Let’s talk about it in the comments section below.

Use ChatGPT to Create AI-Generated Christmas Cards [How to]

The Christmas season is almost here, and if you’re out of ideas for Christmas cards, you can use ChatGPT to create one for you.

This is incredibly simple to do, and it takes less than a minute for ChatGPT to generate your image, so today, we’ll show you how you can use this feature on your PC.

How can I use ChatGPT to create a Christmas card?

  1. Open ChatGPT and log in with your account.
  2. Make sure you’re using ChatGPT 4. If it’s not currently selected, switch to it.
  3. Next, enter your input and wait for ChatGPT to generate the image.
  4. You should now see your image. If you’re not satisfied with the image, you can enter a new input and ChatGPT will make the adjustments.
  5. If you’re pleased with the new results, click the image.

Can I make a Chat GPT Christmas card for free?

Unfortunately, the image generation feature is available only for ChatGPT4, and it requires a monthly subscription to use it.

ChatGPT Christmas card ideas

Family Christmas card

Santa and reindeers flying

Santa delivering presents

These are just some of the results that we achieved, and it took us just a couple of moments to do so.

It’s incredibly simple to make a Christmas card template with ChatGPT. All you have to do is enter your input, and DALL E will generate Christmas cards for you. You can also fine-tune simple details by editing with DALL-E to get your desired outcome.

If you want to spread holiday spirit this season, then you might want to use these online Christmas cards, or if you’re feeling creative, give these Microsoft Office Christmas templates a try.

Lastly, be sure to check these beautiful Christmas live wallpapers and screensavers and maybe decorate your PC for this holiday season.

Have you ever used ChatGPT as an AI Christmas card generator? If not, this might be a perfect year to try it.

MW3 Reset Rank Error: How to Fix it

Any gamer will tell you how moving from one rank to another in MW3 gives you the thrill so you can understand why a reset rank error can be crippling. Not to worry though. WindowsReport experts experienced the same issue and we thought you’d like to know, it’s not that bad.

Why did my rank get reset in MW3?

Resetting a rank is when you lose all of your progress in a Call of Duty game. It could be that you’ve been found guilty of cheating or using an exploit. However, in this reset rank error in Modern Warfare 3, this happened after a Season 1 update so a corrupt update is the most likely culprit.

It could also be a glitch in the game’s database which causes it to think that you have hit your max level and are locked out of any further progression.

How do I fix the MW3 reset rank error?

If you’re getting this error, try these preliminary steps:

  • Verify that the server status is active.
  • Try resetting your console’s network settings by holding down the power button for 5 seconds until the console shuts down completely then turn it back on again and try to connect again.

1. Click Yes on the prompt

Whenever you get a Niamey Logan error saying You must reset your rank and unlock to continue, you can be a bit skeptical about pressing any prompts. After all, the message does say your rank will be reset.

Well, we tried it, and lucky for you, when you press Yes, you will not lose any game progress. The error message simply indicates your game files had issues when downloading and ended up being corrupt.

Note that you may lose some of your saved builds, loadouts, and blueprints but on the bright side, at least your rank will remain.

2. Update your Xbox console

  1. Press the Xbox button on your console and click on your account icon to open Settings.
  2. Click on Devices and connections.
  3. Select Accessories.
  4. Click on your Xbox controller and select Update now and restart once it is finished.

3. Clear system cache 

  1. Press the Guide button on your controller.
  2. Navigate to Settings and select System Settings.
  3. Click on Storage.
  4. Highlight a storage device then press the Y button on your controller to open Device Options.
  5. Click on Clear System Cache under Device Options screen.
  6. Click Yes when the confirm storage device maintenance prompt pops up.

4. Verify the integrity of game files

  1. Press the Windows key, type steam, and click Open.Steam Open -directx error mw3
  2. Go to Library, locate the game, right-click it, and choose Properties.lIBRARY - pROPERTIES
  3. Click the Installed files option from the left pane, and click the Verify integrity of game files.steamwebhelper_Verify integrity of game files
  4. Once done, the files would be repaired if found corrupted.

Verifying the game files can also help you fix the MW3 different version error and Dev Error 12744; read this guide to learn more about the issue.

5. Reset your Xbox console

  1. On your controller, press the Xbox button, and on the menu, click the System tab to open Settings.
  2. Select System, then click on Console info and hit Reset console.
  3. Choose Reset and keep my games & apps.

Tips to avoid your rank from being reset in Modern Warfare

  • Avoid using hacks, glitches, or mods, and do not play on a private server because these tools can get your account banned permanently or temporarily.
  • Do not play on accounts that are banned from playing on your main account.
  • Play as often as possible. The higher the number of games played, the less likely it is that your rank will be reset.
  • Avoid installing updates immediately after they’re released. Wait for a while for some feedback from other players on community forums to gauge its performance.

Unfortunately, launch errors in MW3 are quite common so you just need to deal with them as and when they appear. Sometimes, MW2 may even uninstall itself but like we said, it’s nothing you can’t handle.

Hopefully, the methods we have discussed above will help you to fix the Modern Warfare 3 reset rank error problem and get you back into your game without any further interruptions.

That’s it. If you have any other unmentioned tricks for this error, please leave a comment as you can help out someone else who is stuck.

How to Disable Handsfree Audio on Windows 11

If you’re not using the Handsfree Audio feature in Windows 11, you can disable it, and in this guide, we’ll explain how.

Handsfree Telephony allows Windows to effectively manage the phone call functionality of audio devices connected via Bluetooth. The feature splits the sound profile into two, significantly affecting the audio playback.

Follow the steps below to quickly turn it off:

How can I disable hands-free telephony in Windows 11?

Tip icon Tip
Turning off hands-free telephony will outright disable the ability of the device to function as a microphone. You won’t be able to access that functionality anymore.

1. Disable for individual devices

  1. Press Windows + I to open Settings, go to Bluetooth & devices from the navigation pane, and then click on Devices.devices
  2. Scroll down to the bottom and click on More devices and printer settings.
  3. Right-click on the affected audio device, and select Properties.properties
  4. Go to the Services tab, wait for the options to appear, and then uncheck the Handsfree Telephony entry.uncheck to disable handsfree telephony in windows 11
  5. Click Apply and OK to save the changes.

2. Disable permanently for all devices

  1. Press Windows + R to open Run, type services.msc in the text field, and hit Enter.services
  2. Locate the Bluetooth Audio Gateway Service, right-click on it, and select Properties.properties
  3. Select Disabled from the Startup type dropdown menu, and click the Stop button under Service status.disable handsfree telephony in windows 11
  4. Once done, click Apply and OK to save the changes.

When you disable the Bluetooth Audio Gateway Service, all the connected devices lose their hands-free telephony functionality at once in Windows.

Also, after disabling the service, you may find devices such as AirPods disconnecting from the PC.

What can I do if handsfree telephony keeps turning back on?

  • Disable the Hands-Free driver: Open the device properties via Control Panel > go to the Hardware tab > select Hands-Free or Hands-Free AG option > click Properties > click on Change settings > head to the Driver tab > click the Disable Device button.disable device
  • Update the Bluetooth drivers.
  • Re-connect to the device: Go to Devices in Settings > click the ellipsis next to the audio device > select Remove device > click on Add device > choose Bluetooth > select the device you removed > follow the on-screen instructions to complete the process.add device

These are all the ways you can permanently disable handsfree telephony in Windows 11 and fix things if it keeps turning back on. This even helps if headphones are not working on Zoom.

Remember, the feature could be necessary for some and, at the same time, troublesome for others. In case you face issues with the audio device afterwards, re-enable hands-free telephony.

Before you leave, discover some quick tips to improve the sound quality in Windows 11!

For any queries or to share the problem you were facing, drop a comment below.

Free Zoom Christmas Backgrounds: Best Holiday Images & How to Add Them

If you want to bring festive cheer to your meetings, there’s nothing better than fitting some Zoom Christmas backgrounds.

In this article, you will learn how to set up a Zoom Christmas background and the best places to get interesting and festive images.

What are the best Zoom Christmas backgrounds?

1. The Bash Zoom Christmas Backgrounds – Best choice

The Bash probably has the best selection of Zoom Christmas backgrounds you may find online.

They are high-rez, hand-picked, and ready with download links for the Zoom Desktop app (1920×1080 pixels) or the Zoom mobile app (756×1008 pixels).

You will find 85 beautiful holiday images. The only downside is the watermark from the bottom right corner of the pictures.

⇒ Get The Bash Zoom Christmas Backgrounds

2. Christmas Zoom virtual background templates – Customizable

Canva offers 224 customizable Zoom Christmas templates that you can edit and change as you please in the dedicated editor, even with a free account.

Many of them are free, and some even have moving elements that can be fun for everybody in a meeting.

Besides, you can add your images and personalize them into unique creations.

⇒ Get Christmas Zoom virtual background templates

3. Popsugar Christmas Zoom Backgrounds – Funny and free

A cap popping its head from a Christmas tree is only one of the 20 selected holiday images by Popsugar.

It’s a cute set of high-rez images with links to free sources like Unsplash and Pexels, and they are free to download and use.

One of those will probably the right choice for your Zoom virtual background in any call.

⇒ Get Popsugar Christmas Zoom Backgrounds

4. Pixabay Christmas Backgrounds – Almost 8000 free images

Pixabay is a huge source of free backgrounds for Zoom, Teams, or your Windows desktop.

Only the Christmas selection has almost 8000 images you may download for free.

The only downside is that they are not formatted, especially for Zoom, so you might want to crop or resize them to be 1920×1080 pixels, which is ideal for the meeting app. Here’s our list of the best image-resizing apps in case you need one.

⇒ Get Pixabay Christmas Backgrounds

5. Unsplash Christmas Backgrounds – Over 900 festive images

You will find another huge selection of Christmas backgrounds on Unsplash. They have over 900 holiday images free to download, so you will definitely get a few that you like.

However, like in the case of Pixabay, you will need to resize or crop the images to fit the Zoom background.

There are a lot of funny Zoom Christmas backgrounds in the mix if you have the time to browse through the whole lot.

⇒ Get Unsplash Christmas Backgrounds

How do you put a Zoom background on Christmas?

  1. Open the Zoom desktop app and start a video meeting.
  2. Now, click on the arrow next to the Video icon and select Choose Virtual Background.
  3. Click on the + button and select Add Image.
  4. Locate the Zoom Christmas background on your computer and click Open, and it will be added automatically.

As you might have noticed, you may also add Zoom video filters and videos to your background.

The easiest way to add Zoom virtual backgrounds is to go to the Zoom App Marketplace and download the Video Backgrounds app.

After that, go to Apps and select Virtual Backgrounds. There, you can search for Christmas and find a lot of free holiday-themed Zoom backgrounds from Pexels.

How do I generate a Zoom Christmas background using AI?

There are a lot of image generator apps right now, so if you’re not happy with any of the images from the sources above, you can create your own Zoom Christmas background.

For instance, we have asked ChatGPT 4 to create a 1920×1080 pixels Christmas background for Zoom and include a cat.

There is no limit on how you may personalize and customize your images, and you can even include some of your photos. We have a list of the best AI art generator software you may use to create any such background.

So, that was our selection of holiday Zoom backgrounds, and we also explained how you can set them up and generate your own.

If you need more inspiration, you can check our Microsoft Teams Christmas background list. The images have the same recommended resolution, so they will work seamlessly for Zoom.

We also have amazing Christmas backgrounds for Google Meet if you prefer using it instead.

Did you find what you needed? Let us know in the comments section below and spread the holiday cheer.

How to Disable & Remove HP Wolf Security on Windows 11

HP devices often come with preinstalled security software, and many are wondering how to disable HP Wolf Security on Windows 11. The reason for this is that this software can cause certain issues and come into conflict with other applications, so today we’ll show you how to disable it.

This is a legitimate application from HP, but it often comes preinstalled and causes performance issues and conflicts with other security software, and this is why many consider it bloatware.

How can I disable HP Wolf Security on Windows 11?

1. Use the system tray icon

  1. In the system tray, locate the HP Wolf Security icon and right-click it.
  2. Now choose Disable HP Sure Click.
  3. The software should be now disabled.

2. Use the desktop application

  1. Click on the HP Wolf Security tray icon and select Open Desktop Console.
     
  2. After that, click the Disable button.
  3. The software will now be disabled.

3. Use the command line

  1. Press the Windows key + S and type cmd. Choose Run as administrator.
    CMD elevated - Privacy error on Roblox
  2. Run the following commands:
    cd %brs%
    brmanage vSentry disable
  3. HP Wolf Security will now stop.
  4. Alternatively, use the following command to perform a hard disable: brmanage vsentry system-disable

How do I remove HP Wolf Security from Windows 11?

  1. Press the Windows key + X and choose Apps & features.
  2. Locate HP Wolf Security on the list. Click the three dots next to it and choose Uninstall.
  3. Follow the instructions on the screen to complete the process.

Do I need an antivirus if I have HP Wolf Security?

According to HP, no additional antivirus is required if you’re using Wolf Security. Using another antivirus alongside it can cause conflicts and performance issues.

As you can see, it’s easy to Disable HP Wolf Security on Windows 11, and you can do it right from the application settings. For a more permanent solution, you might want to consider removing the software.

This isn’t the only HP software that is causing problems and many users also want to disable HP Support Assistant. Some users want to go a step further and uninstall HP Support Assistant entirely.

A few users also had to uninstall HP Print and Scan Doctor to fix the problems on their PCs, so as you can see, it’s not uncommon for HP software to cause issues.

What method did you use to remove this software? Let us know in the comments.

Fix: Nintendo Switch Error Code 2122-2503

Many users have complained about encountering error code 2122-2503 while playing their favorite game on Nintendo Switch.

In this guide, we will talk about the reasons for this error and offer WR experts recommended solutions to fix the issue so that you can enjoy the gaming session without interruption.

What causes error code 2122-2503?

  • Unstable internet connection.
  • The server is down due to maintenance or technical issues.

How do I fix error code 2122-2503 on Nintendo Switch?

Before moving to the detailed troubleshooting steps to fix this connection error, make sure you go through these preliminary checks:

  • Check the network status. If it is down, wait for a while before trying again; it could be a few hours to a day.
  • Power off your console, unplug the router, wait for a few seconds, then plug it back in. Let the router restart, then turn on the console and try connecting to the internet. This also helps with connection issues in Splatoon 3.

1. Add the Wi-Fi network connection again

  1. Open System settings on your console.System settings Nintendo Switch Error Code 2122-2503
  2. Locate and select Internet.Internet
  3. Click Internet Settings, then select View available networks.
  4. Choose your Wi-Fi network and click Change Settings.
  5. Scroll down and select Delete Settings.
  6. Follow the prompt to confirm the action.

Now go to the available networks, select the Wi-Fi network, and enter the credentials to establish the connection.

2. Update the firmware

  1. Go to the System Settings option from the main menu.System settings Nintendo Switch Error Code 2122-2503
  2. Next, select the System tab.
  3. Under System, select System Update and follow the on-screen steps to complete the process.System Update - Nintendo Switch Error Code 2122-2503

3. Reset your router

Note icon NOTE
These steps will erase the personalized Wi-Fi settings, including your Wi-Fi name and password or even the internet plan you have subscribed to. So, follow these steps only if you know how to configure the router.
  1. Ensure your router is plugged in, then look for a reset button. Usually, it is a small hole either at the back, where all the ports are, or at the bottom.
  2. Take a paperclip or pin and insert it in the hole to hold the Reset button for about 30 seconds.Reset router - paper clip -Nintendo Switch Error Code 2122-2503
  3. Release the button and wait for the router to turn back on.

Once done, the router will be as good as new. Now configure it, then try using the internet on your Nintendo Switch to check if it works.

Resetting a router can be a great help if you can’t connect to it on your devices, including Windows 10 computers.

4. Contact the Nintendo support team

If, even after several hours of wait, a smooth internet connection, and updated firmware, you are stuck with error code 2122-2503 on Nintendo Switch, we recommend you contact customer support.

Explain to them the issue, how it occurred, and what steps you took; all these details will help them understand it better.

Remember that this error code usually occurs when the server or network status is down due to technical issues or maintenance; however, if everything is working on the server’s end, the problem could be your network.

The first step would be to wait for the server to come online; if that happens and you are still facing the issue, refresh your internet or talk to your internet service provider.

While you wait for the server or the network to come up, you can check out the Nintendo Switch emulators for PC and start playing your favorite games on your computer.

Besides, if you don’t want to download an emulator, you can play Nintendo Switch games online; check out how.

Another common error is Nintendo eShop not available in region and we have a special guide to help you fix it.

Did we miss a step that helped you? Don’t hesitate to mention it in the comments section below. We will happily add it to the list.

GeForce NOW Error Code 0x800B0000 [Solved]

The GeForce NOW app recently threw the error code 0x800B0000 when trying to launch any game. The error message read, There was a problem connecting to GeForce NOW.

Apparently, the error was limited to the Windows and MacOS apps, while the website worked fine during the period.

What is the GeForce NOW error code 0x800B0000?

0x800B0000 is a network error that affects users worldwide, with no possible solutions in sight. Relaunching the app, changing the network configuration, switching to Ethernet, or re-logging in didn’t yield any results.

How do I fix the GeForce NOW error code 0x800B0000?

Before we start with the slightly complex solutions, try these quick ones:

1. Use a VPN

Your primary approach when faced with the GeForce NOW Error Code: 0x800B0000 should be to use a reliable VPN solution.

It will help bypass geo-based restrictions and eliminate local server issues, in addition to providing a safer gaming experience without throttled speed.

A powerful VPN such as ExpressVPN can handle this task easily. This tool is perfect for gaming due to its incredible connection speeds and large number of servers, spread all over the world. Also, you can use this VPN to secure all your internet traffic, making it untrackable.

ExpressVPN

Enjoy your favorite games without any errors with this powerful VPN solution.
Check Price Visit Website

2. Change the DNS server

  1. Press Windows + R to open Run, type ncpa.cpl in the text field, and hit Enter.ncpa.cpl
  2. Right-click on the active network adapter, and select Properties from the context menu.properties
  3. Select Internet Protocol Version 4 (TCP/IPv4), and click on the Properties button.properties
  4. Choose Use the following DNS server addresses and enter the following in the fields underneath:
    • Preferred DNS server: 8.8.8.8
    • Alternate DNS server: 8.8.4.4change dns to fix GeForce NOW Error Code 0x800B0000
  5. Click OK to save the changes.

We choose Google’s DNS address, but for higher speed, you can choose the fastest DNS server near you, as long as the error doesn’t appear again.

3. Contact GeForce NOW support

When nothing else works, you should contact the GeForce NOW support. If it’s a server-based issue, they will provide a timeline as to when things will be up and running.

For localized problems at your end, the support team should share a series of fixes, one of which would work.

These are all the ways you can resolve the GeForce NOW Error Code: 0x800B0000 in no time. Remember, for server issues, you will have to wait until a fix is implemented by the developers. It usually takes only a few hours, or at max, a day.

Before you leave, find out how to optimize the PC for gaming and get the best performance out of it!

For any queries or to share more solutions with us, drop a comment below.

Fix: Can’t Connect Two DualShock Controllers to PC

If you can’t connect two DualShock Controllers to your PC, it can frustrate you, but don’t worry, this guide can help!

We will point out the probable causes and offer effective solutions tested by WR experts to fix this connectivity issue.

Why can’t I connect 2 DualShock controllers to a PC?

  • Bluetooth limitations or outdated driver.
  • Incompatible with your computer or third-party software interference.
  • Outdated firmware of controller.

How do I fix the can’t connect 2 DualShock controllers to a PC issue?

Before proceeding to detailed steps to fix can’t connect 2 DualShock controllers to a PC, go through the following preliminary checks:

  • Ensure your computer’s Bluetooth adapter supports connecting multiple devices simultaneously, and check if the USB ports are working properly.
  • Disconnect other Bluetooth devices from the PC, then turn off the Bluetooth of nearby devices and disable third-party software for other controllers temporarily (if applicable)
  • Make sure you have a micro-USB cable for the PS4 controller and a USB-C to USB-A cable for the PS5 controller.

1. Reset your controllers

  1. Turn off the controller, flip them over, and locate the Reset button (tiny hole) next to the L2 button.
  2. Take a pin or paperclip and insert it in the reset hole, then press & hold the Reset button for approximately 5 seconds.Reset - Can't Connect Two DualShock Controllers to PC
  3. Once done, connect the DualShock controller to your computer via a USB cable.
  4. Once connected, press the PlayStation or PS button to pair it wirelessly.PlayStation - Can't Connect Two DualShock Controllers to PC

Repeat the same process with the other controller to successfully reset it.

2. Update your drivers & clear the USB connectivity issues

  1. Press Windows + R to open the Run window.Device Manager Run command - Can't Connect Two DualShock Controllers to PC
  2. Type devmgmt.msc and click OK to open the Device Manager app.
  3. Locate and click Bluetooth to expand it.
  4. Right-click the driver and select Update driver from the context menu.Update driver
  5. Click Search automatically for drivers.Update driver 2 -Can't Connect Two DualShock Controllers to PC
  6. Follow the on-screen instructions to complete the process.

Installing correct and updated drivers can also help you prevent audio driver issues while using PS4 controllers; read this to learn more.

Next, to clear out USB connectivity issues, follow these steps:

  1. Go to the View tab and select Show hidden devices.Show hidden devices -Can't Connect Two DualShock Controllers to PC
  2. Next, locate Universal Serial Bus controllers and click it to expand.
  3. Locate all the greyed devices one by one and select Uninstall device for each to remove so that your PC gets a cleaner environment to identify and configure the DualShock controller.Uninstall device
  4. Reboot your computer to let the changes take effect.

3. Check the Bluetooth settings on your PC

  1. Press Windows + I to open the Settings app.
  2. Go to Bluetooth & devices and click Devices.Bluetooth & devices - Can't Connect Two DualShock Controllers to PC
  3. Next, check the list under Input to ensure enough slots are available to connect the controllers.

Usually, for PCs and laptops, the maximum number of Bluetooth devices that can be connected simultaneously is 7. However, depending on the manufacturer, it could be restricted to 3 or 4.

4. Update DualShock 4 controller firmware

  1. Connect a DualShock 4 controller to your computer using a USB cable.
  2. Download the DS4Windows on your computer from the official website. Double-click the file to install the software.
  3. Launch the software, then go to the Settings tab and click the Check for Update Now.DS4WindowsSettings tab and click the Check for Update Now.
  4. If there is an update available, click it to initiate the process, then follow the on-screen instructions to complete it.

Make sure the controller stays connected to the PC throughout the process, and disconnect the controller. Repeat the same steps for the other controller as well.

5. Use the DS4Windows tool to establish the connection

  1. First, download and install  .NET 8.0 Desktop Runtime.
  2. Next, download the DS4Windows x64 zip file from its GitHub page.DS4Windows -an't Connect Two DualShock Controllers to PC
  3. If you get a prompt to install .NET runtime, click Yes to proceed.install .NET runtime
  4. On the Choose Components window, select Full and click to choose what features you want to install, and click Next.Choose Components
  5. Click Install.Install
  6. On the ViGEm Bus Driver Setup Wizard, click Next and follow the onscreen instructions to complete the process.
  7. On the HidHide Setup wizard, click Next and follow the prompts to install it.
  8. Once all the components are installed, click Yes to reboot your computer. Make sure you save your work before doing so.click Yes to reboot your computer
  9. Once your computer restarts, right-click DS4Windows, then select Run as administrator to launch it.
  10. Choose DS4 Device Support and click Close. You can also choose other options if you use other controllers.

Now that DS4Windows is configured, follow these steps to connect DualShock controllers to your PC:

  1. Connect your controller to your computer via a USB cable.
  2. Go to the Controllers tab; you will see the controller listed.DS4Windows Can't Connect Two DualShock Controllers to PC
  3. Once it shows up, connect another controller and check if it is listed.

You can also go to the Profiles tab, click Default profile, or create a new one, then configure settings the way you want your controller to work.

However, usually, you don’t have to tweak any settings as most games work fine with the default settings if you have set up the software correctly.

6. Use Steam

Note icon NOTE
This workaround is fruitful for those who have most games on Steam. Also, if you are using DS4Windows, disable it for the time being.
  1. Connect your controller to your PC using the micro USB lead.
  2. Press the Windows key, type steam, and click Open.Steam Open -Can't Connect Two DualShock Controllers to PC
  3. Click Steam from the top left corner, then choose Settings.Steam Settings
  4. On the Steam Settings page, go to the Controller option on the left pane.
  5. Locate Controller Settings.Controller Settings.
  6. Place a checkmark next to PlayStation Configuration Support.PlayStation Configuration Support.
  7. Name the controller, and adjust the settings, then click Submit.controller, and adjust the settings, then click Submit

Repeat the steps for the other controller, and you will see it in the list as well.

So, to connect both DualShock controllers successfully to your PC, ensure the Bluetooth driver is updated and remove unwanted Bluetooth devices from the list.

You can also try resetting the controller, updating its firmware or using DS4Windows to seamlessly connect it to your PC.

If the DS4Windows is not working on your computer, we have a detailed guide for you explaining the causes and solutions.

Additionally, you can use Steam settings to connect the controllers to your PC but remember to disable the DS4Windows tool before that. However, it will only work for games on Steam.

Did we miss a step that helped you? Don’t hesitate to mention it in the comments section below. We will happily add it to the list.

Best Microsoft Teams Christmas Party Ideas in 2023

As working remotely is the new normal, celebrating holidays and sharing festivity with your team is a tough task.

However, you can throw a virtual party; we have compiled some of the best Microsoft Teams Christmas party ideas to help you organize a fun virtual event before holidays.

What are the best Microsoft Teams Christmas Party Ideas?

1. Festive attire

Festive attire

The holiday season is fun, and dressing up is a part of it. It doesn’t matter if you can’t step out for an office party this Christmas.

You can ask your team to follow a certain dress code to jazz things up in the Microsoft Teams meeting room.

Before deciding on the dress code, you can always take the opinions of people to make it feasible so that everyone can participate, making it a success.

2. Foods and drinks

Food - Microsoft teams Christmas party ideas

If you are feeling extra festive, you can send your team members an interesting recipe for food, mocktail, or cocktail in advance and ask them to get the ingredients ready before the party.

At the time of the meeting, you can ask them to follow the recipe to make a special meal together over a video call on Microsoft Teams and turn it into an activity.

3. Christmas Quizzes 

 Multiple Christmas quiz ideas

You can prepare a funny set of questions and answers to make quizzes of your own, and it could be a fun way to interact with your team members.

Here are some great Christmas quiz ideas that you can use on Microsoft Teams, along with the detailed steps to make interactive quizzes on the app; read this guide to know more.

4. Photo booth

Photo booth -Microsoft teams Christmas party ideas

Ask your team to go on a treasure hunt in their home or office to find props – their daughter’s tiara, sunglasses, or whatever they think is fun and cool.

Once they have the props, ask them to pose, then take screenshots to share on Microsoft Teams to memorialize the moment.

You can ask them to use Snap Camera & its festive lenses for digital photo booths. They can also use stickers, text, and other things to enhance the holiday spirit in their virtual photos.

For a symmetrical look, you can ask them to choose the same custom background or the winter wonderland Together mode scene from Microsoft Teams.

5. Break into small groups

Break into small groups

Parties are a great way to meet people outside your team. Have you ever thought that virtual parties could do the same for you?

You can use the Breakout Rooms feature in Microsoft Teams to divide them into smaller groups so that people can interact and get to know each other.

Additionally, you can divide the team into 3 or 4 and suggest that they create a funny and interesting presentation and put a timer. Then, ask the teams to present the slides, and the best presentation wins. This could be like your virtual PowerPoint party.

6. Games

Games -Microsoft teams Christmas party ideas

There are plenty of party games available online, which you can play easily with your team members via Microsoft Teams’ screen-sharing feature.

You can go to the Kahoot website for learning games, check out games like Blather Round, Champ’d Up, and Role Models on Jackbox Games, or check out the list of Christmas games we curated.

7. Use White Elephant for gift exchange

What is a Christmas office party with Secret Santa, right? But it is not the only way to exchange gifts with your colleagues; there are other choices like White Elephant Online.

It allows you to buy a wild and quirky gift for your teammates & even steal gifts from them without even leaving your house.

You can play it remotely by asking team members to upload an item’s image that you want to gift someone, then ask them to open and steal gifts.

So, at the end of the game, every team member will know what they won, and the gifts can be shipped to their addresses.

8. Watch a movie

Watch a movie

Create a poll and suggest some Christmas classics or the new ones coming this season to decide on a movie you could watch with your team. If you want to look for options to add, take a look at the list of Christmas movies we have curated.

You can use apps like Teleparty, sync your screens, and send messages in the live chat box. You can even start with a conversation, then play a movie and wrap this party by asking about holiday plans from teammates.

9. An online charity drive party

Christmas is the time to spread happiness, share love, and be charitable. You can throw a virtual party, engage people in games, and encourage everyone to donate to the less fortunate.

You can choose an organization or orphanage yourselves or ask your team members to donate things or money to their nearest health centres, orphanages, or animal shelters.

10. Guess the Christmas tune

Another fun activity that you can try is to host a meeting, split people into smaller groups, play some famous Christmas tunes, and ask people to guess the song time.

The team that gets the most names correct is the winner, and offer them some themed prizes like earphones, a subscription to Spotify, etc.

Tips to make the virtual Christmas party merrier

  • Use Together mode -Transport your team to a coffee shop, classroom, conference room, etc, to make the holiday party more interesting. All you need to do is in a meeting, choose Together mode, then click the small pencil to select a scene.
  • Custom backgrounds – You can ask all the team members to select a holiday-themed custom background for video calls and meetings.
  • Breakout rooms – Just like a party, where a group of people interact with each other, you can divide the meeting into sub-groups to facilitate discussions using Breakout rooms.

If you are looking for holiday special custom backgrounds, you can go to the Microsoft webpage or read this guide to learn about others .

From interactive games to themed activities, these tips can help you boost team spirit and infuse the joy of the season into your online gatherings.

We have an incredible list of Christmas live wallpapers and screensavers for Windows; we suggest you take a look.

As the holiday spirit is already in the air, why not bring it to your documents with amazing Christmas templates for Microsoft Office?

What do you think about the Microsoft Teams Christmas party ideas? Tell us if you have other fun ideas to make the office Christmas party unforgettable.

15 Microsoft Office Christmas Fonts to Keep You in The Holiday Spirit (Word, Powerpoint & More)

We’re here to help you find the list of Christmas-themes fonts for Office applications from Microsoft. It’s not just about conveying a message, it’s about spreading cheer and making a lasting experience.

What is the best Christmas font on Word?

1. Old English Text MT – Vintage style cheer

Word’s preinstalled fonts include several variations on festive letters and Old English text is one you may want to get into.

Old English Text is a font that looks like it was written by hand. It has very thin lines and has a very old look to it. The font has a very cool feel to it, which makes it perfect for any project where you want to make a lasting statement.

It’s very traditional and has a vintage and antique feel that makes it perfect for this time of year if you’re in your feels and want to go back in time.

⇒ Get Old English Text MT

2. Harrington – New generation font

Harrington is a modern font with a classic touch. It is a charming font that adds a personal touch to your designs. It is a clean, simple, and friendly font that is not only great for invitations and cards, but for more personal messages.

You can also go the extra mile and use it for graphic design projects, logos, posters, flyers, t-shirts, labels, and more. It’s the classic look-good-without-trying-too-hard.

⇒ Get Harrington

3. Beyond Wonderland – Gothic style with a touch of elegance

The font you choose to use on your Christmas cards can make a big difference in the overall look and feel, so it’s important to pick the right one.

If you’re looking for a font that isn’t too busy and over-the-top, Beyond Wonderland is a great option. This font is beautiful and elegant, with a touch of gothic flair.

The upper-case letters have an embellished appearance, while the lower-case letters have more of a traditional style.

You can use it to create logos, invitations, greeting cards, and other designs that require a touch of elegance.

4. Ink Draft – Personalized font

Ink Draft is a free font that mimics the look and feel of ink on paper. It’s the perfect modern and minimalist font that’s perfect for any kind of design.

If you’re looking for a handwriting font, Ink Draft is one of the best options available. It comes with a set of beautiful swashes, which can help you create an elegant and contemporary look in your designs.

This is a great way to create the illusion of personal messages because handwritten messages create that sentimental effect.

⇒ Get Ink Draft

5. Cool Santa font – Over-the-top font

This font is a good choice for the festive season because it has all the Christmas attributes. It has some snowflakes, some bells, and some presents. Santa’s font looks great on Christmas cards, posters, flyers, logos, and any other design you want to add a little Christmas cheer to.

If you’re looking for a way to usher in the festive season and you’re not trying to be subtle about it, this is the one.

⇒ Get Cool Santa font

What is a good Christmas font on PowerPoint?

1. Kogles Script Typeface – Subtle sophistication

The Kogles Script Typeface is a beautiful font that is perfect for any project that requires a sophisticated look.

It is a bold and modern script font that’s perfect for your Christmas designs. With its unique characters and some extra swashes, it’s great for headlines and logos.

The font comes with uppercase and lowercase letters, numbers, punctuation marks and ligatures. It can be used for both personal and commercial projects, but it must be purchased before being used in any way.

⇒ Get Kogles Script Typeface

2. Christmas Nordic – Scandinavian style

Christmas Nordic is a beautiful Christmas font that will add a warm festive feel to your document. The design of this font was inspired by the Scandinavian style.

It comes with uppercase letters, numbers, and symbols. It is perfect for adding a bit of sparkle to your work with its stylish, elegant letterforms and festive elements.

⇒ Get Christmas Nordic

3. Hunny Bummy – Cuteness in simplicity

Hunny Bummy is a fun font that will bring a smile to your face. It has a very simple design, which makes it perfect for use in any project.

There are no extra details or effects in this font; it’s just the letters themselves. However, anyone you send a message using this font will feel the love and cheer of the season. It’s not too much but it is definitely noticeable.

If you’re starting a new relationship or want to make someone feel that you’re thinking of them, this is the one.
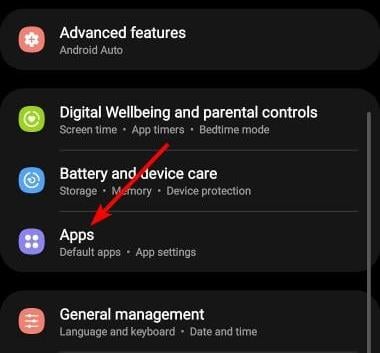
4. Jingle Bells – Retro style design

Christmas is a time for giving, and this Jingle Bells font is the perfect way to spread some holiday cheer. You can use it on your Christmas cards, or add it to your Christmas scrapbook pages.

Jingle Bells is a fun font that works well with vintage or retro designs. It’s bold, but not too heavy, so it looks great on its own.

It’s perfect for restaurants displaying new menus. You want your customers to be in the festive spirit but you also don’t want them too distracted to find what they’re looking for.

⇒ Get Jingle Bells

5. Hai Brush – Bold with a statement

Hai Brush is a modern brush script font with a hand-painted feel. It has a bold and dramatic look suitable for headings and large text.

The font has a modern, clean aesthetic with an old-fashioned feel. It’s been designed to be highly legible even at small sizes and works well in both all caps and lower case text.

Easy-to-read fonts like this one make good for sales so if you’re trying to make a quick buck this festive season, you know which font got your back.

What is the best Christmas font on Outlook?

1. Winterante – Handwritten goodness

Winterante is a fun holiday font that would be great for Christmas cards and other holiday projects. It has a handmade feel to it, but with a more modern look.

It’s a bit different from the usual Christmas fonts because it doesn’t have any snowflakes or trees or presents. If you’re looking for a Christmas font that’s not too over the top, Winterante is a great choice.

That’s why it’s perfect for Outlook because it’s been business all year round but you want to break the monotony.

⇒ Get Winterante

2. Chopin Script – Elegance and style

The Chopin Script font is easy to read, but it has a distinct cursive style that sets it apart from other common fonts. The font also has some swashes and flourishes which can add a touch of elegance to your Christmas cards.

It can be used for both informal and professional purposes. It’s a great choice if you want something elegant but not too formal.

3. Amelia Duo Script – Bring out the flair

Amelia Duo Script is an elegant, sophisticated typeface with a timeless quality. Its clean lines and delicate details make it well-suited for branding, wedding invitations, and greeting cards.

It has a lot of character compared to other cursive fonts but isn’t too fussy or hard to read. The Amelia Duo Script font works well in dark backgrounds to bring out the gorgeous details and decorations. It’s perfect for adding a little extra flair to your Christmas cards or gifts this year.

⇒ Get Amelia Duo Script

4. Berkshire Swash Font – Delicate in the curls

Berkshire Swash is a warm and friendly font family, with a swashy feel. It’s great for headlines, posters, logos, and more. It has a hand-drawn feel, with delicate curls that can be used to add an extra touch of style to your designs.

If you’re planning to throw an end-of-year party with great performances, this is the font to go for. It’s the perfect balance of warm, friendly, and subtle.

⇒ Get Berkshire Swash Font

5. Griffy Font – Versatile font

The Griffy font is a very popular font used in the Microsoft Office suite of products. It is a fun and friendly font for your Christmas cards, letters, and emails.

It has a retro feel and looks like a classic pen and ink style but oozes simplicity and elegance. This makes it versatile and would look great in any design, especially if you want to create a holiday card or something like that.

⇒ Get Griffy Font

How do I add fonts to Microsoft Office apps?

You can get locally available fonts by opening any Office app, clicking on the font menu, and clicking Download on any font of your choice. Alternatively, if you’d like more variety, the Microsoft Store comes equipped with lots of fonts you’ll be spoilt for choice.

If you don’t see what you want in Word’s built-in fonts, there are plenty of other options available online. A quick Google search will turn up dozens of sites offering free Christmas-themed fonts for download. All you have to do is download them and add them to your fonts folder.
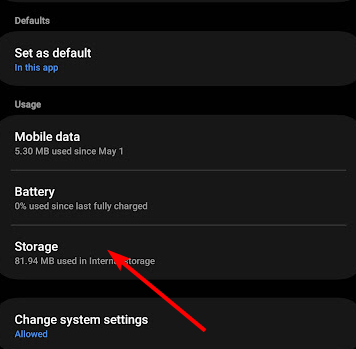
We’ve provided a rich list of amazing fonts for this festive season but if you feel none is up to par, you can always create your own fonts. This way, you have the liberty to tweak it to your liking. After all, it’s the thought that counts at the end of the day.

Whether you’re looking for a font to add to your holiday Christmas cards or work emails, you should have no shortage of options with these 15 Microsoft Christmas fonts. And when you add page borders, it creates an even more thought-out gift of the season.

Finally, it’s not Christmas without some music so here are our top Christmas songs we think would make a great addition to your music library.

We hope we’ve managed to inspire you to incorporate fonts and design into your life this festive season. As this list is not exhaustive, we’d like to hear about your fonts. What artsy designs have you celebrating this season in cheer? Let us know in the comment section below.

Best Google Meet Christmas Backgrounds & Where to Get Them

The festive season is just around the corner, and for people stuck working, joining video calls, Google Meet Christmas backgrounds will surely cheer up the mood!

And given that you can choose from thousands of curated Christmas backgrounds or even create one in no time, things aren’t as difficult as you would imagine. So let’s get straight to it!

What are the best Google Meet Christmas backgrounds?

1. Pixabay – Choose from over 7,000+ images

Pixabay has become synonymous with free images. It’s got one for every season and needs!

For Christmas backgrounds, you can choose any of the thousands of images available on the website, download them in no time without registration, and make your Google Meet calls livelier than ever.

The Pixabay collection comprises a background of the moon and stars, Santa, the Christmas tree, gifts, decorations, and much more!

⇒ Get Pixabay Christmas backgrounds

2. Progressive Church Media – Backgrounds that speak

The Progressive Church Media has a curated collection of free Christmas backgrounds for Google Meet or any other video conferencing software.

The free backgrounds offered the Progressive Church Media consist of greetings, the Christmas tree, and stars, amongst others.

The free collection is somewhat limited, but you can always browse through the paid backgrounds. There are 200+ images to choose from!

⇒ Get Progressive Church Media Christmas backgrounds

3. Pexels – The biggest collection

The most diverse of all, Pexels is the only website you need to check to get the best Christmas backgrounds for Google Meet. There are over 10,000 free backgrounds available for download.

Be it lights and decorations, gifts, Churches, Christmas tree, snowfall, or a setting that demonstrates a festive mood, Pexels has got it all!

⇒ Get Pexels Christmas background

How do I set a Christmas background on Google Meet?

  1. While in the meeting, click the Apply visual effects icon.visual effects
  2. Under Backgrounds, click the Upload a background image option.upload google meet christmas background
  3. Now, locate the file that you want to add, select it, and click Open.apply google meet christmas background
  4. The selected Christmas background will apply immediately.

For Google Meet’s custom backgrounds, it’s best to use JPG, JPEG, or PNG formats, and the image resolution should ideally be 1920x1080p.

How do I create my own Google Meet Christmas background?

You can easily create custom Google Meet Christmas backgrounds in no time. Use ChatGPT 4 or Pixlr, amongst of range of other AI image generator tools.

Background image generated using Pixlr

AI-image generation is easy. Just describe the background you are looking for and it will automatically generate a captivating image in no time!

Now that you how to get the best Google Meet Christmas backgrounds, download a few and use a different one for every meeting. There’s no dearth of images, so why limit yourself!

And if you use other video conferencing apps as well, check the best Christmas backgrounds for Microsoft Teams.

For any queries or to share other sources that you prefer for festive backgrounds, drop a comment below.