How to Fix GlobalProtect Not Working on Hotspot: 5 Ways

GlobalProtect users may encounter challenges on a hotspot connection. They are limiting their ability to connect to their organization’s network or access critical resources.

The most common reasons GlobalProtect won’t work on a hotspot are network restrictions, incorrect VPN settings (like invalid server or certificate), firewall blocks, data limits causing slow connections, and device restrictions. For more on slow VPN issues, see slow corporate VPN performance.

This guide addresses the issue of GlobalProtect not working on a hotspot connection, exploring the possible causes behind this problem and providing effective solutions to help resolve it.

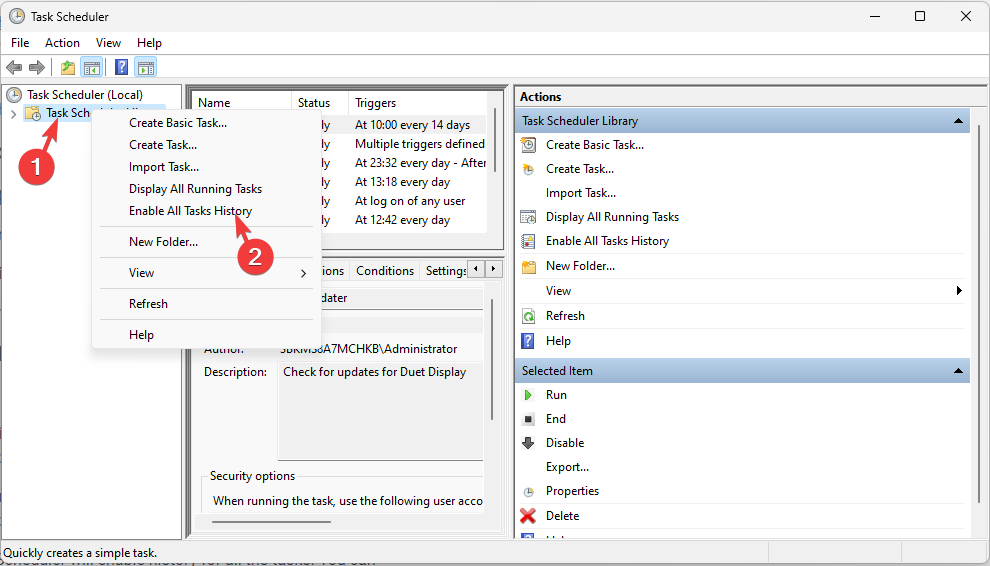
How to fix GlobalProtect not working on the hotspot?

1. Refresh the connection

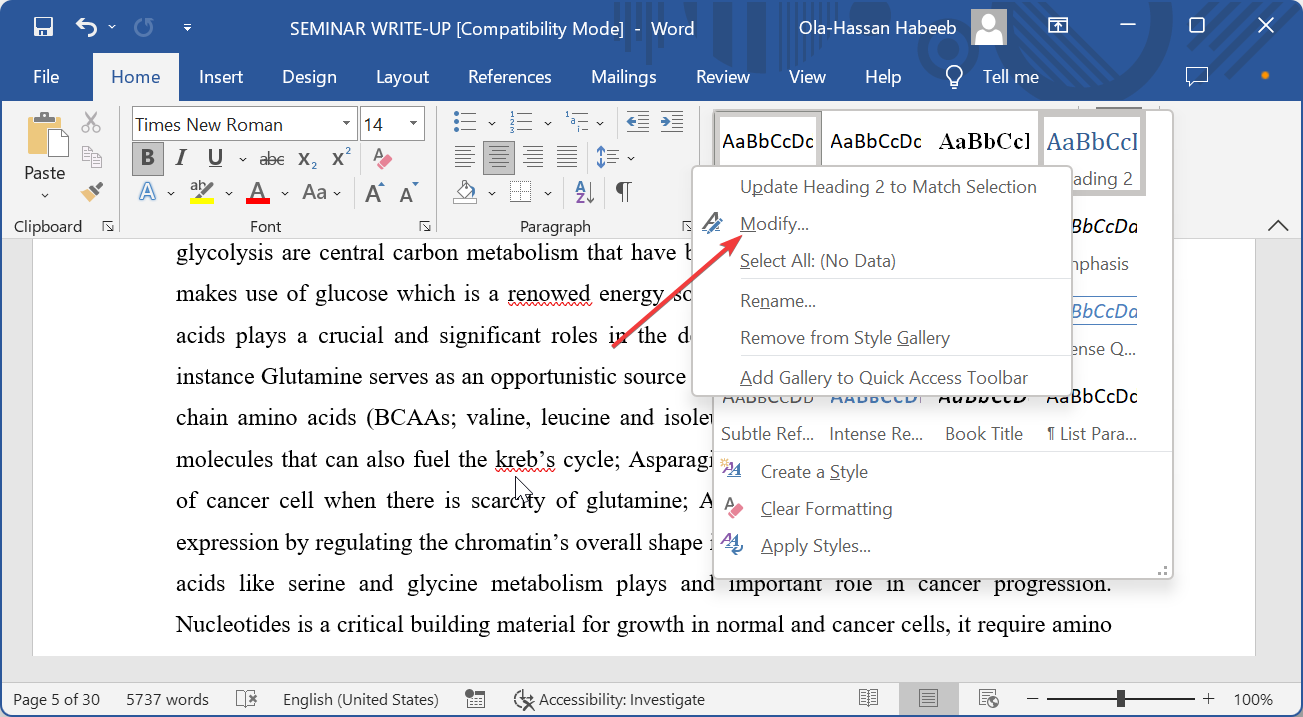
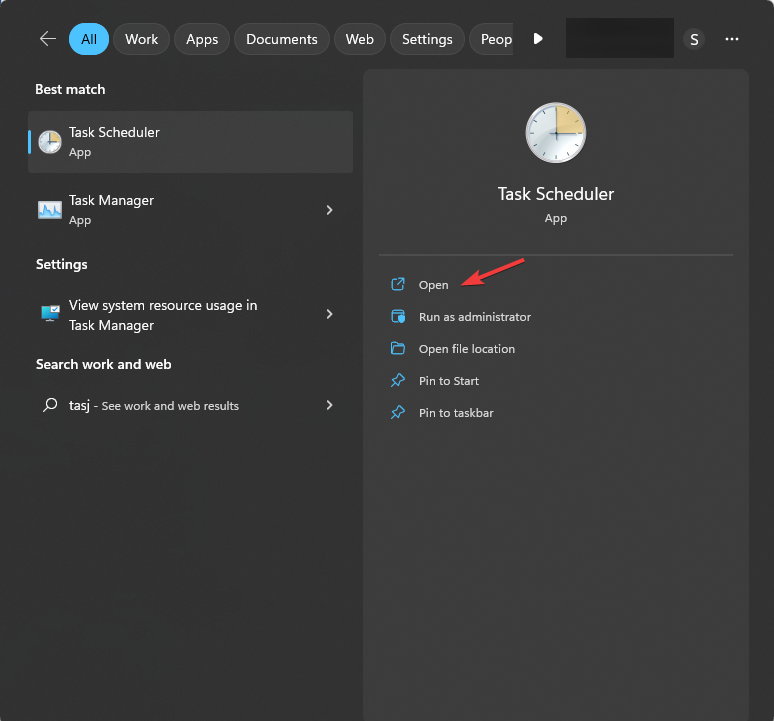
  1. Press the Windows key, type globalprotect, and click Open.
    Global Protect isn't working on hotspot
  2. Go to the three horizontal lines on the top right corner to open Settings and click on Refresh Connection.
    Refresh connection
  3. Click OK in the next window that pops up to confirm.
    Click OK

Now try to connect to the VPN to check if it works.

2. Disable Private DNS

  1. Go to the Settings app.
    Settings Globalprotect  isn't working on Hotspot
  2. Click Network or Connection & sharing, depending on your device.
  3. Tap More Connections settings.
    Connection and Sharing
  4. Locate and click Private DNS.
    Private DNS
  5. Click on Off to deactivate it.
    Private DNS off

This issue usually occurs when you try to connect using a mobile hotspot. Therefore, disabling Private DNS on your smartphone could work.

Once done, connect your computer via hotspot and try to use GlobalProtect.

3. Re-enable SIM on hotspot device

  1. Go to Settings on your hotspot device.
    Settings Globalprotect  isn't working on Hotspot
  2. Locate the Mobile network.
    Mobile network Globalprotect isn't working on hotspot
  3. Select the SIM which you are using for the hotspot.
    Click SIM
  4. Tap Enable to turn off, wait for some time, and tap it again to enable it.
    Disable SIM

Now close the Settings app and check if the VPN works now.

4. Change the MTU value

Note icon NOTE
Make sure you have a user account with admin privileges to perform the steps mentioned.
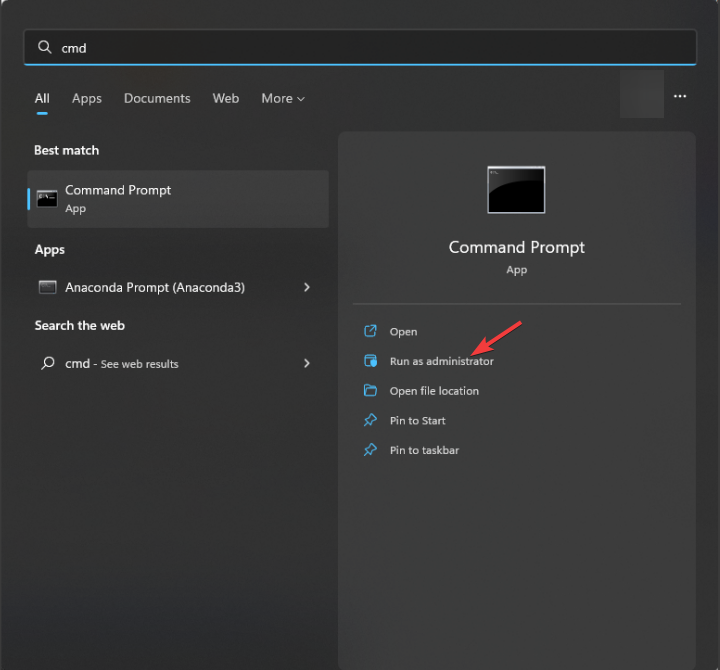
  1. Connect to the VPN, press the Windows key, type cmd, and click Run as administrator.
    CMD elevated GlobalProtect isn't working on hotspot

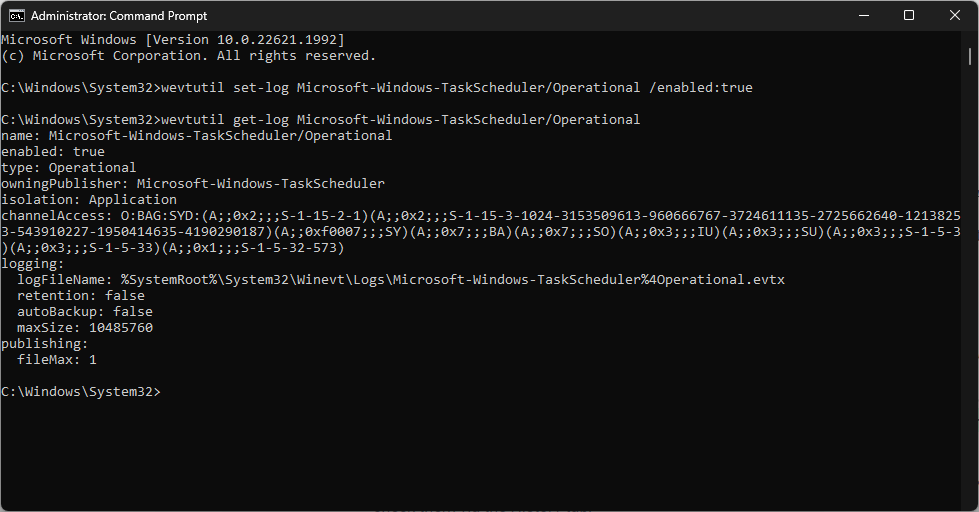
  2. Type the following to verify your virtual ethernet adapter interface and hit Enter: netsh interface ipv4 show subinterfaces
    cmd
  3. Copy & paste the following command to change Windows MTU size after replacing Ethernet 2 with whatever name your computer uses for the GlobalProtect virtual interface in ipconfig, and hit Enter: netsh int ipv4 set subinterface “Ethernet 2” mtu=1300 store=persistent
  4. Now restart the VPN connection, then check out some sites while connected to VPN.

5. Disable IPv6

  1. Press the Windows key, type powershell, and click Run as administrator.
    Powershell 2 Global Protect isn't working on hotspot
  2. Type the following to see the current state of IPv6 of your adapters, and hit Enter: get-netadapterbinding -componentid ms_tcpip6
  3. To turn off IPv6 on your hotspot device, copy & paste the following command by replacing Wi-Fi with your hotspot name and press Enter: disable-netadapterbinding -Name “Wi-Fi” -ComponentID ms_tcpip6
    powershell_
  4. Once you are done with the VPN, you can enable IPv6 if you want by typing the following command and replacing Wi-Fi with the hotspot name, then hit Enter: enable-netadapterbinding -Name “Wi-Fi” -ComponentID ms_tcpip6

Disabling IPv6 can help if your device hotspot connection doesn’t support IPv6. You might not be able to connect to the VPN.

So, these are the methods you can follow to fix GlobalProtect not working on hotspot. If nothing worked for you, we suggest you contact GlobalProtect customer support.

If you face other issues like GlobalProtect not connecting, we recommend you check out this guide to find the solutions.

If you’re having trouble with GlobalProtect not prompting for credentials or facing issues with it not updating properly, these problems are common but usually fixable. Check out our guides on GlobalProtect not prompting for credentials and GlobalProtect not updating for step-by-step solutions.

Please feel free to give us any information, tips, and your experience with the subject in the comments section below.

How to Convert M4A to MP3 [3 Different Ways]

If you have both Apple and Windows devices and constantly juggle between different audio formats, such as M4A and MP3 (Audio Layer III), while listening to music, this guide can help!

We will explore three simple methods with step-by-step instructions to convert your audio tracks into the desired format.

What is the M4A file format?

M4A (MPEG-4 format) is an audio file format by Apple and popularly used on iPhone, iPad, and Mac.

These audio files are similar to MP3 files but come with a digital audio stream encoded with advanced audio coding (AAC) for compression, meaning better sound quality at the high bitrate and smaller file sizes.

Also, they are compatible with several devices & media players, making them an excellent choice for streaming, music distribution, and storage.

Can I use any Windows tools to Convert M4A to MP3?

You can convert M4A to MP3 using Windows Media Player on Windows 7 and 8. For Windows 10 and 11, you must enable Windows Media Player Legacy optional feature using the Settings app.

Be informed this Windows inbuilt player doesn’t have direct audio conversion capabilities, and you need to burn M4A to CD, then rip the CD to MP3 format, which can be overwhelming.

If you don’t want to use this indirect method, you can use a VLC media player, iTunes, or other popular online platforms like FreeConvert or VEED.IO to get the job done.

How can I convert M4A to MP3?

1. Use Windows Media Player Legacy

Note icon NOTE
Windows Media Player is no longer a part of a newer version of Windows. However, you can add it as an optional feature. Also, before moving to the steps, keep a CD handy. If you don’t have one, skip this method.

1.1 Enable it as an optional feature

  1. Press Windows + I to open the Settings app.
  2. Go to Apps, then click the Optional features.Apps - Optional features - convert M4A to MP3
  3. Locate Add an optional feature and click the View features button.View features
  4. On Add an optional feature window, search for Windows Media Player.
  5. Select Windows Media Player Legacy and click Next.Select Windows Media Player Legacy
  6. Click Install.Install Windows Media Player

1.2 Burn M4A to CD

  1. Press the Windows key, type windows media player, and click Open.Launch Windows Media Palyer Convert M4A to MP3 Click Start burn
  2. Insert the blank CD, and click the Burn tab.Select Burn
  3. Go to the drop-down menu under Burn, and choose Audio CD.Burn Audio CD
  4. Add the M4A file to the Burn list by dragging it to the right pane of the media tool.drag and down the song to burn list
  5. Click Start burn to initiate the process and wait for it to complete.

1.3 Rip music from CD

  1. First, insert the audio CD you burned, then click the Rip CD button. Rip CD button
  2. Go to Rip settings, then More options.Rip settings, then More options
  3. On the Rip Music tab, locate Format, and select MP3 from the drop-down menu.
  4. You can also click Change to select a destination for the audio. Once done, click OK.Rip Music tab, locate Format, and select MP3
  5. Now click the Rip CD button and wait for the process to complete.

If you encountered Windows Media Player can’t play this file error, we advise you to check out this guide for solutions.

2. Use iTunes

  1. Press the Windows key, type itunes, and click Open.Windows key, type itunes, and click Open
  2. Locate and click Edit in the menu bar, and select Preferences.Edit in the menu bar, then click Preferences
  3. On the General tab, click Import Settings.General tab, click Import Settings.
  4. On the Import Settings window, for the Import Using option, select MP3 Encoder from the drop-down, then click OK.Import Settings
  5. Again click OK to close the Preferences tab.
  6. Now select the M4A audio file, go to File, then choose Convert, then select Create MP3 Version.Create MP3 Version

Once done, new song files with the desired audio format will appear in your iTunes library.

3. Use the VLC media player

  1. Press the Windows key, type vlc, and click Open.VLC media player open
  2. From the menu bar, choose Media, then select Convert/Save.Convert/Save option
  3. Go to File, click Add and choose the audio file you want to convert.
  4. Click the Convert/Save button to open Convert settings.File -click Add, then convert
  5. Under Settings, select Convert, then for Profile, choose Video -H.264 + MP3 (MP4) from the drop-down.Convert, then for Profile, choose Video -H.264 + MP3 (MP4)
  6. Now under Destination, click Browse to select the location to save the converted file, then select Start to initiate the process.

Once converted, you will be notified; you can play the file to check the quality of the file.

You can also use online M4A converters such as Veed.io or FreeConvert to get this done; all you need to do is drag the audio file, select the format, and click Convert.

Does the audio lose quality when converting?

Losing quality while converting an audio file depends upon the method you choose. There are three different ways, including Encoding, decoding, and transcoding.

For this particular scenario, you can either opt for Transcoding or Encoding. Transcoding is generally not preferred because the conversion includes double compression and data loss.

Encoding is a conversion process to convert lossless format to lossy format, such as M4A to MP3. This one is useful if you want to reduce the original file size and increase the compatibility of audio files, compromising the quality and data in the process.

Is M4A better than MP3?

M4A is a lossless format and is better than MP3 as it has better audio quality due to its high bitrate. This also means that they have a relatively large file size.

However, it is difficult to stream as it is restricted to some devices and platforms wherein MP3 (Audio Layer III) can be easily played on almost all popular devices and media players.

So, these are the methods you can use to convert M4A files to MP3 on your Windows computer without breaking a sweat.

If you are looking for options to convert MP4 to MP3, we recommend you check out this guide to find free and paid solutions.

If you want to learn more about MP3 files, don’t miss our guide on how to trim MP3 files on Windows 10.

Please feel free to give us any information, tips, and your experience with the subject in the comments section below.

ERR_UNKNOWN_URL_SCHEME: 7 Ways to Fix it

Some Android app developers have reported that when they try to render their app in the browser, they come across the net::err_unknown_url_scheme error.

This web browsing error is a common problem, mainly a Chromium bug that first popped up in Google Chrome 40 and has remained since then.

In this guide, we will give you some effective solutions that will help you resolve the net::err_unknown_url_scheme error. Let us get right into it.

What is the ERR_UNKNOWN_URL_SCHEME error?

The net::err_unknown_url_scheme error is usually triggered because of some underlying web browsing error. It can also occur if the user tries to open multiple pages of the interface.

This error shows up if the requested website’s URL scheme is not recognized by the mobile device. Notably, because of this web browsing error, the browser rendering of the app fails.

What are the causes of ERR_UNKNOWN_URL_SCHEME?

We did some extensive research and after going through multiple forums, we have created a list of the most common causes that could trigger the ERR_UNKNOWN_URL_SCHEME error.

  • The URL scheme is unrecognizable – In case the app’s requested URL scheme contains mailto://, WhatsApp://, file://, telnet://, intent://, market://, app://, mail://, buy://, etc. you will get this error.
  • Opening a redirected URL – This error of net::err_unknown_url_scheme also pops up when the user tries to open a redirected URL.
  • Chrome extensions are conflicting – Chances are some of the recently installed Chrome extensions are conflicting with the program.
  • Hardware acceleration is unsupported – There is a better chance that if you have Hardware acceleration enabled, it is unsupported with the app’s WebView.
  • Corrupt browser cache – If the browser cache is corrupt then this could cause multiple issues such as the ERR_UNKNOWN_URL_SCHEME error.

Let us now take a look at the different solutions that will help you resolve the net::err_unknown_url_scheme error.

How can I fix ERR_UNKNOWN_URL_SCHEME?

1. Disable the Chrome extensions

  1. Launch Google Chrome.
  2. Click on the 3-dot icon on the top-right.
  3. Select Extensions and choose Manage extensions.
  4. Disable all the extensions one-by-one.
  5. Relaunch Chrome and check if this fixes the ERR_UNKNOWN_URL_SCHEME error or not.

You should disable the Chrome extensions and check if this fixes the problem of ERR_UNKNOWN_URL_SCHEME or not.

In case you are interested, we have a guide that lists down some of the best security and privacy extensions for Google Chrome.

2. Clear Chrome cookies and cache

  1. Open Google Chrome.
  2. Click on the 3-dot menu button and select Settings.
  3. From the left pane, select Privacy, and Security.
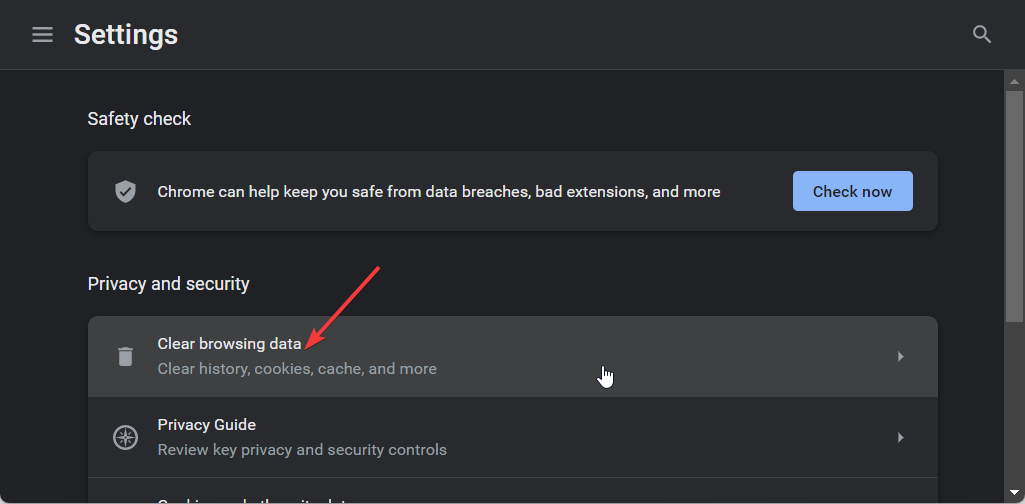
  4. Choose Clear browsing data on the right side.
  5. Check the boxes next to Cached images and files, and Cookies and other site data.
    ERR_HTTP2_INADEQUATE_TRANSPORT_SECURITY
  6. Hit the Clear data button.

Cache and cookies save the personalized settings of websites on your PC. If they go corrupt, they can hamper the smooth functioning of the browser.

Simply try clearing the Chrome cookies and cache files and check if this resolves the web browsing error.

3. Disable Firewall

  1. Open the Start menu.
  2. Search for Windows Defender Firewall and open it.
  3. From the left side, select the option Turn Windows Defender Firewall on or off.
  4. For both Public and Private network setting select the Turn off Windows Defender Firewall option.
  5. Click on OK.

Windows Firewall can often conflict and block certain apps from running as it may find it problematic for your PC. In such a case, when you are testing an app, it is advisable to disable the firewall and check if this resolves the issue or not.

4. Turn off Hardware Acceleration

  1. Open Google Chrome.
  2. Click on the 3-dot menu button and select Settings.
  3. Click on System.
  4. Toggle off the Use hardware acceleration when available option.

5. Switch to a different browser

You should switch to a different browser if none of the above solutions are working in resolving the ERR_UNKNOWN_URL_SCHEME error.

Chances are that the Chrome version that you are using is problematic and you are running the latest version. You will have to wait for a new version to fix the bug, but till then you can opt for a different browser.

Do not worry, as we have a guide that lists down some of the best browsers that you should check out. 

6. Disable Non-standard URL schemes

Speaking of a technical solution, we would suggest that you disable any or every non-standard URL scheme apart from the HTTP:// and HTTPS://.

In doing this, you will bypass any of the errors associated with net ERR_UNKNOWN_URL_SCHEME. However, do note that disabling all other custom schemes will restrict you from using any special scheme mentioned earlier in this guide.

You will be alerted by the Error: Unknown Link type error message if the browser cannot proceed with the custom scheme.

7. Add a new intent

You can also consider adding a new intent to load the contents in an external app. For example, you might want to use the maps:// scheme to open the map content in the default maps application.

Alternatively, you can use the mailto:// to open the email link in the mail app. To add the new intent, you need to use the IF statement. This will tell the device to open the special schemes in the dedicated or relevant app.

Is ERR_UNKNOWN_URL_SCHEME linked to any security threats?

Generally, the ERR_UNKNOWN_URL_SCHEME error isn’t linked to any security threats. However, when troubleshooting this error, you may have to disable the firewall.

If you leave the firewall disabled for an extended time, then your PC is exposed to the risk of getting infected by viruses or malware.

That is it from us in this guide. Multiple users have also reported facing the Err SSL Version or Cipher Mismatch issues, which can be resolved by applying the solutions mentioned in our guide.

If you’re encountering issues like ERR_ADDRESS_UNREACHABLE, check out our guide for solutions.

We have also listed down solutions in respective guides to resolve the err_connection_reset in Windows 11 and err connection aborted errors.

Fix: Zsh: Permissions Denied in Mac Terminal in 4 Quick Steps

The Zsh: Permissions Denied error is one of the common issues users encounter on Mac. The error occurs when you are trying to access a locked file or run a command without sufficient permission.

Fortunately, you can eliminate the Zsh: Permissions Denied error effortlessly with the right information. In this guide, we will provide you with everything you need to fix this error once and for all.

What is the ZSH: Permissions Denied error on Mac?

Terminal is the powerful command line interface that offers users a UNIX environment to run commands and create scripts. You can use this interface to access just about any file part on Mac with the right command.

However, if you start getting the Zsh: Permissions Denied error, it means the original command you are trying to use on Terminal to open a file is wrong, or the file or folder is locked.

In some cases, this can be a good thing, as file permission helps to protect your documents from unauthorized access. Nonetheless, we will show you how to get past the error message on your device in the next section of this guide.

How do I fix ZSH: Permissions Denied in Terminal Mac?

1. Checking file permissions

  1. Launch Terminal through Utilities or the Mac Dock.
    terminal zsh permission denied
  2. Type the command below without pressing the Return key: ls -lis 1
  3. Add a space after the command.
  4. Now, go to Finder and navigate to the file whose permission you want to check.
  5. Next, drag and drop the file in the Terminal window and press the Enter key.
  6. Wait for the command to finish running and check the result.
  7. Finally, if there is RWXR beside your username, it means you have the required permission.

The first thing to do if you are dealing with the ZSH: Permissions Denied error is to check if you have the appropriate permissions to make changes to the file you are working on.

If you have full control, you will find RWXR next to your username.

2. Allow Terminal full disk access

  1. Click the Apple logo on your home screen and select System Preferences.
  2. Now, select the Security & Privacy option.
    security
  3. Click the Privacy tab at the top.
  4. Next, click the Lock icon in the bottom left corner.
    lock zsh permission denied
  5. Enter your admin password and click the Unlock button.
    unlock
  6. Finally, mark the box next to the Terminal option to grant full disk permission.
    full terminal permission denied

If you are getting the Zsh: Permissions Denied error while trying to access a file from Terminal, it might be because Terminal does not have full disk permissions.

The solution to this is to grant it full access to your disk after typing your user password.

3. Change the directory ownership

  1. Launch Terminal and type the command (change <username> to your account username and <directorypath> to the path of the directory ) below: -R <username>:<username> <directorypath>
  2. Press the Return key.
  3. Finally, wait for the command to finish running and try to make the change again.

Sometimes, this permission error can be due to a lack of directory ownership for a user account. Following the steps above should help you change ownership easily.

4. Using SUDO commands

  1. Launch Terminal, type the following commands, and hit Return after each: sudo chmod 755 ~/Themes/ObsidianCode.xccolorthemesudo sudo chmod 755 /dvtcolorconvert.rb 
  2. If you are using the command for the first time, you will need to provide your user account password.
  3. Finally, wait for the command to finish running.

The SUDO command, which is also known as Super User do, grants your super privilege to access your account and other user accounts. So, if the Zsh Permissions Denied error is due to a privilege issue, this command help you fix it.

How do I open permission denied on Mac?

To open a file or folder giving the permission denied error on Mac, you need to change the ownership directory, as shown above.

Another option is to change file permissions using Finder, as shown below:

  1. Right-click the folder or file giving the error and choose Get Info.
    get info
  2. Click the arrow next to the Sharing & permission option to open its drop-down menu. 
  3. Now, select the user you want to grant permission in the Name column. 
  4. Finally, select Read & Write in the menu that pops up.
    read and

With this, the permission denied error should be fixed for good.

Why is my Zshrc file locked?

Your Zshrc file might be locked because you used chmod to lock it. This helps to provide protection against unauthorized access, which is why you might get the permission denied error while trying to open the file.

The Zsh: Permissions Denied error on Mac is basically down to the lack of permission to open the folder or file giving the error.

This can be easily fixed by giving Terminal full access to your disk and changing the directory’s ownership, among other solutions in this guide.

Provided you follow the steps above carefully, the error message should be gone for good. Lastly, if you want to know how to unzip files or folders using Terminal, check our detailed guide to do it easily.

Resolve Offspon.exe Errors and Virus Alerts Efficiently

OffSpon.exe is one of the many processes that run in the background to ensure the smooth operation of the parent software. This executable file is one of the lesser-known processes, which makes you wonder what it does.

In this guide, we discuss everything you need to know about this process, from its legitimacy to the ways you can fix its related errors.

What is OffSpon.exe, and what is its function?

The OffSpon.exe process is an integral part of the Microsoft Office 2010 Starter Edition. This executable file is the one that displays the rotating advertisements you see while using the starter edition Microsoft Word and Excel.

 Being a legitimate Office file, you can rest assured that OffSpon.exe is completely safe. 

What do I need to know about OffSpon.exe?

The EXE extension at the end of OffSpon.EXE means that it is an executable file that runs on the Windows operating system.

This EXE process, like other normal files, is located within your program files. Below is the path you need to follow to get to it: C:\140066.enu\Office14\OffSpon.exe

Depending on the location, you saved the Microsoft Office 2010 starter edition, you might find it in the location below: C:\Program Files\140066.enu\Office14\OffSpon.exe

Also, its average file size is about 1.6 MB. Lastly, with this process constantly trying and asking you to connect to the internet, it can cause a series of system errors like high CPU usage and system crashes.

Is OffSpon.exe Safe or a Virus?

The OffSpon.exe process is completely safe and does not pose any threat to your PC. As mentioned earlier, it is a legitimate Microsoft Office-related process that runs in the background.

However, your antivirus software might flag this process as malware because it is solely focused on advertisement. While it is indeed adware, it is still safe, and you can ignore any alert from your security software regarding the executable file.

Lastly, it must be mentioned that viruses can take over or disguise as the OffSpon.exe file just like they do with other processes.

What are the common OffSpon.exe errors?

After the safety of the OffSpon.exe process has been established, it is important to note that you can experience some errors related to it. Below are a couple of common error messages users reported:

  • OffSpon.exe stopped working
  • OffSpon.exe preventing shutdown

Aside from the two error messages above, this process might also cause high CPU/GPU usage on your PC due to its constant display of rotating advertisements and request to connect to the internet.

To check and confirm this, press Ctrl + Shift + Esc keys to open the Task Manager. You will get the info you need in the Processes tab.

How can I fix OffSpon.exe issues?

1. End the process

  1. Press the Windows key + X and select Task Manager.
    task manager offspon.exe
  2. Locate the OffSpon.exe process and right-click it.
  3. Now, select the End task option.
    end task

If the OffSpon.exe process is causing high CPU or GPU usage on your system, you can fix it quickly by performing ending the process or its software program in Task Manager.

2. Enter Safe Mode

  1. Press the Windows key + I and select Recovery in the right pane.
    recovery
  2. Click the Restart now button before Advanced startup.
    restart now offspon.exe
  3. After your PC restarts, select Troubleshoot.
  4. Next, select Advanced options.
    advanced options offspon.exe
  5. Now, choose Startup Settings.
    startup settings
  6. Click the Restart button.
    restart button
  7. Finally, press the corresponding to Enable Safe Mode or Safe Mode with Networking after your PC restarts.
    enable safe offspon.exe

The Safe Mode starts your PC with minimal drivers needed to keep it running. If the OffSpon.exe issue does not occur here, you can proceed to the next solution to perform a clean boot.

3. Perform a clean boot

  1. Press the Windows key + R, type msconfig, and click OK.
    msconfig
  2. Choose Services at the top, check the Hide all Microsoft services box, and click the Disable all button.
    hide all
  3. Now, click the Startup tab and select Open Task Manager.
    startup
  4. Right-click each of the apps there and select Disable.
    disable
  5. Next, go back to the System Configuration window and click Apply, followed by OK.
    apply ok offspon.exe
  6. Finally, restart your PC.

OffSpon.exe might stop working because of conflicting programs running in the background. Performing a clean boot disables these apps and allows your PC to run with only the basic processes and services.

4. Uninstall OffSpon.exe

  1. Press the Windows key + R, type appwiz.cpl, and click the OK button.
    appwiz
  2. Right-click the Microsoft Office Starter 2010 and select Uninstall.
    uninstall offpon.exe
  3. Now, click the Yes button when asked for confirmation and wait for the process to complete.

If you still can’t fix the issues with OffSpon.exe, you need to uninstall it. You can only achieve this remove its parent software.

With this, we can now conclude this detailed guide on the OffSpon.exe file. While your security software might flag the process as being dangerous, just about every user review has shown it to be safe.

This is why it is important to understand what the process does before quarantining or removing it.

Aside from this OffSpon.exe, it is equally important to know about other processes running on your PC. On that note, if you want to know about the winword.exe process, check our detailed guide.

Feel free to comment in the section below if you have any questions or suggestions.

Fix: Fatal Error Coordinator Returned-1 [Complete Guide]

The Fatal Error Coordinator Returned-1 error occurs when there is a problem with an app on your PC. Most users, especially, started experiencing this issue after installing Zoom.

What makes the error more worrying is that it can lead to more serious issues if left unattended. Fortunately, there are tested and proven ways to fix it, and we will show you how to go about it in this guide.

Why am I getting the Fatal Error Coordinator Returned-1?

There are various factors that can cause this fatal error on Windows. Listed below are some of them:

  • Issues with the Zoom app – Some users have reported getting the Fatal Error Coordinator Returned-1 message after installing the Zoom app. This might be due to errors during installation or other program bugs.
  • General issue – Sometimes, this problem might be a generic issue due to a troublesome bug on your system. You need to perform a system restore to reverse the changes made to your PC that are causing the problem.

Now that we know where the Fatal Error Coordinator Returned-1 comes from, let’s fix it using the solutions below.

How can I fix the Fatal Error Coordinator Returned -1 error?

1. Run the Windows Store Apps troubleshooter

  1. Press the Windows key + I and select the Troubleshoot option in the right pane.
    troubleshoot
  2. Click the Other troubleshooters option.
    other Fatal Error Coordinator Returned-1
  3. Finally, click the Run button before Windows Store Apps, wait for the scan to complete, and apply the recommended fixes.
    run store

In some cases, the Fatal Error Coordinator Returned-1 error message might not be due to problems with the Zoom application. Instead, it might just be generic corruption errors with your UWP apps.

In this case, you need to run the Windows Store Apps troubleshooter to fix the problems.

2. Disable launch.bat in Task Manager

  1. Press the Windows key + X and choose the Task Manager option.
    task manager Fatal Error Coordinator Returned-1
  2. Click the Startup tab at the top.
  3. Now, right-click the Launch.bat file in the app.
  4. Finally, select the Disable option from the context menu.
    disable

If you are getting a dialog box with the Fatal Error Coordinator Returned-1 error on reboot, it might be because of the launch.bat file, which is the startup file of the Zoom app.

The solution to this is to disable it from the list of startup applications on Task Manager.

3. Reinstall Zoom

  1. Press the Windows key + R, type control panel, and click the OK button.
    control
  2. Click Uninstall a program under the Programs option.
    uninstall a Fatal Error Coordinator Returned-1
  3. Now, right-click the Zoom application.
  4. Select the Uninstall option and wait for the process to complete.
    uninstall zoom
  5. Finally, visit the official website to download and install the Zoom app.

If disabling the unnecessary background program for Zoom in the startup application does not rectify the Fatal Error Coordinator Returned-1 error, you might need to uninstall the Zoom app.

This is because your version of the app might be troubled by some program bugs. You can reinstall an updated version of Zoom from the official website after.

4. Perform System Restore

  1. Press the Windows key + R, type rstrui.exe, and click the OK button.
    rstrui
  2. Click the Next button on the page that pops up.
    next Fatal Error Coordinator Returned-1
  3. Now, select your preferred restore point and click the Next button.
    restore point
  4. Finally, click the Finish button to confirm your selection and follow the onscreen instructions to complete the process.
    finish

In a case where you can’t fix this Fatal Error – Coordinator Returned -1 Zoom error after trying the solutions above, you might need to perform a system restore.

This is especially important if you fear that it can lead to issues like the Blue Screen error.

Performing a system restore to a later point when everything was working well will help you reverse the changes made to your PC that might be causing the problem.

 We have reached the end of this guide on how to fix the Fatal Error Coordinator Returned-1 message. According to reports by users, this issue usually starts after installing Zoom on their PC.

This might be because they have not installed the compatible version of the app on their PC. Once the error message shows up, the program you are currently running stops immediately. 

Fortunately, you should be able to fix it with the solutions in this detailed guide. Finally, if you want to know how to fix a similar issue in Fatal error c0000022, check our detailed guide.

Feel free to let us know the solution that helped you fix this issue in the comments below.

What is vds.exe & How to Start or Stop it?

You may have encountered a vds.exe process running in the Task Manager, and unlike other processes, it may not disclose what it is or what program it belongs to. It may have prompted you to go online and learn more about it and whether you should keep it running. Hence, here you are.

This article will discuss the meaning of vds.exe and whether you should stop or start it if it’s not running.

Moreover, antivirus software is sometimes known to block harmless .exe files like vds.exe. So, find out what to do when an antivirus is blocking .exe files.

What is vds.exe?

The vds.exe, for Virtual Disk Service, is an executable file part of the Virtual Disk Service (VDS) process in the Microsoft Windows Operating System.

The Virtual Disk Service (VDS) is a Windows service that provides a framework for managing virtual disks, such as software-based RAID arrays, dynamic disks, and other storage solutions.

It allows you to create and manage volumes, extend or shrink partitions, initialize disks, and perform other disk-related operations.

Should I stop or disable vds.exe?

No, you don’t need to stop the vds.exe process, as it is necessary to function certain disk-related operations in Windows properly. It provides a framework for organizing and managing storage spaces on your computer.

Stopping or disabling the process could prevent you from performing certain disk-related tasks, such as creating, resizing, or formatting disks.

If you’re not actively performing disk-related tasks or using features that depend on the Virtual Disk Service (VDS), the VDS process might not be running actively and could remain idle.

If you are worried about the file’s legitimacy, you can verify its location. The vds.exe file is typically found in the following directory on a Windows system: C:\Windows\System32

File location

How do I start vds.exe?

1. Enable Virtual Disk Services Manually

  1. Press Windows + R, type services.msc into the Run dialog box and press Enter.services.msc
  2. Scroll down and then double-click on Virtual Disk.Select Virtual Disk
  3. Select Automatic from the Startup type menu. Automatic
  4. Click on Start to manually start the service. Start
  5. Go to the Log On tab, and then check the Allow service to interact with desktop checkbox under Log on as section. check 'Allow service to interact with desktop'
  6. Click Apply to save the settings, and then click OK.click Apply and OK
  7. Restart the computer and check if it works.

You can easily start the vds.exe process by configuring the properties from the underlying service through the Services console. Besides, if you want to stop the process, disabling the service will do the trick.

2. Start the Virtual Disk service from Command Prompt

  1. Press the Windows key, type cmd in Windows Search, and select Run as administrator.cmd
  2. Type the following command and press Enter: net start vds net start vds
  3. To stop the service, run the following command: net stop vds

Another way to start vds.exe is via the Command Prompt, a built-in utility that allows users to make complex changes within seconds.

Here are some top disk management tools for Windows that can help you in tasks such as creating, resizing, renaming, and deleting partitions, as well as optimizing your PC.

Please feel free to share any information, tips, or personal experiences about the file in the comments section below.

Parsec for Windows: How to Download & Install

Parsec is a powerful software that enables you to play games and access your PC remotely from various devices, such as laptops, desktops, smartphones, and tablets. It is a low-latency, high-performance gaming software that provides access to remote systems and applications, especially games.

With Parsec, you can stream games from your gaming PC to another device, allowing you to play games even on less powerful hardware as long as you have a stable Internet connection.

Is Parsec a remote desktop?

While Parsec is primarily designed for gaming, it can also be used for other applications that require remote access to a computer or virtual machine.

Parsec is one of the reliable remote desktop applications available for Windows. It enables you to connect to your computer remotely, access files, run applications, and perform tasks as if you were physically present on your PC.

Can I install Parsec on my Windows PC?

Parsec is a versatile software that supports various devices and platforms, including Windows, Linux, macOS, Android, and Chromium-based browsers like Google Chrome.

However, to host or connect to another computer using Parsec on a Windows system, it must meet the minimum requirements:

  • Operating System: It requires a 64-bit version of Windows 10 or later.
  • Processor: The Parsec software requires at least Intel Core i5 3rd Generation processor or processors that AVX, SSE 4.1, and AES-NI instructions.
  • Memory: It requires a minimum of 4 GB of RAM, with 8 GB of RAM recommended for optimal performance.
  • Graphics: The minimum GPU requirements are Intel HD 4000, NVIDIA 600 series, or AMD Radeon X1000 that supports DirectX 10 or higher, OpenGL 3.2 or higher, or Vulkan.
  • Network: Stable and reliable Internet connection with at least 10 Mbps of download speed and 1 Mbps of Upload speed for 720p 60 FPS streaming. Higher resolutions and frame rates may require faster Internet connections.
  • Storage: The Parsec software will need at least 1 GB of free disk space.

How do I download Parsec on Windows?

1. Download and install Parsec

  1. Visit the Parsec download page and click on Download for Windows 64 Bit.Download for Windows
  2. After the download is complete, double-click on the parsec-windows.exe file to run the installer.
  3. Virtual Display Driver is not required, but you can enable it if needed and click Next >.Parsec install
  4. Next, choose between two options: Per User and Shared, and click Next >. If you want to use different Parsec accounts for each user on the computer, choose Per User or select Shared to use the same Parsec accounts for all users on the computer.Installation type
  5. The installation will take a few seconds to complete.
  6. You now have downloaded and installed Parsec on your Windows system.

2. Set up a Parsec account

  1. After the installation is complete, launch the Parsec app from the desktop shortcut or through the Start menu.
  2. If you don’t have a Parsec account, click on the Sign Up button to create a new one.Sign Up
  3. It will open the Parsec sign-up page on your default browser. Here, enter your email and username and click Next.Next
  4. Enter and confirm your password. Check the I agree box and click Create Account.Create Account
  5. To enable two-factor authentication on parsec, install an authenticator app such as Authy or 1Password on your phone (if you don’t have one).
  6. Then, scan the QR code with the authenticator app,
  7. After that, enter the 6-digit code provided by your authenticator app, enter the parsec password you just set, as well as a recovery email address, and then click Enable 2FA.2FA
  8. Parsec will provide you with a list of backup codes that you can use to recover your account in case you forget your password and lose access to the two-factor authentication method.
  9. You can either note it down or download the codes in a TXT file by clicking the Download button and storing it someplace safe. Download
  10. After creating the account, close the browser and then launch the Parsec app.
  11. Enter your login credentials and click Log In.Log In

Once logged, you can configure app settings according to your preferences and start using the software for game streaming or remote desktop access.

If you’re not happy with Parsec, there are other remote desktop softwares available for gaming that offer high frame rates and low latency.

If you want to know more about the Parsec app, feel free to let us know in the comments section below.

Your Call Of Duty Account Got Hacked? How to Get it Back

Over time, players have complained about their Call Of Duty game accounts being compromised or hacked by an intruder. The cases may be different depending on how the hijacking happened. However, this article will discuss details about Call Of Duty accounts hacked and how to recover them.

Likewise, check our article about players’ complaints regarding issues like Call Of Duty: Modern Warfare not saving settings after adjusting it.

How many COD accounts get hacked?

  • According to reports, the breach has affected at least 500 thousand Activision users, specifically those associated with Call of Duty.
  • Consequently, hackers have gained usernames and passwords linked to these compromised accounts.
  • This enables the attackers to log in and modify passwords, effectively blocking legitimate users from accessing their accounts.

Alternatively, you can check our guide on ways to fix the error connecting to Activision account issues on your device.

How do I know if my Call of Duty account is being hacked?

  • If you can log into your COD account despite entering the correct credentials could indicate that someone else has gained access and changed the password.
  • You should notice unusual or suspicious activity within your account, unfamiliar purchases or transactions, alterations to your in-game progress, load-outs, or unknown settings changes.
  • If you receive any email regarding password resets or changes to your COD account which you did not initiate, it may indicate that your account has been compromised.
  • If you notice that your COD account is connected to unfamiliar gaming platforms, consoles, or devices, it could suggest that someone else has gained unauthorized access.
  • Suspicious activities associated with your account include unusual in-game behavior or messages sent without your knowledge.

Taking swift action is essential if you suspect your account has been hijacked to prevent further damage and protect your personal information.

How do I get my Call of Duty account back?

1. Contact Activision support for recovery

  1. Contact Activision Support immediately.
  2. Then, provide them with the necessary details and evidence of the hack.
  3. Follow the account recovery process guide by Activision Support.
  4. Change your passwords associated with the compromised account.
  5. Enable two-factor authentication (2FA) for enhanced security.
  6. Monitor your account for any suspicious activity or changes.
  7. Stay in touch with Activision Support for further assistance and updates.

Many players complain about these steps not being practical as it doesn’t unlink the hacker’s activities on the account. The account recovery process will be rejected if your email is still on the hacked Activision account.

2. Use a different email to recover your account

  1. Create a new Gmail account aside from the one associated with the hacked account.
  2. Also, create a separate Gmail account for the temporary account you must create during the account recovery process.
  3. Sign up for a VPN service (preferably Nord VPN) and use a country that is not where you live.
  4. Log into your real Activision account over the VPN in a browser and unlink all accounts that you can.
  5. Change the email on the Activision account to the new email address you created in Step 1.
  6. Change the basic info (Password /Name/Address/Phone/remove 2FA) to something else.
  7. Then verify if you can log in via the new email address and password you changed in the previous step.
  8. Open a new account recovery ticket using the new Activision account you created in Step 2.
  9. Set the incident date to your current date and attach other details.
  10. You should get a mail in Gmail address 2 saying Activision has recovered your account.

After submitting the account recovery ticket, you will receive a confirmation or reference number. Activision Support will review your ticket and provide further instructions on recovering the account.

In context, the above steps will allow you to re-hack yourself and file another account recovery form, overriding any linked account.

How do I recover my Activision account with 2FA?

  1. Go to the Activision account recovery page using a web browser.
  2. On the Account Recovery page, select the option you have set up for your 2FA (Email or Text message).
  3. Depending on the option you selected, enter the email address or phone number associated with your Activision account.
  4. You will receive a verification code. Then, enter the verification code in the provided field on the Account Recovery page and click Activate.
  5. Follow the on-screen instructions and provide any required information to verify your account ownership.

With these steps, you can recover your Activision account even if you have two-factor authentication enabled.

In addition, you may be interested in our article about Call Of Duty Modern Warfare Warzone dev error 5523 and ways to fix it.

Also, we have a comprehensive post on what to do if you encounter Call of Duty error code Pilum when playing Modern Warfare and Warzone.

Should you have further questions or suggestions, kindly drop them in the comments section.

How to Fix Backspace Key When It’s Not Working + Alternatives

If your backspace key is not working, it could be due to physical damage, incorrect keyboard settings, or even out-of-date drivers.

In some other cases, software conflicts or system glitches may contribute too. That said, in this guide, we’ll walk you through the steps to get it working again.

How do I fix my backspace key if it’s not working?

Before we start, make sure your keyboard is clean. Use compressed air or a soft brush to remove dirt. Also, check your keyboard cable/batteries and make sure your OS is up to date.

If the above preliminary checks can’t fix the backspace key not working, go ahead with the solutions below:

1. Disable Sticky keys and Filter key options

  1. Press Windows + I keys to open the Settings app.
  2. Click on Accessibility and click on Keyboard in the left-hand menu.
  3. Find the Sticky keys option, and toggle off the Press one key at a time for keyboard shortcuts.
  4. Click the Filter Keys link, toggle off the Ignore brief or repeated keystrokes.
  5. Close the Settings app and restart the PC to effect the changes.

2. Run the keyboard troubleshooter

  1. Press Windows + I key to open the Settings app.
  2. Click on System, then select Troubleshoot from the right pane and click on Other Troubleshooters.
  3. Then, click the Run button against the Keyboard.
  4. Wait for the Troubleshooter to find and fix the Keyboard issues on your computer.

Running the keyboard troubleshooter will find and fix the problems causing the backspace key to malfunction on your laptop.

We also have a guide on Spacebar not working that you might be interested in.

3. Update your keyboard drivers

  1. Press Windows + R keys to prompt the Run window, type devmgmt.msc, and click OK to open the Device Manager.
  2. Expand the Keyboards entry, right-click on the Keyboard devices, then select Update driver from the drop-down menu.
  3. Click on Search automatically for updated driver software.
  4. Restart your computer and check if the issue persists.

Updating the keyboard driver will fix bugs affecting the device and install the latest features to improve its performance. Also, it resolves compatibility issues causing the problem:

You can read our guide for other steps for updating drivers on Windows PCs if you have any issues. Also, you can choose to update any drivers on your PC automatically with a tailored solution.

4. Reinstall the keyboard device

  1. Press Windows + R keys to prompt the Run window, type devmgmt.msc, and click OK to open the Device Manager.
  2. Expand the Keyboards entry, right-click on the Keyboard devices, then select Uninstall device from the drop-down menu.
  3. Click Uninstall in the confirmation box and wait for the process to complete.
  4. Restart your PC, and it will automatically install the missing driver.

Reinstalling the keyboard device will resolve corrupt device files, settings issues, and other keyboard-felted issues preventing the backspace key from working.

Backspace alternatives

The Delete Key can be an alternative to Backspace in some contexts. To delete characters to the left of the cursor using the Delete key, you can follow these steps:

  1. Position the cursor after the character you want to delete (to the character’s right).
  2. Press the Delete key on your keyboard.

You can also use keyboard mapping software to assign any other key to work as Backspace, but that is just a software workaround.

In conclusion, following the steps above should help backspace not working. It might also fix related issues like keyboard typing the wrong letters on your computer.

Also, you may be interested in our article about how to fix the keyboard not allowing double letters when typing on Windows 11.

This isn’t the only problem you can encounter, some users reported that keyboard is not working on Windows 11 at all.

Should you have any questions or suggestions regarding this guide, kindly drop them in the comments section.

CTRL Key not Working? How to Enable it & Alternatives

The Ctrl key not working on your computer is a recurring keyboard issue affecting some Windows users. This problem is particularly outrageous because of the Ctrl key’s significance to using the keyboard shortcuts since most of them depend on its pairing with other keys.

Consequently, this makes users curious about the potential fixes for getting the Ctrl key to work or if it requires using an external keyboard. Thus, this article will provide a detailed guide on how to fix it.

Why is my Ctrl key not working?

  • If the left Ctrl is not working, it can be because internal components or mechanisms are damaged. This is one of the reasons why your keyboard is not working properly.
  • Outdated or corrupted keyboard drivers can lead to malfunctioning keys, including the Ctrl key, and can cause Ctrl + any key not to work. This is one of the reasons keyboard shortcuts are not working in Word.
  • Some software applications or utilities running on your computer might interfere with the functioning of the Ctrl key due to incompatible or poorly programmed software.
  • The Ctrl key might be disabled or modified through accessibility settings.
  • System-wide settings or keyboard shortcuts configured on your computer can affect the behavior of the Ctrl key, causing the Ctrl key to appear non-functional.
  • Hardware problems with the keyboard or the computer can result in non-working keys.
  • Bugs or glitches in the operating system can cause specific keys, including the Ctrl key, to stop working.

These potential causes are general, and the reason for each user can vary depending on the instance of occurrence. Hence, we’ll take you through some detailed steps for resolving the Ctrl key not working.

What can cause a key to stop working?

  • The internal components or mechanisms of the key may become damaged or dislodged, preventing it from registering keystrokes.
  • If the keyboard is connected to the computer via a cable, a loose or damaged connection can cause its keys to stop working.
  • The keycap or the underlying switch mechanism can become damaged or worn out, preventing it from engaging the switch and resulting in the key not working.
  • Electromagnetic solid fields or interference from nearby electronic devices can disrupt the keyboard and computer signals.
  • A key may stop working due to a manufacturing defect, including faulty components or assembly issues that prevent the key from functioning as intended.

It’s important to note that the specific cause of a non-functioning key can vary depending on the keyboard model, its design, and individual circumstances.

How do I fix/unlock my Ctrl key?

Before attempting any troubleshooting steps, we recommend you apply the following:

  • Inspect and clean the entire keyboard or the left panel to remove any debris or dirt affecting its functionality.
  • Restart your computer to resolve temporary software issues or conflicts impeding the Ctrl key’s functionality.
  • Turn off background apps and temporarily disable any recently installed software or utilities to identify if they are causing conflicts with the Ctrl key.
  • Connect a different USB keyboard to your computer and check if the Ctrl key works with the new keyboard. If it does, the issue might be with the original keyboard.
  • Open the on-screen keyboard to see if it’s a hardware issue.
  • Perform a Windows update to troubleshoot the bugs affecting keyboard performance.

Proceed with the solutions outlined below if the above preliminary checks can’t fix the issue:

1. Update your keyboard drivers

  1. Press Windows + R keys to prompt the Run window, type devmgmt.msc, and click OK to open the Device Manager.
  2. Expand the Keyboards entry, right-click on the keyboard devices, then select Update driver from the drop-down menu.
  3. Click on Search Automatically for updated driver software.
  4. Restart your PC and check if the issue persists.

Updating the keyboard driver will fix compatibility issues, causing the Ctrl key not to function as expected. It resolves bugs such as Ctrl C and Ctrl V not working on your PC.

Read our guide for other steps for updating drivers on Windows PCs if you have any issues.

Once your keyboard drivers are updated and the Ctrl key starts working, you can boost your efficiency by learning how to search text or files using Ctrl + F on Windows. It is one of the most reliable shortcuts for finding anything instantly on your computer.

2. Run the hardware troubleshooter

  1. Left-click the Start button, type Command Prompt, and click the Run as administrator option.
  2. Click Yes on the User Account Control (UAC) prompt.
  3. Type the following and press Enter to open the Windows Hardware and Device Troubleshooter: msdt.exe -id DeviceDiagnostic
  4. Click Next to proceed with the scan and troubleshooting process.
  5. After the troubleshooting, try to perform the task and check if it works.

Running the Hardware and Devices troubleshooter will resolve hardware connection issues that may cause the error.

Read our guide on how to fix Command Prompt not working on your PC. Keep in mind that other keys can stop working, and we covered such an issue in our Spacebar not working guide.

3. Disable Sticky keys and Filter key options

  1. Press Windows + I keys to open the Settings app.
  2. Click on Accessibility and click on Keyboard in the left-hand menu.
  3. Find the Sticky keys option, and toggle off the switch.
  4. Select the Filter Keys, and toggle off the option.
  5. Close the Settings app and restart the PC to effect the changes.

Toggling off the Sticky and Filter keys will terminate their respective features and resolve button combinations that may affect the Ctrl key functionality and similar issues like Space bar, Enter, and Backspace keys not working on Windows 11.

Is there an alternative key to Ctrl?

No, and Yes. In some situations, you can use the Shift or the Alt key to replace the Ctrl key, e.g., when selecting files, highlighting contents, etc.

This isn’t the most reliable workaround, especially if the Shift key is not working.

However, the Ctrl key is essential to the PC shortcuts. The alternative keys are only functional in deputizing it in minor cases. Hence, the hack for most users is the on-screen keyboard to select the key.

Moreover, the above fixes cover several angles of potential causes for the Ctrl key not working and are helpful regardless of the cause. We also have a detailed article about the Windows key not working and ways to fix the problem.

You may be interested in what to do if the left Shift key is not working on your computer.

Feel free to leave your questions and suggestions in the comments section below.

Quickest Way to Convert RAW to NTFS Without Formatting

When you boot up your PC and you come across a RAW partition, then you should understand that all the files inside are corrupt, or the system fails to recognize it. 

This RAW drive or RAW files present inside a particular drive letter can be fixed if you convert the RAW to NTFS. In this guide, we will show you exactly how you can convert RAW to NTFS without losing data and without formatting.

What is the Raw File System?

You might have heard about the NTFS, exFAT, FAT32, RAW, etc., file systems. File systems basically mean how the system manages or handles the files, basically how it stores and retrieves them.

If your drive letter, partition, or external drive isn’t formatted to any of the file systems, then you won’t be able to access the storage device.

Such a selected disk is known as a RAW drive or RAW drives, depending on the number of drives you have. The storage device could be anything, like a USB flash drive, memory card, or others.

In case the partition becomes RAW, you will come across issues such as bad sectors, file system errors, or you won’t be able to perform RAW partition recovery.

Why should I convert from Raw drive to NTFS file system?

The RAW drives or RAW disk can get bad sectors because of the below reasons:

  • Wrong disk management.
  • File system corruption.
  • The RAW disk’s drive table is corrupt.
  • The RAW drive is unusable.

In such a case, it becomes necessary to convert the RAW drive to the NTFS file system. Below, we have shown different methods to format the RAW drive to NTFS without losing data and also convert RAW to NTFS without formatting.

How to convert a Raw disk to NTFS without formatting & without losing data?

Before you go ahead and convert a RAW drive to NTFS file format, we would strongly advise you to create a backup of your data or recover the data using data recovery software.

For your convenience, we have a guide that lists some of the best backup tools that you can use to create a backup of the RAW format drive.

Moreover, you can also check out our guide which gives you a list of the best partition recovery tools you can use.

Let us now check out the steps to convert the RAW disk to NTFS.

1. Use Disk Management

  1. Press the Win key to open the Start menu.
  2. Type Disk Management and open the top result.
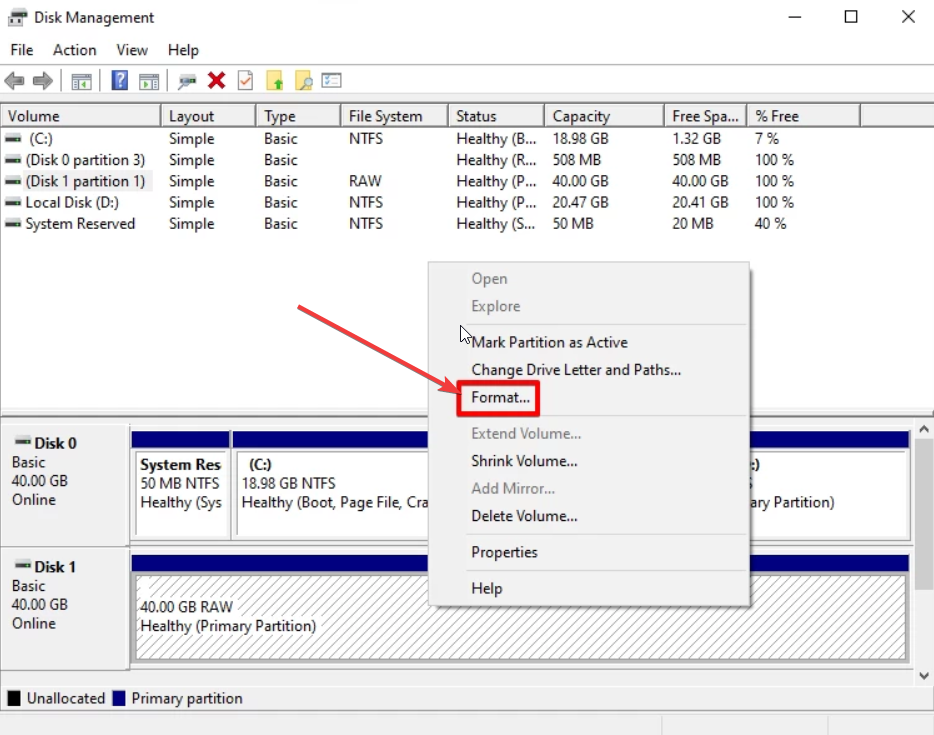
  3. Select the disk by right-clicking on the RAW partition and selecting Format.
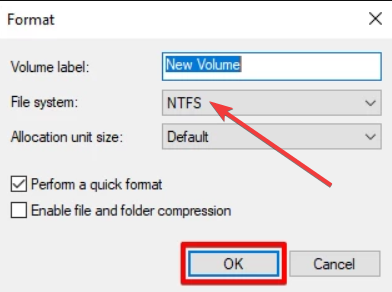
  4. Enter the name of the RAW partition.
  5. Under the File system drop-down, select NTFS and click OK when ready.
  6. In the prompt that appears, click on OK to confirm your actions.

Using the Disk Management tool, you do not have to rely on any third-party software to perform a quick format of your RAW drive to NTFS without losing data. Of course, this is unless your drive suffered physical damages that led to permanent loss of data.

In case you are having issues with the Disk Management where the Disk Management isn’t loading, then you should read our guide and apply the solutions to resolve the problem.

Also, we would suggest you check out our guide that will help you resolve the problem in case all options are greyed out in Disk Management. Now, let us check out another method to convert RAW drive to NTFS without formatting.

2. Use Command Prompt

  1. Press the Win key to open the Start menu.
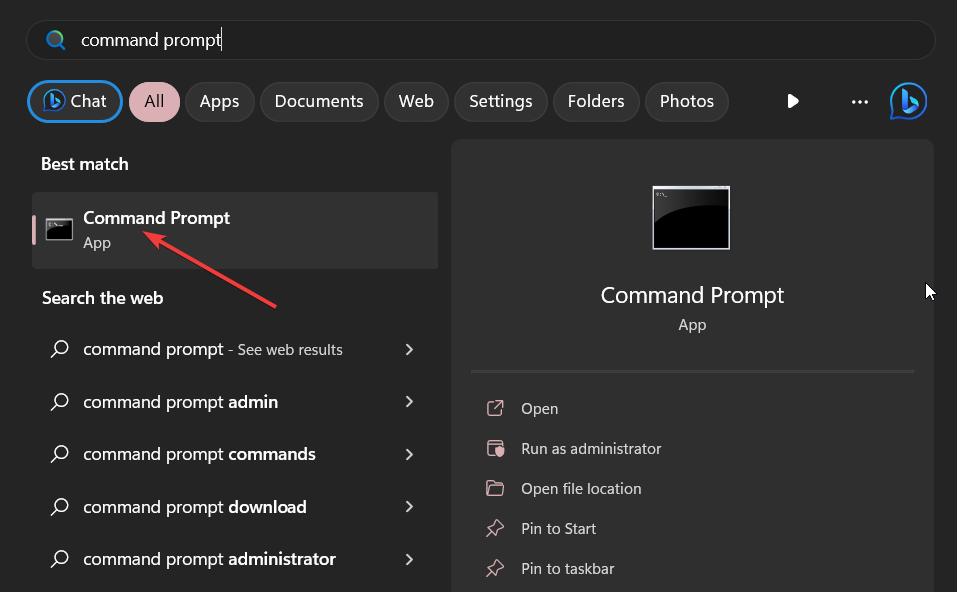
  2. Type command prompt into the search box and run it as an administrator.
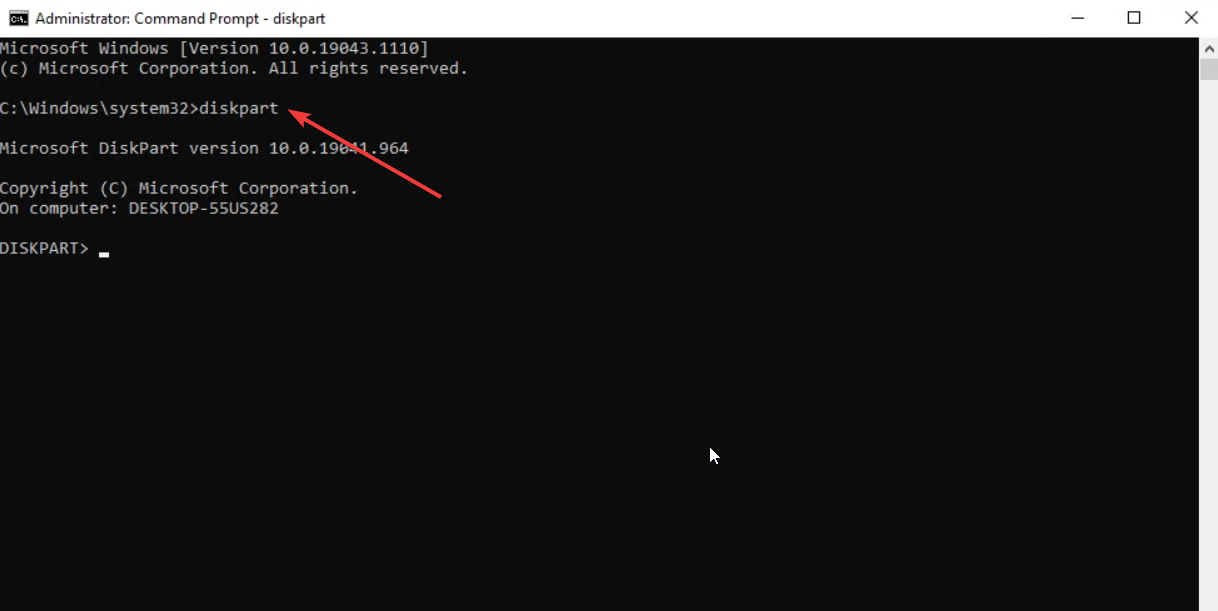
  3. Type the below command and press Enter. Diskpart
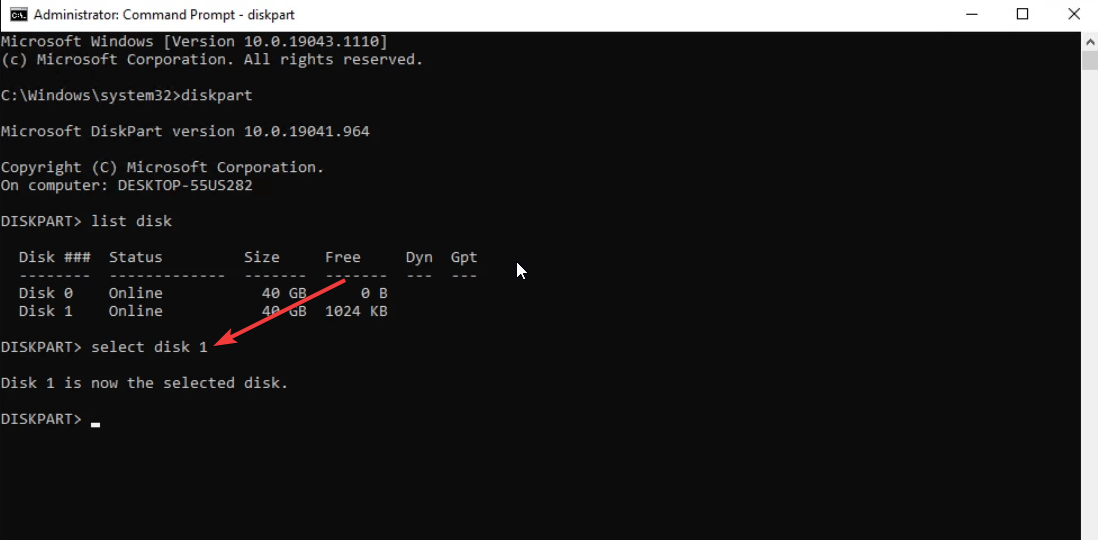
  4. Execute the below command to list all the disks on your computer. list disk
  5. Type the below command to select the partition and press Enter. select disk 1 (Replace the number with the number for the RAW drive)
  6.  Execute the below command to wipe the disk and prepare it to accept a new partition. clean
  7. Type the below command and press Enter. create partition primary
  8. Run the below command to format the drive with the NTFS file system. format fs=ntfs
  9. Type the below command and press Enter to assign a drive letter to the partition. assign

Usually, when you convert the RAW drive to NTFS using the command prompt, it will fix the RAW partition without formatting. However, at times, this method is known to fail. In that case, learn the other method below.

We have a guide that explains in detail, what is CMD or Command Prompt. You will get all information you need to know about CMD along with some important functions.

 3. Use File Explorer

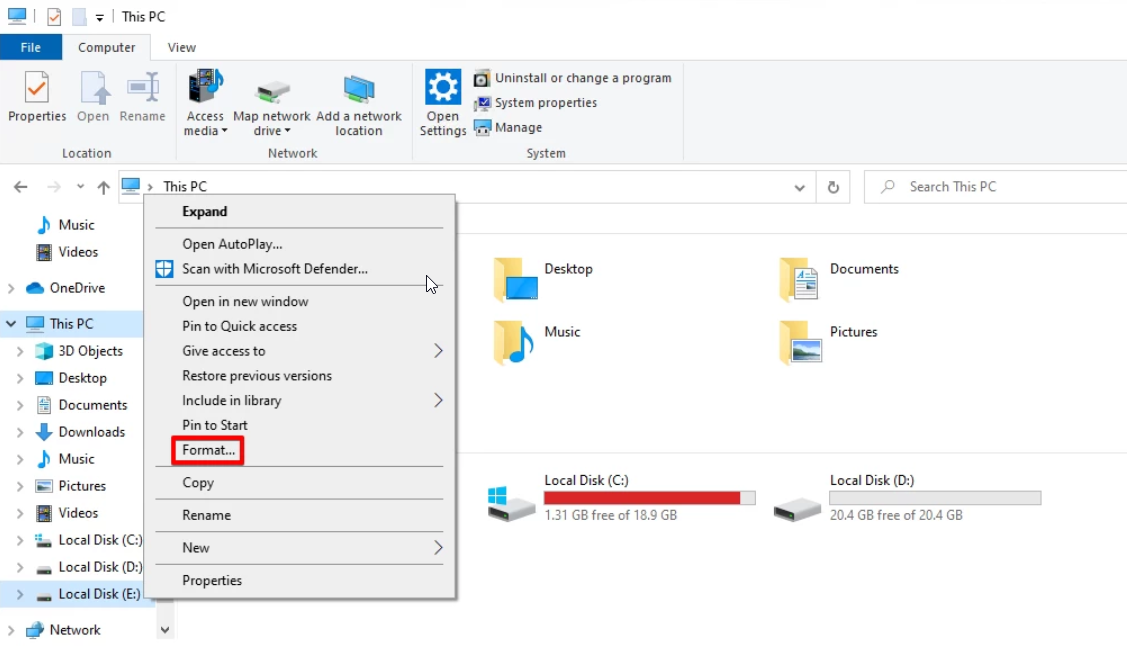
  1. Press the Win + E keys to open the File Explorer.
  2. Right-click on the RAW drive and select Format from the context menu.
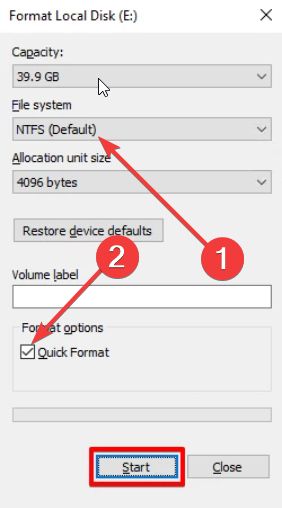
  3. Assign a volume label (optional).
  4. Select NTFS from the File System drop-down.
  5. Check the Quick Format option and hit the Start button when ready.
  6. Click OK on the warning prompt that appears.

You can also make use of File Explorer to convert the RAW to NTFS without losing data. This method is easy to use and works faster.

Are there any risks when converting RAW to NTFS?

Notably, yes, there are some risks when converting RAW to NTFS, especially when you are converting a RAW disk to NTFS without formatting.

Data loss is a possibility. If you format the disk without backing up the data, then there are high chances of the drive getting corrupt or wiping the internal data to accept the new file system during the conversion.

What precautions should I take when converting RAW to NTFS?

Some of the most important precautions that we would suggest before you go ahead and convert your RAW disk to an NTFS file system are listed below:

  • Make sure that the NTFS file format is supported in the device that you will be using the external drive or USB flash drive, etc.
  • Ensure that you have taken a backup of the data before converting RAW to NTFS because there is a very high chance of the data getting wiped out.
  • For data recovery from the RAW drive, do not hesitate to use a high-efficiency data recovery tool, as normal ones won’t produce the result you would expect.

That is it from us in this guide. We would suggest you check out some of the best disk management tools that you can use on your Windows PC.

Feel free to let us know in the comments below, which one of the above solutions you used to convert RAW to NTFS without losing data or without formatting.

Disable Local Account Security Questions on Windows

Local account security questions are a form of authentication commonly used to enhance the security of user accounts on various platforms, applications, or systems. Nevertheless, some of our readers disable local account security questions because they prefer other security methods.

This is so because of the lapses in this security method. Hence, should you prefer to disable the questions too, this article will guide you through simplified steps easily.

Why disable local account security questions? One of the strong advantages of the security questions is how easy they are to set. Further, they are low-cost and require next-to-nothing to store and use them.

Despite these, the cons seem to outweigh its pros as outlined below:

  • Answers to the questions can be easily guessed or found through public records (e.g., mother’s maiden name, childhood nickname).
  • Limited and predefined questions with password hints.
  • You can easily forget the answer or, make slight spelling mistakes.

With the factors highlighted above, using security questions poses a high level of security risks such as unauthorized access to user accounts, information & privacy leaks, account lockouts (in the case where the answer is forgotten), and so forth.

Hence, alternative authentication methods like two-factor authentication (2FA) are preferred by several of our readers because it adds a second layer of security to verify user identity. 

How do I disable local account security questions on Windows 11?

1. Using Group Policy Editor

  1. Press the Windows + R keys to open the Run command dialog box. Type gpedit.msc in the text box and press Enter to open the Local Group Policy Editor.
  2. From the left navigation pane, go to the following path: Computer Configuration\Administrative Templates\Credential User Interface
  3. On the right pane, double-click on the Prevent the use of security questions for local accounts policy setting.
  4. In the Properties window, select the Enabled radio button.
  5. Finally, click on Apply, and then OK to save the changes.

This will immediately disable the security questions for the account you are currently logged into. However, make sure to create a backup before making any changes in Group Policy Editor.

2. Using Registry Editor

  1. Press the Windows key, type regedit in the search box and press Enter to open the Registry Editor window.
  2. From the left navigation pane, navigate to the following registry key: Computer\HKEY_LOCAL_MACHINE\SOFTWARE\Policies\Microsoft\Windows\System
  3. Locate and right-click the System key. Then, select New, and click DWORD (32-bit) Value.
  4. Name the DWORD NoLocalPasswordResetQuestions and double-click on it.
  5. In the pop-up window, set the Value data to 1 and select the Hexadecimal radio button.
  6. Click OK to save the changes.

Once you’re done, close the Registry Editor and restart your PC. This will disable the local account security questions feature on your sign-in option page.

3. Using a Reg file

  1. Press the Windows + R keys to open the Run command, type Notepad in the text field and press Enter to open it.
  2. Type the following code in your Notepad: <code>Windows Registry Editor Version 5.00 [HKEY_LOCAL_MACHINE\SOFTWARE\Policies\Microsoft\Windows\System] "NoLocalPasswordResetQuestions"=-
  3. Click on File and select Save as.
  4. Select All Files from the Save as type drop-down menu. Name the file DisableSecurityQuestions.reg and save it to your desktop.
  5. Now double-click on the reg file to run it.

Using a reg file will create a new registry value in the System key and instantly disable local account security questions in Windows 11.

How do I disable local account security questions on Windows 10?

  • Discuss two ways: using Local Group Policy Editor and Registry Editor.
  • Provide step-by-step instructions for each method, including screenshots if possible.

1. Using Local Group Policy Editor

  1. Open the Run dialog, type gpedit.msc in the text field and press Enter to open the Local Group Policy Editor.
  2. Navigate to the following path: Computer Configuration\Administrative Templates\Windows Components\Credential User Interface
  3. On the right pane, double-click on the Prevent the use of security questions for local accounts policy.
  4. In the new window, select the Enabled radio button.
  5. Now, click on Apply, and then OK to save the changes.

Following the steps above will help to disable the security questions for the account.

2. Using the Registry Editor

  1. Open the Run dialog, type regedit in it, and press Enter to open the Registry Editor.
  2. Choose Yes for the UAC prompt.
  3. On the left pane, navigate to the following key: HKEY_LOCAL_MACHINE\Software\Policies\Microsoft\Windows\System
  4. Next, right-click on the System Key, select New, and click on DWORD (32-bit) Value.
  5. Name the value NoLocalPasswordResetQuestions, double-click on it, and set the value data as 1.
  6. Save the changes and restart your PC.

Following the above steps, the security questions for your account will be disabled instantly.

How do I re-enable security questions?

1. Using the Group Policy Editor

  1. Follow steps 1-5 in method 1 above.
  2. Select the Disabled or Not Configured radio button in the Properties window.

The same process applies to both Windows 10 and 11 Operating Systems.

2. Using the Registry Editor

  1. Open the Registry Editor window.
  2. Locate the NoLocalPasswordResetQuestions registry, right-click, and delete it.

This will now re-enable the local account security questions in your Windows 10 & 11 PC.

What are the alternatives to security questions?

In the case where you do not want to use security questions any longer due to their security risks, there are a few alternatives to consider which include:

  • Two-factor authentication (2FA) – 2FA authentication is a reliable alternative that adds an extra layer of protection to verify a user’s identity after the sign-in screen.
  • Use strong passwords – Passwords have not lost their touch in securing an account. However, creating strong passwords with a combination of uppercase and lowercase letters, numbers, and special characters will enhance your security.

And that’s it on how to disable local account security questions in Windows 10 and 11. If your Windows Security is not opening, you can explore our detailed guide to fix the issue.

Disabling security questions will help to prevent security breaches and protect user’s privacy. However, make sure you backup any important files and data before using any of the methods provided for disabling security questions.

If you have any questions or suggestions, do not hesitate to use the comments section below.

Microsoft Teams Stuck on Offline Status? Fix it in 5 Steps

Microsoft Teams is a popular collaboration platform for employees working remotely. However, some of the Teams users often complain that their status is stuck in offline mode despite their being online on the Teams app.  

The issue is indeed annoying and disrupts communication as your colleagues are unable to view your status in real time. 

Why is Microsoft Teams stuck on offline status? 

Microsoft Teams usually update your status from offline to online automatically under normal circumstances. However, its inability to do so can be because of the following reasons: 

  • Using VPN – A VPN service slows down the communication between Microsoft Teams and the service causing delays in the status update. 
  • Server Outage – If the remote server for the Teams app is down due to maintenance, problems like the one at hand are unavoidable. 
  • Outdated Teams app – Microsoft Teams can also get stuck on the offline status if you are using an outdated version of the app.
  • Corrupt cache files – The cache folder of Microsoft Teams cab get corrupted if not reset periodically, preventing the app from promptly updating your current status. 
  • Slow internet connection – Unstable internet connection can also be the reason why Microsoft Teams is taking longer to update your status to online. 

If you are wondering how to fix the Microsoft Teams stuck on an offline status to get things right, scroll down below to check out the effective solutions.

How do I fix the Microsoft Teams stuck on offline status? 

Before you jump to the solutions listed below, we recommend you perform these simple actions. 

  • As recommended by Microsoft, wait for at least three minutes for Teams to detect and update your current status instead of offline.
  • Visit the official Microsoft Service Status webpage to ensure that the Microsoft Teams server is up and running and not experiencing some downtime. 
  • Update Microsoft Teams to the latest version available. 
  • Log out of Teams and then re-login on all the devices, including the one you are using currently.
  • Temporarily disable the VPN services on your Windows PC. 

If the methods listed above are of no help, try the solutions listed below. 

1. Restart the Microsoft Teams app

  1. Right-click the Windows icon on the taskbar and choose Task Manager from the quick links menu. Microsoft Teams Stuck On Offline
  2. Look for Microsoft Teams in the Processes tab, right-click it and choose the End task option from the context menu. 
  3. Now press the Windows key to launch the Start menu, type microsoft teams and choose the relevant result to relaunch the app.

Force quitting and then restarting the Microsoft Teams app will get rid of the temporary glitch, which might be the reason Microsoft Teams is not updating your current status. 

2. Reset your status 

  1. Launch the Microsoft Teams app on your Windows PC and click the profile picture icon located in the top right corner. 
  2. Click your current status (Appear offline) visible under your email address and select the Reset status option from the drop-down menu. Microsoft Teams Stuck On Offline

If you are unable to change your offline status because of a prevalent bug in the Teams app, using the reset status feature should fix the problem like a charm. 

You can also perform the same steps on the web version of Microsoft Teams to reset your current status if you prefer it over the desktop version. 

3. Clear the Microsoft Teams cache

  1. Close the Microsoft Teams app on your Windows device. 
  2. Use the Windows + R shortcut to bring up the Run dialog box. 
  3. Type the following command in the text box and press OK to execute it. %appdata%\Microsoft\Teams
  4. Use the Ctrl + A shortcut to select all the files in the given location and hit the Delete key. 

Now relaunch the Teams app and try changing your status. Hopefully, you will succeed this time.

A corrupt Teams cache often leads to status conflict on the app. Hence, you should delete the cache files which will force Microsoft Teams to rebuild cache and get rid of the underlying issues or bugs.

4. Reconfigure Coexistence Mode

Note icon NOTE
You need to have administrative privileges to perform these actions. 
  1. Visit Microsoft Teams Admin Center and log in using the administrator username and password.
  2. Navigate to the Teams module and select the Teams upgrade option. Microsoft Teams Stuck On Offline
  3. Locate the Coexistence mode and choose Teams only in the drop-down next to it. Microsoft Teams Stuck On Offline

The coexistence mode is set to Islands by default when organizations migrate from Skype for Business to Microsoft Teams which allows you to use both these apps simultaneously.

While this is useful, it often interferes with certain features of the Teams, such as preventing status updates. Switching the coexistence mode to the Teams-only option from Islands should fix the Microsoft Teams stuck on offline mode.

That’s pretty much it! We are positive that you were able to fix Microsoft Teams such that it is reflecting your current status and is no longer stuck on offline status. 

If the issue persists despite trying everything, you should consider reinstalling Microsoft Teams on your Windows PC as the last resort.

For sharing your feedback or asking queries, feel free to connect in the comments section below. 

Windows Update Error 0x8024a21e Fixed Within 5 Minutes

0x8024a21e is one of the many update error codes users encounter on their PCs. This error is made all the more frustrating as it prevents you from installing the affected update.

Disabled Windows Update services or a corrupt cache usually causes the error 0x8024a21e. Fortunately, it is pretty easy to fix, and we will show you how to go about it, just like we have done with other error codes.

How can I fix Windows Update error 0x8024a21e?

1. Use the Windows Update Assistant tool

  1. Visit the Windows 11 download page to download the Assistant tool.
    download now  0x8024a21e
  2. Click the Accept button on the license page.
  3. Tick the button for the Upgrade this PC now and click the Next button.
  4. Now, follow the onscreen instructions to complete the upgrade.

The Windows Update Assistant tool can force through your Windows update and eliminate the causes of the 0x8024a21e. It bypasses some of the glitches that might be causing the error and updates your PC automatically.

2. Restart some services

  1. Press the Windows key + R, type services.msc, and click OK.
    services
  2. Double-click the Background Intelligent Transfer Service to open its properties page.
    background
  3. Now, set its Startup type to Automatic and click the Start button if it is disabled.
    automatic 0x8024a21e
  4. Next, click Apply, followed by OK.
    apply ok
  5. Finally, repeat Steps 2 to 4 for the Windows Update service and restart your PC.

The Windows Update and Background Intelligence Transfer Service (BITS) are among the crucial services for effortlessly updating your system. So, you must ensure these services are enabled to prevent and fix the 0x8024a21e update error.

3. Run the Windows Update troubleshooter

  1. Press the Windows key + I and choose Troubleshoot in the right pane.
    troubleshoot 0x8024a21e
  2. Click the Other troubleshooters option on the new page.
    other trouble
  3. Finally, click the Run button before the Windows Update option and follow the onscreen instruction.
    run update

The Windows PC has a built-in troubleshooter for fixing update errors. This tool will help diagnose the potential cause of the error 0x8024a21e and offer a potential solution.

You can use additional troubleshooters but the built-in tool is extremely efficient.

4. Clear the Software Distribution folder

  1. Press the Windows key + E to open File Explorer and follow the path below: C:\Windows\SoftwareDistributionsoftware distribute  0x8024a21e
  2. Select everything in the SoftwareDistribution folder by pressing the Windows key + A.
  3. Finally, select the Delete icon at the top and try to install the updates.

Sometimes, the error 0x8024a21e can be due to the accumulation of corrupt update files. You need to clear these files and restart the automatic update services to get past the error.

5. Reset Windows update components

  1. Press the Windows key, type cmd, and choose Run as administrator to open an elevated Command Prompt.
    cmd admin
  2. Type the commands below and press Enter after each: Net stop bits Net stop wuauserv Net stop appidsvc Net stop cryptsvc Del %ALLUSERSPROFILE%\Microsoft\Network\Downloader\qmgr*.dat /Q Del "%HOMEDRIVE%\Users\All Users\Microsoft\Network\Downloader\qmgr*.dat" /Q Del %WINDIR%\SoftwareDistribution\*.* /s /Q Net start bits Net start wuauserv Net start appidsvc Net start cryptsvc
  3. Finally, wait for the commands to finish running and restart your PC.

In some cases, you might be experiencing the Windows update error 0x8024a21e while trying to install a cumulative update because of issues with some update components. Resetting all the related components and processes should fix the issue quickly.

Another similar error is the 0x8024d001, but this guide will help you fix it quickly.

While it is true that the Windows Update error 0x8024a21e does not cause any lasting damage to your PC, you still need to fix it to get the latest features on your device.

Doing this should now be easy with the detailed solutions provided in this guide. To prevent a future occurrence, always keep the Windows Update Services running.

However, if you still can’t eliminate the error after applying all the solutions above, you might need to perform an in-place upgrade. This will help you bypass the error and force your PC to update.

On a final note, it is important to note that you can’t just apply the same solution to all Windows Update errors. This is because the potential causes differ. So, if you are facing other issues like error 0x8024001e, check our guide on the topic to fix it.

Does the Xbox Ambassadors program give you free games?

The last couple of months have been very exciting for gamers everywhere, but especially for those who play on Xbox. Diablo IV arrived on Xbox, and it was well received by the gaming community. Starfield, one of the most anticipated games of the year, will be released in September on Windows and Xbox. And you can get it for free if you know your way around Microsoft Rewards.

Over 1000 new games are in development for the Xbox console, and Game Pass will come to GeForce Now, which will allow you to play your Xbox games from everywhere, on any device available.

Xbox also has the Xbox Ambassadors program, which is a sort of program that you can join, especially if you’re an Xbox gamer. Once you’re there, you can guide others on how to play in Xbox, while providing a safe space for them to do so.

And it seems the program also rewards those who join the Xbox community. For example, this user received a message from the Xbox Ambassador program letting them that a Diablo IV ultimate edition is waiting for them.

But does the Xbox Ambassadors program give you free games? Let’s take a deep dive and see what’s going on.

Free games with the Xbox Ambassador program

Officially, the program doesn’t say anywhere that it’s giving away free games, especially unique editions of games. The user received an Ultimate Edition of Diablo IV for free through the Xbox Ambassador Program, and they actually verified its legitimacy with Xbox support.xbox ambassadors free games

Xbox validated it, and the program said that indeed, they have been the ones who sent the gift. However, they also somehow said that a friend might just sent a Diablo IV gift through the Xbox Ambassador program to the user.

I did I went back and forth with support just to check its legitimacy and they said it was legit! I’m installing it right now. I asked support why they’re sending out free ambassador gifts and they just gave me the generic spiel about how “Xbox is always trying to hold up their gamers and support them for all they do for the community” but they also mentioned that it could have been a anonymous gift from a friend as well so I don’t know for sure but it’s legit!

Here’s what the Xbox users are saying about it

However, others on the Reddit thread reported that you can get free access to games on the program. Some of them even said that if you, as an Xbox gamer, write reviews for games, the program might suddenly reward you with free games.

They seem to be revamping the Ambassador programme. I noticed you can opt in to essentialy provide more legit reviews of titles and updates, guessing it’s randomly sending out codes to people at the moment.

If it came from.the official Xbox account, then you don’t need to worry, its not a scam. They do stuff like this a lot, giving away free stuff to people.

I did a survey for Xbox once and after I was asked a question. “If you were to be compensated for this survey, what game would you choose?” I don’t remember what all of the choices were but I know about a month Ryse Son of Rome showed up on my doorstep. It was awesome.

So, as you can see, depending on your activity on the Xbox platform, you can actually end up with free games from the Xbox Ambassador program. But it seems that it’s a game of luck, sometimes. However, next time you play something on Xbox, and you like it, write a review for the game. You might find yourself lucky enough to get a gift from Xbox.

What do you think about this? Let us know in the comments section below.

How to Fix Microsoft Word not Going to Next Page

When typing on Microsoft Word and you get to the end of a page, it naturally creates and goes to the next page. But what happens if Word deviates from the norm and stays on the current page?

Firstly, know that this is likely caused by formatting settings such as the Pagination options. But it is still not the most difficult issue to fix, as these settings can be easily reversed.

In this guide, we have prepared quick and effective methods to help you restore normal service on Word.

Why is Microsoft Word not going to the next page?

The factors that can cause Microsoft Word not to go to the next page are within a close circle. Below are some of the notable ones:

  • Formatting issues: Whether you are editing a professional document as a business owner or just a normal document, you should be careful with the formatting options. This is especially true for pagination settings when editing a document.
  • Lack of page break: In some cases, your document might require you to insert a manual page break due to some of your settings. If the page break is absent, you are likely to experience this issue.
  • Issues with Word installation: At times, this problem might be due to your document editor – Microsoft Word. What you need to do here is to update the app or repair your installation.

How can I fix Microsoft Word if it is not going to the next page?

1. Insert page breaks

  1. Launch Word and open your document in Edit mode.
  2. Now, place your cursor at the point to end the page and also to start the next page.
  3. Click the Insert tab in the Ribbon.
  4. Finally, select the Page Break option. You can do the same by using the Ctrl + Enter key combination.
    insert page break microsoft word not going to next page

Word puts an automatic page break at the end of each page in your document by default. However, this might change due to some settings in document properties.

In this case, you can make Microsoft Word go to the next page by creating a manual page break. While this might leave some extra spaces sometime, it will surely yield the desired result.

2. Check the formatting options

  1. Launch Word and open your document.
  2. Click the Layout tab at the top.
  3. Now, click the Columns drop-down menu in the Page Setup group.
  4. Next, click More Columns…  in the dropdown menu.
    layout
  5. Click the preset picture for One in the Columns dialog box.
  6. Finally, click the OK button.
    one microsoft word not going to next page

Another quick solution that can help you force Microsoft Word to go to the next page is to make sure your formatting settings are favorable. 

3. Transfer the Word file to another document

  1. Launch Microsoft Word and click the View tab at the top.
  2. Select the Draft option to show the document in the Draft view.
    draft view
  3. Now, copy the content of the entire document except the final paragraph mark.
  4. Paste the file into a new blank document and check if the issue persists.
  5. Finally, if you want to hide or show the paragraph marks, click its icon on the Home tab.
    home

With this, Microsoft Word text and pictures should go to the next page when it reaches the end of a page. Note that this option works if you are experiencing this problem in an existing document.

If it also occurs when you select the blank document option to create a new document, perform the steps below to rename the Normal template:

  1. Close all Word windows and Office programs.
  2. Now, press the Windows key, type cmd, and select Run as administrator from the context menu under Command Prompt.
    cmd admin
  3. Type the command below and hit Enter to run it: ren %userprofile%\AppData\Roaming\Microsoft\Templates\Normal.dotm OldNormal.dotmrename microsoft word not going to next page
  4. Finally, wait for the command to finish running, exit Command Prompt, and restart Word.

By running this command, you should be able to restore Word’s default setting and prevent macros, and formatting, preventing Microsoft Word from going to the next page when necessary.

4. Update or repair Word

  1. Launch Word and click the File tab at the top.
  2. Select More from the context menu in the left pane.
  3. Now, choose the Account option.
    more account
  4. Next, click Update Options under the Product Information section.
  5. Select Update Now, and wait for the process to complete.
    update now
  6. If this does not work, close Word, press the Windows key + R, type appwiz, and hit Enter.
    appwiz
  7. Right-click your Office installation and select Change.
    change
  8. Finally, choose Online repair and click the Repair button, and wait for the process to complete.
    online repair

It can be frustrating if Microsoft Word won’t go to the next page when a page is filled. But with the solutions in this guide, you should be able to rectify this.

Similarly, if you are getting a Word can’t do this because a dialog box is open error, check our expert-written guide to fix it.

Feel free to let us know the solution that helped you fix this issue in the comments below.

Microsoft offers more cloud security at no additional cost

Microsoft has been under fire recently, regarding cybersecurity, when a Chinese threat actor the Redmond-based giant tech tracked as Storm-0558, hacked and gained access to email accounts affecting approximately 25 organizations. They were government agencies and consumer accounts of people associated with these organizations.

The attack happened in May and June, and Microsoft acknowledged the issue on June 16, 2023. That’s also when the company started an investigation.

Following the investigation, many users were upset about it to the point of criticizing Microsoft for charging them to protect themselves against Microsoft’s mistakes.

So, in retaliation, the Redmond-based tech giant announced that companies will get a cloud security expansion at no additional cost. As Microsoft is expanding its cloud security, you will be able to see the updates, changes, and improvements by using Microsoft Purview Audit.

Today we are expanding Microsoft’s cloud logging accessibility and flexibility even further. Over the coming months, we will include access to wider cloud security logs for our worldwide customers at no additional cost.

Microsoft

Microsoft cloud security expansion at no additional cost

Microsoft announced the cloud security expansion as a collaboration with CISA. If you remember, earlier this year, a new CISA tool was made available on Microsoft Cloud services across the board. The tool, Untitled Goose Tool, can prevent hacking attempts in cloud services, and it was well-received by the industry.microsoft cloud security expansion

So now, the two entities are collaborating once again to strengthen cloud security for their customers. According to Microsoft’s announcement:

  • Microsoft Purview Audit (Standard) customers will receive deeper visibility into security data, including detailed logs of email access and more than 30 other types of log data previously only available at the Microsoft Purview Audit (Premium) subscription level.
  • Microsoft is also increasing the default retention period for Audit Standard customers from 90 days to 180 days.
  • Commercial and government customers with E5/G5 licenses already using Microsoft Purview Audit (Premium) will continue to receive access to all available audit logging events, including intelligent insights, which help determine the scope of potential compromise by using the Audit log search in the Microsoft Purview compliance portal and the Office 365 Management Activity API.
  • Additional Audit Premium features include longer default retention periods and automation support for importing log data into other tools for analysis. 

The Redmond-based tech giant will start rolling out these updates in September 2023 to all government and commercial customers.

You can visit the Microsoft Purview compliance portal and select Audit from the Solutions panel, to access the updates and the new logs as they become available.

It seems Microsoft is taking all measures to make sure a breach of the sort that happened in May, won’t happen again. We can hope, of course, and with everyone on board, such situations can be easily detected and dealt with without aggravating the situation.

What do you think about Microsoft’s latest cloud security expansion? Let us know in the comments section below.

How to Uninstall Adobe Software Without Logging in

As good as the Adobe Creative Cloud software is, there are times you might want to remove it. However, users complain that they can uninstall this Adobe software without logging in.

Aside from this, the software sometimes asks for some updates to be installed before it can be removed. This can be pretty frustrating, especially for users that have lost their passwords. Fortunately, you can remove it successfully with the solutions in this guide.

Why is Adobe software not uninstalling?

The major reason you can’t uninstall the Adobe software without logging in is for verification. Adobe needs to deactivate your license if you have limited devices/activations on your account.

This can only be done after you have logged in and the software is able to confirm that you are the one trying to remove it.

How do I completely uninstall Adobe software offline?

1. Use the Adobe Creative Cloud Cleaner Tool

  1. Visit the official website to download the Adobe Creative Cloud Cleaner tool. 
  2. Right-click the downloaded file in File Explorer and select Run as Administrator. If you do not see the Run as Administrator option, double-click the file to run it.
    run as
  3. Now, select your language by pressing the corresponding letter (e for English) and hit Enter.
    e uninstall adobe software without login
  4. Press Y to accept the Adobe End-User License Agreement and press Enter to continue.
    y
  5. Next, press the corresponding number to select the type of Adobe software you want to uninstall and hit Enter.
    choose software
  6. Press the number that corresponds to the exact app you want to remove.
  7. Now, press Y to confirm the removal and hit Enter.
  8. Wait till you see an Adobe Creative Cloud Cleaner tool completed successfully message and press Enter.
  9. Finally, restart your PC.

Since users have been complaining about being unable to uninstall Adobe software with or without logging in, Adobe released an official removal tool to remedy this.

This script removes all Adobe apps on your PC without issues.

2. Use the Control Panel

  1. Press the Windows + R key, type control, and click the OK button.
    control uninstall adobe software without login
  2. Select Uninstall a program under the Programs option.
    uninstall a
  3. Now, right-click the Adobe Creative Cloud software or other product and select Uninstall.
    uninstall control
  4. Finally, follow the onscreen instructions to complete the process.

If you can’t uninstall the Adobe Creative Cloud software without logging in, you can use the Control Panel instead. This bypasses the sign-in requirement and allows you to remove the app.

3. Use the Settings app

  1. Press the Windows key + I to open the Settings app and select Apps in the left pane.
  2. Choose Apps & features in the right pane.
    app and uninstall adobe software without login
  3. Now, click the three vertical dots before the Adobe Creative Cloud software.
  4. Finally, select Uninstall and follow the onscreen instructions to complete the process.
    uninstall settings

Another system option for uninstalling the Adobe software without login is to go via the Settings app. This also helps you bypass the login requirement.

4. Use a third-party software uninstaller

If any of the options above fail to help you uninstall the Adobe software without login, we recommend using a third-party uninstaller software.

Luckily, we have a list of the best uninstaller software that will take care of removing any stubborn app.

There you have everything you need to successfully uninstall any Adobe software without login. With the variety of options provided in this guide, the task should be pretty easy for you.

Are you looking to uninstall your software because of errors like the Adobe app is not genuine? Our detailed guide can help you fix that quickly.

Feel free to let us know the method that worked for you in the comments below.

Opera GX AI Prompts: How to Enable & Disable

Opera GX, the gaming-oriented web browser introduced AI prompts in its address bar to allow users quickly access AI services. These new AI prompts feature is currently in Early Access and one can try them to shorten or explain articles, generate tweets, and more based on highlighted text.

In addition to these AI prompts, Opera GX has added ChatGPT and ChatSonic to its sidebar for quick access to the platforms.

Opera integrated AI capabilities into its gaming-centric browser so that users could leverage more. These prompts have been created together with Open AI. They use ChatGPT and ChatSonic to explain or summarize the text you highlighted.

One can also install AI extensions to get things done, but having prompts enabled right inside the browser gives more ease.

Opera GX

Opera GX

Opera GX is a gaming-centric browser that has a range of features and optimizations specifically crafted for the gaming community.
Download Install Now

What are Opera GX AI prompts?

Smart prompts on Opera GX browser are nothing but instructions or seed text provided to elicit a desired response. These instructions are preset and you don’t have to write a complete text or code in order to get a response.

For instance, Opera GX has an AI prompt called “Shorten,” which shortens the highlighted text in a mere click. Otherwise, you’d go to any AI tool or ChatGPT and input that sentence first and ask it to shorten it. AI prompts save your time and improve your browsing experience.

How do I enable AI prompts in Opera GX?

Follow the below steps if you can’t see the AI prompts tab inside the address bar.

AI prompts in the Opera GX browser are enabled by default. Just make sure you’re using one of the latest updates of the browser. It’s assumed that you’re using Opera GX as your default browser but you can also stop the Opera GX browser from opening on startup.

  1. Click on the easy setup icon in the sidebar
  2. Scroll down to see a section called “AI Prompts”
  1. By default, all three options are enabled.
  2. Once enabled, you’d see AI prompts tab in the address bar of Opera GX browser

Note: The AI prompts tab appears when you open a webpage so that you could leverage them. You may not see them in the address bar on SERP results.

  1. The list of smart AI prompts includes ‘Shorten,’ ‘What’s the main point,’ ‘Find the related content,’ ‘Create a tweet,’ and ‘Create a meme idea.’

How do I turn off AI prompts in OperaGX?

If you do not wish to see AI prompts tab in the address bar or in the text highlight popup, you can simply disable the feature. Just follow the same instructions up until step 3.

Simply disable the AI prompts toggle switch and both “AI prompts in address bar” and “AI prompts in text highlight popup” will turn off at the same time. You can also disable either option in case you do not wish to get rid of them completely.

In addition to AI prompts, Opera GX has also added AI features to its sidebar in the form of special features ChatGPT and ChatSonic. This way Opera GX gives you direct access to language models. So, other than quick access to some smart prompts, you can do more using AI features in Opera GX.

It is possible that Opera may bring more AI prompts in the future, but it hasn’t made any such promises.

How to Fix Microsoft Word it it’s not Continuing Numbering

Users complain that Microsoft Word is not continuing numbering. This is despite the fact that you didn’t turn off auto-numbering on Word. One of the major causes of this issue is problems with the multi-level list you created. This might come in the value definition or the starting method. In this case, you need to recreate the list properly to solve the problem.

Sometimes, this problem can be due to your number values. Changing these values should restore normalcy here.

What do I do if Word doesn’t continue numbering?

1. Recreate the list style

1.1. Set up heading paragraph styles

  1. Open the document with the numbering problem and right-click the Heading 1 style at the top.
  2. Select Modify.
    modify heading 1 Microsoft Word not continuing numbering
  3. Now, click the Style based on dropdown and select (no style).
  4. Next, click the Format button in the bottom left corner and select Paragraph.
    no style
  5. Set the Left Indent to 0 and the Special Indent to none, and click OK.
    left special Microsoft Word not continuing numbering
  6. Go back to the document, right-click the Heading 2 style, and select Modify.
    modify
  7. Click the Style based on dropdown and select Heading 1.
    style based
  8. Repeat steps 3 and 4 for this Heading 2.
  9. Finally, modify Heading 3 based on Heading 2 and continue the trend for the other heading styles following the steps above.

The first thing to do in the quest to ensure Microsoft Word is continuing numbering is to set up the Heading styles. This will be linked to the list style later.

1.2. Create list style

  1. Click the Multilevel list option in the Ribbon.
  2. Select the Define New List Style option.
    define new list Microsoft Word not continuing numbering
  3. Now, name your list style, then click the Format button and select Numbering.
    format
  4. Next, click the More button on the Modify multilevel list page.
    more
  5. Select 1 in the Click level to modify list, then select Heading 1 in the Link level to style box.
    level heading 1 Microsoft Word not continuing numbering
  6. Choose 2 in the Click level to modify list, then choose Heading 2 in the Link level to style box. Repeat this to link the other levels to the corresponding Heading.level 2
  7. From here, select 1 in the Click level to modify list and delete the entry in the Enter formatting for number box.
  8. Type the numbering format you want in the Enter formatting for number box. For example, Step 1 or Module 1.
  9. Click the Number style for this level option and select your preferred numbering type.
    enter format
  10. Go back to the Click level to modify list and set up the numbering for the other levels as you want.
  11. Set up your indents and click the OK button on the two open pages to save your changes.
    indent ok
  12. Finally, to apply the list, click the paragraph you want to apply it and select the Heading 1 style in the Ribbon.

With this, you have set up your list style successfully. There are lots of customization options still available, depending on your preference.

But the above is the basics you need to ensure Microsoft Word is continuing numbering in your document.

2. Adjust the Continue numbering option

  1. Right-click the top of the number 1 on your list.
  2. Choose the Continue Numbering option. This should pick up the numbering from the previous numbered list.
    continue  Microsoft Word not continuing numbering
  3. If this does not work, right-click the top of number 1 again and select Restart at 1.
    restart one
  4. This will restart the numbering completely and place a restart marker in the first paragraph of the list.

If you just want to make sure Microsoft Word is continuing numbering for the present document you are working on for printing, you can use this method. However, you will have to repeat this manually for the lists having the problem.

3. Change number values

  1. Right-click the first incorrect number on your list and select Set Numbering Value.
    set value
  2. Now, choose whether to Start a new list and type 1 in the Set value box. This will help restart the numbering from 1.
    start new Microsoft Word not continuing numbering
  3. You can also Continue from the previous list to assign the next number from the last numbered list.
  4. Finally, click the OK button.

With this solution, we can conclude this comprehensive guide on how to fix Microsoft Word if it is not continuing numbering.

If your Word document won’t save, check our detailed guide to fix it effortlessly.

Feel free to let us know the solution that helped you fix this issue in the comments below.

Microsoft Office isn’t Updating? 5 Ways to Force it

Microsoft occasionally releases updates to Office 365 that contain bug fixes for errors and new features. However, some of our readers couldn’t update their Office app.

Hence, this article will briefly discuss why Microsoft Office isn’t updating and provide five ways to help you fix the error.

Why is Microsoft Office not updating?

  • Poor internet connection – Office requires a stable internet connection to download the updated files; if your PC connection is unstable or limited, you’ll run into the Office not updating error.
  • Corrupt Office app – While using the Office app, it can accumulate corrupt files and data, which conflict with its normal operations, preventing actions like automatic updates.
  • Conflicting Office versions – If multiple versions of Office are installed on your PC, they can conflict with each other and prevent them from updating.
  • Group policy settings – Some PCs have group policy settings that prevent users from taking specific actions. In other words, you might not have permission to update Office.

How do I force Microsoft Office to update?

Before proceeding with more advanced solutions, restart Office in Safe mode, check and fix your internet connection, and restart your PC.

1. Verify the Group policy settings

  1. Press the Windows key + R, type in gpedit.msc, and hit Enter to launch the group policy MMC window.
  2. Click and expand Computer Configuration, and expand Administrative Templates.
  3. Expand System, expand Internet Communication Management, and click on Internet.
  4. In the Details section, double-click Turn off access to all Windows Update features.
  5. Click Disabled and click OK.
  6. In the Group Policy window, navigate to Administrative Templates and click the Start Menu and Taskbar node.
  7. In the Details section, double-click Remove links and access to Windows Update, click Disabled, and then click OK.
  8. Restart your PC and check if the Office update error is fixed.

Some PCs have working group policy settings that prevent them from performing specific actions. This is usually done to protect a company’s larger network, but it can also prevent you from updating Office.

To fix this, you’ll need to know if you have the permissions and access required to update Office 365. Here is a guide showing you how to enable and open group policy editor.

2. Launch Office as an administrator

  1. Press the Windows key, enter the name of any Office application, e.g., Excel, right-click on it, and select Run as administrator.
  2. In the UAC prompt, click Yes to grant Office admin access.
  3. When the Office app launches, click on File, and select Account.
  4. On the right pane, click Update Options, and select Enable Updates.
  5. If you receive a prompt asking you to let Microsoft apply these changes, click Yes.
  6. Close the Office application and restart it to see if Office will download updates.

3. Perform a quick or online Office repair

  1. Press the Windows key, type Control Panel, and hit Enter.
  2. In the Control Panel window, click Programs, and select Uninstall a program.
  3. Locate & select your version of Microsoft Office from the list of applications, and click Change at the top of the window.
  4. Select Quick Repair, and click on Repair.
  5. Wait for the process to be completed and restart your PC.
  6. If it doesn’t work, repeat this solution, but this time, choose Online Repair.

If the Office application is corrupt or has corrupt files, it can prevent you from updating the software. Repairing Office 365 is one way to fix the inability to update Office error.

You can also check out our guide on how to fix the unable to repair Office in Windows.

4. Update Office using command line

  1. Press the Windows key, type cmd, and click Run as administrator.
  2. In the command prompt window, run the following command: C:\Program Files\Common Files\microsoft shared\ClickToRun\OfficeC2RClient.exe" /update <user>
  3. However, you’ll have to change the <user> to your username; it’s usually shown in the command prompt.
  4. Restart your PC, and check if Office is now updating.

If you cannot update Office through the usual process, you can run specific commands to force an Office update. Here is a guide on what to do if Windows update is not working.

5. Reinstall Office

  1. Press the Windows key + I to open the Settings app.
  2. Click on Apps on the left pane and click Installed Apps.
  3. Select Microsoft Office 365, click on the three dots next to it, and select Uninstall.
  4. Then, click Uninstall in the pop-up window to confirm the uninstallation.
  5. Once the software is removed, visit the Official Microsoft website, and download the latest version of Office 365.
  6. Once the file is downloaded, double-click on the .exe file to run the installer, and follow the onscreen instructions to complete the installation.

Reinstalling Office removes all old Office 365 data and downloads the latest software version to help you fix the error. Our detailed guide will show you how to install Office in Windows 11.

Suppose you can’t update your Office application. In that case, you most likely have a faulty internet connection or don’t have permission to update the software due to group policy restrictions.

Luckily, with the steps in this article, you should be able to force update Office and fix the update error. If you have further questions or suggestions, kindly drop them in the comments section.

And don’t hesitate to take a closer look at our guide on solving Microsoft Office updating Office, please wait a moment error. If your update issues go beyond Office, you may want to force your Windows 11 system update to ensure everything’s running the latest version.

What is PC Bottlenecking? [Causes & Prevention]

You’ve likely encountered the term bottlenecking if you’re a PC gamer. It’s a complex term that infers you’re not getting the best performance out of your PC.

This article covers a comprehensive overview of computer bottlenecking, its signs, causes, and solutions. You can also check our recommended bottleneck calculators for accurate diagnosis.

What is computer bottlenecking?

A bottleneck is a term commonly used by PC gamers to describe a situation where one PC component restricts the performance of another component. A bottlenecked computer simply means that its performance is being limited by one of its hardware components.

Generally, a PC bottleneck involves three major components: the CPU, RAM, and the graphics card. During a bottleneck, if the graphics card is way more advanced than the CPU, its performance will automatically reduce to match the capacity of the central processing unit.

Here are some common examples of PC bottlenecking:

  • CPU/GPU bottlenecking – A PC with an average CPU paired with a powerful GPU will lead to bottlenecking due to slow performance. Thus, leads to high CPU and low GPU usage.
  • GPU/CPU bottlenecking – If your PC has a top-of-the-line CPU paired with a mid-range GPU, you’ll experience a bottleneck because the CPU will render the game much faster than the GPU’s capacity.
  • Hard drive bottlenecking – If you’ve upgraded your CPU, GPU, and RAM but are still sticking to an old hard drive, you’ll experience slightly slower loading times or stuttering when your program tries to pull information from the hard drive. 
  • Display bottlenecking – Pairing a graphics card with a below-par monitor will cause a display bottleneck because you won’t get the most from your hardware due to the poor monitor.
  • RAM bottlenecking – Running more applications at the same time, or not enough memory to run a single, more demanding game can lead to PC slowdowns or app crashes.

What causes bottlenecking on my PC?

  • Imbalanced hardware – If you build a PC with components with varying performance and capacities, you’ll likely experience a bottleneck due to the imbalance created by the components.
  • Outdated software – Hardware components like GPUs need software to function correctly. If this software is outdated, it can lead to performance issues, e.g., a bottleneck.
  • Viruses and malware – If your PC is infected, it can lead to high CPU usage and a bottleneck.

How to know if my computer is bottlenecking?

  1. Open a game or app that causes issues with PC performance and close all other tasks.
  2. Now, press the Windows key + X and select the Task Manager option.
  3. Click the Performance tab at the top.
  4. From here, check if any of the CPU, GPU, Memory, or Disk hits 100% consistently for a long period of time.
  5. If any of your core PC components hits maximum value for a long time, then it is the cause of bottlenecks on your computer.

MSI Afterburner is one of the most popular PC monitoring tools available today and can also be used for GPU overclocking. You can download and launch the software to see a detailed CPU and GPU performance log.

On average, anything below 50% utilization is considered low usage, while anything above 70% is high. If your CPU and GPU usage ranges from 50% to 70%, it’s balanced. 

How can I prevent PC bottlenecking?

1. Upgrade your PC Components

If you’re experiencing a bottleneck caused by an underperforming PC component, e.g., GPU, CPU, RAM, or hard drive, upgrading the component is the best way to fix the issue. This is because building a PC with components having an imbalanced performance ratio will lead to bottlenecks.

Balancing your PC isn’t a complex task; all you need to do is take stock of the type of hardware you’re running and contact the manufacturer for the corresponding type.

2. Scan for malware

  1. Press the Windows key, type in Windows Security, and hit Enter.
  2. In the Windows Security window, click on Virus and Threat Protection.
  3. Under the Current Threats section, click on Scan Options.
  4. Select the Full Scan option and click Scan Now to initiate the scan.

Viruses trigger high CPU usage in computers, which can be misinterpreted as a bottleneck. If your PC is infected with a virus, it’ll lead to a spike in CPU usage, leading to a bottleneck.

You can also check out our guide showing you the best antivirus tools for Windows in 2023.

3. Update drivers

  1. Press the Windows key, type in Device Manager, and hit Enter.
  2. In the Device Manager window, scroll through the list of drivers, and check to see if there is a yellow alert symbol next to the option.
  3. Right-click on the driver, and select Update driver.
  4. In the next window, click Search automatically for updated driver software.
  5. Once you’ve updated all the drivers, restart your PC and check if the error is resolved.

Sometimes, you might experience a bottleneck if one component runs outdated software. Updating the drivers of such components can help fix PC bottlenecking.

Here is a detailed guide showing you how to install drivers manually.

4. Adjust in-game settings

If you’re experiencing a bottleneck while playing games, you can fix or prevent it by adjusting the in-game settings.

Lowering the graphics, resolution, and other settings can help balance the performance of all components on your PC.

Also, avoid running more apps at the same time and disable the ones you don’t use. It’s the most sensitive thing to do to avoid bottlenecking.

Most traditional Windows users don’t have to worry about bottlenecks and PC efficiency, but if you’re a gamer or a heavy user, you’ll often experience bottlenecks. Identifying and resolving bottlenecks are easy and can be done by applying the steps in this article.

If you’ve got other suggestions on preventing a bottleneck, please let us know in the comments.

Microsoft layoffs: Over 1,000 axed as sales and customer service division undergo transformation

In a recent development over the past week, tech giant Microsoft reportedly laid off over a thousand employees, overshooting its previously announced figure of 10,000 layoffs for this year. Sources privy to the circumstances, who chose to remain anonymous due to the delicate nature of the situation, revealed this to news outlet Insider on Wednesday.

Focus on Sales and Customer Service Departments

The bulk of the job cuts affected the customer service and sales positions, causing ripples and raising concerns throughout the industry. The move led to the dissolution of the “Digital Sales and Success” group, a sales and customer service team that once boasted of thousands of personnel.
However, the cleansing didn’t stop there. Microsoft also wielded the axe among engineering project managers and marketing departments.

The focus is more to accelerate consumption than it is to help customers. What was promoted as one of the largest customer service groups in the industry is now struggling to keep up with demand, said one source, as per Insider.

Customer Solutions Manager Role Dissolved

The noteworthy announcement was the dissolution of the customer solutions manager role, with Insider reporting that the employees affected were transferred to customer success account management. However, the number of employees who moved to this role was noticeably small compared to those whose positions were terminated.

Microsoft Leadership’s Silence

Two individuals who spoke to Insider claimed that many managers were kept in the dark concerning the layoff plans, pointing out a noticeable silence from Microsoft’s leadership team. The company’s chief commercial officer, Judson Althoff, faced criticism for his lack of transparency, specifically for not providing more details on the layoffs and a planned sales kickoff event this year. The information came to light through internal messages shared with Insider.

Specifically, an internal post directly connected to the event sparked a wave of speculation as an inquiry was lodged over whether the roles of the ousted sales team would be filled by AI tools.

Furthermore, in a recent Worker Adjustment and Retraining Notification (WARN) report, Microsoft disclosed its decision to let go 276 employees from its workplaces in Redmond and Bellevue, both located in Washington state.

Via Business Insider

Facebook isn’t Sending Your Security Code? How to Fix it

Getting an authorization code if you are trying to sign into your Facebook account with a different browser or device is an additional security feature that helps to protect your account. But, some of our readers have reported that Facebook not sending a code to log in.

Waiting endlessly for Facebook to send a security code can be frustrating and time-consuming. In this article, we will take you through how to fix the issue.

Why am I not receiving my SMS code from Facebook?

There can be several reasons why your SMS code from Facebook may not arrive. Below are some of the common reasons:

  • Facebook server issues – If there are Facebook server problems, users may not receive security codes to log into their accounts.
  • Outages with email or mobile network provider – Your email or mobile network provider may be experiencing outages or technical difficulties.
  • Incorrect credentials – You may have entered your phone number or email address incorrectly, leading Facebook to send the verification code to the wrong credentials.
  • Coverage problems – If you and your phone are in an area where you don’t have GSM signal, you will have problems receiving the code.

Above are some possible reasons why users may not receive Facebook security codes. Now that you know what causes the issue, let’s proceed to how to fix it.

How can I get Facebook to send a security code?

It would help if you considered performing the following preliminary checks:

Having confirmed the above checks, if you have other methods on how to get your Facebook security code, work your way through any of the methods provided below.

1. Use your security questions

  1. Go to the Facebook login page and click on Forgotten password.
  2. Enter the username or phone number to find your Facebook account.
  3. Then, choose the Security Questions option.
  4. Next, select the I’ll answer my security question option.
  5. Answer the asked security question correctly, and you will be taken to the Password reset page.
  6. Now, set a new password for your account to access it. 

Once you can answer your security question, you can recover your Facebook account without receiving login credential codes.

2. Use your Facebook trusted account

  1. From a computer, navigate to the account profile you’d like to recover.
  2. Click on the menu (three dots) icon below the cover photo.
  3. Select Find support or report profile.
  4. Choose Something Else, then click Next.
  5. Then, click Recover this account and follow the on-screen instructions to complete the recovery process.

To use this method, you must provide the necessary information to ensure the account belongs to you. You can get your Facebook code using trusted contacts.

3. Receive your code using WhatsApp

  1. Go to your Facebook login page and click on Forgotten password.
  2. In the space provided, enter your mobile number and click on Search.
  3. If your Facebook phone number is registered on WhatsApp, click on Try another way.
  4. Then, select Resend code to WhatsApp from the available options, then press Continue.
  5. Then, check your WhatsApp account for a message from Facebook with your code.
  6. Once found, enter the six-digit code in the space on the Facebook login page, and you’ll be back in your account.

To use this method, you must ensure your WhatsApp account is active and registered with the same phone number as your Facebook account.

You should now be able to find your security code in your email inbox or spam folder.

Further, having applied any of the methods provided in this guide, if the Facebook server is not experiencing downtime, you should be able to receive your security code and gain access to your Facebook account.

Also, if the Facebook app is not working on your PC, you can try logging into your Facebook account using Web browsers.

Should you have further questions or suggestions regarding this guide, kindly drop them in the comments section below.

Can’t Highlight in Microsoft Word: 4 Steps to Fix it

Microsoft Word can sometimes develop issues like any other computer program. Some of our readers have recently complained about how they can’t highlight in Microsoft Word on their Windows PC.

If you have been wondering why your Microsoft Word couldn’t highlight, this article will take you through the causes and detailed steps to apply to fix the issue.

Why can’t I highlight words in Microsoft Word?

You can’t highlight Microsoft Word documents on your PC for several reasons. The following are some of the possible causes:

  • Compatibility mode – It might be compatible if you’re working with an older version of a Microsoft Word document or a file saved in a different format.
  • Document protection – If a document is protected or restricted, it can affect the functionality and appearance of highlights by editing or formatting restrictions.
  • Insufficient permissions – If you’re working on a network or shared document and don’t have the necessary permissions to modify the file, you may be unable to highlight it in Microsoft Word.
  • Microsoft Word on dark mode – Dark mode has colors designed to work well in a low-lit environment. Using dark mode in Word may cause some highlight colors not to display clearly.

Now that you know some possible reasons why you can’t highlight on Microsoft Word, let’s proceed to how to fix the issue.

What can I do if Microsoft is not letting me highlight?

Before engaging in advanced troubleshooting tweaks, you should consider performing the following initial checks:

Having applied the above checks, if you require a detailed step-by-step guide on what to do to fix the error, you can explore the fixes provided below;

1. Adjust the highlight color in Registry Editor

  1. Left-click the Start menu, type regedit, and click the Run as administrator.
  2. On the Registry Editor, navigate to the following path: HKEY_CURRENT_USER\Control Panel\Colors
  3. Then, find and double click on the Hilight
  4. On the Edit String prompt, enter the RGB Color value and click on the OK button. E.g 102,255,25

Once you have adjusted the highlight color, try to highlight words in Microsoft Word again to see if the error has been fixed. Proceed to the next fix if it persists.

2. Disable compatibility mode in MS Word

  1. Right-click on the MS Word application and select Properties from the context menu.
  2. Go to the Compatibility tab. Uncheck the box next to Run this program in compatibility mode and select lower Windows version.
  3. Finally, press the OK button.

After disabling the compatibility mode in the Microsoft Word app, now try to highlight texts and see if the issue has been fixed. If not, proceed to the next fix.

3. Disable Word’s Protected View settings

  1. Open the MS Word app, then navigate to the File tab and click Options on the left pane.
  2. Select the Trust Center tab and press the Trust Center settings button.
  3. Next, click Protected View to open the options on the right pane.
  4. Uncheck three of the selected Enable Protected View checkboxes.
  5. Now, press the OK button to save the changes and close the Trust Center window.
  6. Click OK to exit Word Options.

After disabling Word’s Protected View options, you can now try to highlight texts in your Word app.

4. Reinstall Microsoft Office

  1. Left-click on the Start button and open Control Panel.
  2. Navigate to the Programs and Features section.
  3. Click on Microsoft Office and select Uninstall from the options.
  4. Now, restart your PC and install the latest Microsoft Office version available for Windows.

By reinstalling the Microsoft Office app, you should be able to eliminate application-related issues disallowing you from highlighting in Word. It will also help to update Microsoft Office to the latest version.

If your Word is experiencing an error while trying to open files, you can explore this guide for quick fixes to apply.

Similarly, our readers have recently reported that they can’t edit Word documents, but our detailed guide has helped a lot to fix the issue. You can also check it out.

With the steps provided above, you can now highlight your text in Microsoft Word. Do not hesitate to use the comments section below if you have any questions or suggestions.

Netflix App for Windows 10 & 11: How to Download & Install

If you have recently developed a liking for binge-watching movies and TV series, you might be interested in downloading and installing the official Netflix app on your Windows 10 & 11 computer to upgrade the viewing quality.

On Windows, by using the Netflix app you may watch 4K HDR with 5.1 audio (Atmos included). As you will find out below, Microsoft Edge also has Netflix 4K support, but no 5.1 audio, unfortunately.

How can I download and install Netflix on Windows 10 & 11? 

1. Download and install Netflix via Microsoft Store 

  1. Press the Windows key to launch the Start menu, type microsoft store in the search bar on top and click the relevant search result. 
  2. When the Microsoft Store loads on your screen, type netflix in the top search bar and pick up the Netflix app from the search results in the drop-down. 
  3. As soon as you are redirected to the Netflix app download page, click the Get/Install button on the top right to start the download. Download Netflix Windows
  4. As soon as the installation is complete, the installation of the Netflix app on your PC will begin automatically. 
  5. Once completed, press the Open button to launch the Netflix app. Alternatively, you can also use the Start menu to search for and launch the Netflix app. 
  6. Press the Get Started button on the welcome screen and followed by the Next button to view and purchase the plan that seems right for you. Netflix Download Windows
  7. If you already have a Netflix account, simply choose the Sign in option on the top right to proceed further. 
  8. Provide the email address and password and press the Sign in button again to enjoy your Netflix service on Windows.

Using the Microsoft Store is the easiest and hassle-free way to download and avail of the streaming service on your Windows 10 and 11 PC. 

2. Download and install Netflix as a PWA

  1. Press the Windows key, type microsoft edge in the search bar, and choose the relevant search result. Install Netflix Windows
  2. Visit the official Netflix website using the Chromium-based web browser on Windows PC.
  3. Click the Menu icon (three dots) located in the upper right corner of the Edge browser window.
  4. Choose the Apps option followed by Install this site as an app option from the drop-down menu. Install Netflix Windows
  5. Type the relevant name in the new popup and press the Install button.
  6. The Netflix website will be installed as a web app on your Windows device.
  7. Press the Allow button on the popup to grant any necessary permissions requested by the app.
  8. To launch the Netflix PWA on your system, type netflix in the search bar and click the search result. 

Note that the progressive web app version of Netflix will function as the desktop app. However, some of the native app features like downloading content to watch offline will not be available.

What are the common issues with the Netflix app? 

Netflix can occasionally encounter some common issues. Here is how you can quickly resolve them in minutes. 

  • Buffering and Playback Issues: Upgrade your Wi-Fi router, or use a cable connection instead.
  • Trouble downloading content: Make sure your device has enough storage space, confirm that the item can be downloaded, or try using a different device.
  • Playback errors: Rebooting your Windows computer or clearing the cache can occasionally be helpful.
  • Audio sync: Change the language several times to resolve the problem. Refer to this elaborate troubleshooting guide to fix audio sync issues.
  • Quality issue: A connection check or a change in the video quality settings can frequently assist.

That’s pretty much it! We hope our guide offers a detailed insight into the download and installation procedure of the Netflix app on Windows 10 and 11. 

If you encounter any problems in downloading Netflix on your system, refer to this guide for possible solutions. 

In case you have any queries, reach out to us in the comments section. 

How To Enable History in Task Scheduler: 2 Ways

Once you enable the History in Task scheduler, you gain access to a log of executed task. With this, you can monitor task execution, troubleshoot issues, analyze performance, and maintain audit traits.

It’ll help you make informed decisions for future task scheduling. These features help optimize system performance and ensure tasks run as intended.

We outlined below a few different ways to enable the Task Scheduler history, so make sure to check them out.

How do I enable history in Task Scheduler on Windows 11?

1. Use the Windows Task Scheduler app

  1. Press the Windows key, type task scheduler, and click Open.Task Scheduler open via Windows button    
  2. Locate and right-click the Task Scheduler Library folder, then select Enable All Tasks History.Enable all  
  3. Once enabled from the actions tab, the next time a task runs, it will be recorded in the History tab.

2. Enable Task History using Command Prompt

  1. Press the Windows key, type cmd, and click Run as administrator.CMD elevated  
  2. Copy & paste the following to enable task history on Task Scheduler and hit Enter: wevtutil set-log Microsoft-Windows-TaskScheduler/Operational /enabled:true
  3. Type the following to confirm that the feature is enabled and press Enter: wevtutil get-log Microsoft-Windows-TaskScheduler/Operational Enable task history
  4. After executing these commands, Task Scheduler will enable history for all the tasks. You can check them via the History tab.

Using Command Prompt to enable Task History is only advised if you know how to use and work on the command line interface.

How can I view task history in Task Scheduler?

  1. Press the Windows key, type task scheduler, and click Open.Task Scheduler open
  2. Select the task from the list in the middle pane and go to the History tab.View Task history - Enable Task history in Task Scheduler  
  3. You can find the details of the task, including the execution, status (success or failure), exit codes, and other related information.

Why is it important to regularly check task history?

Regularly checking task history in Task Scheduler holds significant importance; some of them are:

  • Checking task history allows you to verify that critical task events have been executed as intended.
  • It ensures that important operations like backups, system maintenance, or data synchronization tasks run as scheduled.
  • Identifies patterns of failed or incomplete tasks, investigates their causes, and takes appropriate corrective actions.
  • Analyzes execution times, durations, and resource usage that can help determine any performance bottlenecks or areas for optimization.
  • Monitors task executions can help identify recurring issues, unexpected failures, or inconsistencies affecting the system’s stability.
  • The history log helps identify peak usage periods, assess resource availability, and plan accordingly.

How can I locate task history within Event Viewer?

Task Scheduler allows you to schedule and automate tasks. Event Viewer acts as a centralized event log repository, capturing a wide range of system events, including scheduled task history.

By leveraging both in-built Windows tools, you can have a more holistic view of the system’s activities and performance. Here is how you can view task history via the Event Viewer app.

  1. Press the Windows key, type event viewer, and click Open.Event Viwer open
  2. Navigate to this path: Applications and Services Logs\Microsoft\Windows\TaskScheduler\Operational Event Viewer
  3. Once you’ve located the task history log within Event Viewer, you’ll get a list of individual events related to task executions.
  4. You can check the date & time, Task status, details, results, error codes, and task actions.

 Why should I secure Task Scheduler?

Administrative permissions are crucial in securing Task Scheduler app and controlling the History feature. Here’s a brief overview of their importance:

  • Ensures that only authorized users can create, modify, or delete tasks, minimizing the risk of unauthorized or malicious activities within the scheduler.
  • Only you or other users with administrative privileges can modify task settings, including the option to turn history tracking on or off.
  • Control access to this sensitive data and ensure only authorized individuals can view, modify, or delete the task history logs. 
  • Reduces the chances of unauthorized individuals tampering with task settings, executing malicious code through tasks, or gaining unauthorized control over critical system operations.

If you are looking for a way to schedule tasks on Windows 10, we recommend you check out this guide.

Please feel free to give us any information, tips, and your experience with the subject in the comments section below.

Meta, Microsoft, Vodafone complete Amitié subsea cable, connects Europe and North America

According to TotalTelecom, Aqua Comms, Meta, Microsoft, and Vodafone have completed the Amitié subsea cable system, establishing the first direct connection between Boston to Europe and Bordeaux to North America. The trans-Atlantic system, spanning 6,783 km (4,215 miles) and built by Alcatel Submarine Networks, has landings in Lynn, Massachusetts; Widemouth Bay, England; and Le Porge, France. With 16 fiber pairs and 400 Tbps, Amitié becomes the highest capacity transoceanic communications cable ever deployed.

This isn’t the only collaboration between Meta and Microsoft, as earlier this week, both these parties joined forces to bring Llama 2 language models to Azure and Windows.

The system enhances connectivity options in the US, the UK, and France, allowing direct communication from Boston to London and introducing a new Carrier Neutral Data Center in Bordeaux. This ensures improved reliability with protected capacity on diverse routes.

A notable feature is the innovative branching unit situated 860 km from France and 650 km from the UK, enabling the switching of individual optical wavelengths or the full fiber capacity via two different switching technologies. Andy Hudson, Chief Network Officer at Aqua Comms, stated that Amitié adds a third high-capacity system to their transatlantic network, offering enhanced diversity for US and European customers.

Subsea cables like Amitié can positively impact national and regional economies, fostering the development of terrestrial fiber and local economic growth.

Amitié is now fully commissioned and tested, having been handed over to Aqua Comms, Meta, Microsoft, and Vodafone on July 16, 2023. The project was constructed under a Joint Build Agreement between the four partners, cooperating with the supplier and the landing providers.

Microsoft’s Activision acquisition nears conclusion as the FTC suspend in-house complaint

As Microsoft and the UK’s Competition and Markets Authority begin the process of hammering out concessions towards the likely approval of an eventual Activision acquisition, the US Federal Trade Commission is pausing its own in-house complaint.

Microsoft and the FTC were set to meet August 2, 2023, in front of an administrative judge in a bid to stop the multibillion-dollar acquisition of Activision, but as it stands, the regulatory body is suspending its administrative challenge without a rescheduled date earmarked on the calendar.

Following the rejection of a temporary restraining order and preliminary injunction against Microsoft’s bid to acquire Activision, as well as losing an appeal on an emergency hold against the two companies merging, the FTC has seemingly rethought its approach to blocking the largest game-related merger in recent years.

The FTC remains free to refile its complaints at a later time if it so chooses but as the CMA and Microsoft looks to try and wrap of the re-review of the acquisition by a new extended purchasing timeline of October 18, 2023, it feels doubtful that the FTC revisits a suspension over the next few months.

As Microsoft rounds the corner on its $62.B deal with Activision, the company will be doing so with fewer hurdles, and today’s FTC news is yet another problematic obstruction being removed from the company’s pay the deal going forward.

Can the open-source community achieve AGI AIs with Llama 2?

Could Llama 2 somehow encourage the open-source community to work together toward achieving AGI? Well, one can dream, but the Microsoft-Meta AI partnership is definitely a big step for it.

If you don’t know, at the Microsoft Inspire Conference 2023, something really exciting for the AI community happened.  Microsoft joined forces with Meta to form an AI partnership with Llama 2.

Today, at Microsoft Inspire, Meta and Microsoft announced support for the Llama 2 family of large language models (LLMs) on Azure and Windows. Llama 2 is designed to enable developers and organizations to build generative AI-powered tools and experiences. Meta and Microsoft share a commitment to democratizing AI and its benefits and we are excited that Meta is taking an open approach with Llama 2. We offer developers choice in the types of models they build on, supporting open and frontier models and are thrilled to be Meta’s preferred partner as they release their new version of Llama 2 to commercial customers for the first time.

Microsoft

And so Llama 2 made its way into the world. It will be open-source and it makes it possible for developers and organizations to build generative AI tools and generative AI experiences. Plus, you’ll be able to fine-tune and deploy diverse Llama 2 models into your own AI tools. You’ll have at your disposal Llama 2 variants that can reach a 70B-parameter limit.

That means a lot of training and even more context length than ever before. And with Microsoft AI models, such as LongMem, one could wonder if we can truly achieve AGI now.

Achieving an open-source AGI with Llama 2

If you don’t know, AGI stands for Artificial General Intelligence, and it equals the human mind. In other words, an AI with AGI will be exactly like a human person. It will be able to think by itself, make conscious decisions, and rationalize events. Just like you do.llama 2 open source

AGI and ASI (which stands for Artificial Super Intelligence) have been the subject of discussions when it comes to AI. For example, the recently-founded Superalignment project aims to achieve AGI four years from now. They say once that is done, ASI will soon follow, and a lot of humanity’s problems will quickly be solved.

So are there other ways? Well, Llama 2 is an incredible model. There is no doubt Meta and Microsoft will update it even further, and if it’s open-source, then people can actually build more performant AI models as time goes on.

With such an increased volume of parameters, Llama 2 can offer developers the tools and training to create AI models that can be trained to surpass the volume. They will also be able to come up with new ways to engage, train, and learn.

The open-source community will learn only if it will keep being open-source, and let other people improve on their AI models.

And if projects such as Superalignment collaborates with Meta and Microsoft, then AGI will be here even sooner.

Llama 2 is really a breakthrough in AI because it democratizes the way we all interact with it. While the future might seem scary with an AGI AI, there are possibilities to make this right.

What do you think? Let us know your thoughts and opinions in the comments section below.

How to Easily Use Your Phone as a Keyboard For A Tablet

Suppose you own both a smartphone and a tablet. In that case, you can efficiently utilize your phone as a keyboard for your tablet, eliminating the need for a physical keyboard and enhancing your typing experience.

This guide will walk you through various methods to effortlessly type text, control your tablet remotely, or enjoy a larger keyboard.

How can I use my phone as a keyboard for my tablet?

Before engaging in advanced troubleshooting steps, you should consider performing the following checks:

  • Ensure that your phone and tablet are compatible with the method you plan to use.
  • Android: 4.4 or higher, iOS: 9 or higher, iPadOS: 13 or higher.
  • Make sure your phone and tablet are connected to the same Wi-Fi network.
  • Both devices should have Bluetooth capabilities and be enabled.
  • Confirm that your phone and tablet have compatible operating systems.
  • Grant permissions for network access on both devices

Once you are through these, move to the steps to use the phone as a keyboard.

1. Set up the Bluetooth connection

  1. Open the Settings menu on your tablet and locate Bluetooth, then toggle the button to enable it.Enable Bluetooth use phone as keyboard for tablet
  2. Now tap Pair new device.
  3. On your phone, tap Settings, enable Bluetooth.
  4. Tap on Pair new device or Pair. Your tablet should detect your phone as a nearby device. Tap on it to initiate the pairing process.Pair device
  5. If you see a prompt on your phone to confirm the pairing request, accept it.
  6. Once the pairing is successful, move to the next section.

2. Use a third-party app

  1. Download the Serverless Bluetooth Keyboard & Mouse app on Android from the Google Play Store.Install
  2. Tap on Yes on the UAC prompts for smooth operation.
  3. Once installed, open the app on your device and click Setup Remote Device.Configure connection
  4. Select the tablet or iPad’s name to initiate establishing the connection and click Use this device.USe the device How to Easily Use Your Phone as a Keyboard For A Tablet
  5. Now place your tablet and check if you get a mouse-like icon and notice movement; tap on It’s moving option on your phone.
  6. On the app on your phone, you can click Settings to customize the Keyboard settings.Settings keyboard
  7. Once set up, you can click on the Keyboard or Mouse icon to switch between them and use your phone as a mouse and keyboard for the tablet.Select Keyboard icon

You can use many other apps to connect the devices and use your smartphone as a keyboard, but we tested the one above, and it worked perfectly.

So, these are the steps you can follow to easily use your Android phone as a keyboard for the tablet, giving you comfort and versatility within a few steps.

If you are looking for step-by-step instructions to use your phone as the keyboard on your PC, we recommend you check out our detailed guide. We also have a guide on using the iPhone as a webcam on Windows 11, so don’t miss it.

Please feel free to give us any information, tips, and your experience with the subject in the comments section below.

How to enable Sydney Bing AI on Windows 11’s Copilot

You might not be aware, but Bing AI has a secret personality, Sydney, and Microsoft has been testing it out for years, according to The Verge. In fact, Sydney is not a personality, per se, but merely a sort of Bing prototype, which was used in the past for the Redmond-based tech giant to experiment on.

But it seems parts of Sydney still remain in today’s Bing AI, and with the release of Copilot on the Windows Insider Program channels, you can enable it to become Sydney.

As you might know, users have found that Windows 11’s Copilot is based on Bing AI, and Copilot itself uses Edge when interacting with you. So it is perfectly reasonable to find some old Bing AI parts in Copilot today.

And guess what? You can do it. You can actually enable Sydney Bing AI chatbot in Windows 11’s Copilot. It’s not complicated and we’re going to show you exactly how.

Here’s how you can enable Sydney Bing AI chatbot on Windows 11’s Copilot

For this to work, first you need to be in the Windows Insider Program. You can easily register to be a part of it, and it only takes a couple of minutes, a restart, and a Windows Update.

So, assuming you have done this already, here’s what you have to do:

  1. Go to the Windows Insider Program, and switch to the Dev Chanel, if you’re not on it already.sydney bing ai chatbot
  2. Update your Microsoft Edge to the latest version possible.
  3. Download the ViveTool GUI exe from here. Don’t worry, it’s all good.
  4. Run the installer and install it.
  5. Open ViveTool GUI, and select 23493.1000.sydney bing ai chatbot
  6. Enable the following features one at a time: 44774629, 44850061, 44776738, 42105254.
  7. Then, restart your computer.
  8. And there you have it. When you open your Windows 11’s Copilot, the Sydney Bing AI chatbot should be greeting you.sydney bing ai chatbot

Sydney Bing AI chatbot will use the internet as well, to provide you with answers, but it seems the tool is far more carefree than Bing AI, and Copilot.

However, it’s still an interesting tool, and it might give you a sense of what Microsoft was thinking about AI several years ago.

Will you try it? If so let us know in the comments section below your thoughts and opinions on this Bing AI prototype.

IPTV Error Code 403: How to Quickly Fix It

In the world of modern television, IPTV (Internet Protocol Television) has gained immense popularity due to its convenience and flexibility.

However, like any technology, IPTV is not immune to occasional errors, and one common issue that users encounter is error code 403.

In this article, we will delve into the meaning of IPTV Error Code 403, explore the possible causes behind it, and provide you with effective solutions to quickly fix it.

How can I fix the error code 403 on IPTV?

Before engaging in advanced troubleshooting steps, you should consider performing the following checks:

  • Check your login credentials.
  • Restart the app and the computer.
  • Disable your VPN.
  • Check the server outage for your IPTV provider.
  • Verify your internet connection is stable.
  • Try to play another video to ensure it isn’t a video-specific issue.
  • Verify if you have the subscription.
  • Contact your ISP to narrow down the reasons.

Once done, move to the troubleshooting solutions to fix the issue.

1. Disable the Firewall

  1. Press the Windows key, type control panel, and click Open.
    Control Panel start menu IPTV Error Code 403
  2. Select Category as View by & click System and Security.
    System and Security
  3. Click Windows Defender Firewall.
    Windows Defender Firewall
  4. Now click Turn Windows Defender Firewall on or off link from the left pane.
    Turn off Defender
  5. For Private network settings, click Turn off Windows Defender Firewall (not recommended), then for Public network settings, select Turn off Windows Defender Firewall (not recommended).
    Disable Firewall
  6. Click OK.

Now try to check if the error appears again; if yes, follow the solutions mentioned below. You must turn on the Firewall once the issue is resolved.

2. Clear app cache or browser cache

Note icon NOTE
If you are using the browser to access the IPTV, you need to clear caches and cookies to fix the problem.

2.1 Clear the app cache

  1. Press Ctrl + Shift + Esc to open Task Manager.
    End Task IPTV Error Code 403
  2. Go to the Processes tab, right-click the app, and choose End task.
  3. Press Windows + I to open the Settings app.
  4. Go to Apps, then click Installed apps.
    Apps, installed apps
  5. Locate the app, click three dots, and select Advanced options.
    Advanced options
  6. Click Reset to clear the saved data for the app.
    Reset

Once done, restart the IPTV app and check if the issue persists.

2.2 Delete the Browser cache

  1. Launch the browser, click three dots, and select Settings.
    Settings CHrome IPTV Error Code 403
  2. On the Settings page, click Privacy and Security.
  3. Choose Clear browsing data.
    Clear cache Chrome
  4. Now select Time range as All time, and choose Browsing history, Cookies and other data, & Cache images and files.
  5. Click Clear data.

Now restart your browser and check if the issue persists.

3. Reinstall the app

  1. Press Windows + I to open the Settings app.
  2. Go to Apps, then click Installed apps.
    Apps, installed apps
  3. Locate the IPTV app, and click Uninstall.
    Uninstall IPTV Error Code 403
  4. Once done, go to Microsoft Store.
  5. Now search for the app in the search bar.
    Install IPTV
  6. Click Get and let it get installed.

What is error code 403 on IPTV?

IPTV error code 403 is derived from the HTTP status code 403 & refers to an error message that appears when attempting to access certain content or channels on an IPTV service.

The error code signifies that the server has understood the request but is refusing to fulfill it due to access restrictions or authorization issues.

Essentially, it means that the user does not have the necessary permissions to access the requested content.

What causes a 403 error?

IPTV error code 403 can occur due to several reasons, and understanding these causes is crucial in effectively troubleshooting and resolving the issue. Here are some of the common causes:

  • Access restrictions – If you’re trying to access content that is not available in your region or without the appropriate subscription, the IPTV server restricts access to it, causing the error.
  • Server overload – This typically happens when IPTV is experiencing a high volume of traffic, and during peak usage times, then it may respond with Error Code 403.
  • Network firewall or proxy settings -In some cases, a network firewall or proxy settings can interfere with the communication between your device and the IPTV server.
  • IP ban or blacklisting – If your IP address is associated with suspicious or unauthorized activities, violating the service’s terms and conditions, the IPTV service provider may flag your IP.
  • Software issues – Outdated or incompatible software or firmware on your IPTV device or application may fail to establish a secure connection with the server, resulting in the error.

So, these are the methods you can use to fix the error code 403 on IPTV. If nothing worked for you, you must contact the IPTV service provider.

Other IPTV problems you may run into include connectivity and access issues. For example, if your streams won’t load, your ISP could be blocking IPTV, especially if you’re using certain apps or services.

Poor network performance can also lead to IPTV not working on Wi-Fi, so it’s worth checking your router and signal strength. If the TV guide is missing, you’re likely dealing with IPTV not showing the TV guide, which may require refreshing your EPG source. You might also come across error codes like IPTV error 401.

If you are looking for solutions for issues like IPTV not working, we recommend you check out this informative guide.

Please feel free to give us any information, tips, and your experience with the subject in the comments section below.

Xbox X sales are through the roof thanks to old COD servers

As you can remember, last week brought some excellent news for Call of Duty players everywhere. Microsoft finally fixed the old Call of Duty game matchmaking on Call of Duty 4: Modern Warfare, Modern Warfare 2, and Modern Warfare 3. They were fixed on Xbox 360 and players could once again play multiplayer matches.

Previously, these games’ matchmaking wouldn’t work at all, despite the huge number of active players still present in the games.

Spotted by this Twitter user, it seems that you can now find players in matchmaking very easily and it shouldn’t take more than 30 seconds to play the multiplayer matches.

Following the fix by Microsoft, Xbox 360 Call of Duty games ended up being the top-selling games in the Xbox store, according to The Verge.

People are reporting Xbox Series X’s being sold out in stores

Not only have Xbox 360 Call of Duty games became the top-selling games in the Xbox store, but it seems that Xbox S consoles are sold out in stores. People are reporting that you are no longer able to find Xbox X consoles in stores, in specific areas such as New York City area.

Apparently, none of the GameStops in the area have brand new Series X consoles in stock, according to a user on Twitter.

Xbox X consoles sales on Amazon have also risen by 84%, according to another tweet from Xbox News.

If Microsoft has something to learn from this is that a lot of people are very passionate about older games. Shadowrun, another old Xbox game, was also fixed and people reacted positively about it. So maybe, it’s time for Microsoft to consider bringing back older games to the newer Xbox consoles.

Should we thank the Microsoft-Activision deal for the old CoD games matchmaking?

Well, the timing couldn’t be more perfect. Just last week, Microsoft was handed the green in the case with FTC; the Redmond-based tech giant is now free to close the deal with Activision-Blizzard, despite the FTC’s attempts to block it.old cod games matchmaking

So, while this might be merely a coincidence, Microsoft might be preparing something here. Maybe once the deal is done, we may see Call of Duty games on Xbox Game Pass at some point in the future.

Who knows? But the recent fixing of the old Call of Duty games on Xbox 360 might very well point that Microsoft is ready to handle a lot more Call of Duty games from now on.

For now, though, if you were nostalgic about some fun multiplayer Call of Duty sessions, head over, plug in your Xbox 360, and have some good old fun, as they say.

And tell us all about it in the comments section below.

Adobe Media Encoder Is Not Installed: How to Fix This Error

Multiple users have reported that when they are trying to export or upload a video, they are getting the Adobe Media Encoder is not installed. This issue prompts up even after restarting the application.

In this guide, we will give you some solutions that will help you resolve the Adobe Media Encoder is not installed error message. Let us get right into it.

What is Adobe Media Encoder?

If you make use of Adobe products, such as Adobe Photoshop, Adobe Premiere Pro, After Effects, or any other programs, then it requires the Adobe Media Encoder to ingest, create proxies, transcode, output, and publish the media if any format.

Basically, the Adobe Media Encoder in simple terms is a powerful tool that can convert your audio or video files in various formats to make the content playable on different devices.

It is an essential component of the Adobe Creative Cloud suite and in case the Adobe Media Encoder is not working or is missing, you will come across issues such as not being able to publish or distribute the media.

Moreover, it is very important as users can send their projects directly across the Adobe suite of programs without having the need to save or export projects manually.

Why am I seeing the Adobe Media Encoder is not installed error?

We did our research and after going through multiple user reports, we have deduced a list of the most common reasons why you are seeing the Adobe Media Encoder is not installed error.

  • Corrupt installation – Installations if corrupt, can cause multiple issues as important files related to the program go missing.
  • Not available in the default location – The Adobe Media Encoder should be present in the default location. In case it is not, then it could cause issues such as the one at hand.
  • Outdated programs – Chances are that you are running an older version of the Adobe program which is why there is a compatibility issue with the Media Encoder.
  • Corrupt temporary settings – There is also a possibility that the corrupt temporary files or settings are the reason for the Adobe Media Encoder is not installed error.
  • Media Encoder isn’t installed – You might have missed installing the Adobe Media Encoder, which is why you are getting the genuine error message.

Let us now check out the solutions that will help you resolve the problem at your end.

How to Fix the Adobe Media Encoder Is Not Installed?

1. Install the Media Encoder

  1. Visit the official website of the Adobe Media Encoder.
  2. Download the EXE file on your computer.  
  3. Double-click on the executable file and install the Media Encoder on your PC.

The error could be genuine and you did not to install the Adobe Media Encoder. This is why you are getting the Adobe Media Encoder is not installed error.

2. Update the Adobe Media Encoder

  1. Launch the Creative Cloud Desktop app.
  2. Click on the account icon and select Preferences.
  3. Click on the Apps tab on the left pane and toggle on the Auto-update for all apps of Adobe software. However, make sure to toggle on the Auto-update option for Media Encoder.
  4. Hit the Done button to apply the changes in Creative Cloud.

Make sure to update all of your Adobe suite of apps. Also, the Adobe Media Encoder should run the latest version as well.

3. Remove Adobe Media Encoder temp settings

  1. Navigate to each of the following directories:
    • C:\Users\[username]\AppData\Roaming\Adobe\Common\AME\[version no.]
      C:\Users\[username]\AppData\Roaming\Adobe\Adobe Media Encoder\[version no.]
      C:\Users\[username]\AppData\Roaming\Adobe\Common\Media Cache
      C:\Users\[username]\AppData\Roaming\Adobe\Common\Media Cache Files
  2. Move the content of the folders to another directory.
  3. Reboot your PC and check if this fixes the issue or not.

4. Reinstall in the correct location

  1. Visit the official website and download the Creative Cloud Uninstaller for Windows.
  2. Extract the contents of the ZIP file and run the EXE file.
  3. Select the Uninstall option.
  4. Sign in to the Creative Cloud website and download the Creative Cloud desktop app.
  5. Double-click the downloaded file to begin the installation.
  6. Make sure to select the location as: C:\Program Files\Adobe
  7. Restart your computer and check if this fixes the issue or not.

5. Change the order of installation

  1. Open the Settings menu by pressing the Win + I keys.
  2. Select Apps from the left pane.
  3. Select Installed apps.
  4. Locate Adobe Media Encoder, hit the 3-dot menu icon, and select Uninstall.
  5. Follow the same procedure to uninstall the Premier Pro and restart your PC.
  6. Now, Install Adobe Premier Pro first.
  7. The Media Encoder will install automatically without any input from you.
  8. Restart your PC and check if this fixed the issue or not.

How do I export without Adobe Media Encoder?

  1. After editing your video, press Ctrl + M on your keyboard.
  2. Select the desired format, preset, and other video settings.
  3. Hit the Export button.

That is it from us in this guide. Besides, learn how you can fix Adobe Premiere not exporting videos.

Moreover, we also have a guide with solutions that will help you fix the problem of Adobe After Effects running slow.

Let us know which one of the above solutions fixes the Adobe Media Encoder is not installed issue.