Microsoft Word is one of the most popular word processors in the world, offering a variety of features and tools for creating professional documents. With the release of Windows 11, many users ask how to download Microsoft Word for free.
Therefore, we will examine how to download and install MS Word for free on your Windows 11. Likewise, you can read about free Word Processors for Windows 11.
Navigate to the Microsoft 365 Official freetrial page.
Select your subscription plan and click the free Try 1 Month Free button.
Create a Microsoft account or log in with your existing Microsoft account.
Select the 1-month free trial and click the Next button.
Choose your means of payment, input your payment details, and click Save.
Press the Start Trial, Pay Later button and click the Continue button after confirming your subscription.
Select the Download the Desktop Apps button, and click the Install Office button from the new tab.
Choose the language and the version you want to download, and click the Install button.
Select the storage location to download the file and click on Save.
Double-click the downloaded file, and Microsoft will automatically install the entire collection of Microsoft 365 apps to your computer.
Microsoft allows you to download their free 30 days trial before subscribing. Should you include your card details, you may be automatically charged for a subscription when the free trial elapses.
After you install the app, you can follow our step-by-step guide on how to use Microsoft Word so you can start creating and saving documents right away.
Input your student email address and select the Get started button.
Select the I’m a student option if you are a student.
Microsoft will send a confirmation link to your school email address.
Click the link in your email address and proceed to create your password.
Microsoft allows students to use its Word software for free if their institution supports it. Also, other institutions like non-profit organizations can use it for free.
The MS Word online version allows you to use the Word tool for free with your internet connection. The web-based version has a 5GB storage space to store your Word document.
It uses Cloud base storage and saves your file in real time, preventing data loss. Also, it saves files in .docx format, which makes it easy to share files with others like the Google docs counterpart.
FAQ
How can I download Microsoft Word on Windows 11?
You can download Microsoft Word from the official Microsoft Store or via the Microsoft 365 website after signing in with your Microsoft account.
Is Microsoft Word free on Windows 11?
Word isn’t completely free, but you can access a free online version through Office.com or get a free trial of Microsoft 365.
Can I install Microsoft Word without Microsoft 365?
Yes, you can purchase and download Word as a standalone app from the Microsoft Store without subscribing to Microsoft 365.
Why can’t I install Word on Windows 11?
Installation issues often happen due to pending system updates, lack of storage, or corrupted files—restart your PC and try again.
Kojima Productions has entered into a collaboration with famed designer Gresham Blake to create a Death Stranding-themed clothing line. The seven-piece unisex collection is now available over on the Kojima Productions Store.
The collection includes tracksuits, tee shirts, hats, jackets and more. The collection is considered luxury apparel, and a few examples can be seen below.
Gresham Blake X Death Stranding Tracksuit $245.00
For those unfamiliar,
Gresham Blake is a design led tailoring business and ready to wear clothing brand, creating bespoke, made to measure & limited edition luxury clothing, shoes & accessories for both men and women.
With stores situated in the heart of Shoreditch, London and Brighton’s famous North Laine.
Our website offers worldwide shipping, simple returns and exchanges alongside unparalleled customer service.“—From the Gresham Blake site’s About Us page.
Gresham Blake X Death Stranding Silk Jacket $1,050.00
The collection was previewed rather surreptitiously at The Game Awards back in December when Kojima wore the Death Stranding Silk Jacket onstage during the Death Stranding 2 presentation. Senior Director of Marketing and Communications at Kojima Productions Jay Boor had htis to say on the launch of the Gresham Blake X Death Stranding Collection.
Death Stranding has inspired porters around the globe through its thought-provoking storytelling, amazing cast and unique gameplay. We continue to be humbled by the passion shown from our player community and now we are excited to offer them a new way to engage with the franchise through the launch of a bespoke fashion line that pays homage to the game.”
If you often interact with PowerPoint to make your presentations, then you’ll be happy to know that Microsoft has added a new feature.
While it has been possible to add videos to your presentation from online platforms like YouTube and Vimeo, PowerPoint didn’t support the incorporation of videos from a user’s own device.
Launch a new or existing presentation in PowerPoint for the web.
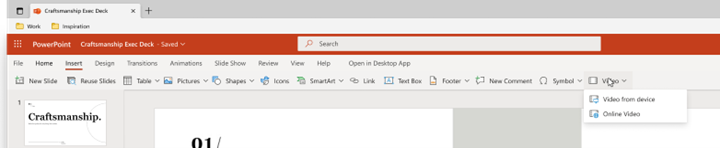
Next, select Insert > Video > Video from the device.
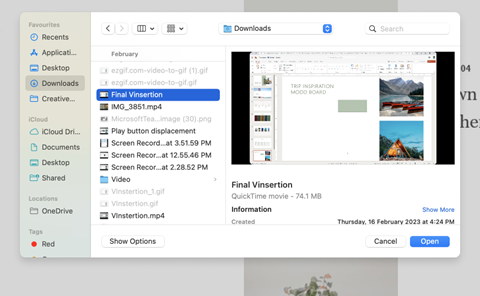
Then, pick the video you’d like to add to your presentation and click on the Open button to insert it.
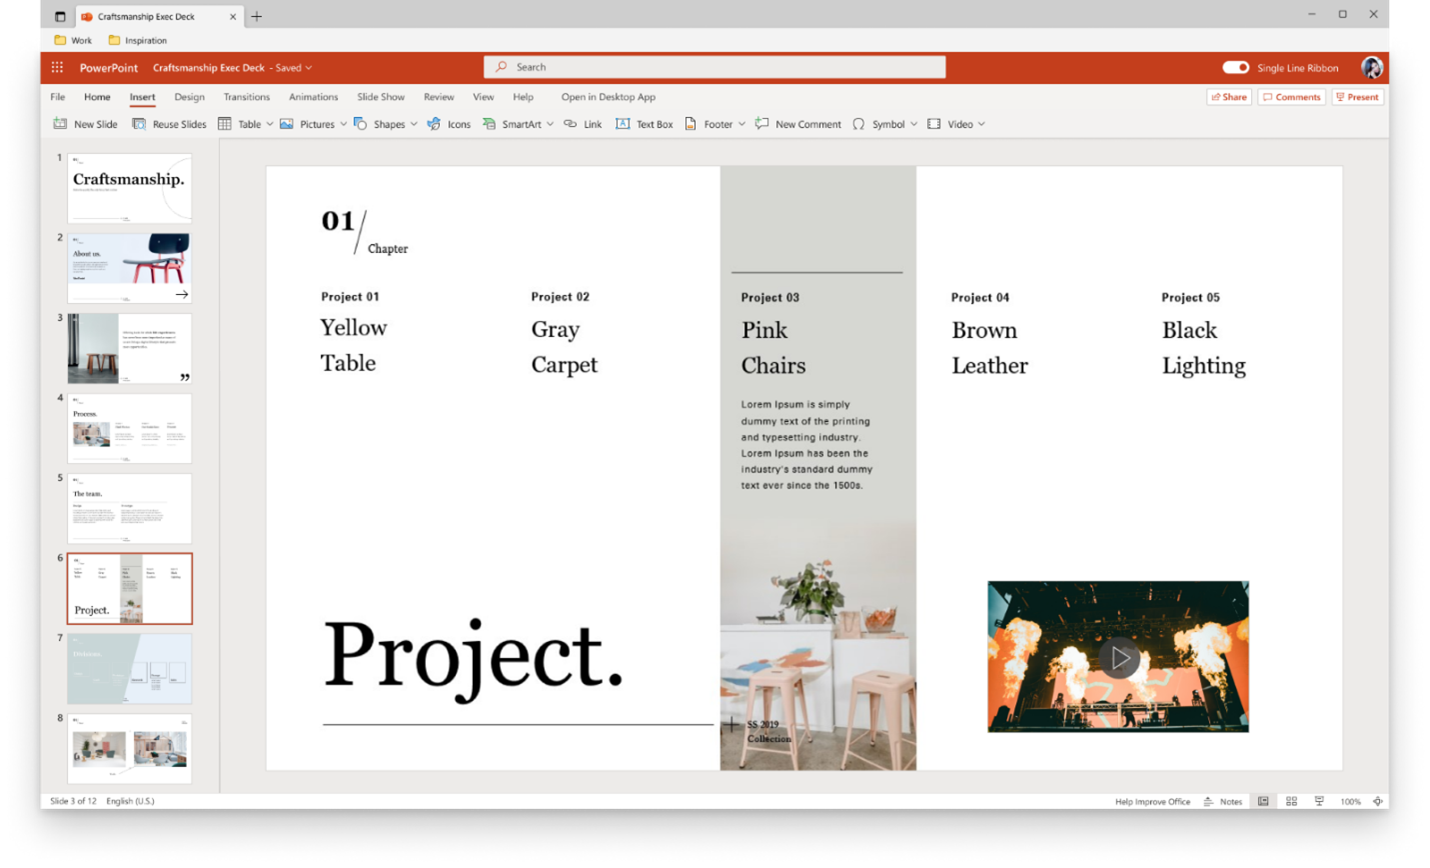
Note: Once the video appears in your slide, you can resize, move, or even apply shape effects to it.
It should also be noted that the maximum size of the video you can include in your presentation is 256MB. Microsoft also recommends a .mp4 video file format for a better and quality experience.
Your internet connection also plays a major role and determines how fast you are able to insert a video into your PowerPoint presentation. In related news, users can also be able to convert their presentations to animated GIFs.
One of the neat features of Microsoft Edge is that it allows users to access legacy websites without switching browsers. This functionality is possible through the Internet Explorer Mode feature. Hence, if you’ve been searching for a way to enable IE mode in Microsoft Edge, this article will provide the steps needed to enable the feature in Microsoft Edge.
Can you use Internet Explorer on Edge?
The short answer is yes, you can use Internet Explorer on Windows. Microsoft Edge is Windows’ upgraded browser developed to replace Internet Explorer.
Even the latest version of Internet Explorer has become obsolete and rarely used. However, some of the browser’s functionalities are still used by some people, especially Web Developers.
Microsoft retired Internet Explorer on June 15, 2022, but you’ll still be able to access some of the functionalities and utilities in Microsoft Edge.
Users can access Internet Explorer’s functionalities through Internet Explorer Mode.
How can I Enable IE Mode in Microsoft Edge?
If you’d like to enable the IE Mode to access Internet Explorer’s functionalities, follow the steps listed below:
Press the Windows key, type in Microsoft Edge and hit Enter.
In the Browser window, Click the More (Ellipsis) button in the top right corner, and click on Settings.
In the Settings window, click on the Default Browser tab from the list of options.
Under the Internet Explorer compatibility section on the right pane, set the option to Allow next to the Allow sites to be reloaded in Internet Explorer mode (IE mode).
Then, click the Restart button to save your changes and refresh the browser.
In addition, you can also use Internet Explorer mode to open specific incompatible websites. To open an incompatible webpage, follow these steps:
Press the Windows key, type in Microsoft Edge, and hit Enter.
Then, click the Settings after the More (ellipsis) button in the top right corner.
Hover on More tools, and click on Reload in Internet Explorer Mode.
Edge will automatically reload the page and render the page like an Internet Explorer web page. Also, the web page will display an Internet Explorer logo to confirm that you’re viewing the page in IE mode. You can click on the logo to get more information.
Further, if you want to exit Internet Explorer mode, there’ll be an exit button at the top of the page. Click on the option to exit Internet Explorer mode.
The Internet Explorer mode is not a very common feature among regular PC users. However, the feature proves very useful to some users as it allows them to view older web pages without switching between browsers.
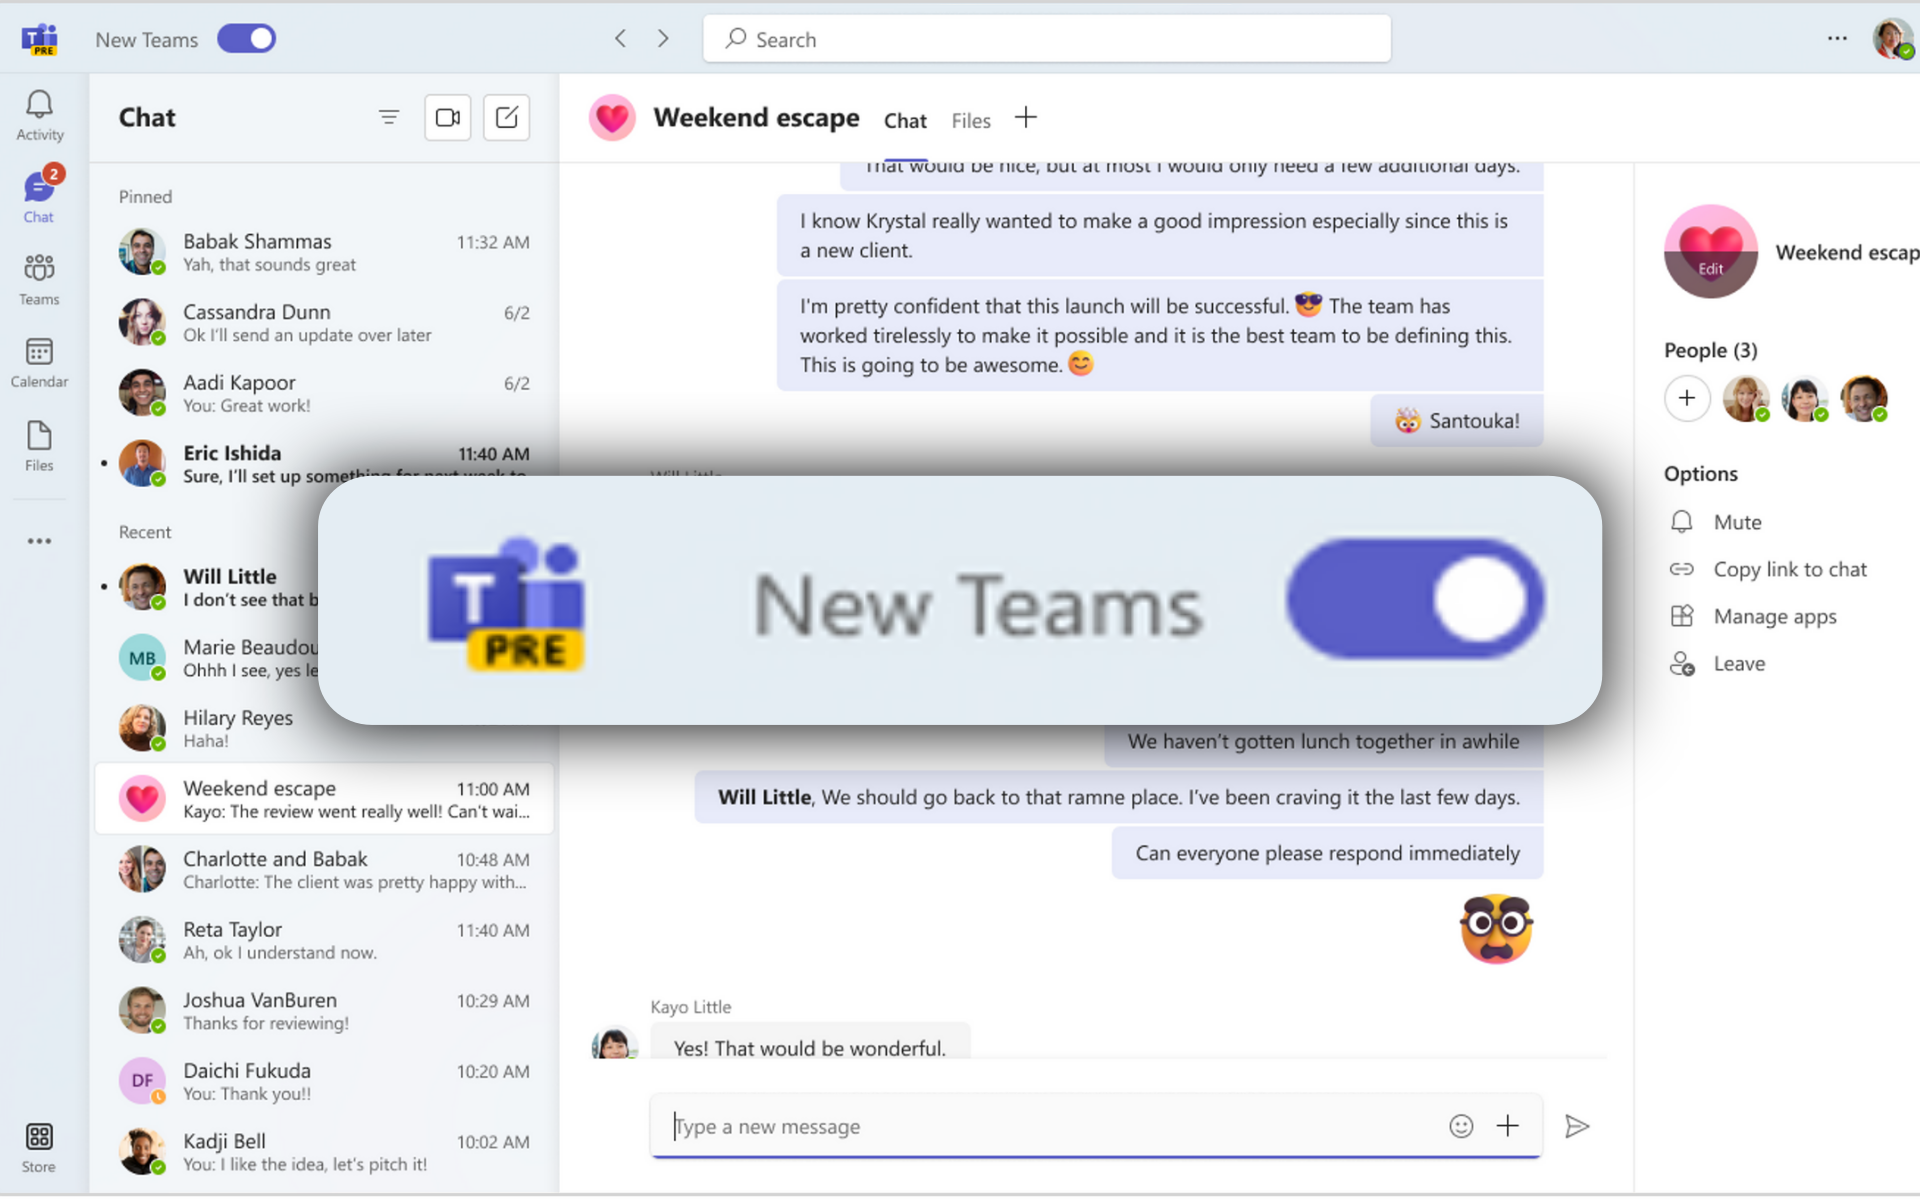
Microsoft said that a newer, speedier, and more energy-efficient Teams app is coming soon — some calls it as Microsoft Teams 2.0.
Speaking in a blog post, Redmond official Anupam Pattnaik said that the app has arrived for preview release for several select insiders as an experiment before rolling it out for all mobile and desktop users in the June 2023, including on Mac and web devices.
The app has never been far from performance issues since it first came out, not to mention the endless loop of its over-the-top data usage.
“The preview of the new Teams app is currently only available to our commercial users on Windows. We’re working on extending the preview of the new Teams to a broader set of customers, including Education, Government Clouds, and platforms such as Mac, VDI, and Web later this calendar year.”
Previously, rumors about Microsoft Teams 2.0 have been circulating. Several tech publications reported the same thing: a rebuilt version, dubbed Teams 2.0, is coming and it will be a ground-up revolution & a nice upgrade to Edge Webview 2 and Javascript library React-powered technologies.
What does Microsoft Teams 2.0 mean?
While Redmond officials do not officially call it a “Teams 2.0,” the brand-new app will boast a plethora of nice updates, especially in speed and performance.
Installing, launching, joining a meeting, and switching between chats and channels will at least be twice faster as the current version. It will also consume less memory by half and less disk space by almost a third of four.
Not only that, but the new Teams will also support a swift and smooth switch between emails, and it can be super helpful for those working in different organizations eg: one for work and one for school.
Microsoft also adopts Trusted Types and implements a more stringent Content Security Policy to protect users’ data from cyberattacks, especially cross-site scripting.
What do you think about this? Let us know in the comments!
The Apple ecosystem comprises products and applications exclusive to Apple Devices like Mac or iPhone. This makes it virtually impossible to access Apple applications like iMessage from a non-apple device.
However, there are a few workarounds that you can attempt to help you access iMessage on Windows. This article provides you with the necessary steps on how to get and use iMessage on Windows.
Can MacOS apps work on Windows 11?
Traditionally, the Apple ecosystem was designed so that non-Apple devices like Android and Windows can’t access their products and applications. Apple created the ecosystem this way to help improve the security of their devices.
However, you can access macOS applications on a Windows computer. You should note that the steps involved are not straightforward, and it often takes quite a while to get familiar with the workaround.
In summary, macOS applications aren’t designed to work on Windows, but with a few tweaks, you should be able to get your desired app working on your Windows PC.
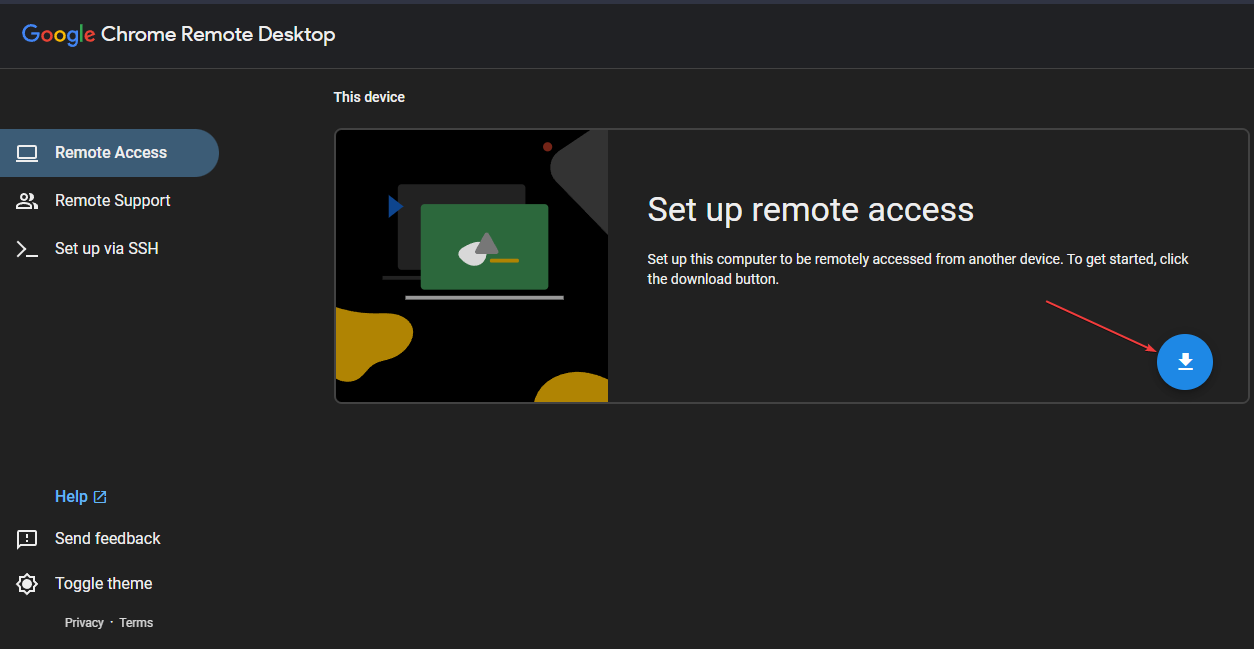
Click the Download button on the right pane under the Set up remote access section.
You’ll need to download the extension on both systems.
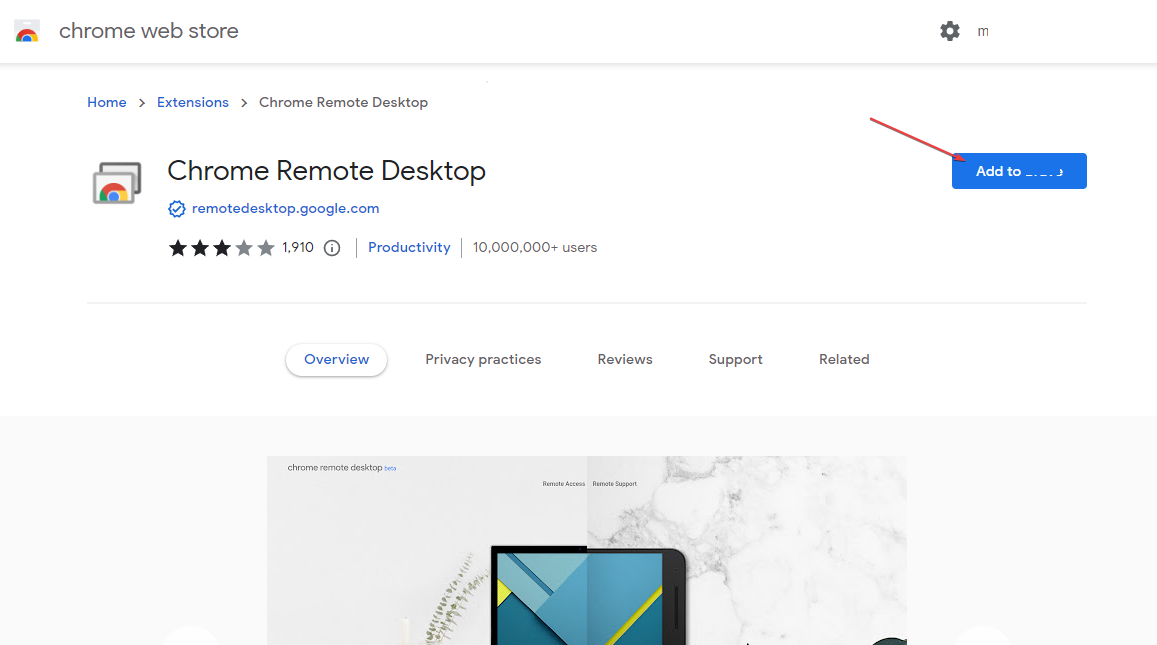
In the next window, click the Add to Chrome button on the far-right corner and click on the Add Extension button.
Wait until the installation is complete and close the Chrome Web Store.
1.2 Set up Remote Desktop for iMessage
Once the extension is downloaded, the Remote Desktop automatically downloads the host file for both Windows and Mac.
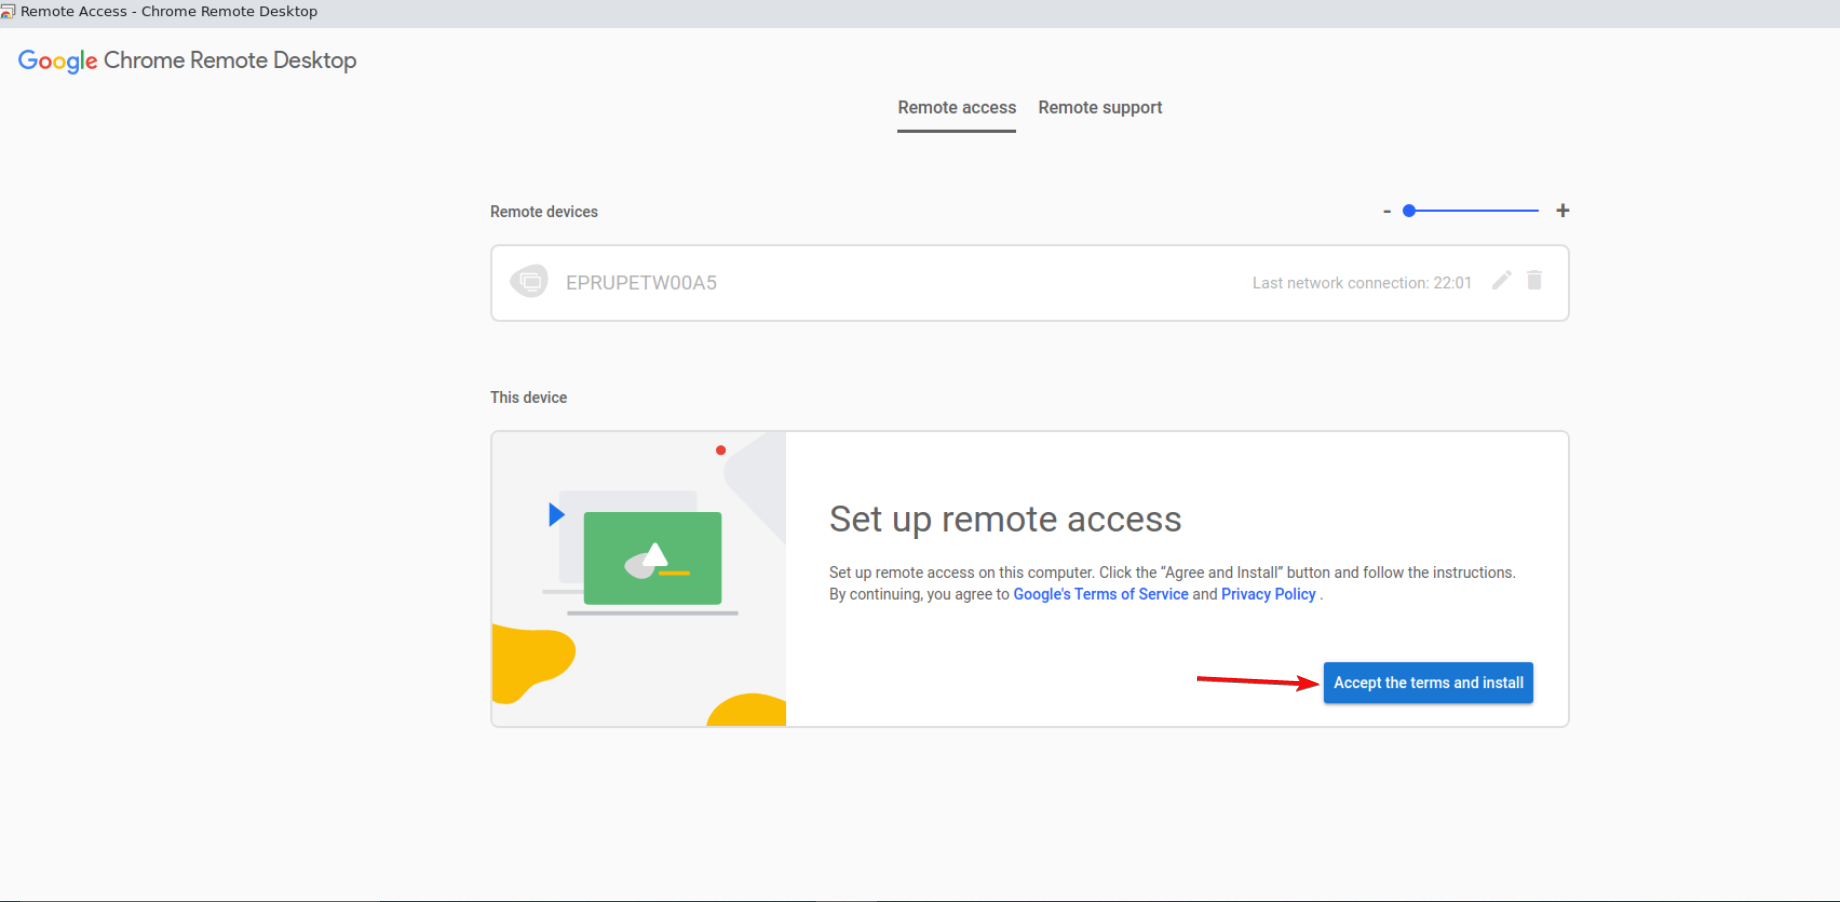
While in your browser, navigate to the Chrome Remote Desktop page, and click the Accept and Install button on the right–pane.
In the next popup window, select Yes to allow Chrome to open the downloaded.msi for Windows.
Select Yes again in the User Account Control (UAC) window to allow Windows to set up remote access.
In the next window, type in your preferred name for your PC or leave it at its default and click Next.
Enter your preferred PIN to connect your PC remotely and click Start to complete the setup.
Click Yes again in the next UAC window to allow your PC to set up a remote connection.
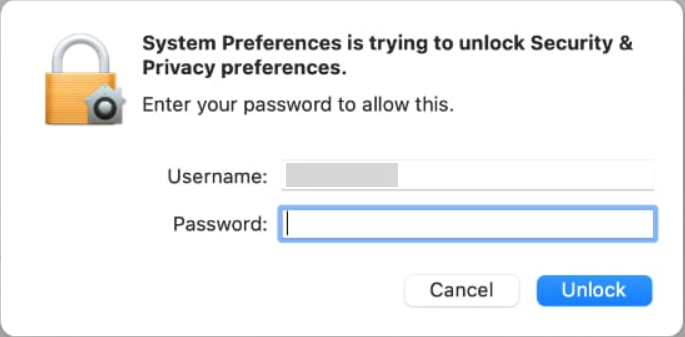
Type in your Mac Administrator password to allow Chrome Remote Desktop Host permissions.
The Chrome Remote Desktop setup will be complete on both Windows and Mac in a few seconds.
Keep Chrome running on your Windows PC and return to the Chrome Desktop page on your Mac.
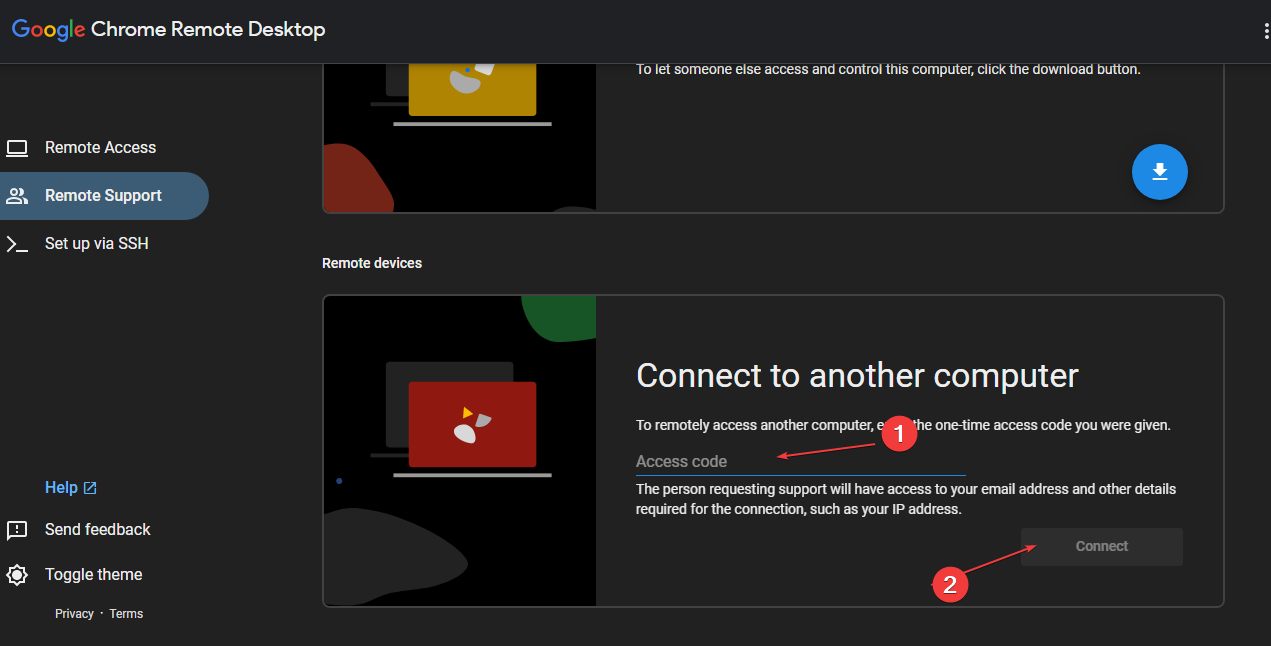
Click on the Remote Support tab and Generate Code under the Share this screen section.
On your Windows PC, navigate to your Chrome Remote Desktop window, select Remote Support, type in the code generated on your Mac, and click Connect.
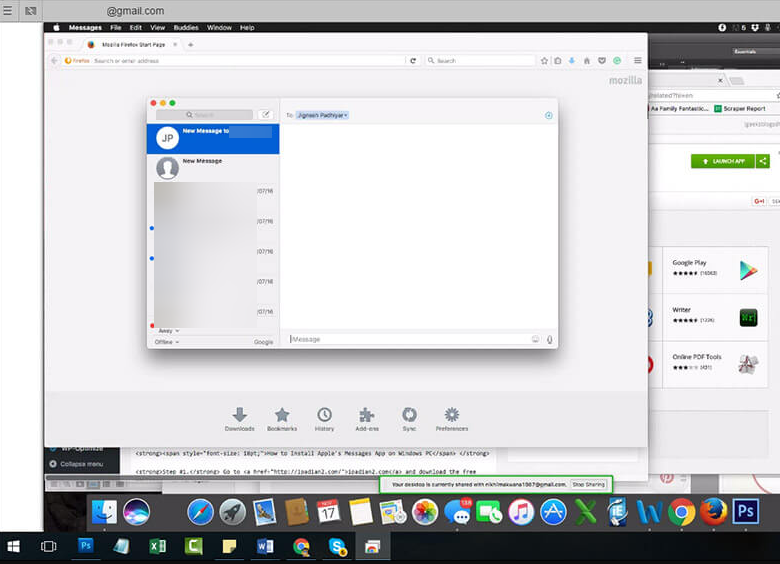
Open iMessage on your Mac to access the app from your Windows PC.
To keep the iMessage app running on your Windows PC, your Mac must be running and connected to the internet. You’ll also need a Mac with iMessage and a computer running Windows 11.
2. Use the iPadian Simulator
Launch your preferred browser, navigate to the iPadian official website on your Windows PC, and click on the Download button.
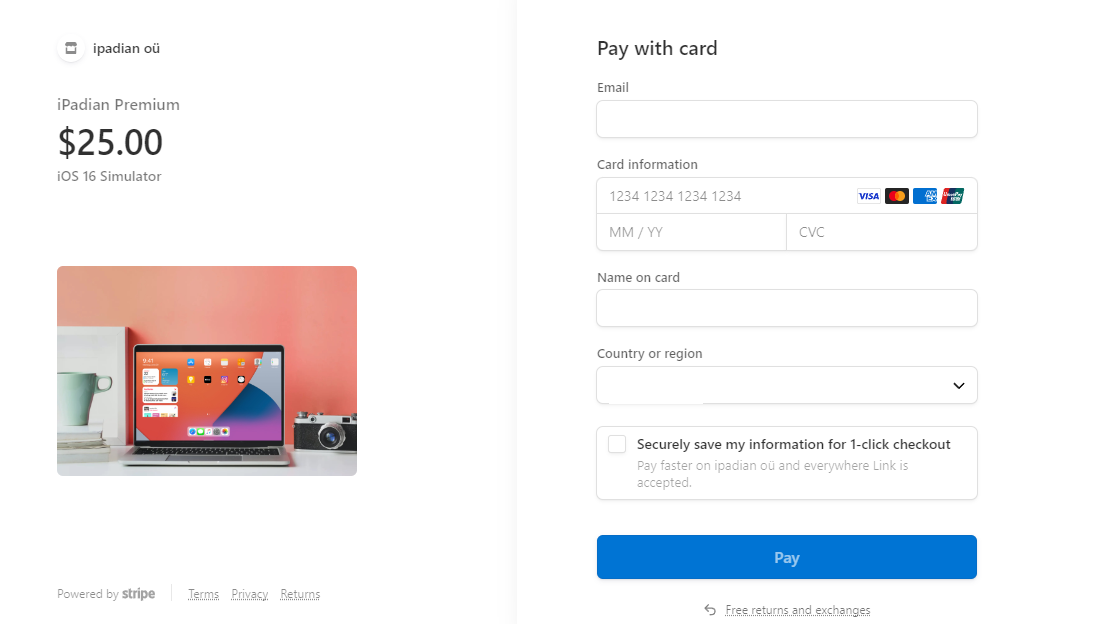
You’ll need to complete the payment process to download the simulator. You can choose to pay with Paypal or a Credit/Debit card.
Once you’ve purchased, press Windows + E to open File Explorer.
Navigate to the Downloads folder, locate the just downloaded .exe file,and double-click on it to install the simulator.
Follow the on-screen instructions to complete the installation process and close the installer window after completing the installation.
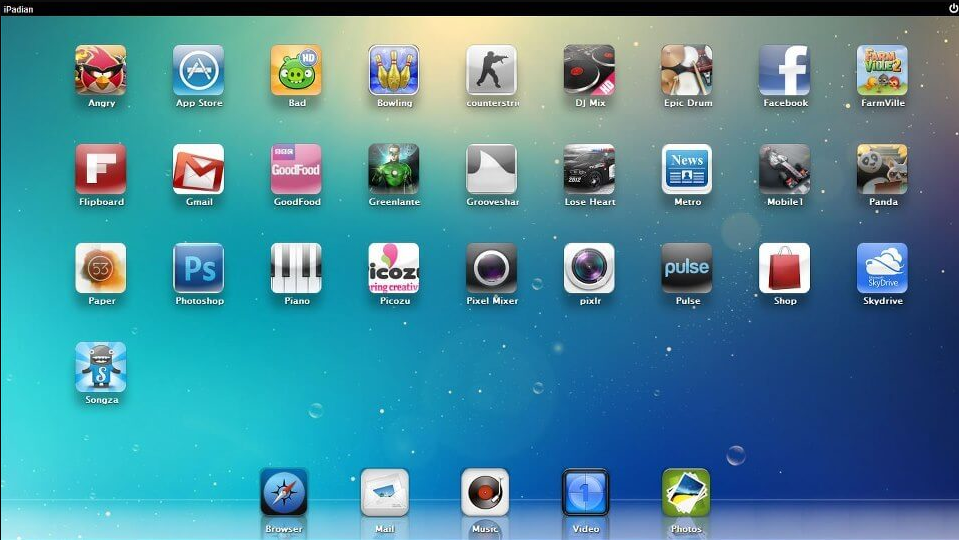
Press the Windows key + S, type in iPadian simulator, and hit Enter.
In the iPadian simulator window, locate the search bar, and type in iMessage.
Click on the iMessage app from the search results, and log in to your account with your correct Apple ID.
After successfully logging in, you can use the iMessage app on your Windows PC.
Accessing iMessage via the iPadian simulator is one of the most seamless processes requiring little to no technical know-how. The only downside is that you’ll need to pay for a subscription to get the software.
However, considering the intuitiveness and simplicity of accessing iMessage from the iPadian simulator, it’s most likely your best bet if you have the cash to spare.
How do I use the iMessage app?
Once you’ve successfully accessed iMessage on your Windows PC, it’s time to learn how to use it. Here are the steps you should follow to use the iMessage app on Windows 11:
Launch the iMessage app on your Windows PC.
In the iMessage app, navigate to Settings, and select the iMessage button.
Then, log in with your Apple ID to gain access to the iMessage app.
Click on the Compass button to write and send messages. You can also click the Attach button to attach files and documents to your messages.
3. Use Windows’ built-in Phone Link app
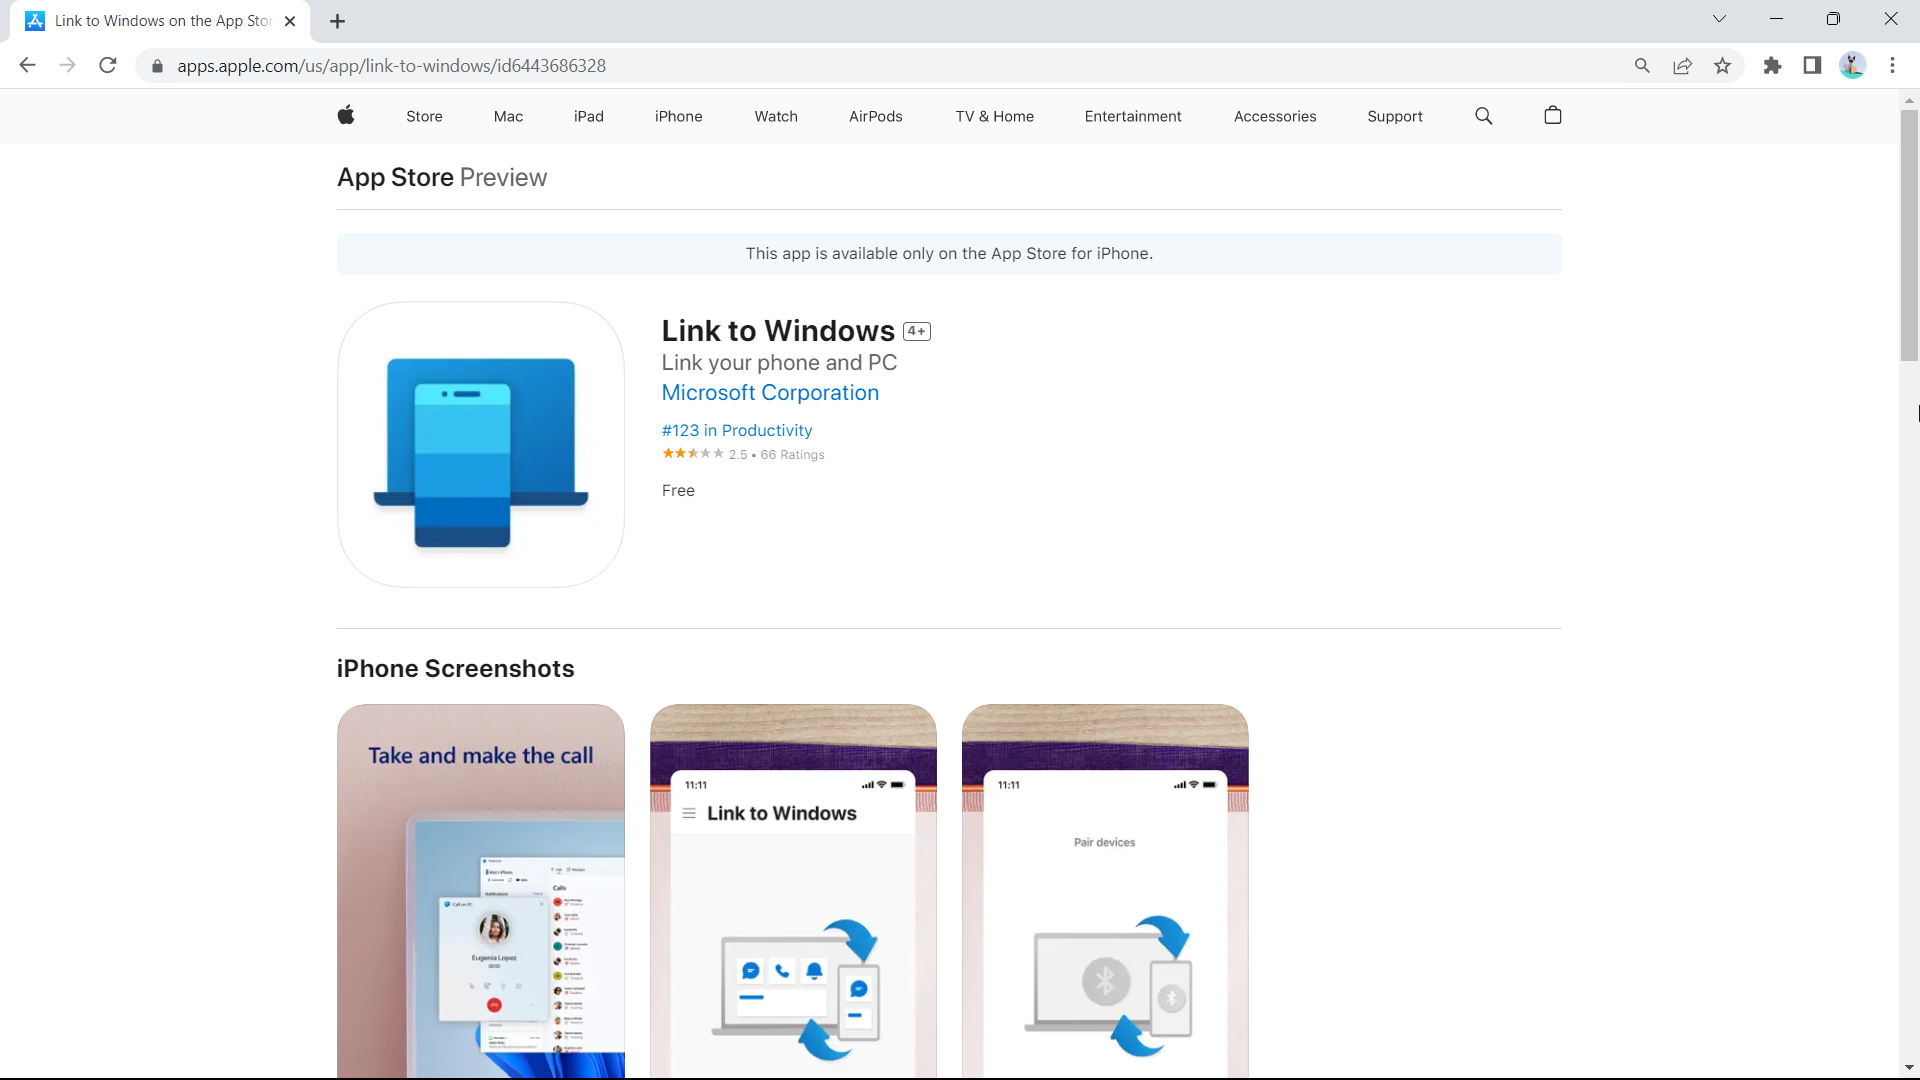
1. Make sure to have Bluetooth activated and Link to Windows app installed on your phone.
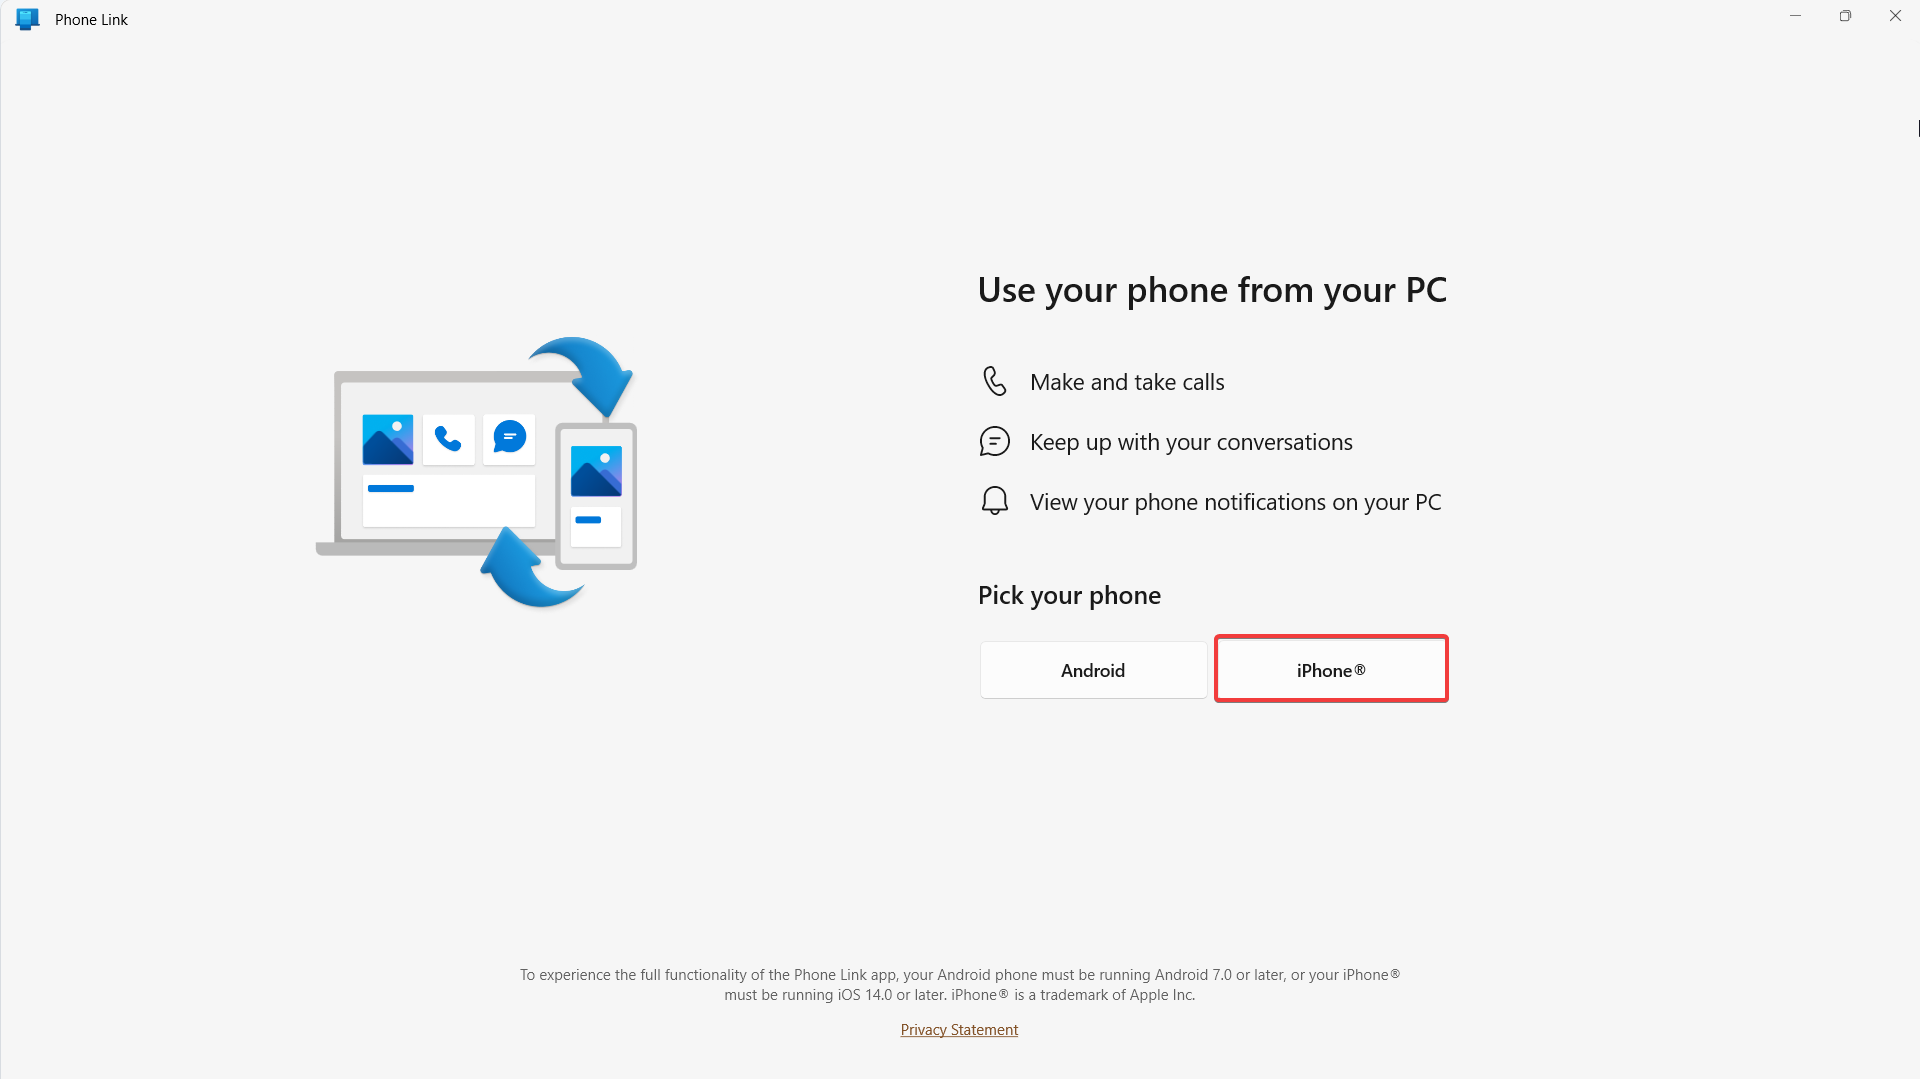
2. Open the Phone Link app. Click iPhone.
3. Open your iPhone’s camera and scan the QR code displayed.
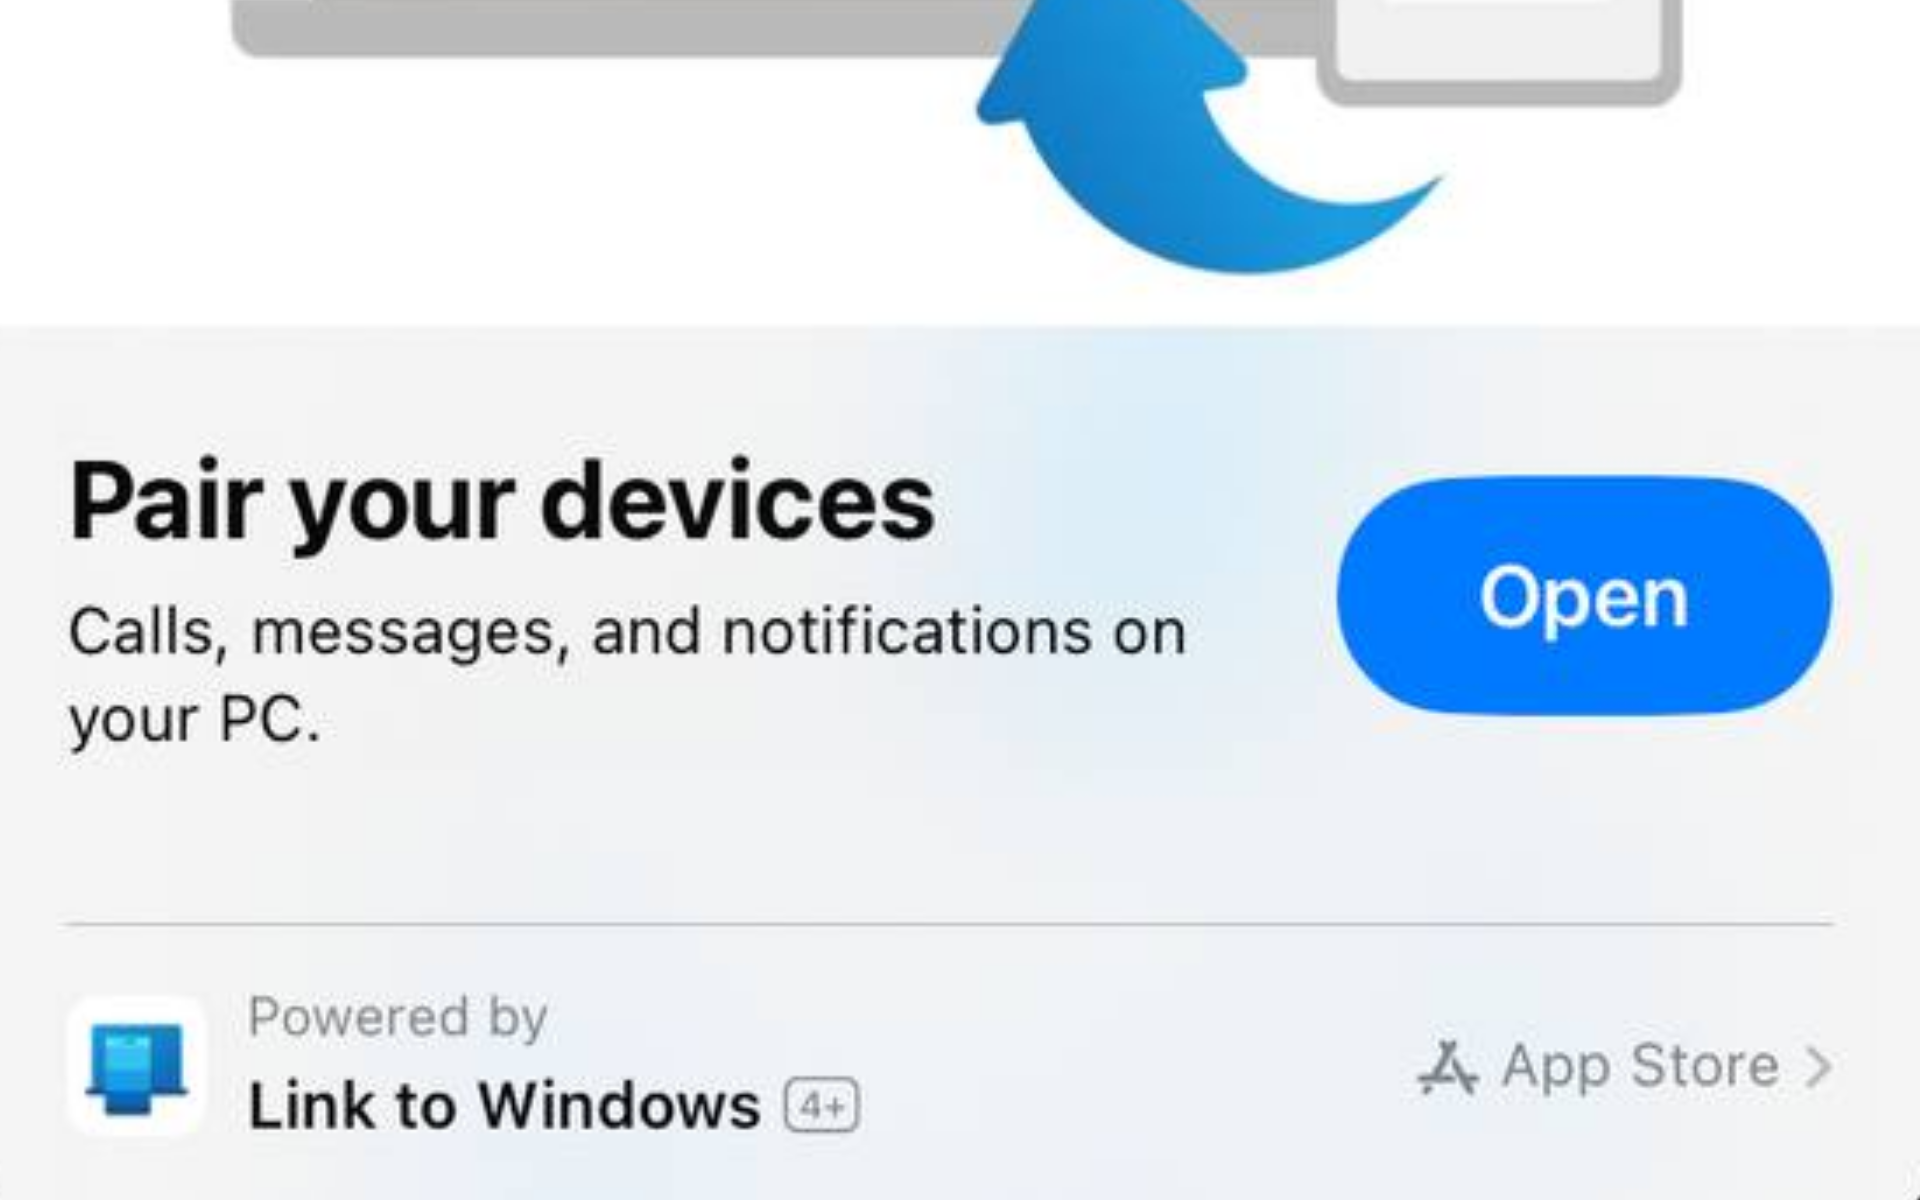
4. Still on your phone, click Pair your devices, then Open.
5. On Continue pairing with Bluetooth screen, click Continue.
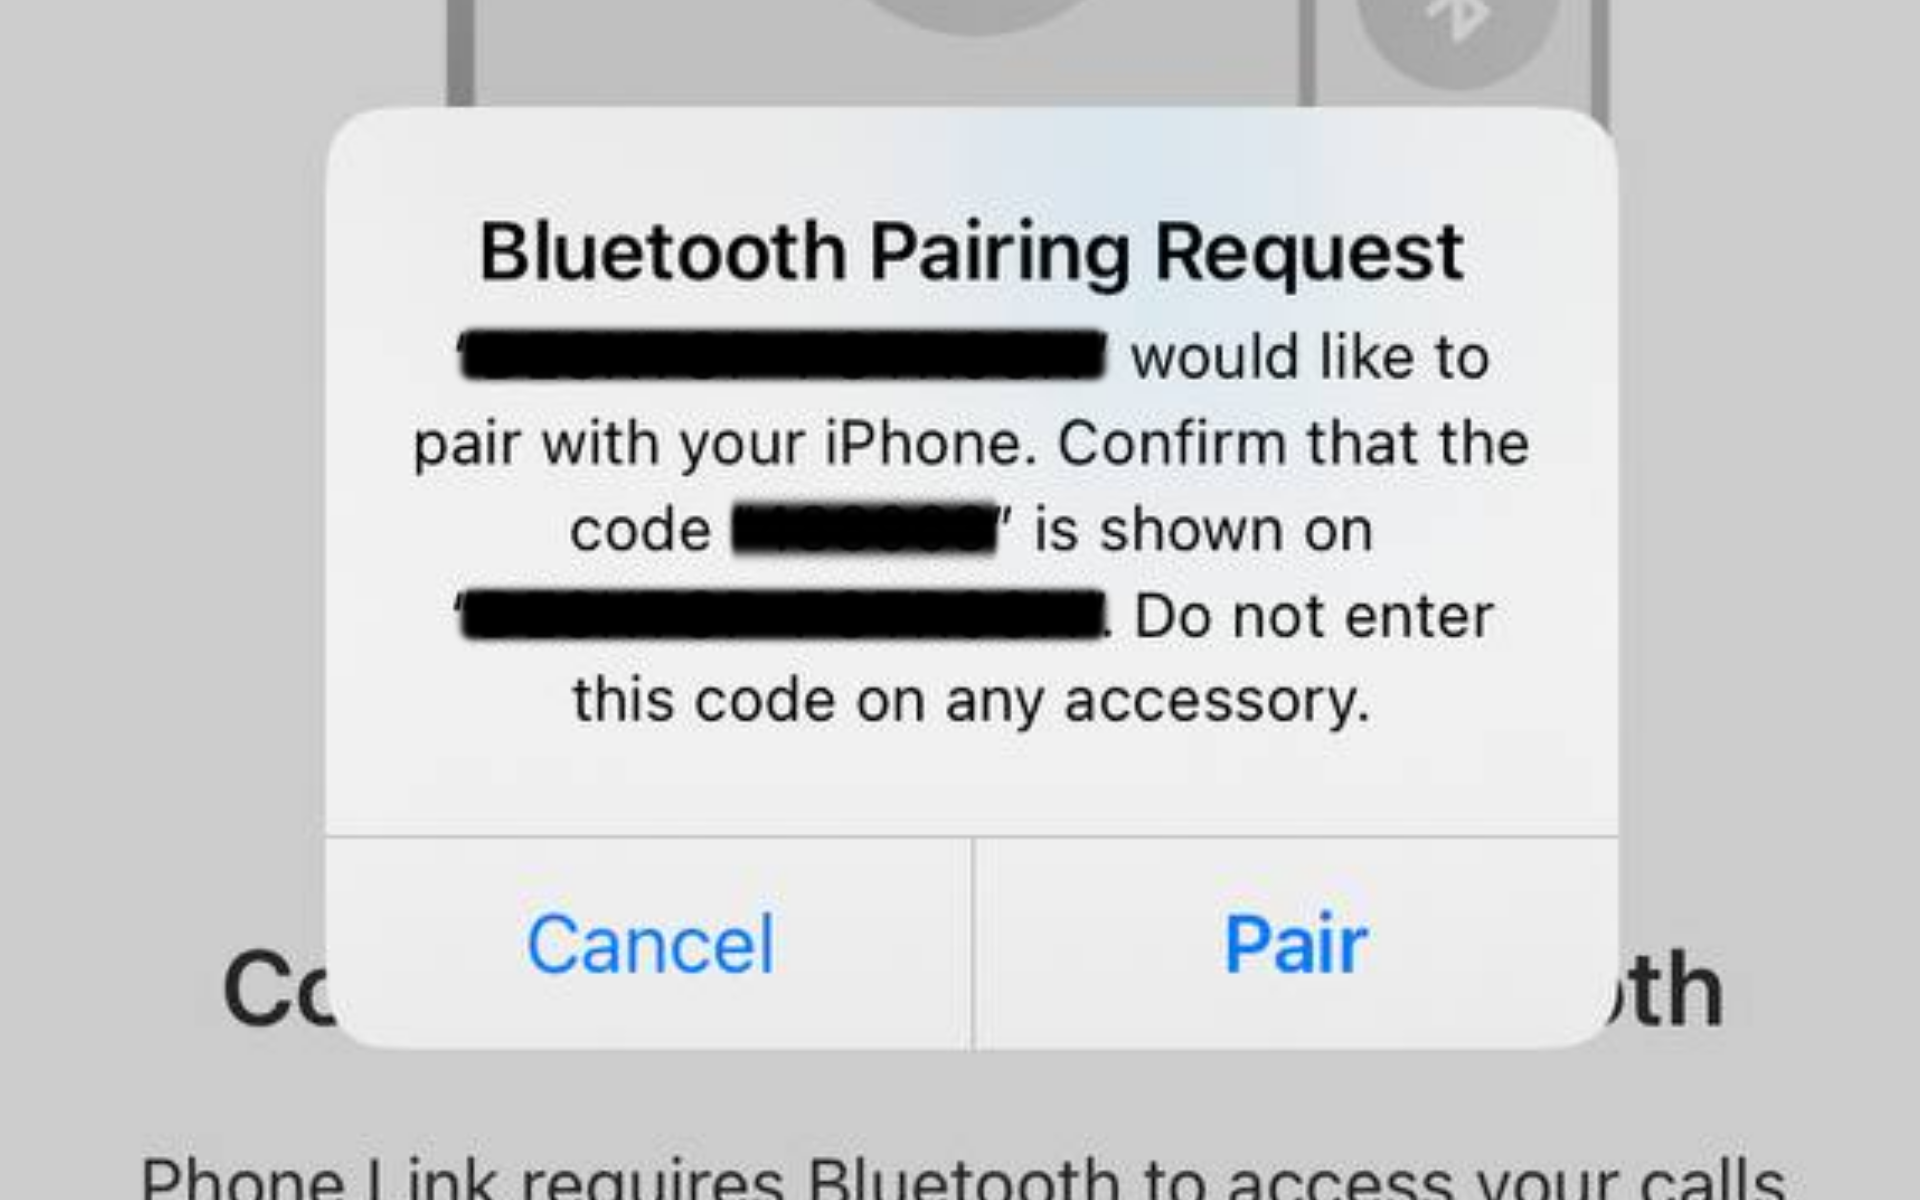
6. Click Pair on both your PC and mobile and you’re set!
The Apple ecosystem is designed to prevent non-Apple devices from accessing its products and services. Applications like iMessage are built exclusively for iOS devices.
However, by following the above workarounds, you should be able to get iMessage running on your Windows 11 PC.
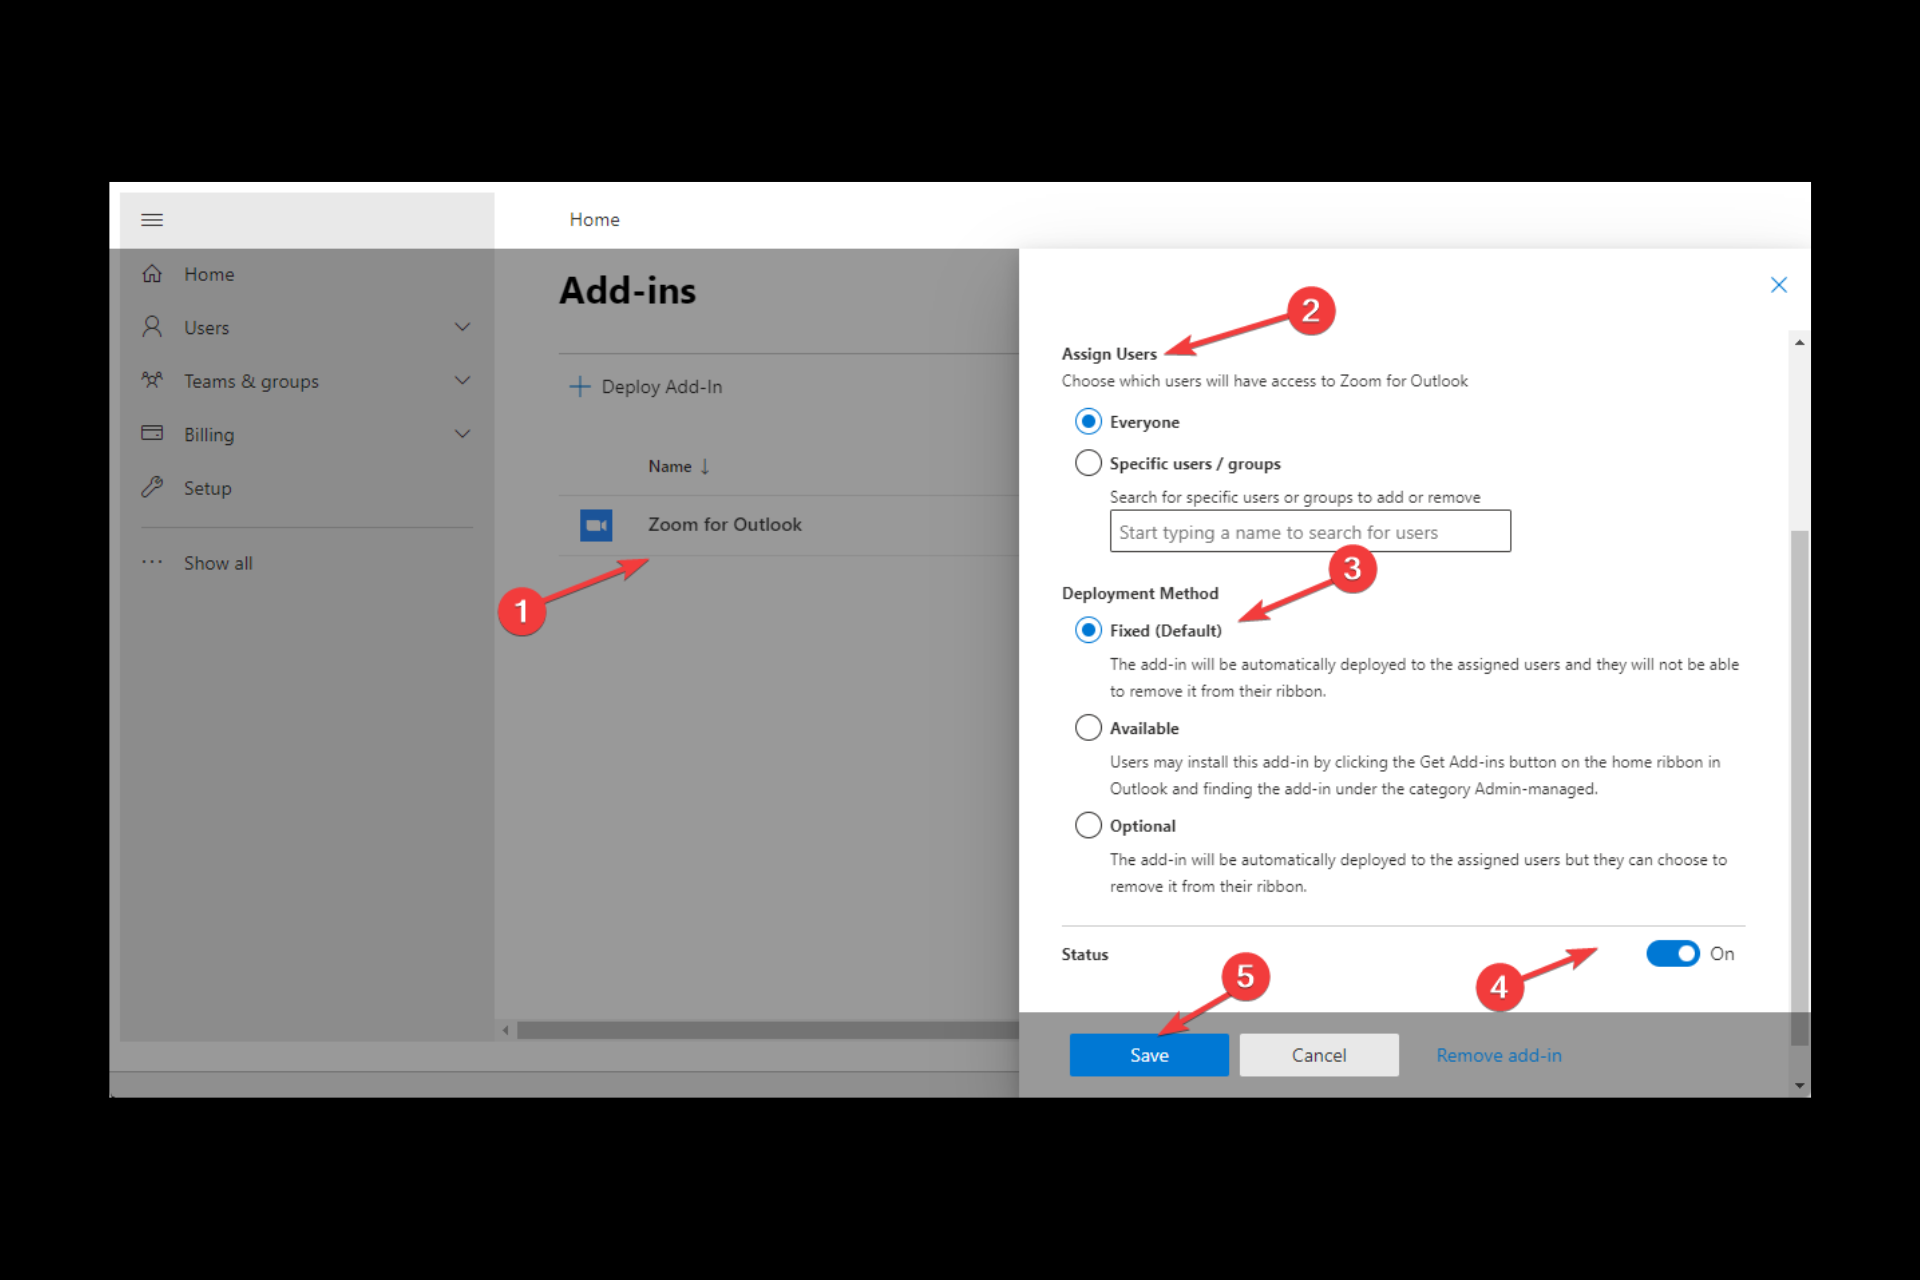
If you use Zoom for attending meetings and your day is planned according to Outlook and its calendar, it is a wise option to add Zoom to your Outlook as an add-in.
The Zoom for Outlook plugin enables you to manage and schedule meetings within your Outlook web or desktop app. This guide will discuss how we can install and use it on desktop, mobile, or web apps. Let’s start!
How can I add the Zoom plugin for Outlook?
1. Use Office 365 Admin Portal
1.1 Install the add-in from the Integrated apps option
Follow the onscreen prompts to complete the process.
3. On Older version of Outlook (2013, 2016)
You must add a Microsoft Exchange account to Outlook to install Zoom for Outlook on your desktop app. To check that, go to File, then Account Information. However, you can use Zoom for Outlook on the web app if you have an IMAP account.
Once done, go to File, then under Account Information, select Manage Add-ins.
From the Add-Ins for Outlook option, type Zoom for Outlook and select the appropriate option.
Click Add.
Follow the instructions to add it to the desktop app.
Enter the meeting details and click Zoom. From the drop-down, select Add Zoom meeting.
On the pop window, select Allow.
Sign in to your Zoom account and click Save.
To edit, join or delete the meeting, click Calendar event, select the meeting, and choose an appropriate option.
2. On the Outlook desktop app
Launch the Outlook desktop app. Go to the Home tab, click New items, then select Meeting.
Enter details like title, timings, and attendees’ email addresses.
Go to Zoom and click Settings.
You will be prompted to sign in; once done, click Add Zoom Meeting.
So, this is how you can install the Zoom plugin for Outlook on your web, desktop, and mobile apps. Now scheduling and joining a meeting on Zoom will become quick and hassle-free. Try it and tell us about your experience in the comments section below.
Downloading Outlook on Windows 11 is easier than you think. All you have to do is hit the Microsoft Store. Of course, you may also download the Microsoft 365 suite or simply use it online.
Find below all possible methods to download and install Outlook on your PC;
How can I download and install Outlook on Windows 11?
Now install the app on your PC, log in with your Microsoft account and you’re all good to go.
The easiest way to get Outlook is to download it straight from the Microsoft Store, as shown above. The app has been refurbished and it works great on Windows 10 an 11.
We have received many complaints from our readers who have encountered error code 0x80300024 when installing Windows. It pops up irrespective of whether you are installing a newer or older OS version.
Fortunately, we have some fixes to resolve the error. Further, you can check our article about failed Windows 10 installation and ways to fix it on your PC.
What is error 0x80300024?
Error code 0x80300024 appears while you’re trying to install any version of the Windows OS. It is usually accompanied by a message saying Windows is unable to install to the selected location. Error code 0x80300024.
Furthermore, numerous factors may contribute to the occurrence of this error. Some are:
Issues with the hard disk partition – It can be due to the target disk, partition, or volume where you are trying to install Windows doesn’t have enough storage space or another file stopping it.
Corrupted or damaged Windows installation media – 0x80300024 error will also occur if the USB flash drive or DVD that helps with installing a new copy of Windows is corrupt or incompatible.
Hardware or software issues – Having many external devices and peripherals connected to the system can cause Windows installation failure. Also, the activities of third-party software running on the computer may influence or trigger the error.
Nevertheless, we’ll take you through some basic steps to fix the error below.
How can I fix the error code 0x8030002?
Try the following preliminary checks before proceeding with any advanced troubleshooting steps:
Plug in the Installation Media to a different USB port – The USB port may be faulty, so switch the flash drive and insert it into another USB port to see if it works.
If you can’t fix the problem still, try the solutions below:
1. Format the installation device
Plug in the bootable Installation media to your PC and power it off.
Restart your computer and select Boot from the plugged-in installation media option.
Set up your language, keyboard layout, and other preferences.
Press the Custom option on the kind of Windows installation prompt.
Click on Drive options (advanced) when asked where you want to install Windows.
Select the destination hard drive partition where you want to install Windows, then press the Format button and confirm the process.
When the formatting is complete, click the Next button to continue the installation.
Formatting the hard drive partition where you want to install Windows will remove corrupt data interfering with the installation. Read about how to create a Windows 11 bootable USB drive on your PC.
2. Set the target hard drive at the top of the Boot Order
Ensure the system is off.
Press the Power button, and press F1, F2, or Del keys to boot into the BIOS setup.
Go to the Boot tab, then locate the Boot configuration/order.
Find the hard drive where you want to install Windows, then move it to the top of the list.
Under the Boot mode option, select UEFI.
Press the F10 key to Save the changes and exit BIOS.
Restart Windows and check if the Windows Installation Error 0x80300024 appears.
The above steps will set the hard drive on which you want to install Windows above others and allow it to run with priority.
Left-click the Start button, type Command Prompt, and click the Run as administrator option.
Click Yes on the User Account Control window.
Type the following commands one after the other and press Enter: diskpartlist disk
Identify the number for the disk partition where you want to install Windows. Based on the partition number, type and enter a command like the below one: Select Disk 1 (change 1 to the disk number).
Having trouble booting into Windows 10? You’re likely facing a corrupt bootloader, bad update, or missing system file. A dedicated Windows 10 boot repair tool can help fix these issues quickly – no tech skills required.
In this guide, we’ll show you the best tools to repair Windows startup problems and get your PC running again.
What is a boot repair tool?
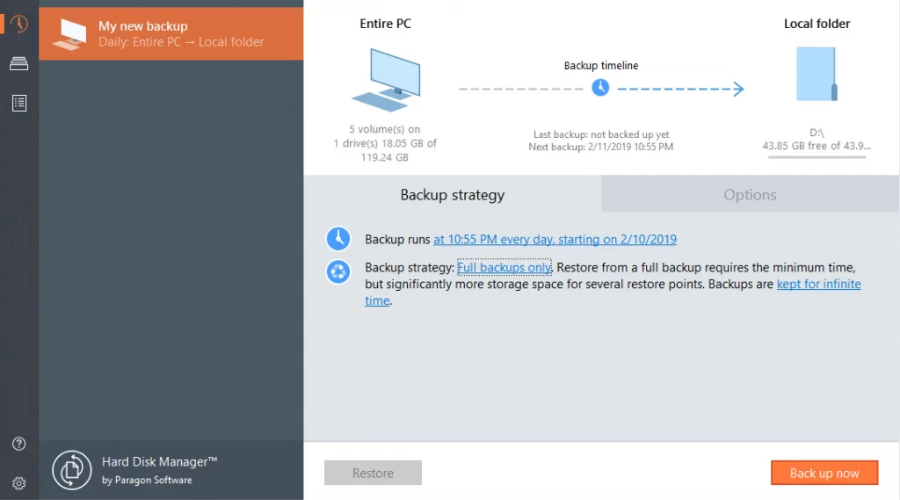
A boot repair tool or software is a simple program that specifically focuses on boot problems and fixes them in just a couple of clicks. Usually, the best Windows boot repair software comes in a light installer package and they have a very easy-to-use interface.
All of them are pretty simple to use, have multiple features that are useful and can improve PC health and some are free or have free trials.
Product
Operation System
Our Rating
Link
Tenorshare Windows Boot Genius
Windows 11, Windows 10, Windows 8, Windows 7, MacOS
Windows Boot Genius is a professional bootable Windows repair tool that can fix computer booting issues, repair crashed or corrupted Windows, recover lost data, and restore broken partitions.
Also, thanks to this tool, you don’t have to worry about BSOD or black screen issues while trying to start your computer. Instead, you can gain access to your system after fixing it with a boot CD, DVD, or USB disk.
Additionally, Windows Boot Genius allows you to create a bootable CD or USB using a .iso file, and an extensive range of related fixes, like boot file repair, sector repair, registry repair, and a helpful registry editor.
Ensuring that your system can be reverted to its original state, this software also allows you to reset Windows local and domain passwords easily and back up or restore all system elements, including hard disk setups and partitions.
To get started, just put the bootable CD in your CD/DVD drive, plug the USB drive into your PC, and restart your computer to begin the system recovery process.
To create a bootable CD/DVD or USB drive, run the Windows 10 boot repair software tool, insert the preferred media into your PC, then click Burn.
After the setup is done, keep the rescue device connected to the PC before restarting. Then, you should spot the Windows Boot Genius icon when accessing the WinPE environment.
Clicking the icon sends the corrupt PC to Windows Rescue mode. Here, you can recover boot files in Boot File Recovery mode or locate a master boot code in MBR Recovery mode.
Lastly, we must note that Windows Boot Genius requires no kind of expertise, so you can safely use it to create an emergency disk and fix your Windows 10 operating system when it fails to boot.
Some other useful features:
Recover lost, deleted, or formatted data
Recover Microsoft product keys for Windows 10, Microsoft Office, etc.
Wipe data to make it unrecoverable
Optimized UI for easy use
Tenorshare Boot Genius
Fix your computer and ensure proper maintenance with this portable software.
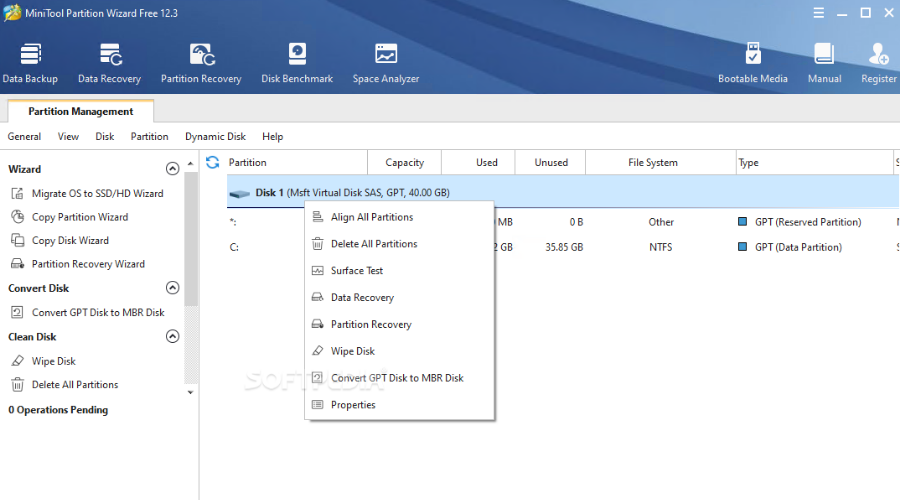
MiniTool Partition Wizard is a great partition manager that you can download and use for personal and business purposes. The application is packed with an easy-to-use interface and has a wizard that helps you complete all partition-related tasks in just a few steps.
MiniTool Partition Wizard is an all-in-one utility with full partition control to create, format, delete, copy partitions, and organize your hard drive to ensure storage media capacity and performance.
With Minitool, you have access to a space analyzer to check which files are taking up too much space on your disk so you know exactly how to clean your partition
It’s an incredibly intuitive Windows application that comes bundled with easy wizards to help you swiftly carry out various operations related to disks, partitions, and volumes.
In addition, you can use several customization features to set partitions as active or inactive, show labels, change drive letters, change partition type IDs, change serial numbers, etc.
The tool also offers a solution for users concerned about storing sensitive data. With MiniTool, you can show or hide partitions with just a few clicks, ensuring that no one can access your information without your knowledge.
The key features of MiniTool Partition Wizard include:
Copy system and non-system disk
Migrates OS to SSD/HDD
Disk Cleanup
Disk benchmark
Convert FAT to NTFS
The software’s Partition Recovery Wizard works like a charm and enables users to recover all partitions. MiniTool Partition Wizard also supports all hard disks such as IDE, SCSI, and external USB disks.
MiniTool Partition Wizard
Take full control over partitions and keep your computer in top shape with this intuitive software.
Part of Paragon Hard Disk Manager, Paragon Rescue Kit is a Windows 10 boot repair software solution with excellent compatibility and usability features.
It works with older Windows versions, too, including Windows XP. This program boasts a wide range of features, works fast and safely, and has a user-friendly interface.
Also, this software allows you to repair drive letters in the System Registry of a selected Windows installation, fixes boot.ini issues, restores BCD files from partitions, fixes booting records, and also enables you to change serial numbers or partition IDs.
Additionally, you can easily repair the MBR executable code, reorder primary partitions to fit your needs, and allow you to create, display, and save a boot correction report, which can be very useful if performing any back-end troubleshooting on your system.
Furthermore, all these elements are contained in an easy-to-understand interface that enables quick access to any of these options and provides efficiency. Additionally, the software automatically creates a log for each change performed to ensure no information is lost after performing any action.
To ensure the security of your system even further, the Paragon Hard Disk Manager enables you to create back-ups for your system’s sectors efficiently and allows you to recover them with just a few clicks of your mouse.
The recovery feature can also be optimized further to take effect on an entire disk, on separate partitions, and even when it comes down to specific files.
Like all the other Windows 10 boot repair software solutions presented in this article, Paragon’s tool can create a system recovery environment using a CD, DVD, or USB flash drive.
Finally, its Boot Correction Wizard is among the most powerful features on the market.
Some other useful features:
Robust Recovery Media Builder
Easy sector backup to save on-disk information
Backup to local or externally mounted storage
Backup to network shares and virtual disks (VHD, pVHD, VMDK, VHDX)
File Transfer Wizard
Undelete Partition Wizard
Network Configurator Wizard
Paragon Hard Disk Manager
Repair windows and easily manage computer settings with Paragon Hard Disk Manager.
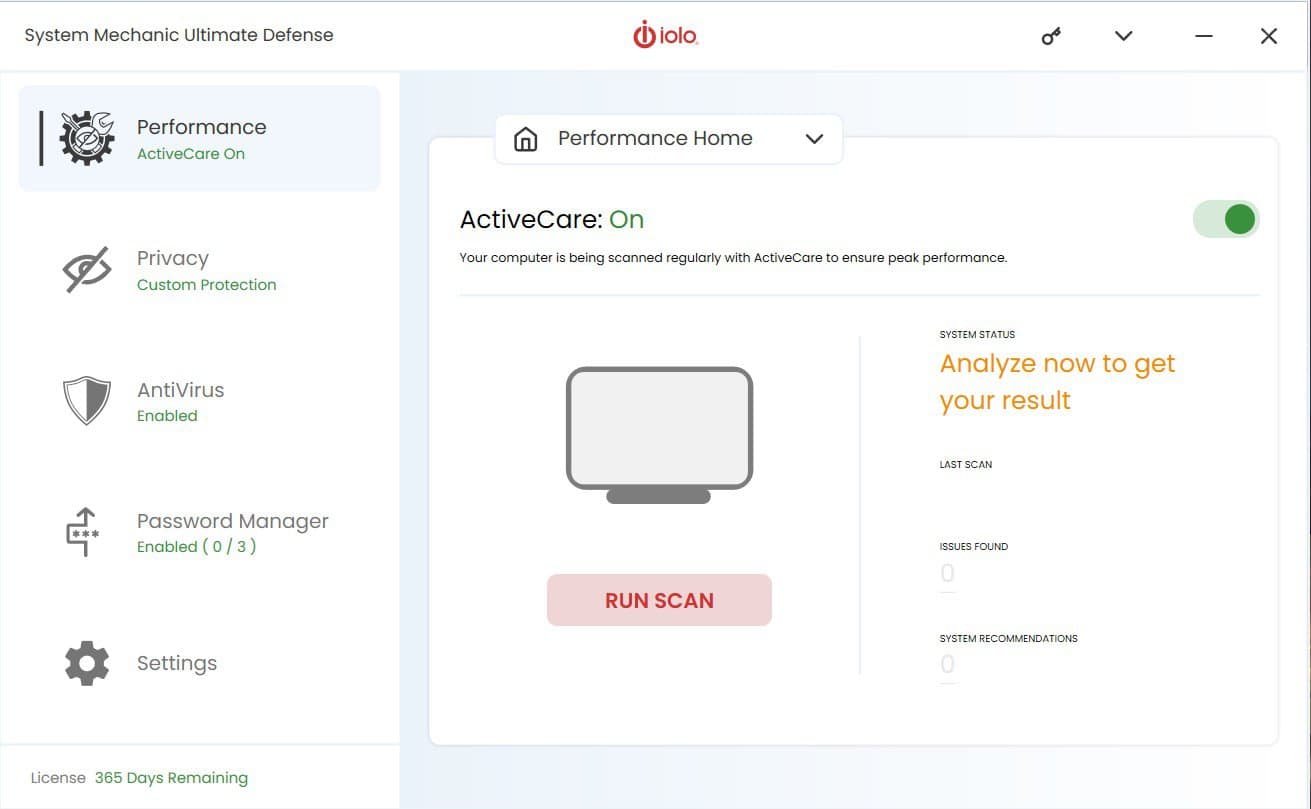
Iolo System Mechanic is an overall health PC provider and Windows 10 boot fix tool for many operations.
This solution has your name if you want to achieve high computer safeguarding through AI protection. And about booting issues, it detects and fixes all the system problems automatically.
So, this tool can deliver various services that help any PC to function properly. Thus, it increases CPU and RAM availability speed,removes bloatware, or eliminates confidential browsing activity.
Decluttering your system while detecting and removing malware threats using AI Technology, the System Mechanic offers a complete set of recovery tools for your system.
Additionally, it can repair a whopping number of 30.000 issues by replacing the damaged files with the correct ones stored in the IOLO Labs database.
Furthermore, regarding System Mechanic’s functions, it’s good to inform you about services like advanced cleaning of risky files, removal of bloatware at startup, or optimizing the internet speed.
Finally, this strong software will perfectly support your system in combating operational issues in no time.
Some other useful features:
Removes slowing down bloatware from the system
Protection of data security and privacy
Cleans up more than 5 types of junk files
Accelerate boot time considerably
Iolo System Mechanic
Repair any Windows 10 issue with this professional tool.
AOMEI Partition Assistant is an extremely practical tool that resolves any partition requests.
This solution is a fit for anyone who needs to make hard drive or partition changes, free up the storage, or perform any other tasks related to disk partition management.
Additionally, the partition manager helps you be completely safe before making any major changes on a PC that may cause boot problems.
Thus with this free partition tool, you can manage everything, from changing partition labels, merging partitions, moving, cloning and others.
On the other hand, you can clone your disk, test the disk surface, or completely erase the hard drive. Also, it comes with different wizards to help computer beginners with clone disk wizards.
Some other useful features:
Initializes disk surface test and checks partition
Converts file system between FAT32 and NTFS
Allocates free space
Splits partitions
Hides or unhides partitions
Changes drive letter or disk labels
Create, format or merge partitions
Partially wipes disks or hard drive
Disk copy wizard
AOMEI Partition Assistant
Take control over hard drive impediments while protecting your PC with this partition assistant.
Ultimate Boot CD is a lightweight Windows 10/11 boot repair tool that can help you troubleshoot and rescue your damaged PC.
Firstly, it creates a bootable ISO on a CD, DVD, or USB pen drive and offers some great diagnostic tools.
Also, because floppy drives are already a thing of the past, Ultimate Boot CD can run floppy-based diagnostics from CD-ROM or USB drives at a higher speed.
Wrapped in an interface similar to BIOS, the Windows 10/11 boot repair software utility works by creating a virtual instance of the floppy. It also has a script you can use to access its features from a removable drive.
Developed over 15 years, Ultimate Boot CD is a bootable collection of the best freeware tools for various rescue tasks.
Lastly, you can easily use it directly from your USB device without requiring installation.
Some other useful features:
Clone or selectively copy from dying drives
Check individual hardware components
Update the BIOS to the latest version
Determine what’s gone wrong with your hardware
CPUID V2.19, ASTRA V6.50, G4u V2.6, and HDClone V.7 support
Hiren’s Boot CD is a popular system rescue solution specially made for Windows computers. It has every required tool to make your computer operational again.
Also, this Windows 10/11 boot repair software tool is a pre-installation environment with bonus tools.
This way of dealing with your Windows 10/11 booting problems offers you a Windows-like visual platform that will run beside your damaged Windows installation.
Hiren’s Boot CD is made for modern workstations, which supports UEFI booting and requires a minimum of 2 GB RAM. You can solve many PC issues with useful tools inside the BootCD ISO. Besides, it’s completely free to use.
Additionally, after the installation, Hiren’s BootCD pre-installation environment sets up the graphics card, sound, wireless, and Ethernet card drivers for your specific hardware configuration.
One of its most valuable features is the support for UEFI booting from DVD and USB flash drives. Hiren’s Boot CD has an ISO2USB portable tool specifically designed to accomplish that process more efficiently.
Lastly, it requires administrator privileges to run it, but it’s free for commercial and non-commercial use.
Let’s quickly look atits key features:
BCD-MBR tools: – BootIce, EasyBCD
HDD defrag – Defraggler v2.22
HDD diagnostic – GSmart Control, HDDSCAN
Hard Disk tools/ Data recovery
HDD imaging – Acronis TrueImage, Macrium Reflect PE
HDD security – HDD Low-Level Format Tool
Antivirus – ESET Online Scanner
System tools – Speccy v1.32, Ccleaner v5.4, Windows PowerShell
Yes, Windows 10 does come with a built-in repair tool that aids in troubleshooting common computer problems. But frequently, it can turn out to be insufficient.
Windows 10 has a useful feature called the Windows Startup Repair Tool. The Windows Startup Repair Utility can be used to resolve problems if Windows is not starting up correctly or if you have other issues that point to system corruption.
How do you repair Windows 10 if it does not boot?
Don’t give up if Windows 10 won’t boot; many workarounds are available, and any of the following fixes would be a good call:
Clear or reset the CMOS – Your device’s BIOS can be reset to help you progress with a computer that won’t boot. However, it is essential to remember that this strategy is more straightforward to use on a desktop than on a laptop.
Boot from a USB – This is a workaround that gives you access to your computer and an opportunity to investigate and repair the damaged files.
Repair corrupted system files – Once you gain access to your computer, probably by booting with a USB, you should run some script to repair damaged files.
Once you have tried any of these abovementioned solutions, you should be able to boot your Windows 10 PC.
How do I run Startup Repair from the Command Prompt?
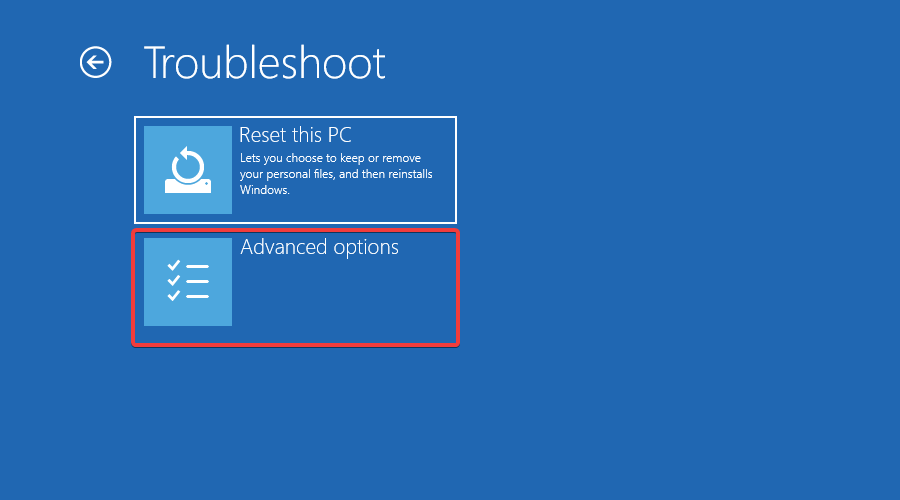
Press the power button to force your PC to shut down and repeat this operation a few times (until Windows automatically boots into the Recovery Environment).
Then, select Troubleshoot.
Go to Advanced options, and Command Prompt.
Once the CMD windows open, there are several commands you can try: sfc /scannow rstrui.exe systemreset -cleanpc BootRec
Some might require a bootable installation media, downloading a repair utility, etc. In contrast, others imply that previous measures should be implemented (such as creating a system restore point) to work.
As you can see, a fair amount of tweaking is involved, and the procedures can be laborious, risky, and time-consuming. Not to mention that these native tools are not infallible themselves.
How do I fix Windows 10/11 without boot repair tools?
Windows 10 has many recovery options, such as Safe Mode, Last Known Good Configuration, and Startup Repair. You can even take action if the factory reset doesn’t work.
However, if these tools don’t fix the issue and you don’t want to reset your system, you have to turn to software specialized in Windows 10/11 boot repair, system rescue, and data recovery. Here are some of the cases a repair tool would help:
Boot-Repair-Disk
Boot-Repair USB
Boot-repair GRUB
For instance, if your problems are caused by malware, you can explore antivirus tools with a boot scan. But malware removal isn’t enough if critical system files or even the hard drive structure is damaged.
It’s time to look into solutions to fix your Windows 10 boot. In this article, we are exploring the best Windows 10 boot repair software for 2022.
This article suggested some of the best Windows 10/11 boot repair software solutions.
Even if you don’t currently have any issues with the boot sequence, downloading, installing, and using one of the programs on this list is still a good idea.
This way, you can prepare for the worst-case scenario and create an emergency disk to salvage your Windows operating system if disaster strikes.
Finally, let us know your opinion about our software picks and if you have other Windows 10/11 boot repair recommendations, and feel free to share them with us via the comments section below.
Sony’s beloved PlayStation exclusive, The Last of Us, has finally arrived on PC.
Dubbed ‘Part I,’ the game centers around Joel, a man in a post-apocalyptic world, as he travels across the country to smuggle 14-year-old Ellie. Little does he know, the pair will develop an unlikely father-and-daughter figure, but not without its ups and downs.
On top of its top-notch storytelling, the game boasts rich visuals—at least on PlayStation 4 & 5. On PC, however, it is horrible, and it seems like it kills the hype that its HBO adaptation has created in recent weeks.
On Steam, for example, users are tearing apart the game’s PC port. Some users reported that they waited for hours for the game to build shaders while crashing in the main menu every 5 minutes. Others also stated that on its medium settings, it consumes over 8 GBs of VRAM, and they were unable to boot it despite meeting the minimum system requirements. Unfortunately, the list could go on and on.
Naughty Dogs, the devs behind the game, said that the team is working closely to investigate all the issues, promising that they will be fixed in upcoming patches that are coming in days or weeks.
The Last of Us Part I PC players: we've heard your concerns, and our team is actively investigating multiple issues you've reported.
We will continue to update you, but our team is prioritizing updates and will address issues in upcoming patches.
In the meantime, until they released those patches, we’ve covered some of the most The Last of Us bugs, but we’ll expand the list as updates on forums and Naughty Dog’s official page show up.
Some users said that The Last of Us on PC takes forever to load its shaders. Then, at the same time, its performance is super unstable and stuttering while the shaders are loading. For a game with visuals of this caliber, it’s not a good look. Joel and Ellie have seen better days.
“I really wanted this to be good. And there are a lot of good things here, but the game is ruined by severe stuttering. Shouldn’t be shader compilation stutter, so I’m guessing it has to do with asset streaming.”
2. Stuttering & out-of-sync problems
For some users with PCs that tiptoe on The Last of Us’ minimum requirement, it’s common to see horrible stuttering and drops in fps. Then, the video and audio are also out of sync, and it can get annoying.
“For me I’ve been getting near constant stuttering in game (even in the main menu), cinematics stutter as well and even going out of sync almost every time, everything takes forever to load.”
“Please don’t waste your time with this terrible port, and don’t listen to people telling you how great it is… the only people defending it saying ‘yOu gUyS hAvE bAd pCs’ are all people privileged enough to have the best parts money can buy for the performance issues to not matter to them or they’re delusional enough to ignore clear poor optimization.”
3. Unable to boot
Or, better yet, the game is not booting at all despite meeting the minimum requirements. Keep in mind that The Last of Us has AMD Ryzen 5 1500X or Intel Core i7-4770K for CPU, AMD Radeon 470 (4 GB), NVIDIA GeForce GTX 970 (4 GB), or NVIDIA GeForce GTX 1050 Ti (4 GB) for GPU, and 16 GB RAM as its minimum requirement.
“Unfortunately this port is not worth it in its current state, I´ve tried the game for 3 hours, one of which was compiling the shaders, the rest was waiting on loading screens inside the game, I think i have a pretty capable machine, at least it has handled everything i´ve thrown at it so far, but it´s not handling this game whatsoever.”
4. Potential memory leak issue
The potential memory leak issue comes from a discovery that The Last of Us’ devs used a buggy 2.9.6 version of the Oodle decompression library, which has had memory-leaking issues problems in the past.
“The developers/porters used a bugged release of the Oodle decompression library (2.9.6) which has confirmed memory leaking issues.”
“Several UE4/UE5 games use v. 2.9.5 of ODL. It’s not a perfect solution, but using an older version of ODL is working for me right now much better than the version they shipped with.”
How to fix common The Last of Us bugs?
1. Shade bugs
The long waiting time for shaders to reload is usually caused by errors from its decompression library. Although each of these bugs is connected to the other, we’d recommend you wait for Naughty Dogs’ upcoming patches. As the devs promised, they’re working closely to fix these issues as soon as possible.
2. Stuttering problem
1. With the game open, press Esc to go to the pause menu.
2. Lower the Graphics option to Medium, or even lower.
3. Reboot the game to find out if the problem persists.
3. Unable to boot
Again, as we mentioned, it’s best to wait for developers to step up and fix this issue with their patches.
4. Memory leak issue
To bypass that, this Redditor recommends finding its 2.9.5 version and rewriting it on TLOU’s install directory. You can do it if you have FIFA 23, Warframe, or Destiny 2. Or, you can also download it from a third-party website, but it would be very risky.
1. Open C:\Program Files (x86)\Steam\steamapps\common\[THE NAME OF THE GAME]\Tools\Oodle\x64\oo2core_9_win64.dll
2. Right-click and hit Copy, then Paste it somewhere else.
3. Go to your TLOU install directory, also at C:\Program Files (x86)\Steam\steamapps\common\The Last of Us\Tools\Oodle\x64
4. Paste oo2core_9_win64.dll there.
There you go, these are some of the most common bugs that The Last of Us players on PC are facing. We will keep you updated once Naughty Dog or Sony have had their say in patches, but until then, let us know if you have any comments!
The Win32Bridge.Server.exe has been a recurring error our readers complain about on their PCs. The annoying thing about the error is that it can show up at any time and disrupt your activities. Hence, we’ll discuss ways to resolve the error and fix your system.
Several variants of error messages accompany the Win32Bridge.Server.exe, and many factors can cause the error. Some are:
Corrupt system files – Win32Bridge.Server.exe may not be associated with any program but is a corrupt system file impeding the activities of other apps.
Cortana issues on your PC – The main cause of the Win32Bridge.Server.exe error is the Cortana app running on the computer. It will interfere with the task or activity you’re trying to perform, resulting in the error code saying the app can’t start correctly.
Recent Windows updates – Many of our readers complained about the error appearing after installing a recent update on their computers. So, the installed updates may be faulty or corrupted, causing the system to malfunction.
Though the error can be confusing to tackle due to its varying error messages, we’ll outline some of the best tweaks to fix it.
You can also try reliable software to minimize the effort by automatically repairing the corrupt or broken files found after scanning your computer with new components from its vast online database.
3. Uninstall unnecessary apps
Left-click the Start button, type Control Panel, then open it.
Click on Programs, then select Programs and Features.
Find the app you want to uninstall, right-click on it, then select Uninstall from the drop-down.
Follow the onscreen instructions and Restart your PC to see if you can resolve the error.
Uninstalling unused programs prevents the threats they may cause the system and removes their components.
4. Disable the Connected Devices Platform Service
Press Windows + R key to open the Run dialog box, type services.msc, and press Enter to open the Services window.
Navigate to Connected Devices Platform Service and double-click on it to open its Properties.
On the General tab, select Disabled from the list of Startup type options. Click the Stop button under Service status.
Click Apply, then OK to save the changes.
Restart your PC to see if the error persists.
The above steps will stop the service from running and prevent any connected device activities from causing the Win32Bridge.Server.exe error.
5. Run System Restore
Press Windows + R key to open the Run dialog box, type control, then press Enter to open the Control Panel.
Type recovery, select it from the results, then click Open System Restore.
Click Next in the Restore system files and settings window.
Choose the restore point you want to restore from, then click Scan for affected programs, and click Next.
When using Bing AI, you may come across the error code E010006. This error prevents you from making any further queries. Some users even reported that they found themselves back on the waitlist after encountering this error.
Most Bing AI error codes have something to do with an overloaded server, given the high number of people trying out the feature. Still, we look at other possible causes of this issue and subsequent fixes in this article.
What is the Bing error code E010006?
From what we have gathered from most community groups, users are facing a new Bing error code, E010006. Users are being kicked out of their accounts and back on the waitlist.
If you’ve been following closely on Bing AI, Microsoft had introduced a waitlist for users to be among the first to try it out before it was made available to the general public.
Now that they gained access and started using it, they have since been kicked out, and whenever they try to log in again, they find themselves on the waitlist.
Speculations indicate it could be a region/location issue, as most of the complaints received were predominantly from one area.
How can I fix the Bing error code E010006?
Before you embark on the slightly complex solutions, try the following:
Sign out, sign in again from your account, and check if the issue persists.
Refresh your browser.
Check for any browser updates and update accordingly.
Launch your Edge browser and click on the three ellipses at the top right corner.
Select Settings.
Click on Cookies and site permissions on the left pane, then select Manage and delete cookies and site data option on the right pane.
Next, click on See all cookies and site data.
Now click on Remove all.
2. Disable your VPN
Click on the Start Menu icon and select Settings.
Next, select Network & internet and select VPN in the right-side menu.
Select the VPN connection you want to disable, click on the drop-down, and select Remove.
With the VPN issue, if disabling it does not work, try enabling it and selecting different server locations. Sometimes, servers from a particular location may be experiencing downtime, and switching to another can resolve the issue as you wait.
To that effect, we have an excellent recommendation for VPNs that are not geo-restricted.
If you were using the Bing AI app on your phone, you can reinstall it. Android and iOS users can download the Bing AI app from the Google Play store and Apple store, respectively.
Also, when downloading the Bing app, ensure you’re not downloading from untrusted third-party sites, as they could come bundled with malware. Further, check your phone for any viruses that may infect the program and prevent it from working properly.
With some errors, Bing support may be able to help, especially if it’s a new error code not listed on their website. You can leave feedback through their Email, Facebook, or any other channel provided by the Microsoft page.
For users who reinstalled the app and found themselves on the waitlist again, clicking the Join waitlist button automatically redirected them to their AI page.
That’s all we had for this article and the Bing error code E010006. If you’re enjoying the AI wave, we have more AI software that could help you automate your tasks on Windows.
The Redmond-based tech giant has announced Microsoft Security Copilot, a friendly AI assistant for cyber security experts, which keeps an eye on cyber threats for them.
In this comprehensive review of Microsoft Security Copilot, we learn about its capabilities and how it can help an organization monitor IT work environments in real time.
Benefits of Using Microsoft Security Copilot
AI security guidance informed by 65 trillion daily signals can enhance your IT team’s strength.
Security experts can now respond to cyber threats and security incidents within minutes instead of hours or days.
Empowers security defenders to locate malicious activities & prioritize threat signals that might go undetected.
It bridges the gap created by the constraints of limited team size and the innate limits of human attention, allowing security teams to effectively navigate and respond to the ever-evolving landscape of threats and challenges.
Features of Microsoft Security Copilot
Threat intelligence
With real-time threat intelligence sourced from a company’s security products and Microsoft’s comprehensive daily threat signals, this AI assistant makes sure that security teams are updated with the latest insights on cyber criminals and their strategies.
Apart from this, it comes with analysis and reporting capabilities, helping in visualizing the threat intelligence your company is taking in. Security Copilot also uses this intel and recognizes pertinent patterns to provide actionable insights, thereby helping organizations preemptively address vulnerabilities.
Language modeling
It is based on OpenAI’s GPT-4, a large language model that can generate natural language responses to various prompts, and a Microsoft security-specific model, which combines threat intelligence from Microsoft’s global network and security skills.
When the product receives a prompt from a security professional, Security Copilot uses security security-specific model to its fullest and uses skills & queries to harness the capabilities of the latest advanced language models.
Ongoing attack protection
Microsoft Security Copilot analyzes the incident as a security expert, generates steps for threat response, and suggests ways to eliminate risks, thereby speeding up the recovery process.
Closed-Loop Learning system
The feedback feature of Microsoft Security Copilot means it allows users to provide explicit feedback and learn from their experiences & interactions. Due to this, it is continuously improving and optimizing security-related actions & recommendations.
Bing chatbot interface
With a familiar interface like Bing chatbot, Microsoft Security Copilot provides a user-friendly experience for users and timely response, encouraging users to ask security-related questions more often. Although, it doesn’t respond to general queries like Copilot in Outlook.
However, it is sourcing results from the Cybersecurity and Infrastructure Security Agency, the National Institute of Standards and Technology’s vulnerability database, and Microsoft’s own threat intelligence database.
The Prompt book feature of Security Copilot is an important aspect as it contains a set of automation that people can store into a single prompt.
Threat Hunting capabilities
Threat handling starts with forming a hypothesis on what to look for within your environment. Microsoft Security Copilot helps by offering insights into tactics, techniques, and procedures (TTPs) used by threat actors, thereby aiding in detecting potential threat scenarios.
With these insights, the security experts can create custom hunting queries utilizing Security Copilot’s integration with Microsoft’s Advanced Hunting in Defender for Endpoint and Sentinel.
This enables them to look for attack data like suspicious activities, IOCs, and evolving cybersecurity threat patterns.
OpenAI’s GPT-4 Integration
Powered by OpenAI GPT-4 and Microsoft’s own security-specific model, the security product, though looks like a simple prompt box that accepts natural language inputs, is designed to improve the efficiency of security analysts.
With 65 trillion daily signals in Microsoft threat intelligence collection and security skills, it ensures faster detection, thorough investigation, and rapid response at the time of crisis.
Vulnerability management
Security Copilot can pull real-time security data from all your ending point devices and servers to check software versions & test them against known vulnerabilities gathered from threat intelligent feeds. If found vulnerable, it can provide remediation steps and defense hardening to eliminate the risks involved.
Microsoft Defender for Endpoint already does this, but AI factors like generating preemptive steps, performing complex risk mitigation activities, or patching software without manual intervention speed up the security improvement process of an organization.
Moreover, the security product allows users to prompt the tool with queries about potential vulnerabilities in their tech stack.
This is how Microsoft Security Copilot keeps the threats at bay; another great AI assistant, Windows Copilot, is now available and can help customize your computing experience & perform general tasks like changing the mode on your computer. To know about it, read this guide.
Deployment and management of Microsoft Security Copilot
Microsoft Security Copilot is only in preview and available for only selected customers. You can sign up for Microsoft Security updates to know about the product release, security insights, and updates. To sign up, follow these steps:
Visit the Microsoft website on your web browser. Click the All Microsoft option, and select Microsoft Security.
Click the appropriate option; usually, it is For enterprise.
Next, go to the Products option, then Security AI, and select Microsoft Security Copilot.
Click Subscribe for updates.
You need to enter the company name, email address, and security contact information. Once you have completed the registration process, you need to wait for approval from Microsoft.
After approval, you can access Security Copilot through the Microsoft Security Center.
How does Security Copilot handle your data?
Your data is your own, stays under your control, and you can choose how you want to use and monetize it.
The data will not be used to train or enhance foundational AI models by external parties. AI developed from your data or business will only benefit your company.
At every step, your data and AI models are protected using powerful enterprise compliance and top-tier security measures, proving comprehensive protection.
Pricing & Support for Microsoft Security Copilot
As of now, to use Microsoft Security Copilot is available for enterprises, & you need to subscribe to one of Microsoft’s security products, such as Microsoft Intune, Microsoft Sentinel, Microsoft Defender, Microsoft Purview, etc., and then sign up using the steps above.
Microsoft has not announced the public release date for the security product and how it will be available, licensed, or priced.
But, given the prices of the recent AI-powered products like Microsoft 365 Copilot, it might be available on a monthly basis.
If you are a coder and want AI-generated suggestions right into your editor, you can try out GitHub Copilot or wait for Copilot X, the next-gen tool.
Overall, Microsoft Security Copilot can answer your queries related to security concerns using information from the Cybersecurity and Infrastructure Security Agency. The chatbot can help with security investigations, create reports & summarize security events.
Microsoft Security Copilot is an innovative step in the future of cybersecurity that will empower security defenders with domain-specific knowledge about their organization’s infrastructure, making them effective at detecting and defending against security incidents. Also, find out more about Copilot vs. Copilot Pro and the versions for the general audience and advanced users.
What do you think about the security product? Feel free to mention your thoughts in the comments section below.
If you are seeing this error message, it means that the web browser you are using does not support Mapbox GL, a technology essential for rendering maps on AllTrails. So, what browser supports Mapbox-GL?
Currently, Mapbox.com and its associated subdomains, such as docs.mapbox.com, are compatible with all available web browsers, including Internet Explorer 11.
In fact, it’s supported by all browsers that support WebGL, a GPU-propelled JavaScript-based technique for rendering dynamic 3D graphics. If, for instance, your browser suddenly failed to initialize WebGL, you’ll have a hard time running 3D content in games and such.
However, the error stating that the browser does not support Mapbox GL can pop up even though your browser does support Mapbox GL. For instance, we were able to trigger this error in Firefox, which is considered a Mapbox GL-compatible browser along with Chrome, Safari, and Edge.
Why does my browser not support Mapbox-GL?
Here’s what you can expect to see:
the map container element should be empty, otherwise the map’s interactivity will be negatively impacted. if you want to display a message when WebGL is not supported, use the Mapbox GL supported plugin instead.
your browser does not support WebGL so cannot display maps
Mapbox not working in Chrome
MapboxGL is not defined
When you see this error, you will either need to switch to a new browser or update your current browser to the most recent version.
If you do decide to go for a Mapbox alternative browser, we encourage you to give Opera a try and we can guarantee that it does a fine job at working with WebGL-based technologies.
Should you use a particular browser and want to enable WebGL or have already upgraded to the most recent version but are still encountering this problem, check the browser’s settings to see if you can make the changes.
There are several configuration changes you may make to guarantee that Mapbox GL is turned on. Keep on reading to find out more about it!
How do I fix a browser that does not support Mapbox GL?
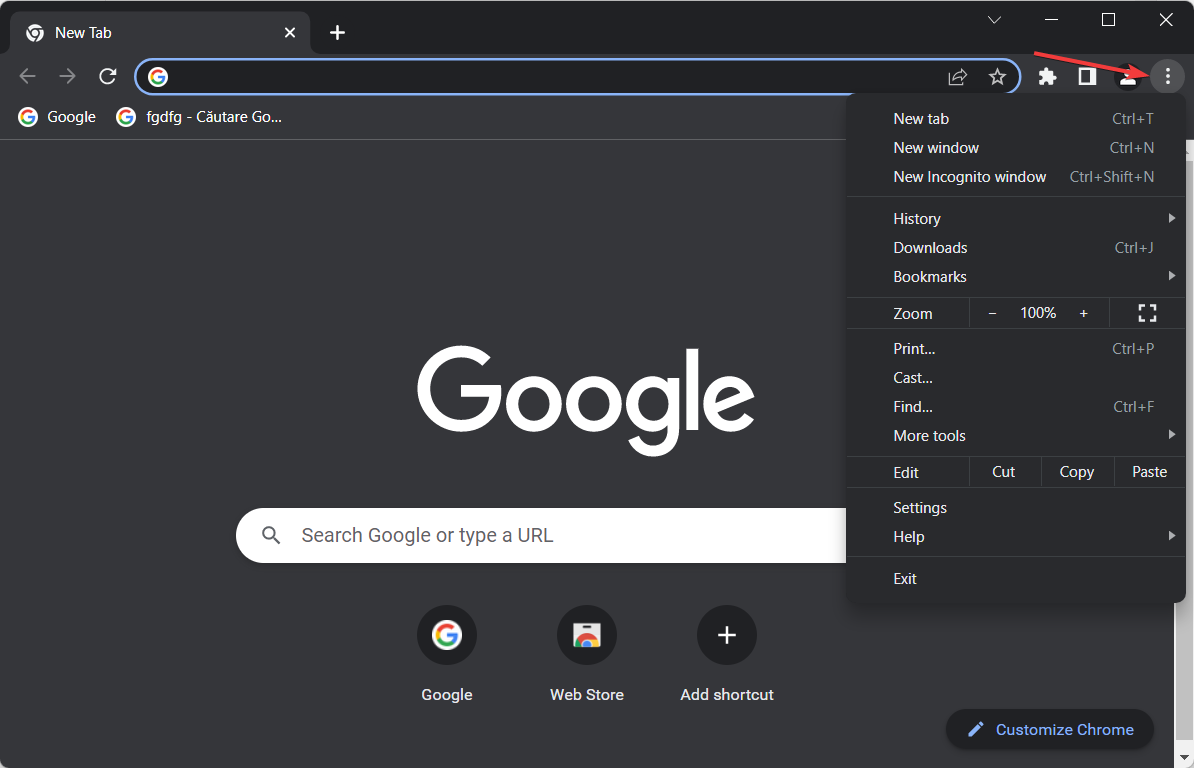
Launch Chrome and click on the three vertical dots icon in the upper-right corner.
In the Settings menu, identify the Help option and hover over it with your mouse.
Select About Google Chrome in the new window. Your browser will automatically search for updates and install them if available.
Finally, restart Chrome and check if the error stating your browser does not support Mapbox GL is still there.
As always, you should not ignore outdated browser warnings and make sure you always have the latest version available installed in order to avoid web errors and other incompatibility issues.
2. Allow hardware acceleration
Open Google Chrome and click on the three-dot menu from the top right corner to select Settings.
Scroll down and select Advanced, followed by System.
Next, allow the Use hardware acceleration when available option.
Refresh or restart Chrome to apply the changes made. This way, the Mapbox not working in Chrome issue will be resolved.
3. Enable WebGL
3.1. Allow WebGL on Chrome
Launch Chrome and type the following in the URL address bar: chrome://flags/
Use the search box to look for WebGL-related options and make sure you set the value to Enabled.
Finally, click Relaunch Now to restart Chrome.
3.2. Allow WebGL on Firefox
Open Firefox and paste about:config in your URL bar in order to search for the webgl.enable-webgl2 option.
Once you find it down the page, make sure it is set to true. If it isn’t, click on the reverse icon to the right in order to set the option to true.
Next, look for the webgl.force-enabled option and check whether it is set to true. If it isn’t, set it just like we did in the second step.
Lastly, search for webgl.disabled and make sure this preference is set to false.
Restart or refresh Firefox in order to apply the changes made. That’s it! Even if Mapbox GL is supported, you will have to tweak the above settings.
3.3. Allow WebGL on Safari
Open Safari and from the menu bar, click Safari, then select Preferences.
Navigate to the Websites tab.
Select WebGL from the list on the left side of the window. Note that this will only be displayed if it is displayed. If you can’t find it, it means it is enabled already.
Refresh or restart Safari to apply the changes made.
What is the difference between Mapbox and Mapbox-GL?
Mapbox GL JS is a client-side JavaScript framework that you can use to build online maps and web apps. The best part is that you can view Mapbox maps in a web browser or client by using this technology.
Additionally, using this same tool, you can add user interactivity and modify the map experience within your application.
Instead of being generated statically on a server, Mapbox GL JS maps are dynamically produced in the browser by merging vector tiles with style rules (mapbox-gl/dist/mapbox-gl css).
This allows for the style and the data presented on the maps to be altered in response to user input.
The map service offered by Mapbox is highly versatile. You can also include it in mobile applications by using the SDKs that are specific to iOS and Android.
Of course, there is also a Mapbox GL API and plugin available. As far as Mapbox troubleshooting is concerned, you needn’t worry. If your browser does not support Mapbox GL, update it first, then make sure WebGL is enabled. Should none of that work, simply go for an alternative browser that supports Mapbox-GL.
Was this guide useful to you? Don’t hesitate to leave a comment in the section below and share your thoughts with us. Thanks for reading!
Microsoft Edge is the default browser for Windows. It’s not a bad browser, but it’s often criticized for being slower than its counterparts. More so, recent versions of Windows are forcing it on users as the only browser. Still, Edge has some notable features that put it ahead.
However, while Microsoft Edge may be a better web browser than its predecessor, some issues with the software keep people from using it full-time. One issue is that Microsoft Edge sometimes stops updating itself automatically. We find out why this happens and how to resolve it.
Why is Microsoft Edge not updating?
Third-party plugins – While most plugins or extensions enhance the functionality of your browser, some can cause performance issues.
Virus infection – A virus may have found its way to your system and altered your PC’s functions. This can cause such anomalies as your Edge browser not updating.
Firewall settings – Sometimes, your firewall settings may prevent updates.
Incompatible OS – Browser updates are usually released for specific OS versions. They will fail if your OS is not compatible with the browser update.
A pirated copy of Windows – If you’re running a non-genuine copy of Windows, the Edge browser update may fail because it does not recognize the version of Windows installed on your PC.
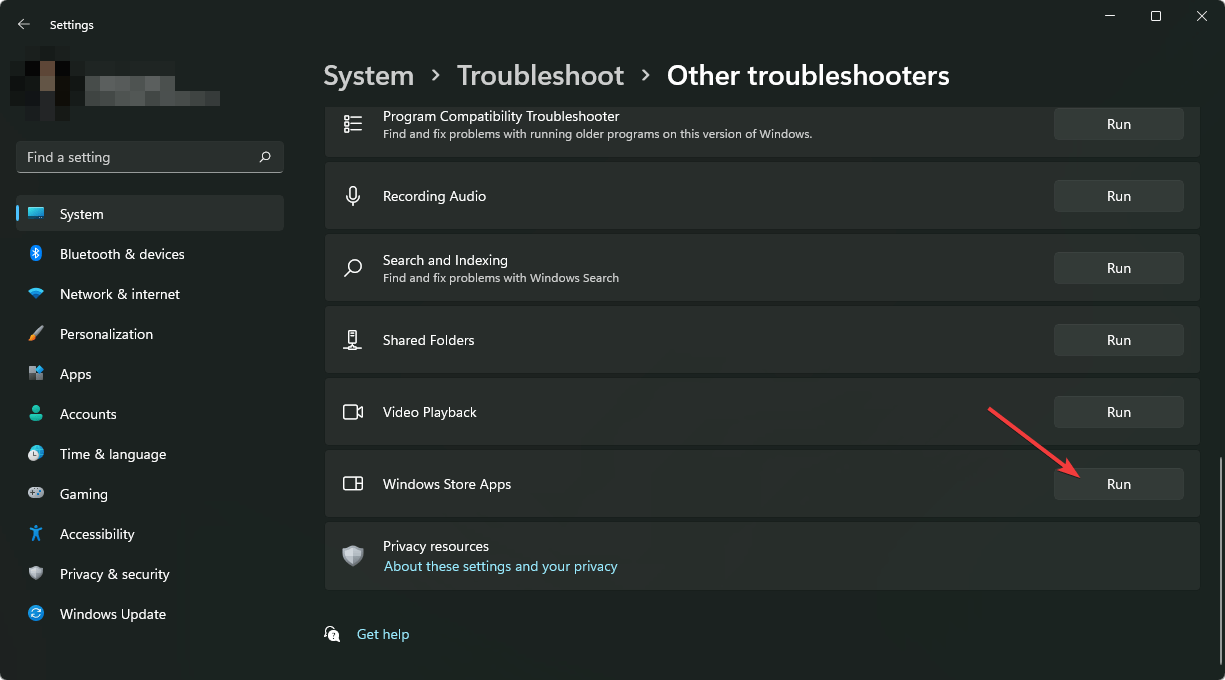
Click on System on the left pane, then Troubleshoot on the right pane.
Select Other troubleshooters.
Scroll down, locate Windows Store Apps, and click the Run button.
2. Restart the Microsoft Edge Update service
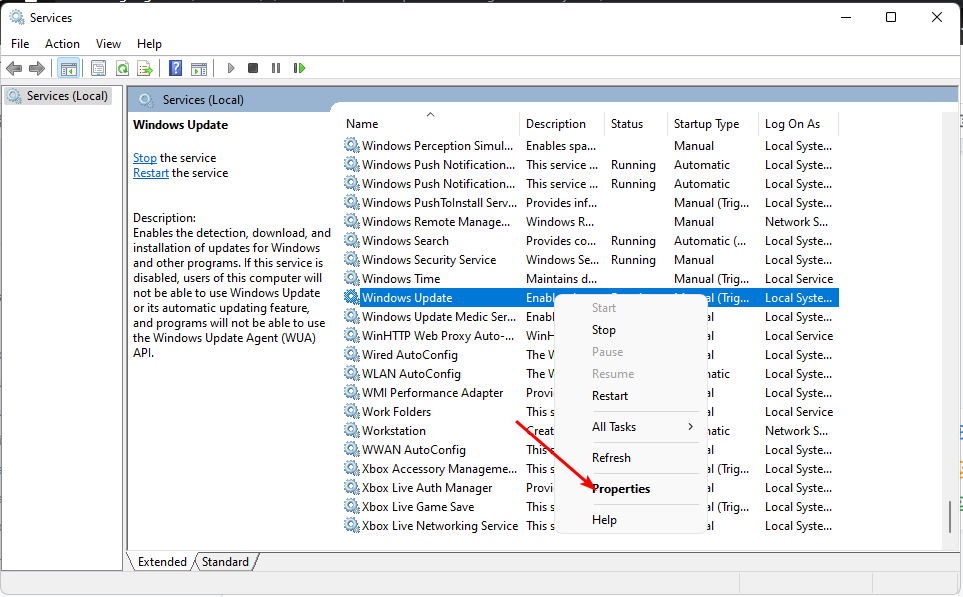
Hit the Windows + R keys to open the Run command.
Type services.msc and hit Enter.
Locate Microsoft Edge Update service, double-click on it, and select Properties.
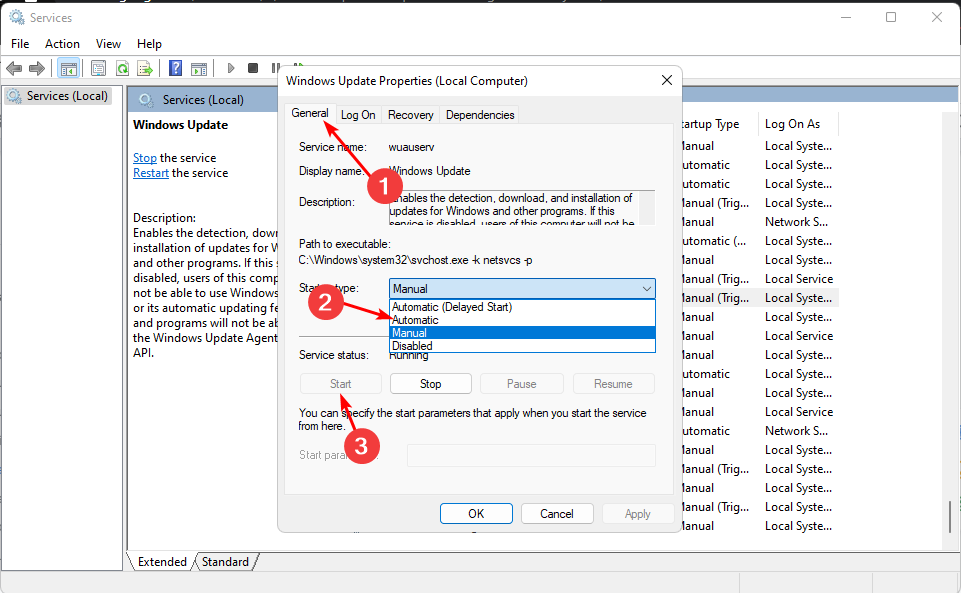
Navigate to the General tab, under Startup type, select Automatic from the drop-down options, and click on the Start button.
Next, click Apply and then OK.
The Microsoft Edge Update service updates your application whenever new updates are available. If disabled, the app will be exposed to security vulnerabilities that may prevent it from detecting updates.
How do I download the latest version of Microsoft Edge?
Like many other browsers, Microsoft Edge receives software updates occasionally to improve features or fix bugs. Some users’ browser settings are automatic, so new browser updates are automatically downloaded whenever available.
For others, you may have to trigger the updates manually to enjoy the new version. The issue arises when you can no longer update your browser, even after manually triggering them.
The time has come for stable Windows 11 users to get new features delivered via cumulative updates, so Insiders need to sit on the sideline for this one.
If you haven’t yet upgraded to the latest Windows 11 version (22H2), we have a guide that will show you where to get it and how to install it.
Now, if you use a stable Windows 11 release and do not mind installing a cumulative update, here is a new release from the Redmond giant for you.
That being said, KB5023778 (build 22621.1485), is now available with several notable changes and non-security fixes.
Please note that Microsoft is changing how it delivers preview versions of its cumulative updates, so another thing you should definitely check out.
On that note, beginning April 2023, the company will ship optional non-security updates every fourth Tuesday of the month.
In other words, Windows users will now have two Patch Tuesdays rollouts, one mandatory and one that is optional.
0
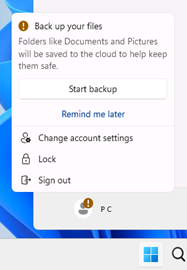
This latest update introduces notifications for Microsoft accounts in the Start menu. This is only available to a small audience right now, and it will deploy more broadly in the coming months.
Furthermore, the search box on the taskbar will be lighter when you set Windows to a custom color mode, which can be changed in the Settings app.
KB5023778 also addresses an issue that affects the Notepad combo box in Settings, one that fails to show all the available options.
The issue that affects Microsoft PowerPoint, making it stop responding when you use accessibility tools, is history and we no longer have to deal with it.
There was also an annoying problem that affected Microsoft Narrator and it failed to read items in dropdown lists in Microsoft Excel. Microsoft has dealt with that as well.
Before we get into the rest of the changelog, know that this update addresses an issue that affects USB printers, so you can kiss that goodbye.
Improvements
This update adds many new features and improvements to Microsoft Defender for Endpoint. For more information, see Microsoft Defender for Endpoint.
This update addresses an issue that affects complexity policy settings for PINs. They are ignored.
This update addresses an issue that affects the Fast Identity Online 2.0 (FIDO2) PIN credential icon. It does not appear on the credentials screen of an external monitor. This occurs when that monitor is attached to a closed laptop.
This update addresses an issue that affects a Clustered Shared Volume (CSV). The CSV fails to come online. This occurs if you enable BitLocker and local CSV managed protectors, and the system recently rotated the BitLocker keys.
This update addresses an issue that affects Active Directory Users & Computers. It stops responding. This occurs when you use TaskPad view to enable or disable many objects at the same time.
The update addresses an issue that affects the Remote Procedure Call Service (rpcss.exe). The issue might cause a race condition between the Distributed Component Object Model (DCOM) and the Microsoft Remote Procedure Call (RPC) endpoint mapper.
This update addresses an issue that affects Microsoft PowerPoint. It stops responding on the Azure Virtual Desktop. This occurs while you are using Think-Cell Features.
This update addresses an issue that affects Windows Search. Windows Search fails inside of Windows container images.
This update affects the Group Policy Editor. It adds Transport Layer Security (TLS) 1.3 to the list of protocols that you can set.
This update affects the Arab Republic of Egypt. The update supports the government’s daylight saving time change order for 2023.
This update affects jscript9Legacy.dll. It adds ITracker and ITrackingService to stop MHTML from not responding.
This update addresses an issue that affects the Microsoft HTML Application Host (HTA). This issue blocks code execution that uses Microsoft HTA. This occurs when you turn on Windows Defender Application Control (WDAC) User Mode Code Integrity (UMCI) enforced mode.
This update affects the Group Policy Management Console. It addresses a scripting error in the Group Policy Preferences window.
This update addresses an issue that affects the Windows Remote Management (WinRM) client. The client returns an HTTP server error status (500). This error occurs when it runs a transfer job in the Storage Migration Service.
This update addresses an issue that affects Desired State Configuration. It loses its previously configured options. This occurs if metaconfig.mof is missing.
This update addresses an issue that affects the Dynamic Host Configuration Protocol (DHCP) option 119 – Domain Search Option. The issue stops you from using a connection-specific DNS Suffix Search List.
This update addresses a rare issue that might cause an input destination to be null. This issue might occur when you attempt to convert a physical point to a logical point during hit testing. Because of this, the computer raises a stop error.
This update addresses an issue that affects the Simple Certificate Enrollment Protocol (SCEP) certificate. The system reports some SCEP certificate installations as failed. Instead, the system should report them as pending.
This update addresses an issue that affects the new Windows Runtime (WinRT) API. This issue stops an application from querying for location information using MBIM2.0+.
This update addresses a known issue that affects kiosk device profiles. If you have enabled automatic logon, it might not work. After Autopilot completes provisioning, these devices stay on the credential screen. This issue occurs after you install updates dated January 10, 2023, and later.
Known issues
Using provisioning packages on Windows 11, version 22H2 (also called Windows 11 2022 Update) might not work as expected. Windows might only be partially configured, and the Out Of Box Experience might not finish or might restart unexpectedly. Provisioning packages are .PPKG files which are used to help configure new devices for use on business or school networks. Provisioning packages which are applied during initial setup are most likely to be impacted by this issue. For more information on provisioning packages, please see Provisioning packages for Windows.
Copying large multiple gigabyte (GB) files might take longer than expected to finish on Windows 11, version 22H2. You are more likely to experience this issue copying files to Windows 11, version 22H2 from a network share via Server Message Block (SMB) but local file copy might also be affected.Windows devices used by consumers in their home or small offices are not likely to be affected by this issue.
Updates released February 14, 2023 or later might not be offered from some Windows Server Update Services (WSUS) servers to Windows 11, version 22H2. The updates will download to the WSUS server but might not propagate further to client devices. Affected WSUS servers are only those running Windows Server 2022 which have been upgraded from Windows Server 2016 or Windows Server 2019. This issue is caused by the accidental removal of required Unified Update Platform (UUP) MIME types during the upgrade to Windows Server 2022 from a previous version of Windows Server. This issue might affect security updates or feature updates for Windows 11, version 22H2. Microsoft Configuration Manager is not affected by this issue.
After installing this or later updates, Windows devices with some third-party UI customization apps might not start up. These third-party apps might cause errors with explorer.exe that might repeat multiple times in a loop. The known affected third-party UI customization apps are ExplorerPatcher and StartAllBack. These types of apps often use unsupported methods to achieve their customization and as a result can have unintended results on your Windows device.
What can I do if I can’t install KB5023778?
Press Win+ I to access Settings.
Select the System category and click on Troubleshoot.
Press the Other troubleshooters button.
Press the Run button next to Windows Update.
Make sure to report any other issues you might come across, in order for Microsoft to address and improve the overall OS experience for us all.
This is everything you can expect if you are a Windows 11 user. Leave a comment below if you found any issues since installing this build.
We all know Windows updates are supposed to make things better. If a few features have been experiencing glitches or your PC has been slow, updating it to the latest version could resolve this issue.
The Windows update error 0x80d02013 doesn’t seem to be doing any of these things. The download will complete successfully, but nothing changes on your PC. This sounds peculiar, but let’s try to figure it out below.
What is error code 0x80d02013?
The error code 0x80d02013 is a Windows update error that appears when you try to download and install the latest Windows updates. The results may vary across users, but a constant that remains is that the Windows updates are not successful.
For some, the updates download and install, but there are no notable changes, even those indicated in the bug fixes. Others report that they keep trying to install the updates but are unsuccessful in every instance.
So what causes these issues, and why is my Windows 11 update failing? Below are some possible reasons:
Type regedit in the dialog box and hit Enter to open the Registry Editor.
Navigate to the following location: HKEY_LOCAL_MACHINE\SOFTWARE\Policies\Microsoft\Windows\WindowsUpdate
Locate WUServer and WIStatusServer on the right-hand pane and delete them. (Note that these components may be missing from your PC. If so, skip this step).
Restart your PC.
For users who will find the components available, remember that tampering with your Registry could have serious repercussions. If unsure of what you’re doing, you should skip this step or consult a tech expert.
Alternatively, you can create a restore point before editing the Registry so that if anything goes wrong, you can have a safe point of return.
4. Reset Windows update components
Hit the Windows key, type cmd in the search bar, and click Run as administrator.
Type the following commands and press Enter after each one: net stop bitsnet stop wuauservnet stop appidsvcnet stop cryptsvcDel "%ALLUSERSPROFILE%\Application Data\Microsoft\Network\Downloader\*.*"rmdir %systemroot%\SoftwareDistribution /S /Qrmdir %systemroot%\system32\catroot2 /S /Qregsvr32.exe /s atl.dllregsvr32.exe /s urlmon.dllregsvr32.exe /s mshtml.dllnetsh winsock resetnetsh winsock reset proxynet start bitsnet start wuauservnet start appidsvcnet start cryptsv
Another side effect of the Windows updates failing, some users reported that other apps also failed to launch. The most notable is the Microsoft Store. If you face any issues with this or any other program, the best option would be to repair or reset it.
Finally, if the built-in troubleshooter is still giving you problems after all these solutions, you can visit Microsoft’s official page and download the updates manually.
Consider using Windows Update Repair tools to help you resolve this issue faster, especially if you keep trying solutions with no success.
That’s all we had as far as the Windows update error 0x80d02013 is concerned. Unfortunately, such errors are in plenty, and you may come across 0x80080008 or 0xc1900223 errors. Luckily, we’ve covered their respective fixes in our helpful guides.
Back in December 2022, Microsoft released the commercial version of its artificial intelligence-powered Copilot platform for developers at $19 per month which leverages open-source code to help developers create quick reference code for a plethora of projects.
Yesterday, Google announced its latest partnership with Replit Inc. to create its own GitHub Copilot-like platform to also deliver AI-infused code to developers.
The details of both Microsoft and Google’s business models are a bit different, but look to deliver similar outputs for developers.
Google and Replit revealed that it will leverage a customized version of Google’s new language-generation AI to power its flagship Ghostwritter app. While a select number of testing consumers are getting their hands on Google’s Bard AI chat bot powered by the company’s newest LLM models, Google’ Cloud vice president June Yang alluded to a more customized language-generation AI for Replit’s purposes that will host a combination of different systems to address a multitude of developer tasks.
Roughly for the past seven years Replit has used its own AI to host its 20 million Ghostwriter customers and more than 240 million projects, but soon it will have the power of Google’s new AI to help win over larger enterprise contracts as Google will also use its own channels to distribute the platform to its partners.
Under the new partnership, Replit developers will get access to Google Cloud infrastructure, services, and foundation models via Ghostwriter, Replit’s software development AI, while Google Cloud and Workspace developers will get access to Replit’s collaborative code editing platform.
Inversely, Microsoft owns GitHub and sought a partnership with OpenAI back in 2020 to create a collaborative AI-led developer platform.
While Microsoft offers commercial Copilot plans for developers at $19 a month to leverage the vast library of GitHub open-source code, it is unclear at this point what how Replit and Google plan to structure their own monetization model around an upgraded Ghostwriter platform.
Microsoft has released a non-security update for Windows 11 22H2 with build 22621.1485 (KB5023778). The update, which follows the updated cadence of releasing security updates on the second Tuesday of the month and non-security updates like this one on the fourth Tuesday, makes one notable upcoming change, adding notifications (some would say “ads”) to the Start Menu:
New!This update introduces notifications for Microsoft accounts in the Start menu. This is only available to a small audience right now. It will deploy more broadly in the coming months. Some devices might notice different visual treatments as we gather feedback. See the example below.
22621.1485 also makes a change we’ve seen in recent Windows Insider updates, changing the search box on the taskbar to a lighter color when you use a custom color combination:
New!The search box on the taskbar will be lighter when you set Windows to a custom color mode. This will occur when you set the Windows mode to dark and the app mode to light in Settings > Personalization > Colors.
The update also includes a number of issues addressed, as well as a long list of improvements. You can check out the Microsoft Support post for all the details.
To install this update, “Go to Settings > Update & Security > Windows Update. In the Optional updates available area, you’ll find the link to download and install the update.”
Outlook is Microsoft’s email client that comes with most versions of windows. It has evolved since its inception and keeps improving with every upgrade if its features are anything to go by. Whereas it has made notable strides, it is plagued with errors from time to time.
One of these errors is the 0x8004011d that brings your email to a standstill. You won’t be able to send or receive any emails. Usually, this is a server-related problem, but let’s dig deeper to get to the root cause and consequent remedies.
What is error 0X8004011d in Outlook?
The Outlook error 0x8004011d occurs when trying to sync an email account in Outlook. Outlook has many accounts, including Exchange and IMAP. You will get this error if these accounts fail to synchronize with Outlook.
This error is often caused by a problem with the Microsoft Exchange Server hosting your mailbox. In other instances, you may experience issues sending or receiving emails in Microsoft Outlook. You’ll receive an error message similar to Outlook the server is not available, contact your administrator.
Why is Outlook sending error 0X8004011d?
If you receive this error message, there are several possible causes for the issue:
Unstable internet connection – In order to connect to Microsoft servers, you need a strong connection. Limited connections get interrupted before a connection has been established.
Incomplete installation – The process must be seamless, with no interruptions when downloading and installing Outlook. If the download was interrupted, you may have incomplete files, and the installation may not be complete.
Firewall restrictions – It is possible that your Windows firewall or antivirus is blocking the system ports and preventing communication with the server.
Virus infection – Viruses and malware infections are known to corrupt files and your Outlook OST files are no exception. This is where your Outlook data files are stored.
How do I fix error code 0X8004011d?
Error 0x800401d is not easy to fix, but you can try some basic troubleshooting steps:
Close all Outlook instances from the task manager, close the Outlook application and open it again.
Visit Microsoft’s site and check the server status for Outlook.
Check if you are using any third-party add-ins or plug-ins on your computer, as they may interfere with your connection to Exchange Server.
Hit the Windows key, type Control Panel in the search bar, and click Open.
Type Mail in the search bar and click to open.
Click on Email Accounts.
Find and double-click on the Exchange account you’re using.
Next, check the Use Cached Exchange Mode to download email to an Outlook data file box, then restart Outlook.
And that’s how we wrap up this article. Check out our other articles on Outlook errors, such as the 0x80040115 error code or Outlook error 500 for easy fixes.
Drop us a comment below for any additional thoughts on this topic.
Bing chat AI has been instrumental in helping users generate answers to questions they’d usually spend hours on end researching. However, the chat AI has been plagued by the error code E010007 when they try to generate answers.
AI is still fairly new in the market, but it has already surpassed over 100 million users per day. With the numbers steadily rising, the server may be overloaded occasionally, hence throwing some errors. Let’s take a closer look at what this error means.
Is Bing AI available?
Yes. Bing AI is available and has been for a while. It is available on all Microsoft Edge browser devices, including Windows PCs, phones, and tablets. Initially, it was only limited to Edge, but users can now access Bing AI on other browsers.
The chatbot does the research for you as you input in queries and will respond with human-like answers.
How can I fix the Bing chat AI error code E010007?
A few preliminary checks before any main solutions include:
Switch to an incognito or private tab/window on your browser and try again.
Try another browser like Opera to ascertain that your browser is not plagued by bugs.
Wait a few moments and try again. The server may be overloaded and needs a moment to get back up.
1. Update your browser
Since Bing chat AI is a Microsoft product, it uses Microsoft Edge browser, so we shall follow the steps to update the browser.
Launch your Edge browser and click on the three ellipses at the top right corner.
Select Settings.
Click on About Microsoft Edge and check whether there are any updates available.
If you’re using other browsers, the steps may slightly differ, but you get a view of how the general steps should go.
It is important to check for updates as the chatbot is regularly updated regularly. This will ensure that your browser always meets the requirements for running the Bing chat AI.
2. Clear browser cache and cookies
Launch your Edge browser and click on the three ellipses at the top right corner.
Select Settings.
Click on Cookies and site permissions on the left pane, then select Manage and delete cookies and site data option on the right pane.
Next, click on See all cookies and site data.
Now click on Remove all.
Your cache build-up may be preventing Bing chat AI from displaying properly, especially if it has gotten corrupt.
Hit the Windows key, type Windows Security in the search bar, and click Open.
Click on Firewall & network protection, then select Public network.
Locate Microsoft Defender Firewall and toggle the off button.
Sometimes, firewalls and antivirus programs block certain sites if flagged as a risk to your system. Disabling will allow you to see if the Bing chat AI has been blocked.
If none of the above methods resolve the Bing chat AI error code E010007, we recommend that you contact Bing support. The chat is still fairly new, and they may not be aware of such errors.
By providing feedback, you allow the Bing team to examine their internal controls and develop bug fixes for the overall improvement of the AI assistant.
The early phases of any new technology are usually a hit or a miss, so you can expect many new changes and improvements with the Bing Chat AI.
Those on Claude may also encounter the internal server error but it is right up our alley so check out how to resolve it.
On to more exciting news, have you had a chance to preview Bing AI’s rival Bard? The newly launched AI assistant could give Bing a run for its money, and we have the scoop on our in-depth comparison of Bing AI vs Bard AI.
That’s it for this error, but be sure to leave us a comment below for any additional thoughts on this topic.
We are edging closer to the end of this month and as usual, Microsoft has released a comprehensive list of new features that made it to Microsoft Excel in March. We’ve already recapped February’s features in a separate post, here’s everything new in Excel this month:
Excel for the web
Unwanted formatted cells are a menace in workbooks since they negatively impact the user’s productivity. However, Excel now ships with a new capability that automatically detects these unwanted formatted cells. It then suggests launching Check Performance.
Next up, users no longer need to seek assistance from external sources whenever they need help writing formulas. With Formula Argument Assistance, you can confidently write formulas without having to worry about them being eroneous.
Additionally, Microsoft has incorporated Drag & Drop in Queries Pane into Microsoft Excel. The addition will make it easier for users to organize queries by either moving them between folders or sorting them out.
Excel for Windows
Microsoft is making Excel on Windows safe by adding an extra layer of protection to your sheets. Block untrusted XLL Add-Ins are designed to protect you from attacks coming through XLL add-ins. Most attackers leverage the add-in to spread malware to unsuspecting users.
And finally, both Excel for Windows and Excel for Mac users can now delegate duties within Microsoft Excel and Word easily with the new Assign a Task with @mentions feature. What’s more, users will get an email notification immediately after a task is assigned to them.
Be sure to check out Microsoft’s blog post for more details on everything added to Microsoft Excel this month, and let us know which feature fascinates you most in the comments.
Your Windows 11 PC entering sleep mode when idle is great for conserving battery life, but it can interrupt critical tasks like installations or updates. Fortunately, Windows lets you easily control this behavior.
In this quick guide, you’ll learn how to quickly turn sleep mode on or off in Windows 11, ensuring your computer stays active during important processes or conserves battery when idle. Let’s dive right in!
From the selected battery plan, click on Change plan settings.
Select Never for Turn off the display and Put the computer to sleep options for both On battery and Plugged in.
Click on the Save changes option.
3. Use Advanced Power Options
Press the Win + R keys to open the Run dialogue.
Type control.exe powercfg.cpl,,3 and press Enter.
Expand the Display category.
Click on the Turn off display after option.
Select Never for On battery option.
Type 0 for Plugged in (Minutes) option.
Click Apply and OK.
You can also use the Advanced power options menu to turn off sleep mode in Windows 11. This will help you prevent your PC from sleeping when you are doing something important or otherwise.
4. Use Command Prompt
Open the Start menu by pressing the Win key.
Open the command prompt as an admin.
Type the below command and press Enter. powercfg -h off
Restart your PC.
You can also use the simple command on an elevated command prompt to turn off the sleep mode in Windows 11.
5. Using Registry Editor
Press the Win + R keys to open the Run dialogue.
Type regedit and press Enter.
Navigate to the below path in the Registry Editor. Computer\HKEY_LOCAL_MACHINE\SYSTEM\CurrentControlSet\Control\Power
Double-click on the CsEnabled entry on the right.
Change the Value data to 0 from 1.
Click OK to apply the changes.
Restart your PC for the changes to take effect.
Using the Registry Editor will help you turn off the sleep mode in Windows 11. However, you should not tweak any registry settings if you aren’t aware of what you are doing.
In fact, it is advisable that you create a registry backup before you do anything with any registry entry. For worse scenarios, we have a guide that explains how you can restore the registry in case you haven’t created a backup.
6. Using group policy editor
Press the Win + R keys to open the Run dialogue.
Type gpedit.msc and press OK.
Navigate to the below path. Computer Configuration \Administrative Templates\System\Power Management\Sleep Settings
Double-click on Allow Standby States (S1-S3) When Sleeping (Plugged In).
If the sleep mode on your Windows 11 PC closes all programs then this could be problematic. The good thing is that we have a guide that gives you a bunch of solutions to resolve the problem at hand.
There are some users that have reported that for them the Windows 11 randomly shuts down after some time.
Some of our readers encountered the error code 0x8004e4be right after signing in to Microsoft OneDrive with the message Something went wrong [1001]. Logging in from the web seems to work perfectly, so 0x8004e4be is strictly related to the client app. Follow the steps below to fix it fast:
How can I fix the OneDrive sign-in error 0x8004e4be?
If none of these fixes worked for you, let’s perform the solutions below to fix the 0x8004e4be error from OneDrive.
1. Reset OneDrive
Press the Windows key + R and type or paste the following command: %localappdata%\Microsoft\OneDrive\onedrive.exe /reset
Press Enter or click OK to run it. In a few seconds, OneDrive will reset.
If you get a Windows cannot find… error, use this command in the Run console and press Enter: C:\Program Files\Microsoft OneDrive\onedrive.exe /reset
You may also reset the app from its Settings menu, but if you can’t access OneDrive, that may be impossible.
Resetting the OneDrive app is the quickest way of solving this problem and it worked for many. However, you will have to enter your credentials again manually after this procedure. For more detailed instructions, check out our complete guide on fixing OneDrive stuck on signing in.
2. Reset Microsoft Store
Press the Windows key + Rto open the Run console, type wsreset.exe, then select OK or press Enter.
After approximately 10 seconds, Microsoft Store will be reset, and the app will open.
Try to log into OneDrive again.
Some of our readers managed to fix the OneDrive error 0x8004e4be by resetting Microsoft Store, so you should try it out by performing the above solution.
3. Reinstall OneDrive
Click the Start button and select Settings.
Choose Apps from the left pane and Installed apps from the right.
Look for Microsoft OneDrive in the list of apps, click on the three dots to its right, and select Uninstall.
Now, go to the official OneDrive download page and hit the Download button to get the app and install a fresh copy.
Reinstalling the OneDrive app may be the last resort to fix error 0x8004e4be, but it doesn’t take long, and if there’s an issue with the software, this will fix it for sure.
4. Clear OneDrive cache
Close OneDrive and all related processes.
Press Windows + E to launch File Explorer.
To access the OneDrive cache folder, type this path in the address bar: %userprofile%\AppData\Local\Microsoft\OneDrive and press Enter.
Open the Logs folder within the OneDrive directory.
Select and delete all files within it.
Restart OneDrive and check if the error persists.
What is error code 0x8004e4be on OneDrive?
The OneDrive error code 0x8004e4be is a sign-in problem related to the client app on Windows. Here are some of the most important causes that may trigger this issue:
Corrupted files – Corrupted system files or within OneDrive can cause the error 0x8004e4be when signing in on OneDrive.
Interfering apps – This problem may also be triggered by apps interfering with OneDrive, especially firewalls or antiviruses.
Inconsistent connection – If you have problems connecting to the OneDrive services, this may be caused by problems with your local connection, or the services may be down temporarily.
We hope our solutions helped you solve the OneDrive sign-in error 0x8004e4be, and it’s working fine now.
According to statement from Microsoft, Microsoft Teams Free (classic) hasn’t been available since April 12, 2023. This is because Microsoft is revamping Teams from the ground up.
With Teams 2.0 being available to the general public, Microsoft is forcing all users to upgrade, and the migration process should be finished by the end of March 2024.
If you’re unfamiliar with the new version, we have an in-depth review of Teams 2.0, so don’t miss it. In case you haven’t used this software before, we also have a guide on how to use Microsoft Teams that you should check out.
In the meantime, if you’re also having a problem with data usage on Teams and want to limit it, we’ve prepared a simple workaround you can try.
Did you find a different way to switch back to old Teams? If so, let us know in the comments!
Users are facing an issue when they are trying to update their Windows 11 PC. They come across an error 0x80888002 that prevents them from installing the latest update on their PCs. Some users are facing this issue when they try to download a feature update.
If you are also experiencing or coming across the same error 0x80888002, then this guide is for you. Here, we will give you a bunch of solutions that will help you resolve the Windows update problem. Let us get right into it.
What is causing the Windows update error 0x80888002?
After researching the internet, we have found some common reasons why you will come across the Windows update error 0x80888002.
How can I fix the Windows update error 0x80888002?
1. Run a couple of commands
Open the Start menu by pressing the Win key.
Open the command prompt as an admin.
Type the below command and press Enter. reg delete "HKLM\SOFTWARE\Microsoft\Windows NT\CurrentVersion\Image File Execution Options\vdsldr.exe" /f
If the above command doesn’t work, then you can try the below command and press Enter. wmic /namespace:"\root\subscription" path __EventFilter where Name="Skip TPM Check on Dynamic Update" delete
One user suggested this solution on the official Microsoft forum and it has helped several users fix the Windows update error 0x80888002. You can also try running either of the above two commands and check if this resolves the issue or not.
Follow the onscreen prompts to begin the troubleshooting.
Apply the promoted fixes.
Restart your PC.
Try downloading the Windows Update and see if this fixes the issue or not.
Windows Update troubleshooter can help you resolve multiple issues on your PC related to Windows updates. You can try running it and see if this fixes the error 0x80888002.
4. Reset Windows Update components
Open the Start menu by pressing the Win key.
Run the command prompt as an admin.
Type the below commands and press Enter after each one.net stop bitsnet stop wuauservnet stop appidsvcnet stop cryptsvcDel “%ALLUSERSPROFILE%\Application Data\Microsoft\Network\Downloader*.*”rmdir %systemroot%\SoftwareDistribution /S /Qrmdir %systemroot%\system32\catroot2 /S /Qexe /s atl.dllexe /s urlmon.dllexe /s mshtml.dllnetsh winsock resetnetsh winsock reset proxynet start bitsnet start wuauservnet start appidsvcnet start cryptsvc
Restart your PC.
Resetting the Windows update components has also helped several users resolve the Windows update error 0x80888002.
5. Ensure the Windows Update service is running
Open the Run dialogue by pressing the Win + R keys.
Type services.msc and press Enter.
Locate Windows Update service.
Double-click to open it.
Press the Start button under Service status to run it.
If the Windows Update service isn’t running on your PC, then you should start it and check if this resolves the issue. You can also try stopping it and running it back again after waiting for some time to fix the issue.
That is it from us in this guide. If you are getting Windows update error code 0x80240004, then you can refer to the solutions mentioned in our guide.
For all internet users, you know that at some point, you might experience connection problems. The obvious response would be to troubleshoot the problem to regain connection. However, other users may tether their phones via USB, especially if in a hurry.
While this may work most of the time, sometimes USB tethering your phone can bring up issues such as the RNDISMP6.SYS BSoD error. Sounds familiar? Let’s dive deeper into what it means and what steps to follow to eliminate it.
Why am I getting the RNDISMP6.SYS BSoD error?
The RNDISMP6.SYS BSoD is a stop error that occurs when Windows stops operating because of some critical error or anomaly on your PC. You’ll notice that when you connect your phone via USB to your PC, you’ll get this BSoD error.
The exact reason why you’re getting this RNDISMP6.SYS BSoD will vary depending on what’s causing it, but most often occur due to faulty hardware or memory issues on your computer.
Other causes include:
Faulty driver – If the USB drivers are corrupt, your PC will likely experience errors because of incompatibility issues.
Incompatible device – If you recently added new hardware to your computer, this may cause an error message because Windows cannot recognize the new devices yet.
How can I fix the RNDISMP6.SYS error?
Before you advance to the slightly technical solutions, we recommend you try the following first:
Disconnect all other peripherals on your PC that are unnecessary for the USB tethering operation. Next, try reconnecting your phone and check if the issue persists.
Opt for creating a mobile hotspot using a wireless connection instead of USB tethering. This will allow you to access the internet on your PC without having to rely on the USB cable as an intermediary.
Ensure you’re running an updated version of Windows.
Restart your computer. Sometimes just restarting your computer will clear up the issue and let you start using tethering again without any problems.
1. Perform the DISM and SFC scans
Click on the Search icon on your taskbar, type cmd in the search bar, and click Run as administrator.
Type the following commands and press Enter after each one: DISM.exe /Online /Cleanup-Image /Restorehealthsfc /scannow
Restart your PC.
2. Update your USB drivers
Hit the Windows key, type Device Manager in the search bar, and click Open.
Find your USB device, right-click and select Update driver.
Select Search automatically for drivers.
Restart your PC and try reconnecting.
We also recommend using a driver updater tool, especially if you want to ensure you’re getting the right driver. Windows sometimes can recommend incompatible drivers. Outbyte Driver Updater is an automatic tool that will not only scan and detect corrupt drivers but also download and install them.
Outbyte Driver Updater
Let Outbyte Driver Updater install compatible drivers for your computer without effort.
Hit the Windows key, type cmd in the search bar, and click Run as administrator.
Type in the following command and hit Enter: sc.exe config netsetupsvc start=disabled
Hit the Windows key, type Powershell in the search bar, and click Run as administrator.
Type in the following command and hit Enter: $ErrorActionPreference = 'SilentlyContinue' $path = Get-ChildItem -Path 'HKLM:\SYSTEM\CurrentControlSet\Control\Class\{4D36E972-E325-11CE-BFC1-08002BE10318}' | Get-ItemProperty | Where-Object { $_.DriverDesc -like "*NDIS*" } | Select-Object -ExpandProperty PSPath New-ItemProperty -Name *IfType -Value 6 -LiteralPath $path -Force New-ItemProperty -Name *MediaType -Value 0 -LiteralPath $path -Force New-ItemProperty -Name *PhysicalMediaType -Value 14 -LiteralPath $path -Force
Go back to the Command Prompt window and Enter the following command: sc.exe config netsetupsvc start=demand
Restart your PC.
What is an NDIS error?
An NDIS error is a network configuration error that prevents Windows from connecting to the Internet. NDIS stands for Network Driver Interface Specification, a set of rules or standards defining how software interacts with hardware. The RNDISMP6.SYS BSoD error falls under this category.
Keeping your Dell laptop drivers updated is essential for performance and compatibility. The fastest way is to use the Dell Update Utility App, but other methods like SupportAssist or manual downloads also work. Below are several easy and advanced ways to get updates for your computer.
How to Update Drivers on a Dell Laptop (Windows 11/10)
Once downloaded, run the setup and follow on-screen instructions.
Launch the software, then click Run under Get Drivers & Downloads.
Follow the prompts to install available updates.
If you’re unsure how to handle Dell drivers update manually, this is a safe alternative. For non-Dell users, you can also try a free Windows 11 driver updater to handle generic drivers across other systems.
3. Download Drivers Manually from Dell Support
Want full control over which drivers you install? Go directly to the Dell Support Drivers portal.
The Dell Update Utility App ensures quick and automated updates for essential drivers and BIOS
SupportAssist adds proactive diagnostics and update suggestions
Manual downloads allow granular control for experienced users
Device Manager is a fallback to handle basic Windows-based driver updates
This flexibility makes it easy to keep your Dell support drivers current. Even if you’re using a system with an older CPU, you can still install Windows 11 on an unsupported processor and proceed with updates.
FAQs
How do I automatically update Dell drivers on Windows 11?
You can use the Dell Update App to automatically scan for and install the latest drivers. Simply open the app and click Check, then Install.
What is the best way to check for Dell driver updates?
The most reliable way is through Dell SupportAssist or the Dell Update Utility App, which scan and download updates for your system model.
Is the Dell Update App safe to use?
Yes, it’s an official Dell tool. Download it only from the Dell Support website.
Can I update Dell drivers without using any software?
Yes, visit the Dell support page to manually download drivers by entering your Service Tag, or use Device Manager.
Why are my Dell drivers not updating automatically?
This may happen if the Dell Update App is not installed, is disabled, or you don’t have admin rights. Try updating manually as a backup.
How often should I update my Dell laptop drivers?
Check for updates every 4–6 weeks, or after major Windows updates. Regular updates help avoid conflicts and improve stability.
Can I use the Dell Update App on unsupported systems?
No, it’s made for Dell hardware. If you’re running Windows 11 on an unsupported CPU, use manual installation or Device Manager instead.
Final Thoughts
Updating Dell drivers on Windows 11 is easier than ever, thanks to tools like the Dell Update Utility App and SupportAssist. No matter if you prefer automatic updates or downloading drivers manually, these methods help ensure your hardware stays compatible, secure, and running smoothly.
Make it a habit to check for updates regularly to avoid performance issues and get the most out of your Dell device.
Microsoft is ready to allow users to access the first preview of the Loop project. Now, let’s learn where to get it from, how to install it, and how to make the most of it.
Want to find out how to utilize this software across Office apps and manage tasks? You are in the right place.
What is Microsoft Loop?
How should we put this? You can compare Loop to a project board. Here, you can see a list of all Loop components and Loop pages and who is currently working on them.
Think of it as a modern File Explorer, where everything is live and collaborative. Loop pages are individual canvases where people can share and collaborate on Loop components.
Also, Loop components are constantly updated and editable for whoever they’re shared with, which is a pretty nice fight.
You can drop the content as a Loop component into a Teams message or Outlook email. Also, any edits to the table will be reflected wherever it’s embedded or shared.
Microsoft said that Loop would use the Fluid Framework open-source platform. Thus, it will allow Microsoft 365 users to collaborate and share content in real-time.
This great idea is that users can see everything on their project in just one workspace. There will be three parts to Loop, according to its official website.
Workspaces: Group all-important project elements in Loop workspaces to see what everyone’s working on and track progress toward shared goals.
Pages: Organize your Loop components and essential elements in your project. Links, files, and data, in Loop pages, can grow to match the size of your ideas.
Components: Collaborate in the flow of work with Loop components. Work together on lists, tables, notes, or even a customer sales opportunity from Dynamics 365. Do it on a Loop page or in a chat, email, meeting, or document.
And, once shared, you can view your co-workers’ tasks and see when they check off each of those items. This tool can be a helpful functionality to keep the team intact.
Loop components stay in sync wherever they’re shared.
Now everyone can see you checked off that action item, regardless of where they’re working. ? pic.twitter.com/vvG2NJqJoT
The Loop app is also available for mobile. This will help you keep up with whatever you do while on the road.
Remember that Loop elements can be used with Teams and many other Microsoft 365 apps.
How do I start using Microsoft Loop?
First of all, you are going to want to use the sidebar to navigate the Loop app. Everything you need has been simplified and neatly put into a few categories.
When you log in for the first time, Loop will provide you with some essential guidance. The Getting Started section will help us not feel completely overwhelmed.
Now that you’ve become a bit more familiar with the Loop app, we can move on to your projects.
It’s time to look at projects. You can switch between the Getting Started screen and Workspaces by clicking this small button.
Moving on, let’s look at how to create a new Workspace. We’ll also see how to manage the ones you already have on your Loop app.
We’re also going to take a look at creating Loop components. Let’s see how to share them on whatever platform you need to share them on.
How can I create a new Workspace in Loop?
Once on the Workspaces page, click on the Plus button.
Click the Update cover button to select a photo cover for your Workspace.
Choose the picture you want, then click on the Select button.
Please select a name for your Workspace, then click on the plus sign next to it and select an emoji.
You’ve successfully created a new Workspace. You will find it and be able to interact with it on the Workspaces page.
Need to reverse an edit or fix a mistake? Check this detailed guide on how to undo in Microsoft Loop to keep your work error-free.
Know that you can also edit these Workspaces after creating them. So, don’t worry if it isn’t what you envisioned just yet.
By clicking on the three dots on each Workspace icon, you can set it as a favorite, edit it, or rename it. You can also change the cover or emoji, add or remove members, and even delete it.
Need a step-by-step for changing workspace titles? Follow this guide to rename a workspace in Microsoft Loop and apply the correct name quickly.
How can I create a Loop component?
After creating your project in the new Workspace, click on the dots icon next to it and select Create Loop component.
Now your Workspace has a Loop component that you can share.
How do I share Loop components?
Click on the Copy Loop component button.
A link to your Loop component will be generated, so click the Copy button.
Paste the link where you want your colleagues to see and interact with it.
This is all you must do in order to create, manage, and share your Loop Workspace components with colleagues via mail or Teams.
Now that Microsoft is opening Loop to public preview, businesses and consumers can access an early version of the software.
Suppose you have a Microsoft Account or Azure Active Directory account. In that case, you can access the web app, and iOS and Android versions will also be available to businesses today and consumers soon.
Excited about the new release? Be sure to share your thoughts, ideas, and opinions with us in the comments section below.
An error our readers complain about is the 0x87e00017 which appears on the Microsoft Store. It occurs when they try to download or update games from Xbox Game Pass. Hence, we’ll discuss the error and ways to fix it.
0x87e00017 is a fatal error code that appears when you try to update Game Pass games via Microsoft Store.
It indicates something unexpected happened. Also, it is usually associated with issues with Xbox gaming components or Microsoft Store.
What causes the error code 0x87e00017?
Many factors may be responsible for the error code 0x87e00017, and some are:
Issues with Microsoft Store – The error can occur while updating or downloading Xbox games due to Microsoft Store cache files interference with the process. When the cache files get old, they can become corrupted and impede the collection of more data, resulting in errors.
Xbox app and Microsoft Store corrupt installation files – The Xbox Game Pass performance may be impeded due to the corrupt installation, resulting in trouble with the error code 0x87e00017.
As we go further into this article, we’ll show you steps to resolve the error.
How can I fix the error code 0x87e00017?
Before proceeding with any advanced troubleshooting steps, go through the following preliminary checks:
Check the Xbox servers status – Visit the Xbox server status page to check for any updates regarding the server.
If you can’t fix the problem, try the solutions below:
1. Run Windows Store Apps Troubleshooter
Press Windows + I key to open the Settings app.
Click on System and select Troubleshoot. Proceed to click on Other troubleshooters.
Then click on the Run button beside the Windows Store Apps.
Running the Troubleshooter will resolve issues with Windows Store apps that may cause error code 0x87e00017.
2. Reset the Windows Store cache
Press Windows + R keys to open the Run dialogue box, type wsreset.exe, then press Ctrl + Shift + Enter keys to clear the cache as an administrator.
Wait while the process runs until it closes automatically.
Restart your PC and launch the Microsoft store to check if the error code 0×80073d01 persists.
Clearing the cache on Windows as an administrator will remove any bugs and corrupt files in the cache files and fix the Windows store error 0x87e00017.
Left-click the Start button, type Services, then open it from the search results.
Find the Gaming Services, right-click on them, and select Restart from the drop-down.
Find all the Xbox services in the list, right-click them, and select Restart from the drop-down.
Restarting Xbox Services and Gaming Services will fix any background tasks impeding their processes on your PC. Check how to download the Xbox gaming services app on your PC.
4. Repair the Microsoft Store app
Press Windows + R keys to open the Run dialogue box, type ms-settings:appsfeatures, then press Enter.
Locate and select the Microsoft Store, then click on the Advanced options.
Go to the Reset tab and click the Repair button.
Restart your PC after the repair process and check if the error is fixed.
Repairing the Microsoft Store app will resolve any issues and corrupt installation files affecting its performance, leading to the 0x87e00017 error.
5. Update Windows Operating System
Press Windows + I key to open the Windows Settings app.
Click on Windows Update and click the Check for updates button. If there are any updates available, it will search for and install them.
Germany has set its sights on Microsoft as it opens proceedings to determine if Microsoft’s business in the country can be subject to special abuse measures, aka the German Competition Act, due to the company’s sprawling digital ecosystem.
President of the Bundeskartellamt, Andreas Mundt addressed German’s preliminary investigative probe into Microsoft with the following,
With Windows and its Office products Microsoft has had a long-standing and very strong position with regard to operating systems and office software. Based on this, the company has continuously expanded its product range both for business customers and consumers. More recently, we have seen a strong increase in the importance of the cloud services Azure and OneDrive, which are often linked to other Microsoft applications, and the resounding success of Teams, a software for video conferences and collaborative working. In addition, Microsoft is also active in other areas, including gaming with its Xbox, career networks with its service LinkedIn or internet searching with its search engine Bing. Most recently, the company has attracted attention with the integration of AI applications. In light of this, there are good reasons to examine whether Microsoft is of paramount significance for competition across markets. Such a finding would allow us to take action at an early stage and prohibit possible anti-competitive practices.
It should be noted that the FCO is taking the formal step of investigating Microsoft but not actually filing an antitrust claim against the company, and will most likely consult with the European Commission and other regulatory bodies in the region before issuing any official antitrust complaint.
Today’s decision to initiate a proceeding does not yet entail a proceeding to assess specific practices employed by Microsoft. If complaints or other information suggest that there are indications of Microsoft engaging in potentially anti-competitive practices, a separate decision will have to be issued in this matter – also in consultation with the European Commission and possibly other competition authorities.
It’s also unclear what Microsoft has done specifically that may have sparked the FCO’s investigation into the company, but some speculate that it could involve the almost yearlong Activision Blizzard buyout or rumors of the company already applying a heavy hand in regards to data restrictions on 3rd parties looking to jump into the AI chatbot field recently.
Whatever the reason, Microsoft joins several other big names under the FCO microscope and with as many moving parts as it has currently, a formal complaint could become an inevitability.
Lately, some of our readers report the error code 0xC0000374 appearing on their computers. The error occurs when installing Realtek sound card drivers on the PC. Hence, this guide will discuss the correct approaches to resolve the problem.
The Install Realtek HD Audio Driver Failure, Error OxC0000374, occurs when you try to install the necessary Audio drivers for the Realtek sound card on your system.
Hence, let’s explore possible things that might trigger the problem:
Sound card failure – When the sound card is not intact or working, it can cause the Audio services not responding error.
Outdated operating system – Running an outdated OS prevents the system from accessing updates, resulting in bugs impeding hardware devices and drivers’ activities.
Issues with the Microsoft UAA bus driver – UAA bus driver for High Definition Audio can interfere with the Realtek driver installation process and cause the 0xc0000374 error. It is because it supports older devices like Realtek 2.51, and installing a new version can cause compatibility problems.
Nevertheless, you can resolve the error by following the troubleshooting steps below.
How can I fix the exception code 0xc0000374?
Before proceeding with any advanced fixes, go through the following:
Press Windows + R key to open the Run dialog box, type devmgmt.msc, and press Enter to open the Device Manager.
Expand the Sound, video, and game controllers tab. Right-click on Realtek High Definition Audio, and select the Uninstall device option from the drop-down menu.
Check the box for the Delete the driver software for this device option, then click Uninstall.
Restart your computer to automatically install the driver.
Right-click the Start button, then select the Device Manager from the drop-down.
Expand the Sound, video, and game controllers tab. Right-click on Realtek High Definition Audio, and select Update driver.
Click on Search Automatically for the updated driver software option.
Restart your PC and check if the error persists.
Updating the driver will fix bugs that impede its functionality and cause the 0xc0000374 error.
If you need a straightforward alternative, you can try using dedicated software, such as Outbyte Driver Updater, which will automatically locate the latest updates after detecting all outdated or missing drivers found on your computer.
Press Windows + R key to open the Run dialog box, type devmgmt.msc, then press Enter to open the Device Manager.
Find the Sound, video, and game controllers entry and click on it. Click on Action at the top bar, and select Add legacy hardware from the drop-down.
Select Install the hardware I manually selected from a list (Advanced), then click Next.
Click the Sound, video, and game controllers options and click Next.
Select Realtek from the Manufacturer tab on the left and select the latest version from the Model tab on the right.
Click Next to continue the process. Follow the on-screen instructions to complete the hardware installation.
Adding legacy hardware installs a Peripheral Controller Interface (PCI), manual configuration, and jumper installation to help run the Realtek Audio device.
Alternatively, Realtek Audio Manager can be used to the same effect. If the Realtek HD Audio Manager is missing on your PC, hop here to find the fixes to reverse it.
Some readers encounter error code 0xc0000428 Blue Screen of Death on their PCs. This usually occurs not long after a system update and can be critical.
Fortunately, there are a couple of fixes to resolve the error. You can also check our detailed guide about some factors that can cause a Blue Screen of Death on your PC.
What causes the BSoD error Oxc0000428?
Issues with Boot files – You can encounter error code 0xc0000428 during startup because the Boot files or disk are damaged. It prevents the system from accessing the necessary files and components to communicate with the booting center, resulting in a BSoD.
Illegitimate or unauthorized files, drivers, or apps – Installing illegitimate apps can trigger the Digital Signature feature to impede the system’s processing due to programs or files that are not digitally signed or belong to doubtful parties.
Cloning or resizing of the OS hard disk – Tampering with the disk drives on the computer can cause disk boot failure. Also, it may be due to an essential system file being moved or a partition being affected while resizing the OS hard disk.
Nevertheless, we’ll discuss some troubleshooting steps to help you resolve it and get your system working.
How can I fix the BSoD error Oxc0000428?
Before trying advanced troubleshooting steps, power cycle your computer, disconnect external devices and peripherals from the PC, and restart Windows in Safe Mode to check if the error appears.
1. Rebuild Boot Manager via the Command Prompt
Plug in a bootable USB drive and press the Power button to boot the PC.
Press any key to boot from USB.
Set your Language preferences and click the Next button.
Selectthe Repair your computer option on the Install now screen.
Click the Troubleshoot option, then Troubleshoot.
Click Advanced and select Command Prompt.
Select your account, type the following commands in the Command Prompt window and press Enter after each of them:
C:
cd boot
attrib bcd -s -h –r
bootrec /rebuildbcd
Close the Command Prompt window and restart your PC.
Press Windows + I key to open the Windows Settings app.
Select System and click on Recovery from the left pane.
Locate Advanced startup and press the Restart now button below the tab.
On startup, select the Troubleshoot option.
Click Advanced and select Startup Settings from the menu.
Navigate to the Disable driver signature enforcement option and click F7 to enable it.
Restart your PC.
Disabling the Driver signature enforcement option should help you boot your PC successfully. Also, it prevents the feature from checking programs and files during startup.
We’re on the verge of concluding the month of March, and it’s during this time when Microsoft gives up a round-up of everything new. This time it’s for Microsoft Teams Rooms and Devices.
Microsoft Teams Rooms continues to provide users with simple and easy-to-use meeting rooms that feature “innovative new solutions for inclusive collaboration, with audio and video that gave everyone a voice.” And with these new additions, Microsoft continues to build on this premise with the aim of enhancing the user experience.
Ultimately, helping satisfy the ever-growing hybrid meeting needs while simultaneously providing simple solutions. Here’s everything you need to know:
Teams runs natively on Cisco
Building on Microsoft’s goal to have multiple avenues through which users can join meetings and collaborate together, native Microsoft Teams Rooms is now accessible on Cisco meeting devices. “The new Cisco Board Pro, available in 55-inch and 75-inch sizes, are among the first Cisco devices certified for Teams,” says Microsoft.
Now, users with Cisco devices certified for Teams can easily connect from a native Teams Meeting to a Webex meeting, What’s more, they also have the alternative of setting Microsoft Teams Rooms as the default experience.
Team displays are now easier to use
Users can now manipulate Teams displays with the hotdesk experience to reserve a seat in the workplace, thus allowing you to make plans in a timely manner. In turn, promoting effectiveness and efficiency.
Microsoft has plans in place to launch a new QR code sign-in experience later in the summer that will allow hotdesking users to easily access their personal Teams account by simply scanning the QR code on the Teams display, then using the Teams app on their mobile devices to sign in faster.
Therefore, you no longer have to enter your details manually into the device which saves you a lot of time.
Teams meeting experiences expand to Windows and Android
Microsoft has laid out its plans to expand the availability of Teams meeting experiences across both Windows and Android with the aim of providing users with more consistency as well as functionality. Surface Hub is slated to join Teams Rooms later this year, marking the first touch-enabled board running Teams Rooms on Windows.
Microsoft device ecosystem platform
The platform is designed to unify the best experiences from both Microsoft and Android that’s curated specifically for shared spaces and optimized for Microsoft Teams devices. It’s built on the Android Open Source Project (AOSP), which provides security, reliability, management, and easy deployment.
“The Microsoft device ecosystem platform delivers class-leading security tailored for shared spaces and features a class-leading collection of security and tamper resistance features including secure and verified boot, anti-rollback, access-controlled security policies, partition Logical Unit Number (LUN) locking, and data at rest encryption,” Microsoft states in the Tech Community blog post.
Microsoft Defender for Endpoint Plan 2
Microsoft has also announced that it will be further enhancing Team Room’s endpoint security for Teams Rooms Pro to ensure that the meeting experience is secure at all times. The company intends to integrate Microsoft Defender for Endpoint Plan 2 into the Microsoft Teams Rooms Pro license and the Pro Management Portal by the end of Q2 2023, thus making the experience better and more secure.
This means users will no longer have to incur an additional cost while seeking other security services since it has now been incorporated into the experience making it more seamless. The feature will be included automatically for those with existing licenses, and it will also be incorporated into new Teams Rooms Pro licenses.
Teams Rooms on Windows devices gets new UI
Microsoft has also announced its plans to revamp Teams Rooms’ user interface on Windows this month. The redesign will feature five beautiful new themes, more intuitive messages, a homepage and function screen design refresh as well as the ability to customize unique themes that align with your organization’s brand. The redesign will be consistent across Android and Windows devices.
Microsoft Teams Rooms on Android updates
And finally, Microsoft has incorporated a host of new capabilities for Android users such as the ability to quickly start an ad-hoc meeting with the Meet button, and even invite other participants to join from the table console.
What’s more, users will be able to join meetings using an ID. The front-row experience is also available for Teams Rooms users on Android.
That’s it for this month folks, we invite you to check out Microsoft’s blog post for more information as we only hit the key points. Be sure to also share your thoughts with us in the comments.
Google Sheets is a cloud-based spreadsheet program for calculations and other tasks. However, you can encounter calculation errors due to data not being recognized as text instead of numbers. Therefore, we will examine quick ways to convert text to numbers on Google Sheets.
There could be a few reasons why you are unable to convert text to numbers in Excel:
Data format – There are different data formats in Excel. However, you won’t be able to convert text to numbers if the data is in text format. It prevents Excel from recognizing it as a number in the Excel Toolbar.
Non-numeric characters – Text that contains non-numeric characters such as letters or symbols is usually not converted to numbers on Excel. You have to remove any non-numeric characters before attempting to convert the data.
Data size – If the data is too large or too small, Excel may not be able to recognize it as a number. In this case, you may need to adjust the number format or use scientific notation.
Calculation settings – Converting text to number can be challenging if your Excel calculation settings are manual. It requires you to recalculate your Excel sheet before the conversion can take effect.
Nevertheless, we will discuss methods to convert text to numbers on Google Sheets.
How do I convert text to numbers on Google Sheets?
1. Convert using the main menu
Press the Ctrl + A key to select all data.
Click the Format tab and select Number from the options.
Select the Number option again for the sub-menu.
Click the Decrease decimal place button on the ribbon to decrease the decimal place in your data and the Increase decimal place button on the ribbon to increase the decimal place in your data.
The Google Sheet has an inbuilt number function that allows you to modify numerical data.
2. Convert using the multiply function
Click the cell you want to convert to identify the cell reference.
Select the cell to which you want to convert the value to.
Type = MULTIPLY(cell references, 1) in the cell you want to convert to and press the Enter key. Example = MULTIPLY(B2, 1)
Multiplying the unrecognised cell will the operand to the numerical value.
Select the cell range you want to convert to identify the cell reference.
Select the cell to which you want to convert the data, type =ArrayFromula( cell reference range*1), and press Enter key. Example =ArrayFromula( A1:A5*1)
Check if the value is numeric using the =ISNUMBER() function.