Dell Laptop Black Screen: 5 Ways to Quickly Fix it

Dell is one of the most popular computer manufacturers across the globe and is known for delivering quality products. Yet, some users report issues with it. The most common being, a black screen on a Dell laptop.

Black screen issues are not new and affect all computers, be it a desktop or a laptop. And the underlying cause is often difficult to identify, given the large number of issues that can trigger the problem.

Also, while some users get a black screen on a Dell laptop after powering on, others find it after the Dell logo. No matter what, a well-researched approach should help you fix things. Keep reading to find out!

What causes the Dell laptop screen to go black?

Here are the primary reasons you come across a black screen on a Dell laptop running Windows 11:

  • Outdated graphics driver: An outdated graphics driver is one of the most common underlying causes that trigger a black screen. Besides, it also results in poor performance and app crashes.
  • Improper power supply: The display (monitor) needs electrical power to work, and when it doesn’t receive any, the screen remains black. Even a shortfall in power supply can lead to the issue.
  • Issues with the BIOS: For many users, a recent BIOS update caused the problem, generally due to introduced changes or an improper installation.
  • Connection problems: If the connections are loose or the cable is damaged, you will get a black screen on startup in the Dell laptop.
  • Malfunctioning hardware: Often, the display itself, the battery (both the main one and CMOS), the RAM modules, the graphics adapter, or any other vital hardware component stops functioning, leading to the problem.

How do I fix a black screen on my Dell laptop?

Tip icon Tip
Some of the solutions listed here require you to access Windows and its components. This works when you are getting a black screen intermittently. Or boot the PC into Safe Mode and then execute the fixes.

Before we move to the slightly complex solutions, here are a few quick ones to try:

  • Restart the computer. The simplest solution often does wonders!
  • Unplug the charger, remove the battery if possible, and hold the power button for 30 seconds. This will drain any residual charge. Once done, reconnect everything and power on the laptop.
  • Disconnect all non-critical external devices connected to the PC.
  • Often, you will see a black screen with a cursor on a Dell laptop due to overheating. So, wait for a while and let the laptop cool down.
  • Install the latest Windows updates if you come across the Dell laptop’s black screen after login.
  • Remove the RAM modules, clean any carbon deposits with an eraser or a soft piece of cloth, then place them back and turn on the laptop.
  • Update the BIOS in case you started encountering the problem after installing a new version. Be cautious with the process since it’s tricky, and even a minor fault can render the laptop useless.

If none work, move to the fixes listed next.

1. Update the graphics driver

  1. Press Windows + X to open the Power User menu, and select Device Manager from the list.
  2. Expand the Display adapters entry, right-click on the graphics adapter, and select Update driver.update drivers to fix dell laptop black screen
  3. Now, choose Search automatically for drivers and let Windows find and install the best one available locally.search automatically

One of the fixes that worked for most users when faced with a Dell laptop’s black screen in Windows 10 was to update the graphics driver.

Though there’s always the possibility that the OS can’t find a newer version, and you would have to head to the manufacturer’s website and update the driver manually. And once done, make sure to disable automatic driver updates in Windows.

2. Uninstall recent Windows updates

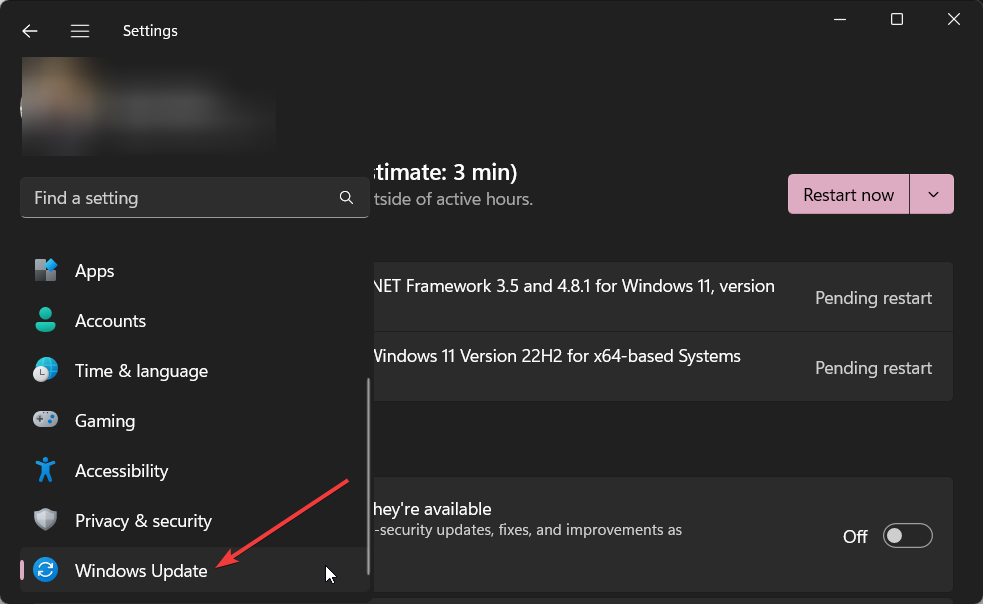
  1. Press Windows + I to open Settings, head to the Windows Update tab from the navigation pane, and click on Update history. update history
  2. Scroll down to the bottom, and click on Uninstall updates.uninstall updates to fix dell laptop black screen
  3. Click Uninstall next to the recently downloaded update.uninstall
  4. Again, click Uninstall in the confirmation prompt.
  5. Restart the computer and verify whether the problem is resolved. If not, remove other recent updates.

In many cases, users found that when the Dell laptop’s black screen won’t turn off, it was a recent OS update to blame. And uninstalling Windows updates did the trick.

3. Reset the BIOS

  1. Turn off the Dell laptop, then hold the power button, and as soon as the display lights up, press the F2 or F12 key to access the BIOS.
  2. Now, look for a Load Defaults or similar option, and click on it.reset BIOS to fix dell laptop black screen
  3. Choose the appropriate response to confirm the change.
  4. Once done, restart the device.

Often misconfigured settings in the BIOS, especially those introduced after an update, can lead to a situation where the Dell laptop has a black screen, but the keyboard is lit up. And a quick fix here is to reset the BIOS to its default.

Another way to load BIOS defaults is to remove the CMOS battery placed within the laptop. So, if you could open that back panel, unplug the battery, wait for a minute, and then put it back in.

4. Perform an in-place upgrade

Tip icon Tip
The steps listed here are for Windows 11. In case you are running the previous iteration, performing an in-place upgrade in Windows 10 is just as easy.
  1. Go to Microsoft’s official website, choose the OS edition and product language, then download the Windows 11 ISO.
  2. Now, double-click the ISO, and run the setup.exe file.setup.exe
  3. Click Yes in the UAC prompt.
  4. Click Next to proceed.
  5. Now, click Accept to agree to Microsoft’s license terms.
  6. Finally, verify that the setup reads Keep personal files and apps, then click on Install to start the process.in-place upgrade to fix dell laptop black screen

When the other software solutions fail to work, a repair upgrade often helps if you see a black screen with caps lock on in a Dell laptop. Though it takes a few hours to complete, you don’t lose any files or apps.

5. Contact the manufacturer or a repair shop

If nothing else works, the last option is to visit a certified Dell repair center or contact the Dell support team.

We don’t recommend opening the laptop to examine the components and connections. Let the experts deal with it. And once they are done, you will know the problematic component and the repair price. Proceed as you deem fit!

By now, you know how to restart a Dell laptop with a black screen and should have things up and running.

Before you leave, check the most effective PC best repair tools and get one to eliminate such issues before they become a problem.

For any queries or to share the solution that worked, drop a comment below.
Fix: No Signal on the Monitor but the PC is Working

In an unfortunate circumstance, you might have noticed a no-signal error on the monitor as soon as you turn on your Windows PC. When this happens, no image is displayed on the screen, rendering your monitor useless. 

If you are facing the same issue on your system, this guide has got you covered. 

Why is there no signal on the monitor, but the PC is working? 

  • Loose or faulty cables – A loose connection between the PC and Monitor and a broken cable often causes this error. 
  • Incorrect display settings – The no signal on monitor error also indicates that the display settings are not properly configured. 
  • Faulty monitor – You may also witness the no signal on the monitor message if there is some fault in the output device itself.
  • Outdated drivers – If the display drivers become corrupt or outdated, you are likely to face display errors like the one at hand. 
  • Hardware issue – Some physical damage to the hardware, particularly the monitor, CPU, and cables, can also trigger the error. 

Regardless of the reasons why the no signal error on the monitor error shows up, it is quite easy to troubleshoot.

How do I fix the no signal on the monitor error?

Before moving on to advanced fixes, you should check that the video cable is firmly connected, make sure that the graphic card is firmly inserted into its slot located on the motherboard, and connect a spare monitor to the PC to check for any damage to the monitor. 

1. Select the correct input source

  1. Power on your computer and then your monitor. 
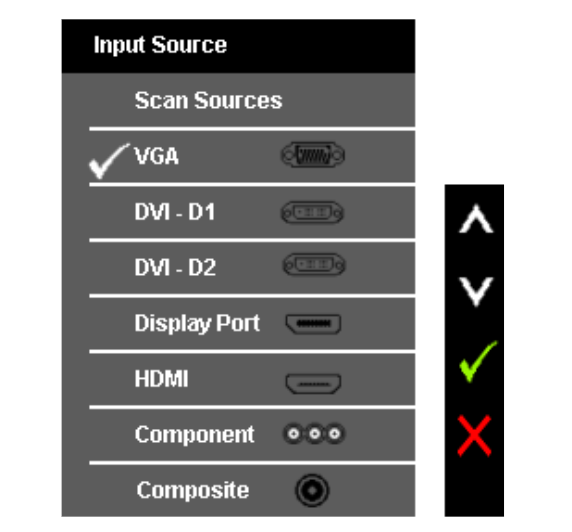
  2. Press the Menu button on the side of the monitor to view the menu options.
  3. Keep pressing the Menu button to access the Input Source and then select the correct choice. For instance, if your monitor is connected to the VGA port, you should select VGA as the input source. no signal on monitor

If the incorrect input source is selected, your system will run into the no signal on monitor issue. Hence, you should verify that your monitor is connected to the correct input source selected in the settings. 

2. Update your graphic driver

  1. Right-click the Windows icon on the taskbar to access the Quick Links section and choose Device Manager from the list of options. no signal on monitor
  2. Expand the Display adapter category to view the list of graphic cards installed on your computer.
  3. Right-click each graphic card one by one and select the Update driver option from the context menu.
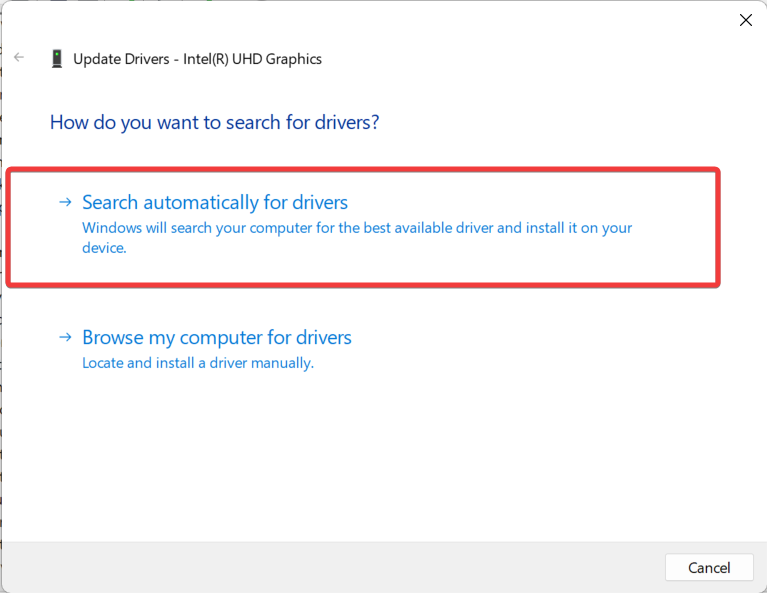
  4. Next, click the Search automatically for drivers option on the pop-up window that appears. 
  5. Now wait for Windows to look for any available driver update and automatically download and install it.

Apart from this, you can visit the manufacturer’s website to download and install the latest available driver updates or use a specialized tool like Fortect Driver Updater that can automatically replace all outdated drivers with the newest versions.

Outdated display drivers often cause compatibility issues between the system and the output display device, causing errors like the one at hand.

3. Check The Resolution Settings

  1. First of all, boot your PC in safe mode from the bios settings. 
  2. Now access the Windows Settings using the Windows + I shortcut keys. 
  3. Choose the Display option located in the System settings section. 
  4. Look for the Display resolution option under the Scale & Layout section and click to expand the drop-down next to it. 
  5. Choose the relevant display resolution with respect to the maximum capability of the monitor. 
  6. Press the Keep Changes button on the confirmation popup to apply the changes. 

You can check the ideal display resolution settings mentioned on the graphics card to ensure that the correct options are selected. 

A no signal on monitor error can occur if the display resolution is higher than your graphic card can handle.

That’s everything about the no signal error on the monitor and the different ways to tackle the problem. 

If the monitor turns off or goes black randomly, check the dedicated guide to fix the problem.

Before you go, check our guide on troubleshooting DP signal loss on Dell laptop monitors if you’re having additional problems.

In case you have any queries or feedback, reach out to us in the comments section. 

What is Microsoft Kernel Debug Network Adapter?

Microsoft Kernel Debug Network Adapter is one of the network adapters in Device Manager. This network driver is designed for a special purpose and generally hidden from view.

In this guide, we will explain everything about the Microsoft Kernel Debug Network Adapter and for purpose which it is used. 

What is Microsoft Kernel Debug Network Adapter? 

Microsoft Kernel Debug Network Adapter is a virtual Network Interface Card (NIC) that is developed to carry out the remote debugging of Windows using the network connection.

The primary purpose of the virtual network adapter is to collect the data from the Windows kernel to carry out the debugging procedure. 

Previously, Windows only supported debugging using the serial, USB, or Firewire but with Windows Server 2012, Microsoft introduced network debugging, which is still prevalent in the current version of Windows 11, which leverages the network adapter in question. 

The Microsoft Kernel Debug Network Adapter generally remains hidden. It only pops up when Windows debugging is enabled and Windows is configured to boot into the kernel debug mode. 

What are the advantages of Microsoft Kernel Debug Network Adapter? 

Kernel debugging over a network using the Microsoft Kernel Debug Network Adapter is indeed a complex task. However, it offers a slew of advantages over debugging using other types of connectivity. Some of these are: 

  • The host and target computers can be remotely connected over the local network. 
  • You can debug several target computers from one host computer.
  • Network debugging is a faster process than serial port debugging.

As inferred, the network adapter is necessary to carry out the kernel debugging process successfully on a Windows PC and is not essential for the normal day-to-day functioning of your system. 

Additionally, several users have reported that they begin to experience problems when using the network over the ethernet connection when the Microsoft Kernel Debug Network Adapter is enabled. Hence, you may want to disable the adapter when not in use. 

How do I disable the Microsoft Kernel Debug Network Adapter? 

1. Via Command Prompt 

  1. Press the Windows key to launch the command prompt, type cmd in the search bar on top and choose Run as administrator from the search results. Microsoft Kernel Debug Network Adapter
  2. Press the Yes button on the User Action Control prompt to launch the Command Prompt with elevated permissions. 
  3. Type or paste the following command in the command prompt and hit the Enter key to execute it. bcdedit /debug off

Executing the above command will disable the Windows debugging features such that the Microsoft Kernel Debug Network Adapter will no longer be required.

If you ever want to enable Windows debugging in the future, all you need to do is to run the bcdedit /debug off command in the Windows command prompt. 

2. From Device Manager

  1. Right-click the Windows key to bring up the Quick Links menu, and choose Device Manager from the list of options. 
  2. Click the View option on the top menu bar and disable the Show Hidden Devices option by clicking it once. 
  3. Now expand the Network adapters category and look for the Kernel Debug Network Adapter. 
  4. If the driver still appears in the list of network adapters, right-click it and choose Disable device option from the context menu. 
  5. Click Yes on the confirmation popup that appears to perform the required action. 

You can easily disable the Microsoft Kernel Debug Network Adapter from the device manager window. To enable the concerned device again, simply choose the Enable Device option from the context menu of the Microsoft Kernel Debug Network Adapter. 

That’s pretty much it! Here’s everything you need to know about the Microsoft Kernel Debug Adapter that facilitates kernel mode debugging. 

Before you leave, you may want to check out the best debugging software for Windows. 

In case you have any queries or feedback for us, do reach out to us in the comments section. 

Microsoft Word Margins are not Working? 3 Ways to Fix them

Margins in Microsoft Word are the white spaces between the edges of the page and the document content. By default, the margins on Word are set to 1-inch on all sides of the page.

However, some users are complaining that Microsoft Word margins are not working for some reason, especially from top to bottom.

If you are dealing with this issue, rest assured that the foxes in this guide will help you solve it.

What are the common margin issues?

Below are some of the major margin issues you can encounter on Microsoft Word: 

  • Word’s Compatibility with Printers – You can sometimes encounter margin issues on Word because of the compatibility with printers. Most printers will have issues if you set the top margin to zero.
  • Headers and Footers – The top and bottom Margin sizes remain the same irrespective of the header and footer styles because they are both considered part of the margin. But you still need to know how to manage headers, footers, and sections in Word to use them correctly.
  • Issues with Imported Files – If you copy or move a docx file, for example, with different formatting (say custom margins) to another document, it will take the current margins of the destination document. So, your preset margins and other formatting might change when you import a file.
  • Use of Sections -While the white space defaults are usually uniform throughout a document, you can still have different section-specific settings. For example, if you change the value of the bottom margin in a section of a multi-section file, the value will not change in the remaining sections.

What are the reasons behind missing margins?

Listed below are some of the reasons your margins might not be working on Microsoft Word:

  • Margin settings – The first thing to check if you experiencing margin-related issues is the margin settings. If the top margin is set to zero, you will not have any margins. But you can always adjust Word’s margin settings for each side and set them to the default 1-inch margin sizes.
  • Viewing modes – The only viewing mode that shows margins is the Print Layout view, and it is the default. This mode presents your document layout the way it will look when you print it out. But other modes like Web, Read, and Draft do not show margins.
  • Multiple sections with varying settings – As mentioned above, you can have a multi-section document with different margin settings and formatting. This makes the margin differ throughout the entire document.
  • White space defaults – While the Print Layout view shows margins and the horizontal and vertical ruler, the top and bottom margins can disappear because of the white space default settings. To restore the margin, you need to change the white space preference settings in your Display options.

How can I fix the Microsoft Word margins if they are not working properly?

1. Use the special cursor

  1. Launch Microsoft Word and click the icon for Print Layout in the bottom right corner.
    print layout microsoft word margins not working
  2. Now, move your mouse cursor to the top of the page till it turns into a double-edged arrow.
    double arrow
  3. Finally, double-click this special cursor, and the margin should appear.

2. Use the Display Options menu

  1. Click the File tab in the Ribbon.
  2. Select More, and choose Options in the left pane.
    more options
  3. Now, choose the Display option.
  4. Finally, check the checkbox for Show white space between pages in Print Layout view and click OK.
    show space microsoft word margins not working

This should get the Microsoft Word margins working again.

3. Set custom margins as default

  1. Click the Layout tab at the top.
  2. Select Margins to open the preset margins drop-down menu.
  3. Now, click the Custom Margins option.
    custom margins
  4. Finally, set your margins accordingly in the Page Setup window and click the Set As Default button, followed by OK.
    set default

If you have different margins on different sections of the file, using this method will make it uniform on the entire document.

We have reached the end of this guide on how to fix Microsoft Word margins if it is not working. This article touches the important aspects like the causes of the issue and the surefire ways to fix it.

Similarly, if you want to know how to resolve common margin errors in Word, our detailed guide will help you.

Were you able to fix this issue? Let us know in the comments below.

5 Quick Ways to Remove OneDrive Memories

OneDrive memories is one of the endearing features of the excellent cloud storage, but some users are looking to remove the notification. This is because it can clutter your inbox, especially if you upload a lot of photos and videos.

If you are looking to remove the feature from OneDrive, rest assured, as we have gathered different ways to achieve it in this guide.

Why is OneDrive sending me memories?

There is no special motive for the memories OneDrive sends. It just sends a photo or video on the same day you uploaded it to preserve your memory of that item.

However, the memory might come at the wrong time, like in the middle of work. But the essence of it is to remind you of your yearly landmark moments so that you won’t miss out on them.

How can I stop OneDrive from showing me memories?

1. Use the web page

  1. Launch your browser, visit the OneDrive online website, and sign into your account.
    sign in  remove onedrive memories
  2. Click the Gear icon in the top right corner and choose Options.
    options
  3. Now, scroll down to the Notifications section and uncheck the box for On this day memories are available.
  4. Finally, click the Save button.
    save

If you want to remove or turn off OneDrive on this day memories, you can do it via the web page. This will stop the app from sending the notification to your email.

2. Change the settings within the app

  1. Right-click the OneDrive (cloud) icon on your Taskbar.
  2. Click the Gear icon in the top right corner.
  3. Now, select the Settings option.
    settings icon remove onedrive memories
  4. Next, click the Notifications option in the left pane.
  5. Finally, toggle the switch for Notify me when “On this day” memories are available backward to disable it.
    notify me

Another effective option to disable and remove the on this day OneDrive memories notification is to use the PC app. This ensures that the app never bothers with unnecessary notifications again.

3. Disable On this day in Registry Editor

  1. Press the Windows key + R, type regedit, and click the OK button.
    regedit
  2. Click the Yes button when prompted by UAC.
  3. Now, navigate to the path below in the left pane of the Registry Editor: HKEY_CURRENT_USER\Software\Microsoft\OneDrive\Accounts\Personalpath
  4. Locate the OnThisDayPhotoNotificationDisabled value in the right pane and double-click it.
    on this remove onedrive memories
  5. Finally, set its Value data to 1, click the OK button, and close the Registry Editor.
    value data

If you keep getting the OneDrive memories you have been trying to remove on your PC, you might need to create a registry value to achieve this. This will disable everything that has to do with the notification on your PC permanently.

4. Turn off OneDrive notification

  1. Press the Windows key + I to open the Settings app and select Notifications in the right pane.
    notifications remove onedrive memories
  2. Scroll down and toggle the switch before OneDrive backward to disable it.
    disable
  3. Now, restart the app and check if you are still getting the memories.

If the earlier solutions could not help you remove the OneDrive memories, you need to disable notifications from the app altogether. The only caveat here is that you won’t get any pop-ups from OneDrive on your PC till you reverse the settings.

5. Stop OneDrive from starting up

5.1. Use Settings

  1. Press the Windows key + I and select the Apps option in the left pane.
  2. Choose Startup in the right pane.
    startup remove onedrive memories
  3. Finally, toggle the switch before Microsoft OneDrive backward to disable it.
    disable startup

OneDrive services usually start up in the background with your PC when you power it on. This allows it to send you notifications automatically when they are ready.

By disabling the app from startup, it will not run in the background until you launch it, thereby removing the OneDrive memories notification. If you can’t find OneDrive in startup apps in Settings, you can disable it within the app itself, as shown below:

5.2. From the OneDrive app

  1. Right-click the OneDrive icon on the Taskbar and click the Settings icon in the top right corner.
  2. Select the Settings option.
    settings
  3. Now, click the Settings tab at the top.
  4. Uncheck the box for Start OneDrive automatically when I sign in to Windows.
  5. Finally, click the OK button.

With this, OneDrive should not start automatically again when you power on your PC.

We can now conclude this detailed guide on how to remove OneDrive memories notification. You should be able to disable the notification for good before exhausting the methods listed above.

If you are dealing with another type of error like OneDrive storage full, check our excellent guide on the topic for the fixes to apply.

Feel free to let us know the method that worked for you in the comments below.

Internet Explorer Won’t Close? How to Force Quit

If you are still using it and find yourself unable to close Internet Explorer and it seems to be stuck, this guide will provide you with steps to force quit the browser.

Why won’t Internet Explorer close?

There can be several reasons why Internet Explorer won’t close or becomes unresponsive. Here are a few common causes:

Now that you know the reasons let us know how to deal with the situation.

How do I force quit Internet Explorer on Windows?

Before proceeding with any steps to force quit Internet Explorer, go through the following preliminary checks:

  • Click on the X button to close the browser.
  • Go to Taskbar, right-click Internet Explorer, and select Close Window.

If these didn’t help you, move to the detailed steps.

  1. Press Ctrl + Shift + Esc to open the Task Manager app.
  2. Go to the Processes tab, locate, & right-click Internet Explorer, then select End task.End task IEInternet Explorer Won’t Close?
  3. Now go to the Details tab, locate any processes that start with iexplorer, right-click it, and choose End task.Processes close
  4. Once done, close the Task Manager app.

How can I fix Internet Explorer won’t close?

1. Delete the browsing data

  1. Press the Windows key, type internet explorer, and click Open.
  2. Locate the Settings option from the upper right corner and click it.
  3. Go to the Safety option and click Delete Browsing history.afety option and click Delete Browsing history
  4. Place a checkmark next to all the options in the list and click the Delete button.Delete
  5. Now try to close the browser.

2. Disable browser extensions

  1. Press the Windows key, type internet explorer, and click Open.
  2. Click the Settings option from the top right corner.
  3. Choose Manage add-ons.Manage add-onsInternet Explorer Won’t Close?
  4. A list of extensions will appear, select the add-on and click Disable.iexplore_Disable add on
  5. Repeat the same steps to remove all the other extensions.

3. Run the troubleshooter

  1. Press Windows + I to open the Settings app.
  2. Go to System, then click Troubleshoot.System troubleshoot
  3. Click Other troubleshooters.Other Troubleshooters Internet Explorer Won’t Close?
  4. Locate the Windows Store apps option and click Run.Windows store app Internet Explorer Won’t Close?
  5. Follow the onscreen instructions to complete the process.

4. Turn off Internet Explorer

  1. Press the Windows key, type turn windows features on or off, and click Open.Turn Windows Features on or off Internet Explorer Won’t Close?
  2. Locate Internet Explorer and remove the checkmark next to it.Internet Explorer
  3. Click Yes on the UAC prompt, then OK to save the changes.
  4. Now restart your PC if prompted.

5. Reset the browser

  1. Press Windows + I to open the Settings app.
  2. Go to Apps, then click Installed apps.Apps, installed apps Internet Explorer Won’t Close?
  3. Locate Internet Explorer, and click on three dots, select Advanced options.Advanced options
  4. On the next window, scroll down and choose Reset.Reset

So, this is how you can fix the Internet Explorer not closing issue on Windows. If it is not working for you, we suggest you switch to other reliable browsers available.

If you are facing other issues like Internet Explorer not connecting internet, we advise you to read this guide to find quick solutions.

Please feel free to give us any information, tips, and your experience with the subject in the comments section below.

How to Remove Page Breaks from Microsoft Word with Ease

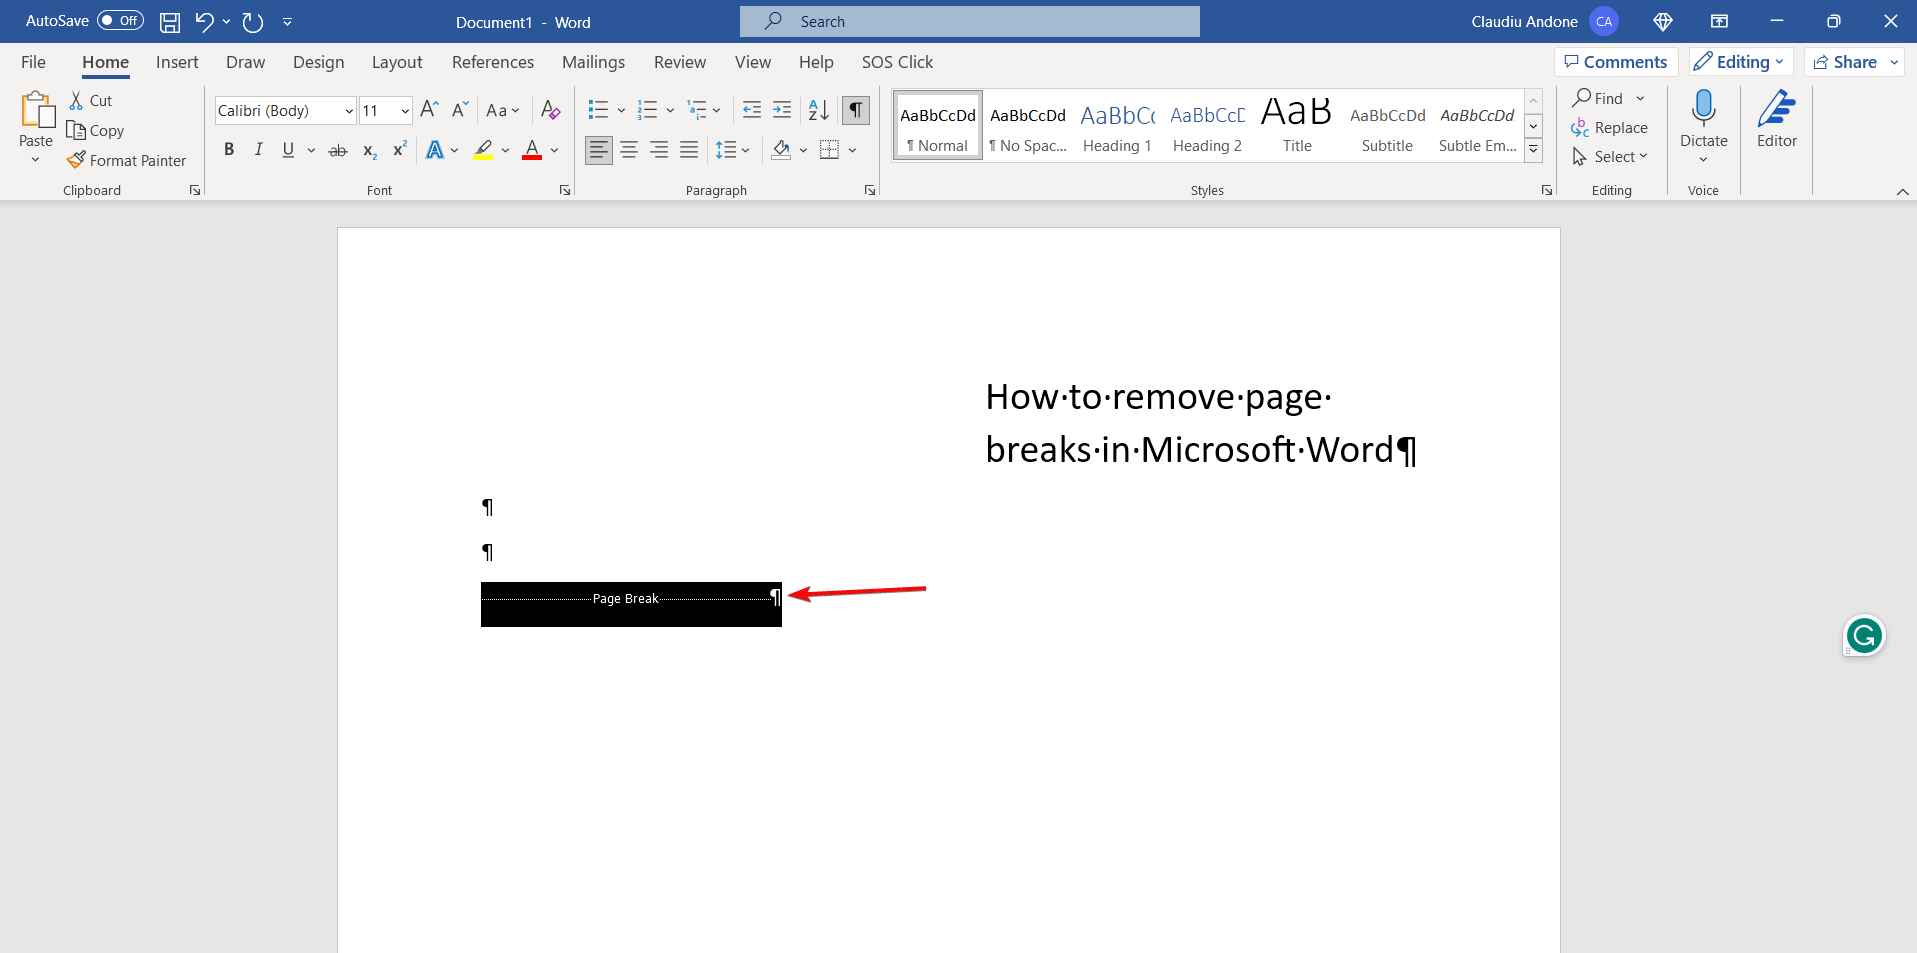
To see the page breaks, click the Home tab, then hit the Show/Hide button from the Paragraph section. You will immediately see the words Page Break in the middle of the dotted lines. This way, you will also see a lot of other special formatting, like paragraph marks, and more.

First, ensure the Track Changes feature is off because otherwise, you won’t be able to see or remove the page breaks. To do so, click the Review tab, go to Track Changes in the Tracking group, and select Track Changes from the drop-down menu to turn it off.

How do I remove a page break in Microsoft Word?

1. Use the Show/Hide option

  1. Open the document you want to remove the page breaks from.
  2. Click the Home button and select the Show/Hide icon as described above to reveal the page breaks.
  3. Now, just double-click or select the page break in your document and press the Delete button on your keyboard.  

This is the easiest way to remove a manual page break in Microsoft Word. If you want to insert a page break in Word, use the Ctrl + Enter key combination. There is no shortcut to delete it, though.

We also have a guide on how to remove page breaks in Google Docs if you’re working in that editor.

2. Use Find and Replace

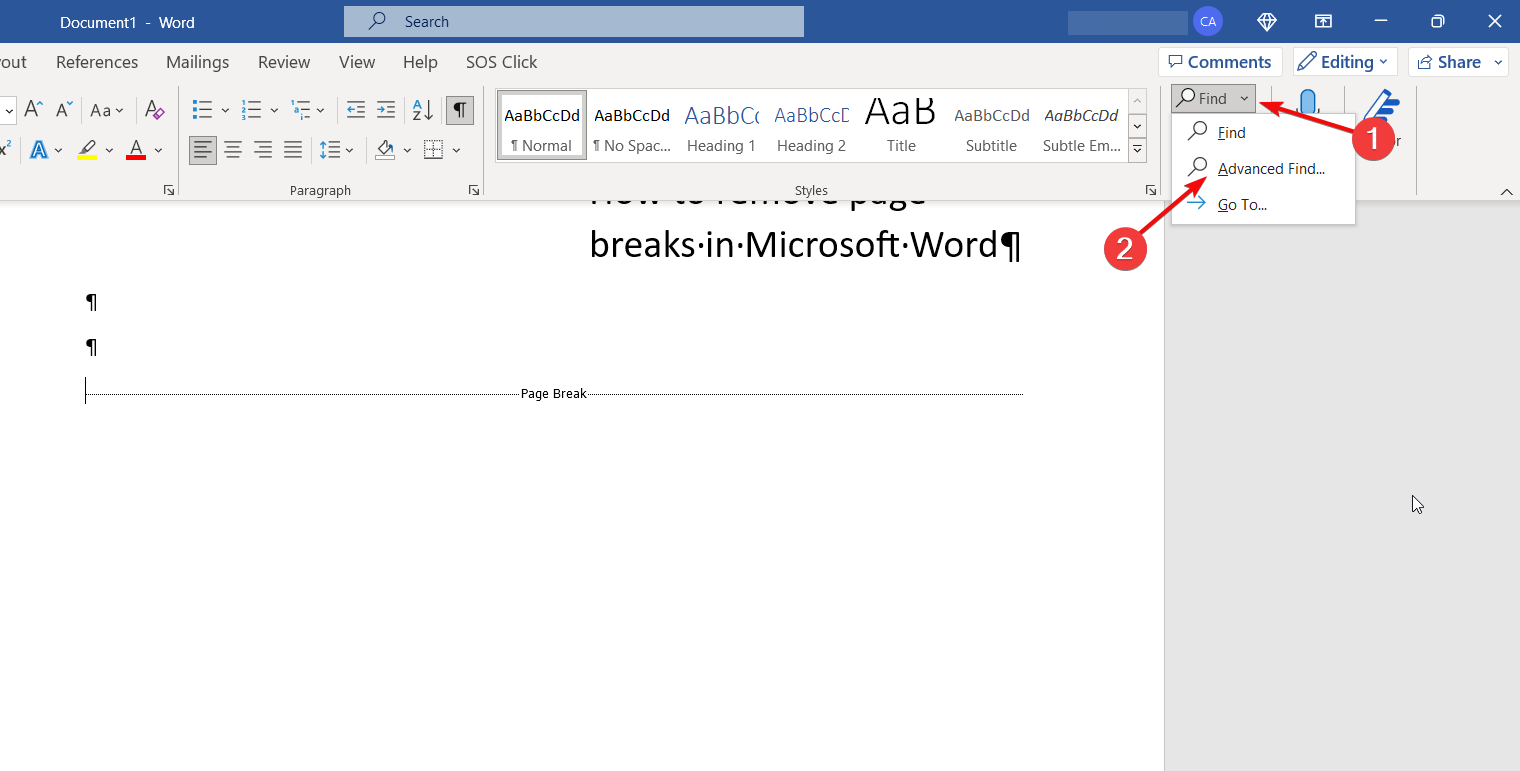
  1. Click on the arrow next to the Find option in the Home tab, then select Advanced find from the drop-down menu.
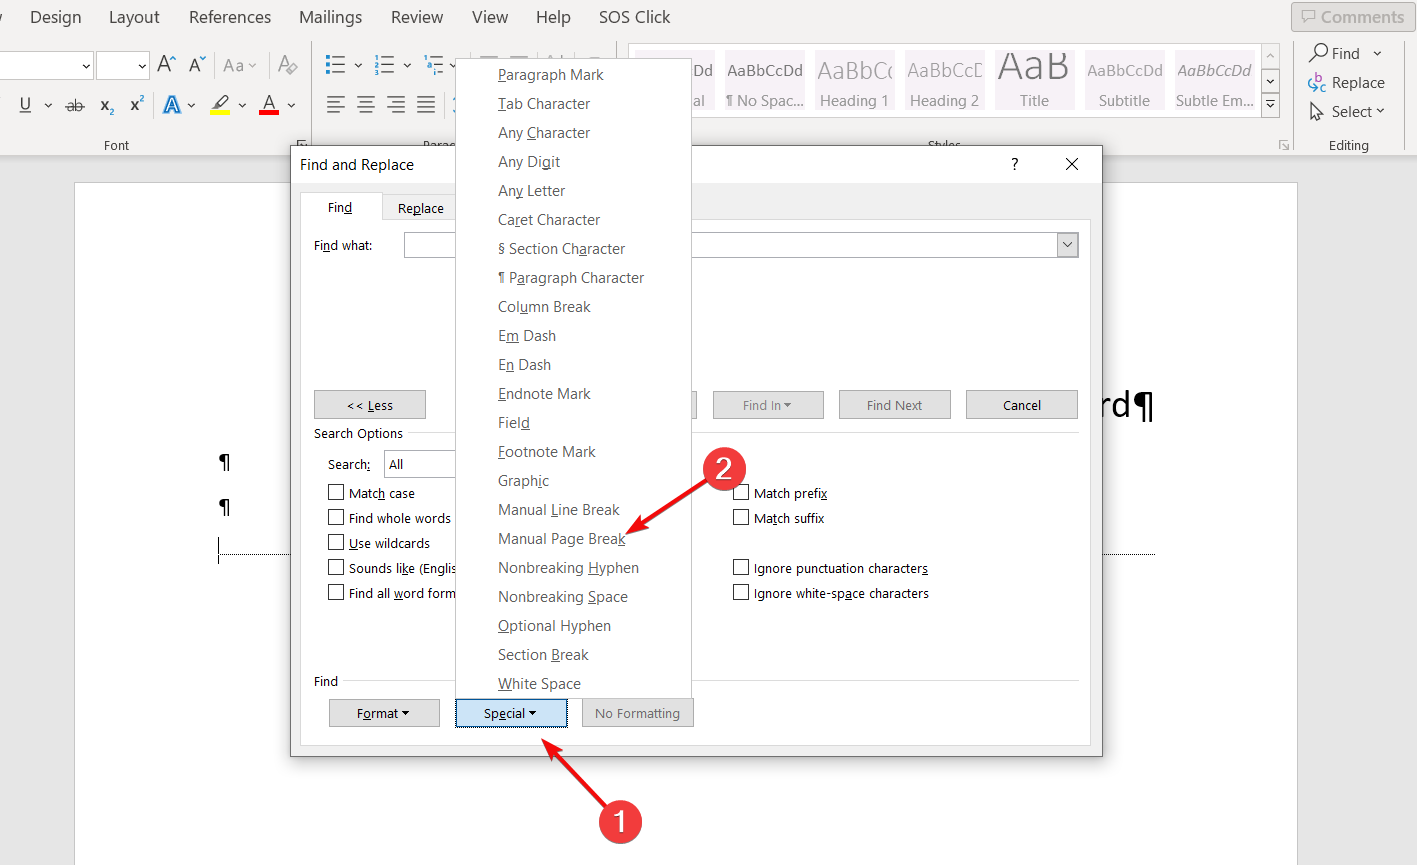
  2. Now, click on the Special button from the bottom of the dialog box and select Manual Page Break from the list of options in the Special menu.
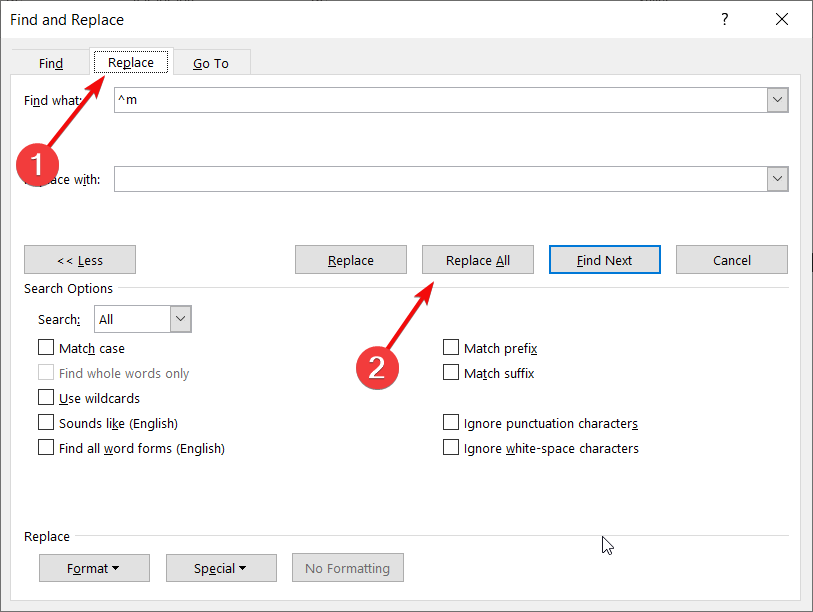
  3. Finally, click on the Replace tab leave an open space in the Replace with field and click the Replace all button.
  4. This action will automatically delete all the page breaks in your document.

You should know that there are also Automatic Page Breaks in Word. However, you can’t remove those because they are the natural delimitations of the page.

However, you can always make the used space bigger by making the margins bigger, and obviously, the Automatic Page Breaks will be further apart.

For other formatting issues, you may also want to remove a section break in Microsoft Word to keep your document layout consistent.

What happens if I remove the page breaks?

The page breaks send the text after them to the next page, so if you remove them, the text will immediately move upwards, right where the page break was inserted.

Therefore, unfortunately, if you have used our second solution and removed all of them, you will need to reformat the entire document.

It is not so difficult to fix things by adding spacing instead. If you have further issues, we suggest reading our guide on what to do if you can’t edit a Word document.

So, now you know how to remove page breaks from Word and what happens if you do that. You can also create a different first page header if you like especially if you are adding a table of contents.

If none of the solutions worked for you, try to reset Word to its default settings and try again.

Also, if the Read out loud feature is not working in Word, the highlighted guide comes with the necessary solutions to fix it.

Have you managed to delete the page breaks in your Word document? Leave us a line in the comments section.

You are being Rate Limited on Discord: How to Fix It

Discord is a popular instant messaging platform flocked by gamers or people wanting to interact with users having similar interests. 

However, users often complain that they are abruptly restricted from accessing the platform by an error message – You are being rate limited. If you are also getting the same error, keep reading about its reason and ways to bypass it. 

How do I fix the rate limitation error on Discord? 

1. Wait and try after a few minutes

According to Discord, the best course of action in this situation is to sit tight and wait it out. As rate limited is a temporary restriction, your account will be unblocked automatically for you to resume activities. 

Sometimes, you are presented with the exact duration, ranging from minutes to hours, that you need to cool off before your account gets unblocked. But, in most cases, there is no specified period after which Discord will restore the operation. 

2. Switch to a different internet source 

Discord rate limits you based on IP address, account, or even a browser cookie. To change your IP address, you should switch to a different internet source such as a mobile hotspot.  

Enable your mobile hotspot on your Android smartphone and connect your Windows PC to the network. To be on the safe side, restart your PC to flush out the cache. 

Also, close the Discord app before changing the network so that the IP address change is not detected. 

3. Restart the router

Nowadays, ISPs rely on dynamic IP addresses that keep changing every time you restart your Wi-fi router. So, in case you cannot connect to a different network at the moment, restarting your router will suffice. 

Disconnect your router from the power source and turn off your router. Make sure your Windows PC is shut down during this time. You can also press the reset button on the back to clear the router cache. After a short duration say thirty seconds, reconnect your router to the power source and press the power button. 

When your router reboots, a new IP address will be assigned this time. If that’s the case, it will help circumvent the IP address ban. Try to log into the Discord app again, as the rate-limited error may be resolved. 

4. Use a VPN 

Try enabling a VPN service like ExpressVPN to dodge Discord’s location restrictions. This VPN will also mask your personal details, such as your IP address, which will fix the rate-limited error if it is due to a soft ban. 

It also enhances your online experience by allowing you unrestricted access worldwide, defeating restricted content and censorship of videos, social media, music, and so on.

With ExpressVPN, you can protect your activity against hackers and prying eyes thanks to its top-class encryption and leakproof features.

ExpressVPN

Connect to the fastest VPN servers and enjoy your Discord activity without experiencing any kind of issues.
Free Trial Visit Website

If the VPN was already enabled when you were rate limited, you should log out of Discord, disable it, and retry to log in.

5. Switch to incognito mode

If Discord applied the rate limited restriction based on your browser cookie, you should consider switching to the incognito mode of your browser, and then logging into your Discord account will resolve the rate limited restriction. 

Similarly, trying a different browser to access your Discord account might work if Discord blocked your browser cookies. 

6. Contact Discord support 

If none of the workarounds mentioned above work the rate-limited ban might be because of violating one or more Discord policies. Generally, Discord rate limits the user accounts suspected of spamming and it cannot be undone by trying these simple tricks. 

In this case, you are recommended to contact Discord support and discuss your issue to manually reverse the ban. The process is time-consuming and unfortunately, Discord may completely ban your account based on their jurisdiction. 

Why am I being rate limited on Discord? 

Discord implements several security measures to ensure that hackers and bots do not swamp the Discord server with automated requests to gain unauthorized access to a user account. One of them is the error message – You Are Being Rate Limited.

The error usually appears when you perform one action multiple times, such as trying to type in the text verification code several times in a line without a time interval between the attempts. 

In such a situation, Discord interprets the action to be botted and temporarily blocks the account by displaying the error code in question such that users cannot perform any further action.

Apart from this, the error can also show up if you recently used auto-clicker software or are fond of emoji spamming. 

That’s pretty much it! Hopefully, you eliminated the rate-limited error using the simple methods discussed above. To learn more, we also have a guide on Discord channel verification, so don’t miss it.

In case you are unable to launch the Discord app on Windows, refer to this guide for help. We covered a similar issue in our latest Resource is being rate limited in Discord guide, so don’t miss it.

Which of the above workarounds worked in your case, do let us know in the comments section. 

PC Always Boots Twice? 5 Ways to Permanently Stop it

Boot issues are among the dreadful problems users don’t want to encounter due to the technicality usually involved in fixing them. Some of our readers are reporting that their PC always boots twice.

This issue is not the most complex, as it allows you to get into your PC after the second boot, unlike the Windows 11 keep restarting issue. But fixing it is still not easy unless with detailed information like the one provided in this guide.

Why does my PC boot twice?

Listed below are some of the notable reasons your PC always boots twice before starting up:

  • Overclocking – If you overclock your device by activating PLL overvoltage, your PC may restart 2 times before booting. What you need to do here is to disable all overclocking features.
  • Problems with Fast Startup – This issue can be caused by the Fast Startup feature that allows your PC to boot quickly after you shut it down. Disabling this feature should help you fix the issue.
  • Outdated PC – If your system is outdated, it is likely to encounter different issues, including this one. You need to update your OS to the latest version to restore normal service on your device.
  • Outdated BIOS – At times, your device might boot multiple times because your BIOS is outdated. To fix this, you need to install the latest version of the BIOS and update it.

Now that we know the possible causes, let’s go ahead and apply the solutions below.

How can I fix my PC if it always boots twice?

Before exploring the more detailed fixes in this section, below are some basic troubleshooting steps to try:

  • Update your BIOS from the manufacturer’s website.
  • Make sure that your Windows is updated as well.
  • Remove one of your RAMs if you use two to check if the problem is with either of them. Try with another RAM if you use just one.
  • Replace the CMOS battery (if applicable).

Another option is to simply ignore it because this is common in ASUS motherboards that have dual boots.

So, if your device boots normally on the second boot without any problem, you might want to ignore it, especially if you are not overclocking anything and your BIOS is up-to-date.

However, you may delve into the fixes below if you want to get rid of this problem.

1. Disable Fast Startup

  1. Press Windows + S, type control, and select Control Panel.
    control panel pc always boots twice
  2. Choose System and Security.
    system and
  3. Now, select Power Options.
    power options
  4. Click the Choose what the power buttons do option in the left pane.
    choose what pc always boots twice
  5. Next, click Change settings that are currently unavailable.
    change settings
  6. Uncheck the box for Turn on fast startup (recommended).
  7. Finally, click the Save changes button.
    turn on

The Fast Startup feature does not allow your PC to shut down completely in a bid to increase the startup time. This is why some users’ PC always boots twice. So you need to disable the feature to solve the problem.

2. Disable the Internal PLL overvoltage

  1. Power off your PC and power it on again. Keep pressing the BIOS key (F2, Del, or the corresponding one for your PC) when the manufacturer’s logo shows up to enter BIOS.
  2. Now, use the arrow keys to navigate to the AI Tweaker option at the top and press Enter. In some BIOS, you will find Extreme Tweaker instead.
  3. Next, scroll down and select Internal PLL Overvoltage.
    internal pc always boots twice
  4. Finally, set its value to Disabled, save your changes, and restart your PC.

The CPU PLL overvoltage allows you to reach a higher frequency on your CPU. It is mostly used by users who want to reach 4.6 GHz and above.

However, this feature is known to cause sleep issues and has been reported to make a PC always boot twice or more. So, if you don’t need a high CPU frequency, you should disable the feature.

Note that the BIOS configuration might differ – the above is for ASUS BIOS. But the differences should not be too wide.

3. Enable Power On by PCIe

  1. Enter BIOS as shown in step 1 of solution 4.
  2. Navigate to the Advanced tab at the top using the arrow keys and press Enter.
    advanced apm
  3. Now, select APM Configuration on the next page.
    apm config pc always boots twice
  4. Select the Power on By PCl-E option.
    power on
  5. Set it to Enable.
  6. Finally, save the settings and restart your PC.

The Power On by PCle feature makes your device boot quickly when it detects a network. This can improve your boot time and eliminate the factors that make your PC always boots twice.

4. Disable ERP

  1. Enter BIOS as shown in previous solutions.
  2. Select the Advanced tab at the top.
    advanced
  3. Next, choose APM Configuration.
    apm config pc always boots twice
  4. Navigate to ErP Ready and press Enter to select it.
    erp ready
  5. Finally, choose the Disable option, save the changes, and restart your system.

The ErP mode helps to improve power-saving on your PC. So, your PC shuts down completely and might require it always to boot twice to come up. Also, it automatically disables wake-up features like Power On by PCIe and Power On by keyboard.

So, you need to disable it to get past the issue.

5. Turn off XMP

  1. Enter BIOS as shown in the previous solutions.
  2. Navigate to the Ai Tweaker tab and select it.
    ai tweaker
  3. Now, choose Ai Overclock Tuner.
  4. Set it to Auto and save your changes.
    ai overclock pc always boots twice
  5. Finally, restart your PC.

XMP is the safe overclocking feature included in your BIOS. However, there are some devices with specifications that are not that compatible with this feature.

If you are using such a device, it might be the reason your PC always boots twice. So, you need to disable the feature for good. Note that on AMD motherboards, you will see DOCP instead of XMP.

We have reached the end of this detailed guide on how to fix your PC if it always boots twice. If you have gotten to this point, the issue should be gone for good, provided you follow the fixes above carefully.

Similarly, if your computer keeps restarting before Windows loads, check our detailed guide to fix it.

Feel free to let us know the solution that helped you fix this issue in the comments below.

Canon LBP2900B is not Printing? Here’s What you can do

Canon LBP2900B is one of the most used printers, but that doesn’t save it from printing issues like other models. Some users are complaining that the printer is not printing at all on their Windows PC.

This issue can be frustrating as it makes the device completely useless. Fortunately, there are surefire ways to get the printer working normally again, and we will show you how to go about it in this guide.

Why is my Canon LBP2900B printer not printing?

There are several factors that can make the Canon LBP2900B printer stop printing. Listed below are some of the prominent ones:

  • Outdated driver – One of the major reasons for this issue is an outdated or faulty printer driver. To fix this, you need to reinstall or update the driver.
  • Corrupt print spooler – If the print spooler data is corrupt, you might experience printing problems. The solution to this is to clear the printer spooler data.
  • Issues with the printer installation – At times, this issue might be caused by problems with your printer installation. You need to uninstall and reinstall the printer to solve this.

Now that we know what we’re dealing with, let’s perform the solutions below to fix it.

How can I fix my Canon LBP2900B printer if it is not printing?

Below are a few preliminary checks to perform before proceeding to the more sophisticated solutions:

  • Restart the printer.
  • Connect the printer to another USB port on your PC.

If the issue persists, you can delve into the fixes below.

1. Update the printer driver

  1. Press the Windows key + X and select the Device Manager option.
    device manager Canon LBP2900B printer not printing
  2. Double-click the Print queues section and right-click your printer under it.
  3. Now, select the Update driver option.
    update driver
  4. Finally, choose Search automatically for drivers and install any available updates.
    search auto

In some cases, the Canon LBP2900B printer might not be printing because of an outdated disk driver. The solution to this is to update your driver.

If the Windows driver updater can not find the latest driver, you can go to the manufacturer’s website to download and install the latest driver.

To save yourself from the stress of having to do this manually, we recommend using a dedicated driver updater in Outbyte. This software automatically scans and updates any outdated driver because it can cause problems.

⇒ Get Outbyte Driver Updater

2. Run the Printer troubleshooter

  1. Press the Windows key + I and select Troubleshoot in the right pane.
    troubleshoot Canon LBP2900B printer not printing
  2. Select the Other troubleshooters option.
    other troubleshooters
  3. Now, click the Run button before the Printer option and follow the onscreen instructions.
    run printer

In some cases, the Canon LBP2900B printer might show ready to print and stop printing because of problems with some printing-related processes and services. To fix this, you need to run the built-in troubleshooter to clear these glitches.

3. Check dependent services

  1. Press the Windows key + R, type services.msc, and click OK.
    services Canon LBP2900B printer not printing
  2. Double-click the Print Spooler option to open its properties.
    print spooler
  3. Click the Dependencies tab at the top.
  4. Now, go back to the services window and check if any of the dependent services are missing or stopped.
    dependencies
  5. If any of the services are stopped, right-click it and select Start.
    start Canon LBP2900B printer not printing

If any of the dependent services are missing, you need to uninstall and reinstall the printer driver. This should fix the Canon LBP2900B printer not detected or printing issues for good.

4. Clear Printer Spooler

  1. Press the Windows key + R, type services.msc, and click the OK button.
    services Canon LBP2900B printer not printing
  2. Now, double-click the Print Spooler option to launch its properties.
    print spooler
  3. Set the Startup type to Disabled and click the Stop button.
  4. Next, click OK.
    disabled stop
  5. From here, press the Windows key + E to launch File Explorer and navigate to the path below: C:\Windows\System32\Spool\PRINTERSprinters
  6. Select the contents of the PRINTERS folder and click the Delete option.
  7. Now, go back to the Services window, set the Startup type to Automatic, and click the Start button.
  8. Finally, click the Apply button followed by OK.
    automatic Canon LBP2900B printer not printing

Sometimes, corrupt Print Spooler data might be the reason Canon LBP2900B is not printing. You need to clear the data and restart your PC to fix this.

5. Uninstall and reinstall the printer

  1. Press the Windows key + R, type control, and click OK to launch Control Panel.
    control
  2. Select View devices and printers under the Hardware and Sound section.
    view devices
  3. Now, right-click the faulty printer, select Remove device, and follow the onscreen instruction to complete the process.
    remove device
  4. Finally, connect the printer again and reinstall it.

If everything proves abortive in getting Canon LBP2900B printing again, you need to uninstall and reinstall it.

With this, we can now conclude this guide on fixing the Canon LBP2900B printer not printing issue. You should now be able to fix the issue for good, provided you follow the solutions in this guide.

Additionally, if you want to know how to download and install Canon drivers on Windows 11, check our detailed guide on the topic.

Feel free to let us know the solutions that helped you fix this issue in the comments below.

How to Make your Windows 11 Taskbar Always on Top

Windows 11 comes with a series of customization options, including the ability to place your Taskbar in different positions. With this, some users are looking for ways to make the Windows 11 Task always stay on top like it is in some operating systems.

While moving the Taskbar to the top is pretty straightforward, making it stay there is another thing entirely. In this guide, we will show you the steps you need to follow to achieve this effortlessly.

How do I keep the Taskbar on top on Windows 11?

1. Use Regedit

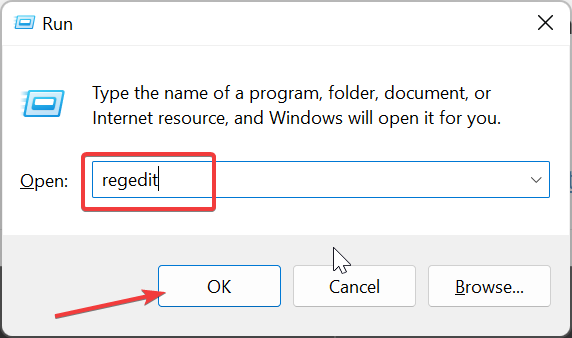
  1. Press the Windows key + R, type regedit, and click OK.
    regedit
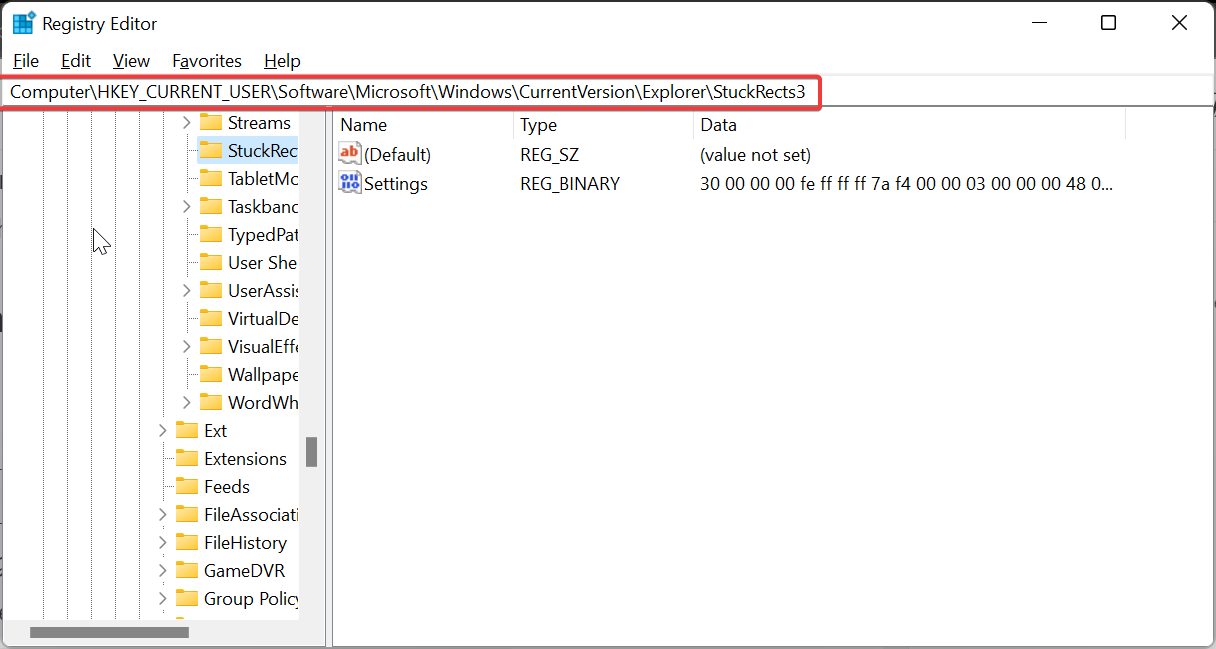
  2. Navigate to the path below in the left pane: HKEY_CURRENT_USER\SOFTWARE\Microsoft\Windows\CurrentVersion\Explorer\StuckRects3path windows 11 taskbar always on top
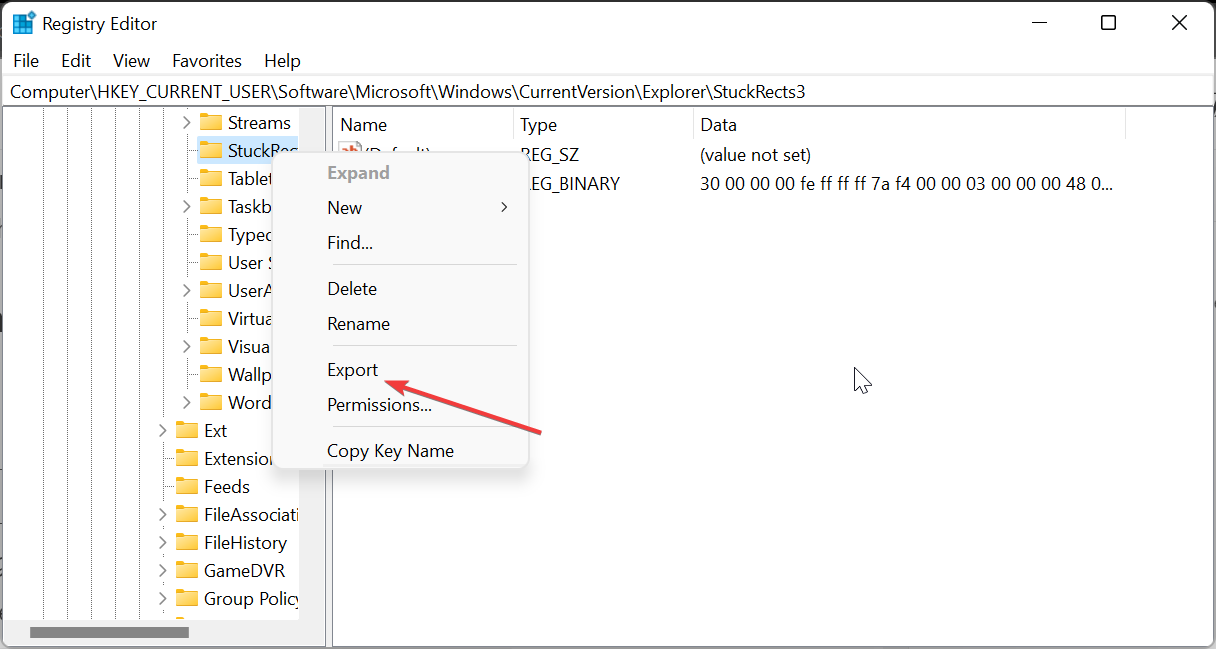
  3. Now, right-click the StuckRects3 key and choose Export.
    export
  4. Save the REG file on your desktop with a name that you will easily remember. This will serve as a backup in case something goes wrong later.
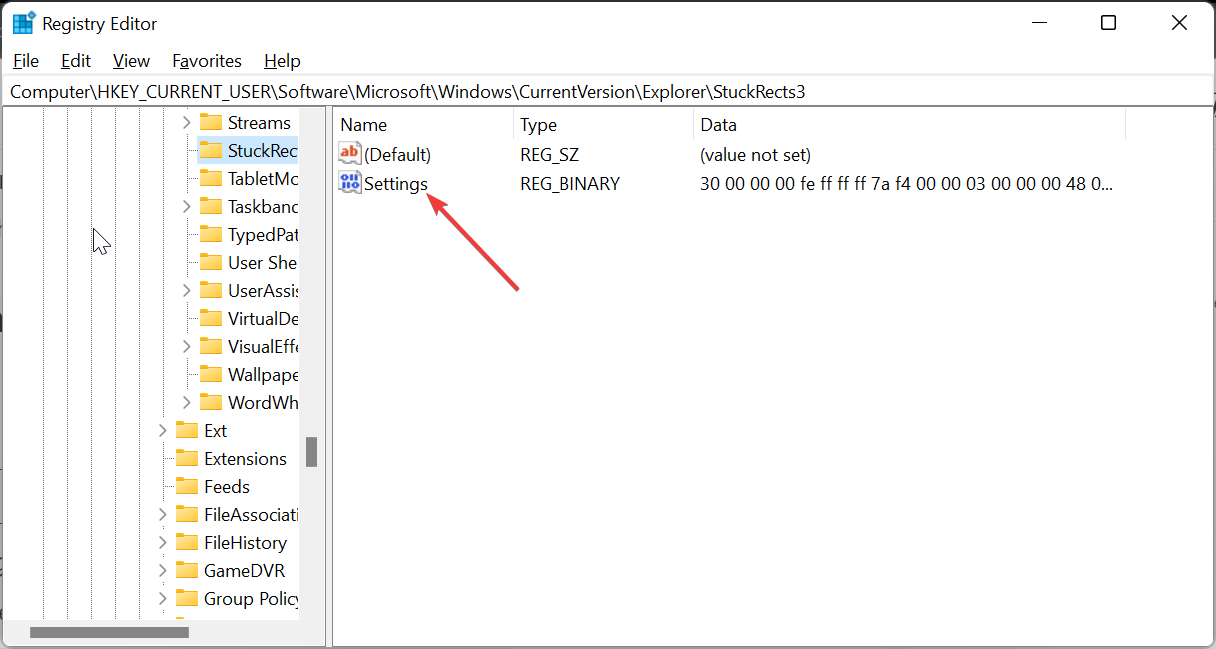
  5. Next, double-click the Settings value in the right pane to open its properties.
    settings windows 11 taskbar always on top
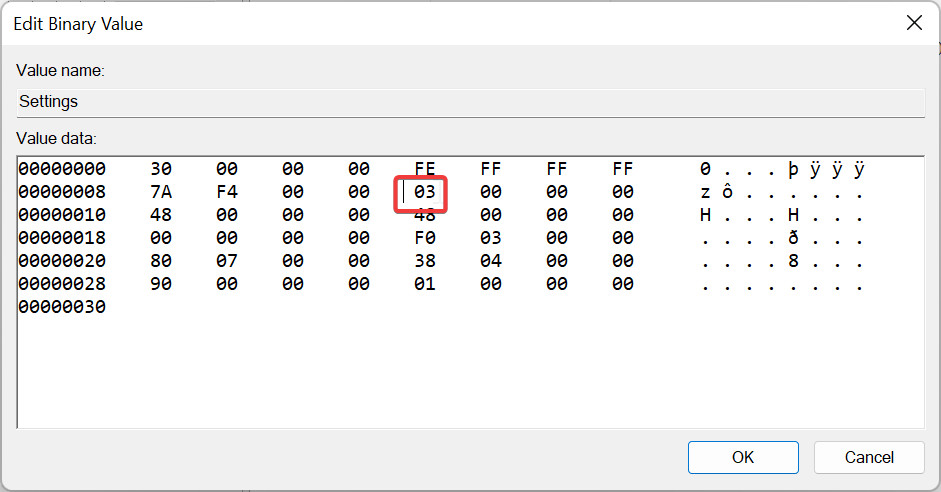
  6. Go to line 0008 and place your cursor in the fifth column before the 03 value.
    three
  7. Now, press the Delete button to delete the value 03.
  8. Type 01 as the new value in the same spot, click the OK button, and close Registry Editor.
    one
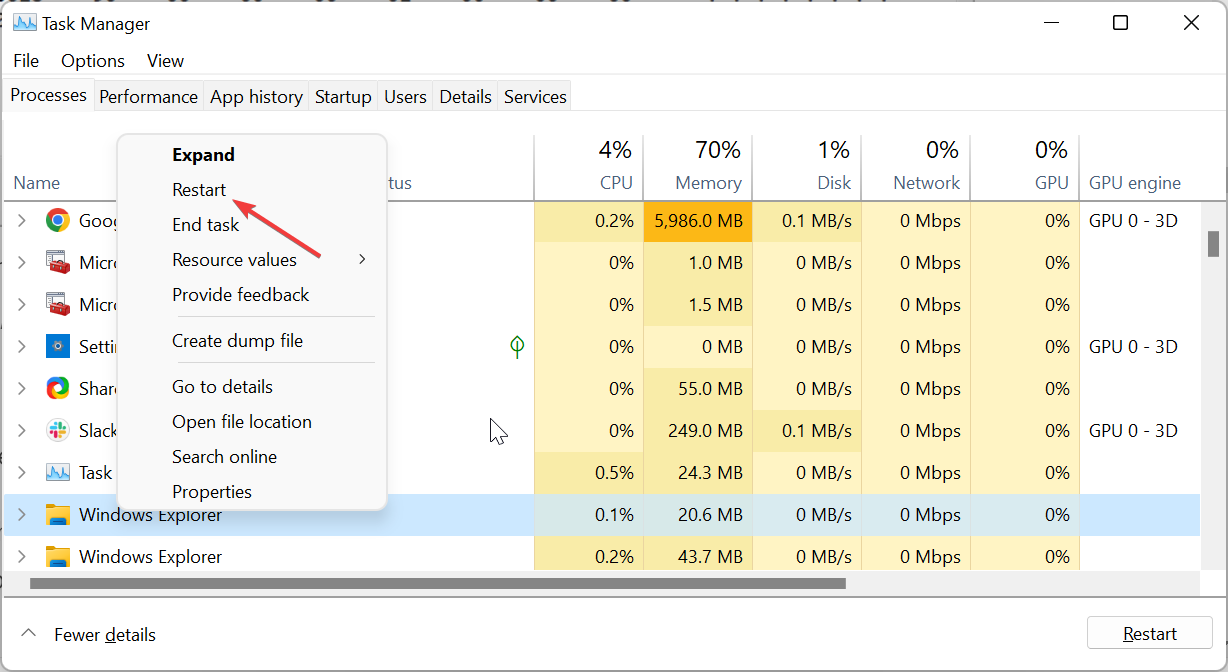
  9. From here, press the Ctrl + Shift + Esc to launch Task Manager.
  10. Finally, right-click Windows Explorer and select Restart.
    restart

After completing the steps above, the Windows 11 Taskbar will always appear at the top of your PC.

To change the settings and make it return to the bottom, you only need to restore the registry file you backed up by double-clicking it and restarting Windows Explorer.

2. Use a third-party tool

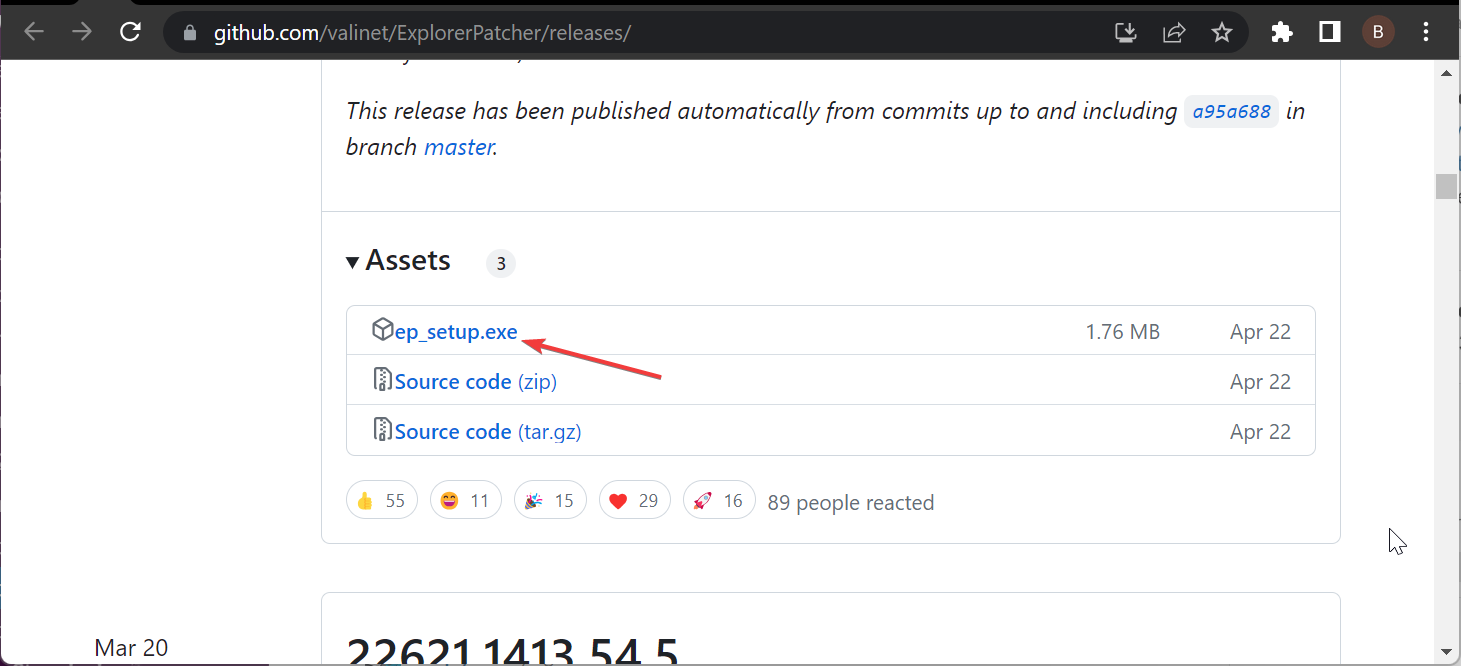
  1. Visit the GitHub official website to download the ExplorerPatcher app.
    download windows 11 taskbar always on top
  2. Double-click the downloaded file and follow the onscreen instructions to complete the installation. When the installation is complete, your Taskbar will change to Windows 10 format.
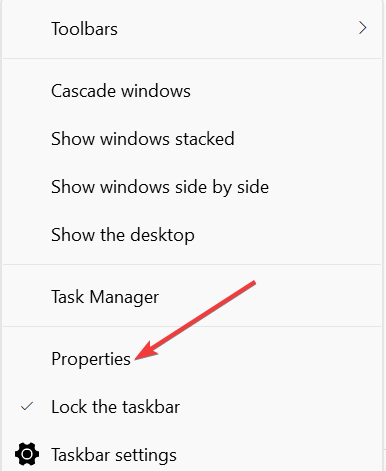
  3. Now, right-click the Taskbar and select Properties.
    properties
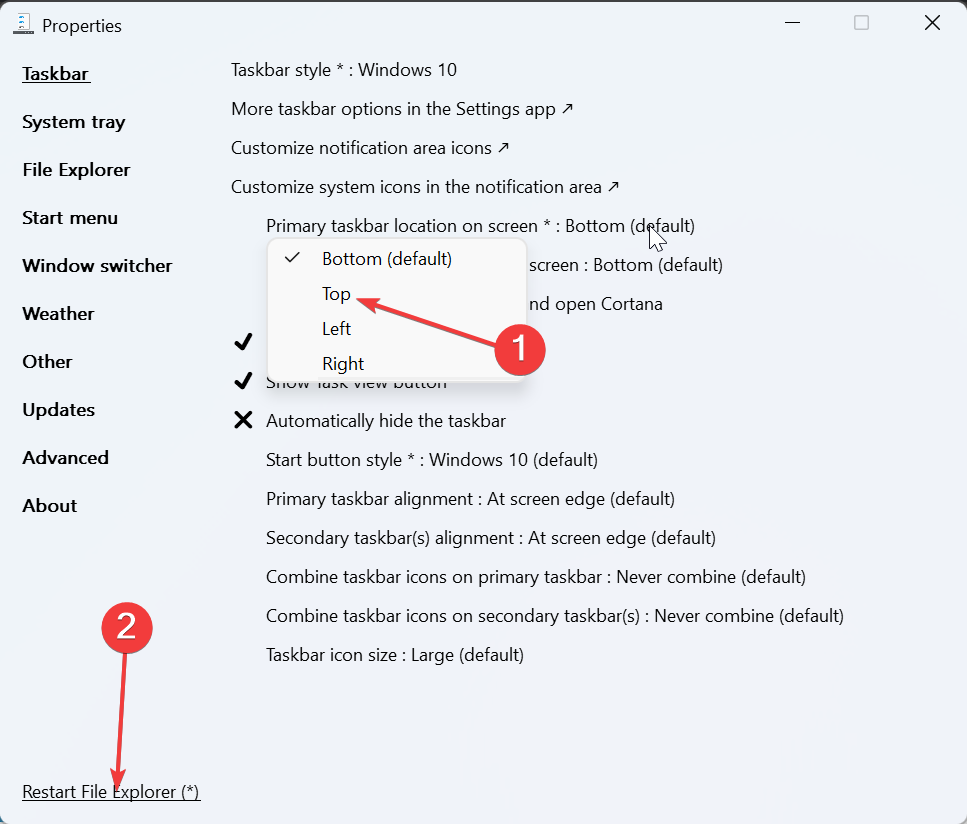
  4. Next, select Taskbar in the left pane and set the Primary taskbar location on screen to the Top.
  5. Click the Restart File Explorer option in the bottom left corner. This will move the Taskbar to the top almost immediately.
    top windows 11 taskbar always on top
  6. For more effective results, click the Start menu tab at the top.
  7. Change the Start menu style to Windows 10 and set the Position on screen to At screen edge.
  8. This will make the Taskbar fixed in the top left corner and in Windows 10 format.

With the above steps, the Windows 11 Taskbar should always appear at the top. The only downside is that the Taskbar will be in Windows 10 format and to the left of the screen at the top.

If you try to change it to Windows 11, the Start Menu is likely to stop working, or the Taskbar can just go back to the bottom of the page.

We also have a list full of Windows 11 customization software and some of them can also tweak your taskbar.

How can I fix my Taskbar if it doesn’t stay on top?

1. Restart Windows Explorer

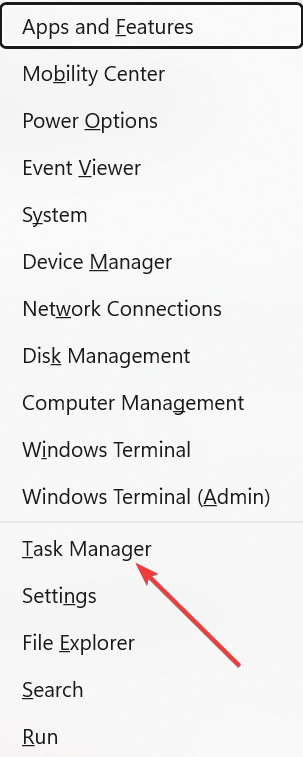
  1. Press the Windows key + X and select Task Manager.
    task manager windows 11 taskbar always on top
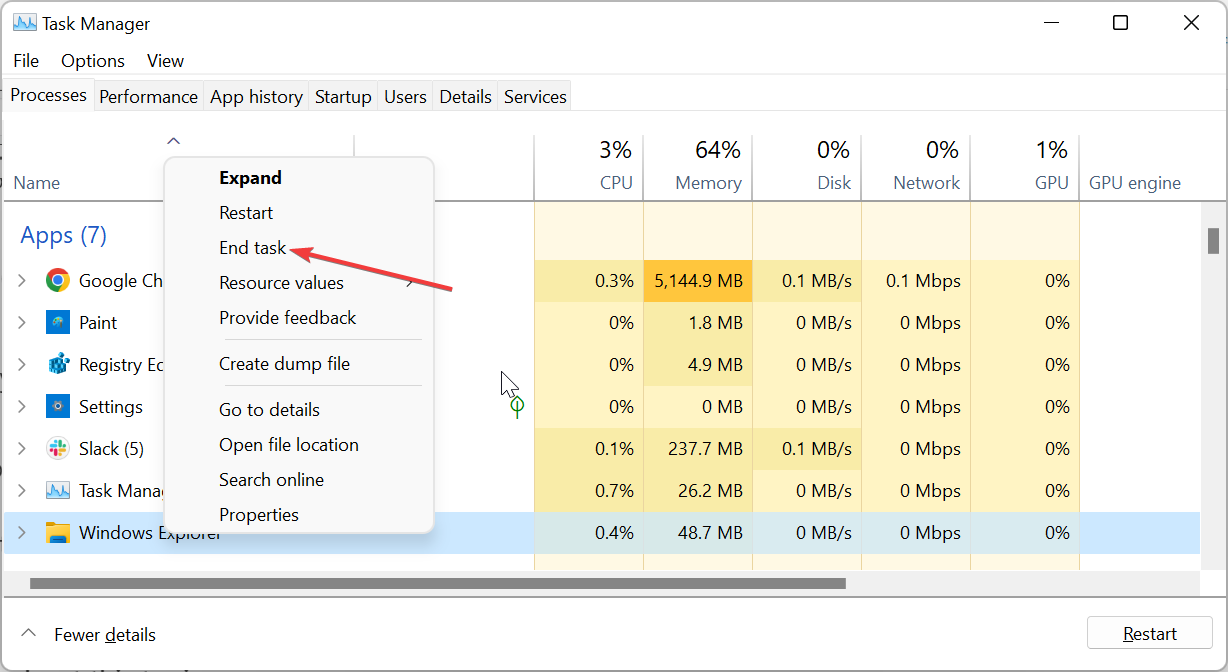
  2. Right-click the Windows Explorer process and select End task.
    end task
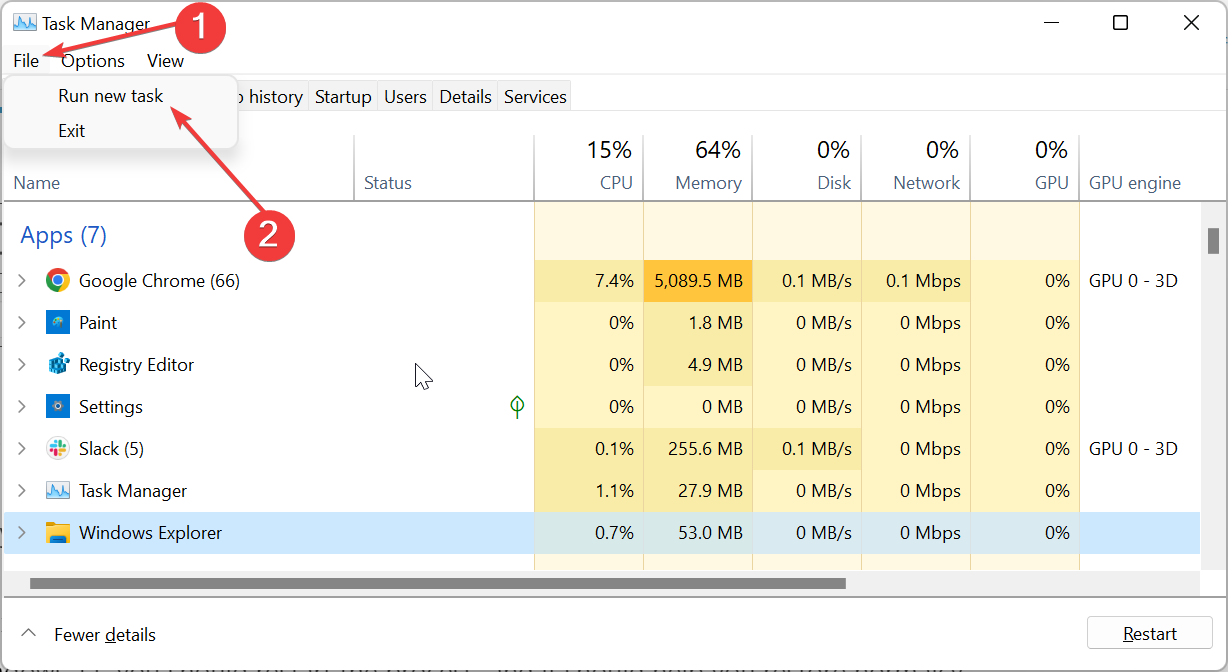
  3. Now, click the File tab at the top and select Run new task.
    run new
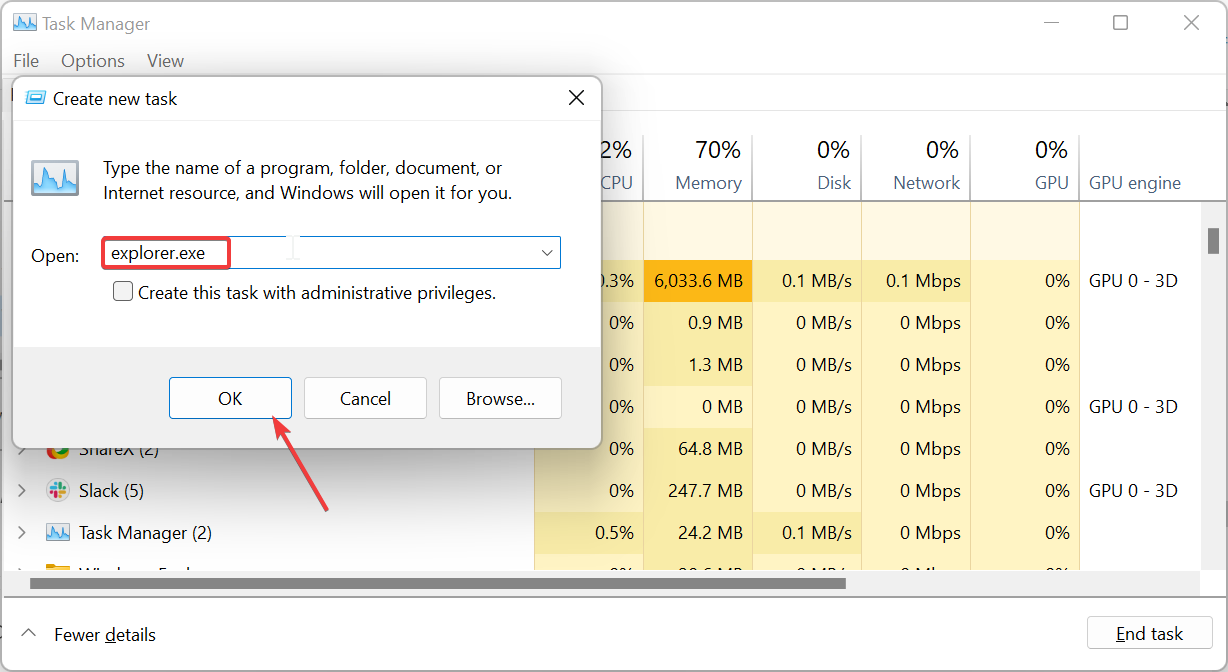
  4. Finally, type explorer.exe and click the OK button.
    explorer

Windows Explorer process controls the File Explorer app and the Taskbar. So, if the Taskbar won’t stay on top on Windows 11, you should restart the process, and it should help you restore normalcy.

2. Disable the Xbox Game bar

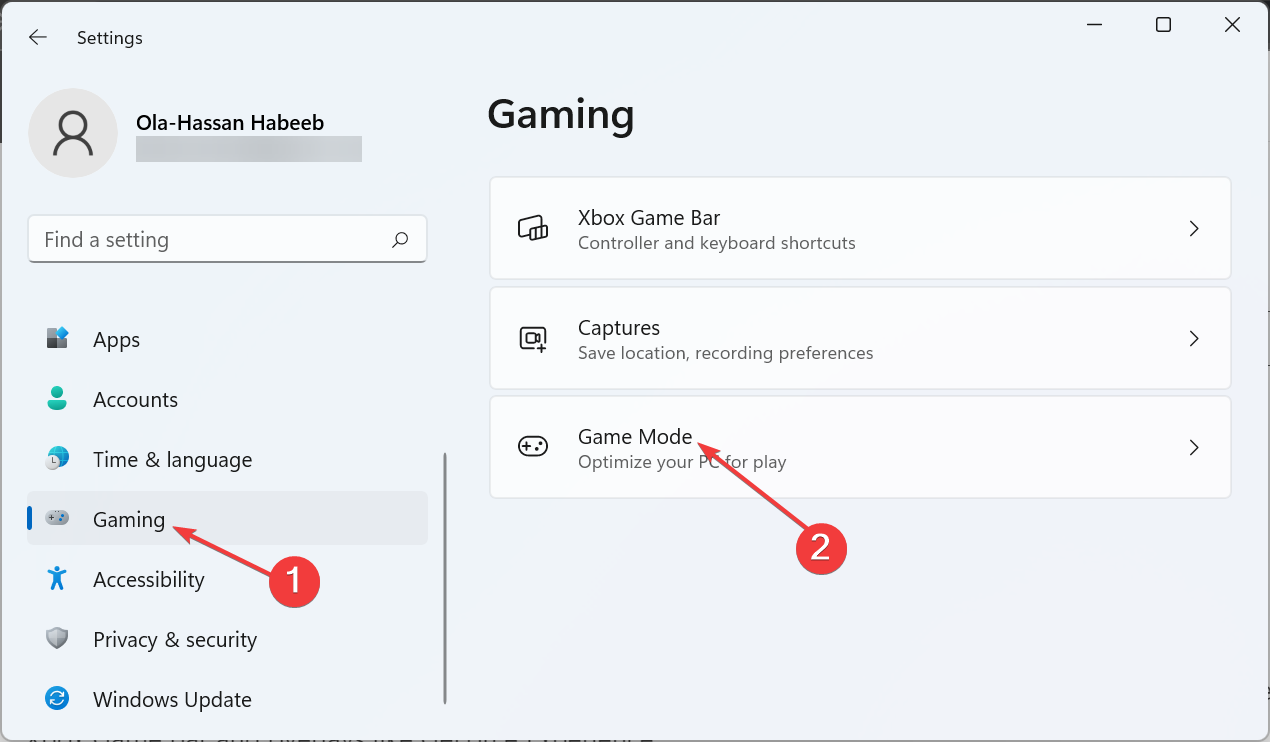
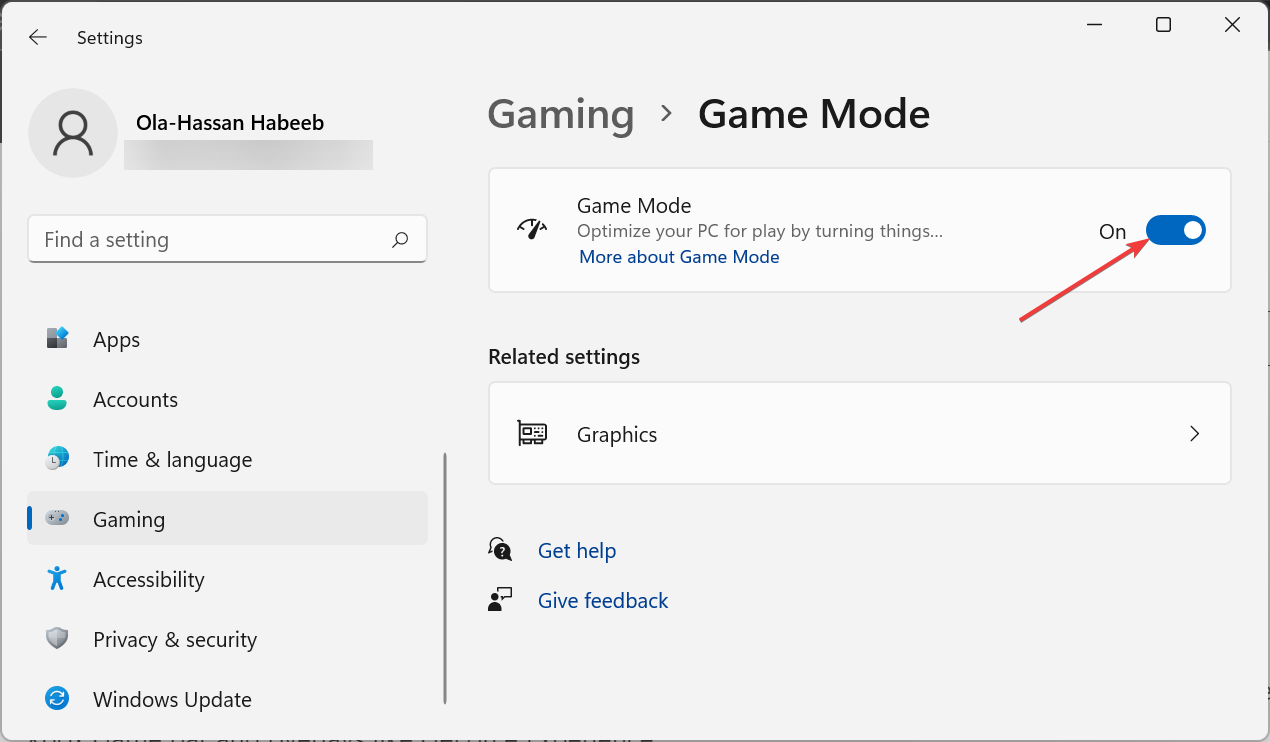
  1. Press the Windows key + I and select the Gaming option in the left pane.
  2. Select the Game Mode option in the right pane.
    gaming
  3. Now, toggle the switch before Game Mode backward to disable it.
    game mode windows 11 taskbar always on top
  4. Finally, if you have overlays like GeForce Experience active, make sure to disable them and restart your PC.

Some users have reported that the Windows 11 Taskbar won’t stay at the top because of features like the Xbox Game bar and overlays like GeForce Experience.

Disabling these features helped them fix this issue for good, especially in cases where every window overlays in front of the Taskbar.

3. Reset your PC

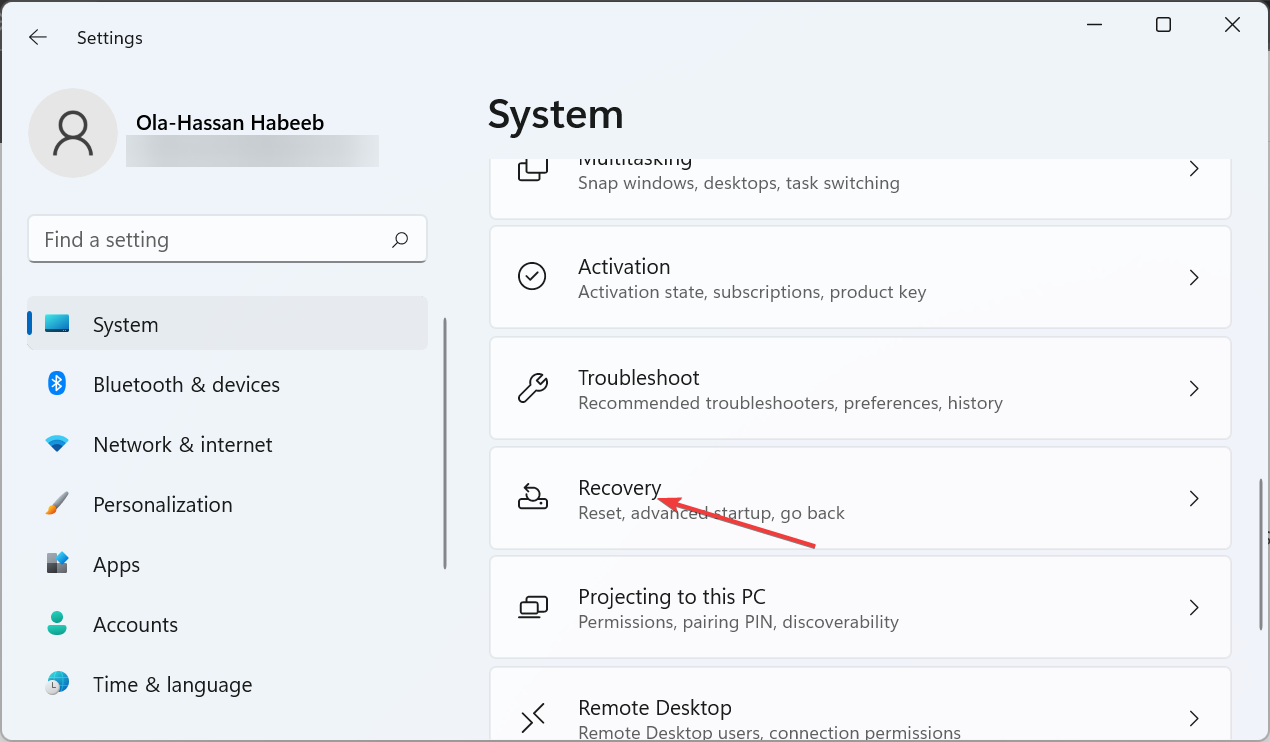
  1. Press the Windows key + I to open the Settings app and select Recovery in the right pane.
    recovery
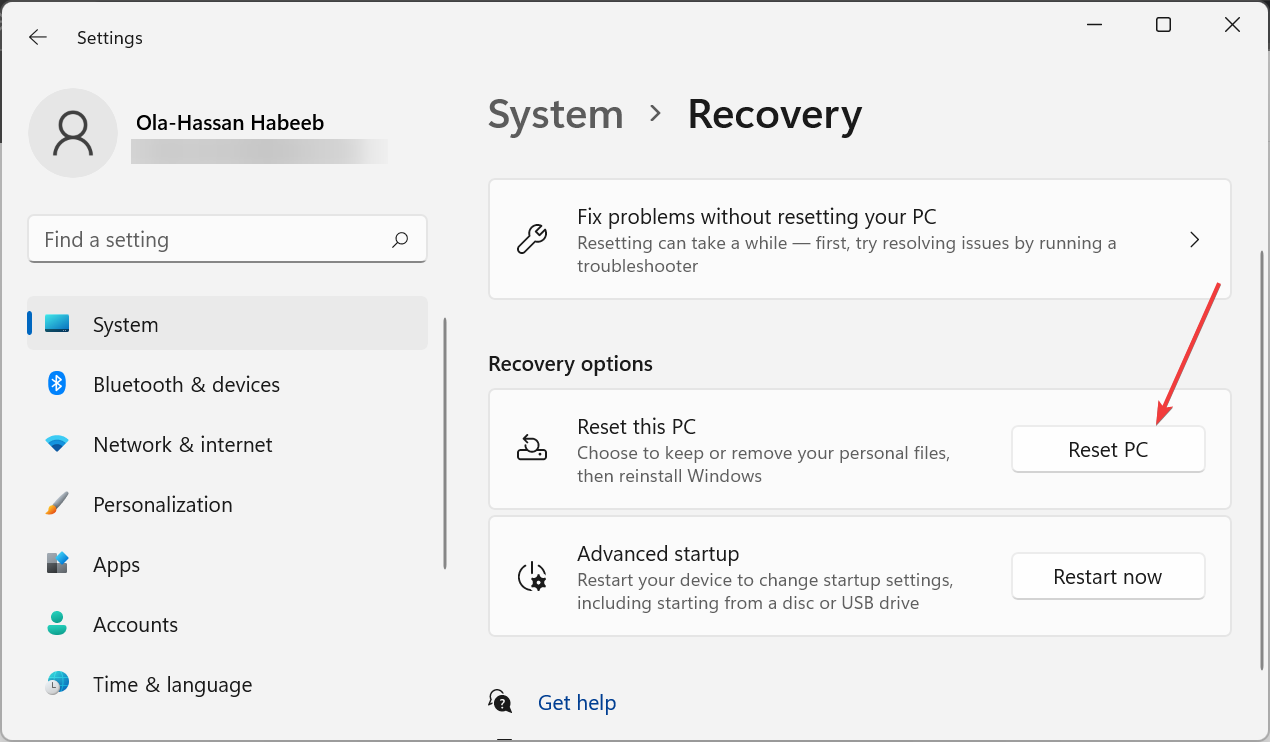
  2. Click the Reset PC button before the Reset this PC option.
    reset pc
  3. Finally, choose whether to keep your files or remove them and follow the onscreen instructions to complete the process.

If push comes to shove and you still can’t get your Taskbar to stay on top on Windows 11, you need to reset your PC. You can do this without losing your files, and it has proved to work for many users.

With this, we can now conclude this detailed guide on how to make the Windows 11 Taskbar always stay on top. We have detailed 2 simple ways to achieve this feat and also shown how to fix some of its related issues.

So, you are now equipped with all the information you need. If you need more customization options and want to change the Taskbar size, our comprehensive article will guide you.

Feel free to let us know in the comments below if you encounter any problems applying the steps above.

IPTV Error 404: 2 Simple Ways to Fix It

The error code 404 in the context of IPTV apps like TiviMate typically indicates that the requested content or channel is unavailable or cannot be found.

Hence, we’ll walk you through the steps for fixing the IPTV error code 404 problem.

Let’s get started:

How do I fix IPTV error code 404?

1. Clear the IPTV cache

  1. Log out and close the IPTV app.
  2. Go to Settings and locate the list of installed apps.
  3. Scroll down until you find your IPTV app.
  4. Look for options that say delete or clear cache or data. (Apps like IPTV Smarters also let you clear the cache in-app)
  5. Restart the IPTV app and check if the IPTV error code 404 persists.

Several users have claimed they could bypass this error after clearing their app cache. Hence, this step is considered to be highly effective.

2. Update your IPTV app

  1. Left-click the Start button, type Microsoft Store, and launch it.
  2. Then, click on Library,
  3. Now, select Get Updates.
  4. If an update prompts for IPTV and click the Update button beside it.
  5. Once the update is complete, you will have the updated version of the IPTV app on your computer.

Once the update is complete, you will have the latest version of the IPTV app installed on your device. It will resolve compatibility and outdated software issues causing the response code 404 in IPTV.

IPTV error 404 indicates the content cannot be found

In the context of IPTV, the response code 404 refers to the HTTP status code 404, which stands for Not Found.

This code indicates that the server could not find the requested resource or content. It means the server hosting the IPTV service couldn’t locate the content or channel you are trying to access.

The issue can occur for several reasons, such as:

  • The server may have removed or temporarily taken down the content or channel due to licensing issues, technical problems, or updates to the IPTV service.
  • It can occur if the server cannot locate the requested resource because the provided URL does not match any available content or channels.
  • If you are accessing the IPTV service from a region where the content or channel is unavailable, you may receive a 404 error.
  • Sometimes, the 404 error may occur due to server or network-related problems. It could be on the side of the IPTV service provider or your network connection.

?Check our guide on what to do if the ISP is blocking IPTV on your device.

In addition, you can check our article about quick ways to fix IPTV if it’s not working. For a similar issue on Apollo TV error 404, check out our article on how to fix it.

And if you want to switch to a different service, you may be interested in our article about the best IPTV software for Windows PCs.

Should you have further questions or suggestions regarding this guide, kindly drop them in the comments section.

The Microsoft Activision acquisition saga is sorta kinda maybe almost over

Microsoft made an almost $69 billion bid to acquire Activision Blizzard King, the home to many of gaming’s biggest titles, including Call of Duty, World of Warcraft, and Candy Crush, back in January 2022. Microsoft first announced that the deal was expected to close by the end of the fiscal 2022 year (which ended June 30, 2023) but later amended that to July 18, 2023, with a $3 billion termination fee to be paid to Activision if the deal didn’t close.

So it’s been a bit dicey these past few weeks. First, the UK’s CMA (Competition and Markets Authority) blocked the deal, and then in the US the Federal Trade Commission filed to stop the deal too. In a pair of decisions in the past two weeks, the FTC was first denied a Preliminary Injunction to stop the deal, then appealed, but that appeal was just denied by the US 9th Circuit Court of Appeals. Here’s what they said:

“The motion for injunctive relief (Docket Entry No, 21) is denied. See Fed. Trade Comm’n v. Warner Commc’ns Inc., 742 F.2d 1156, 1159-60 (9th Cir. 1984) (defining standard by which the Federal Trade Commission may obtain a preliminary injunction); see also Feldman v. Ariz. Sec’y of State, 843 F.3d 366, 367 (9th Cir. 2016) (discussing standard for an injunction pending appeal).

The existing briefing schedule remains in effect.”

In layman’s terms, this means that Microsoft is free to close the deal before the Tuesday deadline, and is expected to do so either this weekend or possibly Monday.

However, there’s still the problem of the CMA. Although Microsoft and the CMA agreed to pause litigation in order to try and work something out, the deal is still officially blocked in the UK. Both sides seem to be willing to make concessions though, and it appears that the deal may well close anyway, leaving the CMA and Microsoft to work out the details. There’s a first thing Monday morning CAT (the UK’s Competition Appeal Tribunal) conference, so we may know more very soon.

We’ll be keeping a close eye on the action over the weekend, but this long saga may finally be reaching a conclusion, and then we’ll be able to look ahead at’s what’s next. Stay tuned to OnMSFT.com for all the latest!


PayDay 2 Error Failed Joining Game: How to Fix It

PayDay 2, developed by Overkill Software, is a popular cooperative first-person shooter game that puts players in the shoes of professional criminals performing various heists.

However, PayDay 2 is not immune to technical issues that can disrupt the seamless experience of joining games. One such issue that players frequently encounter is the Failed joining game error.

In this guide, we will delve into the possible causes behind the error and provide practical troubleshooting steps to help you fix it.

Why can’t my friend join me on PayDay 2?

The Failed joining game error in Payday 2 can be caused by several factors, ranging from network issues to software conflicts; some of the common causes that can trigger this error:

  • Network connectivity problems – If your internet connection is weak, you are experiencing frequent drops, or issues with your router, it can prevent you from successfully joining the game.
  • Game version mismatch – Payday 2 is regularly updated with patches and fixes, and if you and the host of the game you’re trying to join have different versions of the game, it can result in an error.
  • Server outage – The game utilizes Steam’s infrastructure for its multiplayer functionality. If Steam’s servers are experiencing technical difficulties or maintenance, it can disrupt the game’s connectivity.
  • Mods or custom content – If you have installed mods or custom content in your Payday 2 game, it’s possible that they might conflict with the host’s game or cause compatibility issues, hence the error.
  • Firewall or antivirus restrictions – Sometimes, your antivirus software can interfere with the game’s connection and block the necessary ports or protocols to establish a successful connection.

Now that you know the causes of the issue, let us check out the solutions.

How can I fix failed joining game error on PayDay2?

Before engaging in advanced troubleshooting steps, you should consider performing the following checks:

Once you are through, move to the detailed steps to fix the problem.

1. Run the game as an administrator

  1. Go to the game directory; you can probably find it under C:\Program Files
  2. Right-click the app and select Properties.Properties Payday 2 Error Failed Joining Game
  3. Go to Compatibility, and place a checkmark next to Run this program as an administrator.Run this program as an administrator
  4. Click Apply, then OK to confirm the changes.

2. Verify the game is up to date

  1. Press the Windows key, type steam, and click Open.Steam Payday 2 Error Failed Joining Game
  2. On the Steam client, go to Library.
  3. Locate & right-click the PayDay2 app and choose Properties.Game properties Payday 2 Error Failed Joining Game
  4. Go to the Updates tab and select Always keep this game updated.Updates tab
  5. Now restart Steam to check if the issue persists.

3. Verify the integrity of game files

  1. Press the Windows key, type steam, and click Open.Steam Payday 2 Error Failed Joining Game
  2. On the Steam client, go to Library.
  3. Right-click PayDay2 from the installed games list and choose Properties.Game properties Payday 2 Error Failed Joining Game
  4. Go to Local Files and click Verify the integrity of game files.Verify integrity of game files
  5. The process may take some time; once completed, restart your PC.

Verifying the game files can help you repair & recover the missing files of the game and is a common solution for issues like Nebula Data error on PayDay 3: Failed To Fetch Config Data.

4. Use the Google DNS server

  1. Press the Windows key, type control panel, and click Open.
  2. Select Category as View by and click Network & Internet.Network & Internet Payday 2 Error Failed Joining Game
  3. Click Network and Sharing Center.Network snd Sharing center
  4. Now click the Change adapter settings link. Change adapater settings
  5. Right-click the active connection and select Properties.Network connection properties
  6. Select Internet Protocol Version 4 (TCP/IP) and click Properties.IPv4 Properties
  7. Place a checkmark next to Use the following DNS server addresses.
  8. Now for the Preferred DNS server, type 8.8.8.8, and for the Alternate DNS server, type 8.8.4.4
  9. Click OK.DNS server address
  10. Then again, click OK.

5. Add the game to your Windows Firewall

  1. Press the Windows key, type control panel, and click Open.
  2. Select Category as View by and click System & Security.System and Security
  3. Click Windows Defender Firewall.Windows Defender Firewall
  4. On the left pane, click Allow an app or a feature through Windows Firewall.Allow an appPayday 2 Error Failed Joining Game
  5. Check for PayDay 2 from the list of programs and apps that are allowed by the firewall. If available, ensure Public and Private are selected.
  6. If you can’t find the game, click Change Settings, then click Allow another app.Change settings
  7. Click Browse and go to the game directory, then choose the app to be added.Browse
  8. Click Add, then click OK. Make sure Public and Private are selected.ADD
  9. Click OK to close the Allowed apps window.

So, these are the methods you can use to fix the Failed Joining Game error in PayDay2. If nothing worked for you, we suggest you contact PayDay 2 customer support.

If you are experiencing other issues related to this game, like PayDay 2 crashing on Startup or not launching, we advise you to check out this solution guide.

Please feel free to give us any information, tips, and your experience with the subject in the comments section below.

5 Best Video Speed Controller Browser Extensions

Some of the best video speed controller extensions offer more than basic functionality. Their role in handling video playback is beneficial in various situations that go unnoticed.

For example, individuals with specific learning disabilities utilize these speed control extensions to learn at their own pace and improve comprehension. These extensions serve as accessibility tools, allowing individuals to adjust the playback according to their specific needs. Although they provide the same service, their role varies depending on the individual.

Video speed controller extensions also enable users to speed up YouTube videos to X speed, reducing watching time. Additionally, one can slow down the video speed and enable fullscreen mode quickly. In case you’re encountering issues like YouTube video lagging in Chrome during the full screen, you can resolve them now.

To take advantage of these features, simply install some of the recommended video speed controller extensions listed below.

How can I Control the Speed of a Video?

Video speed controller extensions provide keyboard shortcuts using which you can control the speed of a video quickly. These options are easy to memorize as they align with conventional keyboard shortcuts.

For example, the + increases and the – keyboard button decreases the speed of a YouTube video. Hence, the shortcuts are quite simple to understand for most browser extensions as they align with the standard.

There are several video speed controller extensions available that work on almost every browser.

  • Video Speed Controller
  • YouTube Playback Speed Control
  • Playback Speed
  • Video Speed Control

These extensions work on new browsers like Opera One as well. This brand-new browser comes with a multimedia extension and integrated player in the sidebar. You can try it out right away.

  Opera One

Opera One

Opera One is the latest browser version that comes with improved design and functionality with enhanced extension support.

It’s also one of the browsers that support the AV1 decoding format to take care of your watching experience.

Is there an Extension to Speed up the Videos?

1. Video Speed Controller – Best video speed controller extension

Popular video speed controller extension

It’s one of the most popular video speed controller extensions available in the market. Users rely on it to control HTML content such as videos hosted on YouTube. The speed controller extension is available for Firefox and most other widely used browsers.

The UI is fairly simple with suggestive buttons to speed up or slow down the speeds. You can easily access the speed menu right on your videos and change the speeds at different rates like 0.5x, 1x, or even 4x faster. Not only that, the extension comes with 10 seconds rewind or forward buttons for more user control.

In addition, there are shortcut keys you can set up in order to change video speeds faster and more conveniently. You may as well edit the keys and add new ones for different actions.

Get Video Speed Controller

2. Video Speed Manager Plus – Best video speed controller

A simple yet effective video speed modifier is available for the Google Chrome browser. It comes with multiple speed options. You’ll be able to change the way videos are played on video-sharing apps like YouTube. Additionally, you change speeds 10x faster or slower.

There are thousands of users that chose this one due to its easy configuration, incredibly effortless user experience, and free of use. It is compatible with almost all video sites that you use every day.

It’s worth noting that you have great compatibility with most websites where you can change video speeds however you like.

Get Video Speed Manager Plus

3. GlobalSpeed – Most effective video speed-up

Best video speed controller extension for Chrome overall

Here’s another Chrome extension that lets you control the playback of any web video. It’s compatible with nearly all video and audio streaming sites including YouTube, Netflix, and Podcast sites. Also, you can pin, seek through, and set marks.

Apart from providing general hotkeys, the extension lets you apply several filters as well. Try Sepia, Grayscale, and more to change the look of any YouTube video. Using Settings, you can change the shortcut keys as per your preference.

The extension is quite sophisticated over the other extensions available. We recommend trying it for once.

Get Global Speed extension

4. YouTube Playback Speed Controller –

Video Speed Controller extension

Here’s one popular Chrome extension that is dedicated to YouTube videos. You can specifically control YouTube videos using this extension.

This extension choice is undoubtedly a practical tool for anybody who needs more control while playing videos, whether you’re listening to a song or watching a movie review on YouTube. Plus, the extension appears smoothly on the top-left of the video.

Not only that, you have the possibility to change the playback speed on any videos with HTML5 support on other websites out there. There are times when you may see YouTube is unable to buffer videos in Chrome, so just follow the guide to get it sorted.

Get YouTube Playback Speed Pro

5. Dynamo – Safari Video Speed Controller

Here comes a Safari browser extension to let you control video playback. Just like other best video controller extensions mentioned here, this extension also lets you customize hotkeys as per your preference.

The extension works on all your favorite web video sites. By default, the extension offers four shortcuts to get you started. ‘S’ slows down a video, ‘D’ sets the speed back to normal, ‘F’ makes the content flow faster, and ‘E’ lets you skip the ads.

All these keyboard shortcuts are customizable. Just click the in your Safari toolbar and then choose the Settings icon to edit the hotkeys. At the same time, this solution is ideal for skipping aggressive ads from any videos and letting the user enjoy the content. 

Get the Dynamo extension

Which Video Player Can Change the Speed of a Video?

Speaking of videos available on your PC, you can use video player software like VLC Media Player to control the speed of video. Most likely, you can install and run this video player for any video files and modify the speeds according to your needs.

In conclusion, we truly believe that using any of the recommended extensions above will support your needs and change the video speeds at your command.

Clicking on Windows 11 Taskbar Icons is Not Switching Apps [Fix]

If you are involved in dealing with multiple apps for your work, which many of your would, then if the Windows 11 taskbar is not switching apps, it could be a frustrating issue.

In this guide, we will share with you some effective solutions that will help you resolve the Windows 11 taskbar is not switching apps problem. Let us get right into it.

Why are Windows 11 taskbar icons not switching apps?

We did our research and found some of the common reasons why clicking on the Windows 11 taskbar icons is not switching apps.

  • Corrupt system files – Chances are that some important system files might be corrupt related to Windows 11 taskbar or are missing on your PC, which is why it is malfunctioning.
  • The current Windows version is buggy – If you have installed a new Windows update, it could be the reason why the system is misbehaving.
  • The taskbar isn’t registered – Often a third-party program or app can un-register the taskbar and cause such problems where the taskbar icons are not switching apps.
  • Explorer services issues – Some underlying bugs or glitches in the Explorer services are causing the problem.
  • Corrupt user account – Your user account might be problematic and causing the problems at hand.

Let us now apply the solutions to fix the Windows 11 taskbar icons not switching apps problem.

What do I do if the Windows 11 taskbar is not switching apps?

1. Fix corrupt system files

  1. Press the Win key to open the Start menu.
  2. Type command prompt and run it as an administrator.
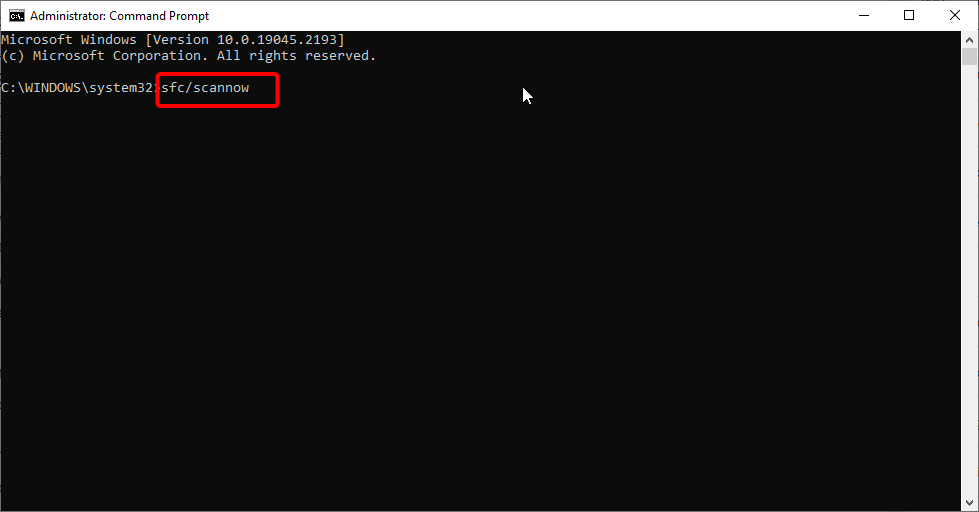
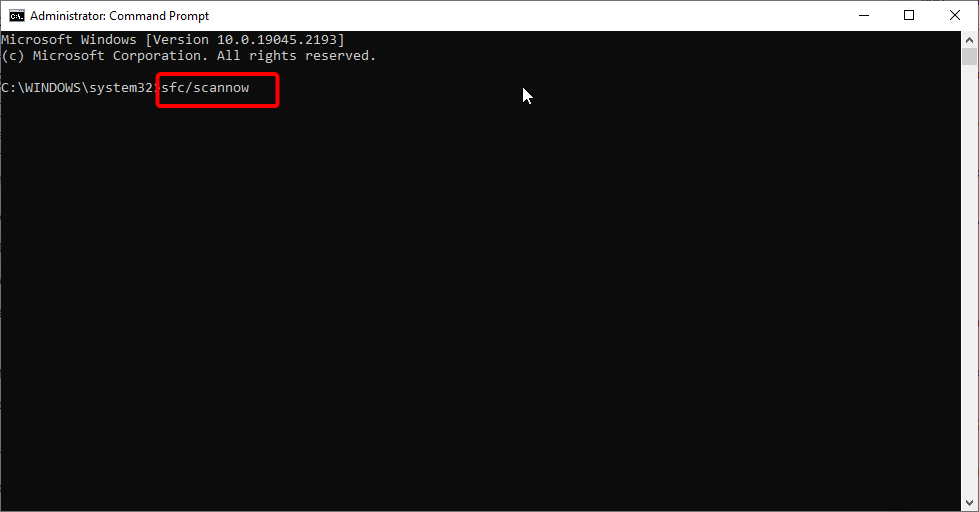
  3. Type the below command and press Enter: sfc /scannowsfc scannow
  4. The process will resolve the corrupt system files.
  5. Type the below commands and press Enter after each one: Dism /Online /Cleanup-Image /CheckHealth Dism /Online /Cleanup-Image /ScanHealth Dism /Online /Cleanup-Image /RestoreHealthDotPeek DLL not Supported
  6. Restart your computer.

There is a high chance that the corrupt or missing system file is the reason behind Windows 11 taskbar not switching apps.

2. Uninstall the recently installed update

  1. Press the Win + I keys to open the Settings menu.
  2. Click on Windows Update on the left.
  3. Click on the Update history.
  4. Select Uninstall updates option.
  5. Hit the Uninstall button next to the recent update that you have installed.

The recently installed Windows update might be problematic. So, you should uninstall it in case you started experiencing the Windows 11 taskbar not switching apps problem.

3. Tweak the Foreground Lock time

  1. Press the Win + R keys to open the Run dialogue.
  2. Type regedit and press OK.
  3. Navigate to the below path and press Enter: HKEY_CURRENT_USER\Control Panel\Desktop
  4. Change the value of ForegroundLockTimeout key from 200000 to 0.

When you change the ForegroundLockTimeout key, it ensures that no other application can take away the focus from the current apps.

4. Re-register the Taskbar

  1. Press the Win key to open the Start menu.
  2. Type Windows PowerShell and run it as an administrator.
  3. Type the below command and press Enter: Get-AppXPackage -User ([System.Security.Principal.WindowsIdentity]::GetCurrent().Name) ShellExperienceHost | Foreach {Add-AppxPackage -DisableDevelopmentMode -Register “$($_.InstallLocation)\AppXManifest.xml”}
  4. Restart the computer.

Following the above steps, you will be re-registering the taskbar on your PC. This could really be the problem as there are several users who have reported this solution fixes the problem of the taskbar at hand.

5. Restart the Windows Explorer process

  1. Press the Ctrl + Shift + Esc to open the Task Manager.
  2. Switch to the Processes tab.
  3. Locate the Windows Explorer service and press Restart.
  4. Switch to the Details tab and look for the below-listed services:
    • ShellExperienceHost.exe
    • SearchIndexer.exe
    • SearchHost.exe
    • RuntimeBroker.exe
  5. Right-click on each one of the services and select End Task.

Restarting these tasks will help you fix the temporary bugs associated with these programs. Notably, a glitch in the Explorer process is responsible for the Windows 11 taskbar not switching apps issue. Simply restart all the above-mentioned processes and check if this resolves the problem or not.

6. Tweak the Registry

  1. Press the Win key to open the Start menu.
  2. Type Command Prompt and open it as an administrator.
  3. Execute the below command: reg add “HKEY_LOCAL_MACHINE\SOFTWARE\Microsoft\Windows\CurrentVersion\Shell\Update\Packages” /v “UndockingDisabled” /d 1 /t REG_DWORD /f
  4. Reboot your PC.

7. Enable Diagnostic Tools while debugging

  1. Launch Visual Studio on your PC.
  2. Click on Tools on the top bar and select Options.
  3. Scroll down on the right side and check the box for Enable Diagnostic Tools while debugging option.
  4. Click OK to apply the changes.

Many users have reported that when Visual Studio 2022 is running the debugger, the Windows taskbar becomes unresponsive. You can fix this issue by simply enabling the diagnostic tools option as shown above.

That is it from us in this guide. You can also try fixing the corrupt user profile on your PC by following the solutions mentioned in our guide.

Feel free to let us know in the comments below, which one of the above solutions resolved the problem for you.

How to Fix GlobalProtect Not Updating Issue: Step-by-Step

GlobalProtect not updating can be a headache, but it’s often easy to fix. The problem usually comes down to a bad network connection, antivirus interference, or incorrect settings.

Start by restarting your device, rebooting your router, and closing unnecessary background apps. Temporarily disable any third-party antivirus or firewall.

If you’re still stuck, keep reading. We’ve listed proven fixes below to get GlobalProtect updating properly again.

1. Clear the GlobalProtect cache

  1. Ensure the GlobalProtect client software is not running.
  2. Then, press the Windows + E keys to open File Explorer.
  3. Navigate to the following directory path: C:\Program Files\Palo Alto Networks\GlobalProtect
  4. In the GlobalProtect folder, select the Cache folder, right-click on it, and select Delete from the drop-down menu.
  5. Confirm the action when prompted.
  6. After deleting the cache folder, right-click the Recycle Bin icon on your desktop and select Empty Recycle Bin from the context menu.
  7. Then, launch the GlobalProtect client software to recreate a new cache folder and check if you can update it.

Deleting the cache folder will remove corrupt data in the app folder and resolve the problem impeding the update process.

2. Manually update GlobalProtect

  1. Go to the GlobalProtect client software downloads page.
  2. Locate the appropriate version of GlobalProtect for your operating system, then click on the download link to initiate the download process.
  3. Once the download is complete, locate the downloaded installer file and double-click on it to run the installation wizard.
  4. Choose the Upgrade option rather than a fresh installation to preserve your existing settings and configurations.
  5. Then, follow the on-screen instructions to complete the installation process.

Open the GlobalProtect client software and navigate to the About or Version section to confirm the successful update.

3. Uninstall and reinstall GlobalProtect

  1. Press the Windows key, type Control Panel in the search bar, and click Open.
  2. Navigate to Programs and Features.
  3. Then, select GlobalProtect from the list of installed apps and click Uninstall.
  4. Restart your PC, then download and install the GlobalProtect client.

Reinstalling GlobalProtect will install the new and latest version of the app. Check our article on how to download GlobalProtect VPN on Windows 11.

In addition, kindly read our detailed guide on Windows VPN not working after the update and ways to fix it.

Also, you can check our article about the best corporate and small business VPN solutions to help your organization.

For more information about this VPN, check out our guides on fixing GlobalProtect with no network connectivity, resolving issues when GlobalProtect isn’t working on a hotspot, what to do if it’s not prompting for credentials, or when you’re not authorized to connect.

If you have further questions or suggestions regarding this guide, kindly drop them in the comments section.

7 Quickest Ways to Lock Your Windows 11 PC

Microsoft is keen on privacy and has been releasing updates and features keeping this aspect in mind. But no matter how much Microsoft insists on it or develops a privacy-oriented OS, it’s the user’s actions that matter. One step towards a secure experience is to lock Windows 11.

Locking a PC differs from shutting it down or signing out of the active user account. The former saves us from a lot of hassle and should be the preferred approach when leaving the PC unattended for a short while. Let’s find out all about it!

Why should I lock the PC?

Locking a Windows 11 computer over similar actions, such as shutting down, has several benefits. Here are the primary ones:

  • Prevents others from accessing data: When working in a public space, you have to keep the data from prying eyes. And a quick way to do that is to lock the PC.
  • Saves power: The display, as well as other active critical processes, consume significant power, and when the computer is locked, you end up saving a decent amount.
  • Relatively quicker: Locking a PC is much easier and simpler compared to shutting it down. With the latter, you can quickly get things up and running while, after shutting down, the PC resumes from scratch.
  • Resume where you left off: When you lock a Windows 11 computer, the background processes and active applications keep running, so you can always continue where you left off.

How do I lock a Windows 11 computer?

1. With the keyboard shortcut

The easiest way to auto lock Windows is to press Windows + L, the dedicated keyboard shortcut to lock Windows 11, before you move away from the PC.

Another option is to lock the PC from the Security Options window. Simply press Ctrl + Alt + Delete and select Lock from the available options. This works the same way, though it is slightly more time-consuming than the dedicated shortcut.

2. Via the Start menu

  1. Press the Windows key to open the Start menu.
  2. Now, click on the active user account name and select Lock from the flyout menu.lock windows 11

For those wondering how to lock screen on Windows 11, another quick option is to use the Start menu. It’s easy, quick, and doesn’t require you to open any additional windows.

3. From the Task Manager

  1. Press Ctrl + Shift + Esc to open the Task Manager, and navigate to the Users tab.users
  2. Now, select the currently signed-in user account, and then click on Disconnect.disconnect to lock Windows 11
  3. Click on Disconnect user in the confirmation prompt that appears.disconnect user

The Task Manager serves as a handy tool that helps view the resource consumption, terminate tasks, disable the startup programs, and view the app history. Many didn’t know that one can lock Windows 11 using Task Manager, though now you do!

Also, you can sign out other users from the Task Manager.

4. With the Command Prompt

  1. Press Windows + R to open Run, type cmd, and hit Ctrl + Shift + Enter.cmd
  2. Click Yes in the UAC prompt.
  3. Now, paste the following command and hit Enter:Rundll32.exe user32.dll,LockWorkStationcommand to lock screen in Windows 11
  4. The Windows 11 computer will automatically lock now.

The Command Prompt allows users to make complex changes to the PC within seconds. And while it’s usually considered slightly intricate and risky to use, locking a Windows 11 PC via the Command Prompt is quite simple.

5. Configure the Screen Saver Settings

  1. Press Windows + S to open the Search menu, type Change Screen Saver, and click on the relevant search result.
  2. Select the desired visual effect from the dropdown menu.visual effect
  3. Tick the checkbox for On resume, display logon screen, and enter the time period in the text field.lock screen in windows 11
  4. Once done, click on Apply and OK to save the changes.

The Screen Saver Settings is another way to lock a Windows 11 PC. Besides, it allows users to change/set the desired screensaver from many options.

6. Use a desktop shortcut

  1. Right-click on the desktop, hover the cursor over New, and then select Shortcut.shortcut
  2. Now, enter the following in the text field and click Next:rundll32.exe user32.dll,LockWorkStationadd path
  3. Enter a name for the shortcut, and click on Finish to create it. Make sure to choose a name that makes the purpose of the shortcut evident, say, Lock the PC.create shortcut to lock windows 11

If you regularly lock the PC but are not a big fan of keyboard shortcuts, a quick trick is to create a dedicated desktop shortcut to lock Windows 11. Anytime you click on it, the PC will lock out immediately and prevent others from accessing data on it.

7. Lock Windows 11 with phone

  1. Press Windows + I to open Settings, select Bluetooth & devices from the navigation pane, and click on Add device.add a device
  2. Select Bluetooth from the options listed here.bluetooth
  3. Click on the phone you would like to connect to.
  4. Verify the code displayed on the computer screen is the same as that on the phone, and click Connect.connect
  5. At the same time, tap the Pair option on your phone.
  6. Once the two devices are connected, navigate to the Accounts tab, and click on Sign-in options.sign in options
  7. Expand the Dynamic lock option, and tick the checkbox for Allow Windows to automatically lock your device when you’re away.dynamic lock to lock windows 11

The Dynamic Lock is a built-in feature in Windows to ensure enhanced privacy and security by locking the Windows 11 PC when you move away. It identifies this by assessing the signal strength from the connected device, in this case, your phone.

And when the signal dies down as you move, Windows will automatically lock the PC. This is a rather secure and automatic method, but remember to take the phone with you every time you step away.

8. Modify the Registry to lock Windows 11 after inactivity

  1. Press Windows + R to open Run, type regedit in the text field, and hit Enter.
  2. Click Yes in the prompt that appears.
  3. Paste the following path in the address bar and hit Enter:HKEY_LOCAL_MACHINE\SOFTWARE\Microsoft\Windows\CurrentVersion\Policies\Systempath
  4. Locate the InactivityTimeoutSecs DWORD.
  5. If you can’t find it, right-click on the empty portion, hover the cursor over New, select DWORD (32-bit) Value, and name it InactivityTimeoutSecs.create DWORD
  6. Double-click on the DWORD.
  7. Select Decimal under Base, and enter the time period in seconds after which you want the computer to automatically lock when inactive. The range here is 0 to 599940 seconds.change value data to lock windows 11
  8. Click on OK to save the changes and then restart the computer.

That’s it! Making changes to the Registry will automatically lock Windows 11 after inactivity, and you won’t have to do it manually, as was the case with the other methods listed earlier.

By now, you know all about the Windows 11 screen lock settings and the different ways to lock the PC, manually or automatically, after a set period of inactivity.

Besides, if you are wondering about the unlock screen shortcut in Windows 11, simply press any key when the PC is locked, and sign in with either the biometric authentication or the configured password, as the case may be.

In case your PC is locked remotely, we have a guide on how to unlock a PC after locking it with the Microsoft Find My Device feature, so don’t miss it.

Before you leave, do check some quick tips and tricks to improve performance in Windows 11.

For any queries or to share how you prefer locking Windows 11, comment below.

9 Quickest Ways to Lock Your Windows 10 PC

Windows 10 remains one of the most successful iterations of the OS and still commands a significant market share. For an operating system this massively employed, it’s vital that users understand how to ensure security. And the first step towards it is to lock Windows 10.

While many look for the auto lock in Windows 10, others try to find ways to lock the screen after inactivity. No matter the case, the OS offers a suitable option for each. Keep reading to find out how to lock the screen on Windows 10!

Why should I lock the computer?

Locking the PC offers several vital advantages, most related to security and privacy. It prevents others from accessing critical files, personal data, or login information, whether stored locally or on cloud storage. Though with the latter, we usually have another verification to complete.

But as per reports, leaving the PC unlocked even for a few minutes in the office, or any public space, for that matter, can put the data at risk. Experts strongly recommend locking Windows 10 or any other device that has vital data.

Besides, unlocking a locked computer is simpler since the background processes keep running, and the device resumes operation from where you last left. So, you don’t have to launch them all manually, as is the case with a restart.

Tip icon Tip
Remember, locking a PC simply prevents unauthorized access in a physical space. It doesn’t protect you from online threats. So it’s vital that you download the best-in-segment security software for a safer Windows experience.

How can I lock my Windows 10 PC?

1. Use the dedicated keyboard shortcut

By far, the simplest way out there is the keyboard shortcut to lock the screen in Windows 10. No matter the task, you can always press Windows + L, which will automatically lock the computer.

This is also the most used method, given its ease and simplicity. But for many who don’t prefer keyboard shortcuts and would rather go with the GUI methods, the ones listed next should do the trick.

2. From the Security Options window

  1. Press Ctrl + Alt + Delete to open the Security Options window.
  2. Click on the Lock option here.lock from Security Options

While most of us generally open the Task Manager from the Security Options window, it also lists a dedicated button to quickly lock Windows 10.

3. With the Start menu

  1. Press the Windows key to open the Start menu.
  2. Click the user account icon and select Lock from the flyout menu.lock

When looking to quickly lock Windows 10, an easy approach would be to use the Start menu. The lock option here immediately secures the PC from any unauthorized access while you are away.

4. Via the Task Manager

  1. Press Ctrl + Shift + Esc to launch the Task Manager.
  2. Navigate to the Users tab, select the account you are currently signed in with, and click on Disconnect.disconnect to lock Windows 10
  3. Click on Disconnect user in the confirmation prompt that appears.

The Task Manager, too, allows an easy way to lock Windows within a few clicks. Besides, it also lists all the other user accounts on the PC, thus providing you with detailed information in case you plan to log into another one.

5. Through the Command Prompt

  1. Press Windows + R to open Run, type cmd, and hit Ctrl + Shift + Enter.cmd
  2. Click Yes in the UAC prompt.
  3. Now, paste the following command and hit Enter to immediately lock the PC:Rundll32.exe user32.dll,LockWorkStationlock Windows 10 with a command

The Command Prompt is a useful command-line tool that performs complex tasks within seconds. And for the simpler ones, it takes an even shorter period.

The problem here is that users have to remember the command or keep it stored somewhere easily accessible. But this, too, can be eliminated by creating a desktop shortcut instead.

6. With a desktop shortcut

  1. Right-click anywhere on the desktop, select New, and then click on Shortcut in the flyout menu.desktop shortcut
  2. Paste the following in the text field and click on Next:Rundll32.exe user32.dll,LockWorkStationcommand
  3. Once done, enter a name for the shortcut, something that helps easily identify its purpose, and click Finish. We named the shortcut, Lock the computer.shortcut to lock Windows 10

Now, anytime you double-click on the shortcut, it would automatically lock Windows 10, and users would be required to re-enter the password or use biometrics, if applicable, to gain access.

7. By reconfiguring the Screen Saver Settings

  1. Press Windows + S to open the Search menu, type Change sreen saver in the text field, and click on the relevant search result.screen saver settings
  2. Tick the checkbox for On resume, display logon screen, and then select the time period after which the computer locks when the screensaver is displayed.lock Windows 10 after inactivity
  3. You can also select the screensaver visual effects from the dropdown menu.screensaver
  4. Once done, click OK to save the changes.

With this method, you can set the time period after the screen saver appears, and the PC is locked. It’s a great method to auto-lock Windows 10 after inactivity, but experts recommend manually locking the computer instead for enhanced security.

Also, you mustn’t set the time period too low since the PC may lock while working. Besides, setting it too high gives others a significant margin to access the computer when you step away. So choose the time period that works best in your case.

8. Using the Dynamic Lock feature

  1. Press Windows + I to open Settings, and click on Devices.devices
  2. Click on Add Bluetooth or other device on the right.add bluetooth or other devices
  3. Select Bluetooth.bluetooth
  4. Select your phone when it appears. If it doesn’t appear, make sure that Bluetooth is enabled on the phone and that the device is discoverable.phone
  5. Now, verify that the code listed on the screen is the same as that on the phone, and click Connect.connect phone to lock Windows 10
  6. At the same time, tap Pair on the phone.
  7. Once the devices are connected, head to Accounts in Settings.
  8. Next, navigate to the Sign-in options tab, and tick the checkbox for Allows Windows to automatically lock your device when you’re away under Dyncamic lock.dynamic lock feature to lock Windows 10
  9. If the phone was connected properly earlier, it should be listed here right away.

That’s it! Though slightly tricky to set up for some users, an effective way to automatically lock Windows 10 when you step away is to enable Dynamic Lock.

The feature identifies when you move away through Bluetooth connectivity (signal strength), and as soon as you are at a distance from the PC, it will automatically lock.

A major drawback with Windows 10 Dynamic Lock/Unlock is that you would have to take the phone, or any other device used when stepping away.

9. Remotely locking Windows 10

Tip icon Tip
Don’t remotely lock a Windows 10 PC unless it’s a critical situation where no other alternatives work or the device is lost/stolen.
  1. Head to the official website, and log into your Microsoft account.
  2. Navigate to the Devices tab.devices
  3. Locate the computer you want to lock, and click on the Find my device option under it.find my device
  4. Now, click the Lock button.lock windows 10
  5. Follow the on-screen instructions to complete the process.

You can also remotely lock Windows 10, automatically logging out any active users and preventing local accounts from accessing the PC. However, administrator accounts will still have access. Remember, it should always be used as a last resort only in critical situations.

And now that you know all the ways to lock a Windows 10 PC, check some quick tips to enhance security by reconfiguring the settings in Windows.

For any queries or to share which method works best for you, comment below.

Widgets won’t unpin from the taskbar in Windows 11 anymore

Good news for Windows users: there’s a new build, KB5028254, available to Insiders in the Release Preview Channel on Windows 11, version 22H2, which fixes the issue that caused widgets to unpin from the taskbar in Windows 11.

If you remember, earlier this year, a lot of Windows users reported that widgets don’t stay pinned on the taskbar, and at the time Microsoft did not offer a solution to this issue.

But now, it seems Microsoft has decided to release a build that contains an update to this problem. Windows 11 Build 22621.2066 is available now in the Release Preview Channel, which means the update will come to Windows 11 most likely in August Patch Tuesday.

For now, you should download the latest Windows updates, including the ones from this week’s Patch Tuesday. You will be able to quickly email files to yourself on Windows 11, and use the new voice command features, 

Here’s the list of improvements, changes, and features coming in KB5028254

These will be installed after you get the latest updates in the Release Preview Channel.KB5028254

  • New! This update affects the Handwriting Software Input Panel (SIP), the Handwriting Engine, and the Handwriting Embedded Inking Control. They now support GB18030-2022 conformance level 2. Because of this, they meet the level 3 requirements.
  • This update addresses an issue in the Windows Notification Platform. The issue affects how much power your device uses.
  • This update affects the Windows Push Notification Services (WNS). It makes the connection between the client and the WNS server more reliable.
  • This update addresses an issue that affects hybrid joined devices. You cannot sign in to them if they are not connected to the internet. This occurs when you use a Windows Hello for Business PIN or biometric credentials. This issue applies to a cloud trust deployment.
  • This update affects Windows Autopilot profiles. The process to download the Windows Autopilot policy is more resilient. This helps when a network connection might not be fully initialized. This update increases the retry attempts when you try to download the Windows Autopilot profile.
  • This update addresses an issue that affects Event Forwarding Subscriptions. When you add an Event Channel to the subscription, it forwards events you do not need.
  • This update addresses an issue that affects the Windows Management Instrumentation (WMI) repository. This causes an installation error. The issue occurs when a device does not shut down properly.
  • This update addresses an issue that affects certain CPUs. There is inconsistent reporting of the L2 cache.
  • This update makes brightness settings more accurate.
  • This update enhances hinting for some of the letters of the Verdana Pro font family.
  • This update affects user mode printer drivers. They unload unexpectedly. This occurs when you print from multiple print queues to the same printer driver.
  • This update affects text edit controls in XAML. You cannot edit the controls again after they become read only. This occurs when you use the new Microsoft Input Method Editor for Japanese, Chinese, and Korean.
  • This update makes Narrator announce the “Change product key” label.
  • This update addresses an issue that affects the Defender Firewall Profile. It fails to automatically switch from a LAN that is trusted to a public network.
  • This update makes Country and Operator Settings Asset (COSA) profiles up to date.
  • This update addresses an issue that affects a printing job. An unexpected Internet Printing Protocol (IPP) mode switch can cause the print job to abruptly stop. This occurs when there is an independent hardware vendor (IHV) driver.
  • This update addresses an issue that affects certain wireless wide area network (WWAN) devices. After every restart, a dialog reappears. It asks you to switch to embedded SIM (eSIM) even when you choose No.
  • This update addresses an issue that affects certain display and audio devices. They are missing after your system resumes from sleep.
  • This update addresses a deadlock in Internet Protocol Security (IPsec). When you configure servers with IPsec rules, they stop responding. This issue affects virtual and physical servers.
  • This update addresses an issue that affects the MPSSV service. The issues causes your system to restart repeatedly. The stop error code is 0xEF.
  • This update affects the Windows Kernel Vulnerable Driver Blocklist, DriverSiPolicy.p7b. It adds drivers that are at risk for Bring Your Own Vulnerable Driver (BYOVD) attacks.
  • This update addresses an issue that affects Windows Defender Application Control (WDAC). The issue copies unsigned WDAC policies to the Extensible Firmware Interface (EFI) disk partition. This partition is reserved for signed policies.
  • This update addresses an issue that affects WDAC. The “Disabled: Script Enforcement” option might create audit events you do not need.
  • This update addresses an issue that affects Widgets. They unpin from the taskbar when you do not expect it.
  • This update addresses an issue that affects the fastfat file system driver. It stops responding because of a race condition.
  • This update addresses an issue that affects I/O over Server Message Block (SMB). It might fail when you use the LZ77+Huffman compression algorithm.

What do you think about it? Have you experienced the issue with the unpinned widgets? Let us know in the comments section below.

Larry Hryb, Xbox’s Major Nelson, to leave Microsoft

After 20 years with Xbox and 22 with Microsoft, “Major Nelson,” as he is known to millions of gamers and Xbox fans, is leaving Microsoft. Larry Hyrb tweeted out the news:

Hyrb goes on to thanks Xbox team members, to say he’s going to spend some time with his family (“no really!”), to enjoy the Seattle summer, and then begin work “on the next chapter of my career.”

The news was greeted with an outpouring of responses, from Phil Spencer, Aaron Greenberg, Sarah Bond, multiple other Xbox team members past and present, and even from an arch rival:

Hyrb has been one of the faces of Xbox for years, keeping followers up to date on the latest games, interviewing game developers and executives, emceeing Xbox showcases and events, taking time for just about everyone.

As he just tweeted out, he’s cherished every moment, and fans around the world have cherished Major Nelson, too:

I want you to all know that every moment I was able to interact with you the community – here on Twitter, Instagram, Twitch, Mixer or at the many events I attended around the world, I cherished every single moment. Every hand shake, every time I got stopped on the streets around a convention (happened a lot), every discussion we had about games and every photo we took together. The real magic in gaming is the community who makes, plays, enjoys and celebrates video games TOGETHER. Xbox, PlayStation, Nintendo, PC, Mobile – I don’t care where or how you play – we are ALL one community. 

Thanks to Larry Hyrb for making gaming at Xbox a personal and fun experience.

What do you think about Microsoft’s new Aptos font?

Big week for Microsoft Office users everywhere, there is a new Microsoft default font: Aptos. Aptos is set to take Calibri’s place, after 15 years of usage within Microsoft Office apps, such as Microsoft Word, PowerPoint, Excel and so on.

For 15 years, our beloved Calibri was Microsoft’s default font and crown keeper of office communications, but as you know, our relationship has come to a natural end. We changed. The technology we use every day has changed. And so, our search of the perfect font for higher resolution screens began.

Microsoft

And so the Redmond-based giant tech found the next Microsoft default font. Aptos, which was previously known as Bierstadt (the german for Beer Town, pretty suiting), was the right choice. Microsoft was looking for something sharp, uniform, and good looking on screen. Of course, there are a lot of fonts who would fit this description. But Microsoft chose to go with Aptos.

Aptos is set to become the default font on all Microsoft 365 apps in the following weeks and months to come. For now, you should get ready for the changes, and properly say goodbye to Calibri while it still is the default font.

Here’s how the Microsoft Aptos font looks like

Aptos was created and designed by Steve Matteson, which one of the world’s leading type designers. According to Microsoft, he previously created the original Windows TrueType core font and the font of Segoe. He chose to name font Aptos, after the California little town, and he says the Aptos font has a humanist touch.microsoft aptos font

There’s always that little voice inside of me saying, ‘You know, you gotta try to sneak in a little bit of humanity. You can’t just use rulers and straight edges and French curves (a template used to help draw uniformed curves) to make all these shapes mechanical.’ I did that by adding a little swing to the R and the double stacked g.

Steve Matteson for Microsoft Design Blog

Even if the Aptos is now the default Microsoft font, you can still change the default font to the one you like in the Microsoft 365 apps. So if you’re not ready for the change just yet, you can still keep Calibri or the font that you love as the default one for your devices.

However, Aptos should be incorporated in every single Microsoft product from now on, and by end of thid year, it should totally replace Calibri.

What do you think about this new Microsoft font? Do you like it? Let us know in the comments section below.

HTTP ERROR 431: What Is It & How to Fix It

Errors when accessing the Internet are common. While some affect all the websites, others are specific to one or a few. The reason for the latter it’s not improper network connectivity to blame but localized issues at the user’s end. One such is HTTP ERROR 431.

Generally encountered when accessing a website, the error can be seen on all major browsers, including Chrome, Firefox, Opera, and Edge. Given that it falls under the 4** level, the problem is at the client’s end. Keep reading to find out solutions that worked for others!

What is HTTP Error 431?

HTTP ERROR 431, which reads, Request header fields too large, implies that the size of the header sent by the user is too big and, subsequently, it has been rejected by the server. In this case, an ideal course of action would be to reduce the size of the headers.

But it’s not as complex as it appears. While the definition states jargon, the underlying causes and the fixes are relatively simple. Here are the former:

  • Corrupt browsing data: The most common reason behind HTTP ERROR 431, and others in the same category, is the corrupt browsing data, either cache or cookies, and clearing it does the trick.
  • Issues with the DNS: When the DNS server is down, its cache is corrupt, or you are simply using an ineffective DNS, the error may appear.
  • Conflicting extensions: Often, third-party extensions installed on the browser to enhance its functionality often conflict with the critical operations, and as a result, an HTTP ERROR appears.
  • Browser is incompatible: Some users found their browser incompatible with the website they were trying to open, which triggered the error.

How do I fix HTTP Error 431?

Before we head to the slightly complex solutions, here are a few quick ones to try:

  • Refresh the page. You can either hit F5 or click the Refresh icon in the toolbar.
  • Try opening the website in Incognito/Private mode. You can do so by pressing Ctrl + Shift + N in Chrome, Edge, and Opera or Ctrl + Shift + P in Firefox.
  • Use another reliable browser to access the website that’s throwing the error.
  • Disable any VPN or firewall configured on the device.
  • Update the network adapter driver and verify whether the HTTP ERROR 431 is fixed.

If none work, move to the fixes listed next.

Tip icon Tip
The solutions listed here are Google Chrome. In case you are using another browser, the steps remain similar. In case of issues, refer to the manufacturer’s website for the exact process.

1. Clear the browsing data

  1. Launch the affected browser, and press Ctrl + Shift + Delete to open the Clear browsing data window.
  2. Select All time from the Time range dropdown menu, tick the checkboxes for all three entries, Browsing history, Cookies and other site data, and Cached images and files, and then click on Clear data.clear browsing data to fix http error 431

One of the quickest ways to fix HTTP ERROR 431 is to clear the browsing data, both the cache and cookies. In case you don’t want to lose other critical information, there’s also the option to clear data specifically for the problematic website.

2. Remove third-party extensions

  1. Launch the browser, paste the following in the address bar, and hit Enter:chrome://extensions/
  2. Turn off the toggle under an extension to disable it and verify whether the error disappears. Do it for all the installed extensions.extensions
  3. Once the problem is fixed, click on Remove under the extension removed last.remove extensions to fix http error 431
  4. Again, click on Remove in the confirmation prompt.

For those wondering how to fix HTTP ERROR 431 in Chrome and other browsers, an effective solution is to disable all third-party extensions, especially those from unreliable sources.

3. Flush the DNS cache

  1. Press Windows + R to open Run, type cmd, and hit Ctrl + Shift + Enter.
  2. Click Yes in the UAC prompt.
  3. Now, paste the following command and hit Enter:ipconfig /flushdnsflush dns
  4. Once done, restart the computer for the changes to come into effect.

DNS, or Domain Name System, is a critical directory that helps that device identify the corresponding address when you enter the website’s name. And when its cache is corrupt, chances are the HTTP ERROR 431 may appear. So, flushing it will do the trick.

4. Create a new browser profile

  1. Launch your browser, click on the profile icon near the top right, and select Add.add user profile
  2. Click on Continue without an account to create a localized profile.continue without an account
  3. Read the listed information and proceed.
  4. Now, enter the user profile name, choose the desired theme, and confirm the profile creation.new profile to fix http error 431
  5. Once done, use the new user profile to access the website.

HTTP errors often arise due to issues with a user profile, and in this case, it’s best to create a new one rather than identifying and fixing the underlying cause, which is time taking.

5. Reinstall the browser

  1. Press Windows + R to open Run, type appwiz.cpl in the text field, and hit Enter.appwiz.cpl
  2. Now, select Google Chrome, or another affected browser, from the list of programs, and click Uninstall.uninstall browser to fix http error 431
  3. Follow the on-screen instructions to complete the process.
  4. Once done, press Windows + E to open File Explorer, paste the following path in the address bar, and hit Enter:%localappdata%appdata
  5. Locate the folder for the browser you just uninstalled, open it, press Ctrl + A to select all the files, then hit Delete to remove them.
  6. Next, restart the computer for the changes to come into effect.
  7. Finally, head to Chrome’s official website, download the setup and run it to install the browser.

That’s it! If the previous solutions didn’t work, reinstalling the browser will fix HTTP ERROR 431 in no time. Sadly, this isn’t the only error you can encounter, and many reported 406 Not acceptable error on their devices.

Besides, you could use an effective uninstaller software to clear any registry entries or leftover files with the browser before initiating a fresh install. Before you leave, check some quick tips to increase the Internet speed in Windows.

This is one of many error you can encounter, and speaking of which, many users reported Error parsing HTTP request header, but we covered that one in-depth in another guide.

For any queries or to share more solutions with us, drop a comment below.

How to view your phone photos in the File Explorer gallery

Microsoft has released Windows 11 Insider Preview Build 23471 to the Dev Channel and it comes with an important and exciting feature. You can soon view your phone photos in the File Explorer gallery.

The feature adds a new button in the Command Bar titled “Add Phone Photos” to allow you to easily access your phone’s gallery.

There are currently ways to do that. For Iphones, for example, you have several ways to do it, and for Android phones, you can try Google Photos to manage your phone gallery.

However, the newly added feature in the Insider Build 23471 lets you directly access your photos just with a few clicks. Follow along and we’ll show you how to do it.

Here’s how you can view your phone photos in the File Explorer gallery

  1. In the Gallery folder, head over to the Command Bar.
  2. You should see the newly added button Add Phone Photos; click on it.view phone photos file explorer
  3. Once you click it, it will open a URL with a QR code. Scan the QR code and you will then start the process of connecting your phone to your PC.

When the two devices are connected, you should be able to your phone photos in the File Explorer whenever you click on the new feature.

Files Explorer is getting a lot of updates, fixes, and changes on this Insider Preview Build. For example, you now have the ability to tear out and merge tabs in File Explorer. Other fixes focus on issues with accessibility when pressing certain commands wouldn’t work.

Microsoft has made sure File Explorer got everything it needed to function to make it work more seamlessly. Head over to the official release statement of this build to read more about the changes.

You’ll be able to see your phone photos in the new File Explorer Gallery

Microsoft released Windows 11 Insider Preview Build 22621.2048 and Build 22631.2048 (KB5028247) to the Beta Channel, and it’s coming with a brand new File Explorer Gallery, as you can see below.view phone photos file explorer

You’ll be able to access your most recent photos with it, aside from easily accessing your phone photos. If you OneDrive or Camera Roll Backup set on your phone, each photo you take will automatically appear at the top of the view.

Through the Collection dropdown, you can choose which folders are shown in the Gallery. You’ll also be able to easily use Gallery to insert photos into your emails, social media posts or even PowerPoint presentations.

What do you think about this new feature? Will you try it? Let us know in the comments section below.

Disk at 99% in Windows 10? You Can Fix It in 8 Steps

The disk is an integral part of the computer and is used to store files. High disk usage typically refers to a situation where a large part of the disk is being actively used by the PC to run programs and tasks. And problems appear when disk usage hits 99% in Windows 10.

Anything above 90% can affect the PC’s performance and significantly slow it down. Some even reported Windows 10 high disk usage on startup. No matter the case or when you face the problem, there are a few solutions that might help. Keep reading to find out!

Why is my disk running at 99 in Windows 10?

Here are a few reasons you are witnessing 99% disk usage in Windows:

  • Too many background processes: When several background processes are running, it’s bound to take up disk space and lead to poor performance.
  • Windows services consuming resources: For many users, the built-in Windows services led to high disk usage, and disabling these fixed 99% disk usage in Windows 10.
  • Startup programs: If too many programs are configured to load when you boot Windows, it may result in high disk usage on startup.
  • Issues with the disk: Oftentimes, problems with the disk, be that bad sectors or physical damage, can render certain space unusable, which leads to perforce-related errors.
  • Malware or virus infection: A system infected with malware or virus will also exhibit signs of a slowdown, and the Task Manager may show a high CPU usage in Windows 10.

How do I fix 99% disk usage in Windows 10?

Before we head to the slightly complex solutions, here are a few quick ones to try:

  • Restart the computer.
  • Verify whether a background process is active when the disk touches 99% in Windows 10. It’s often the Windows updates or automatic scans by the antivirus to blame.
  • Scan the PC for malware using the built-in Windows Security or a reliable antivirus solution.
  • Check for pending Windows updates and install them.
  • If the problem appeared recently, uninstalling the apps installed in the last couple of days should help.
  • Disable any third-party antivirus installed on the PC.
  • In case you see 100% disk usage in Windows 10 only while running certain programs, update them individually.

If none work, move to the fixes listed next.

1. Manually terminate programs

  1. Press Ctrl + Shift + Esc to open the Task Manager.
  2. Click the Disk option to list the processes in decreasing order of disk usage.disk
  3. Select the programs that consume the maximum disk individually, and click on End task.end task to fix windows 10 disk 99%

When terminating programs and processes, make sure not to kill a critical one, as it might affect the device’s functionality. For instance, if you terminate the process pertaining to audio, there will be no sound on the PC.

2. Disable non-critical services

  1. Press Windows + R to open Run, type services.msc in the text field, and hit Enter.
  2. Locate the Sysmain service, right-click on it, and select Properties.sysmain
  3. Select Disabled from the Startup type dropdown menu, and then click on the Stop button.service
  4. Once done, click on Apply and OK to save the changes.
  5. Similarly, disable the following services as well:
    • Windows Update (disables automatic updates)
    • Windows Search (disables indexing, takes longer to search for apps and files)

Once done, restart the computer and verify whether the 99% disk usage in Windows 10 reduces to normal levels. And don’t look at the immediate effect. Rather, monitor it over an extended period for accurate results.

3. Turn off notifications and tips

  1. Press Windows + I to open Settings, and click on System.
  2. Go to the Notifications & actions tab, disable the toggle for Get notifications from apps and other senders, and then untick the checkbox for Get tips, tricks, and suggestions as you use Windows.disable notifications to fix windows 10 disk 99%

The notifications and Windows tips and tricks often result in increased CPU usage, sometimes as high as 99% in Windows 10. Disabling it did the trick for most users!

4. Run the CheckDisk utility

  1. Press Windows + S to open Search, type Command Prompt in the text field, and click on Run as administrator.command prompt
  2. Click Yes in the UAC prompt.
  3. Paste the following command and hit Enter:chkdsk /rcheck disk to fix windows 10 disk 99%
  4. Now, press Y and hit Enter to confirm running the scan the next time you reboot the PC.check disk
  5. Finally, restart the computer and let the utility kick in.

Check Disk is a built-in utility in Windows that helps fix errors that appear while scanning the disk and repairs corrupt sectors. Both may result in 100% disk usage even when nothing is running. So, it’s imperative that you run the Check Disk utility to fix disk issues.

5. Repair the corrupt system files

  1. Press Windows + R to open Run, type cmd, and hit Ctrl + Shift + Enter.cmd
  2. Click Yes in the prompt that appears.
  3. Paste the following commands individually and hit Enter after each:DISM /Online /Cleanup-Image /CheckHealth DISM /Online /Cleanup-Image /ScanHealth DISM /Online /Cleanup-Image /RestoreHealth
  4. Next, execute this command to run the SFC scan: sfc /scannowsfc scan to fix windows 10 disk 99%

Corrupt system files, too, may affect the functioning of the device and lead to 99% disk usage in Windows 10. In this case, the DISM commands and SFC scan should do the trick.

6. Perform a clean boot

  1. Type System Configuration in the Search bar, and click on the relevant search result.
  2. Navigate to the Services tab, tick the checkbox for Hide all Microsoft services, and click on Disable all.disable services
  3. Press Ctrl + Shift + Esc to open the Task Manager, and head to the Startup tab.
  4. Select the programs configured to load at startup individually, and click on Disable.disable startup apps to fix windows 10 disk 99%
  5. Go back to System Configuration, and click on Apply and OK to save the changes.
  6. Click Restart in the confirmation prompt that appears.

Once the PC restarts, check whether 99% disk usage in Windows 10 subsides. If it does, one of the disabled startup apps or services is the underlying cause.

Again, open System Configuration, enable them one at a time, restart the computer after each, and verify whether there’s an increase in disk usage.

As soon as you notice a change, the service/program enabled last is the culprit. So, have it disabled, at least for the time being, until an update is released.

7. Reset the virtual memory

  1. Press Windows + S to open Search, type View advanced system settings, and click on the relevant result.
  2. Click the Settings button under Performance.settings
  3. Navigate to the Advanced tab, and click on Change under Virtual Memory.change
  4. Tick the checkbox for Automatically manage paging file size for all drives, and then click OK to save the changes.automatically manage virtual memory to fix windows 10 disk 99%

While many recommend increasing the Virtual Memory, it’s often best to let Windows set the right size. Change it only when you are facing issues pertaining to performance or the RAM usage is high.

8. Perform an in-place upgrade

  1. Go to Microsoft’s official website and download the Media Creation Tool.
  2. Run the Windows 10 Setup and wait for things to get ready.
  3. Click Accept to agree to Microsoft’s license terms.accept
  4. Choose Upgrade this PC now, and click on Next to proceed.upgrade this PC to fix windows 10 disk 99%
  5. Wait for Windows to download and then follow the on-screen instructions to complete the in-place upgrade.

A repair upgrade is often used as a last resort but helps fix various issues with Windows. It replaces the current OS installation with a new one without affecting the stored data, installed apps, or configured settings.

Tip icon Tip
If none of the solutions listed here worked, it’s likely that the disk itself is faulty and needs to be replaced. However, before you do that, inspect it by a professional because a simple repair might get things up and running.

Now that you have fixed 99% or higher disk usage in Windows 10, check some quick tips to increase the data transfer speed on the PC.

For any queries or to share which solution worked for you, drop a comment below.

Facebook Error Code 2: What it Means & How to Fix it

Facebook error code 2 can be frustrating and prevent you from accessing or using the platform. In this guide, we will explore various methods to fix Facebook Error Code 2 and regain full access to the social media platform.

If you are looking for ways to fix a similar error, the error code 1 on Facebook, read this guide to find easy solutions.

What is error code 2 for Facebook login?

Facebook Error Code 2 is an error message that users may encounter when logging in to or accessing their accounts.

It typically occurs on iPhone, iPad, & Android devices and indicates a problem with your login credentials or a temporary issue with Facebook’s servers.

What causes the error code 2 on Facebook?

On an iPhone, Facebook error code 2 can occur due to various factors; some of the potential causes are:

  • Network connectivity issues – If your device cannot establish a stable connection to the internet, it can hinder the login process and trigger the error.
  • Outdated Facebook app – Using an outdated version of the Facebook app on your iPhone may result in compatibility issues and lead to error code 2.
  • Corrupted app data or cache – Over time, the app data and cache of the Facebook app on your device can become corrupted, which can cause login errors. Reinstall the Facebook app.
  • Facebook server issues – Sometimes, Facebook’s servers may experience temporary issues or maintenance, leading to login errors like this one. Check the server status to know if that’s the case.
  • Incorrect login credentials – If you enter the wrong login credentials, such as an incorrect email address or password, Facebook will not authenticate your account and display the error.

So, these are the causes of the issue; let us check out the detailed methods to fix it.

How do I fix error code 2 on Facebook?

Before engaging in advanced troubleshooting steps, you should consider performing the following checks:

  • Restart your phone or computer and router.
  • Relaunch the app on your iPhone.
  • Check the Facebook server status.
  • Verify you are connected to a stable internet connection.
  • Enable Airplane mode, then turn it off after 60 seconds.
  • Disable VPN (if applicable).
  • Switch from Wi-Fi to Cellular or vice versa.
  • Log out of your Facebook account from all devices.

Once done, move to the troubleshooting steps to eliminate this issue.

1. Reset the network settings

  1. On your iPhone, locate & tap Settings from the home screen.Settings Facebook error code 2
  2. Go to General.General
  3. Now tap Transfer or Reset iPhone.Transfer or reset
  4. Tap Reset.Reset
  5. From the pop-up menu, select Reset Network Settings.Reset Network Settings
  6. Enter your passcode to confirm the action.
  7. Click Reset Network Settings.Reset 2

2. Update the local time

  1. On your iPhone, locate & tap Settings from the home screen.Settings Facebook error code 2
  2. Go to General.General
  3. Tap Date and Time.Date and Time
  4. Toggle on the Set Automatically option to set the time on its own.Set time automatically

Once the time is updated, open the Facebook app to check if the issue is resolved.

3. Check for updates

  1. On your iPhone, locate & tap Settings from the home screen.Settings Facebook error code 2
  2. Go to General.General
  3. Click Software Update. iPhone will check for updates; if available, connect your iPhone to Wi-Fi and click Download & Install.
  4. Your device will restart to install the update.

4. Clear the browser cache (if using Facebook on the browser)

  1. Close all the apps on your iPhone. Locate and tap Settings.Settings Facebook error code 2
  2. Scroll down and locate Safari; tap it to open.Safari
  3. On the next page, tap Clear History and Website Data.Clear website data Facebook error code 2
  4. Select Clear History And Data from the prompt menu to confirm the action.

Now try to use Facebook and check if the issue persists.

5. Reinstall the Facebook app (iPhone)

  1. On the home screen, tap and hold Facebook to get options.
  2. Select Remove app.Remove Facebook error code 2
  3. Click the Delete App to confirm the changes.Delete App
  4. Again click Delete to remove the app data.Delete
  5. On the home screen, locate and tap App Store.App store
  6. Click the Search icon, type Facebook, and click the downward arrow to download the latest app version.Install  Facebook error code 2

So, these are methods that you can use to fix the error code 2 for Facebook login. If none of the above worked for you, contact Facebook Support for further assistance.

If you are facing similar issues, like the Facebook app not working, we recommend you check out this guide to find quick solutions.

Please feel free to give us any information, tips, and your experience with the subject in the comments section below.

Meta set to launch commercial AI model, aims to compete with OpenAI and Google in generative AI race

As reported by Financial Times, Meta is set to launch a commercial version of its AI model, entering the competitive field of generative AI development alongside Microsoft-backed OpenAI and Google. The software, fueled by large language models (LLMs), enables the creation of text, images, and code using extensive data training and computing power.

While Meta previously released its LLaMA language model exclusively to researchers, the forthcoming commercial version will offer broader accessibility and customization. Meta emphasizes that its LLMs are “open-source,” in contrast to the closed nature of competitors like OpenAI’s GPT-4.

This move comes as Silicon Valley tech giants vie for dominance in AI. Meta’s global affairs chief, Nick Clegg, extolled the benefits of an open-source approach, positioning Meta to catch up with rivals by allowing companies of all sizes to enhance the technology.

Despite Meta’s decade-long AI research, it lagged after the release of OpenAI’s ChatGPT, prompting a push to diminish OpenAI’s dominance. While Meta plans to monetize its AI model by charging enterprise customers for fine-tuning using proprietary data, there are no immediate plans for charging with the upcoming release.

Meta’s CEO, Mark Zuckerberg, aims to build a metaverse, investing over $10 billion annually. Meta established a generative AI unit led by Chief Product Officer Chris Cox to strengthen its AI focus. Executives hint at developing multiple AI chatbots across platforms like Instagram and WhatsApp, powered by Meta’s LLMs.

Open-source models allow for increased user adoption, leading to more data input and enhanced capabilities. They also enable bug detection and improvement in technology and security, addressing privacy and misinformation concerns. Providing free software can help corporations capture new markets.

However, open-source AI models present risks, including misuse by bad actors. Child safety groups report a rise in AI-generated child sexual abuse imagery. Meta’s previous AI model, BlenderBot 2, spread misinformation. Although BlenderBot 3 was improved, instances of false information generation remained.

Intellectual property and copyright pose regulatory and legal risks. Comedian Sarah Silverman filed a lawsuit against Meta and OpenAI, claiming her work was used to train models without consent. Meta’s VP of AI Research, Joelle Pineau, highlights that releasing something as open source doesn’t relinquish intellectual property rights.

Why this matters:

  • Meta’s commercial release of its open-source LLaMA LLM allows companies to freely adopt and profit from this AI model.
  • LLaMA is already a popular foundational model for many open-source LLMs, and now they can be used commercially.
  • Meta’s chief AI scientist, Yann LeCun, hints at significant changes coming with open-source platforms that are as good as closed ones.

Game-changing for Meta:

  • Open-source enables Meta to leverage the expertise of a vast developer community, driving rapid progress in AI development.
  • Fine-tuning open-source models is affordable and fast, offering cutting-edge techniques like LoRA.
  • The existing development of numerous open-source LLMs on LLaMA paves the way for widespread commercial use.

In conclusion, Meta’s upcoming commercial release positions it as a contender in the generative AI field. With an open-source approach, Meta aims to catch up with rivals and provide opportunities for businesses to enhance technology. However, risks associated with open-source AI models and legal considerations surrounding intellectual property persist.

Legal battle reveals potential arrival of Nintendo Switch successor in 2026

As reported by GameRant, according to a recent document emerging from the legal battle involving the Federal Trade Commission (FTC) and Microsoft, Nintendo might be releasing a successor to the Nintendo Switch in 2024. The original Nintendo Switch, which debuted in 2017, achieved great success; however, there has been a growing demand for a new system capable of handling modern games more effectively. It was also revealed in the same document that Microsoft expected ‘Xbox exclusives’ Starfield and Indiana Jones would sell 10m on PlayStation.

The Nintendo Switch played a pivotal role in revitalizing the esteemed reputation of the company, especially after the lackluster performance of its predecessor, the Wii U. With standout titles like Super Smash Bros. Infinite, The Legend of Zelda: Breath of the Wild, and Super Mario Odyssey, the console moved Nintendo, a veteran game developer, back into the forefront of the gaming industry. Despite doubts from competitors, Nintendo managed to regain its relevance. Now, it seems that Nintendo is poised to launch the successor to the Switch.

The document, titled “Defendants’ Proposed Post-Trial Findings of Fact and Conclusions of Law,” delves into facts, definitions, and pertinent details relevant to the FTC’s efforts to prevent Microsoft from acquiring Activision Blizzard. On page 92 of this 153-page document, an intriguing statement appears: “Nintendo is expected to release the successor to the Switch as early as next year.”

Defendants’ Proposed Post-Trial Findings of Fact and Conclusions of Law

This revelation could be a significant development, providing the first substantial confirmation of a new Nintendo console, which had previously been the subject of speculation. It is important to note that this information does not originate directly from Nintendo, so it should be cautiously approached. Nevertheless, considering Microsoft’s vested interest in monitoring Nintendo’s activities, given the competition between their respective consoles, it is plausible that the information disclosed in the document is accurate.

Fans have long been requesting an upgrade to address the relatively modest specifications of the Nintendo Switch, which often result in performance issues, particularly with more demanding games.

If the new console proves to be backward compatible with Switch games while offering significant performance improvements to ensure smoother gameplay across a broader range of titles and even potentially opening doors for high-performance games like Cyberpunk 2077 or Elden Ring to be ported to Nintendo, it would undoubtedly generate substantial interest and popularity among gamers.

Microsoft expected ‘Xbox exclusives’ Starfield and Indiana Jones would have sold 10m on PlayStation

As reported by Eurogamer, in a recent court document from the Microsoft-FTC trial revealed that prior to confirming their Xbox exclusivity, Microsoft had expected to sell over 10 million copies of Bethesda’s Starfield and MachineGames’ Indiana Jones game on PlayStation.

According to Microsoft Gaming CFO Tim Stuart’s testimony, even though they had projected significant sales for both games on PlayStation, Microsoft believed that any potential losses from making ZeniMax games exclusive could be offset by increased console sales through Game Pass.

Images of the document that came out in the FTC hearing are in the tweet below.

Meanwhile, Xbox Free Play Days are one till 16 July, and some amazing games are on the table.

Microsoft acquired ZeniMax, the parent company of Bethesda Softworks, in 2021. While games like Deathloop and Ghostwire: Tokyo were intended for PlayStation prior to the acquisition, all other ZeniMax projects, including the highly anticipated Starfield, were planned as Xbox exclusives.

Microsoft is close to finalizing a deal to purchase Activision Blizzard for nearly $69 billion. If the deal goes through, Microsoft will gain ownership of popular gaming franchises like Crash Bandicoot, Overwatch, World of Warcraft, and Call of Duty.

Regarding the exclusivity of Activision projects, it remains unclear how Microsoft will handle them once the acquisition is completed. However, Microsoft has previously stated that Call of Duty will continue to be available on PlayStation consoles even after the Activision deal closes.

As the gaming landscape continues to evolve, Microsoft’s strategic moves to secure exclusive titles and redefine platform boundaries are reshaping the industry dynamics, setting the stage for fierce competition among console manufacturers and shaping the choices available to gamers.

Fix: Internet Explorer is Not Downloading Chrome

Google Chrome is the go-to browser for the majority of users across the world. However, for that, you need to manually install Chrome on your Windows PC using Internet Explorer.

There are multiple users that have reported that Internet Explorer is not downloading Google Chrome on their PCs. In this guide, we will share with you some solutions that will help you fix the problem. Let us get right through it.

Why is Internet Explorer not downloading Google Chrome?

We did our research and after going through multiple user reports, we have deduced a list of the most common reasons why Internet Explorer is not downloading Google Chrome:

  • The security level is set to high – You might have accidentally set the Internet Explorer security settings to high which is why it is blocking the Chrome download.
  • File downloads are turned off – Some users might have by chance turned off the file downloading feature in Internet Explorer because of which they are coming across the error.
  • Some underlying problems with the browser – Chances are that the version of Internet Explorer that you are using is problematic and has a bug that is causing the problem.
  • The Chrome download link is problematic – Also, the link from where you are trying to download Google Chrome might be experiencing some issues.

Let us now apply the solutions and fix the problem of Internet Explorer not downloading Chrome on a Windows PC.

How can I download Google Chrome using Internet Explorer?

1. Lower the security level in Internet Explorer

  1. Press the Win key to open the Start menu.
  2. Open Control Panel.
  3. Click on Internet Options.
  4. Switch to the Security tab.
  5. Under the Security level for this zone section, lower the Allowed levels for this zone value to Medium.
  6. Hit the OK button to save changes and restart your computer.

Many users have reported that changing the security level for Internet Explorer to Medium has helped them resolve the problem, and they were able to download Google Chrome using IE.

Once you have lowered the security level, simply visit the Google Chrome download link and check if this resolves the problem for you or not. If not, then check out the next solution.

2. Turn on file downloads in Internet Explorer

  1. Press the Win key to open the Start menu.
  2. Open Control Panel.
  3. Click on Internet Options.
  4. Switch to the Security tab.
  5. Click on Custom Level.
  6. Scroll down to the Downloads section.
  7. Under File download, select Enable and hit OK to save the changes.
  8. In the prompt that pops up, click Yes.
  9. Click Apply and OK and reboot your PC.
  10. Visit the official website of Google Chrome download and check if this resolves the issue or not.

You should make sure that Internet Explorer is allowed to download software or apps from third-party websites. For that, you should follow the above steps and enable the File Download option and check if this resolves Internet Explorer not downloading Chrome problem.

3. Ensure necessary services are running

  1. Press the Win + R keys to open the Run dialogue.
  2. Type services.msc and press OK.
  3. Locate Background Intelligent Transfer Service and open it.
  4. Change the Startup type to Automatic.
  5. Ensure the Service status is Running.

Some people have reported that because the Bluetooth Intelligent Transfer Service wasn’t enabled on their PCs, Chrome wasn’t downloading using Internet Explorer. In other words, It allows you to install different programs from other devices and the Internet.

4. Clear browser cache and cookies

  1. Launch Internet Explorer.
  2. In the upper-right corner of Internet Explorer, click the Settings icon, then select Internet options.
  3. Click the Delete button in the Browsing history section.
  4. Check the box for Temporary Internet files and Cookies.
  5. Click Delete.

You should try clearing the browser cache and cookies of Internet Explorer and then try visiting the official website and downloading the Google Chrome browser.

5. Change the browser

If nothing works, then we would suggest you skip using Google Chrome and use a different browser. You will be glad to know that there are other browsers that are safer, feature-full, and faster than Google Chrome browsers available in the market.

For users who are confused about which browser they should opt for, we would suggest you check out our guide which lists some of the best browsers that you can choose in 2023.

That is it from us in this guide. You can check out our guide that will help you to turn on Google Chrome memory saver.

Feel free to drop a comment in the comments section below and let us know which one of the above solutions resolved the problem of Internet Explorer not downloading Chrome.

Microsoft rolls out Paint update with dark mode and enhanced zoom controls for Windows 11 Insiders

Microsoft has announced a new update for the Paint app on Windows 11, exclusively for Windows Insiders in the Canary and Dev Channels. The update, labeled version 11.2304.17.0, brings a range of changes and improvements expected to be well-received by the community.

In the other big news, Windows 11 Insider build 22631.2048, which is now available, introduces Gallery for File Explorer for Beta Channel Insiders.

One of the key features introduced in this new Paint app update is the support for dark mode in Paint. By default, the app will adapt to the system’s theme preferences. However, users now have the option to manually change this setting on the newly added settings page, providing them with greater customization control.

Screenshot 2023 07 14 At 7.14.15 Pm

In addition to dark mode, Microsoft has enhanced the zoom controls in Paint. Users will now enjoy increased flexibility and control over the view of their content on the canvas. While the classic presets are still available, the update introduces finer granularity increments on the zoom slider, allowing for more precise zooming. Users can even set a custom zoom value for even greater accuracy. Furthermore, a new “fit to screen” option has been introduced to optimize the zoom level to match the window size, enabling users to adjust their canvas quickly.

Screenshot 2023 07 14 At 7.14.39 Pm

To align with the new Windows 11 design, Microsoft has updated the “Image Properties” dialogues to match the app’s backdrop. Moreover, numerous accessibility and usability improvements have been implemented throughout the app, enhancing the overall user experience. The company has also focused on improving access key and keyboard shortcut support, aiming to boost accessibility and productivity for keyboard users.

Screenshot 2023 07 14 At 7.14.55 Pm

Windows Insiders can now look forward to exploring the latest features and improvements in the updated Paint app. With the introduction of dark mode, enhanced zoom controls, and various accessibility enhancements, it’s clear that. Microsoft aims to provide a more intuitive and user-friendly experience for Windows 11 users.

Microsoft lets clients know Windows 10 22H2 will be the final version

As part of its Windows client July 2023 roadmap, Microsoft is updating customers on the various operating system releases for the month that include Windows 11 23H2 being an enablement package and Windows 10 22H2 being the final version of the OS going forward.

Microsoft has repeatedly listed 2025 as the year Windows 10 stops receiving support from the company and as part of its client roadmap customers get some extra details regarding this finality. Clients still on Windows 10 will receive version 22H2 as their final version of Windows 10 and the end of support date is listed as October 14, 2025 “for all editions of that version.”

Microsoft also released a new Windows 10 Insider build for the Release Preview Channel, upping the version number to 19045.3269.

.For any company looking to make a last-ditch effort to transition to Windows 11, Microsoft also lists that there will be a Long-Term Servicing Channel (LTSC) made available for Windows 11 during the second half of 2024. As for everyone else, there will be an upcoming Windows 11 23H2 enablement package (eKB) that allows users on version 22H2 to update to version 23H2. The eKB can be rolled out through various Windows Services such as Windows Server Update Services, Windows Update for Business, and Windows Autopatch.

When making the transition, clients can reset their service lifecycle and extend their license for another three years for the following products:

  • Enterprise
  • Education
  • IoT Enterprise

Lastly, Windows 10 IoT Enterprise LTSC will remain available through Volume Licensing as opposed to its traditional direct licensing format.

Clients will be able to access their Windows 10 IoT LTSCs starting August 1, 2023. Microsoft recommends clients consider the longer 10-year lifecycle of Windows 10 for devices specifically used in IoT scenarios and the limitation on special devices purchased outside of the IoT LTSC license from other OEMs.

Threads vs Twitter: What’s the difference? [Comparison]

Threads is riding a very popular wave right now. Over 100 million users sign up in the first 5 days of its release. Even Windows users are hooked because they learned how to download it and use it on Windows 11. Scammers find it very easy to scam by stealing other people’s identities before they have the chance to claim their names there.

However, the app is not without controversy. For now, you can’t delete your Threads account without deleting your Instagram account. However, Meta is working on a feature that will allow you to do it. And it seems the app is a privacy nightmare because it asks for too much information.

This has made it impossible for Threads to be released in Europe, for now. The European legislation is very clear when it comes to digital privacy. And, it seems Threads is bound to share the market with Twitter. Some agree Threads will be the dominant app in this market.

However, some specialists agree that Threads might be offering too much, and while the app is still in its infancy, this would be the perfect time to correct it. By borrowing the best elements that the other social media platforms have and then addressing their limitations, experts think Threads might be that rare app that makes it.

And with this in mind, we’ve decided to make a comparison between Threads and Twitter, since the two social media platforms will most likely have begun a battle of domination that will last for months to come.

Threads vs Twitter

We’re taking a closer look at how specific features compare in Threads and Twitter. We’ve created this table below where we can better visualize the differences:

FeatureThreadsTwitter
Multiple accountsYesYes
Character limit500 280 – for unpaid users; 25000 – for paid users.
Video limit5 minutes2 minutes and 20 seconds
The following listDoesn’t showIt shows when you follow
Verification Yes, if you’re verified on Instagram$11 a month for mobile
Private account optionYesYes
Trending listIt doesn’t have oneIt has a trending list
Deleting accountsYes, but you’ll have to delete Instagram tooYes
Usage limitsNoneTemporarily
Feed optionMain threadTrending, chronological, followers, and people you follow
Post draftingNoYes
Editable postsNoPaid subscribers only
Direct messagesNoYes
Desktop optionsNo (but you can use it on Windows 11’s WSA)Yes
AdsNo (for now)Yes
HashtagsNoYes
Android/iOSBoth Both
NSFW content allowedNoNo

For now, one of the best things about Threads is that it doesn’t have Ads on its feed, though Meta will probably implement it in the following weeks.

Threads doesn’t have a Trending list, which is one of Twitter’s most popular features, because it revolves around what’s popular around the world, and it gives you an idea about what to post. And most importantly, it helps you engage in conversations.

This is what can Threads do better to surpass Twitter

There is, naturally, the conversation around which will win in the long run. Threads or Twitter? Twitter is still very much a product of the time, and it manages to become such a cultural platform every time something important is going on in the world. Twitter is also democratizing the conversation, meaning everyone can start it, theoretically.threads vs twitter

However, Twitter still doesn’t cater to the regular user. The platform is a broadcast one, and public persons with a large following will always start a conversation. So do the paying subscribers who are promoted in the feed. But the regular user can’t start a conversation at all.

Threads can take this part of Twitter, and focus on the regular user. This way, they will be far more motivated to use Threads for sharing news about their lives. The Meta app can even further democratize the conversation by giving regular users a more powerful voice than Twitter does.

Meta should do it now and position it as a worthy rival to Twitter’s stance on who can start a conversation. However, Threads should also allow for more options on the platform, while still retaining its policies.

A better feed for Threads?

Yes, definitely. For now, Threads’ feed feels overwhelming because it is. You have a lot of content from everyone regarding everything without an apparent filter.

It’s true, Threads is still in its infancy, so the algorithm will be updated in the following weeks, but Meta must update it. It must make it flow, according to what you want to see. So we’re talking about a curated feed, that will permanently adapt to your content choices.

We’ll keep this article updated, as Threads becomes more updated in the following weeks. However, we’d like to know what you think about it. Is Threads better than Twitter, or could it be better in the long run?

Let us know in the comments section below.

VXLAN vs VLAN: Differences, Advantages & Disadvantages

Knowingly or unknowingly we make use of virtual servers, networks, desktops, storage, etc., in our daily lives to enjoy the convenience of cost-saving, enhanced features, and security.

In this guide, we will discuss VXLAN Vs VLAN networks, and understand which one is better than the other. Let us get right into the guide.

What is VLAN?

VLAN is an acronym for Virtual Local Area Network. As the name suggests, with VLAN you can create a virtual network in your local area for computers to connect and group together locally.

LAN can be used in an office, school, or building, which can come under a single network. VLAN is an extension of the Ethernet protocol with an extra header.

With that extra header, VLAN gains the ability to tag traffic with a number from 1 to 4094 (called VLAN ID). Each device connected in its respected VLAN ID will be securely separate and can be communicated over a firewall.

You can basically group multiple devices together using VLAN that frequently communicate with each other. For example, you can create a VLAN for the HR department, marketing team, and finance team, all of them having different VLAN IDs.

Some of the highlights of VLAN over LAN are that it is created by one or more LANs, its latency is less, it is cost-effective, the network packet is sent over to a specific broadcast domain, etc.

There are three types of VLAN or Virtual Local Area Network:

  • Port-based VLAN – VLAN groups virtual local area networks by port, where a port can be configured manually to a member of VLAN.
  • Protocol-based VLAN – This type of VLAN uses the traffic-based protocol to define filtering criteria for untagged packets.
  • MAC-based VLAN – In this type of VLAN, the untagged packets are assigned virtual LAN allowing them to be classified based on their packet source address.

What is VXLAN?

VXLAN stands for Virtual eXtensible Local Area Network and is an extension of the VLAN. VXLAN is a tunneling technique that establishes a logical tunnel on the IP network between the source and destination and forwards the user-side packets through the tunnel.

It transmits layer 2 packets over Layer 3 network, which is ethernet over IP. VXLAN is used because of the limitation of VLAN where due to the 12-bit identifier you can only set up 4094 virtual networks.

Since VXLAN is a 24-bit identifier, you can set up around 16 million VXLAN IDs. The main purpose of VXLAN is to solve the issue of scalability.

Each physical server can set up multiple virtual servers with its own IP address and operating system. This lets you move a virtual machine from one physical server to another without affecting the user.

What are the differences between VLAN vs VXLAN?

VLANVXLAN
VLAN is Virtual Local Area Network.VXLAN is a Virtual eXtensible Local Area Network.
Scalable up to 4094 VLANs because of using a 12-bit identifier.Scalable up to 16 million VXLANS because of using a 24-bit identifier.
Layer 2 ethernet connectivity to all the endpoints.Layer 3 connectivity between each VXLAN tunnel endpoint.
Redundancy and loop avoidance are limited to ethernet-based solutions.Redundancy and loop avoidance are limited to whatever is supported by Layer 2 or Layer 3.

It cannot be natively extended over a Layer 3 network segment.VXLAN can be extended to whatever scalability the Layer 3 connectivity supports.
VLAN requires extra precaution and care and can be a bit frustrating to maintain in a large environment.With the proper configuration adding and extending VXLANs is relatively easy, even in very large environments.
Simple to configure and maintain in small networks.Manual configuration and maintenance are a bit challenging even in small networks.
It is less flexible in the multitenant environment.More flexible as compared to VLAN in multitenant environments.
Makes use of the VLAN tag on the Layer 2 frame for encapsulation.VXLAN uses MAC-in-UDP encapsulation to extend Layer2 segments across endpoints.
Since VLAN uses STP to block redundant paths, only half of the available paths are utilized.VXLAN uses an underlying Layer 3 protocol to use all the available parts making it more cost-effective.

What are the advantages and disadvantages of VXLAN and VLAN?

1. Advantages

1.1 VXLAN

  • Increases scalability because of using 24-bit identifiers in the virtualized cloud environments allowing you to create 16 million isolated networks
  • Runs over IP transport
  • Negates the need for STP (Spanning Tree Protocol)
  • Gives you access to a large of endpoints
  • Maintenance in a large environment is easy
  • Uses Layer 3 protocol to utilize all available routing protocols
  • Flexible and suitable for multitenant structure

1.2 VLAN

  • It reduces the size of the broadcast domain
  • VLAN is more cost-effective than LANs
  • VLAN gets you an additional layer of security
  • Easily manageable in small networks
  • You can logically group devices based on their function rather than by their location
  • VLAN lets you keep hosts separated
  • You do not require additional hardware or cabling

2. Disadvantages

2.1 VXLAN

  • Difficult to scale a centralized controller
  • Manual configuration in small networks is a bit difficult
  • Deployment of VXLAN is complicated

2.2 VLA

  • A packet leak from one VLAN can transfer over to another
  • Infection in one VLAN can carry over to another
  • Requires an additional router to control large networks
  • Cannot forward network traffic to other VLANs

Verdict: VLAN vs VXLAN

The main advantage of using VXLAN over VLAN is that it allows you to extend the overlay of the Layer 2 domain to the Layer 3 underlay network.

This basically eliminates the STP avoiding the redundant paths and utilizes all available paths. So, using VXLAN can help maximize the performance of the data center and reduce costs, especially in large environments.

You can deploy VXLAN via three methods:

  • Host-based VXLAN – In this, the VXLAN runs on the host, where a virtual switch can act as a VTEP encapsulating and decapsulating the data packets.
  • Gateway-based VXLAN – It is a hardware-based VXLAN, where the VTEP is within a switch or a router and is referred to as gateway VXLAN.
  • Hybrid VXLAN – This is a combination of the above two VXLANs, where some VTEPs are on the host while some are on hardware. In this, the traffic flows from the source VTEP to the destination VTEP, which could be both hardware or software.

So, VXLAN has several benefits, one of the highlights being it allows you to change either network without the need to change the other network. Moreover, it lets you easily upgrade the virtual network by shifting the virtual machines to another server.

That is it from us in this guide. You should check out our guide that explains how you can easily resolve the problem where the VLAN ID is missing in Windows.

We also have a guide that lists some of the best network switches for a small business, that are powerful, efficient, and lets you control your business the way you want.

Feel free to let us know in the comments below if you were able to understand the differences between VLAN vs VXLAN by reading this guide or not.

You’ll be able to report inappropriate voice chats on Xbox

Good news for Xbox users everywhere: Xbox has a voice reporting feature now, meaning that you’ll be able to report inappropriate voice chats on Xbox.

Microsoft is taking all the precautions to make the Xbox experience as good as it can be for everybody. After announcing that Xbox will be the home for over 5000 new games currently in development for the console, it seems that the Redmond-based tech giant wants to make sure everyone is safe playing them.

The new feature is going to be live starting this week, and it has backward compatibility with all the games released on the Xbox as a whole, so far, including Xbox 360. If these games offer multiplayer-voice chat, then you’ll be able to use this feature to report inappropriate voice chats.

The feature will be available in Xbox Series X/S and Xbox One, and you’ll be able to use it in any multiplayer voice chat. It will be available first in English-speaking countries: the US, Canada, Great Britain, Ireland, Australia, and New Zealand, and you can find the feature in the Xbox Insider Program. Additional languages will be added in time.

With reactive voice reporting, Xbox continues to help players feel protected. Empowering players with easy-to-use tools helps foster togetherness, while improving the greater health of the gaming community on Xbox. With measures like this in place, players can feel confident they are in a safe, welcoming environment. 

Stephen Balkam, CEO, Family Online Safety Institute

How does the Xbox voice reporting feature work?

The feature is built in such a way that it can be used without affecting your gameplay. When you notice inappropriate language, you can quickly record and the Xbox will save it into the device for 24 hours.

That’s more than enough time for you to choose if you’re going to report it or not. Microsoft agrees that you have full control over what you record and report. Clips will not be uploaded, they will only be saved until you are ready to deal with them.xbox voice reporting feature

If you choose not to report the clip, then it will be deleted automatically from your Xbox. If you choose to report it, Microsoft has updated the notification features, and it will let you know about what’s next.

Xbox users are already thrilled about this new feature.

As a woman online, I often find myself staying silent in online multiplayer to avoid abuse and harassment. I am excited for features like this that can help give people like me their voices back. Nobody should miss out on interaction with their fellow gamers because they are afraid to speak.

CamicaziBoss, Xbox Ambassador

What do you think about it? Let us know your thoughts and opinions on this in the comments section below.

SMART Status Bad Error: Main Causes & How to Fix it

Some of our readers have recently reported that they are stuck with the SMART status bad error but don’t know what triggered the error in their HDD and SSD or how to fix it.

In this article, we will take you through the leading causes of the error and how to resolve the issue to prevent potential data loss or drive failure.
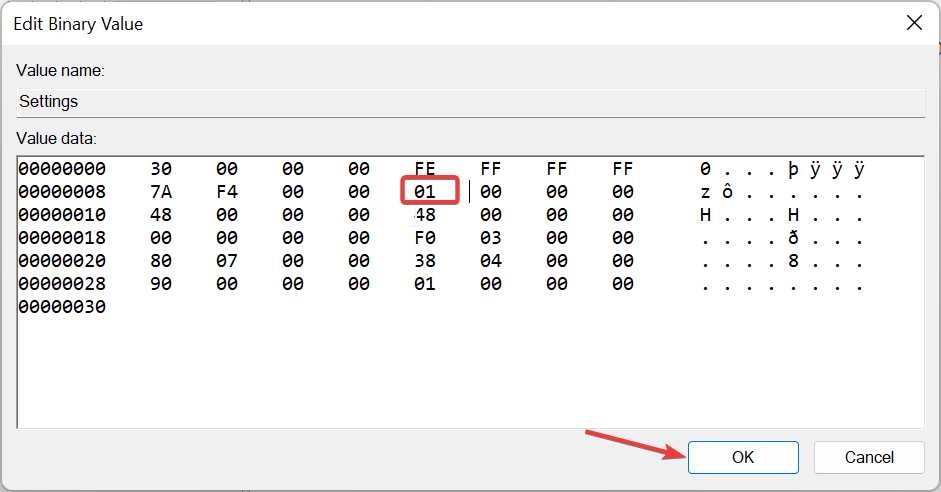
What causes the SMART status bad error?

A variety of factors can cause the SMART status bad error. Below are some of the common reasons as reported by users:

  • Hardware failure – The SMART status bad error can occur due to physical issues with the hard drive or SSD.
  • Power supply issues – Some readers claim that they started getting the SMART status bad error due to an unstable power supply.
  • Bad sectors – When the SMART system detects many bad sectors, it may trigger the SMART status bad error.
  • Overheating issues – High temperatures can damage the components of a hard drive or SSD, leading to increased error rates and potential drive failure.

It is important to note that the specific cause of the SMART status bad error may vary depending on the individual situation. Sometimes, a drive can fail even if SMART does not report any errors.

How can I fix the SMART status bad error?

Consider performing the following checks to salvage what’s left of your drive:

Having confirmed the above checks, if you require further assistance, below are detailed instructions on how to fix the SMART status bad error. You will also need a bootable drive nearby to help you.

1. Disable the SMART system from BIOS

  1. Restart your PC and press F2, Del, Esc, or F10 (depending on the model of your PC) to access the BIOS/UEFI settings.
  2. Navigate to the Advanced Settings section and select SMART settings.
  3. Then, click on SMART self-test.
  4. The setting is enabled by default. Now, select the Disable option to turn off the SMART setting.

It’s important to note that disabling the SMART status bad error from the BIOS is not recommended by manufacturers and does not hinder drive failure.

However, you can disable this setting if you have your data backed up already or are not worried about the data on the drive.

2. Run the CHKDSK Utility

  1. Press the Start button, type cmd in the Search box, and choose Run as administrator.
  2. Next, type the following command (replace D with your drive letter) and press Enter to run it: chkdsk d: /r
  3. Follow the on-screen prompts to restart your PC.

However, if your Windows OS can no longer launch the desktop, you can use an installation disc or drive to boot it:

  1. Insert the installation DVD or USB, then click on Repair your computer.
  2. Now, click on Command Prompt.
  3. Next, type in the command and press Enter: chkdsk d: /r

The Check Disk Utility (CHKDSK) can be used to check and fix any bad sectors on your hard drive.

And that’s it on how to fix the SMART status bad error. However, if you receive a SMART status bad error, it is crucial to take it seriously and take appropriate action to safeguard your data.

Additionally, you can explore our detailed guide for tips to apply if Windows 10/11 cannot be installed on your Disk.

Finally, some readers have found our article on Windows 11 not recognizing SSD helpful. It might be worth a check for you too.

If you have any questions or suggestions, do not hesitate to use the comments section below.