[Fixed] Ntoskrnl.exe High Disk & CPU Usage: Windows 11 & 10

In order to run properly, Windows 10 uses various processes in the background, and one of these processes is ntoskrnl.exe.

Even though this is a system process, many users claim that Ntoskrnl is causing high disk and CPU usage on their PC, and today we’re going to show you how to fix that problem.

Why does Ntoskrnl use so much CPU?

There are various factors that can cause the Ntoskrnl high disk and CPU usage. Below are some of the popular ones:

  • Corrupt system files: Broken or faulty system files are among the leading causes of this issue. The solution is to repair these files using the built-in repair tools.
  • Third-party app interference: Sometimes, this issue might due to problems with a third-party app or process. You need to perform a clean boot to identify the faulty app.
  • Outdated drivers: Another potential cause of the Ntoskrnl high disk and CPU usage is an outdated or faulty driver. The solution to this is to update your drivers to the latest version.

How do I fix Ntoskrnl.exe’s high CPU usage?

1. Perform SFC and DISM scan

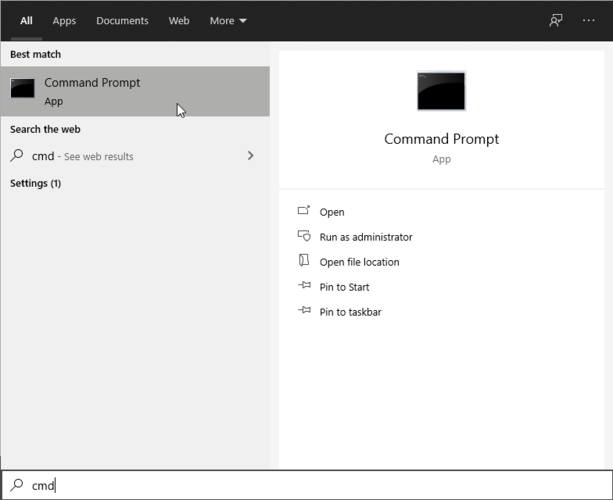
  1. Press Windows, then type cmd and choose the Run as administrator option.cmd-run-admin 0x80070002 windows update
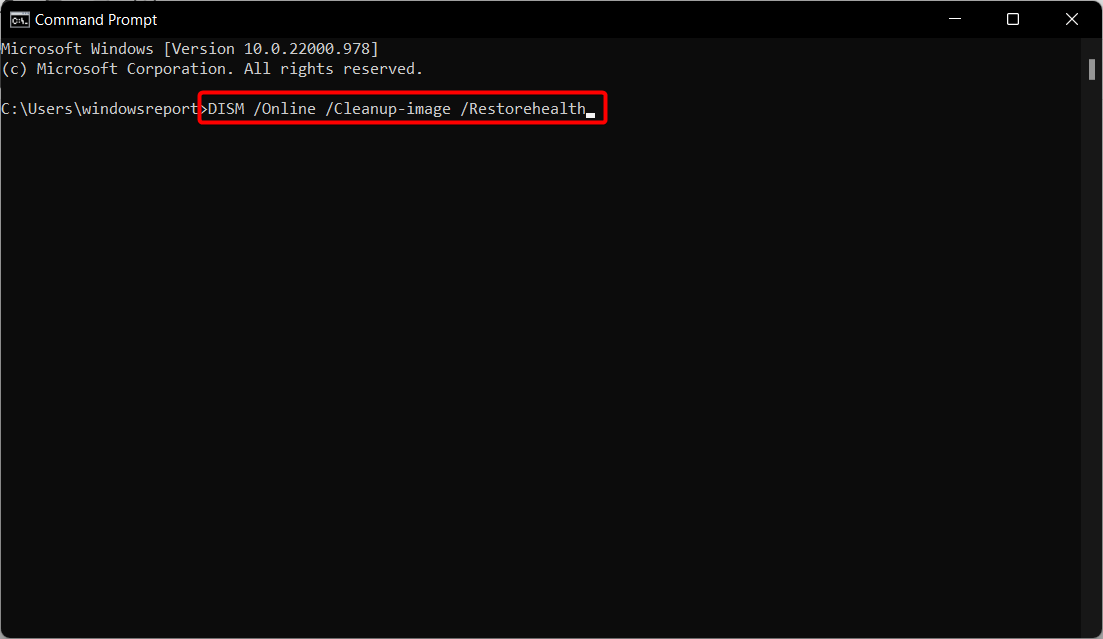
  2. Paste the following command, and press Enter: DISM /Online /Cleanup-image /RestorehealthDISM-RESTORE faulting application path
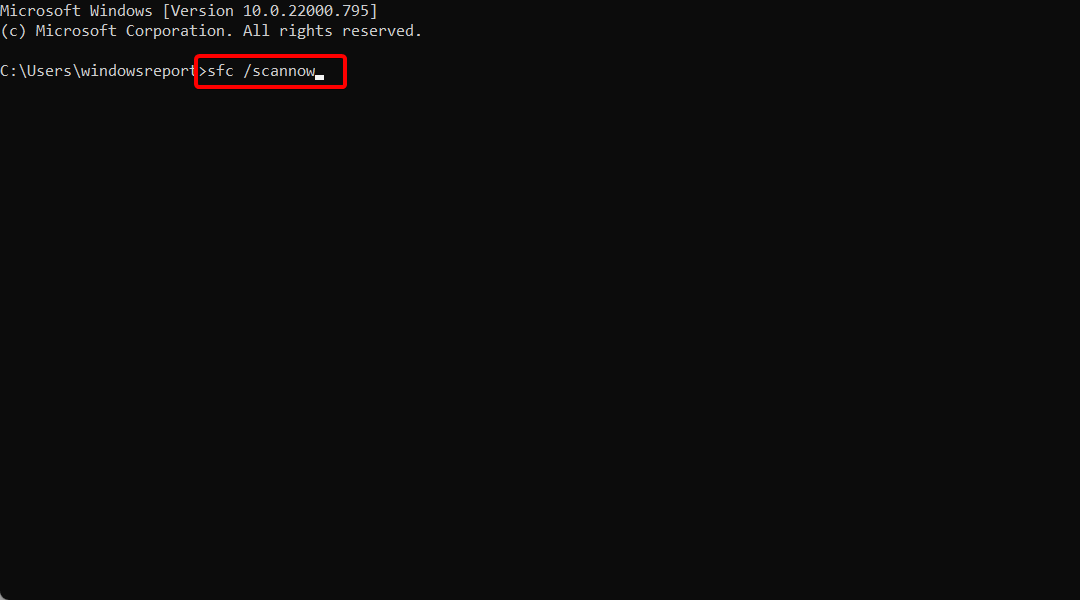
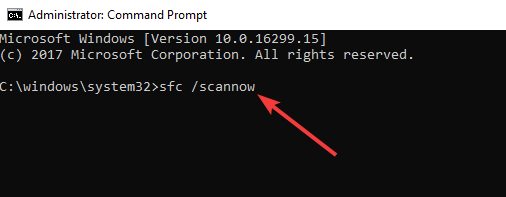
  3. Once the scan is done, type the following one and press Enter:sfc /scannowscannow 0x80070002 windows update

Sometimes this problem can be caused by file corruption on your PC. To fix it, it’s recommended to perform an SFC scan.

Other than following the manual steps, you can also try using a dedicated program to finish this task automatically.

2. Perform a clean boot

  1. Type or paste msconfig in the Windows search box and press Enter.msconfig-w10 vertical lines on monitor
  2. Go to the Services tab, and tick the Hide all Microsoft services box, then click Disable all.hide-disable vertical lines on monitor
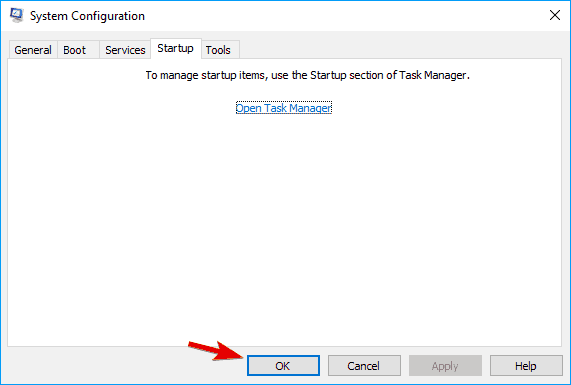
  3. Navigate to the Startup tab, then tap Open Task Manager.startup-open vertical lines on monitor
  4. Select all the programs in there, one by one then choose Disable.disable-process  high cpu low gpu
  5. Exit Task Manager, click OK in the System Configuration window, and restart your computer.

3. Clean your registry

Your registry holds all sorts of information related to all installed third-party applications. If you tend to install many third-party applications, your registry can become filled with unnecessary entries that can slow down your system.

This can cause ntoskrnl.exe to register 100 percent disk usage. Furthermore, these entries might create issues with ntoskrnl.exe and excessive CPU utilization.

But you could use registry cleaning software to resolve the problem. Before running any system file cleaning tool, we recommend creating a backup of your database.

To see how to export your registry, we advise you to check Solution 1 for detailed instructions.

4. Update your drivers

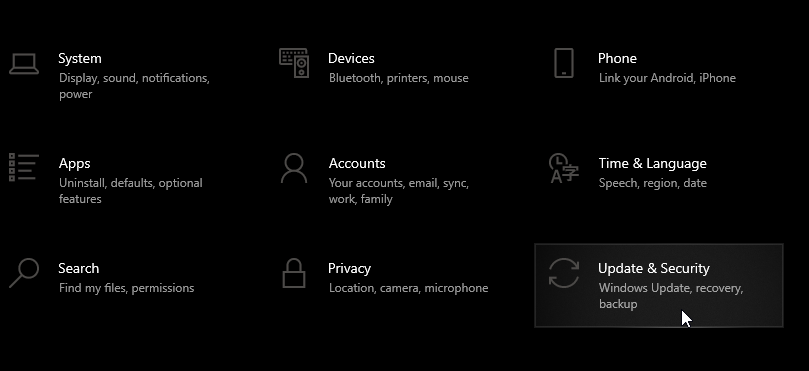
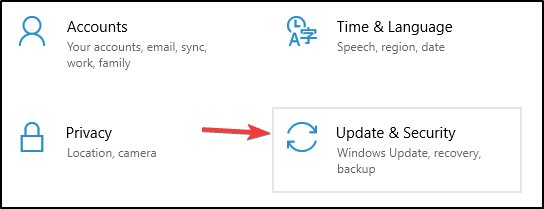
  1. Press the Windows + I keys, then click Update & Security.update-security nmi hardware failure windows 10
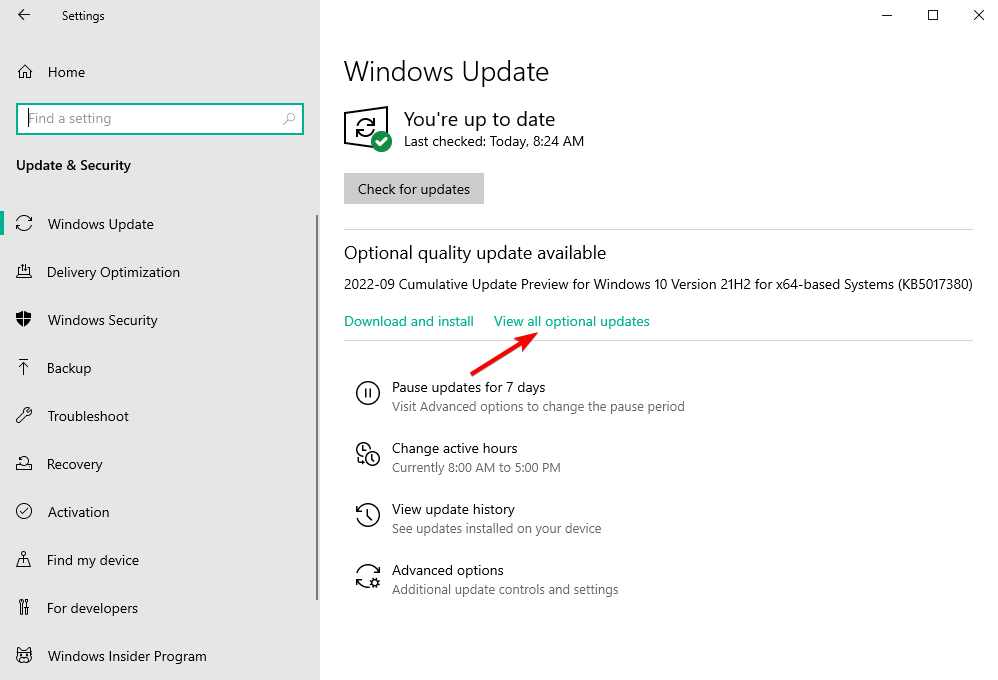
  2. Click View all optional updates.opt-updates faulting application path
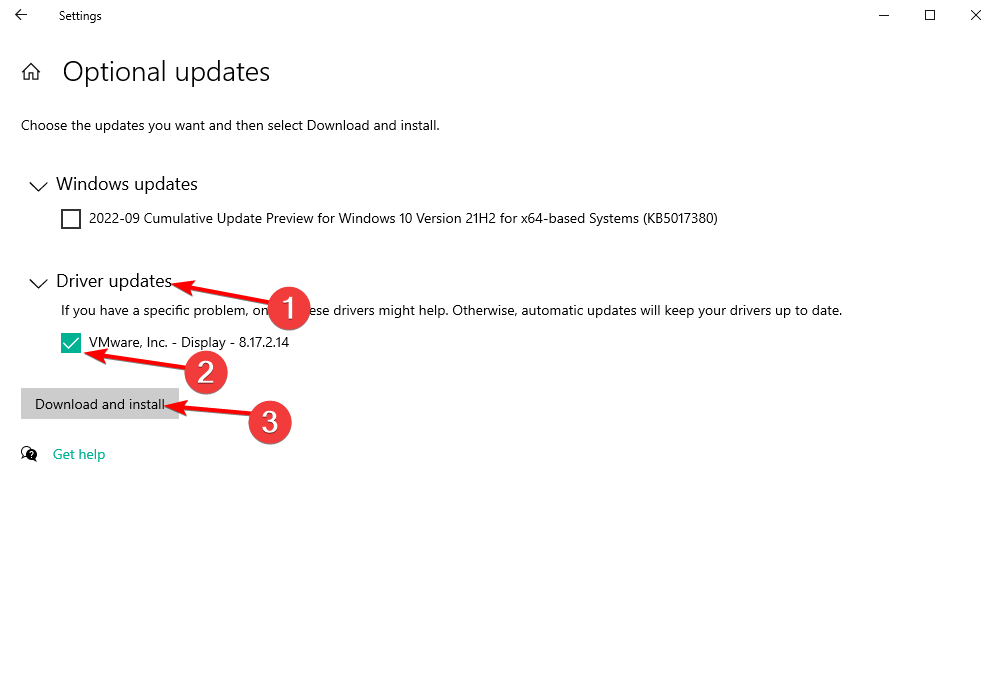
  3. Click the Driver updates section, check all the updates listed and select Download and install.drive-install-updates faulting application path

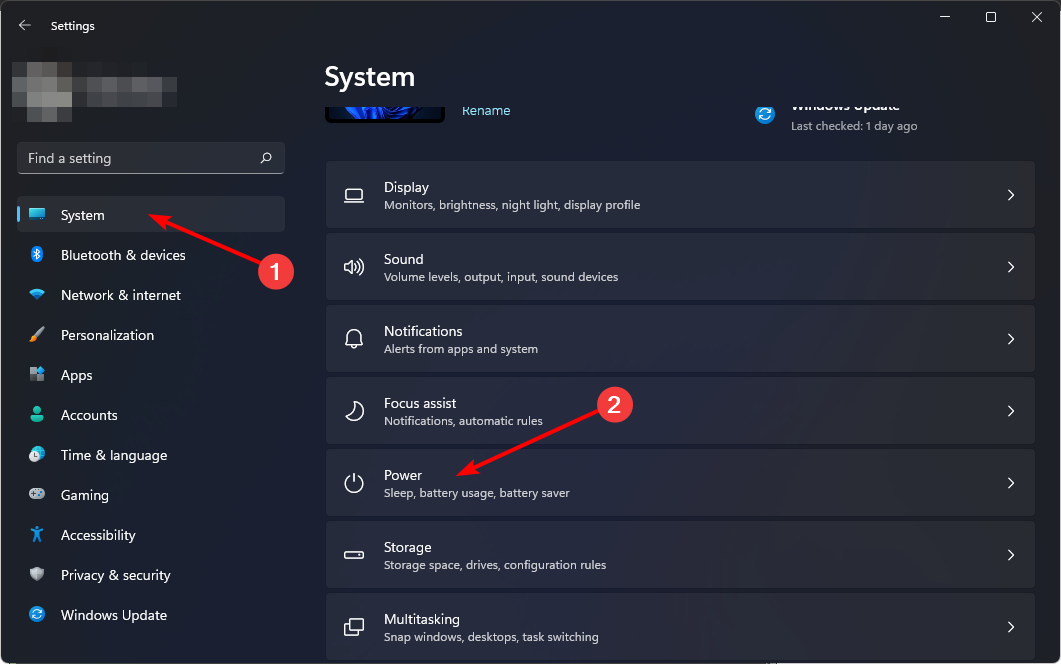
5. Switch to High-performance power mode

  1. Press Windows then enter edit power plan and click the first result.edit-powerplan  high cpu low gpu
  2. Choose the Power Options window.power-options high cpu low gpu
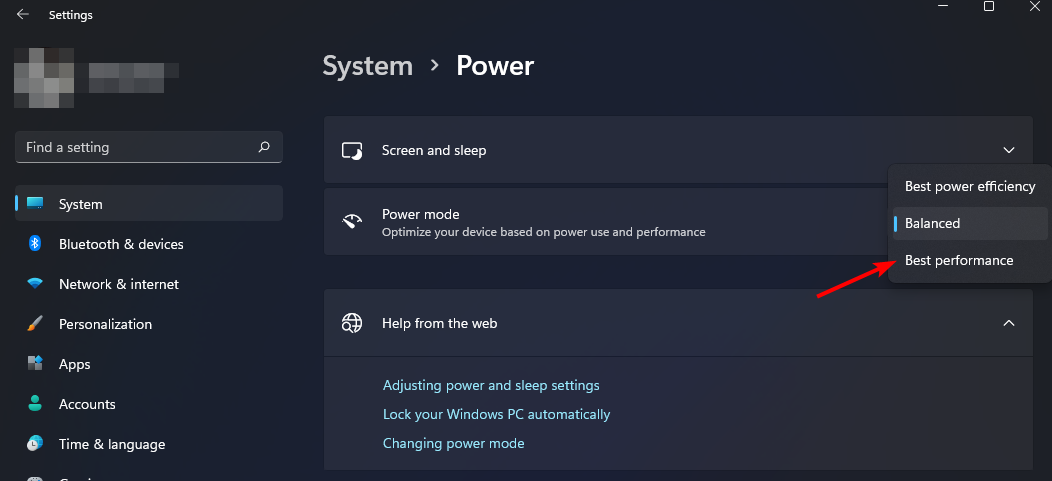
  3. Select High performance profile.high-performance  high cpu low gpu

Windows comes with several power modes that you can use, and by switching to a different mode, you can increase your performance or lower power consumption.

According to users, you can fix the problem with high CPU usage simply by switching to a High performance mode.

After switching to a high-performance power mode, the problem should be completely resolved. Remember that this mode uses more energy, so it will drain your laptop battery a bit faster.

6. Check your PC malware

According to users, malware can often infect ntoskrnl.exe and cause many other problems. You must perform a detailed antivirus scan to ensure that you don’t have any malware on your PC.

We understand that searching for the ideal solution for your PC can be time-consuming, but we’ve got you covered.

With a list of the most popular and trustworthy antimalware solutions to help you narrow your search, you’ll find one that works with your Windows 10 PC with no effort whatsoever.

7. Install the latest updates

  1. Press Windows + I and click on Update & security.update-security nmi hardware failure windows 10
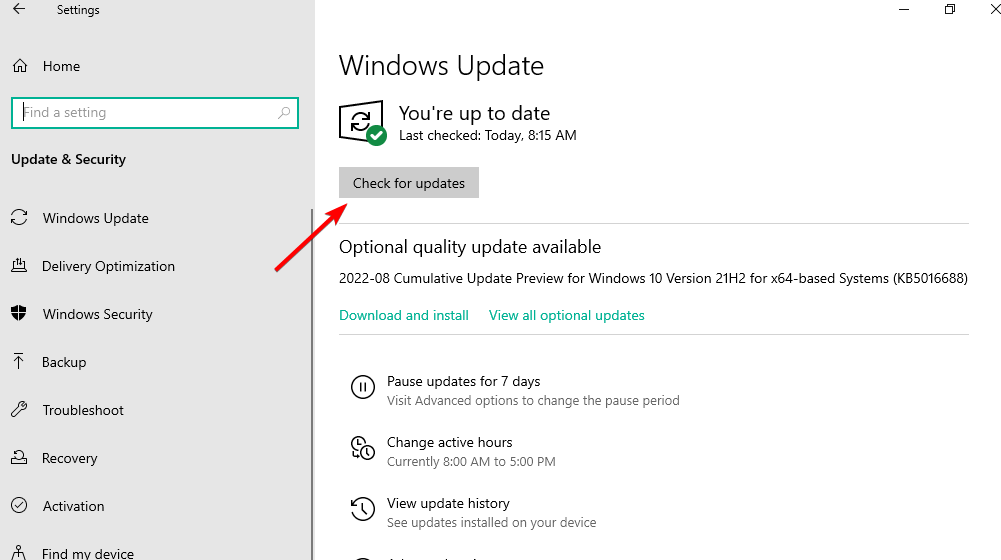
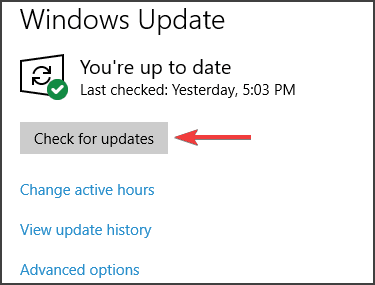
  2. Next, click the Check for updates button.check-updates searchui windows 10

8. Temporarily remove/uninstall your antivirus

According to users, this problem can sometimes appear due to your antivirus software. To fix this issue, we advise you to temporarily disable your antivirus software and check if that solves the problem.

If the issue persists, you might need to remove your antivirus software entirely.

Don’t give up on your protection against attacks and dangerous viruses. Looking deeper, you may discover a better suitable solution for your needs from our list of the best antivirus software. Therefore we strongly recommend you read more about this in the article.

Admittedly, there are plenty of solutions to try in this article, but if you know of any other one we may have missed, tell us about it in the comments section below.

Map a Network Drive on Windows 11 [3 Different Ways]

Mapping a network drive simplifies access to shared folders across different PCs, making it as seamless as local access. Learn how with Windows 11’s Map Network Drive tool, Command Prompt or Windows Powershell.

How can I map a network drive in Windows 11?

1. Utilize the Map Network Drive utility

  1. Click the folder taskbar button for opening File Explorer.
    The File Explorer button map network drive windows 11
  2. Select This PC on the left side of File Explorer.
  3. Then click the See more button on File Explorer’s toolbar.
    See more button map network drive windows 11
  4. Next, select the Map network drive option on the menu that opens.
     Map network drive option map network drive windows 11
  5. Choose a letter on the Drive drop-down menu.
  6. Press the Browse button on the Map Network Drive window.
  7. Then select a shared folder you want to map a drive for on the Browse for Folder window. You might also need to enter the credentials (login details) for the PC the folder is on to do so.
    Browse For Folder window map network drive windows 11
  8. Click OK to close the Browse for Folder window.
  9. Press the Finish button to confirm.
    The Map Network Drive window map network drive windows 11
  10. Thereafter, click This PC in File Explorer again. Now you should see a new mapped network drive as in the snapshot below.
    A mapped drive map network drive windows 11
  11. Alternatively, you can double-click the mapped network drive in File Explorer’s sidebar to view its contents.
Note icon NOTE
You can only set up a mapped drive for one network path. If you want to include multiple folders for a mapped drive, select a root directly that incorporates subfolders (such as your user folder for example).

2. Map a network drive with the Command Prompt

  1. Click the magnifying glass taskbar button.
  2. Enter cmd within the search tool’s text box.
  3. Right-click Command Prompt in the search results to select Run as administrator.
  4. Then input this map drive command within the Prompt’s window: net use DLetter: \\PATH /PERSISTENT: YES
  5. Press the Enter key to execute the map drive command.

You’ll need to replace DLetter in that command with an actual drive letter and PATH with a real network folder location. With a drive letter and network path specified, the command will look more like this:

net use E: \DESKTOP-8PHHAN9\Program Files /PERSISTENT: YES

3. Map a network drive using Powershell

  1. Press Win + S, type powershell, and press Enter.windows powershell
  2. Map the Network Drive:
    • Type the following command and press Enter
      eNew-PSDrive -Name "Z" -PSProvider FileSystem -Root "\\ServerName\ShareName" -Persist
      • Replace Z with the desired drive letter.
      • Replace \\ServerName\ShareName with the network path.map driver command powershell

Setting up mapped drives in Windows 11 with the Map Network Drive utility is relatively straightforward. You can also set up mapped drives with that tool in Windows 10 and 7 platforms, not to mention that you can map network drives over VPN.

For some users, map network drive is missing on Windows 11, but you can easily get it back.

Map Network Drive hasn’t changed much in the latest platform. Users who often utilize the Command Prompt might prefer method two. There are also various other net use commands that you can enter to set up and configure mapped drives.

For step-by-step syntax, credential flags, and persistence options, see our guide to net use commands, which includes copy-ready examples you can run in Command Prompt.

Overall, drive mapping is a handy network feature in Windows. With a mapped drive set up, you’ll have more direct access to its shared folder in File Explorer.

So, it’s a good idea to set up mapped drives for shared folders if you need to share files between two, or more, local PCs. Let us know your opinion in the comments area below.

If you’re still on an older version of Windows, you can easily map a network drive on Windows 10 with these steps.

FAQs

Why can’t I map a drive in Windows 11?

The issue may be due to disabled network discovery, incorrect credentials, or missing sharing permissions. Make sure network discovery and file sharing are enabled.

How do I map a drive for all users in Windows 11?

You need administrator rights. Use Group Policy Editor or a logon script with the net use command to apply it to all users.

Can I map OneDrive or SharePoint as a network drive in Windows 11?

Yes, you can. Copy the document library’s link, then use the Map network drive option in File Explorer to add it.

Best Math Type Software for Writing Mathematical Equation [2026 Guide]

A math type software is a computer program or software used to typeset mathematical works or formulas.

This tool has two purposes: first is to allow word processing and publication of technical content for print or for web pages and presentations.

The second objective is to provide a way that users can specify input to computational systems that is easier to read and check plus easy to understand.

If you’re looking for the best software to write mathematical equations, check out our top picks.

What is the best software to write mathematical equations?

MathType

best software to write mathematical equations

MathType is a math writing app that steps in when you need a complementary program to create equations where word processors are limited, and insert the equations in your documents.

It is a powerful equation editor among the best software to write mathematical equations which you can use with Office, or even on its own.

Its strong points include the many symbols accessible right from your keyboard, plus its compatibility with different operating systems for importing and exporting formulas like TeX or MathML.

You can change or move any part of the mathematical equation, as this software features nine tabs that give you access to frequently used tools offered.

You can also customize the software completely from the font to keyboard shortcuts and much more.

It is professional, has different auto format writing styles, keyboard shortcuts for most used formulas, and it is easy to export results, however, only a limited number of shortcuts can be added.

⇒ Get MathType

MathMagic

best software to write mathematical equations

This mathematics formula editor comes with an easy-to-use interface that has a WYSIWYG editing capability, customizable features, and productivity, and you get to publish quality equations using this powerful software.

It is available in four different versions, the MathMagic Lite, Personal Edition, Pro Edition, and Prime Edition, all for use with different operating systems and Office programs.

With MathMagic, you can write beautiful equations and symbols easily and very fast, whether you’re good at Math or not, and the quality is designed to meet the DTP professionals’ requirements.

It is also designed for use with any word processor, DTP layout software, presentation, and/or graphic software. Equations can be used through drag and drop, copy and paste, or export and import tools.

However, the Pro Editions have their own plugins or extensions, so you can write or edit equations inside InDesign or QuarkXPress documents without having to export or import.

If you’re interested in other learning and education software, check out our wide collection of guides.

⇒ Get MathMagic

MathCast

best software to write mathematical equations

This is an equation editor that lets you input mathematical equations for use in documents, emails, and web pages. You can render the equations graphically to your computer’s screen, or to picture files and MathML.

It is free, open-source, and was first released in 2004, and features a powerful and friendly graphical interface for rapid development of mathematical equations.

The Rapid Mathline is a part of the MathCast interface that is intuitive and effective and supports an extensive set of mathematical symbols, operators, and functions.

Some of its classical features include:

  • Support for word processors like Microsoft Word, so you can insert into written documents like equation sheets, lab reports, study guides, and any other type
  • Support for output to picture files like BMP, PNG, and EMF, which you can incorporate into presentations and web pages.
  • The equations can be copied and pasted into an email, webmail, and other apps
  • Support for exporting equations to MathML which is based on XML
  • Mathcasting provides a WYSIWYG tool to author XHTML web pages with math equations

⇒ Get MathCast

LyX

best software to write mathematical equations

This is an open-source document processor based on the LaTex typesetting system, that has a WYSIWYM (what you see is what you mean) approach such that what you see on your screen is an approximation of what will be displayed on the page.

LyX is popular among technical authors and scientists because of its advanced mathematical modes but is being used increasingly today by non-mathematically oriented scholars because of features like the ability to manage multiple files and its bibliographic database integration.

Features include a mathematical formula editor, copy/paste tool to and from LaTex source code, support for customizable math macros, basic support for various computer algebra systems, and you can enter equations via point and click interface or via keyboard with LaTex commands.

Other features include graphics and tables with support for many graphic formats and intelligently floating figures and tables, document formats, and support for writing documents in many languages of the world.

The graphical user interface gives you access to all functions via menus and mouse, plus has extensive documentation which includes beginners’ tutorials available in many languages, text completion support, and typesetting in the background.

There’s so much more this tool offers like change tracking, yellow sticky notes, support for external version control systems like RCS, CVS, Git, and others, and it is fast plus doesn’t hog your computer’s memory.

⇒ Get LyX

MathJax

best software to write mathematical equations

MathJax consortium is a joint venture of the American Mathematical Society and Society for Industrial and Applied Mathematics (SIAM) to advance mathematical and scientific content on the web.

This is a JavaScript display engine for mathematics that works with all browsers, without the need for setup for readers.

Features include high-quality typography as it uses CSS with web fonts or SVG, instead of bitmap images or Flash, so equations scale with surrounding text at all zoom levels.

Additionally, it is highly modular in input and output, so you can use MathML, TeX, and ASCIImath as input and produce HTML+CSS, SVG, and MathML as output.

It is also accessible and reusable as it is compatible with screen readers and provides zoom, plus you can copy equations into Office, LaTex, wikis, and other software.

Whether you’re a casual user or serious author, or even a professional developer, you can integrate MathJax. It has a rich API to help you create interactive content, advanced authoring tools, and math-enabled web and mobile apps.

⇒ Get MathJax

Do you have a tool you use for writing mathematical equations? Let us know, or share your experience with any of the software listed here, by leaving a comment in the section below.

10 Best Live Moving Wallpapers for Windows 10 [Updated List]

A live wallpaper Windows 10 is highly customizable and you can, basically, do a lot on your own if you have some time and a concept you want to follow. With slideshows and a self-created photo library, you can transform your dull desktop background into an inspiring experience.

However, you’ll need to install a third-party application in order to get the best live wallpapers PC and configure the preferred live wallpaper to suit your preferences.

Furthermore, the sole presence of a live wallpaper will take a toll on your PC so make sure you’re able to run it. Some of them come on their own without the supporting software, but we advise you to use the trusted app we enlisted below.

How can I install supporting software?

First, let us stress the levels of CPU this application uses. Sometimes, live wallpapers for Windows 10 will take up to 10% of your CPU. So, we advise you to disable (and stick with the standard wallpaper) while gaming to avoid high CPU usage.

On the other hand, if you have a PC that’s good enough for Windows 10, the presence of a Windows 10 live wallpaper won’t affect the system most of the time.

Once we got that out, we can move to downloading and installing the supporting program that enables you to use a live wallpaper Windows 10 in the first place.

There are some paid solutions out there, but we decided to go with DeskScapes which offers a large variety of beautiful live wallpapers in high definition.

DeskScapes

Want to bring your desktop to life? There is no tool better for the job than DeskScapes, so give it a try!
Check price Visit Website

Where can I get live wallpapers for PC?

Sky Citadel

Need a wallpaper that can help your mind relax during your PC breaks? Then the Sky Citadel wallpaper is what you are looking for.

Take your desktop under the water and try to keep up with the fishes swimming around with this classic-themed wallpaper.

The photo-realistic graphics and the water sounds will take you into an almost-real ocean aquarium.

The wallpaper is available in a trial version and a full-featured version. You can access both of them from the link below.

⇒ Download SKY CITADEL Live wallpaper

Fall Watermill

The Fall Watermill Live wallpaper is all about – you guessed it – a nice watermill in the woods during a beautiful fall scenery.

It’s not only a very beautiful depiction of simple rural life but the creaking sounds of the wheel and the shooting water splashing sounds can have an extremely calming effect.

The wallpaper is available in two versions, a free trial and the full one that you can access from the link below.

⇒ Download FALL WINDMILL Live wallpaper

Vintage Aircraft

If you’re looking to immerse yourself in a flying experience, try the Vintage Aircraft Live wallpaper. As the name suggests, you will be engaged in a multiple-view flight alongside some vintage planes from WWI.

You will not only enjoy the skills of the aviators and the legendary planes but also the aerial landscape and the sunny day.

A little spoiler: You will also see an old german zeppelin.

⇒ Download VINTAGE AIRCRAFT Live wallpaper

Winter Wonderland

An old church, the chimney slowly puff smoke from a house full of children eagerly waiting for Christmas, and the snow seamlessly covering all around.

It’s a Winter Wonderland indeed, just like the name of this awesomely calming Live wallpaper.

Oh, dear! A deer is crossing right in front of our eyes. All is peaceful, silent, and dreamy, the perfect wallpaper for the winter season.

⇒ Download WINTER WONDERLAND Live wallpaper

Flag

There’s a good reason why we make the flags out of fabric and not from solid boards. The flag flapping in the wind can almost trigger the reaction to salute simply because it’s majestic.

The FLAG Live wallpaper brings you a lot of flags of many countries from the world on a sunsetting sky background.

It’s nice, it’s clean and it’s calming.

⇒ Download FLAG Live wallpaper

Fish

A Koi Fish pond is the pinnacle of harmony and tranquility, and that is all about in the FISH Live wallpaper.

The water looks extremely real, the brightly-colored Koi fish are smoothly sliding on the clear surface and the fine aquatic vegetation completes the cool, 3D picture.

Pleasant mood music is a gentle final touch to this almost therapeutic show.

⇒ Download FISH live wallpaper

Medieval castle

Medieval Castle is the perfect 3D screensaver for all romantic people with a passion for the Middle Ages.

Excellent, almost photographic-quality graphics depict the authentic atmosphere of a centuries-old castle teeming with life as it used to be in those almost forgotten times.

Wellcome SirKnight or wonderful Milady into an almost enchanted realm.

⇒ Download MEDIEVAL CASTLE

Earth

This is the brand new Earth 3D for Windows Desktop! And mere the Earth as you’ve never seen it before.

It has a day and night cycle, a real starry sky with the actual position of the Sun and the Moon phases, and comes with a plethora of information about the nature of our planet and about the great wonders of the world.

In a galaxy where our planet is like a grain of salt, this wallpaper makes you feel a little bigger.

⇒ Download EARTH Live wallpaper

Animal world

The ANIMAL WORLD Live wallpaper is especially great for kids because it’s an interactive journey around our planet to the areas inhabited by the members of its animal kingdom.

This way they will learn about the incredible diversity of the animal kingdom and their important role in our ecosystem.

⇒ Download ANIMAL WORLD Live wallpaper

Spirit of Fire

Probably there’s nothing more soothing and calming than watching a woodfire in the fireplace.

Spirit of Fire is a fine 3D screensaver that will bring the warmth of a log cabin fireplace inside your office or home.

The fire and the fireplace are graphically exquisite and this screensaver stands out!

⇒ Download SPIRIT OF FIRE Live wallpaper

Finally, besides the best live wallpapers PC we enlisted, you can roam freely through various categories and download anything that suits you. Whether it is a Windows 10 live wallpaper or another piece of software, it’s all up to you.

With that, we can conclude this article. And, once you pick out a live wallpaper for Windows 10, don’t forget to share your experience with us. You can do it in the comments section below.

How to Move and Set Vertical Taskbar on Windows 11

Many aren’t pleased with the new Taskbar, and they want to use a vertical Taskbar on Windows 11.

This is possible, and in this guide, we’re going to show you a couple of ways to do that, so let’s get started.

How can I set a Windows 11 vertical taskbar?

1. Download StartAllBack

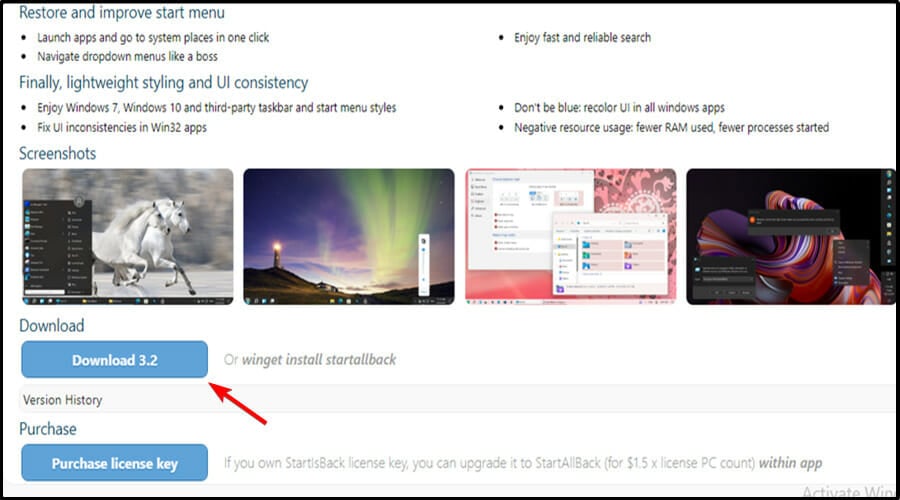
  1. Go to your default browser and visit the official download page of StartAllBack for Windows 11.
  2. Then, go ahead and click on the Download button, then wait for the download to complete once you are on the correct download page.download

2. Install StartAllBack

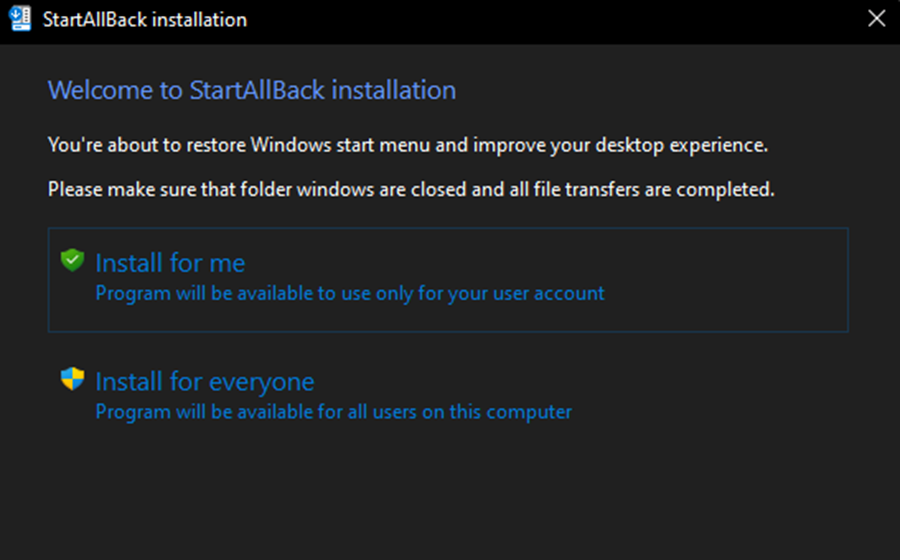
  1. After the download is complete, double-click on the StartAllBack executable that you’ve just downloaded.
  2. At the next screen, click on Install for everyone or Install for me.click
  3. Then, at the user account control, click Yes and wait until the installation is complete.

If you’re worried about installing this tool, we have a guide that analyzes how safe StartAllBack is, so don’t miss it.

3. Configure StartAllback

  1. Now that the utility is installed, it’s time to configure it. The easiest way to do so is from the StartAllBack configuration wizard that just appeared on the screen.
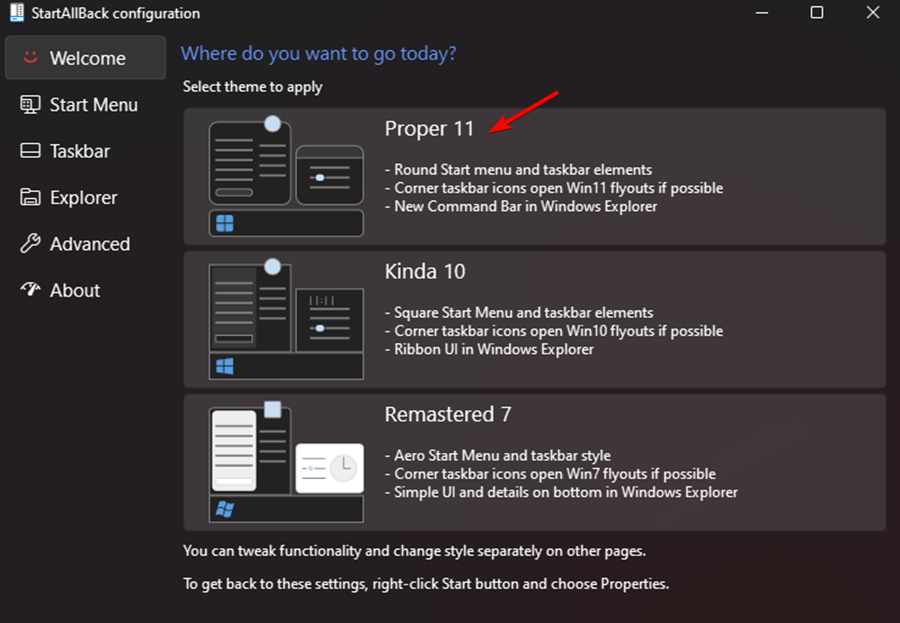
  2. You can select from 3 different themes – Proper 11, Kinda 10, and Remastered 7.select
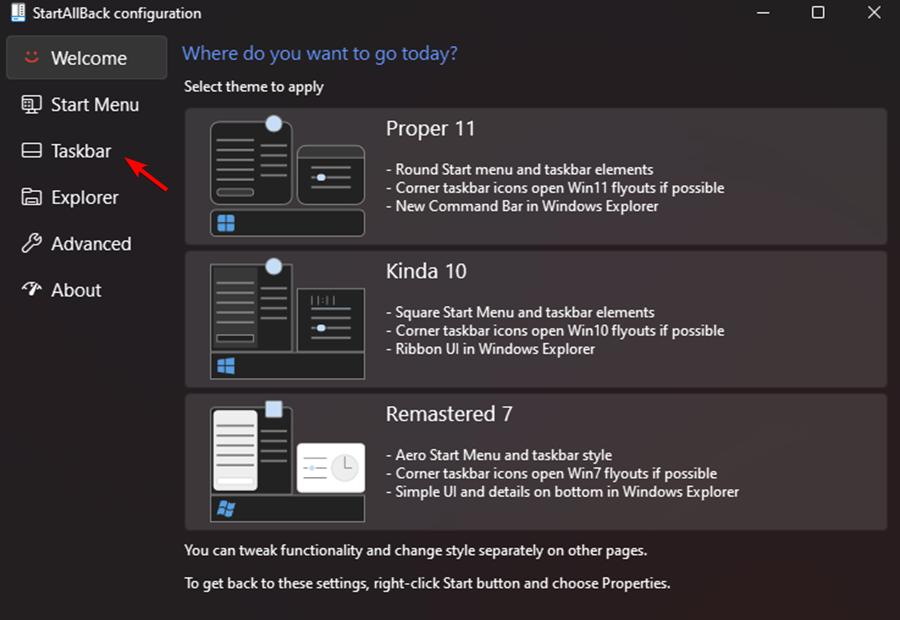
  3. Next, from the same wizard window, click on Taskbar from the vertical menu on the left.select
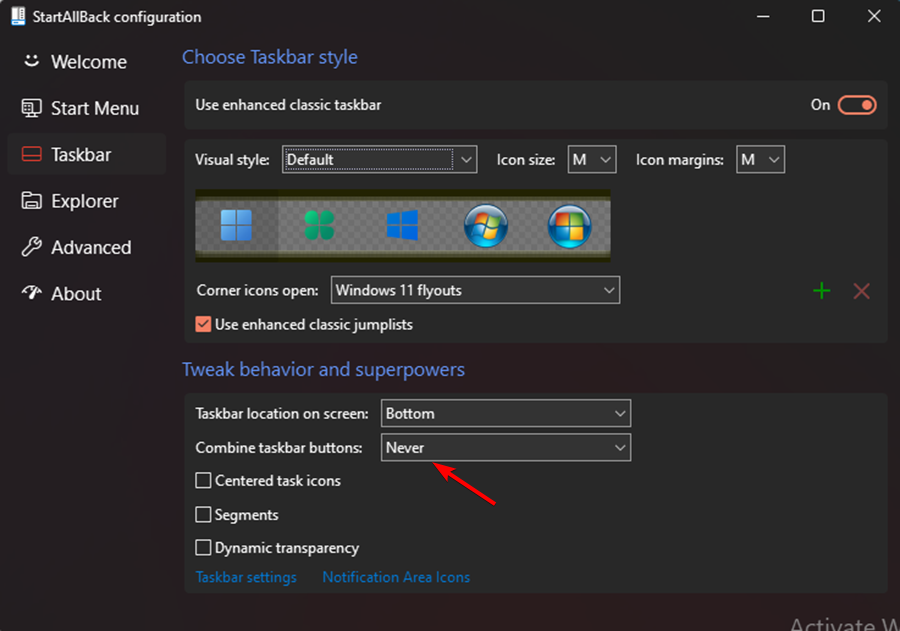
  4. With the Taskbar menu selected, move over to the right-hand pane, go under Tweak behavior and superpowers and change the Combine taskbar buttons and On secondary taskbars to Never.set
  5. Next, all that’s left to do is to unlock the taskbar so you can move it freely to any part of the screen. You can do this simply by right-clicking on your taskbar and clicking on Lock all taskbars to unlock it.
  6. If you followed the instructions above you successfully achieved an uncombined and unlocked taskbar on Windows 11.

If you ever want to stop using this tool, we have a great guide that shows you how to disable StartAllBack, so don’t miss it.

Note icon NOTE
One of the best ways to get that retro feel with a taskbar that is unlocked and uncombined is with the Remastered 7 program.

Does Windows 11 have a customizable taskbar?

The Taskbar offers limited customization options, and its a lot less customizable than in previous versions.

Why is my Windows taskbar not hiding in full screen?

To activate the taskbar, you should have Automatically hide the taskbar in desktop mode in the Settings enabled.

Even then, if it is still visible in full-screen mode despite your efforts to hide it, there are probably apps running in the background that is preventing it from going into fullscreen mode.

Why does the taskbar move on its own?

The taskbar is supposed to reside on the bottom of the screen, but it sometimes moves to a position that is off-center, such as to the left side. This is usually caused by temporary bugs.

Why is my taskbar frozen?

The Windows 11 taskbar may freeze for many reasons, including an incomplete operating system update, a bug in the update process, file corruption on your device or in your user accounts, or an issue with Windows Explorer.

This issue with the vertical taskbar Windows 11 can be annoying. However, we hope that some of these solutions were helpful to you.

Alternatively, users facing other challenges with their taskbar benefitted from reading our article on how to fix the unresponsive taskbar in Windows 10 (yes, these fixes are still applicable to the Windows 11 OS, despite it talking about Windows 10).

A number of users have also discovered that the taskbar is not centered in Windows 11 after a preview build upgrade. Take a peek at our guide on solving Windows 11 taskbar not centered and it will help you bypass the issue.

Regarding the customization, we have a great guide on how to change the Taskbar size on Windows 11, as well as a guide on how to make the Taskbar transparent on Windows 11.

Before you go, we also have a guide on how to move the Windows 11 Taskbar to the top, so don’t miss it for more solutions.

Did the above fixes help you? Share your thoughts with us in the comments section below.

How to See Who Is Invited to a Meeting in Outlook & Attending

Outlook’s Calendar can come in handy for many things, such as organizing and scheduling meetings. If you want to know how to see who is invited to a meeting in Outlook, you’re in the right place.

After inviting attendees to a meeting, you must check who has accepted or declined your invitations.

Meeting organizers can check who is attending their meetings within Outlook as follows.

How do I see who has been invited to a meeting in Outlook?

1. Check the tracking status for meetings

  1. The tracking list provides an overview of responses to meeting invites. To check a meeting’s tracking status, click the Calendar button in Outlook.
  2. Then double-click the meeting on your calendar to check the invites.
  3. Click the Tracking button.The Tracking button outlook how to check who is attending a meeting
  4. Click the View Tracking Status option.
  5. Thereafter, a meeting attendee list will open in Outlook. The Response column tells you whether the invited attendees have accepted, declined, or not responded.Meeting attendee list outlook how to check who is attending a meeting
  6. You can get in touch with any of the recipients who have not responded with the email addresses listed there.

If you made a mistake in the meeting description, you can update the Outlook meeting without sending the message to the attendees. We have a special guide that addresses that, so be sure to check it.

2. How to print meeting attendee lists

  1. To print the meeting attendee list, click the Calendar button to open the calendar that includes the meeting.
  2. Double-click the meeting on the calendar.
  3. Click Tracking to select the Copy Status to Clipboard option.
  4. Next, open Excel.
  5. Paste the copied meeting status list into Excel by pressing the Ctrl + V hotkey.
  6. Then click File > Print to print the pasted meeting attendee list.
The Print button outlook how to check who is attending a meeting

So, checking meeting invite responses is straightforward in Outlook.

The Tracking Status option provides a handy overview of meeting responses so you can see exactly who has accepted, declined, or not responded to invites.

3. How to see who has accepted a meeting in Outlook if you are not the organizer

Now, that is how to see who is invited to a meeting in Outlook 2022, 2016, or 365 – the process is fairly similar. But what if you’re not the actual organizer? Is it still possible to see or check attendees in Outlook meetings?

It depends on the version of Outlook that you are using. If you use Outlook (Microsoft) 365, you can see attendees and check responses to the meeting invite even if you’re not the organizer.

  1. Open Outlook in your browser and go to Calendar.
  2. Select the meeting for which you want to check attendees.
  3. In the meeting window, click View Event and expand the list to view individual responses.

To learn more about meetings, we have a fresh guide on how to send an Outlook invite multiple times, so we encourage you to visit it.

We also recommend reading more on how to copy the attendees from an Outlook meeting for more information.

For any other questions or suggestions, feel free to reach for the comments section below.

How to Play League of Legends on Your Second Monitor

Learning how to put League of Legends on a second monitor can be a little tricky at first, especially if you’re running dual monitors on Windows 10 or 11.

The client and game don’t behave like your average windowed app, so dragging things around doesn’t always work the way you’d expect. But once you get the setup right, it’s smooth sailing, and you’ll get to enjoy cleaner multitasking and less clutter on your main screen.

How to play League of Legends on a second monitor

1. Change your secondary monitor to primary

  1. Click on Start.
  2. Select Settings.
  3. Open Display.
  4. Click the Identify button to check which display is your primary (tagged 1) and secondary (tagged 2).
  5. Select your secondary monitor.
  6. Scroll down to Multiple Displays.
  7. Check Make this my main display option.
  8. Your monitors will switch now.

2. Run LoL in Windowed mode

  1. Launch the game.
  2. Press Esc to access the Menu.
  3. Go to Video.
  4. On the right, click the slider and select Window Mode.
    Set it to Windowed or Borderless.
  5. Now you can drag the Window and place it on the second monitor. You can go back to fullscreen once you’re happy with the placement.

3, Use Display Settings + Keyboard Shortcuts

Launch League of Legends in Windowed or Borderless mode, then press Windows + Shift + Left/Right Arrow to move the window to your second monitor. If you’re in Fullscreen mode, switch temporarily to Windowed, move it, then hit Alt + Enter to toggle Fullscreen back on.

4. Use a Dedicated Cursor Tool (Like Dual Monitor Tools)

If your mouse keeps drifting onto the wrong screen, download Dual Monitor Tools. It lets you lock your cursor to one monitor using a hotkey, great for avoiding mid-match distractions.

5. Nvidia or AMD Control Panel Monitor Tweaks

Open the Nvidia Control Panel or AMD Radeon Settings, and go to the display setup section. Arrange displays, set the refresh rate, and choose which monitor is the default for gaming. This helps force League (and other games) to launch where you want.

6. Shortcut-Based Launch (Experimental)

Right-click on your LeagueClient.exe shortcut, go to Properties, and in the Target field, try adding -display=2 at the end. This sometimes works with games built on Unity or DirectX, but it’s not officially supported by Riot—so mileage may vary.

7. Use a Script or Macro Software

For a more advanced option, use AutoHotKey to write a small script that moves League to your second monitor automatically.

Run, "C:\Path\to\LeagueClient.exe"
Sleep, 5000
WinMove, League of Legends, , 1920, 0

Only recommended if you’re comfortable with basic scripting.

How to fix User Account Control bugs when playing on dual monitors

Tip icon Tip
First, if your cursor keeps going off the screen when playing League of Legends on two monitors, try pressing Alt + Tab twice. This can often fix the problem without needing further steps. If you still have problems, keep reading:

The first thing to try is modify the User Account Control settings:

  1. Click on Start.
  2. Type control and click on Control Panel.
  3. Go to Security and Maintenance.
  4. Click on Change User Account Control Settings.

  5. If the slider is set to Never Notify, move it a notch higher towards Always Notify.
  6. Click OK to save the changes.

The recommended setting is to set the slider to Notify me only when apps try to make to my computer option. Make sure to click OK to save the changes.

If the issue persists, run the Windows troubleshooter:

  1. Click on Start.
  2. Select Settings.
  3. Go to Update and Security.

  4. Click on Troubleshoot.

  5. Scroll down to the end of the page.
  6. Click on Windows Store Apps.
  7. Click on Run the Troubleshooter.
  8. Windows Troubleshooter will scan the Windows Store apps for any issues and apply potential fixes.

To play League of Legends on the second monitor with full screen or borderless you can either use the second monitor as the primary monitor or enable the Windowed Mode feature in the game.

To fix the League of Legends cursor bug, enable User Account Control from the settings. If the issue persists, use the Dual Monitor Tool to lock the cursor on your preferred monitor.

Create Your Own Book with Flip PDF Plus Pro Flipbook Software

PDF documents are widely used for their versatility and security. But did you know that using PDF flipbook software such as Flip PDF Plus Pro can turn them into appealing booklets or even books?

Here, we will discuss some of its best features and advantages.

What is Flip PDF Plus Pro and how can it help you?

Flip PDF Plus Pro from FlipBuilder is a digital publishing software that transforms your interesting PDF document into realistic publications you can share with anyone online.

If you have the task of creating E-Magazines, E-Books, E-Catalogs, E-Reports, E-Newsletters, and E-Brochures, Flip PDF Plus Pro will help you do just that.

The tool also allows you to directly insert images, audio, video, animations, etc. to vividly show your content.

What are Flip PDF Plus Pro’s best features?

1. Fast and easy to use

With Flip PDF Plus Pro, you will have your digital book ready in just a few minutes, by following simple steps.

To create a flipbook, you just need to insert your PDFs or images, select a template and a theme from the many available, add some multimedia and publish or share it.

All the user interface is very self-explanatory click & edit driven so the learning curve for the software is very steep.

2. Extensive library of templates and content

First, there are 17 default flipbook templates you can choose from and that is a huge start. After you choose one close to your needs, you may customize it and save it as your own to use in other instances.

Thereafter, we counted 46 themes that will further help you personalize your creation. And on top of that, there are also 17 scenes, nice animation effects that can make things even more interesting in the background.

Moreover, if your PDF is not complete, you can create new pages and insert images, sounds or music, links, QR codes, buttons, text, and a lot more.

3. Full multimedia editor

If you already have a ready-made PDF, you can go right through this step, but if you’re missing something, Flip PDF Plus Pro features a full multimedia editor.

As we’ve mentioned above, you may add new pages to your PDF, insert text, videos, images, sounds, links, QR codes, shapes, and arrows, then personalize or place and reshape them with your mouse.

You may even include effects and animation to any element on your page to get more momentum on some aspects inside the flipbook.

How do I create a flipbook easily with Flip PDF Plus Pro?

  1. Visit the FlipBuilder official page and download the app for free.
  2. Then, run the app and insert one or more PDF documents by clicking the import button or just by dragging and dropping them into the designated area. You will get a flipbook with realistic page-turning effects and sound in seconds.
  3. Now, choose a template that better suits your book.
  4. Next, you have the option to add a theme. That will be the background image, behind the book itself.
  5. You may also add a so-called scene that is a nice animation in the background but that is not necessary. Although it makes everything more interesting, it can be a distraction.
  6. Now, click the Multimedia Editor button to edit the content and pages of your flipbook. That is only if you need to, of course.
  7. In the editor, you can practically add new pages and content and simply place it on the page with your mouse. Also, the menu on the left is very simple to use for any type of content you may want to include.
  8. When you’re done, just click the Save button from the top right corner and close the editor.
  9. To make sure that everything is OK, you can preview your flipbook for mobiles and tablets as well because Flip PDF Plus Pro adapts the content automatically for any platform.
  10. Finally, hit the Publish button to save or upload your creation.
  11. As you probably noticed, you may create your flipbook as an HTML5 page, an EXE or APP file, or even as an APK or plug-in.
  12. That’s it, now you can share or embed your content on any web page, social media, etc.

That’s it! You have your own book or flipbook, complete with that swooshing page-flipping sound and 3D look that would enjoy from a paper publication.

Of course, there are many other features of Flip PDF Plus Pro that we didn’t get to cover but you may explore them on your own.

As we mentioned above, this tool comes with a free version limited to 12 PDF pages and a watermark.

If you want to remove these limitations, you may buy a permanent license. Hit the link below to learn about the current rates.

⇒ Get Flip PDF Plus Pro

We hope that our article provided you with meaningful information about this software and we recommend trying it to draw your own conclusions.

As we conclude, you might also be interested in checking the best free and paid PDF editors for Windows.

Have you tried this software yet? Tell us all about your experience in the comments section below.

How to Fix “There was an error while registering your Kindle, Try Again Later”

The amazon Kindle registration error isn’t uncommon and it’s most likely because you didn’t update your Kindle OS.

You might see there was an error while registering your Kindle, even with the right login. It’s common on devices you haven’t used in a while. It asks you to re-register, then fails. Using another account doesn’t help.

Updating your Kindle, de-registering and trying to register again and making sure your account is up and running will fix this. Keep reading to see how to do all of these if you’re unable to register Kindle.

What to do if I am unable to register my Kindle with an Amazon account?

1. Update the Kindle device manually

  1. Visit the Kindle E-Reader Software Updates page.
  2. Locate your device type from the list and click on the Download Software Update link beside it.
     there-was-an-error-while-registering-your-kindle-manual-update
  3. Wait for the download to finish.
  4. Connect your device to the computer with a reliable USB cable, and transfer the downloaded update to the root directory of the Kindle device.
  5. Disconnect the Kindle from your computer.
  6. Tap on the Menu icon and select Settings.
  7. Click Menu again, and this time, go to Update Your Kindle.
  8. Click the OK button to trigger the updating process. You will now see a message that says Your Kindle is Updating.

The updating process takes less than five minutes. On completion, the device will restart.

If the update goes as planned, then you can log in and register your Kindle device with your Amazon account no there was an error while registering your Kindle message.

2. Confirm your Amazon account information

check-amazon-login-credentials- there-was-an-error-while-registering-your-kindle

Generally, updating your device’s OS should fix the Kindle registration error. So, if you followed the previous solution and still don’t get rid of the there was an error while registering your kindle message, you are probably using incorrect account credentials.

Confirm that the email and password with which you are attempting to log in are correct. You will be unable to register Kindle if they’re not correct.

3. Deregister your Kindle

Deregistering is an option that appears on your settings page after you register a Kindle with an account from Amazon.com. When your Amazon account is registered on the Kindle, deregistering the account removes its access to Amazon content, such as ebooks.

The account will also not be capable of making purchases. But this is no issue because most users deregister because they no longer want to use it to make get apps or in-app purchases.

Does deregistering a Kindle remove content?

Yes, deregistering the Kindle will wipe the device and remove all content saved or downloaded on it. To deregister your Kindle device, follow the steps below:

  1. Visit Amazon.com and navigate to Manage Your Content and Devices.
  2. Log in using your Amazon email and password.
  3. Click on the Devices button.
  4. Hit Deregister.

Can you have multiple accounts on a Kindle?

You can have as many accounts as possible on a Kindle. However, there are things you must know. Though Kindle lets you use multiple accounts, you can only register one account at a time.

To use a different account on the Kindle, you must deregister the account and register the one you wish to use.

Why can’t I connect my Kindle to my Amazon account?

 cant-connect-my-Kindle-to-my-Amazon-account

When Kindle devices run on outdated software editions, Amazon disconnects it from the network. Meaning you can’t log in on the device or use Amazon services.

To register your Kindle device and make use of it, you need to update it.

Now, this is a dicey situation because, on the one hand, your device is cut off because of outdated software. And on the other hand, you cannot update the software because the Kindle is cut off.

Continue reading to learn what to do if you can’t register your device due to the Kindle registration error.

We hope that you found this guide useful and that the information contained in it managed to resolve the Error while registering your Kindle issue quickly.

For further assistance, you might find these resources helpful:

Feel free to share your experience with us by leaving a comment in the section found below this article.

Windows 11 Rollback to Windows 10: Best Ways to Downgrade

Microsoft released Windows 11 a while ago, but not many are happy with it. Many are wondering how to perform a Windows 11 rollback to Windows 10.

While this process is simple, many reported that Go back button isn’t available in Windows 11, but we covered that issue in a separate guide.

If you’re looking to roll back to Windows 10, this guide will provide you with all the information you need.

Can I downgrade from Windows 11 to 10 after 10 days?

No matter what build of Windows 11 you’re using, you can roll back to Windows 10 without any problems.

The only impediment to this idea is that you can only do so in the first 10 days after the installation process of Windows 11.

However, there’s a workaround that will allow you to continue your trial of Windows 11 for more than 10 days, and we’re going to show you how to use it in this guide.

If the 10-day trial period expires, you’ll have to reinstall Windows 10 to back to it.

Is it possible to uninstall Windows 11?

Yes, you can technically uninstall Windows 11 from your PC and go back to Windows 10. Keep in mind that you need to do this during the first 10 days since the upgrade.

In case you don’t do that, you’ll need to uninstall Windows 11 by performing a clean install of Windows 10.

How can I roll back from Windows 11 to Windows 10?

1. Extend the trial period to 60 days via command line

Note icon NOTE
It is worth mentioning that this method will only work if you perform it before the initial 10 days have passed.
  1. Open Windows Terminal by pressing the Win + X keys on your keyboard and selecting the app from the menu.
  2. Run the following command: DISM /Online /Set-OSUninstallWindow /Value:60
  3. Now run this command: dism.exe /online /Get-OSUninstallWindow
  4. The trial period should now be extended to 60 days.

2. Use the built-in Settings app to rollback to Windows 10

  1. Click on the Start Menu and open Settings.
  2. Choose Windows Update, then click on Advanced options.
  3. Scroll down the list and choose Recovery.
  4. Click on the Go Back button under the Recovery options menu.
  5. Microsoft will ask about the reasons you have to go back to Windows 10. Choose an answer and then click Next.
  6. Select the No, thanks button.
  7. Click Next to confirm.
  8. Make sure you don’t forget your PIN and password because you’ll need it later. Click Next.
  9. Click the Go back to earlier build button.

We also recommend you back up your files. While downgrading does not delete your personal data from your PC, it’s better to be safe than sorry if something goes wrong and you have to format your drives.

Is it possible to perform Windows 11 rollback to Windows 10 using the command line?

Many users, especially advanced ones, prefer using the command line for various tasks, simply because it’s faster and involves less clicking. However, if you want to downgrade to Windows 10 with the command line, we have some bad news.

There’s no command available that will downgrade Windows 11 to Windows 10. If you wish to downgrade, you’ll need to use the Settings app.

How to go back to Windows 10 from Windows 11 after 10 days without losing data?

To downgrade to Windows 10 after 10 days, first, you need to use the command line as we showed you in the earlier section.

The downgrade process explained above won’t cause you to lose any data. However, since unplanned issues can occur, we always suggest backing up your data, just in case.

What to do if Windows 11’s installation automatically starts after the rollback?

1. Delete the update downloaded files

  1. Do not restart when the pop-up appears.
  2. Press the Windows key + E to start File Explorer and navigate to the following path: C:\Windows\SoftwareDistribution\Download
  3. After that press Ctrl + A to select all the files at that location.
  4. Press Shift + Delete to completely remove the files and click Yes to confirm.
  5. Click the Start button and choose Update and Restart.

After these steps are completed, your OS will try to install Windows 11, but the needed files were removed, so the process will not go through.

2. Use Disk Cleanup

  1. Click the Search button in your taskbar, type disk cleanup, and click on the app from the results.
  2. Click the Clean up system files button.
  3. Wait for the process to complete, then restart your PC.

How can I check how long ago I installed Windows 11?

  1. Press Windows key + I to open the Settings app.
  2. In the System section, scroll all the way down and select About in the right pane.
  3. Scroll down to Windows specifications and check the Installed on date.

What can I do if the 10-day trial has passed?

If the rollback period has passed, the only method to go back to Windows 10 is to install a fresh copy of the OS. Fortunately, that is a straightforward process:

  1. Head over to the Microsoft download page. While here, download the Media Creation Tool.
  2. Run the downloaded file and accept the terms of service.
  3. Click on the Upgrade this PC now option, then hit the Next button.
  4. Media Creation Tool will start downloading Windows 10. This might take a few hours depending on your Internet speed.
  5. Click Accept to agree to terms of service.
  6. Click Next. Keep in mind that you won’t be able to keep any of your personal files.
  7. Click the Yes button to confirm the option.
  8. Wait while the tool inspects your system.
  9. The last step is to click the Install button.

If this solution was hard to follow, we also have a complete guide on how to reinstall Windows 10 that will help you.

Although installing a Windows 10 fresh copy is a longer process than a rollback, you will know that it will work and everything will return to normal.

Rolling back from Windows 11 to Windows 10 is pretty simple, and the best way to do it is from the Settings app. The process is fully automated so that anyone can perform it.

Many users want to move back to an earlier Windows version and you can learn how to do that in this detailed Windows feature update rollback guide.

If you want to know more about Windows 11 and how it compares to Windows 10, we’ve covered all the elements worth considering, with features and even update tips.

Do you think you’ll upgrade to Windows 11 again? Tell us in the comments section below, and let’s start a discussion.

Fix: Service Host Local Service High CPU [Network Restricted]

Some Windows users complain that their CPU usage is high without any particular reason. It can be that Service Host: Local Service (Network Restricted) is causing high CPU usage.

The problem occurs whenever the computer wakes up from sleep or even during regular work. If you’re facing a similar issue, you will find a solution in this post.

How do I fix high CPU usage by Service Host local system?


1. Disable the Superfetch service

  1. 1. Go to Search, type services and open Services.

    services service host local system high cpu
  2. 2. Find the Superfetch service, right-click on it and go to Stop.

    stop
  3. 3. Restart your computer.

That’s all. After disabling the Superfetch service, your CPU usage should return to normal, and you’ll be able to continue working on your computer without any problems.

Although Microsoft says that the Superfetch service improves computers’ performance over time, in practice, it’s the opposite.

Many users complained that this service keeps performance-optimized only when the system is newly installed, but it decreases its performance after some time.

Also, Superfetch services run on very low priority, so it should not affect other IO activities because normal IO activities run at high priority.

Several users reported that they fixed the Service Host: local system high CPU problem simply by disabling Windows Update and Event Log service. So you might want to try that as well.

2. Run SFC and DISM scan

If Service Host is causing high CPU usage, that can sometimes be due to file corruption. Your system files can get corrupted; if that happens, you can repair them by running an SFC scan. To do that, follow these steps:

  1. Press the Windows key + X to open Win + X menu. Select Command Prompt (Admin) from the list. If Command Prompt isn’t available, select PowerShell (Admin) instead.
    Service Host Local System slow
  2. When Command Prompt opens, enter sfc /scannow and press Enter to run it.
    Service Host Local System startup
  3. SFC scan will now start. This process can take about 10 minutes, so don’t interrupt it.

After the SFC scan is finished, check if the problem is resolved. If the issue persists, or if you can’t run an SFC scan, you’ll need to use the DISM scan instead. To do that, follow these steps:

  1. Open Command Prompt as administrator.
  2. When Command Prompt starts, enter DISM /Online /Cleanup-Image /RestoreHealth.
    Service Host Local System memory leak
  3. DISM scan will now start. This process can take 15-20 minutes, so be sure not to interrupt it.

After the DISM scan is finished, check if the problem persists. If you were unable to run the SFC scan before, be sure to try running it now. After both scans are completed, the problem should be completely resolved.

If you’re having trouble accessing Command Prompt as an admin, you better take a closer look at this guide.

3. Run Windows Update troubleshooter

According to users, you might be able to fix this problem simply by running the Windows Update troubleshooter.

If Service Host is causing high CPU usage, the problem can be related to Windows Update, and running the troubleshooter should fix it. To do that, follow these steps:

  1. Press Windows Key + I to open the Settings app.
  2. When the Settings app opens, navigate to Update & security.
    Service Host Local Service virus
  3. In the left panel, navigate to Troubleshoot section. Select Windows Update and click Run the troubleshooter.
    Service Host Local System high network usage
  4. Wait while the troubleshooter scans your system and checks for problems.

If you’re having trouble opening the Setting app, look at this article to solve the issue.

You can also run the troubleshooter by following these steps:

  1. Press Windows Key + S and enter control panel. Select Control Panel from the list.
    Service Host Local System taking up resources
  2. When Control Panel opens, go to Troubleshooting.
    Service Host Local System slow
  3. Click on View all in the menu on the left.
    Service Host Local System startup
  4. Click on Windows Update.
    Service Host Local System memory leak
  5. When the Windows Update window opens, click on Advanced and Run as administrator. Now click on Next and follow the instructions on the screen to complete the troubleshooting.
    Service Host Local Service virus

Both methods will check Windows Update and fix any potential problems. After the troubleshooting is finished, check if the problem still appears.

4. End unnecessary HP processes

When Service Host is causing high CPU usage, the cause might be related to HP processes that are running in the background. To fix the problem, you need to end the HP processes from Task Manager by doing the following:

  1. Press Ctrl + Shift + Esc to open Task Manager.
  2. When Task Manager opens, look for any HP processes. Users reported that the HP Help process was causing this problem on their PC, but other processes can also cause this issue. If you see any HP processes, right-click them and choose End Task from the menu.
    Service Host Local System high memory usage
  3. After ending all HP processes, check if the problem persists.

If disabling the HP processes fixes the problem, you might have to repeat this solution whenever this issue appears. If you want a permanent solution, you’ll have to find the HP applications related to those processes and uninstall them.

Most users have no idea how to deal with a slow Task Manager. Don’t be one of them, and read this quick guide to learn how to make it faster!

5. Remove problematic applications

If Service Host is causing high CPU usage, the problem might be related to third-party software. According to users, it seems that the problem was caused by Dragon Naturally Speaking software.

To fix the problem, users suggest completely removing this application from their PCs. If you’re using Dragon Naturally Speaking frequently and don’t want to remove it, update it to the latest version and check if that solves the problem.

Another application that can cause this problem to appear is MSI Command Center. Many users reported that removing this application fixed the problem on their PC, so be sure to do that.

Several users reported that a Chrome VPN extension caused the issue, so if you installed any new extensions recently, be sure to remove them and check if that solves the problem.

6. Perform a Clean boot

As we already mentioned, sometimes third-party applications and services can cause this problem to appear. If Service Host is causing high CPU usage on your PC, performing a Clean boot is recommended to find the application causing it.

To do that, follow these steps:

  1. Press Windows Key + R and enter msconfig. Press Enter or click OK.
    Service Host Local System slow
  2. Go to the Services tab and check the Hide all Microsoft services option. Now click on Disable all button.
    Service Host Local System startup
  3. Navigate to Startup section and click on Open Task Manager.
    Service Host Local System memory leak
  4. A list of all startup applications will now appear. Right-click the first entry on the list and choose Disable. Now repeat this step for all entries on the list. After disabling all startup items, close Task Manager.
  5. In the System Configuration window, click Apply and OK to save changes. Restart your PC to apply the changes.
    Service Host Local System high disk usage

After your PC restarts, check if the problem still appears. If not, it means that one of the disabled applications or services was causing this issue.

To find out which application is the cause, enable apps and services individually or in groups until you find the one causing the problem. After you find it, you can keep it disabled, remove it or reinstall it and check if that solves the problem.

If you want to know how to add or remove startup apps on Windows 10, check out this simple guide.

7. Change processor scheduling

According to users, if Service Host is causing high CPU usage, you might be able to fix the problem by changing processor scheduling. This is relatively simple, and you can do it by following these steps:

  1. Press Windows key + S and enter advanced. Choose View advanced system settings.
    Service Host Local System taking up resources
  2. When the System Properties window opens, in the Performance section, click on the Settings button.
    Service Host Local System slow
  3. Go to the Advanced tab and set Adjust for best performance of Programs.
  4. Now, click on Apply and OK to save changes.
    Service Host Local System startup

After making the changes, the problems with high CPU usage should be resolved completely.

8. Restart the Windows Update service

If Service Host is causing high CPU usage, you might be able to fix the problem simply by restarting the Windows Update service. To do that, follow these steps:

  1. Open Command Prompt as administrator.
  2. Now run the following commands:
    • net stop wuauserv
    • net stop bits
  3. Minimize Command Prompt.
  4. Open File Explorer and navigate to C:/Windows/SoftwareDistribution directory. Delete all files from the SoftwareDistribution folder.
  5. Now go back to Command Prompt and run the following commands:
    • net start wuauserv
    • net start bits

After doing that, the problem should be completely resolved.

Service Host: local system high CPU Windows 11

Below are some of the surefire solutions to apply if you are facing this issue on Windows 11:

  • Disable the Windows Update and Background Intelligent Transfer Service
  • Remove corrupt system files
  • Disable the Superfetch service
  • Perform a clean boot

Thankfully, we have shown how to perform most of these fixes in the Windows 10 section. You might just need a tweak or two due to the OS difference.

Common Service Host Local System errors

Problems with high CPU usage can drastically impact your performance, and users reported the following issues as well:

  • Service Host Local System high disk usage, network usage, memory usage: Many users reported other problems with this service. According to them, Service Host Local can also cause high disk and memory usage.
  • Service Host Local System taking up resources: This is another common problem with this service, and many users reported that Service Host Local System is taking up various resources.
  • Service Host Local System slow: Another problem that can occur due to this service is various slowdowns. According to users, your system might become slow due to high CPU usage.
  • Service Host Local System startup: Sometimes, issues with this service can occur as soon as your system starts. Many users reported that high CPU problems start appearing right after startup.
  • Service Host Local System memory leak: Another problem related to Service Host Local System is memory leaks. Memory leaks can be problematic, and they can drastically affect your performance.
  • Service Host Local Service virus: In some cases, problems with Service Local Host Service can be caused by virus infections. If you suspect that your PC is infected, be sure to perform a detailed malware scan.

Service Host and high CPU usage can cause many problems, but we hope you solve this problem using one of our solutions. You can learn more about related bandwidth spikes by checking this guide on high network usage caused by Service Host Network Service, which helps you understand why certain host processes create heavy network traffic.

If you face other issues like Windows Explorer’s high CPU usage, check our detailed guide to fix it quickly.

For more suggestions or questions, reach for the comments section below.

Microsoft said that Windows 8.1 ESU officially ends today

You might not know it yet, but today is a day that will go down in history, as far as the Windows operating system is concerned.

Why? Well, because ESU for both Windows 7 and Windows 8.1, two extremely popular OS versions, is coming to a grinding halt.

Microsoft has announced these changes already and it seems like it’s finally happening. We’ve already discussed how ESU for Windows 7 ends today as well.

That being said, the wisest thing you can do is upgrade to one of the supported versions of the operating system.

No more extended support for Windows 8.1

Indeed, Microsoft’s Windows 8.1 operating system (OS) has finally reached its end-of-support date after almost a decade.

Thus, as of today (January 10/2023), the Redmond tech giant will no longer provide the OS with software updates, technical support, or security patches.

Of course, you won’t immediately notice anything different if you keep using the OS past this date, but don’t make the mistake of letting that fool you into a false sense of security.

Because the operating system no longer receives security updates, your entire system will become more vulnerable to viruses, ransomware, and other security threats.

Furthermore, if your PC encounters any issues, you will find it to be sort of difficult to get support without paying a premium.

Not to mention some programs may no longer work properly as some software manufacturers discontinue support for Windows 8.1.

Keep in mind that Windows 8.1 was first introduced back on October 17, 2013, as Microsoft’s response to the many negative user complaints about Windows 8.

Among other things, it brought back the Start button, but not the menu, provided users with the ability to boot straight to the desktop instead of the Start Screen, and featured a Bing-based unified search system.

Windows 8.1 also had a tighter integration with SkyDrive, known now as OneDrive, a transparent device encryption system based on BitLocker on compatible devices, and support for 3D printing.

Also, according to Statcounter, which is a pretty reliable source, a total of 2.59% of PCs worldwide still run Windows 8.1 as of December 2022.

We strongly recommend you upgrade to either Windows 10, or the newer Windows 11, in order to avoid unpleasant situations for you and your enterprise.

Have you considered moving to a newer version of the Windows OS? Share your thoughts with us in the comments section below.

Computer Browser Service Depends on Server Service [Failed to Start]

Computer Browser Service is one of several services on Windows 10 and 11 that gives a list of all computers and shared resources on a network. Without it, you won’t be able to see those computers.

It runs on the SMBv1 protocol which is pretty old at this point, and Microsoft itself even recommends not using it. In fact, the company tells users to disable it. However, some networks still use it for connecting to other computers and seeing what’s going on.

What causes Computer Browser Service errors?

A Computer Browser Service error is actually pretty rare, so it’s a little difficult to pin down the exact reason why it happens. It involves parts of Windows that are old and not commonly used.

The following is a list of the potential reasons why this happens:

  • Your computer is infected with malware or a virus: This is one of the likely reasons. We recommend downloading some anti-malware software and cleaning out your computer.
  • An app is causing compatibility issues: This is the other likely reason, especially if you downloaded something from an unofficial source. Uninstall it as soon as you can.
  • Files on your computer are damaged: To address this problem, you’ll need to run some DISM commands. Don’t worry; it’s really easy to do. It’s not at all complicated.
  • There’s something wrong with another computer: Since Computer Browser Services requires a connection to another machine, check what’s wrong with that computer.

Because this error is so rare there aren’t many solutions out there. It’s a fairly rare issue to have. But what solutions do exist will have you going into either the Control Panel or Services app.

What can I do if the Computer Browser Service failed to start?

This problem affects certain Windows functions, so it can get a little confusing. But before you go into the complex solutions, try out the simpler tips below:

  • Run your computer’s troubleshooter feature to have it seek out the problem and automatically fix it at that moment.
  • Conversely, you can also use a repair tool to do it for you if you prefer a third-party option.
  • Also, it’s recommended that you contact the network administrator, if there is one, with help if it’s another computer failing.
  • Perform a clean boot which will restart Windows with a minimal amount of drivers and startup programs working. If your computer works fine after this, you may have a problematic app.

1. Double-check certain functions on Services

  1. In the Windows Search bar, bring up the Services app.
  2. Scroll down and locate DNS Client. See if it’s running. If not, right-click and select Start.
  3. Now check the following three services and see if they’re running: Function Discovery Resource Publication, SSDP Discovery, and UPnP Device Host.
  4. And like before, if they’re not running, right-click them then select Start.

2. Ensure Network Discovery is allowed

  1. Launch Windows Defender Firewall.
  2. Click Allow an app or feature through Windows Defender Firewall on the left-hand side of the window.
  3. Click the Change settings button, and in the menu below, locate Network Discovery.
  4. Next to Network Discovery, click the box under Domain and Private. For the latter, do so if your private network is secure.

3. Turn on the Computer Browser service

  1. Open the Control Panel and go to Network and Sharing Center. If you don’t see it, set the View By setting to Large Icons.
  2. Click Change advanced sharing settings.
  3. Turn on File and printer sharing.
  4. Now in the Windows Search bar, bring up the Services app.
  5. Locate the Computer Browser service and double-click it to open the Properties window.
  6. In the Properties window, set the Startup Type to Manual then click Apply.
  7. Now change the Startup Type again to Automatic. Click Apply then OK to finish up.

4. Enable the SMBv1 feature

  1. In the Control Panel, click Programs and Features.
  2. Click Turn Windows feature on or off on the left-hand side.
  3. Scroll down and locate SMB 1.0/CIFS File Sharing Support.
  4. Click the box to SMB 1.0/CIFS File Sharing Support to activate, then select the OK button.

There are tons of networking errors on Windows that cause service problems. For that reason, we’re only going to focus on two of them.

The first one revolves around what to do when Google Chrome fails a download. This error can happen because of an overbearing anti-virus interrupting the service.

Or the Windows Attachment Manager isn’t working. The other one is Error Code 0x800704cf which is a problem that prevents you from accessing a network for whatever reason.

Solutions for this can be complex as you may have to change the DNS settings or reset your machine’s proxy.

Feel free to leave a comment below if you have any questions about other network problems. Leave a suggestion about guides that you’d like to see or information on other Windows errors.

Amazon Fire TV Storage Full? Here is How to Make More Space

Amazon Fire TV is an amazing streaming device, but many reported that their Amazon Firestick is low on storage. This can be a problem and it will make you unable to install apps on Amazon Fire TV.

Since this can be a major problem, in today’s guide we’re going to show you how to permanently fix it, once and for all.

How do I fix critically low storage on Amazon Fire TV?

1. Clear cache

  1. Navigate to Settings on your Fire TV.
     
  2. After that, head over to Applications.
  3. Navigate to Manage installed applications.
  4. Select the application whose cache you want to clear.
  5. Now choose Clear Cache and then Clear data.

2. Uninstall unused apps

  1. Go to Settings and then select Applications.
     
  2. After that, go to Manage installed applications.
  3. Select the app you want to remove.
  4. Now choose Uninstall from the menu.

After doing that, check if the problem is resolved.

3. Reset the Amazon Fire Stick

Note icon NOTE
Use this method as the last option since it will remove all data from your Fire TV.
  1. Go into Settings in your Fire Stick home screen.
  2. Navigate to My Fire TV.
     
  3. Scroll down to find and click on Reset to Factory Defaults.
  4. Select the Reset button.

If nothing works, go ahead and contact Amazon support for a more specific solution. Your problem might require a more technical fix.

In case your device isn’t recognized at all, we have a useful guide on what to do if your Amazon Fire Stick isn’t recognized by the TV.

Did our solution work for you? Did you find another way to create space in your Amazon Fire Stick? Do let us know in the comments section below!

10 Easy Fixes to Google Drive Full But no Files [Pro Tested]

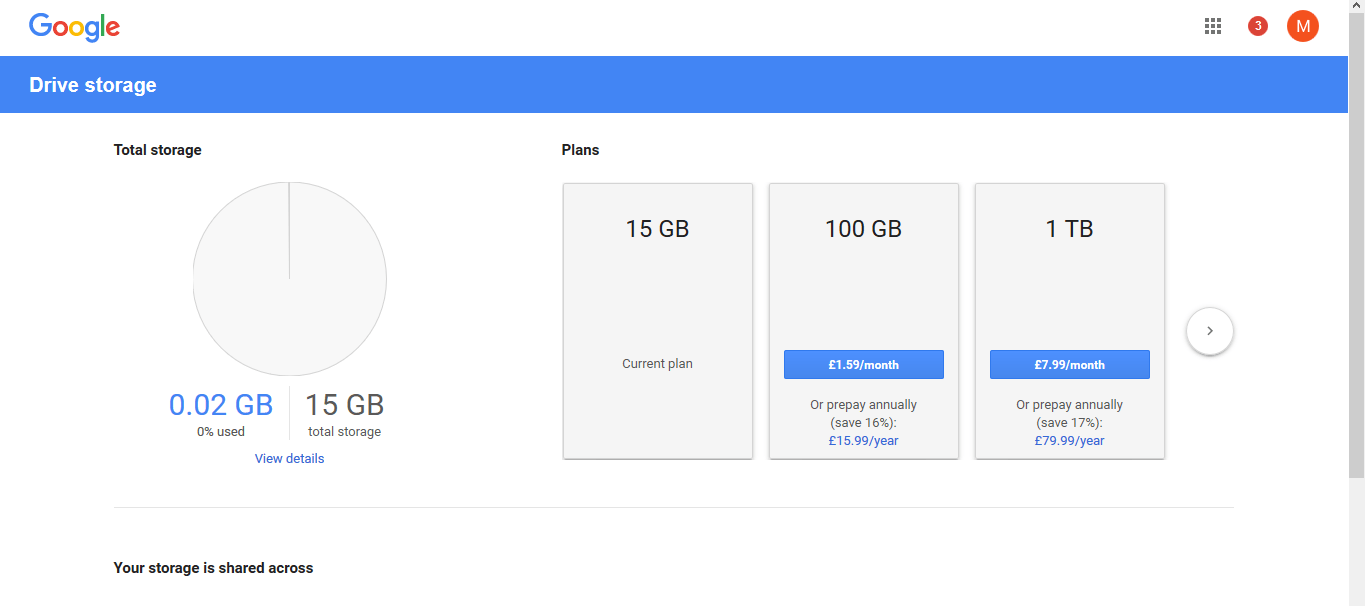
The Google Drive quota provides an overview of how much GD cloud storage space you’ve used up. However, exceptions can happen, such as Google Drive being full but no files in it.

Sometimes the quota might highlight you’re using much more storage space than expected. The full message reads: your Google Drive account storage was full, please delete another file in your Google Drive or log in with another Google account.

If that’s so, it’s not usually the case that the Google Drive quota is inaccurate, just that it includes a lot of extra data from other sources.

Although Google Drive is a great cloud storage service, sometimes issues can occur. Several users reported a Google Drive storage full but no files in it.

Why is my Google Drive full but no files?

From actual space issues to sync issues or specific file anomalies, there can be more than one culprit responsible for google drive being full but having no files in it.

Quota can show inaccurate data on occasion and shared drives are also likely to cause havoc, especially if used by other users for storage.

Speaking of quota issues, here are some similar problems reported by users:

  • Google Drive space not updating – This isn’t a serious issue, and sometimes it might take a few days for the space to update. If the amount of space doesn’t change, try removing files from your Trash and check if that helps.
  • Google Drive storage full but no files – To fix this issue, you need to remove Google Photos as well as attachments from Gmail. It can also be helpful to clean the Trash directory.
  • Also, Google Drive showing more used space – If you encounter this problem, check if you have any shared folders. If other users are using them for storage, that will affect your data quota.
  • Google Drive storage not accurate – Sometimes your Google Drive quota might not be fully accurate. If Google Drive is not showing correct storage, be sure to try some of our solutions.
  • Google Docs says storage is full but it’s not
  • Storage is full no edits can be made to this file. Delete files for more space – But, Google Photos storage not updating after deleting
  • Bought more Google Storage but still says full – Google Drive storage not updating after purchase
  • Gmail says storage full but it’s not – This can impact all versions of windows, including Win 11 (see The drive Is full but there are no files in Windows 11 error)
  • Google Drive empty but space used

So if Google Drive says storage is full but it’s not, this is how to fix it.

Google Drive space not updating

How do I fix Google storage full?

  1. Empty Google Drive Trash
  2. Use Sync
  3. Check Google Drive Application Data
  4. Search for Orphaned Files
  5. Check Google Photos and Gmail Storage
  6. Check for shared folders
  7. Remove large files and check back
  8. Delete files from Trash folder and sign out of all Gmail accounts
  9. Delete photos from your devices
  10. Convert your documents

1. Empty Google Drive Trash

Firstly, note that deleted Google Drive files go to a Trash folder similar to Recycle Bin. Thus, they’re not really erased and still hog cloud storage space. So you should empty the Trash folder as follows:

  1. Log in to your Google Drive.
  2. Click Trash on the left of the GD page as below.Google Drive full but no files
  3. Then click Trash just beneath the search box, and select Empty Trash from the menu. This could save you many gigabytes of storage.Google Drive showing full when it's not
  4. Click your Google Drive quota to check how much extra storage space you have. Now it will only include files you haven’t deleted.

It’s also worth mentioning that you can try to locate and remove duplicate files from Google Drive in order to free up some space.

2. Try a different file storage platform

There are many options when it comes to storage, and a bit of help from a third-party tool might be just what you need when looking for Google Drive alternatives.

Keeping all of your assets synchronized has never been easier thanks to Sync, the tool that allows you to store, share, and access all of your files from any location.

The best part is that you get up to 5 GB to store all those important files in the cloud absolutely free of charge.

But Sync delivers more than storage, it also protects your data with end-to-end encryption, making sure your confidential documents are completely safeguarded from unauthorized access.

Raising the stakes even further, Sync also acts as a powerful backup solution to keep your files synced across all of your devices with no risk of data loss or leakage.

⇒ Get Sync

3. Check Google Drive Application Data

Note that applications connected to Google Drive also use up their storage space. Thus, apps such as Whatsapp might be hogging hundreds of megabytes of your cloud storage. This is how you can remove Google Drive apps.

  1. Click the Settings button at the top right of your Google Drive page.
  2. Select Settings from the menu.
  3. Then you can select Manage Apps in the Settings window shown below. That lists all your Google Drive apps.Google Drive quota not accurate
  4. Now remove Google Drive apps by clicking the Options button beside them and selecting Disconnect from Drive. Press the Disconnect button to confirm.

Many users reported that WhatsApp can also take up your storage space.

According to users, there was a WhatsApp application backup on their Google Drive, but after removing it, they managed to fix the issue with Google Drive quota, so be sure to try that.

4. Search for Orphaned Files

You might have lots of GD files without parent folders. These are orphaned files that can inflate the Google Drive storage quota. This is how you can search for and delete orphan files in Google Drive.

  1. Input is:unorganized owner:me into the Google Drive search box and press Enter.
  2. Google will search for and display any orphaned files. Delete them by right-clicking a file and selecting Remove from the context menu.
  3. Hold the Ctrl key to select multiple files to erase.
  4. You can also drag and drop the orphan files to Trash on the left Google Drive menu to delete them. Empty the Trash folder to fully erase.

5. Check Google Photos and Gmail Storage

Note that your Google Drive quota also includes Google Photos and Gmail files. So your extra photos and email might also be inflating the GD quota.

Clicking View Details beneath the quota pie chart highlights that as shown in the shot directly below.

Google Drive space not updating
  1. Log in to Google Photos and click the Main menu button at the top left.
  2. Then select Settings from the menu to open the options below.Google Drive full but no files
  3. That page includes Original and High Quality settings. If Original is selected there, the photos will reduce your Google Drive storage space; so select High Quality on that page if required.
  4. Open your Gmail account, if you have one, and delete outdated emails from there.
  5. Emails in the trash should also be deleted. Click More > Trash on the left of your Gmail page.
  6. Click Empty Trash now to erase emails that also inflate the Google Drive storage quota.

6. Check for shared folders

According to users, sometimes shared folders can affect your data quota, even if you don’t use them. If you have shared a folder with other users, their data usage will reflect on your bandwidth. To fix the problem, keep a close eye on shared folders.

If you have any shared folders, be sure to contact the person you’re sharing the folder with, and ask them to back up their files.

Once their files are downloaded, you can delete the folder and all its contents. After the shared directories are deleted, the issue with the data quota should be resolved.

7. Remove large files and wait

The easiest way to fix the problem with Google Drive quota is to delete the large files from your Google Drive. However, it’s worth mentioning that it might take some time for the data quota to update.

Usually, this process takes a couple of days, but some users reported that it might take weeks for the quote to update, so you’ll have to be patient.

8. Delete files from Trash folder and sign out of all Gmail accounts

According to users, to fix the problem with quota and Google Drive, first, you need to delete all files from the Trash folder. We already showed you how to do that in one of our previous solutions, so be sure to check it out for detailed instructions.

After doing that, you need to sign out of Gmail on all devices and applications. This can be quite tedious to do manually since you might have multiple devices with several applications that use Gmail.

However, you can sign out of Gmail on all devices with a single click. To do that, just follow these steps:

  1. Open Gmail in your web browser.
  2. Once you sign in, scroll all the way down.
  3. In the bottom right corner, you should see the Last account activity message. Click on Details.
    Google Drive full but no files
  4. Now you’ll see all recent web sessions. Click the Sign out all other web sessions button.
    Google Drive space not updating

After doing that, you should be successfully signed out on all accounts. Now log in to Google Drive again and check if the problem still persists.

9. Delete photos from your devices

As you probably know, Google Photos shares the storage space with Google Drive, and if you have a lot of pictures in the Google Photos app, that will reflect on your Google Drive quota.

To fix this problem, remove pictures from Google Photos and check if that solves the issue.

Several users reported that removing the pictures from Google Photos won’t permanently solve your data quota problem. To fix the issue, you need to access Google Photos on all your devices and remove your pictures from there.

Even if you remove pictures from the web version of Google Photos, your other devices might sync the missing pictures again, causing the issue to reappear.

Therefore it’s crucial that you delete pictures from Google Photos on all your devices in order to permanently fix the problem.

Several users reported that this worked for them, so feel free to try it out.

10. Convert your documents

As you probably know, Google Drive allows you to create documents and spreadsheets using its own web apps. Unlike Word, Excel, or PDF documents, these documents don’t take up any space.

It’s also worth mentioning that you can convert your documents to this format and save some space.

If you have dozens of documents on Google Drive, you can convert them to Google-compatible format in order to free up some space. To do that, you just need to follow these simple steps:

  1. Open your Google Drive in a web browser.
  2. Locate the document you want to convert, right-click it, and choose Open With. Now select the desired application from the list.
    Google Drive quota not accurate

Google Drive will now create a copy of your document. Once the new document is created, you can delete the original document. Before deleting the original, be sure to check if the new document is working properly.

This can be a tedious solution, especially if you have dozens of online documents, but it might help you free up some space.

Now, your Google Drive quota will surely have more free storage space than before. Also, note that any changes you make to Google Drive might need a few days for the Google servers to sync.

If you have any questions, don’t hesitate to leave them in the comments section below and we’ll be sure to check them out.

Encarta Kids: Is it Still Available & How to Download it

Microsoft Encarta Kids was used by many in the early 2000s, and many are wondering if it is still available and if can it be installed. We’re going to answer this question in this guide.

How can I download and install Encarta Kids?

Is Microsoft Encarta still available?

Microsoft Encarta and Encarta Kids were discontinued in 2008, and they are no longer available.

Why was Encarta Kids discontinued?

The Encrata software was discontinued since the way users search for information has changed. Instead of traditional encyclopedias, users started relying on online encyclopedias which led to the discontinuation of the software.

Can I still download Encarta Kids?

If you’re looking to download Encarta Kids for Windows 10 or 11, you should know that the software is discontinued, therefore it’s no longer available for download from official sources.

Microsoft Encarta premium edition

However, it’s available from third-party websites, but we can’t guarantee that those websites are malware-free, so if you choose to install Encarta Kids, use a reliable source and scan the downloaded files before running them.

What was the last version of Encarta?

The last version of Encarta was Encarta Premium 2009 which was released in 2008.

Is Encarta free?

Encarta was a commercial software so it wasn’t free. Microsoft released Encarta Kids online website, which was free but it had advertisements.

Is there an Encarta for Android?

No, there has never been an Encarta or Encarta Kids app for Android since it was discontinued when the first Android phones started appearing. However, there are encyclopedia apps that you can use on Android.

Is there an alternative to Encarta?

While there are no software alternatives that you can download, Wikipedia is probably the best alternative to Encarta that you can use.

As you can see, while you can still download Encarta Kids for PC, you need to use third-party sources, which may not be 100% safe to use, so you’ll be using them at your own risk.

You can also experience compatibility issues while trying to run the software, so be prepared for that as well.

This isn’t only discontinued software from Microsoft, and we already wrote on how to download and use Microsoft Mathematics.

As for other tools, we have articles on how to download and install Microsoft Expression Studio as well as a guide on how to use Microsoft Money for Windows 11.

USB Not Working On TV: 4 Ways to Fix It

If your TV is not reading your USB, it could be an issue with formatting or physical damage to the hardware. The USB should be a FAT32 for it to work on your TV. Here’s how to make sure you have the right format and a few extra tips for error-free use of your USB on TV.

What can I do if my USB drive is not working on the TV?

Here’s how to fix your TV not recognizing your flash drive:

1. Format USB in FAT32/exFAT

Tip icon Tip
To prevent data loss, save and backup all the files on your USB drive before you start formatting. You can simply copy and paste them into your PC or add them to a cloud platform.
  1. Plug the memory stick into a USB port on a computer that runs the Windows operating system.
  2. Check if the drive has been detected and locate it in This PC.
  3. Right-click the USB drive in question and click Format. USB
  4. Click the File system dropdown menu to see the list of file systems available and choose FAT32 or exFAT. USB1
  5. Initiate the formatting by clicking Start at the bottom.
  6. The USB drive will have been wiped clean by now.
  7. Retrieve the files you transferred to backup storage and check if the USB drive works on the TV.

Format your USB drive to FAT32 or exFAT. These are the file systems most TVs can read.

2. Update the TV firmware

Another probable cause that can prevent USB devices from working properly on a TV is outdated firmware. Make sure you have installed the latest firmware on your TV.

Otherwise, look for the updated TV firmware from the manufacturer’s website and refer to the Readme file.

3. Check the condition of the USB ports on the TV

First, if your TV has multiple USB ports, try inserting your drive in another one. It’s possible the one you’re using is damaged, but the other work fine.

Also, make sure that the ports are free from dust. Sometimes, the build-up of dust on ports can cause minor problems with the connection.

Another thing you can try is to use another USB drive and insert it into the port to make sure the issue isn’t specific to the drive you’re currently using.

Keep in mind that if you have a USB 3.0 drive and your TV has only 2.0 ports, it might not work because of the power output of your TV. In fact, some TV models like Technika won’t turn on.

4. Manually locate the USB drive

  1. On your TV, go to your source options.
  2. Locate the USB/Media device section.
  3. Let your TV scan and detect any connected devices. Your USB should how up here.
  4. Just select it and start navigating through its files to access any type of supported media.

Older TV models won’t automatically detect and run your USB. You’ll have to manually go through the menus that access those media files.

Summary

That’s how you will be able to fix your USB when it’s not working on TV. If you want to learn more about USB troubleshooting, consider checking out our guides on USB not working on Windows 10 or USB to HDMI not working.

Do you know another workaround for a faulty USB device-TV connection? Please let us know in the comments section below.

The next Microsoft Duo could become an Uno according to sources

Microsoft may be looking for a new brand name for its latest foray into smartphones as the next Surface Duo will reportedly ditch its duo screens for a single foldable one.

According to Zac Bowden over at Windows Central, sources close the project have shared that, after months of prototyping and testing, the Microsoft Duo team has settled on a going with “a more traditional foldable design, with a 180-degree hinge, internal foldable screen and external cover display, similar to devices like the Vivo X Fold and Honor Magic Vs.”

Vivo X Fold

Perhaps more interesting than the actual pivot itself, is the timing at which the Surface Duo team decided to switch designs. Bowden is reporting that plans for yet another dual screen Duo as a Surface Duo 3 release were already finalized and would have been in line with the rumored 2023 timeframe.

With Microsoft’s seemingly late-in-the-game pivot to a single folding screen design the 2023 release timeframe for Surface Duo 3 may go right out the window.

As Microsoft comes more in line with the rest of the industry regarding foldable designs, it will buttress against standing out and claiming a purchase stake from customers. Fortunately, the company seems aware of the inevitability of becoming an “also-ran” and is working on a software experience dubbed “Perfect Together” according to Bowden.

Microsoft’s “Perfect Together” software package will aim to create a cross platform ecosystem between Windows PCs and this Android powered device similar to iPhones and Macs, as Bowden puts it.

While pivoting on the Duo’s design, Microsoft may also be backtracking on a previous smartphone redline and revisiting traditional slab phone manufacturing as well.

Once again Bowden’s sources say the Surface team has been exploring different form factors that include the old single screen, non-transformable candy bar smartphone design and “could ship as a “mainstream” Surface phone offering.”

Surface Solo Concept 0

Microsoft hasn’t officially addressed any Surface Duo 3 news or rumors, and while Bowden’s sources are routinely accurate, timing, and products aren’t official until they are.

Best Xbox 360 Emulator for PC to Use in 2026 [Updated]

Did you know that you can now enjoy Xbox 360 games on your PC? Do you want to know how you can do that?

Read this article with rapt attention. We’ll be showing you some of the best emulator Xbox 360 for PC, which can easily be employed to imitate Xbox 360 gaming console on Windows PC.

Xbox 360 is one of the gaming consoles of Xbox, a prominent gaming franchise owned by Microsoft. It is a mirrored version of Xbox One, packed with a myriad of exciting games.

Xbox 360 is exclusively designed in such a way that its games can only be played on the gaming console.

However, the advent of specialized Xbox emulators has eliminated the console’s exclusiveness. As such, Xbox 360 (and Xbox One) games can now be enjoyed on PCs.

In light of this, we are going to be looking at four of the best emulator Xbox 360 for PC, with special reference to Windows computers.

What are the best Xbox 360 emulators for PC?

Xenia – Best overall

Xenia is arguably the best emulator Xbox 360 for PC. In fact, as posited by many, it is the only Xbox emulator that perfectly imitates Xbox 360 on Windows PC, with very few incidences of lags and other performance-related defects.

Although the Xenia Xbox 360 emulator is only supported on Windows, for now, there are indications that a Linux OS version would be released soon.

Basically, Xenia requires a set of advanced Windows versions to perform at optimum capacity.

At present, it is only supported on Windows 10/8.1/8 PCs that are equipped with Vulkan-compatible graphic processing unit, 64-bit x86 processor, Xinput-supported controller, AVX-support.

Xenia also offers a relatively easy set-up; all you need to do is to download the program, extract the .zip file and run the program as an administrator.

You can then open the Xenia emulator and proceed to download your desired Xbox 360 game(s) on your PC. For now, you can download and play over 600 Xbox 360 games on your computer, using Xenia.

Xenia is an open-source program; hence, it is available for free download.

⇒ Get Xenia

CXBX Emulator – Xbox emulation veteran

CXBX is another widely used emulator for playing Xbox games on Windows PC. While it is originally designed to emulate Xbox One games on PC, it can also be used for Xbox 360.

Although there are still controversies surrounding its efficiency in emulating Xbox 360. CXBX is optimized to eliminate system lags, even while playing high-powered Xbox games.

In light of this, CXBX is easy to download and install, and it comes with a built-in program, which allows you to convert Xbox games into .exe files.

With this, you don’t need to create a virtual machine to imitate the Xbox 360 games, as you can easily enjoy the games directly on your PC.

However, there is a limit to the number of Xbox games you can play with CXBX, as it supports only about six Xbox 360/One games.

Also, it operates at optimum capacity on only high-powered versions (both 64-bit & 32-bit) of Windows.

Lastly, CXBX Emulator is available for free download, as it is licensed under the GNU Public License. Hence, you can easily download and enjoy it for free.

⇒ Get CXBX Emulator from GitHub

⇒ Get CXBX from Official Website

XQEMU – Open source and still in development

Xqemu is an open-source emulator that has caught the spotlight because it is simple and it relies on independent developers for updates.

It can emulate over 300 Xbox 360 games which is a pretty big number for an open-source emulator. And it can also emulate Xbox One games and original Xbox games too on Windows, Mac, and Linux!

Yeah, you can encounter some bugs on the way but you need to remember that it’s a free Xbox 360 emulator. Anyway, the bugs depend on the platform you’re using it too.

It has an easy user interface, an easy setup, and it can save/load your games, add controllers, and so on. You may need some technical experience with using emulators though!

⇒ Get XQEMU

VR Xbox 360 PC Emulator – Not updated in a while

best emulator xbox 360 for pc

VR Xbox 360 PC Emulator is another top-rated emulator for playing Xbox 360 games on PC. It is one of the most widely used Xbox emulators, with a record of about 300,000 downloads.

The program is compatible with mid-level Windows versions (both 64-bit and 32-bit), ranging from Windows 2000 to Windows XP to Windows 7.

This Xbox 360 emulator features a relatively high fps (frame per second) rate, improved memory consumption, SSE 3/4 CPU, Radeon GPU support, quick load time, and more.

Essentially, it offers an excellent gaming experience, with the akin reflection of what is obtainable on the Xbox 360 game console.

VR Xbox 360 PC Emulator is a free program, and it is available for download on the source website. The latest version of the program is tagged Version 1.0.5, and it has a size of 21.91 MB.

⇒ Get VR XBox 360 PC Emulator

Best tips on how to use the emulators efficiently

Emulators are excellent if you don’t want to invest money in the physical console. With a click of a mouse, you can access hundreds of games just like on the real deal.

However, there are a few considerations to optimize and prepare to make things better about using the emulators.

Run it on a potent system

Consoles are only made for gaming and they are good at it. If you’re running an emulator, make sure you have a powerful configuration PC.

That’s because the emulator will only take some of the resources available on PC. We’re specifically talking about RAM and graphics cards.

If you only have 4GB of RAM and an integrated graphics card, don’t even bother to download the emulator because you won’t be able to use all the amount on the emulator.

Check the games you can run

If you’re specifically thinking of playing a certain game, visit the developer website of the emulator and check if the game you want to play is on the list.

Most emulators can’t run all the games you can play on a regular Xbox 360 console so you risk having a bad surprise.

Get a controller

If you’re a PC gamer, this will come hard on you but we’re still going to break it on you: get a controller, preferably an Xbox one.

Why? The games were made to be played on a controller. The dynamics, the gameplay, all depend on the movement and buttons from a controller.

In fact, you won’t even be able to play some of the games unless you have a controller, so here’s our list of the best gaming controllers to choose from.

The advent of Xbox emulators has empowered game lovers, as they can now emulate the gaming console on their personal computers.

With this, Xbox 360 (and Xbox One) lovers can now save their money and enjoy a near-perfect Xbox gaming experience on their PCs.

We have reviewed five of the best emulator Xbox 360 for PC in this article, to better inform your decision on which emulator to choose for your PC.

Now that you have your best emulator installed, we have a guide on how to make your emulator run faster on Windows 10.

For a broader overview, you can also check out this comprehensive guide on Xbox emulators for PC.

If you have any other questions, leave them in the comments section below and we will get back to you as soon as possible.

Tweet from Xbox executive adds fuel to the Xbox Developer_Direct speculation fire

Yesterday we posted that Xbox would reportedly be hosting a Developer_Direct event on January 25th. The news confirmed weeks of speculation that began following The Game Awards 2022 show last month, in which Xbox’s presence was conspicuously sparse.

According to the original source, Windows Central, the Xbox Developer_Direct show is slated to broadcast at 12pm PT on Xbox’s official YouTube and Twitch channels on January 25th. The show will be jointly hosted by Microsoft and Bethesda.

As for what we’ll see at the Xbox Developer_Direct showcase, we will likely get new looks (and possibly release dates) at the usual suspects—Redfall, Forza Motorsport, and Minecraft Legends. It is speculated, however, that Starfield may be a no-show.

At any rate, a tweet from Xbox Marketing VP Aaron Greenberg on Monday has added further buzz to the speculation.

While this may not seem like much to go on, it seems apparent that Microsoft has something in store for Xbox fans this week. While it could be a surprise Game Pass announcement, it could also be related to the Xbox Developer_Direct event in some way. Possibly a teaser trailer for the event? Going off Greenberg’s tweet, we should know by the end of the week.

Featured image via Game-eXperience.it. 

How to Fix AutoCAD When It’s Not Opening: Step-by-Step

AutoCAD not opening? Many people report similar issues, especially after updating their operating system. The app might show a Run initializing message, but won’t get past that.

A common cause is version compatibility. If you run an out of date software, make sure to update. PC clutter and corrupt files may also contribute.

How do I fix AutoCAD not opening?

Tip icon Tip
The latest version, AutoCAD 2023 recommends using a 3+ GHz processor, a minimum of 8 GB (16 GB recommended) of RAM, and a discrete DirectX 12 compatible graphics card with 4 GB of recommended memory. Make sure your machine

1. Reinstall AutoCAD

  1. Click on the Start button and select Settings from the list.
  2. Now select Apps from the set of options.
  3. Scroll down and find AutoCAD, click on it and select Uninstall.
  4. Now open File Explorer and go to the folder you have AutoCAD installed. Usually, it’s: C:\Autodesc\AutoCAD 20xx
  5. Delete the contents of the folder.
  6. Up next, delete the following folder too: C:\Program Files\Common Files\Autodesk Shared
  7. Press the Windows key + R to start the Run app.
  8. Type regedit and press Enter or click OK.
  9. Navigate to the following keys and delete them: HKEY_CURRENT_USER\Software\Autodesk and HKEY_LOCAL_MACHINE\Software\Autodesk
  10. Now that you’ve completely eliminated AutoCAD, you can download and install it.
  11. Run the installer and follow the instructions on the screen to complete the installation. You will also need to restart your system.

Before starting to reinstall AutoCAD, make sure you back up all your important CAD files.

2. Change the Registry settings

  1. Press the Windows key + R to start the Run application.
  2. Type regedit and press Enter or click OK.
  3. When the Registry Editor opens, navigate to the following key: HKEY_LOCAL_MACHINE\SOFTWARE\Microsoft\NET Framework Setup\NDP\v4\Client
  4. Find the key called Version. Find its value and remember it or write it down, because you’ll need it later.
  5. Now, right-click the Client entry on the left side and choose Permissions.
  6. Click the Advanced button.
    HKEY_LOCAL_MACHINESOFTWAREMicrosoftNET Framework SetupNDPv4Client permissions for client
  7. Find the Owner section on the top and next to the TrustedInstaller click Change link.
  8. In the Enter the object names to select field enter Administrators. Click on the Check Names button, then click on OK.
  9. If you don’t have the Administrators account, fill in your administrator account name.
    allow administrative permission for netframework client
  10. Click Apply and OK to save your settings.
    allow administrative permission for netframework client
  11. Change the Value of the Version key in Registry Editor to 4.5.0. Click on OK to save the changes.
    allow administrative permission for netframework client
  12. Without closing the Registry Editor, run the AutoCAD setup and install it.
  13. After the installation is completed, in Registry Editor, navigate to this path once again: HKEY_LOCAL_MACHINE\SOFTWARE\Microsoft\NET Framework Setup\NDP\v4\Client
  14. Find the Version key, right-click on it, and select Modify.
  15. Set its value from the current one to the value that you got from Step 4, then click OK.

3. Reset AutoCAD settings to default

  1. Click on the Start button in Windows and look for AutoCAD 20xx from the menu.
  2. Select it and click on Reset Settings to Default.

4. Disable User Account Control

  1. Press Windows key + S and enter user control. Select Change User Account Control settings.
  2. When User Account Control Settings window opens, move the slider all the way down to Never notify. Now click on OK to save changes.
    disable UAC

5. Disable or remove your antivirus software

5.1 Disable your antivirus

  1. Look for your antivirus program in the system tray.
  2. Right-click on its icon and select Disable. Most antivirus products have a disable feature accessible from the system tray. If not, start the antivirus and you should find it in its main menu.

If that doesn’t solve the problem, you may need to move to the next step and uninstall it at least temporarily.

5.2 Uninstall your antivirus

  1. Click on the Start button and select Settings.
  2. Now click on the Apps option from the menu.
  3. Scroll down on the list of programs, find your antivirus program, click on it and select Uninstall.

To remove all files associated with your antivirus software, users are suggesting using one of the best removal tools from our list.

Note icon NOTE
The steps above are generic and may apply only to a limited number of antiviruses. If they don’t apply to your product, consult its documentation on how to disable and/or uninstall them.

6. Try to install AutoCAD as Administrator

  1. Find the AutoCAD setup file on your PC. By default, the setup files are usually extracted to the C:\Autodesk directory, so make sure to navigate there.
  2. Right-click on it and select the Run as administrator option. You will need administrator privileges to do that.

If the procedure is not working, read our guide on what to do if nothing happens when you select Run as administrator.

7. Run AutoCAD in compatibility mode

  1. Right-click on the AutoCAD shortcut and choose Properties from the menu.
    open Properties
  2. Navigate to the Compatibility tab and check Run this program in compatibility mode for. Now select the desired version of Windows from the list. Lastly, click OK and Apply in order to save the changes.
    compatibility options

According to users, if AutoCAD is not working, you might have to run it in Compatibility mode. This is a useful feature of Windows that allows you to run older software that might not be fully optimized for Windows 10.

8. Install the necessary VisualC++ Redistributables

  1. Press the Windows key + S to show the search bar, type windows features, and select Turn Windows features on or off from the list of results.
  2. Locate DotNet Framework 4.8 on the list and uncheck it. Now click on OK to save changes.

9. Install the latest updates for AutoCAD

  1. Go to the Autodesk account page and log in with your account.
  2. Click on the Product updates option from the left.
  3. In the next window, you should see any available updates for your Autodesk products, available for download.

That’s about it, we hope at least one of these solutions helped you solve the AutoCAD not opening problem. While you managed to fix AutoCAD, you might also be interested in our guide on how to fix AutoCAD files in Windows 10.

If you have any questions, comments, or suggestions, just reach out to the comments section below.

Sound Blaster Z has No Sound on Windows 10: 7 Confirmed Fixes

Windows operating systems can commonly cause sound issues, and this usually happens after a new update. Renewing the digital infrastructure to Windows 10 makes no difference.

Thus, users often reported that Sound Blaster Z has no sound on Windows 10. This may be a cause of some kernel changes related to hardware timers, made by Microsoft.

Why does Sound Blaster Z have no sound on Windows 10?

From what readers told us, the device is plagued with issues such as audio stuttering, crackling, popping, or sudden channel swapping. If you ever encountered the Sound Blaster Z audio issues on Windows 10, make sure you read this article. It will surely be an important support, to fix your problem.

After some research on multiple support forums, we have created a list of the most common reasons that would cause the Sound Blaster Z no sound error:

  • Your PC does not meet the requirements: Before running any software, you should ensure that your PC meets the minimum requirements or not.
  • Default playback settings: If for some reason the default playback device isn’t set as Sound Blaster, then also you will come across this issue.
  • Volume is muted: Accidentally, you might have turned down the volume which is why you are getting this problem.
  • The driver isn’t updated: You should ensure that every driver on your PC is up to date, to avoid compatibility and other program-related issues.
  • Compatible Windows version: Some users have reported rolling back the Windows version fixed the problem for them.

What can I do if Sound Blaster Z has no sound on Windows 10?

1. Check default playback device settings

  1. Open the Start menu by pressing the Win button.
  2. Open Control Panel.
  3. Go to Sound.
  4. In the Playback tab, right-click on Sound Blaster Z.
  5. Select default playback device.
  6. Close the Windows.
  7. Restart your PC.

For a sound-related program to work properly, you need to make it the default device. Follow the above steps and check if this resolves the issue or not.

2. Check soundboard settings

  1. Open Sound Blaster Z-Series Control Panel.
  2. Click on the Speakers/Headphones tab on the left.
  3. Click on the Speakers/Headphones Configuration drop-down and select speakers and Stereo (2.0/2.1).
  4. Check the volume, so it is not muted.

You can also hit the Test button to check if the sound driver is working properly or not after you have made the above-mentioned selection.

3. Update the sound driver

  1. Open the Start menu by pressing the Win button.
  2. Type Device Manager and open it.
  3. Expand Sound, video, and game controllers.
  4. Right-click on Sound Blaster Audio Controller and select Properties.
  5. Select the Driver tab on the right side.
  6. Click on the Update driver option.
  7. Select Search automatically for updated driver software.

The Sound Blast has no sound issues may also be caused by an old version of it. Thus, updating the sound driver from your PC might be an efficient option.

You can follow the above steps to update the driver on your PC. However, it may take some time, as there are a few steps to follow, and it can become tedious in case you have to update all drivers.

For such scenarios, we would suggest you take use of a third-party recommended tool called Outbyte Driver Updater. Using Outbyte Driver Updater, you will be able to update all the drivers on your PC with just a few clicks.

Apart from updating drivers, you can also schedule scans, create driver backups, use it as an efficient download manager, and more.

⇒ Get Outbyte Driver Updater

4. Rollback to the previous version

  1. Open the Start menu by pressing the Win button.
  2. Type Device Manager and open it.
  3. Expand Sound, video, and game controllers.
  4. Click on Sound Blaster Audio Controller.
  5. Select the Driver tab on the right side.
  6. Click on Rollback driver.
  7. Click OK.
Note icon NOTE
Most commonly, it seems that installing the latest Sound Blaster Controller Audio driver can cause our presented issue. Rolling back to the previous driver should solve the problem.

5. Install the latest Sound driver in Compatibility Mode

  1. Right-click on your Sound Blaster Z driver EXE file.
  2. Select Properties.
  3. Click on the Compatibility tab.
  4. Under Compatibility Mode, click Run this program in compatibility mode for.
  5. Select the down arrow and then choose the Windows version of the driver.
  6. Click on OK.
  7. Install the driver.

Even if, as mentioned before, rolling back to the previous driver should solve the problem, you should also consider installing the latest Sound driver in Compatibility Mode.

6. Run the Audio Troubleshooter

  1. Press the Windows + I keys to open Settings.
  2. Go to Update & Security.
  3. On the left side, select Troubleshoot.
  4. Click Additional troubleshooter on the right side.
  5. Under Get up and running, select Playing Audio.
  6. Click on Run the troubleshooter.
  7. If any issues are found, allow the troubleshooter to fix Audio services.

This option will help you have a clear vision of sound troubleshooters in a well-organized list.

7. Downgrade PC to Windows 10 Pro

  1. Press Win + R keys to open the Run dialogue.
  2. Type regedit and press Enter.
  3. Navigate to the below path. Computer\HKEY_LOCAL_MACHINE\SOFTWARE\Microsoft\Windows NT\CurrentVersion
  4. Double-click the ProductName key on the right side.
  5. In the Value data field, type Windows 10 Pro.
  6. Download Media Creation Tool.
  7. Run the EXE.
  8. Accept the agreements.
  9. Choose the Upgrade this PC now option.
  10. Follow the on-screen prompts.

The above steps will force the Media Creation Tool to automatically download the Windows 10 Pro, which as per one of our readers fixed the problem of Sound Blaster Z audio issues.

However, the reader advised updating to Version: 21H1 OS Build: 19043.1083 Experience: Windows Feature Experience Pack 120.2212.3530.0, and avoiding the Windows version 2H22. This is because it will mute the sound card again.

These were our suggested possibilities that will surely support you to fix the Sound Blaster Z audio issues on Windows 10. As you noticed, there are quite a few options you can easily apply.

You can always check a full guide related to sound problems in Windows 10. Thus, you will not worry again about this annoying problem.

Feel free to share your thoughts with us by using the comments section below. We’d love to hear your opinion.

Latest bug in the Windows 11 2022 Update might affect the conversion of text in certain languages

Microsoft has yet again confirmed another bug affecting the Windows 11 2022 Update, this time it causes the conversion of text in certain languages not to work well. This is likely to affect users typing in languages that use multibyte character sets such as Japanese, Korean, and Chinese.

According to Microsoft, “Text conversion occurs when a series of characters is transformed into different characters by means of user selection. This commonly involves additional Prediction candidate and Conversion candidate windows, which appear near the cursor position while typing.”

Here are a couple of things that you can look out for that will let you know if this bug is affecting your conversion of texts functionality:

  1. An incorrect range of characters is automatically selected for conversion, resulting in the conversion candidate window displaying unexpected options.
  2. The cursor might move to an unexpected position, resulting in the selection of the wrong sequence of characters for conversion. This can cause symptom 1.

Microsoft hasn’t provided a workaround for this issue, though it has indicated that it is working on a fix that s likely to be part of a future release. The Windows 11 2022 Update has had its fair share of issues this past year like unresponsive apps, printer not working, and broken Remote Desktop Connections.

Have you encountered the issue highlighted above? Let us know in the comment section.

How to Easily Find the Sleep Button on a Windows Laptop

Putting your laptop to sleep when it’s not in use can save electricity (and battery power). In most cases, you can put your Windows 10 laptop to sleep using the Start menu.

However, a quicker option would be to use a button located on the laptop itself. Most notebook manufacturers, highlight the sleep button with a crescent moon or a Zz symbol on one of the function keys, and the sleep function is triggered by pressing it together with the Fn key.

What can I do if I can’t find the sleep button?

As we mentioned above, the sleep button on the laptop keyboard has a little crescent moon or a Zz design on one of the Function keys.

The location of the sleep button depends on the manufacturer or even the model of the laptop so we can’t pinpoint it for every single device.

Some laptops don’t include such a key. However, below, you will find out all the key combinations and ways to program the Power button for this purpose

How can I find the sleep button on my laptop?

1. Check the brand of your laptop

Because the specific location of the sleep button will vary from laptop to laptop, you can use this list to ensure you’re on the right track:

  • Asus laptops – You can access the sleep function on an Asus laptop by pressing the Fn + F1 keys. There is no dedicated sleep button.
  • Lenovo – You can put most Lenovo laptops to sleep by pressing the Fn + 4 keys. Older models from the B5 series require you to press Fn + F1 keys.
  • Dell – Dell laptops such as the Inspiron 7577 use the Fn + Insert. You can put Alienware laptops to sleep by tapping the power key/button once.
  • HP – Hewlett-Packard marks the sleep keys on most of its laptops with a crescent moon symbol. Press and hold the Fn key and the moon key to put your laptop to sleep.
  • Acer – The sleep button on an Acer laptop is marked with a Zz symbol. If you find this symbol on the F4 key, you can put the laptop to sleep by pressing it along with the Fn key.

If you don’t like using the Fn key combination to put your laptop to sleep, you can control in which situations Windows 10 can go to sleep.

2. Convert the power button into a sleep button in Windows 10

  1. Press the Win + R keys.
  2. Type Control Panel and press Enter.
    run-dialog-control-panel-shortcut
  3. View items according to small icons.
  4. Click on Power Options.
    control-panel-power-settings
  5. Click on Choose what the power buttons do.
    power-settings-control-panel
  6. Set When I press the power button to sleep for both the On battery and Plugged in options.
  7. Click on the Save changes.

    power-buttons-drop-down-menus

If your laptop doesn’t have dedicated or integrated sleep keys, you can convert your power button.

You can still use the power key to shut the laptop down by long-pressing it. You can set the laptop to sleep when you close the lid.

If you still didn’t figure things out, our article on how to put your laptop to sleep will offer even more information.

Did you find this guide helpful? Please leave a comment down below.

3 Xbox video games just got special Oreo-themed skins

Microsoft, this month, is collaborating with Oreo to release limited edition Xbox-themed Oreo cookies in 22 European countries.

The Oreo cookies are being made with cookie designs showing the Xbox logo, the ABXY controller buttons, and the D-pad directional arrow. All cookies within a pack can be rearranged to form a code which can then be entered on the official Oreo Xbox website. If entered correctly, correct codes will unlock Oreo-themed skins in Halo Infinite, Forza Horizon 5, or Sea of Thieves and can also reward participants with a variety of real-world prizes ranging from Game Pass subscriptions and Xbox consoles to an actual trip for an entire family.

Xbox Oreo cookies. Image credit: Microsoft

This isn’t the first time Microsoft has collaborated with Oreo. Back in 2019, the tech giant released an Xbox One X console with an Oreo cream-inspired skin.

Telegram updates on Windows with new contact and media options

The official Telegram Messenger app updated for Windows devices this week with several improvements to hidden media, contact profile pictures, and lists.

After installing this update, Telegram users will be able to hide list members from others, upload custom photos for contacts, and customize privacy settings for profile photos.

Here’s the release notes:

Hidden Media

  • Media with spoiler effects. You can wrap photos and videos you send in a fuzzy cover by selecting media in the attachment menu and tapping (⋯) > Hide With Spoiler.

Profile Pictures for Your Contacts

  • Setting pictures for your contacts. You can choose your own picture for a contact – only you will see it on their profile.
  • Suggested profile pictures. When editing your contacts, you can suggest a photo for their profile. It will take them just two clicks to add the picture you suggested.
  • Public profile pictures. If you only allow certain users to see your profile photos, you can set a public picture for everyone else.
  • Ultimate profile picture privacy. You can set Who can see my profile photos to Nobody and add some users or groups as exceptions.

Hiding Members in Large Groups

  • Member list privacy. Owners of large groups can hide the list of members.

In addition to these Windows app changes, a variety of new features and functions have also been added to both the Android and iOS Telegram apps. You can read all about those here.

After more Windows app news? Give us a follow on Twitter.

Telegram Messenger
Telegram Messenger

[Answered] How do I Force a Game to Run on my GPU?

The GPU is a vital component of your gaming experience, so it’s important to ensure it’s running optimally. However, this may not always happen and sometimes you may find that your game is not using your GPU.

It, therefore, goes without saying that you need a good graphics card especially when running a graphic-intensive game. Sometimes it’s your PC that is unable to detect the GPU or other underlying issues which we shall look at in this article.

Why is a game using 0 GPU?

There are several reasons why you might find your GPU isn’t being used in games. Below are some possible causes:

  • The game does not require the GPU – Not all games require the GPU to run. Some games only require the CPU so you need not worry in such cases.
  • Insufficient memory – If your PC is low on memory, your game may not be running properly and you’ll face performance issues. 
  • Outdated OS – It is possible that you’re using a version of Windows that has not been optimized for the game hence the 0 GPU usage. You can upgrade to a Windows edition that’s best for gaming.
  • Too many programs running – This can happen if you have too many applications open at once and they’re using all your GPU leaving none for your game.
  • Integrated GPU – Sometimes, running an integrated GPU means it’s not powerful enough to run a game. An integrated GPU has very few features compared to a dedicated GPU, but it’s still capable of running games at a good framerate.
  • Incorrect/missing drivers – If your computer has missing drivers or incorrect drivers installed, the GPU becomes useless. If this is the case, then you will need to uninstall and reinstall the driver to correct this.
  • Outdated game – If you are not running the latest version of your game, it is possible that there are some inconsistencies with the current system requirements.

How do I force a game to run on my GPU?

A few preliminary checks before jumping into the slightly technical solutions include:

  • Check the system requirements for the game and ensure your PC meets or exceeds these requirements.
  • Ensure that you have enough memory available on your graphics card to run the game. Here’s what to do if your PC is not using all RAM.
  • Make sure the game uses the correct display settings for your system. These can be found in the options menu or by looking at this list of common display settings.
  • Check your GPU temperature to ensure it’s not overheating.

1. Upgrade graphic performance settings 

  1. Press Windows + I to open Settings.settings windows 11
  2. Click on System on the left pane then select Display.System - Display- Photoshop not using GPU
  3. Under Related settings, click on Graphics.
  4. Select your preferred game from the list, and click on Options.
  5. Now, choose High Performance and click Save.

2. Update your graphics driver 

  1. Click on the Windows key, type Device Manager in the search bar, and click Open.black-screen-installing-graphics-card-driver
  2. Navigate to Display adapters to expand, right-click on your graphics card, and select Update driver.update-graphics-driver video memory management internal windows 11
  3. Select Search automatically for drivers.

Consequently, there’s also another straightforward and faster method of updating your drivers. When you use an automatic tool, you’re able to get the job done faster and avoid any mishaps especially if you’re not sure of the correct driver to install.

Outbyte Driver Updater is a driver updater tool that detects, scans, downloads, and installs any missing, outdated or corrupt drivers from its huge database.

⇒ Get Outbyte Driver Updater

3. Reinstall your graphics card 

  1. Click on the Windows key, type Device Manager in the search bar, and click Open.black-screen-installing-graphics-card-driver
  2. Navigate to Display adapters to expand, right-click on your graphics card, and select Uninstall device.Reinstall graphics driver
  3. Restart your PC and the drivers will be automatically reinstalled.

4. Enable hardware acceleration

  1. Hit the Windows key and select Settings.settings windows 11
  2. Click on System on the left pane, then Display on the right pane.System - Display- Photoshop not using GPU
  3. Scroll down and select Graphics.
  4. Select the Change default graphics settings option.
  5. Now, toggle on the Hardware-accelerated GPU scheduling option.disable Hardware-accelerated GPU scheduling

5. Use a dedicated GPU 

  1. Click on the Start Menu icon, type Device Manager in the search bar, and click Open.black-screen-installing-graphics-card-driver
  2. Navigate to Display adapters to expand, right-click on your graphics card, and select Disable device.
  3. Next, launch your dedicated graphics card control panel (In this case, Nvidia Control Panel).
  4. Select Manage 3D settings from the navigation pane on the left.manage 3d settings
  5. Choose a High-performance NVIDIA processor from the Preferred graphics processor dropdown menu.

6. Update your OS

  1. Hit the Windows key and click on Settings.settings windows 11
  2. Select Windows Update and click on Check for updates.check-updates-w11 windows 11 blue screen
  3. Download and install if available.

7. Install overclocking software

Overclocking software comes into play when using a dedicated GPU. Such programs enhance the performance of your PC and ensure that your GPU is being used for its intended purposes.

The only downside is that it comes at a cost – instability and high GPU temperature. As such, it is essential that you monitor closely using overclocking test stress software to keep your system secure.

If everything fails, you can reset your GPU especially if you’re facing compatibility issues. Alternatively, it may be time to get yourself a new GPU that’s able to meet today’s modern game system requirements.

This issue can affect any game, and we already wrote about Minecraft not using GPU in one of our older guides.

And that’s how you ensure that your game is using your GPU to capacity whenever you’re playing games. Let us know of any additional thoughts you may have on this topic down below.

Fix GTA V Not Using GPU on PC [Low Usage]

It’s no secret that GTA V is one of the best PC games and also the most-feted releases in the GTA series editions. Whereas gamers enjoy its features most of the time, some hiccups such as GTA 5 not using the GPU may arise from time to time.

GTA 5 has a lot of graphics so it is essential that your GPU is operating optimally for an overall great experience and performance while playing the game.

Why is GTA V not using all of my GPU?

If you’re wondering why GTA 5 may not be using your GPU, below are some possible causes:

  • Graphic settings – Your graphic settings play a vital role in the overall performance of your game. If GTA 5 is not using your GPU, you may need to tweak the settings to optimize the GPU.
  • Integrated GPU – When using an integrated GPU, it may not be able to handle all the graphic-intensive tasks associated with GTA 5. You may need to upgrade to a new GPU.
  • Corrupt installation – If you downloaded GTA 5 from an unverified source, it is possible that the game files are corrupted or there was an incomplete installation. This could trigger an error where your GPU is not being detected.
  • Competing programs – You may need to turn off background programs that may be using the GPU. If they are using up the GPU, it is possible that there’s none left for GTA 5.
  • Outdated drivers – With time, drivers can become incompatible especially if it’s been a while since you last updated them. It’s possible that GTA 5 does not recognize them anymore. If you’re unable to install drivers, check out our article on how to bypass this issue.

How can I make sure GTA V is using GPU on my PC?

Before proceeding to the slightly complex solutions, we recommend you give these basic ones a try:

1. Change graphic settings

  1. Press Windows + I to open Settings.settings windows 11
  2. Click on System on the left pane then select Display.System - Display- Photoshop not using GPU
  3. Under Related settings, click on Graphics.
  4. Select GTA 5 from the list, and click on Options.
  5. Now, choose High Performance and click Save.

2. Adjust power plan settings

  1. Hit the Windows key and click on Settings.settings windows 11
  2. Select System on the left plane then Power on the right pane.
  3. Click on the drop-down menu next to Power mode and select Best performance.

3. Verify the integrity of game files

  1. Launch Steam and navigate to the Library tab.Steam library
  2. Right-click on Grand Theft Auto V and click on Properties.
  3. Select the Local Files tab, click on Verify Integrity of Game Files and wait until the process is completed.
  4. Launch GTA V after the scan.

4. Update graphic drivers

  1. Click on the Windows key, type Device Manager in the search bar, and click Open.black-screen-installing-graphics-card-driver
  2. Navigate to Display adapters to expand, right-click on your graphics card, and select Update driver.update-graphics-driver video memory management internal windows 11
  3. Select Search automatically for drivers.

If you’re new to updating drivers or just want to avoid the manual method, you may benefit from a third-party driver updater utility. Such programs are extremely helpful as they are more thorough.

You don’t have to worry about downloading the wrong driver as Outbyte Driver Updater will detect, scan, download, and install any missing, corrupted, or outdated driver with a single click.

⇒ Get Outbyte Driver Updater

5. Reinstall GTA 5

  1. Launch Steam and navigate to the Library tab.Steam library
  2. Right-click on GTA V, select Manage and click on Uninstall to completely remove GTA V.
  3. Restart your PC, and reinstall the game on Steam.

Reinstalling should be a last resort in case you installed the wrong version or a corrupted one. If you find that GTA 5 is only using 50 GPU, you may enable hardware acceleration provided your GPU is up for the task.

Does GTA 5 use GPU or CPU?

GTA 5 uses both the GPU and CPU. It’s a very demanding game and requires a lot of processing power. When playing the game, you should be able to strike a balance between the two so that neither is using too much or too little. 

If you find that GTA is using 0 GPU, then there may be an underlying problem as your CPU may be getting overwhelmed. In such cases, you’ll experience frequent crashes but we have an answer if GTA keeps crashing.

When GTA is not using full GPU, it could be a sign that yours has served its purpose and it’s time for an upgrade. To that effect, we have an excellent recommendation of the best GPUs for gaming that you should check out.

While you’re still here, ensure to check out our list of GTA 5 VPNs that prove to be helpful especially for gamers facing geo-restrictions or just for an overall performance boost.

We appreciate your feedback so don’t hesitate to leave a comment down below if you have any additional thoughts on this topic.

Fix: Doordash Payment Failed, Use Different Payment Method

Doordash Payment Failed error will prevent you from making purchases on this service, and that can be a problem.

Luckily, there are a couple of ways to fix this error, so let’s try how to fix this issue.

How can I fix Doordash payment failed error?

1. Doordash payment not working

  1. Login to your account.
  2. Click on menu icon in the top left.
  3. Next, click on Payment.
  4. Check if your credit payment information is valid.
  5. You can also try removing your card and adding it again.

2. Doordash Cart not showing up

fix Doordash your cart is not available anymore

Many users are experiencing problems when trying to check out, after entering their product order in the app. It could be an error validating basket or the cart just doesn’t show up.

Usually, this is solved by going to their website and placing the order there. All you need to do is log in and then create and place the order.

3. Check your internet connection

For everything to work, you need a good internet connection when ordering on DoorDash. Turn on and off your Wi-Fi to force reconnection.

If you are not using Wi-Fi, make sure the mobile data is working.

4. Clear data and cache

  1. Click the Menu button in the top right of your browser.
  2. Choose Clear browsing data.
  3. Make sure that All time is set as a Time range. Click on Clear data.

5. Check DoorDash social media accounts

how to fix doordash cart not available error

Looks like DoorDash is very responsive on their social media accounts, especially Twitter. Make sure to check there for any reported issues on their part.

This isn’t the only problem you can encounter, and we already covered Dasher must be active DoorDash error as well as DoorDash network error in our previous guides.

Hopefully, one of these solutions will help you fix the error you have encountered. However, if you’ve used another method, feel free to share it with us in the comment section below.

How to Check Who Tried to Log in to My Instagram & Secure Account

Instagram notifies users of any suspicious activity for general security reasons, or to prevent spammers, eliminate fake accounts, and stop hackers.

As a result, many Instagram users get every once in a while out-of-nowhere warnings that the app has detected an unusual login attempt.

The app also offers some options to move forward, such as getting help to log in, receiving a security code via text message, or confirming that you own the account.

Sometimes you might experience issues when logging in to Instagram and there are ways to fix it. But what does suspicious activity on Instagram mean?

Just like you, there are plenty of other users who wonder the same thing, so let’s start by finding out what is unusual activity on Instagram.

Why does Instagram keep logging me out for suspicious activity?

The mentioned warning usually appears when you try to log in from a different device when Instagram detects a different IP address than the usual one.

In other words, an Instagram account can get locked for suspicious or unusual activity when you change the usual location (travel often, move to another country), or when someone tries to access your account for various reasons.

If such is the case, can you see login attempts on Instagram? You can and we’ll show you exactly how to go about it.

How to know who is trying to login my Instagram account?

  1. Open the Instagram site in your browser of choice.
  2. Click on your profile icon and select Settings.
  3. Next, click on Login Activity. You should see a list of all recent login attempts, either by your or someone else.
  4. Note that the top result should display an Active now tag under the location corresponding to the device from which you are currently logged in.
  5. Use the arrows to review each login attempt and remove the ones that look suspicious. By suspicious, we mean with different locations or devices than the ones you might be using.

If Instagram is not working on Chrome, for instance, you can do the same from your mobile phone or via the Instagram app for your desktop, depending on the case.

How do I fix a suspicious login attempt on Instagram?

1. Accept security verification

That is, confirm whether it was you or not.  Maybe you or someone else tried to access your account from another IP address or an unrecognized device or computer.

If it was you, click the This Was Me option and you’ll be allowed to use your account.

If it wasn’t you, don’t panic, as most probably their attempt failed. Just click This Wasn’t Me. The app will then prompt you to change your password.

At this stage, you should consider changing your password with a stronger one, and a never-before-used password. We recommend that you use a password manager that will help with storing complicated passwords for all your apps and devices.

After changing your password, and confirming it twice, you tap on the Submit option and you should be good to go.

Note that some users deactivated their accounts when seeing the warning and then couldn’t get back in with a password change.

If this is the case, try to change the password using Instagram’s webpage (logging in from a browser). Also, disable any VPN or proxy connection that you might have.

2. Insert security code (if applicable)

If you’ve enabled the two-factor authentication method, Instagram will require a security code to log in.

The code is sent to the email address associated with your Instagram account. You just have to use that code and you’ll get access to your account. 

This step is required only some of the time and only if the extra layer of protection is enabled. Again, we recommend that you activate this option especially if you frequently get suspicious login attempts.

To do this, in your account, tap on your profile, choose Settings and then click the Two-Factor Authentication option. Then, simply turn on the Require Security Code option.

Now every time you log into your Instagram account, the app will send you a code via text message. Indeed, it might be a little annoying at first, but better safe than sorry.

We hope that you found this article useful. Any comments or suggestions are welcome in the dedicated section below.

How to Fix OneNote Not Responding / Crashing [9 Ways]

OneNote is a very useful part of the Microsoft Office package, especially for students. But, some people have reported that they’re having some issues with this tool.

So, we’ve created this article in order to help you solve the OneNote problem in Windows 10.

OneNote is a useful note-taking application that many Windows 10 users use.

Even though OneNote is incredibly useful, sometimes certain issues can appear while using this app. Speaking of issues, many users reported the following problems:

  • OneNote keeps crashing, not responding: These are some of the problems that can appear with OneNote, but you should be able to fix most of them by using one of
  • OneNote won’t open Windows 10: Many users reported that OneNote won’t open at all on their PC. If this happens, you need to delete the settings file and see if that helps
  • OneNote not opening, working: Several users reported that OneNote won’t work or open at all. This can be a big problem, but you should be able to fix it simply by reinstalling the application
  • OneNote problems Windows 10 something went wrong: This is another common problem with OneNote. If you encounter this issue, you should be able to fix it by using one of our solutions
  • OneNote won’t sync: Syncing is an important part of OneNote since it allows you to view your notes on different devices. If your device won’t sync, you might be able to fix the problem by resetting the application to default
  • OneNote error 0x803d0013: This is one of many error codes that can appear while using OneNote. This problem can be caused by a corrupted user profile, and you can fix it by creating a new user profile in Windows
  • OneNote you are not connected to the Internet: Sometimes you might get this error message while trying to use OneNote. In most cases, this issue is related to your security software, so be sure that your antivirus or firewall isn’t interfering with OneNote

How do I fix OneNote not working on Windows 10?

1. Use PowerShell

  1. Open the Windows search bar and type cmd.
  2. Select the Command Prompt Run as administrator option.
  3. Enter PowerShell command and press Enter:
    onenote problem in windows 10
  4. After that, enter this command and press Enter:
    • get-appxpackage *microsoft.office.onenote* | remove-appxpackageproblem with onenote windows 10
  5. After that, enter one more command and press Enter:
    • remove-appxprovisionedpackage –Online –PackageName Microsoft.Office.OneNote_2014.919.2035.737_neutral_~_8wekyb3d8bbwe
  6. Restart your computer

After you perform the above steps, try to open your OneNote again. Now, everything should work fine again. If these steps did not helped with your issue, go to the next solutions.

2. Re-install Microsoft Office

If the PowerShell solution didn’t solve the problem, you can try reinstalling the complete Microsoft Office package.

If you used Office before you upgraded your system to Windows 10, there’s a chance that something went wrong while the system was upgrading.

So, reach for the Programs and Features, uninstall the complete Office, and then download it or install it from the installation disc again.

If you have downloaded Microsoft Office from a not-so-secure website you might have a problem. Get them from trusted sources:

3. Delete the settings.dat file

  1. Press Windows Key + R and enter %localappdata%.
  2. Now press Enter or click OK.
    OneNote won't open Windows 10
  3. Now navigate to PackagesMicrosoft.Office.OneNote_8wekyb3d8bbweSettings directory and delete settings.dat file.
    OneNote not working

If you’re having OneNote problems, the issue might be related to the settings.dat file. This is a settings file for OneNote, and if this file gets corrupted, you won’t be able to start OneNote properly.

To fix the problem, it’s advised to delete the settings.dat file and restart OneNote. After doing that, try to start OneNote again and check if the problem still persists.

4. Switch to a different page

Several users reported syncing problems with OneNote. According to them, document changes aren’t being synced across devices.

This can be a big problem since you won’t be able to access your documents from a different device. However, users have found a useful workaround that might help you with this problem.

According to users, after you’re done editing your document, switch to a different page in OneNote. By doing so you’ll force OneNote to sync your changes.

By default, OneNote should sync any changes as soon as you make them, but if that doesn’t happen, be sure to try this workaround.

This isn’t a permanent solution, however, you should at least be able to sync your documents by using this workaround.

5. Click the + button

Several users reported that OneNote is unable to sync. According to users, they are stuck waiting for their notebooks to load. This can be a big problem since you won’t be able to access your notes at all.

However, users found a way to fix this problem. To fix the issue, simply click the + tab while your notebooks load.This will allow you to sign in to your account.

After doing that, the loading should finish and you’ll be able to access your notes again. This seems like a strange bug, but you should be able to fix it by using this solution.

6. Delete OneNote cache

  1. Press Windows Key + R to open the Run dialog.
  2. Now enter OneNote /safeboot.
    OneNote you are not connected to the Internet
  3. After doing that select Delete cache and Delete settings.

If you’re having OneNote problems, you might be able to fix them by removing OneNote cache. Once you delete cache and settings, you should be able to start OneNote without any problems.

7. Create a new user account

  1. Press Windows Key + I to open the Settings app.
  2. When Settings app opens, go to Accounts section.
  3. In the left pane, choose Family & other people.
  4. In the right pane, choose Add someone else to this PC.
    OneNote problems Windows 10 something went wrong
  5. Select I don’t have this person’s sign-in information.
    OneNote won't sync
  6. Now choose Add a user without a Microsoft account.
    OneNote error 0x803d0013
  7. Enter the desired user name and click Next.
    OneNote you are not connected to the Internet

If you’re having OneNote problems, you might be able to fix the issue simply by creating a new user account.

OneNote is a built-in application in Windows 10, closely related to your user account, and if your user account gets corrupted, you won’t be able to access OneNote anymore.

However, you can easily check if your user account is the problem by creating a new user account. After creating a new user account, switch to it and check if the problem is still present.

If not, it means that your old user account is corrupted. You can’t repair a corrupted account, but you can move all your personal files from the corrupted account to your new one.

8. Reset OneNote app

  1. Open the Settings app and go to Apps section.
  2. List of installed applications will appear.
  3. Select OneNote from the list and click Advanced options.
    OneNote won't sync
  4. Now click the Reset button.
  5. A confirmation dialog will appear. Click the Reset button again to confirm.
    OneNote error 0x803d0013

If you’re having OneNote problems on your PC, you might be able to solve this issue simply by resetting your app to default.

9. Install the missing updates

  1. Open the Settings app and go to Update & security section.

  2. Now click the Check for updates button in the right pane.

OneNote issues might be due to missing updates. Windows 10 is a solid operating system, but sometimes certain bugs can appear, and since OneNote is a built-in application, these issues can affect it.

It’s advised to keep your Windows up to date. By default, Windows 10 installs the missing updates automatically, but sometimes you might miss an important update due to certain bugs or errors.

If any updates are available, Windows will download them in the background and install them once you restart your PC. If your PC is already up to date, you might want to try some other solution.

By following these steps you should be able to solve all of the most common OneNote issues that can happen in Windows 10.

If you have any comments, reach for the comment section below, and we’ll try to clear up all uncertainties. 

Windows 11 Widgets Not Working? Fix Them in 5 Steps

Windows 11 widgets are probably among the best features of the new operating system. This feature, while bringing back memories of the Windows 7 widgets, is completely redesigned with a more clean and sleek design., and new functionalities.

Having the widgets on your new OS not working is not an entirely new problem in the software world. This problem can be caused by several reasons.

However, some users have reported either blank or unresponsive widgets. If you are reading this then you are probably having the same problem. We have listed some solutions that have been tested and confirmed to fix the Windows 11 widgets not working issue once and for all.

What can I do if Windows 11 widgets are not working?

1. Enable Widgets via Settings

  1. Click the Windows button from the taskbar and choose the Settings icon.WINDOWS_settings
  2. Choose Personalization from the left side menu.personalization(windows 11 widgets not working)
  3. Click on Taskbar.taskbar
  4. Toggle the Widgets button to on.widgets-button

2. Switch from local account to Microsoft account

  1. Click the Windows button then choose on the Settings option.WINDOWS 11_settings
  2. Click on Accounts.accounts
  3. Choose the Your info option.your-info
  4. Under the account settings section, click on Sign in with a Microsoft account instead.signin-microsoft-account
  5. Provide your username and password then click Sign in.

3. Enable widgets from group policy

  1. Press Windows button + R and then type gpedit. msc. Press the Enter button.win+r (windows 11 widgets not working)
  2. Click on Computer Configuration.comp-config (windows 11 widgets not working)
  3. Choose Administrative Templates.admin-templates (windows 11 widgets not working)
  4. Open the Windows Components folder from the left side list.win-components (windows 11 widgets not working)
  5. Search for and click on the Widgets folder.widgets (windows 11 widgets not working)
  6. Double click on Allow widgets.allow widgets (windows 11 widgets not working)
  7. In the window that appears click on Not configured then click the OK button.not configured (windows 11 widgets not working)

4. Set Microsoft Edge as your default browser

  1. Open Settings after clicking the Windows logo in your taskbar.WINDOWS settings( windows 11 widgets not working)
  2. Click on Apps.apps (windows 11 widgets not working)
  3. Choose the Default apps option.default - apps (windows 11 widgets not working)
  4. Under related settings, click on Choose defaults by file type.choose-defaults-by-file-type (windows 11 widgets not working)
  5. In the search tab search for .html.search html (windows 11 widgets not working)
  6. Set Microsoft Edge as the default app for both .htm and .html options.pick-default-app (windows 11 widgets not working)

5. Disable Graphics Drivers

  1. Press the search button from the taskbar,type control panel, and open it.open-control-panel (windows 11 widgets not working)
  2. Click on Hardware & Sound.
  3. Under the Devices and Printers section, click on the Device Manager option.device-manager (windows 11 widgets not working)
  4. Click on Display adapters.display adapters (windows 11 widgets not working)
  5. Right-click on the graphics card then select Properties.adapter properties (windows 11 widgets not working)
  6. Click on the Drivers tab.driver tab (windows 11 widgets not working)
  7. Choose the Disable device option.disable device (windows 11 widgets not working)

Most users on online forums have used the above solutions to fix the widget problem once and for all, so they might prove efficient in your case as well. If that did not help, you can try updating your drivers with the help of Outbyte Driver Updater which will scan your PC and replace missing or outdated drivers.

Windows 11 widgets can be directly accessed from the taskbar or by simply pressing Win + W. It gives users quick access to various feeds such as sports, weather, stock, traffic, etc.

Users are also able to customize their widgets by adding & removing user interests or even changing the language settings.

As you can see, fixing blank or unresponsive widgets is not so complicated. We hope one of the solutions listed above helped you with your problem.

You can also explore how to disable widgets on Windows 11 in case you want a free and clean taskbar.

Feel free to use the comment section in case you have a question or a solution that you would like to share with us.

GPG Verify Signatures Failed Unexpected Error: 3 Easy Fixes

If you are encountering the GPG: verify signatures failed unexpected error, make sure to follow this article for an in-depth solution.

GPG, or the GNU Privacy Gaurd, is an excellent and one of the free encryption tools that many enthusiasts use for data exchange or other purposes. However, many users also encounter errors, particularly signature verification failure or similar issues with GPG.

What causes the Verify signatures failed: unexpected error with GPG?

Usually, you should be able to encrypt data using GPG successfully. If an exception happens with the error message we are talking about, it may be because of the following things:

  • Problem with the key file: For some users, the key name may have a problem that prevents GPG from verifying encryption properly.
  • Incorrect configuration: If you have just installed GPG and start getting this error, it is also possible that there is something wrong with the configuration or it has been corrupted.
  • Problem with the encryption method: In case you are getting verify signatures failed: unexpected error message constantly, it is possible that you are not using the GPG properly.

How do I fix GPG: Verify signatures failed: Unexpected error?

Before going through our solutions, we suggest you ensure the following things:

  • Make sure you have installed the GPG tool correctly.
  • Ensure your downloaded files are not corrupted. Try not to use the download manager in this case or vice versa. Learn which are the best download managers.

After that, follow these methods one by one to see which one fixes the verify signatures failed unexpected error message while using the GPG tool.

1. Use the correct way to verify

  1. Put the certificate and the file in the same location. In our case, we have put in LocalDisk E.
  2. Open the Start Menu, type PowerShell, and press Enter.
  3. Go to the location with the following command format: cd E:/
  4. Type the following command to import the correct key: gpg --import keyfilenameimporting keyfile command powershell
  5. Run the following command to verify the signature: gpg --verify datafile.extension.asc datafile.extensionverifying signature gpg powershell command

Depending on the file you are trying to verify against a signature, there may be slight changes in the instructions. So, you also may look for proper documentation if you are trying to verify a specific software or app.

2. Use the GUI solution

  1. Download GPG4Win and install it on your PC.
  2. Open the software.
  3. Import the certificate or key by clicking on Import.importing keyfile kleopatra
  4. Click on Decrypt/Verify and choose the file you want to verify.

For Windows, we have used GPG4Win, which automatically installs Kleopatra, a tool that allows you to use GPG from the graphical user interface. If you are using a different OS, you may need a different tool.

However, if you are not comfortable with the command line tool and get the error, using the GUI solution will fix gpg: verify signatures failed: unexpected error message.

3. Use the correct key

  1. Go to the website from where you downloaded the key or contact the provider of the key.
  2. Download the correct key file and save it with the correct name.downloading electrum signature
  3. Then, try again.

In most cases, the signature failed message appears with an unexpected error due to the wrong or corrupted key file. So, if you get the error even after using the correct commands, redownloading the signature file can help.

Also, you should make sure that the key file and the certificate names are as suggested by the provider.

If you have been using GPG to encrypt your file, you also can consider these best AES encryption tools.

This article has explained how you can fix GPG: verify signatures failed: unexpected error message. If you have any better suggestions, feel free to let us know in the comment box.

Best Virtual Machine For Windows 11 (Free & Paid)

A virtual machine or VM is a piece of software that emulates a computer and acts as a substitute for the real thing. VMs mimic a computer’s hardware and architecture to offer the same functionality.

You can run existing apps and services on a virtual machine without having to risk the stability of your regular PC. Windows 11, for example, has a lot of bugs right now that may make the experience frustrating.

A virtual machine would allow people to try it out without having to sign up for anything. Read on to find out which is the best virtual machine for Windows 11 that fits your needs and wants.

What is the best virtual machine for Windows 11?

VMware Workstation

VMware Workstation is one of the best virtual machines on the market, as it is highly versatile. This software is capable of installing multiple virtual machines and operating systems on the same host computer.

You can deploy the different iterations of Windows that have been released over the years and MacOS too with VMWare Fusion. It can do all this at a high speed.

Downloading VMware Workstation is pretty easy with straightforward instructions. It’s very user-friendly and casual users can run it to try out Windows 11 and its upcoming features. 

There are currently two versions of it. The free edition will satisfy the needs of casual users and it’s more for personal/educational purposes. If you want to use it for a business environment, it’s recommended that you buy a license for VMware Workstation Player.

VMware Workstation

Take your VM experience to the next level by trying out this powerful software on your Windows 11 PC today!
Check price Visit website

Hyper-V

Microsoft has its own virtual machine with Hyper-V that comes with an accessible interface and is packed with intuitive features. In addition to creating a virtual operating system, Hyper-V can create a virtual version of hard drives, switches, external drives, and other devices, but you can’t use it for graphics card virtualization.

Hyper-V is free to use and comes pre-installed in Windows 10 Pro, Windows Server, and in some builds of Windows 11, so you can try out the operating system’s beta version that way if you haven’t upgraded your computer yet. It’s ideal for managing other Windows VMs and is useful as a testing ground for unstable apps. It is a great choice and a top pick in our list of the best virtual machine for Windows 11.

However, your machine must meet certain hardware requirements if you plan on activating and using Hyper-V.

For starters, your PC must have:

  • A 64-bit processor with second level address translation
  • CUP support for the VM Monitor Mode Extension
  • A RAM of 4GB memory at minimum
  • Virtualization enabled on the system’s BIOS
  • Hardware Enforced Data Execution Prevention also enabled on BIOs.

Citrix Hypervisor

Citrix Hypervisor is a virtual machine that is specifically optimized for an app, desktop, and server virtualization. It’s easy to use and has a high level of security that allows work teams to store large files on there and collaborate on them.

Citrix Hypervisor has more of a business-centered focus rather than catering to the casual user. It’s intended to be used in a business environment with many different people working on a singular project and this is seen through its features.

It has an enhanced graphics workload and supports Nvidia’s GRID graphics cards. The basic version is pretty bare-bones in what it can do outside of creating a VM. For paying customers, they get sophisticated management tools and control over the business’s virtual environments.

The VM even supports cloud-hosted environments include Microsoft Azure’s Virtual Desktop.

If you do decide to use Hypervisor, check if your computer meets the hardware requirements needed to run Windows 11. Microsoft has a helpful post on their website detailing everything with an important one being TPM 2.0 support.

⇒ Get Citrix Hypervisor

Azure

Azure is also owned by Microsoft, and it is actually a collection of online services that organizations and businesses can use to build, host, and deliver apps.

And now Azure offers Windows 11 on its virtual desktop service, a feature that was just recently added. The virtual desktop allows users to create their own digital computer on a Microsoft data center so you don’t have to use your own machine in case your machine doesn’t meet hardware requirements.

Business owners will enjoy the opportunity to try out Windows 11 Enterprise and the Microsoft 365 apps on Azure, giving an opportunity to learn the OS and get comfortable with its features.

The only issue is that Azure isn’t free, but you do have the option to try out the service for free for an entire year and get a $200 credit. After the year, that $200 will go to paying off what you owe from using the service. All you have to do is pay off the rest and then sign up for a plan.

⇒ Get Azure

How can I get the most out of my virtual machine?

With virtual machines, it’s possible to export and clone multiple operating systems. There may come a time where you will need to do some changes to your VM so it’s a good idea to create backups just in case things go wrong. If you’re using VMWare, it’s recommended that you export a VM into an OVF format.

Learning how to clone a virtual machine is also a good idea because it can allow you to test computer architecture in a controlled environment. If you end up bricking the VM, it’s totally fine because the original system will be safe.

It’s important to mention there are many virtual machines that are currently incompatible with Windows 11 because of a recent change by Microsoft.

What are the advantages of using a VM?

Many people and businesses use virtual machines to try out features on operating systems and to run different systems as well.

A huge advantage of using a VM is the ability to run apps that would otherwise be unavailable due to a different operating system.

You can run a Windows 11 virtual machine on a Mac computer, Linux on a PC, and vice versa.

A virtual machine can be used to join the Windows Insider Program and try out the beta version of Windows 11 and the new features before they officially come out. With this, you can try out the Windows 11 Android app feature currently out on beta.

But there are a wide variety of virtual machines out there that it can be difficult to decide which ones are the best. This list will break down the best virtual machines for Windows 11.

Are VMs safe to use on a PC?

Yes, virtual machines are safe to use on a PC. There is no added risk to downloading one from a verified source and using it to try out a new operating system.

However, virtual machines don’t come with any sort of extra protection as a default and have the same security risks as the host computer.

A VM can be infected with a virus the same way a PC can, so don’t go around opening up suspicious e-mails or going to malware-infested websites thinking you’re safe.

Some vendors, like VMware, do provide security solutions as a bonus layer or protection.

Prior to its launch, Microsoft made TPM (Trust Platform Module) 2.0 support a requirement for computers and virtual machines to run Windows 11. It’s a technology that protects the data used to authenticate the PC you’re using.

Many virtual machines don’t have this capability, but some like Hypervisor and VMware have a virtual version of this chip.

Because of this, many virtual machines are unusable with Windows 11 and will have to create some kind of workaround in their product in order to be used with Windows 11.

Feel free to leave a comment below if you have any questions about our choice of the best virtual machines for Windows 11. Leave a suggestion about guides that you’d like to see or information on other Windows 11 aspects.

Fix: Facebook Messenger Call not Working [Android, iPhone]

Many users have experienced that a video call in Facebook Messenger is unavailable for uncertain reasons. When you call someone on Facebook Messenger, it rings once or twice, but then the call breaks the connection.

What should you do if the Facebook Messenger video call does not work? There are 5 possibilities to solve this annoying problem that you will find in the following lines of this article. But first, let’s see what triggers the issue, to begin with.

Why won’t my video call work on Facebook Messenger?

From connection issues to faulty settings blocking your camera or microphone, there can be many culprits responsible for the Messenger video call not working issues.

And speaking about issues, here are some frequent scenarios reported by users worldwide:

  • Messenger floating video call not working Android, iPhone
  • Facebook Messenger call not connecting, not ringing
  • Facebook Messenger call not showing up
  • No video call icon on Messenger, no option to call on Messenger
  • Messenger incoming call not showing
  • Messenger missed call notification not showing
  • Facebook Messenger call ends immediately
  • Messenger Kids video not working

How can I fix Messenger video call not working?

1. Allow access to the camera

Camera access Facebook Messenger video call not working

iPhone

  1. Go to Settings.
  2. Tap on Privacy, and find Camera in it.
  3. Tap Camera and you will find Facebook Messenger.
  4. Click on Camera.
  5. This will allow your Facebook Messenger to use the camera.

Android

  1. Go to Settings.
  2. Tap on Apps.
  3. Next, you should find Facebook Messenger.
  4. Go to Permission.
  5. Turn on the Camera.

If your device does not allow Facebook Messenger to access the camera, your camera driver will not work when you run Facebook Messenger, so a video call will not work.

2. Allow access to the microphone

iPhone

  1. Navigate to Settings.
  2. Tap on Privacy.
  3. Click on Microphone.
  4. Then switch to Facebook Messenger.

Android

  1. Navigate to Settings.
  2. Tap on Apps.
  3. Locate the Facebook Messenger.
  4. Then tap Permission.
  5. Turn on the microphone until it turns green.

After you allow Facebook Messenger to access the camera, you must also allow access to the microphone. This allows the application to make a video call.

3. Check the network connection

Reset settings on Facebook Messenger video call not working

iPhone

  1. Go to Settings.
  2. Then tap General.
  3. Go to Reset.
  4. Select Reset Network Settings.
  5. Enter your PIN code and you can reset the network settings.
  6. Reset Network Settings.

Android

  1. Navigate to Settings.
  2. Tap on General management.
  3. Go to Reset.
  4. Select Reset Network Settings.
  5. Confirm Reset Settings.
  6. Enter the PIN code/password/fingerprint/pattern.
  7. Tap Reset Settings again to confirm.

If the Facebook video call fails to connect, it may be due to network problems. To troubleshoot network problems on your device, follow these steps:

  1. You might want to switch between mobile data and Wi-Fi first to see if there is something wrong with the network.
  2. It would be helpful to connect to a different Wi-Fi if possible.
  3. You could try resetting the network settings.

4. Sign in to Facebook Messenger again

iPhone

  1. Since there is no Delete data option on iOS, to log out of Facebook Messenger on an iOS device, you should log out using Facebook (because Messenger is linked to Facebook). You can do the following steps:
  2. If you did not install the Facebook app, you should download and install it on your device first.
  3. Go to the Facebook screen
  4. Tap the hamburger icon in the bottom right corner of the screen.
  5. Scroll down and tap Settings.
  6. Go to Account Settings.
  7. Select Security (Security and Login).
  8. You would see a list where you can sign in and find Facebook Messenger.
  9. Tap the cross nearby to sign out of Messenger.

Android

  1. First, you have to log out of the app.
  2. There are no logout buttons on Facebook Messenger, so we have to:
  3. Go to Settings.
  4. Tap on Apps.
  5. Select Facebook Messenger.
  6. Tap Delete data.
  7. You can then log out of the app.
  8. Then you need to go to the home screen.
  9. Tap the Messenger icon to log in again.

If the Facebook Messenger video call still does not work on your device, you can continue with this method.

5. Check for updates and reinstall Messenger

  1. You can first go to Settings.
  2. Tap on Apps.
  3. Select Facebook Messenger.
  4. Then tap Uninstall.
  5. Finally, you can download the latest version from the App Store on an iOS device or Google Play on an Android device.

The latest version of Facebook Messenger usually includes new features and fixes for known bugs. So installing the latest Facebook Messenger could be very helpful in not fixing the video calling problem.

Here’s how to fix Messenger video call problems with ease by simply tweaking the Facebook Messenger video call settings.

Windows Server Manager Is Not Opening: 3 Easy Fixes to Apply

The Windows Server Manager is sort of a one-stop shop that enables the IT staff to keep a tab on all the servers hosted on a network. However, many of our readers reported that Windows Server Manager is not opening.

An alternative error connected to this issue is The procedure entry point could not be located in the dynamic link library c:\windos\system32\servermanager.exe.

Why is Windows Server Manager not opening?

This issue is pretty frustrating, and although there is not much information about the exact causes, we highlight some of the possibilities:

  • A hardware failure – If you recently witnessed a hard disk drive crash or malfunction, this may have triggered a Server Manager file corruption.
  • ServerManager.exe file broken – The executable file might have been altered by a virus, or it’s simply corrupted. For this part, we recommend using one of the best antiviruses for Windows Server.

Now that we know what we’re dealing with, let’s go to the actual solutions to fix the problem.

However, before starting, make sure to install the latest Windows Server updates in the Settings menu.

What do I do if Windows Server Manager is not opening?

1. Run DISM and SFC scans

  1. Click the Start button, type cmd in the Search box, and click on Run as administrator from the search result shown.
  2. In the Command Prompt window, type the following command and hit Enter: DISM.exe /Online /Cleanup-image /RestorehealthWindows Server Manager in not opening? Use RestoreHealth command to set things right.
  3. Now, type the following command and press Enter to run it: sfc /scannowsfc scannow command prompt
  4. This will initiate the process and might take several minutes before it is completed.
  5. While you are still in the Command Prompt window, type the following command and press Enter: dism /online /cleanup-image /startcomponentcleanup
  6. Wait until the process is completed and restart the machine.

Most of our readers managed to fix this issue by running these simple scans on their Windows Server machines.

Make sure you run Command Prompt with full privileges. The DISM commands will not work otherwise.

2. Manually delete the user.config file

  1. Press the Windows key + E to start File Manager.
  2. Navigate to the following file in your system or root folder: C:\Users\YourUserName\AppData\Local\Microsoft_Corporation\ServerManager.exe_StrongName_m3xk0k0ucj0oj3ai2hibnhnv4xobnimj10.0.0.0user.config
  3. Delete the user.config file.
  4. Restart Server Manager. This recreates the file.

Deleting the user.config file will also address any issues of the file being corrupted so we strongly recommend performing this action.

3. Rollback the graphics card driver

Note icon NOTE
Only perform this solution if you recently update the graphics card driver prior to this issue occurring.
  1. Right-click the Start button and select Device Manager.
  2. Go to the Display adapters section, right-click the graphics driver, and select Properties.
  3. In the next window, click the Driver tab and hit the Rollback driver button if the option is not grayed out. If it is grayed out, that means you don’t have a previous version.

The above steps should help deal with the situation when Windows Server Manager does not open.

Also, if you’re using one of the best Windows Server backup software, this problem may be fixed by reverting the changes to an earlier moment.

If you have any other solutions or questions, don’t hesitate to leave them in the comments section below.