Fix: Lock Screen Background Reverts to Blue Screen in Windows 11

Quite a few users who set a lock screen background in Windows 11 found that it reverts to a blue screen with white wavy lines, the default selection. The same happens in the previous iterations of the OS as well.

The problem appears whether you use Windows Spotlight, select a picture, or go with the slide show. The changes don’t reflect after a reboot. And in most cases, it turned out to be an issue at the user’s end.

Why does my lock screen wallpaper keep changing in Windows 11?

  • Windows Spotlight not registered properly (if using the feature)
  • Corrupt system files
  • Critical apps and components not running in the background
  • The user doesn’t have access to the required folders/files
  • A third-party application is triggering conflicts

What can I do when the lock screen background reverts to blue screen in Windows 11?

Before we start with the slightly complex changes, try these quick ones first:

  • Check for any pending Windows updates and install them.
  • Re-enable Windows Spotlight, or if you have configured a picture or slide show, re-set it.
  • Make sure you are connected to a network and have a stable Internet speed.

1. Re-register Windows Spotlight

  1. Press Windows + R to open Run, type cmd, and hit Ctrl + Shift + Enter.cmd
  2. Click Yes in the UAC prompt.
  3. Now, paste the following two commands and hit Enter after each: DEL /F /S /Q /A "%USERPROFILE%/AppData\Local\Packages\Microsoft.Windows.ContentDeliveryManager_cw5n1h2txyewy\LocalState\Assets" DEL /F /S /Q /A "%USERPROFILE%/AppData\Local\Packages\Microsoft.Windows.ContentDeliveryManager_cw5n1h2txyewy\Settings"command to fix lock screen background reverts to Blue screen Windows 11
  4. Press Windows + S to open Search, type Windows Powershell, right-click on the relevant result, and select Run as administrator.
  5. Click Yes in the UAC prompt.
  6. Execute the following command: Get-AppXPackage -AllUsers |Where-Object {$_.InstallLocation -like "SystemApps"} | Foreach {Add-AppxPackage -DisableDevelopmentMode -Register "$($_.InstallLocation)\AppXManifest.xml"}reregister to fix lock screen background reverts to Blue screen Windows 11
  7. Once done, reboot the PC and check for improvements.

When Windows Spotlight is not working, and the lock screen wallpaper reverts to a blue wavy picture, your primary approach should be to re-register Windows Spotlight.

2. Modify the permissions

2.1 Accessing the SystemData folder

  1. Press Windows + E to open File Explorer, click the View menu, select Show, and choose Hidden items if it’s presently unchecked.show hidden items
  2. Navigate the following path or paste it in the address bar and hit Enter: C:\ProgramData\Microsoft\Windows

2.2 Taking full control of the folder

  1. Right-click on the SystemData folder and select Properties.
  2. Go to the Security tab, and click the Advanced button.advanced
  3. Click on Change.change
  4. Type your current profile name in the text field, click on Check Names, and then OK.check names to fix lock screen background reverts to Blue screen Windows 11
  5. Tick the checkbox for Replace owner on subcontainers and objects, and click Apply.replace owner
  6. Click Yes in the confirmation prompt.
  7. Again, go to the Security tab in the Properties window of the SystemData folder, and click Advanced.
  8. This time, tick the checkbox for Replace all child object permission entries with inheritable permission entries from this object and click OK.replace permissions to fix lock screen background reverts to Blue screen Windows 11
  9. Confirm the change.

2.3 Finding the SID

  1. Press Windows + R to open Run, type cmd in the text field, and hit Enter.
  2. Paste the following command and hit Enter: wmic useraccount get name,SIDSID
  3. Identify the SID for the affected user account.

2.4 Moving the files

  1. Go back to File Explorer, and double-click the SystemData folder to view its contents.
  2. Now, double-click the folder with the same SID as the affected user profile.folder
  3. Open the ReadOnly folder.
  4. Now, open the LockScreen folder. There might be several here with different letters. Choose one which stores the wallpaper you see on the lock screen.ReadOnly
  5. Now, move the image you want to set as the lock screen wallpaper here and remove the default blue one.move image to fix lock screen background reverts to Blue screen Windows 11

3. Allow Microsoft Edge and Store to run in the background

3.1 Microsoft Edge

  1. Launch Microsoft Edge, click the ellipsis near the top right, and select Settings from the flyout menu.settings
  2. Go to the System and performance tab, and enable the toggle for Continue running background extensions and apps when Microsoft Edge is closed.run edge in background to fix lock screen background reverts to Blue screen Windows 11

3.2 Microsoft Store

  1. Press Windows + I to open Settings, and click on System Components on the right in the System tab.system components
  2. Click on the ellipsis next to Microsoft Store, and select Advanced options.
  3. Now, select Always under the dropdown menu for Let this component run in background.always to fix lock screen background reverts to Blue screen Windows 11

4. Repair the corrupt system files

  1. Press Windows + R to open Run, type cmd, hold Ctrl + Shift and click OK.
  2. Click Yes in the UAC prompt.
  3. Paste the following DISM commands individually and hit Enter after each: DISM /Online /Cleanup-Image /CheckHealth DISM /Online /Cleanup-Image /ScanHealth DISM /Online /Cleanup-Image /RestoreHealth
  4. Execute the following command for the SFC scan: sfc /scannowsfc scan to fix lock screen background reverts to Blue screen Windows 11

If it’s the corrupt system files to blame for the Windows 11 lock screen wallpaper automatically changing, running the DISM tool and SFC scan should get things running. Alternatively, you can use dedicated repair software to automatically replace corrupt system files with healthy versions from an extensive database.

5. Uninstall conflicting applications

  1. Press Windows + R to open Run, type appwiz.cpl in the text field, and hit Enter.
  2. Select any antivirus or similar security software from the list that might prevent access to the network, and click Uninstall.uninstall to fix lock screen background reverts to Blue screen Windows 11
  3. Follow the on-screen instructions to complete the process.
  4. Reboot the device and check for improvements.

We saw a few users fix things when the lock screen background reverts to a blue screen in Windows 11 by removing BitDefender, AVG Internet Security, and Total AV or uninstalling apps in the same category.

if that doesn’t work right away, consider using an effective software uninstaller tool to remove any leftover files and Registry entries, and clear any changes made by the app.

6. Perform an in-place upgrade

  1. Go to Microsoft’s official Windows 11 page, select the OS edition and product language, and then download the Windows 11 ISO.windows 11 iso
  2. Once downloaded, double-click the ISO file and click Open in the prompt.
  3. Run the setup.exe file.setup.exe
  4. Click Yes in the UAC prompt.
  5. Click Next to proceed.next
  6. Check the license terms and click Accept.
  7. Verify that the Windows 11 setup reads, Keep personal files and apps, and click Install.in-place upgrade to fix lock screen background reverts to Blue screen Windows 11
  8. Wait for the in-place upgrade to complete. It may take a few hours.

A repair upgrade is an effective solution when the problem lies with the OS or the system files. It’s equivalent to reinstalling Windows, but you don’t lose the installed apps or stored files.

7. Create a new user account

  1. Press Windows + R to open Run, type netplwiz in the text field, and click OK.netplwiz
  2. Click the Add button.add to fix lock screen background reverts to Blue screen Windows 11
  3. Click on Sign in without a Microsoft account (not recommended).
  4. Now, click on Local Account.local account
  5. Enter the user name and password (not mandatory) for the new profile, and click Next.User name
  6. Once done, select the new user account, and click on Properties.properties
  7. Go to the Group Membership tab, select Administrator, and click OK to save the changes.administrator to fix lock screen background reverts to Blue screen Windows 11
  8. Finally, sign in with the new user profile, customize the lock screen, and verify whether the changes reflect after subsequent reboots.

If nothing else works, the last option is to create a local account when the lock screen background wallpaper reverts to a blue screen in Windows 11. To transfer data between the two accounts, use an external USB drive. Besides, you can always make apps available to all users.

Remember, the problem is fixable, though it might take some time, depending on the underlying cause. As a last resort, you can reinstall Windows 11, but it shouldn’t come down to that for most!

And if it’s specifically the lock screen slideshow not working, you will have to check indexing and modify the local group policies.

For any queries or to share which fix worked for you, drop a comment below.

BBC iPlayer Error Code 02050: How to Fix it

Streaming apps like BBC iPlayer may fail to load content and throw error code 02050 on your screen.

It could be a temporary issue that resolves itself, but if not, keep reading to discover what our WindowsReport experts were able to come up with to address this issue.

How do I fix BBC iPlayer error code 02050?

Before we start, verify that your streaming device has been registered with BBC iPlayer. You can also register it again. Check your Internet speed and restart your router.

1. Update your device’s firmware

1.1 TV firmware

  1. For this solution, we shall be using the TCL model.
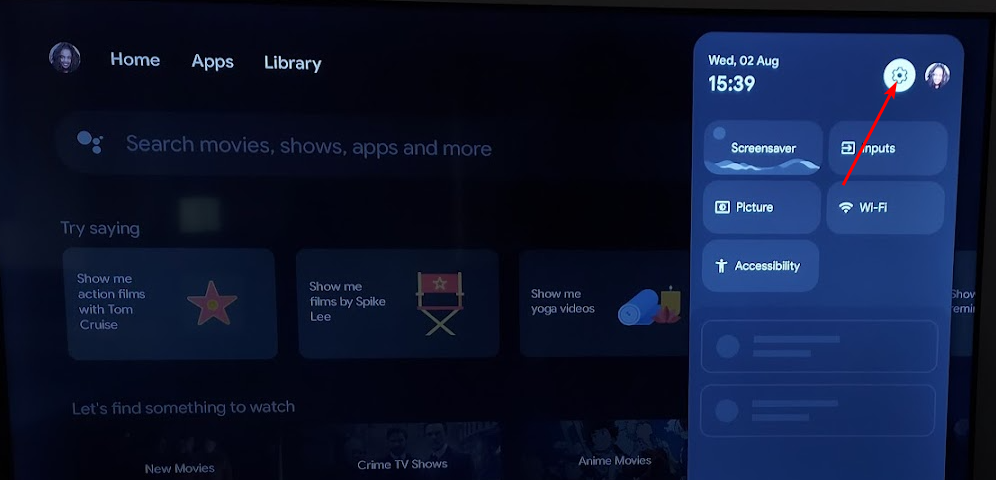
  2. On your TV, find your Settings.
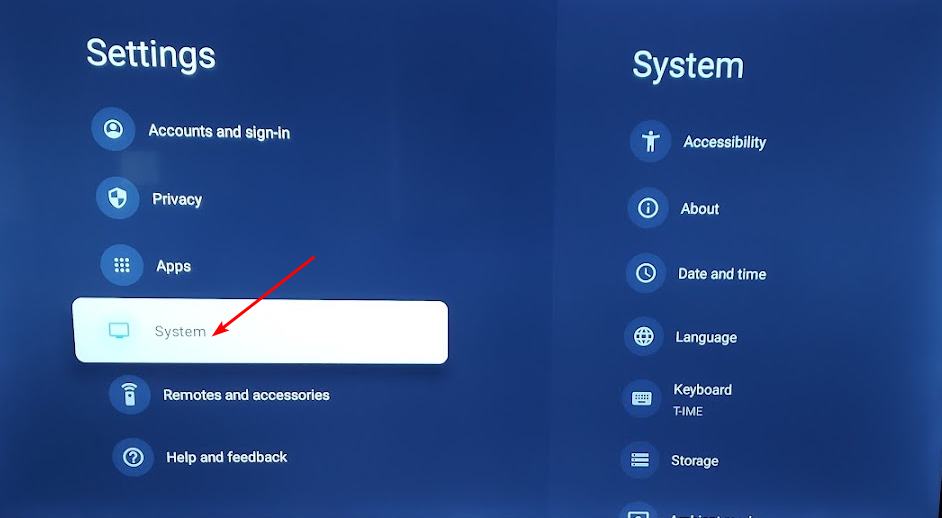
  3. Go to System.
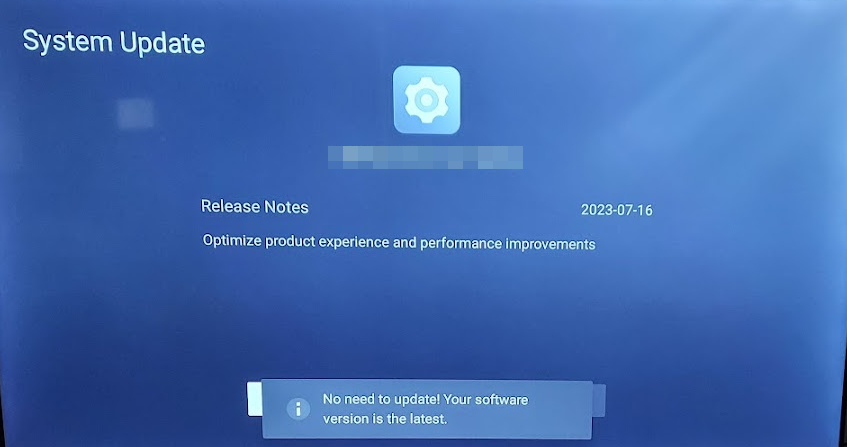
  4. Click on About then select Software update.
  5. Select Network update and click on System update.
  6. Now click on Check Update. Your system will scan for any available updates.
  7. You’ll either start downloading updates or get a message that your TV is already up to date.

1.2 Phone OS

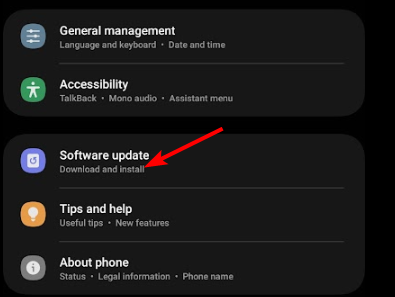
  1. Locate Settings on your device. (We’ll be using the Samsung model for this step).
  2. Go to Software update.
  3. Tap on Download and install.
  4. Wait for the update to finish installing if available, and retry your transaction.

Updating your device’s software can also help with other loading issues on BBC iPlayer like error code 02062.

2. Clear cache

2.1 On your TV

  1. On your TV, find your Settings.
  2. Go to Apps.
  3. Find BBC iPlayer and click on it.
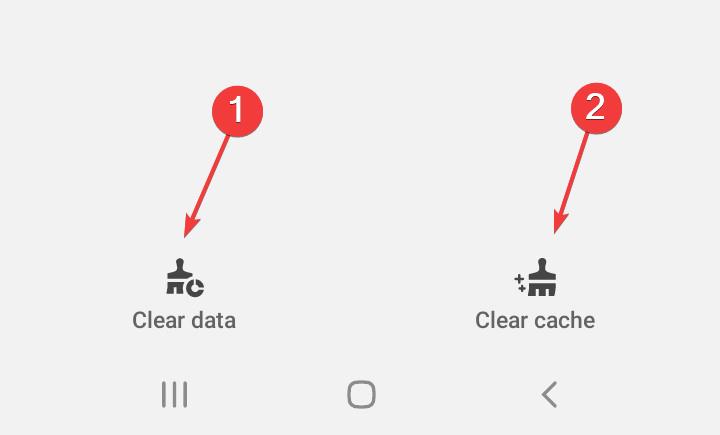
  4. Scroll down and select Clear data and Clear cache.

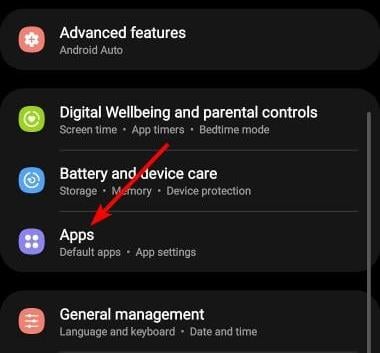
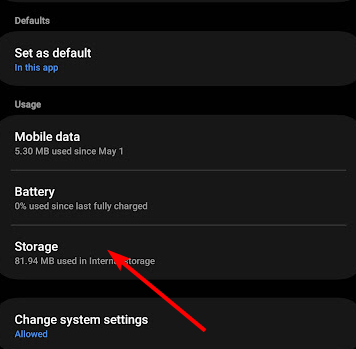
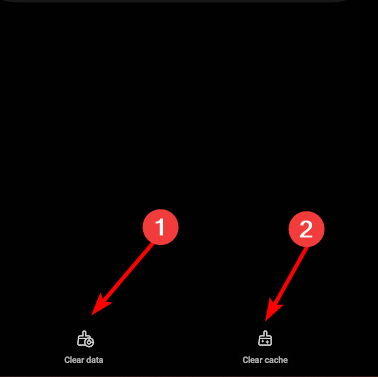
2.2 Android app

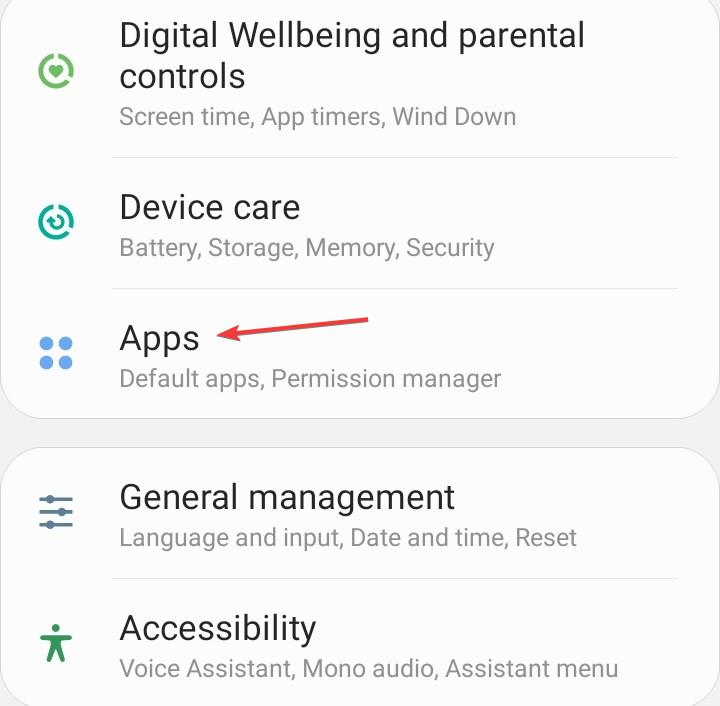
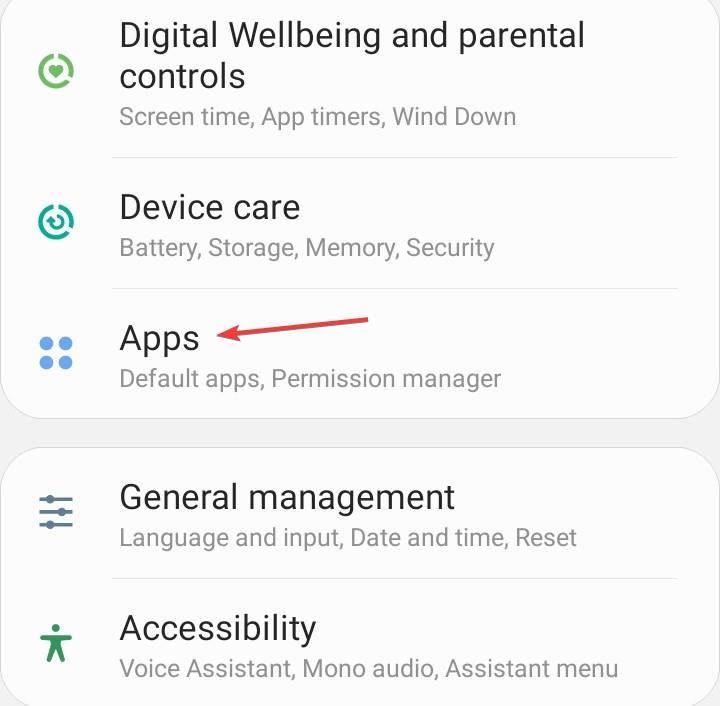
  1. Open the Settings app on your Android device, and select Apps.apps
  2. Choose BBC iPlayer from the list of applications.
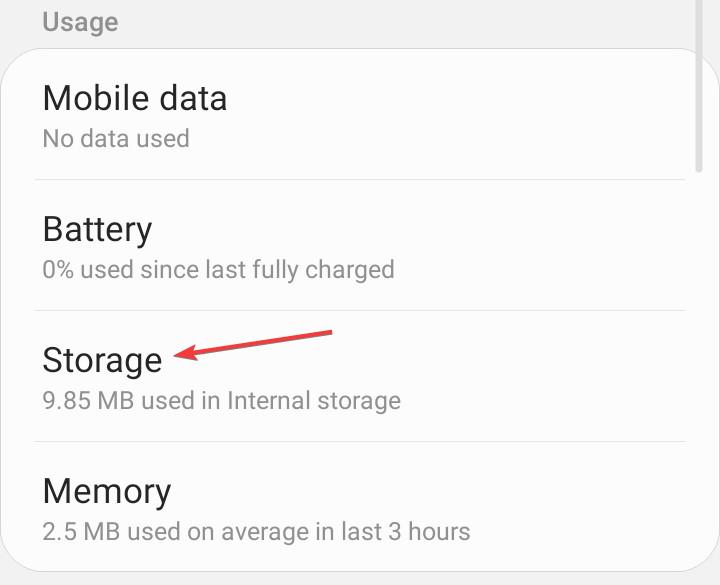
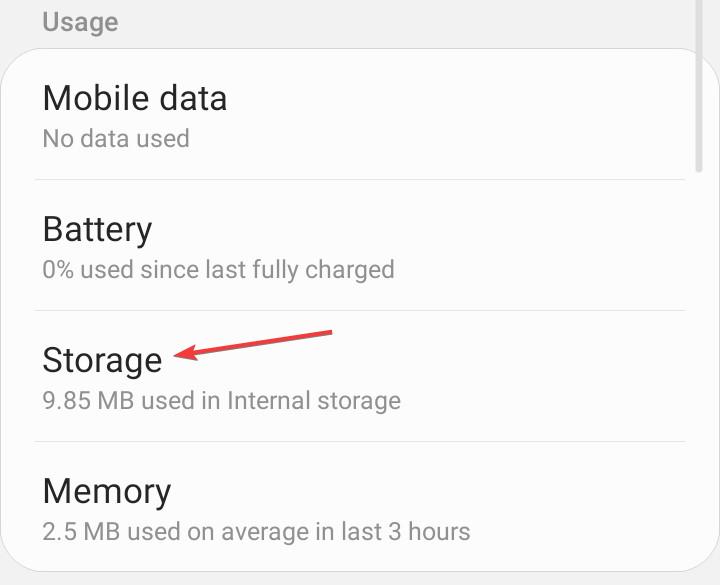
  3. Tap on Storage.storage
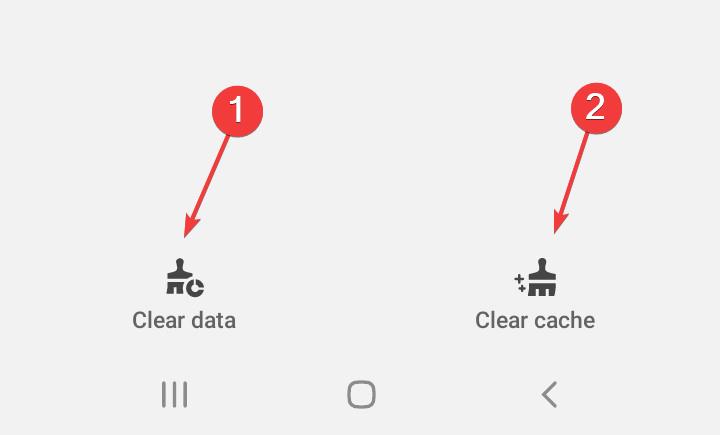
  4. Tap on Clear data and then on Clear cache.clear cache to fix error code 14 disney plus
  5. Open the BBC iPlayer app again and check for improvements.

2.3 Browser cache

  1. For this step, we shall be using the Chrome browser.
  2. Launch your Chrome browser and click the three vertical ellipses in the top right corner.
  3. Select Settings.Settings CHrome
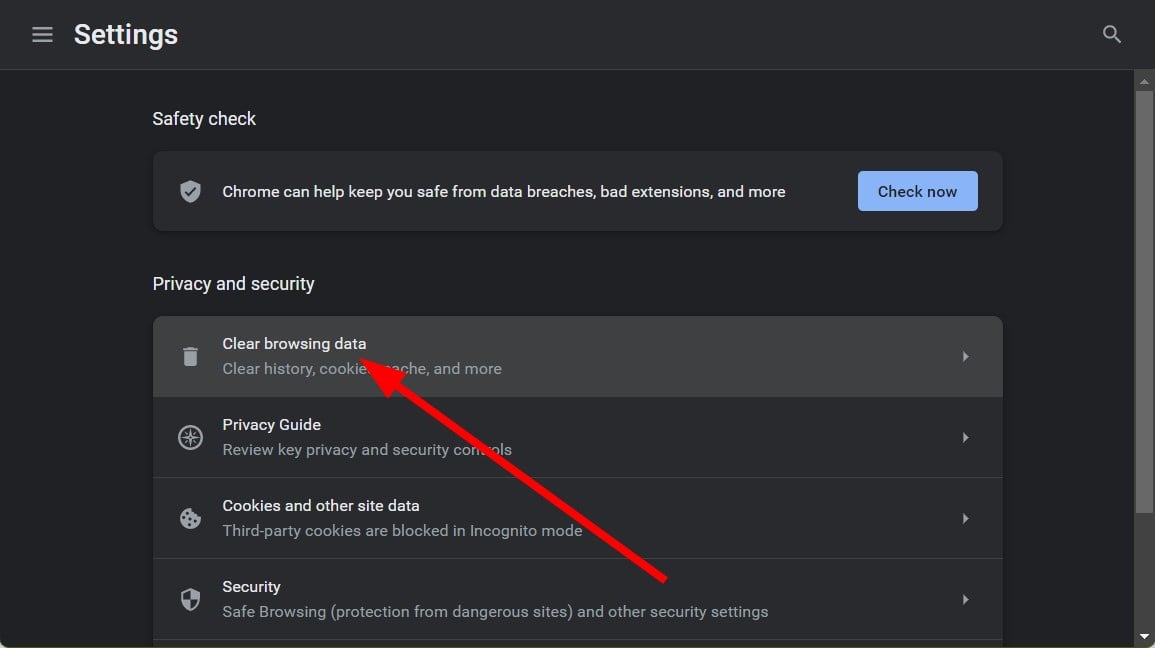
  4. Click on Privacy and security, then select Clear browsing data.
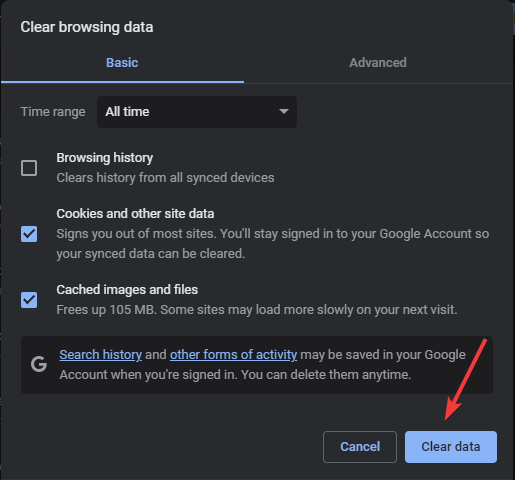
  5. Check Cookies and other site data and Cached images and files, then hit Clear data.Clear data

3. Enable/disable VPN 

  1. Press the Windows key and select Settings.settings windows 11
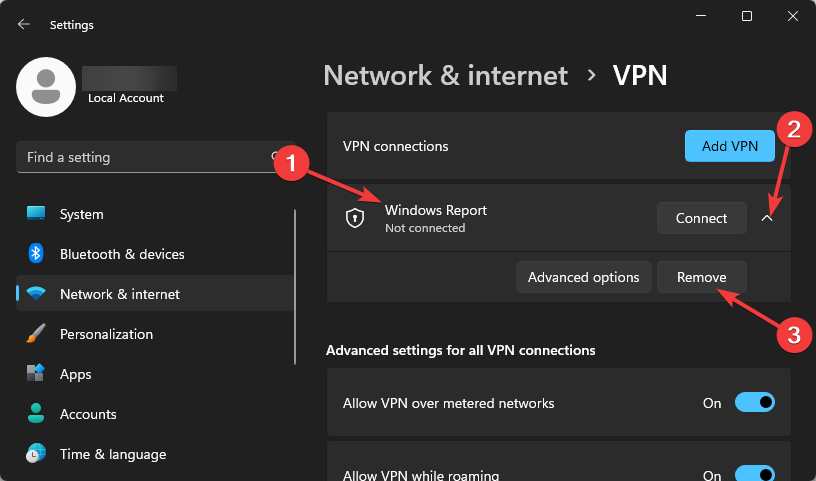
  2. Next, select Network & internet and click on VPN in the right-side menu.
  3. Select the VPN connection you want to disable, click on the drop-down and select Remove.remove VPN

BBC iPlayer is a geo-restricted app so, if you’re in a blacklisted location, you may need to use a VPN that can bypass the limitations.

If you were already using one but still spotted the error code 02050, it could mean your VPN has been detected or BBC iPlayer is just not working well with a VPN enabled. You’ll need to switch to a more reliable VPN that can bypass detection.

4. Enable/disable Proxy 

  1. Press the Start Menu icon and select Settings.settings windows 11
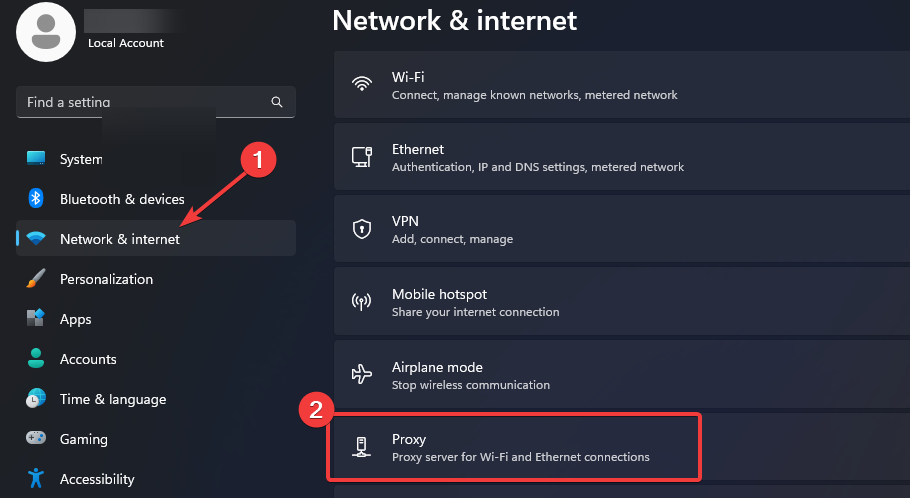
  2. Click on Network & Internet on the left pane, then scroll down and click Proxy on the right pane.Network proxy settings
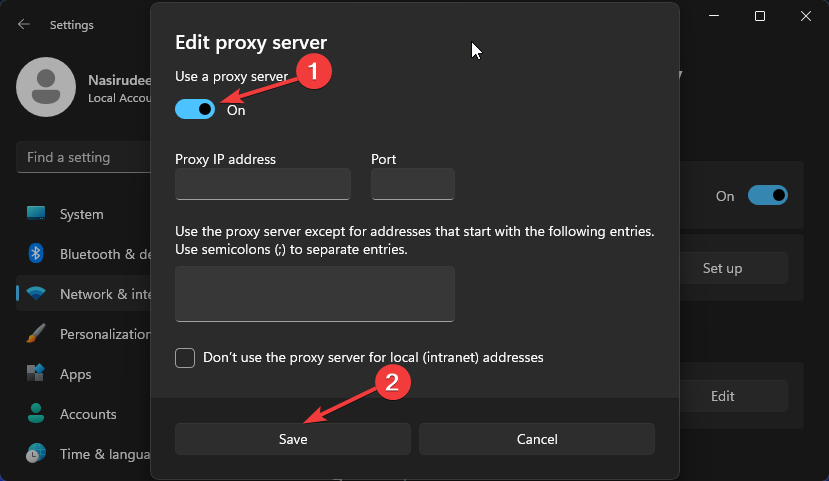
  3. Select Edit next to Use a proxy server option in the Manual proxy setup section, toggle off Use a proxy server and click on Save.Disable proxy server

5. Reinstall BBC iPlayer

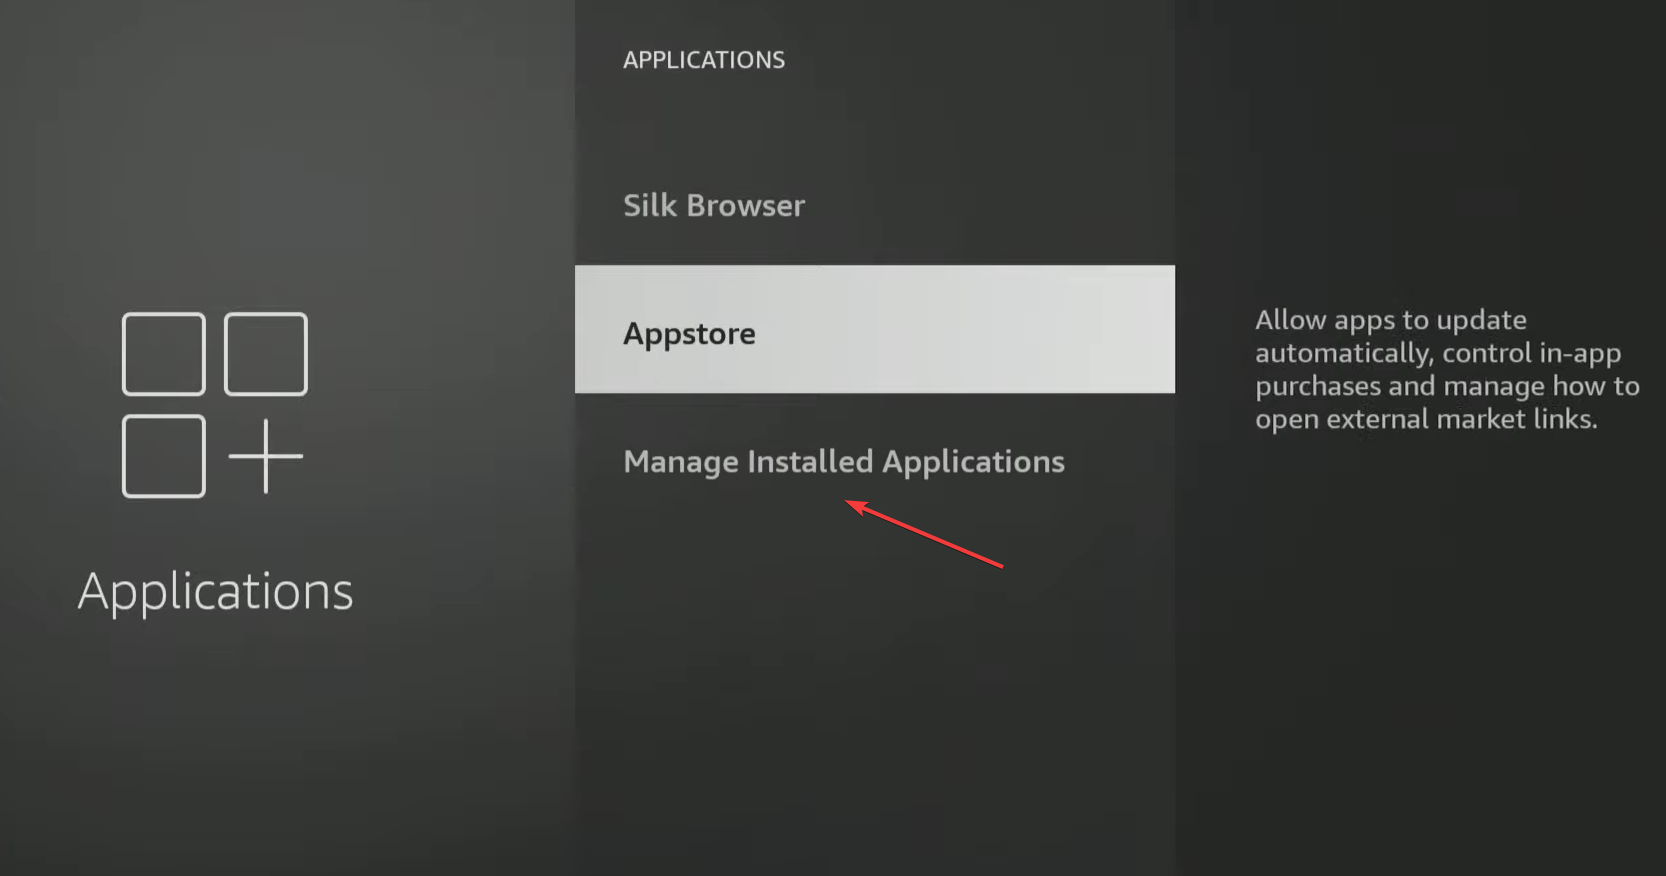
  1. On your TV, open Settings, and go to Applications. 
  2. Head down and select Manage installed applications.manage installed applications
  3. Choose BBC iPlayer from the list.
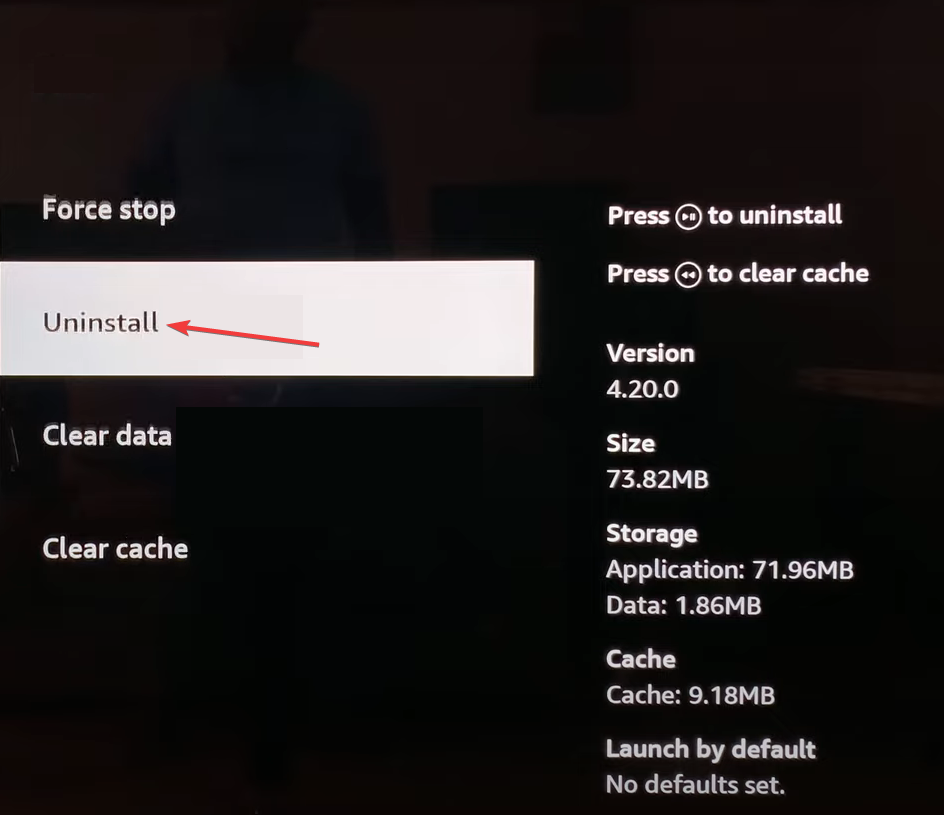
  4. Scroll down to the bottom and select Uninstall.uninstall to fix iplayer error code 02062
  5. Finally, choose Confirm to start the uninstallation.
  6. Once done, reinstall the BBC iPlayer app from the dedicated app store and verify whether error code 02050 has disappeared.

You should also consider a browser to stream BBC iPlayer content from because apps tend to have a bunch of loading issues like the Something went wrong iPlayer error or error code 02062.

By following the advice above, you may be able to resolve the problem you’re experiencing with BBC iPlayer not loading content error 02050. It’s worth noting that these instructions will work on any device that allows you to stream BBC iPlayer content.

There may still be other ways to fix this issue that are beyond the scope of this article. As such, we’d like to welcome any additional or even unorthodox solutions that may have helped you bypass this issue. Drop us a line in the comment section below.

Error 201 in Arena of Valor: How to Fix it

Arena of Valor is a popular MOBA (Multiplayer Online Battle Arena) mobile game available for Android and iOS, but recently, users on both received Error 201 when launching the game’s app.

Troubleshooting it is a tad bit difficult, given the lack of information on the web. But, in most cases, things are fixed automatically within a few hours.

What is error code 201 in Arena of Valor?

The error code highlights an issue with the Arena of Valor servers, which usually happens when an update is being deployed. Ideally, the developers should apprise users of the update beforehand, but that has not been the case with Arena of Valor. Also, issues with the game files and network can trigger the error.

How do I fix Arena of Valor Error 201?

Before we start with the slightly complex solutions, try these quick ones:

  • Make sure Arena of Valor servers are up and running. Check the developer’s official Twitter (X) account, their Facebook page, or the Reddit community for any server issue updates.
  • Check for any pending game updates and install them. Also, switch to another network. If you are using Wi-Fi, connect to mobile data and vice-versa.
  • Force close Arena of Valor, then launch the game and check for improvements. Alternately, reboot the device.
Tip icon Tip
Before you start manually troubleshooting things, we recommend waiting a few hours in case the issue is server-related. If that doesn’t work or you have been facing the error for some time, start with the solutions listed below.

1. Clear the game cache

1.1 Android

  1. Open the phone Settings, and go to Apps.apps
  2. Select Arena of Valor from the list.
  3. Tap on Storage.storage
  4. Now, tap on Clear data and Clear cache to delete the corrupt files.clear data to fix error 201 arena of valor
  5. Once done, relaunch Arena of Valor and check whether it now runs fine.

1.2 iOS

iOS devices don’t offer an option to clear just the app cache, and you will have to uninstall the application altogether. But don’t do it just yet! Try the next solution and then proceed with the uninstall.

Remember, clearing the cache works for all mobile apps, including the Disney Plus error code 83.

2. Reset the network settings

2.1 Android

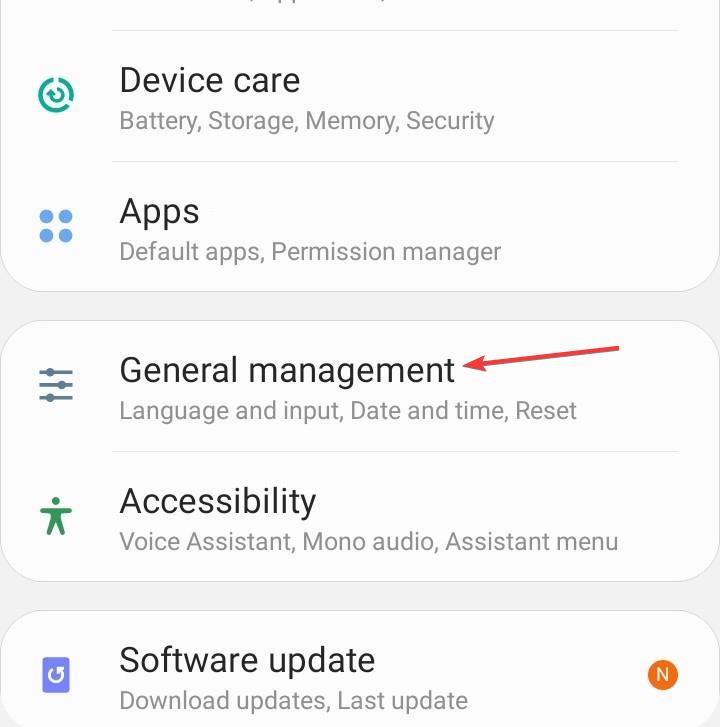
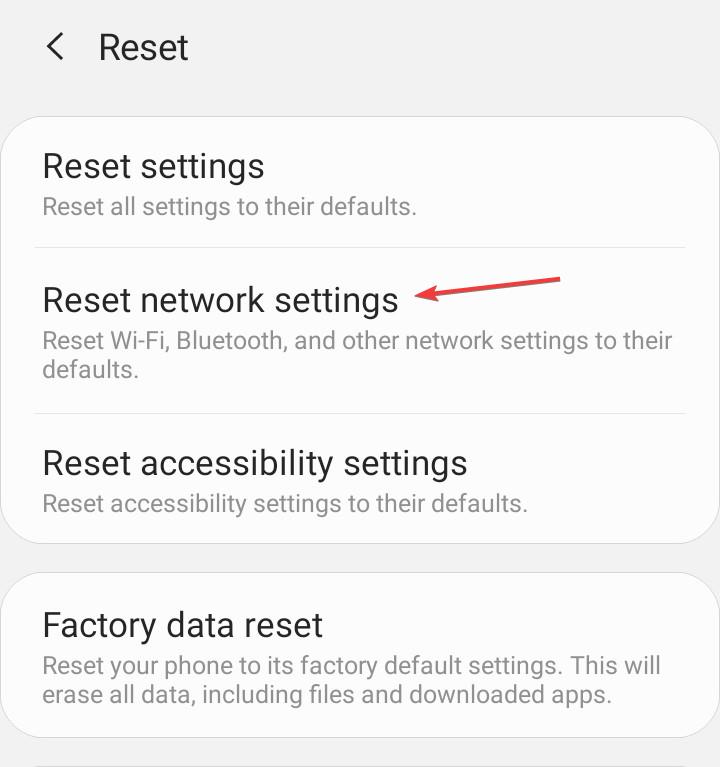
  1. Open the phone Settings, and go to General management.general management
  2. Tap on Reset.
  3. Now, select Reset network settings from the list of options.reset network settings to fix error 201 arena of valor
  4. Tap on Reset settings to confirm.

2.2 iOS

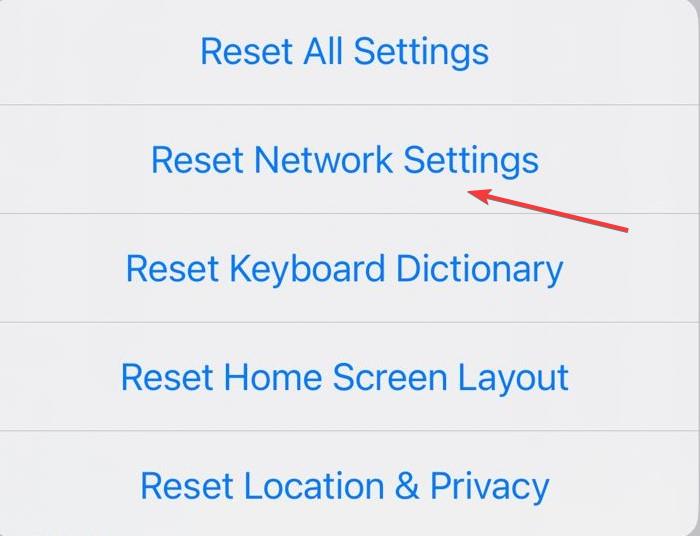
  1. Open the iPhone Settings, and go to General.general
  2. Tap on Transfer or Reset iPhone.
  3. Tap Reset at the bottom.reset to fix error 201 arena of valor
  4. Select Reset Network Settings from the list of options.reset network settings
  5. Enter the device’s passcode to confirm the reset.

A reset is effective against the Arena of Valor Error 201, when the problem lies at your end, especially with the network configuration. It also helps with SMS issues like the Vodafone error 69.

3. Reinstall Arena of Valor

3.1 Android

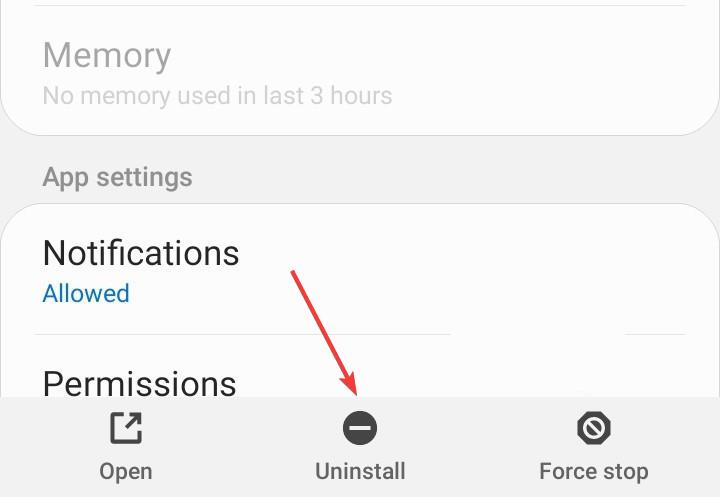
  1. Open the device Settings, and go to Apps.
  2. Choose Arena of Valor from the list.
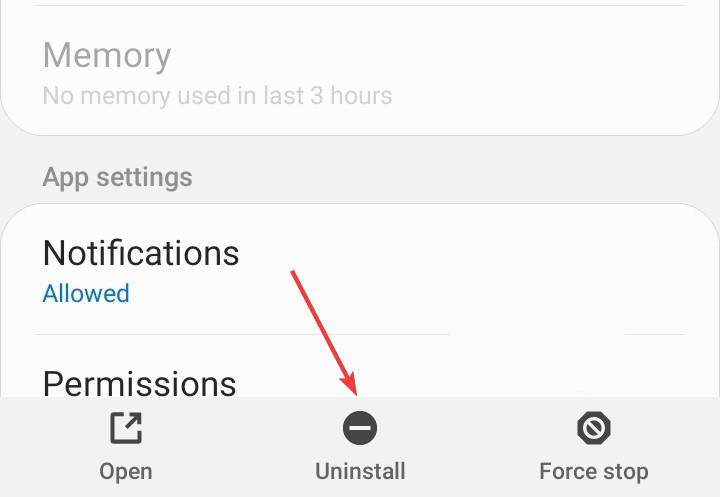
  3. Tap on Uninstall at the bottom and confirm the change.uninstall to fix error 201 arena of valor
  4. Now, reboot the Android device, and then reinstall Arena of Valor from the Google Play Store.

3.2 iOS

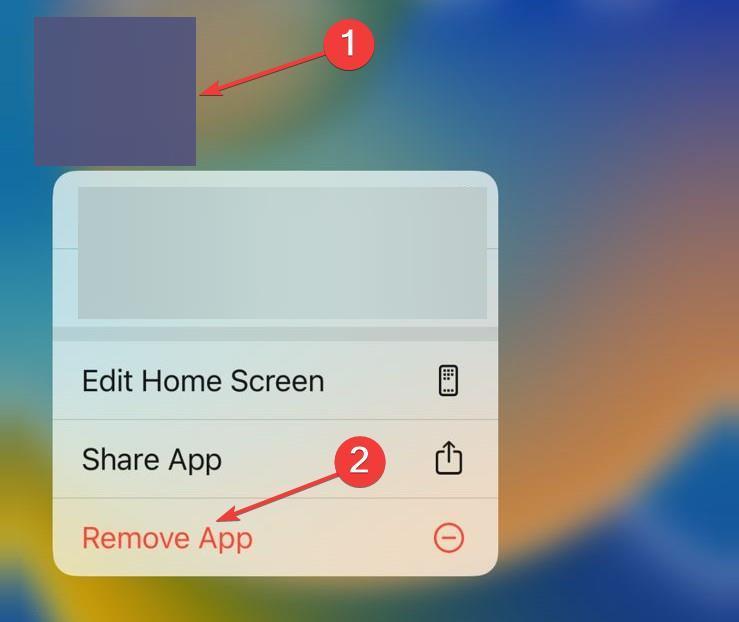
  1. Tap and hold Arena of Valor on the iPhone’s home screen, and select Remove app.remove app
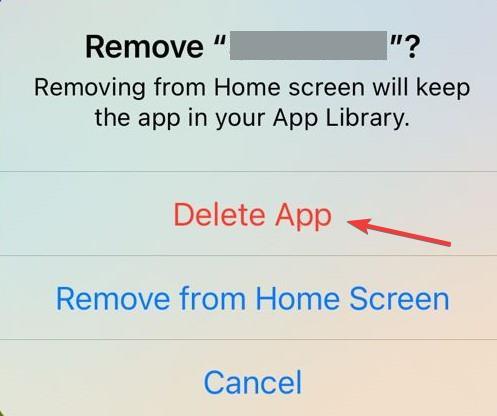
  2. Choose Delete app in the prompt that appears.delete app to fix error 201 arena of valor
  3. Tap Delete to confirm the uninstall.
  4. Now, reboot the device and download Arena of Valor from the Apple App Store.

4. Contact Arena of Valor support

When nothing else works, contact the Arena of Valor support through the official website. Just click the Support option at the top, select the appropriate problem, and look for a solution or try connecting to a support agent.

The Arena of Valor support interface is not that good or user-friendly, but in most cases, things shouldn’t come down to that!

These are all the ways you can fix the Arena of Valor Error 201 in no time! Remember, for server or network-related issues with most mobile games or even apps in general, you will have to follow a similar approach.

If you are a seasoned gamer, consider using an Android emulator for the best gaming experience.

For any queries or to share what worked for you, drop a comment below.
How to Fix Paramount Plus Error Code 3205

If you have encountered the Paramount Plus error code 3205 while trying to watch a series, channel, or sometimes multiple shows on your Android TV, phone, or browser, this guide can help!

We will explore the probable causes along with the recommended fixes by WR experts to get the app working in no time.

Why does the error code 3205 occur on Paramount Plus?

  • The Paramount app is corrupted or outdated.
  • TV firmware is not updated, or you have an unstable internet connection.
  • Incompatible browser, adblocker, or device you are using.

How can I fix the Paramount Plus error code 3205?

Before proceeding with any advanced steps, restart your computer or TV and ensure your app is compatible, or try using a different device; verify if you have a stable internet connection and an updated browser version, and try using a different browser.

1. Force close the app (on Android device)

  1. Tap on the Settings icon from the home screen.Settings - Fix Paramount Plus Error Code 3205
  2. Select Apps from the list of options.
  3. Tap on App Management.App Management - Paramount Plus Error Code 3205
  4. Now scroll to find Paramount Plus, then tap on it.Select the app from the list
  5. Under the app name, locate and click Force stop.Force stop the app

Forcing the app to close can help you clear out other issues like Paramount Plus fatal error; read this guide to learn the other detailed steps.

2. Delete the browser cache

  1. Launch your preferred browser. Here, we are demonstrating the steps using Google Chrome.
  2. Click the three dots icon, then click Settings from the drop-down.Settings CHrome - Paramount Plus Error Code 3205
  3. Select the Privacy & security option from the left pane, and click Clear browsing dataSettings 2 - Clear browsing data from the right.
  4. For Time range, select All time from drop-down list, and place a checkmark next to Cookies and other site data, & Cached images and files.Clear data to fix Paramount Plus Error Code 3205
  5. Click Clear data.

If you cannot access the Paramount Plus on the browser, it could be due to corrupted or outdated cached data stored; these steps could help you delete it, resolving the problem.

3. Clear the app cache (on Android devices)

  1. Tap on the Settings icon from the home screen.Settings - Fix Paramount Plus Error Code 3205
  2. Select Apps from the list of options.Apps
  3. Tap on App Management.App management
  4. Locate Paramount Plus, then tap on it.Select the game Paramount Plus Error Code 3205
  5. Click Storage usage.Storage usage
  6. Now tap on Clear cache to clear the app cache, and check if the issue reappears.Clear cache of the app  -Paramount Plus Error Code 3205
  7. If it does, repeat the steps and choose Clear data this time.Clear data
  8. Tap on Delete to confirm.Delete the data

Steps to clearing the app data can vary from device to device; however, you can look for similar options to perform on other devices; for example, on iOS, you need to look for the Offload App option. Also, once the data is cleared, you must sign in to your Paramount Plus account the next time you launch the app.

4. Disable the ad blocker

  1. Launch your preferred browser. Here, we are demonstrating the steps using Google Chrome.
  2. Click the three dots icon, then click Settings from the drop-down.Settings CHrome - Paramount Plus Error Code 3205
  3. Select the Privacy & security option from the left pane, and click Site Settings.Site settings 1 Paramount Plus Error Code 3205
  4. Click the downward arrow next to Additional content settings to expand it, and choose Intrusive ads from the list.aDDITIONAL site settings
  5. Under the default behavior, place the checkmark next to Any site you visit can show any ad to you, to remove it from the Ads are blocked on sites known to show intrusive or misleading ads option.Disable ADBLOCKER

If you use an extension to remove ads, click Extensions instead of Settings and toggle off the switch next to the add-on to disable it.

Disabling ad blockers can also eliminate other Paramount Plus error codes like 3304; read this guide to learn the detailed solutions.

5. Update/reinstall the app

  1. First, open the Paramount app, then log out of it.
  2. Launch Google Play Store from the home screen, search for Paramount Plus, and click Update if available.
  3. On your device’s home screen, locate Paramount Plus, then tap & hold to get options.
  4. Select Uninstall to delete the app.UNinstall the app - Fix Paramount Plus Error Code 3205
  5. Go to the Play Store again, search Paramount Plus, and tap Install to get the app on your device.

If you are using it on your Android TV or iOS device, try updating or reinstalling the app and check if it fixes the issue.

Remember that this issue usually occurs if your app is outdated or corrupted or you try to run the site using an incompatible browser, so for the browser version to work seamlessly, make sure you check your internet connection, clear browser cookies, and verify your browser is compatible & updated with the latest version.

Also, if using it on a TV or phone, check the app for updates, switch to the Wi-Fi connection, force stop the app, update or reinstall it to fix the problem.

Speaking of connectivity, a slow internet connection could also lead to other issues on the app, including Paramount Plus keeps buffering; read this guide to learn more.

Before you go, don’t forget to check our guide on Paramount Plus error code 3002 for additional solutions.

If you have any questions or suggestions about the subject, please mention them in the comments section below.

Zoom Error 3000: How to Fix it

You may have trouble installing Zoom, which will throw error code 3000. It is a very common issue with the users of this software, and it can be fixed easily by following some simple steps.

What is Zoom error 3000?

This installation error may appear when you try to upgrade your Zoom client. It can happen because of an incorrect version of the software installed on your system, leading to connection errors.

The installer will fail to complete the setup process because an existing file cannot be overwritten, probably because it is corrupt.

How can I fix Zoom error 3000?

Kickstart the troubleshooting process with these preliminary steps:

  • Verify that your device meets Zoom system requirements to rule out any compatibility issues.
  • Ensure you have a stable and working internet connection. You can boost your internet speeds if they’re not up to par.
  • Check that your drivers are up-to-date and your computer’s operating system is running the latest version available.

1. Run the Windows Store Apps troubleshooter 

  1. Hit the Windows key and click on Settings.settings windows 11
  2. Click on System on the left pane, then Troubleshoot on the right pane.Open system troubleshooter
  3. Select Other troubleshooters.other troubleshooters
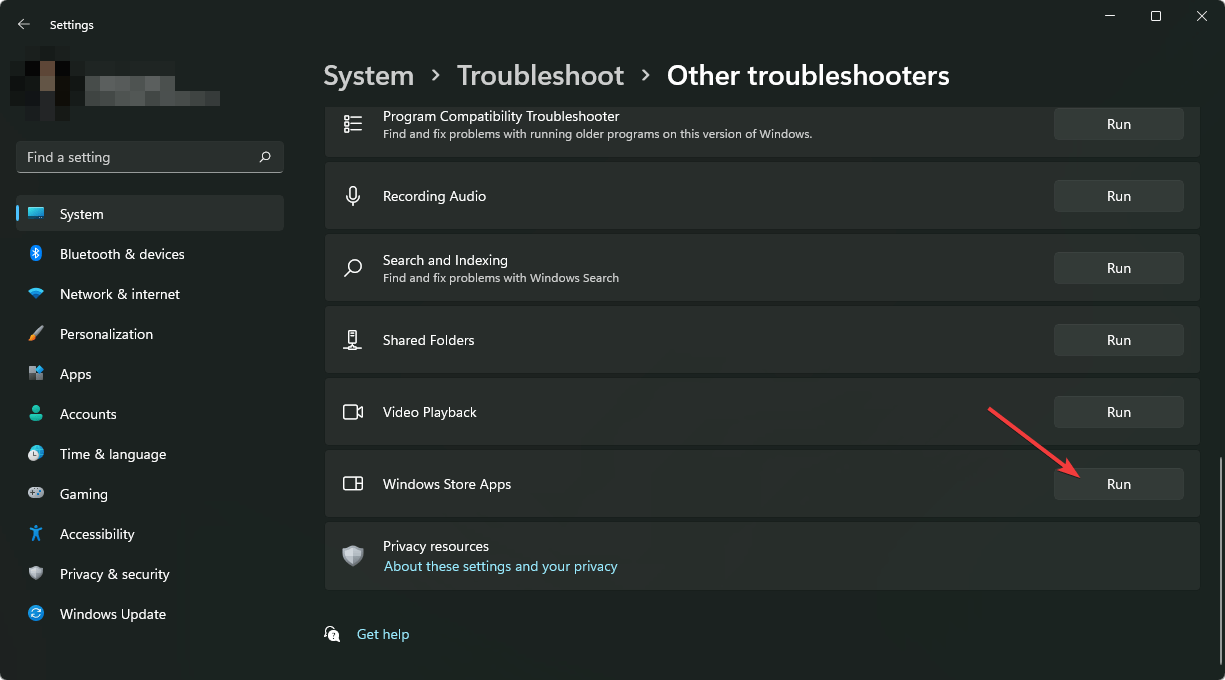
  4. Scroll down, locate Windows Store Apps, and click the Run button.clicking run windows store apps troubleshooter

You’ll also be able to resolve any issues with Zoom not detecting your camera when you run this troubleshooter.

2. Run the Program Install and Uninstall troubleshooter

  1. Download the Program Install and Uninstall troubleshooter and install it.
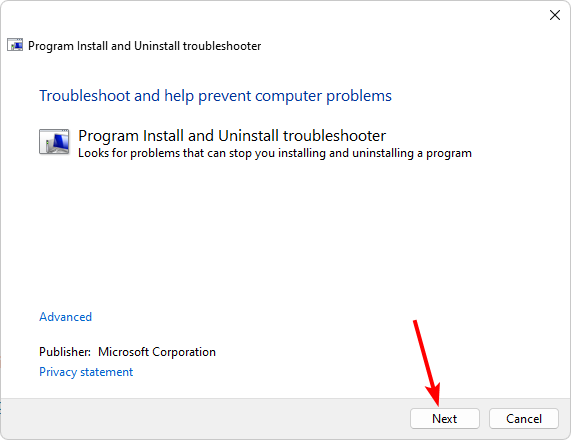
  2. Open it and click on Next.
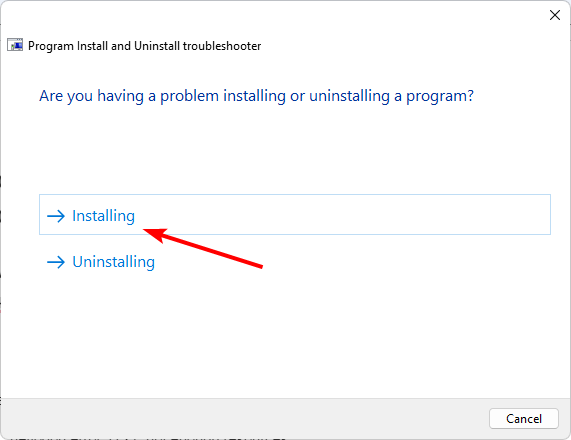
  3. You’ll be asked whether you have a problem installing or uninstalling a program. Select one option.
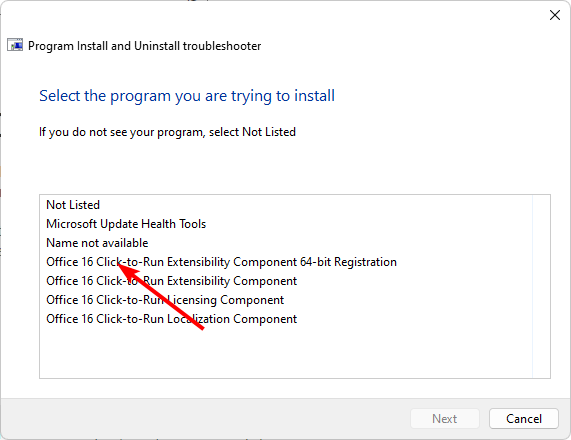
  4. Next, you’ll be asked to select the program that is not installing. Pick the problematic program from the list.
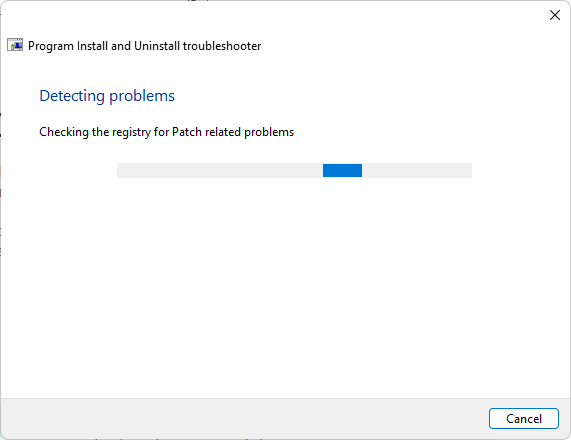
  5. The troubleshooter will start scanning for problems.
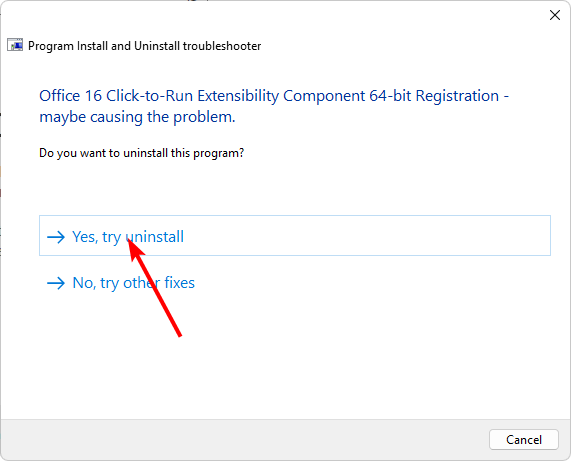
  6. Once it completes, you’ll be presented with two options. Pick either and wait for the troubleshooter to recommend fixes.

3. Disable the Windows Firewall temporarily

  1. Press the Windows key, type control panel, and click Open.Control Panel start menu -Zoom error 4502
  2. Select Category as View by and click System and Security.System and Security CP -Zoom error 4502
  3. Click Windows Defender Firewall.Windows Defender Firewall
  4. Select Turn Windows Defender Firewall on or off.Select Turn Windows Defender Firewall on or off
  5. Click the radio button next to Turn off Windows Defender Firewall for both Private & Public network settings.Turn off Windows Defender Firewall for both Private & Public network settings.
  6. Click OK.

Antiviruses and firewalls have the tendency to block certain programs from being installed if they flag them off as potential risks. Disabling them momentarily can help you address installation errors, but don’t forget to enable them to keep your system secure.

4. Scan for viruses

  1. Press the Windows key, search Windows Security, and click Open.
  2. Select Virus & threat protection.
  3. Next, press Quick scan under Current threats.
  4. If you don’t find any threats, proceed to perform a full scan by clicking on Scan options just below Quick scan.Scan options
  5. Click on Full scan, then Scan now to perform a deep scan of your PC.Full Scan Scan Now
  6. Wait for the process to finish and restart your system.

Once done, proceed with a disk cleanup to free up space and get rid of unnecessary files.

5. Reinstall the Zoom client

  1. Press Windows + I to open the Settings app.
  2. Go to Apps, then click Installed apps.Apps - Installed apps -Zoom Error 4502
  3. Locate Zoom, click the three dots icon, and select Uninstall.
  4. Click Uninstall to confirm the action.
  5. Go to Zoom’s official website, locate Zoom Desktop Client, and click Download.Download Zoom to fix zoom error code 4502
  6. Once the executable file is downloaded, double-click it to install the app.

It’s important to start by uninstalling the old version of the app and removing any remnant files that may interfere with the new installation.

Corrupt files that lead to an incomplete installation can present problems like Zoom not launching.

Next, you will need to download the new version from the official website for your platform. If you’re on Windows, you’ll need to run the installer with administrative privileges.

While the process outlined above may seem like a tedious one, it’s nonetheless a relatively simple way of fixing the Zoom error 3000. Once you’ve gone through this step-by-step guide and rebooted your computer so that the change takes effect, your problem should be solved.

We also acknowledge that Zoom errors like error code 103033 may be in plenty, so if it’s no longer your cup of tea, consider exploring other web conferencing apps that offer similar services.

We appreciate your feedback, so in the same spirit, if you have any additional thoughts on this article, drop us a comment below.

Reddit User Agent Error: Whoa There, Pardner! [Fixed]

Several users recently received the Reddit user agent error wherein they were informed that their account was blocked.

The message read, Whoa there, pardner! Reddit’s awesome and all, but you may have a bit of a problem. Make sure your User-Agent is not empty, is something unique and descriptive and try again. If you’re supplying an alternate User-Agent string, try changing back to default as that can sometimes result in a block.

But that’s not the case. It turned out to be a temporary glitch due to a bad code change, which got fixed automatically within a few hours. Before starting anything else, check the official Reddit service status or Downdetector and access Reddit on another browser or on the mobile app. Also, try using old.reddit.com or new.reddit.com to access Reddit.

How do I fix the Reddit user agent error?

1. Clear the browser cache and cookies

  1. Launch the browser, and press Ctrl + Shift + Delete to open the Clear browsing data box.
  2. Select All time from the Time range dropdown menu, tick the checkboxes for Cookies and other site data and Cached images and files, and then click on Clear data.clear browsing data to fix  reddit user agent error
  3. Relaunch Reddit and check for improvements.

If the Reddit user agent error in Chrome is intermittent and keeps reappearing after a while, clearing the browsing data will do the trick! Besides, it also helps when Reddit is not loading in Chrome.

2. Reset the Reddit password

  1. Go to Reddit’s Reset your password page, enter the username and associated email address, and then click on Reset Password.reset password to fix reddit user agent error
  2. Now, check your emails, open the one from Reddit, and click the Reset Password button.email
  3. Enter the new password in both fields and click on Set Password.set password
  4. Verify whether you are now able to access Reddit.

3. Change the User Agent in the browser

  1. Open Google Chrome, click the ellipsis near the top-right corner, hover the cursor over More tools and select Developer tools.developer tools
  2. Click the More tools icon to the left of Console.more tools
  3. Select Network conditions from the list of options.
  4. Untick the checkbox for Use browser default next to User agent.don't use browser default to fix reddit user agent error
  5. Now, choose another one from the dropdown menu or manually set a custom user agent in the field underneath.user agent
  6. Finally, with the Developer Tools still open, go to Reddit in the same tab, and check whether the user agent error is fixed.

If you’re using Firefox, we have a great guide on how to change user agent in Firefox, so don’t miss it.

If the issue still looks like a wider platform block or you continue to see error messages after changing the User Agent, check this detailed Reddit server error troubleshooting guide for additional solutions.

4. Contact Reddit support

When nothing else works, it is best that you contact Reddit support. But don’t do it via the email address link provided in the error message. Instead, go with the official support channel, i.e., the dedicated website.

And Reddit should inform you of any localized issues at your end or whether the outage is still affecting devices. Though as per user reports, the problem seems to have been fixed completely.

These are all the ways you can fix the Reddit user agent error. Remember, in most cases, it shouldn’t come down to that and the Whoa there, pardner! Reddit error message should disappear automatically.

Besides, if you are a seasoned Redditor, do consider trying a user-friendly Reddit app for Windows.

For any queries or to share which fix worked for you, drop a comment below.
How to Fix An Error Occurred 10104 on Pokemon Masters?

If your Pokemon Masters is not opening and you see the An error occurred 10104 pop-up, then this guide can help! We will discuss the probable causes and WR expert-tested solutions to fix the issue and play your favorite game.

What causes the An Error Occurred 10104 issue?

  • The app cache is corrupted.
  • The Pokemon Masters server is down.
  • Outdated game.

How can I fix the An Error Occurred 10104 on Pokemon Masters?

Before proceeding with any steps for fixing the error code 10104, go through the following preliminary checks:

  • Switch the Wi-Fi connection to mobile data or vice versa, and make sure your phone has sufficient storage space.
  • Restart your device and relaunch the game.
  • Ensure your Android or iOS operating system is up to date and check the game’s server status.

1. Switch to a mobile connection

  1. Scroll downwards on your phone to get options, and tap the Wi-Fi option to turn it off.Turn off Wi-Fi
  2. Next, enable Mobile data.Mobile Data - Fix An Error Occurred 10104 on Pokemon Masters
  3. Tap on the app to relaunch it.

2. Force close the app

Android

  1. Tap on the Settings icon from the home screen.Settings Android
  2. Select Apps from the list of options.Apps
  3. Tap on App Management.Apps Management
  4. Now scroll to find Pokemon Masters, then tap on it.
  5. Under the app name, locate and click Force stop.Force stop -Fix An Error Occurred 10104 on Pokemon Masters

iPhone

  1. On your phone’s home screen or while in the app, swipe up from the bottom.
  2. Wait for a while until you see the App Switcher. Next, swipe left and right to navigate through the open apps.Close the app - pokemon masters error 10104
  3. Once you see Pokemon Masters, swipe up to close the app.

3. Clear the app cache

Android

  1. Tap on the Settings icon from the home screen.Settings Android
  2. Select Apps from the list of options.Apps
  3. Tap on App Management.Apps Management
  4. Locate Pokemon Masters, then tap on it.
  5. Next, click Storage usage.Storage usage - Fix An Error Occurred 10104 on Pokemon Masters
  6. Now tap on Clear cache to clear the app cache, and check if the issue reappears.Clear cache
  7. If it does, repeat the steps and choose Clear data this time.Clear data
  8. Tap on Delete to confirm.Delete - Fix An Error Occurred 10104 on Pokemon Masters

Clearing the app data can help you fix other Pokemon game issues on Android, like Pokemon Home error code 400; read this guide to learn more.

iPhone

  1. Tap the Settings icon from the home screen.Settings - pokemon masters error 10104
  2. Next, locate and tap General.General
  3. Tap iPhone Storage.iPhone Storage- pokemon masters error 10104
  4. Scroll and locate Pokemon Masters, then tap it.tap on Pokemon Masters EX
  5. Click Offload App.Offload an app
  6. Tap the Offload App option again when prompted.Offload App

Offloading unused apps can recover space on your phone while backing up important data in case you want to use the app again.

4. Reinstall the app

Android

  1. On your device’s home screen, locate Pokemon Masters, then tap & hold to get options.
  2. Select Uninstall to delete the app.
  3. Go to the Play Store, search Pokemon Masters, and tap Install to get the app on your device.Install - Fix An Error Occurred 10104 on Pokemon Masters

iPhone

  1. Tap the Settings icon from the home screen.Settings - pokemon masters error 10104
  2. Next, locate and tap General.General
  3. Tap iPhone Storage.iPhone Storage- pokemon masters error 10104
  4. Scroll and locate Pokemon Masters, then tap it.tap on Pokemon Masters EX
  5. Tap the Delete app option.Delete app - pokemon masters error 10104
  6. Click Delete App.Delete the app
  7. Go to the App Store and tap Get to install the app again.

Deleting the app removes all the data from your phone and ensures you can reinstall the app as a new one.

In case you want to play Pokemon games on Windows, try this guide to learn how to install Pokemon Go on your computer.

If nothing worked for you, you need to contact Pokemon Masters customer support and explain to them the issue & fixes you tried for further assistance.

If you like to play Pokemon games on your browser on PC,  learn how to play the best Pokemon games online on your browser; check our guide for the steps to do it easily.

Did we miss a step that helped you? Don’t hesitate to mention it in the comments section below; We will happily add it to the list.

Error 1067: The Process Terminated Unexpectedly [Fix]

Error 1067: The process terminated unexpectedly is a system error affecting several Windows services, including Bluetooth Support Service and Windows Audio, and third-party services, namely MySQL and Autodesk Desktop Licensing Service, on the local computer.

The problem was reported on all iterations of the OS, including Windows 7, Windows 10, and Windows 11. And based on our findings, it was generally an issue or misconfiguration at the user’s end.

What is Error 1067: The process service terminated unexpectedly?

This is usually an OS-related error arising from corrupt system files or missing permissions. For services related to hardware functionality, it could be the outdated drivers to blame. Besides, if it’s a third-party service, an incorrect software installation might trigger the error.

How do I fix Error 1067: The process terminated unexpectedly?

Before we start with the slightly complex changes, try these quick ones:

  • Check for low storage space on the drive where the application/service is installed. If that’s the case, run Disk Cleanup.
  • In case the RAM usage is high, terminate a few resource-intensive programs.
  • For Error 1067: The process terminated unexpectedly with third-party services, disable the antivirus or whitelist the related app in the firewall. Also, if it has a License Manager, reinstall it.
Tip icon Tip
Based on our research, checking the error logs helps identify what’s triggering Error 1067 and effectively eliminating the issue. So, we recommend you do that first and directly head to the relevant fix. Otherwise, try them all in the listed sequence.

1. Repair the corrupt system files

  1. Press Windows + S to open Search, type Command Prompt in the text field, right-click on the relevant result, and select Run as administrator.command prompt
  2. Click Yes in the UAC prompt.
  3. Paste the following DISM commands individually and hit Enter after each: DISM /Online /Cleanup-Image /CheckHealth DISM /Online /Cleanup-Image /ScanHealth DISM /Online /Cleanup-Image /RestoreHealth
  4. Now, execute this command to run the SFC scan: sfc /scannowsfc scan to fix error 1067 the process terminated unexpectedly
  5. Finally, restart the computer and check for improvements.

If it’s the corrupt system files to blame for the Error 1067: The process terminated unexpectedly issue, running the DISM commands and SFC scan should get things up and running.

This also helps with the STATUS_SYSTEM_PROCESS_TERMINATED error.

2. Change the service’s log on settings

  1. Press Windows + R to open Run, type services.msc in the text field, and hit Enter.services.msc
  2. Locate the affected service, right-click on it, and select Properties.properties
  3. Now, select Automatic from the Startup type dropdown menu.automatic to fix error 1067 the process terminated unexpectedly
  4. Go to the Log On tab, choose Local System account, and then tick the checkbox for Allow service to interact with desktop.local system account to fix error 1067 the process terminated unexpectedly
  5. Finally, click on Apply and OK to save the changes, then reboot the PC and check for improvements.

Changing the Log On type helps when you get Error 1067: The process terminated unexpectedly with the Autodesk Desktop Licensing Service, MySQL, and Windows services.

If this doesn’t work or the Local System account is already selected, choose This account instead, enter the password for it, and confirm the change.

3. Update the related drivers

  1. Press Windows + X to open the Power User menu, and select Device Manager from the list of options.
  2. Locate the device related to the affected service, right-click on it, and select Update driver.update driver to fix error 1067 the process terminated unexpectedly
  3. Choose Search automatically for drivers and let Windows install the best locally available version.search automatically for drivers
  4. Once done, restart the computer.

Often, outdated drivers can trigger Error 1067: The process terminated unexpectedly, especially with the Bluetooth Support Service or the Windows Audio service. So, update the drivers for the relevant device.

If Windows can’t find a better version, head to the manufacturer’s official website and manually install the latest driver.

4. Delete the cache (only for the MySQL service)

  1. Open the Services window, right-click on the MySQL service, and select Stop from the context menu.stop
  2. Once done, press Windows + E to launch File Explorer, go to your MySQL installation, and open the Data folder.
  3. Now, select ib_logfile0 and ib_logfile1, and hit the Delete to remove them.delete logfile to fix error 1067 the process terminated unexpectedly
  4. Head back to the Services window, right-click on the MySQL service, and select Start.
  5. Finally, reboot the PC and check for improvements. Remember, on restart, the files will be recreated, and you won’t lose the database tables.

5. Reinstall the service via the Registry Editor

  1. Press Windows + R to open Run, type regedit in the text field, and click OK.
  2. Click Yes in the prompt that appears.
  3. Navigate the following path or paste it in the address bar and hit Enter: Computer\HKEY_LOCAL_MACHINE\SYSTEM\CurrentControlSet\Servicespath
  4. Right-click on the affected service’s key, and select Export (saving a backup to be on the safer side).export
  5. Head to the desktop (our choice) or another preferred storage path, enter a file name and click Save.save registry key
  6. Now, right-click on the service’s key, and select Delete.delete key to fix error 1067 the process terminated unexpectedly
  7. Click Yes in the confirmation prompt.
  8. Finally, restart the computer and check for improvements.

In case the OS or the software doesn’t automatically add the service to the Registry after reboot, export it on another working PC, move it to the affected computer, and then import the key under the Services.

To do that, select the Services key > click the File menu > choose Import > select the required .reg file > click Open > confirm the change.

Besides, if you can’t delete the key, take full control and then proceed. The process is similar to taking ownership of files and folders.

6. Reinstall the related application

  1. Press Windows + R to open Run, type appwiz.cpl, and hit Enter.appwiz.cpl
  2. Select the application related to the service (if it’s a third-party program), and click Uninstall.uninstall to fix error 1067 the process terminated unexpectedly
  3. Follow the on-screen instructions to complete the process.
  4. Now, restart the PC and then download the program from an official source.

7. Perform an in-place upgrade

Note icon NOTE
The steps listed here are for Windows 11. In case you are running the previous iteration, learn how to perform an in-place upgrade on Windows 10.
  1. Go to Microsoft’s official website, choose the OS edition and product language, and then download the Windows 11 ISO.windows 11 ISO
  2. Double-click the ISO file and select Open in the prompt.
  3. Run the setup.exe file.setup.exe
  4. Click Yes in the UAC prompt.
  5. Click Next to proceed.next
  6. Check the license terms, and click Accept.
  7. Finally, verify that the setup reads Keep personal files and apps, click Install, and wait for the process to complete.in-place upgrade to fix error 1067 the process terminated unexpectedly

When nothing else works against Error 1067: The process terminated unexpectedly with Windows services, an in-place upgrade will get things running. Besides, you won’t lose any files or apps during the process, as opposed to reinstalling Windows 11.

Remember, for third-party services like Jenkins, Apache Tomcat Webserver, or MongoDB, always check the folder permissions and take access, free up disk space, or reinstall the program.

If the problem remains unresolved, check the fixes for Windows could not start the service on Local Computer, as one of these might work.

For any queries or to share more solutions with us, drop a comment below.

Best Extensions to Unblock Websites & Browse Anonymously

Whether you want to break free of geographical restrictions or browsing limitations, choosing the right extension is the key to liberating your online experience.

In this comprehensive guide, we will talk about the best extensions to unblock websites and help you browse seamlessly.

What should you consider while choosing an extension to unblock websites?

  • Ensure the extension is compatible with the browser you are using.
  • Robust security features to guarantee a protected browsing experience.
  • Should be able to unblock a wide range of websites.
  • Check the impact of the extension on your browsing speed.

What are the best extensions to unblock websites?

NordVPN – Fatest VPN extension

Nord VPN - proxy extension to unblock websites

Nord VPN is one of the popular extensions that can be used to unblock websites and browse anonymously, and it comes with 5000+ servers in over 57 countries.

With next-gen encryption, NordVPN comes with advanced security at a faster speed and hides your IP and location, providing complete privacy.

The Threat Protection Lite Feature blocks intrusive ads and websites that might contain malware, and it also protects your online payments, preventing malicious websites from stealing your data.

Another fantastic feature is Stop WebRTC leaks, which protects your IP address from getting exposed through WebRTC protocol.

You can download the VPN app, add an extension to your browser, sign in using the credentials, select a server & click Quick Connect to get started.

Some other features of this extension are:

  • Available for Chrome, Firefox, and Edge
  • Comes with a 30-day trial version
  • Uses Split tunneling to exclude particular URLs
  • 24*7 customer support via email or live chat

ExpressVPN – Connects to the most secure HTTPS versions of websites

Item media 1 screenshot

Express VPN extension is available in multiple languages and has WebRTC blocking features, ensuring the websites you visit can’t access your location and IP address.

Break the region-based restrictions and access websites across borders with a different IP address while keeping your privacy intact.

The extension for ExpressVPN is optimized for speed, so you can stream and browse online seamlessly.

The VPN never logs IP addresses, traffic destinations, browsing history, DNS queries, or metadata, thereby keeping your sensitive information private.

With the Network Lock kill switch, you can block your internet traffic the minute your VPN loses connection, ensuring you are always safe.

Additional features of this extension are:

  • Available for Google Chrome, Firefox, Brave and Vivaldi
  • VPN servers are located in over 105 countries, including Canada, the UK, the USA, and Australia
  • Comes with advanced AES 256-bit encryption
  • Lets you bypass ISP throttling, which helps you eliminate buffering

⇒ Get Express VPN

CyberGhost VPN – State-of-the-art encryption

CyberGhost VPN -

CyberGhost VPN is a browser extension that allows you to access websites without geo-restrictions and without slowing down your network connection’s speed.

With the free extension, you don’t need to sign up; you can install the extension and choose from eight available servers in the United States, Romania, Germany, or the Netherlands to connect & browse anonymously.

With the app’s premium version, you can access servers in 125 cities, 100 countries, and 20 dedicated IP locations.

With a single click, you can change your IP address to one in a different country, rerouting your data via encrypted servers and letting you access streaming services and websites worldwide.

CyberGhost VPN has a no-logs policy, which means it never tracks, stores, or sells whatever you do on the servers.

Additional features of this extension are:

  • Available as an extension on Chrome and Firefox
  • Comes with a free trial and a 45-day money-back guarantee
  • The data standards are equal for both the extension and the app
  • Secures your identity with military-grade AES-256 encryption and VPN protocols

⇒ Get CyberGhost VPN

Private Internet Access VPN – Best In-browser protection

Item media 3 screenshot

With the global server network, Private Internet Access VPN lets you access content on the Internet without any limitations.

This extension can cut out ads, disable trackers, and block WebRTC detection to secure your online presence.

One of the amazing features of the extension is Webcam Blocking, which prevents unauthorized microphone and webcam access to ensure personal privacy.

The anti-tracking tools of the extension block tracking scripts, cookies, and URLs to ensure your browsing habits are private.

It can convert supported websites from insecure connections to HTTPS encryption, fortifying the security and privacy of user data in online interactions.

Some other features of this extension are:

  • Available as an extension on Chrome, Opera and Firefox
  • Stops websites to access and share your location data
  • Comes with a strict no-logs policy
  • 24/7 Customer Support via on-page chat or email

HotSpot Shield – Doesn’t affect device performance

Hotspot Shield

With 3200 VPN servers in over 80 countries, the HotSpot Shield VPN extension for Chrome can help you access content worldwide without any restrictions.

You can stay anonymous and have the best browsing experience while hiding your IP address and location on public Wi-Fi.

The Hotspot Shield has built-in malware and phishing protection, preventing malicious apps and suspicious websites from compromising the user’s device and personal information.

The app’s premium version includes unlimited streaming, 115 virtual locations, and the Hydra VPN protocol to ensure fast VPN speeds with stable and secure internet proxy connections.

With military-grade encryption and unlimited bandwidth, the Express VPN extension ensures top-notch security and seamless connectivity in the online realm.

Some other features of this extension are:

  • Available as an extension on Chrome and Firefox
  • Doesn’t keep track of any connection logs or IP addresses
  • 24/7 live customer chat support
  • Comes with a free version but limited features

⇒ Get HotSpot Shield

Surfshark – Wide range of security features

The Cookie pop-up blocker feature lets you access your favorite websites without having to select consent requests.

With 3200+ servers, 100 countries, and 6 continents, Surfshark VPN extension is one of the safest ways to preserve internet speed while keeping your security intact.

Ensure you turn on website safety warnings to get detailed pop-up notifications about breaches of the pages you surf.

With the Surfshark extension, accessing geo-blocked websites by connecting via the right servers and unblocking the internet is easier than ever.

It also keeps personal information safe even when you connect to the internet using a public network, and the CleanWeb feature prevents annoying ads from spoiling your browsing experience.

Additional features of this extension are:

  • Available as an extension on Chrome, Edge and Firefox
  • Doesn’t store activity logs
  • Free trial and 30 days refund policy
  • Offers unlimited bandwidth

⇒ Get Surfshark

TunnelBear – Lightweight extension

TunnelBear extension for Chrome, Firefox, and Edge helps keep your data and location hidden from ISPs, hackers, and malicious websites.

You can choose a country server & access websites, and browse content blocked at your real location.

This browser extension keeps your browsing activities private even when using the internet via public Wi-Fi.

Get unlimited data on the TunnelBear extension with monthly or yearly subscriptions for the VPN for a seamless browsing experience.

With 5000+ secure VPN servers in more than 47 countries across the world, the VPN comes with a range of VPN protocols, including OpenVPN, WireGuard, and more.

Some other features of this extension are:

  • Available as an extension for Chrome, Edge, and Firefox
  • Doesn’t log your activities
  • Strong AES 256-bit encryption
  • Lightning-fast private network

⇒ Get TunnelBear

AdGuard – Offers unlimited bandwidth

With AdGuard VPN enabled on your browser, you can access content on various popular streaming services without interruption.

You can use the Exclusions feature to choose which websites you want to access using the VPN or select the sites to know your real identity.

The AdGuard VPN extension, when teamed up with AdGuard Ad Blocker, ensures you surf the internet anonymously and is free from ads.

It also lets you change the default DNS server according to your preferences to boost your DNS privacy with options to avoid ads & trackers and even filter adult content.

The private proxy hides your location, IP address, and the websites you visit from everyone, including ISPs, to ensure your browsing activities stay anonymous.

Additional features of this extension are:

  • Available as an extension for Chrome, Edge, Opera and Firefox
  • Do not collect or share any of your online activity data
  • Over 65+ locations to choose from
  • Securely encrypts your traffic, which makes it inaccessible to third-party observers

⇒ Get AdGuard

Windscribe – Comes with advanced privacy features

Make your browsing experience better with Windscribe, as it eliminates ads and prevents you from accessing malware domains & social networks, keeping you secure.

With servers in more than 112 cities in 69 countries, Windscribe gives you the freedom to surf the internet without geo-restrictions.

With the WebRTC Slayer feature, the extension blocks WebRTC from leaking your sensitive information outside the tunnel.

Another great feature is Double Hop, which proxies your connection via any two servers on the Winscribe network.

Using it is very simple; all you need to do is download the extension, add it to the compatible browser, sign in or sign up, click the On button, choose a server location, or let the extension choose it for you, and voila, you are a ghost!

Some other features of this extension are:

  • Available as an extension for Chrome, Edge, and Firefox
  • Delete the cookies once you close the tab
  • Keeps an eye out for trackers that follow you across the web
  • 24*7 customer support via email

⇒ Get Windscribe

1ClickVPN – Comes with a freemium model

With 531 VPN servers across 52 countries, the 1ClickVPN extension lets you connect to the nearest server or the server of your choice to enable you to visit geo-location-restricted sites.

It makes your browsing history totally undetectable with zero IP or DNS leaks, keeping your browsing activities safe.

Keeping your identity hidden even from internet service providers to avoid the speed throttle, enabling you to stream your content seamlessly.

You can use this free VPN without sign-ups or long-term commitments; all you need to do is install the extension, click Quick Connect, select the server, and browse anonymously.

Private browsing and unlimited sessions ensure you browse the web safely while keeping your data fully anonymous.

Additional features of this extension are:

  • Available as an extension for Chrome, Edge, and Firefox
  • Supports 256-bit encryption for complete protection
  • Does not maintain logs
  • Is available for free

⇒ Get 1ClickVPN

VeePN – Hassely free setup

With advanced encryption, a user-friendly interface, and a 2500 worldwide network of VPN servers in 89 countries, VeePN ensures you can browse the internet limitlessly.

It stops search engines, website owners, and markets from following you and collecting your sensitive information.

With VeePN connected, you no longer have to think about geo-restrictions and access websites blocked by your ISP without any issues.

It protects your data and hides your identity while shopping online, even when you are connected using public Wi-Fi.

VeePN lets you browse freely with 100% protection of your data and no speed limit to stop you from streaming your favorite shows.

Some other features of this extension are:

  • Available as an extension for Chrome, Edge, and Firefox
  • No logs policy
  • Spoofs location, time, and browser language
  • 24/7 live chat support

⇒ Get VeePN

Now that you know a few extensions to browse anonymously, however, if you want to prevent other PC users from accessing your browsing history, go for private browsing instead.

To conclude, the VPN extensions to unblock websites listed can help you with secure encrypted connections to advanced protection against malware and phishing threats, providing you with accessibility and a secure browsing experience.

If you want complete freedom and total anonymity on your device while surfing the internet, you should opt for a VPN app; check out the list of best VPN apps available.

Which one is your favorite and why? Don’t hesitate to mention the one you like the most in the comments section below.

Exclusive: Here is Samsung’s 2026 Galaxy Book 4 lineup’s full specifications

Samsung’s Galaxy Book laptops are well known for their mobility and flexibility characteristics, carrying out enough power to work or to do a bit of gaming on the road. The lineup is seen as a soft of rival to the Microsoft Surface laptops, or even Apple’s MacBooks.

The new lineup, Galaxy Book 4, is set to debut in 2024, and thanks to our trusty source, we have exclusive insights on it. There are 5 new devices: Galaxy Book 4, Galaxy Book 4 360, Galaxy Book 4 360 Pro, Galaxy Book 4 Pro, and finally, Galaxy Book 4 Ultra.

At first glance, they’re similar in specifications to the Galaxy Book 3 lineup. All of the new devices sport Intel processors, continuing the current lineup’s usage of Intel CPUs (why wouldn’t Samsung try AMD processors, though?).

This lineup also comes as a surprise regarding processors, because we were all kind of expecting Samsung to eventually integrate the new Qualcomm Oryon processors, announced last year, into the Galaxy Book laptops. However, these laptops are Intel-based, so it might be a while until Oryon is released (we speculate a 2024 Q2-Q3 release).

But without further ado, let’s get into details about the new Galaxy Book 4 devices.

Galaxy Book 4 lineup: Full specifications

As we mentioned earlier, there are 5 new devices in this lineup. Each of them is different and suited for different situations, but as far as we can tell from the specifications, all of them are meant for mobility.

Galaxy Book 4

The lightest of them all, the Galaxy Book 4 is the entry device in this lineup. Based on the main specifications, as you can see below, this laptop is meant for office work.

CPUIntel® Core™ 5 Processor 120U (Up to 5.0 GHz 12 MB Smart Cache)
GPUIntel® Graphics
RAM8 GB LPDDR4x
Display15.6” FHD LED
Anti-Glare
1920 x 1080
Storage512 GB NVMe SSD
Slots: 2
ConnectivityBluetooth v5.1
Wi-Fi 6
802.11 ax 2×2

We don’t have a price for it, but if we are to compare it to Galaxy Book 3’s $999 price, this device should be around it, more or less.

Galaxy Book 4 360

Book 4 360’s heavier specs could make it a suitable choice for those who want to work, and do a bit of light content editing/gaming on the side as well, as you can see in the specs below.

CPUIntel® Core™ 5 Processor 120U (Up to 5.0 GHz 12 MB Smart Cache)
GPUIntel® Graphics
RAM8 GB LPDDR5
Display15.6” FHD AMOLED
1920 x 1080
Touch Screen
Storage265 GB NVMe SSD
Slots: 2
ConnectivityBluetooth v5.3
Wi-Fi 6E
802.11 ax 2×2

This one should cost around $999 as well, as the current Galaxy Book 3 360 is priced around this sum.

Galaxy Book 4 Pro

This device is a better version of the Galaxy Book 4, focused on ultra mobility and a stronger set of specifications, as you can see below. It’s meant for the same goals, office work + editing on-the-go.

CPUIntel® Core™ 7 Processor 155U (Up to 4.8 GHz 24 MB Smart Cache)
GPUIntel® Arc Graphics
RAM16 GB LPDDR5X
Display14” WQXGA AMOLED
2880 x 1800
Touch Screen
Anti-Reflective
Storage512 GB NVMe SSD
Slots: 2
ConnectivityBluetooth v5.3
Wi-Fi 6E
802.11 ax 2×2

We don’t have a price for it, but if we compare it to Galaxy Book 3 Pro, this device should cost around $1.449.

Galaxy Book 4 Pro 360

The Pro 360 version is meant for those who want a 2-in-1 device: for working and gaming. This is a big laptop, and it has some big specs to show it.

CPUIntel® Core™ 7 Processor 155U (Up to 4.8 GHz 24 MB Smart Cache)
GPUIntel® Arc Graphics
RAM16 GB LPDDR5X
Display16” WQXGA AMOLED
2880 x 1800
Touch Screen
Anti-Reflective
Digitizer
Storage1 TB NVMe SSD
Slots: 1
ConnectivityBluetooth v5.3
Wi-Fi 6E
802.11 ax 2×2

The price for it might be around $1899 if we compare it to the current Galaxy Book 3 Pro 360.

Galaxy Book 4 Ultra

The high-end laptop of this lineup, Book 4 Ultra sports some incredible specifications, as you can see below. It comes with a Core 9 Processor, GeForce RTX 4070, and 32 GB of RAM. Basically, you can use it for high-end gaming, high-end professional editing, content production, and so on.

CPUIntel® Core™ 9 Processor 185H (Up to 5.1 GHz 24 MB L3 Cache)
GPUNVIDIA® GeForce® RTX 4070 Laptop GPU 8GB GDDR6
RAM32 GB LPDDR5X
Display16” WQXGA AMOLED
2880 x 1800
Touch Screen
Anti-Reflective
Storage1 TB NVMe SSD
Slots: 2
ConnectivityBluetooth v5.3
Wi-Fi 6E
802.11 ax 2×2

However, you should know that this device could end up being quite expensive. If we compare it to the current Galaxy Book 3 Ultra, which costs around $2.399, this device should have a similar or even higher price.

Below, you can find a list of the complete specifications of all the Galaxy Book 4 devices:

Galaxy Book4Galaxy Book4 360Galaxy Book4 360 ProGalaxy Book4 ProGalaxy Book4 Ultra
ProcessorIntel® Core™ 5 Processor 120U (1.4 GHz up to 5.0 GHz 12 MB Smart Cache)Intel® Core™ 5 Processor 120U (1.4 GHz up to 5.0 GHz 12 MB Smart Cache)Intel® Core™ 7 Processor 155U (Up to 4.8 GHz 24 MB Smart Cache)Intel® Core™ 7 Processor 155U (Up to 4.8 GHz 24 MB Smart Cache)Intel® Core™ 9 Processor 185H (Up to 5.1 GHz 24 MB L3 Cache)
Display15.6” FHD LED
Anti-Glare
1920 x 1080
15.6” FHD AMOLED
1920 x 1080
Touch Screen
16” WQXGA AMOLED
2880 x 1800
Touch Screen
Anti-Reflective
Digitizer
14” WQXGA AMOLED
2880 x 1800
Touch Screen
Anti-Reflective
16” WQXGA AMOLED
2880 x 1800
Touch Screen
Anti-Reflective
Storage512 GB NVMe SSD
SSD Slots: 2
265 GB NVMe SSD
SSD Slots: 2
1 TB NVMe SSD
SSD Slots: 1
512 GB NVMe SSD
SSD Slots: 2
1 TB NVMe SSD
SSD Slots: 2
OSWindows 11Windows 11Windows 11Windows 11Windows 11
Weight1,57 kg (3.46 lbs)1,46 kg (3.22 lbs)1,66 kg (3.66 lbs)1,26 kg (2.78 lbs)1,86 kg (4.10 lbs)
Audio/Video720p HD Camera
Stereo Speakers Dolby Atmos® Internal Dual Ray
Digital Mic
1080p FHD Camera
Stereo Speakers Dolby Atmos® Internal Dual Ray
Digital Mic
2M Camera
AKG Quad Speakers Smart Amp Dolby Atmos® Internal Dual Ray
Digital Mic
2M Camera
AKG Quad Speakers Smart Amp Dolby Atmos® Internal Dual Ray
Digital Mic
2M Camera
AKG Quad Speakers Smart Amp Dolby Atmos® Internal Dual Ray
Digital Mic
Memory8 GB LPDDR4x8 GB LPDDR516 GB LPDDR5X16 GB LPDDR5X32 GB LPDDR5X
Adapter54 Wh 45 W USB
Type-C Adapter
68 Wh 65 W USB
Type-C Adapter
76 Wh 65 W USB
Type-C Adapter
68 Wh 65 W USB
Type-C Adapter
76 Wh 140 W USB
Type-C Adapter
Width Depth Height365 x 229 x 15.4 mm (14.04″ x 9.02″ x 0.61″)355 x 228 x 13.7 mm (14″ x 9.9″ x 0.5″)355 x 252 x 12.8 mm (14.04″ x 9.02″ x 0.61″)312.4 x 223 x 11.6 mm (12.30″ x 8.8″ x 0.46″)355 x 250 x 16.5 mm (13.99″ x 9.86″ x 0.65″)
NetworkBluetooth v5.1
Wi-Fi 6
802.11 ax 2×2
Bluetooth v5.3
Wi-Fi 6E
802.11 ax 2×2
Bluetooth v5.3
Wi-Fi 6E
802.11 ax 2×2
Bluetooth v5.3
Wi-Fi 6E
802.11 ax 2×2
Bluetooth v5.3
Wi-Fi 6E
802.11 ax 2×2
ColorMoonstone GrayMoonstone GrayMoonstone GrayMoonstone GrayMoonstone Gray
Peripherals1 USB 3.2
2 Thunderbolt™ 4
1 HDMI
MicroSD Card Reader
Headphone/Mic jack
1 USB 3.2
2 Thunderbolt™ 4
1 HDMI
MicroSD Card Reader
Headphone/Mic jack
1 USB 3.2
2 Thunderbolt™ 4
1 HDMI
MicroSD Card Reader
Headphone/Mic jack
1 USB 3.2
2 Thunderbolt™ 4
1 HDMI
MicroSD Card Reader
Headphone/Mic jack
1 USB 3.2
2 Thunderbolt™ 4
1 HDMI
MicroSD Card Reader
HeadPhone/Mic jack
Video cardIntel® GraphicsIntel® GraphicsIntel® Arc GraphicsIntel® Arc GraphicsNVIDIA® GeForce® RTX 4070 Laptop GPU 8GB GDDR6
SecurityTPMTPM
Fingerprint Reader
TPM
Fingerprint Reader
TPM
Fingerprint Reader
TPM
Fingerprint Reader
KeyboardNumeric Key
Clickpad
Numeric Key
Backlit
Touchscreen
Clickpad
Numeric Key
Backlit
Touchscreen
Clickpad
Backlit
Touchscreen
Clickpad
Numeric Key
Backlit
Touchscreen
Clickpad

If Galaxy Book 4 is priced around the current Book 3 devices, these new laptops can become a real competitor to Microsoft Surface laptops, or Apple’s MacBooks, as we mentioned earlier. Samsung has the potential to be a strong competitor in this market, as well.

What do you think? Are you excited about the Galaxy Book 4 lineup?

Solved: Error Code 83 on Disney Plus

Most streaming services like Disney Plus have dedicated standalone apps to prevent compatibility issues like error code 83. However, even apps are not immune to such errors, but our WindowsReport experts were able to get down to the root cause of this issue and came up with the following fixes.

Causes of error code 83 on Disney Plus:

  • Using emulators, unofficial or modded versions instead of the official Disney Plus app.
  • Streaming using unsupported devices.
  • Poor and unstable internet connections.

How do I fix error code 83 on Disney Plus?

Before we begin with the slightly complex solutions, try these quick ones first:

  • Check your Internet speeds and boost them if necessary, then relaunch the app.
  • Double-check that your device is among the Disney Plus supported devices and verify that the server status is up and running.
  • Confirm that all cables are securely connected, and restart your device.

1. Update your device’s firmware

1.1 TV firmware

  1. For this solution, we shall be using the TCL model.
  2. On your TV, find your Settings.
  3. Go to System.
  4. Click on About then select Software update.
  5. Select Network update and click on System update.
  6. Now click on Check Update. Your system will scan for any available updates.
  7. You’ll either start downloading updates or get a message that your TV is already up to date.

1.2 Phone OS

  1. Locate Settings on your device. (We’ll be using the Samsung model for this step).
  2. Go to Software update.
  3. Tap on Download and install.
  4. Wait for the update to finish installing if available, and retry your transaction.

2. Clear cache

2.1 On your TV

  1. On your TV, find your Settings.
  2. Go to Apps.
  3. Find Disney and click on it.
  4. Scroll down and select Clear cache.

2.2 Android app

  1. Open the Settings app on your Android device, and select Apps.apps
  2. Choose Disney + from the list of applications.
  3. Tap on Storage.storage
  4. Tap on Clear data and then on Clear cache.clear cache to fix error code 14 disney plus
  5. Open the Disney + app again and check for improvements.

Clearing the cache also does the trick when faced with Arena of Valor error 201.

2.3 Browser cache

  1. For this step, we shall be using the Chrome browser.
  2. Launch your Chrome browser and click the three vertical ellipses in the top right corner.
  3. Select Settings.Settings CHrome
  4. Click on Privacy and security, then select Clear browsing data.
  5. Check Cookies and other site data and Cached images and files, then hit Clear data.Clear data

3. Reinstall the Disney Plus app

3.1 On a Windows PC

  1. Press Windows + I to open Settings, go to Apps from the navigation pane, and click on Installed apps on the right.installed
  2. Locate Disney + from the list, click the ellipsis next to it, and select Uninstall.uninstall to fix error code 14 disney plus
  3. Again, click Uninstall in the confirmation prompt.
  4. You can now download Disney + from the Microsoft Store.

3.2 Android TV

  1. On your Android device, click on Settings. android tv settings
  2. In the Settings menu, click on Apps.android TV apps
  3. From the list of apps, click on Disney+, and then press Force Stop. force stop disney plus
  4. Next, press OK to confirm the action.
  5. Now, go back to the app menu, click on Clear Cache, and press OK again to confirm the action.clear cache disney plus
  6. Again, in the menu, click on Clear Data, and click on OK to confirm. clear data disney plus
  7. Return to the app menu, and click on Uninstall.uninstall disney plus
  8. Press OK to confirm the uninstallation of the app.

3.3 On a mobile phone

  1. Open the phone Settings, and go to Apps.apps
  2. Select Disney + from the list.
  3. Tap on Uninstall at the bottom.uninstall
  4. Choose OK in the confirmation prompt.
  5. Finally, reinstall Disney + from the app store. 

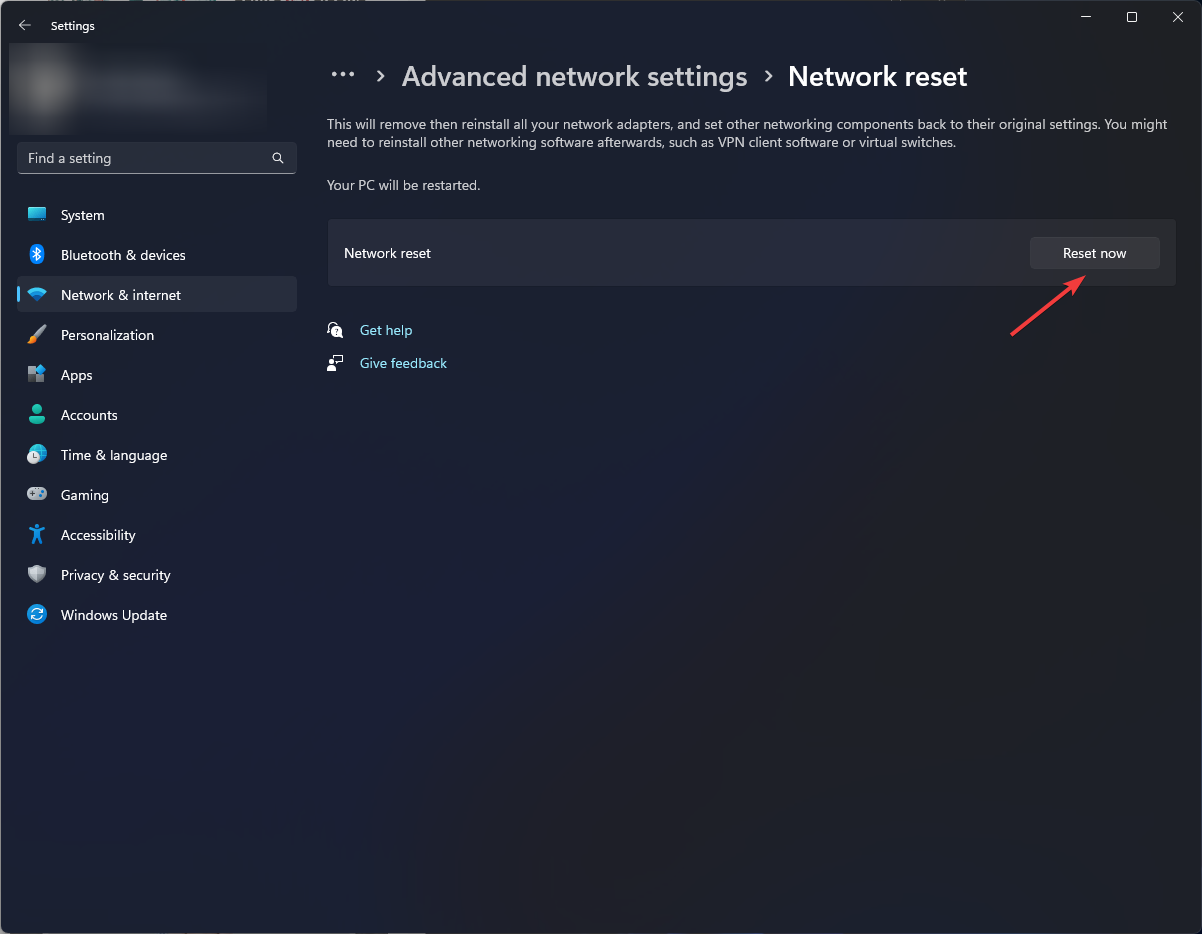
4. Reset your Network

  1. Hit the Windows key and click on Settings.settings windows 11
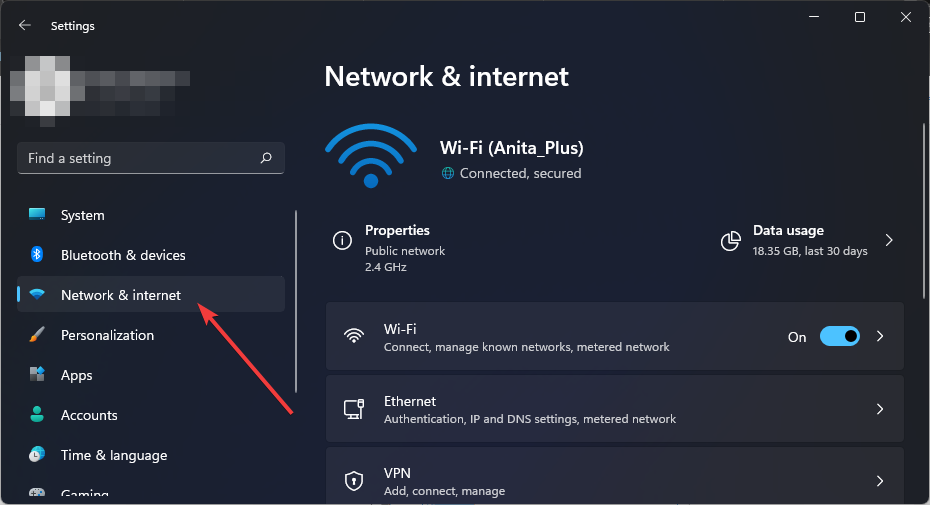
  2. Navigate to Network & internet.
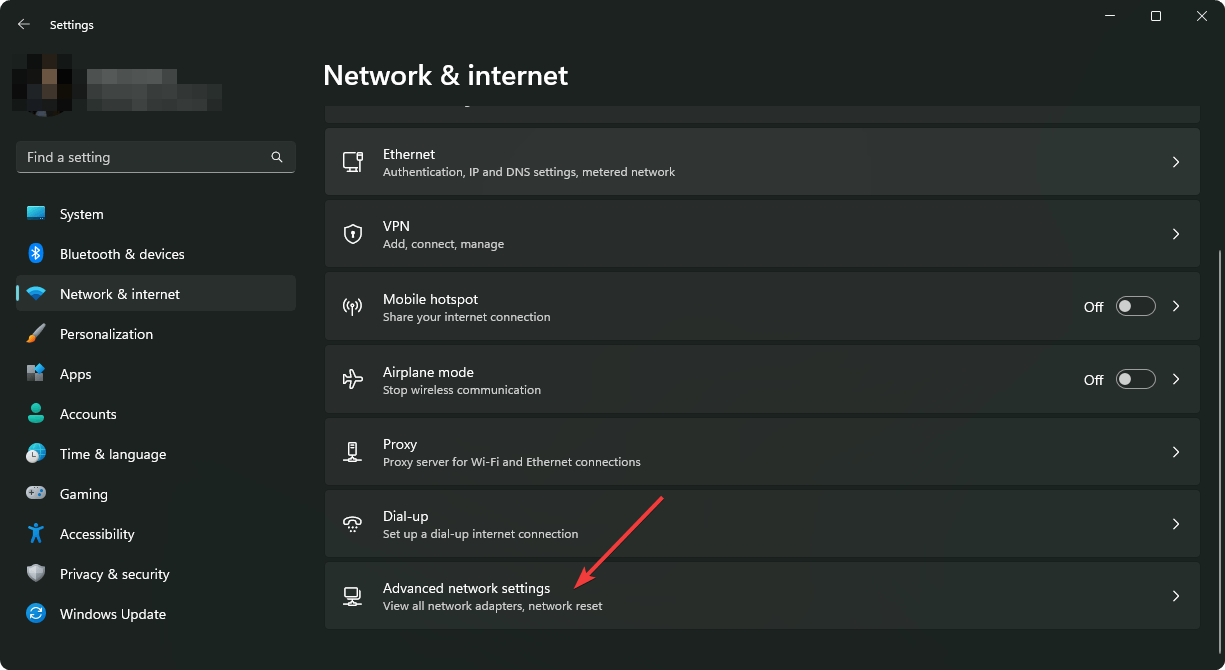
  3. Select Advanced network settings.going advanced network settings win11
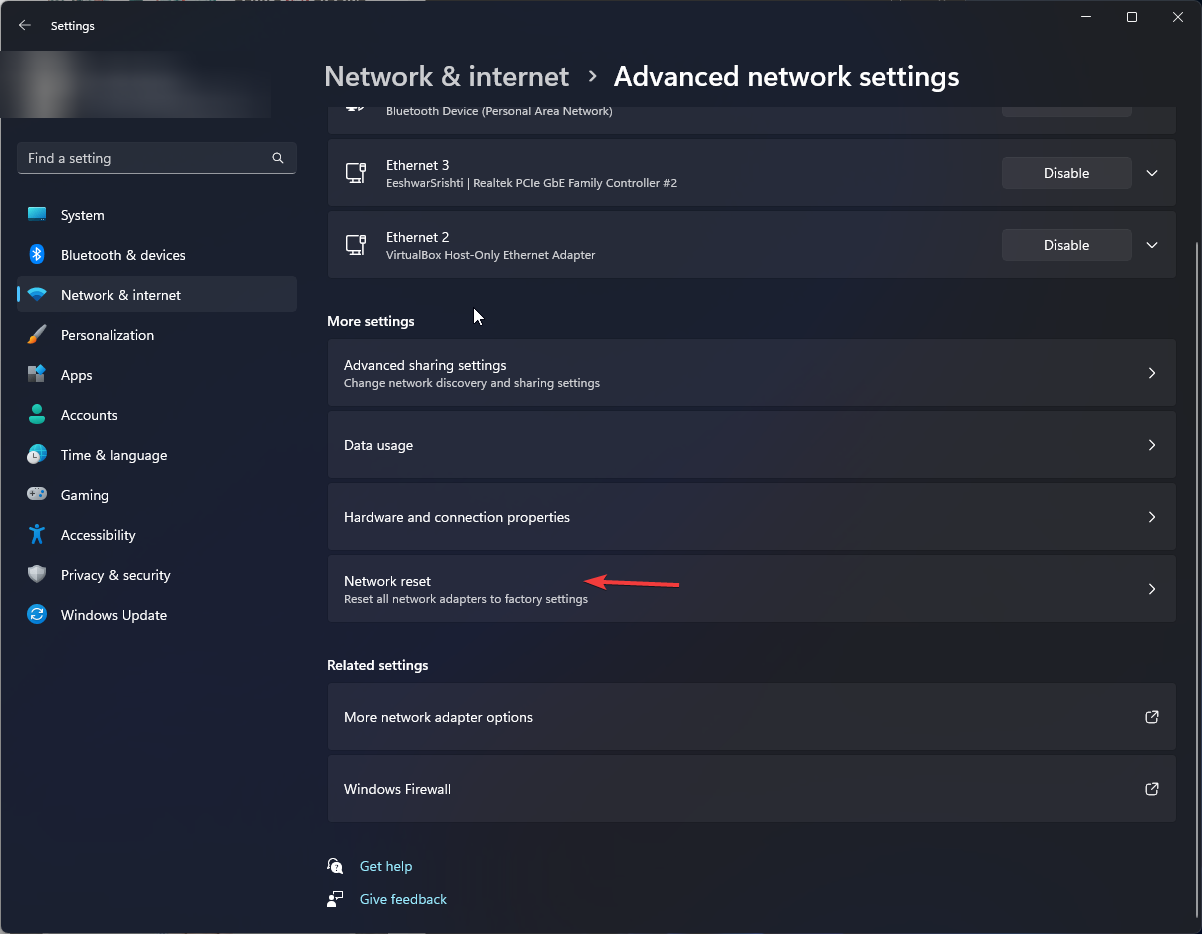
  4. Click on Network reset.Network Reset 1
  5. Next, hit the Reset now button.Network Reset now

If you previously had an issue with your ISP and there was an outage for a moment, resetting the network may help fix this error along with buffering issues on Disney Plus. When you do, ensure you re-login to your Disney Plus account.

Finally, contact Disney support if none of the above steps worked. Sometimes, it’s an internal issue, and you’ll just have to wait until it’s fixed. You can also visit Disney Plus’s FAQ section and try other recommended fixes.

They may not resolve the error code 83, but they can help with other Disney Plus errors. We also have our own dedicated section for such issues as the error code 1026, so don’t hesitate to visit our expert article for quick solutions.

For any additional thoughts or comments on this article, get in touch with us in the comment section below.

Ticketmaster Error Code 504: How to Fix it

When purchasing tickets, you may encounter the Ticketmaster error 504, and your seats may be lost. However, this is no cause for alarm, as this can happen to anyone. Luckily, the workaround is pretty easy to execute.

Why am I getting the Ticketmaster error 504?

When purchasing tickets on Ticketmaster, your internet connection may drop, or the server may become temporarily unavailable. This can prevent you from completing your purchase, but make sure you check your email and account for any payment notifications before re-purchasing.

How do I get rid of Ticketmaster error code 504?

Perform the following preliminary checks before any advanced troubleshooting: verify the status of the Ticketmaster website for downtimes and ensure your Internet speeds are fast enough, check for an app update, try another connection, and restart your browser/device.

1. Log out from all devices

  1. Launch your browser and go to Ticketmaster’s Website.
  2. Navigate to the top right corner of the interface and hover over your profile and click on Sign out.
  3. Repeat the steps on all your secondary devices, leaving only your primary device logged in then try purchasing the tickets again. 

2. Clear cache

2.1 Browser cache

  1. For this step, we shall be using the Chrome browser.
  2. Launch your Chrome browser and click the three vertical ellipses in the top right corner.
  3. Select Settings.Settings CHrome
  4. Click on Privacy and security, then select Clear browsing data.
  5. Check Cookies and other site data and Cached images and files, then hit Clear data.Clear data

If this doesn’t resolve the error, you may have disabled your browser cookies or facing a case of a slow Chrome browser, so try another faster option like Opera and see if there are any changes.

2.2 App cache

  1. Tap on settings on your phone.
  2. Next, tap on Apps.
  3. Find the Ticketmaster app and tap on it.
  4. Scroll down and select Storage.
  5. Tap on Clear data and Clear cache, then try again.

3. Update your device’s firmware

  1. Locate Settings on your device. (We’ll be using the Samsung model for this step).
  2. Go to Software update.
  3. Tap on Download and install.
  4. Wait for the update to finish installing if available, and retry your transaction.

If you’re using the Ticketmaster on your PC, proceed to check for updates on your Windows device and ensure your browser is the latest version, too.

4. Reset your network

  1. Hit the Windows key and click on Settings.settings windows 11
  2. Navigate to Network & internet.
  3. Select Advanced network settings.going advanced network settings win11
  4. Click on Network reset.Network Reset 1
  5. Next, hit the Reset now button.Network Reset now

If your internet connection is having issues, you may be unable to confirm your purchase because Ticketmaster cannot send a confirmation code. A reset will refresh the connection and hopefully clear any connection problems.

5. Reinstall the Ticketmaster app

On your phone, locate the Ticketmaster app, tap and hold, then select Uninstall. Go to your app store and download it then try purchasing the tickets again and see if the error persists.

If you’re out of luck, you can contact the Ticketmaster support team for further assistance. And while you may successfully solve the Ticketmaster error 504, there are a host of other purchase-related errors like the Ticketmaster: Pardon the Interruption pop-up.

Still, the solutions are pretty easy, so you should feel confident enough to handle any bombshell.

For those facing another error, fixing U533 error on Ticketmaster is made easy too. This guide will assist you in navigating and resolving this issue efficiently.

If you managed to resolve this error using a solution not mentioned above, we’d love to hear from you. drop us a line below.

This Page Has Been Blocked By Opera? Unblock it Now [How to]

The This page has been blocked by Opera error stops you from accessing websites. You also get an error code, ERR_BLOCKED_BY_CLIENT that signals the same problem.

Based on our research, the cause is almost always on the user’s end. The website itself is rarely the culprit. No matter the case, we’ll show you how to fix it in no time.

How do I unblock blocked sites on Opera?

First things first: turn off your VPN, switch to Private Mode (Ctrl+Shift+N), and restart Opera. If you’re still having trouble, it’s time to dive into some more advanced troubleshooting.

1. Disable the conflicting extension extensions

  1. Launch the Opera browser, click the Extensions icon near the top-right, and select Manage extensions.manage extensions
  2. Now, click the Disable button under all the extensions here and check for improvements.disable to fix this page has been blocked by opera
  3. If the problem is fixed, click the Enable button to re-enable the extensions one at a time and wait for the error message to appear.
  4. As soon as it does, the extension enabled last is the culprit. Click the Remove button to delete it.remove
  5. Again, click Remove in the confirmation prompt.

Often, the This page has been blocked by Opera error appears due to an extension, especially an adblocker or VPN. So, disable or remove all such extensions. This also helps when Opera keeps opening new tabs.

2. Whitelist the website in the built-in ad blocker

  1. Open the website that throws the error in Opera.
  2. Now, click the Privacy Protection icon in the toolbar, and click the Turn off for this site button for ads.disable adblocker
  3. Check if the problem is gone.

3. Disable the ad blocker and allow trackers

  1. Launch the browser, and click the Settings icon in the left pane.
  2. Now, turn off the toggle for Block ads and surf the web up to three times faster and Block trackers under Privacy Protection.disable adblocker to fix this page has been blocked by opera
  3. The issue should be gone now.

4. Reconfigure Opera’s security settings

  1. Open Opera, paste the following path in the address bar and hit Enter: opera://settings/system
  2. Enable the toggle for Use DNS-over-HTTPS instead of the system’s DNS settings, and try the different options listed here. If it’s already enabled, turn off the toggle.enable/disable to fix this page has been blocked by opera
  3. Now, go to the Cookies’ settings using the following path:opera://settings/cookies
  4. Click the Add button next to Sites that can always use cookies.add
  5. Paste the affected website’s address in the text field, tick the checkbox for Including third-party cookies on this site, and click Add.allow website

5. Whitelist Opera in Windows Firewall

  1. Press Windows + S to open Search, type Allow an app through Windows Firewall in the text field, and click the relevant result.
  2. Click the Change settings button.change settings
  3. Make sure both opera.exe and opera_autoupdate.exe have the Private and Public checkboxes ticked.private and public
  4. If opera_autoupdate.exe doesn’t appear here, click the Allow another app button.allow another app to fix this page has been blocked by opera
  5. Click on Browse.
  6. Now, head down the following path, where Username is your current profile’s name, and open the latest version’s folder: C:\Users\Username\AppData\Local\Programs\Opera
  7. Select the opera_autoupdate.exe file, and click Open.opera_autoupdate.exe
  8. Click on Add.
  9. Tick the checkboxes for Private and Public next to opera_autoupdate.exe, and click OK to save the changes.check permissions
  10. Finally, reboot the device and relaunch the website.

If the firewall is blocking a program or port, you will have to manually whitelist it. When the restricted program is Opera, you might get the This page has been blocked by Opera error. This also helps when Opera downloads are stuck at 100%.

6. Reset the browser to default settings

  1. Open the Opera Settings, scroll down to the bottom, and click on Reset settings to their original defaults.restore defaults to fix this page has been blocked by opera
  2. Again, click Reset in the confirmation prompt.
  3. Once done, check for improvements.

7. Reinstall Opera

  1. Press Windows + R to open Run, type appwiz.cpl in the text field, and hit Enter.appwiz.cpl
  2. Select Opera from the list, and click on Uninstall.uninstall to fix this page has been blocked by opera
  3. Follow the on-screen instructions to complete the uninstall process.
  4. Once done, reboot the device and then reinstall Opera from the official website.

Conclusion

One of these methods should have worked against the This page has been blocked by Opera error. Remember, you might also encounter the same This page has been blocked error on Brave, and following a similar approach helps!

This isn’t the only error you can encounter, and many reported various privacy errors in Opera GX, but we have a special guide dedicated to it.

For any queries or to share more solutions with us, drop a comment below.

This Page Has Been Blocked by Brave: 3 Ways to Unblock it

This page has been blocked by Brave message can appear when visiting any website, which will ultimately prevent you from accessing it.

Not being able to access certain websites can be a significant issue, especially if use them for school or business projects, so today we’ll show you how to fix this problem.

Why am I being blocked from a website?

  • Third-party extensions can prevent Brave from accessing specific pages.
  • VPN or antivirus software on your PC can sometimes block certain websites.
  • Corrupted browser installation or cache issues can also cause this problem.

How do I fix This page has been blocked by Brave?

1. Disable extensions

  1. Click the Menu button in the top right corner and choose Extensions.
     
  2. Next, click the switch next to all extensions.
  3. Restart the browser and check if the problem is still there with all extensions disabled.
  4. If the problem is resolved, enable extensions one by one until you manage to find the extension that is causing the problem.

2. Change Avast VPN settings

  1. Open Avast VPN and in the top right corner click on Menu. After that, select Settings.
     
  2. Next, select VPN Protocols in the left pane. In the right pane, select Mimic.
  3. Save changes.

Keep in mind that other VPN software might be causing issues, however, most users reported issues with Avast VPN.

3. Reinstall Brave

  1. Press the Windows key + I to open the Settings app.
  2. Go to Apps and select Installed apps.
  3. Next, locate Brave on the list, click the dots next to it, and choose Uninstall.
  4. Once the browser is removed, install it again and check if that solves the issue.

How do I unblock a website blocked by the administrator?

If a page is blocked by the administrator, you need to adjust your security settings, such as webpage filtering in your antivirus. We tackled this issue in depth in our This page has been blocked by your administrator guide, so don’t miss it.

As you can see, it’s simple to fix This page has been blocked by Brave err_blocked_by_client error, and in most cases, all you have to do is disable a problematic extension or adjust your VPN settings.

Sadly, this isn’t the only issue you can encounter, and many reported that the Brave browser is not working. If you don’t address these issues, you might encounter problems such as YouTube not working in Brave.

It’s worth mentioning that Chrome and Brave share many similarities, and if you need more solutions, perhaps our blocked by client error in Chrome guide can help you.

Besides, you may also encounter the This page has been blocked by Opera error, and a similar approach should get things running!

Did you find a different way to fix this error? If so, don’t hesitate to share it with us in the comments section.

How to Exclude Users From MFA in Azure: 4 Tested Methods

Sometimes, you need to exclude one or more users from MFA in Azure because, for some reason, they can’t use multi-factor authentication.

Our WR software experts have tested a few methods to exclude users from the conditional access policies and outlined them below.

How do I disable MFA for a specific user in Azure?

1. Disable MFA from Azure Active Directory

  1. Open the Azure portal and log in with administrative credentials.
  2. Select Azure Active Directory from main menu.
  3. From the new menu, select Users.
  4. Choose the user you need to exclude from MFA by looking or searching in the list of users, then click Authentication Method from the left pane.
  5.  Now, slide the Multi-Factor Authentication box to Off and confirm the decision.

To confirm that you removed the multi-factor authentication for that user, try to log into Azure with the user credentials and check if there is any request for an MFA login.

2. Create an exclusion group and policy

2.1 Create the exclusion group in Azure

  1. Sign into the Microsoft Entra admin center as an administrator.
  2. Browse to Identity > Groups > All groups.
  3. Select New group and select Security in the Group type list, then specify a name and description.
  4. Leave or set the Membership type to Assigned, then select the owner of the group and the users that should be part of this exclusion group.  Finally, select Create.

2.2 Create an MFA exclusion policy for the group

  1. Browse to Protection and select Conditional Access.
  2. Select Create new policy and fill in the name and description of the policy.
  3. Select Users and groups under Assignments
  4. On the Include tab, select All Users.
  5. Go to Exclude, select Users and groups, and choose the exclusion group you created in solution 2.1 above.  
  6. Continue the process to set up the conditional access policy.

Now, the users from the group you have selected should have been excluded from multi-factor authentication when logging in.

3. Use the What If conditional tool in Azure

  1. Log into Azure with administrative rights, click on Security, and select Conditional access.
  2. Next, click on What if.
  3. Now, click on User from the left pane, look for the user you want to check, and hit the Select button from the bottom right.
  4. Now, you will be able to see to what policies the user is subjected to.

The What If tool allows you to check what policies are applied to each user to see if there are any problems or conflicts. This will help you see if the multi-factor policy or other security policies are enforced.

4. Disable Per User MFA in PowerShell

  1. Connect to Azure AD (Entra) PowerShell by running the following commands:
    • Import-Module MSOnline
      Connect-MsolService
  2. Sign into your Azure AD administrative account (now called Entra).  
  3. Type or paste the following command and replace UPN with the user’s principal name: Set-MsolUser -UserPrincipalName "UPN" -StrongAuthenticationRequirements @()

How do I know if a user is registered for MFA?

You can check the Azure MFA policy in the Security menu, but using the What If tool from Solution 3 above is a lot easier.

Note that in order to have access to users and the security defaults, you will need an administrative account.

So, now you know how to exclude a user from Azure Multi-Factor Authentication (MFA) and restore the user access to the classic username and password method.

You might also be interested in learning how to apply MFA on Windows 11, or how to set up multi-factor authentication on RDP.

If you have any other questions or tested solutions, don’t hesitate to use the comments section below and let us know about them.

Microsoft Technical Takeoff 2023: Where to attend & What to expect?

The second annual Microsoft Technical Takeoff for Windows + Intune will take place at the end of this month, roughly 2 weeks after Microsoft Ignite, which happens later this week.

The event is aimed at organizations and IT professionals who want to find out about the latest updates for everything Microsoft related: Microsoft Entra, Microsoft 365, and Intune, to Windows and Azure Visual Desktop, and beyond.

We’re excited to present the second annual Microsoft Technical Takeoff for Windows + Intune! This virtual technical skilling event takes you deep inside the latest features, capabilities, and scenarios for commercial organizations and the IT professionals that support them.

Microsoft

The main thing that you should know about Microsoft Technical Takeoff is that all of its events are live, and they will have live Q&A. If you, by any chance, can’t attend some of the sessions, they will be recorded and available on demand.

Microsoft Technical Takeoff 2023: Where to watch & What to expect?

Where to watch/How to attend?

The event will take place from Nov 27 2023 07:00 AM to Nov 30 2023 11:30 AM (PST); Microsoft has prepared a list of the sessions taking place, and all you have to do is to go through that list, select the sessions you want to attend, and click on RSPV to save a spot.

You can find the list here. Plus, by selecting RSVP, you will automatically add the event to your calendar, and Microsoft will send you reminders about them, so you won’t be able to miss it.Microsoft Technical Takeoff

What to expect?

According to the list of sessions, AI will take the forefront of this Technical Takeoff edition, while cloud solutions will also be discussed, along with many new capabilities for Microsoft Intune, Windows 365, and Azure Virtual Desktop.

However, below is the complete list of everything waiting for you at the end of this month.

MONDAY
NOVEMBER 27
TUESDAY,
NOVEMBER 28
WEDNESDAY
NOVEMBER 29
THURSDAY
NOVEMBER 30
7:00 AM
Modern management or
Windows 11? It’s more about “and” than “or”
7:00 AM
Uplevel security with Endpoint Privilege Management
+ Windows LAPS
7:00 AM
Generative AI and the next generation of Intune features
7:00 AM
Microsoft Intune reinvents Mac management
7:30 AM
Safeguard devices and data with Microsoft Intune for endpoint security
7:30 AM
On-premises to cloud native in Intune: expert tips and key considerations
7:30 AM
Windows. Cloud. Management. Your questions answered.
7:30 AM
Boosting your productivity with Windows 365 Business
8:00 AM
Exploring Windows cloud solutions: Insights and sample scenarios
8:00 AM
Intelligent IT management for Windows 365 and
Azure Virtual Desktop
8:00 AM
Windows. Cloud. Management. Your questions answered. 
(continued)
8:00 AM
AMA: Windows Subsystem for Linux (WSL)
8:30 AM
What’s new and what’s next for Windows 365 and
Azure Virtual Desktop
8:30 AM
What’s new in Windows identity and credential protection
8:30 AM
Feedback wanted! IT made easy with low-code workflows
8:30 AM
Troubleshooting Windows updates
9:00 AM
Microsoft application management (MAM) for Windows
9:00 AM
Advanced analytics:
supercharge real-time reporting with insights that matter
 
9:00 AM
Coming to the Microsoft Intune Suite – Microsoft Cloud PKI!
9:00 AM
Frontline worker device management in Microsoft Intune
9:30 AM
Windows Firewall: new and upcoming features for 2023
9:30 AM
Advanced analytics:
supercharge real-time reporting with insights that matter
 
(continued)
9:30 AM
Accelerate your migration to Windows 365 and
Azure Virtual Desktop
9:30 AM
Windows 365 Frontline: let’s talk deployment (and the road ahead!)
10:00 AM
Windows Autopatch: Simplifying the update management story
10:00 AM
What’s new in Active Directory
10:00 AM
Simple and secure helpdesk support using
Remote Help in Intune
10:00 AM
MSIX and app attach made easy
10:30 AM
Windows 365 and
Azure Virtual Desktop powered by Microsoft Intune
10:30 AM
The latest on managing Windows updates in Microsoft Intune
10:30 AM
Windows LAPS:
enhancements and roadmap
10:30 AM
Windows + Intune Office Hours LIVE at Technical Takeoff
11:00 AM
Navigate the future of
Enterprise Application Management with Intune
11:00 AM
Securing Windows in the cloud:
a practical approach for
Cloud PCs and Cloud VDI

11:00 AM
Windows 11 migration and app validation made easy with
Test Base for Microsoft 365
11:00 AM
Windows + Intune Office Hours LIVE at Technical Takeoff
(continued)
11:30 AM
How secure is Universal Print?
11:30 AM
Windows on Arm app showcase
11:30 AM
VMware Horizon for Windows 365 deep dive


You can simply click on any of the events, and it will take you to the session’s presentation where you can sign up to attend.

Are you excited about this Microsoft Technical Takeoff edition?

Also, note that CES 2024 focused on AI, transportation, smart cities, and digital health, so take a closer look at our dedicated article.

WhatsApp will allow you to hide lock chats with a secret code

If you have ever thought you needed more protection or privacy when opening up a WhatsApp chat, then we have good news for you. According to the WhatsApp-based site, WaBetaInfo, the communication app will receive a feature that will allow users to type in a secret code to hide/unhide locked chats.

The feature comes weeks after WhatsApp released channels, the new trend for communication platforms. Skype debuted something similar as well, which makes us wonder if the Microsoft-owned app will also introduce secret codes for hidden conversations.

Most recently, it was also revealed that WhatsApp for Windows will get an update that lets users start chats with unknown numbers. However, the feature we’re covering in this article will only be available for Android devices, according to WaBetaInfo.

The feature is currently rolling out to WhatsApp users on the Beta channel, with a release scheduled most probably at the end of this month.

How to enable a secret code for a lock chat on WhatsApp?

In the list of your locked chats on WhatsApp, a new settings page will appear, called Chat lock settings. Here, you’ll have the option to enable setting up a secret code that you can use to unlock hidden chats, as you see in the image below.lock chat secret code whatsapp

Configuring a secret code will make all your locked chats disappear and unable to be accessed. This way, if your phone ends up in the wrong hands, people won’t be able to see that you have a list of locked chats.

After you set up your secret code, typing it into the Search bar within the Chats tab will automatically unhide the list of locked chats for the session.

As WaBetaInfo reported, this feature is quite useful, especially in situations where information would be compromised, such as someone else having access to your phone, and such.

The feature is only available on Android for now, with a general release scheduled to take place in the following weeks. However, WhatsApp will most likely release the feature on other platforms, as well.

What are your thoughts on this?

Thrustmaster Control Panel Not Working? 7 Ways to Fix it

While Thrustmaster products work fine most of the time, you often need to reconfigure the settings in the Control Panel, and if it’s not working, the gaming experience stands affected.

For some models, you simply need to plug them in and configure the settings in-game. But for a few, especially on PCs, it’s critical to have the components set right, or else the Thrustmaster Control Panel won’t show up.

Why isn’t my Thrustmaster working?

It’s usually due to missing or outdated drivers or when you are running an older version of the firmware. Besides, when the wheel is connected to a USB 3.0 port, it won’t be detected, and subsequently, you will find the Thrustmaster Control Panel not showing.

Incompatibility, misconfigured settings, and a bug in the OS are other common reasons to blame.

What can I do when the Thrustmaster Control Panel is not working?

Before we start with the slightly complex solutions, perform these few quick checks:

  • Restart the computer. Also, if you are connected to a USB 3.0 port, switch to USB 2.0, and make sure not to use a USB hub or any additional power cord.
  • In case you are using the T300 RS racing wheel base and connected to a PC, set the USB sliding switch to PC-PS3.
  • If you are facing problems accessing it, find out how to open the Thrustmaster Control Panel in Windows.

1. Terminate all Thrustmaster process and relaunch

  1. Press Ctrl + Shift + Esc to launch the Task Manager.
  2. Right-click on any Thrustmaster process listed here, and select End task from the context menu.terminate task to fix thrustmaster control panel not working
  3. After terminating all, relaunch the Thrustmaster Control Panel and verify whether it’s working.

2. Make sure all the critical services are running

  1. Press Windows + R to open Run, type services.msc in the text field, and hit Enter.services
  2. Scroll down, locate the Thrustmaster services, right-click on one, and select Properties.properties
  3. Select Automatic from the Startup type dropdown menu, and click the Start button.run to fix thrustmaster control panel not working
  4. Once the service is running, click Apply and then OK to save the changes.
  5. Make similar changes to all other Thrustmaster services, and check for improvements.

3. Repair the current Thrustmaster installation

  1. Double-click the driver setup (.exe file) you downloaded earlier.
  2. Click Yes in the UAC prompt.
  3. Now, choose Repair and click Next to perform a repair operation on the driver.repair to fix thrustmaster control panel not working
  4. Finally, restart the PC and check for improvements.

If you don’t have the installer setup anymore, download the file from the manufacturer’s official website, the same way you did the last time. A quick repair does help when the Thrustmaster Control Panel is not working.

4. Update the Thrustmaster firmware

  1. Press Windows + R to open Run, type joy.cpl in the text field, and click OK.
  2. Select the Thrustmaster device from the list, and click Properties.properties
  3. Click on Check for Updates, and if any new firmware versions are available, install them.check for updates

5. Disable EHCI hand-off and Intel xHCI Mode in BIOS

  1. Turn off the PC, then press the Power button to turn it on, and as soon as the display lights up, hit the F1, F2, F10, F12, or the Del key, depending on the system manufacturer, to access the BIOS.
  2. Go to the Advanced tab, and select USB Configuration.
  3. Now, set EHCI Hand-off to Disabled. To do that, select the option and choose Disabled.disable to fix thrustmaster control panel not working
  4. Similarly, disable the xHCI Hand-off mode.

The xHCI Hand-off mode handles USB 3.0 ports, while EHCI Hand-off manages USB 2.0 ports. Disabling both did the trick when the Thrustmaster Control Panel was not responding or working.

6. Reinstall the drivers

6.1 Uninstalling the current driver

  1. Press Windows + R to open Run, type appwiz.cpl in the text field, and hit Enter.
  2. Locate the Thrustmaster entry, select it, and click Uninstall.uninstall to fix thrustmaster control panel not working
  3. Follow the on-screen instructions to complete the removal process.
  4. Similarly, uninstall any Thrustmaster add-ons or similar entries.

6.2 Re-installing a fresh driver

  1. Disconnect your Thrustmaster controller from the PC.
  2. Go to Thrustmaster’s official support website, and select your product.
  3. Click the Download icon next to the compatible driver. Do verify that the driver is compatible with the installed iteration of Windows.download
  4. Run the installer setup.reinstall to fix thrustmaster control panel not working
  5. Follow the on-screen instructions, and when prompted, re-connect the controller to the PC via a USB 2.0 port.connect product
  6. Complete the installation and then restart the PC.

Often, when the Thrustmaster Control Panel is not working, reinstalling the drivers gets things up and running. Just make sure not to have the product connected all throughout and only plug it in when prompted. Also, reboot the PC for the changes to come into effect.

Besides, you may consider using a reliable driver uninstaller tool to effectively remove the previous installation before re-downloading it.

7. Uninstall recent Windows updates

  1. Press Windows + I to open Settings, go to Windows Update from the navigation pane, and click on Update history.update history
  2. Scroll down to the bottom and click on Uninstall updates.
  3. Click the Uninstall button next to the recently installed update.uninstall to fix thrustmaster control panel not working
  4. Again, click Uninstall in the confirmation prompt.

With a few new OS versions, changes are introduced that may lead to the Thrustmaster Control Panel not working. So, you will have to uninstall Windows updates to get things running, sometimes even a few.

These fixes will work, no matter the underlying cause. Based on our research, 9 out of 10 times, reinstalling the driver while following the instructions provided in the Thrustmaster manual helped. So, do it as the manual says!

Once you have things up and running, consider optimizing the PC for gaming to get the best performance.

For any queries or to share what worked for you, drop a comment below.
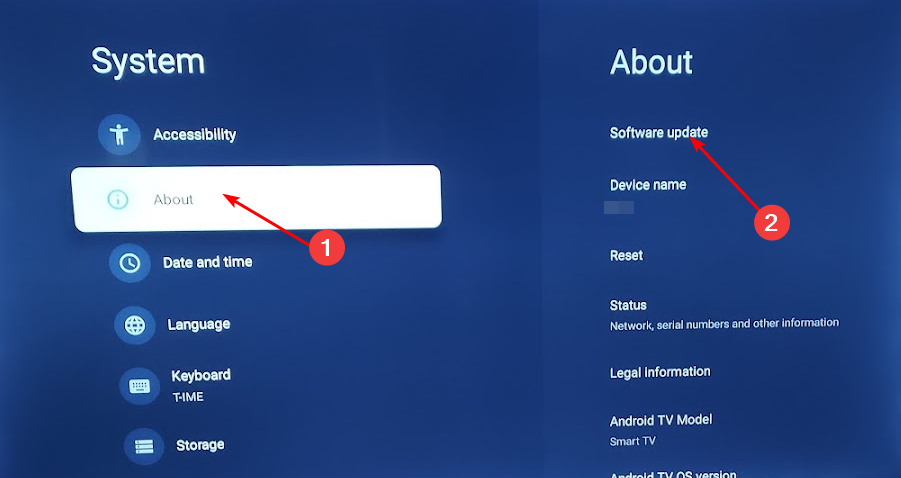
Logitech Keyboard Not Lighting Up: 3 Tested Fixes

If the Logitech keyboard is not lighting up, you’re in the right place. We figured out why this happens and we’ll show you how to fix it. Notably, issues with selected lightning profiles can lead to this. Outdated firmware or faulty settings can also play a role.

Let’s see what you can do to fix it.

What can I do if the Logitech keyboard is not lighting up?

First, try the following:

  • Use 4-5 colors and try different profiles; avoid single-color options.
  • Disconnect the keyboard, try a new USB port, and press the Power button a few times.
  • Update the Logi app.
  • Check that the backlight is on.

If you did and the keyboard still won’t light up, keep reading:

1. Use the keyboard shortcut

  1. Press the Light key + 1 to turn on the lighting
  2. Next, press the Light key + 0 to select the preferred color.
  3. Repeat this whenever you encounter this problem.

2. Update the firmware

  1. Download the Logitech Firmware Update Tool and install it.
  2. Start the software and follow the instructions on the screen.
  3. Once the process is finished, you’ll have the latest firmware installed.

3. Check the software settings

  1. Open the Logitech keyboard software.
  2. Click on Keyboard and then on More.
  3. Make sure that Disable backlighting isn’t checked.

How do I reset my Logitech keyboard?

This varies on the model, but many wireless models can be reset by pressing the following keyboard keys in a sequence: Esc, O, Esc, O, Esc, B.

Keep in mind that this works only for some models, mostly MX and K series. The reset can sometimes help if the Logitech wireless keyboard not lighting up, so don’t hesitate to try it.

Do keep in mind that certain models require you to use the dedicated software, so be sure to check your keyboard manual.

If the Logitech Pro keyboard not lighting up the issue is most likely related to your settings or outdated software or firmware. If that’s the case, be sure to download Logitech G Hub or Logitech Unifying software and keep it up to date.

If the Logitech keyboard is not working on your PC, or suddenly stops working, you may be having pairing issues. To avoid them, be sure to follow our instructions on how to pair the Logitech keyboard.

Did you find a different solution for this problem? If so, share it with us in the comments section.

2026 will bring a new Office client, per new leaked images confirmed by Microsoft

2024 will bring more than a new Windows client (AI-based Windows 12, everyone): Microosft will be releasing a new Office client, Microsoft Office LTSC Professional Plus 2024, according to new leaked images, provided by Windows enthusiast, @techosarusrex.

Office 2024 Preview Hmm.

New Windows Client

New Windows Server

New Windows Client LTSC

And now new Office.

2024 is shaping up to be an amazing year

@techosarusrex

The images are seemingly confirmed by Microsoft, as the official Windows Insider Program X (formerly known as Twitter) profile commented on the leaked images.

The future is bright indeed.

Windows Insider Program

The date of the release is yet to be announced, but Office 2024 will be out in Q3 or Q4, next year. It will include 7 apps of the Microsoft Suite package, including Word, Office, and PowerPoint.

New Office 2024 client: How does it compare to Microsoft 365?

A new Office 2024 client means that it could get into conflict with the existing Microsoft 365 Suite. The difference between them, however, should be enough to end this conflict, as Office products can be purchased on a standalone version, rather than going for a monthly subscription, as is the case with Microsoft 365.

Another difference would be the lack of certain features: for example, Microsoft 365 is getting Copilot this month, and Office 2024 might not get it, but we’ll have to wait for the official announcement from Microsoft, on this.Office 2024 client

However, the release of a new Office client should be good news for those users who want to own a license rather than pay a subscription, and it’s something that people have been requested for already.

2024 is also the year Microsoft is set to unveil the new Windows iteration, and it will most likely be AI-based. Copilot was recently added to Windows 11, and the AI tool will surely be on this Windows iteration, as well.

What do you think about the new Office client?

Want to let others know which Teams apps to avoid? Here’s how to leave reviews

Microsoft Teams has introduced App Ratings and Reviews in the platform, allowing users to rate apps and leave reviews for those that made an impact on their daily activity in Teams. According to the announcement, this new option will allow users to get feedback and interact with others on apps they want to install or have installed already.

If you ask us, Microsoft should have implemented this option sooner, but it’s never too late: this new feature is part of what Microsoft promised for Teams, last month. In October, the Redmond-based tech giant debuted a new default client for Teams, dubbed the new Teams, or Teams 2.0.

Microsoft says this new version is faster and optimized for modern applications. The company also said that Teams will get more new features, and here we are.

The new App Ratings and Reviews should be available to everyone using Microsoft Teams. Just make sure your Teams is updated to the latest version.

How to leave a review on Microsoft Teams apps

Users won’t have to do anything to enable the new App Ratings and Reviews, as the option will be automatically added when updating Teams to the latest version.

Once you open Teams, going to the App section will automatically enable the new layout for App Ratings and Reviews, as you can see in the image below.review teams apps

You’ll easily be able to rate an app and leave a review for it, by clicking on the said app and assigning a rating.review teams apps

Once you’ve done that, all you have to do is click Submit and that’s it. As you can see, you can rate an app from 1 star to 5 stars, and once you’ve submitted your review, other users can choose to vote as helpful or not.

Plus, Microsoft Teams will encourage you to rate any app that you’ve installed and review them. Of course, this is not mandatory and you can opt out of it if you like.

What are your thoughts on this?

Fix: This Page is Blocked by Microsoft Edge

Occasionally, Microsoft Edge will block access to a page because it is deemed unsafe. Other times, it’s a mistake that you can fix with a few tweaks. Try the site on another browser to check if the issue is with your network or Microsoft Edge. Also, check if your browser is updated and whether your ISP or firewall is blocking the connection.

The quickest fix is to set the Tracking prevention to Balanced in Edge. Go to Settings > Privacy, search, and services and click on Balanced from Track prevention. See the detailed instructions below.

How do I unblock this page is blocked by Microsoft Edge?

1. Adjust your tracking prevention settings

  1. Open Microsoft Edge and click on the three horizontal ellipses at the top right corner.
  2. Click on Settings.
  3. Select Privacy, search, and services.
  4. Toggle on the Tracking prevention option and click on Balanced.

Your browser may have come in the Strict setting, which offers maximum protection by blocking tracking cookies used by third-party advertisers to track your browsing behavior. The problem with this is that it blocks most of the websites and makes them inaccessible.

With the Balanced setting, you get most of the benefits of stricter settings while avoiding the risk of getting blocked. Better yet, you can enable web filtering to take charge of what content is displayed on your browser.

2. Disable extensions

  1. Open Microsoft Edge and click on the three horizontal ellipses at the top right corner.
  2. Click on Extensions, then select Manage extensions.
  3. Locate any recently added extensions and toggle the off button. Ad blockers are the most popular culprits so start off with those.

If the culprit is a critical extension, you can reinstall it. Sometimes, a corrupted or outdated extension tends to cause issues with certain web pages, but once they’re updated, they’re good to go.

3. Add the blocked site as a trusted site

  1. Open the Start Menu, type Internet options, and hit Enter.
  2. Go to the Security tab and select Trusted sites.going trusted sites internet options
  3. Click on Sites.
  4. Add the problematic website to the trusted site list.adding trusted sites
  5. Restart your computer.

This may also be the reason why Edge keeps logging you out of Google if it’s a blacklisted site.

4. Repair Microsoft Edge

  1. Click on the Start Menu icon and open Settings.
  2. Select Apps, then Apps & features.
  3. Under App list, search Microsoft Edge.
  4. Click on the three dots next to Microsoft Edge and select Modify.
  5. Select Repair. Repair Microsoft Edge to fix error code.

5. Reset Microsoft Edge

  1. Open Microsoft Edge and click on the three horizontal ellipses at the top right corner.
  2. Click on Settings.
  3. Select Reset settings and hit Restore settings to their default values.
  4. Confirm Reset in the dialog box that appears.

6. Reinstall Microsoft Edge

  1. Hit the Windows key and select Settings.settings windows 11
  2. Click on Apps on the left pane then select Apps & features.
  3. Locate Microsoft Edge, click on the three ellipses, and select Uninstall.
  4. Confirm Uninstall in the dialog box that pops up.
  5. Now go to the Microsoft Store, search for Microsoft Edge and click Install.

If you’re still having trouble with a specific page after examining the above troubleshooting guide, your network or proxy likely is to blame. You can try with another connection and see if there are any changes.

If so, get in touch with your network administrator for further assistance. However, we recommend you enable insecure content blocking so that your browser can flag off untrusted sites.

This, too, can get annoying with the constant warning pop-ups, so another workaround is to remove the warning alerts.

Many users also reported that the Edge flags page is blocked by the administrator, and we have a guide that can help you fix that.

We also have an article on Result_Code_Killed_Bad_Message error code, so feel free to check it out.

So there you have it. Here are a few effective workarounds to get you by. Let us know which solution worked out for you in the comment section below.

Luminar Neo: Painting Pixels with Generative AI [Review]

Whether you are a seasoned photographer or a budding enthusiast, you need a photo editing tool that seamlessly translates your vision into pixels. That’s where a tool like Luminar Neo fits the bill, a photo editing software designed to bring your imagination to life.

From its intuitive interface, RAW image processing, organizational tools to cutting-edge generative AI features like GenErase, GenSwap & GenExpand, Luminar Neo transcends conventional editing, providing a platform for creativity.

In this comprehensive review of Luminar Neo, we will discuss its innovative features, benefits over other photo editors, and how it redefines your image.

What are the best features of Luminar Neo?

1. Streamlined creativity: Simple interface & basic requirements

The advanced photo editor tool is easy to download & set up, and the software has a clear and dark interface, which lets you concentrate on your image.

With a simpler design and easy-to-navigate interface, it doesn’t overwhelm you and is, therefore, the best for beginners.

Once you launch the tool, you need to sign up, and you will have the Catalog (For viewing images) interface open with different options displayed on the left pane to store, browse, and sort the images.

The other two options, Presets (for single-click adjustments) and Edit (for modifying images as per your preferences), are what you need to polish your images.

The 2025 version brings a customizable workspace and a unified cloud-based Catalog, allowing for seamless cross-device editing between desktop and the new mobile app.

The minimum & recommended computer specs to run this photo editor smoothly on your computer are

CategoryWindowsMac
Model/HardwareWindows-based hardware PC with mouse or similar input deviceMacBook, MacBook Air, MacBook Pro, iMac, iMac Pro, Mac Pro, Mac mini, early 2010 or newer
OS version10 version 1909 or higher (only 64-bit OS)
macOS 10.14.6 or higher.
RAM8 GB or more (16+ GB RAM is recommended)8 GB or more (16+ GB RAM is recommended)
ProcessorCPU Intel® Core i5 or above, AMD Ryzen 5 or aboveCPU Intel® Core i5 or above
Disk spaceHard disk 10 GB free space; SSD for best performanceHard disk 10 GB free space; SSD for best performance
DisplayOpen GL 3.3 or later compatible graphics card1280×768 size or better

2. GenErase – Remove the unwanted elements from the image

One of the latest additions to the photo editor is GenErase, which helps you replace or eliminate unwanted objects from your image while smartly filling in the gaps with matching textures and elements from the surrounding areas.

This enhances overall composition, removes distractions, and helps you focus on your subject and create the images as you envisioned them.

Now available on mobile as well, GenErase gives users powerful AI removal tools on the go.

3. GenSwap – Replace objects in your pictures

3. GenSwap - Replace objects in your pictures - Luminar Neo

Bid goodbye to the dull and faded objects in images with the GenSwap tool and embrace the unlimited possibilities to bring your creativity to life.

You can replace the unwanted elements of your photos with AI-generated yet realistic visuals in a couple of clicks.

4. A wide range of dynamic editing tools

From Erase, Denoise, Toning to Light, this software has over 20 core tools to help you fine-tune your photos to deliver the desired results.

You can add as many layers as you like, duplicate an image, edit each layer separately, or choose an effect or preset to apply on a specific layer.

5. Advanced AI-powered tools

Advanced AI-powered tools

The photo editing software is packed with many useful AI-powered tools like Crop, Enhance, Sky, Structure, Relight, Atmosphere, Portrait Bokeh, Face, Skin, and Body to help you bring the details in the image you want.

New in 2025, **Relight AI 2.0** enhances depth detection and lighting balance in both portraits and landscapes, improving realism and scene atmosphere.

The mobile app also includes core AI tools such as Enhance AI, Sky AI, and GenErase, making it easier than ever to edit on the go.

How can I use Luminar Neo to transform my photos?

  1. Download Luminar Neo from its official website and double-click the setup file to install it. You can also use the coupon code WR10 to get a 10% discount.luminar website
  2. Launch the software and sign up to start using it.
  3. You will be greeted with the Catalog interface; click Add Photos, then select Add folder or Add image to add a folder or an image to get started.
  4. Select an image, click Presets, explore the categories, and choose any to add pre-defined effects to your image.
  5. If you want to control the modifications, click Edit, and you will get over 20 tools like Details, Color, Develop, and more to polish the picture.
  6. You can add layers or crop an image using AI, increase the contrast, and add more details using different tools like Develop, Erase, Crop, Color, & more.
  7. You can view all the Edits done under the Edits tab, and to remove the changes, click Discard Edits and start afresh.
  8. If you want to swap an object or remove it completely, you can use the GenSwap or GenErase features present in the Catalog tab.
  9. Once satisfied with the changes, click on Luminar Neo from the upper left corner, select File, then Export. Choose a location to save the edited image and click Export. The default location of the photo is, wherein USERNAME is the user profile name on your computer: C:\Users\USERNAME\Pictures

What are the benefits of using Luminar Neo?

Using the advanced photo enhancer tool, Luminar Neo, which is intuitive, supports multi-platform, and helps you create beautiful images with a few clicks, has its perks, some of which are:

  • User-friendly interface – A simple, adaptive user interface with a streamlined Catalog feature that lets you seamlessly store, browse, and sort your images.
  • Generative AI capabilities – With the AI-enhanced tools, the software assists you with automatic enhancements and provides creative suggestions, saving you time and effort.
  • Variety of Presets – A vast array of presets to choose & apply the predefined effects to your photo, adding the wow factor in a single click.
  • Single slider controls – Allows you to adjust multiple image controls with a single slider, making it easy to achieve the desired look without intricate manual adjustments.
  • Versatile editing tools – A wide range of editing tools enable you to make basic to advanced adjustments, catering to various editing styles and preferences.
  • Cross-platform accessibility – Available for both Windows and Mac computers, and now on iOS and Android, allowing seamless editing from anywhere.Syncing between apps – Edit photos across different apps

So, this is how this photo editor helps you bring out the narratives, stories, and emotions of your images, turning them into masterpieces.

Luminar Neo is not just a photo editing software but a comprehensive suite of essential editing tools and generative AI features, making it the perfect choice for beginners and professionals.

Upon testing, we found the software true to all its claims and works wonders in turning your pictures into artistic visions.

If you are a professional photographer or just starting to work like one, investing in Luminar Neo could help you create stunning photos without feeling overwhelmed by its advanced features.

If you have any questions or suggestions about the software, feel free to mention them in the comments section below.

How to Pair Logitech Keyboard [USB Receiver, Bluetooth, iPad]

Before you can use a new wireless keyboard with your PC, it’s required that you pair it, and in this guide, we’re going to show you how to pair a Logitech keyboard properly.

The process is pretty straightforward and requires just a couple of clicks, so join us while we show you how to do this on your PC.

How do I put my Logitech keyboard in pairing mode?

  1. Turn on your keyboard.
  2. If the LED is not blinking, press and hold the Easy-Switch key until it starts blinking.
  3. After that, the keyboard will be in pairing mode.

How do I pair my Logitech wireless keyboard?

Use the Bluetooth section in the Settings app

  1. Make sure that the keyboard is in the pairing mode.
  2. Click on the Start button and select Settings.
    Click on Settings in Start menu
  3. Navigate to Bluetooth & devices and click on Add device.
  4. Select Bluetooth from the menu.
    Add a device Bluetooth
  5. Select your Logitech keyboard from the list of devices.
  6. You might be asked to type a certain code before pairing, so be sure to do that.
  7. After that, click on Connect and that’s it.

How to pair a Logitech keyboard with a USB Unifying receiver?

  1. Download Logitech Unifying software and install it.
  2. Connect the Unifying receiver to the USB port on your PC.
  3. Start the Logitech Unifying software and click on Next.
  4. Next, power on your keyboard.
  5. Wait for it to connect, and then click Next.
  6. Test your keyboard in the input field, and if it works, select Yes and click Next.
  7. Lastly, click on Finish to complete to process.

In case you run into any issues, we have a great guide on what to do if the Logitech Unifying receiver is not working, so don’t miss it.

How to pair a Logitech keyboard with an iPad?

  1. Firstly, set the keyboard to pairing mode.
  2. On iPad, open Settings and go Bluetooth.
  3. Select your Logitech keyboard from the list of devices.

Where is the Easy-Switch button on the Logitech keyboard?

On most Logitech keyboards, you can find the Easy-Switch buttons in the top left corner. They are usually the first three F buttons.

Now you know how to pair Logitech keyboard K380, K780, and all other models. As you can see, you need Bluetooth on your PC, and the process is pretty simple. If you don’t have Bluetooth, you can always use Logitech Connection Utility and a USB dongle.

In case you encounter any issues, we have great guides on what to do if the Logitech keyboard is not working, or if the Logitech keyboard is not lighting up.

And if you happen to own a Ubotie keyboard, rest assured that setting up a Ubotie keyboard on Windows, Mac, and iPad is incredibly easy as well.

What is your favorite method of connecting a Logitech keyboard to a PC? Let us know in the comments below!

How to Download Canon Mg2540s Driver for Windows 11

It is imperative to get the driver right for your printer; in this case, the Canon Mg2540s. Canon is known for the quality and efficiency of its products and services and their printers are not a different case.

Given that this is an all-in-one type of hardware, getting the right driver should be on top of your list and we show you just how easy it is.

Is Canon PIXMA compatible with Windows 11?

Yes, Canon PIXMA is compatible with earlier and later versions of the Windows operating system. Further, it supports both 34-bit and 64-bit systems.

How do I download the Canon Mg2540s driver for Windows 11?

1. Download from the manufacturer’s official site

  1. Navigate to your browser, go to the Canon official site, and type in the Canon PIXMA Mg2540s model.
  2. Select Software & Drivers.
  3. Choose your Windows version from the drop-down menu, select your printer driver from the results and hit the Download button.
  4. Locate the exe file in your Downloads folder, double-click on it to run then follow the on-screen prompts to install it.
  5. Restart your PC for the changes to take effect.

Ensure you get drivers from the official sites as some third-party sites tend to bundle up the downloads with additional software that could be harmful to your PC. In this modified form, your PC may fail to detect the Canon printer.

2. By using the Device Manager

  1. Hit the Windows key, type Device Manager, and click Open.device manager w11
  2. Locate the Canon PIXMA printer, and once found, right-click on it and select Update driver from the context menu.
  3. Select Search automatically for drivers and wait for Windows to update the drivers.

3. By using a driver updater utility

Using a driver updater to upgrade Canon Mg2540s drivers is strongly recommended. This method will deliver the most effective results and protect you from failures.

The best practice for using such a tool is to ensure that the download is easy to use, simple to install, and very cost-effective, which Outbyte Driver Updater guarantees.

4. By using Windows Update

  1. Press the Windows key and click on Settings.settings windows 11
  2. Navigate to Windows Update, and click on Advanced options.
  3. Now, click on Optional updates.
  4. Tick the checkboxes for all the available updates under Driver updates, and click on Download & install.

What are the benefits of using a Canon PIXMA printer in Windows 11?

  • Affordable – While there may be thousands of different types of printers available on the market today, not all of them offer great value for money, like the Canon PIXMA.
  • Multifunctional – You get a two-in-one deal because it comes with a scan feature. A printer that can take care of all your printing needs is a wonderful convenience.
  • Versatile – The printer accommodates a variety of paper types such as photo paper and envelopes. It also supports MacOS and different paper sizes such as A4, letter, and legal size.
  • Energy-saving – The printer has an auto-off feature, which is programmed into it so that it will automatically shut down after some time if no activity is detected on its side. Your printer not shutting down will be a thing of the past.

And while Canon printer errors may be in plenty, there’s so much more than meets the eye when it comes to the Canon PIXMA printer. Be sure to check its advanced features and get to explore its full potential and capabilities.

Once you’re on board, some Canon printing programs may interest you if you’re looking to take your printing jobs to the next level.

So, if you’ve wondering how to download the Canon Mg2540s driver for Windows 11, we hope this article was helpful. And if any of your questions were answered by this article, or you have anything at all that you’d like to add, please leave a comment below.

Canon MF3010 Driver for Windows 11: Download and Install

The Canon MF3010 driver is critical for the printer’s functioning in Windows 11. And even if the driver is already installed, an updated version helps improve the performance and eliminate any errors.

Remember, it’s not too difficult to download the Canon MF3010 printer driver, and given the various methods available, it wouldn’t take more than a few minutes.

How do I install the Canon MF3010 scanner driver?

1. Via Device Manager

1.1 Automatic install

Tip icon Tip
This method only applies if you already have a driver for the Canon MF3010 printer/scanner and want to install a more recent version. Also, you may have to view the hidden devices if the printer doesn’t show up.
  1. Press Windows + X to open the Power User menu, and select Device Manager from the options.
  2. Expand the Printers entry, right-click on Canon MF3010, and select Update driver.printer
  3. If you can’t find the printer, click the View menu, select Show hidden devices, and then update the driver.show hidden devices
  4. Choose Search automatically for drivers and wait for Windows to install the best locally available version.update the canon mf3010 driver for windows 11

1.2 Manual install

  1. Press Windows + R to open Run, type devmgmt.msc in the text field, and hit Enter.devmgmt.msc
  2. Double-click the Printers entry, right-click on the Canon MF3010 device, and select Update driver.
  3. Choose Browse my computer for drivers.browse my computer
  4. Now, select Let me pick from a list of available drivers on my computer.
  5. Select Canon from the left, pick Canon MF3010 from the right, click Next, and wait for the driver installation to complete.install canon mf3010 driver for windows 11
  6. Once done, restart the computer for the changes to apply.

Downloading the latest printer drivers in Windows 11 is simple, and using the Device Manager utility should be your primary approach.

If it sounds too tricky, a reliable driver updater tool can help you. It will detect all connected devices, search for the latest drivers, and install them automatically.

2. Use Windows Update

  1. Press Windows + I to open Settings, go to Windows Update from the left pane, and click on Advanced options.advanced options to download canon mf3010 driver for windows 11
  2. Click on Optional updates.
  3. Expand the Driver updates entry, tick the checkbox for the Canon MF3010 printer driver, and click on Download & install.download & install
  4. Finally, restart the computer.

For newer driver versions to show up under Windows Update, you must have the Canon MF3010 printer connected to the PC. And wired connections are often more reliable in such situations.

3. Download the driver setup from the website

  1. Go to Canon’s official website, scroll down and expand Software and Drivers, and then select Windows 11 as the operating system version.operating system
  2. Now, click the Download button next to the Canon MF3010 64-bit driver.download the canon MF3010 driver for Windows 11
  3. Once you have downloaded the setup, double-click the .exe file, and follow the on-screen instructions to complete the installation process.

While downloading drivers from the web, be careful and only download files from the official website. You should avoid all third-party websites. Also, since Windows 11 is a 64-bit OS, only download the Canon MF3010 64-bit driver.

Updating the drivers also helps if your PC can’t detect the Canon printer or when you face scanning issues with a Canon device.

For any queries or to share your driver update experience, drop a comment below.

How to Fix Outlook Data File Has Not Been Configured

When you open Outlook and get a prompt to configure your data file, you need to set up your email account properly to use it, or else you risk losing important files.

We will share the main causes of this error and the solutions to resolve it.

What does Outlook data file not configured mean?

Outlook stores information about your Outlook profile in a PST file on your computer. However, if you have previously deleted the PST file or if it is corrupted due to a virus infection, you may see this error message when you start Outlook.

It can also occur if you’re trying to access your email account on a different computer than you normally use.

How do I fix Outlook data file has not been configured?

Check off the following preliminary steps first:

  • Close all Office 365 programs and any other superfluous processes.
  • Verify that the Outlook server is up and running and ensure your app is updated.

1. Start Outlook in Safe Mode

  1. Hit the Windows Search icon, type outlook.exe /safe in the search bar, and click Open.
  2. Try sending emails in Outlook and check whether the problem persists.

2. Force update Outlook

  1. Repeat steps 1-3 in solution 1 to start Outlook in Safe Mode.
  2. Click on File at the top of the screen, select Office account, and click the Office updates menu.
  3. Click the Update Options button, then select the Update Now option from the drop-down to install pending updates on Outlook.
  4. Restart your PC and launch Outlook to see if the error persists.

3. Repair the PST file

  1. Press the Windows + E key to open File Explorer.
  2. Navigate to the following path depending on where your Outlook files are located: C:\Program Files\Microsoft Office\Office14 C:\Program Files\Microsoft Office(x86)\Office14
  3. Double-click on the SCANPST key to launch the SCANPST.EXE utility.
  4. On the Microsoft Outlook Inbox Repair utility page, click Browse, and choose the PST file.
  5. Click Start to scan the file for errors; if there are errors, click Repair and wait for the Repair to complete.

Scanning and repairing your PST files using the built-in tool may be the easiest way, but it may not be effective. We recommend using a tool designed specifically for repairing corrupt PST files. Stellar Repair for Outlook can repair even the severely damaged PST files in just a few minutes.

⇒ Get Stellar Repair for Outlook

4. Repair Microsoft Office

  1. Hit the Windows key, type Control Panel in the search bar, and click Open. control-panel-search fallout new vegas runtime error
  2. Navigate to Uninstall a program under Programs.going uninstall program control panel
  3. Locate MS Office, click on it, and select Change.
  4. Select the Online Repair option and click on the Repair button.
  5. Wait for the repairs to complete and try launching the app again.

5. Reset the Outlook app

  1. Press the Windows key + I to open the Settings app.
  2. Click on Apps followed by Apps & features.
  3. Within the Apps & features box, seek for the Office application by typing its name into the search area and selecting it from the three-dot menu, then selecting Advanced options.office-advanced-option windows 11 outlook crashing
  4. Scroll down until you reach the Reset area, and then click on the Reset button to restart the process.reset-app windows 11 skype crashing

6. Delete and re-add the problematic account

  1. Hit the Windows key, type Control Panel in the search bar, and click Open.control-panel-search fallout new vegas runtime error
  2. Type Mail in the search bar and click to open.
  3. Next, click on Show Profiles under Profiles in the Mail Setup window that pops up.
  4. A list of Outlook profiles registered on your PC will appear. Find the one that was having problems, click on it, then select Remove.
  5. A confirmation dialog box will appear, click Yes to confirm.
  6. Repeat the same steps, but when you get to step 4, instead of Remove, click on Add.
  7. Follow the on-screen prompts to re-add the account.

7. Reinstall Outlook

  1. Hit the Windows key, type Control Panel in the search bar, and click Open. control-panel-search fallout new vegas runtime error
  2. Navigate to Uninstall a program under Programs.going uninstall program control panel
  3. Locate MS Office, click Uninstall at the top of the menu, and then press OK.
  4. Restart your computer, then go to the Outlook download page to install the latest version available for your computer.

If all else fails, you can download your Outlook mail or switch to other email clients with similar or even more advanced features than Outlook.

In the future, consider converting your PST files to the OST format because of its many benefits. You can rest assured you won’t lose any data during the conversion process, but if you do, you can restore Outlook emails easily.

This should also sign that it’s time to start backing up your important files.

These solutions are relatively easy to complete and will not cost you much time. Your feedback is important to us, so let us know which solution did it for you in the comment section below.

Discord Rules Screening Not Working: 5 Ways to Fix it

Rules Screening in Discord allows server administrators to set up rules that new members must accept before joining the servers and interacting with other users, but it’s often not working.

Either the server admin can’t find the rules, or they are not displayed to a new member when joining. It’s a common problem, and moving the rules screening settings added to the confusion.

Why can’t I see rule screening in Discord?

You must first set up a community to see rules screening in Discord. The feature is exclusive to communities, though it doesn’t necessarily have to be discoverable. Besides, rules screening in the server settings is now moved to the Safety Setup tab under Moderation.

What can I do if Discord rules screening is not working?

Before we start with the slightly complex solutions, try these quick ones:

  • If you don’t see rules screening in Discord, terminate the process via Task Manager and then relaunch the app.
  • When new members don’t see rules at the time of joining, ensure you have at least set up some and that a bot is not assigning roles.

1. Check the Safety Setup tab

  1. Launch Discord, right-click on your server, and select Server Settings.server settings
  2. Go to the Safety Setup tab under Moderation, and click on the Edit button next to DM and Spam Protection.safety setup to fix discord rules screening not working
  3. Enable to toggle for Members must accept rules before they can talk or DM, then add a description, set the server rules, and save the changes.enable rules

2. Set up a community

  1. In Discord, right-click on your server, and select Server Settings.
  2. Go to the Enable Community tab, and click on Get Started.get started
  3. Tick the checkboxes for Verified email required and Scan media content from all members, and click the Next button.set up community to fix discord rules screening not working
  4. Follow the on-screen instructions to set up the community.
  5. Once done, either head to the Onboarding tab under Community or Safety Setup under Moderation to configure the rules screening in Discord.

3. Update the Discord app

With each update, Discord may introduce new features, rearrange the elements, and release patches for known bugs. And if Discord rules screening is not working or you can’t set up rules under the server settings, updating the app will do the trick!

To update Discord in Windows, terminate the app > reboot the PC > launch Discord > allow it to check for updates and download any pending ones.

Updating the app also jelps fix the Channel verification level is too high error on Android.

4. Re-enable the rule

  1. Right-click on your server in Discord, and select Server Settings.
  2. Go to the Safety Setup tab, and click the Edit button next to DM and Spam Protection.
  3. Disable the toggle for Members must accept rules before they can talk or DM.toggle
  4. Terminate the app via Task Manager and then relaunch it.
  5. Again, head to the server settings and re-enable the rules screening setting.

5. Add a small delay

When you have bots assigning roles to members at the time of joining, the membership screening is bypassed. While you could disable bots from assigning roles, another option is to add a delay.

And you can easily introduce a delay using MEE6, a popular Discord bot. To do that, enable the toggle for Delay at server rules acceptance, and keep the delay minimal, say 1-2 minutes.

So, if Discord rules screening is not working, you should be able to fix it now. Remember, the settings have been reshuffled a bit, and setting up a community is a must. Understand this aspect, and things should work.

And if you own a server with several members, discover the best Discord rules template for streamlined management.

For any queries or to share what worked for you, drop a comment below.
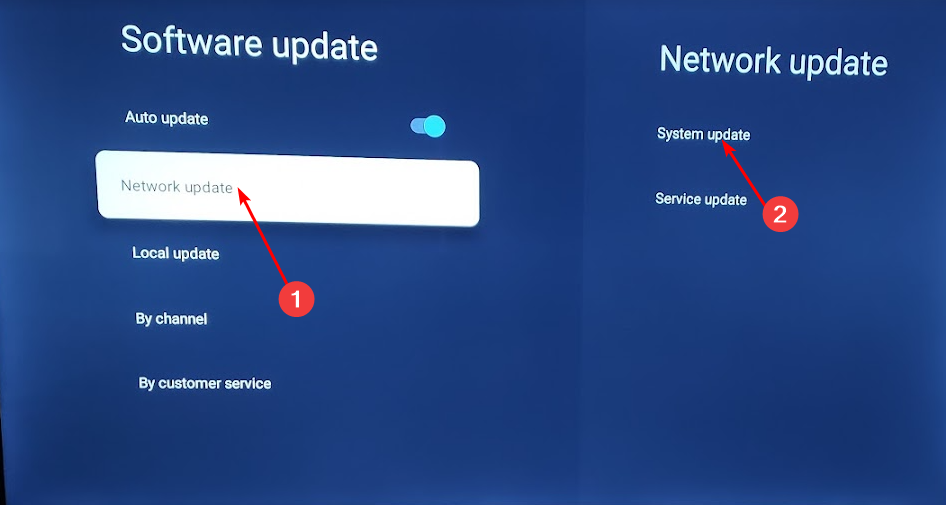
Exclusive Images: This is Samsung Galaxy Fit 3

Samsung will release a new fitness tracker called Samsung Galaxy Fit 3, and we’ve got the first images from our trusted source that confirm its existence.

There have been talks and rumors about Samsung Galaxy Fit 3 since we heard rumors about a patent that seemed to describe the device.

It has been a long while since Samsung released a fitness tracker. Fit 2 was launched in September 2020, and the new Galaxy Fit 3 shows a remarkable evolution in design.

Its main competitors are the Fitbit, Xiaomi, and Garmin trackers, and their manufacturers already have a tradition of producing such devices.

Samsung Galaxy Fit 3 design and features

We don’t know much about the technical specifications of Samsung Galaxy Fit 3. Still, Fit 2 has a 1.1-inch full-color AMOLED screen, heart rate monitor, gyro, accelerometer, sleep tracking, and automatic workout detection. Of course, it also featured display notifications and music playback control for the paired smartphone.

The Galaxy Fit 3 display is obviously much bigger, and from what we can tell, it might have an Android OS instead of the old rtOS, but it looks like Samsung definitely included a vivid AMOLED display.

By looking at the back of Galaxy Fit 3, we also notice a heart rate monitor sensor and docking connections.

Although Fit 3 looks slimmer than Fit 2, it might also include the GPS sensor that the older model lacked.

We also might expect built-in memory for storage and stand-alone music playback while it’s not connected to the phone.

A great feature that made Fit 2 popular was the fact that you could change the wristband that included the rubber bezel of the fitness tracker. That gave you the opportunity to get a band in any color you would like to fit your mood or clothes.

At first glance, Fit 3 has no hinge or mechanism to replace the band. If you can’t change it, you will be stuck with whatever colors Samsung releases.

We don’t know anything about Fit 3’s autonomy yet, but Fit 2 had approximately 15 days of battery life on normal usage and 21 days with low usage. Since 2020, batteries have become more efficient, but we can expect the same from Fit 3 if we consider the bigger screen.

Samsung Galaxy Fit 3 price and availability

We don’t have that information yet, but Fit 2 was released at $59 three years ago. However, Fit 3 looks like a more expensive tracker.

About the launch date, fitness trackers are traditionally launched together or around the date of a smartphone release. Since we’re expecting Samsung Galaxy S24 in January 2024, that will also be a great opportunity for the Fit 3 launch.

Will it be launched for Christmas this year instead? It could be a great present for fitness and fashion buffs alike.

What do you think about Samsung Galaxy Fit 3? Let’s talk about it in the comments section below.

How to Try-except-print an Error in Python

To write a working code, it’s necessary to find and handle any errors, and this can be achieved by using try-except and printing error information in Python.

By handling errors, you will ensure that your code is working, so it’s crucial to learn how to do it properly, and this guide will help you with that.

Do Python exceptions stop the execution?

This depends on the error but in most cases, if the code encounters an unexpected error, such as invalid syntax or an invalid integer, it won’t be able to proceed and it will stop the program execution.

How to use try except print for errors in Python?

1. Use the try and except block

  1. Open the code editor.
  2. Add the following lines:
    try:
    print("The value of X variable is:", x)
    except:
    print("An error occurred")

  3. Run the code and you should get a message in the terminal saying that an error occurred.

2. Get the error description

  1. Open your Python file.
  2. Use the following code:
    try:
    print("The value of X variable is:", x)
    except Exception as error:
    print("The following error occurred:", error)

     
  3. When you run the code you’ll get the error message in the terminal thanks to the exception class and the error information will be printed from the exception object.

With these two methods, you only get the basic information, such as an error description, which can be useful for beginners or smaller projects.

When using try-except for debugging, it also helps to know which Python version you’re running, since error messages can differ. Here’s how you can check Python version in Windows CMD before testing your scripts.

3. Use the traceback module

  1. Open your coding tool.
  2. Enter the following:
    import traceback
    try:

    open("randomfile.txt")
    except Exception:
    print(traceback.format_exc())

  3. When you try to run the code, you’ll get an exception message saying which error occurred, along with the information about the file name and the exact line that caused the error.

You can also use traceback.print_stack() instead if you want to see the stack trace that led to that error.

What is the difference between print and raise exceptions?

  • The print function will just display the error name as well as the line and file name where the error occurred.
  • With the raise statement, you can use custom exceptions, set exception types, and you can optimize your code using the exception handler.

This is how you can use try-except block and print errors in Python, and by using these tips, you’ll ensure that your code is always working properly without any unhandled exceptions.

While working with Python, you’ll encounter various issues, such as Python runtime error and ImportError: The specified module could not be found, but we covered both of these in separate guides.

Many also experienced PermissionError [Errno 13], but we have a guide that addresses it.

If you are facing another issue with Python, such as python setup.py bdist_wheel did not run successfully or _xsrf’ argument missing from POST, we have separate guides on them.

Did you ever use try-except to print error stack trace in Python? Share your tips with us in the comments section.

Solved: A Critical Error Has Occurred in Valorant

If you have encountered A critical error has occurred and the process must be terminated in Valorant when trying to launch the game, this guide can help!

We will discuss the probable causes and offer WR experts tested solutions to get rid of the error message so you can enjoy the game without interruptions.

What does critical system error mean?

When the game launcher or your Windows system encounters a problem that interferes with the game while it is trying to launch, it could cause the game to crash or throw you an error like this. The main reasons are:

  • Faulty game configuration files or server issues.
  • Riot Vanguard service is disabled or stopped.
  • Outdated graphics card drivers or game launch settings.

How can I fix a critical error has occurred issue in Valorant?

Before we go to the advanced fixes, here are a few preliminary checks you should do:

  • Restart your computer & router, and ensure Windows is updated to the latest version.
  • Verify your computer meets the minimum requirements, check Valorant server status to ensure that’s not the issue, and temporarily disable the third-party antivirus.
  • Close all the unnecessary programs, including RTSS and Afterburner, and update your BIOS firmware.

1. Run the game always as an administrator

  1. Locate the Valorant desktop shortcut, right-click it, and select Properties.Properties - a critical error has occurred and the process must be terminated
  2. On the Properties window, go to the Compatibility tab.
  3. Under Settings, select Run this program as administrator.Under Settings, select Run this program as administrator.
  4. Click Apply, then OK to confirm the choice.

2. Update your graphics drivers

  1. Press Windows + R to open the Run dialog box.Device Manager Run command - a critical error has occurred and the process must be terminated
  2. Type devmgmt.msc and click OK to open the Device Manager app.
  3. Locate Display adapters and click it to expand.
  4. Right-click your graphics driver and select Update driver.Graphics Driver update
  5. Select Search automatically for drivers.Update driver 2 -Search automatically for drivers.
  6. Follow the on-screen instructions to complete the process.

Keeping your graphics drivers up to date can also help you prevent other game issues like Valorant not working on Windows 11; read this guide to learn more about it.

3. Change the Startup type for the vgc service

  1. Press Windows + R to open the Run window.Services RUn command -a critical error has occurred and the process must be terminated
  2. Type services.msc and click OK to open the Services app. locate vgc and double-click it to open its Properties.
  3. In the Services list, locate vgc and double-click it to open its Properties.
  4. In the Properties window, for Startup type, select Automatic from the drop-down list.Startup type, select Automatic
  5. Click Apply, then OK to confirm, then close the Services window.
  6. Press Windows + E to open File Explorer and navigate to this path: C:\Riot Games\VALORANT\live\ShooterGame\Binaries\Win64
  7. Locate the VALORANT-Win64-Shipping.exe file, right-click it, and select Properties.Properties - a critical error has occurred and the process must be terminated
  8. Go to the Compatibility tab, and under Settings, place a checkmark next to Run this program as administrator.explorer_Run this program as administrator.
  9. Click Apply, then OK to save the changes.

4. Perform a TCP/IP reset, DNS flush and port forward

  1. Press the Windows key, type cmd, and click Run as administrator.CMD elevated -a critical error has occurred and the process must be terminated
  2. Type the following command to remove all static IP information for all the NICs on the machine and hit Enter: netsh int ip resetcmd_netsh command
  3. Copy & paste the following commands to remove the current IP configuration and request your DHCP client to reset an IP address and press Enter after every command:
    ipconfig /release
    ipconfig /renew
  4. To clear the corrupted or incorrect DNS cache, type the following command and hit Enter: ipconfig /flushdnscmd_ipconfig/flushdns - a critical error has occurred and the process must be terminated
  5. Copy & paste the following command to reset Winsock settings and recover your PC from socket errors if any, and press Enter: netsh winsock resetcmd_netsh winsock reset
  6. Restart your computer to let the changes take effect.

5. Change the Unicode settings

  1. Press the Windows key, type control panel, and click Open.Control Panel start menu -a critical error has occurred and the process must be terminated
  2. Select Category as View by and click Clock and Region.explorer_Clock and Region.
  3. Locate Region, and click Change date, time, or number formats.explorer_Change date, time, or number formats - a critical error has occurred and the process must be terminated
  4. Go to the Administrative tab on the Region window and click Change system locale.rundll32_Change system locale.
  5. On the Region Settings window, for the Current system locale, select English (United States) from the drop-down list.rundll32_English (United States) from the drop-down list.
  6. Click OK, then OK to save the changes.
  7. If this doesn’t work, go to the Region Settings again and place a checkmark next to Use Unicode UTF-8 for worldwide language support.se Unicode UTF-8 for worldwide language support.
  8. Click OK, then OK to confirm the changes.
  9. Reboot your computer and check if the issue persists.

6. Modify the GameSettings file

  1. Press Windows + R to open the Run dialog box.explorer_%localappdata% - a critical error has occurred and the process must be terminated
  2. Type %localappdata% and click OK to open the Local AppData folder.
  3. Navigate to this path: ShooterGame\Saved folder\Config\WindowsClient\GameUserSettings.ini
  4. Double-click the file to open it in Notepad. Locate DefaultMonitorIndex, change its value to -1 & then look for LastConfirmedMonitorIndex, and change the value to 0.Notepad_Edit gameusersettings - a critical error has occurred and the process must be terminated
  5. Press Ctrl + S to save the changes.

7. Repair/reinstall Valorant and Riot Games client

  1. Go to Valorant’s official website and click Download.Download - a critical error has occurred and the process must be terminated
  2. Double-click the installer file and select Advanced options.Install_VALORANT_(1)_Advanced options
  3. You will get the location where Valorant will be installed; choose the location of the existing app, then click Install.Install_VALORANT_(2)You will get the location where Valorant is installed; choose the exact one, then click Install.
  4. Wait for 10 minutes, then restart your PC.

If you are still experiencing the issue, follow these steps to reinstall the Valorant app:

  1. Press Windows + I to open the Settings app.
  2. Go to Apps, then click Installed apps.Apps - Installed apps -a critical error has occurred and the process must be terminated
  3. Locate Valorant, and click three dots, then select Uninstall.Uninstall Valorant a critical error has occurred and the process must be terminated
  4. Click Uninstall to confirm the changes.
  5. Go to Valorant’s official website and click Download.Download - a critical error has occurred and the process must be terminated
  6. Double-click the installer file and select Install to initiate the installation.

If you are not able to uninstall Valorant on Windows 11, try closing all the related processes, including Riot Vanguard, and try again.

If you use Blitz, MSI Afterburner, or Rivatuner, try uninstalling them using Steps 1-3 and check if the issue persists.

To avoid all common issues related to the game, like Valorant not updating, always run the app as administrator, allow it through the Windows firewall, and ensure the device has a stable internet connection.

If nothing worked for you, go to the Riot support page and submit a request explaining the issue and methods tried for further assistance.

Did we miss a step that helped you? Don’t hesitate to mention it in the comments section below. We will happily add it to the list.

How to Fix Error Code Weasel in Destiny 2

Destiny 2 errors are common, but they are usually quite straightforward, except for the weasel error code. There’s a certain lack of clarity as to what the error entails.

And until recently, a quick search on Google highlighted that it’s related to a ban applied to your account, which added to the confusion.

What is the error code weasel in Destiny 2?

As per the official website, Weasel is an all-encompassing error message indicating an issue with the network. Though it also shows up when a user is banned, and they are returned to the title screen.

The weasel error arises due to a problem with the Internet connection, using non-compatible mods, or network restrictions. 

How do I fix error code Weasel in Destiny 2?

Before we start with the slightly complex solutions, try these quick ones:

  • Check Destiny 2’s Server Network and Update Status, and make sure everything is up and running. 
  • Verify that you don’t have the Empowering Finisher equipped along with another finisher mod if you are getting the Destiny 2 error code weasel when changing loadout. Also, check for other invalid combinations and change the class item mods.
  • Switch to another network. If on a wireless connection (Wi-Fi), switch to a wired connection (Ethernet cable), and vice-versa. Besides, you could connect to a mobile hotspot. Also, perform a power cycle of the console, or if it’s a PC, simply restart it.
Note icon NOTE
The error message is encountered across devices, be it Xbox, PlayStation, or PC. And though our solutions are focused on Windows, the idea applies across the three. So, the equivalent measures on a different device will help.

1. Use a VPN

Your primary approach when faced with the error code weasel in Destiny 2 should be to use a reliable VPN solution. Often, selecting a server based in another region helps bypass any local local or network-related issue.

Remember, you will have to try out the different servers or, sometimes, even switch servers after a session to continue playing. But it should, in all likelihood, work out. 

We recommend for this task a reliable and powerful VPN, such as ExpressVPN. This tool has servers in 105 countries so you can always pick a new one if you were not satisfied at first.

ExpressVPN also offers very high connection speeds and very good security features, which you know for sure are very important when playing your favorite online games.

⇒ Get ExpressVPN

2. Verify the integrity of game files

Tip icon Tip
This solution only works if you have installed Destiny 2 via Steam.
  1. Launch the Steam app, and go to Library.
  2. Right-click on Destiny 2 from the game list, and select Properties.properties
  3. Go to the Installed Files tab, and click on Verify integrity of game files.repair files to fix destiny 2 error code weasel
  4. Once done, relaunch Steam, run Destiny 2, and check for improvements.

When corrupted game saves, missing app data or issues with the cache are to blame for Destiny 2’s error code weasel, using the built-in file repair option will work.

3. Whitelist the game in the firewall

  1. Press Windows + S to open Search, type Allow an app through Windows Firewall in the search bar, and click the relevant result.
  2. Click the Change settings button.
  3. Make sure Destiny 2, and the platform have both the Private and Public checkboxes ticked.private and public
  4. If you can’t find one, click on Allow another app at the bottom.allow another app to fix destiny 2 error code weasel
  5. Click the Browse button.
  6. Now, go to the app launcher’s location, select the .exe file, and click Open.
  7. Click on Add.add
  8. Tick the checkboxes for Private and Public, and click OK to save the changes.

If the firewall is blocking a port or program, you will have to whitelist it manually. It will get rid of the Destiny 2 error code weasel on a PC. Also, do the same for any third-party firewalls.

This also helps with Destiny 2 error code calabrese.

4. Change the DNS server

  1. Press Windows + R to open Run, type ncpa.cpl in the text field, and hit Enter.ncpa.cpl
  2. Locate the active network adapter, right-click on it, and select Properties.properties
  3. Choose Internet Protocol Version 4 (TCP/IPv4), and click the Properties button.
  4. Select Use the following DNS server addresses, and input the following:
    • Preferred DNS server: 8.8.8.8
    • Alternate DNS server: 8.8.4.4change DNS to fix destiny 2 error code weasel
  5. Click OK to save the changes, reboot the PC, and check for improvements.

While we used Google’s DNS server, it also makes sense to use the fastest DNS server near you as long as it works.

5. Enable UPnP

  1. Open your router settings using a web browser. The internal IP address is usually printed on the router’s backside.
  2. Go to the Advanced Network tab, and then select Advanced. 
  3. Tick the checkbox for Enable UPnP and save the changes.UPnP
  4. Relaunch Destiny 2 and check whether the error code weasel is fixed.

6. Reinstall the game

  1. Press Windows + R to open Run, type appwiz.cpl in the text field, and click OK.
  2. Select Destiny 2 from the list of apps, and click the Uninstall button.uninstall app
  3. Follow the on-screen instructions to complete the process.
  4. Once done, reboot the PC and download Destiny 2 again.

If the game error persists, use an effective software uninstaller tool to get rid of any leftover files.

7. Contact support

When nothing works, you can always contact Bungie support. Though, as per user feedback, it’s not a very pleasant experience. Also, if you were indeed banned and believe that it was wrongly imposed, raise a ticket to support.

Besides, while waiting for a response, you can always contact the ISP (Internet Service Provider) and check for issues with the network connection. If it’s an unstable Internet connection, increase the Wi-Fi signal strength or switch to a faster plan.

These solutions will help get rid of the weasel error code in Destiny 2.

Remember, a similar approach helps with most gaming issues, including the Destiny 2 error code buffalo. And if you are looking for something more comprehensive, discover all Destiny 2 error codes and their solutions.

For any queries or to share which fix worked for you, drop a comment below.
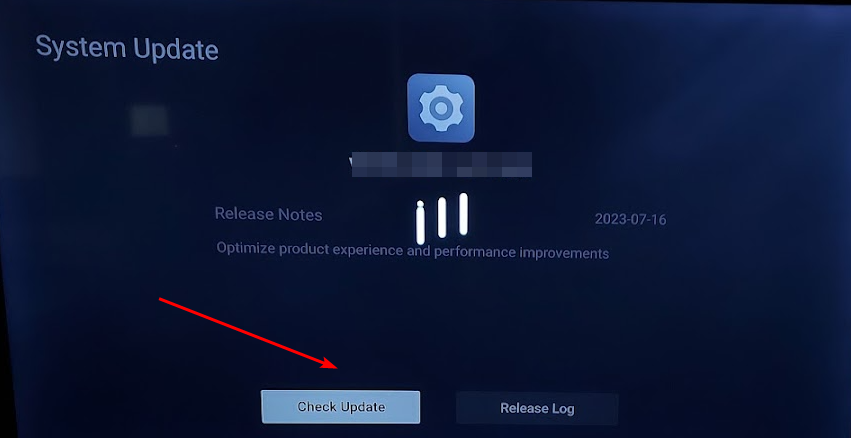
How to Find & Change Microsoft Teams Recording Location

Whether you want to save the lecture to take notes after or revise important points a client has provided for a new project, recording a Teams meeting can be helpful.

In this guide, we will talk about how to find and change the Microsoft Teams recording location so that you can efficiently manage & access the recorded content whenever you want.

Where are recordings from Microsoft Teams stored?

1. For the Teams channel meetings

  1. Press the Windows key, type teams, and click Open.Teams - Find & Change Microsoft Teams Recording Location
  2. Click Teams from the left pane and select the channel. Files tab from the top menu.
  3. Click the Files tab from the top menu in the meeting chat feed.Teams -microsoft teams recording location
  4. You will get the Recordings folder, then double-click it to open the Teams meeting recordings list.

Now that you know where Teams Meetings are recorded, you can easily access and view them.

2. For the Non-channel meetings

  1. Log in to your OneDrive account.OneDrive - Recording microsoft teams recording location
  2. Locate the Recordings folder, double-click it to open it, and you will find all the recordings of the meetings for which you initiated the recording.

Remember, for the non-channel meeting, only the meeting organizer can access the recording as it is stored in their OneDrive Recordings folder. However, all team members can access the recording from the Files tab for the Team channel meetings.

If you cannot find the recording files in the SharePoint folder, you need to rearrange the files correctly. To know more, read this guide.

How do I change the location of Microsoft Teams recordings?

Now that you know where Teams meetings are recorded, let’s see if you can change the default location. While the answer is no, you can move recordings from SharePoint or OneDrive if needed.

1. For the Teams channel meetings

  1. Go to Teams, select the channel, and then click the Files tab from the top menu in the meeting chat feed.Teams_Teams, select the channel, and then click the Files tab
  2. Select the recording, then click Open in SharePoint.Open in SharePoint
  3. Locate the recording, click the three dots next to it, and select Move to.Locate the recording, click on the three dots next to it, and select Move to.
  4. Navigate to the location and click Move here.chrome_Navigate to the location and click Move here - microsoft teams recording location

2. For the Non-channel meetings

  1. Locate the recording in OneDrive, click the three dots next to it, and select Move to.click the three dots next to it, and select Move to -microsoft teams recording location
  2. Now, choose the folder or other location to move the recordings and click Move here.chrome_click Move here.

Since the Microsoft Teams meeting recordings have an expiration date, so if you want to save them longer, download them on your Windows 11 computer or move them to another location on the drive itself.

Why can’t I find my Teams recording?

  • The meeting recording has passed its expiration time of 120 days or the limit set by your organization.
  •  The recording was not initiated appropriately.
  •  You had unstable internet connectivity during the meeting, causing the issue.
  •  The default storage location is full, or the Microsoft Teams app is outdated.

Tips for Optimizing and Enhancing Your Meeting Recordings with Microsoft Teams

  • Before the meeting is initiated, inform all the participants that the session will be recorded to ensure everyone gives consent and engages in discussions for a productive session.
  •  Preview your video before turning on the camera to ensure it appears how you want while recording.
  •  Use Reactions, like Raise hand (indicating that you want to speak up) or Applause/Heart to show how you feel about a topic.
  •  Select a video layout for the meeting; on the meeting controls, choose More options, and choose from Gallery, Large gallery, or Together mode.
  •  Spotlight the main speaker video to ensure everyone sees them on their screen; right-click the speaker video, and select Spotlight>Spotlight to confirm the choice.
  •  Use breakout rooms for focused conversations; in the Teams app, select Breakout rooms>Select number of rooms you need> Assign participants> Create rooms>Start rooms.

FAQs

Where are Microsoft Teams meeting recordings saved by default?

Teams meeting recordings are saved to OneDrive for non-channel meetings and to SharePoint for channel meetings.

How do I find a recording from a regular Teams meeting?

For non-channel meetings, recordings are stored in the meeting organizer’s OneDrive under the Recordings folder.

Where are recordings stored if the meeting took place in a channel?

Channel meeting recordings are saved in the channel’s SharePoint site inside the Recordings folder.

Can I access Teams meeting recordings from the chat?

Yes. A link to the recording automatically appears in the meeting chat or channel conversation after the session ends.

Is it possible for admins to change the storage location of recordings?

Yes. Administrators can configure policies to adjust where recordings are stored based on organizational needs.

Now you know where Teams meetings are recorded, but remember that as of 2021, the recordings are no longer stored in Microsoft Stream but are found in SharePoint (Channel meetings) or OneDrive(other meetings).

Also, you can’t change the default location of recordings but can move them to a different location for future use and recover the storage on the drive.

Before you go, check our guide on how to properly record Teams meeting on your PC. Keep in mind that if you delete your recordings, you can easily restore Microsoft Teams recordings, so you don’t have to worry about losing them.

If you are on limited data and have to attend Teams meetings now and then, you must limit your data usage to ensure you stay within the data limit.

If you have any questions or suggestions about the subject, feel free to mention them in the comments section below.
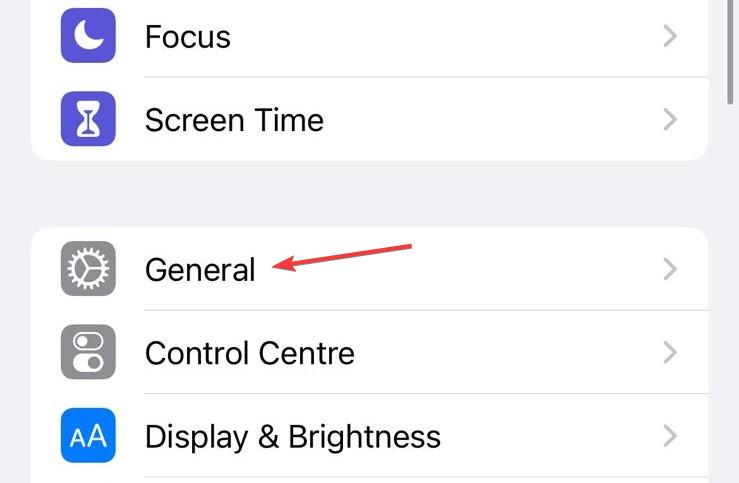
Midjourney Internal Server Error: How to Fix it

One downside of a high-performing site like Midjourney is sometimes issues like the internal server error may occur because too many people are trying to access it. Fortunately, we found a way around it so that you can continue using it when such errors occur.

How can I fix the Midjourney internal server error?

First, verify that the Midjourney and Discord server statuses are up and running. Also close any system-hogging apps and processes then restart the app.

1. Clear Discord cache

  1. Press the Windows key + R to open the Run box, type %appdata%, and hit Enter.
  2. Locate the Discord folder in the Roaming folder, right-click, and select Delete.
  3. Once the folder is deleted, close the window, and restart your PC to complete the fix.

2. Re-add the bot

  1. Open the Discord app on your mobile or computer and locate the Midjourney Bot.
  2. Click on the bot’s name. Then click on Kick Midjourney Bot to remove the bot from your server.
  3. Wait for a few minutes to allow time for the bot to reboot before inviting the bot again.
  4. Go to the Midjourney server. click on people icon, click on Midjourney Bot, and select Add to server.
  5. Select your server, and Continue.
  6. Then, select Authorize.

3. Rejoin the Midjourney Server

  1. Firstly, press the Windows key, type Discord in the search bar, and hit Enter to open the app.
  2. In the Discord window, locate and open the Midjourney bot. Click the Downward arrow next to Midjourney, and click Leave Server.
  3. Then, press the Windows key, enter the name of your browser, and hit Enter.
  4. In your browser window, navigate to Midjourney’s official website to locate the Discord invite link.
  5. On the Midjourney webpage, click Join the Beta, and click Accept Invite to rejoin the Midjourney server.
  6. Check to see if the error is fixed.

4. Check your commands

At times, nothing is wrong with the servers and the issue is on your end. According to an X user, they repeatedly got the internal server error on Midjourney because of using double colons. After making the switch to commas, the error disappeared.

Midjourney may fail to process your commands because of common mistakes like these. Examine your commands and ensure you’re not using characters or commands that may fail to generate the images. You can familiarize yourself with some of the Midjourney commands to avoid making mistakes.

5. Reinstall Discord

  1. Press the Windows key, type Control Panel, and hit Enter.
  2. Click on Programs and Features in the Control Panel window.
  3. Scroll down to locate Discord, click on it, and click Uninstall.
  4. If there is a confirmation prompt, click Yes to confirm the uninstallation and close the Control Panel once the process is completed.
  5. Press the Windows key, type Microsoft Store, and hit Enter.
  6. Type Discord, and click on the displayed result.
  7. Click the Get or Install button to download the app.
  8. Once it’s installed, launch the app to see if the error is fixed.

6. Contact Discord support

If you have tried all the solutions above but still have no luck fixing the internal server error in Midjourney, we suggest that you contact the support team of Discord and let them know of the server issue. 

Alternatively, you can also check out the Member support channel where moderators, server members, and other Discord users give updates on common errors, technical issues, and available fixes in real time.

You will likely encounter a variety of errors along the way, but there is always a way through them.

To continue using the app seamlessly and avoid issues like an unresponsive Midjourney app, ensure your CPU resources are sufficient, you have no corrupt system files, and your PC is malware-free. After all, the goal is to continue creating more bespoke art designs.

Hopefully, with the tricks in this article, you’ll be able to get past that annoying Midjourney server error and save yourself the disappointment or confusion when you come across this for the first time.

And in the same breath, if you have any tricks related to this error that could be potential solutions, drop us a line below.
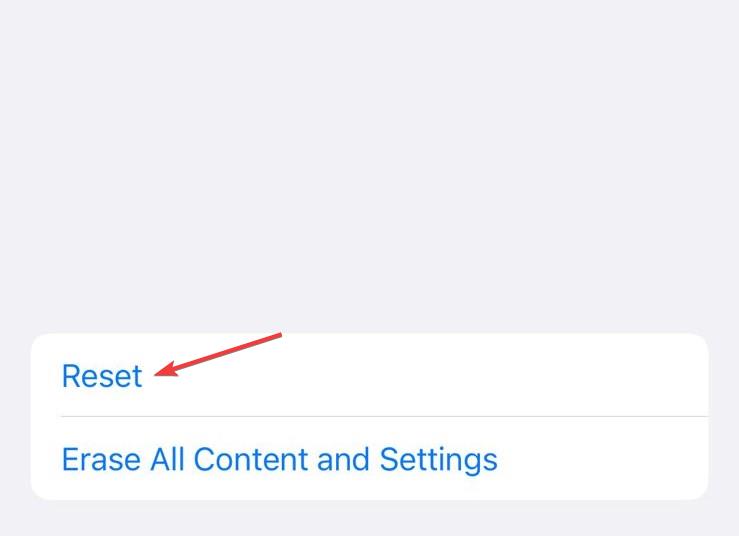
Solved: Spotify is Not Working on PS4

While Spotify runs seamlessly across devices, a few users on PS4 reported that the app is not working. For some, it wouldn’t appear in the app list, many had an error message, while others couldn’t download it altogether. 

Users even had audio issues with Spotify on the PlayStation, and in most cases, it turned out to be a problem at their end.

Why is Spotify not working on PS4?

  • Spotify is installed on an external storage
  • The PS4 database is corrupted
  • Issues with the DNS server and cache
  • The PlayStation Network or Spotify servers are down

How do I get Spotify to work on my PS4?

Before we start with the slightly complex solutions, try these quick ones first:

  • Make sure both Spotify and the PlayStation Network are up and running. For the former, use Downdetector, while for the latter, you can go to the official Network Service Status page.
  • Log out of the app, reboot the console, and then log back in if Spotify won’t play on PS4. Also, re-login to the PlayStation Network.
  • Make sure your Internet connection works fine. Consider switching to a wired connection (Ethernet) or mobile hotspot. Also, install the latest updates for both the Spotify app and the PlayStation.
  • If the PS4 Spotify is not playing music, make sure to increase the volume from the interface. It’s different from the general console volume.

1. Install Spotify on the PS4 system storage

Tip icon Tip
This method only works when you have installed Spotify on an external hard drive. We recommend you give it a try, even when using an external drive. If not, skip it and move to the next solution.
  1. Disconnect the external storage from your PS4, turn off the console, remove the power cable, plug it back, and reboot the device. Do not connect the external hard drive yet.
  2. Now, open the PlayStation Store and download Spotify.download to fix spotify not working on ps4
  3. Reconnect the external drive.
  4. When prompted with a message saying that Spotify is installed in two places and has to be deleted from one, remove it from the external HDD or SSD.
  5. Once done, reboot the console, and Spotify should work on your PS4. 

Installing the app directly on the built-in storage and removing it from the external drive worked for 9 out of 10 users. It even eliminates any Spotify installation errors on PS4.

2. Rebuild the database

  1. Hold the PS button on your console, go to Power from the menu, and select Turn off PS4.turn off
  2. Now, with the controller connected, hold the power button on the console for 12-15 seconds until you hear two beeps and the PS4 enters Safe Mode.
  3. Choose Rebuild Database from the options.rebuild database to fix spotify not working on ps4
  4. Select OK to confirm.
  5. Now, wait for the process to complete. It typically takes a few minutes, but in rare cases, the process could go on for an hour or more.database
  6. Once done, boot the console and check whether Spotify is still not working on PS4.

3. Disable linking with other services

  1. Launch the PS4 main menu, and open Settings.
  2. Go to Account Management.account management
  3. Select Link with Other Services.link
  4. Choose Spotify from the list of apps.
  5. Select Sign out.sign out to fix spotify not working on ps4
  6. Now, reboot the console and check for improvements. 

4. Change the DNS server

  1. On your PS4 console, go to Settings.
  2. Select Network from the list of options.network
  3. Choose Set Up Internet Connection.
  4. Select the Use Wi-Fi option.use Wi-Fi
  5. Go with the Custom setting.
  6. Choose your Wi-Fi network from the list, enter the password for it, and proceed.
  7. For the IP Address Settings, choose Automatic, then for DHCP Host Name, select Do not specify, and when you reach DNS Settings, go with Manual.dns
  8. Now, enter the following in the two fields and save the changes:
    • Primary DNS: 8.8.8.8
    • Secondary DNS: 8.8.4.4change to fix spotify not working on ps4
  9. For the remaining settings, go with the default selection and set up the network.

Also, while configuring the DNS settings, manually changing the MTU (Maximum Transmission Unit) to 1450 did the trick for many! Changing the MTU and DNS also helps with PS4 error CE-37813-2, WS-37431-8.

5. Reinstall Spotify

  1. Press the PlayStation button on the controller to open the main screen.
  2. Highlight Spotify from the list of apps (do not open it), expand the options, and select Delete.uninstall to fix spotify not working on ps4
  3. Select OK in the prompt to confirm the change.
  4. Now, reinstall Spotify from the PlayStation Store.

6. Reset the PS4 console to factory defaults

  1. On the PS4 main menu, select Settings.
  2. Scroll down to the bottom and choose Initialization.initialization
  3. Select the Initialize PS4 option.initialize PS4 to fix spotify not working on ps4
  4. Choose Full and follow the on-screen instructions to complete the process. It will take a few hours.full
  5. Once the PS4 boots up after the reset, download Spotify all over again.

When the previous solutions failed, and Spotify is not working on PS4, a full-factory reset might do the trick! Besides, it helped many with the A serious error has occurred message on PS4 

7. Create another Spotify account

Lastly, you may try creating another account and signing into Spotify with it. A few claimed that their account created using the Facebook profile was the reason Spotify was not working on the PS4. And switching to a regular account set up using an email address worked.

You may also contact Spotify support since they might be able to transfer the data from the old account to the new one.

If Spotify was not working earlier, it should do now on the PS4 console. Remember, the problem often lies with the network settings, the console’s configuration, or the app itself. But things are always easy to troubleshoot!

Before you leave, find out how to play PS4 games on your PC using the remote play software.

For any queries or to share more solutions with us, drop a comment below.