The code 0x80832003 is a network error that can occur on Xbox consoles. It means the console encountered trouble connecting to Xbox Live or other online services. However, this guide will examine how to fix the temporary network problem error code 0x80832003.
The error code 0x80832003 can occur due to several possible reasons:
Internet connectivity issues – The error may occur if there are issues with your internet connection, such as a weak or unstable signal, network congestion, or a temporary outage.
Xbox Live service disruption – Sometimes, the Xbox Live service may experience temporary outages. Also, maintenance of the servers can cause this error to occur.
DNS settings – Incorrect DNS configuration on the Xbox console can cause connectivity issues and result in the error code 0x80832003.
Xbox Live account issues – Problems with your Xbox Live account or subscription may cause the error.
These factors of the error may vary depending on the situation. However, we discuss trying the troubleshooting steps below to resolve the issue.
How can I fix the temporary network problem error code 0x80832003?
Before trying advanced steps to fix the error on your console, here are some steps that you can perform:
Press the guide button to open the Xbox Guide and select Settings.
Click the System link and navigate to Console Info.
Select Reset This Xbox and click on Reset and Keep my Games and Apps.
Following the process above will reset your device without losing all your games and data. Also, we have a detailed guide about the Xbox One factory reset bug still affects many gamers.
4. Play the game offline
Press the Xbox button to open the guide and select the Profile & System option.
Select Settings and click on General Settings.
Navigate to the Network settings and select the Go offline option.
The Go offline option lets you play your game offline while waiting for the network. Read our guide on fixing for this game you need to be online Xbox error on your console.
Blue screen errors are a menace and worse if you don’t know what’s causing them. Luckily, most follow a general rule, and updating your drivers often does the trick. The afd.sys is one such error that affects your network connection.
You will be unable to use the internet until you fix this issue. With that, a few solutions were upvoted by most users when trying to resolve this error.
What is the AFD in Windows?
The AFD Ancillary Function driver is a kernel-mode device driver in the Windows operating system. It allows file systems to communicate with network adapters uniformly.
That being said if you spot the afd.sys BSoD error, you’ll automatically know that it is related to your network. You will not be able to connect to any network when you encounter this error.
If you’re wondering why you are getting this error, below are some possible reasons:
New hardware – If you have recently installed new hardware, such as an unsupported processor on your PC, it may be incompatible with your system hence the BSoD error.
Outdated OS – Your Windows version plays a big role as it requires the latest drivers for compatibility. If there’s a mismatch, the drivers cannot communicate with your OS.
Corrupted drivers – Most BSoD errors are caused by corrupt drivers, so it is worth checking whether you have updated your drivers.
Software conflict – This is probably one of the major causes, as many users reported the afd.sys error after installing a game.
Select Windows Update and click on Check for updates.
Download and install if available.
2. Run the DISM and SFC scans
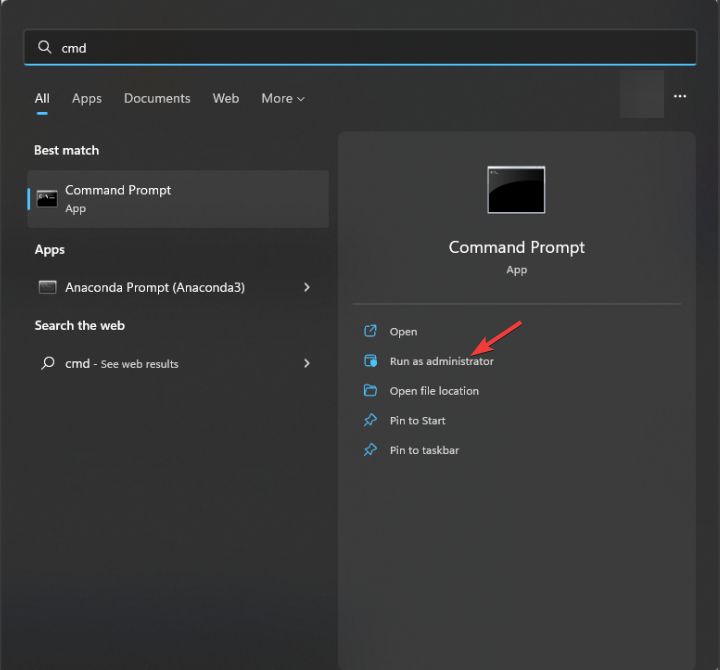
Hit the Windows key, type cmd in the search bar, and click Run as administrator.
Type the following commands and press Enter after each one: DISM.exe /Online /Cleanup-Image /Restorehealthsfc /scannow
Restart your PC.
Repairing system files can help you fix the AsIO3.sys; which is caused by a driver related to ASUS; read this guide to know more.
If this process seems too complicated and you’re searching for a solution that does it for you, there are PC repair tools that will diagnose Windows stop codes and broken system files, repairing them right away.
3. Run a virus scan
Press the Start Menu, search Windows Security and click Open.
Select Virus & threat protection.
Next, press Quick scan under Current threats.
If you don’t find any threats, proceed to perform a full scan by clicking on Scan options just below Quick scan.
Click on Full scan to perform a deep scan of your PC.
Wait for the process to finish and restart your system.
Click on the Search icon, type Device Manager in the search bar, and click Open.
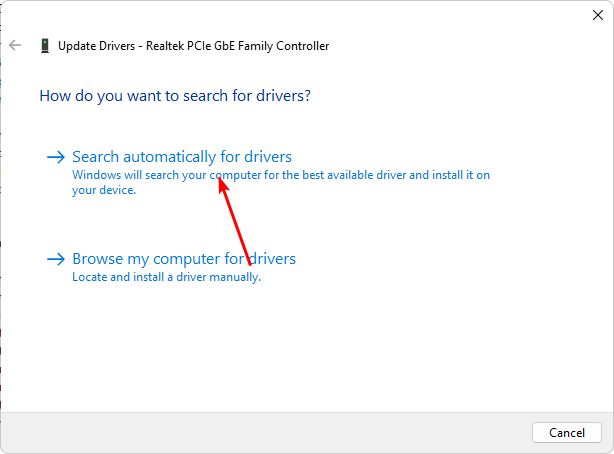
Navigate to your Network adapter, right-click, and select Update driver.
Select Search automatically for updated drivers.
You should opt for a driver updater tool for a faster and more accurate method. With this utility, you can update all the drivers in one click.
5. Reinstall your network driver
Click on the Search icon, type Device Manager in the search bar, and click Open.
Navigate to Network adapter, right-click on your card, and select Uninstall device.
Confirm Uninstall in the next prompt.
Restart your PC for freshly installed drivers.
6. Roll back to a previous network driver
Click on the Search icon, type Device Manager in the search bar, and click Open.
Navigate to Network adapter to expand, right-click on your network card and select Properties.
Click on the Driver tab, and select Roll Back Driver.
Select a reason for rolling back in the next prompt, then click Yes.
Restart your PC, and the previously installed drivers for your device will be loaded.
7. Turn off the Driver Verifier
Hit the Windows key, type cmd in the search bar, and click Run as administrator.
Type the following command and press Enter: verifier /reset
Restart your PC.
Driver Verifier can help you troubleshoot problems like the afd.sys BSoD error. If you have problems with hardware or an application that you think might be related to a recent driver change, you can use Driver Verifier to test your theory.
This utility is perfect for BSoD errors as it works best when a crash occurs and can isolate the drivers responsible. However, you need to be careful with this tool as it can make your system unstable or stop it from working properly.
If you wish to keep this utility on, create a restore point and back up all your files. In addition, do not run it in Safe Mode, as this environment does not load all drivers, making it impossible to pinpoint the problematic driver.
That brings us to the close of this article, but check out other related errors, such as the RNDISMP6.SYS error which is also a network-related BSoD error.
We’d also suggest that you familiarize yourself with BSoD fixers as they will make the repair process effortless.
Feel free to share any other solutions missing from our list that may have helped you resolve this error.
Some of our readers complain about having issues using their computers’ Windows Autopilot Reset feature. The error code 0x80070032 while resetting the device is the most common among them. Thus, we will discuss solutions to fix the Windows Autopilot reset error 0x80070032.
What causes the Windows Autopilot Reset Error 0x80070032?
Various factors can cause the Windows Autopilot Reset Error 0x80070032, some are listed below:
Insufficient Storage Space – When resetting a device using Windows Autopilot, the process requires enough storage space to create a temporary copy of the device’s current state. Without enough storage space on the device, the process will fail and generate the error code 0x80070032.
Network Connectivity Issues – If there is a problem with the network connectivity, such as an unstable or network congestion, the reset process may fail.
Windows Autopilot Configuration Issues – The system may fail when using the Windows Autopilot feature due to configuration errors.
Firewall or Security Software – Sometimes, the security software or firewall settings on your device can interfere with the Windows Autopilot reset process resulting in the error code 0x80070032.
Corrupted System Files – If the device has corrupted system files or registry entries, it can cause issues with the Windows Autopilot reset process, resulting in the error code 0x80070032.
Nonetheless, you can fix the issue by following the detailed steps outlined below.
How can I fix Windows Autopilot Reset Error 0x80070032?
Apply the following preliminary checks before proceeding with advanced troubleshooting:
Left-click the Start button, type Command Prompt, then click Run as administrator.
Click Yes on the User Account Control (UAC) prompt.
Type the following and press Enter: sfc /scannow
Type the following commands and press Enter: DISM /Online /Cleanup-Image /RestoreHealth
Restart your PC and check if the error persists.
Running an SFC/DISM scan on your PC will locate and fix the corrupt system file causing the error. Check our complete guide about how to fix SFC scannow not working on your Windows devices.
As an alternative, you can utilize dedicated software that can solve this Windows error and address additional PC issues such as:
Damaged system files
Hardware issues
HDD and low memory problems
3. Update Windows OS
Press the Windows + I key to open the Windows Settings.
Select Windows Update and click the Check for updates button. Wait for the process to complete, and select the Download & Install button if an update is available.
Updating the Windows OS will fix bugs, install security patches, and resolve compatibility issues that can cause the Windows Autopilot Reset Error 0x80070032.
4. Reset Windows
Press the Windows + I key to open the Windows Settings.
Select System and click on Recovery.
Then, select the Reset PC button from the right pane.
Select the Keep My Files option, delete apps, and reset settings to default after reinstalling.
Select the Remove everything option, to perform a full Windows reset.
Many of our readers complain about experiencing the Srtasks.exe task with high CPU usage on their PC. It causes the system or programs to work slowly or crash,s. Hence, this guide will enumerate the steps to fix the problem.
Srtasks.exe is a legitimate Microsoft process known as System Protection Background Tasks. The Task Scheduler often uses it to create restore points for the PC automatically.
Though the Srtasks.exe may be problematic, and your antivirus might pick it up as a threat, it isn’t malware.
What causes Srtasks.exe high CPU usage?
Srtasks.exe high CPU usage may occur due to many factors. Some notable ones are:
Corrupt System Files – When your system files are corrupted, they can infect files like Srtasks.exe on the PC. Hence, it distorts the performance of the file tasks, causing high CPU usage when it is under use.
Interference from other running apps – Srtasks.exe processes on your computer can be affected by the activities of other apps like antivirus software delaying its performance. Also, having many apps running concurrently can affect the tasks running on your PC, and it doesn’t give enough system resources to Srtasks.exe, causing high CPU usage.
Malware or virus attacks – When you have malware infection on your computer, it can impede its ability to communicate correctly with programs and services.
Fortunately, we have gathered some steps you can follow to fix the high CPU usage. We’ll take you through them as we go further into the article.
If the problem continues, proceed with the troubleshooting steps below:
1. Perform a Clean Boot
Press Windows + R key to open the Run dialog box, type msconfig, and click OK.
Select the Services tab, check the box for the Hide all Microsoft services option, then click the Disable all button.
Select the Startup tab and open Task Manager.
Click the startup programs, then the Disable button.
Restart your PC and check if the Srtasks.exe high CPU usage persists.
A clean boot can fix background app tasks causing issues with your PC’s Microsoft System Protection Background Tasks.
2. Disable System Protection in Restore Point
Left-click the Start button, type Create a restore point and launch it.
Select Configure under the System protection.
Check the radio button for Disable system protection and click on Apply.
3. End task for ccSvcHst.exe
Right-click the Start button and select Task Manager.
Select the Processes tab. Select Srtasks.exe, right-click on it, then click End task from the drop-down.
Restart your PC and check if the Srtasks.exe high CPU persists.
Ending the task process will refresh its processes and fix issues that may cause high CPU usage. You can check for shortcuts to open Task Manager on your PC.
Microsoft is getting serious with promoting its Bing AI chatbot. Not only did it reach over 100 million active daily users within the first month of its release, but now, the tech giant is slapping the AI tool on its SwiftKey keyboard for Android phone devices.
As spotted by Windows enthusiast @XenoPanther, you can see the Bing logo sitting nicely on the toolbar atop the keyboard.
Bing Chat is coming to SwiftKey. Download the latest SwiftKey beta and sign in to your MSA. Reposted with cleaner screenshots. pic.twitter.com/dBss7gnOzn
With that said, however, the feature is only available for Beta testers, so it may take a while for Bing AI to arrive on general users’ keyboards. You can still head over to the Google App Store and get the SwiftKey beta. If you already have the regular version, you can still install and switch it.
What can you do with Bing AI for SwiftKey keyboards?
As mentioned, the Bing button will be on the upper left of your keyboard.
Once you click on it, you’ll see options for Search, Tone, and Chat. The latter will take you straight to the chat mode where you can write your word prompts, ChatGPT style.
With Search, as you may have guessed, you can directly perform a web search directly on your keyboard without having to open a new browser window. In Tone, you can type a phrase and ask the chatbot to paraphrase it under certain tones (funny, formal, descriptive, etc.)
It’s safe to say that Microsoft has been leading in this AI race for quite a while A little over a while ago, Redmond officials launched Bing AI chatbot integration within Skype on mobile and Edge. On those apps, you can summon the chatbot and ask it to create to-do lists, create plans, and more.
Plus, Microsoft Copilot is the next big thing that you don’t want to miss. Powered by the latest GPT-4 model, the tool, which is coming to Office 365 apps soon, can help you draft a topic, create compelling presentations, summarize long email threads, and more with simple word prompts.
What do you think about this addition of Bing AI on Microsoft SwiftKey keyboards on Android? Let us know in the comments!
When developing software, choosing the right Integrated Development Environment (IDE) is important. The environment should be easy to use and must integrate well with the languages you are using. The two most popular IDEs for developing software are Visual Studio and PyCharm. Both software have their distinctive features and advantages, which makes them appropriate for different projects.
In this guide, we will compare Visual Studio vs PyCharm to help you decide which IDE you should use for your next project. Read on!
What is Visual Studio?
Visual Studio is an Integrated Development Environment (IDE) by Microsoft. It is primarily used for developing Windows apps. However, it supports other languages, including Python, C++, C#, Visual Basic, F#, and Javascript.
This IDE offers a wide range of tools and features for developers to write, test or debug software applications for various platforms. It comes with a range of project templates and code snippets to help developers get started quickly.
What is PyCharm?
PyCharm is an IDE specifically designed for Python programming languages by JetBrains. It offers a comprehensive set of tools and features to write, test, and debug Python applications.
PyCharm is available in two editions, community and professional. The former edition is free and open-source, while the latter provides additional features, including scientific tools, web development tools, database tools, and support for other programming languages like HTML, JavaScript, and CSS.
Visual Studio vs PyCharm: What are the differences?
1. Debugging
Visual Studio is a Microsoft development tool limited to Windows and macOS. However, PyCharm is a cross-platform tool and can be used on Windows, macOS, and Linux for debugging.
Both IDEs have powerful debugging features like breakpoints, watch variables and call stack exploration. However, PyCharm also has a robust interactive debugger that enables developers to run code step by step and inspect variables in real time.
Visual Studio comes with profiling tools, but those need an additional installation. On the other hand, PyCharm has in-built profiling tools which help developers identify performance bottlenecks and optimize the code.
2. Collaboration
Visual Studio and PyCharm have in-built support for version control systems such as Mercurial, Git, and Subversion, making it easy for developers to collaborate on code.
However, Visual Studio also comes with Azure DevOps, which provides additional collaboration features such as continuous integration, project tracking, and deployment. It also has a Live Share feature which helps in collaboration in real time.
PyCharm integrates with various collaboration tools, including Jira, Trello, and Slack, making it easier for developers to track and manage their collaborative work. However, unlike Visual Studio, PyCharm does not offer real-time collaboration.
3. Extensions
Visual Studio has an extensive collection of extensions & plugins with over 8000 extensions available in Marketplace. On the other hand, PyCharm has over 5000 plugins available on JetBrains Plugin Repository.
4. Cost
Visual Studio offers both free & paid versions; the latter has additional features and benefits. The cost varies according to the version and licensing model.
PyCharm has a free Community edition and a paid Professional edition. The Professional edition’s price also depends upon the number of licenses and subscription model.
PyCharm is simple to use, has a user-friendly interface, and can be installed easily. On the other hand, Visual Studio has a complex interface, and installing it is not straightforward as it requires you to download its dependencies.
Visual Studio is faster and more responsive than PyCharm when working on large projects. However, the performance depends on the complexity and size of the projects. The former is optimized for Microsoft technologies, but the latter works best with Python.
PyCharm is a lightweight IDE that consumes fewer system resources. On the other hand, Visual Studio has a higher memory footprint which impacts overall system performance.
6. Remote development
Both IDEs come with remote development features, which enable developers to work on code running on a remote container. However, with an in-built SSH terminal, remote debugger, and remote interpreter, PyCharm offers better support for remote development.
7. Integration
Visual Studio integrates well with other Microsoft development tools, such as Azure and GitHub. However, PyCharm works well with third-party tools and services, including Kubernetes, Docker, and AWS.
Both Visual Studio and PyCharm offer built-in support for Git integration, which makes managing code repositories and collaborating with other developers easy.
Although, PyCharm’s Git integration is more advanced and provides better support for Git-specific features like cherry-picking, rebasing, and conflict resolution.
8. Language support
Visual Studio supports multiple programming languages, including C++, C#, F#, and Visual Basic, while PyCharm is primarily focused on Python but gives support for other languages such as CSS, JavaScript, and HTML.
PyCharm’s debugging tools are optimized for Python development and offer better support for Python-specific features like Django and Flask frameworks.
9. Code Management
Both IDEs have excellent code completion and highlighting features, which are useful in writing code faster with fewer errors. However, PyCharm is more advanced and offers better support for Python-specific syntax and libraries.
Visual Studio has excellent code management features, namely, IntelliSense, project templates, and code refactoring. Also, it supports a wide range of programming languages and frameworks. On the other hand, PyCharm offers similar code management features, but they are more focused on Python development.
10. Refactoring
Visual Studio provides a comprehensive set of code analysis tools that enables developers to quickly identify and fix issues in their codebase. On the other hand, PyCharm comes with code analysis tools, but they are more focused on spotting issues related to Python-specific syntax and libraries.
Both IDEs offer various code refactoring tools, such as extract method, rename, and change signature. However, PyCharm comes with more advanced refactoring tools specifically for Python, including introducing a named tuple, wrapping a code block with a try/except statement, and generating a list comprehension.
Visual Studio vs PyCharm: Which one to choose?
Choosing either of the two IDEs depends on the specific requirements and preferences of the project you are working on. Here are a few factors which you can consider to make the choice:
Language – If you are developing apps in .NET, C#, or other Microsoft technologies, you should opt for Visual Studio. However, if working on Python, JavaScript, CSS, or HTML, you can go for PyCharm.
Platform – PyCharm works cross-platform and supports Windows, Linux, and macOS. However, Visual Studio is primarily a Windows-based IDE but can support macOS and Linux via Visual Studio Code.
Project Size – You should go for Visual Studio if you are working on large projects with many files and dependencies, as it will offer better code management features. On the other hand, for smaller projects focused on Python, PyCharm is a better choice.
Learning Curve – Visual Studio has an extensive range of features and tools, therefore, has a steeper learning curve than PyCharm. However, developers who are new to Python can also find PyCharm overwhelming.
To conclude, both Integrated development environments offer robust tools and features for software development. Choosing between depends on your project requirements. Visual Studio vs PyCharm: which would you choose?
Feel free to mention your choice in the comments section below.
Microsoft releases new updates and patches for Windows to help fix bugs and improve performance. However, our readers report the error 0x800700c1 during their updates installation. Hence, this article will discuss how to fix the error on Windows 11.
Some notable factors that can cause the Window update error 0x800700c1 on your PC are:
Faulty Windows update components – The installation process requires certain services to work on your PC. If these services are not running correctly, it can cause issues with the installation process.
Windows update Temporary cache folder – Old updates and patches installed on your computer are stored in the Windows updates installer patch files and saved as cache files in a folder. They can become corrupt with time and, as a result, can cause interference with the Windows update services.
Corrupt system files – When your system files are corrupt, they prevent the Windows update installation process from using them when needed and cause the Windows update error 0x800700c1.
Irrespective of the causes, you can resolve the error by following the below steps.
How can I fix the Windows update error code 0x800700c1?
Before attempting any advanced troubleshooting steps, go through the following preliminary checks:
If you can’t resolve the error, go ahead with the solutions below:
1. Run Windows Update troubleshooter
Press Windows + I key to open the Settings app.
Select System, Troubleshoot, then click on the Other troubleshooters.
Go to Most Frequent, select Windows Update, and click the Run button.
Follow the on-screen instructions to complete, then restart your PC.
The Windows Update troubleshooter will resolve issues affecting the Windows updates installation. You can check ways to run the Windows Update troubleshooter on Windows 11.
2. Reset the Windows Update components
Left-click the Start button, type Command Prompt, and select the Run as administrator option.
Click Yes on the User Account Control prompt.
Copy and paste the following commands and press Enter after each one: net stop wuauservnet stop cryptSvcnet stop bitsnet stop msiserver
Copy and paste the following command one after the other: ren C:\Windows\SoftwareDistribution SoftwareDistribution.oldren C:\Windows\System32\catroot2 Catroot2.old
Type the following commands and press Enter after each one: net start wuauservnet start cryptSvcnet start bitsnet start msiserver
Left-click the Start button, type control panel, then press Enter.
Select the Windows Defender Firewall option.
Click the Turn Windows Defender Firewall on or off option from the left pane.
Navigate to Private network settings and Public network settings, then click the radio buttons for the Turn off Windows Defender Firewall (not recommended) option.
Restart your PC to see if you can install the Windows update.
Disabling the Windows Defender Firewall will resolve any interference it’s causing during the Windows installation process. Read our article about how to disable the Windows Defender Firewall on Windows 11.
4. Perform an SFC scan
Left-click the Start button, type Command Prompt and click on Run as administrator.
Click Yes on the User Account Control prompt.
Type the following and press Enter: sfc /scannow
Restart your PC and check if the error persists.
An SFC scan will find and repair corrupted or missing system files on your PC liable for causing the Update error. You can read about how to fix SFC scannow not working on your Windows device.
There are also efficient solutions that can help you solve PC errors automatically and resolve Windows update issues. These are the system repair tools that will troubleshoot your Windows device and repair registry or file errors with one click.
5. Clear Windows Update cache
Press Windows + I to open File Explorer.
Go to Local Disk (C) and right-click, then click on Properties from the drop-down.
Select Disk Clean-up, then click the Cleanup system files button.
Check the boxes for Windows upgrade log files and Temporary Windows Installation files, then click OK.
Exit the File Explorer and restart your PC to check if the error persists.
Deleting the Windows update cache files will clear the corrupt update files affecting the update process and allow the system to write new files.
There’s been plenty of things happening in the space of AI in the past few months: Bing AI, Microsoft Copilot, and ChatGPT by OpenAI to name a few. The latter is the pinnacle of them all and a tool that can do a lot of wonders, like drafting a long message/plan with simple word prompts.
To access that, however, you’d need to log into OpenAI’s website. That process can be annoying sometimes, as many people have started relying on it to draft their messages or just do simple searches.
If you’re looking for a workaround to get through that, we introduce you to the UniJump browser extension. With this tool, you can access ChatGPT from any website, so say goodbye to switching between tabs or windows.
UniJump is a seamless browser extension that enhances your daily usage of ChatGPT from any website you are browsing without the need of leaving that website. UniJump improves your writing, helps you get answers to your questions, and inspires you to experiment with different communication styles
Read along to find out how you can download the extension and how it functions.
How to get access to ChatGPT from any website with the UniJump extension
1. Open your browser. In this case, we’re using Google Chrome.
4 Click on the puzzle icon, then click on UniJump to activate it by signing into your OpenAI account.
5 Once activated, you can click Alt + J to summon ChatGPT whenever you open any website.
In the meantime, OpenAI has launched a GPT-4 version of the tool, allowing you to access even more powerful functions. The new technology can reportedly pass bar exams and do image & voice inputs. So good that you can even take a picture of your fridge and ask it to create a recipe from that.
What do you think about this extension? Let us know in the comments!
It can be annoying to run into the Steam error code e20 as it prevents you from downloading or playing your favorite games on the platform, but there are ways to fix it, and this guide will show you how to do it.
How can I fix the Steam error code e20?
Before we try anything else, you can try connecting to Steam using your mobile hotspot. You can also try logging in by scanning the QR code on your phone.
1. Clear the htmlcache folder
Close Steam completely.
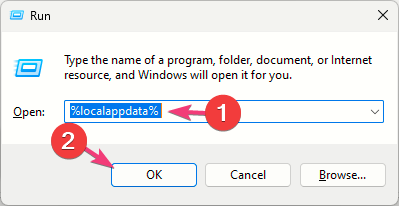
Press the Windows key + R, enter %localappdata%, and click OK.
Next, navigate to Steam\htmlcache
Delete everything from htmlcache folder.
Start Steam again.
2. Flush the DNS
Press the Windows key + S and enter cmd. Select Run as administrator.
Run the following command: ipconfig /flushdns
Wait for the process to finish and start Steam again.
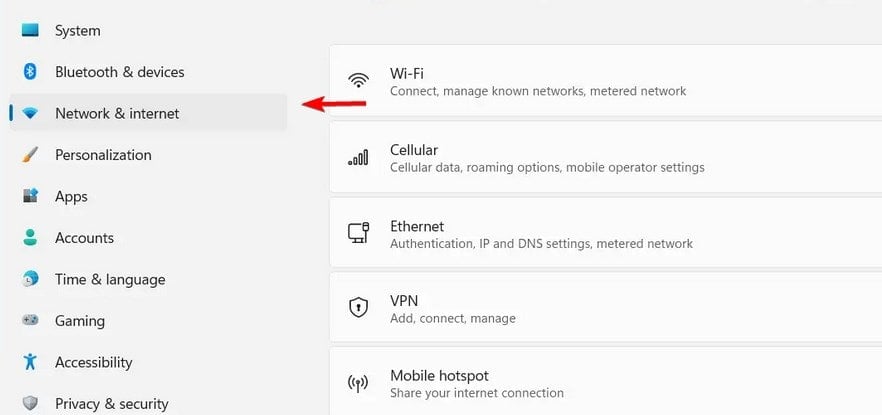
Next, go to Network & Internet and select your connection type.
Set the Network profile type to Private.
4. Run Steam as an Administrator and in Compatibility Modes
Right-click on the Steam icon on your desktop screen and select Properties.
Go to the Compatibility tab and check the box for the Run this program as an administrator option. Then, check the box for Run this program in compatibility mode, then choose a Windows version from the drop-down.
Click OK to save the changes.
5. Disable Windows Firewall
Click the Start button, type the control panel, and press Enter.
Select Windows Defender Firewall.
Click the Turn Windows Defender Firewall on or off option from the left pane.
Go to the Private network settings and Public network settings, then click the radio buttons for the Turn off Windows Defender Firewall (not recommended) option.
Restart your PC and check if the error persists.
Disabling your firewall isn’t advised as a permanent solution, so be sure to turn back the firewall if everything works.
Running the Steam client as an administrator will resolve permission and compatibility issues causing the error. You can check what to do if running as administrator is not working on your PC.
We also have a guide on Steam Service error, so don’t hesitate to check it out for more information.
Should you have any questions regarding this common Steam error, kindly drop them in the comments section. We also have a new guide on error code E2 on Steam, so you might want to check it out.
It’s not uncommon to see different learning platforms today. However, not many talk about LMS hosting costs. So, in comes the big question: is LMS cost-effective? To establish that, we have to take a few things into consideration, such as:
The actual cost of LMS (LMS SaaS pricing, LMS cost per user, LMS pricing models, and finally, the LMS price comparison)
LMS hosting (best hosting for LMS, and so on)
As you can see, there are many factors that influence our learning management system cost comparison, and one of them is them is the price of online LMS hosting services.
Before we dig in, you might want to double-check your browser and make sure you have the latest version installed. Since we’re dealing with online services, it’s best to avoid outdated browser warnings.
If you want to rule out any potential browser issues, we recommend you install and give Opera a try.
Here’s a quick overview of the available LMS hosting services:
Creating an LMS from scratch is costly, especially because you need a whole team of developers and designers to set up the whole project.
This can be expensive, and it can cost up to $50.000 or even more, depending on the size of the project. If you’re looking to subscribe to an already existing one, understanding the final LMS fee meaning is crucial.
How much does an LMS subscription cost?
How much does LMS hosting cost?
Things to consider: → LMS cost per user vs → LMS pricing models
Things to consider: → LMS SaaS pricing vs → Local LMS hosting services
When it comes to hosting and LMS, there are two types, locally hosted and software as a service, also known as SaaS.
With a local server, you provide your hardware and infrastructure. As a result, you have full control over the server and the platform.
On the other hand, SaaS is hosted on a remote server and all your data is stored in the cloud.
? LMS Price comparison: hosting services
Locally hosted ?️
When it comes to locally hosted LSM, the setup price can go up to $25,000. This includes the initial setup, the necessary hardware, staff training, basic support, etc.
This is an expensive option, but it allows you to have full control over your platform, and all your files are stored on your local server.
However, this might not be the best choice if you’re not technically experienced and you don’t have the necessary staff to handle such a project.
Remote hosting ?
The pricing is significantly lower when you’re using a remote host because all the hosting, maintenance, and potential server issues are handled by your hosting provider.
WP Engine also provides a great service, and the starting price for managed WordPress hosting is $23 per month. This gives you one website and about 25,000 visits per month.
As for the storage, you’ll get 10GB and 50GB of bandwidth. Of course, there are higher tiers that cost up to $218 or more per month.
A2 Hosting is optimized for LMS, and the starting price is set at $6.99 on monthly basis. This includes one website, 100GB SSD, easy site migration, SSL certificate, website staging, and the ability to choose a data center location.
For more hardware power, there are plans that cost up to $16.99 per month, but these are intended for advanced users.
Kinsta – High cost of LMS hosting but convenient features
This service is available with a starting price of $35 per month, and it gives you one WordPress site and 25,000 visits. Regarding the storage, you’ll get 10GB available.
Of course, the basic package includes SSL, CDN, staging, and free migrations. If this doesn’t work for you, they are other plans, with the top plan costing $1,650 on monthly basis.
Regarding the pricing, it varies greatly depending on your provider. For example, DomainRacer offers premium LMS hosting starting at $6.99 per month for a single website.
The service also offers its own LMS software as well as a private video platform, so you won’t have to worry about video storage.
Additional features include free SSL, Litespeed, and unlimited storage, so you’ll get everything that you need to start your LMS.
Other companies, such as Web Active, ask for $75 as a starting price for hosting, and with it, you’ll get 1 website, unlimited visits, 20GB of storage, and 2TB of bandwidth.
Additional features include SSL, hourly backups on-site as well as daily off-site backups. If you want access to advanced features, more bandwidth, and storage then you might be interested in the Extreme Performance package that starts at $150 per month.
LMS price comparison: Pros & cons of different hosting types
➡️ Locally hosted
Locally hosted LMS is highly customizable and more secure. This is especially true if you work with sensitive data that you want to keep on your servers.
On the other hand, initial setup and implementation can be more complicated, depending on the structure and expertise of your IT department.
Lastly, such implementation requires you to have on-site technical staff that can fix any issue that might occur.
➡️ Remote hosting
With SasS-hosted LMS, it’s quick and easy to set up and get started. You don’t need any staff or hardware since it will be provided by the hosting company.
However, these types of hosting have their flaws, and one of them is the lack of customization. This might not be suitable for more demanding users.
With SaaS, your data is stored in a remote location, and that can be an issue for some users as well.
Creating an LMS isn’t a simple task, and it requires an investment on your part. While local hosting might be a more secure option, it’s more costly, in terms of initial setup and maintenance.
This is why many are choosing remote hosting instead, it’s less expensive and requires less configuration. Reliable hosting is crucial if you want to avoid malformed or illegal requests in your browser, so choose carefully.
We hope that this guide helped you find the right LMS hosting that matches your budget. What’s your hosting provider of choice? Let us know in the comments below.
This error may only occur on one user account. Before moving forward, check and see if any other users are suffering from the same thing.
What causes the Unavailable Location error to appear?
There are a wide variety of reasons why this error appears. And it’s important to learn about them to ensure a situation like this doesn’t happen again.
Malware has infected your computer – Computer viruses can mess with a lot of your computer. It is strongly recommended that you run some antivirus software to clean it up.
An app was incorrectly installed – If something interrupts an app as it’s being installed, it can become corrupt. You’ll need to run the Windows 11 repair program.
System crashes have broken your files – Malware, overheating, and faulty RAM can result in a system crash, which can cause the Unavailable Location error.
Corrupt files are preventing normal functions – As a consequence of the previous two causes, corruption can linger. Be sure to run an SFC scan to clear up everything.
Important files have been deleted – Be mindful of what you change in the Registry Editor. Deleting the wrong file can cause a cascade of problems.
The last Windows 11 Update was faulty – Something may have gotten wrong in a recent Windows 11 Update. Microsoft has a series of instructions on its website on how to roll back updates.
The Windows 11 Beta is unstable – Microsoft allows its users to try out new features through its Insider Preview program. Sometimes the betas don’t work properly, occurring in multiple errors.
How can I fix this Unavailable Location error?
Fortunately, this error has an assortment of fixes you can try. Below is a collection of easy solutions that take almost no time to complete and more complex ones that take a bit longer.
One of the complex solutions will involve you going into the Registry Editor. Be careful not to change anything outside of what’s being shown in the instructions.
Install a third-party repair app, like MiniTool Partition Wizard, to fix missing files. Windows 11 does have its native tool, but it’s not the greatest. You’re better off using something else.
Perform a clean boot on Windows 11 and check your recent apps. If you find a faulty app in this state, immediately uninstall it. Instructions on how to do a clean boot are on Microsoft’s website.
If you suspect the error is due to a Windows 11 beta, leave the Insider Program. Instead, install a more stable version of Windows 11. The problem should go away then.
If you have a restore point available, install that older version of Windows 11 to revert any changes. If you don’t have a restore point, we recommend learning how to create one for the future.
And if all else fails, you can perform a System Restore to revert your computer to its factory settings. This will erase your data, so be sure to back everything up.
1. Create a new account
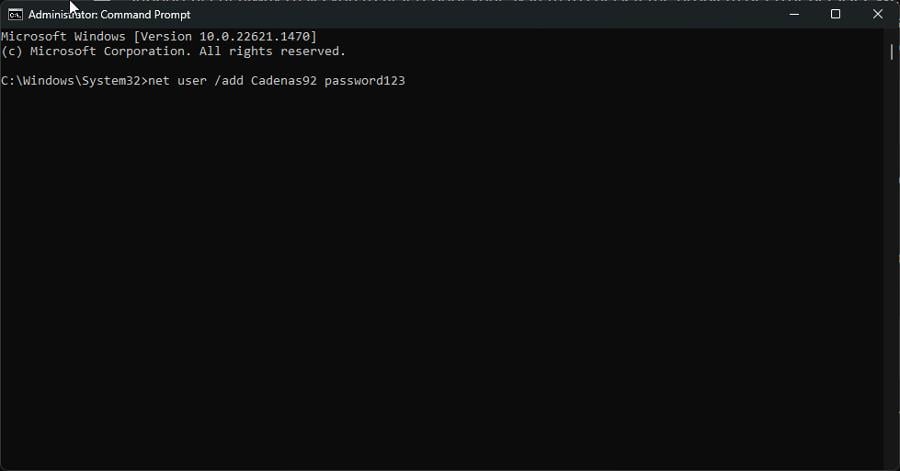
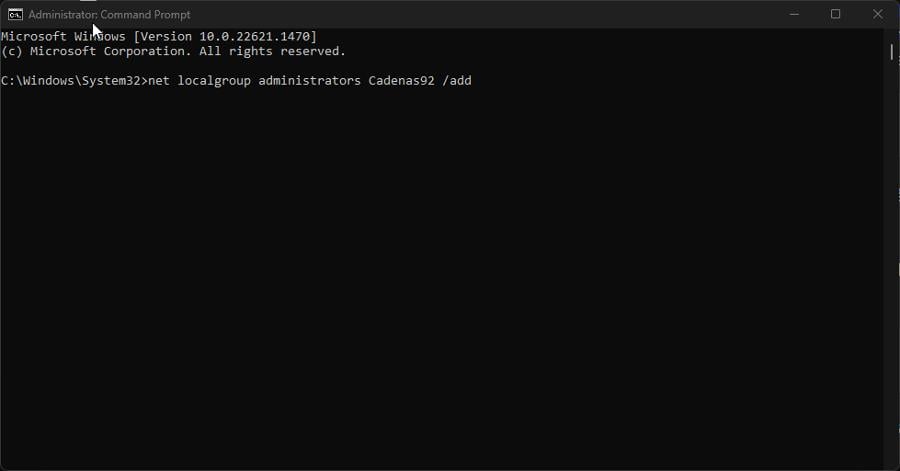
First, bring up the Command Prompt in the search bar and select Run as administrator.
Enter the following command: net user /add USERNAME PASSWORD
Replace USERNAME and PASSWORD with your desired entries.
Next, run the following command: net localgroup administrators USERNAME /add
Once you’ve created a new account, you must transfer the data over from the old profile. You can do this via the third-party TransWiz app.
2. Copy the Desktop folder path
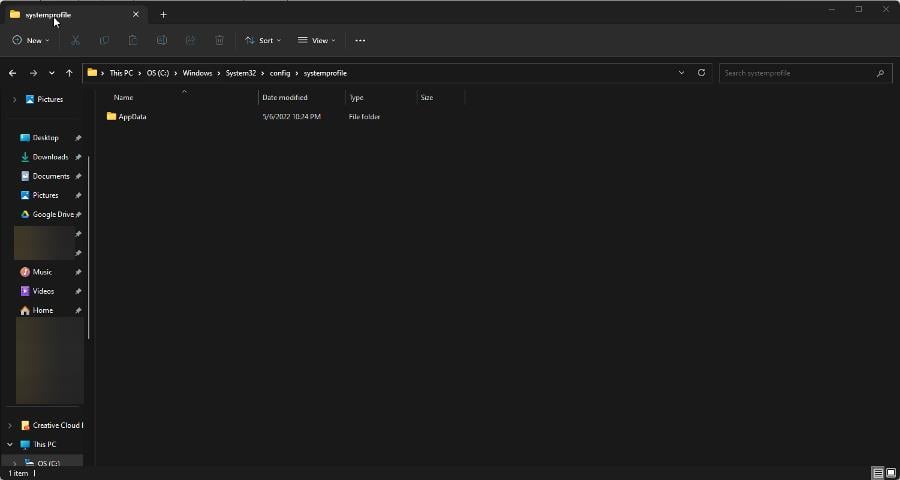
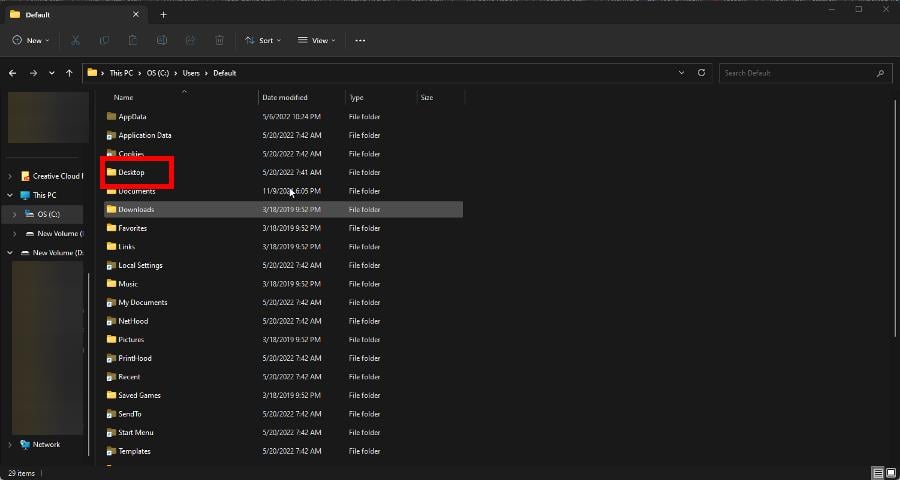
Launch the File Explorer. Copy and paste the following to the address bar: C:\Windows\system32\config\systemprofile
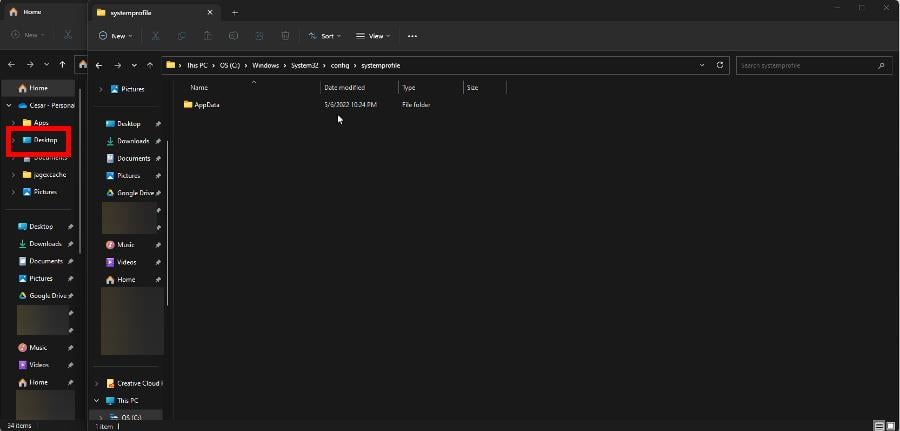
See if the Desktop folder is present under System Profile. If it isn’t, drag the Desktop folder from another File Explorer window to the previous window.
Additionally, you can copy the Desktop folder from the following address: C:\Users\Default
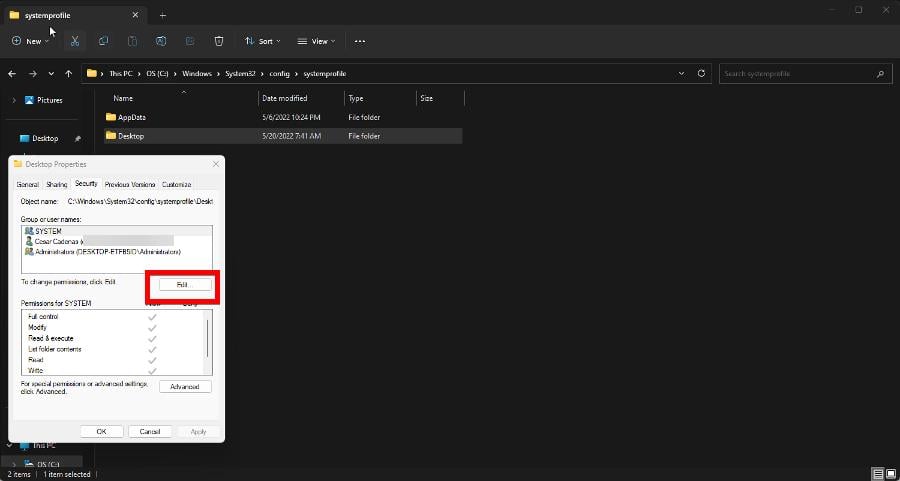
Once done, you will need to give the folder full permission. Right-click Desktop and select Properties.
Go to the Security tab in the Properties window. Select the Editbutton.
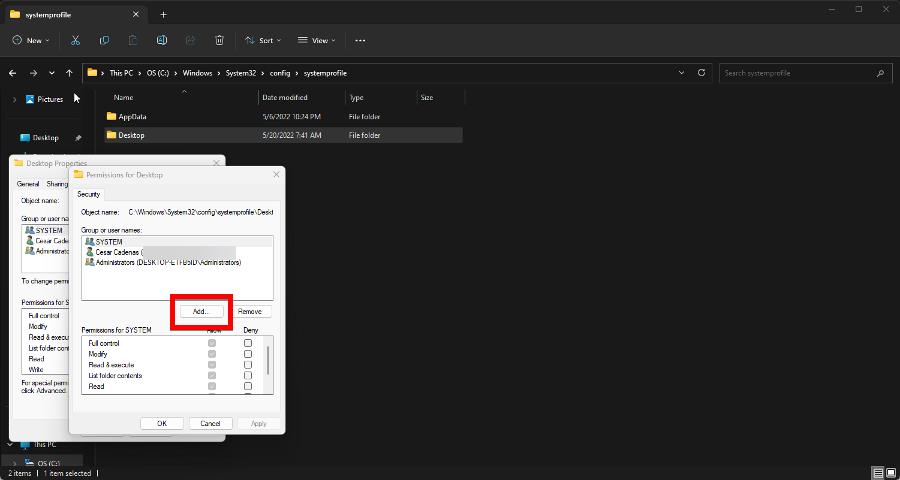
Under Group or User Names, click the Add button.
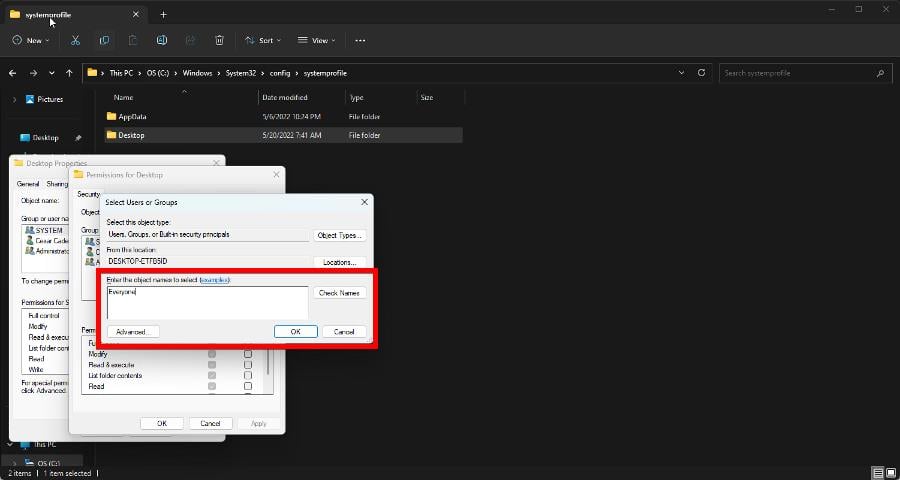
In the Enter the object names to selectsection, type inEveryone, then click the Check Names button.
Then, click the OK button.
3. Set Remote Procedure Call to Manual
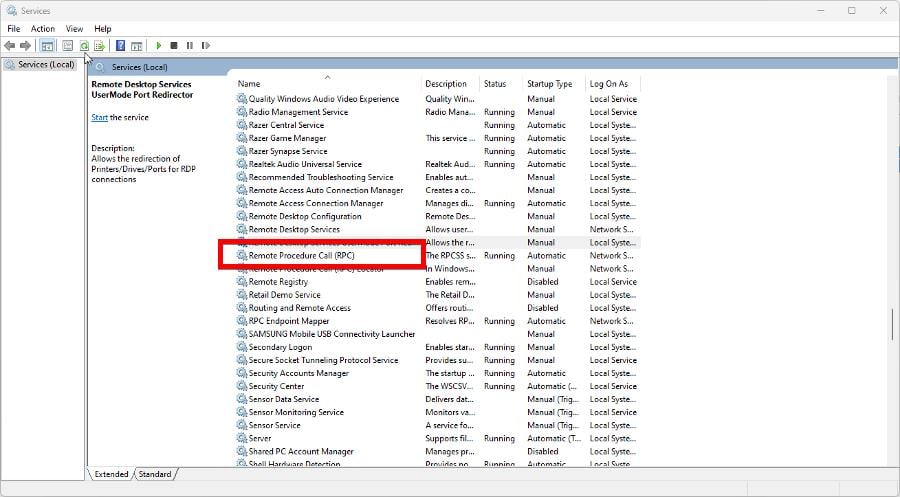
Launch the Services app. Scroll down until you locate Remote Procedure Call (RPC).
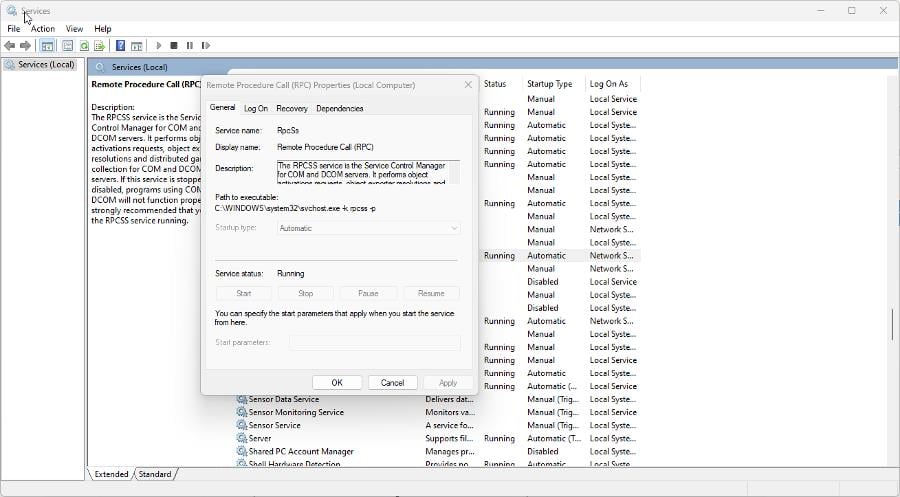
Right-click it and select Properties. Check what the Startup Type status is and see if it’s running.
You can change these settings in an attempt to fix the Unavailable Location error. Right-click Remote Procedure Call, and select Refresh.
Go back into the Properties window. Set the Startup Type to Manual instead.
If the problem persists, perform the same steps to Remote Procedure Call Locator.
4. Restore the Default path
Launch the File Explorer and go to the Users folder. Enter your username folder and locate Desktop.
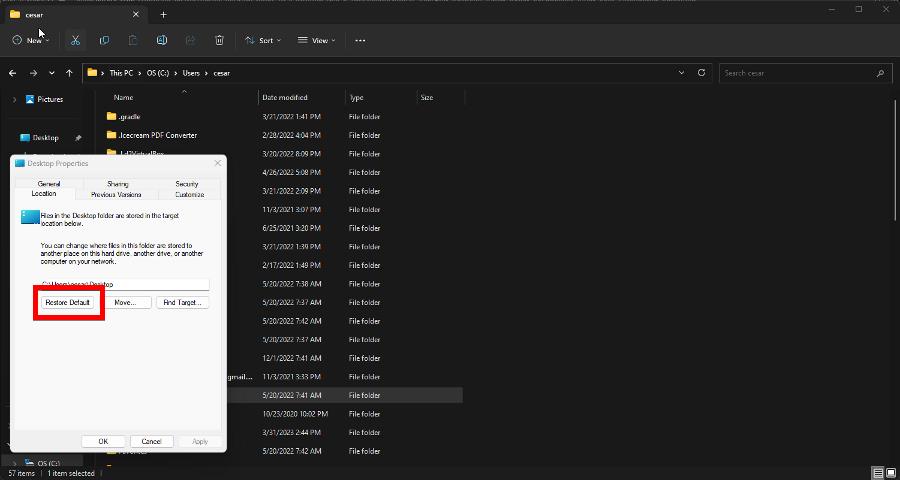
Right-click Desktop, then select Properties.
Go to the Locationtab. Next, click the Restore Default button.
Now click the now available Apply button, then OK.
Restart your computer. See if the problem has been fixed.
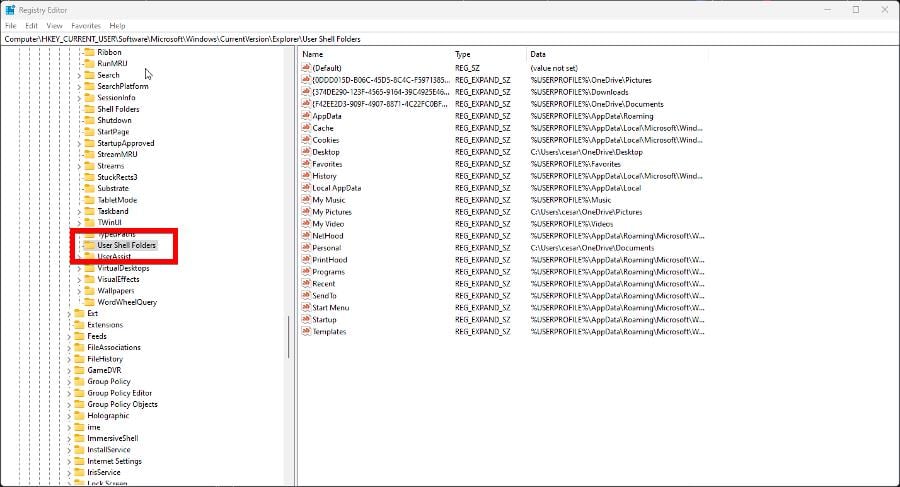
5. Change Desktop location in Registry Editor
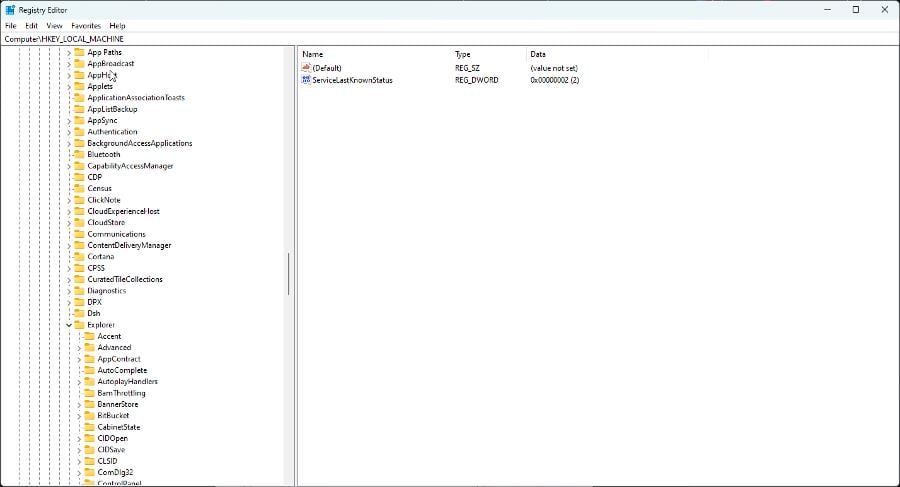
Launch the Registry Editor from the search bar. If a User Access Control window appears, select Yes.
Expand the HKEY_CURRENY_USER folder and open the following in this order: Software > Microsoft > Windows > Current Version > Explorer.
Click User Shell Folders.
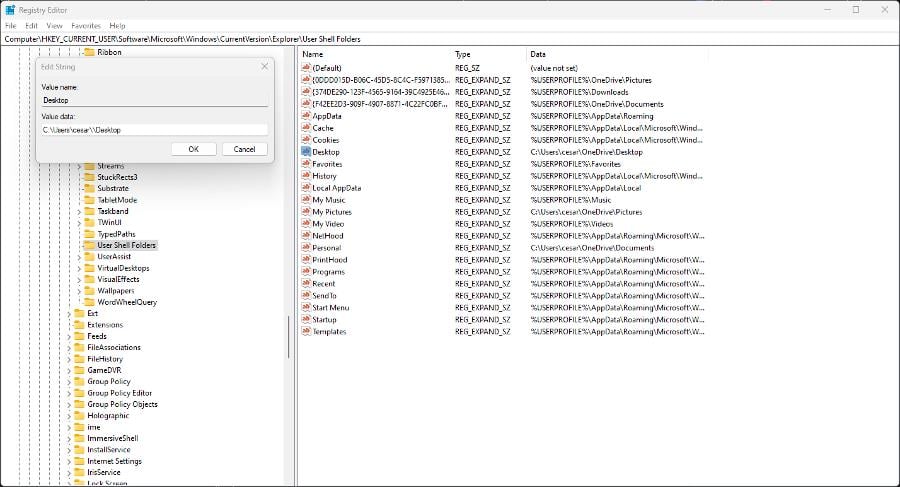
Double-click the Desktop entry. Make sure the Value Data is set to C:\Users\USERNAME\Desktop.
If not, change it so it matches the following image. Click OK when done.
Restart your computer.
What can I do if my Remote Desktop Connection isn’t working?
If you’re experiencing some service interruption with your Remote Desktop Connection, first check your internet connection. You may have to contact your internet service provider to sort things out.
But what if your connection is fine? In that case, the next best thing you can do is change the settings on Windows Defender Firewall by giving Remote Desktop the right permissions.
You have the likes of RocketDock to change where your taskbar stays and Winaero Tweaker to add shortcut tools for apps.
Feel free to comment below if you had other Windows 11 questions. Also, leave comments below about reviews you’d like to see or information on other desktop or hardware issues,
The error 0x00000142 is a Microsoft Office-related issue that can happen when you try to launch any of its programs. Outlook seems to be the most affected culprit, as most users who reported this error associated it with the email client.
While there are other alternatives for Office apps, it can sometimes be tedious because the Office Suite comes as a package that makes work easier. If you have been unable to launch the associated app, we share how to fix this error below.
What is error 0x0000142 in Outlook?
The error 0x00000142 occurs when you try to open any of the Microsoft Office-related apps. It could be Word or Outlook.
Some of the possible triggers for this error include:
Add-ins – You may have recently downloaded Outlook add-ins or other third-party computer applications causing conflicts.
Outdated app – Sometimes Microsoft releases updates for its Office suite that can cause problems with older versions of its software.
Incomplete installation – If you installed Microsoft Office, but the process was interrupted, or some installation files were missing, an app may fail to open.
Multiple versions – Office apps are designed to work with only one version of a file at a time. If you have multiple app versions installed, it may fail to open.
Insufficient permissions – You may not have permission to access the Office 365 subscription associated with your Microsoft account.
How do I fix error 0x0000142?
Before you try out the slightly complex solutions listed below, apply the following basic steps:
Sign out of your Microsoft account, restart your PC then sign in again.
1. Restart the Office Software Protection Platform
Hit the Windows + R keys to open the Run command.
Type service.msc in the dialog box and hit Enter.
Locate Office Software Protection Platform or Software Protection, depending on your Windows and Office version. Next, right-click on it and select Properties.
Navigate to the Startup type, click the drop-down menu, and select Automatic.
Hit Start, then click Apply and OK to save the changes.
Note that the Office Software Protection Platform may not be present in newer versions of Office. If so, skip this step and proceed to the next one.
2. Repair Microsoft Office
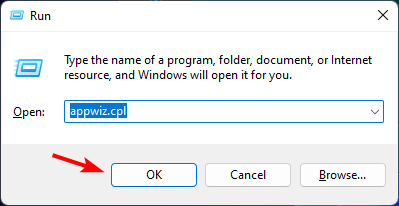
Hit the Windows + R keys to open the Run command.
Type appwiz.cpl in the dialog box and press Enter.
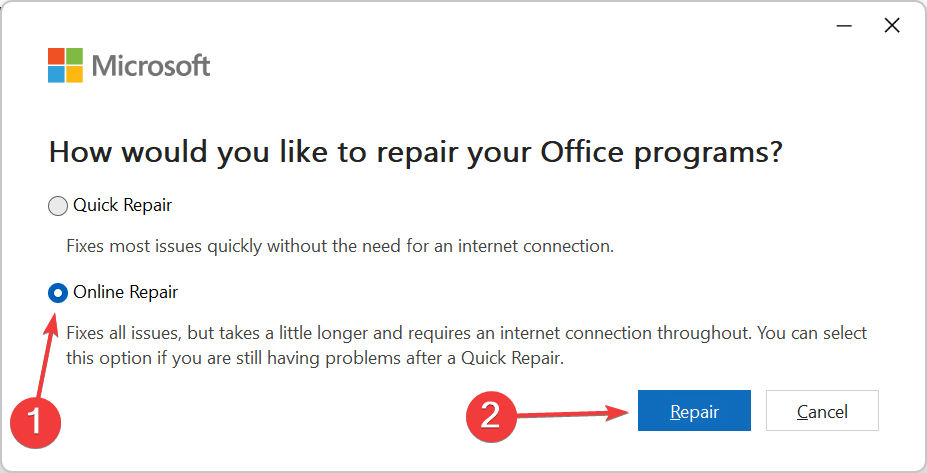
Select your Microsoft Office suite software. Then, click the Change button to open a repair utility for MS Office.
Select the Online Repair option and click the Repair button.
3. Start the associated program in Safe Mode
Hit the WindowsSearch icon, type outlook.exe /safe in the search bar, and click Open.
Try opening the app again and check whether the problem persists.
Since Outlook is the associated Office app that kept bringing up the error 0x0000142, we chose to run it in Safe Mode to see if it would work.
4. Reinstall Microsoft Office
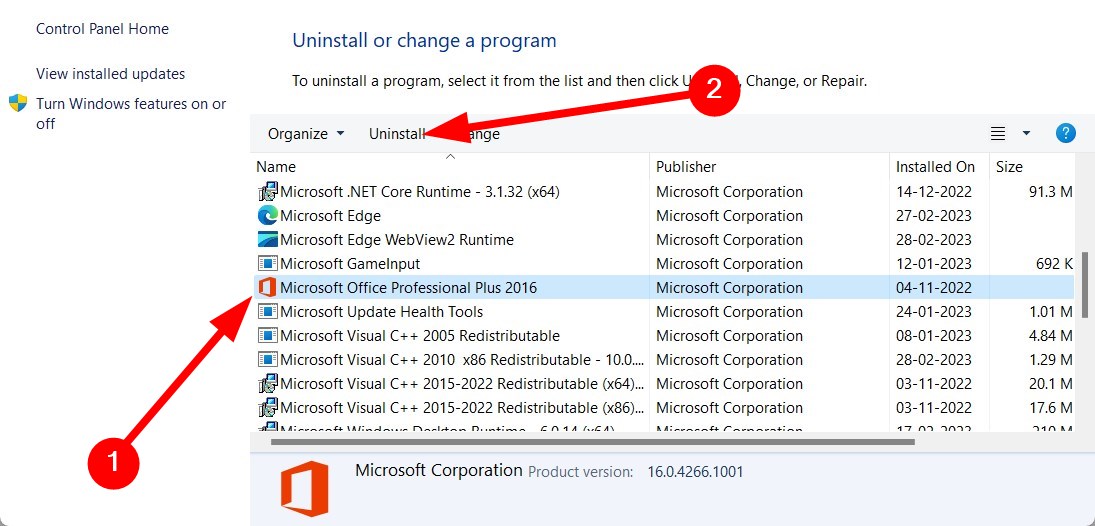
Hit the Windows key, type Control Panel in the search bar, and click Open.
Click on Uninstall a program under Programs.
Find your MS Office suite software and clickUninstall to remove the software.
Restart Windows after you’ve uninstalled MS Office.
Also, do a clean sweep by removing any software leftovers. These files are often problematic and downloading the app again will present the same problems if not removed.
Hit the Windows key, type msconfig, and open System Configuration.
Switch to the Services tab and select Hide all Microsoft services.
Click on the Disable all button, then hit the Apply button to save the changes.
Go back and click on the Startup tab, select Open Task Manager then click OK.
In the Startup tab of the Task Manager, Disable all the Enabled startup items.
Close Task Manager and restart your PC.
Hopefully, at this stage, you have resolved the error 0x0000142. In case Office is having temporary server issues, we have a few tricks up our sleeves that could fix this issue for you.
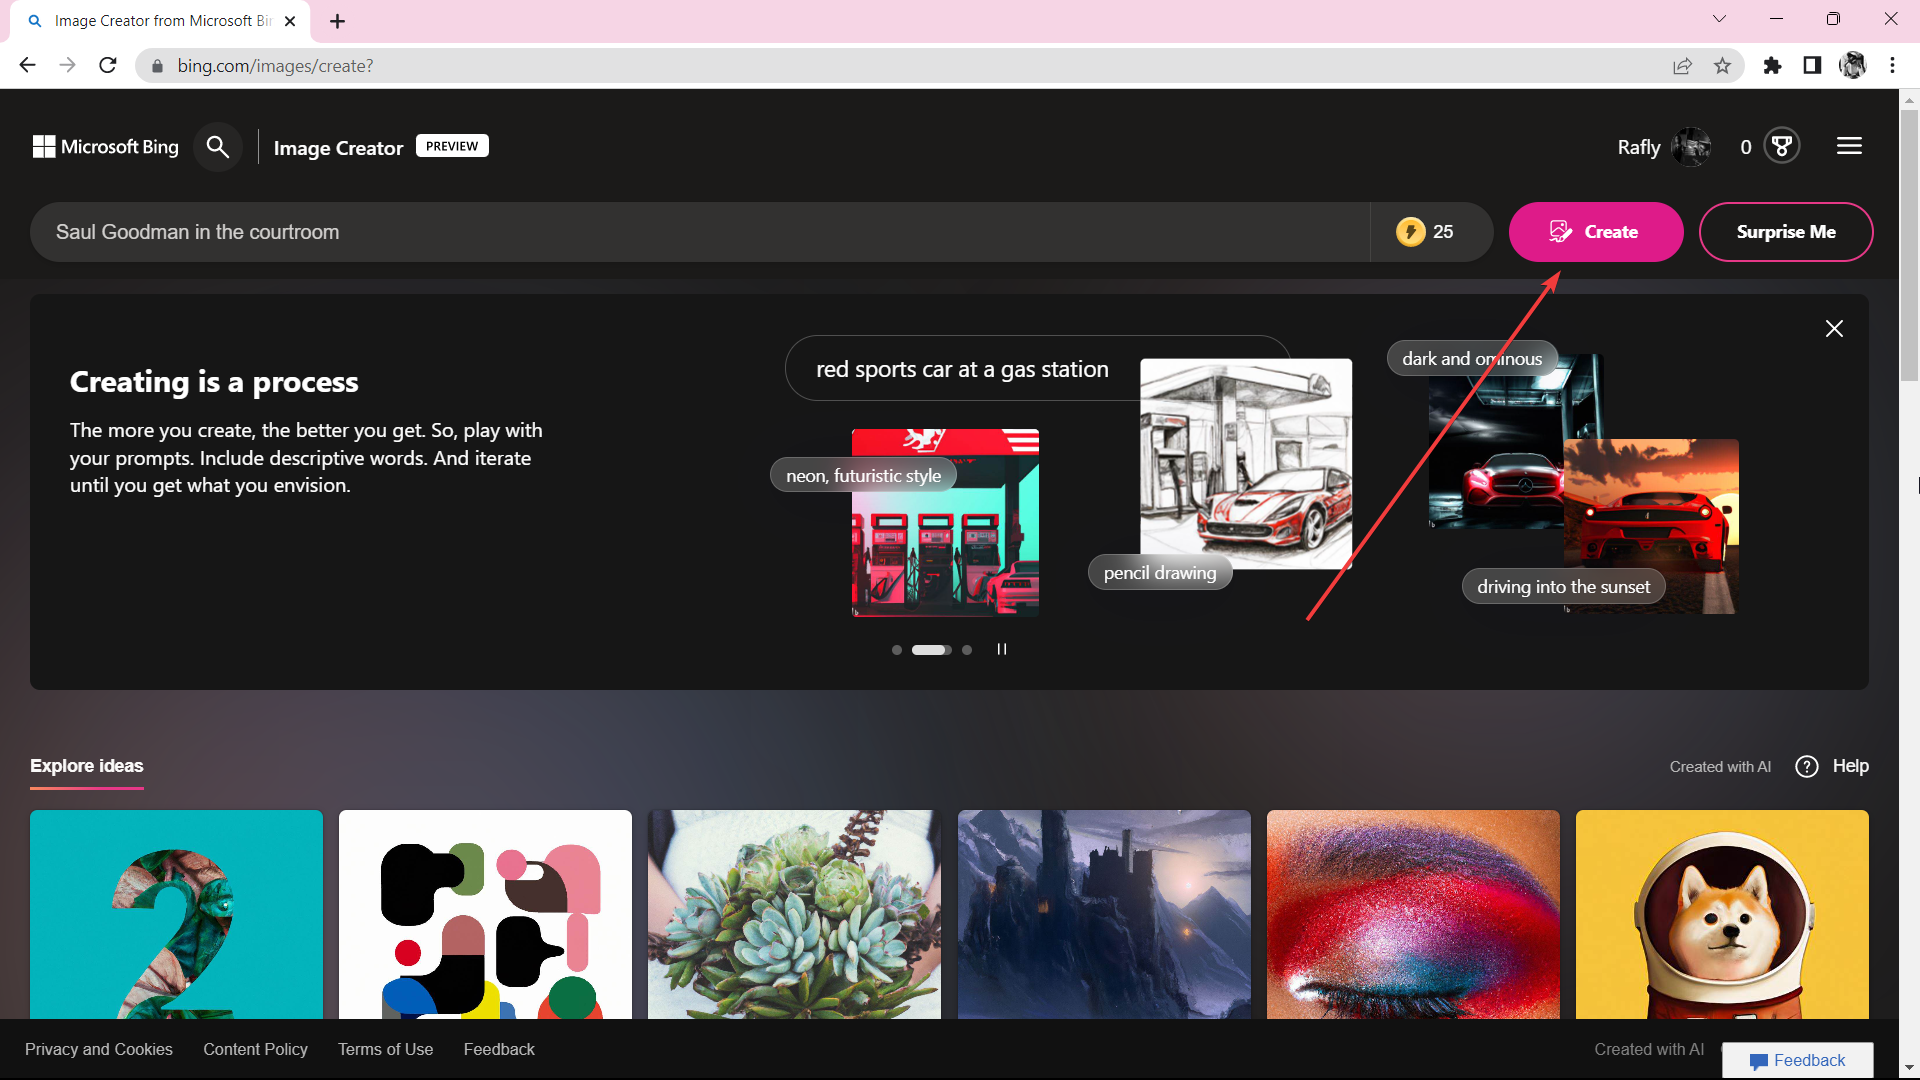
After integrating GPT-4 into its AI-powered Bing and bringing the technology to Office 365 users, Microsoft takes OpenAI’s DALL-E image creator neural network to the chatbot. Now, you can create image, artwork, or any visual using AI-powered Bing.
Initially launched in 2021, the 12-billion parameter version of GPT-3 can create images from texts. And, just like how it’s done on ChatGPT, you can ask Bing Image Creator to create any visual using word prompts.
By typing in a description of an image, providing additional context like location or activity, and choosing an art style, Image Creator will generate an image from your own imagination.
On top of that, you can also add any type of art you want the AI to generate, like impressionism, abstract, surrealism, or realism.
The feature is now available on Bing’s Creative Mode before being fully integrated into its AI-powered chatbot. Most images come under 1024 × 1024 resolution with options to download, share, and give feedback.
It’s like your creative copilot. Just type something like “draw an image” or “create an image” as a prompt in chat to get creating a visual for a newsletter to friends or as inspiration for redecorating your living room.
The feature is also living comfortably in Microsoft’s built-in browser, Edge, which has begun rolling out for several select insiders. Upon its availability, you’ll see a button to create images on your sidebar.
The tool also limits users to only submit one prompt at a time per user, and you have to wait a little longer before submitting another one. There’s also a ‘boost’ option to fasten up the artwork-generating process, but each user only gets 10 Boosts at a time.
You’ll need to log into your Microsoft account to do so. It does work perfectly on other browsers like Chrome, but it doesn’t run on incognito windows.
3. Enter your Microsoft account’s email and password.
4. Type the prompts that you want to create, then hit Create.
While the excitement around its promise has been outstanding, especially since Microsoft propelled the success of ChatGPT to a whole new level, Redmond officials are also working closely to tighten up the image creator’s safety measures to limit harmful and unsafe usages.
Stable Diffusion is also a popular alternative to Bing AI, but it has its share of issues, and we wrote about the Stable Diffusion model failed to load error in a separate guide, so don’t miss it.
What do you think about this addition? Let us know in the comments!
If you experience Kaspersky high CPU usage, do not worry as we have compiled some steps to reduce it efficiently in this article to enable your PC to run smoothly without crashing.
What causes high CPU usage in Kaspersky?
There can be several reasons why you are experiencing the Kaspersky high CPU usage error on your Windows PC. Below are some of the possible reasons:
Scanning large files or directories – Kaspersky’s antivirus software conducts periodic scans of your system to detect and remove malware. If it encounters a large file or directory during a scan, it may consume a lot of CPU resources and slow down your system.
Real-time protection – Kaspersky’s real-time protection feature constantly monitors your system for any malicious activity. This continuous monitoring can increase CPU usage, especially if there are a lot of applications running at the same time.
Outdated Application – If your Kaspersky application is outdated, it may not be optimized to work efficiently on your system. This can therefore cause higher CPU usage and slow down your computer.
Conflicts with other software – Kaspersky may conflict with other programs on your system, causing higher CPU usage. This is particularly true if you have multiple antivirus programs installed on your computer.
Malware infection – If your system is infected with malware, it may cause high CPU usage as the malware tries to replicate and spread across your system. You should try out one of the best antivirus software to fix the issue.
Hardware issues – Finally, high CPU usage in Kaspersky may be caused by hardware issues such as overheating or a failing CPU. These issues can cause your system to slow down and Kaspersky’s antivirus software to use more CPU resources.
Now that you know some of the possible reasons behind the Kaspersky high CPU usage error, let us proceed to how you can reduce it efficiently too.
How can I fix Kaspersky high CPU usage?
Before trying any of the advanced troubleshooting or settings tweaks for the Kaspersky high CPU usage error, try to perform the following preliminary checks:
Use one of the best antivirus software to detect and get rid of malware infections.
Update your Kaspersky application.
If after attempting the above checks, the issue persists, you can explore the advanced solutions provided below.
1. Restart your PC
Click the Start button from the taskbar.
Select the Power button and choose Restart from the pop-up that appears.
You can fix a lot of software problems by merely restarting your PC. Even on a normal day, you should reboot your PC, check if the antivirus is properly running or not and turn this into a habit at least once per week. That will help keep your PC at its best state.
2. Manually disable background applications
Right-click on the Start menu and open Task Manager.
Click on the Startup tab. Select every program that you don’t need to start alongside Windows and click the Disable button.
Now, close Task Manager, type msconfig in the Windows Search bar and open System Configuration.
Next, click on the Services tab, check the box with Hide all Microsoft services, and click the Disable button.
Finally, restart your PC.
Even when you are not using some programs, they continue to run in the background and use CPU resources.
By stopping these programs from launching automatically, you can reduce CPU consumption and resolve the Kaspersky high CPU usage issue.
Install the software afresh, and this may help resolve the high CPU usage issue. Alternatively, you can explore our detailed guide on how to reduce high CPU usage on Windows 11 PC.
And that’s it on how to fix the Kaspersky high CPU usage issue. If you have any questions or suggestions, do not hesitate to use the comments section below.
Some of our readers have recently reported that their Spotify keeps crashing on Windows 10 and 11 PC and they don’t know what to do if the error persists.
If you’re experiencing similar issues, do not worry as we have compiled some potential fixes to apply to get your Spotify working properly.
Why is Spotify crashing on my PC?
There can be several reasons why users are experiencing Spotify keeps crashing on either Windows 10 or Windows 11. Below are some of the possible reasons:
Corrupted or outdated software – If your version of Spotify is outdated or there are updates available for your operating system, this could cause the app to crash. Be sure to check for updates regularly.
Corrupted system files – Sometimes, files within the Spotify application can become corrupted, causing issues with the program. Try using some of the dedicated tools to fix the issue.
Conflicts with other programs – If you have other programs running in the background that are conflicting with Spotify, this can cause crashes. Try closing other programs or use the uninstaller software to see if this resolves the issue.
Firewall or antivirus settings – Sometimes, firewall or antivirus settings can interfere with Spotify’s ability to run properly. Try adjusting your settings to allow Spotify to run without interference.
Hardware issues – If your computer’s hardware is faulty or outdated, this can cause issues with running Spotify. Check your computer’s specifications to ensure they meet the minimum requirements for running Spotify.
Network connectivity issues – If you are experiencing network connectivity issues, this can cause Spotify to crash. Try resetting your router or modem, or check with your internet service provider to see if there are any known issues in your area.
These are just a few possible reasons why Spotify may be crashing on your Windows 10 or 11 PC. Let’s proceed to how to fix the issue seamlessly.
How can I fix Spotify if it keeps crashing?
Before engaging in any advanced troubleshooting, you should perform the following preparatory checks:
Visit the Downdetector website to check Spotify’s server status and user reports.
Ensure that you are running the latest version of Spotify.
Disable your antivirus software.
Make sure you are properly connected to the Internet.
Ensure that your PC meets the minimum requirements for the app.
Restart your PC.
Having confirmed the above checks and if you still require further assistance, work your way through any of the steps provided below to fix the issue on Windows 10 and 11 PC.
1. Force quit Spotify and restart it
Right-click on the Start button and select Task Manager.
Then, navigate to the Processes tab, locate Spotify, right-click on it, and choose End task.
Now, open Spotify and check if the problem is fixed.
When Spotify keeps crashing, try closing the app completely through force-quitting and then launching it again.
2. Run Spotify as an Administrator
Right-click the Spotify icon on your desktop and select Run as administrator.
Then, click on Yes if the User Account Control prompt comes up to let the app make changes to your PC.
Running an application as an administrator gives you completely unrestricted access to all of its components. Therefore, this method can potentially fix the issue of Spotify crashing on Windows.
3. Run Spotify in Compatibility Mode
Click on the Start button and type Spotify in the search box and select Properties.
In the next pop-up, select Compatibility. Tick the checkbox for Run this program in compatibility mode and select an older Windows version.
Finally, click OK to close the pop-up and apply the changes.
Running Spotify in compatibility mode for an older version of Windows can help fix the issue. Make sure to try Windows 7 and 8 only, as those are the most likely to work.
4. Clear Spotify’s cache
Press the Windows + R keys to open the Run dialog box. Paste the following %LocalAppData%\Spotify\Storage\, and press Enter.
Press the Ctrl + A keys to select all the files and press the Shift + delete keys.
A pop-up will appear asking if you want to permanently delete the files in the folder, click Yes.
The Spotify app on Windows 11 can build up a large cache and use it over time. Clearing it can help improve its performance and also prevent it from crashing.
If you are facing issues like Spotify error code auth 74, we recommend you read this guide to find solutions.
5. Troubleshoot Spotify
Press the Windows key + I to open the Settings app.
Then, navigate to System, Troubleshoot, and Other troubleshooters.
Locate Windows Store Apps and click the Run button next to it.
Wait till the troubleshooting process is complete and then implement any suggested solutions. It will also apply some fixes automatically.
However, do note that this method only works if you downloaded Spotify from the Windows Store. The apps troubleshooter will inspect your apps and help you fix any problems it finds.
6. Disable Hardware Acceleration
Open the Spotify app, click the Username on the top right, and choose Settings.
Then, scroll down to the Compatibility section in the settings and turn off the toggle for Enable hardware acceleration.
The hardware acceleration option in the Spotify app is known to cause a few issues, as reported by many users in Spotify online forums.
And that’s it on how to fix the Spotify keeps crashing on Windows 10 and 11 PC errors. Alternatively, users can also check our detailed guide on what to do if Spotify is not working on Windows 11.
If you have any questions or suggestions, do not hesitate to use the comments section below.
The HTTP2 network protocol allows users to access websites faster. It was developed to replace HTTP. However, the protocol sometimes displays the err_http2_protocol_error.
The issue is pretty standard and affects a lot of Windows users. If you’re currently experiencing the err_http2_protocol error, this article will provide steps to resolve it.
What is ERR_HTTP2_PROTOCOL_ERROR?
The err_http2_protocol error occurs when a user attempts to visit a website, but the web request is unsuccessful, which then displays the HTTP2 error code.
The error can be attributed to a string of issues reported in all famous browsers like Chrome or Firefox.
Unlike most browser errors, the err_http2_protocol error is known to occur on both the client and server sides and is also found in different operating systems like Windows, Linux, Mac, etc.
What causes ERR_HTTP2_PROTOCOL_ERROR?
The following are some of the most common causes of the err_http2_protocol error:
Outdated Browser – If you’re running an outdated version of your browser, you’ll experience a series of compatibility issues. The server will find it hard to parse data packets sent from an incompatible browser and thus refuse any further connection.
Conflicting Browser Extensions – Sometimes, the err_http2_protocol error can be triggered due to internal conflicts between browser extensions. Third-party extensions installed on your PC can interfere with client-server communication, leading to the err_http2_protocol error.
Corrupt Browser Cookies – If the browser cookies, cache or history is corrupt, the data packets relayed by the client to the server might fail to authenticate the device’s legitimacy. When this happens, the server will refuse the connection with the client.
Outdated OS – If your system’s operating system is outdated, it can lead to incompatibility issues with third-party applications like your browser.
In order to solve this issue in a clever way, we advise you to consider a sleek browser such as Opera.
With its enhanced navigation and stability, every user can surf the web without any HTTPS errors or privacy issues due to its enhanced security or VPN protection.
Opera
Navigate freely on this new-age browser and avoid any unpleasant issues.
Before we proceed with more advanced solutions, here are a couple of quick fixes you can attempt:
Restart your PC.
Close and Relaunch your browser.
Fix network congestion.
If the error persists after attempting the above fixes, here are advanced troubleshooting techniques you can try:
1. Update your Browser to the Latest Version
Press the Windows key, type in Chrome, and hit Enter.
Click on the three vertical ellipses, hover over the Help option, and click on About Google Chrome.
In the next window, click on Update Chrome on the right pane. If there is no update button, it means Chrome is running the latest version.
Click Relaunch after the update and check if the error persists.
2. Run Windows Update
Press the Windows key + I to open the Settings app.
Select Windows Update and click Check for Updates on the right pane.
Wait for Windows to scan for available updates. If there are available updates, click on Download to install them.
Once the updates are installed, click the Restart now button to restart your PC.
Updating your PC is a sure way to troubleshoot any issues affecting the apps on it.
3. Set the correct Date and time
While on your Desktop, right-click on the Clock in the system tray, and select Adjust Date and Time.
Click the Set Time Automatically toggle button in the next window to disable the feature.
While in the window, locate the Time Zone option and click the Change button in front of the Set the Date and Time manually option.
Set the correct date and time in the menu and click on Change.
Restart your PC and check to see if the err_http2_protocol error is resolved.
If the device’s date and time are not correct, you could trigger a series of browser errors like the err_http2_protocol error.
This is because wrongly time-stamped data packets may be refused by the host and thus trigger the issue. To prevent this, you’ll need to correctly adjust the date and time on your device.
Press the Windows key, type in Google Chrome, and hit Enter.
Click the Extension icon next to the address bar at the window’s top-right corner.
Select Manage Extensions, click on any extensions you wish to disable and turn the toggle switch off.
Repeat the above step until you’ve entirely removed all unnecessary extensions and restart your PC.
Extensions are very useful tools that serve a unique purpose depending on the extension type. However, certain third-party extensions can conflict with the regular operations of Windows. In such cases, you’ll need to uninstall such extensions.
Google Chrome is one of the best browsers on Windows. However, the browser is known to be very resource hungry. To this effect, Google released the memory saver feature to help free up space.
This article will briefly overview the Chrome memory saver and the steps to enable the feature.
What is Chrome memory saver?
Chrome memory saver is a feature designed by Google to help free up space while using the app.
If you have a bunch of tabs opened up which are currently inactive, the memory saver feature swoops in and hibernates such tabs, thereby freeing up memory so you can browse other websites.
The feature is handy for memory-intensive activities like video editing or gaming. Once the memory saver feature is enabled, inactive tabs will be hibernated and only refreshed when needed.
How can I enable the memory saver in Chrome?
It’s important to note that the memory saver feature is not available in all versions of Chrome. However, here are the steps to enable memory saver in Chrome:
Press the Windows key, type in Chrome, and hit Enter.
In the search bar, type in chrome://flags and hit Enter.
In the Search Flags search box, type in efficiency, and select Enabled from the dropdown next to the Enable the high-efficiency mode feature in the Settings option.
Click the Relaunch button at the bottom right corner to refresh the window.
Once you’ve enabled the High-Efficiency Mode, proceed with the following steps:
In the Chrome window, click on the three vertical ellipses at the window’s top right corner, and select Settings.
In the next window, click on Performance on the left pane. Click and enable the Memory Saver toggle.
Close the Settings tab.
Once done, Chrome will automatically free up memory from inactive tabs. This will help free up space for the active tabs to run efficiently.
In some cases, you’ll want to enable the memory saver feature but exclude specific sites from being included in the memory saving.
To do this:
While in the Memory Saver section, click the Add button next to the Always keep these sites active option.
Type in the website URL in the window that appears, and click the Add button.
Once you’ve added the website to this list, it’ll be automatically excluded from any of the memory saver’s functionalities.
The Memory Saver feature helps free up space while using the Chrome browser. It’s a handy feature that can help smoothen your browsing experience.
By the end of this article, you should be able to enable and disable the memory saver feature in Chrome. You can also learn how to disable Google Lens during image search.
Overwatch is one of the most CPU-intensive games available today. The game requires PCs with very decent specs. However, even with such specs, you may notice high CPU usage in Overwatch.
High CPU usage is good, but abnormally high CPU usage can cause the computer to freeze or crash. In this article, we’ll briefly discuss the causes of high CPU usage in overwatch and proffer steps to help resolve the issue.
What causes high CPU usage in Overwatch?
The following are some of the common causes of high CPU usage in Overwatch:
CPU Intensive App – One of the most obvious reasons you’re experiencing high CPU usage in Overwatch is that the game is CPU intensive. As a result, you’re bound to experience high CPU usage while running the game.
Too Many Background Processes – If your PC has too many running background processes, it takes up significant memory for processing essential tasks. Gradually, your PC will run out of available RAM which can lead to high CPU usage.
Overclocked Hardware – Overclocking is one of the most common practices by heavy gamers. It helps improve your PC’s speeds and processing power by increasing the components’ clock rate. However, overclocking has a few disadvantages, like overheating, damaged processors, etc.
System Requirement – Most modern games require systems to meet a minimum system requirement to run the game optimally. If your PC doesn’t meet the minimum system requirements for Overwatch, you’ll often experience high CPU usage while playing the game.
How can I fix the high CPU usage in Overwatch?
Before we proceed with more advanced troubleshooting solutions, here are a couple of quick fixes you can try:
Close and restart Overwatch.
Restart your PC.
If the error persists after applying those quick fixes, here are more advanced solutions you can attempt:
1. Close all unnecessary background processes
Press the Windows key + R, type in msconfig, and hit Enter.
In the popup window, navigate to the Services tab, check the option of Hide all Microsoft Services, and click Disable All.
Navigate to the Startup tab, and click the Open Task Manager link.
In the Task Manager window, right-click on any Process that’s taking up too much memory, and select End task.
Repeat the above step until you’ve successfully closed all unnecessary background applications.
Memory-intensive games like Overwatch use up a lot of memory and processing power. If your PC is running low on RAM or memory, you’ll experience extremely high CPU usage which can lead to a system crash.
2. Disable Power Preservers
Press the Windows key, type in Control Panel, and hit Enter.
In the Control Panel, click on the Power Options tab.
In the next window, select High Performance on the right pane.
Close the Control Panel, and restart your PC to check if the error is resolved.
The Power Preserver is a handy Windows utility that can help you conserve your PC’s battery life. However, it does this at the expense of your PC’s performance and speed. If you’d like to run your PC at optimal capacity, you should switch off the Power preserver.
This error prevents your PC from updating drivers. Be sure to read our guide on how to resolve it.
Yet, in order to manage all the drivers securely and update them fast, it’s advisable to use application software that will detect outdated drivers and install their latest version as we speak.
Overwatch, like most modern games, is memory and CPU-intensive. Ensuring that your PC meets the minimum system requirements before running such games is essential. This is because excessively high CPU usage can lead to a series of hardware problems for your PC.
If you’ve been experiencing high CPU usage while playing Overwatch, we hope the four steps outlined above will help you get your PC back to normal.
The NET START command is a built-in command in Windows that can be used to start and stop services and other programs. Sometimes, when running this command, you may encounter a Net Helpmsg 2186 error.
Most users who encountered this error were trying to restart the Windows Update Service by running the NET START WUAUSERV command. If the Windows Update service is disabled or not running, your system may be at risk because you can’t get the latest updates.
Let’s explore in detail why this error occurs and how to bypass it. Shall we?
What is error 2186?
The Windows Update service helps protect your computer by installing the latest critical updates and security features. You can use the net start command to start the Windows Update service if it is disabled or has stopped responding.
If you have recently shut down or restarted your computer, the Windows Update Services service may have stopped running. You will need to restart it. To do this, you will need to run a command. When running the command, the net helpmsg 2186 comes in.
Users are getting a message that reads The service is not responding to the control function. More help is available by typing NET HELPMSG 2186.
So why is the service not responding? Below are some possible causes:
Outdated antivirus software – Your antivirus software may not be up-to-date and fails to recognize the update files as safe.
Missing or corrupted Windows Update files – If you have recently installed any software or hardware on your computer, it may have corrupted some of the Windows Update files.
Corrupt profile – The user profile is where Windows stores all your settings and other data. If this gets corrupted, it can cause many problems, including this one.
How can I fix the Net helpmsg 2186 error?
Try the following basic workarounds before the more technical solutions:
Make sure that you have an active internet connection before attempting to run Windows Update. If you don’t have an active internet connection, Windows won’t be able to download any updates from Microsoft’s servers and install them on your computer.
Run Windows update as an administrator.
Create another profile and try running the command again. If you’re successful, it means your previous profile had been corrupted. You can take the necessary steps to repair the profile.
1. Run the System Maintenance troubleshooter
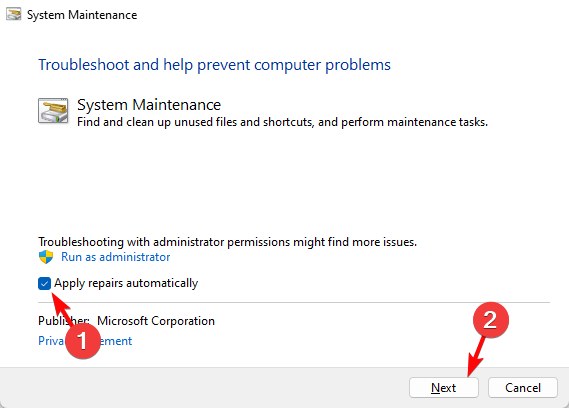
Hit the Search icon on the taskbar, type Perform recommended maintenance tasks automatically, and click Open.
Click on Advanced.
Select Apply repairs automatically, then click on Next.
2. Reset the Windows Update components
Hit the Windows key, type cmd in the search bar, and click Run as administrator.
Type the following commands and press Enter after each one: net stop bitsnet stop wuauservnet stop appidsvcnet stop cryptsvcDel "%ALLUSERSPROFILE%\Application Data\Microsoft\Network\Downloader\*.*"rmdir %systemroot%\SoftwareDistribution /S /Qrmdir %systemroot%\system32\catroot2 /S /Qregsvr32.exe /s atl.dllregsvr32.exe /s urlmon.dllregsvr32.exe /s mshtml.dllnetsh winsock resetnetsh winsock reset proxynet start bitsnet start wuauservnet start appidsvcnet start cryptsv
3. Perform a clean boot
Hit the Windows key, type msconfig, and open System Configuration.
Switch to the Services tab and select Hide all Microsoft services.
Click on the Disable all button, then hit the Apply button to save the changes.
Go back and click on the Startup tab, select Open Task Manager then click OK.
In the Startup tab of the Task Manager, Disable all the Enabled startup items.
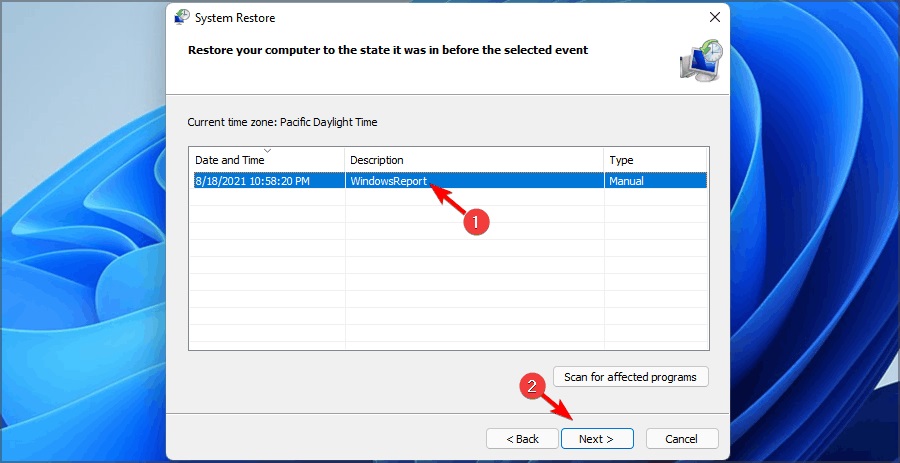
Press the Windows + R keys, type rstui, and hit Enter.
Select the restore point you wish to revert to and click on Next.
Now click on Finish.
Ensure you had created a restore point before rolling back otherwise, there’s no point in performing the System Restore.
Other related errors include net helpmsg 2185 and net helpmsg 2250. We have devised various ways to bypass them in our expert articles if you come across them.
And that brings us to the end of this article. If you have any other queries or related questions, feel free to leave them in the comment section below.
When you power up your PC, you expect to be taken to the login page. This way, you can get started on whatever activities you have planned for the day. Some users are unlucky as they are greeted with a blue screen with the error code 0xc000014c.
This type of BSoD error completely locks you out of your PC, and you’ll have to fix it before you can access anything. Stay put as we show you how to fix this error.
What causes error code 0xc000014c?
The error 0xc000014c is usually caused by a missing or corrupt file on your computer. If you have this error, it means that Windows cannot find some of the files required to load when it tries to boot.
The most likely reason is that something has changed on your computer, such as a new application, hardware being installed, or an update being applied. This change can cause Windows to detect an issue with the hard drive and try to correct it by creating a new boot file.
Other causes include:
New hardware – You may see this error if you have recently installed a new hardware device, such as a printer, and Windows cannot locate the appropriate drivers.
Bad sectors – If you have formed a habit of not turning off your PC properly, your hard drive can develop bad sectors over time and eventually cause the error 0xc000014.
Corrupt system files – Error code 0xc000014c can also occur if your computer cannot find its essential system files.
Missing BCD – BCD files contain information about the operating system and its configuration. If any of these is corrupted or missing, Windows will not start properly.
How do I fix error 0xc000014c?
Try the following before you move on to the complex solutions:
Enter Safe Mode and uninstall any recent apps that may be causing the issue.
Still in Safe Mode, run a CHKDSK scan to see if there are any errors in your hard drive.
1. Run the SFC scan
Select the Windows key and press the Power button. Click on Restart to start the troubleshooting via the Advanced Startup option.
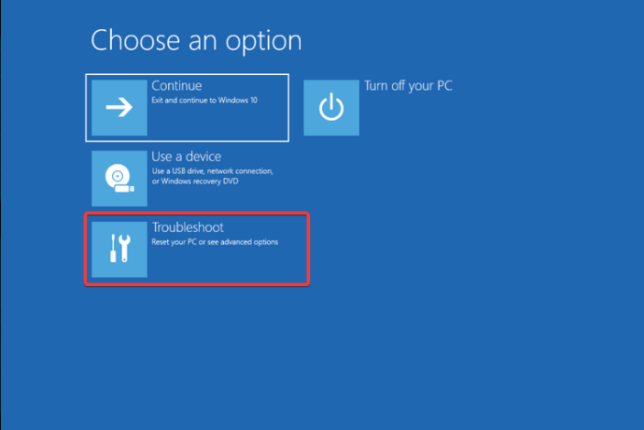
A new window will appear with a set of options. Select Troubleshoot.
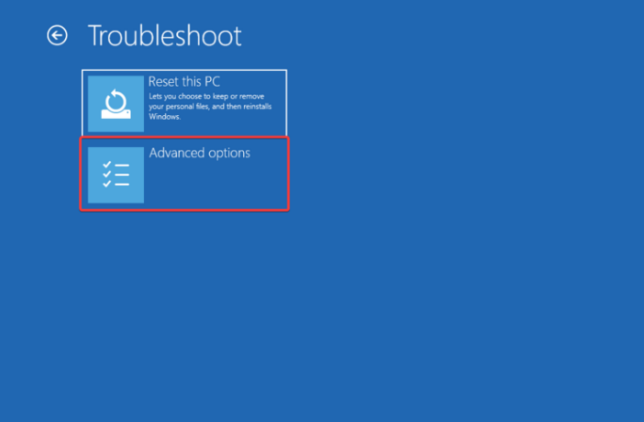
Select Advanced options.
Next, select Command Prompt.
Type in the following command and hit Enter: sfc /scannow
This Windows process may seem too tricky for some users, and you can choose to scan and repair your PC issues with a dedicated solution that will entirely diagnose your PC and fix missing system files, and resolve booting issues such as the 0xc000014c error code.
Still in the Windows Recovery Environment, click on Troubleshoot.
Click on Advanced options.
Next, select System Restore.
Select a point of return from the options listed, then click Next.
A System Restore is an attempt to revert your computer to a known good backup that was created before you started experiencing issues. This will not only fix the error but also restore other system files that may have been affected by the corruption.
That’s why it is advisable to always create a restore point before making major changes to your computer or installing new software or hardware.
In the future, you need to pay closer attention to how you shut down your PC, the type of software you install, and any new hardware changes. For unexpected shutdowns, you can get a UPS to protect your PC from power surge-related issues.
As for software, having a comprehensive antivirus solution will do you some good in keeping malware at bay. Hardware changes should be left to the experts. You can also consult your manufacturer for the perfect match if one of your hardware components fails.
That brings us to a close for this article, but let us know of any other solutions that may have assisted you but not mentioned above.
To install software on Windows, you need to download an installer on your computer. There are two most popular installation file formats .exe and .msi. Both formats serve the same purpose of installing software. However, a few differences make one better than the other in certain scenarios.
In this guide, we will compare the EXE file vs the MSI file side by side, explain their differences, and which to choose in what scenario. Let’s start!
What is an .EXE file?
.EXE is an executable file that can be run on your computer to install or launch a program. It is a self-extracting archive with the necessary files and instructions to install the software on your computer.
EXE files can be easily downloaded from the internet or installed using a storage device. To execute the file, you need to double-click it, and it will extract the essential files and launch the installation wizard.
What is an .MSI file?
MSI stands for Microsoft Installer (now called Windows Installer Package), a file format developed by Microsoft for installing software on Windows OS. These are database files with necessary information about software, including program files, registry keys, and settings.
They offer customized installation options suitable for enterprise environments where software deployment needs to be automated & centrally managed. Software developers use them to create and distribute software packages that can be installed on different Windows machines.
What are the differences between EXE and MSI files?
1. Installation process
The installation process of EXE and MSI files is similar. Both launch the installation wizard when initiated, guiding you through the installation process.
However, MSI files come with customizable options that are easier to automate for large-scale deployments.
2. Installation location
EXE files can be installed anywhere on your computer, including C drive, desktop, or any other location you choose.
However, the MSI file is typically installed using predefined paths specified in the package, and a copy of the installation database may be stored in the Windows Installer cache for future repair or uninstallation.
3. Installation options
Unlike EXE files, MSI files come with many customization options, such as selecting which program components to install, creating desktop shortcuts, or adding the program to the Start menu.
4. Software dependencies
EXE files can be standalone, but many still require dependencies like .NET Framework or Visual C++ Redistributables to run properly. Similarly, MSI files may depend on specific system components or libraries as they rely on Windows Installer services.
Regardless of format, installers often bundle or prompt installation of required components to ensure successful deployment.
Programs installed via EXE or MSI can both appear in the Programs & Features list in Windows. However, MSI-based installs offer more consistent support for uninstallation, repair, and modification using built-in Windows Installer services.
This makes MSI packages especially useful in enterprise environments where clean removal and self-repair options are important.
6. Customizability
MSI files can be modified using several tools and technologies to include custom installation options, including choosing the software’s features, registry keys to change, or files to install or delete.
On the other hand, EXE files are generally preconfigured by the software vendor and can’t be easily modified.
7. Automation
MSI files are designed for automated software deployment and management. These files can be installed on multiple computers without user interaction; therefore useful for large-scale software deployments.
However, EXE files require user interaction to install and configure software on a Windows computer.
8. Security
Both MSI and EXE files can and should be digitally signed to verify authenticity and ensure the file hasn’t been tampered with. The signing process is identical for both formats and depends entirely on the developer’s implementation.
Unsigned files—regardless of format—pose a security risk. Always check for digital signatures before running any installer.
9. Size
MSI files contain more information & metadata about the software, including configuration data, dependencies, and installation options; hence are larger.
However, EXE files only contain the executable code and necessary resources for a software application.
.EXE file vs .MSI file: Which is better?
There can’t be one answer to this question, as choosing the file format depends on the needs and specific requirements of the installed software. Here are a few scenarios which can help you understand better:
If you installing software that needs customization during installation, an MSI file is better as it comes with various customization options.
If installing software that needs to be managed centrally across several computers in an organization, then you need an MSI file. You can use software deployment tools such as Group Policy to manage them.
An EXE file is better if you use the software on a personal computer as it is less complex and easy to install.
To conclude, upon comparing the EXE file vs MSI file, it is evident that choosing one has its benefits or disadvantages. EXE file is useful for a single computer, whereas an MSI file is preferred for deploying software on multiple computers.
So, the choice depends on the software requirements you want to install.
Which one would you prefer and why? Feel free to share your thoughts on this in the comments section below.
Microsoft has just released an update for PowerToys bumping it to version 0.69. The new update features a new utility, the long-awaited Registry Preview tool that’s designed to help advanced users preview the impact of importing a .reg file into the registry, along with registry editing options.
Thanks to this new addition to the platform, users will no longer have to rely on external software like Notepad to make edits and adjustments through .reg files. The update also features a fix for the crashing issue caused by thumbnail image loading as well as support for per-user scope installation.
Additionally, the update also features a ton of fixes as well as improvements. Be sure to check out the full changelog over at GitHub’s repository.
If you already have PowerToys running on your device, it should automatically notify you of this update. Alternatively, you can get this update today by launching your app, then clicking on General followed by the Check for Updates, and then the Install Now button.
Microsoft just rolled out a nice update for Edge users. Now live on the Canary channel for select insiders, a feature to strictly block autoplay videos from playing is now available.
We have heard your requests for strict blocking of media autoplay, and we are excited to share it is now available! Edge Canary now has a new autoplay setting, Block, this allows you to stop all media on a site from automatically playing.
With that said, however, being an insider-only feature means that Redmond officials only roll it out for several select insiders. Even if you’re in the Canary channel, that doesn’t always mean that your PC gets this update.
However, there’s still an option to limit it that’s been living in Edge’s settings for ages. It may not be as strict as what Microsoft is testing among insiders, but it still counts for something.
If you’re still curious, here’s how you can block autoplay videos on Microsoft Edge.
How to block autoplay videos on Microsoft Edge
1. Open your Edge browser.
2. Type edge://settings/content/mediaAutoplay in the address bar.
3. Make sure the option stays on Limit.
As noted from their blog post, Microsoft promises that the feature will be rolling out for general users in the coming weeks, but we will keep you updated once it’s out.
In the meantime, if you’re having a problem with the black screen on Edge, we’ve prepared a simple guide you can try.
What do you think about this feature to block autoplay videos on Edge? Let us know in the comments!
The taskbar allows you to easily access minimized programs and bring them back to the screen. Sadly, our readers complain about programs not maximizing from the taskbar on Windows 11 for some reason.
Why won’t the program maximize from the taskbar on Windows 11?
Some notable factors that can cause the program not to maximize from the taskbar are:
Display resolution issues – If your display resolution is beyond the PC’s original screen dimensions, the taskbar may be unable to resolve maximizing programs.
Corrupt system files – The issue may occur if important taskbar-related system files are missing, causing problems with their interactions with your programs. Also, corrupt system files can cause the taskbar not to work.
Viruses and malware – You can experience difficulty maximizing apps from your taskbar due to the impact of viruses and malware on the computer.
Faulty File Explorer – Programs not maximizing from the taskbar on Windows 11 can also occur if File Explorer isn’t working correctly. It affects the processes and tasks running in the taskbar and can cause it to be unresponsive.
As we go further into this article, we’ll discuss steps to fix the issue and get your taskbar working again.
What can I do if programs won’t maximize from the taskbar?
Left-click the Start button, type the command prompt, and select Run as administrator.
Click Yes on the User Account Control prompt.
Type the following and press Enter: sfc /scannow
Restart your PC and check if it can maximize from the taskbar.
The System File Checker scan will check and remove corrupt system files affecting performance. Check our article about what to do if you have corrupt system files on Windows 11.
4. End tasks for File Explorer processes on your PC
Press Windows + R key to open the Run dialog box, type taskmgr.exe, and click OK to open Task Manager.
Find File Explorer, right-click it, then select End Task from the drop-down menu.
Click on File from the taskbar and select Run new task from the menu.
Type explorer.exe and click OK to restart the File Explorer process on your PC.
Check if you can maximize your program from the taskbar.
Restarting the File Explorer processes will stop background activities affecting the taskbar.
For a clearer understanding of how window controls work and how to restore or resize apps properly, see our complete guide on how to minimize and maximize windows in Windows.
The best USB block software tools cut access to your USB ports to ensure that you will be protected from USB flash drives infected with malware.
Considering the risks of external drives that may come in contact with your computer, securing USB activity it’s a conscious decision. Not to say you can benefit from data leakage prevention right away.
Plus, it’s not enough to take into consideration only USB drives, but use blocking services too for external hard drives or CD/DVD drives. Thus any removable device won’t be a risk for the system.
Some software solutions also come with password protection for USB port block settings. Others provide the opportunity of keeping the USB port read-only.
It’s useful to have such a tool because USB Flash drives are one of the most significant potential threats to your system.
Unsafe and unchecked USB drives could carry all kinds of malware and viruses that could have a severe impact on your system. USB port block programs offer enhanced protection from undesired data transfer as well.
Blocking your USB ports is best done via USB control software, and few are as efficient as Device Control Plus since it offers you all the tools you may ever need to gain better control over your USB-based removable media.
Besides being able to scan and limit the access of USB devices to your content thanks to the zero-trust approach, Device Control Plus can also block them entirely, so you don’t have to block a USB port.
However, if that is unavoidable, Device Control Plus can fully or partially block access to a USB port, with this being changeable later on without much headaches on the user’s part.
Other important points include data loss in case of undesirable attacks. With this solution, its likely to monitor and block dangerous attempts using removable devices like USB.
Therefore, you can set read-only access for new devices, block copying of files, limit data transfer, and more to go.
Above all, large-scale industries and companies are at risk regarding data leakage, thus anyone should take action to prevent malware or cyberattacks through transferable devices.
Focus features:
Identifies devices that attempt to access your PC
Facilitates access to authorized devices
Limits USB-based malware attacks
Monitors device behavior
Device Control Plus
USB ports can be fully blocked to limit access to unauthorized removable media. Get Device Control Plus today!
GiliSoft USB Lock is the top USB block software solution for Windows PC. It’s feature-rich and incredibly intuitive.
With this solution, you can be relaxed regarding your confidential files and protect PC data from USB drives to avoid any information theft.
If you experienced data theft with USB flash drives you know how badly can be regarding your privacy. Thereby in these situations, anybody needs a solution like a USB drives block that prevents data leaks.
So, this software provides complex protection against data loss with USB drives, external drives, CD/DVD drives, and other portable devices. It can also hinder websites and applications to see and steal your online data.
However, you can create a whitelist option that allows you to copy files only to approved devices, in case of certain USB pen drives usage.
Gilisoft USB lock can block both USB and SD discs and includes copy protection features that prevent the copying of important files.
You can secure optical discs and prevent them from being read or getting burned by anyone without permission.
You can easily install it on any removable media device and protect it with a password. This way, if somebody would like to delete the application, they would have to provide a password.
Moreover, for increased protection of highly sensitive data, you can set up email alerts and get notified in real-time if someone tries to access the software with the wrong password.
Here are its highlights:
Invisible Mode lets the software run in the background without detection
Ability to see USB activity history
Can monitor all file operations on removable storage
Ability to view access history and the activity of whitelisted devices
Therefore, try this USB blocker software to safely protect your Windows 10 PC from external unwanted devices.
Gilisoft USB Lock
Prevent any information crime from your PC using this leading USB lock software.
By choosing this practical solution, you get to protect your PC against data loss by removable device attacks. So, it’s recommended to set up usernames and passcodes for devices that require access to your system.
More so, it’s necessary to use a single password to block and unblock USB ports every time, in that way improving the security of crucial data. It also works with all versions of Windows so any user can afford it.
Another essential feature allows you to protect more devices at once, and therefore block more USB ports. So you only have to install it on each PC to secure your data all over.
This program comes with a user-friendly interface, and even beginners can easily get the hang of it.
The tool can lock your ports so no one without permission is able to carry out any data on removable media.
You have to set up a password and enter it whenever you want to unblock and use your USB port.
The tool can block and unblock an unlimited number of USB ports, on multiple machines.
Other key features of Systools USB Blocker include:
Interactive User interface
Online usage guide
Lightweight
This tool is compatible with all Windows versions. You can get SysTools USB Blocker from the official website and see how it works. It has a free, limited version, and a premium version.
Systools USB Blocker
Provide effective protection for vulnerable systems using Systools software to block USB drives now.
NewSoftwares USB Block is one of the top USB block software tools. It prevents data leaks by restricting USB drives, external devices, and ports on your computer. You will be able to whitelist only your portable drives while blocking all the others.
So it’s highly required to secure confidential information from any devices, considering various data theft used to hack so many systems in order to crack high-value intel.
Using this theft-proof solution it’s incredibly simple to secure your data from removable devices able to infect the system.
Plus, it’s possible to monitor hacking attempts on your PC by checking when someone tries to access data on a USB Block. Hence, you could prevent such attacks from the very beginning.
Using this program, you can authorize trusted USB drives and devices. If an unauthorized device is detected, there’s a password prompt that comes up asking you to either whitelist the device or cancel the access.
Netsoftwares USB Block is able to secure and protect all your confidential files.
You can set up real-time notifications and be informed whenever someone attempts to access your USB with the wrong password.
The tool can also monitor hack attempts and prevent data leaks in companies and offices.
Other key features of Netsoftwares USB Block include:
Trusted USB drives and devices
Intuitive UI
Stealth mode
In conclusion, the lightweight program helps to manage and protect your PC in an intuitive manner by locking USB ports with ease.
This software is a premium-level tool, but you can try it out for free as it offers a limited free trial version.
If you’re looking for a USB block-free tool, try USB Disk Manager. It might be free and lightweight, but it’s still one of the best USB block software solutions ever made.
This utility offers a portable and very easy configurable solution to control USB disks more accurately on your PC. You’re able to disable USB drives anytime your need.
In terms of protection, this program can offer valuable features capable of high USB security and therefore prevent malicious attacks or spreading viruses between systems.
More exactly, you can write-protect USB drives, deny execution access from other devices, disable USB disks, and more to go.
USB Disk Manager can completely hide USB devices from your PC, and it also prevents any third-party applications from opening or making any changes to the USB drive.
The tool has USB write protection, so no unauthorized person is able to add data to the device.
On top of that, the tool prevents anyone without permission from copying files to your PC.
Not only that, but no third party can access or run the applications on the USB drive.
Other key features of USB Disk Manager include:
Disable autorun feature
Portable application (AutoCopy)
Minimalistic and intuitive interface
Hence you shouldn’t have second thoughts about data privacy measures and use this beneficial USB data safety tool.
USBDeview is also a free tool and one of the top USB block software programs that deserve your attention. Made by NirSoft, it allows you to enable and disable the USB port lock.
With the help of this freeware, you will be able to view the list of USB ports and also the devices that are connected to them.
For each of the USB devices, you will see displayed extended information including the following: device’s name and description, type, serial number, the date and time that it was added to your system, VendorID, ProductID, and more.
Thus you have full knowledge about all removable USB drives connected to your system, plus a historical view of technical data that might be helpful.
Another functionality allows the user to uninstall previously used USB devices or disconnect USB drives currently in use.
USB DeView displays a list of all the USB devices that are connected to your system. It also keeps track of all devices that were previously used.
To enable or disable access to your ports, you will have to select the port in question and click the red button if you want to disable it, and the green button to enable it.
The tool also supports remote connections. You can use USBDeview on a different computer as long as you provide your user credentials and password.
You can also uninstall USB devices that you have previously used and disconnect the USB devices that are currently connected to your system.
Other key features include:
You can change up and organize port names
Sort by column
Lets you save reports and data as text files
All in all, this small but resourceful program is suitable for any PC in order to monitor USB drives connections over periods of time.
Yes, a USB data blocker can rescue all your private data from your PC from potential hacking or digital snooping.
It’s possible that blackhat hackers or viruses can infect your device through your USB flash drive, hence a port USB blocker should be a must.
How do I know if my USB is blocked?
The most valid proof that your USB device is blocked should be when the PC asks for access permission every time a USB drive it’s detected.
More so, the USB block software will allow you to block specific ports for public usage and restrict any unknown removable media.
These were our top USB block software solutions. With their help, you can prevent unauthorized access to your PC and stop malware from spreading to your PC through USB ports.
After you take a look at their extended sets of features, you’ll definitely be able to make an informed decision that will provide enhanced safety for your system.
While there are many password managers out there, very few meet the acceptable industry standard. Among these are RoboForm and NordPass, undoubtedly two of the biggest names.
In this RoboForm vs. NordPass comparison, we will show how these tools stack against each other and their suitability to different use cases.
Is RoboForm better than NordPass?
In all fairness, a RoboForm vs. NordPass comparison usually shows two excellent password managers with more in common than differences. However, they still have a lot of differences that set them apart.
We will analyze them in the next section of this guide and decide which is better.
RoboForm vs NordPass: The comparison
1. Security and Privacy
1.1. Encryption
Regarding encryption, NordPass has a significant edge over RoboForm and most other password managers. This is thanks to its employment of the ChaCha20 encryption algorithm, variant XChaCha technology.
This technology is far more secure and faster than the 256-bit encryption found in most tools.
However, it should be noted that RoboForm is no slouch, either. It employs the industry-standard 256-bit AES encryption, one of the safest.
Lastly, both password managers employ a zero-knowledge encryption policy. With this, you are sure that both encryption and hashing are done locally on your device.
1.2. Multi-factor authentication
RoboForm has multiple multi-factor authentication options, including email, SMS, and third-party authenticators like Microsoft Authenticator and Authy. The only downside is that you must be on the paid plan to use them.
With NordPass, however, you cannot use it with two-factor authentication. It makes the option available for free and paid users.
Also, it supports all options available on RoboForm with the addition of third-party security keys. So, NordPass triumphs in this aspect of the RoboForm vs. NordPass comparison.
1.3. Third-party security audit
NordPass has undergone a well-publicized security audit by a notable third-party firm called Cure53. The results show a password manager that is reliable but also secure and trustworthy.
Also, the few vulnerabilities found were quickly attended to by the developers to ensure you can always trust the tool.
Recently, RoboForm has undergone a security audit and penetration test conducted by Secfault Security, which levels the playing field for this particular aspect.
1.4. Privacy policy
The last aspect of this RoboForm vs. NordPass security comparison is the privacy policy of the two tools. RoboForm’s privacy policy claims that they collect little data, which can include some of your personal information from the license page and PC.
However, you can control how the company uses some of your data and prevent it from collecting some.
On the other hand, NordPass collects only basic statistical data. These include less personal information, like the strength of your password. You can check out the full privacy policy to know what you are signing up for.
2. Ease of use
2.1. Password importing
RoboForm and NordPass rank equally in the password importing and exporting aspect. You can import your data from various sources, like browsers and password managers, such as 1Password and Keeper, and use CSV files for other platforms.
Finally, both password managers can import bulk passwords, which is pretty straightforward.
2.2. Password sharing
NordPass, like RoboForm, allows you to share your password via email with just a few clicks of the mouse. Also, the two apps give you control over who can access the shared password, and you can revoke the access at any time.
However, with RoboForm, the recipient needs to have a RoboForm account, which shouldn’t be a problem as they can always use the free version.
So, we can call this section of our RoboForm vs. NordPass comparison a tie.
2.3. Autofill
This is another area where RoboForm and NordPass rank equally. They both provide an icon on any site you log into, which you can use to save your login information.
Once you visit the same site again, you only need to click the icon, and the required fields will be filled out automatically.
3. Affordability
RoboForm and NordPass provide some of the best free password managers you can get. However, RoboForm’s free version offers more features.
You can enjoy password generation, auto-filling, auditing, and unlimited logins. To enjoy everything RoboForm offers, upgrade to RoboForm Everywhere or the Family plan.
The Everywhere plan is available for just $1.99/month for 1 user, while the Family plan goes for $3.98/month for 5 users. It also has a Business plan where you can customize the number of users. However, if you go for a 1-year plan, you only pay $16.68.
NordPass, on the other hand, is a bit cheaper. To upgrade to the Premium plan, you only need to pay $1.49/month for 1 user, but the Family plan is $2.79/month for 6 users. If you go for a yearly plan, you pay $23.88 for the first year, then it’s $35.88 for the next ones.
Hence, if you go for monthly payments, NordPass is a bit cheaper, but if you commit to a longer plan, RoboForm has the edge.
RoboForm’s interface is refreshingly easy to use. Also, it is easy to navigate, and you get a short YouTube video after the installation and registration to ease your acclimatization.
The same thing can be said about NordPass too, as it boasts a modern and user-friendly interface. Moreover, the two tools have an excellent dark mode that makes them easy on the eyes.
5. Platforms
RoboForm and NordPass are available on all major platforms, like Windows, Linux, iOS, macOS, Chrome OS, and Android. Also, they have extensions for major browsers, including Chrome, Edge, Safari, Firefox, and Opera.
The exception here is that NordPass has an extension for Brave browser, which RoboForm lacks.
So, you are not short of options, irrespective of your device, and you can call this aspect of the RoboForm vs. NordPass comparison a tie.
6. Customer support
NordPass provides virtually the same amount of support for free and paid users. This includes live chat and 24/7/365 support. However, premium users are given higher priorities and are attended to promptly.
RoboForm also provides both live chat and 24/7 ticket support. However, this is for only premium users.
Also, RoboForm’s live chat support is available from 9 AM to 5 PM (EST), Monday to Friday. The major support option for free users is emailing the support staff.
RoboForm vs Bitwarden: Final words
This RoboForm vs NordPass comparison has shown that the two of the best password managers available have a lot in common. So, it’s pretty much down to what works best for you when choosing one or the other.
Here are some points on each side that may help you decide:
NordPass
24/7/365 support, whether you’re a paying customer or using the free version
Brave browser extension
Slightly cheaper
RoboForm
Simple and easy-to-navigate interface
Several two-factor authentication options
Recent successful security audits and penetration test
So, we recommend testing both of them to see which fits your requirements better.
Feel free to share your experience using the two password managers in the comments below.
If you use Visual Studio for coding, you will be glad to know that in this guide, we will share with you the 15 best productivity Visual Studio extensions that will help boost your efficiency in implementing applications.
Visual Studio is the best code editor available and has a vast ecosystem of tools responsible for its popularity. To develop its software, Visual Studio uses Windows API, Windows Forms, Windows Presentation Foundation, and Windows Store platforms. Let us check out the best Visual Studio extensions.
What are the best Visual Studio extensions to improve productivity?
Live Server – Loads your code directly onto the browser
Using the Live Server Visual Studio extension, you will be able to view your code directly onto a web browser.
This is a nice tool for developers as it automatically reloads and views the code on the web page without reloading manually.
The best part is that the Live Server Visual Studio extension negates the need to frequently save your work in the editor, reload the browser, and see the changes.
It also comes with hotkey control, a single click to start/stop a server, support for any web browser, remote WLAN connection, SVG support, HTTP support, and much more.
Here are some of the highlighting features of Live Server:
Auto-reload the web browser to view the code.
Support any web browser.
Comes with HTTP and SVG support.
Proxy support.
Lets you start or stop a server with just a single click.
When someone reads something, cautiously or uncautiously, they will find errors in your spelling. If you write comments then this could be pretty embarrassing.
The Visual Studio Spell Checker extension can easily resolve such petty issues. The main feature of this extension is to check for spelling mistakes on comments, strings, and plain text within an interactive window.
One feature that makes it a must-have extension is that you can customize its spell-checking ability to perform a spell check over an entire solution, a project, or selected items.
Of course, it can wrongly highlight a correct word not in its database, which you can easily add to ignore specific words.
Here are some of the best features of Visual Studio Spell Checker:
Lets you add words that you wish to ignore checking.
Gives you the option to replace all occurrences of a misspelling.
You can use Ignore Once to ignore one instance of a specific word.
Can help spell check the inner text of XML.
Can spell check any WPF text box within Visual Studio.
Settings Sync – Easily sync all snippets, themes, and other settings
Developers will find the Settings Sync Visual Studio extension very helpful. The main reason is that it will help you sync all of your snippets, theme, settings, key binding, etc., across various machines in one go.
It uses GitHub Gists to facilitate these services and offer the sync service. It will give you a detailed summary of the affected configurations and extensions due to the sync process.
Moreover, it automatically updates the settings across all machines as soon as they boot up. This negates the need to sync each setting again and again.
Some of the best features of the Settings Sync extension are:
You can use your GitHub account and Gist.
Shows a summary of the affected configurations and extensions.
Loads all the configurations across machines when the PC boots up.
Lets you sync any file across your machines.
Easy to use single click upload and download features.
Lets you sync keybindings, settings, themes, workspaces folder, etc.
Peacock – Helps you change the color of your workspace
When working on a project, viewing the same color while coding could get boring. You can easily change that with the help of the Peacock Visual Studio extension.
After enabling Peacock, it will change the color of all the active code editors opened. The best part of using this extension is that it will help you differentiate between different code editors and projects you are working on.
You can use this tool to create any color of your choice and give it to the editor open. Also, you can customize the different parts of the VS code with various colors.
Some of the notable features of the Peacock extension are:
Let’s you change the color of the editors.
You can customize the editor with any color of your choice.
Lets you tweak the color of the different parts of the code.
You can use the contrast adjuster to give a different tone.
Prettier – Follow the same standard style guide across the team
Working on a coding project can not only be tiring but less colorful. This is why we suggest you use the Prettier Visual Studio extension.
It lets you apply and make your development team follow the same style guide. This helps make all of your codes look consistent.
The Prettier Visual Studio extension supports JavaScript, TypeScript, JSON, CSS, and more. It takes into account the maximum line and length of the code and wraps the code whenever necessary to give it a clean look.
Here are the best features of the Prettier extension:
Stylelint – Highlight various constructs of your code
When you come across syntax errors, bugs, duplicates, etc, when you code, it can be difficult to find them because it can be a headache when working on a big project.
Stylelint defines a particular set of style rules that will help you highlight the dubious errors in your code. It has more than 170 built-in rules for modern CSS features.
You can create your own personalized rule and apply Stylelint to your development team for them to follow suit. It is easy to install on Virusl Studio and use.
Here are some of the notable features of the Stylelint extension:
Won’t that be great that in today’s advanced world, you have the power of AI to help you when you are coding? Well, Visual Studio IntelliCode brings that to you.
With the Visual Studio IntelliCode, you can enhance your accuracy using the whole-line autocompletion feature. The AI detects the code you are writing and fills in with the best suggestions.
The AI is trained by analyzing thousands of open-source contributions on GitHub, which helps it accurately suggest recommendations. With the Visual Studio IntelliCode, you can even define your custom code base properties.
Here are the best features of the Visual Studio IntelliCode extension:
When you write code, especially a lengthy one, it becomes pretty exhausting to check all the errors and remove all the whitespace from your code.
Using the Trailing Whitespace Visualizer Visual Studio extension, you can easily remove any trailing whitespace on any line of the Visual Studio editor.
When the Trailing Whitespace Visualizer Visual Studio extension is enabled, it will highlight the whitespace and help you eliminate them. You can change the color of the highlight.
Here are some of the best features of the Trailing Whitespace Visualizer extension:
SonarLint – Highlights issues even before they arise
Isn’t it better to have a tool that will help you fix your code even before the error occurs? Yes, with SonarLint, that is possible.
It works like a spellchecker, but it checks for bugs and security vulnerabilities in your code instead of spelling.
The SonarLint Visual Studio extension gives suggestions on how to improve and correct your mistakes, even before they are committed. This helps you stay on the right path instead of going back and correcting them once you are done.
Here are some of the best features of SonarLint:
It checks and rectifies the codes even before they occur.
One of the essential extensions for any developer to have in their arsenal would be the ReSharper Visual Studio extension.
You can use this extension to automate your coding routines. Notably, you can use the ReSharper to highlight and rectify compiler mistakes, runtime errors, and redundancies as you code.
You can jump straight to the exact file and line instead of reviewing your entire solution and fixing it. You can create code formats and cleanup features and apply them across your development team to ensure consistency.
You can use ReSharper with multiple coding languages, and also lets you decompile library code if required.
Some of the best features of ReSharper are:
Lets you automate your coding routines for better consistency.
Using the File Icons Visual Studio extension, coders can add icons to the files that Solution Explorer doesn’t recognize.
This simple extension can help you recognize your files better and quickly. The File Icons extension lets you find the missing icons for the known file types.
You can also report missing icons for a file type simply by right-clicking on the file and hitting the option. The File Icons extension supports different languages and can be expanded for more using the Syntax Highlighting Pack.
Some of the best features of File Icons Visual Studio extension are:
Project Manager – This lets you organize and find projects easily
Do you find it difficult to organize or locate your projects? If so, you can use the Project Manager Visual Studio extension.
You will be able to open any project regardless of the location they saved in. It allows you to save workspaces or folders as projects. You can even give a tag to your project to organize them easily.
Project Manager automatically detects Git, Mercurial, or SVN repositories. You can view the projects in the same or a new window, and it even offers a dedicated sidebar.
Here are some of the notable features of the Project Manager:
Lets you save your folders or workspace as projects.
You can give tags to your projects for easier identification.
As a developer, the most important thing you are bound to provide is a great feasible experience for your customers.
The pages should load faster; the most important thing is that the images should load faster. To do that, you can use the Image Optimizer Visual Studio extension.
It uses efficient tools to improve and optimize the quality of images of various formats. This includes any JPEG, PNG, GIF, and GIFs.
Some of the best features of this Image Optimizer are:
Another open-source Visual Studio extension you can use to enhance your productivity is the GitLens extension.
Using the GitLens extension, you will get important information related to your codes. Notably, you can know who, why, and when a change was made to your code line.
This process takes just a few seconds, and you can easily navigate the codes through the file revision history.
Some of the best features of GitLens include:
Know who, when, and why changed the codes.
Displays the most recent modification at the end of your code line.
Offers a sidebar for better tracking.
Can be integrated with GitHub, GitLab, Gitea, Gerrit, and more.
Last but not least, we have the Remote – SSH extension. Using this extension, you will be able to execute a command and run other Visual Studio extensions from a remote PC.
The best part about this extension is that it does not require you to have the source code installed on your local machine.
It supports different operating systems, including Windows, macOS, Ubuntu, Debian, and CentOS. You can use this extension to create apps and software remotely.
Here are the best features of Visual Studio Code Remote:
If you have encountered that the operation was canceled by the user (0x4C7) while launching a game on Steam, it could be due to corrupt installation files. In this guide, we will discuss some of the methods to fix the issue right after explaining the potential causes. Let’s start!
What causes the operation was canceled by the user (0x4C7) error on Steam?
There could be various reasons for this error to appear; some of the common ones are mentioned here:
Corrupt add-on files – If your game add-on files or the installation files are missing, not downloaded correctly, or corrupted, you may face this error. You need to verify the integrity of the files to be sure.
Network connectivity issues – If you have a flaky internet connection, there is a chance that it interrupted the Steam server while downloading the add-on or game files, hence the error. Check your internet connection and try to install the files again.
Steam server is under maintenance – If the Steam server is facing an outage or is under maintenance, then you could see this error. Check the server status; if down, wait until it is up and try again.
What can I do to fix the operation was canceled by the user (0x4C7) error on Steam?
Before engaging in advanced troubleshooting steps, you should consider performing the following checks:
Locate the game’s installation file. You may find the file inside the Steam folder: C:\Program Files (x86)\Steam
Go to the .exe file of the game, right-click it, and select Run as administrator.
2. Troubleshoot the network
Press the Windows key, type Control Panel, and click Open.
Select View by as Category and click Network and Internet.
Click Network and Sharing Center.
From the left side, locate and click Change adapter settings.
Select the connection that you are using and click Change settings of this connection.
On the Properties window, switch to Sharing tab.
Under the Internet Connection Sharing option, place a checkmark next to Allow other network users to connect through this computer’s Internet connection.
Click OK.
3. Check the integrity of game files
Launch Steam. Click on the Library option.
Select the game, right-click it, and click Properties.
Go to the Local Files tab and click Verify integrity of game files.
Launch Steam. Click Steam from the top left corner.
Select Settings.
On the Settings page, click Downloads.
Now select Clear Download Cache and click OK.
5. Disable antivirus temporarily
Press the Windows key, type Windows Security, and click Open.
Go to Virus & threat protection and click Manage settings.
Now toggle off the switch under Real-time protection.
Click Yes on the UAC prompt to confirm the change.
6. Update device drivers
Press Windows + R to open the Run console.
Type devmgmt.msc and click OK to open Device Manager.
Go to each category, expand it, right-click the driver listed one by one, and select Update driver.
On the next window, click Search automatically for drivers.
Follow the onscreen instructions to complete the process.
Otherwise, you have an alternative solution that will help you update device drivers or any other ones in minutes. Namely, Outbyte Driver Updater is the ideal software for this job that can also fix this error code.
So, these are methods you can use to fix the operation that was canceled by the user (0x4C7) error on Steam. If nothing worked for you so far, reinstall the affected game and ensure the installation process is not interrupted.
If you have any questions about the Steam error, please mention them in the comments section below. We will be happy to help!
After months of living in insiders’ devices, Microsoft Edge’s Drop feature is here for general users.
As explained by Redmond officials, the tool offers a simple way to send files and notes across all your signed-in mobile and desktop devices. You can even write a note to yourself to help you describe what’s inside the file so you don’t lose track.
In some ways, it works as cloud storage that you can access anywhere on any device as long as you’re signed in.
However, it still comes with a few limitations. On a free storage plan, Microsoft only gives you 5 GB of free storage, but you can upgrade it to 1 TB for $69.99/year or 6 TB for multiple users at $99.99/year.
Read along to find out how you can do that.
How to send files using Microsoft Edge’s Drop feature
1 With your Edge browser open, click on the airplane logo on your right ➔ Start.
2 Click on + to upload your files.
3 Select your files then click Open.
4 You’ll be able to see them if you have Edge on other devices signed in, whether it’s desktop or mobile.
This is an exceptional feature that most other browsers don’t have unless you’d be willing to install a third-party extension or send those files outside the app.
If you also have problems connecting to the internet with Edge, we’ve prepared a simple guide here.
Do you find Microsoft Edge’s Drop feature helpful? Let us know in the comments.
If you are a freelancer, you probably know how Upwork works. Having the right skill set is the first step but you also need to find out those Upwork supported browsers that will allow you to browse jobs and get the best freelancing experience overall. No lag, no Upwork complaints, right?
Upwork is one of the most popular freelancing websites. With hundreds of gigs created daily, the platform is constantly a beehive of activity.
Once you join, you can create a profile, access an Upwork work list and browse jobs, you can even work on your projects, all for free. However, upgrading to Freelancer Plus would help promote your work more effectively, make bids, and beat the competition.
And speaking of that, Upwork is a very competitive marketplace, that does not always favor newcomers. So, is Upwork good for beginners? With a painstakingly created profile, beginners will be able to land jobs as well.
Freelancing platforms such as Upwork or headless eCommerce platforms are growing more popular by the day, so staying flexible and being able to work online is quintessential.
Can I use Upwork without the app?
You can! As a matter of fact, you don’t need to download the desktop or mobile application as you can browse Upwork, search for jobs and even work on projects or find talent directly in your browser.
If you’re wondering which browser is the quickest for Upwork, we’ve made the test for you:
Firefox – Best for Upwork browse jobs with privacy
In this article, we focus on Upwork freelancing and share with you a well-researched list of Upwork supported browsers.
The website has become highly dynamic and robust and will only be adequately navigated with an equally powerful browser. Thus, getting the best browser is vital for a positive freelancing experience.
After being leap-flogged by Chrome, the Opera browser has been returning strong in recent years. It is a feature-rich, fast, and reliable browser and an excellent option for exploring all your gigs and progress on Upwork.
Of its many features, we love the built-in VPN that guarantees all your connection and IP locations are hidden and safe.
And finally, it integrates social platforms to allow you to get all your work done without leaving the tab. Experience one of the best Upwork supported browsers today and never look back.
Additional features:
Secure private mode
Anti-tracking settings
Broad add-ons library
Opera
Use this professional browser with smooth navigation to promote yourself on Upwork safely.
2. UR Browser – Fastest for Upwork skills showcasing
Of the web navigators that make the list of best Upwork supported browsers, UR is the least known and least used, but not necessarily a bad option. We love it because it has the fastest rendering speed for freelance services.
Even though it sheds on a few features, it compensates by being very lightweight, making it adaptable to most new or old devices. Plus, it’s lightweight, fast, and reliable, slightly edging the rest.
Google Chrome is the biggest name in the browser niche. Even though it is often tagged as a resource hogger, it is very robust, which over-compensates its seemingly insatiable appetite.
No matter how dynamic the pages are, they will be perfectly rendered on Chrome. What’s more, you have the possibility to further personalize your freelancing gigs with an Upwork Chrome extension.
For instance, you can go for an Upwork time tracker Chrome extension or a plugin that enables quicker job alerts. Here are 2 popular options you might want to explore closer:
Of course, we love it because it has a vast extension library, meaning you will be able to implement new features. There are also fewer Upwork complaints by users on this browser.
4. Edge – Best for Windows | Upwork supported browsers
Edge browser is relatively a newcomer to the browser market, but it has grown quickly; this also is because it is adopted as the default Windows browser.
There is, however, so much to the browser. It is also very expandable since it uses Chromium, and it is robust enough to render all sorts of dynamic webpages, including Upwork.
5. Firefox – Best for Upwork browse jobs with privacy
If you need a private and secure browser for Upwork, then you should turn to Firefox. The browser is integrated with many privacy and security-centered features like anti-phishing and anti-tracking.
In addition, it includes a private mode for elevated privacy.
Finally, just like other browsers on this list, it is robust and can render almost every media type.
Upwork Alternative ? What’s better Fiverr vs Upwork?
There are many criteria to consider, but out of the box, both offer free plans; however, Fiverr takes commissions of 20%, while Upwork is flexible, and commissions range between 5 and 20%.
Both marketplaces offer 24/7 customer services and pay promptly. While many other factors may be considered, Upwork has a slight advantage.
We have not made this list in any particular order and are curious to hear which is your favorite to use on Upwork. Note that these browsers also fit as the best browsers for Upwork in the Philippines.
If you have encountered a blue screen of death error caused by usbstor.sys, this guide can help! This usually occurs if the computer has outdated drivers or system files are corrupted. We will discuss some expert-tested solutions to fix this BSOD error in no time. Let’s start!
What is USBSTOR.SYS?
USBSTOR.SYS, a Windows system driver file, manages USB mass storage devices, such as flash drives and external hard drives. When you connect any USB mass storage device to your computer, this file takes over and manages the device.
What causes the usbstor.sys blue screen error?
There could be various reasons for this BSOD error; some of the common ones are listed here:
Hardware issues – If your USB storage device, external hard drive, or hardware component has any problems, you might face this issue. You need to check if the flash drive is working or not.
Corrupt system files – If your computer’s important system files related to the USB storage devices are corrupt or missing, it may lead to this BSOD error. You need to repair the system files using Command Prompt.
Virus or malware infection – If your computer is infected with a virus, it could damage important files on your computer, including this file, causing the blue screen of death error. You need to run a malware scan to fix the problem.
What can I do to fix the usbstor.sys blue screen error?
1. Run the SFC scan
Press the Windows key, type CMD, and click Run as administrator.
Type the following command to repair system files and hit Enter: sfc/scannow
Wait for the command to be executed. Once done, restart your computer.
If you want a more in-depth repair solution, we suggest you try a specialized app with an extensive repository that repairs all your device’s corrupt system files.
2. Check Windows updates
Press Windows + I to open the Settings app.
Go to Windows Update and click Check for updates.
If available, click Download and Install to start the process.
3. Manually Register the USBSTOR.SYS file
Press the Windows key, type CMD, and click Run as administrator.
Copy and paste the following command to unregister the file and hit Enter: regsvr32 /u USBSTOR.SYS
Type the following command to re-register the file again and hit Enter: regsvr32 /i USBSTOR.SYS
On the Disk Cleanup: Drive Selection window, select C drive and click OK.
Now, click Clean up system files.
Again on the Disk Cleanup: Drive Selection window, select C drive and click OK.
Select all files under Files to delete and click OK.
Click Delete Files on the next prompt.
5. Run a malware scan
Press the Windows key, type Windows Security, and click Open.
Go to Virus & threat protection and click Scan options.
Now select Full scan and click Scan now.
The tool will scan your computer to find infectious files. Once found, delete them when prompted.
6. Perform a System Restore
Press the Windows key, type Control Panel, and click Open.
Select View by as Large icons and click Recovery.
Click Open System Restore.
On the System Restore window, select Choose a different restore point and click Next.
Select the restore point and click Next.
Click Finish, and your system will be restarted and it will be restored to the previous version.
So, these are methods that you need to follow to fix the usbstor.sys Blue screen of death error. If nothing has worked for you so far, it is advised to perform a clean installation of Windows to fix the error.
If you have any questions about the BSOD error, please mention them in the comments section below.
It’s another stacked week for Xbox Free Play Days with another 4 games available from Thursday through Sunday, April 9. Note that Xbox Free Play Days is a perk for subscribers of Xbox Live Gold and Xbox Game Pass Ultimate. See the lineup below.
Black Desert
Black Desert is a living-world MMORPG. Experience fast-paced, action-packed combat, hunt monsters and huge bosses, fight with friends in a guild to siege nodes and region castles, train your life skills such as fishing, trading, crafting, cooking, and much more!
Players will enjoy jaw-dropping graphics,
intuitive skill-based combat, and an immersive story encased in our expansive
world that’s just waiting to be explored. Accompanied by a Black Spirit, a
companion whose destiny is intertwined with their own, players will discover
the secret of the Black Stones and the history of their corrupting effects.
Bravery and Greed
Bravery and Greed is a beat ’em up, roguelite, dungeon brawler for up to four players. Choose from four classic fantasy classes, engage in a deep robust combat system, and play a variety of co-operative and competitive game modes with friends via local, online or both. Get rich, or die trying!
PGA Tour 2K23 (Xbox One, Xbox Series X|S)
Hit the links with more swagger in PGA TOUR 2K23. Take your skills, and your swag, on the PGA TOUR and become the next FedExCup Champion. Compete against other TOUR pros with your MyPLAYER and establish new rivalries.
The Elder Scrolls Online: Tamriel Unlimited
Join over 18 million players in the award-winning online multiplayer RPG and experience an ever-expanding story in a persistent Elder Scrolls world.
• ESO COMES TO Xbox Series X|S – Experience the award-winning RPG like never before with game-changing features/enhancements such as 60-fps performance mode, advanced lighting and shadows, improved reflections, shorter loading times and more! • BEGIN YOUR ADVENTURE – Discover Tamriel’s Second Era and enjoy all the epic quests, memorable characters, and dangerous enemies you expect in an Elder Scrolls game. • PLAY YOUR WAY – Battle, craft, steal, siege, or explore. Combine different types of weapons, armor, and abilities to create your own style of play. • TELL YOUR OWN STORY – Experience any story in any part of the world, in whichever order you choose – alone or with friends.
Wrap up
Xbox Free Play Days has been on something of a roll lately, and this week’s lineup is pretty sweet with a couple of big MMOs thrown into the mix. Which of these will you be playing this weekend? Let us know down in the comments. If you would like to learn more, head on over to the Xbox Free Play Days FAQ page.
Steam is one of the most popular video game distribution platforms used worldwide. Still, it is prone to errors. One of the most common errors is the Steam error code E8. This guide will discuss what this error means and how we can fix it. Let’s get started!
What is Steam Error Code E8?
Steam Error Code E8 is an error that occurs if Steam cannot connect to its servers. This happens generally when you try to launch a game. This could occur due to an unstable internet connection or problems with the Steam network.
What causes the Steam Error code E8?
There could be several possible reasons for this Steam code error; some of the common ones are mentioned here:
Network connectivity issues – If your Internet connection is weak or unstable, you might have connectivity issues which can lead to this Steam error. Check your internet connection and try another network to fix the issue.
Firewall/antivirus settings – Sometimes, antivirus software or firewall conflicts with Steam and doesn’t let the Steam client connect to the internet. This might cause an error.
Server maintenance – If the Steam servers are under maintenance or are down, this could prevent you from playing games on Steam, hence the error. You need to wait for a while and try to connect again later.
Steam app outdated – If the Steam app has updates pending, it could prevent the client or Steam app from connecting to the internet, hence the error. To fix this issue, check for the Steam client app update, and download it if available.
What can I do to fix the Steam error code E8?
Before moving to the troubleshooting methods, you must go through:
Restart Steam and your computer.
Check your internet connection.
Restart your router.
Verify that you are using the correct credentials to log in.
Once the .exe file will be downloaded, double-click the file and follow the onscreen prompts to complete the process.
So, these are methods you need to follow to fix Steam Error code E8 on your computer. Try them and let us know what worked for you in the comments section below.
Wednesday’s ID@Xbox showcase gave us another glimpse at some of the best indie games coming to Xbox in 2023 and beyond, with 11 games featured in total. Check out the everything revealed below.
Cassette Beasts
Omega Strikers
The Karters 2: Turbo Charged
Coffee Talk Episode 2
Homestead Arcana
Closer The Distance
The Explorator
Lil’ Guardsman
Kabaret
The Last Case of Benedict Fox
Vampire Survivors
There’s plenty for indie game fans to get excited about here. What was your favorite showcase from the ID@Xbox Showcase April 2023 event? Let us know in the comments.
ID@Xbox is Microsoft’s program that helps independent game developers to publish their games on Windows, Xbox One and Xbox Series X|S platforms. At present over 2000 games have been published through ID@Xbox, totaling more than $2.5 billion in revenue for independent developers.
There is a series of top-notch and secure password management tools, with RoboForm and Bitwarden among the leading ones. These tools have some features in common with a RoboForm vs. Bitwarden comparison but many differences, too.
In this guide, we will put these two excellent tools at loggerheads and decide on the better one.
What is the very best password manager?
There are different password managers for different purposes. There are top-notch tools with emergency access that you can access from just about any location.
So, it is hard to choose one as the very best. However, if you want the ideal tool that ranks well in all parameters, you should consider RoboForm.
Is RoboForm better than Bitwarden?
1. Security and Privacy
1.1. Encryption
Regarding security, a RoboForm vs. Bitwarden comparison is closer than expected. The two software use 256-bit AES encryption, the most secure encryption mode.
Also, they employ a zero-knowledge encryption policy. This means that both encryption and hashing are done locally on your device.
1.2. Multi-factor authentication
Another important security feature is the use of multi-factor authentication. RoboForm supports all major multi-factor authentication, including Google Authenticator and Authy. But you must be on the paid plan to enjoy all the MFA options.
Bitwarden also supports emails and other authentication apps on its free version, while premium users can enjoy additional two-factor authentications like Yubikey and Duo.
So, both RoboForm and Bitwarden are adequately set up to secure your data. The only aspect RoboForm tips this comparison is its user-friendly privacy.
2. Ease of use
2.1. Password importing
RoboForm is the go-to option when it comes to ease of use. It has a password-importing feature allows you to import your data from various sources like CSV files, browsers, and other password managers.
Also, you can import bulk passwords, which is pretty straightforward.
Bitwarden, on the other hand, also boasts impressive options you can import passwords from – more than what is available on RoboForm. However, it does not support bulk importation.
2.2. Password sharing
Another ease-of-use feature is password sharing, which is a stronghold of RoboForm. It allows you to share your password via email with just a mouse click.
However, Bitwarden is pretty limited in this area and requires you to be on the premium plan to use it. Also, you can only share your password with one user unless you are on the family plan.
The family plan lets you share your data with as many as 6 users.
2.3. Autofill
In terms of autofill, RoboForm comes out on top. You only need to click its icon to fill in the required fields.
There is also an autofill feature on Bitwarden, but most users prefer not to use it. This is because it requires you to go through a long process to select the data you want to fill in before the app does the needful.
3. Affordability
Both RoboForm and Bitwarden are pretty affordable. However, RoboForm’s free version offers more features than Bitwarden.
You get to enjoy most of the core features of the app. But to enjoy the complete package, you need to upgrade to RoboForm Everywhere or the Family plan.
The Everywhere plan is available for just $1.99/month for 1 user, while the Family plan goes for $3.98/month for 5 users.
With Bitwarden, most of its features are only available in the premium version, with just a few left for a free trial. To upgrade to the Everywhere plan, you only need to pay $0.83/month for 1 user, but the Family plan is $3.33/month for 6 users.
RoboForm is pretty easy to use on the interface front and boasts a user-friendly interface. The good thing about it is that all its apps on different platforms look similar.
So, you need some minutes to get used to it, and you are good to go. Bitwarden, on the other hand, needs some getting used to.
This is because some of its features are hidden and require one to find them. Fortunately, the interface is clean and not complex.
5. Platforms
RoboForm and Bitwarden are available on all major platforms, like Windows, Linux, iOS, macOS, and Android. Also, they have browser extensions for major browsers, including Chrome, Edge, Safari, Firefox, and Opera.
So, you are not short of options, irrespective of your device.
6. Customer support
RoboForm provides more customer support options than Bitwarden. It provides both live chat and 24/7 ticket support. However, only premium users can access priority online and live chat support during business hours.
Bitwarden, on the other hand, is limited to just online support via email, community forums, and the Q&A session.
RoboForm vs Bitwarden: Verdict
RoboForm and Bitwarden are, without a doubt, among the leading password managers available. While they rank equally regarding security, RoboForm edges its counterpart in just about other parameters that matter.
Moreover, recently, RoboForm completed a security audit and penetration test conducted by Secfault Security. That proves it’s a trustworthy tool you should definitely consider.
So, we can conclude that RoboForm is the better option on the balance of things and overall suitability. However, you won’t regret using either of the two tools.
Feel free to share your experience using the two tools in the comments below.
Microsoft and Banco Santander are teaming up together with Oxentia Foundation to launch a new challenge for entrepreneurs across 11 different countries. The challenge will mainly focus on finding innovative AI solutions that aim to mitigate issues affecting society.
The challenge is open to entrepreneurs from the US, Germany, Chile, Mexico, Argentina, Poland, Uruguay, the UK, Portugal, Mexico as well as Brazil. You can apply to take part in the challenge from now through to April 27.
What’s in store for you once you win the challenge? Aside from getting the chance to attend the award ceremony in Silicon Valley which is set to take place later this year on June 29, the top six projects will also get 120,000 euros in prize money.
The 120,000 euros will be split into two categories, with the first category getting 30,000 euros. The share will be split among the top three startups, and each of them will receive 10,000 euros.
As for the remaining 90,000 euros, it will be split among the top three scaleups. Each of them will receive 30,000 euros. Additionally, the winners will get the opportunity to become Santander X 100 members. Santander X 100 is essentially designed to provide its members with all the necessary resources to elevate their businesses to the next level.
What’s more, the winners will also get the opportunity to work side by side with Microsoft experts in artificial intelligence and get mentorship. They’ll also be able to leverage this opportunity and get to present projects to M12.
Microsoft’s General Manager EMEA – Data & AI, Jens Hansen has indicated that:
At Microsoft, we have always viewed technology as a catalyst for progress, and we believe that AI will have a positive and transformational impact on our lives if used responsibly. We are committed to democratizing the use of AI, which is why we are delighted to join Banco Santander in the Santander X Global Challenge | The AI Revolution.
In addition, winners will be mentored by Microsoft experts in artificial intelligence to present projects to M12, Microsoft’s venture capital initiative.