Press Windows + R key to open the Run dialog box, type control, then press Enter to open the Control Panel.
Click on the View by drop-down button and select Large icons from the options. Next, find and select the Keyboard.
Select the Key settings tab.
Double-click the Caps Lock, then uncheck the Display caps lock on-screen option.
Close the Control Panel and restart your PC to check if the Caps Lock On notification appears.
2. Edit the Display adapter properties
Left-click the Start button, type View advanced display info, and open it from the best match.
Under Display information, click on the Display adapter properties for Display 1.
Select the Screen configuration tab, then uncheck Enable on-screen display option.
Restart your PC and click the Caps Lock button to see if its notification appears.
Preventing the Display adapter from allowing on-screen display will stop the keyboard from using the feature to notify you.
3. Use Windows Settings
Press Windows + R key to open the Run dialog box, type ms-settings:easeofaccess-keyboard, and press OK.
Toggle Off the Play a sound whenever you press Caps Lock, Num Lock, or Scroll Lock option.
Reboot the PC and check if the issue persists.
The above steps disable the notification and sound when you click the Caps Lock button. In addition, you may refer to our fix for the Windows key not working on Windows 11.
4. Via the Control Panel
Press the Window + R keys to launch Run, and type control access.cpl, then click OK.
Scroll down and click on Make it easier to focus on tasks.
Navigate to Adjust time limits and flashing visuals tab, then check the box for the Turn off all unnecessary animations (when possible) option.
Restart the computer and click the Caps Lock button to check if the notification appears.
Turning off unnecessary animation will prevent devices and peripherals from prompting notifications on the system.
If you own a server, it’s imperative that you keep a close eye on it for any potential issues. There are several ways to do that, but the best one is by using server monitoring software.
When it comes to server monitoring tools, there are many great applications, and in this article, we’re going to show you the best applications that let you keep an eye on your server at all times.
What should you look for in a server monitoring software?
Whether you want to monitor SQL, mail, or web servers, you need the best tool to get the most needed information and take action quickly.
Let’s go through a few of the most important ones you should consider:
➡ Easy implementation
The most important aspect of a server monitoring tool is to be able to implement it easily on any server, no matter its role or platform.
This is usually performed through plugins so make sure you have everything you need when committing to such software, including implementation assistance.
➡ Features and metrics
When you monitor one or more servers, it’s important to detect any traffic spikes quickly so you can act fast and resolve the situation.
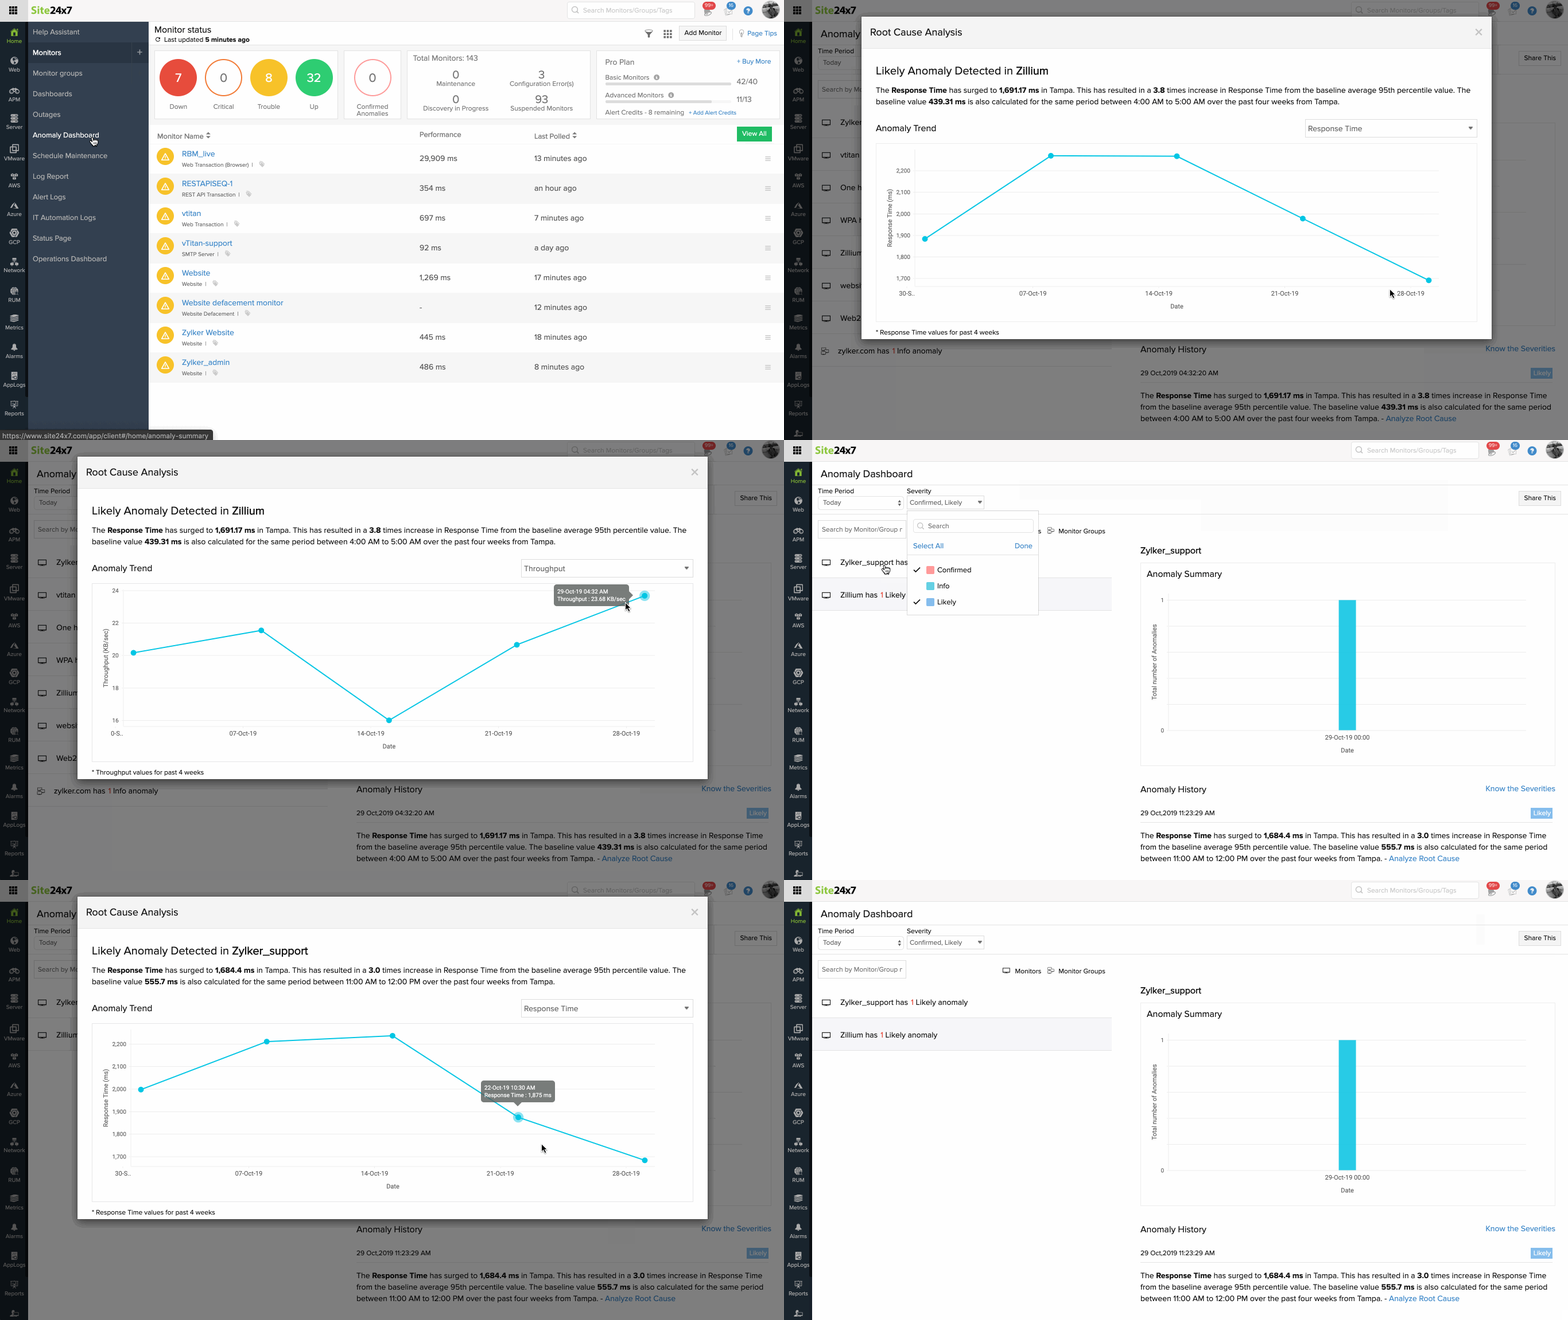
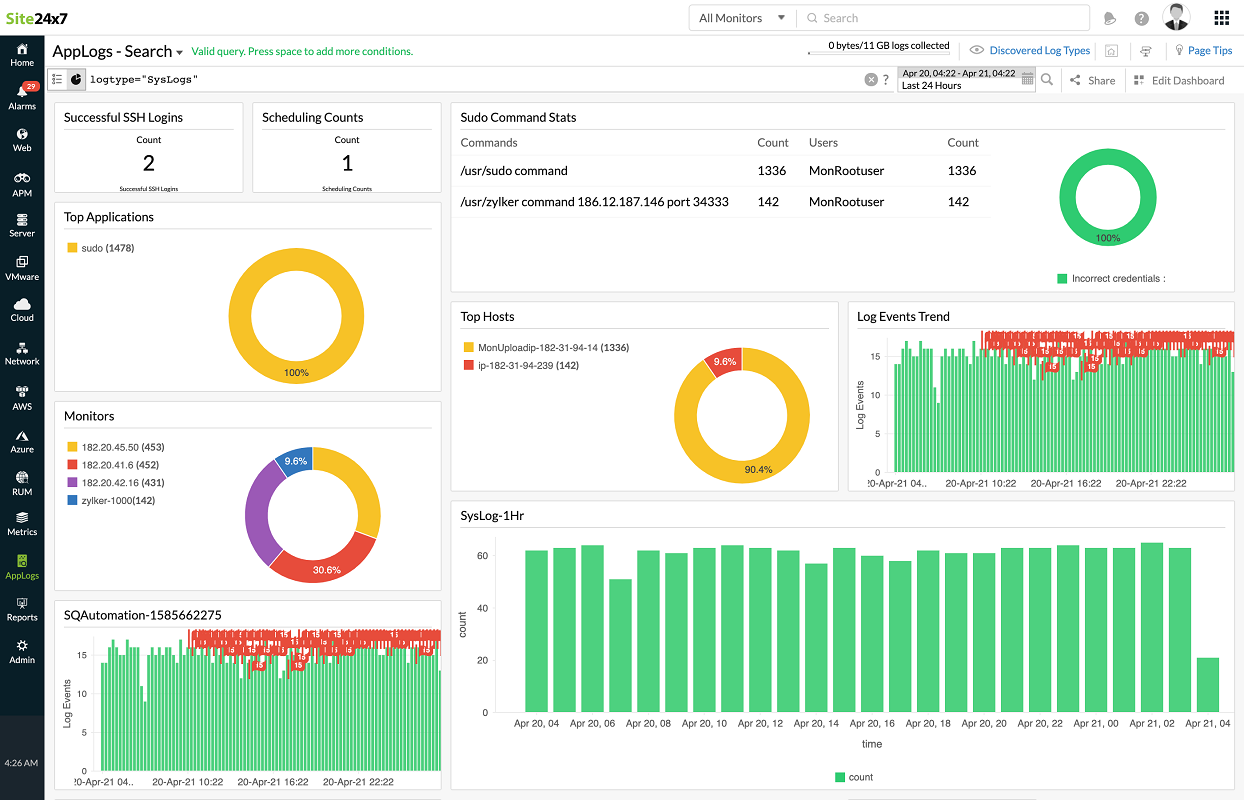
Anomaly detection in Site24x7
Make sure that the software you choose monitors all the metrics you need. For instance, Site24x7 comes with an Anomaly Dashboard that will alert you immediately when it detects unusual behavior.
➡ Free or paid
There are some open-source server monitoring software out there and if you have a skilled IT management team, they will get the best out of it.
However, some of the software below have very accessible plans and if you want to guarantee a certain quality of service, you should go for a paid solution.
Mostly because obviously, free server monitoring software doesn’t ensure ideal performance metrics stability and there is no customer support.
What is the best server monitoring software for Windows?
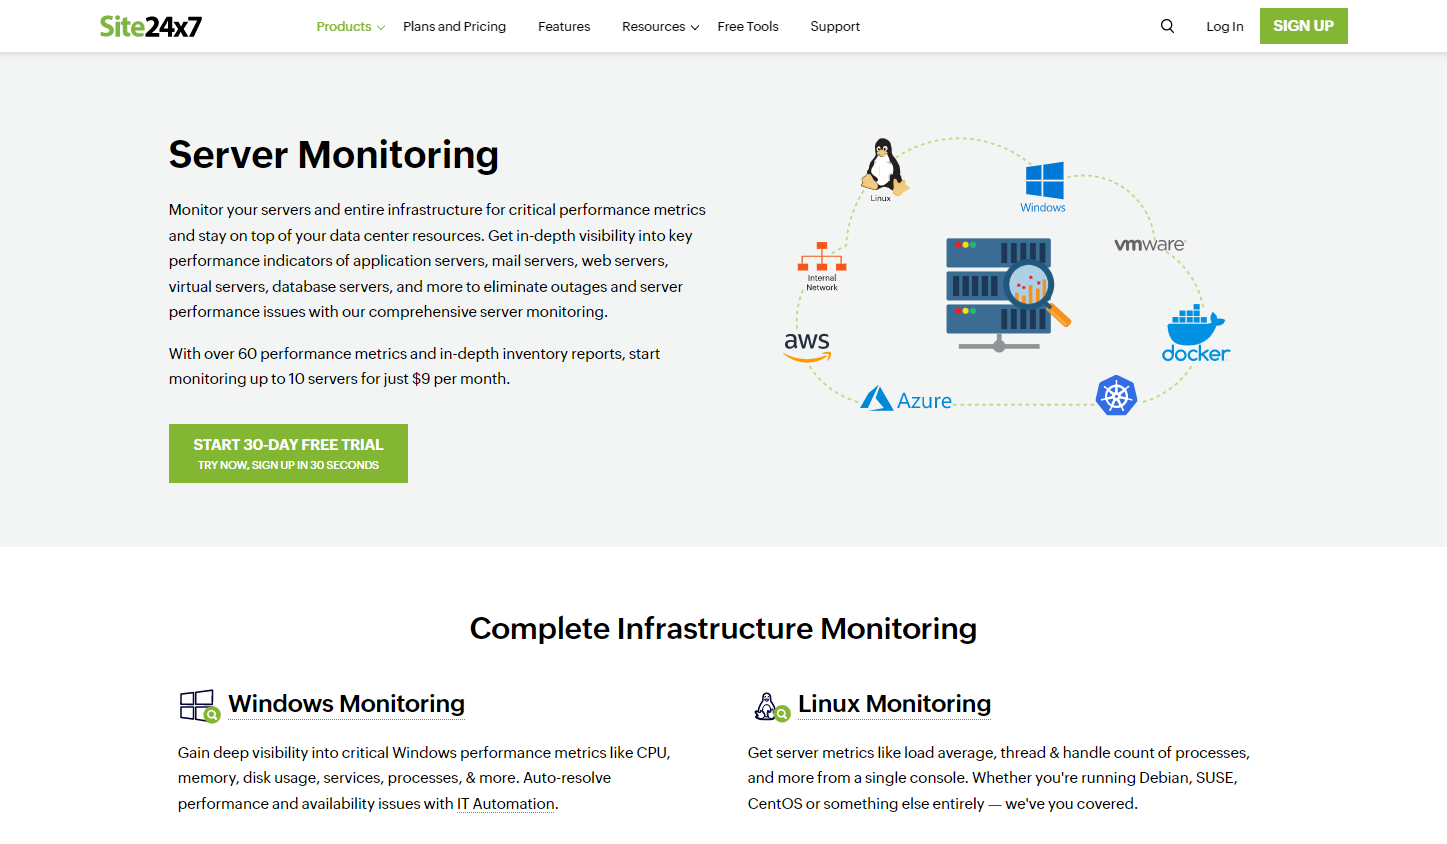
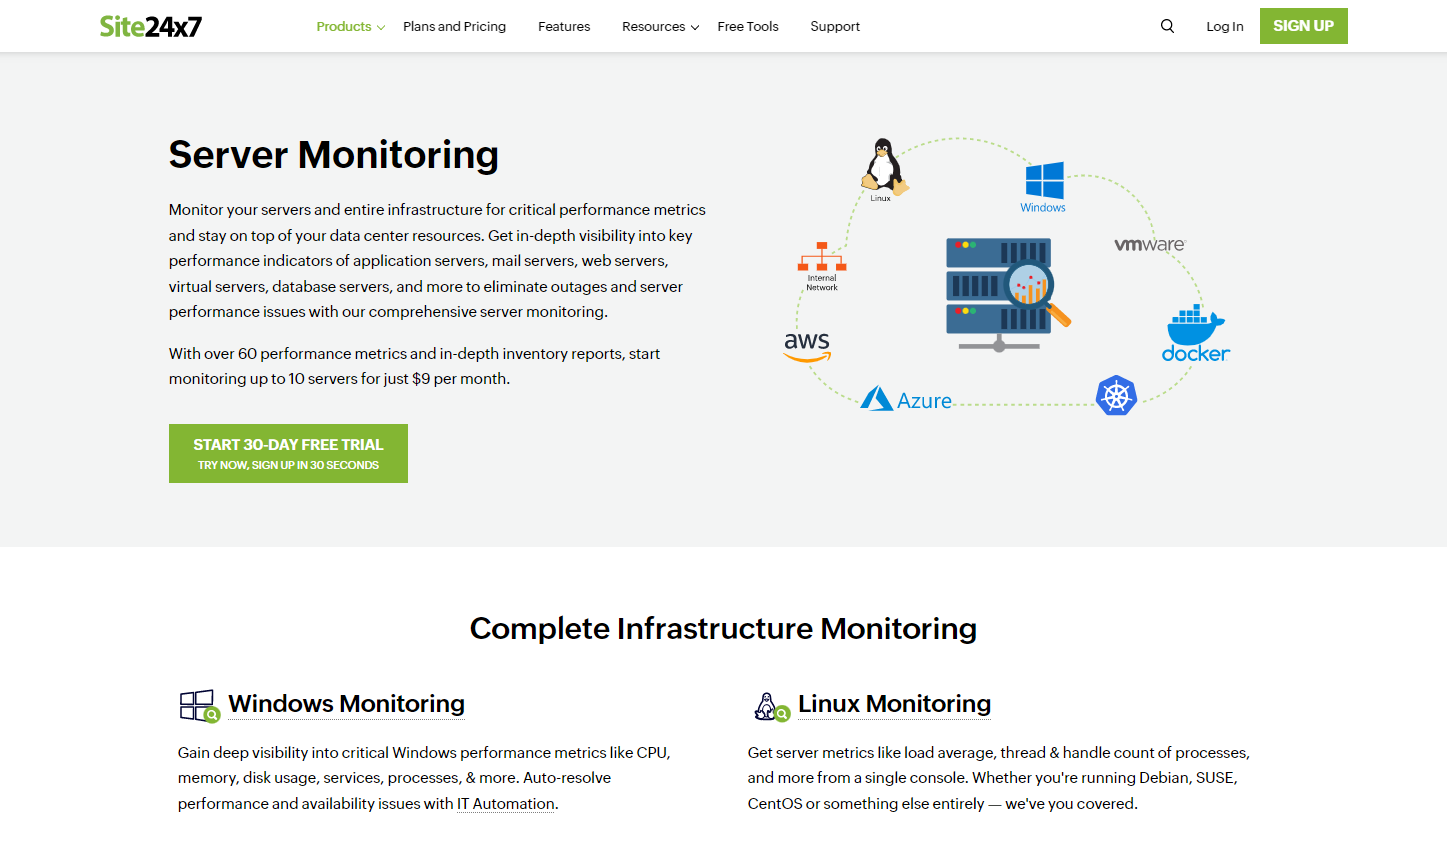
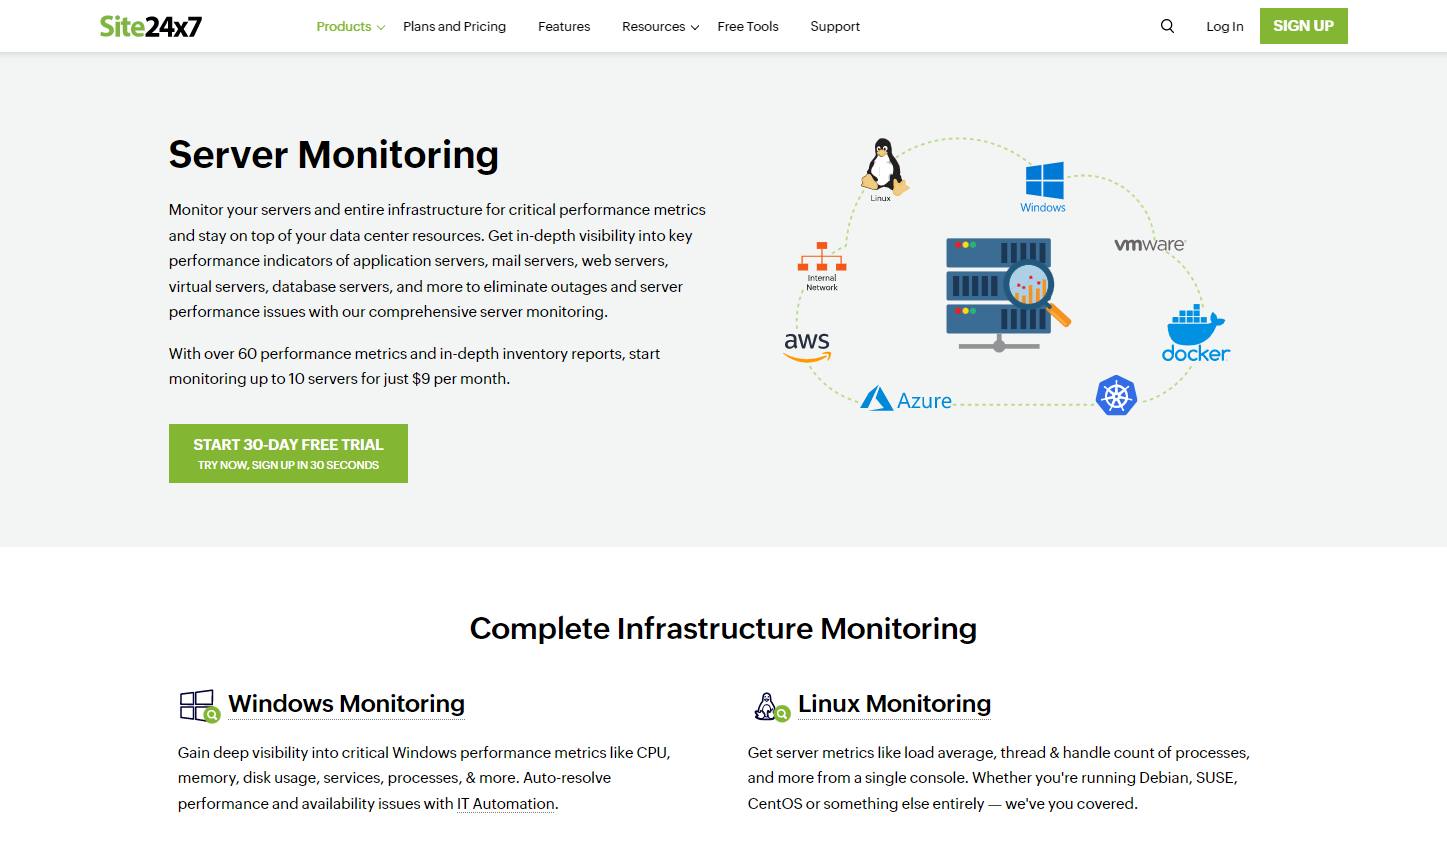
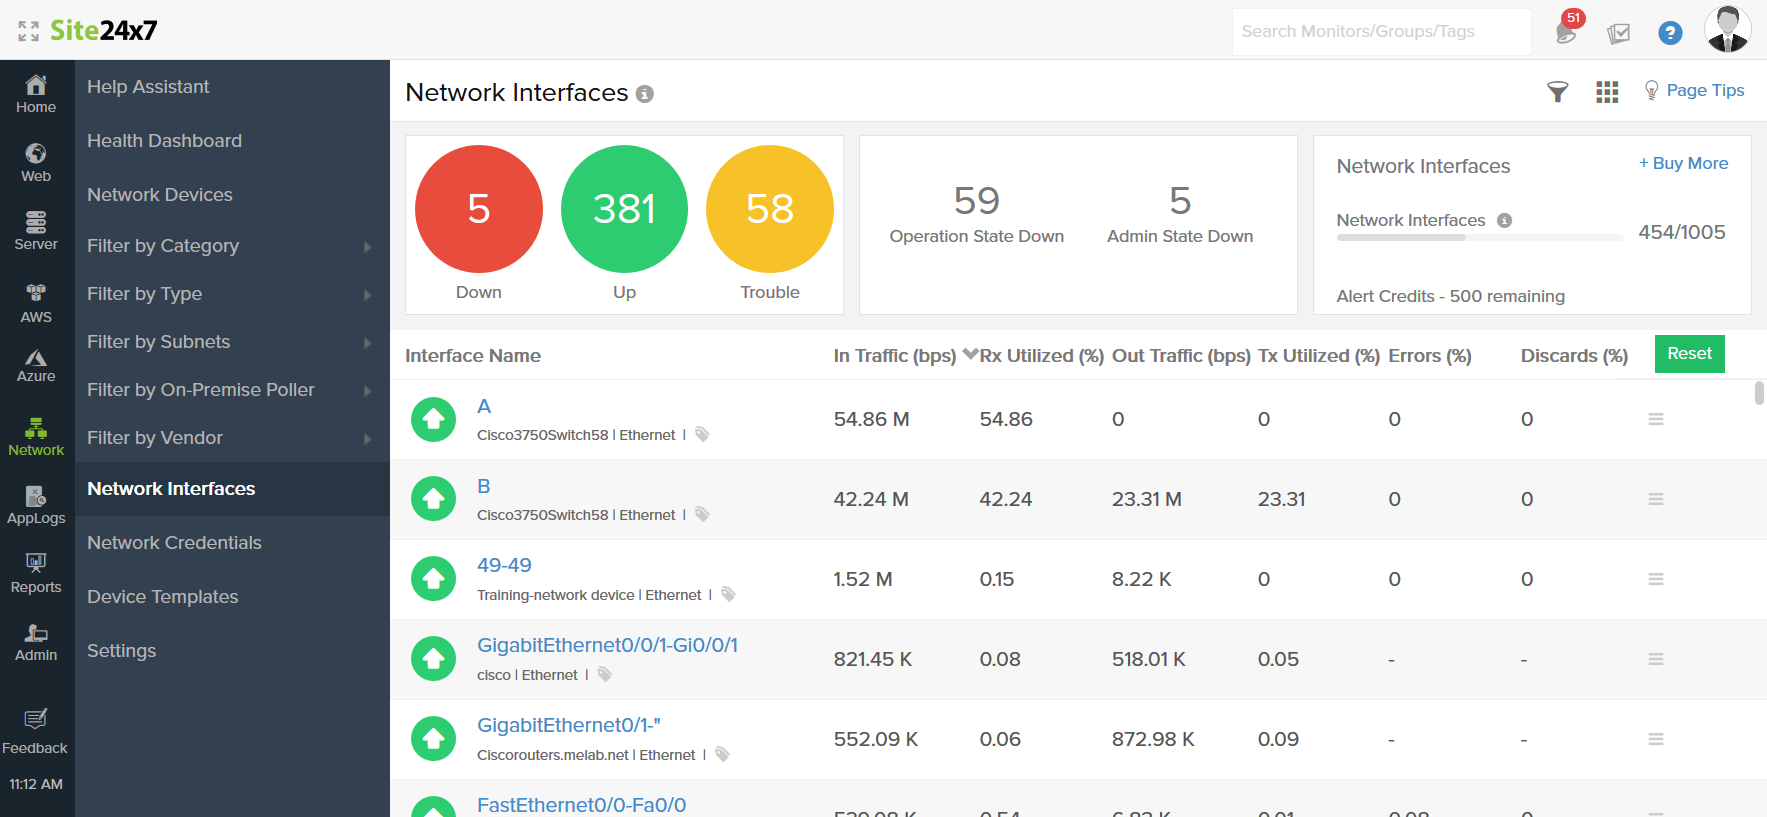
If you’re looking for the best server monitoring software, you can’t overlook Site24x7. In fact, this tool will not only cater to your server needs but to your entire network infrastructure.
Whether they are application servers, mail servers, web servers, virtual or database servers, this too will offer you in-depth visibility of all key performance indicators.
In fact, you will get over 60 performance metrics and comprehensive inventory reports of up to ten servers for a small monthly fee.
The data includes load average, thread and handle count of processes, and more, all that from a single dashboard even if you’re running Debian, SUSE, CentOS, or something else.
However, Site24x7 is not limited to network architecture but also analyzes the performance of Microsoft applications like Exchange, IIS, SQL, Windows server backups, SharePoint, Office 365, Active Directory, Failover Cluster, & Hyper-V.
The solution offers plugin integrations like Apache, MySQL, and Nagios, but you can also write your own to monitor the required data.
And if your business implies managing the customers’ accounts, you will be able to do that securely manage them and support their capabilities and endpoints from a single place.
Site24x7 features:
Over 60 performance metrics
Monitor Microsoft applications like Exchange, IIS, SQL and more
Apache, MySQL and Nagios plugin integrations
Control everything from a single dashboard
Manage customer accounts and endpoints securely
Site24x7
Monitor your whole network infrastructure with over 60 performance metrics from a single dashboard.
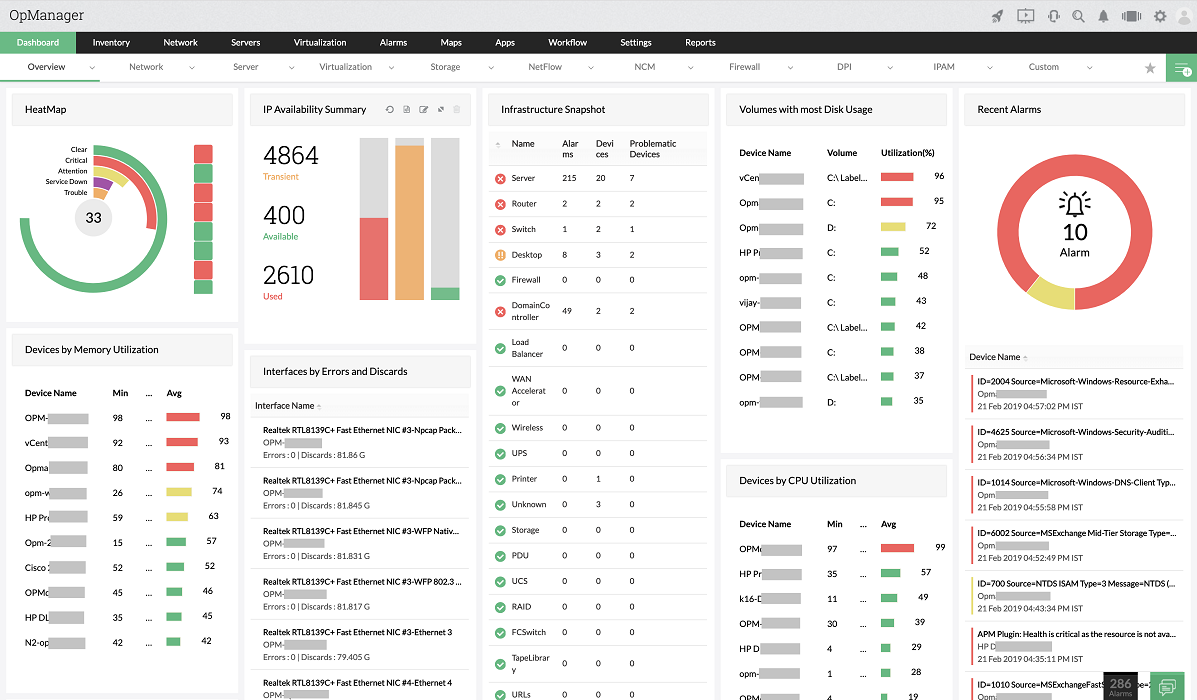
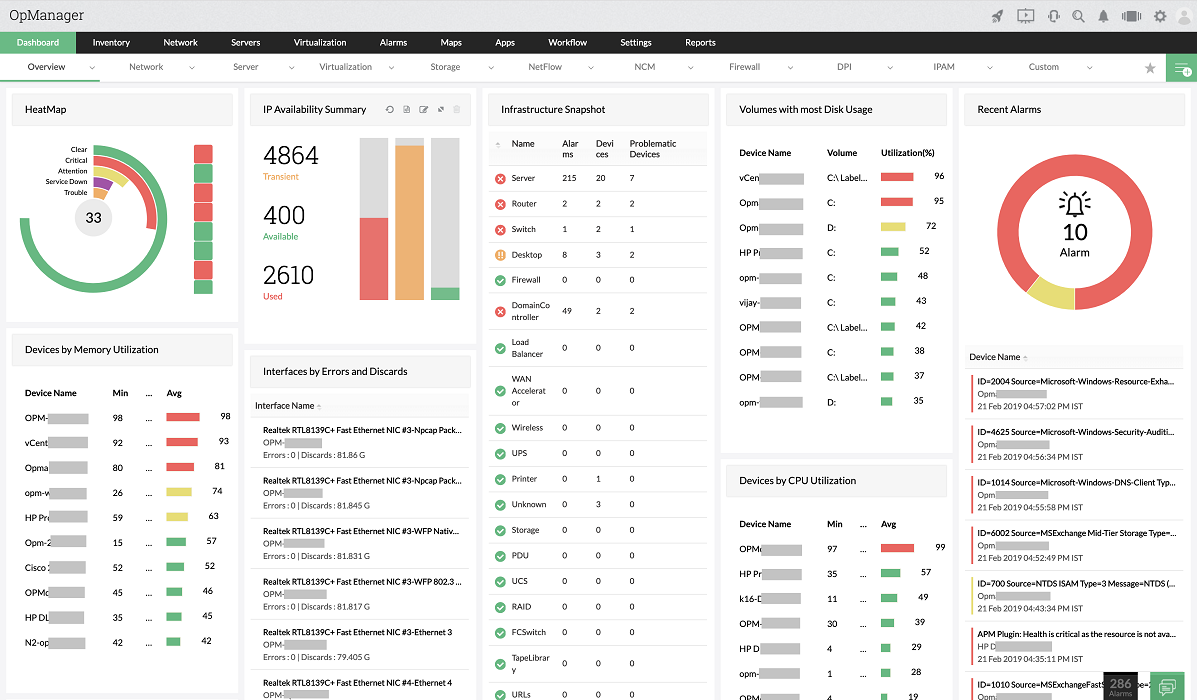
ManageEngine’s Op Manager uses the SNMP and WMI protocols to monitor your servers and make sure they are at peak performance at all times.
The solution stores all the data for historical performance tracking and troubleshooting, to eliminate the need for multiple server monitoring tools.
With OpManager, you will get detailed server reports in real-time so that the IT manager can perform key adjustments if needed.
Moreover, this network management solution identifies all the devices within your network at any time so you can keep track of any activity.
So, it not only takes care of the servers but the whole network by using agents and sensors to detect key performance metrics, including response times, packet loss, and more.
OpManager can even detect break-in attempts on your application servers. That includes login failures, account lockouts, failed attempts to access secure files, and more. And that is achieved by constantly processing Windows Event logs and syslog monitoring.
However, one of the best advantages is that Op Manager has a cloud-based dashboard that can be accessed from anywhere in the world.
ManageEngine OpManager key features:
Real-time server performance monitoring
Proactive server monitoring with multi level thresholds
Advanced network device discovery features
Windows event log monitoring
Single web-based dashboard accessible from any location in the world
ManageEngine OpManager
Take server monitoring to the next level with this complete network management solution!
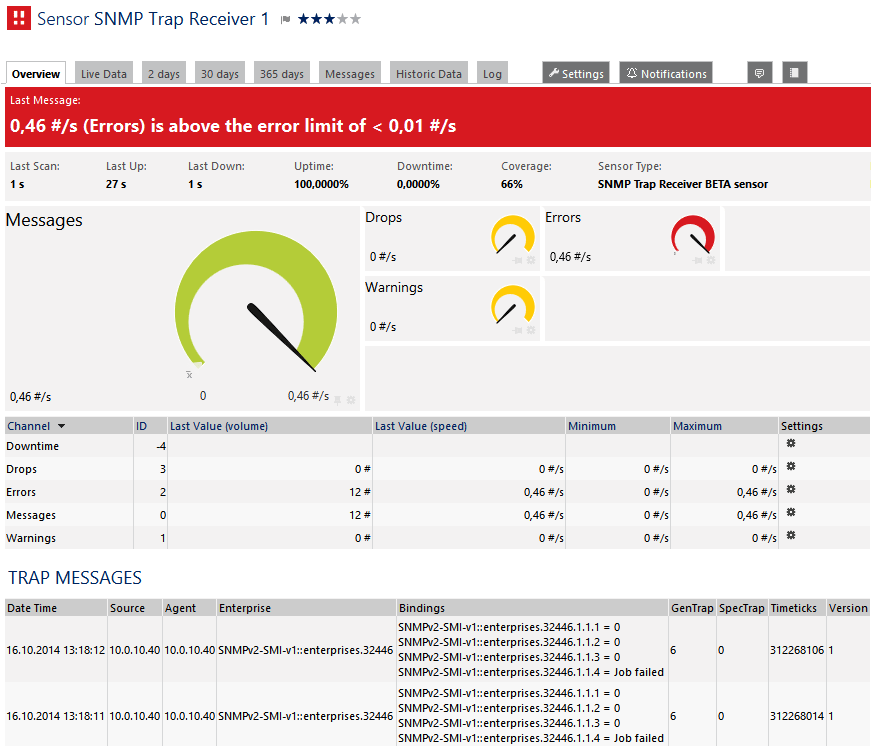
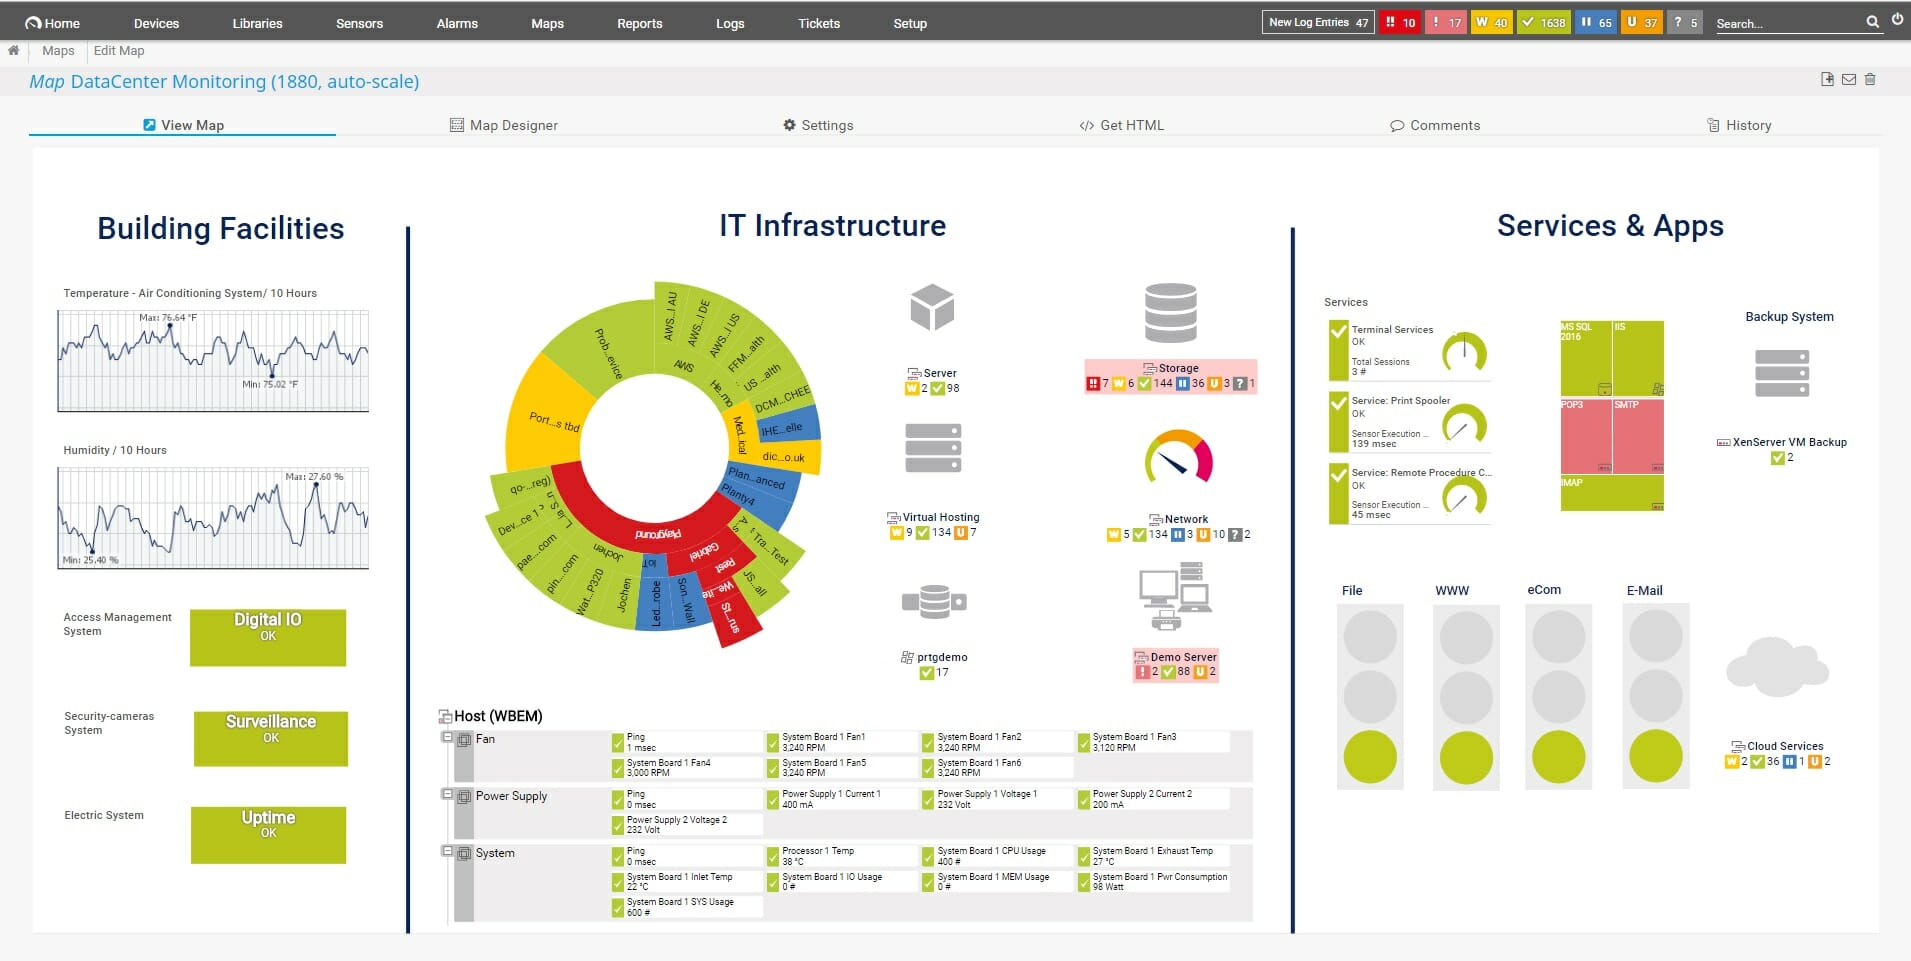
PRTG comes from Paessler, and it allows you to view important server data such as server uptime, health, disk, space, and performance.
By keeping all this information easily available, you’ll ensure that your server is working at peak performance without any issues.
Regarding the server types, PRTG works great for mail servers, web servers, database servers, file servers, and other types of servers that you might use.
The software can also monitor your bandwidth and it has 12 sensors available allowing you to easily find the source or any bottlenecks on your server.
PRTG monitors your database, and you may view specific datasets from your database, and thanks to the customizable reports, you’ll ensure that your database is running smoothly.
Since server security is crucial, it’s worth mentioning that the firewall monitoring feature is also available, so you can have a detailed report of all incoming and outgoing network traffic.
For maximum security, there’s support for automatic notifications, and you’ll receive them if there are any issues with your firewall or if the network security is compromised in any way.
Speaking of security, the software offers port monitoring, package capturing, and network traffic monitoring, so you can keep up with the traffic activity on your server.
PRTG includes a wide array of features, and we just barely mentioned some of its most prominent features. If you’re looking for professional and secure server monitoring software, PRTG is the best way to go.
PRTG features:
Extensive server monitoring
Application monitoring
Bandwidth and database monitoring
Firewall monitoring
Port and network traffic monitoring
PRTG Network Monitor
PRTG offers advanced server monitoring features for server administrators.
If you’re looking for a professional server monitoring software, then Netwrix Auditor might be the perfect choice for you.
The software works with various services, including Active Directory, Azure AD, Exchange, SharePoint, Windows Server, SQL Server, Oracle Database, and many others.
Netwrix Auditor offers extensive reporting so you can easily identify potential security issues. There is also a log feature available, so you may see who is accessing certain files.
Thanks to the alert feature, you’ll receive alerts whenever a suspicious activity is detected in your environment so you can prevent any data breaches from occurring.
Netwrix Auditor offers solid features, and it might be just the perfect server monitor software for your needs.
Netwrix Auditor features:
Works with various services including Active Directory, Azure AD, Windows Server, etc.
Another powerful server monitoring software that you might want to consider is Manage Engine Applications Manager.
The tool offers extensive monitoring features, and it allows you to keep track of your server’s hardware performance and temperature with ease.
With Manage Engine Applications Manager you may also troubleshoot application server issues. The application can monitor private, public, and hybrid clouds as well as cloud-hosted applications.
The software keeps track of your database, so you may easily monitor its performance, and see the detailed performance reports.
Manage Engine Applications Manager offers a wide array of features, and if you want all-in-one server monitoring software, this might be the perfect choice for you.
Manage Engine Applications Manager features:
Extensive monitoring features
Ability to troubleshoot server issues
Support for cloud monitoring
Database monitoring
ManageEngine Applications Manager
Keep track of your server’s hardware performance and temperature with this powerful tool.
Solarwinds Server & Application Monitor offers a remote monitoring feature that allows you to easily monitor the overall performance and availability of your servers.
By analyzing the data, you can easily identify issues and remotely fix them. You may also identify and troubleshoot issues associated with server hardware health.
The software supports over 1200 monitoring templates including Azure, AWS, Microsoft, Active Directory, and Apache Server Monitoring.
There’s an Application monitoring feature too, and by using it, you’ll ensure that your applications are fast, reliable, and at their peak performance.
Overall, Solarwinds Server & Application Monitor offers great features, so you might want to try it out.
Zabbix is an open-source and completely free server monitoring software. It allows you to monitor the server hardware, and you’ll be notified if new components are added or removed, and the same goes for the network module.
You can also keep a close eye on your resource usage, bandwidth usage, and packet loss rate. Of course, you’ll get notifications if there are warnings on your system or if the server temperature is too high or too low.
Zabbix offers cloud monitoring, application monitoring, and services monitoring. Thanks to the dozens of available templates and supported services, you should be able to manage any server without issues.
When you’re a server administrator, you know that there are many parameters that need to be monitored if you plan on doing your job effectively, so the right tools can mean everything.
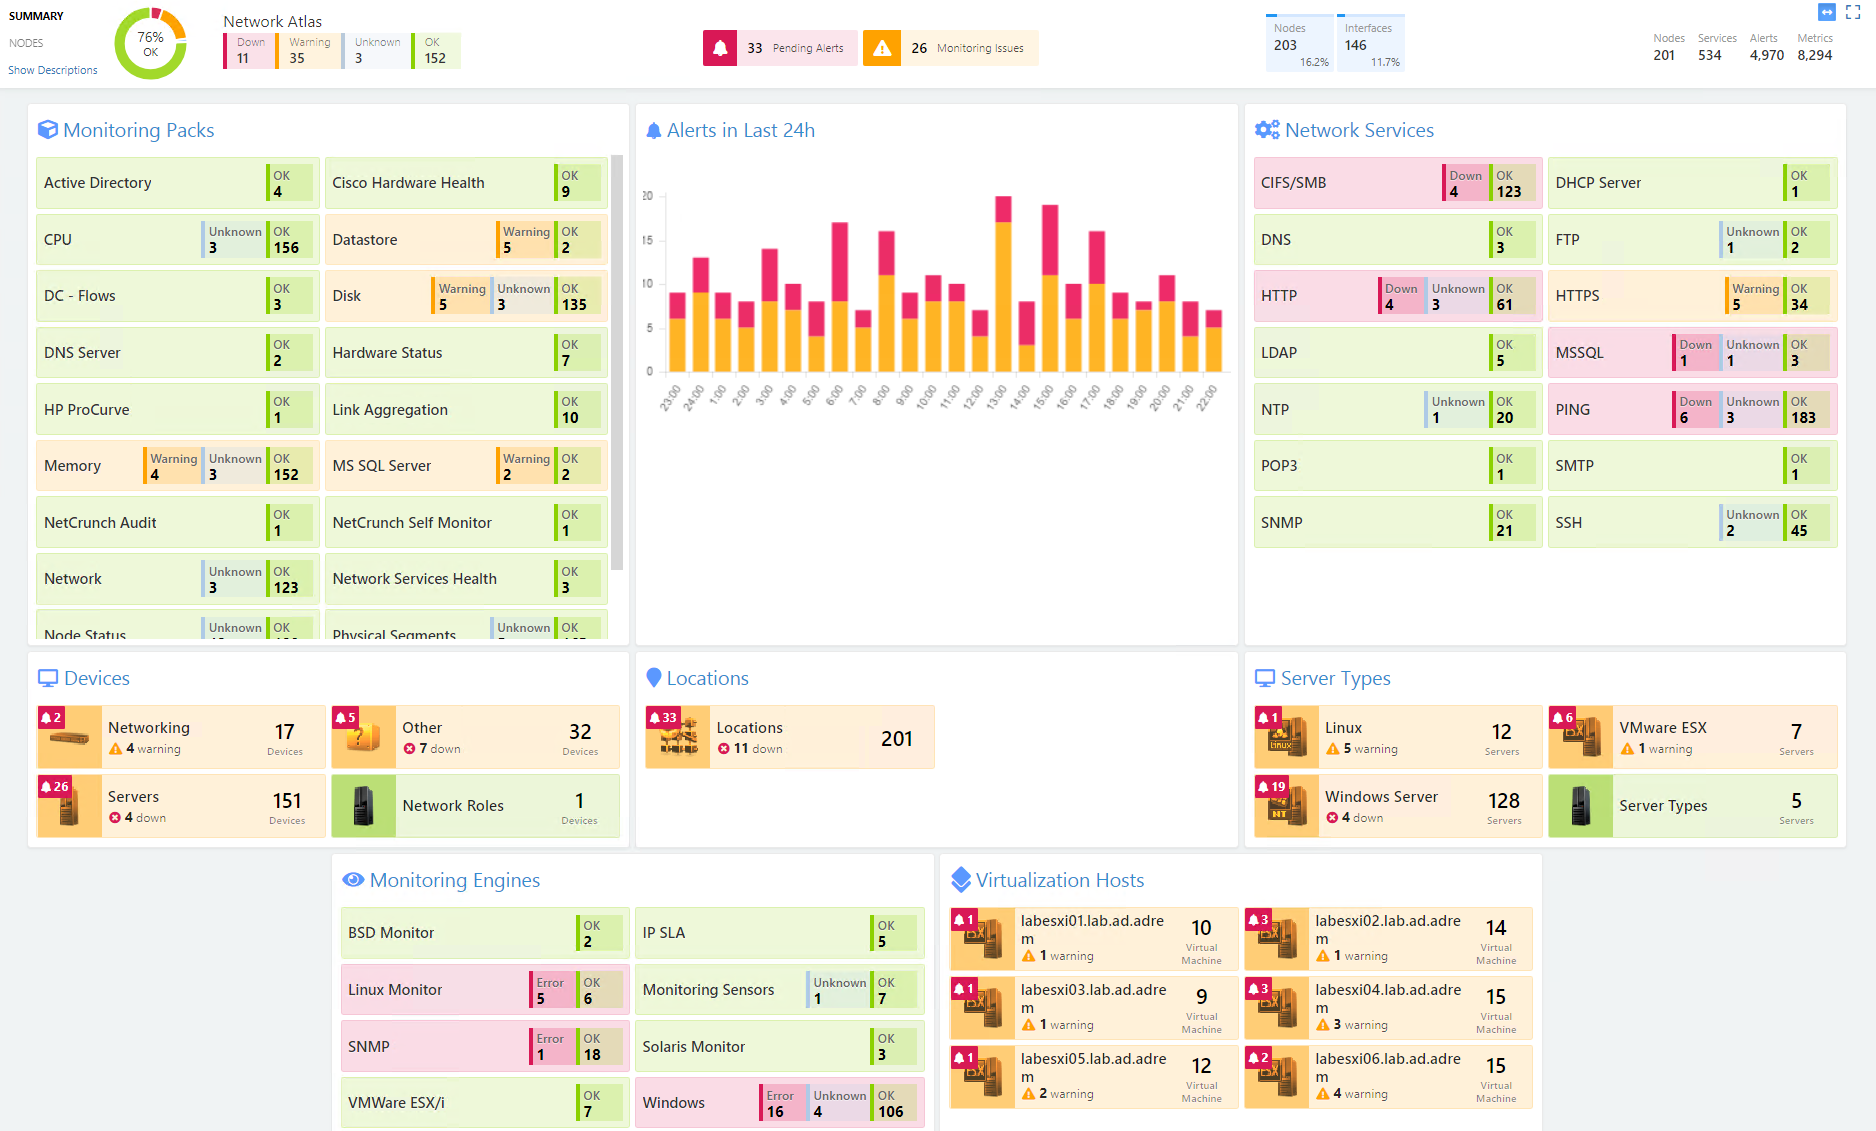
Well, NetCrunch offers the complete package when it comes to agentless server monitoring, starting from hardware, virtualization, and operating systems, and ending with containers and application services.
Thanks to these tools, NetCrunch lets you identify all present and potential issues, all thanks to a system that involves layers of monitoring that are constantly and persistently checked.
NetCrunch prioritizes system stability, and the built-in automatic reaction system lets your network handle itself and fix possible problems with minimal user input.
Lastly, NetCrunch does a fine job collecting data and analyzing it in order to optimize its actions for future scans and fixes, basically adapting itself to your network’s needs and most common issues.
Here’s a brief overview of NetCrunch’s capabilities:
Server Monitoring with OS Performance Monitors for Windows, Linux, Mac OS, BSD, FreeBSD, Solaris SQL Sensors for Oracle, SQL Server, MySQL, MariaDB, ODBC
Over 250+ monitor types, including protocols, monitoring packs, and advanced sensors
Log Monitoring (Windows, Apache, Log4J, Text logs in custom format)
Syslog Server, VMware ESXi, vCenter, and Hyper-V monitoring
Windows 11 OS has great features and an interesting design. It also brought different context menus, but although they seem to be better, they confused a lot of users.
That’s why many want to disable the new context menu and revert to the old one from Windows 10.
We have written a full Windows 11 build review so you can read all about these changes, but now, let’s see how we can get back the menus we’re used to.
How can I manage the new context menu in Windows 11?
1. Revert File Explorer to the old look
Press the Windows + R to open Run, type regedit in the text field, and click OK.
Click Yes in the UAC prompt.
Navigate to the following path in Registry Editor: HKEY_LOCAL_MACHINE\SOFTWARE\Microsoft\Windows\CurrentVersion\Shell Extensions
Right-click the Shell Extensions key, then select New and choose Key.
Name the new key Blocked and navigate to it.
Right-click an empty space, select New, and choose String value.
Enter this exact value: {e2bf9676-5f8f-435c-97eb-11607a5bedf7} and press Enter.
Restart your PC for the changes to take effect.
If you followed the steps correctly, File Explorer should be just like before in Windows 10.
Of course, if you change your mind and want to have the new File Explorer, all you need to do is to get back into the Registry Editor and delete the key you’ve created.
You can also use Registry Editor to remove apps from the context menu as well, to know how to remove apps like Clipchamp, Photos, and Paint 3D.
2. Show more options
As we’ve noticed from a lot of other features, Microsoft kept all the menus from Windows 10 either dormant or accessible. It goes the same for the old context menus, which are still present, without you needing to do much work.
You need to select the Show more options feature in any context menu, and it will bring the old menu back.
If you want to activate this feature quickly, you can also use the Shift + F10 shortcut used earlier to open the Windows 11 classic context menu. So, if you do not wish to turn off the context menus altogether, you can make them look like the old ones.
Also, if you want to have Windows 11 Show more options by default, there’s currently no quick setting.
3. Disable the new context menu
Users who want to completely disable the new context menu can do so using the Local Group Policy Editor. It’s not available in the Home edition of the OS, but users can easily install the Group Policy Editor in Windows.
1. Press Windows + R to open Run, type gpedit.msc, and hit Enter.
2. Under the User Configuration tab, expand Administrative Templates, and select Windows Components.
3. Select File Explorer from the left, and then click on the Remove File Explorer’s default context menu policy.
4. Select Disabled, and click on OK to save the changes.
5. If these don’t reflect right away, restart the computer.
Less cluttered context menus in Windows 11
As you can see, the new context menus are much less cluttered and easier to work with because they are simpler.
Only the fact that the Cut, Copy, Rename, and Delete options have been transformed into small icons that sit at the top of the context menu makes things a lot cleaner.
However, we can also understand users who say they are too small and should be transformed into bigger targets to click on for more efficiency.
We hope you managed to get the context menus sorted out and you’re happy with your decision, whatever that would be.
Besides, if you were wondering how do I change the Start Menu view in Windows 11, several customizations are available in Windows Settings, including pinned apps, adding or removing folders, and recommendations, amongst others.
iCloud Photo Library is a free service from Apple that allows you to view and manage your iCloud Photo Library from your Mac or PC. It also lets you download photos and videos from your iPhone, iPad, iPod touch, or Mac to the Photos app on your Mac or PC.
For a long time, Apple services and products were only reserved for Apple users. This has since changed, and you can download iCloud for Windows. Getting your iCloud photos to your Windows PC is another process, and we show you how to do that in this article.
Can I save all my iCloud photos to my computer?
Yes, you can. You must ensure you have the right settings enabled on your iPhone or iPad. For instance:
Enable iCloud Photo Library – The iCloud photo library enables you to access your photos from any device. You can sync them from anywhere and access them from another when you turn on this feature.
Clear storage space – Depending on the number of photos you want to download, ensure you have enough storage space to accommodate them on your PC. You can free up some hard drive space if you feel it won’t be enough.
Have a stable connection – It is critical that your internet speeds are fast so your Photos don’t get stuck while downloading.
You also need to ensure your devices meet the minimum system requirements and have an Apple ID and a Microsoft account to download the iCloud app. For some, approving iCloud may also be required to access your account from a PC.
How do you download all photos from iCloud to Windows PC at once?
Enter your Apple ID and Password credentials to sign in.
Click on the Photos icon to open your Photos album.
Select a photo on your keyboard, press and hold the Shift + Ctrl + Alt keys, then click the Download icon.
Once the download is complete, locate the pictures in your Downloads folder. They could also be in another location where you have set to save downloaded files.
If, for some reason, you’re having a hard time selecting photos because your iCloud drive is not showing thumbnails, refer to our article on how you can fix this.
On your Windows PC, open the Microsoft Store from the Taskbar and download the iCloud app.
Once set up, sign in to your iCloud account.
Click on Photos.
Next, select iCloud Photo Library in the pop-up that appears.
Now, click on Apply, and syncing of your iCloud Photos to your download folder will begin.
Wait for the files to finish downloading, then hit Windows + E to open File Explorer.
You should see an iCloud Photos folder on the left pane. Here is where your photos will be located. If you have sub-folders, the iCloud folder will open into the sub-folders. You can click on each to find the selected photos.
If you are trying to transfer photos from iCloud to your computer and you keep getting an error message, then it could be because of one or more of the following reasons:
iCloud Photo Library is not enabled – If you’re trying to transfer photos from the iCloud Photo Library, you must enable it first.
No internet connection – Another reason why you can’t transfer photos from iCloud to your PC or laptop is that your device isn’t connected either via Wi-Fi or a cellular data network.
Not enough storage space on your device – If your device does not have sufficient storage space for storing all those photos and videos, it won’t work properly either.
You’re using an older version of iOS – If you’re using an old version of iOS, chances are that you can’t send photos from iCloud because they haven’t been updated yet.
The Photos app is corrupt – If the Photos app is corrupted, it might be unable to communicate with iCloud and, therefore, not allowing you to transfer photos from iCloud to your computer.
Apple account ID issues – There might be an issue with the Apple ID account due to which you cannot easily access photos from iCloud on a PC or Mac computer without any issues.
Hopefully, you’ve been able to download photos from your iCloud to your Windows PC. We also recommend copying the photos onto another folder to avoid losing them in case you disable iCloud.
That’s all we had for this article, but keep the conversation going in the comment section below.
Now, let’s get right into this new Insider Preview build for Windows 11 and see what Microsoft has released to the Canary Channel.
What should I look for in Windows 11 build 25314?
Yes, it’s exactly as you heard. The Redmond tech giant has just launched the first Windows 11 Insider Preview build for the newly established Canary Channel.
The build number is 25314, and it actually contains some of the same new features that are in the Dev Channel release.
We’re going to take a more in-depth look and see what exactly Microsoft has envisioned this time around, as far as system changes go.
Remember that current Dev Channel Insiders are being migrated to the Canary Channel and they will be informed of this change via an email too.
Also important is the fact that those who want to remain on the Dev Channel will need to perform a clean install, which is usually the case when switching to a lower Channel.
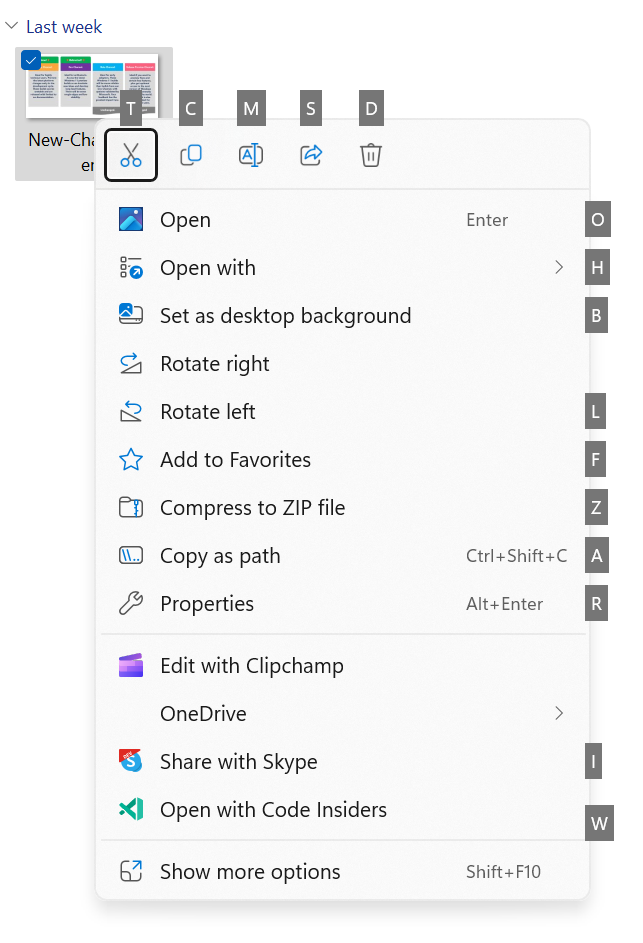
With this new build, Microsoft is adding access key shortcuts to the XAML context menu in File Explorer, in case you didn’t know.
An access key is a one-keystroke shortcut that allows a keyboard user to quickly execute a command in the context menu.
You should know that each access key will correspond with a letter in the display name, as it’s part of an effort to make File Explorer more accessible.
Another notable change is the File Recommendations feature that is coming to File Explorer Home to bring users the most relevant file content right to their fingertips.
This feature will be available to users signed into Windows with an Azure Active Directory (AAD) account, so keep that in mind.
We also have to mention that Local Security Authority (LSA) protection helps protect against theft of secrets and credentials used for login by preventing unauthorized code from running in the LSA process and by preventing dumping of process memory.
On that note, starting with this upgrade, Microsoft will actually audit for a period of time to check for incompatibilities with LSA protection.
Furthermore, the Narrator will now retrieve updates to its Outlook support when the Narrator is started, and you can learn more about the work we did for Outlook in Chapter 5 of the Narrator User Guide.
Keep in mind that Microsoft has not added any additional functionality to our Outlook support, but this work will allow updates to the Outlook experience to be made through the Microsoft Store.
Changes and Improvements
[General]
In order to increase security in Windows 11, starting with this build and later we are disabling the Remote Mailslot Protocol by default.
The legacy Remote Mailslot Protocol is a simple, unreliable, insecure, and unidirectional inter-process communications protocol between a client and server and was introduced in Windows NT 3.1 and will be deprecated in a future Windows release.
If an application attempts to open a Remote Mailslot session over the SMB protocol, you may see one or more of the following errors:
3025 ERROR_REMOTE_MAILSLOTS_DEPRECATED
“The requested operation failed. Remote mailslots have been deprecated.”
If your application still uses Remote Mailslot, contact your vendor about updating their software. The legacy Remote Mailslot is not secure and should not be used under any circumstances.
If you need to temporarily enable Remote Mailslot, run the following command in an elevated PowerShell console:
What can I do if I can’t install Windows 11 build 25314?
Press Win+ I to access Settings.
Select the System category and click on Troubleshoot.
Press the Other troubleshooters button.
Press the Run button next to Windows Update.
Make sure to report any other issues you might come across, in order for Microsoft to address and improve the overall OS experience for us all.
This is everything you can expect if you are a Windows 11 Insider on the Canary Channel. Leave a comment below if you found any issues since installing this build.
Microsoft’s Loop app, a new collaborative canvas allowing teams to collaborate across Microsoft 365 apps is set to ship to public preview late this month.
Microsoft's long-promised Loop app (Notion competitor) will hit public preview in late March. It will be off by default and doesn't yet meet all Microsoft's compliance capabilities: https://t.co/Y2qISQaC4J (thanks @mdreinders)
The nifty tool rolled out in private preview last week for some users to test out and leverage Microsoft’s own Fluid Framework thus allowing them to manage various Loop snips.
Although it is now shipping to public preview “It will be off by default and doesn’t yet meet all Microsoft’s compliance capabilities.” Microsoft is still working on features like eDiscovery and Sensitivity labeling.
Are you anticipating this new app? Share your thoughts with us below.
Xbox Free Play Days is back once again for a pretty stacked week with no less than 4 games. It’s a pretty sweet lineup too, with some pretty big names on the list. These games are accessible for free for subscribers of Xbox Live Gold and Xbox Game Pass Ultimate, from now through Sunday, March 12th. Let’s check out this week’s Xbox Free Play Days games below.
Cities: Skylines is an award-winning, best-selling management game, now remastered for Xbox Series X|S with all of its robust city-simulation gameplay and unique charm along for the ride.
Cities: Skylines – Remastered puts you in charge of a growing city, from the ground-breaking of its first streets to the ever-changing needs of thousands of citizens. Design, build, and manage the city of your dreams, from public services to civic policies, and challenge yourself to grow from a simple town to a bustling metropolitan hub.
Ever wished to play as one of the characters from your favorite horror movies? Dead by Daylight is a 1v4 multiplayer game that draws from all corners of the horror world from a powerful slasher to a terrifying paranormal entity.
Choose between playing an unstoppable Killer and one of 4 Survivors trying to evade a gruesome death. Each character has their own deep progression system and plenty of unlockables that can be customized to fit your personal strategy. Work together to escape, or stalk and sacrifice every Survivor.
Squad up and breach in to explosive 5v5 PVP action. Tom Clancy’s Rainbow Six® Siege features a huge roster of specialized operators, each with game-changing gadgets to help you lead your team to victory. Command an arsenal of gadgets to secure the win: Set traps, fly drones, track footsteps, see through walls, and more! Lead your teammates to victory in intense, fast-paced PVP matches across a wide variety of destructible arenas. Join a massive online community of over 45 million players as you fight for supremacy. An ever-expanding universe of Operators, gadgets, items, and events – updated all year long.
2022 will see the WRC transition to the hybrid era. This is a revolution for the rally world, significantly affecting performance, changing strategies and making drivers and teams adapt.
In terms of gameplay, new mechanics have been integrated to represent the demands of the hybrid engines. In order to win, you have to carefully manage your battery by adapting your engine mapping throughout the special stages you take part in.
As community satisfaction is always a priority , you can now share customised livery and stickers with other players. The best creations will be rewarded and highlighted.
For fans of competition, the new Leagues mode lets players challenge opponents with a similar level online. Finish ahead of your competitors to move up the ladder in the Legends category.
WRC Generations includes more content than ever before in a rally game.
Wrap up
Don’t forget that featured games typically are purchasable with discounts during an Xbox Free Play Days event. To learn more visit the Xbox Free Play Days FAQ page.
Outlook users often need to download files attached to their emails. And there’s a way you can automatically save email attachments to a folder in Outlook using by setting up a rule.
The ability to automatically download all email attachments of newly received emails in Outlook and save them to folders is handy. So, let’s find out how you can do that with a VBA Script.
How can I set up an Outlook rule to automatically save email attachments to a folder?
1. Set up the VBA script
First, set up a VBA script that downloads the attachments to a specified folder. Press the Alt + F11 or Alt + Fn + F11hotkey, depending on whether the function key is locked or unlocked, which opens the Microsoft Visual Basic window.
Click Insert and Module to open a new module window.
Copy this VBA code with the Ctrl + C hotkey: Public Sub SaveAttachmentsToDisk(MItem As Outlook.MailItem) Dim oAttachment As Outlook.Attachment Dim sSaveFolder As String sSaveFolder = "C:\Users\DT168\Documents\outlook-attachments" For Each oAttachment In MItem.Attachments oAttachment.SaveAsFile sSaveFolder & oAttachment.DisplayName Next End Sub
Paste that code into the VBA Module window with the Ctrl + V hotkey.
Note that the C:\Users\DT168\Documents\outlook-attachments path in that script is an example. Replace it with the full path of the folder to download the attachments.
Next, save the new script.
Close the VBA Module window.
For those wondering how to automatically download/save attachments from Outlook to a certain folder VBA, you now know the script. The next step is to set a rule for it.
2. Set up an Outlook rule for the VBA script
NOTE
The option to Run a script has been discontinued in the recent versions of Outlook. You can get it back by making minor changes to the Registry, as illustrated in the first few steps below.
Press Windows + R to open Run, type regedit, and then hit Enter.
Click Yes in the UAC prompt.
Paste the following path ((might be different for other versions of Outlook) in the address bar and hit Enter:Computer\HKEY_CURRENT_USER\Software\Microsoft\Office\16.0\Outlook\Security
Right-click on the empty portion, hover the cursor over New, choose DWORD (32-bit) Value, and then name it EnableUnsafeClientMailRules.
Double-click on the newly created DWORD, enter 1 under Value Data, and then click OK to save the changes.
Now, launch Outlook.
To set up a rule to download attachments, click the Rules button, and then select Manage Rules & Alerts.
Click the New Rule button.
Select the Apply rule on message I receive option and click Next. Some users might need to select a Check messages when they arrive option in older Outlook versions.
Choose the which has an attachment option, and then click Next.
Select the Run a script check box, and then under Step 2, click on a script link.
Select the download attachment script you pasted earlier, and then click the OK button.
Click Next.
Enter a title for the rule in the text box, and select the Turn on this rule option.
You can also select the Run this rule now on messages already in Inbox option if preferred. The rule description box should read as follows: Apply this rule after the message arrives on this computer only run <macro title>.
Click the Finish button.
Once done with the rule, Outlook will automatically download attachments to the folder path in the script. Then you won’t need to download the attachments manually. Open the folder path specified in the macro in File Explorer to look through the attachments.
The Windows Media Creation Tool is a tool that allows you to create a bootable USB drive for your Windows installation. It also creates a recovery USB drive, which can be used to fix problems with your computer.
If the Windows Media Creation Tool progress is stuck at 0, then it means that it has detected an error in the process of installing your new operating system. This is because there’s something wrong with your system, and you need to fix it before proceeding further.
Why is my Windows Media Creation tool stuck at 0?
If you are not sure how long will the Windows Media Creation Tool take to complete, then the amount of information you want to add to your USB drive and how many files you have on your computer should give you a rough idea.
However, if your Windows Media Creation tool is taking forever, below are some possible causes:
Compatibility issues – Your computer’s hardware or software may be incompatible with the Media Creation Tool.
Unstable connection – If you are using a Wi-Fi network, it is also possible that there might be an issue with the router or internet service provider.
Your PC is missing a required component – Your PC might not have a DVD drive or USB flash drive installed because of a hardware problem or because you have disabled them in Windows.
The server is overloaded – Although your internet speeds may be optimal, you may experience extremely slow speeds if Microsoft servers are overcrowded.
Generally, the time it takes for your tool to complete depends on how much content you want to include. The more content you include, the longer it will take.
It’s also possible that the tool may need to download additional content from a server to process the media creation. This could take longer than expected.
The speed of your internet connection can also affect how long it takes for your tool to complete. If you’re using an older or slower connection, you might experience delays when loading new content onto your Windows machine.
What can I do if Windows Media Creation Tool is stuck at 0?
While this issue may seem complex, there are a few workarounds that could improve the progress if the Windows Media Creation Tool is taking forever:
First, ensure that your computer meets the minimum requirements for the tool and that you download and install all required drivers.
Locate the Windows Update service, double-click on it, and select Properties.
Navigate to the General tab, under Startup type, select Automatic from the drop-down options, and click the Start button.
Next, click Apply and then OK.
2. Disable antivirus temporarily
Hit the Start menu icon, type Windows Security in the search bar, and click Open.
Click on Firewall & network protection, then select Public network.
Locate Microsoft Defender Firewall and toggle the off button.
3. Reset Windows update components
Hit the Windows key, type cmd in the search bar, and click Run as administrator.
Type in the following commands and press Enter after each one: net stop wuauservnet stop cryptsvcnet stop bitsnet stop msiserverren %systemroot%\softwaredistribution softwaredistribution.bakren %systemroot%\system32\catroot2 catroot2.baknet start wuauservnet start cryptSvcnet start bitsnet start msiserver
If none of these solutions work for you, we recommend you find an alternative method. Downloading the Windows ISO file and using a program like Rufus to load it into a USB hard drive can be a solution.
Windows 10 has been present for a long time, with many users ditching the latest iteration for the previous one, primarily due to more stability. But it has a few bugs and flaws. One that seems to affect many is when Windows 10 can’t find a printer.
Printers have, of late, become mainstream, and there are several dependable printers available for both home and office use. So, the inability to find and connect to one presents a major problem. Let’s learn about it and the solutions that worked for others.
Why can’t I find my printer in Windows 10?
Here are a few reasons Windows 10 can’t find your printer even though it’s turned on:
Network issue: In most cases, it’s the misconfigured network or PC settings when you can’t find a printer on the network in Windows 10.
Improper connection: When a wired printer cannot be connected, it’s usually an improper connection or a damaged cable to blame.
The printer is incompatible: Before you proceed to the troubleshooting, it’s imperative to identify whether the printer is compatible with the PC. Because if it’s not, there’s little chance that it works.
Outdated driver or firmware: If the printer firmware or driver is outdated, you may encounter issues trying to connect to it.
What can I do if Windows 10 can’t find a printer?
Before we head to the slightly complex fixes, here are a few quick ones you can try:
Restart the computer and check if Windows 10 still can’t find the shared printer.
For wired ones, ensure the cable is plugged in firmly at both ends and that there are no damages.
In the case of wireless printers, verify whether both the printer and the computer are on the same network if Windows 10 can’t find the network printer.
Check for any pending Windows Updates and install them.
Go through the printer’s manual or the official website, and verify whether it’s compatible with the PC.
If none of the work, move to the ones listed next.
1. Run the troubleshooter
Press Windows + R, type msdt.exe -id DeviceDiagnostic, and hit Enter.
In the Hardware and Devices troubleshooter, follow the on-screen instructions, and apply the recommended changes.
If this doesn’t work, press Windows + I to open Settings, and click on Update & Security.
Navigate to the Troubleshoot tab, and click on Additional troubleshooters on the right.
Now, select the Printer entry, and click on the Run the troubleshooter button.
Let the troubleshooter identify issues and apply the recommended changes.
If you can’t find a wireless printer in Windows 10, the primary approach should be to run the built-in troubleshooters. We recommend running both the Printer and Hardware and Devices troubleshooter to identify and eliminate the underlying cause effectively.
2. Reinstall printer drivers
Press Windows + X to open the Power User menu, and select Device Manager from the list.
Locate the printer, right-click on it, and choose Uninstall device.
Tick the checkbox for Attempt to remove the driver for this device, and click Uninstall.
Once done, restart the computer, and Windows will automatically install a fresh driver.
You can skip the restart the computer step and download & install an updated driver from the manufacturer’s website. To know how, check out this Dymo LabelWriter driver installation guide, for example.
If you need more guidance on installing a local printer in Windows 11, check out this guide on installing a local printer on Windows 11 for a comprehensive step-by-step process.
3. Update printer drivers
Press Windows + R to open Run, type devmgmt.msc, and hit Enter.
Right-click on the printer here, and select Update driver.
Now, choose Search automatically for drivers, and Windows will find and install the best driver on the PC.
When Windows 10 can’t find printer, updating the driver may do the trick. The Device Manager method works as an offline update, so you might have to manually install the driver from the manufacturer’s website.
Another dependable procedure for updating your printer drivers is using specialized driver updating programs, that automatically obtain the correct and newest versions from its database.
4. Uninstall recent Windows Update
Press Windows + I to open Settings, and click on Update & Security.
Click on View update history.
Now, click on Uninstall updates at the top.
Select the recently installed update, and click Uninstall.
Click Yes in the confirmation prompt.
If Windows 10 can’t find a printer after an update, it could be a bug in the current version or an introduced incompatibility to blame. So, the best option here is to uninstall the update until the issue is resolved by Microsoft in the subsequent versions of the OS.
Press Windows + E to open File Explorer, paste the following path in the address bar, and hit Enter:C:\Windows\System32\spool\PRINTERS
Press Ctrl + A to select all the files here and then hit Delete.
6. Disable the firewall
Press Windows + S to open Search, type Windows Defender Firewall, and click on the relevant result.
Select Turn Windows Defender Firewall on or off from the navigation pane.
Now, select Turn off Windows Defender Firewall (not recommended) under both Private network settings and Public network settings, and click OK to save the changes.
Several users also found that their firewall blocked the printer, so Windows 10 couldn’t find the printer. We don’t recommend disabling the firewall for long since it puts your PC at high risk.
Press Windows + R to open Run, type regedit in the text field, and click OK.
Click Yes in the UAC prompt.
Now, paste the following path in the address bar and hit Enter:HKEY_LOCAL_MACHINE\System\CurrentControlSet\Control\Print
Right-click on the empty portion, hover the cursor over New, select DWORD (32-bit) Value, and name it RpcAuthnLevelPrivacyEnabled.
Double-click on the RpcAuthnLevelPrivacyEnabled DWORD.
Enter 0 under Value data, and click OK to save the changes.
Once done, restart the computer for the changes to come into effect, and the problem should be resolved.
Tip
If nothing works and you are facing the issue with a wireless printer, try adding the printer with the IP address instead. This has worked for a lot of users.
One of the solutions here should have helped when Windows 10 can’t find a printer, and if the problem reappears, you know where to look.
Cashflow Classic is a free online game that revolves around investments and is developed by Richard Kiyosaki, the author of the bestseller Rich Dad, Poor Dad.
As almost everybody is online, you can play the Rich dad, Poor dad game online. So if you’re interested, make sure to read the entire article.
The game was designed as an interactive tool to teach investing and wealth building by going through scenarios similar to life. Originally, Cashflow was launched as a board game, then found online and made available for PCs, tablets, and mobiles.
What is the difference between Cashflow 101 and 202?
Cashflow 101 is the original game, a more accessible and realistic version than Cashflow 202, with some other significant differences.
Cashflow 202 has some great extras that will make the game fun while ensuring a more realistic experience. However, it is also worth noting that Cashflow 202 will not include a board, so you will need the 101 board to play.
Here are the differences:
Extra sets of Cash Flow Deal and Capital Gain Deal cards
Added Market Cards + Doodad cards
202 is more realistic – crashes in the market, etc.
Beginning Investment portfolio cards
You will need your passive income to double the expenses in 202, making the game a bit longer.
When you buy a business and add the token to it, you can land on it again and accept it as a franchise (two tokens)
When selling a franchised business to another user, you must sell them both.
As you can see, there are considerable differences between the games, so make sure to continue reading to get an answer to all your questions on this topic.
How can I play the Cashflow game in my browser?
Who can play Cashflow online?
The free online game, Cashflow, is aimed at financial illiterates and those who want to improve their financial knowledge.
It is also marketed as an excellent family game or the perfect game to challenge your friends’ financial IQ. And you can also play the Cashflow board game online solo if you prefer.
For the ultimate gaming experience, we recommend using Opera GX as the main browser.
The built-in free adblocker will help you to focus on your game, while the customizable themes and design are a charm. Not to mention that you can continue running other programs in the background with a network limiter option.
What’s more, Opera GX comes with a built-in VPN to secure your online activity, allowing you to play the Cashflow game online for free without worrying about your privacy.
First, you must create an account on the creator’s official website.
Then, you can start a Cashflow 202 game online multiplayer with up to 5 friends or family members. Alternatively, you can join a game with other players from around the globe that are online.
The game has two stages, the rat race and the fast track.
In the rat race, the players learn to follow their dream while investing in small or big opportunities, which helps them increase their income. They also know to keep their accounting and to update personal financial statements.
It is essential that wealth is not acquired for the sake of it but to attain an absolute dream. So players should build their financial knowledge slowly but surely.
The game aims to acquire enough passive income to exceed expenses and get out of the rat race. This builds enough financial stability to live on the fast track and head straight toward your dream.
There are various investment options, be it stocks, property, business, or gold. But not all will help generate a steady passive income, which is the ultimate goal. Stocks, for instance, deliver a one-time profit or loss. So, you must identify the right investments and go with them.
Besides, the second most critical in-game approach should be to reduce expenses. The tracker will list all expenses, and you should try to clear them at the earliest using the in-hand cash, if any, or devise a strategy that helps you minimize expenses in the Cashflow game online.
The game resembles the real-life situation of an average person, be it having babies, losing jobs, securing big and small deals, and the ultimate dream you choose initially.
The game is accessible 24/7, anytime, anywhere, as long as you have an Internet connection.
Can I play the cashflow game by myself?
The developers understood the importance of playing the Rich Dad Poor Dad Cash Flow Online game in groups and developed it as such.
They recommend you play in groups of 3-6 for the best experience. So, invite your friends to it, and you can have a great time playing the Cashflow game by Robert Kiyosaki. But you can still play the board game alone if you would like.
How long does it take to play Cashflow?
Depending on the number of players and how fast all transactions are made, a game of Cashflow 101 could take up to 3-4 hours, while the Cashflow 202 version will take anywhere from 4 to 6 hours of your time because of all the extra cards and features.
Nowadays many applications are running in the cloud, and if you’re a server administrator, you need to keep a close eye on the cloud performance.
There are several ways to do that, but the best one is by using cloud monitoring tools. Speaking of which, in this article, we’re going to show you some great tools for this task.
How can a cloud-based tool help you monitor and improve performance?
Nowadays, when the workforce is scattered across the globe, it’s a lot more difficult to manage your assets or monitor their performance.
But thanks to cloud-based applications you can implement solutions and manage the performance of your systems on the go, without physical presence.
A cloud-based interface will look the same on any system or device and your IT management team or technician can monitor and take critical action wherever he or she is, with a simple Internet connection.
That being said, here’s our selection of network performance monitoring software that works in the cloud.
What is the best performance cloud monitoring tool?
If you’re looking for a cloud monitoring and performance tool, Site24x7 is certainly one of the most impressive because it analyzes your whole network infrastructure.
This solution monitors more than 60 performance metrics of up to ten servers, no matter if they’re running SUSE, CentOS, or Debian.
Actually, Site24x7 uses key metrics, including even CPU usage by processor or by core, used and free memory, and others to monitor server health and availability.
Moreover, the IT management team can use a dedicated mobile app to perform start, stop, and delete actions on the go.
It’s not all about network data because the solution also keeps an eye on Microsoft applications like SQL, Exchange, and more.
All in all, with Site24x7 you will know every single change on your servers and network and will notify you immediately so you can take prompt action.
Site24x7 features:
Monitor more than 60 performance metrics, including CPU usage and memory
Dedicated mobile app for on-the-go actions
Cloud-based dashboard for complete control
Friendly UI and simple implementation
Receive notifications and warnings based on your desired settings
Site24x7
Monitor the performance of your servers from a single cloud dashboard and over 60 performance metrics.
ManageEngine Applications Manager comes with a cloud-monitoring feature that allows you to monitor the performance and availability of apps and services running on the cloud.
You can observe and manage cloud-based and on-premises resources from a single platform. It also provides insights into their performance and availability, including containers, VMs, databases, and cloud services like Microsoft Azure, AWS, and Google Cloud Platform.
It can monitor various apps and services, including Java applications, web applications, .NET applications, databases, etc.
You can generate reports on cloud usage and performance trends to optimize cloud-based resources and ensure that they are being used effectively.
The tool gives you detailed information about an application’s performance, including throughput, response times, and error rates, which allows you to identify and resolve issues before they impact end users.
You can configure ManageEngine Applications Manager to send alerts via emails or SMS and execute remedial actions automatically to fix issues.
It can enhance the performance and availability of popular ERP solutions, including Oracle EBS, SAP, Microsoft Dynamics CRM, and more.
ManageEngine Applications Manager features:
Proactive monitoring and alerting with customizable threshold settings
User-friendly interface with customizable dashboards and widgets
Support for multiple deployment models, including on-premises and cloud
Intelligent fault management with automated diagnosis and corrective actions
Scalability to monitor thousands of applications and servers
ManageEngine Applications Manager
Monitor with ease the performance and availability of various cloud applications and services.
PRTG offers cloud monitoring thanks to the built-in Cloud HTTP sensor that will show the server’s response time and response code. In addition to the Cloud HTTP sensor, there’s also a Cloud Ping sensor available.
The software also supports Amazon CloudWatch, Mail Server, VMware, Microsoft OneDrive, Dropbox, Google Drive, and Google Analytics monitoring.
PRTG Network Monitor also offers a bandwidth monitor allowing you to view your network stats in real time. As for available sensors, there are 11 different sensors available for bandwidth monitoring.
There’s also application performance monitoring, allowing you to easily monitor all-important application data. To top it all off, there’s an extensive server monitoring feature available as well.
Paessler PRTG Network Monitor offers great features, and we listed just a few of them. If you want an advanced cloud monitoring tool, this one is the perfect choice for you.
Paessler PRTG Network Monitor features:
Cloud HTTP and Cloud Ping sensor
Support for Amazon CloudWatch, Mail Server, VMware, OneDrive, Dropbox, Google Drive
Bandwidth monitor
Extensive server monitor
Application monitor
Paessler PRTG Network Monitor
Paessler PRTG Network Monitor is an advanced monitoring tool optimized for server and cloud monitoring.
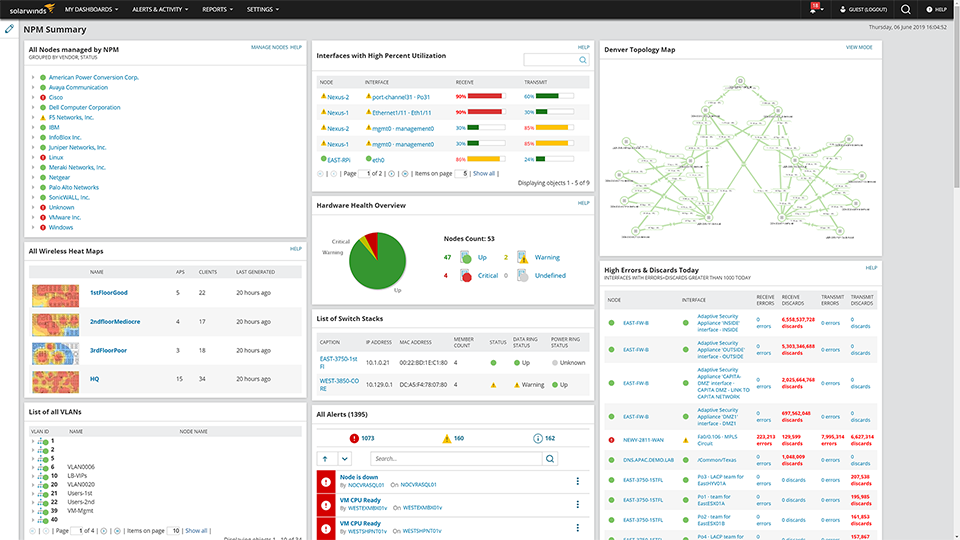
Another great software for cloud monitoring is Solarwinds Network Performance Monitor. The software offers cloud monitoring thanks to the available Cisco ACI monitoring feature.
Speaking of monitoring, the software offers extensive monitoring features, so it’s easy to detect and resolve network issues without too much trouble.
There’s also an advanced pathing feature that lets you visualize all your network paths. By doing so, you can easily get a better insight into your network.
The Alert feature is available as well, so you will get a notification as soon as a specific type of problem occurs. Of course, you may easily filter alerts and only receive the most important alerts.
Solarwinds Network Performance Monitor offers great features, and if you need cloud monitoring software, this might be the perfect tool for you.
If you’re looking for powerful cloud monitoring software, Datadog is what you need. The software lets you monitor your cloud services, serverless functions, databases, containers, and much more.
It’s worth mentioning that Datadog has over 400+ vendor-backed integrations, so you should be able to use it with almost any cloud service.
With the Watchdog feature, the software easily detects issues, and you view all cloud and on-prem servers at a glance. Of course, it’s also possible to monitor the containers and visualize the data in real time.
The software will automatically collect logs from your services, applications, and platforms, and allow you to easily view detailed reports with just a couple of clicks.
Datadog is a powerful cloud monitoring tool, and we just barely covered its features. If you’re looking for a powerful and professional tool, Datadog might be what you need.
Datadog features:
Ability to monitor cloud services, databases, containers, and more
400+ integrations
Ability to view detailed logs and reports
Automatic log collection from services, applications, and platforms
Netdata is an open-source and free cloud monitoring software tool and it can run on AWS, Azure, GCP, Docker, Kubernetes, various Linux versions, FreeNas, macOS, PFSense, and Synology.
It is incredibly simple to install, and you can do that with a single command. The installation process takes only a few minutes and requires zero configuration.
The software can provide you with real-time metrics, and thanks to the dozens of integrations it should work with all the latest services.
It’s worth mentioning that there’s a powerful metrics collector that works with hundreds of collectors. Thanks to this feature you will see and monitor the health and performance of your systems.
Netdata is a great cloud monitoring software, it requires zero configuration, it’s simple to install, and it’s completely free, so there’s no reason not to try it.
Monitoring the cloud doesn’t have to be difficult, and in fact, it’s relatively simple as long as you use specialized tools, such as the ones listed below to do it.
A healthy network will improve the efficiency of your organization and picking the right one for your business can also lead to both financial and personal savings.
However, what if you want to cancel an Outlook meeting from your calendar without sending others a notification? The process is quite simple, and we explain each step below.
Check it out:
How can I cancel an Outlook Meeting without notifying attendees?
1. Cancel the meeting offline
Open Outlook, go to the Send/Receive tab, and click the Work Offline button.
Next, switch to Calendar view, right-click on the meeting, and select Cancel Meeting from the context menu.
Click the Send Cancellation button in the attendee update window that appears. Don’t worry! The email won’t be sent since you are working in offline mode.
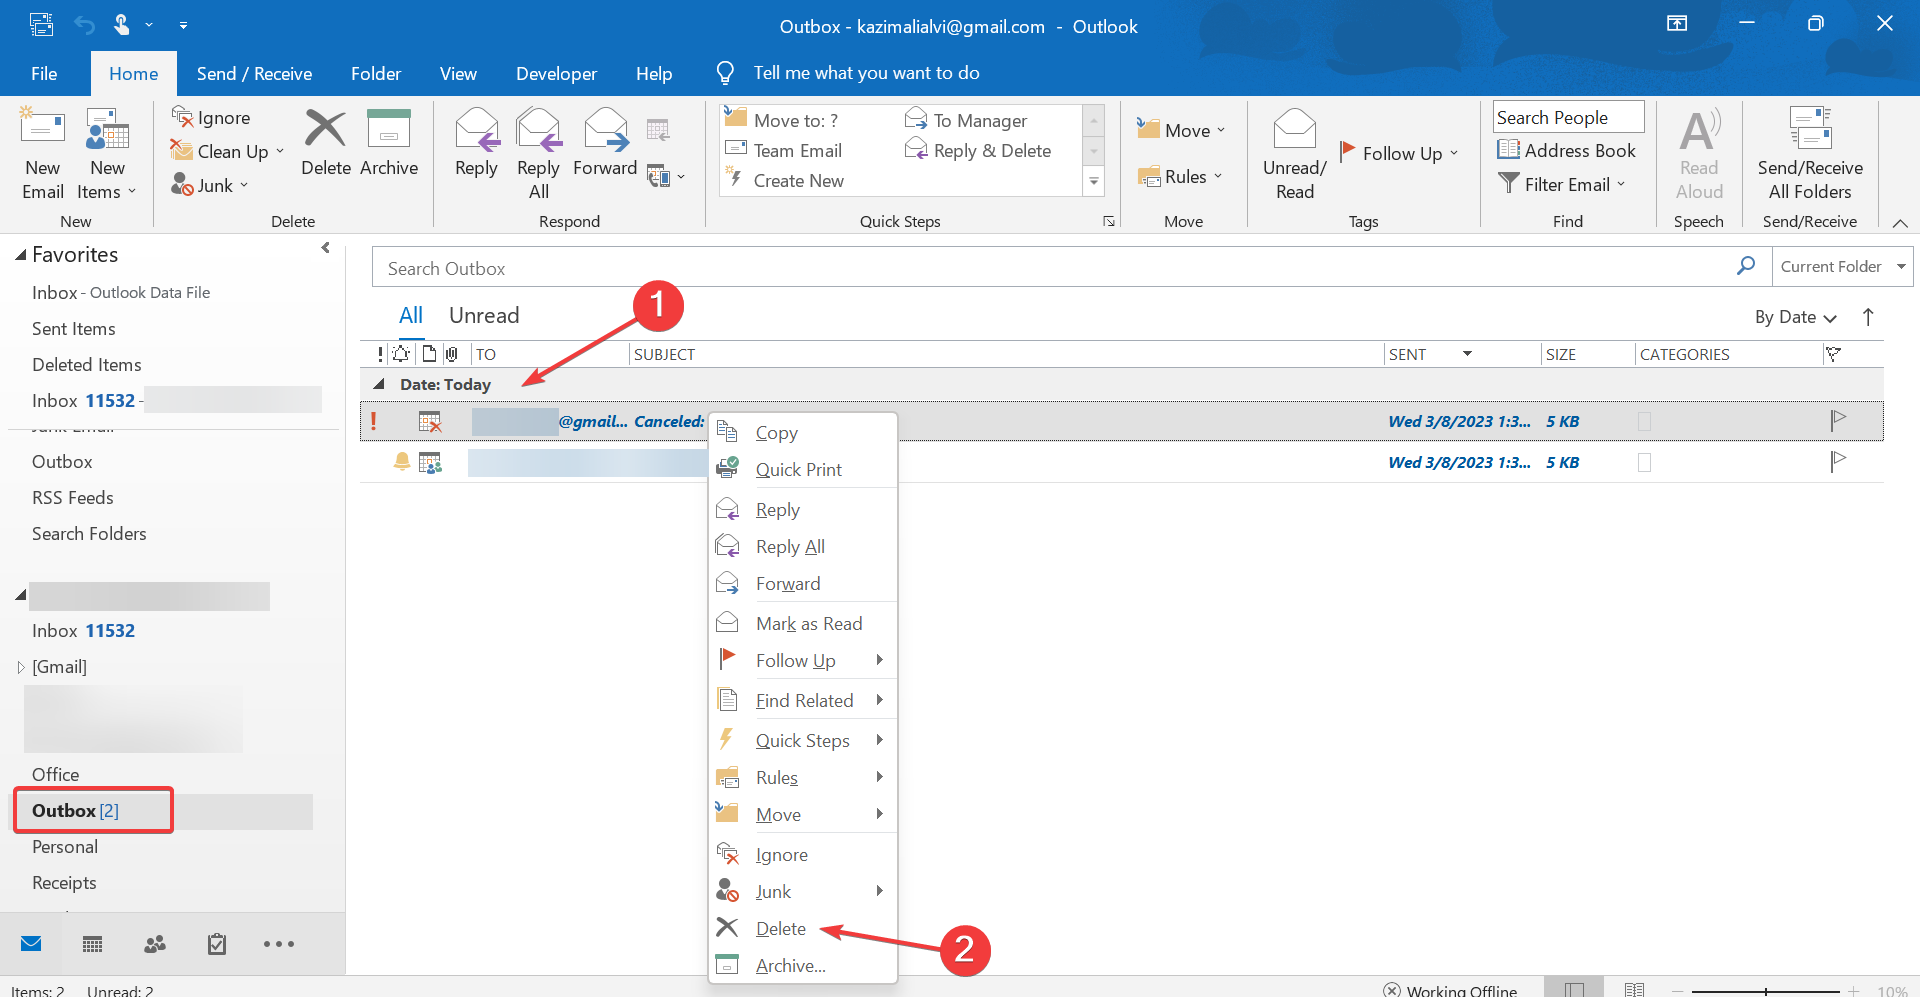
Once done, go to Outbox, right-click on the canceled meeting email notification, and select Delete.
Finally, you can disable the Work Offline mode in the Send/Receive tab and restore Outlook’s connectivity.
2. Remove emails from the meeting
Launch Outlook and sign in with your account.
Click the calendar icon.
Select the meeting in your calendar.
Click on Cancel Meeting from the top menu and remove the email addresses from the Required field.
Now select Send Cancellation.
Now you should have successfully canceled the meetings without sending any notifications.
How to update an Outlook invite without notifying everyone
Go to Outlook Calender, and double-click on the meeting to which you want to invite others.
Now, add the other invitees in the To field, and click on Send Updates.
Select the Send updates to only the added or deleted attendees, and click OK to save the changes.
Now, only the new attendees will receive a notification.
So, that’s how you can cancel meetings without sending notifications in Outlook 365. The process is even simpler for those trying to discover how to remove meetings from the Outlook calendar. Just delete or cancel the event depending on whether you were invited or created.
And the next time you find an Outlook meeting cancellation not sent, check whether you have switched to Work Offline mode.
Windows automatically enhances your photos, and many users wonder how to disable auto-enhance in Photos on Windows 11.
This feature can cause issues and negatively affect the color of your images, so it’s no wonder that many want to turn it off. However, this might not be as simple as you think.
How do I turn off auto-enhance in Microsoft Photos?
1. Disable HDR
Press the Windows key + I to open the Settings app.
Select System and go to Display.
Select HDR.
If HDR is enabled, disable it.
2. Change display adapter properties
Open the Settings app and go to the Display section.
Click on Advanced display.
Select Display adapter properties for Display 1.
Go to the Color Management tab and click the Color Management button.
Check Use my settings for this device and click on Add.
In the ICC section select sRGB IEC61966-2.1 and click on OK.
Select the profile you just added and choose Set as default profile.
While disabling other color correction features is possible, disabling auto-enhancement in Photos apps is impossible. This is why it’s suggested to use a different photo viewer for Windows 11.
Users had the most success with ImageGlass and IrfanView, but you can use any similar app.
You now know how to turn off auto-enhance on photos in Windows 11.
Disable Use hardware acceleration when available option.
4. Disable extensions
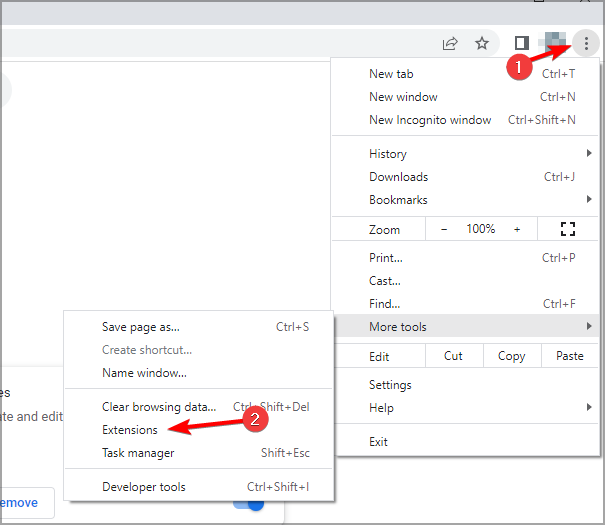
Click the Menu icon and select More tools. Next select Extensions.
Disable all extensions.
Restart your browser.
If the problem doesn’t appear anymore, enable extensions one by one.
5. Use another browser
Try streaming using a lighter browser such as Opera One. It uses way fewer system resources and is one of the fastest browsers on the market.
It runs on a Chromium engine and is compatible with most Chrome extensions. The extension shop has many YouTube and streaming dedicated options to improve your experience even more.
Opera One
Watch high-quality YouTube videos and enhance the experience with this highly integrated browser.
Netflix quality may appear to be worse on Chrome due to various reasons such as:
Codec limitations – Chrome uses the VP9 codec to stream videos, while other browsers, such as Safari and Edge, use the more efficient HEVC codec. VP9 can compress video files to a smaller size, but this compression can sometimes result in lower quality.
Widevine Content Decryption Module – Netflix uses the Widevine Content Decryption Module to stream videos on Chrome. This module can sometimes cause issues with video quality, resulting in blurry or pixelated images.
Hardware Acceleration – Chrome’s hardware acceleration feature can also affect the quality of Netflix videos. Hardware acceleration uses the graphics card to process video data, but if the graphics card is not powerful enough, it can result in lower-quality videos.
Browser settings – Chrome’s default settings can also affect the quality of Netflix videos. For example, if Chrome uses a lower resolution, the video quality will be lower.
Internet connection – The quality of Netflix videos is also affected by the speed and stability of the internet connection. So, when the connection is unstable or slow, it can cause buffering, resulting in lower-quality videos.
Device specifications – The specifications of your device, such as the CPU and RAM, can also affect the quality of Netflix videos. If your device needs to be more powerful to handle the video streaming, it can result in lower-quality videos.
So, these are various ways users can fix poor-quality video playback in Chrome. Users can usually fix bad video quality in Chrome by adjusting playback settings on the video or streaming service websites.
Some pretty troubling remarks from PlayStation CEO Jim Ryan to Activision executives were unearthed yesterday in a Twitter conversation with Tom Warren of The Verge. Activision Blizzard CCO and EVP of Corporate affairs Lulu Cheng Meservey told Warren that Ryan told Activision execs “I don’t want a new Call of Duty deal. I just want to block your merger.”
The remarks apparently came at Brussels back in February. If they are indeed accurate, then it’s a clear demonstration of bad faith on the part of the PlayStation CEO, and stark contradiction to the face Sony has been putting on for regulators.
The CEO of SIE answered that question in Brussels.
In his words:
"I don’t want a new Call of Duty deal. I just want to block your merger.”
This comes as some pretty wild claims from Sony were also revealed in the CMA’s most recent filings. In this latest round of responses between Microsoft and Sony, the latter implied that Microsoft would be able to sabotage Call of Duty’s success on PlayStation by purposefully introducing bugs into the PS versions of games.
While it’s probably needless to say at this point, the ongoing drama over Microsoft’s pending acquisition of Activision Blizzard King keeps getting spicier by the day, it seems. Sony’s suggestion that Microsoft would intentionally hamper what would be one of it’s own IPs seems pretty out there. Anyways, be sure to check back in, as we’ll keep you posted on more Activision Blizzard news as it happens.
Many Windows users are encountering the MOM.exe file error when starting their systems. However, not much information is available about the origin of this file and why it causes Windows errors.
MOM.exe errors affect all Windows versions, but it appears they are prevalent for Windows 7.
What is MOM.exe process?
It is a process related to the AMD Catalyst Control Center. It is a software application used to manage the settings and features of AMD graphics cards.
AMD’s Radeon Software Crimson replaced CCC, so MOM.exe errors are more frequent on Windows 7 computers. Windows 10 devices rely on the newer Crimson driver. This offers speed improvements and better gaming, video, and display quality settings.
The process is responsible for monitoring and managing the various settings of the AMD Catalyst Control Center. These will often include display resolution, color depth, and other visual settings. It is typically located in the path below:
While the MOM.exe process is generally safe and necessary for the proper functioning of the AMD Catalyst Control Center, it can sometimes cause issues such as high CPU usage or crashes. If this folder is, by any chance, located elsewhere, it could be malware hiding as a CCC file.
If you are experiencing problems with the process, consider updating your AMD graphics card drivers or reinstalling the AMD Catalyst Control Center software.
What are common MOM.exe errors?
Some common errors associated with this process that users may experience include:
MOM.exe high CPU usage – In some cases, the process may use up a significant amount of CPU resources, slowing down your system and causing other programs to run slowly.
MOM.exe crashes – Occasionally, the process may crash or stop responding, which can cause the AMD Catalyst Control Center to become unresponsive or stop working altogether.
The MOM.exe missing or not found – You may see the error if you delete or remove the process. Also, if there is a problem with installing the AMD Catalyst Control Center, you may see an error message indicating that MOM.exe is missing or not found.
MOM.exe startup error – Sometimes, the process may fail to start properly when you log in to Windows, preventing the AMD Catalyst Control Center from working correctly.
MOM.exe catalyst control center: monitoring program –
The MOM.exe application error – There is a problem with the application, possibly due to a corrupt installation, outdated drivers, or other issues.
MOM.exe bad image in Windows 10 – The MOM.exe file, associated with the AMD Catalyst Control Center, is either missing, corrupt, or incompatible with your OS.
MOM.exe .net Framework 4.0 – If you encounter errors related to the process and .NET Framework, it may indicate a problem with the installation or configuration of the .NET Framework on your computer.
Updating your AMD graphics card drivers should fix the problem when you have this error message. Also, reinstalling the AMD Catalyst Control Center software should work. Also, check for malware or viruses on your system, as these can sometimes interfere with the MOM.exe process.
This is all we will cover in this guide. So, please let us know if there are any other things you want to know about this process.
For a few users, the internet drops when downloading. This can be an issue as it affects some other processes. It means all processes needing an internet connection must share a limited bandwidth.
This guide considers the many users facing this problem and has recommended some of the best fixes.
Why does my Internet go down when downloading?
There are many reasons why your internet goes down when downloading files. Here are some possible explanations:
Bandwidth saturation – Downloading large files can consume a lot of bandwidth and saturate your internet connection, which may cause it to slow down or even disconnect temporarily.
Network congestion – If many people use the same internet connection or network, it can cause congestion and slow down your connection or cause it to drop altogether.
Router or modem issues – A faulty or outdated router or modem can cause connectivity issues, including intermittent internet drops during downloads.
Software or hardware conflicts – Sometimes, software or hardware conflicts can cause connectivity issues. For example, certain antivirus software or firewalls can interfere with downloads and cause internet drops.
ISP issues – Your internet service provider (ISP) may be experiencing service disruptions or outages in your area, which could affect your internet connection.
What are other Wi-Fi issues?
There are various problems with your Wi-Fi connection that you can encounter, and speaking of Wi-Fi, here are some common issues that users reported:
Wi-Fi keeps dropping and reconnecting – Some common problems can occur with Wi-Fi networks, but you should be able to fix them using our solutions.
Wi-Fi keeps dropping during large downloads – Sometimes, this problem can occur due to your router’s configuration. To fix the problem, simply disable certain features, and the issue should be resolved.
Wi-Fi disconnects frequently – This problem can appear if your drivers are out of date, so be sure to update them and check if that solves your issue.
In today’s article, we will show you how to fix these issues that can occur with Wi-Fi.
What can I do if the Internet drops when downloading?
Here’s what you can do:
You could avoid going through all our solutions by changing your ISP. Sometimes, the service provider may not be as efficient as you wish. Switching to a different network may guarantee constant internet speeds even during downloads.
Also, check your cables. In some rare instances, this problem may occur due to a damaged cable. Sometimes your network cable that goes to your wireless router might be damaged, which can cause the connection to disappear.
Reset your router, so open its configuration page and locate the Reset option. Remember that this option is available only if you log in with administrative credentials. If you’re having trouble finding this feature, you can reset your router by pressing the hidden Reset button on your device. Hold this button for about 5 seconds, and your router should reset to the default settings.
You may also consider replacing your router and wireless adapter. We suggest using GCDN 300M Wireless Adapter.
1. Make sure your drivers are up to date
Press Windows + X and select Device Manager.
Expand the Network adapters category, right-click on your driver, and select Update driver.
Choose the Search automatically for drivers option.
If your Wi-Fi connection drops when downloading files, perhaps the issue is related to your drivers.
Sometimes outdated drivers can lead to this and many other problems, and to fix the issue, it’s advised that you keep your drivers up to date.
To do that, you need to find the model of your wireless adapter and download the latest drivers for it. Once you download the latest drivers, install them, and check if that solves your issue.
Downloading drivers manually can be tedious, especially if you don’t know how and where to search for them.
However, you can always use third-party tools such as Outbyte Driver Updater to download the missing drivers with just a few clicks automatically.
This software will scan your system and compare the found drivers with those in its built-in database. Next, it will repair and fix the broken or missing ones.
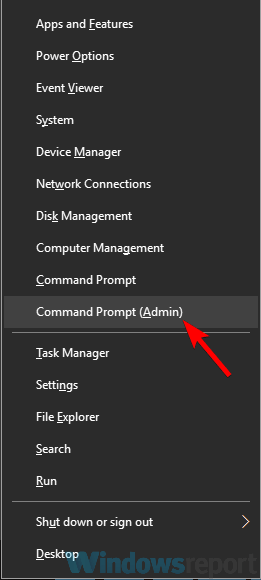
Now choose Command Prompt (Admin) or PowerShell (Admin).
When Command Prompt opens, type the script below and hit Enter: ipconfig /flushdns
Finally, renew the DNS using the script below: ipconfig /renewdns
3. Close unused processes
Press Ctrl + Shift + Esc to open the Task Manager.
Go through the list of processes.
If there is any process you do not need that may use up your internet connection, right-click on it and select End task.
Many running processes may affect your internet speed, especially if you have to download. Some of these processes may be background processes, and you may not have an idea unless you intentionally check for this.
4. Change your uTorrent settings
Launch your uTorrent.
Click on Options, then Preferences.
Set the Global maximum number of connections to 50 and the Maximum number of connected peers per torrent to 20.
Users reported that certain settings in uTorrent, such as Max global connections and Max connections per torrent, could interfere with your Wi-Fi connection and cause various issues.
Keep in mind that you can use lower values if you want. Also, other torrent clients have these options available, so even if you’re not using uTorrent, you need to check your settings and make these adjustments.
According to users, sometimes Wi-Fi issues can occur due to your router’s firmware. If your Wi-Fi connection drops when downloading, the problem can be your firmware, so it’s advised that you upgrade it.
Bear in mind that firmware upgrade is an advanced procedure, and if you’re not careful, you can permanently damage your router.
We’re not responsible for any potential damage that may occur, but to avoid any damage, be sure to check your instruction manual for detailed instructions and follow them carefully.
Once your router firmware is upgraded, check for the problem. Several users reported that they fixed the problem simply by downgrading their router firmware, so you might want to try that as well.
6. Disable DoS Protection
Log on to the router’s admin page (We use Netgear in this case).
Go to the Advanced tab.
Tick the Disable Port Scan and DoS Protection feature in the WAN Setup.
Some users reported that their Wi-Fi connection drops when downloading large files.
It seems that DoS Protection causes this issue, and to fix the problem, you need to find and disable this feature on your router.
Remember that this feature might be available on other routers, so disable it and check if that helps.
7. Change your power settings
Press Windows Key + X and choose Device Manager from the list.
Once Device Manager opens, locate your wireless adapter and double-click it to open its properties.
Head over to the Power Management tab and uncheck Allow the computer to turn off this device to save power option.
Now click OK to save changes.
Good internet across all processes is a must for most computer users. And deeps in speed, especially when running multiple processes, can be very discouraging.
We hope one of these solutions helped you fix the Wi-Fi connection issues. If the internet drops when downloading, you should find success using any of the methods we have recommended above.
This is as much as we will be sharing in this article. Please let us know in the comments section below if you have additional suggestions or recommendations.
Farming Simulator 17 is generally a stable game. Unfortunately, it can sometimes be limited by a series of technical issues. Some users have complained that Farming Simulator 17 won’t launch on PC.
If you’ve encountered this bug, follow the troubleshooting steps listed in this article to fix them.
Why won’t Farming Simulator 17 launch on PC?
There could be several reasons why Farming Simulator 17 is not launching on your PC. Here are a few users have observed:
Insufficient system requirements – The PC’s hardware may not meet the minimum system requirements for Farming Simulator 17, such as not having a compatible graphics card, processor, or sufficient RAM.
Corrupted or missing game files – This could occur due to incomplete or interrupted game installation, malware, or file system errors. Corrupted or lost files can prevent the game from launching.
Outdated or incorrect drivers – Graphics cards, sound cards, and other drivers can become outdated or malfunction, resulting in game or software issues.
Antivirus software – Some antivirus software may detect Farming Simulator 17 as a potential threat and block the game from launching.
What can I do if Farming Simulator 17 won’t launch on PC?
1. Update the graphics card
Press Windows + X and select Device Manager.
Expand the Display adapters category, right-click on your driver, and select Update driver.
Choose the Search automatically for drivers option.
The first thing that you should do is update your graphics driver. Downloading it manually is a process that carries the risk of getting the wrong driver installed.
This may lead to serious malfunctions later, so the easier way to update drivers on a Windows computer is by using an automatic tool.
In that regard, we can only recommend Outbyte Driver Updater. All device drivers are essential software that helps hardware components work smoothly, and this tool acts accordingly.
As you can see, it can update all your drivers at once and has you covered with a large database that gets updated daily.
More so, you can manage different aspects regarding your drivers, installing the latest driver versions or finding missing ones automatically.
Thus if you need reliable support to update any of your drivers, use a dedicated tool confidently.
Right-click Farming Simulator 17 and select Properties.
Go to the Local Files tab and click Browse local files or Browse.
Right-click FarmingSimulator2017.exe and select Troubleshoot compatibility.
Click Troubleshootprogram, check The program requires additional permissions and hit Next.
Select Test the program…, quit the game, and hit Next.
Select Yes, save these settings for this program, and click Close.
Open the x64 folder, run FarmingSimulator2017Game.exe, and click Troubleshoot compatibility.
Click Troubleshootprogram, check The program requires additional permissions and hit Next.
Select Test the program…, quit the game, and hit Next.
Finally, select Yes, save these settings for this program, and click Close.
That is as much as we will cover in this guide. If you have read through, you should be able to scale the problem of Farming Simulator 17 won’t launch on PC.
Lastly, if you’ve encountered other workarounds to fix various Farming Simulator 17 issues, please list the troubleshooting steps in the comment section below. We’ll update this article accordingly.
Security alerts are the worst, especially when such messages are randomly displayed on your Windows 10 device. Although most of these alerts are indicated by the Windows system when an untrusted website is accessed, they can also be a sign of a malware attack.
Suppose you recently received a new Windows 10 security alert that stated that The identity of this website or the integrity of this connection cannot be verified. In that case, you should know that this is a scam.
It’s important to act wisely to remove this particular security alert trying to trick you into purchasing specific software or paying money for a so-called helping hand.
But, right from the start, you need to know that it is all a scam and that some malware is trying to hack your Windows 10 system. So, it would be best if you learned how to remove this malware and its associated files.
What does The identity of this website cannot be verified mean?
The message the identity of this website cannot be verified typically appears when a user attempts to access a website that does not have a valid SSL/TLS certificate or when the SSL/TLS certificate has expired or is not configured correctly.
Web browsers usually display this warning message as a security measure to protect users from potentially malicious websites. Some common causes of the error message include:
Expired certificate – If the website’s SSL/TLS certificate has expired or the configuration is incorrect, you will get the error.
Unknown CA – Users also see the error if the website’s SSL/TLS certificate issuer is untrusted or an unknown Certificate Authority (CA).
Self-signed certificate – Also, you will get the error when the website uses a self-signed SSL/TLS certificate, not recognizable by the browser as a trusted certificate.
Mis-match in domains – Another trigger is if the website’s domain name does not match the domain name listed in the SSL/TLS certificate.
Outdated website elements – Websites using an obsolete or unsupported version of SSL/TLS protocol that is considered insecure by modern web browsers will cause the error.
Malware – Finally, when the website has been compromised or serves malicious content, the browser warns the user not to proceed.
How can I fix The identity of this website cannot be verified security alert?
Do note that the malware can limit your Windows 10 access. So, if you cannot complete the steps below, first choose to restart in Safe Mode with Networking. This can be done by the following:
Access the Run box – press the Win + R hotkeys.
Type msconfig and press Enter to launch System Configuration.
From the window that will be opened, switch to the Boot tab. Choose Safe Boot, and also select the Network option.
Apply all changes and close the window.
Restart your Windows 10 system.
1. Remove the processes related to the malware
Click on the Search icon – located near the Windows start button.
In the Search field, type Programs and features, and click the Apps & features option.
Scroll down between recently installed apps and files and choose to remove any software that might be related to the malware.
To remove a certain process: click on the entry and select uninstall. You may have to confirm your choice.
First of all, search for recently installed apps. Among them, you will find the processes that caused the up-mentioned The identity of this website or the integrity of this connection cannot be verified pop-up.
Of course, you need to remove/uninstall these processes and the related files.
2. Remove infected extensions from the web browser
2.1 Remove extensions in Chrome
Open the web browser and press Alt + F keyboard keys.
Choose More tools and click on Extensions.
Finally, click Remove to remove any extensions that may be infected.
2.2 Remove extensions in Firefox
Launch Firefox.
Press Shift + Ctrl + A and select the extension related to pop-up.
Click the ellipses or 3 dots and select Remove.
2.3 Remove extensions in Edge
Click on the Extension icon on the toolbar beside the URL locator and select Manage extensions.
Search for the malicious extension and click on Remove.
Additionally, you should reset your web browser app. We also recommend you delete the Chrome, Firefox, and Microsoft Edge shortcuts and create new ones before doing anything else.
Type Windows Security in the Search bar, and click on the relevant search result.
Now, click on Virus & threat protection here.
Click on Scan options.
Lastly, select Full scan and click on the Scan now button at the bottom.
If you do not want to use the built-in tool, the next thing to do is install proper antimalware to find and remove the infected files from your computer.
We recommend you use TotalAV for exhaustive system scanning and multilayered security from risky internet malware.
Run the antimalware program and choose to perform a full scan – it might take a while, depending on how many folders and files are located on your PC. When prompted, remove/delete/uninstall the files that cannot be trusted.
Also, set up a web browser filter and apply dedicated security settings for securing your web browser navigation. Don’t forget to enable Windows Firewall on your computer and initiate regular scans to ensure all the files are clean.
Hopefully, after following the guidelines, you will be able to manage the website’s identity cannot be verified malicious pop-up.
Lastly, feel free to share your experience and personal observations in the comments below.
Encountered the “WiFi doesn’t have a valid IP configuration hotspot” error in Windows 10? This message stops you from connecting to any wireless network, even though you have the right username and password. Below, we’ll break down why the error appears and share the most effective fixes so you can get back online quickly and fix the “valid IP configuration” problem
What can I do if WiFi doesn’t have a valid IP configuration?
Before going into the fixes below, try these quick tricks:
Make sure that the security type on your PC matches the one set by your router because sometimes, IP configuration failure can be caused by your security type. To do that, open your router settings page and check what type of security is used.
While in the router settings, ensure the Wi-Fi PMF (Protected Management Frames) setting is disabled. It’s not available on every router, but disabling it should work for the ones where you find the setting.
If these solutions didn’t help, move to the ones listed below.
1. Uninstall your wireless adapter driver
Press Windows + Xand choose Device Manager.
Locate your wireless device, right-click it, and choose Uninstall device.
If available, check the Attempt to remove the driver for this device box and click Uninstall.
Finally, restart your PC.
Windows 10 will automatically install the default wireless driver after the restart. If the default driver works well, you can continue using it, but if there are any problems, you might have to download and install the latest driver.
Keep in mind that updating your drivers is an advanced procedure. If you’re not careful, you can cause permanent damage to the system by downloading the wrong driver version; therefore, exercise extra caution.
We strongly recommend using a specialized tool such as Fortect Driver Updater to download outdated drivers on your PC automatically.
Search for cmd and click on Run as administrator to open Command Prompt with administrative privileges.
Click Yes in the UAC prompt.
Paste the following commands individually and hit Enter after each:
netsh winsock reset
netsh int ip reset
Lastly, close Command Prompt and restart your PC.
Remember that if you use a static IP address, you’ll have to set it again. So if the previous commands didn’t work, you might want to try these commands as well: ipconfig/releaseipconfig/flushdnsipconfig/renew
It was reported that you could fix the WiFi doesn’t have a valid IP configuration hotspot error by accessing your modem and changing the wireless SSID and password.
To do that, you’ll have to connect your PC to your modem using the Ethernet cable, access your modem and change the wireless SSID and password.
For more details on how to do that, we strongly suggest you check your modem’s manual.
4. Set the channel width to Auto
Press Windows + X and select Network Connections from the menu.
Right-click your wireless connection and choose Properties from the menu.
Click the Configure button.
Go to the Advanced tab, locate 802.11n Channel Width for band 2.4, and set it to Auto.
Finally, click OK to save changes.
This method is reliable in solving the WiFi doesn’t have a valid IP configuration hotspot error. If you don’t know what WiFi channel to use, use these fantastic WiFi analyzers to help you choose.
5. Set your IP address manually
Press Windows + X and choose Network Connections.
Right-click your wireless network and choose Properties from the menu.
Select Internet Protocol Version 4 (TCP/IPv4) and click the Properties button.
Select the Use the following IP address option and enter the values presented in the image in the IP address, Subnet mask, and Default gateway fields (you might have to enter different data).
Lastly, click the OK button.
6. Remove your antivirus software
Click on the hidden access arrow in the Taskbar.
Click on your antivirus icon, hover over Avast shields Control and select Disable for 10 minutes (This step varies for different antivirus software).
Antivirus software or firewall can often interfere with your Internet connection and cause IP configuration failure. Therefore, you might want to temporarily remove your antivirus or firewall as a workaround.
Users reported that Avast and AVG antivirus could cause this issue, and after removing the problematic software, the problem was resolved.
Remember that almost any antivirus software can cause this problem, so temporarily remove all third-party antivirus tools.
A normal uninstallation process can’t entirely uninstall many antiviruses and other software. They often leave some files behind that can clog your system or prevent a proper reinstallation.
That’s why we recommend using a professional uninstaller tool that eliminates any trace of your antivirus, even from the Registry.
If removing the antivirus software fixes the problem, you can install the latest version of your antivirus or switch to a different one.
We recommend using reliable antivirus software that optimizes your computer’s process activity, which might prevent you from many problems that might appear while using your PC (including this type of PC errors).
7. Change the number of DHCP users
According to some users, you can fix this problem by increasing the number of DHCP users. However, some routers are usually limited to 50, which can cause the IP configuration failure message to appear.
To fix this issue, you must access the router configuration page and manually increase the number of DHCP users.
Users reported that after increasing the number, all issues were resolved. Check the router manual or head to the manufacturer’s website for the exact steps for your model.
In addition, some users also suggest that you can fix the problem with the IP configuration by increasing the number of maximum wireless users.
Some routers are limited to only 10 wireless users, and the issue was resolved by increasing the maximum number.
8. Perform a Clean boot
Press the Windows + R, type msconfig, and then press Enter.
Choose Selective startup and uncheck Load startup items.
Go to the Services tab, check Hide all Microsoft services, and click the Disable all button.
Go to theStartup tab and click on Open Task Manager.
Right-click each item on the list configured to launch at startup, then choose Disable.
Now, go back to the System Configuration window, and click Apply and OK to save the changes.
Finally, restart your computer.
If the problem doesn’t appear, you might want to enable the disabled services and applications and find the one causing this issue so you can remove or update it.
9. Make sure that DHCP is turned on
Press Windows + R to open the Run command, enter ncpa.cpl in the text field, and hit Enter.
Locate your network adapter, right-click it, and choose Diagnose.
Finally, wait for the scan to finish.
Problems with WiFi IP configuration can prevent you from accessing the Internet, but we hope you managed to fix this problem after using one of our solutions.
Why does WiFi doesn’t have a valid IP configuration error keeps happening?
This error can occur on a Windows computer when the network adapter or the network settings has an issue.
This error message means the computer cannot obtain a valid IP address from the router or the DHCP server. Here are some common reasons why this error may occur:
Incorrect network settings – Sometimes, the network settings on the computer may be incorrect, which can prevent it from obtaining a valid IP address from the router. This can happen if the network settings are manually configured or if the settings are corrupted.
Network adapter driver issue– If the network adapter driver is outdated, corrupted, or incompatible, it can cause problems with the network connection, including the error.
DHCP server issue – If there is an issue with the DHCP server, which assigns IP addresses to devices on the network, it can cause the error.
The WiFi doesn’t have a valid IP configuration hotspot message can prevent you from accessing the Internet. There are some variations of this error, and speaking of similar issues, here are the most common ones:
No valid IP configuration in Windows 10 – This can occur due to your antivirus or security settings. You should be able to fix the problem by disabling your antivirus.
WiFi doesn’t have valid IP configuration on Lenovo, HP, Windows 10 Toshiba, ASUS, Surface Pro 4, and Dell –It can appear on almost any device, and your drivers usually cause it. So be sure to update your drivers to the latest version.
WiFi doesn’t have a valid IP configuration hotspot unidentified network, no Internet access, no Internet secured –These are some variations of this error, but you can fix all of them by using the solutions from this article.
If your WiFi is not working on the laptop, but it does on other devices, things are not as complex as they appear and can be fixed in no time.
Lastly, if you have any other advice or possible solutions for the WiFi that doesn’t have a valid IP configuration hotspot, don’t hesitate to provide them in the comment section below.
If you’re an avid user of Apple’s products, the iTunes suit is a must. And, even though it’s native to MacOS, the Windows platform version is quite well-optimized and designed.
However, that doesn’t make this software perfect. Many users experienced issues with Bonjour service, the essential part of the iTunes suite. One of the most common errors goes by the 100 code.
To address this, we offer some of the most effective solutions. If you’re constantly experiencing issues with Bonjour service, check out the steps below.
What is Bonjour service error?
Bonjour service error is an error message that occurs when the Bonjour service, a networking protocol developed by Apple Inc., encounters a problem. Here are some common causes of Bonjour service errors:
Incompatible software – Bonjour service errors can occur if the software on your device is incompatible with the Bonjour protocol. This can cause conflicts and result in errors.
Network issues – Network issues, such as connectivity problems or a firewall blocking the Bonjour service, can cause errors.
Corrupt files – Corrupt Bonjour-related files will usually trigger this error.
Outdated drivers – If your device’s network adapter drivers are outdated, it can cause Bonjour service errors.
Malware or viruses – Malware or viruses can cause problems with the service and other network protocols, resulting in errors.
Apple software update issues – If there are issues with an Apple software update, it can cause problems with the Bonjour service.
System conflicts – Conflicts between the Bonjour service and other system components or software can cause errors.
How can I fix Bonjour service error?
1. Start the service
Press Windows + R, type services.msc, and hit Enter.
Double-click on Bonjour service.
Set the Startup type to Automatic and click Start.
Click Apply and OK.
Lastly, reopen the application that triggered the error; hopefully, this will resolve the error.
Navigate to the path below: Computer\HKEY_LOCAL_MACHINE\SYSTEM\CurrentControlSet\Services\Bonjour Service
Click on the ImagePath key, and ensure the path is set to Program Files rather than Program Files (x86).
If not, change the path to the below indicated: C:\Program Files\Bonjour\mDNSResponder.exe
Finally, reopen the application that triggered the error; hopefully, this will resolve the error.
That should resolve the ”100” error within Bonjour service and get you going. However, if you have a better alternative, please share it in the comments section below.
Since computer networks and their performance are one of the most important aspects of any IT infrastructure business, having the right tool to measure it is equally important.
Networks are prone to many errors and, unfortunately, if left undiscovered or unattended in due time, they can affect the end-user performance.
How can a network performance management app help me?
If you’re an IT manager, your first concerns are network security and its performance. A healthy network is not easily maintained but that’s why dedicated apps are a must.
A network performance management tool is crucial to monitor all aspects of your network infrastructure, including servers, endpoints, and other devices.
By monitoring key performance metrics of your network, you will be able to detect and fix any possible bottlenecks, intrusions, or attacks and take action immediately.
In this article, we’ve handpicked the best network performance management software solutions and tested them as well in order to better help you in making an informed decision.
What are the best network performance management tools?
Site24x7 is definitely one of the best network performance management software tools that you can get your hands on.
It’s an SNMP-based solution that identifies all the devices on your network based on their IP, or by using the Classless Inter-Domain Routing (CIDR) technology.
After you set discovery rules, device, and interface filters, you will gain access to all the data concerning network traffic behavior,
That’s because the built-in On-Premise Poller tool will retrieve the requested information like traffic, bandwidth, packets, error, discards, and other such parameters.
After all, is set in place, it’s time to customize your dashboards to generate specific reports on network security that can also be shared with your peers.
The availability of a free trial version makes it all a lot easier because you can test its features before purchasing the software.
Key features of Site24x7:
In-depth device and application tracking
Uses more than 60 performance metrics
Cloud-based configurable dashboard for easy access even on the go
Classless Inter-Domain Routing (CIDR) technology
Detailed graphical statistics and data
Site24x7
Manage your network with a professional-grade tool that monitors over 60 performance metrics.
With ManageEngine OpManager, all the factors that impact your network performance will be closely monitored and analyzed.
Since network downtime has high financial repercussions, this tool helps you maintain continuous uptime by pinging all monitored devices at defined intervals.
If any device is slow to respond or packet loss is huge, then you’ll immediately receive a notification in order to promptly address the situation.
Moreover, the CPU memory, traffic, errors and discards, and the WAN performance are other important factors that ManageEngine OpManager helps you keep an eye on.
Key features of ManageEngine OpManager:
Monitor parameters such as temperature, power, and voltage
SNMP, WMI, Telnet, SSH, and VMware native API to monitor devices
Network performance monitoring tools
NetFlow module for in-depth visibility of network traffic patterns
ManageEngine OpManager
Identify and monitor all devices on your network quickly to prevent and fix any issues before they become critical.
PRTG Network Monitor comes with advanced network monitoring tools that will help maintain a congestion-free network that will keep the business up and running.
This software has multiple built-in features designed to make your work as easy as possible. The incorporated alert and notifications system will let you know in real-time where the issues occur so that you can intervene.
You’ll also be able to identify bottlenecks thanks to complex data analysis and traffic monitoring tools. Moreover, you can also upgrade your network to meet the specific needs that your business may have.
All in all, this is the perfect tool to ensure that your network level of uptime is as close to 100% as possible.
Key features of PRTG Network Monitor:
Built-in alert and notifications system
Helps you increase the overall uptime of your network
Monitors all key performance metrics
Easy to implement and manage
Detailed statistics about every application running in your network
PRTG Network Monitor
Get the best network performance monitoring with PRTG Network Monitor and ensure high performance to your network.
The multi-vendor network monitor capabilities of this software will scale and expand the performance of your network.
SolarWinds Network Performance Monitor offers complex network monitoring tools, network insights to increase visibility, and intelligent maps.
The NetPath and PerfStack features are perfect for easy troubleshooting all the problems that could happen.
Moreover, thanks to the advanced alerting system you will be promptly informed of anything that is not working as it should in order to quickly address and fix the issue.
Key features of SolarWinds Network Performance Monitor:
Customizable topology and dependency-aware intelligent alerts
Critical path visualization
Intelligent mapping available
Detailed monitoring of F5 BIG-IP family of products
Nagios Network Analyzer provides complete analyzing and monitoring tools that allow for easy access to data and charts.
Thanks to the built-in features you’ll have access to networks status, and you’ll be able to quickly detect any network outages or protocol failures.
This software is a cloud-based monitoring tool that provides a centralized view of all network traffic alongside granular data and in-depth network analysis.
Moreover, the tool will let you set up bandwidth restrictions where needed, especially when critical thresholds are exceeded.
These software solutions help you better analyze and have a central view of your network performance. As you can see, with the right tool this can be a much easier task than first thought.
Another day, another new controller for made for Xbox Series X/S and Xbox One.
Microsoft just rolled out the design of its Xbox Velocity Green wireless controller. Sporting a textured grip, hybrid D-pad, 40 hours of battery life, a 3.5mm headset jack, and the gaming giant’s signature color, the newest addition to its line of colorful wireless controllers are priced at $64.99 on Microsoft’s Official Store.
Share with your friends your best clips and highlights using the dedicated Share button, which can be customized to record or take screenshots using the Xbox Accessories App.
While on the Accessories app, you can customize your controller even further with button remapping and create custom controller profiles. Feel free to take your controller beyond the Xbox Series X|S and Xbox One consoles, with Bluetooth technology that allows for wireless gaming on your PC and mobile devices.
Besides the signature green, Xbox has also rolled out its Shock Blue, Pulse Red, Deep Pink, and Electric Volt variants. They all support the next-gen consoles of Xbox Series X/S and the older gen of Xbox One.
It also comes with a purchase option of Razer’s universal quick charging stand of the same color, priced at $39.99, and an Xbox velocity green hoodie at $60 on the Xbox Gear Shop to compliment the style.
4 Fill in your data (address, payment method, etc.)
The news itself came not too long after the tech giant announced a contest to win a Disney’s Mandalorian-style gaming gear, consisting of customized Xbox Series X/S and a human-sized pram replica.
That’s all we know about Xbox’s latest venture in revamping your gaming experience. Feel free to leave comments!
Having a stable connection is important, and one common problem that can affect your connection’s stability is packet loss.
To keep an eye on these types of issues, it’s advised to use a packet loss monitor, and in this article, we’re going to show you the best software for this task.
How can I prevent packet loss?
Packet loss is a network disruption problem when some of the data packages fail to reach their destination and it’s usually caused by network congestion.
Of course, there are many other reasons for this phenomenon like problematic software, interferences, or even network hardware issues.
Before getting to the list where we included the best network monitoring software, let’s see how you can prevent this inconvenience:
➡ Check the local connection
First of all, you have to make sure that all your local network resources work fine. This brings us to monitoring software but you can also verify your hardware’s settings.
So, check all the cable connections with the router and/or modem and make sure that the devices are set up properly.
➡ Use a VPN client
Because packet loss is mostly produced by traffic congestion, the use of a VPN client can prevent this problem by bypassing a lot of your nodes from the route to the destination.
The network congestion can be triggered by too many connections from your side so try to check if you have any other applications like download managers or browsers with excessive network activity.
To do that, perform the following easy steps:
Type resource monitor in the Search tab and click on the app from the results.
Click on the Network tab and you will see the traffic for all the running apps. You can click on the individual apps to see their detailed connections.
After you’ve determined which app consumes too much of your bandwidth, you can simply close it to improve the situation.
However, Resource Monitor is a basic app that can only tell you so much about this problem. The apps in our list offer a lot more information and options to tackle packet loss.
Packet loss can be a real headache for any IT administrator but Site24x7 is certainly one of the best network packet loss monitoring tools for the job.
This tool will help you supervise your entire network infrastructure, including the servers and all the devices and connections.
Within its dedicated Heath Dashboard, it will be easy to monitor all the top devices based on response time and packet loss but also the top interfaces based on traffic, bandwidth utilization, errors, and discards.
With Site24x7 it’s possible even to assess the quality of VoIP services by tracking different metrics like jitter, latency, and packet loss.
Collecting data like packet loss is very easy because this SNMP-based solution uses over 60 performance metrics and it can detect all the devices within a specified IP range or with the help of CIDR technology.
You will be happy to discover that Site24x7 offers a free trial version so put all these features and more to good use and convince yourself of its efficiency.
Site24x7 best features:
Friendly configurable dashboard
Cloud-based capabilities
Analyzes more than 60 performance metrics
Monitors all the network infrastructure, including the devices and their connections
Advanced packet loss logging based on your required settings
Site24x7
With this SNMP-based tool, you will get all the relevant network metrics, including the packet loss data.
Paessler PRTG Network Monitor is an advanced monitoring tool that allows you to keep a close eye on bandwidth usage, network speed, and network hardware.
The software uses SNMP, Flow, and packet sniffing technology to detect network issues. As for packet loss, there are three sensors that can help you detect packet loss.
PRTG Ping sensor measures the availability of your devices, QoS Round Trip monitors your network paths, and the Cisco IP SLA measures packet loss on your Cisco devices.
The software also supports packet sniffing, but you can also monitor your database, applications, cloud, server, local network, and much more.
Paessler PRTG Network Monitor is one of the best choices as it can monitor packet loss as well as your entire infrastructure, so be sure to consider it.
Paessler PRTG Network Monitor best features:
Ability to monitor all systems and devices in your network
Bandwidth monitor
Packet sniffing and packet loss monitoring
Ability to monitor databases, servers, clouds
QoS Round Trip monitoring for network paths
Paessler PRTG Network Monitor
Paessler PRTG Network Monitor is an advanced network monitoring software that can quickly detect packet loss and other network issues.
If you need to monitor all the network segments including end-users, clouds, and network locations, Obkio Network Monitoring is the all-in one-solution you should try.
The most important component of this solution is the Monitoring Agent that monitors, measures, and troubleshoots network and application performance and availability.
It can be installed in every network location and continuously exchange synthetic traffic to monitor and analyze network performance.
Although it offers detailed network reports, Obkio is very easy to implement. It is a SaaS application that stores data in the Cloud.
That makes the tool easy to install and simple to use and it also comes with Web and mobile apps for iOS and Android.
About its efficiency, we can say that every 500 ms, Obkio measures core network metrics between Monitoring Agents like packet loss, latency, and jitter so you can identify a potential problem immediately.
This tool also uses SNMP Device Monitoring to test the performance of all the network devices like firewalls, routers, switches, and Wi-Fi access points.
Obkio comes with a free trial version so you can test it and see if it meets your expectations before committing to a purchase.
Let’s go through some of the most important features of Obkio:
End-to-End network monitoring
Monitoring using synthetic traffic (no packet capture)
Continuous network metric measurement
Alerts for intermittent network problems
Interface Bandwidth Monitoring
Network path discovery and analysis through Traceroutes
Manage Engine NetFlow Analyzer is another great traffic analytics tool that can monitor packet loss with ease.
The software has a bandwidth monitor so you can see which users and apps are using most of your bandwidth. Speaking of bandwidth, the software can also provide you with detailed reports.
As for supported technologies, Manage Engine NetFlow Analyzer supports the following: NetFlow, sFlow, IPFIX, Netstream, J-Flow, and AppFlow.
The software is also optimized to detect a wide array of internal and external security threats, which is always useful.
Overall, Manage Engine NetFlow Analyzer offers great features, and if you want an advanced packet loss monitor tool, you should try it out.
Take a look at its best features below:
Bandwidth monitor
Ability to monitor packet loss
Detailed reports
Easy implementation
Support for NetFlow, sFlow, IPFIX, Netstream, J-Flow, and AppFlow
ManageEngine Netflow Analyzer
Monitor packet loss with ease and give this software a try.
If you’re looking for software that works as a packet loss monitor, then Solarwinds Network Bandwidth Analyzer Pack might be just what you need.
This tool is designed to detect and diagnose network performance issues. It measures the response time, the availability of your devices, and the uptime of your network hardware.
The Solarwinds Network Bandwidth Analyzer Pack easily detects devices that are using an unusual amount of bandwidth, and you can also monitor the packet loss in your network.
The software also supports advanced alerts to receive notifications when certain conditions are met.
Overall, Solarwinds Network Bandwidth Analyzer Pack is a great tool if you need to monitor your network and packet loss, so be sure to consider it.
EMCO Ping Monitor offers simultaneous host monitoring, and it achieves that by pinging the host on a regular basis.
The free version monitors up to 5 hosts, but you can extend the number depending on the version you’re using.
This software also provides valuable networking information, and it will test the quality of your connection based on packet loss, latency, and jitter.
With EMCO Ping Monitor, you’ll get a detailed report of all your hosts, allowing you to keep track of your hosts at all times. If needed, there’s also the option to view raw ping data for every host as detailed information.
These are some of the most notable features, and if you’re looking for a reliable packet loss monitor, EMCO Ping Monitor might be just what you need.
Another great packet loss monitor that we want to show you is PingPlotter. This software allows you to visualize network performance in order to easily detect issues with your network.
The software will show you important data such as latency, connection jitter, and packet loss for each node in your connection route in the form of a graph.
PingPlotter can be deployed anywhere, ranging from workstations, remote servers, or cloud virtual machines.
The software is incredibly simple to use, and since it visualizes important information such as latency, jitter, and packet loss, you should be able to find network issues easily with PingPlotter.
Some of the best features you’ll benefit from are:
Visualizes network performance
Displays information such as latency, connection jitter, and packet loss
Easy to use and to read
Remote usage
Can be installed on workstations, remote servers and cloud virtual machines
Simple Network Management Protocol or SNMP is a framework widely used for managing devices on the network as it comes with a set of operations for monitoring and managing the network.
You can trace SNMP traffic with the best monitoring tools to leverage the protocol to better monitor devices’ key metrics, receive timely alerts, and take polling.
How does SNMP monitoring work?
SNMP monitoring works by sending protocol data units, known as SNMP Get requests to network devices. Network monitoring tools track these communications and fetch data from SNMP.
You may use SNMP monitoring to keep an eye on network and bandwidth usage and monitor other important issues such as uptime and traffic status.
If you’re looking for the best SNMP monitoring software, Site24x7 can take care of that with excellent results.
Moreover, SNMP traffic tracing is only a small feature offered by this complex tool that will provide all the options to manage your network performance.
Whether they are application servers, mail servers, web servers, virtual or database servers, Site24x7 offers more than 60 performance metrics of up to ten servers.
This solution also helps you analyze the Microsoft applications’ performance. The list includes IIS, SQL, Exchange, Office 365, and a lot more.
All the data is easily accessible from a single command center, even if you’re running Debian, SUSE, CentOS, or another system.
Server monitoring can be also implemented by using plugins and the ones for Nagios, MySQL and Apache are included but you can also build your own.
Key features of Site24x7:
Easy SNMP traffic monitoring
Apache, MySQL and Nagios plugin integrations
Control everything from a single dashboard
Monitor more than 60 performance metrics
Manage customer accounts and endpoints securely
Site24x7
Track the SNMP traffic easily and monitor over 60 metrics with this great tool.
ManageEngine OpManager offers comprehensive and scalable SNMP Trap processing for large IT networks.
Using the SNMP trap as the passive monitoring technique, you can gather information related to performance deviation and device health-related issues when it happens between two polls.
With a robust rule-based trap processing engine, ManageEngine OpManager can handle around 300 SNMP traps per second.
It allows you to easily create SNMP trap processes, troubleshoot trap queries in real-time using SNMP, and with SNMP trap forwarding, you can forward traps received in OpManager to any other NMS.
Key features of ManageEngine OpManager:
Offers granular control over SNMP traps at Varbind level
Easy to create SNMP trap processors
Troubleshoot trap queries in real-time using SNMP trap view
Forward received traps to other NMS platforms
ManageEngine OpManager
Keep your network healthy with this network management tool with SNMP message trapping.
PRTG Network Monitor is an all-in-one network monitoring solution that offers multiple monitoring methods, including SNMP monitoring.
Unlike other tools in the market, it uses sensors as the basic monitoring element of the tool. Each sensor is tasked with monitoring different components such as CPU load, storage allocation, temperature, etc.
The users can create sensors to trace SNMP traffic on a device that provides traffic data to monitor traffic using Simple Network Management Protocol.
PRTG Network Monitor allows you to define the displayed sensor name with port name templates. All the sensors support IPv6 protocol and have a very low impact on the network performance.
The auto-discovery feature creates SNMP traffic sensors for all the interfaces whose SNMP traffic counters are above 0.
Key features of PRTG Network Monitor:
SNMP compatible with a large range of manufacturers
Built-in alert feature with a custom threshold value
Management console with a dashboard view
IPv6 compatible and low impact on system performance
PRTG Network Monitor
Easily trace SNMP traffic on your network with this poweful and easy to use tool.
Kaseya Network Monitoring solution makes it easy to perform standard SNMP device monitoring for different types of devices, including routers, switches, and printers on your network.
It provides SNMP monitoring for network devices, routers and switches, and printers.
The VSA Network Topology Map provides complete IT Network visualization. Integrated Kaseya VSA, a network, and remote monitoring package that tacks everything from hypervisors to routers and firewalls.
Key features of Kaseya Network Monitoring:
SNMP monitoring for network devices, routers, switches, and printers
VSA Network Topology Map for complete IT network visualization
SNMP monitoring is a commonly used method to monitor large networks with several hundred or even thousands of sensors.
Apart from network usage monitoring, SNMP can also monitor other network parameters such as CPU usage, temperature, and other readings on requested queries and devices.
Skimming through loads of SNMP traps can add too much stress to everyday IT operations.
SNMP traffic monitoring tool can help you set alerts for specific SNMP traps and filter unwanted trap-based alerts while also other vital data related to your network performance.
The company just rolled out its beta waitlist for Slack ChatGPT, which will be coming within the Slack App directory.
Noah Desai Weiss, Slack’s chief product officer, also promised that the move could give customers new superpowers by helping them tap the collective knowledge of their organization’s channel archives.
OpenAI has been a great Slack customer, and we’re even more excited for them to be an amazing Slack partner. The ChatGPT app for Slack deeply integrates the power of OpenAI’s cutting edge large language models into Slack’s conversational interface. There couldn’t be a more natural fit.
If anything, this could be a million-dollar move that changes the way we work remotely. While the news has been met with some perplexing receptions, it’s still a highly-anticipated technology that could help you summarize threads, compose important messages and even research information from the outside.
The app was built on top of Slack’s trusted platform, and will be available alongside more than 2,600 other integrations in the app ecosystem. This ensures customers have granular controls to safely manage third-party access of Slack data. Any data that the app has permission to access will not be used to train ChatGPT’s language model.
The news itself came amidst Salesforce’s announcement of Einstein GPT, its world’s first generative AI for CRM. Together, the two forces combined ChatGPT’s enterprise-grade tech with the company’s private AI models, so here’s hoping for a much better experience than the polarizing-viewed Bing AI chatbot.
It’s also worth noting that Microsoft, the tech giant behind its Teams platform, has spent over $10 billion in OpenAI, ChatGPT’s company, so it could be interesting to see this feature rolling out on Slack, notably a direct rival to Teams.
What are your thoughts about this feature? Let us know in the comments!
Managing an entire network or a server can be a challenging task, but it doesn’t have to be if you use the proper tools for the job.
To do this, you’ll need software that supports SNMP monitoring, and in today’s article, we’re going to show you the best SNMP monitoring tools on the market.
First, SNMP is an acronym that is translated by Simple Network Management Protocol and it’s a layer included in the Internet protocol suite that is used by virtually all communication devices.
SNMP basically talks to all devices within a network by sending and receiving messages called PDUs (Protocol Data Units).
And based on this exchange, the system is able to retrieve any information from the devices about traffic and other metrics.
Therefore, an SNMP monitoring tool is essential to assess the availability and health of a network environment and offers the most important data for IT administrators.
The Site24x7 network monitoring tool is SNMP-based so you’re right on target with this complex solution.
To discover the devices on your network you may either specify an IP range or use the Classless Inter-Domain Routing (CIDR) technology.
Of course, you are also able to set discovery rules and device and interface filters and that will definitely provide a more accurate discovery.
Once you identified and added the devices, the On-Premise Poller tool quickly starts retrieving data like traffic, bandwidth, packets, error, discards, and other performance data from them.
Setting up threshold limits for selected performance metrics at the device and interface level will further help you fix any possible breach and keep the network healthy.
Although it can monitor your entire network with more than 60 performance metrics, Site24x7 also helps you with Microsoft applications.
These include key products like Exchange, IIS, SQL, Windows server backups, SharePoint, Office 365, Active Directory, Failover Cluster, and Hyper-V.
Site24x7 features:
Discovers all the devices on your network based on IP or CIDR
Cloud-based, single dashboard control
Monitors more than 60 performance metrics
Efficient device and interface filtering
Extensive logging and data display features
Site24x7
Use this SNMP-based tool to discover all the devices on your network and monitor their activity quickly.
If you’re looking for a professional-level SNMP monitoring tool, you can’t overlook ManageEngine’s Op Manager.
The solution uses asynchronous SNMP trap messaging to extract all the management information on all the network devices.
It comes with all the tools needed to monitor availability and network performance. That will make it easy for the IT staff to manage and correct any network faults in your devices.
First, OpManager will automatically identify all the devices that are connected to your network at any given time, a crucial feature to keep everything organized. You may even schedule the device discovery to automate the process.
With OpManager you will then get comprehensive reports for key performance metrics, such as network availability, response times, throughput, and resource usage.
Then, the SNMP agent running on a machine will provide a report of any network faults. Actually, OpManager’s monitor SNMP alerts you well in advance of network issues such as breakdowns and slowdowns.
And everything is displayed on a single dashboard that can be customized with over 200 performance widgets.
ManageEngine OpManager features:
Automatic and scheduled network device discovery
Key performance metrics reports on network availability, response times, throughput, and resource usage
Asynchronous SNMP trap messaging
Single web-based dashboard accessible from any location in the world
Simple and easy implementation for any organization size
ManageEngine OpManager
Keep your network in top shape and fix any performance issues in record time with this great tool.
PRTG supports SNMP protocol, and it comes with several SNMP sensors, including Cisco, HP, Dell, and Synology. Of course, support for custom SNMP sensors is available as well.
The software supports alerts via email SMS, or push notifications, so you’ll be notified as soon as any issues appear in your network.
Thanks to the auto-discovery feature, you can easily detect all devices available for NSMP monitoring, and with extensive reports, you’ll keep a close eye on neatly organized data.
The software also offers extensive bandwidth, database, application, cloud, server, LAN monitoring, and much more.
Paessler PRTG Network Monitor is an extensive and professional monitoring software, and if you’re looking for reliable SNMP monitoring software, PRTG is the way to go.
Paessler PRTG Network Monitor features:
SNMP monitoring support with Cisco, HP, Dell, Synology sensors
Alerts via email, SMS, and push notifications
Automatic discovery
Bandwidth, database application monitor
Cloud, server, LAN monitor
PRTG Network Monitor
This tool includes all the sensors from major manufacturers and offers LAN monitoring.
Another great software for SNMP monitoring is the ManageEngine NetFlow Analyzer. The software uses flow technologies such as NetFlow, sFlow, IPFIX, Netstream J-Flow, and AppFlow.
The application works as a bandwidth monitor, and it can provide you with real-time information regarding your network bandwidth. The information is clearly displayed and easy to read, to detect issues easily.
ManageEngine NetFlow Analyzer will allow you to easily view your network traffic, devices, interfaces, access points, and all other network hardware.
The software can also detect a wide array of security issues thanks to the Continuous Stream Mining Engine technology, and you can even detect network anomalies and zero-day threats.
Overall, ManageEngine NetFlow Analyzer offers great features when it comes to network monitoring, and if you want to monitor SNMP devices, this might be the best tool for the job.
ManageEngine NetFlow Analyzer features:
Bandwidth monitor
Real-time information
Detailed and easy-to-read reports
Ability to view all network devices in the network
SNMP monitoring
ManageEngine Netflow Analyzer
Get the latest flow technologies and extract all the management information with ManageEngine.
If you’re looking for SNMP monitoring software, Solarwinds Network Bandwidth Analyzer Pack might be just what you need.
The software can track the status of your SNMP device so you can easily see data such as response time, availability, network bandwidth performance, and traffic patterns.
Support for advanced alerts is available, and you can customize the alerts and be notified about the most crucial ones.
As for alerts, they can be delivered by email or text, and they offer extensive information.
The software also supports intelligent mapping thanks to Orion Maps, to easily visualize your entire network, network devices, and nodes.
Overall, Solarwinds Network Bandwidth Analyzer Pack is a great software for SNMP monitoring, so be sure to try it out.
Kaseya VSA software allows you to manage your IT environment with ease. With this software, you can view all devices on your network as well as the status of your endpoints.
The software supports SNMP monitoring, and it can also generate reports and visualize all important data in dashboards allowing you to keep track of important information.
Speaking of visualizing information, you will see all discovered endpoints on the network topology map. Kaseya VSA also supports automatization, so you set automated tasks that can fix common problems.
The software can also automate patch management in order to eliminate security vulnerabilities. For extra security, there is also available to control the access with 2-factor authentication.
Kaseya VSA offers a wide array of features, and we just covered some of the most basic ones. If you need a professional SNMP monitoring tool, Kaseya VSA might be the right choice for you.
Pulseway is another remote monitoring software optimized for mobile devices so that you can always keep track of your network.
The software can easily and automatically detect all your network devices, and you should be able to easily see all your endpoints and deploy Pulseway.
In addition to network discovery, the SNMP monitoring feature is also available. The software supports automatization to create smart triggers and easily fix common issues automatically.
Additional features include patch management, so it’s easy to ensure that OS and third-party applications are up to date.
The remote control feature is available from both desktop and mobile clients, allowing you to easily fix all sorts of issues. Overall, Pulseway is a great monitoring software, so you should consider it.
These are some of the best SNMP monitoring tools that you can use, so be sure to consider all of them.
We have to mention that all the tools listed above can be used on Windows 11 without any problems and some of them have cloud-based interfaces that will work on virtually any system.
Roblox is a popular online sandbox gaming platform for Windows and Apple iOS. However, some players have reported an error code 264 issue for Roblox. That error message says:
Disconnected… Same account launched game from different device. Reconnect if you prefer to use this device. (Error Code: 264).
As a result, players can’t play Roblox whenever that issue occurs.
Some other players have reported this error even when playing Roblox on one device. In this case, corrupted cache data for the game is another possible cause for error code 264.
How do I fix error code 264?
1. Log out of all Roblox accounts
Ensure you’ve logged out of all Roblox accounts on all devices you play the game. For example, select Settings at the top right of Roblox to log out on a Windows PC and click the Logout option.
When you’ve logged out of all your Roblox accounts, try logging back in on just your Windows PC. You can log back in from this Login to Roblox webpage.
Clearing cache and logging out & logging in can help you fix similar issues like error code 267; to learn more, read this guide.
2. Clear Roblox’s cache files
Press Windows + X to select the Run shortcut option on your Power User menu.
Type this text into Run: %temp%\Roblox
Click OK to open a Roblox data folder.
Press the Ctrl + A key combination to select everything.
Then press the Shift + Delete hotkey to delete the selected data entirely.
Click Yes on the Delete Multiple Items window.
Finally, log out and back into your Roblox account.
Clearing app cache can help you fix similar issues like error code 403; to learn about other solutions, read this guide.
NOTE
You can try clearing the Temp folder if a Roblox data folder doesn’t open. First, enter %temp% in Run, then select to delete everything in the Temp folder.
3. Flush the DNS cache
Please open the file search tool in Windows (click the magnifying glass on your taskbar to view it).
Next, input cmd within the Type here to search box.
Select Run as administrator on the right side of the search tool to launch Command Prompt.
Type in this flush DNS command and hit Return: ipconfig /flushdns
This solution may also fix the Roblox Error Code E01 but this guide will provide additional solutions.
Try applying the abovementioned method to fix error code 264 for playing Roblox on an iPad. In addition, you can log out of the Roblox iPad app by tapping its … button and selecting Log out at the bottom of the menu.
If that’s not enough, we recommend clearing the Roblox app’s data by reinstalling it. You can reinstall the Roblox iPad app in the following steps:
First, tap the Settings app on your iPad.
Select General and iPhone Storage within Settings.
There aren’t many confirmed potential resolutions for fixing the Roblox error code 264 issue. However, resetting your Windows browser and switching to an alternative DNS server might be worth trying.
If you cannot play Roblox due to error code 524, it could be due to network congestion; read this guide to learn more about it.
You can contact Roblox support if you still need to fix error code 264 after applying the resolutions specified above. To do so, fill out the form on this Contact Us page.
Before you leave, check some quick tips to optimize your PC for gaming and get the best experience. And don’t forget to read about Roblox Error Code 1001, the scariest prank doing rounds on the Internet.
You can talk about the Roblox error code 264 by entering comments ago. Have you found another way to fix error code 264? If so, let us know about it below.
There’s nothing wrong with wanting to cut corners, especially when you want to access high-traffic websites faster. First and foremost, you need a resilient and trustworthy browser to access a busy website.
The good news is, that there are a few great options available if you want to know how to access a site when it has high traffic:
Opera One – Resource-friendly browser to open heavy traffic websites easily
Chrome – Faster page loading for priority on websites
Edge – Improved compatibility to access busy websites
Vivaldi – Fully-featured browser to load & access websites faster
Brave – Private browser to access blocked sites without VPN
Firefox – Best way to open high-traffic sites when the server is busy
Go to Google search and type the name of the website.
As the website name appears, click on the three dots next to it.
Here, go to the bottom right and click on Cached.
To access a website that fails to open due to excess traffic, you can use a CDN (Content Delivery Network) service.
It’s a collection of geographically distributed proxy servers that work along with data centers to bring the cache copy of the website to your location.
For example, to use a free service like CoralCDN, simply add .nyud.net at the end of your website URL. This will open Google’s cache of the said website with all the content in place.
You may often come across situations when you click on a URL and the page opens to an error code. There can be many different reasons why a site is unreachable:
How do I access a website that is down?
You can visit the Wayback Machine page for Internet archives to access a website that is down.
So, when a website is unreachable, you can try changing the browser to the one from our recommendations to access the desired content easily.
However, if you are unable to connect to websites due to browser security verification loops, you can refer to our detailed post for solutions.
If you are still struggling to open a website due to any other errors, do let us know in the comments box below.
OpUtils is a comprehensive IP address and switch port management tool that enables effective switch and system port scanning capabilities.
Businesses can either use OpUtils as a standalone product or integrate OpUtils with OpManager, a ManageEngine network monitoring tool where you can monitor and manage your entire network infrastructure while also monitoring and managing IP Addresses and switch ports.
You can also specify a timeout value for the scan and choose to run a Basic or Advanced scan. The Advanced scan option will provide detailed information on open ports, including the service name and version.
This is extremely useful to identify potential security vulnerabilities by recognizing the open ports that attackers could use to gain access to sensitive information.
You can scan a single IP address or a range of IP addresses to see if they are open or closed. It also identifies the ports blocked by firewalls or other network devices, real assets to troubleshoot network connectivity issues.
OpUtils monitors your network devices, including servers, routers, printers, and switches, in real-time. The software offers threshold-based alerts and notifications that help determine and resolve issues before they escalate into critical problems.
With the Switch Port Mapper feature, the solution enables you to map the physical connectivity of your network devices, such as switches, routers, and servers. You can also identify the devices that are connected to each switch port and can help troubleshoot network issues related to them.
You also have a bandwidth monitoring feature for real-time usage monitoring across your network, allowing you to identify bandwidth-hogging applications or users and take corrective measures.
Key features of ManageEngine OpUtils:
Enables you to remotely power on network devices
Allows you to back up, store and restore the configuration files of your network devices.
Helps you to avoid IP conflicts and provides an accurate view of IP usage across your network.
Monitors the network’s bandwidth usage and generates utilization reports for various parameters.
Resolves domain names to IP addresses, helping administrators identify network devices.
ManageEngine OpUtils
Monitor the key performance of your network performance and scan your ports safely!
PRTG Network Monitor is widely used in the monitoring software industry and is without a doubt our number-one choice also.
With the help of this tool, you can monitor all the infrastructure including network links, applications, servers, and devices that are connected to the network.
The software has two kinds of port sensors included that can monitor and report back their activity.
By doing this, you will be able to easily see which port is open or closed, and even how long it took for the connection to happen.
Key features of PRTG Network Monitor:
Scan and add private IP addresses automatically thanks to the IP scanner with auto-discovery feature
IP sensor to check the reachability with your IP Network
Complex network analysis
Pre-configured SNMP sensors that are compatible with multiple vendors
PRTG Network Monitor
Monitor up to 100 port sensors for free with PRTG Network Monitor in order to get the best view of ports status at all times.
Angry IP Scanner is one of the fastest and most reliable port scanners out there. With this tool, you will easily scan the IP address and the ports in range.
Angry IP Scanner has a cross-platform utility, which means that is compatible with both Windows and Mac and other operating systems as well.
The scan results can be saved and exported in several file formats CSV, TXT, XML, or IP-Port.
Moreover, the Angry IP Scanner offers access to NetBIOS information, IP address ranges, web server detection, and many more.
Key features Angry IP Scanner:
Reliable cross-platform IP scanner
Pings and optionally resolves hostname, scans ports, and determines MAC address
This software is widely used in corporations where large IT networks are present but can just as well be used in small home networks with a lesser number of devices.
Network Scanner by LizardSystems will scan the IP addresses and devices along with the allocated number of computers and subnets.
Thanks to the Terminal Services Manager you will also be able to see the details of the users connected, the sessions, and their active processes as well.
Key features of Network Scanner:
A great choice for network administrators and regular users.
Scan multiple computers per minute.
Excellent filtering options.
Network resource audit to check access rights to resources.
In this article, we’ll rank the top VPN apps for Windows 10 PCs, laptops, and tablets, making it easy for you to choose the best one for your needs.
Whether you’re looking to secure your online activity, access geo-blocked content, or maintain privacy while browsing, we’ve reviewed the most reliable VPNs that work flawlessly with Windows 10
ExpressVPN has over 3,000 VPN servers in 160 locations. It also runs zero-knowledge DNS servers to ensure your online traffic remains private. China users can run ExpressVPN, too.
You can use this VPN app to unblock Netflix US and other streaming services and engage in torrenting activities safely. It supports a kill switch called Network Lock and a Smart DNS feature called MediaStreamer.
To raise your security and privacy level, look no further than NordVPN. Its reputation precedes itself, delivering consistent results in the VPN market.
NordVPN has more than 5,400 VPN servers in 59 countries. You can use the OpenVPN and NordLynx protocols, obfuscation mode, P2P, Double VPN, and Onion-over-VPN servers.
Surfshark is another fan favorite, thanks to affordable subscription plans, advanced security features, and the fact that you can set it up on any number of devices. It’s actually the best VPN for multiple devices.
Moreover, Surfshark has a malware blocker called CleanWeb, a kill switch, multi-hop VPN connections, split tunneling, and obfuscated servers (Camouflage Mode).
You can use CyberGhost to unblock the best Netflix libraries, including Netflix US, UK, and Canada. Plus, you can set it up on devices without native VPN support by using its Smart DNS feature.
The app successfully unblocked restricted websites in our evaluation, without error. Discover our experience with this VPN service in our detailed CyberGhost VPN review.
More about CyberGhost VPN:
Windows, Linux, Mac, iOS, Android, Chrome, Firefox, Fire TV, routers
7 device connections at the same time
No identifying or traffic logs
24/7 live chat support
Up to 45-day money-back guarantee
CyberGhost
Try CyberGhost VPN’s free trial for secure, safe browsing and streaming!
IPVanish is a great choice if you want fast connections, even for file sharing. It supports P2P, offering excellent performance. With over 2,000 servers in 75 locations, it offers unlimited bandwidth with no speed throttling.
Moreover, the intuitive app interface and wide device compatibility makes it a great choice not only for your Windows 10, but for the other devices you use internet on.
More about IPVanish:
Platforms: Windows, Mac, iOS, Android, Linux, Fire TV, routers
Unlimited simultaneous connections
Advanced security with AES-256 encryption
Automatic kill switch and DNS leak protection
24/7 live chat support
30-day money-back guarantee
IPVanish
Enjoy a high-speed VPN for streaming and secure file sharing!
VyprVPN is a great option if you want to bypass online restrictions an censorship. For that, it uses it proprietary Chameleon protocol with built-in obfuscation.
In essence, this hides the fact that you use VPN. The tool operates its own server network, ensuring robust privacy wth no third-party involvement.
VyprVPN
Unlock the internet securely and bypass restrictions with VyprVPN!
Lastly, remember that VPNs are key for privacy, but backing up your data is equally important. Learn more with our backup software for servers guide. Have experience with any VPNs? Share your thoughts in the comments!
Microsoft Edge is nowhere near what it used to be when it was first launched a few years back. It is one of the best browsers for all devices, boasting many features. But many reported the Microsoft Edge flickering problem.
Complaints against it are mounting, and so is the clamor for a solution. Unfortunately, while the Microsoft Edge flickering issues continue to be pervasive, a sure-fire solution is still elusive.
There are a few workarounds available that can be of help. However, before we get to the solution, it could be worth shedding some more light on the problem itself.
Why are my tabs flashing orange?
If you were wondering what it means when your screen flashes, the problem is hard-coded in the browser itself if it can be referred to as such. This feature is designed to be beneficial by drawing attention to anything Edge feels you should be attending to.
So any changes in a dormant tab, such as getting logged out automatically or a download that has finished, will set the tab flashing and will continue until you click on it.
By that time, another tab might have started blinking, and you could soon be reduced to playing a nice game of whack-a-mole. Not bad, except that you didn’t ask for it.
This brings us to the next logical question, how to get rid of it. There aren’t many options here, though you can try the ones listed below, which worked for many users.
Quick Tip:
Switch to another reliable browser until we resolve the issue with Edge. As you get familiar with the design, in Opera One you can navigate between various tabs, workspaces, tab islands and built-in social media chat.
The browser has versions for PC, mobile, Mac, or Linux. Besides, you can synchronize the Opera One browser across all your devices and it has a built-in AI
Opera One
Sync devices and use tab management in groups and workspaces to avoid flashy orange tabs.
Flags are experimental features in Edge and can be removed by the developers after they make their way to the stable builds. So, if you can’t find Vulkan, check the browser settings for the option, and in case it’s not there, move to the next solution.
Launch Edge, paste the following path in the address bar, and hit Enter:edge://flags/
Search for Vulkan, click on the dropdown menu next to the relevant entry, and select Disabled.
Finally, click on Restart for the changes to come into effect.
If you have Microsoft Edge flashing, the easiest way to fix things is to disable the relevant flag. The fix was shared by one of our readers and will help others facing the Microsoft Edge screen glitch.
2. Disable content on the Edge home screen
Launch Edge, click on the Page settings icon, and choose Custom from the Layout dropdown menu.
Now, turn off the toggle for Recent Bing searches, Show greetings, Office sidebar, and New tab tips.
Finally, under the Content dropdown menu, choose Content off.
That’s it! Once you are done disabling all forms of informational or other display items from Microsoft Edge, flickering should automatically stop. In case it doesn’t, head to the next solution.
3. Uncheck visual notifications
Press the Windows key + R to open the Run prompt.
Type control in the run box and click the OK button.
Click on the Ease of Access option.
Select the Ease of Access Center option.
Click on Use text or visual alternatives for sounds.
Uncheck the box for Turn on visual notifications for sounds (Sound Sentry) checkbox is activated.
Click on Apply to exit the dialog box.
This should prompt your browser to play a notification sound instead of Microsoft Edge flickering screen on the laptop. At least many have claimed this worked for them. Once done, verify whether this fixes Microsoft Edge flickering in Windows 10.
If Microsoft Edge keeps flickering, the next solution might do the trick.
4. Choose a Light theme
Click the menu button (three horizontal dots) at the top right corner.
Select the Settings option.
Choose the Appearance option in the left pane.
Select the Light theme.
Again, this is believed to have worked for many in preventing the Microsoft Edge flickering in Windows 11 and the previous iterations. So, if you have Microsoft Edge white flash, switching to the light theme would help.
Press the Windowskey + I to open the Settings app on your PC.
Select the System option.
Choose Multitasking in the left pane.
Click the dropdown in the Alt + Tab section and choose your preferred option.
The Microsoft Edge screen flickering issue can quickly dent your browsing experience. Fortunately, it is not difficult to fix. But remember to verify whether the problem lies with the browser or if the screen is flickering in Windows.
We suppose you are reading this article because you installed the latest Windows 10 OS version on your computer and want to fix error 0x80070057.
We’ve got a piece of good news for you: if you carefully follow the steps listed below in the order they are described, you can get on with your Windows 10 usage in no time at all.
What is error 0x80070057 in Windows Update?
The 0x80070057 Windows 10 update error points to a problem with the system storage, usually the storage drive. So, your primary approach should be to check for issues with it. Here are a few reasons you are getting the error:
Issues with the file system: If you have an incorrect file system, one not compatible with Windows, it will lead to issues downloading and installing OS updates.
Third-party apps blocking the update: Oftentimes, a third-party app, usually a security software, may be blocking the updates and causing error 0x80070057 in Windows update.
How can I fix the Windows Update error 0x80070057?
Before we start making complex changes, here are a few quick ones to try:
Restart the PC.
Make sure to disable any antivirus or security software installed on the computer. A few users reported that disabling Cybereason Ransomware did the trick for them.
If these don’t work, move to the solutions listed next.
Tip
For you to fix the 0x80070057 error code, you will need to have administrator rights on Windows 10 for the Group Policy Editor, not available in Home edition. Also, you will need to have administrator rights to run the required command lines in the Command Prompt window.
1. Configure Automatic Updates
Press Windows + R to open Run, type gpedit.msc, and hit Enter.
Now that you have the Local Group Policy Editor in front of you, double-click on the Computer Configuration icon present in the right side.
Now double-click to open the Administrative Templates folder.
From the Administrative Templates folder, double-click to open Windows Components folder.
From within the Windows Components folder, double-click to open Windows Update folder.
In the Windows Update folder, search for Configure Automatic Updates, and make sure it is set to Not Configured.
Once done, again press Windows + R to open Run, paste the following command, and hit Enter:gpupdate /force
Let the process finish, and then reboot your Windows 10 computer.
2. Repair your partition/ Run Disk Cleanup
Right-click on the problematic partition, and choose Properties.
Go to Tools, and under Error checking, click on the Check button to check your drive for system errors.
Error 0x80070057 often occurs when the partition that you reserved for your OS is damaged. Fortunately, you can quickly fix this issue by running a dedicated hard drive repair software to restore your partition health.
Temporary files and other junk files may also cause your hard drive and OS partition to behave erratically. You can fix this by running Disk Cleanup.
3. Run the Windows Update troubleshooter
If you’re looking for a quick and reliable method to fix Windows update errors, you can try running the built-in Windows Update Troubleshooter.
This tool quickly scans and repairs Windows Update components so that you can then install the available OS update without any problems.
4. Download the latest Servicing Stack Update (SSU)
First of all, you need to see what OS version you’re using: 32-bit or 64-bit Windows. To do this, go to Settings > System > About > scroll down to System type.
Launch Command Prompt as administrator and then paste the following commands and hit Enter after each:
net stop bits
net stop wuauserv
net stop appidsvc
net stop cryptsvc
Delete the qmgr.dat update files by running this command:Del "%ALLUSERSPROFILE%Application DataMicrosoftNetworkDownloader*.*"
Clear the Windows Update cache by executing these commands:rmdir %systemroot%SoftwareDistribution /S /Qrmdir %systemroot%system32catroot2 /S /Q
Now, you’re going to register all the Windows Update DLL files on the Windows Registry. All you need to do is enter the following commands and then hit Enter after each one:
regsvr32.exe /s atl.dll
regsvr32.exe /s urlmon.dll
regsvr32.exe /s mshtml.dll
regsvr32.exe /s shdocvw.dll
regsvr32.exe /s browseui.dll
regsvr32.exe /s jscript.dll
regsvr32.exe /s vbscript.dll
regsvr32.exe /s scrrun.dll
regsvr32.exe /s msxml.dll
regsvr32.exe /s msxml3.dll
regsvr32.exe /s msxml6.dll
regsvr32.exe /s actxprxy.dll
regsvr32.exe /s softpub.dll
regsvr32.exe /s wintrust.dll
regsvr32.exe /s dssenh.dll
regsvr32.exe /s rsaenh.dll
regsvr32.exe /s gpkcsp.dll
regsvr32.exe /s sccbase.dll
regsvr32.exe /s slbcsp.dll
regsvr32.exe /s cryptdlg.dll
regsvr32.exe /s oleaut32.dll
regsvr32.exe /s ole32.dll
regsvr32.exe /s shell32.dll
regsvr32.exe /s initpki.dll
regsvr32.exe /s wuapi.dll
regsvr32.exe /s wuaueng.dll
regsvr32.exe /s wuaueng1.dll
regsvr32.exe /s wucltui.dll
regsvr32.exe /s wups.dll
regsvr32.exe /s wups2.dll
regsvr32.exe /s wuweb.dll
regsvr32.exe /s qmgr.dll
regsvr32.exe /s qmgrprxy.dll
regsvr32.exe /s wucltux.dll
regsvr32.exe /s muweb.dll
regsvr32.exe /s wuwebv.dll
You can now restart the relevant services by running these commands (don’t forget to hit Enter after each one):
net start bits
net start wuauserv
net start appidsvc
net start cryptsvc
6. Run DISM and SFC commands
Open Command Prompt as administrator, type the following command, and then hit Enter:DISM.exe /Online /Cleanup-image /Restorehealth
Now use the System File Checker tool by executing this command:sfc /scannow
Once done, restart the computer, and check for Update again.
If you’re experiencing error 0x80070057 Windows 11 or even the other iterations, Microsoft recommends you run the DISM tool and SFC scan.
7. Uninstall third-party tools
Some users confirmed that uninstalling third-party software helped them fix the problem. So, if you recently installed new apps on your computer, uninstall the program and then check for updates again to see if this fixed the problem.
Follow the steps above and get the Windows Update feature up and running in just a few minutes of your time.
Where else can I find this error?
Now, error code 0x80070057 is primarily linked to the Windows 10 upgrade, but unfortunately, it can transcend this scenario to plague even more platforms, apps, and actions. Let’s take a closer look.
Windows Update client failed to detect with error 0x80070057 (In some cases, there is a more comprehensive message displayed: There were some problems installing updates, but we’ll try again later. If you keep seeing this and want to search the web or contact support for information, this may help: (0x80070057).
Certain error messages, or rather notifications, are meant to protect your files. But being prevented from accessing, copying, deleting, or modifying a file/folder because of inadequate permissions is no fun. And the Location is not available error does present a similar situation.
When you get the Access is denied error that reads Location is not available on desktop in Windows 10, it’s usually a trivial issue and can be fixed in no time. Let’s find out all about it.
Why am I getting Location is not available access is denied?
Here are a few reasons you might be getting the error:
Missing ownership: When you don’t have the drive or folder ownership, this might trigger errors when trying to access it.
Permissions were changed: Sometimes, the folder or drive permissions change inadvertently, thus resulting in Location is not available on Windows 10.
Third-party app blocking access: When Location is not available if the location is on this PC, it could be third-party applications, usually antivirus or security software, preventing access to certain folders and files.
Issues with the drive: A hard drive with bad sectors or malfunctioning hardware, too, can lead to the problem.
How do I fix Location is not available on Windows 10?
Before we start making major changes, here are a few quick things you can try:
Restart the computer and check whether the Location is not available folder is now accessible.
For an external hard drive, connect it to another PC and check whether the affected folder can be opened. If yes, the permissions are misconfigured, or a third-party app is blocking access.
Disable Windows Security, the built-in antivirus, or any third-party antivirus you may have installed.
If you haven’t updated the OS in a while, check for pending Windows Updates and install them.
Let’s now head to the solutions listed next.
1. Change permissions
Right-click on the folder/drive that’s throwing the error, and select Properties.
Head to the Security tab, and then click on Advanced.
Click on Change.
Type your current username in the text field, click on Check Names, and then OK.
Now, tick the checkboxes for Replace owner on subcontainers and objects and Replace all child object permission entries with inheritable permission entries from this object, and click OK.
Click Yes in the confirmation prompt.
Again, click OK to save the changes.
Next, open the folder/drive Properties, head to the Security tab, and click on Edit.
Click Add.
Enter the username you used earlier, and click on Check names followed by OK.
Select the user account, tick the checkbox for Full control, and click OK.
Click OK on all subsequent windows for the changes to come into effect.
That’s it! In most cases, reconfiguring the permissions and taking ownership of the affected folder/drive should fix the Location is not available error in Windows.
2. Check the disk for errors
Press Windows + R to open Run, type cmd, and hit Ctrl + Shift + Enter.
Click Yes in the UAC prompt.
Now, paste the following command and hit Enter:chkdsk /r
Hit Y and press Enter to schedule the tool.
Restart the computer, let Check Disk run, and it will automatically fix issues with the drive.
For the Location is not available The parameter is incorrect error, the best fix is to run Check Disk, a built-in tool, in Windows. It can fix a range of issues, in addition to identifying and repairing bad sectors.
3. View hidden folders and hide protected files
Press Windows + S to open Search, type File Explorer Options, and click on the relevant search result.
Go to the View tab, select Show hidden files, folders, and drives under Hidden files and folders, tick the checkbox for Hide protected operating system files (recommended), and click OK to save the changes.
Restart the computer and check if you can now access the folder that earlier threw the error.
4. Perform in-place upgrade
NOTE
Before proceeding, make sure you are connected to the Internet and have a decent Internet speed because the method requires downloading Windows.
Run the setup, click on Yes in the prompt, and let it get things ready.
Click Accept to agree to the license terms.
Now, choose the Upgrade this PC now option, and click Next.
Wait for the setup to download Windows, and then follow the on-screen instructions to complete the in-place upgrade.
The in-place upgrade usually takes a few hours to complete, but it wouldn’t delete any files, remove any apps, or reconfigure the chosen settings. The PC would be the same as before, except that all issues with the OS would be eliminated.
Tip
If nothing works, you can always use a reliable File Manager in Windows. The error is found to affect the built-in File Explorer, but third-party tools continue to work fine. So, try that until you identify the underlying cause or Microsoft fixes the problem in the subsequent updates.
One of the solutions here should help get rid of the Location is not available error in Windows 10. If none do, it could be an issue with the hard drive, one that requires physical inspection. So, you might consider consulting a hardware expert on the matter.
And while we are on the subject, find out what to do if the File Explorer is slow, a problem reported by many.
For any queries or to share another solution that worked for you, drop a comment below.
A virtual private network (VPN) protects your privacy while online and secures your Internet connection by creating an encrypted environment. Using a VPN for laptop is an easy way to protect yourself from ISP or vicious attacks from hackers, that is why a lot of users install VPNs on their PC right after they buy it.
What makes VPNs popular among computer and Internet users is that all the traffic on the network flows through the VPN without being seen by anyone, including your internet service provider.
VPNs prevent other people from intercepting your Internet traffic. They are very useful when you’re using public Wi-Fi or traveling as they hide your actual IP address and you can’t be tracked easily online.
A VPN is also good when your personal and/or professional security is at stake, as an investigative journalist, or if your profession also requires heightened safety so that you can communicate with others across the world.
If you’re looking for the best VPN software for laptops, you need to check for affordability, reputable service, performance, encryption and transparency, support (tech or otherwise), ease of using the VPN, among other features.
This Express VPN International Ltd. service ranks number one among its rivals judging from independent and user reviews, as well as ratings.
It is the number one trusted leader in VPN with high speed, ultra-secure protection, ease of use, and instant setup.
With ExpressVPN, you can access any content across 94 countries and unblock the sites and apps you love, avoiding hacking or tracking using powerful encryption, backed by 24/7 support through live chat.
You also get blazing-fast VPN speeds on a huge network of over 1700 global VPN servers, unlimited bandwidth, and an easy-to-use VPN service for Windows and other operating systems.
Zero restrictions on streaming and downloading from anywhere while your IP is hidden, plus offshore privacy protection with no activity or connection logs are also part of the package.
Other features include protection from hacking and surveillance with 256-bit AES encryption, DNS/IPv6 leak protection, kill switch, and split tunneling.
ExpressVPN
Want the best privacy protection for your laptop? Don’t waste any more time and get ExpressVPN.
Developed by Tefincom & Co., S.A., NordVPN is everything you need to protect your privacy online.
As one of the best VPNs for laptops, NordVPN offers features such as double VPN combinations to encrypt your Internet traffic, and CyberSec technology to protect yourself from intrusive ads and malicious online threats.
Even more, its DNS leak protection ensures data protection. As for the no-logs policy, you’re assured your data isn’t tracked or monitored.
You can also secure your browsing on Chrome or Firefox, enjoy a secure streaming experience with SmartPlay technology, and join the NordVPN network of over 5400 servers in 59 countries globally.
The benefits of using NordVPN include lightning speeds, ease of download and installation, plus you can connect up to 6 devices simultaneously and protect your privacy on the go with mobile apps.
You also get a dedicated IP address for better connectivity and a faster VPN experience, plus if you need any assistance, NordVPN’s customer service is on standby to assist you anytime.
NordVPN
Wasting sleep trying to find the best VPN for your laptop? Look no further, check out NordVPN.
Surfshark is one of the few VPN providers to offer unlimited access to all types of devices. If you are a laptop user, you can easily get connected to the web using this VPN’s large number of servers – 1700+ in over 63 countries.
Your local IP address is totally masked when you’re using this VPN’s servers. You’ll also have access to top-notch AES 256-bit encryption.
When you need to hide your local IP address at a Wi-Fi hotspot, this Surfshark LTD VPN solution is a secure, reliable choice.
Your privacy will also be protected by their strict no-logs policy, which makes sure that your activity on the Internet is only known by you.
In addition, there’s a kill switch feature that protects you if the service ever disconnects.
One of the top benefits that you’ll receive when using Surfshark is the fast speeds that you’ll get with their servers.
They also offer one of the best ways to access Netflix with 14 Netflix libraries available.
Besides being able to connect with your laptop that uses macOS or the Windows operating system, you also have access to apps for Android and iOS, which can come in handy if you only have your smartphone with you.
The support team at this VPN is available 24/7 if you ever have any issues.
Private Internet Access (PIA) offers top-notch security and privacy for all those eager to find the best VPN software for laptops.
Developed by the online privacy company Kape Technologies, PIA uses advanced encryption algorithms and proudly adheres to a strict no-logs policy.
Creating your account only means revealing an email address and your payment information. However, even these can be done anonymously if you feel safer this way.
Private Internet Access supports multiple VPN technologies such as PPTP, L2TP/IPsec, SOCKS5, OpenVPN, and even the new WireGuard.
Most users still prefer the OpenVPN protocol, which is open-source software, therefore its code has zero vulnerabilities.
It’s also worth noting that PIA doesn’t log user activity and includes DNS leak protection. On top of that, it has a secure killswitch to ensure your data isn’t leaked even if VPN connection drops.
Private Internet Access
Enjoy optimal protection on your laptop with Private Internet Access. Currently available at a major discount!
CyberGhost is a favorite among the best VPN software tools for laptops as it protects your privacy on a multi-platform privacy solution.
Features include the highest encryption available with 256-bit encryption technology, hiding of your IP, and Wi-Fi protection if in a public area.
You also get a strict no-logs policy that doesn’t track your Internet activity, multiplatform apps for all your devices, security for transactions and conversations, plus access to over 6400 VPN servers in 89 countries.
The benefits of using CyberGhost include access to restricted content, protection for all your devices, ad blocking, malware blocking, and the highest possible speeds you can get on a VPN.
? Which VPN is free and best for laptops?
Good VPNs should have up-to-standard encryption, no logs policy, proven connection speed, and a decent number of servers. Not many free clients include all these, but we have a reliable option:
Tunnel Bear – proven zero logs and great free version
TunnelBear is an intuitive VPN service created by McAfee LLC with dedicated applications for multiple platforms, including Windows-operated laptops.
This VPN has a simple, yet witty and fun user interface that lets you connect to a private server at the press of a button.
Users can connect to an automatically determined server or pick the location of their choice manually.
This VPN service places no limit on data usage and secures your connection with military-grade AES-256-bit encryption.
TunnelBear keeps your data private even in case the connection drops. It blocks all traffic data until you are able to reaccess a VPN server.
With proven fast speed rates, Tunnelbear offers a map view of all its VPN locations that are spread across 49 different countries.
It
TunnelBear is a very reliable VPN that has both free and paid versions. The free version has a daily data limit but is a good option in terms of privacy and speed. The paid version has two plans, for personal and business use.
Yes, a VPN protects your data when connected to the Internet, so you are less likely to be tracked down by malicious third parties.
Thanks to the encryption, your connection will be secure even on Public Wi-Fi.
There are other key benefits of using a VPN, including the possibility to bypass geo-blocks, stop ISP throttling and improve connection speed.
How do I set up a VPN on my laptop?
Most VPN clients come with easy-to-install native applications for all major operating systems, so you’ll be able to set it up in no time:
After you decide which VPN to use, head to its official website and get a subscription. We use ExpressVPN because it’s very reliable, fast, and easy to use.
Download the dedicated app to your device and install it.
Launch ExpressVPN and click on the power button in the main UI to connect to a server.
A VPN will tunnel and encrypt your traffic through its secure servers so no information about your activity or identity can be leaked.
Good VPNs like the ones we mention in this article can be used on any type of laptop model, including Dell laptops or Lenovos.
Ready to start using the best VPN software for laptops? Let us know your favorite pick.
If there’s one you use that didn’t make the list, tell us about it by leaving a comment in the section below.