5 Quick Ways to Fix Evil Dead When It’s Not Working

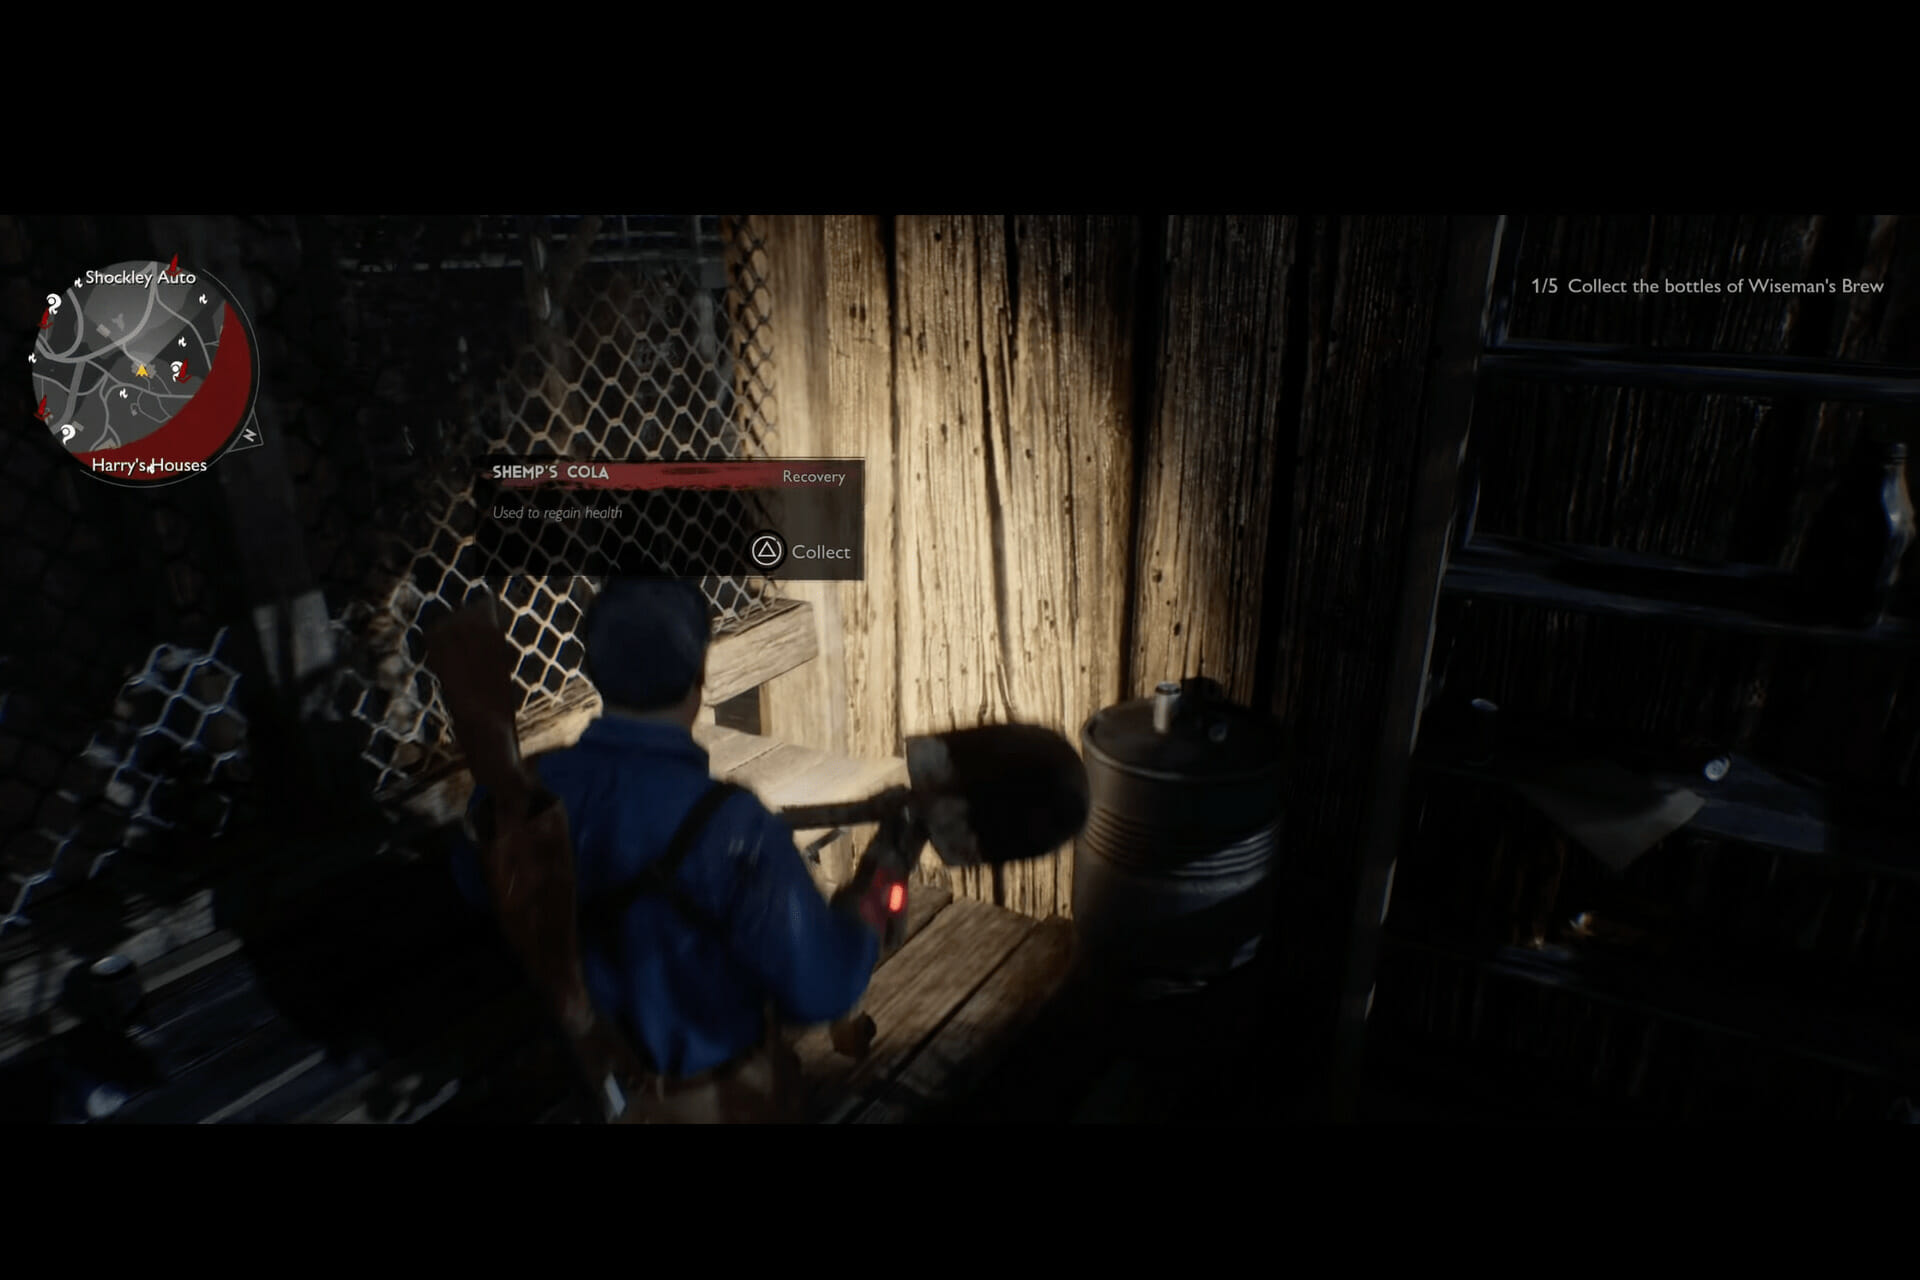
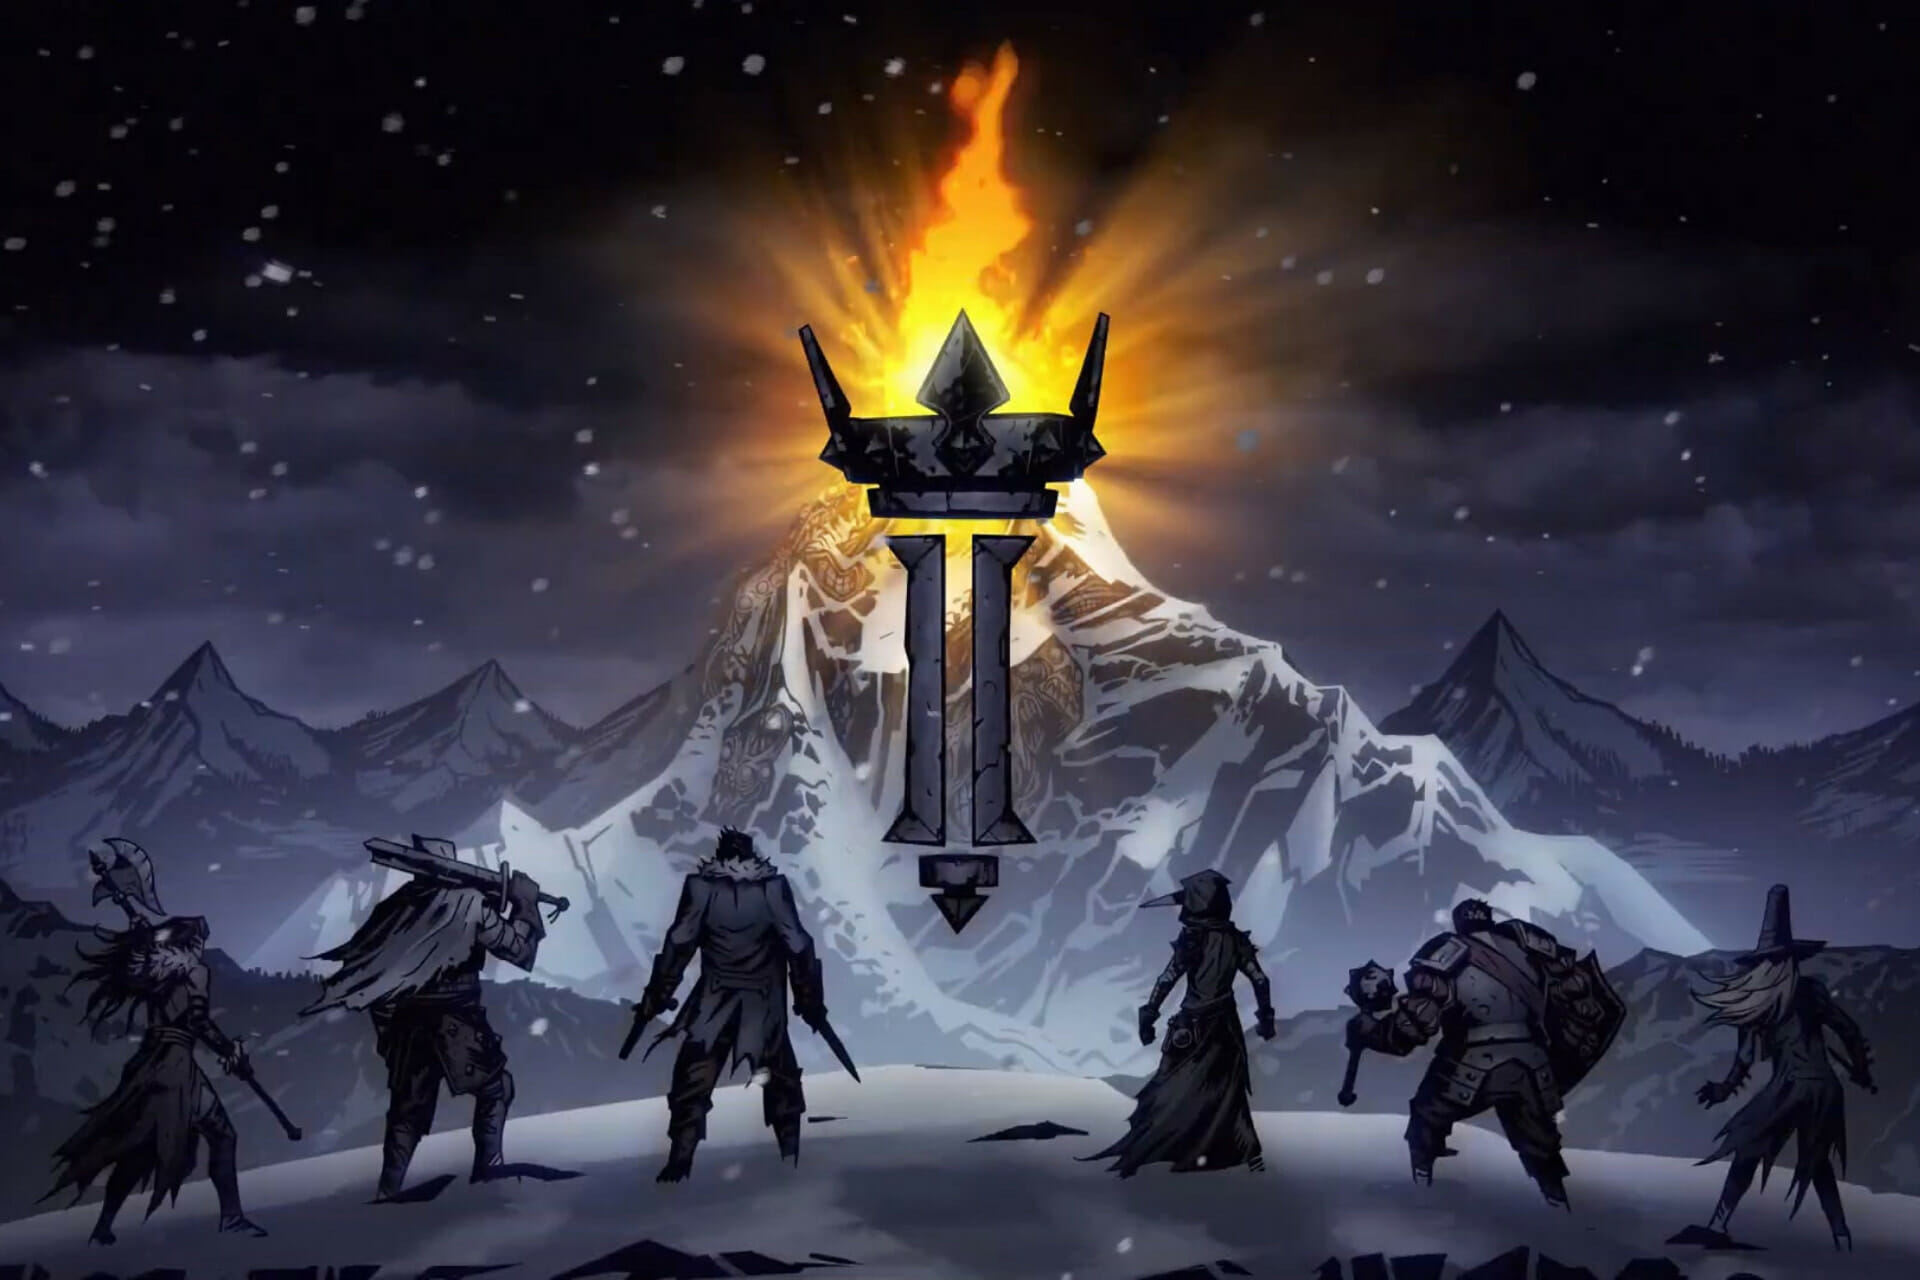
The Evil Dead: Ghost was just launched a few days ago for PS5, PS4, Windows, Nintendo Switch, and Xbox One, Xbox Series X, and Series S. This game was released widely, but a few users have reported that the game is not working.

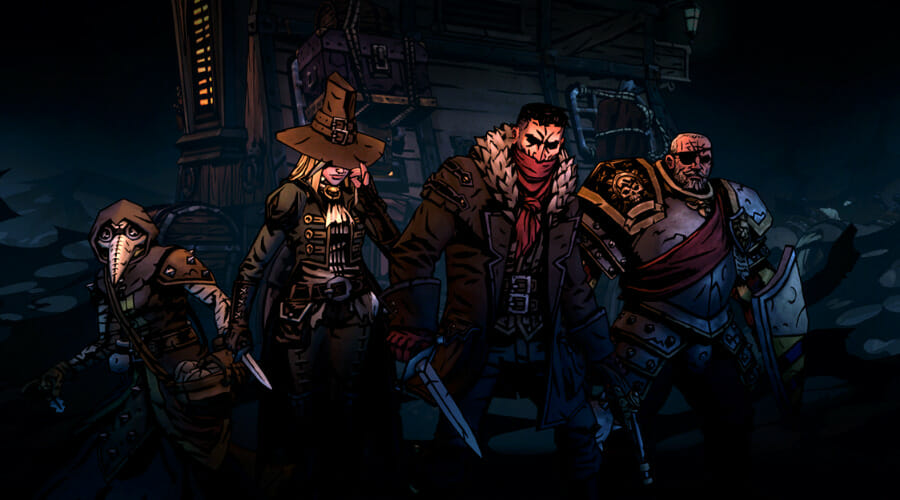
This is an action-horror game where you play with the iconic characters of the Evil Dead franchise: Ash, Kelly, Scotty, and other friends that were portrayed in the 1981 movie.

Saber Interactive quietly released the game on May 13th, but since then, users have reported that the Evil Dead game is not working on PS5 and other devices.

Keep reading as today we have got 3 quick fixes that you can use to fix the Evil Dead game that is not working and make it work again on your Windows computer, Xbox, PS5, and so on. 

What can I do if the Evil Dead game isn’t working on my PC?

1. Evil Dead does not work on PC

1.1 Verify game files in the EPIC launcher

  1. Open the launcher, and next to Evil Dead: The Game, click the three dots.Opening Epic Games Launcher
  2. Select Verify to initiate the verification. During this process, there is a possibility that additional files may download as well.Verifying the game files of Evil Dead
  3. Once done, restart the computer and relaunch the game.

If the game is still not working, follow the below steps.

1.2 Use Windows CHKDSK Utility

  1. Click on the Start button and search for the Command Prompt.
  2. Open it as an administrator by selecting Run as administrator.Opening the command prompt as an administrator
  3. Type chkdsk C: /r and press Enter.Running the CHKDSK command using the command prompt
  4. Enter your password and the scan will begin automatically.

1.3 Check for Windows Updates

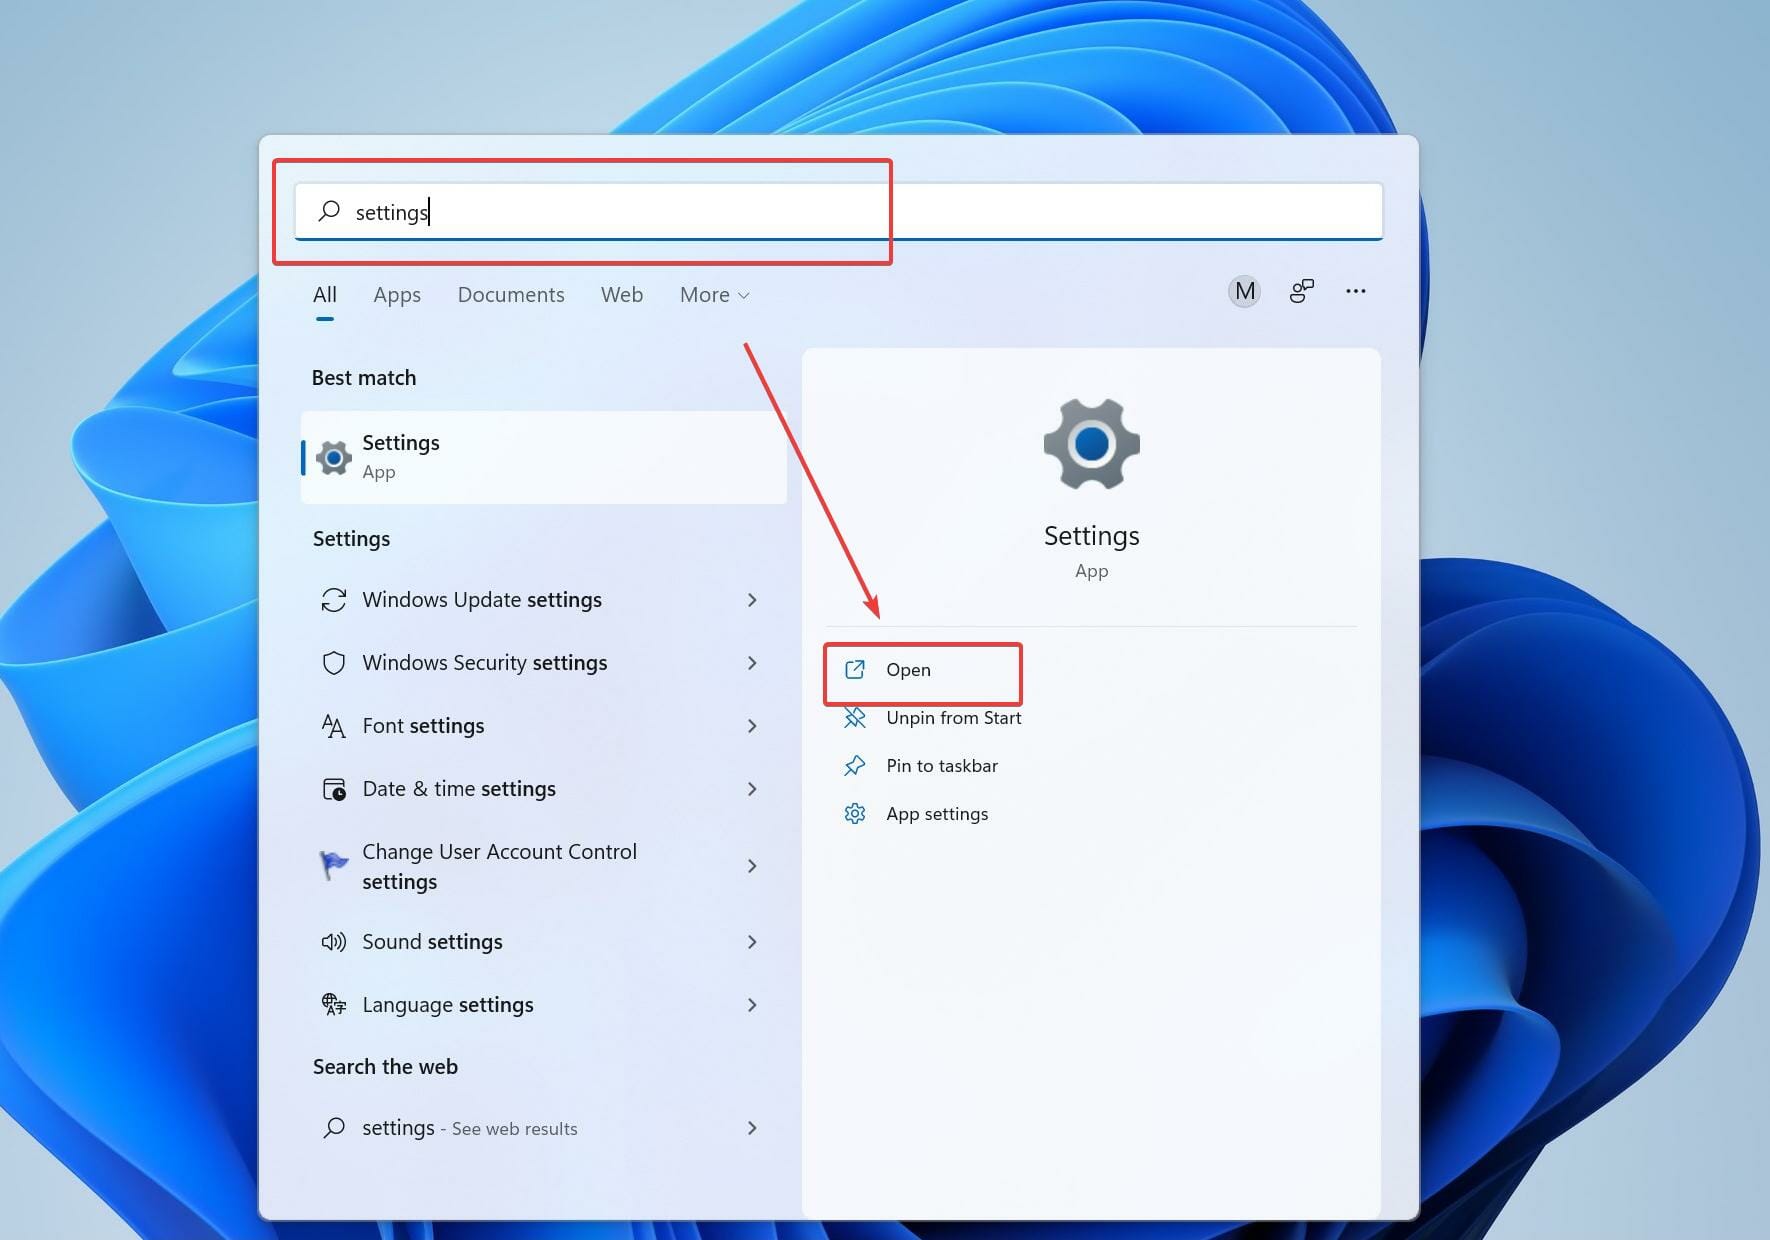
  1. Click on the Start button and search for Settings.Opening Settings from the Start page
  2. Now, click Windows Update and then select Check for updates.Checking for new updates from Microsoft to download
  3. If there are new updates available, download and install them.Downloading and installing the new updates from Microsoft
  4. Once the installation is complete, restart your computer.
  5. Reinstall the game 

If you’ve tried everything and still Evil Dead: The Game is not working, try re-installing the game again from the Epic store.

2. Evil Dead not working on PS5

2.1 Update your PS5

  1. Go to the Settings page of your PS5 and select System and then System Software.Selecting System inside the PS5 settings page
  2. Choose System Software Update and Settings and then select Update System Software.Selecting System Software Update to update the software of PS5
  3. Choose Update Using Internet and go back to System Software and select System Feature Updates.Updating the PS5's software
  4. Restart your PS5 to apply the changes.

2.2 Delete Saved Game Data

  1. Go to Settings again, and select Storage.Selecting the Storage in the settings menu of PS5
  2. Now open Games and Apps. Select Saved Data and then select Evil Dead.Opening the Games and Apps menu to select games and delete their data
  3. On the controller, press the Options button, and then select the saved game data files.
  4. Select Delete and then a window will pop up asking if you are sure. Confirm your decision to proceed ahead.
  5. Now reboot your console once the saved game data has been deleted.

2.3 Reset your PS5

  1. Go to Settings and select System.Selecting System inside the PS5 settings page
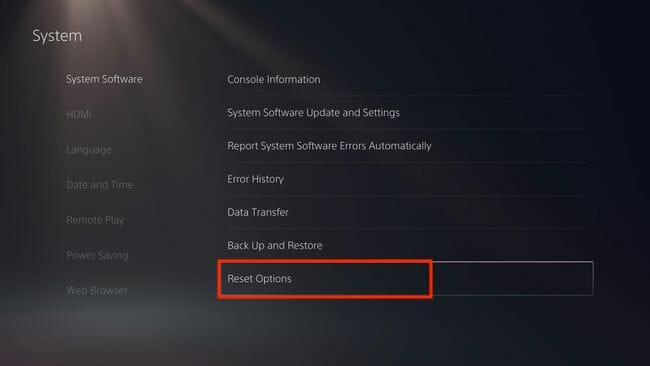
  2. Now, select System software and and then Reset options.Selecting Reset options inside PS5 settings page
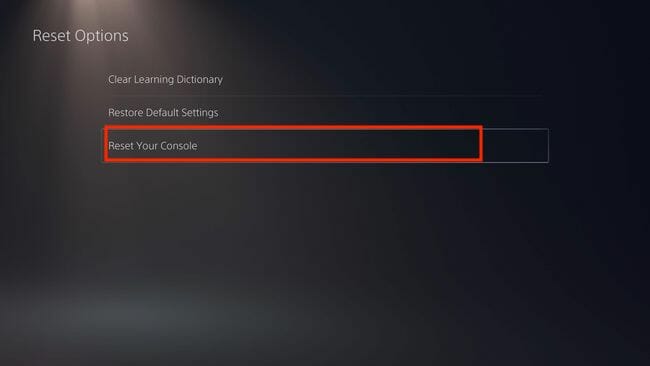
  3. Select Reset Your console and then select Reset.Selecting Reset Your Console to reset the PS5 to factory settings
  4. Your PlayStation will now return to its factory settings. This process may take a few hours to complete. Make sure your console doesn’t lose power during the process.
  5. Once the process is completed, restart your PS5.

3. Evil Dead not working on Xbox

Unfortunately, there isn’t a fix at the moment for Xbox users due to a system error as per the Saber support. But the problem has been acknowledged by them, and they have tweeted out that a fix is on its way.

4. Controls for Evil Dead Regeneration are not working

Try disabling and re-enabling the gamepad, or if you are using a controller, disconnect the keyboard and the mouse from your computer. 

The game controls occasionally fail to function because multiple input devices are connected and it is unsure which one to use.

5. The Evil Dead 4K is not widescreen

Yes, the Evil Dead 4K is not widescreen, but instead it has its original aspect ratio of 1.33.

Is it a problem? Absolutely not. You’ll get used to the aspect ratio without an issue.

To make the 4K version of the movie, the negatives were scanned in full native 4K with both Dolby Vision and HDR 10. But due to technological constraints, the movie can not be scaled to widescreen.

The Evil Dead: Ghost is based on the original movie that was released in 1981. The game was released with a lot of bugs, but developers are currently hard at work releasing patches.

Meanwhile, you can try the above-mentioned fixes to fix the issue and play the game.

500 Internal Server Error in NGINX [Troubleshooting Guide]

NGINX is an open-source software used for web serving, reverse proxying, caching, load balancing, etc. It started as a web server designed for maximum performance and stability.

The 500 Internal Server Error is a common issue that prevents it from returning a proper response. Errors like these can occur due to a faulty script or missing files referenced by code.

NGINX is typically a reverse proxy server, so one of the most common reasons for the 500 Internal Server Error could be one of its web servers like Apache.

Keep reading this post to know more about this error and how to fix it in no time.

What is the meaning of the 500 Internal Server Error?

The 500 Internal Server Response code indicates that the website has encountered an unexpected condition that is this evening it from fulfilling the request.

It’s a generic catch-all response that shows that the server cannot find a better error code in response. This error code is a very general HTTP status code on the website server but isn’t precisely the exact problem.

Quick Tip:

The Opera One browser has a VPN proxy that allows you to connect to a few servers. Accessing and connecting to a different server is helpful when you have internal server issues with another browser.

When you click on the blue VPN box, a drop-down menu appears, allowing you to switch the VPN on or off and pick a location.

Opera One

With the built-in VPN, you can change the location and bypass internal server issues in NGINX.

What can I do to fix the 500 Internal Server Error in NGINX?

1. Reload the web page

This error can occur sometimes due to a temporary problem on the webserver. If that’s the case reloading the page might help.

Reload the page by pressing F5 or CTRL + R and check if the NGINX 500 Internal Server Error localhost message disappears.

2. Clear your browser’s cookies and cache

On Chrome

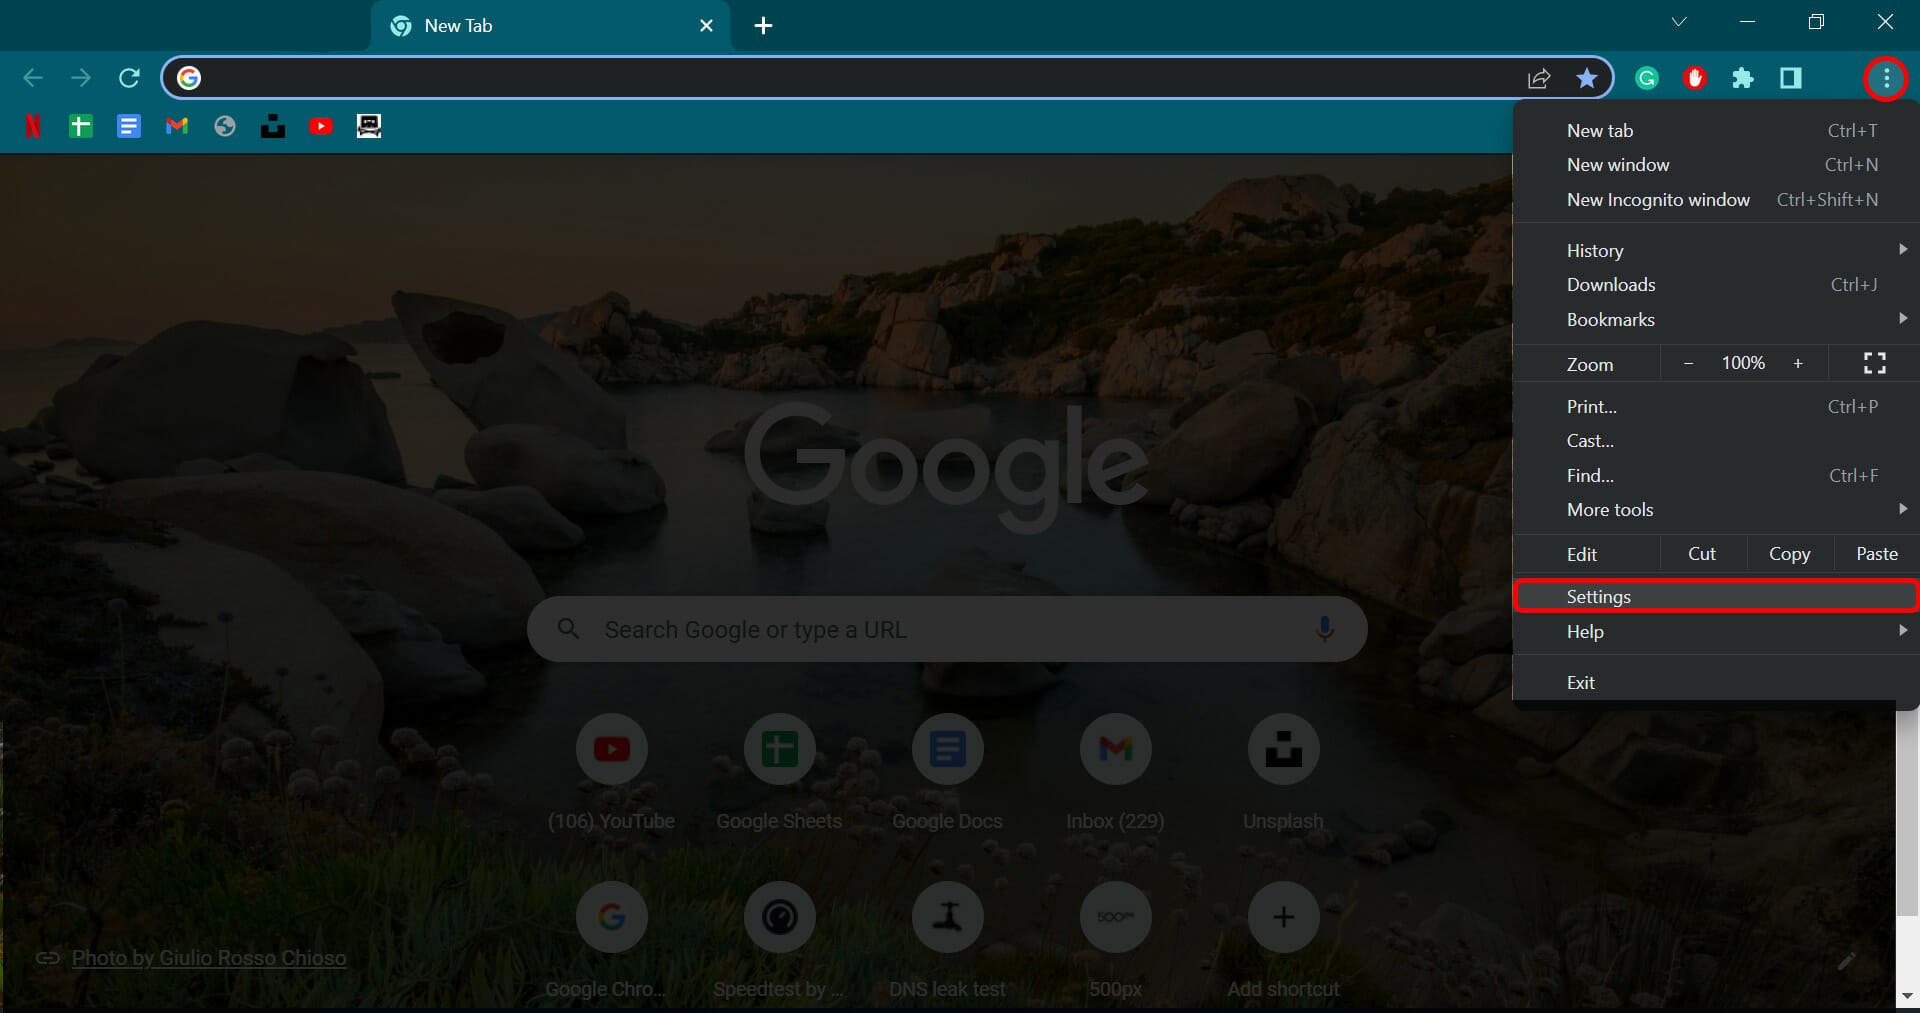
  1. Open Google Chrome and click on three vertical dots at the top right corner.
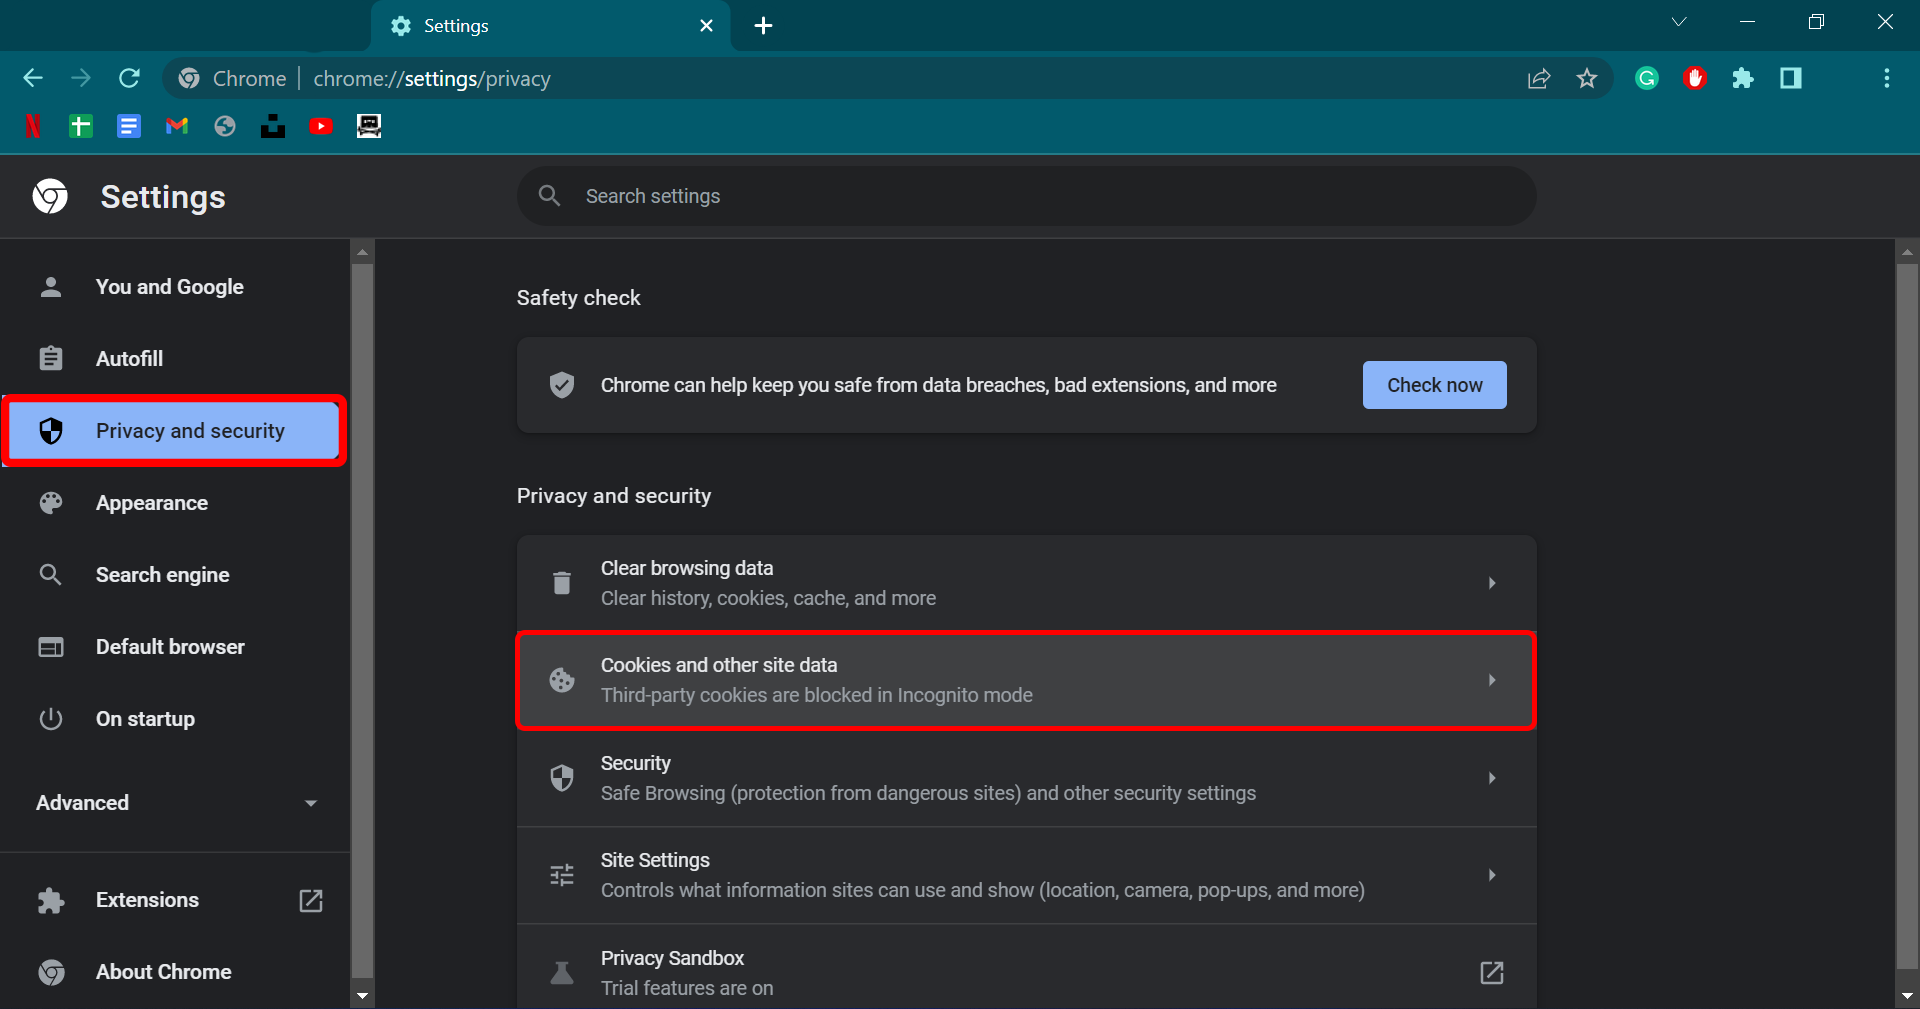
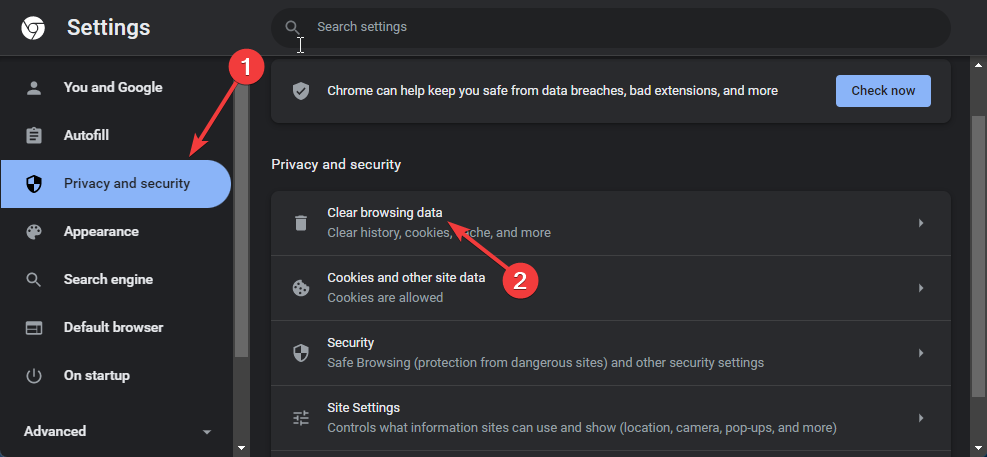
  2. Click on Settings and navigate to Privacy and Security.
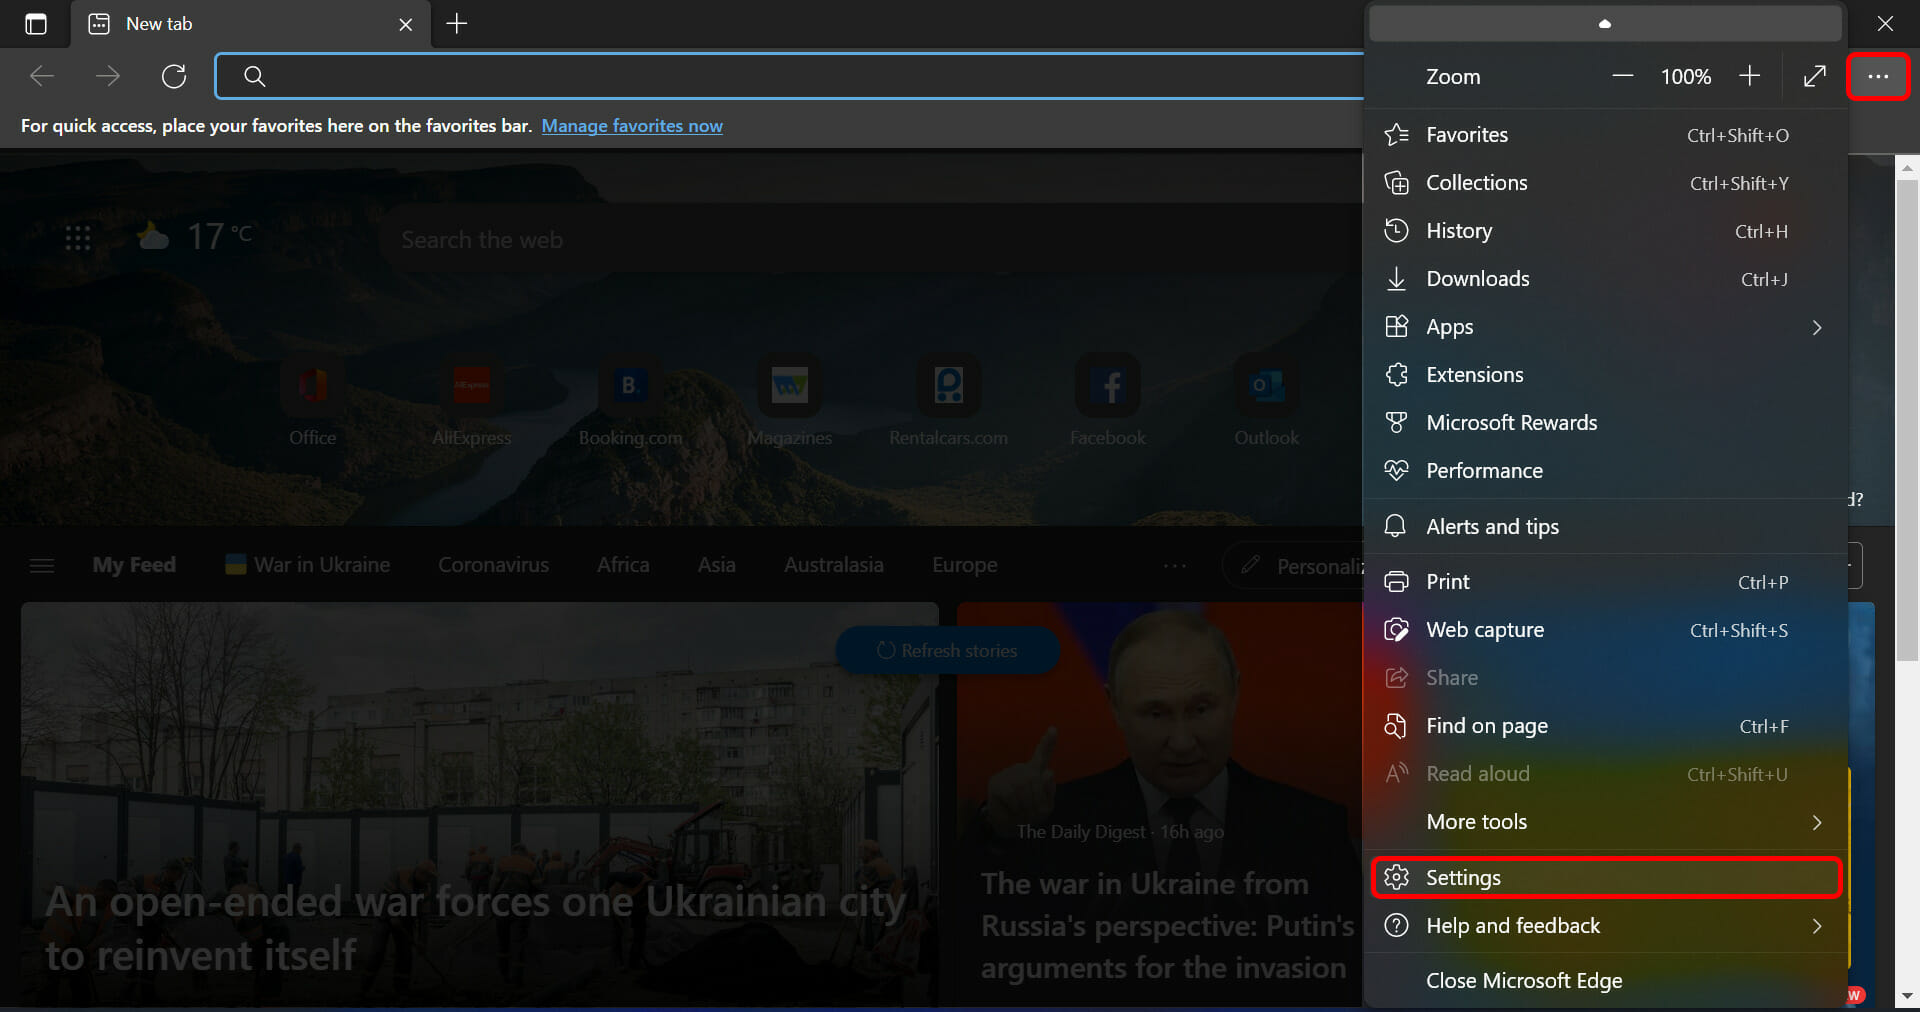
  3. Click on Clear Browsing Data.
    500 internal server error NGINX
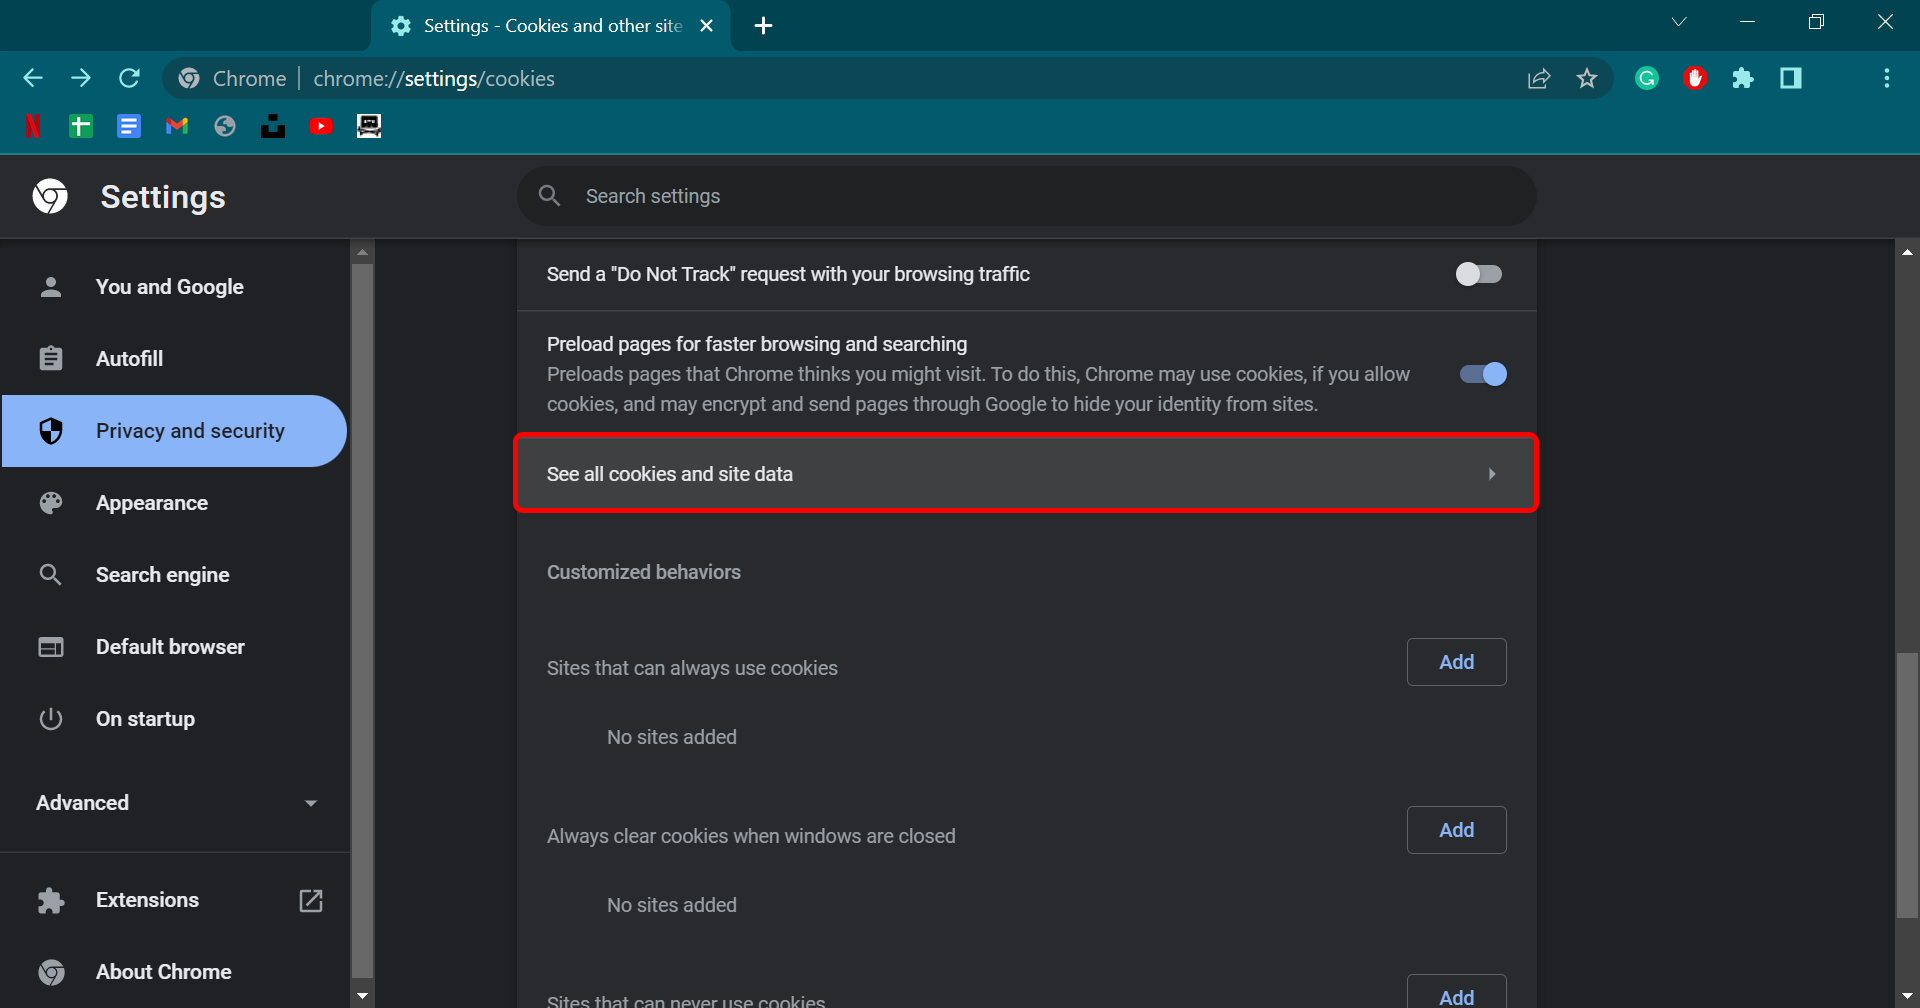
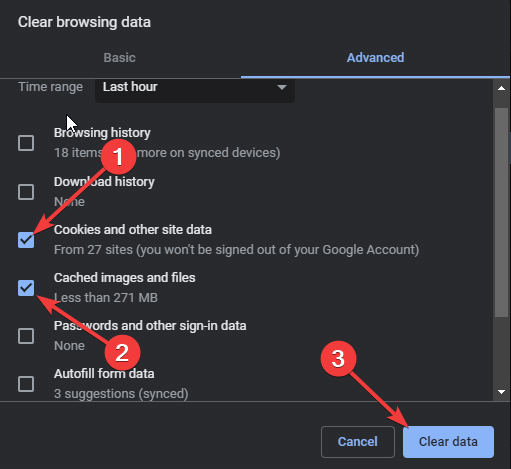
  4. Check the options Cookies and other site data and Cached images and files.
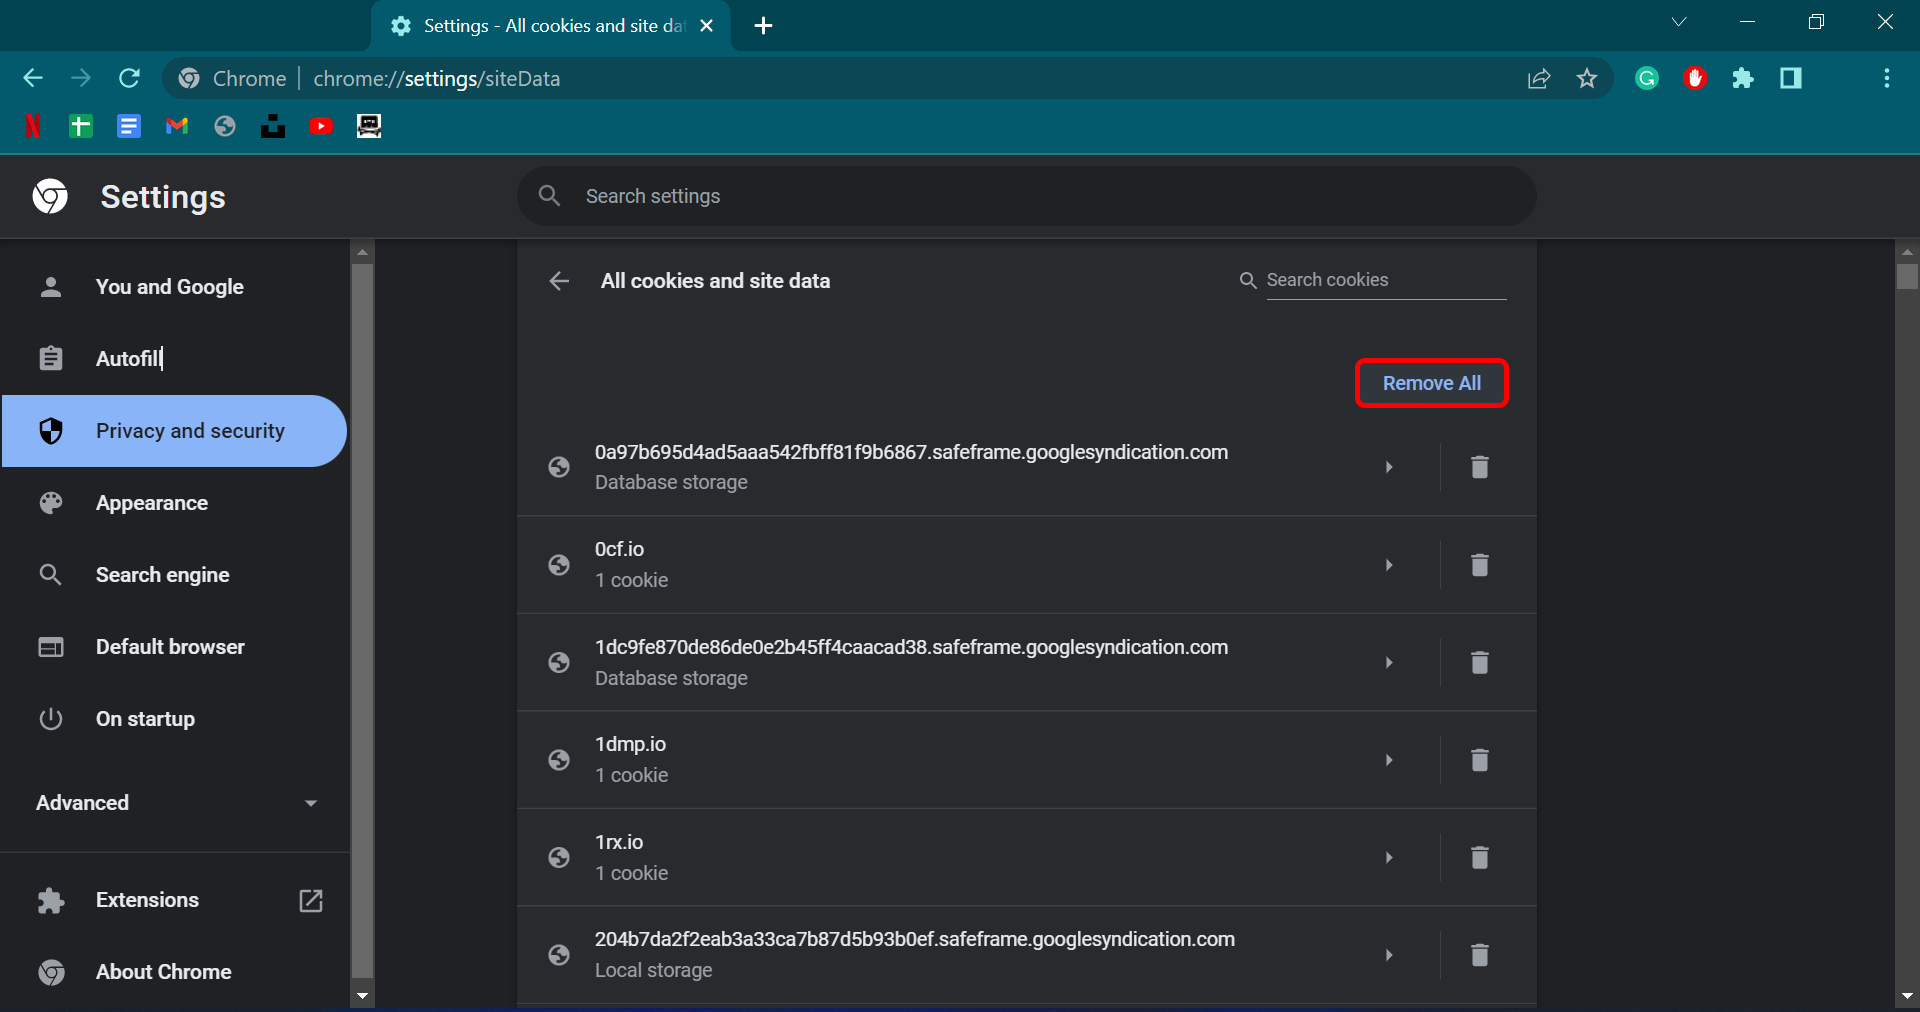
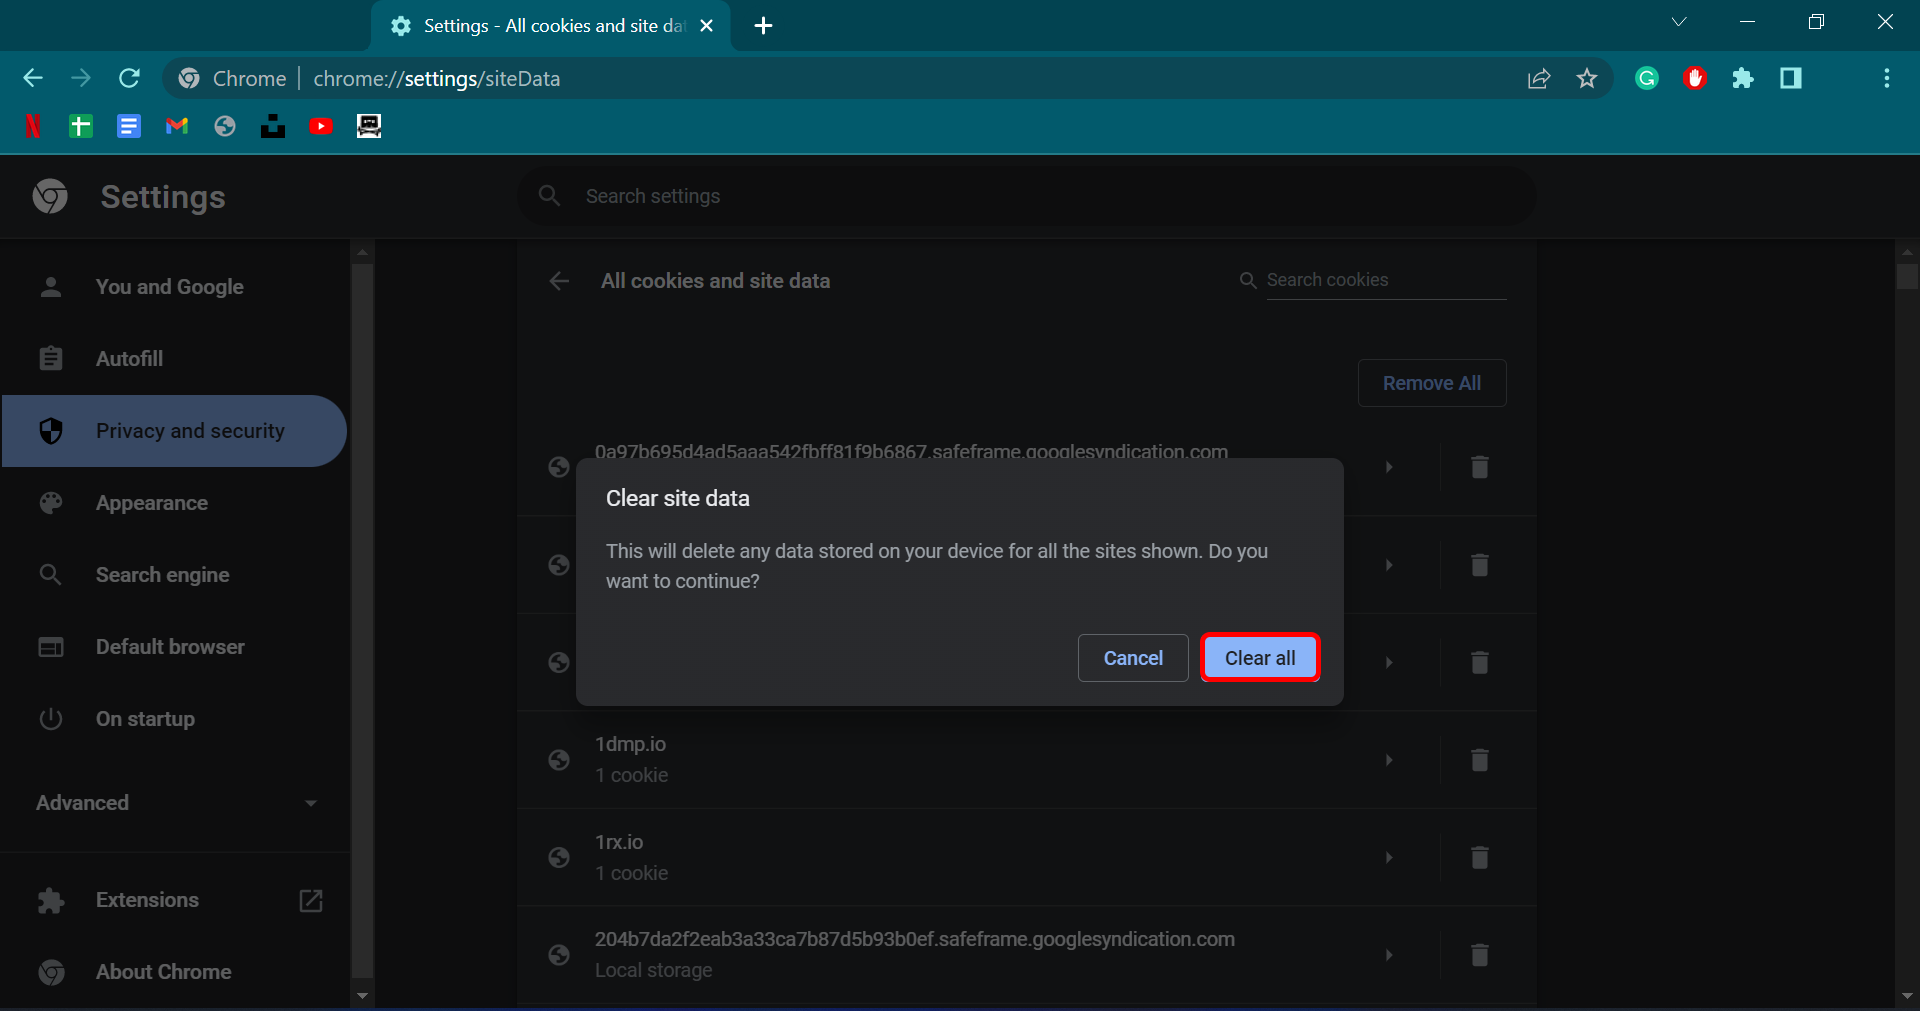
  5. Once done, click on Clear Data.
    500 internal server error NGINX

If Chrome’s cache data gets corrupt or full it can cause the 500 Internal Server Error NGINX. Clear Chrome’s cache data and cookies then check if the error gets fixed.

Alternatively, you may want to use a free multi-purpose utility that not only clears the cache but removes any unnecessary data on the computer.

On Firefox

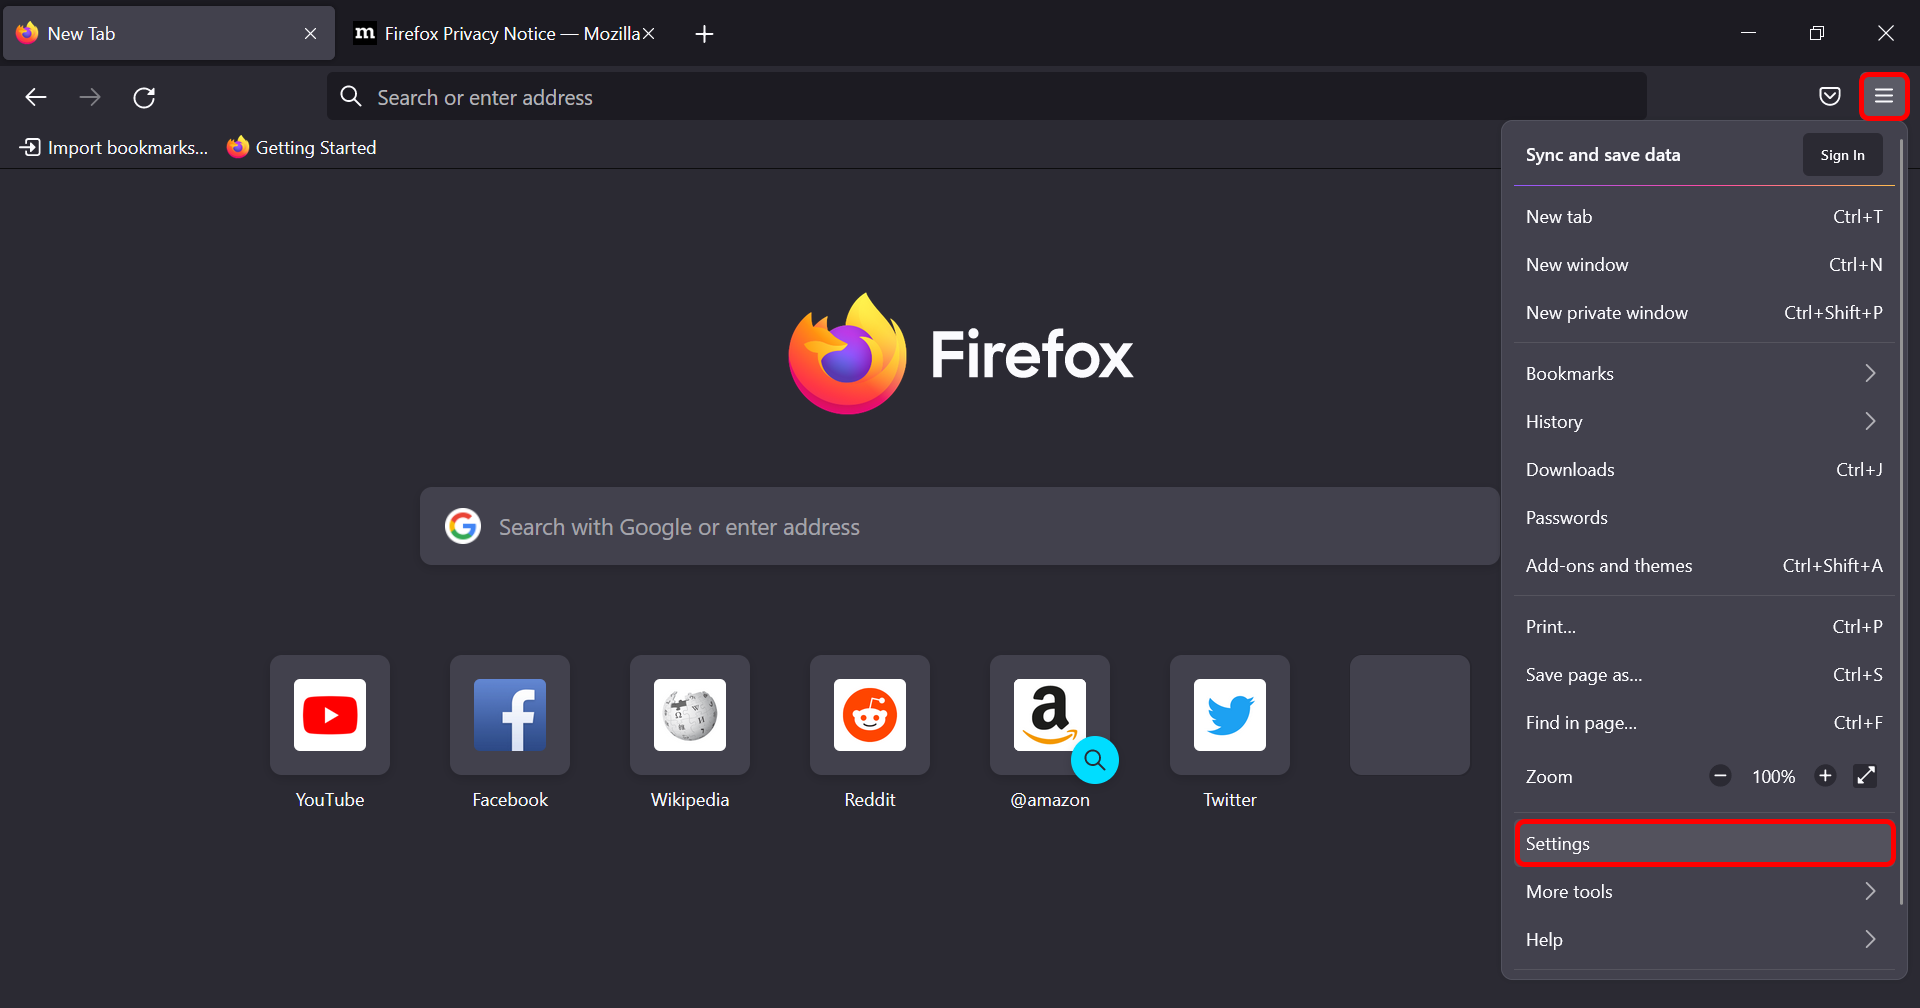
  1. Open Firefox, click on the hamburger icon at the top right corner, and click on Settings.
    firefox-settings-1
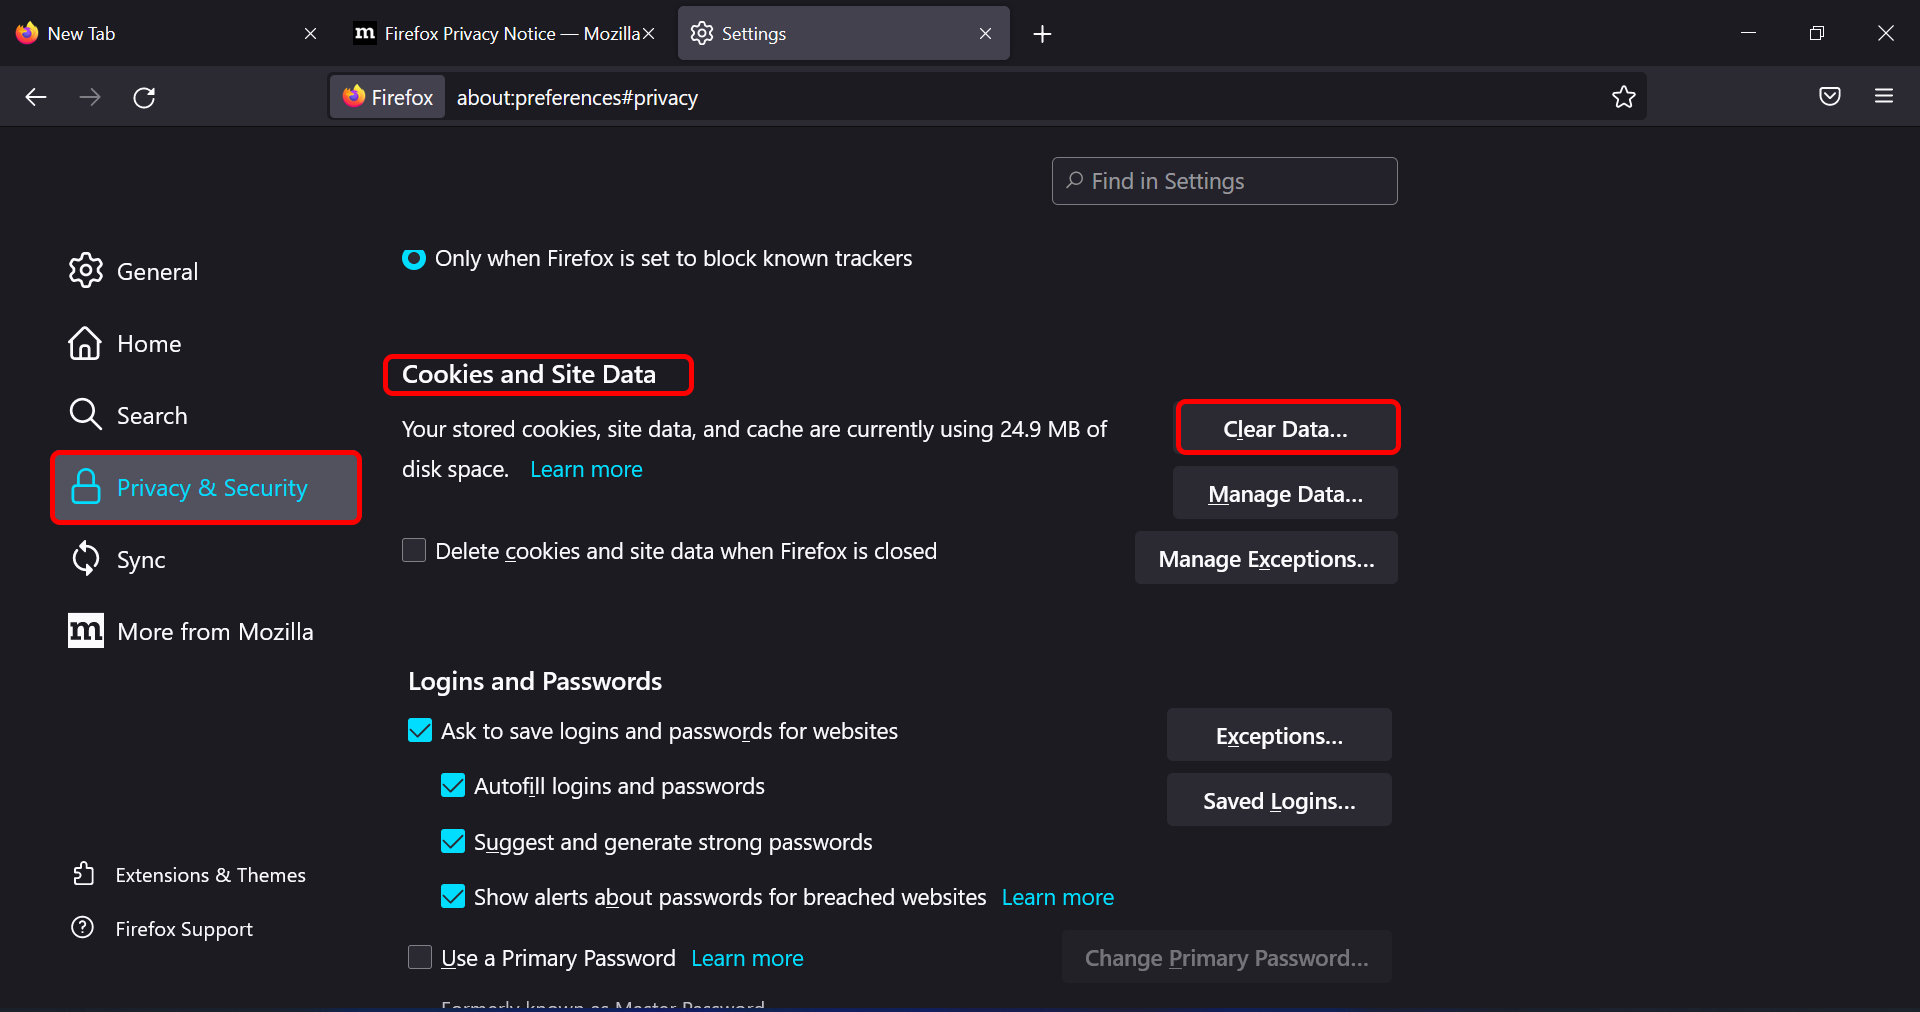
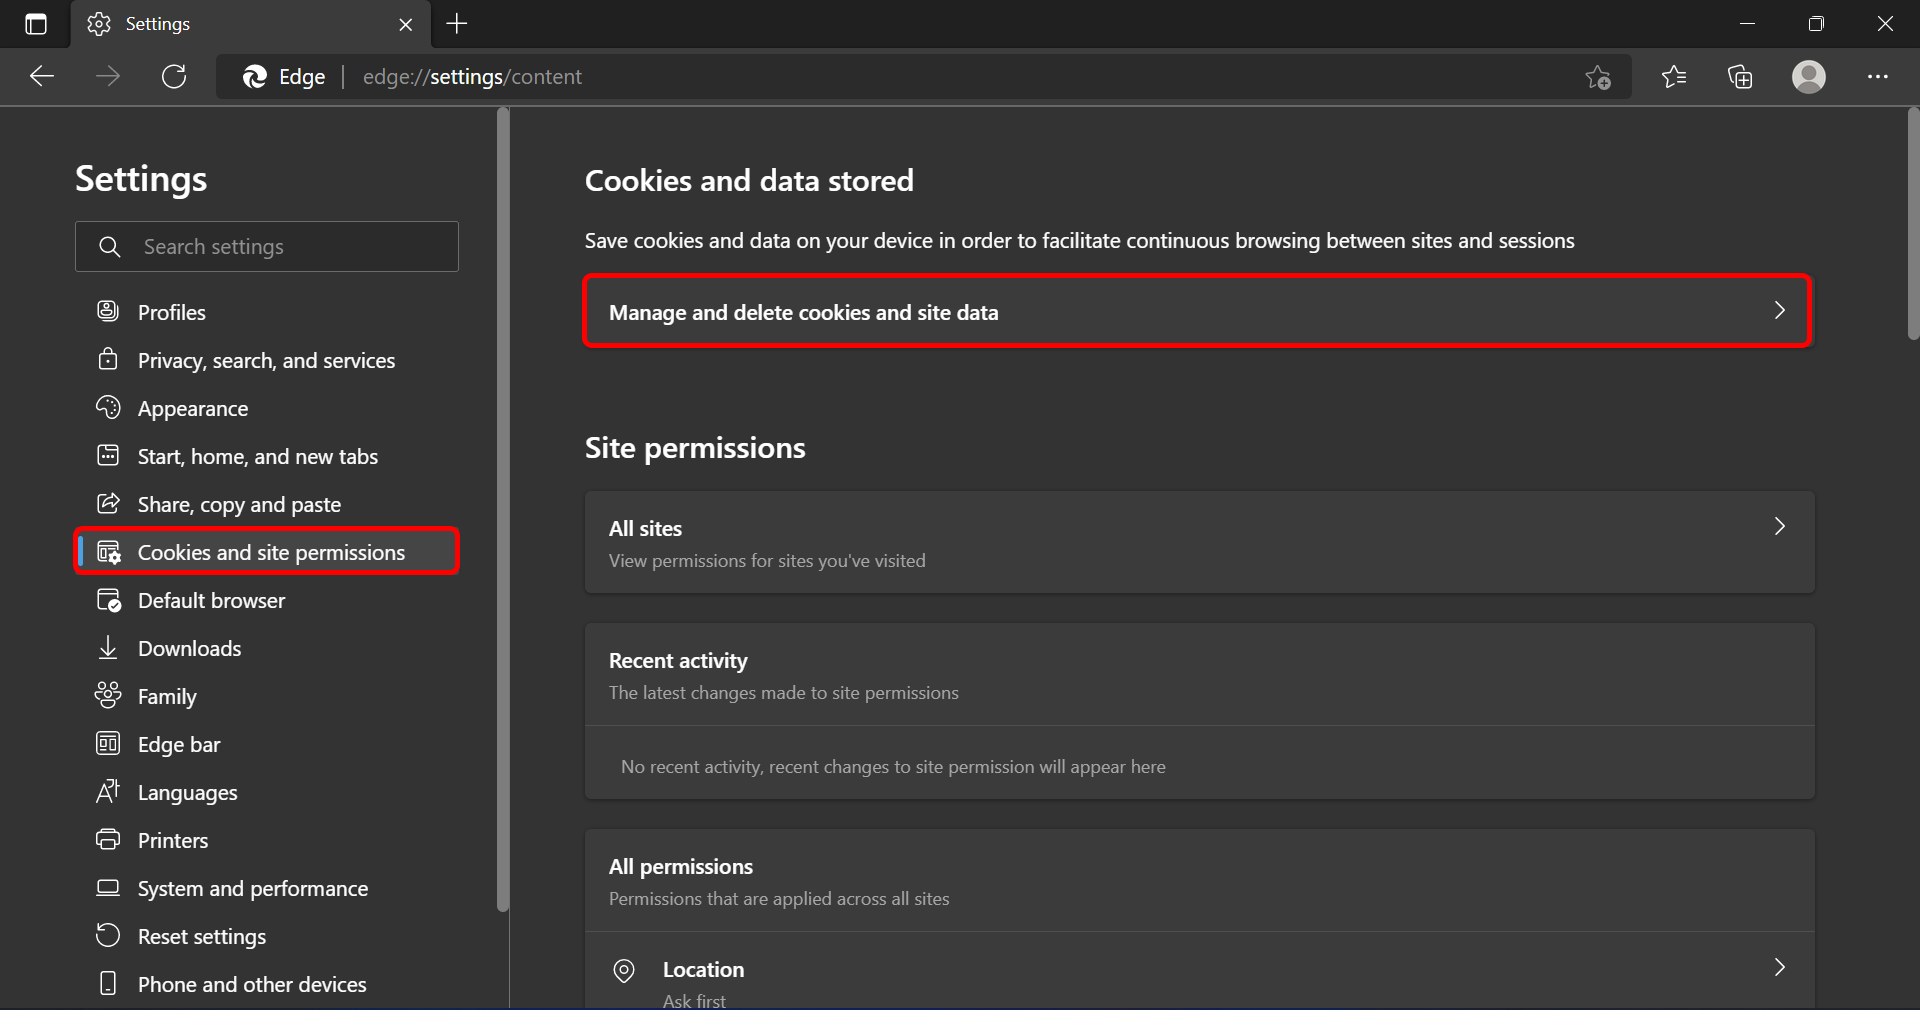
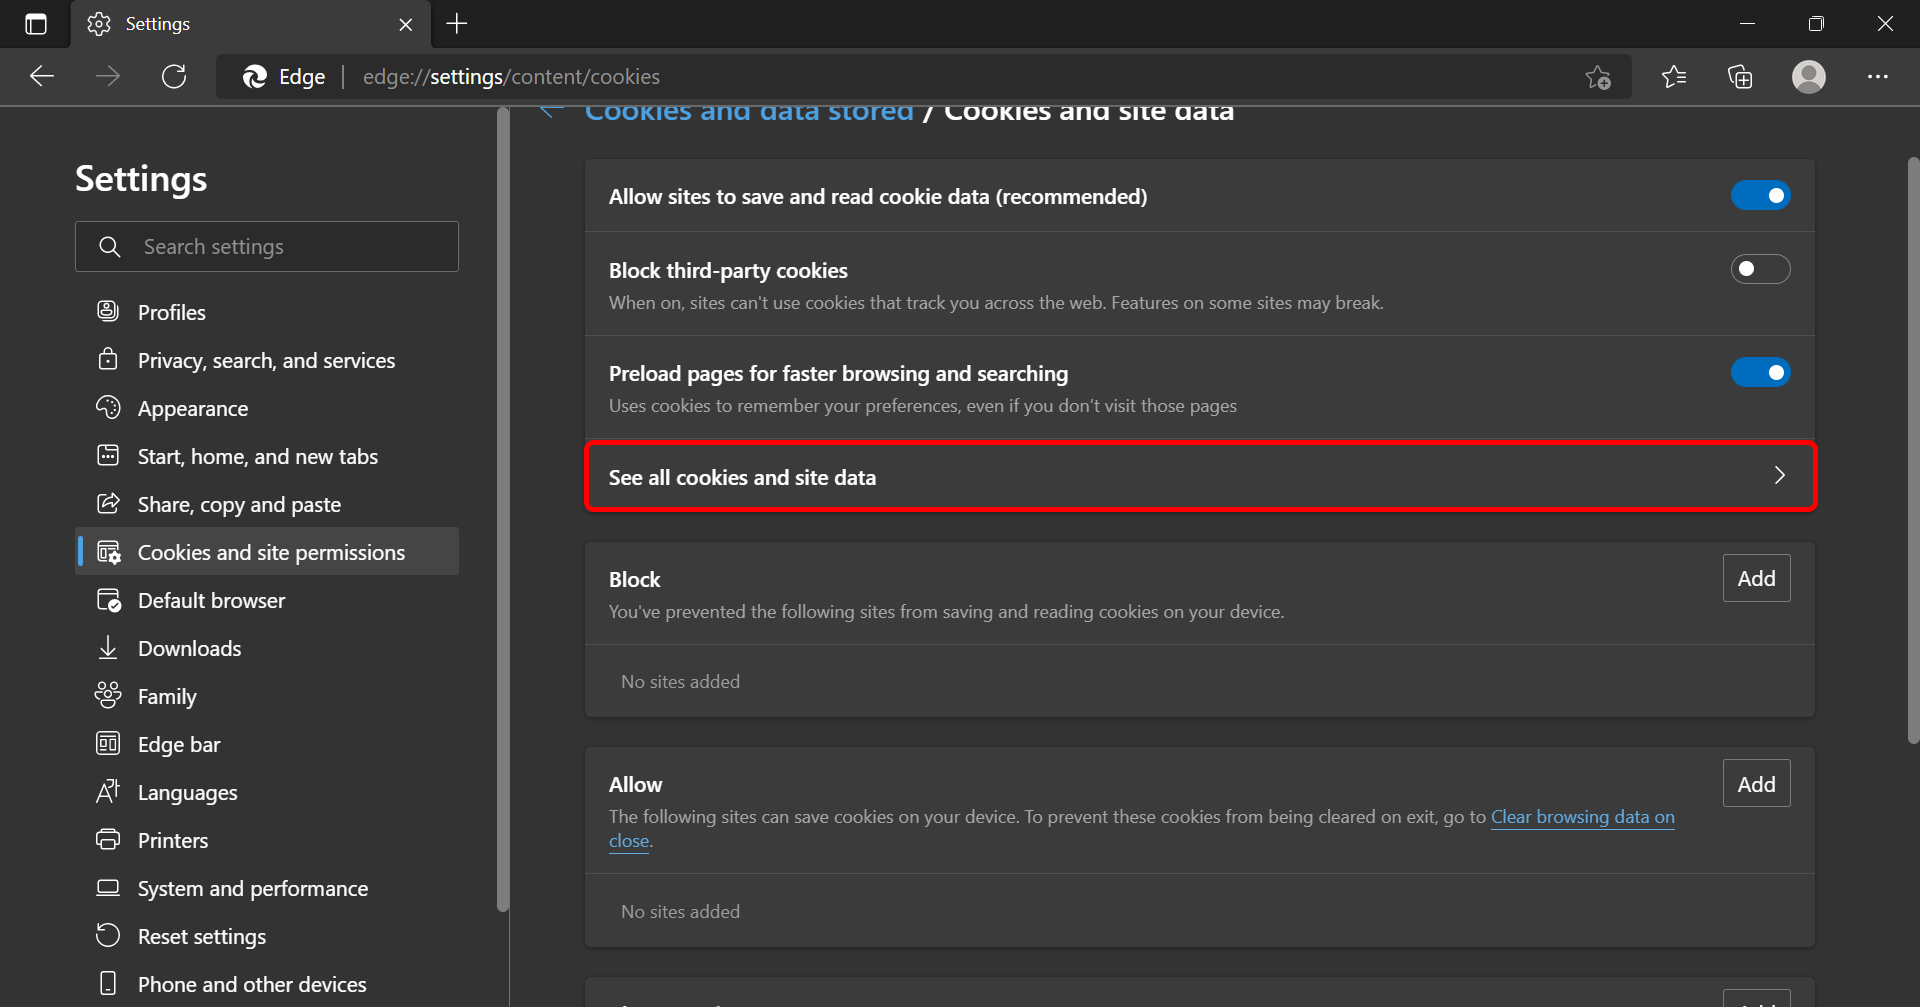
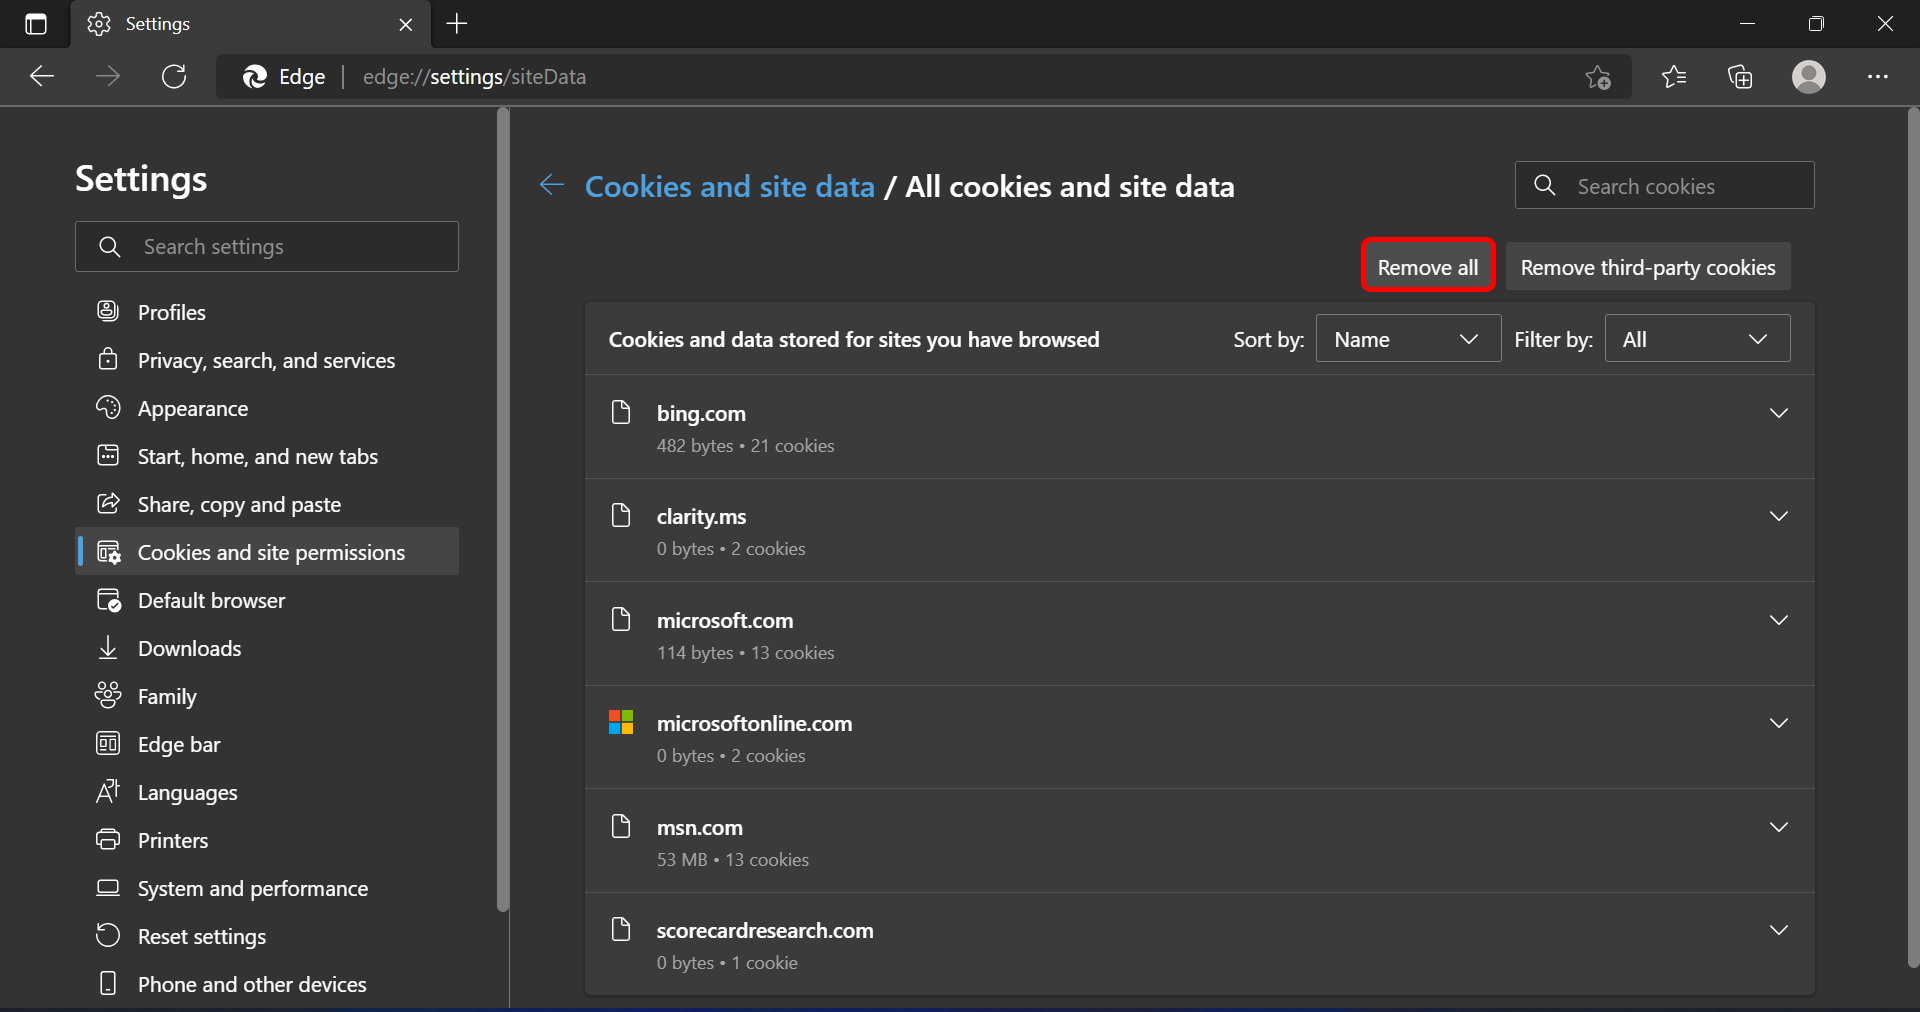
  2. Navigate to Privacy & Security and in the Cookies and Site Data section, click on Clear Data.
    500 internal server error NGINX
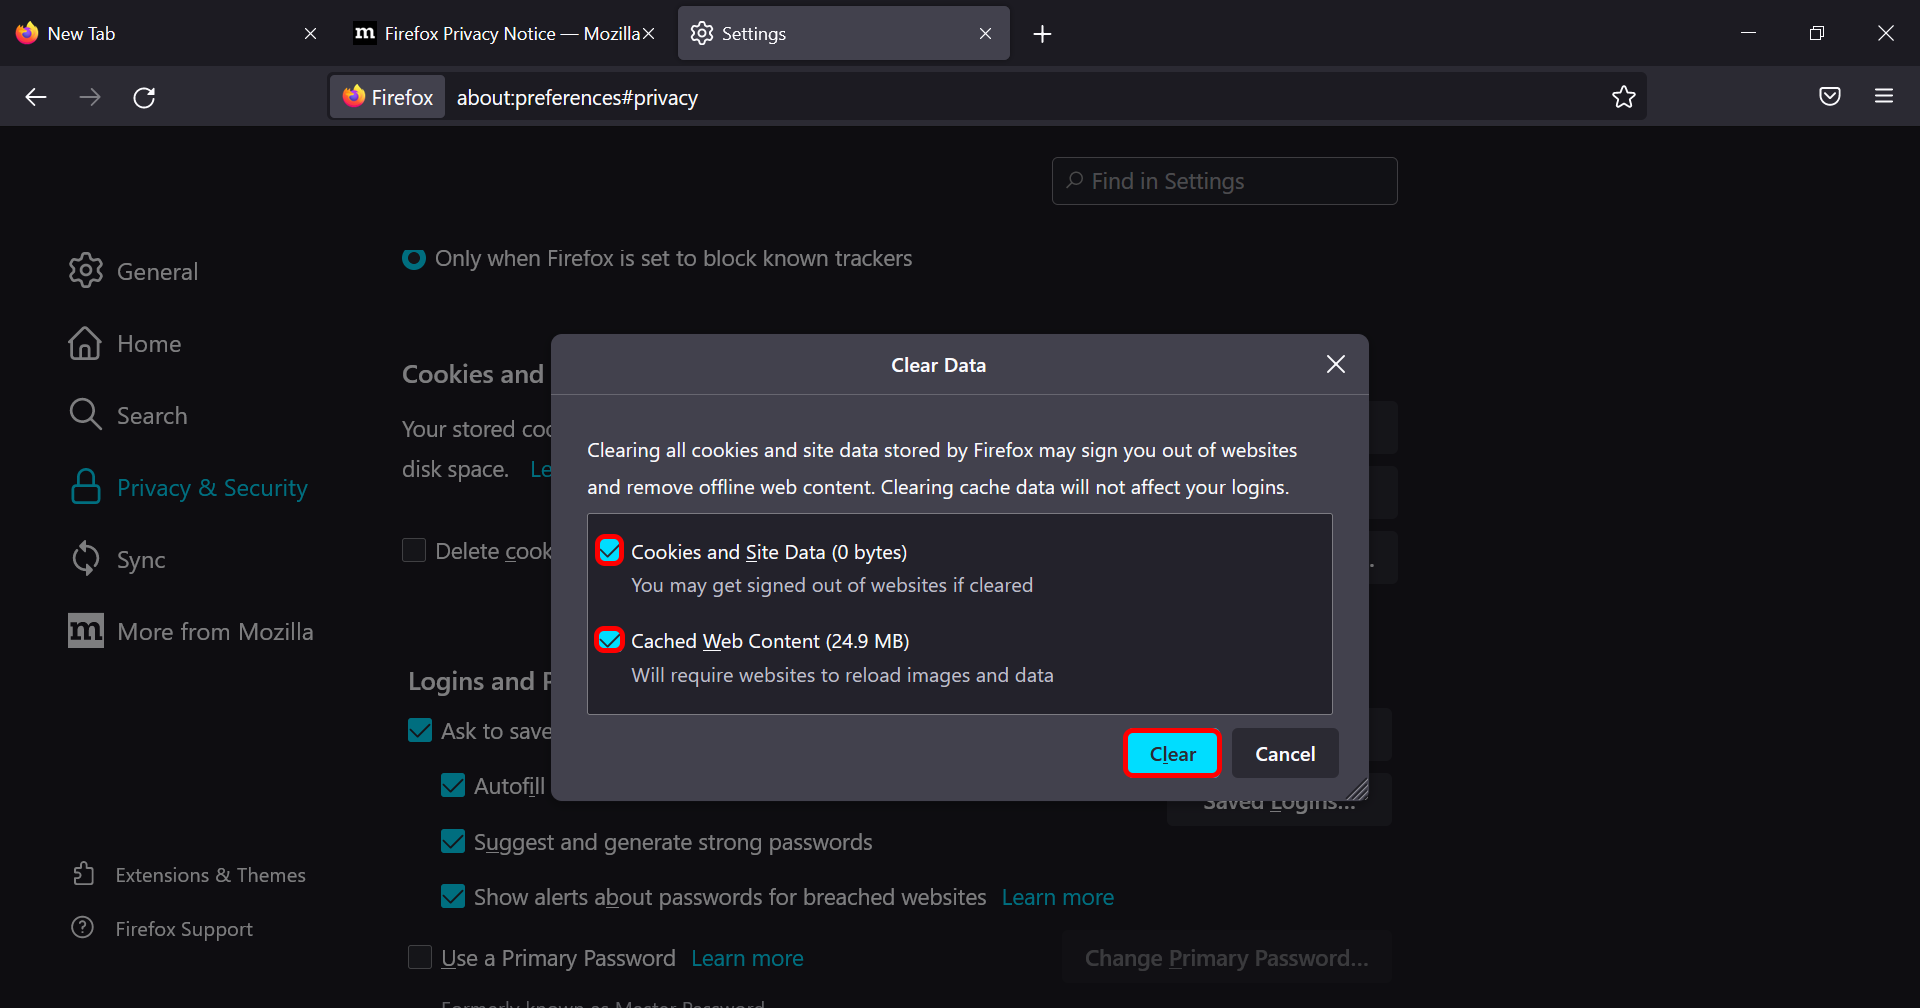
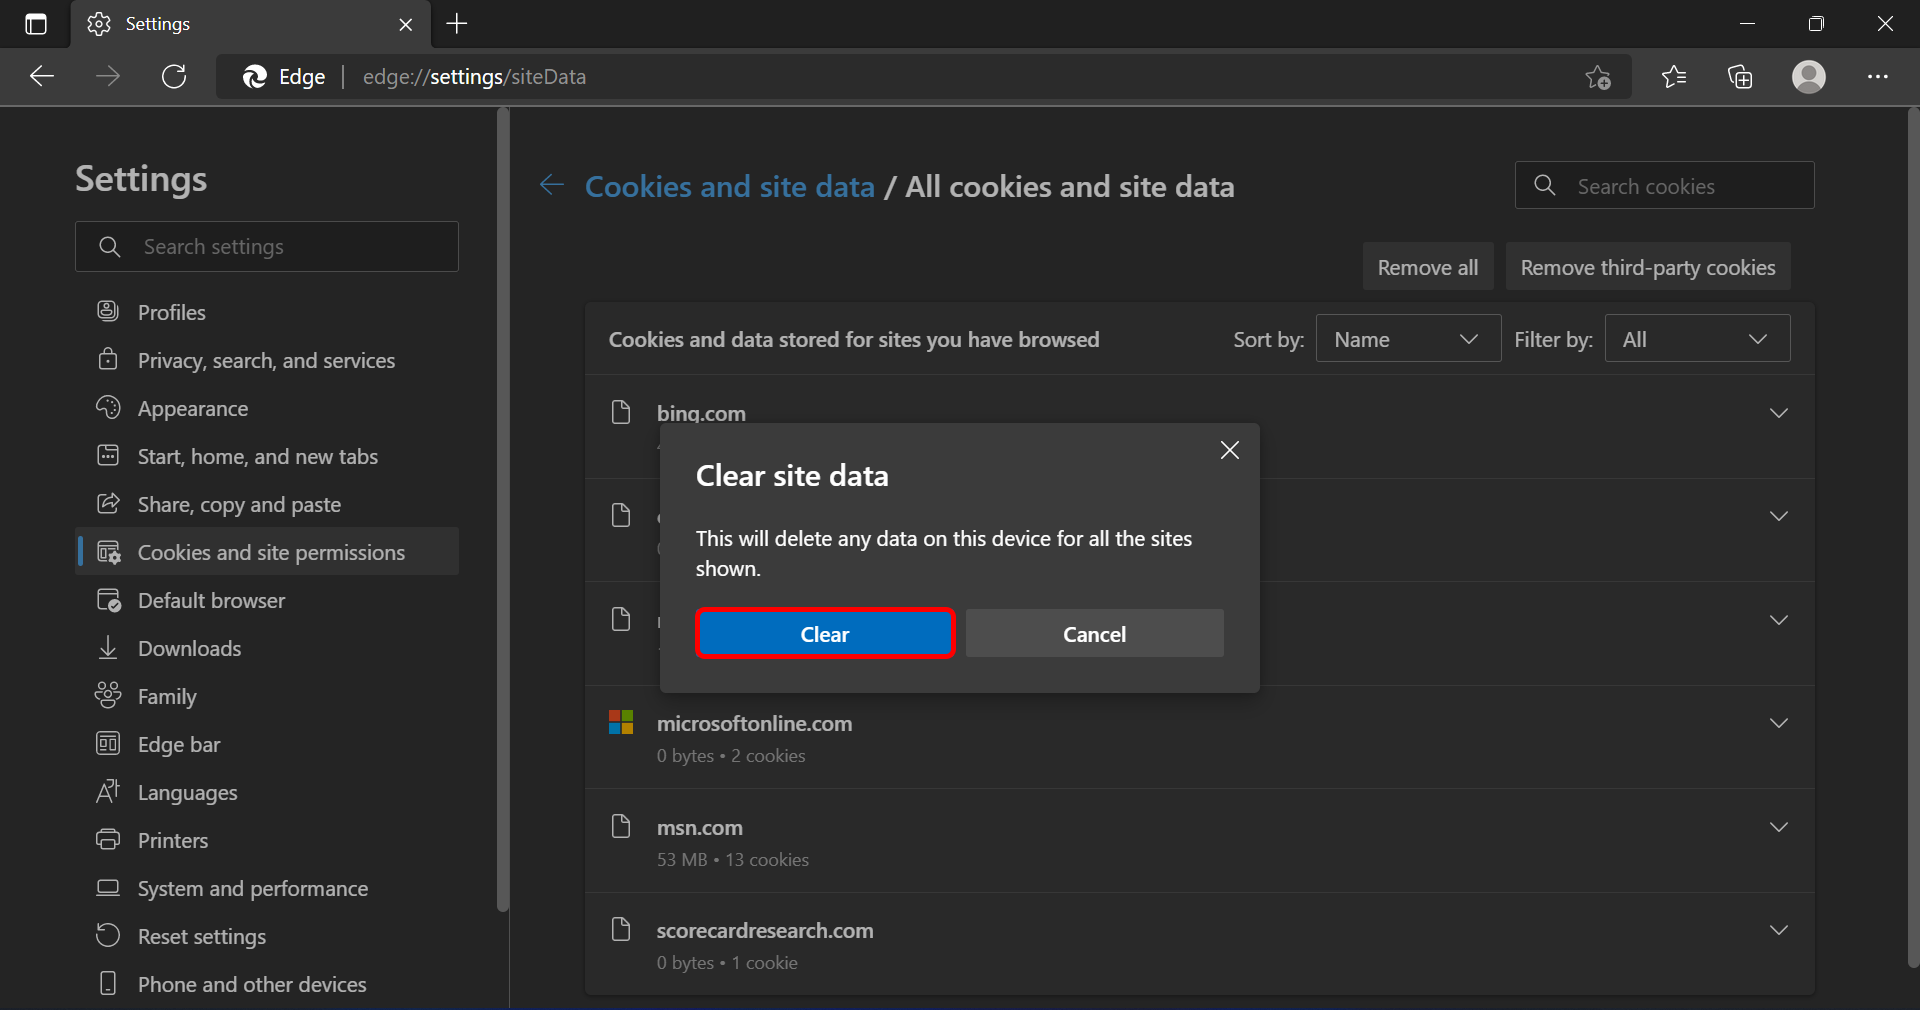
  3. Now click on Clear to confirm the process.
    500 internal server error NGINX

3. Disable VPN

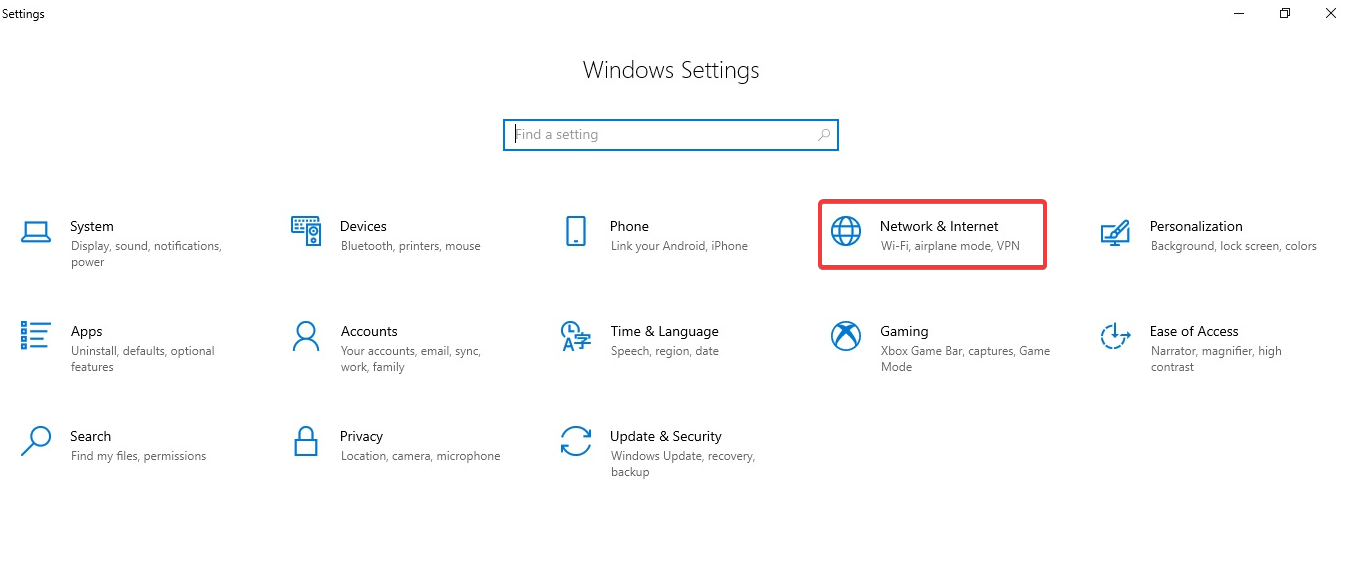
  1. Press Windows key + I to open the Settings app.
  2. Navigate to Network & Internet.
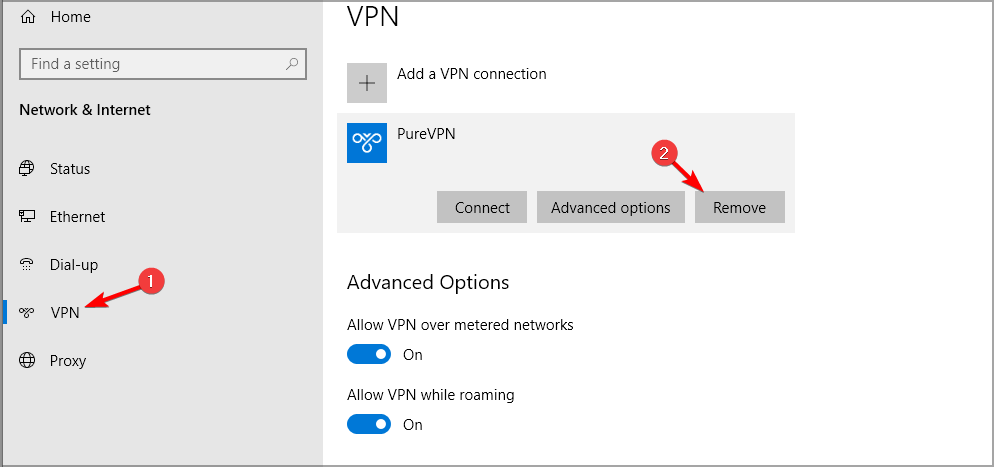
  3. Select VPN from the left pane. In the right pane, pick your VPN connection and click on Remove.
    vpn remove
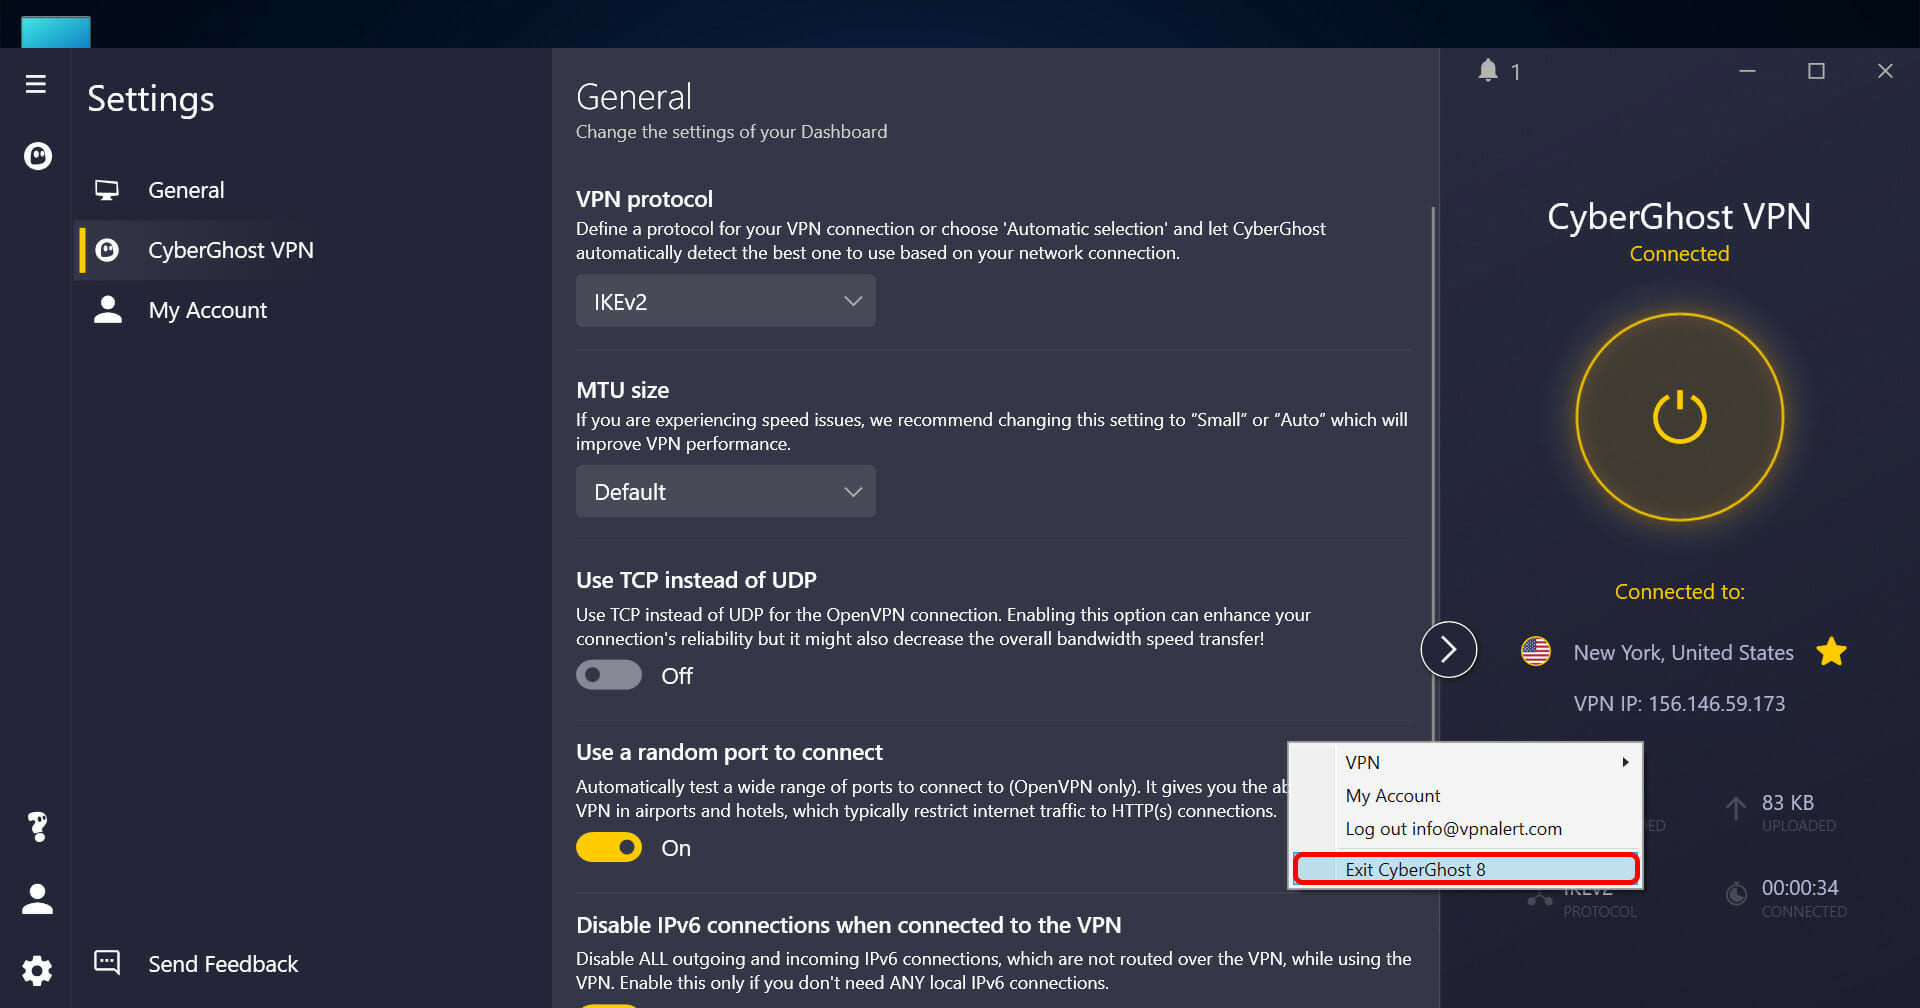
  4. If you’re using a VPN client, make sure to disconnect from the VPN.

Once done, restart your device and check if the 500 Internal Server Error NGINX is resolved.

4. Check your Internet connection

  1. Visit Fast i.e., a speed test website.
    Speed test
  2. As soon as the website opens it’ll automatically start testing your network’s speed.
  3. Wait while your connection is being tested.

If you don’t prefer this, you can use any other Internet speed tester to check your connection.

That’s all on how you can fix the 500 Internal Server Error in NGINX. Several issues are to be blamed, but this usually occurs due to a bad Internet connection. Things are no different for those complaining about getting the 500 Internal Server Error when using the React app

Follow the steps mentioned above to fix this error. If the troubleshooting methods mentioned above could not help you, feel free to drop a comment below. We’re eager to hear from you.

Lightweight Video Editor: 8 Best Software to Use in 2026

Not all users have powerful PCs that can handle advanced video editing, and this is why many are looking for a lightweight video editor. Otherwise, you’ll have to optimize your PC for it.

These types of applications might not have the same features as professional tools, but they won’t put a strain on your hardware, so let’s see what are some of the best applications that you can get.

Does Windows 10 have a simple video editor?

Yes, there’s a hidden video editor in Windows, and the only way to access it is by opening the desired video in the Photos app and choosing the Trim option.

This video editor is extremely simplistic, and it can only be used to trim videos, therefore many users are looking for tools with more features.

What is the lightest video editing software?

Adobe Premiere Pro – Best tool for video editing professionals

As a no surprise, Adobe Premiere Pro made it to the top of our list. It virtually transforms your PC into a multimedia creation machine.

The latest version of it comes with a couple of new features that put it far away from the competition, especially when we talk about video editing software for Windows.

The amount of effort that Adobe puts into its products is huge, and so is the case for Adobe Premiere Pro and which is highly likely to stay for a while. 

The latest update came with 360 VR, 4K video support, and the most important one, the Lumetri Color feature which lets you play with white balance, color grading, and much more.

Besides, now you can collaborate with other members of your team by sharing and organizing the files into a cloud.

It’s also worth mentioning the customizable interface for maximum comfort and efficiency, multiple non-linear timelines that let you customize complex projects, and one of our favorites being template bins which saved us hundreds of hours.

Adobe Premiere Pro also comes with the Adobe Media Encoder package which provides a variety of presets optimized for output formats and green screen editing capabilities.

Some important reasons to consider Premiere Pro:

  • Easy multicam editing
  • Customizable interface
  • Fast load speeds
  • Seamless DVD and Blue-ray export 
  • Team collaboration

AceMovi Video Editor – Great for novice editors

The next entry on our list of lightweight video editing tools is AceMovi Video Editor.

Not only is it low on resource demands, but it also feels very lightweight to the user because of the sleek and intuitive interface.

We all know how video editors have a reputation for needing monster PCs to run properly, and how their interfaces are usually cluttered and filled with tools that you won’t even use unless you edit for a living.

Well, that’s not the case with AceMovi Video Editor, since you can use it to simply record your screen or import your media, drop and drop text, music, transitions, and more effects.

Then you will be able to export and share your video to a wide variety of media and platforms.

Let’s get through some of its key features:

  • Low PC configuration requirements
  • Friendly interface, easy to use by anyone
  • Great selection of video effects
  • Accurate time tracking and editing
  • Multitrack configuration available

AceMovi Video Editor

This tool offers advanced video editing tools wrapped in a friendly, easy-to-use interface!
Free trial Visit Website

Wondershare Filmora – Great instant video editing

Another lightweight software for editing videos is the Wondershare Filmora. It is a lightweight and easy-to-use application that is compatible with Windows 7, 10, and 11.

It supports almost every video, audio, and image format, and it also allows live cast recording of your computer screen.

Filmora is an all-in-one video editor that comes with all the basic tools that you may need to edit your videos, such as cropping, splitting, trimming, and merging.

It also comes with a wide range of special effects tools such as face-offs, filters, overlays, transitions, motion effects, picture-in-picture, and mosaics. Furthermore, it also supports green-screen video editing.

Filmora is incredibly easy to learn and use, thanks to its intuitive interface.

With editing features for everyone, from the beginner to the professional, and well over 300 video effects, it is an all-in-one tool that can help create professional videos.

One drawback of this lightweight video editor is that it can sometimes become unstable, especially when the user opens multiple videos for editing.

Filmora is free to download and try, but a license must be purchased for extended use.

Let’s review some of its most important features:

  • Over 300 video special effects
  • Record a live cast of your PC screen
  • Compatible with Windows 7 all the way to Windows 11
  • Very easy to use by anyone without additional training
  • Great step-by-step instant video feature

Pinnacle Studio – Ideal for multi-camera editing

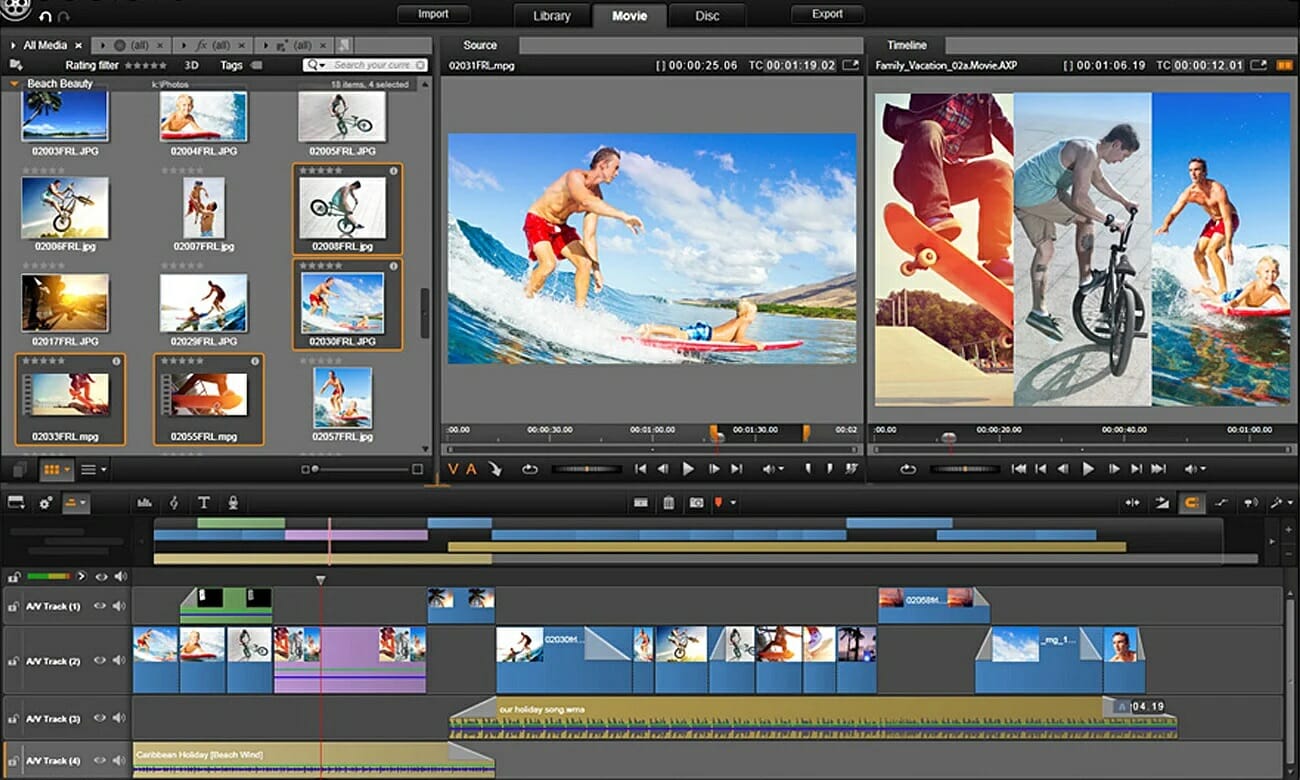
Pinnacle Studio has been a fan favorite for more than a decade now. Its intuitive interface makes it an easy-to-use software, but that doesn’t limit its capabilities as a professional editor.

It has all the basic features expected of a lightweight video editor and a lot more than that.

Some of its more notable features include its ability to make photo slideshows, remove unwanted scenes from videos, add audio/text overlays, 2D transitions, and numerous video effects.

All in all, Pinnacle is a great video editor. Thanks to its support for numerous file formats, users do not need to worry about compatibility issues.

Also, its timeline interface makes video editing so much more intuitive. All this doesn’t necessarily mean that Pinnacle VideoSpin is without its fair share of problems.

The first and most notable issue is that users may be required to seek registration prior to installing this program.

Also, since the initial version imposes restrictions on some of the advanced file formats, you will be required to purchase an Advanced Codecs Pack.

Here are some of its key features:

  • Multi-camera editing
  • Screen recording
  • Split-screen video
  • Keyframe controls and audio editing
  • HD video resolution

Vegas Movie Studio – Adaptive for any editing skill level

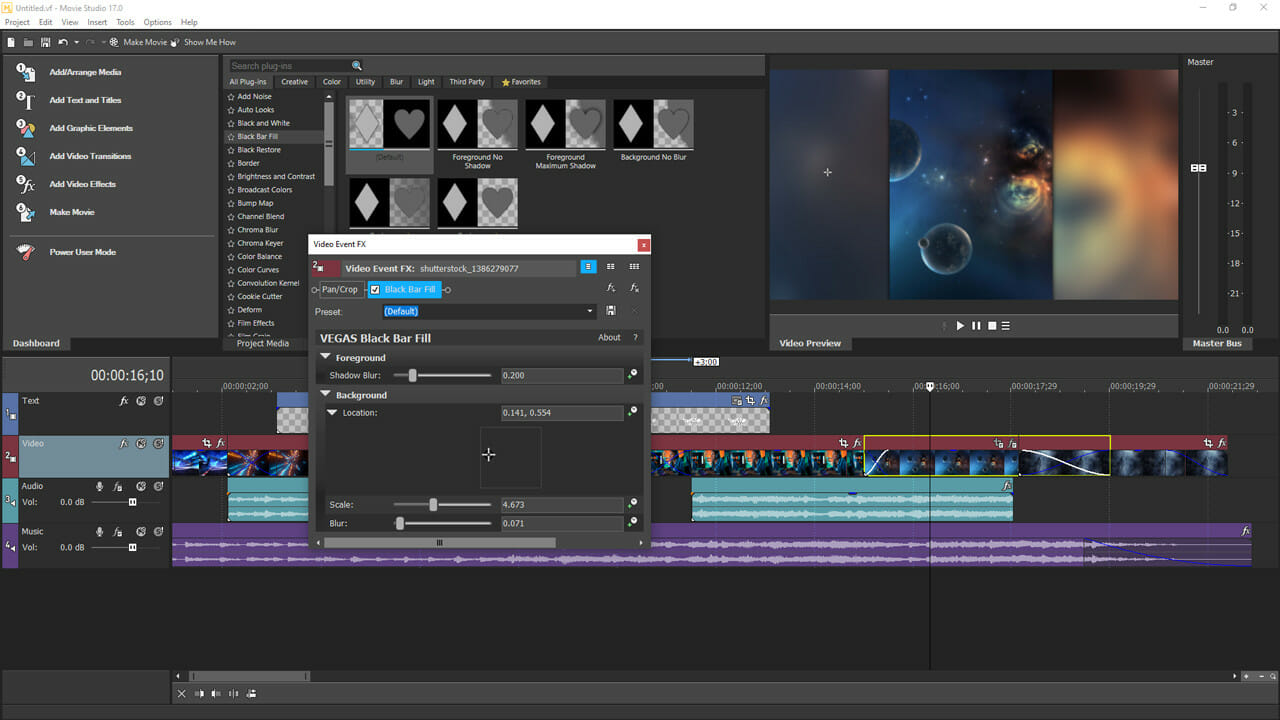
The Vegas Movie Studio series are a range of premium video editing software.

Formerly known as the Sony Vegas Movie Studio, the software is available in three different versions: classic, Platinum, and Suite.

While the last two are more suited for professionals, Vegas Movie Studio classic is perfect for beginners and can be considered a lightweight video editor.

Some of the notable features of Vegas Movie Studio include a user-friendly interface, a range of video/audio effects, support for High DPI monitors, direct upload to Vimeo, YouTube, or Facebook, and a music maker software.

It also supports an almost limitless range of input/output formats, so compatibility will not be an issue. Also, there are plenty of tutorials available online on how to use this application.

If it weren’t for its high price, Vegas Movie Studio would be an almost flawless entry on this list of video editors.

Consider its key features below:

  • Direct upload to Vimeo, YouTube, or Facebook
  • Wide selection of video and audio effects
  • Great tutorials on how to use the software
  • Support for High DPI monitors
  • User-friendly interface

VideoPad – Great free app for beginners

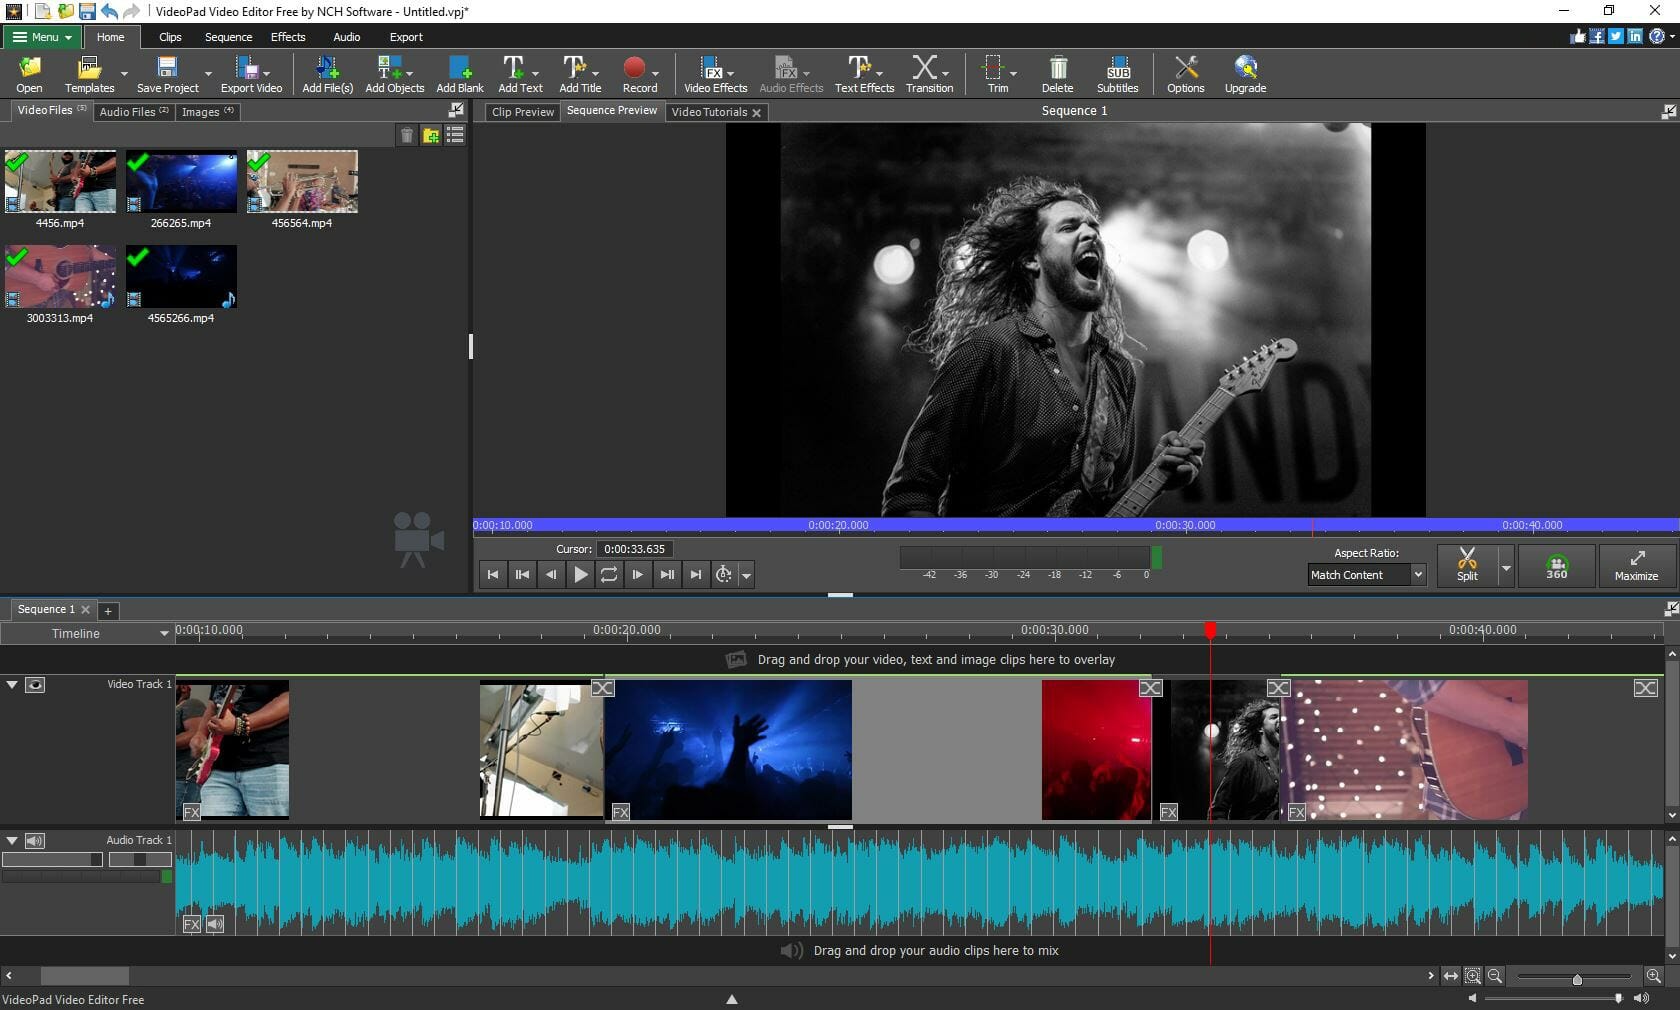
VideoPad is a great intuitive and easy-to-use video editing software. Beginners will particularly benefit from its drag-and-drop modeled timeline.

This video editor comes with a wide range of special effects and transitions, which can all be applied to make videos that are more attractive.

It also comes with the option to directly share edited videos on social media platforms such as Facebook or YouTube.

Among its range of features, you can find are 3D video editing, overlaying text for captions/credits, chroma key green screen video production, a range of visual effects templates, 2D to 3D stereoscopic conversion, and a wide range of video transitions.

One of the most notable features of this application is its ability to create stop-motion animation. This means that it can import image sequences from your videos to create a GIF.

VideoPad is a lightweight video editor that also comes with a range of video optimization options, including Fine-tuning of colors, slowing down/speeding up of videos, reverse video clip playback, video stabilization, adding digital images/photos, creation/import-export of subtitles, and other visual effects.

Thes software has plugin support for thoughts of third-party tools and effects, truly making it an all-in-one software. This software is free of cost for non-commercial use.

You will benefit from the following best features:

  • Drag-and-drop functionality
  • Wide range of video optimization options
  • Video stabilization feature
  • Plug-in support for third-party tools and effects
  • Easy subtitle creation and insertion

VirtualDub – Good for video file conversion

VirtualDub is another great lightweight video editor for Windows. It is an open-source software, which means that it is available free of cost and is supported by its community.

The app comes with a user-friendly interface that makes tasks like adding/deleting files, cropping sidebars and rotating videos seem as intuitive as its general range of features.

Apart from editing videos, it also doubles as a simple video format converter.

VirtualDub supports video capturing. What this means is that you will not have to import your files every time you want to edit them.

Furthermore, it also allows for extending files using third-party video filters. Finally, it also supports batch processing, which means that it can handle multiple video files simultaneously.

Some beginners have reported difficulty in understanding how VirtualDub works. Furthermore, it has been reported to be prone to delivering poor performances at times.

Take a look at some of its key features:

  • Great functionality apart from its outdated interface
  • Supports video capturing
  • Video format conversion
  • It can handle multiple video files simultaneously
  • Basic editing features

⇒ Get VirtualDub

Clipify – Smart and clean interface

Have a lot of family videos that you want to turn into a memorable movie? Wish to send your greetings to a loved one via video card? You can do it all with Clipify video editing software.

With this program, editing videos seem like a vacation. In Clipify, every tool is right where you’d expect it to be.

So even if you’ve never tried to edit videos on a home PC before, it will take you no more than 20 minutes to master this automatic movie maker and start editing like a pro.

Despite its rich toolkit, this app ensures smooth performance. Not only that, but it’s less demanding on your hardware than other more robust programs.

While the application is available for free download, it will add watermarks to videos and ask you occasionally to upgrade, but it’s still a great video editor that you must try.

Take a look at its best features:

  • Edit video clips of 50+ formats: AVI, MP4, MKV, MOV, WMV, etc.
  • Capture videos using your web camera & add them to the program
  • Trim, cut, split, merge, rotate, and mix videos for stunning montages
  • Apply 160+ special effects, title cards, text captions & stickers
  • Change dull video backgrounds with the easy Chroma Key tool
  • Add voice comments or one of 200+ royalty-free music tracks
  • Export to Full HD, burn DVDs or upload directly to YouTube

What is the simplest video editing program?

When it comes to simplicity, Clipify is one of the simplest applications you can use. It comes with a straightforward user interface that lets you easily edit your videos or add various effects.

If you’re looking for more suggestions, check our guide on the best video editing software for beginners.

What is the best lightweight video format?

The most lightweight video format is HEVC or H.265. However, the format isn’t free, and it comes with a licensing fee.

There you go, these are the best lightweight video editing software that you can install on your PC. In case you don’t want to stress your PC, you can always use online video editors instead.

If you found our suggestions a bit expensive, there are many great free video editing software available that you can try.

If you’ve got other software suggestions, let us know in the comments below.

6 Ways to Disable or Uninstall Cortana for Good in Windows 10

Cortana is one of Windows 10’s signature features, but not all users are delighted with it. Some people don’t find Cortana that useful, so they want to disable it, or even completely uninstall it from their computers.

First things first, we don’t recommend uninstalling Cortana. If you want to get rid of Microsoft’s virtual assistant, it’s a better choice to just disable it. Why? Because uninstalling Cortana isn’t supported by Microsoft, as Cortana is one of the few Windows 10 features that can’t be uninstalled normally.

Why can’t I turn off Cortana?

When Cortana was first introduced as a built-in Windows app, it had an enable/disable button within the app.

That is no longer the case. As for more recent updates, the personal assistant cannot be disabled directly from its UI.

Windows does not allow you to uninstall Cortana from the Add or Remove panel either. The app is listed there, but you can’t make any changes to it.

So, if you want to disable Cortana on your Windows computer, you will need to make use of other methods that are not as straightforward and intuitive.

There are ways to disable Cortana or completely remove it from your PC, but you must be careful. Some of these methods include working in the registry which can cause serious problems if done incorrectly.

Can I uninstall Cortana Windows 11?

In Windows 11, Cortana is no longer pinned to the taskbar by default. The app is not automatically enabled as it used to be on Windows 10.

Cortana is still a pre-installed application in Windows 11, but it is no longer running in the background at all times by default.

If you have used Cortana and enabled it and want to remove it, you can do so from the Apps and features panel or from the Task Manager.

How do I permanently disable Cortana in Windows 10?

1. Rename the Microsoft.Windows.Cortana folder

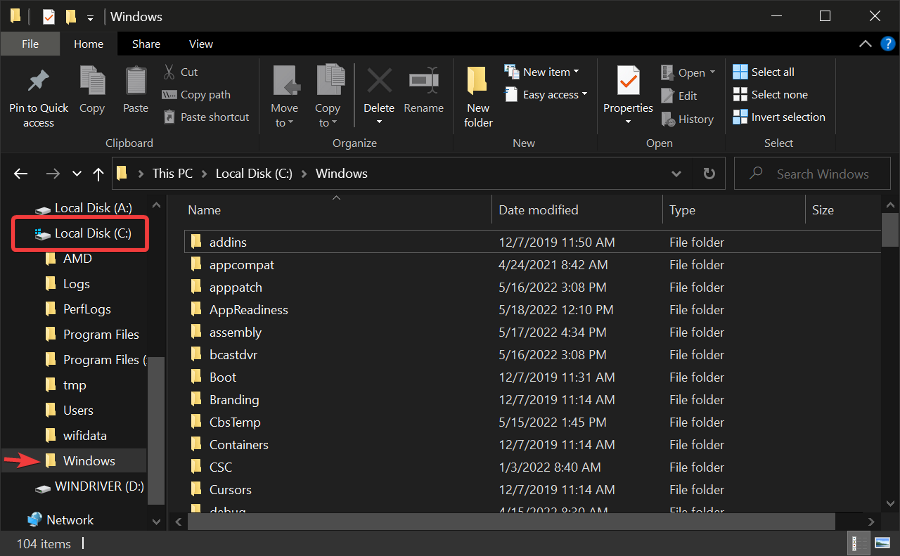
  1. Go to This PC, expand your system partition (usually C) and select Windows.
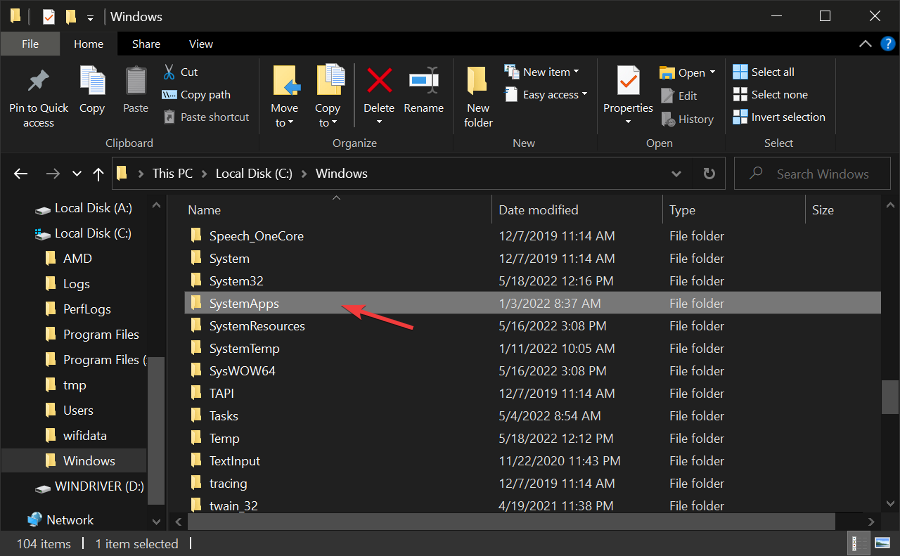
  2. Open the Windows folder and then the SystemApps folder.
    disable cortana windows 10
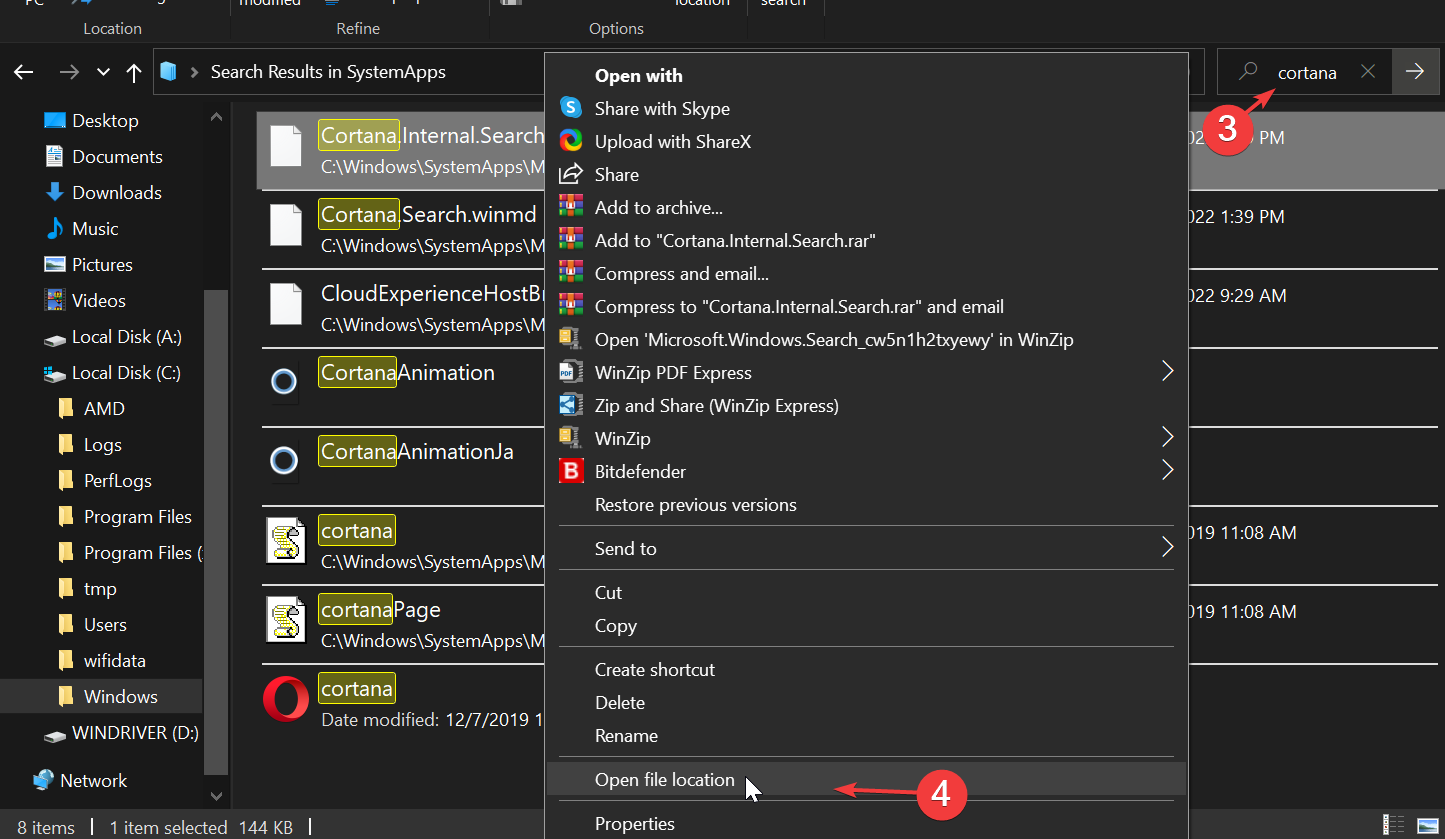
  3. In the search bar, type Cortana.
  4. Right-click on the first result and select Open file location.
    disable cortana widnows 10
  5. Now, rename the Microsoft.Windows.Cortana_cw5n1h2txyewy folder to Microsoft.Windows.Cortana_cw5n1h2txyewy.old
  6. If you get an Access Denied error, open the Task Manager, locate Cortana and end the task.

2. How do I disable Cortana in Windows 10 registry?

  1. Go to Start, type regedit, and hit Enter
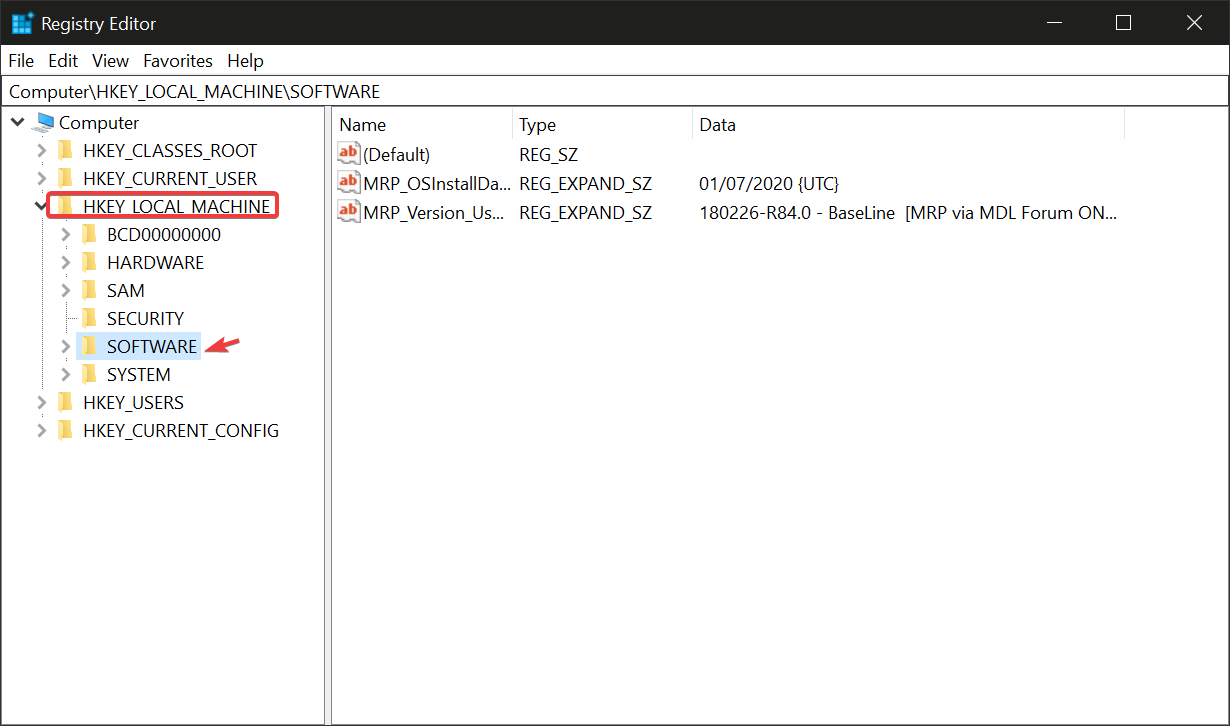
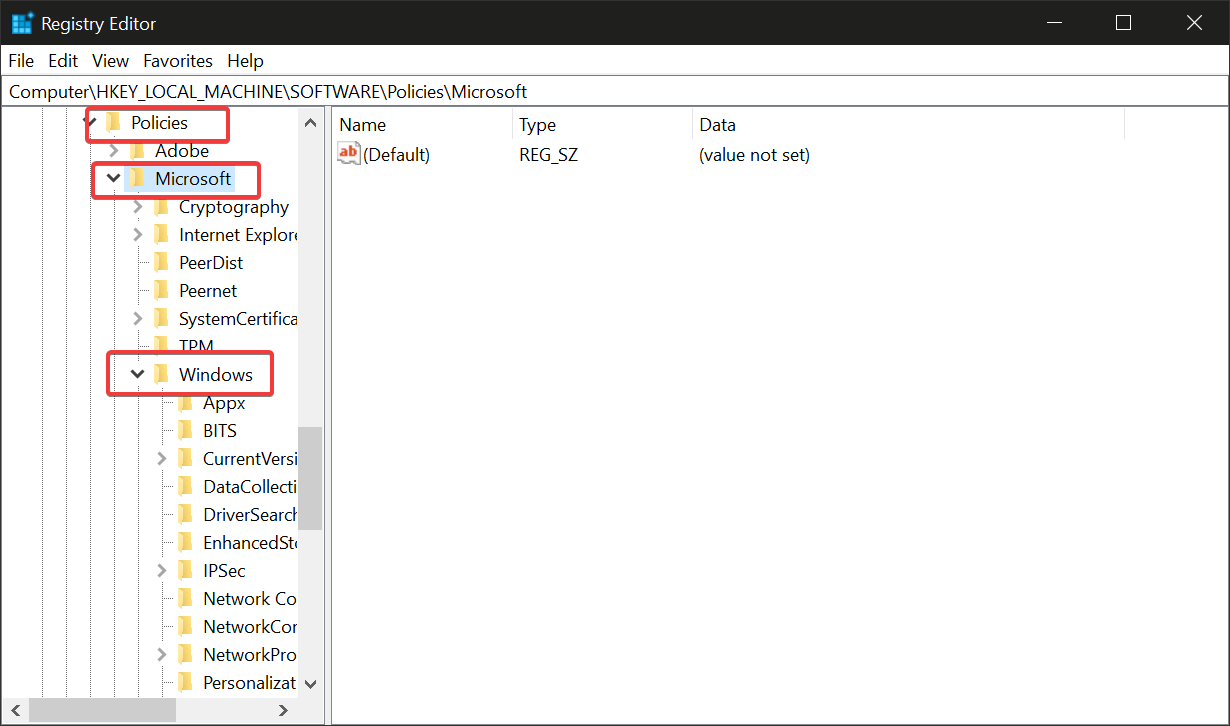
  2. Go to HKEY_LOCAL_MACHINE > SOFTWARE.
    disable cortana windows 10
  3. Then select Policies > Microsoft > Windows.
    disable cortana windows 10
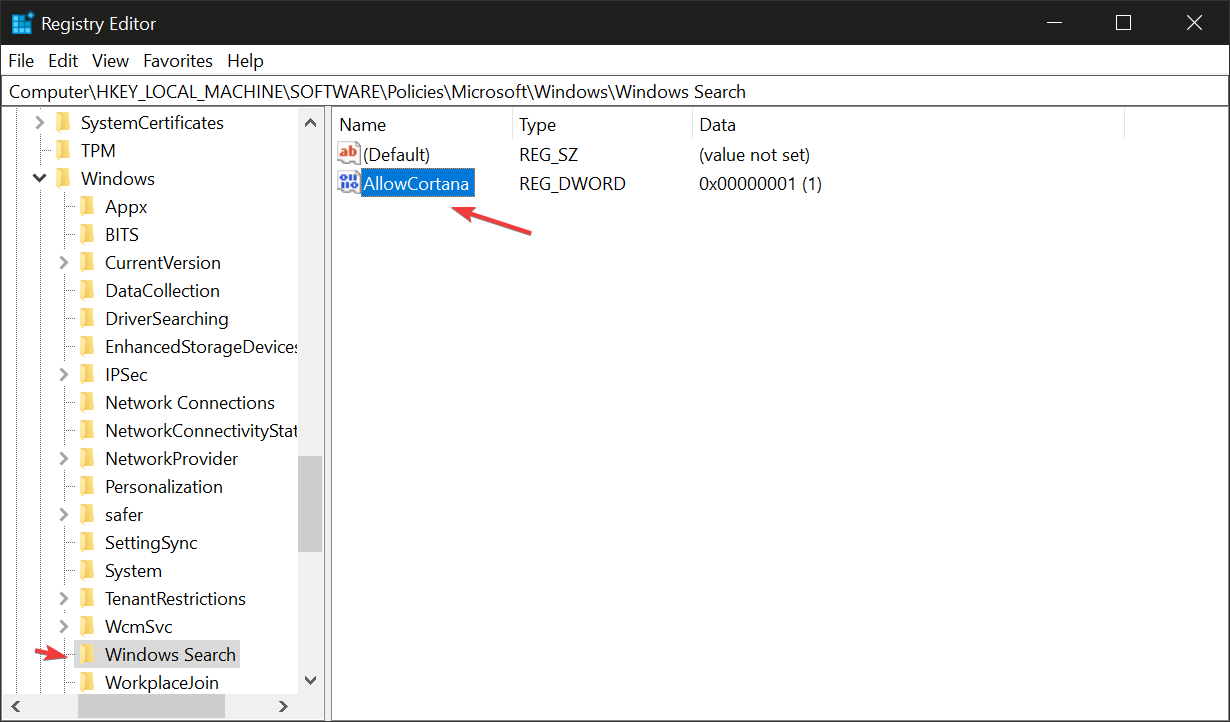
  4. Go to Windows Search to create the Search key and hit Enter.
  5. Select AllowCortana.
    disable cortana windows 10
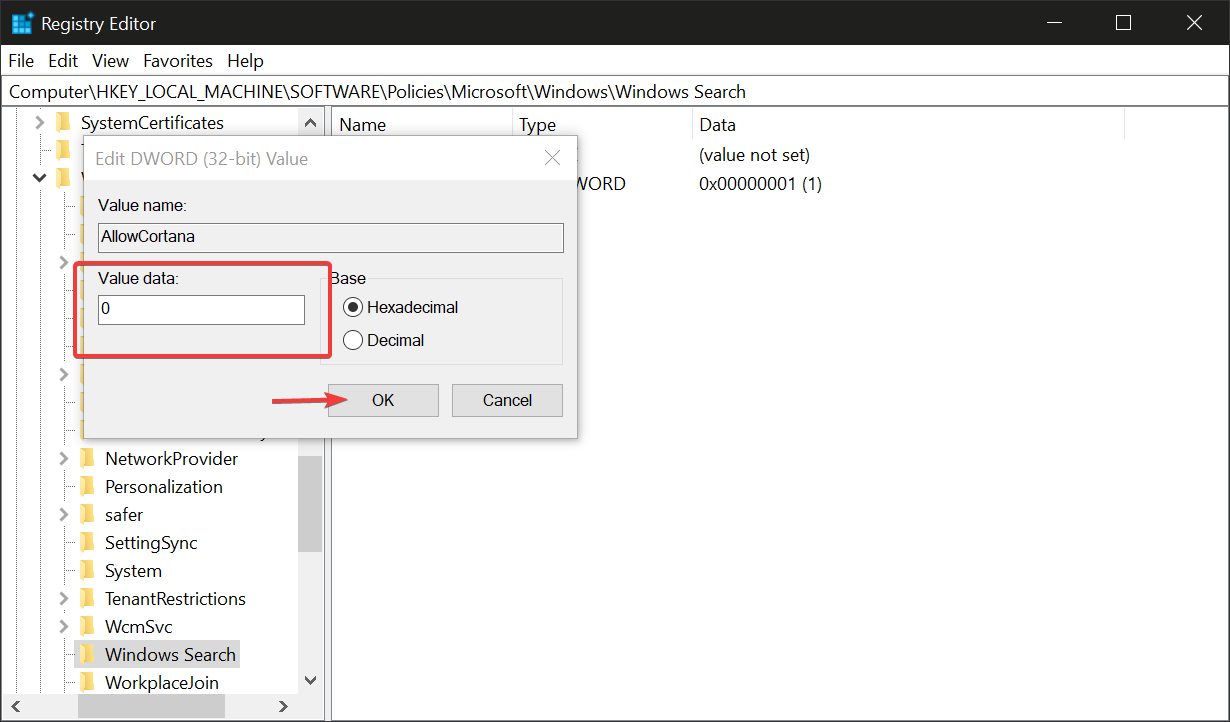
  6. Double-click on AllowCortana, and type in 0 under Value Data. This command will permanently disable Cortana.
    disable cortana

3. How do I disable Cortana from Control Panel?

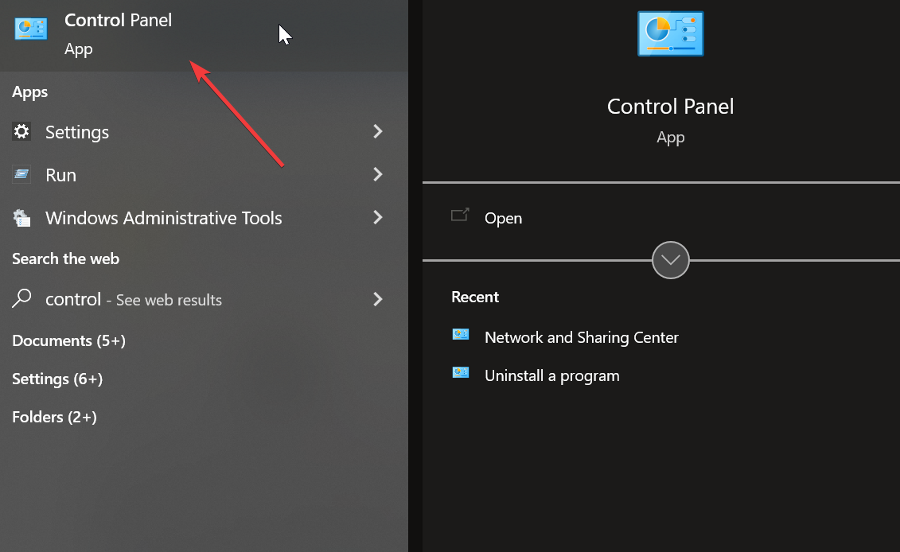
  1. Type control panel in the taskbar and open Control Panel.
    disable cortana windows 10
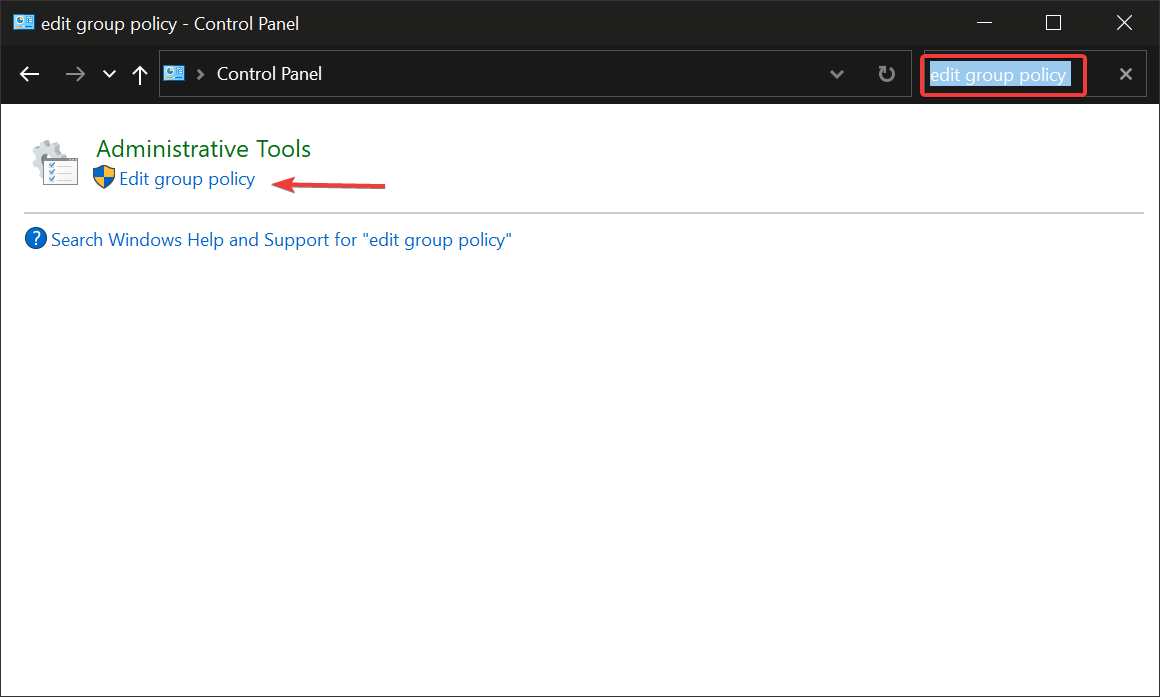
  2. Type edit group policy in the Control Panel search box and click on the Edit group policy result link under Administrative tools.
    disable cortana windows 10
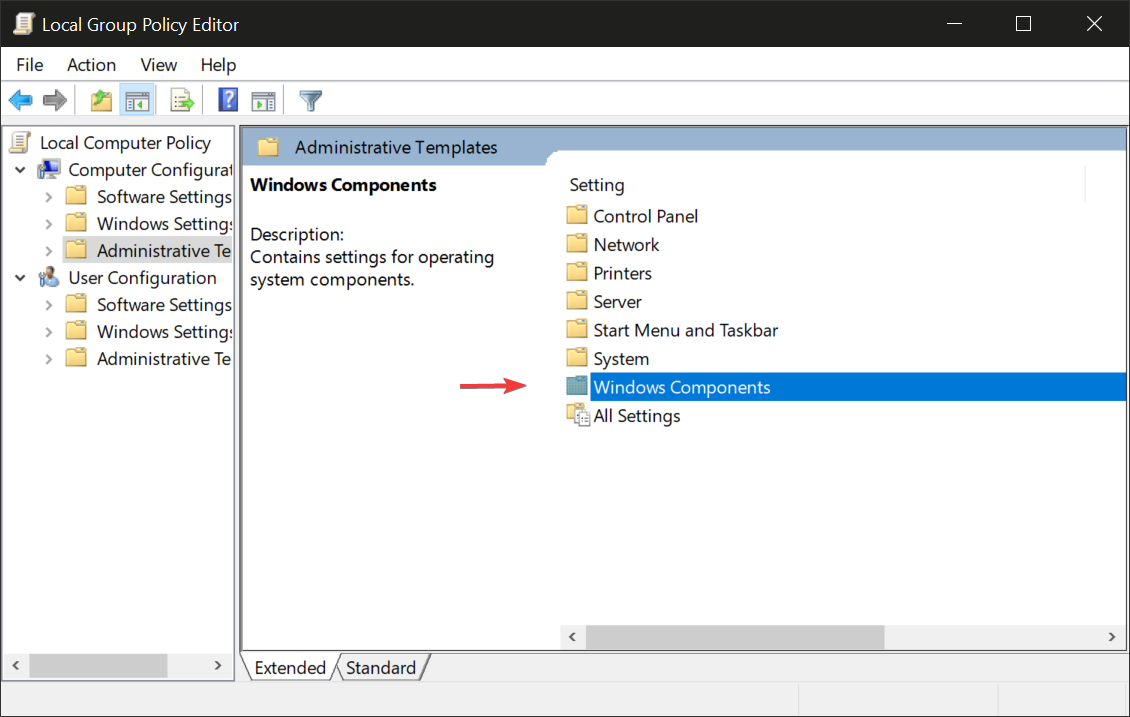
  3. Go to Computer configuration and open the Administrative Templates folder.
    disable cortana windows 10
  4. Select Windows Components.
    disable cortana windows 10
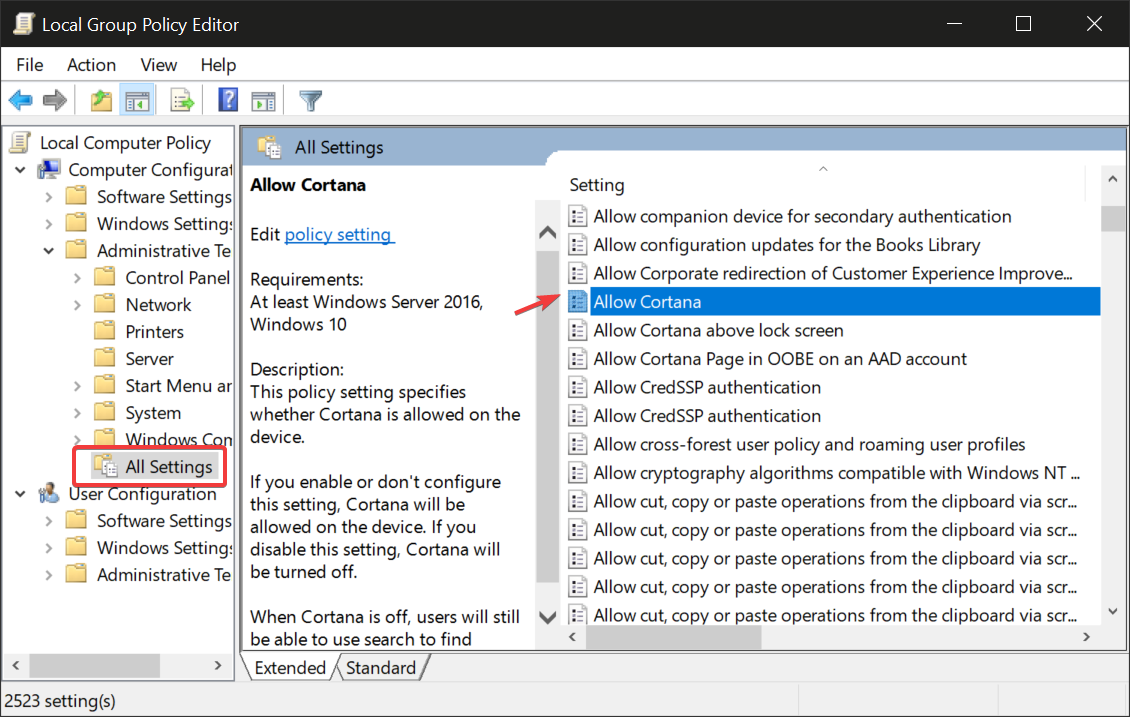
  5. Go to All Settings and find Allow Cortana in the settings list.
    disable cortana windows 10
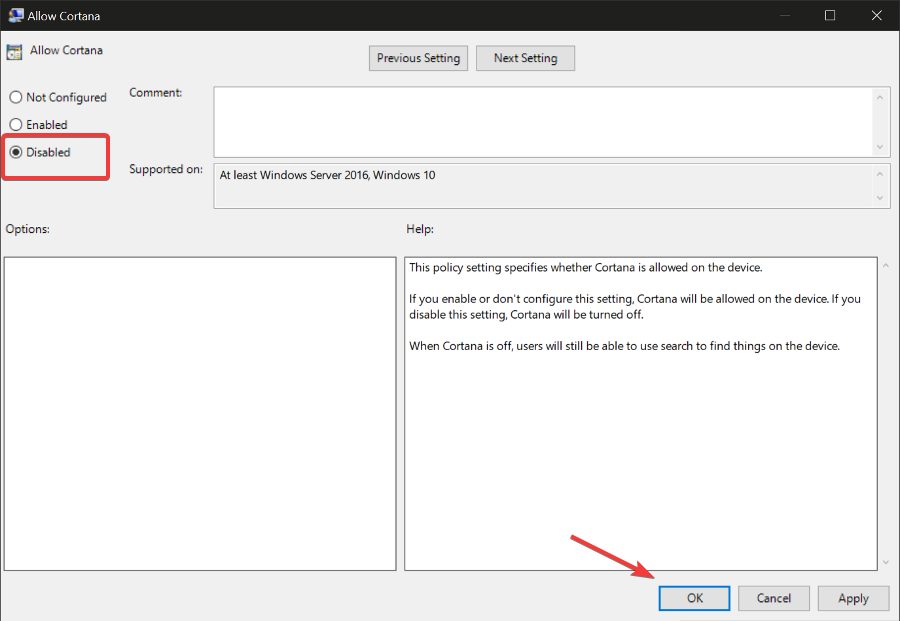
  6. Double Click on Allow Cortana. Select Disabled and then click OK.
    disable cortana windows 10
  7. Restart your computer.

4. How do I disable Cortana from Task Manager?

  1. Press Ctrl+ Shift+ Esc to open the Task Manager.
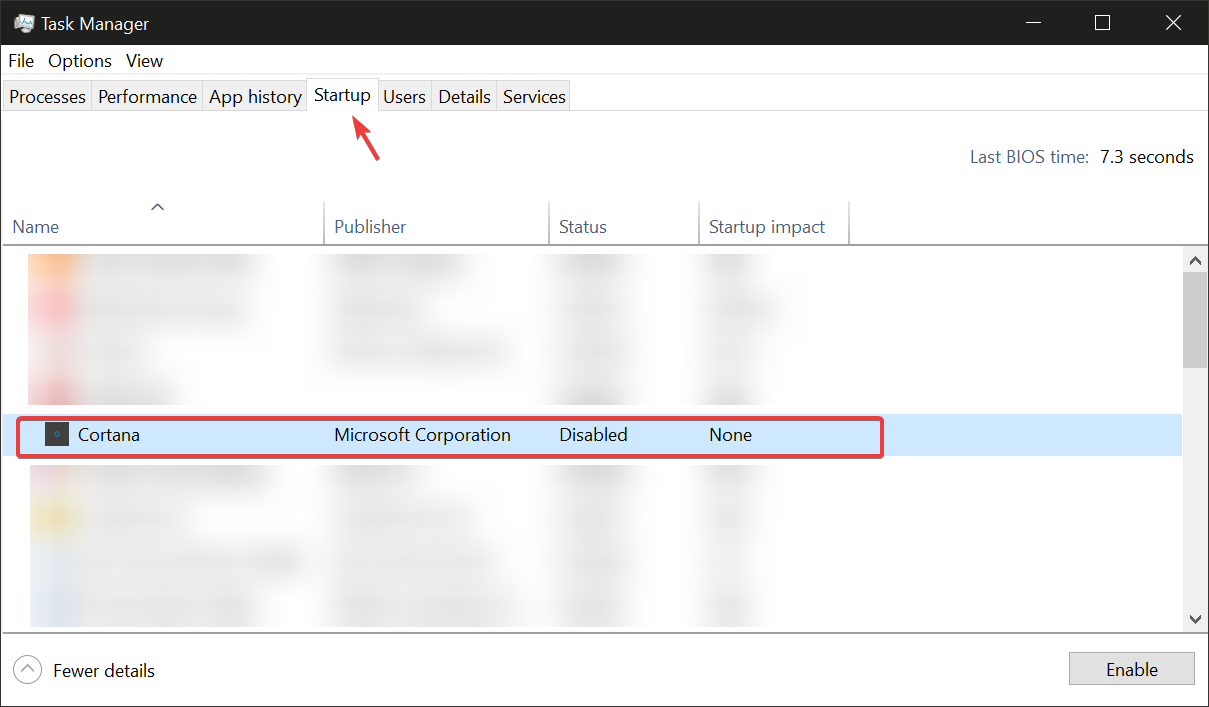
  2. Go to the Startup tab and find Cortana.
    disable cortana widnows 10
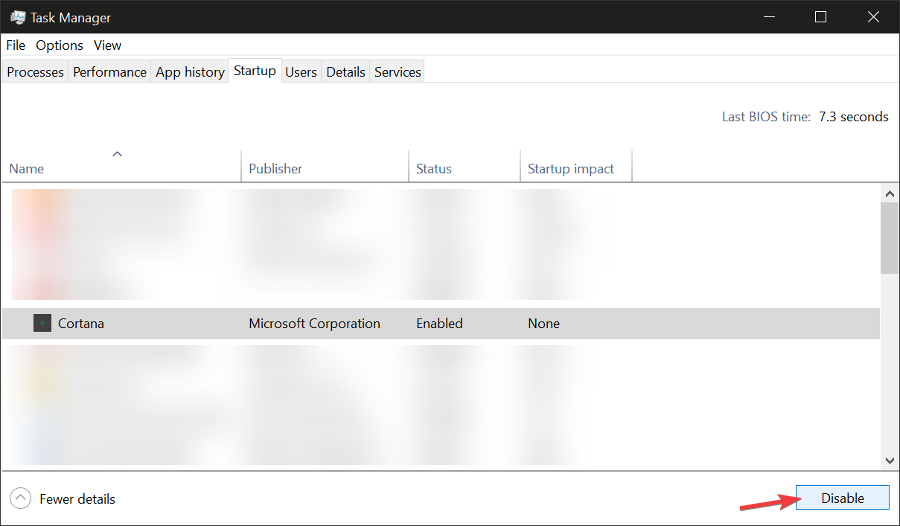
  3. Select Cortana and click Disable. Close the Task Manager.
    disable cortana windows 10
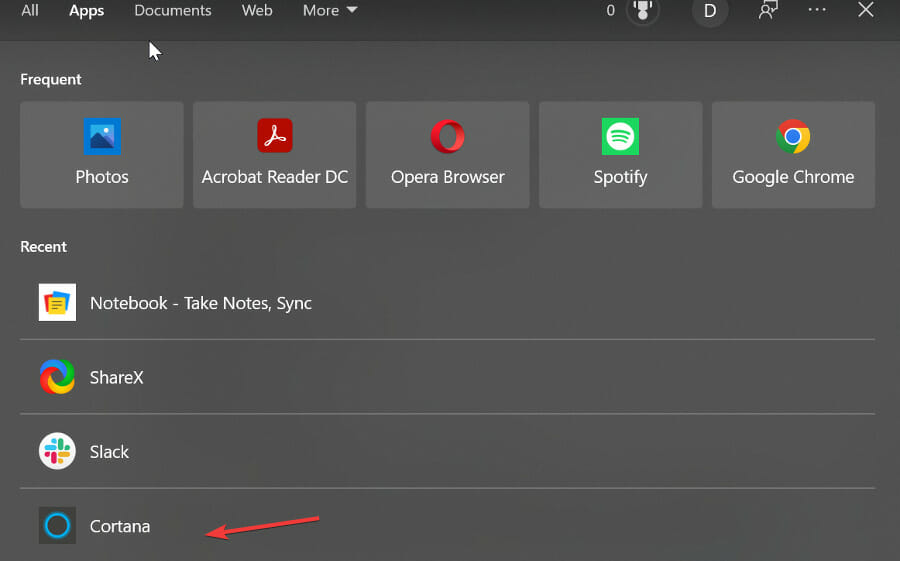
  4. Find Cortana in the Taskbar. Search for it or locate it under All Apps.
    disable cortana windows 10
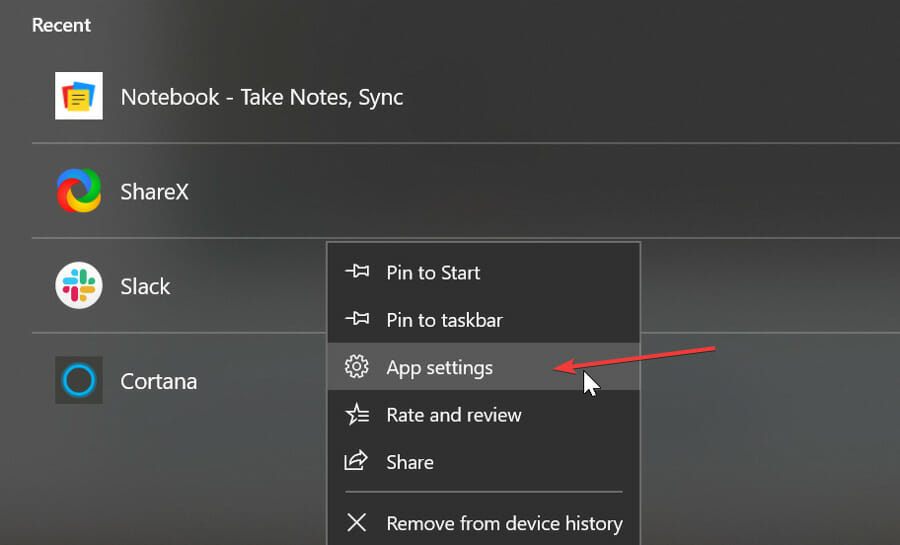
  5. Right-click on it and select App settings.
    disable cortana windows 10
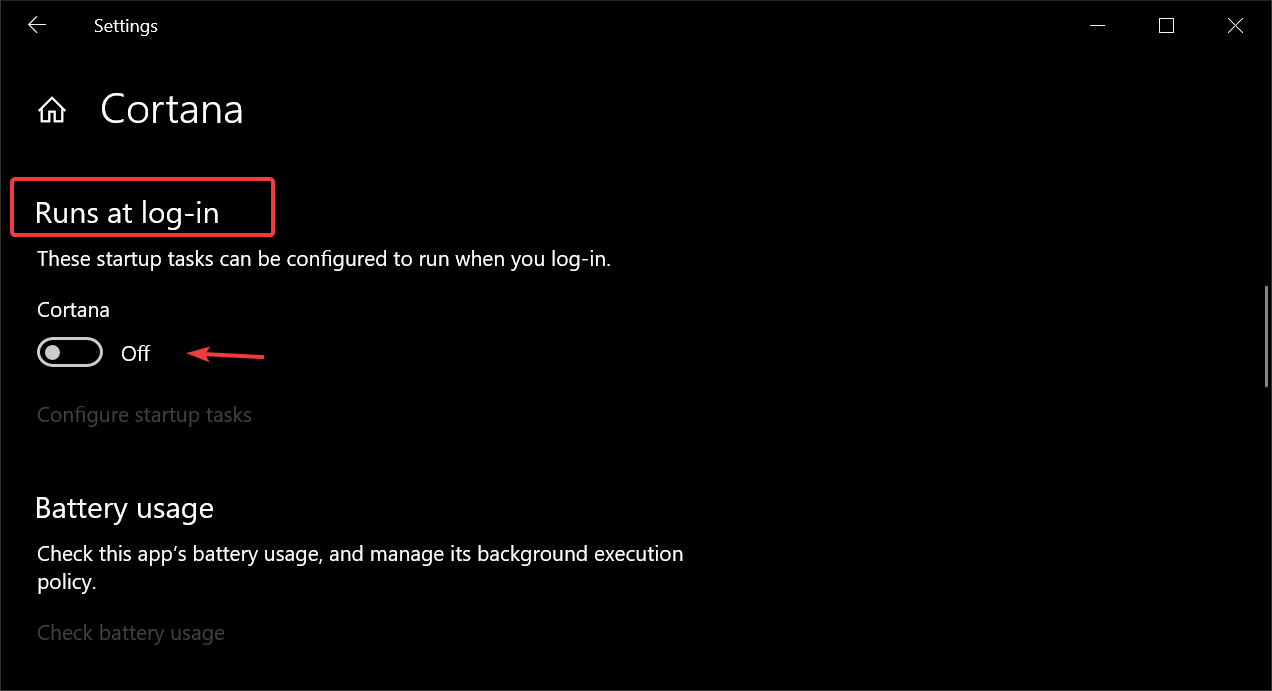
  6. Make sure the Runs at log-in option is set to Off.
    disable cortana

How do I permanently remove Cortana from Windows 10?

If you want to completely uninstall Cortana from your Windows 10 PC instead of disabling it, you can do with the help of WindowsPowershell. You can also use a removal tool.

It is not very difficult and if you want to re-install Cortana in the future, you can easily do so in just a few clicks.

1. Uninstall Cortana Windows 10 Powershell

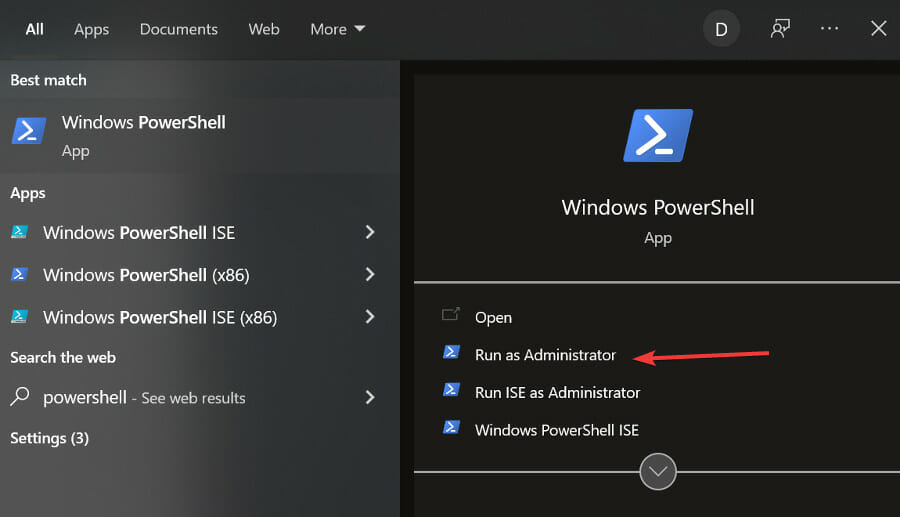
  1. Type Powershell in the taskbar search box and select Run as Administrator under Windows Powershell.
    disable cortana windows 10
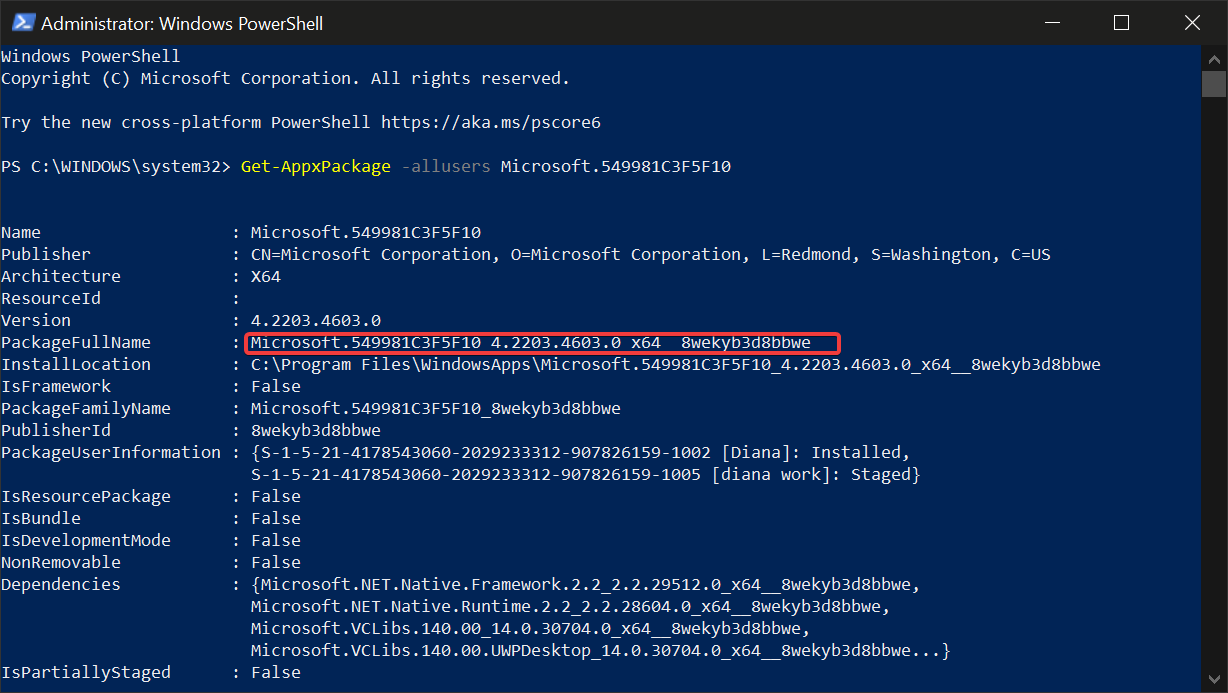
  2. Type this Command: Get-AppxPackage -allusers Microsoft.549981C3F5F10 and press enter.
    disable cortana windows 10
  3. Copy the result in PackageFullName:
    disable cortana windows 10
  4. Enter this command: Remove-AppxPackage and paste the name you copied. It should look something like: Remove-AppxPackage Microsoft.549981C3F5F10_4.2203.4603.0_x64__8wekyb3d8bbwe. Press enter.
    disable cortana windows 10

Now the Cortana package will be removed from your system. You can close the Powershell Window.

Note icon NOTE
The Cortana package names vary depending on your version of Windows. That is why we recommend you check yours and copy and paste it. If you type the wrong package name, you will get an error message.

If you want to reinstall Cortana in the future, you can find it in the Microsoft Store. Just press the Install button and Windows will automatically install it to your PC.

2. Completely remove Cortana with a third-party tool

  1. Download the Uninstall Cortana ZIP file
  2. Extract all files from the ZIP archive you downloaded to any you want
  3. Right click the Uninstall Cortana.cmd file and select Run as Administrator
  4. Wait till the process is done
    uninstall cortana windows10
  5. Restart your computer.
Note icon NOTE
If you uninstall Cortana from an older Windows version, that will break up the start menu and search bar. Microsoft has separated Cortana from the taskbar search box for newer versions, but if you use an older one, you may need to use a third-party Start Menu.

If the application does not cause you any problems, we recommend disabling it instead of uninstalling it. Even though it runs in the background, it does not use up too many resources.

But if you really want to uninstall Cortana, and probably mess up a few more features along the way, there are a few solutions that you can use. So, here’s what you need to do to completely remove Cortana from your Windows 10 computer.

There you go, once you’ve uninstalled Cortana, just download some third-party Start Menu, and you’re good to go. But we have to tell you again, that you should have a good think before you do such a thing because once you uninstall Cortana, there’s no way back (except reinstalling Windows 10 completely).

If you want to make sure that your computer has removed absolutely all the Cortana-related files and folders, we recommend running CCleaner.

Cortana is a useful Windows 10 application that can help users be more productive and make the best of the Windows integrated utilities.

It can be operated by voice commands and you can use it to set up reminders, take quick notes, and navigate within your operating system.

There have been some privacy concerns and controversies regarding the app. Some users are worried about the voice-operated function and how much of their surroundings are recorded by Cortana.

Windows has however stated repeatedly that the app does not breach user privacy. It does however keep some activity logs.

If you prefer Google’s assistant instead, make sure it works properly by checking our guide on Hey Google not working for step-by-step fixes.

We hope this guide helped you successfully disable or remove Cortana from your PC. If you have any suggestions, please let us know in the comments below.

SOLVED: PDF not Opening in Chrome

Undoubtedly, Google Chrome is one of the best web browsers worldwide. It comes with a built-in PDF viewer tool, which can edit PDF files.

The Chrome PDF viewer is a powerful tool that offers instant and fast access to PDF files. It allows you to view a file without having to download it.

Unlike Adobe, the Chrome PDF viewer can be used to do a lot more than just read PDF files. Some of its features are split pages, document rotation, saving web pages as PDF, etc.

However, recently many users have complained about PDFs not opening in Chrome. Errors like these usually occur when Chrome’s cache data gets full.

As it’s an issue of concern, it should be taken care of right away. Keep reading this post to learn how you can fix PDFs not opening in Chrome and view your files once again.

Quick Tip:

If you want a simple, web-based solution for reading and managing your PDFs, we suggest you get SodaPDF because it has an extensive set of features that give you all the freedom you need to take care of PDF files.

You can use it to view, edit, convert, and create PDFs. It has dedicated support for e-signatures, OCR, markup tools, and a built-in spellchecker.

SodaPDF

Read, edit, convert, and organize your PDFs with this simple multi-platform solution.
Free Trial Visit Website

How do I get my PDFs to open in Google Chrome?

Google Chrome’s built-in PDF reader is turned on by default. However, certain apps and extensions can sometimes disable it.

Once you switch on this feature on Chrome, all PDF files will open in a new tab instead of getting downloaded directly. Below mentioned are the steps to make your PDF files open in Google Chrome:

  1. Open Google Chrome, click on three vertical dots at the top right corner and select Settings.
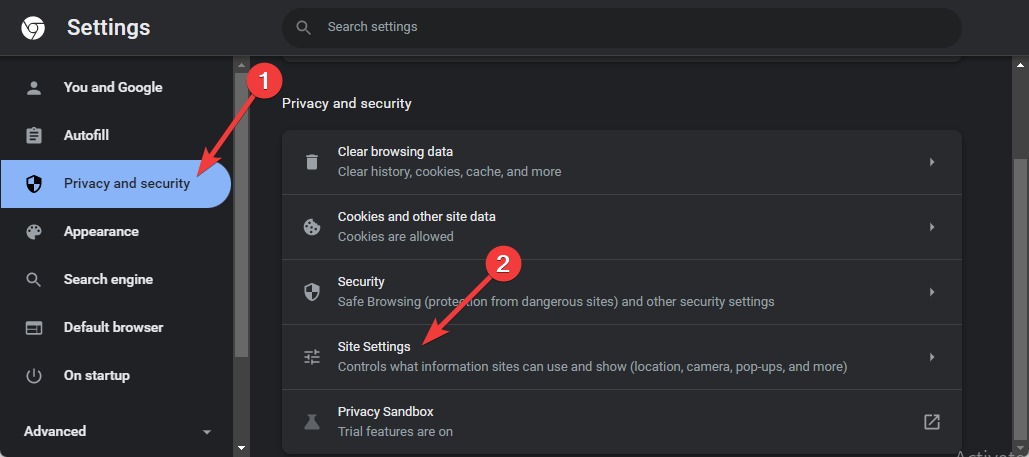
  2. Click on Privacy & Security on the left pane.
  3. Now click on Site Settings in the right pane.
    pdfs not opening in chrome
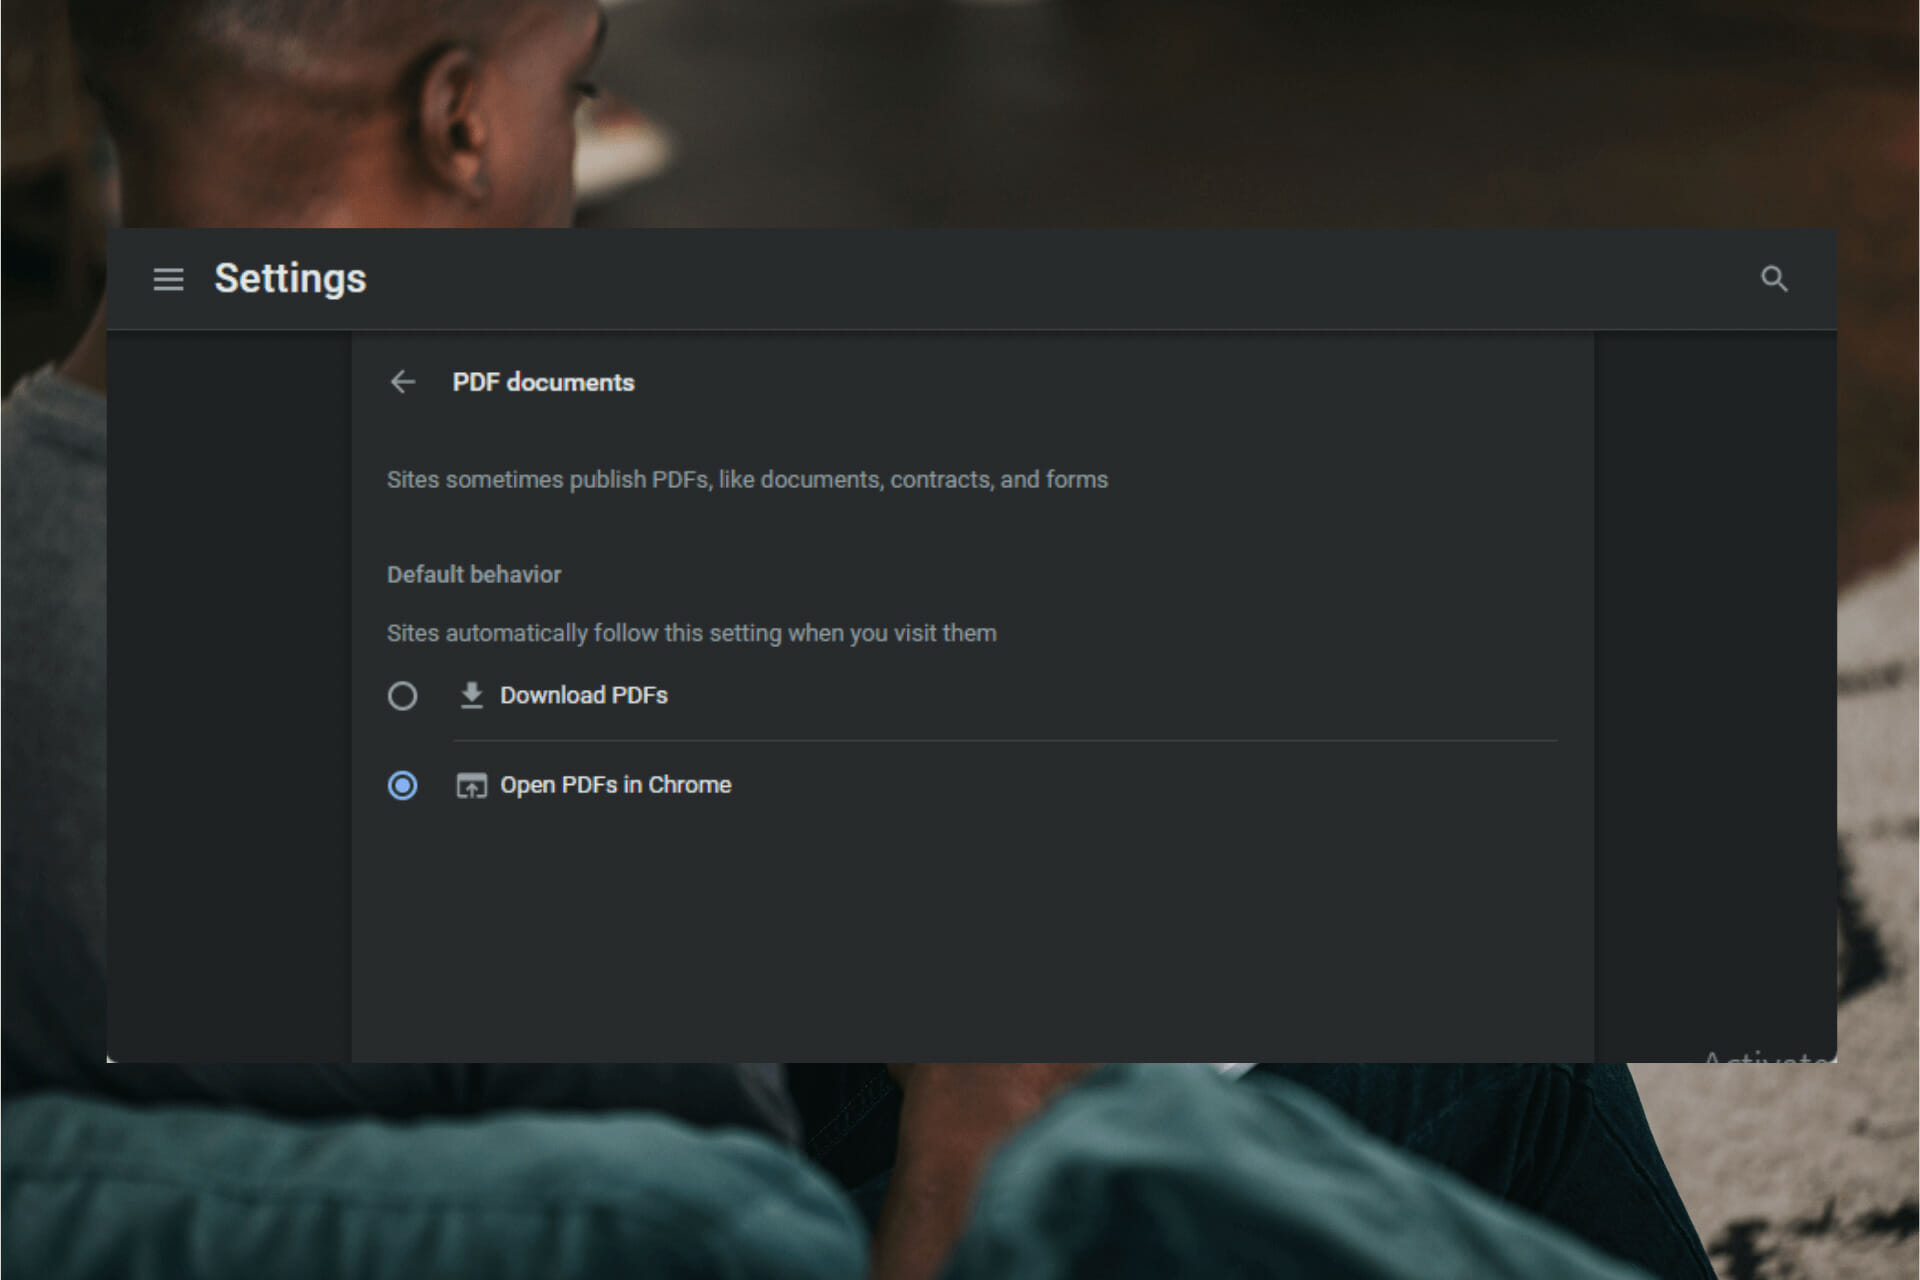
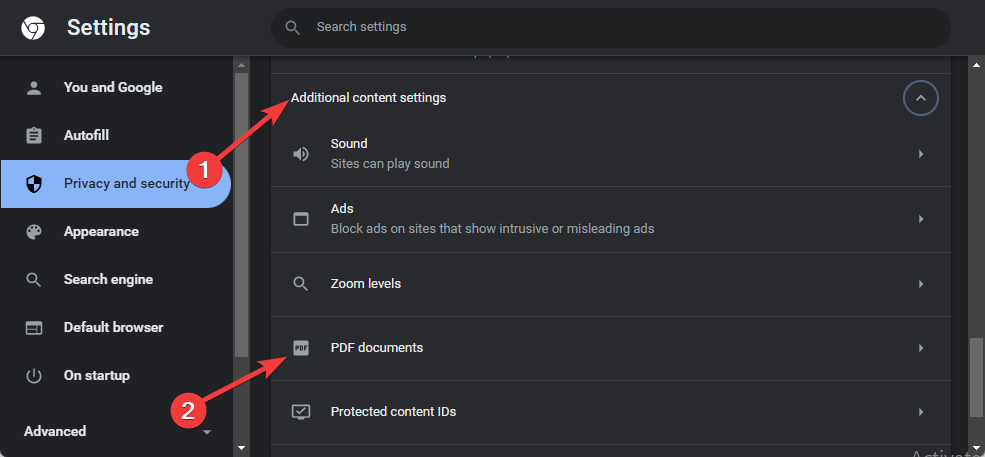
  4. Scroll down to click on Additional content settings and then on PDF documents.
    PDF documents
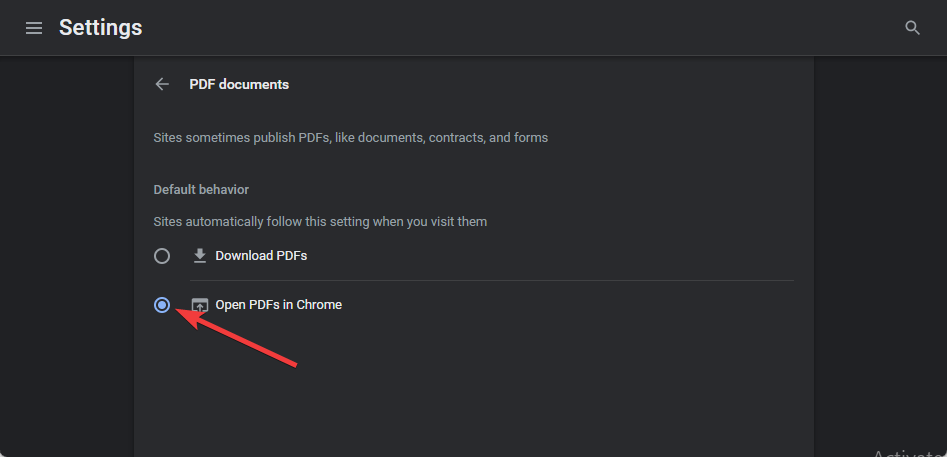
  5. Select the option Open PDFs in Chrome.
    pdfs not opening in chrome
  6. If you select Download PDF, it will download PDF files instead of automatically opening them in Chrome.

Why are PDFs not opening in Chrome?

1. Check Internet connection

Check your internet connection before getting started with complex troubleshooting methods to fix this issue. An unstable or poor internet connection could be one of the reasons behind PDFs not opening in Chrome.

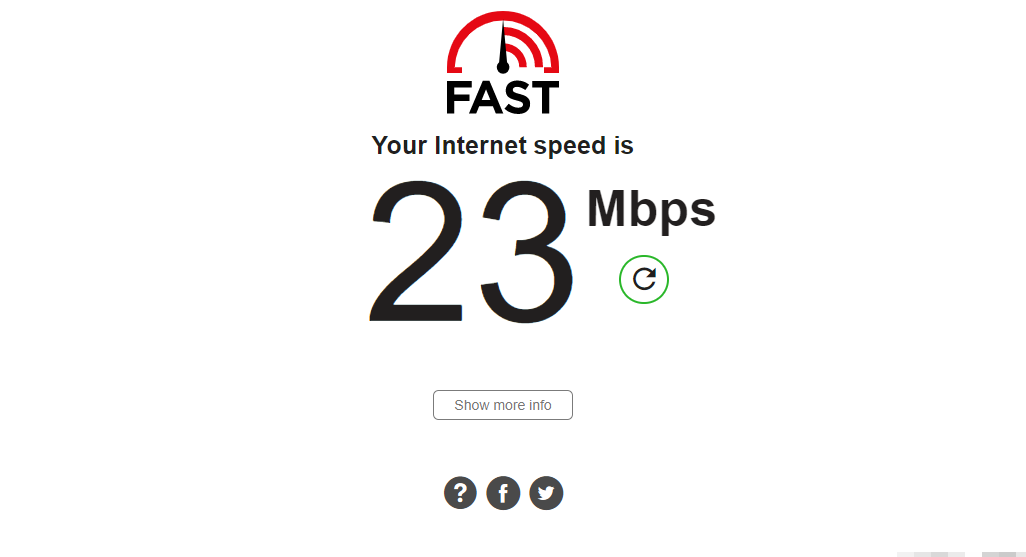
You can perform an Internet speed test from Fast.com to check your internet connection. If you don’t prefer this, you can check your connection with any other Internet speed tester.
PDFs not opening in chrome

2. Clear Chrome cookies and cache

  1. Open Google Chrome and click on three vertical dots at the top right corner.
  2. Click on Settings and navigate to Privacy and Security.
    PDFs not opening in Chrome
  3. Click on Clear Browsing Data.
  4. Check the options Cookies and other site data and Cached images and files.
  5. Once done, click on Clear Data.
    Clear-Data-1

If the cache data gets corrupt or full, it could be why you’re facing PDFs not opening in Chrome. Clear Chrome’s cache data and cookies, then check if the error gets fixed.

3. Update Google Chrome

  1. Open Chrome, click on three dots at the top right corner, and open Settings.
  2. Click on Help and About Google Chrome at the bottom.
    PDFs not loading in Chrome
  3. Chrome will now automatically search for updates and install them.
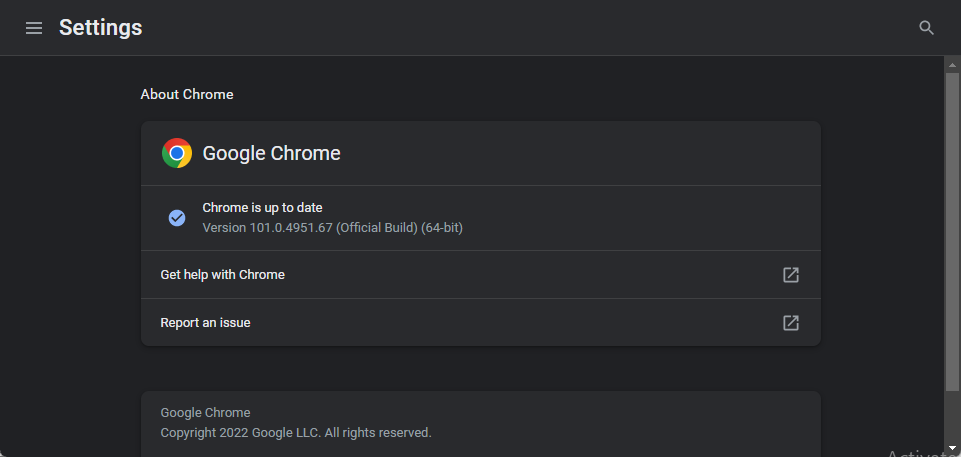
    Chrome update page

Essential Chrome functions can malfunction if you use an outdated version of Chrome. Updates are released regularly by Google to enhance the user’s browsing experience.

So follow these steps to update your Chrome browser and check if PDFs not opening in Chrome is fixed. Several users complain about the fact that they are unable to update Chrome. Rest assured that our guide shows you what to do in case that happens.

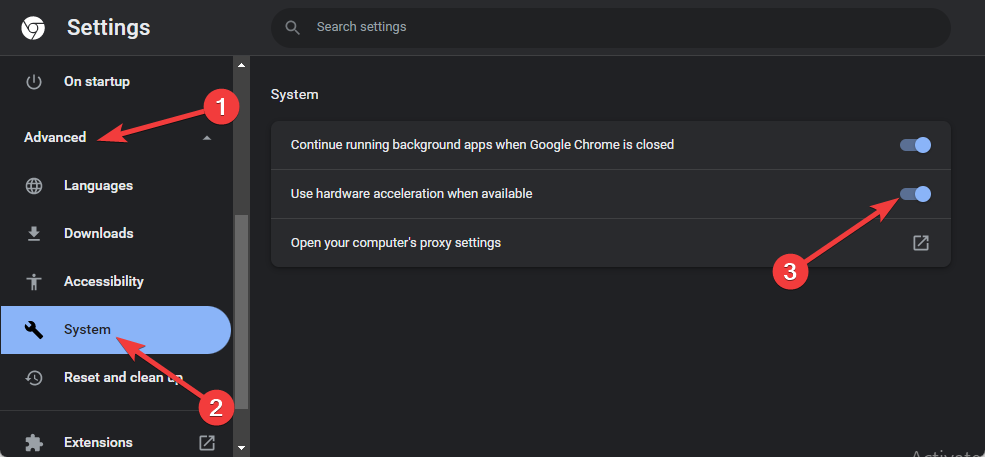
4. Enable or Disable Hardware Acceleration

  1. Launch Chrome and open Settings.
  2. Click on Advanced and then on System.
  3. Click on the toggle switch beside Use hardware acceleration when available to enable/disable it.
    Hardware Acceleration

Hardware Acceleration is a Chrome feature that makes the device’s GPU take over specific tasks that the CPU cannot deal with. If your device has a powerful GPU, enabling Hardware Acceleration will be of great help; else, disable it.

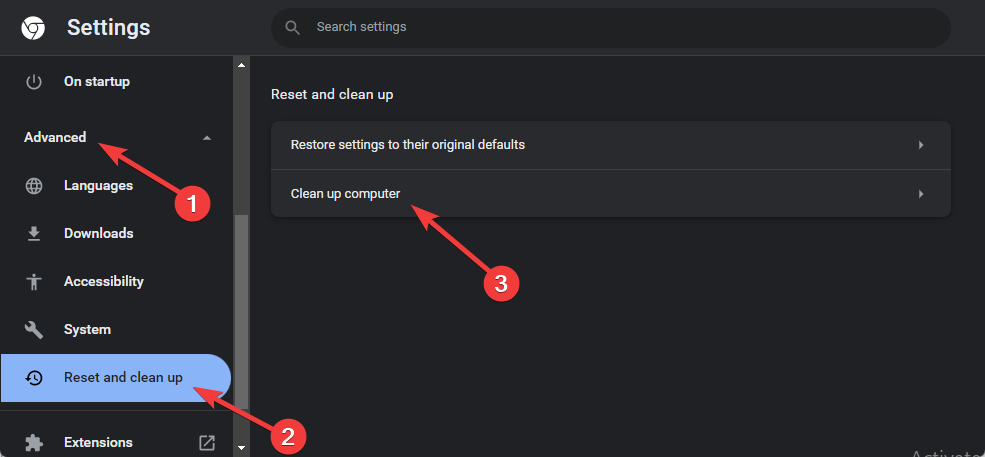
5. Use Chrome’s inbuilt Cleanup tool

  1. Open Chrome, click on three dots, and open Settings.
  2. Navigate to Advanced and click on Reset and clean up.
  3. Now click on Clean up computer.
    pdfs not opening in chrome
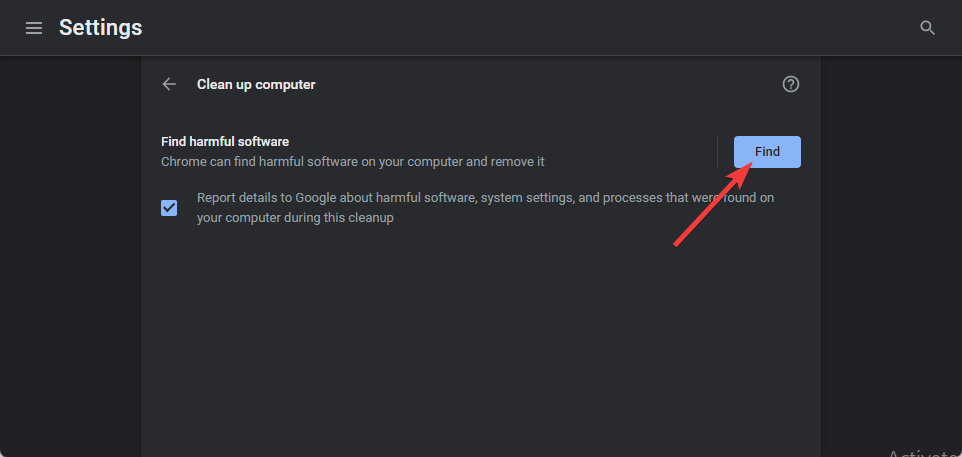
  4. Click on Find beside Find harmful software.
    Chrome troubleshooter

Malware or harmful files on your device can sometimes tamper with Chrome PDF settings. If that’s the case, use Chrome’s inbuilt cleanup tool to scan and eliminate these harmful files from your system.

6. Remove Chrome extensions

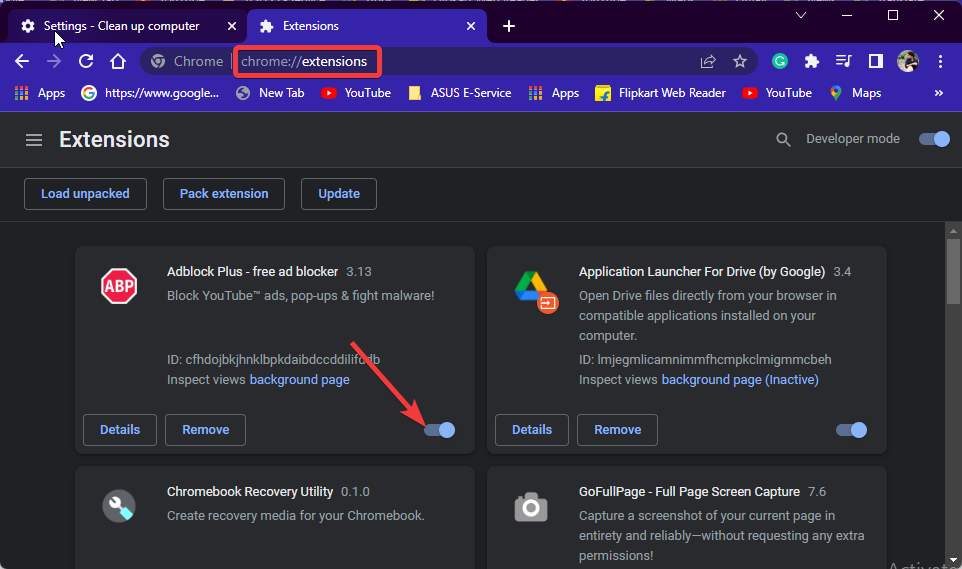
  1. Type chrome://extensions in the browser and hit Enter. The Manage Extensions page will open.
  2. Disable all extensions one by one and check if the PDF file opens.
    pdfs not opening in chrome

You can also switch to Incognito Mode to check for a faulty extension. To open it, click the three dots placed in the top-right corner and select the New incognito window. 

Suppose you can view PDFs while in the Incognito mode; then the PDF opening in Chrome issue is caused by one of your extensions. To find out which extension is causing you trouble, turn off all extensions and then enable them.

7. Reset Chrome

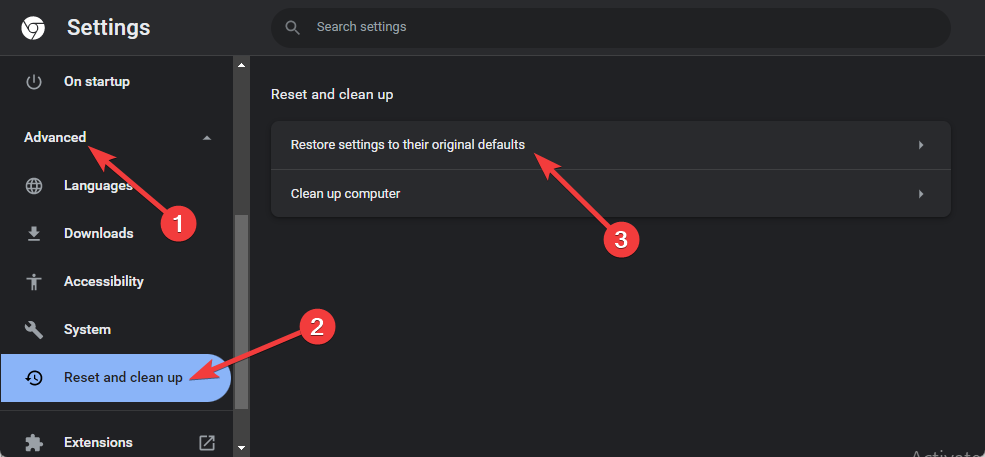
  1. Open Chrome, click on three dots at the top right corner, and open Settings.
  2. Navigate to Advanced and click on Reset and clean up.
  3. Now select Restore settings to their original defaults.
    Restore Chrome
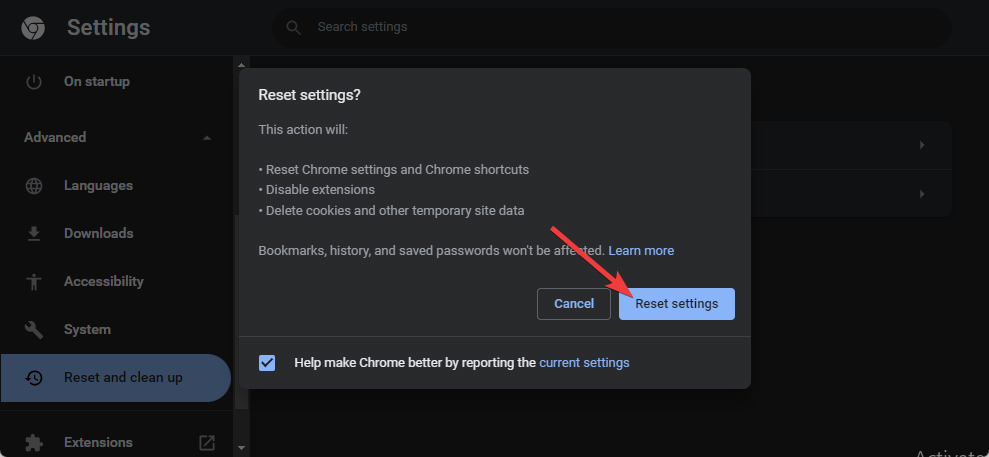
  4. Click on Reset settings and wait for the procedure to complete.
    Reset Settings Chrome
  5. Once done, restart your device and continue using Google Chrome.

If none of the above-mentioned troubleshooting methods could fix PDFs not opening in Chrome, reset it. Resetting Google Chrome will restore all its settings to their original default.

Is there a Chrome Fix if when I try to open a PDF it says Please wait?

Now that we know how to fix PDFs not opening in Chrome let’s move on to another issue many users face. Users have also complained whenever they try to open a PDF, it says, please wait.

This issue occurs due to an unstable or slow internet connection. However, it can also happen due to Chrome’s cache data or extensions. Follow the steps mentioned above to fix PDFS that open blank in Chrome or Please wait messages.

Also, several users have complained about facing Google Chrome black screen issues. If you’re among those too, read our post to learn how to fix it.

What can I do if I get a grey screen when opening PDFs in Chrome?

Another Chrome issue users have a tough time with is receiving a grey screen when opening PDFs in Chrome. It’s a very inconsistent issue as sometimes the PDFs show up as they should. Other times the PDF pages never load, and it’s just a grey, blank screen, and the PDF viewer control bar at the top.

This issue mainly occurs if some harmful or malicious files or programs are present on your device. To fix this, use Chrome’s inbuilt Cleanup tool as stated above. Running this cleanup utility will scan and eliminate any malware or harmful files on your device.

If the cleanup tool didn’t fix the PDFs not opening in Chrome issue, the last thing you can try is resetting Chrome. Doing so will reset all of Chrome’s settings to their default values.

That’s all on how you can fix PDFs not opening in Chrome. Several issues are to be blamed, but this usually occurs due to a bad Internet connection.

Follow the steps mentioned above to fix this error. If the troubleshooting methods mentioned above could not help you, try using Chrome extensions to edit and save PDF files online.

If you still have any problems, feel free to drop a comment below. We’re eager to hear from you.

Mug Design Software: 7 Best to Use in 2026

Graphics and design have increased over the years, and many people have started it as a business, and many are focusing on mug printing. However, to do that, you’ll need reliable mug printing software.

People use mugs as gifts during birthdays, weddings, corporates, and academics, and they want them with a personalized message or design. It keeps the mug industry busy, leading to the demand for printed mugs and professionals.

To have a better product, you have to choose the best software. These applications have different features, limiting how far you can go with your design. The article will cover the seven best software for design and printing.

So if you’re interested, keep on reading to find out what’s the best mug printing software to download.

How to print on mugs?

There are several methods you can use to print on mugs, and here are the most popular ones:

  • Direct screen printing: This method is used for simple designs that have no more than four colors, and the ink is applied thanks to the mesh screen.
  • Transfer printing: Your design is printed on special paper that has a coating that allows it to be applied to mugs.
  • Digital printing: Similar to the previous method, digital printing uses paper with a special coating and a waterslide transfer technique.
  • Dye sublimation: This method uses heat transfer and it achieves crystal-clear results while using organic color dyes.
  • Pad printing: Using this method, you’ll etch the desired image on the surface of the mug.

What are the best mug designing and printing software?

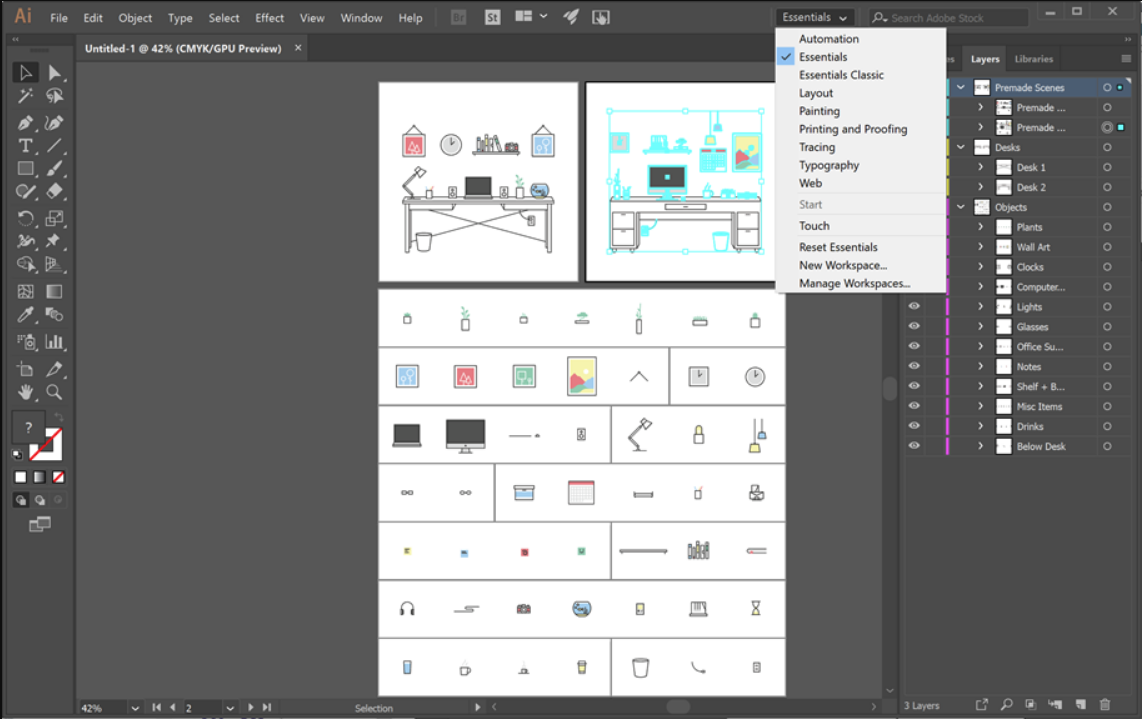
Adobe Illustrator – Best for vector graphics

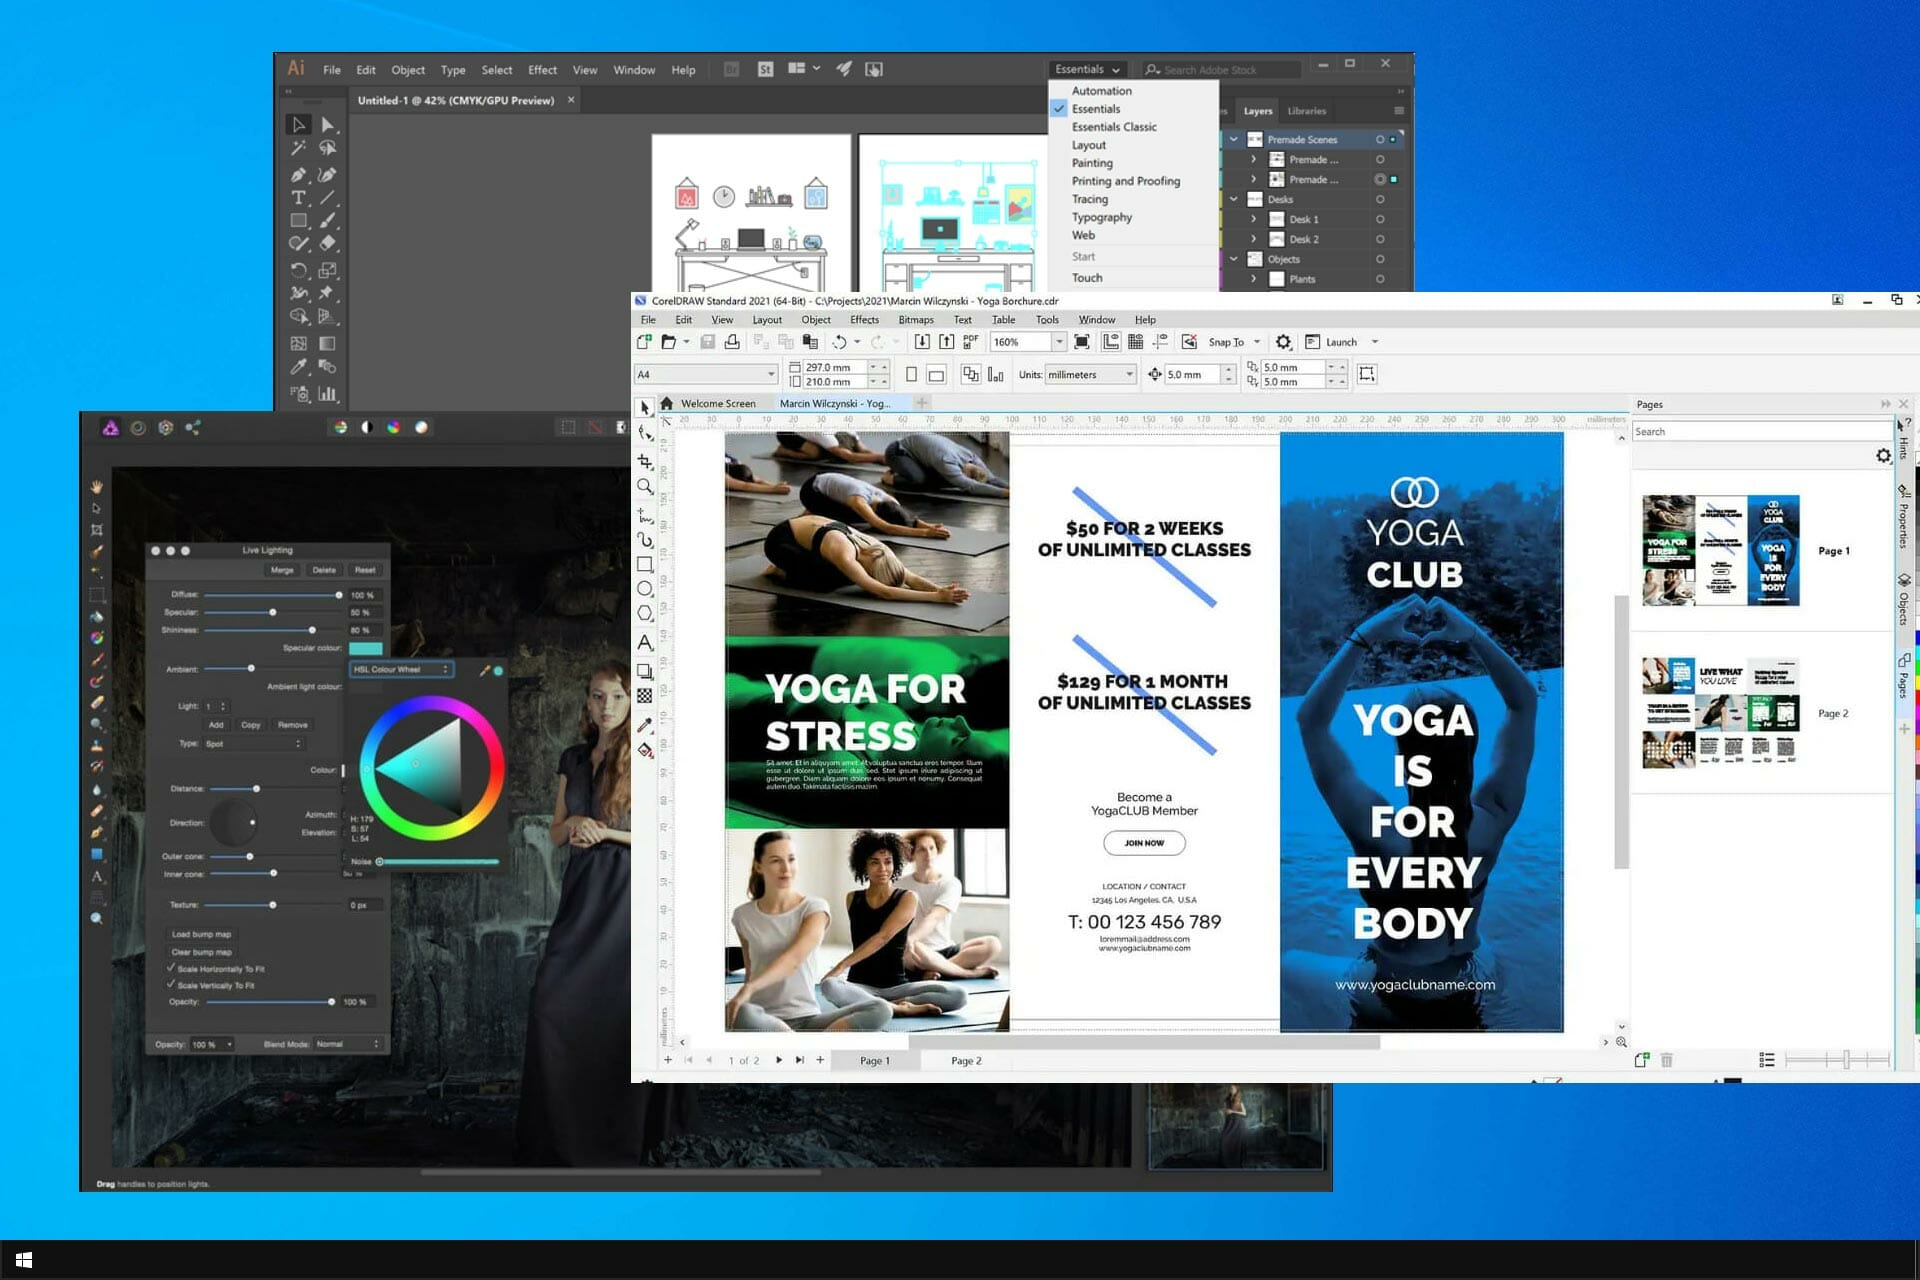
Adobe illustrator mug software

This software is mostly for experienced users who work on big projects and has features and tools that make vector images and designs easy.

Illustrator gives you the ability to increase and reduce the size of the designs to ensure it fits on the mug. It offers a wide array of tools, so you can always create the perfect design.

This app supports drag and drop, ensuring we have the proper position of design elements. If you need a mug printing software to create templates, then this is the perfect choice for you.

Key features:

  • It has collaboration tools
  • You can preview your design before printing
  • Variety of available tools
  • Perfect for large scale prints

Adobe Illustrator

Take care of every detail and create flawless mug designs with Adobe Illustrator.
Free trial Visit website

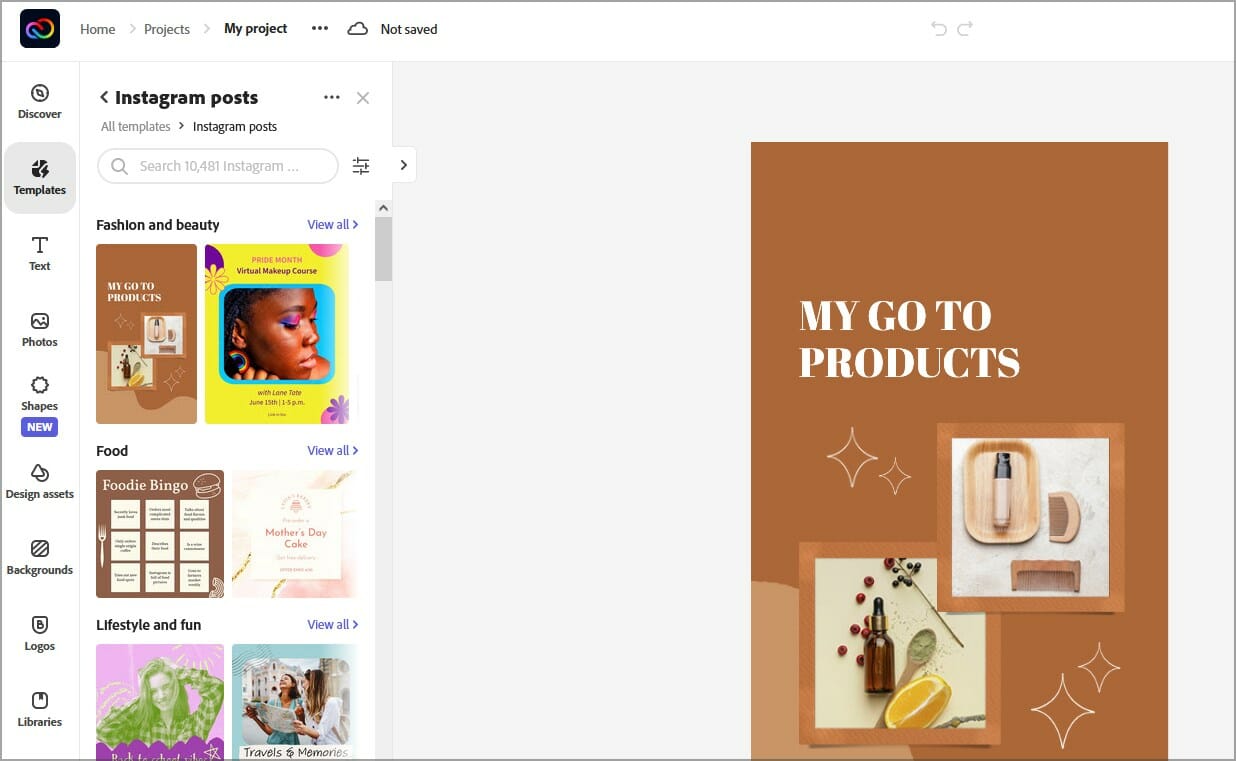
Adobe Creative Cloud Express – Easy to use

It’s web-based graphic design software that one can access using a PC or mobile device. It helps users come up with a design in a few minutes.

It provides an option to create the design from scratch or select one of the templates and personalize it by changing colors, font types, and sizes. After the design, it gives the chance to create a mockup and share it directly on social media handles.

It has other assets that improve the appearance of the designs, i.e., the use of Giphy images, animations, e.t.c. You can also collaborate with your team members to work on the same project.

Since this software is available in the cloud, it’s a perfect online mug printing software for all types of users.

Key features:

  • Available on any platform
  • Works in any web browser
  • Easy to use
  • Abundance of templates

Adobe Creative Cloud Express

Take your mug designs to the next level with this resourceful app for PC and mobile.
Free trial Visit website

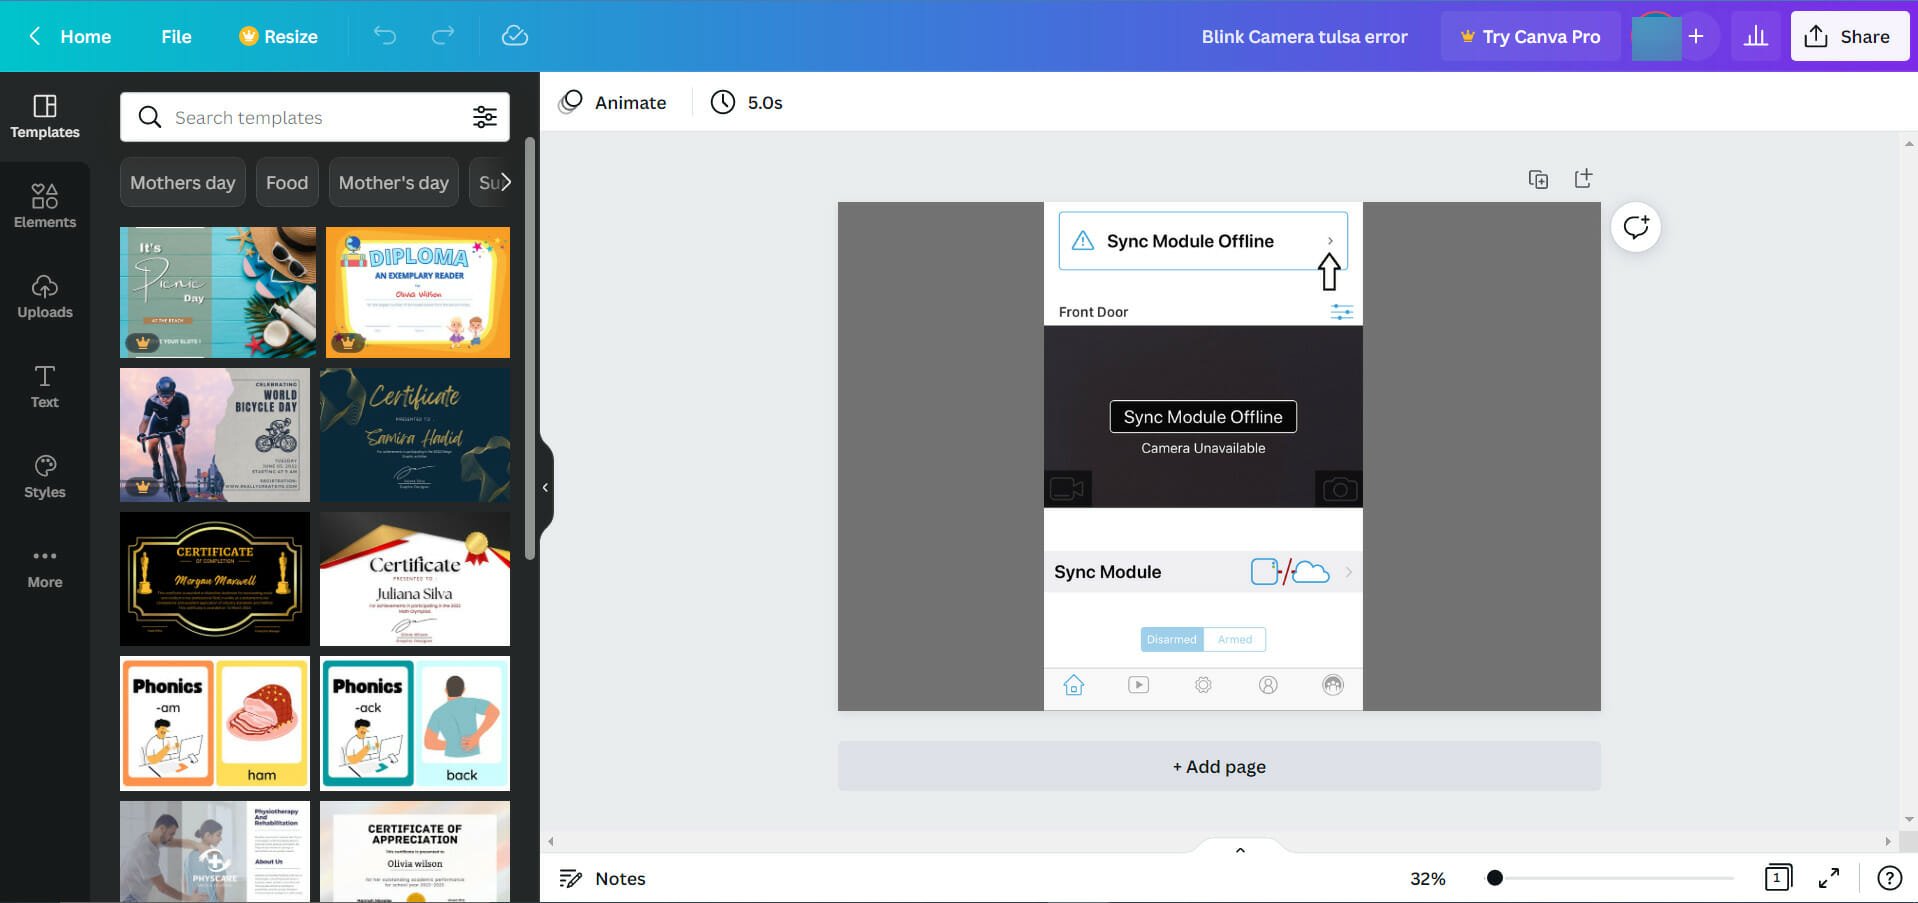
Canva – Great for beginners

Mug design software

It is one of the more user-friendly software to design mugs, and you can either install it or use it as a web-based application. Canva has a free and paid tier that separates how many features users can access.

This software has templates and layouts to choose from and customize to fit their designs. Once you register, you choose the template you like or design from scratch, use the tools to add features like images, illustrations e.t.c

It also provides tools to help perform tasks like changing fonts, color, and size. 

Key features:

  • It enhances the photos for mug printing without losing its quality
  • You can add borders and flips to your designs
  • Ability to download files in different formats
  • They provide tutorials on how to use the software to make designs
  • It has text animations and texture to produce greater designs

Canva

Get inspired with tons of templates and pre-made designs and keep it simple with drag-and-drop functions.

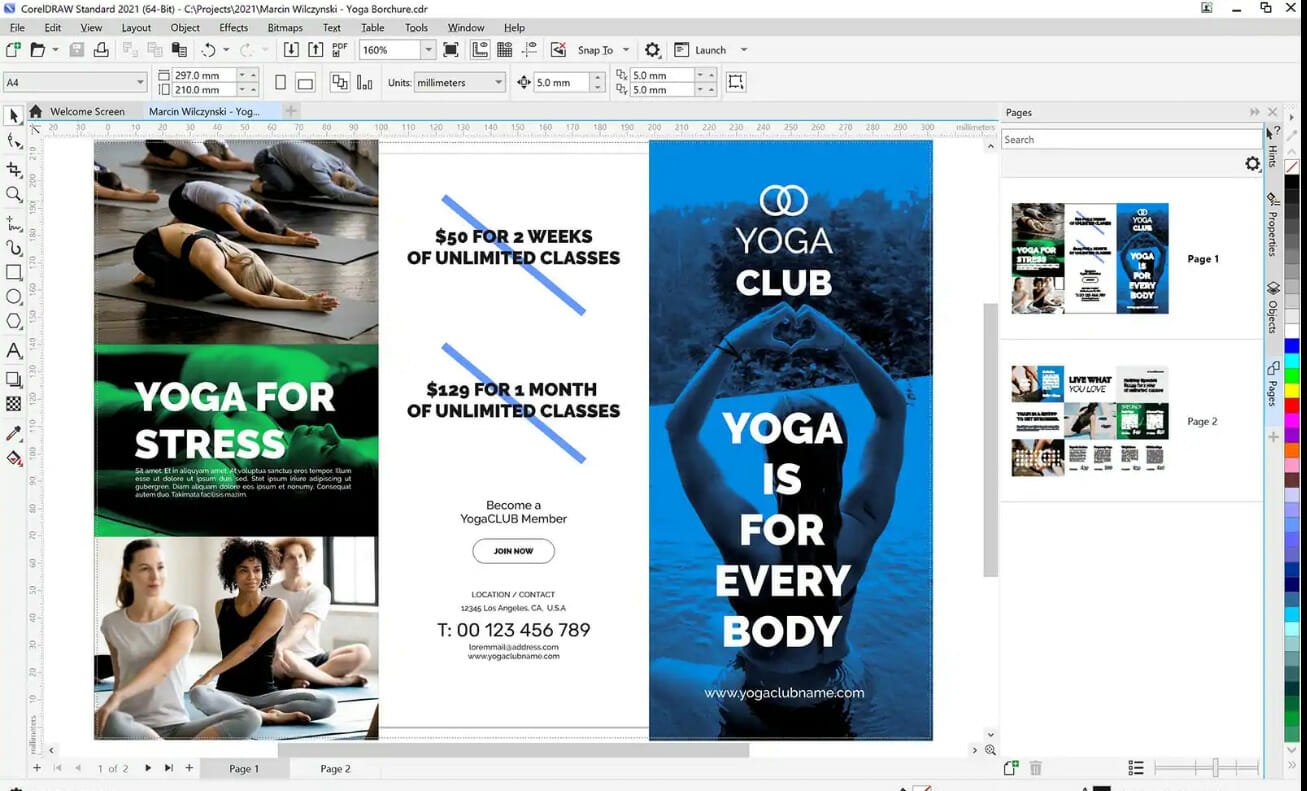
Corel Draw – Good for experts

Mug printing

It’s a powerful design software with many features that improve collaboration and productivity and produce professional mug designs.

It comes with many images, fonts, and images that make it faster. You can change the design interface and choose the tools you prefer to use in your design projects.

Its interface can support up to 48 different files making it easier to shift between different designs. It’s a premium tool, so it’s perfect for professionals that need a reliable mug printing app.

Key features:

  • Works well with vector designs
  • It’s very flexible in that it helps users discover many creative ideas
  • Built-in timer so you can keep track of your work hours
  • Supports raster photo editing

Corel Draw

Make use of professional design tools, collaborate, and share your work with Corel Draw!
Free trial Visit website

Affinity – Optimized for vector and raster graphics

Free mug printing software

Affinity is premium graphic design software that has many useful features. It is mainly made for companies that can buy it and use it in their projects.

You can get the Affinity Designer for better designs, which comes with many mock-ups and design tools.

It comes with add-ons that you can purchase from their website to speed up your workflow. Some of the add-ons include Shadow Overlays, Vibrant strokes, Freestyler, Atmosphere, Distress, etc.

You can create your keyboard shortcuts to speed up the designs. It also supports multiple file formats when exporting the design.

It has a fantastic user interface providing more time to spend on design rather than changing the interface.

Key features:

  • Supports zooming and panning of up to 60 fps
  • It gives you the power to use live adjustments and gradients
  • The software has more transformations and curves
  • Ability to quickly switch workspaces

⇒ Get Affinity

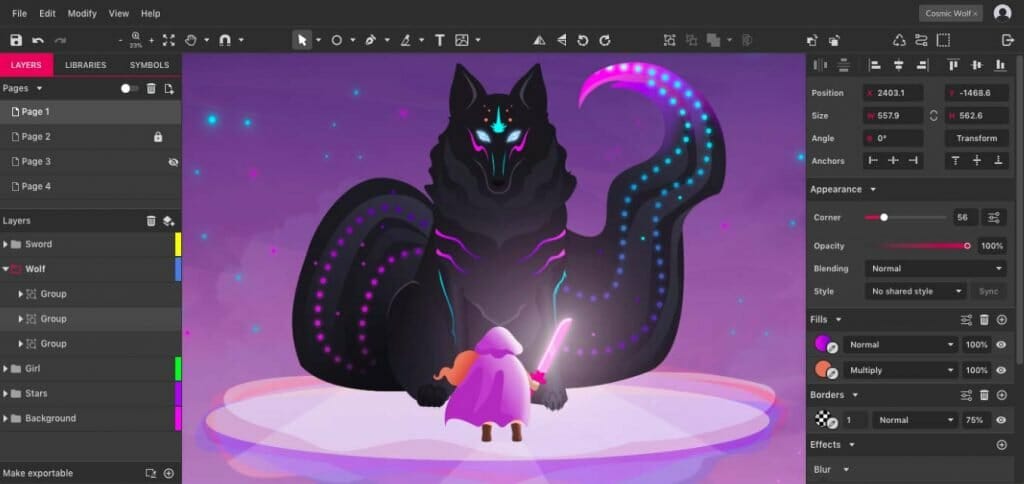
Gravit Designer Pro – Good for experienced designers

It’s a  graphic design application that you can download or use the web version. The web version helps users design from different devices like mobile phones, tablets e.t.c

It produces SVG files, and it can work well with multiple assets. You can use it to edit designs that come from other design software like Adobe Photoshop, Adobe illustrator e.t.c

After designing, you can save all your files in the cloud for future use. It helps users access it anytime at any place.

This is a great free mug printing software, so be sure to consider it.

Key features:

  • Over 30 vector effects.
  • Advanced typography with Google Fonts support
  • Available on multiple platforms
  • Can be used both online and offline

⇒ Get Gravit Designer Pro

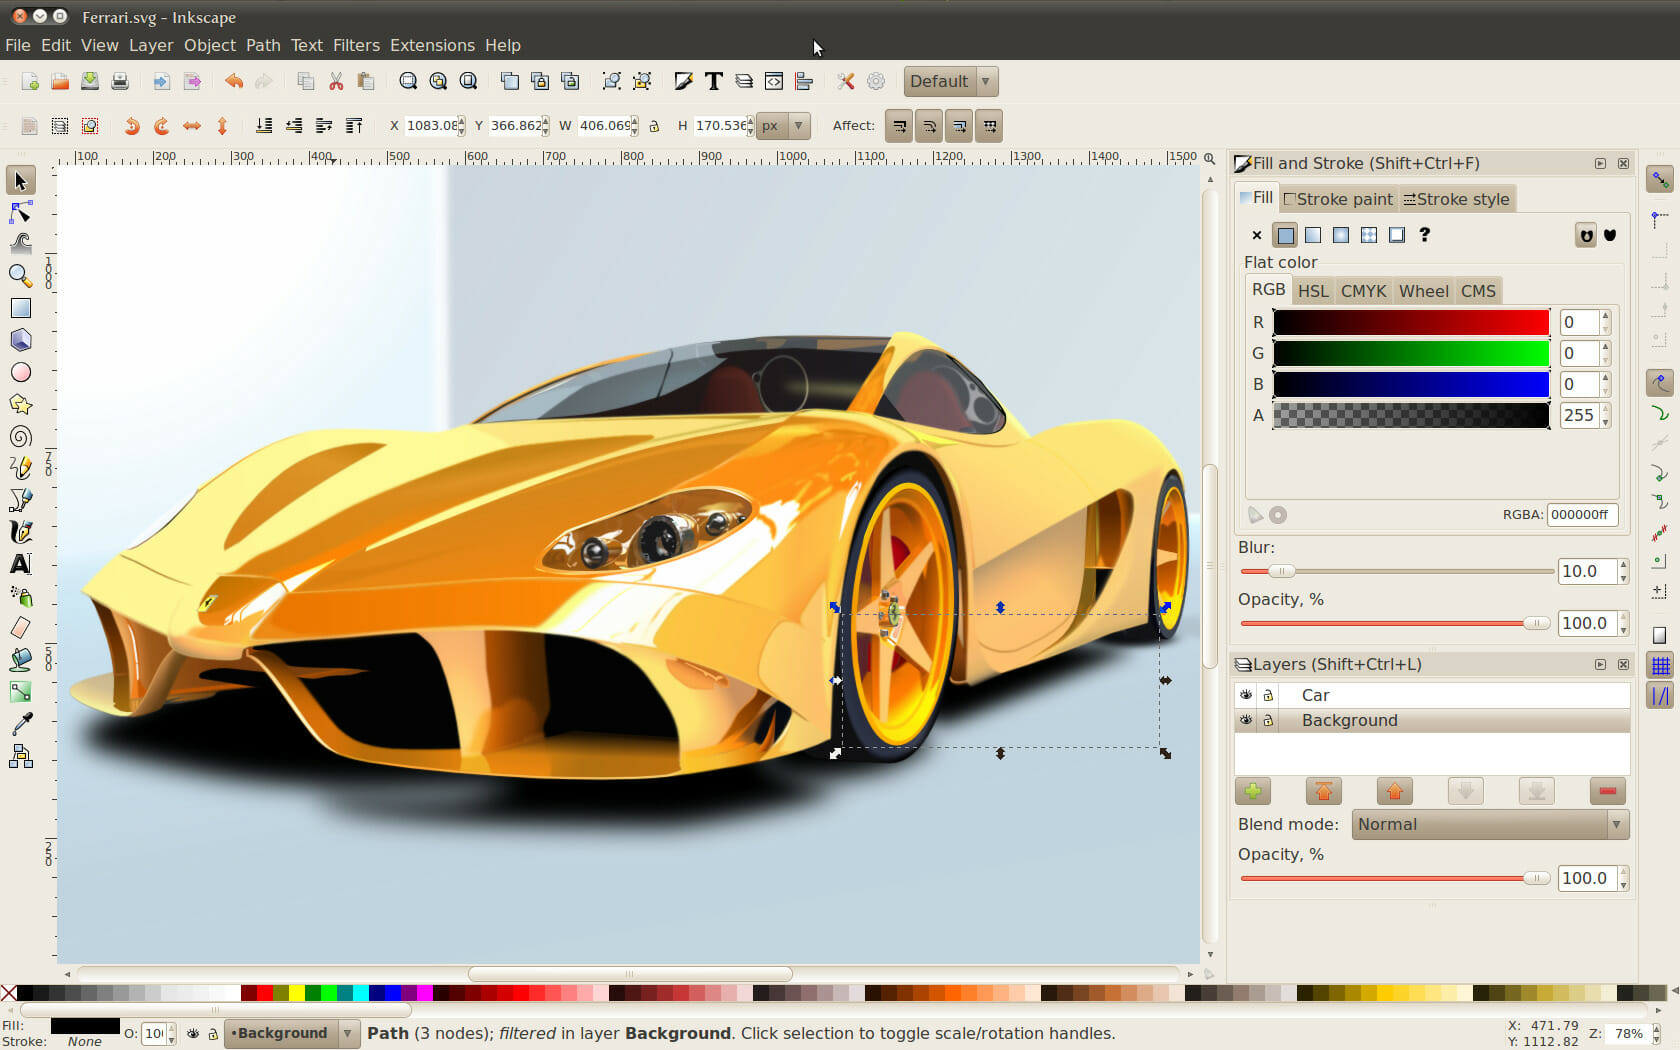
Inkscape – Free to use

Inkscape editor

Inkscape is free mug design software that has the ability to work with vectors. You can also access it on the web, and it’s good to use if you are new to graphic design.

The app creates high-quality designs due to its powerful tools like node movement, transformations, object manipulations, bitmaps, pen tools e.t.c

This software supports Scalable Vector Graphics to create designs that can scale to the desired size without losing quality. It makes it suitable to use in different sectors like manufacturing, marketing, etc., to create designs.

Key features:

  • Open-source
  • Designed for vector graphics
  • It supports different file formats
  • Available on all major desktop platforms

⇒ Get Inkscape

What is mug printing?

Mug printing is a process in which you make your designs, and transfer them to a mug. This is a relatively simple procedure, and there are several methods you can use to perform this.

As for the designing process, it can be done in any app that supports vector or raster graphics, and the only limitation is your creativity.

If you’re looking for mug designing software, then we’re pleased to inform you that any of these apps will be the perfect choice for all your future projects.

Creating mug designs involves many things during the whole process; one of the vital aspects is typography, so if you want to create unique fonts, consider using typography font design software.

Drop us a comment to know which software you currently use to design and print your mugs.

Microsoft Bing allegedly censoring politically sensitive Chinese names

If you have recently tried searching for Chinese political personalities deemed to be sensitive on Microsoft Bing, then your search results might have been limited. The Citizen Lab, based at the University of Toronto’s Munk School came to this conclusion after analyzing Microsoft Bing’s autosuggestion system.

According to the report by Citizen Lab:

We consistently found that Bing censors politically sensitive Chinese names over time, that their censorship spans multiple Chinese political topics, consists of at least two languages, English and Chinese, and applies to different world regions, including China, the United States, and Canada.

Through the analysis carried out, the team of researchers realized that the names of political personalities considered to be sensitive did not pop up immediately after one started typing in the search bar which was a bit peculiar. And, as spotted by Engadget, this is the second-largest category of names to be censored by autosuggest. “We found that the most common reason for a name being collaterally censored was containing the name ‘Dick’, e.g., ‘Dick Cheney.’”

The group of researchers also found out that the same issue was also present in both DuckDuckGo and Yahoo, which are heavily reliant on Microsoft Bing’s search index. However, North American users could always hit the Enter button to access the full set of results to counter the autosuggest issue.

With that said, via email on May 17, Microsoft responded to Citizen Lab’s research findings and indicated that they found a technical error that was responsible for the autosuggest issue, and further highlighted that it has been corrected, as spotted by PCMag. Remember, Microsoft Bing had been requested to shut down the autosuggest feature for seven days back in March by relevant government agency. Maybe this could be part of the reason why people were experiencing this technical error.

The statement shared by Microsoft further indicates that the user’s autosuggestions are based on the query made and determined by their behavior, for instance, what other people are looking up on the internet. “Not seeing an auto-suggestion does not mean it has been blocked.”


Dev Channel Windows 11 Insiders get a servicing build & new Windows Subsystem for Android release

Microsoft is ending the week with two updates in the Windows Insider Program. Dev Channel Windows Insiders are getting a small servicing build, as well as a new update for the Windows Subsystem for Android. Here’s the scoop on what you need to know.

The Dev Channel build is simple. It has no noted feature changes and just bumps your build up to 25120.1010, You’ll see it as KB5015039 in Windows Update. Microsoft says it is intended to test its servicing pipeline. You can check our take on Windows 11 Insider Preview Build 25120, which this build services. As a reminder, that build introduces a new search box on the Windows 11 desktop.

As for the Windows Subsystem for Android update, it is quite significant. This update bumps the WSA to version 2204.40000.15.0 and includes several exciting new features and improvements. The first of those is an update to Android 12.1, another is major Windows integration improvements and a final is a new Settings app experience! Here’s that changelog of new features.

  • We have updated the experience to Android 12.1! This update may cause some apps to fail to launch (see the known issues below for more details)
  • For newer Insider Preview builds (OS Build 22621+), Windows taskbar icons will now show which Android apps are currently using microphone, location, and other system services in the system tray, and an auto-hidden taskbar will now correctly hide/show when Android apps are running.
  • Android toasts will now be reflected as Windows notifications, and the Window title of an Android app will now reflect the Android activity title.
  • Also, for newer Insider Preview builds (OS Build 22621+), Android apps will not be restarted when your devices come out of connected standby but will instead pick up where you left off.
  • The Windows Subsystem for Android Settings app has been redesigned and updated in a huge way. We’ve redesigned the app from the ground up, now with clearer settings groups, grouped navigation and an all-around cleaner user experience. We’ve also added a diagnostic data viewer where you can examine all the diagnostic data collected by the Subsystem, and configuration options in the new compatibility settings to turn on fixes for specific apps such as forcing apps to be non-resizable or enabling swipes for arrow keys.
  • With this update, telemetry collection (optional diagnostic data setting in the Windows Subsystem for Android Settings app) is now off by default. To help us make Windows Subsystem for Android better and provide useful telemetry about Android app usage, please enable this setting in the Windows Subsystem for Android Settings app!
  • Networking for Windows Subsystem for Android on newer Insider Preview builds (OS Build 22621+) has been improved to enable Android apps to connect to devices on the same network as your Windows PC. With advanced networking, you can play your favorite content on a speaker on the same network, or set up a security camera (or other smart home device) with a compatible Android app.
  • Many camera updates are being shipped in this update. The camera orientation is now fixed to natural orientation, and issues with incorrect camera preview, bugs with letterboxing and squishing of the camera feed have now been addressed.
  • Mouse and keyboard support in Windows Subsystem for Android has been improved, with fixes such as improved scroll-wheel support, fixes for the onscreen keyboard focus and fixes for the Android software keyboard displaying correctly.

It’s clearly been a busy week at Microsoft, as there were many developments on the Windows 11 front. It all started when the OS hit broad deployment status earlier this week. Happy downloading, Windows Insiders! And remember to submit that feedback to help make Windows great for everyone.

SCNotification Has Stopped Working: 5 Ways to Fix it

As a Windows user, you are most probably suffering from the SCNotification has stopped working error every time you boot your computer. 

SCNotification.exe is a Microsoft system notification file that because of some reasons such as permission errors and dot net malfunctions, crashes every time you start your PC.

This error is also known by its problem event name. So, instead of knowing it as SCNotification has stopped working, you might know it as error clr20r3.

In this article, we will explore all the steps you need to take to fix SCNotification has stopped working so that it never bothers you again.

What is SCNotification.exe?

SCNotification.exe is a system file implemented by Microsoft. It belongs to System Center Configuration Manager (also known as SCCM).

System Center Configuration Manager was previously referred to as System Management Server (SMS).

SCCM uses the SCNotification.exe file to install and deploy updates. It can also manage systems based on Windows using this file.

Errors such as Configuration Manager not working or Server Manager has stopped working are common in Microsoft systems; however, you can easily fix all of them.

What should I do if SCNotifications has stopped working?

  1. First, download Microsoft .NET Framework Repair Tool from Microsoft’s official website.
  2. Next, launch netfxrepair.exe. A GUI-based window opens so that you can see the repair procedure.Launch netfxrepair.exe
  3. Then, get access to a fully working machine and copy machine.config.default and machine.config files from these locations:
    C:\Windows\Microsoft.NET\Framework\v4.0.30319\Config
    C:\Windows\Microsoft.NET\Framework64\v4.0.30319\ConfigCopy machine.config.default and machine.config from a working computer
  4. Paste the copied files into the same locations of your own computer.
  5. Reboot your system.

How do I repair the .NET installation?

  1. First, close all running applications.
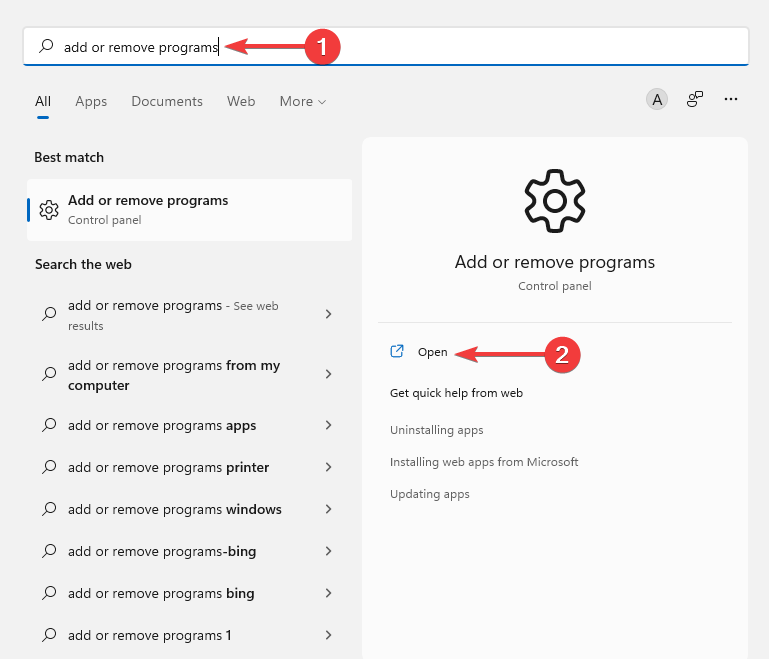
  2. Click on the Start menu, search for Add or Remove Programs, and click on Open.Click on Start menu and search for Add or Remove Programs and click on Open
  3. Next, choose Microsoft .NET Framework 4 Extended and tap on Change/Uninstall.
  4. Then, from the Setup Wizard, click on the Repair button.
  5. Finally, reboot your PC.

Repairing .NET framework installation can help you make sure you never run into SCNotification has stopped working error again. However, you cannot follow these steps if you use Windows 10 as well.

Note that .NET framework 4.0 is an integral component of these operating systems, and it cannot be removed or repaired. Those of you who use these operating systems can benefit from the Microsoft .NET Framework Repair Tool.

Ccmexec.exe is a component of the Microsoft SMS operating system service and is a vital program for the stability and security of your PC.

Mostly, ccmexec.exe file problems happen because their files are missing or corrupted because of viruses or malware. You can easily fix corrupted files by installing a new version of their .exe file.

Let us know if you were able to resolve the SCNotification has stopped working issue in the comments section below.

Entitlement.diagnostics.office.com Certificate Error [Fix]

Are you trying to open Outlook in Office 365 and you encounter the entitlement.diagnostics.office.com certificate error?

The issue may also occur when you try to create a new profile or while the Outlook client is running.

While there could be different reasons why Outlook won’t open, it may also pop up when the old domain name is still unchanged, or due to the wrong hostname.

Fortunately, there are a few solutions that may help you fix the entitlement.diagnostics.office.com error for the users in your Organization.

Before we move over to the solutions, let’s understand what is diagnostic data in Office 365.

What is diagnostic data in Office 365?

Microsoft collects diagnostic data as you use Office 365 and OneDrive to keep your app secure and improve its performance. At the same time, it offers a more personalized experience.

The collection of some data is essential for the proper functioning of Office 365 products. But it does not allow you to fully disable the tracking.

The data does not include your name, email, or any other information that’s not related to Office 365 or OneDrive. Moreover, it does not affect your ability to use the software either.

The good thing is, that Microsoft 365 lets you control your Windows diagnostic data. This helps you to review and check your privacy settings directly from any Office 365 application.

Do not hesitate to read the FAQs in the Account Privacy section to know more about the Office data collection. You can then enable or disable the settings.

Besides, you may also visit the Microsoft Support page to know more about Diagnostic data and how to access and choose your diagnostic data settings.

The entitlement.diagnostics.office.com error is a type of Required Diagnostic data. It checks the entitlement of the Office 365 app you are using.

So, when the certificate is missing, you bump into the error. If you wondering how to fix the Outlook certificate error, follow the below methods.

How do I get rid of certificate errors in Office?

1. Verify the certificate name

  1. Select View Certificate on the Outlook security certificate error. View certificate on Outlook security certificate
  2. Click on Issued to Name and check if the name on the certificate matches the one on the mail server.  fix the entitlement.diagnostics.office.com error in Office 365
  3. If certificate names don’t match, change the name and then restart Outlook.

But if the certificate has different names, you can try each hostname. If none of them is the correct one, get the correct mail server from your Internet Service Provider.

Once you have successfully verified the certificate name, the entitlement.diagnostics.office.com certificate error should not pop up anymore.

2. Change the outgoing SMTP port

  1. Launch the Outlook app and click on the File tab.
  2. Choose the Info tab and then click on the Account Settings on the right.how to get rid of certificate errors in Office
  3. In the Account Settings window, under the E-mail tab, select your email account and press Change.Select email account and click on Change
  4. Next, click on More Settings and select the Advanced tab.
  5. Here, change the Outgoing server (SMTP) port and press OK to save the changes.fix outlook certificate error

If the Internet service provider blocks the outgoing SMTP port, you may encounter the Outlook security certificate error.

Therefore, changing the server from the blocked port to some other port may help fix this issue.

3. Use the domain name of your hosting as a mail server

The hosting providers manage a large number of domains. Therefore, in the case of shared hosting, they provide the same server to users for different domains.

This means that the hosting provider does not renew the SSL certificate for every domain.

They only use the domain name certificate. Thus, it triggers the entitlement.diagnostics.office.com security alert.

Hence, it is recommended to use the domain name of the hosting company, and not the domain name of the mail server.

Outlook security alert certificate keeps popping up

Many end-users in an organization receive a security pop-up with the certificate warning message while trying to open Outlook.  

The error reads the name on the security certificate is invalid after installing Exchange Server 2016.

Another error that you may encounter is The security certificate was issued by a company you have not chosen to trust.

When you install Exchange Server 2016 into the Active Directory, it also deploys the Service Connection Point (SCP) for the Autodiscover service.

Autodiscover is used by email clients to track and collect data related to the exchange mailboxes and services.

Sometimes, the Autodiscover feature may stop working if the DNS records are configured incorrectly. This is when you may encounter the Autodiscover certificate error on Outlook.

You can visit the Microsoft support page to know more about The name on the security certificate is invalid error.

Alternatively, you can install a valid SSL certificate and check if this helps fix the issue. You can follow our detailed guide on how to install certificates and fix email certificate errors.

Another option is to try and connect your email address to a different email client. We recommend that you try Mailbird, which automatically detects the outgoing server your address is using.

It supports IMAP, POP, SMTP which are the most common Outlook server types. This email client service is very reliable and easy to use. If you pick this option, you will have a smooth transition.

You just have to get the application and log into your email with your credentials. Mailbird gives access to powerful email filtering, scheduling options, and other similar tools that keep you more productive and organized.

⇒ Get Mailbird

But if the Outlook security certificate warning keeps popping up on Office 365, do let us know in the comments box below and we will try to find a solution.

Play these 3 video games for free on Xbox this weekend

PGA Tour 2K21, State of Decay 2, and SnowRunner are currently free to play on Xbox One and Xbox Series X console generations until the end of the weekend for all gamers with an active Xbox Live Gold subscription.

It should be noted that both State of Decay 2 and SnowRunner are also part of the Xbox Game Pass library at the moment so those who also use Xbox Game Pass may want to play PGS Tour 2K21 as the other two can be played at any time in the foreseeable future.

As usual with Free Play Day weekend promotions, all three titles are unlocked in full as if Xbox Live Gold players owned them outright and Xbox Achievements can be unlocked. Also, all progress will save to the cloud for continuation at a later date if ever played again.

PGA Tour 2K21, State of Decay 2, and SnowRunner have also been given temporary discounts for Xbox Live Gold subscribers wanting to buy them.

After more Xbox content? Follow us on Pinterest, Twitter, and Facebook.

PGA TOUR 2K21
PGA TOUR 2K21
Developer:
2K
Price:
$59.99


SnowRunner
SnowRunner
Developer:
Focus Entertainment
Price:
Free

3 Ways to Fix Dying Light 2 When It’s Not Saving Your Progress

After much waiting, Dying Light 2 did see the dawn of light and was released earlier this February. But the Dying Light 2 game is full of bugs and it simply isn’t even saving the progress. Even if it saves, the saved files later get corrupted or lost.

The developers will release a patch, but it generally takes months for the patch to arrive. If it is too long to wait for the patch, we know exactly what can help fix the issue and help you enjoy the game.

Keep reading as we are going to let you know how you can fix the issue and save your progress without any difficulty moving forward.

Where are Dying Light 2 saves located?

Dying Light 2 Downloaded from Steam 

If you have downloaded Dying Light 2 from Steam, you can find the save data under the folder name 534380.

You should find the save files in the following locations: 

\Steam\userdata\[USERID]\534380\remote\out\

C:\Users\[USERNAME]\AppData\Roaming\DyingLight2\Saved\

C:\Users\User\Documents\dying light 2\out\save_backups

C:\Users\[USERNAME]\AppData\Local\DyingLight2\Saved\

Dying Light 2 Downloaded from Epic

If you have downloaded Dying Light 2 from Epic, you can find the game save data under the folder DL2.

You can find the save files under the location: 

C:\Users\[USERNAME]\Documents\My Games\DyingLight2\Saved\SaveGames\

C:\Users\[USERNAME]\Saved Games\

C:\Users\[USERNAME]\Documents\My Games

C:\Users\[USERNAME]\AppData\Local\DyingLight2\Saved\

How do I get my saves back on Dying Light 2?

Dying Light 2 is not saving progress on PC

The game was released with numerous bugs and wouldn’t save until you completed the main mission. Many users came up with their own fixes that worked for them, but thankfully, Techland, who is the publisher of this game, has released an update.

The Dying Light Update 1.06 has a backup save system included in the update. The death-loop bug has also been fixed with this update. The mouse key binding issues were fixed, several other crashes were fixed, and the game’s stability was improved.

But if you are still facing the issue, you could create a manual backup of the saved files. You can do this by going to the saved file location and copy-pasting the folder to another location.

If you lose the save files, you can copy the save files that you manually backed up and then paste them at the official save file location.

Dying Light 2 not saving progress PS5

Great news for console users as well. Techland, the company behind this game, also released the patch update 1.06 for consoles as well.

But, we still got a solution for you in case you fear you’ll lose your save data.

You can download the online saved data to your computer, but to do this you have to own the PS Plus membership.

This solution is one of the best we’ve got to protect your saved files. Imagine this: you spend countless hours playing the game and completing all the stages, and then, out of nowhere, your save files are gone.

By downloading and saving the files offline on your computer, you don’t lose your progress.

Dying Light 2 co-op is not saving progress

If you like playing co-op missions and have found out that your co-op progress was not saved it can be frustrating. There reason it didn’t save is because the game only saves the host’s progress and not the other players’ progress.

So, if you want to save progress, you can do that by being a host. But, whatever items you pick up in the co-op missions, you get to keep them.

How do you save game progress on the PC?

The game progress is automatically saved on your computer once you pass a mission.

But due to a bug or error, the steam can fail to save the progress. You can wait for a patch from the developers, or you can create a copy of the save files after you finish playing the game.

Most developers work grueling hours to meet the deadlines, and sometimes due to these deadlines, the game can have several bugs during launch.

If you were previously unsure how to save your Dying Light 2 Stay Human progress, I hope we have helped you by offering the best solutions at the present time.

Lively Wallpaper Isn’t Working on Windows: 3 Quick Fixes

If you don’t know Live wallpapers are animated wallpapers and they are not static images set as wallpapers. You can set the live wallpapers not only on your PC, but they are also available on smartphones.

Live wallpapers are a cool way to customize and personalize your Windows 11 computer. You can create your live wallpapers and set them as your computer’s wallpaper, add sound to them, and more.

But, what to do if the live wallpaper engine Lively Wallpaper isn’t working?

Keep reading as we have a solution that you can use to fix it!

Does Windows 11 support live wallpaper? 

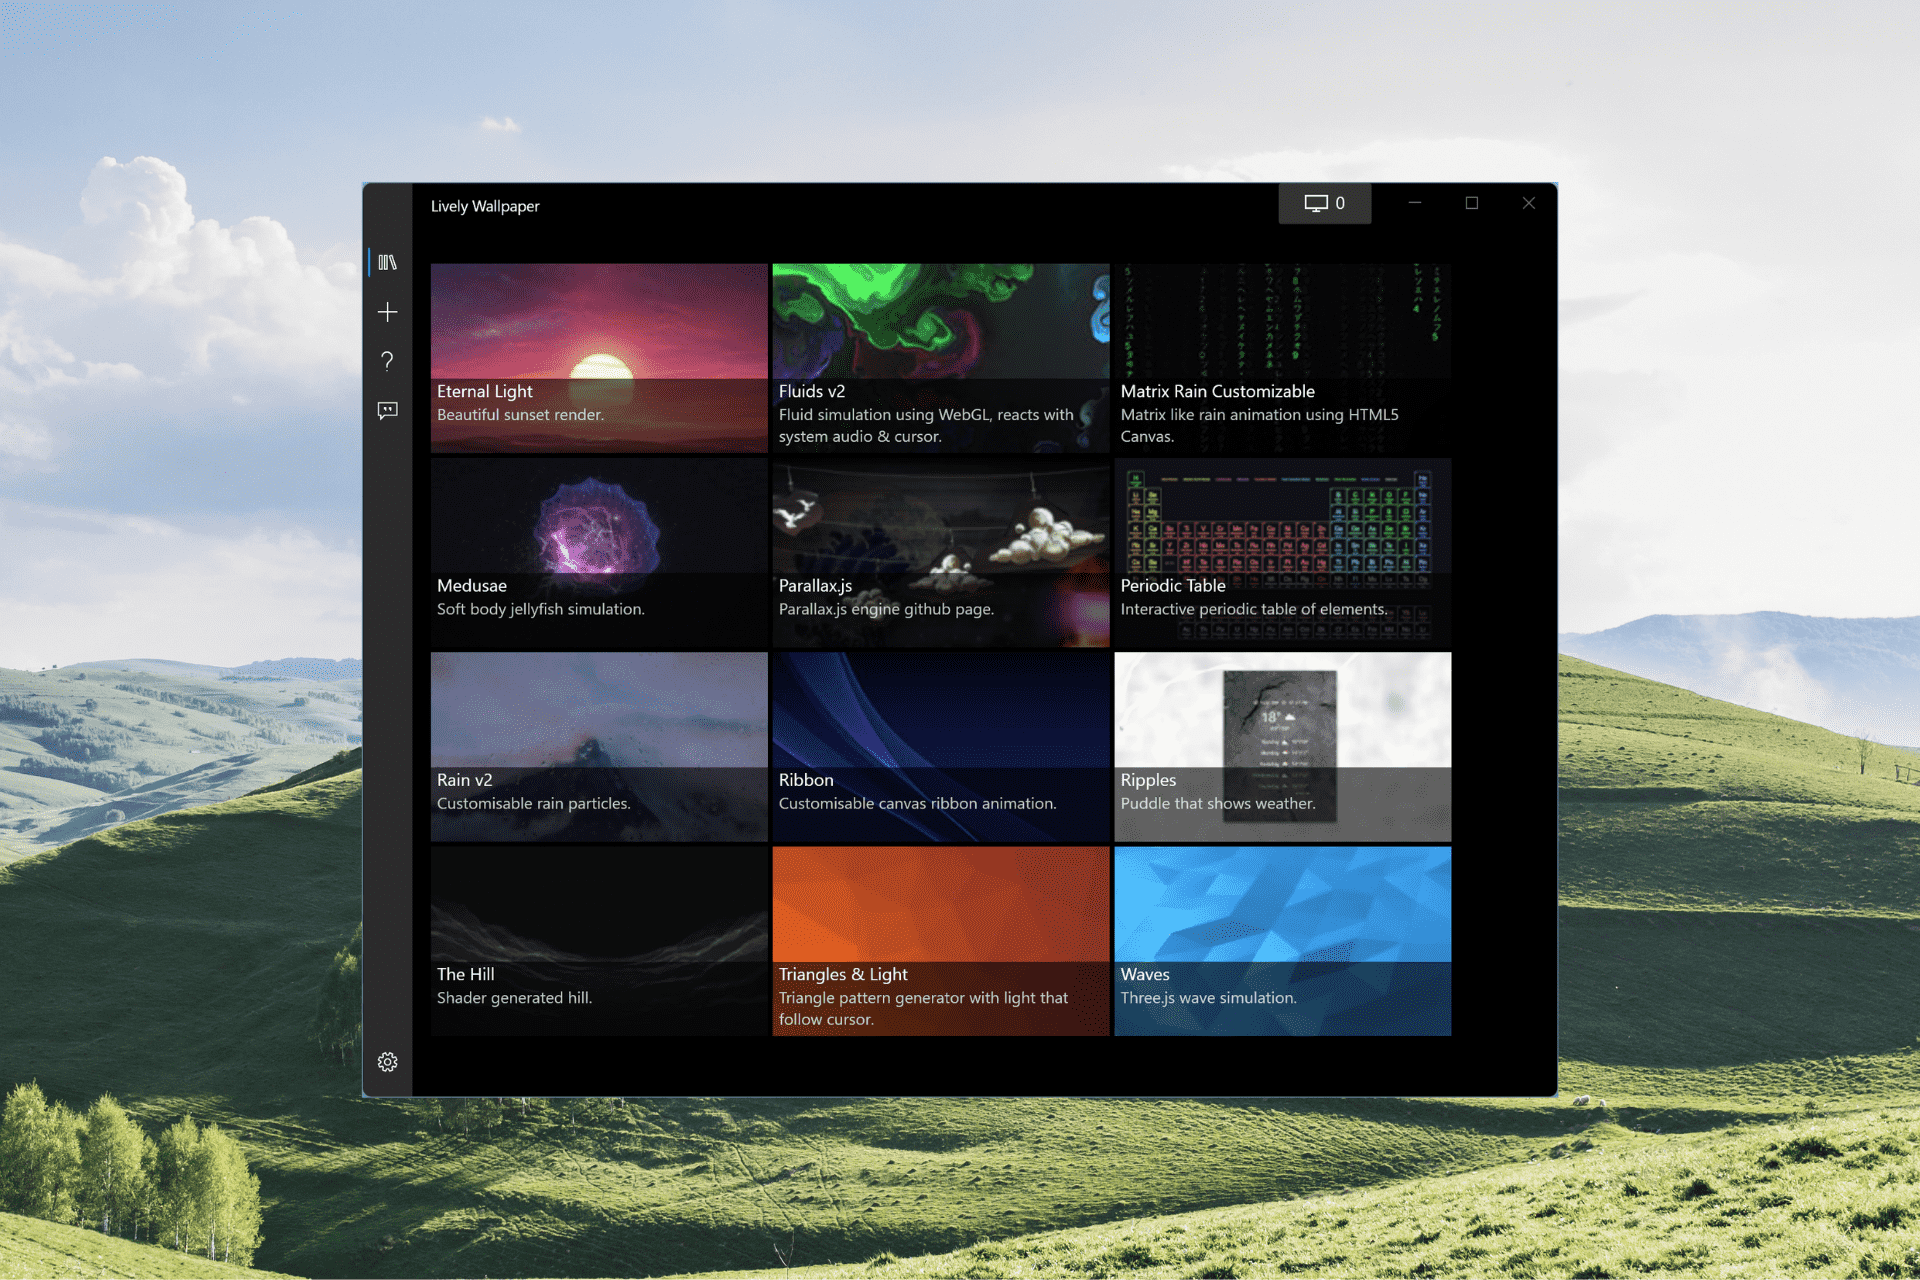
Lively Wallpaper is an open-source wallpaper engine that is free to download.

You can turn your videos, or your favorite gifs, or set a portion of your favorite YouTube video as your computer’s live wallpaper.

Although the wallpaper has a time limit before it resets and repeats from the start, it is a cool way to customize your desktop or your laptop.

If you use multiple monitors, you can set live wallpaper for different monitors as well, or duplicate it across the entire setup.

So, if you’re wondering if Windows 11 supports live wallpapers, they do.

You can download the Lively Wallpaper from the Lively Wallpaper’s website for your Windows 11 computer, as well as for other versions of Windows.

What can I do if Lively Wallpaper isn’t working on Windows 11?

  1. Open the Lively Wallpaper app.
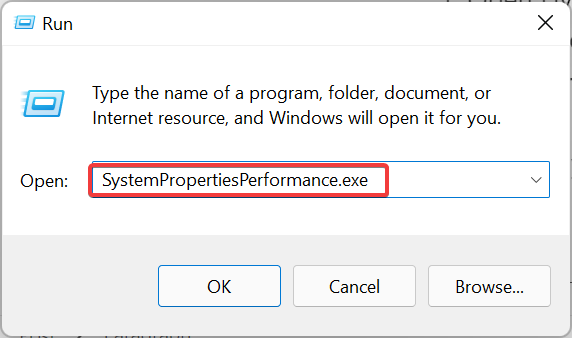
  2. Once it opens, press Win + R to open the Run dialog box.
  3. Type SystemPropertiesPerformance.exe and click on Ok.Opening the seting page of Lively Wallpaper by entering using Run
  4. Tick and untick Animate controls and elements inside windows and then click on Apply and Ok.Ticking and unticking the Animate controls and elements inside windows
  5. The Lively Wallpaper will start working now.

Does the Lively Wallpaper app slow down the computer? 

The short answer is no unless you have set high-resolution wallpapers on multiple monitors and maximum FPS.

Your computer can take a hit on performance if you have set the wallpaper setting on high settings and are running other powerful applications simultaneously, such as games or if you are editing videos or photos.

But, you can solve this by selecting a lower quality live image and reducing the FPS a little bit.

Live wallpapers are becoming even more prevalent thanks to computer hardware getting more powerful each year.

You can add any video as your computer’s wallpaper and it wouldn’t cause any performance issues even if you are using resource-heavy programs, unless and until you are also using high-res 4K live wallpapers as your wallpaper on your Windows 11 computer.

Comment down below to let us know if the Lively Wallpaper works now.

How to Fix a Chromecast that doesn’t Show up in Chrome

The Chromecast is a superb streaming media adapter that allows users to play online content on digital TVs. A product of Google, the dongle plugs into the TV’s HDMI port and is powered via a USB port.

With the help of the Google Home app, you can essentially turn your smartphone, tablet, or desktop into a TV remote. As expected from a product from a tech giant, it can stream media from a series of sources like YouTube, Netflix, Google Play, Hulu Plus, and Chrome browser.

However, users are starting to face problems with this impressive device. Some users complained that they couldn’t find Chromecast on PC in the past.

Now, it is the Chromecast not showing up on Chrome for some reason. If you are facing this problem, be at ease as this guide contains everything you need to fix it with some extra info.

How do I enable Chromecast on Chrome?

  1. Launch Chrome and click on the menu button (three vertical dots) in the top right corner.
  2. Select the Cast option.
    cast option chromecast not showing up
  3. Wait for the scan to complete and select the Chromecast to connect to.
    cast searching
  4. To keep the Chromecast icon permanently on Chrome, right-click on the cast button displayed and select the Always show icon.

That is how simple it is to enable Chromecast on Chrome. To end the cast, you only need to click the Cast icon at the right of the Address bar and select Stop casting.

Why can’t my Chrome browser find my Chromecast?

There are many possible reasons Chrome can’t see your Chromecast on a PC. Sometimes, it might be due to a problem with your browser, the device, or your connection.

Below are some of the popular causes:

  • Outdated browser.
  • Wrong connection between Chromecast and PC.
  • Faulty extensions.
  • Bugs affecting on PC.

How do I fix Chromecast not showing up in Chrome?

1. Restart PC

restart pc chromecast not showing up on chrome

A simple restart might be all you need to solve the Chromecast not showing up on Chrome issue before moving to other sophisticated solutions.

This is because the problem might be due to some bugs on your PC. Consequently, these bugs might stop it from detecting the Chromecast even when all things are set.

This fix has proved effective for Chromecast not showing up on Chrome on Windows 10 and Mac. So, it would be best if you gave it a try too.

2. Ensure PC and Chromecast are connected to the same WiFi

One of the core requirements for Chrome to find your Chromecast is that your PC and the Chromecast are connected to the same WiFi. If they are on different networks, it will not show up on your Chrome browser.

Also, note that your Chromecast can only connect to one network at a time. So, if it is on a different WiFi from your PC, you will need to switch to the same network to stand any chance of casting.

3. Disable VPN temporarily

  1. Press the Windows key + I to open the Settings app.
  2. Select the Network & Internet option.
    network option
  3. Choose VPN on the left pane.
    vpn option chromecast not showing on chrome
  4. Click the Disconnect option to disable your VPN.

Chromecast is designed not to communicate with a PC with a VPN or proxy server active. If you have any of these enabled, Chromecast and its icon will not be showing up on Chrome.

The only way around it is to disable the virtual network temporarily. After ending your cast, you can go back to enable your VPN by following the steps above.

4. Update Chrome

  1. Open Chrome and click the menu button.
  2. Select the Help option.
  3. Choose the About Google Chrome option.
    about chrome
  4. It will show if there is an update available.
    update checking chromecast not showing on chrome

An updated browser makes a world of difference. You should frequently be doing this, even without dealing with errors.

Chrome releases updates frequently (about once every six weeks). So, it is understandable if you miss out once in a while. But this might be why the Chromecast is not showing up in Chrome on iPhone and Android.

Hence, you should update your browser to the latest version. After the update, close and relaunch Chrome to effect the changes.

5. Disable extensions

  1. Click the menu button and select Settings.
    chrome settings
  2. Choose the Extensions option.
    extension option chromecast not showing on chrome
  3. Toggle the switch in front of each extension backward to disable them.
    disable extensions

Extensions help to extend and improve the functionality of your browser. However, some of them might be a counter-program preventing your cast.

You might have a problem detecting the faulty one if you have many extensions on Chrome. In this case, you will need to disable them all and use the elimination method to know the culprit.

6. Reset Chromecast

By default, your Chromecast should connect to Chrome when they are on the same network. But in some rare cases, the Chromecast itself might not be accessible.

This is especially true if you have connected the Chromecast to Chrome on another PC or network. In this case, resetting your device to default should get it back working well.

To reset it, you only need to long-press the button behind your Chromecast device. Once the LED starts blinking, your device has been reset.

After the reset, complete the setup of your Chromecast and ensure you connect it to the same WiFi with your PC. This should solve varieties of problems like Chromecast not showing up on Netflix and the no devices found on setup issue.

If you have reset Chromecast and Chrome still cannot find it, check whether the remote is part of the problem. Use our Google TV remote not working guide to re pair or reset the remote, then try casting again.

How do I make Chromecast discoverable?

  1. Connect your Chromecast to your TV.
  2. Download and install the Google Home app on your mobile device.
    install home app chromecast not showing up on chrome
  3. Open the app and click the Devices button in the top right corner.
  4. Finally, select the Set Up option from the Chromecast options and follow the onscreen instruction to complete the setup.
  5. If it does show any instruction, tap the add button (+ sign) in the top left corner).
    add new device
  6. Select Set up device.
    set up chromecast not showing up on chrome
  7. Finally, choose New device and follow the onscreen instruction.
    new device option

Chromecasts are great devices that give a top-notch casting experience. When paired with Chrome, they tend to take your streaming experience to another level.

This makes the Chromecast not showing up on Chrome issue frustrating, as it denies you the flexibility and fun. Thankfully, it is not the most difficult problem to fix, as we have shown above.

Are you looking to use your Windows 11 PC as Chromecast? Check our detailed article on how to do it.

Feel free to let us know the solution that helped you solve the problem in the comments section below.

You can finally link your PlayStation Network accounts with Discord

We know that many of you were probably still wondering when this functionality will finally hit live and we come bearing the good news you’ve been waiting for.

Apparently, Discord is finally rolling out the ability to connect your PlayStation Network account to the chat app, after making the announcement last year.

However, for the time being, this new integration is pretty limited, both in terms of what it can do and seemingly who has access to it, but it’s likely the first step for things to come later.

And since we’re talking about Discord, you might want to know that the team is also working on an interesting account management feature that we’d love to see make it to everyone.

PlayStation users can now link their accounts

Did you know that, by linking your accounts, your Discord friends will be allowed to see what game you’re currently playing on your PlayStation?

Not only that, you also have the option of adding your PSN ID to your Discord profile so that other people can easily add you to the service.

Judging by Discord’s announcement post, it may take some time before we can use this feature, as it’s gradually rolling out the ability to link your PSN account from Discord.

Developers responsible for the software tweak say it can take up to a week if you’re in the US, with other countries coming next week.

If you also want to link your PSN and Discord accounts, all you have to do is access the Settings menu, look for Connections and simply add the account.

This is excellent news for PlayStation/Discord users, as this functionality has been highly requested throughout these last years.

Furthermore, to make sure that account switching is as natural and fluent as could be, the company’s also been experimenting with a feature that would let you easily switch between available accounts.

Some users have spotted this ability on their Discord apps. However, this feature has only rolled out to a limited number of users, so don’t get your hopes up.

We’re just going to have to wait and see when this functionality will be added to the platform as well. Have you been waiting for the opportunity to link your PS account with Discord?

Share your thoughts with us in the comments section below.

How to Use Discord on PS5 Without a PC [Quick Guide]

If you have a PlayStation 5 and are wondering how to use Discord on PS5 without a PC so you can chat with friends while playing games, you’re in the right place.

Discord is a chat client that has become popular in the gaming community because of its emphasis on fast and easy communication between gamers. However, it is advisable to use Discord on a web browser for a hassle-free experience.

You can also use it to make a voice call or text chat with your friends and family, or even use it as an alternative to Skype.

The PlayStation 5 has a variety of online games. However, one of the biggest limitations of this console is that it doesn’t have an official Discord app. That’s a bummer, but there is still a way to connect your Discord account to your PS5.

In this article, we will provide some tips on how to use Discord on PS5 without a PC.

Can you use Discord on PS5?

If you’re looking to play PS5 games online with friends, you’ll want to know if you can use Discord on the new console. No doubt it is one of the best ways to communicate with other players, but is it PS5 compatible?

Unfortunately, Play Station 5 does not have an in-built browser so you cannot directly use Discord with the same as of present. However, in the future, Sony might introduce the much-anticipated option.

Until then, you can use the steps outlined below to stay connected with your gamer friends.

How can I get Discord on PS5 without a PC?

Via PS5 text message

  1. Hold down the PS button on your controller and select Game Base.
  2. Next, open the chat of any of your friends, send them the link discord.com and click on it.
  3. Once the link is clicked, it will take you to the official website of Discord.
  4. Select Open Discord in your browser.
  5. Login to your account and start enjoying games while staying connected with your friends by clicking on the Games tab at the top.

This is the current way of how to use Discord on a PS5. Therefore, you must follow each step carefully.

If you ever wondered how to use Discord chat on PS5, then this method should give you all the information you need.

Why do gamers use Discord?

Discord is one of the best messaging applications that allow users to create and join groups. While many such applications exist, it has a major advantage and it formed groups for major games much before its rivals.

Even more, the interface is designed for gaming-specific communication. Thus, many people believe that gaming is boring unless you join a community and Discord is almost necessary for the same.

Is Discord safe on PlayStation?

Even though Discord isn’t officially available on PlayStation 5, it’s completely safe to use if you’re using methods from this article.

Using third-party solutions or any unverified apps to get access to Discord can be a security risk, so we advise you to stay away from them.

However, some people prefer privacy over anything and would often wonder how to make Discord not show what game they’re playing. If you are one of them, be sure to click the link and go through our guide for the resolution.

We hope that this post has addressed your issue, but if you want to use Discord on PS5 voice chat, then you might have to wait for the official app to be released.

If you have any questions or concerns that you want to share, please write to us in the comments section below.

Firefox is Already Running but is Not Responding [Fix]

Firefox is a robust browser and provides many features to help you get the best out of your surfing experience. Unfortunately, there are times when Firefox is already running but is not responding on Windows.

Here is what you need to know. When you launch the browser, it opens an instance of Firefox where you can surf and do all the work you need. While it runs, you can still launch new Firefox tabs or sessions, which open as a second instance.

There are no limits to the number of instances you can open, but it can take a toll on your PC since each instance occupies a certain amount of memory. Therefore, the more instances you have open, the more PC resources are used up.

If you have so much memory used up by the browser, you may start experiencing some issues, and Firefox may stop responding in Windows 10/11.

What does it mean a copy of Firefox is already open?

When you click on the Firefox icon, it opens the browser so that you can use it for whatever you wish. At this point, the Task Manager registers a new process running on your computer. In some rare cases trying to launch another Firefox triggers an error where your computer tells you Firefox is already open.

This is not a typical experience as Firefox has no limits on how many copies you can run concurrently. For example, in the image below, I have eight instances of the browser running.

A few other errors users have faced using Firefox include:

  • Update failed error – This is an error that makes updating the browser impossible.
  • Websites don’t load – When you have this error, you can start the browser, but will not be able to reach any website.
  • The bookmarks and history system will not be functional – This error disables your browser history and all saved bookmarks on Firefox.
  • Secure connection failed – When Firefox can’t locate a suitable cipher suite to create a safe internet connection, you’ll see the error message. In most cases, it is due to proxy or VPN issues, a setting misconfiguration, or a security program interference.

What can I do if Firefox is running but not responding?

1. Close Firefox and restart the computer

  1. Click the close button (the X sign at the topmost right part of the browser).
  2. Click the Start menu, click the Power button and click the Restart option.
    firefox is already running but is not responding
  3. Wait for the computer to come back on, then relaunch the Firefox browser and see if the error is gone.

Your computer will function more smoothly if you restart it. A reboot clears the computer’s memory, putting an end to any processes that are using up RAM. Additionally, it’s possible for an app to consume your memory even after you’ve closed it, and a restart makes sure this does not happen. 

Lastly, a reboot may also resolve problems with peripherals and hardware.

2. End the browser process

  1. Righ-click on the Start menu and select Task Manager from the option list.
  2. Click on the Processes tab.
    Firefox is already running but is not responding
  3. On the left pane, search for the Firefox process, right-click on it, and choose the End task option.

End task is a tool in Windows Task Manager’s Application processes tab that enables you to stop any process that is not responding. When one of your applications is frozen or not responding, you may use End Task to terminate it without restarting your computer.

3. Delete profile lock files

  1. Open the Run dialogue using the hotkeys Windows + R.
  2. In the text field, type the path below and hit enter.
    %APPDATA%\Mozilla\Firefox\Profiles\
    Firefox is already running but is not responding
  3. Search for a folder ending with .default, and double click to open it.
  4. In this default folder, search for the parent.lock file and delete it.
  5. Restart the browser and see a Firefox is already running but is not responding error message still shows.

If you can not delete the lock file after an error warning, reboot your computer and delete the file before attempting to re-launch your Firefox browser.

4. Check Firefox access rights

  1. Open the Run dialogue using the hotkeys Windows + R.
  2. In the text field, type the path below and hit enter.
    %appdata%\Mozilla\Firefox
  3. Right-click on the Profiles folder and select the Properties option.
  4. Uncheck the Read-Only attribute, click Apply, then OK.
  5. Relaunch the browser and check to see if the error has disappeared.

Note that when Read-only is selected, the browser becomes incapable of writing to its folder, resulting in the Firefox error message. 

The browser produces system files in a profile folder in the browser’s folder in the C drive to run smoothly. When Firefox loses the needed rights owing to read/write or system file failures, it becomes unable to create any files.

5. Open Firefox in troubleshoot mode

  1. Click on the Menu button (the three horizontal lines) at the top right of the browser and select Help from the option list.
  2. From the options on the top-right pane, select Troubleshoot Mode.
  3. Click on the Restart option.
  4. Click on Open.
    firefox is already running but is not responding

Alternatively, hold down the Shift key while double-clicking on the Firefox icon.

Starting your browser in safe mode is a great way to troubleshoot when Firefox is already running but is not responding. It disables all the extensions and bad settings.

If the browser works well in safe mode, then you may consider disabling the latest extensions added, as they may be the cause of the problem.

When Firefox is running but not responding in Linux, you can launch it in safe mode using the script below:
$ firefox -safe-mode

6. Disable Extensions

  1. Click on the menu icon (the 3 horizontal lines) at the top right corner of the browser, and select the Add-ons and themes option.
    Firefox is already running but is not responding
  2. Select Extensions from the left pane, scroll through your extension list on the right pane, and turn off the switch to disable.
  3. Restart your browser.

7. Uninstall and reinstall Firefox

  1. On your Start menu, search for the control panel, and click on the option to Uninstall a program.
  2. Search for Mozilla Firefox from the list of installed programs on the right pane, click on it, and select the option to Uninstall at the top.
    Firefox is already running but is not responding
  3. When asked for confirmation, click to accept the uninstall.
  4. Select Next on the windows for Refresh Firefox Instead.
  5. On the next window, select the option to Uninstall.
  6. Now, restart the computer.
  7. Download the browser’s executable from the Firefox official website.
  8. Begin the installation by double-clicking on the downloaded file.
  9. Click Yes to allow the installation when prompted.
  10. On the installation wizard’s windows click Next.
    Firefox is already running but is not responding
  11. Select Standard from the Setup type options, then click Next.
  12. Click on Install.
  13. Click Finish and launch the browser.

Note that uninstalling Firefox completely removes all of the browser data, including stored bookmarks. If you wish to save your bookmarks, you should export them and then import them when the reinstallation is complete.

How can I refresh or reset my Firefox browser?

  1. Click on the Firefox menu icon (the three horizontal lines), then select the Help option.
    firefox is already running but is not responding
  2. Click on the option for More troubleshooting information.
    firefox is already running but is not responding
  3. From the options on the upper right side of the browser, click on the Refresh Firefox button.
    firefox is already running but is not responding
  4. When prompted, click on Refresh Firefox again.
  5. Click the Finish button, and wait for the browser to close and restart.

When you refresh or reset Firefox to its default settings, the following elements will be impacted:

  • Saved and default search engines will regain their original settings.
  • The browser’s default startup tabs will all be deleted.
  • All settings for your content will be removed and the defaults will reappear
  • Your new Tabs page will appear empty.
  • All you previously pinned tabs will disappear.
  • The browser themes and extensions will be deleted.
  • All your site data and cookies will be deleted.

Resetting Firefox to its default settings might help if it begins to crash, run slowly, or show intrusive adverts. The reset tool resolves a variety of difficulties by reverting the browser to its original default mode while retaining important data such as active tabs and bookmarks.

There you have it. We hope you have been able to successfully resolve your Firefox issue. Please note that we have not written these solutions in any particular order but we recommend starting with a simple computer reboot.

While it may not be the most efficient solution, it is the easiest and allows the computer to fix its problems when possible.

These steps are mainly specific to issues of Firefox is already running but is not responding, but you would be able to fix more general Firefox issues on Windows 10 & 11 in a few steps as well.

What does Discord Do Not Disturb Mean and How to Use it?

If you have the Discord do not disturb feature enabled, then you won’t see any notifications on your app. This includes servers, group chats, and direct messages.

Discord is a chat app that allows users to communicate within games with text, pictures, and video calls. It was designed to be a communication channel for gamers to chat and coordinate with each other in real-time.

The DND setting allows you to disable all incoming messages that you don’t want to see. This can be useful should you not wish to be disturbed by any messages while working.

Moreover, you also get to try the best Discord bots that will help you administrate your guild when you’re away.

If you are wondering what Discord do not disturb means and how to use it, this guide should be helpful.

What does the Discord do not disturb mean?

Discord is a free voice and text chat app for gamers that offers a great deal of customization. You can have multiple, separate servers where all your friends can group and talk.

However, with so many notifications popping up on Discord, it can get a little overwhelming for some people. The problem with these notifications is that they can be loud and distracting, depending on your server settings.

That’s where the do not disturb feature comes in handy. It changes your user status and you won’t get any notifications at all while it’s enabled.

The DND feature means you can turn off all notifications in the desktop app. This helps you be more focused and lose distractions.

With this setting, you get a red minus icon next to your avatar. This signifies to others that you don’t want to be contacted at the moment. Whether someone talks to you via DM, mentions you or adds you to a server, you won’t receive any notifications at all.

An important thing to note is that while this will stop any messages from popping up in the app, other people will still be able to talk to you as usual. You have to open the app and check messages and mentions manually.

Why and when should you set the do not disturb mode on Discord?

Do not disturb mode on Discord is one of the most popular features for setting up your server. It allows you to set up a time window in which members won’t be able to contact you.

This can be useful for not getting disturbed while sleeping or having a professional meeting. Furthermore, you may get irritated with the number of notifications you receive if you’re on a large number of servers or have a large friends list on Discord.

One of the things you will notice about Discord is that there are a lot of people from different time zones. You might have people in Australia talking to people in New Zealand, and vice versa.

Therefore, you should switch to the DND mode to avoid any interruptions in your schedule. You can also consider setting your Discord do not disturb schedule for bedtime, during meetings, and during other conditions where you want to avoid interruptions.

How to enable the Discord do not disturb feature on the desktop app?

Enable the feature via desktop

  1. The first step is to click on your avatar. On the desktop app, your avatar is beside your username on the bottom left of the screen.
  2. You can recognize do not disturb from a list of user statuses that are immediately visible on the app. Tap on it.
  3. Finally, select the do not disturb status to let people know that you’re unavailable for chatting and picking up calls.

Once done, you’ll see a red minus symbol on the corner of your avatar. That symbol signifies that you are now offline, or in do not disturb mode.

How to set DND on Discord mobile?

  1. Open the Discord app and click on your profile picture in the bottom right corner of the screen.
  2. Next, click on Set Status.
  3. Navigate to the Do Not Disturb option and click on it.

That’s it, you have successfully enabled the feature on your mobile app.

Why does Discord do not disturb only disable desktop notifications?

The do not disturb setting is enabled when you launch the Discord mobile app, so when you exit the app your status turns offline and you receive alerts. This differs from the desktop app, which stays open and does not receive notifications.

There are a lot of ways for Android users to configure what types of notifications they’ll get. For instance, if you don’t want notifications from specific servers or channels, you can simply mute them.

How can I fix Discord not muting notifications on my phone?

1. Suppress everyone

  1. Right-click on the server you want to mute and go to Notification Settings.
  2. Under Server Notification Settings, select Only @mentions.
  3. Toggle the Suppress @everyone and @here option on.
  4. Click Done to save the setting.

Instead of disabling the mentions entirely, you can set your preferences to suppress them. This means that you won’t receive any notifications when someone sends a message with an @everyone or @here mention. This is an option that can be enabled even if you are not the server admin.

2. Update Discord

  1. First, exit the Discord app on your computer. You’ll need to make sure that the app is fully closed.
  2. Next, reopen Discord on your PC and wait as it checks for updates. A notification will let you know if any are available.
  3. If there’s an update available on the app, it will automatically download and install it for you.

Discord is constantly trying to improve the experience with new updates. These updates may include bug fixes, performance improvements, and sometimes even new features. The purpose of an update is to make your experience with Discord easier and more enjoyable.

What is the purpose of Discord do not disturb?

Given the title, you can probably guess what it does. The DND feature that Discord provides is made for those who don’t like to be disturbed by constant notifications.

It is a very useful option for the users as it provides them with much-needed peace. On both mobile and desktop, you will be free from pings and alerts that notify you of new messages.

Why is Discord do not disturb not working on mobile?

Discord’s do not disturb feature on the desktop app works beautifully. The smartphone app, on the other hand, might have a slight hiccup with some users reporting that it doesn’t work as expected cross-platform.

The difference in architecture between platforms causes inconsistency. There is also the issue with different versions of the same mobile platform ( iOS or Android ).

DND setting in most smartphones just removes pop-up notifications and sound, so you’ll only get a tiny notification icon. But some users have reported that it works differently on the mobile app.

Tip icon Tip
If you want to avoid Discord notifications on your phone, preferably rely on your phone’s notification settings.

Are there any Discord do not disturb exceptions?

As of present, there is no exception to the do not disturb mode on Discord. It would have been perfect if there was a whitelist option where you could add some friends or servers to an exception list that is not affected by the feature.

However, this option is not available yet, so you are left with two choices, either enable the DND mode and mute servers and friends one at a time, or just avoid them.

What are the pros and cons of the Discord do not disturb feature?

Discord is a chat app primarily used by gamers. Even though multiplayer games have in-built features that allow players to mute players who are disruptive, some players still have to put up with distracting notifications, which can lead to a bad gaming experience.

The benefits of using the DND are numerous. It will help you avoid unwanted messages or calls while you focus on something more important.

More importantly, it will ensure that no one is distracted by the notifications coming in all day long and help enhance productivity.

The feature could be pretty useful for people who work from home or anyone who tends to let work spill over into their time.

The Discord do not disturb feature is very interesting as it can be used to help players take a break from the game. However, it also has some cons that should be considered before using it.

Although DND stops your phone from constantly buzzing, it could also ruin your day. As it blocks all types of notifications, you might miss essential or even urgent notifications.

There is currently no option to customize settings to filter or whitelist certain contacts. As a result, the DND status works equally for everyone.

Therefore, it is important to be mindful of what situation you are in before activating DND on Discord.

Does Discord do not disturb block calls?

DND Disturb blocks notifications, including calls and text messages. So, when you enable the Do Not Disturb status, you won’t receive notifications of incoming calls or text messages.

Now onward, if you ever notice someone in Discord who has a red icon on their profile, that person has chosen not to be disturbed. You can feel free to send them a message even if they’re unavailable because they won’t receive the notification.

If you have the person’s email or phone number, you can send them a follow-up email or text respectively. If not, all you can do is patiently wait for the person to return to the platform.

You might want to go through our guide for a permanent resolution if your Discord app keeps freezing.

If you have any questions or doubts, do write to us in the comments below.

Online Solitaire: Play Your Favorite Card Game Online for Free

The Solitaire goes a long way back to when humans were struggling with a dial-up internet connection and not many things to do on the PC. Time has passed but the card game is still one of the favorites. Luckily, you can play it online and Online Solitaire is a free online solitaire game that anyone can play from anywhere.

Play Online Solitaire without downloading anything

As soon as you reach the website, you are thrown straight inside a draw-three Solitaire card game.

The animation of the game is very fluid, and we had no problems while playing it. The art style is a mix between cartoonish and overly simplistic, but you will see that you can change that very easily.

If you just want to play a few games occasionally, you are probably not interested in more advanced features. However, if you hit the settings button, you will have a nice surprise.

If you switch to the design tab, you can customize the cards and the background design, and you even have detailed game statistics so you can keep track of how well you play.

Change the settings of Online Solitaire

It isn’t too common for an online card game to have complex settings. We usually find only things related to sound.

In contrast, Online Solitaire has a whole Settings menu that you can use and change the whole way you play it.

For starters, it’s possible to switch from a 3-card draw to an easier 1-card draw just by hitting the Turn 1 button.

Next, you can toggle On the timer, the score, and the Show moves options which are Off by default.

You even have an autoplay feature that is set to When obvious by default. That means that for instance, when you can deposit the next card on the four piles, the game will do that automatically.

However, you can switch that option to Off or set it only for the final moves, when you have already won.

If you get stuck, the Hint and Undo buttons will help a lot but when you can’t do anything else, the New Game button is your only solution.

The animation speed has also a variable and the animation can be switched off completely. From the Settings menu, it’s also possible to reset the statistics.

But you should know that the settings and statistics are saved only if you create an account or you download the desktop version.

Online Solitaire is free online but after a few seconds of playing, some ads will start showing on the right side of the screen.

To deactivate them, you will need to pay a small monthly fee although, in our play, they were not so intrusive.

It goes without saying that Online Solitaire works on any browser and on any device that can run one. All you need is the Internet connection.

All in all, we recommend Online Solitaire to anyone that wishes for a quick card game, so go ahead and try it!

FIX: Forza Horizon 4’s This app can’t open error

Forza Horizon 4 is among the best racing games for Windows. However, some players have posted in forums about a This app can’t open error they need to fix for Forza Horizon 4. That racing game doesn’t start up when the This app can’t open error arises.

How can I fix the This app can’t open error for Forza Horizon 4?

1. Reinstall the app

If none of the resolutions below fix Horizon’s 4 This app can’t open error, try reinstalling the game as a last resort. You can uninstall software and leftover files more thoroughly with a third-party uninstaller.

As opposed to a regular uninstallation, dedicated uninstaller software will remove all registry entries related to your game.

This will allow you to have a clean and error-free reinstallation. Often times leftover files will interfere with the new files or you won’t be able to reinstall the app at all because the installation wizard will wrongfully detect that it is already installed on your PC.

From the list of installed apps in your uninstaller UI, select Forza Horizon, and wait for the uninstallation to complete. Then download the installer wizard again, run it and see if the problem persists.

2. Troubleshoot MS Store apps

  1. First, press the Windows and I hotkey to launch Settings.
  2. Click Update & Security and got to Troubleshoot to open the tab shown directly below.
    Troubleshoot tab forza horizon 4 this app can't open
  3. Then click Additional troubleshooters to open the troubleshooter list.
  4. Select Windows Store Apps and press the Run the troubleshooter buttons to open the window in the snapshot directly below.
    Windows Store Apps troubleshooter forza horizon 4 this app can't open
  5. Then go through the troubleshooter that opens to detect and fix app issues.

This is a simple solution, but it can help you if you’re having issues with Windows apps, so be sure to try it if you’re having Forza Horizon 4 this app can’t open error.

3. Reset Forza Horizon 4

  1. Press the Windows and I keys at the same time.
  2. Click Apps to open a list of installed software.
    Apps & features tab forza horizon 4 this app can't open
  3. Select Forza Horizon 4 in the app list.
  4. Click Advanced options to open the settings in the shot directly below.
    The Reset button forza horizon 4 this app can't open
  5. Then press the Reset button.
  6. Click Reset again to provide confirmation.

4. Clear the MS Store Cache

  1. Open the Win + X menu by pressing the Windows key and X at the same time.
  2. Select Run on the menu to launch that accessory.
  3. Type this reset command into Run: wsreset
    Run window forza horizon 4 this app can't open
  4. Press the Enter key to run the command.

Your cache can be the cause for Forza Horizon 4 this app can’t open so be sure to clear it and check if that helps.

5. Turn off the firewall

  1. First, click Windows 10’s Type here to search button to open that utility.
  2. Input the keyword firewall in the search box, and click Windows Defender Firewall to open that applet.
    The Windows Defender Firewall forza horizon 4 this app can't open
  3. Next, click Turn Windows Defender Firewall on or off.
  4. Select the Turn off Windows Defender Firewall radio buttons.
    The Turn off Windows Defender Firewall settings forza horizon 4 this app can't open
  5. Press the OK button to save the settings.
  6. Try launching Forza Horizon 4 with the firewall off.

6. Temporarily disable antivirus software

  1. Double-click the Windows Security system tray icon to open it.
  2. Then click the Virus threat and protection shield button.
  3. Click Manage settings to open the options in the shot directly below.
    Real-time protection option forza horizon 4 this app can't open
  4. Toggle off the Real-time protection and Cloud-delivered protection settings off.

Users with third-party antivirus software installed should disable them via their context menus. Right-click your antivirus utility’s system tray icon and select its disable option to temporarily turn off the shield. Thereafter, try playing Forza 4 with your antivirus software turned off.

Once your antivirus is turned off, check if Forza Horizon 4 this app can’t open error is still there.

Note: Forza’s support team has confirmed the Avast, Avira, Sophos, Comodo, Trend Micro Maximum Security, Bitdefender Firewall, and Sophos antivirus packages stop F4 from launching. So, make sure you disable, or even uninstall, those third-party antivirus utilities.

7. Disable ReadyBoost and disconnect all unneeded USB device

  1. Press the Windows and E keyboard keys simultaneously to open File Explorer.
  2. Next, right-click any USB flash drive you have inserted in your PC and select Properties.
  3. Select the ReadyBoost tab shown directly below.
  4. Click the Do not use this device radio button.
  5. Press the Apply button.
  6. Click OK to leave the window.
  7. Thereafter, disconnect all unneeded USB devices from your PC.
  8. Then try playing Forza Horizon 4 after you’ve removed all the superfluous USB devices.

8. Clean boot Windows

  1. Open Run as outlined within the first two steps of resolution four.
  2. To open MSConfig, input this command and click OK: msconfig
  3. Next, click the Selective radio button if it’s not selected.
  4. Deselect the Load startup checkbox.
  5. Make sure you have the Load system services and Use original boot configuration checkboxes selected.
    Selective startup radio button forza horizon 4 this app can't open
  6. Select the Hide all Microsoft services setting on the Services tab to exclude Microsoft system services.
    Services tab forza horizon 4 this app can't open
  7. Press the Disable all button to deselect the remaining services.
  8. Click the Apply option.
  9. Select the OK option to exit MSConfig.
  10. Click the Restart option on the dialog box that pops up.
  11. When you’ve restarted Windows, try playing Forza Horizon 4.

Note: If this resolution fixes the issue, then an incompatible program or service was likely conflicting with Forza Horizon 4. Discord, Xsplit, Logitech G Hub, Sonic Audio, Warsaw Banking App, OBS, EVGA Precision, and MSI Afterburner are among the programs confirmed to conflict with Horizon 4.

So, those are some of the more likely ways to fix the This app can’t open error for Forza Horizon 4. Note that some of the above resolutions might also fix the same app can’t open issue for other games and software. Some fixes in our Windows 10 apps won’t open guide might also help resolve this issue.

Discord Automatically Determine Input Sensitivity [FIX]

Users reported that Discord automatically determines the input sensitivity. It seems like the mic options are set on a different model than the one needed.

Using the microphone in optimal conditions is one of the main actions when we stay connected with our friends.

Moreover, the mic’s volume is lower or higher than users want. Also, other devices are placed as default.

Today’s article will show you some useful options to fix your Discord mic sensitivity.

Why does Discord automatically determine the input sensitivity?

You should know that, by default, Discord will activate your microphone when it detects noise.

Even if the app automatically determines mic sensitivity, you can effortlessly turn this setting off. Then adjust the slider to be more or less sensitive.

Now, let’s discover the best options to disable the automatic mode and change the Discord input sensitivity.

What can I do if Discord automatically determine the input sensitivity?

1. Disable the automatic sensitivity option

  1. Hit the Windows key, type Discord, then open the first result.
  2. In the left bottom corner of the app, go to Discord Settings (marked as a gear).
  3. From the left side, select Voice & Video.
  4. Turn off the Automatically determine input sensitivity option.

If Discord automatically determines the input sensitivity, this is the easiest solution that will help. Many users seem to solve our today’s problems with this option.

2. Set the default device

  1. Hit the Windows key, type Discord, then open the first result.
  2. In the left bottom corner of the app, go to Discord Settings (marked as a gear).
  3. From the left side, select Voice & Video.
  4. Under Input Device, open the drop-down menu, and set the microphone or headset you want Discord to use.

If Discord still automatically determines the input sensitivity after using the first method, you might adjust your default device as needed.

Note that if you choose the Default setting, Discord will defer to whichever microphone is set on.

3. Adjust the mic’s volume

  1. Hit the Windows key, type Discord, then open the first result.
  2. In the left bottom corner of the app, go to Discord Settings (marked as a gear).
  3. From the left side, select Voice & Video.
  4. Under Input Volume, drag the slider, then adjust the volume.
  5. Under the Mic Test, click on Let’s Check, then test the volume of your mic.

4. Use the Push to talk option

  1. Hit the Windows key, type Discord, then open the first result.
  2. In the left bottom corner of the app, go to Discord Settings (marked as a gear).
  3. From the left side, select Voice & Video.
  4. In Discord’s Voice & video section, select the Input Mode, then checkmark the Push to talk box.
  5. You’ll have to assign a key that will activate the microphone every time you’ll want to use it.
  6. Every time you need to use your mic in Discord, you’ll have to press that key.

5. Use a different web browser

If Discord still automatically determines the input sensitivity, you should consider using a different web browser.

Even though you can use Discord on any navigator, we have the option that offers you unique features to get the most out of both gaming and browsing.

We strongly recommend Opera GX. This is a free and special version of the Opera browser built specifically for gamers. 

Opera GX will let you talk with your teams, friends, and communities. Moreover, you don’t have to worry about using Discord. The app will run without any trouble.

With Opera GX, you’ll level up your gaming experience, controlling your privacy and security with the free integrated VPN.

If you choose to use this browser, you’ll be able to navigate with fewer headaches and load websites faster with the built-in adblocker.

Take a look at Opera’s most important features:

  • Dedicated to gaming experiences
  • Integrated VPN
  • Ad-blocker

What else should I know abut the Discord input sensitivity?

Input sensitivity is a feature that allows you to set your sensitivity levels for different input devices, such as keyboards, microphones, or mice.

Many gamers have been experiencing input issues with the Discord application and this usually happens with the mouse.

You should know that when it comes to emoji, it seems like some people do not get a consistent experience with the emoji or the colors, and as a result, end up with a distorted look.

These were our best solutions you can use if Discord automatically determines the input sensitivity.

If your Discord mic is still not working, you should check a full fix guide regarding this subject.

Also, if you have any other additional questions, don’t hesitate to ask in the section below.

Darkest Dungeon 2: The Shroud Of The Deep Update Is Live Now

Darkest Dungeon 2 players, we have some amazing news for all of you! Redd Hook Studios has almost finalized the work on the newest update for your favorite game.

The Shroud of the Deep, as it is called, will be available in the Experimental Branch and it will be moved to the Live Branch after the team can confirm that there are no critical issues.

So, equip your best gear, polish your revolvers, say a prayer, and prepare to face the toughest foes you ever laid eyes upon.

What’s new in Darkest Dungeon 2: The Shroud of the Deep?

Starting with this update, your coach will find no easy purchase on the rotted, salt-soaked planks and jetties that connect the waterlogged homes of the Fisherfolk.

The back story here is that, after being driven to a debased worship of the sea, the denizens of the coastal regions have taken to the water and been changed by it.

The Shroud is a new full-sized region packed with a complete faction of amphibious horrors and a terrible threat from the lowest depths of the seafloor.

You’re probably wondering what to expect from this new adventure, and we’re here to answer that question as well:

  • 7 new monsters, from the gestating Cabin Boy to the imposing Docker
  • A New Lair Boss lurks just beneath the tideline
  • 2 New Lair Boss trophies
  • 6 New region-specific trinkets
  • All new combat score by the inimitable Stuart Chatwood
  • New narration – the Academic (Wayne June) reflects on the decline of the coastal population

New Confession: Resentment

Redemption demands an acknowledgement of failures past. Sign your confession anew, and face the personification of your second sin.

This milestone introduces the next Confession/Act 2, with new story content and a new final boss.

Narrative presentation has also had an overhaul:

  • Main story narration has been moved from the Valley to the Void
  • Each Confession now has an intro, repeatable lines, and an outro that tells the game story at run start and upon successful final boss kill
  • Art panels have been added to support the main narrative
  • Reformatted the Denial narration to match the new presentation
  • Added the Resentment narration and artwork

Ordained Monsters

Monsters now have a chance to spawn as “Ordained”, which means that they are blessed with extra power by the end boss for that Confession/Act. The blessing increases the monster’s damage, health, speed, and some other stats. These powers vary based upon which Confession you signed at the outset of your journey.

The chance of a monster being Ordained increases as you approach the Mountain.

  • When in the first full region past the valley, 10% of monsters will spawn as Ordained
  • When in the second full region past the valley, 40% of monsters will spawn as Ordained
  • When in the third full region past the valley, 80% of monsters will spawn as Ordained
  • Lair bosses and corpses will never be Ordained

Related: we’ve lowered base monster HP and damage by 20%. Thus, monsters should be a little easier than before when you are in the first region. By the third full region, they should be mostly harder than before.

The goal of this feature is to establish power scaling and threat escalation as you approach the Mountain, while also slightly lowering region 1 difficulty so it’s easier to get your expedition started.

Food Redesign

The function of food has been redesigned. Before, food was used primarily to heal HP at the Inn. Now, HP is always fully healed when arriving at the Inn. Food is instead used to buff Max HP and also buff other stats. Those buffs will last for the entire next region.

Each hero can only eat one meal (consume one food item) in each Inn. So choose your best food item to feed them. The exception being the Roast Pig. You can always add a Roast Pig feast on top of everything else.

Hero base HP has been lowered by 10% across the board, to adjust for food being used to buff HP. (The worst food item buffs 10%.)

Driving

A comprehensive look at Stagecoach experience/driving/route selection/preparation will be the focus of an upcoming milestone. Meanwhile:

  • Crack the Whip! Stagecoach speed now increases once you are clear of intersections and nodes, reducing travel time between nodes!
  • Visual improvements to many nodes
  • Adjusted road object loot table (slightly bigger chance overall; more relic than anything else)
  • Infernal Torch can no longer be swapped between open stagecoach slots. Once equipped in a slot it is locked until the run is over.

Resist Encounters

  • Resist Encounters will give parties with less than 4 Heroes new options for buffed Engage and Avoid choices.
  • Fixed several small errors related to effects and glyphs.

Assistance Encounters

  • Assist Encounters are now split into 3 variants and have new loot tables as appropriate:
    • Standard: The party receives Flame primarily
    • Combat: The party receives combat-related supplies
    • Provisions: The party receives Inn items and other useful non-combat items
  • [COMMUNITY] Robbery variant Assistance Encounters de-emphasize food in exchange for more supplies/items.
  • Fixed several small errors related to effects and glyphs.

Academic Study Encounters

  • [COMMUNITY]New Avoid options for stressed Heroes
  • New Low Relic/Low Inventory Interact options for greedy Heroes
  • [COMMUNITY]Fixed Shambler Altar issues
  • Fixed several small errors related to effects and glyphs
  • Fixed party torch misapplication as rewards for Caged Creature and Thing in Corner variants

UI

  • [Community] Skill Upgrade ALT view now available on Character Sheet
  • [Community] Disease indicator on driving portraits
  • [Community] Affinity preview on encounter choices
  • [Community] Show equipped skills on mastery
  • [Community] Space bar to enter nodes
  • [Community] Patch Notes viewable in options menu
  • [Community] Combat Skills tab now default on Character Sheet
  • [Community] Added Random Party button to the Crossroads.
  • [Community] Hero Story recap tab at Cross roads
  • [Community] Slide out panels (map, character sheet, inventory, etc) can now be closed by right-click and ESC
  • [Community] Show discounted prices in stores
  • [Community] Double click to auto drive Stagecoach
  • [Community] New Cinematic section on main page
  • [Community] Autosave indicator
  • [Community] Feedback on quirk removal when using a rest item or an inn effect.
  • Updated all instances of RED being used as enemy target indicators to now be BLUE, to match the game’s general color scheme
  • Inn tooltips now anchor more consistently to the placard
  • Enter Node text sheen is now less boxy
  • When a character’s name is changed in combat, the portrait tooltip should update correctly
  • Fixed the ability to open UI elements before the game was finished loading
  • Extended health bar on driving rosters to match stress bar width
  • Max health modifiers from Inn items and quirks are no longer incorrectly combining under the Conditions tab in the Character Sheet
  • Corrected The Good Doctor tooltip to correctly state it heals a disease and not a quirk
  • Fix for Restorative Herbs tooltip incorrectly listing its two effects. It should now correctly list +10% healing from traveling & the +20% healing from skills.
  • Raised the Inn select receipt banner to not block hero bark bubbles
  • Users can no longer open the Stagecoach screen when making a choice at an encounter
  • Minimap scout ping correctly waits for the encounter screen to close first before animating
  • Stealth token icon color is no longer gold and now better matches its effect text color of purple
  • Newly added items now get added to the bottom of your Inventory
  • “Discard items for Hope” message is now more visible on the screen

Heroes

  • Hero base HP reduced by 10% to account for new Food Design
  • Fixed an issue where the effects of Quirks like Thanatophobia were applied when a Hero corpse “dies”
  • Fixed an issue where Heroes could receive stress damage when a Hero corpse was CRIT

Hellion

  • Fixed an issue where Bloodlust could be blocked by Denial of Reason

Monsters

  • Reduced the base health, damage, and speed of most monsters to account for Ordainment (see earlier)
  • Several types of Quirk/Trinket effects are no longer applicable when striking/killing an enemy corpse
  • Champions now have a low chance of spawning in Guardian fights
  • Champions now have a low chance of spawning in Lair fights
  • Adjusted the pool of Diseases available to several monster skills

Creature Den

  • Webber and Spitter Bite attacks can now inflict the Tarantism Disease
  • Spitter Spit attacks can now inflict the Tarantism Disease
  • Fixed erroneous glyphs related to food costs
  • Fixed incorrect effects on certain choices

Cultists

  • Fixed an issue where the Cultist Deacon did not receive the Cultist Cardinal’s passive RES Buff
  • Removed the ability to retreat from Cultist Node Choices, except with the appropriate quirks

Dreaming General

  • Dreaming General now spawns with a permanent Immobilize Token
  • Tap Root now spawns with a permanent Immobilize Token
  • Rewards now drop proper region trinkets

Librarian

  • The fidelity of Librarian’s books better matches the characters

Harvest Child

  • Rewards now drop proper region currency and trinkets

Shambler

  • [Community] Improved rewards and are now guaranteed

Combat

  • Combo Tokens now last for an additional round; this change affects Heroes and monsters alike
  • The permanent version of the Immobilize Token has an updated color and description to differentiate it from the standard version
  • Fixed an issue where Start Round skills (e.g. Denial of Reason) were subject to Daze/Stun
  • Fixed an issue where Start Round skills were unintentionally triggering Extra Action effects
  • Character movement in general has had a polish pass and should now be cleaner and snappier
  • Combat Consumables now fire all vfx, tokens and numbers simultaneously, making them more responsive to use
  • Guard tokens are removed when a guarding actor is captured.
  • Added Combo Token to poptext when it’s consumed
  • Changed CRIT poptext to now read Critical!
  • Heroes now only say their Move barks when affected by non friendly skills.
  • Shuffles shuffle better now. Algorithm gremlins were exorcised
  • Fix for Dreaming General hit reaction delay
  • Fix for exploit with Riposte that would reveal kills via token highlights

Quirks

  • Sunny Disposition and Curmudgeon quirks now affect affinity ticks for the party (pos and neg respectively)
  • New Heavy Handed quirk: 5% chance of moving an opponent via melee attack
  • Punch Drunk’s Stun can no longer trigger off of DOT damage
  • Cowardice quirk update: Take 1 stress damage when hit (5%), Move to back when in the front rank (15%)
  • Pyromaniac and Field Surgeon now have token-driven bonus item skills for Fire Bomb and Healing Salve
  • Various Fisherfolk and Shroud-related quirks added to reflect the existing other Biome/Faction quirks
  • The Runs is now a disease, not a quirk
  • Added Disarmer quirk, 10% chance of giving a weakness token to the enemy that hit the Hero
  • Tarantism Disease added (chance for forced Move), exclusive to Spiders
  • Algal Bloom Disease added (chance of proc’ing Barnacle or small damage per turn), exclusive to Leviathan boss
  • Slugger quirk now has a chance to add Stun, which replaces the damage bonus
  • Removed Strength token possibility from Vicious quirk
  • Various quirk corrections and adjustments for balance and bugs
  • [Community] Fixed an issue with The Jinx consuming CRIT tokens when the Hero was hit

Items

  • [Community] Sneaker’s Standard: Trigger change from Turn Start to Round Start and Stealth chance increased from 10% to 33%
  • [Community] Covert Cloak: Trigger change from Turn Start to Round Start
  • Faceless Visage: Taunt chance increased from 20% to 33%
  • Annotated Textbook and Early Experiment names properly assigned
  • New Stagecoach Upgrade Almanac: The Shroud

Misc Gameplay

  • Added “Heat Wave” region modifier. (Reduced Burn resistance)
  • HALE battle modifier bonuses reduced from 25% to 10%
  • FRENZIED battle modifier bonus damage reduced from 25% to 20%
  • Adjusted food-related Stagecoach upgrades due to new food design
  • Tea Service now properly reduces negative banter instead of increases it
  • Battle configurations were adjusted to use multiple conditions where relevant (e.g. shambler has increased chance of spawning when torch is low AND region is closer to the mountain). Also adjusted all region # conditions for full-length region # instead of raw region #. This ensures that taking the SLUICE doesn’t mess up power scaling.
  • Added new region goals for “Visit Oasis” and “Visit Creature Den”. Adjusted chances of other region goals.
  • Retune of Triage Kit and Healing Salve: stacking limits reduced; prices increased. Increased heal value of Triage Kit
  • Added many new hero Barks (Food consumption, leaving Shrines of Reflection, and many more!)
  • Tuned down all relationship act out frequency some
  • Revised the “Block partner from moving” relationship Act Out to only block moves where the partner themself is moving (now won’t block situations where the partner tries to move someone else)
  • Note: we will be revising Relationships significantly in a future update

Fixes

  • Fixed an issue with the Stagecoach not loading properly after changing the livery
  • Fixed an error caused by toggling the Inn Provision screen too quickly
  • Fixed missing gender for localization of hero death to quirk strings
  • Fixed an issue with combat sorting
  • Fix for resolution dropdown sometimes not updating properly after monitor switch
  • Fix for meltdowns not logging in the players run log when occurring outside of combat
  • Fix for being able to drive the coach while over-encumbered if you quit to the main menu and reloaded
  • Fixed a softlock caused by the same hero having multiple meltdowns
  • Fix for healing poptext at the Inn to be consistent with other poptext locations
  • Fixed an issue when encounter choice lock-in continues through other screens
  • Fixed a display issue with various quirks and effects applying before the poptext appears
  • Fix to biome modifiers being rolled without biome goals
  • Fix for barks overlapping with combat and affinity zoom ins
  • Fixed an issue where the character sheet would become inactive if toggled too quickly
  • Fixed an issue where the relationships tab on the character sheet would break when only one hero remained in the party.
  • Fix to CRIT strikethrough to show CRIT value when striking through
  • Various UI fixes for non-english localization
  • Inn store inventory saves

⇒ Get Darkest Dungeon 2 from Kinguin

Excited about the new patch coming to Darkest Dungeon 2? Share your thoughts with us in the comments section below.

5 Quick Solutions for Disney Plus Error Code 76

You may have encountered the Disney Plus error code 76 when trying to stream content and sometimes it comes with the There was a problem streaming. Please try again later message.

A few different things can cause Disney Plus error code 76, including issues with your Internet connection, home network or your ISP. However, we can’t exclude server maintenance or high traffic problems with Disney Plus servers.

How can I fix Disney Plus error code 76?

1. Check your Internet connection and make sure it’s stable

The first thing you should do is check your Internet connection and make sure it is stable.

If there are any interruptions or issues, especially when you’re using a Wi-Fi connection, this may cause the Disney Plus error code 76 to arise.

Just resetting the router may fix the problem

Additionally, check that all other connected devices are working properly and that the cables are all set firmly in place.

If you find that your Internet connection is stable and there are no other issues with your network, the next step is to try restarting your device.

This can resolve similar issues like Error code 73 and allow you to stream content on Disney Plus successfully.

2. Restart your router and update its firmware

Unplug your router from the power outlet and wait for 30 seconds to fix the Disney Plus error code 76 problem.

Plug it back in and turn it on. Once it’s finished booting up, try opening Disney Plus again. If you’re still seeing the error, you can try a few other things.

Check the router for firmware updates

First, check to see if any updates are available for your router’s firmware. If there are, install them and then try restarting your router again.

Try connecting to Disney Plus using a different device if that doesn’t work either.

If you can watch videos on that device without any issues, then it’s likely that there is a problem with your original device or network connection.

3. Clear the cache and cookies on your browser

On Google Chrome:

  1. Click the Menu button in the top-right corner of the window and choose Settings.Settings
  2. Go to Privacy and security and tap on Cookies and other site data.Privacy and Security
  3. Scroll down to See all cookies and site data and tap on it. Cookies and site data
  4. Tap on the Remove All button near the top.Remove all
  5. This will open a pop-up window labeled Clear site data. Click on Clear all to finish the process.Clear Data

On Firefox:

  1. Click the Menu button in the top-right corner of the window and tap on Settings.Settings
  2. Click Privacy & Security, tap on the Cookies and Site data section, then click the Clear Data button.Clearing cookies and cache
  3. Check the boxes next to Cookies and Site Data and Cached Web Content in the pop-up window, then select the Clear button.Clear Data

On Microsoft Edge:

  1. Click the Menu button in the top-right corner of the window and choose Settings.Settings
  2. Tap on Cookies and site permissions from the left panel, then click on Manage and delete cookies and site data.Manage Cookies
  3. Then select See all cookies and site data.See all cookies
  4. Tap Remove all.Remove All
  5. A pop-up window labeled Clear site data will appear. Tap on Clear to complete the process.Clear

Try loading Disney Plus again after clearing the cache and cookies on your browser. The Disney Plus error code 76 should be gone by now. This also works when you see Disney Plus Error code 14.

We have described how to clear the cache and data on the most popular browsers but the procedure is very similar on others as well.

If you want an automated solution that scans your browser for useless data and gives you an informative report, use CCleaner. It lets you pick exactly what you want to remove, including recent URLs, download history, and more.

4. Disable any VPN or proxy service you may be using

  1. Open your VPN or proxy software and look for the option to disable it. This is usually found in the settings menu.Disabling VPN
  2. Once you’ve disabled your VPN or proxy service, restart your computer and try accessing Disney Plus again.

Once you’ve disabled your VPN or proxy service, restart your device and try accessing Disney Plus again.

If the Disney Plus error code 76 problem persists, you may need to completely uninstall your VPN or proxy software.

5. Contact Disney Plus support

If you have followed these steps and are still encountering the error code 76, it may be necessary to reach out to Disney Plus customer support for further assistance.

They will be able to help troubleshoot the issue and determine if there is a larger problem that needs to be addressed. 

In most cases, following these simple steps will fix Disney Plus error code 76 and allow you to enjoy all of your favorite shows and movies on Disney Plus.

We have an extensive Disney error codes troubleshooting guide where you will find solutions for all the problems you may face on the service.

If you can’t get into your account, check our guide on what to do if the Disney Plus login is not working to fix the problem.

For additional support, especially if you’re dealing with repeated crashes, use our guide to fix Disney Plus crashes with these methods. Quick and effective troubleshooting is guaranteed.

For any other questions or suggestions, feel free to use the comments section below and tell us all about it.

Microsoft releases Windows Insider Server Preview Build 25120

We previously mentioned that Microsoft had just released the new Insider Preview Build 25120 for the Windows 11 Dev Channel.

You would know that the company also released a new build of the Windows Server Insider Preview which has the same number 25120.

This build is now available to download as an ISO from the Windows Server Insider website along with a VHDX, so head on over there and get your hands on it.

What’s new with Windows Server Build 25120?

It’s true, build 25120 uses the same underlying kernel as the Windows 11 Sun Valley 3 development, but there’s no changelog, so it’s unclear what’s new.

Not even the branding for Server has been updated, thus it still remains as Windows Server 2022 in the preview.

Furthermore, Microsoft is asking Insiders to refer to these builds as vNext rather than Windows Server 2022 which is already in the market.

As we mentioned, there is no official changelog for this software release, so there isn’t really much to tell about it.

There is, however, a dedicated list called Available Downloads:

  • Windows Server VNext Preview in ISO format in 18 languages,
    and in VHDX format in English only.
  • Windows Server VNext Preview VHDX
  • Microsoft Server Languages and Optional Features Preview
  • Windows Admin Center 2110.2 Preview

Microsoft also provided the keys but clearly stated that they are only available for Preview Builds, so keep that in mind.

  • Server Standard: MFY9F-XBN2F-TYFMP-CCV49-RMYVH
  • Datacenter: 2KNJJ-33Y9H-2GXGX-KMQWH-G6H67

Also, to download, registered Insiders can head over to the Windows Server Insider Preview download page.

Keep in mind that Redmond officials also noted that this Preview will expire on September 15, 2022, just a few months from now.

Wireless Display Install Failed? Here’s What to do

Wireless display represents a technology that allows you to project photos, movies, and web content. And any kind of media, from a compatible mobile device or computer onto another device.

Even if it should always work in proper conditions, Windows 11 users reported that some wireless display installations failed. This is how they describe the problem in the Microsoft forums:

I have installed Windows 11 Pro Version Dev (OS Build 21996.1) on ProBook 6470b and it’s showing an error in wirelessly projecting to this PC, and when installing an optional feature of wireless display it shows Install Failed.

Fortunately, there are a lot of ways to easily solve this annoying issue. After all, you already know how Windows 11 compares to Windows 10 and there’s no way of turning back.

We selected the best options, so make sure you read this article completely to discover which one suits you the most.

Important things to consider before installing a wireless display

Installing a wireless display is always helpful and it can actually clear the clutter from your desk. As well as eliminate the wear and tear problems associated with the cable connection.

However, your device must have a crucial component to install, connect and use a wireless display: Miracast technology.

What is Miracast and what does it do?

Miracast is a standard devised by the Wi-Fi Alliance that allows the mirroring of content wirelessly from a compatible PC. Or a smartphone, and tablet screen to a TV, or monitor.

It is commonly known as HDMI over Wi-Fi because it’s wireless and it can replace all known HDMI cables.

Make sure your device is Miracast compatible

If you want to project your screen to a wireless display, your device and the screen must be Miracast compatible with a wireless broadcasting technology.

To see if your device is Miracast compatible go to Settings, then click on the System from the left pane, and select the Projecting to this PC option from the right pane.

If you see a screen like the one below, that will display the message This device doesn’t support receiving Miracast, so you can’t project to it wirelessly, which means your device doesn’t have the capability.

The fact that your device doesn’t have Miracast capability can prevent you from installing a wireless display so you should check this nevertheless.

If your device doesn’t have this capability, you can always buy a separate Miracast dongle that you can connect to your device and use, but make sure that the display is also Miracast compatible.

This being said, let’s jump into the list of solutions and note that they will also address the wireless display install failed in Windows 10.

What can I do if the wireless display installation failed?

1. Connect to the Internet

Besides the fact that Windows 11 can’t run on devices without Internet access, in some cases, users forget to connect to the Internet before trying to perform the installation. This is supposed to be the quickest and the simplest method to install your wireless display additional features.

If you encounter issues while trying to connect to a network in Windows 11, check out the article linked in order to find out how to fix it. After this, the Windows 11 wireless display not working issue will be solved.

Thus, we strongly recommend trying to connect to it and then reloading the process. However, if this first option didn’t work, keep reading this guide.

2. Try a different Internet source

If the first solution failed, it might be still a random bug and a reason for poor Internet connectivity. The second thing to do is trying to connect to a different Internet source.

As you can see, the first two options are just a few seconds fixes, and they help you to make sure everything is prepared on good terms for the wireless display installation.

3. Turn off the metered connection

  1. Open Settings by holding the Windows and I keys together and go to Network & Internet and click on Properties.network-properties windows 11 wireless display install failed
  2. Scroll down, then click on the toggle button to set the Metered connection to Off.metered-off windows 11 wireless display install failed

Once you’ve done that, try to install the wireless display again and see if it works now.

4. Use Command Prompt

  1. Click on the magnifying glass icon and type cmd inside the search bar in order to right-click on the topmost result and choose Run as administrator.
  2. In the pop-up window, type the following command, then press the Enter: DISM /Online /Add-Capability /CapabilityName:App.WirelessDisplay.Connect~~~~0.0.1.0cmd-dism windows 11 wireless display install failed
Note icon NOTE
You can also use PowerShell to run the mentioned command, by following the steps below.
  1. Tap on the magnifying glass icon and type PowerShell then choose Run as Administrator under it on the right side.powershell windows 11 wireless display install failed
  2. In the pop-up window, type the following command which is the same as above, and press Enter:DISM /Online /Add-Capability /CapabilityName:App.WirelessDisplay.Connect~~~~0.0.1.0powershell-command-dism windows 11 wireless display install failed

So, these are the most valuable options that will work if your wireless display install failed. As you can see, they are not complicated, so you don’t have to be an expert to have them quickly done.

For those of you who are interested in discovering more about the latest OS version design, we recommend checking our post on 15+ new features you should know about Windows 11.

Alternatively, take a look at the best security & privacy features in Windows 11 and learn how this OS version takes care of your data.

In addition, do not forget to share your thoughts regarding this subject by leaving a comment in the section below.

3 Ways to Safely Sync Your Chrome Passwords With a Keychain

We love to show you how to sync Chrome passwords with Keychain in this article, and this is important because Google Chrome is the most used browser today.

It packs a lot of features and many of these are centered around privacy and security. For example, the browser has an incognito mode, that allows you to browse the internet without leaving fingerprints as you would in normal mode.

However, this is just the tip of the iceberg, as the browser also comes equipped with passwords and other sensitive data storage features.

One such feature is the ability to sync Chrome passwords with iCloud’s Keychain. This is both convenient and another privacy and security way to go.

Additionally, when you connect to websites using Chrome, you can use the built-in password manager to remember all of your passwords. The browser will autofill registration forms and passwords on login every time you view the page after you’ve stored them.

It even integrates features to enable weak password checks in Chrome. So, without much ado, let’s jump into it.

How can I import & export Chrome passwords?

Export Chrome passwords

  1. on the address bar of the browser type the code below and hit enter.
    chrome://settings
  2. Select Autofill on the left pane and choose Password on the right pane.
    sync chrome passwords with keychain
  3. This redirects you to the browser’s password manager. Alternatively, you can paste the code below on the address bar and hit enter.
    chrome://settings/passwords
  4. To the right of the Saved password option, click on the ellipse (3 dots) to reveal the Export passwords option.
    sync chrome passwords with keychain
  5. Click on the Export passwords button again on the prompt.
  6. You will be prompted to enter your pin or password, after which you will export the passwords to whatever location you choose.

Import Chrome passwords

  1. On the address bar type the link below and hit enter.
    chrome://flags
  2. Type password import in the search box at the top of the window, click the arrow to reveal more options in front of the password import flag and select Enable.
    sync chrome passwords with keychain
  3. Click Relaunch at the bottom right of the browser.
  4. On your browser address bar type the link below and hit enter.
    chrome://settings/passwords
  5. To the right of the Saved password option, click on the ellipse (3 dots) and select the Import passwords option.
  6. You will be able to navigate to where your passwords are saved and import them.

Now let’s see how you can sync Chrome passwords with Keychain on iPhone and mac.

How do I transfer passwords from Chrome to Keychain?

1. Import passwords to Safari

  1. Launch Safari.
  2. Click on File, then Import from, and finally select Google Chrome.
  3. Tich the checkbox for Passwords, and hit the Import button.
    sync chrome passwords with keychain

2. Manually transferring exported Chrome data

  1. Tap your iPhone’s settings app.
  2. Scroll down and tap Passwords.
  3. Click the Passwords plus (+) sign.
  4. Complete the form with the Website name, User Name, and Password.
    sync chrome passwords with keychain
  5. Save the password and you would have been able to import passwords to Keychain on iPhone.

3. Import passwords using third-party apps

  1. Download and install 4uKey.
  2. Connect your iPhone to your PC using a cable.
  3. On the left pane, select Import passwords, then select Chrome on the right pane.
  4. Click the Import file button, then navigate to select where you have your passwords CSV, select it, and click Next.
  5. Wait for the import to finish, and you would have been able to import passwords to Keychain from CSV.

If you have enjoyed following this guide using Chrome, then you would love Opera One as well since it offers the same password export features. It is a robust browser with a pleasant UI that allows you quick access to all your favorite tools and social media platforms.

It is built on Chromium and equally has a vast extension collection, and gives you access to quick and reliable support. Plus, it comes with it’s own AI built-in.

⇒ Get Opera One

There you have it. You have now been able to transfer your passwords from Chrome to your iCloud Keychain password manager.

You will find this tool useful as it helps autofill passwords when you use the Safari browser.

We recommend that after exporting passwords on your local machine, you should delete them. They could become a huge risk if your computer is compromised. This is also important because your exported Chrome passwords are not masked.

For Windows users, we recommend using any of the best Windows 10/11 password managers for guaranteed password protection.

If you’re on a different browser, you might be interested in our iCloud Passwords for Firefox guide, and learn how to get access to all your passwords.

403 Forbidden Error: 7 Common Causes & Their Fixes

The 403 Forbidden Error occurs typically when the webserver’s admin has put in place access rights and you are denied access to the resource. If the permissions have been incorrectly configured, you will also be denied access and get the error code. 

Web developers may alter the appearance of a 403 error, just as they can with 404 errors. As a result, different 403 pages may appear on various websites.

What does error 403 mean on Roblox?

Roblox Error 403 usually appears when you make an invalid request or when you upload an image. When uploading graphic data, a network error may occur, resulting in graphic data corruption.

There is no room for worries, there are a few solutions that you can implement on your own, and we will show you all of them in this article.

Users have also experienced the 404 error, and you can also fix this HTTP error 404 with a few steps.

What causes 403 Forbidden?

Several things may cause the 403 Forbidden error. The most probable reason is that your server’s file permissions are wrong. Additionally, a corrupt .htaccess file or a defective plugin might cause this issue for site developers or designers.

Furthermore, it could be caused by the following:

  • Wrong IP address – Entering an incorrect IP address for a resource will trigger a forbidden error message.
  • Broken WordPress plugin – If users need to access pages connected to plugins that no longer work, they will receive the error message.
  • Missing index page – An index page is the default for websites. If it is misnamed or missing, it becomes unreachable and will trigger the 403 error message.
  • New web page link – When a web page or resource has a new link, users may get the error message if this is not updated on the front end.
  • Malware infection – Malware and viruses are the common culprits across different computer errors. They can delete files and act in other malicious forms to render a server unresponsive.
  • Geographical restrictions – On services like Netflix, you get access to content based on geographical location. If you try to access content not meant for your location, it will trigger this error.
  • Misconfigured servers – On servers, files should be appropriately named, and users should be granted rights according to the access they are meant to have. When this is not configured correctly, some pages may become unreachable.

How do you fix code 403 on Roblox?

The suggested method for resolving this problem is to save the file or image and reupload it to check whether it has been resolved. Another great alternative that saves you a lot of time is to try uploading on a different browser for Roblox.

To modify specific site settings, you may need to contact your service provider or the site’s administrator.

If it doesn’t work, you should check the following solutions to discover what works best for you.

What are the variations for the 403 Forbidden error?

One of the response or status codes for HTTP deployed by servers to interact with client browsers is the 403 Forbidden, implying that the server believes you don’t have elevated privileges necessary to view that page.

Typically, the error message comes in different variations set by the web admin, but they all mean the same thing, for example, here are a few variations:

  • Your client does not have permission to get URL (address) from this server.
  • 403 forbidden access is denied
  • It appears you don’t have permission to access this page.
  • 403 forbidden access to this resource on the server is denied!
  • You are not authorized to view this page.
  • Forbidden – You don’t have permission to access (Name of the directory) on this server.

How do I fix the 403 Forbidden error?

How do I fix 403 Forbidden Nginx?

1. Rename the index file

  1. Open your terminal using Ctrl + Alt + T.
  2. Type in the code below and hit enter.
    ssh -p 232 66.99.206.145
    403 forbidden error
    Be sure to replace 232 with your port number or omit -p 232 if you do not have an assigned port number, and also replace 66.99.206.145 with your server IP or username.
  3. Type yes and hit enter, then enter your password and hit enter.
  4. Navigate to the HTML directory using the code below:
    cd /var/www/html/
  5. Rename your index file to index.php using the code below and hit enter:
    mv home.php index.php

    Replace home.php with the file’s name that currently serves as your index.
  6. Refresh your browser, and the error should disappear.

This fix will work only in cases where you have misconfigured your server and have not appropriately named the index file. Additionally, you need to be an admin for this fix to work.

2. Wait it out

If you do not have administrative rights, waiting it out may be all you can do. Within this time, you should try contacting the server admin.

The server may be down or on maintenance, and if this is the case, you should have access in no time.

How do I fix the 403 Forbidden error on Google Chrome?

1. Double-check the URL and reload

  1. Look through the address bar of the browser.
  2. Confirm that the address entered is the correct one.
    403 forbidden error
  3. Click on the reload button or hit the F5 key.

2. Clear the browser cookies and cache

  1. Click on the ellipsis on the top right corner of the Chrome browser.
  2. From the options, navigate More tools, then Clear browsing data.
  3. Click on the Basic tab, select the desired Time range, tick the checkboxes for Browsing history, Cookies and other site data, and Cached images and files, then click the Clear data button.
  4. Restart the browser.

If you feel that manually erasing history, browsing data, cache, and cookies will take too much time, you may consider using a professional cleaning application that is automated.

You may delete unnecessary cookies with a single mouse click using CCleaner cache and cookie cleaning. However, not all cookies are damaging or obtrusive.

Some cookies are completely harmless to computers. They are present in the computer to improve Internet browsing speed and user experience. Smart Cleaning in CCleaner assists you in choosing what exactly you want to delete, without disturbing any saved data on your Chrome browser.

3. Log in to the website

This is an essential solution because sometimes, the 403 Forbidden error means you do not have the authority to visit that webpage or resource. However, if you have an elevated log-in credential, you only need to log in, and you will have access to the page without the error.

However, if a misconfiguration has triggered the error, this solution will be useless.

4. Restart your computer

  1. Click on the Start menu.
    403 forbidden error
  2. Click on the Power button and select Restart.
    403 forbidden error

During a reboot, a variety of things happen that assist in resetting different elements within a computer. Restarting the system can help flush the memory, stop memory leaks, correct software glitches, and fix emergent issues such as the 403 Forbidden error.

5. Wait it out

This may not be the best solution when you feel impatient, but sometimes it is the only solution. When you do not have issues with your device or browser and have the right to access the resource, you will have to give it time.

In this case, there could be a configuration flaw that the site admin will have to address. It could also mean that the site is under maintenance or the server is down. Whichever is the reason, trying again sometime in the future may be your best bet.

How do I fix the 403 Forbidden error on Roku TV?

1. Disable Limit Ad Tracking

  1. Go to your Home screen, then scroll down to Settings.
  2. Once in Settings, press the right remote button and scroll down to Privacy.
  3. Once again, press the right button to navigate to Advertising, and make sure the Limit Ad Tracking option is unchecked.

2. Clear the cache

  1. Click the Home button on the remote control twice to navigate to your home screen.
  2. Press the Up button once.
  3. Press the left rewind << button twice.
  4. Press the right fast-forward >> button twice

The TV will restart, and when it comes back on, it should have cleared your cache.

How do I fix the 403 Forbidden error on Postman?

1. Update the user role

  1. Visit the Postman website.
  2. Next to your profile picture at the top right corner, click the arrow to expose additional options.
  3. From the dropdown list, select Manage teams.
  4. Click on the tiny arrow in the Roles column for the member whose roles you want to change.
    403 forbidden error
  5. Tick the roles you want this member to have in the list of options, and click the Update roles button.

2. Clear your browser cache

  1. Click on the ellipsis on the top right corner of the Chrome browser.
  2. From the options, navigate More tools, then Clear browsing data.
  3. Click on the Basic tab, select the desired Time range, tick the checkboxes for Browsing history, Cookies and other site data, and Cached images and files, then click the Clear data button.
  4. Restart the browser and relaunch the address.

Depending on what browser you use, this step may vary slightly.

Please note, that while we have written this solution for Chrome, we love to recommend you try the website on a different browser as well. We love to recommend Opera.

It is a robust web browser, that offers a very smooth UI with all your most-used tools easily accessible. Opera is built on Chromium and has a very large community implying that you will be able to find resources to troubleshoot errors quite easily. The browser also offers great options for privacy and security customization.

⇒ Get Opera

How do I fix the 403 forbidden error in WordPress?

1. Deactivate your plugins

  1. Log into your WordPress dashboard.
  2. On the left pane of the dashboard, click on Plugins.
  3. Tick the checkboxes beside the plugins you wish to deactivate, click the arrow to review more options on the top menu, select Deactivate, and click Apply.
    403 forbidden error
  4. Refresh the browser to see if it is fixed.

2. Change file permissions

  1. Log into your host, and under Files, click on File Manager.
  2. Select all the files whose permission you want to change, right-click and select Permissions.
  3. Tick the boxes to modify permissions as you desire, and click the CHANGE button.
    403 forbidden error
  4. Refresh the page to see if the error is gone.

3. Delete and reinstall .htaccess

  1. Log into your host, and under Files, click on File Manager.
  2. Click on the public_html folder on the left pane, then on the right pane, right-click on the .htaccess file, and select Delete.
    403 forbidden error
  3. Next, log into your WordPress dashboard and click on settings from the left pane.
  4. Without making any changes, scroll down to the bottom of the Settings page and click Save Changes. This should automatically reinstall the .htaccess file.
    403 forbidden error
  5. Refresh the webpage and see if the error has disappeared.

How can I avoid the 403 Forbidden error?

Most times users have encountered this error, it has been because some critical housekeeping has been omitted. To avoid this error, here are a few things you can do:

  • Regularly update browsers
  • Properly configure access rights on websites and resources
  • Periodically scan your servers and PCs for malware
  • Ensure that all websites are correctly pointing to an index page.

Additionally, you must note that file permissions apply to every file on your website. These file permissions determine who has access to your site’s files and directories. Hence, it would help to allow directory browsing on web server apps to avoid 403 forbidden errors. 

The 403 Forbidden error is one error associated mainly with user rights, but with the solutions offered in this article, you should have successfully fixed it.

Remember that a practical step may include contacting a support rep, especially when you are not an admin of the web service. They could give valuable information and often help you know if waiting it out and trying again later is the best solution to adopt.

The error can also happen on major web services like Paypal, and the steps to fix the 403 Forbidden error on PayPal are similar to some solutions in this article.

We hope this article has been helpful. We look forward to reading your comments.

7 Ways to Fix Audio and Video Sync Problems with YouTube

The YouTube out of sync issue is pretty concerning, affecting many platforms. YouTube is the world-leading streaming platform used by creators and many people around the world.

It is the home to a series of vital information and an essential marketing tool. As expected, it is supported on various platforms like iOS, Android, Windows, macOS, Xbox, and Smart TVs, to name a few.

With its series of streaming options, including mobile, webcam, and encoder, it is safe to say it represents everything good users want in a streaming platform.

So, any problem with the platform, either slight like this out of sync issue or complex like the YouTube 500 internal server error, will affect many people.

This guide contains seven simple yet effective fixes for the YouTube out of sync issue on different devices. Irrespective of the cause of the problem, this article’s got you covered.

Why is my YouTube sound out of sync?

The YouTube sound out of sync issue occurs on different platforms for various reasons. Below are some of the common ones:

  • YouTube out of sync Windows 11: This could be due to outdated graphics drivers, faulty browser data, and outdated YouTube app, among others.
  • Xbox YouTube out of sync: The common causes are a slow internet connection and outdated Xbox software.
  • YouTube out of sync on TV: This is usually due to a bad connection between the TV and the audio device connected to it. It might also be due to the accumulation of corrupt YouTube data.
  • YouTube out of sync on Firestick: This error is usually because of glitches within the YouTube app.
  • Android YouTube out of sync: This could be due to an outdated YouTube app, corrupt app data, or faults from the device.
  • YouTube out of sync iPhone: It is caused by network issues, outdated YouTube app, and corrupted app cache.

How do I fix YouTube sound and video delay?

Fix YouTube audio out of sync Firefox

1. Use Firefox in Safe Mode

  1. Click the menu button (three horizontal lines) on the top right corner.
  2. Select the Help option.
    settings youtube out of sync
  3. Choose Troubleshoot Mode…
    restart firefox
  4. Click the Restart button when prompted.
    restart firefox youtube out of sync

The Troubleshoot Mode starts Firefox with most add-ons disabled. If the YouTube audio is not out of sync in this mode, one of your extensions is the cause of the problem.

You need to disable them all and use the elimination method to detect the extension causing the problem.

2. Increase the session save internal value

  1. Copy the command below in the Address bar and press the Enter key. about:config
  2. Click the Accept the Risk and Continue button when prompted to be careful.
    accept and continue
  3. Copy the command below in the search box. browser.sessionstore.interval
  4. Double-click the result and increase its value to a high figure like 100000.
    increase browser session youtube out of sync

Firefox has a feature that lets it save browsing sessions around every 15 seconds. This process could make the sound fail to sync on YouTube.

Changing the value to a high figure increases the time it takes to save your sessions. Consequently, there will be no little breakage that causes the delay in the sound or video.

Note that you need to close and relaunch Firefox after changing the value to effect the change.

Fix YouTube audio out of sync Chrome

1. Disable hardware acceleration

  1. Click the menu button (three vertical dots) in the top right corner.
  2. Select the Settings option.
    chrome settings
  3. Click the Advanced option on the left pane.
    advanced setting youtube out of sync
  4. Select System from the dropdown.
  5. Toggle the switch before Use hardware acceleration when available backward to disable it.
    disable hardware acceleration

Hardware acceleration is an important feature in most modern-day browsers. It takes advantage of your PC’s GPU to take off a little load from the CPU and improve media playing performance.

However, it can cause YouTube audio to be out of sync due to its processes. Simply disabling it and restarting Chrome should do the trick here.

2. Clear browser cache

  1. Click the menu button and choose Settings.
    chrome browsing data settings
  2. Select Privacy and security on the left pane.
  3. Click Clear browsing data.
    Privacy and security youtube out of sync
  4. Click the dropdown next to Time range at the top and select All time.
    time rsnge youtube out of sync
  5. Check the checkbox for Cached images and files.
  6. Click the Clear data button.
    clear data button

Cached images and files help with faster processing and navigation of sites you have visited in the past. But these files can get corrupt with time.

And this leads to errors like YouTube sound out of sync on Chrome. After clearing the cache, close and relaunch your browser to effect the changes.

3. Try another browser

If you can’t solve the YouTube audio out of sync issue on Firefox and Chrome with the fixes above, you might be better off trying another browser for a change.

And there is no better alternative than the top-notch Opera One browser. Opera One is a lightning-fast app based on the same Chromium engine as Firefox and Chrome.

Whether a news site or streaming, it does not lag and loads every page with ease. Thanks to its intuitive and customizable interface, it is also pretty easy to use.

What’s more, it boasts some truly impressive privacy and security features. It has a built-in VPN and ad blocker that keeps you safe online.

Opera One just ticks so many right boxes without the frequent problems encountered in other modern browsers.

Opera One

Browse the internet and watch videos error-free with Opera One.

YouTube audio out of sync Smart TV

1. Restart TV

This might appear to be a simple fix, but it has proven to be effective time and again. If YouTube is out of sync on your Smart TV, it might be due to glitches within the appliance.

Also, it might be because of a transmission lag between your TV and the audio device (especially Bluetooth devices). Restarting your TV should restore normalcy in this case. And this can be done by holding the power button on the remote control for a few seconds.

2. Clear app cache

  1. Press the Home button on your remote control.
  2. Open the Settings app and select the Apps option.
    settings smart tv youtube out of sync
  3. Choose the System apps option.
    system smart tv
  4. Select YouTube and click the Clear cache option.
  5. Click the OK button to confirm.

YouTube cache is vital in its smooth running on a Smart TV. However, they are only useful when they are not corrupt.

Once the cache becomes faulty, it leads to problems like YouTube sound out of sync. Clearing the data and restarting your TV should solve the issue in this case.

Can I download the YouTube app on my PC?

youtube download

You can download the YouTube app on your PC but it is only available on third-party websites. Downloading from these websites is not advisable for the overall safety of your PC and data.

Hence, we would advise using YouTube on your browser, as you would still get maximum value from it.

The YouTube out of sync problem can mar your streaming sessions. Fortunately, it is not the most difficult issue to solve, irrespective of the platform, as we have shown.

Are you facing other issues like YouTube embed not working? Check our detailed guide on fixing it.

Let us know the solution that helped you get back to streaming effectively on YouTube in the comments section below.

3 Simple Ways to Fix Firefox Error Code SEC_ERROR_UNKNOWN_ISSUER

The Firefox SEC_ERROR_UNKNOWN_ISSUER error code shows up when the browser can’t trust a website’s SSL certificate.

Whenever you try to visit a website on Firefox, it checks the SSL certificate from the site. This certificate must be valid and be from a trusted certificate authority.

If there is a problem with the website’s security certificate, it shows this error code to warn you of the potential risks of the site. This is all part of its security feature to protect you from dangerous websites.

However, if you face the error code SEC_ERROR_UNKNOWN_ISSUER in Firefox but not in Chrome, especially on trusted websites, it means the issue is far beyond just the SSL certicate. trusted websites like Google.

Plus, this is not the first time an error like this has prevented users from accessing sites on Firefox. People have encountered some of the errors below at one point or another on the browser.

Like we did with the errors above, we have also provided practicable fixes to this error. Read on to find out more!

What causes SEC_ERROR_UNKNOWN_ISSUER?

The error code SEC_ERROR_UNKNOWN_ISSUER occurs on Firefox due to a conflict between the browser and the website certificate. But other factors could cause it.

Below are some of the popular ones:

  • A website’s SSL certificate is not from a trusted certificate authority. This can also be that the certificate has been self-signed.
  • A website’s certificate is obtained from a provider whose root certificate has been removed from the root store.
  • Presence of malware on PC or the website.
  • Activities of third-party software.

It is important not to bypass or ignore the Firefox SEC_ERROR_UNKNOWN_ISSUER issue if it is due to the first two factors above. However, if you face the problem on a trusted website, you can make exceptions.

How do I fix SEC_ERROR_UNKNOWN_ISSUER?

1. Perform virus scan

1.1 Use the built-in virus scanner

  1. Press the Windows key and type Virus & threat.
  2. Select the Virus & threat protection option.
    virus and threat sec_error_unknown_issuer
  3. Click Scan options.
    scan options
  4. Select the Full scan or Microsoft Defender Offline scan.
  5. Click the Scan now button.
    scan now firefox error code sec_error_unknown_issuer

If a virus infects your system, it might prevent Firefox from finding a website’s certificate. This stops it from establishing a secure connection, leading to the error code SEC_ERROR_UNKNOWN_ISSUER.

You might also notice that the Firefox security warning keeps popping up no matter what you try. In this case, your best bet is to perform a virus scan and remove the malware. After the scan, restart your PC and relaunch Firefox to check if the error persists.

1.2. Use a third-party antivirus software

While your PC’s built-in malware and virus protection is pretty reliable, Microsoft is not a security company. Hence, there is room for improvement.

One software that gives you the all-around security you need is the ESET NOD32 antivirus. It is an award-winning cybersecurity technology that uses cutting-edge expertise and advanced machine learning to protect your digital life.

What’s more, it offers malware, ransomware, and phishing protection to keep you protected from threats of different kinds. Add its privacy and banking protection, and you know you are always secured online.

If you need an antivirus that keeps your devices running fast and detects viruses before they manifest, with a bonus of a free trial and cheap pricing, ESET NOD32 is what you are looking for.

⇒ Get ESET NOD32

2. Disable third-party antivirus temporarily

  1. Press the Windows key + X and select Task Manager.
    task manager
  2. Click Startup in the top menu bar.
  3. Right-click on your third-party antivirus program and select Disable. Note that the app used in the diagram is for explanation only and should be replaced with your antivirus as needed.
    disable startup firefox error code sec_error_unknown_issuer
  4. Restart your PC to effect the changes.

The Firefox error code SEC_ERROR_UNKNOWN_ISSUER and sometimes the Firefox did not connect: Potential security issue can be due to some of the security features of your third-party antivirus software.

Most modern antivirus programs offer special web shielding properties that can block access to insecure sites.

If you have such software and trust the site you want to visit, disable the antivirus temporarily. To enable the app later, you only need to repeat the steps above and select Enable instead of Disable in the last step.

3. Switch to another browser

If the fixes above prove futile in solving the error code SEC_ERROR_UNKNOWN_ISSUER on Firefox, your best bet is to try a new browser in Opera One.

Opera One is a secure browser that keeps you safe online from hackers, tracking, and data theft. It warns you of suspicious web pages after checking the page against a database of malware and phishing websites.

It also supports the SSL v2, SSL v3, and TLS 1.0 protocols to ensure the website is truly secure. However, these features can be disabled if you don’t need them.

All these, plus its built-in VPN, ad blocker, and anti-tracking feature, rank it as one of the most secure browsers, albeit without the frequent error messages.

⇒ Get Opera One

The error code SEC_ERROR_UNKNOWN_ISSUER on Firefox is not as bad as it is made to look until it starts blocking trust sites. In this guide, you have everything you need to fix the error effortlessly.

Did Firefox encounter an unexpected problem on your Windows PC? Our comprehensive guide contains detailed steps for fixing it.

Before you leave, don’t miss our latest guide on Sec_Error_Bad_Signature in Firefox for more information.

Feel free to let us know the solution that helped you fix the error code in the comments section below.
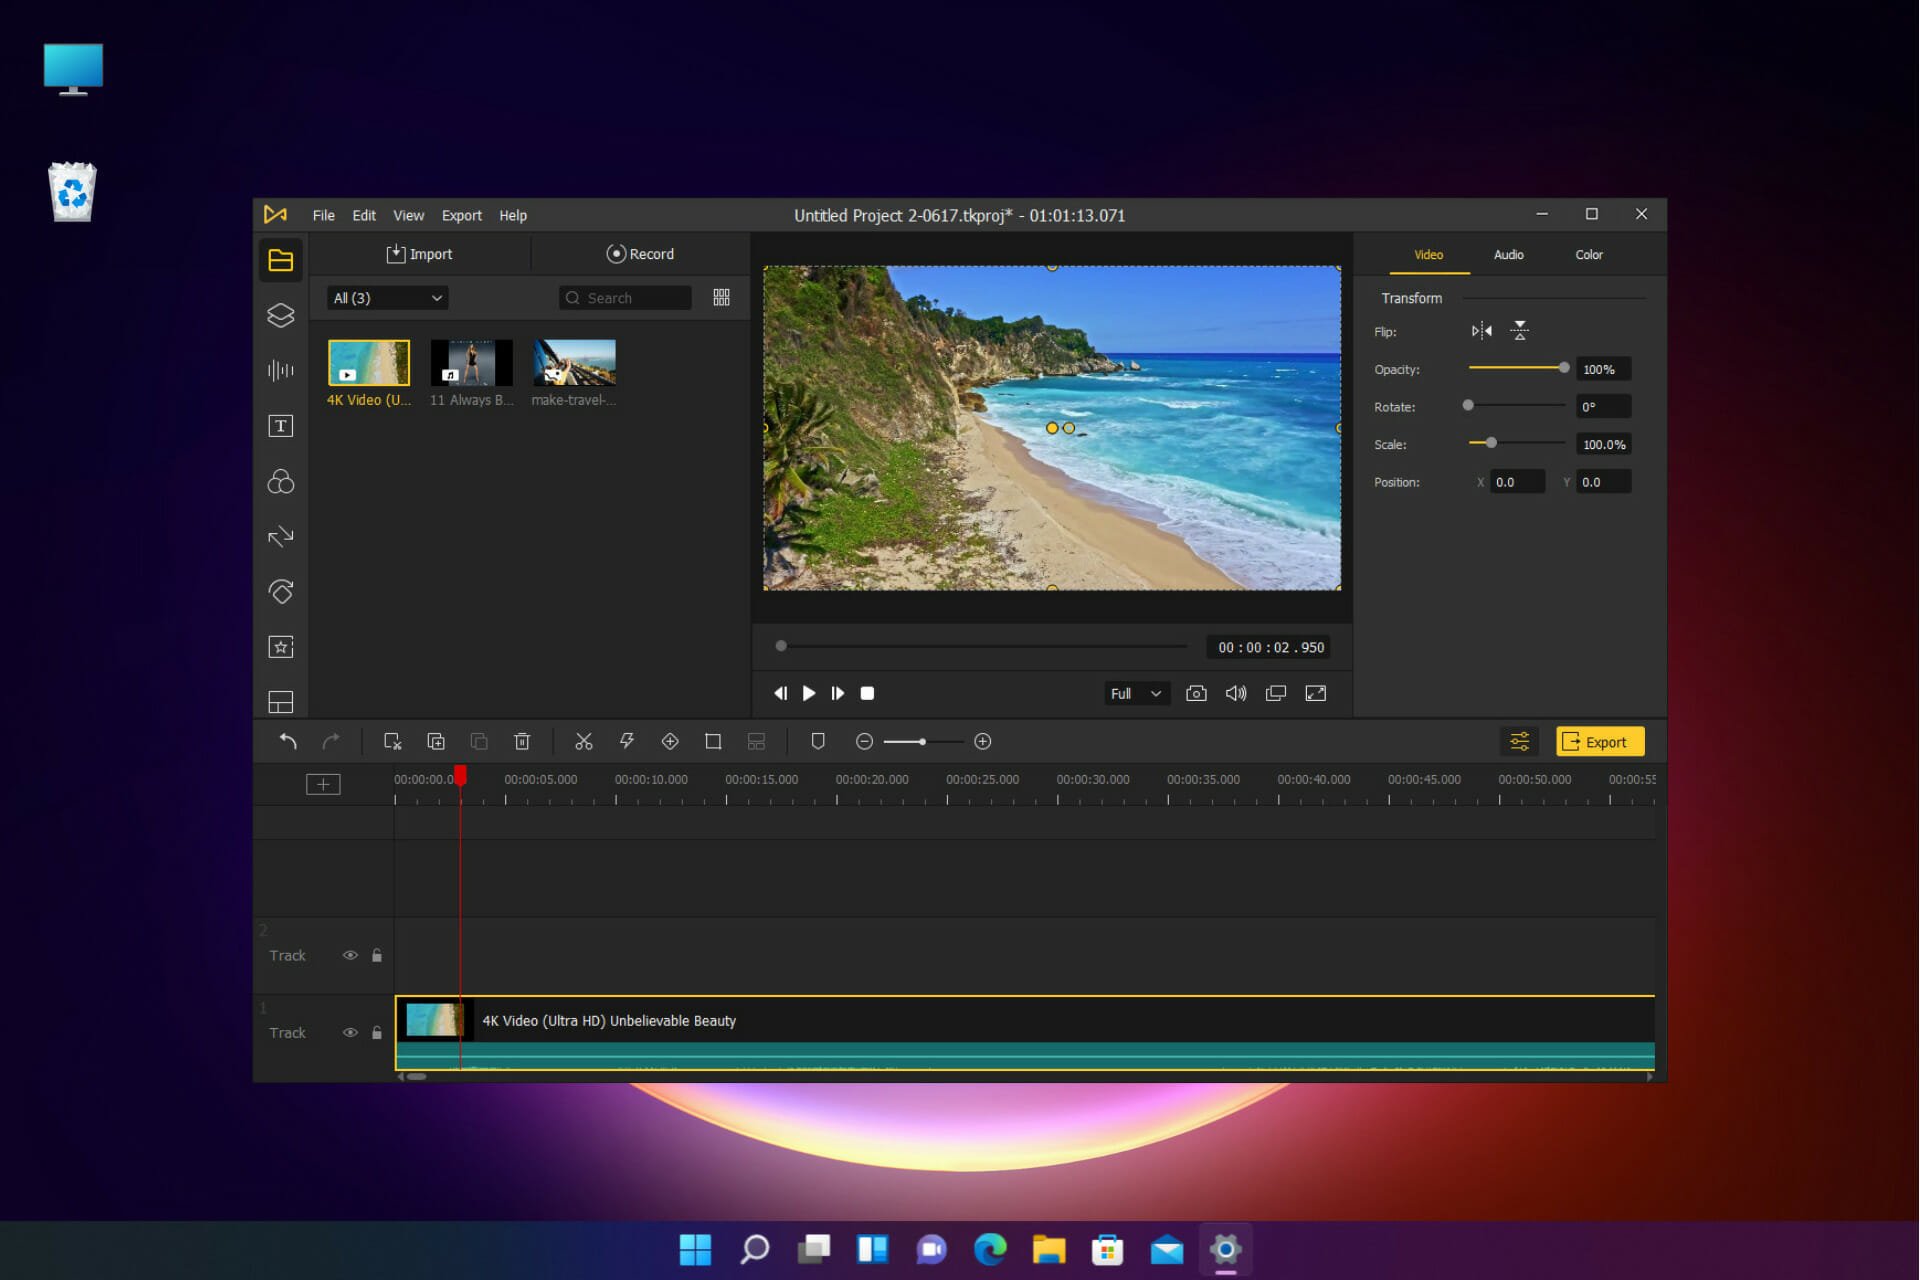
Is Discord mic not working in browser/app? Fix it fast

After the continued success and rise of Discord, more and more gamers started to use it as their main communication app. Many of them said that the user-friendly interface and the quick bug fixes got them on board.

Although the development team behind Discord is always on the watch for any issues that may come up, one, in particular, evaded them for a long time.

Of course, we are talking about the infamous microphone problems in Windows 10 app. If you find out that you can’t hear anyone on Discord, then the mic got into trouble.

This can be an extremely irritating issue, so we’re here to show you what to do to fix it.

How to give Discord access to the mic?

A quick way to solve the problem is to grant access to your mic for apps in some cases, the Discord settings and Windows 10 Sound settings don’t match. After that, you can reset your Discord settings or use Push to Talk.

Before you start, perform some basic checks to make sure that everything is working properly:

  • Check your hardware’s integrity.
  • In case you are using an external mic, try connecting it through another port.
  • If you’re using an external mic, try connecting it to another PC to check if it works.
  • Make sure you have all the drivers installed.

What can I do if the Discord mic is not working?

Table of contents:

  1. Enable microphone access in Windows 10
  2. Use a different web browser
  3. Log out and re-login
  4. Reset your voice settings
  5. Select your input device
  6. Enable Automatic Input Sensitivity
  7. Use Push to Talk

1. Enable microphone access in Windows 10

  1. Use the following keyboard shortcut to go to Windows Settings: Windows + I.
  2. Head to Privacy.
  3. Scroll down in the left panel, and under App Permissions click on Microphone.
  4. In the right section, under Allow apps to access your microphone toggle the switch to ON.

This is a simple solution, and by changing these settings you’ll allow Discord to use your mic.

2. Use a different browser

If the mic not working in Discord in the web browser, perhaps you should consider using a different web browser.

Although Discord works in all browsers, only Opera GX offers a full Discord integration out of the box, allowing you to quickly use it.

Opera GX also offers many gamer-oriented features such GX Control feature that lets you allocate resources and ensure smooth gameplay at all times, so it’s worth checking out.

After the initial setup, the home page called Speed Dial appears whenever you create a new tab. 

This page includes links to Twitch, Discord, Reddit, YouTube, and Changelog, as you can see in the following image. Keep in mind that you’re allowed to add more other sites to the list.

One of the most interesting things is that you can choose to limit network bandwidth, the amount of RAM usage, and CPU usage. In case you choose a too-low setting, a warning will inform you about the impact on the browser.

Moreover, the most impressive is the built-in ad blocker and VPN. While the first one can be enabled during the setup process, the VPN service is hidden within the settings menu. 

Check out Opera GX’s most important features:

  • Easy to use
  • Limit the network bandwidth
  • Ad blocker
  • Integrated VPN
  • Dedicated for Discord

Opera GX

With the newest Discord interation on Opera GX, you’ll get instant access to your messengers!
Download Free

3. Log out and re-login

  1. Hit the Windows key, type Discord, then click on the first result.
  2. In the Discord app, click on the User Settings icon (bottom-right cog icon).
  3. Then scroll down and click on Log Out.
  4. A new window will appear. Click Log Out again.
  5. After you logged out, restart Discord and log in with your credentials.

From time to time, some software bugs can render your mic unusable. Logging out and then re-logging in can refresh the interface and help if the Discord mic is not working.

4. Reset your voice settings

  1. Use the following keyboard shortcut: Windows + S.
  2. Type Discord, then open the first result.
  3. Navigate to User Settings (in the left-bottom corner, marked as a cog icon).
  4. In the left sidebar choose Voice & Video.
  5. In the right section, scroll down. You should see a Reset Voice Settings button. Click on it.
  6. For a quick test of the mic, scroll up and click on Let’s Check button under Mic Test.

This is a quick little tip, but it might help you if the Discord mic is not working.

5. Select your input device

  1. Hit the Windows key, type Discord, then click on the first result.
  2. Open Discord Settings (you can find it in the left bottom of the window, marked as a gear).
  3. In the left sidebar, choose again Voice & Video.
  4. Under Input Device, instead of Default, choose your preferred microphone.
  5. After that, make sure that the volume slider is all the way to the right.

If you use an external mic, it’s possible that in Discord that device isn’t set as default, so be sure to make the changes mentioned above.

6. Enable Automatic Input Sensitivity

  1. Hit the Windows key, type Discord, then click on the first result.
  2. Open Discord Settings (you can find it in the left bottom of the window, marked as a gear).
  3. In the left sidebar, choose again Voice & Video.
  4. Scroll down a bit and under Input Sensitivity, toggle on the Automatically determine input sensitivity.
  5. Now you can test your mic and if the indicator is green, that means that the problem is solved.

Sometimes adjusting the settings can help if your mic isn’t working in Discord, so be sure to try that.

7. Use Push to Talk

  1. Hit the Windows key, type Discord, then click on the first result.
  2. Open Discord Settings (you can find it in the left bottom of the window, marked as a gear).
  3. In the left sidebar, choose again Voice & Video.
  4. In the right section, you will see Input Mode and two options. Check the box right next to Push to Talk.
  5. You’ll need to assign a key that will activate the micropone every time you’ll want to use it. Under Shortcut, record a keybind and press your desired key.
  6. The next time you want to use your mic in Discord, you’ll have to press that key.

Why does the Discord mic not working?

In case you’re still wondering what are the reasons why your microphone is not working on Discord, check out the following list:

  • Network problems – These ones might occur randomly and unexpectedly. We recommend checking your Internet and Wi-Fi connection. Moreover, you can also use a different web browser, as suggested above.
  • Wrong microphone settings – The first things to do are allowing the mic’s access and choosing your input device.
  • Temporary bugs – These are pretty annoying, but you’ll be able to fix them in a few seconds. In this case, we recommend log out, then re-log in Discord and reset the voice settings.
  • Third-party app is blocking Discord – Remember that there are apps and programs that can alter the Discord audio functions. Though it won’t cause any damage to the hardware of your device, it can affect your microphone. Before running Discord in audio mode, make sure you ended all the unnecessary processes from Task Manager.

Our presented issue may occur several times, so we recommend saving this guide. Thus, you’ll ensure easily solving it anytime your microphone is not working on Discord.

If you have any more questions or suggestions, go for the comments section below and we’ll be sure to check them out.

Discord Camera Not Working: 6 Easy Methods to Enable It

Discord is a messaging app where users can utilize their cameras for video calls. It’s a popular software, particularly amongst the gaming and crypto community. But, some users found that the Discord camera is not working.

This presents a major problem because it affects their ability to interact with others. But the problem is usually due to a problem at the user’s end and can be fixed in no time. So, let’s find out!

Why is the camera not working on Discord?

Here are a few reasons the Windows 10 camera is not working on Discord:

  • Improper connection: Due to an improper connection or damaged cable, you may see the Discord camera’s black screen in Windows.
  • Missing permissions: Oftentimes, users do not provide Discord the required permissions to access the camera, and as a result, it’s not working.
  • Issues with the driver: A corrupt, incompatible, or outdated driver is just as likely to be the reason the Discord camera is loading forever. And updating the driver should do the trick in all three cases.
  • Misconfigured Discord settings: There are a few Discord settings that were found to conflict with the camera, and disabling them worked for users.

What can I do if the Discord camera is not working?

Before we start with the complex changes, here are a few quick ones to try:

  • Restart the computer and check whether you still find the Discord video not working.
  • Launch Discord with administrative privileges. To do that, right-click on the launcher and choose Run as administrator.
  • Make sure the webcam is plugged in properly. In the case of a wired one, connect it to a different USB port on the computer. Also, check whether the USB ports are not working.
  • Check for any pending Windows updates and install them.
  • In case you have a third-party antivirus installed, look for Webcam Protection (present in BitDefender) or a similar feature and disable it.

If these don’t work, move to the solutions listed next.

1. Check the camera app access settings

  1. Press the Windows + S keys at the same time to open the Search menu.
  2. Type camera settings, then select Choose which apps can access your camera to open the window in the snapshot directly below.
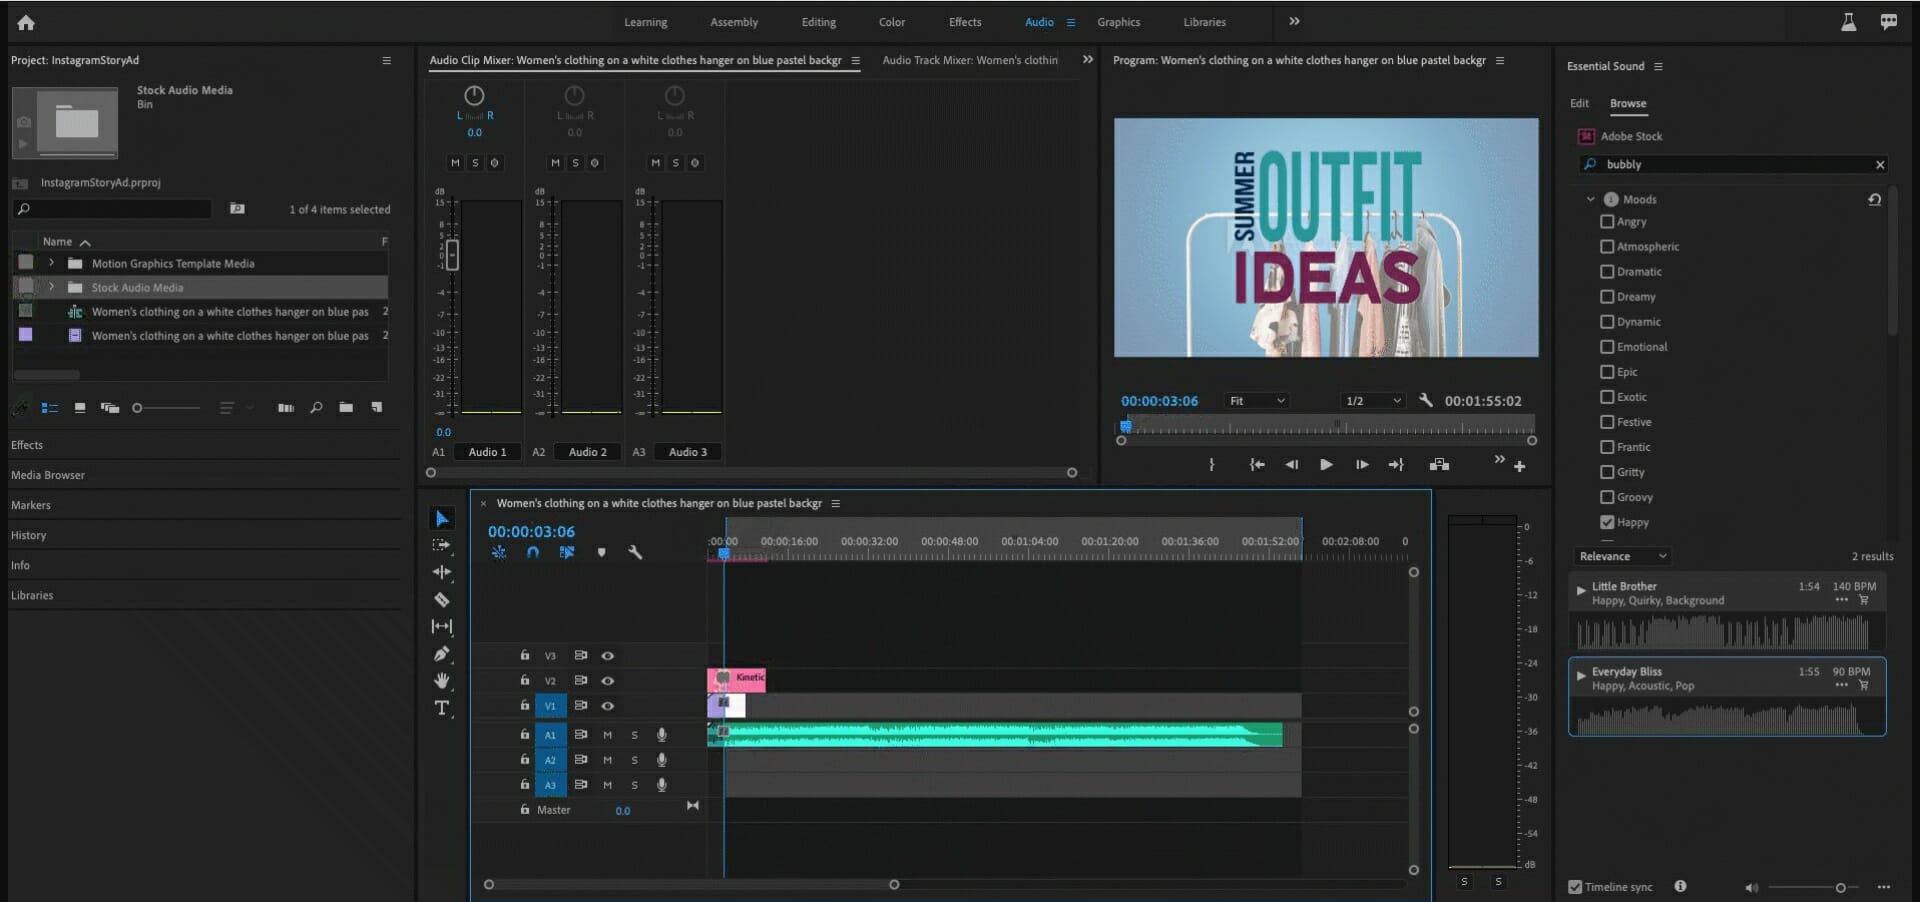
  3. Toggle on the Allow apps to access your camera option, if it’s disabled.

2. Update your camera drivers

  1. In the Windows search box, type Device Manager, then open it.
  2. Expand the Cameras section.
  3. Right-click on your camera, then choose to Update driver.
  4. Select Search automatically for drivers.
  5. If the best drivers are already installed, you’ll be notified.
  6. In case your system finds new drivers to update, follow the on-screen instructions.

Additionally, you can update your camera drivers or other ones automatically with specialized driver software when the Discord camera is not working.

Outbyte Driver Updater is a practical tool that can handle any drivers with automated updating tools, so you don’t need to worry about system issues or malfunctions.

It’s also possible to install or find missing driver versions from an extensive database with millions of driver files.

Plus, you can even create a restore point for any drivers in case you need a backup for unexpected circumstances.

Outbyte Driver Updater

Use this tool to quickly update camera drivers and fix the issue on Discord.
Free trial Download now

3. Reset voice settings

  1. Open Discord, and click on the Settings icon.settings
  2. Navigate to the Voice and Video tab, scroll down to the bottom on the right, and click on Reset Voice Settings.reset voice settings to fix discord camera not working
  3. Click Okay in the confirmation prompt.reset

If the Discord camera is not working, but Google Meet works perfectly, it’s likely the app’s built-in settings to blame. So, reset these, and the problem should be resolved.

4. Turn off Discord Hardware Acceleration

  1. Hit the Windows key, type Discord, then open the first result.
  2. Click the User Settings button.
  3. Click on the Advanced section.
  4. Turn off the Hardware Acceleration option.
  5. Click the Okay button to confirm. 

5. Reinstall Discord

  1. Use the following keyboard shortcut: Windows + S.
  2. Type Apps & Features, then open the first result as shown directly below.
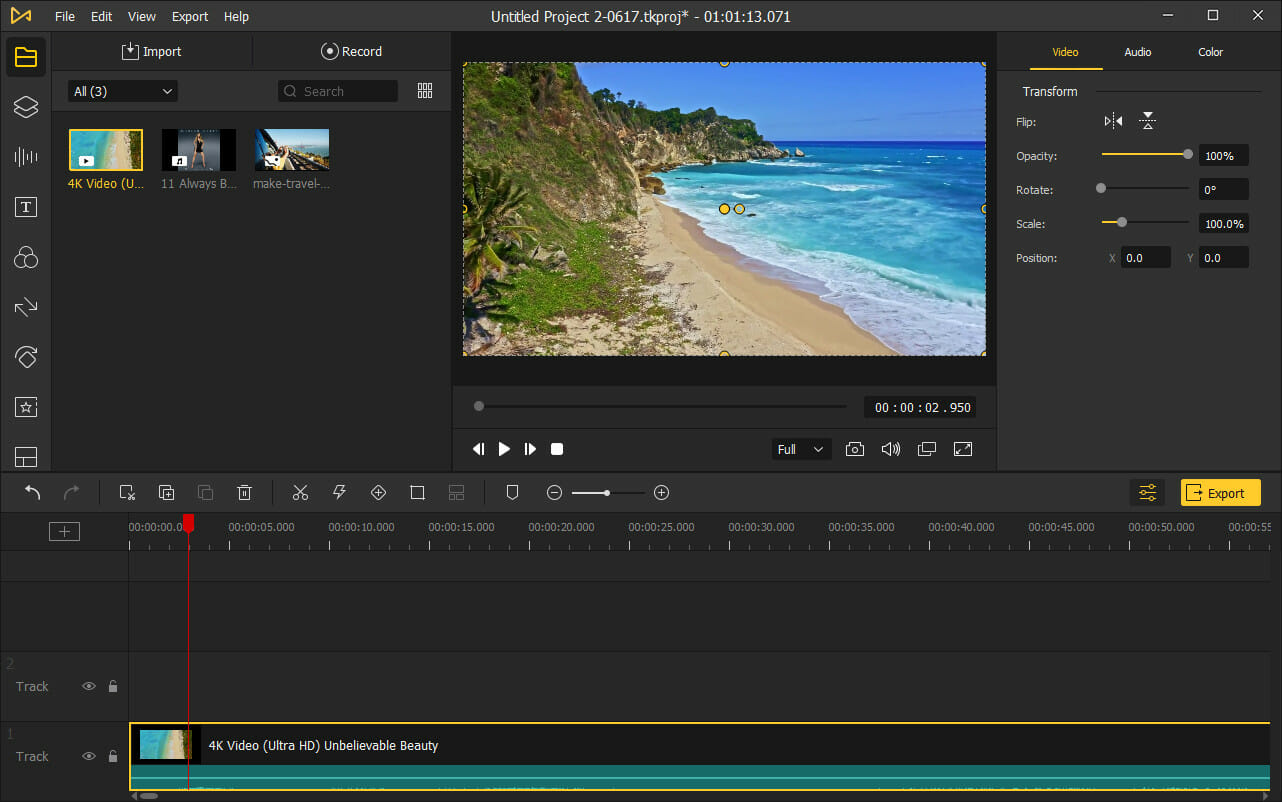
  3. Next, select the Discord app.
  4. Press the Uninstall button and confirm by clicking Uninstall again.
  5. Press the Windows + R keys simultaneously and type %appdata% in the dialog that opens.
  6. Right-click the Discord folder in File Explorer and select Delete.
  7. Now use again the following keyboard shortcut: Windows + R, then type %LocalAppData%, and hit the Enter key.
  8. Right-click the Discord folder in Local to select Delete.
  9. Restart your desktop or laptop.
  10. Click Download for Windows on the Discord website, and follow the on-screen instructions.

6. Uninstall the antivirus

  1. Press Windows + R to open Run, type appwiz.cpl in the text field, and hit Enter.appwiz.cpl
  2. Select the third-party antivirus, and click Uninstall.uninstall antivirus to fix discord camera not working
  3. Follow the on-screen instructions to complete the process.
  4. Once done, verify whether the problem is resolved.

When the Discord camera is not working, and you can’t access the webcam on other apps as well, it’s most likely the antivirus or security software to blame. So, remove it right away and switch to Windows Security, the built-in antivirus.

Those are some of the potential resolutions that can fix camera issues for the Discord software.

If you still need more potential fixes, however, send a support ticket from Discord’s Submit a request page. Or check our curated list of the best video conferencing software and get one today!

There’s also a Discord web app you can utilize in browsers by clicking the Open Discord in your browser button.

Opera GX Privacy Error: 4 Ways to Get Rid of it Permanently

Opera GX privacy error will prevent you from accessing certain websites, and this can severely impact your browsing performance, so today we’re going to show you how to fix that.

How do I remove privacy error in Opera GX?

1. Update your web browser

  1. Launch the Opera app.
  2. Click on the Opera icon on the top left, then select Update & Recovery.
    settings selected opera menu
  3. If your version is not updated, you will have an Update button in place of the Check for updates button.
    check for update opera gx
  4. Restart the Opera browser.

2. Enable DNS over HTTPS

  1. Click the Opera icon and choose Settings.
    opera gx menu settings
  2. Scroll all the way down and click Advanced.
    opera gx settings advanced
  3. Locate Use DNS-over-HTTPS instead of the system’s DNS settings and enable it if it’s off. If it’s on, disable it.
    use dns over https opera gx

3. Clear the cached browser data

  1. Launch your browser.
  2. Click on the Opera icon at the top left of your browser and select the Settings option.
    opera menu settings
  3. On the browser’s left pane, select the Advanced option, then select Privacy & security.
    opera settings advanced privacy and security in sidebar
  4. Click on Clear browser data on the right pane, then from the pop-up windows, select a Time range, select all the checkboxes, and click the Clear data button.
    clearing browsing data in opera
  5. Relaunch your browser and check if the Gmail error has been solved.

4. Disable third-party browser extensions

  1. Launch the Opera browser.
  2. Click on the Menu icon at the top right corner, select the Extensions option, and select Extensions again.
    opera menu extensions
  3. At the top of the extensions list, select All, then for every individual extension to be uninstalled, select the Remove button.
    extension selected remove in opera
  4. Once they are all removed, relaunch the browser and see if the error is fixed.

We hope this guide has been helpful. You can also try to circumvent this issue by using Opera GX incognito mode.

We covered a similar issue in our This page has been blocked by Opera guide, so check it out for more information.

Before we go, you might be interested in the Opera Mail client for Windows 11. We have an entire guide dedicated to how to download it.

Dev Channel Build 25120 tests a search box on the Windows 11 desktop

The second major build since the “split” in channels in the Windows Insider program happened has arrived. Now standing on its own, and free for Microsoft to explore with, the Windows 11 Dev Channel is introducing a new search box option on the Windows desktop.

As a reminder, since the Dev channel tests concepts and ideas, this doesn’t mean that this desktop search box will roll out to everyone in a future Windows release. Microsoft warns about that upfront and the fact that even after a reboot and installation of this build, not all Windows Insiders might see this feature. Anyway, this seems to be part of Microsoft’s new model of “exposing lightweight interactive content on the Windows desktop,” per today’s changelog.

You can see that with how the search box surfaces and lives cleanly in the middle of the desktop. It looks very reminiscent of the Spotlight feature in MacOS, and a bit the floating search bar that was first teased in Windows 10 Redstone 4 back in 2017. For those who do not like this, it can be removed by right-clicking on the desktop and “Show more options,” and toggling the “Show search” option.

Overall, this search box seems like a quick way to open Edge and other online content, and we’re sure that some people will like it — but it seems as though more things like this could be on the way soon. In the changelog, Microsoft mentions this as “the first exploration in this area,” when talking about interactive content on the Windows desktop. That’s just speculation though. Here are other notes from the changelog.

  • Suggested actions should appear for more date and time formats now.

  • Addressed some issues with certain formats when copying a date and/or time.
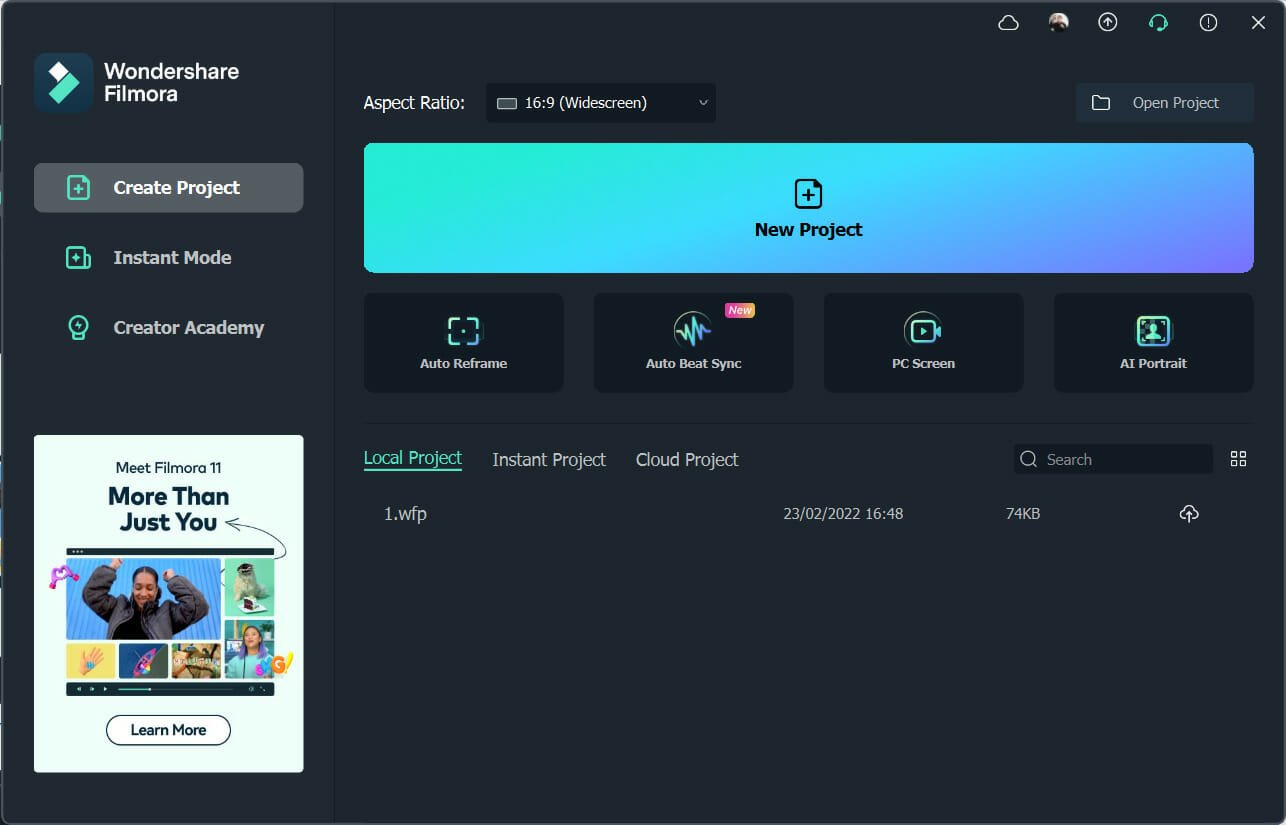
  • Improved overall performance and reliability of the feature.
  • Fixed an issue that could crash Settings when opening and looking at the battery usage graph.
  • Improved performance of displaying Wi-Fi networks after enabling Wi-Fi from the Wi-Fi section of Quick Settings.
  • Addressed an issue leading to some unreadable text in the Performance page when a contrast theme was enabled.
  • Fixed an issue which could cause Windows Update to stall and roll back updates for WSA users.
  • Did some work to address a stutter in the progress wheel animation when upgrading to a new build.

There are three known issues in this release. For the first, some games that use Easy Anti-Cheat may crash or cause your PC to bug check. In the second, certain apps in full screen (e.g., video players) prevent live captions from being visible. Lastly, Certain apps positioned near the top of the screen and closed before live captions are run will re-launch behind the live captions window positioned at the top.

ISO files for this build are also available if you want to manually download and clean-install the release. Happy downloading, Windows Insiders!

[Fix] Arma Reforger Can’t Join Server / No Connection With Backend

So, you think that after playing all these shooter games out there, your skills are fine-tuned enough to join the ranks of the Arma Reforger players?

We sure hope so, for your sake. And, if you aren’t jumping the gun here, you might just have a chance against the other pros engaged in this intense battle simulation.

Great, all that’s left is for each and every one of us to get their gear ready and load up the trucks. However, for some players, doing so is not quite as easy as you might think.

Lots of Arma Reforger players have actually reported dealing with no connection with backend errors which prevent them from playing the game.

If that is the case, we can show you the necessary troubleshooting steps you should take in order to get past this annoying situation and keep on playing.

How can I fix the no connection with backend error?

People reported even creating their own servers to be able to play but ended up receiving the same annoying errors.

But, rest assured, we will help you fix this situation quickly with the guide we prepared for you. Thus, carefully go through the troubleshooting process and restore game functionality.

1. Troubleshoot your Internet connection

  1. Test if your network connection is working
  2. Restart your router (make sure you unplug the power cord and leave it for 30 seconds switched off)
  3. Right-click the network icon in the Taskbar and select Troubleshoot problems
  4. Open a Command Prompt and type the following commands (one by one):
    • ipconfig/release
    • ipconfig/all
    • ipconfig/flushdns
    • ipconfig/renew
    • netsh winsock reset
  5. Try to run Steam again

2. Allow Arma Reforger through your Firewall

  1. Press the Windows key, search for Firewall and select Open.open firewall
  2. Click on Allow an app through Firewall.allow app through firewall
  3. If Arma Reforger isn’t in the list, click Change Settings, then Allow another app.Allow another app
  4. Click the Browse button, locate your game and press the Add button.browse firewall games

3. Update your network drier

  1. Press the Windows key, search for Device Manager and click on Open.run device manager
  2. Expand Network Adapters, right-click on the one you use and select Update driver.network driver
  3. Select Search automatically for drivers.search for driver automatically

If you’re into gaming, surely you can do without all the crashes, lags, or freezes by keeping all drivers up to date and error-free easily. 

Sometimes, manual checks are hard to perform, that’s why we recommend using an automated assistant that will scan for fresh driver versions daily.

In case you’re a beginner, you don’t have to worry! Outbyte Driver Updater is smart, simple, engaging and its user interface was built to make your life easier.

⇒ Get Outbyte Driver Updater

4. Check game file integrity

  1. In Steam, right-click Arma Reforger and select Properties.dying light steam properties
  2. Select the Local Files tab and click on the Verify integrity of game files.game file integrity

5. Opt out of all Steam Beta programs

  1. Click on Steam and select Settings.Steam settings
  2. Select Account and press the Change button under Beta participation.Steam account
  3. Click on None – opt out of all beta programs and press the OK button.opt out of beta

6. Run Steam as an administrator

  1. Locate your Steam installation folder.steam folder
  2. Right-click on the Steam executable and select Properties.steam properties
  3. Click on the Compatibility tab and tick the box next to Run this program as an administrator.run as admin - steam
  4. Press the Apply button and close the window.apply

These are pretty much the troubleshooting steps you are looking at if you happen to be in a situation like the one described in this article.

Be sure to always start with troubleshooting your Internet connection, just to make sure you don’t go through the entire process needlessly.

Go through the fix steps listed above and tell us which one did the trick for you in the dedicated comments section located below.
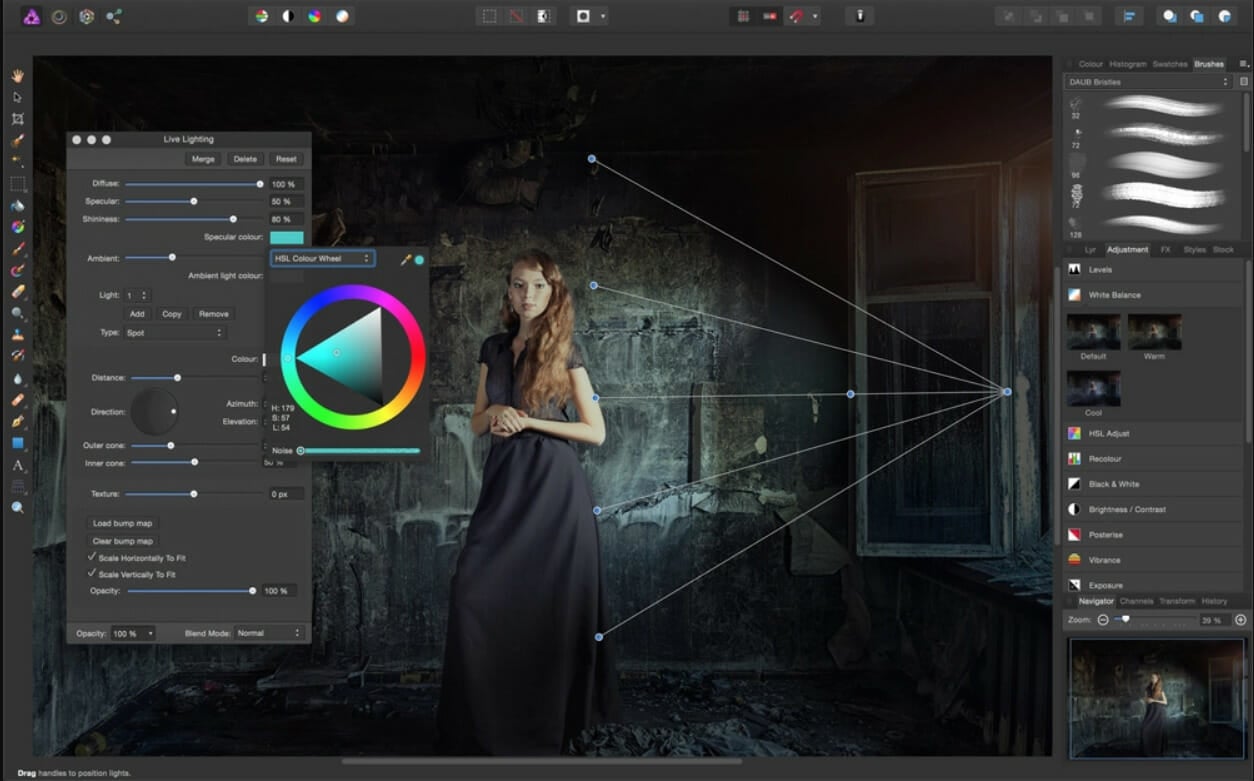
Discord Won’t Update on Windows 10: How to Fix it

Discord is the best cross-platform chat app for gamers, but many users reported that Discord won’t update on Windows 10.

This can be an annoying issue, and in today’s article, we will show you how to fix it once and for all so you’ll always be able to update Discord on your PC without any problem.

Before discovering the most efficient solutions, let’s examine some reasons for this error.

Why Discord won’t update on Windows 10?

In most cases, this app gets stuck in a failed update loop and doesn’t allow you to proceed with it. Because you need to be aware of the most common reasons why this is happening, we recommend checking the following information:

  • Antivirus/Windows Defender blocks the update – Antivirus software and Windows Defender might prevent Discord from downloading and installing the required update files. This can happen if the antivirus programs mistake the files for malware. 
  • Wrong privileges – If the Discord client you’re using on your computer is not running the administrator privileges, you won’t be able to complete the updation process.
  • Corrupted cache files – Discord cache files on your PC might have gotten corrupted. In this situation, you’ll need to uninstall Discord, delete all Discord-related files, and then download and re-install it from the official website. Remember that cache files might also determine the Discord opening links in wrong browser error.

As you can see, there are multiple reasons why Discord won’t update on Windows 10. Fortunately, we ensured we delivered the best solutions for each problem.

What can I do if Discord won’t update on Windows 10?

1. Run Discord as Administrator

  1. Make sure Discord is completely closed.
  2. Right-click on your Taskbar and selecting Task Manager.
  3. End any process related to Discord.
  4. Reboot your system.
  5. After the reboot, right-click on the Discord app and select Run as Administrator.

This can also help in a situation where Discord updates are taking forever.

2. Reinstall Discord on the existing installation

  1. Download the latest version of the Discord from the official website.
  2. Run the installer and allow Windows to proceed with the installation if you see a warning message.

Uninstalling Discord is the last resort if you are trying to fix the file cannot be empty issue; to learn other solutions, read this guide.

3. Rename the Update File

  1. Use the following keyboard shortcut: Windows + R
  2. Type %LocalAppData% in the Run box and hit the Enter key.
  3. In the Local folder, look for Discord folder and open it.
  4. Find Update.exe, right-click it, and select Rename.
  5. Set the name as UpdateX.exe or Update1.exe or anything else.
  6. Launch the Discord app and try to install the update. Or simply download the latest version from the official website.

Another commonly suggested workaround for this issue is to rename the update.exe file in the AppData Local folder to something else.

After that, run the installer and try to update the app either through the existing installer or by downloading it from the official website as suggested in the earlier solution.

4. Uninstall Discord and delete the local app data

  1. Press on the Windows + R keys.
  2. In the Run dialogue box, type %LocalAppData% and hit the Enter key.
  3. Look for Discord folder, then right-click on it and select Delete.
  4. Next, type %appdata% in the Run dialogue box and hit Enter.
  5. Again right-click on the Discord folder and select Delete.
  6. Download the Discord app from the official website.

Run the installer. As you have downloaded the installer directly from the official website, the installer is most likely will install the latest version of the Discord app.

Reinstalling the Discord app can also help you fix the Elevated API latency issue; read this guide to learn more.

Another way to remove Discord from your PC is to use uninstaller software such as Revo Uninstaller. By using uninstaller software, you’ll ensure that Discord and all of its files are completely removed from your PC.

5. Check your antivirus

Sometimes, Discord won’t update because your antivirus is interfering with the update process.

If you are using any antivirus software, disable the software temporarily or close/quit the app from the Taskbar.

If your antivirus is the issue, perhaps you should consider switching to another Windows 10/11 antivirus software that will not interfere with other applications on your PC.

The market offers plenty of worthwhile options that incorporate multiple layers of protection to ensure your system has no weak points.

When you pick your antivirus, make sure that it gets constant updates and uses a comprehensive threat database in order to identify and block any malicious attack.

Good antiviruses come with plenty of features that protect you in real-time without taking a toll on your system. They are typically lightweight and easy to use.

We advise you to keep your current antivirus or enable Windows Defender until you decide which third-party security software you want to install.

Not being able to update Discord may be annoying, but keeping your machine protected should be your priority.

6. Disable Windows Defender Firewall

  1. Hit the Windows key, type Firewall, theb open Firewall and Network Protection.
  2. Click on the Public connection that has Active next to it.
  3. Under Windows Defender Firewall, click on the toggle switch to disable Firewall.
  4. Make sure the Block all incoming connection, including those in the of allowed apps option is unchecked.
  5. Repeat the same steps for the Public and Private connection.

Another program that can create issues with Discord is your firewall. If Discord doesn’t update, your firewall may be blocking something in the background, so it’s advised to disable it temporarily.

What else should I know about updating Discord?

Keeping Discord updated means it will (generally) be properly optimized to work on your device efficiently. Moreover, it will generate fewer bugs or none and be more protected against malicious software.

You should know that updates can take just a few minutes, depending on the size of the update and the speed of your internet. Sometimes, it can take longer, so you must be a bit patient.

There is no specific button you can click on to update Discord while in the application. Instead, the process is automatic.

You can try these solutions if Discord won’t update on your PC. Feel free to try them all, and let us know if they worked for you.