Call of Duty will remain on PlayStation, but for how long?

As you might have heard, Microsoft has won the case against FTC, and now it’s free to close the deal with Activision Blizzard. This means that Microsoft is now sort of responsible for Activision Blizzard games, including titles such as Diablo, World of Warcraft, and especially Call of Duty.

Naturally, many players have started to ask what’s going to happen from now on with the games, and one of the most obvious questions had to do with Call of Duty. Will it stay on PlayStation, or it will become a Microsoft exclusive only?

And now the answer is here: it seems that Microsoft and PlayStation have signed an agreement to keep Call of Duty on PlayStation following the acquisition of Activision Blizzard, per Phil Spencer, head of Xbox.

We are pleased to announce that Microsoft and @PlayStation have signed a binding agreement to keep Call of Duty on PlayStation following the acquisition of Activision Blizzard. We look forward to a future where players globally have more choice to play their favorite games.

Phil Spencer

So you will be able to keep playing Call of Duty on PlayStation for a while now. Microsoft also fixed the old Call of Duty matchmaking servers last week, following the news of winning against FTC. So it seems the Redmond-based tech player is really gearing up for the future of gaming.

Call of Duty on PlayStation

According to the deal, the agreement between Microsoft and PlayStation is 10 years long, so for 10 years from now, you’ll be able to keep playing CoD on the PlayStation consoles. The deal is only in regards to the Call of Duty titles, and them alone.cod on playstation

But Sony is still worried that Microsoft will somehow sabotage the Call of Duty games on PlayStation, according to the Verge.

Microsoft might release a PlayStation version of Call of Duty where bugs and errors emerge only on the game’s final level or after later updates. Even if such degradations could be swiftly detected, any remedy would likely come too late, by which time the gaming community would have lost confidence in PlayStation as a go-to venue to play Call of Duty.

Sony

While this is unlikely to happen, Microsoft could have reasons to do it. Recently, the Redmond-based tech giant admitted that Xbox is losing the console war against Nintendo and PlayStation, so everything is possible.

However, users are excited. Some of them even think that this means Sony will take the matter into its own hands and will start releasing their exclusives on Xbox too, just to spite Microsoft.

Time for Sony to take a chunk of Microsoft revenue and release some of their games to Xbox.

Others would like to see Bethesda titles, such as the upcoming Starfield, on the PlayStation as well. Let’s not forget Starfield is a Microsoft exclusive, and it’s one of the most anticipated titles of the year.

I would rather see some Bethesda games on PlayStation than Call of Duty, but that’s just me.

It would be interesting if these would happen in the long run. What do you think? Let us know in the comments section below.

Outlook not Showing Up in Office 365? How to Enable it

Office 365 combines your apps and makes it easy to access them all from a single location. However, some users complain that Outlook is not showing up in Office 365 for some reason.

Being an email client that users use multiple times in a day, this can be troublesome. If you are also facing this issue, rest assured that the solutions in this guide will help you fix it quickly.

Why is Outlook not appearing in Office 365?

There are a series of reasons Outlook might not be appearing on Office 365. Below are a couple of notable ones:

  • Invalid license: If a particular user on an Office 365 business account is experiencing this issue, it might be because the person is using an invalid license. In this case, the user needs to verify their license.
  • Outlook removed from launcher: In some cases, this issue might occur because you somehow removed the Outlook icon from the launcher. You can fix this by pinning the app back where it should be.

How do I get Outlook back on Office 365?

1. Pin Outlook to the launcher

  1. Visit the Office 365 portal and log into your account.
    sign in Outlook not appearing in Office 365
  2. Click the More button at the top to show your apps.
  3. Select the All apps option.
    all apps
  4. Now, right-click Outlook.
    option
  5. Finally, select Pin to Launcher.

Sometimes, the reason Outlook might not be appearing in Office 365 might be simple. You might have mistakenly removed it from the App launcher.

You only need to re-add it, and you will be able to access the app easily again.

2. Check the license

This issue can sometimes occur if usING the wrong license in Office 365. This makes all apps disappear and not just Outlook.

Hence, you must confirm that you are using the correct license. If not, you can request the original from the admin.

3. Use PowerShell

Tip icon Tip
The steps below can only be applied by an administrator because it requires you to sign in to Office 365 with the Global Administrator account.
  1. Press the Windows key + S, type powershell, and select Run as administrator under Windows PowerShell.
    powershell Outlook not appearing in Office 365
  2. Type the command below and hit Enter to store user credentials: $Credential = Get-Credentialcredentials
  3. Now, enter your Office 365 credentials when the window pops up and click OK.
    sign in
  4. Next, type the command below and press Enter to start a new Office 365 PowerShell session:$ExchangeSession = New-PSSession -ConfigurationName Microsoft.Exchange -ConnectionUri “https://outlook.office365.com/powershell-liveid” -Credential $credential -Authentication “Basic” –AllowRedirection
  5. Run the command below to start the Exchange Online session: Import-PSSession $ExchangeSessionimport Outlook not appearing in Office 365
  6. After establishing the connection and starting the session, run the command below to revoke the permission of the user having this issue from accessing the Shared Mailbox. Note that we will be revoking permission for [email protected] for [email protected] user: Remove-MailboxPermission -Identity [email protected] -User [email protected] -AccessRights FullAccess
  7. Finally, re-assign permission to Shared Mailbox for the user with the command below: Add-MailboxPermission -Identity [email protected] -User [email protected] -AccessRights FullAccess -AutoMapping:$false

If your Outlook is not appearing in the web version of Office 365, it might be because you don’t have access to Shared Mailbox. This is because the Outlook web app is only available to users with mailbox permission.

So, if you are the admin and have a user dealing with this issue, you can perform the steps above if you once gave the user permission in the past.

With this solution, we can now conclude this guide on how to fix Outlook if it is now showing up in Office 365. Provided you follow the steps above, the issue should be history.

If you are unable to add an email account to Outlook 365 for some reason, check our comprehensive guide to fix it.

Feel free to let us know the solution that helped you fix this issue in the comments below.

E425-B301 Epson Scan Error: How To Fix It Fast

The Epson Scan 2 error E425-B101 is a fairly common issue that pops up, especially when users try to scan double-sided documents.

What makes it more frustrating is that it can sometimes block all scanning functions until it’s resolved. The good news? It’s fixable, and in this guide, we’ll walk you through exactly how to get things working again.

How can I fix the Epson Scan 2 error E425-B101?

1. Restart the WIA service

  1. Press the Windows key + R, type services.msc, and click the OK button.
    services Epson Scan 2 error E425-B101
  2. Double-click the Windows Image Acquisition service to open its properties.
    windows image
  3. Now, set its Startup type to Automatic and click the Start button.
  4. Finally, click Apply, followed by OK.
    automatic

The WIA service plays an important part in the scanning of documents on your PC. When it is disabled, you are likely to get the error E425-B101 on Epson Scan 2 and face issues with other scanners.

Hence, you need to keep it active at all times.

2. Update the scanner driver

  1. Press the Windows key + X and select the Device Manager option.
    device manager Epson Scan 2 error E425-B101
  2. Double-click the Imaging Devices section and right-click the device under it.
  3. Next, select the Update driver option.
    update driver
  4. Finally, select Search automatically for drivers, install any available updates, and restart your PC.
    search auto

Sometimes, the Epson Scan 2 error E425-B101 can be caused by problems with the scanner connected to it. This usually comes in the form of an outdated or faulty driver issue. So, you need to ensure your scanner driver is up-to-date.

3. Reset Epson Scan 2

  1. Press the Windows key, type epson, and choose the corresponding option.
  2. Choose the Epson Scan Utility option.
  3. Now, click the Other tab.
    other  Epson Scan 2 error E425-B101
  4. Finally, click the Reset button and wait for the process to complete.

If you still can’t fix the Epson Scan 2 error E425-B101 after updating your drivers, you need to reset the software. This will help clear the potential glitches that might be causing the problem.

Aside from the Other tab above, you can also reset the Counter tab.

4. Contact Epson support

If all the solutions above prove abortive in fixing the Epson Scan 2 error E425-B101, you need to contact Epson support. The problem might be beyond your software and require technical support.

Why am I getting the Epson Scan 2 error E425-B101?

Listed below are some of the potential causes of this error:

  • Disabled service: Some users have found this issue to occur when the Windows Image Acquisition (WIA) service is disabled. Enabling the service should restore normalcy here quickly.
  • Outdated scanner driver: If you are using Epson Scan 2 with a scanner, you can get this error if the driver is not up-to-date. You need to update the driver to the latest version to fix this.
  • Outdated software: You can also get this error message if the scanning software is outdated. The solution is to go to the official website to download the newest version.

There you have everything you need to fix this issue for good. With the information in this guide, you should be able to get the scanning software working perfectly again.

Similarly, if Epson scan is not working at all on Windows 11, check our detailed guide to fix it. You can also check out this guide to download Epson Scan 2 on Windows 11 and this fix for the “not enough memory” error if you run into setup problems.

Feel free to let us know the solution that helped you fix this issue in the comments below.

Claude 2: Why it could outperform ChatGPT and Bing AI

Good news for AI lovers everywhere, there is a new and improved AI on the market. Claude 2 AI is the next version of Claude AI, an AI model which was released earlier this year, in March.

Anthropic, the company behind Claude AI, promises that this new version is better than its predecessor, much more creative than ever, and safe.

We are pleased to announce Claude 2, our new model. Claude 2 has improved performance, longer responses, and can be accessed via API as well as a new public-facing beta website, claude.ai. Think of Claude as a friendly, enthusiastic colleague or personal assistant who can be instructed in natural language to help you with many tasks.

Anthropic

The new Claude aims to help with tasks on topics such as coding, math, and reasoning. Anthropic also claims that Claude 2 scored a 76.5% on the multiple-choice section of the Bar exam. On coding, Claude 2 managed to get a 71.2% up from 56.0% on the Codex HumanEval, a Python coding test.

And the model is quite proficient at math too: on GSM8k, a large set of grade-school math problems, Claude 2 scored 88.0% score, which is quite impressive. Anthropic also aimed to make Claude 2 AI safer, and by it, they wanted the model to give harmless responses. According to them, Claude 2 is 2x better at giving harmless responses, when compared to the previous version.

So, where does Claude 2 stand in the pantheon of AI models?

Claude 2 performance – better than ChatGPT or Bing AI?

Naturally, there has to be a comparison between Claude 2 AI, ChatGPT, and Bing AI. For example, ChatGPT is capable of many things, and developers at OpenAI want it to reach AGI (artificial general intelligence) in the next 4 years.claude 2 performance

Bing AI, while based on GPT technology is also capable of many things. For example, it can process visual input from users, but it can also generate visual input. It can be used as an assistant in software such as Copilot. And it seems that the tool can get very creative when pushed, despite users agreeing that Bing has somewhat become too restrictive.

Where does Claude 2 stands here? Claude 2 is pretty much capable of everything ChatGPT and BingAI are capable of. The Guardian reports that Claude 2 is capable of summarising entire novels, so its context length seems superior. Anthropic agrees, it’s 100K tokens in each prompt.

Claude is renowned for its spectacular creative writing abilities, so if you are not pleased with the poems and little short stories Bing is writing, try Claude 2.

Claude 2 will give insights on any text file that you upload, from summarising novels, as we said earlier, to come with its own insights on pieces that you wrote. Plus, the high scores in math and coding prove that Claude 2 is a worthy assistant to your technical tasks.

Outperforming ChatGPT, Bing AI, and Bard?

While we don’t have an official list of stats for a proper comparison, it’s clear that Claude 2 is in the same league, or it might even surpass ChatGPT.

It already surpasses Bing AI and Google’s Bard on many tasks. With the proper updates and improvements, Claude 2 will easily surpass all three.

What do you think about it? Will you give it a try? Let us know in the comments section below.

How Does a Corporate VPN Work? [All You Need to Know]

With the rise in popularity of consumer VPNs, it’s easy to forget that the concept of a virtual private network actually originated in the workplace.

In fact, in today’s interconnected business landscape, the need for secure and reliable network connections has never been more important.

VPNs help secure an organization’s internal resources, connecting different offices, and allowing staff or partners to access the network remotely.

Read on to learn more about corporate VPNs and how they work.

What is a corporate VPN?

A corporate VPN is an encrypted tunnel that secures all traffic between an authorized user’s device and the organization’s network. 

This prevents anyone from intercepting or viewing the data as it travels over the internet.

There are two main types of corporate VPNs: remote access VPNs and site-to-site VPNs. They often work in tandem.

  • Remote access VPNs allow individual users to connect to the company’s network from a remote location. The main benefit here is for employees who work from home or are traveling.
  • Site-to-site VPNs connect two or more office locations together. The main use case is to create a single, secure network that spans multiple locations owned by large corporations. 

How does a corporate VPN work?

A corporate VPN works via one or more VPN servers at the main office, data center, or third-party provider. These act as the gateway for all VPN connections and manage the secure communication between sites or a user and the network.

Each user, remote location, or branch office installs VPN client software or uses dedicated VPN hardware. These clients facilitate a secure tunnel from the remote site to the VPN server.

When a site or user establishes a connection to the server, the client authenticates itself and negotiates an encrypted tunnel. This tunnel is created using various encryption protocols, such as IPsec (Internet Protocol Security) or SSL/TLS (Secure Sockets Layer/Transport Layer Security).

Once the tunnel is established, all data transmitted to and from the network is encrypted. This ensures that sensitive information remains secure as it travels over public networks.

With the VPN tunnel in place, remote workers and employees at the remote site can securely access resources and services located within the corporate network. 

This includes accessing shared files, databases, internal websites, and other resources that are typically only accessible from within the organization’s premises.

The VPN server effectively extends the organization’s private network to the remote locations. This creates a virtual network that behaves as if all sites are connected directly to the same local area network (LAN). 

This integration allows seamless communication and resource sharing between different branches or remote offices.

Corporate VPN benefits and drawbacks

Now that you have a general idea of how corporate VPNs work, let’s take a look at the benefits they have to offer:

Security – Corporate VPNs encrypt all traffic, which makes it very difficult for hackers to eavesdrop or steal data.

Compliance – Many industries, such as finance and healthcare, must comply with strict security regulations. Corporate VPNs can help businesses meet these regulations.

Remote working – Corporate VPNs allow employees to work from anywhere in the world, which can improve productivity and collaboration.

However, there are also some drawbacks to corporate VPNs, including:

Cost – Corporate VPNs can be expensive, especially for larger businesses. Although third-party providers are driving costs down.

Complexity – Internally managed corporate VPNs can be complex to set up and maintain.

Performance – Corporate VPNs can sometimes slow down speeds, especially if there’s a lot of traffic on the network.

Types of business VPNs

There are several kinds of business VPNs that work slightly differently, though they may overlap or be applied at the same time. 

The most common are as follows:

Site-to-Site VPN

A site-to-site VPN, also known as router-to-router, enables secure communication between two or more geographically separate networks. 

It establishes a virtual tunnel between the routers or firewalls of the connected sites, allowing data to travel securely over the internet but only between the two sites.

This setup is commonly used by organizations with multiple locations or branch offices. it facilitates the sharing of resources, files and databases, and internal network activities as if they were connected directly via a private network.

Remote Access VPN

A remote access corporate VPN works by enabling authorized users such as employees to securely connect to a company’s internal network from remote locations. 

It provides a secure tunnel for remote access, allowing access to resources, files, apps, and services as if they were physically present within the office.

Remote access VPNs are essential for businesses with remote workforces, enabling staff to connect safely from any location, including home, hotels, or public Wi-Fi networks.

Internet VPN

An internet VPN is essentially the same as a personal one but is provided within a workplace, so users can securely access the internet. 

This helps protect the business network from outside threats.

Extranet VPN

An extranet VPN extends a company’s private network to external partners, vendors, or suppliers. 

It enables secure communication and resource sharing between the company and its trusted external entities, granting them controlled access to specific network resources or shared information. 

What’s the difference between a personal and a corporate VPN?

Personal and corporate VPNs are similar, in that they provide an encrypted connection. 

However, they are different in one key area. 

A personal VPN is for secure connections to the internet, while a corporate VPN is for secure connections to the corporate network.

Personal VPN 

Sometimes called a consumer VPN, a personal VPN is aimed at the everyday person. It provides a secure and private connection to the internet. Its main features are data encryption, anonymity, and the ability to bypass regional restrictions, ISP throttling, and censorship.

Individuals commonly use them to protect their online privacy, secure their internet communications on public Wi-Fi networks, access geo-restricted content, or to mask their IP address location.

Corporate VPN

A corporate VPN, also known as an enterprise or business VPN, is tailored for organizations and their employees. It enables secure and private communication within a company’s network or between remote employees and the company’s internal resources. 

Corporate VPNs allow employees to access company files, systems, and applications remotely while maintaining data security. They often use advanced authentication and encryption protocols to safeguard sensitive business information and protect against unauthorized access.

A corporate VPN’s main purpose is to protect the network, while a personal VPN’s main purpose is to protect the user. 

Key differences between corporate and consumer VPNs

Here’s a closer look at the technical differences and use cases:

Infrastructure – Corporate VPNs are built to accommodate the connectivity needs of multiple employees or branches, requiring a more robust infrastructure and configuration.  

Personal VPNs typically serve an individual with a handful of personal devices.

Management – Corporate VPNs are either managed by the organization’s IT department or an enterprise provider. These maintain oversight and control over user access, security policies, and network configurations. 

Personal VPNs, on the other hand, are managed by the individual user, while the VPN provider handles the servers.

Security Requirements – Corporate VPNs place a strong emphasis on security, often incorporating features like multi-factor authentication, intrusion detection systems, and centralized management of user accounts. 

Personal VPNs, while providing encryption and privacy features, may have different security requirements based on the individual user’s preferences.

Access to Resources – Corporate VPNs typically provide employees with access to internal company resources, such as shared drives, databases, or enterprise applications. 

Personal VPNs focus on securing internet connections for personal browsing, accessing online services, or bypassing geo-restrictions.

Best corporate VPNs

While there are benefits for businesses handling their own VPNs, cloud-based providers are becoming much more cost-effective. 

Here are the top corporate VPN providers to consider for your small or medium-sized organization: 

1. Perimeter 81 

Perimeter 81 is the most well-known business VPN and security solution, and for a good reason. It provides secure access to your corporate assets with military-grade encryption while keeping user accounts protected through two-factor authentication.

You can even manage authorized devices. So, not only is the user authenticated, but they must also be using a specific device, such as a work laptop.

No outsider is gaining access to your data and the Perimeter 81 company cannot see it either.

Because the server infrastructure is cloud-based, it’s easily scalable and maintains performance for one or many users.

Resources are also ring-fenced to your organization’s account, not shared with other users. This includes dedicated servers and IP addresses.

Admins get full control via an intuitive user management system that has endless settings. You can do everything from corporate split-tunneling (keeping some apps exclusive to the office) to blocking social media on the network.

Pros:

  • 10 device connections per staff member. 
  • Easy-to-use client apps.
  • Detailed user session monitoring.
  • Extremely secure.

Cons:

  • Not the cheapest.
  • Speed can vary from country to country.

Perimeter 81

Benefit from advanced security features and high scalability with this versatile corporate VPN.

2. NordLayer

Nord is a leading name in consumer VPNs but it also offers a business solution called NordLayer. 

This impressive cloud VPN and security suite is aimed at small to medium businesses and can be tested with a demo account before committing.

It seamlessly integrates with your legacy network and provides a single centralized control panel that lets you add new users quickly by email. You can then easily manage their permissions and trusted devices.

As well as a catch-all VPN, you can also allow users to connect to separate gateways with dedicated servers and IPs. You can then assign each their own selection of apps and company assets. This is an excellent way to manage different teams.

User accounts are secured by either 2FA, SSO, or biometric authentication. All they have to do is download the relevant NordLayer client app for their device. Each user can connect up to 6 devices simultaneously.

Additional security features include a kill switch, firewall, and threat protection.

Pros:

  • Remote and site-to-site VPNs.
  • Client apps for all major operating systems.
  • No-logs policy.
  • Fast and stable.

Cons:

  • Desktop apps are less-intuitive than mobile.
  • No kill switch on iOS.

NordLayer

Enjoy bulletproof security and seamless intergration with this leading business VPN provider.

3. GoodAccess 

GoodAccess is a static IP VPN solution, aimed at small to medium businesses. Headquartered in the Czech Republic, it gives users encrypted access to internal apps and assets from anywhere in the world via 35 server locations. 

Users must authenticate before signing in, and you can offer 2FA, MFA, or SSO via Google, Azure AD, Active Directory, LDAP Okta, or SAML.

The network is further protected by 256-bit encryption, DNS leak prevention, and the ability to log access and monitor users.

Admins get full control via a web-based dashboard and can manage teams by deploying separate gateways with static IPs and/or permission groups. 

For example, you can keep your marketing team and finance department separate with their own apps and resources.

The GoodAccess app is available for all conceivable devices, including Windows, macOS, Linux, Chrome OS, Android, and iOS. 

Pros:

  • 16 Built-in integrations for SaaS apps.
  • Free starter plan.
  • Zero-trust model.
  • Split tunneling.

Cons: 

  • Not the best for large businesses. 
  • Would benefit from more server locations.

GoodAccess

Benefit from a balanced combination of security and ease-of-use with GoodAccess.

4. VyprVPN for Business Cloud

The Business Cloud is VyprVPN’s corporate VPN solution. It provides dedicated cloud VPN servers, IP addresses, and full control over your staff. 

Several cloud hosts support the service with one-click install, including DigitalOcean, Amazon Web Services (AWS), and VirtualBox.

The central administrator control panel lets you add and remove users, change permissions, and set up different servers for different teams in your organization, using concurrent connections.

Permission levels include Owner, Admin, Technical, Billing, and User.

The VPN technology itself is robust, offering 256-bit AES via OpenVPN, port forwarding, and a kill switch that halts traffic if the secure connection drops.

There are apps for all the major operating systems — Windows, MacOS, Android, and iOS. 

Users can connect with up to 5 devices at a time. If you ever run into problems, 24/7 live chat support is just a click away.

Pros:

  • Easily host your corporate VPN.
  • Verified no-logs policy.
  • 30-day money-back guarantee.

Cons:

  • Lacks extra security features.
  • User permission groups aren’t customizable.

5. Windscribe ScribeForce

ScribeForce is Windscribe’s business offering. This is much closer to a consumer VPN than the other picks, but extends its services to teams.

This means users get a secure connection when connecting to the internet or corporate network and the admin gets full control over user accounts. To connect to internal resources, the Windscribe app allows port forwarding.

You can choose from servers in 110 cities across 63 countries, which is ideal if you have remote workers all across the world. Moreover, users can receive static IPs for better security and session monitoring.

To prevent users from accidentally compromising your corporate network, the ROBERT feature blocks malicious sites and web ads. Alternatively, you can configure a firewall to prevent any connectivity from outside the encrypted tunnel. 

Pros:

  • Very affordable.
  • Easy-to-use apps.
  • Consistent server performance.

Cons:

  • Fewer features than the average corporate VPN.
  • Must manage internal resources separately.

Summary

So, how does a corporate VPN work? 

In much the same way as a consumer one. But instead of encrypting and securing the user’s connection to the internet, it encrypts and secures connections to the corporate network. 

This may be between a remote user and the network or between two or more office network locations.

The best solutions allow organizations to fully manage user access, segmenting teams and departments accordingly.

Although many organizations maintain their own in-house VPN, corporate VPN providers like Perimeter 81 and NordLayer can be much more cost-effective.

How to Use Opera GX Password Manager to Retrieve Passwords

Opera GX, a special version of Opera browser designed specifically for gamers, does have a Password Manager to let you save and view passwords. Just like other browsers, Opera’s gaming browser has this built-in setting where gamers can save their passwords and retrieve them whenever needed.

Password managers offer convenience as they eliminate the need to remember lengthy and complex passwords. You just have to remember one master password, and it will take care of the rest.

They automatically populate usernames and passwords for the websites from the list of saved passwords, eliminating the need to manually type them every time. Thus, it saves time and unnecessary effort. Our guide will show you how you can save, retrieve, import, export, and remove passwords using Opera GX Password Manager.

If Opera GX is your preferred browser, you can set it as your default browser. You can also disable Opera GX at startup if you don’t want the browser to get opened every time you’re starting your machine. Exporting bookmarks from the Opera browser is not difficult either.

  Opera GX

Opera GX

Install Opera GX, a special Opera browser dedicated to gamers.

How to Save and View Passwords in Opera GX Browser?

Saving and managing passwords using the Opera GX password manager is simple. You have to tweak a setting to get started. So, let’s dive straight into how you can use a password manager on the Opera GX gaming browser and enjoy hassle-free logins on your favorite gaming sites.

  1. Click on the hamburger menu provided in the top right corner of the browser and look for Go to full Browser Setting.
  2. Click on Privacy & Security from the sidebar.
Opera GX Privacy Settings
  1. Scroll down and click Advanced.
Opera GX Password Manager
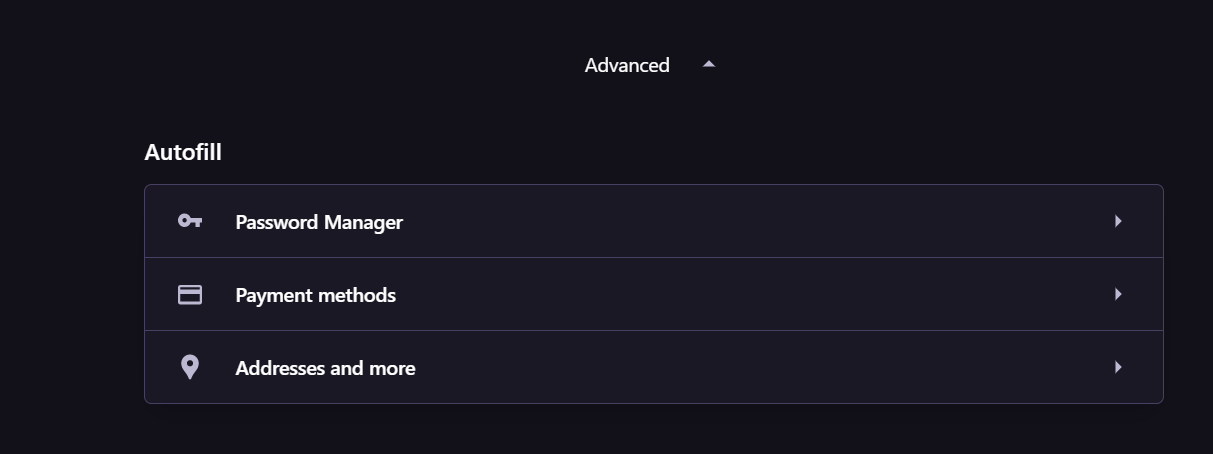
  1. Now, you will see the Autofill option that includes Password Manager.
Opera GX Password Manager feature
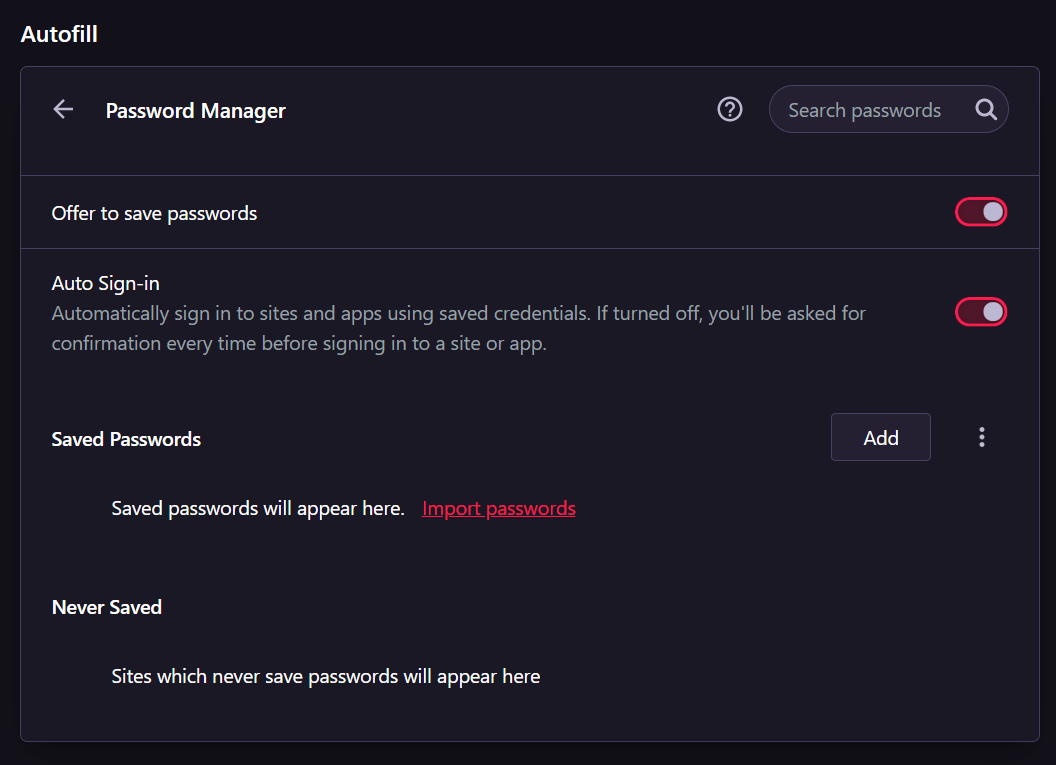
  1. Click on Password Manager in order to allow the Opera GX browser to save your password.
  2. A new panel will open that lets you save passwords that offer three options.
  3. Toggle ‘Offer to save passwords.’

These steps will save your passwords with the Opera GX browser.

Note: By default, the Opera GX browser saves your password. You can disable it by following the aforementioned steps.

Opera GX Password Manager gives you the choice to save your password whenever you log into a website. If you click ‘Never,’ that site will be added to Opera GX’s never saved list.

It’s worth mentioning that in order to use Password Manager you have to first sign in to the browser. As the passwords get linked to your Account.

How Can I Retrieve Stored Passwords in Opera GX?

Once you’ve chosen to save passwords using Opera GX password manager, you can retrieve them anytime. After following the steps mentioned above, toggle the Auto sign-in option as well. This will allow Opera GX to automatically fill in your saved credentials.

You can also manually add a website name, username, and password to Opera GX in order to let the browser save your credentials for specific websites.

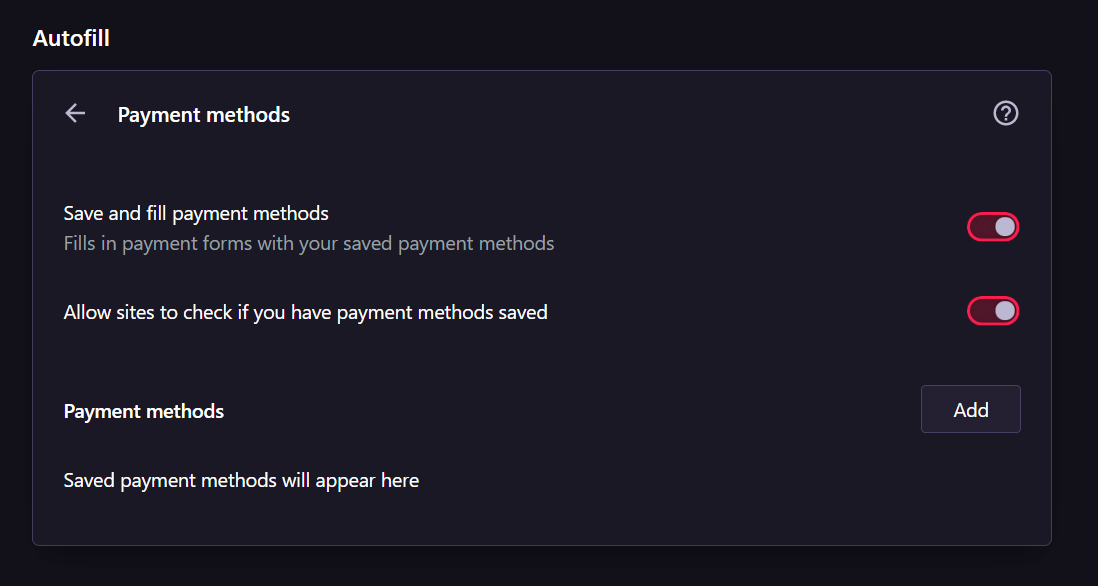
In order to let Opera GX browser save your sensitive credentials like credit or debit card information and address, go back to Advanced Settings and look for Payment methods and Addresses and more options.

Opera GX Password Manager Payments Method


By default, Opera GX saves payment methods but if you don’t want the browser to save this information, you can choose to disable them completely.

You can also manually add Payment methods to the Opera GX browser to quickly make payments. By doing so, you don’t have to enter your card details every time you’re going to make payments. Note that these details are saved on the current device only.

You can also import and export passwords on the Opera GX browser.

How Can I Remove Saved Passwords from Opera GX Browser?

Opera GX password manager lets you remove saved passwords as well. Go to Password Manager once again and look for the list of saved passwords

Click on the three-dot menu right beside the website for which you want to delete the password and click on Remove. This will delete the saved passwords from the Opera GX browser.

The steps are pretty simple to follow similar to how you clear autofill on Chrome. The same Password Manager on Opera GX also shows the list of ‘Never’ Saved websites for which passwords have never been saved.

So, these were the simple steps to save, manage, and retrieve passwords using Opera GX Password Manager. If you find any difficulty using the Password Manager, let us know and we will try to come up with a solution.

Fix: Taskbar Overflow is not Working on Windows 11

When the Windows 11 Taskbar Overflow feature stops working, users lose important customization option. This is because the feature allows you to add as many apps as possible to your Taskbar and launch them easily.

While this issue can be frustrating, it is not the most difficult to fix. In this comprehensive guide, we have prepared surefire ways to get the Taskbar Overflow feature working again.

Why is Taskbar Overflow not working on Windows 11?

Several factors can cause Taskbar Overflow not to work on Windows 11, as reported by users. Below are some of the notable causes:

  • Outdated PC: An outdated operating system is a major reason for this issue. This is especially true if you use any version later than the Windows 11 Insider Preview Build 22616. So, you need to update your PC to solve the problem.
  • Taskbar Overflow disabled: Sometimes, you might have mistakenly disabled the feature. An app or process on your PC might have also disabled it. So, you need to enable it again to get it working.

How can I fix Windows 11 Taskbar Overflow if it is not working?

1. Update PC

  1. Press the Windows key + I to open the Settings app and click Windows Update in the left pane.
  2. Click the Check for updates button.
    check updates windows 11 taskbar overflow not working
  3. Finally, download and install all available updates, and restart your PC.

Most users have complained that Windows 11 Taskbar Overflow is only not working in older builds of the OS. The issue has been fixed since the release of Windows 11 Insider Preview Build 22616.

While your PC should automatically install updates, you can sometimes miss out on crucial patches due to changes to your settings. So, it is good practice to check for and install the latest Windows 11 updates.

2. Enable Taskbar Overflow

  1. Press the Windows key + I to open Settings and select Personalization in the left pane.
  2. Click Taskbar in the right pane.
    personalization
  3. Now, select Taskbar corner overflow.
    option
  4. Finally, toggle the switch before the apps there forward to enable them.
    enable windows 11 taskbar overflow  not working

Some software and processes might disable your apps in the Taskbar corner overflow. This might be the reason it is not working on Windows 11.

To be sure, check the settings and enable the apps that should be there.

3. Use the ViVeTool software

  1. Visit GitHub to download the ViveTool software.
    download
  2. After the download is complete, go to the Download folder in File Explorer, and right-click the downloaded file.
  3. Select the Extract all option.
    extract all
  4. Now, click the Extract button.
    extract
  5. Next, right-click the extracted folder and select Copy as path.
    copy as
  6. From here, press the Windows key, type cmd, and select Run as administrator under Command Prompt.
    cmd admin
  7. Type the following command (paste the path copied in step 5 in place of pathcopied) and press Enter to go to the ViVeTool folder: cd pathcopiedcd  windows 11 taskbar overflow  not working
  8. Note that the version of the ViVeTool we used here is ViVeTool-v0.3.3, which is the latest at this time. So, make sure to change the version accordingly in the command above if yours differs.
  9. Next, type the commands below and press Enter after each to enable Taskbar overflow: vivetool /enable /id:35620393viv enable vivetool /enable /id:35620394
  10. Finally, restart your PC.

In some older builds of Windows 11, Taskbar Overflow might not work even after enabling it in the Settings app. In this case, you can use ViVeTool software to enable it.

To disable the feature later, you need to run the commands in steps 7 and 8 but replace enable with disable in step 8.

We have reached the end of this comprehensive guide on fixing the Windows 11 Taskbar overflow if it is not working. The issue should now be history on your PC, provided you follow the steps above carefully.

If, for some reason, you need to reset your Taskbar on Windows 11, our detailed guide will help you do it effortlessly.

Feel free to let us know the solution that helped you fix this issue in the comments below.

5 Ways to Unlock Your HP Laptop Without the Password

If you don’t frequently use your laptop or have recently changed your password to a complex one, it’s easy to forget your password. And that’s why you need to know how to unlock an HP laptop without a password.

Forgetting your laptop account password means you won’t be able to log in to your laptop. This presents a significant problem. Keep reading to find out how to regain access to the HP laptop without a password.

Can I unlock an HP laptop without a password?

You can easily unlock your HP laptop if you have forgotten your password with a Windows password reset disk. It is sometimes possible to open a computer without a password, but certain methods might involve resetting the PC completely. This would result in the deletion of apps, settings, and more.

However, there are ways to open your computer even if you’ve forgotten the password without deleting any important files using the Windows installation disk.

How do I unlock my HP laptop if I forgot my password?

1. Reset the password from another admin account

Note icon NOTE
You don’t have to use the Administrator user account, but your user account needs to have administrator-level privileges to modify another user’s account.
  1. When you are on the login screen, select a different user account with administrator privileges from the list of users, and log in using that account.
  2. Press the Windows key, type control panel, and select Control Panel app.control panel
  3. Select User Accounts.User Accounts
  4. Then, select User Accounts again.User accounts
  5. Click the Manage another account link.Manage another account
  6. From the list of accounts, select your locked user account.select the account
  7. Next, click on Change the password.change the password
  8. Enter your new password and password hint and click the Change password button.Change password

2. Reset the password with a password reset disk

Note icon NOTE
To use this method, you need to have made a password reset disk on the locked computer before forgetting your password.
  1. Insert the password reset disk/USB drive that you already created.
  2. When the login screen appears, enter any incorrect password and press Enter. An error message box will appear on the screen. Click OK to display an additional sign-in option. OK
  3. Now, click on Reset password.Reset password
  4. Click on Next.next
  5. Select the password reset disk from the drop-down menu and click on Next.select the key disk
  6. Type in your new password and new password hint, and click Next.next
  7. Finally, click Finish to reset your password.click Finish
  8. You can then use the newly created password to unlock your HP computer.

3. Use HP Recovery Manager

  1. Turn on or restart your HP Windows laptop and repeatedly press the F11 key on your keyboard until the Windows Recovery Environment appears. Then, click on Troubleshoot to proceed.Troubleshoot
  2. Click on Recovery Manager on the next screen.
  3. Next, select System Recovery from the Help section.system recovery
  4. Follow the on-screen prompts to reset your HP laptop to its original factory settings.
  5. After that, restart your laptop, and you should be able to unlock your HP laptop without a password.

4. Use the Windows installation disk

4.1 Access Command Prompt

  1. Create a Bootable Installation Media (USB or DVD) on a different computer for the respective Windows operating system, and then insert it into your HP laptop.
  2. Turn on or restart your computer and press F9 or Esc, or any other respective key to open Boot Device Options menu.
  3. Select the Installation media (USB or DVD) to boot from it.
  4. When the Windows Setup screen appears, click Next to proceed. Click Next
  5. Next, click on Repair your computer to enter the Windows Recovery Environment.Repair your computer
  6. Click on Troubleshoot to proceed.Troubleshoot
  7. Next, select Advanced options.advanced options
  8. Select Command Prompt under Advanced options.Command Prompt

4.2 Identify the drive letter for the system drive

Tip icon Tip
The C: drive is typically assigned as the system drive, where the operating system is installed. However, when you boot into the Recovery Mode, the system drive may be assigned a different letter, such as D:, E:, or any other available drive letter.
  1. To determine the current drive letter of the system drive, run the following commands one after the other: diskpart list volume
  2. This command will display all the available volumes and their corresponding drive letters. Take note of the Windows drive letter.
  3. Type this command to leave the Diskpart utility: exitdiskpart
  4. Once you find out the drive letter, use the below command to navigate to that drive while replacing C: with the drive letter of your system drive: C:

4.3 Execute commands

  1. Type the following commands one after the other and press Enter after each: cd Windows\System32 ren utilman.exe utilman.exe.bak copy cmd.exe utilman.exe wpeutil rebootutilman.exe
  2. After the computer restarts, click on the Ease of Access icon next to the Power button on the login screen.Ease of Access
  3. This will launch a Command Prompt window on your login screen.
  4. Now, type the following command and press Enter while replacing the username with your locked account username and password with your new password: net user username passwordnet user
  5. You can now log into your computer using the new password.
  6. After resetting the password, you need to restore the utilman.exe and cmd.exe files.
  7. To do that, follow the steps under 4.1 and 4.2, and run these commands instead: cd Windows\System32 del utilman.exe ren utilman.exe.bak utilman.exe wpeutil rebootrestore the files

5. Reset your PC

  1. Turn on your system and go to the Sign-in screen.
  2. Click on the power icon and, while holding the Shift key on your keyboard, select the Restart option.Restart
  3. Then, confirm the restart by clicking on Restart anyway.login screen
  4. Your PC will restart and boot into the Windows Recovery Environment (WinRE). Click on the Troubleshoot option to continue.Troubleshoot
  5. Next, click on Reset this PC.Reset this PC
  6. Select the Keep my files option to keep your personal files. Keep my files
  7. Next, decide how you want to install Windows on your computer: either by Cloud download or Local reinstall.Cloud or local install
  8. Finally, click on the Reset button to start the process.Reset PC
  9. Be patient and wait for the process to complete, as it may take some time, depending on your settings and system performance.

Please remember that when you perform a reset, it will restore your computer to its original settings. This means that all your installed apps and settings you have made will be deleted. So, it’s best only to use this method if you have no other options.

If you happen to lose or forget your laptop password, try these specialized password recovery tools to recover them on your Windows 10 or 11 devices.

Let us know in the comments which method worked for you or if you have any other suggestions. 

The customize sidebar option in Edge is getting a revamp

Edge is Microsoft’s browser and Windows’s native browser, and it’s Internet Explorer but taken to the next level. This browser has become one of the fastest browsers out there, partly because Microsoft has invested a lot of resources into it.

However, it’s still not so popular among users, even though Bing AI, a big part of what is Edge today, is one of the most performant AI tools on the market.

But despite this, Edge still has a big community of users, and Microsoft is doing its best to improve it with new features. For example, a Reddit user has discovered that the customize sidebar option in Edge is getting a revamp.

The revamp can be seen on the Edge Canary Channel, where the Edge browser is getting all the new features and changes before they are implemented on live servers.

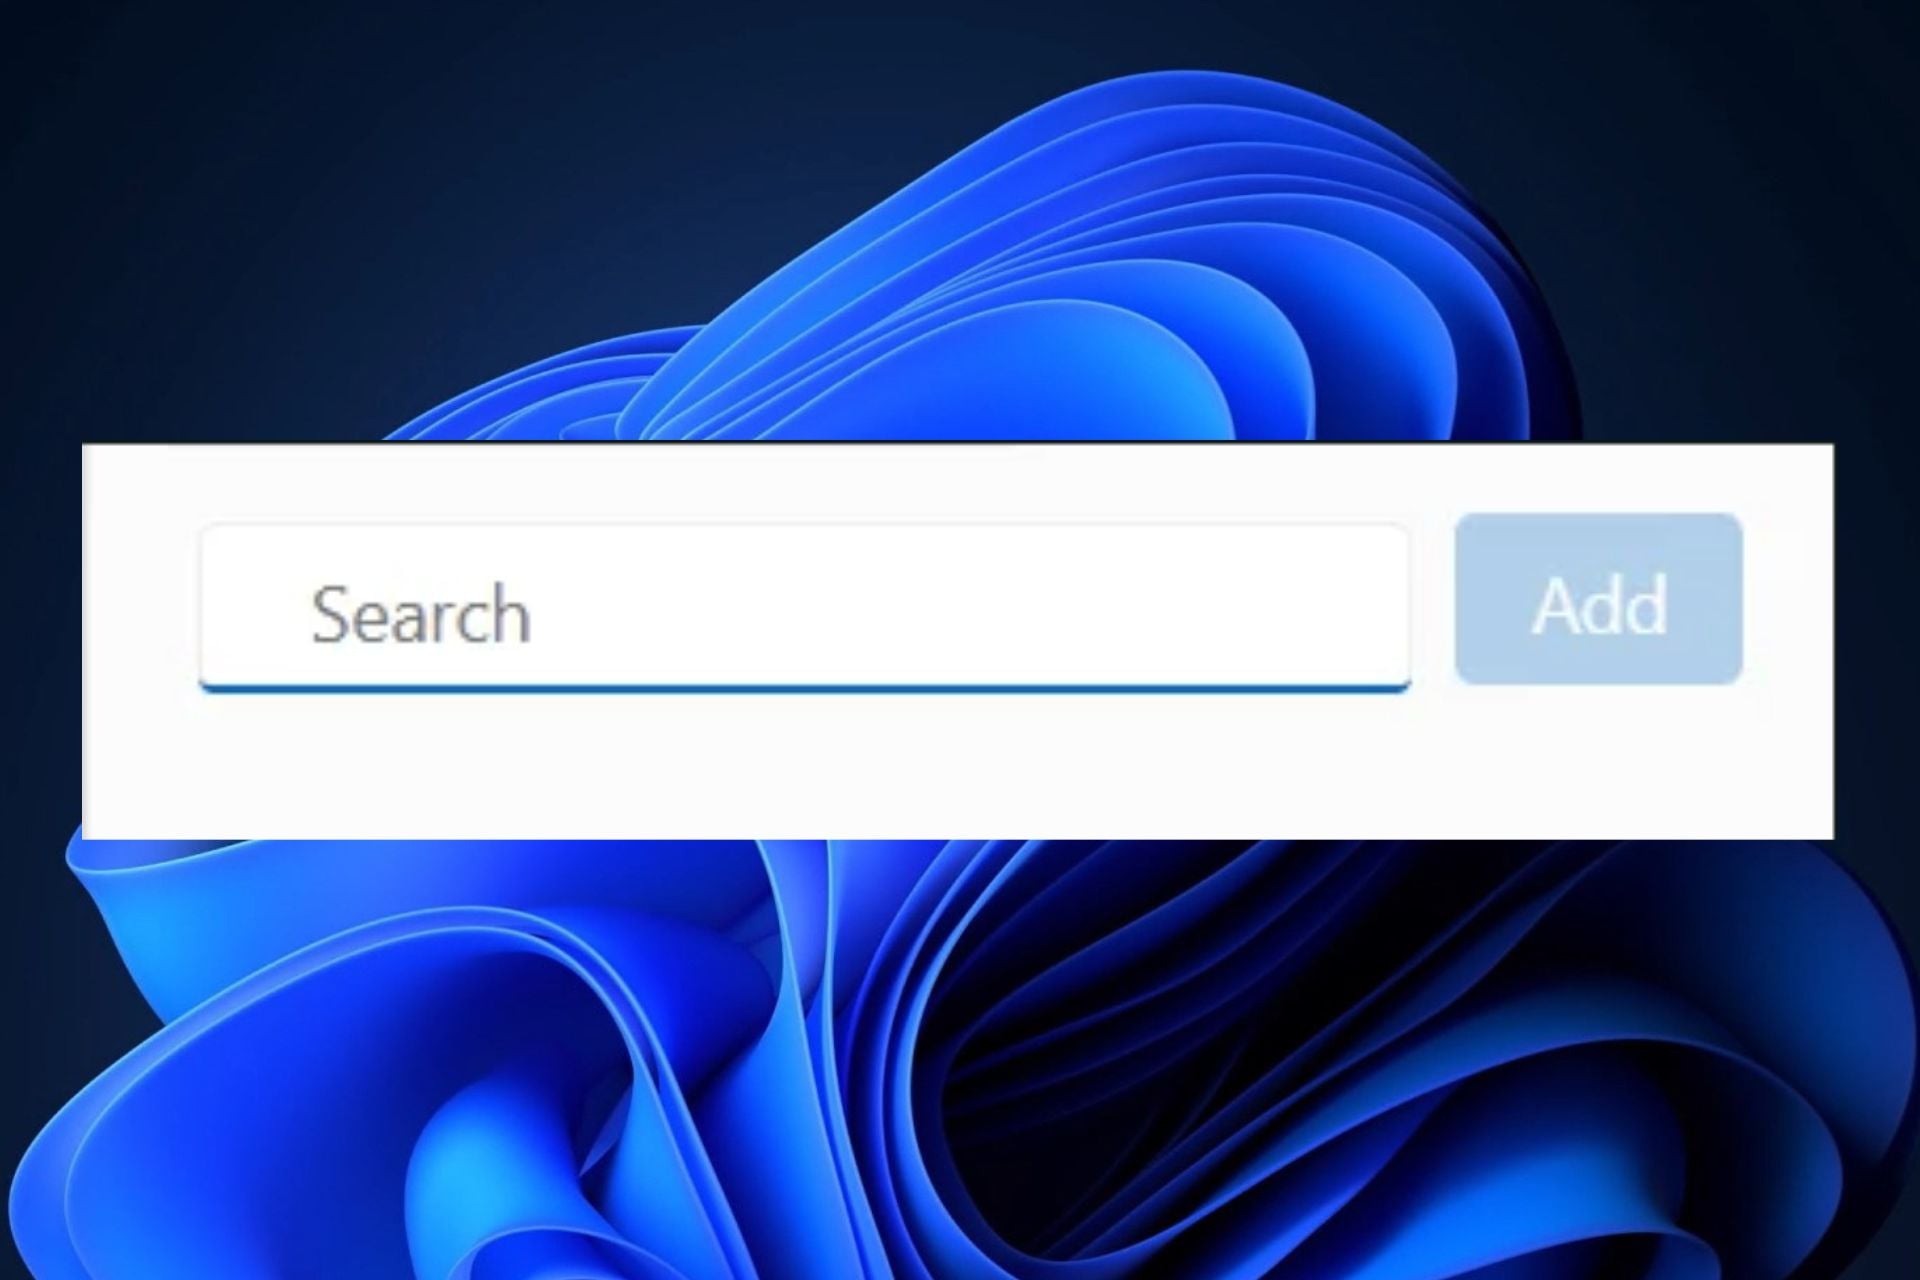
This is how the Edge Customize sidebar revamp looks

The revamp follow the Windows 11 design, with the blue underline on the bottom of the Search box. The look is also minimalistic, simple, and intuitive.edge customize sidebar revamp

The Redmond-based tech giant implemented a lot of new features in Edge. For example, besides the Customize sidebar revamp, you will be able to customize Edge from the Bing Chat soon. The feature was spotted on the Insider Program, meaning it’s coming to Edge very soon.

Edge is also getting a much darker mode, but it’s still in the testing phase, per Microsoft. So it will take some weeks before we can fully experience it, but the feature is looking very good.

And since updates for Edge never seem to stop, Microsoft is also experimenting with a feature to turn Edge into a Photo Viewer. You can just drag and drop photos in Edge, and it automatically turns into Photo Viewer. The feature is still at the beginning, but it looks promising.

What do you think about this new customize sidebar? Let us know in the comments section below.

Windows recommends buying a new PC, but should you?

As operating systems, Windows 10 and Windows 11 have some really useful features. Windows 11, for example, is all about integrating AI into its performance, from Copilot, to eventually moving out on the cloud. Windows 10, while still very popular among Windows users, has reached the end, with the current version also being the last Windows 10 version.

However, it seems that on Windows 10, at least, the OS is keen on reminding users that maybe their PC is also reaching the end. Talking about it, from this perspective, Windows 10 might have just developed its own native AI capabilities; jokes aside, this user got a message/recommendation from Windows telling them their PC might have just reached its end. Or at least it’s approaching it.

The message is very straightforward and simple, and it tells you how to recognize a dying PC.

Is your computer starting to show its age? Learn to sport the signs that it might be time for a new PC. Low battery life, slow performance, and noisy cooling fans are all signs your computer is on decline. Learn about other signs that it may be time to consider buying a new PC.

So Windows recommends you buy a new PC, and it tells you why? But should you do it?

If Windows recommends you buy a new PC, here’s what you should do first, instead

Sure, buying a new PC is always the final answer. But you have to know that there are some things you can do, first. Maybe it’s not really the end of your computer, just yet.

First things first, optimize your Windows 10 and Windows 11. You should get rid of unnecessary items, files, and folders on your Windows 10 and Windows 11. Use a third-party app if possible, and clean your registries as well.

Keep your Windows 10 and Windows 11 as free as possible, by erasing all the data that you don’t need. That means trivial files should be deleted to make space.

After you’re done optimizing your Windows, move over to clean your hardware.windows recommends to buy a new pc

If you have a desktop computer, carefully disassemble it and clean the dust with wet wipes. Take out your coolers, clean them, and put them back. You can watch YouTube tutorials on how to disassemble your model. But don’t worry, you can do it even if you have never done it before.

For a laptop, it’s better to get it to a service, where specialists will take care of cleaning it for you. It’s still much cheaper than buying a whole new one.

Our advice is that you should not buy a new PC just because Windows recommends you buy a new PC. If your PC is still performing well, you should just take some time to maintain it.

What do you think about this? Let us know in the comments section below.

IPTV Error Code 401: How to Fix It in 4 Steps

IPTV, or Internet Protocol Television, delivers video content like television programming using the Internet protocol suite over a packet-switched network. A few users have recorded an IPTV 401 error code, especially TiviMate users.

This guide shows you some of the best ways to fix it. You may also consider reading our other guide to find the best IPTV software options for Windows.

What is error code 401 on IPTV?

This HTTP status code shows a lack of valid authentication credentials for the target resource. It is caused by the following:

  • Incorrect username or password.
  • Expired user credentials.
  • Varying connection issues.
  • Problems with the IPTV provider.

You may consider our other guide, which discusses detailed solutions if IPTV is not working.

How do I fix error code 401 on IPTV?

Before you go through the main solutions, try these workarounds:

  • Double-check the username or password you entered.
  • Reboot your IPTV device and router.
  • Disable VPNs and ad-blockers on your computer.

If the error persists, continue to the solutions below.

1. Clear your cache and cookies

  1. Launch your browser.
  2. Press Ctrl + Shift + Del to open the browser data option page.
  3. Pick a Time range, tick all the checkboxes, and click the Clear data button.
    iptv error code 401
  4. Lastly, verify it fixes the error code 401 on IPTV.

2. Reinstall the IPTV provider’s app

  1. Press Windows + R to open the Run dialog.
  2. Type appwiz.cpl and hit Enter.
    iptv error code 401
  3. Select your IPTV provider’s app and click the Uninstall button.
    iptv error code 401
  4. Once the uninstallation is complete, redownload and install the app, then verify if it fixes the error code 401 on IPTV.

3. Change your user agent

  1. On your browser, click on the three dots at the top right corner, select More tools, then Developer tools.
    iptv error code 401
  2. Select the dev tools ellipses, click More tools, and select the Network conditions option.
  3. Uncheck the User agent Use browser default option, then from the dropdown, select any that suits you.
  4. Finally, verify if it solves the IPTV error.
Note icon NOTE
If you use an IPTV provider app, you may have to change the User Agent from the specific app settings.

4. Contact IPTV support

Contact your IPTV provider for assistance if you have tried other solutions and are still receiving error code 401. They might be able to assist you in troubleshooting the issue and restoring your IPTV service.

The way you contact them will depend on the device you use. You should visit their official website for a contact form, link, or phone number.

That is as much as we cover in this guide. We hope you have been able to resolve the error now. You may check our other guide if you face other errors like the IPTV Error Code 404 for solutions.

Other IPTV problems you may face include issues caused by your internet provider — in some cases, your ISP might be blocking IPTV, which can prevent streams from loading entirely.

If you’re using a wireless connection, you might also run into IPTV not working on Wi-Fi, usually due to weak signals or router restrictions. Missing program details? That’s often linked to IPTV not showing the TV guide. And if you see an access denial like IPTV error code 403, it could be a permissions issue or a blocked connection.

Please let us know in the comments section which solutions were most helpful.

How to Fix “You Are Not Authorized to Connect to GlobalProtect Portal” Error

Seeing You Are Not Authorized to Connect to GlobalProtect Portal? This often comes down to incorrect credentials, network issues, or lack of user permissions.

Update your system and Windows 11 drivers, double-check your login, and make sure you’re on a stable connection. Still stuck? You might want to try another corporate VPN or follow the steps below.

1. Allow GlobalProtect client through VPN

  1. Type firewall in Windows Search and select Allow an app through Windows Firewall.
  2. Click the Change settings button, then click the Allow another app button.
  3. Select the Browse button and add your GlobalProtect client.
    globalprotect not authorized to connect
  4. Click OK and verify it fixes the connection issue.

2. Restart the GlobalProtect service

  1. Type services in Windows search and select the Services option.
    globalprotect not authorized to connect
  2. Double-click PanGPS.
    globalprotect not authorized to connect
  3. Click the Start button.
    globalprotect not authorized to connect
  4. Finally, try reconnecting the VPN and verify if it fixes GlobalProtect not authorized to connect.

3. Reinstall the GlobalProtect client

  1. Press Windows + R to open the Run dialog.
  2. Type appwiz.cpl and hit Enter.
    globalprotect not authorized to connect
  3. Select GlobalProtect and click the Uninstall button.
    globalprotect not authorized to connect
  4. Follow the wizard to complete the process, then verify if it fixes the not authorized to connect issue on GlobalProtect.

What IP addresses does GlobalProtect VPN use?

For each company, GlobalProtect VPN employs a distinct IP address. The company that controls the GlobalProtect VPN will give the VPN a selection of IP addresses. The GlobalProtect clients will connect to the VPN using these IP addresses.

You can ask your IT administrator for assistance if you’re unsure of the IP addresses GlobalProtect VPN use.

That is all we share in this guide. You should be able to resolve the connection issue using any solutions in this guide.

In conclusion, you may check out our other guide, where we explore the problem of Global Protect not connecting. Other common GlobalProtect issues include VPN not working on Windows 11, connection problems when using a mobile hotspot, GlobalProtect not prompting for credentials, and GlobalProtect not updating properly.

Lastly, in the comment section below, let us know which solutions are most effective.
Microsoft Teams introduces second video stream feature in public preview

Microsoft announced that Teams Public Preview users can now take advantage of a new feature that allows them to enable a second video stream during their meetings. This feature, called Teams Content Camera, allows presenters to share content while maintaining engagement with the call attendees. Microsoft also launched a classwork app to streamline lesson planning for Teams for Education customers.

To utilize the second video stream feature, users must have two or more cameras connected to their Windows or Mac desktop computer, which may include a built-in laptop camera. By turning on their video and selecting “Share content > Content from camera > Video,” presenters can enable the second video stream.

In the content from the camera dialog box, users can choose a Content Camera different from the one used for their video and customize the options as desired. Once everything is set up, presenters can click the Share button to share their Content Camera with the meeting attendees.

To enable the Teams client for the Public Preview, IT administrators must set an update policy that activates the Show preview features. By following the instructions provided in the Public preview in the Microsoft Teams guide, administrators can ensure that the preview features are available to their users.

Availability

To activate the Public Preview for your Teams client, IT administrators should configure an update policy that enables the “Show preview features” option. Detailed instructions on how to do this can be found in Public Preview in Microsoft Teams.

  • If the “Follow Office Preview” option is chosen, Teams Public Preview features will be automatically enabled for any enrolled user in the Office Current Channel (Preview). No additional steps are required from the end user.
  • If the “Enabled” option is selected, the end user will need to manually opt into Teams Public Preview within their Teams app to gain access to the preview features.
  • If the “Forced” option is chosen, Teams Public Preview will be automatically enabled for the end user. No further actions are required from the end user.

What we can make out from this is that this update aims to enhance the collaboration experience for Microsoft Teams users, allowing presenters to seamlessly share content while maintaining a personal presence in the meeting.

Xbox Game Pass Friends & Family Plan to end preview in August

Microsoft has announced that it is ending the Xbox Game Pass Friends & Family Plan. The plan rolled out last September in soft launch that was later expanded to a total of eight countries: Ireland, Colombia, New Zealand, Sweden, Israel, Chile, Hungary, and South Africa.

The Xbox Game Pass Friends & Family Plan allowed users to add up to five people under one account, at a discounted price compared to that of five separate memberships. For a time it was widely speculated that the plan would eventually come to other markets including the U.S., but that never materialized. The plan will be discontinued on August 15.

As a Microsoft spokesperson told Eurogamer,

We’re excited about how the Friends and Family plan has resonated with gamers and will be evaluating the learnings to help create an offer that we can bring to more players worldwide in the future.

There was no word on whether we’ll see anything more of Game Pass Friends & Family in its current form or perhaps another. Current members will get an Xbox Game Pass offer as a thank you for participating. The spokesperson said this was also “a way to ensure they can continue to play the games they love after the preview ends.”

Microsoft has announced the closure of the Xbox Game Pass Friends & Family feature in countries where it was previously launched for testing | gagadget.com

Interestingly, the Friends & Family Plan was never referred to as a preview until this announcement. Instead, it was stated that the plan was being piloted in select countries.

The discontinuation of Xbox Game Pass Friends & Family comes as Microsoft announces a price increase for the Game Pass console and Ultimate tiers. This in addition to the recent announcement that Xbox Live Gold would be evolved into Xbox Game Pass Core beginning in September.

Featured image via Digital Spy. 

Microsoft launches classwork app to streamline lesson planning for Teams for Education customers

Microsoft has announced the launch of Classwork, a new app aimed at simplifying the lesson planning process and improving the organization of class resources for Teams for Education customers. This new tool consolidates various features into one convenient platform, eliminating the need to navigate multiple apps and platforms. Microsoft Teams for Education will be getting all the benefits of the upcoming new Teams updates.

With Classwork, teachers can easily create and organize class resources such as Assignments, OneNote Class Notebook pages, web links, files, and Teams channels. This centralized approach allows educators to curate a comprehensive view of content and resources, providing students with a streamlined experience. Classwork aims to save teachers time and effort by eliminating the hassle of managing multiple tools.

How To Use Classwork In Microsoft Teams 0 43 Screenshot

One of the critical benefits of Classwork is the ability to keep students informed and engaged. Teachers can publish and pin study modules, ensuring students can access all necessary materials. Classwork provides valuable support to keep classes organized and students on track, whether in-person or online.

Microsoft is not stopping at the initial release of Classwork; the company is already working on further enhancements. Classwork will introduce the ability to reuse modules from previous classes or terms in the upcoming months. This feature will significantly reduce setup time for teachers, enabling them to refine their lesson plans and teaching methods year after year.

To get started with Classwork, users can access the app through Teams for Education. By opening or creating a new Class Team, teachers can easily use Classwork to improve classroom management and enhance the teaching and learning experience.

In short, it streamlines lesson planning and resource organization, offering a centralized platform for teachers. Classwork keeps students engaged and informed, with upcoming features to reuse modules from previous classes. The app is available now.

via Neowin

Voicemail Error Code 9007 on Verizon: How to Fix It

If you are getting a Verizon phone error code 9007, this post is for you. Code 9007 is a critical voicemail error in Verizon that can leave you wondering why your voicemail isn’t working properly. Perhaps you have an important message but can’t get to it because of this error.

What’s worse is that not receiving voice messages is not the worst part. Your phone could suddenly experience freezes and crash at some point. Given the severity of this error, it is important to fix it immediately, and this is how to go about it.

Why is my Verizon voicemail having issues?

When you use Verizon voicemail, you expect it to work. Unfortunately, it’s not always reliable. Voicemail issues can be frustrating and make you feel like your phone is broken. 

Fortunately, you can resolve the issue quickly and return to using your phone normally again.

However, before you fix it, you need to know the cause of the issue, and below are some possible reasons:

  • Firmware updates – We all love updates to our phones because they bring bug fixes and new features. However, some are the opposite of that. According to a user, the voicemail error code 9007 on Verizon came about after upgrading.

Ever since my Galaxy S6 had the Android OS upgrade to 6.0.1 (marshmallow) I get an error in my Voice mail.  It says “Something went wrong.  Sorry, we ran into a problem.  Please try again later.  If there is still a problem, please contact Customer Service at 800-922-0204 and tell them the error code is 9007.

  • Network connection – This may seem obvious, but sometimes people forget that their phone must be connected to the network for voice service to work. If your phone has been off for an extended period of time, it may take some time for the device to reconnect and sync with Verizon’s network once it’s powered on.

In fact, a user was able to resolve the issue in just five minutes.

Ok so I just diconnected wifi, and after about 5 minutes I was finally able to get voicemails

  • Virus/malware – If a virus has found its way to your phone, it can alter some settings, including how you receive voice messages.
  • Change in settings – It is possible you’ve unknowingly made changes to your device that affect your ability to receive voice messages. 

How do I fix my Verizon voicemail?

Start off with the following preliminary checks:

  • Check for issues with your smartphone’s connectivity by trying other apps that use mobile data or Wi-Fi.
  • Verify that your SIM card is inserted correctly and has not been damaged.
  • Try using another phone or calling from a different number to test if the issue occurs only on your device.
  • Switch your internet connection and see if this changes things.
  • Restart your phone.

1. Clear app data 

Phone settings are different depending on your model, so for the purposes of this article, we shall be using the Samsung model.

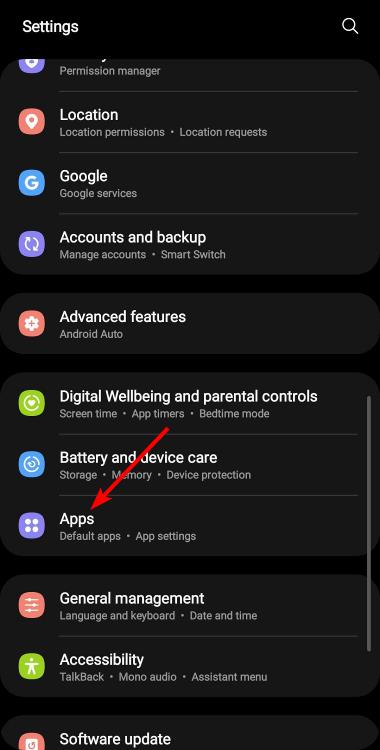
  1. Tap on settings on your phone.
  2. Next, tap on Apps.
  3. You may have to Show system apps so tap on the menu to the right of the app section and toggle on system apps and hit OK.
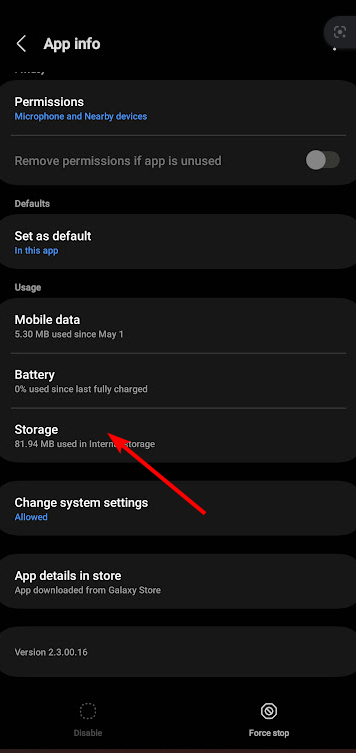
  4. Find the Voicemail and tap on it.
  5. Scroll down and select Storage.
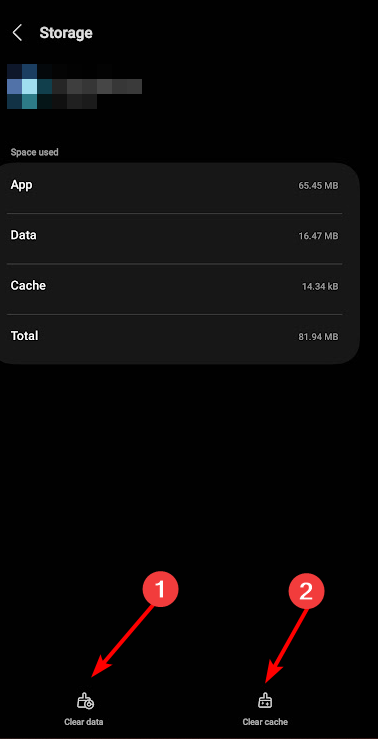
  6. Tap on Clear data and Clear cache, then try again.

2. Disable battery optimization

  1. Tap on settings on your phone.
  2. Next, tap on Apps.
  3. Find the Voicemail app and tap on it.
  4. Scroll down and select Battery.
  5. Click on the Unrestricted option and try again.

This is one of the most upvoted solutions by users. Apparently, enforcing battery limits on such apps throttles the speed of your phone, which can cause problems with apps using data.

3. Reset your Verizon voicemail

If you’re having trouble receiving voicemails, you may be able to fix the problem by resetting your account. So How do I reset my voicemail with Verizon? Verizon can send you a reset voicemail PIN code.

To reset your voicemail, dial *86 from your mobile phone or landline. Listen for instructions from the automated system. Follow these instructions carefully and enter the new numbers when prompted.

You can check on Verizon’s website to ensure you’re dialing the correct number, as it’s subject to change.

4. Reset your phone

If you’ve recently added a new number to your account, you may not have received it in your voicemail. Resetting your phone will give you access to voicemail again.

Press and hold the Power button and Volume down key simultaneously. Release both keys when the phone vibrates. The reset procedure differs for every phone, so check with your manufacturer if you’re unsure how to proceed.

5. Contact support

If you’ve tried all of the above and are still having trouble, then it’s time to contact Verizon customer support. When contacting Verizon voicemail, you’ll need to provide your phone number and any other information related to your account.

Hopefully, you’ve resolved the voicemail error code 9007 on Verizon. As a last resort, wireless providers still use other network providers for their service.

Did you find any other ways to fix this problem? Let us know in the comment section below.

Posted in Fix

ChatGPT Failed to Get Service Status? Here’s What You Can Do

Chat GPT is certainly not new in the market, and by now, everyone at least knows how it works. While trying to generate content from the AI, you may get an error message that says ChatGPT failed to get service status.

We’ve already covered what to do when ChatGPT is not working, so this is just another component of the AI-powered chat tool that could be having issues and needs some tweaking. Here’s how to go about it.

How do you define failed to get service status in ChatGPT? 

From what we’ve seen from previous ChatGPT problems, it’s mostly a user-end problem. You’ll find that you either have a weak connection, have exhausted your limits, or just haven’t cleared your cache and cookies in a while.

With the ChatGPT failed to get service status problem, you can rest assured that this has nothing to do with you and more with ChatGPT itself. From the title, you can already tell it is a server issue. 

The failure to get service status is a common error that happens when ChatGPT cannot connect to the server. This could be because the chatbot did not receive any response from the server, received an invalid response, or no response at all.

You may ask yourself. Why does this happen? Well, below are some possible reasons:

  • Server overload – You may have gotten a message that ChatGPT is at capacity at some point while using the tool. When the server is overloaded, it cannot respond to requests quickly enough.
  • Browser compatibility – The issue may not really be a lack of support for a browser but the version you’re using. If your browser is outdated, it may not be compatible with ChatGPT. This can make the server unresponsive.
  • Server is down – If you are unable to get service status on ChatGPT, there is a good chance that the website is down or ChatGPT is having an exceptionally high demand error.
  • Server maintenance – All websites go under maintenance from time to time. This is to ensure they keep improving to meet the needs of their users adequately. 
  • Server error – A server error message indicates that the server could not process your request. It will most likely return with an error code. It could be a new error, or one ChatGPT has already covered in their FAQ section.

What can I do if ChatGPT has failed to get service status?

Try the following basic checks first:

1. Clear browser cache and cookies 

  1. For this step, we shall be using the Chrome browser.
  2. Launch your Chrome browser and click the three vertical ellipses in the top right corner.
  3. Select Settings.Settings CHrome
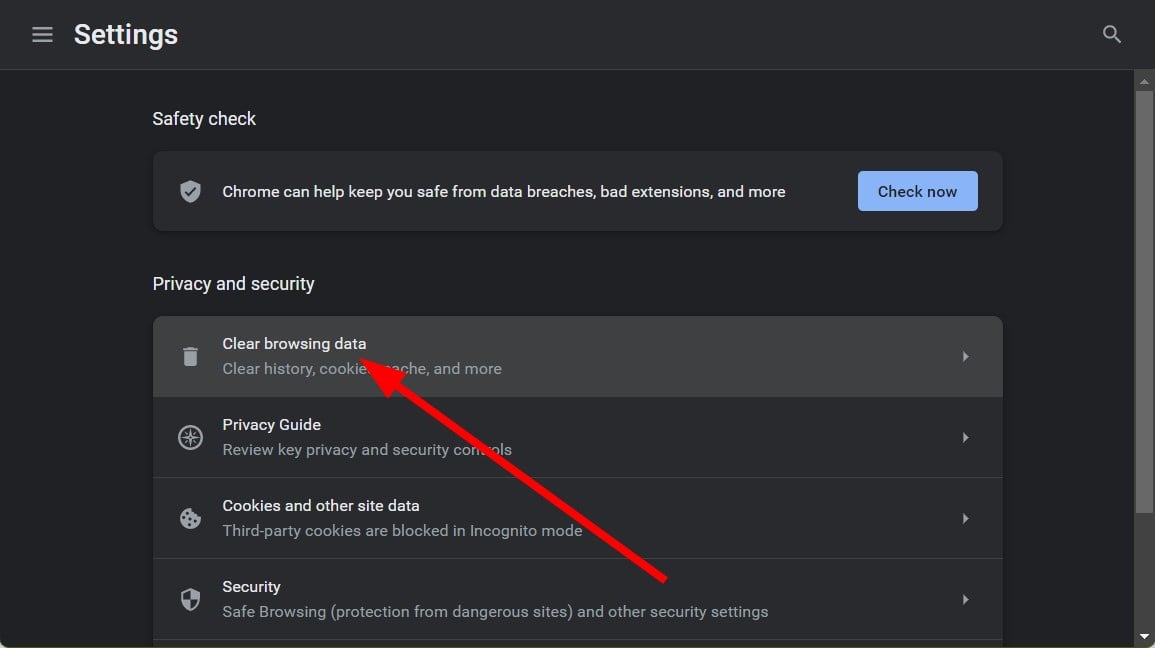
  4. Click on Privacy and security, then select Clear browsing data.
  5. Check Cookies and other site data and Cached images and files, then hit Clear data.Clear data

2. Disable your antivirus temporarily 

  1. Hit the Start menu icon, type Windows Security in the search bar and click Open.
  2. Click on Firewall & network protection, then select Public network.league of legends black screen after champion select
  3. Locate Microsoft Defender Firewall and toggle the off button.turning off Microsoft Defender Firewall Windows

If you have a third-party antivirus, ensure you also disable it but don’t forget to turn it back on.

3. Disable/enable VPN 

  1. Press the Windows key and select Settings.settings windows 11
  2. Next, select Network & internet and click on VPN in the right-side menu.
  3. Select the VPN connection you want to disable, click on the drop-down, and select Remove. remove VPN

If you haven’t been using one, you can add a VPN and see if it changes things. Sometimes, the server you’re using is having issues, and a VPN allows you to switch servers.

If you still can’t find a solution, do not hesitate to contact the ChatGPT customer service team. They will do their best to help you solve your problem as soon as possible.

Consequently, you can try another version of ChatGPT dubbed ChatGPT Professional. It has more features than the free version and priority access even during high demand, so server issues may be a thing of the past.

The only downside is that it comes at a cost. If you’re not willing to part with a few bucks, we have ChatGPT alternatives that are just as good.

We’re looking forward to your responses on how you solved this issue, so leave a comment below.

0xC1900101 – 0x20004 Install Error: 3 Ways to Fix it

The error code 0xC1900101 – 0x20004 is commonly encountered during the installation or upgrade of the Windows operating system. Several users have shared their experiences of getting stuck at 25% while installing their Windows PC update.

In this article, we will discuss the causes and provide efficient solutions to rectify them promptly.

What causes the 0xC1900101 – 0x20004 install error?

There can be factors leading to this error. The following are a few common causes:

  • Incorrect BIOS settings or faulty SATA cables – Incorrect BIOS settings & faulty SATA cables are potential causes for the 0xC1900101 – 0x20004 install errors.
  • Incompatible hardware drivers – When upgrading to Windows, specific drivers may not be compatible with the new operating system, leading to installation errors.
  • Insufficient disk space on the drive -The update process may fail if your system doesn’t have enough free space on the hard drive.
  • Windows update service issues – Problems with the Windows Update service, such as corrupted files or settings, can also trigger this error.

Now that you know some of the potential reasons behind the 0xC1900101 – 0x20004 install error, let’s now proceed to how to resolve the error.

How can I fix the 0xC1900101 – 0x20004 install error?

Before attempting any of the advanced solutions outlined in this guide, it could prove beneficial to start with the following initial checks: 

Once you have completed the checks above, you can utilize any of the methods outlined below if you need additional support.

1. Remove all unused SATA devices

  1. Shut down your computer and disconnect the power cable from your computer.
  2. Open the computer case.
  3. Identify the unused SATA devices. (These can include hard drives, solid-state drives (SSDs), optical drives, or any other SATA-connected devices).
  4. Gently pull out the SATA cables from the SATA ports on the unused devices.
  5. Unscrew any mounting brackets or screws that secure the unused devices in place. Carefully slide or lift the devices out of their slots or drive bays.
  6. Close the computer case and secure any screws or panels that were removed earlier.

Removing the unused SATA devices has been proven by several users to have fixed the 0xC1900101 – 0x20004 install error. After removing the SATA cables, try the installation again.

Alternatively, if your SATA controllers do not support the AHCI mode, try to exchange the SATA drivers.

2. Disable the WLAN chip

  1. Press the Windows + R keys to open the Run command dialog.  Type devmgmt.msc and press Enter to open the Device Manager.
  2. Expand Network Adapters, right-click on the WLAN chip and select Disable.
  3. Now try the Windows 10 installation again and re-enable the WLAN chip in Device Manager.

Some users claimed disabling the network adapters worked for them, hopefully, the error should be fixed by now.

3. Update BIOS through Windows

  1. Download the newest BIOS version from your motherboard manufacturer’s website and copy it onto an USB flash drive.
  2. Open the Start Menu and click the Power button.
  3. Hold the Shift key and choose the Restart option.
  4. You should see several options available. Choose Troubleshoot.
  5. Now select Advanced options and select UEFI Firmware Settings.
  6. Click the Restart button and your computer should now boot to BIOS.
  7. Once you enter BIOS, look for BIOS update option and select it.
  8. Now you need to choose the BIOS update file from your USB flash drive and wait while your BIOS updates.

4. Reset BIOS 

  1. Shut down your computer and disconnect the power cable.
  2. Open the computer case to access the motherboard and locate the CMOS battery on the motherboard.
  3. Remove the CMOS battery from its socket and wait a few minutes to allow the residual power to drain.
  4. Reinstall the CMOS battery into its socket and close the computer case.
  5. Reconnect the power cable and power on your computer to boot into the default BIOS settings.

It is important to note that resetting the BIOS will revert any custom settings made, so you may need to reconfigure any preferences or parameters you previously set.

And that’s it on how to fix the 0xC1900101 – 0x20004 install error. The methods provided in this guide have worked for others. Hopefully, you should be able to resolve the error too.

Some other users have reported similar issues, such as Windows 11 0xC1900101 (We couldn’t install Windows), 0xC1900101 – 0x30018 install error, etc.

If you have any questions or suggestions, do not hesitate to use the comments section below.

Unsupported 16-bit Application Error: 5 Ways to Fix it

Have you ever encountered an unsupported 16-bit application error? Perhaps while trying to install an old game or just out of a sudden (which may be a sign your PC is infected by a virus).

Whatever the case, join us in the next few paragraphs, as today, we’ll explain everything about the unsupported 16-bit application error – what it is, when it happens, and how to fix it.

What is the unsupported 16-bit application error?

The Unsupported 16-bit application error is a weird glitch error to happen in your Windows PC.

It’s most commonly accompanied by the pop-up message explaining that the app cannot start or run due to compatibility issues with 64-bit versions of Windows and that you should contact the software vendor for the 64-bit compatible version.

It typically occurs when:

  • You try to run a 16-bit application on a 64-bit operating system: Windows 64-bit no longer supports 16-bit apps; only its 32-bit version can run it. You can try running compatibility mode or installing a virtual machine.
  • The app you’re trying to run is incompatible with your operating system.
  • Your PC is infected: Malware masks itself as a legit file, but when your computer suspects something is out of the ordinary, it could result in getting the error. Don’t forget to run thorough and frequent virus checks with your trusted antivirus software.
  • There are corrupted system files: Occasionally, corrupted files are the culprit behind the glitch.

All in all, encountering such an error out of the blue is your computer telling you there’s something wrong and you need to fix it. However, if you’re trying to install a 16-bit app on your new Windows 11 or Windows 10 PC, you will have to find some workaround.

How do I fix an unsupported 16-bit application?

1. Enable Compatibility Mode

  1. Right-click on the app icon and open Properties. compatibility-mode
  2. Navigate to the Compatibility tab. Check the box next to Run this program in compatibility mode and select an older version of Windows. Additionally, you might check Run this program as an administrator.16-bit-app-64-bit-windows
  3. Click on OK to save the changes.

If you’re sure your app isn’t 16-bit and it suddenly started displaying this error message, you may try to tweak its compatibility settings.

Enabling compatibility mode tricks the operating system into running the application as if it were running on an older version of Windows. This can often resolve the unsupported 16-bit application error.

2. Fix corrupted files with System File Checker

  1. Tap Windows and search for Command Prompt. Click on Run as administrator.16-bit-application-system-files
  2. Type in the following command and press Enter: sfc /scannowsystem-file-checker
  3. If SFC returns an error, try the following commands and press Enter after each one: DISM /Online /Cleanup-Image /CheckHealth DISM /Online /Cleanup-Image /ScanHealth DISM /Online /Cleanup-Image /RestoreHealthsfc-command-unsupported-16-bit

The SFC and DISM commands help you repair system file corruption, which is also a common reason behind the application error.

Besides this manual process, you can also perform these steps even safer and faster with specialized third-party repair software.

3. Scan for viruses

  1. Press the Windows key, search for Windows Security, and click Open.unsupported-16-bit-virus
  2. Go to Virus & threat protection.16-bit-application-virus
  3. Open Scan options.virus-threat-protection
  4. Choose Full scan and click on Scan now.antivirus-protection

The most common reason for the unsupported 16-bit application error is a virus infection. Don’t worry! Performing a deep scan with Windows built-in tool or with your reliable antivirus software should get rid of the issue.

4. Perform a clean boot

  1. Press Windows + R key to open the Run dialog. Type the following command and press Enter: msconfig.exeunsupported-16-bit-application-error
  2. Go to the Services tab and check the Hide all Microsoft services box. Then click on Disable all.clean-boot-windows
  3. Now, go to the Startup tab and click on Open Task Manager.perform-clean-boot
  4. Disable all items in the Startup apps section by right-clicking on each one and choosing Disable from the menu.remove-startup-apps
  5. Close Task Manager and click Apply and OK in the System Configuration window.
  6. Select Restart in the pop-up window that appears.clean-boot-restart

If you’re unable to identify which application is causing the issue, then it might be a good idea to perform a clean boot. This way, you’ll be able to determine the culprit app.

5. Reinstall the affected application

  1. Press Windows + I key to open Settings. Go to Apps and then Installed Apps.16-bit-application-uninstall
  2. Locate the program that resulted in the issue. Click on the three horizontal dots and choose Uninstall.uninstall-program-windows-11
  3. Follow the on-screen prompts to remove the software completely. If you wish to reinstall the program again, visit its website and download it from the official source.
  4. Once the installation is complete, check if the error still persists.

However, if you’re looking for a way to enable 16-bit application support in Windows 10 or 11, you have to do some additional manual work (hint: the most common fix is setting up a virtual machine).

Also, you may want to learn how to install and play old games on your Windows 11 machine.

That’s it for today! We hope you managed to resolve your unsupported 16-bit application error. If not, as always, you can leave your comments or questions below, and we’ll get back to you.

What is Ns.exe & How to Fix its Application Errors?

There are several background processes that work to ensure your apps run smoothly without any issues. However, if you come across an executable file you don’t recognize, it could be harmful to your computer. You might not even know it’s there until it starts causing problems.

One such file is ns.exe in the Windows systems. This guide will discuss what it is, its purpose, and effective ways to fix its application errors.

What is ns.exe?

The ns.exe process is an executable file that is part of different programs, and it can be either a real program or harmful software depending on the source and location of the file.

Here are some of the common associations for the ns.exe file:

  • NirSoft Utilities: The ns.exe file might be related to one of the software tools developed by NirSoft. NirSoft provides free tools for different uses. If you have downloaded and installed any of these tools from the official NirSoft website, ns.exe could be a part of those tools.
  • NSIS (Nullsoft Scriptable Install System): NSIS is a commonly used software for making Windows installers. It is not normally malicious, but NSIS could possibly be used to make installers that have ns.exe as a part of harmful software.
  • Norton Security: ns.exe may be associated with Norton Security software developed by Symantec. It’s a necessary part of the Norton Security suite and handles important tasks for the program to work properly.
  • MSDN Disc 11: ns.exe is known to be part of MSDN Disc 11, developed by Microsoft. It provides software developers with tools, development kits, and resources.

Is ns.exe safe or a virus?

To determine if the ns.exe file on your computer is safe and legitimate, you can check the file’s location, scan it with antivirus software, and verify software sources.

  1. Find where the ns.exe file is stored on your computer and see its file path. To check the file location, press Ctrl + Shift + Esc to open Task Manager. Find the ns.exe file in the Details tab, right-click on it, and select Open file location.open file location
  2. The legitimate file is usually located in a subfolder of the following location or the installation directory of any of the software mentioned above. C:\Windows C:\Windows\System32
  3. If the ns.exe file is found within a subfolder of the following locations or any other suspicious location, it is likely a trojan infection.C:\Users\username\AppData\Local\Temp C:\Users\username\AppData\Roaming
  4. Use a reliable antivirus program to scan your computer thoroughly. This will help you identify any possible malware or harmful files related to ns.exe.

Make sure you download software from trusted sources and official websites.

How can I fix errors related to ns.exe?

Before we move to the slightly complex solutions, it’s worth giving these quick fixes a shot:

  • Update Windows: Ensure you have installed the latest updates on your Windows. Check for updates and install any pending updates.
  • Restart your computer: Sometimes, performing a basic restart can resolve temporary issues with the app.
  • Update the app: Ensure that you have the latest version of the application associated with ns.exe. Check the developer’s website or official sources for updates or patches.

1. Terminate the process

  1. Press Ctrl + Shift + Esc to open Task Manager, and select the Details tab.Details
  2. Find and right-click the ns.exe process, then select End task.End Task
  3. Once done, restart your PC.

2. Run SFC and DISM scans

  1. Press Windows + R to open the Run command, type cmd, and press Ctrl + Shift + Enter.cmd
  2. Click Yes in the UAC prompt.
  3. Paste the following commands one at a time and hit Enter after each:DISM /Online /Cleanup-Image /CheckHealth DISM /Online /Cleanup-Image /ScanHealth DISM /Online /Cleanup-Image /RestoreHealthDSIM.exe
  4. Now, run the following command to perform the SFC scan:sfc /scannowsfc scan
  5. Once done, restart your PC.

If you’re searching for a faster procedure for scanning and repairing your system files, you can use dependable software.

3. Run a full virus scan

  1. Press the Windows key, search Windows Security, and click Open.Win Security
  2. Select Virus & threat protection tab and click on Quick scan under Current threats.Quick Scan
  3. If the quick scan doesn’t find any threats, you can proceed to perform a full scan by clicking on Scan options just below Quick scan.scan now
  4. Then select Full scan, and then click Scan now to perform a deep scan of your computer.full scan
  5. Wait for the process to complete and restart your PC.

4. Reinstall the associated app

  1. Press the Windows key, type Control Panel, and click on Open to access the Control Panel.open
  2. Ensure that Category is selected as the view option and click on Uninstall a program.uninstall a program
  3. Find the application associated with ns.exe (such as Norton Antivirus, NirSoft Utilities, etc.).
  4. Select the app and click on Uninstall/Change to remove it from your system.Uninstall
  5. Follow the onscreen instructions provided to complete the uninstallation process.
  6. Visit the official website of the app and download the app.
  7. Follow the onscreen prompts to reinstall the app.

If Windows Security isn’t doing a good job of finding and stopping threats, you can try one of these best antivirus programs for Windows instead.

Please share any questions or suggestions you may have about this guide in the comments section.

Does PC Health Check Work on Windows 7?

PC Health Check provides users with diagnostic reports about their computer’s hardware, software, and system settings. However, Windows 7 users find it impossible to run the program due to compatibility issues. Hence, this guide will discuss running a health check on Windows 7.

Also, we have a comprehensive article about PC Health Check not opening and how to fix the problem on your PC.

Does PC Health Check work on Windows 7?

Microsoft’s official PC Health Check tool is incompatible with Windows 7. The tool was designed for Windows 10 to help users determine if their system meets the minimum requirements for upgrading to Windows 11.

Microsoft’s focus shifted toward newer operating systems as Windows 7 reached its end-of-support on January 14, 2020. Therefore, the PC Health Check tool is not intended for Windows 7 and may not provide accurate information or function properly on that operating system.

However, Windows 7 has a diagnostic feature to help you keep your PC running smoothly and error-free. The Resource and Performance Monitor provides comprehensive information about your CPU, memory, network connections, and a variety of other systems in your PC.

Check our post about downloading PC Health Check to test your Windows 11 computer.

How do I run a Health Check on Windows 7?

Use the Performance Monitor

  1. Left-click the Start button, type perfmon in the search bar, and click on perfmon.exe to launch the Performance Monitor.
  2. Expand the Monitoring Tools section in the left sidebar, then click Performance Monitor.
  3. On the toolbar of the Performance Monitor window, click on the green plus sign icon labeled New to create a new performance counter.
  4. Ensure the Use local computer counters option is selected.
  5. Scroll down the list of counters and locate System Diagnostics under the Diagnostics section.
  6. Expand System Diagnostics and select the checkbox next to System Health.
  7. Click the Add button at the bottom of the window and close the Add Counters window.
  8. Right-click on System Health and choose Start from the context menu.
  9. Once the data collection is complete, right-click on System Health again and select Stop.
  10. To view the generated System Health Report, expand Reports in the left sidebar of the Performance Monitor window.
  11. Under Reports, expand System and then click on System Diagnostics.

In the main window, you will see the System Health Report summary and detailed information about the various system components.

In addition, you may be interested in our detailed guide on what to do if the PC Health Check app is not installed on your Windows PC.

If you have further questions or suggestions regarding this guide, kindly drop them in the comments section below.

Fix: PC not Booting After New CPU Install

Upgrading your computer CPU to a new and better version helps improve system performance and increase speed and multitasking capabilities. However, users complained about PCs not booting after installing the new CPU. This guide will outline the fixes for the problem.

Alternatively, you can read our detailed article about low FPS after CPU upgrade and what to do if you experience it on your PC.

Can a CPU cause a computer not to turn on?

Yes, it is possible for a new CPU installation to cause a computer not to turn on. There are several reasons why this could happen, and some are listed below:

  • If the new CPU is incompatible with the motherboard, the PC won’t boot.
  • In cases where the new CPU is not seated properly in the socket, the thermal paste is not applied correctly, or any CPU pins are bent or damaged, the computer won’t turn on.
  • If the existing power supply wattage is insufficient to handle the power requirements of the new CPU, the computer may fail to turn on.
  • Sometimes, a motherboard may require a BIOS update to support a new CPU.

Fortunately, the problem is fixable, and we’ll take you through some basic steps to get around it later in this post.

Moreover, you can check out our article about Windows 11 not booting and how to force start it.

How long should a new CPU take to boot?

  • In general, the boot time for a new CPU can range from a few seconds to a couple of minutes.
  • The time varies depending on the specific hardware configuration and the OS used.
  • The speed of the storage device, the RAM, and the complexity of the BIOS settings can all influence the boot time.

Moreover, during the boot process, the computer performs several tasks, such as initializing hardware components, running the power-on self-test (POST), and loading the OS. Hence, all these determine the time taken to boot.

What do I do if the PC won’t boot after a new CPU install?

Before trying any fixes, observe the following preliminary checks:

  • Ensure the new CPU is compatible with your motherboard.
  • Confirm that the motherboard BIOS supports the new CPU.
  • Verify if the CPU is correctly seated in the socket and the CPU cooler is securely attached with thermal paste.
  • Ensure any necessary power connections to the CPU are connected correctly.
  • Disconnect all unnecessary components, such as additional hard drives, graphics cards, and external devices, to see if it works.

If the PC still doesn’t boot after trying the preliminary checks, proceed with the solutions below:

1. Clear CMOS

  1. Turn off your computer and unplug the power cable from the power outlet.
  2. Locate the CMOS jumper on your motherboard. It is usually a set of three pins with a plastic jumper cap covering two pins. The CMOS jumper is typically labeled CLR_CMOS, CMOS, or Reset BIOS.
  3. Please take note of the CMOS jumper cap’s current position, then remove it from its current position.
  4. Move the jumper cap to cover the other two pins. For example, if it covered pins 1 and 2, move it to pins 2 and 3.
  5. Leave the jumper cap in this position for about 10-15 seconds. It will clear the CMOS settings.
  6. After the specified time, remove the jumper cap from pins 2 and 3.
  7. Move the jumper cap back to its original position, covering the original pins it was on (either pins 1 and 2 or pins 2 and 3).
  8. Reconnect the power cable to your computer and turn it on.

Following these steps, you have effectively cleared CMOS (complementary metal-oxide-semiconductor) settings on your motherboard. It is essential to do this as it activates any recent hardware changes to the motherboard.

2. Switch from UEFI to CSM (Compatibility Support Module)

  1. Restart your computer.
  2. As the computer restarts, then press F2, F10, F12, Del, or Esc (depending on your PC) repeatedly during startup until the BIOS or UEFI setup utility opens.
  3. Navigate to the Boot or Boot Options section using the arrow keys on your keyboard.
  4. Look for an option related to Boot Mode, Boot Type, or Boot Protocol.
  5. Depending on your motherboard and BIOS/UEFI version, you may have different options, such as UEFI, Legacy, and CSM. Select the option that enables CSM or Legacy boot mode.
  6. Save the changes and exit the BIOS setup utility.
  7. Your computer will restart, and the system should boot in CSM or Legacy mode.

Note that these steps vary depending on your computer’s manufacturer and BIOS/UEFI version. Hence, you can consult your motherboard’s manual or the manufacturer’s website for detailed instructions for your system.

In addition, you may be interested in our post about installing Windows 11 on an unsupported CPU and the easiest way to go about it.

Likewise, you can check our article about ways to fix slow boot issues on your Windows 11 PC and make it faster.

Should you have further questions or suggestions regarding this guide, kindly drop them in the comments section.

Gpedit not Showing Administrative Templates [Fix]

Administrative templates include settings for Windows components like NetMeeting, Terminal Services, Windows Media Player, and Windows Update. Sadly, many users complain about Gpedit not showing Administrative templates. Hence, we’ll discuss how to fix and add it back.

Likewise, you can check our article about ways to enable and install a missing Gpedit.msc (Local Group Policy Editor) on your Windows PC.

Why is Gpedit not showing Administrative templates?

If you can’t see Administrative templates in the Group Policy Editor (gpedit.msc), it could be due to several reasons. Some notable ones are outlined below:

  • The Group Policy Editor may be absent if you use a different edition because it is unavailable in all Windows editions.
  • The files required for displaying the Administrative templates may be missing or corrupted.
  • If these specific registry keys and values to display Administrative templates are missing, incorrect, or modified, it can prevent the templates from appearing.
  • Gpedit may not display Administrative templates if your system’s User Account Control settings are configured to restrict access to certain administrative features.
  • Sometimes, the Group Policy settings may not refresh properly on the local system, preventing it from loading the Administrative templates.
  • If the Central Store is missing or contains outdated templates, it can affect the visibility of administrative templates.
  • In rare cases, system corruption or incompatibility issues may interfere with the proper functioning of the Group Policy Editor and prevent the display of administrative templates.

Fortunately, we’ll take you through some detailed steps for fixing the issue and adding Administrative templates to your Gpedit.

How do I add Administrative templates to Group Policy?

Before trying any steps for adding the Administrative templates to Group Policy, apply the following:

  • Restart your PC to refresh its process and fix temporary problems that may be causing Administrative templates not to load.
  • Ensure the Administrative templates folder is in this folder path: C:\Windows\PolicyDefinitions
  • Ensure your User Account Control (UAC) settings are not set to the highest level, as it may restrict access to certain administrative features.

If you still can’t find the Administrative templates in the Group Policy, proceed with the solutions below:

1. Update Group Policy

  1. Left-click the Start button, type Command Prompt, then click Run as administrator.
  2. Click Yes on the User Account Control (UAC) prompt.
  3. Type the following and press Enter to run the Group Policy update command: gpupdate /force

Updating the Group Policy will help refresh the policy settings and fix other issues, helping it to display the Administrative templates.

2. Set up a Central Store for Group Policies

  1. On the Domain Controller, press the Windows + E keys to open the File Explorer on the computer, and navigate to the following directory: C:\WINDOWS\SYSVOL\sysvol\{your_domain_name}\Policies 
  2. Inside the Policies folder, right-click and create a new folder named PolicyDefinitions. It will serve as the central store for the administrative template files.
  3. On a source computer with the necessary administrative template files, navigate to the following directory: %SystemRoot%\PolicyDefinition
  4. Then copy all the files and folders within the PolicyDefinitions folder.
  5. Paste the copied files and folders into the PolicyDefinitions folder you created in Step 3.
  6. Press Windows + R key to open the Run dialog box, type gpmc.msc, and click OK to open the Group Policy Management Console.
  7. In the GPMC, expand the Group Policy Objects folder, and select an existing Group Policy Object (GPO) or create a new one.
  8. Then, right-click the selected GPO and choose Edit from the context menu to open the Group Policy Editor.
  9. You should now see the administrative template settings for various Windows components under the Administrative Templates node.

Setting up a Central Store for Group Policies ensures all administrators in your domain use the same Administrative template files.

This centralization helps maintain consistency and ensures the latest Administrative templates are available for configuring Group Policy settings.

In addition, you may be interested in our article about how to edit Group Policy on Windows PCs or our piece on how to fix gpedit not being found in Windows Home Editions.

Also, please read our detailed guide on ways to open Group Policy Editor on your computer.

Should you have further questions and suggestions regarding this guide, kindly drop them in the comments section.

How to Exit Windows Recovery Mode if You’re Stuck

The easiest way to get out of the Windows Recovery mode is to press and hold the Power button on your PC. However, this isn’t going to work all the time. We’ll show you a few more advanced solutions below.

While the Windows Recovery Environment is a useful segment of Windows that allows you to repair various issues, many users get stuck in it. Windows keeps booting into recovery mode.

Keep reading to learn how to exit Windows RE in just a few simple steps.

How do I exit Windows Recovery Mode?

1. Using the Continue option

  1. Before you can troubleshoot your PC, you’ll get a list of options.
  2. Select Continue to boot to Windows normally.
  3. Alternatively, you can use Turn off your PC.

Keep in mind that this method will only work if there aren’t any issues with your system.

2. Use Startup Repair

  1. When you access Recovery Mode, choose Troubleshoot.
  2. Next, click on Advanced options.
  3. Select Startup Repair.
  4. Windows will now try to repair your installation.

This feature doesn’t require any user input, but it can only help with minor issues, such as missing or damaged system files, so it’s not as useful as others in Windows Recovery Environment.

3. Use System Restore

  1. Choose Troubleshoot and Advanced options when you enter Recovery Mode.
  2. Now select System Restore.
  3. Select your user account and enter your password.
  4. Now follow the instructions on the screen and select the desired point to restore to.

This feature is rather simple to use, and it can help if issues started appearing after installing a certain update, software, or driver. By using this feature, you’ll restore your system to a different point in time and hopefully fix the problem.

Do keep in mind that this isn’t an all-powerful feature, so it can’t help with major issues. It’s also worth mentioning that to use this feature, you need to create a system restore point beforehand.

Usually, Windows does that automatically, but it’s not always reliable.

4. Use System Image Recovery

  1. After you access Recovery Mode, go to Troubleshoot and select Advanced Options.
  2. Next, select System Image Recovery and click on See more recovery options, and then select System Image Recovery.
  3. Make sure that the drive with your system image is connected.
  4. Windows should now automatically detect the system image. If it doesn’t you’ll have to manually search for it.
  5. Select the desired image and follow the instructions on the screen to complete the process.

In case you’re not familiar, a system image is an exact copy of your hard drive. With it, you can restore your entire drive to the exact state it was while creating a drive image.

This is an incredibly powerful recovery feature, and it can fix almost any problem on your PC. However, it’s not enabled by default, and to use it, you need to manually create a system image and store it on a secure drive.

5. Use Safe Mode

  1. Once you enter Recovery Mode, go to Troubleshoot and select Advanced options.
  2. From advanced startup, choose Startup Settings and click Restart.
  3. You’ll be presented with various startup options. Now choose one of several versions of Safe Mode by pressing the corresponding keyboard key.

Safe Mode is a special mode of Windows that starts with limited drivers and files. As such, you can use it to troubleshoot issues with any third-party apps and drivers.

If an issue appears in Safe Mode, it means that the issue you’re dealing with is caused by a damaged installation or hardware.

To complete these steps, you need a working keyboard. In case you’re having issues, we have a guide that can help if keyboard is not working in Recovery Mode.

6. Use Command Prompt

  1. Just like with previous methods, select Troubleshoot and Advanced options.
  2. From advanced startup, select Command Prompt.
  3. The command line will now start.

In Command Prompt, you can use SFC scan to fix your system:

sfc /scannow /offbootdir=d: /offwindir=d:\windows

Keep in mind that you might have to change the drive letters in Windows Recovery Environment in order for this command to work.

You can use the DISM command from the Windows image to repair your system:

Dism /Image:C:\offline /Cleanup-Image /RestoreHealth /Source:c:\test\mount\windows

Remember that you need to replace the Source path with the path that matches the location of the Windows image file on your installation media.

You can also use Command Prompt to repair scan your hard drive and repair damaged files with this command:

chkdsk /r C:

Lastly, you can fix boot records by running these commands:

bootrec /RebuildBcd

bootrec /fixMbr

bootrec /fixboot

7. Uninstall recent updates

  1. In recovery mode, go to Troubleshoot.
  2. Navigate to Advanced Options and choose Uninstall Updates.
  3. Select if you want to remove quality or feature update.
  4. Follow the steps on the screen to complete the process.

This method is useful if your PC can’t boot anymore after a bad update, so you might want to try this feature.

8. Perform a Windows reset

  1. Boot to Recovery Mode and choose Troubleshoot.
  2. Now select Reset this PC.

  3. Select Just remove my files.
  4. Follow the instructions on the screen to complete the process.

How can I disable Automatic Repair Tool?

  1. Start your PC in Recovery Mode.
  2. Navigate to Troubleshoot and choose Advanced options.
  3. Select Command Prompt.
  4. Run the following command: bcdedit /set {default} recoveryenabled no

In case the command doesn’t work run bcdedit command and use it to find the identifier in Windows Boot Loader. Use that identifier instead of {default}.

Many users choose to disable this feature because it starts automatically after Windows crashes a couple of times. Unfortunately, automatic repair doesn’t usually fix any problems. However, users still have to wait every time for the scan to finish before they can access Windows Recovery Environment.

This is why some are choosing to disable this feature to get faster to the troubleshooting process.

As you can see, you can exit Windows Recovery Mode easily, but if you’re stuck inside it, you can always use the recovery tools from this guide to repair your PC and fix any underlying issues you might have.

These tools are also helpful for advanced troubleshooting, so you should familiarize yourself with them.

Although this guide mostly covers Windows 11, it’s just as easy to enter Recovery Mode on Windows 10 and use it to repair your PC. We also have a great guide on how to enter into Recovery Mode in Windows 11, so don’t miss it.

We hope you found this guide informative, and if you have any questions, feel free to ask in the comments section below.

Frequently Asked Questions

What is Windows Recovery Mode?

  • It’s a special segment of Windows used for troubleshooting and repair.
  • After several unsuccessful boot attempts, your PC will start in recovery mode.
  • You can use it to start your PC in Safe Mode.
  • System Restore is also available in Recovery Mode.
  • You can use this feature to restore Windows from a system image.
  • Removing system updates is also possible from the Recovery Mode.
  • For more advanced users, there’s Command Prompt available.
  • If your PC cannot recover, you can use it to perform a factory reset.

Why is my PC booting into Recovery Mode?

  • Your Windows installation is damaged, and it can’t start.
  • Issues with drivers or software can cause your PC to get stuck in Recovery Mode.
  • Problems with new hardware can cause the PC not to boot properly.
  • Issues with the boot drive.
  • Faulty hardware is another cause for this issue.

Keep in mind that sometimes Windows won’t enter Recovery Mode, but we covered that in a separate guide.

How can I troubleshoot hardware issues with Recovery Mode?

Hardware issues are hard to diagnose, but you can use the Recovery Mode and Command Prompt to scan your hard drive with chkdsk command as we discussed earlier.

If you notice many damaged files, your drive is probably damaged and needs to be replaced. You can also use diskpart command to check if your drive is showing on your PC.

Lastly, you can use Safe Mode to remove any incompatible drivers from your PC

How can I avoid getting stuck in the Windows Recovery Mode?

  • Make sure that you regularly create System Restore points.
  • Have the system disk image ready for recovery.
  • Keep your drivers and system up to date.
  • Make sure not to install conflicting applications on your PC.

Fix: External Monitor Not Working With Thunderbolt Connector

Connecting an external monitor to your computer using a Thunderbolt connector can enhance your productivity and visual experience. However, issues with the external monitor not working with the Thunderbolt connector can be frustrating.

Thus, we will provide a detailed troubleshooting guide here. Likewise, you can learn about how to set up Thunderbolt Display on Windows.

Why is my Thunderbolt not recognizing my external monitor?

  • An incompatible Thunderbolt cable or adapter can cause the error.
  • Incorrect display settings on your computer can cause the Thunderbolt to work with external monitors.
  • An outdated driver or firmware for your Thunderbolt controller, or graphics card can cause non-optimal performance.
  • Physical damage or faulty Thunderbolt cables, connectors, and adapters may prompt the error.
  • Thunderbolt device prioritization, such as docking stations or external GPUs, may take precedence over the external monitor.
  • Multiple display connections on your can cause an error if the external monitor is disabled or not set as the primary display.
  • Specific software or drivers installed on your computer may conflict with the Thunderbolt connection.
  • The factors stated above vary on different PCs. Nonetheless, we will discuss how to fix the error on your computer.

What can I do if the external monitor is not working with the Thunderbolt connector?

Try the following preliminary checks before proceeding with advanced steps:

  • Ensure the Thunderbolt cable is securely connected and verify that all cables and adapters are in good condition.
  • Power cycle your computer and external monitor for a few seconds.
  • Update drivers and firmware to ensure the Thunderbolt controller, graphics card, and monitor drivers are up to date.

Proceed with the following advanced steps if the error persists.

1. Rollback graphics card driver

  1. Press the Windows key, type devmgmt, and press Enter to open the Device Manager.
  2. Double-click the Display adapters to expand it, right-click on your graphics driver, and select Properties.
  3. Then, click on the Driver tab from the top, and click the Roll Back Driver button.
  4. Select the Yes button to complete the process and restart your device.

Rolling back your graphics card will restore the graphics card driver to the previous version, troubleshooting compatibility issues. Hence, the external monitor not working with the Thunderbolt connector should be fixed.

You can read about how to roll back drivers on Windows PCs.

2. Via the use of Registry Editor

  1. Right-click on the Windows icon, select Device Manager from the pop-up menu.
  2. Double-click on Display Adapters to expand it, right-click the one for the external monitor, and click on Properties.
  3. Click on the Details tab from the dialog box, click Property drop-down arrow, and select Class Guid.
  4. Note the Value code and close the Device Manager.
  5. Left-click the Windows icon, type Regedit, and press Enter to open the Registry Editor.
  6. Select Yes on the User Account Control dialog box.
  7. Copy and paste the following directory into the address bar and press Enter: HKEY_LOCAL_MACHINE\SYSTEM\ControlSet001\Control\Class
  8. Navigate to the folder with the same code name noted earlier.
  9. Click the 0002 folder and set the RMEnablePhyRepeater entry to 1.

Note that if you don’t have the 0002 folder on your computer, you can change the parameters in the 0000 folder.

Check out our guide about how to fix disabled Registry editing by administrator on Windows.

In addition, we have a guide about Thunderbolt not showing attached devices on Windows and how to fix it.

Also, check our complete guide on setting the Thunderbolt application not in use anymore error on your computer.

Should you have further questions or suggestions regarding this guide, kindly drop them in the comments section below.

Internet Explorer Won’t Download Files? Here’s What to do

Many users say their Internet Explorer is not downloading files. This occurs in different versions and can be persistent. However, this article will discuss potential causes and fixes for the problem.

Also, we have a detailed guide discussing Internet Explorer 11 proxy problems after an update and some steps for resolving the problem.

Why is Internet Explorer not downloading files?

  • Using an outdated version of Internet Explorer may lack the necessary updates and security fixes to handle file downloads correctly.
  • Internet Explorer’s security settings may be configured to restrict file downloads.
  • Antivirus or firewall software installed on your PC can interfere with Internet Explorer’s ability to download files.
  • The issue may occur due to restrictions on downloading certain file types.
  • Slow or unstable internet connections and network congestion on your device can interrupt or hinder file downloads.
  • Further downloads may be affected if the temporary files folder storing the downloaded files becomes corrupted.
  • You may experience Internet Explorer not opening downloaded files if you have a malfunctioning browser add-on.

The causes listed above are general and can vary on different devices. Nevertheless, you can fix the issue by following the steps provided in the next section.

Please read our article about Internet Explorer not connecting to the internet on Windows 11.

How do I enable downloads in Internet Explorer?

Before trying any advanced troubleshooting steps, we recommend you go through the following preliminary checks:

  • Resolve internet connection problems by power cycling your router/modem or switching to a stable network for the file to download.
  • Close and reopen the Internet Explorer browser to fix temporary errors that may interfere with the file download process.
  • Temporarily terminate third-party security apps and antivirus software on your computer.
  • Turn off background apps running on the PC and close programs that are not needed.
  • Disable any add-ons that are not necessary or that you suspect might be causing the issue.

Proceed with the solutions below if the above steps can’t fix the problem:

1. Delete Internet Explorer Temporarily files

  1. Open Internet Explorer on your computer.
  2. Click on the Tools menu, then select Internet Options from the drop-down menu.
  3. On the General tab, click the Delete button.
  4. Check the box for History and Temporary Internet files. Then click Delete.
  5. Reopen Internet Explorer and check if the issue is gone.

Clearing the Internet Explorer temporary file will remove corrupt caches and cookies that may block the file download access.

2. Delete the Internet Explorer Index.dat file

  1. Log out the current user and log into another user account with Administrator privileges.
  2. Press Windows + R keys to open the Run dialog box, type cmd in the command bar, then press Enter to open the Command Prompt.
  3. Type the following commands: cd drive:\User\username\Local Settings\Temporary Internet Files\Content.IE5 
  4. Replace the drive with the Internet Explorer installation drive and the username with the correct name.
  5. Type the following and then press Enter: del index.dat
  6. Then type this and press Enter: Exit
  7. Restart your computer and reopen Internet Explorer to see if you can download files without problems.

After clearing the browser’s temporary files, the above steps will help you delete the Index.dat file that might remain on your PC. It removes the files impeding the file download.

3. Change Internet Explorer security settings

  1. Launch Internet Explorer on your PC.
  2. Click on the Tools menu, then select Internet Options from the drop-down menu.
  3. Click on the Advanced tab, go to the Do not save encrypted pages to disk option, uncheck the box for it, then click OK to save the changes.
  4. Restart Internet Explorer and check if the issue persists when downloading files.

Tweaking Internet Explorer Security settings will resolve security features blocking the browser from initiating the file download. Check what to do if Internet Explorer keeps crashing on your computer.

4. Tweak the Registry Editor

  1. Press Windows + R key to open the Run dialog box, type Regedit, and press OK to open the Registry Editor.
  2. For a per-user setting, navigate to the following registry key: HKEY_CURRENT_USER\SOFTWARE\Microsoft\Windows\CurrentVersion\Internet Settings
  3. On the Edit menu, click Add Value, and then add the following value: BypassSSLNoCacheCheck=Dword:00000001
  4. Exit Registry Editor and launch IE browser to check if the file download issue is resolved.

The above steps will change the Internet Settings registry value and fix the keys affecting Internet Explorer file downloads.

5. Enable file download in Internet Explorer

  1. Open Internet Explorer, go to the Tools menu, and select Internet Options from the context menu.
  2. Click the Security tab, and then click Custom Level.
  3. Scroll to the Downloads section, under File download, select the Enable option, and click OK.
  4. In the confirmation dialog box, click Yes to affirm the process.
  5. Click Apply, then OK.

Microsoft disables the file downloads option by default in some Internet Explorer versions for security policy purposes. So, this procedure will allow file downloads and resolve the issues.

Lastly, you can check our article on downloading 32-bit & 64-bit Internet Explorer for your Windows  PC.

To conclude the article, we have a comprehensive guide you can go through about how to fix Internet Explorer automatically opening Edge.

If you have further questions or suggestions, kindly drop them in the comments section.

Can Hackers Create Fake Hotspots? [Prevention Guide]

Can hackers create fake hotspots? The answer is a thundering Yes! Imagine somebody hacking your mobile or laptop and gaining access to sensitive information. All this can be done by creating a Wi-Fi hotspot that is pleasing and innocent-looking. 

You can say goodbye to privacy. But this doesn’t have to be you. This article will teach you what hackers and other scammers can do, how to prevent them from hacking you, the facts behind this dangerous trick, and its dangers.

What is a malicious hotspot? 

A malicious hotspot is a wireless network that you can connect to that is set up by an attacker. Its main aim is to trick users into downloading malware onto their devices.

Hotspots are convenient and relatively inexpensive ways to get online when you’re traveling or in a public place, but they’re also easy targets for hackers. 

That’s because they’re meant to be shared by multiple people at once, so their security is often not as good as that on your home Wi-Fi network.

Modern-day businesses and shops have availed free Wi-Fi on their premises to attract more clientele. Unfortunately, these places have also become a target for cybercriminals to set up shop and pry on unsuspecting users.

Attackers near popular public locations, such as coffee shops, airports, and hotels, set up malicious hotspots. They’re designed to look like legitimate Wi-Fi networks so that people will connect without thinking twice about it.

How do hackers use hotspots?

Now that you know what a malicious hotspot is, the next question is Can hackers hack your hotspot? Yes, they can.

Hackers can use various methods to intercept your data when you’re on a public Wi-Fi hotspot. They can capture traffic as it passes through the router or exploit vulnerabilities in the software that runs it.

They can also choose to set up their own hotspots and trick people into connecting to them. This is called evil twin Wi-Fi because the hacker’s network looks just like a legitimate one.

It is their fake access point attack, and once you connect, your computer or device will be at their mercy. 

They can hack your device for various reasons, including stealing your personal information, such as passwords or installing other malicious software inside your system.

How can I protect myself from fake hotspots?

The first thing you need to do is identify the fake hotspots. You cannot protect yourself if you don’t know the tell-tale signs of a fake hotspot. Below are some obvious signs:

  • They’re usually free – Fake hotspots will usually have a name like FREE_hotel_Wi-Fi. Not saying that hotels can’t have free Wi-Fi, but always confirm from the staff what their Wi-Fi name is if you have any doubts.
  • Missing security features – If you see an open network with no password and no encryption enabled, this is a big red flag that something fishy is going on.
  • Page redirects – If there are too many page redirects or you’re redirected to a page that asks for personal information such as your address, phone number, or credit card details before you can access anything on the Internet, that should tell you it’s not a legitimate Wi-Fi hotspot.
  • Slow speeds – Fake hotspots will often advertise fast download speeds because they want to get you hooked into their network as soon as possible. However, once you’re connected, those speeds are short-lived and become extremely slow once other people start using them.

It is also important to understand that there are two types of wireless networks: open and secure. Open networks let anyone connect to them, while secure ones require a password. 

Now, onto prevention methods.

1. Switch off the automatic Wi-Fi connection

Most, if not everyone, has a feature on their phone or laptops to connect to a Wi-Fi network whenever available automatically. 

While this may be convenient, it is not exactly safe. Since hackers mostly set up free Wi-Fi hotspots, you will likely end up as a victim because your device ended up being the sell-out.

To turn off the automatic connection, follow the steps below:

  1. Go to Settings on your phone.
  2. Tap on Connections.
  3. Locate your Wi-Fi connection and tap on it.
  4. Tap on the three ellipses and select Intelligent Wi-Fi.
  5. Ensure the Turn Wi-Fi on/off automatically, and Auto Hotspot connection options are turned off and set to Never respectively. Also, toggle on the Detect suspicious networks option.

Note that the steps may vary depending on the phone you’re using. For purposes of this article, the above are from a Samsung model.

2. Get an antivirus 

We cannot stress enough the importance of securing your devices with an antivirus solution. Whether you’re using a PC/laptop or mobile device, an antivirus can help you detect and block malicious apps before they can harm you. 

Most people believe an antivirus should be for PCs, but even if you’re not a big user of antivirus software, it’s worth considering installing one on your mobile device.

Many antivirus apps, like TotalAV, include Wi-Fi protection features, which monitor network traffic and warn you when suspicious activity is detected. If you’re not going to install an antivirus for your phone, make sure you use a browser with one at the very least.

Also, for layered protection, TotalAV offers a strong firewall, so make sure it is turned on and configured to block all incoming connections. Not all firewalls come with this capability, but this tool got you covered.

⇒ Get TotalAV

3. Look for HTTPS in the URL

This is one of the easiest ways to know if you’re on the right website. If the website address doesn’t start with HTTPS and uses HTTP instead, then it’s likely that it’s not secure, and you need to take extra precautions when entering personal information.

All websites that offer secure transactions use SSL certificates, which end in HTTPS. But keep in mind that some websites use HTTPS but don’t encrypt all information sent between you and them.

Can a VPN protect you from a fake hotspot?

Yes, a VPN can protect you from a fake hotspot. Because hackers are always devising new methods to stay in the game, you might not be able to tell if a public Wi-Fi hotspot is fake. 

Still, you can protect yourself from this attack by using a virtual private network (VPN). A VPN creates a secure connection between your device and the internet, letting you surf the web anonymously. 

It also encrypts all of your data so that someone on the same network can’t read it as you. Unfortunately, not all VPNs have these security features, especially free VPNs. We have a special list for VPNs to use while in public places so check that out.

With an increasing number of consumers using free Wi-Fi hotspots to surf the web when they’re away from home, preventing your computer or smartphone from connecting to fake hotspots is more important than ever.

The risks and the preventive measures make it very clear that public hotspots are not for browsing.

The takeaway from this article is that public hotspots are not that secure. So if you can, avoid using public Wi-Fi altogether if possible. If you must use it, turn off location services on your phone and never access sensitive information while connected.

Now that you know how easy it is to diffuse a public WiFi hotspot, you’ll probably never take a free connection for granted again. 

Have you been a victim of a fake hotspot before? How did you know of it, and what steps did you take to protect your information? Share with us in the comment section below.

How to Remove the Breathing Noise From a Video

No matter the type of video you are making, you will likely want to remove breathing noise from it, as you don’t want your audience to hear them. While this might look difficult to do, it is actually pretty simple with the right information.

In this guide, we have compiled some of the best methods to eliminate any form of breathing noise from your video. Read on!

Can people hear my breathing on video?

Breathing noise escaping into your mic is part of the norm when you are recording a video. This can be in the form of your breath or other background noise.

In some cases, it might be negligible and will be almost unnoticeable to your audience. However, there are times when the noise might be too loud, causing a disturbance in your video.

How can I remove breathing noise from my video?

1. Use a noise gate

Most video recorders have a built-in noise gate for the audio, while some allow you to install a plugin for this purpose. All you need to do is to locate the functionality.

Then, you need to set a volume threshold where the breathing starts, and the gate closes by turning the volume down or muting it.

The only situation you can encounter issues is if the breathing noise you want to remove from your video is the same volume as your speaking voice.

2. Use Audacity

Audacity has a series of options that for removing noise. But before you use Audacity to remove breathing noise, you need to separate the audio from your video.

After separating the audio, use any of the options below to remove the noise:

2.1. Using the Amplify effect

  1. Launch Audacity and click the File tab.
  2. Select Import and navigate to the path where the audio file from the video containing the breathing noise is.
    file import remove breathing video
  3. Select the file and click Open.
  4. Now, use the selection tool that looks like I to highlight the area of the audio that contains the breathing noise.
  5. Next, click the Effect tab at the top.
  6. Select Amplify under the Volume and Compression section.
    amplify
  7. From here, adjust the amplification level in the dialog box to a lower level and click Apply when everything is all right.
    apply amplify
  8. Now, click the File tab at the top and select Export to save the edited audio.
    export
  9. Finally, choose the exportation format and click the Save button

The first option to use to remove the breathing noise from your video using Audacity is Amplify effect. This option is useful if the audio you are working on is short.

2.2. Using the noise gate effect

  1. Repeat steps 1 to 3 in solution 2.1 above.
  2. Now, click the Effect tab and choose Noise Removal and Repair, then pick Noise Gate.
    removal gate remove breathing noise from video
  3. Next, set the required parameters like Gate threshold, Decay time, and Attack time.
  4. Click the Preview button to check the effect on the audio.
    preview noise
  5. Finally, click Apply if it is perfect.
    apply gate

If the breathing noise you want to remove from your video is only prominent between words, this is the go-to effect for you.

2.3. Use the noise reduction effect

  1. Repeat steps 1 to 3 from solution 2.1.
  2. Click the Effect tab again and select Noise Removal and Repair, then pick Noise Reduction.
    reduction remove breathing noise from video
  3. Now, click the Get Noise Profile button.
    get noise profile
  4. Next, go back to the Noise Reduction settings and click the OK button.
  5. You can now check if the noise is gone. If it is not, undo the effect by pressing the Windows key + Z.
  6. Finally, repeat steps 2 to 5 above and adjust the noise reduction parameter till you are satisfied.

If the breathing sounds you want to remove from your video exist between multiple segments of the audio, this effect will help you eliminate them at once. The only downside is that it can also reduce the audio quality a bit.

3. Use Adobe Premiere Pro

  1. Launch Adobe Premiere Pro and click File, then select Import to import the audio from your video.
    file  import
  2. Click the Effects tab at the top.
  3. Now, select Audio Effects, go to Noise Reduction/Restoration, and choose DeNoise.
    premiere pro denoise remove breathing from video
  4. Next, drag the DeNoise effect over the audio track.
  5. Launch the Effect Controls, select Custom Setup, and click the Edit button.
  6. Finally, reduce the Amount to 40 to 45% and save your changes.

With this method, we can now conclude this guide on how to remove breathing noise from your video. You should now be able to achieve this feat with relative ease.

We used Audacity and Adobe Premiere Pro in our examples because they are popular and easy to use but there are plenty of tools out there that have similar noise removal features.

If you need a list of the best audio editing software, our guide contains the top picks in the industry.

Let us know in the comments below if you encounter any issues applying the steps above.

Can You Get Hacked Through Instagram DM? [Prevention Guide]

We are all aware of the dangers of social media and how it can be used against us. However, cybercriminals are always devising new ways to catch us off guard, hence today’s big question. Can someone hack my Instagram through DM?

Yes, but if you’re careful enough, this can never be you. Your Instagram may not be opening because you’ve been hacked. If you’re not sure of the preventative techniques, aren’t you lucky? We lay it all for you in this article.

How do Instagram accounts get hacked?

There are several ways that hackers can take over your account, but one of the most common ways is by sending you a malicious link in an Instagram DM. It may look like it’s from someone you know but isn’t actually from them at all.

Usually, it’s from someone impersonating them with a fake account designed specifically for phishing attacks. This is not the only way so here are more ways they can do so:

  • Password reuse – Cybercriminals will try to access your email or other online accounts by using passwords that you’ve used on other websites. For example, if you use the same password for your Facebook account as you do for Instagram, then a cybercriminal can easily gain access to your Instagram account if they know your Facebook password. That’s why password managers come in handy.
  • Phishing scams – Phishing is when someone sends you an Instagram DM asking you to click on a link or open an attachment. They usually don’t contain anything interesting in mind. Instead, they just want access to your account so they can take it over or steal information from it. Once they have access to your account, they can change your password making it difficult for you to regain control of your account.
  • Social engineering – Social engineering is when hackers try to trick you into giving up your login details. They might pose as a company employee and ask you to confirm your login details over the phone. Find out more about these and other browser attacks and how to avoid them.
  • Brute force attacks – Believe it or not, there are people who sit on their computers trying out different passwords until they figure out yours. Brute force attacks involve using a program that tries millions of passwords until it finds yours. You’ll be surprised to find out how many passwords are hacked every day.

How to know if someone hacked your Instagram account

Let’s face it, we are all using Instagram to keep up with the Joneses or to boost our businesses. Whatever the case, our Instagram accounts, whether big or small are precious to us, and losing them to hackers can be devastating.

To stay safe, we need to know when we’ve been compromised. Below are some quick questions that will help shed light on this matter:

  • Can someone hack my Instagram through my username – Yes. If someone knows your username and can guess your password, they can get into your account and take over.
  • Can someone hack your phone through Instagram – Yes. If you click on suspicious links you receive via DM or on people’s stories, they could be targeting malicious software that gives them remote access to your phone.
  • Can someone hack your Instagram through your phone number – Yes. The infamous Instagram hack sms link can do this. You may receive a text message claiming to be from Instagram, and once you click on it, your Instagram account may be compromised.
  • Can you get hacked by accepting a follow request on Instagram – No. Follow requests are just requests by people to be part of your followers. In fact, you can even communicate with your follower on DMs. There’s no harm in that.

So, does Instagram notify you if you get hacked? No. You’ll probably get an email that your password has been changed or that you can’t log into your account after the hacker has already taken over.

How can I prevent getting hacked through Instagram DM?

Before we get into the main points, we’d like to reiterate a few basics that anyone on the Internet should practice:

  • Don’t share your login details. Nobody needs to know your password.
  • Don’t use the same password for multiple accounts. 
  • Change passwords regularly or enable password expiration if you forget easily.
  • Don’t log in from shared devices.
  • Avoid using public Wi-Fi.

1. Enable two-factor authentication (2FA)

Two-factor authentication adds an extra layer of protection when logging into your account by requiring you to enter a security code that is sent to your phone via text message or generated by an app.

This adds a layer of security such that even if your account was compromised, the hacker would need to enter a code when logging in from a new device or IP address.

To enable two-factor authentication on Instagram, follow the steps below:

  1. Open your Instagram app and click on your Profile at the bottom right corner.
  2. Next, tap on the menu at the top right corner and select Settings.
  3. Tap on Security.
  4. Find the Two-factor authentication option.
  5. Select one or more of the methods listed where the authentication code will be sent.

2. Never click on links in messages 

If you receive a suspicious link, don’t click on it. Instead, report the message as spam and block the user who sent it. 

This includes clicking on the link in an invite from someone you don’t know or even from someone you know. Sometimes, they’ve been hacked too, and are looking to add more casualties.

You should also be cautious about responding to a message with personal content. For example, if someone sends you a message asking for your phone number or address, ignore it and report them as spam instead of giving out that information.

3. Enforce message controls

Instagram DM is one of the most recent examples of the importance of utilizing message controls. You have all the power to decide who can send you an Instagram DM. This way, you can filter out all those unsolicited messages from people you don’t know.

To do this:

  1. Open your Instagram app and tap on the messages icon.
  2. Tap on Requests.
  3. Again, tap on Decide who can message you.
  4. Here, decide whether to receive the requests based on your relationship with the users.

This is a very effective way of avoiding Instagram DMs from people you don’t know or unauthorized followers.

4. Don’t share personal information

It may seem counter-productive given that we’re on Instagram to share a huge part of our lives. However, some personal information shouldn’t be on the Internet, and here’s why.

We spend a lot of time sharing our day-to-day lives. Take this example, for instance. A typical day on Instagram will show you how people took their pets for a walk, who celebrated their birthday, and maybe even snippets from their high-school friends.

All these activities probably require you to share some personal information, like the name of your pet, because you can’t keep saying you took your dog for a walk every day. Your pet has a name, and you want to connect with your followers.

Next, you’ll post where you went for your birthday and which high school friends attended the party. Here, you’ll probably share how old you’re turning, and anyone can quickly figure out your birth year and the high school you attended.

If any of this information forms part of your password, someone could have been watching and keeping tabs. If they take a wild guess and make out your password from the information you’ve shared, you could get in trouble.

What is the moral of the story? Don’t share personal information.

5. Perform regular account checks

Sometimes you’ll find you want to log into Instagram on another device and somehow forgot to log out. It happens. If your account ends up in the wrong hands, you stand to lose your Instagram profile.

To prevent such, perform regular housekeeping on your account. Check your account activity by following the steps below:

  1. Open your Instagram app and click on your Profile at the bottom right corner.
  2. Next, tap on the menu at the top right corner and select Settings.
  3. Tap on Security.
  4. Select Login activity.
  5. Here, you can see all locations where your account is logged in. If you notice any suspicious device, you can log out and secure your account.

Perhaps most interesting here is how easy it is to hack into a victim’s account through Instagram DMs. That, in itself, might be worth taking heed of.

But the other takeaway from this story should be obvious. Your personal information may not be as secure as you’d hoped. From this article, we hope you have taken all the precautionary steps to ensure you never fall victim.

We’d also advise getting anti-hacking software just to double up on the protection. You can also install VPNs that have the same anti-hacking features.

Have you encountered a suspicious DM on Instagram before? What made it seem suspicious? Let us know in the comments section below.

0x80072726 Mail Sync Error: 3 Ways to Quickly Fix it

There are varieties of sync errors users encounter on the Mail app. Among the prominent ones is the 0x80072726 Mail sync error, which stops users from sending and receiving emails.

This renders the app users as users need to use another email client. Fortunately, this issue is easy to fix, and we will show you how to go about it in this guide.

What Mail sync error code 0x80072726?

The Mail sync error code 0x80072726, is similar to the 0x8007274 error code, and occurs when there is a problem with network connection issues on your PC. Below are some of the potential causes of the error:

  • Antivirus/firewall interference – Often, this error occurs when the required network process is blocked by your antivirus software or firewall. It would help if you made an exception for the process in your security software.
  • Issues with the Mail app – If there are problems with the Mail app, you can also get this error message. What you need to do here is to reset the app and set it up all over again.

How can I fix the Mail sync error 0x80072726?

Try the following troubleshooting steps before proceeding to the more sophisticated fixes in this section:

  • Set your network type to Trusted in your third-party firewall, especially on BitDefender
  • Temporarily disable the third-party firewall to see if that changes the situation.

If the issue persists, proceed to the solutions below:

1. Add a trusted path for svchost.exe in Windows Defender Firewall

  1. Press the Windows key, type firewall, and select the Windows Defender Firewall option.
    firewall 0x80072726
  2. Choose Allow an app or feature through Windows Defender Firewall in the left pane.
    allow an app
  3. Click the Change Settings link.
    change settings
  4. Now, click the Allow another app button.
    allow another app 0x80072726
  5. Next, past the paths below in the path box and click the Add button after each: C:\Windows\System32\svchost.exe C:\Windows\SYSWOW64\svchost.exe
  6. From here, check the main window, and you will have a new feature named Host Process for Windows Service listed.
  7. Mark the checkboxes for both the Public and Private network settings.
  8. Finally, click the OK button.

The first thing to do if you are getting the 0x80072726 error on the Mail app is to allow the svchost.exe process through Windows Defender Firewall. This makes it trusted on your PC and eliminates the major cause of the error.

2. Add a trusted path for svchost.exe in Windows Defender

  1. Press the Windows key + S, type virus, and select Virus & threat protection.
    virus
  2. Click the Manage settings link.
    manage settings 0x80072726
  3. Now, go to the Exclusions section and select Add or remove exclusion.
    add or remove
  4. Click the Yes button when prompted by UAC.
  5. Next, click Add an exclusion.
  6. Select Process from the dropdown.
    add process 0x80072726
  7. Copy the paths below in the box and click Add after each: C:\Windows\System32\svchost.exeadd sys32 C:\Windows\SYSWOW64\svchost.exeadd syswow 0x80072726
  8. Finally, close Windows Security and launch the Mail app.

Sometimes, it might not be Windows Firewall blocking the svchost.exe process but Windows Defender antivirus. This can also lead to the 0x80072726 error. Hence, you need to add an exception for the process in Windows Defender too.

3. Reset the Mail app

  1. Press the Windows key + I and select the Apps option in the left pane.
  2. Select Apps & features in the right pane.
    app and
  3. Next, click the three vertical dots before the Mail & Calendar app and choose Advanced options.
    advanced options
  4. Click the Repair button and wait for the process to complete.
    repair 0x80072726
  5. Finally, if repairing the Mail app does yield the expected result, go back to the page and click the Reset button.
    reset

If you have tried everything and the 0x80072726 and 0x8007274 errors persist, you need to reset the Mail app. This should clear up the minor issues that might be causing the error.

There you have everything you need to fix the Mail sync error 0x80072726. This error is usually due to network issues but can be fixed easily if you carefully apply the solutions in the guide.

Similarly, if you are dealing with the Mail app error 0x80048830, check our detailed guide to fix it.

Feel free to let us know the solution that helped you solve this issue in the comments below.

Can Someone Hack You Through Discord? [Prevention Guide]

Discord is a popular private chat message app that allows gamers to communicate with each other during games. What makes Discord so popular is its versatility. You can operate it on both desktop and mobile devices.

While there are many great things about Discord, it lacks read receipts but the potential security risks that could compromise your data and expose you to hackers is the most crucial. This article explains what to do if someone hacks your Discord account and tips to help you prevent it.

How can I prevent getting hacked on Discord?

1. Use a secure password

If someone were to hack into your account, they’d need the password. The best way to ensure that doesn’t happen is by using a strong and unique password. The longer and more complex your password is, the harder it will be for anyone else to crack it.

Also, avoid reusing passwords across different sites or apps. Using the same password everywhere is tempting because it’s easy to remember just one password. But if someone gets hold of the data on one site, they could also access all your other accounts.

We understand remembering complex passwords for multiple sites can be tricky, but that’s why we have password managers.

2. Use two-factor authentication (2FA)

In order to make it more difficult for hackers to gain access to your Discord account, you should enable 2-factor authentication (2FA). 

When you have 2FA enabled on your Discord account, you must enter both your username and password when logging in from a new device or browser. A secret code will also be sent to your chosen device that only you have access to for verification.

This makes it harder for hackers to access your Discord account because even with your password, they still couldn’t log in.

3. Install an antivirus

Antivirus software is designed to protect your computer from viruses and other threats. Hackers can also gain access to personal information about you because of security flaws within the app or your PC.

Using outdated software is one vulnerability they can exploit and gain access to your personal information. The best way to keep your computer secure is to ensure you’re up-to-date on all your software, including your browser and antivirus.

This way, any sites hiding malicious code and software will be flagged before they get into your PC and make unnecessary changes.

⇒ Get TotalAV

4. Avoid bots

Bots are programs that can send direct messages to your friend’s list or users in general. They are used for legitimate purposes like helping players find teammates for games or chat rooms. 

However, hackers who want to phish for sensitive information such as usernames, passwords, and email addresses can also use these bots.

A common way for hackers to access accounts is by impersonating bots and asking for a password reset. If you see a message from a bot that looks suspicious, don’t click on it. Instead, ignore the message or report it as spam if it continues to bother you.

5. Avoid clicking on links in messages

This one seems obvious, but people often click on links in Discord messages from strangers. Always check the email address or username of the sender before replying to any messages.

This is especially true if it is from someone you don’t know personally. You can hover over the link to see if it will reveal its source.

Can you get your account hacked on Discord?

The answer is yes. So, What are ways you can get hacked on Discord?

  • Phishing sites – Phishing scams are designed to trick you into giving up your personal information. The hackers usually pretend to be someone or something you trust. They often use email as their delivery method but can also come through social media sites.
  • Virus/malware – A virus or malware can be installed on your computer without your knowledge. This can happen if you visit a website with malicious code embedded in it or if you download a file that contains malware. Once it gets into your computer, it can use all kinds of techniques to try and take over your account.
  • Poorly secured accounts – If you’re not using a strong password or use the same password for all your accounts, you’re at risk. Someone can get a hold of it, log in and do whatever they want on your account. It is even easier in the absence of two-factor or multi-factor authentication software.
  • Suspicious links – This is another common way people get hacked on Discord. You’ll probably get a message thinking it’s someone who wants to connect with you by sharing an invite link. Once you click on the link, it steals your login details.
  • Brute force attacks – People often choose easy passwords, making them vulnerable to hacking. A good example is using 123456 as your password. It is easy for someone else to guess using a brute force attack, trying every possible combination until one works.
  • Using public servers – If you want to talk with people who aren’t already in your group, you can use plenty of public servers. The downside is that you risk being exposed to predators and having your personal information stolen by hackers.

How do I know if my Discord account is hacked?

If you’re not sure whether your account has been compromised or not, here are some signs that might help:

  • You can’t log in to your account – If you were previously able to log in but suddenly you’ve been locked out despite not having changed your password, your account may have been hacked.
  • Your profile picture has been changed – If you did not change it, it is a huge sign that someone else has taken over your account.
  • Someone is sending messages from your account – If you check your messages and do not recognize the sent ones, your account is likely hacked.
  • You have unexpected charges on your credit card – If you see a charge on your credit card that you didn’t make, it might be a sign that your account has been hacked. 

How safe is Discord?

Over time, Discord has become one of the most popular chat apps among gamers. With so many people joining the platform, you may wonder just how safe it is for you, given that you’ll be sharing your personal information.

Unfortunately, a platform with such a huge number of users makes it an easy target for hackers because the more, the merrier.

Since hackers are evolving and devising newer ways to hack into users’ accounts, Discord has stepped in the right direction to secure their users’ safety on the platform.

Discord uses a proactive spam filter to protect users from unwanted messages and bots. This means you don’t need to worry about annoying spam messages sent to your server or channel. Discord automatically detects them and stops them from reaching your device.

While Discord’s security is not perfect, it’s pretty good. Still, even with these measures in place, there have been incidences where hackers were able to bypass such restrictions. For instance, Discord updates taking forever could be a sign that you’re using an unofficial app.

You can still take other precautionary measures to enhance your security further. Depending on Discord’s security measures alone do not guarantee you a hacker-free life.

You’ll also need to be proactive and practice safety measures to avoid getting your account hacked. You can check out our list of social media protection software to keep yourself at arm’s length with all the viruses and other harmful software that may find their way to your PC.

We’d love to know how you keep safe on Discord. Have you experienced any instances that could be hackers’ attempts to take over your account? Let us know in the comment section below.

Microsoft news recap: Chinese hackers breached email accounts of U.S. Government agencies, Windows 365 consumer edition on the cards, and more

Microsoft news recap is a weekly feature highlighting the top Microsoft news stories of the past week. Sit back, grab some coffee, and enjoy the read!

Microsoft set to launch affordable Windows 365, revolutionizing cloud computing

A Windows 365 subscription that’s more affordable than the existing enterprise version is set to launch in the future, which is predominantly aimed at individuals and families. It would allow people to purchase a Windows 365 subscription and be able to boot into a Windows environment, which could be a game changer as it removes some of the hardware requirements in accessing the latest edition of Windows.

Larry Hryb, Xbox’s Major Nelson, to leave Microsoft

Larry Hryb, also known as Major Nelson, has announced that he is leaving Microsoft after 20 years with Xbox and 22 with the company. He tweeted that he will take a step back and work on the next chapter of his career, and thanked the millions of gamers and Xbox fans who have supported him. He also expressed his appreciation for the gaming community and the Xbox team members.

The news was met with a lot of reactions from people in the gaming industry, including Phil Spencer, Aaron Greenberg, Sarah Bond, and even a PlayStation executive. Hryb has been one of the most recognisable faces of Xbox, hosting shows, interviewing developers, and interacting with fans. He said he will spend some time with his family and enjoy the Seattle summer before starting his new journey.

Xbox's Major Nelson

Microsoft announces new Xbox voice reporting feature to improve online gaming safety

Microsoft has announced a new voice reporting feature for Xbox that will allow users to capture a 60-second video clip of harassing or abusive chat behaviour and submit it as evidence to the Xbox Safety Team. The feature will work with thousands of games with online multiplayer voice chat, including backward-compatible Xbox 360 titles. Players have full control over what to capture and report, drawing the line on what is and isn’t acceptable behaviour on the platform. Only the player can initiate the capture of the last 60 seconds of gameplay activity for content moderation purposes. This new feature is part of Microsoft’s ongoing efforts to improve online gaming safety and prevent harassment in multiplayer game voice chat.

Xbox Voice Reporting Custom

Microsoft says Chinese hackers breached email accounts of U.S. Government agencies

Microsoft has disclosed that a Chinese state-sponsored hacking group has successfully gained access to the email accounts of approximately 25 organisations, including U.S. government agencies. The hacker has also compromised the consumer accounts of individuals likely associated with the affected organisations. Microsoft has notified the affected organisations and is working with them to help them secure their systems. The company is also providing technical assistance to law enforcement agencies investigating the attack.

Linkedin Hack 2021

That’s it for this week. We will be back next week with more Microsoft news.

Fix: Can’t Add Your Folder Right Now OneDrive Error

The Sorry, can’t add your folder right now OneDrive error occurs on the OneDrive Business client. Some users experience it while trying to sync their files, while it pops up when others try to install the latest version of the client.

This error can be frustrating, as it renders makes it impossible to sync your files. Fortunately, there are proven solutions that can get rid of it for good, and we will detail them in this guide.

Why can’t OneDrive add my folder?

There are a series of potential factors that can cause the OneDrive sync error sorry, can’t add your folder to OneDrive right now on Windows 10 and 11. Below are some of the prominent ones:

  • Wrong settings – The major cause of this issue is applying the wrong settings within the OneDrive Business client. This might be due to required columns or, in some cases, check-out settings.
  • Issues with the OneDrive client – In some cases, this problem might be due to minor glitches with the OneDrive. You might need to reset or reinstall the app to fix this error.
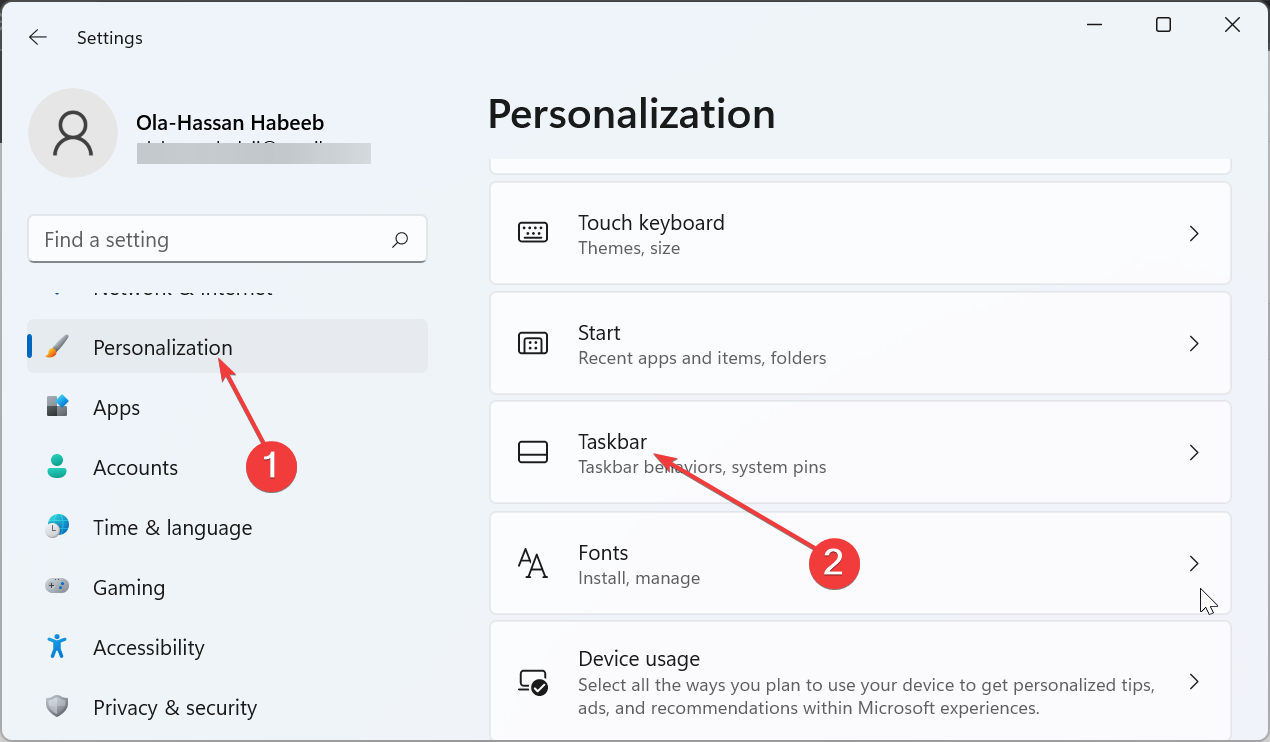
  • Syncing as a guest user – Using an external account to sync on the Business client is currently not allowed. Hence, you will get the Sorry can’t add your folder to OneDrive using a guest user account.

Now that we know where this comes from, let’s apply the solutions below to fix it.

What do I do if OneDrive can’t add my folder?

Below are a few quick troubleshooting steps to try before proceeding to the solutions in this section:

  • Check OneDrive storage.
  • Disable third-party antivirus.
  • Try adding another folder.

If these fail to solve the problem, explore the fixes below:

1. Remove any required column

  1. Click the Gear icon in the Classic view of the library and enable the Ribbon if it is disabled.
  2. Click the Library tab.
  3. Now, choose Library Settings.
  4. Check all the available columns for a check mark under the Required tab.
    required cant add your folder to OneDrive right now
  5. Next, select any column with the check mark.
  6. Finally, change the value for Require this column to contain information to No.
    update required cant add folder onedrive right now

If you are getting the can’t add your folder to OneDrive right now error, it might be because there are required column entries for the library. These columns might cause limitations and restrictions while trying to sync the folder.

The solution is to remove these columns and try the sync again.

2. Change the Require Check Out setting to No

  1. Go to the Library Settings as shown in Solution 1 above.
  2. Choose Versioning Settings from the list of options.
    versioning settings
  3. Change the value for Require Check Out from Yes to No.
    require check out
  4. Finally, click the OK button and try the sync again.

If the Require Check Out option is enabled on the library you are trying to sync a folder from, you are likely to get the Sorry, can’t add your folder to OneDrive error. Hence, you need to check and disable this feature.

3. Change the Draft Item Security value

  1. Navigate to the Library Settings page, as shown in the previous solutions.
  2. Select the Versioning Settings option.
    versioning settings
  3. Now, check the Draft Item Security option on the Versioning Settings page.
  4. Finally, set it to Any user who can read.

Sometimes, OneDrive can’t add your folder due to your security settings. This is especially true for the Draft Item Security option that can restrict the access to a file.

4. Reinstall OneDrive

  1. Press the Windows key + I and select Apps in the left pane.
  2. Click Apps & features in the right pane.
    app and cant add your folder to onedrive right now
  3. Now, click the three vertical dots before Microsoft OneDrive.
  4. Finally, click the Uninstall button and follow the onscreen instructions to complete the process.
    uninstall

If everything you try fails to fix the can’t add your folder to OneDrive right now error, you need to repair or uninstall the app. After uninstalling it, restart your PC and go to the Microsoft Store to reinstall it.

We have reached the end of this detailed guide on fixing the can’t add your folder to OneDrive right now error. The issue should now be history, provided you follow the solutions therein carefully.

Similarly, if OneDrive shared folder is not syncing, check our comprehensive guide to fix it quickly.

Feel free to let us know the solution that helped you fix this issue in the comments below.

Posted in Fix

Outlook View Not Showing Columns? Fix it in 3 Steps

Microsoft Outlook view column is a vertical area that allows you to customize how your information as From, Subject, and Attachment are displayed. However, Outlook users have complained about missing view columns. Thus, we will discuss fixing Outlook view columns not showing in four steps.

Alternatively, you can read about why Outlook view changed itself and how to get it back to normal on Windows 11.

Why is the column not showing in Outlook view?

  • Accidentally hidden columns may be from the Field Chooser, causing Outlook view not to show columns.
  • Customizing the Outlook view in Settings may cause specific columns to be hidden or removed.
  • Outlook’s Compact View mode hides specific columns to provide a streamlined interface.
  • A corrupted view due to malware attacks may lead to missing columns.
  • Software issues with Outlook during download or installation may cause missing columns.

Note that these reasons vary in different scenarios; identifying the cause will help you know the appropriate fix.

What can I do if Outlook view is not showing columns?

Try the following preliminary checks before Proceeding with advanced troubleshooting.

  • Restart your computer to refresh your system, clear the background app, and temporary issues affecting Outlook performance.
  • Update the Windows operating system to download patches and securities needed for Outlook’s effective functioning.
  • Perform an antivirus scan to remove virus attacks that affect Outlook on your PC.

Proceed to the advanced troubleshooting below if the error persists after trying the preliminary checks.

1. Disable compact layout

  1. Launch the Outlook app, select View, and click on View Settings.
  2. Scroll down to Other Settings and click on it.
  3. Clear the Use compact layout in widths smaller than 125 characters checkbox and double-click on OK.
  4. Close the Outlook window and open it to check if the error persists.

The above process will disable the Compact View causing some columns not to show.

2. Reset View

  1. Open Outlook, click on View and select Reset View.
  2. Navigate to View and select View Settings.
  3. Left-click on Columns to check if the views are there.

Resetting the Outlook view will troubleshoot it to default.

3. Repair the Outlook app

  1. Right-click the Windows icon and select Installed Apps.
  2. Navigate to Microsoft Office or the Outlook app if you downloaded a stand-alone Outlook software and click on it.
  3. Select Modify and click Yes if the User Account Control prompts.
  4. Click the Quick Repair radio button and select Repair.
  5. Wait for the repair process to complete, close the Window and check if the error persists.

Repairing Outlook or the Microsoft Office suite will troubleshoot issues with the Outlook app. Note: if the error continues, you can try the Online repair in step 4. But you might lose some data.

You can read our guide about the best repair tools for PCs.

In addition, you can read about quick ways to fix Outlook if verification is not working. Also, check our guide about fixing Outlook couldn’t set up your account on your PC.

Fix: Bluetooth Device is not Discoverable on Windows 7

Bluetooth is one of the main connectivity methods between PCs and other peripherals. However, some users on older operating systems complain that their Bluetooth device is not discoverable on Windows 7.

This issue makes it virtually impossible to connect your devices to your system. Thankfully, there are ways to fix it and get back to connecting your devices effortlessly.

Why is my Bluetooth device not discoverable on Windows 7?

Below are some of the reasons Windows 7 might not discover your Bluetooth device:

  • Outdated driver: If your Bluetooth driver is outdated, you might encounter connectivity issues. What you need to do here is to update your driver to the latest version.
  • Disabled service: Some users have found this issue to be due to the fact that the Bluetooth service is disabled. You need to restart this service to restore normalcy.
  • Discoverability feature disabled: In some cases, the Bluetooth discoverability feature might be disabled. This makes it impossible for it to discover your device. You need to enable the feature to solve the problem.

How do I make my Bluetooth device discoverable on Windows 7?

1. Enable discoverable mode

  1. Press the Windows key, type Control Panel, and select it.
  2. Type bluetooth in the Control Panel search box, and select Change Bluetooth settings.
  3. Now, click the Options tab at the top of the Bluetooth Settings dialog box.
  4. Mark the box for Allow Bluetooth devices to find this computer to make your computer discoverable to Bluetooth devices.
    allow find bluetooth device not discoverable windows 7 
  5. Next, tick the checkbox for Allow Bluetooth devices to connect to this computer to permit the addition of Bluetooth devices to your PC.
    allow connect
  6. Check the checkbox for Alert me when a new Bluetooth device wants to connect to be notified when a Bluetooth device is trying to connect to your PC.
    alert
  7. Finally, click the Apply button, followed by OK to save the changes.

The first thing to do if your Bluetooth device is not discoverable on Windows 7 is to check if the discoverability settings are enabled. If they are not, you can tweak them by following the steps above.

2. Update the Bluetooth driver

  1. Press the Windows key and right-click the Computer option.
  2. Choose the Manage option.
    manage
  3. Now, select the Device Manager option in the left pane.
    device manager
  4. Next, double-click the Bluetooth section to open it and right-click your device.

  5. Choose the Update driver software option.
  6. Finally, select Search automatically for updated driver software, wait for the scan to complete, and install any available update.
    search auto Bluetooth device is not discoverable on Windows 7

An outdated Bluetooth driver can cause many issues, including not making your device discoverable on Windows 7. If the Window driver cannot find the latest driver, you can go to the manufacturer’s website to download and install it.

3. Enable Bluetooth service

  1. Press the Windows key + R, type services.msc, and click OK.
  2. Double-click on the Bluetooth option to open its properties.
    support bluetooth device not discoverable windows 7
  3. Now, set its Startup type to Automatic and click the Start button.
  4. Finally, click the Apply button, followed by OK.

There are a series of services and processes that work in the background to make your Bluetooth work. So, if your Bluetooth device is not discoverable in Windows 7, you need to enable the related service.

4. Run Hardware and Device troubleshooter

  1. Launch the Control Panel and type troubleshooter in the search box.
    search
  2. Select the Troubleshooting option.
  3. Now, click Configure a device under Hardware and Sound.
    configure a
  4. Enter your password if prompted to continue.
  5. From here, click the Next button to run the troubleshooter.
    next hardware bluetooth device not discoverable windows 7
  6. Finally, wait for the scan to complete and click Apply this fix if it found any issues.

In some cases, a hardware problem might be the reason your Bluetooth device is not discoverable on Windows 7. Fortunately, you can use the Hardware and Devices troubleshooter to diagnose and fix the issue.

5. Perform a system restore

  1. Launch Command Prompt and select System and Security.
    system and
  2. Click the System option.
  3. Now, select System protection.
  4. Choose System Restore on the next page.
    system restore Bluetooth device is not discoverable on Windows 7
  5. Next, select your preferred restore point and click the Next button.
    next restore
  6. Finally, click the Finish button to confirm the restore point and click Yes to start the process.

If everything you tried in a bid to make your Bluetooth device discoverable on Windows 7 fails, you need to perform a system restore. This is especially true if you have used the device on your PC in the past.

With this, we can end this guide on fixing the Bluetooth device not discoverable issue on Windows 7 issue. Similarly, if you use Windows 10 and the Bluetooth is not detecting devices, check our detailed guide to fix it.

Feel free to let us know the solution that helped you fix this issue in the comments below.

Fix: CcmSetup Failed With Error Code 0x87d00227

If you’re using Microsoft Configuration Manager, you should know how to troubleshoot it, as encountering its errors is not uncommon. For instance, some users have reported getting the 0x87d00227 error code while installing the app or deploying updates.

Since the problem isn’t extensively covered, things are more difficult to resolve. As always, we’re here to help. Keep reading to learn what causes the 0x87d00227 error code and how to fix it.

What is the 0x87d00227 error code?

The 0x87d00227 error code is usually accompanied by the ccmsetup failed message. It translates to Functionality disabled and indicates an issue with the client installation process.

This error can prevent the System Center Configuration Manager from being installed or upgraded successfully, disrupting the software management process.

It often occurs when the client system is set to use metered connections, as SCCM won’t allow deployment of the client’s content over such a connection.

Many users report that no ordinary solutions (e.g., restart, system reset, or app repair) help fix the problem. So, what can you do then?

How do I fix the 0x87d00227 error code?

Before you try our tested solutions, check out these simple workarounds:

If none of them worked, continue to advanced troubleshooting:

1. Use Registry Editor to change to a non-metered connection

  1. Press Windows + R key. Type regedit in the search dialog and click OK.0x87d00227-regedit
  2. Navigate to the following path: HKEY_LOCAL_MACHINE\SOFTWARE\Microsoft\Windows NT\CurrentVersion\NetworkList\DefaultMediaCost0x87d00227-metered-connections
  3. Right-click on the string(s) and choose Modify. Set the user cost to 0.metered-connection-sccm
  4. Restart your Data Usage and try to install the SCCM client again.

2. Tweak the Registry Editor’s settings

  1. Open Registry Editor by holding Windows + R, typing regedit, and hitting Enter.regedit
  2. Go to the following directory: HKEY_LOCAL_MACHINE\SOFTWARE\Microsoft\DusmSvc\Profiles\0x87d00227-non-metered
  3. If there are any adapters set to metered, they will appear here with a non-0 value under the Data property. Change it to 0.
  4. Restart your Data Usage and try again to install the SCCM client.

Each network adapter has its own key. If it holds a value different than 0, it’s set to metered connection, while a value of 0 means a non-metered one.

Don’t forget to restart your data usage for the changes to take effect. Only after that can you try to redeploy the client and get rid of the 0x87d00227 error issue.

3. Use Windows PowerShell

  1. Press the Windows key and search for Windows PowerShell. Click on Run as administrator to open.0x87d00227-powershell
  2. Confirm by clicking Yes in the UAC (User Account Control) message.
  3. Type the following commands to change all adapters to non-metered: # Change 'UserCost' value to '0' for all network adapter profiles
    Get-ChildItem 'Registry::HKEY_LOCAL_MACHINE\SOFTWARE\Microsoft\DusmSvc\Profiles\*' | Set-ItemProperty -Name UserCost -Value 0
    # Restart the Data Usage service
    Restart-Service DusmSvc
  4. Reinstall the SCCM client.

We hope these managed to fix your ccmsetup failed with the 0x87d00227 error code issue.

Additionally, you might want to check the steps to turn off a metered connection on Windows 11. Then, you can force the SCCM client to use a metered connection by tweaking its settings. Remember that this is not recommended, especially when using limited data plans. Even more, here’s what to do if CcmSetup failed with error code 0x80004005.

Which solution worked for you? Tell us in the comment section below.